
Getting Started Guide - Red Wing Software
154
Red Wing Windows Accounting Series Getting Started Guide by Red Wing Business Systems, Inc. All rights reserved. No part of this book or system may be reproduced or transmitted in any form or by any means, electronic or mechanical, including photocopying, recording, or by information storage retrieval system, without permission in writing from the publisher. Changes in tax law, business practice, or your operating environment may cause your system to require changing. Red Wing cannot guarantee these changes will be reflected in future releases of software. This system is sold with the understanding the publisher is not engaged in rendering legal, accounting, or other professional service. If legal advice or other expert assistance is required, the services of a competent professional should be sought. Microsoft, Microsoft Access, Microsoft Word and Microsoft Excel are all registered trademarks of Microsoft Corporation. Windows is a trademark of Microsoft Corporation. Portions copyrighted by Open Systems, Inc. Copyright Red Wing Business Systems, Inc. June 1999 Revised January 2000, March 2001 ISBN 0-87265-257-2
-
Upload
khangminh22 -
Category
Documents
-
view
0 -
download
0
Transcript of Getting Started Guide - Red Wing Software

Red Wing Windows Accounting Series
Getting Started Guideby
Red Wing Business Systems, Inc.
All rights reserved. No part of this book or system may be reproduced or transmitted inany form or by any means, electronic or mechanical, including photocopying, recording, orby information storage retrieval system, without permission in writing from the publisher.
Changes in tax law, business practice, or your operating environment may cause your systemto require changing. Red Wing cannot guarantee these changes will be reflected in futurereleases of software.
This system is sold with the understanding the publisher is not engaged in renderinglegal, accounting, or other professional service. If legal advice or other expertassistance is required, the services of a competent professional should be sought.
Microsoft, Microsoft Access, Microsoft Word and Microsoft Excel are all registeredtrademarks of Microsoft Corporation. Windows is a trademark of Microsoft Corporation.
Portions copyrighted by Open Systems, Inc.
Copyright Red Wing Business Systems, Inc. June 1999Revised January 2000, March 2001
ISBN 0-87265-257-2

Important Please complete the software licensing agreement and return the white copyto Red Wing Business Systems. Returning the licensing agreement benefitsyou in the following ways:
� We keep you informed of improvements to our software, includingreleases of new versions and enhancements to current versions.
� We keep you informed of product training opportunities.
Complete the licensing agreement andmail the white copy today!

Table of Contents iii
Table of Contents
Chapter One
Introduction
Introduction ...................................................................................... 1-2Features ........................................................................................... 1-2
General .................................................................................... 1-2What's New in Version 4.0 ........................................................ 1-4Red Wing Applications ............................................................. 1-7
How this Manual is Organized ........................................................... 1-8Standards Used in This Manual ......................................................... 1-9
Chapter Two
Red Wing Resources
Tips for Calling Customer Support .................................................... 2-1Online Help....................................................................................... 2-2Cue Cards ........................................................................................ 2-3Custom Help..................................................................................... 2-3Installation Help ................................................................................ 2-4Red Wing Company Setup Wizard.................................................... 2-4Practice Systems.............................................................................. 2-5Customer Support Plans................................................................... 2-6Training ............................................................................................ 2-6World Wide Web .............................................................................. 2-7User Guides...................................................................................... 2-7Forms............................................................................................... 2-7
Chapter Three
Installation
Introduction / Setup Wizards ............................................................. 3-2Technical Specifications Hardware .................................................................................. 3-3 Software ................................................................................... 3-3 Printer ....................................................................................... 3-3Single User / Demo Install ................................................................. 3-4Network Install .................................................................................. 3-5 How to Switch from a Single-user to a Multi-user System ......... 3-8Step-by-step Through the Installation Setup Wizard .......................... 3-9Installing Practice Systems ............................................................... 3-11Uninstall ........................................................................................... 3-12Miscellaneous Directory Structure .................................................................... 3-13 Registry Entries ......................................................................... 3-16 Red Wing Icons ........................................................................ 3-17Installing with Office 2000 ................................................................. 3-18

iv Table of Contents
Chapter Four
Working in Red Wing
How to Use the Main MenuOverview .................................................................................. 4-2Change Company button .......................................................... 4-3Suggestions button................................................................... 4-3Versions button ........................................................................ 4-3System Information .................................................................. 4-3Cue Cards ................................................................................ 4-4
Red Wing Windows StandardsEntry Screens........................................................................... 4-4Sample Entry Screen................................................................ 4-5Moving From One Field to the Next........................................... 4-5Pull-down Menus ...................................................................... 4-6Menu Bar.................................................................................. 4-6Control Menu Box..................................................................... 4-6Toolbar..................................................................................... 4-7Minimize and Maximize Buttons ................................................ 4-7Status Bar ................................................................................ 4-7Entry Field ................................................................................ 4-8Check Box................................................................................ 4-8Combo Box .............................................................................. 4-8Option Buttons ......................................................................... 4-8Command Buttons.................................................................... 4-9Quick Selection ........................................................................ 4-9Scroll Bar ................................................................................. 4-9Record Selector Buttons ........................................................... 4-9
Chapter Five
Hands-on Entry—Tutorial
How to Start Red Wing Accounting ................................................... 5-1Introduction ...................................................................................... 5-2Navigate the Main Menu ................................................................... 5-3Exit an entry screen .......................................................................... 5-4Move from one field to the next ......................................................... 5-5View and select options .................................................................... 5-6Change an entry ............................................................................... 5-7Select or clear a check box ............................................................... 5-8Move from one record to the next and add new records ..................... 5-9Delete a record ................................................................................. 5-10Select options with radio buttons ....................................................... 5-11More keyboard help .......................................................................... 5-12

Table of Contents v
Chapter Six
Frequently AskedQuestions
Introduction ...................................................................................... 6-2Codes and IDs
What are the restrictions for codes and IDs............................... 6-2How are codes and IDs sorted? ................................................ 6-2
Getting StartedHow do I log on to the system? ................................................. 6-3How do I open a company? ...................................................... 6-3How do I set up a new company? ............................................. 6-4
Tips and Hints for Every DayHow do I enter dates?............................................................... 6-4How do I close a screen? .......................................................... 6-4How do I use the Main Menu? ................................................... 6-4What are the most frequently used key commands? ................. 6-5
MiscellaneousHow do I delete a company?..................................................... 6-5
System Manager ............................................................................... 6-6Accounts Receivable ......................................................................... 6-7Accounts Payable ............................................................................. 6-9General Ledger ................................................................................. 6-9Inventory........................................................................................... 6-10Purchase Orders ............................................................................... 6-11Errors................................................................................................ 6-12
Chapter Seven
Red Wing Toolbars,Menu Bars and KeyCommands
Introduction ...................................................................................... 7-2Toolbars ........................................................................................... 7-2Menu Bar Selections ......................................................................... 7-8Report Command Buttons................................................................. 7-15Standard Key Commands ................................................................. 7-16
Chapter Eight
Red Wing Utilities
Introduction ...................................................................................... 8-2Backup/Restore Utilities
Make Backups .......................................................................... 8-2Restore Data ............................................................................ 8-3
Database UtilitiesRepair a Database.................................................................... 8-4Compact a Database................................................................ 8-5Database Files and Locations ................................................... 8-6

vi Table of Contents
Chapter Nine
Technical Comparisonbetween DOS (version8.0) and Windows
Introduction ...................................................................................... 9-2Network Manager.............................................................................. 9-2System Manager............................................................................... 9-2Accounts Payable ............................................................................. 9-3Accounts Receivable ......................................................................... 9-5Point of Sale..................................................................................... 9-7General Ledger ................................................................................. 9-7Inventory .......................................................................................... 9-8Order Entry....................................................................................... 9-10Project Cost...................................................................................... 9-10
Chapter Ten
Special Options
Introduction ...................................................................................... 10-2System Manager
Label Wizard............................................................................ 10-2General Ledger
ASCII Input .............................................................................. 10-2Change Posted Transactions.................................................... 10-3Report Designer........................................................................ 10-3Change Account Number / Change Account Structure .............. 10-3Consolidated Statements.......................................................... 10-3
Accounts ReceivableASCII Input (Customers/Transactions/DOS Payroll) ................. 10-4
Accounts PayableASCII Input (Vendors/Transactions) ......................................... 10-4
InventoryASCII Input .............................................................................. 10-4
Chapter Eleven
Accounts (How andWhen They are Used)
Introduction ...................................................................................... 11-2System Manager .............................................................................. 11-2Accounts Receivable ........................................................................ 11-4Accounts Payable............................................................................. 11-6Order Entry ...................................................................................... 11-8Inventory .......................................................................................... 11-8
Glossary

Introduction to Red Wing Windows Accounting 1-1
Chapter One — Introduction to Red WingWindows Accounting
This chapter introduces the Red Wing Windows AccountingSeries, its features and an overview of how this guide isorganized.
Contents Introduction.............................................................................. 1-2Features................................................................................... 1-2
General ............................................................................. 1-2What's New in Version 4.0................................................. 1-4Red Wing Applications ...................................................... 1-7
How this Manual is Organized .................................................. 1-8Standards Used in This Manual ................................................ 1-9

1-2 Introduction to Red Wing Windows Accounting
Introduction
The Red Wing Windows Accounting Series is an affordable CPA-strengthaccounting solution designed for maximum flexibility.
Red Wing handles your day-to-day bookkeeping needs and then takes thosenumbers and turns them into powerful management and financial analysisreports to help you make the best decisions to operate your business.
Features
General Multi-tasking—Easily switch from one application to another; or work onseveral tasks within the same application at the same time.
Written using Access 97—Tight integration with the current MicrosoftOffice Professional 97 product. Easily produce reports in Microsoft Word andExcel format. The system runs more reliably (less chance of the system crashingand taking down the rest of your programs in the process) on the Windowsplatform.
Red Wing Help—Red Wing builds extensive, fully integrated online helpright into the system with plenty of “how to” and reference information,glossaries, and even direct access to the Internet. Cue cards stay on top of yourscreen and guide you step-by-step through most day-to-day routines. Thepractice systems (using the sample company) let you safely experience RedWing's power and versatility.
Company Setup Wizard—The setup wizard will help you set up your datafiles. It doesn't matter whether you are migrating from our DOS product or are abrand new customer and are starting out with our Windows product. In bothcases, the "Company Setup Wizard" will help get your data files set up properly.
Flexible Setup—Match Red Wing Accounting to your operation, rather thanthe other way around. Many features are optional, so you determine theinformation you need to track.

Introduction to Red Wing Windows Accounting 1-3
Tightly Integrated—Once you enter your one-time setup information, it iscarried across all modules, saving time and eliminating inconsistencies.
Comprehensive Reporting—Red Wing reporting is extremely flexible, withan almost infinite array of options and report ranges. The wide variety anddesign options for Red Wing’s Income Statements and Balance Sheets willsatisfy the demands of any accountant, banker or tax adviser. You can even printchecks, invoices, purchase orders and orders on dot-matrix printers, whileprinting all other reports on your laser or ink jet printer.
System Security—Easily separate access by data entry staff from that ofmanagement staff. If you need more control, have the system directly track useractivity.
Snapshots—Often called “drill-down” or “look-up” capabilities, Red Winggives you instant access to customer, vendor and inventory information. Trackinformation all the way back to an original invoice or transaction.
Add Information “On-the-fly”— When you are entering a transaction, justone keystroke opens another screen for adding (or changing) a vendor, customer,inventory item, etc. You can even add information across modules.
Quick Lookups—Are you looking for a customer or a vendor, but can onlyremember the contact person? Press the F2 key to “pop up” a search window.Sort by “Contact” to quickly locate the customer or vendor. Quick Lookup is agreat help when searching for invoices, general ledger entries and inventoryitems.
Full-featured Tax Tracking—Simplify your tax reporting with detailed taxreports and full tracking of government-mandated tax data.
Strong Inventory Control and Project Costing—The Inventory, ProjectCost and Purchase Order modules give you the power to control your businessbottom line before it controls you!
Unlimited number of companies. When setting up a new company you cancopy information from an existing company. This makes starting up a newcompany much quicker.

1-4 Introduction to Red Wing Windows Accounting
What's New inVersion 4.0
These are just a fewof the changes madeto the newest versionof the WindowsAccounting Series.
Accounts Receivable
• New UOM plain paper invoice includes a unit of measure column on detaillines, along with an expanded inventory item number (from 14 to 19numeric characters). When printing invoices, select the new “Plain Paper,UOM” in the form type field.
• New Customer History Report shows detail activity for any time period. Forexample, find a customer’s highest balance over a two-year period, the lastpayment received from a customer or how frequently a customer madepurchases. Management Reports > Customer History Report.
• New information appears on reprinted invoices, including Ship To, ShipNo., Ship Via, Due Date and Discount Date.
• All invoices (except dot matrix format) show Y (yes) for taxable and N (no)for not taxable in the Tax column, making them much easier to understand.(The tax class was formerly shown as a single-digit number that had nomeaning for customers.)
• New Apply Open Credit menu selection automatically applies credits tounpaid invoices for a range of customers. Much quicker and more efficientthan previous versions. Enter Invoices/Payments > Apply Open Credit.
• You cannot enter or modify the default cost for an inventory item (from theRed Wing Inventory system) on the Detail tab in Invoice Entry. Continue toenter costs for non-inventory items and System Manager inventory items. (Inearlier versions, you could enter a cost, but it was ignored and the inventorycost was used.)
• The Customer List has two new selection ranges, class code and salespersoncode (using the “first” salesperson code entered for each customer), plus anew option to sort by salesperson code.
• The Customer Snapshot sorts payment detail in descending order bypayment date (the most recent payments are shown first) to match the wayinvoices are shown.
• New option to sort the Top Customer Report by gross profit lists your mostprofitable customers first.
• Set up “use tax” as well as sales tax in Tax Location Groups (SystemManager). The use tax is calculated by multiplying the tax rate by the cost ofthe item purchased. Select sales tax or use tax when entering invoices andprint the Sales Tax Report for sales tax, use tax or both. System Manager >Setup > Tax Location Groups and Accounts Receivable > End of Period >

Introduction to Red Wing Windows Accounting 1-5
Sales Tax Report.
• The detail version of the Daily Journal Report now shows projectinformation for those who track projects.
• New option to print statements in customer name order. Handy for filinginternal copies in alphabetical order. Sorts by last name first and then byfirst name.
Order Entry
• New UOM plain paper Packing Slip and Order formats include a unit ofmeasure column on detail lines, along with an expanded inventory itemnumber. When printing orders, select the new “Plain Paper, UOM” in theform type field.
• New option to print Packing Slips in a dot matrix format with the new unitof measure column. When printing Packing Slips, select the new “PlainPaper, UOM” or “Preprinted Dot Matrix” in the form type field.
Accounts Payable
• Detail lines on Purchase Orders print in entry order, rather than inventoryitem order.
• New Vendor History Report shows detail activity for any time period. Forexample, find a vendor’s highest balance over a two-year period, the lastpayment sent to a vendor or how often purchases were made from a specificvendor in the past year. Management Reports > Vendor History Report .
• New Invoice Payment option to “pay oldest” invoices first, based on thespecific dollar amount you enter. Check Writing > Modify Selected Invoices.
• The final two steps in Check Writing are run automatically. As soon aschecks are printed, the Check Register is printed, followed by the UpdateVendor Balances process. Cancel either step and run it later, if desired.
• In Print Checks you can reprint a range of check numbers, rather thanhaving to print every check from a specific point to the end of the batch.
• Vendor phone number, fax number and contact name are printed on allPurchase Orders.
• Print an online Purchase Order directly from Maintain Purchase Orders.

1-6 Introduction to Red Wing Windows Accounting
General Ledger
• New option to run the Trial Balance Report for specific profit centers or forspecific accounts. Another new option lets you choose to skip all zerobalance accounts.
• New Account Inquiry menu selection lets you view account details for anyaccount balance for a specific year. Transaction Reports/Post > AccountInquiry.
• New Check Register menu selection shows the balance and detailedtransactions for an account over any time period. Useful, for example, if youwant to see all checks written during a certain time period and the accountbalance at that time. Transaction Reports/Post > Check Register.
Inventory
• When using serial numbers and entering Accounts Receivable invoices, the“unsold” serial numbers are listed first. However, when entering returns, the“sold” serial numbers are listed first.
• Along with the item number, the inventory item description has been addedto the Physical Inventory Counts Worksheet, making it easier to identifyitems.
• A new Inventory Customization option lets you restrict cost changes toprotect the cost information maintained within your system.
• The default bin number is shown for each item on the Item Status andInventory Valuation Reports.
• Run the Safety Stock Alert report using either Available Quantity (takinginto account current orders) or On Hand Quantity.
• New Price List Report shows up to five selling prices for each inventoryitem. Use it to produce a Price Book for salespeople showing “calculated”selling prices. Reports > Price Book.
• New Bill of Material Report shows ALL inventory items required by theselected assemblies, rather than showing only inventory items that are inshort supply (as shown in the Shortage Report). Assemblies > Bill ofMaterial Report.

Introduction to Red Wing Windows Accounting 1-7
Red WingApplications
For more detailedoverviews of eachsystem, use theContents tab in onlinehelp.
Use Red Wingmodules as stand-alone systems ornetworked.
System Manager—The control center for all Red Wing Windows modules.Required to run the system.
General Ledger—The key financial tool in the Red Wing WindowsAccounting Series. Double entry accounting system that tracks, reports,compares and analyzes information critical to the success of your business.
Accounts Receivable—Red Wing's key sales analysis tool, handling allreceivable management activity.
Accounts Payable—The principle cash control and purchase analysiscomponent of Red Wing software.
Inventory—Total inventory management. Track how many items you have onhand, their cost, and know when you need to reorder.
Order Entry—Enter orders, check available inventory and keep customerpurchase history. (Requires Accounts Receivable and Inventory.)
Point of Sale—Process over-the-counter sales and print receipts. (RequiresAccounts Receivable, Inventory is optional.)
Project Cost—Manage projects efficiently, effectively and profitably.
Purchase Orders—Create purchase orders, send them to your vendors andthen compare what you receive to those purchase orders. (Requires AccountsPayable, Inventory is optional.)
Payroll—A full-featured stand-alone system that can link to System Managerfor check reconciliation, General Ledger for posting and Project Cost fortransferring project information.

1-8 Introduction to Red Wing Windows Accounting
How This Manual is Organized
Chapter 1 Introduction—Overview of the Red Wing Windows Accounting Series.
Chapter 2 Red Wing Resources—An introduction to all the resources available withyour system from Red Wing Business Systems.
Chapter 3 Installation—Steps for installing your software on both individual andnetwork systems. Includes additional technical specifications and informationon using the Installation Setup Wizard.
Chapter 4 Working in Red Wing—Introduction to the Red Wing Main Menu andstandard Windows features found throughout the system.
Chapter 5 Hands-on Entry Tutorial—Experience using key commands to movethrough your Red Wing software. This practice system is an excellentopportunity to "get the feel" of working in Red Wing.
Chapter 6 Frequently Asked Questions—Answers to the most asked questions fornew Red Wing users. Tips on getting started, opening a company, how to setup codes and IDs, etc. Also, explains common error codes.
Chapter 7 Toolbars, Menu Bars and Keyboard Commands—Detailedexplanations of each toolbar, menu bar, report command and keyboardcommand.
Chapter 8 Red Wing Utilities—Learn how to make backups, restore data, compactdatabases and repair databases.
Chapter 9 Technical Comparison between DOS and Windows—Detailedcomparison between the Red Wing DOS (version 8.0) accounting software andthe Red Wing Windows accounting software. Primarily for customersmigrating from one system to the other.
Chapter 10 Special Options—A brief overview of the add-on programs available for theWindows Accounting Series, including the Label Wizard, ASCII Input options,and a General Ledger Report Designer.

Introduction to Red Wing Windows Accounting 1-9
Standards Used in This Manual
Notes and hints are identified by a push pin and are printed in italics. These areimportant messages and suggestions that can save you time and help you avoidpotential problems.
Extremely important information is printed in boldface type. Notreading this information or following the suggestions offered canlead to serious problems.

1-10 Introduction to Red Wing Windows Accounting
NOTES:

Red Wing Resources 2-1
Chapter Two — Red Wing Resources
Red Wing provides a wide range of resources to make usingyour system easier and to help with a variety of needs.Review this information carefully and take advantage of allof Red Wing’s resources.
Contents Online Help................................................................................ 2-2Cue Cards ................................................................................. 2-3Custom Help.............................................................................. 2-3Installation Help ......................................................................... 2-4Red Wing Company Setup Wizard ............................................. 2-4Practice Systems ....................................................................... 2-5Customer Support Plans ............................................................ 2-6Training ..................................................................................... 2-6World Wide Web ....................................................................... 2-7User Guides............................................................................... 2-7Forms........................................................................................ 2-7
When to CallCustomer
Support
Before calling...• Check the Cue Cards at the Main Menu.• Press F1 (Help) on the screen you are having difficulties with. This will
give you a complete description of the menu item and some How To’s.• Check FAQs in your Red Wing Windows Getting Started Guide, on our
Web page www.redwingsoftware.com and in our newsletters.
Have ready...1. Version of the software installed. (The Versions button on the Main Menu
will give you this information.)2. System information:
• PC Processor• RAM• Operating System
3. If your computers are networked, please have the following informationavailable:• Type of network (Win95, Novell, Windows NT, etc.)� Know which computer is the server.

2-2 Red Wing Resources
Online Help
Press F1 anytime forimmediate online help!Secondary windowspop up to give you evenmore help.
Use the comprehensiveHelp Index to find anyhelp topic quickly andefficiently.
The Help Contents andIndex link to online helpfor all modules in theRed Wing WindowsAccounting Series.

Red Wing Resources 2-3
Cue Cards
Cue Cards stay on topof the screen and walkyou through each stepof a procedure.
Custom Help
Press Shift F1 todisplay a Custom Helpwindow for any screen.Enter your ownreminders, schedules,tips, etc.

2-4 Red Wing Resources
Installation Help
Press F1 duringinstallation forimmediate online help.
No more questionsabout single userversus networkinstallationrequirements!
The help is alwaysavailable, even afterinstallation.
Red Wing Company Setup Wizard
Select the Setup Wizardfrom the Main MenuHelp menu bar and letthe wizard walk youthrough your initialsystem setup.

Red Wing Resources 2-5
Practice Systems
VERY IMPORTANTTO YOUR SUCCESSWITH RED WING!
Use Red Wing'ssample company filesand go through eachsystem learning andexperiencing thebasics.
Install the PracticeSystems from theCD-ROM. They areincluded as AdobeAcrobat .pdf files. AnAdobe AcrobatReader is alsoavailable. See page3-10 for installationinstructions.

2-6 Red Wing Resources
Customer Support Programs
For an explanation ofwhen to call CustomerSupport, see page 2-1.
Red Wing's Customer Support Plans are your key to success with Red Wing!
• Quick access to a staff of highly skilled professional technicians.
• Toll-free telephone support.
• Discounts on upgrades, training, and more.
For Details Call 1-800-732-9464
Red Wing Training
One of the best ways to learn Red Wing is through our regular training sessions.
• Traditional classroom (class size is limited)
• Online NetMeeting training
• Beginning and advanced courses available
• On-site training available
For more information, call 1-800-732-9464

Red Wing Resources 2-7
World Wide Web
Red Wing Business Systems maintains an active web site at:
www.redwingsoftware.com
Bookmark this site and check frequently for information on updates, trainingseminars, frequently asked questions, new releases and much more!
User Guides
Separate user guides for each application are available from your local Red Wingdealer or directly from Red Wing for a nominal charge. These handy booksinclude practice systems, examples of reports, "how to" information andexplanations of each menu selection.
Forms
Order your invoices, checks, statements and other forms from Red Wing Forms.Enjoy custom imprinting, hundreds of design options and the confidence thatyour forms will always work.
To Order Forms Call 1-800-294-9695
Or Visit: www.redwingforms.com

2-8 Red Wing Resources
NOTES:

Installation 3-1
Chapter Three — Installing Red Wing WindowsAccounting
This chapter provides general installation information,including networking requirements. Much of this informationis also available in online help during installation.
Contents Introduction / Setup Wizards .................................................... 3- 2Technical Specifications Hardware ............................................................................ 3- 3 Software ............................................................................. 3- 3 Printer................................................................................. 3- 3Single User / Demo Install ........................................................ 3- 4Network Install ......................................................................... 3- 5 How to Switch from a Single-user (Stand-alone) System to a Multi-user System............................................ 3- 8Step-by-step Through the Installation Setup Wizard ................. 3- 9Installing Practice Systems ...................................................... 3-11Uninstall................................................................................... 3-12Miscellaneous Directory Structure .............................................................. 3-13 Registry Entries................................................................... 3-16 Red Wing Icons .................................................................. 3-17Installing with Office 2000 ........................................................ 3-18

3-2 Installation
Introduction
Install Red Wing Windows on a stand-alone computer or on a network server fordownloading to workstations.
Red Wing Windows requires Microsoft Access 8.0 or Microsoft Access Runtime8.0 (included with the system). If you already have Microsoft Access 8.0, theruntime version that comes with the system is not installed.
Microsoft Access 8.0 is one component of Microsoft Office 97 Professional.
IMPORTANT: If you are installing onto a computer with Office2000, be sure to read the last section of this chapter, beginningon page 3-18.
Setup Wizards There are two Setup Wizards for use in installing and setting up your Red Wingsoftware:
• The Installation Setup Wizard walks you step-by-step through theinstallation of the software. It is also explained thoroughly in this chapter.
• The Red Wing Company Setup Wizard walks you step-by-step throughsetting up your accounting system data files.
After installing your Red Wing software, install the Practice Systems(page 3-11) and first go through the Practice System for each module youhave installed. This gives you an excellent overview of how each applicationworks.
From the menu bar on the Main Menu, select Help. Next, select SetupWizard. Follow the steps on the Setup Wizard to set up your systemcorrectly. For help on using the Setup Wizard, click on the Help buttonlocated on the Setup Wizard screen.

Installation 3-3
Technical Specifications
Hardware
(Recommended)
Ram Memory 32 MB or greater (Red Wing requires a 32 bit MicrosoftWindows operating system.)
CPU Pentium 150 MHz or greater (266 MHz or greater isrecommended!)
Video Card SVGA or greater (800 x 600)
Disk Space 100 MB or greater
Software • Microsoft Windows 95 or greater
• Microsoft Windows NT Workstation 3.51 /w Service Pack 5 or greater
• Microsoft Windows NT Workstation 4.00 /w Service Pack 3 or greater
• Microsoft Windows NT Server 3.51 /w Service Pack 5 or greater
• Microsoft Windows NT Server 4.00 /w Service Pack 3 or greater
Printers • Laser or inkjet printer(s).
• Also, dot matrix (continuous feed) printers can be used for checks, invoices,orders and purchase orders. However, they CANNOT be used for 1099forms, which require a laser printer.
• ALL forms must be 8-1/2" x 11". Accounts Payable 1099 forms require alaser printer.
Novell NetwareParameters
File and record lock parameters may have to be raised to successfully use RedWing Windows products with Netware. These parameters should be included inNetware’s AUTOEXEC.NCF file and entered manually from a console prompt.Suggested settings are:
Maximum record locks = 200000
Maximum record locks per connection = 10000
Maximum file locks = 10000
Maximum file locks per connection = 1000

3-4 Installation
Single User / Demo Installation
Single User orDemo CD-ROM
1. Start Microsoft Windows.
2. Close all other applications, including mail and the Microsoft OfficeShortcut Bar.
3. Insert the Red Wing CD-ROM in the CD-ROM drive.
4. Windows launches Red Wing’s Installation Setup Wizard automatically.
Note: If Red Wing does not start up automatically (auto launch), follow thisprocedure:
1. From the Windows desktop, click Start, click Run. (For Windows NT3.51, from the Program Manager, click File, click Run.)
2. Enter d:\Launch.exe (where d is the drive letter of your CD-ROM) andclick OK.
5. Click the Install Software icon.
6. Follow the step-by-step instructions on page 3-9.
Single User orDemo Diskette
1. Start Microsoft Windows.
2. Close all other applications, including mail and the Microsoft OfficeShortcut Bar.
3. Install Microsoft Access Runtime 8.0 if Microsoft Access / Office 97 is notcurrently installed. (If you are updating Red Wing Windows, version 3.0 orhigher, do not re-install Microsoft Access Runtime.)
• Insert the first disk from the Microsoft Access Runtime 8.0 disk set intoyour diskette drive.
• From the Windows desktop, click Start, click Run. (For Windows NT3.51, from the Program Manager, click File, click Run.)
• Enter a:\setup.exe (where a is the drive letter of your diskette) and clickOK.
• Follow the instructions for each dialog.
4. Install Red Wing Windows
• Insert the first disk from the Red Wing Windows disk set into yourdiskette drive.

Installation 3-5
• From the Windows desktop, click Start, click Run. (For Windows NT3.51, from the Program Manager, click File, click Run.)
• Enter a:\setup.exe (where a is the drive letter of your diskette) and clickOK.
• Follow the step-by-step instructions on page 3-9.
Network Installation
All network installations MUST be installed from a workstation tothe server (do not install directly on the server). In other words,DO NOT run the installation process while sitting at your server(the main computer that will serve as your network “hub”).
Windows NTSpecifications
1. Use TCP/IP protocol, if possible.
2. Make sure you have NetBios enabled if using IPX/SPX
3. Make sure you have service pack 3 installed on the server if you are usingWindows NT 4.xx
4. Make sure you have service pack 5 installed on the server if you are usingWindows NT 3.51
5. Check the date and version of VREDIR.VXD on Windows 95 workstations.
6. Any VREDIR dated 08/24/96 or 07/25/97 have problems and should beupdated.
7. Replacement drivers can be found atftp://ftp.microsoft.com/softlib/mslfiles/vrdrupd.exe
8. The Shared volume should be left with EVERYONE = FULL ACCESS.
9. The Red Wing directories (RWBS2 and RWBS2S) should be set so the usershave Change/Change rights.
10. An NTFS partition is recommended.

3-6 Installation
Novell NetwareParameters
File and record lock parameters may have to be raised to successfully use RedWing Windows products with Netware. These parameters should be included inNetware’s AUTOEXEC.NCF file and entered manually from a console prompt.Suggested settings are:
Maximum record locks = 200000
Maximum record locks per connection = 10000
Maximum file locks = 10000
Maximum file locks per connection = 1000
Peer-to-PeerInstallation usingWindows 95
Follow the same instructions as for a standard network install.
This installation MUST be installed from a workstation to theserver (do not install directly on the server). In other words, DONOT run the installation process while sitting at your server (themain computer that will serve as your network “hub”).
Installation fromCD-ROM
Step 1 -- Install to the server from a workstation
1. Start Microsoft Windows on the workstation. (You must haveAdministrative privileges.)
2. Close all other applications, including mail and the Microsoft OfficeShortcut Bar.
3. Insert the Red Wing CD-ROM into the CD-ROM drive.
4. Windows will automatically launch Red Wing’s Installation Setup Wizard.
Note: If Red Wing does not start up automatically (auto launch), follow thisprocedure:
1. From the Windows desktop, click Start, click Run. (For Windows NT3.51 from the Program Manager, click File, click Run.)
2. Enter d:\Launch.exe (where d is the drive letter of your CD-ROM) andclick OK.
5. Click the Install Software icon.
6. Follow the step-by-step instructions on page 3-9.
Note: Select Server from the Setup Type dialog.

Installation 3-7
Step 2 -- Download to each workstation that uses Red WingWindows.
1. Start Microsoft Windows on the workstation.
2. From the Windows desktop, click Start, click Run. (For Windows NT 3.51,from the Program Manager, click Start, click Run.)
3. Enter f:\Rwbs2S\Setup.Exe (where f:\Rwbs2S is the drive letter and pathfor the server installation) and click OK.
4. Follow the instructions for each dialog, accepting the default at each prompt.
Note: Select Workstation from the Setup Type dialog.
Installation fromDiskette
Step 1 -- Install to the server from a workstation
1. Start Microsoft Windows on the workstation. (You must haveAdministrative privileges.)
2. Close all applications, including mail and the Microsoft Office Shortcut Bar.
3. Insert the first disk from the Red Wing Windows disk set into your diskettedrive.
4. From the Windows desktop, click Start, click Run. (If you are usingWindows NT 3.51, from the Program Manager, click File, click Run.)
5. Enter a:\setup.exe (where a is the drive letter of your diskette) and click OK.
6. Follow the step-by-step instructions on page 3-9.
7. Note: Select Server from the Setup Type dialog.
Step 2 -- Install Microsoft Access on each workstation.
1. Start Microsoft Windows on the workstation.
2. Install Microsoft Access Runtime 8.0 if Microsoft Access / Office 97 is notcurrently installed. (If you are updating Red Wing version 3.0 or higher, donot re-install Microsoft Access Runtime.
3. Insert the first disk from the Microsoft Access Runtime 8.0 disk set into yourdiskette drive.
4. From the Windows desktop, click Start, click Run. (Or, for Windows NT3.51, from the Program Manager, click File, click Run.)
5. Enter a:\setup.exe (where a is the drive letter of your diskette) and click OK.

3-8 Installation
6. Follow the instructions for each dialog.
Step 3 -- Download to each workstation that uses Red WingWindows.
1. From the Windows desktop, click Start, click Run. (Or, for Windows NT3.51, from the Program Manager, click File, click Run.)
2. Enter f:\Rwbs2S\Setup.Exe (where f:\Rwbs2S is the drive letter and pathfor the server installation) and click OK.
3. Follow the instructions for each dialog, accepting the default at each prompt.
Note: Select Workstation from the Setup Type dialog.
Installation -- Step-by-Step
Overview After completing the preliminary steps for either single-user/demo (page 3-4) ornetwork installations (page 3-5), the following “dialogs” are displayed as youproceed through the Installation process.
Welcome Dialog Close all applications, including e-mail and the Microsoft Office Shortcut Bar.
• Click Next if all other applications are closed.
• Click Cancel to exit the Installation Setup Wizard.
Activation KeyDialog
• Click Demo to install a 30-day trial version of the Red Wing WindowsAccounting Series. No activation key is required.
• Click Purchased and enter your activation code to install the system. Keepthe activation key in a safe place . You will need it to install future updates.
• Click Back to return to the Welcome dialog.
• Click Next to continue to the Setup Type dialog.
• Click Cancel to exit the Installation Setup Wizard.

Installation 3-9
Setup Type Dialog Select a setup type and destination path. Options are:
Single User (full install default directory=c:\rwbs2; demo defaultdirectory=c:\rwbs2D)
Server (default directory=c:\rwbs2S)
Workstation (default directory=c:\rwbs2)
• Click Browse to select a different destination path.
If you are installing an update to an existing 32-bit Red Wing application(Red Wing 3.0 or greater), you must select the same destination path as yourprevious install.
Do not attempt to install the 32-bit version into a 16-bit (Windows 3.x)directory (normally, rwbs or rwbssrvr).
• Click Back to return to the previous dialog.
• Click Next to continue.
• Click Cancel to exit the Installation Setup Wizard.
Select ProgramFolder Dialog
The Installation Setup Wizard creates icons (page 3-17) under the ProgramFolder name entered on this dialog.
• Click Back to return to the previous dialog.
• Click Next to continue.
• Click Cancel to exit the Installation Setup Wizard.
Start CopyingFiles Dialog
Confirm the information selected for your installation.
• Click Back to return to the previous dialog.
• Click Next to continue. The system will copy files and create registry entries(page 3-16) and create icons (page 3-17).
• Click Cancel to exit the Installation Setup Wizard.

3-10 Installation
How to Switchfrom a Single-user(Stand-alone)System to a Multi-user System
1. From a workstation that does not currently have Red Wing, install theprograms to the server.
2. Download to this workstation.
3. Log in to the Accounting Software and create a company with the same3-character code as your original company.
4. Exit the Accounting Software.
5. (If you have Payroll), log in to Payroll and create a company with thesame 3-character code as your original company.
6. Exit Payroll.
7. Copy the data files for this company from the original stand-aloneworkstation to the folder (for this company) on the server.
8. Go into the Accounting Software from the workstation to which youdownloaded and verify that your data is there. Do the same in Payroll (ifapplicable).
9. If all of your data has been copied, uninstall the stand-alone versionfrom the original workstation.
10. Delete the rwbs2 directory from the original workstation.
11. Download to all workstations, including the original stand-alone one.

Installation 3-11
Installing Practice Systems
Introduction You can install the Practice Systems from the CD-ROM. Be sure to go throughthe Practice Systems before entering your own data into the Red Wing software.The Practice Systems use a sample company to introduce you to many of thefeatures of the system safely and efficiently.
If you are usingWindows 95 orWindows NT 4.xx
1. Start Microsoft Windows on the workstation.
2. Close all other applications, including mail and the Microsoft OfficeShortcut Bar.
3. Insert the Red Wing CD-ROM into the CD-ROM drive.
4. Windows will automatically launch Red Wing’s Installation Setup Wizard.
Note: If there is a problem with the CD-ROM and Red Wing does not startup automatically (auto launch), follow this procedure:
1. From the Windows desktop, click Start, click Run.
2. Enter d:\Launch.exe (where d is the drive letter of your CD-ROM) andclick OK.
5. Click the Install Practice System icon.
6. Follow the step-by-step instructions
If you are usingWindows NT 3.51
1. Start Microsoft Windows.
2. Close all other applications, including mail and the Microsoft OfficeShortcut Bar.
3. Insert the Red Wing CD-ROM into the CD-ROM drive.
4. From the Program Manager, click File, click Run.
5. Enter d:\Launch.Exe (where d is the drive letter of your CD-ROM) and clickOK.
6. Click the Install Practice System icon.
7. Follow the step-by-step instructions.

3-12 Installation
After Installation: If you do not have the Adobe Acrobat reader installed on your computer, you caninstall the copy found on the CD-ROM. To install the Adobe Acrobat reader,double-click on the rs40eng.exe file (located in your "install" directory; i.e.c:\rwbs2\manuals) and follow the on-screen instructions.
IMPORTANT: If you already have the Adobe Acrobat readerinstalled, it must be version 4.0 or higher to read practice systems.
Printing thePractice Systems
The Practice Systems are installed in a MANUALS directory inside the directorywhere you installed your Red Wing programs. Select any one of the files in theMANUALS directory and double-click to open the file. (The Adobe Acrobatreader must be installed on your computer to open the file.)
Uninstall
If you are usingWindows 95 orWindows NT 4.x
1. From the Windows Desktop, click Start, click Settings, click Control Panel.
2. From the Control Panel window, click Add/Remove programs.
3. Click on one of the following entries in the order shown below:• Microsoft Access Runtime 8.0• Red Wing Windows 2 (Server)• Red Wing Windows 2 (Demo)• Red Wing Windows 2
4. Click Add/Remove once the entry is selected.
5. When Windows asks if you want to Remove Shared Files, click on theNo to All button.
6. Return to step 3 to remove each of the programs you have installed.
If you are usingWindows NT 3.51
1. From the Program Manager, locate the common program group whichcontains Red Wing Windows, click the Uninstall icon. Uninstall theapplications in the following order.
• Microsoft Access Runtime 8.0• Red Wing Windows 2 (Server)• Red Wing Windows 2 (Demo)• Red Wing Windows 2
2. Return to step 1 to remove each of the programs you have installed.
Installation 3-13
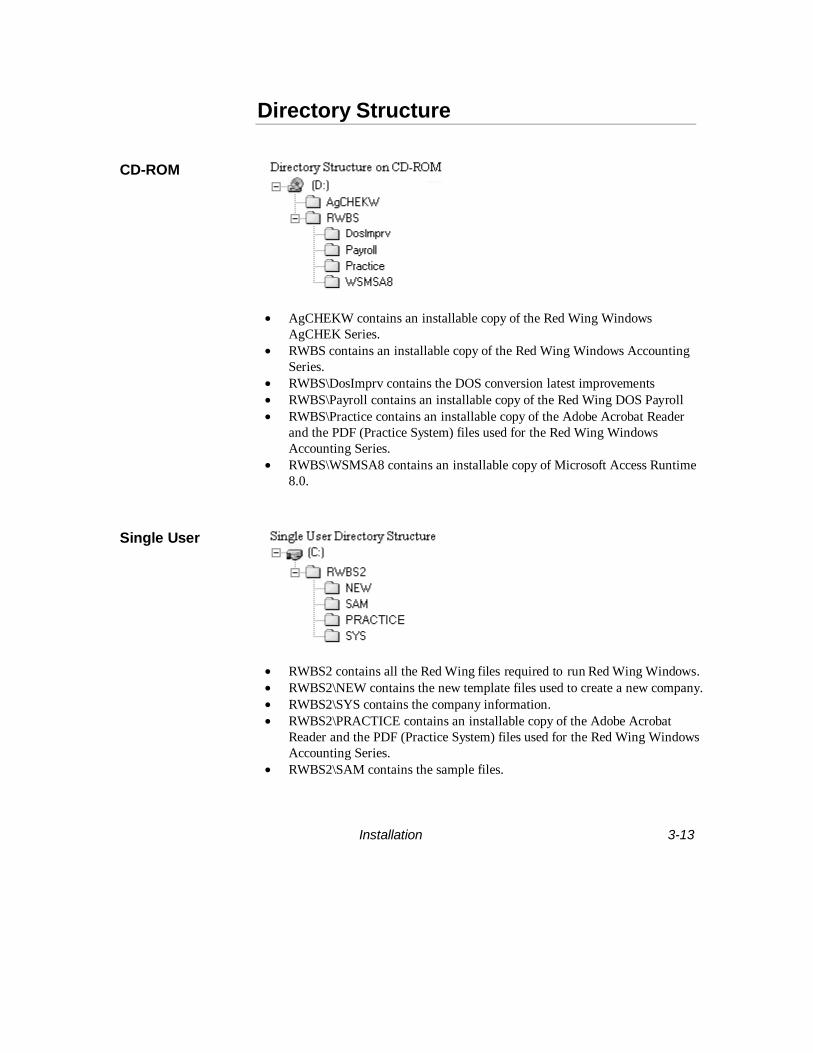
Directory Structure
CD-ROM
• AgCHEKW contains an installable copy of the Red Wing WindowsAgCHEK Series.
• RWBS contains an installable copy of the Red Wing Windows AccountingSeries.
• RWBS\DosImprv contains the DOS conversion latest improvements• RWBS\Payroll contains an installable copy of the Red Wing DOS Payroll• RWBS\Practice contains an installable copy of the Adobe Acrobat Reader
and the PDF (Practice System) files used for the Red Wing WindowsAccounting Series.
• RWBS\WSMSA8 contains an installable copy of Microsoft Access Runtime8.0.
Single User
• RWBS2 contains all the Red Wing files required to run Red Wing Windows.• RWBS2\NEW contains the new template files used to create a new company.• RWBS2\SYS contains the company information.• RWBS2\PRACTICE contains an installable copy of the Adobe Acrobat
Reader and the PDF (Practice System) files used for the Red Wing WindowsAccounting Series.
• RWBS2\SAM contains the sample files.

3-14 Installation
Demo
• RWBS2D contains all the Red Wing files required to run the Red WingWindows Demo.
• RWBS2D\NEW contains the new template files used to create a newcompany.
• RWBS2D\SAM contains the sample files.• RWBS2D\PRACTICE contains an installable copy of the Adobe Acrobat
Reader and the PDF (Practice System) files used for the Red Wing WindowsAccounting Series.
• RWBS2D\SYS contains the company information.
Workstation
• RWBS2 contains the Red Wing Windows program and supplemental filesrequired to run from a server version of Red Wing Windows.
• RWBS2\PRACTICE contains an installable copy of the Adobe AcrobatReader and the PDF (Practice System) files used for the Red Wing WindowsAccounting Series.
Data is stored in a shared location on the server.

Installation 3-15
Server
• RWBS2S contains all the Red Wing files required to run Red WingWindows.
• RWBS2S\NEW contains the shared new template files used to create a newcompany.
• RWBS2S\SAM contains the shared sample files.• RWBS2S\SYS contains the shared company information.• RWBS2S\WSFONTS files are copied to the Windows Fonts directory during
a workstation download.• RWBS2S\WSLIB files are copied to the Red Wing Windows common
directory (program files/common files/Red Wing Windows) during aworkstation download.
• RWBS2S\WSMSA8 files are used to automatically install Microsoft AccessRuntime 8.0 to the workstation.
• RWBS2S\WSOFFICE files are copied to the Microsoft Office directoryduring a workstation download.
• RWBS2S\WSSYS files are copied to the Windows System directory during aworkstation download.
• RWBS2S\WSSYSSR files are copied to the Windows System directoryduring a workstation download.

3-16 Installation
Registry Entries
Introduction Registry entries created by the Installation Setup Wizard are created under the[HKey_Local_Machine\Software] key. Red Wing Windows creates additionalvalues under the [HKey_Local_Machine\Software\Red Wing Business Systems,Inc.\Red Wing Windows\2.01.000] key for each installed module.
[HKey_Local_Machine] [Software] [Red Wing Business Systems, Inc.] [Red Wing Windows] See note #1 [2.01.000] ActivationKey “User’s activation key”
RegisteredOrganization“”
RegisteredOwner “” ShowIntro “1” to show intro screen, “0” skips intro screen [FirstTime] P2Pserver "1" when the peer-to-peer workstation/server are the
same machine/computer; otherwise, "0" ProgPath “C:\Rwbs2” See note #2 SamPath “C:\Rwbs2\Sam” See note #2 Setup “1” to run first time, “0” skips first time SysPath “C:\Rwbs2\Sys” See note #2 [Jet] [3.5] [Engines] SystemDB “C:\Rwbs2\RwAdmin.Mdw” See note #2 [Report Formats] HTML “html,SOA_RptToHtml,1,HTML (*.html),1” Microsoft Excel “xls,SOA_RptToBIFF, Biff5,Microsoft Excel (*.xls),0” MS-DOS Text “txt,SOA_RptToAscii,1,MS-DOS Text (*.txt),0” Rich Text Format “rtf,SOA_RptToRTF,Rich Text Format,Rich Text Format (*.rtf),0” [Run-Time Options] AppHelpFile “C:\Rwbs2\Sm2.Hlp” See note #2 AppIcon “C:\Rwbs2\Rwbs2.Ico” See note #2 AppStartupScreen “C:\Rwbs2\Rwbs2.Bmp” See note #2
Note #1: The [Red Wing Windows] key will vary based on setup type.Single User: Red Wing Windows Server: Red Wing Windows (Server)Demo: Red Wing Windows (Demo) Workstation: Red Wing Windows
Note #2: The paths will vary based on user selected destination path and the setup type.Single User Default: C:\Rwbs2 Server Default: F:\Rwbs2SDemo Default: C:\Rwbs2D Workstation Default: C:\Rwbs2

Installation 3-17
Red Wing Icons
Overview The Installation Setup Wizard creates several icons using the followingproperties:
Red Wing WindowsTarget: "C:\Program Files\Microsoft Office\Office\MSACCESS.EXE""C:\Rwbs2\Rwbs2.Mdb" /excl /runtime /profile Rwbs2 /cmdVer:2.01.000
Red Wing UtilityTarget: "C:\Program Files\Microsoft Office\Office\MSACCESS.EXE""C:\Rwbs2\RwUtil2.Mde" /excl /runtime /profile Rwbs2 /cmdVer:2.01.000
Red Wing Windows (Demo)Target: "C:\Program Files\Microsoft Office\Office\MSACCESS.EXE""C:\Rwbs2D\Rwbs2.Mdb" /excl /runtime /profile Rwbs2 /cmdVer:Demo2.01.000
Red Wing Utility (Demo)Target: "C:\Program Files\Microsoft Office\Office\MSACCESS.EXE""C:\Rwbs2D\RwUtil2.Mde" /excl /runtime /profile Rwbs2 /cmdVer:Demo2.01.000
Notes 1. Quotes ( " ) must be used as part of the Target.
2. "C:\Program Files\Microsoft Office\Office\MSACCESS.EXE" is based onthe location of Microsoft Access or Microsoft Access Runtime.
3. "C:\Rwbs2\Rwbs2.Mdb" is the executable file name.
4. /excl opens the MDB exclusively.
5. /runtime is used when Microsoft Access Runtime is installed.
6. /profile tells Access which run-time options to use.
7. /cmd tells Red Wing which sub key to access from the registry.

3-18 Installation
Office 2000 and Red Wing
Introduction With the recent release of Microsoft Office 2000, several issues have come tolight that may affect the use and operation of Red Wing Windows Productsincluding the Windows Accounting Series.
Issue 1
How to add Office2000 to a computerwhere a Red WingWindows product isalready installed.
Start the Office 2000 Setup but watch very carefully during the first few setupscreens for the option to do a Customized Setup. Use that selection! Do NOTuse the button labeled Update Now. When the Customized Setup option isinvoked, Setup checks for earlier versions of Office and displays those findingswhile asking if it should "Keep These Programs." Be very careful, making sureyou keep Access 2.0 or Access 97 on the computer. Allow Setup to remove olderversions of Word, Excel, PowerPoint, Outlook, etc., if they are not neededanymore. Proceed with the Office 2000 Setup and everything should be fine.
The key point is that the default setup routine supplied with Office 2000 assumesit should replace all earlier versions and components of Office. The Red WingWindows products are built around earlier versions of Microsoft Access,components of older Microsoft Office versions. The programming code writtenfor these Red Wing products are NOT compatible with Access 2000. Theyrequire the older Access versions in either full or runtime installs. So, if you runthe default setup for Office 2000, the older Access will no longer exist on thecomputer and Red Wing won’t run!
Issue 2
How to install RedWing Windowsproducts on a newcomputer that alreadyhas Office 2000.
From the Red Wing Windows CD, install Access Runtime to its default directory\WsMSA8. Install the Red Wing programs to the network server or stand-alonecomputer. If running the Windows Accounting Series on a network, do theWorkstation Download. Verify that the Red Wing Windows software operatesproperly. At this point, some key files in the Office 2000 installation may havebeen overwritten by the older versions. That is why it is necessary to run theOffice 2000 Setup with the Customize option and be sure to "Keep ThesePrograms" as discussed above.

Installation 3-19
Issue 3
A new copy of Office2000 software wasinstalled on acomputer using RedWing Windows andan attempt was madeto enter Red Wing.
Any number of oddthings happen whenattempting to useRed Wing, but onething is for sure, youcan’t get into youraccounting software.
This differs from Issue 2 because an attempt was made to open Red Wing withOffice 2000 present. Several default settings, data paths and registry entries arenow invalid. If your technical skills aren’t compatible with the followinginstructions, be sure to enlist some local expertise or call Red Wing TechnicalSupport. To correct this situation, use the Control Panel feature Add/RemovePrograms and the following step by step process.
1. Uninstall Office 2000.2. Uninstall Red Wing.3. If Access Runtime is still there, uninstall it.4. Open Windows Explorer.5. Find the company data subdirectories under \RWBS or, when networked,
\RWBS2S.6. Copy company data folders to a safe place like a \TEMP or \BAK
subdirectory.7. Delete all Red Wing and Microsoft Office folders including: \RWBS2,
\RWBS2S, \Program Files\Microsoft Office.8. Close Windows Explorer.9. At the Windows Desktop, click Start, Run, and type REGEDIT.10. Click OK.11. Once in the registry editor, make a backup of the registry by selecting
Registry, Export Registry File, …12. Delete the registry key
\HKEY_CURRENT_USER\Software\Microsoft\Office.13. Delete the registry key
\HKEY_LOCAL_MACHINE\Software\Microsoft\Office.14. Delete the registry key \HKEY_LOCAL_MACHINE\Software\Red Wing
Business Systems, Inc.15. Exit the registry editor.16. Shut down the computer and turn it off. Allow it to rest for 15 – 20 seconds.17. Restart the computer.18. Reinstall Access Runtime from the Red Wing CD.19. Reinstall Red Wing Windows to your original configuration.20. In Red Wing, use the sample company (SAM) to verify that everything
seems OK.21. Open Windows Explorer.22. Copy company data files back to their original location under \RWBS2 or
\RWBS2S.23. From the Red Wing System Manager Main Menu, add new companies using
existing data.24. Change to those companies one at a time to verify that all data is intact.25. Reinstall Office 2000, using Customized Setup. See Issue 1, page 3-18.

3-20 Installation
Important Office2000 ThingsWe’ve Learned
• Use Customize Setup to prevent Office 2000 from deleting older Officeversions
• When using multiple Office versions, install the oldest version first
• Windows Uninstall may not be thorough; you may have to manually deletesome folders and registry keys
• Failed or aborted install attempts may corrupt the Windows Registry causingserious computer problems
• Office 2000 Setup overwrites all Office 95/97 icons in the Windows StartMenu

Working in Red Wing 4-1
Chapter Four — Working in Red Wing
Get acquainted with Red Wing's Main Menu, the keynavigational tool in the Red Wing Windows AccountingSeries. Also, review the standard Windows features foundthroughout Red Wing software.
Contents How to Use the Main MenuOverview............................................................................. 4-2Change Company button..................................................... 4-3Suggestions button ............................................................. 4-3Versions button................................................................... 4-3System Information............................................................. 4-3Cue Cards........................................................................... 4-4
Red Wing Windows StandardsEntry Screens ..................................................................... 4-4Sample Entry Screen .......................................................... 4-5Moving From One Field to the Next ..................................... 4-5Pull-down Menus................................................................. 4-6Menu Bar ............................................................................ 4-6Control Menu Box ............................................................... 4-6Toolbar ............................................................................... 4-7Minimize and Maximize Buttons .......................................... 4-7Status Bar........................................................................... 4-7Entry Field .......................................................................... 4-8Check Box .......................................................................... 4-8Combo Box......................................................................... 4-8Option Buttons .................................................................... 4-8Command Buttons .............................................................. 4-9Quick Selection................................................................... 4-9Scroll Bar............................................................................ 4-9Record Selector Buttons...................................................... 4-9

4-2 Working in Red Wing
How to Use the Main Menu
Overview The Main Menu is the "control center" of your Red Wing application. It isdisplayed when you start Red Wing and also when you press Ctrl M.
Use your mouse or right, left, up and down arrow keys to move from section tosection in the Main Menu. To select an item from a menu, double-click theitem or use the up and down and right and left arrow keys to highlight the itemand press Enter.
To exit the Main Menu, double-click the control box button (in the upper leftcorner of the menu) or press Alt F X.
The Main Menu is divided into four quadrants as follows:
Each installed application is listed in the upper left section of the MainMenu.
The menu selections for the highlighted application are shown in the lowerleft section of the Main Menu.

Working in Red Wing 4-3
The lower right section shows submenu selections for the highlightedmenu selection (shown in the lower left section). Select these and pressEnter or double-click on them to display an entry screen.
The upper right section lists four command buttons.
Press F1, use the Help Menu on the menu bar or click on the help
tool for help anytime!
Change Companybutton
Use this selection to change to a different company's records.
Suggestionsbutton
Use this screen to enter suggestions about specific applications. When you arefinished you can print the suggestion and mail or fax it to Red Wing BusinessSystems, Inc. The information is printed as a Product Suggestions Report,ready for submittal.
Versions button This selection shows a list of all currently installed Red Wing applications andtheir current database path. The application ID, description, version andinstallation date are listed. The information is updated automatically each timeyou install an update to your current system.
SystemInformation
This selection gives you access to some of the "inner workings" of your RedWing Accounting system. In general, most options are needed only whenworking with Red Wing Customer Support to solve a problem. The four tabbedscreens are:
Data Paths—This tab shows the file names and locations for each of themodules under the selected Company ID.
Applications—Use this tab to locate program files and install or uninstallspecific files; features that are generally used by Red Wing developers andCustomer Support personnel.
4-4 Working in Red Wing
Users/Registration—This tab lists basic information about your system. TheUser List shows the computer names that are currently in the system.
Advanced—This tab lists the libraries you are using and other technicalinformation. This information is used primarily by developers and Red WingCustomer Support. Use only under the direction of Red Wing CustomerSupport.
See online help for more details. (Search for System Information on the Indextab.)
Cue Cards Online help that stays on top of your screen as you follow the step-by-stepprocedure.
Red Wing Windows Standards
Entry screens An entry screen is any window through which you can communicate with(make entries into) your Red Wing system. They are usually displayed whenyou make a menu selection from the Main Menu.
When you close an entry screen, all changes are saved. To close an entryscreen, double click on the toolbox in the upper left corner of the entry screen
OR click on the Close button, when available, OR click on the close icon in the toolbar.
To exit the screen without saving your changes press Escape (Esc) twice toclear entries or select the Cancel button, if available.

Working in Red Wing 4-5
Combo box
Sample entryscreen
Moving from onefield to the next onan entry screen
To move from one option to the next, press Tab, type Alt +(underlinedletter), or use your up and down, right and left arrow keys.
You can also press the Enter key to move from one option to the nextor, alternately, to save the record, depending on how it is set up inView options.
Menu bar Toolbar
Minimize/Maximizebuttons
Controlmenu box
Headersection
Detailsection
Totalssection
Entryfields
Check box
Command button

4-6 Working in Red Wing
Pull-down menus Click your left mouse button on a heading in the menu bar or type Alt + anyunderlined letter on the menu bar to display a pull-down menu.
• Each pull-down menu item has a command associated with it or afurther list of options. All are standard Windows commands. Whenyou select a pull-down menu option, an action is taken (such asExit) or an additional pull-down menu or dialog box is displayed.
• Dimmed (grayed-out) text indicates options that are not available.
• To close a menu, click anywhere outside the menu, press Alt tocancel the menu and return to the desktop, or press Esc to close itand remain on the menu bar.
Menu bar
The menu bar lists available menu categories which control commonactivity in the system. To activate a menu selection, press Alt plus theunderlined letter of the selection (or selections). For example to open Printon the File Menu, press Alt F P.
Control menu box The Control Menu is used to control the windows on your desktop. Analternative to using the menu is to use your mouse.
• To quickly close a window or report, double-click on the Control MenuBox in the upper left corner of your main window.
• To open the Control Menu, click once or press Alt Spacebar.
• To close the Control Menu, point to the Control Menu Box and clickthe left mouse button once, or click on Close, or press Alt F4.

Working in Red Wing 4-7
Toolbar
The toolbar displays buttons you can click on with your mouse for quick accessto specific functions. For example, click on the closing door to close the currentwindow (it is removed from the screen).
Use the toolbar buttons to close files, to print reports, to get help, etc. Whentoolbar buttons are "dimmed," they are inactive and are not available for use.
For descriptions of frequently used tools see Chapter Seven.
Minimize andmaximize buttons
Use these buttons, located in the upper right corner of your screen, to shrinkthe window to an icon or fill the entire desktop or screen area.
Status bar
The status bar is a line of information displayed at the bottom of your screen. Itshows the current company, the ID of the user logged into the machine, andwhether the Lookup or Maintenance commands are available for the activefield.
Lookup Command — This option lets you locate a value for an active entryfield by searching according to name, contact, zip code, etc. For example, if youneed the vendor ID of a company and you know only the name of the person youdo business with, you can locate the vendor ID by searching by contact person.This command is available when F2 Lookup is displayed on the status bar.
Maintenance Command — This option lets you update information withouthaving to quit your current task. For example, if you are entering transactionsand discover the vendor has not been set up, you can double-click on the VendorID entry field (or press F6) and define the vendor, then return to the transaction.This command is available when F6 Maint is displayed on the status bar.

4-8 Working in Red Wing
Entry field Type information into these boxes (fields) on a dialog or accept thedefault information shown.
You are not required to enter information into every entry field.However, if you skip a required entry field, the system reminds you toenter information in the field when you attempt to save the record.
Check box Click on a check box to select (place a check mark in the box) or unselect(clear the check mark from the box). A check mark indicates yes / true /include. An empty check box indicates no / false / exclude. You can also useyour Spacebar to select or unselect the option when it is highlighted.
Combo box A combo box displays a list of available options for a field. You can also type anew entry to be added to the list on some fields. Click on the down arrow tosee a list of system choices (or type Alt ). Type the first character or highlighta selection and press Enter to select any of the available choices.
See Chapter Seven for a list of combo box key commands.
Option buttons Select only one option button in an option group at a time. Click to select ortype Alt +(underlined letter) and press the Spacebar.

Working in Red Wing 4-9
Command buttons
Click on a command button to cause an immediate action, indicated by thename of the button. Frequently used command buttons include Close and OK.
Quick selection Whenever you have a list of records or transactions, you can quickly select arecord by placing the mouse pointer on a row and double-clicking your leftmouse button to select it.
Scroll bar Use scroll bars to move to unseen parts of the selection list or entry screen.Click on the up or down arrows or click on the slider bar to move the list on thescreen up and down.
Record selector buttons Use these buttons to move from one record to the next.Each is described in Chapter Seven, Toolbars, Menu Barsand Key Commands.

4-10 Working in Red Wing
NOTES:

Hands-on Entry—Tutorial 5-1
Chapter Five — Hands-on Entry Tutorial
Use this chapter as a tutorial to learn how to navigate RedWing Windows Accounting Applications using yourkeyboard, rather than the mouse. This can greatly speedyour day-to-day activity.
Contents Introduction.............................................................................. 5- 2Navigate the Main Menu........................................................... 5- 3Exit an entry screen.................................................................. 5- 4Move from one field to the next................................................. 5- 5View and select options............................................................ 5- 6Change an entry....................................................................... 5- 7Select or clear a check box....................................................... 5- 8Move from one record to the next and add new records ............ 5- 9Delete a record......................................................................... 5-10Select options with radio buttons .............................................. 5-11More keyboard help.................................................................. 5-12
How to StartRed Wing
Accounting
To start your system, double-click on the Red Wing Windows icon. ALogon screen is displayed. Type the Name and Password. (Thepassword must be in lower case letters). Click on OK.
If you have just installed the system, type Admin for the Name andpassword (lower case only) for the Password.
If you have not registered your software, a Registration screenappears. Call Red Wing and register. (You can use the system up to10 times before registering it.) Click on Continue.The next screen shows all Red Wing modules and how they integrate witheach other. Click on any module "button" to continue. The Main Menu isdisplayed. Click on System Manager to access the System Manager menus.

5-2 Hands-on Entry—Tutorial
Using key commands for hands-on entry
Overview Many Red Wing Accounting users find they want to navigate as much aspossible using key commands, rather than their mouse. Use this exercise topractice making menu selections and moving through screens using onlykeystrokes.
Make sure you are working with the Sample Company (SAM) whilepracticing these keyboard techniques. Select Change Company on theMain Menu of you need to change to SAM.

Hands-on Entry—Tutorial 5-3
Navigate the Main Menu
• Overview
Use your right and left arrow keysto move from the list of modules tothe main menu selections and thento the sub-menu selections. (� �)
Use the up and down arrow keys tomove up and down through a seriesof menu selections. ( � � )
Once a sub-menu selection ishighlighted, press Enter to openthat window.
• Practice
Make sure System Manager is themodule selected in the upper leftquadrant of the Main Menu. If it isnot, press your up arrow key until itis highlighted.
Press your right arrow key to moveto the main menu selections. Thefirst selection (Company Setup ) ishighlighted.
Press your right arrow key to moveto the sub-menu selections. Thenuse your down arrow key tohighlight Company Information.
Press the Enter key to open theCompany Information screen.

5-4 Hands-on Entry—Tutorial
Exit an entry screen
• Overview
To exit an entry screen, saving allchanges, press the F7 function keyor click on the close window icon
{Or, if there is a Close button, youcan press the Alt key and type theletter C (Alt C).}
• Practice
Press the F7 function key to returnto the Main Menu. Press Enter toreturn to Company Information.

Hands-on Entry—Tutorial 5-5
Move from one field tothe next
• Overview
To move from field to field on anentry screen, press the Enter or Tabkeys. This saves a new or changedentry.
If a letter is underlined in the entryfield name, press Alt plus theunderlined letter. This feature letsyou move from section to section onlarge entry screens more quickly
You can also use the arrow keys toquickly move from field to field ifyou are not changing them.
• Practice
Press Enter to move down to theCity field on the CompanyInformation screen.
To return to the Company IDfield, press Tab and use the uparrow key �.
Experiment by moving aroundthe Company Information screenusing your arrow keys and theTab key.
To select any tab, button, or field name with anunderlined letter, you can always press the Alt keyand type the letter.

5-6 Hands-on Entry—Tutorial
View and select options(open the combo box)
• Overview
To view all available options for afield (when a combo box isavailable), press Alt and the downarrow (Alt �) to open the selectionbox or click on the combo box.
Use your arrow keys to move thehighlighter bar up and down theoptions in the selection box. PressEnter to select the highlightedoption.
• Practice
Use your down arrow (or Enter orTab) keys to move to the Countryfield.
Press Alt and the down arrow key(Alt �) to open the selection box.
Type the letter c. The highlighterbar will move up to CAN. Use yourdown arrow to move it to MEX.
Press Enter to select Mexico.
Next, to take even quickeradvantage of the fast find capability,use your up arrow to move back tothe country field. Do not open theselection box, but rather type theletter u in the Country field. Thecode for the United States isdisplayed. Press Enter to save itand move to the next field.
Fast Find Capability: If you know the first lettersor numbers of the code or ID you are selecting, typethem into a field. The selection box will display codesor IDs starting with those characters.
Because the F6 Maint option is available when you are onthe Country field, you can also press F6 when the cursor isin that field to add a new country “on the fly” or changecountry information, such as the postal code format.

Hands-on Entry—Tutorial 5-7
Change an entry
• Overview
To change the informationdisplayed in a field, go to thefield and enter the newinformation. The current entry isreplaced. Type the newinformation and press Enter (orTab) to save it and move to thenext field.
• Practice
On the Company Informationscreen, move to any address fieldand type a different address. PressEnter or Tab to save it, whilemoving to the next field.

5-8 Hands-on Entry—Tutorial
Select or clear a checkbox
• Overview
To select a check box, positionthe cursor on it and click with theleft mouse button. This puts acheck mark in it (or removes thecheck mark). Or, you can tabdown (or use your arrow keys orthe Enter key) to the field andpress the space bar. This worksas a toggle switch, eitherselecting or clearing the box.Press Enter (or Tab) to move tothe next field.
• Practice
From the General tabbed screen,type Alt O to move to the Optionstab.
Select any field with a check boxand press the space bar.
Repeat to switch back to thecorrect entry.
Press F7 to return to the MainMenu.

Hands-on Entry—Tutorial 5-9
Move from one record tothe next and add newrecords.
• Overview
Use these keys and keycommands to move betweenrecords and to add records.
On screens showing multiplerecords, record selector buttons tothe left of the record identify thecurrently selected record and
whether it already exists , is
the next empty record or is
being added (written to) .
As you work with other RedWing modules, each transaction(invoice, payment, etc.) entered isa record.
• Practice
Select Sales Categories from theSetup and Maintenance Menu.
Experiment using the keycommands shown above. Add atleast one new record.
For experience with largerrecords, select Inventory Itemsfrom System Manager Setup andMaintenance and experimentwith the same key commands tosee what happens.
Ctrl A Adds a new, empty record. Enter the new data andpress Ctrl S to save it.
Page Up When multiple records are displayed, or on a multi-page window, displays the previous page.
Page Down When multiple records are displayed, or on a multi-page window, displays the next page.
Ctrl Page Up Displays (or moves to) the previous record.Ctrl Page Down Displays (or moves to) the next record.Ctrl Home Displays (or moves to) the first record.Ctrl End Displays (or moves to) the last record.

5-10 Hands-on Entry—Tutorial
Delete a record
• Overview
To remove a record, select therecord and press the F3 key orclick on the Delete button on the
toolbar -- .
You are asked if you are sure youwant to delete the record. PressAlt Y to delete the record.Otherwise, press Enter or Alt Nto return to the record withoutdeleting it.
Some records cannot be deleted.A message is generally displayedtelling you why, if that is thecase.
• Practice
Select Inventory Items from theSetup and Maintenance Menu.
Press F3. A message is displayedasking if you really wish toremove the record. The default isNo. Press Enter (or Alt N) toreturn to the record withoutdeleting it.
(Do NOT delete the record in thisexercise.)
Press F7 to return to the MainMenu.

Hands-on Entry—Tutorial 5-11
Select options withradio buttons
• Overview
As soon as you tab down to a sortbox (each option is preceded by aradio button), use the up anddown arrow keys to move fromoption to option. Press Enter toselect an option.
• Practice
Select User Information List fromthe Setup and Maintenance ListsMenu.
Tab down to the Sort By box anduse your up and down arrow keysto select the options. Press Enterto select any option.
The next field selected is thePreview button. Press Enter topreview the User InformationList. Press F7 to close the list andF7 again to return to the MainMenu.

5-12 Hands-on Entry—Tutorial
More keyboard help
More keyboard commands areavailable for almost any situation.Listed below are three resourcesto check for keyboard commandhelp:
Getting Started Guide, ChapterSeven: Lists all key commands.
Online Help: Glossary andSearch.
On-screen: Press Ctrl F1 todisplay a brief list of common keycommands, including the handyShift F1 (Custom Help), F10(Calculator) and Shift F10(Calendar) commands.
^ = Ctrl+ = Shift

Frequently Asked Questions 6-1
Chapter Six — Frequently Asked Questions
These are questions most asked by new users to Red Wingsoftware. Refer to these questions and answers to help youas you start using your Red Wing software. Common errorsare also listed, along with suggestions for resolving them.
Contents Introduction................................................................................ 6- 2Codes and IDs
What are the restrictions for codes and IDs ......................... 6- 2How are codes and IDs sorted?........................................... 6- 2
Getting StartedHow do I log on to the system? ........................................... 6- 3How do I open a company? ................................................. 6- 3How do I set up a new company? ........................................ 6- 4How do I install my Windows upgrade? ............................... 6- 4
Tips and Hints for Every DayHow do I enter dates? ......................................................... 6- 4How do I close a window (screen)? ..................................... 6- 5How do I use the Main Menu? ............................................. 6- 5What are the most frequently used key commands? ............ 6- 5
MiscellaneousHow do I delete a company? ............................................... 6- 6How do I convert my Windows files? ................................... 6- 6What has changed in Payroll posting?................................. 6- 6How do I convert my DOS data? ......................................... 6- 7How do I install DOS Latest Improvements?........................ 6- 7How do I install Payroll from the CD-ROM?......................... 6- 7How should I handle errors?................................................ 6- 7Why is Microsoft Access still “open”? .................................. 6- 8How can I get help on procedures?...................................... 6- 8What do I need when calling Customer Support .................. 6- 8
System Manager........................................................................ 6- 9Accounts Receivable .................................................................. 6-10Accounts Payable ...................................................................... 6-12General Ledger .......................................................................... 6-12Inventory.................................................................................... 6-13Purchase Orders........................................................................ 6-14Errors ........................................................................................ 6-15

6-2 Frequently Asked Questions
Introduction
This chapter is basically full of helpful tips and suggestions in the form ofquestions and answers. There are also explanations of common errors. Reviewthis information as part of your introduction to the Red Wing WindowsAccounting Series and then come back as needed.
Codes and IDs
What are therestrictions forcodes and IDs?
When you define IDs and codes, it is important to know how they appear in acombo box list after they are sorted. Red Wing sorts alphanumeric dataalphabetically by comparing first characters, then second characters and so on.When two alphanumeric characters are compared, the character with thesmaller ASCII value comes first in the alphabetic sort.
Listed below are the alphanumeric characters in ascending alphabetic order:
� special characters ( -, *, /, etc.)
� numbers (0 - 9)
� lowercase letters (a - z)
� uppercase letters (A - Z)
Alphabetical rules are not intuitive when numbers are involved. For example,in numerical sorting 60 comes before 112; in alphabetical sorting 112 comesbefore 60. To ensure that numbers appear in the same order in both analphabetic and a numeric sort, fill in numbers to the left with zeros until theyare the same length. For example, if 60 is defined as 060, 060 comes before112 in both an alphabetic and a numeric sort.
How are codes andIDs sorted?
Before you begin assigning IDs, codes or accounts, decide on general namingconventions to make it easy for users to find them. Establish a format thatmakes sense for your business and use it consistently. A few suggestions arelisted at the top of the next page:

Frequently Asked Questions 6-3
� Do not use the following characters in an ID, code or account:
| " ' & # (reserved for system use)
� Use zeros to make all IDs the same length to prevent sorting problems. Ifthey are divided into more than one part, the parts should be the samelength for every ID. Also, do not use spaces to divide IDs into more thanone part. For example, use ACE-01 and ACE-11 or ACE01 and ACE11.
� Use descriptive IDs. For example, WIN001 and WIN002 are moredescriptive than 000001 and 000002.
� To sort items by a particular attribute (name or group), put the attribute inthe ID. For example, to organize vendors by name, put the first charactersof the name of the vendor in the vendor ID, such as ACMEFR (AcmeFreight Company) and JOHNSO (Johnson Bros. Freight Company).
Getting Started
How do I log on tothe system?
The first time you use the Red Wing Accounting Series (and continuing untilyou set up your own user names and passwords) enter the following:
Name — admin
Password — password (lower case required)
Click on OK or press the Enter key to continue.
The sample company (Company ID is SAM) is the first-time default.
How do I open acompany?
The system automatically starts with the company you most recently worked in.If you want to work with another company, click on the Change Companybutton on the Main Menu (or right-click your mouse) and select anothercompany.

6-4 Frequently Asked Questions
How do I set up anew company?
Starting from the Main Menu, select Setup Wizard from the Help menu (on themenu bar at the top of your screen).
Select Setting Up a New Company and follow the step-by-step instructions asthe Wizard walks you through company setup.
After you have completed the Setup Wizard, use Setup and Maintenance ineach application and enter the applicable information (budgets, vendors,customers, product lines, etc.). Press F1 for help on any setup window.
I currently use anearlier version ofRed Windowssoftware. How do Iinstall my new RedWing software?
Insert the new CD-ROM into your CD-ROM drive and the Install Wizard willlaunch automatically. At that point, just press your F1 key to start the onlinehelp, if desired.
REMEMBER! If you are doing a network install, you must install from aworkstation. If you install at the actual server, the system will not be able toautomatically set up the correct drive paths and workstations will not be able touse the software!
*If you are a Red Wing DOS Payroll user, you must install additional softwarefrom the CD-ROM. Please see Payroll-related questions and answers underMiscellaneous, starting on page 6-6.
Tips and Hints for Every Day
How do I enterdates?
Tip: To display anonline calendar, pressShift F10.
Enter dates in a Date box by clicking the spin buttons on the right side of thebox to change a date or enter dates by typing them in the format MM/DD/YY.For example, to enter the date January 25, 2000, type 012500.
You can enter dates for the years 1930 through 2029. Thus, a date entered as05/21/13 is for May 21, 2013.

Frequently Asked Questions 6-5
How do I close ascreen (window)?
Click on the Close Window icon on the toolbar or press F7.
If you have already started entering data and want to cancel your entries (forthe current record), press Esc two times (Esc Esc) to return to the first field onthe screen and then press F7.
How do I use theMain Menu?
Using the Main Menu is explained in detail on pages 4-2 through 4-4 inChapter Four, Working in Red Wing.
To experience using the Main Menu and to get a comfortable start with yourRed Wing software, go through the Hands-on Entry Tutorial, Chapter Five.
What are the mostfrequently used keycommands?
Use these handy keycommands to help yousave time and workmore efficiently.
For a complete list ofkey commands, seeChapter Seven.
To... Press
Open online help F1
Open custom help Shift F1
List common key commands Ctrl F1
Open calculator F10
Open calendar Shift F10
Change workstation date Ctrl W
Close current window F7
Open combo box Alt �
Add new record Ctrl A
Save record Ctrl S
Print Ctrl P

6-6 Frequently Asked Questions
Miscellaneous
How do I delete acompany?
Use this procedure to remove a company's data files from your Red Wingsystem. (Make sure you are NOT in the company you want to delete.)
1. Click on the System Information button on the Main Menu (or right clickand select System Info from the shortcut menu).
2. Select the Company ID you want to remove.
3. Click on the Delete Comp button. You are asked if you are sure you wantto remove the company before the delete process is completed.
I am using an earlierversion of Red WingWindows software.Do I need to doanything to convertmy files?
Version 3.0 installs the program files to the same directory as version 2.0(rwbs2) and the conversion is handled automatically the first time you open acompany's data files.
If you are updating from version 1.22, the files are installed in a differentdirectory (rwbs2) than version 1.22. When you go into the Version 3.0 programthe first time you are asked if you want to convert your data. Click on Yes. Thesystem searches for your SYSSM1.rwd file. Click OK if it brings up the correctlocation for that file (it normally it will find the correct location).
When you click on Change Company, all the companies you were using in theprevious version should appear. The first time you switch to each company, itconverts the company and creates the new files for Version 3.0.
Each company’s Version 3.0 data files are located in a subdirectory under theprogram directory. For example, if your company’s 3-character code is DATand you installed the Version 3.0 software to C:\RWBS2, the new data files arelocated in C:\RWBS2\DAT.

Frequently Asked Questions 6-7
I post from DOSPayroll to theWindows GeneralLedger and/orWindows AccountsPayable. Do I haveto do anythingdifferent for Version3.0?
If you are converting from Windows, Version 1.22 , YES! The postingprocedure from DOS Payroll to Windows General Ledger (and WindowsAccounts Payable) changed dramatically. If you are currently posting fromDOS Payroll to Windows General Ledger, you must install the following twocomponents from the Version 3.0 CD-ROM:
� Payroll� DOS Latest Improvements
After installing the updated programs, please refer to the following Cue Cards:
� DOS Payroll Posting Process Within the Payroll Module� Post from DOS Payroll to the Windows General Ledger� Create Accounts for Payroll� Import DOS Payroll invoices to Windows Accounts Payable
How do I convertmy DOS data to thenew Windowssoftware?
The “Company Setup Wizard” feature will walk you through the conversion.The Setup Wizard is found in the Help Menu at the top of your Main Menuscreen.
Before converting, you must install your Version 3.0 Windows software andthe DOS Latest Improvements. (See instructions for installing DOS LatestImprovements from the CD-ROM below). The DOS Latest Improvements willinstall the latest DOS to Windows conversion files into your system.
How do I install theDOS LatestImprovements fromthe CD-ROM?
Insert the CD-ROM in your CD drive. The Installation “Wizard” will launchautomatically. Click on DOS Latest Improvements. Follow the on-screeninstructions. The installation process will search for your DOS Red Wingdirectory (normally c:\redwing) and install over the older files. These latestimprovements are ONLY for version 8.0 of the DOS programs! ContactRed Wing Business Systems (1-800-732-9464) if you have an earlier version.
How do I installWindows Payrollfrom the CD-ROM?
Insert the CD-ROM in your CD drive. The Installation “Wizard” will launchautomatically. Click on Payroll. Follow the on-screen instructions.

6-8 Frequently Asked Questions
I am running into anerror on my system.What should I trybefore callingCustomer Support?
Yes. Check the Errors section in Chapter Six of your Red Wing WindowsGetting Started Guide. You can also find a list of errors on our Web pagewww.redwingsoftware.com and in our customer newsletter.
After I closed RedWing Windows,there was an icon atthe bottom of myscreen that saidMicrosoft Access.
This is a known problem with the current version of Microsoft Access, RedWing’s base program. Occasionally Microsoft Access is unable to closeautomatically after running Red Wing Windows. To close it manually, click onthe Microsoft Access icon at the bottom of your screen and click on your Ctrl,Alt and Del buttons simultaneously on your keyboard. This opens a CloseProgram window. Click on Microsoft Access and then click on End Task.
I’m not sure how todo a procedure inthe Windowssoftware. Is thereanywhere I can getthe informationwithout callingCustomer Support?
� Check the Cue Cards at the Main Menu.
� Press F1 (Help) on the screen you are having difficulties with. This willgive you a complete description of the menu item and some How To’s.
� Check FAQs in your Red Wing Windows Getting Started Guide, on ourWeb page www.redwingsoftware.com and in our newsletters.
Should I have anyspecial informationavailable before Icall CustomerSupport?
1. Version of the software installed. (The Versions button on the Main Menuwill give you this information.)
2. System information:� PC Processor (example: 266 MHz Pentium)� RAM (example: 32 MB of memory)� Operating System (example: Windows 95)
3. If your computers are networked, please have the following informationavailable:� Type of network (Win95, Novell, Windows NT, LANtastic, etc.)� Know which computer is the server.

Frequently Asked Questions 6-9
System Manager
I added a newmodule to my RedWing software. Thenew module showsup in the samplecompany, but not inmy company. Whatshould I do?
Because your company files were created before the new modules were added,you must manually create the files for your company.
In System Manager select Create Data Files from the Company Setup Menu.
1. For the Company to Create Data Files From, select New.
2. For the Company to Create Data Files For, enter your company's 3-character company code.
3. The system will automatically put a check in the "Create" column for thenewly added modules.
4. Click on Create.
5. At the Main Menu, click on Change Company and select your company.
How do I move mydata to a newlypurchasedcomputer?
Using the Red Wing backup feature (in Red Wing Utilities), make a backup ofboth your data files and system files on the original computer. Install the RedWing Software on the new computer. Restore both backups onto the newcomputer.
How often should Iback up my data?
We recommend that your company data files be backed up each night using aseparate set of diskettes. (Recycle them about once a week.) A system backup isrecommended monthly.
IMPORTANT! Keep at least one backup off-site!

6-10 Frequently Asked Questions
Accounts Receivable
Should I use batchcodes?
Always use batches in a multi-user environment. They let you enter invoices,print journals and post without locking out other users. Single user systemsoften use this option to group transactions, such as by day of week.
Why do paidinvoices appear onmy Open Invoicereport?
Invoices that have been paid during the current month, as well as theirpayments, appear on the Open Invoice report until you go through month-end.
After I calculatedfinance charges andran statements, Inoticed financecharges that neededto be revised orremoved. How can Icorrect thosefinance charges?
If you have not yet gone through month-end processing, you can revise financecharges that were calculated.
1. In Accounts Receivable select Customers from the Setup and MaintenanceMenu. Click on the Balance Tab.
2. Put the correct finance charge amount in the “Unpaid Finance Charge”field.
How can I reverseunpaid financecharges for acustomer who isnever going to paythe financecharges?
Create a Payment Method for Reversing Finance Charges
1. In Accounts Receivable select Payment Methods from the Setup andMaintenance Menu.
2. Click on the Create New icon on the toolbar .
3. For the Payment Method ID, enter ReverseFC (or something similar)
4. For the Payment Method, select Other.
5. Choose the Finance Charge account number.

Frequently Asked Questions 6-11
6. Each time you need to reverse a finance charge, enter a normal payment,but instead of choosing Cash or Check for the payment method choose theReverseFC method. (This debits the finance charge account instead of thecash account.)
7. Post.
Why don't my Salesby Customer Detailand Sales byCustomer Summaryreports match?
These two reports actually include two different types of transactions.
� Sales By Customer Detail—Shows ALL sales transactions.
� Sales by Customer Summary—Shows all sales transactions that had anyinventory items. If a customer bought both inventory and non-inventoryitems, they will all appear on this report. If they bought only non-inventoryitems, none of their transactions will appear on this report.
I have a customerwith an outstandingcredit balance. Howdo I write a checkfor the balance andclear the books?
1. Enter an invoice for this customer.
2. Post the invoice.
3. Apply the open credit to the newly posted invoice in Enter Payments.
4. Post.
5. Go to Edit Transactions in the General Ledger and change the salesaccount to the checking account.
6. Manually write a check to the customer.

6-12 Frequently Asked Questions
Accounts Payable
Should I use batchcodes?
Always use batches in a multi-user environment. They let you enter invoices,print journals and post without locking out other users. Single user systemsoften use this option to group transactions, such as by day of week.
I voided a check.How do I removethe invoice that itpaid?
Use Void (Reverse) Invoice which creates a debit memo. Accounts Payablewill automatically apply the debit memo to the invoice the next time you gothrough a check writing process.
How can I print acheck registershowing all of mychecks?
Select Management Reports and then select the Payment History report.
This report can be sorted in check number order, for all checks or a range ofchecks (or a range of dates).
General Ledger
How do I change anaccountdescription?
1. From Setup and Maintenance select Account Segments/Profit Centers.
2. Scroll down to the account number with the description being revised.
3. Change the description.
I modified financialstatements in aprior version of theWindows software.Will they be avail-able in Version 3.0?
Yes, your modified reports will automatically convert to the new system.

Frequently Asked Questions 6-13
Inventory
In transaction entry,there are four typesof transactions onthe Sale andPurchase tabs. Howare they used?
These four scenarios reflect what happens when Inventory is used as astand-alone system.
� If you would like to track orders received and shipped, enter the originalorder as a New Order. When the item is shipped, use Verify Order.
or
Enter a sale using Invoice. This tells the system the item was ordered andshipped.
� Use Misc Credit when items are returned.
� If the item you purchased has already been received, enter it on thepurchases tab as an Invoice.
� If the item has been ordered, but not yet received, enter as a New Order.When the item is received enter another transaction using GoodsReceived. When using these two transaction types together, you do notneed to enter an Invoice.
How do I assigndifferent accountnumbers toinventory items?
Each item in Inventory has an account code assigned to it. The account codeallows you to assign different account numbers to individual inventory items.

6-14 Frequently Asked Questions
Purchase Orders
How do I create aninvoice for itemsreceived onpurchase orderswhen I haven’treceived the invoicefrom the vendoryet?
1. In Accounts Payable select Customization from the Setup andMaintenance Menu. Turn "on" batch processing.
2. In Accounts Payable, select Batches from the Setup and MaintenanceMenu. Create a new batch called purchord (or something similar).
3. In Receive Purchase Orders fill in the quantity and click on Receive.
4. Leave all fields blank, except Invoice Date, which can be left at thedefault. Change to the batch that was created in Step 2 (purchord).
5. Click on Create Invoice.
These first five steps put all invoices created from purchase orders into onebatch in Accounts Payable. NEVER include this batch (purchord) in theposting process. As you receive the actual invoices from the vendor, follow theinstructions below:
1. Select Transaction Entry in Accounts Payable. Click on Transaction IDand choose the transaction created from Purchase Orders for this vendor.
2. Change the batch to one that will be posted that day.
3. Fill in the following information: Invoice Number, Invoice Date, Freight,Sales Tax and Miscellaneous Charges.
4. Check the prices on line items purchased and edit if needed.
5. Click on Next Transaction.
This invoice will now be posted along with other transactions for that day.

Frequently Asked Questions 6-15
Errors
3049 or 3343
Corrupt Database
A database can become corrupted a number of different ways (lock-ups, loss ofnetwork connection, power surges, etc.). To correct the error, rebuild themodule referred to in the error message. For example, if the error says “Errorcreating main AR batch,” you must rebuild the Accounts Receivable file foryour company. To rebuild a file follow these instructions:
Before you begin: Make a BACKUP of your data files.
1. Everyone must exit Red Wing Windows Software.
2. Click on Start, Programs, Red Wing Windows and Red Wing Utility orchoose the Red Wing Utilities icon.
3. Log in as Administrator.
4. Click on Repair.
5. Click on Data.
6. Click in the white field to the right of Database Path to open a browsescreen.
7. Choose the drive and path your data files are located in. For example,select c:\rwbs2\xxx (where xxx is your three-character company code).
8. Choose the correct file on the left side of the screen. Click OK.
9. Click on Start.
10. When the rebuild is complete, click on Compact and Start.
11. If this does not resolve the 3049 or 3343 error, please call Red WingCustomer Support.
If you receive a 3343 error, it is probably because you have not installedthe required Windows NT network changes.

6-16 Frequently Asked Questions
3040
Disk I/O Error
The system has detected a bad spot on the hard drive. Follow these instructionsto run a Windows 95 scandisk on the drive.
1. Everyone must exit Red Wing Windows Software.
2. Click on Start, Programs, Accessories, System Tools, Scandisk.
3. Click on the C drive.
4. Click on Standard.
5. Click on Automatically Fix Errors.
6. Click on Start.
If you are running a networked version of Red Wing Windows, also runscandisk on the server.
3315
Occurs during aposting procedure fromAccounts Payable orAccounts Receivable tothe General Ledger.
A customer or vendor name being used on an invoice is blank.
1. Select Customer Detail (Accounts Receivable) or Vendor Detail (AccountsPayable) from the Setup and Maintenance Lists Menu.
2. Click on Preview.
3. Review all customer/vendor records. Find the record with a blank namefield.
4. Go to Customers (or Vendors) on the Setup and Maintenance Menu.
5. Open the record for the customer (vendor) with a blank name.
6. Enter the Customer name.
7. Go through the posting process again.
3000
or
3043
Normally this error is caused by not having the correct Novell Networkparameters set up. Contact your Network Administrator.
Recommended Novell Network parameters (include in Netware’sAUTOEXEC.NCF file or enter manually from a console prompt):
� Set maximum record locks = 200000� Set maximum record locks per connection = 10000� Set maximum file locks = 100000� Set maximum file locks per connection = 1000

Frequently Asked Questions 6-17
Rollback 225
Invalid GL Accounts
During a posting process in Accounts Payable or Accounts Receivable there arefields that are missing General Ledger account numbers.
1. Select Customization from the Setup and Maintenance Menu in AccountsReceivable/Accounts Payable.
2. Click on the Invalid GL Account List button. (Be sure to include SystemManager when asked.)
3. Print the report.
4. Choose a valid account for each field listed on the report.
5. Go through the posting process again.
Error ReadingDrive “X”
Your workstation has lost connection to the server. You must reboot yourworkstation.
Please notify your Network Administrator so that the cause of thedisconnection can be found.
Locked Batch This error can be caused by closing out of transaction entry without firstclicking on the Next Transaction button. To unlock the batch:
1. Select Batch Codes from the Setup and Maintenance Menu.
2. Click on the Current Activity button to the right of the batch listed in theerror.
3. Click on the Delete button.
4. If there are additional users or transactions listed, continue clicking on theDelete button until the only record in this screen has a blank user andtransaction ID field.
This user is alreadylogged into thesystem. You mustlog in with a uniqueuser code or repairthe database.
1. Click OK.
2. Click on Yes to repair the database.
*If you are on a networked version of Red Wing, all other users must be out ofRed Wing before you click on Yes to repair the database.

6-18 Frequently Asked Questions
NOTES:

Menu Bars, Toolbars & Keyboard Commands 7-1
Chapter Seven— Toolbars, Menu Bars andKeyboard Commands
This chapter explains each of the toolbars, menu bars,report commands and keyboard commands used in RedWing Accounting software.
Contents Introduction ...................................................................................... 7- 2Toolbars........................................................................................... 7- 2Menu Bar Selections......................................................................... 7- 8Report Command Buttons ................................................................ 7-15Standard Key Commands................................................................. 7-16

7-2 Menu Bars, Toolbars & Keyboard Commands
Introduction
The Red Wing Accounting Series has numerous options for navigation,including icons on toolbars, options on menu bars and keyboard commands toreduce use of the mouse. This chapter explains these navigation tools and canserve as a helpful reference as you learn the system.
Toolbars
Overview Eight standard toolbars are available in the Red Wing Accounting software.Each is pictured, with a detailed explanation.
Main Menu Toolbar — Displayed above the Main Menu.
Change Company — Click on the drop-down box to change to anothercompany.
Add to Favorites — Add menu option or procedure to the Favorites folder.Open the desired menu selection and then minimize it. Click on the Add toFavorites icon to save it as a favorite.
Red Wing Favorites — A pop-up dialog shows all favorites. Highlight afavorite and click on Go To or double-click to open it. Click on Edit to changethe title of the favorite.
Help Contents and Index — Display online help contents and index.
Explorer Toolbar — Display Red Wing menu selections in standardWindows explorer menu mode.
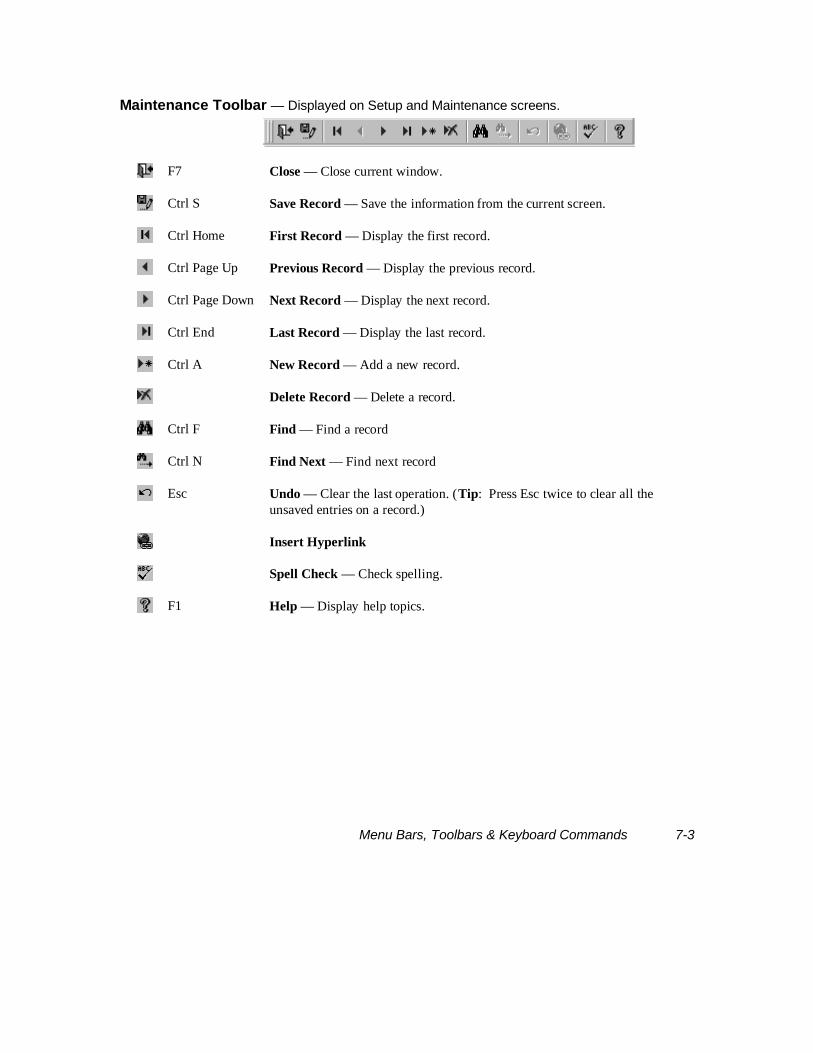
Menu Bars, Toolbars & Keyboard Commands 7-3
Maintenance Toolbar — Displayed on Setup and Maintenance screens.
F7 Close — Close current window.
Ctrl S Save Record — Save the information from the current screen.
Ctrl Home First Record — Display the first record.
Ctrl Page Up Previous Record — Display the previous record.
Ctrl Page Down Next Record — Display the next record.
Ctrl End Last Record — Display the last record.
Ctrl A New Record — Add a new record.
Delete Record — Delete a record.
Ctrl F Find — Find a record
Ctrl N Find Next — Find next record
Esc Undo — Clear the last operation. (Tip: Press Esc twice to clear all theunsaved entries on a record.)
Insert Hyperlink
Spell Check — Check spelling.
F1 Help — Display help topics.

7-4 Menu Bars, Toolbars & Keyboard Commands
Data Entry Toolbar — Displayed on Transaction Entry and other entry screens.
F7 Close — Close current window.
Ctrl S Save Record — Save the information from the current screen.
Ctrl Home First Record — Display the first record.
Ctrl Page Up Previous Record — Display the previous record.
Ctrl Page Down Next Record — Display the next record.
Ctrl End Last Record — Display the last record.
Ctrl A New Record — Add a new record.
Delete Record — Delete a record.
Ctrl X Cut — Delete the highlighted information in the currently selected field.
Ctrl C Copy — Copy the highlighted information in the currently selected field.
Ctrl V Paste — Insert the information that has most recently been cut or copied.
Ctrl F Find — Find a record
Ctrl N Find Next — Find next record
Esc Undo — Clear the last operation. (Tip: Press Esc twice to clear all theunsaved entries on a record.)
Insert Hyperlink
Spell Check — Check spelling.
F1 Help — Display help topics.

Menu Bars, Toolbars & Keyboard Commands 7-5
Report Toolbar — Displayed on all report screens.
F7 Close — Close current window.
Ctrl P Print — Send current report to printer.
Preview Report — Display report in Preview mode. See the Print PreviewToolbar (below).
Output to File — Output report in HTML, MS Excel, MS DOS Text or RichText format.
Reset Report Parameters — Clear the fields to their original default entries.
F1 Help — Display help topics.
Print Preview Toolbar — Displayed in Preview mode.
F7 Close — Close current window.
Ctrl P Print — Send current report to printer.
Ctrl U Page Setup — Change margins, page orientation, printers.
Zoom — Toggle between the specified magnification percent and the "bestfit" to view the current report.
One Page — Display one page of the report.
Two Pages — Display two pages of the report.
Multiple Pages — Choose the number of pages to display at one time (up to 2rows of 3 pages each).
Zoom — Choose the percent of magnification to view.

7-6 Menu Bars, Toolbars & Keyboard Commands
or
or
Office Links — Output report to MS Office. Choose from the followingoptions:
• Merge it to Microsoft Word: Outputs report to Microsoft Word.
• Publish it in Microsoft Word: Outputs report to Microsoft Word in richtext format (*.rtf)
• Analyze it in Microsoft Excel: Outputs report to MS Excel in *.xls format
Send — Output report to HTML, MS Excel, MS DOS Text or Rich TextFormat.
Output to Notepad — Output the report to Notepad in MS-DOS text format(*.txt).
F1 Help — Display help topics.
Inquiry Toolbar — Displayed on inquiry screens.
F7 Close — Close current window.
Ctrl Home First Record — Display the first record.
Ctrl Page Up Previous Record — Display the previous record.
Ctrl Page Down Next Record — Display the next record.
Ctrl End Last Record — Display the last record.
Ctrl F Find — Find a record
Ctrl N Find Next — Find next record
F1 Help — Display help topics.

Menu Bars, Toolbars & Keyboard Commands 7-7
Red Wing Toolbar — Displayed on snapshot screens.
F7 Close — Close current window.
F1 Help — Display help topics.
Explorer Menu Toolbar — Displayed when the Explorer Menu icon is clicked on the MainMenu toolbar.
Change Company — Click on the drop-down box to change to anothercompany.
Add to Favorites — Add menu option or procedure to the Favorites folder.Open the desired menu selection and then minimize it. Click on the Add toFavorites icon to save it as a favorite.
Red Wing Favorites — A pop-up dialog shows all favorites. Highlight afavorite and click on Go To or double-click to open it. Click on Edit to changethe title of the favorite.
Large Icons — List modules horizontally using large icons.
Small Icons — List modules horizontally with small icons.
List — List modules vertically with small icons.
Detail — Show more menu detail, if available.
Help Contents and Index — Display online help contents and index.
Standard Menu — Return to the standard menu mode.

7-8 Menu Bars, Toolbars & Keyboard Commands
Menu Bar Selections
Overview The menu bar selections vary, depending on what is open.
File Menu — Use these menu selections to close an active window, set up your print options, tosend reports through Microsoft Mail and to exit the Red Wing Windows Accounting applications.
Name Description Available From...
ChangeCompany...
Change Main MenuExplorer Menu
Suggestions... Opens the Product Suggestions form. Main MenuExplorer Menu
System Info... Displays information about the each set of company files. Main MenuExplorer Menu
Main Menu Return to the Main Menu. InquiryReportsPreviewProcessSetup & MaintenanceData Entry
WorkstationDate
Change the workstation date. You can also press Ctrl W. InquiryReportsProcessSetup & MaintenanceData Entry

Menu Bars, Toolbars & Keyboard Commands 7-9
File Menu Continued
Name Description Available From...
Close Close the active window. InquiryReportsPreviewProcessSetup & MaintenanceData Entry
Print Report... Print the previewed report. Use the options screen to printmultiple copies, select the pages to print, print to a file,and to determine the print quality.
ReportsPreview
Preview Report... Display report in Preview mode. Reports
Output To... Output the active screen in Microsoft Excel format(*.xls), Rich Text format (*.rtf), MS-DOS text format(*.txt) or HTML.
InquiryReportsPreviewSetup & MaintenanceData Entry
Page Setup Change margins, page orientation, printers. Preview
Reset ReportParameters
Clear the fields to their original default entries. Reports
Exit Exit from Red Wing. Main MenuExplorer Menu

7-10 Menu Bars, Toolbars & Keyboard Commands
Tools Menu — These are generally standard Windows selections that perform unique tasks.
Name Description Available From...
AutoCorrect... Set automatic correction settings. Main MenuExplorer Menu
User and GroupAccounts...
Add, change, delete or view user and group information.Change user logon password.
Main MenuExplorer Menu
TechnicalSupportUtilities...
Display technical support utilities screen. Password isrequired to access utilities.
Main Menu
Favorites Menu — This is a standard Windows selection.
Name Description Available From...
Add toFavorites
Add menu option or procedure to the Favorites folder.Open the desired menu selection and then minimize it.Click on the Add to Favorites icon to save it as a favorite.
Main MenuInquiryReportsProcessSetup & MaintenanceData EntryExplorer Menu
Open Favorites A pop-up dialog shows all favorites. Highlight a favoriteand click on Go To or double-click to open it. Click onEdit to change the title of the favorite.
Main MenuInquiryReportsProcessSetup & MaintenanceData EntryExplorer Menu

Menu Bars, Toolbars & Keyboard Commands 7-11
Edit Menu — These are generally standard Windows selections to use in editing entries andtext.
Name Description Available From...
Undo/Can'tUndo Ctrl+Z
Undo the last change or there is no change to undo. ReportsSetup & MaintenanceData Entry
Cut Ctrl+X Write the selected text to the clipboard and delete it fromthe field. You can also type Ctrl X.
ReportsSetup & MaintenanceData Entry
Copy Ctrl+C Write the selected text to the clipboard. You can also typeCtrl C.
ReportsSetup & MaintenanceData Entry
Paste Ctrl+V Insert the contents of the clipboard at the cursor location.You can also type Ctrl V.
ReportsSetup & MaintenanceData Entry
Paste Special Insert the contents of the clipboard into your document astext.
ReportsSetup & Maintenance
Paste Append ReportsSetup & Maintenance
Delete Remove the selected text from the field. You can alsopress Delete.
ReportsSetup & MaintenanceData Entry
Delete RecordDel.
Delete the entire record. ReportsSetup & MaintenanceData Entry
Select Record Select the record the cursor is in. ReportsSetup & MaintenanceData Entry

7-12 Menu Bars, Toolbars & Keyboard Commands
Edit Menu Continued
Name Description Available From...
Select AllRecordsCtrl+A
Select all the records. ReportsSetup & MaintenanceData Entry
Find Ctrl+F Find a specified text string. ReportsSetup & MaintenanceData Entry
ReplaceCtrl+H
Replace a specified text string with another string. ReportsSetup & MaintenanceData Entry
Go to Go to the first, last, next, or previous record or add a newrecord.
ReportsSetup & MaintenanceData Entry
View Menu — Use these selections to select custom toolbars and to set various Accessoptions.
Name Description Available From...
Zoom Choose the percent of magnification you want to use toview the report.
Preview
Pages Choose to view 1 to 12 pages on-screen. Preview
Large Icons List modules horizontally using large icons. Explorer Menu
Small Icons List modules horizontally with small icons. Explorer Menu
List List modules vertically with small icons. Explorer Menu
Detail Show file detail, if available. Explorer Menu

Menu Bars, Toolbars & Keyboard Commands 7-13
Records Menu — Use these selections to add new records and hide existing records and tomove among records.
Name Description Available From...
Save Record(Shift + Enter)
Save the information from the currently displayed record. InquirySetup & MaintenanceData Entry
Refresh Updates the system with newest entries. Generally used innetworked systems to update all records or to viewupdated records (in Inquiry).
InquirySetup & MaintenanceData Entry
Window Menu — These are standard commands available for most Windows applications.
Name Description Available From...
TileHorizontally
Arrange open windows side by side. All menu bars
Tile Vertically Arrange open windows above each other. All menu bars
Cascade Arrange open windows in an overlapping pattern. All menu bars
Arrange Icons Arrange program icons in a row at the bottom of thewindow.
All menu bars
The lower section of this menu shows all currently open windows.

7-14 Menu Bars, Toolbars & Keyboard Commands
Help Menu — Use these selections to get online help while working in Red Wing WindowsAccounting applications.
Name Description Available From...
Red Wing Help(F1)
Display online help for the currently displayed window. All menu bars
Contents andIndex
Display the Red Wing online help index. You can accessonline help for all applications from this index. (You canalso press the F1 function key for immediate help fromany window.)
All menu bars
Cue Cards Display the cue card index. You can also access the CueCard Contents and Find tabs.
All menu bars
Setup Wizard Display the Red Wing Company Setup Wizard optionsscreen. Choose the Wizard you want to follow. Thewizard will guide you through company setup — for userswho are converting from Red Wing DOS systems and forusers who are new to Red Wing.
Main Menu
Red Wing Onthe Web...
Access the Red Wing Business Systems home page. All menu bars
About RedWing...
View general information about Red Wing. All menu bars
Insert Menu — Use this menu to add new records.
Name Description Available From...
New Record Add a new record. (Ctrl+A) Setup & MaintenanceData Entry

Menu Bars, Toolbars & Keyboard Commands 7-15
Report Command Buttons
Overview These buttons are displayed at the bottom of report screens.
Not availableon all reports
Printers... — Use this selection to set up reports to print on differentprinters (other than the default Windows printer) or to print multiplecopies of a report. If you do not enter any users/printers on this screen,the report automatically prints one copy to the default printer. Settingsremain as defaults until changed.
1. Report Name — The currently selected report is displayed.
2. User — Choose to redirect the report for a single user by selectingone user. To select all users, enter an asterisk (*).
If you set up a record for all users (*) as well as for individual users,the report will print to the current user’s printer(s), if any are set up.If not, the report uses the all users (*) settings.
3. Printer — Select the printer to use for the selected user(s).
To Print Multiple Copies, enter two records for the same user.
To Redirect a Report, change to a different printer (other than {Default}).
Alt R Reset — Clear the fields to their original default entries.
Alt F File — Save the report to a file, as follows:• HTML• Microsoft Excel• Rich Text Format (Microsoft Word)• MS-DOS Text
Alt V Preview — Switch to Preview mode where you can view the report,print it, output it to a file or other software. For more information seePreview Toolbar (page 7-5) and Preview Menu Bar (page 7-5).
Alt P Print — Immediately send the report to the currently selected printer. APrinting dialog is displayed, showing the progress of your report. Whenprinting is complete, you are returned to the report screen.
Alt C Close — Close current window.

7-16 Menu Bars, Toolbars & Keyboard Commands
Standard Key Commands
Overview The Red Wing Windows Accounting Series comes with preset key commandsthat activate a variety of functions. You can use the standard key commands orchange key commands through the keyboard selection on the WorkstationMenu.
Main Menu key commands
����������������
Move among menu items to select a menu to work from.
Ctrl W Change date—Change the Red Wing work date. This date is used as the defaultduring transaction entry. The default date and time are taken from the date and timespecified by the operating system.
Enter Select menu item—After highlighting a menu item, press Enter to access that item.
Combo box key commands
Alt ���� Open—Open the combo box.
���� Next item—Highlight the next item in the combo box list.
���� Previous item—Highlight the previous item in the combo box list.
Page Down Next page—Display the next page of items in the combo box list.
Page Up Previous page—Display the previous page of items in the combo box list.
Ctrl Home First item—Highlight the first item in the combo box list.
Ctrl End Last item—Highlight the last item in the combo box list.
Enter Select—Select the highlighted item in the combo box list.

Menu Bars, Toolbars & Keyboard Commands 7-17
Field editing key commands
���� Move right—Move the cursor one character or one field to the right. The exactfunction depends on the keyboard option you set in Access.
���� Move left—Move the cursor one character or one field to the left. The exact functiondepends on the keyboard option you set in Access.
Delete Delete the character to the right of the cursor.Delete the highlighted characters.
Back-space Delete the character to the left of the cursor.Delete the highlighted characters.
Home Start of field—Move the cursor to the first character of the field.
End End of field—Move the cursor to the last character of the field.
Detail section key commands
���� Move right—Move the cursor one character or one field to the right. The exactfunction depends on the keyboard option you set in Access.
���� Move left—Move the cursor one character or one field to the left. The exact functiondepends on the keyboard option you set in Access.
Page Down Next screen—Move to the next screen or to the last line if you are on the last screen.
Page Up Previous screen—Move to the previous screen or to the first line if you are on the firstscreen.
Ctrl Home Start—Move to the start of the field.
Ctrl End End—Move to the end of the field.
Enter Edit—Edit the line item at the cursor.
Insert Insert/Overwrite—Toggle between insert mode and overwrite mode.

7-18 Menu Bars, Toolbars & Keyboard Commands
Multiple screen/section key commands
Page Up Display the previous page when not in a detail section. Display the previous page ofrecords when in a detail section.
Page Down Display the next page when not in a detail section. Display the next page of recordswhen in a detail section.
Ctrl Page Up Display the previous record.
Ctrl Page Down Display the next record.
Ctrl Home Display the first record
Ctrl End Display the last record.
Ctrl A Create a record. (You can reassign this key.)
Ctrl H Move the cursor to the first updateable field in the header. (You can reassign thiskey).
Ctrl D Move the cursor to the current field in the detail section. (You can reassign this key.)
Ctrl T Move the cursor to the first field in the totals section. (You can reassign this key.)
Alt letter The label for some fields has an underlined letter you can use to form a key commandwhich places the cursor in the field. For example, the key command that correspondsto Vendor ID is Alt V.
Red Wing Key Commands
Ctrl 2 Custom toolbar—Display a custom toolbar
Ctrl A New record—When in the detail section of a screen, create a record.
Ctrl C Copy—Copy the highlighted text to the clipboard. (You cannot reassign this key.)
Ctrl D Go to detail—When on a screen that has a detail section, move the cursor to the detailsection.
Ctrl F First record—When in the detail section of a screen, move the cursor to the firstrecord.

Menu Bars, Toolbars & Keyboard Commands 7-19
Ctrl H Go to header—When on a screen that has a header, move the cursor to the header.
Ctrl L Last record—When in the detail section of a screen, move the cursor to the lastrecord.
Ctrl M Main Menu—Move to the Main Menu, but do not close the active screen.
Ctrl N Next record—When in the detail section of a screen, move the cursor to the nextrecord.
Ctrl P Previous record—When in the detail section of a screen, move the cursor to theprevious record.
Ctrl S Save—Save the current record.
Ctrl T Go to totals—When on a screen that has a totals section, move the cursor to the totalssection.
Ctrl V Insert the contents of the clipboard at the cursor. (You cannot reassign this key.)
F1 Help—Shows information about the screen you are working on. (You cannot reassignthis key.)
F2 Lookup—Activate the Lookup command if Lookup is displayed on the status bar.
F3 Delete—Delete the current record.
F6 Maintenance —Activate the Maintenance command if Maint is displayed on thestatus bar. For example, on a transaction entry screen, you can use this command inan ID field to go directly to the appropriate Setup and Maintenance selection toupdate information.
F7 Save and exit—Save changes and exit from the screen or menu. If you are at a menu,you will exit the Red Wing Accounting system.
F10 Calculator—Display an online calculator.
Ctrl F1 Keyboard commands—Show the keyboard command assignments. (You cannotreassign this key.)
Shift F1 Custom help—Start custom help. (You cannot reassign this key.)
Shift F9 Update list—Update a combo box list after you have used a maintenance function.

7-20 Menu Bars, Toolbars & Keyboard Commands
Esc Undo field—Undo the changes you made in the current field if changes have not beensaved.Undo the changes you made in the current record if changes have been saved.(You cannot reassign this key.)
Esc Esc Undo all—Undo the changes you made. However, in some cases changes you mademay have been saved and cannot be undone. (You cannot reassign this key.)
Page Up Previous screen—Move the cursor to the previous screen of a multi-screen function.Previous record—Move the cursor to the previous record on a single-screen data entryor maintenance screen.(You cannot reassign this key.)
Page Down Next screen—Move the cursor to the next screen of a multi-screen function.Next record—Move the cursor to the next record on a single-screen data entry ormaintenance screen.(You cannot reassign this key.)
Tab Next field—Move the cursor to the next field.
Shift Tab Previous field—Move the cursor to the previous field.
���� Next item—Highlight the next item in the combo box list.
���� Previous item—Highlight the previous item in the combo box list.

Red Wing Utilities 8-1
Chapter Eight — Red Wing Utilities
Use these Red Wing features to maintain your valuabledata. Backups are particularly important and should bemade routinely as a part of every business day.
Contents Introduction.............................................................................. 8-2Backup/Restore Utilities
Make Backups ................................................................. 8-2Restore Data ................................................................... 8-3
Database UtilitiesRepair a Database........................................................... 8-4Compact a Database....................................................... 8-5Database Files and Locations .......................................... 8-6

8-2 Red Wing Utilities
Introduction
These procedures give you control over your valuable data.
� Backups are essential to the smooth operation of your business. Youshould follow a regular schedule of backups. They are easy to do andabsolutely necessary!
� Restoring your data is the process used when recovering information froma backup.
� Compacting your database allows you to more efficiently use yourcomputer's hard drive.
� Repairing your database is the first step in salvaging information from asystem "crash." Use it only when a system error occurs that requires it.You may lose corrupt data.
Backup/Restore Utilities
Make Backups Use this procedure to back up your data onto a hard drive or a diskette.
Make backups frequently. Also, it is VERY IMPORTANT to keep a set of up-to-date backup copies off site. In case of theft, fire, flood or other majorcatastrophe, you’ll always have a complete record of your business finances.
1. Select Programs from the Start Menu and select Red Wing Windows.
2. Select Red Wing Utility. A logon dialog box will appear. Enter your logonname and password and click OK or use the RW Utility icon on yourdesktop.
3. On the Utility screen choose Backup/Restore. Click on OK.
4. On the Backup/Restore screen choose Backup.
5. Company ID — You must select a company ID to identify the files beingbacked up. Click on the combo box (or type Alt ) and select a company IDfrom the list box.

Red Wing Utilities 8-3
There is a company ID for every business operation set up in your RedWing Windows system. There is also a system database that is shared byall companies. It is listed in the company ID list box as SystemDatabase.
Every time you make a backup copy of your company files, you should alsomake a backup copy of the system database. Back up the system databaseto a separate location (hard drive) or to a separate set of disks.
6. Format — Answer Yes, to have the system automatically format new disksand “quick” format used disks (delete all files and directories). Thismethod is recommended. It applies only to backups being made to diskette(not backups to hard drives). If you answer No, the formatting step isskipped and you are responsible for formatting the diskettes.
7. Destination — The standard Windows file lookup screen pops up whenyou click on this field. Accept the default name that will be used for thebackup or enter another file name (do not change the extension -- .zip).The default file name is the company ID, the month and day. For example,company ABC being backed up on October 3rd is named abc1003.zip.
Select the destination location. For example, select drive A: if that is whereyour backup diskette(s) is located. If backing up to your current hard drive,be sure to change to a different directory.
Click on Open to return to the Backup/Restore screen.
8. When you are ready to start the backup, insert the first diskette in theappropriate drive (if you are backing up to a diskette) and click on theStart button (Alt S).
Restore Data Use this procedure to restore data from a backup copy.
1. Select Programs from the Start Menu and select Red Wing Windows.
2. Select Red Wing Utility. A logon dialog box will appear. Enter your logonname and password and click on OK.
3. On the Utility screen choose Backup/Restore. Click on OK.
4. On the Backup/Restore screen choose Restore.
5. Overwrite — Answer Yes if you want to overwrite all existing files in thedestination directory. If you answer No, every time the system detects anexisting file, you are asked if you want to overwrite it or not.
6. Source — The standard Windows file lookup screen pops up when youclick on this field. Select the name of the backup zip file (file set) you wantto restore. Click on Open.

8-4 Red Wing Utilities
Next, the Drive Selection dialog is displayed. Use it to select thedestination drive location (by double-clicking on the drive).
7. Click on the Start button (Alt S) to begin the restore process.
8. When you are finished, exit the utility.
Database Utilities
Repair a database Use this procedure to repair damaged (corrupt) Red Wing databases. This canhappen when your Red Wing system quits unexpectedly because of networkfailure, a power outage, or other mechanical problems.
Repairing a database does not guarantee a full return of your data. The bestprotection against unforeseen system "crashes" is a good set of backups.
If problems persist, repair each of the underlying Red Wing data-file databases.Compact the databases after repairs are successfully completed.
Microsoft Access and Red Wing generally ask if you want to repair thedatabase after damage occurs. In some situations, Microsoft Access and RedWing may not detect that a database has been damaged. If a database behavesunpredictable, use the Repair Database command to repair it.
Before repairing the database, make sure all users have logged out of a multi-user system. You cannot repair the database while users are logged into thesystem.
1. Select Programs from the Start Menu.
2. Select Red Wing Windows.
3. Select Red Wing Utility.
4. A logon dialog box will appear. Enter your logon name and password andclick on OK.
5. On the Utility screen choose Compact/Repair. Click on OK.
6. On the Red Wing Utility screen, choose Repair. Choose Data for the Type.
7. Click on the Database Path field to "Select the data path and file name."Choose the drive your Red Wing data is located on and double-click onyour company ID. Choose the *.rwd file to repair and click on Open.

Red Wing Utilities 8-5
Examples: c:\rwbs2\sam\samap2.rwd (single user)f:\rwbs2s\sam\samap2.rwd (network)
8. On the Red Wing Utility screen click on Start to begin the repair process.
9. When the file is repaired successfully, go to Compact the Database.
Compact adatabase
Use this procedure to periodically compact your Red Wing databases todefragment the files and remove deleted records and temporary objects.Compacting makes a copy of the database, rearranging how the database file isstored on disk. To speed up performance when accessing data, routinelycompact all Red Wing databases.
See also: Database Files and File Locations.
Before compacting a database, make sure the following conditions are met:
• You have repaired all databases (if you have had problems with thedatabase).
• All users have logged out of a multi-user system. You cannot compact thedatabase while users are logged in to the system.
• You have administrative access (set up on the Security Menu) to thedatabase tables.
• There is enough disk space for the original database and the compacteddatabase. The compact operation fails if there is not enough disk space.
Make sure you have a backup copy before compacting the database.
1. Select Programs from the Start Menu.
2. Select Red Wing Windows.
3. Select Red Wing Utility.
4. A logon dialog box will appear. Enter your logon name and password andclick on OK.
5. On the Utility screen choose Compact/Repair. Click on OK.
6. On the Red Wing Utility screen, choose Compact. Choose Data for theType.
7. Click on the Database Path field to "Select the data path and file name."Choose the drive your Red Wing data is located on and double-click onyour company ID. Choose the *.rwd file to compact and click on Open.
Examples: c:\rwbs2\sam\samap2.rwd (single user)f:\rwbs2s\sam\samap2.rwd (network)

8-6 Red Wing Utilities
NOTE: If you just repaired a database, it will default to that file.
8. On the Red Wing Utility screen click on Start to begin the compactprocess.
9. When the file is compacted successfully, exit the utility.
Database Filesand Locations
Listed below are the database file names and their locations relative to theprogram location for a single-user system.
Definitions
* = Part of the Red Wing system
xxx = Company ID
Structure Example
\Executablerwbs2.mdb*
\RWBS2\rwbs2.mdb\RWBS2\rwbssm.mde\RWBS2\rwbssm2.mdb\RWBS2\rwbsar.mde\RWBS2\rwbsap.mde\RWBS2\rwbsgl.mde\RWBS2\rwbsgl2.mdb\RWBS2\rwbsin.mde\RWBS2\rwbsoe.mde\RWBS2\rwbspc.mde
\xxx xxxAR2.RWD \RWBS2\SAM\SAMAR2.RWD xxxAP2.RWD \RWBS2\SAM\SAMAP2.RWD xxxGL2.RWD \RWBS2\SAM\SAMGL2.RWD xxxSM2.RWD \RWBS2\SAM\SAMSM2.RWD
\xxx xxxAR2.RWD \RWBS2\ABC\ABCAR2.RWD xxxAP2.RWD \RWBS2\ABC\ABCAP2.RWD xxxGL2.RWD \RWBS2\ABC\ABCGL2.RWD xxxSM2.RWD \RWBS2\ABC\ABCSM2.RWD
\sys syssm2.RWD* \RWBS2\SYS\SYSSM2.RWD

DOS to Windows Comparison 9-1
Chapter Nine — Technical Comparison betweenDOS (Version 8.0) and Windows
This chapter is designed for users of Red Wing's DOS,Version 8.0 Accounting software who are migrating to theWindows system. It explains the major differences betweenthe DOS and Windows systems.
Contents Introduction.............................................................................. 9- 2Network Manager ..................................................................... 9- 2System Manager ...................................................................... 9- 2Accounts Payable .................................................................... 9- 3Accounts Receivable ................................................................ 9- 5Point of Sale ............................................................................ 9- 7General Ledger ........................................................................ 9- 7Inventory.................................................................................. 9- 8Order Entry .............................................................................. 9-10Project Cost ............................................................................. 9-10

9-2 DOS to Windows Comparison
Introduction
This chapter is for Red Wing users who are moving from Red Wing DOSsoftware, Version 8.0 to the Red Wing Windows Accounting Series. The chaptercovers what's new in Windows, what is not handled by Windows, what isconverted (and what is not converted), and what has changed.
Network Manager
New Features inWindows
1. Windows uses universal naming conventions on a peer to peer network;DOS needs one logical drive.
DOS-onlyFeatures
1. The network version is not capped by the number of users.2. The network version is less expensive.
System Manager
New Features inWindows
1. Online cue cards are available for special procedures.2. Extensive online help on every screen.3. Menu security for all modules. DOS allows it only for General Ledger and
Payroll.4. User passwords for all modules.5. Error log is available by date range.6. User log shows who has come in and out of the system.7. Enter user information into the system.8. Enter additional country codes.9. Set up as many as 1000 inventory items without purchasing the Inventory
module. Not as extensive as the Inventory system, but item, cost, price, andaccounts are easily accessed.
DOS to Windows Comparison 9-3
DOS-onlyFeatures
1. On check reconciliation in DOS you can delete a range of checks; inWindows you can only delete one at a time.
RenamedReports and NewProcedures
1. Bank accounts are now set up once, instead of in each module in DOS.2. Tax codes are set up in System Manager instead of Accounts Receivable. If
you have set up your own tax codes instead of state abbreviations, they willnot convert. You must set them up in System Manager.
Windows SpecialOptions
1. Label Wizard – A more extensive version of designing labels. Print labelsfor A/R, A/P and INV, including item number bar codes and postnet barcodes.
2. Label Printing
Accounts Payable
New Features inWindows
1. Online cue cards are available for special procedures.2. Extensive online help on every screen.3. Custom entry options for either invoices or debit memos.4. Export to Microsoft Word or Excel for graphing capabilities.5. Extensive vendor notes save up to 16 pages of information in a comment file
for each vendor.6. The vendor snapshot provides a quick, complete view of vendor activity.7. Multiple payment due dates allow up to three separate payment entries.8. Extensive reporting capabilities with numerous sorting options.9. Specify starting/ending dates for recurring invoices.10. Specify beginning balances for recurring invoices and number of payments.11. Produce magnetic media 1099s.12. Track 1099 totals for two years instead of one year.13. Automatically removes temporary vendors.14. Perform vendor searches on fields by Name, ID, Contact, Zip Code or Phone
Number.15. The number of payment due dates has increased from one to three per
invoice.16. Lets you void batches of checks.17. Tracks fax numbers and e-mail addresses.18. Prints a purchase analysis graph.19. Shows vendor totals by item.

9-4 DOS to Windows Comparison
20. Additional notes field is included on the invoice.21. Windows has distribution codes that let you set up different combinations of
accounts payable, sales tax, freight, and miscellaneous accounts to vendors.22. ASCII output is built into the program vs. a special option in DOS.
DOS-onlyFeatures
1. During a check run, you can choose more than one checking account.2. Accounting method can be either cash or accrual; Windows allows accrual
only.3. DOS lets you have multiple check runs. You can have one vendor and print
two checks in the same run. In Windows you go through the check writingprocess twice for two separate checks.
4. During a check run, the overflow of invoices onto the next page does notassign a check number.
5. DOS does mass updates; Windows does not.
RenamedReports and NewProcedures
1. On DOS you can run a check register anytime, while in Windows you canonly run a check register before you update vendor balances. The paymenthistory report shows the same information as the DOS check register.
2. In Windows there is no selection for handwritten checks; you must enterthem as a prepaid check.
3. A quick check in DOS is now called an online check.4. In Windows you must update vendor balances after entering an online check
to affect the cash account. In DOS the cash account is affected as soon asyou move off the last item.
5. When entering comments on a transaction in Windows, it needs to bewritten on the header tab rather than after each detail line.
Windows SpecialOptions
1. ASCII Input – Bring in information from other software.2. Change Vendor Codes – Windows does not have this special option and
vendor codes cannot be changed.3. Check Designer – Not available in Windows.4. Purchase Orders – A special option in Windows.
New Features in Windows Purchase Ordersa. Set up standard orders (similar to recurring invoices).b. Saves original purchase orders for any length of time.c. Export to Microsoft Word or Excel for graphing capabilities.d. Custom entry options for either transactions or credit memos.e. During conversion purchase orders come over as standard orders.
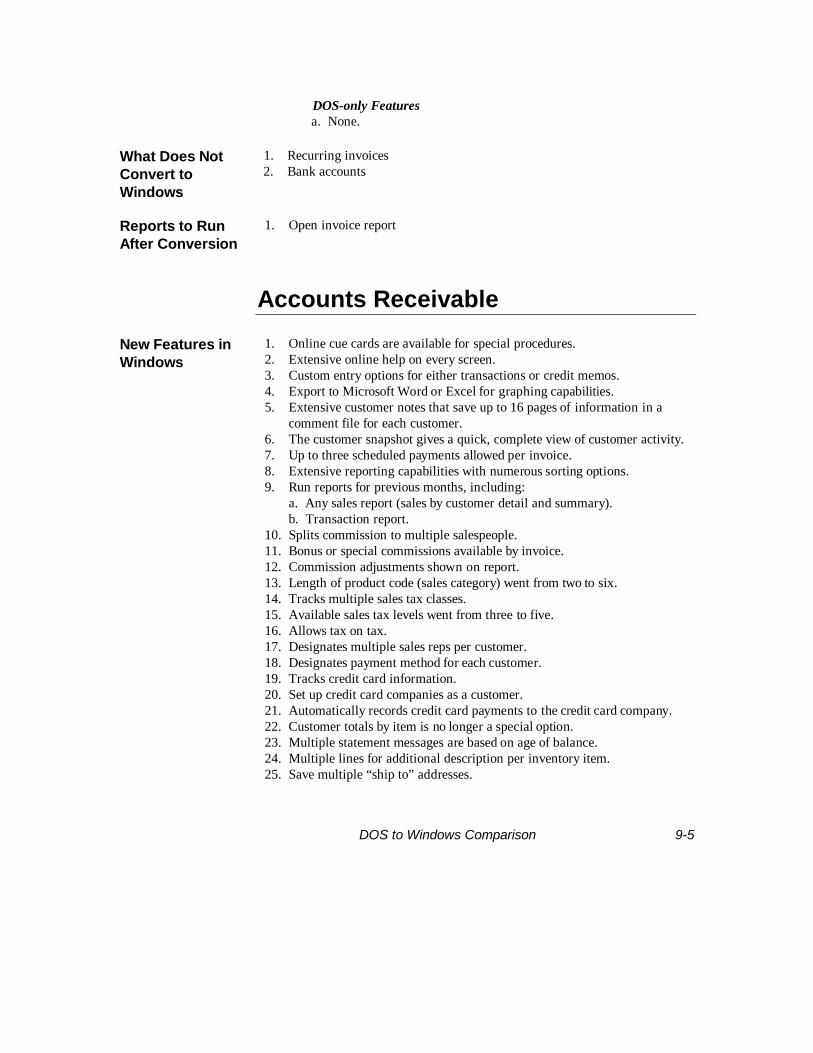
DOS to Windows Comparison 9-5
DOS-only Featuresa. None.
What Does NotConvert toWindows
1. Recurring invoices2. Bank accounts
Reports to RunAfter Conversion
1. Open invoice report
Accounts Receivable
New Features inWindows
1. Online cue cards are available for special procedures.2. Extensive online help on every screen.3. Custom entry options for either transactions or credit memos.4. Export to Microsoft Word or Excel for graphing capabilities.5. Extensive customer notes that save up to 16 pages of information in a
comment file for each customer.6. The customer snapshot gives a quick, complete view of customer activity.7. Up to three scheduled payments allowed per invoice.8. Extensive reporting capabilities with numerous sorting options.9. Run reports for previous months, including:
a. Any sales report (sales by customer detail and summary).b. Transaction report.
10. Splits commission to multiple salespeople.11. Bonus or special commissions available by invoice.12. Commission adjustments shown on report.13. Length of product code (sales category) went from two to six.14. Tracks multiple sales tax classes.15. Available sales tax levels went from three to five.16. Allows tax on tax.17. Designates multiple sales reps per customer.18. Designates payment method for each customer.19. Tracks credit card information.20. Set up credit card companies as a customer.21. Automatically records credit card payments to the credit card company.22. Customer totals by item is no longer a special option.23. Multiple statement messages are based on age of balance.24. Multiple lines for additional description per inventory item.25. Save multiple “ship to” addresses.
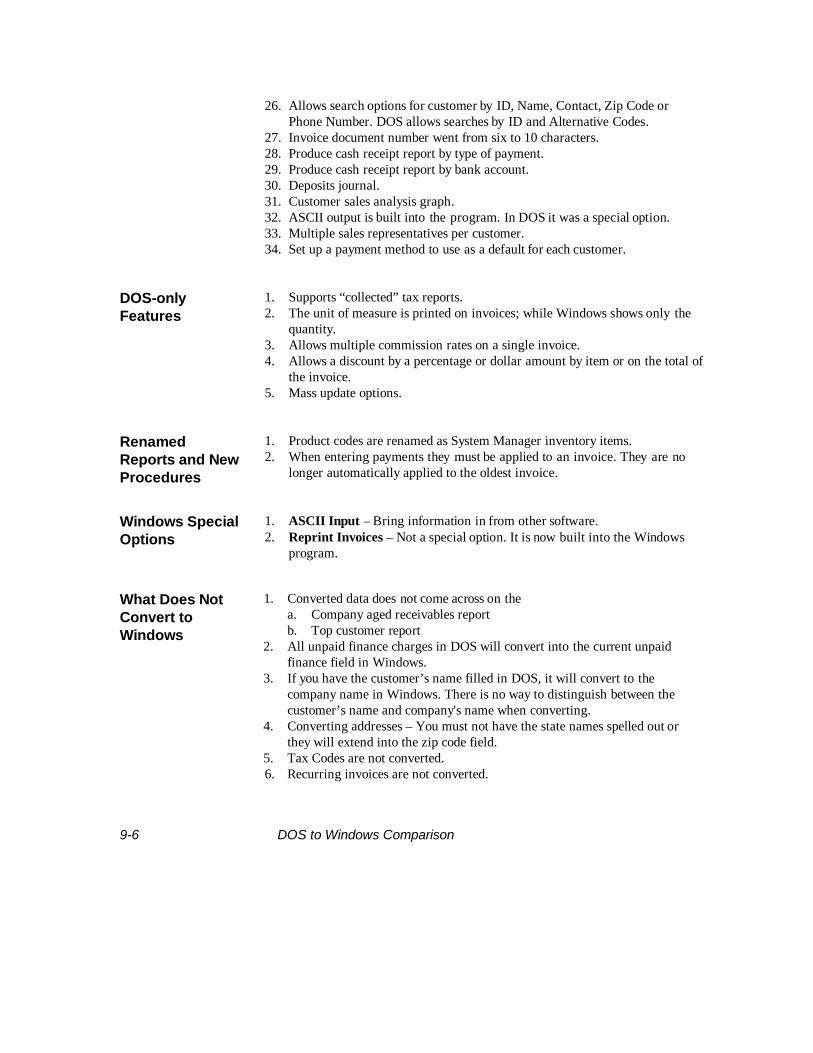
9-6 DOS to Windows Comparison
26. Allows search options for customer by ID, Name, Contact, Zip Code orPhone Number. DOS allows searches by ID and Alternative Codes.
27. Invoice document number went from six to 10 characters.28. Produce cash receipt report by type of payment.29. Produce cash receipt report by bank account.30. Deposits journal.31. Customer sales analysis graph.32. ASCII output is built into the program. In DOS it was a special option.33. Multiple sales representatives per customer.34. Set up a payment method to use as a default for each customer.
DOS-onlyFeatures
1. Supports “collected” tax reports.2. The unit of measure is printed on invoices; while Windows shows only the
quantity.3. Allows multiple commission rates on a single invoice.4. Allows a discount by a percentage or dollar amount by item or on the total of
the invoice.5. Mass update options.
RenamedReports and NewProcedures
1. Product codes are renamed as System Manager inventory items.2. When entering payments they must be applied to an invoice. They are no
longer automatically applied to the oldest invoice.
Windows SpecialOptions
1. ASCII Input – Bring information in from other software.2. Reprint Invoices – Not a special option. It is now built into the Windows
program.
What Does NotConvert toWindows
1. Converted data does not come across on thea. Company aged receivables reportb. Top customer report
2. All unpaid finance charges in DOS will convert into the current unpaidfinance field in Windows.
3. If you have the customer’s name filled in DOS, it will convert to thecompany name in Windows. There is no way to distinguish between thecustomer’s name and company's name when converting.
4. Converting addresses – You must not have the state names spelled out orthey will extend into the zip code field.
5. Tax Codes are not converted.6. Recurring invoices are not converted.

DOS to Windows Comparison 9-7
Reports to RunAfter Conversion
1. Aged receivables2. Open invoice (You may have some invoices that have been paid already and
they will clear during end-of-month.)
Point of Sale
New Procedures 1. In DOS, discounts are by line item. In Windows the discounts are by percentand dollar amount based on the line item, invoice total or sale price.
General Ledger
New Features inWindows
1. Online cue cards help with special situations.2. Extensive online help.3. Reports can be exported to Microsoft Word or Excel.4. Extensive reporting capabilities with numerous sorting options.5. Graphs that show account trends and comparisons, by dollars or quantities.6. Print transaction lists to include both posted and unposted entries on one
report.7. No need to close periods; transactions are date sensitive.8. Choose from 10 sample charts of accounts to copy from department to
department, or from company to company.9. In addition to budgets, enter forecast balances by percentages, dollars or
yearly allocations.10. No end-of-period process.11. Modify reports by “account type.”12. Working trial balance for end-of-year adjustments, etc.13. Not restricted to three periods before end-of-year. Can go back to previous
years anytime.
DOS-onlyFeatures
1. Batch processing. Windows posts by period only.2. Track partnership reports.3. Check Writer special option.4. No heading accounts on reports in Windows.

9-8 DOS to Windows Comparison
RenamedReports and NewProcedures
1. The transaction list in Windows General Ledger will only print one year at atime, but previous years' reports can be printed one year at a time.
Windows SpecialOptions
1. ASCII Input – Bring in information from other software.2. Change Posted Transactions3. Consolidated Statements4. Change Account Number/Structure5. Report Designer
What Does NotConvert toWindows
1. Queues and projects2. Modified reports3. There is no longer a partnership report4. Heading, primary, and subsidiary accounts are no longer available.
Reports to RunAfter Conversion
1. Financial statements
Inventory
New Features inWindows
1. Online cue cards help with special situations.2. Extensive online help.3. Extensive reporting capabilities with numerous sorting options.4. Produces a shortage report for assemblies.5. Increased sorting options on reports.6. Export to Microsoft Word or Excel for graphing capabilities.7. Process physical inventory by a count tag and/or worksheet.8. Pictures can be stored in the system.9. Track comments and additional description back to the item number.10. Price breaks.11. User-defined fields.12. Assign substitute items to inventory items.13. Subassembly levels went from zero to five.14. Automatically creates serial numbers.15. Item reorder levels by location.16. Tracks UPC code by unit of measure.17. Enter material requisitions. Tracks internal use departmental transfers of
inventory.

DOS to Windows Comparison 9-9
18. Unlimited price calculation markup codes.19. “Alias” available for items.20. Different selling prices and costs are available by location.21. Account codes are assigned to each inventory item.22. Lot tracking is built-in; it is no longer sold as a special option.23. Unlimited selling prices; DOS has a limit of five.24. Unlimited locations; DOS has a limit of 100.25. Unlimited characters for units of measure; DOS allows two.26. ASCII output is built-in.
DOS-onlyFeatures
1. Use a different inventory cost method per item (LIFO, FIFO, Average,Standard, Replacement Costs). Windows only lets you have one system-widemethod.
2. Replacement Costs as an inventory cost method.3. Purchase orders is a separate special option in Windows Accounts Payable.4. Mass update option. Windows has mass update of inventory price and costs
only.
RenamedReports and NewProcedures
1. Transactions that were entered into DOS Inventory are now entered throughAccounts Payable and Accounts Receivable.
2. Product centers come across as account codes and sales categories inInventory.
Windows SpecialOptions
1. ASCII Input – Bring in information from other software.
What Does NotConvert toWindows
1. Everything should convert.
Reports to RunAfter Conversion
1. Item status report2. Valuation report

9-10 DOS to Windows Comparison
Order Entry
New Features inWindows
1. Online cue cards help with special situations and extensive online help.2. Custom entry options for inputting orders, quotes, return authorizations,
backorders, and templates.3. Pick report.4. Export to Microsoft Word or Excel for graphing capabilities.5. On the detail open order report, sort by the order date, class code, and sales
rep. ID.6. Search by class code and sales rep ID in "Fill Orders." Also, select the sort
order to print by.7. ASCII output is built-in.8. Option for summary or detailed entry.
DOS-onlyFeatures
1. Discount by a dollar amount and percentage; Windows calculates bypercentage.
2. Search by the purchase order number in "Fill Orders."
What Converts toWindows
Nothing converts.
Project Cost
New Features inWindows
1. Import transactions from both the DOS and Windows modules.2. More sorting options on reports.3. Cost/billing report shows the dollar and percentage profitability.4. ASCII output is now built-in.5. Project descriptions allow short and long multi-line comments (DOS has a
short comment line).

Special Options 10-1
Chapter Ten — Special Options
Special options are add-on programs that give addedcapabilities to Red Wing software. Contact Red WingBusiness Systems or your Red Wing provider for informationon new Special Options.
Contents Introduction......................................................................... 10-2System Manager
Label Wizard ............................................................... 10-2General Ledger
ASCII Input .................................................................. 10-2Change Posted Transactions ....................................... 10-3Report Designer ........................................................... 10-3Change Account Number / Change Account Structure.. 10-3Consolidated Statements ............................................. 10-3
Accounts ReceivableASCII Input (Customers/Transactions/DOS Payroll) ..... 10-4
Accounts PayableASCII Input (Vendors/Transactions) ............................. 10-4
InventoryASCII Input .................................................................. 10-4

10-2 Special Options
Introduction
These handy add-on programs add even more power to your Red WingAccounting software. They interface seamlessly and are designed to meet yourunique needs.
For more information or to order Special Options, contact your Red Wingprovider or Red Wing Business Systems at 1-800-732-9464 or [email protected].
System Manager
Label Wizard Use the Label Wizard to create labels for Accounts Payable, AccountsReceivable, Inventory, Order Entry and Purchase Orders. Based on standardAvery label sizes and formats you can create labels listing a wide variety ofinformation and can even print bar codes on labels in a variety of formats.
The Label Wizard takes you step-by-step through the label creation (or editing)process.
General Ledger
ASCII Input The ASCII Input Special Option transfers transaction information from anASCII file into the General Ledger. You can use the standard Red Wing ASCIIfile format or design a custom definition describing your input file.

Special Options 10-3
Change PostedTransactions
Use this Special Option to change current year posted transactions. You canmake changes to text fields (this capability is also available in ReviewTransactions), and can make the following changes to posted transactions:
� Change debits, credits, primary quantities, alternate quantities, accountsand periods. Account balances are adjusted accordingly.
� Delete transactions.
Report Designer This Special Option lets you make major modifications to your IncomeStatement or Balance Sheet reports. Use it to change the type of informationthat is printed in each column of these reports.
Change AccountNumber/ChangeAccount Structure
Use this Special Option to change an account number. All of the accountinformation is preserved — the only thing that changes is the account numberitself. Not only is the account number changed in the General Ledger, but alsoin all Red Wing modules that interface with the General Ledger.
You can also use this selection to combine one account with another. Do thisby changing an account number to one that already exists. The originalaccount's totals are then added to the existing account's totals.
Use this selection (a part of the Change Account Number Special Option) tochange the number of segments in your account number structure or to changethe length of an existing account segment. Not only is the account structurechanged in the General Ledger, but also in all Red Wing modules that interfacewith the General Ledger.
ConsolidatedStatements
Use this Special Option to print consolidated financial statements, combiningmore than one company's records.

10-4 Special Options
Accounts Receivable
ASCII Input(Customers/Transactions)
Use this selection to transfer transactions or customers from third partysoftware into Accounts Receivable.
� Customers—Read customer information from an ASCII file into theAccounts Receivable system or modify the definition file used to describethe format of the ASCII input file.
� Transactions—Read transaction information from an ASCII file into theAccounts Receivable system or create the definition file used to describethe format of the ASCII input file.
Accounts Payable
ASCII Input(Vendors/Transactions)
Use this selection to transfer transactions or vendors from third party softwareinto Accounts Payable.
� Vendors—Read vendor information from an ASCII file into the AccountsPayable system or modify the definition file used to describe the format ofthe ASCII input file.
� Transactions—Read transaction information from an ASCII file into theAccounts Payable system or create the definition file used to describe theformat of the ASCII input file.
Inventory
ASCII Input Use this selection to transfer inventory items from third party software intoInventory, reading item information from an ASCII file into the Inventorysystem or modifying the definition file used to describe the format of the ASCIIinput file. You can set up your own import definition, or use one of the importdefinitions that comes with the system.
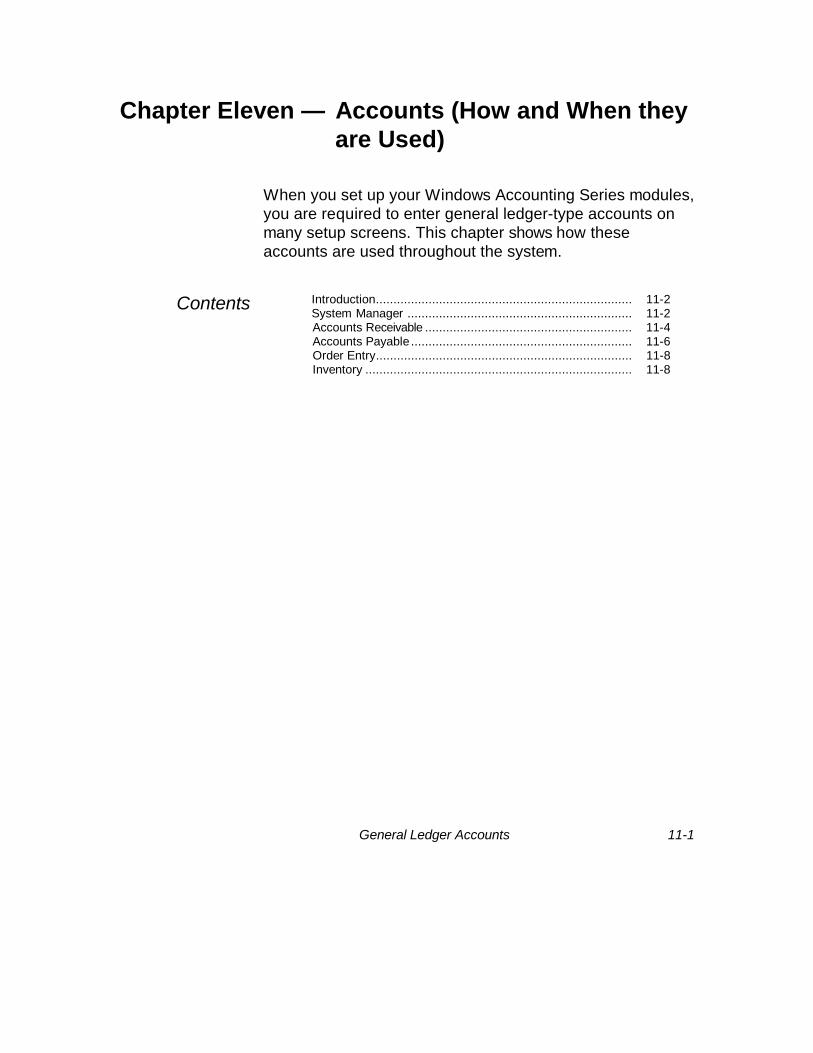
General Ledger Accounts 11-1
Chapter Eleven — Accounts (How and When theyare Used)
When you set up your Windows Accounting Series modules,you are required to enter general ledger-type accounts onmany setup screens. This chapter shows how theseaccounts are used throughout the system.
Contents Introduction......................................................................... 11-2System Manager ................................................................ 11-2Accounts Receivable ........................................................... 11-4Accounts Payable ............................................................... 11-6Order Entry......................................................................... 11-8Inventory ............................................................................ 11-8

11-2 General Ledger Accounts
Introduction
Your "accounting" system is filled with general ledger-type accounts; whetheryou post to the General Ledger module or not. In either case, you need to trackcertain information by accounts that will have either a debit or a credit affect.
This chapter shows each setup screen that requires an account and how thataccount is used by the system.
Abbreviations: AR Accounts ReceivableAP Accounts PayableCOGS Cost of GoodsGL General LedgerIN InventoryOE Order Entry
System Manager
Setup & Maintenance
Bank Accounts
Field: GL Cash AccountType of Account: Checking AccountNormal GL Balance: DebitAffected By: AR, Enter Payments Debit
AR, Invoice Entry, Payments DebitAP, Update Vendor Balances CreditAP, Void Checks Debit
Setup & Maintenance
Tax Locations
Field: Tax Liability AccountType of Account: Sales Tax PayableAffected By: AR, Invoice Entry, Invoices with Sales Tax Credit
AR, Invoice Entry, Credit Memos with Tax Debit
Field: Tax Refundable AccountType of Account Sales Tax Payable (normally the same
account as above)Affected By: Not used by any transactions at this time.

General Ledger Accounts 11-3
Setup & Maintenance
Inventory Items
Field: Expense AccountType of Account: Miscellaneous ExpenseAffected By: Not used by any transactions at this time.
Field: Sales AccountType of Account: Revenue/IncomeAffected By: AR, Invoice Entry, when this item is added
to an invoice CreditAR, Invoice Entry, when this item is added
to a credit memo Debit
Field: COGS AccountType of Account: Cost of Goods SoldAffected By: AR, Invoice Entry, when this item is added
to an invoice DebitAR, Invoice Entry, when this item is added
to a credit memo Credit
Note: The system will only assign a transactionto the COGS and Inventory accounts IF youhave a cost amount entered in the cost field onthe invoice.
Field: Inventory AccountType of Account: Inventory (Asset)Affected By: AR, Invoice Entry, when this item is added
to an invoice CreditAR, Invoice Entry, when this item is added
to a credit memo Debit
Note: The system will only assign a transactionto the COGS and Inventory accounts IF youhave a cost amount entered in the cost field onthe invoice.

11-4 General Ledger Accounts
Accounts Receivable
Setup & Maintenance
Customization -Defaults tab
Field: Cash ReceiptsType of Account: Checking AccountAffected By: Not used by any transactions at this time
Field: DiscountsType of Account: Sales Discount Account (Income Account)Affected By: AR, Payments posted to invoices that were
entered with an early payment discount Debit
Field: InventoryType of Account: Inventory Account (Asset Account)Affected By: AR, Invoice Entry, Detail tab will default
to this Inventory account Credit
Note: This default is only used if you areselling a non-inventory item and the non-inventory item has a cost in the cost field.
Field: COGSType of Account: Cost of Goods Sold AccountAffected By: AR, Invoice Entry, Detail tab will default
to this COGS account Debit
Note: This default is only used if you areselling a non-inventory item and the non-inventory item has a cost in the cost field.
Field: SalesType of Account: Revenue or Income AccountAffected By: AR, Invoice Entry, Detail tab will default
to this Sales account Debit
Note: This default is only used if you areselling a non-inventory item.
Field: Finance ChargeType of Account: Finance Charge Income AccountAffected By: AR, Calculate Finance Charges Credit
Note: When you go through the month-endprocess, after calculating finance charges,it will post all finance charges to this account.

General Ledger Accounts 11-5
Setup & Maintenance
Default Sales/CostAccounts
Field: Sales AccountType of Account: Revenue or Income AccountAffected By: AR, Enter Invoices Credit
(Account codes in Enter Invoices areoptional.)
Note: If you choose an account code in EnterInvoices, instead of accepting the defaults, itwill use this account).
*A credit memo debits this account.
Field: Cost AccountType of Account: Cost of Goods Sold AccountAffected By: AR, Enter Invoices Debit
(Account codes in Enter Invoices areoptional.)
Note: If you choose an account code in EnterInvoices, instead of accepting the defaults, itwill use this account).
*A credit memo credits this account.
Setup & Maintenance
DefaultReceivablesAccounts
Field: ReceivablesType of Account: Accounts Receivable AccountAffected By: AR, Enter Invoices, Invoice Debit
AR, Enter Invoices, Credit Memo CreditAR, Enter Payments, Credit
Field: FreightType of Account: Freight Income AccountAffected By: AR, Enter Invoices, Invoice, Freight field
on the Totals tab CreditAR, Enter Invoices, Credit Memo, Freight
field on the Totals tab Debit
Field: MiscType of Account: Miscellaneous Income AccountAffected By: AR, Enter Invoices, Invoice, Misc field
on the Totals tab CreditAR, Enter Invoices, Credit Memo, Misc
field on the Totals tab Debit

11-6 General Ledger Accounts
Setup & Maintenance
Payment Methods
Field: Debit AccountType of Account: Varies*Affected By: AR, Enter Payments Debit
OE, Order Entry, Payments tab (paymentsonly, not deposits) Debit
*Depends on what you are using this paymentmethod for. For example, if you are setting upa payment method to reverse finance charges,the debit account is your Finance ChargeIncome Account. Normally this is a checkingaccount.
Accounts Payable
Setup & Maintenance
Customization -Defaults tab
Field: CashType of Account: Checking AccountAffected By: Not used by any transactions at this time
Field: DiscountsType of Account: Purchase Discount Account (Expense
account – offsets expense)Affected By: AP, Payments posted to invoices that were
entered with an early payment discount Credit
Field: InventoryType of Account: Inventory Account (Asset account)Affected By: Not used by any transactions at this time
Field: COGSType of Account: Cost of Goods AccountAffected By: Not used by any transactions at this time

General Ledger Accounts 11-7
Setup & Maintenance
Vendors
Field: Expense AccountType of Account: Expense AccountAffected By: AP, Transaction Entry, Invoice Debit
AP, Transaction Entry, Debit Memo Credit
Note: This account will only be used if an inventoryitem is not chosen on the Detail tab of Transaction Entry.If you choose an inventory item, it will use the InventoryAccount for that item.
Setup & Maintenance
Distribution Codes
Field: PayablesType of Account: Accounts Payable Account (Liability Account)Affected By: AP, Transaction Entry, Invoice Credit
AP, Transaction Entry, Debit Memo Debit
Field: Sales TaxType of Account: Sales Tax Expense AccountAffected By: AP, Transaction Entry, Invoice, Sales Tax
field on the Totals tab DebitAP, Transaction Entry, Debit Memo, Sales
Tax field on the Totals tab Credit
Field: FreightType of Account: Freight Expense AccountAffected By: AP, Transaction Entry, Invoice, Freight
field on the Totals tab DebitAP, Transaction Entry, Debit Memo, Freight
field on the Totals tab Credit
Field: MiscType of Account: Miscellaneous Expense AccountAffected By: AP, Transaction Entry, Invoice, Misc field
on the Totals tab DebitAP, Transaction Entry, Debit Memo, Misc
field on the Totals tab Credit

11-8 General Ledger Accounts
Order Entry
Setup & Maintenance
Customization -Defaults tab
Field: Discount AcctType of Account: Sales Discount Account
Affected By: Option field: If discounts are given in OrderEntry (this is a sales discount, not an earlypayment discount), this account is debited.
Inventory
Setup & Maintenance
Customization -Defaults tab
Field: Material Expense AcctType of Account: Expense AccountAffected By: Material Requisition Transactions Debit
Field: Material Inventory AcctType of Account: Inventory AccountAffected By: Not used by any transactions at this time
Field: Material Misc AcctType of Account: COGS AccountAffected By: Not used by any transactions at this time
Field: AP GL Offset AccountType of Account: Accounts Payable or COGS AccountAffected By: IN, Transactions, Adjustment tab, Decrease Debit
IN, Transactions, Purchase tab, Invoice Credit
Note: Unless you are tracking your payablesthrough inventory, normally you would usethe COGS account in this field

General Ledger Accounts 11-9
Setup & Maintenance
Customization -Defaults tab(Continued)
Field: AR GL Offset AccountType of Account: Accounts Receivable or COGS AccountAffected By: IN, Transactions, Adjustment tab, Increase Credit
IN, Transactions, Sale Tab, Invoice Debit
Note: Unless you are tracking your receivablesthrough inventory, normally you would usethe COGS account in this field
Setup & Maintenance
Account Codes
Field: Sales AccountType of Account: Revenue or Income AccountAffected By: AR, Invoice Entry, Invoice (inventory
item on the Detail tab) CreditAR, Invoice Entry, Credit Memo
(inventory item on the Detail tab) DebitIN, Transactions, Sale tab Credit
Field: Cost of Goods Sold AccountType of Account: Cost of Goods Sold AccountAffected By: AR, Invoice Entry, Invoice (inventory
item on the Detail tab) DebitAR, Invoice Entry, Credit Memo
(inventory item on the Detail tab) CreditIN, Transactions, Sale tab Debit
Field: Inventory AccountType of Account: Inventory AccountAffected By: AR, Invoice Entry, Invoice (inventory
item on the Detail tab) CreditAR, Invoice Entry, Credit Memo
(inventory item on the Detail tab) DebitIN, Transactions, Sale tab CreditIN, Transactions, Purchase tab DebitIN, Transactions, Location Transfers Credit
Field: Work In ProcessType of Account: Work In ProcessAffected By: Not used by any transactions at this time

11-10 General Ledger Accounts
Setup & Maintenance
Account Codes
(Continued)
Field: Inventory AdjustmentType of Account: Inventory Adjustment Account (Asset)Affected By: IN, Physical Inventory, counted quantity is
less than expected quantity CreditIN, Physical Inventory, counted quantity is
more than expected quantity DebitIN, GL Adjustment Journal, (automatic
adjustments) Debit/Credit
Field: COGS AdjustmentType of Account: COGS Adjustment Account (COGS or Expense
Account)Affected By: IN, GL Adjustment Journal, (automatic
adjustments) Debit/Credit
Field: Purchase Price VarianceType of Account: COGS Account (COGS or Expense Account)Affected By: Not used by any transactions at this time
Field: Physical Count AdjustmentType of Account: COGS or Inventory Adjustment Expense
AccountAffected By: IN, Physical Inventory, counted quantity is
less than expected quantity DebitIN, Physical Inventory, counted quantity
is more than expected quantity Credit
Field: Transfer CostType of Account: Transfer Expense AccountAffected By: IN, Transactions, Location Transfers Credit

Glossary 12-1
Red Wing WindowsAccounting — Glossary
accountA storage unit of financial data in accounting,usually grouping related information under oneaccount number.
account categoriesIn standard accounting practice, divisions intowhich accounts of a business are categorized --current assets, current liabilities, equity, income,expenses, and so on.
account codeIndicates whether the account is a debit, creditor memo account.
accounting periodPreset units of time in accounting used to trackand report financial information; generallymonthly, quarterly or annually. For example,you might want a report to include transactionsentered for the month of January.
acknowledgmentA form sent to the customer reporting thereceipt of an order. An acknowledgment givesthe customer an opportunity to look over theorder for accuracy and confirms the order wasreceived.
activityThe changes in account balances resulting fromtransactions (sales, purchases, payments ofwages, adjustments, and other journal entries)between the business and one or more outsideparties.
activity balanceThe activity balance for a period is the sum ofall journal entries posted for the period.
activity ratiosRatios that show the sales activity of thebusiness in relation to its inventory and otherassets; for example, the rate of return on fixedassets is the ratio of sales to fixed assets.
actual inventoryInventory physically on-hand.
adjustmentA type of transaction that corrects differences inquantity (in Inventory).
agingThe process of classifying accounts receivable oraccounts payable into time periods determinedby the number of days elapsed since the due dateor the transaction entry date.
aliasAn alternate name for an inventory item. Forexample, the alias for item 700873920PS isplumbing supplies.
allocateEarmark inventory for an order. Settinginventory aside, but not necessarily physicallymoving it.
alternate / alternate itemItems that are comparable to or can besubstituted for other items. An alternate item isused when you sell an item with insufficientquantities.
amortizationDepreciation applied to intangible assets such asgoodwill and leasehold improvements.
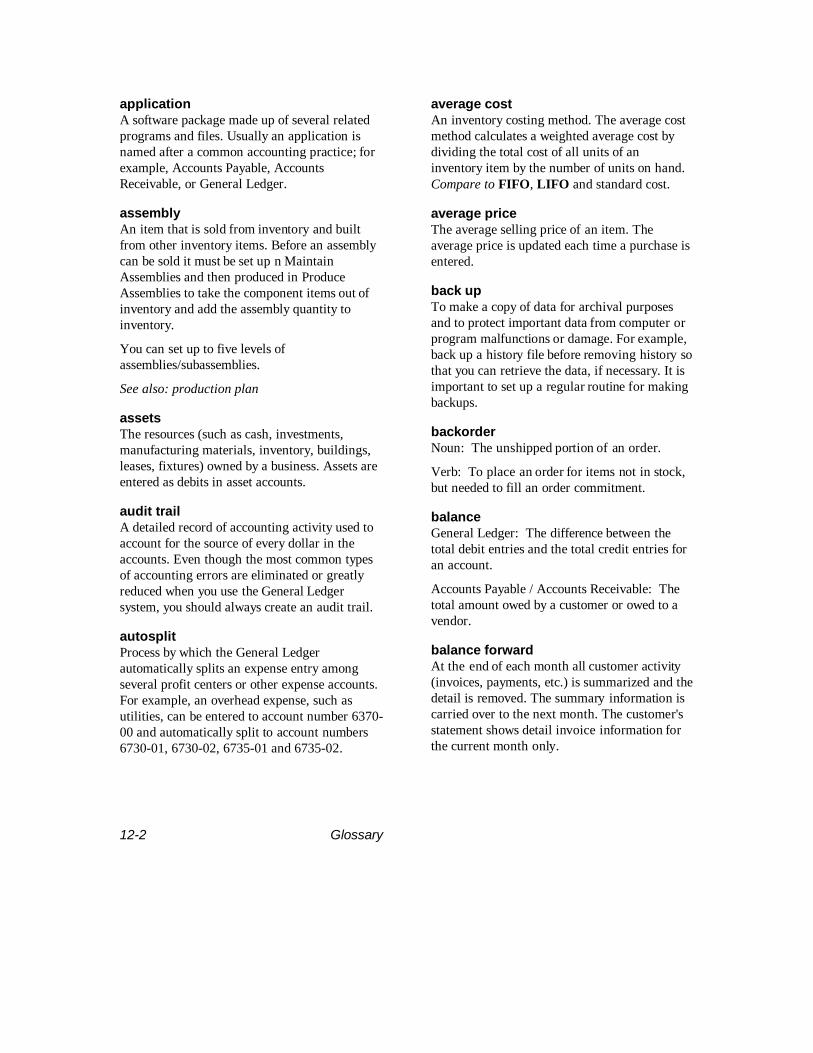
12-2 Glossary
applicationA software package made up of several relatedprograms and files. Usually an application isnamed after a common accounting practice; forexample, Accounts Payable, AccountsReceivable, or General Ledger.
assemblyAn item that is sold from inventory and builtfrom other inventory items. Before an assemblycan be sold it must be set up n MaintainAssemblies and then produced in ProduceAssemblies to take the component items out ofinventory and add the assembly quantity toinventory.
You can set up to five levels ofassemblies/subassemblies.
See also: production plan
assetsThe resources (such as cash, investments,manufacturing materials, inventory, buildings,leases, fixtures) owned by a business. Assets areentered as debits in asset accounts.
audit trailA detailed record of accounting activity used toaccount for the source of every dollar in theaccounts. Even though the most common typesof accounting errors are eliminated or greatlyreduced when you use the General Ledgersystem, you should always create an audit trail.
autosplitProcess by which the General Ledgerautomatically splits an expense entry amongseveral profit centers or other expense accounts.For example, an overhead expense, such asutilities, can be entered to account number 6370-00 and automatically split to account numbers6730-01, 6730-02, 6735-01 and 6735-02.
average costAn inventory costing method. The average costmethod calculates a weighted average cost bydividing the total cost of all units of aninventory item by the number of units on hand.Compare to FIFO, LIFO and standard cost.
average priceThe average selling price of an item. Theaverage price is updated each time a purchase isentered.
back upTo make a copy of data for archival purposesand to protect important data from computer orprogram malfunctions or damage. For example,back up a history file before removing history sothat you can retrieve the data, if necessary. It isimportant to set up a regular routine for makingbackups.
backorderNoun: The unshipped portion of an order.
Verb: To place an order for items not in stock,but needed to fill an order commitment.
balanceGeneral Ledger: The difference between thetotal debit entries and the total credit entries foran account.
Accounts Payable / Accounts Receivable: Thetotal amount owed by a customer or owed to avendor.
balance forwardAt the end of each month all customer activity(invoices, payments, etc.) is summarized and thedetail is removed. The summary information iscarried over to the next month. The customer'sstatement shows detail invoice information forthe current month only.

Glossary 12-3
balance forward customersCustomers whose statements show invoicedetails for the current month only and asummary line for previous months activity.
balance sheetDefinition -- A financial report summarizingthe values of the assets, the liabilities, and thecapital (net worth) of a business at a particularpoint in time. In fact, the balance sheet mustsatisfy the basic accounting formula:
Assets = Liabilities + Capital
The assets (what is owned) are always listed firston the balance sheet, while the liabilities andcapital (who owns it) are listed last.
Example -- The basic format of a balance sheetis shown below: Assets $ $ $ $$$$
Liabilities $ $ $ $$$ Capital $ $$$$
base costThe cost used for calculating prices as a markupfrom cost.
base priceA price assigned to each unit.
batchA group of items, locations, bins, product lines,and user-defined fields that are assigned an ID.Batch IDs are used in the physical count processto group similar items.
batch codeA code, up to six characters, assigned to eachtransaction. One batch code can be assigned to
multiple transactions. The transactions are thenposted by batch, rather than individually
bin numberA number that identifies the location of an item.
burdenThe dollar amount or percentage applied to eachproject for indirect expenses. These costs are notdirectly attributable to a project (such as phonebills, insurance, and electricity) or are costs thatare difficult to assign to a specific project (suchas employer's share of FICA, workers'compensation costs, and State Unemploymentcosts).
In Project Cost the burden cost can either be arate (burden amount that is multiplied times thequantity being recorded) or a percent (burdenpercent that is multiplied times the total costthat is being recorded).
Add burden costs at either of two levels:
1. Project -- Set up a different burden rate orpercent for each project. All costtransactions entered for the project havethis burden amount/rate applied.
2. Category Code -- Set up a specific burdenrate or percent for each cost classificationwithin a category. For example, enter aburden rate for the labor classificationwithin a category, but no burden rate forequipment rental for that same category.
As each transaction is entered into Project Cost,the burden amount is calculated and attached tothat transaction. You can change burden ratesanytime during the life of the project. Onlytransactions entered after the change areaffected.
Also called Overhead.

12-4 Glossary
Example: A transaction is entered for eighthours at $9.50 per hour for a total cost of $76.00($9.50 x 8=$76.00).
• If a burden rate of $7.00 is applied tothis transaction, the total burdenamount is $56.00 ($7.00 x 8 hours).
• If a burden percent of 40% is appliedto this transaction, the total burdenamount is $30.40 (.40 x $76.00).
COGS / cost of goods soldThe beginning inventory plus purchases, minusthe ending inventory.
calendarOn any date field you can press Shift F10 todisplay a calendar from which you can selectbeginning and ending dates.
capitalClaims on a company’s assets by the owners;either the capital put up by the owners or theincome earned by the business and notdistributed (retained earnings).
carrying cost percentThe percentage of the total value of inventory.This amount is used in the EOQ calculation inthe reorder process.
categoryA user-defined task or project step used toaccumulate costs, billing totals and vendorpayments. For example, an electrical contractorcould use Main Service, Lighting, and Generalcost categories; while a general contractor usesPermits, Demolition, Excavation, etc.
Categories are tracked by user-defined, two-character category codes. They can be as generalor as specific as you want.
Each category code can be further subdividedinto classifications.
class codeA code used to sort information for reports.
In Accounts Receivable, class codes are used togroup customers.
In Accounts Payable, class codes are used togroup vendors. For example, you can classifythem by type of product supplied or assigning arating system (good, excellent, average, etc.).
In the General Ledger it is the general categoryan account type fits into -- for example, long-term asset, current asset, or long-term liability.This information is used to simplify financialstatement setup.
classificationsPredefined subdivisions within each categorycode used to track costs, billing, and vendorinformation. The Project Cost system has fivecost classifications: Materials, Labor,Subcontractor, Equipment Rental, and Other.There is also a billing classification (AccountsReceivable) and vendor payment classification(Accounts Payable).
Several reports show summary totals for eachclassification code. For example, you can see thetotal labor costs for a project, even though it hasseveral labor categories.
Each classification is assigned a classificationcode as follows:
10 = Materials20 = Labor30 = Subcontractor40 = Equipment50 = Other60 = Billings70 = Vendor Payments
closeThe transfer of the balances from income andexpense accounts to an equity account at the end
Glossary 12-5
of the fiscal year (or quarter) to clear theaccounts for the next year’s entries.
column heading buttonsButtons that control active/inactive fields inTransaction Entry and Estimate Entry. "Down"(light gray buttons) are inactive. Click on abutton to change it from active to inactive andvice versa.
companyIn Red Wing, a business record associated withits own files, tables, and menu of applications.Companies are identified by 3-character codes.
compound entryA journal entry in which a debit is offset bymore than one credit (or vice versa).
conversionThe process of updating existing files, programs,or applications to the current version.
conversion factorThe portion of the base unit that is the alternateunit. For example, if the base unit is EACH andthe alternate unit is BOX of 10, the conversionfactor is 10.
copyThis function in Project Cost copies a recordfrom the most recently modified record to thecurrent record. For example, if you change acategory code on one record, press Ctrl F5 tocopy all fields to the current record.
costing methodThe method used for costing sales andinventory: FIFO, LIFO, average cost, orstandard cost.
count dateThe date on which a physical count of inventoryitems is taken.
counted quantityThe quantities from the on-hand physicalinventory, generally listed on tags orworksheets. Compare to frozen quantity.
credit limitThe dollar amount a customer's balance cannotexceed.
credit memoA form/entry used to adjust a customer's balanceby decreasing it. A credit memo is the same as anegative invoice.
customer order pendingAn accumulated dollar total of all open ordersfor a customer.
customizationThe process of setting up the Red WingAccounting Series modules to fit your uniquebusiness. Setting up defaults in Setup andMaintenance, speeds up data entry when you usethe system(s).
debit memoA form/entry used to adjust a customer's balanceby increasing it.
defaultDefaults are system-supplied responses. Youcan change default responses to fit your specificneeds. They save you time by eliminating theneed to repeatedly type the same information.
default iconA "toggle" button available to the right ofthe column heading buttons in TransactionEntry and Estimate Entry. Click on this
button to reset all fields to their default entrypositions or to clear defaults.

12-6 Glossary
depositPayment for an order being shipped in thefuture. A deposit is considered a liability in theGeneral Ledger until the item is shipped.
Example: An order with a deposit is placed inJanuary for shipment in April. The money isdeposited in the checking account in January,but is still a liability in the General Ledger.
depreciationAllocating the cost of using up fixed assets overtime by allocating a portion per accountingperiod.
discountA dollar amount subtracted from the full amountof a vendor invoice in return for promptpayment.
discount typeA method of handling discounts in Point of Sale.
distribution codeA code (up to six characters) that indicates howamounts are to be distributed among generalledger accounts. For example, in AccountsPayable it indicates how amounts are to bedistributed among general ledger payableaccounts (tied to vendor records) and inAccounts Receivable it indicates how amountsare to be distributed among general ledgerreceivable accounts (tied to customer records).
dividendsThe portion of the net income paid out directlyto the stockholders as a return on their capitalinvestment.
division codeAn optional code, up to six characters, that canbe used in sorting reports in Accounts Payable.Typically, division codes indicate branches ordepartments of a company. They are set up in
Division Codes on the Accounts Payable Setupand Maintenance Menu.
Economical Order Quantity (EOQ)The quantity at which it is most economical toplace an order.
expensesThe costs incurred in earning the income: thecost of goods sold, wages, rent, and so on.
F2=LookupUse the F2 function key to locate a specificcustomer, invoice, vendor, order, etc. You cansearch by customer ID, name, zip code, contact,or phone. For example, if you need the customerID and you know only the contact, you canlocate it by searching by contact.
This command is available when is displayed on the status bar.
EXAMPLE:
Replace Button -- Use this button on theLookup screen to change from one customer toanother. For example, if customer JUSTICJ isshown on the Transaction Entry screen, you canpress the F2 key, select the customer you want tochange to, and click on the Replace button. Theselected customer ID is used as a replacement onthe current transaction.
Find Button -- Use this button to find a specificitem, using the following procedure:
1. Select the search criteria you want to"Lookup By" (for example, Contact.).
2. Enter the name of the specificcustomer you want to find (the name,phone, zip code, etc., etc. selected toLookup By).
3. Click on the Find button. Thecustomer ID field on the entry screenis changed to the selected customer.

Glossary 12-7
F3=DeleteUse the F3 key to delete information, such as auser-defined code or a record. You can also click
on the trash can icon to delete a record.
F6=MaintenanceUse the F6 key to update information withouthaving to quit your current task. For example, ifyou are entering transactions and discover thecustomer ID has not been set up, you candouble-click on the Customer ID entry field (orpress F6) and define the customer, then return tothe transaction.
This command is available when is displayed on the status bar.
F7=Close WindowUse the F7 function key to save the informationon the active screen, close the active windowand return to the prior window. You can also
click on the close window icon to save andclose an active window.
F9=DefaultThis function is available in Project Cost.
Depending on the field, this function key isavailable in transaction entry, importtransactions, estimate entry, and importestimates as follows:
Class Fills in the firstclassification that was setup for the currentcategory. A category isrequired.
Source Fills in the default sourcecode, PC.
Date Fills in the workstationdate.
Unit of Measure Fills in the primary unit ofmeasure that was set upfor the current category
and classification. If noprimary unit of measurewas set up, the field is leftblank. Both a categoryand classification arerequired.
Unit Amount Fills in the unit amountfor the current categoryand classification. Ifone has not been set up,the field is left at.00000. If it is a costclassification, the unitcost is used; if it is abilling, the billingamount is used; and if itis a vendor payment,the field is left at.00000.
Unit Cost Fills in the unit cost forthe current category andclassification. If one hasnot been set up, thefield is left at .00000.
Unit Price Fills in the unit pricefor the current categoryand classification. Ifone has not been set up,the field is left at.00000.
Description Fills in the descriptionfor the matchingestimate record (orcategory description forestimates), if one hasbeen entered. If noestimate description isavailable, the field isleft blank. A project,category andclassification arerequired.

12-8 Glossary
FIFOA costing method that uses the oldest items inyour inventory as the basis for costing your salesand inventory. FIFO allocates the oldest unitcosts to the cost of goods sold and the mostrecent unit costs to the ending inventory. Whencosts rise, the FIFO method yields the highestnet income; when costs fall, the FIFO methodyields the lowest net income. Compare toaverage cost, LIFO, and standard cost.
fileA collection of records stored under a particularname. Option screens often represent files, butyou do not directly see a file.
fillThe process of allocating quantity shippedamounts to an open order in preparation forshipment. After an order is filled, the open orderis turned into an invoice/credit memo.
freezeA step in physical inventory in which inventoryquantities are calculated and stored before theinventory is counted.
frozen quantityThe calculated inventory totals that are storedbefore the inventory is counted (the quantity youexpect to find). Compare to counted quantity.
general ledgerA record of accounts consisting of a chart ofaccounts and associated accounting periods.General Ledger tracks the effects on accountsfrom transactions entered in it and all otherinterfaced applications. General Ledger isupdated by all applications that interface with it.
groupGroups are used to classify projects into varioustypes. You can then compare various types ofprojects by group or list all the projects in a
group. For example, a general contractor mighthave Residential, Commercial, andMiscellaneous groups, each with one or moreprojects in it. An electrical contractor may haveNew Homes, Remodeling, Commercial, andIndustrial groups.
You can produce graphs comparing cost per unitor profit trends within a single group, orcompare one group against another to see whereyour most profitable projects are.
The Project Cost system comes with three built-in groups: New, Change Order, Rework. Youcan also easily add new groups.
incomeThe excess of revenues over expenses in anaccounting period.
income statementA key report showing the financial progress of abusiness over a period of time in terms of netincome or loss. The period of time is mostcommonly a month, a quarter, or a year.
Net income represents an increase in capital orowner's equity. Net loss represents a decrease incapital or owner's equity.
Example -- The basic format of an incomestatement is shown below: Total Income: $XXXX Cost of Goods Sold - XXXX Gross Profit $ XXX Total Expenses - XXX Net Income (Loss) $ XXX
income summary accountAn account that holds the net incometemporarily when closing the books, before it isdistributed to various equity accounts.
interfaceTo join to another application so thatinformation entered in one application updatesinformation in another application's files. For

Glossary 12-9
example, all Red Wing Windows Accountingapplications interface to the General Ledger.
inventoryThe goods a business owns at a particular time,whether held for direct sale or for use inmanufacturing goods for future sale. Manufac-turing inventory is usually divided into rawmaterial, work in process, and finished goods.
item numberNumber (code) assigned to each inventory itemto identify it. Quantities are unlimited for eachitem. Using serial and/or lot numbers to identifyeach piece is optional.
journalA chronological record of transactions.
journal entriesTransactions recorded in a journal.
LIFOA costing method that uses the last itemsbrought into inventory as the basis for costingyour sales and inventory. When costs of yourinventory items rise, the LIFO method yields thelowest net income of all the costing types; wheninventory item costs fall, the LIFO methodyields the highest net income. LIFO is oftenpreferred when prices rise because it results in alower pretax income and a lower tax obligation.Compare to average cost, FIFO, and standardcost.
lead timeThe time it takes to process an order(manufacture or receive the item(s) / packaging)so that it can be shipped by the required date.For example, if the lead time is set to five inOrder Entry Customization and the daterequired is October 31st, the scheduled ship datedefaults to October 26th (five days before therequired date).
leverage ratiosRatios used to determine how much the businessis encumbered by its liabilities: the ratio of debt(liabilities) to assets and of debt to equity.
liabilitiesThe claims of creditors upon the business’sresources (assets)—accounts, salaries, taxes, andso on -- payable to parties other than the owners.
liquidity ratiosRatios that indicate the amount of cash thatcould be available for investment after meetingshort-term obligations. The current liquidityratio is the ratio of current assets to currentliabilities. The quick ratio is the ratio of currentassets less inventory to current liabilities.
list priceThe basic, published price for each unit withoutdiscounts added to it.
locationEach place your inventory is stored. It isidentified by a Location ID. A default LocationID is set up in System Manager in CompanyInformation. Additional locations may be set upin the Red Wing Inventory system.
lotted itemsItems that are grouped for identification andgiven a lot number, such as items with the sameshipping, receiving, or expiration date.
magnetic mediaA diskette that contains data, submitted to thefederal government in lieu of printed forms.
material requisitionA document used by a business to recordinternal use of stock items from its ownwarehouse.

12-10 Glossary
memo accountAn account that stores various numbers you mayneed in calculations; for example, the number ofshares of stock outstanding or the number ofdays in each month (for sales reports).
miscellaneous debitA transaction that nullifies a purchase, resultingfrom a return or an adjustment to the purchasetransaction. Miscellaneous debits reduce thetotal amount of accounts payable due vendors.
nonserialized itemRegular inventory items identified by the itemID and description.
online checkA single check printed immediately afterentering an invoice.
open creditA credit (payment or credit memo) that has notbeen applied to a specific invoice.
open invoice customersCustomers whose statements show invoicedetails for all unpaid invoices, regardless of age.
open orderAn order/backorder that has not totally beenfilled.
orderA term used in Order Entry as both a genericterm for any document you enter into thesystem, as well as a specific document type. Forexample, in Enter Orders you can enter orders,return authorizations, quotes, etc.
order pointThe quantity you want to have on hand whenyou reorder an item for a location.
ordering cost amountThe total cost of shipping, stocking, and labor.This amount is used in the EOQ calculation inthe reorder process.
packing slipA document sent with an order or partial orderlisting the contents. It generally does not containprices, but otherwise, has much the sameinformation as the order/invoice.
partial orderPortion of an order filled (shipped) at any pointin time.
payment terms code / terms codeIn Accounts Receivable, a code, up to sixcharacters, that serves as a shorthand notationfor the payment terms for a customer, such asCOD for cash on delivery.
In Accounts Payable, a code, up to sixcharacters, that serves as a shorthand notationfor the payment terms from a vendor, such asCOD for cash on delivery. Payment termsindicate if an early payment discount isavailable, the time the discount is available, andthe date payment is due.
penalty typeThe percent or amount used to determine theprice when fractional parts of a unit are sold.
periodic inventoryPhysical inventory taken at the end of the year toestablish ending inventory.
perpetual inventoryA continuous record of inventory maintained bykeeping detailed records of purchases and sales.
phasePhases are groupings of categories, generally bystage of the project. For example you may

Glossary 12-11
complete a house in three phases:Permits/Planning, Construct Shell, andFinishing and assign several categories to eachphase. It is then easy to produce reports showingcategories by phase.
The Project Cost system comes with one built-inphase: ALL. If you do not want to use phases,use the default ALL for all categories. You caneasily add new phases.
physical inventoryThe actual on-hand inventory.
pick reportDocument used in-house by the person filling anorder to check off items taken off the shelf as theorder is being filled.
postTo transfer information from one place toanother, usually at the end of the day or at adistinct break in business.
price codePrice codes are used to set up customer pricinglevels for use when calculating prices forinventory items, together with the price ID.Typical price codes could be high, medium andlow volume or wholesale, retail, employees andnon-profit. When setting up customers, you canassign a price code. They are set up in AccountsReceivable Setup and Maintenance.
price breakA reduction in price based on quantity, generallygiving increasing discounts as the quantity ofsales increase.
price IDPrice IDs identify your different pricing methodsand are used in Price Calculations (Inventory)with the customer's price code (set up inAccounts Receivable) to tell the system how to
calculate prices in transaction entry. You canassign a default price ID to each item.
priority codeA one-character code used as a selection optionfor paying invoices and sorting reports inAccounts Payable. They are set up in PriorityCodes on the Accounts Payable Setup andMaintenance Menu.
product lineA category of similar items used for sorting.
production planOne or more assemblies that need to be builtfrom inventory. Production plans can be set upon a one time basis or set up and built on aroutine basis. Once a production plan is set upyou can use it to determine the parts necessaryto produce the assemblies on that plan.
profitability ratiosAn indication of how much the net profit is inrelation to the size of the business. The netprofit margin is the ratio of net profit to sales;the return on assets and return on equity arethe ratios of the profit to total assets and toequity, respectively. The earnings per shareshow the dollar amount of profit per share ofstock.
projectA job or contract; an undertaking. Use theProject Cost system to track all informationabout projects and to record and save costs forthe life of the project.
Included in the project information tracked areproject code; project description; multi-linecomments; customer information; groupinformation; retainage information; status;burden information; beginning, ending, and duedates; last activity and billing dates; andbid/estimate.

12-12 Glossary
Projects (designated by codes, up to sixcharacters) are easily set up.
prox termsTerms of a business arrangement which specifythat the payment due date is based on days fromthe beginning of the next month. See also,regular terms.
purchase price variance (PPV)The difference between the standard cost and theactual price paid for an item in the standardcosting valuation method. For example, if yourstandard cost for an item is $50 and youpurchase the item at $60, the purchase pricevariance between the standard cost and whatwas paid for the item is $10.
purchases journalA chronological record of invoices.
quarterly systemThe system you use if your basic accountingperiod is one week and you close the books atthe end of every quarter (13 weeks). You canalso use a fiscal-year system, with a basicaccounting period of one month.
queueThe placing of more than one item in an orderlyline. In the General Ledger, a queue is a lineupof reports to be printed, one after the other.
quotePrice estimate of what an order will cost.
ratio analysisA financial report you can use to assess aspectsof financial performance. There are activity,leverage, liquidity, and profitability ratios.
recurring invoices/recurring transactionsInvoices you enter regularly, such as for loans(in Accounts Payable) or produce regularly (in
Accounts Receivable) for the same amounts.You can copy them all at once at the appropriatetimes.
General Ledger: Transactions you enterregularly in the same amounts; for example,depreciation. You can set up recurringtransactions in Recurring Entries on the Set-upand Maintenance Menu and copy them all atonce at the appropriate times.
regular termsTerms of a business arrangement which specifythat the payment due date is based on days afterthe invoice date. See also, prox terms.
retainageThe dollar amount or the percentage of the totalproject cost that is not billed (or the customerholds back) until the project is complete. This isalso the amount the contractor holds back fromsub-contractors.
The retainage period is the length of time theretainage can be withheld after completion ofthe project.
return authorizationA form/entry used to adjust a customer's balanceby decreasing it.
retained earningsIncome earned by a company during the year,but not yet distributed as dividends to theowners/stockholders. Retained earnings formpart of the equity of the business.
reversing entryA journal entry you make to cancel a previousentry. It consists of an equal credit to theaccount previously debited and a correspondingdebit to the account previously credited.

Glossary 12-13
run codeA six-character code that identifies the group arecurring invoice belongs to. Frequently days ofthe month or week are used for run codes. Theyare set up in Recurring Invoices.
In General Ledger a number that identifies thegroup a recurring transaction belongs to.
safety stockThe quantity to have on hand as a safeguardagainst order process uncertainty.
sales categorySales categories identify the market you sellgroups of items to and help you analyze sales.They can be as simple as retail and wholesale ormore complex. You must set up at least onesales category. The sales categories codes areused to sort historical information, such as detailsales history in Accounts Receivable.scaling
The process of decreasing dollar amounts to thenearest hundred or thousand dollars, so thatlarge values fit in less space (or are moresignificant). Available scaling factors are by 100and by 1000.
serialized item
An item that is identified by a serial number,such as an appliance, a computer, or a stereosystem.
service item
Tasks you perform for customers, such asservice warranties and repair services.
source codeThe two character identifier showing where atransaction originated. For example, the sourcecode for transactions imported from Payroll isPR. Source codes are:
PC Project Cost (includes alltransactions imported from any non-Red Wing software application)
PR PayrollAP Accounts PayableAR Accounts ReceivableIN Inventory
standard costA costing method that is an estimate of costs youset. For example, in a manufacturing operationthe standard cost is the cost of the item pluscosts of raw materials, labor, and overhead.
Compare average cost, FIFO, and LIFO.
standard orderA Transaction Type option available inMaintain Purchase Orders that lets you createpurchase orders that are never dropped by thesystem, do not affect the on order quantity inInventory, and are meant to be used as templateswhen adding new purchase orders. For example,if you frequently order the same items from avendor, you can set up a standard order to avoidre-entering the same information each time.
statement contentsRecords that control the contents of thestatements and reports you print through theFinancial Statements selection on theManagement Reports Menu.
statementsThe standard financial statements (such as thebalance sheet and the income statement) youproduce at the end of each accounting period,which detail the company’s financialperformance. You can also produce the RatioAnalysis and other reports (such as salesreports).

12-14 Glossary
statusThe project's current state of activity. Use statuscodes to keep active projects separate frominactive projects. You can then list only activeprojects on your daily reports. Use closedprojects for comparisons when similar projectscome up in the future.
Set up your own project status codes or use thedefaults: Active, Inactive, Bid and Closed.
subassemblyAn assembly used in building another assembly.
suggestA function available in Project Cost.
• In transaction entry, press Ctrl F2 to view alist of default unit amounts for the currentproject/category.
• In estimate entry, press Ctrl F2 to view alist of detail unit costs/unit prices for thecurrent project/category.
These defaults are taken from the category detailand estimate files. If the list is blank, categorydetail or estimates have not been entered.
superseded item IDAn ID assigned to an item that is set up toreplace an item that is no longer available.
tax classTax classes are categories of goods or servicesthat are taxed at a set rate. The system comeswith predefined tax class codes that areautomatically added by the system; you cannotchange them. You can add new tax class codesor modify the description of existing codes. Taxclasses are set up in System Manager.
tax location group (tax group)Tax locations are placed into tax location groups(identified by a Tax Group ID). These are thenused to determine sales tax rates. For example,
Minnesota has a statewide sales tax and the cityof Rochester has a city sales tax. For businessesin Rochester, you can set up a tax location groupmade up of both tax locations. They are set up inSystem Manager.
tax locationTax locations identify the taxing authorities forwhich you accumulate sales tax (states, cities,etc.). Tax locations are set up in SystemManager.
templateAn order type that is set up once for frequentlyrepeated orders and then copied to a standardorder as needed.
temporary vendorA vendor that is set up for a one time or cashpurchase. The vendor is removed during theend-of-period process when the balance is zero.Set up temporary vendors in Vendors on theAccounts Payable Setup and MaintenanceMenu.
transaction• In Accounts Receivable, an exchange
between a business and a customer, leadingto an accounting entry. Transactionsinclude invoices, paid invoices, creditmemos and recurring invoices. Transactionsare recorded in the Cash Receipts Journal,Sales Journal, Miscellaneous CreditsJournal, Daily Sales Tax Report, CashReceipts by Payment Type and CashReceipts by Bank.
• In Accounts Payable, an exchange betweena business and a vendor, leading to anaccounting entry. Transactions includeinvoices, paid invoices, debit memos andrecurring invoices. Transactions arerecorded in the Purchases Journal orMiscellaneous Debits Journal.

Glossary 12-15
• In General Ledger, an exchange between abusiness and another party, leading to anaccounting entry. This entry is recorded inthe Transaction Journal.
trial balanceA report that shows the balance of each accountin the General Ledger. The total credits mustequal the total debits.
UPCThe universal product code that records theidentification number for an item.
validate buttonDisplayed to the right of each transactionor estimate in Project Cost. Click on it tocheck (validate) the transaction orestimate. A Transaction Errors or Estimate
Errors screen is displayed, listing any errors.
varianceThe difference between two balances for thesame account; for example, between the balanceof this year and last year.
variance amountThe difference between frozen quantities andcalculated (counted quantities x cost) quantities.
vendorAn individual or business that supplies goods orservices.
vendor codeA code, up to 10 characters, used to identifyeach vendor. For example, JBCONST for J.B.Construction. They are set up in Vendors on theAccounts Payable Setup and MaintenanceMenu.
work orderIn-house document describing what must bedone to complete an order. The comments
printed on a work order do not transfer to thecustomer's invoice.
work order commentA comment that is entered by detail line and isonly printed on orders. Work order commentsdo not transfer to an invoice. The comment isretained until all items are shipped.
workstation datePress Control W to change the defaultworkstation date. You must remember to changethe date back to the current date when you arefinished.

12-16 Glossary

Index 1
INDEX
2000, Microsoft version 3-183000 error 6-163040 error 6-153043 error 6-163049 error 6-1532-bit installation 3-103315 error 6-16
AASCII input special option
accounts payable 10-4accounts receivable 10-4general ledger 10-2inventory 10-4
Access 97 1-2problems with closing 6-8
account codeshow used 11-1 to 11-10naming conventions 6-3sorting 6-2
account description, change 6-12Accounts Payable
account codes (how they are used) 11-6ASCII input special option 10-4DOS to Windows 9-3post from DOS payroll 6-6print check register 6-12removing voided check 6-12using batch codes 6-12
Accounts Receivableaccount codes (how they are used) 11-4ASCII input special option 10-4DOS to Windows 9-5inventory vs. non-inventory trans. 6-11open invoice report 6-10outstanding credit balances 6-11revise/reverse finance charge 6-10using batch codes 6-10
Adobe Acrobat reader 2-5activation key 3-9adding new records 5-9admin as user name 6-3
B, Cback up data 8-2backups, frequency 6-9batch codes
accounts payable 6-12accounts receivable 6-10
calculator 5-12calendar 5-12
display online 6-5change
account number/structure 10-3company 4-3, 7-8posted transactions 10-3single-user to multi-user system 3-8
check box 4-8check register, print 6-12checks, how to order 2-7closing
Microsoft Access 6-8screens 6-5
codes and IDshow they are sorted 6-2restrictions for 6-2
combo box 4-8command buttons 4-9commands, frequently used 6-5compact a database 8-5company
change 4-3delete 6-6open 6-3set up new 6-4
company setup wizard 1-2where it is at 2-4
computer, new 6-9consolidated statements 10-3control menu box 4-6converting from DOS to Windows 6-7, 9-2corrupt database error 6-15cue cards 2-3custom help 2-3

2 Index
customer supportwhen to call 2-1programs 2-6
D, E, Fdata paths 4-3database files and locations 8-6dates
change 5-12how to enter 6-4
deletea company's files 6-6records 5-10
directory structure 3-13disk I/O error 6-15disk space required 3-3DOS
payroll 6-6, 6-7latest improvements 6-7
dot matrix printers 3-3edit menu 7-11entry fields 4-8entry screens 4-4errors
3000 6-163040 6-153043 6-163049 6-153315 6-16locked batch 6-17reading drive x 6-17rollback 225 6-17user already logged on 6-17
escape 6-5explorer menu 1-4DOS, migrating from 9-2F2 = lookup 1-3, 4-7F6 = maintenance 4-7favorites 7-10features, Red Wing software 1-2file locations 8-6file menu 7-8file, send reports to 7-15files, converting 6-6finance charges
reverse/revise 6-10financial statements, convert 6-12
forms, how to order 2-7frequently used commands 6-5
G, H, I, JGeneral Ledger
accounts (how used) 11-1 to 11-10ASCII input special option 10-2change account description 6-12convert modified financial stmts. 6-12DOS to Windows 9-7post from DOS payroll 6-6change acct. number/structure 10-3change posted transactions 10-3consolidated statements 10-3report designer 10-3
hardware requirements 3-3help
company setup wizard 2-4cue cards 2-3custom 2-3customer support 2-6examples, how to use online 2-2installation 2-4keyboard commands 5-12menu 7-14overview 1-2practice systems 2-5training 2-6
icons, installed with system 3-17IDs, restrictions on / sorting 6-2insert menu 7-14installation
2000, install on 3-18change single-user to multi-user 3-8directory structure 3-13hardware/software required 3-3, 3-18network 3-5, 3-6Novell Netware parameters 3-6online help 2-4peer-to-peer 3-6Red Wing icons 3-17registry entries 3-16setup wizards 3-2single user 3-4step-by-step 3-9uninstall 3-12

Index 3
Installation (continued)Windows NT 3-5windows upgrade 6-4
Internet address 2-7Inventory
accounts (how they are used) 11-8ASCII input special option 10-4DOS to Windows 9-8assign accounts to 6-13transaction types 6-13
invoices, how to order 2-7
K, L, Mkey commands
frequently used 6-5introduction to 5-2list 5-12standard 7-16
label wizard 10-2latest improvements, DOS 6-7locked batch error 6-17log in error 6-17logging into the system 6-3logon screen 5-1lookup command 4-7main menu
introduction to 4-2navigating 5-3
maintenance command 4-7manuals, purchase 2-7maximize buttons 4-7menu bar 4-6menu bar selections
edit menu 7-11favorites menu 7-10file menu 7-8help menu 7-14insert menu 7-14records menu 7-13tools menu 7-10view menu 7-12window menu 7-13
Microsoft 2000, install on 3-18Microsoft Access, how to close 6-8Mid County Supply 5-2minimize buttons 4-7name and password 5-1
N, O, P, QNetwork Manager, DOS to Windows 9-2new
company, set up 6-4computer, moving files to 6-9module, adding 6-9
Novell Netware parameters 3-6online help
company setup wizard 2-4during installation 2-4examples, how to use 2-2
open invoice report 6-7option buttons 4-8Order Entry
accounts (how they are used) 11-8DOS to Windows 9-10
output to 7-9page setup 7-9password 5-1, 6-3Payroll
install 6-7post from 6-7
peer-to-peer installation 3-6Point of Sale, DOS to Windows 9-7post from DOS payroll 6-6practice systems
example 2-5for hands-on entry 5-1installing 3-11print 3-12
preview reports 7-15print reports 7-15printer requirements 3-3printers button 7-15Project Cost, DOS to Windows 9-10pull-down menus 4-6Purchase Orders, create invoice in 6-14quick selection feature 4-9
R, Srecord selector buttons 4-9records menu 7-13Red Wing
icons 3-17standards 4-4utilities 8-1
registration 5-1

4 Index
registry entries 3-16repair a database 8-4report command buttons 7-15report designer 10-3reset report parameters 7-9restore data 8-3reverse finance charges 6-10rollback 225 error 6-17SAM 5-2sample company 5-2scroll bar 4-9server
directory structure 3-15install to 3-6
setup wizards 3-2single user
change to multi-user 3-8directory structure 3-13installation 3-4
snapshots 1-3software requirements 3-3sorting codes and IDs 6-2standard key commands 7-16standards, Red Wing 4-4starting Red Wing software 5-1status bar 4-7suggestions 4-3,7-8support, customer 2-6system information 4-3, 7-8System Manager
accounts (how they are used) 11-2DOS to Windows 9-2creating new files 6-9frequency of backups 6-9label wizard special option 10-2move to new computer 6-9
T, U, Vtechnical support utilities 7-10toolbars
data entry 7-4explorer menu 7-7inquiry 7-6introduction to 4-7main menu 7-2maintenance 7-3Red Wing 7-7report 7-5
tools menu 7-10training for Red Wing software 2-6transaction types in inventory 6-13tutorial, hands-on entry 5-1uninstall procedure 3-12upgrades
converting files 6-6how to install 6-6
user and group accounts 7-10user guides, purchase 2-7users/registration 4-3utilities
backup 8-2compact a database 8-5repair a database 8-4restore data 8-3
versions 4-3view menu 7-12voided checks, how to handle 6-12
W, X, Y, Zwindow menu 7-13Windows
requirements 3-3upgrade 6-4
Windows 2000 3-18Windows NT
installing practice systems 3-11requirements 3-3specifications 3-5uninstall procedure 3-12
wizardfor company setup 1-2, 2-4, 3-2installation setup 3-2
workstationdirectory structure 3-14date 5-12, 7-8install to 3-6
world wide web address 2-7


![PIPEPHASE Getting Started Guide[1] - baixardoc](https://static.fdokumen.com/doc/165x107/6315b7d1aca2b42b580df6a1/pipephase-getting-started-guide1-baixardoc.jpg)