Genie Distribution WheatNet-IP Manual v1.6 - Markertek
361
Genie Distribution with WheatNet-IP IP / ISDN / POTS Codec User Manual Software Version: 2.14.88 Manual Version: v1.4 September, 2015
-
Upload
khangminh22 -
Category
Documents
-
view
0 -
download
0
Transcript of Genie Distribution WheatNet-IP Manual v1.6 - Markertek

Genie Distribution with WheatNet-IP IP / ISDN / POTS Codec User Manual
Software Version: 2.14.88Manual Version: v1.4
September, 2015

2
© Tieline Pty. Ltd. 2015
Genie Distribution WheatNet-IP Manual v1.6
Table of ContentsPart I Warnings & Safety Information 6
Part II How to Use the Documentation 7
Part III Manual Glossary of Terms 8
Part IV Getting to know GenieDistribution with WheatNet-IP 10
Part V Genie Distribution with WheatNetRear Panel 12
Part VI Configuring Genie Distributionfor WheatNet-IP 14
................................................................................................................................... 191 Configuring Genie Distribution Sources and Destinations
Part VII Genie Front Panel Controls 20
Part VIII Menu Navigation in GenieDistribution with WheatNet 22
Part IX Genie Distribution WheatNet InputLevels and PPMs 29
Part X Genie DistributionHeadphone/Aux Output 35
Part XI Inserting Hardware Modules 38
Part XII About ISDN Modules 39................................................................................................................................... 401 ISDN Module Settings ................................................................................................................................... 432 ISDN Answering Configuration
Part XIII About POTS Modules 46................................................................................................................................... 471 POTS Module Settings ................................................................................................................................... 502 POTS Answering Configuration
Part XIV Language Selection 52
Part XV About Program Dialing 53
Part XVI Multiple Stream Programs 55
Part XVII 2 and 3 x Stereo Programs 55

3Genie Distribution WheatNet-IP Manual v1.6
© Tieline Pty. Ltd. 2015
Part XVIII 2 x Mono + 2 x Stereo Programs 56
Part XIX Stereo + 4 x Mono Programs 56
Part XX 6 x Mono Programs 56
Part XXI Other Multiple Stream Programs 57
Part XXII Getting Connected Quickly 58................................................................................................................................... 581 Steps to Connect over IP ................................................................................................................................... 612 Monitoring IP Connections ................................................................................................................................... 633 Steps to Connect over ISDN ................................................................................................................................... 664 Monitoring ISDN Connections ................................................................................................................................... 675 Steps to Connect over POTS ................................................................................................................................... 696 Monitoring POTS Connections ................................................................................................................................... 707 Load and Dial Custom Programs ................................................................................................................................... 708 Disconnecting a Connection ................................................................................................................................... 719 Redialing a Connection ................................................................................................................................... 7110 Configuring Auto Reconnect ................................................................................................................................... 7111 Speed Dialing Connections ................................................................................................................................... 7212 Dial/Disconnect Multiple Audio Stream Programs ................................................................................................................................... 7313 Dialing SIP Peer-to-Peer ................................................................................................................................... 7414 Dialing SIP Addresses ................................................................................................................................... 7415 Creating a Multicast Server Program ................................................................................................................................... 7716 Creating a Multicast Client Program ................................................................................................................................... 8017 Deleting Programs ................................................................................................................................... 8018 Selecting Algorithm Profiles ................................................................................................................................... 8219 Genie Distribution Algorithm Profiles ................................................................................................................................... 8320 Genie Distribution Backup Options ................................................................................................................................... 8521 USB File Playback ................................................................................................................................... 8622 Lock or Unlock a Program in the Codec ................................................................................................................................... 8723 Locking the Front Panel
Part XXIII Connecting to the ToolBoxWeb-GUI 89
................................................................................................................................... 901 Opening the Java or HTML5 Web-GUI & Login
................................................................................................................................... 932 Changing the Default Password
Part XXIV Using the Java Toolbox Web-GUI 94................................................................................................................................... 1021 Configuring IP Settings ................................................................................................................................... 1062 Configuring ISDN
................................................................................................................................... 1133 Configuring POTS
................................................................................................................................... 1194 Configuring Codec Input/Output Settings

4
© Tieline Pty. Ltd. 2015
Genie Distribution WheatNet-IP Manual v1.6
................................................................................................................................... 1225 Configure Mono or Stereo Peer-to-Peer Programs
................................................................................................................................... 1316 Configure 2 Mono Peer-to-Peer Dialing Connections in Genie
................................................................................................................................... 1447 Configure 2 or 3 Stereo Peer-to-Peer Programs
................................................................................................................................... 1538 Configure 2 x Stereo + 2 x Mono Peer-to-Peer Dialing Programs
................................................................................................................................... 1619 Configure Stereo + 4 x Mono Peer-to-Peer Dialing Programs
................................................................................................................................... 17010 Configure 6 x Mono Peer-to-Peer Dialing Programs
................................................................................................................................... 17911 Configure Multi-Unicast Dialing Programs
................................................................................................................................... 18512 Configure Multicast Server Programs
................................................................................................................................... 18913 Configure Multicast Client Programs
................................................................................................................................... 19214 Configure SIP Settings
................................................................................................................................... 19415 Configure Peer-to-Peer SIP Programs
................................................................................................................................... 19716 Multiple Peer-to-Peer SIP Programs
................................................................................................................................... 19717 Dial and Disconnect a Program
................................................................................................................................... 19818 Dial/Disconnect Multiple Audio Streams
................................................................................................................................... 20019 View/Edit/Delete Programs
................................................................................................................................... 20120 Edit File Playback Settings
................................................................................................................................... 20121 Reset Factory Default Settings
................................................................................................................................... 20222 Backup and Restore Functions
................................................................................................................................... 20423 Lock or Unlock Programs
................................................................................................................................... 20524 Configuring SNMP in the Codec
................................................................................................................................... 20625 Download Logs
................................................................................................................................... 20726 Configuring Alarms
................................................................................................................................... 21227 RS232 Data Configuration
................................................................................................................................... 21428 Creating Rules
................................................................................................................................... 21629 Upgrading Codec Firmware
Part XXV Using the HTML5 ToolboxWeb-GUI 218
................................................................................................................................... 2311 Using the HTML5 Toolbox Quick Connect Web-GUI
................................................................................................................................... 2382 Configuring IP Settings
................................................................................................................................... 2423 Configuring ISDN
................................................................................................................................... 2494 Configuring POTS
................................................................................................................................... 2555 Configuring Codec Input/Output Settings
................................................................................................................................... 2576 Configure SIP Settings
................................................................................................................................... 2597 Load, Unload and Dial a Program
................................................................................................................................... 2628 Reset Factory Default Settings
................................................................................................................................... 2639 Backup and Restore Functions
................................................................................................................................... 26510 Lock or Unlock Programs
................................................................................................................................... 26611 Configuring SNMP in the Codec
................................................................................................................................... 26712 Download Logs
................................................................................................................................... 26913 Configuring Alarms
................................................................................................................................... 27514 RS232 Data Configuration

5Genie Distribution WheatNet-IP Manual v1.6
© Tieline Pty. Ltd. 2015
................................................................................................................................... 27615 Creating Rules
................................................................................................................................... 28016 Upgrading Codec Firmware
Part XXVI Front Panel Configuration Tasks 281................................................................................................................................... 2811 Configuring IP via the Front Panel ................................................................................................................................... 2842 Selecting an Algorithm ................................................................................................................................... 2913 Configuring the Jitter Buffer ................................................................................................................................... 2954 Configuring Forward Error Correction ................................................................................................................................... 2975 Configuring Encode/Decode Direction ................................................................................................................................... 2976 Enabling Relays & RS232 Data ................................................................................................................................... 2987 Configuring TCP/UDP Ports ................................................................................................................................... 3008 Configuring QoS for IP Packets ................................................................................................................................... 3019 Configuring Data Packet Time-to-Live ................................................................................................................................... 30310 Reset and Restore Factory Default Settings ................................................................................................................................... 30411 Configuring SNMP Settings ................................................................................................................................... 30412 Test Mode
Part XXVII Reference 305................................................................................................................................... 3051 Regular Maintenance ................................................................................................................................... 3062 Installing the Codec at the Studio ................................................................................................................................... 3123 Understanding IP Networks ................................................................................................................................... 3144 Tips for Creating Reliable IP Connections ................................................................................................................................... 3155 Testing IP Network Connections ................................................................................................................................... 3176 Testing ISDN Connections ................................................................................................................................... 3177 Connecting Tieline ISDN to other Codecs
................................................................................................................................... 3318 Using Answer Routes for Sessionless ISDN Calls
................................................................................................................................... 3349 POTS Connection Tips & Precautions
................................................................................................................................... 33610 Genie Compliances and Certifications
................................................................................................................................... 33611 FCC Compliance Statements
................................................................................................................................... 33812 Software Licences
................................................................................................................................... 34813 Trademarks and Credit Notices
Part XXVIII Genie Distribution with WheatNetSpecifications 349
Part XXIX Appendix A: RS232 and ControlPort Wiring 351
Index 353

6 Genie Distribution WheatNet-IP Manual v1.6
© Tieline Pty. Ltd. 2015
1 Warnings & Safety Information1. Both appliance power cables must be removed from the device for Power Disconnection.2. Remove the phone cable from the POTS interface before servicing.
THUNDERSTORM AND LIGHTNING WARNING:DO NOT USE Tieline codecs during thunderstorms and lightning. You may suffer an injuryusing a phone, Tieline codec, or any device connected to a phone during a thunderstorm.This can lead to personal injury and in extreme cases may be fatal. Protective devices canbe fitted to the line, however, due to the extremely high voltages and energy levels involvedin lightning strikes, these devices may not offer protection to the users, or the Tieline codecand equipment connected to the codec.
Secondary strikes can occur. These secondary strikes are induced by lightning strikes andalso produce dangerously high currents and energy levels. You only need to be near anobject struck by lightning to lead to personal injury or damage to equipment. e.g. if you arelocated near a lighting tower at a sports facility, water features and drains on golf courses,you may be affected by these secondary strikes.
Damage to personnel and Tieline codecs may occur during thunderstorm, even if the codec
is turned off but remains connected to the phone or ISDN system, LAN or the power.
ANY DAMAGE TO A TIELINE PRODUCT CAUSED BY LIGHTNING or an ELECTRICALSTORM WILL VOID THE WARRANTY. Use of this product is subject to Tieline'sSOFTWARE LICENSE and WARRANTY conditions, which should be viewed atwww.tieline.com/support before using this product.
DIGITAL PHONE SYSTEM WARNING:DO NOT CONNECT YOUR TIELINE CODEC TO A DIGITAL PHONE SYSTEM.PERMANENT DAMAGE MAY OCCUR! If you are unfamiliar with any facility, check that theline you are using is NOT a digital line. If the Tieline codec becomes faulty due to the useof a digital phone system, the WARRANTY WILL BE VOID.
WARNING:HIGH LEAKAGE CURRENT. EARTH CONNECTION ESSENTIAL BEFORE CONNECTINGSUPPLY.If the total leakage current exceeds 3.5 mA, or if the leakage current of the connectedloads is unknown, connect the supplementary ground terminal to a reliable groundconnection in your facility. Supplementary ground connectionA supplementary ground terminal is provided on the codec to connect the unit to a groundconnection. The ground terminal has an M4 stud with M4 retaining nuts and is compatiblewith all grounding wires. Remove only NUT 2 to connect your ground wire. The ground wiremust have a suitable lug. When refitting NUT 2 ensure that both NUT 1 & NUT 2 arecorrectly tightened to establish and maintain a proper earth connection.

7
© Tieline Pty. Ltd. 2015
Genie Distribution WheatNet-IP Manual v1.6
DisclaimerWhilst every effort has been made to ensure the accuracy of this manual we are not responsible forany errors or omissions within it. The product specifications and descriptions within this manual willbe subject to improvements and modifications over time without notice, as changes to software andhardware are implemented.
2 How to Use the DocumentationManual Conventions
Warnings: Instructions that, if ignored, could result in death or serious personal injurycaused by dangerous voltages or incorrect operation of the equipment. These must beobserved for safe operation.
Cautions: Instructions warning against potential hazards, or to detail practices that must
be observed for safe operation and to prevent damage to equipment or personnel.
Important Note: Information you should know to connect and operate your codecsuccessfully.
Information specific to IP connections.
Information specific to ISDN connections.
Information specific to POTS connections.
Typographic Conventions· Codec software elements are in Arial bold, e.g. Contacts· Codec hardware elements are in bold Capitals, e.g. KEYPAD
Help Button
Press the (information/help) button when navigating codec menus to display a dialogsuggesting the actions which can be performed from within the current menu.

8 Genie Distribution WheatNet-IP Manual v1.6
© Tieline Pty. Ltd. 2015
3 Manual Glossary of TermsDNS The Domain Name System (DNS) is used to assign domain names to IP
addresses over the World-Wide Web
Domain A group of computers or devices on a network which are administered withcommon rules and procedures. Devices sharing a common part of the IPaddress are said to be in the same domain
DSCP The Differentiated Services Code Point is a field in an IP packet header forprioritizing data when traversing IP networks
Failover Method of switching to an alternative audio stream if the primary connection islost
GUI Graphical User Interface
ISP Internet Service Providers (ISPs) are companies that offer customers access tothe internet
IP Internet Protocol; used for sending data across packet-switched networks.
LAN Local Area Network; a group of computers and associated devices sharing acommon communications link
Latency Delay associated with IP networks and caused by algorithmic, transport andbuffering delays
MIB A management information base (MIB) is a database used for managing theentities in a communications network. This term is associated with the SimpleNetwork Management Protocol (SNMP).
Multicast Efficient one to many streaming of IP audio using multicast IP addressing.
Multi-unicast A multi-unicast program (also known as multiple unicast) can transmit a singleaudio stream with common connection settings to a number of differentdestinations.
MSN Multiple Subscriber Number for ISDN
Network AddressTranslation(NAT)
A system for forwarding data packets to different private IP network addressesthat reside behind a single public IP address
Port AddressTranslation(PAT)
Related to NAT; a feature of a network device that allows IP packets to berouted to specific ports of devices communicating between public and private IPnetworks
POTS Plain old telephone system: copper phone network infrastructure
PSU Power Supply Unit
QoS (Quality ofService)
Priority given to different users or data flows across managed IP networks. Thisgenerally requires a Service Level Agreement (SLA) with a Telco or ISP.
RTP A standardized packet format for sending audio and video data streams andensures consistency in the delivery order of voice data packets.
SDP SDP defines the type of audio coding used within an RTP media stream. Itworks with a number of other protocols to establishes a device’s location,determines its availability, negotiates call features and participants and adjustssession management features
SIP SIP is a common protocol which works with a myriad of other protocols toestablish connections with other devices to provide interoperability.
SLA Service Level Agreements (SLAs) a contractual agreement between an ISP anda customer defining expected performance levels over a network
SNMP Simple Network Management Protocol
SPID Service Profile ID number used to identify Terminating Equipment on ISDN lines
STL Studio-to-transmitter link for program audio feeds.
STS Studio-to-studio audio link

9
© Tieline Pty. Ltd. 2015
Genie Distribution WheatNet-IP Manual v1.6
TCP TCP protocol ensures reliable in-order delivery of data packets between asender and a receiver.
UDP User Datagram Protocol: the most commonly used protocol for sending internetaudio and video streams. UDP packets include information which allows themto travel independently of previous or future packets in a data stream.
Unicast Broadcasting of a single stream of data between two points
VLAN Virtual Local Area Network: partitioning of a single layer-2 network to createmultiple distinct broadcast domains
WAN Wide Area Network; a computer network spanning regions and/or countries toconnect separate LANs

10 Genie Distribution WheatNet-IP Manual v1.6
© Tieline Pty. Ltd. 2015
4 Getting to know Genie Distribution with WheatNet-IPTieline's Genie Distribution with WheatNet-IP is the world's most powerful DSP-based IP audiocodec for multipoint audio distribution. It has a purpose-built rear panel designed to distribute 3stereo or 6 mono channels of WheatNet-IP audio via a WheatNet audio card and LAN port. Thecodec seamlessly interfaces with the WheatNet-IP Environment in distributing up to three stereoaudio channels between WheatNet-IP studios over external IP networks like the internet. Designedfor the latest digital IP broadcast networks, you can connect to IP codecs, as well as ISDN andPOTS codecs via optional plug-in transport modules.
Overview of this User ManualUse this manual to learn how to:
· Configure your codec for the WheatNet-IP Environment (please read Configuring a GenieDistribution for WheatNet-IP for more info).
· Configure codec 'programs' (please read About Program Dialing for more info).· Adjust audio and connection settings within the codec.
Please read Getting Connected Quickly for an overview of how to adjust and store audio andconnection settings in your codec using 'programs'.
ApplicationsGenie Distribution delivers superior quality audio over IP (AoIP) on all types of IP networks. It isspecifically designed for continuous operation over mission critical audio paths throughout broadcastIP networks and is ideal for:
· Distributing up to 6 channels between two codecs.· 3 x bidirectional stereo connections.· 2 x stereo and 2 x mono bidirectional connections.· 1 x stereo and 4 x mono bidirectional connections.· 6 x mono bidirectional connections.· Simultaneously distributing up to 3 separate mono or stereo IP multi-unicast audio streams to
a maximum of 50 endpoints in total.· Broadcasting up to 3 separate mono or stereo IP multicast audio streams in multicast server
mode and distributing each of these streams to unlimited endpoints over compatible IPnetworks.
Codec Features· WheatNet audio card and LAN port with Sync/Stream LEDs.· Interfaces with Wheatstone Navigator software for source/destination configuration· Interfaces with Wheatstone Razor software for WheatNet-IP card configuration· DSP-based architecture designed for continuous operation.· 24 Bit 96kHz audio sampling (32kHz audio quality).· Dual Gigabit (10/100/1000) Ethernet ports with automatic switching for redundancy.· Auto switching, dual redundant AC power supplies.· Up to six channels of balanced audio in/out

11
© Tieline Pty. Ltd. 2015
Genie Distribution WheatNet-IP Manual v1.6
· Uncompressed PCM audio plus the low-delay, cascade resilient aptX® Enhanced algorithm.· Other popular algorithms including LC-AAC, HE-AAC v1 and v2, AAC-LD, AAC-ELD, AAC-
ELDv2, Opus, MPEG-1 Layer II and III, Tieline Music and MusicPLUS, G.722 and G.711.· SmartStream PLUS redundant streaming for high reliability over IP networks without Quality of
Service.· IPv4 & IPv6 compatible and ready.· Supports ISDN and POTS connections via optional interface modules.· Asymmetric algorithmic encode/decode* · SNMP and integrated alarm management including automatic silence detection.· Java or HTML5 Toolbox GUI enables remote codec control over WANs.· Low latency in-band RS-232 auxiliary data channel.· Programmable software rules engine via a GUI for Control Port functions.· Streamlined codec wizards and GUI for configuration and control.· Support for multiple languages: English, Spanish, Portuguese, French and Chinese.· Connect to all Tieline IP codecs and Report-IT Enterprise Edition.
* Supported in later releases.

12 Genie Distribution WheatNet-IP Manual v1.6
© Tieline Pty. Ltd. 2015
5 Genie Distribution with WheatNet Rear Panel
XLR Analog InputsXLR IN1 and IN 2 are balanced line inputs.
XLR Analog OutputsXLR OUT 1 and 2 are balanced analog audio line outputs.
Dual Gigabit Ethernet PortsThe codec features two Gigabit (10/100/1000) RJ-45 Ethernet ports for IP connections. By default,the codec assumes ETH1 is the primary LAN connection and ETH2 is the backup LAN connectionwhen in use. If you are only using one Ethernet port, always use ETH1.
WheatNet Audio LAN PortTransport WheatNet-IP audio using a purpose built rear panel and the Tieline WheatNet-IP audiocard. This optional rear panel provides a LAN interface for connecting directly to a WheatNet-IPnetwork and transport IP audio to external sites over IP networks like the internet.
Aux Mic/Line InputAUX IN 6.35mm (1/4") balanced auxiliary mic or line input.
Headphone Out/Aux Line OutHP/AUX OUT 6.35mm (1/4") software configurable stereo headphone output, or balanced auxiliaryline output. The front panel HEADPHONE output and rear panel HP/AUX OUT share the samehardware output. This means both are switched and configured together. I.e. both outputs are eithera stereo headphone output (default setting), or a balanced mono auxiliary output.
Command & Control Interfaces1. Four relay inputs and four opto-isolated outputs for machine control via the DB15 CONTROL
PORT IN/OUT connector. 2. A nine pin female RS-232 serial connection for local and remote control of equipment at either
end of the link.
13
© Tieline Pty. Ltd. 2015
Genie Distribution WheatNet-IP Manual v1.6
Dual Redundant AC Power InputsThe codec is powered by dual 100-240 volt redundant AC power supplies, which use standard IECconnectors.
Dual Module SlotsTwo additional module slots for inserting optional POTS or ISDN modules.
Supplementary Ground TerminalSupplementary ground terminal for connecting the unit to a ground connection. See Warnings andSafety Information for more details.

14 Genie Distribution WheatNet-IP Manual v1.6
© Tieline Pty. Ltd. 2015
6 Configuring Genie Distribution for WheatNet-IPTieline Genie Distribution WheatNet-IP enabled codecs are capable of integrating withWheatstone's WheatNet-IP Environment.
The WheatNet-IP enabled Genie Distribution codec is capable of routing 3 stereo WheatNet-IPaudio channels.
The following procedures describe how to configure the WheatNet-IP card in the codec usingWheatstone's Razor Setup Tool software. This process is required in order to use WheatstoneNavigator software to control the codec's WheatNet-IP destination and source routing. The codecconfiguration process includes:
1. Installation of Wheatstone Razor Setup Tool software onto your PC.2. Configuration of your WheatNet-IP card with Razor software.3. Add the Tieline Codec to the Razor Software Device List.4. Ensure WheatNet-IP Navigator software is installed.5. Add the codec to the Navigator software device list to allow source and destination routing.
Important Note: Ensure installation and configuration is completed in the preceding orderto configure the codec correctly.
Install Razor Software on your PCDownload the Razor Setup Tool software onto your PC using the link and login credentials providedto you by Tieline.
Configure the WheatNet-IP Card's IP AddressThis process will configure the WheatNet-IP card inside the Genie Distribution codec with a differentIP address from the default of 192.168.87.254. (Please note the default IP address was192.168.87.240 in firmware releases up to and including v2.8.xx.).
1. Launch the Razor Setup Tool software.2. Select Hardware > Assign IP Address.

15
© Tieline Pty. Ltd. 2015
Genie Distribution WheatNet-IP Manual v1.6
3. Enter the MAC Address of the WheatNet-IP card in the codec. This is displayed on a label onthe rear of the codec near the WNET Audio connector. Then name the codec, add the IPaddress details for your WheatNet-IP network and click START. Note: By default eachWheatNet-IP device is given an IP address in the 192.168.87.xxx range.
4. Reboot the codec and click OK when the following dialog appears.
5. The following dialog should appear to confirm the WheatNet-IP card in the codec has beenconfigured. Click STOP to close the dialog.

16 Genie Distribution WheatNet-IP Manual v1.6
© Tieline Pty. Ltd. 2015
Important Note: Please verify that Requests in the dialog displays a number other thanzero. This confirms the codec has accepted the new IP address. Please power cycle thecodec if it continues to display zero after several minutes.
Add the Tieline Codec to the Razor Software Device List 1. Launch Razor software and select Hardware > Add New Device.
It is also possible to click the Add button in the Devices pane in the bottom left-hand corner of thegraphical user interface (GUI).
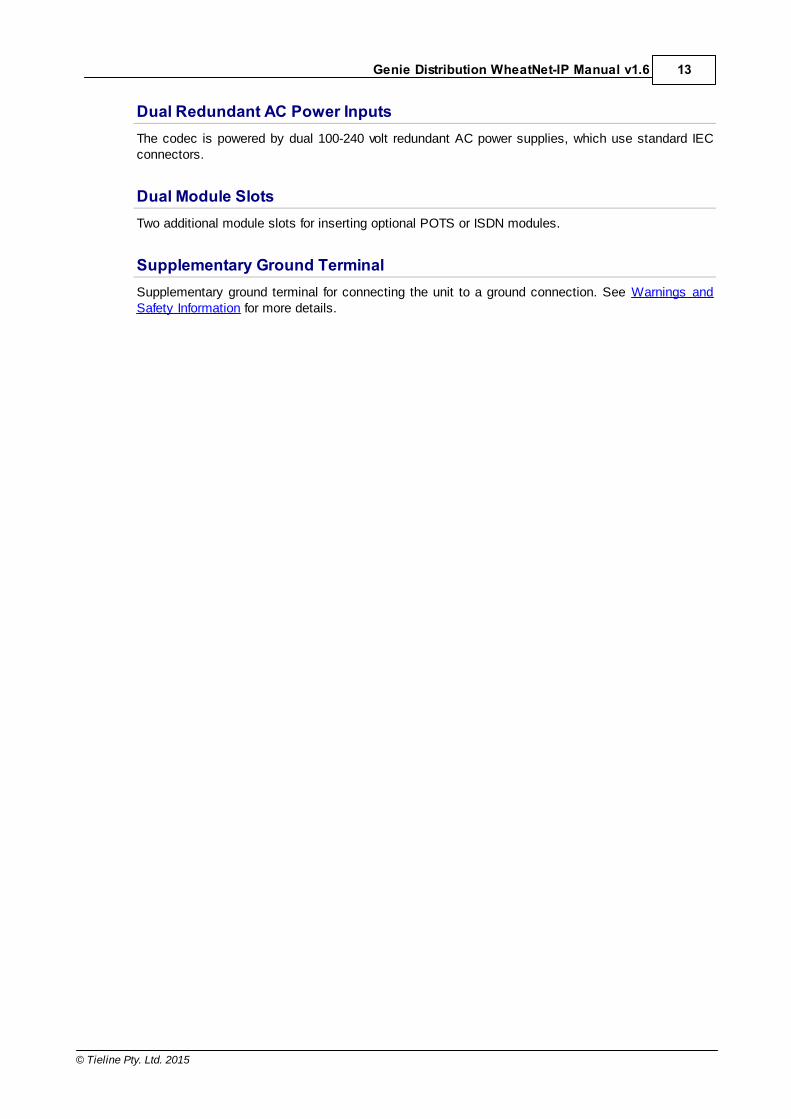
2. In the Add Device dialog enter the codec Name, and then click the drop-down Device Type
arrow and select Tieline Genie. Enter the IP Address and click Ok.
17
© Tieline Pty. Ltd. 2015
Genie Distribution WheatNet-IP Manual v1.6
3. The Genie Distribution codec will now appear in the device list within the Razor Setup Tool.
4. Default WheatNet-IP source and destination names are Src 1-6 and Dst 1-6. If multiple codecs
are being configured it is a good idea to change the names to avoid multiple WheatNet-IPchannels sharing the same name and causing confusion.
Add the Codec to the Navigator Software Device List1. Ensure the WheatNet-IP Navigator software (supplied by Wheatstone) is installed on your PC. 2. Launch the WheatNet-IP Navigator software, select the System 3rd Party Devices tab and click
Add.
3. Enter the codec's Name and IP Address into the Add 3rd Party Device dialog. Click the HostBlade drop-down menu to select the Blade to which the codec is assigned. The Genie codec willuse this Blade as a portal for communication with the WheatNet-IP system. Next, click Ok.
Important Note: A maximum of up to 10 Tieline codecs can be assigned to a singleBlade.

18 Genie Distribution WheatNet-IP Manual v1.6
© Tieline Pty. Ltd. 2015
4. The codec will now appear in the System pane within the GUI and you are ready to configureWheatNet-IP audio routing for your codec.
Important Note: To ensure the codec is added into Navigator correctly, when you addthe codec using the System 3rd Party Devices tab:
1. Ensure you use the identical Name and IP Address used to configure the device inRazor software.
2. Ensure the codec is powered up and connected to the WheatNet-IP network. 3. After configuration the device should be displayed in the System pane in Navigator
software under a Blade. 4. Close Navigator software, remove power from the codec for 5 seconds and then
restore power.5. Restart Navigator and test if codec sources can be routed to Blade destinations.
This is verified when green dots are displayed in the Navigator cross-point matrix.Yellow dots indicate the Blade and Navigator haven't detected the codec correctly.If this occurs, remove the newly added device, close Navigator and remove powerfrom the codec for 5 seconds. Then restore power to the codec and add the devicein Navigator again.
Only one codec should be added to Navigator at a time. For more information on theWheatNet-IP system download Wheatstone user documentation viawww.wheatstone.com

19
© Tieline Pty. Ltd. 2015
Genie Distribution WheatNet-IP Manual v1.6
6.1 Configuring Genie Distribution Sources and DestinationsIntegration of the Genie Distribution codec with the WheatNet-IP environment is depicted in thefollowing image.
For more information about routing destinations and sources through a WheatNet-enabled codecdownload Wheatstone user documentation via www.wheatstone.com.

20 Genie Distribution WheatNet-IP Manual v1.6
© Tieline Pty. Ltd. 2015
7 Genie Front Panel ControlsThe hardware front panel interface features menu navigation buttons, an LCD display with PPMmetering and a dialing keypad.
Navigation ButtonsThe codec has four arrow shaped navigationbuttons for navigating codec menus andadjusting levels, and an OK button forselecting menu items.
Dialing KeypadThe keypad has alpha-numeric buttons, plusstar and hatch (pound) buttons, which canbe used to enter contact and programinformation into the codec.
Operation Button Descriptions
Features Operation Button DescriptionsReturn Button Press to move back through menus & delete characters
Function Button 1 Press to activate codec user functions
Function Button 2 Press to activate codec user functions
Connect Button Press to create an IP connection
Home Button Press to return to home screen
Information Button Press to view a help menu onscreen
Settings Button Press to adjust codec settings
Disconnect Button Press to end a connection
Headphone Button Press to adjust headphone audio levels
Reset Button Press to reboot the codec
Adjusting LCD Screen Contrast Levels
1. Press and hold the button and then press and release the arrow up button to displaythe Contrast adjustment screen.
2. Use the left and right arrow buttons to adjust the LCD screen contrast until viewing isoptimized.

21
© Tieline Pty. Ltd. 2015
Genie Distribution WheatNet-IP Manual v1.6
3. Press when you have finished.
Contrast can also be adjusted by pressing the HOME button, selecting Settings, thenSystem, and using the down button to navigate to Contrast.
Stereo RTS Headphone OutputThe codec has a 6.35mm (1/4") RTS stereo HEADPHONE output for audio monitoring and this canalso be switched to a balanced mono auxiliary line output. The front panel HEADPHONE output andrear panel HP/AUX OUT share the same hardware output. This means both are switched andconfigured together. I.e. both outputs are either a stereo headphone output (default setting), or abalanced mono auxiliary output.
USB 2.0 Host PortUSB 2.0 host port, which can be used for playback of backup audio files and firmware upgrades.

22 Genie Distribution WheatNet-IP Manual v1.6
© Tieline Pty. Ltd. 2015
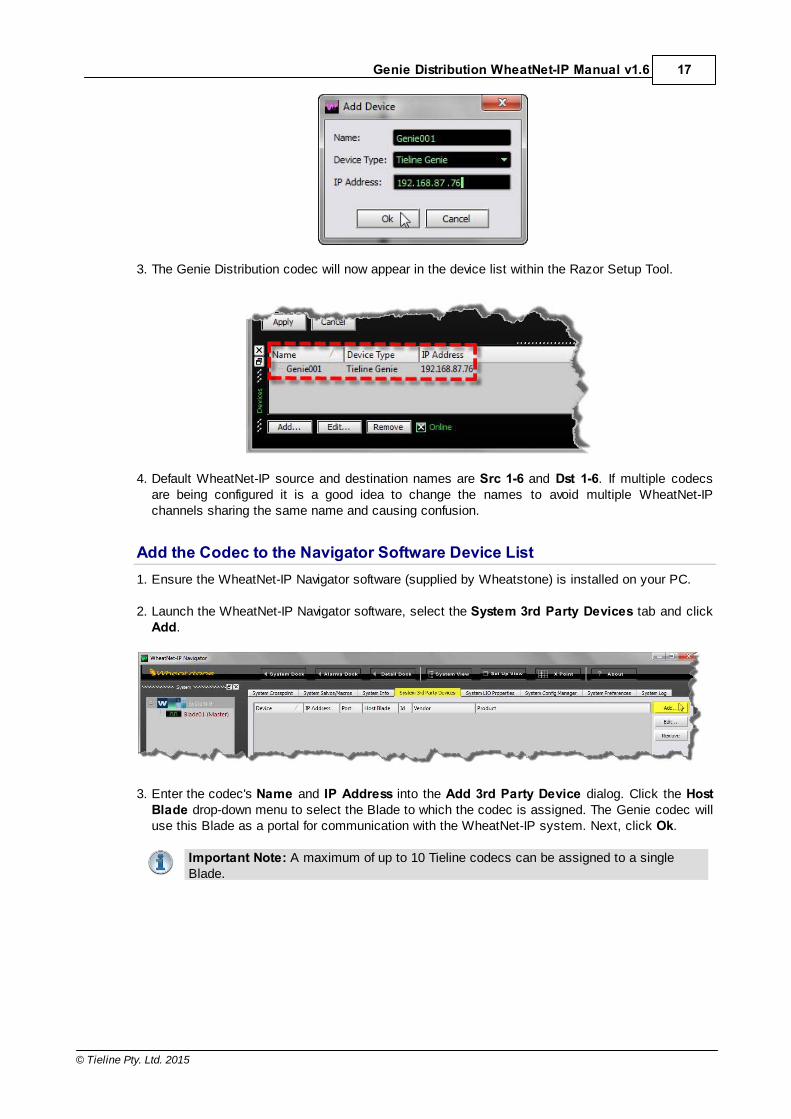
8 Menu Navigation in Genie Distribution with WheatNetAll main codec menus can be launched from the Home screen which includes:
Features Codec Home Screen Elements1 Screen Name The name of the current screen
2 Connect Select to connect and adjust connection settings
3 Cxns Displays the number of current connections and connection details
4 Programs View and edit Program configurations
5 Settings Select to configure codec settings
Press the RETURN button to navigate backwards through menus, or press the HOME button to return to the Home screen from any menu.
If a complete menu cannot be viewed on a single codec screen, arrows on the right hand side of thescreen indicate that the current menu has options below and/or above the visible items. Use thenavigation arrows to scroll up and down.
Features Codec Home Screen Elements1 Up Arrow Arrow indicating menus can scroll upwards
2 Down Arrow Arrow indicating menus can scroll downwards
23
© Tieline Pty. Ltd. 2015
Genie Distribution WheatNet-IP Manual v1.6
Codec Menu OverviewFollowing is an overview of the codec menus from the Home screen.

24 Genie Distribution WheatNet-IP Manual v1.6
© Tieline Pty. Ltd. 2015
Connect Menu

25
© Tieline Pty. Ltd. 2015
Genie Distribution WheatNet-IP Manual v1.6
IP Setup Menu NavigationAfter selecting IP and a connection mode use Setup to adjust connection settings.

26 Genie Distribution WheatNet-IP Manual v1.6
© Tieline Pty. Ltd. 2015
Important Notes: · Depending on the session type selected in the codec, not all options are displayed.
E.g. Session Type and Data are not displayed when configuring Sessionless IPconnections.
· Default settings may also change depending on the session type selected, e.g. TielineSession versus SIP or Sessionless.
ISDN Menu NavigationSelect Connect > ISDN to configure ISDN dialing settings using the codec front panel.

27
© Tieline Pty. Ltd. 2015
Genie Distribution WheatNet-IP Manual v1.6
POTS Menu NavigationSelect Connect > POTS to configure POTS dialing settings using the codec front panel. Note:default settings are surrounded by square brackets.

28 Genie Distribution WheatNet-IP Manual v1.6
© Tieline Pty. Ltd. 2015
Settings Menu
Press the SETTINGS button on the codec front panel to access a wide range of configurationsettings.

29
© Tieline Pty. Ltd. 2015
Genie Distribution WheatNet-IP Manual v1.6
9 Genie Distribution WheatNet Input Levels and PPMsImportant Note: · The codec supports 6 digital inputs/outputs, which are available as sources and
destinations using the WheatNet-IP LAN interface.· Input levels can only be adjusted on analog inputs 1 and 2, which can be selected
instead of WheatNet-IP stereo Destination 1, or mono Destinations 1 and 2. To adjustselect Settings > Audio > Input type.
· Analog inputs can also be configured using the Toolbox Web-GUI. See ConfiguringCodec Input/Output Settings.
Audio Levels and Default PPM MeteringThe PPM meters use dBu to express nominal operating, headroom and noise floor levels. Set audiolevels so that audio peaks average at the nominal 0vu point indicated on the front panel PPMmeters. This represents a program level of +4 dBu leaving the codec. Audio peaks can safely reach+22 dBu without clipping, providing 18dBu of headroom from the nominal 0vu point.
The following PPM settings are displayed by default in the codec. The default settings can beadjusted via Settings > Audio > PPM Mode.
Mono and Stereo MeteringWhen connected with a mono program the codec will display a mix of inputs 1 and 2 on PPM1.PPM 3 displays the level of return audio.
Mono connection displaying audio on PPMs 1 and 3
When connecting with a stereo program, the codec displays audio on PPM1 & 2 for inputs 1and 2 and PPM 3 & 4 for the return program audio.

30 Genie Distribution WheatNet-IP Manual v1.6
© Tieline Pty. Ltd. 2015
Stereo connection with PPMs 1-4 displayinginput and return audio
Important Note: When sending an audio stream to multiple endpoints using a multi-unicast program, the codec PPMs will display the same audio monitoring as for astandard mono or stereo connection. The return audio PPM metering will display returnaudio from the first connection dialed within the multi-unicast program.
Metering 2 or 3 Peer-to-Peer Stereo Audio StreamsThe PPMs by default will display input audio levels when 2 or 3 stereo audio streams areconfigured within a program. Inputs 1-6 are mapped to PPMs 1-6.
Adjusting Default PPM MeteringThe default PPM metering settings can be adjusted via Settings > Audio > PPM Mode. Theoptions include:
PPM Mode Description1 Program Default (default) Displays default program PPM meter settings (i.e. the
settings described previously for mono, stereo, 2 x stereo, 3 xstereo and multi-unicast programs).
2 Input Maps input encoders 1 to 6 with PPM meters 1 to 6.
3 Decoder Maps decoders 1 to 6 with PPM meters 1 to 6.
4 HP Monitor Maps PPM meters to inputs/outputs currently selected via theheadphone monitoring function. The default headphone
monitoring setting is accessed via HEADPHONE >Monitor Source > [Select audio Source].
Selecting Analog Inputs and Adjusting Input Levels
1. Press the SETTINGS button.
2. Navigate to Audio and press .
3. Analog inputs 1 and 2 are displayed under Input Type. Navigate to Analog and press , then
press the RETURN button to exit the menu.
31
© Tieline Pty. Ltd. 2015
Genie Distribution WheatNet-IP Manual v1.6
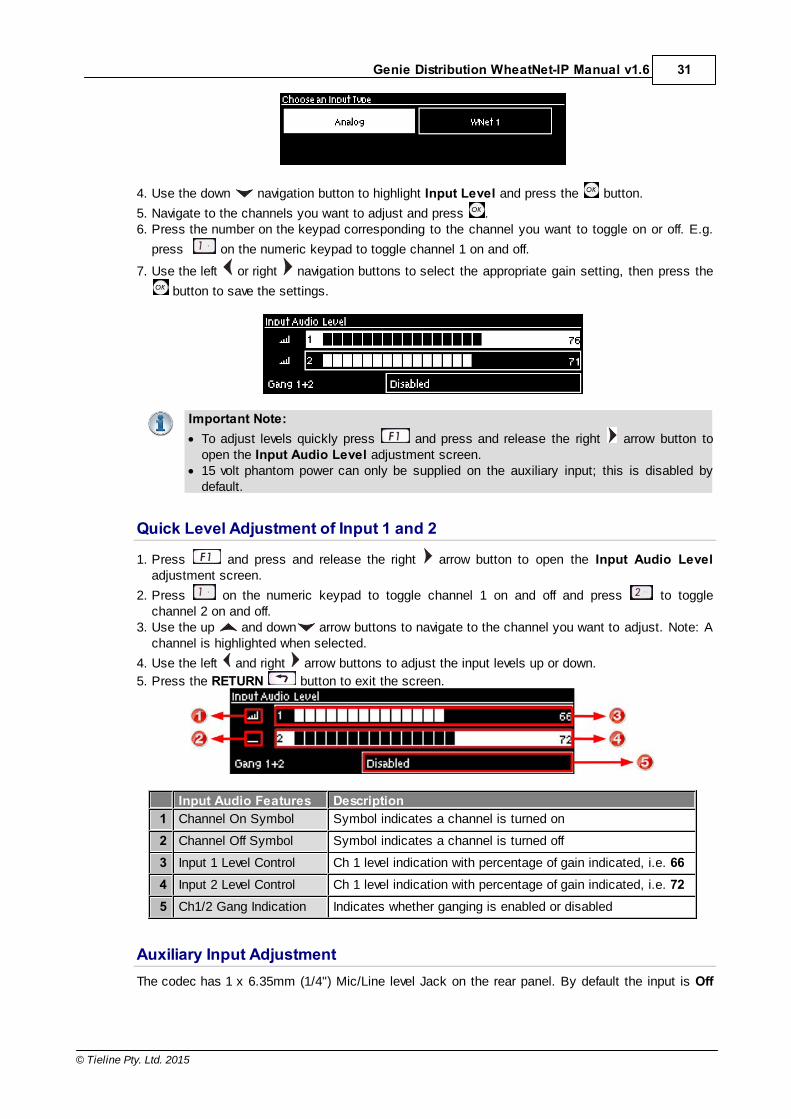
4. Use the down navigation button to highlight Input Level and press the button.
5. Navigate to the channels you want to adjust and press . 6. Press the number on the keypad corresponding to the channel you want to toggle on or off. E.g.
press on the numeric keypad to toggle channel 1 on and off.
7. Use the left or right navigation buttons to select the appropriate gain setting, then press the
button to save the settings.
Important Note: · To adjust levels quickly press and press and release the right arrow button to
open the Input Audio Level adjustment screen.· 15 volt phantom power can only be supplied on the auxiliary input; this is disabled by
default.
Quick Level Adjustment of Input 1 and 2
1. Press and press and release the right arrow button to open the Input Audio Leveladjustment screen.
2. Press on the numeric keypad to toggle channel 1 on and off and press to togglechannel 2 on and off.
3. Use the up and down arrow buttons to navigate to the channel you want to adjust. Note: Achannel is highlighted when selected.
4. Use the left and right arrow buttons to adjust the input levels up or down.
5. Press the RETURN button to exit the screen.
Input Audio Features Description1 Channel On Symbol Symbol indicates a channel is turned on
2 Channel Off Symbol Symbol indicates a channel is turned off
3 Input 1 Level Control Ch 1 level indication with percentage of gain indicated, i.e. 664 Input 2 Level Control Ch 1 level indication with percentage of gain indicated, i.e. 725 Ch1/2 Gang Indication Indicates whether ganging is enabled or disabled
Auxiliary Input AdjustmentThe codec has 1 x 6.35mm (1/4") Mic/Line level Jack on the rear panel. By default the input is Off

32 Genie Distribution WheatNet-IP Manual v1.6
© Tieline Pty. Ltd. 2015
and can be configured by:
1. Selecting the SETTINGS button.
2. Navigate to Audio and press the button. 3. Use the arrow-down button to select Aux Input and press the button to view menu
options.
Input settings which can be adjusted include:
· Input on/off.· Input level.· Input Type: High Gain Mic, Medium Gain Mic, Low Gain Mic, Unbalanced and Line Level.· Phantom power (15V available when enabled).· IGC.
Important Note: When the auxiliary input (AUX IN) is On the default mixer configurationsends audio to all inputs. If you are not using the auxiliary input ensure it is Off to avoidadditional noise in program audio.
Ganging Audio ChannelsIt is possible to gang channels together and adjust the audio level of the ganged channelssimultaneously. When channels are ganged together:
· Both channels highlight together when selected.· The gain setting for both channels is automatically set to match the gain level of the lowest of
the two channels when ganging is first configured.· If one channel is turned on when ganging is first configured then the other one will be turned
on automatically.
1. Press the SETTINGS button.
2. Navigate to Audio and press .
3. Use the down navigation button to highlight Input Level and press the button.
4. Navigate to the channels you want to gang and press the button.
5. Navigate to the Gang function and press the button to toggle between Enabled orDisabled.
6. Use the up and down arrow buttons to highlight and select the audio channels.
7. Use the left and right arrow buttons to adjust the levels for both inputs up or downsimultaneously.
8. Press the RETURN or HOME buttons to exit the screen.
Important Note: · To gang channels quickly press and press and release the right arrow button to
open the Input Audio Level adjustment screen and follow the preceding instructions.

33
© Tieline Pty. Ltd. 2015
Genie Distribution WheatNet-IP Manual v1.6
Intelligent Gain Control (IGC)The codec's inbuilt DSP limiter automatically takes care of any instantaneous audio peaks thatoccur in demanding broadcast situations. Input IGC (Intelligent Gain Control) is enabled by defaultand is automatically activated at +20 dBu (G5 audio scale) and +14dBu (G3 audio scale) to preventaudio clipping.
There are three settings; Auto, Fixed and Off. If Auto is configured the codec will detect whenincoming audio levels have reduced sufficiently and automatically return input levels to the gainsetting prior to IGC being activated. The codec takes just 250 milliseconds to detect audio levelshave returned to normal (after IGC Level has been initiated) and will return the levels to the previoussetting within half a second. This response is linear.
To adjust this setting in the codec:
1. Press the SETTINGS button.
2. Navigate to Audio and press .
3. Navigate to Input IGC and press .
4. Select the channel you want to adjust and press .
5. Navigate to the preferred setting and press .
Configure Audio Reference Metering when Connecting to Tieline G3 CodecsNew generation Genie, Merlin and Bridge-IT IP codecs have more audio headroom than Tieline G3audio codecs, therefore the audio metering reference scale needs to be adjusted when connectingto a Commander or i-Mix G3 codec with one of these codecs. The G3 metering scale is between -11dBu and +18dBu. Tieline codecs perform this metering adjustment automatically when theyconnect to each other or this can be programmed to occur by default.
1. Press the SETTINGS button.
2. Navigate to Audio and press .
3. Navigate to Ref Level and press .
4. Select Tieline G3 and press .
Audio levels should average around the nominal 0vu point and audio peaks should not exceed+16dbu as indicated by the PPM meter.
Features Description1 -11dBu PPM meter low point
2 +4dBu Nominal 0vu reference level at +4dBu
3 +16dBu +16 indication where audio will clip/distort

34 Genie Distribution WheatNet-IP Manual v1.6
© Tieline Pty. Ltd. 2015
Important Note: If your codec (Genie Distribution and Bridge-IT) supports sending multi-unicast connections and the Auto (default) reference level is selected, the first codec youconnect with will configure the reference level used for all subsequent multi-unicastconnections.

35
© Tieline Pty. Ltd. 2015
Genie Distribution WheatNet-IP Manual v1.6
10 Genie Distribution Headphone/Aux OutputThe codec has a 6.35mm (1/4") RTS stereo HEADPHONE output for monitoring inputs and returnaudio. If you are using analog inputs or digital inputs you will see audio metering on the PPMs andcan monitor it with the headphones.
Important Note: The front panel HEADPHONE output and rear panel HP/AUX outputshare the same hardware output. This means both are switched and configured together.I.e. both outputs are either a stereo headphone output (default setting), or a balancedmono auxiliary output.
Configure for Headphone and Aux OutputBoth the front panel HEADPHONE and rear panel HP/AUX outputs are configured as stereoheadphone outputs by default. To adjust this setting:
1. Press the SETTINGS button.
2. Navigate to Audio and press .
3. Select HP/Aux Out and press to toggle between Headphone and Aux Out.
Adjust Headphone Output Settings
1. Press the HEADPHONE button to display the headphone monitoring adjustment screen.
2. Use the left or right navigation buttons to adjust the volume level up or down. The screendisplays level adjustments in real-time.
3. Press the down navigation button to select the Send/Return audio balance and use the left
or right navigation buttons to adjust the balance. The Send/Return audio balance dictateswhether the front panel HEADPHONE output and the rear panel HP/AUX output monitors send(input/encoder) audio only, return audio only (decoder audio from a connected device), or a mix ofboth send and return audio.
4. Press RETURN when you have finished to exit the menu.
Note: Headphone levels can also be adjusted by pressing the SETTINGS button, navigate to
Audio and then HP Vol/Bal and press .
Adjusting the Monitor Source
In headphone listen mode it is possible to select monitoring sources via HEADPHONE >Monitor Source > [Select audio Source].

36 Genie Distribution WheatNet-IP Manual v1.6
© Tieline Pty. Ltd. 2015
Navigate to the source you want to monitor and press . Options include:
1. Default: the default factory program headphone mix2. Audio Stream: monitors the selected codec audio stream.3. Inputs: monitors the codec inputs (i.e. encoders).
The default headphone mixes for factory programs are displayed in the following table.
Codec Programs Left Right1 x Peer-to-Peer Mono Inputs 1&2/ Outputs 1&2 Inputs 1&2/ Outputs 1&2
1 x Peer-to-Peer Stereo Input1 /Output 1 Input 2/Output 2
2 x Mono Peer-to-Peer Input 1 / Output 1 Input 2 / Output 2
2 x Stereo Peer-to-Peer Input1 /Output 1 Input 2/Output 2
3 x Stereo Peer-to-Peer Input1 /Output 1 Input 2/Output 2
2 x Stereo + 2 x MonoPeer-to-Peer
Input 1 / Output 1 Input 2 / Output 2
Stereo + 4 x Mono Peer-to-Peer
Input 1 / Output 1 Input 2 / Output 2
6 x Mono Peer-to-Peer Input 1 / Output 1 Input 2 / Output 2
Multi-unicast Mono Inputs 1&2/Outputs 1&2 Inputs 1&2/Outputs 1&2
Multi-unicast Stereo Input1 /Output 1 Input 2/Output 2
2 x Multi-unicast mono Inputs 1&2/Outputs 1&2 Inputs 1&2/Outputs 1&2
2 x Multi-unicast stereo Input1 /Output 1 Input 2/Output 2
3 x Multi-unicast mono Inputs 1&2/Outputs 1&2 Inputs 1&2/Outputs 1&2
3 x Multi-unicast stereo Input1 /Output 1 Input 2/Output 2
Multicast server mono Inputs 1&2 Inputs 1&2
Multicast server stereo Input 1 Input 2
Multicast client mono Outputs 1&2 Outputs 1&2
Multicast client stereo Output 1 Output 2
2 x Multicast server mono Inputs 1&2 Inputs 1&2
2 x Multicast server stereo Input 1 Input 2
2 x Multicast client mono Outputs 1&2 Outputs 1&2
2 x Multicast client stereo Output 1 Output 2
3 x Multicast server mono Inputs 1&2 Inputs 1&2
3 x Multicast server stereo Input 1 Input 2
3 x Multicast client mono Outputs 1&2 Outputs 1&2
3 x Multicast client stereo Output 1 Outputs 1&2
Adjust Auxiliary Output SettingsSettings for the auxiliary output audio are adjusted similarly to the HEADPHONE output, except thatthe output level is fixed at line level. Configure the front panel HEADPHONE output and rear panelHP/AUX output as an Aux Out and then:
1. Press the HEADPHONE button to display the aux output adjustment screen.
2. Use the left or right navigation buttons to adjust the Send/Return audio balance.

37
© Tieline Pty. Ltd. 2015
Genie Distribution WheatNet-IP Manual v1.6
3. Press RETURN when you have finished to exit the menu.
Note: Send/Return balance can also be adjusted by pressing the SETTINGS button, navigate
to Audio and then Aux Bal and press .

38 Genie Distribution WheatNet-IP Manual v1.6
© Tieline Pty. Ltd. 2015
11 Inserting Hardware ModulesTwo slots are available for inserting optional ISDN or POTS connection modules into the codec. Themodule slots are numbered as follows.
Inserting or Removing a ModuleEnsure the codec is not powered up when inserting or removing modules. Where possibleuse anti-static precautions to help minimize the chance of static charges damaging thehighly sensitive circuitry. Do not force a module into the codec. Modules should beinstalled slowly and gently.
1. Remove power from the codec and then remove the 4 screws from the blanking panel or moduleinstalled in the codec.
2. Carefully slide the new module into the module slot and ensure the base of the module remainsflat during insertion, to ensure it lines up correctly with the module connector within the codec.
3. Reinsert the 4 screws to hold the module firmly in place.4. Power up the codec.
5. Press the SETTINGS button to verify it is installed correctly.
6. Navigate to Modules and press the button.7. The newly installed module should be visible as Module 1 or Module 2.
Important Note: If the module does not appear in the Modules menu in the codec, it ispossible that the connector on the module has not lined up correctly with the connectorinside the codec. Remove the module and reinsert it carefully to resolve this issue.

39
© Tieline Pty. Ltd. 2015
Genie Distribution WheatNet-IP Manual v1.6
12 About ISDN ModulesISDN stands for Integrated Services Digital Network. The Basic Rate Interface (BRI) of ISDNconsists of 2 bearer (B) channels at 64 kbps each and 1 data (D) channel at 16 kbps, i.e. (2B +D).This can be provided over a 2 wire facility and the two B channels can be bonded together to form asingle 128kbps channel. The B channel can carry user information such as voice, video or data. TheD channel carries signaling information between a user and the network.
Tieline codecs fitted with an ISDN G5 module can provide highquality mono or stereo audio over a single B channel using theTieline Music algorithm. If you have 2 B channels you can use oneas a standby, or configure higher bandwidth mono or stereoconnections using algorithms such as MusicPLUS and MPEG. Thecodec has two module slots available. Each module supports 2 Bchannels and it is possible to insert two ISDN modules and bond 4B channels together. This will increase connection bandwidth to 256kbps for connections using high quality algorithms like aptX Enhanced.
Important ConsiderationsThere are a number of things to consider if you are using your codec in ISDN mode. Some of thesethings include:
· Will you be operating within North America or other countries? · Will you be using a single B channel, 2 B channels, or 4 B channels? · Which network will you be using?· Is your ISDN line Point-to-Point or Point-to-Multipoint?· What are your directory numbers (DN)?· If you are in the US, what are your Service Profile ID (SPID) numbers?· What is your Multiple Subscriber Number (MSN) if you need to enter this outside North
America?
The answers to these questions will be influenced by the country in which you operate. Forexample, a SPID does not need to be entered into a Tieline codec for operation within Europe, but itdoes in North America.
U and S/T ISDN InterfacesIn North America the telephone company provides its BRI customers with a U interface. The Uinterface is a two-wire (single pair) interface from the phone switch. It supports full-duplex datatransfer over a single pair of wires, therefore only a single device can be connected to a U interface.
The situation is different in Europe, the UK, most of Asia, Australia, Africa and parts of the MiddleEast, where the phone company is allowed to supply the NT-1 and the customer is given an S/Tinterface. The NT-1 is a relatively simple device that converts a 2-wire U interface into the 4-wire S/Tinterface.
If you have an NT-1 device connected to the U interface line then you will require a Tieline Euro ISDNG5 module (S/T interface - model: TLISDNEUROG5). If you don’t have an NT-1 device installed thenthe Tieline US ISDN G5 module (U interface - model: TLISDNUSG5) will be required. You can ringyour telecommunications provider to ask if you’re not sure. Note: In Japan use the Tieline Euro ISDNmodule.
Important Note: Tieline S/T Euro ISDN G5 modules do not have internal terminatingresistors. When you connect terminating equipment such as a Tieline codec to an NT-1, 100 ohm termination resistors must be connected between pins 3 and 6 and between

40 Genie Distribution WheatNet-IP Manual v1.6
© Tieline Pty. Ltd. 2015
pins 4 and 5 at the last socket on the ISDN line. Check your NT-1 device user manual asthis may be supported. Suppliers of electronic components sell suitable plugs withtermination resistors when required. Please note: U interface ISDN terminations do notrequire terminating resistors.
How to Configure ISDN G5 ModulesTo configure the codec to dial using ISDN for the first time:
1. Ensure that the correct country setting is configured in your codec via Settings > System >Country.
2. If you are dialing between two Tieline codecs you normally only need to configure an ISDNdialing program via Connect > ISDN. See Configuring ISDN to adjust settings using the JavaToolbox Web-GUI, or click here to adjust settings using the HTML5 Toolbox Web-GUI.
Other more advanced settings can also be configured:
1. Select Settings > Modules > [Select ISDN Module] to adjust ISDN module settingsspecific to your codec site. See Configure ISDN Module Settings for more information. SeeConfiguring ISDN Modules to adjust settings using the Java Toolbox Web-GUI, or click hereto adjust settings using the HTML5 Toolbox Web-GUI.
2. ISDN answering can be configured to suit:
· Hardware available in the codec, i.e. the number of B channels available.· Expected dialing behaviors, e.g. if B channels should bond or not, and whether audio
streams need to use Route tags.· The type of call being made, e.g. Tieline (with Tieline Session Data) versus non-Tieline
(sessionless calls).
Adjust answering configuration via Settings > Answering > ISDN Answer Configs > [SelectConfig] and see ISDN Answering Configuration for more information (see Configuring ISDNAnswering to adjust settings using the Java Toolbox Web-GUI, or click here to adjust settingsusing the HTML5 Toolbox Web-GUI).
12.1 ISDN Module SettingsISDN settings in the Module menu will determine how each installed module operates at aparticular site. This allows you to copy programs between codecs installed at different locationsand separately configure site-specific settings for how each ISDN module should connect. Otheranswering-related settings are available in the Answering menu via Settings > Answering >[Select ISDN Config].
Configuring ISDN G5 Modules
1. Press the the SETTINGS button, then navigate to Modules and press the button.
Important Note: You can also configure your ISDN module by pressing the HOME button to return to the Home screen and select Connect > ISDN. Then use the down
navigation button to select Module Configuration and press the button.

41
© Tieline Pty. Ltd. 2015
Genie Distribution WheatNet-IP Manual v1.6
2. Navigate to the module you want to configure and press the button. Note: Module 1 is on theleft when looking at the codec rear panel.
Important Note: ISDN Sync should be displayed when an ISDN line is connected to thecodec. This appears regardless of whether you have configured the ‘ISDN Line Type’correctly.
3. Navigate to Accept and press the button. This menu is a call filter to allow or deny voice ordata calls according to your preferences. The default setting allows both Voice & Data. Select
your preferred option and press the button.
Important Note: G.711 is the default algorithm for incoming connections when VoiceOnly is selected. There are two G.711 algorithms and the one used by the codecdepends on the country setting in the codec. The µ-law algorithm is used in the USA,Japan and Canada, whereas the A-law algorithm is used in other countries.
4. Navigate to Network and press the button. Select the Network Type corresponding to the
region in which you are using the codec, then press the button.
42 Genie Distribution WheatNet-IP Manual v1.6
© Tieline Pty. Ltd. 2015
Networks Select
US-Nat If switch type is National ISDN-1 and 2
US-AT&T If switch Type is AT&T 5ESS
EU-ETSI If Switch Type is ETSI(UK, Europe, Australia and most other countries)
JPN-NTT If you are in the Japan and your network is NTT
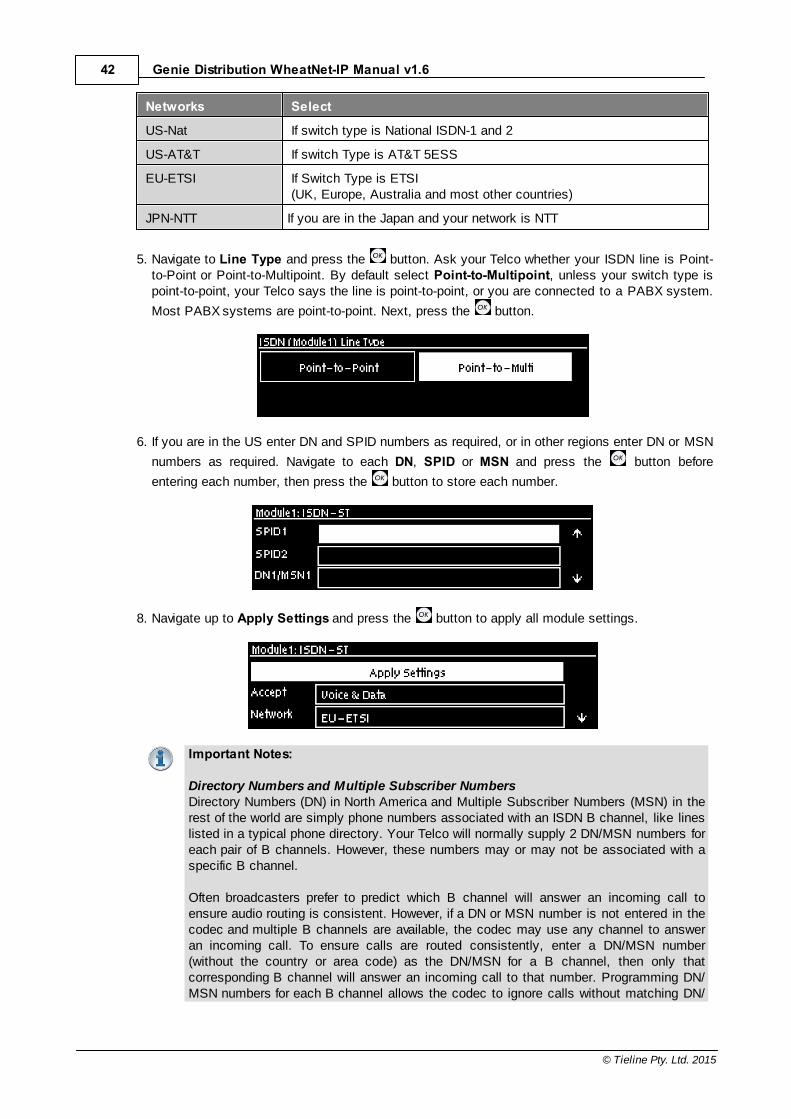
5. Navigate to Line Type and press the button. Ask your Telco whether your ISDN line is Point-to-Point or Point-to-Multipoint. By default select Point-to-Multipoint, unless your switch type ispoint-to-point, your Telco says the line is point-to-point, or you are connected to a PABX system.
Most PABX systems are point-to-point. Next, press the button.
6. If you are in the US enter DN and SPID numbers as required, or in other regions enter DN or MSN
numbers as required. Navigate to each DN, SPID or MSN and press the button before
entering each number, then press the button to store each number.
8. Navigate up to Apply Settings and press the button to apply all module settings.
Important Notes:
Directory Numbers and Multiple Subscriber NumbersDirectory Numbers (DN) in North America and Multiple Subscriber Numbers (MSN) in therest of the world are simply phone numbers associated with an ISDN B channel, like lineslisted in a typical phone directory. Your Telco will normally supply 2 DN/MSN numbers foreach pair of B channels. However, these numbers may or may not be associated with aspecific B channel.
Often broadcasters prefer to predict which B channel will answer an incoming call toensure audio routing is consistent. However, if a DN or MSN number is not entered in thecodec and multiple B channels are available, the codec may use any channel to answeran incoming call. To ensure calls are routed consistently, enter a DN/MSN number(without the country or area code) as the DN/MSN for a B channel, then only thatcorresponding B channel will answer an incoming call to that number. Programming DN/MSN numbers for each B channel allows the codec to ignore calls without matching DN/

43
© Tieline Pty. Ltd. 2015
Genie Distribution WheatNet-IP Manual v1.6
MSN numbers. This is the best way to answer calls from codecs in a predictable manner.
SPID Numbers in North AmericaISDN relies on an initialization procedure for associating Service Profiles with specificterminating equipment (e.g. your audio codec) rather than lines. In the US Telcos assigna Service Profile ID (SPID) number which assists in identifying different ISDN servicesacross the network. Your Telco must provide a SPID for each B channel you order whenconnecting over US-Nat or US-AT&T networks in the US. A SPID is not required whenusing the AT&T PTP protocol.
Typically, each ISDN BRI service in the US will have two SPIDs and these must beentered correctly. When you enter a SPID into your codec and connect it to an ISDN line,an initialization and identification process takes place, whereby the terminating equipment(your codec) sends the SPID to the switch. The switch then associates the SPID with aspecific Service Profile and directory number.
Note: SPID numbers normally include the phone number and additional prefix or suffixdigits up to 20 digits long.
12.2 ISDN Answering ConfigurationImportant Note: For more detailed information about ISDN Answer Config parameters,including bonding and 'route' configuration etc., please see Configuring ISDN Answering inthe Java Toolbox Web-GUI manual, or Configuring ISDN Answering in the HTML5 ToolboxWeb-GUI manual.
ISDN Answering Configs are used to determine how codec ISDN modules will behave whenanswering ISDN calls.
1. Press the the SETTINGS button, then navigate to Answering and press the button.
Important Note: You can also configure your ISDN module by pressing the HOME button to return to the Home screen and select Connect > ISDN. Then use the down
navigation button to select Module Configuration and press the button.
2. Navigate to ISDN Answer Configs and press the button.
3. Navigate to one of the four available Configs and press the button.

44 Genie Distribution WheatNet-IP Manual v1.6
© Tieline Pty. Ltd. 2015
4. Navigate to Edit and press the button.
5. Navigate to each B channel and press the button if you want to select/deselect a B channel
within the selected Config. Navigate to Continue and press the button. Notes: The ticksymbol confirms a B channel has been selected.
Important Note: If a B channel has been selected within another Config it will not bevisible. Only available B channels are displayed.
6. Choose the bonding method if multiple B channels have been selected, then press the button.
7. Select Disable when connecting to Tieline codecs using session data, or select Enable if
connecting to non-Tieline codecs only, then press the button.
Important Note: Select Disable if the codec is expected to receive ISDN calls fromTieline codecs, or both Tieline and non-Tieline codecs (i.e. you are not sure which type ofcodec may call). In this mode, once the codec answers a call, it expects to receiveTieline session data from the caller and configure its own algorithm settings according tothat. If it fails to receive Tieline session data within 5 seconds (i.e. a non-Tieline codec iscalling, or a Tieline codec with session data disabled), it will use the settings in the ISDNAnswering Config instead.
Enable Sessionless Only when answering ISDN calls from non-Tieline codecs only.When Sessionless is configured, the codec will not wait for the session data. Thisreduces the time taken to answer an inbound sessionless call.

45
© Tieline Pty. Ltd. 2015
Genie Distribution WheatNet-IP Manual v1.6
8. Select the default algorithm when receiving a call from a non-Tieline codec, then press the button.
9. Specify the audio stream Route when receiving a call on the answering codec from a non-Tieline
codec, then press the button.
10. Select Yes and then press the button to confirm all changes.
Reset ISDN Answer ConfigsTo reset ISDN answering settings to factory defaults:
1. Navigate to Settings > Answering > ISDN Answer Configs > Reset ISDN Answer Configsand then press the button.
2. Select Yes and press the button.

46 Genie Distribution WheatNet-IP Manual v1.6
© Tieline Pty. Ltd. 2015
13 About POTS ModulesThe Tieline POTS G5 module can be used in the codec to streamhigh quality audio over a POTS (PSTN) phone line. The codec hastwo module slots available and it is possible to insert one or twoPOTS G5 modules, or a mix of POTS G5 and ISDN G5 modulesas required. The Tieline Music algorithm can deliver 15 kHzquality bi-directional audio at bit rates as low as 24kbps over aPOTS connection.
Modem Negotiation and Line QualityThe codec can send and receive high-speed digital information over a standard POTS telephone linevia the modem in the POTS G5 module.
G5 POTS modems initially attempt to establish a link at the lowest Max Bit rate setting configuredin the two modules being connected. If the POTS line doesn't support this bit rate, the modems willattempt to connect at the highest possible bit rate to suit the prevailing line quality at each end ofthe link. The modem then perform a process called ‘training’, during which the codecs at each endof the link analyze the line. The codecs will then 'renegotiate' the link downwards to the highestpossible bit rate where line quality is greater than 70%.
The POTS G5 module contains a SmartDAA™ (Smart Data Access Arrangement) line interface,which isolates the modem from voltages on phone lines. It is important to select the correct countryin the codec from which you are dialing. This allows the SmartDAA to automatically adjust for theline voltage present in that country.
Important Note: It is possible to connect two concurrent POTS connections, however thecodec will not bond two POTS connections.
Connecting to G3 Codecs using POTSThe codec will successfully connect to Tieline Commander G3 and i-Mix G3 codecs over POTS.These Tieline G3 codecs may use:
· POTS modules (older superseded version)· POTS G3 modules (current version)
Connecting to POTS G3 ModulesPOTS G3 modules operate in the same way as POTS G5 modules when connecting, e.g. theyestablish a link at the default bit rate of 28.8kbps and then 'renegotiate' the link downwards tothe highest possible bit rate where line quality is greater than 70%.
Connecting to Legacy POTS Modules in G3 CodecsThese modules have slightly different characteristics when connecting. When dialing from aPOTS G5 module to these older POTS modules the codecs will attempt to connect initially at19.2kbps. If line quality is above 80% at this bit rate then the codec will ‘retrain’ the connectionup to a maximum of 28,800bps (depending on modem handshaking). The codec will thenrenegotiate the link downwards to the highest possible bit rate where line quality is greater than70%.

47
© Tieline Pty. Ltd. 2015
Genie Distribution WheatNet-IP Manual v1.6
How to Configure POTS G5 Codec ConnectionsTo configure the codec to dial using POTS for the first time:
1. Ensure that the correct country setting is configured in your codec via Settings > System >Country. This ensures the correct settings are used by the codec when making POTSconnections.
2. When dialing between two Tieline codecs you normally only need to configure a POTS dialingprogram via Connect > POTS.
Other more advanced settings can also be configured:
1. Select Settings > Modules > [Select POTS Module] to adjust POTS module settingsspecific to your codec site. See Configure POTS Module Settings for more information. SeeConfiguring POTS Modules to adjust settings using the Java Toolbox Web-GUI, or click hereto adjust settings using the HTML5 Toolbox Web-GUI.
2. If you are connecting to non-Tieline codecs you may need to create an answering "Config"via Settings > Answering > POTS Answer Configs > [Select POTS Config], which willdetermine the module used and relevant settings for answering a non-Tieline POTS call. SeeConfigure POTS Module Answering for more information. See Configuring POTS Answering toadjust settings using the Java Toolbox Web-GUI, or click here to adjust settings using theHTML5 Toolbox Web-GUI.
Important Note: The codec has a single analog phone input shared by both modules(default setting is Off). This phone input is used to monitor modem tones in POTS Codecmode and for receiving audio in Analog Phone mode. Phone Input settings can beadjusted via Settings > Audio > Phone Input.
Making Analog Phone (Voice) CallsAll POTS G5 modules are capable of making analog voice calls. It may be necessary to make ananalog call to dial a telephone hybrid, or to use for communications, or because there is no Tielinecodec at the other end of the link. Remember analog voice calls are only 3 kHz audio quality. Toselect analog phone answering mode in a POTS G5 module navigate to Settings > Modules >POTS > Answer Mode [Analog phone].
Important Analog Phone Note: The codec has a single analog phone input which isshared by two POTS G5 modules when installed. As a result, two concurrent analogphone connections are not recommended because both connections share the sameinput and audio will be accepted from the oldest active connection only.
13.1 POTS Module SettingsPOTS settings in the Module menu determine how your codec behaves at a particular site. Thisallows you to copy programs between codecs installed at different locations and configure site-specific settings for how each module should connect. Other answering-related settings areavailable in the Answering menu via Settings > Answering > [Select POTS Config] if you areconnecting to non-Tieline codecs over POTS.
Important Notes: When POTS (Ready) is displayed throughout POTS menus it meansthe POTS module has initialized and is ready to accept or make a call.
How to Configure POTS G5 Modules
1. Press the the SETTINGS button, then navigate to Modules and press the button.

48 Genie Distribution WheatNet-IP Manual v1.6
© Tieline Pty. Ltd. 2015
2. Navigate to the module you want to configure and press the button. Note: Module 1 is on theleft when viewing the codec rear panel.
3. Complete configuration changes as per the following options and then navigate up to ApplySettings and press the button to apply all module settings.
Module (Site) Settings
Answer Mode (Affects Answering Only)Answer Mode selects how the selected module in the codec will be able to answer incomingPOTS line calls. Options include:
· POTS Codec: allows the POTS G5 module to receive encoded audio data over a POTSline.
· Analog Phone: configures the POTS G5 module to receive a standard analog phonecall.
· Disabled: disables the POTS G5 module from receiving a POTS Codec or AnalogPhone call.
Calls are answered based on the settings in Config 1 & 2 via Settings > Answering > POTSAnswer Configs. Adjustments to these Config settings are not normally necessary whenconnecting between Tieline codecs. Default settings may need to be adjusted when connectingto non-Tieline codecs over POTS (see POTS Answering Configuration for more info).
Maximum Bit rate (Affects Dialing and Answering)The default setting for the Max Bitrate is 28800 (28.8kbps) and this only affects POTS Codeccalls. The range of the setting is 9.6kbps to 33.6kbps. Even if the line is capable of establishinga connection at a higher bit rate, the Max Bitrate setting is the highest bit rate that will beattempted.
G5 POTS modems initially attempt to establish a link at the lowest Max Bit rate settingconfigured in the two modules being connected. If the POTS line doesn't support this bit rate,the modems will attempt to connect at the highest possible bit rate to suit the prevailing linequality at each end of the link.

49
© Tieline Pty. Ltd. 2015
Genie Distribution WheatNet-IP Manual v1.6
In the initial connection phase, the modems perform a process called ‘training’, to analyze theline and compensate for frequency and phase response. This also cancels out any echo thatmay be present. The codec will then 'renegotiate' the link downwards to the highest possible bitrate where line quality is greater than 70%. Negotiation is the process of bit rate adjustment.
Reducing this value can improve connection reliability on poor quality lines. If two codecs arenot configured the same, they will always attempt to connect at the lowest of the two Max Bitrate settings.
Dialing Method (Affects Dialing only)Use this menu to select Tone (DTMF) or Pulse dialing over POTS Codec connections. Tonedialing is used always when the Answer Mode is Analog Phone.
Dial Tone Detect (Affects Dialing only)There are two settings in this menu:
· Dial Tone Detect: The module will only be allowed to dial when a dial tone is present onthe line.
· Blind Dialing: Allows the module to dial when no dial tone is present.
Monitor Modem Tone (Affects Dialing and Answering)This setting can be Enabled or Disabled. If enabled the module will allow audio monitoring ofmodem tones during connection in POTS Codec mode via the phone input. By default, thefollowing phone input monitoring rules apply when multiple POTS G5 modules are installed in acodec and multiple POTS connections are dialed.
Module 1 Module 2 Audio RulePOTS Codec
(Monitor Modem Tone)POTS Codec
(Monitor Modem Tone) The phone input receives a mix of modem toneaudio from both modules
POTS Codec (Monitor Modem Tone)
Analog Phone The phone input receives analog phone inputaudio only and mutes modem tone monitoring
Analog Phone Analog Phone The phone input accepts audio from the oldestactive connection only
Important Notes: · POTS modem tones are audible in the left side of the headphone output, irrespective of
the type of program loaded in the codec.· Modem tone monitoring will work even if Phone Input Enable is Off via Settings >
Audio > Phone Input > Phone Input Enable [Off].· Modem tone monitoring is only enabled during the initial connection training and
negotiation period in POTS Codec mode.· The monitoring volume can be adjusted via Settings > Audio > Phone Input > Level.

50 Genie Distribution WheatNet-IP Manual v1.6
© Tieline Pty. Ltd. 2015
CountryThis displays the current country setting in the codec. To adjust this setting select Settings >System > Country.
Caution: Don't forget to navigate up to Apply Settings and press the button to apply allmodule settings before leaving this menu!
13.2 POTS Answering ConfigurationConnection setting preferences are normally exchanged via session data sent between two Tielinecodecs when a connection is established. If you answer a call from a non-Tieline codec you willneed to create an answering "Config" to determine the settings used when connecting, anddesignate which module will answer the call (if more than one POTS module is installed).
Important Notes: · POTS Answer Config settings are applied to POTS Codec connections and not
Analog Phone connections.· When receiving a call from a Tieline codec sending session data (i.e. not a
Sessionless connection), the algorithm setting from the dialing codec overrides thesetting in the POTS Answer Config menu.
· The default POTS Answer Configs accept a call from an incoming Tieline codec withsession data enabled. They will also answer a call from a Comrex POTS codec by usingthe Other algorithm.
· For more information about POTS answering parameters, including 'route' configuration,please see Configuring POTS Answering in the Java Toolbox Web-GUI manual, orConfiguring POTS Answering in the HTML5 Toolbox Web-GUI manual.
1. Press the the SETTINGS button, then navigate to Answering and press the button.
2. Navigate to POTS Answer Configs and press the button.
3. Navigate to Config 1 and press to configure a POTS module in module slot 1, or navigate to
Config 2 and press to configure a POTS module in module slot 2.
4. Select Info to view current settings or Edit to adjust Config settings, then press the button.

51
© Tieline Pty. Ltd. 2015
Genie Distribution WheatNet-IP Manual v1.6
5. Select Disable when connecting to Tieline codecs using session data, or select Enable if
connecting to non-Tieline codecs only, then press the button.
Important Note: Select Disable if the codec is expected to receive POTS calls fromTieline codecs, or both Tieline and non-Tieline codecs (i.e. you are not sure which type ofcodec may call). In this mode, once the codec answers a call, it expects to receiveTieline session data from the caller and configure its own algorithm settings according tothat. If it fails to receive Tieline session data within 5 seconds (e.g. a Comrex POTScodec is calling), it will use the settings in the ISDN Answering Config instead.
Enable Sessionless Only when answering POTS calls from non-Tieline codecs only.When Sessionless is configured, the codec will not wait for the session data. Thisreduces the time taken to answer an inbound sessionless call.
6. Select Other when connecting to Comrex® Vector, Matrix® and BlueBox® codecs, then press
the button.
Important Note: On the Comrex codec select its "Music" algorithm. Please note that9.6kbps connections are not supported by the Comrex codecs.
7. If required you can specify the audio stream Route when answering a call from a non-Tieline
codec, then press the button.
8. Select Yes and press the button to confirm the new Config settings.

52 Genie Distribution WheatNet-IP Manual v1.6
© Tieline Pty. Ltd. 2015
9. The new Config will be displayed showing the updated settings.
Reset POTS Answer ConfigsTo reset POTS answering settings to factory defaults:
1. Navigate to Settings > Answering > POTS Answer Configs > Reset POTS AnswerConfigs and then press the button.
2. Select Yes and press the button.
14 Language SelectionEnglish is the default language in the codec. To select a new language:
1. Press the SETTINGS button.
2. Navigate to System and press .
3. Use the navigation buttons to select Language and press .
4. Select a language and press .

53
© Tieline Pty. Ltd. 2015
Genie Distribution WheatNet-IP Manual v1.6
15 About Program Dialing
What Defines a Program?Tieline Genie and Merlin codecs use programs to connect to another codec. A Program configuresa Tieline codec to send or receive one or more Audio Streams based upon the particularapplication the codec is being used for at any given time. The attributes of the audio stream andassociated connections are embodied within a program when it is created, including theconfiguration, dialing and answering parameters.
Tieline Genie and Merlin codecs operate similarly to Tieline G3 codecs. By default, Tieline codecssend proprietary session data when connecting to each other in order to establish, manage andterminate connections. When a connection between two codecs is established:
1. The dialing codec sends information about how the codec receiving the call should beconfigured.
2. Once the codec receiving session data from the dialing codec has received informationsuccessfully, it sends an acknowledgement to the dialing codec and streaming cancommence.
For example, if you configure a standard stereo program on the dialing codec using a particularalgorithm and bit rate settings etc., these settings will be configured on the dialing codec when thecodec connects. It is also possible to lock a loaded program in a codec to ensure the currentlyloaded program cannot be unloaded by a codec dialing in with different program settings.
For example, if your routing requirements require the codec at the studio to always connect inmono, simply load and lock a mono program in the codec. Generally programs will be up or down-mixed by the answering codec to match the loaded program type. In some situations incompatibleprogram types will be rejected.
Defining Audio Streams within ProgramsEach audio stream within a program can be defined separately and contain a variety of settingsrelating to the number of connections (e.g. primary and backup) and the number of destinations towhich each audio stream is distributed. Each audio stream is capable of being configured to includedial and answer connections, dial connections only, or answer connections only. Each audio streamhas its own:
· Name.· Connection, Transport, and Destination settings.· Backup configuration options.
The following image displays a simple peer-to-peer program in the Programs panel within the JavaToolbox Web-GUI, which can be used to configure and edit all program parameters. The programdisplayed is configured to send a single stereo audio stream and will allow the codec to both answerand dial (via dialing and answering connections) if required. A backup dialing connection isconfigured in case the primary connection fails.

54 Genie Distribution WheatNet-IP Manual v1.6
© Tieline Pty. Ltd. 2015
Creating ProgramsOnly the simplest peer-to-peer (point-to-point) programs can be created using the codec front panel.The Java Toolbox web-GUI contains a Programs panel with a wizard for configuring programsettings and backup connections. Edit settings easily at the touch of a button and use existingprograms as templates for creating other programs.
Mono and Stereo Peer-to-Peer ProgramsNew peer-to-peer programs can be created using the codec front panel keypad (see Steps toConnect over IP). If you know the IP address of the codec you want to dial then all you need todo is enter this into the codec, choose your preferred connection settings and then press
CONNECT .
Front panel configured programs are automatically saved as Recent Programs which retain allthe audio stream dialing and configuration information. These Recent Programs are displayed
when you press the CONNECT button from within any menu except the IP Mode or SIPMode screens, or the Connect IP or Connect SIP screens.
Ensure you configure all the correct connection settings when using the codec front panel,because these are stored as part of the program's profile when you first connect. They cannotbe adjusted afterwards without using the editing features in the Program panel within theToolbox Web-GUI.
Important Note: When configuring a connection use the Save function in the ConnectIP and Connect SIP screens to save programs permanently to the codec's Programsmenu. Otherwise they are stored to the Recent Programs list and will be overwrittenafter several calls have been made.

55
© Tieline Pty. Ltd. 2015
Genie Distribution WheatNet-IP Manual v1.6
Peer-to-peer connection configured via the codec front panel
16 Multiple Stream ProgramsPrograms can be configured to connect a single audio stream to multiple destinations, or connectmultiple audio streams to different destinations.
2 x Mono Peer-to-Peer ProgramsA 2 x Mono Peer-to-Peer program includes two mono audio streams. Each audio stream includesa separate peer-to-peer connection to a different destination, which can also be configured withdifferent transport, audio and backup settings.
17 2 and 3 x Stereo Programs
2 x Stereo Peer-to-Peer ProgramsA 2 x Stereo Peer-to-Peer program includes two bidirectional audio streams. Each audio streamcan be configured as a separate stereo peer-to-peer connection to the same destination codec, orwith two different destination codecs. Each audio stream can be configured with different transport,audio and backup settings.
3 x Stereo Peer-to-Peer ProgramsA 3 x Stereo Peer-to-Peer program includes three bidirectional audio streams. Each audio streamcan be configured as a separate stereo peer-to-peer connection to the same destination codec, orwith up to three different destination codecs. Each audio stream can be configured with differenttransport, audio and backup settings.

56 Genie Distribution WheatNet-IP Manual v1.6
© Tieline Pty. Ltd. 2015
18 2 x Mono + 2 x Stereo ProgramsA 2 x Stereo + 2 x Mono Peer-to-Peer program includes two bidirectional stereo audio streamsand two bidirectional mono audio streams. Each audio stream can be configured as a separatepeer-to-peer connection to the same destination codec, or with different destination codecs. Eachaudio stream can be configured with different transport, audio and backup settings.
19 Stereo + 4 x Mono ProgramsA Stereo + 4 x Mono Peer-to-Peer program includes one bidirectional stereo audio stream andfour bidirectional mono audio streams. Each audio stream can be configured as a separate peer-to-peer connection to the same destination codec, or with different destination codecs. Each audiostream can be configured with different transport, audio and backup settings.
20 6 x Mono ProgramsA 6 x Mono Peer-to-Peer program includes six bidirectional mono audio streams. Each audiostream is a separate peer-to-peer connection with a different destination codec and eachconnection can also be configured with different transport, audio and backup settings.

57
© Tieline Pty. Ltd. 2015
Genie Distribution WheatNet-IP Manual v1.6
21 Other Multiple Stream Programs
Multi-Unicast ProgramsA multi-unicast program (also known as multiple unicast) can transmit a single audio stream withcommon connection settings to a number of different destinations. All connections that are part of amulti-unicast connection will automatically attempt to reconnect if they are terminated remotely.
Multi-unicasts are useful for distributing audio to several studios and can only be created using thePrograms panel in the Java Toolbox Web-GUI. Once multi-unicast connections have been created
you can press CONNECT on the codec keypad to connect without using the Java or HTML5Toolbox Web-GUIs. The codec can also simultaneously send up to 3 different mono or stereo multi-unicast audio streams simultaneously to a maximum of 50 endpoints in total.
Multicast ProgramsA multicast audio stream can be used to broadcast to unlimited numbers of 'subscriber' (clientcodecs) wanting to receive a particular audio transmission. Multicast transmissions are broadcastby a multicast server codec using a dedicated IP multicast address, which looks similar to a regularIP address, and multicast subscribers request transmissions from this address. It is possible tosimultaneously broadcast 3 separate stereo streams in multicast server mode and distribute each ofthese streams to unlimited endpoints over compatible IP networks.
Multi-unicast and Multicast program configuration using the web-GUI
58 Genie Distribution WheatNet-IP Manual v1.6
© Tieline Pty. Ltd. 2015
22 Getting Connected QuicklyBefore attempting a new audio stream connection please connect and adjust the following:
1. Attach power to the codec. 2. For IP connections, attach RJ45 Ethernet cables to at least one of the ETH ports on the
codec's rear panel. Attach cables to ISDN or POTS modules inserted in your codec asrequired.
3. Attach headphones to the 6.35mm (1/4") headphone jack on the codec's front panel.4. Check that the correct country is selected in the codec.
i. Press the SETTINGS button.
ii. Navigate to System and press the button.
iii. Navigate to Country and press the button.
iv. Use the navigation buttons to select your country of operation and press the button.5. Make sure you know the IP address, or line numbers for dialing over ISDN or POTS to the
destination codec.
Important Note: It is important to set the correct country setting for connections overPOTS to adjust the POTS G5 module for varying line voltages in different countries. Thecountry setting also affects whether G.711 µ-Law (North America/Japan) or A-Law(Europe/Australasia) coding is used over IP, SIP and ISDN connections.
22.1 Steps to Connect over IPThe following procedure will create a custom peer-to-peer connection program using the codec frontpanel keypad and navigation buttons. It instructs how to connect your codec over IP for the very firsttime without using the Toolbox Web-GUI and your computer for configuration.
Important Notes: · See Using the Java Toolbox Web-GUI for details on configuring connections remotely
via a computer. Creation of programs is not currently supported in the HTML5 ToolboxWeb-GUI.
· See Installing the Codec at the Studio for valuable information about installing yourcodec, negotiating firewalls and port forwarding.
· See Tips for Creating Reliable IP Connections for a range of IP information to assistwith setting up IP services for your codecs.
· See Testing IP Network Connections to learn how you can test and verify the reliabilityof your IP connection.
1. Press and press and release the right arrow button to open the Input Audio Leveladjustment screen.
· Press the number on the keypad corresponding to the channel you want to toggle on or off.
E.g. press on the numeric keypad to toggle channel 1 on and off.
· Use the up and down navigation buttons to select the gang function and press the button to toggle ganging on/off.
· Use the up and down navigation buttons to select a single channel, or gangedchannels. Note: A channel is highlighted when selected.
· Use the left and right navigation buttons to adjust the input levels up or down.
2. Press the HOME button to return to the Home screen, select Connect > IP > Tielineand press the button. Note: Select SIP or Sessionless instead of Tieline if theseconnections are required.

59
© Tieline Pty. Ltd. 2015
Genie Distribution WheatNet-IP Manual v1.6
3. Use the RETURN button to delete any numbers if already entered, then use the numeric
KEYPAD to enter the IP address of the codec you want to dial, using the or buttons toenter the periods in the IP address. Next, press the down navigation button to select Setupand press .
Important Note: The codec remembers recent IP addresses just like a cell-phone. Toview these addresses just press when you select the Connect IP screen. The mostrecent addresses and programs are listed first and you can use the navigation buttons toscroll up and down. Press to select the address you have highlighted.
4. Navigate to Algorithm and press .
5. Use the navigation buttons to select an algorithm profile or manually enter algorithm settings,
then press .
6. If you decide to manually program the algorithm, use the navigation buttons to select your
preferred algorithm sample rate (if displayed) and bit rate, pressing after each option isselected.
7. Press the down navigation button to select Jitter Buffer and press to select a differentautomatic jitter buffer setting for your connection, or to enter a fixed buffer setting in milliseconds(maximum 5000 ms). The default Auto, Best Compromise setting is a good starting point formost internet connections.
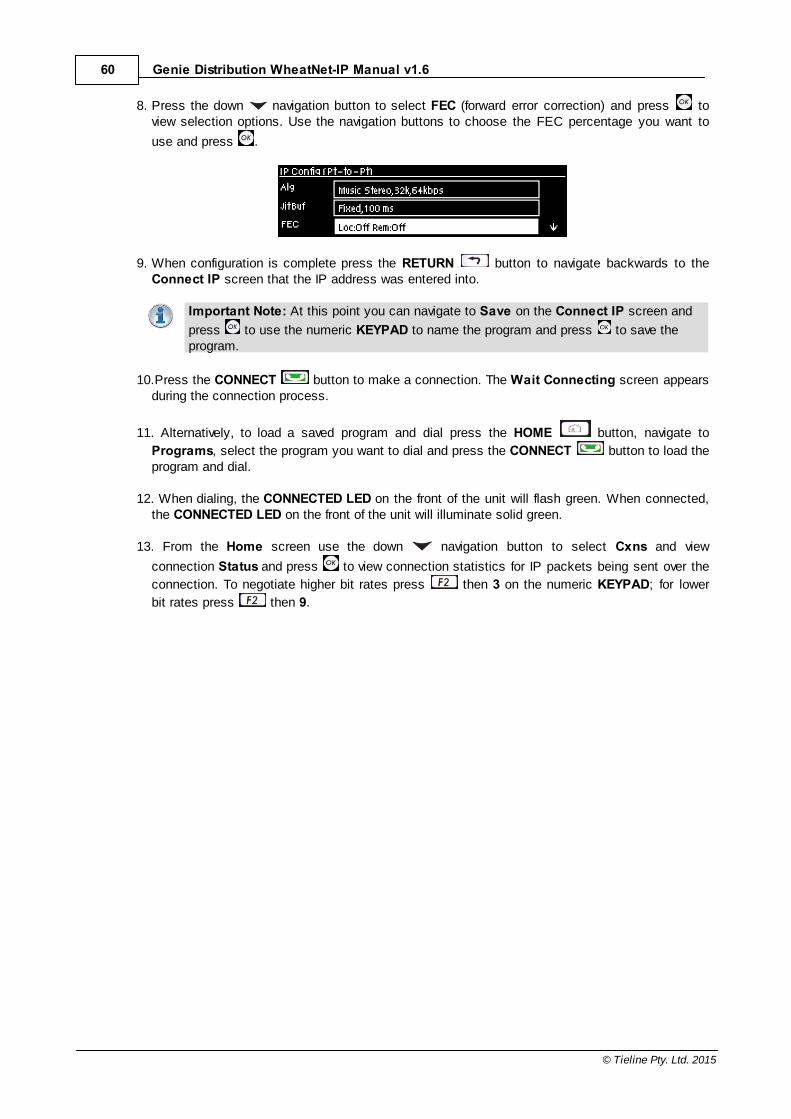
60 Genie Distribution WheatNet-IP Manual v1.6
© Tieline Pty. Ltd. 2015
8. Press the down navigation button to select FEC (forward error correction) and press toview selection options. Use the navigation buttons to choose the FEC percentage you want to
use and press .
9. When configuration is complete press the RETURN button to navigate backwards to theConnect IP screen that the IP address was entered into.
Important Note: At this point you can navigate to Save on the Connect IP screen and
press to use the numeric KEYPAD to name the program and press to save theprogram.
10.Press the CONNECT button to make a connection. The Wait Connecting screen appearsduring the connection process.
11. Alternatively, to load a saved program and dial press the HOME button, navigate to
Programs, select the program you want to dial and press the CONNECT button to load theprogram and dial.
12. When dialing, the CONNECTED LED on the front of the unit will flash green. When connected,the CONNECTED LED on the front of the unit will illuminate solid green.
13. From the Home screen use the down navigation button to select Cxns and view
connection Status and press to view connection statistics for IP packets being sent over the
connection. To negotiate higher bit rates press then 3 on the numeric KEYPAD; for lower
bit rates press then 9.
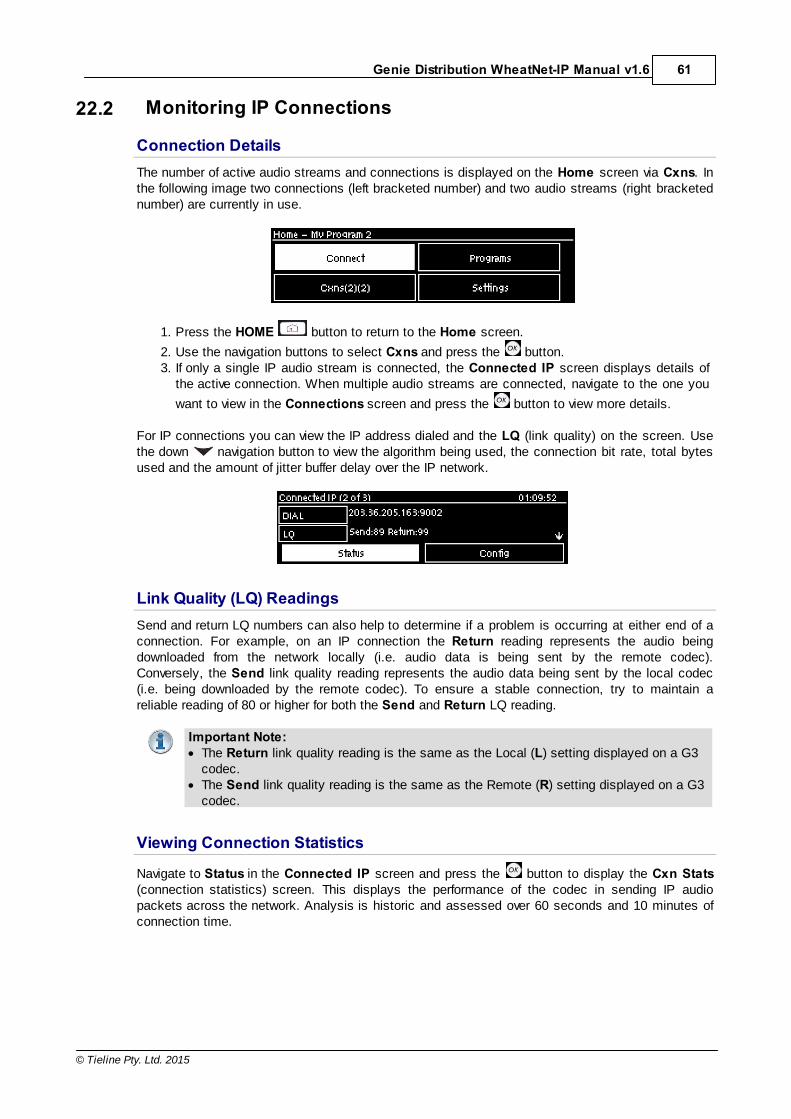
61
© Tieline Pty. Ltd. 2015
Genie Distribution WheatNet-IP Manual v1.6
22.2 Monitoring IP Connections
Connection DetailsThe number of active audio streams and connections is displayed on the Home screen via Cxns. Inthe following image two connections (left bracketed number) and two audio streams (right bracketednumber) are currently in use.
1. Press the HOME button to return to the Home screen.
2. Use the navigation buttons to select Cxns and press the button.3. If only a single IP audio stream is connected, the Connected IP screen displays details of
the active connection. When multiple audio streams are connected, navigate to the one you
want to view in the Connections screen and press the button to view more details.
For IP connections you can view the IP address dialed and the LQ (link quality) on the screen. Usethe down navigation button to view the algorithm being used, the connection bit rate, total bytesused and the amount of jitter buffer delay over the IP network.
Link Quality (LQ) ReadingsSend and return LQ numbers can also help to determine if a problem is occurring at either end of aconnection. For example, on an IP connection the Return reading represents the audio beingdownloaded from the network locally (i.e. audio data is being sent by the remote codec).Conversely, the Send link quality reading represents the audio data being sent by the local codec(i.e. being downloaded by the remote codec). To ensure a stable connection, try to maintain areliable reading of 80 or higher for both the Send and Return LQ reading.
Important Note: · The Return link quality reading is the same as the Local (L) setting displayed on a G3
codec.· The Send link quality reading is the same as the Remote (R) setting displayed on a G3
codec.
Viewing Connection Statistics
Navigate to Status in the Connected IP screen and press the button to display the Cxn Stats(connection statistics) screen. This displays the performance of the codec in sending IP audiopackets across the network. Analysis is historic and assessed over 60 seconds and 10 minutes ofconnection time.

62 Genie Distribution WheatNet-IP Manual v1.6
© Tieline Pty. Ltd. 2015
Feature Description1 Lost Packets Packets sent that failed to arrive
2 Empty (JitterBuffer)
Indicates how often the jitter buffer ‘reservoir’ empties causing loss ofaudio
3 Late Packets The number of packets that arrive late, i.e. after audio play out
4 FEC Packets Indicates the number of forward error correction (FEC) packets thathave been sent if it is enabled in the codec
5 1 minute Statistics listed for the last minute of network activity
6 10 minutes Statistics for the last 10 minutes of network activity
Important Note: If the jitter buffer, FEC or the connection bit rate is changed, werecommend assessing a minute of recent connection performance in preference to 10minutes of historical connection performance. 10 minutes of data will include connectionsettings which may no longer be relevant. ‘Packet arrival history’ is cleared when you hangup a connection.
Following is a packet arrival analysis table with solutions for any noticeable packet loss statisticsdisplayed on the screen.
PacketAnalysis
Displays Possible Causes Possible Solutions
Loss Packets sent andthat failed toarrive.
· LAN/WAN congestion· Unreliable ISPs· Unreliable networks· Inferior IP hardware
· Renegotiate connection bit ratedownwards
· If link quality good add or increaseFEC as required
· Assess ISPs QoS if very badperformance
Empty Indicates howoften the jitterbuffer ‘reservoir’empties causingloss of audio.
· High number ofpackets being lost orarriving late
· Signal dropoutsusing cell-phonenetworks
· Renegotiationcauses the jitterbuffer reservoir toempty
· Once could be an anomaly –assess lost & late packets
· If many lost packets and network isunreliable – renegotiate bit rateand /or FEC down
· If many late packets, increase jitterbuffer
Late The number ofpackets thatarrive late andafter audio playout.
· Network congestion· Jitter Buffer depth is
too low
· Auto-jitter buffer will adjustautomatically
· For manual jitter buffer settingsincrease jitter buffer depth 50-100ms & reassess (if only a fewpackets arrive late over time, audiorepairs will be automatic and maynot require buffer changes).
FECd Indicates the · Packets have been · Assess audio quality & the number

63
© Tieline Pty. Ltd. 2015
Genie Distribution WheatNet-IP Manual v1.6
number of FECrepaired packetsif FEC active.
lost or corrupted overthe network
of FEC repairs – if many packets arebeing ‘lost’ perhaps reduce FEC &/or renegotiate bit rate down.
22.3 Steps to Connect over ISDNThe following procedure explains how to create a custom peer-to-peer program and dial anotherTieline codec over ISDN using the front panel keypad and navigation buttons.
Important Notes:· See Testing ISDN Connections for valuable information about setting up and
maintaining reliable ISDN connections.· See ISDN Module Configuration for details on module settings.· See ISDN Answering Configuration for details on ISDN answering settings.· See Configuring ISDN for details on configuring connections via the Java Toolbox Web-
GUI, or click here for details on using the HTML5 Toolbox Web-GUI to configure.
1. Press and press and release the right arrow button to open the Input Audio Leveladjustment screen.
· Press the number on the keypad corresponding to the channel you want to toggle on or off.
E.g. press on the numeric keypad to toggle channel 1 on and off.
· Use the up and down navigation buttons to select the gang function and press the button to toggle ganging on/off.
· Use the up and down navigation buttons to select a single channel, or ganged channels.Note: A channel is highlighted when selected.
· Use the left and right navigation buttons to adjust the input levels up or down.
2. Press the HOME button to return to the Home screen, select Connect > ISDN and press
the button.
3. Navigate to Setup and press the button.
4. Select whether to dial with Tieline Session Data or select Sessionless if dialing a non-Tieline
codec, then press the button.
Important Note: By default, when Tieline codecs dial they send call configurationsettings to the remote codec using Tieline Session Data. This configures the codec

64 Genie Distribution WheatNet-IP Manual v1.6
© Tieline Pty. Ltd. 2015
receiving the call with matching algorithm, sample rate and bit rate settings. This does notoccur when dialing to non-Tieline devices, therefore Sessionless must be selected toprovide compatibility.
5. Select the Dial Route to use for this audio stream if one is required, then press the button.Note: See Configuring ISDN Answering for more information on Dial Route and Answer Routetags. These are useful when routing multiple audio streams over transports like ISDN.
6. Select the number of B channels being used for the audio stream connection, then press the button.
7. Select an algorithm, then press the button.
8. Select the sample rate if required, then press the button.
9. Select Destination 1 and press the button, then use the numeric KEYPAD to enter the ISDN
number you want to dial and use the RETURN button to delete any numbers already
entered. Then press the button.
10. Select the preferred B channel to use when dialing and press the button.
11. If you are dialing over multiple B channels to create a bonded connection select the next

65
© Tieline Pty. Ltd. 2015
Genie Distribution WheatNet-IP Manual v1.6
destination, e.g. Destination 2, and use the numeric KEYPAD to enter the next ISDN numberyou want to dial. Do this for all B channel destinations.
12. Navigate down to Auto Reconnect and press the button to toggle between Enabled andDisabled. Note: This is normally enabled on the dialing codec only.
13. At this point we recommend you save a program to simplify dialing and to store thisconfiguration for future use. Use the up navigation button to select Save as Program and
press the button.
14. Use the numeric KEYPAD to name the program, then press to save the program.
15. It is possible to dial the B channels associated with this audio stream from this menu. Use the
up navigation button to select Connect and press to connect.
16. When dialing, the CONNECTED LED on the front of the unit will flash green. When connected,the CONNECTED LED on the front of the unit will illuminate solid green.
Important Note: To load a saved program and dial press the HOME button,navigate to Programs, select the program you want to dial and press the CONNECT
button to load the program and dial.

66 Genie Distribution WheatNet-IP Manual v1.6
© Tieline Pty. Ltd. 2015
22.4 Monitoring ISDN ConnectionsEach new audio stream connection becomes visible in the Cxns menu via the Home screen.
1. Press the HOME button to return to the Home screen.
2. Use the navigation buttons to select Cxns and press the button.3. If a single ISDN audio stream is connected, the Connected ISDN screen will display details
of the active ISDN connection. When multiple audio streams are connected, navigate to the
one you want to view in the Connections screen, e.g. ISDN, and press the button toview more details.

67
© Tieline Pty. Ltd. 2015
Genie Distribution WheatNet-IP Manual v1.6
22.5 Steps to Connect over POTSThe following procedure explains how to create a custom peer-to-peer program and dial anotherTieline codec over POTS using the front panel keypad and navigation buttons.
Important Notes: · See POTS Connection Tips and Precautions for valuable information about setting up
and maintaining reliable POTS connections.· See POTS Module Settings for details on module settings.· See POTS Answering Configuration for details on POTS answering settings (required for
answering calls from non-Tieline POTS codecs)· See Configuring POTS for details on configuring codec connections via a computer.· The Local and Remote line quality displayed for POTS Codec connections is related to
the actual POTS line quality at either end of the link. This reading affects the maximumallowable bit rate when the codec is training and negotiating a connection.
1. Press and press and release the right arrow button to open the Input Audio Leveladjustment screen.
· Press the number on the keypad corresponding to the channel you want to toggle on or off.
E.g. press on the numeric keypad to toggle channel 1 on and off.
· Use the up and down navigation buttons to select the gang function and press the button to toggle ganging on/off.
· Use the up and down navigation buttons to select a single channel, or ganged channels.Note: A channel is highlighted when selected.
· Use the left and right navigation buttons to adjust the input levels up or down.
2. Press the HOME button to return to the Home screen, select Connect > POTS and press
the button.
3. Use the RETURN button to delete any numbers if already entered, then use the numericKEYPAD to enter the number you want to dial. Note: When POTS (Ready) is displayedthroughout POTS menus it means the POTS module has initialized and is ready to accept ormake a call.
4. Navigate to Setup and press the button.
5. Select Via to nominate the module used when dialing a connection, or select Any to use any
available module in the codec, then press the button.

68 Genie Distribution WheatNet-IP Manual v1.6
© Tieline Pty. Ltd. 2015
6. Navigate to the connection Mode and press the button to toggle between selecting eitherPOTS Codec or Analog Phone. Note: Redundant settings in the menu will disappear If youselect Analog Phone.
7. Select an algorithm, then press the button.
8. Select Tieline Codecs session data when connecting to another Tieline codec or Sessionlesswhen dialing to non-Tieline POTS codecs.
Important Notes: To dial a Comrex® Vector, Matrix® or BlueBox® codec over POTSselect the Other algorithm and Sessionless. Please note that 9.6kbps connections arenot supported by Comrex codecs.
9. Select the Dial Route to use for this audio stream if one is required, then press the button.Note: See Configuring POTS Answering for more information on Dial Route and Answer Routetags. These can be useful when routing multiple audio streams.
10.Navigate to Auto Reconnect and press the button to Enable or Disable this setting asrequired.
11. Select Module Configuration to adjust other settings specific to how you want POTSmodules to dial and answer, e.g. Maximum connection bit rate and dial tone settings etc.

69
© Tieline Pty. Ltd. 2015
Genie Distribution WheatNet-IP Manual v1.6
12.When configuration is complete press the RETURN button to navigate back to theConnect POTS screen.
Important Note: At this point you can navigate to Save on the Connect POTS screen
and press to use the numeric KEYPAD to name the program. Then press to savethe program.
13. Press the CONNECT button to make a connection. The Wait Connecting screenappears during the connection process.
Note: To load a saved program and dial press the HOME button, navigate to Programs,
select the program you want to dial and press the CONNECT button to load the program anddial.
14.To negotiate higher bit rates press then 3 on the numeric KEYPAD; for lower bit rates
press then 9.
Important Note: To load a saved program and dial press the HOME button,navigate to Programs, select the program you want to dial and press the CONNECT
button to load the program and dial.
See Monitoring POTS Connections for more details on monitoring the different POTS connectionstates.
22.6 Monitoring POTS Connections
Monitoring POTS Calls when Dialing and Connecting1. When dialing and connecting:
· The CONNECTED LED on the front of the unit will flash green.· The Cxns section on the Home screen displays Pending while the call is connecting (prior
to streaming audio data).
Cxns Displays Pending
· Connecting is displayed in the Modules menu via Settings > Modules.

70 Genie Distribution WheatNet-IP Manual v1.6
© Tieline Pty. Ltd. 2015
Modules Displays Connecting
2. While connecting you can also monitor dial tones and modem handshaking etc., via the leftchannel of the headphone output. For more details see the Monitor Modem Tones section inPOTS Module Settings.
Monitoring POTS Calls when Connected1. The CONNECTED LED on the front of the codec illuminates solid green when connected.
2. The newly connected audio stream connection becomes visible in the Cxns menu via the Homescreen. To view connection details:
a. Use the down navigation button to select Cxns and press the button.b. When multiple audio streams are connected, navigate to the one you want to view and press
the button to view connection details.
The Local and Remote line quality displayed for POTS Codec connections is related to the actualPOTS line quality at either end of the link. This reading affects the maximum allowable bit rate whenthe codec is training and negotiating a connection. It also indicates the stability of the connectionwhen a call has been connected for a long period of time. If the line quality starts drop quite low afterbeing connected for a long period, we recommend you retrain the connection to improve the linequality and avoid loss of audio.
22.7 Load and Dial Custom ProgramsCustom programs stored on the codec are simple to load and dial from the codec front panel.
1. Press the HOME button to return to the Home screen.
2. Use the navigation buttons to select Programs and press the button.3. Use the up and down navigation buttons to select the program you want to use, then
press the CONNECT button to load the program and make a connection. 4. The Wait Connecting screen appears during the connection process and then connection
details are displayed.
22.8 Disconnecting a Connection1. Press the red DISCONNECT button on the numeric KEYPAD at any time to hangup a
connection.
2. Use the right navigation button to select Yes and press the DISCONNECT button or the
button to confirm the disconnection.

71
© Tieline Pty. Ltd. 2015
Genie Distribution WheatNet-IP Manual v1.6
22.9 Redialing a ConnectionPress the CONNECT button from any codec menu to redial previous connections (exceptmenus accessed via the Connect > IP, ISDN or POTS screens).
Manually dialed connections are saved as programs - retaining all the dialing and configurationinformation programmed into the codec. A program is identified in the Recent Programs redialscreen using either a previously entered name, or by a dialing address or number (manually dialedconnections).
22.10 Configuring Auto ReconnectAuto Reconnect is disabled by default. When enabled, the dialing codec attempts to reconnect ifdata is temporarily lost over a connection.
Important Note: When Auto Reconnect is enabled, the dialing codec will continue toattempt a connection with the remote codec until Disconnect is pressed either on thedialing codec's keypad, or in the web-GUI.
Auto Reconnect using IP
1. Press the HOME button to return to the Home screen, select Connect, then select IPand press the button.
2. Select the IP Session mode you are using to connect.
3. Select Setup and press .
4. Navigate to Auto Recon and press to toggle between Enabled and Disabled.
Auto Reconnect using ISDN
1. Press the HOME button to return to the Home screen, select Connect, then select
ISDN and press the button.
2. Navigate to Auto Recon and press to toggle between Enabled and Disabled.
Auto Reconnect using POTS
1. Press the HOME button to return to the Home screen, select Connect, then select
POTS and press the button.
2. Select Setup and press .
3. Navigate to Auto Recon and press to toggle between Enabled and Disabled.
22.11 Speed Dialing Connections
Assigning Speed Dial Numbers
1. Press the HOME button to return to the Home screen.

72 Genie Distribution WheatNet-IP Manual v1.6
© Tieline Pty. Ltd. 2015
2. Use the navigation buttons to select Programs and press the button.
3. Navigate to the program you want to assign a speed number to and press the button.
4. Navigate to Speed Dial and press the button.
5. Navigate to the program you want to assign a speed dial number, then press the button.6. A confirmation message will display the number assigned.
Speed Dialing
1. Press the HOME button to return to the Home screen.2. Use the numeric KEYPAD to enter the speed dial number.
3. When the Speed Dial screen appears, press the button or the CONNECT button toconnect.
22.12 Dial/Disconnect Multiple Audio Stream Programs
Multiple Audio Streams within ProgramsSome programs are created to allow simultaneous audio stream connections with differentdestination codecs, e.g. 2 x Mono peer-to-peer programs. These programs can only be createdusing the Toolbox web-GUI.
There are two ways to simultaneously dial multiple audio stream connections within these types ofprograms:
1. Load the program into the codec via the front panel and dial.2. Connect to the codec using the Toolbox web-GUI and use the Master panel to load the
program and connect.
Dialing Multiple Audio Stream Programs with the Front Panel
1. Press the HOME button to return to the Home screen.
2. Use the navigation buttons to select Programs and press the button.3. Use the up and down navigation buttons to select the program you want to connect
with, then press the CONNECT button to make a connection. 4. The Wait Connecting screen appears briefly and then the Home screen is displayed.
It is also possible to redial the connection, see Redialing a Connection for more information.
Disconnect All Audio Stream Connections
1. Press the red DISCONNECT button on the numeric KEYPAD at any time to hangup all

73
© Tieline Pty. Ltd. 2015
Genie Distribution WheatNet-IP Manual v1.6
connections.
2. Use the right navigation button to select Yes and press the DISCONNECT button or
the button to confirm the disconnection.
Disconnect a Single Audio Stream (not available for multi-unicast connections)
1. Press the HOME button to return to the Home screen.
2. Use the navigation buttons to select Cxns and press the button.3. Use the up and down navigation buttons to select the connection you want to
disconnect.
3. Press the red DISCONNECT button on the numeric KEYPAD.
4. Use the right navigation button to select Yes and press the DISCONNECT button or
the button to confirm the disconnection.
22.13 Dialing SIP Peer-to-PeerImportant Note: When connecting to a Tieline G3 codec using SIP you need to manually
select the G3 audio reference level. To do this select SETTINGS > Audio > RefLevel > Tieline G3. In addition, select the following on the G3 codec prior to dialing.
· Select either a mono or stereo profile· Select [Menu] > [Configuration] > [IP1 Setup] > [Session Type] > [SIP]· Select [Menu] > [Configuration] > [IP1 Setup] > [Algorithm] > [G711/G722 or
MP2]
Dialing Peer-to-Peer SIP IP ConnectionsSIP can be used to make direct peer-to-peer calls to different brands of IP codecs with public IPaddresses, or between two codecs over a LAN which do not pass through firewalls. Peer-to-peer SIPcalls are usually used to connect to other brands of codecs and perform call and sessionmanagement tasks. Peer-to-peer SIP calls between two codecs are detected automatically andrequire no special pre-programming.
To make a peer-to-peer call between codecs we recommend both codecs use public IP addresses:
· Find out the IP address of the remote codec being dialed.· Program each codec with a compatible algorithm and sample rate etc.· Dial using SIP within the Connect menu.· If the remote codec has a private IP address then it should be configured for port forwarding
and should dial the public IP address at the studio (see Programming TCP/UDP Protocols formore details on port forwarding).
1. To dial peer-to-peer press the HOME button to return to the Home screen, select Connect> IP > SIP.
2. Use the numeric KEYPAD to enter the IP address of the codec you want to dial, using the or
buttons to enter the periods in the IP address and use the RETURN button to deletenumbers already entered.

74 Genie Distribution WheatNet-IP Manual v1.6
© Tieline Pty. Ltd. 2015
3. Then press the down navigation button to select Setup and press to adjust thealgorithm, jitter buffer and encode/decode direction if required.
4. Press the RETURN button to navigate backwards to the Connect SIP screen.
5. Press the CONNECT button to make a connection.
22.14 Dialing SIP Addresses
Dialing a SIP Address via the Codec Front Panel
1. Press the HOME button to return to the Home screen, then select Connect > IP > SIPand press the button.
2. Use the KEYPAD to enter any combination of alphabetic and numeric characters in the SIP
address of the codec you want to dial. Use the or buttons to enter the periods in the SIP
address and use the RETURN button to delete any numbers already entered. Alternatively,
if you have dialed the SIP address previously, press the RETURN button to view the RecentCall screen and select the SIP address you want.
3. Press the down navigation button to select Setup and press , then adjust the algorithm,jitter buffer, encode/decode direction, port and auto reconnect settings if required.
4. Press the RETURN button to navigate backwards to the Connect SIP screen and selectSave to name and save the program.
5. Press the CONNECT button to make a connection.
Important Notes: · See Configuring SIP Settings for instructions on entering SIP account details into the
codec. If your codec is registered with same SIP registrar as the destination codecthen you only need to enter the SIP user name to dial successfully.
· If you don't save the program during configuration, a temporary program is created afteryou dial the SIP connection for the first time using the codec KEYPAD. The temporaryprogram will appear in the recent calls list if you want to redial the program.
It is also possible to configure SIP programs using the Toolbox web-GUI. See the sectiontitled Configuring SIP Programs for more information.
22.15 Creating a Multicast Server ProgramTwo different types of multicast programs need to be created when multicasting:
· A multicast server program is used by the broadcasting codec to send multicast IP packetsto multicast routers on a network.
· A multicast client program is used by codecs to receive multicast IP audio packets.

75
© Tieline Pty. Ltd. 2015
Genie Distribution WheatNet-IP Manual v1.6
Important Notes: · You cannot edit a program when it is currently loaded in the codec.· Ensure all connection related settings like the port, algorithm, bit rate (etc) match
on both multicast server and client programs or they will not be able to joinmulticast streaming sessions.
· There is no jitter buffer setting in a multicast server program because it is an encodeonly program and never receives audio packets.
· Genie Distribution codecs are capable of creating up to 3 simultaneous multicastconnections, however only one can be configured using the front panel of the codec.The default UDP audio port is 9000 for a multicast server program configured via thecodec front panel.
· You can lock a loaded custom program in a codec to ensure the currently loadedprogram cannot be unloaded by a codec dialing in with a different program type.
· Always dial the multicast server codec connection first before connecting multicastclient codecs.
· Multicast client codecs will display return link quality (LQ) only. The Return readingrepresents the audio being downloaded from the network locally. Multicast servercodecs do not display LQ readings.
· Forward Error Correction (FEC) is not available for multicast connections.· It is not possible to send auxiliary data using multicast connections.· It is not possible for a G3 codec to receive multicast IP audio streams.· To learn more about programs see the section titled About Program Dialing.· See Toolbox web-GUI documentation for more detailed information about
Configuring Multicast Server Programs or Configuring Multicast Client Programs
1. Press the HOME button to return to the Home screen, select Connect > IP > Sessionlessand press the button.
2. Select Multicast Server to configure a server codec program.
3. Use the RETURN button to delete any numbers already entered, then use the numeric
KEYPAD to enter the multicast IP address you want to dial, using the or buttons to enterthe periods in the IP address. Note: The same multicast address and audio port must be used forboth the server and client programs. Next, press the down navigation button to select Setupand press .

76 Genie Distribution WheatNet-IP Manual v1.6
© Tieline Pty. Ltd. 2015
4. Press the down navigation button to select Algorithm and press .
5. Use the navigation buttons to select an algorithm profile or manually choose algorithm settings,
then press .
6. Navigate to and select TTL and enter the IP Time-To-Live value, then press . The TTL valueyou need to use is dependent upon your network infrastructure. Please consult your networkadministrator if you are unsure about how to configure this setting.
7. Select Protocol to select the audio protocol and adjust the Send Audio Port. Select UDP/IP+RTP for RFC compliant IP streaming. Press to save settings.
8. If required, enable Auto Reconnect and navigate to Via to specify which IP streaming interface
is used to dial this connection, e.g. Primary (port ETH1) or Secondary (port ETH2). Note: Bydefault Any will select ETH1 if it is available and ETH2 if it is unavailable.
9. Press the RETURN button when configuration is complete to navigate backwards to theConnect IP screen that the multicast IP address was entered into.
Important Note: At this point you can navigate to Save on the Connect IP screen and
press to save the settings as a custom program for subsequent recall and dialing. Use

77
© Tieline Pty. Ltd. 2015
Genie Distribution WheatNet-IP Manual v1.6
the numeric KEYPAD to give the program a name and press to save the program. Aconfirmation message is displayed after the program is saved.
Connecting a Multicast Program1. After you have created multicast server and client programs on your codecs you can dial
multicast connections. First select the multicast server program you want to use on the servercodec:
a. Press the HOME button to return to the Home screen.
b. Use the navigation buttons to select Programs and press the button.c. Use the up and down navigation buttons to select the multicast server program you
want to connect with, then press the button to load the program.
d. Press the CONNECT button to make a connection.
2. Select and load the multicast client program on each of the multicast client codecs and dial themulticast IP address to begin receiving multicast audio packets.
You can navigate to Cxns on the Home screen to view a codec's connection Status, then press to view connection statistics for IP packets being sent over the connection.
22.16 Creating a Multicast Client ProgramTwo different types of multicast programs need to be created when multicasting:
· A multicast server program is used by the broadcasting codec to send multicast IP packetsto multicast routers on a network.
· A multicast client program is used by codecs to receive multicast IP audio packets.
Important Notes: · You cannot edit a program when it is currently loaded in the codec.· Ensure all connection related settings like the port, algorithm, bit rate (etc) match
on both multicast server and client programs or they will not be able to joinmulticast streaming sessions.
· The default UDP audio port is 9000 for a multicast client program configured via thecodec front panel.
· You can lock a loaded custom program in a codec to ensure the currently loadedprogram cannot be unloaded by a codec dialing in with a different program type.
· Always dial the multicast server codec connection first before connecting multicastclient codecs.
· Multicast client codecs will display return link quality (LQ) only. The Return readingrepresents the audio being downloaded from the network locally.
· Forward Error Correction (FEC) is not available for multicast connections.· It is not possible to send auxiliary data using multicast connections.· It is not possible to connect to a G3 codec and receive multicast IP audio streams.· To copy multicast client programs onto multiple codecs see Save and Restore
Configuration Files.· To learn more about programs see the section titled About Program Dialing.· See Toolbox web-GUI documentation for more detailed information about

78 Genie Distribution WheatNet-IP Manual v1.6
© Tieline Pty. Ltd. 2015
Configuring Multicast Client Programs
1. Press the HOME button to return to the Home screen, select Connect > IP > Sessionlessand press the button.
2. Select Multicast Client to configure a client codec program.
3. Use the RETURN button to delete any numbers already entered, then use the numeric
KEYPAD to enter the multicast IP address you want to dial, using the or buttons to enterthe periods in the IP address. The same multicast address and audio port must be used for boththe server and client programs. Next, press the down navigation button to select Setup and
press .
4. Press the down navigation button to select Algorithm and press .
5. Use the navigation buttons to select an algorithm profile or manually choose algorithm settings,
then press .
6. Click to configure the Jitter Buffer from either Auto Jitter Adapt or Fixed Buffer Level , thenand enter the Jitter Depth, which must be between 12ms and 5000ms depending on the
algorithm you select, then press .

79
© Tieline Pty. Ltd. 2015
Genie Distribution WheatNet-IP Manual v1.6
Important Notes: Automatic or fixed jitter buffer settings can be adjusted on individualclient codecs as required. There is no jitter buffer setting on the server codec because itnever receives audio packets.
7. Select Protocol to select the audio protocol and adjust the Return Audio Port. Select UDP/IP+RTP for RFC compliant IP streaming. Press to save settings.
8. If required, enable Auto Reconnect and use Via to specify which IP streaming interface is used
to dial this connection, e.g. Primary (port ETH1) or Secondary (port ETH2). Note: By defaultAny will select ETH1 if it is available and ETH2 if it is unavailable.
9. Press the RETURN button when configuration is complete to navigate backwards to theConnect IP screen that the multicast IP address was entered into.
Important Note: At this point you can navigate to Save on the Connect IP screen and
press to save the settings as a custom program for subsequent recall and dialing. Use
the numeric KEYPAD to give the program a name and press to save the program. Aconfirmation message is displayed after the program is saved.
Connecting a Multicast Client Program1. After you have created multicast server and client programs on your codecs you can dial
multicast connections. First select the multicast server program you want to use on the servercodec and dial to connect.
2. Select and load the multicast client program on each of the multicast client codecs and dial themulticast IP address to begin receiving multicast audio packets.
a. Press the HOME button to return to the Home screen.

80 Genie Distribution WheatNet-IP Manual v1.6
© Tieline Pty. Ltd. 2015
b. Use the navigation buttons to select Programs and press the button.c. Use the up and down navigation buttons to select the multicast client program you
want to connect with, then press the button to load the program.
d. Press the CONNECT button to make a connection.
You can navigate to Cxns on the Home screen to view a codec's connection Status, then press to view connection statistics for IP packets being received over the connection.
22.17 Deleting Programs1. Press the HOME button to return to the Home screen.
2. Use the navigation buttons to select Programs and press the button.
3. Navigate to the program you want to delete and press the button.
4. Navigate to Delete and press the button.
5. Confirm the deletion and press the button.
22.18 Selecting Algorithm ProfilesA number of pre-programmed mono and stereo dialing profiles are available for programming thecodec quickly without individually selecting algorithms and bit rates etc. These profiles have beenprogrammed with the most popular settings that provide high quality connections using eachavailable algorithm.
1. Press the HOME button to return to the Home screen.
2. Use the navigation buttons to select Connect and press the button.
3. Select IP and press the button.
4. Select Tieline session mode and press the button. Note: algorithm profiles are onlyavailable for Tieline session connections.
5. Use the down navigation button to select Setup and press the button.
6. Select Algorithm and press the button.
7. Use the right navigation button to select Profile.8. Choose the profile you want from the Favorite, Mono or Stereo menus.

81
© Tieline Pty. Ltd. 2015
Genie Distribution WheatNet-IP Manual v1.6
Features Codec Home Screen Elements1 Favorite Displays a list of favorite profiles that have been selected manually
within the codec by users
2 Mono Displays preprogrammed mono profiles within the codec
3 Stereo Displays preprogrammed stereo profiles within the codec
Adding a Profile into the Favorite Menu
1. Press the HOME button to return to the Home screen.
2. Use the navigation buttons to select Connect and press the button.
3. Select IP and press the button.
4. Select your preferred IP Session mode and press the button.
5. Use the down navigation button to select Setup and press the button.
6. Press the button to select Algorithm.
7. Use the right navigation button to select Profile.8. Select the profile you want from the Mono or Stereo menus.
9. Press the hatch (pound) button to add the profile into the Favorite menu.
Profiles that have been added into the Favorite menu are identified by the hatch (pound) symbolnext to their name after they have been selected.
Deleting a Profile from the Favorite Menu
1. Press the HOME button to return to the Home screen.
2. Use the navigation buttons to select Connect and press the button.
3. Select IP and press the button.
4. Select your preferred IP Session mode and press the button.
5. Use the down navigation button to select Setup and press the button.
6. Press the button to select Algorithm.
7. Use the right navigation button to select Profile.8. Select the profile you want to delete from the Favorite menus.
9. Press the hatch (pound) button to delete the selected profile from the favorite menu.

82 Genie Distribution WheatNet-IP Manual v1.6
© Tieline Pty. Ltd. 2015
22.19 Genie Distribution Algorithm ProfilesThe following algorithm profiles are programmed into Genie Distribution codecs.
ProfilesAlgorithm Mono/Stereo Sample Rate (kHz) Bit rate (kbps)
1 AAC Mono 48 64
2 AAC Stereo 48 128
3 AAC Stereo 48 256
4 HE-AAC Mono 32 16
5 HE-AAC Stereo 32 24
6 HE-AAC Stereo 32 48
7 AAC-LD Mono 32 48
8 AAC-LD Stereo 32 64
9 AAC-ELD Mono 32 24
10 AAC-ELD Stereo 32 48
11 aptX Enhanced Mono 32 (16 bit) 128
12 aptX Enhanced Mono 48 (24 bit) 288
13 aptX Enhanced Stereo 32 (16 bit) 256
14 aptX Enhanced Stereo 48 (24 bit) 576
15 G.711 Mono 8 64
16 G.722 Mono 16 64
17 MPEG 1 Layer 2 J-Stereo 32 128
18 MPEG 1 Layer 2 J-Stereo 48 192
19 MPEG 1 Layer 2 Mono 24 64
20 MPEG 1 Layer 2 Mono 48 256
21 MPEG 1 Layer 2 Stereo 32 128
22 MPEG 1 Layer 2 Stereo 48 256
23 Music Mono 32 28.8
24 Music Mono 32 48
25 Music Stereo 32 64
26 Music Stereo 32 96
27 MusicPLUS Mono 48 48
28 MusicPLUS Mono 48 96
29 MusicPLUS Stereo 48 96
30 MusicPLUS Stereo 48 128
31 MusicPLUS Stereo 48 192
32 PCM Mono Mono 48 (16bit) 768
33 PCM Stereo Stereo 48 (16bit) 1,540
34 PCM Mono Mono 96 (24bit) 2,304
35 PCM Stereo Stereo 96 (24bit) 4,608
36 Opus Mono Mono 48 64
37 Opus Stereo Stereo 48 128

83
© Tieline Pty. Ltd. 2015
Genie Distribution WheatNet-IP Manual v1.6
22.20 Genie Distribution Backup OptionsTieline codecs feature highly advanced backup and redundancy options to maintain reliable audiocodec streaming. These include the options outlined in the following table:
Tieline Audio Codec Backup FeaturesBackupOption
Transport: IP, ISDN or POTS
Time Required toRespond
How to Enable
SmartStreamPLUS
IP Only (Note: concurrent packetstream sent; codecdetects IP packet loss ordelayed packets)
No time delay -simultaneous dualredundant streaming
Enabled in dialing codecprogram; configures localdecoding, or remotedecoding via session data
On-demand(cold) Failover
All transports (Note: codec detectsloss of data orconnection and redialsthe backup connection)
User configurabledetection parametersduring programconfiguration*. Delay isequal to detection timeplus the time required todial the alternativeconnection
Dialing codec programmonitors streaming andmanages failover
File Playback All transports(Note: enabled by loss ofdecodable audio orconnection problem)
User configurabledetection parametersduring programconfiguration*
Enabled in the answeringor dialing codec program
FEC(ForwardErrorCorrection)
IP Only(Note: decoding codecdetects IP packet loss ordelayed packets)
No time delay - packetreplacement occurs inreal-time
Dialing codec configureslocal and remote FECsettings via session datatransfer when connecting
AutoReconnect
All transports; codec willredial continuously to tryand reconnect
Immediately redials afterloss of IP stream detected
Enabled in dialing codecprogram
* Note: POTS can take up to 60 seconds to connect successfully.
Important Note: Failover and SmartStream PLUS redundant streaming are not availablewith SIP or sessionless IP connections.
SmartStream PLUS Redundant IP StreamingTieline’s proprietary SmartStream PLUS IP technology ensures you’re always on the air. The codecfeatures dual Ethernet IP ports allowing two completely independent IP connections. There are threelevels to SmartStream PLUS IP streaming.
1. The codec can stream simultaneous redundant data streams from both Ethernet ports anddeliver seamless redundancy by switching back and forth, without loss of audio, from thenominated primary data link to the backup link if one fails and then subsequently recovers.Use IP links from two different IP network providers for optimal redundancy over missioncritical connections.
2. Second, when multiple redundant audio streams are sent, the decoding codec automaticallyreconstructs audio into a single stream on a first packet arrived basis, to minimize programlatency and ensure audio integrity.
3. Third, SmartStream features automated jitter buffer management and Forward Error

84 Genie Distribution WheatNet-IP Manual v1.6
© Tieline Pty. Ltd. 2015
Correction (FEC) and these advanced network management tools deliver uncompromisingaudio quality, while dynamically responding to variable conditions over unmanaged IPnetworks like the internet.
These combined measures ensure Tieline is capable of offering a rock solid IP audio solution fordistributing IP audio economically and efficiently across broadcast networks. See the procedures forconfiguring different programs using the web-GUI for more configuration details.
On-Demand Failover (IP, ISDN or POTS)On-demand failover requires configuration of a primary connection and an on-demand 'cold' backupconnection. On-demand failover is activated when the dialing codec program detects the loss of theprimary connection, or if audio streaming ceases. The backup connection is then dialed to replacethe primary connection.
The codec can be configured to switch to a backup connection over IP, ISDN or POTS as required.For example, you can create a program with IP as the primary connection and also create a backupISDN or POTS connection in the same program. For details on configuring backup connectionsusing failover see Configure Mono or Stereo Peer-to-Peer Programs.
USB File Backup ConnectionsThe codec features a USB 2.0 Host port for connection to USB memory sticks and selectedexternal devices. Backup connections are configured using the web-GUI and this is outlined inConfiguring Mono or Stereo Peer-to-Peer Programs; USB file backup specifically is outlined inConfigure File Playback on Silence Detection.
Important Notes: · Ensure MP3 recordings used are not variable bit rate files.· When you create your MP2 or MP3 files please ensure that the audio levels match the
audio scale of your codec connection and that peaks average at the correct levels,because IGC is only used on audio inputs and not file playback.
USB file backup is automatic and occurs:
1. If encoded audio streaming from a remote codec is lost for a time period predetermined withinthe web-GUI (default 30 seconds).
2. Immediately if a connection to another codec is lost, i.e. someone hangs up the call at theremote codec.
3. Immediately if the LAN cable is removed from the local codec.

85
© Tieline Pty. Ltd. 2015
Genie Distribution WheatNet-IP Manual v1.6
The codec Home screen indicates failover to a USB device has occurred by displaying (F) in theCxns display. The audio file will play continuously in loop mode until a new connection is created.Backup USB failover will continue as you attempt to dial a new connection and only ceases when asuccessful reconnection is made.
Important Note: · USB backup audio is only sent to the outputs of the local codec to which a USB drive is
attached. USB file audio is not sent to encoders and cannot be transmitted via an audiostream to another codec.
· The USB drive can be inserted or removed at any time as long as the codec is notalready playing audio in failover mode. Removing the USB drive while audio is playingfrom it will result in poor audio quality and should be avoided. If it is removedaccidentally you must reboot the codec to ensure USB failover will work in future.
Caution: Do not attach a bootable USB drive to the USB HOST PORT or the codec willattempt to reboot using the USB drive instead of the codec if the codec is repowered. Toensure a drive is non-bootable, remove all system partitions and format the device withoutsystem startup files.
Forward Error Correction (FEC)FEC transmits a secondary stream of audio data packets over a single connection. If packets arelost or corrupted over the connection then replacement FEC data packets can be substituted toreplace them.
Note: FEC should not be confused with SmartStream PLUS. FEC packets are sent over a singledata stream connection, whereas SmartStream PLUS dual redundant streaming transmits twocompletely redundant audio data streams. FEC is also a subset of features within SmartStreamPLUS, which means you can configure SmartStream PLUS dual redundant data streams and alsoconfigure FEC on each of these data streams. For more info on FEC see Configuring Forward ErrorCorrection.
Auto ReconnectAuto Reconnect is the simplest form of connection backup whereby the codec will redial a lostconnection continuously until it is either:
· Re-established, or· Dialing is manually stopped.
Auto reconnect can be enabled when configuring a codec program designed to dial another codec orcodecs. See the procedures for configuring different programs using the web-GUI for moreconfiguration details.
22.21 USB File Playback
Playing Audio from the USB PortA device connected to the USB HOST PORT is treated as a connection and files can be playedback using the codec front panel controls.
1. Press the HOME button to return to the Home screen.
2. Select Connect, then select File and press the button.3. Use the navigation buttons to select a file.
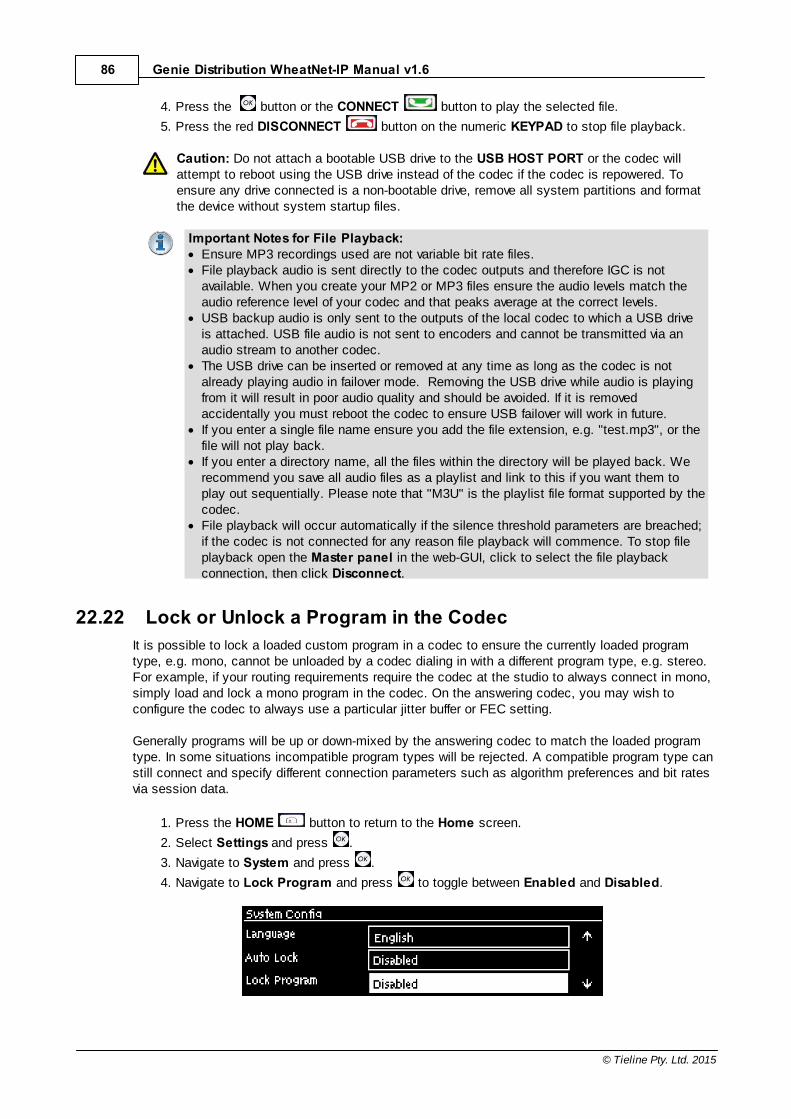
86 Genie Distribution WheatNet-IP Manual v1.6
© Tieline Pty. Ltd. 2015
4. Press the button or the CONNECT button to play the selected file.
5. Press the red DISCONNECT button on the numeric KEYPAD to stop file playback.
Caution: Do not attach a bootable USB drive to the USB HOST PORT or the codec willattempt to reboot using the USB drive instead of the codec if the codec is repowered. Toensure any drive connected is a non-bootable drive, remove all system partitions and formatthe device without system startup files.
Important Notes for File Playback: · Ensure MP3 recordings used are not variable bit rate files.· File playback audio is sent directly to the codec outputs and therefore IGC is not
available. When you create your MP2 or MP3 files ensure the audio levels match theaudio reference level of your codec and that peaks average at the correct levels.
· USB backup audio is only sent to the outputs of the local codec to which a USB driveis attached. USB file audio is not sent to encoders and cannot be transmitted via anaudio stream to another codec.
· The USB drive can be inserted or removed at any time as long as the codec is notalready playing audio in failover mode. Removing the USB drive while audio is playingfrom it will result in poor audio quality and should be avoided. If it is removedaccidentally you must reboot the codec to ensure USB failover will work in future.
· If you enter a single file name ensure you add the file extension, e.g. "test.mp3", or thefile will not play back.
· If you enter a directory name, all the files within the directory will be played back. Werecommend you save all audio files as a playlist and link to this if you want them toplay out sequentially. Please note that "M3U" is the playlist file format supported by thecodec.
· File playback will occur automatically if the silence threshold parameters are breached;if the codec is not connected for any reason file playback will commence. To stop fileplayback open the Master panel in the web-GUI, click to select the file playbackconnection, then click Disconnect.
22.22 Lock or Unlock a Program in the CodecIt is possible to lock a loaded custom program in a codec to ensure the currently loaded programtype, e.g. mono, cannot be unloaded by a codec dialing in with a different program type, e.g. stereo.For example, if your routing requirements require the codec at the studio to always connect in mono,simply load and lock a mono program in the codec. On the answering codec, you may wish toconfigure the codec to always use a particular jitter buffer or FEC setting.
Generally programs will be up or down-mixed by the answering codec to match the loaded programtype. In some situations incompatible program types will be rejected. A compatible program type canstill connect and specify different connection parameters such as algorithm preferences and bit ratesvia session data.
1. Press the HOME button to return to the Home screen.
2. Select Settings and press .
3. Navigate to System and press .
4. Navigate to Lock Program and press to toggle between Enabled and Disabled.

87
© Tieline Pty. Ltd. 2015
Genie Distribution WheatNet-IP Manual v1.6
5. When program lock is Enabled a warning message confirms program status.
6. When program lock is Disabled a warning message confirms incoming calls may load anysupported factory program.
7. Press the RETURN button to exit the warning message.
Important Note: It is only possible to lock custom programs in a codec. If LockProgram is enabled and you load a new custom program in the codec, Lock Programremains enabled and locks the most recently loaded custom program.
22.23 Locking the Front PanelThe codec features a front panel lock feature for tamper-proof operation. This feature is disabled bydefault.
There are two levels of panel lock and each requires a user to enter a PIN to access differentfeatures:
1. Admin PIN: Required to change codec connection or configuration settings accessed via
the SETTINGS button. (Default PIN is: 456789)2. User PIN: Required to use the codec front panel buttons and dial/hangup a connection
(Default PIN is: 123456)
Enabling the Front Panel Lock Feature
1. Press the SETTINGS button.
2. Navigate to System and press .
3. Navigate to Auto Lock and press to toggle from Disabled to Enabled.
4. Navigate down to the panel Lock Timeout field and press to enter the desired time-outperiod in seconds. Note: The time-out period is the time in seconds before the codec frontpanel is relocked after being used.

88 Genie Distribution WheatNet-IP Manual v1.6
© Tieline Pty. Ltd. 2015
5. If you want to change the default Admin PIN or User PIN, navigate down to each in turn and
press to enter a new PIN.

89
© Tieline Pty. Ltd. 2015
Genie Distribution WheatNet-IP Manual v1.6
23 Connecting to the ToolBox Web-GUIThere are three graphical user interface (GUI) options for configuring Tieline G5 codecs:
1. Java Toolbox Web-GUI: codecs can be fully configured including program creation, dial andhangup, command and control.
2. HTML5 Toolbox Web-GUI: most codec settings can be configured, dial and hangup existingprograms only, quick connect option available for simple peer-to-peer connections, commandand control.
3. HTML5 Toolbox Quick Connect Web-GUI: designed for simple peer-to-peer connections andnon-technical users.
About the Java Toolbox Web-GUICodecs can be fully configured using the Java ToolBox Web-GUI and this can be launched using anIP/LAN connection with the codec. Instructions for using the Java web-GUI are contained in theapplication itself from the Help panel and additional information is available at http://www.tieline.com/support/toolbox. The Tieline Java Toolbox Web-GUI application runs on:
· Internet Explorer 6 or greater on Windows® XP, Windows Vista ® and Windows 7 ®. · Firefox® 3 or greater on Windows® XP, Windows Vista ® and Windows 7 ®, Solaris™ and
Linux®.
Java Toolbox Web-GUI Prerequisites1. To use the Java ToolBox Web-GUI you will need to download the latest version of Java™ by
visiting http://www.java.com. The Web-GUI will prompt you to do this if Java is not installedand you attempt to launch the Java ToolBox Web-GUI.
2. After updating to the latest version of Java you need to refresh your browser.
About the HTML5 Toolbox Web-GUIThe HTML5 Toolbox Web-GUI was developed to improve the user experience with G5 codeccommand and control. With some major web-browsers moving away from Java compatibility, Tielinehas delivered an HTML5 configuration option which runs seamlessly on modern browsers.
The HTML5 Toolbox Web-GUI will run on computers and tablets, as well as iOS and Androidsmartphones, which expands the range of devices engineers can now use for configuration. Inaddition, many users have previously experienced connectivity issues due to regular Java updatesdesigned to mitigate exposure to security vulnerabilities. By using the HTML5 Toolbox these issueswill be avoided.
Most codec settings can be configured using the HTML5 Toolbox Web-GUI, including:
· Dial and hangup existing programs only (currently program creation wizard is not available).· Quick connect option available for simple peer-to-peer connections: configure IP, SIP, ISDN
and POTS connections including the algorithm, sample rate, bit-rate and dial number/address.
· Extensive command and control of codec settings.
About the HTML5 Toolbox Quick ConnectThe HTML5 Toolbox Quick Connect Web-GUI has a reduced feature-set and allows non-technicalusers to load existing programs and dial via the Quick Connect panel. Users can dial a simplepeer-to-peer connection over POTS, ISDN or IP.

90 Genie Distribution WheatNet-IP Manual v1.6
© Tieline Pty. Ltd. 2015
23.1 Opening the Java or HTML5 Web-GUI & Login1. Attach an Ethernet cable to the ETH1 port on the codec.
2. Press the SETTINGS button and select Unit to display the IP address programmed intoyour codec.
3. Ensure your PC is connected to the same LAN.4. Open your web browser and type the IP address of your codec into the address bar of your
browser, e.g. http://192.168.0.xxx (the last digits are the private address details unique to yourcodec over a private LAN).
5. Refresh the browser and the Web-GUI landing page will display the various command and controloptions.
Launching the Java Toolbox Web-GUI
1. Click to launch the ToolBox Web Start Desktop Application (this is recommended inpreference to launching the Java Toolbox Browser Applet). Note: When you launch for the firsttime the application will download and launch the desktop Toolbox application that will allow youto configure your codec. A desktop short-cut will also be created.
DesktopIcon
2. When you launch Toolbox an authentication dialog prompts you to enter a password to login. Thefirst time you log in you can enter the default setting "password" and click the OK button. Tielinehighly recommends you click the hyperlink in the login dialog or visit Changing the DefaultPassword to change the password. This will provide better network security to maintain reliabilityduring live broadcasts.

91
© Tieline Pty. Ltd. 2015
Genie Distribution WheatNet-IP Manual v1.6
Important Note: If you update Java software or clear the Java cache on your computeryou will need to repeat the preceding steps. If you have trouble launching the Web-GUI ina browser, type http://<insert codec IP address>.htm directly in your browser.
Launching the HTML5 Toolbox Web-GUI1. Click to launch the HTML5 Toolbox Web-GUI.
2. When you launch Toolbox for the first time an authentication dialog prompts you to enter the username "admin" and password "password" to login, then click the OK button. Tieline highlyrecommends you change the password (see Changing the Default Password). This will providebetter network security to maintain reliability during live broadcasts.
Launching the HTML5 Toolbox Quick Connect1. Click to launch the HTML5 Toolbox Quick Connect Web-GUI.
2. When you launch Toolbox for the first time an authentication dialog prompts you to enter the username "admin" and password "password" to login, then click the OK button. Tieline highlyrecommends you change the password (see Changing the Default Password). This will providebetter network security to maintain reliability during live broadcasts.
Using the Web-GUI over the InternetIf your codec is connected over the internet via a public static IP address it is possible to connectand configure it from any PC which is also connected to the internet.

92 Genie Distribution WheatNet-IP Manual v1.6
© Tieline Pty. Ltd. 2015
LAN Troubleshooting
PC LAN SettingsCheck the LAN settings on your PC if it is connected to a LAN and is having trouble opening theToolbox Web-GUI in a web-browser.
1. Open Internet Explorer.2. Click Tools > Internet Options > Connections.3. Click the LAN settings button.4. If the PC is using a proxy server over the LAN you may need to select the Bypass
proxy server for local addresses option box.5. If you still can't connect, click the Advanced button in the LAN Settings dialog and ask
your IT administrator to assist you with entering the IP address of the codec into theExceptions pane of the Proxy Settings dialog.
Port SelectionBy default port 80 is used by your PC to communicate with the codec and launch the web-GUI.If port 80 cannot be used across your network for some reason, type the IP address of yourcodec into your browser with a full colon and the port number 8080.
E.g. 192.168.0.176:8080
It is also possible to specify a different port for connecting the Toolbox web-GUI to your codec.
1. Press the HOME button on the codec to return to the Home screen.
2. Use the navigation buttons to select Settings and press the button.
3. Use the navigation button to navigate down to WebGUI and press the button.
4. Select Alt. Port and press .
5. Use the KEYPAD to enter a new port number and press the button to save the newsetting.
6. Type the IP address of your codec into your browser with a full colon and then the newport number.
Important Note: Any new port specified must be within the range 2000 to 65535inclusive.

93
© Tieline Pty. Ltd. 2015
Genie Distribution WheatNet-IP Manual v1.6
23.2 Changing the Default PasswordThe default password for the Toolbox Web-GUI is password. Enter this in the authentication dialogto use the Web-GUI initially and then Tieline highly recommends changing the default password toprotect your codec from being tampered with during live broadcasts.
Toolbox Java Web-GUI Login Dialog
Toolbox HTML5 Web-GUI Login Dialog on a Merlin Codec
Caution: Codecs connected to the internet can be accessed by anyone with knowledge ofthe codec's public IP address. Setting a strong password protects your equipment frombeing tampered with and jeopardizing live broadcasts.
Creating a New PasswordThe authentication login password can be changed at any time using the codec keypad and LCDscreen. Note that passwords are case sensitive:
1. Press the SETTINGS button.
2. Use the navigation button to select WebGUI and press the button.
3. Select Password and press .
4. Use the KEYPAD to enter a new password and press the button to save the new setting(Note: there is no character limit for passwords).
If you forget the password for the Toolbox web-GUI then you can always press the SETTINGS button on the codec and navigate to WebGUI to view the current password and change it ifrequired.
Important Note: The Username in the codec menu is permanently set to admin andcannot be changed; only the Password can be changed.

94 Genie Distribution WheatNet-IP Manual v1.6
© Tieline Pty. Ltd. 2015
24 Using the Java Toolbox Web-GUIThe following sections provide an overview of the different programming panels available within theJavaToolbox Web-GUI. Navigate with the mouse pointer to a symbol at the top of the Web-GUIscreen and click to open the panel selected. When a panel is opened in the Web-GUI, the textbelow the symbol at the top of the screen is highlighted (see Master in the following image).
Web-GUI Symbols for Opening Panels
The most recently opened panel is displayed underneath the Master panel by default. Click the
Maximize/Minimize symbol to view a panel in full-screen mode, or click to minimize back tothe default panel size.
Master Panel to Load Programs and Connect Audio Streams
Feature Description1 Input/Output PPMs 6 PPM meters to display audio levels for inputs and outputs
2 Connections Provides a summary of connection details and audio streams
3 Locked program Symbol indicates the currently loaded program is locked
4 Maximize/Minimize Click to maximize a panel to view it in full-screen mode, or clickto minimize back to the default panel size
5 Close button Click to close the Master panel6 Connect button Click Connect to connect all audio streams configured within the
currently selected program in the Programs list; this button alsoloads the program currently selected in the Programs list
7 Load button Click to load the program currently selected in the Programs list
8 Programs list Lists all configured programs which have been added into thecodec. Click to select a program before loading or connecting
9 Disconnect button Click to disconnect the currently selected audio stream or aspecific connection. Note: this button becomes a Connect orUnload button when all audio streams are disconnected.
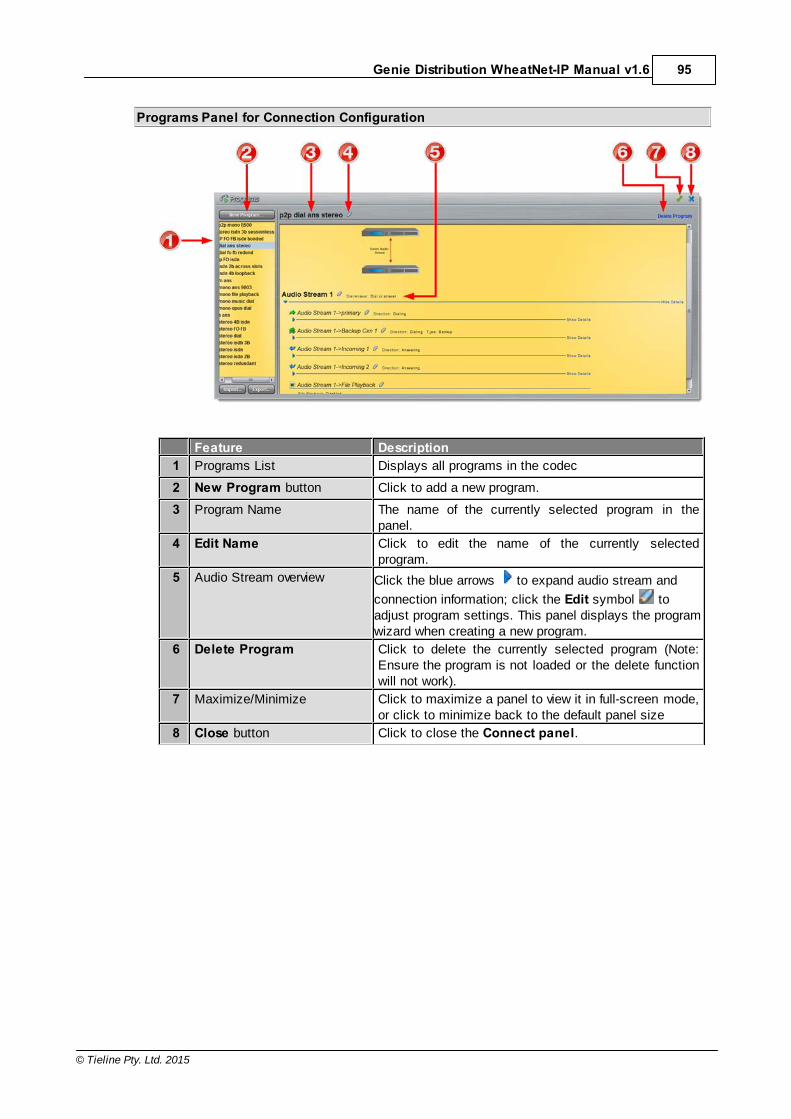
95
© Tieline Pty. Ltd. 2015
Genie Distribution WheatNet-IP Manual v1.6
Programs Panel for Connection Configuration
Feature Description1 Programs List Displays all programs in the codec
2 New Program button Click to add a new program.
3 Program Name The name of the currently selected program in thepanel.
4 Edit Name Click to edit the name of the currently selectedprogram.
5 Audio Stream overview Click the blue arrows to expand audio stream and
connection information; click the Edit symbol toadjust program settings. This panel displays the programwizard when creating a new program.
6 Delete Program Click to delete the currently selected program (Note:Ensure the program is not loaded or the delete functionwill not work).
7 Maximize/Minimize Click to maximize a panel to view it in full-screen mode,or click to minimize back to the default panel size
8 Close button Click to close the Connect panel.

96 Genie Distribution WheatNet-IP Manual v1.6
© Tieline Pty. Ltd. 2015
Inputs Panel for Input Adjustments
Important Note: Tieline codecs have different input configurations, therefore the imageshown may not reflect the number of inputs displayed in your codec Web-GUI.
Feature Description1 Channel ON/OFF Buttons Click to turn each channel ON or OFF2 Reference levels menu Click the drop-down arrow to select the codec input
reference level (default setting Auto)
3 Lock Button Click to lock all Input panel settings (greys out whenlocked)
4 View local Click to view local codec inputs (default)
5 Settings button Click to adjust input Name, Type, IGC and Ganging6 Maximize/Minimize Click to maximize a panel to view it in full-screen mode,
or click to minimize back to the default panel size
7 Close button Click to close the panel
8 Input Sliders/Faders Input gain control sliders/faders
9 Analog/AES3 Indication Indicates whether the codec input is configured foranalog or digital audio sources
10 Input PPM meter Input PPM meter

97
© Tieline Pty. Ltd. 2015
Genie Distribution WheatNet-IP Manual v1.6
Statistics Panel for Monitoring Connection Stability
Feature Description1 Headings Headings for the various packet arrival statistics available
2 Connection Statistics Right-click to view audio stream bit-rate and jitter bufferstatistics
3 Maximize/Minimize Click to maximize a panel to view it in full-screen mode, orclick to minimize back to the default panel size
4 Close button Click to close the panel

98 Genie Distribution WheatNet-IP Manual v1.6
© Tieline Pty. Ltd. 2015
Rules Panel for Creating Relay Activation Rules
Rule Description1 Connect and disconnect a
program when an input istoggled
Click to configure Connection and Disconnection bytoggling an input
2 Connect when an input isswitched ON; Disconnectwhen another input isswitched ON
Click to configure Connection and Disconnection afterdifferent relay inputs are switched ON
3 Connect and Disconnect onAudio Detection
Click to configure the codec to connect when audio isdetected and disconnect when silence is detected
4 Synchronise a local relay inputwith a remote relay output
Click to configure a local relay input to synchronisewith the state of a remote relay output
5 Toggle a relay based on aconnection's status
Click to configure a relay to toggle based onconnection status
6 Maximize/Minimize Click to maximize a panel to view it in full-screenmode, or click to minimize back to the default panelsize
7 Close button Click to close the Rules panel

99
© Tieline Pty. Ltd. 2015
Genie Distribution WheatNet-IP Manual v1.6
Alarms Panel
Feature Description1 Current Alarms Click to view current device alarms
2 Alarm History Click to view the history of device alarms
3 Acknowledge SelectedAlarm
Click to acknowledge an alarm after activation
4 Alarm details pane Displays alarm details
5 Alarm description pane Troubleshooting information to assist users whenalarms occur
6 Maximize/Minimize Click to maximize a panel to view it in full-screen mode, orclick to minimize back to the default panel size
7 Close button Click to close the Alarms panel
8 Configure alarms Click to create or edit alarms.

100 Genie Distribution WheatNet-IP Manual v1.6
© Tieline Pty. Ltd. 2015
Settings Panel
Feature Description1 Network tab Click to edit or view codec network configuration settings
2 Options tab Click to configure RS232 and QoS data settings, lock a loadeduser Program and adjust Session Port settings and SNMP.
3 Audio tab Click to configure the AES Output Clock sample rate
4 SIP tab Click to edit or view SIP configuration settings
5 Modules tab Click to edit hardware module configuration
6 ISDN Answer tab Click to configure ISDN Answering settings
7 POTS Answer tab Click to configure POTS Answering settings
8 Firmware tab Click to view software versions and perform an upgrade
9 Licensing tab Click to select a license file and install it into the codec
10 Reset/Restore tab Click to reset codec default settings and perform backup/restoreof codec programs and settings
11 DNS Pane Activate to specify DNS addresses and domains to search.
12 Maximize/Minimize Click to maximize a panel to view it in full-screen mode, or clickto minimize back to the default panel size
13 Close button Click to close the panel
14 Network Interface Select a network interface for configuration options
15 Network InterfaceIdentifier
Control and streaming configuration options for each networkinterface, e.g. Ethernet Port 1 or 2.
16 IPv6 details IPv6 addressing details and configuration
17 MAC Address Device MAC address
18 IPv4 details IPv4 addressing details and configuration
19 Save Settings button Saves all configuration settings

101
© Tieline Pty. Ltd. 2015
Genie Distribution WheatNet-IP Manual v1.6
Help Panel
Feature Description1 About Details of the Toolbox Web-GUI and codec firmware versions, as
well as the codec serial number
2 Resources Links to open the user manual in a new browser, or view supportinformation
3 Support Logs Click to download diagnostic information that can be sent toTieline support
4 Event Logs Click to download user-viewable event logs
5 Maximize/Minimize Click to maximize a panel to view it in full-screen mode, or clickto minimize back to the default panel size
6 Close button Click to close the Help panel
Language Selection
The Toolbox Web-GUI offers language support for several languages.
1. Click on the language drop-down menu arrow in the top right-hand corner of the Web-GUIpage.
2. Select your language of choice.
3. Click to refresh your web-browser and display the new language selected.

102 Genie Distribution WheatNet-IP Manual v1.6
© Tieline Pty. Ltd. 2015
24.1 Configuring IP SettingsClick the Settings symbol to open the Settings panel and click the Network button to viewEthernet and VLAN interface settings in the Web-GUI.
Important Note: For assistance with configuration of IPv4 or IPv6 network connectionscontact your IT Administrator.
IPv4 versus IPv6An IP address is a unique address to identify a device on a TCP/IP network. Your codec uses dualIP protocol stacks to allow your codec to work on both IPv4 and IPv6 networks. Your Tieline codecsupports both DHCP (default) IP addressing and static IP addresses for dialing IPv4 connectionendpoints.
If you want to dial a codec with a public IP address you simply dial the IP address to connect. If youwant to dial a codec with a private IP address you need to perform network address translation(NAT). NAT allows a single device, such as a broadband router, to act as an agent between thepublic internet and a local private LAN. Usually this will be set up at the studio end so you can dialinto the studio from the remote codec.
Support for IPv6 connections allows you to use IPv6 infrastructure to connect to other codecsglobally.
Configuring Ethernet Ports and VLANsThe codec features two physical Ethernet port interfaces and up to four additional VLAN interfaces.
VLAN interfaces have features similar to physical Ethernet interfaces. However, your networkadministrator will need to configure VLAN support throughout your network for them to be supportedin your codec.
As an example, if only one physical Ethernet interface is available, VLANs can be used to operateSmartStream PLUS or to separate codec Control and Streaming functions if required. Ethernet andVLAN interfaces can be configured for:
· Controlling audio: codec control and command only from the Ethernet port.· Controlling and Streaming: stream audio and control and command the codec via the Ethernet
port.· Streaming audio: stream audio only from an Ethernet port (ETH2 and VLANs only).· Nothing: Disable the Ethernet port from streaming audio and codec command and control
(VLANs only).
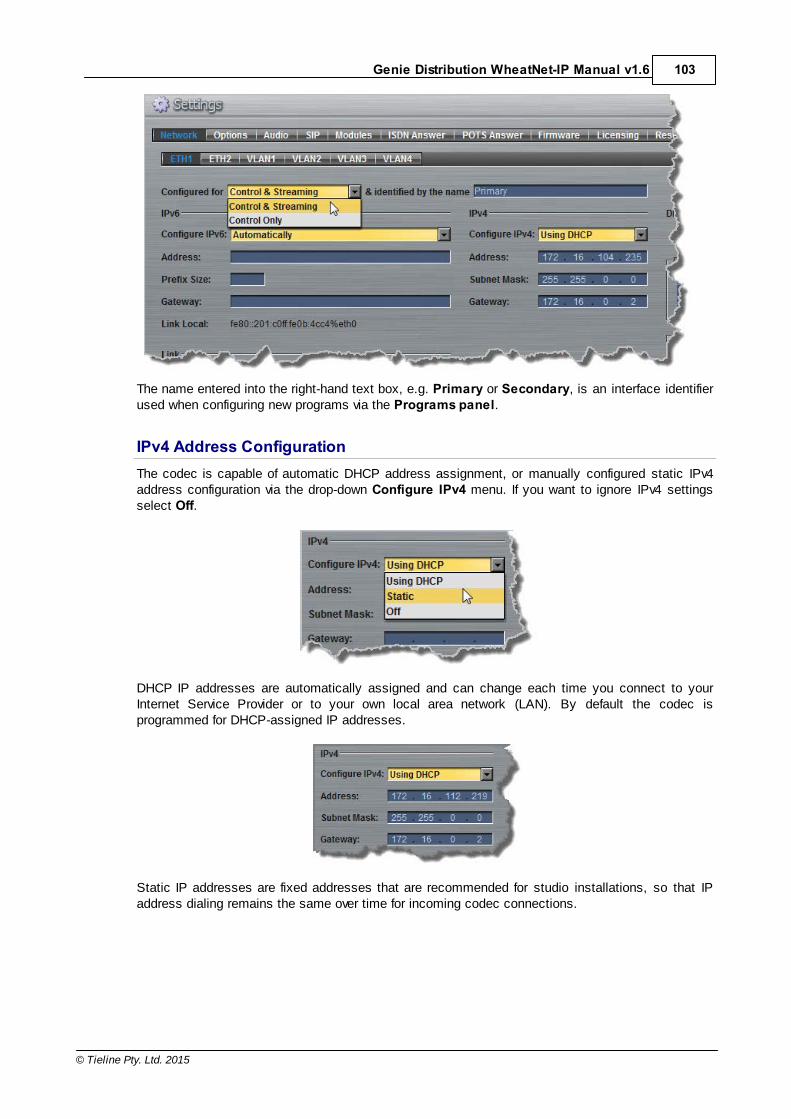
103
© Tieline Pty. Ltd. 2015
Genie Distribution WheatNet-IP Manual v1.6
The name entered into the right-hand text box, e.g. Primary or Secondary, is an interface identifierused when configuring new programs via the Programs panel.
IPv4 Address ConfigurationThe codec is capable of automatic DHCP address assignment, or manually configured static IPv4address configuration via the drop-down Configure IPv4 menu. If you want to ignore IPv4 settingsselect Off.
DHCP IP addresses are automatically assigned and can change each time you connect to yourInternet Service Provider or to your own local area network (LAN). By default the codec isprogrammed for DHCP-assigned IP addresses.
Static IP addresses are fixed addresses that are recommended for studio installations, so that IPaddress dialing remains the same over time for incoming codec connections.

104 Genie Distribution WheatNet-IP Manual v1.6
© Tieline Pty. Ltd. 2015
Click Save Settings to store all configuration settings.
Note: The Subnet Mask is used by the TCP/IP protocol to determine whether a host ison the local subnet or on a remote network. The default Gateway is the router linking thecodec's subnet to other networks. See your IT administrator for more details.
IPv6 Address ConfigurationAn IPv6 address is represented by 8 groups of 16-bit hexadecimal values separated by colons (:).The drop-down Configure IPv6 menu provides three address configuration options:
1. Auto: An address is automatically assigned to the codec when you connect the codec to anIPv6 router. This process is similar to how an IPv4 DHCP address is assigned.
2. Manual: Select to enter static IPv6 address details.3. Off: Select to ignore IPv6 address details.
Important Note: Select Off in the drop-down Configure IPv6 menu if you are not usingIPv6 to connect to another device. This ensures your codec will attempt to connect usingIPv4 at all times.
Types of IPv6 AddressesThere are two types of addresses displayed in the IPv6 section:
1. IPv6 address (normally global): A router-allocated IP address with 'global' visibility,details of which are displayed in the Address, Prefix and Gateway text boxes.
2. Link Local Address: A local address which can only be used to connect to anotherdevice directly over a LAN. This address is allocated by the codec internally based onMAC address details.
Auto Address AssignmentBy default the codec is programmed for connecting to an IPv6 router which automaticallyallocates IPv6 address details, as displayed in the following example.

105
© Tieline Pty. Ltd. 2015
Genie Distribution WheatNet-IP Manual v1.6
Manual IPv6 Address AssignmentTo configure IPv6 address details into the codec manually, select Manual and enter details intothe Address, Prefix and Gateway text boxes.
Click Save Settings to store all configuration settings.
Specifying DNS SettingsIt is possible to specify Domain Name Server (DNS) settings to allow easy look up of codecs withinthe specified DNS Addresses or Domains.
The codec can be configured to tag IP data packets sent across a network by entering a value intothe Differentiated Services Code Point (DSCP) field within the header of data packets transmittedover the network.
Configuring QoS
1. Open the Java Toolbox Web-GUI and click the Settings symbol at the top of the screen todisplay the Settings panel.
2. Click the Options button at the top of the Settings panel.
3. Click in the QoS text box and enter the new value.

106 Genie Distribution WheatNet-IP Manual v1.6
© Tieline Pty. Ltd. 2015
4. Click the Save Settings button to save the new setting.
Important Note: Check with your IT administrator before changing this setting. By defaultthe codec is programmed for Assured Forwarding and more details about DSCP areavailable on Wikipedia at http://en.wikipedia.org/wiki/Dscp.
24.2 Configuring ISDNTwo slots are available for inserting optional ISDN modules into the codec. These can be configuredusing the codec front panel or the Toolbox graphical user interface (GUI). See About ISDN Modulesfor additional information on ISDN.
You can use the Java Toolbox Web-GUI to configure a dial and/or answer program with ISDNsettings. You may also need to:
1. Configure ISDN module settings.2. Configure ISDN Answering settings.
24.2.1 Configuring ISDN ModulesISDN settings in the Module menu determine how each codec module operates at a particular site.You can copy similar programs between codecs installed at different locations and also configuresite-specific settings for how each ISDN module should connect. ISDN module settings may needto be adjusted depending on your country and network requirements.
1. Open the Java Toolbox web-GUI and click the Settings symbol at the top of the screen todisplay the Settings panel.
2. Click the Modules button at the top of the Settings panel.
3. Select Module 1 or Module 2.
4. Click the drop down arrow for Accept and select whether to allow or disallow circuit switchedvoice or data calls. The default setting allows Data Only.
Important Note: G.711 is the algorithm used when Voice Only is selected.
5. Click the drop down arrow for Network and select the Network Type corresponding to the region

107
© Tieline Pty. Ltd. 2015
Genie Distribution WheatNet-IP Manual v1.6
in which you are using the codec (see ISDN Module Configuration for more details).
6. Click the drop-down arrow for Line Type and select your preferred option. Ask your Telcowhether your ISDN line is Point-to-Point or Point-to-Multipoint. By default select Point-to-Multipoint, unless your switch type is an AT&T 5ESS custom point-to-point.
7. If you are in the US enter DN and SPID numbers as required, or in other regions enter DN or MSNnumbers as required.
8. Click the Save Settings button when configuration is complete.
Important Notes:
Directory Numbers and Multiple Subscriber NumbersDirectory Numbers (DN) in North America and Multiple Subscriber Numbers (MSN) in therest of the world are simply phone numbers associated with an ISDN B channel, like lineslisted in a typical phone directory. Your Telco will normally supply 2 DN/MSN numbers foreach pair of B channels. However, these numbers may or may not be associated with aspecific B channel.
Often broadcasters prefer to predict which B channel will answer an incoming call toensure audio routing is consistent. However, if a DN or MSN number is not entered in thecodec and multiple B channels are available, the codec may use any channel to answeran incoming call. To ensure calls are routed consistently, enter a DN/MSN number(without the country or area code) as the DN/MSN for a B channel, then only thatcorresponding B channel will answer an incoming call to that number. Programming DN/MSN numbers for each B channel allows the codec to ignore calls without matching DN/MSN numbers. This is the best way to answer calls from codecs in a predictable manner.
SPID Numbers in North AmericaISDN relies on an initialization procedure for associating Service Profiles with specificterminating equipment (e.g. your audio codec) rather than lines. In the US Telcos assigna Service Profile ID (SPID) number which assists in identifying different ISDN servicesacross the network. Your Telco must provide a SPID for each B channel you order whenconnecting over US-Nat or US-AT&T networks in the US. A SPID is not required whenusing the AT&T PTP protocol.
Typically, each ISDN BRI service in the US will have two SPIDs and these must beentered correctly. When you enter a SPID into your codec and connect it to an ISDN line,an initialization and identification process takes place, whereby the terminating equipment(your codec) sends the SPID to the switch. The switch then associates the SPID with aspecific Service Profile and directory number.
Note: SPID numbers normally include the phone number and additional prefix or suffixdigits up to 20 digits long.

108 Genie Distribution WheatNet-IP Manual v1.6
© Tieline Pty. Ltd. 2015
24.2.2 Configuring ISDN AnsweringISDN Answer Configs are used to determine how codec ISDN modules will behave whenanswering ISDN calls.
The following image explains the difference between answering calls from Tieline codecs sendingsession data, and non-Tieline codecs making sessionless ISDN calls. Codecs sending TielineSession Data contain all the information required to connect, e.g. algorithm and audio streamrouting settings. When answering sessionless calls it is necessary to configure the answeringcodec with an ISDN Answer Config, which tells the answering codec how a sessionless call willtry and connect.
It is possible to save up to four different ISDN Answer Configs, which allow up to 4 ISDN Bchannels to be individually configured for unique answering behaviors. ISDN answering can beconfigured to suit:
· Hardware available in the codec, i.e. the number of B channels available.· Expected dialing behaviors, e.g. if B channels should bond or not, and whether audio streams
need to use Dial and Answer Route tags.· The type of call being received by the codec, e.g. Tieline (with Tieline Session Data) versus
non-Tieline sessionless calls.· The algorithm expected when receiving sessionless calls.
Each of the four available Configs allows you to select which B channel or channels are used toanswer a call or calls from incoming ISDN codecs. A maximum of up to 4 B channels can beselected if 2 ISDN modules are installed in the codec.

109
© Tieline Pty. Ltd. 2015
Genie Distribution WheatNet-IP Manual v1.6
Important Note: B channels can only be selected once and are greyed out once theyhave been selected in one of the four ISDN Configs.
Single B Channel ConfigTo use a single 64kbps B channel for a connection (e.g. a 1 x Mono Peer-to-Peer audio stream)simply select a B channel from those available and click the Save settings button. If only one Bchannel is selected then Unbonded Only is the default setting.
Multiple B Channel Bonding ConfigA point-to-point audio stream can also bond multiple B channels to create higher bandwidthconnections. In the following example, two B channels from Module 2 have been selected withinConfig 2. Note that B Channel 1 in Module 1 has already been selected in Config 1 and istherefore unavailable in Config 2.
Configure the bonding setting that best suits the audio stream with which this Config will beassociated. Bonded or Unbonded is the best setting in most situations. Note: Click the Savesettings button to apply changes to the Config.

110 Genie Distribution WheatNet-IP Manual v1.6
© Tieline Pty. Ltd. 2015
Bonding Setting BehaviorUnbonded Only Unbonded single B Channel
Bonded or Unbonded (MayBond)
Calls using the same algorithm from the same Tieline codec,or sessionless calls, will attempt to bond when received. Callsusing incompatible algorithms will not be bonded
Bonded Only Will only bond compatible algorithms. This mode will rejectincompatible calls which cannot be bonded, e.g. G.711 andG.722
Dial and Answer Route Settings in ProgramsDial Route and Answer Route tags allow you to associate a B channel (or channels) in a Configwith a particular incoming audio stream from either Tieline or non-Tieline codecs. This is notnecessary in simple point-to-point ISDN audio stream configurations, however it is very useful inmultiple audio stream codecs using multiple B channels. When dialing Tieline to Tieline over ISDNusing the Merlin or Genie family of codecs, you can configure a Dial Route in the dialing codec'sprogram and a corresponding Answer Route in the answering codec's program. This will ensure aparticular audio stream is routed between two codecs consistently.
In principle, the concept of 'routes' operates similarly to how audio ports are used to route multipleaudio streams over IP. Selecting different IP audio port numbers allows users to define whichincoming IP audio stream is routed to a specific answering audio stream configuration on the codec.This ensures inbound calls from multiple codecs can be consistently routed to the same answeringcodec audio streams, and therefore the same inputs and outputs. Following is an example of how toconsistently route incoming ISDN audio streams using dial and answer routes.
Answer Routes for Non-Tieline (Sessionless) ISDN CallsIn some situations you may receive a call from a non-Tieline codec which doesn't support sessiondata and Dial Route tags. In this situation you can still specify the audio stream Route on theanswering codec using Config 1-4 in ISDN Answer. You can also select the default algorithm.
For example, if a call from a non-Tieline codec is received via B Channel 1 on Module 1 (i.e. noDial Route has been specified in the dialing codec):
1. Select a Route for this B channel in one of the four Configs within ISDN Answer, e.g.Route1, then select the default Encoding algorithm to use when connecting (default settingis G.722).

111
© Tieline Pty. Ltd. 2015
Genie Distribution WheatNet-IP Manual v1.6
2. Click Save Settings to store the new Config settings.
3. This will associate the incoming call with a corresponding Answer Route configured in theanswering codec program, e.g. Answer Route 1.
More detailed information about how to configure the codec to answer and route multiplesessionless ISDN calls is available in Using ISDN Answer Routes for Sessionless ISDN Calls. Thisuses examples to explain how to set up consistent deterministic routing of multiple incomingsessionless calls.
Answering both Tieline Session and Sessionless ISDN CallsLeave the Sessionless Only checkbox in the ISDN Answering Config unchecked if the codec isexpected to receive ISDN calls from Tieline codecs, or both Tieline and non-Tieline codecs (i.e. youare not sure which type of codec may call). In this mode, when the codec answers a call it initiallyexpects to receive Tieline session data from the dialing codec and configure its own algorithmsettings according to that. If it fails to receive Tieline session data within 5 seconds (i.e. a non-Tieline codec is calling, or a Tieline codec with session data disabled), it will use the settings in theISDN Answering Config instead.
The following image displays how the answering codec will behave in this mode when receiving callsfrom both Tieline and non-Tieline codecs.

112 Genie Distribution WheatNet-IP Manual v1.6
© Tieline Pty. Ltd. 2015
Allow Answering of Sessionless ISDN Calls OnlySelect Sessionless Only when answering ISDN calls from non-Tieline codecs only. WhenSessionless Only is selected, the codec will not wait to receive the Tieline session data. Thisreduces the time taken to answer an inbound sessionless call.
The following image displays how the answering codec will respond with Sessionless Onlyselected, i.e. calls from both Tieline and non-Tieline codecs are always regarded as sessionless.
Answering Multiple ISDN Calls from Tieline and non-Tieline CodecsTieline codecs capable of answering multiple incoming audio streams can be configured to answerboth Tieline session data and sessionless ISDN calls at different times. They can also supportconnections using other transports such as IP or POTS. The following example shows how a Tielinecodec can be configured to answer up to 4 separate mono ISDN calls at different times from bothTieline and non-Tieline codecs, as well as two mono IP audio streams.
Default Answering SettingsWhen a B channel is not associated with a Config it inherits the following default settings:
· Tieline Session· Unbonded· G.722 algorithm· Audio route: None

113
© Tieline Pty. Ltd. 2015
Genie Distribution WheatNet-IP Manual v1.6
24.3 Configuring POTSTwo slots are available for inserting optional POTS modules into the codec. These can beconfigured using the codec front panel or the Toolbox graphical user interface (GUI). See AboutPOTS Modules for additional information on POTS.
You can use the Web-GUI to configure a dial and/or answer program with POTS settings. You mayalso need to:
1. Configure POTS module settings.2. Configure POTS Answering settings.
24.3.1 Configuring POTS ModulesPOTS settings in the Module menu determine how your codec will connect at a particular site.You can copy similar programs between codecs installed at different locations and also configuresite-specific settings for how each module should connect. The default Config settings for POTSmodules are designed to suit Tieline codecs. These settings will need to be adjusted to connect tonon-Tieline POTS codecs or connect in Analog Phone mode.
Configuring POTS G5 Modules
1. Open the Java Toolbox Web-GUI and click the Settings symbol at the top of the screen todisplay the Settings panel.
2. Click the Modules button at the top of the Settings panel.
3. Select Module 1 or Module 2.
4. Click the drop down arrow to adjust the Answer Mode and select how the module in the codecwill be able to answer incoming POTS calls. Options include:
· POTS Codec: allows the POTS G5 module to receive incoming audio data over a POTS line.· Analog Phone: configures the POTS G5 module to receive a standard analog phone call. · Disabled: disables the POTS G5 module from receiving a POTS Codec or Analog Phone
call.

114 Genie Distribution WheatNet-IP Manual v1.6
© Tieline Pty. Ltd. 2015
Calls are answered based on the POTS Answer settings in Config 1 & 2. Adjustments tothese Config settings are not normally necessary when connecting between Tieline codecs.They are normally adjusted when connecting to non-Tieline codecs over POTS (see ConfiguringPOTS Answering for more info).
5. Click the Max Bitrate drop-down arrow to adjust the maximum bit rate (dialing and answering).The default setting is 28800 (28.8kbps) and this only affects POTS Codec calls. The range of thesetting is 9.6kbps to 33.6kbps. Even if the line is capable of establishing a connection at a higherbit rate, the Max Bitrate setting is the highest bit rate that will be attempted. Reducing this valuecan improve connection reliability on poor quality lines. If two codecs are not configured thesame, they will attempt to connect at the lowest of the two Max Bit rate settings.
Important Note: G5 POTS modems initially attempt to establish a link at the lowestMax Bitrate setting configured in the two modules being connected. If the POTS linedoesn't support this bit rate, the modems will attempt to connect at the highest possiblebit rate to suit the prevailing line quality at each end of the link.
Dialing Method (Dialing only)Click the drop-down arrow for Dialing Method to select Tone (DTMF) or Pulse dialing overPOTS Codec connections. Tone dialing is used always when the Answer Mode is AnalogPhone.
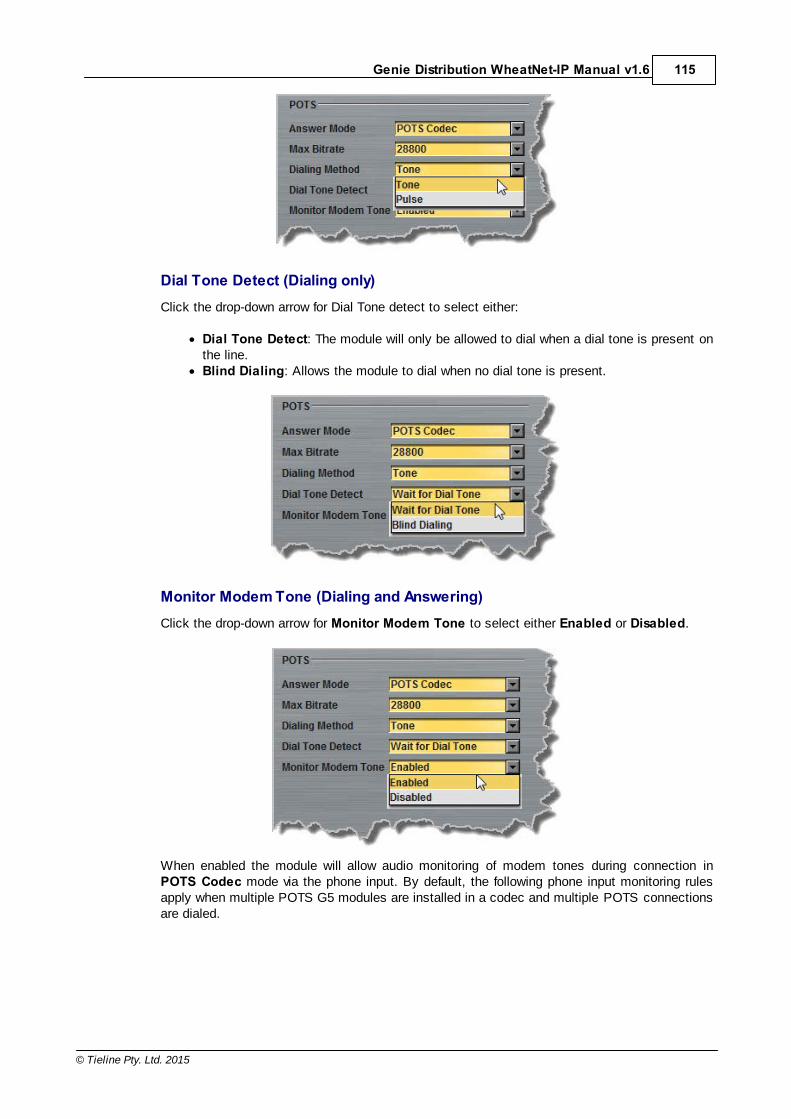
115
© Tieline Pty. Ltd. 2015
Genie Distribution WheatNet-IP Manual v1.6
Dial Tone Detect (Dialing only)Click the drop-down arrow for Dial Tone detect to select either:
· Dial Tone Detect: The module will only be allowed to dial when a dial tone is present onthe line.
· Blind Dialing: Allows the module to dial when no dial tone is present.
Monitor Modem Tone (Dialing and Answering)Click the drop-down arrow for Monitor Modem Tone to select either Enabled or Disabled.
When enabled the module will allow audio monitoring of modem tones during connection inPOTS Codec mode via the phone input. By default, the following phone input monitoring rulesapply when multiple POTS G5 modules are installed in a codec and multiple POTS connectionsare dialed.

116 Genie Distribution WheatNet-IP Manual v1.6
© Tieline Pty. Ltd. 2015
Module 1 Module 2 Audio RulePOTS Codec
(Monitor Modem Tone)POTS Codec
(Monitor Modem Tone) The phone input receives a mix of modem toneaudio from both modules
POTS Codec (Monitor Modem Tone)
Analog Phone The phone input receives analog phone inputaudio only and mutes modem tone monitoring
Analog Phone Analog Phone The phone input receives audio from the oldestactive connection only
Important Notes: · Modem tone monitoring will work even if Phone Input Enable is Off via Settings >
Audio > Phone Input > Phone Input Enable [Off].· Modem tone monitoring is only enabled during the initial connection training and
negotiation period in POTS Codec mode.· The monitoring volume can be adjusted using the codec front panel via Settings >
Audio > Phone Input > Level, or by opening the Inputs panel in the Web-GUI andadjusting the Phone input volume slider.
CountryThis displays the current country setting in the codec. To adjust this setting select Settings >System > Country.
24.3.2 Configuring POTS AnsweringIt is possible to store a different POTS Answer Config for each POTS module installed in thecodec. POTS answering can be configured to suit:
· The type of call being made, e.g. Tieline (with Tieline Session Data) versus non-Tieline(Sessionless).
· Expected dialing behaviors and encoding, e.g. whether audio streams use Route tags andwhich algorithm is used.
If you answer a call from a non-Tieline codec you will need to create an answering "Config" todetermine which module in the codec will answer the call and the settings used when connecting.
Important Notes: · POTS Answer Config settings are applied to POTS Codec connections and not
Analog Phone connections.· When receiving a call from a Tieline codec with session data enabled (i.e. not
Sessionless), the algorithm setting from the dialing codec overrides the setting in thePOTS Answer Config menu.
POTS Config SettingsThe default POTS Answer module Config settings are:
· Tieline Codecs Session Data,· The Other algorithm.
This configuration will accept the settings from an incoming Tieline codec when it dials withsession data enabled. It will also allow the codec to answer a call from a Comrex POTS codecsupporting the Other algorithm setting.

117
© Tieline Pty. Ltd. 2015
Genie Distribution WheatNet-IP Manual v1.6
Answering Calls from Non-Tieline POTS CodecsSelect the Sessionless Only check-box when only non-Tieline codecs are dialing a Tieline codecover POTS. This allows you to choose the default encoding setting and Route the incoming call to anominated audio stream via a corresponding Answer Route in the answering codec program ifrequired.
Important Note: Select Other in the Encoding drop-down menu when connecting toComrex® Vector, Matrix® and BlueBox® codecs. On the Comrex codec select its"Music" algorithm. Please note that 9.6kbps connections are not supported by theComrex codecs.
Dial and Answer Route Settings in ProgramsDial Route and Answer Route tags allow you to associate a POTS Config with a particularincoming audio stream from either Tieline or non-Tieline codecs.
In principle, this operates similarly to how audio ports are used to route multiple audio streams overIP. Selecting different IP audio port numbers allows users to define which incoming IP audio streamis routed to a specific answering audio stream configuration on the codec. This ensures inboundcalls from multiple codecs can be consistently routed to the same answering audio streams, andtherefore the same inputs and outputs.
This is not necessary in simple point-to-point POTS audio stream configurations, however it is veryuseful in multiple audio stream codecs which support POTS connections. When dialing Tieline toTieline over POTS using the Merlin or Genie family of codecs, you can configure a Dial Route in thedialing codec's program and a corresponding Answer Route in the answering codec's program. Thiswill ensure a particular audio stream is routed between two codecs consistently.

118 Genie Distribution WheatNet-IP Manual v1.6
© Tieline Pty. Ltd. 2015
Answer Routes for Non-Tieline POTS CodecsIn some situations you may receive a call from a non-Tieline POTS codec which doesn't supportDial Route tags. In this situation you can still specify the audio stream Route on the answeringcodec using Config 1 or 2 in POTS Answer. You can also select the default algorithm.
For example, if a call from a non-Tieline codec is received via POTS Module 1 (i.e. no Dial Routehas been specified in the dialing codec):
1. Select an answering Route for this POTS module in one of the two Configs within POTSAnswer, e.g. Route1, then select the default Encoding algorithm to use when connecting(Note: Other is used for connecting to Comrex POTS codecs).
2. Click Save Settings to store the new Config settings.
3. This will associate the incoming call with a corresponding Answer Route configured in theanswering codec program, e.g. Answer Route 1.

119
© Tieline Pty. Ltd. 2015
Genie Distribution WheatNet-IP Manual v1.6
24.4 Configuring Codec Input/Output Settings
Click the Inputs symbol to view input controls available within the Java Toolbox Web-GUI.
Important Note: 15 volt phantom power can only be supplied on the Auxiliary input; thisis disabled by default.
Configuring Input Channel Settings
Renaming Input Channels:
1. Click the Input Settings symbol on the input channel you want to rename.2. Select Name and click in the text box to edit or enter a new name.3. Click Change Name to confirm the name change.
Selecting Analog and Digital Audio Sources:Codec inputs are configured for analog high-gain mic level audio sources by default.
1. Click the Input Settings symbol.2. Select Type and click to select either Analog or WNet.
3. When you select WNet, the display changes to reflect 100% input levels; slider andinput on/off controls are locked on.
Important Note: Input levels can only be adjusted on analog inputs.
Ganging Channels:Ganging is useful because it allows you to adjust the audio level of both inputs simultaneously.
1. Click the Input Settings symbol on either channel.

120 Genie Distribution WheatNet-IP Manual v1.6
© Tieline Pty. Ltd. 2015
2. Select Gang and click to either gang or ungang channels.
3. When ganged, the two channel sliders move in sync with each other when draggedusing a mouse-pointer.
4. Click the Link symbol to temporarily disable the ganging function and fine-tune channelaudio levels. Click the Link symbol again to resume ganging.
Setting Analog Audio LevelsAudio levels on the Input panel should be set to ensure audio peaks average at the first yellowindications on the PPM meters, which represents +4dBu. These levels should also be checkedagainst the Input PPM Meters on the Master panel.
Other Input ControlsAdjust the IGC (Intelligent Gain Control) input settings toAuto, Fixed or Off as required.
Important Note: When the auxiliary input (AUX IN) is On the default mixer configurationsends audio to all inputs. If you are not using the auxiliary input ensure it is Off to avoidadditional noise in program audio.

121
© Tieline Pty. Ltd. 2015
Genie Distribution WheatNet-IP Manual v1.6
Locking Input Settings
1. Click the Lock symbol to lock all Input panel settings.
2. When locked, the Input panel is greyed out and the lock symbol appears in the bottom-leftcorner.

122 Genie Distribution WheatNet-IP Manual v1.6
© Tieline Pty. Ltd. 2015
24.5 Configure Mono or Stereo Peer-to-Peer ProgramsThe Programs panel incorporates a wizard to configure a new program and all audio streamsettings. Before you configure a new codec program consider if:
· You want your codec to be capable of dialing and answering, dialing only or answering only.· A backup connection is required.
This section contains instructions for:1. Configuring Point-to-Point Programs: Dialing2. Configuring a Backup Connection or Auto Reconnect3. Configuring the Codec to Answer Connections4. Configuring File Playback on Silence Detection
For more information about programs and audio streams within programs see the section titledAbout Program Dialing. Note: The following instructions will display how to configure a dial andanswer program, with a backup connection and USB file playback. If you want the codec to eitherdial or answer only, select the option and the wizard will automatically display relevant screens toallow you to configure the codec correctly.
Configuring Peer-to-Peer Programs: DialingImportant Notes: Before you start program configuration please note:
· You cannot edit a program when it is currently loaded in the codec.· You can lock a loaded custom program in a codec to ensure the currently loaded
program cannot be unloaded by a codec dialing in with a different type of program..· Some drop-down menus and settings may be greyed out intentionally depending on
features available and the transport selected (e.g. IP or ISDN).· It is possible to save a program at several points throughout the program wizard
and use default settings to save configuration time.· Failover and SmartStream PLUS redundant streaming are not available with SIP or
sessionless IP connections.· POTS is not supported for stereo audio stream connections.· To learn more about programs see the section titled About Program Dialing.
1. Open the Java Toolbox Web-GUI and click the Programs symbol at the top of the screen todisplay the Programs panel.
2. Click the New Program button to open the wizard and:· Click in the text box to name the new program. · Select Mono/Stereo Peer-to-Peer, or if you want to use an existing program as a template,
select this option. Then click Next.
Important Note: When you decide to use an existing program as a template, the newprogram inherits all the settings of the template program and you can adjust thesesettings as required by continuing through the program wizard.

123
© Tieline Pty. Ltd. 2015
Genie Distribution WheatNet-IP Manual v1.6
3. Enter a name for the Audio Stream and configure the codec to dial, answer or dial and answer.Then click Next.
It is also possible to select a Dial Route or Answer Route if required. When routingmultiple audio streams over transports like ISDN or POTS, you can use Dial andAnswer Routes to configure deterministic routing of audio streams. Use of Dial andAnswer Routes is not recommended over IP. See Configuring ISDN Answering orConfiguring POTS Answering for more information. Use the default settings for IPconnections.
4. This audio stream connection in the wizard will allow the codec to dial. Enter the name of theconnection in the text box, then click Next.
5. Follow the instructions on the right-hand side of the panel to configure the transport settings forthe connection, then click Next.
Important Note: See RS232 Data Configuration for detailed information on RS232 dataand see Enabling Relays and RS232 Data for more information on relay operations.
6. Configure destination codec dialing and encoding settings:

124 Genie Distribution WheatNet-IP Manual v1.6
© Tieline Pty. Ltd. 2015
For IP connections configure the IP address, ports, and then specify which streaminginterface is used to dial this connection, e.g. Primary (port ETH1) or Secondary (portETH2). Note: By default Any will select ETH1 if it is available and ETH2 if it is unavailable.
Important Note: The Send Audio Port is the codec port at the remote end ofthe link to which you are sending audio. The Return Audio Port is used by thelocal codec to receive audio from the remote codec. When Tieline Codecs isthe Session Protocol selected (using Tieline session data), the default portvalue for the Return Audio Port is Automatic. Note: Automatic indicates thatthe codec will arbitrarily allocate the return port value and send this informationto the codec to which you are dialing. Click to deselect the Automatic check-box and change this setting. When you select Sessionless as the SessionProtocol, the Session Port is not configurable and you can manuallyconfigure the Send Audio Port and Return Audio Port.
Click Save Program to save the program with the default algorithm, jitter and FECsettings which are physically entered in the codec. Alternatively, click Next to specifyindividual algorithm, jitter buffer and FEC settings and configure a backup connection orSmartStream PLUS for this audio stream (recommended).
Click the drop-down arrows on the right-hand side of each text box to adjust the
Encoding, Sample rate and Bit rate options.
For IP connections click to configure:· Auto Jitter Adapt and the preferred auto jitter setting using the drop-down arrow
for Buffer priority, or

125
© Tieline Pty. Ltd. 2015
Genie Distribution WheatNet-IP Manual v1.6
· Fixed Buffer Level and enter the Jitter Depth, which must be between 12ms and5000ms depending on the algorithm you select.
· Local and Remote FEC settings if required.
Click the check-box to select Enable Redundant SmartStream PLUS and configuredual Ethernet SmartStream IP streaming. Alternatively, click Next to configure AutoReconnect or a backup connection, whereby the alternative connection is dialed if theprimary connection fails.
By default, primary IP streaming is via ETH1. To achieve the maximum level ofredundancy select Secondary to configure redundant streaming from the secondary IPport ETH2. The redundant stream uses Send Audio Port 9001 by default and the Return Audio Port allocated is Automatic. Note: Automatic indicates that the codec willarbitrarily allocate the return port value and send this information to the codec to whichyou are dialing.
Important Note: Dual SmartStream PLUS redundant streaming over both Ethernet portsmitigates lost packets on either link and will provide IP network backup if an IP link islost. To learn more about SmartStream PLUS redundant IP streaming visit http://www.tieline.com/Transports/SmartStream-IP

126 Genie Distribution WheatNet-IP Manual v1.6
© Tieline Pty. Ltd. 2015
For ISDN connections enter a number and select which B channel to use. Select theEnable bonded connections check-box to configure and bond multiple B channels.
Next, click Save Program to save the program with default algorithm settings, or clickNext to specify a different algorithm and configure a backup connection if required.(recommended).
Dialing settings for this ISDN audio stream are now complete.
Select POTS Codec in the Mode drop-down menu to encode/decode using POTS, orselect Analog Phone to configure a standard analog phone call, then click Next.

127
© Tieline Pty. Ltd. 2015
Genie Distribution WheatNet-IP Manual v1.6
Next, enter the phone number of the codec or device you want to dial. When multiplePOTS modules are installed, click the Via drop-down menu and select Module 1 orModule 2 to specify which POTS module will dial. Next, click Save Program to savethe program with default settings, or click Next to specify algorithm settings andconfigure a backup connection if required (recommended).
Dialing settings for this POTS audio stream are now complete.
Configuring a Backup Connection or Auto ReconnectAt this point in the wizard you can choose to configure Auto Reconnect or create a backupconnection for the audio stream you are configuring.
Important Note: When Auto Reconnect is enabled, the dialing codec will continue toattempt a connection with the remote codec until Disconnect is pressed either on thedialing codec's keypad, or in the Web-GUI.
To configure a backup connection:
1. Click to select the check-box for Create a Backup Connection. Adjust the parameters andclick Next.

128 Genie Distribution WheatNet-IP Manual v1.6
© Tieline Pty. Ltd. 2015
Note: The explanations within the following table can be used to assist with backup connectionconfiguration.
Screen Display Description1 Threshold The percentage of lost data measured during a given time
frame
2 Time Frame The time frame against which lost data is measured
3 Keep Alive The keep connection alive time before failing over to abackup connection; Tieline RTP pings every second toconfirm connectivity
4 Automatic Resume Select the check-box to configure fail back to a higherpriority connection
5 Stable Time The amount of time a primary connection must remainstable before attempting to fail back from the backupconnection
6 Maximum Retries The maximum number of fail back retries a codec can trybefore ending fail back attempts
7 Time Frame The time frame used to measure the number of fail backretries attempted
2. Enter a name for the backup connection and click Next.
3. Click Next to continue through the wizard and configure the backup connection in a similarmanner to how you configured the primary connection.
Configuring the Codec to Answer ConnectionsThe codec is capable of being configured to accept calls via different transports (e.g. IP and ISDN),or to accept calls using different audio ports. If you are configuring the codec to allow it to answerone or more incoming audio stream connections:
1. Enter a name for the answering connection and click Next.
2. Configure the transport settings:
For IP select the Session Protocol and Return Audio Port, then click Next to configurejitter buffer and FEC settings.
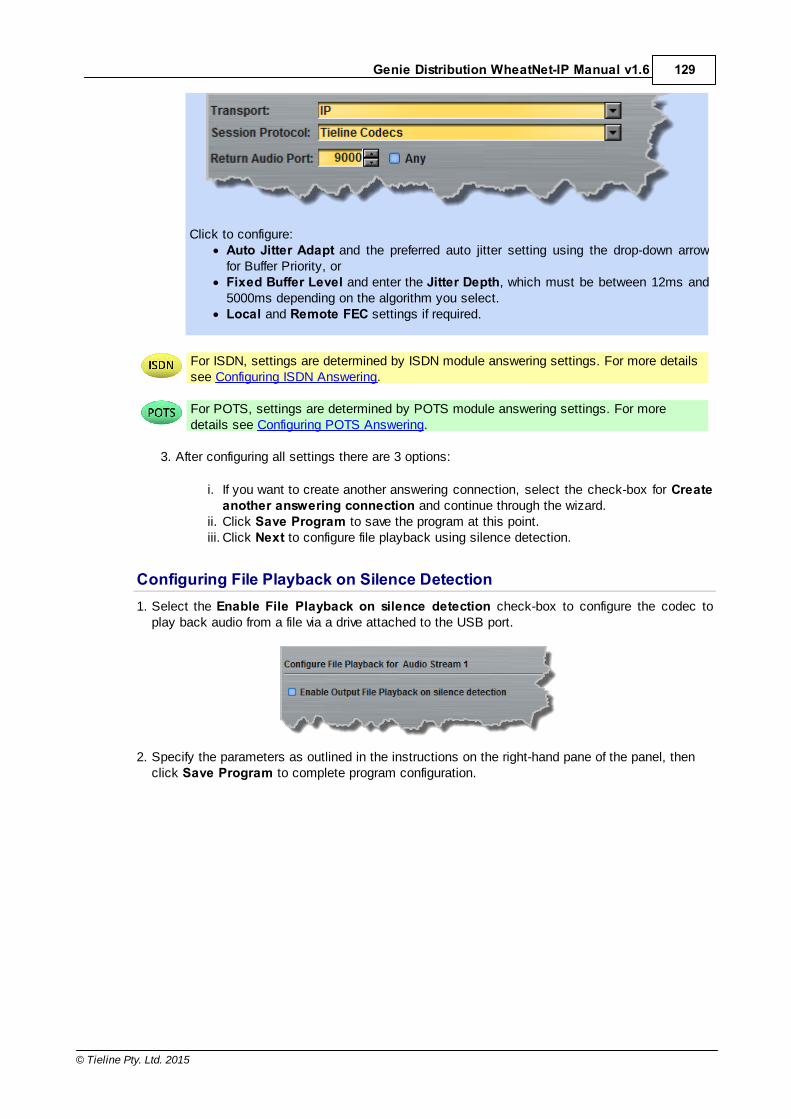
129
© Tieline Pty. Ltd. 2015
Genie Distribution WheatNet-IP Manual v1.6
Click to configure:· Auto Jitter Adapt and the preferred auto jitter setting using the drop-down arrow
for Buffer Priority, or · Fixed Buffer Level and enter the Jitter Depth, which must be between 12ms and
5000ms depending on the algorithm you select. · Local and Remote FEC settings if required.
For ISDN, settings are determined by ISDN module answering settings. For more detailssee Configuring ISDN Answering.
For POTS, settings are determined by POTS module answering settings. For moredetails see Configuring POTS Answering.
3. After configuring all settings there are 3 options:
i. If you want to create another answering connection, select the check-box for Createanother answering connection and continue through the wizard.
ii. Click Save Program to save the program at this point.iii. Click Next to configure file playback using silence detection.
Configuring File Playback on Silence Detection1. Select the Enable File Playback on silence detection check-box to configure the codec to
play back audio from a file via a drive attached to the USB port.
2. Specify the parameters as outlined in the instructions on the right-hand pane of the panel, thenclick Save Program to complete program configuration.
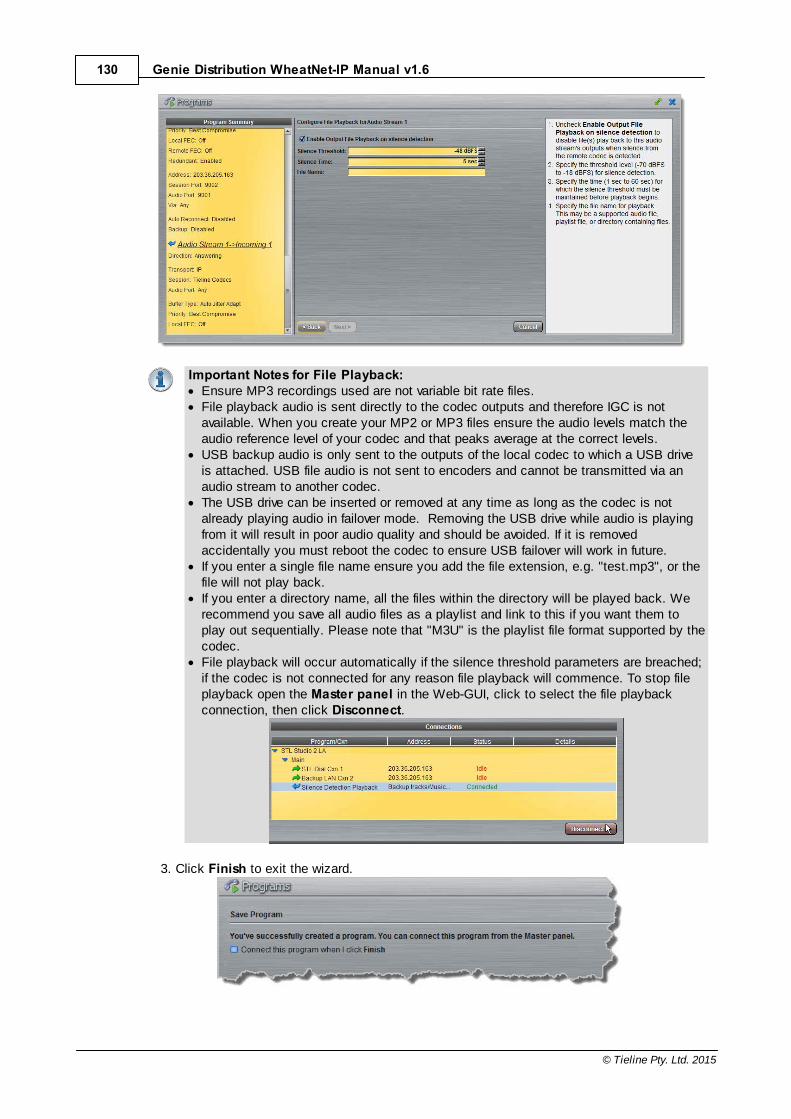
130 Genie Distribution WheatNet-IP Manual v1.6
© Tieline Pty. Ltd. 2015
Important Notes for File Playback: · Ensure MP3 recordings used are not variable bit rate files.· File playback audio is sent directly to the codec outputs and therefore IGC is not
available. When you create your MP2 or MP3 files ensure the audio levels match theaudio reference level of your codec and that peaks average at the correct levels.
· USB backup audio is only sent to the outputs of the local codec to which a USB driveis attached. USB file audio is not sent to encoders and cannot be transmitted via anaudio stream to another codec.
· The USB drive can be inserted or removed at any time as long as the codec is notalready playing audio in failover mode. Removing the USB drive while audio is playingfrom it will result in poor audio quality and should be avoided. If it is removedaccidentally you must reboot the codec to ensure USB failover will work in future.
· If you enter a single file name ensure you add the file extension, e.g. "test.mp3", or thefile will not play back.
· If you enter a directory name, all the files within the directory will be played back. Werecommend you save all audio files as a playlist and link to this if you want them toplay out sequentially. Please note that "M3U" is the playlist file format supported by thecodec.
· File playback will occur automatically if the silence threshold parameters are breached;if the codec is not connected for any reason file playback will commence. To stop fileplayback open the Master panel in the Web-GUI, click to select the file playbackconnection, then click Disconnect.
3. Click Finish to exit the wizard.

131
© Tieline Pty. Ltd. 2015
Genie Distribution WheatNet-IP Manual v1.6
4. The newly created program will be displayed in the left pane within the Programs panel and inthe Master panel. Select and connect audio streams in a program using the Master panel, ordial the program manually using the codec front panel.
24.6 Configure 2 Mono Peer-to-Peer Dialing Connections in GenieGenie Distribution can be configured to send a mono feed of inputs 1 and 2 to separate codecs overdifferent connections.
Genie Distribution 2 x Mono Peer-to-Peer Configuration
On the codec from which the calls originate, it is necessary to create a program with two separatemono audio streams and associated dialing connections (i.e. select the 2 x Mono Peer to Peeroption from the drop-down menu in the first screen of the program wizard as illustrated in thefollowing image).
In the majority of situations the answering codec will use a default 2 x peer-to-peer program (or theMan Dflt Dual Pgm profile in G3 codecs) to create the connection. If the codec does not supportthe 2 x Mono Peer-to-Peer program, the codec will load the default mono peer-to-peer program.
Configure and Dial 2 x Mono Peer-to-Peer Codec Connections from GenieDistribution
Important Notes: Before you start program configuration please note:· You cannot edit a program when it is currently loaded in the codec.· You can lock a loaded custom program in a codec to ensure the currently loaded
program cannot be unloaded by a codec dialing in with a different type of program.· Some drop-down menus and settings may be greyed out intentionally depending on
features available and the transport selected (e.g. IP or ISDN).· It is possible to save audio stream or program settings at several points throughout
the program wizard and use default settings to save configuration time.· Failover and SmartStream PLUS redundant streaming are not available with SIP or
sessionless IP connections.

132 Genie Distribution WheatNet-IP Manual v1.6
© Tieline Pty. Ltd. 2015
· To learn more about programs see the section titled About Program Dialing.
1. Open the Java Toolbox Web-GUI and click the Programs symbol at the top of the screen todisplay the Programs panel.
2. Click the New Program button to open the wizard and:· Click in the text box to name the new program. · Select 2 x Mono Peer-to-Peer, or if you want to use an existing program as a
template, select this option. Then click Next.
Important Note: When you decide to use an existing program as a template, the newprogram inherits all the settings of the template program and you can adjust thesesettings as required by continuing through the program wizard.
3. Enter a name for the Audio Stream and select Dial only. Then click Next.
It is also possible to select a Dial Route if required. When routing multiple audiostreams over transports like ISDN or POTS, you can use Dial and Answer Routes toconfigure deterministic routing of audio streams. Use of Dial and Answer Routes is notrecommended over IP. See Configuring ISDN Answering or Configuring POTS Answeringfor more information. Use the default settings for IP connections.
Important Notes: If the codec you are configuring needs to be capable of dialing 2 x mono peer-to-peerconnections, as well as answering two incoming mono peer-to-peer connections, select Dial or answer and configure both dialing and answering connections in this program. Ifyou only configure dialing connections within the program and the codec receives a callfrom a codec requesting a mono peer-to-peer connection, the codec will allow this firstconnection but will not allow a second incoming mono peer-to-peer connection. For thepurposes of this outgoing 'distribution' example, answering is excluded. For more detailsabout configuring answering connections for 2 x mono peer-to-peer connections see Configure 2 Mono Incoming Peer-to-Peer Connections.
4. This audio stream connection in the wizard will allow the codec to dial and connect the first audiostream of the two audio streams being configured. Enter the name of the connection in the textbox, then click Next.

133
© Tieline Pty. Ltd. 2015
Genie Distribution WheatNet-IP Manual v1.6
5. Follow the instructions on the right-hand side of the panel to configure the transport settings forthe connection, then click Next.
Important Note: Bidirectional auxiliary IP data is available on one audio stream. Whenauxiliary data is enabled on one stream the option is greyed out for other audio streams inthe program wizard.
6. Configure destination codec dialing and encoding settings:
For IP connections configure the IP address, ports, and then specify which streaminginterface is used to dial this connection, e.g. Primary (port ETH1) or Secondary (portETH2). Note: By default Any will select ETH1 if it is available and ETH2 if it isunavailable.
Important Note: Important Note: The Send Audio Port is the codec port atthe remote end of the link to which you are sending audio. The Return AudioPort is used by the local codec to receive audio from the remote codec. WhenTieline Codecs is the Session Protocol selected (using Tieline sessiondata), the default port value for the Return Audio Port is Automatic. Note:Automatic indicates that the codec will arbitrarily allocate the return port valueand send this information to the codec to which you are dialing. Click todeselect the Automatic check-box and change this setting. When you select

134 Genie Distribution WheatNet-IP Manual v1.6
© Tieline Pty. Ltd. 2015
Sessionless as the Session Protocol, the Session Port is not configurableand you can manually configure the Send Audio Port and Return AudioPort.
Session Port 9002 and Send Audio Port 9000 are used by default for the first IP audiostream. The audio for this audio steam will use analog or digital input and output 1 forboth the dialing and answering codecs. If you need to change default port settings on thecodec from which the call originates, this will also need to be adjusted in the answeringcodec using a custom program.
Click Save Program to save the program with the default algorithm, jitter and FECsettings which are physically entered in the codec. Alternatively, click Next to specifyindividual algorithm, jitter buffer and FEC settings and configure a backup connection orSmartStream PLUS for this audio stream (recommended).
Click the drop-down arrows on the right-hand side of each text box to adjust the
Encoding, Sample rate or Bit rate options.
For IP connections click to configure:· Auto Jitter Adapt and the preferred auto jitter setting using the drop-down arrow
for Buffer priority, or · Fixed Buffer Level and enter the Jitter Depth, which must be between 12ms and
5000ms depending on the algorithm you select. · Local and Remote FEC settings if required.
Click the check-box to select Enable Redundant SmartStream PLUS and configure

135
© Tieline Pty. Ltd. 2015
Genie Distribution WheatNet-IP Manual v1.6
dual Ethernet SmartStream IP streaming. Alternatively, click Next to configure AutoReconnect or a backup connection, whereby the alternative connection is dialed if theprimary connection fails.
By default, primary IP streaming is via ETH1. To achieve the maximum level ofredundancy select Secondary to configure redundant streaming from the secondary IPport ETH2. The redundant stream uses Send Audio Port 9001 by default and the Return Audio Port allocated is Automatic. Note: Automatic indicates that the codec willarbitrarily allocate the return port value and send this information to the codec to whichyou are dialing.
Important Note: Dual SmartStream PLUS redundant streaming over both Ethernet portsmitigates lost packets on either link and will provide IP network backup if an IP link islost. To learn more about SmartStream PLUS redundant IP streaming visit http://www.tieline.com/Transports/SmartStream-IP
For ISDN connections enter a number and select which B channel to use. Select theEnable bonded connections check-box to configure and bond multiple B channels.
Next, click Save Program to save the program with default algorithm settings, or clickNext to specify a different algorithm and configure a backup connection if required.(recommended).

136 Genie Distribution WheatNet-IP Manual v1.6
© Tieline Pty. Ltd. 2015
Dialing settings for this ISDN audio stream are now complete.
Select POTS Codec in the Mode drop-down menu to encode/decode using POTS, orselect Analog Phone to configure a standard analog phone call, then click Next.
Next, enter the phone number of the codec or device you want to dial. When multiplePOTS modules are installed, click the Via drop-down menu and select Module 1 orModule 2 to specify which POTS module will dial. Next, click Save Program to savethe program with default settings, or click Next to specify algorithm settings andconfigure a backup connection if required (recommended).
Dialing configuration settings for this POTS audio stream are now complete.
Configuring a Backup Connection or Auto ReconnectAt this point in the wizard you can choose to configure Auto Reconnect or create a backup

137
© Tieline Pty. Ltd. 2015
Genie Distribution WheatNet-IP Manual v1.6
connection for the audio stream you are configuring.
Important Note: When Auto Reconnect is enabled, the dialing codec will continue toattempt a connection with the remote codec until Disconnect is pressed either on thedialing codec's keypad, or in the Web-GUI.
To configure a backup connection click to deselect Enable Auto Reconnect and click to select thecheck-box for Create a Backup Connection. Follow the procedure for configuring a backupconnection, as you would for a peer-to-peer connection (see Configure Mono or Stereo Peer-to-PeerConnections for more details).
Configuring File Playback on Silence Detection1. Select the Enable File Playback on silence detection check-box to configure the codec to
play audio from a file via a drive attached to the USB port. Specify the parameters as outlined inthe instructions on the right-hand pane of the panel, then click Next.
Important Notes for File Playback: · Ensure MP3 recordings used are not variable bit rate files.· File playback audio is sent directly to the codec outputs and therefore IGC is not
available. When you create your MP2 or MP3 files ensure the audio levels match theaudio reference level of your codec and that peaks average at the correct levels.
· USB backup audio is only sent to the outputs of the local codec to which a USB driveis attached. USB file audio is not sent to encoders and cannot be transmitted via anaudio stream to another codec.
· The USB drive can be inserted or removed at any time as long as the codec is notalready playing audio in failover mode. Removing the USB drive while audio is playingfrom it will result in poor audio quality and should be avoided. If it is removedaccidentally you must reboot the codec to ensure USB failover will work in future.
· If you enter a single file name ensure you add the file extension, e.g. "test.mp3", or thefile will not play back.
· If you enter a directory name, all the files within the directory will be played back. Werecommend you save all audio files as a playlist and link to this if you want them toplay out sequentially. Please note that "M3U" is the playlist file format supported by thecodec.

138 Genie Distribution WheatNet-IP Manual v1.6
© Tieline Pty. Ltd. 2015
· File playback will occur automatically if the silence threshold parameters are breached;if the codec is not connected for any reason file playback will commence. To stop fileplayback open the Master panel in the Java Toolbox Web-GUI, click to select the fileplayback connection, then click Disconnect.
Configure the Second Peer-to-Peer Audio Stream1. Enter a name for the second Audio Stream associated with the second peer-to-peer connection
and select Dial only. Then click Next.
2. This audio stream connection in the wizard will allow the codec to dial and connect the secondaudio stream. Enter the name of the connection in the text box, then click Next.
3. Continue through the steps in the wizard to complete configuration in the same way as the firstpeer-to-peer connection was configured. Click Save Program to save all program settings, thenclick Finish to exit the wizard.
Important Notes: Session Port 9002 and Send Audio Port 9010 are used by default forthe second IP connection. This will route incoming audio from the remote codec to analogor digital output 2 of the Genie Distribution codec from which the call originates. If youconnect to a G3 codec using IP2 you will need to change the session port on the GenieDistribution codec to 9012 for the second audio stream connection, as this is used bydefault on G3 codecs for IP2.
The newly created program will be displayed in the left pane within the Programs panel and in theMaster panel. Select and connect audio streams in a program using the Master panel, or dial theprogram manually using the codec front panel.
24.6.1 Configure 2 Mono Peer-to-Peer Answering ConnectionsTo ensure two incoming mono peer-to-peer audio stream connections are always routed to thesame outputs, configure a new 2 x peer-to-peer answering program for the Genie Distribution codecanswering the calls.
Important Notes: On each of the codecs from which the calls originate create a programwith two separate mono audio streams and associated dialing connections (see Configure

139
© Tieline Pty. Ltd. 2015
Genie Distribution WheatNet-IP Manual v1.6
2 Mono Peer-to-Peer Connections for more details). Use audio stream 1 (connection 1) todial and send audio to output 1 of the Genie Distribution codec answering the calls. Useaudio stream 2 (connection 2) to dial and send audio to output 2 of the Genie Distributioncodec answering the calls.
If your dialing codecs don't support 2 x peer-to-peer programs, create mono peer-to-peerprograms using different session data and audio ports to ensure routing to designatedoutputs of the Genie Distribution codec answering the calls. E.g. Send Audio Port 9000,Return Audio Port 9000 and session port 9002 for the first IP connection (routes to output1) and Send Audio Port 9010, Return Audio Port 9010 and session port 9002 for thesecond IP connection (routes to output 2). If you connect to a G3 codec using IP2 youwill need to change the session port on the Genie Distribution codec to 9012 for thesecond audio stream connection, as this is used by default on G3 codecs for IP2connections.
Routing 2 Incoming Mono Peer-to-Peer Connections to Specific CodecOutputs
Important Notes: Before you start program configuration please note:· You cannot edit a program when it is currently loaded in the codec. · You can lock a loaded custom program in a codec to ensure the currently loaded
program cannot be unloaded by a codec dialing in with a different type of program.· Some drop-down menus and settings may be greyed out intentionally depending on
features available and the transport selected (e.g. IP or ISDN).· It is possible to save a program at several points throughout the program wizard and
use default settings to save configuration time.· Failover and SmartStream PLUS redundant streaming are not available with SIP or
sessionless IP connections.· To learn more about programs see the section titled About Program Dialing.
1. Open the Java Toolbox Web-GUI and click the Programs symbol at the top of the screen todisplay the Programs panel.
2. Click the New Program button to open the wizard and:· Click in the text box to name the new program. · Select 2 x Mono Peer-to-Peer, or if you want to use an existing program as a template,
select this option. Then click Next.
3. Enter a name for the Audio Stream and select Answer only. Then click Next.

140 Genie Distribution WheatNet-IP Manual v1.6
© Tieline Pty. Ltd. 2015
Note: if the codec you are configuring needs to dial connections as well as answer, you can selectDial or answer and configure both dialing and answering connections. For the purposes of thisexample dialing is excluded.
It is also possible to select an Answer Route if required. When routing multiple audiostreams over transports like ISDN or POTS, you can use Dial and Answer Routes toconfigure deterministic routing of audio streams. Use of Dial and Answer Routes is notrecommended over IP. See Configuring ISDN Answering or Configuring POTS Answeringfor more information. Use the default settings for IP connections.
4. Enter the name of the connection in the text box, then click Next.
5. Configure the transport settings:
For IP click the drop-down Session Protocol menu and select Tieline Codecs andensure the Any check-box is not selected, then click Next.
Important Note: The Return Audio Port is used by the local codec to receiveaudio from the remote codec. When Tieline Codecs is the Session Protocolselected (using Tieline session data), the Return Audio Port is automaticallyconfigured as UDP audio port 9000 by default for the first audio streamconnection. Click to deselect the Automatic check-box to adjust this setting.
Click to configure:· Auto Jitter Adapt and the preferred auto jitter setting using the drop-down arrow
for Buffer Priority, or

141
© Tieline Pty. Ltd. 2015
Genie Distribution WheatNet-IP Manual v1.6
· Fixed Buffer Level and enter the Jitter Depth, which must be between 12ms and5000ms depending on the algorithm you select.
· Local and Remote FEC settings if required.
Important Note: If Any is not selected then a codec dialing this connection and usingthe ports specified will always be routed to output 1 on the codec receiving the call. Bydefault, Return Audio Port 9000 is the port specified for the first IP connection made byany Tieline codec. If you change the default port settings on the dialing codec, copy thissetting into the answering codec program.
ISDN module answering settings are used if you select ISDN as the connection transport.For more details see Configuring ISDN Answering.
For POTS, settings are determined by POTS module answering settings. For moredetails see Configuring POTS Answering.
6. Click to configure the jitter buffer and FEC settings if required, then click Next. Note: Select theCreate another answering connection at this point to setup an alternative answeringconnection for this audio stream, e.g. a backup ISDN answering connection.
7. Select Enable File Playback on silence detection to configure the codec to play back audiofrom a file via a drive attached to the USB port.

142 Genie Distribution WheatNet-IP Manual v1.6
© Tieline Pty. Ltd. 2015
Important Notes for File Playback: · Ensure MP3 recordings used are not variable bit rate files.· File playback audio is sent directly to the codec outputs and therefore IGC is not
available. When you create your MP2 or MP3 files ensure the audio levels match theaudio reference level of your codec and that peaks average at the correct levels.
· USB backup audio is only sent to the outputs of the local codec to which a USB driveis attached. USB file audio is not sent to encoders and cannot be transmitted via anaudio stream to another codec.
· The USB drive can be inserted or removed at any time as long as the codec is notalready playing audio in failover mode. Removing the USB drive while audio is playingfrom it will result in poor audio quality and should be avoided. If it is removedaccidentally you must reboot the codec to ensure USB failover will work in future.
· If you enter a single file name ensure you add the file extension, e.g. "test.mp3", or thefile will not play back.
· If you enter a directory name, all the files within the directory will be played back. Werecommend you save all audio files as a playlist and link to this if you want them toplay out sequentially. Please note that "M3U" is the playlist file format supported by thecodec.
· File playback will occur automatically if the silence threshold parameters are breached;if the codec is not connected for any reason file playback will commence. To stop fileplayback open the Master panel in the Java Toolbox Web-GUI, click to select the fileplayback connection, then click Disconnect.
8. Enter a name for the second Audio Stream and select Answer only. Then click Next.
9. Enter the name of the second audio stream connection in the text box and click Next.
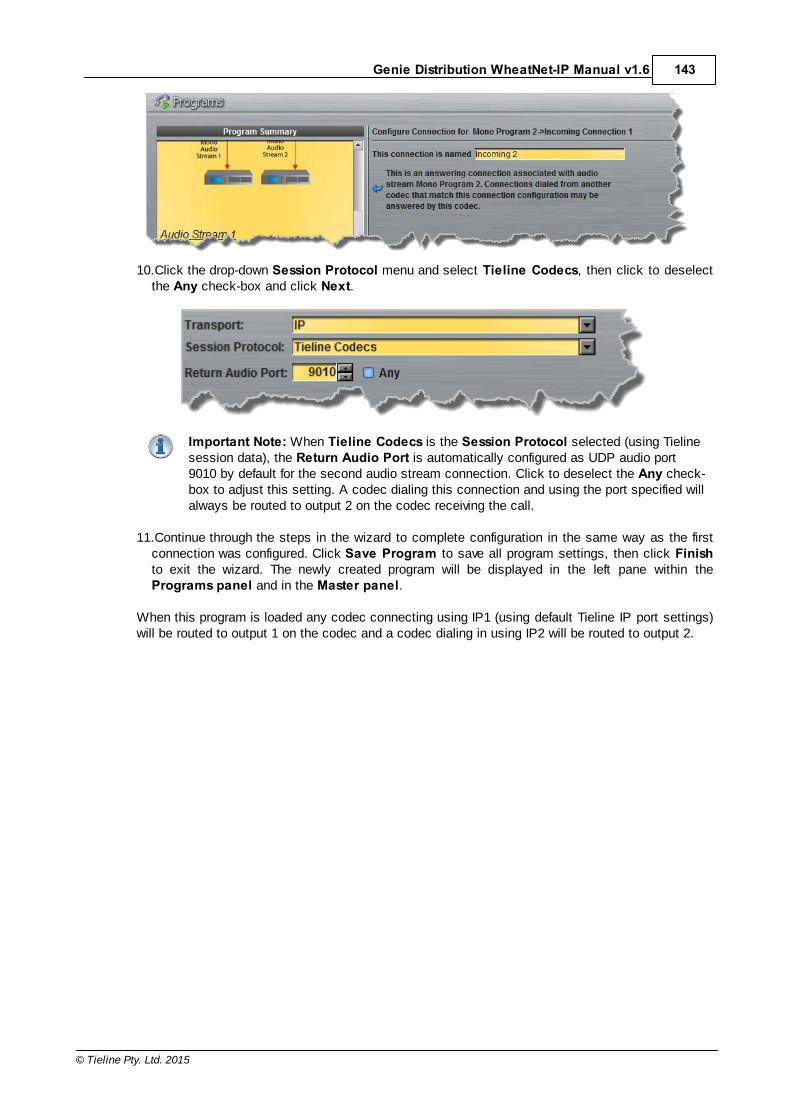
143
© Tieline Pty. Ltd. 2015
Genie Distribution WheatNet-IP Manual v1.6
10.Click the drop-down Session Protocol menu and select Tieline Codecs, then click to deselectthe Any check-box and click Next.
Important Note: When Tieline Codecs is the Session Protocol selected (using Tielinesession data), the Return Audio Port is automatically configured as UDP audio port9010 by default for the second audio stream connection. Click to deselect the Any check-box to adjust this setting. A codec dialing this connection and using the port specified willalways be routed to output 2 on the codec receiving the call.
11.Continue through the steps in the wizard to complete configuration in the same way as the firstconnection was configured. Click Save Program to save all program settings, then click Finishto exit the wizard. The newly created program will be displayed in the left pane within thePrograms panel and in the Master panel.
When this program is loaded any codec connecting using IP1 (using default Tieline IP port settings)will be routed to output 1 on the codec and a codec dialing in using IP2 will be routed to output 2.

144 Genie Distribution WheatNet-IP Manual v1.6
© Tieline Pty. Ltd. 2015
24.7 Configure 2 or 3 Stereo Peer-to-Peer ProgramsGenie Distribution codecs are capable of creating two or three simultaneous peer-to-peer stereoaudio streams which operate independently. These audio streams can be connected peer-to-peerbetween two Genie Distribution codecs, or from one Genie Distribution to either two or threecodecs.
Important Notes: In most situations you need to create a dial only program in your GenieDistribution codec. A compatible codec receiving the call will answer using a defaultprogram. There is no requirement to create an answering program, however if you requirefile playback on the answering codec it will be necessary to create an answering programwhich integrates this feature as explained in Configure Mono or Stereo Peer-to-PeerPrograms.
Configuring 2 or 3 x Stereo Peer-to-Peer ProgramsImportant Notes: Before you start program configuration please note:
· You cannot edit a program when it is currently loaded in the codec.· Session port 9002 is used by default for all audio streams. If you connect to a G3
codec using IP2 you will need to change the session port on the Genie Distributioncodec to 9012 for the second audio stream connection, as this is used by default onG3 codecs for IP2.
· Some drop-down menus and settings may be greyed out intentionally depending onfeatures available and the transport selected (e.g. IP or ISDN).
· It is possible to save a program at several points throughout the program wizard anduse default settings to save configuration time.
· You can lock a loaded custom program in a codec to ensure the currently loadedprogram cannot be unloaded by a codec dialing in with a different program type.
· Failover and SmartStream PLUS redundant streaming are not available with SIP orsessionless IP connections.
· POTS is not supported for stereo audio stream connections.· To learn more about programs see the section titled About Program Dialing.
1. Open the Java Toolbox Web-GUI and click the Programs symbol at the top of the screen todisplay the Programs panel.
2. Click the New Program button to open the wizard and:

145
© Tieline Pty. Ltd. 2015
Genie Distribution WheatNet-IP Manual v1.6
· Click in the text box to name the new program. · Select 2 x Stereo Peer-to-Peer (or 3 x Stereo Peer-to-Peer), or if you want to use an
existing program as a template, select this option. Then click Next.
Important Note: When you decide to use an existing program as a template, the newprogram inherits all the settings of the template program and you can adjust thesesettings as required by continuing through the program wizard.
3. Enter a name for the Audio Stream and select Dial only. Then click Next.
It is also possible to select a Dial Route if required. When routing multiple audiostreams over transports like ISDN or POTS, you can use Dial and Answer Routes toconfigure deterministic routing of audio streams. Use of Dial and Answer Routes is notrecommended over IP. See Configuring ISDN Answering or Configuring POTS Answeringfor more information. Use the default settings for IP connections.
4. This audio stream connection in the wizard will configure the codec to connect the first audiostream. Enter the name of the connection in the text box, then click Next.
5. Follow the instructions on the right-hand side of the panel to configure the transport settings forthe connection, then click Next.

146 Genie Distribution WheatNet-IP Manual v1.6
© Tieline Pty. Ltd. 2015
Important Note: Bidirectional auxiliary IP data is available on one audio stream. Whenauxiliary data is enabled on one stream the option is greyed out for the other audiostreams in the program wizard. See RS232 Data Configuration for detailed information onRS232 data and see Enabling Relays and RS232 Data for more information on relayoperations.
6. Configure destination codec dialing and encoding settings:
For IP connections configure the IP address, ports, and then specify which streaminginterface is used to dial this connection, e.g. Primary (port ETH1) or Secondary (portETH2). Note: By default Any will select ETH1 if it is available and ETH2 if it is unavailable.
Important Note: The Send Audio Port is the codec port at the remote end ofthe link to which you are sending audio. The Return Audio Port is used by thelocal codec to receive audio from the remote codec. When Tieline Codecs isthe Session Protocol selected (using Tieline session data), the default portvalue for the Return Audio Port is Automatic. Note: Automatic indicates thatthe codec will arbitrarily allocate the return port value and send this informationto the codec to which you are dialing. Click to deselect the Automatic check-box and change this setting. When you select Sessionless as the SessionProtocol, the Session Port is not configurable and you can manuallyconfigure the Send Audio Port and Return Audio Port.
Click Save Program to save the program with the default algorithm, jitter and FECsettings which are physically entered in the codec. Alternatively, click Next to specifyindividual algorithm, jitter buffer and FEC settings and configure a backup connection orSmartStream PLUS for this audio stream (recommended).
Note: Session Port 9002 and Send Audio Port 9000 are used by default for the first IPaudio stream. The audio for this audio steam will use analog or digital inputs and outputs1 and 2 for both the dialing and answering codecs. If you need to change default port

147
© Tieline Pty. Ltd. 2015
Genie Distribution WheatNet-IP Manual v1.6
settings on the codec from which the call originates, this will also need to be adjusted inthe answering codec.
Click the drop-down arrows on the right-hand side of each text box to adjust the
Encoding, Sample rate or Bit rate options.
Click to configure:· Auto Jitter Adapt and the preferred auto jitter setting using the drop-down arrow
for Buffer priority, or · Fixed Buffer Level and enter the Jitter Depth, which must be between 12ms and
5000ms depending on the algorithm you select. · Local and Remote FEC settings if required.
Click the check-box to select Enable Redundant SmartStream PLUS and configuredual Ethernet SmartStream IP streaming. Alternatively, click Next to configure AutoReconnect or a backup connection, whereby the alternative connection is dialed if theprimary connection fails.
By default, primary IP streaming is via ETH1. To achieve the maximum level ofredundancy select Secondary to configure redundant streaming from the secondary IPport ETH2. The redundant stream uses Send Audio Port 9001 by default and the Return Audio Port allocated is Automatic. Note: Automatic indicates that the codec willarbitrarily allocate the return port value and send this information to the codec to whichyou are dialing.

148 Genie Distribution WheatNet-IP Manual v1.6
© Tieline Pty. Ltd. 2015
Important Note: Dual SmartStream PLUS redundant streaming over both Ethernet portsmitigates lost packets on either link and will provide IP network backup if an IP link islost. To learn more about SmartStream PLUS redundant IP streaming visit http://www.tieline.com/Transports/SmartStream-IP
For ISDN connections enter a number and select which B channel to use. Select theEnable bonded connections check-box to configure and bond multiple B channels.
Next, click Save Program to save the program with default algorithm settings, or clickNext to specify a different algorithm and configure a backup connection if required.(recommended).
Dialing settings for this ISDN audio stream are now complete.

149
© Tieline Pty. Ltd. 2015
Genie Distribution WheatNet-IP Manual v1.6
Select POTS Codec in the Mode drop-down menu to encode/decode using POTS, orselect Analog Phone to configure a standard analog phone call, then click Next.
Next, enter the phone number of the codec or device you want to dial. When multiplePOTS modules are installed, click the Via drop-down menu and select Module 1 orModule 2 to specify which POTS module will dial. Next, click Save Program to savethe program with default settings, or click Next to specify algorithm settings andconfigure a backup connection if required (recommended).
Dialing settings for this POTS audio stream are now complete.

150 Genie Distribution WheatNet-IP Manual v1.6
© Tieline Pty. Ltd. 2015
Configuring a Backup Connection or Auto Reconnect1. At this point in the wizard you can choose to configure Auto Reconnect or create a backup
connection for the audio stream you are configuring. Click to deselect Enable Auto Reconnectand click to select the check-box for Create a Backup Connection, then click Next.
Important Note: When Auto Reconnect is enabled, the dialing codec will continue toattempt a connection with the remote codec until Disconnect is pressed either on thedialing codec's keypad, or in the Web-GUI.
2. Enter a name for the backup connection and click Next.
3. Continue through the wizard and configure the backup connection.
Configuring File Playback on Silence Detection1. Select Enable File Playback on silence detection to configure the codec to play back audio
from a file via a drive attached to the USB port, then click Next.
Important Notes for File Playback: · Ensure MP3 recordings used are not variable bit rate files.· File playback audio is sent directly to the codec outputs and therefore IGC is not
available. When you create your MP2 or MP3 files ensure the audio levels match theaudio reference level of your codec and that peaks average at the correct levels.
· USB backup audio is only sent to the outputs of the local codec to which a USB driveis attached. USB file audio is not sent to encoders and cannot be transmitted via anaudio stream to another codec.
· The USB drive can be inserted or removed at any time as long as the codec is notalready playing audio in failover mode. Removing the USB drive while audio is playingfrom it will result in poor audio quality and should be avoided. If it is removedaccidentally you must reboot the codec to ensure USB failover will work in future.
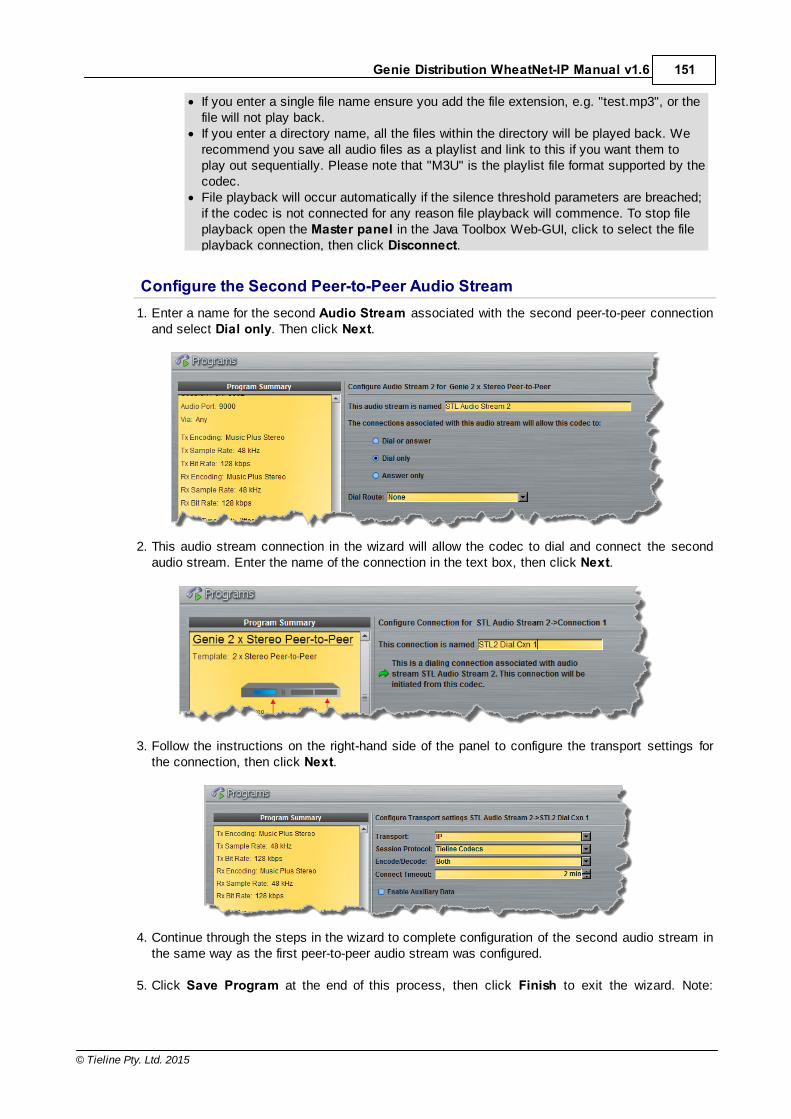
151
© Tieline Pty. Ltd. 2015
Genie Distribution WheatNet-IP Manual v1.6
· If you enter a single file name ensure you add the file extension, e.g. "test.mp3", or thefile will not play back.
· If you enter a directory name, all the files within the directory will be played back. Werecommend you save all audio files as a playlist and link to this if you want them toplay out sequentially. Please note that "M3U" is the playlist file format supported by thecodec.
· File playback will occur automatically if the silence threshold parameters are breached;if the codec is not connected for any reason file playback will commence. To stop fileplayback open the Master panel in the Java Toolbox Web-GUI, click to select the fileplayback connection, then click Disconnect.
Configure the Second Peer-to-Peer Audio Stream1. Enter a name for the second Audio Stream associated with the second peer-to-peer connection
and select Dial only. Then click Next.
2. This audio stream connection in the wizard will allow the codec to dial and connect the secondaudio stream. Enter the name of the connection in the text box, then click Next.
3. Follow the instructions on the right-hand side of the panel to configure the transport settings for
the connection, then click Next.
4. Continue through the steps in the wizard to complete configuration of the second audio stream inthe same way as the first peer-to-peer audio stream was configured.
5. Click Save Program at the end of this process, then click Finish to exit the wizard. Note:

152 Genie Distribution WheatNet-IP Manual v1.6
© Tieline Pty. Ltd. 2015
Configure the third audio stream in the same way as the first two if you are creating a 3 x StereoPeer-to-Peer program, then save the program.
This program will now allow incoming codec calls to establish 2 or 3 x Stereo Peer-to-Peerconnections and stream audio as per the input/output and port assignments indicated in the imageat the beginning of this section. The newly created program will be displayed in the left pane withinthe Programs panel and in the Master panel. Select and connect audio streams in a programusing the Master panel, or dial the program manually using the codec front panel.

153
© Tieline Pty. Ltd. 2015
Genie Distribution WheatNet-IP Manual v1.6
24.8 Configure 2 x Stereo + 2 x Mono Peer-to-Peer Dialing ProgramsA 2 x Stereo + 2 x Mono Peer-to-Peer program includes two bidirectional stereo audio streamsand two bidirectional mono audio streams. Each audio stream can be configured as a separatepeer-to-peer connection to the same destination codec, or with different destination codecs. Eachaudio stream can be configured with different transport, audio and backup settings.
Important Notes: In most situations you need to create a dial only program in your GenieDistribution codec. A compatible codec receiving the call will answer using a defaultprogram. There is no requirement to create an answering program, however if you requirefile playback on the answering codec it will be necessary to create an answering programwhich integrates this feature as explained in Configure Mono or Stereo Peer-to-PeerPrograms.
Configuring 2 x Stereo + 2 x Mono Peer-to-Peer ProgramsImportant Notes: Before you start program configuration please note:
· You cannot edit a program when it is currently loaded in the codec.· Session port 9002 is used by default for all audio streams. If you connect to a G3
codec using IP2 you will need to change the session port on the Genie Distributioncodec to 9012 for the second audio stream connection, as this is used by default onG3 codecs for IP2.
· Some drop-down menus and settings may be greyed out intentionally depending onfeatures available and the transport selected (e.g. IP or ISDN).
· It is possible to save a program at several points throughout the program wizard anduse default settings to save configuration time.
· You can lock a loaded custom program in a codec to ensure the currently loadedprogram cannot be unloaded by a codec dialing in with a different program type.
· To learn more about programs see the section titled About Program Dialing.· The stereo audio streams are configured first and then the two mono audio
streams.· Failover and SmartStream PLUS redundant streaming are not available with SIP or
sessionless IP connections.· POTS is not supported for stereo audio stream connections.· Selection of a mono algorithm and associated settings is the only difference when
comparing configuration of a mono audio stream to a stereo audio stream.

154 Genie Distribution WheatNet-IP Manual v1.6
© Tieline Pty. Ltd. 2015
1. Open the Java Toolbox Web-GUI and click the Programs symbol at the top of the screen todisplay the Programs panel.
2. Click the New Program button to open the wizard and:· Click in the text box to name the new program.· Select 2 x Stereo + 2 x Mono Peer-to-Peer, or if you want to use an existing program as a
template, select this option. Then click Next.
Important Note: When you decide to use an existing program as a template, the newprogram inherits all the settings of the template program and you can adjust thesesettings as required by continuing through the program wizard.
3. Enter a name for the first stereo Audio Stream and select Dial only. Then click Next.
It is also possible to select a Dial Route if required. When routing multiple audiostreams over transports like ISDN or POTS, you can use Dial and Answer Routes toconfigure deterministic routing of audio streams. Use of Dial and Answer Routes is notrecommended over IP. See Configuring ISDN Answering or Configuring POTS Answeringfor more information. Use the default settings for IP connections.
4. This audio stream connection in the wizard will configure the codec to connect the first audiostream. Enter the name of the connection in the text box, then click Next.
5. Follow the instructions on the right-hand side of the panel to configure the transport settings forthe connection, then click Next.

155
© Tieline Pty. Ltd. 2015
Genie Distribution WheatNet-IP Manual v1.6
Important Note: Bidirectional auxiliary IP data is available on one audio stream. Whenauxiliary data is enabled on one stream the option is greyed out for the other audiostreams in the program wizard. See RS232 Data Configuration for detailed information onRS232 data and see Enabling Relays and RS232 Data for more information on relayoperations.
6. Configure destination codec dialing and encoding settings:
For IP connections configure the IP address, ports, and then specify which streaminginterface is used to dial this connection, e.g. Primary (port ETH1) or Secondary (portETH2). Note: By default Any will select ETH1 if it is available and ETH2 if it is unavailable.
Important Note: The Send Audio Port is the codec port at the remote end ofthe link to which you are sending audio. The Return Audio Port is used by thelocal codec to receive audio from the remote codec. When Tieline Codecs isthe Session Protocol selected (using Tieline session data), the default portvalue for the Return Audio Port is Automatic. Note: Automatic indicates thatthe codec will arbitrarily allocate the return port value and send this informationto the codec to which you are dialing. Click to deselect the Automatic check-box and change this setting. When you select Sessionless as the SessionProtocol, the Session Port is not configurable and you can manuallyconfigure the Send Audio Port and Return Audio Port.
Click Save Program to save the program with the default algorithm, jitter and FECsettings which are physically entered in the codec. Alternatively, click Next to specifyindividual algorithm, jitter buffer and FEC settings and configure a backup connection orSmartStream PLUS for this audio stream (recommended).
Note: Session Port 9002 and Send Audio Port 9000 are used by default for the first IPaudio stream. The audio for this audio steam will use analog or digital inputs and outputs1 and 2 for both the dialing and answering codecs. If you need to change default portsettings on the codec from which the call originates, this will also need to be adjusted in

156 Genie Distribution WheatNet-IP Manual v1.6
© Tieline Pty. Ltd. 2015
the answering codec.
Click the drop-down arrows on the right-hand side of each text box to adjust the
Encoding, Sample rate or Bit rate options.
Click to configure:· Auto Jitter Adapt and the preferred auto jitter setting using the drop-down arrow
for Buffer priority, or · Fixed Buffer Level and enter the Jitter Depth, which must be between 12ms and
5000ms depending on the algorithm you select. · Local and Remote FEC settings if required.
Click the check-box to select Enable Redundant SmartStream PLUS and configuredual Ethernet SmartStream IP streaming. Alternatively, click Next to configure AutoReconnect or a backup connection, whereby the alternative connection is dialed if theprimary connection fails.
By default, primary IP streaming is via ETH1. To achieve the maximum level ofredundancy select Secondary to configure redundant streaming from the secondary IPport ETH2. The redundant stream uses Send Audio Port 9001 by default and the Return Audio Port allocated is Automatic. Note: Automatic indicates that the codec willarbitrarily allocate the return port value and send this information to the codec to whichyou are dialing.
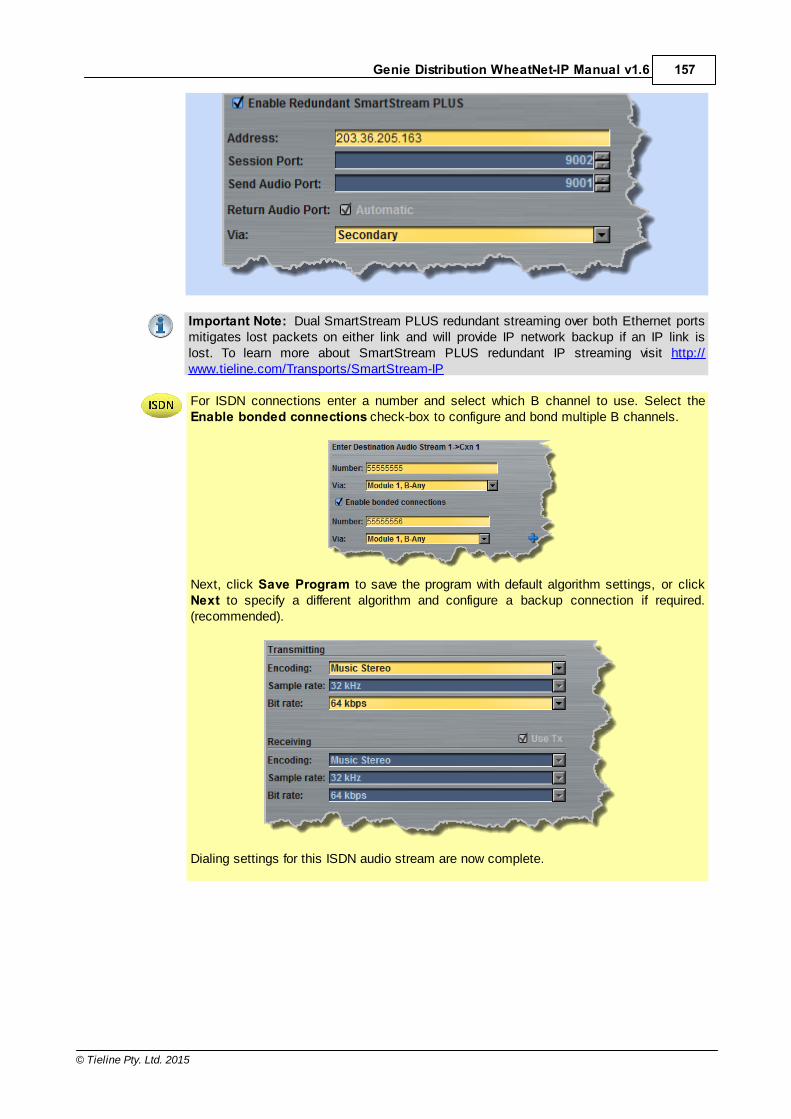
157
© Tieline Pty. Ltd. 2015
Genie Distribution WheatNet-IP Manual v1.6
Important Note: Dual SmartStream PLUS redundant streaming over both Ethernet portsmitigates lost packets on either link and will provide IP network backup if an IP link islost. To learn more about SmartStream PLUS redundant IP streaming visit http://www.tieline.com/Transports/SmartStream-IP
For ISDN connections enter a number and select which B channel to use. Select theEnable bonded connections check-box to configure and bond multiple B channels.
Next, click Save Program to save the program with default algorithm settings, or clickNext to specify a different algorithm and configure a backup connection if required.(recommended).
Dialing settings for this ISDN audio stream are now complete.

158 Genie Distribution WheatNet-IP Manual v1.6
© Tieline Pty. Ltd. 2015
Select POTS Codec in the Mode drop-down menu to encode/decode using POTS, orselect Analog Phone to configure a standard analog phone call, then click Next.
Next, enter the phone number of the codec or device you want to dial. When multiplePOTS modules are installed, click the Via drop-down menu and select Module 1 orModule 2 to specify which POTS module will dial. Next, click Save Program to savethe program with default settings, or click Next to specify algorithm settings andconfigure a backup connection if required (recommended).
Dialing settings for this POTS audio stream are now complete.
Configuring a Backup Connection or Auto Reconnect1. At this point in the wizard you can choose to configure Auto Reconnect or create a backup
connection for the audio stream you are configuring. Click to deselect Enable Auto Reconnectand click to select the check-box for Create a Backup Connection, then click Next.

159
© Tieline Pty. Ltd. 2015
Genie Distribution WheatNet-IP Manual v1.6
Important Note: When Auto Reconnect is enabled, the dialing codec will continue toattempt a connection with the remote codec until Disconnect is pressed either on thedialing codec's keypad, or in the Web-GUI.
2. Enter a name for the backup connection and click Next.
3. Continue through the wizard and configure the backup connection.
Configuring File Playback on Silence Detection1. Select Enable File Playback on silence detection to configure the codec to play back audio
from a file via a drive attached to the USB port. Specify the parameters as outlined in theinstructions on the right-hand pane of the panel, then click Next.
Important Notes for File Playback: · Ensure MP3 recordings used are not variable bit rate files.· File playback audio is sent directly to the codec outputs and therefore IGC is not
available. When you create your MP2 or MP3 files ensure the audio levels match theaudio reference level of your codec and that peaks average at the correct levels.
· USB backup audio is only sent to the outputs of the local codec to which a USB driveis attached. USB file audio is not sent to encoders and cannot be transmitted via anaudio stream to another codec.
· The USB drive can be inserted or removed at any time as long as the codec is notalready playing audio in failover mode. Removing the USB drive while audio is playingfrom it will result in poor audio quality and should be avoided. If it is removedaccidentally you must reboot the codec to ensure USB failover will work in future.
· If you enter a single file name ensure you add the file extension, e.g. "test.mp3", or thefile will not play back.
· If you enter a directory name, all the files within the directory will be played back. Werecommend you save all audio files as a playlist and link to this if you want them toplay out sequentially. Please note that "M3U" is the playlist file format supported by thecodec.
· File playback will occur automatically if the silence threshold parameters are breached;if the codec is not connected for any reason file playback will commence. To stop fileplayback open the Master panel in the Java Toolbox Web-GUI, click to select the fileplayback connection, then click Disconnect.
Configure the Second Peer-to-Peer Audio Stream1. Enter a name for the second Audio Stream associated with the second stereo peer-to-peer
connection and select Dial only. Then click Next.

160 Genie Distribution WheatNet-IP Manual v1.6
© Tieline Pty. Ltd. 2015
2. This audio stream connection in the wizard will allow the codec to dial and connect the secondaudio stream. Enter the name of the connection in the text box, then click Next.
3. Follow the instructions on the right-hand side of the panel to configure the transport settings for
the connection, then click Next.
4. Continue through the steps in the wizard to complete configuration of the second stereo audiostream in the same way as the first audio stream was configured. Configure the two mono audiostreams in the same way and then click Save Program at the end of this process.
5. Click Finish to exit the wizard.
This program will now allow incoming codec calls to establish 2 x Stereo + 2 x Mono Peer-to-Peer connections and stream audio as per the input/output and port assignments indicated in theimage at the beginning of this section. The newly created program will be displayed in the left panewithin the Programs panel and in the Master panel. Select and connect audio streams in aprogram using the Master panel, or dial the program manually using the codec front panel.

161
© Tieline Pty. Ltd. 2015
Genie Distribution WheatNet-IP Manual v1.6
24.9 Configure Stereo + 4 x Mono Peer-to-Peer Dialing ProgramsA Stereo + 4 x Mono Peer-to-Peer program includes one bidirectional stereo audio stream andfour bidirectional mono audio streams. Each audio stream can be configured as a separate peer-to-peer connection to the same destination codec, or with different destination codecs. Each audiostream can be configured with different transport, audio and backup settings.
Important Notes: In most situations you need to create a dial only program in yourGenie Distribution codec. A compatible codec receiving the call will answer using adefault program. There is no requirement to create an answering program, however if yourequire file playback on the answering codec it will be necessary to create an answeringprogram which integrates this feature as explained in Configure Mono or Stereo Peer-to-Peer Programs.
Configuring Stereo + 4 x Mono Peer-to-Peer ProgramsImportant Notes: Before you start program configuration please note:
· You cannot edit a program when it is currently loaded in the codec. · Session port 9002 is used by default for all audio streams. If you connect to a G3
codec using IP2 you will need to change the session port on the Genie Distributioncodec to 9012 for the second audio stream connection, as this is used by default onG3 codecs for IP2.
· Some drop-down menus and settings may be greyed out intentionally depending onfeatures available and the transport selected (e.g. IP or ISDN).
· It is possible to save a program at several points throughout the program wizard anduse default settings to save configuration time.
· You can lock a loaded custom program in a codec to ensure the currently loadedprogram cannot be unloaded by a codec dialing in with a different program type.
· To learn more about programs see the section titled About Program Dialing.· The stereo audio stream is configured first and then the four mono audio streams.· Failover and SmartStream PLUS redundant streaming are not available with SIP or

162 Genie Distribution WheatNet-IP Manual v1.6
© Tieline Pty. Ltd. 2015
sessionless IP connections.· POTS is not supported for stereo audio stream connections.· Selection of a mono algorithm and associated settings is the only difference when
comparing configuration of a mono audio stream to a stereo audio stream.
1. Open the Java Toolbox Web-GUI and click the Programs symbol at the top of the screen todisplay the Programs panel.
2. Click the New Program button to open the wizard and:· Click in the text box to name the new program.· Select Stereo + 4 x Mono Peer-to-Peer, or if you want to use an existing program as a
template, select this option. Then click Next.
Important Note: When you decide to use an existing program as a template, the newprogram inherits all the settings of the template program and you can adjust thesesettings as required by continuing through the program wizard.
3. Enter a name for the Audio Stream and select Dial only. Then click Next.
It is also possible to select a Dial Route if required. When routing multiple audiostreams over transports like ISDN or POTS, you can use Dial and Answer Routes toconfigure deterministic routing of audio streams. Use of Dial and Answer Routes is notrecommended over IP. See Configuring ISDN Answering or Configuring POTS Answeringfor more information. Use the default settings for IP connections.
4. This audio stream connection in the wizard will configure the codec to connect the first audiostream. Enter the name of the connection in the text box, then click Next.

163
© Tieline Pty. Ltd. 2015
Genie Distribution WheatNet-IP Manual v1.6
5. Follow the instructions on the right-hand side of the panel to configure the transport settings forthe connection, then click Next.
Important Note: Bidirectional auxiliary IP data is available on one audio stream. Whenauxiliary data is enabled on one stream the option is greyed out for the other audiostreams in the program wizard. See RS232 Data Configuration for detailed information onRS232 data and see Enabling Relays and RS232 Data for more information on relayoperations.
6. Configure destination codec dialing and encoding settings:
For IP connections configure the IP address, ports, and then specify which streaminginterface is used to dial this connection, e.g. Primary (port ETH1) or Secondary (portETH2). Note: By default Any will select ETH1 if it is available and ETH2 if it isunavailable.
Important Note: The Send Audio Port is the codec port at the remote end ofthe link to which you are sending audio. The Return Audio Port is used by thelocal codec to receive audio from the remote codec. When Tieline Codecs isthe Session Protocol selected (using Tieline session data), the default portvalue for the Return Audio Port is Automatic. Note: Automatic indicates thatthe codec will arbitrarily allocate the return port value and send this informationto the codec to which you are dialing. Click to deselect the Automatic check-box and change this setting. When you select Sessionless as the SessionProtocol, the Session Port is not configurable and you can manuallyconfigure the Send Audio Port and Return Audio Port.
Click Save Program to save the program with the default algorithm, jitter and FECsettings which are physically entered in the codec. Alternatively, click Next to specifyindividual algorithm, jitter buffer and FEC settings and configure a backup connection orSmartStream PLUS for this audio stream (recommended).
Note: Session Port 9002 and Send Audio Port 9000 are used by default for the first IP

164 Genie Distribution WheatNet-IP Manual v1.6
© Tieline Pty. Ltd. 2015
audio stream. The audio for this audio steam will use analog or digital inputs and outputs1 and 2 for both the dialing and answering codecs. If you need to change default portsettings on the codec from which the call originates, this will also need to be adjusted inthe answering codec using a custom program.
Click the drop-down arrows on the right-hand side of each text box to adjust the
Encoding, Sample rate or Bit rate options.
Click to configure:· Auto Jitter Adapt and the preferred auto jitter setting using the drop-down arrow
for Buffer priority, or · Fixed Buffer Level and enter the Jitter Depth, which must be between 12ms and
5000ms depending on the algorithm you select. · Local and Remote FEC settings if required.
Click the check-box to select Enable Redundant SmartStream PLUS and configuredual Ethernet SmartStream IP streaming. Alternatively, click Next to configure AutoReconnect or a backup connection, whereby the alternative connection is dialed if theprimary connection fails.
By default, primary IP streaming is via ETH1. To achieve the maximum level ofredundancy select Secondary to configure redundant streaming from the secondary IPport ETH2. The redundant stream uses Send Audio Port 9001 by default and the Return Audio Port allocated is Automatic. Note: Automatic indicates that the codec willarbitrarily allocate the return port value and send this information to the codec to whichyou are dialing.
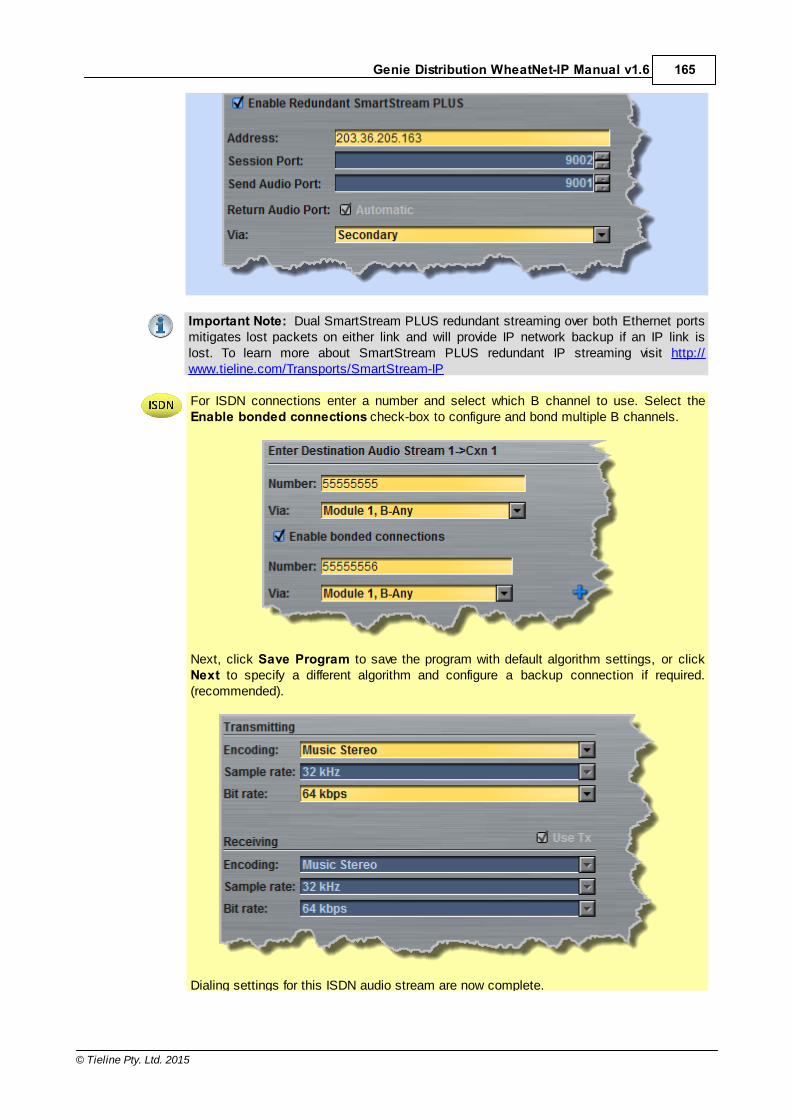
165
© Tieline Pty. Ltd. 2015
Genie Distribution WheatNet-IP Manual v1.6
Important Note: Dual SmartStream PLUS redundant streaming over both Ethernet portsmitigates lost packets on either link and will provide IP network backup if an IP link islost. To learn more about SmartStream PLUS redundant IP streaming visit http://www.tieline.com/Transports/SmartStream-IP
For ISDN connections enter a number and select which B channel to use. Select theEnable bonded connections check-box to configure and bond multiple B channels.
Next, click Save Program to save the program with default algorithm settings, or clickNext to specify a different algorithm and configure a backup connection if required.(recommended).
Dialing settings for this ISDN audio stream are now complete.

166 Genie Distribution WheatNet-IP Manual v1.6
© Tieline Pty. Ltd. 2015
Select POTS Codec in the Mode drop-down menu to encode/decode using POTS, orselect Analog Phone to configure a standard analog phone call, then click Next.
Next, enter the phone number of the codec or device you want to dial. When multiplePOTS modules are installed, click the Via drop-down menu and select Module 1 orModule 2 to specify which POTS module will dial. Next, click Save Program to savethe program with default settings, or click Next to specify algorithm settings andconfigure a backup connection if required (recommended).
Dialing settings for this POTS audio stream are now complete.

167
© Tieline Pty. Ltd. 2015
Genie Distribution WheatNet-IP Manual v1.6
Configuring a Backup Connection or Auto Reconnect1. At this point in the wizard you can choose to configure Auto Reconnect or create a backup
connection for the audio stream you are configuring. Click to deselect Enable Auto Reconnectand click to select the check-box for Create a Backup Connection, then click Next.
Important Note: When Auto Reconnect is enabled, the dialing codec will continue toattempt a connection with the remote codec until Disconnect is pressed either on thedialing codec's keypad, or in the Web-GUI.
2. Enter a name for the backup connection and click Next.
3. Continue through the wizard and configure the backup connection.
Configuring File Playback on Silence Detection1. Select Enable File Playback on silence detection to configure the codec to play back audio
from a file via a drive attached to the USB port. Specify the parameters as outlined in theinstructions on the right-hand pane of the panel, then click Next.
Important Notes for File Playback: · Ensure MP3 recordings used are not variable bit rate files.· File playback audio is sent directly to the codec outputs and therefore IGC is not
available. When you create your MP2 or MP3 files ensure the audio levels match theaudio reference level of your codec and that peaks average at the correct levels.
· USB backup audio is only sent to the outputs of the local codec to which a USB driveis attached. USB file audio is not sent to encoders and cannot be transmitted via anaudio stream to another codec.
· The USB drive can be inserted or removed at any time as long as the codec is notalready playing audio in failover mode. Removing the USB drive while audio is playingfrom it will result in poor audio quality and should be avoided. If it is removedaccidentally you must reboot the codec to ensure USB failover will work in future.

168 Genie Distribution WheatNet-IP Manual v1.6
© Tieline Pty. Ltd. 2015
· If you enter a single file name ensure you add the file extension, e.g. "test.mp3", or thefile will not play back.
· If you enter a directory name, all the files within the directory will be played back. Werecommend you save all audio files as a playlist and link to this if you want them toplay out sequentially. Please note that "M3U" is the playlist file format supported by thecodec.
· File playback will occur automatically if the silence threshold parameters are breached;if the codec is not connected for any reason file playback will commence. To stop fileplayback open the Master panel in the Java Toolbox Web-GUI, click to select the fileplayback connection, then click Disconnect.
Configure the Second Peer-to-Peer Audio Stream1. Enter a name for the second Audio Stream associated with the second peer-to-peer connection
and select Dial only. Then click Next.
2. This audio stream connection in the wizard will allow the codec to dial and connect the secondaudio stream. Enter the name of the connection in the text box, then click Next.
3. Follow the instructions on the right-hand side of the panel to configure the transport settings for
the connection, then click Next.
4. Continue through the steps in the wizard to complete configuration of the second audio stream(first mono audio stream) in the same way as the first audio stream was configured. Configurethe remaining mono audio streams in the same way. Click Save Program at the end of thisprocess, then click Finish to exit the wizard.

169
© Tieline Pty. Ltd. 2015
Genie Distribution WheatNet-IP Manual v1.6
This program will now allow incoming codec calls to establish Stereo + 4 x Mono Peer-to-Peerconnections and stream audio as per the input/output and port assignments indicated in the imageat the beginning of this section. The newly created program will be displayed in the left pane withinthe Programs panel and in the Master panel. Select and connect audio streams in a programusing the Master panel, or dial the program manually using the codec front panel.

170 Genie Distribution WheatNet-IP Manual v1.6
© Tieline Pty. Ltd. 2015
24.10 Configure 6 x Mono Peer-to-Peer Dialing ProgramsA 6 x Mono Peer-to-Peer program includes six bidirectional mono audio streams. Each audiostream is a separate peer-to-peer connection with a different destination codec and eachconnection can also be configured with different transport, audio and backup settings.
Important Notes: In most situations you need to create a dial only program in yourGenie Distribution codec. A compatible codec receiving the call will answer using adefault program. There is no requirement to create an answering program, however if yourequire file playback on the answering codec it will be necessary to create an answeringprogram which integrates this feature as explained in Configure Mono or Stereo Peer-to-Peer Programs.
Configuring 6 x Mono Peer-to-Peer ProgramsImportant Notes: Before you start program configuration please note:
· You cannot edit a program when it is currently loaded in the codec.· Session port 9002 is used by default for all audio streams. If you connect to a G3
codec using IP2 you will need to change the session port on the Genie Distributioncodec to 9012 for the second audio stream connection, as this is used by default onG3 codecs for IP2.
· Some drop-down menus and settings may be greyed out intentionally depending onfeatures available and the transport selected (e.g. IP or ISDN).
· It is possible to save a program at several points throughout the program wizard anduse default settings to save configuration time.
· You can lock a loaded custom program in a codec to ensure the currently loadedprogram cannot be unloaded by a codec dialing in with a different program type.
· Failover and SmartStream PLUS redundant streaming are not available with SIP or

171
© Tieline Pty. Ltd. 2015
Genie Distribution WheatNet-IP Manual v1.6
sessionless IP connections.· To learn more about programs see the section titled About Program Dialing.
1. Open the Java Toolbox Web-GUI and click the Programs symbol at the top of the screen todisplay the Programs panel.
2. Click the New Program button to open the wizard and:· Click in the text box to name the new program.· Select 6 x Mono Peer-to-Peer, or if you want to use an existing program as a template,
select this option. Then click Next.
Important Note: When you decide to use an existing program as a template, the newprogram inherits all the settings of the template program and you can adjust thesesettings as required by continuing through the program wizard.
3. Enter a name for the Audio Stream and select Dial only. Then click Next.
It is also possible to select a Dial Route if required. When routing multiple audiostreams over transports like ISDN or POTS, you can use Dial and Answer Routes toconfigure deterministic routing of audio streams. Use of Dial and Answer Routes is notrecommended over IP. See Configuring ISDN Answering or Configuring POTS Answeringfor more information. Use the default settings for IP connections.
4. This audio stream connection in the wizard will configure the codec to connect the first audiostream. Enter the name of the connection in the text box, then click Next.
5. Follow the instructions on the right-hand side of the panel to configure the transport settings forthe connection, then click Next.

172 Genie Distribution WheatNet-IP Manual v1.6
© Tieline Pty. Ltd. 2015
Important Note: Bidirectional auxiliary IP data is available on one audio stream. Whenauxiliary data is enabled on one stream the option is greyed out for the other audiostreams in the program wizard. See RS232 Data Configuration for detailed information onRS232 data and see Enabling Relays and RS232 Data for more information on relayoperations.
6. Configure destination codec dialing and encoding settings:
For IP connections configure the IP address, ports, and then specify which streaminginterface is used to dial this connection, e.g. Primary (port ETH1) or Secondary (portETH2). Note: By default Any will select ETH1 if it is available and ETH2 if it is unavailable.
Important Note: The Send Audio Port is the codec port at the remote end ofthe link to which you are sending audio. The Return Audio Port is used by thelocal codec to receive audio from the remote codec. When Tieline Codecs isthe Session Protocol selected (using Tieline session data), the default portvalue for the Return Audio Port is Automatic. Note: Automatic indicates thatthe codec will arbitrarily allocate the return port value and send this informationto the codec to which you are dialing. Click to deselect the Automatic check-box and change this setting. When you select Sessionless as the SessionProtocol, the Session Port is not configurable and you can manuallyconfigure the Send Audio Port and Return Audio Port.
Click Save Program to save the program with the default algorithm, jitter and FECsettings which are physically entered in the codec. Alternatively, click Next to specifyindividual algorithm, jitter buffer and FEC settings and configure a backup connection orSmartStream PLUS for this audio stream (recommended).
Note: Session Port 9002 and Send Audio Port 9000 are used by default for the first IPaudio stream. The audio for this audio stream will use analog or digital input and output 1for both the dialing and answering codecs. If you need to change default port settings onthe codec from which the call originates, this will also need to be adjusted in the

173
© Tieline Pty. Ltd. 2015
Genie Distribution WheatNet-IP Manual v1.6
answering codec using a custom program.
Click the drop-down arrows on the right-hand side of each text box to adjust the
Encoding, Sample rate or Bit rate options.
Click to configure:· Auto Jitter Adapt and the preferred auto jitter setting using the drop-down arrow
for Buffer priority, or · Fixed Buffer Level and enter the Jitter Depth, which must be between 12ms and
5000ms depending on the algorithm you select. · Local and Remote FEC settings if required.
Click the check-box to select Enable Redundant SmartStream PLUS and configuredual Ethernet SmartStream IP streaming. Alternatively, click Next to configure AutoReconnect or a backup connection, whereby the alternative connection is dialed if theprimary connection fails.
By default, primary IP streaming is via ETH1. To achieve the maximum level ofredundancy select Secondary to configure redundant streaming from the secondary IPport ETH2. The redundant stream uses Send Audio Port 9001 by default and the Return Audio Port allocated is Automatic. Note: Automatic indicates that the codec willarbitrarily allocate the return port value and send this information to the codec to whichyou are dialing.

174 Genie Distribution WheatNet-IP Manual v1.6
© Tieline Pty. Ltd. 2015
Important Note: Dual SmartStream PLUS redundant streaming over both Ethernet portsmitigates lost packets on either link and will provide IP network backup if an IP link islost. To learn more about SmartStream PLUS redundant IP streaming visit http://www.tieline.com/Transports/SmartStream-IP
For ISDN connections enter a number and select which B channel to use. Select theEnable bonded connections check-box to configure and bond multiple B channels.
Next, click Save Program to save the program with default algorithm settings, or clickNext to specify a different algorithm and configure a backup connection if required.(recommended).
Dialing settings for this ISDN audio stream are now complete.

175
© Tieline Pty. Ltd. 2015
Genie Distribution WheatNet-IP Manual v1.6
Select POTS Codec in the Mode drop-down menu to encode/decode using POTS, orselect Analog Phone to configure a standard analog phone call, then click Next.
Next, enter the phone number of the codec or device you want to dial. When multiplePOTS modules are installed, click the Via drop-down menu and select Module 1 orModule 2 to specify which POTS module will dial. Next, click Save Program to savethe program with default settings, or click Next to specify algorithm settings andconfigure a backup connection if required (recommended).
Dialing settings for this POTS audio stream are now complete.

176 Genie Distribution WheatNet-IP Manual v1.6
© Tieline Pty. Ltd. 2015
Configuring a Backup Connection or Auto Reconnect1. At this point in the wizard you can choose to configure Auto Reconnect or create a backup
connection for the audio stream you are configuring. Click to deselect Enable Auto Reconnectand click to select the check-box for Create a Backup Connection, then click Next.
Important Note: When Auto Reconnect is enabled, the dialing codec will continue toattempt a connection with the remote codec until Disconnect is pressed either on thedialing codec's keypad, or in the Web-GUI.
2. Enter a name for the backup connection and click Next.
3. Continue through the wizard and configure the backup connection.
Configuring File Playback on Silence Detection1. Select Enable File Playback on silence detection to configure the codec to play back audio
from a file via a drive attached to the USB port. Specify the parameters as outlined in theinstructions on the right-hand pane of the panel, then click Next.
Important Notes for File Playback: · Ensure MP3 recordings used are not variable bit rate files.· File playback audio is sent directly to the codec outputs and therefore IGC is not
available. When you create your MP2 or MP3 files ensure the audio levels match theaudio reference level of your codec and that peaks average at the correct levels.
· USB backup audio is only sent to the outputs of the local codec to which a USB driveis attached. USB file audio is not sent to encoders and cannot be transmitted via anaudio stream to another codec.
· The USB drive can be inserted or removed at any time as long as the codec is notalready playing audio in failover mode. Removing the USB drive while audio is playingfrom it will result in poor audio quality and should be avoided. If it is removedaccidentally you must reboot the codec to ensure USB failover will work in future.

177
© Tieline Pty. Ltd. 2015
Genie Distribution WheatNet-IP Manual v1.6
· If you enter a single file name ensure you add the file extension, e.g. "test.mp3", or thefile will not play back.
· If you enter a directory name, all the files within the directory will be played back. Werecommend you save all audio files as a playlist and link to this if you want them toplay out sequentially. Please note that "M3U" is the playlist file format supported by thecodec.
· File playback will occur automatically if the silence threshold parameters are breached;if the codec is not connected for any reason file playback will commence. To stop fileplayback open the Master panel in the Java Toolbox Web-GUI, click to select the fileplayback connection, then click Disconnect.
Configure the Second Peer-to-Peer Audio Stream1. Enter a name for the second Audio Stream associated with the second peer-to-peer connection
and select Dial only. Then click Next.
2. This audio stream connection in the wizard will allow the codec to dial and connect the secondaudio stream. Enter the name of the connection in the text box, then click Next.
3. Follow the instructions on the right-hand side of the panel to configure the transport settings for
the connection, then click Next.
4. Continue through the steps in the wizard to complete configuration of the second mono audiostream in the same way as the first audio stream was configured. Configure the remaining monoaudio streams in the same way.

178 Genie Distribution WheatNet-IP Manual v1.6
© Tieline Pty. Ltd. 2015
5. Click Save Program at the end of this process, then click Finish to exit the wizard.
This program will now allow incoming codec calls to establish 6 x Mono Peer-to-Peer connectionsand stream audio as per the input/output and port assignments indicated in the image at thebeginning of this section. The newly created program will be displayed in the left pane within thePrograms panel and in the Master panel. Select and connect audio streams in a program usingthe Master panel, or dial the program manually using the codec front panel.

179
© Tieline Pty. Ltd. 2015
Genie Distribution WheatNet-IP Manual v1.6
24.11 Configure Multi-Unicast Dialing ProgramsGenie Distribution can also simultaneously send up to 3 different mono or stereo multi-unicastaudio streams to a maximum of 50 endpoints in total. For example, the first stream could be sentto 10 endpoints, the second stream to 15 endpoints and the last stream could be sent to 25endpoints. The first connection from each multi-unicast audio stream is capable of bidirectionalaudio.
Important Notes: Before you start program configuration please note:· You cannot edit a program when it is currently loaded in the codec.· You can lock a loaded custom program in a codec to ensure the currently loaded
program cannot be unloaded by a codec dialing in with a different program type.· If you are dialing to both G3 and Bridge-IT, Merlin or Genie codecs, by default the
Audio Reference Level will be configured for the compatibility of the codec dialedfirst. I.e. if you dial a G3 codec first then the G3 Audio Reference Level will beconfigured for all connections.
· Connections are dial only for multi-unicast programs.· Some drop-down menus and settings may be greyed out intentionally depending on
features available.· It is possible to save a program at several points throughout the program wizard and
use default settings to save configuration time. The first connection in each multi-unicast stream determines default settings (e.g. algorithm, sample rate, bit rate), forall subsequent connections in that stream, except for dialing settings.
· All algorithms are supported for multi-unicast connections, however only one can beused for each audio stream.
· Bidirectional audio is only available on the first connection dialed.· Forward Error Correction (FEC) is not available on multi-unicast connections.· Renegotiation of connection bit rates is not possible when connected.· Ensure you have sufficient connection bandwidth at the local codec to support all
the connections to which you are connecting.· SmartStream PLUS is not available for multi-unicast connections.· If a codec is answering more than one mono or stereo multi-unicast connection it is

180 Genie Distribution WheatNet-IP Manual v1.6
© Tieline Pty. Ltd. 2015
necessary to create an answering program to suit the answering configuration andlock this program in the codec.
· To learn more about programs see the section titled About Program Dialing.
Creating a Multi-Unicast Program
1. Open the Java Toolbox Web-GUI and click the Programs symbol at the top of the screen todisplay the Programs panel.
2. Click the New Program symbol to open the wizard and then:· Click in the text box to name the new program. · Select Multi-unicast, 2x Multi-unicast, 3 x Multi-unicast, or if you want to use an existing
program as a template, select this option. Then click Next. Note: In this example we willcreate a 2 x Multi-unicast program.
Important Note: When you decide to use an existing program as a template, the newprogram inherits all the settings of the template program and you can adjust thesesettings as required by continuing through the program wizard.
3. Enter a name for the Audio Stream and then click Next.
4. This audio stream connection in the wizard will allow the codec to dial. Enter the name of theconnection in the text box, then click Next.
5. Follow the instructions on the right-hand side of the panel to configure the transport settings forthe connection, then click Next. Note: only the first connection dialed in a multi-unicast programcan encode and decode audio. All other connections are unidirectional and encode only.

181
© Tieline Pty. Ltd. 2015
Genie Distribution WheatNet-IP Manual v1.6
Important Note: Bidirectional auxiliary IP data is available on one audio stream whenconfiguring 2 or 3 x Multi-Unicast dialing programs. When auxiliary data is enabled on onestream the option is greyed out for other audio streams in the program wizard. AuxiliaryIP data connections are not possible between the codec and G3 Commander and i-Mixcodecs over multi-unicast connections. See RS232 Data Configuration for detailedinformation on RS232 data and see Enabling Relays and RS232 Data for more informationon relay operations.
6. Configure destination codec dialing and encoding settings:
For IP connections configure the IP address, ports, and then specify which streaminginterface is used to dial this connection, e.g. Primary (port ETH1) or Secondary (portETH2). Note: By default Any will select ETH1 if it is available and ETH2 if it is unavailable.
Important Note: The Send Audio Port is the codec port at the remote end ofthe link to which you are sending audio. The Return Audio Port is used by thelocal codec to receive audio from the remote codec. When Tieline Codecs isthe Session Protocol selected (using Tieline session data), the default portvalue for the Return Audio Port is Automatic. Note: Automatic indicates thatthe codec will arbitrarily allocate the return port value and send this informationto the codec to which you are dialing. Click to deselect the Automatic check-box and change this setting.
Click Save Program to save the program with the default algorithm, jitter and FECsettings which are physically entered in the codec. Alternatively, click Next to specifyindividual algorithm, jitter buffer and FEC settings (recommended).
Click the drop-down arrows on the right-hand side of each text box to adjust the
Encoding, Sample rate or Bit rate options.

182 Genie Distribution WheatNet-IP Manual v1.6
© Tieline Pty. Ltd. 2015
Click to configure:· Auto Jitter Adapt and the preferred auto jitter setting using the drop-down arrow
for Buffer priority, or · Fixed Buffer Level and enter the Jitter Depth, which must be between 12ms and
5000ms depending on the algorithm you select. · Local and Remote FEC settings if required.
7. Select the Enable Auto Reconnect check-box if you want to enable this feature.
8. Select the Create another dialing connection check-box to configure another connection,
then click Next.

183
© Tieline Pty. Ltd. 2015
Genie Distribution WheatNet-IP Manual v1.6
9. Enter the name of the second connection in the text box, then click Next.
10.Continue through the program wizard and configure all multi-unicast connections. After allconnections are configured, select the Enable Output File Playback on silence detectioncheck-box if you want to enable this feature.
11.Click Save Program to save the program settings when configuring a 1 x Multi-unicastprogram.
Important Notes: For 2 x Multi-unicast and 3 x Multi-unicast programs, configure newaudio streams and connections as required in the same way as the first multi-unicastaudio stream.
Audio Send Port 9000 is configured by default for the first audio stream's connections. Asecond audio stream (2 x Multi-unicast programs and 3 x Multi-unicast programs)uses Audio Send Port 9010 by default; a third audio stream (3 x Multi-unicastprograms) uses Audio Send Port 9020.
The newly created program will be displayed in the left pane within the Programs panel and in theMaster panel. Select and connect audio streams in a program using the Master panel, or dial theprogram manually using the codec front panel.

184 Genie Distribution WheatNet-IP Manual v1.6
© Tieline Pty. Ltd. 2015
Monitoring Multi-Unicast ProgramsThe Master panel in the ToolBox Web-GUI is used to monitor connection details and view PPMs,as displayed in the following image. Click the blue arrow in the Program/Cxn column to expandand minimize multiple connection details for a program that you dial (as displayed below).

185
© Tieline Pty. Ltd. 2015
Genie Distribution WheatNet-IP Manual v1.6
24.12 Configure Multicast Server ProgramsGenie Distribution in multicast server mode supports sending up to three separate mono or stereomuliticast audio streams to unlimited endpoints over compatible IP networks. It is also possible touse multicast client mode to simultaneously receive 3 separate multicast streams.
How Multicasting WorksMulticast transmissions are sent using a dedicated IP multicast address that looks similar to aregular IP address and multicast subscribers request transmissions from this address. This uniqueaddress allows multicast routers to identify multicast requests from a group of codecs interested ina particular transmission and packets are replicated depending on demand. This can create largedemands on network bandwidth if the multicast group is significant in size.
As a result, only small sections of the internet are multicast enabled and many internet serviceproviders (ISPs) block multicast traffic over wide area networks. This restricts most multicastbroadcasts to private local area networks. Some ISPs provide quality of service (QoS) priority tomulticast streams for an increased service charge. You need to check with your ISP to find out whatmulticast services, if any, are available over WANs.
Important Notes: · When a connection is dialed Tieline codecs normally use session data to configure
settings like the algorithm, connection bit rate and sample rate etc. Multicastconnections do not use session data and it is imperative that all codecs are configuredwith the same connection settings prior to connecting, or they will not be able to joinmulticast streaming sessions.
· Automatic or fixed jitter buffer settings can be adjusted on individual client codecs asrequired. There is no jitter buffer setting on the server codec because it never receivesaudio packets.

186 Genie Distribution WheatNet-IP Manual v1.6
© Tieline Pty. Ltd. 2015
Multicast Server versus Multicast Client ProgramsTwo different types of multicast programs need to be created when multicasting:
· A multicast server program is used by the broadcasting codec to send multicast IP packetsto multicast routers on a network.
· A multicast client program is used by codecs to receive multicast IP audio packets.
A multicast server codec sends audio packets only and a multicast client codec receives audiopackets only. Codecs using the client program request multicast packets (sent from the servercodec), which are distributed by multicast routers.
Creating Multicast Server ProgramsImportant Notes: Before you start program configuration please note:
· Ensure all connection related settings like the port, algorithm, bit rate (etc) match onboth multicast server and client programs or they will not connect successfully.
· You cannot edit a program when it is currently loaded in the codec.· You can lock a loaded custom program in a codec to ensure the currently loaded
program cannot be unloaded by a codec dialing in with a different type of program.· Some drop-down menus and settings may be greyed out intentionally depending on
features available.· It is possible to save a program at several points throughout the program wizard and
use default settings to save configuration time.· To learn more about programs see the section titled About Program Dialing.· Always dial the multicast server codec connection first before connecting multicast
client codecs.· Multicast client codecs will display return link quality (LQ) only. The Return reading
represents the audio being downloaded from the network locally. Multicast servercodecs do not display LQ readings.
· The default UDP audio port setting is 9000 for the first multicast, 9010 for the secondmulticast and 9020 for the third multicast. The client and server port settings mustmatch to receive an audio stream. E.g. if a client codec wishes to receive multicastaudio stream 2 then it must use audio port 9010.
· Forward Error Correction (FEC) is not available for multicast connections.· It is not possible to send auxiliary data using multicast connections.
· Use firmware higher than 2.8.xx in the Bridge-IT, Genie and Merlin families of codecs totransmit auxiliary data.
· It is not possible to connect to a G3 codec and receive multicast IP audio streams.· To copy multicast client programs onto multiple codecs see Save and Restore
Configuration Files.
1. Open the Java Toolbox Web-GUI and click the Programs symbol at the top of the screen todisplay the Programs panel.
2. Click the New Program button to open the wizard and:· Click in the text box to name the new program. · Select Multicast Server, 2 x Multicast Server or 3 x Multicast Server according to
how you want to stream multicast audio, or if you want to use an existing program as atemplate, select this option. Then click Next.

187
© Tieline Pty. Ltd. 2015
Genie Distribution WheatNet-IP Manual v1.6
Important Notes: When you decide to use an existing program as a template, the newprogram inherits all the settings of the template program and you can adjust thesesettings as required by continuing through the program wizard.
3. Enter a name for the Audio Stream, then click Next.
4. This audio stream connection in the wizard will allow the codec to dial. Enter the name of theconnection in the text box, then click Next.
5. Follow the instructions on the right-hand side of the panel to configure the transport settings forthe connection, then click Next. Note: select UDP/IP +RTP for RFC compliant streaming.
Important Note: · The encode and decode direction is configured automatically for Encode Only (server
program) or Decode Only (client program). This setting is configured when you selecteither Multicast Server or Multicast Client when you first create the program in thewizard.
· The TTL value you need to use is dependent upon your network infrastructure. Pleaseconsult your network administrator if you are unsure about how to configure this setting.

188 Genie Distribution WheatNet-IP Manual v1.6
© Tieline Pty. Ltd. 2015
· When auxiliary data is enabled on one stream the option is greyed out for other audiostreams in the program wizard.
· Use firmware higher than 2.8.xx in the Bridge-IT, Genie and Merlin families of codecs toenable auxiliary data.
6. Configure the multicast IP address and Send Audio Port (the same multicast address and portmust be used for both the server and client programs), then specify which IP streaming interfaceis used to dial this connection, e.g. Primary (port ETH1) or Secondary (port ETH2), then clickNext. Note: By default Any will select ETH1 if it is available and ETH2 if it is unavailable.
7. Click the drop-down arrows on the right-hand side of each text box to select the Encoding,Sample rate, Bit rate or Sample size options. Click Next to continue.
8. Click to select Enable Auto Reconnect if required.
9. Click Save Program if you are configuring a 1 x Multicast Server program. Continue throughthe wizard to configure audio streams for 2 x Multicast Server and 3 x Multicast Serverprograms, then click Save Program.
Important Note: There is no jitter buffer setting on the server codec because it neverreceives audio packets.
9. Configure multicast server and multicast client programs and load all codecs with the appropriateprogram. Dial the multicast server program connection first and then connect multicast clientcodec programs to begin receiving multicast audio packets. Select and connect audio streams ina program using the Master panel, or dial the program manually using the codec front panel.

189
© Tieline Pty. Ltd. 2015
Genie Distribution WheatNet-IP Manual v1.6
24.13 Configure Multicast Client ProgramsImportant Notes: Before you commence program configuration please note:
· Ensure all connection related settings like the port, algorithm, bit rate (etc) matchon both multicast server and client programs or they will not connect successfully.
· You cannot edit a program when it is currently loaded in the codec.· You can lock a loaded custom program in a codec to ensure the currently loaded
program cannot be unloaded by a codec dialing in with a different program type.· Some drop-down menus and settings may be greyed out intentionally depending on
features available.· It is possible to save a program at several points throughout the program wizard
and use default settings to save configuration time.· To learn more about programs see the section titled About Program Dialing.· Always dial the multicast server codec connection first before connecting multicast
client codecs.· Multicast client codecs will display return link quality (LQ) only. The Return reading
represents the audio being downloaded from the network locally. Multicast servercodecs do not display LQ readings.
· The default UDP audio port setting is 9000 for the first multicast, 9010 for thesecond multicast and 9020 for the third multicast. The client and server port settingsmust match to receive an audio stream. E.g. if a client codec wishes to receivemulticast audio stream 2 then it must use audio port 9010.
· Forward Error Correction (FEC) is not available for multicast connections.· Use firmware higher than 2.8.xx in the Bridge-IT, Genie and Merlin families of codecs to
enable auxiliary data.· It is not possible to connect to a G3 codec and receive multicast IP audio streams.· To copy multicast client programs onto multiple codecs see Backup and Restore
Functions.· If the codec is answering more than one mono or stereo multicast connection it is
necessary to create an answering program to suit the answering configuration andlock this program in the codec.
Configuring Multicast Client Programs
1. Open the Java Toolbox Web-GUI and click the Programs symbol at the top of the screen todisplay the Programs panel.
2. Click the New Program button to open the wizard and:· Click in the text box to name the new program. · Select Multicast Client to configure a multicast program, or if you want to use an
existing program as a template, select this option. Then click Next.
Important Notes: When you decide to use an existing program as a template, the newprogram inherits all the settings of the template program and you can adjust thesesettings as required by continuing through the program wizard. Genie Distribution codecsalso support 3 simultaneous client audio stream connections via 2 x Multicast Client or

190 Genie Distribution WheatNet-IP Manual v1.6
© Tieline Pty. Ltd. 2015
3 x Multicast Client programs.
3. Enter a name for the Audio Stream, then click Next.
4. This audio stream connection in the wizard will allow the codec to dial. Enter the name of theconnection in the text box, then click Next.
5. Follow the instructions on the right-hand side of the panel to configure the transport settings forthe connection, then click Next. Note: select UDP/IP +RTP for RFC compliant streaming.
Important Note: Bidirectional auxiliary IP data is available on one audio stream whenmulticast dialing programs. When auxiliary data is enabled on one stream the option isgreyed out for other audio streams in the program wizard. See RS232 Data Configurationfor detailed information on RS232 data and see Enabling Relays and RS232 Data for moreinformation on relay operations.
6. Configure the multicast IP address and audio port (the same multicast address and port must beused for both the server and client programs), then specify which IP streaming interface is used todial this connection, e.g. Primary (port ETH1) or Secondary (port ETH2), then click Next. Note:By default Any will select ETH1 if it is available and ETH2 if it is unavailable.
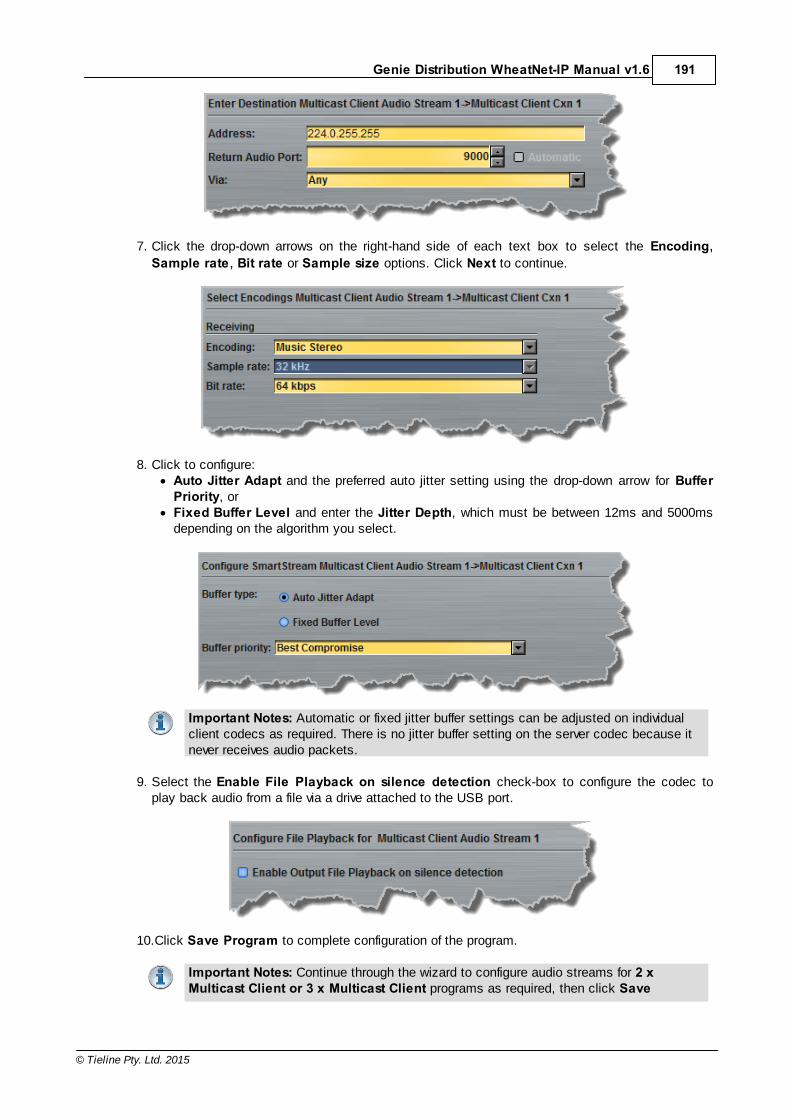
191
© Tieline Pty. Ltd. 2015
Genie Distribution WheatNet-IP Manual v1.6
7. Click the drop-down arrows on the right-hand side of each text box to select the Encoding,Sample rate, Bit rate or Sample size options. Click Next to continue.
8. Click to configure:· Auto Jitter Adapt and the preferred auto jitter setting using the drop-down arrow for Buffer
Priority, or · Fixed Buffer Level and enter the Jitter Depth, which must be between 12ms and 5000ms
depending on the algorithm you select.
Important Notes: Automatic or fixed jitter buffer settings can be adjusted on individualclient codecs as required. There is no jitter buffer setting on the server codec because itnever receives audio packets.
9. Select the Enable File Playback on silence detection check-box to configure the codec toplay back audio from a file via a drive attached to the USB port.
10.Click Save Program to complete configuration of the program.
Important Notes: Continue through the wizard to configure audio streams for 2 xMulticast Client or 3 x Multicast Client programs as required, then click Save

192 Genie Distribution WheatNet-IP Manual v1.6
© Tieline Pty. Ltd. 2015
Program.
11. Configure multicast server and multicast client programs and load all codecs with theappropriate program. Select and connect audio streams in a program using the Master panel, ordial the program manually using the codec front panel. Dial the multicast server programconnection first and then connect multicast client codec programs to begin receiving multicastaudio packets.
24.14 Configure SIP SettingsThe codec is fully EBU N/ACIP Tech 3326 compliant when connecting using SIP (Session InitiationProtocol) to other brands of IP codecs.
About SIPSIP provides superior interoperability between different brands of codecs due to its standardizedprotocols for connecting devices and is intended to be used when connecting Tieline codecs to non-Tieline devices. Devices primarily use SIP to dial another device’s SIP address and find its locationwith a minimum of fuss. This task is usually performed by SIP servers, which communicate betweenSIP-compliant devices to set up a call.
When connecting two devices, SDP performs similar tasks to Tieline’s proprietary session data,which is used to configure all non-SIP IP connections. There are two very distinct parts to a callwhen dialing over IP. The initial stage is the call setup stage and this is what SIP is used for. Thesecond stage is when data transference occurs and this is left to the other protocols used by adevice (i.e. using UDP to send audio data).
All the mandatory EBU N/ACIP 3326 algorithms are supported (G.711, G.722, MPEG-1 Layer 2 and16 bit PCM), as well as optional algorithms including LC- AAC, HE-AAC and aptX Enhanced. Thedefault algorithm selected when connecting using SIP is G.711.
Important Notes: · Each codec should be registered to a different SIP server account to avoid connection
conflicts.· SIP account registration can only be configured via Ethernet port 1.· SIP dialing is only supported over point-to-point connections, not multi-unicast
connections. · Tieline G3 codecs do not support connections using AAC and will default to MPEG
Layer 2 if an incoming call is programmed to use this algorithm.· Failover and SmartStream PLUS redundant streaming are not available with SIP
connections.· When connecting to a Tieline G3 codec using SIP you need to manually select the G3
audio reference level in the codec. To do this select SETTINGS > Audio > RefLevel > Tieline G3. In addition, select the following on the G3 codec prior to dialing. Select either a mono or stereo profile Select [Menu] > [Configuration] > [IP1 Setup] > [Session Type] > [SIP] Select [Menu] > [Configuration] > [IP1 Setup] > [Algorithm] > [G711/G722 or
MP2]
SIP Server Connections: Getting StartedRegistering codecs for SIP connectivity is simple. First, choose the SIP server that you wish toregister your codec with. On a LAN this may be your own server, or it could be one of the many

193
© Tieline Pty. Ltd. 2015
Genie Distribution WheatNet-IP Manual v1.6
internet servers available. We recommend that you use your own SIP server and configure it to useG.711, G.722, MP2 and AAC algorithms. This is because most internet SIP servers are for VoIPphones and are only configured for G.711 and GSM algorithms.
When you register an account with a SIP server you will be provided with:
· The SIP server IP address.· A username (often the same as a SIP number).· A password.· Domain details.· Realm details (sometimes).
Program the Codec for SIP using the Java Web-GUIUse the Java Toolbox Web-GUI to configure SIP account registration details into your codec. Oncethese details have been entered into the codec, each time it is connected to a public IP address itwill contact the SIP server automatically to acknowledge its presence over a wide area network.
1. Connect your codec to a LAN connection with a public IP address, then login to the Java
Toolbox Web-GUI and click the Settings symbol at the top of the screen to display theSettings panel.
2. Click the SIP button in the top-left corner of the System panel.3. Enter the account details into the relevant text boxes.4. Enter the Registration Timeout (this shouldn't need to be adjusted from the default setting).5. Click to select Activate Account and click the Save Settings button to create the account
in the codec. Settings Saved is displayed in the bottom-left corner of the Settings panel ifthe account details are saved successfully.
6. Navigate to SETTINGS > SIP > Accounts to verify that the account has been
registered to the SIP server. The registration symbol appears when it is activatedsuccessfully.

194 Genie Distribution WheatNet-IP Manual v1.6
© Tieline Pty. Ltd. 2015
Important Notes: Some ISPs may block SIP traffic over UDP port 5060.
24.15 Configure Peer-to-Peer SIP ProgramsSIP programs are like a normal IP program to configure, with two small differences; entering a SIPaddress and selecting SIP as the Session Protocol.
Important Notes: Before you start program configuration please note:· You cannot edit a program when it is currently loaded in the codec. · Some drop-down menus and settings may be greyed out intentionally depending on
features available.· Failover and SmartStream PLUS redundant streaming are not available with SIP
connections.· To learn more about programs see the section titled About Program Dialing.
1. Open the Java Toolbox Web-GUI and click the Programs symbol at the top of the screen todisplay the Programs panel.
2. Click the New Program button to open the wizard and:· Click in the Program Name text box to name the new program. · Select Mono/Stereo Peer-to-Peer, or if you want to use an existing program as a template,
select this option. Then click Next.
Important Notes: When you choose to use an existing program as a template, the newprogram inherits all the settings of the template program and you can adjust thesesettings as required by continuing through the program wizard.
3. Enter a name for the Audio Stream and configure the codec to dial, answer or dial andanswer. Then click Next.
Note: The following example will display how to configure a dial and answer program. If you want thecodec to either dial or answer only, select the option and the wizard will automatically displayscreens to allow you to configure the codec correctly.

195
© Tieline Pty. Ltd. 2015
Genie Distribution WheatNet-IP Manual v1.6
4. This audio stream connection in the wizard will allow the codec to dial. Enter the name of theconnection in the text box, then click Next.
5. Follow the instructions on the right-hand side of the panel to configure the transport settingsfor the connection: Ensure that you select:
· IP as the Transport.· SIP from the Session Protocol menu option.
Then click Next.
6. Configure the destination codec Address, then specify the network interface used to dial theconnection, e.g. Primary (Ethernet port 1).
At this point you can click Save Program and save the program with default algorithm and jittersettings. Alternatively, click Next to confirm and specify algorithm and jitter settings for thisconnection and configure backup audio settings (recommended).

196 Genie Distribution WheatNet-IP Manual v1.6
© Tieline Pty. Ltd. 2015
Important Notes: · If your codec is registered with same SIP registrar as the destination codec then you
only need to enter the SIP user name to dial successfully.· The default UDP audio port when using SIP for a peer-to-peer connection is 5004 in
Tieline codecs. To contact a codec that is behind a firewall or NAT-enabled router, it isessential that this and all other relevant ports are open and forwarded to the otherdevice.
7. Click the drop-down arrows on the right-hand side of each active drop-down menu to adjustthe Encoding, Sample rate or Bit rate parameters. Click Next to continue.
Click to configure:· Auto Jitter Adapt and the preferred auto jitter setting using the drop-down arrow for Buffer
Priority, or · Fixed Buffer Level and enter the Jitter Depth, which must be between 12ms and 5000 ms
depending on the algorithm you select.
Click Save Program to save all settings, or click Next to configure Auto Reconnect. If you clickSave Program, select the check-box if you want to connect the program immediately, then clickFinish.
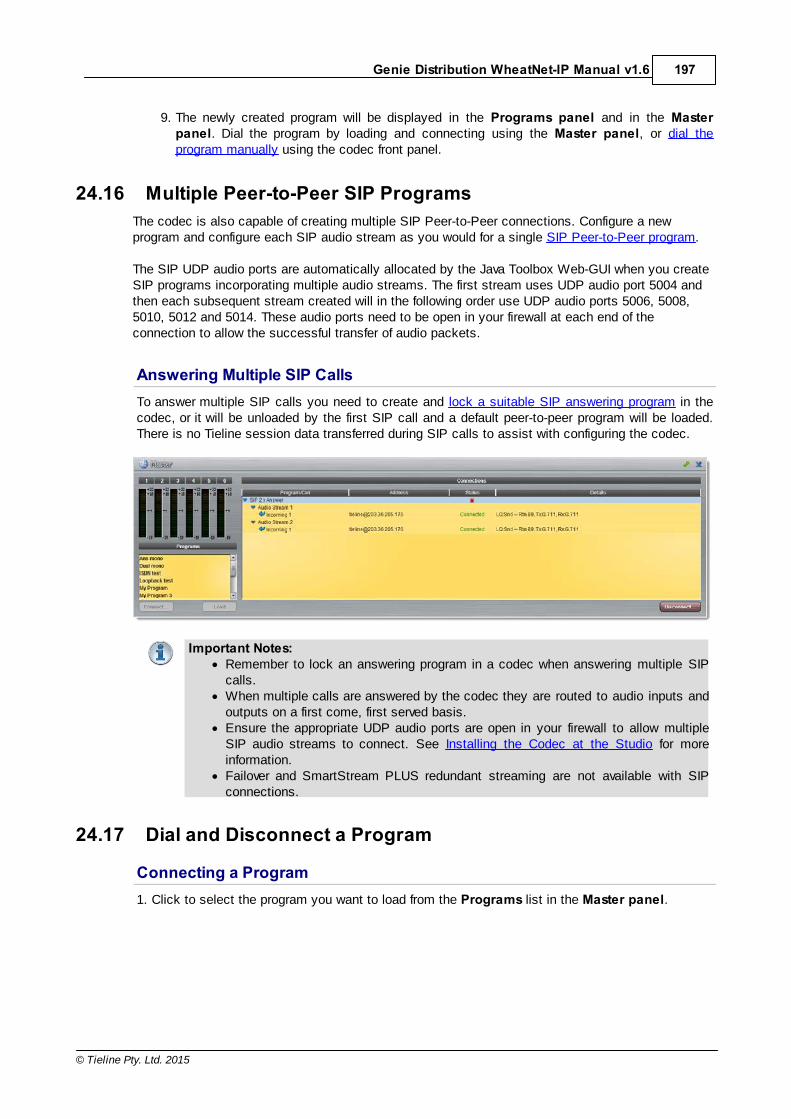
197
© Tieline Pty. Ltd. 2015
Genie Distribution WheatNet-IP Manual v1.6
9. The newly created program will be displayed in the Programs panel and in the Masterpanel. Dial the program by loading and connecting using the Master panel, or dial theprogram manually using the codec front panel.
24.16 Multiple Peer-to-Peer SIP ProgramsThe codec is also capable of creating multiple SIP Peer-to-Peer connections. Configure a newprogram and configure each SIP audio stream as you would for a single SIP Peer-to-Peer program.
The SIP UDP audio ports are automatically allocated by the Java Toolbox Web-GUI when you createSIP programs incorporating multiple audio streams. The first stream uses UDP audio port 5004 andthen each subsequent stream created will in the following order use UDP audio ports 5006, 5008,5010, 5012 and 5014. These audio ports need to be open in your firewall at each end of theconnection to allow the successful transfer of audio packets.
Answering Multiple SIP CallsTo answer multiple SIP calls you need to create and lock a suitable SIP answering program in thecodec, or it will be unloaded by the first SIP call and a default peer-to-peer program will be loaded.There is no Tieline session data transferred during SIP calls to assist with configuring the codec.
Important Notes: · Remember to lock an answering program in a codec when answering multiple SIP
calls.· When multiple calls are answered by the codec they are routed to audio inputs and
outputs on a first come, first served basis.· Ensure the appropriate UDP audio ports are open in your firewall to allow multiple
SIP audio streams to connect. See Installing the Codec at the Studio for moreinformation.
· Failover and SmartStream PLUS redundant streaming are not available with SIPconnections.
24.17 Dial and Disconnect a Program
Connecting a Program1. Click to select the program you want to load from the Programs list in the Master panel.
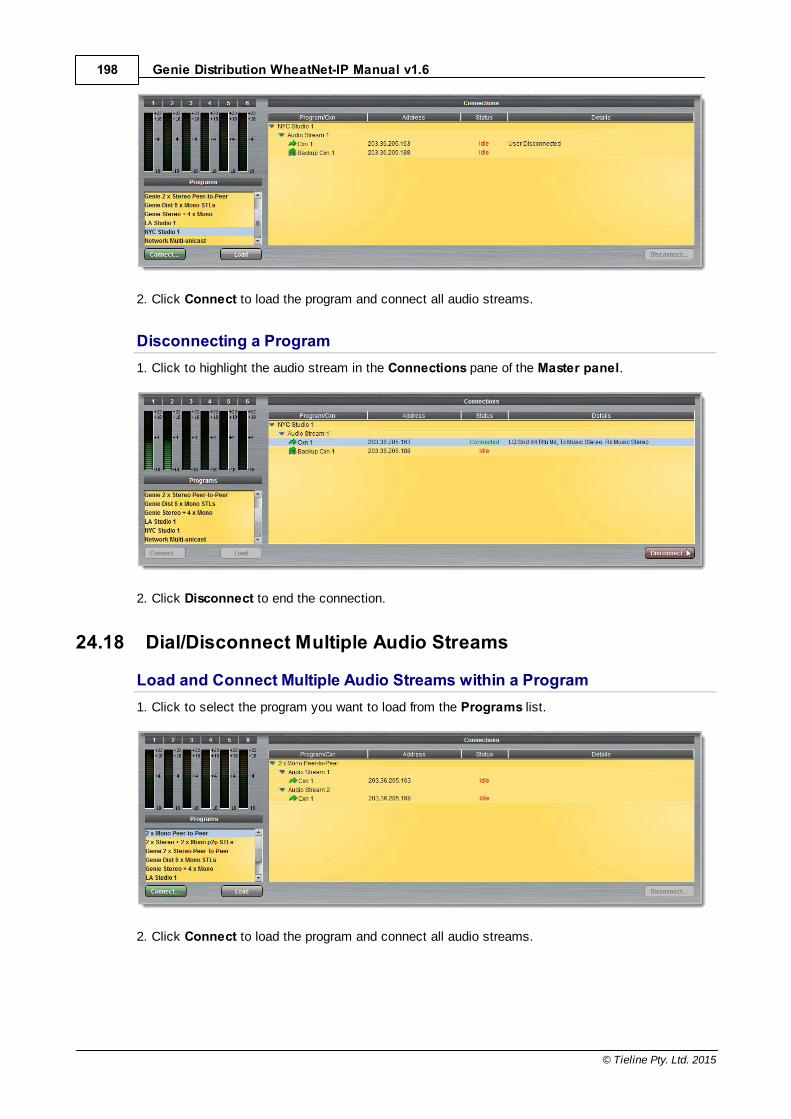
198 Genie Distribution WheatNet-IP Manual v1.6
© Tieline Pty. Ltd. 2015
2. Click Connect to load the program and connect all audio streams.
Disconnecting a Program1. Click to highlight the audio stream in the Connections pane of the Master panel.
2. Click Disconnect to end the connection.
24.18 Dial/Disconnect Multiple Audio Streams
Load and Connect Multiple Audio Streams within a Program1. Click to select the program you want to load from the Programs list.
2. Click Connect to load the program and connect all audio streams.

199
© Tieline Pty. Ltd. 2015
Genie Distribution WheatNet-IP Manual v1.6
Disconnect All Audio Stream Connections1. Click to select the program in the Connections pane, e.g. 2 x Mono Peer-to-Peer in the
following example.
2. Click the Disconnect button.3. Click Yes in the confirmation dialog to disconnect all audio stream connections.
Disconnect a Single Audio Stream Connection1. Click to select the audio stream connection you want to disconnect.
2. Click the Disconnect button.3. Click Yes in the confirmation dialog to disconnect all audio stream connections.

200 Genie Distribution WheatNet-IP Manual v1.6
© Tieline Pty. Ltd. 2015
24.19 View/Edit/Delete ProgramsImportant Notes: You cannot edit or delete a program when it is currently loaded in thecodec; ensure you have unloaded a program prior to editing the current configuration.
To view configuration settings for an existing program, or edit settings:
1. Open the Java Toolbox Web-GUI and click the Programs symbol at the top of the screen todisplay the Programs panel.
2. Click to select a program in the left-hand pane.
3. Click the blue arrow to expand audio stream information and click the Edit symbol toadjust program settings.
4. The program wizard will open at the relevant point to facilitate editing of connection
parameters. Click Save Program to store settings.
Deleting ProgramsThere are two ways to delete a program.
1. Ensure the program you want to delete is not currently loaded in the codec.2. Click to select a program listed on the left hand side of the Programs panel and then right-
click to display menu options.
3. Select and click Delete Program.4. Click Yes in the confirmation dialog.
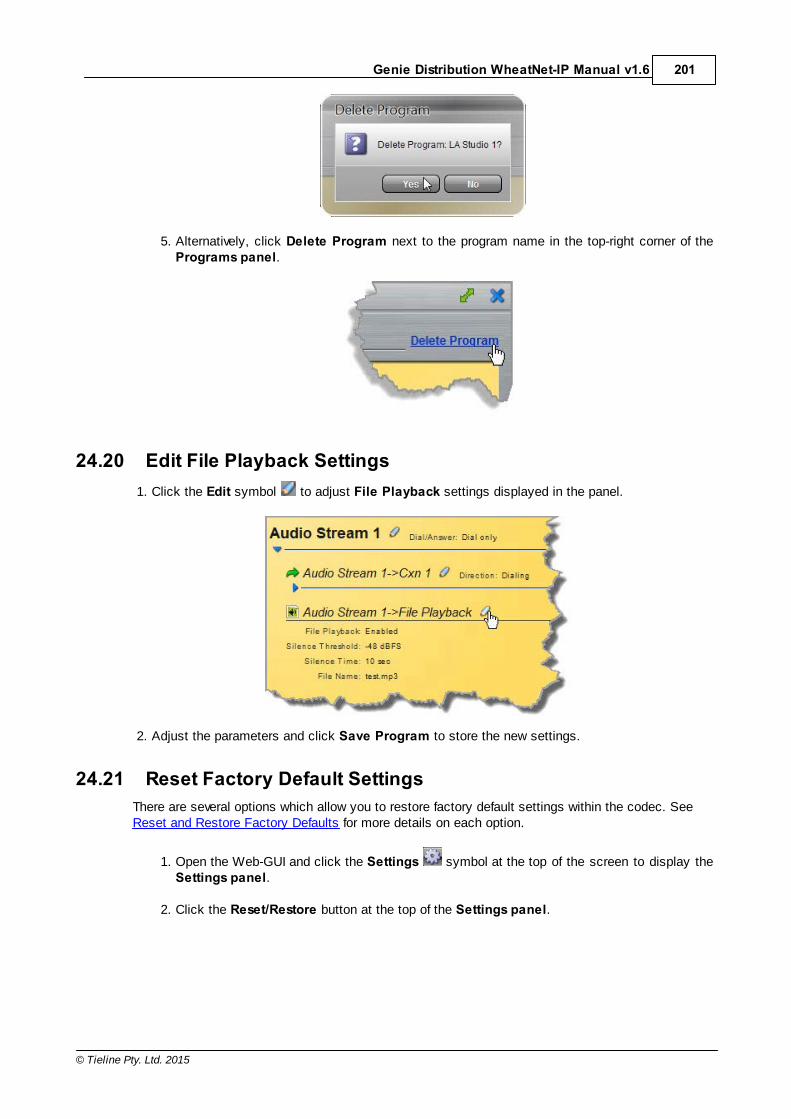
201
© Tieline Pty. Ltd. 2015
Genie Distribution WheatNet-IP Manual v1.6
5. Alternatively, click Delete Program next to the program name in the top-right corner of thePrograms panel.
24.20 Edit File Playback Settings1. Click the Edit symbol to adjust File Playback settings displayed in the panel.
2. Adjust the parameters and click Save Program to store the new settings.
24.21 Reset Factory Default SettingsThere are several options which allow you to restore factory default settings within the codec. See Reset and Restore Factory Defaults for more details on each option.
1. Open the Web-GUI and click the Settings symbol at the top of the screen to display theSettings panel.
2. Click the Reset/Restore button at the top of the Settings panel.

202 Genie Distribution WheatNet-IP Manual v1.6
© Tieline Pty. Ltd. 2015
3. Click one of the four reset options available.
4. A confirmation dialog appears for each option, click Yes to proceed or No to cancel the resetfunction.
24.22 Backup and Restore FunctionsThe Java Toolbox Web-GUI can be used to backup and restore codec settings, including:
· Programs containing a variety of connection settings.· All system settings that have been adjusted to change the factory default codec settings
(current runtime settings).
Files can also be used to copy configurations onto other similar codecs. Programs are essentiallyconnection profiles that may include:
· Program, audio stream and connection names.· IP address, port, algorithm, jitter buffer, FEC and bit rate settings (etc.) for audio stream
connections.
Creating Backup Files
1. Open the Java Toolbox Web-GUI and click the Settings symbol at the top of the screen to

203
© Tieline Pty. Ltd. 2015
Genie Distribution WheatNet-IP Manual v1.6
display the Settings panel.
2. Click the Reset/Restore button at the top of the Settings panel.
3. Click Backup.
4. Use your mouse-pointer to click and select the check boxes to confirm your backuprequirements, then click Backup.
5. Click Save and select a location on your PC to save the configuration file.
Restoring Configuration File Settings
1. Open the Java Toolbox Web-GUI and click the Settings symbol at the top of the screen todisplay the Settings panel.
2. Click the Reset/Restore button at the top of the Settings panel.
3. Click Restore.

204 Genie Distribution WheatNet-IP Manual v1.6
© Tieline Pty. Ltd. 2015
4. Navigate to the configuration file on your PC that you want to load, then click Open. 5. Use your mouse-pointer to click and select the check boxes for restoring items. For example,
you could select the Include programs check-box and deselect the Include system check-boxif you are only copying programs onto codecs.
6. Click Restore to copy the configuration file settings onto the codec; confirmation of successfulfile restoration is provided.
Note: The codec will automatically reboot to ensure the restored configuration takes effect in thecodec.
24.23 Lock or Unlock ProgramsIt is possible to lock a loaded custom program in a codec to ensure the currently loaded programtype, e.g. mono, cannot be unloaded by a codec dialing in with a different program type, e.g. stereo.For example, if you require the codec at the studio to always connect in mono, simply load and locka mono program in the codec. Generally programs will be up or down-mixed by the answering codecto match the loaded program type. In some situations incompatible program types will be rejected.
1. Open the Java Toolbox Web-GUI and click the Settings symbol at the top of the screen todisplay the Settings panel.
2. Click the Options button at the top of the Settings panel.3. Click the Lock Loaded User Program check-box to lock or unlock a user program in the codec.

205
© Tieline Pty. Ltd. 2015
Genie Distribution WheatNet-IP Manual v1.6
4. Click Save Settings to save the new configuration.
Important Note: · It is only possible to lock custom programs in a codec. · If Lock Program is enabled and you load a new custom program in the codec, Lock
Program remains enabled and locks the most recently loaded custom program.· A red Padlock symbol appears in the Status section of the Master panel to indicate a
program is locked in the codec.
24.24 Configuring SNMP in the CodecThe codec supports Simple Network Management Protocol (SNMP ) for managing devices on IPnetworks. There are two elements to configuring SNMP in your codec:
1. Configure SNMP Device settings in your codec.2. Configure SNMP Traps via the Alarms Panel in the Java Toolbox Web-GUI (see SNMP Trap
Configuration in Configuring Alarms, or to configure using the codec front panel see ConfiguringSNMP Settings).
Description of SNMP Settings in the Codec
Features Operation Button DescriptionsCodec Name A user-specified alphanumeric identifier which may be used by third-
party SNMP software to identify a device. The device namecorresponds to the ".iso.org.dod.internet.mgmt.mib-2.system.sysName" SNMP attribute and is completely independentof DNS, NIS, WINS or other device naming and identificationschemes, though convention is to use the device's fully-qualifieddomain name.
Codec Location A user-specified alphanumeric string which may be used by third-party SNMP software to identify a device. Device locationcorresponds to the ".iso.org.dod.internet.mgmt.mib-2.system.sysLocation" SNMP attribute.
Contact A text identifier for the contact person for this managed node,together with information on how to contact this person.
R/O Community SNMP provides two types of access, namely Read-Only access and

206 Genie Distribution WheatNet-IP Manual v1.6
© Tieline Pty. Ltd. 2015
Read-Write access. The R/O Community identifier allows Read Onlylevel access.
R/W Community The R/W Community identifier allows Read/Write level access.
Configuring SNMP Settings in the Codec
1. Open the Java Toolbox Web-GUI and click the Settings symbol at the top of the screen todisplay the Settings panel.
2. Click the Options button at the top of the Settings panel.
3. Click in the text boxes to enter SNMP configuration settings.
4. Click the Save Settings button to save the new settings.
MIB Files for SNMP ConfigurationManagement Information Base (MIB) files are required for SNMP applications to interact with yourTieline codec and interpret SNMP data. The codec supports SNMPv1 and SNMPv2 MIB protocols.The required MIB files can be downloaded from the codec using the following link in a PC webbrowser connected to the same network as your codec:
· http://<YOUR_CODEC_ADDRESS>/mibs/tieline-mibs.zip
Save the .zip file to your PC and import the contents into the MIB browser you use to manageSNMP-enabled network devices.
Important Note: The codec supports the attributes specified in the MIB-II standard.Please verify that your SNMP software contains the required files as specified in RFC1213.
24.25 Download LogsThe codec is capable of providing diagnostic information via user logs, which can either be sent toTieline support, or downloaded for user diagnostics.
Procedure for Sending Logs to Tieline
1. Open the Java Toolbox Web-GUI and click the Help symbol at the top of the screen todisplay the Help panel.

207
© Tieline Pty. Ltd. 2015
Genie Distribution WheatNet-IP Manual v1.6
2. Click Download Logs.
3. Save the file to your computer and then send it as a .zip file to Tieline support [email protected]
Download Event LogsEvent logs can be downloaded from the codec and viewed using any text editor, e.g. Microsoft®Word.
1. Open the Java Toolbox Web-GUI and click the Help symbol at the top of the screen todisplay the Help panel.
2. Click Download Event Log and select a location to save the log file.
Clearing LogsThis option should only be used if instructed to by Tieline support staff. To clear all event and otherlogs in the codec via the front panel see the Reset and Restore Factory Default Settings section ofthis manual, or see Reset Factory Default Settings to clear recent log history using the Web-GUI.
24.26 Configuring AlarmsClick the Alarm symbol at the top of the Java Toolbox Web-GUI to view and configure a rangeof alarms, which can provide alerts as required.
Alarm TypesClick Alarm Types to display the alarm overview pane within the Alarms Panel.

208 Genie Distribution WheatNet-IP Manual v1.6
© Tieline Pty. Ltd. 2015
The following System and Audio alarms are available:
Alarm AlarmType
Explanation
PSU Failure System Raises an alarm if one or both PSUs fail
Chassis Fan Failure System Raises an alarm if the internal fan fails
Temperature Too High System Raises an alarm if the temperature is too high
Input Silence Audio Raises an alarm if input audio is lost (according topreconfigured silence detection threshold parameters)
AES Input Lost Audio Raises an alarm if the AES input signal is lost
AES Reference Lost Audio Raises an alarm if the AES reference clock signal is lost
Configuring an Alarm's Severity LevelCodec alarms can be configured for three different severity levels:
1. Click an alarm in the Alarm Type pane to highlight it.
2. Click the Severity drop-down menu and select the preferred severity level.

209
© Tieline Pty. Ltd. 2015
Genie Distribution WheatNet-IP Manual v1.6
3. Perform this for each alarm you want to configure and then click Apply or OK to savesettings.
Enabling AlarmsTo enable and disable alarms:
1. Click the Enabled check-box to toggle enabling and disabling of an alarm.
2. Click Apply or OK to save settings.
Configuring Input Silence Detection ParametersWhen configuring an Input Silence alarm it is also necessary to configure the audio silencethresholds and timeout duration.
1. Click Input Silence to highlight the alarm and ensure it is Enabled.
2. Configure the dBFS threshold and timeout duration in seconds within the Conditions paneand ensure the input check-boxes are selected. An alarm will be raised when thesethresholds are breached.

210 Genie Distribution WheatNet-IP Manual v1.6
© Tieline Pty. Ltd. 2015
3. Click Apply or OK to save settings.
Configuring Alarm Dissemination Severity AlertsAlerts for each alarm severity level are configured using the Alarm Dissemination tab.
1. Click Alarm Dissemination.
2. Click to highlight the Alarm Severity level you want to configure, then select and configurethe alerts as required.
3. Click Apply or OK to save settings.
SNMP Trap ConfigurationSimple Network Management Protocol (SNMP) is a protocol used to manage devices on IPnetworks. SNMP provides the ability to send traps (notifications or alerts), which are packetscontaining data relating to a system component. These packets are generated by agents on amanaged device and may be either statistic or status related. Please see your systemadministrator if you require more information.
1. Click to select the Send SNMP trap check-box.
2. Click edit to open the Enter the SNMP trap target dialog and enter the SNMP traptarget, then click OK.

211
© Tieline Pty. Ltd. 2015
Genie Distribution WheatNet-IP Manual v1.6
24.26.1 Managing AlarmsActive codec alarms are indicated in the Current Alarms screen in the Java Toolbox Web-GUI .
The user is alerted to active alarms by:
1. The Alarm Symbol flashing in the top right-hand corner of the Java Toolbox Web-GUIscreen.
2. All new alarms being listed in the Current Alarms tab within the Alarms Panel.3. Other alerts as per Alarm Dissemination settings.4. The codec front panel ALARM LED flashing red.
Important Note: When a connection is active the front panel CONNECTED LED isilluminated solid green. Illumination will cease if a connection is lost.
Acknowledging AlarmsTo acknowledge an alarm:
1. Click to select the alarm in the Current Alarms tab.2. Click Acknowledge selected alarm.
After acknowledging the alarm:
1. The State will change from Active to Acknowledged.
2. The Alarm Symbol will stop flashing but remain visible in the top right-hand corner ofthe Java Toolbox Web-GUI screen.
3. The codec front panel ALARM LED will stop flashing and illuminate solid red.
4. The state of other alerts may change, as per Alarm Dissemination settings.
212 Genie Distribution WheatNet-IP Manual v1.6
© Tieline Pty. Ltd. 2015
Alarm State Front Panel AlarmLED
Web-GUI Alarm Symbol
Active Flashing red Flashing
Acknowledged Solid red Stops flashing, remains visible
Deactivating AlarmsAn alarm is deactivated automatically when the alarm state is reversed. E.g. if power is restoredafter a PSU Failure alarm, or if audio is restored after an Input Silence alarm.
Deactivating Input Silence AlarmsAn Input Silence alarm is activated when the configured audio and duration thresholds havebeen breached. To recover from this alarm state the codec must detect input audio higher thanthe failure threshold. When audio at this level is detected, the codec monitors input audio toensure it doesn't drop below the recovery threshold setting more than 5 times within thenominated Input Silence duration time. The alarm is then deactivated automatically.
Alarm HistoryClick the Alarm History tab within the Alarms Panel to display a record of all system alarmswhich have been raised.
Click the Purge Alarm History button to clear all alarms from the Alarm History tab.
24.27 RS232 Data ConfigurationThe codec supports both in-band and out-of-band data depending on the connection transport andalgorithm you are using. RPTP data is automatically enabled when using the Tieline Music orMusicPLUS algorithms over any transport. Over IP it is also possible to enable synchronized out-of-band data using any algorithm.
Algorithm Selected IP ISDN and POTSTieline Music andMusicPLUS
· In-band RPTP data enabledautomatically
· Synchronized out-of-band datacan be enabled and disabled
· In-band RPTP data enabledautomatically
All otheralgorithms
· Synchronized out-of-band datacan be enabled and disabled
· No in-band or out-of-band dataavailable
The codec can be connected to external devices and send RS232-compatible data via the serial

213
© Tieline Pty. Ltd. 2015
Genie Distribution WheatNet-IP Manual v1.6
port on the rear panel of the codec. To enable RS232 data within a connection, select EnableAuxiliary Data when creating a program in the Programs panel wizard. Alternatively, select usingthe codec Setup menu (see Enabling RS232 Data).
Setting RS232 Data Rates and Flow Control
1. Open the Java Toolbox Web-GUI and click the Settings symbol at the top of the screen todisplay the Settings panel.
2. Click the Options button.3. Click the Baud rate drop-down menu arrow to select the serial port baud rate which matches the
baud rate of the external device connected to the RS232 port on the codec.4. Click to select the Enable flow control check box and enable flow control, then click Save
settings.
Important Notes: · When connecting to G3 codecs over IP, ISDN or POTS only in-band data is available via
the Music and MusicPLUS algorithms.· Use firmware higher than 2.8.xx in the Bridge-IT, Genie and Merlin families of codecs to
enable auxiliary data over multicast connections.· It is important to enable serial port flow control as it regulates the flow of data through
the serial port. If disabled, data will flow unregulated and some may be lost.· Ensure you configure the serial port baud rate to match the setting of the external device
to which you are connecting. Ideally the settings on both codecs should match, or youcould have data overflow issues.
· Only the dialing codec needs to be configured to send RS232 data. Session data sentfrom the dialing codec will configure all other compatible codecs (non-G3) when youconnect.
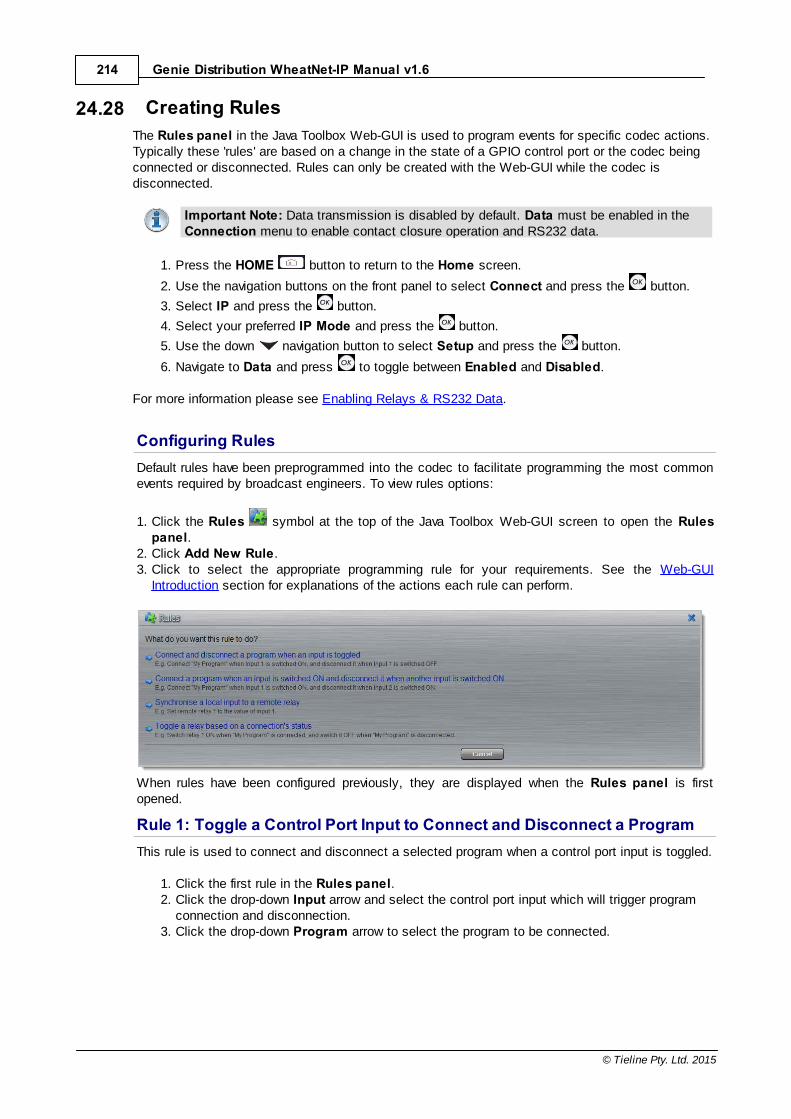
214 Genie Distribution WheatNet-IP Manual v1.6
© Tieline Pty. Ltd. 2015
24.28 Creating RulesThe Rules panel in the Java Toolbox Web-GUI is used to program events for specific codec actions.Typically these 'rules' are based on a change in the state of a GPIO control port or the codec beingconnected or disconnected. Rules can only be created with the Web-GUI while the codec isdisconnected.
Important Note: Data transmission is disabled by default. Data must be enabled in theConnection menu to enable contact closure operation and RS232 data.
1. Press the HOME button to return to the Home screen.
2. Use the navigation buttons on the front panel to select Connect and press the button.
3. Select IP and press the button.
4. Select your preferred IP Mode and press the button.
5. Use the down navigation button to select Setup and press the button.
6. Navigate to Data and press to toggle between Enabled and Disabled.
For more information please see Enabling Relays & RS232 Data.
Configuring RulesDefault rules have been preprogrammed into the codec to facilitate programming the most commonevents required by broadcast engineers. To view rules options:
1. Click the Rules symbol at the top of the Java Toolbox Web-GUI screen to open the Rulespanel.
2. Click Add New Rule.3. Click to select the appropriate programming rule for your requirements. See the Web-GUI
Introduction section for explanations of the actions each rule can perform.
When rules have been configured previously, they are displayed when the Rules panel is firstopened.
Rule 1: Toggle a Control Port Input to Connect and Disconnect a ProgramThis rule is used to connect and disconnect a selected program when a control port input is toggled.
1. Click the first rule in the Rules panel.2. Click the drop-down Input arrow and select the control port input which will trigger program
connection and disconnection.3. Click the drop-down Program arrow to select the program to be connected.

215
© Tieline Pty. Ltd. 2015
Genie Distribution WheatNet-IP Manual v1.6
4. Check the Rule Summary and click Create Rule to save the settings.
Rule 2: Switch Different Control Port Inputs On to Connect and Disconnecta ProgramThis rule is used to connect and disconnect a selected program when different codec control portinputs are turned on.
1. Click the second rule in the Rules panel.2. Click the drop-down arrows to select the control port input for connecting and the alternative
one for disconnecting.3. Click the drop-down Program arrow to select an individual program which will be connected
and disconnected by the change in the control port input states.
4. Check the Rule summary and click Create Rule to save the settings.
Rule 3: Synchronise Local Control Port Input Status with a Remote RelayOutputUse this rule allow a local codec's control port input to change the state of a remote relay output.
1. Click the fourth rule in the Rules panel.2. Click the drop-down arrow to select the local control port input used to control a remote relay
output.

216 Genie Distribution WheatNet-IP Manual v1.6
© Tieline Pty. Ltd. 2015
3. Check the Rule summary and click Create Rule to save the settings.
Rule 4: Toggle a Relay Output with each Change in Connection StatusThis rule is used to toggle a codec's control port relay output each time a program connects anddisconnects.
1. Click the fifth rule in the Rules panel.2. Click the drop-down Relay arrow and select the relay output you want to toggle.3. Click the drop-down Program arrow to select a specific program which will affect the relay
toggle function, or use the default setting whereby any program will toggle the relay output.
4. Check the Rule summary and click Create Rule to save the settings.
Deleting Rules
1. Click the Rules symbol at the top of the Java Toolbox Web-GUI screen to open the Rulespanel.
2. Click the Delete button next to the rule you want to delete.3. Click Yes in the confirmation dialog.
24.29 Upgrading Codec FirmwareTo download the latest codec firmware visit http://www.tieline.com/Support/Latest-Firmware.
Manual Firmware UpgradesThe following procedure explains how to perform codec firmware upgrades with a downloadedfirmware file saved to your PC.

217
© Tieline Pty. Ltd. 2015
Genie Distribution WheatNet-IP Manual v1.6
1. Click the Settings symbol at the top of the Java Toolbox Web-GUI screen if the Settingspanel is not displayed.
2. Click Firmware.
3. Click Update from a selected file and click the Select File button.4. Select the .bin file you are using to perform the upgrade and click Open.5. Press the Update Firmware button to commence the upgrade.
Automatic Firmware UpgradesBy default the Web-GUI application integrates with TieServer to automatically update users when afirmware upgrade is available.
1. Connect your codec to your PC using either a LAN or USB connection and open the JavaToolbox Web-GUI (See Connecting to the Web GUI)
2. If new software is available the Update symbol appears in the top-left of the screen.3. Position your mouse-pointer over the Update symbol and click the update dialog when it
appears to download the new software.
4. Click More Information in the Updating firmware dialog to display details of the upgradeprocess.
Important Note: Firmware upgrade files are very large and it is usually much quicker todownload the file to your PC first and then upgrade the codec manually using the ManualFirmware Upgrade procedure.

218 Genie Distribution WheatNet-IP Manual v1.6
© Tieline Pty. Ltd. 2015
25 Using the HTML5 Toolbox Web-GUIThe following sections provide an overview of the different configuration panels available within thecodec's HTML5 Toolbox Web-GUI. Navigate with the mouse pointer to the Menu bar at the top ofthe Web-GUI screen and click to select and open each panel in turn.
HTML GUI Menu Bar for Opening Panels
When you first open the HTML5 Toolbox Web-GUI the Program Loader panel, Connectionspanel and PPMs panel are loaded by default. If you retain cookies in your browser, any panelsopened previously in the Web-GUI are automatically populated when you log in next. The defaultpanel view is displayed on login if cookies have been cleared.
Adjusting the ThemeTo adjust the Theme or 'skin' of the HTML5 Toolbox Web-GUI, navigate to the Menu bar at the topof the screen and click Theme, then click to select your preferred option. Note: this manual usesthe White theme for most images.
Opening a Panel & Adjusting Screen PositionClick an item in the Menu bar to display available panel options, then click to select and open apanel. New panels automatically open in the top left of the screen.
Position the mouse pointer over a panel's Title bar and click and drag to move a panel andreposition it in a preferred screen position.

219
© Tieline Pty. Ltd. 2015
Genie Distribution WheatNet-IP Manual v1.6
Master Panels: Load Programs & Manage Audio Streams
Program Loader Panel
Feature Description1 Programs list Lists all configured programs which have been added into the
codec. Click to select a program before loading.
2 Close button Click to close the panel.
3 Check-box symbol The Check-box symbol identifies the currently loaded programin the codec.
4 Load and Unloadbutton
Click Load to load the currently selected program in thePrograms list; the button changes automatically to Unload afterloading, to allow unloading of a program when required.

220 Genie Distribution WheatNet-IP Manual v1.6
© Tieline Pty. Ltd. 2015
Connections Panel
Feature Description1 Program Connect/
Disconnect buttonClick to connect/disconnect all audio streams in a program.
2 Audio StreamConnect/Disconnectbutton
Click to connect/disconnect all connections in an audio stream.
3 Connection Connect/Disconnect button
Click to connect/disconnect an individual connection.
4 Show/Hide Arrow Click to show/hide audio stream and connection details.
5 Close button Click to close the panel.
Statistics Panel

221
© Tieline Pty. Ltd. 2015
Genie Distribution WheatNet-IP Manual v1.6
Feature Description1 Show/Hide Arrow Click to show/hide audio stream statistics.
2 Show/Hide Arrow Click to show/hide individual connection statistics.
3 Close button Click to close the panel.
PPMs Panel
Feature Description1 PPM Meters 6 PPM meters.
2 Close button Click to close the panel.

222 Genie Distribution WheatNet-IP Manual v1.6
© Tieline Pty. Ltd. 2015
Inputs Panel for Input Adjustments
Important Note: Tieline codecs have different input configurations, therefore the imageshown may not reflect the number of inputs displayed in your codec Web-GUI.
Feature Description1 Settings button Click to adjust input Name, Type and IGC.
2 Input PPM meter Input PPM meter.
3 Close button Click to close the panel.
4 On/Off button Click to toggle an input on or off.
5 Input Sliders/Faders Input gain control sliders/faders.

223
© Tieline Pty. Ltd. 2015
Genie Distribution WheatNet-IP Manual v1.6
Rules Panel for Creating Relay Activation Rules
Rule Description1 Connect and disconnect a
program when an input istoggled
Click to configure connection and disconnection bytoggling an input.
2 Connect when an input isswitched ON; Disconnectwhen another input isswitched ON
Click to configure connection and disconnection afterdifferent relay inputs are switched ON.
3 Synchronise a local relay inputwith a remote relay output
Click to configure a local relay input to synchronisewith the state of a remote relay output.
4 Toggle a relay based on aconnection's status
Click to configure a relay to toggle based onconnection status.
5 Back / Add New Rule button Click to add a new rule, or exit the rule creationfunction.
6 Close button Click to close the panel.

224 Genie Distribution WheatNet-IP Manual v1.6
© Tieline Pty. Ltd. 2015
Alarm Panels: Configure & Monitor Alarms
Configure Alarms Panel
Feature Description1 List of alarm types Click to select an alarm type to configure.
2 Scroll bar Click and drag the scroll bar to view all listed alarms.
3 Enable Alarm check-box Click the Enabled check-box to enable the currentlyselected alarm.
4 Edit / Save button Click to edit an alarm, or save configured alarm settingswhen in edit mode.
5 Alarm Severity Setting Click the drop-down arrow to select an alarm severitysetting.
6 Close button Click to close the panel
Alarm Dissemination PanelAlerts for each alarm severity level are configured using the Alarm Dissemination panel.
Feature Description1 List of alarm severity levels Click to select an alarm severity level to configure it.
2 Front panel alarm &Toolbox check-box
Select the check-box (default enabled) to deliver frontpanel ALARM LED notifications and HTML5 ToolboxWeb-GUI alarm notifications.
3 Close button Click to close the panel.
4 Relay drop-down selection Click the drop-down arrow to select a relay to open whenan alarm using the current severity level is activated.

225
© Tieline Pty. Ltd. 2015
Genie Distribution WheatNet-IP Manual v1.6
5 SNMP Trap Target text-box Click in the text box in edit mode to enter the SNMP traptarget for alarms using the currently selected severitylevel.
6 Edit / Save button Click to edit alarm dissemination settings, or saveconfigured settings when in edit mode.
7 Send SNMP trap check-box Select the check-box to enable SNMP traps to be sent(for alarms using the selected severity level).
Current Alarms
Feature Description1 Current alarm description View a list of active alarms in the codec
2 Close button Click to close the panel
Alarm History

226 Genie Distribution WheatNet-IP Manual v1.6
© Tieline Pty. Ltd. 2015
Feature Description1 Alarm history description View the history of previous alarms in the codec.
2 Close button Click to close the Alarms panel.
3 Purge History button Click to clear the alarm history.

227
© Tieline Pty. Ltd. 2015
Genie Distribution WheatNet-IP Manual v1.6
Settings Panels
There are 9 Settings panels which can beopened in the Web-GUI. Each panel providesspecific codec configuration settings and options.Click to select and open each panel.
As an example, the Network panel is displayedwith network interface configuration options. Abrief description of the other panel options is alsoprovided.
Settings panels
Feature Description1 Network tab Click to select and edit, or view network configuration settings for
each Ethernet and VLAN interface.
2 Network Interface Control and streaming configuration options for each networkinterface.
3 IPv4 details IPv4 address details and configuration.
4 DNS details Select the check-box and specify DNS addresses and domainsto search.
5 Edit / Save button Click to edit Network settings, or save configured settings.
6 IPv6 details IPv6 address details and configuration.
7 Reset Click to open the panel; reset codec default settings and performbackup/restore of codec programs and settings.
8 Licensing tab Click to open the panel; select a license file and install it in thecodec.
228 Genie Distribution WheatNet-IP Manual v1.6
© Tieline Pty. Ltd. 2015
9 Firmware tab Click to open the panel; view software versions and perform anupgrade.
10 POTS Answer tab Click to open the panel and configure POTS Answering settings.
11 ISDN Answer tab Click to open the panel and configure ISDN Answering settings.
12 Modules tab Click to edit hardware module configuration.
13 SIP tab Click to open the panel and edit or view SIP configurationsettings.
14 Options tab Click to open the panel; configure RS232 and QoS data settings,lock a loaded user Program and adjust Session Port settings andSNMP. Also configure the AES Output Clock sample rate.
15 MAC Address / LinkLocal
Click to open the panel and view the device MAC address andIPv6 local network address created by the codec.

229
© Tieline Pty. Ltd. 2015
Genie Distribution WheatNet-IP Manual v1.6
Help Panels
Resources
Feature Description1 Close button Click to close the panel.
2 User manual link Click to open the codec user manual in a new browser, or viewsupport information (Note: the codec name displayed will vary byproduct type)
3 Support website link Click to visit the support page on the Tieline website.
4 Email Support Click to email Tieline support.
5 Event Logs Click to download user-viewable event logs
6 Support Logs Click to download diagnostic information that can be sent toTieline support
About PanelDetails of the codec Toolbox and firmware version, as well as the codec serial number. Note:the codec name displayed will vary by product type.

230 Genie Distribution WheatNet-IP Manual v1.6
© Tieline Pty. Ltd. 2015
Language Selection
The HTML5 Toolbox Web-GUI offers language support for several languages.
1. Click on the Language drop-down menu arrow in the top right-hand corner of the Web-GUIpage.
2. Select the preferred language to display.

231
© Tieline Pty. Ltd. 2015
Genie Distribution WheatNet-IP Manual v1.6
25.1 Using the HTML5 Toolbox Quick Connect Web-GUIThe HTML5 Quick Connect Web-GUI is designed for simple peer-to-peer connections and non-technical users. It has a reduced feature-set and allows users to:
1. Load existing programs in a codec via the Program Loader panel and then dial via theQuick Connect panel.
2. Use the Quick Connect panel to create and dial a simple peer-to-peer connection using IP/SIP, ISDN or POTS.
Important Note: Simple peer-to-peer connections are not saved as programs with uniquenames. Details of the last ad hoc dial are retained in the Quick Connect panel, evenafter a program is loaded and unloaded using the Program Loader panel.
Launching the HTML5 Quick Connect Web-GUI1. Type the codec IP address in your web-browser.2. Click to launch the HTML5 Toolbox Quick Connect Web-GUI.3. Enter the authentication Password for the codec and click OK.4. The panels in the Quick Connect Web-GUI will automatically be displayed.
Important Note: To change the password using the codec front panel navigate to
Settings > WebGUI > Password and press the button. Use the keypad to enter a
new password and press the button to save the new setting.
Loading and Unloading an Existing ProgramIf programs are saved in the codec they are displayed in the Program Loader panel.
1. Click to select a program in the Program Loader panel and click the Load button to loadit in the codec.

232 Genie Distribution WheatNet-IP Manual v1.6
© Tieline Pty. Ltd. 2015
2. The Check-box symbol appears next to the program name to confirm it has been loadedand the Load button changes to an Unload button.
To unload a program click the Unload button.
Dial a Loaded Program1. Click the Connect button in the Quick Connect panel to dial a loaded program. Note: After
connecting, the Connect button changes to a Disconnect button.

233
© Tieline Pty. Ltd. 2015
Genie Distribution WheatNet-IP Manual v1.6
Disconnect a Loaded Program1. Click the Disconnect button in the Quick Connect panel.
2. Click Yes in the confirmation dialog to disconnect the connection.

234 Genie Distribution WheatNet-IP Manual v1.6
© Tieline Pty. Ltd. 2015
Dial Peer-to-Peer over IP with Quick Connect
Important Notes: · Click the Unload button in the Program Loader panel if a program is currently
loaded. · The transcriptor algorithm is for closed captioning and not normal broadcast
configurations.
1. Click the drop-down Transport menu arrow in the Quick Connect panel and select IP.
2. Click the drop-down Algorithm menu and select an algorithm.

235
© Tieline Pty. Ltd. 2015
Genie Distribution WheatNet-IP Manual v1.6
3. Click the select the appropriate Sample Rate and Bit Rate for the connection. Note: If only onesample rate is available this will be automatically selected.
4. Click in the Destination text box and enter the IP address of the destination codec.
5. Click the Connect button to dial.
Dial Peer-to-Peer over ISDN with Quick Connect
Important Notes: · Click the Unload button in the Program Loader panel if a program is currently
loaded. · The transcriptor algorithm is for closed captioning and not normal broadcast
configurations.
1. Click the drop-down Transport menu arrow in the Quick Connect panel and select ISDN.
2. Click the drop-down Algorithm menu and select an algorithm.
3. Click the drop-down B Channels menu and select the number of channels required for thisconnection.

236 Genie Distribution WheatNet-IP Manual v1.6
© Tieline Pty. Ltd. 2015
4. Click to select the appropriate Sample Rate for the connection.
5. Click in each Destination text box in turn to enter the ISDN number for each B Channel.
6. Click the Connect button to dial.
Dial Peer-to-Peer Over POTS with Quick Connect
Important Notes: · Click the Unload button in the Program Loader panel if a program is currently
loaded. · The transcriptor algorithm is for closed captioning and not normal broadcast
configurations.
1. Click the drop-down Transport menu arrow in the Quick Connect panel and select POTS.
2. Click the drop-down Algorithm menu and select an algorithm. The connection bit rate isconfigured automatically. Note: G5 POTS modems initially attempt to establish a link at thelowest Max Bit rate setting configured in the two modules being connected. If the POTS linedoesn't support this bit rate, the modems will attempt to connect at the highest possible bit rateto suit the prevailing line quality at each end of the link.
3. Enter the phone number in the Destination text box.

237
© Tieline Pty. Ltd. 2015
Genie Distribution WheatNet-IP Manual v1.6
4. Click the Connect button to dial.
Monitoring PPMsSet audio levels so that audio peaks average at the nominal 0vu point indicated below on the PPMmeters. This represents a program level of +4 dBu leaving the codec. Audio peaks can safely reach+22 dBu without clipping, providing 18dBu of headroom from the nominal 0vu point. Note: the audiometering reference scale is automatically adjusted by default when a Merlin codec connects to aCommander G3 codec. The G3 metering scale is between -11dBu and +18dBu.
Mono and Stereo PPM MeteringWhen connected with a mono program the codec will display a mix of inputs 1 and 2 on PPM1.PPM 3 displays the level of return audio.

238 Genie Distribution WheatNet-IP Manual v1.6
© Tieline Pty. Ltd. 2015
When connecting with a stereo program, the codec displays audio on PPM1 and 2 for inputs 1and 2 and PPM 3 and 4 for the return audio.
25.2 Configuring IP SettingsOpen the HTML5 Toolbox Web-GUI and click Settings and then click Network to view andconfigure Ethernet and VLAN interface settings in the Web-GUI.
Important Note: For assistance with configuration of IPv4 or IPv6 network connectionscontact your IT Administrator.
IPv4 versus IPv6An IP address is a unique address to identify a device on a TCP/IP network. Your codec uses dualIP protocol stacks to allow your codec to work on both IPv4 and IPv6 networks. Tieline codecssupport both DHCP (default) IP addressing and static IP addresses for dialing IPv4 connectionendpoints.
If you want to dial a codec with a public IP address you simply dial the IP address to connect. If youwant to dial a codec with a private IP address you need to perform network address translation(NAT). NAT allows a single device, such as a broadband router, to act as an agent between the

239
© Tieline Pty. Ltd. 2015
Genie Distribution WheatNet-IP Manual v1.6
public internet and a local private LAN. Usually this will be set up at the studio end so you can dialinto the studio from the remote codec.
Support for IPv6 connections allows you to use IPv6 infrastructure to connect to other codecsglobally.
Configuring Ethernet Ports and VLANsThe codec features two physical Ethernet port interfaces and up to four additional VLAN interfaces.
VLAN interfaces have features similar to physical Ethernet interfaces. However, your networkadministrator will need to configure VLAN support throughout your network for them to be supportedin your codec.
As an example, if only one physical Ethernet interface is available, VLANs can be used to operateSmartStream PLUS or to separate codec Control and Streaming functions if required. Ethernetand VLAN interfaces can be configured for:
· Controlling audio: codec control and command only from the Ethernet port.· Controlling and Streaming: stream audio and control and command the codec via the Ethernet
port.· Streaming audio: stream audio only from an Ethernet port (ETH2 and VLANs only).· Nothing: Disable the Ethernet port from streaming audio and codec command and control
(VLANs only).
The Name text box, e.g. Primary or Secondary, is an interface identifier used when configuringnew programs via the Programs panel.
IPv4 Address ConfigurationClick the Edit button in the Network panel to configure settings. The codec is capable of automaticDHCP address assignment, or manually configured static IPv4 address configuration via the drop-down Configure IPv4 menu. If you want to ignore IPv4 settings select Off.
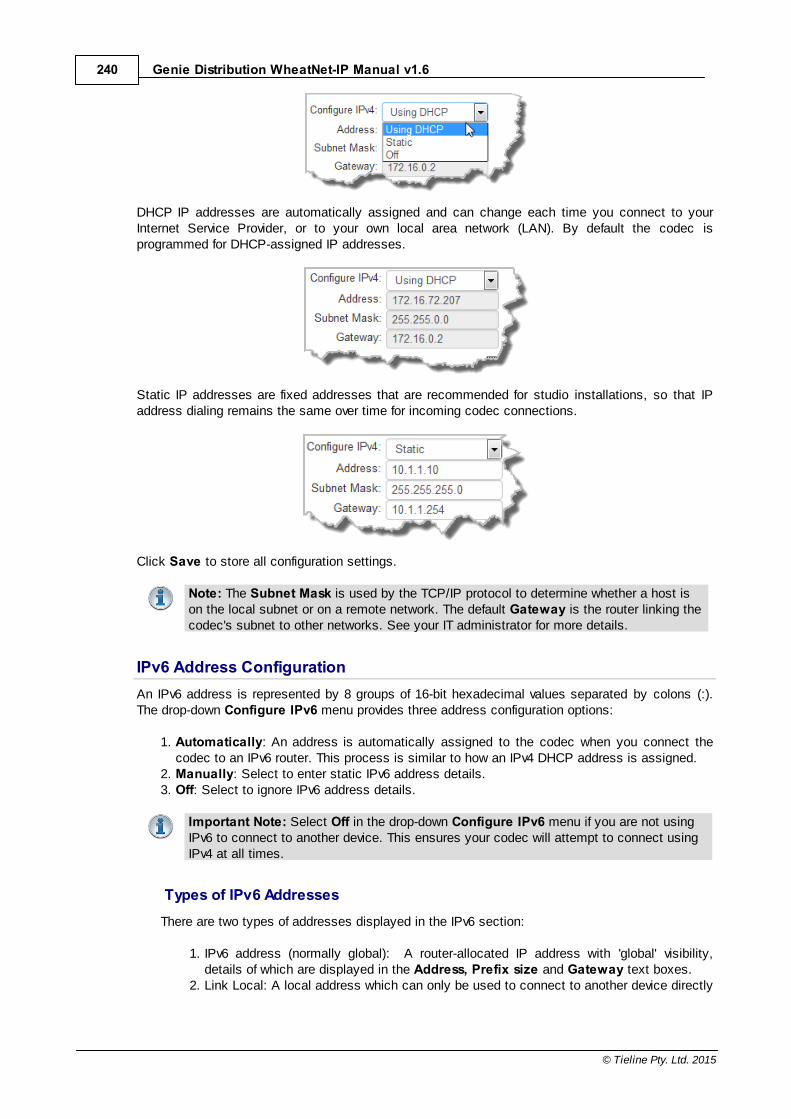
240 Genie Distribution WheatNet-IP Manual v1.6
© Tieline Pty. Ltd. 2015
DHCP IP addresses are automatically assigned and can change each time you connect to yourInternet Service Provider, or to your own local area network (LAN). By default the codec isprogrammed for DHCP-assigned IP addresses.
Static IP addresses are fixed addresses that are recommended for studio installations, so that IPaddress dialing remains the same over time for incoming codec connections.
Click Save to store all configuration settings.
Note: The Subnet Mask is used by the TCP/IP protocol to determine whether a host ison the local subnet or on a remote network. The default Gateway is the router linking thecodec's subnet to other networks. See your IT administrator for more details.
IPv6 Address ConfigurationAn IPv6 address is represented by 8 groups of 16-bit hexadecimal values separated by colons (:).The drop-down Configure IPv6 menu provides three address configuration options:
1. Automatically: An address is automatically assigned to the codec when you connect thecodec to an IPv6 router. This process is similar to how an IPv4 DHCP address is assigned.
2. Manually: Select to enter static IPv6 address details.3. Off: Select to ignore IPv6 address details.
Important Note: Select Off in the drop-down Configure IPv6 menu if you are not usingIPv6 to connect to another device. This ensures your codec will attempt to connect usingIPv4 at all times.
Types of IPv6 AddressesThere are two types of addresses displayed in the IPv6 section:
1. IPv6 address (normally global): A router-allocated IP address with 'global' visibility,details of which are displayed in the Address, Prefix size and Gateway text boxes.
2. Link Local: A local address which can only be used to connect to another device directly

241
© Tieline Pty. Ltd. 2015
Genie Distribution WheatNet-IP Manual v1.6
over a LAN. This address is allocated by the codec internally based on MAC addressdetails.
Auto Address Assignment1. Click the Edit button in the Network panel to configure settings. 2. By default the codec is programmed for connecting to an IPv6 router which automatically
allocates IPv6 address details, as displayed in the following example.
3. Click Save to store all configuration settings.
Manual IPv6 Address Assignment1. Click the Edit button in the Network panel to configure settings.2. To configure IPv6 address details into the codec manually, select Manual and enter
details into the Address, Prefix and Gateway text boxes.
3. Click Save to store all configuration settings.
Specifying DNS SettingsIt is possible to specify Domain Name Server (DNS) settings to allow easy look up of codecs withinthe specified DNS Addresses or Domains.
1. Click the Edit button in the Network panel to configure settings.
2. Click Save to store all configuration settings.
Configuring QoS1. Open the HTML5 Toolbox Web-GUI and click Settings and then click Options to open the
Options panel.

242 Genie Distribution WheatNet-IP Manual v1.6
© Tieline Pty. Ltd. 2015
2. Click the Edit button.3. Click in the DSCP field and enter the priority setting recommended by your IT administrator.4. Click Save to store configuration settings.
4. Click Save to store the new configuration.
Important Note: Check with your IT administrator before changing this setting. By defaultthe codec is configured for Assured Forwarding and more details about DSCP areavailable on Wikipedia at http://en.wikipedia.org/wiki/Dscp.
25.3 Configuring ISDNTwo slots are available for inserting optional ISDN modules into the codec. These can be configuredusing the codec front panel or the HTML5 Toolbox Web-GUI. See About ISDN Modules foradditional information on ISDN.
You can use the Java Toolbox Web-GUI to configure a dial and/or answer program with ISDNsettings. You may also need to:
1. Configure ISDN module settings.2. Configure ISDN Answering settings.
25.3.1 Configuring ISDN ModulesISDN settings in the Modules panel determine how each codec module operates at a particularsite. You can copy similar programs between codecs installed at different locations and alsoconfigure site-specific settings for how each ISDN module should connect. ISDN module settingsmay need to be adjusted depending on your country and network requirements.
1. Open the HTML5 Toolbox Web-GUI and click Modules to view and configure ISDN sitesettings.

243
© Tieline Pty. Ltd. 2015
Genie Distribution WheatNet-IP Manual v1.6
2. Click to select Module 1 or Module 2.
3. Click the Edit button to configure settings.
4. Click the drop-down arrow for Accept to select whether to allow or disallow circuit switchedvoice and data calls. The default setting allows Data only.
Important Note: G.711 is the algorithm used when Voice Only is selected.
5. Click the drop-down Network arrow and select the Network Type corresponding to theregion in which you are using the codec (see ISDN Module Settings for more details).
6. Click the drop-down Line Type arrow and select your preferred option. Ask your Telcowhether your ISDN line is Point-to-Point or Point-to-Multipoint. By default select Point-to-Multipoint, unless your switch type is an AT&T 5ESS custom point-to-point.

244 Genie Distribution WheatNet-IP Manual v1.6
© Tieline Pty. Ltd. 2015
7. If you are in the US enter DN and SPID numbers as required, or in other regions enter DN orMSN numbers as required.
8. Click Save when configuration is complete.
Important Notes:
Directory Numbers and Multiple Subscriber NumbersDirectory Numbers (DN) in North America and Multiple Subscriber Numbers (MSN) in therest of the world are simply phone numbers associated with an ISDN B channel, like lineslisted in a typical phone directory. Your Telco will normally supply 2 DN/MSN numbers foreach pair of B channels. However, these numbers may or may not be associated with aspecific B channel.
Often broadcasters prefer to predict which B channel will answer an incoming call toensure audio routing is consistent. However, if a DN or MSN number is not entered in thecodec and multiple B channels are available, the codec may use any channel to answeran incoming call. To ensure calls are routed consistently, enter a DN/MSN number(without the country or area code) as the DN/MSN for a B channel, then only thatcorresponding B channel will answer an incoming call to that number. Programming DN/MSN numbers for each B channel allows the codec to ignore calls without matching DN/MSN numbers. This is the best way to answer calls from codecs in a predictable manner.
SPID Numbers in North AmericaISDN relies on an initialization procedure for associating Service Profiles with specificterminating equipment (e.g. your audio codec) rather than lines. In the US Telcos assigna Service Profile ID (SPID) number which assists in identifying different ISDN servicesacross the network. Your Telco must provide a SPID for each B channel you order whenconnecting over US-Nat or US-AT&T networks in the US. A SPID is not required whenusing the AT&T PTP protocol.
Typically, each ISDN BRI service in the US will have two SPIDs and these must beentered correctly. When you enter a SPID into your codec and connect it to an ISDN line,an initialization and identification process takes place, whereby the terminating equipment(your codec) sends the SPID to the switch. The switch then associates the SPID with aspecific Service Profile and directory number.
Note: SPID numbers normally include the phone number and additional prefix or suffixdigits up to 20 digits long.
25.3.2 Configuring ISDN AnsweringISDN Answer Configs are used to determine how codec ISDN modules will behave whenanswering ISDN calls.
The following image explains the difference between answering calls from Tieline codecs sendingsession data, and non-Tieline codecs making sessionless ISDN calls. Codecs sending TielineSession Data contain all the information required to connect, e.g. algorithm and audio streamrouting settings. When answering sessionless calls it is necessary to configure the answeringcodec with an ISDN Answer Config, which tells the answering codec how a sessionless call willtry and connect.

245
© Tieline Pty. Ltd. 2015
Genie Distribution WheatNet-IP Manual v1.6
It is possible to save up to four different ISDN Answer Configs, which allow up to 4 ISDN Bchannels to be individually configured for unique answering behaviors. ISDN answering can beconfigured to suit:
· Hardware available in the codec, i.e. the number of B channels available.· Expected dialing behaviors, e.g. if B channels should bond or not, and whether audio streams
need to use Dial and Answer Route tags.· The type of call being received by the codec, e.g. Tieline (with Tieline Session Data) versus
non-Tieline sessionless calls.· The algorithm expected when receiving sessionless calls.
Each of the four available Configs allows you to select which B channel or channels are used toanswer a call or calls from incoming ISDN codecs. A maximum of up to 4 B channels can beselected if 2 ISDN modules are installed in the codec.
Important Note: B channels can only be selected once and are greyed out once theyhave been selected in one of the four ISDN Configs.
Single B Channel Config
To use a single 64kbps B channel for a connection (e.g. a 1 x Mono Peer-to-Peer audio stream):
1. Click the Edit button to configure settings.2. Select a B channel from those available and then click Save. Unbonded Only is the default

246 Genie Distribution WheatNet-IP Manual v1.6
© Tieline Pty. Ltd. 2015
setting if only one B channel is selected.
Multiple B Channel Bonding ConfigA point-to-point audio stream can also bond multiple B channels to create higher bandwidthconnections.
1. Click the Edit button to configure settings.2. In the following example, two B channels from Module 2 have been selected within Config 2.
Note that B Channel 1 in Module 1 has already been selected in Config 1 and is thereforegreyed out and unavailable in Config 2.
3. Configure the bonding setting that best suits the audio stream with which this Config isassociated. Bonded or Unbonded is the best setting in most situations.
Bonding Setting BehaviorUnbonded Only Unbonded single B Channel
Bonded or Unbonded (MayBond)
Calls using the same algorithm from the same Tieline codec,or sessionless calls, will attempt to bond when received. Callsusing incompatible algorithms will not be bonded
Bonded Only Will only bond compatible algorithms. This mode will rejectincompatible calls which cannot be bonded, e.g. G.711 andG.722
3. Click Save to apply changes to the Config.
Dial and Answer Route Settings in ProgramsDial Route and Answer Route tags allow you to associate a B channel (or channels) in a Configwith a particular incoming audio stream from either Tieline or non-Tieline codecs. This is notnecessary in simple point-to-point ISDN audio stream configurations, however it is very useful inmultiple audio stream codecs using multiple B channels. When dialing Tieline to Tieline over ISDNusing the Merlin or Genie family of codecs, you can configure a Dial Route in the dialing codec's

247
© Tieline Pty. Ltd. 2015
Genie Distribution WheatNet-IP Manual v1.6
program and a corresponding Answer Route in the answering codec's program. This will ensure aparticular audio stream is routed between two codecs consistently.
In principle, the concept of 'routes' operates similarly to how audio ports are used to route multipleaudio streams over IP. Selecting different IP audio port numbers allows users to define whichincoming IP audio stream is routed to a specific answering audio stream configuration on the codec.This ensures inbound calls from multiple codecs can be consistently routed to the same answeringcodec audio streams, and therefore the same inputs and outputs. Following is an example of how toconsistently route incoming ISDN audio streams using dial and answer routes.
Answer Routes for Non-Tieline (Sessionless) ISDN CallsIn some situations you may receive a call from a non-Tieline codec which doesn't support sessiondata and Dial Route tags. In this situation you can still specify the audio stream Route on theanswering codec using Config 1-4 in ISDN Answer. You can also select the default algorithm.
For example, if a call from a non-Tieline codec is being received via B Channel 1 on Module 1 (i.e.no Dial Route has been specified in the dialing codec):
1. Click the Edit button to configure settings.2. Select a Route for this B channel in one of the four Configs within ISDN Answer, e.g.
Route1, then select the default Encoding algorithm to use when connecting (default settingis G.722).
3. Click Save when configuration is complete to store the new Config settings.4. This will associate the incoming call with a corresponding Answer Route configured in the
answering codec program, e.g. Answer Route 1.

248 Genie Distribution WheatNet-IP Manual v1.6
© Tieline Pty. Ltd. 2015
More detailed information about how to configure the codec to answer and route multiplesessionless ISDN calls is available in Using ISDN Answer Routes for Sessionless ISDN Calls. Thisuses examples to explain how to set up consistent deterministic routing of multiple incomingsessionless calls.
Answering both Tieline Session and Sessionless ISDN CallsLeave the Sessionless Only check-box in the ISDN Answering Config unchecked if the codec isexpected to receive ISDN calls from Tieline codecs, or both Tieline and non-Tieline codecs (i.e. youare not sure which type of codec may call). In this mode, when the codec answers a call it initiallyexpects to receive Tieline session data from the dialing codec and configure its own algorithmsettings according to that. If it fails to receive Tieline session data within 5 seconds (i.e. a non-Tieline codec is calling, or a Tieline codec with session data disabled), it will use the settings in theISDN Answering Config instead.
The following image displays how the answering codec will behave in this mode when receiving callsfrom both Tieline and non-Tieline codecs.
Allow Answering of Sessionless ISDN Calls OnlySelect Sessionless Only when answering ISDN calls from non-Tieline codecs only. WhenSessionless Only is selected, the codec will not wait to receive the Tieline session data. Thisreduces the time taken to answer an inbound sessionless call.
The following image displays how the answering codec will respond with Sessionless Onlyselected, i.e. calls from both Tieline and non-Tieline codecs are always regarded as sessionless.
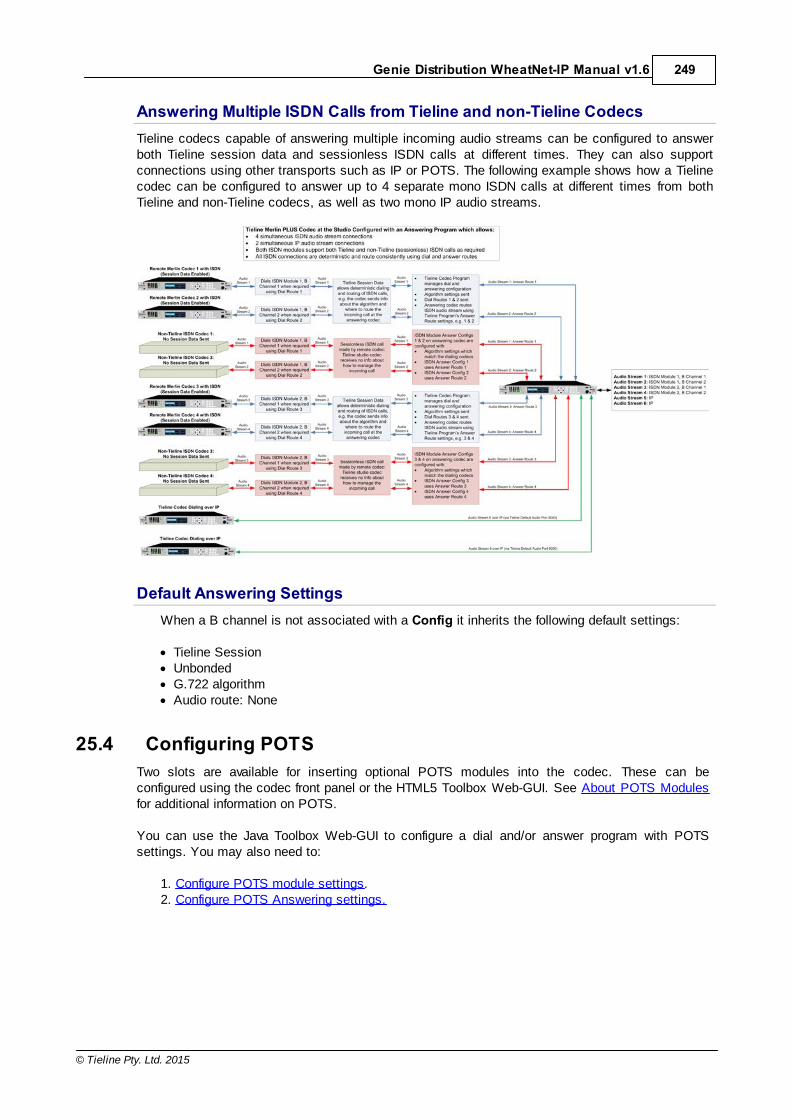
249
© Tieline Pty. Ltd. 2015
Genie Distribution WheatNet-IP Manual v1.6
Answering Multiple ISDN Calls from Tieline and non-Tieline CodecsTieline codecs capable of answering multiple incoming audio streams can be configured to answerboth Tieline session data and sessionless ISDN calls at different times. They can also supportconnections using other transports such as IP or POTS. The following example shows how a Tielinecodec can be configured to answer up to 4 separate mono ISDN calls at different times from bothTieline and non-Tieline codecs, as well as two mono IP audio streams.
Default Answering SettingsWhen a B channel is not associated with a Config it inherits the following default settings:
· Tieline Session· Unbonded· G.722 algorithm· Audio route: None
25.4 Configuring POTSTwo slots are available for inserting optional POTS modules into the codec. These can beconfigured using the codec front panel or the HTML5 Toolbox Web-GUI. See About POTS Modulesfor additional information on POTS.
You can use the Java Toolbox Web-GUI to configure a dial and/or answer program with POTSsettings. You may also need to:
1. Configure POTS module settings.2. Configure POTS Answering settings.

250 Genie Distribution WheatNet-IP Manual v1.6
© Tieline Pty. Ltd. 2015
25.4.1 Configuring POTS ModulesPOTS settings in the Modules panel menu determine how your codec will connect at a particularsite. You can copy similar programs between codecs installed at different locations and alsoconfigure site-specific settings for how each module should connect. The default Config settings forPOTS modules are designed to suit Tieline codecs. These settings will need to be adjusted toconnect to non-Tieline POTS codecs or connect in Analog Phone mode.
Configuring POTS G5 Modules1. Open the HTML5 Toolbox Web-GUI and click Modules to view and configure POTS site settings.
Important Notes: The POTS module Status is displayed in the Modules panel. NoPhone Line is displayed when a cable is detached; Ready is displayed when a cable isattached and the line voltage is good.
2. Click to select Module 1 or Module 2.
3. Click the Edit button to configure settings.
4. Click the drop down arrow to adjust the Answer Mode and select how the module in the codecwill be able to answer incoming POTS calls. Options include:
· POTS Codec: allows the POTS G5 module to receive incoming audio data over a POTS line.· Analog Phone: configures the POTS G5 module to receive a standard analog phone call. · Disabled: disables the POTS G5 module from receiving a POTS Codec or Analog Phone
call.
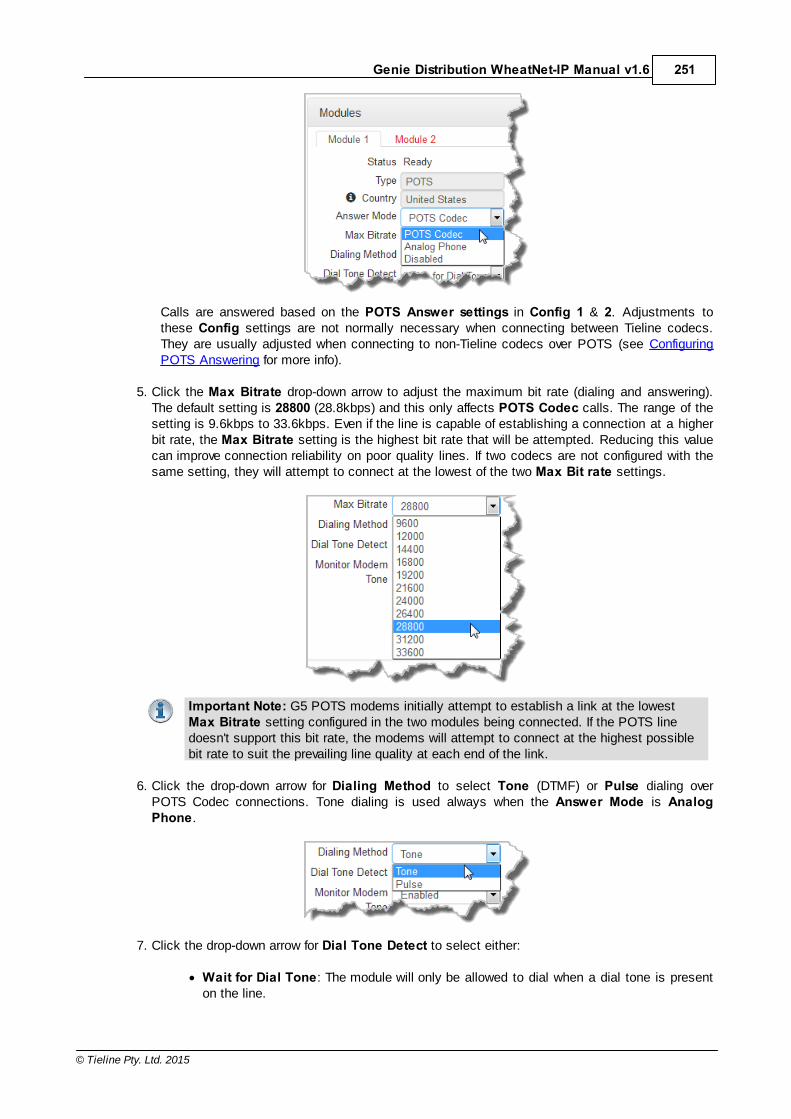
251
© Tieline Pty. Ltd. 2015
Genie Distribution WheatNet-IP Manual v1.6
Calls are answered based on the POTS Answer settings in Config 1 & 2. Adjustments tothese Config settings are not normally necessary when connecting between Tieline codecs.They are usually adjusted when connecting to non-Tieline codecs over POTS (see ConfiguringPOTS Answering for more info).
5. Click the Max Bitrate drop-down arrow to adjust the maximum bit rate (dialing and answering).The default setting is 28800 (28.8kbps) and this only affects POTS Codec calls. The range of thesetting is 9.6kbps to 33.6kbps. Even if the line is capable of establishing a connection at a higherbit rate, the Max Bitrate setting is the highest bit rate that will be attempted. Reducing this valuecan improve connection reliability on poor quality lines. If two codecs are not configured with thesame setting, they will attempt to connect at the lowest of the two Max Bit rate settings.
Important Note: G5 POTS modems initially attempt to establish a link at the lowestMax Bitrate setting configured in the two modules being connected. If the POTS linedoesn't support this bit rate, the modems will attempt to connect at the highest possiblebit rate to suit the prevailing line quality at each end of the link.
6. Click the drop-down arrow for Dialing Method to select Tone (DTMF) or Pulse dialing overPOTS Codec connections. Tone dialing is used always when the Answer Mode is AnalogPhone.
7. Click the drop-down arrow for Dial Tone Detect to select either:
· Wait for Dial Tone: The module will only be allowed to dial when a dial tone is presenton the line.
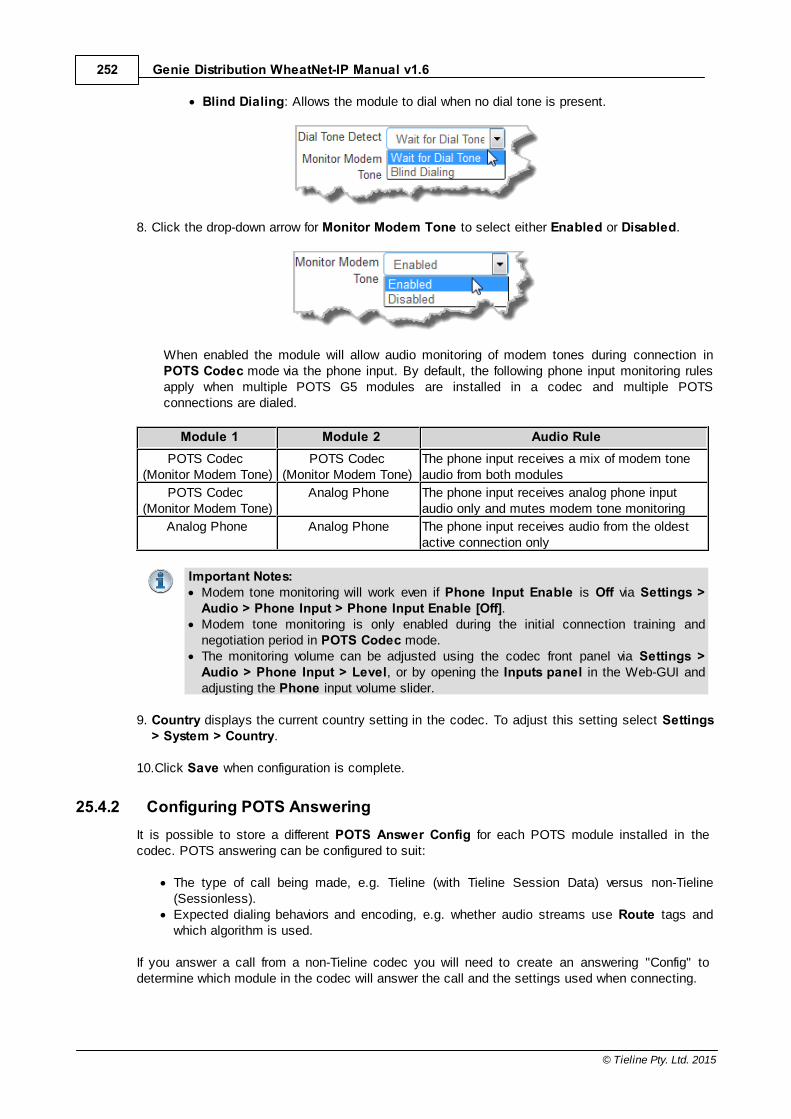
252 Genie Distribution WheatNet-IP Manual v1.6
© Tieline Pty. Ltd. 2015
· Blind Dialing: Allows the module to dial when no dial tone is present.
8. Click the drop-down arrow for Monitor Modem Tone to select either Enabled or Disabled.
When enabled the module will allow audio monitoring of modem tones during connection inPOTS Codec mode via the phone input. By default, the following phone input monitoring rulesapply when multiple POTS G5 modules are installed in a codec and multiple POTSconnections are dialed.
Module 1 Module 2 Audio RulePOTS Codec
(Monitor Modem Tone)POTS Codec
(Monitor Modem Tone) The phone input receives a mix of modem toneaudio from both modules
POTS Codec (Monitor Modem Tone)
Analog Phone The phone input receives analog phone inputaudio only and mutes modem tone monitoring
Analog Phone Analog Phone The phone input receives audio from the oldestactive connection only
Important Notes: · Modem tone monitoring will work even if Phone Input Enable is Off via Settings >
Audio > Phone Input > Phone Input Enable [Off].· Modem tone monitoring is only enabled during the initial connection training and
negotiation period in POTS Codec mode.· The monitoring volume can be adjusted using the codec front panel via Settings >
Audio > Phone Input > Level, or by opening the Inputs panel in the Web-GUI andadjusting the Phone input volume slider.
9. Country displays the current country setting in the codec. To adjust this setting select Settings> System > Country.
10.Click Save when configuration is complete.
25.4.2 Configuring POTS AnsweringIt is possible to store a different POTS Answer Config for each POTS module installed in thecodec. POTS answering can be configured to suit:
· The type of call being made, e.g. Tieline (with Tieline Session Data) versus non-Tieline(Sessionless).
· Expected dialing behaviors and encoding, e.g. whether audio streams use Route tags andwhich algorithm is used.
If you answer a call from a non-Tieline codec you will need to create an answering "Config" todetermine which module in the codec will answer the call and the settings used when connecting.

253
© Tieline Pty. Ltd. 2015
Genie Distribution WheatNet-IP Manual v1.6
Important Notes: · POTS Answer Config settings are applied to POTS Codec connections and not
Analog Phone connections.· When receiving a call from a Tieline codec with session data enabled (i.e. not
Sessionless), the algorithm setting from the dialing codec overrides the setting in thePOTS Answer Config menu.
POTS Config SettingsThe default POTS Answer module Config settings, which can be viewed in the POTS Answerpanel are:
· Tieline Codecs Session Data,· The Other algorithm.
This configuration will accept the settings from an incoming Tieline codec when it dials withsession data enabled. It will also allow the codec to answer a call from a Comrex POTS codecsupporting the Other algorithm setting.
Answering Calls from Non-Tieline POTS Codecs1. Click the Edit button to configure settings.2. Select the Sessionless Only check-box when only non-Tieline codecs are dialing a Tieline codec
over POTS. This allows you to choose the default encoding setting and Route the incoming callto a nominated audio stream via a corresponding Answer Route in the answering codec programif required.

254 Genie Distribution WheatNet-IP Manual v1.6
© Tieline Pty. Ltd. 2015
3. Click Save to apply changes to the Config.
Important Note: Select Other in the Encoding drop-down menu when connecting toComrex® Vector, Matrix® and BlueBox® codecs. On the Comrex codec select its"Music" algorithm. Please note that 9.6kbps connections are not supported by theComrex codecs.
Dial and Answer Route Settings in ProgramsDial Route and Answer Route tags allow you to associate a POTS Config with a particularincoming audio stream from either Tieline or non-Tieline codecs.
In principle, this operates similarly to how audio ports are used to route multiple audio streams overIP. Selecting different IP audio port numbers allows users to define which incoming IP audio streamis routed to a specific answering audio stream configuration on the codec. This ensures inboundcalls from multiple codecs can be consistently routed to the same answering audio streams, andtherefore the same inputs and outputs.
This is not necessary in simple point-to-point POTS audio stream configurations, however it is veryuseful in multiple audio stream codecs which support POTS connections. When dialing Tieline toTieline over POTS using the Merlin or Genie family of codecs, you can configure a Dial Route in thedialing codec's program and a corresponding Answer Route in the answering codec's program. Thiswill ensure a particular audio stream is routed between two codecs consistently.
Answer Routes for Non-Tieline POTS CodecsIn some situations you may receive a call from a non-Tieline POTS codec which doesn't support
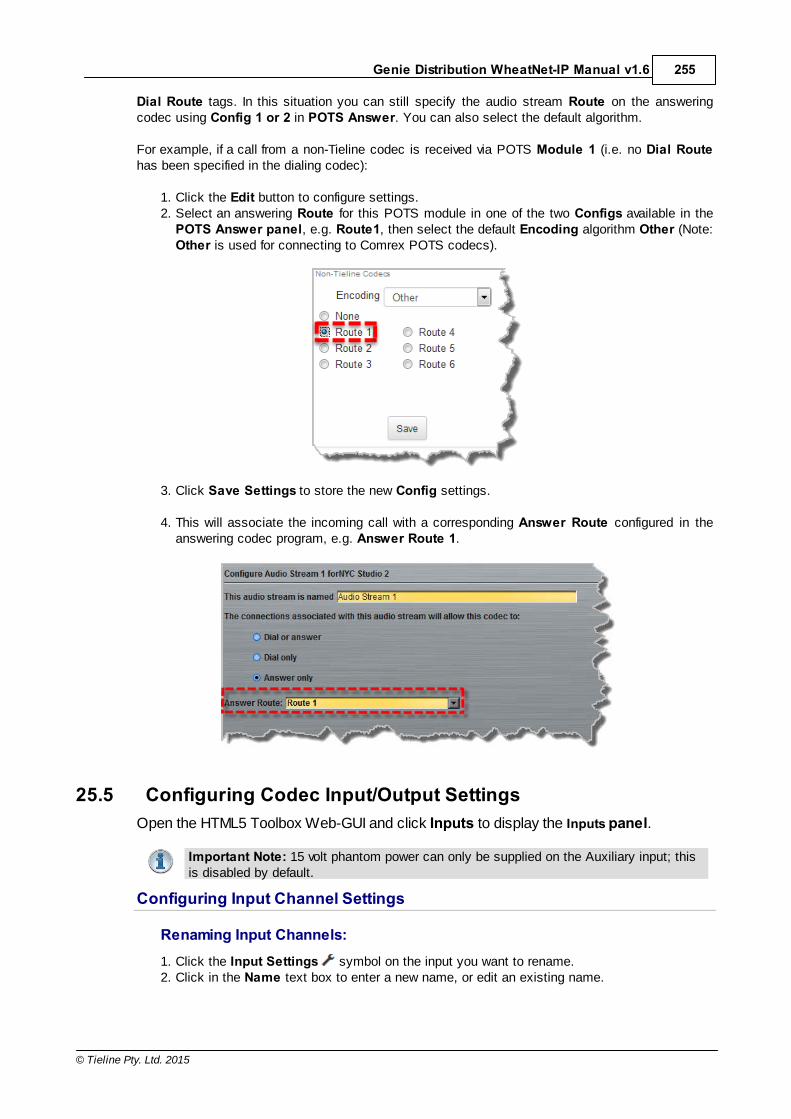
255
© Tieline Pty. Ltd. 2015
Genie Distribution WheatNet-IP Manual v1.6
Dial Route tags. In this situation you can still specify the audio stream Route on the answeringcodec using Config 1 or 2 in POTS Answer. You can also select the default algorithm.
For example, if a call from a non-Tieline codec is received via POTS Module 1 (i.e. no Dial Routehas been specified in the dialing codec):
1. Click the Edit button to configure settings.2. Select an answering Route for this POTS module in one of the two Configs available in the
POTS Answer panel, e.g. Route1, then select the default Encoding algorithm Other (Note:Other is used for connecting to Comrex POTS codecs).
3. Click Save Settings to store the new Config settings.
4. This will associate the incoming call with a corresponding Answer Route configured in theanswering codec program, e.g. Answer Route 1.
25.5 Configuring Codec Input/Output SettingsOpen the HTML5 Toolbox Web-GUI and click Inputs to display the Inputs panel.
Important Note: 15 volt phantom power can only be supplied on the Auxiliary input; thisis disabled by default.
Configuring Input Channel Settings
Renaming Input Channels:1. Click the Input Settings symbol on the input you want to rename.2. Click in the Name text box to enter a new name, or edit an existing name.

256 Genie Distribution WheatNet-IP Manual v1.6
© Tieline Pty. Ltd. 2015
3. Click Save to confirm the name change.
Selecting Analog and Digital Audio Sources:Codec inputs are configured for analog line level audio sources by default.
1. Click the Input Settings symbol.2. Select Type and click to select either Analog or WNet.
3. When you select WNet, the display changes to reflect 100% input levels; input level andinput on/off controls are unable to be adjusted.
Important Note: Input levels can only be adjusted on analog inputs.
Setting Analog Audio LevelsAudio levels on the Input panel should be set to ensure audio peaks average at the first yellowindications on the PPM meters, which represents +4dBu. These levels should also be checkedagainst the Input PPM Meters on the Master panel.
Other Input ControlsAdjust the IGC (Intelligent GainControl) input settings to Auto,Fixed or Off as required.
Important Note: When the auxiliary input (AUX IN) is On the default mixer configurationsends audio to all inputs. If you are not using the auxiliary input ensure it is Off to avoid

257
© Tieline Pty. Ltd. 2015
Genie Distribution WheatNet-IP Manual v1.6
additional noise in program audio.
25.6 Configure SIP SettingsThe codec is fully EBU N/ACIP Tech 3326 compliant when connecting using SIP (Session InitiationProtocol) to other brands of IP codecs.
About SIPSIP provides superior interoperability between different brands of codecs due to its standardizedprotocols for connecting devices and is intended to be used when connecting Tieline codecs to non-Tieline devices. Devices primarily use SIP to dial another device’s SIP address and find its locationwith a minimum of fuss. This task is usually performed by SIP servers, which communicate betweenSIP-compliant devices to set up a call.
When connecting two devices, SDP performs similar tasks to Tieline’s proprietary session data,which is used to configure all non-SIP IP connections. There are two very distinct parts to a callwhen dialing over IP. The initial stage is the call setup stage and this is what SIP is used for. Thesecond stage is when data transference occurs and this is left to the other protocols used by adevice (i.e. using UDP to send audio data).
All the mandatory EBU N/ACIP 3326 algorithms are supported (G.711, G.722, MPEG-1 Layer 2 and16 bit PCM), as well as optional algorithms including LC- AAC, HE-AAC and aptX Enhanced. Thedefault algorithm selected when connecting using SIP is G.711.
Important Notes: · Each codec should be registered to a different SIP server account to avoid connection
conflicts.· SIP account registration can only be configured via Ethernet port 1.· SIP dialing is only supported over point-to-point connections, not multi-unicast
connections. · Tieline G3 codecs do not support connections using AAC and will default to MPEG
Layer 2 if an incoming call is programmed to use this algorithm.· Failover and SmartStream PLUS redundant streaming are not available with SIP
connections.· When connecting to a Tieline G3 codec using SIP you need to manually select the G3
audio reference level in the codec. To do this select SETTINGS > Audio > RefLevel > Tieline G3. In addition, select the following on the G3 codec prior to dialing. Select either a mono or stereo profile Select [Menu] > [Configuration] > [IP1 Setup] > [Session Type] > [SIP] Select [Menu] > [Configuration] > [IP1 Setup] > [Algorithm] > [G711/G722 or
MP2]
SIP Server Connections: Getting StartedRegistering codecs for SIP connectivity is simple. First, choose the SIP server that you wish toregister your codec with. On a LAN this may be your own server, or it could be one of the manyinternet servers available. We recommend that you use your own SIP server and configure it to useG.711, G.722, MP2 and AAC algorithms. This is because most internet SIP servers are for VoIPphones and are only configured for G.711 and GSM algorithms.
When you register an account with a SIP server you will be provided with:
· The SIP server IP address.· A username (often the same as a SIP number).

258 Genie Distribution WheatNet-IP Manual v1.6
© Tieline Pty. Ltd. 2015
· A password.· Domain details.· Realm details (sometimes).
Configure the Codec for SIP using the Web-GUIUse the HTML5 Toolbox Web-GUI to configure SIP account registration details in your codec. Oncethese details have been entered into the codec, each time it is connected to a public IP address itwill contact the SIP server automatically to acknowledge its presence over a wide area network.
1. Connect your codec to a LAN connection with a public IP address, then login to the HTML5Toolbox Web-GUI.
2. Click Settings at the top of the screen and then click SIP to display the SIP panel.
3. Click the Edit button to configure settings.4. Enter the account details into the relevant text boxes.5. Enter the Registration Timeout (this shouldn't need to be adjusted from the default setting).6. Click to select the Activate Account check-box and click Save to create the account in the
codec.
7. Navigate to SETTINGS > SIP > Accounts to verify that the account has been
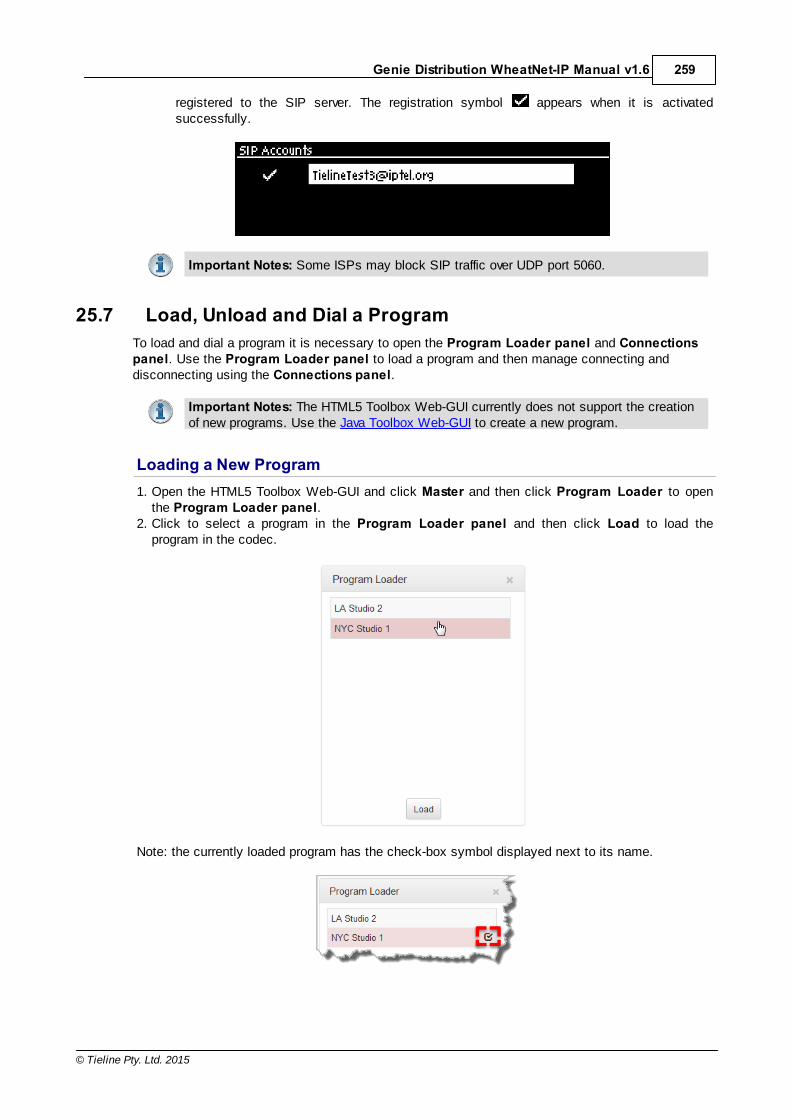
259
© Tieline Pty. Ltd. 2015
Genie Distribution WheatNet-IP Manual v1.6
registered to the SIP server. The registration symbol appears when it is activatedsuccessfully.
Important Notes: Some ISPs may block SIP traffic over UDP port 5060.
25.7 Load, Unload and Dial a ProgramTo load and dial a program it is necessary to open the Program Loader panel and Connectionspanel. Use the Program Loader panel to load a program and then manage connecting anddisconnecting using the Connections panel.
Important Notes: The HTML5 Toolbox Web-GUI currently does not support the creationof new programs. Use the Java Toolbox Web-GUI to create a new program.
Loading a New Program1. Open the HTML5 Toolbox Web-GUI and click Master and then click Program Loader to open
the Program Loader panel.2. Click to select a program in the Program Loader panel and then click Load to load the
program in the codec.
Note: the currently loaded program has the check-box symbol displayed next to its name.

260 Genie Distribution WheatNet-IP Manual v1.6
© Tieline Pty. Ltd. 2015
Connecting a ProgramTo connect audio streams and connections within an existing program there are three options:
1. Click the program Connect/Disconnect symbol and then click Connect; this connectsall active audio streams and connections associated with the program.
2. Click the audio stream Connect/Disconnect symbol and then click Connect; thisconnects all connections associated with this audio stream.
3. Click the connection Connect/Disconnect symbol and then click Connect; thisconnects an individual audio stream connection.
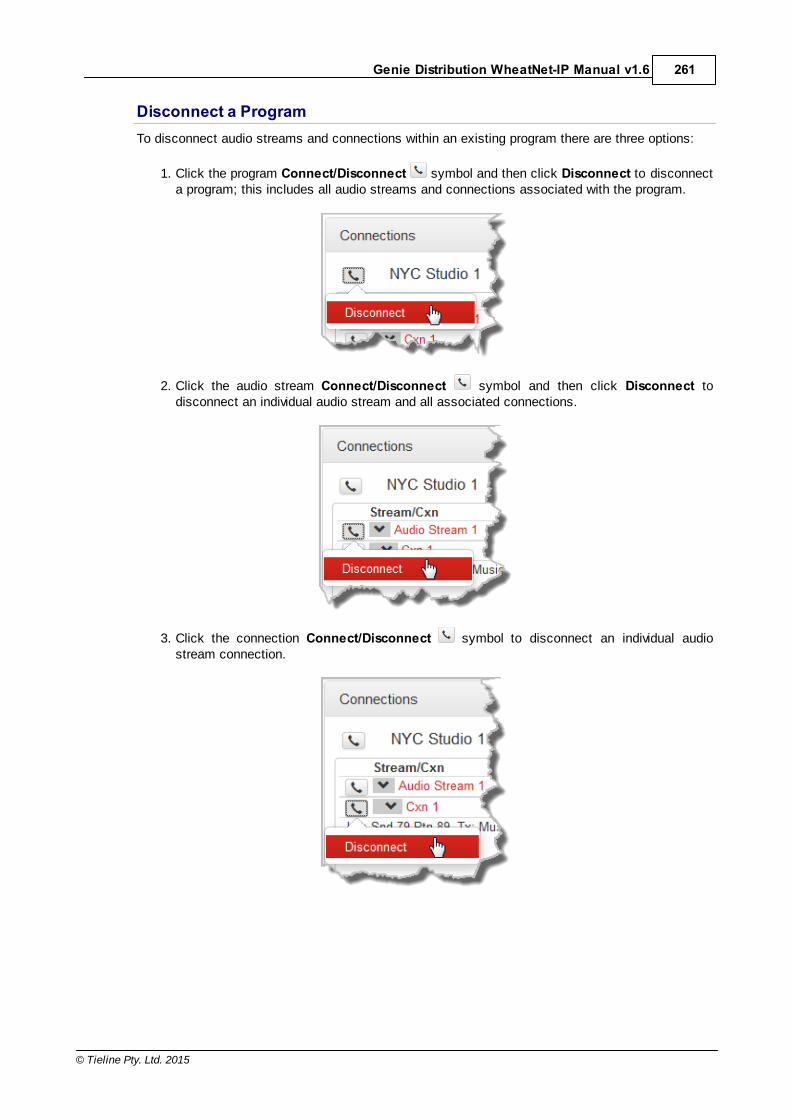
261
© Tieline Pty. Ltd. 2015
Genie Distribution WheatNet-IP Manual v1.6
Disconnect a ProgramTo disconnect audio streams and connections within an existing program there are three options:
1. Click the program Connect/Disconnect symbol and then click Disconnect to disconnecta program; this includes all audio streams and connections associated with the program.
2. Click the audio stream Connect/Disconnect symbol and then click Disconnect todisconnect an individual audio stream and all associated connections.
3. Click the connection Connect/Disconnect symbol to disconnect an individual audiostream connection.

262 Genie Distribution WheatNet-IP Manual v1.6
© Tieline Pty. Ltd. 2015
Unloading a Program1. Click to select the loaded program in the Program Loader panel and then click Unload to
unload the program in the codec.
25.8 Reset Factory Default SettingsThere are several options which allow you to restore factory default settings within the codec. See Reset and Restore Factory Defaults for more details on each option.
1. Open the HTML5 Toolbox Web-GUI and click Settings at the top of the screen, then clickReset to display the Reset panel.
2. Click one of the available reset options to adjust codec settings, or reboot the codec. Note:
Hover with the mouse pointer over the Information symbol to view a tool-tip for each resetoption..

263
© Tieline Pty. Ltd. 2015
Genie Distribution WheatNet-IP Manual v1.6
4. A confirmation dialog appears for each option; click Yes to proceed.
25.9 Backup and Restore FunctionsThe HTML5 Toolbox Web-GUI can be used to backup and restore codec settings, including:
· Programs containing a variety of connection settings.· All system settings that have been adjusted to change the factory default codec settings
(current runtime settings).
Files can also be used to copy configurations onto other similar codecs. Programs are essentiallyconnection profiles that may include:
· Program, audio stream and connection names.· IP address, port, algorithm, jitter buffer, FEC and bit rate settings (etc.) for audio stream
connections.
Creating Backup Files1. Open the HTML5 Toolbox Web-GUI and click Settings at the top of the screen, then click
Reset to display the Reset panel.

264 Genie Distribution WheatNet-IP Manual v1.6
© Tieline Pty. Ltd. 2015
2. Click Backup.
3. Click to select the check-boxes to confirm your backup requirements, then click Backup.
4. Select a location on your PC to save the configuration file. Note: You may need to "allow" yourbrowser to display the pop-up dialog.
Restoring Configuration File Settings1. Open the HTML5 Toolbox Web-GUI and click Settings at the top of the screen, then click
Reset to display the Reset panel.
2. Click Restore.
3. Click to select the check-boxes and confirm your restore settings. For example, you could selectthe Include programs check-box and deselect the Include system check-box if you are onlycopying programs onto codecs.
4. Click Restore and select the .tgz file you want to load onto the codec. A Success dialogconfirms the files are restored.

265
© Tieline Pty. Ltd. 2015
Genie Distribution WheatNet-IP Manual v1.6
Note: The codec will automatically reboot if you restore system settings.
25.10 Lock or Unlock ProgramsIt is possible to lock a loaded custom program in a codec to ensure the currently loaded programtype, e.g. mono, cannot be unloaded by a codec dialing in with a different program type, e.g. stereo.For example, if you require the codec at the studio to always connect in mono, simply load and locka mono program in the codec. Generally programs will be up or down-mixed by the answering codecto match the loaded program type. In some situations incompatible program types will be rejected.
1. Open the HTML5 Toolbox Web-GUI and click Settings at the top of the screen, then clickOptions to display the Options panel.
2. Click the Edit button to configure settings.3. Click the Lock Loaded User Program check-box to lock or unlock a user program in the
codec.
4. Click Save to store the new configuration.
Important Note: · A black Padlock symbol appears next to the program name in the Connections
panel and in the Program Loader panel, to indicate a program is locked in the

266 Genie Distribution WheatNet-IP Manual v1.6
© Tieline Pty. Ltd. 2015
codec.· It is only possible to lock custom programs in a codec. · If Lock Program is enabled and you load a new custom program in the codec, Lock
Program remains enabled and locks the most recently loaded custom program.
25.11 Configuring SNMP in the CodecThe codec supports Simple Network Management Protocol (SNMP ) for managing devices on IPnetworks. There are two elements to configuring SNMP in your codec:
1. Configure SNMP Device settings in your codec.2. Configure SNMP Traps via the Alarms Panel in the Web-GUI (see SNMP Trap Configuration in
Configuring Alarms, or to configure using the codec front panel see Configuring SNMP Settings).
Description of SNMP Settings in the Codec
Features Operation Button DescriptionsCodec Name A user-specified alphanumeric identifier which may be used by third-
party SNMP software to identify a device. The device namecorresponds to the ".iso.org.dod.internet.mgmt.mib-2.system.sysName" SNMP attribute and is completely independentof DNS, NIS, WINS or other device naming and identificationschemes, though convention is to use the device's fully-qualifieddomain name.
Codec Location A user-specified alphanumeric string which may be used by third-party SNMP software to identify a device. Device locationcorresponds to the ".iso.org.dod.internet.mgmt.mib-2.system.sysLocation" SNMP attribute.
Contact A text identifier for the contact person for this managed node,together with information on how to contact this person.
R/O Community SNMP provides two types of access, namely Read-Only access andRead-Write access. The R/O Community identifier allows Read Onlylevel access.
R/W Community The R/W Community identifier allows Read/Write level access.
Configuring SNMP Settings in the Codec1. Open the HTML5 Toolbox Web-GUI and click Settings at the top of the screen, then click
Options to display the Options panel.2. Click the Edit button to configure settings.3. Click in the text boxes to enter SNMP configuration settings.

267
© Tieline Pty. Ltd. 2015
Genie Distribution WheatNet-IP Manual v1.6
4. Click Save to store the new configuration.
MIB Files for SNMP ConfigurationManagement Information Base (MIB) files are required for SNMP applications to interact with yourTieline codec and interpret SNMP data. The codec supports SNMPv1 and SNMPv2 MIB protocols.The required MIB files can be downloaded from the codec using the following link in a PC webbrowser connected to the same network as your codec:
· http://<YOUR_CODEC_ADDRESS>/mibs/tieline-mibs.zip
Save the .zip file to your PC and import the contents into the MIB browser you use to manageSNMP-enabled network devices.
Important Note: The codec supports the attributes specified in the MIB-II standard.Please verify that your SNMP software contains the required files as specified in RFC1213.
25.12 Download LogsThe codec is capable of providing diagnostic information via user logs, which can either be sent toTieline support, or downloaded for user diagnostics.
Procedure for Sending Logs to Tieline1. Open the HTML5 Toolbox Web-GUI and click Settings in the Menu Bar, then click Help to
display the Help panel.2. Click Download Logs.
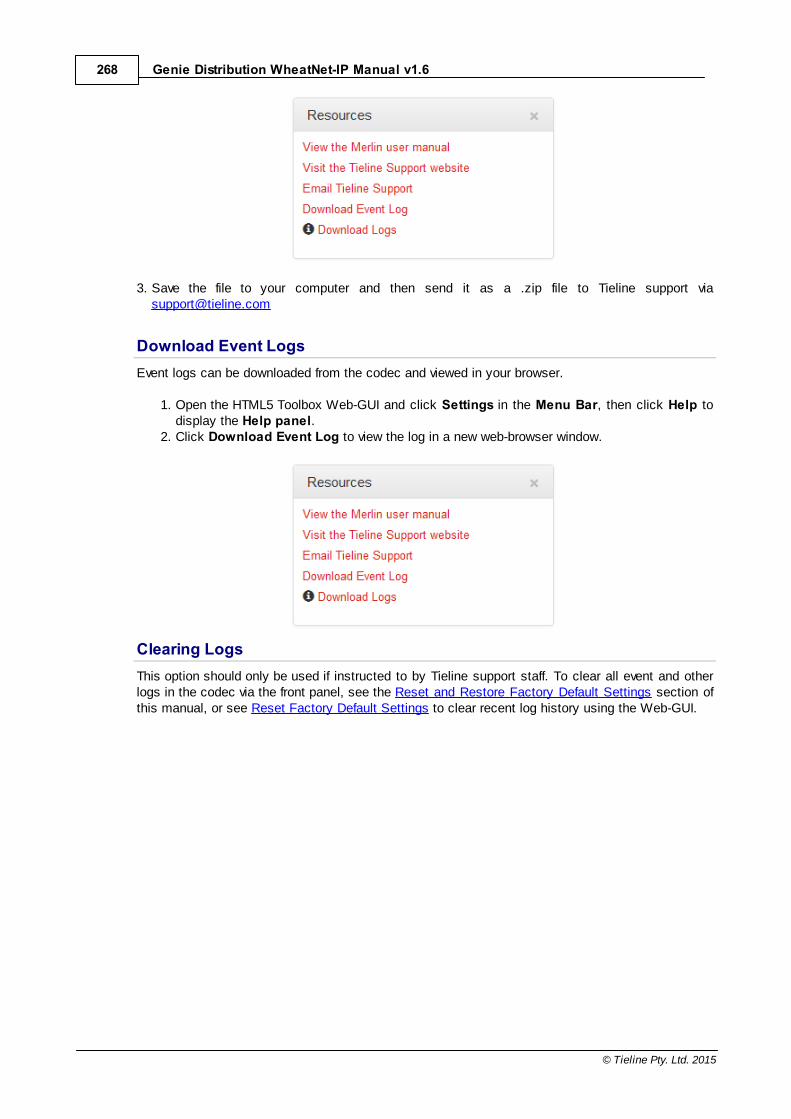
268 Genie Distribution WheatNet-IP Manual v1.6
© Tieline Pty. Ltd. 2015
3. Save the file to your computer and then send it as a .zip file to Tieline support [email protected]
Download Event LogsEvent logs can be downloaded from the codec and viewed in your browser.
1. Open the HTML5 Toolbox Web-GUI and click Settings in the Menu Bar, then click Help todisplay the Help panel.
2. Click Download Event Log to view the log in a new web-browser window.
Clearing LogsThis option should only be used if instructed to by Tieline support staff. To clear all event and otherlogs in the codec via the front panel, see the Reset and Restore Factory Default Settings section ofthis manual, or see Reset Factory Default Settings to clear recent log history using the Web-GUI.

269
© Tieline Pty. Ltd. 2015
Genie Distribution WheatNet-IP Manual v1.6
25.13 Configuring AlarmsOpen the HTML5 Toolbox Web-GUI and click Alarms to open and view panels used to configureand monitor a range of alarms.
Configure and Enable Alarms1. Open the HTML5 Toolbox Web-GUI and click Alarms, then click Configure alarms to open the
panel.
2. Click to select an alarm from the list on the left side of the panel.3. Click Edit to configure alarm settings.4. Click the Enabled check-box to activate the alarm and then select an Alarm Severity level from
the drop-down menu.
3. Click Save to store the new settings.

270 Genie Distribution WheatNet-IP Manual v1.6
© Tieline Pty. Ltd. 2015
Note: The following System and Audio alarms are available:
Alarm AlarmType
Explanation
PSU Failure System Raises an alarm if one or both PSUs fail
Chassis Fan Failure System Raises an alarm if the internal fan fails
Temperature Too High System Raises an alarm if the temperature is too high
Input Silence Audio Raises an alarm if input audio is lost (according topreconfigured silence detection threshold parameters)
AES Input Lost Audio Raises an alarm if the AES input signal is lost (notavailable in WheatNet-IP capable codecs)
AES Reference Lost Audio Raises an alarm if the AES reference clock signal is lost(not available in WheatNet-IP capable codecs)
Configuring an Alarm's Severity LevelCodec alarms can be configured for three different severity levels:
1. Click to select an alarm from those displayed in the Configure alarms panel.
2. Click Edit to configure alarm settings.3. Click the Alarm Severity drop-down menu and select the preferred severity level.
4. Click Save to store the new settings for the selected alarm.
Configuring Alarm Dissemination Severity AlertsAlerts for each alarm severity level are configured using the Alarm Dissemination panel.
1. Open the HTML5 Toolbox Web-GUI and click Alarms, then click Alarm Dissemination toopen the panel..

271
© Tieline Pty. Ltd. 2015
Genie Distribution WheatNet-IP Manual v1.6
2. Click to highlight the Alarm Severity level you want to configure.
3. Click Edit to configure notification settings.4. Click Save to store the new settings.
SNMP Trap ConfigurationSimple Network Management Protocol (SNMP) is a protocol used to manage devices on IPnetworks. SNMP provides the ability to send traps (notifications or alerts), which are packetscontaining data relating to a system component. These packets are generated by agents on amanaged device and may be either statistic or status related. Please see your systemadministrator if you require more information.
1. Click to select the Send SNMP trap check-box.
2. Enter the SNMP trap target in the text box, then click Save to store the new settings.

272 Genie Distribution WheatNet-IP Manual v1.6
© Tieline Pty. Ltd. 2015
Configuring Input Silence Detection ParametersWhen configuring an Input Silence alarm it is also necessary to configure the audio silencethresholds and timeout duration.
1. Click Input Silence to select the alarm.
2. Click Edit to configure alarm settings.3. Configure the dBFS threshold and timeout duration in seconds and ensure the input Enabled
check-boxes are selected. An alarm will be raised when these thresholds are breached.
4. Click Save to store the new input silence alarm settings.
25.13.1 Managing AlarmsOpen the HTML5 Toolbox Web-GUI and click Alarms, then click Current Alarms to view activealarms.

273
© Tieline Pty. Ltd. 2015
Genie Distribution WheatNet-IP Manual v1.6
Viewing Current AlarmsActive alarms are indicated by:
1. The red Alarm Symbol flashing in the toolbar of the HTML5 Toolbox Web-GUI screen.
2. All new alarms being listed in the Current Alarms panel.3. Other alerts as per Alarm Dissemination panel settings.4. The codec front panel ALARM LED flashing red.
Important Note: When a connection is active the front panel CONNECTED LED isilluminated solid green. Illumination will ceases if a connection is lost.
Acknowledging AlarmsTo acknowledge an alarm in the Current Alarms panel:
1. Click to select the alarm in the Current Alarms panel.
2. Click Acknowledge selected alarm.
After acknowledging the alarm:
1. The State will change from Active to Acknowledged.2. The red Alarm Symbol will stop flashing but remain visible in the toolbar of the HTML5
Toolbox Web-GUI screen.3. The codec front panel ALARM LED will stop flashing and illuminate solid red.4. The state of other alerts may change, as per Alarm Dissemination panel settings.

274 Genie Distribution WheatNet-IP Manual v1.6
© Tieline Pty. Ltd. 2015
Alarm State Front Panel AlarmLED
Web-GUI Alarm Symbol
Active Flashing red Flashing
Acknowledged Solid red Stops flashing, remains solid red
Deactivating AlarmsAn alarm is deactivated automatically when the alarm state is reversed. E.g. if power is restoredafter a PSU Failure alarm, or if audio is restored after an Input Silence alarm.
Deactivating Input Silence AlarmsAn Input Silence alarm is activated when the configured audio and duration thresholds havebeen breached. To recover from this alarm state the codec must detect input audio higher thanthe failure threshold. When audio at this level is detected, the codec monitors input audio toensure it doesn't drop below the recovery threshold setting more than 5 times within thenominated Input Silence duration time. The alarm is then deactivated automatically.
Alarm History1. Open the HTML5 Toolbox Web-GUI and click Alarms, then click Alarm History to display a
record of all system alarms which have been raised.
Click the Purge alarm history button to clear all alarms from the Alarm History panel.

275
© Tieline Pty. Ltd. 2015
Genie Distribution WheatNet-IP Manual v1.6
25.14 RS232 Data ConfigurationThe codec supports both in-band and out-of-band data depending on the connection transport andalgorithm you are using. RPTP data is automatically enabled when using the Tieline Music orMusicPLUS algorithms over any transport. Over IP it is also possible to enable synchronized out-of-band data using any algorithm.
Algorithm Selected IP ISDN and POTSTieline Music andMusicPLUS
· In-band RPTP data enabledautomatically
· Synchronized out-of-band datacan be enabled and disabled
· In-band RPTP data enabledautomatically
All otheralgorithms
· Synchronized out-of-band datacan be enabled and disabled
· No in-band or out-of-band dataavailable
The codec can be connected to external devices and send RS232-compatible data via the serialport on the rear panel of the codec. To enable RS232 data within a connection, select EnableAuxiliary Data when creating a program in the Programs panel wizard. Alternatively, select usingthe codec Setup menu (see Enabling RS232 Data).
Setting RS232 Data Rates and Flow Control1. Open the HTML5 Toolbox Web-GUI and click Settings in the Menu Bar, then click Options
to display the Options panel.2. Click the Edit button to configure settings.3. Click the Baud rate drop-down menu arrow to select the serial port baud rate which matches
the baud rate of the external device connected to the RS232 port on the codec.4. Click to select the Enable flow control check box and enable flow control, then click Save
to store the new settings.
Important Notes: · When connecting to G3 codecs over IP, ISDN or POTS only in-band data is available via
the Music and MusicPLUS algorithms.· Use firmware higher than 2.8.xx in the Bridge-IT, Genie and Merlin families of codecs to
enable auxiliary data over multicast connections.· It is important to enable serial port flow control as it regulates the flow of data through
the serial port. If disabled, data will flow unregulated and some may be lost.· Ensure you configure the serial port baud rate to match the setting of the external device
to which you are connecting. Ideally the settings on both codecs should match, or youcould have data overflow issues.
· Only the dialing codec needs to be configured to send RS232 data. Session data sentfrom the dialing codec will configure all other compatible codecs (non-G3) when youconnect.

276 Genie Distribution WheatNet-IP Manual v1.6
© Tieline Pty. Ltd. 2015
25.15 Creating RulesThe Rules panel in the Toolbox Web-GUI is used to program events for specific codec actions.Typically these 'rules' are based on a change in the state of a GPIO control port or the codec beingconnected or disconnected. Rules can only be created with the Web-GUI while the codec isdisconnected.
Important Note: Data transmission is disabled by default. Data must be enabled in theConnection menu to enable contact closure operation and RS232 data.
1. Press the HOME button to return to the Home screen
2. Use the navigation buttons on the front panel to select Connect and press the button
3. Select IP and press the button
4. Select your preferred IP Mode and press the button.
5. Use the down navigation button to select Setup and press the button.
6. Navigate to Data and press to toggle between Enabled and Disabled.
For more information please see Enabling Relays & RS232 Data.
Programming RulesDefault rules have been preprogrammed into the codec to facilitate programming the most commonevents required by broadcast engineers. To view rules options:
1. Open the Toolbox HTML5 Web-GUI and click Rules in the Menu Bar to display the Rulespanel.
2. Click Add New Rule.3. Click to select the appropriate rule for your requirements. See the Rules panel section in Using
the Toolbox HTML5 Web-GUI for an explanation of the action each rule can perform.
Note: When rules have been configured previously they are listed when the Rules panel is opened.

277
© Tieline Pty. Ltd. 2015
Genie Distribution WheatNet-IP Manual v1.6
Rule 1: Toggle a Control Port Input to Connect and Disconnect a ProgramThis rule is used to connect and disconnect a selected program when a control port input is toggled.
1. Click the first rule in the Rules panel titled Connect and disconnect a program when aninput is toggled.
2. Click the drop-down Input arrow and select the control port input which will trigger programconnection and disconnection.
3. Click the drop-down Program arrow to select the program to be connected.
4. Check the Rule Summary and click Create Rule to save the settings.
Rule 2: Switch Different Control Port Inputs On to Connect and Disconnecta ProgramThis rule is used to connect and disconnect a selected program when different codec control portinputs are turned on.
1. Click the second rule in the Rules panel titled Connect a program when an input isswitched ON and disconnect it when another input is switched ON.
2. Click the drop-down arrows to select the control port input used to connect and the alternativeinput for disconnecting.
3. Click the drop-down Program arrow to select an individual program which will be connectedand disconnected by the change in the control port input states.

278 Genie Distribution WheatNet-IP Manual v1.6
© Tieline Pty. Ltd. 2015
4. Check the Rule summary and click Create Rule to save the settings.
Rule 3: Synchronise Local Control Port Input Status with a Remote RelayOutputUse this rule allow a local codec's control port input to change the state of a remote relay output.
1. Click the third rule in the Rules panel titled Synchronise a local input to a remote relay.2. Click the drop-down arrow to select the local control port input used to control a remote relay
output.
3. Check the Rule summary and click Create Rule to save the settings.
Rule 4: Toggle a Relay Output with each Change in Connection StatusThis rule is used to toggle a codec's control port relay output each time a program connects anddisconnects.
1. Click the fourth rule in the Rules panel titled Toggle a relay based on a connection'sstatus.
2. Click the drop-down Relay arrow and select the relay output you want to toggle.3. Click the drop-down Program arrow to select a specific program which will affect the relay
toggle function, or use the default setting whereby any program will toggle the relay output.
4. Check the Rule summary and click Create Rule to save the settings.

279
© Tieline Pty. Ltd. 2015
Genie Distribution WheatNet-IP Manual v1.6
Deleting Rules1. Open the Toolbox HTML5 Web-GUI and click Rules in the Menu Bar to display the Rules
panel.2. Click to select the rule you want to delete.3. Click the Delete button.
4. Click Yes in the confirmation dialog.

280 Genie Distribution WheatNet-IP Manual v1.6
© Tieline Pty. Ltd. 2015
25.16 Upgrading Codec FirmwareTo download the latest codec firmware visit http://www.tieline.com/Support/Latest-Firmware.
Firmware UpgradesThe following procedure explains how to perform codec firmware upgrades with a downloadedfirmware file saved to your PC.
1. Open the Toolbox HTML5 Web-GUI and click Settings in the Menu Bar, then clickFirmware to display the Firmware panel.
2. Click Browse firmware to search for the firmware for your codec and download it to yourcomputer.
3. Once the firmware has been saved, click Update from a selected file in the Firmwarepanel.
4. Select the .bin file you are using to perform the upgrade and click Open to start the upgrade.

281
© Tieline Pty. Ltd. 2015
Genie Distribution WheatNet-IP Manual v1.6
26 Front Panel Configuration TasksThe following sections explain how to configure codec settings using the front panel LCD screenand KEYPAD.
26.1 Configuring IP via the Front Panel
Checking IP Address Details in the Codec
1. Press the SETTINGS button.
2. Select Unit and press the button.3. IP address details and other unit details are listed. Use the arrow up and down buttons
to scroll and view all details listed.
Important Note: See the Configuring IP Connections sections for more details about IPconnections. For assistance with configuration of IPv4 or IPv6 network connectionscontact your IT Administrator.
Ethernet and VLAN Configuration OptionsThe codec features two physical Ethernet port interfaces and up to four additional VLAN interfaces.
VLAN interfaces have features similar to physical Ethernet interfaces. However, your networkadministrator will need to configure VLAN support throughout your network for VLANs to besupported in your codec.
As an example, if only one physical Ethernet interface is available, VLANs can be used to operateSmartStream PLUS or separate codec Control and Streaming functions if required.
Following are a range of options which can be configured in the LAN menu. After completing
configuration ensure you navigate to Apply Setting and press the button to apply the newsettings.
Configure an IPv4 DHCP AddressBy default the codec is programmed for DHCP-assigned IP addresses. DHCP IP addresses areautomatically assigned and can change each time you connect to your Internet Service Provider orby a router on your local area network (LAN).
1. Press the SETTINGS button.
2. Select LAN and press the button.

282 Genie Distribution WheatNet-IP Manual v1.6
© Tieline Pty. Ltd. 2015
3. Use the down navigation button to select ETH1, ETH2 or a VLAN interface.4. Select Usage and choose the appropriate control and/or streaming mode for the connection,
then press the button.
5. Select IPv4 Mode and press the button.
6. Select DHCP and press the button.7. Use the up navigation button to scroll to the top of the menu and select Apply Setting,
then press the button to confirm the new settings.
Configure a Static IPv4 AddressStatic IP addresses are fixed addresses which are recommended for studio installations. Using astatic IP address ensures remote codecs can connect reliably using the same IP address over time.
1. Press the SETTINGS button.
2. Select LAN and press the button.3. Use the down navigation button to select ETH1, ETH2 or a VLAN interface.4. Select Usage and choose the appropriate control and/or streaming mode for the connection,
then press the button.
5. Select IPv4 Mode and press the button.
6. Select Static and press the button.
7. Navigate to IPv4 Static and enter the IP address, then press the button.
8. Navigate to IPv4 Subnet and enter the Subnet Mask, then press the button.
9. Navigate to IPv4 Gateway and enter the Gateway details, then press the button.
10.Use the up navigation button to scroll to the top of the menu and select Apply Setting,
then press the button to confirm the new settings.11.Check the Unit Details menu to ensure the new static IP address has been entered
correctly.
IPv6 Address AssignmentThere are three IPv6 settings available for each Ethernet port on the codec and any VLANs whichare configured.
1. Auto: An address is automatically assigned to the codec when you connect the codec to anIPv6 router. This process is similar to how an IPv4 DHCP address is assigned.
2. Manual: Select to manually enter IPv6 address details.3. Off: Select to ignore IPv6 address details.
Important Note: Select Off if you are not using IPv6 to connect to another device. Thisensures your codec will attempt to connect using IPv4 at all times.
To adjust this setting:
1. Press the SETTINGS button.
2. Select LAN and press the button.

283
© Tieline Pty. Ltd. 2015
Genie Distribution WheatNet-IP Manual v1.6
3. Use the down navigation button to select ETH1, ETH2 or a VLAN interface.
4. Select IPv6 Mode and press the button.
5. Select Auto, Manual or Off and press the button.
By default the codec is configured to allow the codec to automatically receive IPv6 addressinformation from an IPv6 enabled router.
Manual IPv6 Address AssignmentSelect Manual mode using the previous procedure and enter information into the IPv6 Static(Address), IPv6 Prefix and IPv6 Gateway fields in the codec to manually configure addressdetails.
DNS ServerIt is possible to specify Domain Name Server (DNS) settings to allow easy look up of codecs withinthe specified DNS Addresses or Domains section within the Web-GUI. This feature can be turnedon or off in the LAN codec menu.
1. Press the SETTINGS button.
2. Use the navigation buttons on the front panel to select LAN and press the button.3. Use the down navigation button to select ETH1, ETH2 or a VLAN interface.4. Use the down navigation button to scroll to Auto DNS.
5. Press the button to toggle between Yes and No.
VLAN ID (VLAN configuration only)The VLAN ID is encapsulated in IP packets to facilitate routing throughout your network.
1. Press the SETTINGS button.
2. Use the navigation buttons on the front panel to select LAN and press the button.3. Use the down navigation button to select a VLAN interface.
4. Select Usage and press the button.5. Select the mode of operation for this VLAN (e.g. Control & Streaming, Streaming only,
Control Only) and press the button.6. Use the down navigation button to scroll to VLAN ID.
7. Press the button to enter a number between 1-4094 inclusive.
8. Press the button to confirm this setting.
VLAN Priority (VLAN configuration only)The VLAN Priority setting represents a prioritization scheme for forwarding data packets throughoutVirtual Local Area Networks.
1. Press the SETTINGS button.
2. Use the navigation buttons on the front panel to select LAN and press the button.3. Use the down navigation button to select a VLAN interface.
4. Select Usage and press the button.5. Select the mode of operation for this VLAN (e.g. Control & Streaming, Streaming only,
Control Only) and press the button.6. Use the down navigation button to scroll to VLAN Priority.
7. Press the button to enter a number from 0 to 7 inclusive.

284 Genie Distribution WheatNet-IP Manual v1.6
© Tieline Pty. Ltd. 2015
8. Press the button to confirm this setting.
VLAN Interface (VLAN configuration only)This setting applies the VLAN settings to a physical Ethernet port in the codec.
1. Press the SETTINGS button.
2. Use the navigation buttons on the front panel to select LAN and press the button.3. Use the down navigation button to select a VLAN interface.
4. Select Usage and press the button.5. Select the mode of operation for this VLAN (e.g. Control & Streaming, Streaming only,
Control Only) and press the button.6. Use the down navigation button to scroll to Interface.
7. Press the button to select ETH1 or ETH2, then press the button.
26.2 Selecting an AlgorithmThe codec offers uncompressed linear audio as well as aptX® Enhanced, LC-AAC, HE-AAC v.1and HE-AAC v.2, AAC-LD, AAC-ELD, AAC-ELDv2, MPEG Layer 2, G.711 and G.722, Tieline Musicand MusicPLUS algorithms. There is a range of pre-programmed connection profiles to simplifycodec configuration. See Choosing Dialing Profiles for more details.
Overview of Tieline Algorithms1. The Tieline Music algorithm is optimized for audio bit rates as low as 19.2kbps with only a 20
millisecond encode delay. It offers 15 kHz mono from 24kbps to 48kbps.2. Tieline MusicPLUS delivers up to 20 kHz mono from 48kbps upwards. It can also deliver up to 20
kHz stereo from 96kbps upwards, offering huge savings on your IP data bills and outstandingaudio quality.
Overview of AAC Algorithms
AAC-LCLC-AAC is optimized for audio bit rates of 64kbps per channel or higher using a sample rate of48kHz. Tieline recommends using LC-AAC instead of HE-AAC if bandwidth of 64kbps or higherper channel is available, to optimise audio quality. If lower bandwidth than 64kbps is availableconsider using HE-AAC, Tieline Music or Tieline MusicPLUS.
AAC-HECodecs include both HE-AAC v.1 and HE-AAC v.2, which are optimized for low bit rateconnections. Selection of HE-AAC v.1 and v.2 is automatically managed within the codec, soonly AAC-HE is displayed on the screen. When used for mono connections, HE-AAC v.1performs best at bit rates of 24kbps per channel or higher. HE-AAC v.1 is also used for stereoconnections when audio connection bandwidth is 48kbps or higher.
HE-AAC v.2 is used for stereo connections when audio connection bandwidth is below 48kbpsand is capable of delivering 15kHz quality stereo audio at audio bit rates as low as 24kbps.
A sample rate of 32kHz is used in the codec's default profiles to achieve ultra-low bit-rateconnections, but this is adjustable to 44.1kHz or 48kHz if required.

285
© Tieline Pty. Ltd. 2015
Genie Distribution WheatNet-IP Manual v1.6
AAC-LDAAC-LD (Low Delay AAC), AAC-ELD (Enhanced Low Delay AAC) and AAC-ELDv 2 areoptimized for low latency real-time communication. AAC-LD is suited to bit rates of 96kbps orhigher for stereo audio.
AAC-ELDAAC-ELD is optimised for high quality stereo connections from 48 - 96kbps and performs betterat these bit rates when compared with AAC-LD.
AAC-ELD v 2For stereo connections below 48kbps AAC-ELD v2 will deliver better performance than AAC-ELD down to 24kbps.
Overview of aptX Enhanced Audio CodingaptX® Enhanced audio coding is used by thousands of radio stations to deliver very low delay audiofor IP broadcasts and is ideal for high quality studio-to-transmitter links and audio distribution. Itdelivers outstanding audio quality with exceptionally low delay across a range of IP networks.
32kHz or 48kHz sample rates are available at either 16 bit or 24 bits per sample. aptX Enhancedhas a minimum connection bit rate of 128kbps per channel and offers 10Hz to 24kHz frequencyresponse. 24 bit, 48kHz aptX Enhanced at the maximum bit rate of 576kbps delivers >120dB ofdynamic range.
aptX® Enhanced is supported over ISDN at the following sample and bit rates:
Encoding Bit rate Required B Channels RequiredaptX® Enhanced Mono 16 bit, 32 kHz 128 kbps 2
aptX® Enhanced Mono 16 bit, 48 kHz 192 kbps 3
aptX® Enhanced Mono 24 bit, 32 kHz 192 kbps 3
aptX® Enhanced Stereo 16 bit, 32 kHz 256 kbps 4
Overview of Opus AlgorithmOpus is a highly versatile open source audio coding algorithm. It incorporates technology from thewell-known SILK and CELT codecs to create a low latency speech and audio codec. It is a variablebit rate algorithm ideal for live broadcast situations because of its capacity to deliver high quality,real-time Audio over IP (AoIP) at low bit rates. Visit http://www.opus-codec.org for more info.
There are three Opus algorithm configurations available:
Algorithm Recommended connection for on-air use
Opus Voice High quality low bit rate remotes (9.6kbps -64kbps)
Opus Mono Very high quality mono remotes, STLs and audio distribution (48kbps -128kbps)
Opus Stereo Very high quality stereo remotes, STLs and audio distribution (64kbps -256kbps)

286 Genie Distribution WheatNet-IP Manual v1.6
© Tieline Pty. Ltd. 2015
Configuring an Algorithm in the Codec
1. Press the HOME button to return to the Home screen.
2. Use the navigation buttons on the front panel to select Connect and press the button.
3. Select IP and press the button.
4. Select your preferred IP Session mode and press the button.
5. Use the down navigation button to select Setup and press the button.
6. Navigate to Algorithm and press .7. Navigate to Manual to configure all settings manually, or Profile to choose a pre-configured
algorithm profile, then press .
How do I choose the right algorithm?The algorithm you select will not only affect the quality of the broadcast but it will also contribute tothe amount of latency or delay introduced. For example, if MP2 algorithms are used, programdelays will be much longer than when using Tieline Music or MusicPLUS algorithms. This is due tothe additional inherent encoding delays involved when using MP2 algorithms. This can be a majorconsideration for live applications that integrate remotes into a broadcast. The algorithm you chooseto connect with will also depend upon:
· The codecs you are connecting to (Tieline versus non-Tieline)· Whether you are creating multi-unicast connections.· Whether you are connecting using SIP or not. · The uplink bandwidth capability of your broadband connection.
Important Notes: Music and MusicPLUS algorithms cannot be used over SIPconnections. Use MP2 algorithms at 64kbps mono or 128kbps stereo for high qualityconnections when using SIP, or use G.711 and G.722 if required. Tieline G3 codecs donot support connections using AAC and will default to MPEG Layer 2 if an incomingconnection is programmed to use this algorithm.
It can be a good idea to listen to the quality of your program signal using each algorithm and to seehow it sounds when it is sent at different connection bit rates (as well as different FEC and jitter-buffer millisecond settings). This will assist you to determine which is the best algorithm setting forthe connection you are setting up. Please see the following table for details on the connectionrequirements of the different algorithms available.

287
© Tieline Pty. Ltd. 2015
Genie Distribution WheatNet-IP Manual v1.6
Algor-ithm
AudioBand-width
Algor-ithmicDelay
IP bit rateper channel
IP over-head perconnection
Audio Quality andFeatures
Recommendedapplications for on-airuse
Linear/PCM
(Uncom-
pressed)
16/24 bit
up to
45kHz
0ms sample rate x
bits per
sample x no.
channels;
512kbps
minimum
(16bit;32kHz)
to 4.6 Mbps
(24bit; 96
kHz)
80kbps · Full bandw idth,
perfect audio
quality for voice
and music
· No error
concealment/
correction or
artefacts
· Extremely high quality
uncompressed audio
for STLs and audio
distribution.
· Ideal for f iber or high
bandw idth links.
Tieline Music Up to
15kHz
20ms 24 kbps
minimum
16kbps · High quality voice
and music
· Very low delay
at low bit rates
· Great for live voice or
music remotes as w ell
as STLs and audio
distribution w ith limited
connection bandw idth
(e.g. POTS or 3G
w ireless)
· Suitable w hen
bidirectional
communication
betw een announcers
is required
· Deliver 15kHz stereo
over 1 x 64kbps ISDN
B Channel.
Tieline Music-
PLUS
Up to
22kHz
20ms 48 kbps
minimum
(Optimised
for 64kbps
per audio
channel)
16kbps · Very high quality
voice and music
· Very low delay
at low to
moderate bit-
rates
· Very high quality, very
low delay STLs and
audio distribution
· Remote connections
able to achieve
48kbps for each audio
channel
· Suitable w hen
bidirectional
communication
betw een announcers
is required
G.711 3kHz 1ms 64kbps
minimum
80kbps · Low quality 3kHz
POTS phone
quality audio
· Very low delay
at moderate bit
rates
· Highly compatible w ith
other brands of audio
codec
· Low quality and used
generally for
compatibility
G.722 7kHz 1ms 64kbps
minimum
80kbps · Good quality
7kHz voice
· Better quality
than a standard
POTS phone call
· Very low delay
at moderate bit
rates
· Highly compatible w ith
other brands of audio
codec
· Good voice quality
audio for remotes and
other voice quality
applications
MPEG Layer 2 Up to
22kHz
24 to
36ms
64kbps
minimum
8.5 -
13.3kbps
· Very high quality
voice and music
· Low to moderate
delay at
moderate to high
bit rates
· Highly compatible w ith
other brands of audio
codec
· Very high quality audio
for remotes, STLs and
audio distribution

288 Genie Distribution WheatNet-IP Manual v1.6
© Tieline Pty. Ltd. 2015
MPEG Layer 3 Up to
15kHz
100ms 64kbps 8.5 -
13.3kbps
· High quality voice
and music
· Moderate bit
rates
· High delay
· High quality remotes,
STLs and audio
distribution
· Use w hen bidirectional
communication
betw een announcers
is not required
LC-AAC Up to
15kHz
64ms 64kbps 15kbps · High quality voice
and music at
low est bit rate;
better quality at
higher bit rates
· Moderate delay
at moderate to
high bit rates
· Voice or music
remotes as w ell as
STLs and audio
distribution w here
some delay is tolerable
· Tieline Music or
MusicPLUS deliver
low er delay
HE-AAC v.1 Up to
15kHz
128ms 48kbps 7.4kbps · High quality voice
and music at the
low est bit rate;
better quality at
higher bit rates
· Low to Moderate
bit rates
· High delay
· Live voice or music
remotes as w ell as
STLs and audio
distribution w ith limited
connection bandw idth
· Use w hen bidirectional
communication
betw een announcers
is not required
HE-AAC v.2 Up to
15kHz
128ms Minimum
16kbps
(Mono);
24kbps
(stereo)
7.4kbps · High quality voice
and music
· Low bit rates
· High delay
· Used for DAB+ radio
streaming
· Ideal for low bit rate
remotes
· Use w hen bidirectional
communication
betw een announcers
is not required
AAC-LD Up to
20kHz
20ms at
48kHz
48kbps
minimum
30kbps · Very high quality
voice and music
· Very low delay
at low to
moderate bit
rates
· Very high quality, very
low delay STLs and
audio distribution
· Remote connections
able to achieve
48kbps for each audio
channel requiring
· Suitable w hen
bidirectional
communication
betw een announcers
is required
AAC-ELD Up to
20kHz
15-30ms 24 kbps
minimum
15-30kbps · Very high quality
voice and music
· Very low delay
at low bit rates
· Great for live voice or
music remotes
· Suitable w hen
bidirectional
communication
betw een announcers
is required
AAC-ELDv.2 Up to
20kHz
35ms Pending
release
Pending
release
· High quality voice
and music
· Low delay at low
bit rates
· Great for live voice or
music remotes w here
limited connection
bandw idth is available
· Suitable w hen
bidirectional
communication
betw een announcers
is required
aptX Enhanced 10Hz-
24kHz
2.5ms at
48kHz
128kbps
minimum
(16bit; 32kHz)
to 288kbps
80kbps · Very high quality
voice and music
· Extremely low
delay at high bit
· Ideal for STLs and
audio distribution
w here high
connection bandw idth

289
© Tieline Pty. Ltd. 2015
Genie Distribution WheatNet-IP Manual v1.6
(24bit;48kHz) rates
· Highly cascade
resilient
is available and very
low delay is highly
desirable.
· Resilient w ith multiple
encodes/decodes
w hen required
Opus 4Hz-
20kHz
20ms 9.6-256kbps 16kbps · Very high quality
voice and music
· Very low delay
at low bit rates
· "Opus Voice" is ideal
for high quality, and
low delay voice quality
remotes at extremely
low bit rates.
· "Opus Mono" and
"Opus Stereo" are
perfect for high f idelity
remotes, STLs and
audio distribution at
higher bit rates
TxTran /
RxTran
NOT FOR
BROADCAST USE
NOT FOR BROADCAST
USE
Algorithm Selection GuideAlgorithm Very Low
DelayModerate
to HighDelay
ExcellentPerformance
at Low Bit rates
Preferredfor Live
Remotes
Preferred forSTLs and
AudioDistribution
HighlyCompatiblewith other
Codecs
Linear/PCM Opus Tieline Music Tieline MusicPLUS apt-X Enhanced LC-AAC HE-AACv1 HE-AACv2 *AAC-LD AAC-ELD AAC-ELDv2 MPEG Layer 2 MPEG Layer 3 G.722 G.711
* Use with caution for remotes due to high delay; not suitable when bidirectional communications isrequired.

290 Genie Distribution WheatNet-IP Manual v1.6
© Tieline Pty. Ltd. 2015
IP Connection Bit rates Supported

291
© Tieline Pty. Ltd. 2015
Genie Distribution WheatNet-IP Manual v1.6
ISDN Encoding OptionsThe codec supports ISDN connections using the following algorithms and B Channel assignments.
26.3 Configuring the Jitter BufferJitter, (also known as latency or delay), is the amount of time it takes for a packet of data to getfrom one point to another. A jitter buffer is a temporary storage buffer used to capture incoming datapackets. It is used in packet-based networks to ensure the continuity of audio streams bysmoothing out packet arrival times during periods of network congestion. Data packets travelindependently and arrival times can vary greatly depending on network congestion and the type ofnetwork used, i.e. LAN versus wireless networks. The concept of jitter buffering is displayed visuallyin the following image.
Jitter-buffer management is encompassed within Tieline's SmartStream IP technology which can:
· Remove duplicate packets.· Re-order packets if they arrive out-of-order.· Repair the stream in the event of packet loss (error concealment).· Manage delay dynamically based on current network congestion.· Manage forward error correction (FEC).
Tieline codecs can be used to program either a fixed or automatic jitter buffer and the setting you

292 Genie Distribution WheatNet-IP Manual v1.6
© Tieline Pty. Ltd. 2015
use depends on the IP network you are connecting over. Over LANs, WANs and wireless networksthe automatic jitter buffer generally works well. It adapts automatically to the prevailing IP networkconditions to provide continuity of audio streaming and minimizes delay.
A fixed jitter buffer is preferable over satellite connections to ensure continuity of signals.
CAUTION: If a Tieline codec connects to a device that is using non-compliant RTP streamsthen the last fixed setting programmed into the codec will be enabled (default is 500ms).Non-compliant devices include some other brands of codec, web streams and otherdevices.
Tieline ‘Auto Jitter Buffer’ SettingsLeast Delay: This setting attempts to reduce the jitter buffer to the lowest possible point, while stilltrying to capture the majority of data packets and keep audio quality at a reasonable level. Thissetting is the most aggressive in its adaptation to prevailing conditions, so jitter buffer may varymore quickly than with the other settings. It is not recommended in situations where jitter variation issignificant and/or peaky. (E.g. 3G/multi-user wireless networks). It is best for stable and reliablelinks such as dedicated or lightly-loaded WAN/LANs.
Highest Quality: This setting is the most conservative in terms of adapting down to reduce delay.The jitter-buffer setting will actually stay high for a longer period after a jitter spike is detected – justin case there are more spikes to follow. This setting is best used where audio quality is most highlydesired and delay is not so critical. Unless delay is irrelevant, this setting is also not recommendedover peaky jitter networks (such as 3G) and is best used on more stable networks where large jitterpeaks are not as common.
Best Compromise: This (default) setting is literally the midpoint between the jitter buffer levels thatwould have been chosen for the Highest Quality and Least Delay settings. It is designed to providethe safest level of good audio quality without introducing too much extra delay.
Good Quality and Less Delay: These two settings lie between the mid-point setting of BestCompromise and two settings Highest Quality and Least Delay. They indicate a slight preferenceand may assist in achieving better performance from a connection without incurring extreme delaysin transmission or packet loss.
Which Algorithms can use Automatic Jitter Buffering?The following table provides an overview of which algorithms are capable of using the automatic jitterbuffer feature over SIP and non-SIP connections.

293
© Tieline Pty. Ltd. 2015
Genie Distribution WheatNet-IP Manual v1.6
Algorithm Non-SIP Connections SIP Connections
Linear (Uncompressed)
Tieline Music
Tieline MusicPLUS
G.711
G.722
MPEG Layer 2
MPEG Layer 3
LC-AAC
HE-AAC v.1
HE-AAC v.2
AAC-LD
AAC-ELD
Opus
aptX Enhanced
Configuring Automatic Jitter Buffering (Default Setting)
1. Press the HOME button to return to the Home screen.
2. Use the navigation buttons on the front panel to select Connect and press the button.
3. Select IP and press the button.
4. Select your preferred IP Session mode and press the button.
5. Use the down navigation button to select Setup and press the button.
6. Navigate to Jitter Buffer and press .
7. Select Auto Jitter Adapt and press .
8. Select your preferred jitter buffer setting and press .
Important Notes: · Automatic jitter buffering is disabled for a PCM (linear uncompressed) audio
connection.· There is no jitter buffer setting on a multicast server codec because it only sends and
never receives audio packets.
How to get the Best Jitter Buffer ResultsWhen programming automatic jitter buffer settings, establish the IP connection for a while before‘going live’, to let the codec evaluate the prevailing network conditions. The initial jitter buffer settingwhen a codec connects is 500ms and it is kept at this level for the first minute of connection (aslong as observed delay values are lower than this point).
After the initial connection period the jitter buffer is adapted to suit the current network conditionsand is usually reduced. Establish a connection for at least 5 minutes prior to broadcasting, so thatthe codec has been provided with enough jitter history to ensure a reliable connection.
There are five jitter buffer states. Jitter buffer and connection status statistics can be viewed via
HOME > Cxns and use the down and up navigation buttons to scroll through

294 Genie Distribution WheatNet-IP Manual v1.6
© Tieline Pty. Ltd. 2015
connection statistics. The first four stages are observed in “auto” jitter buffer mode.
1. Stabilization period (a1): A few seconds at the start of a connection where no action istaken at all while the establishment of a stable connection means analysis of jitter data is notvalid.
2. Stage 2 (a2): A compatibility check to ensure the RTP connection is compliant and RTPclocks are synchronized enough to perform jitter analysis.
3. Stage 3 (a3): If the compatibility check is successful, this is the analysis hold-off period.During a minute, the jitter buffer is held at a safe, fixed value of 500ms while enough history isrecorded to start jitter buffer adaptation.
4. Stage 4 “live” (A): This is where the codec determines it is safe enough to startbroadcasting using the auto-jitter buffer level. We recommend running the codec for a fewmore minutes to obtain a more comprehensive history of the connection’s characteristics.
5. Fixed (F): This state is displayed if the jitter buffer is fixed.
Auto Jitter Buffer and Forward Error Correction (FEC)If forward error correction is programmed then additional data packets are sent over a connection toreplace any data packets lost. There is no need to modify jitter buffer settings if you are sendingFEC data, only if you are receiving FEC data.
The jitter buffer depth on the receive codec needs to be increased if forward error correction isemployed. We recommend you add 100ms to the jitter buffer on a codec receiving FEC at a settingof 20% and 20ms at a setting of 100%.
Tieline’s auto jitter buffer detects the amount of FEC that is being used and automaticallycompensates to increase the codec jitter buffer if FEC is being used.
Fixing Jitter Buffer SettingsThe default jitter-buffer setting in Tieline codecs is 500 milliseconds. This is a very reliable settingthat will work for just about all connections. However, this is quite a long delay and we recommendthat when you set up an IP connection you test how low you can set the jitter-buffer in your codec.
1. Press the HOME button to return to the Home screen.
2. Use the navigation buttons on the front panel to select Connect and press the button.
3. Select IP and press the button.
4. Select your preferred IP Session mode and press the button.
5. Use the down navigation button to select Setup and press the button.
6. Navigate to Jitter Buffer and press .
7. Select Fixed Buffer Level and press .
8. Use the numeric KEYPAD to enter the fixed buffer value in milliseconds and press .
If you change the jitter buffer setting in a codec it will only adjust to the new level when link quality ishigh (e.g. above 70%). This is done to ensure audio quality is not compromised. When manuallyprogramming the jitter-buffer delay in a codec it is necessary to think carefully about the type ofconnection you will be using. Following is a table displaying rule of thumb settings for programmingjitter-buffer delays into your codec.

295
© Tieline Pty. Ltd. 2015
Genie Distribution WheatNet-IP Manual v1.6
Connection Jitter-Buffer Recommendation
Private LAN 60 milliseconds
Local 100 - 200 milliseconds
National 100 - 300 milliseconds
International 100 – 400 milliseconds
Wireless Network 250 - 750 milliseconds
Satellite IP 500 - 999 milliseconds
Important Note: The preceding table assumes Tieline Music is the algorithm in use. Donot use PCM (uncompressed) audio over highly contended DSL/ADSL connectionswithout enough bandwidth to support the high connection bit rates required.
26.4 Configuring Forward Error CorrectionForward Error Correction (FEC) is designed to increase the stability of UDP/IP connections in theevent that data packets are lost. FEC works by sending a secondary stream of audio packets overa connection so that if your primary audio stream packets are lost or corrupted, then packets fromthe secondary stream can be substituted to replace them. The amount of FEC required depends onthe number of data packets lost over the IP connection.
Both the local and remote codec FEC settings can be configured in your codec before dialing.These settings can also be changed ‘on the run’ while the codecs are connected. FEC should onlybe used if the Send/Return link quality percentage displayed on the codec is below 99, as it is of nobenefit otherwise.
Programming FEC into the Codec
1. Press the HOME button to return to the Home screen.
2. Use the navigation buttons on the front panel to select Connect and press the button.
3. Select IP and press the button.
4. Select Tieline and press the button.
5. Use the down navigation button to select Setup and press the button.
6. Navigate to FEC and press .
7. Select the local codec FEC setting in the Local FEC screen and press .
8. Select the remote codec FEC setting in the Remote FEC screen and press .
The four FEC settings in Tieline codecs are outlined in the following table with their bit rate ratios.

296 Genie Distribution WheatNet-IP Manual v1.6
© Tieline Pty. Ltd. 2015
FEC Setting Bit rate Ratios Connection Use
100%(Lowestdelay)
A simultaneous dual-redundantstream (1:1 ratio) is sent from thecodec. Twice the connection bitrate is required to operate thecodec using the 100% setting.E.g. if your connection is14,400kbps, you will require anadditional 14,400 kbps ofbandwidth to allow for the FECdata stream.
Recommended to be used overwireless and internationalconnections.
50% Additional data is sent using FECin a ratio of 2:1.
Recommended for international &national connections
33% Additional data is sent using FECin a ratio of 3:1.
Recommended for national and localconnections.
20% (Highestdelay)
Additional data is sent using FECin a ratio of 5:1.
Recommended for local and LANconnections.
Off FEC is off in the codec and theconnection bandwidth is equal tothe connection bit rate setting inthe codec.
Recommended for wired LANconnections & managed T1 & E1connections for STLs that haveconnections that aren’t shared &have quality of service (QoS).
Important Note: FEC can only be programmed for use with the Music and MusicPLUSalgorithms.
How does FEC work?If you program a FEC setting of 20% and you are losing one packet in every five sent, the lostpacket will be replaced by FEC to maintain the quality of the connection. If you are losing morepackets than this, say one in three, it will be necessary to increase the FEC setting to 33% tocompensate.
Note: There is an inverse relationship between FEC settings and the jitter-buffer millisecond settingthat you use for IP connections.
So why not use 100% FEC every time? The answer is because you need twice the bit rate toachieve full redundancy and depending on the link conditions, this could potentially cause moredropouts because of network congestion than it fixes. Here is a simple rule to remember: Yourmaximum uplink speed is all the bandwidth you have to play with. As a rule of thumb, try not toexceed more than 80% of your maximum bandwidth. If your link is shared, be even moreconservative.
You should also consider the remote end too. What is their maximum upload speed? Is theconnection shared at either end? Your bit rates, FEC settings and buffer rates must be pre-configured at both ends before you connect, so it's always better to set your connection speed andbalance your FEC according to the available uplink bandwidth at each end for best performance.
As an example, if you want 15 kHz mono (using the Tieline Music Algorithm) you will need at leasta 24kbps connection for audio. Adding 100% FEC will add another 24kbps making your bit rate48kbps plus some overhead of around 10kbps is required. If you're on a 64kbps uplink, you shouldconsider reducing your FEC to minimize the likelihood of exceeding your bandwidth capacity.

297
© Tieline Pty. Ltd. 2015
Genie Distribution WheatNet-IP Manual v1.6
Here is another example, if you want 15 kHz stereo, you need at least 56kbps for the audio. 100%FEC requires at least 112kbps and 50% FEC requires at least 84kbps. If your uplink speed is256kbps and you're on a shared connection, then choosing a lower FEC setting of 20%-33% maygive you better results.
Conserving Bandwidth with FECThere is a trade-off between the quality and the reliability of an IP connection – particularly whenFEC is activated on your codecs. However, it is possible in certain situations to set different FEC oneach codec to match connection bandwidth requirements at either end of the link, conservebandwidth and create more stable IP connections.
For example, if your broadcast is a one-way broadcast from a remote site, i.e. you are not using thereturn path from the studio, or only using it for communications purposes, it is possible to reduce orturn off FEC at the studio codec. This effectively reduces the bandwidth required over the return link(communications channel) and increases the overall bandwidth available for the incoming broadcastsignal from the remote site.
26.5 Configuring Encode/Decode DirectionBy default the codec by is configured to both encode and decode data. However, it is possible toconfigure the codec to either encode or decode audio data only. This is useful for:
· Conserving connection bandwidth when unidirectional data streaming is required.· Lowering data costs.· Increasing overall connection reliability.
Program the transmitting codec to encode only and program the receive codec to decode onlywhen using this feature. To adjust this setting:
1. Press the HOME button to return to the Home screen.
2. Use the navigation buttons on the front panel to select Connect and press the button.
3. Select IP and press .
4. Select your preferred IP Session mode and press the button.
5. Use the down navigation button to select Setup and press .
6. Navigate to Dir and press .
7. Select Encode Only or Decode Only and press .
26.6 Enabling Relays & RS232 DataData must be enabled to activate contact CONTROL PORT closure operation and RS232 data.Please see Appendix A for RS232 and Control Port Wiring information.
1. Press the HOME button to return to the Home screen.
2. Use the navigation buttons on the front panel to select Connect and press the button.
3. Select IP and press the button.
4. Select Tieline (or Sessionless) and press the button.
5. Select Peer-to-Peer and press the button.
6. Use the down navigation button to select Setup and press the button.
7. Navigate to Data and press to toggle between Enabled and Disabled (Note: defaultsetting is Disabled)

298 Genie Distribution WheatNet-IP Manual v1.6
© Tieline Pty. Ltd. 2015
Important Note: Data transmission is disabled by default.
Configuring Control Port Contact Closure OperationThe Rules panel in the Web-GUI can be used to configure switch inputs and relay outputs. See thesection titled Creating Rules for more information.
Configuring RS232 DataOnce Data is enabled, the codec can be connected to external devices and transport RS232-compatible data via the serial port on the rear panel of the codec.
1. Press the SETTINGS button.
2. Navigate to System and press .
3. Select RS232 Config and press .4. Use the navigation buttons to select the correct baud rate.
5. Select Enable for flow control and press to save all settings.
Important Notes: · When connecting to G3 codecs over IP, ISDN or POTS only in-band data is available via
the Music and MusicPLUS algorithms. See RS232 Data Configuration for more details.· It is important that you enable serial port flow control within the codec. Flow control
regulates the flow of data through the serial port. If disabled, data will flow unregulatedand some may be lost.
· Ensure you match the serial port baud rate to match the rate of the external device youare connecting to. Ideally the settings on both codecs should match, or you could havedata overflow issues.
· Only the dialing codec needs to be programmed to send RS232 data. Session data sentfrom the dialing codec will program all other compatible codecs (non-G3) when youconnect.
26.7 Configuring TCP/UDP PortsIn TCP and UDP networks the codec port is the endpoint of your connection. Software networkports are doorways for systems to communicate with each other. For example, several codecs inyour studio may use the same public static IP address. Unique port numbers can be used to routeaudio to each codec.
Tieline Codec Default Port SettingsBy default, the codec uses a TCP session port to send session data and a UDP port to send audio.The session port is programmed to use the TCP protocol because it is the most likely protocol toget through firewalls – ensuring critical session data (including dial, connect and hang-up data) willbe received reliably.
The default session and audio port settings in Tieline codecs, for both TCP and UDP connections,are outlined in the Installing the Codec at the Studio section of the manual. This section alsocontains useful information for configuring port forwarding and troubleshooting IP connections.

299
© Tieline Pty. Ltd. 2015
Genie Distribution WheatNet-IP Manual v1.6
Changing Codec Port NumbersReasons for adjusting the port setting on your codec include:
· Creating a path through gateways and firewalls.· Another IP device is already using a codec’s port number.· More than one studio codec is in use and each codec requires a different port number.
Configuring the Session and Audio Port Numbers used when Dialing aProgramFor two codecs to connect, they need to be configured with matching port numbers. If there is aneed to change codec port settings, in most situations you should consult your organization’sresident IT professional. To adjust either the session or audio port numbers for a particularconnection within a program:
1. Press the HOME button to return to the Home screen.
2. Use the navigation buttons on the front panel to select Connect and press the button.
3. Select IP and press the button.
4. Select your preferred IP Session mode and press the button.
5. Use the down navigation button to select Setup and press the button.
6. Navigate to either Session (session protocol) or Protocol (audio protocols) and press .
7. Select the session or audio port you want and press .
8. Use the numeric KEYPAD to add a new port number and press .
Changing the Tieline Session Ports when AnsweringTo adjust the local Tieline session data port used by your codec:
1. Press the HOME button to return to the Home screen.
2. Use the navigation buttons on the front panel to select Settings and press the button.
3. Select Tieline Session and press .
4. Navigate to Session Port or Alternative Session Port and press .
5. Adjust the setting and press the button to store the new configuration.
Audio Port Settings for Tieline Session Data and Sessionless IP CallsThe codec supports sessionless IP streaming, whereby the codec does not send Tieline sessiondata when attempting to connect. When using this mode you need to configure the "send" audioport (codec port at the remote end of the link to which you are sending audio) and "return" audio port(port used by the local codec to receive audio from the remote codec).
It is also possible to configure the send and return audio ports for a codec using Tieline session datato establish IP connections. This may be required because some firewalls require symmetric portconfiguration.
Sessionless Audio Port ConfigurationWhen you select Sessionless as the Session Protocol:
· The default value for both the Send and Return (audio) Ports is 9000

300 Genie Distribution WheatNet-IP Manual v1.6
© Tieline Pty. Ltd. 2015
· The range of values for the audio ports is 2000 to 65535· The audio port values can be set independently· Both audio ports can always be configured, i.e. there is no dependency on encode/
decode direction
"Tieline Codec" Port ConfigurationIf using the Tieline Codec setting for call establishment (i.e. Tieline session data is enabled),you can also change the default audio ports if required.
· The default value for the Send (audio) Port is 9000· The range of values for the Send Port is 2000 to 65535· The default port value for the Return (audio) Port is Automatic. Note: Automatic
indicates that the codec will allocate the return port value and send this information tothe codec to which you are dialing
· The range of values for the Return Port is 2000 to 65535
Sessionless Multicast ConnectionsFor a sessionless multicast server connection:
· Only the Send Port is available· The default value for the port is 9000· The range of values for the port is 2000 to 65535
For a sessionless multicast client connection:
· Only the Return Port is available· The default value for the port is 9000· The range of values for the port is 2000 to 65535
26.8 Configuring QoS for IP PacketsIt is possible for IP networks to prioritize and differentiate between data packets transmitted throughrouters across networks. This is useful because in modern data networks many different IP serviceslike email, voice, web pages, video and streaming music coexist within the same networkinfrastructure.
Prioritizing IP Data Packets when BroadcastingIP audio data packets can be programmed for expedited or assured forwarding (Quality of Service orQoS) when traversing different networks. Routers can also be programmed to ignore theseforwarding priorities so they are not assured across all networks.
The codec can be programmed to tag IP data packets sent across a network by entering a valueinto the Differentiated Services Code Point (DSCP) field within the header of data packetstransmitted over the network. Check with your IT administrator before changing this setting. Bydefault the codec is programmed for Assured Forwarding and more details about DSCP are availableon Wikipedia at http://en.wikipedia.org/wiki/Dscp.
Configuring QoS
1. Press the SETTINGS button.
2. Use the navigation buttons to select QoS and press the button.

301
© Tieline Pty. Ltd. 2015
Genie Distribution WheatNet-IP Manual v1.6
3. Press the button and use the RETURN button to delete numbers already entered, thenuse the numeric KEYPAD to enter the new setting recommended by your IT administrator.
4. Press the button to save the new setting.
Important Note: To ensure the continuous and regular flow of tagged data packets alongthe path from point to point, all routers and switching equipment must respect the QoSsetting of the packets sent. Any bandwidth partitioning schemes should partition over asmall interval to ensure the codec jitter buffer does not empty and audio remainscontinuous.
26.9 Configuring Data Packet Time-to-LiveTime-to-Live (TTL) is a value you can configure into the codec to set a finite life for data packetssent by the codec. This avoids situations where packets can keep circulating through routerscausing network congestion.
The Time-to-Live setting is configurable and sets the maximum number of router hops allowable formulticast data packets. In most situations the default value of 1 is used, to ensure packets are sentthrough a single LAN router and not over multiple router hops and networks.
This setting is only used in Multicast Server mode.
1. Press the HOME button to return to the Home screen, select Connect, then select IPand press the button.
2. Select Sessionless and press .
3. Press the right navigation button to select Multicast Server and press .

302 Genie Distribution WheatNet-IP Manual v1.6
© Tieline Pty. Ltd. 2015
3. Press the down navigation button to select Setup and press .
4. Press the down navigation button to select TTL and press .
5. Press the RETURN button to delete the current setting and use the numeric KEYPADto enter a new value. Press to confirm the new setting.

303
© Tieline Pty. Ltd. 2015
Genie Distribution WheatNet-IP Manual v1.6
26.10 Reset and Restore Factory Default SettingsThere are several options in the Reset menu which allow you to restore factory default settings withinthe codec.
Function Description1 Reset Audio and
'Connect' SettingsClick to restore factory default settings for Audio and Connectmenu settings
2 Restore FactoryDefaults
Click to restore factory default settings, excluding user definedprograms and call history
3 Delete Programs &Call History
Deletes custom programs and recent calls in the codec; speeddial contacts are retained
4 Reboot Codec Click to restart the codec
5 Clear Logs Deletes codec event and log history. Note: This should only beperformed if instructed to by Tieline support staff.
Important Note: After restoring factory defaults, always reboot the codec using theReboot Codec function, not by removing power from the codec.
1. Press the SETTINGS button.
2. Use the navigation buttons to select Reset and press the button.
3. Navigate to the preferred option from those available and press the button.
4. Select Yes and press the button to confirm the reset function.
Reset and Restore Factory Defaults using the Web-GUIThe Web-GUI can also be used to reset and restore factory defaults. See Reset Factory DefaultSettings for more details.

304 Genie Distribution WheatNet-IP Manual v1.6
© Tieline Pty. Ltd. 2015
26.11 Configuring SNMP SettingsThe codec supports Simple Network Management Protocol (SNMP ) for managing devices on IPnetworks. To configure SNMP settings:
1. Press the SETTINGS button.
2. Use the navigation buttons to select SNMP and press the button.
3. Navigate to each setting in turn and press the button to adjust and save each new setting.
Important Note: For more information on SNMP codec settings see Configuring SNMPin the Codec.
26.12 Test ModeTest mode is used by the codec to perform an input/output loopback test of audio. E.g. Input 1 isrouted to Output 1, Input 2 is routed to Output 2 etc.
1. Press the SETTINGS button.
2. Navigate to Audio and press .
3. Navigate to Test Mode and press
4. Navigate to Info and press to view the Audio Loopback Test Mode summary.
Loopback input/output test mode is enabled while the Audio Loopback Test Mode dialog appearson the screen. When you navigate out of this screen this test mode ceases.

305
© Tieline Pty. Ltd. 2015
Genie Distribution WheatNet-IP Manual v1.6
27 ReferenceThe following sections contain reference and troubleshooting information.
27.1 Regular MaintenanceTieline recommends the codec undergoes regular maintenance to ensure operational efficiency andprolong its life.
WARNINGS: All work should be carried out by suitably qualified personnel. Remove bothpower leads from the codec before removing the cover. All parts are mounted on plugs andonly a Philips screwdriver is required. Ensure that fan mounting lugs are not hooked out bythe cover.
Maintenance ScheduleTieline recommends a three year maintenance schedule which includes the following procedures tobe completed:
1. Evacuate all dust from the unit and clean vents.2. Replace both PSUs.3. Replace the fan.
Controlled rack environments may allow a longer maintenance cycle. Uncontrolled environments,where temperatures are elevated, may require a shorter maintenance cycle.
Tieline recommends that the racks in which codecs are installed are thoroughly evacuated to ensureproper airflow from the bottom to the top. Where space is available, a 1RU gap between codecs willassist in minimizing internal temperature build up. Tieline has incorporated dual redundant PSUsand backup alarm features to assist in maintaining reliable operations. The fan has been carefullychosen for long life operation and should not be replaced by a cheaper equivalent. Fan speed controlcircuitry reduces the fan speed as internal rack temperatures fall below 25 degrees Celsius. Thisgreatly extends the working life of the fan and the codec. If rack temperatures are elevated above 25degrees Celsius, the fan speed will increase to reduce CPU temperature.

306 Genie Distribution WheatNet-IP Manual v1.6
© Tieline Pty. Ltd. 2015
27.2 Installing the Codec at the Studio
Studio IP Streaming Setup for Tieline Audio CodecsThe following instructions are intended to help you configure your internet connection and Tielinecodecs at the studio to enable incoming calls over the internet from a remote Tieline codec. It isassumed that you have a basic understanding of your IP network and how to configure IP devices. Ifyou have limited IT network knowledge, we recommend you engage the services of an ITprofessional to install the public IP address and perform the Network Address Translation (NAT) andport forwarding between the public internet and your private Local Area Network (LAN) at the studio.
PrerequisitesThe following procedures are valid for:
· All firmware versions in the Genie and Merlin codec families.· All Bridge-IT Basic and Pro and Bridge-IT XTRA codecs with firmware release v.2.x or higher.· All Commander G3 and i-Mix G3 codecs.
Getting Started at the StudioTo perform a typical codec installation at the studio you will need to:
1. Contact your Internet Service Provider and organize a dedicated high speed broadbandconnection at the studio for your codec with a public static IP address. Do not share thisconnection with other devices.
2. Install your codec at the studio and attach an active RJ-45 LAN cable to the “LAN” or“Ethernet” port on the rear of the codec. Please note:
· The green LED underneath the “LAN” or "Ethernet" port will illuminate and the orangeLED will flash steadily if you are connected to an active LAN connection.
· The Genie and Merlin families of IP codecs support two simultaneous Ethernetconnections.
3. If you are connecting a single codec to a router without a firewall you can enter the public IPaddress, Subnet Mask and Gateway directly into the codec and your work is done. Note:your Telco should be able to provide this information.
4. Alternatively, if you are connected to a router with a firewall, configure Network AddressTranslation (NAT) in your router. NAT is performed between the public internet and yourprivate Local Area Network (LAN) by your router. Your remote codec sends IP data packetsto the studio router's public static IP address and the router performs NAT, which forwardsthese data packets to the private IP address allocated by the router to your codec. As part ofthis process we recommended you:
· Connect to your router using a web-browser.· Configure it to allocate a static private IP address for each codec.
Important Note: The IP address may change if the codec is allocated a DHCP IPaddress by the router and it loses power or is temporarily disconnected from the LAN. This will cause problems for remote codecs attempting to dial and connect.
5. Ensure your router's firewall is configured with the relevant TCP and UDP IP ports open toallow data traffic between your codec and the remote codec. The process is fairly simple ifyou use the following procedure:
a. Connect to your router using a web-browser.b. Navigate to http://portforward.com/english/applications/port_forwarding/Tieline-G5/
default.htm (Note: when configuring a Commander or i-Mix G3 codec at the studio use

307
© Tieline Pty. Ltd. 2015
Genie Distribution WheatNet-IP Manual v1.6
http://portforward.com/english/applications/port_forwarding/Tieline-G3/default.htm )c. Click to select your router manufacturer from the list.d. Next, click to select your router model from the list.e. Follow the instructions to complete port forwarding
6. Visit www.portforward.com and download the port checking application to verify your router'sports are open.
7. Configure the static IP address in your codec using the instructions in the next section. Toallow multiple codecs to share a single public static IP address behind a firewall and routethe calls correctly, your codecs and the firewall need to be configured similarly to theexample diagram which follows. Ensure the port, IP address, Subnet Mask and Gatewaysettings in your codecs match those configured in your router.
Port Forwarding to 3 Studio Codecs Sharing a Public Static IP Address
Important Note: · The most common studio configuration issue is a firewall which blocks the incoming
and/or outgoing TCP and UDP ports, or not configuring NAT and port forwardingcorrectly. The following table lists the firewall ports you need to open for each model ofTieline codec if they are dialing your router at the studio. If the remote codec is alsoconnected to a LAN with a firewall you may also need to open the ports at the remoteend of the link to connect successfully.
· Some firewalls require symmetric port configuration. The codec supports configurationof the "send" audio port (codec port at the remote end of the link to which you aresending audio) and "return" audio port (port used by the local codec to receive audiofrom the remote codec).

308 Genie Distribution WheatNet-IP Manual v1.6
© Tieline Pty. Ltd. 2015
Firewall PortsCommander G3/i-Mix G3 Bridge-IT/Bridge-IT XTRA Merlin and Genie Codec
Families
TCP UDP TCP UDP TCP UDP
IP1 SessionPort: 9002
IP1 Audio Port:9000
Session Port(Sess): 9002
Audio (Proto):9000
Session Port:9002
Audio PortStream 1: 9000
IP2 SessionPort: 9012
IP2 Audio Port:9010
Web-GUI: 80 SIP Session:5060
AlternativeSession: 9012
Audio PortStream 2: 9010
ToolboxSoftware: 5550
ToolboxSoftware: 5550
AlternativeSession: 9012
SIP Audio:5004
Web-GUI: 80 Audio PortStream 3: 9020
SIP Session:5060
AlternativeWeb-GUI: 8080
AlternativeWeb-GUI: 8080
Audio PortStream 4: 9030
SIP Audio:5004
Audio PortStream 5: 9040
Audio PortStream 6: 9050
SIP Session:5060
SIP Audio:5004, 5006,5008, 5010,5012, 5014
Configuring a Static Public or Private IP Address in Genie, Merlin andBridge-IT (v.2.x firmware) CodecsTo enter a static IP Address into the codec for NAT:
1. Press the HOME button to return to the Home screen.
2. Use the navigation buttons to select Settings and press .
3. Use the down navigation button to select LAN and press .
4. Select Eth1 and navigate to IPv4 mode and press .
5. DHCP is enabled by default. Select Static and press .
6. The Static IP address menu is revealed after DHCP is disabled. Use the navigation buttons to
select IPv4 Static IP and press .
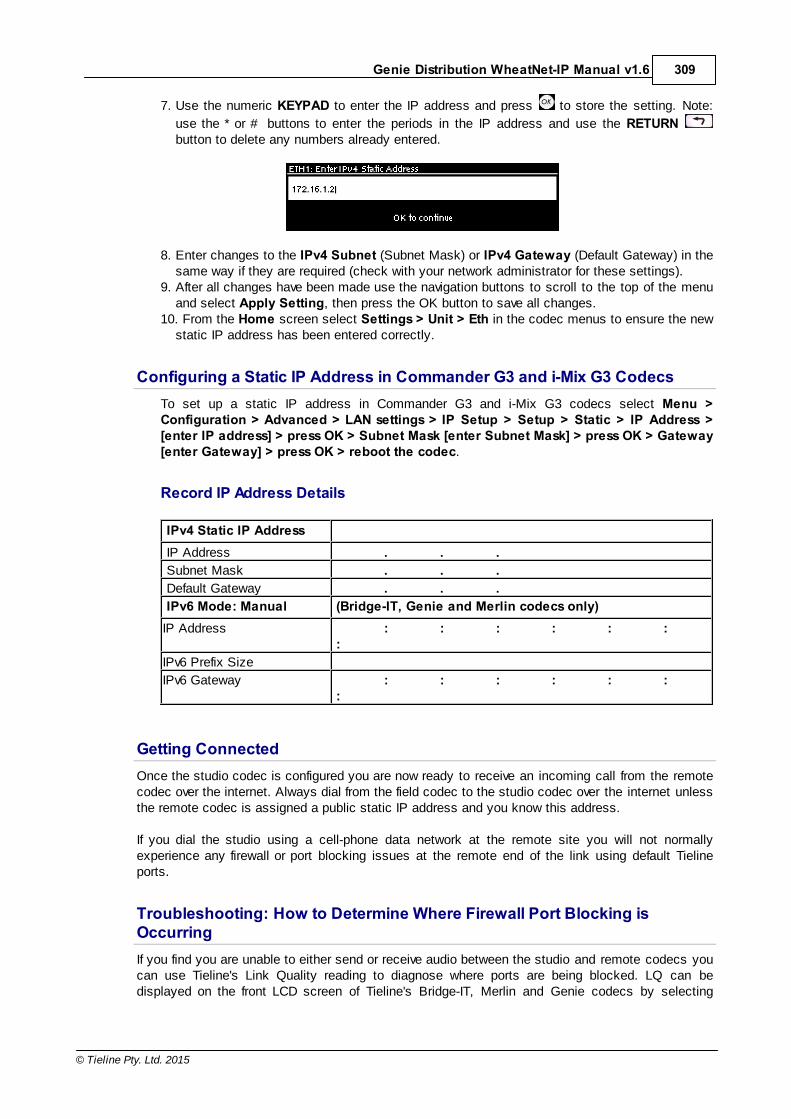
309
© Tieline Pty. Ltd. 2015
Genie Distribution WheatNet-IP Manual v1.6
7. Use the numeric KEYPAD to enter the IP address and press to store the setting. Note:
use the * or # buttons to enter the periods in the IP address and use the RETURN button to delete any numbers already entered.
8. Enter changes to the IPv4 Subnet (Subnet Mask) or IPv4 Gateway (Default Gateway) in thesame way if they are required (check with your network administrator for these settings).
9. After all changes have been made use the navigation buttons to scroll to the top of the menuand select Apply Setting, then press the OK button to save all changes.
10. From the Home screen select Settings > Unit > Eth in the codec menus to ensure the newstatic IP address has been entered correctly.
Configuring a Static IP Address in Commander G3 and i-Mix G3 CodecsTo set up a static IP address in Commander G3 and i-Mix G3 codecs select Menu >Configuration > Advanced > LAN settings > IP Setup > Setup > Static > IP Address >[enter IP address] > press OK > Subnet Mask [enter Subnet Mask] > press OK > Gateway[enter Gateway] > press OK > reboot the codec.
Record IP Address Details
IPv4 Static IP AddressIP Address . . . Subnet Mask . . . Default Gateway . . . IPv6 Mode: Manual (Bridge-IT, Genie and Merlin codecs only)
IP Address : : : : : : :
IPv6 Prefix Size
IPv6 Gateway : : : : : : :
Getting ConnectedOnce the studio codec is configured you are now ready to receive an incoming call from the remotecodec over the internet. Always dial from the field codec to the studio codec over the internet unlessthe remote codec is assigned a public static IP address and you know this address.
If you dial the studio using a cell-phone data network at the remote site you will not normallyexperience any firewall or port blocking issues at the remote end of the link using default Tielineports.
Troubleshooting: How to Determine Where Firewall Port Blocking isOccurringIf you find you are unable to either send or receive audio between the studio and remote codecs youcan use Tieline's Link Quality reading to diagnose where ports are being blocked. LQ can bedisplayed on the front LCD screen of Tieline's Bridge-IT, Merlin and Genie codecs by selecting

310 Genie Distribution WheatNet-IP Manual v1.6
© Tieline Pty. Ltd. 2015
Cxns, then select the connection you want to view and press the OK button. LQ readings are alsodisplayed on the home screen of all Commander and i-Mix G3 codecs.
Link Quality (LQ) ReadingsSend and Return LQ numbers help you to determine if a problem is occurring at either end of aconnection. For example, on an IP connection the Return LQ reading represents the audio beingdownloaded from the network locally (i.e. audio data is being sent by the remote codec).Conversely, the Send LQ reading represents the audio data being sent by the local codec (i.e.being downloaded by the remote codec). To ensure a stable connection, try to maintain areliable reading of 80 or higher for both the Send and Return LQ reading.
Important Note: · The Return link quality reading is the same as the Local (L) setting displayed on a
G3 codec.· The Send link quality reading is the same as the Remote (R) setting displayed on a
G3 codec.
Diagnosing Port Blocking via the Studio Codec LQIf the studio codec Return LQ reading is 01 then incoming audio from the remote codec is beingblocked by a firewall at either point A or B in the following diagram. If the studio codec Send LQreading is 01 then outgoing audio from the studio is being blocked by a firewall at either point Cor D in the following diagram.
Diagnosing Port Blocking via the Remote Codec LQIf you attach your Tieline codec at the remote site to a LAN with access to the internet you canoften dial and connect to the studio without any problem. It is less likely that a firewall will blockoutgoing TCP and UDP ports. However, if there is a firewall at the remote site it may blockincoming data packets from the studio.
The principle is the same at the remote codec for diagnosing blocked ports. If the remote codecReturn LQ reading is 01 then incoming audio from the studio codec is being blocked by afirewall at either point C or D in the preceding diagram. If the remote codec Send LQ reading is01 then the outgoing audio from the remote codec is being blocked by a firewall at either point Aor B in the preceding diagram.
Troubleshooting TCP Port BlockingError messages on the codec screen can help to diagnose TCP port blocking.
1. "Connection Refused" usually means that the firewall is configured correctly but thecodec is not using the expected port. For example, the firewall is set up to forward viaport 9002 but codec is 'listening' to port 10,000. “Connection Refused” is not normallyshown if the firewall is not configured correctly because a firewall will by design silentlydrop any forwarding requests to ports that it doesn’t have open (see next point). Note:"Connection Refused" will also be displayed if the Commander G3 or i-Mix G3 codecyou are calling is already connected.
2. “Connection Timeout” can mean one of two things:· The firewall is not configured correctly and the attempted codec connection is being

311
© Tieline Pty. Ltd. 2015
Genie Distribution WheatNet-IP Manual v1.6
silently dropped, e.g. a remote codec is dialing to port 9002 but the studio firewallport forwarding is not configured.
· The UDP port is not port forwarded correctly. Tieline codecs send test data duringconnection establishment to make sure that the audio path is configured correctly;if this process fails then it will also result in a “Connection Timeout”.
How do I determine which end is blocking data flow?Tieline test codec firewalls have the default Tieline TCP and UDP ports open. You can dial intothese test codecs (or other codecs you know are configured correctly) from your recentlyconfigured studio and remote codecs and use the LQ readings to diagnose whether your studioor remote codec firewall is blocking your data packets. If one codec connects ok and the otherone doesn't, then you will know which end is likely to be causing the problem. As an example:
1. Dial from site 1 to a Tieline test codec.2. Dial from site 2 to Tieline test codec.
If both of these connect successfully then the “outbound” TCP path for session data is OK, andthe inbound UDP audio path is OK.
3. Dial to site 1 from a codec you know is configured correctly.4. Dial to site 2 from a codec you know is configured correctly.
If either of these calls fail then TCP and/or UDP inbound data is being blocked on the failedconnection (see "Troubleshooting TCP Port Blocking" above).
Testing your Codec· Visit http://www.tieline.com/Support/Test-lines for a list of test IP codec addresses you can use
to verify your codec is configured correctly.· See Testing IP Network Connections for more IP test information.
Learning More About IP NetworksFor more IP network information please see the section titled Understanding IP Networks whichdiscusses:
· Private versus public IP addresses.· Static versus DHCP assigned IP addresses.· Network Address Translation (NAT), port forwarding and firewalls.

312 Genie Distribution WheatNet-IP Manual v1.6
© Tieline Pty. Ltd. 2015
27.3 Understanding IP Networks
Types of IP Addresses Available
Type of IPAddress
How the IP Addressis Allocated
Description
Public Static Public IPAddress
Internet ServiceProviders (ISPs)
ISP’s allocate a static public IP address toallow network devices to communicate witheach other over the internet. It works like apublic telephone number and will allow yourremote codec to call your studio codec overthe Internet.
DynamicallyAssigned PublicIP Address
Internet ServiceProviders (ISPs)
ISP’s usually allocate dynamically(automatically) assigned public IPaddresses to allow network devices tocommunicate with each other over theInternet. (Not recommended for studioinstallations because each time youconnect to your ISP the IP address canchange).
Private DynamicallyAssigned PrivateIP Address
DHCP Server/Routeron your own privateLAN network.
A DHCP server-allocated IP address that isautomatically assigned to a device on aLAN to allow it to communicate with otherdevices and the internet. This address canchange each time a device connects.
Static Private IPAddress
LAN Administrator A network administrator-allocated staticaddress which is programmed into a deviceto allow it to connect to a LAN. Often asecurity measure to only allow access todevices approved by a networkadministrator.
Obtaining Public IP AddressesTo send audio streams over the public internet you need to use a public IP address assigned to youby your ISP (Internet Service Provider).
A public IP address is like your public telephone number and allows you to be contacted over theinternet in much the same way people dial your public telephone number. They come in two forms;dynamic (DHCP) and static. Most ISPs assign a dynamic public IP address by default, which canoften change without you knowing. This is suitable for a quick demo of your Tieline codec, but for apermanent installation you will need to request a permanent static public IP address.
Once the Static Public IP address is assigned to your internet connection (router) at the studio youneed to create a link between the public IP address and your codec’s private IP address on theLAN. This is called Network Address Translation.
Depending upon how your network is configured, it may also be possible to simply connect yourTieline codec directly into your ADSL modem/router and receive a public address from the router.
Private LAN IP AddressesBy default your Tieline codec will normally be automatically assigned a private IP address when youconnect it to a typical router over a LAN.

313
© Tieline Pty. Ltd. 2015
Genie Distribution WheatNet-IP Manual v1.6
Private IP Addresses are associated with LANs and normally reside behind a firewall and are notvisible to the internet. They are generally in the ranges: 10.0.0.1 – 10.255.255.255, 169.254.0.0 –169.254.255.255, 172.16.0.0 – 172.31.255.255 and 192.168.0.0 – 192.168.255.255 and areassigned by network DHCP servers and routers.
These IP Addresses are generally assigned for a predefined period (known as a lease) by yournetwork's DHCP server or router. This IP address will generally expire after the lease period. DHCPassigned IP Addresses may also change if the device is disconnected for lengthy periods or if powerto the device is turned off and back on. As a result, it is advised that you make this IP addresspermanent by assigning it as a Static DHCP IP Address. This will ensure you are able to alwaysforward incoming audio packets to your codec using the same private IP address at the studio usingport forwarding (see the section on port forwarding for more details). Consult your NetworkAdministrator if you are unsure how to do this.
Network Address Translation (NAT)Network Address Translation (NAT) is a method of connecting multiple devices to the internet usingone public IP address.
The best way to explain NAT is to use the example of a phone system at an office that has onepublic telephone number and multiple extensions. This type of telephone system allows people tocall you on a single public telephone number and performs the translation and routing of the publicnumber to a particular private extension. Similarly, in order to receive an IP call from a remote codecover the public internet, the same network address translation principle applies. NAT and portforwarding allows a single device, such as a broadband router, to act as an agent between the publicinternet and a local private LAN.
The relationship between public and private IP addresses and NAT is displayed in the followingdiagram and the following section explains port forwarding configuration in more detail.
Port Forwarding: Tieline TCP and UDP Port SettingsFor your Tieline Codec to communicate over the public internet an IP Address alone is not sufficient.In TCP/IP and UDP networks the codec port is the endpoint of your connection. Ports are doorwaysfor IP devices to communicate with each other. Picture a house and imagine the front door is theentry point represented by a public or private IP address. Then you want to get to several codecs indifferent rooms of the same house and ports represent the doors to each of those rooms. In principlethis is how port addressing works.
For example, several codecs may dial into your studio using the same public static IP address. Inthis situation it is necessary to configure codec 'programs' with audio streams using different audioports for discretely routing each incoming and outgoing audio stream. By doing this your studio'snetwork routers know where IP packets for each audio stream should be routed, i.e. to which codecand respective audio outputs.
When data packets are received from remote codecs at a particular public IP address, portinformation is translated from data packets to ensure the correct packets are sent to the correctstudio codecs. This process is performed by PAT (Port Address Translation), which is a feature ofNAT (Network Address Translation) devices.
Tieline codecs use TCP ports for setting up the communication session and UDP ports forstreaming audio. While TCP ports are generally open, UDP ports are generally blocked by networkdevices which contain firewalls and will stop you delivering your audio. Depending on the codecs youare using, you need to configure your firewall to allow TCP and UDP protocols to pass through theports listed in the table below.

314 Genie Distribution WheatNet-IP Manual v1.6
© Tieline Pty. Ltd. 2015
27.4 Tips for Creating Reliable IP ConnectionsThe following 10 tips are provided to help obtain the best possible IP connection between twocodecs, without paying for Quality of Service (QoS).
1. Always use the best quality Internet Service Provider (ISP). Tier 1 service providers are bestas their infrastructure actually makes up the internet ‘backbone’. Wikipedia lists the majorservice providers that make up the internet backbone at: http://en.wikipedia.org/wiki/internet_backbone. In Australia Telstra is equivalent to one of these service providers.
2. You will get the best quality connection if both the local (studio) and remote codecs use thesame ISP. This can substantially increase reliability, audio bandwidth and reduce audiodelay. Using the same service provider nationally can give better results than using differentlocal service providers. This is especially true if one of the service providers is a cheap, low-end domestic service provider, which buys its bandwidth from other ISPs. Second and thirdtier providers sublease bandwidth from first tier providers and can result in connectionreliability issues due to multiple switch hops. We also highly recommend using First TierISPs if connecting two codecs in different countries.
3. Sign up for a business plan that provides better performance than domestic or residentialplans. Business plans typically have a fixed data limit per month with an additional cost fordata beyond that limit. In addition, Service Level Agreements (SLA) will often provide bettersupport and response times in the event of a connection failure. Domestic plans are oftenspeed-limited or “shaped” when usage exceeds a predefined limit. These plans are cheap butthey are dangerous for streaming broadcast audio.
4. Ensure that the speed of the connection for both codecs is adequate for the job. Theminimum upload speed recommended is 256 kbps for a studio codec and 64 kbps for a fieldunit connection.
5. Use good quality equipment to connect your codecs to the internet. (Tieline successfullyuses Cisco® switching and routing equipment.):
· If you are using a DSL or ADSL connection make sure you purchase a high quality modemthat can easily meet your speed requirements. This is especially important if you are over 4kms from an exchange.
· If you have multiple codecs connected to a local area network (LAN) please ensure that yournetwork infrastructure is designed for media streaming and not domestic usage. Tieline hastested several cheap 8-port switches that lose more packets between local computers thanan international IP connection between Australia and the USA!
· If using a wireless connection ensure that the antenna signal strength received is strong. Thetype of antenna used and the amount of output gain also affects connection quality.
Important Note: You should be able to stream audio between two codecs on yourLAN and get high percentage send/return ‘link quality’ readings of around 99. If yousee anything less than this then you should get a network engineer to investigate theissue.
6. Once your internet connection is installed at the studio check that the connectionperformance is approximately what you ordered and are paying for. A connection canperform below advertised bit rates if:
· There is an error in ISP configuration;· There is an error in modem configuration;· There is a poor quality line between the studio and the exchange;· There are too may phones or faxes connected to the phone line; or· Line filters have been connected incorrectly.

315
© Tieline Pty. Ltd. 2015
Genie Distribution WheatNet-IP Manual v1.6
7. Use a dedicated DSL/ADSL line for your codecs. Do not share a link with PCs or companynetworks. The only exception to this rule is if an organization has network equipment andengineers that can implement and manage quality of service (QoS) on its network.
8. Use UDP as the preferred audio transport protocol.
9. When using UDP ensure the total bit rate (audio bit rate plus header bit rate) is no more than80% of the ISP connection rate. IP headers require around 20 kbps in addition to the audiobit rate. For example, with a 64 kbps connection the audio bit rate should be (64-20) x 0.8 =31.2 kbps or lower.
10.Wireless IP connections can easily become congested and result in packet loss and audiodrop-outs. It is very difficult to guarantee connection quality when there is no way of knowinghow many people are sharing the same wireless connection.
Important Note: Be careful when using cell-phone connections at special eventswhere thousands of people have mobile phones. This can result in poor qualityconnections and audio drop-outs if cell-phone base stations are overloaded.
IP Connection ChecklistComplete the following check list and aim for a score of at least 8 out of 10 before going live.
Number Check Result
1 Using a reputable Tier1 ISP that’s part of internet backbone.
2 The same ISP is being used for both codec connections.
3 The ISP Plan is a Business Plan or equivalent.
4 The ISP connection speed is adequate.
5 Equipment is high quality and suitable for media streaming.
6 The ISP connection speed has been tested and is suitable.
7 The ISP connection is not shared with other PCs or devices.
8 UDP is being used as the audio transport protocol.
9 No more than 80% of ISP connection bandwidth is being used.
10 There are no wireless connections being used.
27.5 Testing IP Network ConnectionsThere are a few very simple tools that you can use to test whether a codec can be reached over anIP network. · Visit http://www.speedtest.net/ to test the upload and download speed of your IP connections and
identify your public IP address.· Visit www.portforward.com and download the port checking application to verify your router's ports
are open. Note: Using a port scanner to test a codec will be unsuccessful if you try to scan andthe port is already in use, i.e. the codec is connected.
· Visit www.subnetonline.com and use an online port scanner to check for open and closed TCPports. This site also has numerous other software tools, including an online ping webtool for IPv4,plus TraceRoute and TracePath software tools.

316 Genie Distribution WheatNet-IP Manual v1.6
© Tieline Pty. Ltd. 2015
Ping the CodecA ping test can be used to test whether it is possible to reach a codec or any device over an IPnetwork. A ping test measures:
· The round-trip time of packets.· Any packet loss.
There are two types of ping tests:
1. Short test: sends 4 packets and delivers statistics. i. Point to the start menu on your PC and click once.ii. In the search text box type Run and press Enter.iii. Type CMD in the Run dialog text box and click OK.iv. Type ping and the IP address of the codec you are pinging (i.e. ping 192.168.0.159) and
press the Enter key on your keyboard.v. The round trip time of the packets is displayed, as well as any packet loss.
2. Long test: sends packets continuously until stopped.i. Point to the start menu on your PC and click once.ii. In the search text box type Run and press Enter.iii. Type CMD in the Run dialog text box and click OK.iv. Type ping, the IP address of the codec you are pinging, and then -t (i.e. ping
203.36.205.163 -t) and press the Enter key on your keyboard.v. Let the test run for several minutes and then press CTRL C.vi. The round trip time of the packets is displayed, as well as any packet loss for the period of
time that the test occurred.
Trace the Route of IP PacketsAnother utility available on your PC is traceroute. This tool can be used to determine the route andnumber of hops that data packets are taking to their destination (codec). This is useful because themore routers that packets traverse, the more latency your connection will have, and the less reliableit will be.
i. Point to the start menu on your PC and click once.ii. In the search text box type Run and press Enter.iii. Type CMD in the Run dialog text box and click OK.iv. Type tracert, the IP address of the codec you are contacting (i.e. tracert 203.36.205.163)
and press the Enter key on your keyboard.

317
© Tieline Pty. Ltd. 2015
Genie Distribution WheatNet-IP Manual v1.6
27.6 Testing ISDN ConnectionsTo test your ISDN line is working you can dial a standard phone line or your cell-phone number. Ifthe call is successful this verifies the line is active. To verify ISDN data is being sent you can:
· Dial a codec you know is connected to an active ISDN line, e.g. another codec in yournetwork or a Tieline test codec.
· Dial the test ISDN data number provided by your Telco (when available).· Create a program and perform a loopback test by dialing out on the main ISDN number and
receive the call on the auxiliary ISDN number. (Note: To create a loopback program create a2 x Mono or Stereo Peer-to-Peer program and configure a dial only audio stream using yourmain ISDN number. For the second audio stream create an answer only audio streamconnection configured for ISDN. If you dial the connection and can hear the audio you aresending on the return B channel, you have confirmed ISDN data is being sent successfully.
If you dial using a loopback program and a "disconnect" error message similar to the followingimage appears, you may have the incorrect Line Type configured.
Change the Line Type setting and this should hopefully resolve the issue.
On-Demand ISDN ServicesIf Sync appears for approximately 60 seconds when you connect an ISDN line to the codec andthen disappears, or if Sync does not appear and you know you are connected to an active ISDNinterface, then the line may have ‘On-demand’ enabled by your Telco. To test this you can dial acodec on an ISDN line known to be operational. Dial over ISDN and if Sync appears after connectingit indicates the service has now been activated. Disconnect and then dial again. If this dial issuccessful ‘On Demand’ is enabled. We recommend you contact your network service provider andget them to disable ‘On Demand’ to circumvent any possible connection issues.
27.7 Connecting Tieline ISDN to other CodecsTo dial from a Tieline codec to a non-Tieline codec it is necessary to disable ‘Session Data’ anduse an algorithm like G.722 or MPEG Layer 2 for compatibility. The same settings must beconfigured at both ends for:
· Mono or stereo· Encoding (Algorithm)· Sample Rate· Other relevant settings on the non-Tieline codecFollowing are configuration instructions for
dialing to several non-Tieline codec brands over ISDN.
27.7.1 Connecting to APT Wordcast Equinox ISDN
Configuring the WorldCast Equinox to Make an ISDN Call1. Plug your ISDN line into the back of the codec and attach power.2. Press the "Menu" button on the codec to access the codec menus. 3. Press the "Menu" button to select the "USER" menu.

318 Genie Distribution WheatNet-IP Manual v1.6
© Tieline Pty. Ltd. 2015
4. Select "Primary Connection" and press the "Ent/Dial" button.5. Next select "Codec - ISDN" > "Use Audio Profile" [No] > "Eapt-X16", or "Eapt-X24", "MPEG1-
L2" or G.722.6. Select the appropriate bit rate and whether you are dialing in mono, stereo or Joint Stereo,
and then the sample rate.7. For bonded "MPEG1-L2" connections select "CCS IMUX".8. Complete the profile setup. The codec is now ready to dial or answer.
Configuring the Tieline Codec to Dial the Equinox over ISDN
1. Press the HOME button to return to the Home screen and select Connect > ISDN.
2. Navigate to Setup and press the button.
3. Select Session Type [Sessionless] > Select Dial Route [None] > Number of B Channels[Choose the number of B-channels (between 1 and 4) required for your connection] > Algorithm[Choose G.722 , E apt-X Mono or Stereo, MP2 Mono or Stereo or MP2 J-Stereo (Note:select 32kHz or 48kHz sample rate for MP2 and E apt-X depending on available B-channels)].
4. Navigate to a Destination (e.g. Dest 1 or Dest 2) and press the button to select each one in
turn. Enter the number for each B channel you want to dial and press the button, then select
which B channel will dial using that number and press the button.
5. Navigate down to Auto Reconnect and press the button to toggle between Enabled andDisabled. Note: This is normally enabled on the dialing codec only.
6. Navigate down to Save as Program and press the button to save these settings as aprogram.
7. Navigate down to Module Configuration and press the button.
8. Select the ISDN module you want to configure and press the button.
9. Configure the following settings:· Accept > Voice and Data· Network > Check with your Telco (EU-ETSI in Australia; Europe & most countries outside

319
© Tieline Pty. Ltd. 2015
Genie Distribution WheatNet-IP Manual v1.6
North America; [US Nat] is the most common in the US, but check with your Telco).· Line Type > Check with your Telco and select either Point-to-Multi (point-to-multipoint) or
Point-to--Point (point-to-point).· DN/MSN > Enter the "SPID" and "DN" numbers if required in your region, e.g. a SPID is
normally required in the US.
10. Navigate up to Apply Settings and press the button.
Dialing from the Tieline Codec
Program Dialing
1. If you have saved the ISDN program as previously instructed, press the HOME button toreturn to the Home screen and select Connect > Programs.
2. Select the saved program you want to load and press the button.
3. Select Load and press the button to load the program.
4. Press the CONNECT button to dial the ISDN program connections.
Ad Hoc Dialing1. If you haven't save the program but have entered the dialing numbers and other settings, press
the HOME button to return to the Home screen and select Connect > ISDN > Connect.2. Press the button to dial using the settings previously entered.
Important Note: If you select different algorithm settings on each codec and dial from theTieline codec, the connection will be unsuccessful and the CONNECTED LED on the frontpanel of the Tieline codec will continuously flash. Adjust the algorithm settings andattempt to reconnect.
Dialing from the WorldCast EquinoxImportant Note: Configure ISDN Answer Config settings in the codec before attemptingto dial from the Equinox to the Tieline codec. Select the following settings in the Tielinecodec in one of the Configs (see ISDN Answering Configuration for more detail):
· May bond.· Sessionless.· Algorithm: G.722, MP2 Mono, MP2 Stereo, MP2 J-Stereo or E apt-X Mono or
Stereo.· Sample Rate: 32kHz or 48kHz
1. Navigate to the B-channel you want to dial over and press the "Ent/Dial" button.2. Use the keypad to enter the number of the line you are dialing.3. Press the "Ent/Dial" button again to make the outgoing call from the codec.4. If dialing two B-channels, navigate to the second B-channel and use the keypad to enter the
number, then press the "Ent/Dial" button. Note: the codec screen will display IMUX UNLOCKEDuntil you dial additional connections when bonding multiple channels.
Important Note: When dialing a mono or stereo connection over two B-channels audio isnot available until the second connection is successful.

320 Genie Distribution WheatNet-IP Manual v1.6
© Tieline Pty. Ltd. 2015
27.7.2 Connecting to CDQ Prima ISDNUse the following information to connect a Tieline codec to a Musicam CDQ Prima codec.
Programming the CDQ Prima for a Mono ConnectionSelect a mono profile in the Prima codec for the connection:
1. Press the “SDIAL” button on the front panel of the codec.2. When “ID NUM” is displayed press “8” and then press "Enter" using the down arrow.3. “MPEG2/64K:QS” will be displayed briefly followed by “WORKING”.4. “OK” will be displayed momentarily and then the LCD screen will return to the default screen
and be programmed for:· A Mono connection.· 64Kbps Bit-Rate.· 48K Sample Rate.· MPEG Layer 2 algorithm.· 1 ISDN B channel.· Decoder Independent – No.
5. Press the right arrow on the "Enter" button and navigate to "Interface". Push the down arrowon the "Enter" button to select this menu.
6. Use the "Enter" button and navigate to the type of interface you are using. Note: DuringTieline tests we used an "Internal TA".
7. Select the actual terminal adapter connected to your codec. Note: During Tieline tests weused the internal "TA301".
8. Use the "Enter" button and select the switch type for the country you are in. Check with yourTelco for the correct setting if you are unsure. Note: During Tieline tests we used the internal"NI1" setting for the USA.
9. Use the "Enter" button and keypad to enter the "SPID 1" and "SPID 2" numbers if required.10.Use the "Enter" button and keypad to enter the "ID 1" and "ID 2" (Directory/MSN) numbers if
required.11.The codec should now be configured.
Programming the CDQ Prima for a Stereo Connection1. Press the “SDIAL” button on the front panel of the codec.2. When “ID NUM” is displayed press “27” and then press "Enter" using the down arrow.3. “Zephyr/128K:QS” will be displayed briefly followed by “WORKING”.4. “OK” will be displayed momentarily and then the LCD screen will return to the screen displayed
prior to programming. The codec is now programmed for:· A Joint Stereo connection.· 128Kbps Bit-Rate.· 48K Sample Rate.· MPEG Layer 2 algorithm.· 2 ISDN B Channels· Decoder Independent – Yes
5. Press the right arrow on the "Enter" button and navigate to "Interface". Push the down arrow onthe "Enter" button to select this menu.
6. Use the "Enter" button and navigate to the type of interface you are using. Note: During Tielinetests we used an "Internal TA".
7. Select the actual terminal adapter connected to your codec. Note: During Tieline tests we usedthe internal "TA301".
8. Use the "Enter" button and select the switch type for the country you are in. Check with yourTelco for the correct setting if you are unsure. Note: During Tieline tests we used the internal"NI1" setting for the USA.
9. Use the "Enter" button and keypad to enter the "SPID 1" and "SPID 2" numbers if required.

321
© Tieline Pty. Ltd. 2015
Genie Distribution WheatNet-IP Manual v1.6
10.Use the "Enter" button and keypad to enter the "ID 1" and "ID 2" (Directory/MSN) numbers ifrequired.
11.The codec should now be configured.
Configuring the Tieline Codec to Connect to the CDQ Prima
1. Press the HOME button to return to the Home screen and select Connect > ISDN.
2. Navigate to Setup and press the button.
3. Select Session Type [Sessionless] > Select Dial Route [None] > Number of B Channels[Choose 1B (mono) or 2B (stereo)] > Algorithm [Choose MP2 Mono or MP2 J-Stereo (Note:select 48kHz sample rate for MP2 algorithms)].
4. Navigate to a Destination (e.g. Dest 1 or Dest 2) and press the button to select each one in
turn. Enter the number for each B channel you want to dial and press the button, then select
which B channel will dial using that number and press the button.
5. Navigate down to Auto Reconnect and press the button to toggle between Enabled andDisabled. Note: This is normally enabled on the dialing codec only.
6. Navigate down to Save as Program and press the button to save these settings as aprogram.
7. Navigate down to Module Configuration and press the button.
8. Select the ISDN module you want to configure and press the button.
Important Note: ISDN Sync should be displayed when an ISDN line is connected to thecodec. This appears regardless of whether you have configured the ‘ISDN Line Type’correctly.
9. Configure the following settings:· Accept > Voice and Data· Network > Check with your Telco (EU-ETSI in Australia; Europe & most countries outside
North America; [US Nat] is the most common in the US, but check with your Telco).· Line Type > Check with your Telco and select either Point-to-Multi (point-to-multipoint) or

322 Genie Distribution WheatNet-IP Manual v1.6
© Tieline Pty. Ltd. 2015
Point-to--Point (point-to-point).· DN/MSN > Enter the "SPID" and "DN" numbers if required in your region, e.g. a SPID is
normally required in the US.
10. Navigate up to Apply Settings and press the button.
Dialing from the Tieline Codec
Program Dialing
1. If you have saved the ISDN program as previously instructed, press the HOME button toreturn to the Home screen and select Connect > Programs.
2. Select the saved program you want to load and press the button.
3. Select Load and press the button to load the program.
4. Press the CONNECT button to dial the ISDN program connections.
Ad Hoc Dialing1. If you haven't save the program but have entered the dialing numbers and other settings, press
the HOME button to return to the Home screen and select Connect > ISDN > Connect.2. Press the button to dial using the settings previously entered.
After dialing successfully “FRAMED” should illuminate on the CDQ Prima screen. Tieline codecsalso support 32kHz sampling.
Important Note: Configure ISDN Answer Config settings in the codec before attemptingto dial from the Equinox to the Tieline codec. Select the following settings in the Tielinecodec in one of the Configs (see ISDN Answering Configuration for more detail):
· May bond.· Sessionless.· Algorithm: MP2 Mono, MP2 J-Stereo.· Sample Rate: 48kHz
Making a Mono Call from the CDQ Prima Codec1. Press the "Dial" button on the front panel of the codec.2. Navigate right using the "Enter" button and select "1".3. Enter the number to dial using the numeric keypad.4. Press the "Enter" button (bottom arrow) and the screen will briefly display "Working", then
"Connect" and then the green "Framed" light should illuminate on the front panel.
Making a Stereo Call from the CDQ Prima Codec1. Press the "Dial" button on the front panel of the codec.2. Use the "Enter" button and select "Both".3. Enter the first number to dial using the numeric keypad.4. Press the "Enter" button (bottom arrow) and the screen will briefly display "Dialling line 1" and
then "Connect".5. Enter the second number to dial using the numeric keypad and press the "Enter" button (bottom
arrow).6. The screen will briefly display "Dialling line 2", then "Connect" and then the green "Framed" light
should illuminate on the front panel.
Important Note: When connecting in stereo, the Prima expects both B channel dials tooccur within 5 seconds. This can be performed by the Tieline codec.

323
© Tieline Pty. Ltd. 2015
Genie Distribution WheatNet-IP Manual v1.6
It has also been noted that the CDQ Prima codec will not connect if no audio is presentwhen dialing. It may connect Prima > Tieline, but not Tieline > Prima. If audio is present,the codec should connect and stay connected even if audio is removed subsequently. TheJ-Stereo light on the Prima may also flash when in this mode.
Ideally, have audio connected when dialing and the codec will frame immediately after thefirst dial and then dial the second B channel quickly afterwards.
27.7.3 Connecting to Mayah ISDN
Configuring the Mayah Sporty to Make an ISDN Call1. Plug your ISDN line into the codec and attach power.2. Press "F2 Codec". 3. Press "F3 Setup" 4. Press "F2 Quality"5. Use the navigation buttons to select an algorithm setting from "G.722", "L2 Mono, Stereo or
J-Stereo" or "E apt-X Mono or Stereo", then press the "OK" button to save the setting.6. Press "F4 ESC" to return to the home screen.7. Press "F2 Codec", then "F1 Connect", then "F3 Direct".8. Navigate to "interface" and press "OK" to select ISDN.9. Navigate to "number1" and press "OK" to enter the ISDN number using the keypad, then
press "OK".10.If you are bonding multiple channels navigate to "number2" and press "OK" to enter the ISDN
number using the keypad, then press "OK".
Configuring the Tieline Codec to Dial the Mayah Sporty over ISDN
1. Press the HOME button to return to the Home screen and select Connect > ISDN.
2. Navigate to Setup and press the button.
3. Select Session Type [Sessionless] > Select Dial Route [None] > Number of B Channels[Choose the number of B-channels (between 1 and 4) required for your connection] > Algorithm[Choose G.722 , E apt-X Mono or Stereo, MP2 Mono or Stereo or MP2 J-Stereo (Note:select 32kHz or 48kHz sample rate for MP2 depending on available B-channels)].
4. Navigate to a Destination (e.g. Dest 1 or Dest 2) and press the button to select each one in
turn. Enter the number for each B channel you want to dial and press the button, then select
which B channel will dial using that number and press the button.
5. Navigate down to Auto Reconnect and press the button to toggle between Enabled andDisabled. Note: This is normally enabled on the dialing codec only.
6. Navigate down to Save as Program and press the button to save these settings as aprogram.

324 Genie Distribution WheatNet-IP Manual v1.6
© Tieline Pty. Ltd. 2015
7. Navigate down to Module Configuration and press the button.
8. Select the ISDN module you want to configure and press the button.
9. Configure the following settings:· Accept > Voice and Data· Network > Check with your Telco (EU-ETSI in Australia; Europe & most countries outside
North America; [US Nat] is the most common in the US, but check with your Telco).· Line Type > Check with your Telco and select either Point-to-Multi (point-to-multipoint) or
Point-to--Point (point-to-point).· DN/MSN > Enter the "SPID" and "DN" numbers if required in your region, e.g. a SPID is
normally required in the US.
10. Navigate up to Apply Settings and press the button.
Dialing from the Tieline Codec
Program Dialing
1. If you have saved the ISDN program as previously instructed, press the HOME button toreturn to the Home screen and select Connect > Programs.
2. Select the saved program you want to load and press the button.
3. Select Load and press the button to load the program.
4. Press the CONNECT button to dial the ISDN program connections.
Ad Hoc Dialing1. If you haven't save the program but have entered the dialing numbers and other settings, press
the HOME button to return to the Home screen and select Connect > ISDN > Connect.2. Press the button to dial using the settings previously entered.
Important Note: If you select different algorithm settings on each codec and dial from theTieline codec, the connection will be unsuccessful and the CONNECTED LED on the frontpanel of the Tieline codec will continuously flash. Adjust the algorithm settings andattempt to reconnect.
Dialing from the Mayah Sporty
Important Note: Configure ISDN Answer Config settings in the Tieline codec beforeattempting to dial from the Equinox to the Tieline codec. Select the following settings inthe Tieline codec in one of the Configs (see ISDN Answering Configuration for moredetail):
· May bond.

325
© Tieline Pty. Ltd. 2015
Genie Distribution WheatNet-IP Manual v1.6
· Sessionless.· Algorithm: G.722, MP2 Mono, MP2 Stereo, MP2 J-Stereo or E apt-X Mono or
Stereo.· Sample Rate: 32kHz or 48kHz
1. Press "F4 ESC" to return to the home screen.2. Press "F2 Codec", then "F1 Connect", then "F3 Direct".3. Use the navigation buttons to select "dial" and press the "OK" button to dial all B-channels.
27.7.4 Connecting to Telos Zephyr Xstream ISDN
Configuring the Xstream to Make an ISDN Call1. Plug your ISDN line into the back of the codec and press the "Codec" button below the LCD
screen on the Xstream.2. "Transmit" should be highlighted and this lets you select your transmit algorithm of choice. If
it is not selected use the arrow buttons on the right-hand side of the LCD screen to navigateto this menu item and press the "SEL" button to the right of the LCD screen to select themenu.
3. Use the arrow buttons to navigate to:· "G.722".· "L2 J-Stereo" (for an MPEG Layer 2 stereo connection), or· "L2 Mono 64" or "L2 Mono 128" (for a mono connection, depending on whether you have one
or two B channels available). 4. Press the "SEL" button to store your setting and use the arrow down button to navigate to
"Receive".5. Press the "SEL" button and select the same algorithm that you selected for "Transmit"
previously and then press the "SEL" button to store your setting.
Important Note: It you don't select the same algorithm for "Transmit" and "Receive"algorithms then it can take a long time to connect as the algorithms are scanned by thecodec, or the wrong algorithm could be selected.
6. Use the arrow buttons to navigate to "Bitrate" and check that it displays "64kbps" - this is aper channel rate so both ISDN channels are programmed.
7. Use the arrow buttons to navigate to "Sample" and check that the sample rate is set at"48kHz". Press the "SEL" button and use the arrow buttons to make any adjustments to thecurrent setting.
8. Press the "Tel" button below the codec LCD screen and press it again to display the "SPID"and "DN/MSN" screen. If these numbers need to be entered (check with your Telco), use thearrow buttons to navigate to each SPID and DN/MSN field in turn and when it is highlightedpress the "SEL" button and enter the number using the keypad. Press "SEL" again to storeeach number once it has been entered.
9. Press the "Tel" button if you are not entering these SPID/DN/MSN numbers, or if you havealready entered them, and check the local ISDN switch type setting is configured for yourregion.
10.Press the "SEL" button and use the arrow buttons to adjust the setting.· Select "ETS300" if you are connecting to a Euro ISDN service.· "Natl.I-1" is the most common in the US but check with your Telco.11.Press the "SEL" button to store the ISDN switch type setting that you have selected.
Your codec should now be configured. Press the "Tel" button on the front panel until it displays the"ISDN Status" screen. "Ready" should be displayed next to any active lines. If this is not displayed,check your connections and settings to make sure they are correct.

326 Genie Distribution WheatNet-IP Manual v1.6
© Tieline Pty. Ltd. 2015
Configuring the Tieline Codec to Dial the Xstream over ISDN
1. Press the HOME button to return to the Home screen and select Connect > ISDN.
2. Navigate to Setup and press the button.
3. Select Session Type [Sessionless] > Select Dial Route [None] > Number of B Channels[Choose 1B or 2B] > Algorithm [Choose G.722 , MP2 Mono or MP2 Stereo (Note: select48kHz sample rate for MP2)].
4. Navigate to a Destination (e.g. Dest 1 or Dest 2) and press the button to select each one in
turn. Enter the number for each B channel you want to dial and press the button, then select
which B channel will dial using that number and press the button.
5. Navigate down to Auto Reconnect and press the button to toggle between Enabled andDisabled. Note: This is normally enabled on the dialing codec only.
6. Navigate down to Save as Program and press the button to save these settings as aprogram.
7. Navigate down to Module Configuration and press the button.
8. Select the ISDN module you want to configure and press the button.
9. Configure the following settings:· Accept > Voice and Data· Network > Check with your Telco (EU-ETSI in Australia; Europe & most countries outside
North America; [US Nat] is the most common in the US, but check with your Telco).· Line Type > Check with your Telco and select either Point-to-Multi (point-to-multipoint) or
Point-to--Point (point-to-point).· DN/MSN > Enter the "SPID" and "DN" numbers if required in your region, e.g. a SPID is
normally required in the US.
10. Navigate up to Apply Settings and press the button.

327
© Tieline Pty. Ltd. 2015
Genie Distribution WheatNet-IP Manual v1.6
Dialing from the Tieline Codec
Program Dialing
1. If you have saved the ISDN program as previously instructed, press the HOME button toreturn to the Home screen and select Connect > Programs.
2. Select the saved program you want to load and press the button.
3. Select Load and press the button to load the program.
4. Press the CONNECT button to dial the ISDN program connections.
Ad Hoc Dialing1. If you haven't save the program but have entered the dialing numbers and other settings, press
the HOME button to return to the Home screen and select Connect > ISDN > Connect.2. Press the button to dial using the settings previously entered.
Important Note: If you select different algorithm settings on each codec and dial from theTieline codec, the connection will be unsuccessful and the CONNECTED LED on the frontpanel of the Tieline codec will continuously flash. Adjust the algorithm settings andattempt to reconnect.
Dialing from the Zephyr XstreamImportant Note: Configure ISDN Answer Config settings in the codec before attemptingto dial from the Xstream to the Tieline codec. Select the following settings in the Tielinecodec in one of the Configs (see ISDN Answering Configuration for more detail):
· May bond.· Sessionless.· Algorithm: G.722 or MP2 Mono, or MP2 Stereo.· Sample Rate: 48kHz
1. Press the "Dial" button once.2. Use the keypad to enter the number of the line you are dialing.3. Press the "Dial" button again to make the outgoing call from the Xstream.4. The codec screen will briefly display "Outgoing Ring" and then "Conn" is displayed after a
successful connection.5. If you are making a stereo connection and need to dial the second line press the "Dial" button
again and a screen for "Line 2" is displayed.6. Use the keypad to enter the second number and press the "Dial" button again.7. The "TEL" screen will briefly display "Outgoing Ring" and then "Conn" is displayed after a
successful connection.
Two ISDN B Channels Connected
Important Note: When dialing a stereo connection over two ISDN B lines audio is notheard until the second connection is successful.

328 Genie Distribution WheatNet-IP Manual v1.6
© Tieline Pty. Ltd. 2015
27.7.5 Connecting to Comrex Matrix ISDNTo connect your Tieline codec to a Comrex Matrix rack mount codec:
1. Use the G.722 algorithm.2. Connect using only one 64Kbps ISDN B Channel (bonding of G.722 over two ISDN B
channels is not possible).
Configuring the Matrix to Make an ISDN Call1. Connect an ISDN line to the Matrix codec and power up the unit.2. Press "2" to select "ISDN Status".3. Press "Enter" to configure the connection.4. Press "4" to select the "Configure" menu.5. Press "2 to select the "Network" menu.7. Press "4" to select "Profiles" and then press "1" to select "Load Profile".8. Press "2" to select "Store" and program a new profile using the codec wizard.9. Press ""Enter" to enter a profile number between 1 and 10. Note: This will overwrite any
previously stored profile.10.Next select the number for the ISDN "Switch Type" setting that is appropriate for your region.· Press "4" to select "Euro" if you are connecting to a Euro ISDN service.· Press "1" to select "NI1", which is the most common in the US, but check this with your
Telco.11.If prompted by the menu, use the keypad to enter the "SPID" number the line being used if
this is required in your region. Press "Enter" to store the new number. Note: Use the"Cancel" button to delete numbers.
12.Next use the keypad to enter the "LDN" (DN/MSN) number for the line being used. Press"Enter" to store the new number. Note: Use the "Cancel" button to delete numbers.
13.Enter a "Qdial" (Quick Dial) number.14.Press "1" to select "G.722" as the algorithm.15.Press "2" to select "64" as the bit rate.16.The codec is now programmed to dial.
Configuring the Tieline Codec to Connect to the Matrix over G.722
1. Press the HOME button to return to the Home screen and select Connect > ISDN.
2. Navigate to Setup and press the button.
3. Select Session Type [Sessionless] > Select Dial Route [None] > Number of B Channels[Select 1B ] > Algorithm [ Select G.722].
4. Navigate to a Destination (e.g. Dest 1 or Dest 2) and press the button to select it. Then enter
the number you want to dial and press the button, then select which B channel will dial using
that number and press the button.
5. Navigate down to Auto Reconnect and press the button to toggle between Enabled andDisabled. Note: This is normally enabled on the dialing codec only.

329
© Tieline Pty. Ltd. 2015
Genie Distribution WheatNet-IP Manual v1.6
6. Navigate down to Save as Program and press the button to save these settings as aprogram.
7. Navigate down to Module Configuration and press the button.
8. Select the ISDN module you want to configure and press the button.
Important Note: ISDN Sync should be displayed when an ISDN line is connected to thecodec. This appears regardless of whether you have configured the ‘ISDN Line Type’correctly.
9. Configure the following settings:· Accept > Voice and Data· Network > Check with your Telco (EU-ETSI in Australia; Europe & most countries outside
North America; [US Nat] is the most common in the US, but check with your Telco).· Line Type > Check with your Telco and select either Point-to-Multi (point-to-multipoint) or
Point-to--Point (point-to-point).· DN/MSN > Enter the "SPID" and "DN" numbers if required in your region, e.g. a SPID is
normally required in the US.
10. Navigate up to Apply Settings and press the button.
Dialing from the Tieline Codec
Program Dialing
1. If you have saved the ISDN program as previously instructed, press the HOME button toreturn to the Home screen and select Connect > Programs.
2. Select the saved program you want to load and press the button.
3. Select Load and press the button to load the program.
4. Press the CONNECT button to dial the ISDN program connections.
Ad Hoc Dialing1. If you haven't save the program but have entered the dialing numbers and other settings, press
the HOME button to return to the Home screen and select Connect > ISDN > Connect.2. Press the button to dial using the settings previously entered.
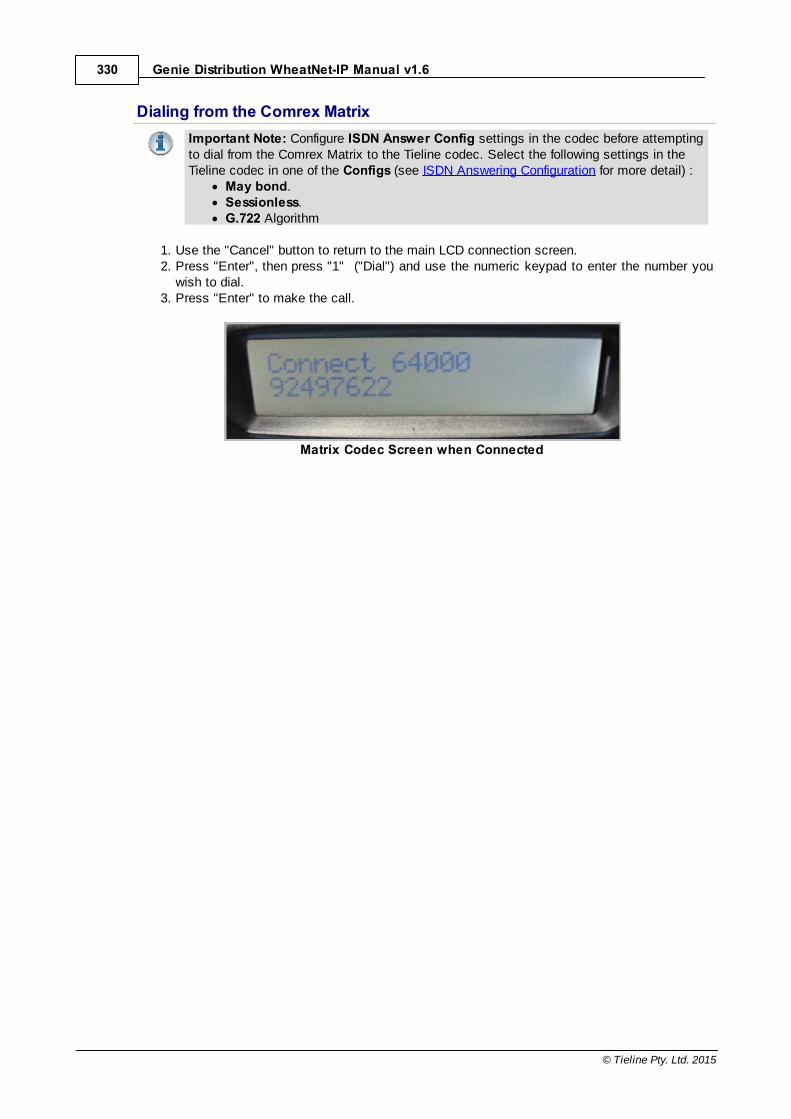
330 Genie Distribution WheatNet-IP Manual v1.6
© Tieline Pty. Ltd. 2015
Dialing from the Comrex MatrixImportant Note: Configure ISDN Answer Config settings in the codec before attemptingto dial from the Comrex Matrix to the Tieline codec. Select the following settings in theTieline codec in one of the Configs (see ISDN Answering Configuration for more detail) :
· May bond.· Sessionless.· G.722 Algorithm
1. Use the "Cancel" button to return to the main LCD connection screen. 2. Press "Enter", then press "1" ("Dial") and use the numeric keypad to enter the number you
wish to dial.3. Press "Enter" to make the call.
Matrix Codec Screen when Connected

331
© Tieline Pty. Ltd. 2015
Genie Distribution WheatNet-IP Manual v1.6
27.8 Using Answer Routes for Sessionless ISDN CallsTieline Genie Distribution and Merlin PLUS audio codecs support multiple connections using avariety of connection transports such as IP, ISDN and POTS. Tieline codecs support using Tielinesession data, which assists with configuration and routing of multiple incoming calls to thesecodecs. In addition, audio ports can be used to successfully route IP calls to your preferred codecinputs/outputs.
If you are accepting calls from multiple non-Tieline ISDN codecs then you will be making"sessionless" connections which require the codecs at both ends to be configured with the sameconnection settings. In addition you can use “Answer Routes” and 'site-specific' module settings inGenie Distribution and Merlin PLUS to route incoming calls to specific codec outputs. (Note: Merlincodecs can also be configured to accept 2 ISDN calls from non-Tieline codecs and would usesimilar settings).
In the following example we will configure two incoming sessionless ISDN audio streamconnections (Note: Genie Distribution and Merlin PLUS support up to 4 sessionless ISDN audiostreams/connections using 2 ISDN modules and 4 B channels).
If you want 2 incoming mono ISDN calls to use input/outputs 1 and 2, then use answering audiostream connections 1 and 2 in your codec program. If you want to use other inputs/outputs thensimply select the corresponding audio stream, e.g. answering audio streams 5 and 6 will routeaudio via inputs/outputs 5 and 6.
So let's get started. There are 2 or 3 steps to ensure this is configured correctly, depending onwhether you want specific incoming calls to always use the same B channels and codec outputs ornot.
Step 1: Configure the Answer Route for the two ISDN Audio Streamanswering connections in the codec program.Setup two ISDN audio stream answering connections in your program and use the Answer Routesetting in the program wizard (as displayed in the following image):
You can use any Answer Route, for example Route 1 for ISDN Audio Stream 1 and Route 2 forISDN Audio Stream 2. The Answer Route number doesn’t have to match the audio stream numberbecause the route you select will be used by the incoming ISDN call. This is similar to how an“extension number” is used to route a phone call.

332 Genie Distribution WheatNet-IP Manual v1.6
© Tieline Pty. Ltd. 2015
Step 2: Configure the ISDN Module to accept two sessionless ISDN calls.This can be configured via Settings > Modules or use the Toolbox Web-GUI via Settings panel >Modules.
1. Select Config 1 and Sessionless Only and Route 1. Select your preferred algorithm, thenclick Save Settings. This means that Module 1 B channel 1 will answer a sessionless ISDNcall using these settings.
2. Next select Config 2 and Sessionless Only and Route 2. Select your preferred algorithm,then click Save Settings. This means that Module 1 B channel 2 will answer a sessionlessISDN call using these settings.

333
© Tieline Pty. Ltd. 2015
Genie Distribution WheatNet-IP Manual v1.6
Both ISDN B channels can now answer incoming sessionless ISDN calls. If it doesn’t matter whichincoming codec call is answered by which B channel then that’s all you need to do. If, however, youwant each non-Tieline codec to use the same B channel and be routed to the same codec outputconsistently, you must configure this in the site config for the ISDN module via Settings >Answering > ISDN Answer Configs, or via the Web-GUI using the Settings panel > Modules.
Step 3: Configuring the module to answer calls from a specific non-Tielinecodec consistently.If a Directory Number (DN) or MSN number is not entered in the codec and multiple B channels areavailable, the codec may use any channel to answer an incoming call. To ensure calls are routedconsistently, enter a DN/MSN number (without the country or area code) as the DN/MSN for a Bchannel, then only that corresponding B channel will answer an incoming call to that number.
Enter the number for the first B channel into the field for Directory Number/MSN1. (This has beenallocated Route 1 previously.) Enter the number for the second B channel into the field for DirectoryNumber/MSN2. (This has been allocated Route 2 previously.) Next, click Save Settings.

334 Genie Distribution WheatNet-IP Manual v1.6
© Tieline Pty. Ltd. 2015
If codec 1 always uses the first directory number to call then it will always be routed via Route 1 tothe Answering Audio Stream Connection using Answer Route 1 (configured in step 1). Codec 2should always use the second directory number and then it will always be routed via Route 2 to theAnswering Audio Stream Connection configured with Answer Route 2.
27.9 POTS Connection Tips & Precautions
POTS Operation PrecautionsPOTS performance is greatly affected by the quality of the line being used. Precautions must betaken to ensure the Tieline codec is not sharing the line with other devices. Please remove thesepossible sources of interference:
· DSL or ADSL Modems· Other telephone handsets· Portable phone base stations· Unused parallel phone sockets· Fax machines· Computer modems· Burglar alarm systems· Extension bells· Call waiting
Call WaitingCall waiting tones may cause the codec to malfunction. Most phone companies supply callwaiting as a feature and you will need to turn it off. Your Telco should be able to provide anumber you can dial to disabling the call waiting feature on the line.
Private Branch Exchanges Avoid connecting the codec to a digital PBX or PABX system, key station, business system or

335
© Tieline Pty. Ltd. 2015
Genie Distribution WheatNet-IP Manual v1.6
any other local switchboard. It may sometimes be tricky to detect if you are connected to one ofthese systems, however, as a general guide, these devices require you to dial an additional digitto access the POTS network.
WARNING: Many of these systems are digital and have non standard telephone lineoperating voltages. If you attach your POTS module to a digital PABX or PBX systempermanent damage may result from the high voltage pulses these systems generate. Even ifthe PBX is not digital, the performance of the codec is unlikely to be as good as a normalPOTS line.
If you have no option other than to use a PBX or PABX System, search for a fax machine. Theoverwhelming majority of fax machines are designed for analog POTS line operation and arenormally on an extension optimized for fax machines and data transmission. Substitute anormal phone for the fax machine to verify correct operation. Use a normal phone, not a venue-supplied phone, because this may have characteristics to match the existing PBX/PABX andnot a POTS line. After confirming correct phone operation, you can unplug the phone andattach the phone line to the codec.
Check the Length of the LineIt is desirable to have a local loop which is as short as possible, i.e. the line from your locationto the local Central Office or Local Exchange. Optimum performance can be expected for linesup to about 2 miles (3 kilometers) in length. Line quality will be reduced over longer distancesand the codec can be expected to perform at lower bit rates. Line quality will also be affected bythe age, condition and type of cabling used, e.g. plastic insulation or paper insulation, water ormoisture entering the cable, age and state of repair of joins.
POTS Party Lines or StubsIn some countries, it was the practice to have more than one phone service attached to one line- sometimes called a 'Party Line'. As more lines are installed, services are separated but theredundant cabling may remain connected across the line, causing problems with the operationof your codec.
Leakage Problems on the LineA good line should have an earth isolation of better than ten mega-ohms. If your line is locatedin an area where water is a problem, ask your Telco to check out the earth leakage.
Equipment Problems at the CO or Local ExchangeAlthough there are many factors at the Telco end that can cause problems, a problem that doesoccasionally occur is that the clock on the interface codec to your line is not synchronized tothe network. A drifting clock will cause instability and unreliable codec performance. If yoususpect that this could be the problem, contact your local Telco.
POTS Exchange ProblemsOn most good POTS lines, Tieline codecs can achieve a 28.8kbps connection at a line qualityof approximately 50% or greater. If you are not able to achieve this level of operation, you mayhave a problem with your line, or the line at the other end of the connection.
Tips for Successful POTS Operation1. Take a phone when you are doing a remote broadcast. Connect it to the line you want to use and

336 Genie Distribution WheatNet-IP Manual v1.6
© Tieline Pty. Ltd. 2015
dial the number to check for any unusual noises. If present, these may be caused by otherdevices connected to the line.
2. Take an ADSL/DSL filter to all remote locations. ADSL/DSL modems can generate noise on aline which will degrade the performance of your codec. Simply place the ADSL/DSL filter betweenthe POTS line and your codec to remove the interference.
3. Tieline USA has a POTS test codec you can dial on +1-317-913 6911 to facilitate line tests ateach end of your connection to diagnose line problems.
4. Tieline recommends that you confirm your broadcast POTS line works well before you try to golive.
27.10 Genie Compliances and Certifications
Declaration of ConformityThis Genie codec meets the requirements of directives for CE and C-Tick certifications. Technicaldocumentation required by the conformity assessment procedure is kept at the head office of TielineTechnology; 1/25 Irvine Drive, Malaga, Western Australia 6090.
EN 55 022 StatementThis is to certify that Tieline Genie is shielded against the generation of radio interference inaccordance with the application of EN 55 022: 2006 Class A. Technical documentation required bythe conformity assessment procedure is kept at the head office of Tieline Technology; 1/25 IrvineDrive, Malaga, Western Australia 6090.
Canadian Department of Communications Radio Interference RegulationsThis digital apparatus (Tieline Genie) does not exceed the Class A limits for radio-noise emissionsfrom digital apparatus as set out in the Radio Interference Regulations of the Canadian Departmentof Communications.
Règlement sur le brouillage radioélectrique du ministère desCommunicationsCet appareil numérique (Tieline Genie) respecte les limites de bruits radioélectriques visant lesappareils numériques de classe a prescrites dans le Règlement sur le brouillage radioelectrique duministère des Communications du Canada.
27.11 FCC Compliance Statements
FCC Part 15Compliance: TIELINE PTY LTD, 25 Irvine Drive, Malaga. Western Australia 6090.
This equipment has been tested and found to comply with the limits for a class B digital device,pursuant to Part 15 of the FCC Rules. These limits are designed to provide reasonable protectionagainst harmful interference when the equipment is operated in a commercial environment. Thisequipment generates, uses and can radiate radio frequency energy and, if not installed and used inaccordance with the instruction manual, may cause harmful interference to radio communications.Operation of this equipment in a residential area may cause harmful interference, in which case theuser will be required to correct the interference at his/her own expense. Changes or modificationsnot expressly approved by Tieline Pty Ltd could void the user’s authority to operate the equipment.

337
© Tieline Pty. Ltd. 2015
Genie Distribution WheatNet-IP Manual v1.6
If this equipment does cause harmful interference to radio or television reception, which can bedetermined by turning the equipment off and on, the user is encouraged to try and correct theproblem by one or more of the following measures:
1. Increase the separation between the equipment and the receiver;2. Connect the equipment into an outlet on a circuit different to that used by the receiver; 3. Consult the dealer or an experienced radio/TV technician.
FCC Part 68 FCC Registration Number: 6NAAUS-34641-MD-ERinger Equivalence Number (REN):0.5B
A label containing, among other information, the FCC registration and Ringer Equivalence Number(REN) for this equipment is prominently posted on the bottom, near the rear of the equipment. Ifrequested, this information must be provided to your telephone company. USOC Jacks: This deviceuses RJ11C terminal jacks. The REN is used to determine the quantity of devices, which may beconnected to the telephone line. Excessive RENs on the telephone line may result in the devicesnot ringing in response to an incoming call. In most, but not all areas, the sum of RENs should notexceed five (5). To be certain of the number of devices that may be connected to the line, asdetermined by the total RENs, contact the telephone company to obtain the maximum RENs forthe calling area.
If this equipment causes harm to the telephone network, the telephone company will notify you inadvance that temporary discontinuance of the service may be required. If advance notice is notpractical, the company will notify the customer as soon as possible. Also you will be advised ofyour right to file a complaint with the FCC if you believe it is necessary.
The Telephone Company may make changes in its facilities, equipment, operations or proceduresthat could affect the operation of the equipment. If this happens the Telephone Company will provideadvance notice for you to make the necessary modifications in order to maintain uninterruptedservice.
If you experience problems with this equipment, contact TIELINE Pty Ltd, 25 Irvine Drive, Malaga.Western Australia, 6090. Ph +61 8 9249 6688 Fax +61 8 9249 6858 email [email protected] (webpage www.tieline.com) for repair and warranty information.
If the problem is causing harm to the telephone network, the Telephone Company may request youremove the equipment from the network until the problem is resolved.
No user serviceable parts are contained in this product. If damage or malfunction occurs, contactTIELINE Pty Ltd for instructions on repair or return. This equipment cannot be used on a telephonecompany provided coin service. Connection to Party Line service is subject to state tariffs.

338 Genie Distribution WheatNet-IP Manual v1.6
© Tieline Pty. Ltd. 2015
27.12 Software LicencesThis product uses a combination of proprietary and open-source software programs.
Some of the software included in this product contains copyrighted software that is
licensed under various open-source licenses (e.g. GNU General Public License v2,
GNU Lesser GPL v2.1). A detailed list of open source licenses used in this product
is included in the user manual. This can be downloaded from the Help Panel in the
Web Browser Interface or from the Tieline website <http://tieline.com>. You may
request a copy for the open source software on DVD by contacting our support team
on +61 (0)8 9249 6688. Tieline Pty Ltd will charge a small handling fee for
distribution of this software.
Some of the open source software of this product is based on the works of the
Gentoo project and is not directed, managed, sold or supported by Gentoo
Foundation, Inc. The Gentoo name is a trademark of Gentoo Foundation, Inc.
Open Source GPL compatible Licenses:
o Some of the open-source software in the product is licensed under GPL version 3.
A copy of the license can be obtained at http://www.gnu.org/licenses/gpl.html.
o Some of the open-source software in the product is licensed under GPL version 2.
A copy of the license can be obtained at http://www.gnu.org/licenses/old-licenses/
gpl-2.0.html.
o Some of the open-source software in the product is licensed under LGPL version 3.
A copy of the license can be obtained at http://www.gnu.org/licenses/lgpl.html.
o Some of the open-source software in the product is licensed under LGPL version
2.1. A copy of the license can be obtained at http://www.gnu.org/licenses/old-
licenses/lgpl-2.1.html.
Open Source BSD style Licenses:
• bind:
o Portions: Copyright (c) 1987, 1990, 1993, 1994 The Regents of the University of
California. All rights reserved. Additional clause - All advertising materials
mentioning features or use of this software must display the following
acknowledgment: This product includes software developed by the University of
California, Berkeley and its contributors.
o Portions: Copyright (c) 2004 Masarykova universita (Masaryk University, Brno,
Czech Republic) All rights reserved.
o Portions: Copyright (c) 1997 - 2003 Kungliga Tekniska Högskolan (Royal Institute
of Technology, Stockholm, Sweden). All rights reserved.
o Portions (2 clause BSD license, 3rd clause removed): Copyright (c) 1998 Doug
Rabson. All rights reserved.
o Portions: Copyright ((c)) 2002, Rice University. All rights reserved.
o Portions: Copyright 2000 Aaron D. Gifford. All rights reserved.
o Portions (2 clause BSD license, 3rd clause removed): Copyright (c) 1998 Doug
Rabson. Copyright (c) 2001 Jake Burkholder. All rights reserved.
o Portions: Copyright (C) 1995, 1996, 1997, and 1998 WIDE Project. All rights
reserved.
o Portions: Copyright (c) 2000-2002 Japan Network Information Center. All rights
reserved.
o idnkit: Copyright (c) 2000-2002 Japan Network Information Center. All rights
reserved.
o zkt: Copyright (c) 2005 - 2008, Holger Zuleger HZnet. All rights reserved.
• dhcpcd - 2 clause BSD license, clause 3 removed
o Copyright (c) 2006-2011 Roy Marples <[email protected]>

339
© Tieline Pty. Ltd. 2015
Genie Distribution WheatNet-IP Manual v1.6
• eventlog
o Copyright (c) 2003 BalaBit IT Ltd.
• file - 2 clause BSD license, clause 3 removed
o Copyright (c) Ian F. Darwin 1986, 1987, 1989, 1990, 1991, 1992, 1994, 1995.
o Software written by Ian F. Darwin and others;
o maintained 1994- Christos Zoulas.
o This software is not subject to any export provision of the United States
Department of Commerce, and may be exported to any country or planet.
• glibc
o Code incorporated from 4.4 BSD: Copyright (C) 1991 Regents of the University of
California. All rights reserved.
o Sun RPC support (from rpcsrc-4.0): Copyright (c) 2010, Oracle America, Inc.
• htop
o Copyright (c) 2004-2006 The Trustees of Indiana University and Indiana University
Research and Technology Corporation. All rights reserved.
o Copyright (c) 2004-2005 The Regents of the University of California. All rights
reserved.
o Copyright (c) 2007 Cisco Systems, Inc. All rights reserved.
o Portions: Copyright (c) 2004-2005 The University of Tennessee and The University
of Tennessee Research Foundation. All rights reserved
o Portions: Copyright (c) 2004-2005 High Performance Computing Center Stuttgart,
University of Stuttgart. All rights reserved.
o Portions: Copyright (c) 2006, 2007 Advanced Micro Devices, Inc. All rights
reserved.
• less - 2 clause BSD license, clause 3 removed
o Copyright (C) 1984-2011 Mark Nudelman
• libpcre
o Basic Library Functions: Copyright (c) 1997-2010 University of Cambridge. All
rights reserved.
o C++ Wrapper Functions: Copyright (c) 2007-2010, Google Inc. All rights reserved
• libuuid
o Copyright (c) 1996, 1997, 1998, 1999, 2007. Theodore Ts'o.
• lighttpd
o Copyright (c) 2004, Jan Kneschke, incremental. All rights reserved.
• net-snmp
o Copyright 1989, 1991, 1992 by Carnegie Mellon University. All rights reserved.
o Derivative Work - 1996, 1998-2000
o Copyright 1996, 1998-2000 The Regents of the University of California. All rights
reserved.
o Copyright (c) 2001-2003, Networks Associates Technology, Inc. All rights
reserved.
o Portions of this code are copyright (c) 2001-2003, Cambridge Broadband Ltd. All
rights reserved.
o Copyright © 2003 Sun Microsystems, Inc., 4150 Network Circle, Santa Clara,
California 95054, U.S.A. All rights reserved.

340 Genie Distribution WheatNet-IP Manual v1.6
© Tieline Pty. Ltd. 2015
o Copyright (c) 2003-2010, Sparta, Inc. All rights reserved.
o Copyright (c) 2004, Cisco, Inc and Information Network. Center of Beijing
University of Posts and Telecommunications. All rights reserved.
o Copyright (c) Fabasoft R&D Software GmbH & Co KG, 2003. [email protected]. Author:
Bernhard Penz <[email protected]>
o Copyright (c) 2007 Apple Inc. All rights reserved.
o Copyright (c) 2009, ScienceLogic, LLC. All rights reserved.
• openrc - 2 clause BSD license, clause 3 removed
o Copyright (c) 2007-2009 Roy Marples <[email protected]>
• OpenSSH
o Copyright (c) 1995 Tatu Ylonen <[email protected]>, Espoo, Finland. All rights
reserved.
o 32-bit CRC compensation attack detector: Copyright (c) 1998 CORE SDI S.A., Buenos
Aires, Argentina. All rights reserved.
o ssh-keyscan: Copyright 1995, 1996 by David Mazieres <[email protected]>.
o One component of OpenSSH source code: Copyright (c) 1983, 1990, 1992, 1993, 1995.
The Regents of the University of California. All rights reserved.
o Remaining components under 2 clause BSD (clause 3 removed) Copyright holders:
Markus Friedl, Theo de Raadt, Niels Provos, Dug Song, Aaron Campbell, Damien
Miller, Kevin Steves, Daniel Kouril, Wesley Griffin, Per Allansson, Nils Nordman,
Simon Wilkinson
o Parts of portable version under 2 clause BSD (clause 3 removed) Copyright
holders: Ben Lindstrom, Tim Rice, Andre Lucas, Chris Adams, Corinna Vinschen, Cray
Inc., Denis Parker, Gert Doering, Jakob Schlyter, Jason Downs, Juha Yrjölä, Michael
Stone, Networks Associates Technology, Inc., Solar Designer, Todd C. Miller, Wayne
Schroeder, William Jones, Darren Tucker, Sun Microsystems, The SCO Group, Daniel
Walsh, Red Hat, Inc.
o Parts of openbsd-compat: Copyright holders: Todd C. Miller, Theo de Raadt, Damien
Miller, Eric P. Allman, The Regents of the University of California, Constantin S.
Svintsoff.
• OpenSSL: crypto/blowfish, crypto/des
o Copyright (C) 1995-1997 Eric Young ([email protected]).
o Clause 3: All advertising materials mentioning features or use of this software
must display the following acknowledgement: This product includes software
developed by Eric Young ([email protected]).
• strace:
o Copyright (c) 1991, 1992 Paul Kranenburg <[email protected]>
o Copyright (c) 1993 Branko Lankester <[email protected]>.
o Copyright (c) 1993 Ulrich Pegelow <[email protected]>.
o Copyright (c) 1995, 1996 Michael Elizabeth Chastain <[email protected]>.
o Copyright (c) 1993, 1994, 1995, 1996 Rick Sladkey <[email protected]>.
o Copyright (C) 1998-2001 Wichert Akkerman <[email protected]>..
o All rights reserved.
• util-linux: text-utils
o Copyright (c) 2000-2001 Gunnar Ritter. All rights reserved.
Redistribution and use in source and binary forms, with or without modification,
are permitted provided that the following conditions are met:
1. Redistributions of source code must retain the above copyright notice, this list

341
© Tieline Pty. Ltd. 2015
Genie Distribution WheatNet-IP Manual v1.6
of conditions and the following disclaimer.
2. Redistributions in binary form must reproduce the above copyright notice, this
list of conditions and the following disclaimer in the documentation and/or other
materials provided with the distribution.
3. Neither the name of the <ORGANIZATION> nor the names of its contributors may be
used to endorse or promote products derived from this software without specific
prior written permission.
THIS SOFTWARE IS PROVIDED BY THE COPYRIGHT HOLDERS AND CONTRIBUTORS "AS IS" AND ANY
EXPRESS OR IMPLIED WARRANTIES, INCLUDING, BUT NOT LIMITED TO, THE IMPLIED
WARRANTIES OF MERCHANTABILITY AND FITNESS FOR A PARTICULAR PURPOSE ARE DISCLAIMED.
IN NO EVENT SHALL THE COPYRIGHT OWNER OR CONTRIBUTORS BE LIABLE FOR ANY DIRECT,
INDIRECT, INCIDENTAL, SPECIAL,EXEMPLARY, OR CONSEQUENTIAL DAMAGES (INCLUDING, BUT
NOT LIMITED TO, PROCUREMENT OF SUBSTITUTE GOODS OR SERVICES; LOSS OF USE, DATA, OR
PROFITS; OR BUSINESS INTERRUPTION) HOWEVER CAUSED AND ON ANY THEORY OF LIABILITY,
WHETHER IN CONTRACT, STRICT LIABILITY, OR TORT (INCLUDING NEGLIGENCE OR OTHERWISE)
ARISING IN ANY WAY OUT OF THE USE OF THIS SOFTWARE, EVEN IF ADVISED OF THE
POSSIBILITY OF SUCH DAMAGE.
Open Source MIT style Licenses:
• glibc: DNS resolver taken from BIND 4.9.5
o Portions Copyright (C) 1993 by Digital Equipment Corporation.
• ncurses
o Copyright (c) 1998-2010,2011 Free Software Foundation, Inc.
o install-sh : 1994 X Consortium
• OpenSSH
o twbs / bootstrap: The MIT License (MIT) Copyright (c) 2011-2015 Twitter, Inc
o mustache.js: The MIT License; Copyright (c) 2009 Chris Wanstrath (Ruby);
Copyright (c) 2010-2014 Jan Lehnardt (JavaScript); Copyright (c) 2010-2015 The
mustache.js community
o gridster.js: Copyright (c) 2012 Ducksboard
o LICENSE.txt: Copyright jQuery Foundation and other contributors, https://
jquery.org/; This software consists of voluntary contributions made by many
individuals. For exact contribution history, see the revision history available at
https://github.com/jquery/jquery
o Portions of code under MIT-style license to the copyright holders: Free Software
Foundation, Inc.
Permission is hereby granted, free of charge, to any person obtaining a copy of
this software and associated documentation files (the "Software"), to deal in the
Software without restriction, including without limitation the rights to use, copy,
modify, merge, publish, distribute, sublicense, and/or sell copies of the Software,
and to permit persons to whom the Software is furnished to do so, subject to the
following conditions:
The above copyright notice and this permission notice shall be included in all
copies or substantial portions of the Software.
THE SOFTWARE IS PROVIDED "AS IS", WITHOUT WARRANTY OF ANY KIND, EXPRESS OR IMPLIED,
INCLUDING BUT NOT LIMITED TO THE WARRANTIES OF MERCHANTABILITY,FITNESS FOR A
PARTICULAR PURPOSE AND NONINFRINGEMENT. IN NO EVENT SHALL THE AUTHORS OR COPYRIGHT
HOLDERS BE LIABLE FOR ANY CLAIM, DAMAGES OR OTHER LIABILITY, WHETHER IN AN ACTION
OF CONTRACT, TORT OR OTHERWISE, ARISING FROM,OUT OF OR IN CONNECTION WITH THE
SOFTWARE OR THE USE OR OTHER DEALINGS IN THE SOFTWARE.
Open Source ISC style Licenses:
• bind

342 Genie Distribution WheatNet-IP Manual v1.6
© Tieline Pty. Ltd. 2015
o Copyright (C) 2004-2011 Internet Systems Consortium, Inc. ("ISC")
o Copyright (C) 1996-2003 Internet Software Consortium.
o Portions: Copyright (C) 1996-2001 Nominum, Inc.
o Portions: Copyright (C) 1995-2000 by Network Associates, Inc.
o Portions: Copyright (C) 2002 Stichting NLnet, Netherlands, [email protected].
o Dynamically Loadable Zones (DLZ) contributer: Rob Butler.
o Portions: Copyright (c) 1993 by Digital Equipment Corporation.
O Portions: Copyright (c) 1999-2000 by Nortel Networks Corporation.
O Portions: Copyright (C) 2004 Nominet, Ltd.
O Portions: Copyright RSA Security Inc.
O Portions: Copyright (c) 1996, David Mazieres <[email protected]>, Copyright (c) 2008,
Damien Miller <[email protected]>
• expat
o Copyright (c) 1998, 1999, 2000 Thai Open Source Software Center Ltd and Clark
Cooper.
o Copyright (c) 2001, 2002, 2003, 2004, 2005, 2006 Expat maintainers.
• libffi
o Copyright (c) 1996-2011 Anthony Green, Red Hat, Inc and others.
• OpenSSH
o Portions of code under ISC-style license to the copyright holders: Internet
Software Consortium, Todd C. Miller, Reyk Floeter, Chad Mynhier.
• popt
o Copyright (c) 1998 Red Hat Software.
• vixie-cron
O Copyright 1988,1990,1993 by Paul Vixie. All rights reserved.
o Copyright (C) 2004-2011 Internet Systems Consortium, Inc. ("ISC")
o Copyright (C) 1997,2000 by Internet Software Consortium, Inc.
THE SOFTWARE IS PROVIDED "AS IS" AND THE COPYRIGHT HOLDERS AND CONTRIBUTORS
DISCLAIM ALL WARRANTIES WITH REGARD TO THIS SOFTWARE INCLUDING ALL IMPLIED
WARRANTIES OF MERCHANTABILITY AND FITNESS. IN NO EVENT SHALL THE COPYRIGHT HOLDERS
AND CONTRIBUTORS BE LIABLE FOR ANY SPECIAL, DIRECT, INDIRECT, OR CONSEQUENTIAL
DAMAGES OR ANY DAMAGES WHATSOEVER RESULTING FROM LOSS OF USE, DATA OR PROFITS,
WHETHER IN AN ACTION OF CONTRACT, NEGLIGENCE OR OTHER TORTIOUS ACTION, ARISING OUT
OF OR IN CONNECTION WITH THE USE OR PERFORMANCE OF THIS SOFTWARE.
Open Source UCB License:
• util-linux
This product includes software developed by the University of California, Berkeley
and its contributors.
Copyright (c) 1989 The Regents of the University of California.
All rights reserved.
THIS SOFTWARE IS PROVIDED BY THE REGENTS AND CONTRIBUTORS ``AS IS'' AND ANY EXPRESS
OR IMPLIED WARRANTIES, INCLUDING, BUT NOT LIMITED TO, THE IMPLIED WARRANTIES OF
MERCHANTABILITY AND FITNESS FOR A PARTICULAR PURPOSE ARE DISCLAIMED. IN NO EVENT
SHALL THE REGENTS OR CONTRIBUTORS BE LIABLE FOR ANY DIRECT, INDIRECT, INCIDENTAL,

343
© Tieline Pty. Ltd. 2015
Genie Distribution WheatNet-IP Manual v1.6
SPECIAL, EXEMPLARY, OR CONSEQUENTIAL DAMAGES (INCLUDING, BUT NOT LIMITED TO,
PROCUREMENT OF SUBSTITUTE GOODS OR SERVICES; LOSS OF USE, DATA, OR PROFITS; OR
BUSINESS INTERRUPTION) HOWEVER CAUSED AND ON ANY THEORY OF LIABILITY, WHETHER IN
CONTRACT, STRICT LIABILITY, OR TORT (INCLUDING NEGLIGENCE OR OTHERWISE) ARISING IN
ANY WAY OUT OF THE USE OF THIS SOFTWARE, EVEN IF ADVISED OF THE POSSIBILITY OF SUCH
DAMAGE.
Open Source OpenSSL License:
• OpenSSL
o "This product includes software developed by the OpenSSL Project for use in the
OpenSSL Toolkit (http://www.openssl.org/)"
o "This product includes cryptographic software written by Eric Young
Copyright (c) 1998-2011 The OpenSSL Project. All rights reserved.
Redistribution and use in source and binary forms, with or without modification,
are permitted provided that the following conditions are met:
1. Redistributions of source code must retain the above copyright notice, this list
of conditions and the following disclaimer.
2. Redistributions in binary form must reproduce the above copyright notice, this
list of conditions and the following disclaimer in the documentation and/or other
materials provided with the distribution.
3. All advertising materials mentioning features or use of this software must
display the following acknowledgment: "This product includes software developed by
the OpenSSL Project for use in the OpenSSL Toolkit. (http://www.openssl.org/)"
4. The names "OpenSSL Toolkit" and "OpenSSL Project" must not be used to endorse or
promote products derived from this software without prior written permission. For
written permission, please contact [email protected].
5. Products derived from this software may not be called "OpenSSL" nor may
"OpenSSL" appear in their names without prior written permission of the OpenSSL
Project.
6. Redistributions of any form whatsoever must retain the following acknowledgment:
"This product includes software developed by the OpenSSL Project for use in the
OpenSSL Toolkit (http://www.openssl.org/)"
THIS SOFTWARE IS PROVIDED BY THE OpenSSL PROJECT ``AS IS'' AND ANY EXPRESSED OR
IMPLIED WARRANTIES, INCLUDING, BUT NOT LIMITED TO, THE IMPLIED WARRANTIES OF
MERCHANTABILITY AND FITNESS FOR A PARTICULAR PURPOSE ARE DISCLAIMED. IN NO EVENT
SHALL THE OpenSSL PROJECT OR ITS CONTRIBUTORS BE LIABLE FOR ANY DIRECT, INDIRECT,
INCIDENTAL, SPECIAL, EXEMPLARY, OR CONSEQUENTIAL DAMAGES (INCLUDING, BUT NOT
LIMITED TO, PROCUREMENT OF SUBSTITUTE GOODS OR SERVICES; LOSS OF USE, DATA, OR
PROFITS; OR BUSINESS INTERRUPTION) HOWEVER CAUSED AND ON ANY THEORY OF LIABILITY,
WHETHER IN CONTRACT, STRICT LIABILITY, OR TORT (INCLUDING NEGLIGENCE OR OTHERWISE)
ARISING IN ANY WAY OUT OF THE USE OF THIS SOFTWARE, EVEN IF ADVISED OF THE
POSSIBILITY OF SUCH DAMAGE.
Original SSLeay License:
This product includes cryptographic software written by Eric Young
([email protected]). This product includes software written by Tim Hudson
Copyright (C) 1995-1998 Eric Young ([email protected])
All rights reserved.
This package is an SSL implementation written by Eric Young ([email protected]).
The implementation was written so as to conform with Netscapes SSL.

344 Genie Distribution WheatNet-IP Manual v1.6
© Tieline Pty. Ltd. 2015
This library is free for commercial and non-commercial use as long as the following
conditions are aheared to. The following conditions apply to all code found in
this distribution, be it the RC4, RSA, lhash, DES, etc., code; not just the SSL
code. The SSL documentation included with this distribution is covered by the same
copyright terms except that the holder is Tim Hudson ([email protected]).
Copyright remains Eric Young's, and as such any Copyright notices in the code are
not to be removed.
If this package is used in a product, Eric Young should be given attribution as the
author of the parts of the library used. This can be in the form of a textual
message at program startup or in documentation (online or textual) provided with
the package.
Redistribution and use in source and binary forms, with or without modification,
are permitted provided that the following conditions are met:
1. Redistributions of source code must retain the copyright notice, this list of
conditions and the following disclaimer.
2. Redistributions in binary form must reproduce the above copyright notice, this
list of conditions and the following disclaimer in the and/or other materials
provided with the distribution.
3. All advertising materials mentioning features or use of this software must
display the following acknowledgement: "This product includes cryptographic
software written by Eric Young ([email protected])". The word 'cryptographic' can
be left out if the rouines from the library being used are not cryptographic
related :-).
4. If you include any Windows specific code (or a derivative thereof) from the apps
directory (application code) you must include an acknowledgement: "This product
includes software written by Tim Hudson ([email protected])"
THIS SOFTWARE IS PROVIDED BY ERIC YOUNG ``AS IS'' AND ANY EXPRESS OR IMPLIED
WARRANTIES, INCLUDING, BUT NOT LIMITED TO, THE IMPLIED WARRANTIES OF
MERCHANTABILITY AND FITNESS FOR A PARTICULAR PURPOSE ARE DISCLAIMED. IN NO EVENT
SHALL THE AUTHOR OR CONTRIBUTORS BE LIABLE FOR ANY DIRECT, INDIRECT, INCIDENTAL,
SPECIAL, EXEMPLARY, OR CONSEQUENTIAL DAMAGES (INCLUDING, BUT NOT LIMITED TO,
PROCUREMENT OF SUBSTITUTE GOODS OR SERVICES; LOSS OF USE, DATA, OR PROFITS; OR
BUSINESS INTERRUPTION) HOWEVER CAUSED AND ON ANY THEORY OF LIABILITY, WHETHER IN
CONTRACT, STRICT LIABILITY, OR TORT (INCLUDING NEGLIGENCE OR OTHERWISE) ARISING IN
ANY WAY OUT OF THE USE OF THIS SOFTWARE, EVEN IF ADVISED OF THE POSSIBILITY OF SUCH
DAMAGE.
Open Source netperf License:
Copyright (C) 1993 Hewlett-Packard Company
ALL RIGHTS RESERVED.
THE SOFTWARE AND DOCUMENTATION IS PROVIDED "AS IS". HEWLETT-PACKARD COMPANY DOES
NOT WARRANT THAT THE USE, REPRODUCTION, MODIFICATION OR DISTRIBUTION OF THE
SOFTWARE OR DOCUMENTATION WILL NOT INFRINGE A THIRD PARTY'S INTELLECTUAL PROPERTY
RIGHTS. HP DOES NOT WARRANT THAT THE SOFTWARE OR DOCUMENTATION IS ERROR FREE. HP
DISCLAIMS ALL WARRANTIES, EXPRESS AND IMPLIED, WITH REGARD TO THE SOFTWARE AND THE
DOCUMENTATION. HP SPECIFICALLY DISCLAIMS ALL WARRANTIES OF MERCHANTABILITY AND
FITNESS FOR A PARTICULAR PURPOSE. HEWLETT-PACKARD COMPANY WILL NOT IN ANY EVENT BE
LIABLE FOR ANY DIRECT, INDIRECT, SPECIAL, INCIDENTAL OR CONSEQUENTIAL DAMAGES
(INCLUDING LOST PROFITS) RELATED TO ANY USE, REPRODUCTION, MODIFICATION, OR
DISTRIBUTION OF THE SOFTWARE OR DOCUMENTATION.
345
© Tieline Pty. Ltd. 2015
Genie Distribution WheatNet-IP Manual v1.6
Open Source Info-ZIP license:
Copyright (c) 1990-2001 Info-ZIP. All rights reserved.
For the purposes of this copyright and license, "Info-ZIP" is defined as the
following set of individuals:
Mark Adler, John Bush, Karl Davis, Harald Denker, Jean-Michel Dubois, Jean-loup
Gailly, Hunter Goatley, Ian Gorman, Chris Herborth, Dirk Haase, Greg Hartwig,
Robert Heath, Jonathan Hudson, Paul Kienitz, David Kirschbaum, Johnny Lee, Onno van
der Linden, Igor Mandrichenko, Steve P. Miller, Sergio Monesi, Keith Owens, George
Petrov, Greg Roelofs, Kai Uwe Rommel, Steve Salisbury, Dave Smith, Christian
Spieler, Antoine Verheijen, Paul von Behren, Rich Wales, Mike White
This software is provided "as is," without warranty of any kind, express or
implied. In no event shall Info-ZIP or its contributors be held liable for any
direct, indirect, incidental, special or consequential damages arising out of the
use of or inability to use this software.
Permission is granted to anyone to use this software for any purpose, including
commercial applications, and to alter it and redistribute it freely, subject to the
following restrictions:
1. Redistributions of source code must retain the above copyright notice,
definition, disclaimer, and this list of conditions.
2. Redistributions in binary form must reproduce the above copyright notice,
definition, disclaimer, and this list of conditions in documentation and/or other
materials provided with the distribution.
3. Altered versions--including, but not limited to, ports to new operating systems,
existing ports with new graphical interfaces, and dynamic, shared, or static
library versions--must be plainly marked as such and must not be misrepresented as
being the original source. Such altered versions also must not be misrepresented
as being Info-ZIP releases--including, but not limited to, labeling of the altered
versions with the names "Info-ZIP" (or any variation thereof, including, but not
limited to, different capitalizations), "Pocket UnZip," "WiZ" or "MacZip" without
the explicit permission of Info-ZIP. Such altered versions are further prohibited
from is representative use of the Zip-Bugs or Info-ZIP e-mail addresses or of the
Info-ZIP URL(s).
4. Info-ZIP retains the right to use the names "Info-ZIP," "Zip," "UnZip," "WiZ,"
"Pocket UnZip," "Pocket Zip," and "MacZip" for its own source and binary releases.
Copyright jQuery Foundation and other contributors, https://jquery.org/
This software consists of voluntary contributions made by many individuals. For
exact contribution history, see the revision history available at https://
github.com/jquery/jquery
The following license applies to all parts of this software except as documented
below:
====
Permission is hereby granted, free of charge, to any person obtaining a copy of
this software and associated documentation files (the "Software"), to deal in the
Software without restriction, including without limitation the rights to use, copy,
modify, merge, publish,
distribute, sublicense, and/or sell copies of the Software, and to permit persons
to whom the Software is furnished to do so, subject to
the following conditions:
THE SOFTWARE IS PROVIDED "AS IS", WITHOUT WARRANTY OF ANY KIND,EXPRESS OR IMPLIED,

346 Genie Distribution WheatNet-IP Manual v1.6
© Tieline Pty. Ltd. 2015
INCLUDING BUT NOT LIMITED TO THE WARRANTIES OF MERCHANTABILITY, FITNESS FOR A
PARTICULAR PURPOSE AND NONINFRINGEMENT. IN NO EVENT SHALL THE AUTHORS OR COPYRIGHT
HOLDERS BE LIABLE FOR ANY CLAIM, DAMAGES OR OTHER LIABILITY, WHETHER IN AN ACTION
OF CONTRACT, TORT OR OTHERWISE, ARISING FROM, OUT OF OR IN CONNECTION WITH THE
SOFTWARE OR THE USE OR OTHER DEALINGS IN THE SOFTWARE.
The MIT License
Copyright (c) 2009 Chris Wanstrath (Ruby)
Copyright (c) 2010-2014 Jan Lehnardt (JavaScript)
Copyright (c) 2010-2015 The mustache.js community
Permission is hereby granted, free of charge, to any person obtaining a copy of
this software and associated documentation files (the "Software"), to deal in the
Software without restriction, including without limitation the rights to use, copy,
modify, merge, publish, distribute, sublicense, and/or sell copies of the Software,
and to permit persons to whom the Software is furnished to do so, subject to the
following conditions:
The above copyright notice and this permission notice shall be included in all
copies or substantial portions of the Software.
THE SOFTWARE IS PROVIDED "AS IS", WITHOUT WARRANTY OF ANY KIND, EXPRESS OR IMPLIED,
INCLUDING BUT NOT LIMITED TO THE WARRANTIES OF MERCHANTABILITY, FITNESS FOR A
PARTICULAR PURPOSE AND NONINFRINGEMENT. IN NO EVENT SHALL THE AUTHORS OR COPYRIGHT
HOLDERS BE LIABLE FOR ANY CLAIM, DAMAGES OR OTHER LIABILITY, WHETHER IN AN ACTION
OF CONTRACT, TORT OR OTHERWISE, ARISING FROM, OUT OF OR IN CONNECTION WITH THE
SOFTWARE OR THE USE OR OTHER DEALINGS IN THE SOFTWARE.
The MIT License (MIT)
Copyright (c) 2011-2015 Twitter, Inc
Permission is hereby granted, free of charge, to any person obtaining a copy of
this software and associated documentation files (the "Software"), to deal in the
Software without restriction, including without limitation the rights to use, copy,
modify, merge, publish, distribute, sublicense, and/or sell copies of the Software,
and to permit persons to whom the Software is furnished to do so, subject to the
following conditions:
The above copyright notice and this permission notice shall be included in all
copies or substantial portions of the Software.
THE SOFTWARE IS PROVIDED "AS IS", WITHOUT WARRANTY OF ANY KIND, EXPRESS OR IMPLIED,
INCLUDING BUT NOT LIMITED TO THE WARRANTIES OF MERCHANTABILITY,FITNESS FOR A
PARTICULAR PURPOSE AND NONINFRINGEMENT. IN NO EVENT SHALL THE AUTHORS OR COPYRIGHT
HOLDERS BE LIABLE FOR ANY CLAIM, DAMAGES OR OTHER LIABILITY, WHETHER IN AN ACTION
OF CONTRACT, TORT OR OTHERWISE, ARISING FROM,OUT OF OR IN CONNECTION WITH THE
SOFTWARE OR THE USE OR OTHER DEALINGS IN THE SOFTWARE.
Status API Training Shop Blog About Pricing
© 2015 GitHub, Inc. Terms Privacy Security Contact Help
Copyright (c) 2012 Ducksboard
Permission is hereby granted, free of charge, to any person obtaining a copy of
this software and associated documentation files (the "Software"), to deal in the
Software without restriction, including without limitation the rights to use, copy,
modify, merge, publish, distribute, sublicense, and/or sell copies of the Software,
and to permit persons to whom the Software is furnished to do so, subject to the
following conditions:
The above copyright notice and this permission notice shall be included in all

347
© Tieline Pty. Ltd. 2015
Genie Distribution WheatNet-IP Manual v1.6
copies or substantial portions of the Software.
THE SOFTWARE IS PROVIDED "AS IS", WITHOUT WARRANTY OF ANY KIND, EXPRESS OR IMPLIED,
INCLUDING BUT NOT LIMITED TO THE WARRANTIES OF MERCHANTABILITY,FITNESS FOR A
PARTICULAR PURPOSE AND NONINFRINGEMENT. IN NO EVENT SHALL THE AUTHORS OR COPYRIGHT
HOLDERS BE LIABLE FOR ANY CLAIM, DAMAGES OR OTHER LIABILITY, WHETHER IN AN ACTION
OF CONTRACT, TORT OR OTHERWISE, ARISING FROM,OUT OF OR IN CONNECTION WITH THE
SOFTWARE OR THE USE OR OTHER DEALINGS IN THE SOFTWARE.

348 Genie Distribution WheatNet-IP Manual v1.6
© Tieline Pty. Ltd. 2015
27.13 Trademarks and Credit Notices1. Windows is a registered trademark of Microsoft Corporation in the United States and/or other
countries.2. Windows XP, Windows Vista and Windows 7 are either trademarks or registered trademarks of
Microsoft Corporation in the United States and/or other countries.3. Firefox is a registered trademark of Mozilla Corporation in the United States and/or other
countries.4. Solaris is a trademark of Sun Microsystems Inc. in the United States and/or other countries.5. Linux is the registered trademark of Linus Torvalds in the U.S. and other countries.6. Java is a trade mark Sun Microsystems Inc. in the United States and/or other countries.7. Comrex® Vector, Matrix® and BlueBox® are registered trademarks of Comrex Corporation in
the United States and/or other countries.8. APT is a registered trademark of Audemat group in the United States and/or other countries.9. Mayah is a registered trademark of MAYAH Communications GmbH in the United States and/or
other countries.10.Telos, Zephyr and Xstream are registered trademarks of Telos Systems in the United States
and/or other countries.11.Other product names mentioned within this document may be trademarks or registered
trademarks, or a trade name of their respective owner.12.MPEG Layer-3 audio coding technology licensed from Fraunhofer IIS and Thomson Licensing.
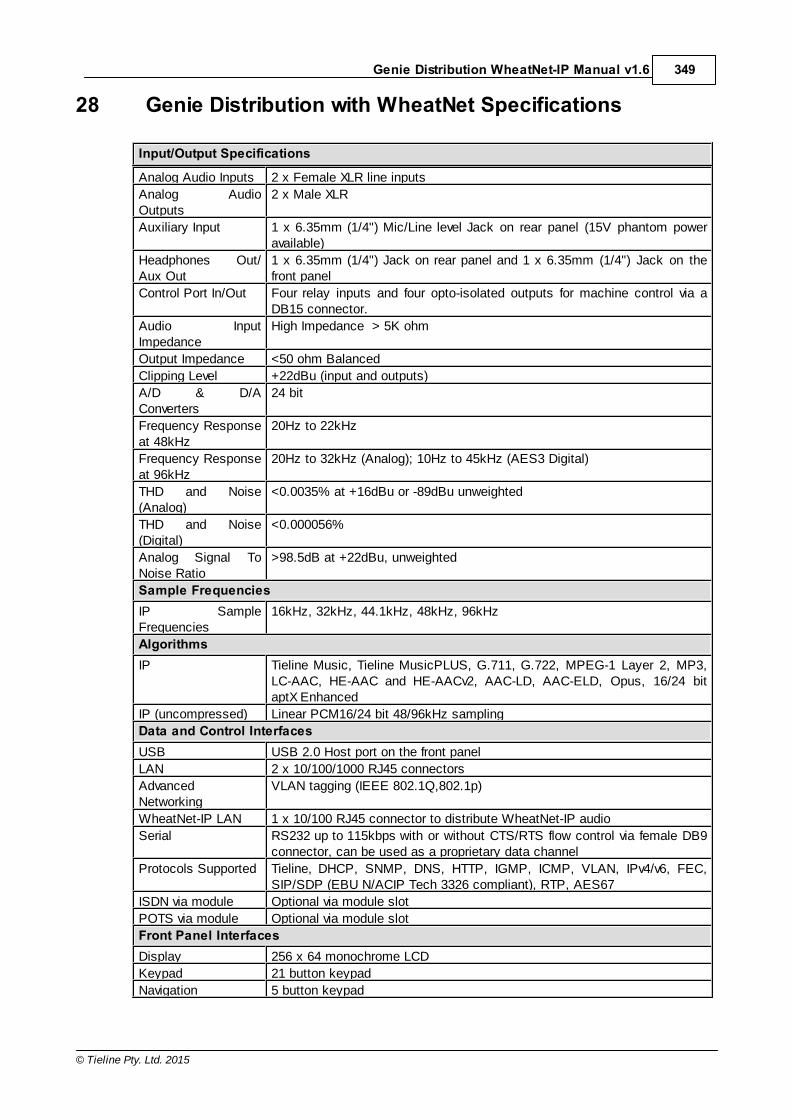
349
© Tieline Pty. Ltd. 2015
Genie Distribution WheatNet-IP Manual v1.6
28 Genie Distribution with WheatNet Specifications
Input/Output Specifications
Analog Audio Inputs 2 x Female XLR line inputs
Analog AudioOutputs
2 x Male XLR
Auxiliary Input 1 x 6.35mm (1/4") Mic/Line level Jack on rear panel (15V phantom poweravailable)
Headphones Out/Aux Out
1 x 6.35mm (1/4") Jack on rear panel and 1 x 6.35mm (1/4") Jack on thefront panel
Control Port In/Out Four relay inputs and four opto-isolated outputs for machine control via aDB15 connector.
Audio InputImpedance
High Impedance > 5K ohm
Output Impedance <50 ohm Balanced
Clipping Level +22dBu (input and outputs)
A/D & D/AConverters
24 bit
Frequency Responseat 48kHz
20Hz to 22kHz
Frequency Responseat 96kHz
20Hz to 32kHz (Analog); 10Hz to 45kHz (AES3 Digital)
THD and Noise(Analog)
<0.0035% at +16dBu or -89dBu unweighted
THD and Noise(Digital)
<0.000056%
Analog Signal ToNoise Ratio
>98.5dB at +22dBu, unweighted
Sample FrequenciesIP SampleFrequencies
16kHz, 32kHz, 44.1kHz, 48kHz, 96kHz
AlgorithmsIP Tieline Music, Tieline MusicPLUS, G.711, G.722, MPEG-1 Layer 2, MP3,
LC-AAC, HE-AAC and HE-AACv2, AAC-LD, AAC-ELD, Opus, 16/24 bitaptX Enhanced
IP (uncompressed) Linear PCM16/24 bit 48/96kHz sampling
Data and Control InterfacesUSB USB 2.0 Host port on the front panel
LAN 2 x 10/100/1000 RJ45 connectors
AdvancedNetworking
VLAN tagging (IEEE 802.1Q,802.1p)
WheatNet-IP LAN 1 x 10/100 RJ45 connector to distribute WheatNet-IP audio
Serial RS232 up to 115kbps with or without CTS/RTS flow control via female DB9connector, can be used as a proprietary data channel
Protocols Supported Tieline, DHCP, SNMP, DNS, HTTP, IGMP, ICMP, VLAN, IPv4/v6, FEC,SIP/SDP (EBU N/ACIP Tech 3326 compliant), RTP, AES67
ISDN via module Optional via module slot
POTS via module Optional via module slot
Front Panel InterfacesDisplay 256 x 64 monochrome LCD
Keypad 21 button keypad
Navigation 5 button keypad

350 Genie Distribution WheatNet-IP Manual v1.6
© Tieline Pty. Ltd. 2015
GeneralSize 1U x 19" Rackmount
Dimensions 19” x 1.75” x 13.5” [482mm (W) x 44mm (H) x 343mm (D) including rearconnectors]
Weight 6lb 5.59oz/2.88kg
Power Consumption Dual AC 100-240V IEC power inlets; 1A - 50-60Hz
OperatingTemperature
0°C to 45°C (32°F to 113°F)
Humidity OperatingRange
20% (0 to 35°C/32°F to 95°F), non-condensing

351
© Tieline Pty. Ltd. 2015
Genie Distribution WheatNet-IP Manual v1.6
29 Appendix A: RS232 and Control Port Wiring
RelaysThe codec uses a DB15 connector to facilitate use of four CMOS solid state relays for the control ofequipment, consisting of four relay closures and four opto-isolated outputs.
InputsThe input signal is referenced to chassis ground, i.e. the ground reference terminal on theconnector is connected the chassis. The input device is a high impedance CMOS device with a330 ohm pull-up resistor to +5 volts.
Operation is as simple as joining the input pin to the ground terminal. This can be via a remoterelay contact or the open circuit collector of a transistor or FET. DO NOT feed voltages into theinputs.
OutputsCMOS field effect transistors switch a low impedance path between the two pins whenactivated. These are opto-isolated and floating above ground. It is important to current-limit thesource as damage will result where the current exceeds 100mA peak-to-peak. No more than 48volts peak-to-peak should be used as a safety precaution. The resistance of the CMOS elementis approximately 25 ohms in the ON state.
Control Port Pin-outsA closing contact across Inputs 1-4 to Ground will provide a closing contact on the remote codecOutputs 1 to 4. If your codec supports multi-unicast connections to multiple codecs, a contactclosure will appear on each of the compatible (non-G3) remote codecs' corresponding contacts. I.e.Input 1 shorted, Output 1 contacts on all connected codecs closed.
Female DB-15 Codec Connector
Pins Pin Function1 Ground
2 Output 4
3 Output 3
4 Output 2
5 Output 1
6 Ground
7 Input 3
8 Input 1
9 Output 4
10 Output 3
11 Output 2
12 Output 1
13 Ground
14 Input 4
15 Input 2
Important Note: For more information about how to program relay operations with aPC using the Toolbox Web-GUI, please see Creating Rules.

352 Genie Distribution WheatNet-IP Manual v1.6
© Tieline Pty. Ltd. 2015
RS232 Pin-outs and Data Connections
Pin INTERFACE FemaleDB9 (RS232) DCE
DATA Male DB9(RS232) DTE
1 No Connection No connection
2 TX Data RX Data
3 RX Data TX Data
4 No connection No connection
5 Signal Ground Signal Ground
6 No Connection No connection
7 CTS RTS
8 RTS CTS
9 No connection No connection
DB9 MaleConnector Pins
DB9 FemaleConnector Pins
Important Notes: · The codec cannot send RS232 data to, or activate relays on Tieline G3 codecs.· It is important that you enable serial port flow control within the codec. Flow control
regulates the flow of data through the serial port. If disabled, data will flow unregulatedand some may be lost.
· Ensure you match the serial port baud rate to match the rate of the external device youare connecting to. Ideally the settings on both codecs should match, or you could havedata overflow issues.
· Only the dialing codec needs to be programmed to send RS232 data. Session data sentfrom the dialing codec will program all other compatible codecs (non-G3) when youconnect.

Index 353
© Tieline Pty. Ltd. 2015
Index- 2 -2 x Stereo + 2 x Mono program
about 56
configure SmartStream PLUS 153
Java Toolbox configuration 153
2 x Stereo Peer-to-Peer program about 55, 55
- 3 -3 x Stereo Peer-to-Peer program
about 55
- 6 -6 x Mono Peer-to-Peer program
configure SmartStream PLUS 170
Java Toolbox configuration 170
6 x Mono program about 56
- A -AAC 284
AES/EBU - HTML5 Toolbox output sample rate 255
AES/EBU - Java Toolbox output sample rate 119
AES3 - HTML5 Toolbox output sample rate 255
AES3 - Java Toolbox output sample rate 119
Alarms - HTML5 Toolbox acknowledging 272
AES input 269
AES reference signal 269
alerts 269
configuration 269
deactivating 272
enabling 269
fan failure 269
history 272
indications 272
input silence 269
lost connection 269
managing 272
PSU failure 269
purge history 272
severity levels 269
silence detection parameters 269
SNMP trap configuration 269
temperature 269
types of alarms 269
Alarms - Java Toolbox acknowledging 211
AES input 207
AES reference signal 207
alerts 207
configuration 207
deactivating 211
enabling 207
fan failure 207
history 211
indications 211
input silence 207
lost connection 207
managing 211
PSU failure 207
purge history 211
severity levels 207
silence detection parameters 207
SNMP trap configuration 207
temperature 207
types of alarms 207
Algorithm favorites 80
profiles 80
Algorithms configuration 284
types 284
Answer routes 331
Applications 10
apt-X Enhanced audio coding 284
Audio levels 2 stereo connections 29
3 stereo connections 29
adjustment 29
ganging inputs 29
IGC 29

Genie Distribution WheatNet-IP Manual v1.6354
© Tieline Pty. Ltd. 2015
Audio levels IGC Auto Level 29
intelligent gain control 29
metering 29
mono connection 29
multi-unicast connections 29
phantom power 29
quick adjustment of levels 29
stereo connection 29
Auto Reconnect operation 71
programming of 71
Aux out, configure 35
Auxiliary input 12audio levels 29
configuration 29
phantom power 29
Auxiliary output configure and adjust 35
- B -Backup, how it works 83
- C -Certifications 336
Compliances 336
Configuration check IP details 281
DHCP IP addresses 281
FEC 295
forward error correction 295
IP addresses 281
IPv4/IPv6 281
jitter buffer 291
static IP addresses 281
via front panel 281
web-GUI software 89
Configuration files backup via HTML5 Toolbox 263
backup via Java Toolbox 202
restore via HTML5 Toolbox 263
restore via Java Toolbox 202
Connecting 58default algorithm profiles 80
dialing 58
dialing ISDN 63
dialing POTS 67
disconnecting 70
first steps 58, 58
hanging up 70
how to connect 58
how to connect ISDN 63
how to connect POTS 67
speed dialing 71
Connection IP link quality 61
IP statistics 61
Connections AC power 12
analog 12
Auxiliary input 12
Ethernet 12
headphone output 12
opto-isolated outputs 12
rear panel 12
Rear Panel Connections 12
relay inputs 12
RS-232 12
WNET LAN port 12
Control port wiring 351
Control ports 12, 297wiring pin-outs 351
Control Ports - HTML5 Toolbox configuration 276
opto-isolated inputs 276
relay outputs 276
Control Ports - Java Toolbox configuration 214
opto-isolated inputs 214
relay outputs 214
Controls 20
Country settings 58
Credit notices 348
- D -Data
bidirectional encoding 297
unidirectional encoding 297
DB15 351
DB9 351
Default password
Index 355
© Tieline Pty. Ltd. 2015
Default password new Toolbox password 93
Default ports 298
Default profiles 82
DHCP IP addresses 281
Dial & disconnect - HTML5 Toolbox dial a program or audio stream 259
disconnect a program or audio stream 259
unload a program 259
Dial & disconnect - Java Toolbox dial an audio stream 197
dial multiple audio streams 198
disconnect an audio stream 197
disconnect individual IP stream 198
disconnect multiple IP streams 198
Dialing default algorithm profiles 80
disconnecting 70
hanging up 70
how to connect 58
how to connect ISDN 63
POTS dialing 67
speed dialing 71
Disconnecting 70
DSCP 102, 238configuration 300
- E -Encode/Decode Direction 297
Ethernet ports 12
- F -Factory default settings - HTML5 Toolbox
restore via web-GUI 262
Factory default settings - Java Toolbox restore via web-GUI 201
Factory defaults restore via front panel 303
Fail over, how it works 83
FCC compliance 336
Features 10
FEC configuration 295
how it works 295
File playback -Java Toolbox
edit settings 201
Firmware upgrades - HTML5 Toolbox 280
Firmware upgrades - Java Toolbox 216
Forward error correction configuration 295
FEC 295
how it works 295
Front panel controls 20
- G -G.711 284
G.722 284
Ganging inputs 29
Glossary 8
GPIOs - HTML5 Toolbox 276
GPIOs - Java Toolbox 214
Ground terminal 12
GUI ports 298
- H -Hanging up a connection 70
Headphone out 12
Headphones monitoring audio 35
output levels 35
stereo connections 35
Help button 7
HTML5 Toolbox Quick Connect dial & disconnect connections 231
IP setup 231
ISDN setup 231
launching 231
load & unload a program 231
POTS setup 231
PPM monitoring 231
HTML5 Toolbox Web-GUI configure connections 238
configure Ethernet ports 238
configure QoS 238
configure VLANs 238
dial a program or audio stream 259
disconnect a program or audio stream 259
DNS settings 238
DSCP 238
IPv4 address configuration 238

Genie Distribution WheatNet-IP Manual v1.6356
© Tieline Pty. Ltd. 2015
HTML5 Toolbox Web-GUI IPv6 address configuration 238
ISDN configuration 242
QoS 238
unload a program 259
- I -IGC 29
Inputs adjusting input levels 29
audio metering 29
ganging 29
IGC 29
IGC Auto Level 29
intelligent gain control 29
phantom power 29
quick adjustment of levels 29
Inputs - HTML5 Toolbox analog 255
digital AES3 255
ganging 255
lock settings 255
renaming 255
setting levels 255
Inputs - Java Toolbox analog 119
digital AES3 119
ganging 119
lock settings 119
renaming 119
setting levels 119
Intelligent gain control 29
Introduction 10
Introduction to the HTML5 Toolbox 218
Introduction to the web-GUI 94
IP testing 315
IP address configuration 281
details 281
DHCP 281
IPv4/IPv6 281
static 281
IP addresses 281
IP and USB backup 83
IPv4/IPv6 281
ISDN about modules 39
bonding 43
connect to non-Tieline codecs 317
connecting to APT 317
connecting to CDQ Prima 320
connecting to Comrex Matrix 328
connecting to Mayah 323
connecting to Zephyr Xstream 325
considerations 39
default answering settings 43
dial and answer route tags 43
front panel module config 40
module settings 40
monitoring connections 66
network types 40
non-Tieline codecs 43
sessionless calls 331
testing 317
U and S/T interfaces 39
using answer routes 331
ISDN - HTML5 Toolbox answering config 244
bonding 244
default answering config 244
deterministic dialing 244
dial and answer route tags 244
Directory Numbers 242
DN 242
GUI module config 242
module config 242
MSN 242
Multiple Subscriber Number 242
non-Tieline codecs 244
SPID 242
ISDN - Java Toolbox answering config 108
bonding 108
default answering config 108
deterministic dialing 108
dial and answer route tags 108
Directory Numbers 106
DN 106
GUI module config 106
module config 106
MSN 106
Multiple Subscriber Number 106
non-Tieline codecs 108

Index 357
© Tieline Pty. Ltd. 2015
ISDN - Java Toolbox SPID 106
ISDN: HTML5 Toolbox configuration 242
ISDN: Java Toolbox configuration 106
- J -Java Toolbox Web-GUI
alarms panel 94
configure connections 102
configure Ethernet ports 102
configure panel 94
configure peer-to-peer mono/stereo 122
configure QoS 102
configure VLANs 102
dial an audio stream 197
dial multiple IP streams 198
disconnect an audio stream 197
disconnect individual IP stream 198
disconnect multiple IP streams 198
DNS settings 102
DSCP 102
help panel 94
inputs panel 94
IPv4 address configuration 102
IPv6 address configuration 102
ISDN configuration 106
master panel 94
programs panel 94
QoS 102
rules panel 94
VLAN Configuration 102
Jitter buffer algorithms 291
automatic 291
configuration 291
fixed 291
SIP 291
- K -Keypad
button descriptions 20
function button descriptions 20
- L -Language selection 94
codec menus 52
Language selection - HTML5 Toolbox 218
Linear audio 284
Link quality IP monitoring 61
IP return link quality 61
IP send link quality 61
Lock programs 86
Lock programs via HTML5 Toolbox 265
Lock programs via Java Toolbox 204
Logs - HTML5 Toolbox send logs to Tieline 267
view event logs 267
Logs - Java Toolbox send logs to Tieline 206
view event logs 206
Loopback audio 304
LQ 61
- M -Maintenance schedule 305
Manual conventions 7
overview 7
Manual Conventions 7
Master panel - Java Toolbox multi-unicast dialing 179
Menus codec menus 22
Meters 2 stereo connections 29
3 stereo connections 29
mono connection 29
multi-unicast connections 29
stereo connection 29
Modules inserting/removing 38
Monitoring headphone outputs 35
headphones 35
IP connection statistics 61
IP link quality 61

Genie Distribution WheatNet-IP Manual v1.6358
© Tieline Pty. Ltd. 2015
Monitoring IP packet reliability 61
ISDN 66
POTS 69
Mono connection metering 29
MP3 284
MPEG Layer 2 284
Multicast - Java Toolbox about 185, 189
Java Toolbox client config 189
Java Toolbox server config 185
multicast server versus client 185
Multicasting front panel configuration 74, 77
multicast client programs 77
multicast server programs 74
Multicasts 57
Multiple unicasts dialing 179
Java Toolbox configuration 179
Multi-unicasts 57dialing 179
Java Toolbox configuration 179
- N -Navigating menus
how to 22
Navigation how to 22
Navigation buttons 20
Navigator software 14
- O -Opto-isolated inputs 297
Overview manual 7
- P -Panel lock 87
Peer-to-Peer Mono x 2 backup connections 131
configure SmartStream PLUS 131
dual mono audio streams 131
file playback 131
Java Toolbox configuration 131
Peer-to-Peer Mono x 2 incoming configure SmartStream PLUS 138
connections 138
dual mono audio streams 138
file playback 138
Java Toolbox configuration 138
Peer-to-Peer Mono/Stereo backup connections 122
configure SmartStream PLUS 122
connections 122
enable data 122
file playback 122
Java Toolbox configuration 122
Peer-to-Peer Mono/Stereo x 2 2 mono/stereo audio streams 144
configure SmartStream PLUS 144
Java Toolbox configuration 144
specify outputs 144
Peer-to-Peer Mono/Stereo x 3 3 mono/stereo audio streams 144
Phantom power 29
Ports 298
POTS about modules 46
about POTS 46
connection tips 334
front panel config 50
front panel module config 47
G3 interoperability 46
how to configure 46
module settings 47
monitoring connections 69
network types 47
non-Tieline codecs 50
precautions 334
POTS - HTML5 Toolbox answer config 252
configuration 249
deterministic dialing 252
dial and answer routes 252
module config 250
module settings 250
POTS - Java Toolbox answer config 116
configuration 113
deterministic dialing 116
dial and answer routes 116

Index 359
© Tieline Pty. Ltd. 2015
POTS - Java Toolbox module config 113
module settings 113
Power inputs 12
Preparing to connect 58
Profiles 82
Programs 2 x Mono Peer-to-Peer 55, 55
2 x Stereo + 2 x Mono 56
3 x Mono Peer-to-Peer 55
6 x Mono, about 56
about multicasts 53
about multi-unicasts 53
about peer-to-peer calls 53
audio streams 53
deleting 80
dial multiple connections 72
dialing 70
disconnect multiple connections 72
how do they work 53
lock 86
multicast 57
multi-unicast 57
session data 53
Stereo + 4 x Mono, about 56
unlock 86
Programs - HTML5 Toolbox backup and restore 263
Programs - Java Toolbox 2 x Stereo + 2 x Mono config 153
6 x Mono audio stream 170
answer 2 x Mono Peer-to-Peer 138
backup and restore 202
configure 2 Mono Peer-to-Peer 131
configure 2 mono audio streams 131
configure multi-unicast dial 179
configure peer-to-peer mono/stereo 122
delete 200
dual mono audio streams 138
dual stereo audio streams 144
edit 200
monitor multi-unicast audio 179
mono audio streams, 2 incoming 138
specify outputs 2 x Mono Peer-to-Peer 131
Stereo + 4 x Mono config 161
triple stereo audio streams 144
view settings 200
- Q -QoS
configuration 300
DSCP 300
Quality of Service configuration 238, 300
DSCP 238, 300
Quality of Service - Java Toolbox configuration 102
DSCP 102
QoS 102
Quick start dialing 58
dialing ISDN 63
dialing POTS 67
first steps 58
how to connect 58
how to connect ISDN 63
how to connect POTS 67
- R -Razor software 14
Rear panel connections 12
Redialing 71
Reference 305
Relay closures 297
Relays configuration 297
pin outs 297
Reset factory default settings 303
programs 303
user settings 303
Reset defaults - HTML5 Toolbox factory default settings 262
programs 262
user settings 262
Reset defaults - Java Toolbox factory default settings 201
programs 201
user settings 201
Restore factory defaults via front panel 303
RS232

Genie Distribution WheatNet-IP Manual v1.6360
© Tieline Pty. Ltd. 2015
RS232 configuration via codec 297
RS232 - HTML5 Toolbox baud rates via web-GUI 275
flow control via web-GUI 275
RS232 - Java Toolbox baud rates via web-GUI 212
flow control via web-GUI 212
RS232 wiring 351
Rules - HTML5 Toolbox control port configuration 276
Rules - Java Toolbox control port configuration 214
- S -Sessionless ISDN
Answer routes 331
SIP dialing SIP addresses 74
peer-to-peer connections 73
SIP - HTML5 Toolbox configure SIP settings 257
SDP 257
session description protocol 257
SIP server configuration 257
SIP - Java Toolbox configure SIP programs 194
configure SIP settings 192
multiple SIP call config 197
SDP 192
session description protocol 192
SIP server configuration 192
SIP ports 298
Site port setting 298
SmartStream 83
SNMP front panel config 304
SNMP - HTML5 Toolbox configuring settings 266
downloading MIB files 266
setting descriptions 266
SNMP - Java Toolbox configuring settings 205
downloading MIB files 205
setting descriptions 205
Software Licences 338
Software upgrades - HTML5 Toolbox 280
Software upgrades - Java Toolbox 216
Speed dialing 71
Static IP addresses 281
Stereo + 4 x Mono program about 56
configure SmartStream PLUS 161
Java Toolbox configuration 161
Stereo Connection metering 29
Studio Codec Installation installation procedures 306
port forwarding 306
testing 306
troubleshooting 306
Sync input 12
- T -TCP port settings 298
Test mode 304
Testing IP connections 315
Testing ISDN connections 317
Tieline Music 284
Tieline MusicPLUS 284
Tieline session port 298
Time-to-live 301
ToolBox Web-GUI options about HTML5 Quick Connect 89
about HTML5 Toolbox 89
about Java Toolbox 89
compatibility 89
connecting to a codec 89
internet connections 90
LAN troubleshooting 90
launching the HTML5 Toolbox 90
launching the Java Toolbox 90
PC LAN settings 90
port selection 90
prerequisites 89
Trademarks 348
Transcriptor Rx 284
Transcriptor Tx 284
Troubleshooting IP connection tips 314
TTL 301
Index 361
© Tieline Pty. Ltd. 2015
- U -UDP port settings 298
Understanding IP networks 312
Unlock Programs 86
Unlock programs via HTML5 Toolbox 265
Unlock programs via Java Toolbox 204
USB 2 host port 20
USB file playback 85
- V -VLAN Configuration 238
- W -Warnings & safety information
digital phone systems 6
earth leakage 6
supplementary ground 6
thunderstorms and lightning 6
Web Browser Using the Java web-GUI 94
Web-GUI - HTML5 alarm dissemination panel 218
alarm history panel 218
change theme 218
configure alarms panel 218
connections panel 218
current alarms panel 218
firmware panel 218
help panels 218
inputs panel 218
ISDN answer panel 218
licensing panel 218
master panels 218
modules panel 218
network panel 218
opening panels 218
options panel 218
POTS answer panel 218
PPMs panel 218
program loader panel 218
reset panel 218
rules panel 218
settings panels 218
SIP panel 218
skin selection 218
statistics panel 218
theme selection 218
WheatNet-IP add device using Navigator 14
add device using Razor 14
configuration 14
configuration examples 19
destinations 19
Navigator software 14
Razor software 14
sources 19
Wiring DB15 control port in/out 351
opto-isolated inputs 351
relay closures 351
RS232 using DB9 351
WNET LAN port 12
- X -XLR in/out 12