
Beyond DHCP - Work Your TCP/IP Internetwork with Dynamic IP
536
SG24-5280-01 International Technical Support Organization www.redbooks.ibm.com Beyond DHCP - Work Your TCP/IP Internetwork with Dynamic IP Oscar Cepeda, Bob Chambers, Julian Mosca, Matt Robbins
-
Upload
khangminh22 -
Category
Documents
-
view
3 -
download
0
Transcript of Beyond DHCP - Work Your TCP/IP Internetwork with Dynamic IP
SG24-5280-01
International Technical Support Organization
www.redbooks.ibm.com
Beyond DHCP -Work Your TCP/IP Internetwork with Dynamic IP
Oscar Cepeda, Bob Chambers, Julian Mosca, Matt Robbins

Beyond DHCP -Work Your TCP/IP Internetwork with Dynamic IP
January 2000
SG24-5280-01
International Technical Support Organization
© Copyright International Business Machines Corporation 1998, 2000. All rights reserved.Note to U.S Government Users – Documentation related to restricted rights – Use, duplication or disclosure issubject to restrictions set forth in GSA ADP Schedule Contract with IBM Corp.
Second Edition (January 2000)
This edition applies to AIX Version 4.3, Windows NT Server, OS/2 Warp Server for e-business, OS/2Warp Server Version 4, OS/2 Warp 4, Workspace On-Demand, and TCP/IP Version 4.1 for OS/2 Warp.This edition also applies to Lotus Notes, Lotus Domino Go Webserver, and Windows 3.1, Windows 95and Windows NT client enhancements from IBM.
Comments may be addressed to:IBM Corporation, International Technical Support OrganizationDept. DHHB Building 003 Internal Zip 283411400 Burnet RoadAustin, Texas 78758-3493
When you send information to IBM, you grant IBM a non-exclusive right to use or distribute theinformation in any way it believes appropriate without incurring any obligation to you.
Before using this information and the product it supports, be sure to read the general information inAppendix E, “Special notices” on page 485.
Take Note!

Contents
Preface . . . . . . . . . . . . . . . . . . . . . . . . . . . . . . . . . . . . . . . . . . . . . . . . . . . .xiThe team that wrote this redbook. . . . . . . . . . . . . . . . . . . . . . . . . . . . . . . . . . . .xiComments welcome. . . . . . . . . . . . . . . . . . . . . . . . . . . . . . . . . . . . . . . . . . . . . xvi
Chapter 1. TCP/IP overview . . . . . . . . . . . . . . . . . . . . . . . . . . . . . . . . . . . 11.1 Network protocols . . . . . . . . . . . . . . . . . . . . . . . . . . . . . . . . . . . . . . . . 11.2 IP addresses . . . . . . . . . . . . . . . . . . . . . . . . . . . . . . . . . . . . . . . . . . . . 21.3 IP subnets . . . . . . . . . . . . . . . . . . . . . . . . . . . . . . . . . . . . . . . . . . . . . . 61.4 IP routing . . . . . . . . . . . . . . . . . . . . . . . . . . . . . . . . . . . . . . . . . . . . . . . 91.5 Assigning IP addresses . . . . . . . . . . . . . . . . . . . . . . . . . . . . . . . . . . . 10
1.5.1 BOOTP and the Dynamic Host Configuration Protocol (DHCP) . 101.6 Domain Name Services (DNS) . . . . . . . . . . . . . . . . . . . . . . . . . . . . . . 12
1.6.1 Domain names . . . . . . . . . . . . . . . . . . . . . . . . . . . . . . . . . . . . . . 131.6.2 Domain versus zone of authority . . . . . . . . . . . . . . . . . . . . . . . . 161.6.3 Differentiating name servers . . . . . . . . . . . . . . . . . . . . . . . . . . . . 181.6.4 Dynamic Domain Name Services (DDNS) . . . . . . . . . . . . . . . . . 221.6.5 Resource record types . . . . . . . . . . . . . . . . . . . . . . . . . . . . . . . . 23
1.7 Network security and the Internet . . . . . . . . . . . . . . . . . . . . . . . . . . . . 251.8 IP Version 6 (IPv6) . . . . . . . . . . . . . . . . . . . . . . . . . . . . . . . . . . . . . . . 261.9 Applications that use TCP/IP . . . . . . . . . . . . . . . . . . . . . . . . . . . . . . . 261.10 Other TCP/IP terms . . . . . . . . . . . . . . . . . . . . . . . . . . . . . . . . . . . . . 26
Chapter 2. Up and Running with DHCP . . . . . . . . . . . . . . . . . . . . . . . . . 292.1 Why DHCP? . . . . . . . . . . . . . . . . . . . . . . . . . . . . . . . . . . . . . . . . . . . . 302.2 OS/2 Warp Server for e-business as a DHCP server . . . . . . . . . . . . . 30
2.2.1 Installation . . . . . . . . . . . . . . . . . . . . . . . . . . . . . . . . . . . . . . . . . 302.2.2 DHCP server preparation . . . . . . . . . . . . . . . . . . . . . . . . . . . . . . 312.2.3 Basic configuration . . . . . . . . . . . . . . . . . . . . . . . . . . . . . . . . . . . 352.2.4 Testing and verification. . . . . . . . . . . . . . . . . . . . . . . . . . . . . . . . 40
2.3 Windows NT as a DHCP server . . . . . . . . . . . . . . . . . . . . . . . . . . . . . 432.3.1 Installation . . . . . . . . . . . . . . . . . . . . . . . . . . . . . . . . . . . . . . . . . 432.3.2 DHCP server preparation . . . . . . . . . . . . . . . . . . . . . . . . . . . . . . 442.3.3 Basic configuration . . . . . . . . . . . . . . . . . . . . . . . . . . . . . . . . . . . 452.3.4 Testing and verification. . . . . . . . . . . . . . . . . . . . . . . . . . . . . . . . 49
2.4 AIX as a DHCP server . . . . . . . . . . . . . . . . . . . . . . . . . . . . . . . . . . . . 502.4.1 Manually configuring the DHCP server . . . . . . . . . . . . . . . . . . . . 502.4.2 Configuring DHCP server through dhcpsconf . . . . . . . . . . . . . . . 512.4.3 Disabling BOOTP support in inetd . . . . . . . . . . . . . . . . . . . . . . . 62
2.5 DHCP clients . . . . . . . . . . . . . . . . . . . . . . . . . . . . . . . . . . . . . . . . . . . 642.5.1 OS/2 Warp 4. . . . . . . . . . . . . . . . . . . . . . . . . . . . . . . . . . . . . . . . 642.5.2 Windows 95 and Windows 98 . . . . . . . . . . . . . . . . . . . . . . . . . . . 72
© Copyright IBM Corp. 1998, 2000 iii
2.5.3 Windows NT Workstation 4.0 . . . . . . . . . . . . . . . . . . . . . . . . . . . 732.5.4 Windows 2000 . . . . . . . . . . . . . . . . . . . . . . . . . . . . . . . . . . . . . . 752.5.5 Apple Macintosh . . . . . . . . . . . . . . . . . . . . . . . . . . . . . . . . . . . . . 772.5.6 IBM Network Station . . . . . . . . . . . . . . . . . . . . . . . . . . . . . . . . . . 792.5.7 AIX . . . . . . . . . . . . . . . . . . . . . . . . . . . . . . . . . . . . . . . . . . . . . . . 862.5.8 Linux . . . . . . . . . . . . . . . . . . . . . . . . . . . . . . . . . . . . . . . . . . . . . 902.5.9 DOS, Windows 3.1, and Windows for Workgroups . . . . . . . . . . . 922.5.10 Sun Microsystems Solaris. . . . . . . . . . . . . . . . . . . . . . . . . . . . . 992.5.11 IBM WorkSpace On-Demand . . . . . . . . . . . . . . . . . . . . . . . . . 1022.5.12 Hewlett-Packard LaserJet 4000 Printer (JetDirect) . . . . . . . . . 105
Chapter 3. DHCP server and client interaction . . . . . . . . . . . . . . . . . . 1133.1 DHCP basics . . . . . . . . . . . . . . . . . . . . . . . . . . . . . . . . . . . . . . . . . . 113
3.1.1 Client states . . . . . . . . . . . . . . . . . . . . . . . . . . . . . . . . . . . . . . . 1133.2 The DHCP lease . . . . . . . . . . . . . . . . . . . . . . . . . . . . . . . . . . . . . . . 114
3.2.1 Getting the lease . . . . . . . . . . . . . . . . . . . . . . . . . . . . . . . . . . . 1143.2.2 Renewing the lease . . . . . . . . . . . . . . . . . . . . . . . . . . . . . . . . . 1153.2.3 Rebinding the lease . . . . . . . . . . . . . . . . . . . . . . . . . . . . . . . . . 1153.2.4 Eviction . . . . . . . . . . . . . . . . . . . . . . . . . . . . . . . . . . . . . . . . . . 116
3.3 Interaction between DHCP server and client . . . . . . . . . . . . . . . . . . 1163.3.1 BOOTP. . . . . . . . . . . . . . . . . . . . . . . . . . . . . . . . . . . . . . . . . . . 1173.3.2 Relay agents . . . . . . . . . . . . . . . . . . . . . . . . . . . . . . . . . . . . . . 118
3.4 DHCP messages . . . . . . . . . . . . . . . . . . . . . . . . . . . . . . . . . . . . . . . 1183.4.1 DHCPDISCOVER. . . . . . . . . . . . . . . . . . . . . . . . . . . . . . . . . . . 1183.4.2 DHCPOFFER . . . . . . . . . . . . . . . . . . . . . . . . . . . . . . . . . . . . . . 1203.4.3 DHCPREQUEST . . . . . . . . . . . . . . . . . . . . . . . . . . . . . . . . . . . 1223.4.4 DHCPNAK . . . . . . . . . . . . . . . . . . . . . . . . . . . . . . . . . . . . . . . . 1263.4.5 DHCPACK . . . . . . . . . . . . . . . . . . . . . . . . . . . . . . . . . . . . . . . . 1273.4.6 DHCPDECLINE . . . . . . . . . . . . . . . . . . . . . . . . . . . . . . . . . . . . 1283.4.7 DHCPRELEASE . . . . . . . . . . . . . . . . . . . . . . . . . . . . . . . . . . . . 1283.4.8 DHCPINFORM . . . . . . . . . . . . . . . . . . . . . . . . . . . . . . . . . . . . . 129
Chapter 4. Serving names . . . . . . . . . . . . . . . . . . . . . . . . . . . . . . . . . . 1314.1 Name serving on the Windows platforms . . . . . . . . . . . . . . . . . . . . . 131
4.1.1 Windows NT as a Static DNS server. . . . . . . . . . . . . . . . . . . . . 1314.1.2 Windows NT as a DDNS using WINS . . . . . . . . . . . . . . . . . . . . 1364.1.3 Windows 95/98 as a static DNS client. . . . . . . . . . . . . . . . . . . . 1424.1.4 Windows NT Workstation 4.0 as a static DNS client . . . . . . . . . 1424.1.5 Windows with IBM Dynamic IP Client . . . . . . . . . . . . . . . . . . . . 143
4.2 OS/2 Warp Server as Dynamic DNS server . . . . . . . . . . . . . . . . . . . 1504.2.1 The Dynamic Domain Name System (DDNS) . . . . . . . . . . . . . . 1504.2.2 The IBM Dynamic DNS (relative to other implementations). . . . 1564.2.3 Scenario . . . . . . . . . . . . . . . . . . . . . . . . . . . . . . . . . . . . . . . . . . 159
iv Beyond DHCP - Work Your TCP/IP Internetwork with Dynamic IP

4.2.4 Tasks . . . . . . . . . . . . . . . . . . . . . . . . . . . . . . . . . . . . . . . . . . . . 1604.2.5 Planning . . . . . . . . . . . . . . . . . . . . . . . . . . . . . . . . . . . . . . . . . . 1604.2.6 Setting up your DDNS server . . . . . . . . . . . . . . . . . . . . . . . . . . 1614.2.7 ProxyArec. . . . . . . . . . . . . . . . . . . . . . . . . . . . . . . . . . . . . . . . . 1764.2.8 Verification . . . . . . . . . . . . . . . . . . . . . . . . . . . . . . . . . . . . . . . . 1774.2.9 DDNS files . . . . . . . . . . . . . . . . . . . . . . . . . . . . . . . . . . . . . . . . 1774.2.10 Providing mail services . . . . . . . . . . . . . . . . . . . . . . . . . . . . . . 185
4.3 Dynamic DNS client support in OS/2 Warp Server . . . . . . . . . . . . . . 1984.3.1 OS/2 Warp 4 with TCP/IP Version 4.1 for OS/2 . . . . . . . . . . . . 1984.3.2 OS/2 Warp 4 with TCP/IP 4.0 . . . . . . . . . . . . . . . . . . . . . . . . . . 2014.3.3 OS/2 Warp 4 using presecured mode . . . . . . . . . . . . . . . . . . . . 2034.3.4 WorkSpace On-Demand using proxy . . . . . . . . . . . . . . . . . . . . 206
4.4 Name serving on AIX . . . . . . . . . . . . . . . . . . . . . . . . . . . . . . . . . . . . 2084.4.1 AIX as a DNS client . . . . . . . . . . . . . . . . . . . . . . . . . . . . . . . . . 2094.4.2 AIX as a static DNS server . . . . . . . . . . . . . . . . . . . . . . . . . . . . 2114.4.3 AIX as a DDNS server . . . . . . . . . . . . . . . . . . . . . . . . . . . . . . . 218
Chapter 5. Integrating file and print services . . . . . . . . . . . . . . . . . . . 2275.1 NetBIOS, NetBEUI and TCPBEUI: What are they?. . . . . . . . . . . . . . 2275.2 Resolving NetBIOS names to IP addresses . . . . . . . . . . . . . . . . . . . 232
5.2.1 Enhancing B-Node clients . . . . . . . . . . . . . . . . . . . . . . . . . . . . 2335.3 New way of using DNS with non-RFC-encoded name . . . . . . . . . . . 2465.4 NetBIOS Name Servers (NBNS). . . . . . . . . . . . . . . . . . . . . . . . . . . . 253
5.4.1 Microsoft WINS . . . . . . . . . . . . . . . . . . . . . . . . . . . . . . . . . . . . 2535.4.2 Network TeleSystems Shadow IPserver . . . . . . . . . . . . . . . . . . 255
5.5 P-Node, H-Node and M-Node clients . . . . . . . . . . . . . . . . . . . . . . . . 2575.5.1 Manually configuring clients to use an NBNS . . . . . . . . . . . . . . 2575.5.2 Dynamically configuring clients to use a NBNS. . . . . . . . . . . . . 262
5.6 IBM Neighborhood Browser Enabler for Warp Server . . . . . . . . . . . . 2715.6.1 Overview . . . . . . . . . . . . . . . . . . . . . . . . . . . . . . . . . . . . . . . . . 2715.6.2 Installing neighborhood browser enabler . . . . . . . . . . . . . . . . . 2725.6.3 Starting and stopping the Neighborhood Browser Enabler . . . . 274
5.7 AIX Fast Connect . . . . . . . . . . . . . . . . . . . . . . . . . . . . . . . . . . . . . . . 2745.7.1 Fast Connect on static server with dynamic client. . . . . . . . . . . 2745.7.2 Fast Connect on a dynamic server with dynamic client . . . . . . . 275
Chapter 6. Expanding your network . . . . . . . . . . . . . . . . . . . . . . . . . . 2776.1 Multiple subnets . . . . . . . . . . . . . . . . . . . . . . . . . . . . . . . . . . . . . . . . 277
6.1.1 Static and dynamic routing between subnets . . . . . . . . . . . . . . 2776.1.2 OS/2 Warp as a router . . . . . . . . . . . . . . . . . . . . . . . . . . . . . . . 2796.1.3 Windows NT as a router . . . . . . . . . . . . . . . . . . . . . . . . . . . . . . 282
6.2 Crossing routers . . . . . . . . . . . . . . . . . . . . . . . . . . . . . . . . . . . . . . . . 2856.2.1 Windows NT as a DHCP Relay Agent. . . . . . . . . . . . . . . . . . . . 286
v
6.2.2 OS/2 Warp as a DHCP Relay Agent . . . . . . . . . . . . . . . . . . . . . 2896.2.3 DHCP relay considerations. . . . . . . . . . . . . . . . . . . . . . . . . . . . 291
6.3 IP masquerading/network address translation . . . . . . . . . . . . . . . . . 2916.3.1 Translation mechanism. . . . . . . . . . . . . . . . . . . . . . . . . . . . . . . 293
6.4 Dynamic IP with Network TeleSystems Shadow IPserver . . . . . . . . . 2936.4.1 Installing Shadow IPserver . . . . . . . . . . . . . . . . . . . . . . . . . . . . 2946.4.2 Installation procedure . . . . . . . . . . . . . . . . . . . . . . . . . . . . . . . . 2956.4.3 IPserver configuration overview . . . . . . . . . . . . . . . . . . . . . . . . 2986.4.4 Configuring through IPmanager . . . . . . . . . . . . . . . . . . . . . . . . 2996.4.5 DHCP configuration . . . . . . . . . . . . . . . . . . . . . . . . . . . . . . . . . 3026.4.6 DHCP pools . . . . . . . . . . . . . . . . . . . . . . . . . . . . . . . . . . . . . . . 3076.4.7 DHCP configurations . . . . . . . . . . . . . . . . . . . . . . . . . . . . . . . . 3096.4.8 Shadow IPserver DNS . . . . . . . . . . . . . . . . . . . . . . . . . . . . . . . 3106.4.9 NetBIOS name services . . . . . . . . . . . . . . . . . . . . . . . . . . . . . . 3126.4.10 Backing up your IPserver configuration. . . . . . . . . . . . . . . . . . 314
Chapter 7. Mobile users . . . . . . . . . . . . . . . . . . . . . . . . . . . . . . . . . . . . 3177.1 PPP dial-up . . . . . . . . . . . . . . . . . . . . . . . . . . . . . . . . . . . . . . . . . . . 317
7.1.1 Prerequisites . . . . . . . . . . . . . . . . . . . . . . . . . . . . . . . . . . . . . . 3187.1.2 Step-by-step procedure . . . . . . . . . . . . . . . . . . . . . . . . . . . . . . 320
7.2 Roaming users . . . . . . . . . . . . . . . . . . . . . . . . . . . . . . . . . . . . . . . . . 3227.2.1 Prerequisites . . . . . . . . . . . . . . . . . . . . . . . . . . . . . . . . . . . . . . 3237.2.2 Automatic connection to file/print domain . . . . . . . . . . . . . . . . . 3237.2.3 Netscape Message of the Day service . . . . . . . . . . . . . . . . . . . 3347.2.4 Custom Netscape INI files . . . . . . . . . . . . . . . . . . . . . . . . . . . . 3417.2.5 Summary . . . . . . . . . . . . . . . . . . . . . . . . . . . . . . . . . . . . . . . . . 346
Chapter 8. Security of DHCP and Dynamic DNS . . . . . . . . . . . . . . . . 3478.1 Security trade-off . . . . . . . . . . . . . . . . . . . . . . . . . . . . . . . . . . . . . . . 3478.2 RSA public key authentication system . . . . . . . . . . . . . . . . . . . . . . . 3488.3 Getting more information from the client to DNS. . . . . . . . . . . . . . . . 3518.4 Presecured domain . . . . . . . . . . . . . . . . . . . . . . . . . . . . . . . . . . . . . 3538.5 ProxyArec consideration. . . . . . . . . . . . . . . . . . . . . . . . . . . . . . . . . . 356
8.5.1 ProxyArec and option 81 . . . . . . . . . . . . . . . . . . . . . . . . . . . . . 3588.6 Securing lease allocations . . . . . . . . . . . . . . . . . . . . . . . . . . . . . . . . 360
8.6.1 Preventing access to unauthorized devices . . . . . . . . . . . . . . . 3608.6.2 Rogue DHCP servers . . . . . . . . . . . . . . . . . . . . . . . . . . . . . . . . 3608.6.3 Connecting to Untrusted Networks - Firewalls . . . . . . . . . . . . . 3618.6.4 Connecting through untrusted networks - VPN . . . . . . . . . . . . . 3638.6.5 TFTP security . . . . . . . . . . . . . . . . . . . . . . . . . . . . . . . . . . . . . . 364
Chapter 9. Reliability . . . . . . . . . . . . . . . . . . . . . . . . . . . . . . . . . . . . . . 3659.1 Battlefield questions . . . . . . . . . . . . . . . . . . . . . . . . . . . . . . . . . . . . . 3659.2 Failure events . . . . . . . . . . . . . . . . . . . . . . . . . . . . . . . . . . . . . . . . . 366
vi Beyond DHCP - Work Your TCP/IP Internetwork with Dynamic IP
9.2.1 Severed connections . . . . . . . . . . . . . . . . . . . . . . . . . . . . . . . . 3669.2.2 Facility loss . . . . . . . . . . . . . . . . . . . . . . . . . . . . . . . . . . . . . . . 3669.2.3 Router outages . . . . . . . . . . . . . . . . . . . . . . . . . . . . . . . . . . . . . 3679.2.4 DHCP server problems . . . . . . . . . . . . . . . . . . . . . . . . . . . . . . . 3679.2.5 Name server difficulties . . . . . . . . . . . . . . . . . . . . . . . . . . . . . . 3689.2.6 Other server vulnerabilities . . . . . . . . . . . . . . . . . . . . . . . . . . . . 3689.2.7 Client failures . . . . . . . . . . . . . . . . . . . . . . . . . . . . . . . . . . . . . . 369
9.3 Redundancy and fault tolerance in DHCP. . . . . . . . . . . . . . . . . . . . . 3699.3.1 The challenge of fault tolerance . . . . . . . . . . . . . . . . . . . . . . . . 3709.3.2 Cooperative redundancy. . . . . . . . . . . . . . . . . . . . . . . . . . . . . . 3709.3.3 Non-cooperative redundancy . . . . . . . . . . . . . . . . . . . . . . . . . . 3719.3.4 Standby DHCP server arrangement . . . . . . . . . . . . . . . . . . . . . 371
9.4 AIX features . . . . . . . . . . . . . . . . . . . . . . . . . . . . . . . . . . . . . . . . . . . 3809.5 Shadow IPserver features . . . . . . . . . . . . . . . . . . . . . . . . . . . . . . . . 380
Chapter 10. Performance . . . . . . . . . . . . . . . . . . . . . . . . . . . . . . . . . . . 38110.1 Leases . . . . . . . . . . . . . . . . . . . . . . . . . . . . . . . . . . . . . . . . . . . . . . 381
10.1.1 Choosing a lease time . . . . . . . . . . . . . . . . . . . . . . . . . . . . . . 38110.1.2 DHCP server differences . . . . . . . . . . . . . . . . . . . . . . . . . . . . 38210.1.3 Multiple leases . . . . . . . . . . . . . . . . . . . . . . . . . . . . . . . . . . . . 383
10.2 Monitoring and troubleshooting . . . . . . . . . . . . . . . . . . . . . . . . . . . 38410.2.1 The PING command . . . . . . . . . . . . . . . . . . . . . . . . . . . . . . . . 38410.2.2 The TRACERTE command . . . . . . . . . . . . . . . . . . . . . . . . . . . 38510.2.3 The IPTRACE command. . . . . . . . . . . . . . . . . . . . . . . . . . . . . 38610.2.4 The ARP command . . . . . . . . . . . . . . . . . . . . . . . . . . . . . . . . 38710.2.5 The NETSTAT command . . . . . . . . . . . . . . . . . . . . . . . . . . . . 38710.2.6 The HOST command . . . . . . . . . . . . . . . . . . . . . . . . . . . . . . . 38810.2.7 The NSLOOKUP command . . . . . . . . . . . . . . . . . . . . . . . . . . 38910.2.8 Other utilities . . . . . . . . . . . . . . . . . . . . . . . . . . . . . . . . . . . . . 389
10.3 Troubleshooting TCP/IP networks . . . . . . . . . . . . . . . . . . . . . . . . . 39010.3.1 Prerequisites for troubleshooting . . . . . . . . . . . . . . . . . . . . . . 39010.3.2 A bottom-up approach . . . . . . . . . . . . . . . . . . . . . . . . . . . . . . 391
10.4 Tuning TCP/IP networks. . . . . . . . . . . . . . . . . . . . . . . . . . . . . . . . . 40310.4.1 An approach to tuning your network . . . . . . . . . . . . . . . . . . . . 40310.4.2 TCP/IP tuning parameters . . . . . . . . . . . . . . . . . . . . . . . . . . . 404
10.5 Bandwidth efficiency. . . . . . . . . . . . . . . . . . . . . . . . . . . . . . . . . . . . 40710.5.1 Broadcast traffic . . . . . . . . . . . . . . . . . . . . . . . . . . . . . . . . . . . 40810.5.2 RSVP . . . . . . . . . . . . . . . . . . . . . . . . . . . . . . . . . . . . . . . . . . . 40810.5.3 Communications server . . . . . . . . . . . . . . . . . . . . . . . . . . . . . 409
Chapter 11. Managing your network . . . . . . . . . . . . . . . . . . . . . . . . . . 41111.1 Remote administration of DHCP and DDNS . . . . . . . . . . . . . . . . . . 411
11.1.1 No extra software . . . . . . . . . . . . . . . . . . . . . . . . . . . . . . . . . . 412
vii
11.1.2 Using a Web server . . . . . . . . . . . . . . . . . . . . . . . . . . . . . . . . 418
Appendix A. Creating DHCP boot diskettes . . . . . . . . . . . . . . . . . . . . . 429A.1 OS/2 Warp boot diskettes . . . . . . . . . . . . . . . . . . . . . . . . . . . . . . . . . . . . 429
A.1.1 Prerequisites. . . . . . . . . . . . . . . . . . . . . . . . . . . . . . . . . . . . . . . . . . 429A.1.2 Step-by-step procedure . . . . . . . . . . . . . . . . . . . . . . . . . . . . . . . . . 430A.1.3 Notes on the step-by-step procedure . . . . . . . . . . . . . . . . . . . . . . . 438
A.2 DOS boot diskettes . . . . . . . . . . . . . . . . . . . . . . . . . . . . . . . . . . . . . . . . . 439A.2.1 Prerequisites. . . . . . . . . . . . . . . . . . . . . . . . . . . . . . . . . . . . . . . . . . 439A.2.2 Step-by-step procedure . . . . . . . . . . . . . . . . . . . . . . . . . . . . . . . . . 439A.2.3 Notes on the step-by-step procedure . . . . . . . . . . . . . . . . . . . . . . . 444
Appendix B. Application issues . . . . . . . . . . . . . . . . . . . . . . . . . . . . . . . 445B.1 DB2 Universal Database. . . . . . . . . . . . . . . . . . . . . . . . . . . . . . . . . . . . . 445B.2 TME 10 Framework . . . . . . . . . . . . . . . . . . . . . . . . . . . . . . . . . . . . . . . . 446B.3 Netfinity . . . . . . . . . . . . . . . . . . . . . . . . . . . . . . . . . . . . . . . . . . . . . . . . . . 447
B.3.1 Manager . . . . . . . . . . . . . . . . . . . . . . . . . . . . . . . . . . . . . . . . . . . . . 448B.3.2 Client (services) . . . . . . . . . . . . . . . . . . . . . . . . . . . . . . . . . . . . . . . 448
B.4 Netscape Navigator . . . . . . . . . . . . . . . . . . . . . . . . . . . . . . . . . . . . . . . . 451
Appendix C. Using the additional material . . . . . . . . . . . . . . . . . . . . . . 453C.1 Using the CD-ROM. . . . . . . . . . . . . . . . . . . . . . . . . . . . . . . . . . . . . . . . . 453C.2 Locating the additional material on the Internet . . . . . . . . . . . . . . . . . . . 454C.3 Second edition CD-ROM contents . . . . . . . . . . . . . . . . . . . . . . . . . . . . . 454C.4 First edition CD-ROM contents . . . . . . . . . . . . . . . . . . . . . . . . . . . . . . . . 454
Appendix D. DHCP options (RFC 2132) . . . . . . . . . . . . . . . . . . . . . . . . . 457D.1 Introduction . . . . . . . . . . . . . . . . . . . . . . . . . . . . . . . . . . . . . . . . . . . . . . . 457D.2 DHCP and BOOTP options . . . . . . . . . . . . . . . . . . . . . . . . . . . . . . . . . . 458
D.2.1 Options 0 and 255: Pad and end . . . . . . . . . . . . . . . . . . . . . . . . . . 458D.2.2 Option 1: Subnet mask . . . . . . . . . . . . . . . . . . . . . . . . . . . . . . . . . . 458D.2.3 Option 2: Time offset . . . . . . . . . . . . . . . . . . . . . . . . . . . . . . . . . . . 458D.2.4 Option 3: Router . . . . . . . . . . . . . . . . . . . . . . . . . . . . . . . . . . . . . . . 459D.2.5 Option 4: Time server . . . . . . . . . . . . . . . . . . . . . . . . . . . . . . . . . . . 459D.2.6 Option 5: IEN 116 (Old) name server . . . . . . . . . . . . . . . . . . . . . . . 459D.2.7 Option 6: Domain name server. . . . . . . . . . . . . . . . . . . . . . . . . . . . 460D.2.8 Option 7: Log server . . . . . . . . . . . . . . . . . . . . . . . . . . . . . . . . . . . . 460D.2.9 Option 8: Cookie server . . . . . . . . . . . . . . . . . . . . . . . . . . . . . . . . . 460D.2.10 Option 9: LPR server . . . . . . . . . . . . . . . . . . . . . . . . . . . . . . . . . . 460D.2.11 Option 10: Impress server . . . . . . . . . . . . . . . . . . . . . . . . . . . . . . 461D.2.12 Option 11: Resource location server . . . . . . . . . . . . . . . . . . . . . . 461D.2.13 Option 12: Host name. . . . . . . . . . . . . . . . . . . . . . . . . . . . . . . . . . 461D.2.14 Option 13: Boot file size . . . . . . . . . . . . . . . . . . . . . . . . . . . . . . . . 462D.2.15 Option 14: Merit dump file name . . . . . . . . . . . . . . . . . . . . . . . . . 462
viii Beyond DHCP - Work Your TCP/IP Internetwork with Dynamic IP
D.2.16 Option 15: Domain name . . . . . . . . . . . . . . . . . . . . . . . . . . . . . . . 462D.2.17 Option 16: Swap server . . . . . . . . . . . . . . . . . . . . . . . . . . . . . . . . 462D.2.18 Option 17: Root path . . . . . . . . . . . . . . . . . . . . . . . . . . . . . . . . . . 463D.2.19 Option 18: Extensions path . . . . . . . . . . . . . . . . . . . . . . . . . . . . . 463D.2.20 Option 19: IP forwarding enable/disable. . . . . . . . . . . . . . . . . . . . 463D.2.21 Option 20: Non-local source routing enable/disable. . . . . . . . . . . 463D.2.22 Option 21: Policy filter. . . . . . . . . . . . . . . . . . . . . . . . . . . . . . . . . . 464D.2.23 Option 22: Maximum datagram reassembly size . . . . . . . . . . . . . 464D.2.24 Option 23: Default IP time-to-live . . . . . . . . . . . . . . . . . . . . . . . . . 465D.2.25 Option 24: Path MTU aging timeout . . . . . . . . . . . . . . . . . . . . . . . 465D.2.26 Option 25: Path MTU plateau table . . . . . . . . . . . . . . . . . . . . . . . 465D.2.27 Option 26: Interface MTU . . . . . . . . . . . . . . . . . . . . . . . . . . . . . . . 465D.2.28 Option 27: All subnets are local . . . . . . . . . . . . . . . . . . . . . . . . . . 466D.2.29 Option 28: Broadcast address . . . . . . . . . . . . . . . . . . . . . . . . . . . 466D.2.30 Option 29: Perform mask discovery . . . . . . . . . . . . . . . . . . . . . . . 466D.2.31 Option 30: Mask supplier . . . . . . . . . . . . . . . . . . . . . . . . . . . . . . . 467D.2.32 Option 31: Perform router discovery. . . . . . . . . . . . . . . . . . . . . . . 467D.2.33 Option 32: Router solicitation address . . . . . . . . . . . . . . . . . . . . . 467D.2.34 Option 33: Static route . . . . . . . . . . . . . . . . . . . . . . . . . . . . . . . . . 467D.2.35 Option 34: Trailer encapsulation. . . . . . . . . . . . . . . . . . . . . . . . . . 468D.2.36 Option 35: ARP cache timeout . . . . . . . . . . . . . . . . . . . . . . . . . . . 468D.2.37 Option 36: Ethernet encapsulation . . . . . . . . . . . . . . . . . . . . . . . . 468D.2.38 Option 37: TCP default time-to-live . . . . . . . . . . . . . . . . . . . . . . . 469D.2.39 Option 38: TCP keepalive interval . . . . . . . . . . . . . . . . . . . . . . . . 469D.2.40 Option 39: TCP keepalive garbage . . . . . . . . . . . . . . . . . . . . . . . 469D.2.41 Option 40: Network information service domain . . . . . . . . . . . . . . 470D.2.42 Option 41: Network information server . . . . . . . . . . . . . . . . . . . . . 470D.2.43 Option 42: Network time protocol server . . . . . . . . . . . . . . . . . . . 470D.2.44 Option 43: Vendor-specific information . . . . . . . . . . . . . . . . . . . . 470D.2.45 Option 44: NetBIOS over TCP/IP name server option . . . . . . . . . 471D.2.46 Option 45: NetBIOS over TCP/IP datagram distribution server . . 472D.2.47 Option 46: NetBIOS over TCP/IP node type . . . . . . . . . . . . . . . . 472D.2.48 Option 47: NetBIOS over TCP/IP scope. . . . . . . . . . . . . . . . . . . . 472D.2.49 Option 48: X-Window system font server option . . . . . . . . . . . . . 473D.2.50 Option 49: X-Window system display manager . . . . . . . . . . . . . . 473D.2.51 Option 64: Network Information Service (plus) domain . . . . . . . . 473D.2.52 Option 65: Network Information Service (plus) server . . . . . . . . . 474D.2.53 Option 68: Mobile IP home agent . . . . . . . . . . . . . . . . . . . . . . . . . 474D.2.54 Option 69: Simple Mail Transport Protocol (SMTP) server . . . . . 474D.2.55 Option 70: Post Office Protocol (POP3) server . . . . . . . . . . . . . . 474D.2.56 Option 71: Network News Transport Protocol (NNTP) server . . . 475D.2.57 Option 72: Default World Wide Web (WWW) server . . . . . . . . . . 475D.2.58 Option 73: Default Finger server . . . . . . . . . . . . . . . . . . . . . . . . . 475
ix
D.2.59 Option 74: Default Internet Relay Chat (IRC) server . . . . . . . . . . 476D.2.60 Option 75: StreetTalk server. . . . . . . . . . . . . . . . . . . . . . . . . . . . . 476D.2.61 Option 76: StreetTalk Directory Assistance (STDA) server . . . . . 476
D.3 DHCP (only) options . . . . . . . . . . . . . . . . . . . . . . . . . . . . . . . . . . . . . . . . 476D.3.1 Option 50: Requested IP address . . . . . . . . . . . . . . . . . . . . . . . . . 477D.3.2 Option 51: IP address lease time . . . . . . . . . . . . . . . . . . . . . . . . . . 477D.3.3 Option 52: Option overload. . . . . . . . . . . . . . . . . . . . . . . . . . . . . . . 477D.3.4 Option 53: DHCP message type . . . . . . . . . . . . . . . . . . . . . . . . . . 478D.3.5 Option 54: Server identifier. . . . . . . . . . . . . . . . . . . . . . . . . . . . . . . 478D.3.6 Option 55: Parameter request list. . . . . . . . . . . . . . . . . . . . . . . . . . 478D.3.7 Option 56: Message . . . . . . . . . . . . . . . . . . . . . . . . . . . . . . . . . . . . 479D.3.8 Option 57: Maximum DHCP message size . . . . . . . . . . . . . . . . . . 479D.3.9 Option 58: Renewal (T1) time value . . . . . . . . . . . . . . . . . . . . . . . . 479D.3.10 Option 59: Rebinding (T2) time value. . . . . . . . . . . . . . . . . . . . . . 480D.3.11 Option 60: Vendor class identifier. . . . . . . . . . . . . . . . . . . . . . . . . 480D.3.12 Option 61: Client identifier . . . . . . . . . . . . . . . . . . . . . . . . . . . . . . 480D.3.13 Option 66: TFTP server name . . . . . . . . . . . . . . . . . . . . . . . . . . . 481D.3.14 Option 67: Boot file name . . . . . . . . . . . . . . . . . . . . . . . . . . . . . . . 481
D.4 Unofficial DHCP options . . . . . . . . . . . . . . . . . . . . . . . . . . . . . . . . . . . . . 481D.5 Options supported by popular operating systems . . . . . . . . . . . . . . . . . 483
D.5.1 Servers . . . . . . . . . . . . . . . . . . . . . . . . . . . . . . . . . . . . . . . . . . . . . . 483D.5.2 Clients. . . . . . . . . . . . . . . . . . . . . . . . . . . . . . . . . . . . . . . . . . . . . . . 483
Appendix E. Special notices . . . . . . . . . . . . . . . . . . . . . . . . . . . . . . . . . . 485
Appendix F. Related publications . . . . . . . . . . . . . . . . . . . . . . . . . . . . . . 489F.1 IBM Redbooks publications. . . . . . . . . . . . . . . . . . . . . . . . . . . . . . . . . . . 489F.2 IBM Redbooks collections. . . . . . . . . . . . . . . . . . . . . . . . . . . . . . . . . . . . 490F.3 Other resources . . . . . . . . . . . . . . . . . . . . . . . . . . . . . . . . . . . . . . . . . . . 490F.4 Referenced Web sites. . . . . . . . . . . . . . . . . . . . . . . . . . . . . . . . . . . . . . . 491F.5 Useful Web and FTP sites . . . . . . . . . . . . . . . . . . . . . . . . . . . . . . . . . . . 493
How to get IBM Redbooks . . . . . . . . . . . . . . . . . . . . . . . . . . . . . . . . . . 495IBM Redbooks fax order form . . . . . . . . . . . . . . . . . . . . . . . . . . . . . . . . . . . . 496
Glossary and abbreviations . . . . . . . . . . . . . . . . . . . . . . . . . . . . . . . . . 497
Index . . . . . . . . . . . . . . . . . . . . . . . . . . . . . . . . . . . . . . . . . . . . . . . . . . . 507
IBM Redbooks evaluation . . . . . . . . . . . . . . . . . . . . . . . . . . . . . . . . . . . 517
x Beyond DHCP - Work Your TCP/IP Internetwork with Dynamic IP
Preface
Beyond DHCP — Work Your TCP/IP Internetwork with Dynamic IP exploresimportant network design issues for today’s modern mixed intranets. Theauthors discuss many different platforms, including Windows 95, Windows98, Windows NT, OS/2 Warp, OS/2 Warp Server, AIX, Macintosh, WorkSpaceOn-Demand, Linux, Solaris, and others. The book examines how to connectthese systems in a reliable, flexible, high-performance TCP/IP network.
When confronted with thorny TCP/IP problems, network specialists, supportstaff, network managers, and other technicians, can refer to this book totroubleshoot network outages and to prevent them from recurring. Theauthors emphasize cost-effective remote management and dynamic setup,providing real world examples of DHCP and DDNS technologies applied toroaming users, intelligent Web browsing, software distribution, printing, PPPdial-up, and other network needs.
This publication helps TCP/IP network operators establish a solid foundationfor future growth without undue expense. Enterprise network staff willappreciate the sections that explore high end technologies, including NetworkTeleSystems’ Shadow IPserver, IBM Communications Server, and UNIXplatforms. All network managers should find the authors’ advice on securitywell worth reading.
This second edition updates the contents of the previous redbook to includeOS/2 Warp Server for e-business with TCP/IP Version 4.21, Windows 98 andWindows 2000, and adds more information about dynamic IP configuration onAIX. It also takes a fresh look at dynamic IP at the protocol level. Mostsections were verified to ensure currency.
The team that wrote this redbook
This redbook is the second edition of a redbook that was published originallyin August, 1998. This update was produced by a team of specialists from theU.S. and South Africa working at the International Technical SupportOrganization in Austin, Texas.
Oscar Cepeda is an Advisory Software Engineer and Project Leader at theInternational Technical Support Organization, Austin Center. He writesextensively and teaches IBM classes worldwide in areas including OS/2,OS/2 Warp Server, WorkSpace On-Demand and Windows client networking.Before joining the ITSO in 1995, Oscar worked in IBM U.S. AvailabilityServices as an I/T Specialist. He has 11 years of experience with IBM.
© Copyright IBM Corp. 1998, 2000 xi
Bob Chambers is a Network Top Gun with IBM Global Services, and aCertified Network Expert (see http://www.cnx.org). For the past six years hehas focused on baseline analysis and problem determination on local andwide area networks. Bob joined IBM in 1982 after receiving a degree fromMcNeese State University in Lake Charles, Louisiana. He can be contactedvia e-mail at: [email protected].
Julian Mosca is an Advisory IT Specialist in Service Delivery with IBM GlobalServices in South Africa. He has seven years of experience in NetworkAdministration. Julian has worked at IBM for four years and has recentlycompleted his B-Tech degree in Information Technology at the TechnikonWitwatersrand. His areas of expertise include electronic software distribution,client/server support and monitoring, security, and LAN and WANadministration. He has also worked extensively with the OS/2 and Windowsplatforms.
Matt Robbins is an RS/6000 Technical Sales Specialist in Dallas, Texas. Hehas over five years of experience with RS/6000 and AIX. His areas ofexpertise include UNIX, TCP/IP, and designing e-business solutions forInternet security and Web traffic. He attended the University of North Texasas a student of computer science.
xii Beyond DHCP - Work Your TCP/IP Internetwork with Dynamic IP
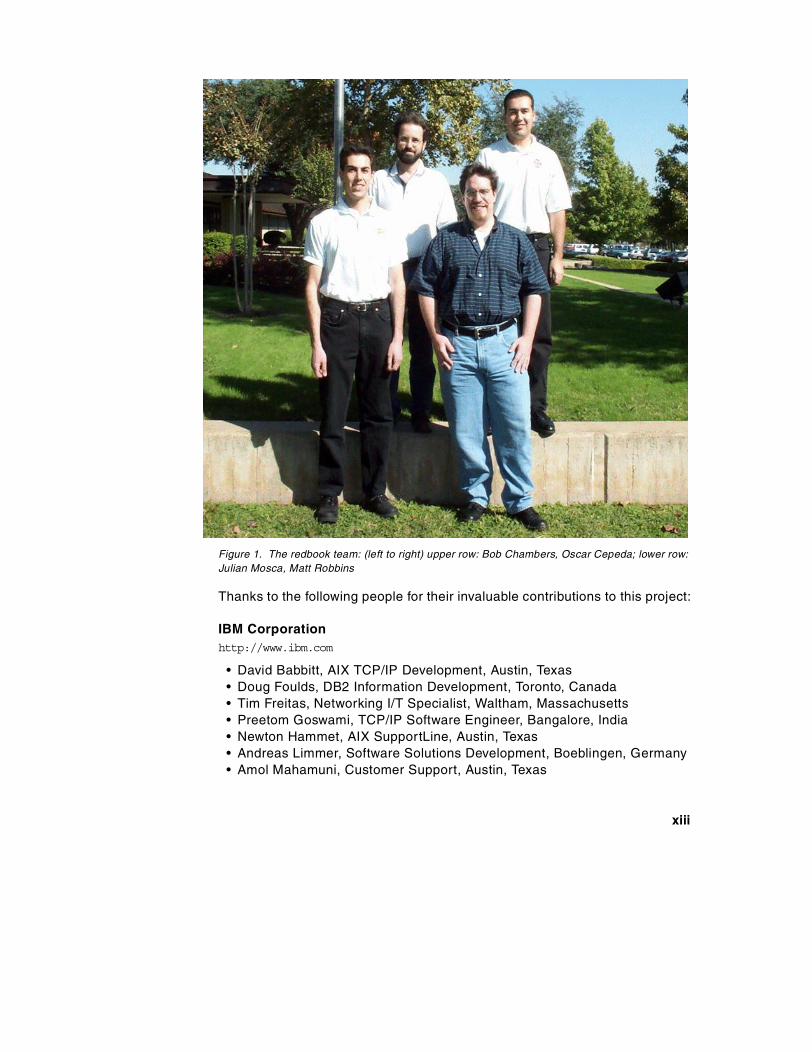
Figure 1. The redbook team: (left to right) upper row: Bob Chambers, Oscar Cepeda; lower row:Julian Mosca, Matt Robbins
Thanks to the following people for their invaluable contributions to this project:
IBM Corporationhttp://www.ibm.com
• David Babbitt, AIX TCP/IP Development, Austin, Texas• Doug Foulds, DB2 Information Development, Toronto, Canada• Tim Freitas, Networking I/T Specialist, Waltham, Massachusetts• Preetom Goswami, TCP/IP Software Engineer, Bangalore, India• Newton Hammet, AIX SupportLine, Austin, Texas• Andreas Limmer, Software Solutions Development, Boeblingen, Germany• Amol Mahamuni, Customer Support, Austin, Texas
xiii
IBM International Technical Support Organization (ITSO)http://www.redbooks.ibm.com
• Richard Hawes, ITSO Austin, Texas• Temi Rose, ITSO Austin, Texas• Theo Winkelmann, ITSO Austin, Texas
Network Associateshttp://www.nai.com
• Glenn KarleNetwork Associates supplied our team with Sniffer Basic.
Network TeleSystems (NTS)http://www.nts.com
• Bob Baumann• Russell Young
We appreciate NTS’ support for Shadow IPserver in our labs.
We also thank Richard Grey of Brookshire Grocery Company for his input.
This redbook is an update of the original redbook which was written by thefollowing team:
• Uwe Zimmermann is an Advisory Systems Engineer and Project Leaderformerly at the ITSO Austin Center. He has more than eleven years ofexperience in heterogeneous networking environments. Before joining theITSO, Uwe worked in an IBM branch office in Stuttgart, Germany, and wasin charge of large accounts as a Networking Systems Engineer. His areasof expertise include OS/2 LAN/Warp Server, Windows 95/NT, NetWare,software distribution (CID), systems management, Dynamic IP, andnetwork computing.
• Peter Degotardi is a LAN Systems Specialist within IBM Global ServicesAustralia. He has thirteen years of experience in networking with a widevariety of computing devices and operating systems. His current areas ofexpertise include OS/2 Warp, OS/2 LAN/Warp Server, Windows NT,TCP/IP, Netfinity, REXX, and software distribution via CID.
• Michael McDaniel, a member of ACM, CPSR, and IEEE, and is alsoowner of The Fourth Crusade, a consulting firm specializing in automationand communications. For the last 21 years, he has worked with highavailability systems in the industrial, financial, and telecommunicationsfields. Mr. McDaniel’s company is an IBM Premier Business Partner(http://www.fourthcrusade.com). His areas of expertise include DB2(various platforms), software distribution (CID, Netfinity), OS/2 Warp
xiv Beyond DHCP - Work Your TCP/IP Internetwork with Dynamic IP
Server, Dynamic IP, and integration with UNIX and Windows 95/NTnetworks. He holds various certifications from IBM, including DB2 andOS/2 Warp Server.
• Toshimasa Shimizu is a Senior IT Specialist with IBM, Japan. He waswith ITSO Austin Center for five years supporting OS/2 LAN Server, OS/2Warp Server, and OS/2 Warp-related products. For more than twentyyears, he has been a systems engineer for large account customerprojects in Japan, providing LAN system designs, distributed systems, andnetworking systems.
• Timothy Sipples is Advisory Technical Marketing Specialist with IBM. Heis based in Chicago, Illinois. He specializes in software distribution issues,Java, and thin clients such as WorkSpace On-Demand. He also hasextensive experience with Lotus Domino, TCP/IP, and the interoperabilityof OS/2 Warp with NetWare. Mr. Sipples is coauthor of the IDG/IBM Pressbook IBM’s Official OS/2 Warp Frequently Asked Questions.
• Akiko Ueno is an IT Engineer with IBM Japan in the PC Server Group.She specializes in customer service for OS/2 Warp Server and IBM PCServers running Windows NT. She joined IBM three years ago.
Thanks to the following people for their invaluable contributions to this project:
IBM Corporationhttp://www.ibm.com
• Greg Althaus, TCP/IP Applications and Kernel Development, Austin, TX• Barry Arndt, LAN Transport Development, Austin, TX• Mel Bryant, OS/2 Warp Server Customer Focal Point, Austin, TX• Esther Burwell, Dynamic IP and Management Development, Raleigh, NC• Charlotte Davis, Dynamic IP and Management Development, Raleigh, NC• Bruce Faulkner, Dynamic IP and Management Development, Raleigh, NC• Steven French, OS/2 Server for e-business, Austin, TX• Pratik Gupta, Dynamic IP and Management Development, Raleigh, NC• Wayne Ha, DB2 Development, Toronto, Canada• Robert Hanner, Network Computing Software, Austin, TX• Bill Hartner, OS/2 Warp Server SMP Development, Austin, TX• Juliana Hsu, DB2 Development, Toronto, Canada• Steven King, OS/2 Warp Server Product Manager, Austin, TX• Saravana Kumar, OS/2 Support, India• Rachele Powell, Dynamic IP and Management Development, Raleigh, NC• Pankaj Sinha, OS/2 Support, India
IBM’s International Technical Support Organization (ITSO)http://www.redbooks.ibm.com
xv
• Marcela Adan, ITSO Rochester, Minnesota• Martin Murhammer, ITSO Raleigh, North Carolina• Elizabeth Barnes, Marcus Brewer, and Tara Campbell, ITSO Austin, Texas
• Steve Gardner, Jasenn McNair, ITSO Austin, Texas
Hewlett-Packard Corporationhttp://www.hp.com
• Wylie McDonald, Austin• Cyndi Watson, Austin
Network Associateshttp://www.nai.com
• Robert S. Kusters, Product Manager• Paul Farr, Director of Product Marketing
Network TeleSystems (NTS)http://www.nts.com
• Bob Baumann, Dallas• Russ Young, Austin
Comments welcome
Your comments are important to us!
We want our Redbooks to be as helpful as possible. Please send us yourcomments about this or other Redbooks in one of the following ways:
• Fax the evaluation form found in “IBM Redbooks evaluation” on page 517to the fax number shown on the form.
• Use the online evaluation form found at http://www.redbooks.ibm.com/
• Send your comments in an Internet note to [email protected]
xvi Beyond DHCP - Work Your TCP/IP Internetwork with Dynamic IP
Chapter 1. TCP/IP overview
Many excellent publications describe TCP/IP and the Internet in acomprehensive fashion. References to several of these publications, includingrequests for comments (RFCs), are included in F.3, “Other resources” onpage 490.
This chapter provides a short introduction to TCP/IP so you can becomeacquainted (or reacquainted) with TCP/IP addressing and other basics. Whatwe have included here are what could be considered pre-requisites to theTCP/IP theories covered later in this book. If you wish to read a more in-depthTCP/IP overview, TCP/IP Tutorial and Technical Overview, GG24-3376, is anexcellent source.
After reading this chapter, you should understand what IP addresses,subnets, routers, and name servers are. You should also learn what thedifferences are between Class A, B, C, and D addresses. Static versusdynamic addressing is discussed, along with basic information on legacyprotocols such as NetBEUI.
If you are already familiar with basic TCP/IP concepts, you may only need tobriefly skim this chapter.
1.1 Network protocols
Computer networks simply deliver bits of information from one point toanother. One requirement for transmitting such information is that thecomputer systems on each end speak the same language or protocol.
You are already familiar with many protocols and how they are defined. Forexample, to address a regular letter or package in the United States you needto write the destination address on the front of the envelope. That addresscould look like:
John DoeYour CompanyAny StreetCity, TX 78758
The protocol for U.S. mail requires a specific location where you write thisdestination address (the front of the envelope), the name of the recipient, thebusiness name (if any), the street address (perhaps with a suite or apartmentnumber), the city, state, and a postal (zip) code. Additional requirements may
© Copyright IBM Corp. 1998, 2000 1
apply, such as the amount of postage, a return address, proper packaging,and so on. All these requirements define the U.S. Postal Service protocol.
Computer network protocols require similar information in a precise format. Apackage of information sent over the network is called a datagram.Datagrams usually include at least a destination address, source address(where it came from), length (size of package), error detection information(such as a checksum), and package contents (the bits and bytes ofinformation being carried).
Transmission Control Protocol/Internet Protocol (TCP/IP) is one of the mostpopular families of network protocols. It also happens to be the one used asthe basis for the Internet.
Many people think of TCP/IP in terms of layers or levels of functions. At thelowest layer, the network interface (such as a LAN) carries the network trafficover wires or other connections. The highest layer, the application layer (suchas a Web browser), uses the various TCP/IP services to communicate. Inbetween these are two additional layers called the transport and internetworklayers.
The transport layer facilitates communication between applications, whetherthey are on the same or different systems. The main transport layer protocolis called TCP, and it can determine whether a message has been received ornot at the other end of the connection. An alternative is UDP (User DatagramProtocol), which simply sends messages without checking to see whether thesystem at the other end has received each part. Applications that needmaximum performance and that verify delivery themselves often use UDP.
Internet Protocol (IP) is one of the internetwork layer protocols, and it isresponsible for properly routing datagrams to other computers across thenetwork. (Other Internet layer protocols include ICMP, IGMP, ARP, and RARP,discussed in “Other TCP/IP terms” on page 26.) IP depends on severalimportant addresses in order to keep track of where messages should bedelivered.
1.2 IP addresses
IP uses addresses to specify both the source and destination systems on aTCP/IP network. Each address consists of 32 bits, usually broken into fourdecimal numbers separated by dots (.). Each decimal number represents an8-bit byte (an octet) in the address.
2 Beyond DHCP - Work Your TCP/IP Internetwork with Dynamic IP

For example:
00001001 01000011 00100110 00000001 32-bit address9 . 67 . 38 . 1 decimal address
Each address can also be separated into two logical parts:
• Network address
The network address is a lot like a postal code, because it identifies whichregion (or section) of the total network contains the system.
• System (or machine, or host) address
The system address is similar to an apartment or suite number, because itspecifically identifies a particular system within that region.
As shown in Figure 2, IP addresses belong to one of four classes dependingon how the entire 32-bit address is split (a fifth class, class E, is notcommonly used).
Figure 2. IP Classes
Class A Class A addresses use 7 bits for the network address portion and24 bits for the host address. With Class A addresses, there are126 (27-2) possible networks (regions) with 16,777,214 (224-2)possible hosts in each, for a total of over 2 billion addresses. One
Chapter 1. TCP/IP overview 3

bit is used to identify the address as Class A, to distinguish it fromother classes.
For example, the following Class A address can be broken apartinto its network and host addresses:
00001001 01000011 00100110 00000001
9 . 67 . 38 . 1
^******* ++++++++ ++++++++ ++++++++
The first bit (marked with ^), a zero, identifies this IP address asClass A. The next 7 bits (*) provide the network number (9). Theremaining bits (+) identify the specific host within network 9, in thiscase 67*(216)+38*(28)+1, or 4,400,641. In other words, this IPaddress identifies the 4,400,641th system in the 9th networkregion.
Class B Class B addresses use 14 bits for the network portion and 16 bitsfor the host portion. These addresses provide an additional16,382 (214-2) networks with 65,534 (216-2) hosts each, a total ofover one billion additional addresses. The first two bits of a ClassB address are 1 and 0.
Class C Class C addresses use 21 bits for the network part and 8 bits forthe machine part, providing 2,097,150 (221-2) networks with 254(28-2) hosts each, a total of over half a billion addresses. Class Caddresses begin with 110.
As you can see, with Classes A through C and 32-bit addresses,TCP/IP can provide service for a theoretical maximum ofapproximately 3.5 billion different hosts.
Class D Class D addresses are reserved for multicasting, a limited form ofbroadcasting only to other hosts sharing the same Class Daddress. Class D addresses begin with bit 1110.
Class E Class E addresses (beginning with 11110) are not widely used atthis point in time and are reserved for future use.
In addition, some special addresses are reserved and cannot be assigned toactual systems on the network. These special addresses include:
All bits 0 Means this. For example, if the network address part isset to 0, the host address refers to a system on this (itsown) network. When making initial contact on thenetwork, a system may use this method if it does not
4 Beyond DHCP - Work Your TCP/IP Internetwork with Dynamic IP
know the network address. Other systems will reply withthe proper network address filled in, and this propernetwork address can be recorded for future use.
All bits 1 Means all. For example, if the host address is set to allones, the IP address identifies all systems within thatparticular network region. In other words, a Class Baddress of 128.2.255.255 refers to all systems onnetwork 128.2. Such an address is also called a directedbroadcast address, because it contains a valid networkaddress and a broadcast (all ones) host address.
Loopback The Class A network 127 (including addresses, such as127.0.0.1) is defined as the loopback network. Systemswill automatically route traffic destined for theseaddresses back into the same system without evercommunicating across the real network. Loopbackaddresses are often used for testing new software, toseparate network problems from simple programmingerrors.
Private addresses Several addresses have been reserved for privatenetworks which are not directly connected to theInternet. These addresses include the Class A group ofaddresses in network 10, the 16 Class B groups ofaddresses in networks 172.16 through 172.31, and the256 Class C groups of addresses in networks 192.168.0through 192.168.255. Web servers, FTP sites, and othersystems available to the public on the Internet will neverhave addresses beginning with 10, 172.16 through172.31, or 192.168. These addresses are quite usefulfor testing purposes, or for totally private use, and youcan use them without having to contact someone toreserve real addresses.
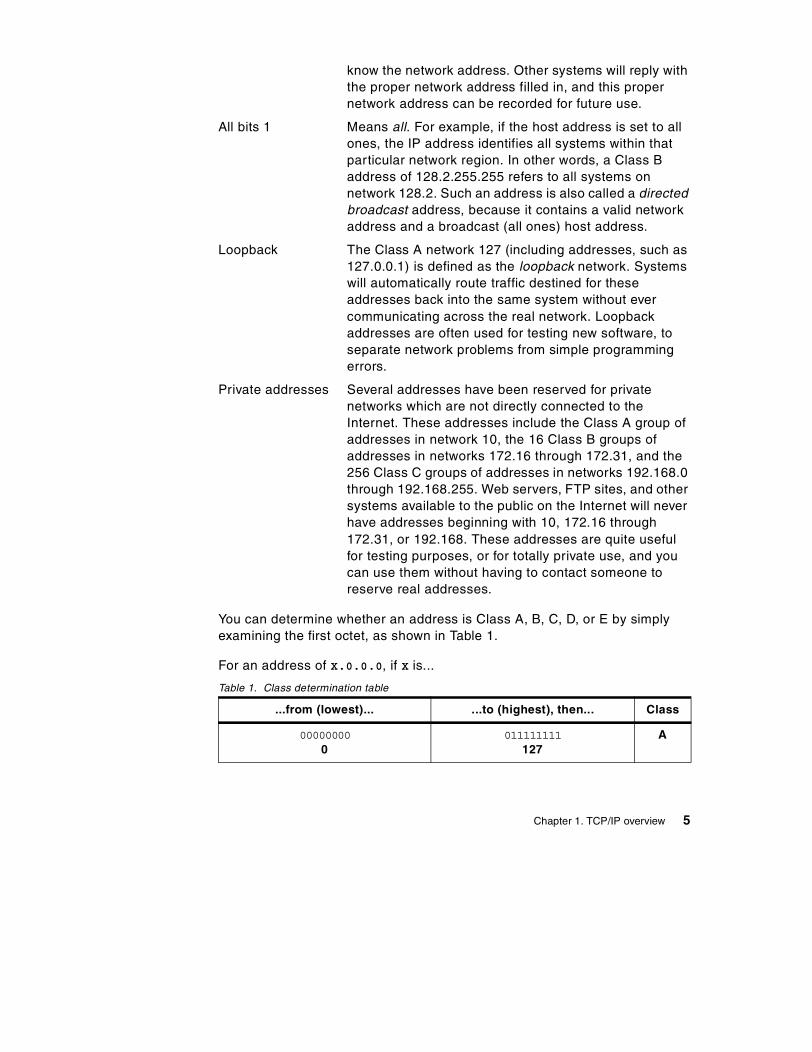
You can determine whether an address is Class A, B, C, D, or E by simplyexamining the first octet, as shown in Table 1.
For an address of X.0.0.0, if X is...
Table 1. Class determination table
...from (lowest)... ...to (highest), then... Class
000000000
011111111127
A
Chapter 1. TCP/IP overview 5
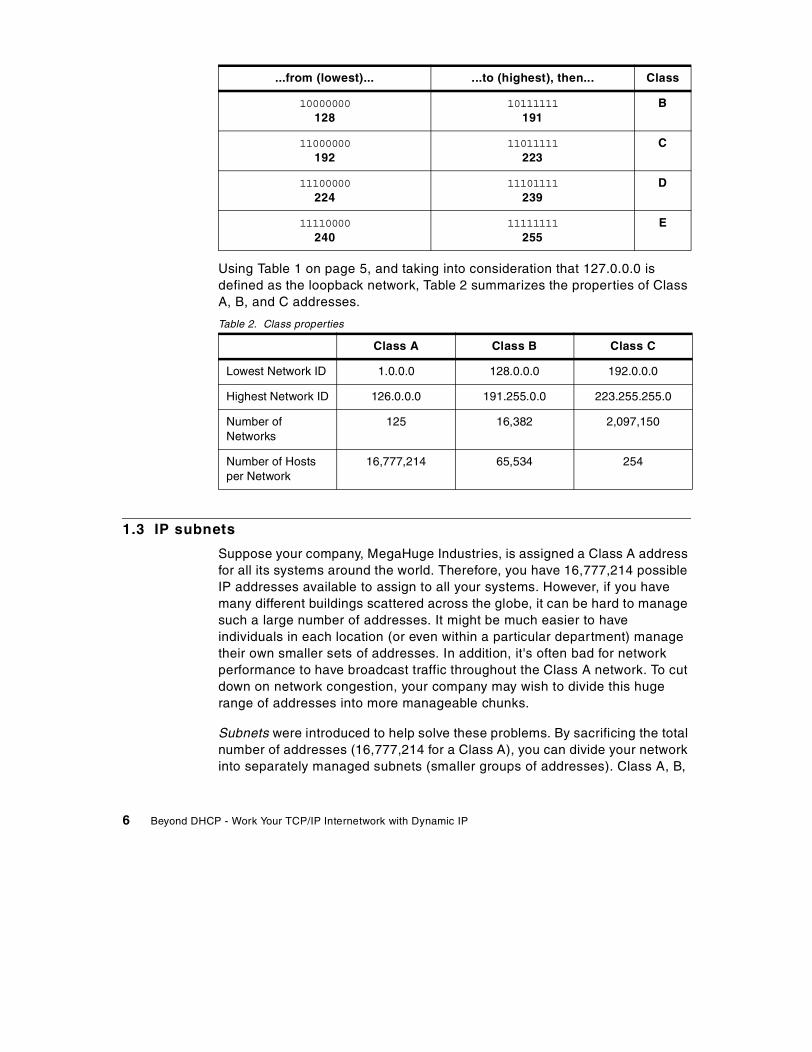
Using Table 1 on page 5, and taking into consideration that 127.0.0.0 isdefined as the loopback network, Table 2 summarizes the properties of ClassA, B, and C addresses.
Table 2. Class properties
1.3 IP subnets
Suppose your company, MegaHuge Industries, is assigned a Class A addressfor all its systems around the world. Therefore, you have 16,777,214 possibleIP addresses available to assign to all your systems. However, if you havemany different buildings scattered across the globe, it can be hard to managesuch a large number of addresses. It might be much easier to haveindividuals in each location (or even within a particular department) managetheir own smaller sets of addresses. In addition, it's often bad for networkperformance to have broadcast traffic throughout the Class A network. To cutdown on network congestion, your company may wish to divide this hugerange of addresses into more manageable chunks.
Subnets were introduced to help solve these problems. By sacrificing the totalnumber of addresses (16,777,214 for a Class A), you can divide your networkinto separately managed subnets (smaller groups of addresses). Class A, B,
10000000128
10111111191
B
11000000192
11011111223
C
11100000224
11101111239
D
11110000240
11111111255
E
Class A Class B Class C
Lowest Network ID 1.0.0.0 128.0.0.0 192.0.0.0
Highest Network ID 126.0.0.0 191.255.0.0 223.255.255.0
Number ofNetworks
125 16,382 2,097,150
Number of Hostsper Network
16,777,214 65,534 254
...from (lowest)... ...to (highest), then... Class
6 Beyond DHCP - Work Your TCP/IP Internetwork with Dynamic IP
and even C addresses can be divided into subnets. Then, addressassignments within a subnet can be performed locally, without having tocontact a central authority to obtain additional addresses. The whole network(with subnets) still appears to be one IP network to the outside world.
For example, consider the Class A address 9.67.38.1. The network address is9 and the host address is 67.38.1. Subnets simply extend this basic addressby treating part of the host address as a subnetwork address. IP addressesthen consist of the class identifier (0 for Class A in this example), the networkaddress (9), the subnetwork address (for example, bits 8 to 25), and the hostaddress (for example, the remaining bits 26 to 31).
A bit mask, known as the subnet mask, is used to identify which bits are partof the subnet address and which are still part of the host address. This 32-bitsubnet mask has the bits for the host address set to 0 and all the other bitsset to 1. By convention, the subnet mask never has a one following a zero.Both the network address and the subnet address are masked by ones.However, only the subnet number needs to be masked.
So for 9.67.38.1, with only bits 26 to 31 representing the host address, thesubnet mask would be:
11111111 11111111 11111111 11000000
or 255.255.255.192 in decimal format. To extract the subnet base address(the network address and the subnet address together), a logical AND isperformed. If both bits in a particular bit position, for both the IP address andthe subnet mask, are set to 1, then the result is also 1. Otherwise, the value is0. In this case:
00001001 01000011 00100110 00000001 = 9.67.38.1 (Class A address)11111111 11111111 11111111 11------ = 255.255.255.192 (subnet mask)======== ======== ======== ======== (logical AND)00001001 01000011 00100110 00------ = 9.67.38 (subnet base address)
and the remainder is:
-------- -------- -------- --000001 = 1 (host address)
Of course the subnet number (by itself) is:
-------- 01000011 00100110 00------ = 68760
Any subnet number can be chosen with the exception of all zeros (thissubnet) or all ones (all subnets).
Chapter 1. TCP/IP overview 7

One disadvantage to using subnets is that the total number of possible IPaddresses available to you decreases. For example, if you have a Class Cnetwork address of 220.23.5 you then have eight remaining bits you control.Without subnets, or more precisely, using just one subnet, you have 254possible host addresses. With two subnets you sacrifice two bits carving outsubnets 01 and 10 (remember all ones and all zeros are reserved) leaving 6bits remaining. Therefore, you're left with two subnets with up to 62 hostaddresses in each for a total of 124 host addresses giving you less than halfthe previous number.
Bear in mind both the advantages and disadvantages of using subnets. UsingTable 3, you can easily determine the number of available subnets and hostsin each subnet. By subnetting your network, you can more easily mix differentnetwork technologies such as Ethernet and token-ring. This can allow you toovercome limitations to the number of hosts per segment and minimizenetwork congestion by reducing broadcast traffic.
If you have... ...then your subnet mask is...Class A 255.X.0.0
Class B 255.255.X.0
Class C 255.255.255.X
...where your choice of X yields...
Table 3. Number of subnets and hosts per subnet (partial)
XNumber ofrequiredsubnets
Number of possible hosts in each subnet
Class A Class B Class C
0 1 16,277,214 65,534 254
128 invalid invalid invalid invalid
192 2 4,194,302 16,382 62
224 6 2,097,150 8,190 30
240 14 1,048,574 4,094 14
248 30 524,286 2,046 6
252 62 262,142 1,022 2
254 126 131,070 510 invalid
255 254 65,534 254 invalid
... ... ... ... invalid
8 Beyond DHCP - Work Your TCP/IP Internetwork with Dynamic IP
Supernetting, the opposite of subnetting, treats multiple networks as if theybelong to one larger network. For example, a company that may need up to2,032 possible hosts could be assigned eight Class C network IDs(8*254=2,032) to form one supernet. For example, if those eight Class Cnetworks are 220.78.168 through 220.78.175, then the subnet mask to createthe supernet would be 255.255.248.0, which corresponds to the subnet maskused for a Class B network with 30 subnets of 2,046 possible hosts in each.Supernets are formed primarily to simplify routing on a TCP/IP network.
1.4 IP routing
As mentioned above, one reason for dividing a network into subnets is to cutdown on the amount of broadcast traffic throughout the network. Generally, asystem on one subnet can send IP datagrams to a system on another subnetonly by working through an intermediary called an IP router or gateway.
Again, let's use the Postal Service as an example. A mail delivery systemwithout subnets would mean that every delivery truck visits every home andbusiness until all the packages and letters are delivered. Such a system mightwork and pickup service would be quite frequent, but delivery would take along time. Consequently, the Postal Service uses subnets by using one truckserving each particular neighborhood. Packages and letters picked up by thattruck are routed to one or more central handling facilities then further routedto other trucks on the delivery side. However, if your package or letter isdestined for your neighbor's house (meaning it is on the same subnet) thereis very little routing involved and the same truck will deliver that particularmail. The size of each truck route, the number of central facilities, the speedof transfers, and so on determine the overall level of service andperformance.
Similarly, there are two types of IP routing. Direct routing (or direct delivery)means that an IP datagram can be sent directly to another system which is onthe same subnet without involving an intermediate gateway. Indirect routingoccurs when the destination host is not on a network directly attached to thesource machine. One or more gateways must handle the traffic, and the IP
A Class C network cannot contain more than 62 subnets. Also, Table 3 onlyshows the possible number of subnets and hosts per subnet when only oneoctet is used for subnetting. For Class A and Class B networks, additionalbits can be used for subnetting, as suggested by the last row in the table.
Note
Chapter 1. TCP/IP overview 9
address of the first gateway must be provided to the machine trying to sendthe datagram. This address is called the gateway address or router address.Each system on the network maintains a routing table to help determinewhich type of routing to use, indirect or direct, to reach another system. Threetypes of routing can be found in the table:
1. Direct routes2. Indirect routes3. Default routes (in case the destination IP network is not found
elsewhere in the table)
A routing table might look like this:
destination router interface129.7.0.0 129.7.0.1 ethernet128.15.0.0 128.15.0.1 modem128.10.0.0 128.10.0.5 Token-Ringdefault 128.10.0.5 Token-Ring127.0.0.1 127.0.0.1 loopback
1.5 Assigning IP addresses
In short, there are generally three pieces of information a system needs inorder to start communicating on a TCP/IP network: an IP address to uniquelyidentify that system on the network, a subnet mask to help divide that 32-bitaddress and determine the subnet and network parts, and at least one defaultrouter address. If a machine does not need to communicate beyond itsimmediate subnet, the router address and the machine’s own IP address areset the same. These three values represent the bare minimum needed for asystem to participate in the TCP/IP world, and they are vital. However, withnetworks changing so quickly, manually programming these values into eachand every device attached to the network and reprogramming them as theychange can quickly become tiresome.
IP addresses assigned to systems manually by changing a setting at eachindividual system are called static addresses. BOOTP and DHCP can beused to assign dynamic addresses.
1.5.1 BOOTP and the Dynamic Host Configuration Protocol (DHCP)BOOTP, the BOOTstrap Protocol, was one of the first attempts to automatedelivery of these critical values. A client system such as a PC can boot upand obtain the address and IP configuration needed to connect to the networkfrom a BOOTP server where all the information is kept and managedcentrally.
10 Beyond DHCP - Work Your TCP/IP Internetwork with Dynamic IP
Although BOOTP is still widely used, its successor, Dynamic HostConfiguration Protocol (DHCP), provides much more flexibility. IPconfigurations can be used and reused according to rules set in the DHCPserver without having to make modifications for every change in the network.Also, many DHCP servers can still provide IP configurations to older BOOTPclients. A well designed DHCP server can save a lot of work and help get yourTCP/IP network up and running more quickly. If you'd like to start exploringDHCP, read Chapter 2, “Up and Running with DHCP” on page 29, andChapter 3, “DHCP server and client interaction” on page 113.
1.5.1.1 MobilityWhy would one wish their clients to have dynamic IP configurations on theirTCP/IP network? DHCP is an answer to the problem of growingadministrative overhead with client configuration for TCP/IP networks. Take,for example, a user who travels from one office to another across the country.While their IP configuration may be completely valid in their Dallas office, thissame IP configuration is not likely to work in their Atlanta office. In this event,the user would not be able to get on the network, and in order to get on wouldhave to communicate with their local network administrator to obtain a full IPconfiguration (IP address, default IP gateway, name server, etc.) in order toreconfigure their machine for proper network communication. Furthermore,the user will have to reconfigure their machine with their original hostconfiguration when they return to Dallas. However, if the user is configured forDHCP instead of a static IP configuration, and both sites are configured withDHCP servers, there will be no administrative overhead associated with theuser travelling between Atlanta and Dallas. The user will be required to simplyattach their machine physically to the network and, upon boot, it will get adynamic IP configuration from a DHCP server in order to be able tocommunicate properly on the local network.
1.5.1.2 Managing a pool of IP addressesAnother example of why one would want to use DHCP is if a company isrunning out of available IP addresses. Let us say a company was only able toobtain 80 addresses for the 100 host machines within their network. Theyknow at any given time at least 20% of the machines on the network will notbe active due to employees being out of the office for sick days, vacations,business trips, or the machines simply not being in use. They can get by onthose 80 addresses by using DHCP to manage their available pool of IPaddresses by only assigning an address to a machine that is active on thenetwork.
Obviously, this scenario will only work properly if users either power off theirmachines while not in use or release their DHCP configuration. For a detailed
Chapter 1. TCP/IP overview 11
discussion of how client DHCP configurations are released, please refer to3.4.7, “DHCPRELEASE” on page 128.
1.6 Domain Name Services (DNS)
DNS servers handle the translation of IP addresses to alpha-numeric hostnames to facilitate easy comprehension of an IP topology. There is nothingwrong with using only addresses to communicate on a network and to keeptrack of where everything is within a network, but it is much easier toremember where merlot1 is in relation to mustard7 than it is to rememberwhere 192.168.6.2 is in relation to 192.168.10.6. In this scenario merlot1 isthe host name and 192.168.6.2 is the IP address.
Furthermore, DNS servers are directly responsible for translating URLs likewww.ibm.com into their IP addresses like 9.19.24.10, and vice versa. As youcan see, www.ibm.com is much easier to remember and more meaningful than9.19.24.10. In this scenario, www.ibm.com is the fully qualified domain nameand 9.19.24.10 is the IP address.
Most systems can accept up to three name server addresses, a primary andup to two backups, contacting each in turn in order to look up the IP addressthat corresponds to a particular name. Yet, there are thousands of DNSservers connected to the Internet, each handling a small portion of the vastlist of names and addresses. To handle these lookups most efficiently, oneDNS server can forward a lookup request it cannot satisfy to another DNSserver. Often, lookup responsibilities are divided according to the dots (.) inthe fully qualified name. For example, charlie may be given one name serveraddress and that local name server (DNS 1) knows the names and addressesof all the systems in the ibmus2.ibm.com group. When charlie requests an IPaddress for gadget.att.com from DNS 1, DNS 1 may forward the request toDNS 2 (serving ibm.com), which then forwards the request to DNS 3 (servingcom), which then forwards the request to DNS 4 (serving att.com), which thenanswers with the proper IP address for gadget.att.com. In practice, nameservers record many of the most recent lookups to help cut down on network
Domain Name Services or Domain Name System? While doingresearch we found many RFCs (request for comments) andBCPs (best common practice) that support both terms for DNS,so you will find us using both Domain Name Services andDomain Name System throughout this book to describe thesame concept.
Note
12 Beyond DHCP - Work Your TCP/IP Internetwork with Dynamic IP
traffic. For example, if samuel.ibmus2.ibm.com requests the IP address forgadget.att.com from DNS 1 just after charlie does, DNS 1 may be able toprovide the answer without bothering DNS 2, DNS 3, or DNS 4.
Traditionally this is setup as a static DNS, which requires the networkadministrator to manually edit and update the lookup table whenever an IPaddress gets assigned or reassigned to a particular name, or when a name isno longer used because the system is out of service. Needless to say, thiscan have quite a large administrative overhead. We discuss how this processcan be handled dynamically, and therefore with much less administrativeintervention, in 1.6.4, “Dynamic Domain Name Services (DDNS)” on page 22.
1.6.1 Domain namesNames assigned to subnets, networks, or any arbitrary collection of IPaddresses, are called domain names. Therefore, a system's fully qualifiedname might be charlie.ibmus2.ibm.com or alice.kingscollege.ac.uk. Domainsare designed to save typing and to provide some structure to the naming ofsystems. Generally, you do not have to include the domain name if you aresimply trying to reach another system within the same domain. Subnets andnetwork addresses can also be assigned names such as com, ibm.net, orkingscollege.ac.uk. The system that has the job of keeping track of whichnames correspond to which IP addresses is called a domain name services(DNS) server. A DNS server simply contains a table of addresses with theircorresponding names. Lookups can be performed in either direction butusually a DNS server translates names into numeric addresses on behalf ofclients. For any machine to take advantage of domain names, it must knowthe IP address of at least one name server. This address is the fourth criticalpiece of information most client machines need in order to get basic TCP/IPservice, although it is optional since it's still possible (albeit cumbersome) toreach other systems using nothing but numeric addresses.
Note that domain names are not case sensitive. For example,charlie.ibmus2.ibm.com, CHARLIE.IBMUS2.IBM.COM, andChArLiE.ibmus2.IBM.cOm will all be treated by a DNS the same way, and theDNS will return an IP address of 9.67.38.1 for each of these variations. It'salso quite common to have multiple listings, known as alias names, withseveral different names corresponding to the same numeric IP address. Anexample of this is that many Web-based companies try to gain a marketingadvantage by registering multiple names, hoping that someone will stumbleinto their Web site by typing a generic name.
The domain name space is tree structured. The top-level domains organizethe Internet domain name space. Examples of top-level domains are:
Chapter 1. TCP/IP overview 13
• com: Commercial organizations, such as IBM (ibm.com) and mycompany(mycompany.com). ibm is a subdomain of the top-level domain com.
• edu: Educational organizations, such as school.edu or university.edu
• gov: Government organizations, such as the National Science Foundation(nsf.gov)
• uk,fr,jp: Country specific domains for United Kingdom, France, and Japan,among many others
The tree is limited to 127 levels; this is a limit on subdomains, although thereis no limit on the number of branches at each node.
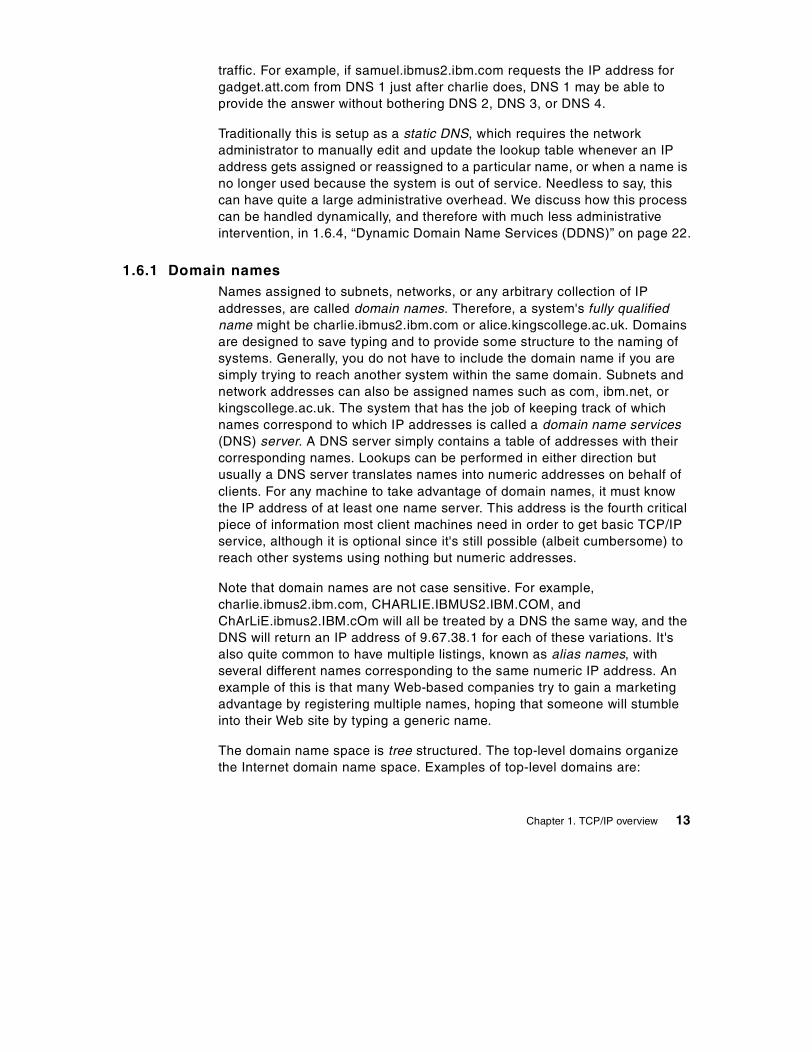
Each node in the tree is labeled with a name (see Figure 3). The root has anull label (" "). The full domain name of any node in the tree is the sequenceof names on the path from the node up to the root with a dot between nodenames. For example, in Figure 3, if you follow the arrows from the bottomlabel to the top from the host: www to the root label you can form the fulldomain name for that host: www.as400.ibm.com.
Figure 3. DNS name space
In DNS, each domain can be administered by a different organization. Eachorganization can then break its domains into a number of subdomains anddole out the responsibility for those domains to other organizations. This isbecause DNS uses a distributed database where you can manage your owndomain (company.com), or parts of the name space (subdomains) can bedelegated to other servers (department.company.com).
as400.ibm.com
ibm.com
com gov mil edu org fr ukjp
www.as400.ibm.comuniversity.edu subdomain
www.university.edu
university.edu
InterNIC" "
Managed by theNetwork Information Center
14 Beyond DHCP - Work Your TCP/IP Internetwork with Dynamic IP
The DNS servers responsible for the top level Internet domains, such as com,are also called Internet root servers, and they manage information about thetop-level domains. For example, the Internet's Network Information Centerruns the edu domain, but assigns individual schools authority over the .edusubdomains.
Domains can contain both hosts and other domains (their subdomains). Forexample, the ibm.com domain contains hosts such as www.ibm.com, but italso contains subdomains such as as400.ibm.com.
Domain names are used as indexes into the DNS database.
Each host on a network has a domain name with a DNS server that points toinformation about the host. This information may include an IP address,information about mail routing, and so on.
Why this complicated structure? It is to solve the problems that a host tablehas. For example, making names hierarchical eliminates the problem of namecollisions. Domains are assigned unique domain names giving organizationsthe freedom to choose names within their domains. Whatever name theychoose it does not conflict with other domain names since it has its ownunique domain name.
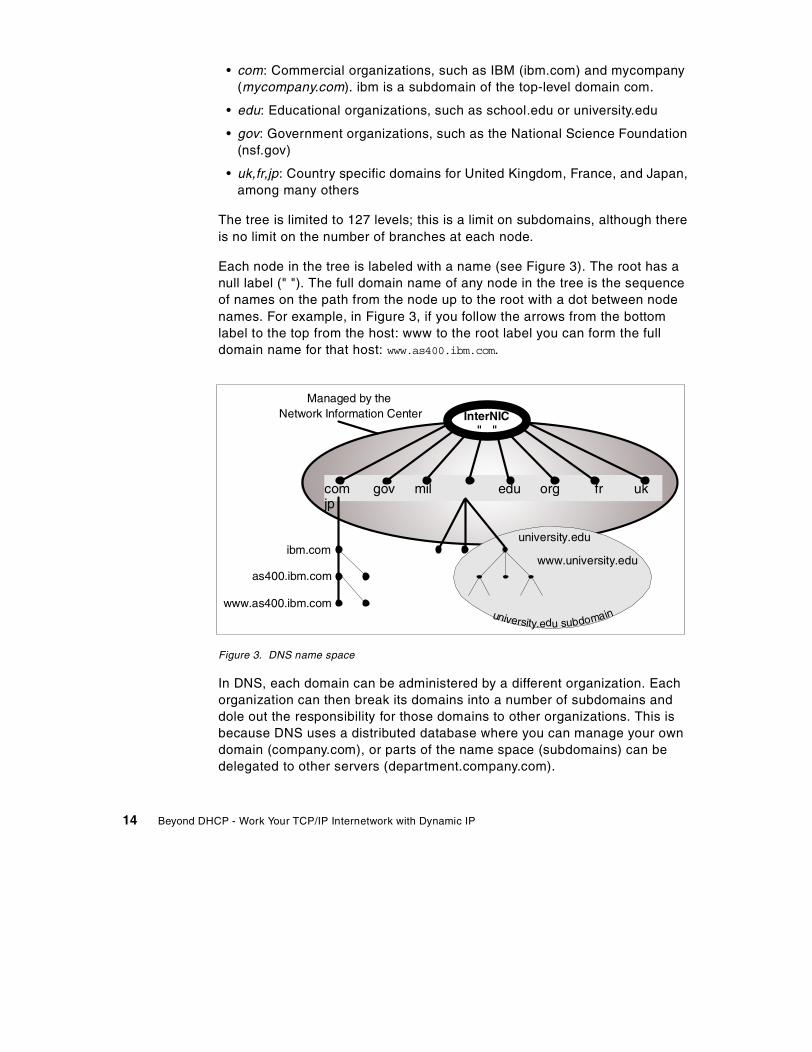
For example, we can have several hosts named www, such as www.ibm.com
and www.Acompany.com because they are in different domains managed bydifferent organizations. See Figure 4 on page 15.
Figure 4. Hosts with the same names in different domains
We can have a host in the same domain that also has the same hostname,such as www.ibm.com and www.as400.ibm.com because they belong todifferent subdomains.
i bm .com dom ain
com do m ain
co m gov m il edu org fr uk jpw w w
as 400 ibm
A com pany
w w w .ibm .com
w w w .A com pany.c om
w w w .as400.ibm .com ib m .com no de
In terN IC" "
Chapter 1. TCP/IP overview 15
Registration of IP addresses and domain names on the Internet is currentlymanaged by a central administrative body called InterNIC, the InternetNetwork Information Center. InterNIC’s Internet Web page can be found at:
http://www.networksolutions.com/
1.6.2 Domain versus zone of authorityThe concept of domains versus zones of authority can be a confusing one.We do our best to explain it in this section.
One of the main goals of the design of the Domain Name System isdecentralization. This is achieved through delegation. The central DNSadministrator in your company administering the company’s domain candivide it into subdomains. Each subdomain can be delegated to otheradministrators. This means that the administrator delegated to becomesresponsible for maintaining the subdomain.
Figure 5 on page 18 shows the domain mycompany.com as a subset of the.com name space. Under mycompany.com, there are other subdomains, suchas:
• endicott.mycompany.com• rochester.mycompany.com• otherdomain.mycompany.com
Name servers are programs running on a system, such as OS/2 Warp Server,AS/400, or AIX, with DNS support. In Figure 5 on page 18, the following hostsare running name server programs:
• as1.mycompany.com• rst.rochester.mycompany.com• otherhost.otherdomain.mycompany.com
They are called Domain Name System (DNS) servers, or simply nameservers.
Name servers have information about the part of the domain name spacecalled a zone or zone of authority. Both domains and zones are subsets of thedomain name space. A zone contains host information and the same datathat the domain contains, excluding the information that is delegated
A domain is a subset or subtree of the name space tree. A subdomain is asubset of the domain.
Domain versus Subdomain
16 Beyond DHCP - Work Your TCP/IP Internetwork with Dynamic IP
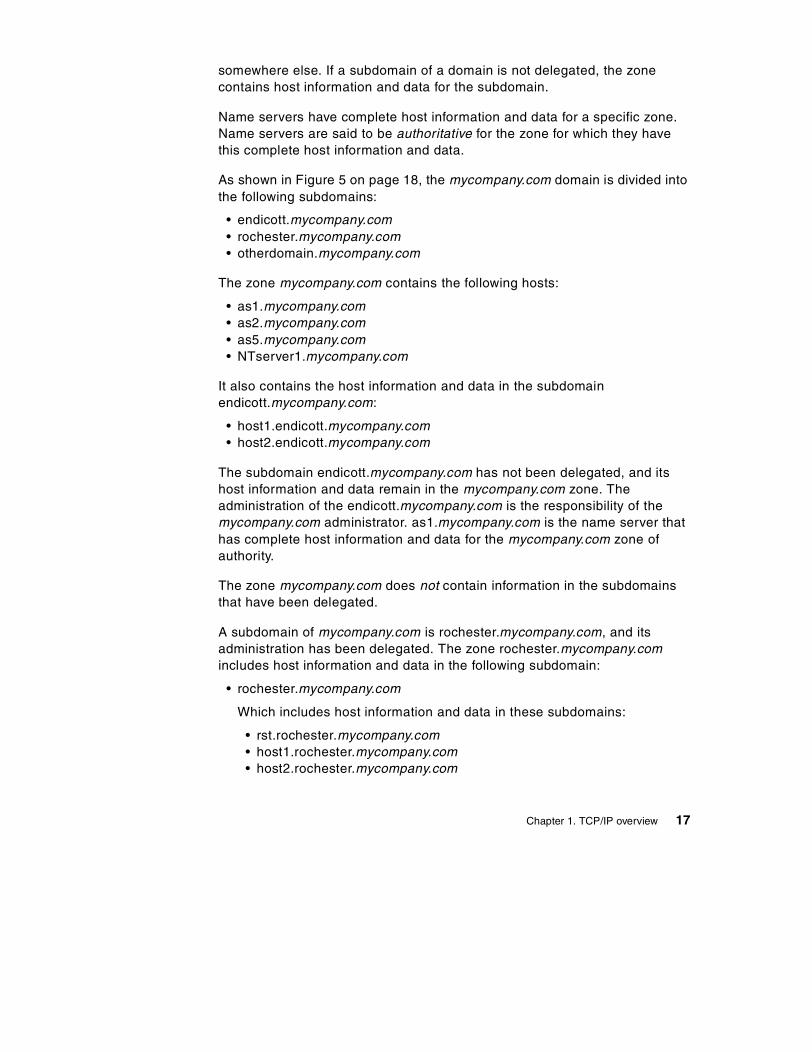
somewhere else. If a subdomain of a domain is not delegated, the zonecontains host information and data for the subdomain.
Name servers have complete host information and data for a specific zone.Name servers are said to be authoritative for the zone for which they havethis complete host information and data.
As shown in Figure 5 on page 18, the mycompany.com domain is divided intothe following subdomains:
• endicott.mycompany.com• rochester.mycompany.com• otherdomain.mycompany.com
The zone mycompany.com contains the following hosts:
• as1.mycompany.com• as2.mycompany.com• as5.mycompany.com• NTserver1.mycompany.com
It also contains the host information and data in the subdomainendicott.mycompany.com:
• host1.endicott.mycompany.com• host2.endicott.mycompany.com
The subdomain endicott.mycompany.com has not been delegated, and itshost information and data remain in the mycompany.com zone. Theadministration of the endicott.mycompany.com is the responsibility of themycompany.com administrator. as1.mycompany.com is the name server thathas complete host information and data for the mycompany.com zone ofauthority.
The zone mycompany.com does not contain information in the subdomainsthat have been delegated.
A subdomain of mycompany.com is rochester.mycompany.com, and itsadministration has been delegated. The zone rochester.mycompany.comincludes host information and data in the following subdomain:
• rochester.mycompany.com
Which includes host information and data in these subdomains:
• rst.rochester.mycompany.com• host1.rochester.mycompany.com• host2.rochester.mycompany.com
Chapter 1. TCP/IP overview 17
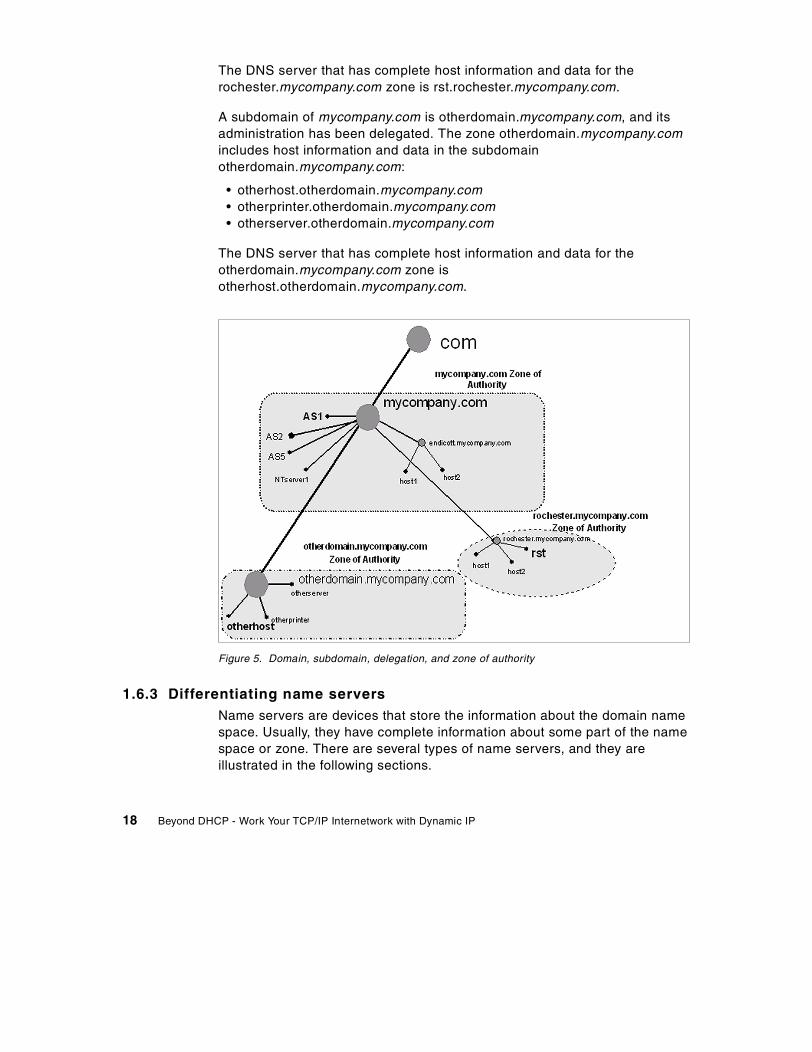
The DNS server that has complete host information and data for therochester.mycompany.com zone is rst.rochester.mycompany.com.
A subdomain of mycompany.com is otherdomain.mycompany.com, and itsadministration has been delegated. The zone otherdomain.mycompany.comincludes host information and data in the subdomainotherdomain.mycompany.com:
• otherhost.otherdomain.mycompany.com• otherprinter.otherdomain.mycompany.com• otherserver.otherdomain.mycompany.com
The DNS server that has complete host information and data for theotherdomain.mycompany.com zone isotherhost.otherdomain.mycompany.com.
Figure 5. Domain, subdomain, delegation, and zone of authority
1.6.3 Differentiating name serversName servers are devices that store the information about the domain namespace. Usually, they have complete information about some part of the namespace or zone. There are several types of name servers, and they areillustrated in the following sections.
18 Beyond DHCP - Work Your TCP/IP Internetwork with Dynamic IP
1.6.3.1 Primary name serversThis is the server that the hosts in the zone of authority are configured on. Itis the server that the DNS administrator configures and maintains. When thisserver gives responses to queries from its primary domain files, theresponses are called authoritative. A name server for a primary domain readsthe primary domain configuration information directly from files configured byDNS administrator and/or updated by dynamic clients.
1.6.3.2 Secondary name serversThis server has the same information as the primary name server. However,instead of getting its information directly from the DNS administratorconfiguring it, it gets its information from another name server through zonetransfers over the network. Secondary name servers are authoritativeservers, just like the primary name servers, and they act just like theprimaries in terms of data storage and data queries.
A zone transfer is a TCP/IP transfer of domain files from another DNS server(called a master name server). This is done automatically when thesecondary name server starts and also when the secondary name serverdetects that its domain files are downlevel from the master name server’sdomain files. The zone transfer is initiated from the secondary name server.The zone transfer cannot take place if the master name server is not active.
A secondary name server is used for two reasons: spreading the DNS queryworkload over more than one server and as a backup in case the primaryname server stops responding.
The name servers configured at the client probably have no directrelationship to the zone being queried, and even if they do, the name serversmight all be secondaries, or the first defined name server might be asecondary. Don’t be confused with the terms primary and secondary nameserver at the client which applies when a client is configured with more thanone DNS server for name resolving. If the first name server (also called theprimary name server) does not respond, the client can query the secondname server (also called the secondary name server). When the secondary
A DNS server can be a primary name server for one or more domains, aswell as a secondary name server for one or more domains. The termsprimary name server and secondary name server are somewhatmisnomers, because any given name server may be primary from somezones and secondary for other zones.
Primary vs. Secondary Name Server
Chapter 1. TCP/IP overview 19
name server gives out a response to a query, the response is also calledauthoritative. In other words, an answer from a secondary name server isconsidered to be just as good as if the answer came from a primary nameserver. The same applies if there is a third name server (also called tertiaryname server) defined at the client resolver configuration.
1.6.3.3 Master name serversThis is the name server from which a secondary name server gets its zonetransfer. A master name server can either be a primary name server oranother secondary name server.
1.6.3.4 Caching-only name serversA name server that does not have authority over any zone is called acaching-only name server. It gets all of its information by querying. Acaching-only name server’s responses are always non-authoritative.
1.6.3.5 Authoritative name serversA server that is considered to be authoritative for a domain is either theprimary server or a secondary server for that domain. If another name serveror a client queries either the primary or the secondary name server forinformation that they are authoritative for, the response is considered to beauthoritative. Can a name server that is not authoritative over a domain give aresponse to a client about that domain and have that response considered anauthoritative response? The answer is yes. If the non-authoritative serverdoes not know the answer and queries an authoritative name server on behalfof the client and then returns the answer to the client, this response isconsidered to be authoritative. The non-authoritative name server caches thisinformation. If a second client requests this same information from thenon-authoritative name server (and this information is still in its cache), thename server gives the response to the client, but now, this same informationis labeled non-authoritative. Why? Because the information in the responsethis second time came out of the name server’s cache. Another way of sayingthis is that at some point, a non-authoritative response came out of a nameserver’s cache.
1.6.3.6 Parent and child name serversThe concept of parent and child domains is equivalent to the concept ofdomain and subdomain. Once your domain grows to a certain size, you mayneed to distribute management by delegating authority of part of your domainto one or multiple subdomains. The upper-level domain is the parent and itssubdomains are the children.
20 Beyond DHCP - Work Your TCP/IP Internetwork with Dynamic IP
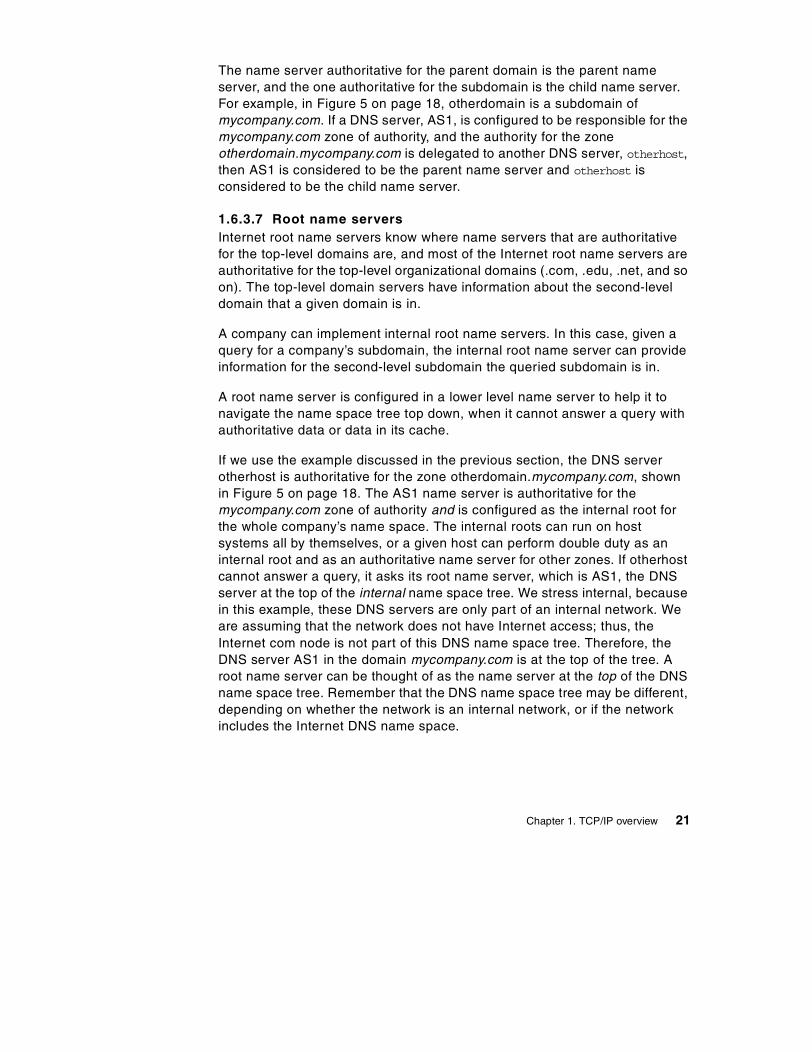
The name server authoritative for the parent domain is the parent nameserver, and the one authoritative for the subdomain is the child name server.For example, in Figure 5 on page 18, otherdomain is a subdomain ofmycompany.com. If a DNS server, AS1, is configured to be responsible for themycompany.com zone of authority, and the authority for the zoneotherdomain.mycompany.com is delegated to another DNS server, otherhost,then AS1 is considered to be the parent name server and otherhost isconsidered to be the child name server.
1.6.3.7 Root name serversInternet root name servers know where name servers that are authoritativefor the top-level domains are, and most of the Internet root name servers areauthoritative for the top-level organizational domains (.com, .edu, .net, and soon). The top-level domain servers have information about the second-leveldomain that a given domain is in.
A company can implement internal root name servers. In this case, given aquery for a company’s subdomain, the internal root name server can provideinformation for the second-level subdomain the queried subdomain is in.
A root name server is configured in a lower level name server to help it tonavigate the name space tree top down, when it cannot answer a query withauthoritative data or data in its cache.
If we use the example discussed in the previous section, the DNS serverotherhost is authoritative for the zone otherdomain.mycompany.com, shownin Figure 5 on page 18. The AS1 name server is authoritative for themycompany.com zone of authority and is configured as the internal root forthe whole company’s name space. The internal roots can run on hostsystems all by themselves, or a given host can perform double duty as aninternal root and as an authoritative name server for other zones. If otherhostcannot answer a query, it asks its root name server, which is AS1, the DNSserver at the top of the internal name space tree. We stress internal, becausein this example, these DNS servers are only part of an internal network. Weare assuming that the network does not have Internet access; thus, theInternet com node is not part of this DNS name space tree. Therefore, theDNS server AS1 in the domain mycompany.com is at the top of the tree. Aroot name server can be thought of as the name server at the top of the DNSname space tree. Remember that the DNS name space tree may be different,depending on whether the network is an internal network, or if the networkincludes the Internet DNS name space.
Chapter 1. TCP/IP overview 21
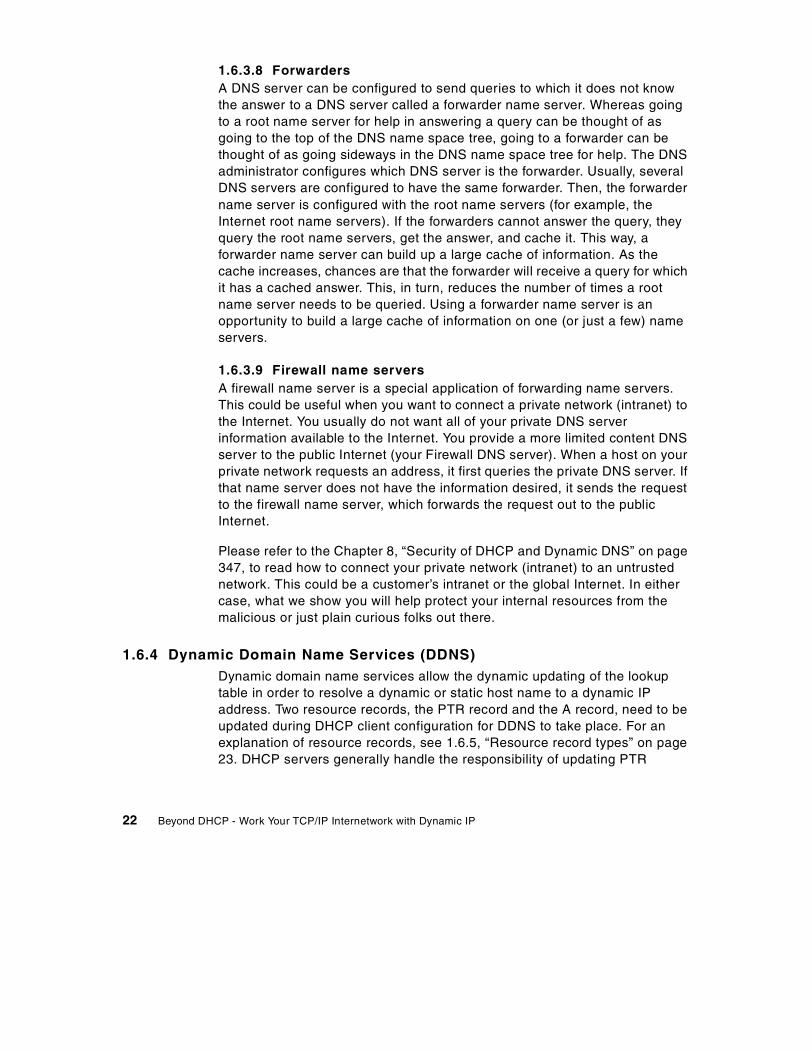
1.6.3.8 ForwardersA DNS server can be configured to send queries to which it does not knowthe answer to a DNS server called a forwarder name server. Whereas goingto a root name server for help in answering a query can be thought of asgoing to the top of the DNS name space tree, going to a forwarder can bethought of as going sideways in the DNS name space tree for help. The DNSadministrator configures which DNS server is the forwarder. Usually, severalDNS servers are configured to have the same forwarder. Then, the forwardername server is configured with the root name servers (for example, theInternet root name servers). If the forwarders cannot answer the query, theyquery the root name servers, get the answer, and cache it. This way, aforwarder name server can build up a large cache of information. As thecache increases, chances are that the forwarder will receive a query for whichit has a cached answer. This, in turn, reduces the number of times a rootname server needs to be queried. Using a forwarder name server is anopportunity to build a large cache of information on one (or just a few) nameservers.
1.6.3.9 Firewall name serversA firewall name server is a special application of forwarding name servers.This could be useful when you want to connect a private network (intranet) tothe Internet. You usually do not want all of your private DNS serverinformation available to the Internet. You provide a more limited content DNSserver to the public Internet (your Firewall DNS server). When a host on yourprivate network requests an address, it first queries the private DNS server. Ifthat name server does not have the information desired, it sends the requestto the firewall name server, which forwards the request out to the publicInternet.
Please refer to the Chapter 8, “Security of DHCP and Dynamic DNS” on page347, to read how to connect your private network (intranet) to an untrustednetwork. This could be a customer’s intranet or the global Internet. In eithercase, what we show you will help protect your internal resources from themalicious or just plain curious folks out there.
1.6.4 Dynamic Domain Name Services (DDNS)Dynamic domain name services allow the dynamic updating of the lookuptable in order to resolve a dynamic or static host name to a dynamic IPaddress. Two resource records, the PTR record and the A record, need to beupdated during DHCP client configuration for DDNS to take place. For anexplanation of resource records, see 1.6.5, “Resource record types” on page23. DHCP servers generally handle the responsibility of updating PTR
22 Beyond DHCP - Work Your TCP/IP Internetwork with Dynamic IP
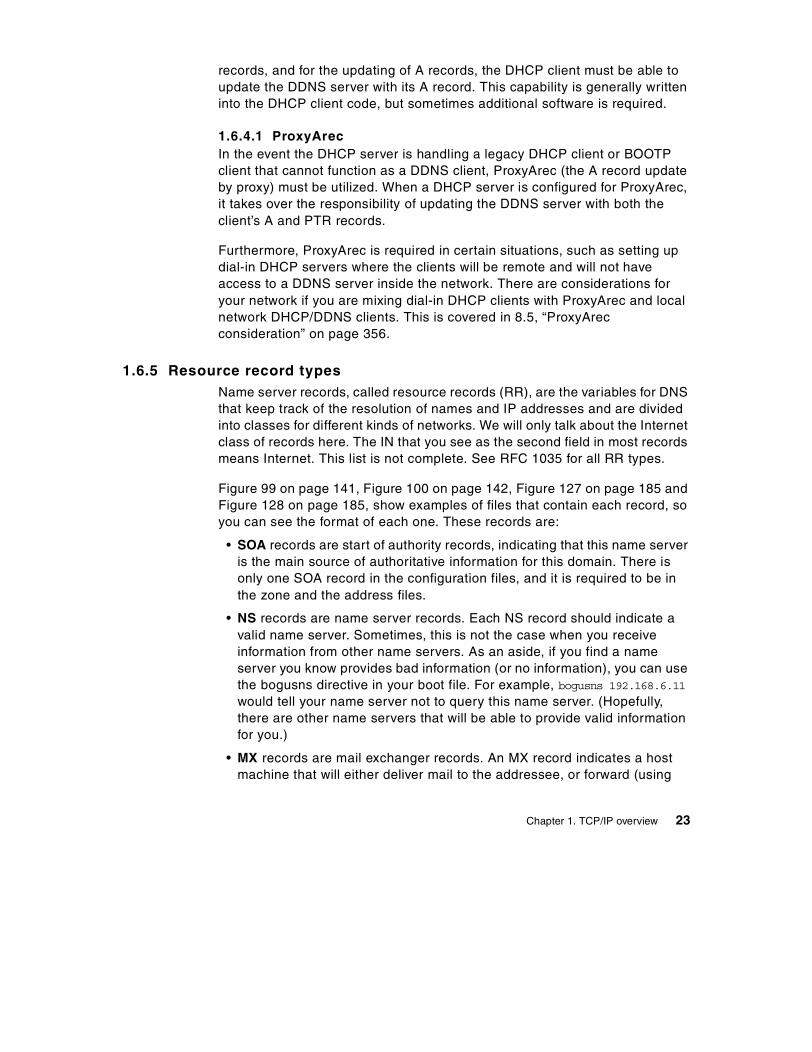
records, and for the updating of A records, the DHCP client must be able toupdate the DDNS server with its A record. This capability is generally writteninto the DHCP client code, but sometimes additional software is required.
1.6.4.1 ProxyArecIn the event the DHCP server is handling a legacy DHCP client or BOOTPclient that cannot function as a DDNS client, ProxyArec (the A record updateby proxy) must be utilized. When a DHCP server is configured for ProxyArec,it takes over the responsibility of updating the DDNS server with both theclient’s A and PTR records.
Furthermore, ProxyArec is required in certain situations, such as setting updial-in DHCP servers where the clients will be remote and will not haveaccess to a DDNS server inside the network. There are considerations foryour network if you are mixing dial-in DHCP clients with ProxyArec and localnetwork DHCP/DDNS clients. This is covered in 8.5, “ProxyArecconsideration” on page 356.
1.6.5 Resource record typesName server records, called resource records (RR), are the variables for DNSthat keep track of the resolution of names and IP addresses and are dividedinto classes for different kinds of networks. We will only talk about the Internetclass of records here. The IN that you see as the second field in most recordsmeans Internet. This list is not complete. See RFC 1035 for all RR types.
Figure 99 on page 141, Figure 100 on page 142, Figure 127 on page 185 andFigure 128 on page 185, show examples of files that contain each record, soyou can see the format of each one. These records are:
• SOA records are start of authority records, indicating that this name serveris the main source of authoritative information for this domain. There isonly one SOA record in the configuration files, and it is required to be inthe zone and the address files.
• NS records are name server records. Each NS record should indicate avalid name server. Sometimes, this is not the case when you receiveinformation from other name servers. As an aside, if you find a nameserver you know provides bad information (or no information), you can usethe bogusns directive in your boot file. For example, bogusns 192.168.6.11
would tell your name server not to query this name server. (Hopefully,there are other name servers that will be able to provide valid informationfor you.)
• MX records are mail exchanger records. An MX record indicates a hostmachine that will either deliver mail to the addressee, or forward (using
Chapter 1. TCP/IP overview 23
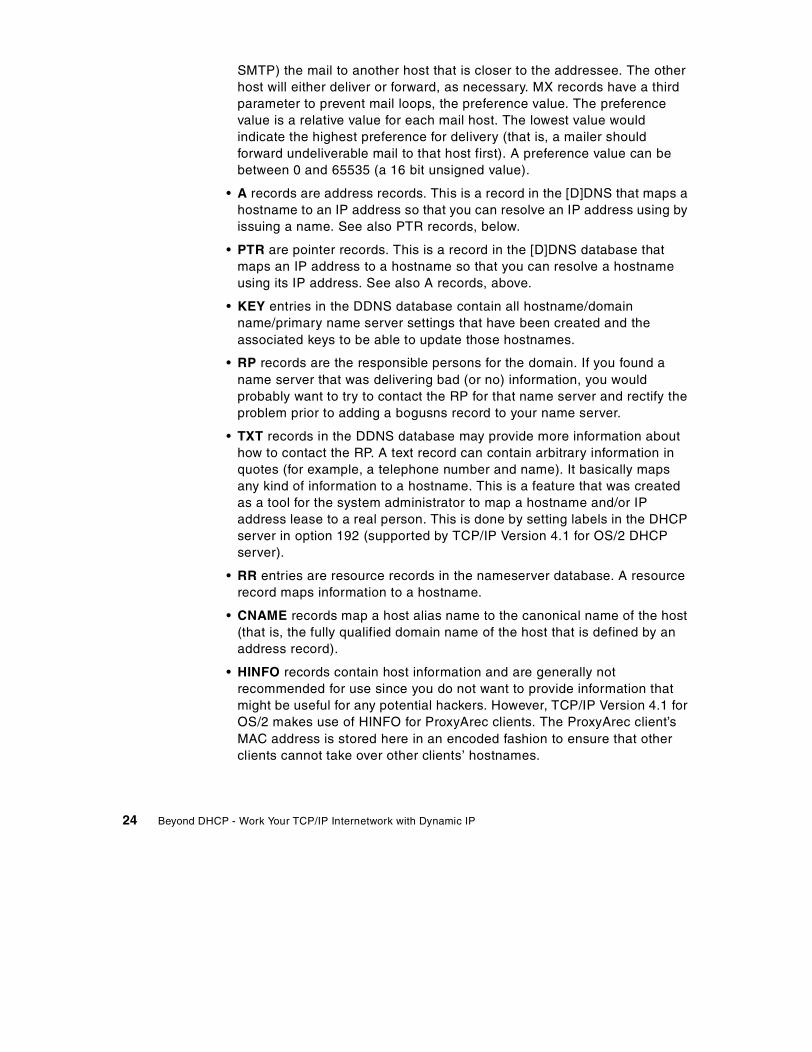
SMTP) the mail to another host that is closer to the addressee. The otherhost will either deliver or forward, as necessary. MX records have a thirdparameter to prevent mail loops, the preference value. The preferencevalue is a relative value for each mail host. The lowest value wouldindicate the highest preference for delivery (that is, a mailer shouldforward undeliverable mail to that host first). A preference value can bebetween 0 and 65535 (a 16 bit unsigned value).
• A records are address records. This is a record in the [D]DNS that maps ahostname to an IP address so that you can resolve an IP address using byissuing a name. See also PTR records, below.
• PTR are pointer records. This is a record in the [D]DNS database thatmaps an IP address to a hostname so that you can resolve a hostnameusing its IP address. See also A records, above.
• KEY entries in the DDNS database contain all hostname/domainname/primary name server settings that have been created and theassociated keys to be able to update those hostnames.
• RP records are the responsible persons for the domain. If you found aname server that was delivering bad (or no) information, you wouldprobably want to try to contact the RP for that name server and rectify theproblem prior to adding a bogusns record to your name server.
• TXT records in the DDNS database may provide more information abouthow to contact the RP. A text record can contain arbitrary information inquotes (for example, a telephone number and name). It basically mapsany kind of information to a hostname. This is a feature that was createdas a tool for the system administrator to map a hostname and/or IPaddress lease to a real person. This is done by setting labels in the DHCPserver in option 192 (supported by TCP/IP Version 4.1 for OS/2 DHCPserver).
• RR entries are resource records in the nameserver database. A resourcerecord maps information to a hostname.
• CNAME records map a host alias name to the canonical name of the host(that is, the fully qualified domain name of the host that is defined by anaddress record).
• HINFO records contain host information and are generally notrecommended for use since you do not want to provide information thatmight be useful for any potential hackers. However, TCP/IP Version 4.1 forOS/2 makes use of HINFO for ProxyArec clients. The ProxyArec client’sMAC address is stored here in an encoded fashion to ensure that otherclients cannot take over other clients’ hostnames.
24 Beyond DHCP - Work Your TCP/IP Internetwork with Dynamic IP

1.7 Network security and the Internet
Firewalls help protect an intranet (private TCP/IP network) against unwantedaccess from the Internet, such as hackers trying to manipulate a company’sWeb page, industrial saboteurs trying to steal confidential information, orpeople who are just plain curious but have no business poking around yourinternal network. At the same time, people on the Internet can still get accessto Internet systems. Whereas a router will pass IP packets from one area of anetwork to another without scrutiny, a firewall router inspects packets, blocksany network packets that are suspect, and logs all transmission of packetsfrom the intranet to the Internet, or vice versa. This process allows internalusers to access information and services on the Internet while also keepingout all unfriendly or unwanted network traffic coming in from the Internet.
Figure 6. Firewalls and your internal network
Firewalls vary in capabilities, but the two basic types are proxy and SOCKSfirewalls. Both pass packets from intranet users to the Internet with thefirewall’s address instead of the user’s, fetching data from the Internet byproxy. This adds an extra layer of protection by keeping the user’s IP addresssecret from the Internet, and for a hacker to break into a user’s computer,they must first know where to attack.
Firewalls can also help link two separate intranets via the Internet (and stillprovide security) using a technology called Virtual Private Networks (VPN).VPNs are set up by creating an IP Tunnel between two intranet firewalls overthe Internet. An IP Tunnel is a network connection where all data sentbetween two IP addresses is encrypted. By encrypting all data that flows
I B MI n t e r n a l
N e t w o r k
I n t e r n e t
H a c k e r sC u r i o u s
I n d u s t r i a lS a b o t e u r s
C N N . c o m
F i r e w a l l
Chapter 1. TCP/IP overview 25
between the two network firewalls, all data flowing between any two points onthe separate networks will be encrypted and therefore protected. Chapter 8,“Security of DHCP and Dynamic DNS” on page 347, takes a look at firewallsin the context of overall TCP/IP network security.
1.8 IP Version 6 (IPv6)
IPv4 with 32-bit addresses allows us slightly over four billion IP addresses,which directly translates to only four billion computers allowed on the Internet.Currently, over two billion addresses are registered to various companies andindividuals and it is projected that within the next five or more years the entirepool of four billion IP addresses will be exhausted.
IPv6 (Internet Protocol Version 6) is proposed to help alleviate some of theaddress constraints and other shortcomings of TCP/IP and IPv4 as more andmore people and devices get onto the Internet. IPv6 will extends today'sTCP/IP environment, so the skills you develop with this book will still beapplicable when these protocol enhancements become available. See RFCs1883 through 1887 for more information on IPv6.
1.9 Applications that use TCP/IP
Programmers have written many applications that communicate usingTCP/IP. Web browsers (HTTP), FTP (file transfer protocol), Telnet (terminalemulation), LPR/LPD (printing over TCP/IP), REXEC and RSH (startingprograms remotely over the network), POP/SMTP/IMAP (e-mail services),NFS (network file sharing), X-Windows (graphics terminal emulation), NNTP(news), SNMP (network management), and Java, among other examples, canall use these common services. Although many variations exist for specificplatforms (such as Winsock for Microsoft Windows), a sockets interfaceallows programmers to write applications that communicate with TCP/IP.
1.10 Other TCP/IP terms
To work properly, IP protocol needs some additional help to manage trafficflow efficiently. These terms are explained briefly; please consult theappropriate references for more detailed information:
• Internet Control Message Protocol (ICMP), a part of IP, helps report errorsin datagram delivery. ICMP can also help discover routers and maximumtransmission units (MTUs) (see below) along the path the datagramtravels. PING, the popular TCP/IP application used to check the
26 Beyond DHCP - Work Your TCP/IP Internetwork with Dynamic IP
connection between two systems on the network, uses ICMP. RFC 792describes ICMP in detail.
• The maximum transmission unit (MTU) is the size of the IP datagram,which can be adjusted depending on network conditions. All systems on aTCP/IP network are required to handle MTUs ranging from 576 to 65,535octets. Each datagram typically packages 20 octets of identifyinginformation, such as the destination address, as part of the structure.
• Internet Group Management Protocol (IGMP) allows systems toparticipate in IP multicasts and to cancel such participation. Additionally,IGMP provides routers with the ability to check hosts to see if they areinterested in participating in multicasts. RFCs 966, 1112, and 1458discuss IP multicasting.
• Address Resolution Protocol (ARP) maps IP addresses to hardwareaddresses on a network. (Hardware addresses are often Ethernet ortoken-ring network adapter addresses consisting of 12 hexadecimaldigits.) Reverse ARP (RARP) provides the reverse lookup. See RFC 826for more information on ARP.
• SLIP (RFC 1055) and PPP (RFCs 1717 and 1661) provide TCP/IPservices over serial lines, such as modems and ISDN (digital telephone)connections. Chapter 7, “Mobile users” on page 317, provides much moreinformation on PPP.
• Traditional LAN (Local Area Network) protocols can be carried by TCP/IP,to provide file and print sharing services for PCs without contaminating aTCP/IP network with other protocols. (Many computer networks areperfectly capable of mixing protocols, but many network managers preferto standardize on one protocol.) For example, RFC 1234 describes howNovell’s IPX operates over TCP/IP; so traditional NetWare servers andclients can communicate via TCP/IP. NetBIOS over TCP/IP (used by theIBM OS/2 Warp Server and clients, IBM DOS/Windows LAN Services,Microsoft Windows 95, Windows NT, and Windows for Workgroups), andexplained by RFCs 1001 and 1002, supports applications written to theNetBIOS programming interface. NetBIOS isn't actually a protocol. Likethe sockets interface, it's a widely accepted way of writing network-savvyapplications. The NetBIOS interface can be supported by a number ofunderlying network protocols, including NetBEUI (NetBIOS over IEEE802.2), TCP/IP (TCPBEUI), and even SNA. Like TCP/IP, NetBIOS alsorelies on names to communicate with other systems on the network,although these names behave much differently. A NetBIOS Name Server(NBNS) can help provide better NetBIOS service over a TCP/IP network.Consult Chapter 5, “Integrating file and print services” on page 227 fordetails on NetBIOS over TCP/IP issues.
Chapter 1. TCP/IP overview 27

28 Beyond DHCP - Work Your TCP/IP Internetwork with Dynamic IP
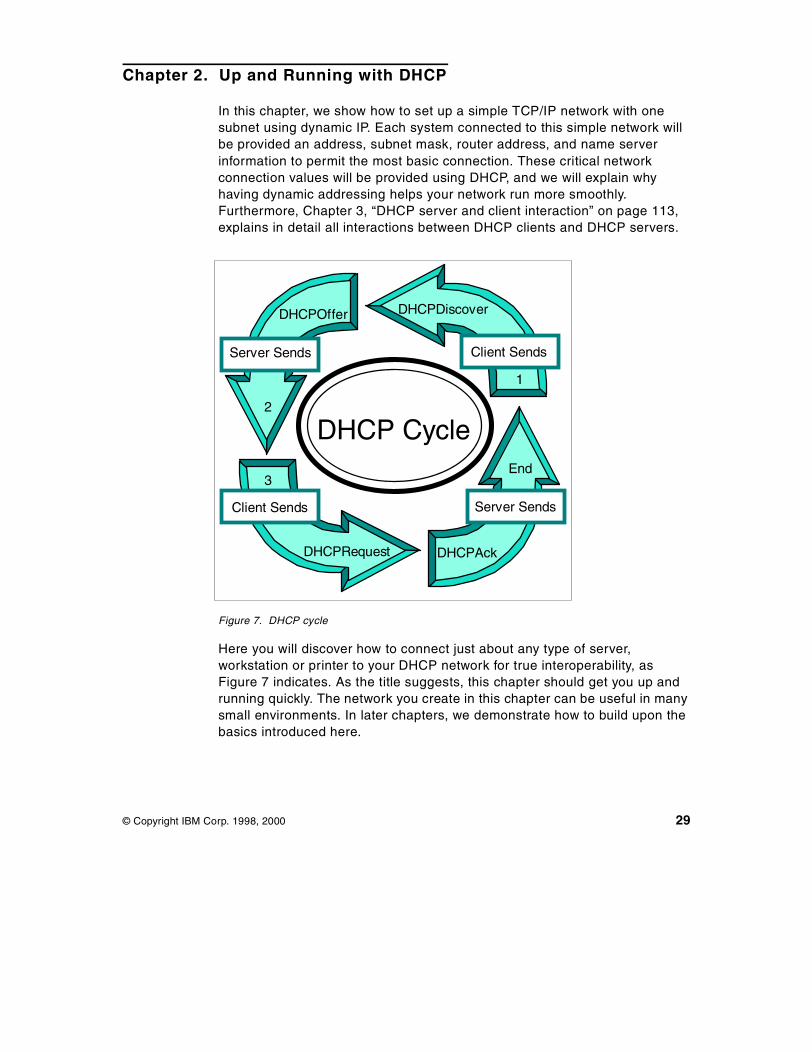
Chapter 2. Up and Running with DHCP
In this chapter, we show how to set up a simple TCP/IP network with onesubnet using dynamic IP. Each system connected to this simple network willbe provided an address, subnet mask, router address, and name serverinformation to permit the most basic connection. These critical networkconnection values will be provided using DHCP, and we will explain whyhaving dynamic addressing helps your network run more smoothly.Furthermore, Chapter 3, “DHCP server and client interaction” on page 113,explains in detail all interactions between DHCP clients and DHCP servers.
Figure 7. DHCP cycle
Here you will discover how to connect just about any type of server,workstation or printer to your DHCP network for true interoperability, asFigure 7 indicates. As the title suggests, this chapter should get you up andrunning quickly. The network you create in this chapter can be useful in manysmall environments. In later chapters, we demonstrate how to build upon thebasics introduced here.
DHCP Cycle
DHCPOffer
DHCPRequest DHCPAck
DHCPDiscover
Server Sends Client Sends
Client Sends Server Sends
3
2
1
End
© Copyright IBM Corp. 1998, 2000 29
2.1 Why DHCP?
Computer networks always seem to be changing. New devices (PCs, printers,and so on) must be attached, old devices disconnected, new branchesadded, mobile workers hosted, temporary employees accommodated, allthese changes can happen every day. Managing all that change can prove amajor undertaking without systems that respond automatically to changingdemands.
On a TCP/IP network, each system must have an IP address, subnet mask,and router address (at a minimum) in order to communicate, as discussed inChapter 1, “TCP/IP overview” on page 1. At least one name server addressshould generally be provided as well. Unless your network contains only asmall number of systems, which rarely (if ever) change, managing all theseaddress settings manually can become overwhelming. Using a DHCP serverto manage these addresses for you can help make your TCP/IP network morereliable, flexible, and less time consuming.
2.2 OS/2 Warp Server for e-business as a DHCP server
OS/2 Warp Server for e-business makes a reliable DHCP server, withsophisticated management features and excellent performance.
This section deals mainly with OS/2 Warp Server for e-business, but if wemake mention of OS/2 Warp Server Version 4, then we are referring to OS/2Warp Server Version 4 Entry, Advanced or SMP.
The IBM TCP/IP Version 4.21 for OS/2, which provides the DHCP capabilitiesof OS/2 Warp Server for e-business, is part of the original package, and maybe installed on OS/2 Warp Server Version 4. TCP/IP Version 4.1 is availablefor OS/2 Warp Server Version 4, and may be downloaded from IBM SoftwareChoice at the following Internet Web site:
http://www.ibm.com/software/os/warp/swchoice/
Note: Some features in the IBM Software Choice catalog, such as TCP/IPVersion 4.1 for OS/2, are fee-based features.
2.2.1 InstallationBe sure to select the DHCP server function during the installation of OS/2Warp Server for e-business. For OS/2 Warp Server Version 4, we recommendmaking the following additions in this order:
• FixPak 42 (or later)
30 Beyond DHCP - Work Your TCP/IP Internetwork with Dynamic IP
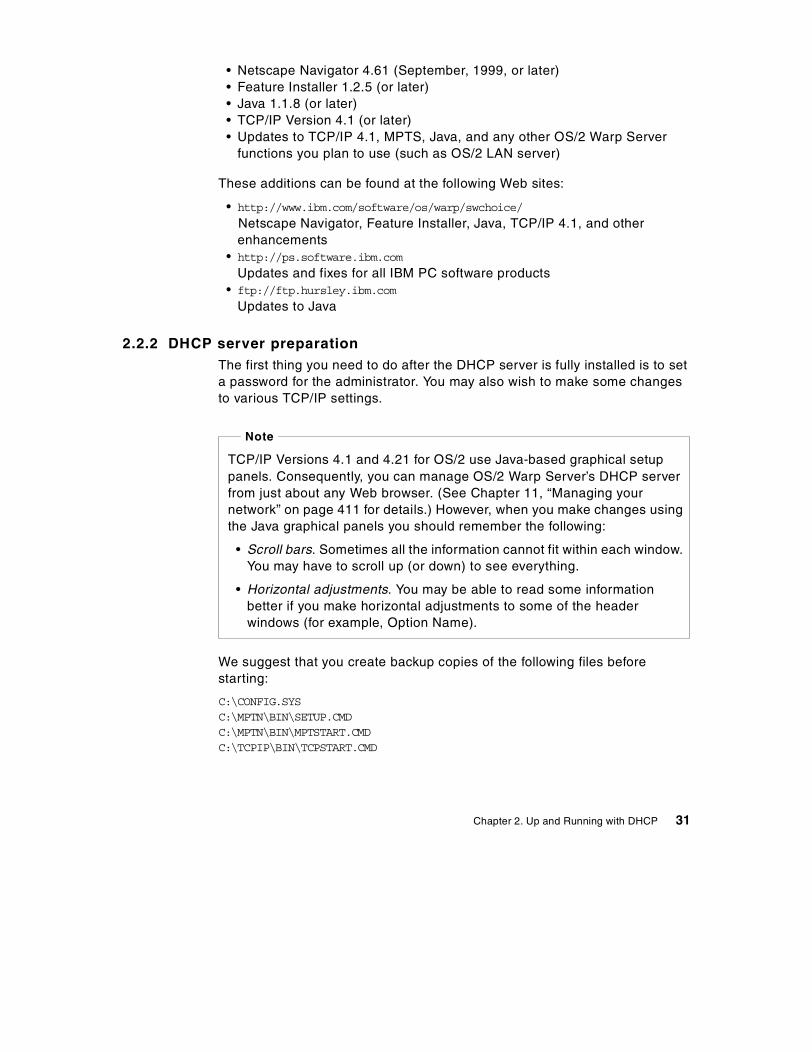
• Netscape Navigator 4.61 (September, 1999, or later)• Feature Installer 1.2.5 (or later)• Java 1.1.8 (or later)• TCP/IP Version 4.1 (or later)• Updates to TCP/IP 4.1, MPTS, Java, and any other OS/2 Warp Server
functions you plan to use (such as OS/2 LAN server)
These additions can be found at the following Web sites:
• http://www.ibm.com/software/os/warp/swchoice/
Netscape Navigator, Feature Installer, Java, TCP/IP 4.1, and otherenhancements
• http://ps.software.ibm.com
Updates and fixes for all IBM PC software products• ftp://ftp.hursley.ibm.com
Updates to Java
2.2.2 DHCP server preparationThe first thing you need to do after the DHCP server is fully installed is to seta password for the administrator. You may also wish to make some changesto various TCP/IP settings.
We suggest that you create backup copies of the following files beforestarting:
C:\CONFIG.SYSC:\MPTN\BIN\SETUP.CMDC:\MPTN\BIN\MPTSTART.CMDC:\TCPIP\BIN\TCPSTART.CMD
TCP/IP Versions 4.1 and 4.21 for OS/2 use Java-based graphical setuppanels. Consequently, you can manage OS/2 Warp Server’s DHCP serverfrom just about any Web browser. (See Chapter 11, “Managing yournetwork” on page 411 for details.) However, when you make changes usingthe Java graphical panels you should remember the following:
• Scroll bars. Sometimes all the information cannot fit within each window.You may have to scroll up (or down) to see everything.
• Horizontal adjustments. You may be able to read some informationbetter if you make horizontal adjustments to some of the headerwindows (for example, Option Name).
Note
Chapter 2. Up and Running with DHCP 31
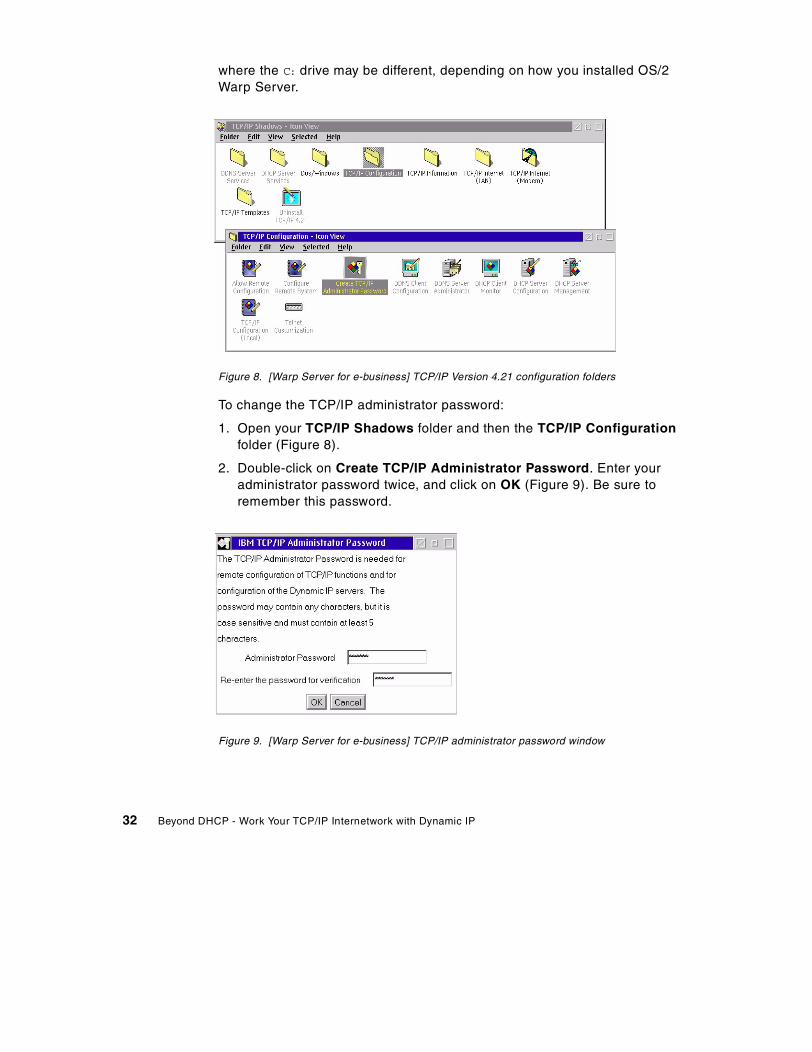
where the C: drive may be different, depending on how you installed OS/2Warp Server.
Figure 8. [Warp Server for e-business] TCP/IP Version 4.21 configuration folders
To change the TCP/IP administrator password:
1. Open your TCP/IP Shadows folder and then the TCP/IP Configurationfolder (Figure 8).
2. Double-click on Create TCP/IP Administrator Password. Enter youradministrator password twice, and click on OK (Figure 9). Be sure toremember this password.
Figure 9. [Warp Server for e-business] TCP/IP administrator password window
32 Beyond DHCP - Work Your TCP/IP Internetwork with Dynamic IP
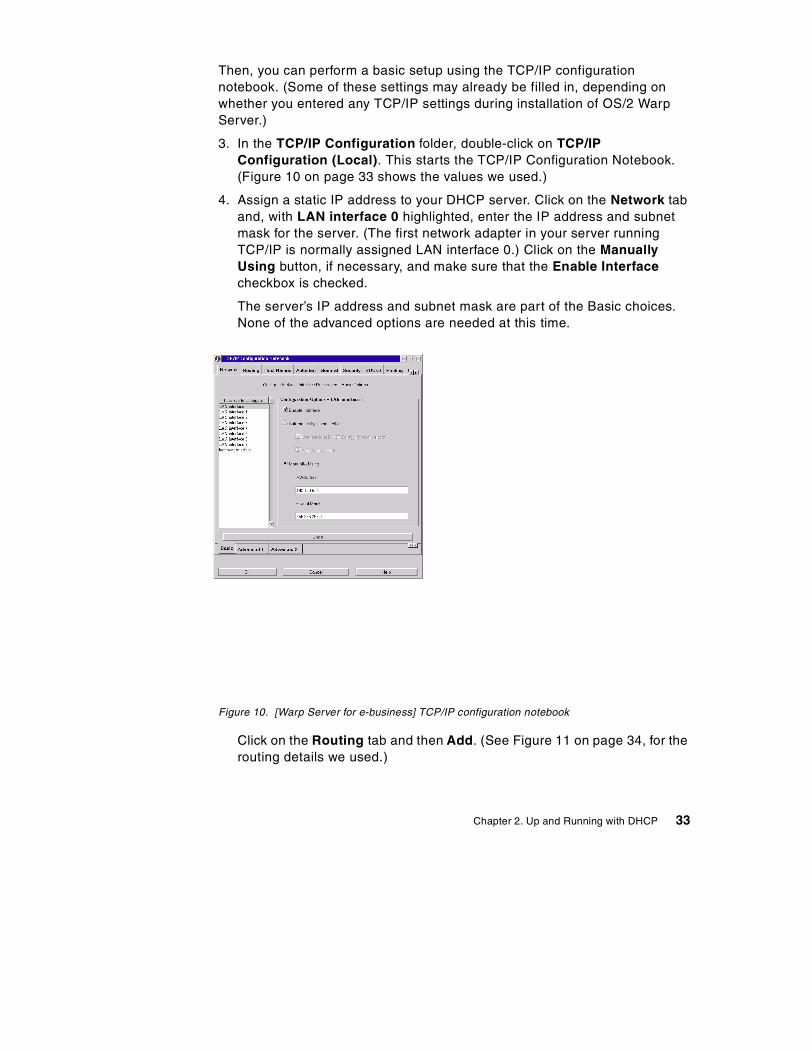
Then, you can perform a basic setup using the TCP/IP configurationnotebook. (Some of these settings may already be filled in, depending onwhether you entered any TCP/IP settings during installation of OS/2 WarpServer.)
3. In the TCP/IP Configuration folder, double-click on TCP/IPConfiguration (Local). This starts the TCP/IP Configuration Notebook.(Figure 10 on page 33 shows the values we used.)
4. Assign a static IP address to your DHCP server. Click on the Network taband, with LAN interface 0 highlighted, enter the IP address and subnetmask for the server. (The first network adapter in your server runningTCP/IP is normally assigned LAN interface 0.) Click on the ManuallyUsing button, if necessary, and make sure that the Enable Interfacecheckbox is checked.
The server’s IP address and subnet mask are part of the Basic choices.None of the advanced options are needed at this time.
Figure 10. [Warp Server for e-business] TCP/IP configuration notebook
Click on the Routing tab and then Add. (See Figure 11 on page 34, for therouting details we used.)
Chapter 2. Up and Running with DHCP 33
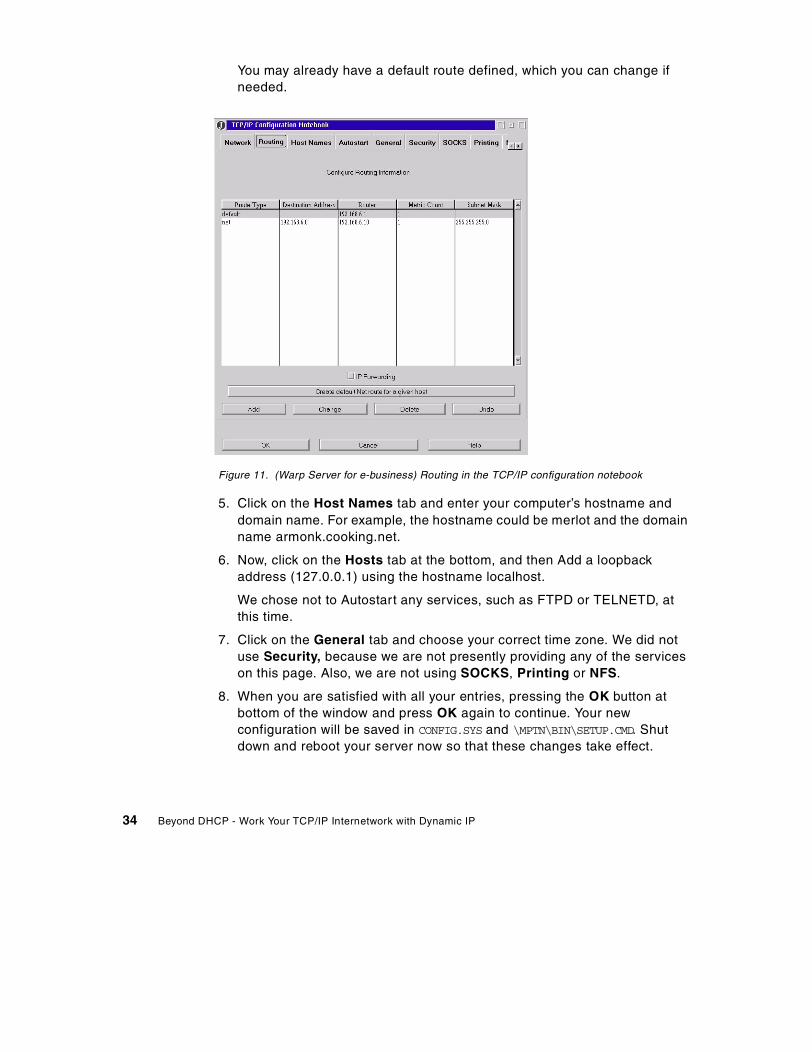
You may already have a default route defined, which you can change ifneeded.
Figure 11. (Warp Server for e-business) Routing in the TCP/IP configuration notebook
5. Click on the Host Names tab and enter your computer’s hostname anddomain name. For example, the hostname could be merlot and the domainname armonk.cooking.net.
6. Now, click on the Hosts tab at the bottom, and then Add a loopbackaddress (127.0.0.1) using the hostname localhost.
We chose not to Autostart any services, such as FTPD or TELNETD, atthis time.
7. Click on the General tab and choose your correct time zone. We did notuse Security, because we are not presently providing any of the serviceson this page. Also, we are not using SOCKS, Printing or NFS.
8. When you are satisfied with all your entries, pressing the OK button atbottom of the window and press OK again to continue. Your newconfiguration will be saved in CONFIG.SYS and \MPTN\BIN\SETUP.CMD. Shutdown and reboot your server now so that these changes take effect.
34 Beyond DHCP - Work Your TCP/IP Internetwork with Dynamic IP
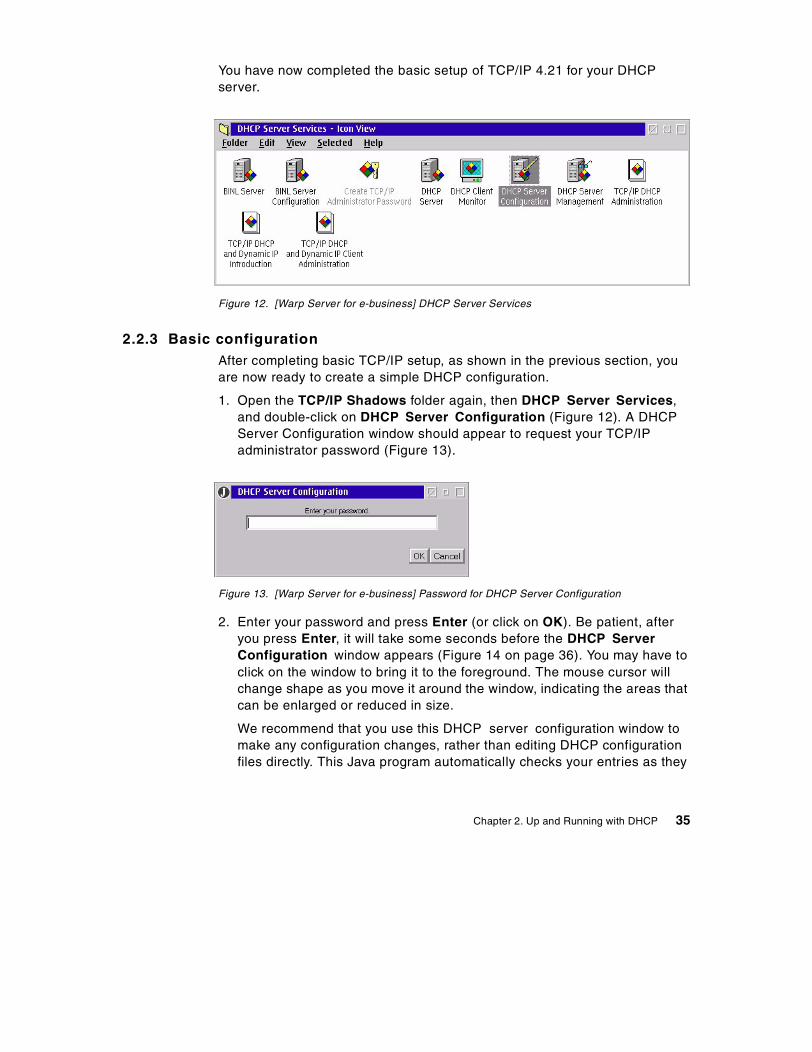
You have now completed the basic setup of TCP/IP 4.21 for your DHCPserver.
Figure 12. [Warp Server for e-business] DHCP Server Services
2.2.3 Basic configurationAfter completing basic TCP/IP setup, as shown in the previous section, youare now ready to create a simple DHCP configuration.
1. Open the TCP/IP Shadows folder again, then DHCP Server Services,and double-click on DHCP Server Configuration (Figure 12). A DHCPServer Configuration window should appear to request your TCP/IPadministrator password (Figure 13).
Figure 13. [Warp Server for e-business] Password for DHCP Server Configuration
2. Enter your password and press Enter (or click on OK). Be patient, afteryou press Enter, it will take some seconds before the DHCP ServerConfiguration window appears (Figure 14 on page 36). You may have toclick on the window to bring it to the foreground. The mouse cursor willchange shape as you move it around the window, indicating the areas thatcan be enlarged or reduced in size.
We recommend that you use this DHCP server configuration window tomake any configuration changes, rather than editing DHCP configurationfiles directly. This Java program automatically checks your entries as they
Chapter 2. Up and Running with DHCP 35
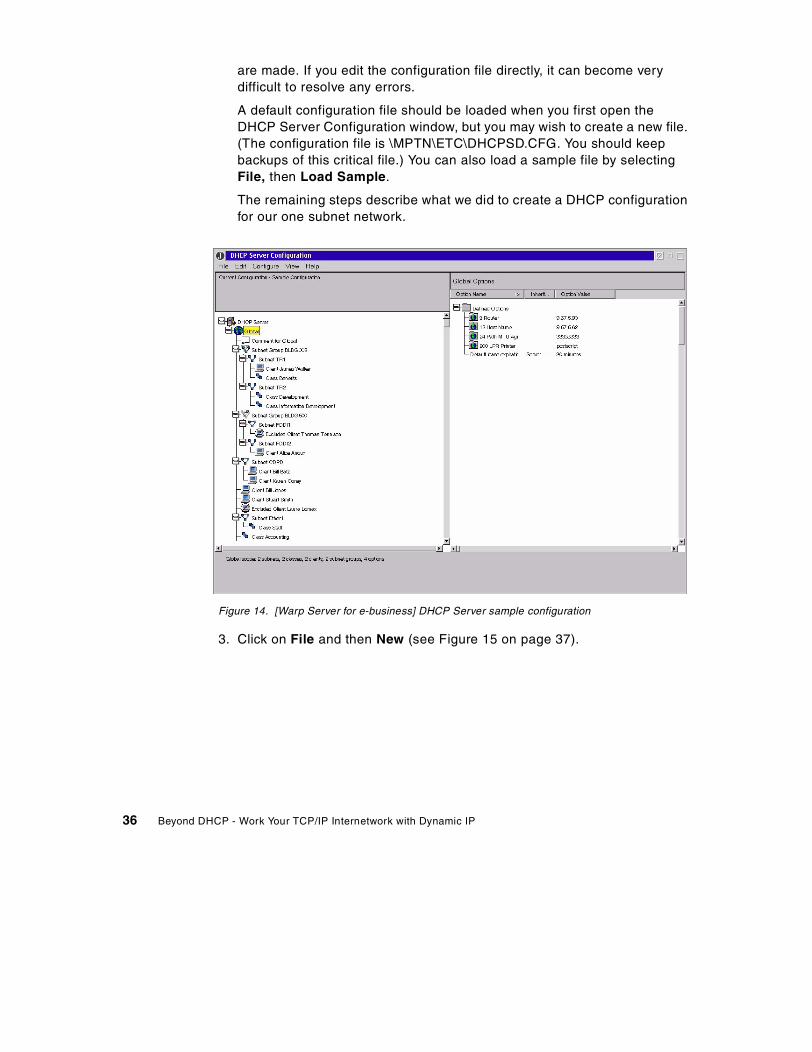
are made. If you edit the configuration file directly, it can become verydifficult to resolve any errors.
A default configuration file should be loaded when you first open theDHCP Server Configuration window, but you may wish to create a new file.(The configuration file is \MPTN\ETC\DHCPSD.CFG. You should keepbackups of this critical file.) You can also load a sample file by selectingFile, then Load Sample.
The remaining steps describe what we did to create a DHCP configurationfor our one subnet network.
Figure 14. [Warp Server for e-business] DHCP Server sample configuration
3. Click on File and then New (see Figure 15 on page 37).
36 Beyond DHCP - Work Your TCP/IP Internetwork with Dynamic IP
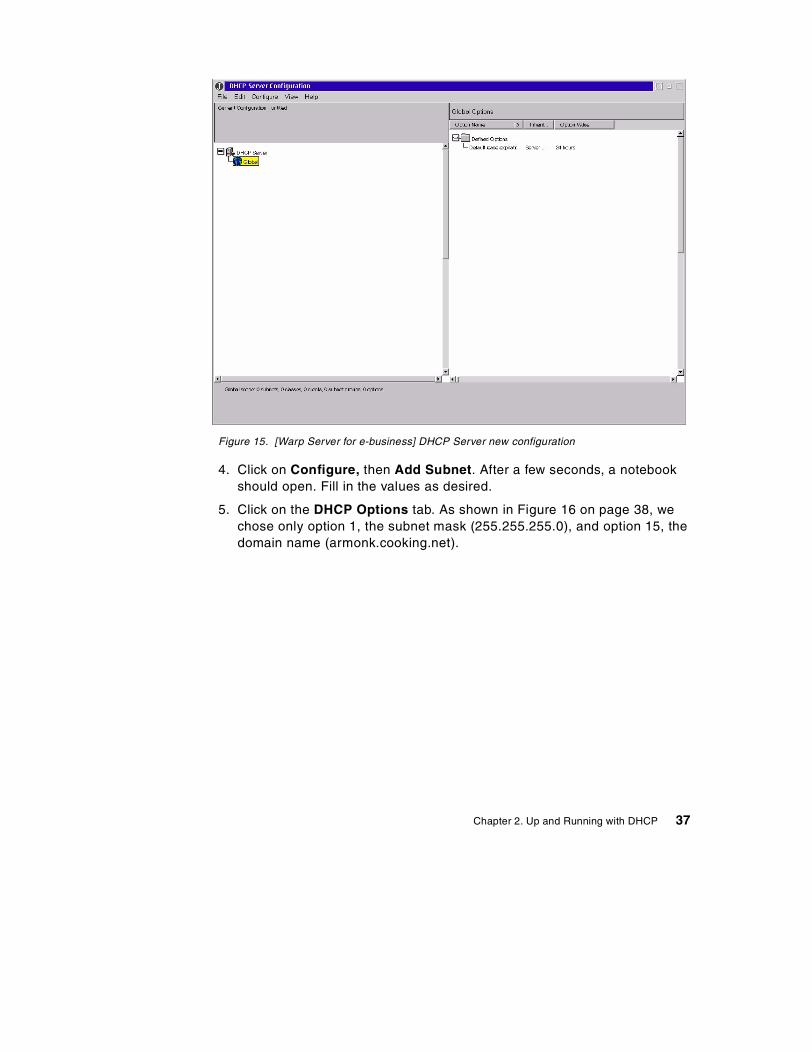
Figure 15. [Warp Server for e-business] DHCP Server new configuration
4. Click on Configure, then Add Subnet. After a few seconds, a notebookshould open. Fill in the values as desired.
5. Click on the DHCP Options tab. As shown in Figure 16 on page 38, wechose only option 1, the subnet mask (255.255.255.0), and option 15, thedomain name (armonk.cooking.net).
Chapter 2. Up and Running with DHCP 37
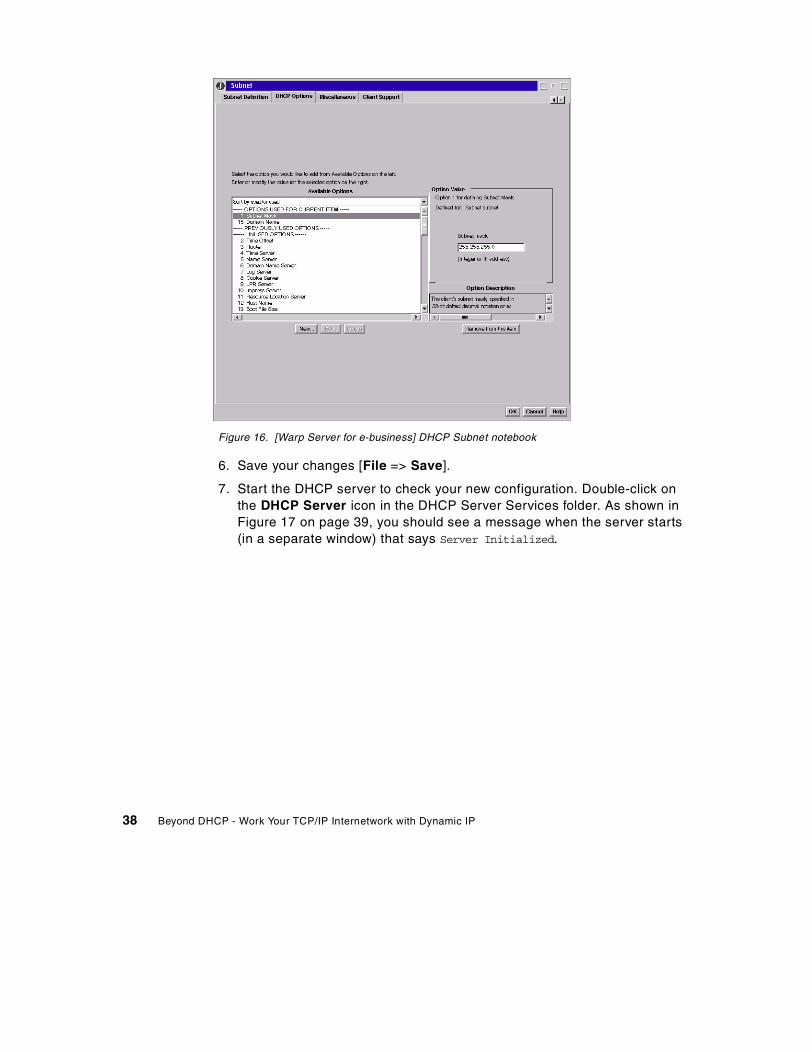
Figure 16. [Warp Server for e-business] DHCP Subnet notebook
6. Save your changes [File => Save].
7. Start the DHCP server to check your new configuration. Double-click onthe DHCP Server icon in the DHCP Server Services folder. As shown inFigure 17 on page 39, you should see a message when the server starts(in a separate window) that says Server Initialized.
38 Beyond DHCP - Work Your TCP/IP Internetwork with Dynamic IP
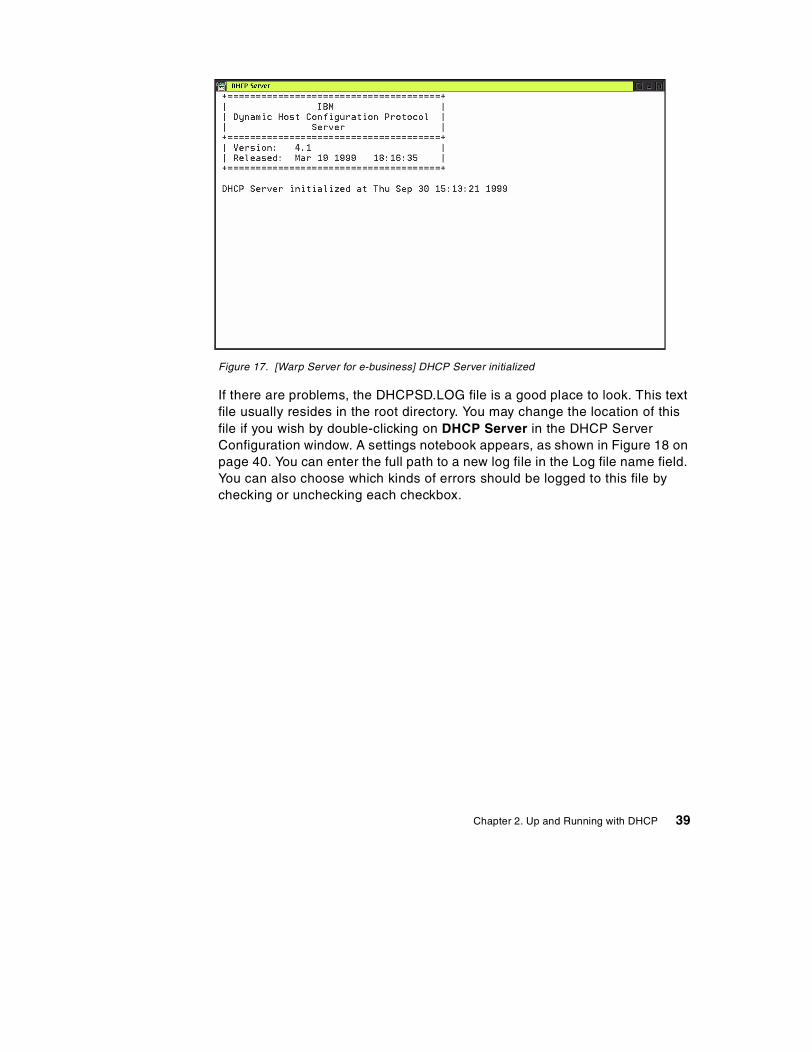
Figure 17. [Warp Server for e-business] DHCP Server initialized
If there are problems, the DHCPSD.LOG file is a good place to look. This textfile usually resides in the root directory. You may change the location of thisfile if you wish by double-clicking on DHCP Server in the DHCP ServerConfiguration window. A settings notebook appears, as shown in Figure 18 onpage 40. You can enter the full path to a new log file in the Log file name field.You can also choose which kinds of errors should be logged to this file bychecking or unchecking each checkbox.
Chapter 2. Up and Running with DHCP 39
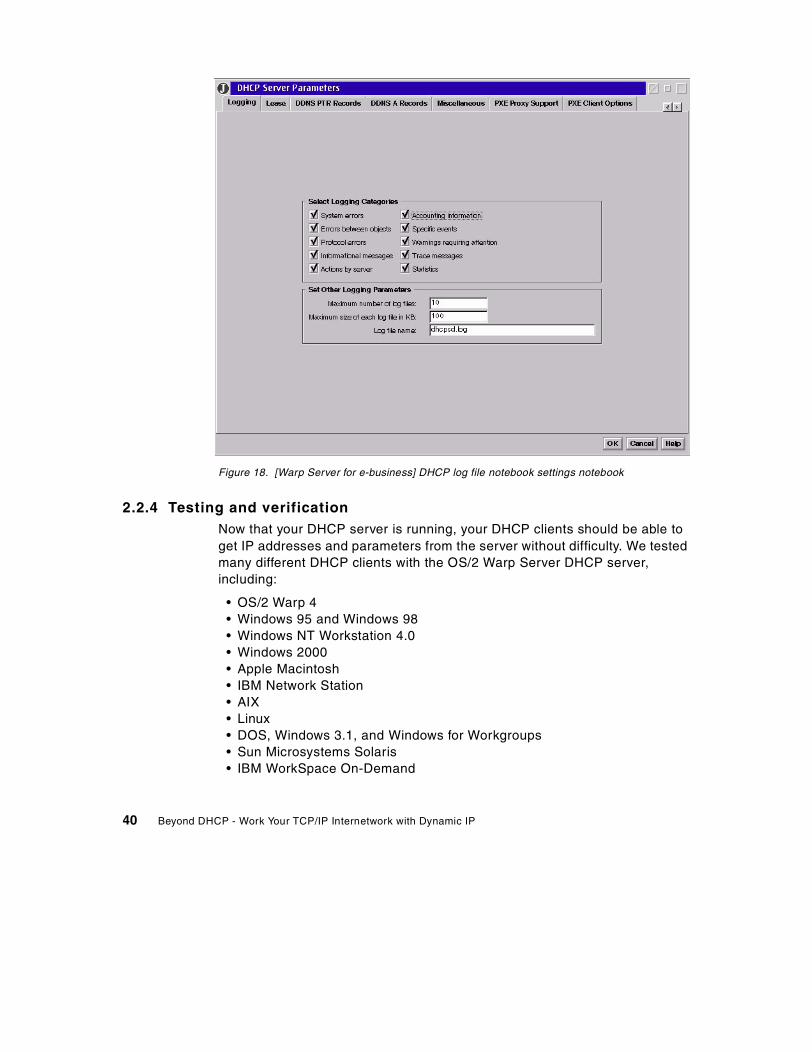
Figure 18. [Warp Server for e-business] DHCP log file notebook settings notebook
2.2.4 Testing and verificationNow that your DHCP server is running, your DHCP clients should be able toget IP addresses and parameters from the server without difficulty. We testedmany different DHCP clients with the OS/2 Warp Server DHCP server,including:
• OS/2 Warp 4• Windows 95 and Windows 98• Windows NT Workstation 4.0• Windows 2000• Apple Macintosh• IBM Network Station• AIX• Linux• DOS, Windows 3.1, and Windows for Workgroups• Sun Microsystems Solaris• IBM WorkSpace On-Demand
40 Beyond DHCP - Work Your TCP/IP Internetwork with Dynamic IP
• Hewlett-Packard LaserJet 4000 Printer with JetDirect
None of these clients had any problems communicating with the IBM DHCPserver. (You can learn how to configure each of these clients in 2.5, “DHCPclients” on page 64.)
To determine which IP addresses are being used by your clients, open anOS/2 command line window and enter the following command on the server:
DADMIN -S | MORE
(You may also wish to check address assignments at each client. Or, you maywish to examine the DHCP log file on the server.)
You can also use the DADMIN command to perform any of the following tasks:
• Re-initialize the DHCP server. (The server re-reads its configuration fileand adopts any changes.)
• Delete a lease.• Control server tracing.• Display client information.• Display IP address information.• Display server statistics.
Where:
-? Displays usage information.
dadmin [-?]
[-v] [[-h]<host>] [-f] -d <ipaddress>[-v] [[-h]<host>] -i[-v] [[-h]<host>] -bi[-v] [[-h]<host>] -s[-v] [[-h]<host>] -t <on/off>[-v] [[-h]<host>] -bt <on/off>[-v] [[-h]<host>] -n <intervals>[-v] [[-h]<host>] -q <ipaddress>[-v] [[-h]<host>] -p <ipaddress>[-v] [[-h]<host>] -c <client id>[-v] [[-h]<host>] -u <User Password>[-v] [[-h]<host>] -x[-v] [[-h]<host>] -a
DADMIN Command Syntax
Chapter 2. Up and Running with DHCP 41
-v Enables verbose mode. This mode provides additional information fordebugging purposes.
-f Forces deletion of the lease without prompting.
-h Specifies either the IP address or the hostname of the DHCP server. Ifno server is specified, the local server is assumed.
-d Deletes the lease for the specified IP address.
-i Re-initializes the specified server.
-bi Re-initializes the specified BINL server.
-s Displays all IP addresses currently leased.
-t Specifies server tracing. Use a value of ON to start tracing or OFF tostop tracing.
-bt Specifies BINL server tracing. Use a value of ON to start tracing or OFFto stop tracing.
-n Requests statistics for the specified server. The value is a decimalinteger indicating the number of intervals from 0 to 100. For example,a value of three returns a summary record that includes totalsinformation, the current interval record, and the three most recenthistory records. A value of zero returns a summary record of activitysince the last summary.
-q Requests the IP address information.
-p Requests the address pool information.
-c Requests information for one or more clients that match the client ID.
-u Specifies the administrator password. If the DHCP server is local, thisparameter is not required. If the password contains blanks, you mustenclose the password in double quotes (").
-x Specifies that the DHCP server is older than the version supplied withIBM TCP/IP Version 4.21. Access is controlled by the RHOSTS file onthe DHCP server, which requires either a HOSTS file or DNS nameresolution.
-a Specifies that no administrator password checking is to be performed.This parameter is used for DHCP servers that are not running on IBMTCP/IP Version 4.21 or on IBM eNetwork Network Station ManagerTCP/IP for Windows NT.
42 Beyond DHCP - Work Your TCP/IP Internetwork with Dynamic IP
2.3 Windows NT as a DHCP server
This section describes how to set up a simple DHCP server using MicrosoftWindows NT Server 4.0 with Service Pack 5.
2.3.1 InstallationWhen you install Windows NT Server 4.0, the DHCP server is not installed bydefault. If you have not installed NT’s DHCP server yet, follow these steps:
1. Click on the Start menu. Select Settings and then select Control Panel.
2. Double-click on the Network icon.
3. Click on the Services tab in the Network notebook, then click on theAdd... button.
4. Select Microsoft DHCP Server from the list and then click on OK.
Note
Service Pack 5 for Windows NT Server 4.0 resolved earlier DHCPproblems that included:
• Ignored Reservations.
• The inability to display years from 2000 to 2009 in the DHCPadministrators’ program.
• Using DHCPCMD to modify a reservation, but instead it converted it to alease.
• The DHCP reconcile could not recover reservations that were out ofscopes.
• The DHCP MIB returned an incorrect OID for the SNMP GetNext
command.
• The DHCP server service could cause an access violation whileadministrating locally or remotely.
• Could not obtain a lease with DHCP scopes using multicast addresses.
• The DHCP scope was marked Bad after the installation of Windows NTService Pack 3.
• DHCP was disabled when connected to an Internet service provider.
For more detailed information on Service Pack 5, please see:http://www.microsoft.com/NTServer/Support/faqs/sp5faq.asp
Chapter 2. Up and Running with DHCP 43
5. When prompted, enter the path to the Windows NT files (Windows NTserver CD-ROM) and click on Continue to copy the files and finish theinstallation.
6. If you had a Service Pack installed on the server before you installed theDHCP server then you must re-install the Service Pack.
2.3.2 DHCP server preparationWe assume a network with one subnet for this example. All clients attached tothe network were previously configured using static IP addresses, includingstatic DNS server addresses. The following changes will be made in oursample network:
• Adding a DHCP server to the network• Configuring all clients to obtain IP addresses, subnet mask, router
address, and name server information from the DHCP server
The following values represent our sample network configuration:
Network ID 192.168.8.0Subnet Mask 255.255.255.0Domain Name bellevue.cooking.netDNS Server 192.168.8.10DHCP Server 192.168.8.10
You should plan your own network configuration before setting up any DHCPserver. You should take the following requirements into consideration:
• Non-DHCP clients must have static IP addresses, and these must beexcluded from the IP address pool.
• The DHCP server must be assigned a static IP address. It cannot be aDHCP client to itself.
• You should determine the range of IP addresses (the scope) that can beassigned to DHCP clients.
• Any other DHCP option values (such as name servers) should also bedefined for the clients.
• The duration of the IP address lease must be chosen.
Much like 2.2, “OS/2 Warp Server for e-business as a DHCP server” on page30, we chose to have our DHCP server handle the private Class C addresses192.168.8.1 through 192.168.8.254, with 192.168.8.1 through 192.168.8.10excluded from this pool in order to reserve a small set of static addresses.One of those reserved addresses, 192.168.8.10, was assigned to the DHCP
44 Beyond DHCP - Work Your TCP/IP Internetwork with Dynamic IP
server itself (which happened to also act as a DNS server). The subnet maskwas 255.255.255.0, and the lease duration was set to one day.
We also chose the following option values for our sample network:
Option 003: Router 192.168.8.1Option 006: DNS Server 192.168.8.10Option 015: Domain Name bellevue.cooking.net
Before you start configuring the DHCP server, you must make sure thatTCP/IP is set up and configured correctly. In particular, the DHCP servermust have a static IP address. To configure TCP/IP manually, follow thesesteps:
1. Open the Control Panel and then open the Network icon.
2. Click on the Protocols tab.
3. Select TCP/IP Protocol and click on Properties.
4. Click on the IP Address tab. Check Specify an IP address and type inthe server’s IP address, subnet mask, and default gateway address.
5. Click on the DNS tab and type in the hostname and domain name for theserver.
6. Under DNS Service Search Order, click on Add.
7. In the DNS server box, type in the IP address for your server (assuming itis also acting as a DNS server) and click on Add.
8. Click on OK to close the notebook.
9. Click on OK to close the Network notebook.
2.3.3 Basic configurationAfter assigning a static IP address to the DHCP server, as shown in theprevious section, you are now ready to create a simple DHCP configuration.
1. By default, the Microsoft DHCP server service starts automatically whenthe computer is started. If the DHCP server is not running, open theServices icon in the Control Panel, select the Microsoft DHCP Serverfrom the service list, and click on the Start button. You can also start theDHCP server from the command line, using the following command:
NET START DHCPSERVER
2. Start the DHCP manager. Click on the Start menu, select Programs, thenselect Administration Tools (Common), and click on DHCP Manager.
Chapter 2. Up and Running with DHCP 45
3. You can manage both local and remote DHCP servers using this utility. Ifyou want to access a remote DHCP server, select Server and then selectAdd from the menu. The Add DHCP Server to Server List window willappear. Enter the address(es) of the remote DHCP server(s) you wish tomanage and click on OK.
4. Next, create the scope for the subnet. In the DHCP manager window,highlight the Local Machine (or the remote server you wish to manage),click on the Scope menu, and then select Create. Fill in the followinginformation (see Figure 19 on page 47):
Start Address Starting IP address for the scope (such as192.168.8.1).
End Address Ending IP address for the scope (such as192.168.8.254).
Subnet Mask Subnet mask assigned to the clients (such as255.255.255.0).
Exclusion Range You can exclude any static IP addresses from thescope using this option. Type in the start address andthe end address, and then click on the Add button.These addresses will not be assigned to DHCPclients.
Lease Duration Duration of the address lease. Click on the Limited Tobutton and then type in the number of days, hours, andminutes to set the lease duration.
Name A name for the DHCP scope. This name appears inthe DHCP manager solely for your convenience.
46 Beyond DHCP - Work Your TCP/IP Internetwork with Dynamic IP
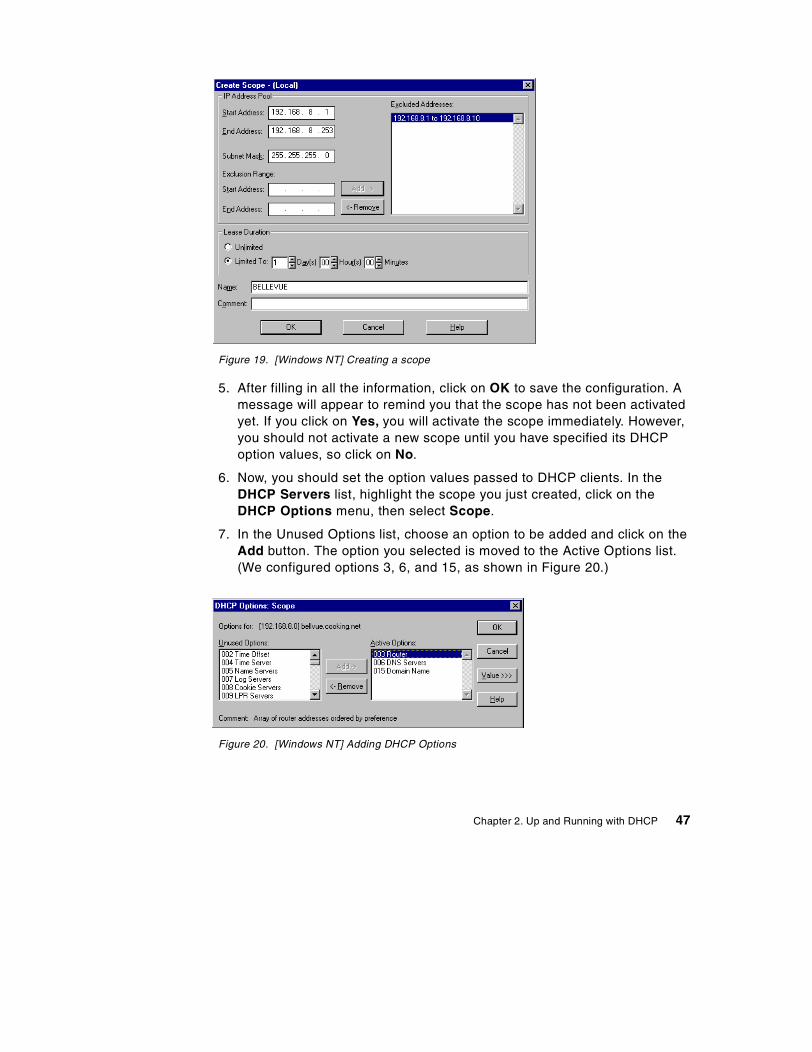
Figure 19. [Windows NT] Creating a scope
5. After filling in all the information, click on OK to save the configuration. Amessage will appear to remind you that the scope has not been activatedyet. If you click on Yes, you will activate the scope immediately. However,you should not activate a new scope until you have specified its DHCPoption values, so click on No.
6. Now, you should set the option values passed to DHCP clients. In theDHCP Servers list, highlight the scope you just created, click on theDHCP Options menu, then select Scope.
7. In the Unused Options list, choose an option to be added and click on theAdd button. The option you selected is moved to the Active Options list.(We configured options 3, 6, and 15, as shown in Figure 20.)
Figure 20. [Windows NT] Adding DHCP Options
Chapter 2. Up and Running with DHCP 47
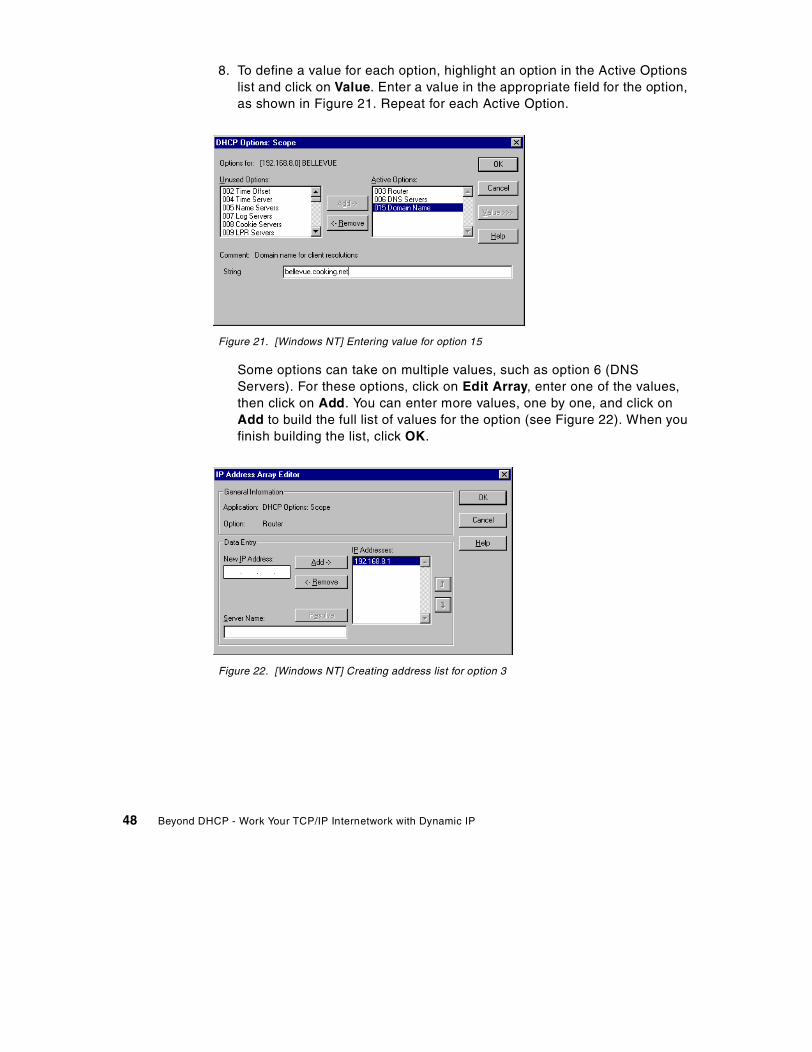
8. To define a value for each option, highlight an option in the Active Optionslist and click on Value. Enter a value in the appropriate field for the option,as shown in Figure 21. Repeat for each Active Option.
Figure 21. [Windows NT] Entering value for option 15
Some options can take on multiple values, such as option 6 (DNSServers). For these options, click on Edit Array, enter one of the values,then click on Add. You can enter more values, one by one, and click onAdd to build the full list of values for the option (see Figure 22). When youfinish building the list, click OK.
Figure 22. [Windows NT] Creating address list for option 3
48 Beyond DHCP - Work Your TCP/IP Internetwork with Dynamic IP
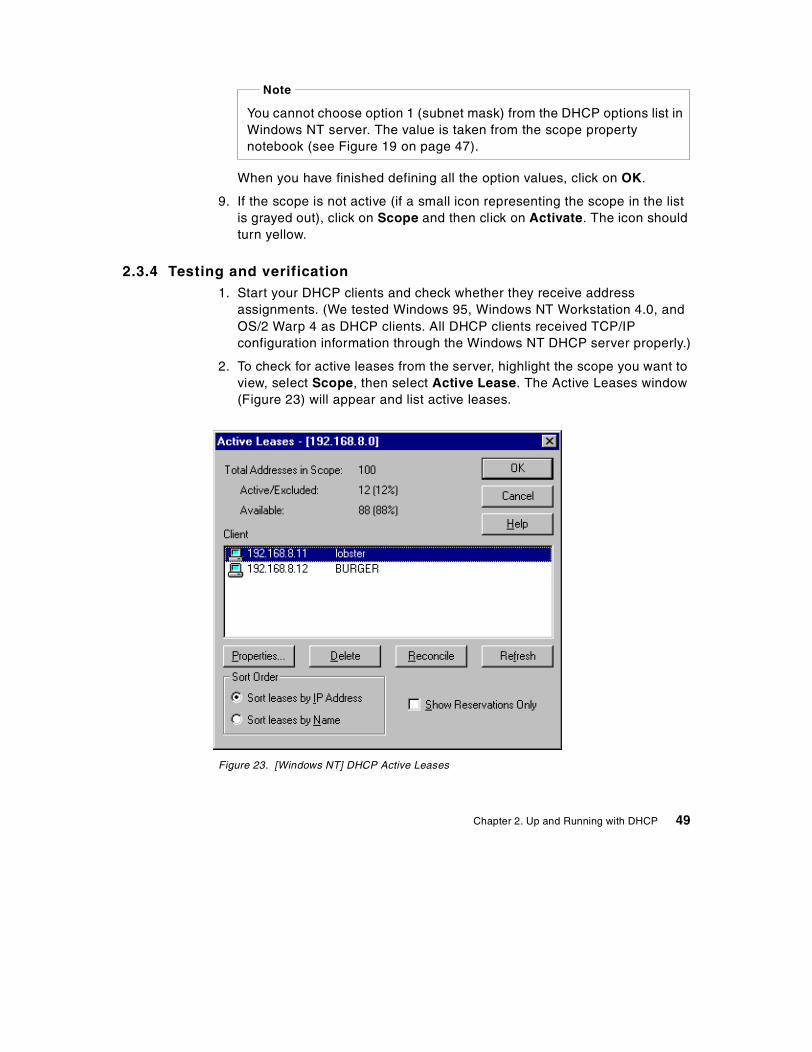
When you have finished defining all the option values, click on OK.
9. If the scope is not active (if a small icon representing the scope in the listis grayed out), click on Scope and then click on Activate. The icon shouldturn yellow.
2.3.4 Testing and verification1. Start your DHCP clients and check whether they receive address
assignments. (We tested Windows 95, Windows NT Workstation 4.0, andOS/2 Warp 4 as DHCP clients. All DHCP clients received TCP/IPconfiguration information through the Windows NT DHCP server properly.)
2. To check for active leases from the server, highlight the scope you want toview, select Scope, then select Active Lease. The Active Leases window(Figure 23) will appear and list active leases.
Figure 23. [Windows NT] DHCP Active Leases
You cannot choose option 1 (subnet mask) from the DHCP options list inWindows NT server. The value is taken from the scope propertynotebook (see Figure 19 on page 47).
Note
Chapter 2. Up and Running with DHCP 49
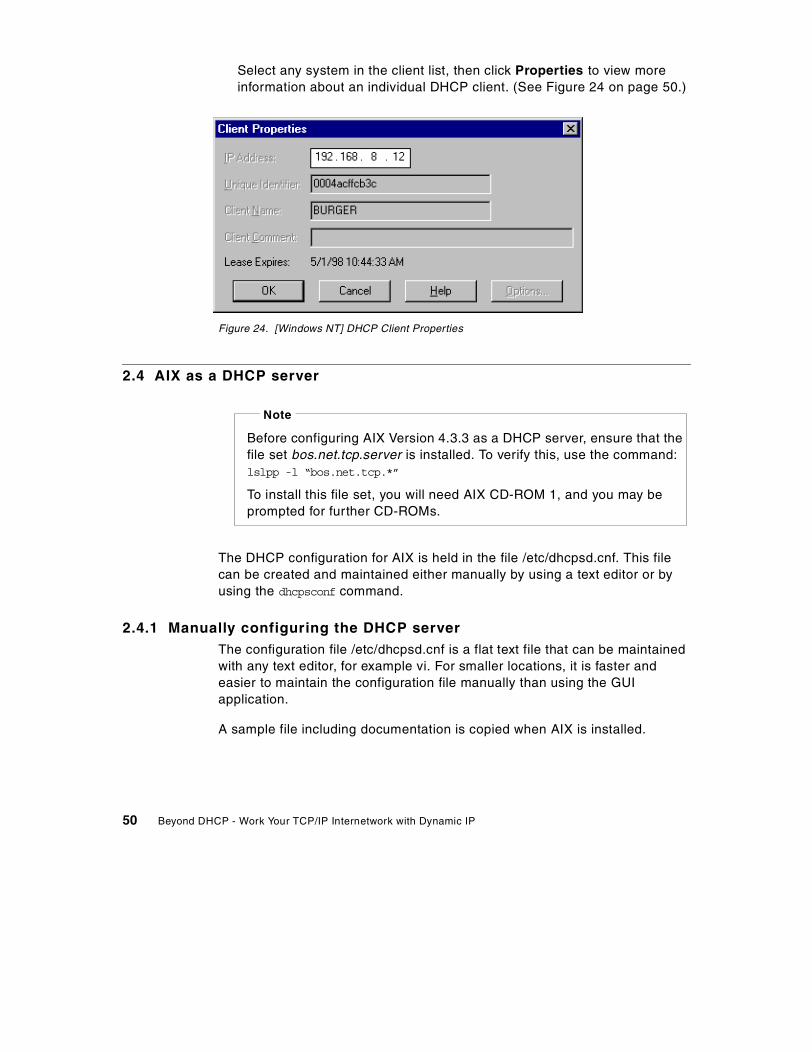
Select any system in the client list, then click Properties to view moreinformation about an individual DHCP client. (See Figure 24 on page 50.)
Figure 24. [Windows NT] DHCP Client Properties
2.4 AIX as a DHCP server
The DHCP configuration for AIX is held in the file /etc/dhcpsd.cnf. This filecan be created and maintained either manually by using a text editor or byusing the dhcpsconf command.
2.4.1 Manually configuring the DHCP serverThe configuration file /etc/dhcpsd.cnf is a flat text file that can be maintainedwith any text editor, for example vi. For smaller locations, it is faster andeasier to maintain the configuration file manually than using the GUIapplication.
A sample file including documentation is copied when AIX is installed.
Before configuring AIX Version 4.3.3 as a DHCP server, ensure that thefile set bos.net.tcp.server is installed. To verify this, use the command:lslpp -l “bos.net.tcp.*”
To install this file set, you will need AIX CD-ROM 1, and you may beprompted for further CD-ROMs.
Note
50 Beyond DHCP - Work Your TCP/IP Internetwork with Dynamic IP
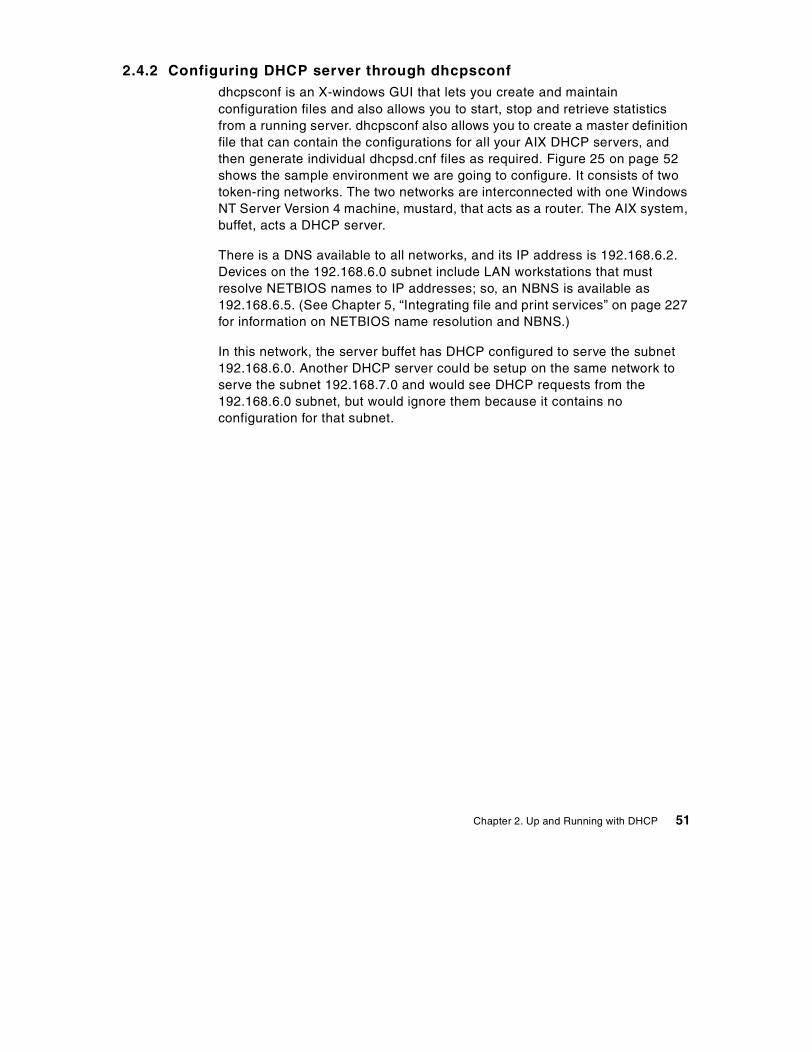
2.4.2 Configuring DHCP server through dhcpsconfdhcpsconf is an X-windows GUI that lets you create and maintainconfiguration files and also allows you to start, stop and retrieve statisticsfrom a running server. dhcpsconf also allows you to create a master definitionfile that can contain the configurations for all your AIX DHCP servers, andthen generate individual dhcpsd.cnf files as required. Figure 25 on page 52shows the sample environment we are going to configure. It consists of twotoken-ring networks. The two networks are interconnected with one WindowsNT Server Version 4 machine, mustard, that acts as a router. The AIX system,buffet, acts a DHCP server.
There is a DNS available to all networks, and its IP address is 192.168.6.2.Devices on the 192.168.6.0 subnet include LAN workstations that mustresolve NETBIOS names to IP addresses; so, an NBNS is available as192.168.6.5. (See Chapter 5, “Integrating file and print services” on page 227for information on NETBIOS name resolution and NBNS.)
In this network, the server buffet has DHCP configured to serve the subnet192.168.6.0. Another DHCP server could be setup on the same network toserve the subnet 192.168.7.0 and would see DHCP requests from the192.168.6.0 subnet, but would ignore them because it contains noconfiguration for that subnet.
Chapter 2. Up and Running with DHCP 51
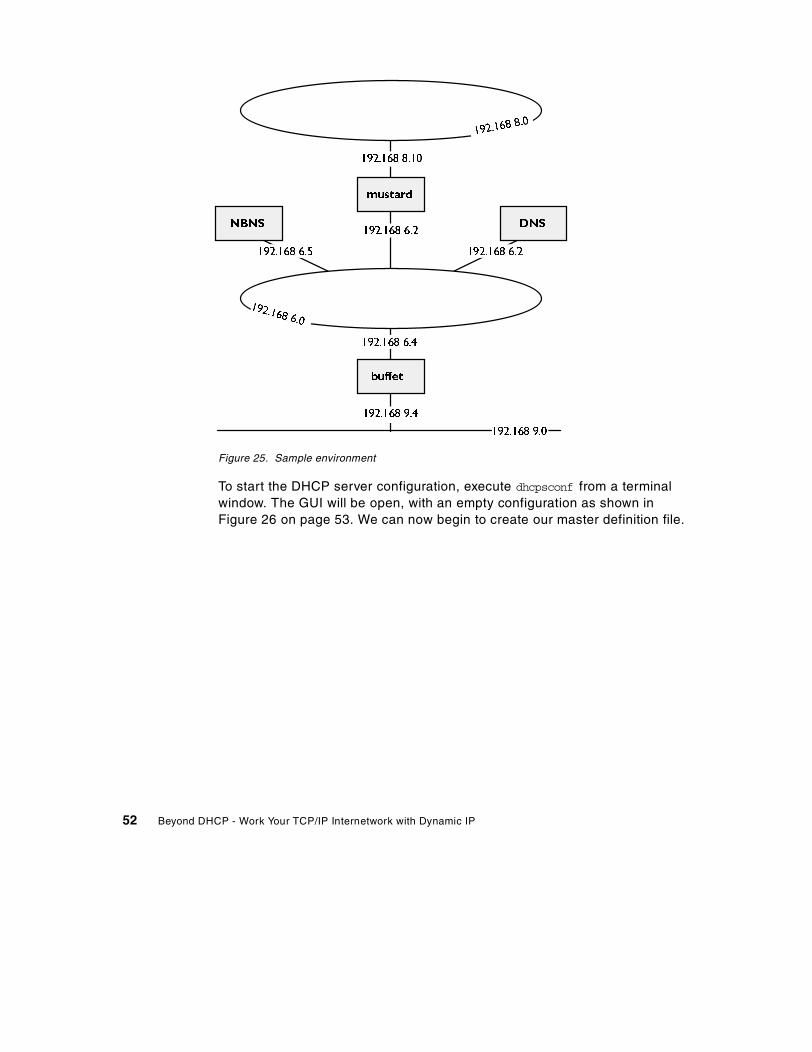
Figure 25. Sample environment
To start the DHCP server configuration, execute dhcpsconf from a terminalwindow. The GUI will be open, with an empty configuration as shown inFigure 26 on page 53. We can now begin to create our master definition file.
192.168 8.0
NBNS DNS
mustard
192.168 8.10
192.168 6.0
192.168 6.2
192.168 6.5 192.168 6.2
buffet
192.168 6.4
192.168 9.4
192.168 9.0
52 Beyond DHCP - Work Your TCP/IP Internetwork with Dynamic IP
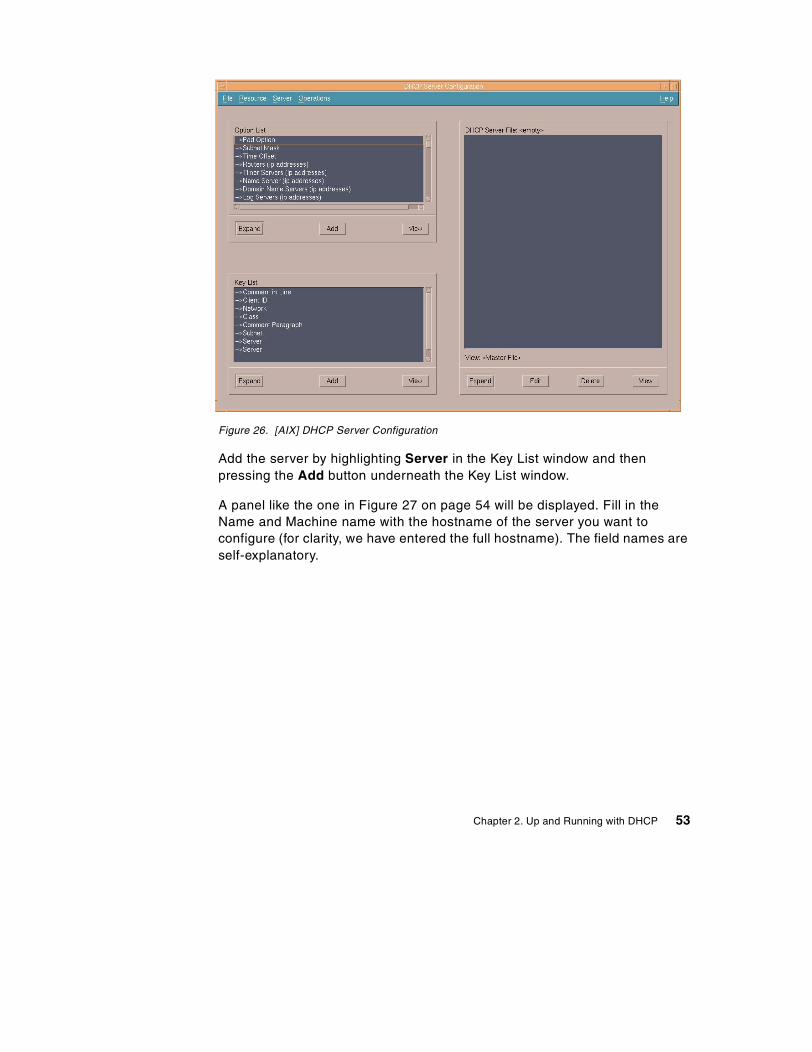
Figure 26. [AIX] DHCP Server Configuration
Add the server by highlighting Server in the Key List window and thenpressing the Add button underneath the Key List window.
A panel like the one in Figure 27 on page 54 will be displayed. Fill in theName and Machine name with the hostname of the server you want toconfigure (for clarity, we have entered the full hostname). The field names areself-explanatory.
Chapter 2. Up and Running with DHCP 53
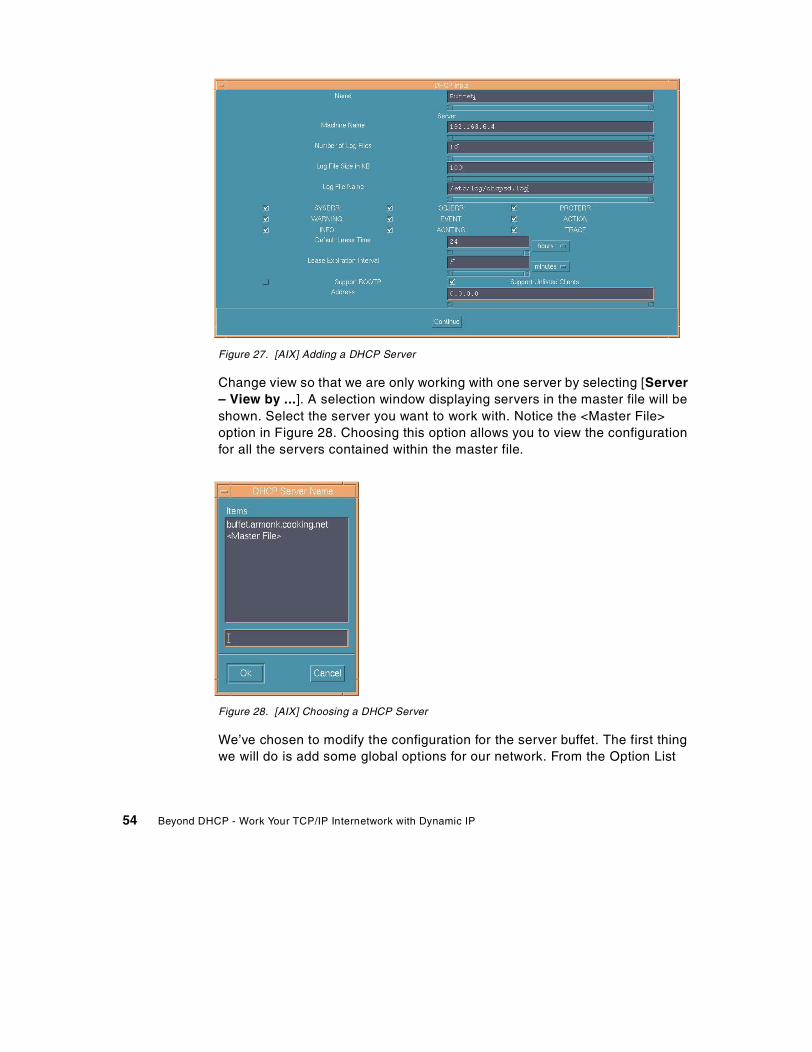
Figure 27. [AIX] Adding a DHCP Server
Change view so that we are only working with one server by selecting [Server– View by ...]. A selection window displaying servers in the master file will beshown. Select the server you want to work with. Notice the <Master File>option in Figure 28. Choosing this option allows you to view the configurationfor all the servers contained within the master file.
Figure 28. [AIX] Choosing a DHCP Server
We’ve chosen to modify the configuration for the server buffet. The first thingwe will do is add some global options for our network. From the Option List
54 Beyond DHCP - Work Your TCP/IP Internetwork with Dynamic IP
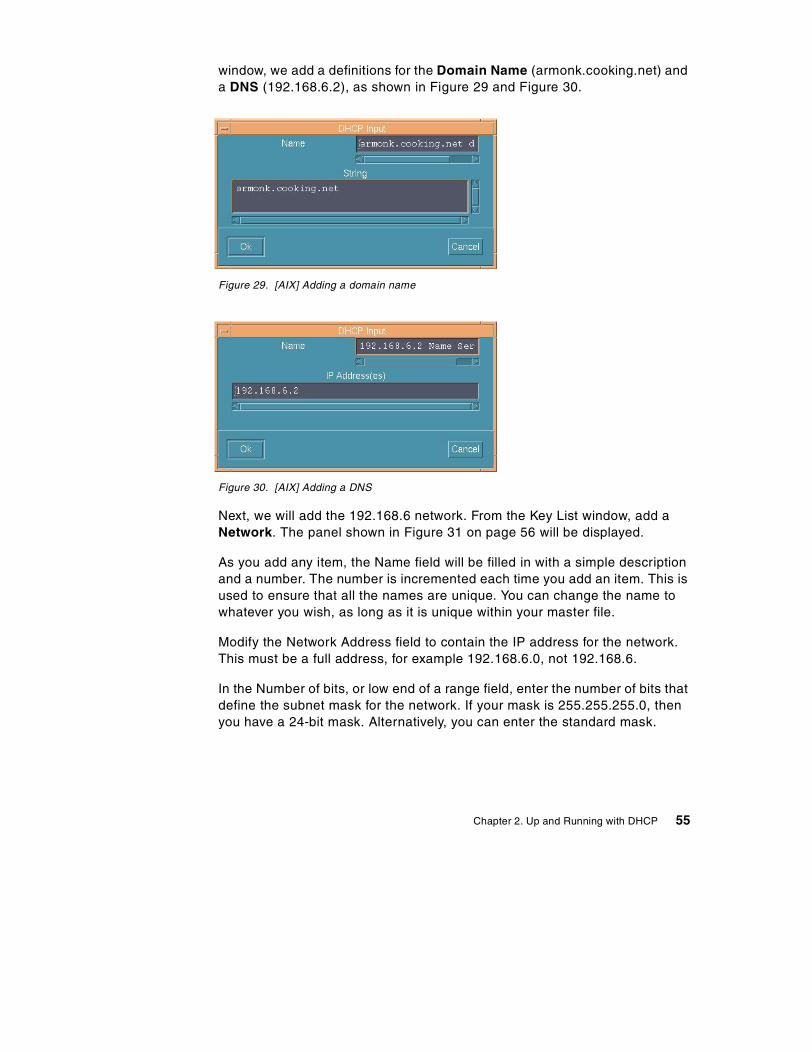
window, we add a definitions for the Domain Name (armonk.cooking.net) anda DNS (192.168.6.2), as shown in Figure 29 and Figure 30.
Figure 29. [AIX] Adding a domain name
Figure 30. [AIX] Adding a DNS
Next, we will add the 192.168.6 network. From the Key List window, add aNetwork. The panel shown in Figure 31 on page 56 will be displayed.
As you add any item, the Name field will be filled in with a simple descriptionand a number. The number is incremented each time you add an item. This isused to ensure that all the names are unique. You can change the name towhatever you wish, as long as it is unique within your master file.
Modify the Network Address field to contain the IP address for the network.This must be a full address, for example 192.168.6.0, not 192.168.6.
In the Number of bits, or low end of a range field, enter the number of bits thatdefine the subnet mask for the network. If your mask is 255.255.255.0, thenyou have a 24-bit mask. Alternatively, you can enter the standard mask.
Chapter 2. Up and Running with DHCP 55
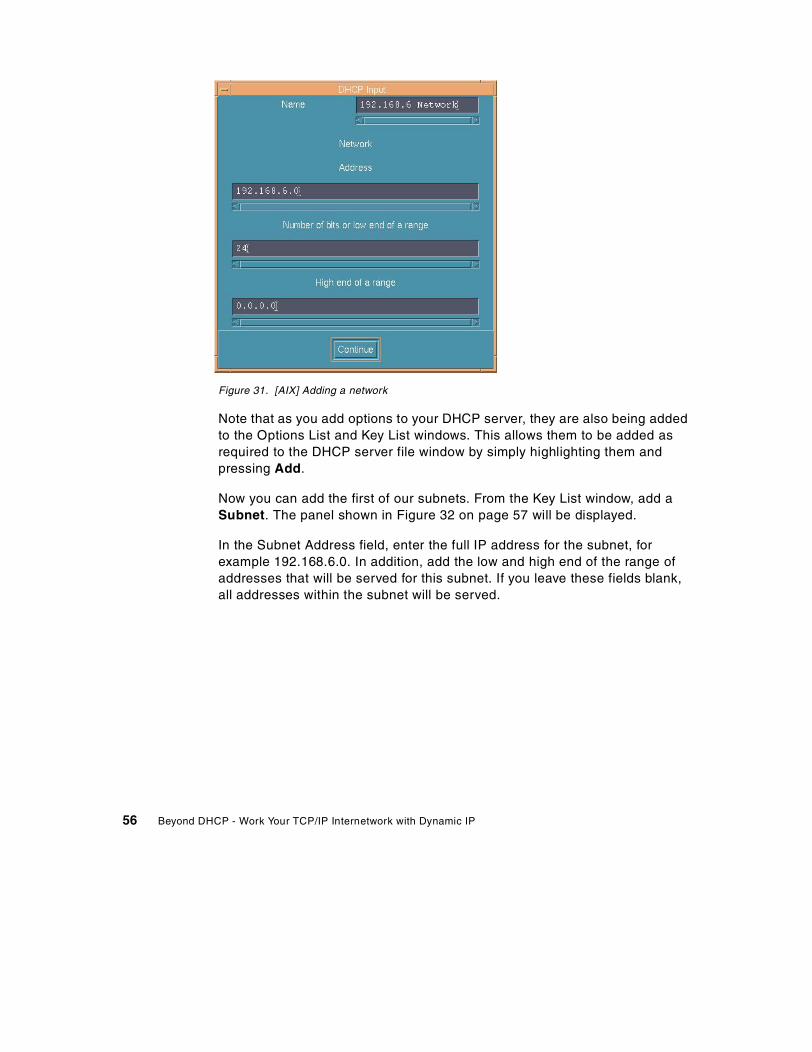
Figure 31. [AIX] Adding a network
Note that as you add options to your DHCP server, they are also being addedto the Options List and Key List windows. This allows them to be added asrequired to the DHCP server file window by simply highlighting them andpressing Add.
Now you can add the first of our subnets. From the Key List window, add aSubnet. The panel shown in Figure 32 on page 57 will be displayed.
In the Subnet Address field, enter the full IP address for the subnet, forexample 192.168.6.0. In addition, add the low and high end of the range ofaddresses that will be served for this subnet. If you leave these fields blank,all addresses within the subnet will be served.
56 Beyond DHCP - Work Your TCP/IP Internetwork with Dynamic IP
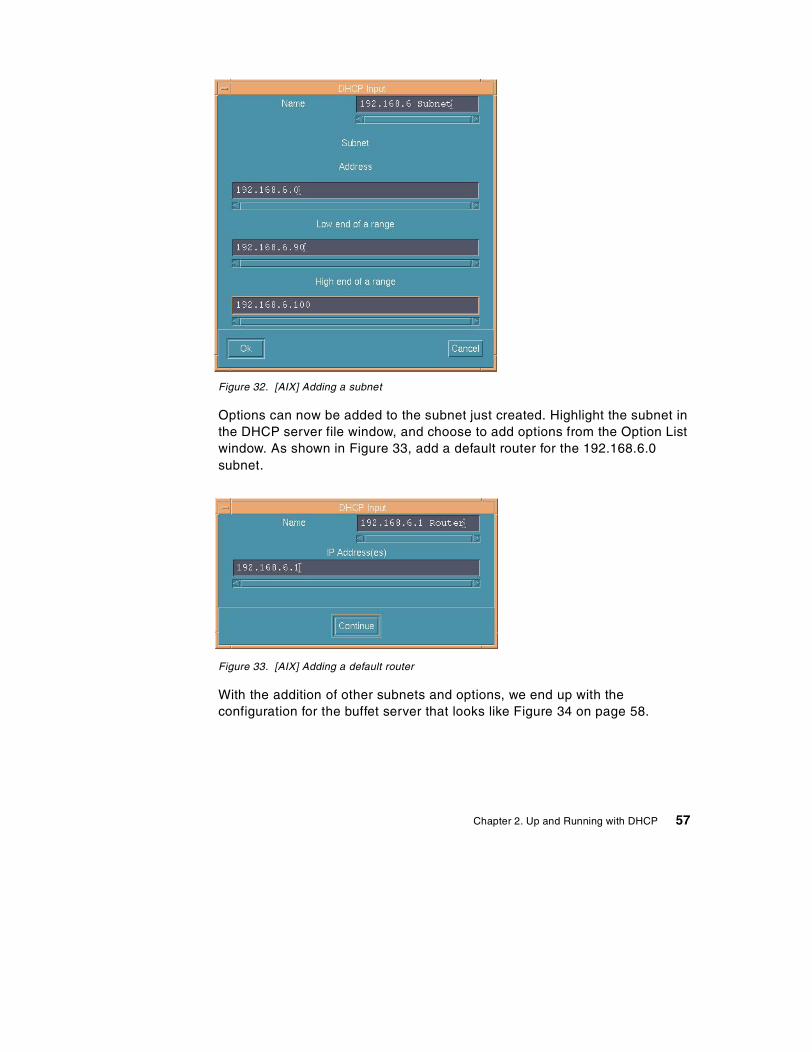
Figure 32. [AIX] Adding a subnet
Options can now be added to the subnet just created. Highlight the subnet inthe DHCP server file window, and choose to add options from the Option Listwindow. As shown in Figure 33, add a default router for the 192.168.6.0subnet.
Figure 33. [AIX] Adding a default router
With the addition of other subnets and options, we end up with theconfiguration for the buffet server that looks like Figure 34 on page 58.
Chapter 2. Up and Running with DHCP 57
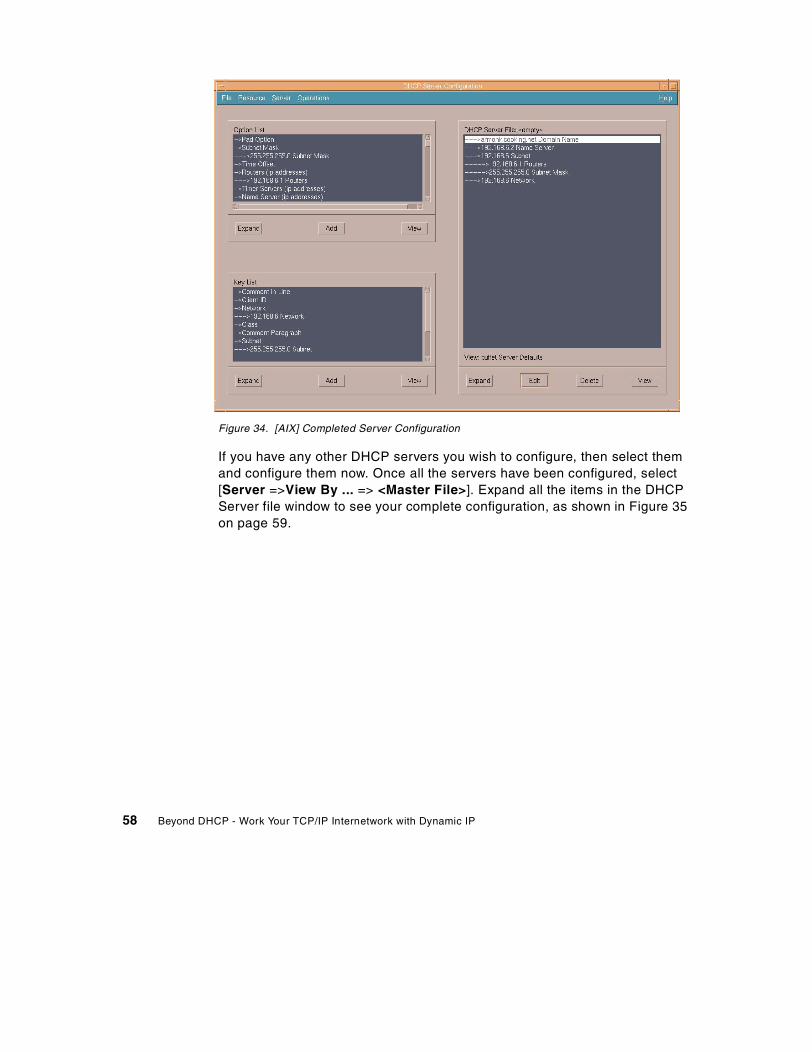
Figure 34. [AIX] Completed Server Configuration
If you have any other DHCP servers you wish to configure, then select themand configure them now. Once all the servers have been configured, select[Server =>View By ... => <Master File>]. Expand all the items in the DHCPServer file window to see your complete configuration, as shown in Figure 35on page 59.
58 Beyond DHCP - Work Your TCP/IP Internetwork with Dynamic IP
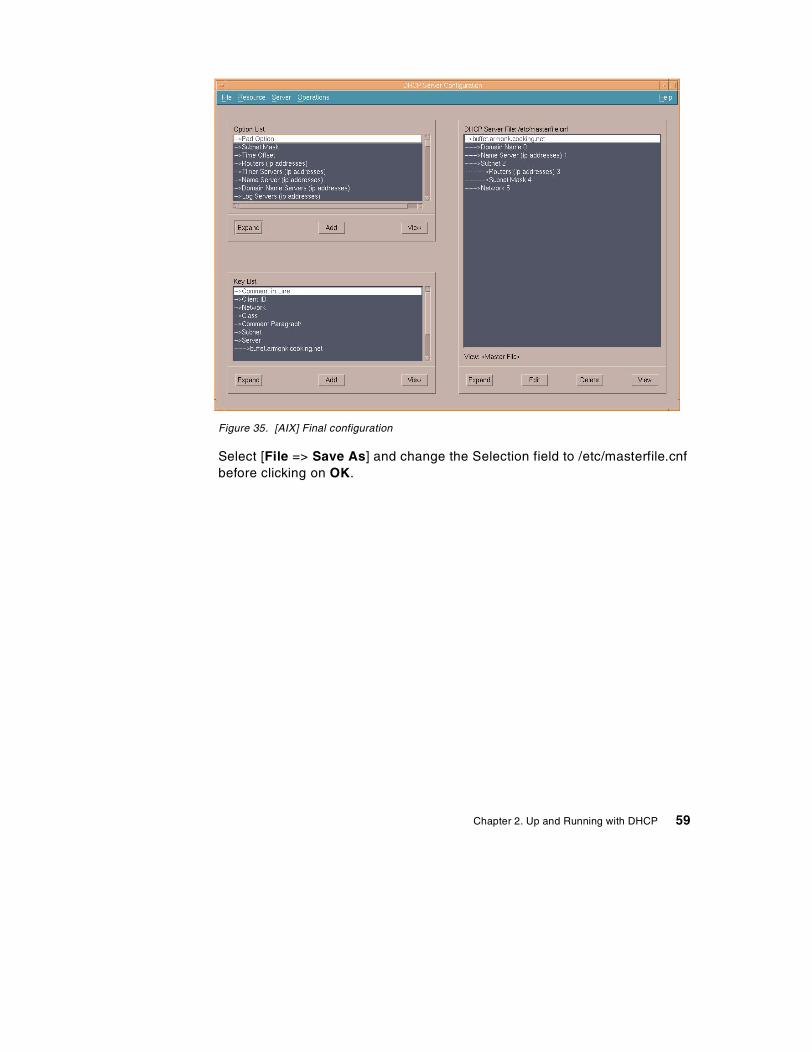
Figure 35. [AIX] Final configuration
Select [File => Save As] and change the Selection field to /etc/masterfile.cnfbefore clicking on OK.
Chapter 2. Up and Running with DHCP 59

Figure 36. [AIX] Saving the master file with [File – Save As]
To build the dhcpsd.cnf file for an individual server, select [Server =>Save File for]. The server selection panel will be displayed.
Assuming we are working at the machine buffet and we want to build itsconfiguration file, we select buffet.armonk.cooking.net and click on OK.
The DHCP Save File Name panel is displayed. Change the Selection field to/etc/dhcpsd.cnf, then click on OK.
Figure 37. [AIX] Saving an individual server file with [Server – Save File for]
60 Beyond DHCP - Work Your TCP/IP Internetwork with Dynamic IP
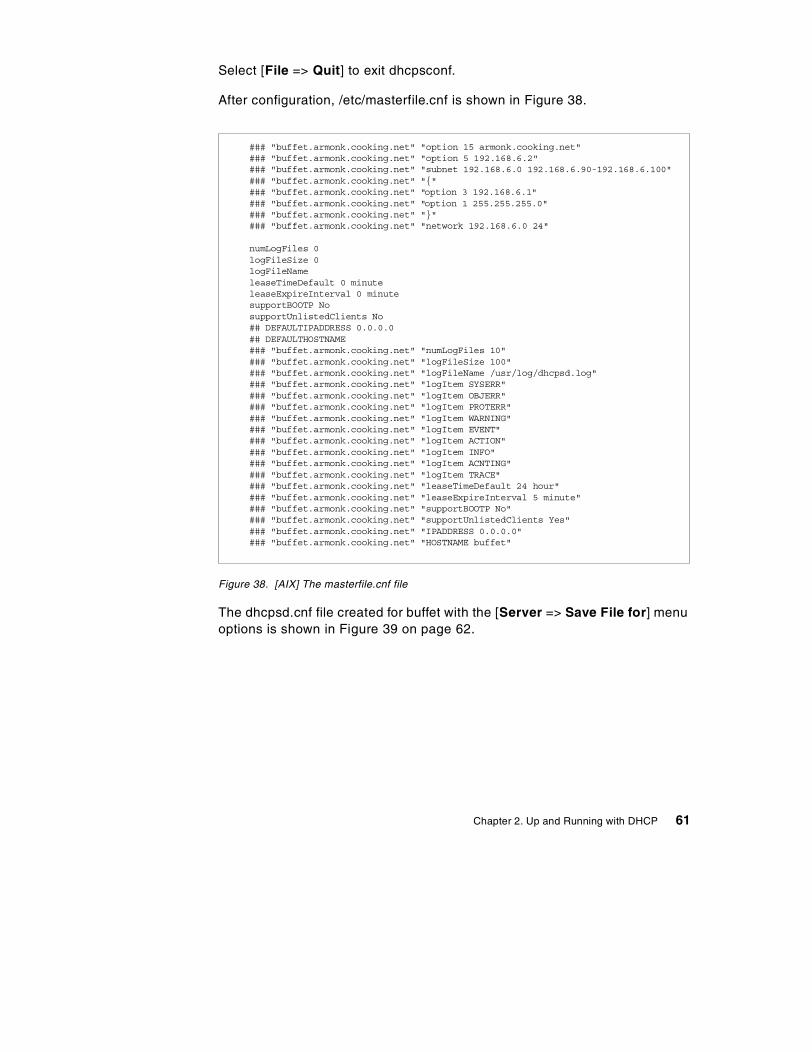
Select [File => Quit] to exit dhcpsconf.
After configuration, /etc/masterfile.cnf is shown in Figure 38.
Figure 38. [AIX] The masterfile.cnf file
The dhcpsd.cnf file created for buffet with the [Server => Save File for] menuoptions is shown in Figure 39 on page 62.
### "buffet.armonk.cooking.net" "option 15 armonk.cooking.net"### "buffet.armonk.cooking.net" "option 5 192.168.6.2"### "buffet.armonk.cooking.net" "subnet 192.168.6.0 192.168.6.90-192.168.6.100"### "buffet.armonk.cooking.net" "{"### "buffet.armonk.cooking.net" "option 3 192.168.6.1"### "buffet.armonk.cooking.net" "option 1 255.255.255.0"### "buffet.armonk.cooking.net" "}"### "buffet.armonk.cooking.net" "network 192.168.6.0 24"
numLogFiles 0logFileSize 0logFileNameleaseTimeDefault 0 minuteleaseExpireInterval 0 minutesupportBOOTP NosupportUnlistedClients No## DEFAULTIPADDRESS 0.0.0.0## DEFAULTHOSTNAME### "buffet.armonk.cooking.net" "numLogFiles 10"### "buffet.armonk.cooking.net" "logFileSize 100"### "buffet.armonk.cooking.net" "logFileName /usr/log/dhcpsd.log"### "buffet.armonk.cooking.net" "logItem SYSERR"### "buffet.armonk.cooking.net" "logItem OBJERR"### "buffet.armonk.cooking.net" "logItem PROTERR"### "buffet.armonk.cooking.net" "logItem WARNING"### "buffet.armonk.cooking.net" "logItem EVENT"### "buffet.armonk.cooking.net" "logItem ACTION"### "buffet.armonk.cooking.net" "logItem INFO"### "buffet.armonk.cooking.net" "logItem ACNTING"### "buffet.armonk.cooking.net" "logItem TRACE"### "buffet.armonk.cooking.net" "leaseTimeDefault 24 hour"### "buffet.armonk.cooking.net" "leaseExpireInterval 5 minute"### "buffet.armonk.cooking.net" "supportBOOTP No"### "buffet.armonk.cooking.net" "supportUnlistedClients Yes"### "buffet.armonk.cooking.net" "IPADDRESS 0.0.0.0"### "buffet.armonk.cooking.net" "HOSTNAME buffet"
Chapter 2. Up and Running with DHCP 61
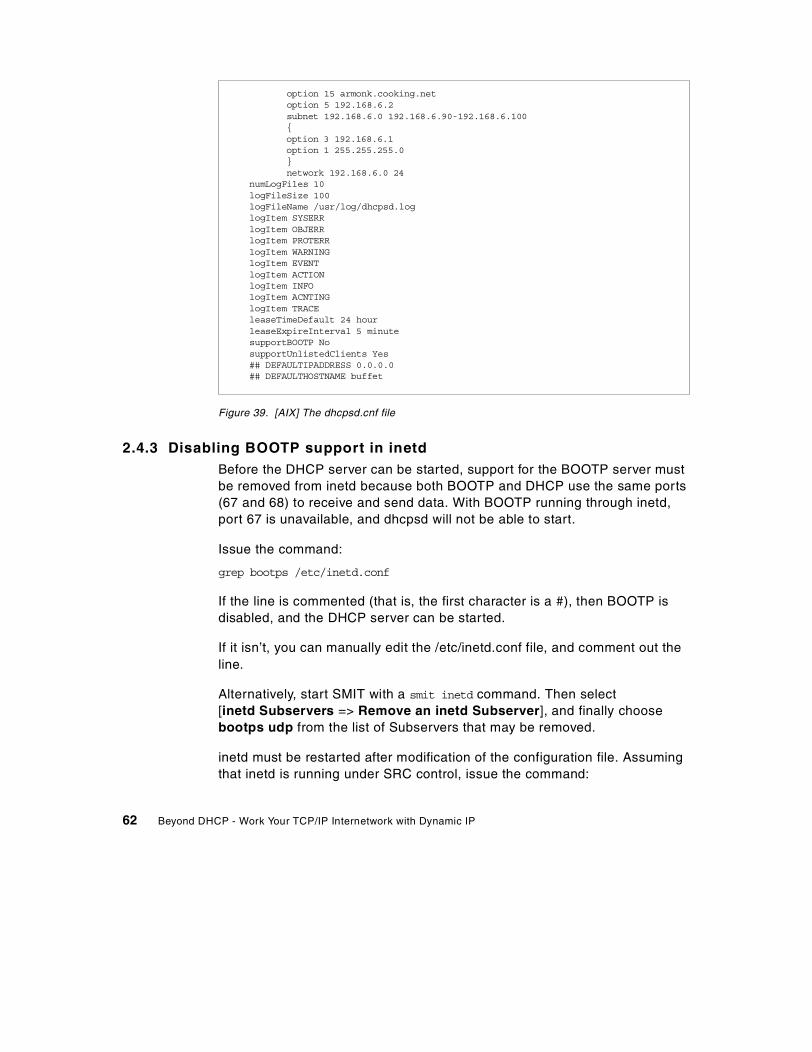
Figure 39. [AIX] The dhcpsd.cnf file
2.4.3 Disabling BOOTP support in inetdBefore the DHCP server can be started, support for the BOOTP server mustbe removed from inetd because both BOOTP and DHCP use the same ports(67 and 68) to receive and send data. With BOOTP running through inetd,port 67 is unavailable, and dhcpsd will not be able to start.
Issue the command:
grep bootps /etc/inetd.conf
If the line is commented (that is, the first character is a #), then BOOTP isdisabled, and the DHCP server can be started.
If it isn’t, you can manually edit the /etc/inetd.conf file, and comment out theline.
Alternatively, start SMIT with a smit inetd command. Then select[inetd Subservers => Remove an inetd Subserver], and finally choosebootps udp from the list of Subservers that may be removed.
inetd must be restarted after modification of the configuration file. Assumingthat inetd is running under SRC control, issue the command:
option 15 armonk.cooking.netoption 5 192.168.6.2subnet 192.168.6.0 192.168.6.90-192.168.6.100{option 3 192.168.6.1option 1 255.255.255.0}network 192.168.6.0 24
numLogFiles 10logFileSize 100logFileName /usr/log/dhcpsd.loglogItem SYSERRlogItem OBJERRlogItem PROTERRlogItem WARNINGlogItem EVENTlogItem ACTIONlogItem INFOlogItem ACNTINGlogItem TRACEleaseTimeDefault 24 hourleaseExpireInterval 5 minutesupportBOOTP NosupportUnlistedClients Yes## DEFAULTIPADDRESS 0.0.0.0## DEFAULTHOSTNAME buffet
62 Beyond DHCP - Work Your TCP/IP Internetwork with Dynamic IP
refresh -s inetd
If it isn’t, then issue the command:
kill -1 inetd_pid
Where inetd_pid is the pid of inetd.
2.4.3.1 Starting the DHCP serverThe DHCP server subsystem can be started in several ways.
• From within dhcpsconf, select [Operations => Start]. Select the name ofthe DHCP server you want started.
Select OK.
• From a command prompt, issue the command:
smit dhcpsd
Select Start using the dhcp Subsystem.
Select NOW.
• From a command prompt, issue the command:
startsrc -s dhcpsd
2.4.3.2 Stopping the DHCP serverThe DHCP server subsystem can also be stopped in several ways. All ofthese methods only stop the DHCPCD subsystem; they do not affect the restof AIX:
• From in dhcpsconf, select [Operations => Stop].
Select the name of the DHCP server you want stopped.
Select OK.
• From a command prompt, issue the command:
smit dhcpsd
Select Stop Using the dhcpsd Subsystem.
Select NOW.
• From a command prompt, issue the command:
stopsrc -d dhcpsd
Chapter 2. Up and Running with DHCP 63

2.5 DHCP clients
Because a DHCP server, such as OS/2 Warp Server for e-business, supportsopen Internet standards, it can service a wide variety of clients. Most largeTCP/IP networks include many different kinds of systems running a widevariety of operating systems. You may be confronted with any or all of thetypes of systems described in this section.
This section explains how to configure several different clients to receiveTCP/IP address assignments from a DHCP server.
2.5.1 OS/2 Warp 4OS/2 Warp 4 includes TCP/IP Version 4.0 as a standard feature. You maywish to upgrade OS/2 Warp 4’s TCP/IP capabilities to Version 4.1, availablefrom the IBM Software Choice Web site, or to TCP/IP Version 4.21 for OS/2,which is a component of OS/2 Warp Server for e-business.
Both TCP/IP versions support DHCP, but they differ in the way DHCP isactivated. (Skip ahead to 2.5.1.3, “OS/2 Warp 4 DHCP client configuration”on page 67, if you plan to use TCP/IP 4.0.)
2.5.1.1 Installing TCP/IP 4.21At a minimum, you must have the following software available prior toinstalling TCP/IP 4.2.1:
• OS/2 Warp 4 with TCP/IP 4.0
• MPTS Version 5.5 (or later)
• Netscape Navigator 4.61 (September, 1999, or later)
• Feature Installer 1.2.5 (or later)
Feature Installer provides plug-ins for Netscape Navigator that are used toinstall Java Version 1.1.8 and TCP/IP Version 4.21.
• Java Version 1.1.8 (or later)
Only the Java runtime is required.
To install TCP/IP Version 4.21 on OS/2 Warp 4, follow these steps:
You can download IBM Software Choice packages, FixPaks, and otherenhancements from the Internet. Please refer to Appendix B, “Where Is It?Internet and IBM Intranet Web Sites” on page 475 for more information.
Note
64 Beyond DHCP - Work Your TCP/IP Internetwork with Dynamic IP
1. Install OS/2 Warp 4 with its built-in TCP/IP 4.0 client services (and otherservices as needed).
2. Install Netscape Navigator 4.61 (September, 1999, or later) for OS/2Warp.
3. Install FixPak 12 (or later) for OS/2 Warp 4. Make sure you shutdown andreboot after installing the FixPak.
4. Install any other FixPaks (for example, File/Print client) as needed.
5. Install Feature Installer 1.2.5 (or later). Shutdown and reboot.
6. Install Java 1.1.8 (or later; we recommend installing Java 1.1.8). Only theruntime is required, but you may wish to install other Java functions.
7. Install MPTS Version 5.5 (or later). This is available on the OS/2 WarpServer for e-business CD.
• When asked whether to install a more recent version of MPTS, selectYes. Your current MPTS configuration will be preserved, but MPTSdrivers and protocols will be updated.
• After installation of the most recent version of MPTS, click on Exit.
• When asked whether to update your CONFIG.SYS file, click on OK.
• Shut down and restart your computer after exiting MPTS.
8. Install TCP/IP Version 4.21 for OS/2.
• Run install.cmd in the TCPAPPS directory. This starts NetscapeNavigator.
• Select the Advanced Path option for this installation.
• Ensure that there is a tick in the check box next to TCP/IP BaseApplications and that the target drive is C.
• Allow the program to start copying the files.
• When the copying has finished, shut down and restart your computerafter exiting the installation program.
9. Apply the latest TCP/IP 4.21, MPTS 5.5, and Java fixes.
Note: You do not need to provide Java fixes if Java 1.1.8 was installed.
The installation of TCP/IP Version 4.21 for OS/2 creates a TCP/IP Shadowsfolder on your desktop.
2.5.1.2 Installing TCP/IP 4.1At a minimum, you must have the following software available prior toinstalling TCP/IP 4.1:
Chapter 2. Up and Running with DHCP 65
• OS/2 Warp 4 with TCP/IP 4.0
• MPTS Version 5.3 (or later)
• Netscape Navigator 4.61 (September, 1999, or later)
• Feature Installer 1.2.5 (or later)
Feature Installer provides plug-ins for Netscape Navigator that are used toinstall Java Version 1.1.8 and TCP/IP Version 4.1.
• Java Version 1.1.8 (or later)
Only the Java runtime is required.
To install TCP/IP Version 4.1 on OS/2 Warp 4, follow these steps:
1. Install OS/2 Warp 4 with its built-in TCP/IP 4.0 client services (and otherservices as needed).
2. Install Netscape Navigator 4.61 (September, 1999, or later) for OS/2Warp.
3. Install FixPak 12 (or later) for OS/2 Warp 4. Make sure you shutdown andreboot after installing the FixPak.
4. Install any other FixPaks (for example, File/Print client) as needed.
5. Install Feature Installer 1.2.5 (or later). Shutdown and reboot.
6. Install Java 1.1.8 (or later). Only the runtime is required, but you may wishto install other Java functions.
7. Use Netscape Navigator’s Java switching utility to switch to Java 1.1.Open the Netscape folder and double-click on Java Version Selection forNetscape Navigator. Select the appropriate Java version and click OK.
8. Install TCP/IP Version 4.1 for OS/2. A new version of MPTS (Version 5.3)and new TCP/IP applications will be installed.
• When asked whether to install a more recent version of MPTS, selectYes. Your current MPTS configuration will be preserved, but MPTSdrivers and protocols will be updated.
• After installation of the most recent version of MPTS, click on Exit.
• When asked whether to update your CONFIG.SYS file, click on OK.
• Do not shutdown or restart your computer after exiting MPTS. Continuewith the rest of TCP/IP Version 4.1 installation.
• After installation of MPTS, Netscape Navigator starts. Follow theinstructions provided to complete installation. Shutdown and rebootyour PC when TCP/IP Version 4.1 installation has finished.
66 Beyond DHCP - Work Your TCP/IP Internetwork with Dynamic IP
9. Apply the latest TCP/IP 4.1, MPTS 5.3, and Java fixes.
Note: You do not need to provide Java fixes if Java 1.1.8 was installed.
The installation of TCP/IP Version 4.1 for OS/2 creates a TCP/IP Shadowsfolder on your desktop.
2.5.1.3 OS/2 Warp 4 DHCP client configurationDHCP client configuration for OS/2 Warp 4 depends on the version of TCP/IPyou are running.
• TCP/IP Versions 4.21 and 4.1 for OS/2
1. Open the TCP/IP Shadows folder, then the TCP/IP Configurationsfolder. Double-click on the TCP/IP Configuration (Local) icon, or justtype TCPCFG2 at an OS/2 command prompt. The TCP/IP Configurationnotebook appears.
2. Click on the Network tab. Highlight the appropriate LAN interface fromthe list (normally LAN interface 0) and make sure the EnableInterface checkbox is checked. Then, select Automatically, UsingDHCP, as shown in Figure 40 on page 68. Click on OK to close theTCP/IP configuration notebook and save this change.
Chapter 2. Up and Running with DHCP 67
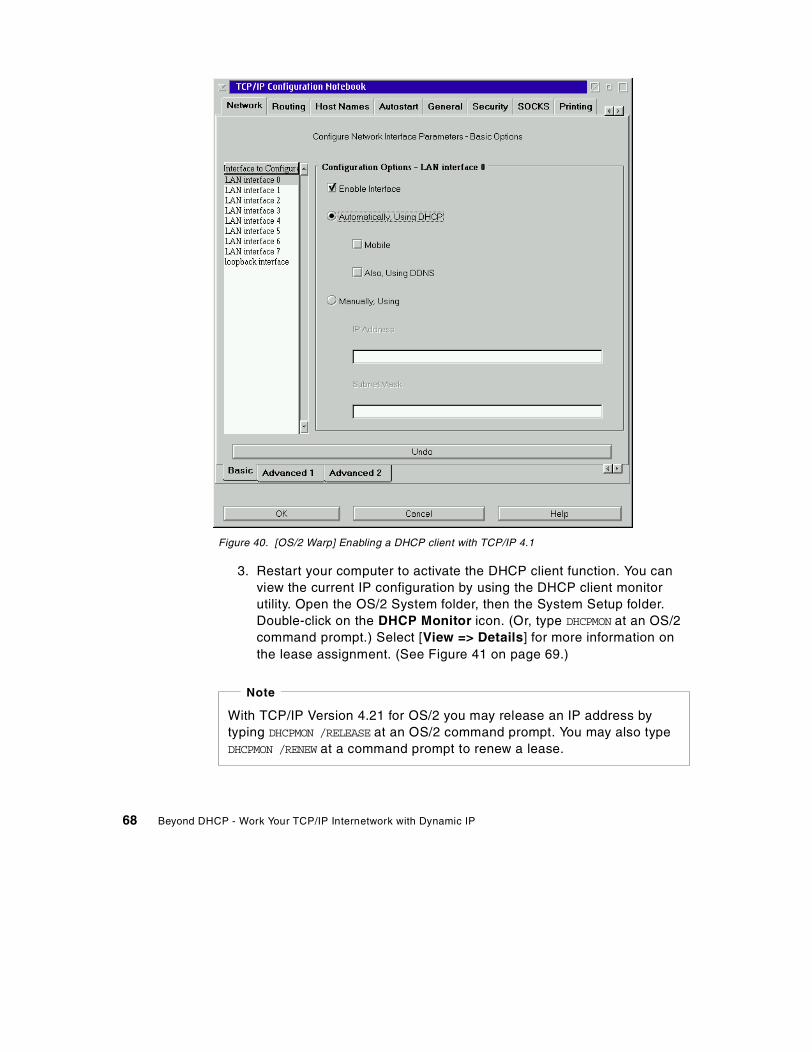
Figure 40. [OS/2 Warp] Enabling a DHCP client with TCP/IP 4.1
3. Restart your computer to activate the DHCP client function. You canview the current IP configuration by using the DHCP client monitorutility. Open the OS/2 System folder, then the System Setup folder.Double-click on the DHCP Monitor icon. (Or, type DHCPMON at an OS/2command prompt.) Select [View => Details] for more information onthe lease assignment. (See Figure 41 on page 69.)
With TCP/IP Version 4.21 for OS/2 you may release an IP address bytyping DHCPMON /RELEASE at an OS/2 command prompt. You may also typeDHCPMON /RENEW at a command prompt to renew a lease.
Note
68 Beyond DHCP - Work Your TCP/IP Internetwork with Dynamic IP
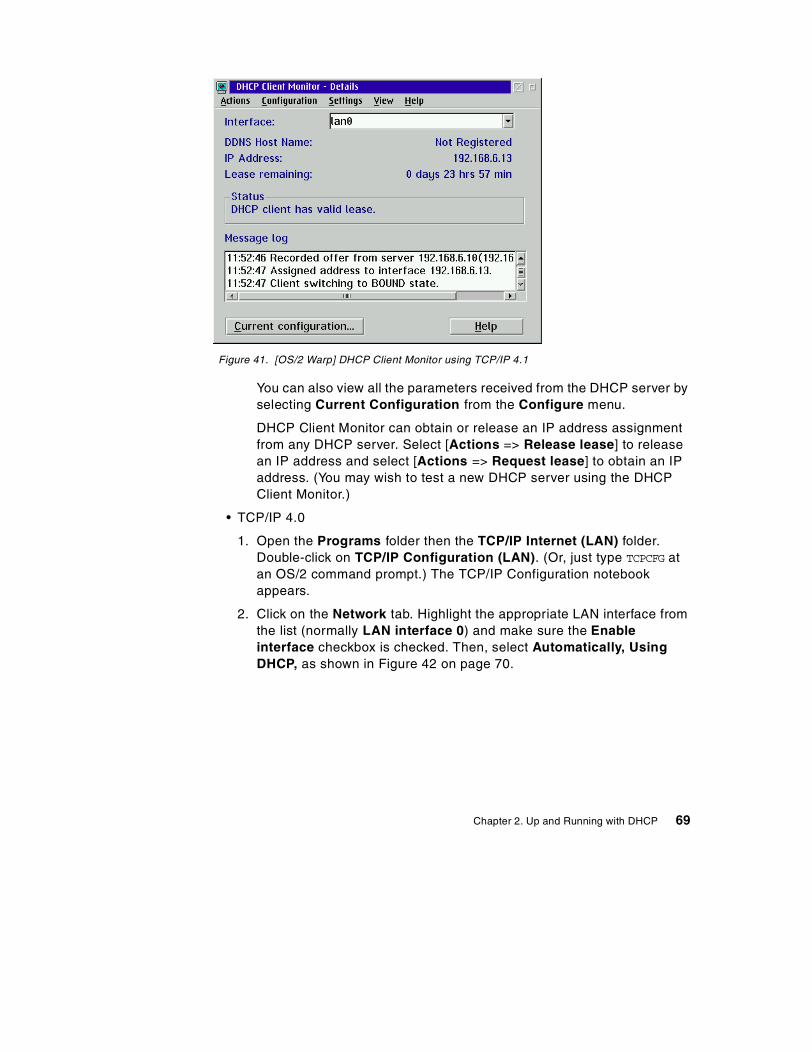
Figure 41. [OS/2 Warp] DHCP Client Monitor using TCP/IP 4.1
You can also view all the parameters received from the DHCP server byselecting Current Configuration from the Configure menu.
DHCP Client Monitor can obtain or release an IP address assignmentfrom any DHCP server. Select [Actions => Release lease] to releasean IP address and select [Actions => Request lease] to obtain an IPaddress. (You may wish to test a new DHCP server using the DHCPClient Monitor.)
• TCP/IP 4.0
1. Open the Programs folder then the TCP/IP Internet (LAN) folder.Double-click on TCP/IP Configuration (LAN). (Or, just type TCPCFG atan OS/2 command prompt.) The TCP/IP Configuration notebookappears.
2. Click on the Network tab. Highlight the appropriate LAN interface fromthe list (normally LAN interface 0) and make sure the Enableinterface checkbox is checked. Then, select Automatically, UsingDHCP, as shown in Figure 42 on page 70.
Chapter 2. Up and Running with DHCP 69
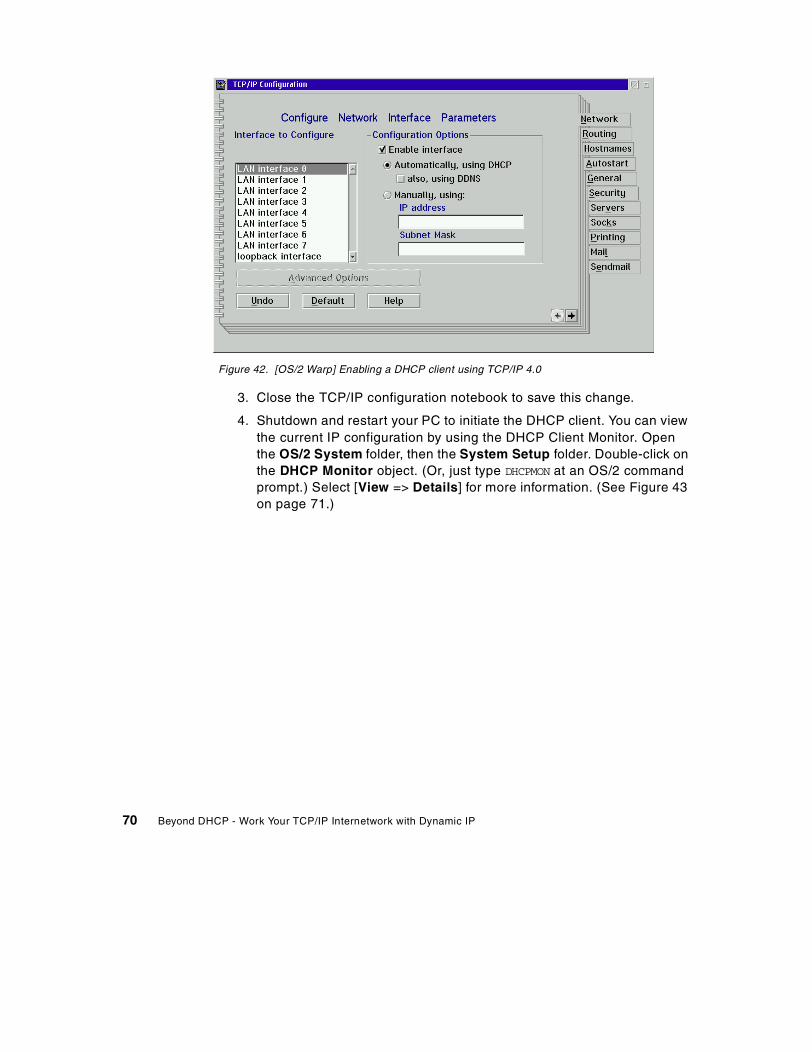
Figure 42. [OS/2 Warp] Enabling a DHCP client using TCP/IP 4.0
3. Close the TCP/IP configuration notebook to save this change.
4. Shutdown and restart your PC to initiate the DHCP client. You can viewthe current IP configuration by using the DHCP Client Monitor. Openthe OS/2 System folder, then the System Setup folder. Double-click onthe DHCP Monitor object. (Or, just type DHCPMON at an OS/2 commandprompt.) Select [View => Details] for more information. (See Figure 43on page 71.)
70 Beyond DHCP - Work Your TCP/IP Internetwork with Dynamic IP
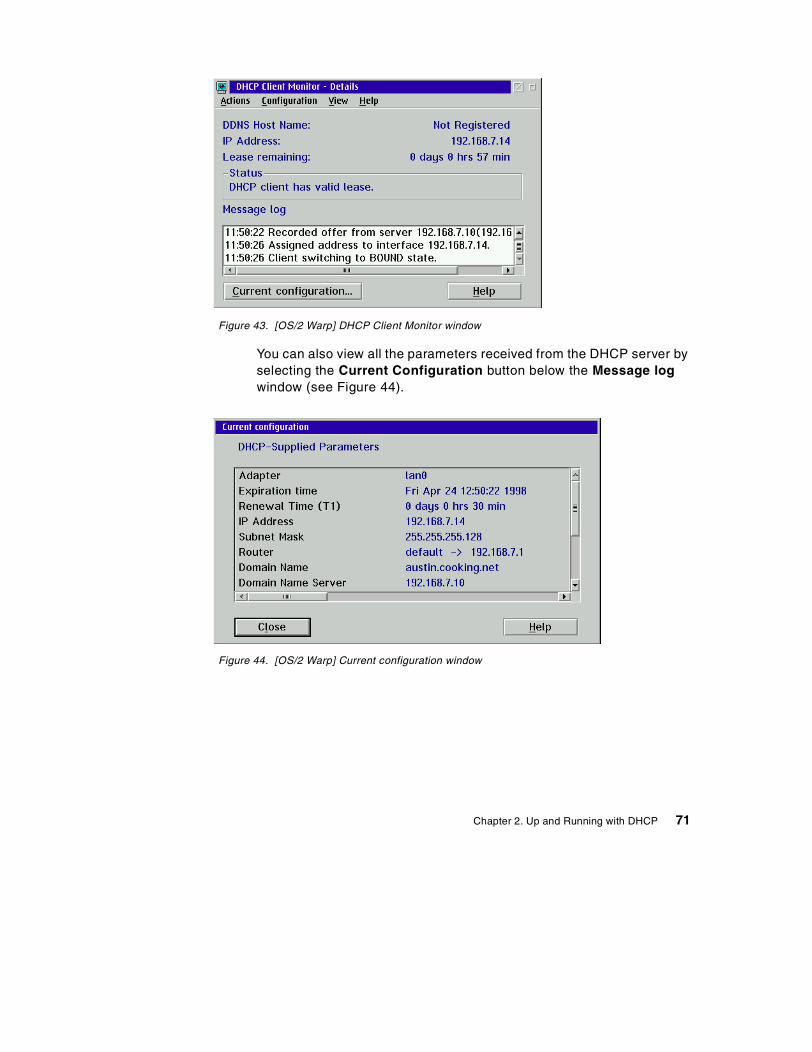
Figure 43. [OS/2 Warp] DHCP Client Monitor window
You can also view all the parameters received from the DHCP server byselecting the Current Configuration button below the Message logwindow (see Figure 44).
Figure 44. [OS/2 Warp] Current configuration window
Chapter 2. Up and Running with DHCP 71

2.5.2 Windows 95 and Windows 98The TCP/IP Properties pages for both Windows 95 and Windows 98 areidentical. Before running your Windows 95 or Windows 98 workstation as aDHCP client, make sure that you have installed the following components:
• TCP/IP protocol
• An appropriate network adapter device driver
1. To set up your Windows 95 or Windows 98 computer as a DHCP client,you need to configure the TCP/IP protocol. Open the Network icon. Toopen the Network icon, select [Start => Settings => Control Panel].Double-click on the Network icon.
2. In the Network notebook, highlight TCP/IP Protocol and click on theProperties button. The TCP/IP properties notebook opens up. Click onthe IP Address tab and check Obtain an IP address automatically, asshown in Figure 45.
Figure 45. [Windows 98] Enabling DHCP client
3. Click OK to finish the Network settings and reboot your system. Now, theWindows 95 computer should be able to obtain an IP address from theDHCP server.
4. You can view the current IP configuration by using the WINIPCFG commandat the command prompt. This will show you a current IP address and other
72 Beyond DHCP - Work Your TCP/IP Internetwork with Dynamic IP
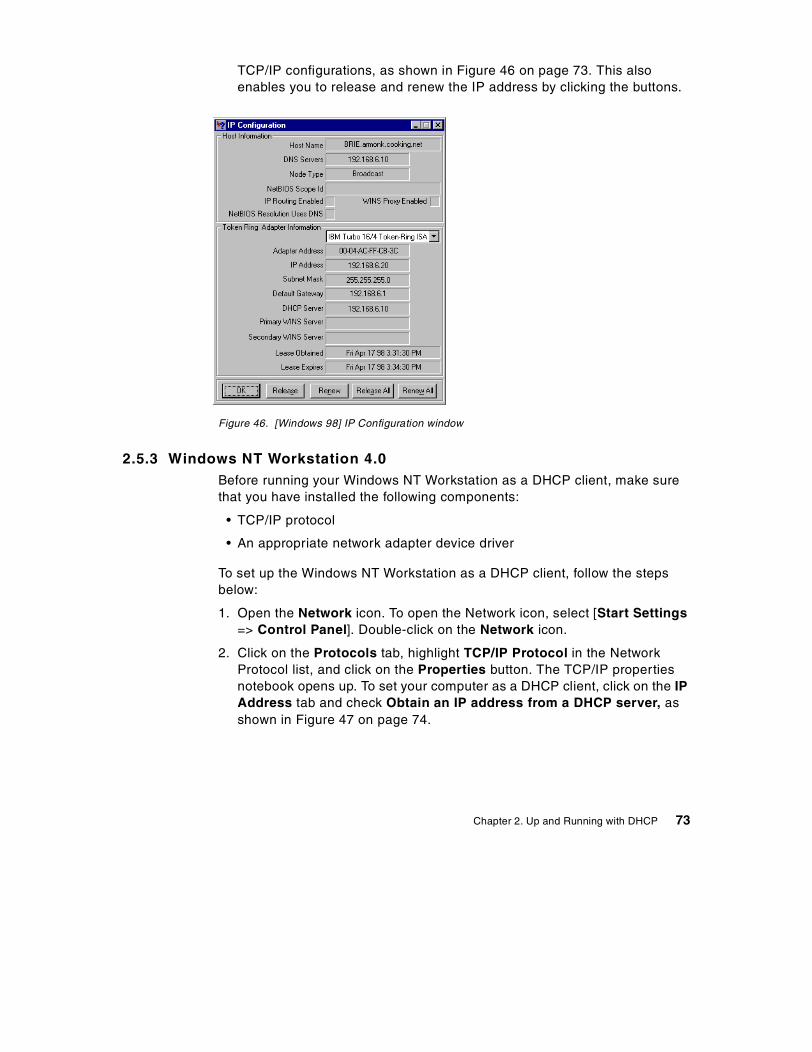
TCP/IP configurations, as shown in Figure 46 on page 73. This alsoenables you to release and renew the IP address by clicking the buttons.
Figure 46. [Windows 98] IP Configuration window
2.5.3 Windows NT Workstation 4.0Before running your Windows NT Workstation as a DHCP client, make surethat you have installed the following components:
• TCP/IP protocol
• An appropriate network adapter device driver
To set up the Windows NT Workstation as a DHCP client, follow the stepsbelow:
1. Open the Network icon. To open the Network icon, select [Start Settings=> Control Panel]. Double-click on the Network icon.
2. Click on the Protocols tab, highlight TCP/IP Protocol in the NetworkProtocol list, and click on the Properties button. The TCP/IP propertiesnotebook opens up. To set your computer as a DHCP client, click on the IPAddress tab and check Obtain an IP address from a DHCP server, asshown in Figure 47 on page 74.
Chapter 2. Up and Running with DHCP 73

Figure 47. [Windows NT] Enabling a DHCP client
3. Click OK to finish the Network settings and reboot your system. Now yourWindows NT Workstation should be able to obtain an IP address from theDHCP server.
You can view the current IP configuration by using the IPCONFIG utility. Type:
IPCONFIG /ALL
at the command prompt. This will show you the current IP configuration forthe operating system and the network adapter, as shown in Figure 48 onpage 75.
74 Beyond DHCP - Work Your TCP/IP Internetwork with Dynamic IP
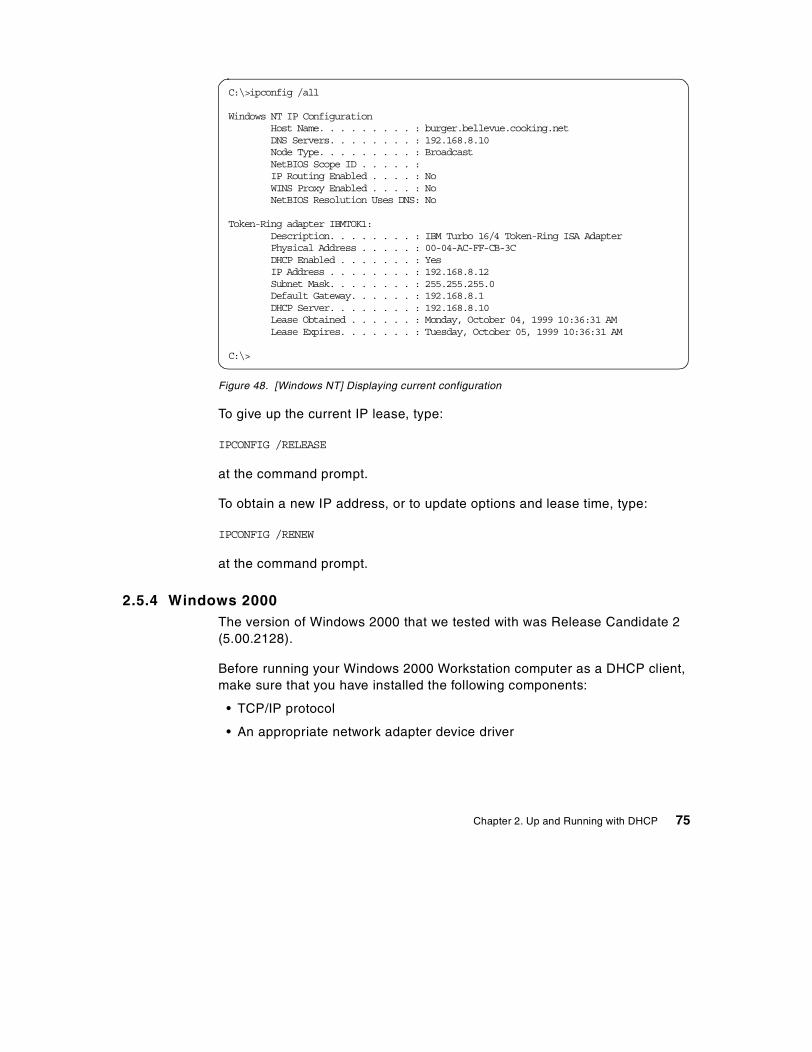
Figure 48. [Windows NT] Displaying current configuration
To give up the current IP lease, type:
IPCONFIG /RELEASE
at the command prompt.
To obtain a new IP address, or to update options and lease time, type:
IPCONFIG /RENEW
at the command prompt.
2.5.4 Windows 2000The version of Windows 2000 that we tested with was Release Candidate 2(5.00.2128).
Before running your Windows 2000 Workstation computer as a DHCP client,make sure that you have installed the following components:
• TCP/IP protocol
• An appropriate network adapter device driver
C:\>ipconfig /all
Windows NT IP ConfigurationHost Name. . . . . . . . . : burger.bellevue.cooking.netDNS Servers. . . . . . . . : 192.168.8.10Node Type. . . . . . . . . : BroadcastNetBIOS Scope ID . . . . . :IP Routing Enabled . . . . : NoWINS Proxy Enabled . . . . : NoNetBIOS Resolution Uses DNS: No
Token-Ring adapter IBMTOK1:Description. . . . . . . . : IBM Turbo 16/4 Token-Ring ISA AdapterPhysical Address . . . . . : 00-04-AC-FF-CB-3CDHCP Enabled . . . . . . . : YesIP Address . . . . . . . . : 192.168.8.12Subnet Mask. . . . . . . . : 255.255.255.0Default Gateway. . . . . . : 192.168.8.1DHCP Server. . . . . . . . : 192.168.8.10Lease Obtained . . . . . . : Monday, October 04, 1999 10:36:31 AMLease Expires. . . . . . . : Tuesday, October 05, 1999 10:36:31 AM
C:\>
Chapter 2. Up and Running with DHCP 75
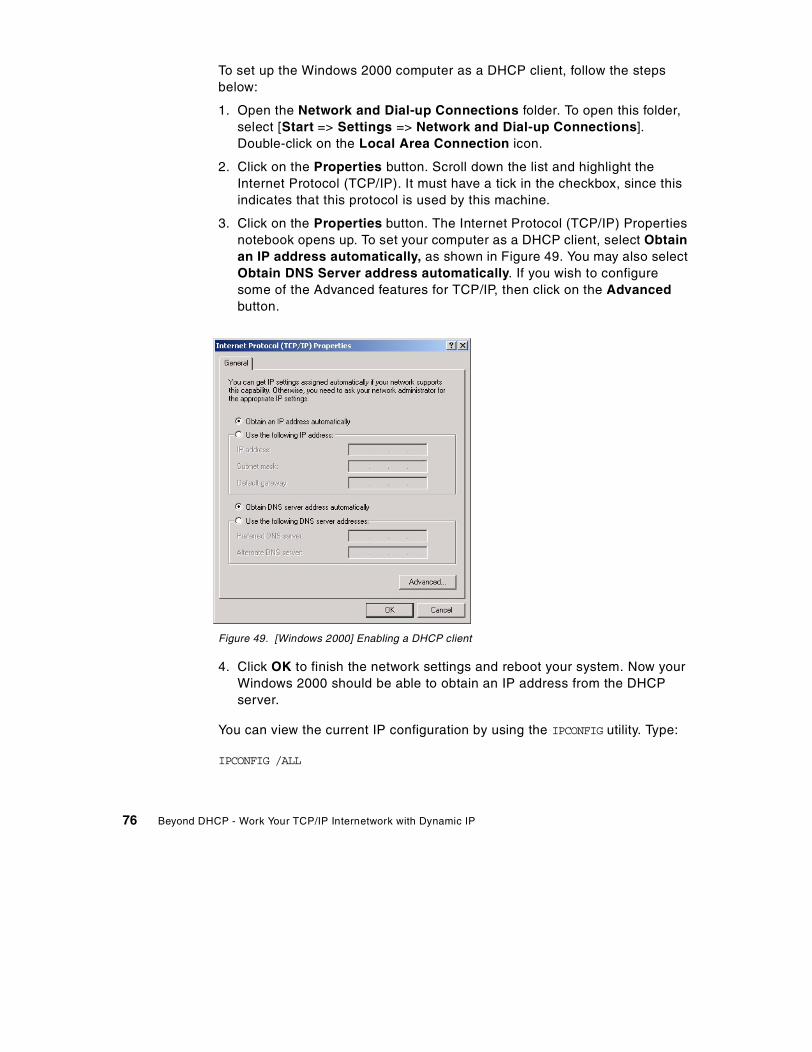
To set up the Windows 2000 computer as a DHCP client, follow the stepsbelow:
1. Open the Network and Dial-up Connections folder. To open this folder,select [Start => Settings => Network and Dial-up Connections].Double-click on the Local Area Connection icon.
2. Click on the Properties button. Scroll down the list and highlight theInternet Protocol (TCP/IP). It must have a tick in the checkbox, since thisindicates that this protocol is used by this machine.
3. Click on the Properties button. The Internet Protocol (TCP/IP) Propertiesnotebook opens up. To set your computer as a DHCP client, select Obtainan IP address automatically, as shown in Figure 49. You may also selectObtain DNS Server address automatically. If you wish to configuresome of the Advanced features for TCP/IP, then click on the Advancedbutton.
Figure 49. [Windows 2000] Enabling a DHCP client
4. Click OK to finish the network settings and reboot your system. Now yourWindows 2000 should be able to obtain an IP address from the DHCPserver.
You can view the current IP configuration by using the IPCONFIG utility. Type:
IPCONFIG /ALL
76 Beyond DHCP - Work Your TCP/IP Internetwork with Dynamic IP
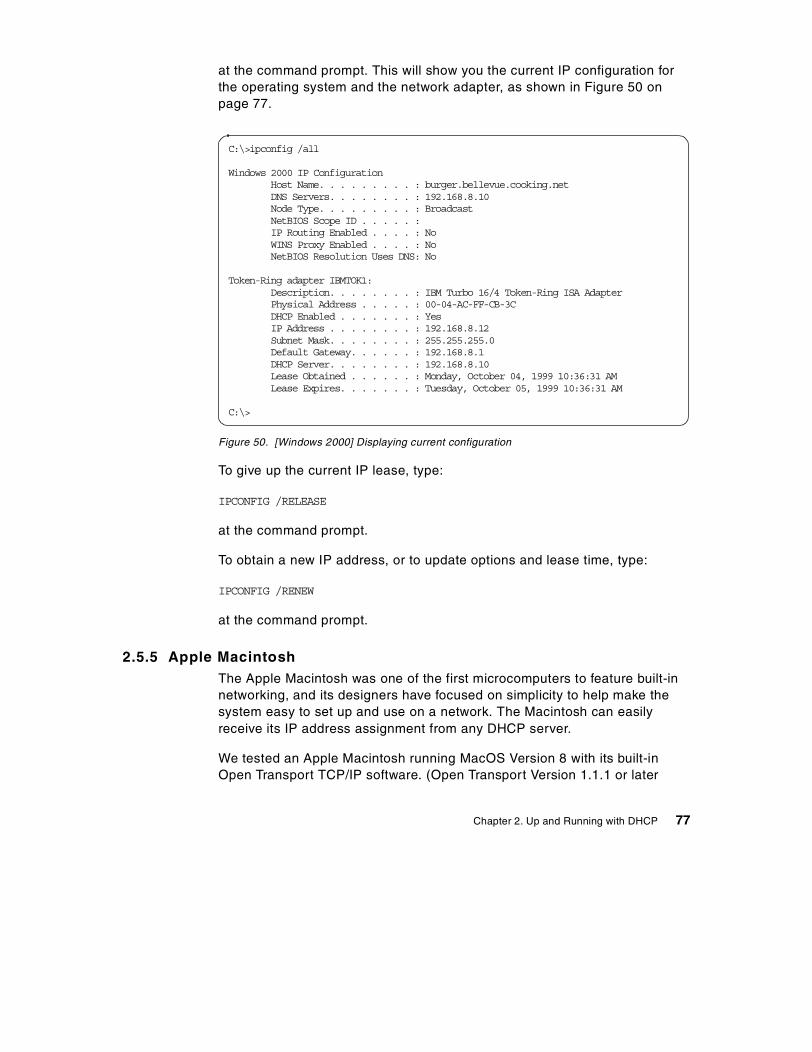
at the command prompt. This will show you the current IP configuration forthe operating system and the network adapter, as shown in Figure 50 onpage 77.
Figure 50. [Windows 2000] Displaying current configuration
To give up the current IP lease, type:
IPCONFIG /RELEASE
at the command prompt.
To obtain a new IP address, or to update options and lease time, type:
IPCONFIG /RENEW
at the command prompt.
2.5.5 Apple MacintoshThe Apple Macintosh was one of the first microcomputers to feature built-innetworking, and its designers have focused on simplicity to help make thesystem easy to set up and use on a network. The Macintosh can easilyreceive its IP address assignment from any DHCP server.
We tested an Apple Macintosh running MacOS Version 8 with its built-inOpen Transport TCP/IP software. (Open Transport Version 1.1.1 or later
C:\>ipconfig /all
Windows 2000 IP ConfigurationHost Name. . . . . . . . . : burger.bellevue.cooking.netDNS Servers. . . . . . . . : 192.168.8.10Node Type. . . . . . . . . : BroadcastNetBIOS Scope ID . . . . . :IP Routing Enabled . . . . : NoWINS Proxy Enabled . . . . : NoNetBIOS Resolution Uses DNS: No
Token-Ring adapter IBMTOK1:Description. . . . . . . . : IBM Turbo 16/4 Token-Ring ISA AdapterPhysical Address . . . . . : 00-04-AC-FF-CB-3CDHCP Enabled . . . . . . . : YesIP Address . . . . . . . . : 192.168.8.12Subnet Mask. . . . . . . . : 255.255.255.0Default Gateway. . . . . . : 192.168.8.1DHCP Server. . . . . . . . : 192.168.8.10Lease Obtained . . . . . . : Monday, October 04, 1999 10:36:31 AMLease Expires. . . . . . . : Tuesday, October 05, 1999 10:36:31 AM
C:\>
Chapter 2. Up and Running with DHCP 77
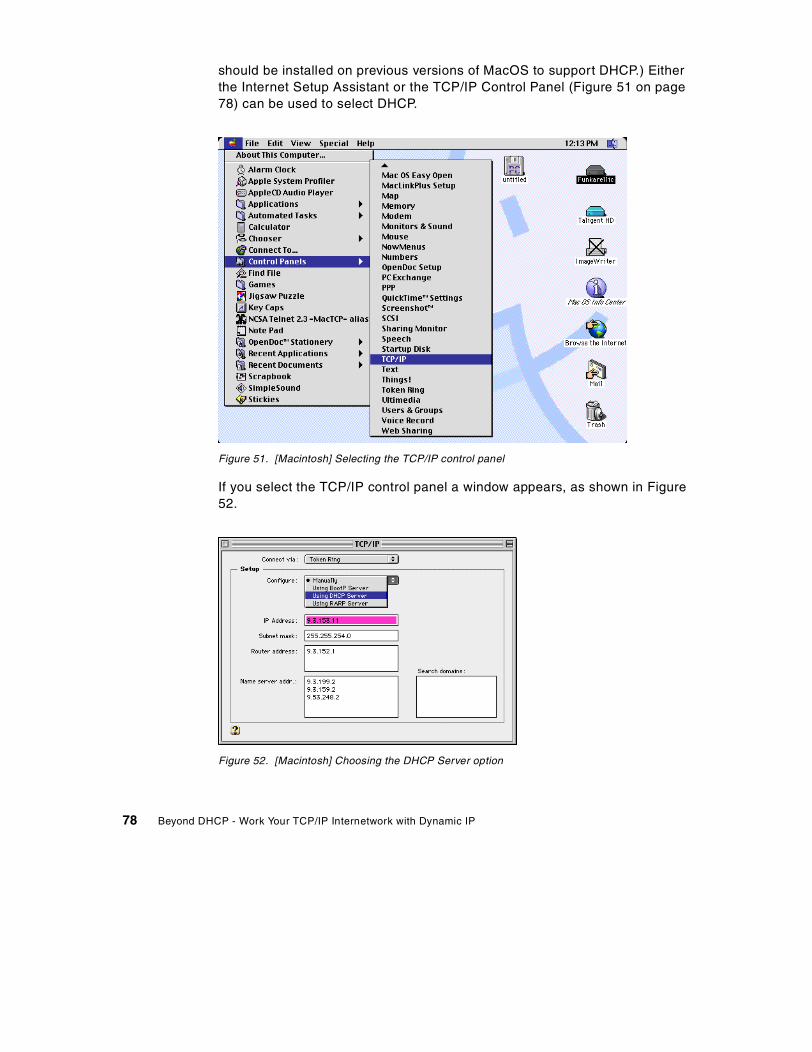
should be installed on previous versions of MacOS to support DHCP.) Eitherthe Internet Setup Assistant or the TCP/IP Control Panel (Figure 51 on page78) can be used to select DHCP.
Figure 51. [Macintosh] Selecting the TCP/IP control panel
If you select the TCP/IP control panel a window appears, as shown in Figure52.
Figure 52. [Macintosh] Choosing the DHCP Server option
78 Beyond DHCP - Work Your TCP/IP Internetwork with Dynamic IP
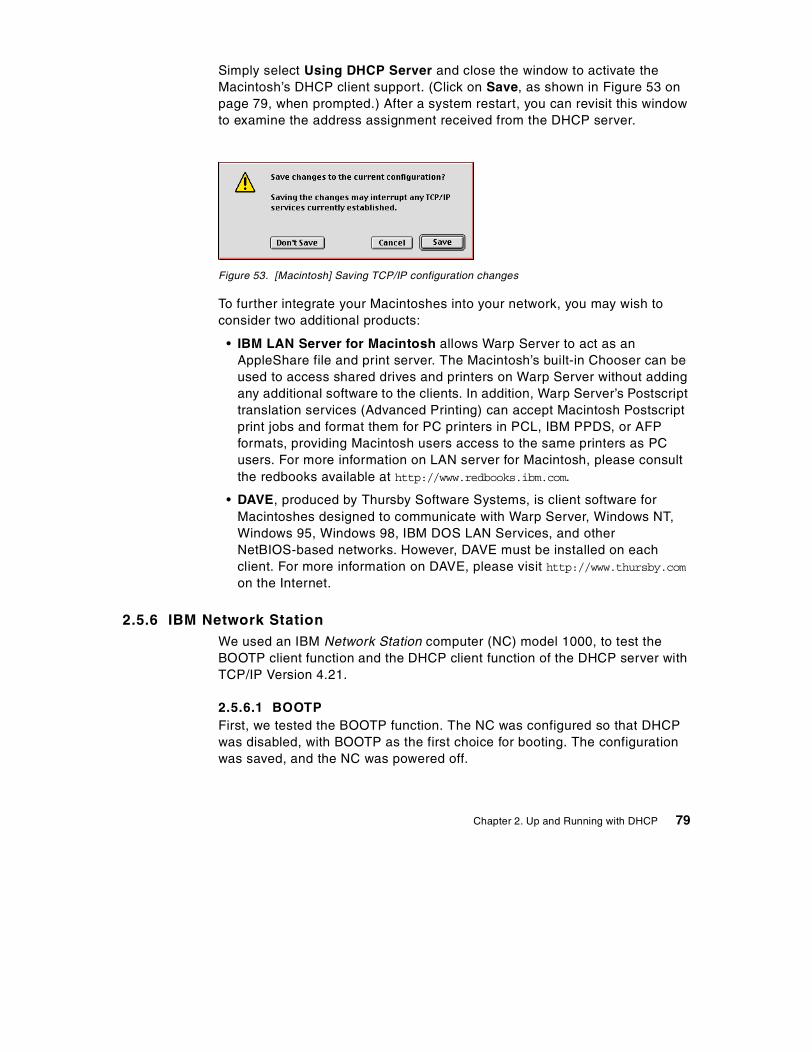
Simply select Using DHCP Server and close the window to activate theMacintosh’s DHCP client support. (Click on Save, as shown in Figure 53 onpage 79, when prompted.) After a system restart, you can revisit this windowto examine the address assignment received from the DHCP server.
Figure 53. [Macintosh] Saving TCP/IP configuration changes
To further integrate your Macintoshes into your network, you may wish toconsider two additional products:
• IBM LAN Server for Macintosh allows Warp Server to act as anAppleShare file and print server. The Macintosh’s built-in Chooser can beused to access shared drives and printers on Warp Server without addingany additional software to the clients. In addition, Warp Server’s Postscripttranslation services (Advanced Printing) can accept Macintosh Postscriptprint jobs and format them for PC printers in PCL, IBM PPDS, or AFPformats, providing Macintosh users access to the same printers as PCusers. For more information on LAN server for Macintosh, please consultthe redbooks available at http://www.redbooks.ibm.com.
• DAVE, produced by Thursby Software Systems, is client software forMacintoshes designed to communicate with Warp Server, Windows NT,Windows 95, Windows 98, IBM DOS LAN Services, and otherNetBIOS-based networks. However, DAVE must be installed on eachclient. For more information on DAVE, please visit http://www.thursby.comon the Internet.
2.5.6 IBM Network StationWe used an IBM Network Station computer (NC) model 1000, to test theBOOTP client function and the DHCP client function of the DHCP server withTCP/IP Version 4.21.
2.5.6.1 BOOTPFirst, we tested the BOOTP function. The NC was configured so that DHCPwas disabled, with BOOTP as the first choice for booting. The configurationwas saved, and the NC was powered off.
Chapter 2. Up and Running with DHCP 79
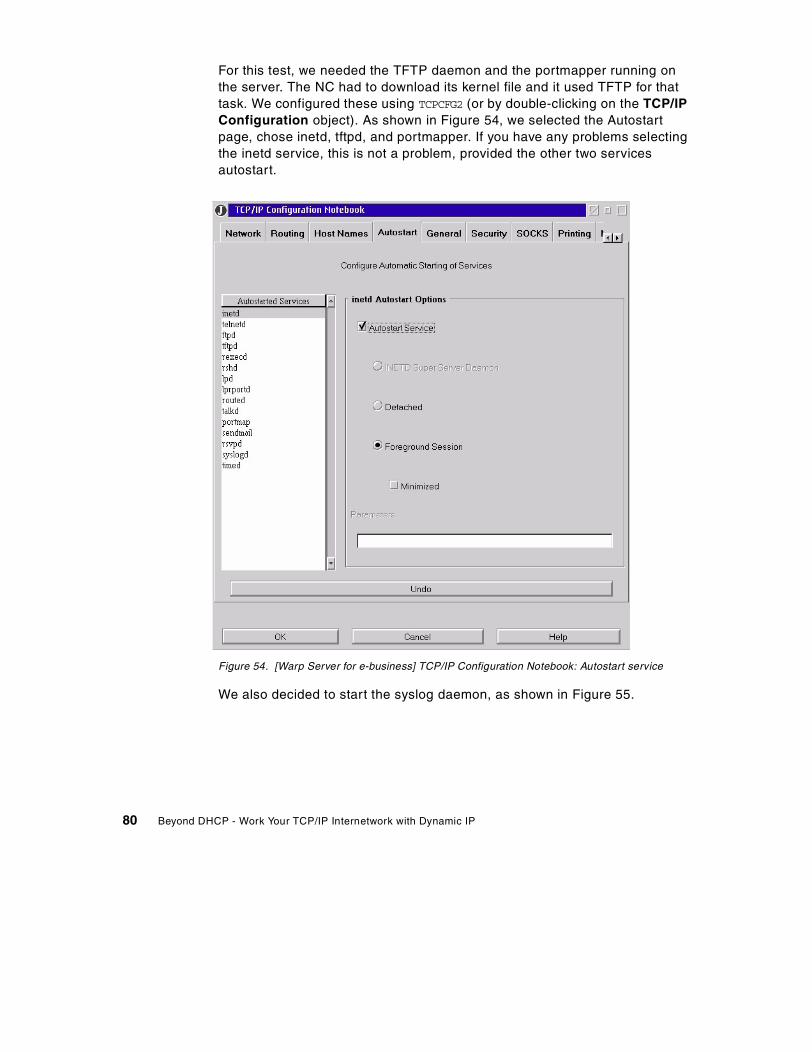
For this test, we needed the TFTP daemon and the portmapper running onthe server. The NC had to download its kernel file and it used TFTP for thattask. We configured these using TCPCFG2 (or by double-clicking on the TCP/IPConfiguration object). As shown in Figure 54, we selected the Autostartpage, chose inetd, tftpd, and portmapper. If you have any problems selectingthe inetd service, this is not a problem, provided the other two servicesautostart.
Figure 54. [Warp Server for e-business] TCP/IP Configuration Notebook: Autostart service
We also decided to start the syslog daemon, as shown in Figure 55.
80 Beyond DHCP - Work Your TCP/IP Internetwork with Dynamic IP
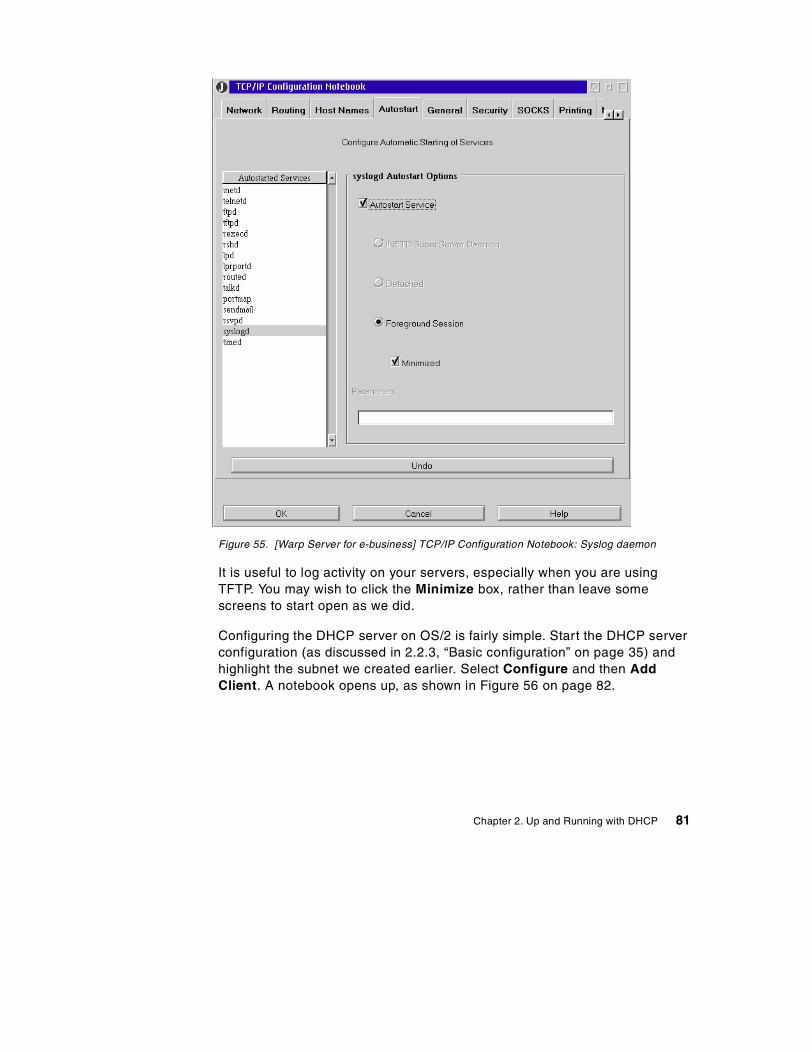
Figure 55. [Warp Server for e-business] TCP/IP Configuration Notebook: Syslog daemon
It is useful to log activity on your servers, especially when you are usingTFTP. You may wish to click the Minimize box, rather than leave somescreens to start open as we did.
Configuring the DHCP server on OS/2 is fairly simple. Start the DHCP serverconfiguration (as discussed in 2.2.3, “Basic configuration” on page 35) andhighlight the subnet we created earlier. Select Configure and then AddClient. A notebook opens up, as shown in Figure 56 on page 82.
Chapter 2. Up and Running with DHCP 81
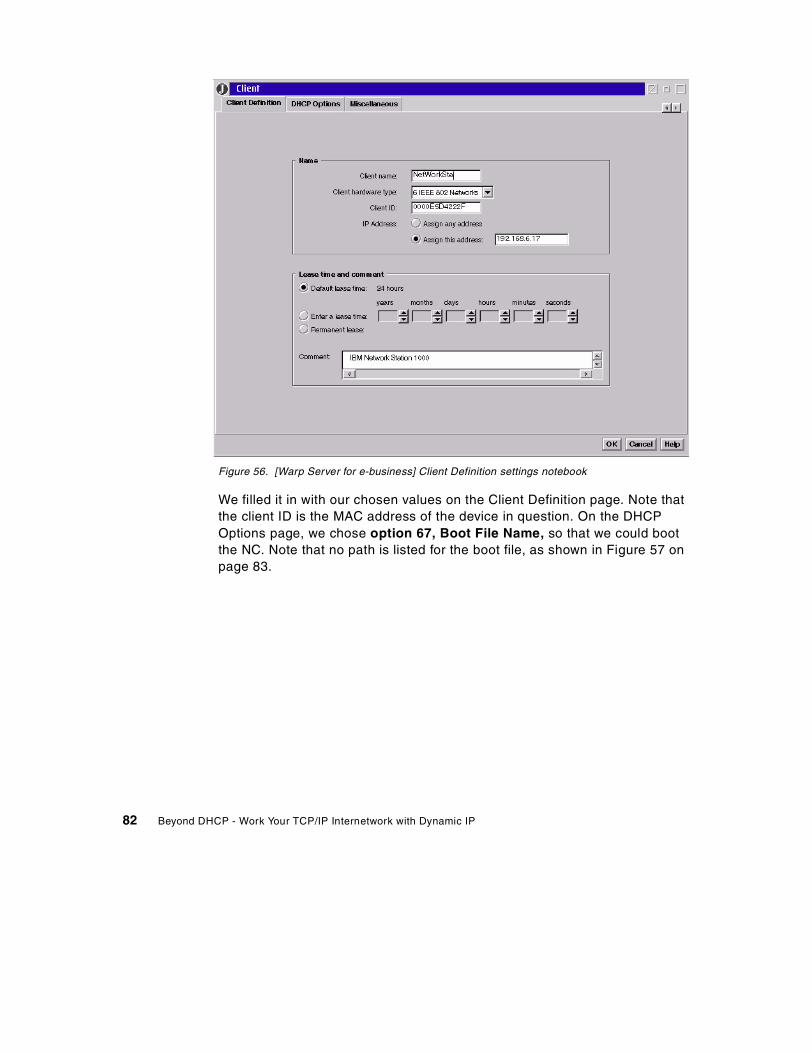
Figure 56. [Warp Server for e-business] Client Definition settings notebook
We filled it in with our chosen values on the Client Definition page. Note thatthe client ID is the MAC address of the device in question. On the DHCPOptions page, we chose option 67, Boot File Name, so that we could bootthe NC. Note that no path is listed for the boot file, as shown in Figure 57 onpage 83.
82 Beyond DHCP - Work Your TCP/IP Internetwork with Dynamic IP
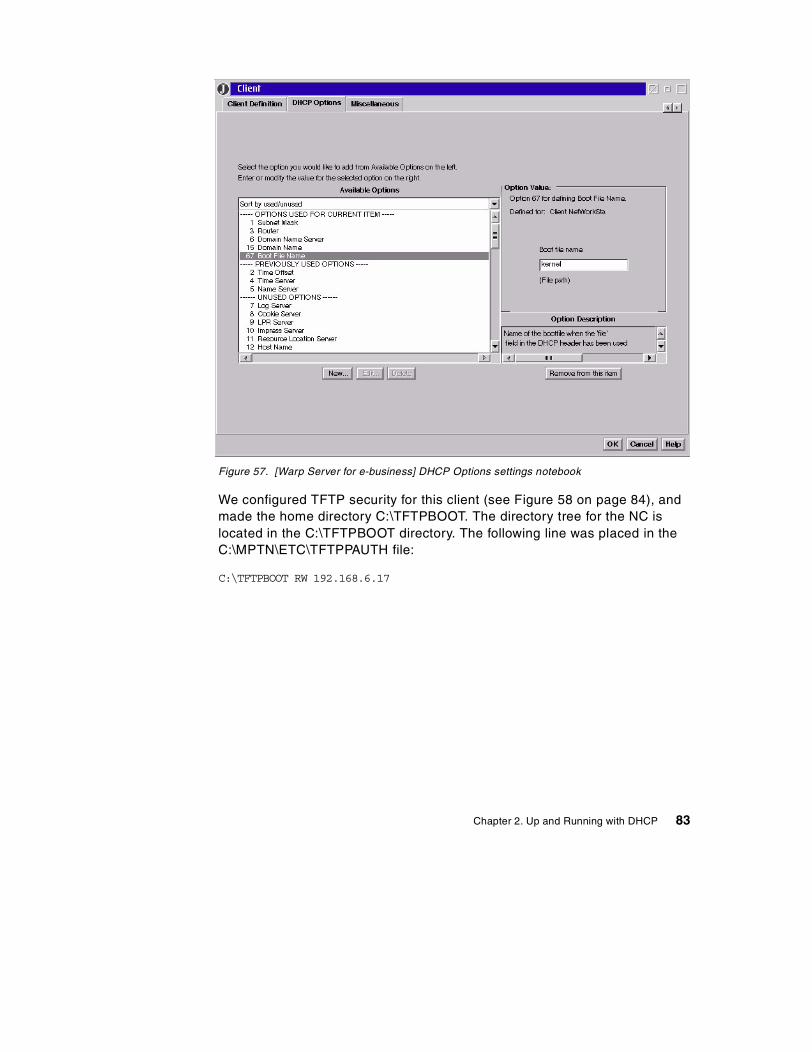
Figure 57. [Warp Server for e-business] DHCP Options settings notebook
We configured TFTP security for this client (see Figure 58 on page 84), andmade the home directory C:\TFTPBOOT. The directory tree for the NC islocated in the C:\TFTPBOOT directory. The following line was placed in theC:\MPTN\ETC\TFTPPAUTH file:
C:\TFTPBOOT RW 192.168.6.17
Chapter 2. Up and Running with DHCP 83
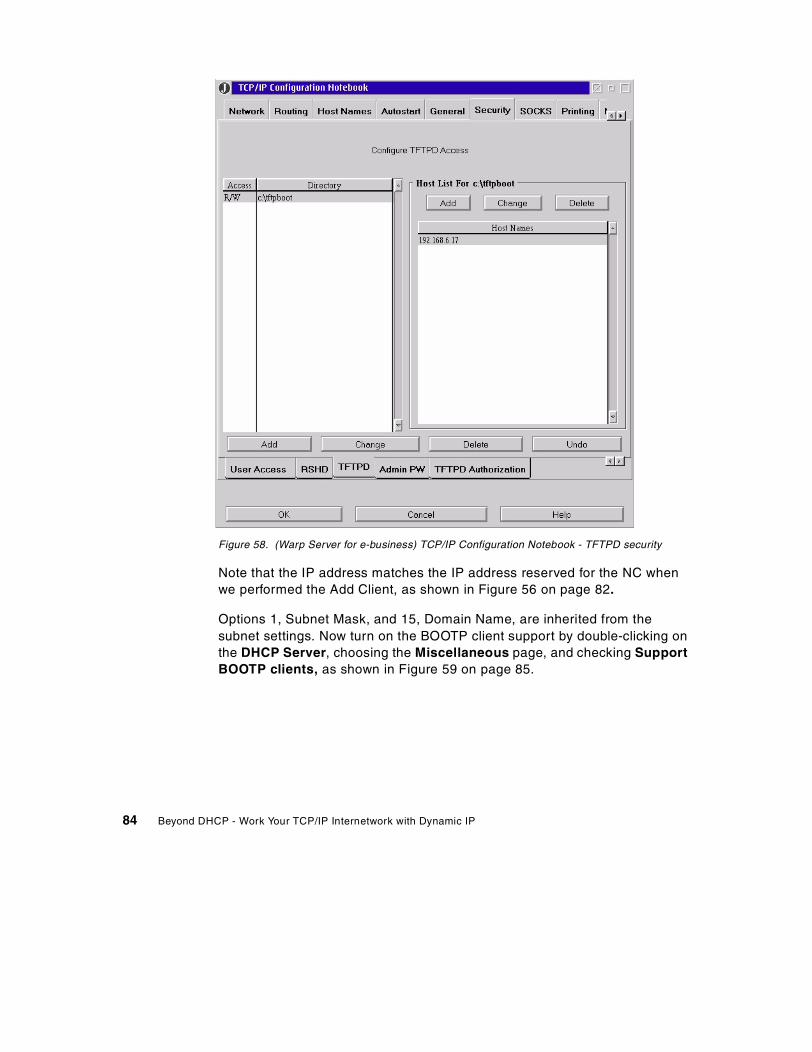
Figure 58. (Warp Server for e-business) TCP/IP Configuration Notebook - TFTPD security
Note that the IP address matches the IP address reserved for the NC whenwe performed the Add Client, as shown in Figure 56 on page 82.
Options 1, Subnet Mask, and 15, Domain Name, are inherited from thesubnet settings. Now turn on the BOOTP client support by double-clicking onthe DHCP Server, choosing the Miscellaneous page, and checking SupportBOOTP clients, as shown in Figure 59 on page 85.
84 Beyond DHCP - Work Your TCP/IP Internetwork with Dynamic IP
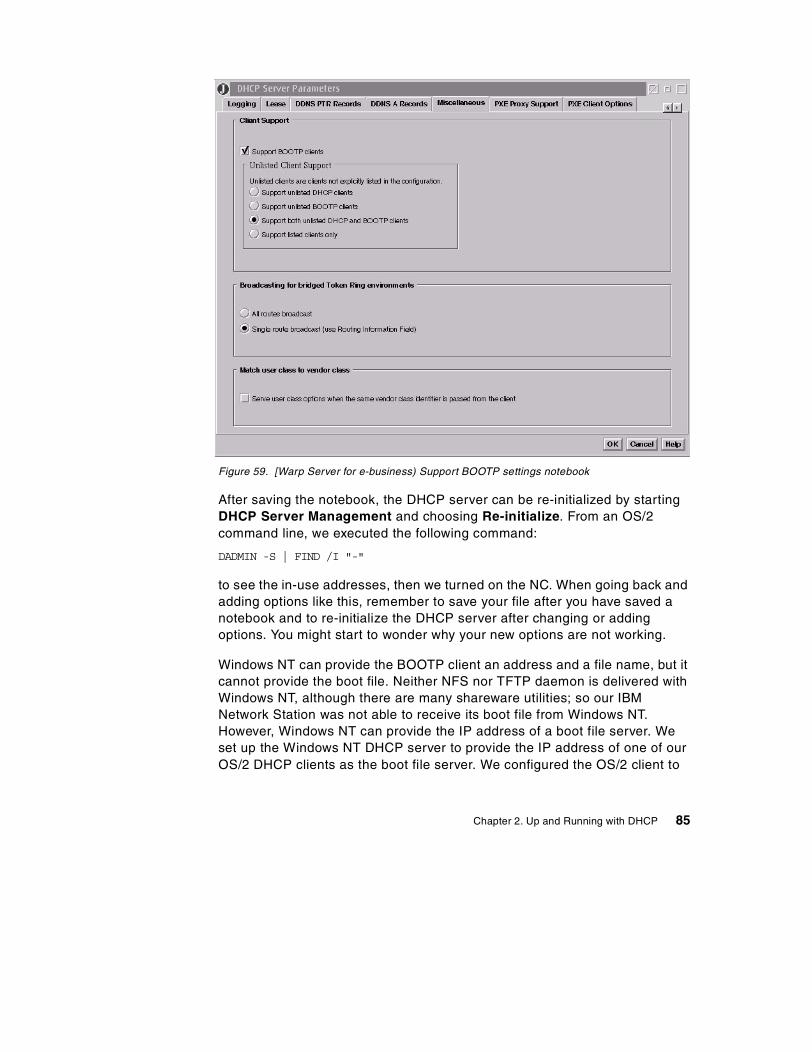
Figure 59. [Warp Server for e-business) Support BOOTP settings notebook
After saving the notebook, the DHCP server can be re-initialized by startingDHCP Server Management and choosing Re-initialize. From an OS/2command line, we executed the following command:
DADMIN -S | FIND /I "-"
to see the in-use addresses, then we turned on the NC. When going back andadding options like this, remember to save your file after you have saved anotebook and to re-initialize the DHCP server after changing or addingoptions. You might start to wonder why your new options are not working.
Windows NT can provide the BOOTP client an address and a file name, but itcannot provide the boot file. Neither NFS nor TFTP daemon is delivered withWindows NT, although there are many shareware utilities; so our IBMNetwork Station was not able to receive its boot file from Windows NT.However, Windows NT can provide the IP address of a boot file server. Weset up the Windows NT DHCP server to provide the IP address of one of ourOS/2 DHCP clients as the boot file server. We configured the OS/2 client to
Chapter 2. Up and Running with DHCP 85
autostart the inet daemon, TFTP daemon (started from inetd), and theportmapper. We rebooted the OS/2 DHCP client to restart everything. Weconfigured the NT DHCP server so that the boot file server provided theBOOTP client (NC) with the address of the OS/2 client. After restarting the NTDHCP server, we powered on the NC and it booted up from the OS/2workstation. So, the Windows NT DHCP server provides a type of BOOTPservice. If you want more than just an address (for example, you actually wantto network boot a workstation), you will need to provide the name of a bootfile server, or add some third party software to Windows NT; so it can provideTFTP services (we did not test any third party add-ons). Note that IBM hasNetworkstation kits for different server platforms that provide file transferservices.
2.5.6.2 DHCPNext, configure the Network Station as a DHCP client. No changes arerequired on the server to boot the Network Station as a DHCP client.
There is still one problem on the Network Station, which may be due to theolder firmware in our machine (Boot Monitor Version 3.0.1). On more thanone occasion, even though the Network Station was configured to get its IPaddress from the network, it insisted on using the IP address that wasconfigured in NVRAM. We solved this problem by setting the NVRAMaddresses to all zeros, except for the subnet address.
2.5.7 AIX
An AIX workstation can also be configured as a DHCP client, but then itcannot be used as a DHCP server. We configured a DHCP client on AIXVersion 4.3.2 using the following procedure:
1. Open the Application Manager, and you will be presented with a windowas shown in Figure 60 on page 87.
Before configuring AIX as a DHCP client, ensure that the file setbos.net.tcp.client is installed. To verify this, use the command:lslpp -l “bos.net.tcp.*”
To install this file set you will need AIX CD-ROM 1, and you may beprompted for further CD-ROMs.
Note
86 Beyond DHCP - Work Your TCP/IP Internetwork with Dynamic IP
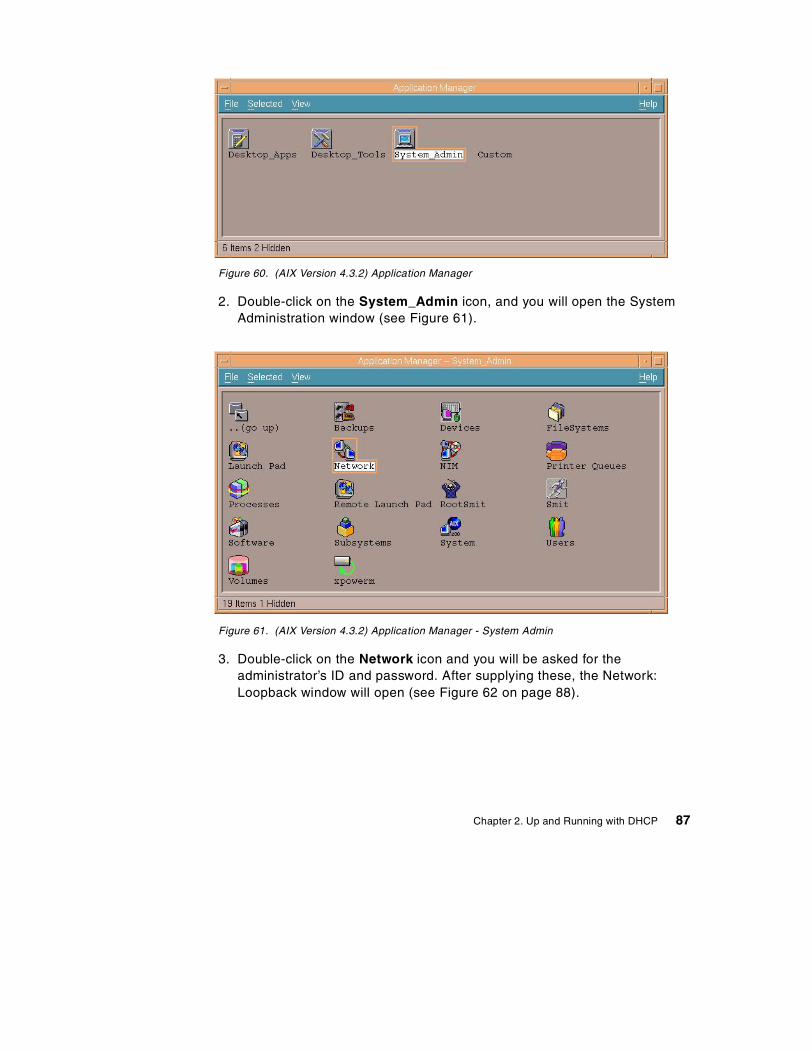
Figure 60. (AIX Version 4.3.2) Application Manager
2. Double-click on the System_Admin icon, and you will open the SystemAdministration window (see Figure 61).
Figure 61. (AIX Version 4.3.2) Application Manager - System Admin
3. Double-click on the Network icon and you will be asked for theadministrator’s ID and password. After supplying these, the Network:Loopback window will open (see Figure 62 on page 88).
Chapter 2. Up and Running with DHCP 87
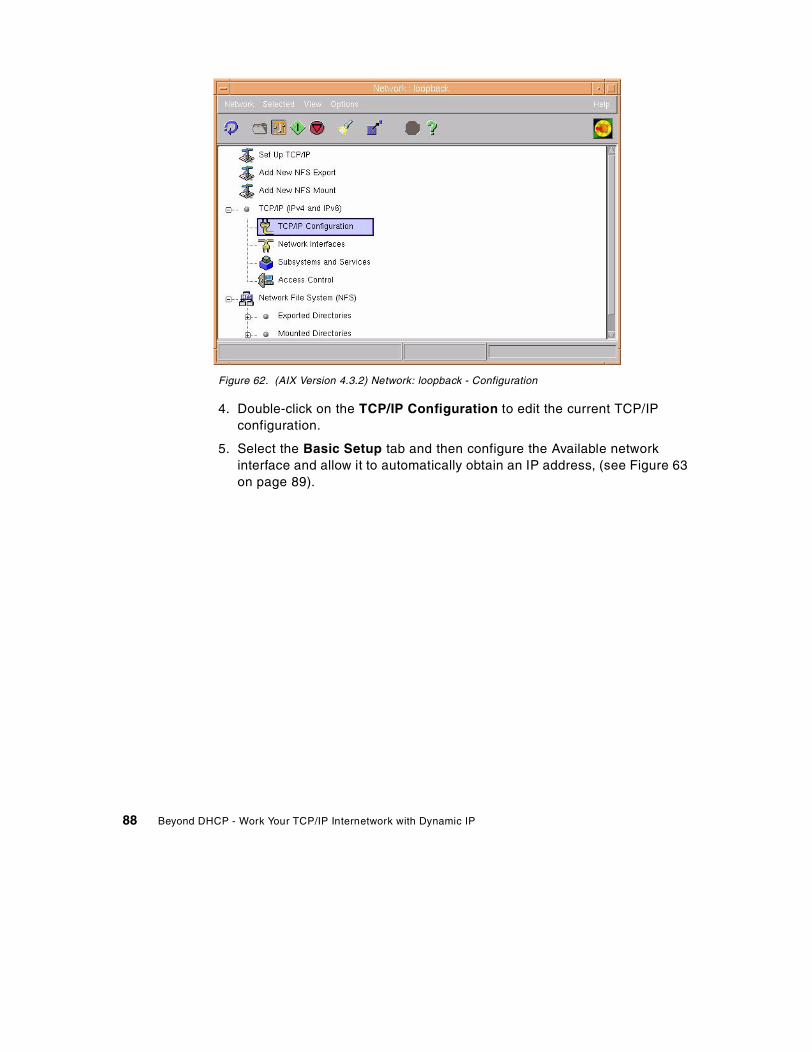
Figure 62. (AIX Version 4.3.2) Network: loopback - Configuration
4. Double-click on the TCP/IP Configuration to edit the current TCP/IPconfiguration.
5. Select the Basic Setup tab and then configure the Available networkinterface and allow it to automatically obtain an IP address, (see Figure 63on page 89).
88 Beyond DHCP - Work Your TCP/IP Internetwork with Dynamic IP
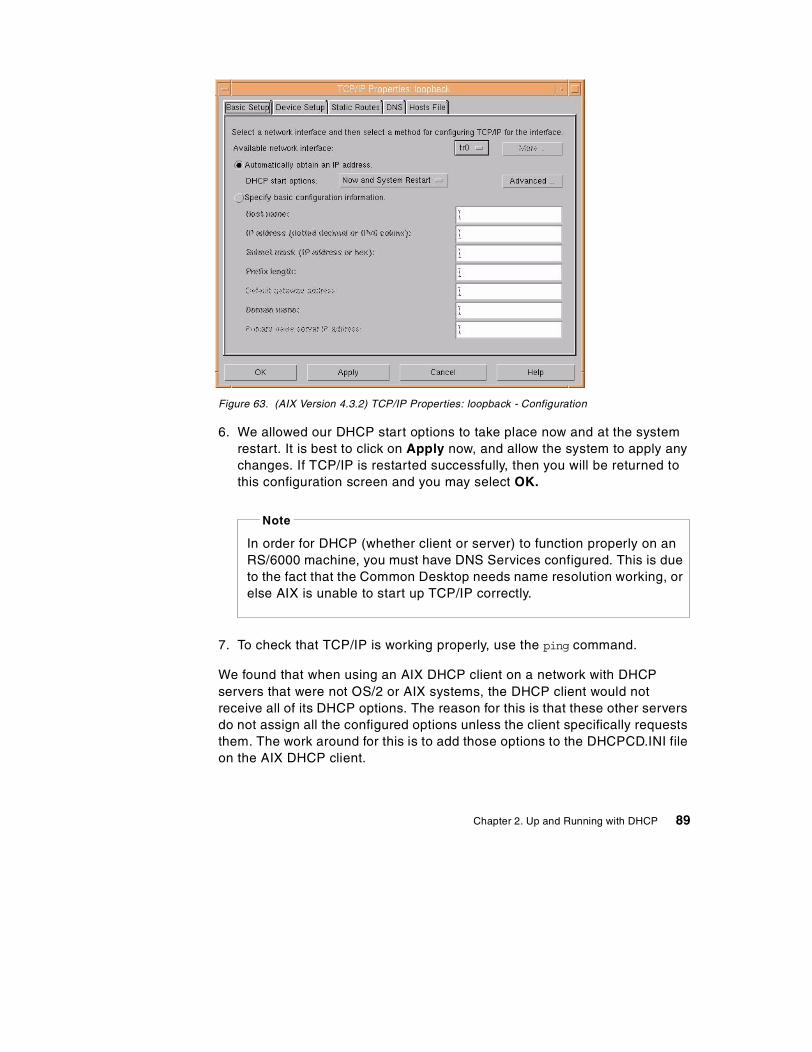
Figure 63. (AIX Version 4.3.2) TCP/IP Properties: loopback - Configuration
6. We allowed our DHCP start options to take place now and at the systemrestart. It is best to click on Apply now, and allow the system to apply anychanges. If TCP/IP is restarted successfully, then you will be returned tothis configuration screen and you may select OK.
7. To check that TCP/IP is working properly, use the ping command.
We found that when using an AIX DHCP client on a network with DHCPservers that were not OS/2 or AIX systems, the DHCP client would notreceive all of its DHCP options. The reason for this is that these other serversdo not assign all the configured options unless the client specifically requeststhem. The work around for this is to add those options to the DHCPCD.INI fileon the AIX DHCP client.
Note
In order for DHCP (whether client or server) to function properly on anRS/6000 machine, you must have DNS Services configured. This is dueto the fact that the Common Desktop needs name resolution working, orelse AIX is unable to start up TCP/IP correctly.
Chapter 2. Up and Running with DHCP 89
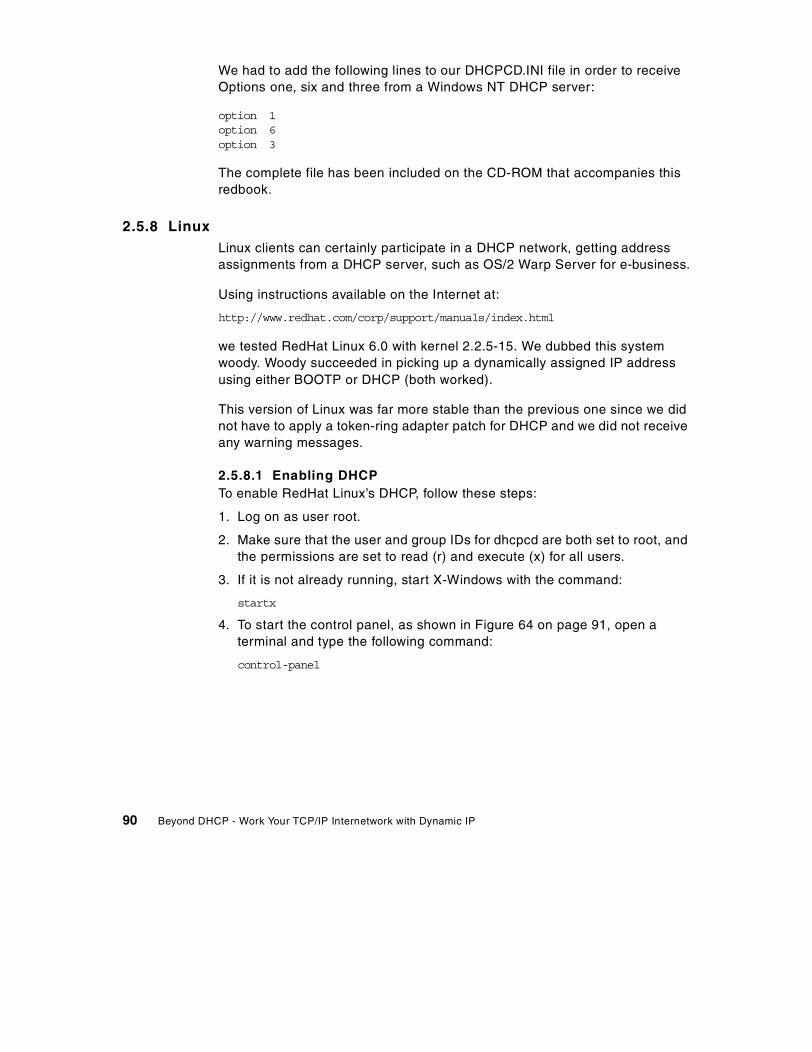
We had to add the following lines to our DHCPCD.INI file in order to receiveOptions one, six and three from a Windows NT DHCP server:
option 1option 6option 3
The complete file has been included on the CD-ROM that accompanies thisredbook.
2.5.8 LinuxLinux clients can certainly participate in a DHCP network, getting addressassignments from a DHCP server, such as OS/2 Warp Server for e-business.
Using instructions available on the Internet at:
http://www.redhat.com/corp/support/manuals/index.html
we tested RedHat Linux 6.0 with kernel 2.2.5-15. We dubbed this systemwoody. Woody succeeded in picking up a dynamically assigned IP addressusing either BOOTP or DHCP (both worked).
This version of Linux was far more stable than the previous one since we didnot have to apply a token-ring adapter patch for DHCP and we did not receiveany warning messages.
2.5.8.1 Enabling DHCPTo enable RedHat Linux’s DHCP, follow these steps:
1. Log on as user root.
2. Make sure that the user and group IDs for dhcpcd are both set to root, andthe permissions are set to read (r) and execute (x) for all users.
3. If it is not already running, start X-Windows with the command:
startx
4. To start the control panel, as shown in Figure 64 on page 91, open aterminal and type the following command:
control-panel
90 Beyond DHCP - Work Your TCP/IP Internetwork with Dynamic IP
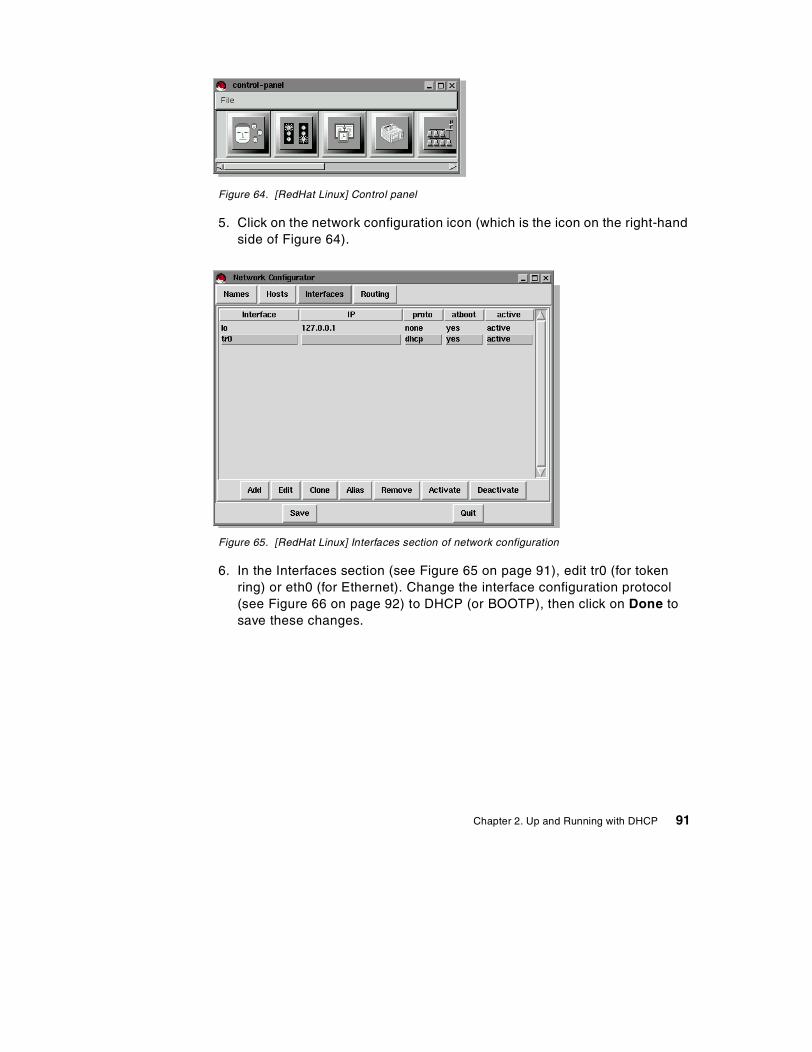
Figure 64. [RedHat Linux] Control panel
5. Click on the network configuration icon (which is the icon on the right-handside of Figure 64).
Figure 65. [RedHat Linux] Interfaces section of network configuration
6. In the Interfaces section (see Figure 65 on page 91), edit tr0 (for tokenring) or eth0 (for Ethernet). Change the interface configuration protocol(see Figure 66 on page 92) to DHCP (or BOOTP), then click on Done tosave these changes.
Chapter 2. Up and Running with DHCP 91
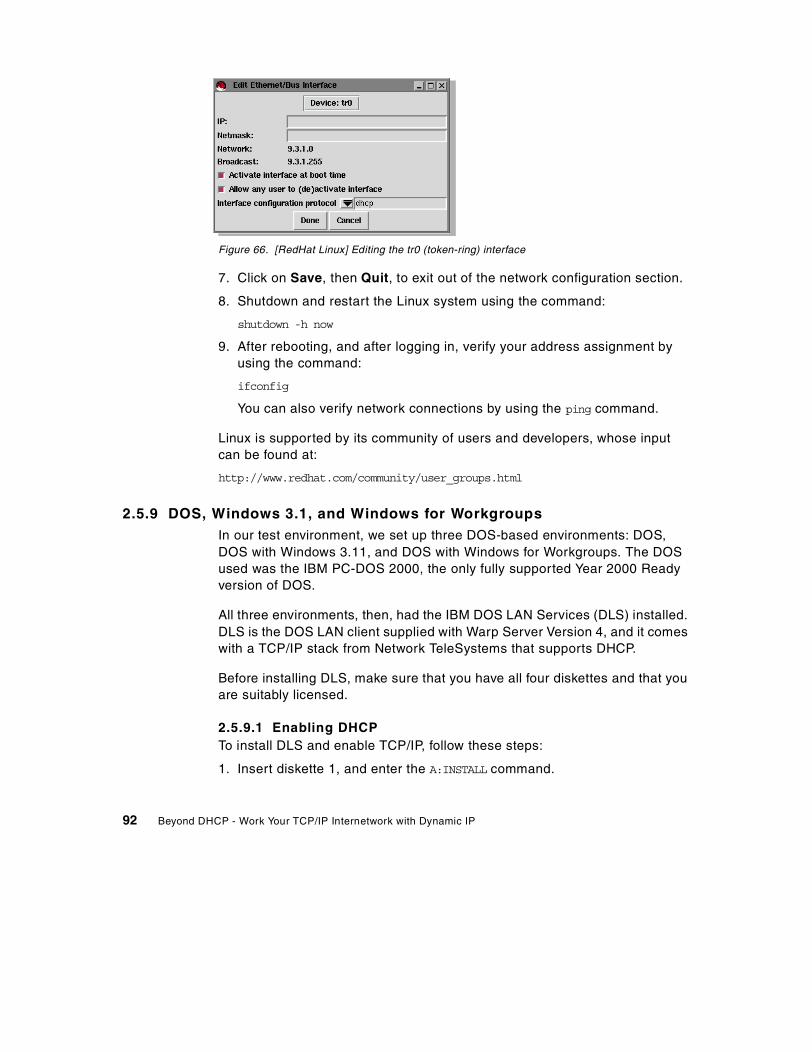
Figure 66. [RedHat Linux] Editing the tr0 (token-ring) interface
7. Click on Save, then Quit, to exit out of the network configuration section.
8. Shutdown and restart the Linux system using the command:
shutdown -h now
9. After rebooting, and after logging in, verify your address assignment byusing the command:
ifconfig
You can also verify network connections by using the ping command.
Linux is supported by its community of users and developers, whose inputcan be found at:
http://www.redhat.com/community/user_groups.html
2.5.9 DOS, Windows 3.1, and Windows for WorkgroupsIn our test environment, we set up three DOS-based environments: DOS,DOS with Windows 3.11, and DOS with Windows for Workgroups. The DOSused was the IBM PC-DOS 2000, the only fully supported Year 2000 Readyversion of DOS.
All three environments, then, had the IBM DOS LAN Services (DLS) installed.DLS is the DOS LAN client supplied with Warp Server Version 4, and it comeswith a TCP/IP stack from Network TeleSystems that supports DHCP.
Before installing DLS, make sure that you have all four diskettes and that youare suitably licensed.
2.5.9.1 Enabling DHCPTo install DLS and enable TCP/IP, follow these steps:
1. Insert diskette 1, and enter the A:INSTALL command.
92 Beyond DHCP - Work Your TCP/IP Internetwork with Dynamic IP
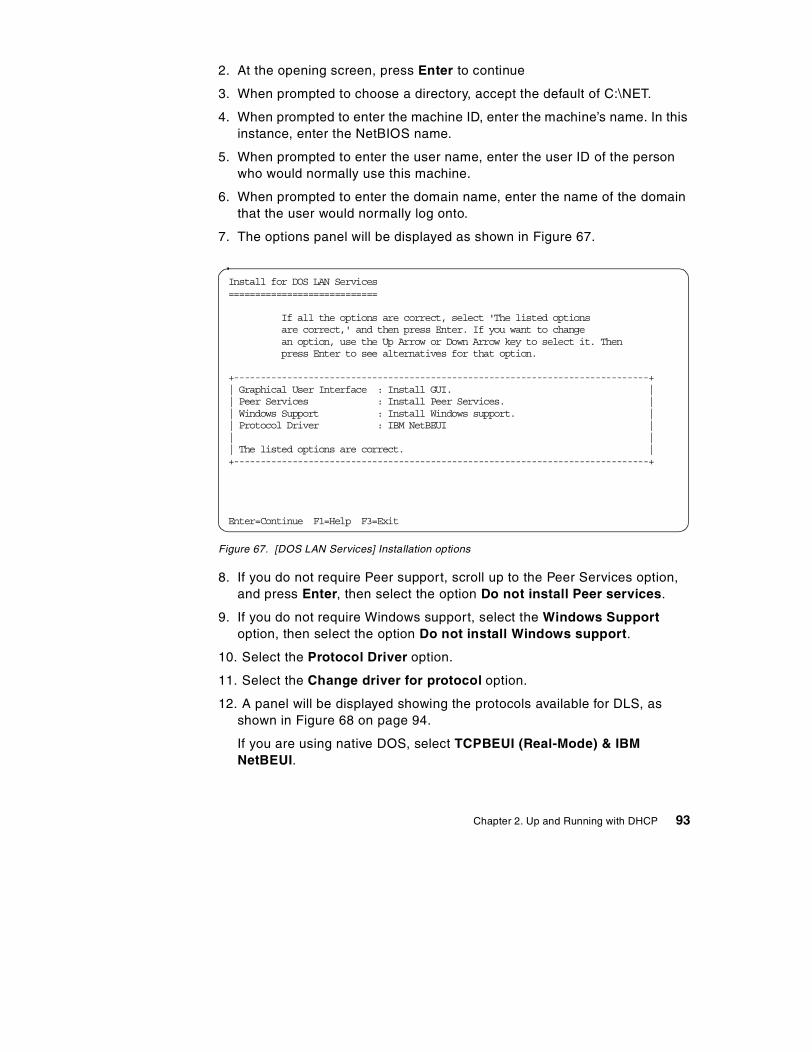
2. At the opening screen, press Enter to continue
3. When prompted to choose a directory, accept the default of C:\NET.
4. When prompted to enter the machine ID, enter the machine’s name. In thisinstance, enter the NetBIOS name.
5. When prompted to enter the user name, enter the user ID of the personwho would normally use this machine.
6. When prompted to enter the domain name, enter the name of the domainthat the user would normally log onto.
7. The options panel will be displayed as shown in Figure 67.
Figure 67. [DOS LAN Services] Installation options
8. If you do not require Peer support, scroll up to the Peer Services option,and press Enter, then select the option Do not install Peer services.
9. If you do not require Windows support, select the Windows Supportoption, then select the option Do not install Windows support.
10. Select the Protocol Driver option.
11. Select the Change driver for protocol option.
12. A panel will be displayed showing the protocols available for DLS, asshown in Figure 68 on page 94.
If you are using native DOS, select TCPBEUI (Real-Mode) & IBMNetBEUI.
Install for DOS LAN Services============================
If all the options are correct, select 'The listed optionsare correct,' and then press Enter. If you want to changean option, use the Up Arrow or Down Arrow key to select it. Thenpress Enter to see alternatives for that option.
+------------------------------------------------------------------------------+| Graphical User Interface : Install GUI. || Peer Services : Install Peer Services. || Windows Support : Install Windows support. || Protocol Driver : IBM NetBEUI || || The listed options are correct. |+------------------------------------------------------------------------------+
Enter=Continue F1=Help F3=Exit
Chapter 2. Up and Running with DHCP 93
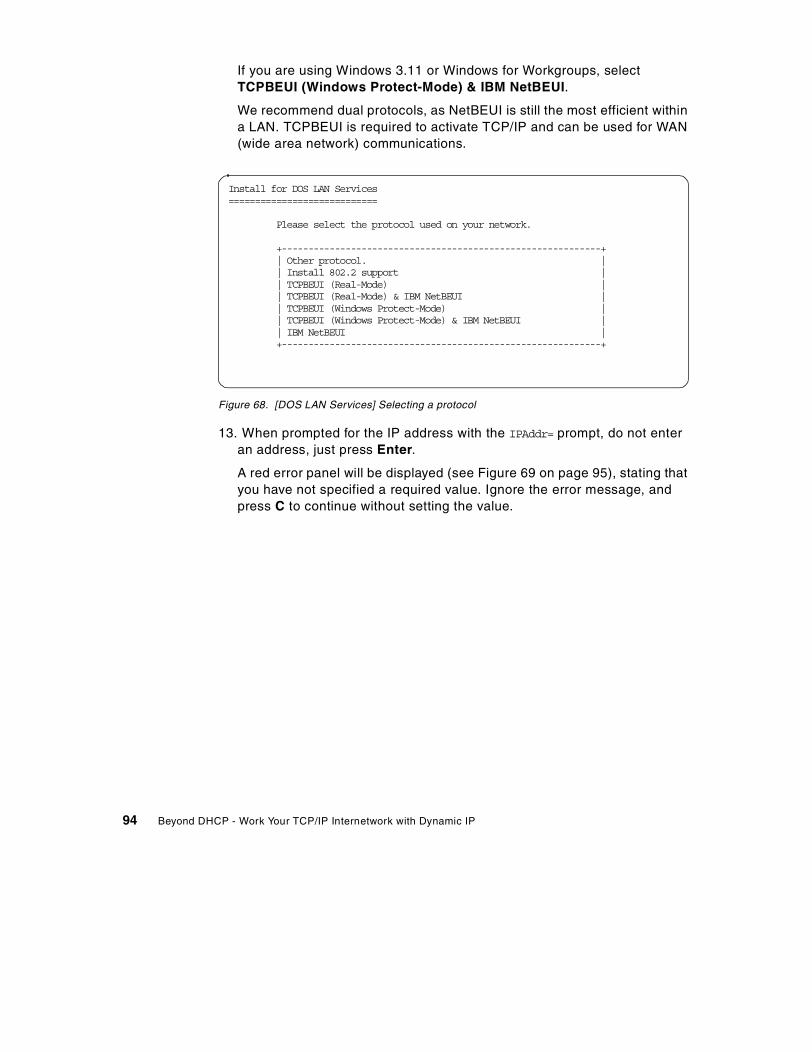
If you are using Windows 3.11 or Windows for Workgroups, selectTCPBEUI (Windows Protect-Mode) & IBM NetBEUI.
We recommend dual protocols, as NetBEUI is still the most efficient withina LAN. TCPBEUI is required to activate TCP/IP and can be used for WAN(wide area network) communications.
Figure 68. [DOS LAN Services] Selecting a protocol
13. When prompted for the IP address with the IPAddr= prompt, do not enteran address, just press Enter.
A red error panel will be displayed (see Figure 69 on page 95), stating thatyou have not specified a required value. Ignore the error message, andpress C to continue without setting the value.
Install for DOS LAN Services============================
Please select the protocol used on your network.
+------------------------------------------------------------+| Other protocol. || Install 802.2 support || TCPBEUI (Real-Mode) || TCPBEUI (Real-Mode) & IBM NetBEUI || TCPBEUI (Windows Protect-Mode) || TCPBEUI (Windows Protect-Mode) & IBM NetBEUI || IBM NetBEUI |+------------------------------------------------------------+
94 Beyond DHCP - Work Your TCP/IP Internetwork with Dynamic IP
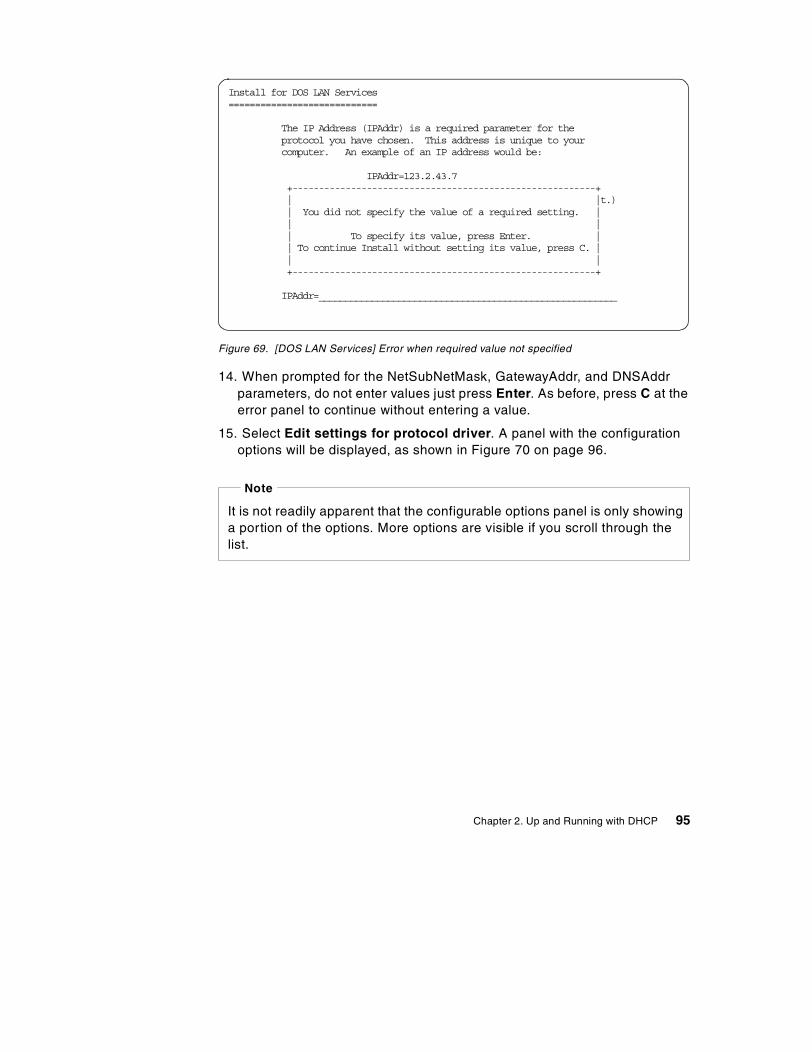
Figure 69. [DOS LAN Services] Error when required value not specified
14. When prompted for the NetSubNetMask, GatewayAddr, and DNSAddrparameters, do not enter values just press Enter. As before, press C at theerror panel to continue without entering a value.
15. Select Edit settings for protocol driver. A panel with the configurationoptions will be displayed, as shown in Figure 70 on page 96.
Install for DOS LAN Services============================
The IP Address (IPAddr) is a required parameter for theprotocol you have chosen. This address is unique to yourcomputer. An example of an IP address would be:
IPAddr=123.2.43.7+---------------------------------------------------------+| |t.)| You did not specify the value of a required setting. || || To specify its value, press Enter. || To continue Install without setting its value, press C. || |+---------------------------------------------------------+
IPAddr=________________________________________________________
It is not readily apparent that the configurable options panel is only showinga portion of the options. More options are visible if you scroll through thelist.
Note
Chapter 2. Up and Running with DHCP 95
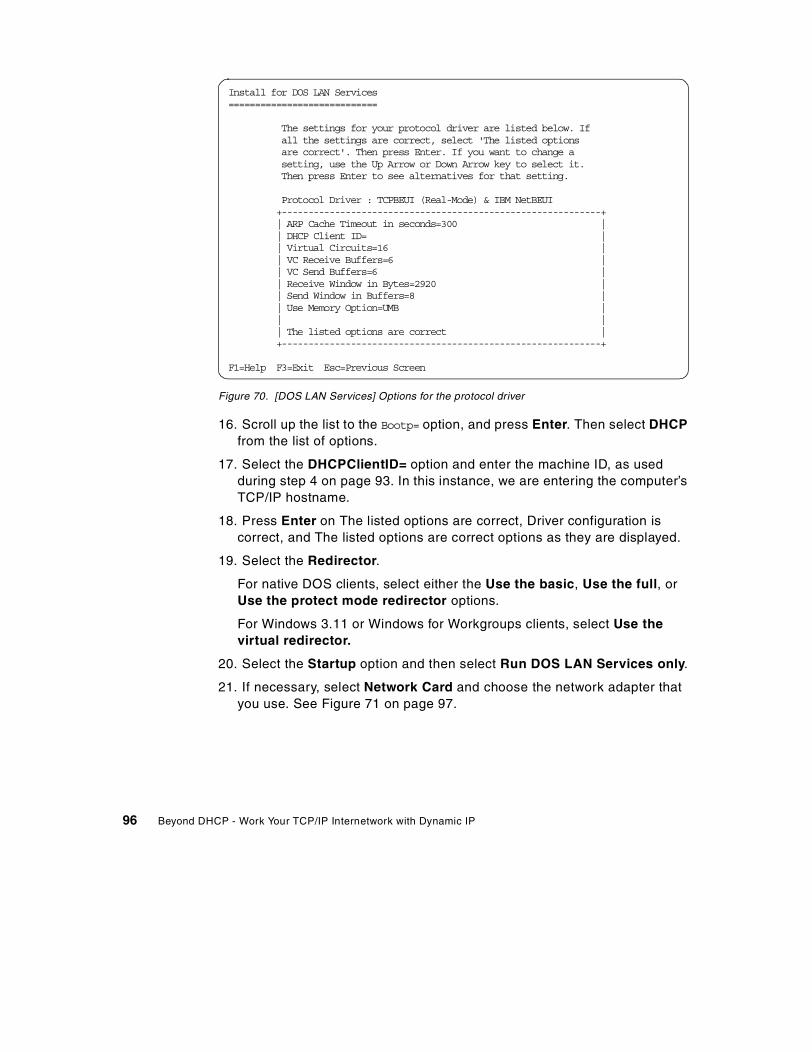
Figure 70. [DOS LAN Services] Options for the protocol driver
16. Scroll up the list to the Bootp= option, and press Enter. Then select DHCPfrom the list of options.
17. Select the DHCPClientID= option and enter the machine ID, as usedduring step 4 on page 93. In this instance, we are entering the computer’sTCP/IP hostname.
18. Press Enter on The listed options are correct, Driver configuration iscorrect, and The listed options are correct options as they are displayed.
19. Select the Redirector.
For native DOS clients, select either the Use the basic, Use the full, orUse the protect mode redirector options.
For Windows 3.11 or Windows for Workgroups clients, select Use thevirtual redirector.
20. Select the Startup option and then select Run DOS LAN Services only.
21. If necessary, select Network Card and choose the network adapter thatyou use. See Figure 71 on page 97.
Install for DOS LAN Services============================
The settings for your protocol driver are listed below. Ifall the settings are correct, select 'The listed optionsare correct'. Then press Enter. If you want to change asetting, use the Up Arrow or Down Arrow key to select it.Then press Enter to see alternatives for that setting.
Protocol Driver : TCPBEUI (Real-Mode) & IBM NetBEUI+------------------------------------------------------------+| ARP Cache Timeout in seconds=300 || DHCP Client ID= || Virtual Circuits=16 || VC Receive Buffers=6 || VC Send Buffers=6 || Receive Window in Bytes=2920 || Send Window in Buffers=8 || Use Memory Option=UMB || || The listed options are correct |+------------------------------------------------------------+
F1=Help F3=Exit Esc=Previous Screen
96 Beyond DHCP - Work Your TCP/IP Internetwork with Dynamic IP

Figure 71. [DOS LAN Services] Network adapter types
22. Select The listed options are correct.
You will be re-prompted to enter the IPAddr, NetSubNetMask,GatewayAddr, and DNSAddr options. As before, leave these entries blankand press C at the error panel to continue without entering a value.
23. Select The listed options are correct.
24. DLS will now be installed. Change diskettes as required.
25. At the completion of the installation, you will be prompted to either pressEnter to restart, or F3 to exit to DOS. Press F3, then use a text editor tomodify the \NET\NETWORK.INI file.
Install for DOS LAN Services============================
Select the type of network card that is installed in yourcomputer, and then press Enter.+------------------------------------------------------------+| IBM 16/4 Token Ring Credit Card Adapter || IBM Token Ring (All Types) || IBM Token Ring (MCA) || IBM Token Ring II || IBM Token Ring 4/16Mbs || IBM Token Ring 4/16Mbs (MCA) || IBM Token-Ring Network 16/4 Adapter II || Intel EtherExpress 16 or 16TP || Intel TokenExpress EISA 16/4 || Intel TokenExpress 16/4 || Novell/Anthem NE2000 || Novell/Anthem NE/2 || Olicom 16/4 Token-Ring Adapter || Proteon Token Ring (P1392) || SMC (WD) EtherCard PLUS/A (MCA) (WD 8003E/A or 8003ET/A) || SMC (WD) EtherCard PLUS Elite 16 Combo (WD/8013EW or 8013EW|+------------------------------------------------------------+
Chapter 2. Up and Running with DHCP 97
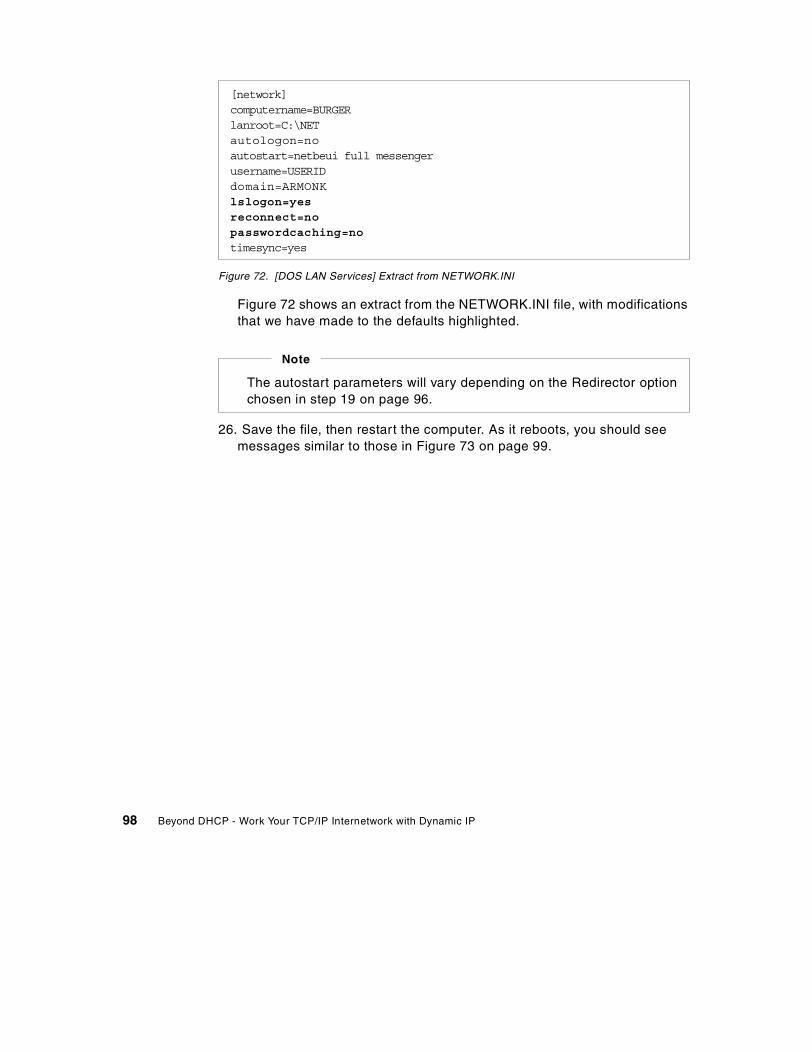
Figure 72. [DOS LAN Services] Extract from NETWORK.INI
Figure 72 shows an extract from the NETWORK.INI file, with modificationsthat we have made to the defaults highlighted.
26. Save the file, then restart the computer. As it reboots, you should seemessages similar to those in Figure 73 on page 99.
[network]computername=BURGERlanroot=C:\NETautologon=noautostart=netbeui full messengerusername=USERIDdomain=ARMONKlslogon=yesreconnect=nopasswordcaching=notimesync=yes
The autostart parameters will vary depending on the Redirector optionchosen in step 19 on page 96.
Note
98 Beyond DHCP - Work Your TCP/IP Internetwork with Dynamic IP

Figure 73. [DOS LAN Services] Messages displayed as a DOS workstation starts
27. You can now test your IP configuration, by using the PING command(either in native DOS or by opening a DOS window from Windows). Forexample, if we had used the TCP/IP name BURGER in step 17 on page96, we would issue the command PING BURGER.
Figure 74. [DOS LAN Services] Testing IP configuration using PING
2.5.10 Sun Microsystems SolarisThe Sun Microsystems SPARCstation 5 workstation is simple to set up as aDHCP client. We wanted to use a token-ring card in our SPARCstation 5, but
IBM Protocol Manager Version 2.1IBM Token-Ring Network Driver Version2.7
NTSTS: Initialization startedInstalling Network TeleSystems TCP/IOPVersion: 2.09 (960320)Using VCs=16 VCSends=6 VCReceiveLarge=6Driver NTSTS$ in section [NTS$NTST2] will bind with module [IBM$GENIBMTOK]NTS$NTSTS2: Initialization succeededIBM DOS LAN Services Driver Version 5Copyright (C) International Business Machines Corporation 1993, 1995Copyright (C) Microsoft Corporation 1992Transport Hooks Enabled
SHARE installedIBM Netbind Version 2.1Waiting for DHCP Server
IBM DOS NETBEUI 3.00Copyright (C) International Business Machines Corporation 1993, 1995Copyright (C) Microsoft Corporation 1992The commmand completed successfully
C:\>
C:\>PING BURGERPING - ICMP Echo Request/Reply 2.09 (960320).Copyright (c) 1995 Network TeleSystems, Inc. All rights reserved.PING burger (192.168.6.16): 56 ICMP data bytes64 bytes from burger: icmp_seq = 0. time < 55 ms
----burger PING Statistics ----1 packets transmitted1 packets received0% packet lossround-trip (ms) min/avg/max = 55/55/55
C:\>
Chapter 2. Up and Running with DHCP 99
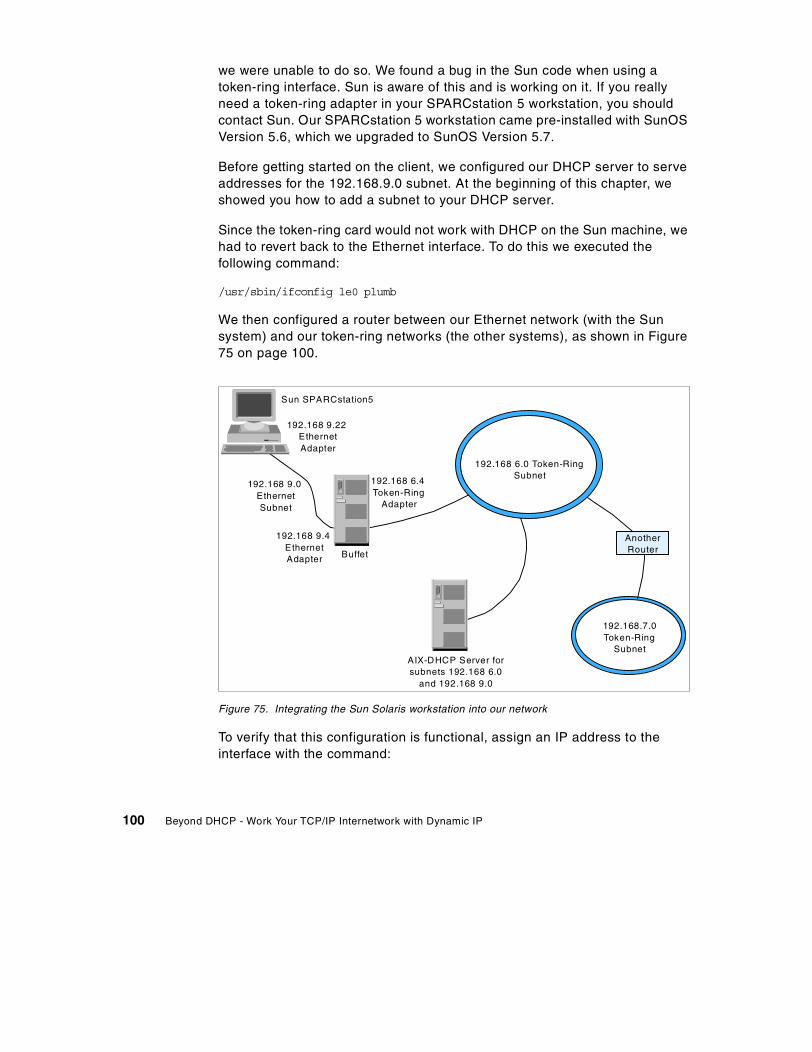
we were unable to do so. We found a bug in the Sun code when using atoken-ring interface. Sun is aware of this and is working on it. If you reallyneed a token-ring adapter in your SPARCstation 5 workstation, you shouldcontact Sun. Our SPARCstation 5 workstation came pre-installed with SunOSVersion 5.6, which we upgraded to SunOS Version 5.7.
Before getting started on the client, we configured our DHCP server to serveaddresses for the 192.168.9.0 subnet. At the beginning of this chapter, weshowed you how to add a subnet to your DHCP server.
Since the token-ring card would not work with DHCP on the Sun machine, wehad to revert back to the Ethernet interface. To do this we executed thefollowing command:
/usr/sbin/ifconfig le0 plumb
We then configured a router between our Ethernet network (with the Sunsystem) and our token-ring networks (the other systems), as shown in Figure75 on page 100.
Figure 75. Integrating the Sun Solaris workstation into our network
To verify that this configuration is functional, assign an IP address to theinterface with the command:
192.168 6.0 Token-RingSubnet
192.168.7.0Token-Ring
Subnet
Buffet
Sun SPARCstation5
192.168 6.4Token-Ring
Adapter
192.168 9.4EthernetAdapter
192.168 9.0EthernetSubnet
AnotherRouter
AIX-DHCP Server forsubnets 192.168 6.0
and 192.168 9.0
192.168 9.22EthernetAdapter
100 Beyond DHCP - Work Your TCP/IP Internetwork with Dynamic IP
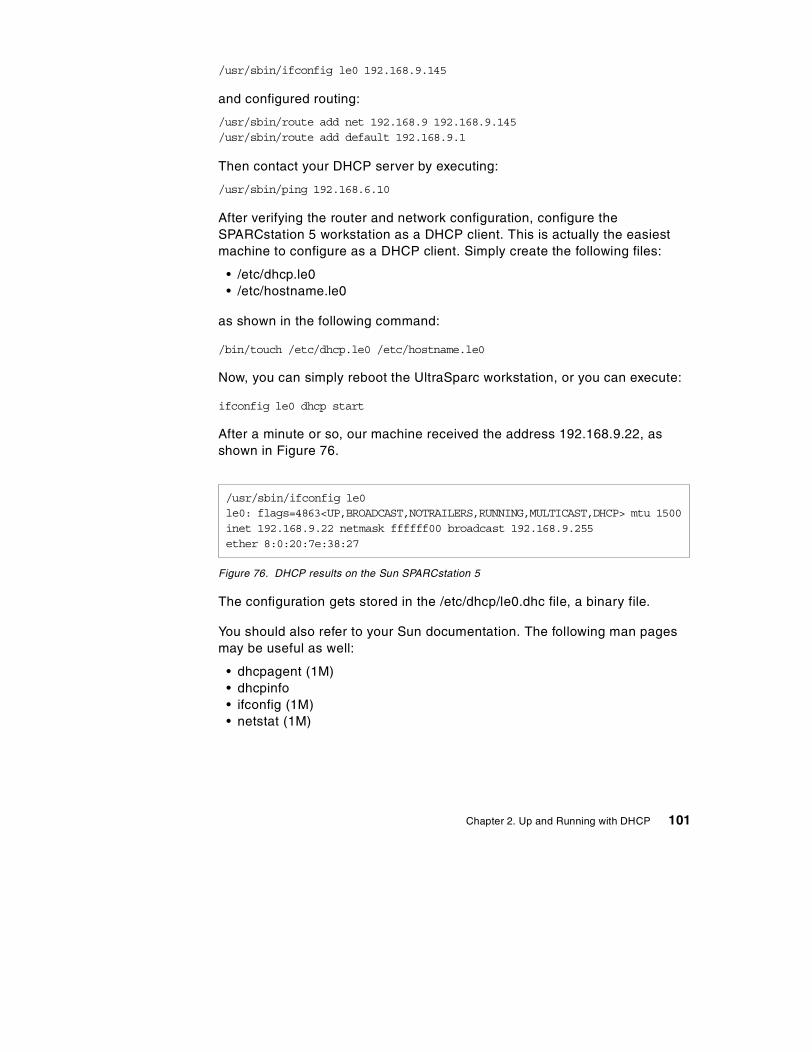
/usr/sbin/ifconfig le0 192.168.9.145
and configured routing:
/usr/sbin/route add net 192.168.9 192.168.9.145/usr/sbin/route add default 192.168.9.1
Then contact your DHCP server by executing:
/usr/sbin/ping 192.168.6.10
After verifying the router and network configuration, configure theSPARCstation 5 workstation as a DHCP client. This is actually the easiestmachine to configure as a DHCP client. Simply create the following files:
• /etc/dhcp.le0• /etc/hostname.le0
as shown in the following command:
/bin/touch /etc/dhcp.le0 /etc/hostname.le0
Now, you can simply reboot the UltraSparc workstation, or you can execute:
ifconfig le0 dhcp start
After a minute or so, our machine received the address 192.168.9.22, asshown in Figure 76.
Figure 76. DHCP results on the Sun SPARCstation 5
The configuration gets stored in the /etc/dhcp/le0.dhc file, a binary file.
You should also refer to your Sun documentation. The following man pagesmay be useful as well:
• dhcpagent (1M)• dhcpinfo• ifconfig (1M)• netstat (1M)
/usr/sbin/ifconfig le0le0: flags=4863<UP,BROADCAST,NOTRAILERS,RUNNING,MULTICAST,DHCP> mtu 1500inet 192.168.9.22 netmask ffffff00 broadcast 192.168.9.255ether 8:0:20:7e:38:27
Chapter 2. Up and Running with DHCP 101

2.5.11 IBM WorkSpace On-DemandUnlike other PC-based software, the IBM WorkSpace On-Demand does notrequire any software to be loaded on a client system. All the software a PCneeds to operate is loaded from the WorkSpace On-Demand manager (basedon OS/2 Warp Server or OS/2 Warp Server for e-business) across thenetwork. All management, installation of new applications, software updates,and other tasks are performed at the server. Consequently, WorkSpaceOn-Demand costs a lot less to manage and support than other PC-basedsolutions.
Because WorkSpace On-Demand supports modern Java and Web-basedapplications, network managers need an easy way to set up TCP/IP for eachclient. Managers can access WorkSpace On-Demand setup right from theserver or from a remote location across the network. Turning on DHCP for aclient merely involves selecting a button and clicking on Set. The WorkSpaceOn-Demand manager can also act as the DHCP server, if needed.Alternatively, a separate DHCP server (such as OS/2 Warp Server fore-business, AIX, or Windows NT) may provide the address information to aWorkSpace On-Demand client.
For Information about WorkSpace On-Demand, please refer to the redbookWorkSpace On-Demand Handbook Release 2.0, SG24-5117.
2.5.11.1 Enabling DHCPTo activate DHCP for a WorkSpace On-Demand Version 2.0 client, followthese steps:
1. Log on to the WorkSpace On-Demand manager as a systemadministrator.
2. Open the LAN Server Administration program (you can also type NETGUI
at an OS/2 command prompt).
3. Open the Local Workstation icon for the WorkSpace server.
4. Open the Remote IPL Requesters folder.
102 Beyond DHCP - Work Your TCP/IP Internetwork with Dynamic IP
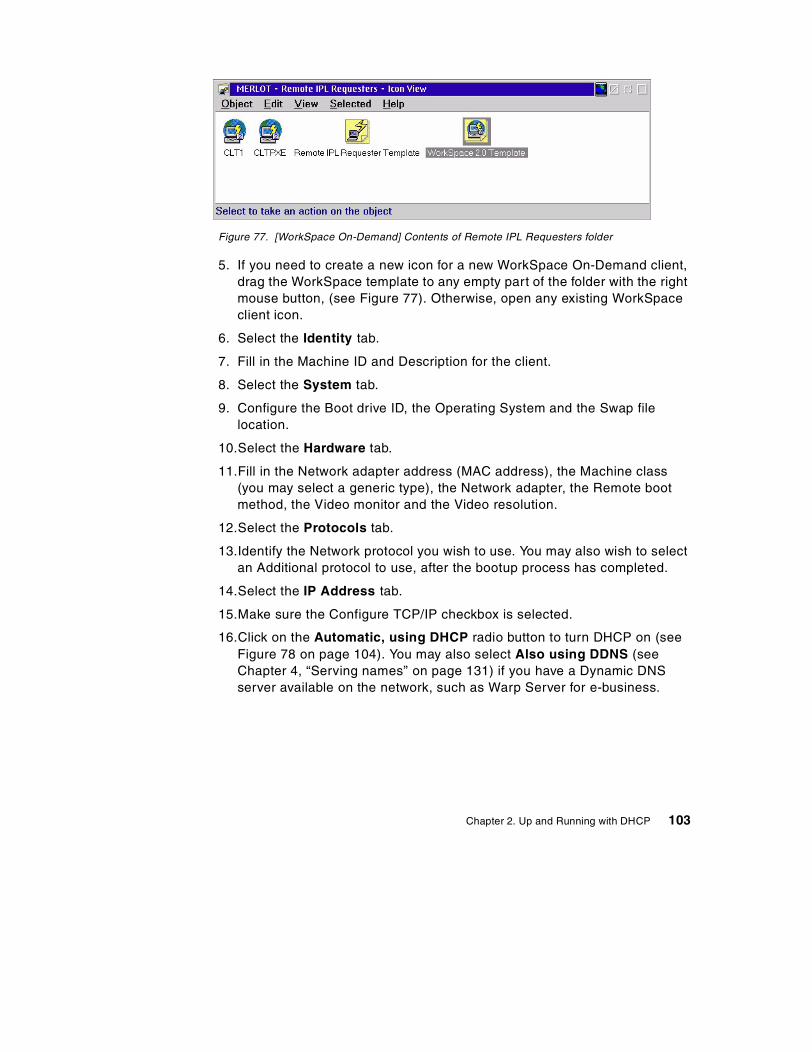
Figure 77. [WorkSpace On-Demand] Contents of Remote IPL Requesters folder
5. If you need to create a new icon for a new WorkSpace On-Demand client,drag the WorkSpace template to any empty part of the folder with the rightmouse button, (see Figure 77). Otherwise, open any existing WorkSpaceclient icon.
6. Select the Identity tab.
7. Fill in the Machine ID and Description for the client.
8. Select the System tab.
9. Configure the Boot drive ID, the Operating System and the Swap filelocation.
10.Select the Hardware tab.
11.Fill in the Network adapter address (MAC address), the Machine class(you may select a generic type), the Network adapter, the Remote bootmethod, the Video monitor and the Video resolution.
12.Select the Protocols tab.
13.Identify the Network protocol you wish to use. You may also wish to selectan Additional protocol to use, after the bootup process has completed.
14.Select the IP Address tab.
15.Make sure the Configure TCP/IP checkbox is selected.
16.Click on the Automatic, using DHCP radio button to turn DHCP on (seeFigure 78 on page 104). You may also select Also using DDNS (seeChapter 4, “Serving names” on page 131) if you have a Dynamic DNSserver available on the network, such as Warp Server for e-business.
Chapter 2. Up and Running with DHCP 103
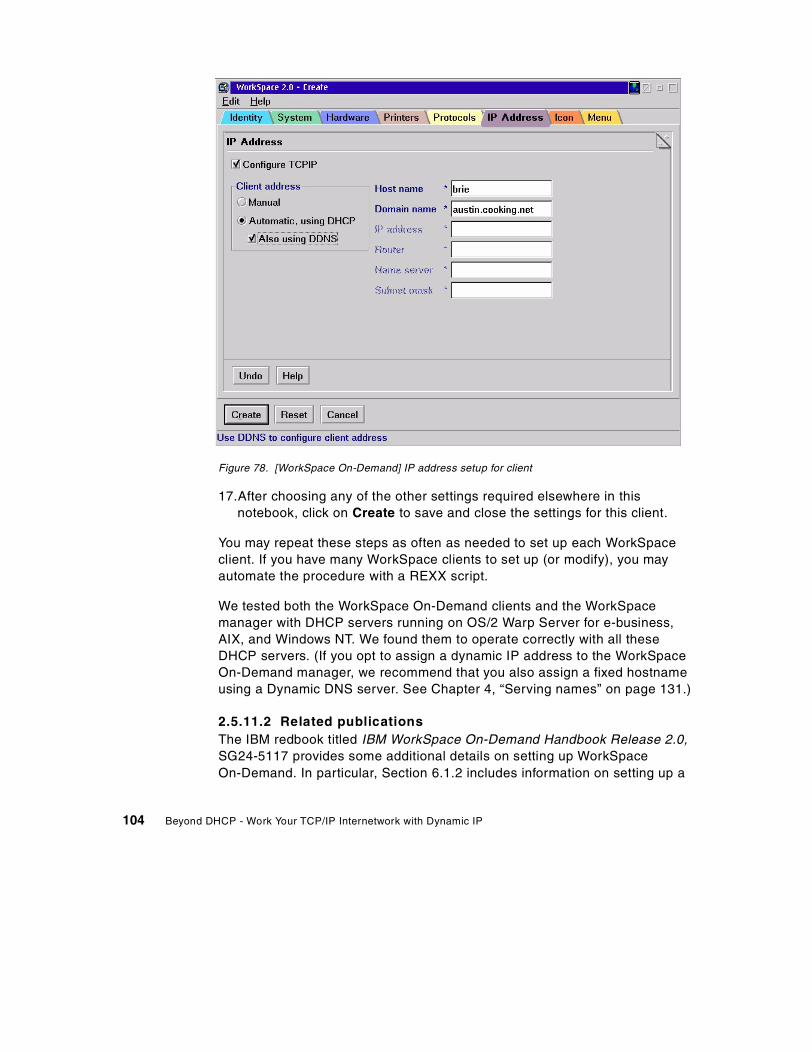
Figure 78. [WorkSpace On-Demand] IP address setup for client
17.After choosing any of the other settings required elsewhere in thisnotebook, click on Create to save and close the settings for this client.
You may repeat these steps as often as needed to set up each WorkSpaceclient. If you have many WorkSpace clients to set up (or modify), you mayautomate the procedure with a REXX script.
We tested both the WorkSpace On-Demand clients and the WorkSpacemanager with DHCP servers running on OS/2 Warp Server for e-business,AIX, and Windows NT. We found them to operate correctly with all theseDHCP servers. (If you opt to assign a dynamic IP address to the WorkSpaceOn-Demand manager, we recommend that you also assign a fixed hostnameusing a Dynamic DNS server. See Chapter 4, “Serving names” on page 131.)
2.5.11.2 Related publicationsThe IBM redbook titled IBM WorkSpace On-Demand Handbook Release 2.0,SG24-5117 provides some additional details on setting up WorkSpaceOn-Demand. In particular, Section 6.1.2 includes information on setting up a
104 Beyond DHCP - Work Your TCP/IP Internetwork with Dynamic IP
large batch of WorkSpace clients using a REXX script and the NETRIPLMACH command file. For Windows clients, there is the redbook,WorkSpace On-Demand 2.0 Feature for Windows Clients, SG24-5396.
2.5.12 Hewlett-Packard LaserJet 4000 Printer (JetDirect)We configured the HP 4000 Laserjet Printer with the JetDirect Token-Ringcard. The firmware on the JetDirect Token-Ring card we used was G.05.35.Please note that there are other methods of configuring addresses onJetDirect cards, which are described in the Hewlett-Packard manuals shippedwith the product. For example, you can use RARP. Please refer to yourmanuals for further information beyond what is described here.
2.5.12.1 DHCPWe set up our DHCP server to reserve an IP address for our printer. If wewant to telnet to the printer to review or change some settings, it is quickerand easier to do so if we already know the printer address. We reserved anaddress on our DHCP server for the printer named potato, as shown in Figure79 on page 106. We used a telnet session with our printer to configure it toact as a DHCP client. To find out the initial IP address that the printer wasusing, we used the buttons on the printer itself to print its configuration.
Chapter 2. Up and Running with DHCP 105
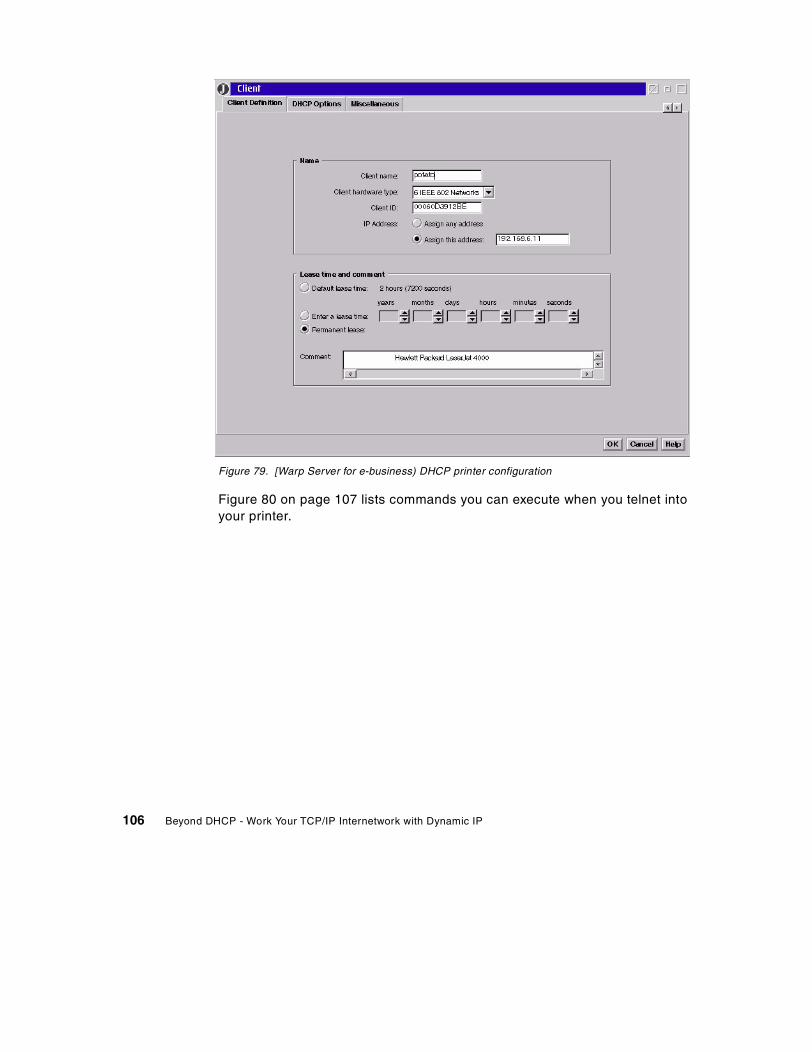
Figure 79. [Warp Server for e-business) DHCP printer configuration
Figure 80 on page 107 lists commands you can execute when you telnet intoyour printer.
106 Beyond DHCP - Work Your TCP/IP Internetwork with Dynamic IP
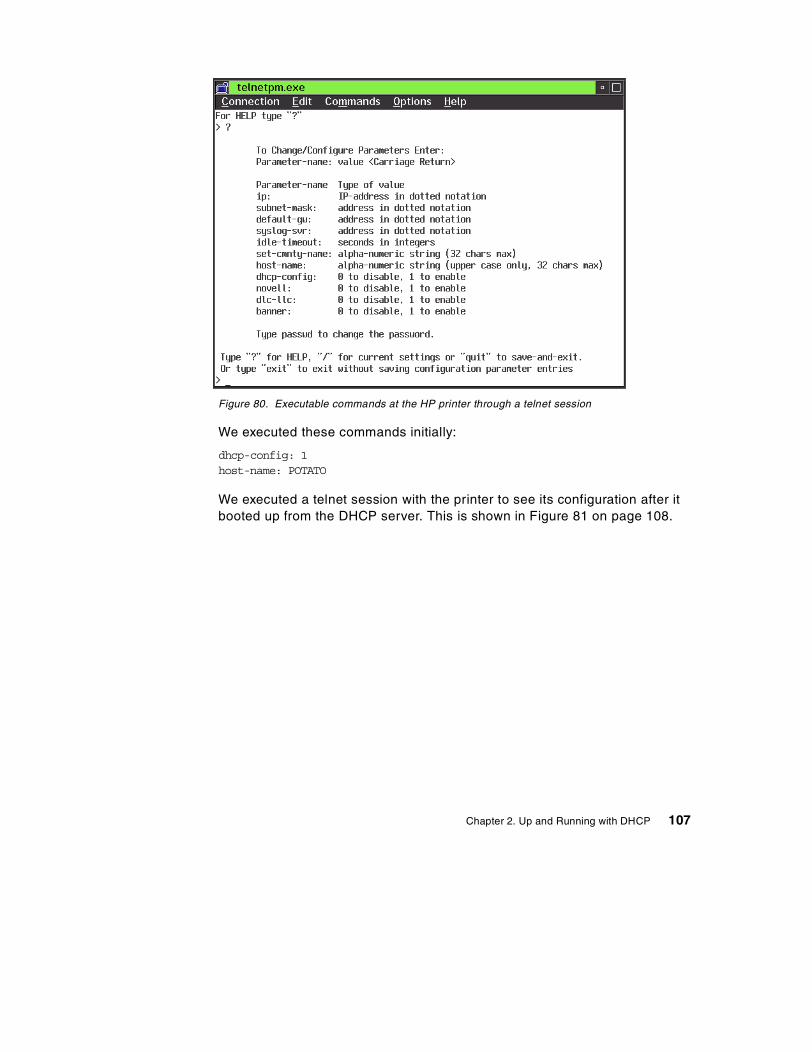
Figure 80. Executable commands at the HP printer through a telnet session
We executed these commands initially:
dhcp-config: 1host-name: POTATO
We executed a telnet session with the printer to see its configuration after itbooted up from the DHCP server. This is shown in Figure 81 on page 108.
Chapter 2. Up and Running with DHCP 107
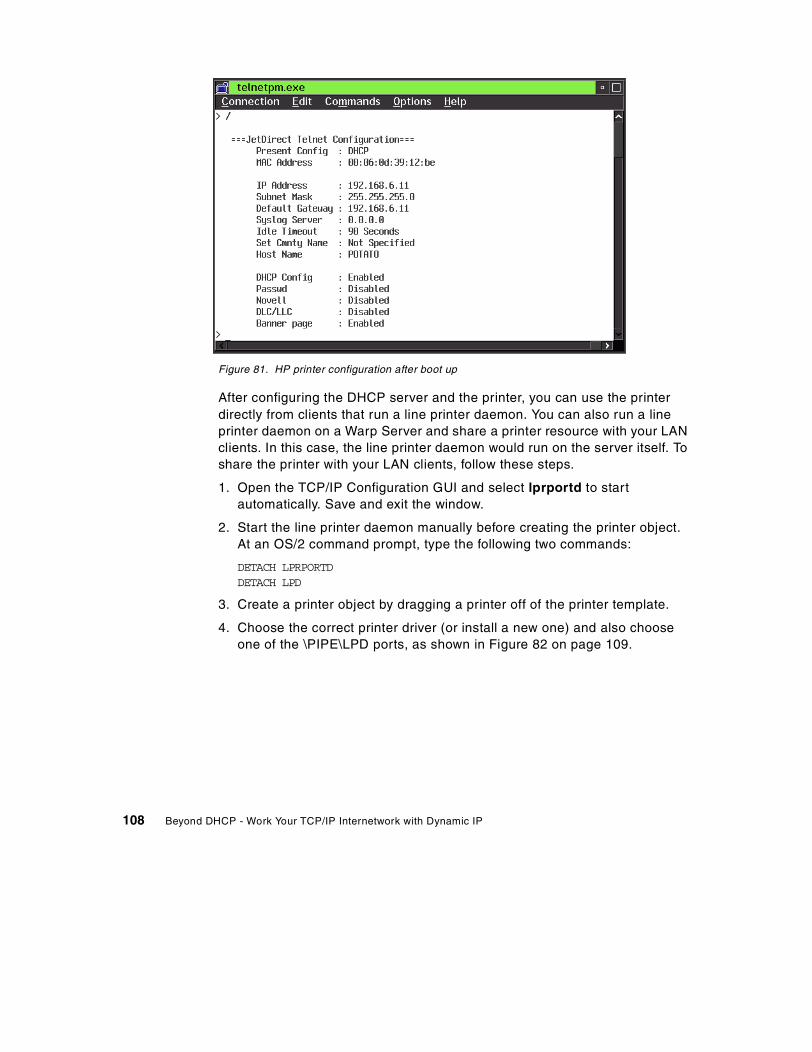
Figure 81. HP printer configuration after boot up
After configuring the DHCP server and the printer, you can use the printerdirectly from clients that run a line printer daemon. You can also run a lineprinter daemon on a Warp Server and share a printer resource with your LANclients. In this case, the line printer daemon would run on the server itself. Toshare the printer with your LAN clients, follow these steps.
1. Open the TCP/IP Configuration GUI and select lprportd to startautomatically. Save and exit the window.
2. Start the line printer daemon manually before creating the printer object.At an OS/2 command prompt, type the following two commands:
DETACH LPRPORTDDETACH LPD
3. Create a printer object by dragging a printer off of the printer template.
4. Choose the correct printer driver (or install a new one) and also chooseone of the \PIPE\LPD ports, as shown in Figure 82 on page 109.
108 Beyond DHCP - Work Your TCP/IP Internetwork with Dynamic IP
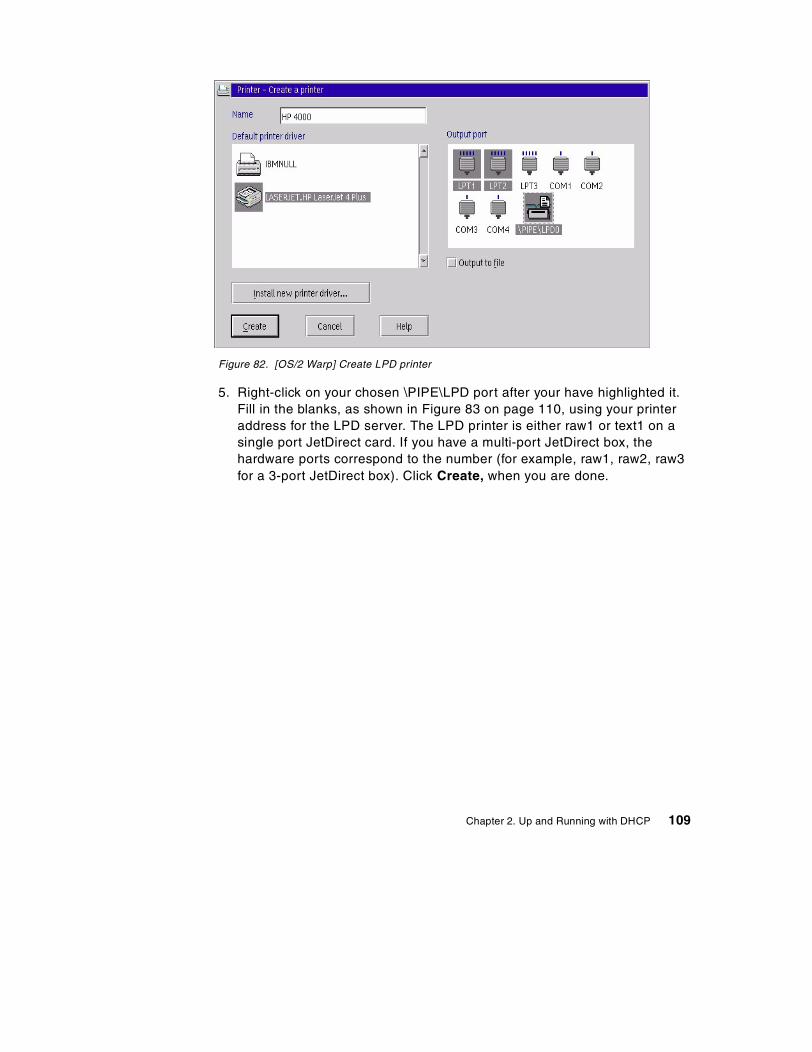
Figure 82. [OS/2 Warp] Create LPD printer
5. Right-click on your chosen \PIPE\LPD port after your have highlighted it.Fill in the blanks, as shown in Figure 83 on page 110, using your printeraddress for the LPD server. The LPD printer is either raw1 or text1 on asingle port JetDirect card. If you have a multi-port JetDirect box, thehardware ports correspond to the number (for example, raw1, raw2, raw3for a 3-port JetDirect box). Click Create, when you are done.
Chapter 2. Up and Running with DHCP 109
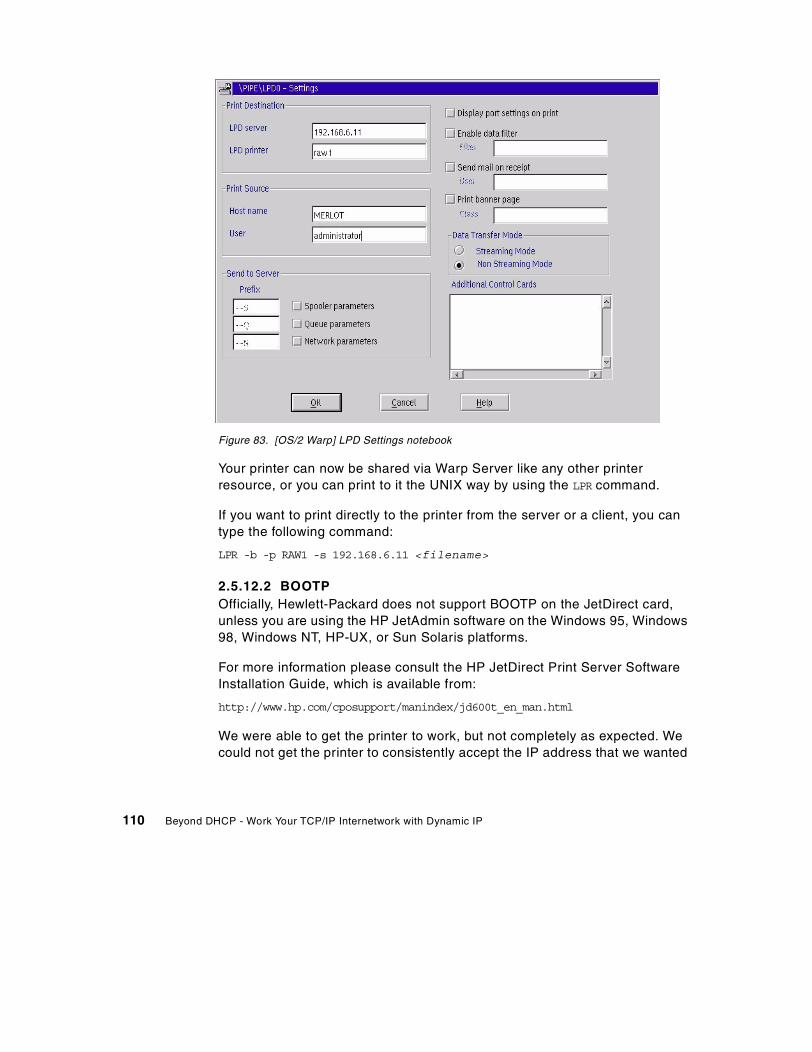
Figure 83. [OS/2 Warp] LPD Settings notebook
Your printer can now be shared via Warp Server like any other printerresource, or you can print to it the UNIX way by using the LPR command.
If you want to print directly to the printer from the server or a client, you cantype the following command:
LPR -b -p RAW1 -s 192.168.6.11 <filename>
2.5.12.2 BOOTPOfficially, Hewlett-Packard does not support BOOTP on the JetDirect card,unless you are using the HP JetAdmin software on the Windows 95, Windows98, Windows NT, HP-UX, or Sun Solaris platforms.
For more information please consult the HP JetDirect Print Server SoftwareInstallation Guide, which is available from:
http://www.hp.com/cposupport/manindex/jd600t_en_man.html
We were able to get the printer to work, but not completely as expected. Wecould not get the printer to consistently accept the IP address that we wanted
110 Beyond DHCP - Work Your TCP/IP Internetwork with Dynamic IP

it to use. We suggest that you use this device as a DHCP client rather than aBOOTP client.
Chapter 2. Up and Running with DHCP 111

112 Beyond DHCP - Work Your TCP/IP Internetwork with Dynamic IP
Chapter 3. DHCP server and client interaction
To help provide a basis for going Beyond DHCP, this chapter takes a closelook at the function of the Dynamic Host Configuration Protocol. We start witha high-level look at DHCP, options, and leases. Then, we illustrate the theorypresented in the RFCs for DHCP by looking at network traces of clientsinteracting with servers at various stages of the configuration process.
The LAN traces discussed in this chapter were captured in our lab using theNetwork Associates Sniffer-Basic product. If you’d like to follow along withyour own protocol analyzer, the trace files can be found in a variety of formatson the CD-ROM that accompanies this redbook.
3.1 DHCP basics
As we discussed in 1.5.1, “BOOTP and the Dynamic Host ConfigurationProtocol (DHCP)” on page 10, DHCP provides a standards-based method ofcentrally managing and dynamically setting critical configuration parametersfor an IP host on a network. In a working DHCP environment, hosts may beadded to the network or moved between networks without the need formanual configuration changes.
DHCP expands on existing BOOTP transport standards to achieve a methodof automatically passing a wide variety of configuration information, known asoptions to clients. In addition to the IP interface address and subnet mask,addresses for gateways, name servers, and many other items can bemanaged and dynamically configured using DHCP servers. Appendix D,“DHCP options (RFC 2132)” on page 457 has detailed information on thebroad scope of DHCP configuration.
Hosts that implement DHCP use the protocol to configure some or all of theirIP interfaces. Each interface is configured independently.
3.1.1 Client statesA DHCP client is in one of six states at all times. The states are defined byRFC 2131 and determine how the client interacts with the DHCP server, andhow the server responds. The states are described in Table 4 below.
© Copyright IBM Corp. 1998, 2000 113
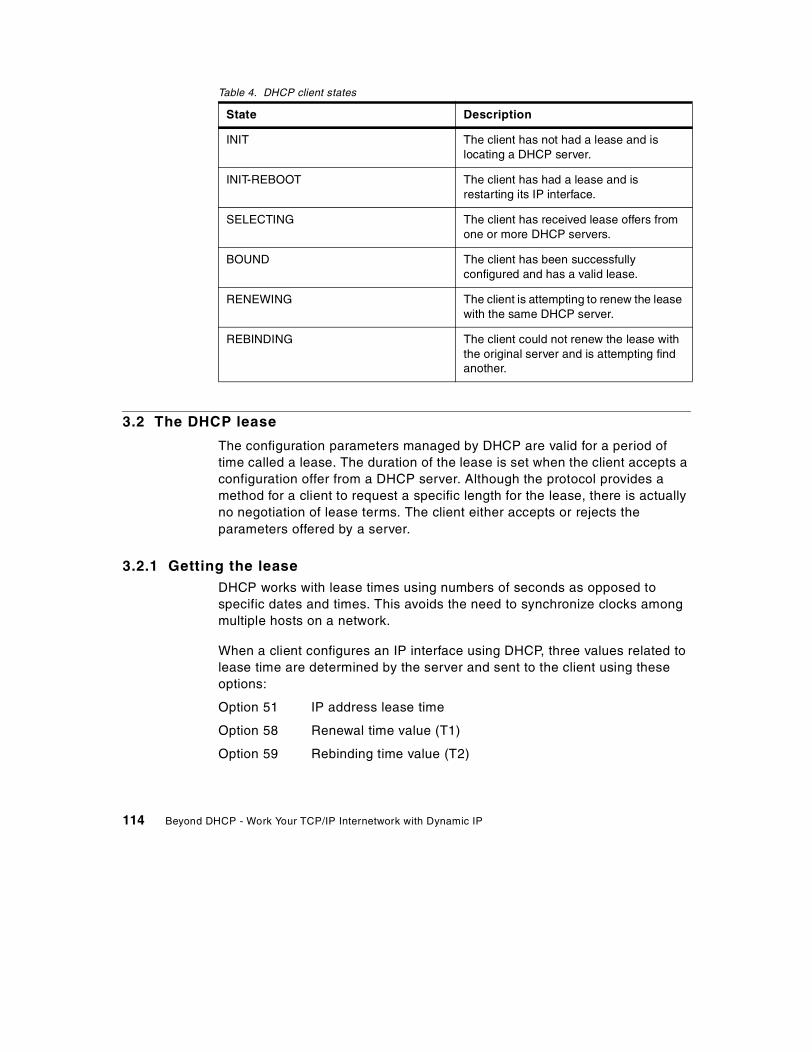
Table 4. DHCP client states
3.2 The DHCP lease
The configuration parameters managed by DHCP are valid for a period oftime called a lease. The duration of the lease is set when the client accepts aconfiguration offer from a DHCP server. Although the protocol provides amethod for a client to request a specific length for the lease, there is actuallyno negotiation of lease terms. The client either accepts or rejects theparameters offered by a server.
3.2.1 Getting the leaseDHCP works with lease times using numbers of seconds as opposed tospecific dates and times. This avoids the need to synchronize clocks amongmultiple hosts on a network.
When a client configures an IP interface using DHCP, three values related tolease time are determined by the server and sent to the client using theseoptions:
Option 51 IP address lease time
Option 58 Renewal time value (T1)
Option 59 Rebinding time value (T2)
State Description
INIT The client has not had a lease and islocating a DHCP server.
INIT-REBOOT The client has had a lease and isrestarting its IP interface.
SELECTING The client has received lease offers fromone or more DHCP servers.
BOUND The client has been successfullyconfigured and has a valid lease.
RENEWING The client is attempting to renew the leasewith the same DHCP server.
REBINDING The client could not renew the lease withthe original server and is attempting findanother.
114 Beyond DHCP - Work Your TCP/IP Internetwork with Dynamic IP
The RFC for DHCP (RFC2131) suggests that the values for T1 and T2 defaultto 50% and 87.5% of the lease duration, respectively. Some DHCP serverimplementations only allow you to configure option 51 and derive the othervalues according to the suggested defaults. On others servers, such as AIX,OS/2 and Shadow IPserver, you are able to specify all three options. TheRFC mandates that the lease time must be greater than T2, and that T2 mustbe greater than T1.
Although a client’s DHCP implementation might use these values to calculatespecific dates and/or times for lease events to occur, conceptually it’s easierto think of them as simple counters. The counters are set to the specifiednumber of seconds at the beginning of the lease, and decrement at the rate ofone per second.
3.2.2 Renewing the leaseWhen the T1 counter reaches zero, the client’s state changes from BOUND toRENEWING. At this time the client attempts to renew its lease with the sameDHCP server that originally provided the configuration. If it is successful, thecounters are reset to freshly calculated values. The client now returns to theBOUND state.
If the client is not able to contact the DHCP server, it continues to tryperiodically. While the client is in the RENEWING state, no disruption of IPtraffic through the interface occurs.
3.2.3 Rebinding the leaseSince T2 must be greater than T1, the T2 counter only expires if the clientwas not able to renew the lease with the original DHCP server. As a result ofthis failure, the client’s state changes from RENEWING to REBINDING.
At this point, the client tries to get a lease from any DHCP server. If theoperation is successful, the counters are set to the values specified in thenew lease. The client then returns to the BOUND state.
If the client is unable to contact any DHCP server, it continues to try for theremainder of the current lease. As with the RENEWING state, a REBINDINGclient is still able to transmit and receive using its assigned IP address with nointerruption. The change in state from BOUND to RENEWING to REBINDINGis transparent to the applications that are using the IP interface.
Chapter 3. DHCP server and client interaction 115
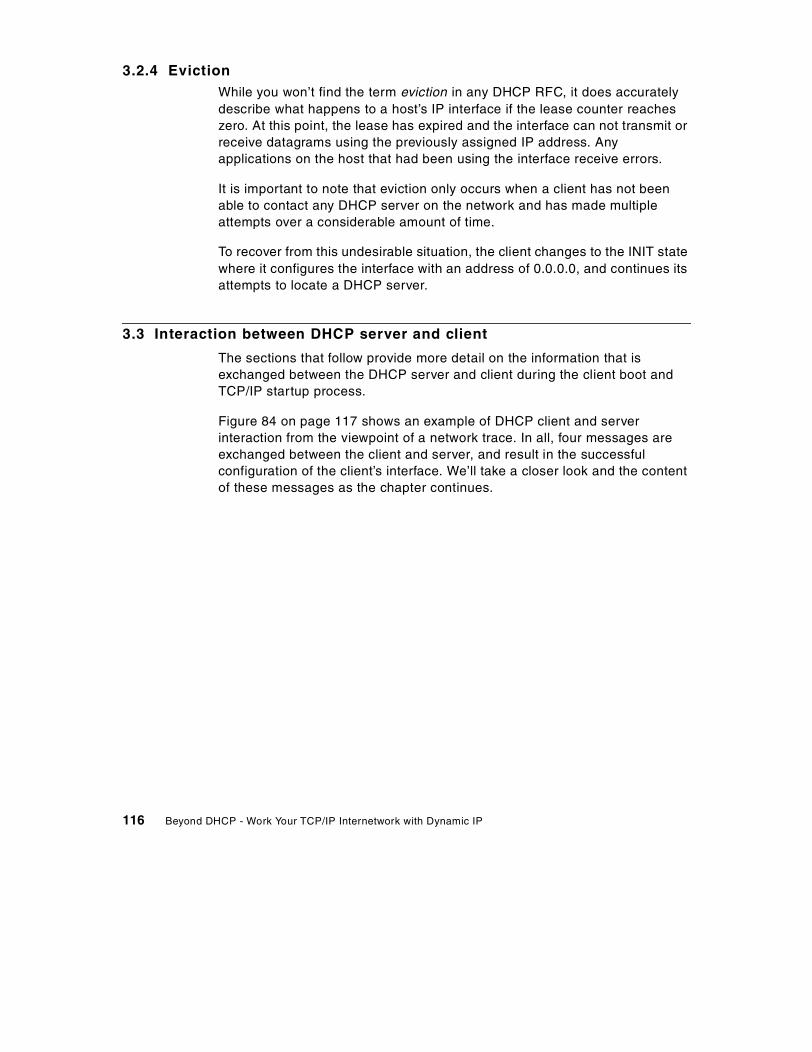
3.2.4 EvictionWhile you won’t find the term eviction in any DHCP RFC, it does accuratelydescribe what happens to a host’s IP interface if the lease counter reacheszero. At this point, the lease has expired and the interface can not transmit orreceive datagrams using the previously assigned IP address. Anyapplications on the host that had been using the interface receive errors.
It is important to note that eviction only occurs when a client has not beenable to contact any DHCP server on the network and has made multipleattempts over a considerable amount of time.
To recover from this undesirable situation, the client changes to the INIT statewhere it configures the interface with an address of 0.0.0.0, and continues itsattempts to locate a DHCP server.
3.3 Interaction between DHCP server and client
The sections that follow provide more detail on the information that isexchanged between the DHCP server and client during the client boot andTCP/IP startup process.
Figure 84 on page 117 shows an example of DHCP client and serverinteraction from the viewpoint of a network trace. In all, four messages areexchanged between the client and server, and result in the successfulconfiguration of the client’s interface. We’ll take a closer look and the contentof these messages as the chapter continues.
116 Beyond DHCP - Work Your TCP/IP Internetwork with Dynamic IP
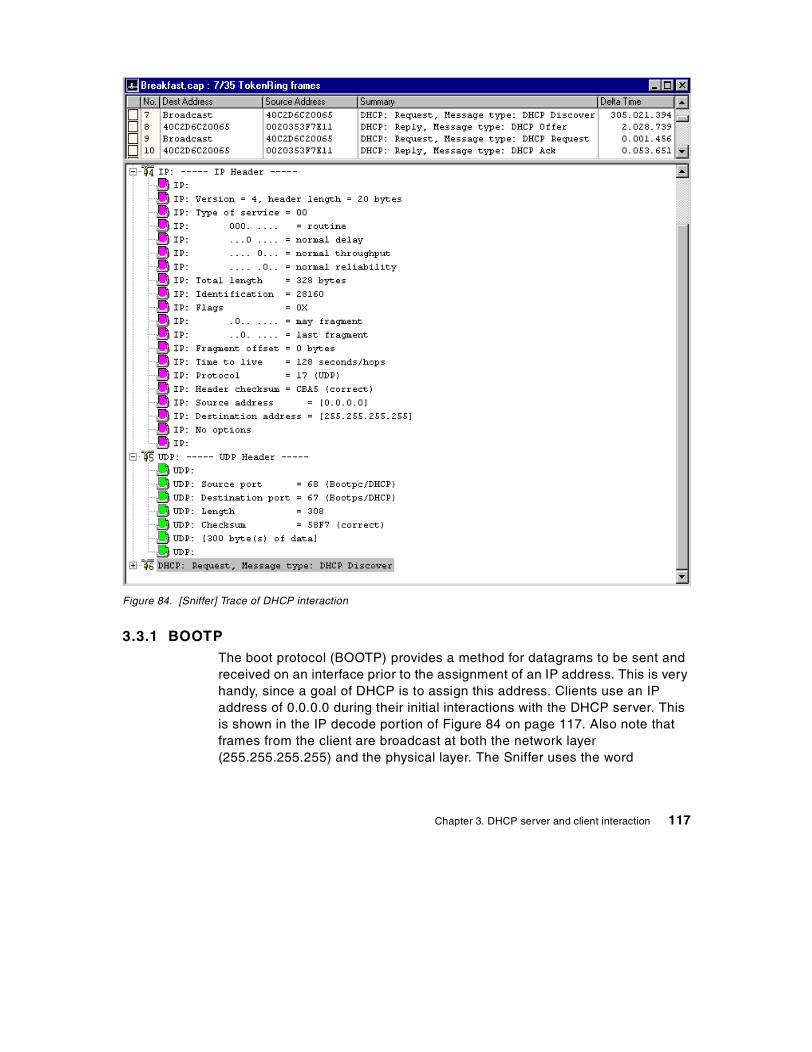
Figure 84. [Sniffer] Trace of DHCP interaction
3.3.1 BOOTPThe boot protocol (BOOTP) provides a method for datagrams to be sent andreceived on an interface prior to the assignment of an IP address. This is veryhandy, since a goal of DHCP is to assign this address. Clients use an IPaddress of 0.0.0.0 during their initial interactions with the DHCP server. Thisis shown in the IP decode portion of Figure 84 on page 117. Also note thatframes from the client are broadcast at both the network layer(255.255.255.255) and the physical layer. The Sniffer uses the word
Chapter 3. DHCP server and client interaction 117

Broadcast in the Destination Address column to indicate a physical layeraddress of xFFFFFFFFFFFF.
DHCP uses the User Datagram Protocol (UDP) to carry traffic betweenclients and server. In the UDP decode section of Figure 84, we see that wellknown ports 67 and 68 are used for DHCP.
3.3.2 Relay agentsBroadcast traffic can be managed by network infrastructure, and issometimes limited to the logical or physical portion where it originates. Bytaking advantage of relay agents, DHCP clients and servers can be locatedvirtually anywhere on the network.
Relay agents forward DHCP traffic to other subnets, and may be configuredwith specific DHCP server addresses. This limits a DHCP client’s broadcasttraffic to the subnet of origin. Many routers can be configured to provide therelay agent function. These agents may be called BOOTP relay agents orDHCP relay agents. OS/2 Warp Server for e-business and Windows NTservers include such agents.
3.4 DHCP messages
The basic unit of communication between the client and server is called aDHCP message. Configuration parameters (options) are carried in the bodyof the message. Each of the eight DHCP message types is described below.
3.4.1 DHCPDISCOVERThis message is used when the client is configuring its interface using DHCPfor the first time, or when it is has been unable to reuse a previously assignedaddress. At this point the client is said to be in the INIT state. Figure 85 onpage 119 takes another look at frame #7 in the trace, this time decoding theDHCP portion of the data.
118 Beyond DHCP - Work Your TCP/IP Internetwork with Dynamic IP
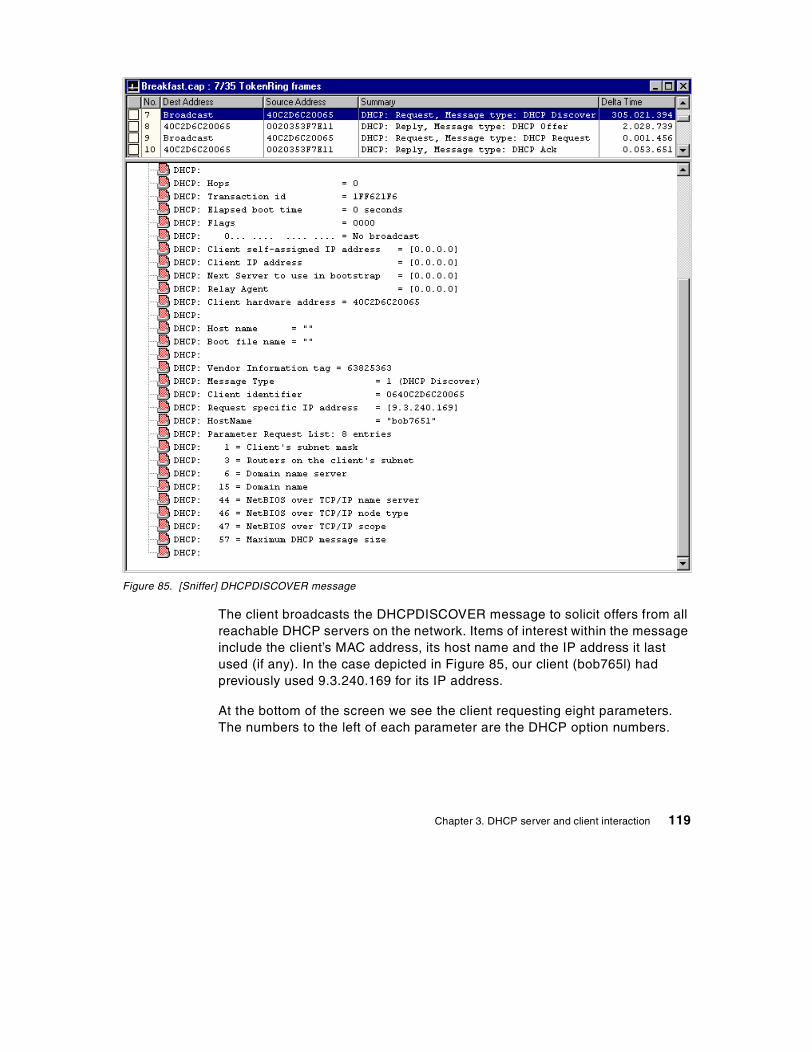
Figure 85. [Sniffer] DHCPDISCOVER message
The client broadcasts the DHCPDISCOVER message to solicit offers from allreachable DHCP servers on the network. Items of interest within the messageinclude the client’s MAC address, its host name and the IP address it lastused (if any). In the case depicted in Figure 85, our client (bob765l) hadpreviously used 9.3.240.169 for its IP address.
At the bottom of the screen we see the client requesting eight parameters.The numbers to the left of each parameter are the DHCP option numbers.
Chapter 3. DHCP server and client interaction 119
At this point, the client expects to get a DHCPOFFER message from one ormore servers. If the client does not receive a response to its request, it waitsa period of seconds before re-sending the DHCPDISCOVER message.
3.4.2 DHCPOFFERA server sends the DHCPOFFER message in response to theDHCPDISCOVER message from the client. If the server has no suitable IPaddress available, it will not respond to the client’s request. The IP address,mask, domain name, lease intervals, and other options are contained in thisdatagram. DHCP servers may temporarily reserve any offered IP addresses,so they will not be offered to several DHCP clients at the same time.
Figure 86 on page 121 shows the decode of the DHCPOFFER message sentby the server in response to our client’s request. At the top of the image is acolumn titled Delta Time, indicating about two seconds elapsed before theserver responded to the client’s DHCPDISCOVER frame. During this time, theserver was checking that the IP address it would offer was not already in useon the network. The server’s ARP activity was filtered out of the trace for thepurpose of clarity.
Note that the Transaction ID value given in Figure 84 on page 117 and Figure85 on page 119 are the same. This ID mechanism is used to give the clientthe ability to match replies to a specific request message it sent.
120 Beyond DHCP - Work Your TCP/IP Internetwork with Dynamic IP
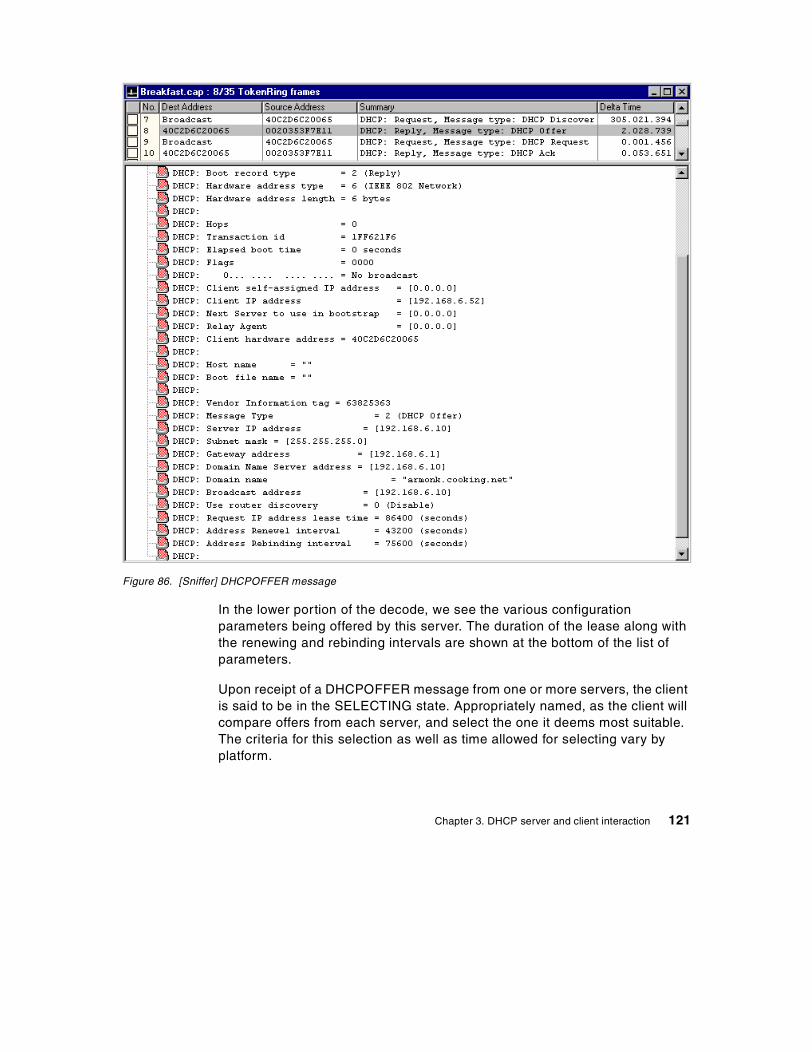
Figure 86. [Sniffer] DHCPOFFER message
In the lower portion of the decode, we see the various configurationparameters being offered by this server. The duration of the lease along withthe renewing and rebinding intervals are shown at the bottom of the list ofparameters.
Upon receipt of a DHCPOFFER message from one or more servers, the clientis said to be in the SELECTING state. Appropriately named, as the client willcompare offers from each server, and select the one it deems most suitable.The criteria for this selection as well as time allowed for selecting vary byplatform.
Chapter 3. DHCP server and client interaction 121
3.4.3 DHCPREQUESTAfter selecting the DHCPOFFER message to work with, the client sends aDHCPREQUEST message that includes a Server Identifier (an IP address) inthe body of the message. The Server Identifier is the IP address of the DHCPserver whose offer is being accepted. The DHCPREQUEST message is sentas a broadcast datagram. This is done so that any other server that had sentan offer would also receive the message. In this manner, a client acceptsparameters from one server and rejects other offers with a single datagram.
The body of the DHPCREQUEST message contains the same parametersthe sever sent in its DHCPOFFER frame, and adds a field called ClientIdentifier. This identifier is important during lease renewal or after a clientreboot.
The content and addressing of the DHCPREQUEST message vary slightlybased on the state of the client. A discussion of the other four types ofDHCPREQUEST messages and how each relates to the state of the clientfollows.
3.4.3.1 DHCPREQUEST from the INIT stateA client is said to be in the INIT state when it is using DHCP for the first time.It also enters the INIT state when it is not able to reuse a previous DHCPassigned configuration.
While in the INIT state the client must use 0.0.0.0 as its IP address. This isshown in Figure 87 on page 123.
122 Beyond DHCP - Work Your TCP/IP Internetwork with Dynamic IP
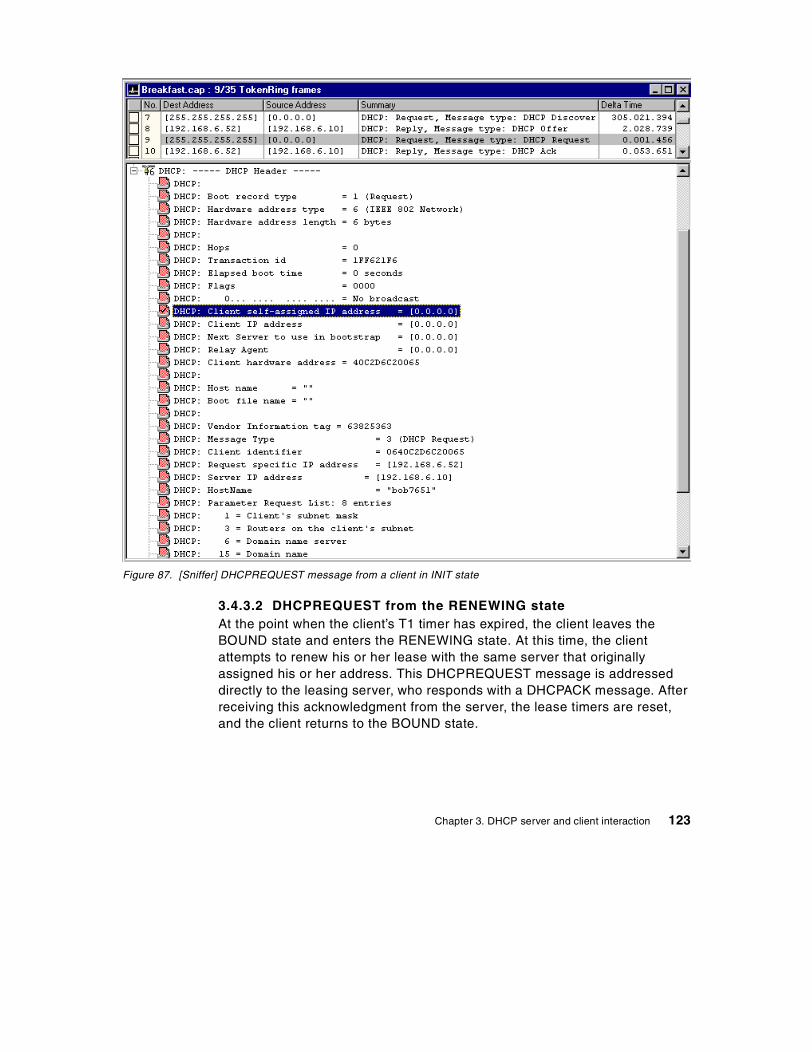
Figure 87. [Sniffer] DHCPREQUEST message from a client in INIT state
3.4.3.2 DHCPREQUEST from the RENEWING stateAt the point when the client’s T1 timer has expired, the client leaves theBOUND state and enters the RENEWING state. At this time, the clientattempts to renew his or her lease with the same server that originallyassigned his or her address. This DHCPREQUEST message is addresseddirectly to the leasing server, who responds with a DHCPACK message. Afterreceiving this acknowledgment from the server, the lease timers are reset,and the client returns to the BOUND state.
Chapter 3. DHCP server and client interaction 123
3.4.3.3 DHCPREQUEST from the REBINDING stateIf the client’s T2 counter expires, the end of the lease is approaching. This iscalled the REBINDING state. In this state, the DHCPREQUEST does notcontain a server identifier, and the datagram is broadcast. A client enters theREBINDING state only after attempting to renew the lease with the originalserver (RENEWING state).
If a client is not successful in renewing or rebinding the lease on itsconfiguration, it must stop using the current configuration information andenter the INIT state.
3.4.3.4 DHCPREQUEST from the INIT-REBOOT stateIf a client previously had successful configuration via DHCP and is restartingthe IP interface, it is said to be in the INIT-REBOOT state. The clientconfigures its IP interface with the address it last used, and broadcasts aDHCPREQUEST message. The server checks that the client identifier valuecontained in the body of the message is the same as when the address waspreviously assigned before responding with a DHCPACK message. Use of theINIT-REBOOT state can help a client retain the IP address, which is desirablein many cases.
Figure 88 on page 125 shows a DHCPREQUEST message from a client inthe INIT-REBOOT state.
124 Beyond DHCP - Work Your TCP/IP Internetwork with Dynamic IP

Figure 88. [Sniffer] DHCPREQUEST message from a client in INIT-REBOOT state
Use of the INIT-REBOOT state can save time because the client neitherbroadcasts the DHCPDISCOVER message nor compares offers, and theserver does not test the requested IP address.
However, there are situations where the attempt to quickly re-use the priorconfiguration can actually take more time. We created such a situation in ourlab to illustrate this scenario.
At the top of Figure 88, note that the client actually transmitted theDHCPREQUEST message five times over a 15 minute period and did notreceive a response. The client eventually changes from the INIT-REBOOT to
Chapter 3. DHCP server and client interaction 125

the INIT state and starts the configuration over with the DHCPDISCOVERmessage in frame #7. The time required for the client to get back to the INITstate can be virtually eliminated if a DHCP server is able to send it aDHCPNAK message. This type of message is discussed in the next section.
3.4.4 DHCPNAKA DHCP server sends this response to the DHCPREQUEST message only ifit can determine that the parameters being requested by the client are notappropriate for the network. When a client receives a DHCPNAK message, itimmediately returns to the INIT state and restarts the configuration processwith the DHCPDISCOVER message.
To create the scenario for Figure 88 on page 125 (where the client stayed inINIT-REBOOT for 15 minutes), we moved the client from a network that wascompletely unknown to our DHCP server. Since the server had noauthoritative knowledge of the clients prior network, it did not respond with aDHCPNAK.
When a server is controlling address assignment for multiple subnets, it canspeed up the retry process by sending a DHCPNAK message. This isillustrated in Figure 89 on page 127, where we moved a client from the192.168.8.0 network to the 192.168.6.0 network. In this case, both subnetsare being managed by the same DHCP server.
126 Beyond DHCP - Work Your TCP/IP Internetwork with Dynamic IP
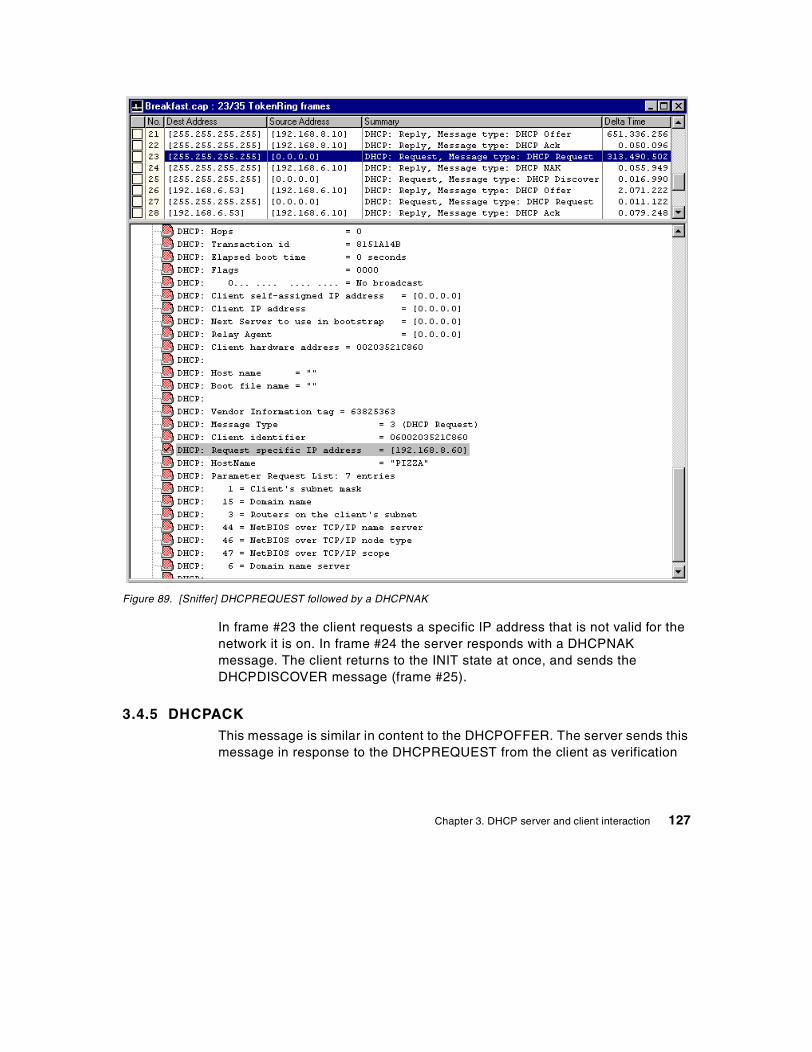
Figure 89. [Sniffer] DHCPREQUEST followed by a DHCPNAK
In frame #23 the client requests a specific IP address that is not valid for thenetwork it is on. In frame #24 the server responds with a DHCPNAKmessage. The client returns to the INIT state at once, and sends theDHCPDISCOVER message (frame #25).
3.4.5 DHCPACKThis message is similar in content to the DHCPOFFER. The server sends thismessage in response to the DHCPREQUEST from the client as verification
Chapter 3. DHCP server and client interaction 127
that the client owns the IP address. If the client was renewing the lease, theDHCPACK resets the lease timers and the client returns to the BOUND state.
If the client is in the INIT or INIT-REBOOT state, the configuration of a client’sinterface is not complete until this message is received. After receipt of thismessage the client should also test (via ARP) that the address is not in use. Ifthe ARP test is successful, configuration is complete and the client is in theBOUND state.
3.4.6 DHCPDECLINEThis message is broadcast by the client to indicate that an IP address thathad been requested, offered, and acknowledged was found to be in use whenthe client tested it. The DHCP server will note that the address is in use andwill not offer it to other clients.
3.4.7 DHCPRELEASEThis message is used by clients to formally cancel their lease. Most clients donot send this message during a shutdown so that they may attempt to use thesame IP address when they are rebooted.
The DHCPRELEASE message is a sent within a unicast datagram to theDHCP server that holds the lease on the client’s configuration. An example ofthe DHCPRELEASE message is shown in Figure 90 on page 129.
128 Beyond DHCP - Work Your TCP/IP Internetwork with Dynamic IP
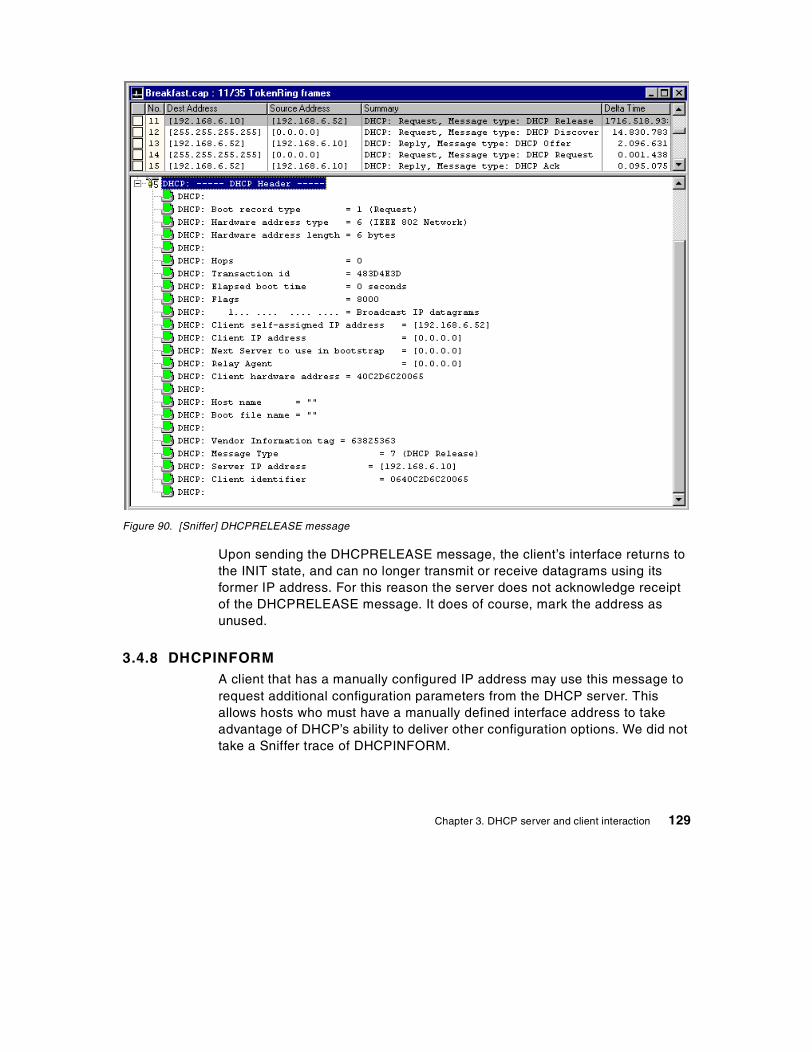
Figure 90. [Sniffer] DHCPRELEASE message
Upon sending the DHCPRELEASE message, the client’s interface returns tothe INIT state, and can no longer transmit or receive datagrams using itsformer IP address. For this reason the server does not acknowledge receiptof the DHCPRELEASE message. It does of course, mark the address asunused.
3.4.8 DHCPINFORMA client that has a manually configured IP address may use this message torequest additional configuration parameters from the DHCP server. Thisallows hosts who must have a manually defined interface address to takeadvantage of DHCP’s ability to deliver other configuration options. We did nottake a Sniffer trace of DHCPINFORM.
Chapter 3. DHCP server and client interaction 129

130 Beyond DHCP - Work Your TCP/IP Internetwork with Dynamic IP
Chapter 4. Serving names
This chapter describes how to assign unique names, statically anddynamically, to all devices on your TCP/IP network. We will see how adynamic name server works and how it integrates with existing static nameservers and firewalls. For information regarding justification of a DNS schemeand how to design a domain name schematic, please refer to 1.6, “DomainName Services (DNS)” on page 12.
4.1 Name serving on the Windows platforms
The following sections will cover Windows 95/98/NT in various static anddynamic DNS scenarios. We first cover Windows NT as a static DNS server,as this will lead into the configuration of Windows NT as a DDNS server usingWINS (Windows Internet Naming Service). After we have given you theserver configuration scenarios for DNS and DDNS on Windows NT, we willcover the Windows 95/98/NT client scenarios with DNS and DDNS.
4.1.1 Windows NT as a Static DNS serverThis section shows you how to set up your Windows NT server as a staticDNS server using an example of a simple internal network environment. Notethat Windows NT’s implementation of DNS cannot be configured as adynamic DNS server.
4.1.1.1 ScenarioIn this section, we use a simple network environment with only one subnet.This network is not connected to the Internet or any other networks. In thisnetwork, we assume that we have a DHCP server on the Windows NT serverup and running. We also have DHCP client computers. In this network weinitially do not have a DNS server.
We configure the Windows NT server as a static DNS server. Later in thischapter, we will also configure Windows NT server as a WINS server.
In our environment, our domain name is bellevue.cooking.net and theDHCP/DNS server’s hostname is mustard. Table 5 illustrates our networkconfiguration:
Table 5. Windows NT server configuration information
Configuration settings Value
Network ID 192.168.8.0
© Copyright IBM Corp. 1998, 2000 131
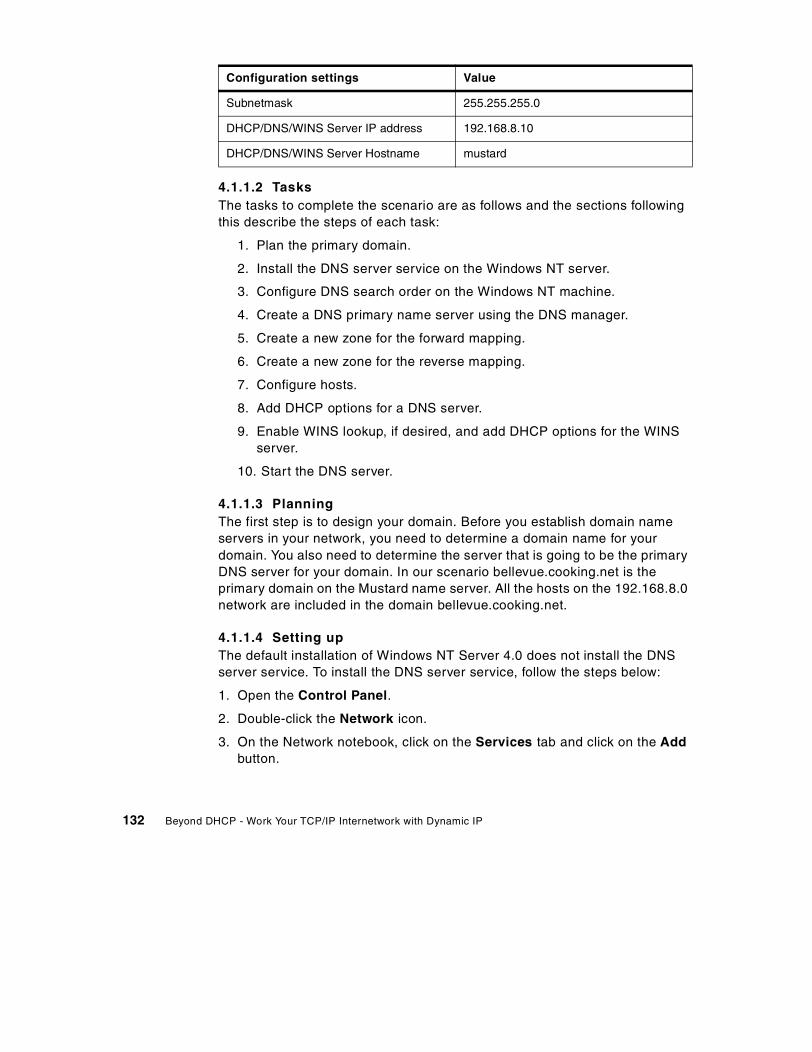
4.1.1.2 TasksThe tasks to complete the scenario are as follows and the sections followingthis describe the steps of each task:
1. Plan the primary domain.
2. Install the DNS server service on the Windows NT server.
3. Configure DNS search order on the Windows NT machine.
4. Create a DNS primary name server using the DNS manager.
5. Create a new zone for the forward mapping.
6. Create a new zone for the reverse mapping.
7. Configure hosts.
8. Add DHCP options for a DNS server.
9. Enable WINS lookup, if desired, and add DHCP options for the WINSserver.
10. Start the DNS server.
4.1.1.3 PlanningThe first step is to design your domain. Before you establish domain nameservers in your network, you need to determine a domain name for yourdomain. You also need to determine the server that is going to be the primaryDNS server for your domain. In our scenario bellevue.cooking.net is theprimary domain on the Mustard name server. All the hosts on the 192.168.8.0network are included in the domain bellevue.cooking.net.
4.1.1.4 Setting upThe default installation of Windows NT Server 4.0 does not install the DNSserver service. To install the DNS server service, follow the steps below:
1. Open the Control Panel.
2. Double-click the Network icon.
3. On the Network notebook, click on the Services tab and click on the Addbutton.
Subnetmask 255.255.255.0
DHCP/DNS/WINS Server IP address 192.168.8.10
DHCP/DNS/WINS Server Hostname mustard
Configuration settings Value
132 Beyond DHCP - Work Your TCP/IP Internetwork with Dynamic IP
4. Select Microsoft DNS Server from the list and then click OK.
5. When prompted, enter the path to the Windows NT files (Windows NT 4.0Server CD) and click Continue to copy the files and finish the installation.
6. After installation, restart your computer.
7. Upon restart you will have to reapply any fixpacks if any were installedbefore the DNS services installation.
4.1.1.5 Verifying TCP/IP configurationThe following steps describe how to set up your Windows NT computer to runthe DNS server. All the values we used to configure in the following steps arethe values we defined in our sample network.
Before you start configuring, make sure that TCP/IP is configured correctly.The DNS server must have a static IP address and, therefore, cannot be aDHCP client.
The DNS server computer itself can also be a DNS client. Follow the stepsbelow to add the DNS server information:
1. Open the Control Panel and then open the Network icon.
2. Click on the Protocols tab.
3. Select TCP/IP Protocol and click on Properties.
4. Click on the DNS tab and type a hostname and domain name.
5. Under DNS Service Search Order click Add.
6. In the DNS server box type the IP address for your computer (DNS server)and click Add.
7. Click OK to close the notebook.
8. Click OK to close the Network notebook.
4.1.1.6 Configuring DNS serverThe following steps illustrate how to set up a static DNS server:
1. By default, the Microsoft DNS server service starts automatically when thecomputer is started. If the DNS server is not running, open the Serviceicon in the Control Panel, select the Microsoft DNS Server in the servicelist, and click on the Start button. You can also start the DNS server at thecommand prompt by using the following command:
NET START DNS
2. Open the DNS manager. To do so, select [Start => Programs =>Administrative Tools (Common) => DNS Manager].
Chapter 4. Serving names 133
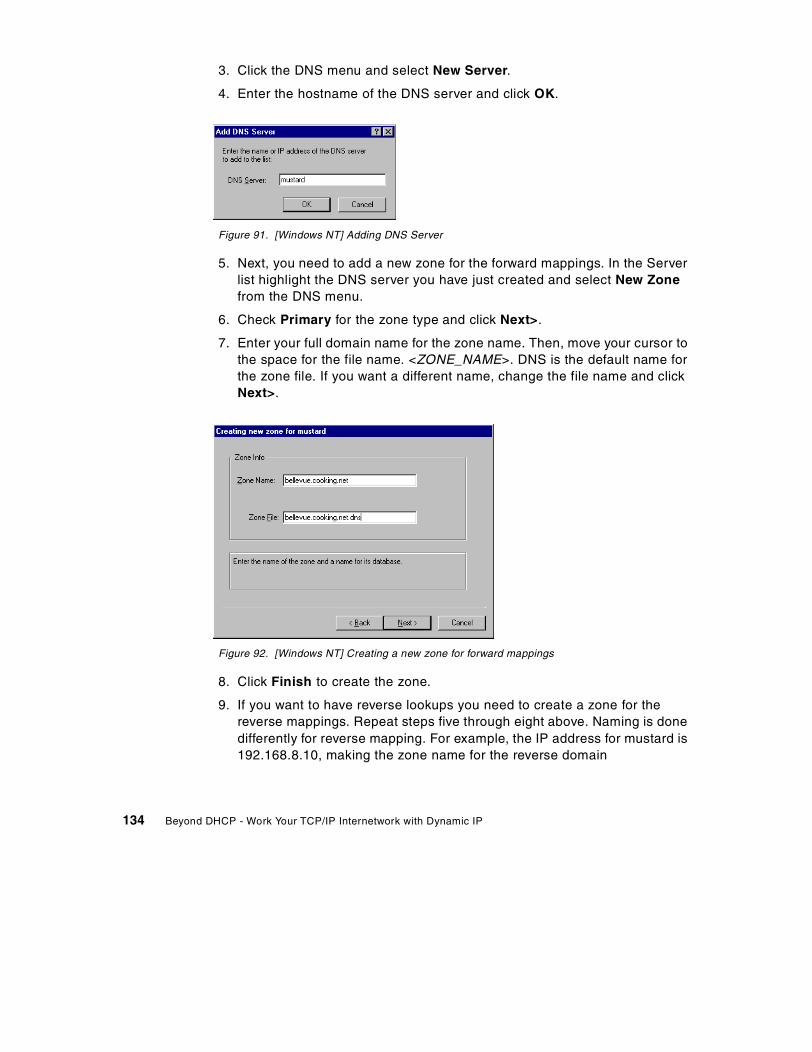
3. Click the DNS menu and select New Server.
4. Enter the hostname of the DNS server and click OK.
Figure 91. [Windows NT] Adding DNS Server
5. Next, you need to add a new zone for the forward mappings. In the Serverlist highlight the DNS server you have just created and select New Zonefrom the DNS menu.
6. Check Primary for the zone type and click Next>.
7. Enter your full domain name for the zone name. Then, move your cursor tothe space for the file name. <ZONE_NAME>. DNS is the default name forthe zone file. If you want a different name, change the file name and clickNext>.
Figure 92. [Windows NT] Creating a new zone for forward mappings
8. Click Finish to create the zone.
9. If you want to have reverse lookups you need to create a zone for thereverse mappings. Repeat steps five through eight above. Naming is donedifferently for reverse mapping. For example, the IP address for mustard is192.168.8.10, making the zone name for the reverse domain
134 Beyond DHCP - Work Your TCP/IP Internetwork with Dynamic IP
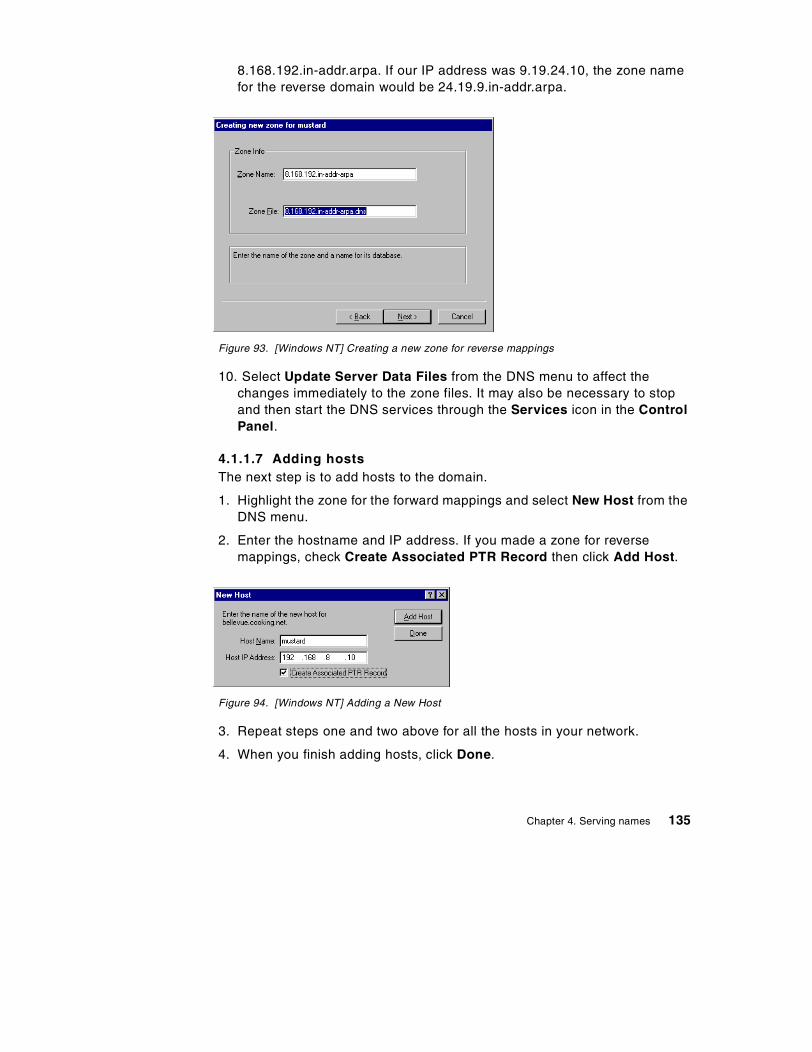
8.168.192.in-addr.arpa. If our IP address was 9.19.24.10, the zone namefor the reverse domain would be 24.19.9.in-addr.arpa.
Figure 93. [Windows NT] Creating a new zone for reverse mappings
10. Select Update Server Data Files from the DNS menu to affect thechanges immediately to the zone files. It may also be necessary to stopand then start the DNS services through the Services icon in the ControlPanel.
4.1.1.7 Adding hostsThe next step is to add hosts to the domain.
1. Highlight the zone for the forward mappings and select New Host from theDNS menu.
2. Enter the hostname and IP address. If you made a zone for reversemappings, check Create Associated PTR Record then click Add Host.
Figure 94. [Windows NT] Adding a New Host
3. Repeat steps one and two above for all the hosts in your network.
4. When you finish adding hosts, click Done.
Chapter 4. Serving names 135
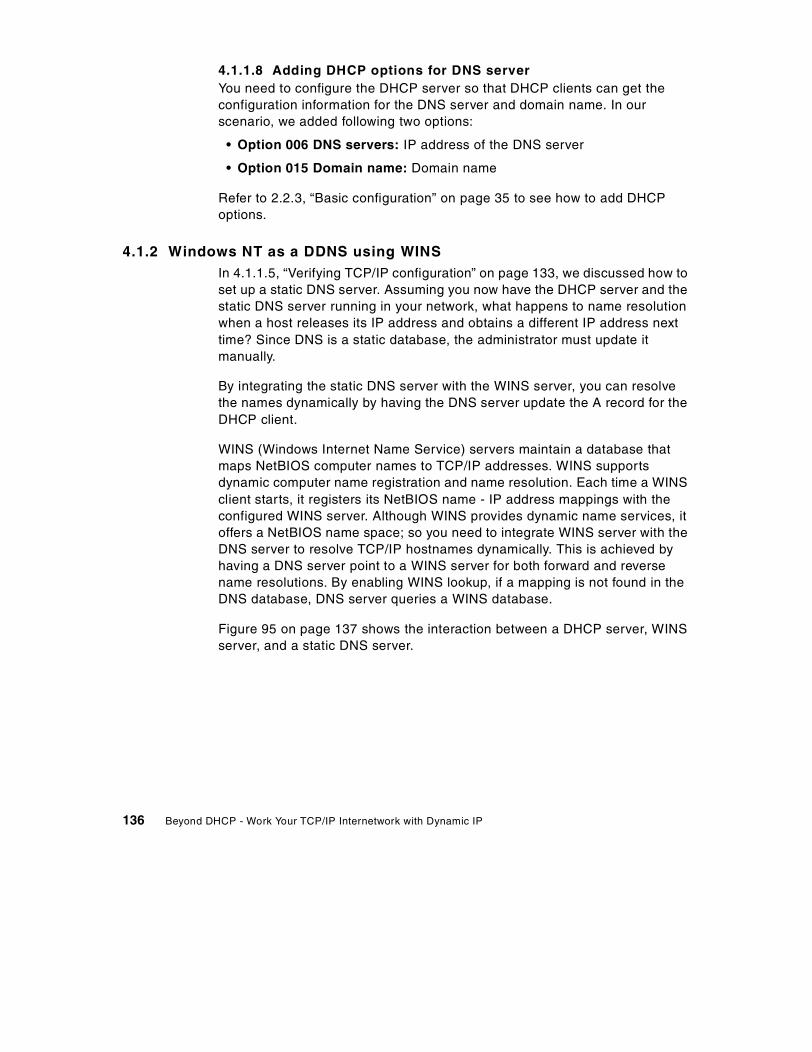
4.1.1.8 Adding DHCP options for DNS serverYou need to configure the DHCP server so that DHCP clients can get theconfiguration information for the DNS server and domain name. In ourscenario, we added following two options:
• Option 006 DNS servers: IP address of the DNS server
• Option 015 Domain name: Domain name
Refer to 2.2.3, “Basic configuration” on page 35 to see how to add DHCPoptions.
4.1.2 Windows NT as a DDNS using WINSIn 4.1.1.5, “Verifying TCP/IP configuration” on page 133, we discussed how toset up a static DNS server. Assuming you now have the DHCP server and thestatic DNS server running in your network, what happens to name resolutionwhen a host releases its IP address and obtains a different IP address nexttime? Since DNS is a static database, the administrator must update itmanually.
By integrating the static DNS server with the WINS server, you can resolvethe names dynamically by having the DNS server update the A record for theDHCP client.
WINS (Windows Internet Name Service) servers maintain a database thatmaps NetBIOS computer names to TCP/IP addresses. WINS supportsdynamic computer name registration and name resolution. Each time a WINSclient starts, it registers its NetBIOS name - IP address mappings with theconfigured WINS server. Although WINS provides dynamic name services, itoffers a NetBIOS name space; so you need to integrate WINS server with theDNS server to resolve TCP/IP hostnames dynamically. This is achieved byhaving a DNS server point to a WINS server for both forward and reversename resolutions. By enabling WINS lookup, if a mapping is not found in theDNS database, DNS server queries a WINS database.
Figure 95 on page 137 shows the interaction between a DHCP server, WINSserver, and a static DNS server.
136 Beyond DHCP - Work Your TCP/IP Internetwork with Dynamic IP
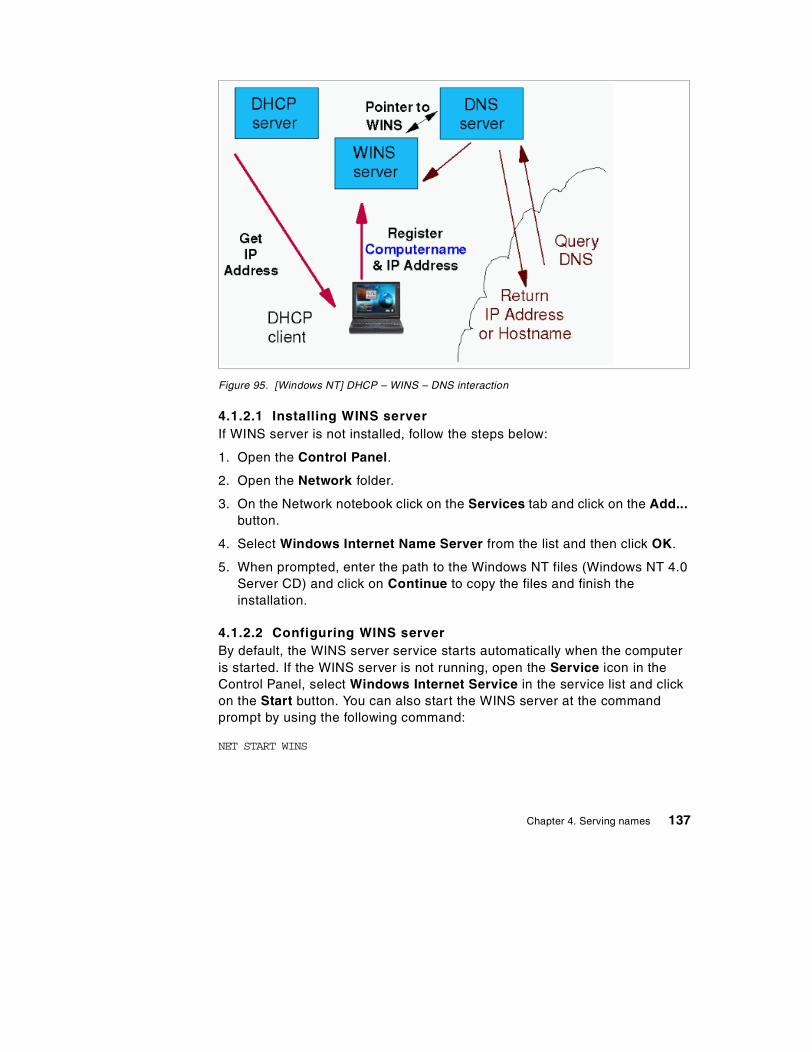
Figure 95. [Windows NT] DHCP – WINS – DNS interaction
4.1.2.1 Installing WINS serverIf WINS server is not installed, follow the steps below:
1. Open the Control Panel.
2. Open the Network folder.
3. On the Network notebook click on the Services tab and click on the Add...button.
4. Select Windows Internet Name Server from the list and then click OK.
5. When prompted, enter the path to the Windows NT files (Windows NT 4.0Server CD) and click on Continue to copy the files and finish theinstallation.
4.1.2.2 Configuring WINS serverBy default, the WINS server service starts automatically when the computeris started. If the WINS server is not running, open the Service icon in theControl Panel, select Windows Internet Service in the service list and clickon the Start button. You can also start the WINS server at the commandprompt by using the following command:
NET START WINS
Chapter 4. Serving names 137

To start the WINS Manager, select Programs from the Start menu, thenselect Administrative Tools (Common). Then click WINS Manager. Click onServer, then Add WINS Server and you will get a screen as seen inAppendix 96, “[Windows NT] Adding a WINS server” on page 138. In thatwindow type in the IP address of your DNS, assuming WINS and DNSservices are going to be on the same address. WINS Manager can showsome basic statistics for the selected server. To display additional statistics,click Detailed Information on the Server menu. You can also view all themappings by selecting Show Database from the Mappings menu.
Figure 96. [Windows NT] Adding a WINS server
To integrate the DNS server with a WINS server, you need to configure yourDNS server to enable WINS lookup for both forward and reverse mappings.Follow the steps below:
1. Open the DNS Manager.
2. Highlight the zone (domain) for forward mappings. Select Properties fromthe DNS menu.
3. Click on the WINS Lookup tab. Check Use WINS Resolution and enterWINS server’s IP address. Click OK.
138 Beyond DHCP - Work Your TCP/IP Internetwork with Dynamic IP

Figure 97. [Windows NT] Enabling WINS lookup
4. Highlight the appropriate in-addr.arpa zone (domain) for reversemappings. Select Properties from the DNS menu.
5. Click the WINS Reverse Lookup tab. Check Use WINS Reverse Lookupand enter the DNS host domain to be appended to the NetBIOS namebefore returning the response. Click OK.
Figure 98. [Windows NT] Enabling WINS reverse lookup
Chapter 4. Serving names 139
6. You also need to add some DHCP options. To add the options, see 2.3.3,“Basic configuration” on page 45. Add and configure the following optionsusing the DHCP manager:
Option 044 WINS/NBNS Servers IP address of the WINS server
Option 046 WINS/NBT Node 0x8 (H-node)
Option 044 is used to configure the IP address of the WINS server. Option046 is used to configure clients to use H-node. For more information aboutH-node, refer to 5.2, “Resolving NetBIOS names to IP addresses” on page232.
7. Restart the DHCP, DDNS, and WINS servers.
4.1.2.3 Configuration filesTable 6 shows DNS configuration files for the Windows NT server. Afterconfiguring a DNS server, these files are created and stored in the\WINNT\SYSTEM32\DNS directory.
Table 6. DNS configuration files
* By default, the NT DNS server is configured to boot from the data in the registry.
Figure 99 on page 141 shows an example of a <zone_name>.dns file.
Name of the file Description of the file
<zone_name>.dns Database fileContains resource records for the zoneUsed for forward mappings
w.x.y.z.in-addr.arpa.dns Reverse lookup fileMaps IP addresses to hostnames
cache.dns Contains names and addresses of the root domain nameservers
Boot file Used by manual start-up method *
\WINNT is the default directory where Windows NT is installed.Note
140 Beyond DHCP - Work Your TCP/IP Internetwork with Dynamic IP
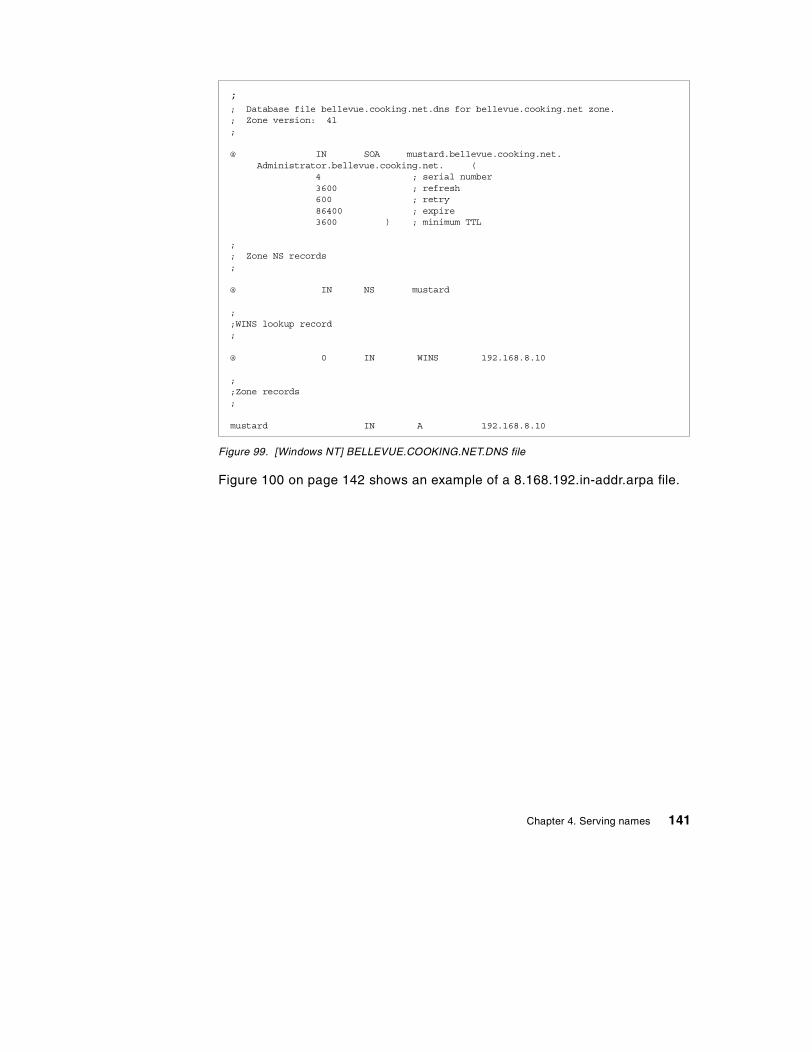
Figure 99. [Windows NT] BELLEVUE.COOKING.NET.DNS file
Figure 100 on page 142 shows an example of a 8.168.192.in-addr.arpa file.
;; Database file bellevue.cooking.net.dns for bellevue.cooking.net zone.; Zone version: 4l;
@ IN SOA mustard.bellevue.cooking.net.Administrator.bellevue.cooking.net. (
4 ; serial number3600 ; refresh600 ; retry86400 ; expire3600 ) ; minimum TTL
;; Zone NS records;
@ IN NS mustard
;;WINS lookup record;
@ 0 IN WINS 192.168.8.10
;;Zone records;
mustard IN A 192.168.8.10
Chapter 4. Serving names 141
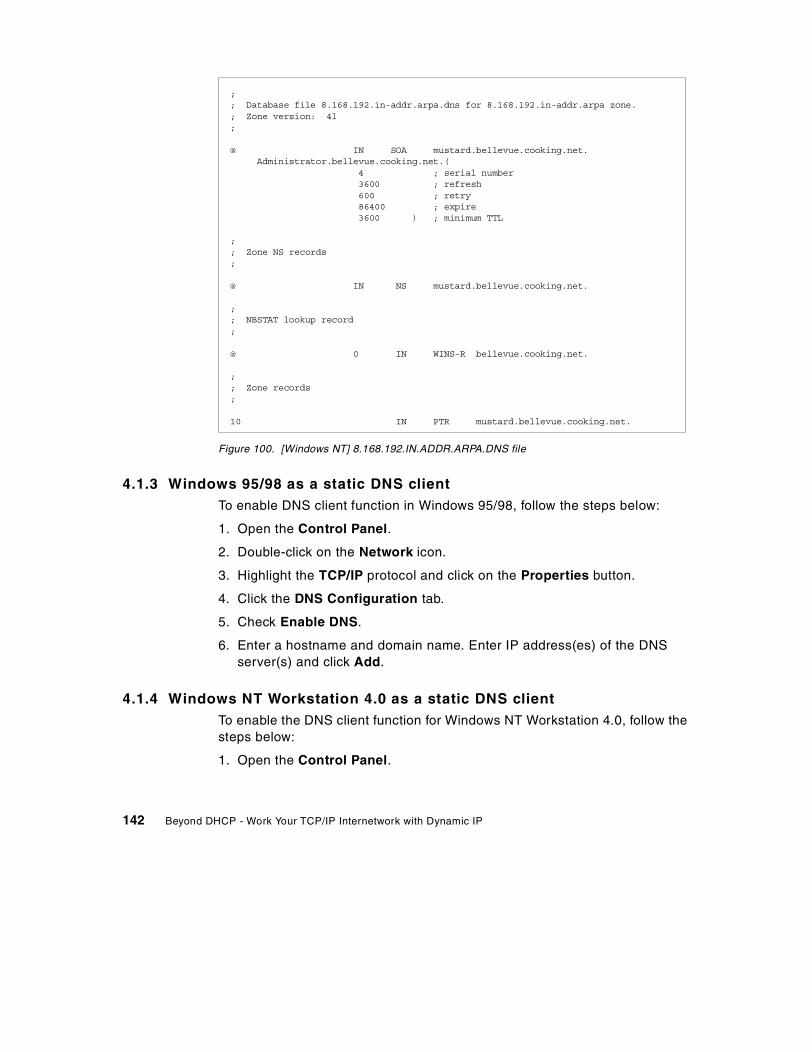
Figure 100. [Windows NT] 8.168.192.IN.ADDR.ARPA.DNS file
4.1.3 Windows 95/98 as a static DNS clientTo enable DNS client function in Windows 95/98, follow the steps below:
1. Open the Control Panel.
2. Double-click on the Network icon.
3. Highlight the TCP/IP protocol and click on the Properties button.
4. Click the DNS Configuration tab.
5. Check Enable DNS.
6. Enter a hostname and domain name. Enter IP address(es) of the DNSserver(s) and click Add.
4.1.4 Windows NT Workstation 4.0 as a static DNS clientTo enable the DNS client function for Windows NT Workstation 4.0, follow thesteps below:
1. Open the Control Panel.
;; Database file 8.168.192.in-addr.arpa.dns for 8.168.192.in-addr.arpa zone.; Zone version: 4l;
@ IN SOA mustard.bellevue.cooking.net.Administrator.bellevue.cooking.net.(
4 ; serial number3600 ; refresh600 ; retry86400 ; expire3600 ) ; minimum TTL
;; Zone NS records;
@ IN NS mustard.bellevue.cooking.net.
;; NBSTAT lookup record;
@ 0 IN WINS-R bellevue.cooking.net.
;; Zone records;
10 IN PTR mustard.bellevue.cooking.net.
142 Beyond DHCP - Work Your TCP/IP Internetwork with Dynamic IP
2. Double-click on the Network icon.
3. Click the Protocols tab, highlight TCP/IP Protocol in the NetworkProtocol list and click on the Properties button.
4. Click on the DNS tab. Enter a hostname and domain name. Click Add. Inthe DNS server box, enter IP address(es) of a DNS server(s) and clickAdd.
4.1.5 Windows with IBM Dynamic IP ClientThe Dynamic IP Client for Windows 95/98/ NT allows a user to have ahostname mapped to their dynamically allocated IP address given by a DHCPserver. This is used in conjunction with the Microsoft DHCP client and is notnecessary for WINS services. However, it is necessary to implement aWindows DDNS client with a non-Microsoft DDNS server. The software canbe found at:
http://techsupport.services.ibm.com/asd-bin/doc/en_us/win95cl/f-feat.htm
To use the IBM Dynamic Client for Windows 95/98/NT the following items arerequired:
• Microsoft Windows 95 or Windows NT (Version 4.0 and higher) configuredwith the TCP/IP protocol
• IBM DDNS server for OS/2 or AIX
• DHCP server (Clients must obtain its IP address using DHCP)
The following sections show you how to set up IBM Dynamic IP Client forWindows NT and Windows 95.
4.1.5.1 Windows NTTo install and run the IBM Dynamic IP Client, the user logged in must be auser who belongs to the Administrator Group. This is because only theadministrator may manually request/renew the lease or set/configure DHCPinformation.
Before you configure DDNS client, make sure that DHCP is enabled on thatcomputer. See 2.5.3, “Windows NT Workstation 4.0” on page 73 for moreinformation.
To install the IBM Dynamic IP client, follow the steps below:
1. Open a command prompt. Change to the directory where IBMDYNIP.EXEis located, and run the program. Or, just double-click on IBMDYNIP.EXEfrom the Windows NT Explorer.
Chapter 4. Serving names 143
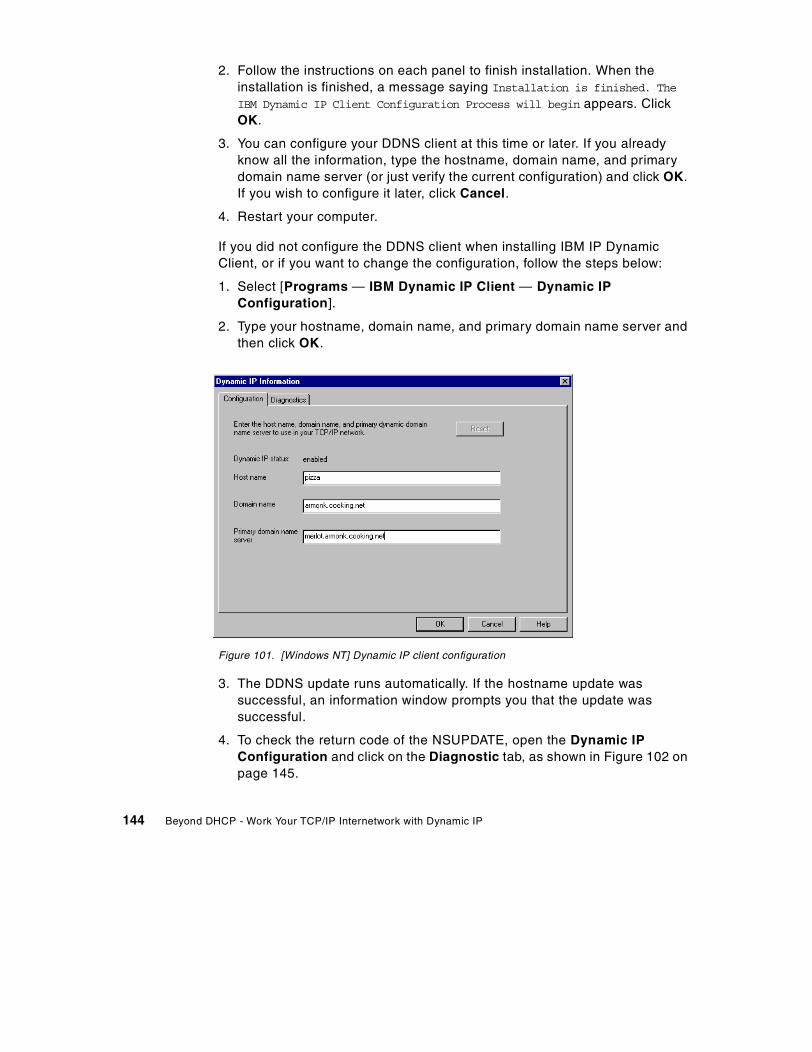
2. Follow the instructions on each panel to finish installation. When theinstallation is finished, a message saying Installation is finished. The
IBM Dynamic IP Client Configuration Process will begin appears. ClickOK.
3. You can configure your DDNS client at this time or later. If you alreadyknow all the information, type the hostname, domain name, and primarydomain name server (or just verify the current configuration) and click OK.If you wish to configure it later, click Cancel.
4. Restart your computer.
If you did not configure the DDNS client when installing IBM IP DynamicClient, or if you want to change the configuration, follow the steps below:
1. Select [Programs — IBM Dynamic IP Client — Dynamic IPConfiguration].
2. Type your hostname, domain name, and primary domain name server andthen click OK.
Figure 101. [Windows NT] Dynamic IP client configuration
3. The DDNS update runs automatically. If the hostname update wassuccessful, an information window prompts you that the update wassuccessful.
4. To check the return code of the NSUPDATE, open the Dynamic IPConfiguration and click on the Diagnostic tab, as shown in Figure 102 onpage 145.
144 Beyond DHCP - Work Your TCP/IP Internetwork with Dynamic IP
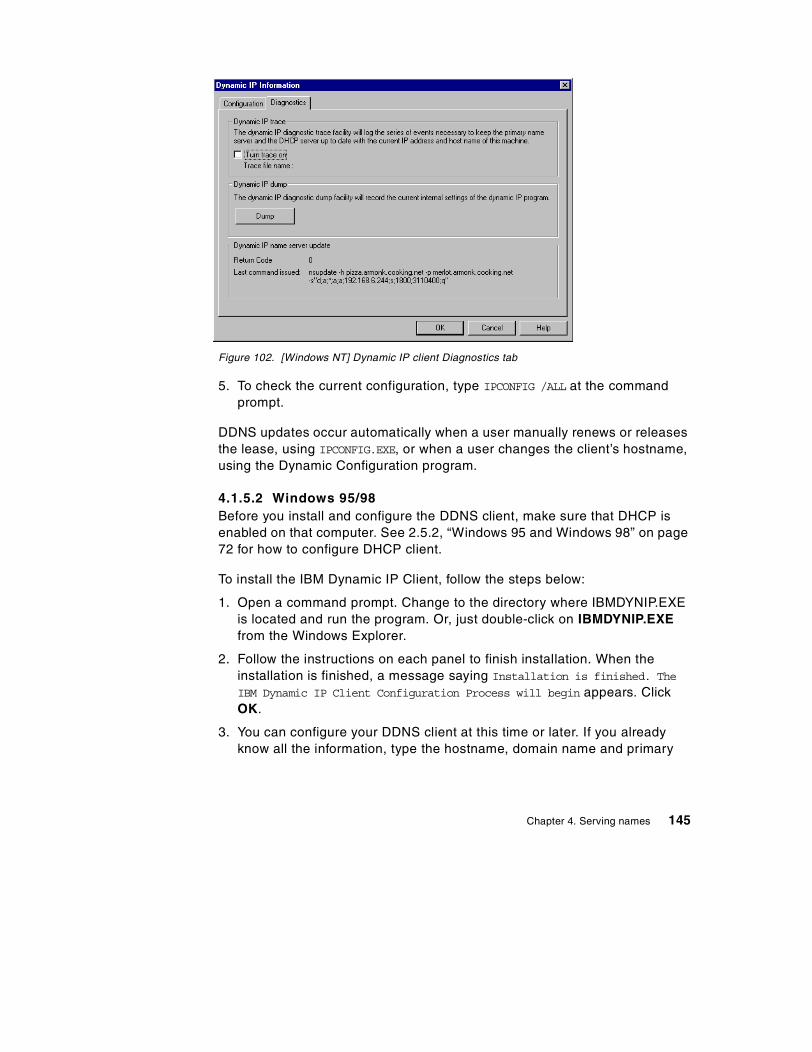
Figure 102. [Windows NT] Dynamic IP client Diagnostics tab
5. To check the current configuration, type IPCONFIG /ALL at the commandprompt.
DDNS updates occur automatically when a user manually renews or releasesthe lease, using IPCONFIG.EXE, or when a user changes the client’s hostname,using the Dynamic Configuration program.
4.1.5.2 Windows 95/98Before you install and configure the DDNS client, make sure that DHCP isenabled on that computer. See 2.5.2, “Windows 95 and Windows 98” on page72 for how to configure DHCP client.
To install the IBM Dynamic IP Client, follow the steps below:
1. Open a command prompt. Change to the directory where IBMDYNIP.EXEis located and run the program. Or, just double-click on IBMDYNIP.EXEfrom the Windows Explorer.
2. Follow the instructions on each panel to finish installation. When theinstallation is finished, a message saying Installation is finished. The
IBM Dynamic IP Client Configuration Process will begin appears. ClickOK.
3. You can configure your DDNS client at this time or later. If you alreadyknow all the information, type the hostname, domain name and primary
Chapter 4. Serving names 145
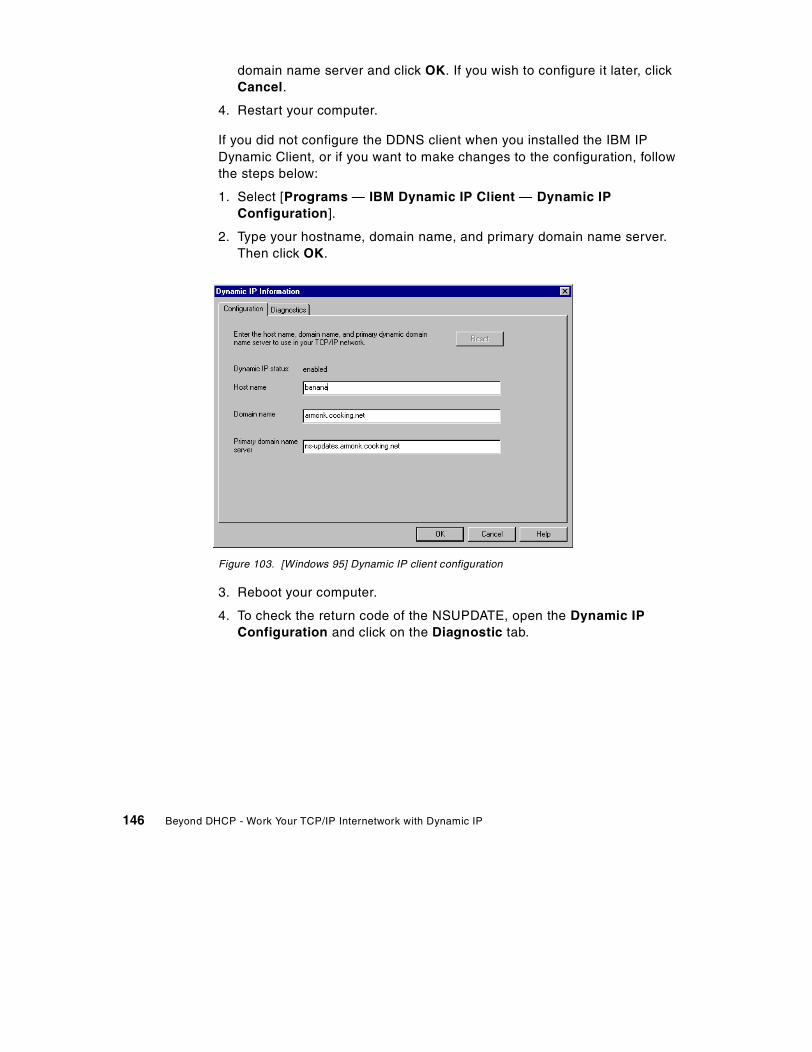
domain name server and click OK. If you wish to configure it later, clickCancel.
4. Restart your computer.
If you did not configure the DDNS client when you installed the IBM IPDynamic Client, or if you want to make changes to the configuration, followthe steps below:
1. Select [Programs — IBM Dynamic IP Client — Dynamic IPConfiguration].
2. Type your hostname, domain name, and primary domain name server.Then click OK.
Figure 103. [Windows 95] Dynamic IP client configuration
3. Reboot your computer.
4. To check the return code of the NSUPDATE, open the Dynamic IPConfiguration and click on the Diagnostic tab.
146 Beyond DHCP - Work Your TCP/IP Internetwork with Dynamic IP
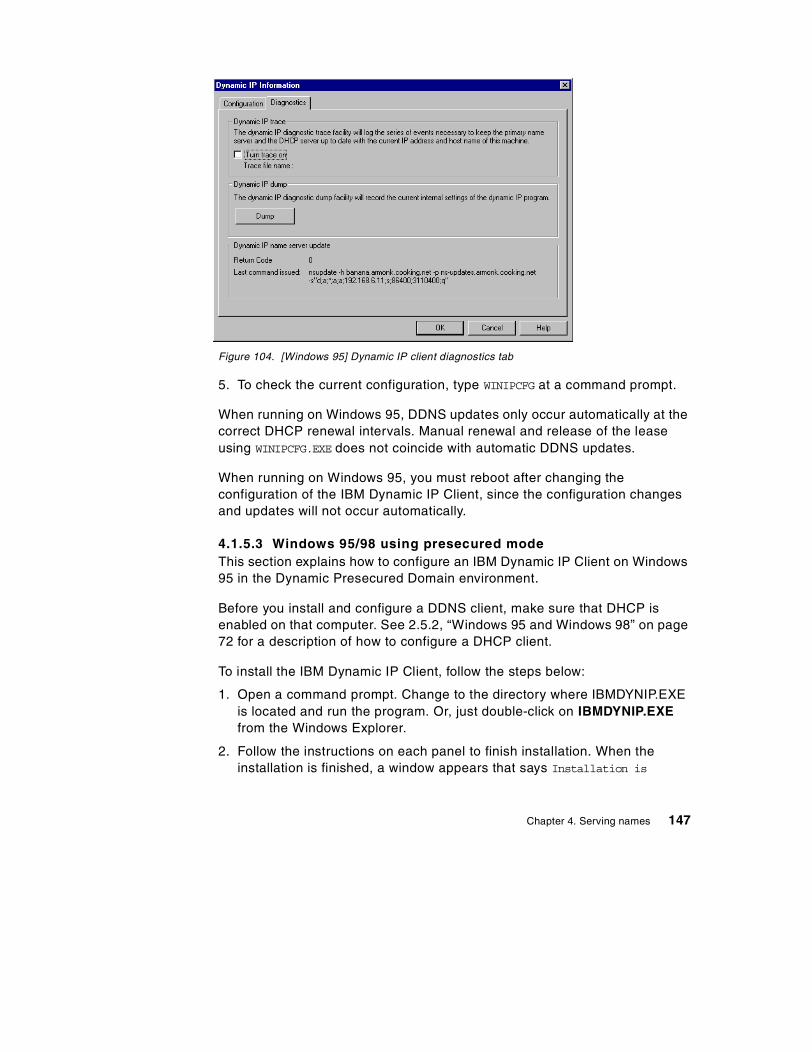
Figure 104. [Windows 95] Dynamic IP client diagnostics tab
5. To check the current configuration, type WINIPCFG at a command prompt.
When running on Windows 95, DDNS updates only occur automatically at thecorrect DHCP renewal intervals. Manual renewal and release of the leaseusing WINIPCFG.EXE does not coincide with automatic DDNS updates.
When running on Windows 95, you must reboot after changing theconfiguration of the IBM Dynamic IP Client, since the configuration changesand updates will not occur automatically.
4.1.5.3 Windows 95/98 using presecured modeThis section explains how to configure an IBM Dynamic IP Client on Windows95 in the Dynamic Presecured Domain environment.
Before you install and configure a DDNS client, make sure that DHCP isenabled on that computer. See 2.5.2, “Windows 95 and Windows 98” on page72 for a description of how to configure a DHCP client.
To install the IBM Dynamic IP Client, follow the steps below:
1. Open a command prompt. Change to the directory where IBMDYNIP.EXEis located and run the program. Or, just double-click on IBMDYNIP.EXEfrom the Windows Explorer.
2. Follow the instructions on each panel to finish installation. When theinstallation is finished, a window appears that says Installation is
Chapter 4. Serving names 147
finished. The IBM Dynamic IP Client Configuration Process will begin.Click OK.
3. You can configure your DDNS client now or later. If you already know allrequired information, type the hostname, domain name, and primarydomain name server and click OK. If you wish to configure at a later time,click Cancel. Do not restart your computer at this time.
4. Copy a key file (<host_name>.key is the default name) in the\WINDOWS\DDNSETC directory (\WINDOWS is the directory whereWindows 95 is installed) and rename the file name to DDNS.DAT. If youalready have a DDNS.DAT file, you can either replace or append the file tothe existing file.
5. Restart your computer.
If you did not configure the DDNS client when you installed the IBM IPDynamic Client, or if you want to make changes to the configuration, followthe steps below:
1. Select [Start => Programs => IBM Dynamic IP Client] and then clickDynamic IP Configuration.
2. Type the hostname, domain name, and primary domain name server (fullyqualified domain name) and then click OK. See Figure 103 on page 146.
3. Reboot your computer.
4. To check the return code of the NSUPDATE, open the Dynamic IPConfiguration and click on the Diagnostic tab. See Figure 104 on page147.
5. To check the current configuration, type WINIPCFG at the command prompt.
When running on Windows 95, DDNS updates only occur automatically at thecorrect DHCP renewal intervals. Manual renewal and release of the leaseusing WINIPCFG.EXE does not coincide with an automatic DDNS updates.
When running on Windows 95, you must reboot the machine after changingthe configuration of the IBM Dynamic IP Client because the configurationchanges and updates will not occur automatically.
Tips for setting upIn 4.3.3, “OS/2 Warp 4 using presecured mode” on page 203, we discussedthat after importing a key file, the hostname, domain name, and primaryDDNS server name were automatically filled in for you in the configurationnotebook. However, using the IBM Dynamic IP client for Windows 95/NT, thisinformation is not filled in automatically (because there is no function toimport a key file).
148 Beyond DHCP - Work Your TCP/IP Internetwork with Dynamic IP
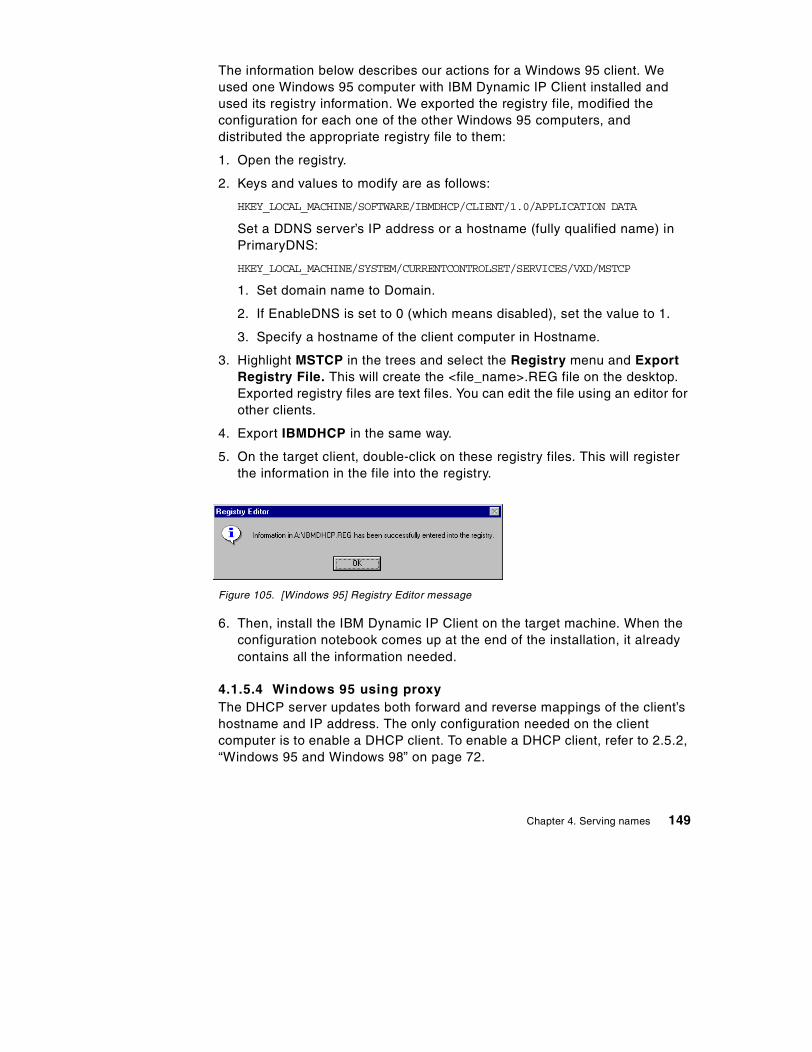
The information below describes our actions for a Windows 95 client. Weused one Windows 95 computer with IBM Dynamic IP Client installed andused its registry information. We exported the registry file, modified theconfiguration for each one of the other Windows 95 computers, anddistributed the appropriate registry file to them:
1. Open the registry.
2. Keys and values to modify are as follows:
HKEY_LOCAL_MACHINE/SOFTWARE/IBMDHCP/CLIENT/1.0/APPLICATION DATA
Set a DDNS server’s IP address or a hostname (fully qualified name) inPrimaryDNS:
HKEY_LOCAL_MACHINE/SYSTEM/CURRENTCONTROLSET/SERVICES/VXD/MSTCP
1. Set domain name to Domain.
2. If EnableDNS is set to 0 (which means disabled), set the value to 1.
3. Specify a hostname of the client computer in Hostname.
3. Highlight MSTCP in the trees and select the Registry menu and ExportRegistry File. This will create the <file_name>.REG file on the desktop.Exported registry files are text files. You can edit the file using an editor forother clients.
4. Export IBMDHCP in the same way.
5. On the target client, double-click on these registry files. This will registerthe information in the file into the registry.
Figure 105. [Windows 95] Registry Editor message
6. Then, install the IBM Dynamic IP Client on the target machine. When theconfiguration notebook comes up at the end of the installation, it alreadycontains all the information needed.
4.1.5.4 Windows 95 using proxyThe DHCP server updates both forward and reverse mappings of the client’shostname and IP address. The only configuration needed on the clientcomputer is to enable a DHCP client. To enable a DHCP client, refer to 2.5.2,“Windows 95 and Windows 98” on page 72.
Chapter 4. Serving names 149

Windows 95 DHCP client sends its computer name (NetBIOS name) asOption 12, and a DHCP server uses this name to update the DDNS server.
4.2 OS/2 Warp Server as Dynamic DNS server
In Chapter 2, “Up and Running with DHCP” on page 29, we discussed how toset up and run a DHCP server. With a DHCP server in your network, IPaddresses and other configuration information are assigned automatically tothe clients. However, one problem persists:
• How can a domain name server learn about those dynamically assignedIP addresses and hostnames so it can update its database accordingly?
One solution is to use a WINS server as discussed in 4.1.2, “Windows NT asa DDNS using WINS” on page 136. However, if you have clients other thanMicrosoft clients, they cannot register their names with WINS servers andthey cannot be reached by names. This problem can be solved by using theDynamic Domain Name System (DDNS) services.
This chapter shows you how to set up your OS/2 Warp Server as a DynamicDNS server. In our scenario, we describe OS/2 Warp Server for e-business,which includes TCP/IP Version 4.21. TCP/IP 4.1 for OS/2 is similar. Before weshow you how to set up the server, we provide a brief introduction of DDNS inthe following section.
4.2.1 The Dynamic Domain Name System (DDNS)The DNS servers only support queries on a statically configured database,and the DNS administrators have to manually update this database wheneverthere is a change in the network and client configurations. The Dynamic DNS(DDNS) protocol defines an extension to this domain name system to updatethe DNS database dynamically. Using DDNS protocol, both the address (A)record, which maps a hostname to its IP address, and the pointer (PTR)record, which maps a host’s IP address to its hostname, can be added anddeleted dynamically.
4.2.1.1 IBM Dynamic Domain Name SystemThe IBM Dynamic Domain Name System (DDNS) is based on, and is asuperset of, the Internet Software Consortium’s publicly availableimplementation of the Berkley Internet Name Domain (BIND) Level 4.9.3.DDNS supports both static and dynamic DNS domains. In dynamic domains,only authorized clients can update their own data. In the IBM DDNS, RSApublic-key digital signature technology is used for client authentication.
150 Beyond DHCP - Work Your TCP/IP Internetwork with Dynamic IP
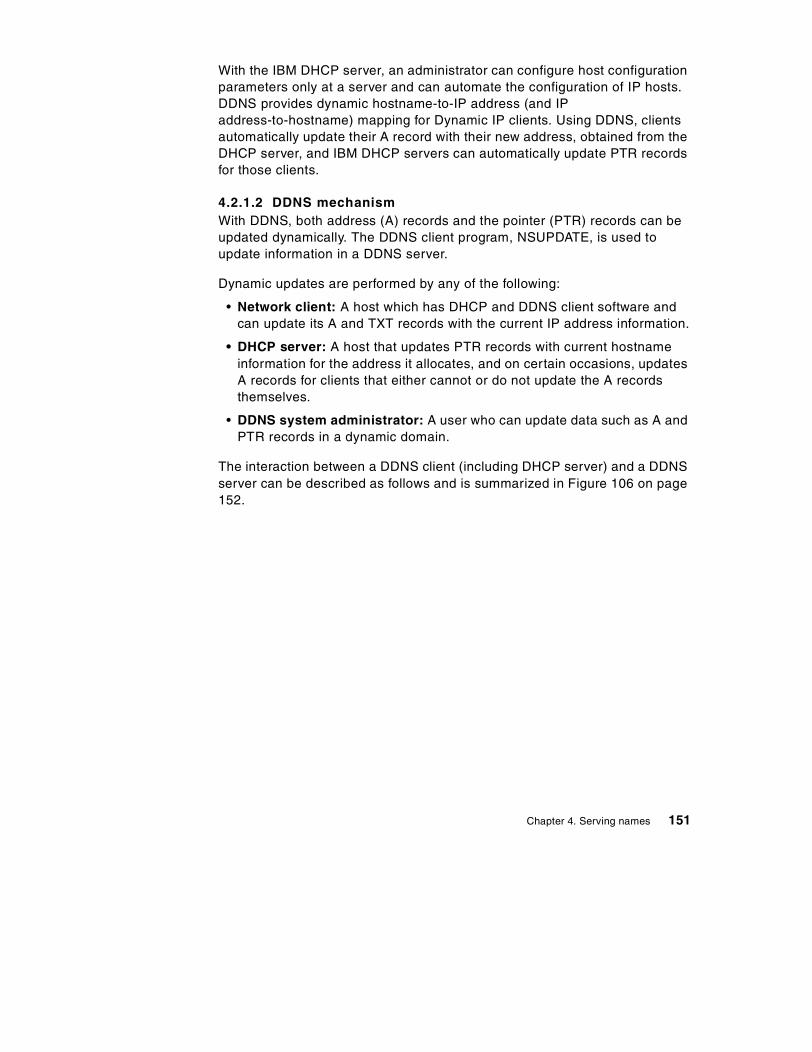
With the IBM DHCP server, an administrator can configure host configurationparameters only at a server and can automate the configuration of IP hosts.DDNS provides dynamic hostname-to-IP address (and IPaddress-to-hostname) mapping for Dynamic IP clients. Using DDNS, clientsautomatically update their A record with their new address, obtained from theDHCP server, and IBM DHCP servers can automatically update PTR recordsfor those clients.
4.2.1.2 DDNS mechanismWith DDNS, both address (A) records and the pointer (PTR) records can beupdated dynamically. The DDNS client program, NSUPDATE, is used toupdate information in a DDNS server.
Dynamic updates are performed by any of the following:
• Network client: A host which has DHCP and DDNS client software andcan update its A and TXT records with the current IP address information.
• DHCP server: A host that updates PTR records with current hostnameinformation for the address it allocates, and on certain occasions, updatesA records for clients that either cannot or do not update the A recordsthemselves.
• DDNS system administrator: A user who can update data such as A andPTR records in a dynamic domain.
The interaction between a DDNS client (including DHCP server) and a DDNSserver can be described as follows and is summarized in Figure 106 on page152.
Chapter 4. Serving names 151
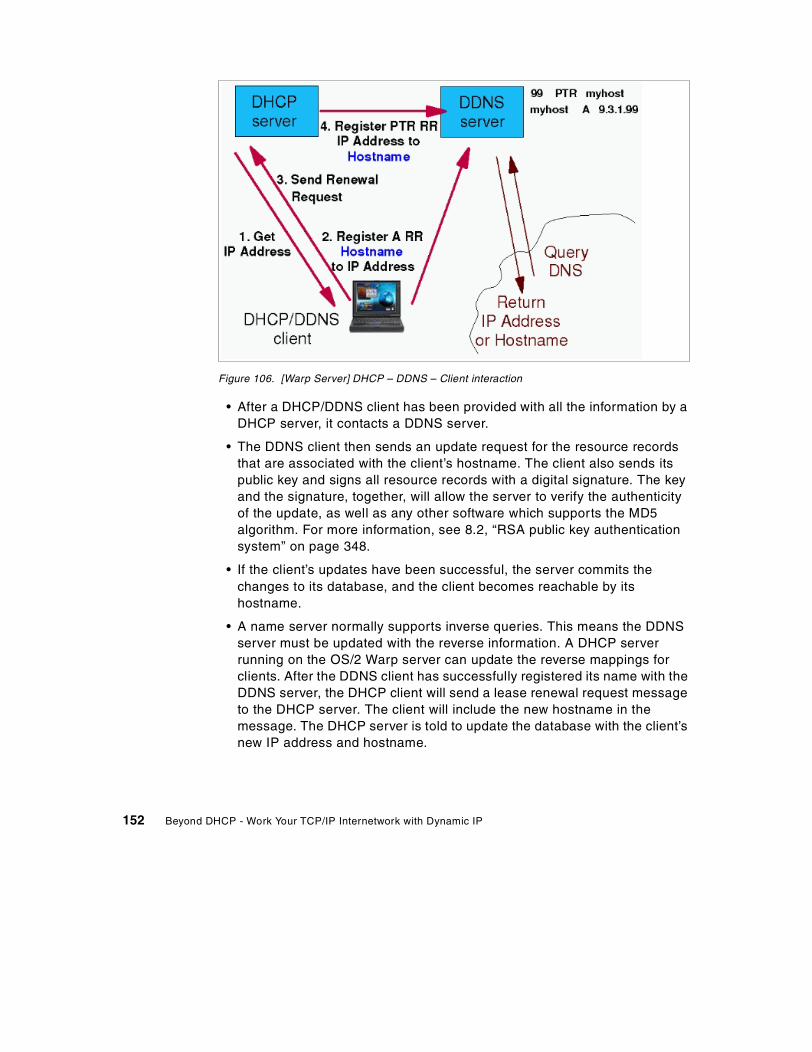
Figure 106. [Warp Server] DHCP – DDNS – Client interaction
• After a DHCP/DDNS client has been provided with all the information by aDHCP server, it contacts a DDNS server.
• The DDNS client then sends an update request for the resource recordsthat are associated with the client’s hostname. The client also sends itspublic key and signs all resource records with a digital signature. The keyand the signature, together, will allow the server to verify the authenticityof the update, as well as any other software which supports the MD5algorithm. For more information, see 8.2, “RSA public key authenticationsystem” on page 348.
• If the client’s updates have been successful, the server commits thechanges to its database, and the client becomes reachable by itshostname.
• A name server normally supports inverse queries. This means the DDNSserver must be updated with the reverse information. A DHCP serverrunning on the OS/2 Warp server can update the reverse mappings forclients. After the DDNS client has successfully registered its name with theDDNS server, the DHCP client will send a lease renewal request messageto the DHCP server. The client will include the new hostname in themessage. The DHCP server is told to update the database with the client’snew IP address and hostname.
152 Beyond DHCP - Work Your TCP/IP Internetwork with Dynamic IP
4.2.1.3 SecurityBy having a DHCP and DDNS server in your network, hostnames can beregistered automatically and updated dynamically. However, this means thatwithout DDNS client authentication, an unauthorized host might impersonatean unsuspecting host by remapping the address entry for the unsuspectinghost to that of its own and could intercept data (for example, logonpasswords) intended for the unsuspecting host.
RSA digital signature technology is implemented for DDNS in TCP/IP forOS/2 to authenticate the owner of the DNS records and to secure the DNSdatabase updates.
RSA digital signature technologyRSA digital signature technology is based on the use of private-public keypairs:
• The private key is used to generate a unique digital signature that can bevalidated only by using the corresponding public key.
• The private key cannot be derived from either the digital signature or thepublic key or the combination of the two.
When a DDNS client registers its hostname for the first time, it generates anRSA key pair. A public key is sent to the DDNS server and registered for thatparticular hostname.
The DDNS client retains the RSA key pair (with the private key encrypted) inthe client key file called DDNS.DAT (in the directory specified by the ETCenvironment variable). When the DDNS client updates the resource recordson the DDNS server, the digital signature is generated by using the privatekey and is sent to the server with the update data.
When the DDNS server receives the update request, it uses the DDNSclient’s public key (in the KEY resource record) to:
• Authenticate the owner of the update request to verify that the updaterequest was signed with the corresponding private key.
• Verify that the data was not changed since it was signed. (In other words,to verify that no one intercepted and changed the data on the way to thename server.)
In this way, only the owners of the original records, who posses the correctprivate key necessary to generate the correct digital signature, can updateresource records that are protected by an existing KEY resource record.
Chapter 4. Serving names 153
In addition, a DDNS administrator can create and use a zone key for eachdynamic domain. The zone key is the administrator’s RSA key pair for aparticular domain. This key enables the administrator to create, modify, ordelete any host’s record in the domain, regardless of who created therecords. The private key is used to generate a signature when theadministrator updates the requests, and the server examines the signature toverify that update requests are from the administrator. The public key isregistered in the domain data file as a KEY resource record for the domain.The private and public keys are stored in the DDNS.DAT file as theadministrator’s key file in the directory specified by the ETC environmentvariable.
For more information, see 8.2, “RSA public key authentication system” onpage 348.
Security planningAs discussed in the previous section, DDNS servers use RSA digitalsignatures to authenticate DDNS updates requests. DDNS supports twomodes of securing updates for a dynamic domain. Both modes protect therecords in the database from unauthorized updates.
Dynamic Secured Mode This is a default mode. In the dynamic secureddomain, DDNS clients can generate their ownRSA key pair and dynamically register a KEYresource record containing the public keywhen they create their own name record forthe first time. This means that servers allowany hosts with DDNS protocol to register theirhostnames, however, once registered, onlyregistered hosts (and administrators) areallowed to update their own entry.
Dynamic Presecured Mode This is an alternate mode to the securedmode. Figure 107 on page 155 summarizesdynamic presecured mode. In the presecureddynamic domain, DDNS clients must bepre-authorized by a DDNS administratorbefore they can create their name record. TheDDNS administrator must preregister hostsand generate RSA keys for each client. Thismeans that in presecured mode, the KEYresource record must be already defined in thedomain before an update is accepted. TheDDNS administrator must also distribute thecorrect corresponding key information to each
154 Beyond DHCP - Work Your TCP/IP Internetwork with Dynamic IP
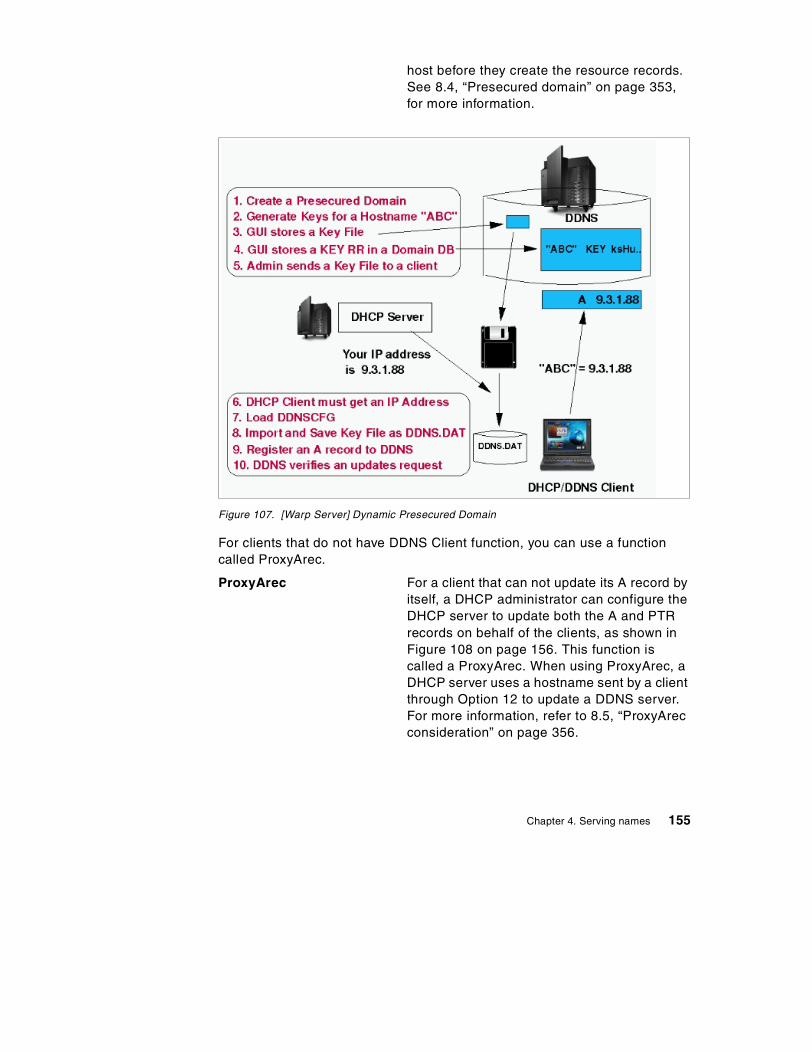
host before they create the resource records.See 8.4, “Presecured domain” on page 353,for more information.
Figure 107. [Warp Server] Dynamic Presecured Domain
For clients that do not have DDNS Client function, you can use a functioncalled ProxyArec.
ProxyArec For a client that can not update its A record byitself, a DHCP administrator can configure theDHCP server to update both the A and PTRrecords on behalf of the clients, as shown inFigure 108 on page 156. This function iscalled a ProxyArec. When using ProxyArec, aDHCP server uses a hostname sent by a clientthrough Option 12 to update a DDNS server.For more information, refer to 8.5, “ProxyArecconsideration” on page 356.
Chapter 4. Serving names 155
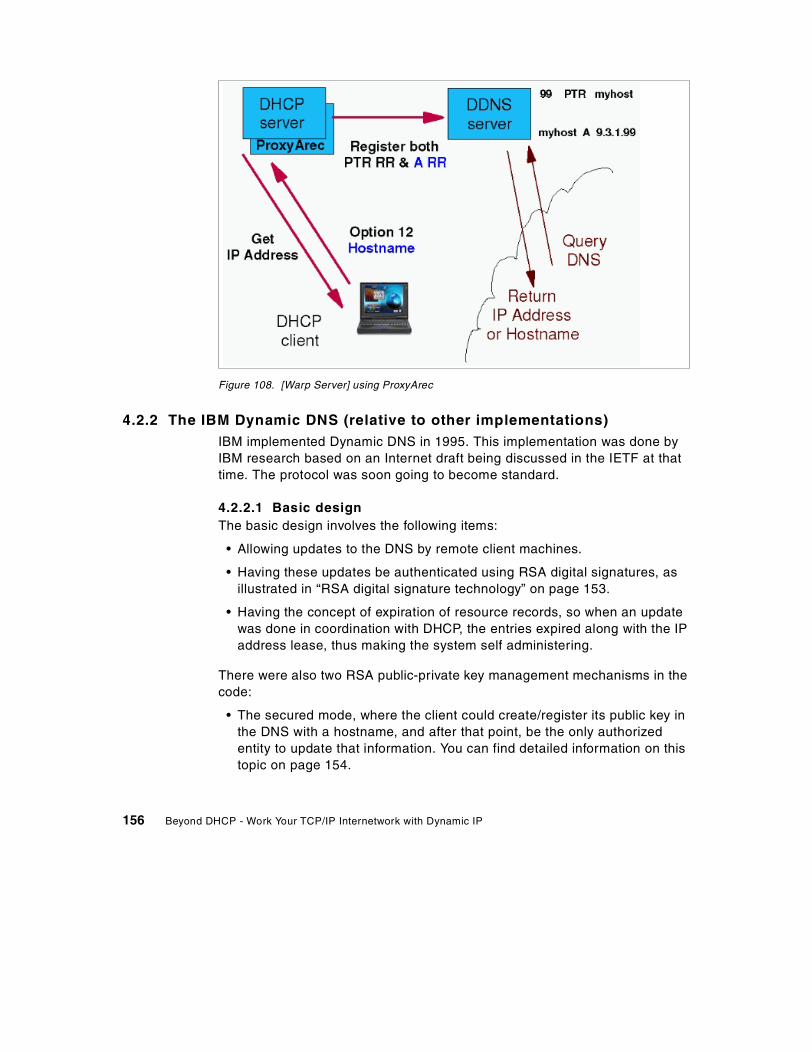
Figure 108. [Warp Server] using ProxyArec
4.2.2 The IBM Dynamic DNS (relative to other implementations)IBM implemented Dynamic DNS in 1995. This implementation was done byIBM research based on an Internet draft being discussed in the IETF at thattime. The protocol was soon going to become standard.
4.2.2.1 Basic designThe basic design involves the following items:
• Allowing updates to the DNS by remote client machines.
• Having these updates be authenticated using RSA digital signatures, asillustrated in “RSA digital signature technology” on page 153.
• Having the concept of expiration of resource records, so when an updatewas done in coordination with DHCP, the entries expired along with the IPaddress lease, thus making the system self administering.
There were also two RSA public-private key management mechanisms in thecode:
• The secured mode, where the client could create/register its public key inthe DNS with a hostname, and after that point, be the only authorizedentity to update that information. You can find detailed information on thistopic on page 154.
156 Beyond DHCP - Work Your TCP/IP Internetwork with Dynamic IP
• The presecured mode, where the systems administrator was the onlyauthorized entity to create/register a public key with a hostname. After thattime, the client machine that had the corresponding private key was theauthorized entity to update that entry. There is more information on thistopic on page 154.
The system was designed to integrate DHCP and DDNS, and moreimportantly, allow the client to manage its own A record in the DNS.
It is important to note that the IETF only standardizes protocol on the wire.The key management policies, the integration of DHCP and DDNS are all IBMdesign, which differentiate an integrated product from a pure technology.
4.2.2.2 Current state of the standardsThe IETF did not standardize the draft that IBM research worked from. Thatstandard evolved into the current RFC 2137 (Secure Dynamic Updates). Itsresource records in the DNS are almost identical to the IBM implementation.However, the protocol on the wire is different. It also deals with the issue ofintegrating dynamic updates into secure DNS resolving (RFC 2065) anddescribes two modes of operation, mode A and mode B. In mode A, theclient-signed RRs are stored as part of the DNS data, whereas in mode B, theserver signs all the records. The IBM implementation of dynamic updates isactually very close to mode A (although the secure resolving described inRFC2065 is not supported yet).
The IETF also has an unsecure updates standard RFC 2136. (It is currently inBIND 8.1.)
There is also another Internet draft using Transaction Signatures (T-Sig),which uses shared secrets rather than public key cryptography to securecommunication between the nameserver and a client. It seeks to be a simpleralternative to both RFC2065 for secure resolving and RFC2137 for dynamicupdates in those situations where the client and the server can establish atrust relationship. This is the mechanism Microsoft will probably use inWindows NT 5.0.
4.2.2.3 Differences in standardsThe following differences apply to IBM’s implementation of secured DynamicDNS versus RFC 2137, RFC2136, and T-Sig.
Chapter 4. Serving names 157
• IBM DDNS and RFC 2137
In normal cases, the logical evolution of IBM implementation would be tomove towards the RFC 2137 mechanism. This would not lead IBM to anynew function, but IBM would have the comfort of stating compliance withRFC 2137. This would become important if other vendors were developingclients or servers with this capability. No one has done so until now; so,doing this does not presently give IBM any practical advantage overmaintaining the current method.
• IBM DDNS and RFC2136
RFC 2136 was not designed for any authentication or expiration ofrecords. It was also not designed for clients updating the DNS records. Itdoes not have the following capabilities, which were essential for ourintegrated product:
- No real security mechanism. It accepts a list of IP addresses where theupdates to any record in the system can originate (per zone). Thus, notonly is this mechanism unsecure (anyone who can update can updateanyone's record), it is not scalable. One cannot realistically list everypossible IP address all the clients may be sending. Some users havetried to use this in a proxy-update mode, where the DHCP serverupdates both the entries, and the DHCP server's IP address is the onlyone allowed to update. This mechanism still has security flaws, sinceany machine can send any other machine’s hostname as the requestedname, and the DHCP server has no mechanism of verifying thatinformation.
- No mechanism of expiration. Thus, if a DHCP client got an address andthen moved away from the network, the DHCP server's IP addresslease would expire after a period of time and the address would getreused, but the DNS entry would have to be manually removed.
- No mechanism to detect out-of-order update requests or preventreplay-attacks. (No timestamp associated with the update request.)
• IBM DDNS and T-Sig
T-Sig accomplishes the goal of providing an authentication mechanism forupdates from clients. But, it still does not provide an expirationmechanism. This means that a client created its A-RR and moved awayfrom the network for some period of time. The PTR record created by theDHCP server could be deleted by it, but the A-RR (the hostname to IPaddress mapping) would remain in the DNS. So, if someone elseconnected to the network and got assigned the same IP address by theDHCP server (which is legal since the lease expired), that machine alsoreceived a hostname that it did not have access to.
158 Beyond DHCP - Work Your TCP/IP Internetwork with Dynamic IP

T-Sig also has scalability issues, since the shared secret keys aretheoretically unique between every client-name server pair, and must bepredefined in each.
T-Sig does have a timestamp associated with its update requests, butsince these timestamps are not stored with the data updated, it isquestionable how out-of-order update requests or replay attacks could beeffectively detected and/or prevented.
4.2.2.4 ConclusionMoving to the BIND 8.1.1 or the T-Sig capability introduces flaws in theupdate system, and is not recommended from a system design perspective.
4.2.3 ScenarioIn this section, we give an example of a simple network environment thatincludes only one subnet. In this network, we have a DHCP server on OS/2Warp Server for e-business (See 2.2, “OS/2 Warp Server for e-business as aDHCP server” on page 30 for details on DHCP server setup) running andanother OS/2 Warp Server with WorkSpace On-Demand manager running.We also have a few DHCP/DDNS client computers and WSOD clients. Whenwe started building our network, we set up a DHCP server, and, initially, didnot have a DNS/DDNS server. In this section we will integrate DDNS into ournetwork.
In this scenario, we configure OS/2 Warp Server as a Dynamic DNS server.We configure a DDNS server using one of two methods:
1. Dynamic secured mode
2. Dynamic presecured mode
Later in this chapter, we also configure our DHCP server to enable ProxyArecand have Windows 95 and WSOD clients configured through this function.
In our example, our domain name is armonk.cooking.net, and theDHCP/DDNS server's hostname is merlot. Table 7 shows our networkconfiguration:
Table 7. OS/2 Warp Server configuration information
Configuration settings Value
Network ID 192.168.6.0
Subnetmask 255.255.255.0
Domain name armonk.cooking.net
Chapter 4. Serving names 159
4.2.4 TasksThe following list describes the tasks required to complete the scenario,followed by detailed, step-by-step instructions.
1. Plan the primary domain.
2. Define your OS/2 Warp Server as a primary DNS server for your DDNSdomain.
3. Create a primary domain for forward mappings.
4. If using presecured mode, generate keys for the clients.
5. If there are hosts using a static IP address, add static records for them.
6. Configure a DHCP server to update PTR records.
7. Start the DDNS server
8. Restart the DHCP server.
9. Verify that the DDNS server is operating correctly.
4.2.5 PlanningBefore you start configuring your Dynamic DNS server, you need to make aplan for the design of your network that includes domain and security issues.
4.2.5.1 Designing your domain and domain name serverThe first step is to design your domain. Before you establish DNS servers inyour network, you need to determine the domain name for your domain.Furthermore, you need to determine which server is going to be the DynamicDNS server for your domain.
In our scenario, armonk.cooking.net is the primary domain name, and merlotis the name of the name server. All hosts on the 192.168.6.0 network areincluded in the domain armonk.cooking.net.
Then, you need to decide which hosts are going to be the DHCP/DDNSclients, and which are not. A DDNS name server must have a static IPaddress and, therefore, cannot be a DHCP client. If you have any other hoststhat have static IP configuration, you have to decide on their names andconfigure the DNS database manually.
DHCP/DDNS Server IP address 192.168.6.10
DHCP/DNS/WINS server hostname merlot
Configuration settings Value
160 Beyond DHCP - Work Your TCP/IP Internetwork with Dynamic IP
4.2.5.2 Security planningThe next step is to decide on security issues. Dynamic DNS in TCP/IPVersion 4.1 for OS/2 supports two modes of security:
• Dynamic Secured Mode• Dynamic Presecured Mode
To decide which mode to implement, refer to 4.2.1.3, “Security” on page 153.Also see Chapter 8, “Security of DHCP and Dynamic DNS” on page 347. Ifyou have clients that do not support DDNS, you need to enable the ProxyArecfunction at the DHCP server. For more information about ProxyArec, refer to8.5, “ProxyArec consideration” on page 356.
4.2.6 Setting up your DDNS serverThis section describes how to set up a DDNS server on your Warp Server.See 4.2.6.2, “Dynamic secured mode” on page 162 for details on how to setup a DDNS server with dynamic secured mode, and 4.2.6.3, “Dynamicpresecured mode” on page 168 shows you how to set up with dynamicpresecured mode. All values we used for configuration in the following stepsare the values we defined in our scenario.
4.2.6.1 Before setting upBefore you start configuring, make sure that the TCP/IP is configuredcorrectly. The Dynamic DNS server must have a static IP address, and,therefore, cannot be a DHCP client.
In addition, before using the DDNS Server Administrator GUI to configureDDNS, make sure that you have created a TCP/IP Administrator password.This was described in 2.2.2, “DHCP server preparation” on page 31.
The Dynamic DNS server itself can also be a DNS client. Follow the stepsbelow to add the DNS server information:
1. Open the TCP/IP Shadows folder and the TCP/IP Configuration folder,then double-click on TCP/IP Configuration (Local) or type TCPCFG2 at anOS/2 command prompt. The TCP/IP configuration settings notebook isdisplayed.
2. Click on the Host Names tab. Type hostname and local domain name.
3. Click Add. Type an IP address for the computer (DNS/DDNS server) andclick on OK.
4. Close and save the configuration.
Chapter 4. Serving names 161
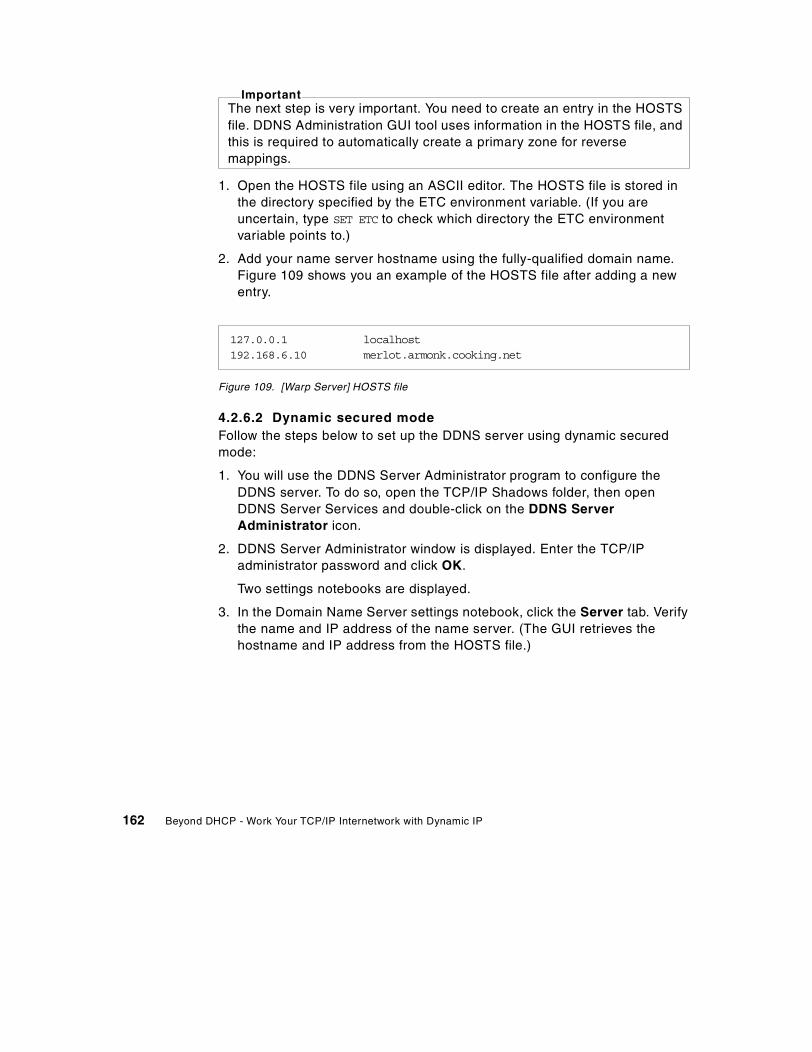
1. Open the HOSTS file using an ASCII editor. The HOSTS file is stored inthe directory specified by the ETC environment variable. (If you areuncertain, type SET ETC to check which directory the ETC environmentvariable points to.)
2. Add your name server hostname using the fully-qualified domain name.Figure 109 shows you an example of the HOSTS file after adding a newentry.
Figure 109. [Warp Server] HOSTS file
4.2.6.2 Dynamic secured modeFollow the steps below to set up the DDNS server using dynamic securedmode:
1. You will use the DDNS Server Administrator program to configure theDDNS server. To do so, open the TCP/IP Shadows folder, then openDDNS Server Services and double-click on the DDNS ServerAdministrator icon.
2. DDNS Server Administrator window is displayed. Enter the TCP/IPadministrator password and click OK.
Two settings notebooks are displayed.
3. In the Domain Name Server settings notebook, click the Server tab. Verifythe name and IP address of the name server. (The GUI retrieves thehostname and IP address from the HOSTS file.)
The next step is very important. You need to create an entry in the HOSTSfile. DDNS Administration GUI tool uses information in the HOSTS file, andthis is required to automatically create a primary zone for reversemappings.
Important
127.0.0.1 localhost192.168.6.10 merlot.armonk.cooking.net
162 Beyond DHCP - Work Your TCP/IP Internetwork with Dynamic IP
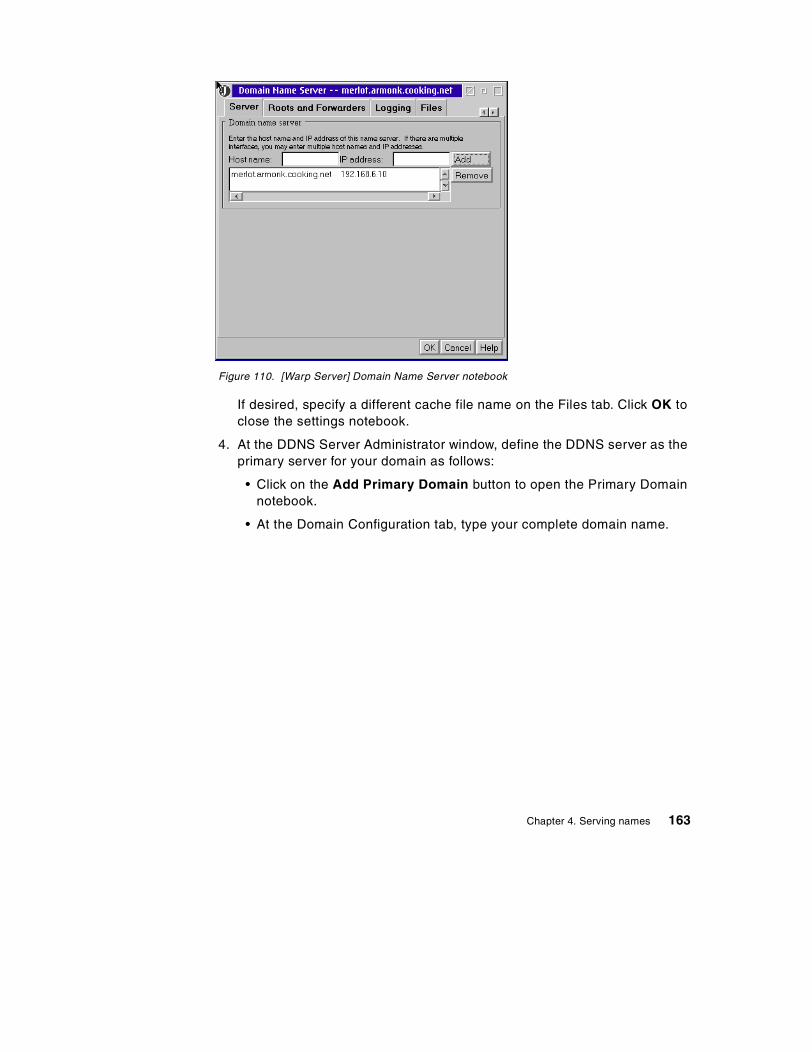
Figure 110. [Warp Server] Domain Name Server notebook
If desired, specify a different cache file name on the Files tab. Click OK toclose the settings notebook.
4. At the DDNS Server Administrator window, define the DDNS server as theprimary server for your domain as follows:
• Click on the Add Primary Domain button to open the Primary Domainnotebook.
• At the Domain Configuration tab, type your complete domain name.
Chapter 4. Serving names 163

Figure 111. [Warp Server] Primary Domain Configuration
• At the Domain Configuration tab, note that the domain type is Dynamicby default, as shown in Figure 111. Click on Dynamic Options andnote that Client automatically creates its own hostname (which meansDynamic Secured mode) is checked, as shown in Figure 112. Click OKto go back to the Domain Configuration tab.
Figure 112. [Warp Server] Setting secured mode
164 Beyond DHCP - Work Your TCP/IP Internetwork with Dynamic IP
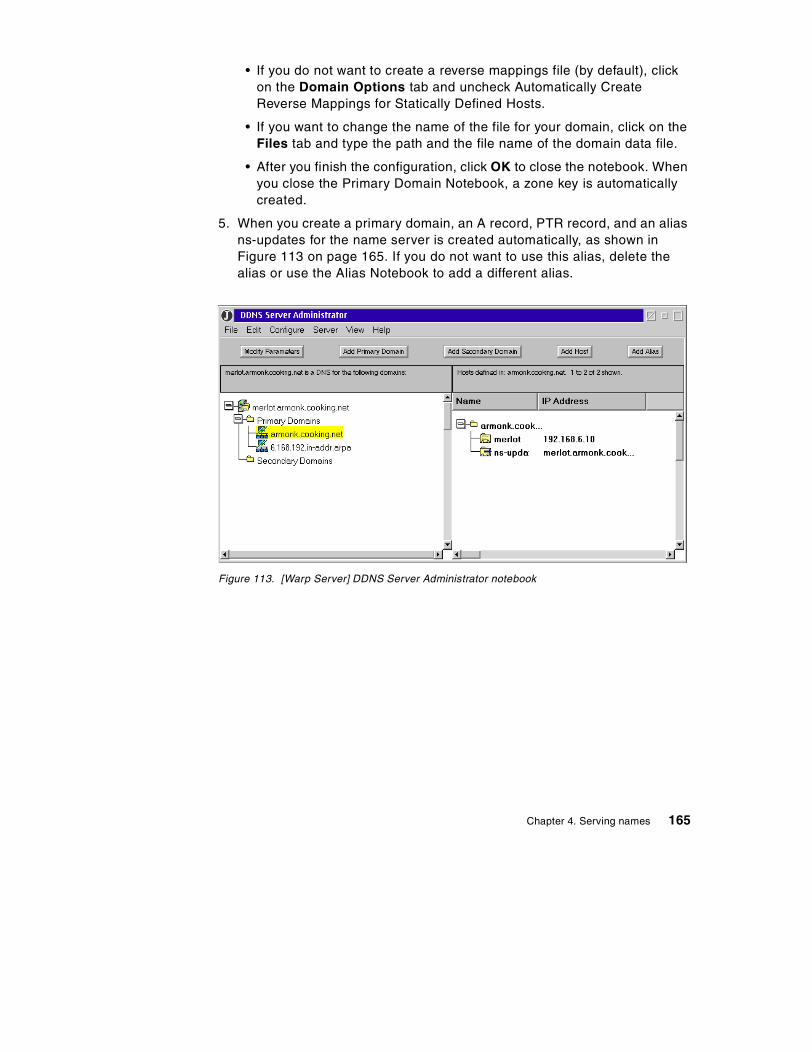
• If you do not want to create a reverse mappings file (by default), clickon the Domain Options tab and uncheck Automatically CreateReverse Mappings for Statically Defined Hosts.
• If you want to change the name of the file for your domain, click on theFiles tab and type the path and the file name of the domain data file.
• After you finish the configuration, click OK to close the notebook. Whenyou close the Primary Domain Notebook, a zone key is automaticallycreated.
5. When you create a primary domain, an A record, PTR record, and an aliasns-updates for the name server is created automatically, as shown inFigure 113 on page 165. If you do not want to use this alias, delete thealias or use the Alias Notebook to add a different alias.
Figure 113. [Warp Server] DDNS Server Administrator notebook
Chapter 4. Serving names 165
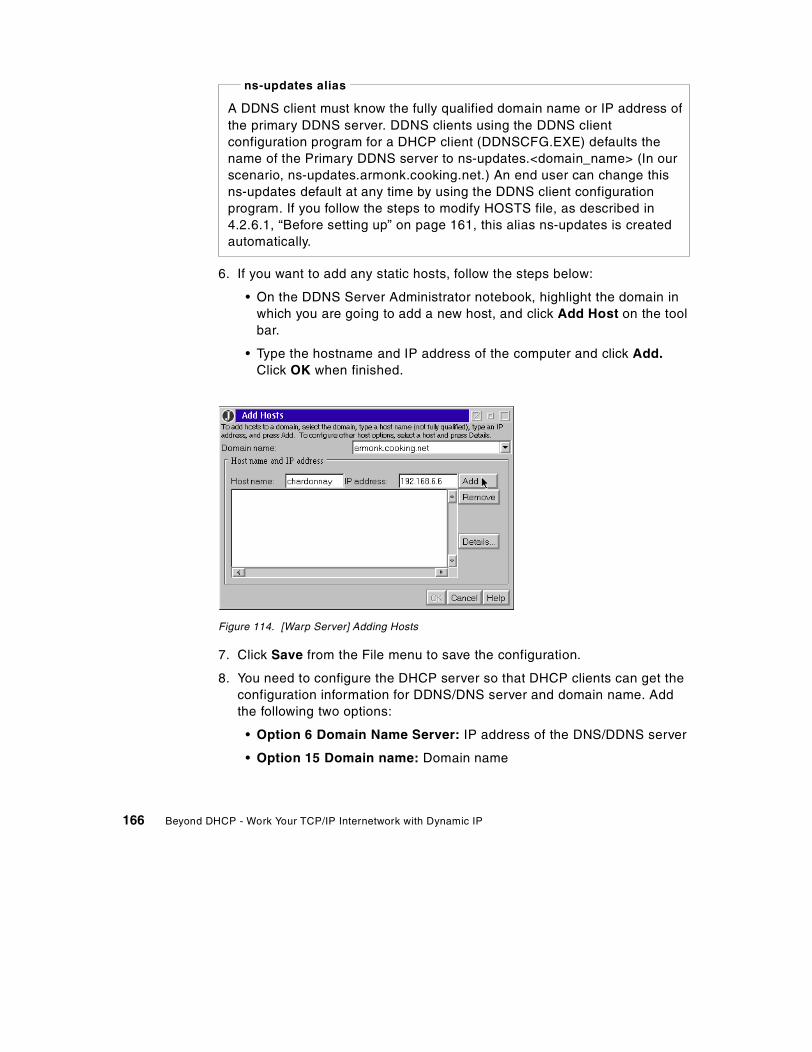
6. If you want to add any static hosts, follow the steps below:
• On the DDNS Server Administrator notebook, highlight the domain inwhich you are going to add a new host, and click Add Host on the toolbar.
• Type the hostname and IP address of the computer and click Add.Click OK when finished.
Figure 114. [Warp Server] Adding Hosts
7. Click Save from the File menu to save the configuration.
8. You need to configure the DHCP server so that DHCP clients can get theconfiguration information for DDNS/DNS server and domain name. Addthe following two options:
• Option 6 Domain Name Server: IP address of the DNS/DDNS server
• Option 15 Domain name: Domain name
A DDNS client must know the fully qualified domain name or IP address ofthe primary DDNS server. DDNS clients using the DDNS clientconfiguration program for a DHCP client (DDNSCFG.EXE) defaults thename of the Primary DDNS server to ns-updates.<domain_name> (In ourscenario, ns-updates.armonk.cooking.net.) An end user can change thisns-updates default at any time by using the DDNS client configurationprogram. If you follow the steps to modify HOSTS file, as described in4.2.6.1, “Before setting up” on page 161, this alias ns-updates is createdautomatically.
ns-updates alias
166 Beyond DHCP - Work Your TCP/IP Internetwork with Dynamic IP
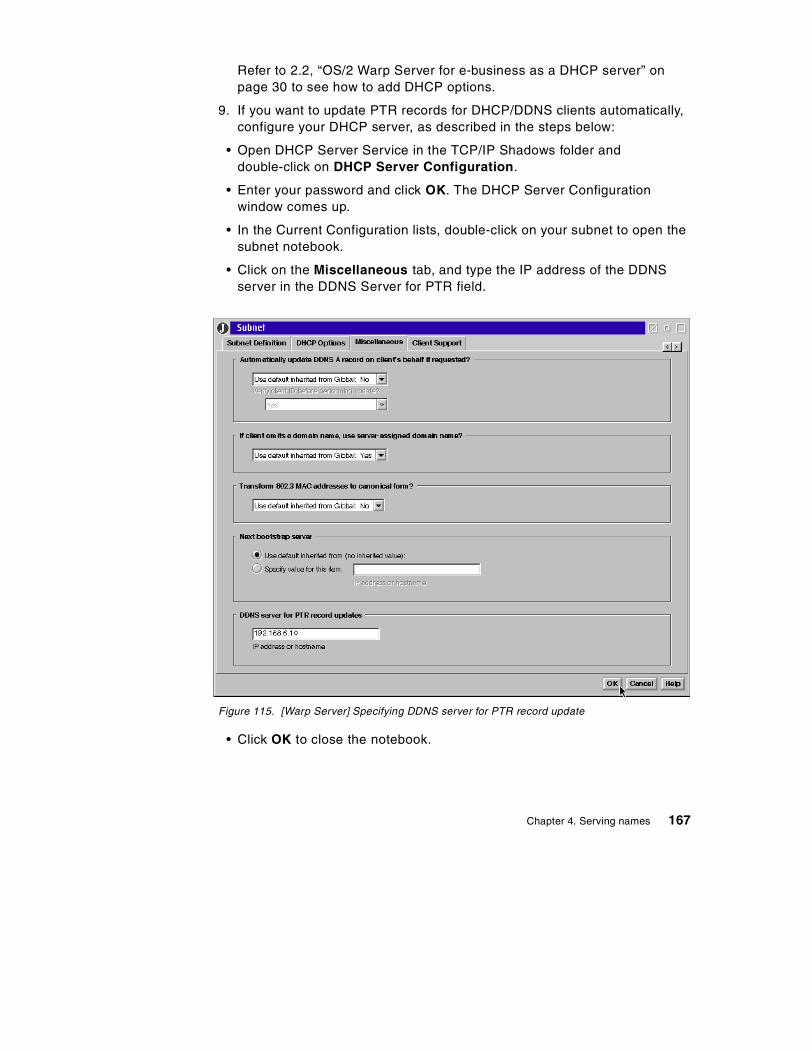
Refer to 2.2, “OS/2 Warp Server for e-business as a DHCP server” onpage 30 to see how to add DHCP options.
9. If you want to update PTR records for DHCP/DDNS clients automatically,configure your DHCP server, as described in the steps below:
• Open DHCP Server Service in the TCP/IP Shadows folder anddouble-click on DHCP Server Configuration.
• Enter your password and click OK. The DHCP Server Configurationwindow comes up.
• In the Current Configuration lists, double-click on your subnet to open thesubnet notebook.
• Click on the Miscellaneous tab, and type the IP address of the DDNSserver in the DDNS Server for PTR field.
Figure 115. [Warp Server] Specifying DDNS server for PTR record update
• Click OK to close the notebook.
Chapter 4. Serving names 167
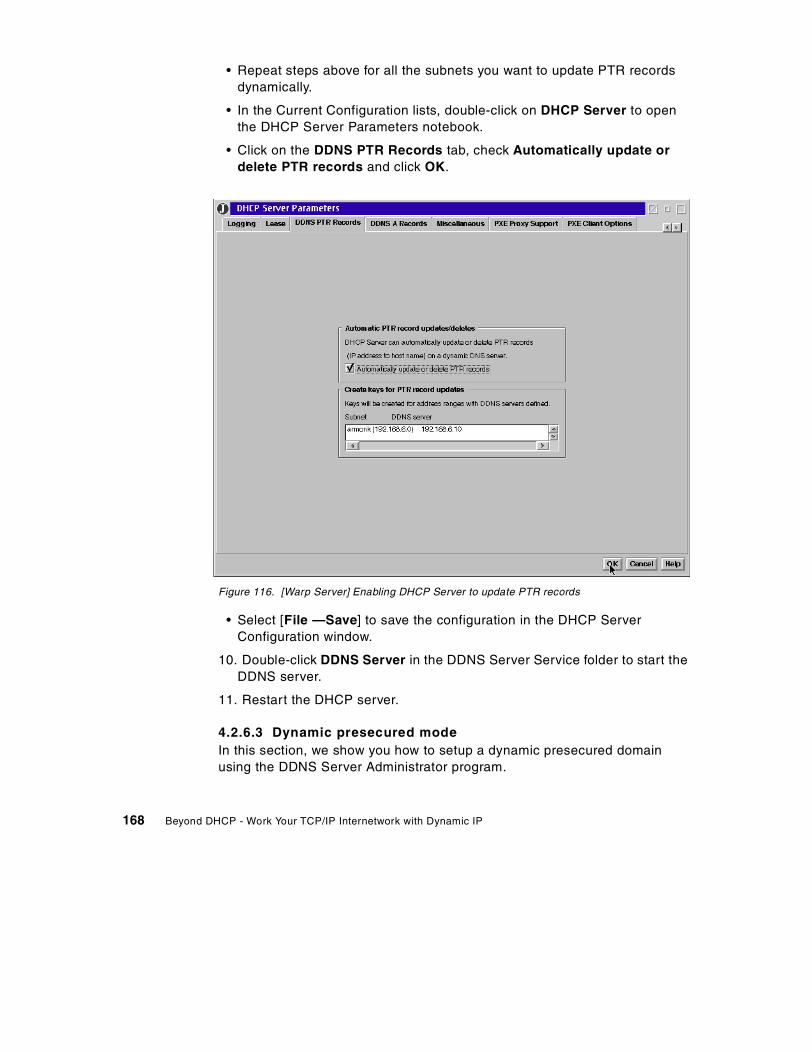
• Repeat steps above for all the subnets you want to update PTR recordsdynamically.
• In the Current Configuration lists, double-click on DHCP Server to openthe DHCP Server Parameters notebook.
• Click on the DDNS PTR Records tab, check Automatically update ordelete PTR records and click OK.
Figure 116. [Warp Server] Enabling DHCP Server to update PTR records
• Select [File —Save] to save the configuration in the DHCP ServerConfiguration window.
10. Double-click DDNS Server in the DDNS Server Service folder to start theDDNS server.
11. Restart the DHCP server.
4.2.6.3 Dynamic presecured modeIn this section, we show you how to setup a dynamic presecured domainusing the DDNS Server Administrator program.
168 Beyond DHCP - Work Your TCP/IP Internetwork with Dynamic IP
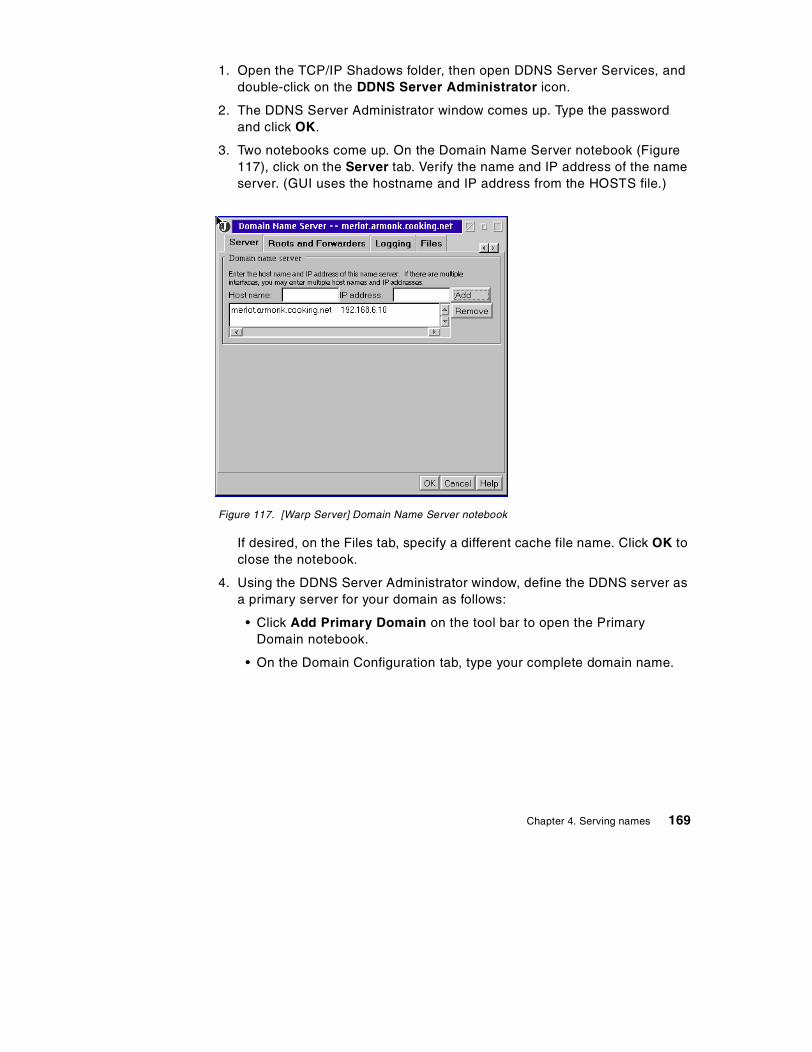
1. Open the TCP/IP Shadows folder, then open DDNS Server Services, anddouble-click on the DDNS Server Administrator icon.
2. The DDNS Server Administrator window comes up. Type the passwordand click OK.
3. Two notebooks come up. On the Domain Name Server notebook (Figure117), click on the Server tab. Verify the name and IP address of the nameserver. (GUI uses the hostname and IP address from the HOSTS file.)
Figure 117. [Warp Server] Domain Name Server notebook
If desired, on the Files tab, specify a different cache file name. Click OK toclose the notebook.
4. Using the DDNS Server Administrator window, define the DDNS server asa primary server for your domain as follows:
• Click Add Primary Domain on the tool bar to open the PrimaryDomain notebook.
• On the Domain Configuration tab, type your complete domain name.
Chapter 4. Serving names 169
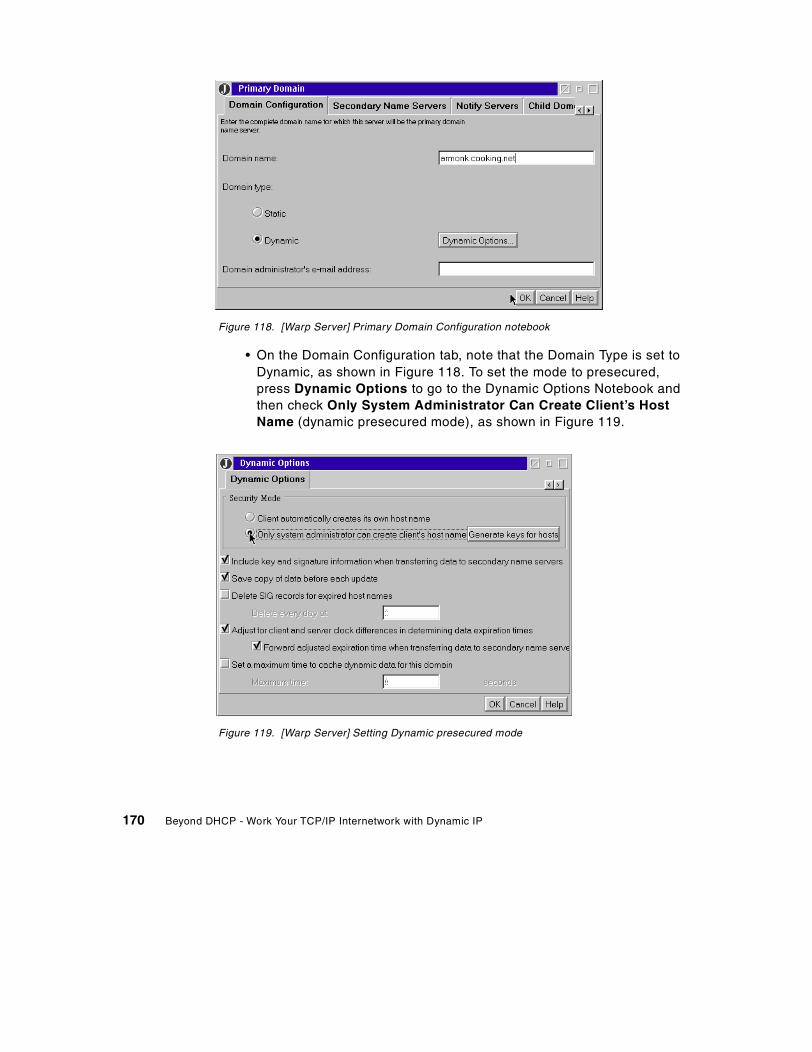
Figure 118. [Warp Server] Primary Domain Configuration notebook
• On the Domain Configuration tab, note that the Domain Type is set toDynamic, as shown in Figure 118. To set the mode to presecured,press Dynamic Options to go to the Dynamic Options Notebook andthen check Only System Administrator Can Create Client’s HostName (dynamic presecured mode), as shown in Figure 119.
Figure 119. [Warp Server] Setting Dynamic presecured mode
170 Beyond DHCP - Work Your TCP/IP Internetwork with Dynamic IP
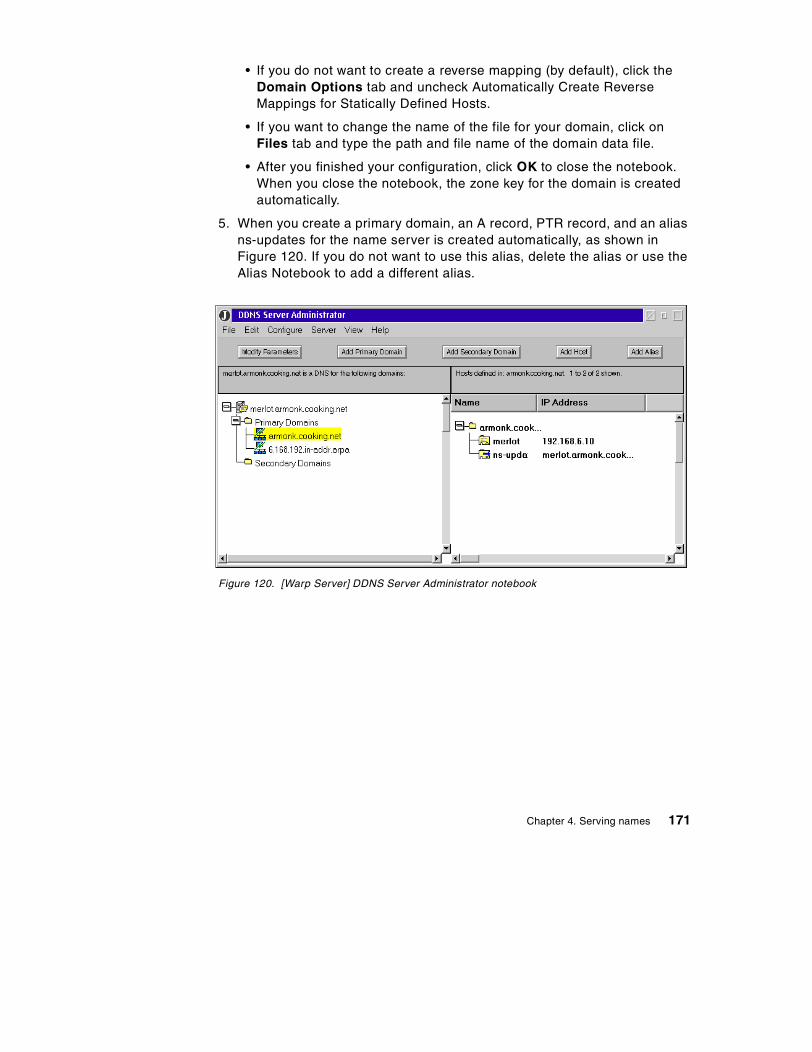
• If you do not want to create a reverse mapping (by default), click theDomain Options tab and uncheck Automatically Create ReverseMappings for Statically Defined Hosts.
• If you want to change the name of the file for your domain, click onFiles tab and type the path and file name of the domain data file.
• After you finished your configuration, click OK to close the notebook.When you close the notebook, the zone key for the domain is createdautomatically.
5. When you create a primary domain, an A record, PTR record, and an aliasns-updates for the name server is created automatically, as shown inFigure 120. If you do not want to use this alias, delete the alias or use theAlias Notebook to add a different alias.
Figure 120. [Warp Server] DDNS Server Administrator notebook
Chapter 4. Serving names 171

A DDNS client must know the fully qualified domain name or IP address ofthe primary DDNS server. DDNS clients using the DDNS clientconfiguration program for a DHCP client (DDNSCFG.EXE) defaults thename of the primary DDNS server to ns-updates.<domain_name>. (In ourscenario, ns-updates.armonk.cooking.net.) An end user can change thisns-updates default at any time by using the DDNS client configurationprogram. If you follow the steps to modify HOSTS file, as described in4.2.6.1, “Before setting up” on page 161, this alias ns-updates is createdautomatically.
ns-updates Alias
172 Beyond DHCP - Work Your TCP/IP Internetwork with Dynamic IP
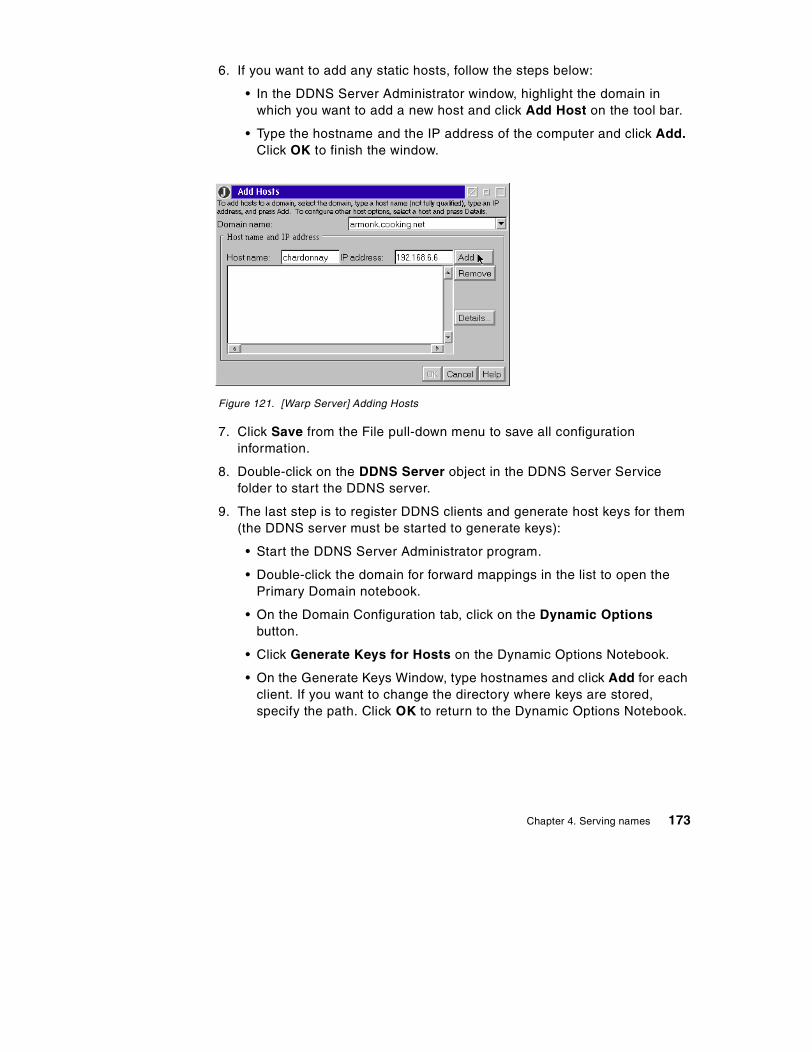
6. If you want to add any static hosts, follow the steps below:
• In the DDNS Server Administrator window, highlight the domain inwhich you want to add a new host and click Add Host on the tool bar.
• Type the hostname and the IP address of the computer and click Add.Click OK to finish the window.
Figure 121. [Warp Server] Adding Hosts
7. Click Save from the File pull-down menu to save all configurationinformation.
8. Double-click on the DDNS Server object in the DDNS Server Servicefolder to start the DDNS server.
9. The last step is to register DDNS clients and generate host keys for them(the DDNS server must be started to generate keys):
• Start the DDNS Server Administrator program.
• Double-click the domain for forward mappings in the list to open thePrimary Domain notebook.
• On the Domain Configuration tab, click on the Dynamic Optionsbutton.
• Click Generate Keys for Hosts on the Dynamic Options Notebook.
• On the Generate Keys Window, type hostnames and click Add for eachclient. If you want to change the directory where keys are stored,specify the path. Click OK to return to the Dynamic Options Notebook.
Chapter 4. Serving names 173
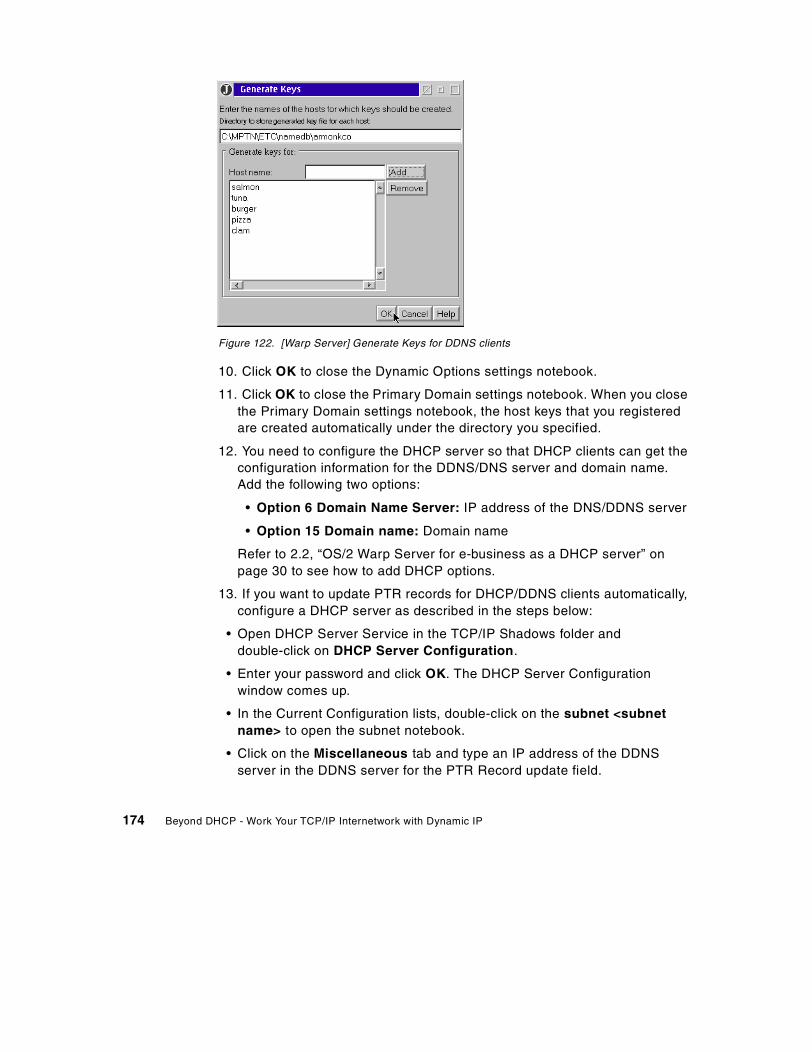
Figure 122. [Warp Server] Generate Keys for DDNS clients
10. Click OK to close the Dynamic Options settings notebook.
11. Click OK to close the Primary Domain settings notebook. When you closethe Primary Domain settings notebook, the host keys that you registeredare created automatically under the directory you specified.
12. You need to configure the DHCP server so that DHCP clients can get theconfiguration information for the DDNS/DNS server and domain name.Add the following two options:
• Option 6 Domain Name Server: IP address of the DNS/DDNS server
• Option 15 Domain name: Domain name
Refer to 2.2, “OS/2 Warp Server for e-business as a DHCP server” onpage 30 to see how to add DHCP options.
13. If you want to update PTR records for DHCP/DDNS clients automatically,configure a DHCP server as described in the steps below:
• Open DHCP Server Service in the TCP/IP Shadows folder anddouble-click on DHCP Server Configuration.
• Enter your password and click OK. The DHCP Server Configurationwindow comes up.
• In the Current Configuration lists, double-click on the subnet <subnetname> to open the subnet notebook.
• Click on the Miscellaneous tab and type an IP address of the DDNSserver in the DDNS server for the PTR Record update field.
174 Beyond DHCP - Work Your TCP/IP Internetwork with Dynamic IP
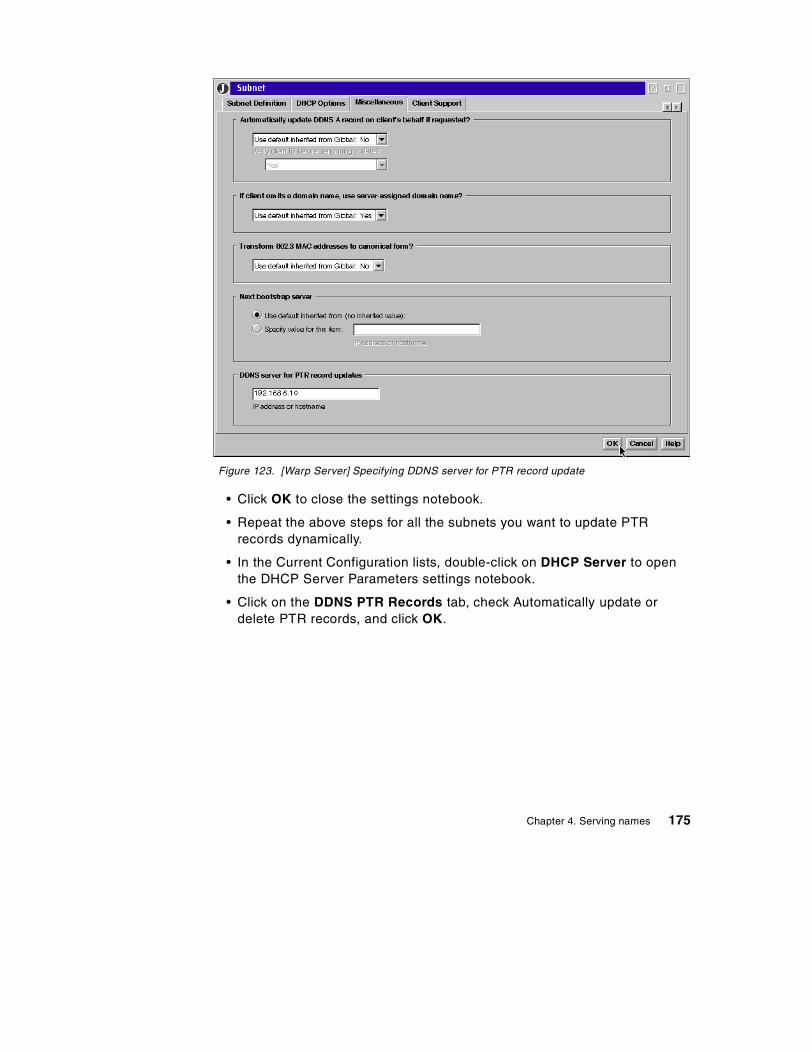
Figure 123. [Warp Server] Specifying DDNS server for PTR record update
• Click OK to close the settings notebook.
• Repeat the above steps for all the subnets you want to update PTRrecords dynamically.
• In the Current Configuration lists, double-click on DHCP Server to openthe DHCP Server Parameters settings notebook.
• Click on the DDNS PTR Records tab, check Automatically update ordelete PTR records, and click OK.
Chapter 4. Serving names 175
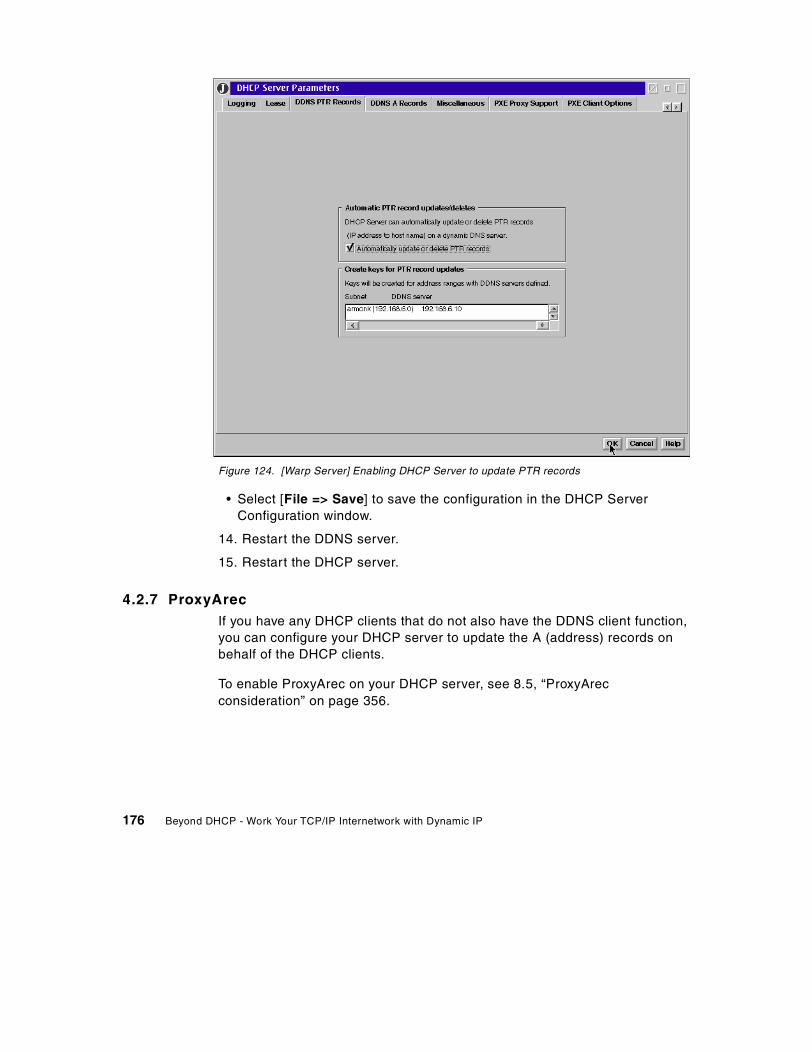
Figure 124. [Warp Server] Enabling DHCP Server to update PTR records
• Select [File => Save] to save the configuration in the DHCP ServerConfiguration window.
14. Restart the DDNS server.
15. Restart the DHCP server.
4.2.7 ProxyArecIf you have any DHCP clients that do not also have the DDNS client function,you can configure your DHCP server to update the A (address) records onbehalf of the DHCP clients.
To enable ProxyArec on your DHCP server, see 8.5, “ProxyArecconsideration” on page 356.
176 Beyond DHCP - Work Your TCP/IP Internetwork with Dynamic IP
4.2.8 VerificationThe last step is to make sure that your DDNS server is working properly. Toverify the configuration, you can do the following:
• Verify that the name server can resolve names.
• Check the NSUPDATE log file.
4.2.8.1 Verifying the DDNS server configurationUse the HOST and NSLOOKUP commands to check whether the DDNS server canresolve names.
The HOST command contacts a DNS server to translate a specified hostnameto its IP address or specified IP address to its hostname. For syntaxinformation on the HOST command, refer to 10.2.6, “The HOST command” onpage 388.
The command NSLOOKUP queries a DNS server in either interactive ornon-interactive mode. The NSLOOKUP command syntax information is providedin 10.2.7, “The NSLOOKUP command” on page 389.
4.2.8.2 Checking the NSUPDATE logThe NSUPDATE agent, when used for a DHCP client, or server, logs allsignificant events to the NSUPDATE.LOG file. This file is stored in thedirectory specified by the ETC environment variable.
4.2.9 DDNS filesThis section describes the configuration files used by the DDNS server. Theconfiguration files used by the DDNS server are:
• Configuration file
• Boot file
• Cache file
• Domain data files
These files are created and updated automatically when you configure yourdomain using the DDNS Server Administrator program. It is possible to createthese files manually, but we recommend you use the DDNS ServerAdministrator program, because this program checks the configuration to seeif there are any mistakes in the configuration you defined. It alsoautomatically updates the serial number so that the secondary name servercan notice that there has been a change in the database. In addition, by using
Chapter 4. Serving names 177
a GUI, you do not need to execute the DDNSZONE command to generate keys,because the program automatically does it for you.
4.2.9.1 Configuration file DNSEXT.CFGMany of the new enhancements IBM has added to the standard BIND DNScode require configuration. These new features are configured in a separatefile, \MPTN\ETC\NAMEDB\DNSEXT.CFG, so that there is no confusion withstandard name server configuration files.
The DDNS server GUI creates the DNSEXT.CFG file. It has a few entries thatit places in there for its own information. However, this file is completelyoptional, since all parameters have default values.
Figure 125 on page 179 shows an example of the DNSEXT.CFG file.
178 Beyond DHCP - Work Your TCP/IP Internetwork with Dynamic IP
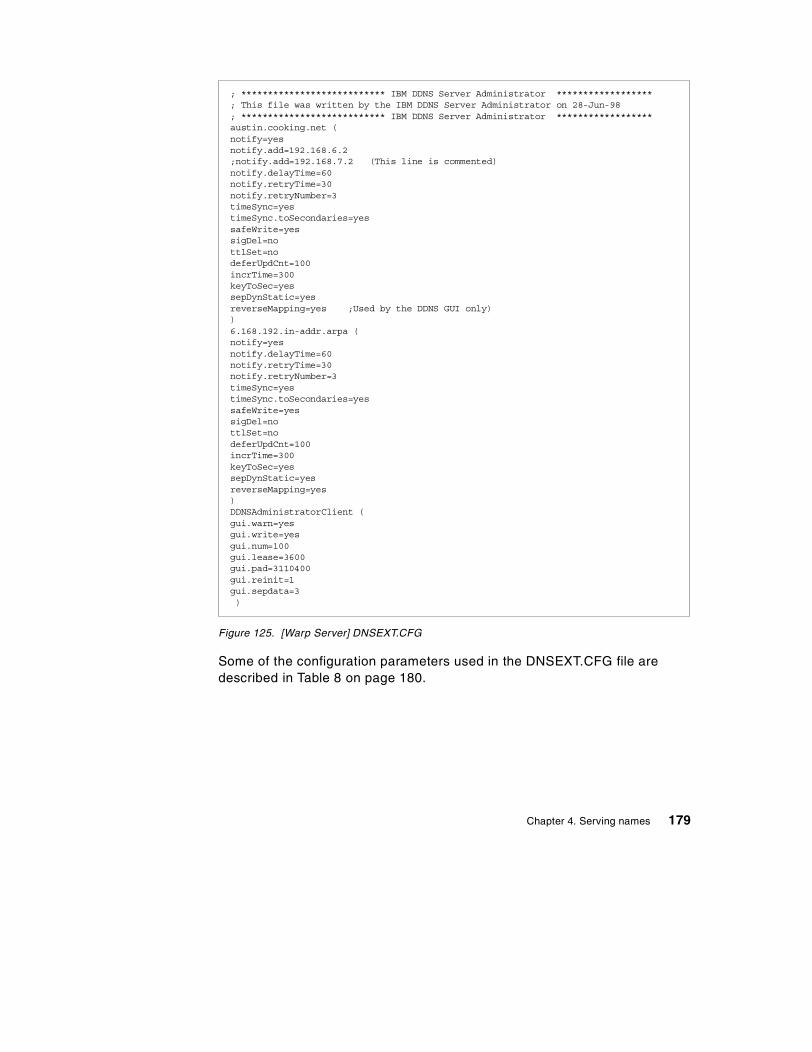
Figure 125. [Warp Server] DNSEXT.CFG
Some of the configuration parameters used in the DNSEXT.CFG file aredescribed in Table 8 on page 180.
; *************************** IBM DDNS Server Administrator ******************; This file was written by the IBM DDNS Server Administrator on 28-Jun-98; *************************** IBM DDNS Server Administrator ******************austin.cooking.net (notify=yesnotify.add=192.168.6.2;notify.add=192.168.7.2 (This line is commented)notify.delayTime=60notify.retryTime=30notify.retryNumber=3timeSync=yestimeSync.toSecondaries=yessafeWrite=yessigDel=nottlSet=nodeferUpdCnt=100incrTime=300keyToSec=yessepDynStatic=yesreverseMapping=yes ;Used by the DDNS GUI only))6.168.192.in-addr.arpa (notify=yesnotify.delayTime=60notify.retryTime=30notify.retryNumber=3timeSync=yestimeSync.toSecondaries=yessafeWrite=yessigDel=nottlSet=nodeferUpdCnt=100incrTime=300keyToSec=yessepDynStatic=yesreverseMapping=yes)DDNSAdministratorClient (gui.warn=yesgui.write=yesgui.num=100gui.lease=3600gui.pad=3110400gui.reinit=1gui.sepdata=3)
Chapter 4. Serving names 179
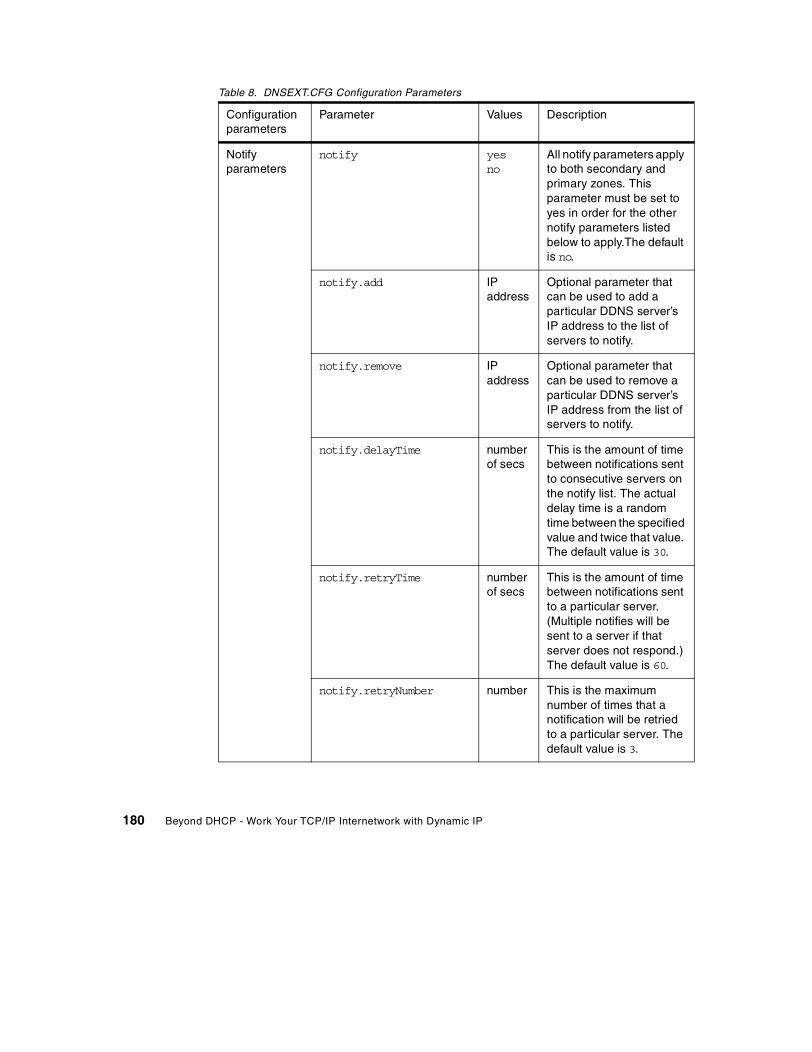
Table 8. DNSEXT.CFG Configuration Parameters
Configurationparameters
Parameter Values Description
Notifyparameters
notify yesno
All notify parameters applyto both secondary andprimary zones. Thisparameter must be set toyes in order for the othernotify parameters listedbelow to apply.The defaultis no.
notify.add IPaddress
Optional parameter thatcan be used to add aparticular DDNS server’sIP address to the list ofservers to notify.
notify.remove IPaddress
Optional parameter thatcan be used to remove aparticular DDNS server’sIP address from the list ofservers to notify.
notify.delayTime numberof secs
This is the amount of timebetween notifications sentto consecutive servers onthe notify list. The actualdelay time is a randomtime between the specifiedvalue and twice that value.The default value is 30.
notify.retryTime numberof secs
This is the amount of timebetween notifications sentto a particular server.(Multiple notifies will besent to a server if thatserver does not respond.)The default value is 60.
notify.retryNumber number This is the maximumnumber of times that anotification will be retriedto a particular server. Thedefault value is 3.
180 Beyond DHCP - Work Your TCP/IP Internetwork with Dynamic IP
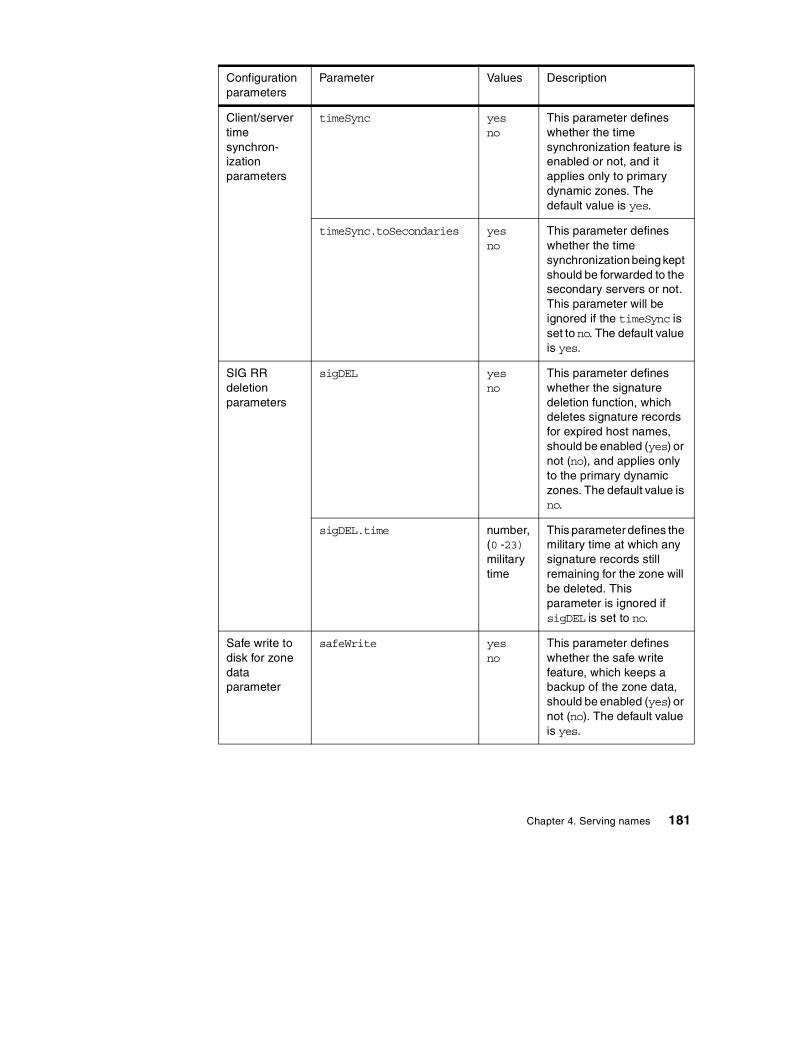
Client/servertimesynchron-izationparameters
timeSync yesno
This parameter defineswhether the timesynchronization feature isenabled or not, and itapplies only to primarydynamic zones. Thedefault value is yes.
timeSync.toSecondaries yesno
This parameter defineswhether the timesynchronization being keptshould be forwarded to thesecondary servers or not.This parameter will beignored if the timeSync isset tono. The default valueis yes.
SIG RRdeletionparameters
sigDEL yesno
This parameter defineswhether the signaturedeletion function, whichdeletes signature recordsfor expired host names,should be enabled (yes) ornot (no), and applies onlyto the primary dynamiczones. The default value isno.
sigDEL.time number,(0 -23)militarytime
This parameter defines themilitary time at which anysignature records stillremaining for the zone willbe deleted. Thisparameter is ignored ifsigDEL is set to no.
Safe write todisk for zonedataparameter
safeWrite yesno
This parameter defineswhether the safe writefeature, which keeps abackup of the zone data,should be enabled (yes) ornot (no). The default valueis yes.
Configurationparameters
Parameter Values Description
Chapter 4. Serving names 181
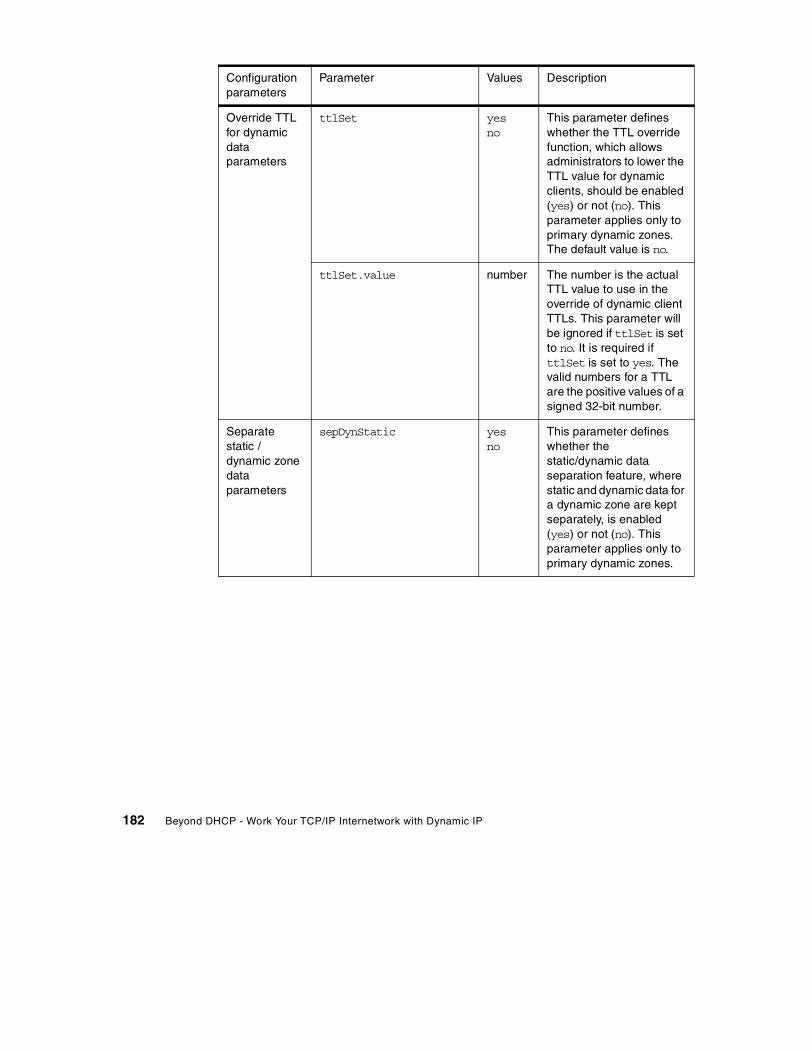
Override TTLfor dynamicdataparameters
ttlSet yesno
This parameter defineswhether the TTL overridefunction, which allowsadministrators to lower theTTL value for dynamicclients, should be enabled(yes) or not (no). Thisparameter applies only toprimary dynamic zones.The default value is no.
ttlSet.value number The number is the actualTTL value to use in theoverride of dynamic clientTTLs. This parameter willbe ignored if ttlSet is setto no. It is required ifttlSet is set to yes. Thevalid numbers for a TTLare the positive values of asigned 32-bit number.
Separatestatic /dynamic zonedataparameters
sepDynStatic yesno
This parameter defineswhether thestatic/dynamic dataseparation feature, wherestatic and dynamic data fora dynamic zone are keptseparately, is enabled(yes) or not (no). Thisparameter applies only toprimary dynamic zones.
Configurationparameters
Parameter Values Description
182 Beyond DHCP - Work Your TCP/IP Internetwork with Dynamic IP

Configurationparameters forInteropera-bility withearlierversions ofDDNS
keyToSec yesno
If keyToSec is set to no, itcorresponds tonokeytosec on theprimary line of the boot filein earlier versions ofDDNS.
incrTime numberofseconds
The default value is 300seconds (five minutes).This value corresponds tothe optional sixthparameter of the SOA RRfor primary dynamic zonesfrom earlier releases ofDDNS. It specifies themaximum amount of timeto wait after an updatebefore incrementing thezone serial number.
deferUpdCnt number The default value is 100.This value corresponds tothe optional seventhparameter of the SOA RRfor primary dynamic zonesfrom earlier releases ofDDNS. It specifies themaximum number ofupdates that can occurbefore the zone serialnumber is incremented.
Parametersused by theDDNS ServerGUI.
reverseMapping yesno
This attribute is placedinside normal domainentries.
DDNSAdministratorClient This value is set up in theform of a domain that isused by the GUI. Thisdomain and all its entriesare created and usedexclusively by and for theGUI.
Configurationparameters
Parameter Values Description
Chapter 4. Serving names 183
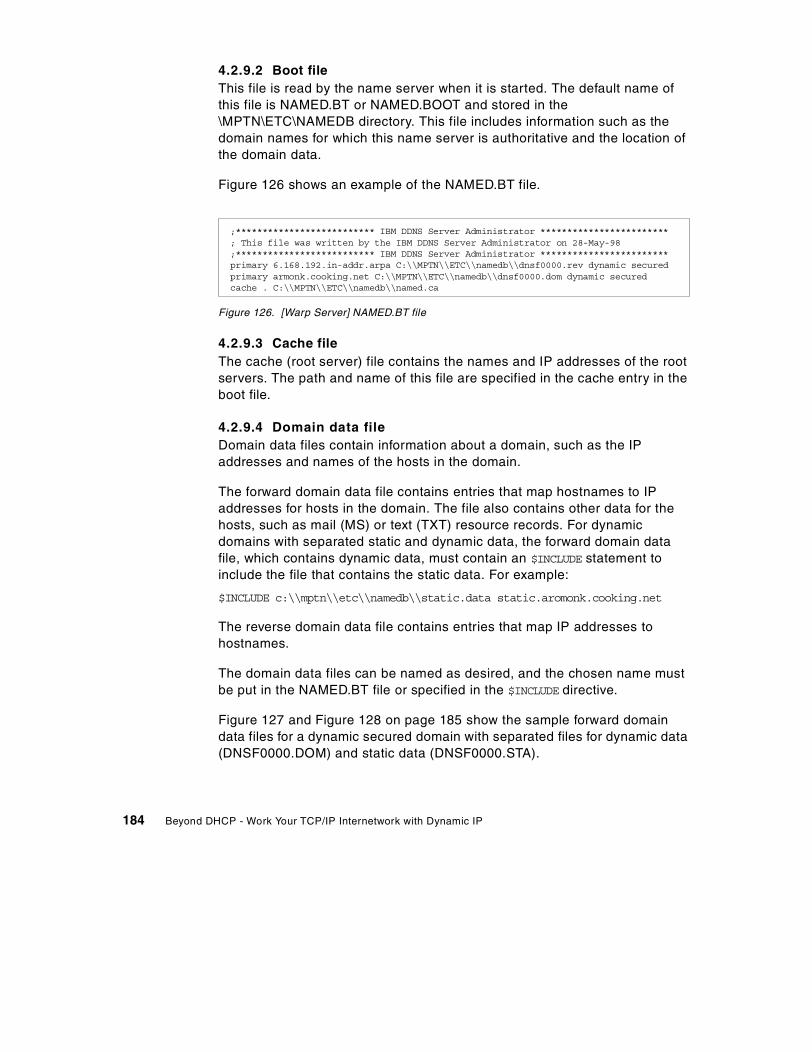
4.2.9.2 Boot fileThis file is read by the name server when it is started. The default name ofthis file is NAMED.BT or NAMED.BOOT and stored in the\MPTN\ETC\NAMEDB directory. This file includes information such as thedomain names for which this name server is authoritative and the location ofthe domain data.
Figure 126 shows an example of the NAMED.BT file.
Figure 126. [Warp Server] NAMED.BT file
4.2.9.3 Cache fileThe cache (root server) file contains the names and IP addresses of the rootservers. The path and name of this file are specified in the cache entry in theboot file.
4.2.9.4 Domain data fileDomain data files contain information about a domain, such as the IPaddresses and names of the hosts in the domain.
The forward domain data file contains entries that map hostnames to IPaddresses for hosts in the domain. The file also contains other data for thehosts, such as mail (MS) or text (TXT) resource records. For dynamicdomains with separated static and dynamic data, the forward domain datafile, which contains dynamic data, must contain an $INCLUDE statement toinclude the file that contains the static data. For example:
$INCLUDE c:\\mptn\\etc\\namedb\\static.data static.aromonk.cooking.net
The reverse domain data file contains entries that map IP addresses tohostnames.
The domain data files can be named as desired, and the chosen name mustbe put in the NAMED.BT file or specified in the $INCLUDE directive.
Figure 127 and Figure 128 on page 185 show the sample forward domaindata files for a dynamic secured domain with separated files for dynamic data(DNSF0000.DOM) and static data (DNSF0000.STA).
;************************** IBM DDNS Server Administrator ************************; This file was written by the IBM DDNS Server Administrator on 28-May-98;************************** IBM DDNS Server Administrator ************************primary 6.168.192.in-addr.arpa C:\\MPTN\\ETC\\namedb\\dnsf0000.rev dynamic securedprimary armonk.cooking.net C:\\MPTN\\ETC\\namedb\\dnsf0000.dom dynamic securedcache . C:\\MPTN\\ETC\\namedb\\named.ca
184 Beyond DHCP - Work Your TCP/IP Internetwork with Dynamic IP
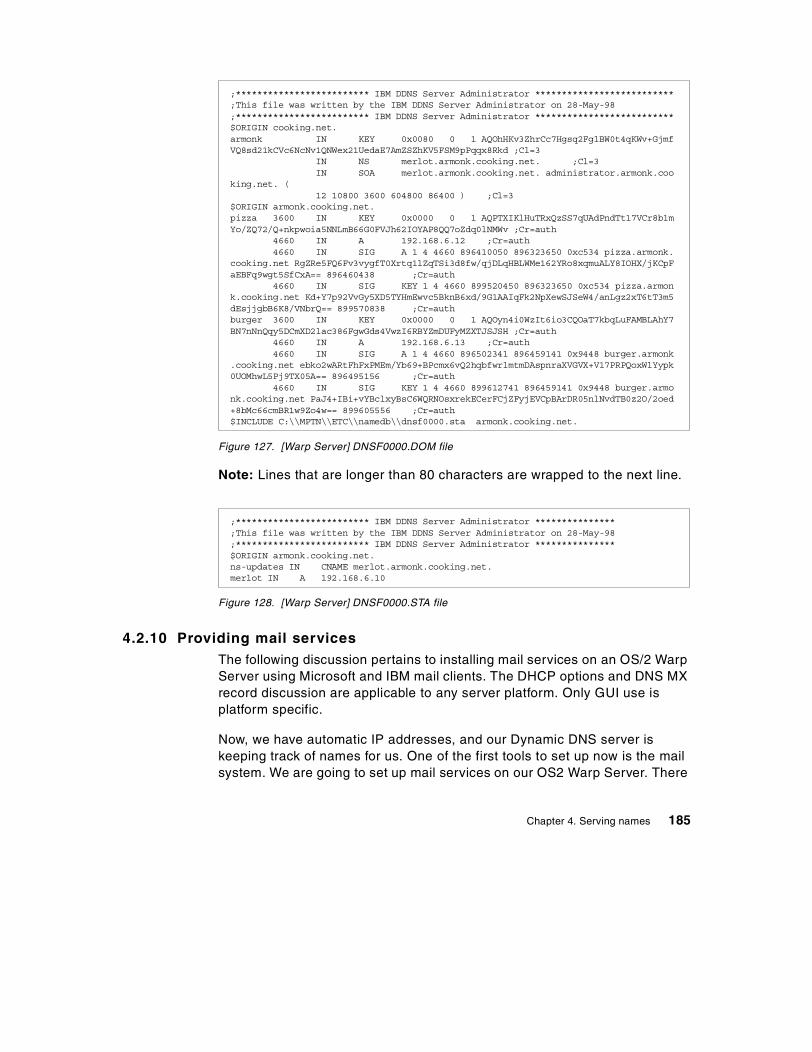
Figure 127. [Warp Server] DNSF0000.DOM file
Note: Lines that are longer than 80 characters are wrapped to the next line.
Figure 128. [Warp Server] DNSF0000.STA file
4.2.10 Providing mail servicesThe following discussion pertains to installing mail services on an OS/2 WarpServer using Microsoft and IBM mail clients. The DHCP options and DNS MXrecord discussion are applicable to any server platform. Only GUI use isplatform specific.
Now, we have automatic IP addresses, and our Dynamic DNS server iskeeping track of names for us. One of the first tools to set up now is the mailsystem. We are going to set up mail services on our OS2 Warp Server. There
;************************* IBM DDNS Server Administrator **************************;This file was written by the IBM DDNS Server Administrator on 28-May-98;************************* IBM DDNS Server Administrator **************************$ORIGIN cooking.net.armonk IN KEY 0x0080 0 1 AQOhHKv3ZhrCc7Hgsq2FglBW0t4qKWv+GjmfVQ8sd21kCVc6NcNv1QNWex21UedaE7AmZSZhKV5FSM9pPqqx8Rkd ;Cl=3
IN NS merlot.armonk.cooking.net. ;Cl=3IN SOA merlot.armonk.cooking.net. administrator.armonk.coo
king.net. (12 10800 3600 604800 86400 ) ;Cl=3
$ORIGIN armonk.cooking.net.pizza 3600 IN KEY 0x0000 0 1 AQPTXIKlHuTRxQzSS7qUAdPndTt17VCr8b1mYo/ZQ72/Q+nkpwoia5NNLmB66G0FVJh62IOYAP8QQ7oZdq0lNMWv ;Cr=auth
4660 IN A 192.168.6.12 ;Cr=auth4660 IN SIG A 1 4 4660 896410050 896323650 0xc534 pizza.armonk.
cooking.net RgZRe5FQ6Fv3vygfT0Xrtq1lZqTSi3d8fw/qjDLqHBLWMe162YRo8xqmuALY8IOHX/jKCpFaEBFq9wgt5SfCxA== 896460438 ;Cr=auth
4660 IN SIG KEY 1 4 4660 899520450 896323650 0xc534 pizza.armonk.cooking.net Kd+Y7p92VvGy5XD5TYHmEwvc5BknB6xd/9G1AAIqFk2NpXewSJSeW4/anLgz2xT6tT3m5dEsjjgbB6K8/VNbrQ== 899570838 ;Cr=authburger 3600 IN KEY 0x0000 0 1 AQOyn4i0WzIt6io3CQOaT7kbqLuFAMBLAhY7BN7nNnQqy5DCmXD2lac386FgwGds4VwzI6RBYZmDUFyMZXTJSJSH ;Cr=auth
4660 IN A 192.168.6.13 ;Cr=auth4660 IN SIG A 1 4 4660 896502341 896459141 0x9448 burger.armonk
.cooking.net ebko2wARtFhFxPMEm/Yb69+BPcmx6vQ2hqbfwrlmtmDAspnraXVGVX+V17PRPQoxWlYypk0UOMhwL5Pj9TX05A== 896495156 ;Cr=auth
4660 IN SIG KEY 1 4 4660 899612741 896459141 0x9448 burger.armonk.cooking.net PaJ4+IBi+vYBclxyBsC6WQRNOsxrekECerFCjZFyjEVCpBArDR05nlNvdTB0z2O/2oed+8bMc66cmBR1w9Zo4w== 899605556 ;Cr=auth$INCLUDE C:\\MPTN\\ETC\\namedb\\dnsf0000.sta armonk.cooking.net.
;************************* IBM DDNS Server Administrator ***************;This file was written by the IBM DDNS Server Administrator on 28-May-98;************************* IBM DDNS Server Administrator ***************$ORIGIN armonk.cooking.net.ns-updates IN CNAME merlot.armonk.cooking.net.merlot IN A 192.168.6.10
Chapter 4. Serving names 185
is a very robust POP3 mail server available called OS2POPS. This waswritten by IBM Employees and is available for free distribution and use. Wehave included Version 2.02 on the CD-ROM, but for the latest version, see:
http://www.raleigh.ibm.com/misc/os2pops
The SMTP mail server (sendmail) is shipped with OS/2 already; so, you canhave a mail system for no extra money. If you have decided to use Domino,you will probably want to use the SMTP (Simple Mail Transport Protocol) andPOP3 (Post Office Protocol) mail servers included in that product (refer toyour Domino documentation for this). The DHCP and DNS records we will talkabout will be applicable to your Domino installation, as well as you mailsystem installation.
In this section, you will learn how to configure a mail server so that it workswith your existing DNS system. You will learn how to install, configure, andsupport the mail system. We will use the DHCP GUI to provide our mailserver address to our clients. We will also use the nslookup tool to examineour name server records. Currently, if you run nslookup on your name server,you will not see any MX (mail exchanger) records. We will add the MX recordafter we setup the mail server. As mentioned in 1.6.5, “Resource recordtypes” on page 23, an MX record indicates a host that will deliver the mail tothe addressee, or it will forward the mail to another host that can do the same(that is, deliver or forward the mail). Forwarding is accomplished via SMTP. Tosummarize, the necessary steps are:
• Install, configure, and run a POP3 mailer.
• Install, configure, and run an SMTP mailer.
• Configure the DDNS server for mail processing or forwarding (MXrecords).
• Configure DHCP server to provide mailer addresses to clients (options 69,70).
Installing OS2POPS is simple. Unzip it into the directory where you want itinstalled, backup \MPTN\ETC\SENDMAIL.CF, and then run the programOS2POPS. You will get a screen similar to the one shown in Figure 129 onpage 187.
186 Beyond DHCP - Work Your TCP/IP Internetwork with Dynamic IP
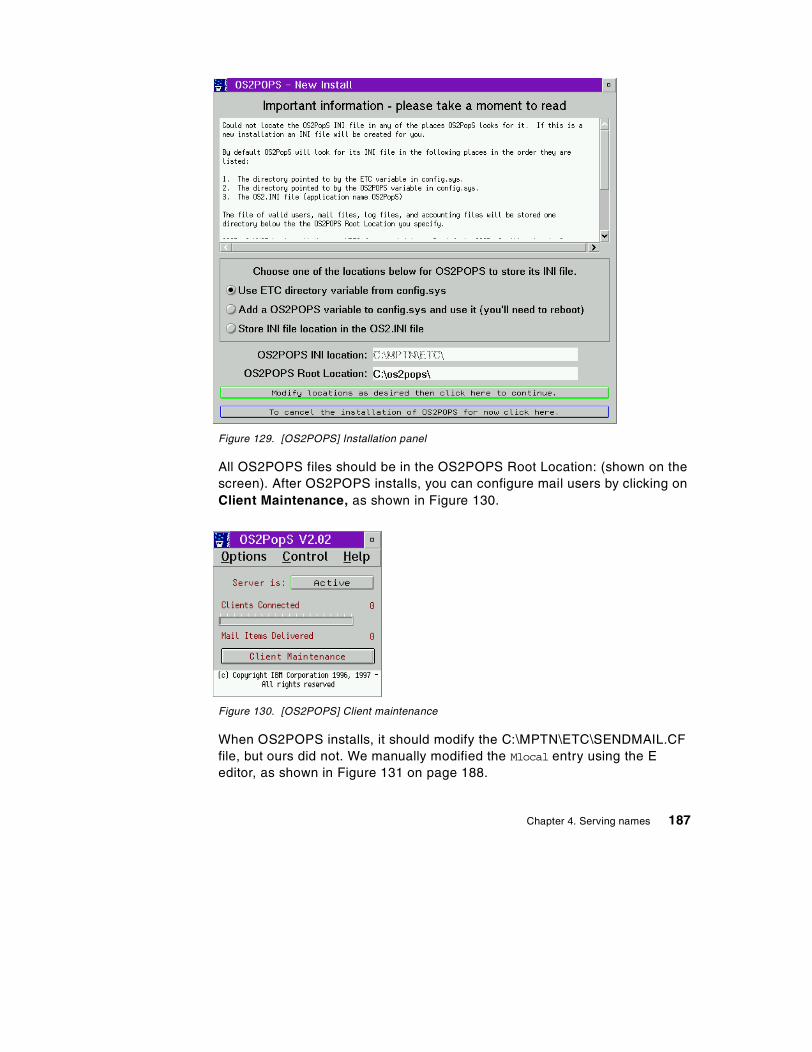
Figure 129. [OS2POPS] Installation panel
All OS2POPS files should be in the OS2POPS Root Location: (shown on thescreen). After OS2POPS installs, you can configure mail users by clicking onClient Maintenance, as shown in Figure 130.
Figure 130. [OS2POPS] Client maintenance
When OS2POPS installs, it should modify the C:\MPTN\ETC\SENDMAIL.CFfile, but ours did not. We manually modified the Mlocal entry using the Eeditor, as shown in Figure 131 on page 188.
Chapter 4. Serving names 187
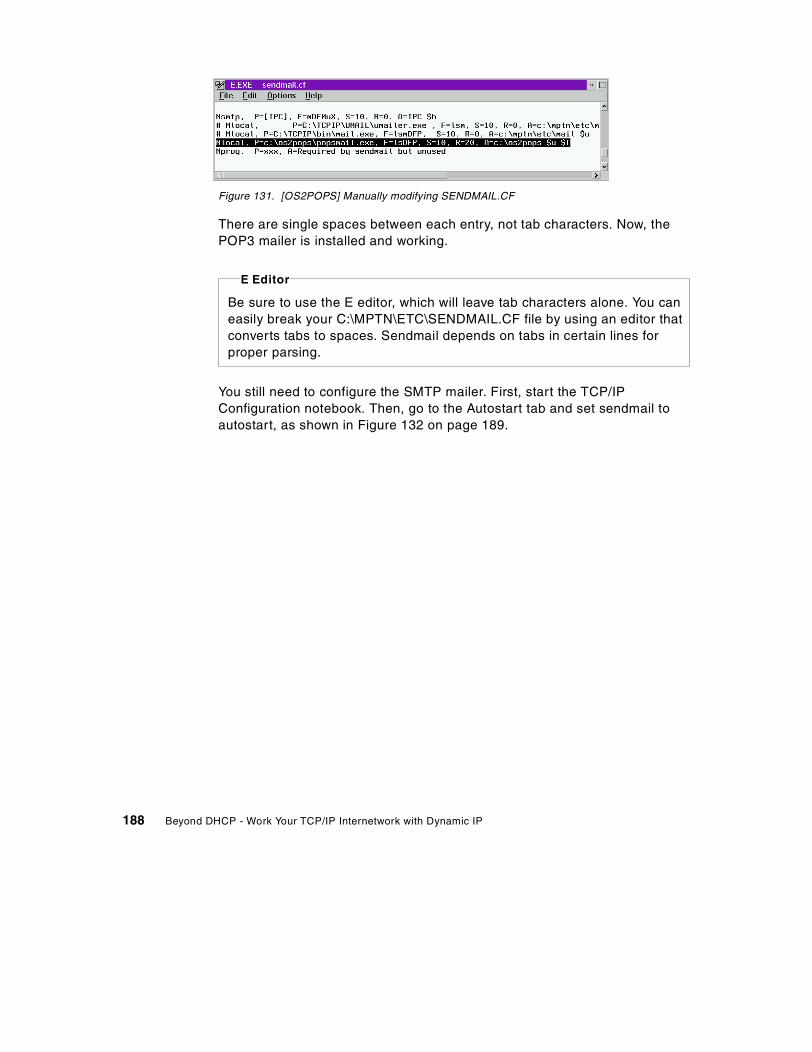
Figure 131. [OS2POPS] Manually modifying SENDMAIL.CF
There are single spaces between each entry, not tab characters. Now, thePOP3 mailer is installed and working.
You still need to configure the SMTP mailer. First, start the TCP/IPConfiguration notebook. Then, go to the Autostart tab and set sendmail toautostart, as shown in Figure 132 on page 189.
Be sure to use the E editor, which will leave tab characters alone. You caneasily break your C:\MPTN\ETC\SENDMAIL.CF file by using an editor thatconverts tabs to spaces. Sendmail depends on tabs in certain lines forproper parsing.
E Editor
188 Beyond DHCP - Work Your TCP/IP Internetwork with Dynamic IP
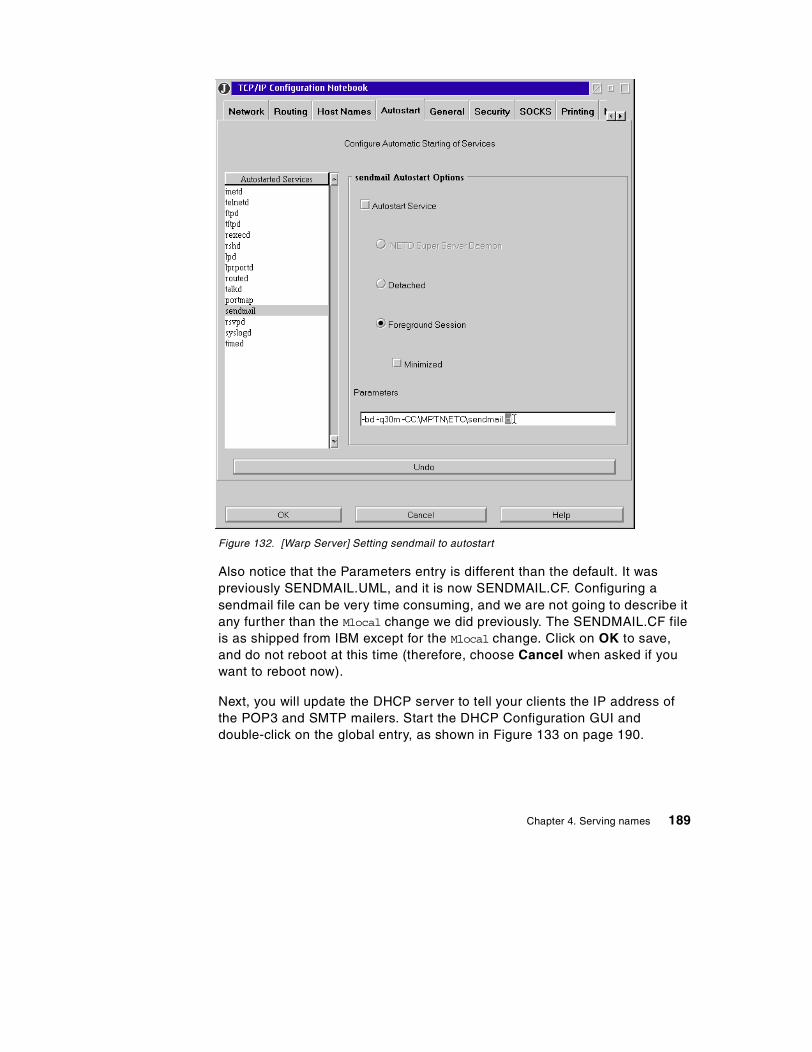
Figure 132. [Warp Server] Setting sendmail to autostart
Also notice that the Parameters entry is different than the default. It waspreviously SENDMAIL.UML, and it is now SENDMAIL.CF. Configuring asendmail file can be very time consuming, and we are not going to describe itany further than the Mlocal change we did previously. The SENDMAIL.CF fileis as shipped from IBM except for the Mlocal change. Click on OK to save,and do not reboot at this time (therefore, choose Cancel when asked if youwant to reboot now).
Next, you will update the DHCP server to tell your clients the IP address ofthe POP3 and SMTP mailers. Start the DHCP Configuration GUI anddouble-click on the global entry, as shown in Figure 133 on page 190.
Chapter 4. Serving names 189
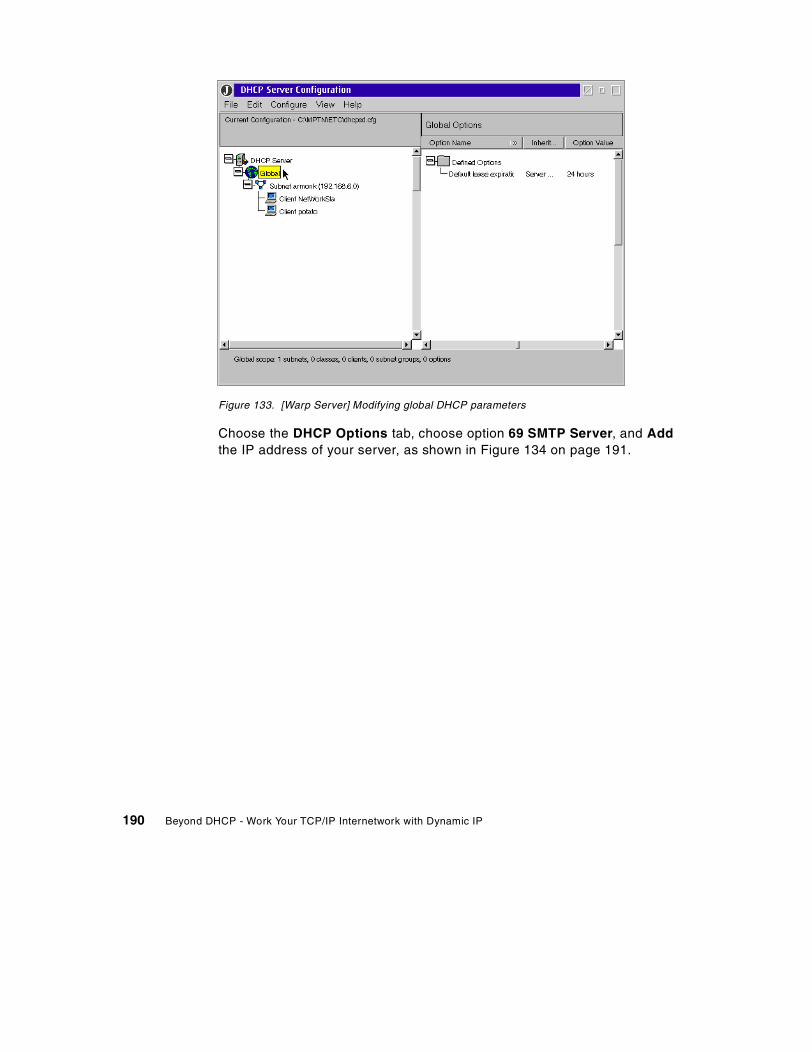
Figure 133. [Warp Server] Modifying global DHCP parameters
Choose the DHCP Options tab, choose option 69 SMTP Server, and Addthe IP address of your server, as shown in Figure 134 on page 191.
190 Beyond DHCP - Work Your TCP/IP Internetwork with Dynamic IP
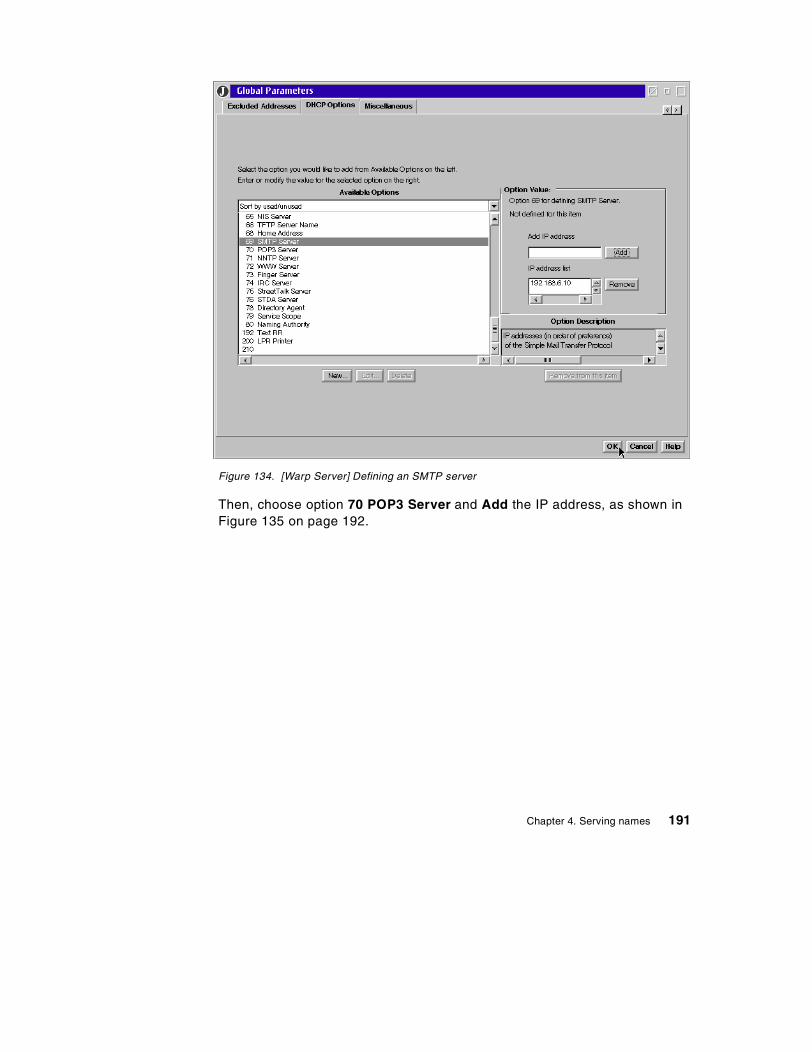
Figure 134. [Warp Server] Defining an SMTP server
Then, choose option 70 POP3 Server and Add the IP address, as shown inFigure 135 on page 192.
Chapter 4. Serving names 191
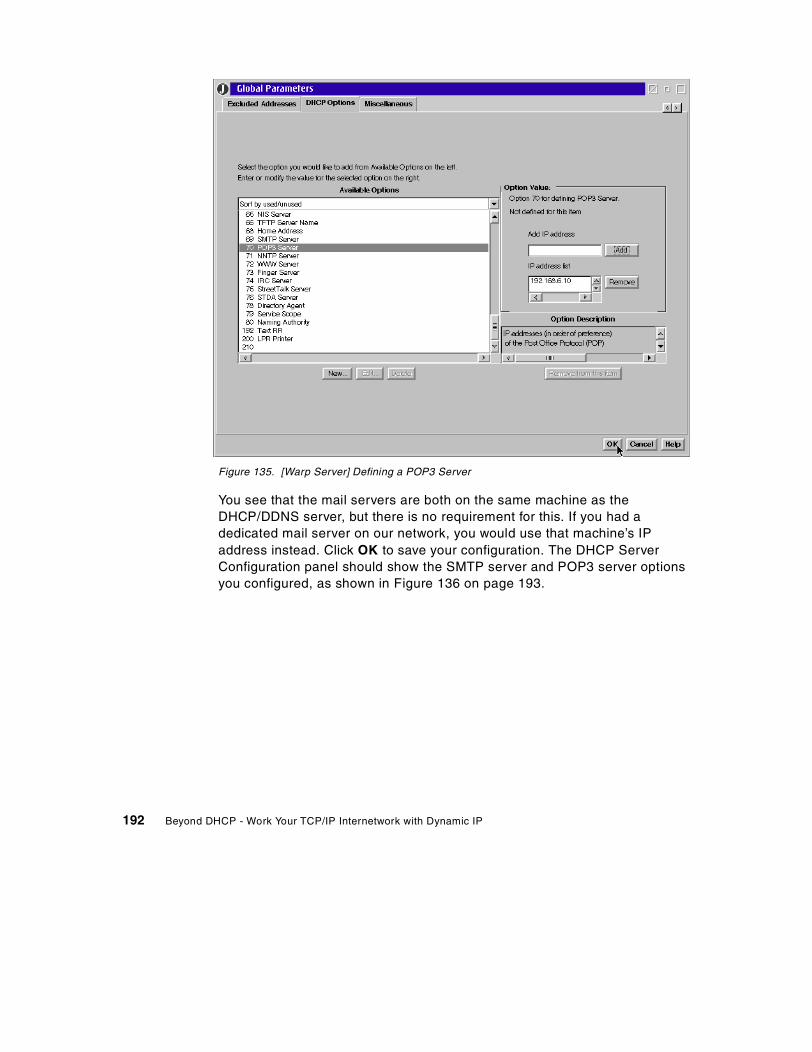
Figure 135. [Warp Server] Defining a POP3 Server
You see that the mail servers are both on the same machine as theDHCP/DDNS server, but there is no requirement for this. If you had adedicated mail server on our network, you would use that machine’s IPaddress instead. Click OK to save your configuration. The DHCP ServerConfiguration panel should show the SMTP server and POP3 server optionsyou configured, as shown in Figure 136 on page 193.
192 Beyond DHCP - Work Your TCP/IP Internetwork with Dynamic IP
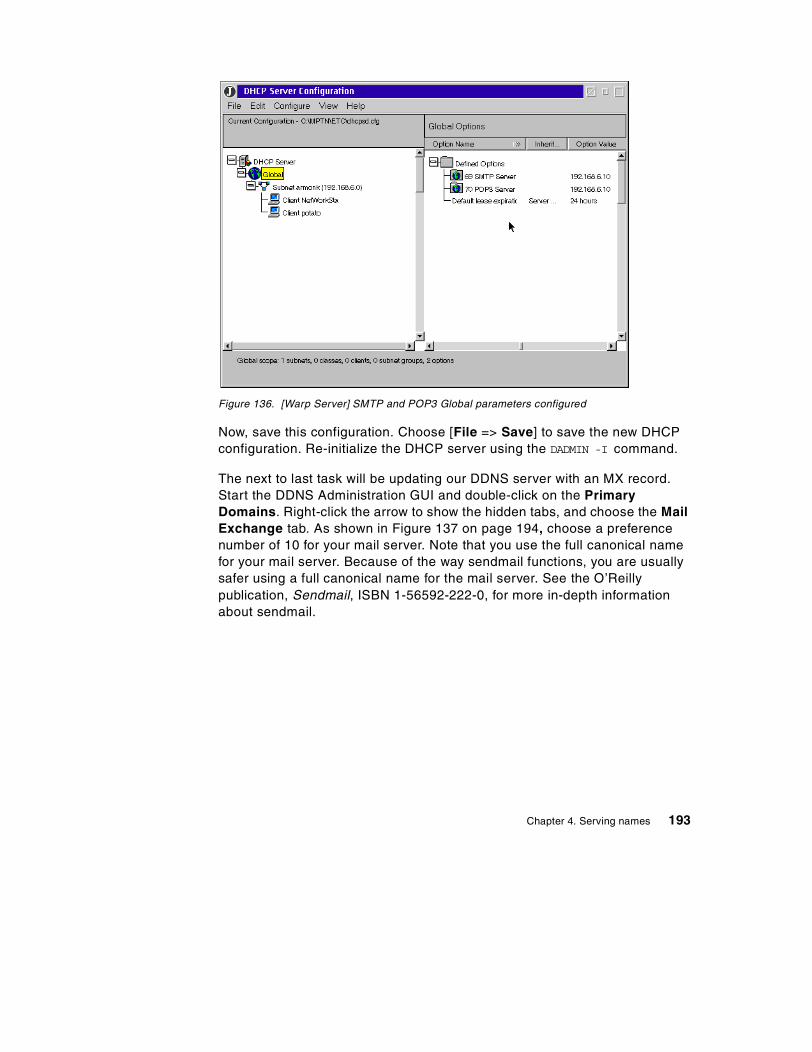
Figure 136. [Warp Server] SMTP and POP3 Global parameters configured
Now, save this configuration. Choose [File => Save] to save the new DHCPconfiguration. Re-initialize the DHCP server using the DADMIN -I command.
The next to last task will be updating our DDNS server with an MX record.Start the DDNS Administration GUI and double-click on the PrimaryDomains. Right-click the arrow to show the hidden tabs, and choose the MailExchange tab. As shown in Figure 137 on page 194, choose a preferencenumber of 10 for your mail server. Note that you use the full canonical namefor your mail server. Because of the way sendmail functions, you are usuallysafer using a full canonical name for the mail server. See the O’Reillypublication, Sendmail, ISBN 1-56592-222-0, for more in-depth informationabout sendmail.
Chapter 4. Serving names 193
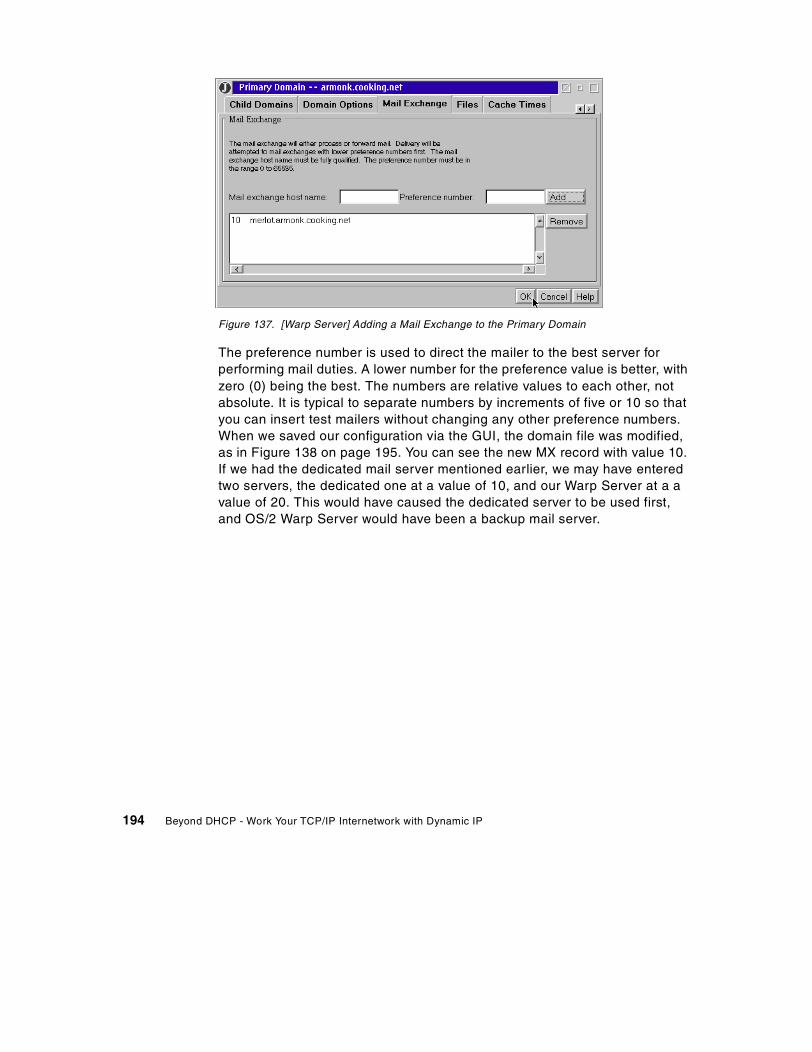
Figure 137. [Warp Server] Adding a Mail Exchange to the Primary Domain
The preference number is used to direct the mailer to the best server forperforming mail duties. A lower number for the preference value is better, withzero (0) being the best. The numbers are relative values to each other, notabsolute. It is typical to separate numbers by increments of five or 10 so thatyou can insert test mailers without changing any other preference numbers.When we saved our configuration via the GUI, the domain file was modified,as in Figure 138 on page 195. You can see the new MX record with value 10.If we had the dedicated mail server mentioned earlier, we may have enteredtwo servers, the dedicated one at a value of 10, and our Warp Server at a avalue of 20. This would have caused the dedicated server to be used first,and OS/2 Warp Server would have been a backup mail server.
194 Beyond DHCP - Work Your TCP/IP Internetwork with Dynamic IP
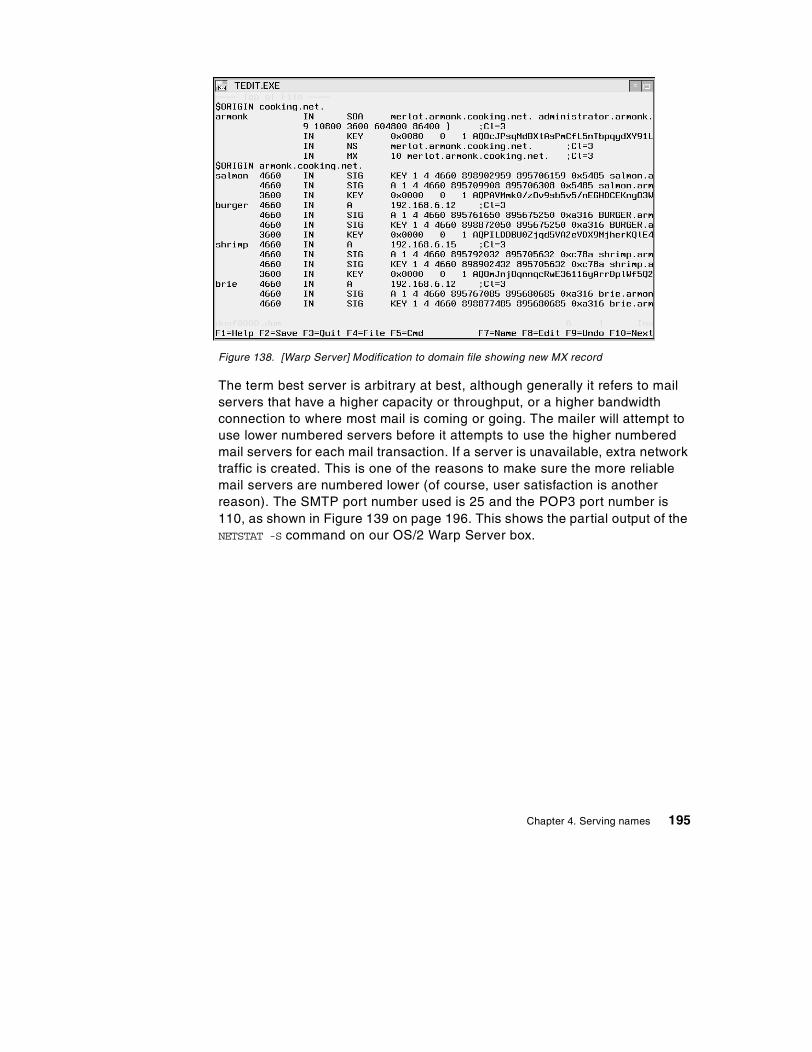
Figure 138. [Warp Server] Modification to domain file showing new MX record
The term best server is arbitrary at best, although generally it refers to mailservers that have a higher capacity or throughput, or a higher bandwidthconnection to where most mail is coming or going. The mailer will attempt touse lower numbered servers before it attempts to use the higher numberedmail servers for each mail transaction. If a server is unavailable, extra networktraffic is created. This is one of the reasons to make sure the more reliablemail servers are numbered lower (of course, user satisfaction is anotherreason). The SMTP port number used is 25 and the POP3 port number is110, as shown in Figure 139 on page 196. This shows the partial output of theNETSTAT -S command on our OS/2 Warp Server box.
Chapter 4. Serving names 195
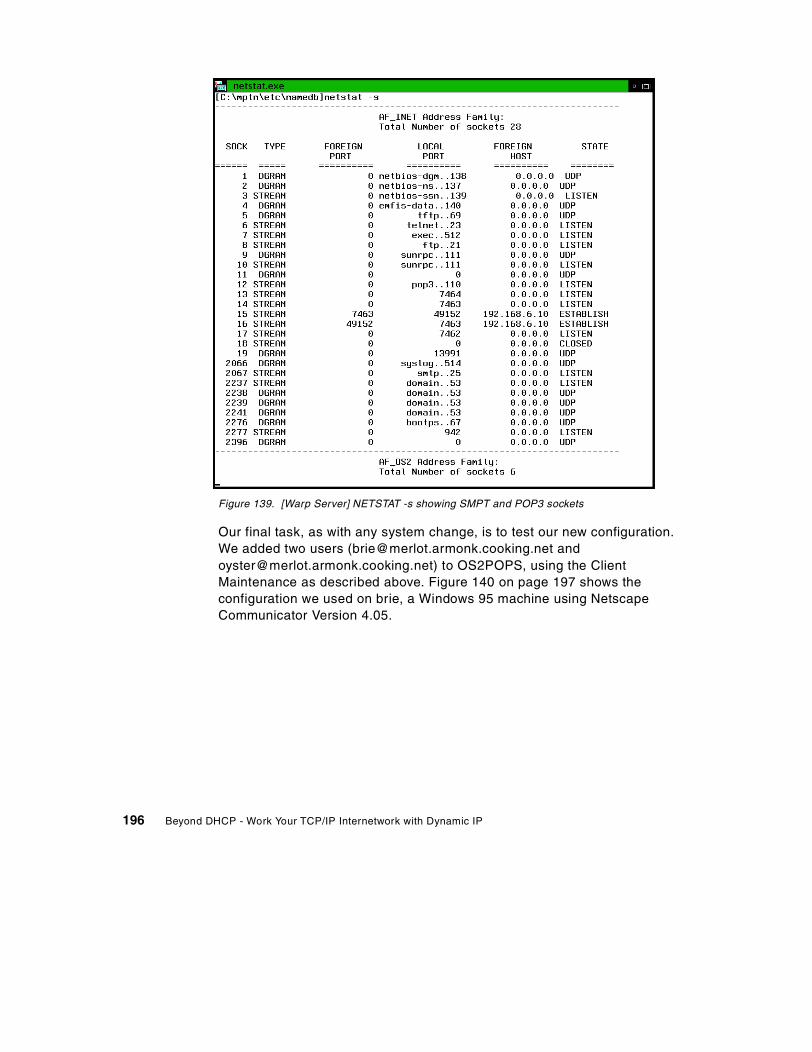
Figure 139. [Warp Server] NETSTAT -s showing SMPT and POP3 sockets
Our final task, as with any system change, is to test our new configuration.We added two users ([email protected] [email protected]) to OS2POPS, using the ClientMaintenance as described above. Figure 140 on page 197 shows theconfiguration we used on brie, a Windows 95 machine using NetscapeCommunicator Version 4.05.
196 Beyond DHCP - Work Your TCP/IP Internetwork with Dynamic IP
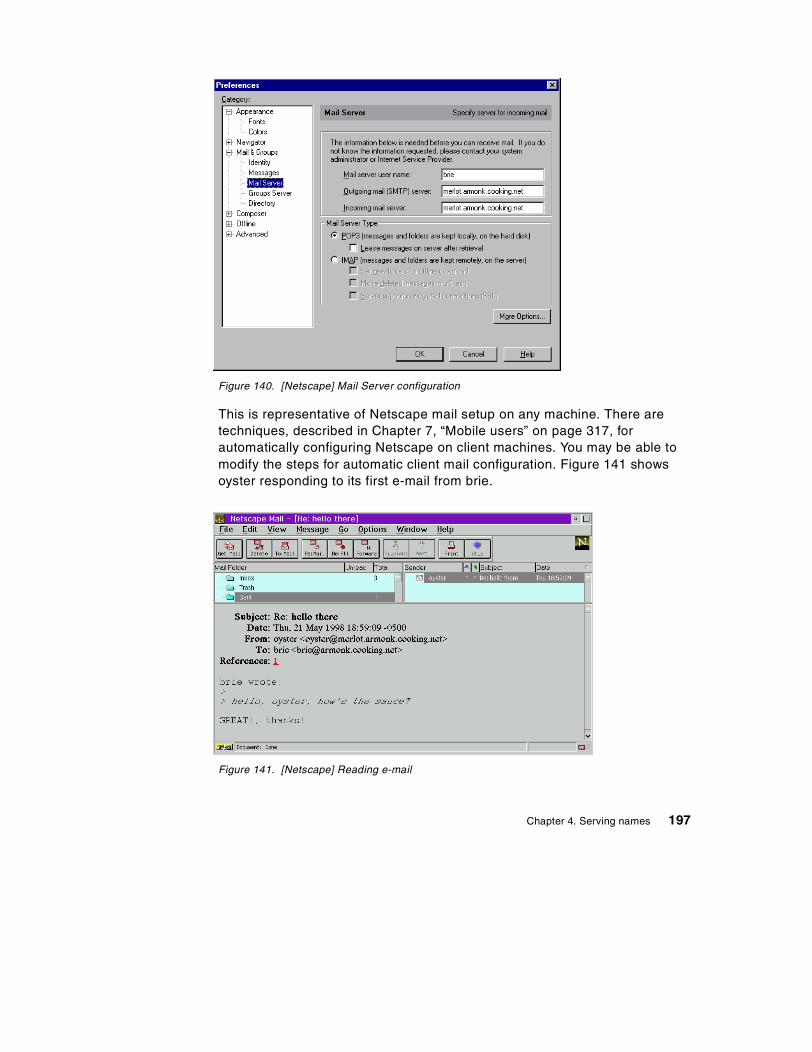
Figure 140. [Netscape] Mail Server configuration
This is representative of Netscape mail setup on any machine. There aretechniques, described in Chapter 7, “Mobile users” on page 317, forautomatically configuring Netscape on client machines. You may be able tomodify the steps for automatic client mail configuration. Figure 141 showsoyster responding to its first e-mail from brie.
Figure 141. [Netscape] Reading e-mail
Chapter 4. Serving names 197
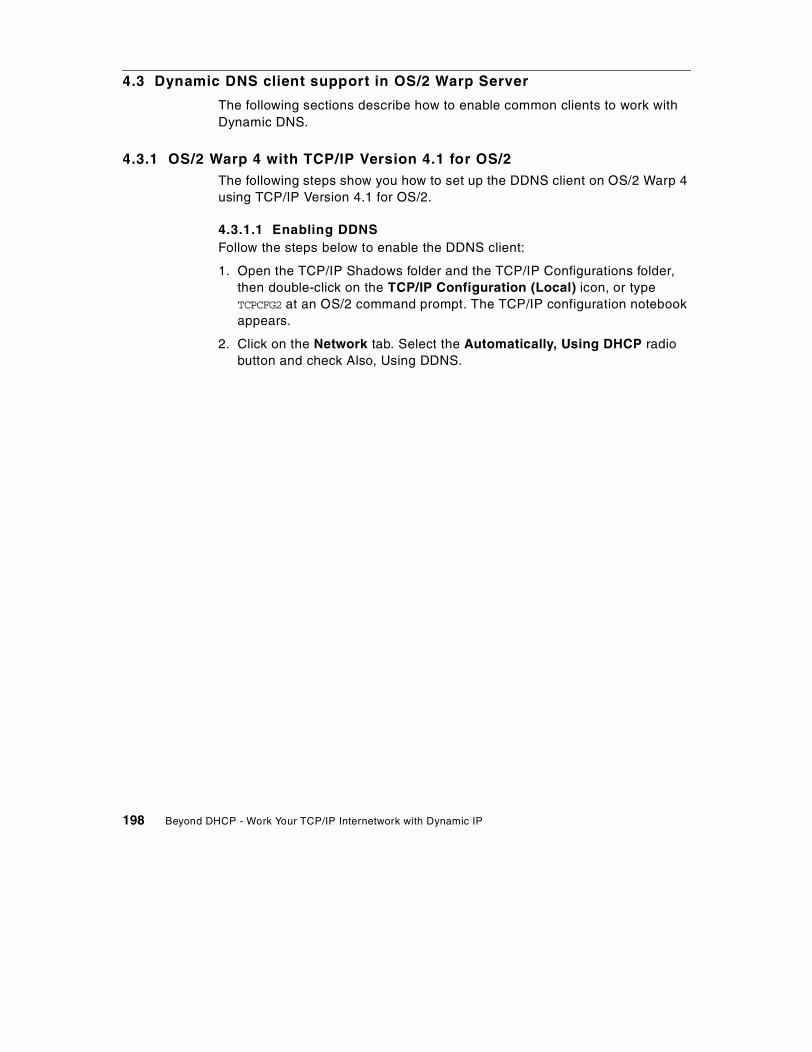
4.3 Dynamic DNS client support in OS/2 Warp Server
The following sections describe how to enable common clients to work withDynamic DNS.
4.3.1 OS/2 Warp 4 with TCP/IP Version 4.1 for OS/2The following steps show you how to set up the DDNS client on OS/2 Warp 4using TCP/IP Version 4.1 for OS/2.
4.3.1.1 Enabling DDNSFollow the steps below to enable the DDNS client:
1. Open the TCP/IP Shadows folder and the TCP/IP Configurations folder,then double-click on the TCP/IP Configuration (Local) icon, or typeTCPCFG2 at an OS/2 command prompt. The TCP/IP configuration notebookappears.
2. Click on the Network tab. Select the Automatically, Using DHCP radiobutton and check Also, Using DDNS.
198 Beyond DHCP - Work Your TCP/IP Internetwork with Dynamic IP
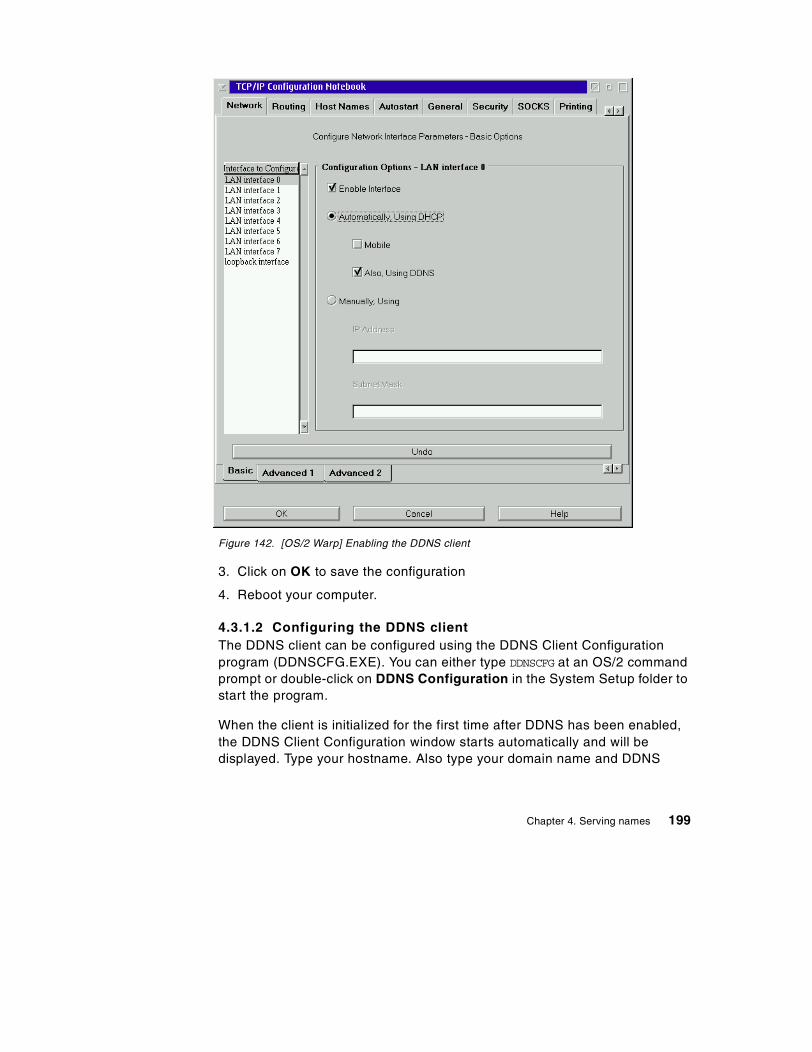
Figure 142. [OS/2 Warp] Enabling the DDNS client
3. Click on OK to save the configuration
4. Reboot your computer.
4.3.1.2 Configuring the DDNS clientThe DDNS client can be configured using the DDNS Client Configurationprogram (DDNSCFG.EXE). You can either type DDNSCFG at an OS/2 commandprompt or double-click on DDNS Configuration in the System Setup folder tostart the program.
When the client is initialized for the first time after DDNS has been enabled,the DDNS Client Configuration window starts automatically and will bedisplayed. Type your hostname. Also type your domain name and DDNS
Chapter 4. Serving names 199
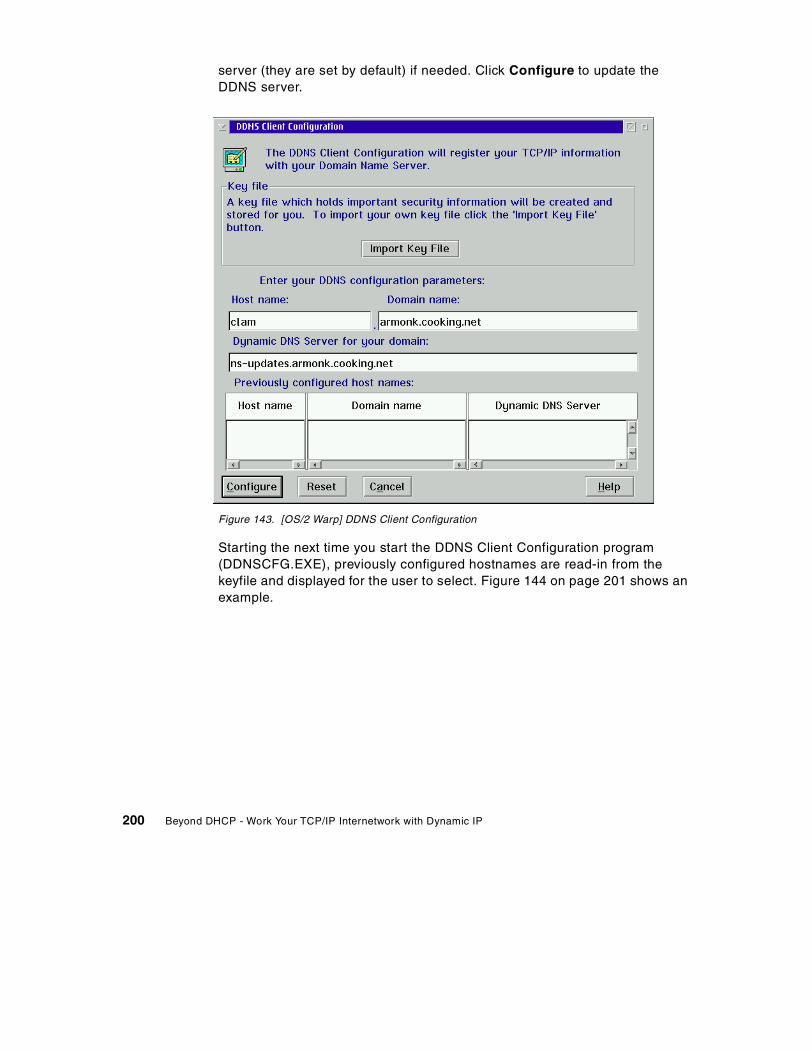
server (they are set by default) if needed. Click Configure to update theDDNS server.
Figure 143. [OS/2 Warp] DDNS Client Configuration
Starting the next time you start the DDNS Client Configuration program(DDNSCFG.EXE), previously configured hostnames are read-in from thekeyfile and displayed for the user to select. Figure 144 on page 201 shows anexample.
200 Beyond DHCP - Work Your TCP/IP Internetwork with Dynamic IP

Figure 144. [OS/2 Warp] Selecting a previous configuration
Once registered, the DHCP Client Monitor displays the hostname. To checkthe hostname, double-click on the DHCP Monitor object in the System Setupfolder.
4.3.2 OS/2 Warp 4 with TCP/IP 4.0The following steps show you how to set up a DDNS client on OS/2 Warp 4using the TCP/IP version that comes with the product, which is TCP/IP V4.0.
4.3.2.1 Enabling DDNSFollow the steps below to enable the DDNS client:
1. Open the Programs folder and TCP/IP Internet (LAN) and thendouble-click on TCP/IP Configuration (LAN), or type TCPCFG at an OS/2command prompt. The TCP/IP configuration notebook appears.
2. Select the radio button that says Automatically, Using DHCP and markthe Also, Using DDNS check box.
Chapter 4. Serving names 201
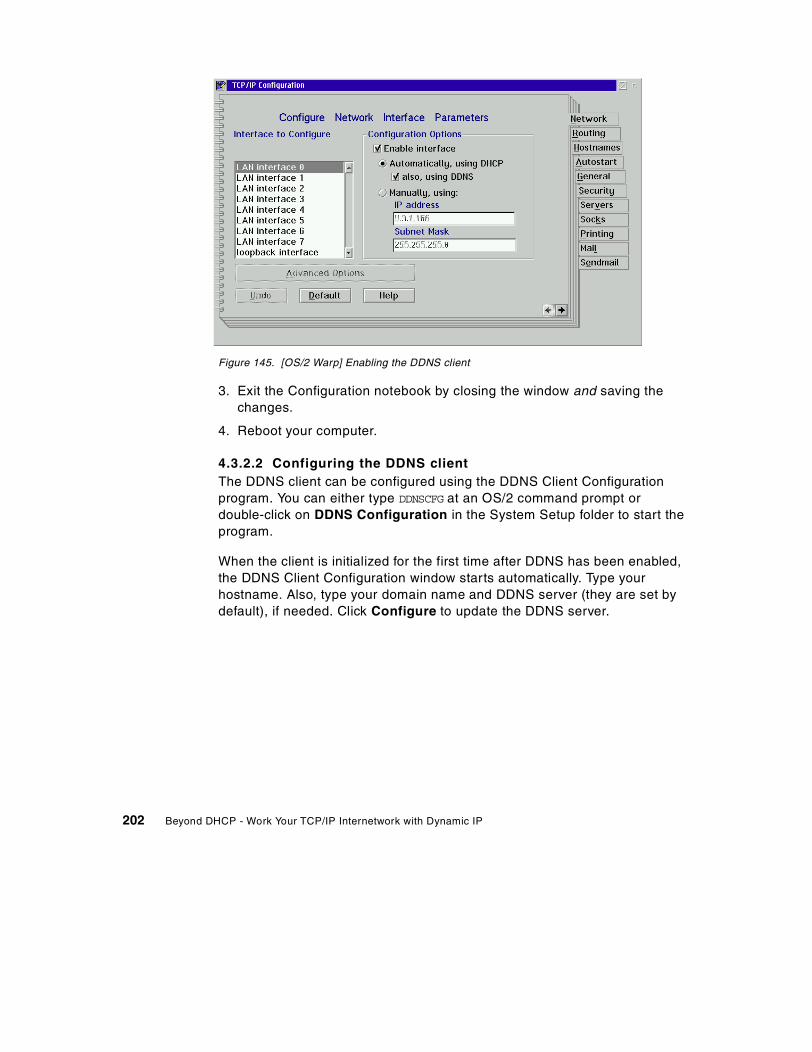
Figure 145. [OS/2 Warp] Enabling the DDNS client
3. Exit the Configuration notebook by closing the window and saving thechanges.
4. Reboot your computer.
4.3.2.2 Configuring the DDNS clientThe DDNS client can be configured using the DDNS Client Configurationprogram. You can either type DDNSCFG at an OS/2 command prompt ordouble-click on DDNS Configuration in the System Setup folder to start theprogram.
When the client is initialized for the first time after DDNS has been enabled,the DDNS Client Configuration window starts automatically. Type yourhostname. Also, type your domain name and DDNS server (they are set bydefault), if needed. Click Configure to update the DDNS server.
202 Beyond DHCP - Work Your TCP/IP Internetwork with Dynamic IP

Figure 146. [OS/2 Warp] DDNS Client Configuration
Once registered, the DHCP Client Monitor displays the hostname.Double-click on the DHCP Monitor icon in the System Setup folder.
Figure 147. [OS/2 Warp] DHCP Monitor
4.3.3 OS/2 Warp 4 using presecured modeThis section explains how to configure an OS/2 Warp 4 DDNS client using thedynamic presecured domain environment.
4.3.3.1 Enabling DDNSFollow the steps below to enable a DDNS client:
Chapter 4. Serving names 203
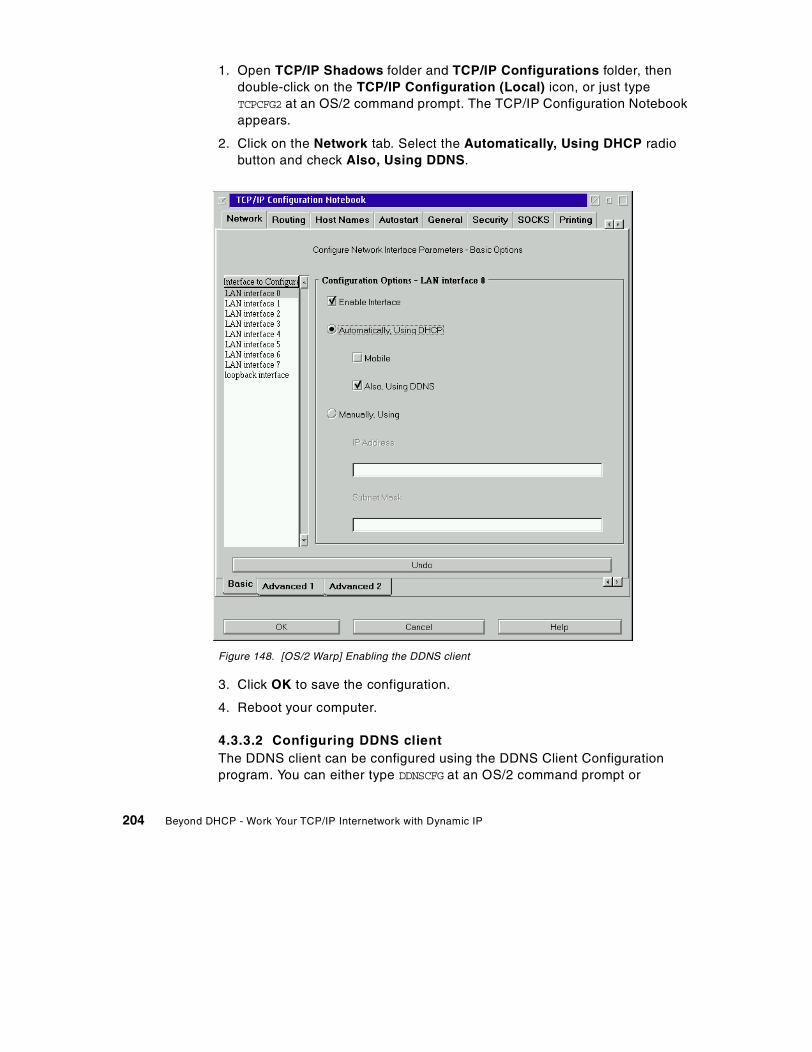
1. Open TCP/IP Shadows folder and TCP/IP Configurations folder, thendouble-click on the TCP/IP Configuration (Local) icon, or just typeTCPCFG2 at an OS/2 command prompt. The TCP/IP Configuration Notebookappears.
2. Click on the Network tab. Select the Automatically, Using DHCP radiobutton and check Also, Using DDNS.
Figure 148. [OS/2 Warp] Enabling the DDNS client
3. Click OK to save the configuration.
4. Reboot your computer.
4.3.3.2 Configuring DDNS clientThe DDNS client can be configured using the DDNS Client Configurationprogram. You can either type DDNSCFG at an OS/2 command prompt or
204 Beyond DHCP - Work Your TCP/IP Internetwork with Dynamic IP
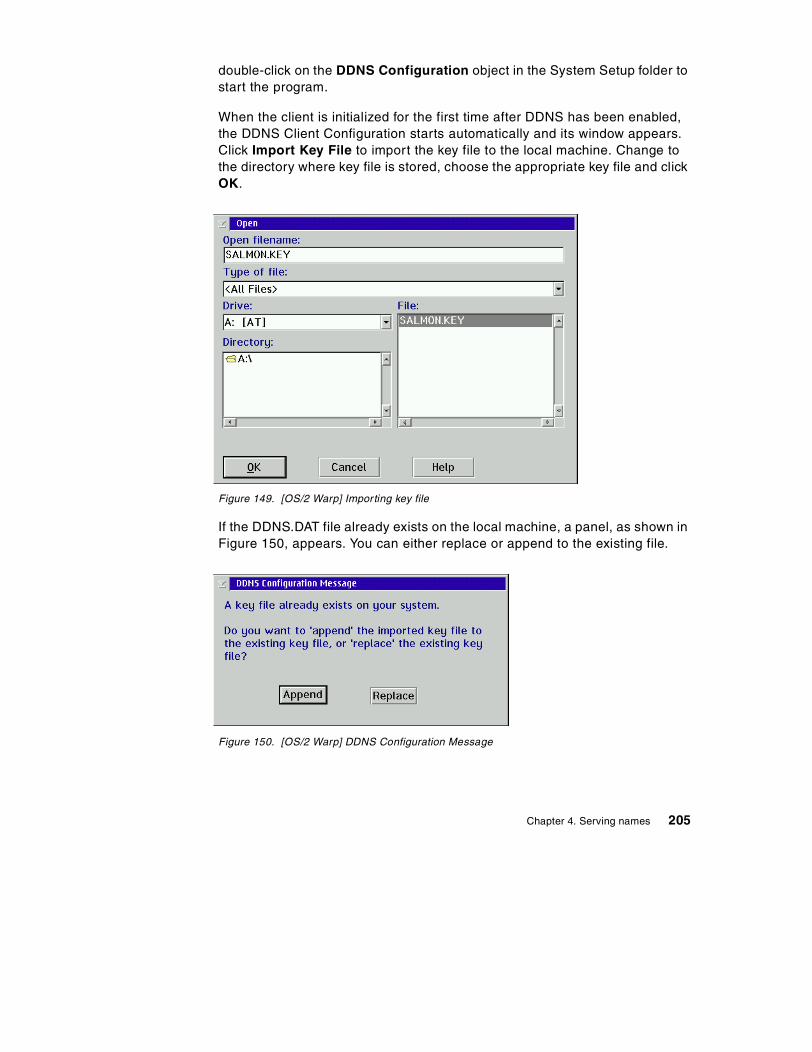
double-click on the DDNS Configuration object in the System Setup folder tostart the program.
When the client is initialized for the first time after DDNS has been enabled,the DDNS Client Configuration starts automatically and its window appears.Click Import Key File to import the key file to the local machine. Change tothe directory where key file is stored, choose the appropriate key file and clickOK.
Figure 149. [OS/2 Warp] Importing key file
If the DDNS.DAT file already exists on the local machine, a panel, as shown inFigure 150, appears. You can either replace or append to the existing file.
Figure 150. [OS/2 Warp] DDNS Configuration Message
Chapter 4. Serving names 205
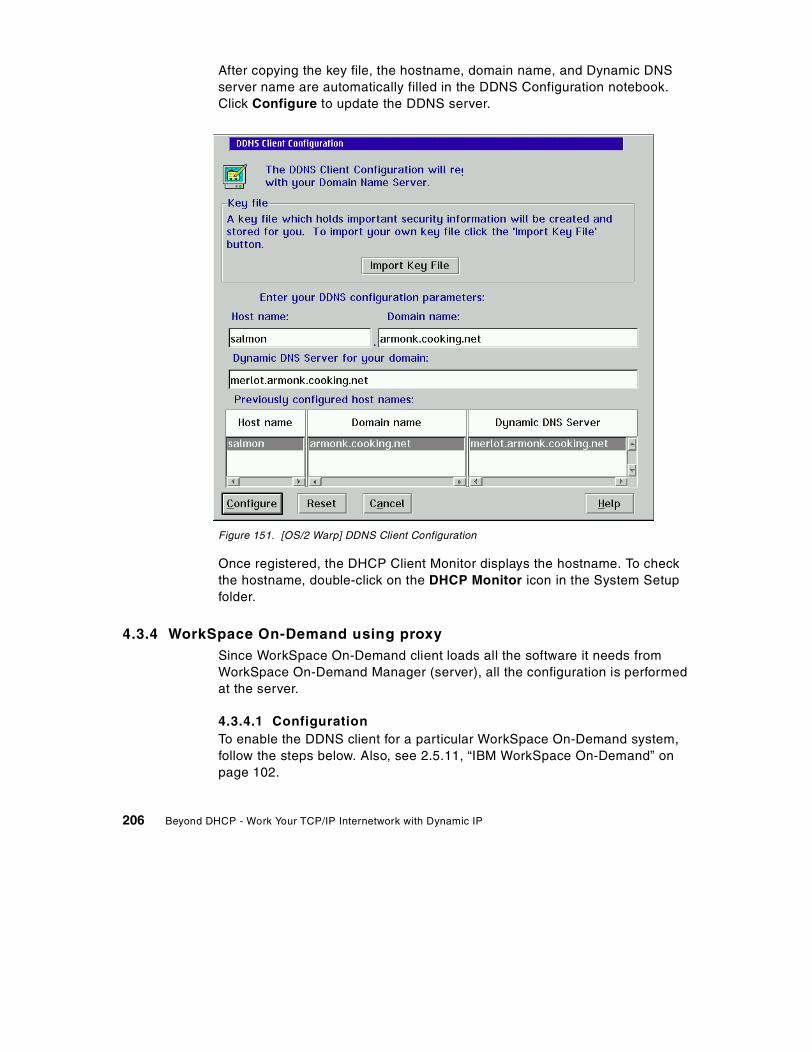
After copying the key file, the hostname, domain name, and Dynamic DNSserver name are automatically filled in the DDNS Configuration notebook.Click Configure to update the DDNS server.
Figure 151. [OS/2 Warp] DDNS Client Configuration
Once registered, the DHCP Client Monitor displays the hostname. To checkthe hostname, double-click on the DHCP Monitor icon in the System Setupfolder.
4.3.4 WorkSpace On-Demand using proxySince WorkSpace On-Demand client loads all the software it needs fromWorkSpace On-Demand Manager (server), all the configuration is performedat the server.
4.3.4.1 ConfigurationTo enable the DDNS client for a particular WorkSpace On-Demand system,follow the steps below. Also, see 2.5.11, “IBM WorkSpace On-Demand” onpage 102.
206 Beyond DHCP - Work Your TCP/IP Internetwork with Dynamic IP
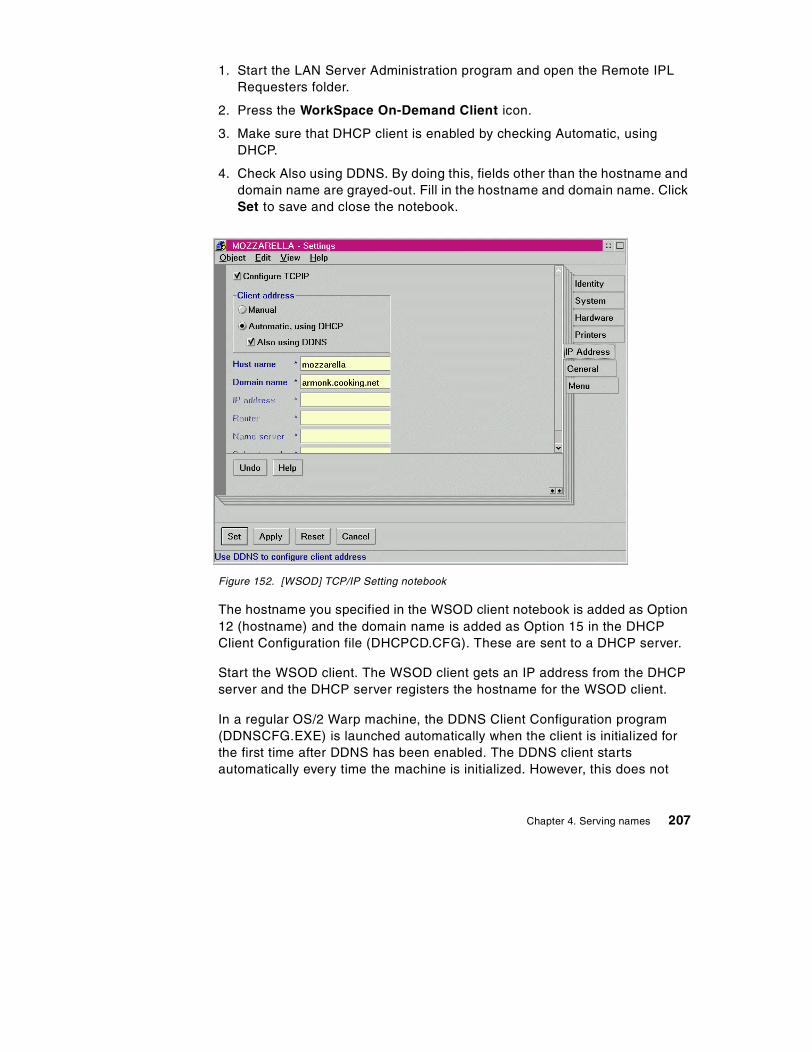
1. Start the LAN Server Administration program and open the Remote IPLRequesters folder.
2. Press the WorkSpace On-Demand Client icon.
3. Make sure that DHCP client is enabled by checking Automatic, usingDHCP.
4. Check Also using DDNS. By doing this, fields other than the hostname anddomain name are grayed-out. Fill in the hostname and domain name. ClickSet to save and close the notebook.
Figure 152. [WSOD] TCP/IP Setting notebook
The hostname you specified in the WSOD client notebook is added as Option12 (hostname) and the domain name is added as Option 15 in the DHCPClient Configuration file (DHCPCD.CFG). These are sent to a DHCP server.
Start the WSOD client. The WSOD client gets an IP address from the DHCPserver and the DHCP server registers the hostname for the WSOD client.
In a regular OS/2 Warp machine, the DDNS Client Configuration program(DDNSCFG.EXE) is launched automatically when the client is initialized forthe first time after DDNS has been enabled. The DDNS client startsautomatically every time the machine is initialized. However, this does not
Chapter 4. Serving names 207
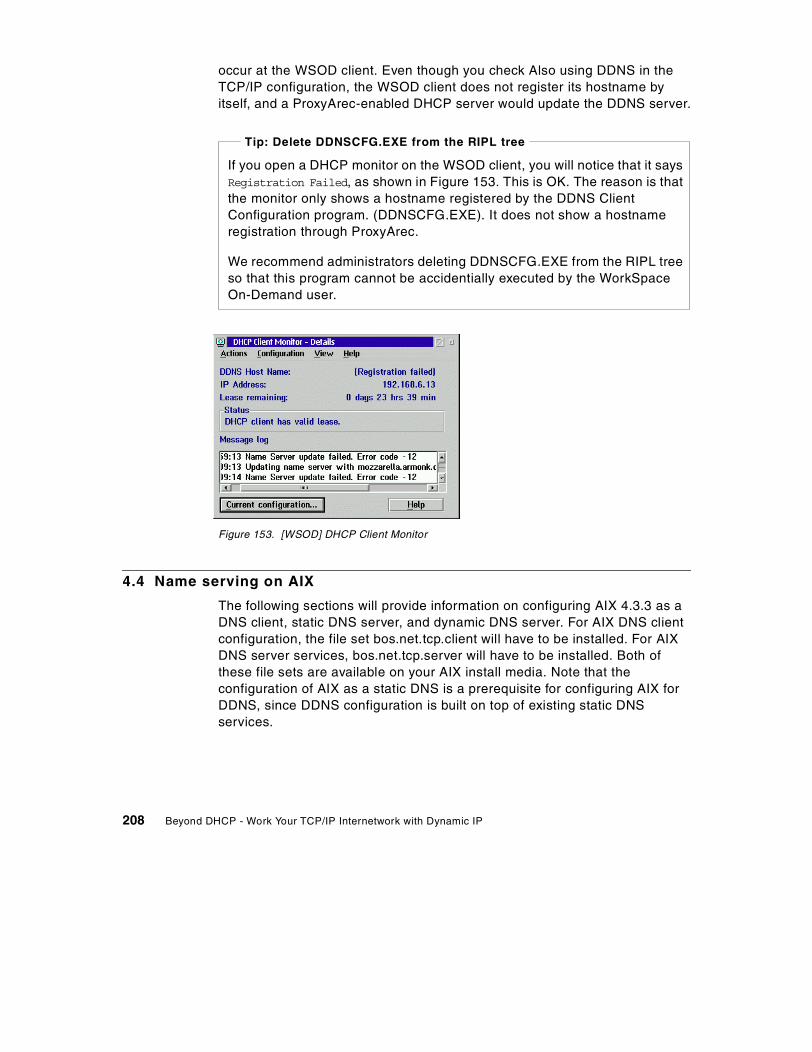
occur at the WSOD client. Even though you check Also using DDNS in theTCP/IP configuration, the WSOD client does not register its hostname byitself, and a ProxyArec-enabled DHCP server would update the DDNS server.
Figure 153. [WSOD] DHCP Client Monitor
4.4 Name serving on AIX
The following sections will provide information on configuring AIX 4.3.3 as aDNS client, static DNS server, and dynamic DNS server. For AIX DNS clientconfiguration, the file set bos.net.tcp.client will have to be installed. For AIXDNS server services, bos.net.tcp.server will have to be installed. Both ofthese file sets are available on your AIX install media. Note that theconfiguration of AIX as a static DNS is a prerequisite for configuring AIX forDDNS, since DDNS configuration is built on top of existing static DNSservices.
If you open a DHCP monitor on the WSOD client, you will notice that it saysRegistration Failed, as shown in Figure 153. This is OK. The reason is thatthe monitor only shows a hostname registered by the DDNS ClientConfiguration program. (DDNSCFG.EXE). It does not show a hostnameregistration through ProxyArec.
We recommend administrators deleting DDNSCFG.EXE from the RIPL treeso that this program cannot be accidentially executed by the WorkSpaceOn-Demand user.
Tip: Delete DDNSCFG.EXE from the RIPL tree
208 Beyond DHCP - Work Your TCP/IP Internetwork with Dynamic IP
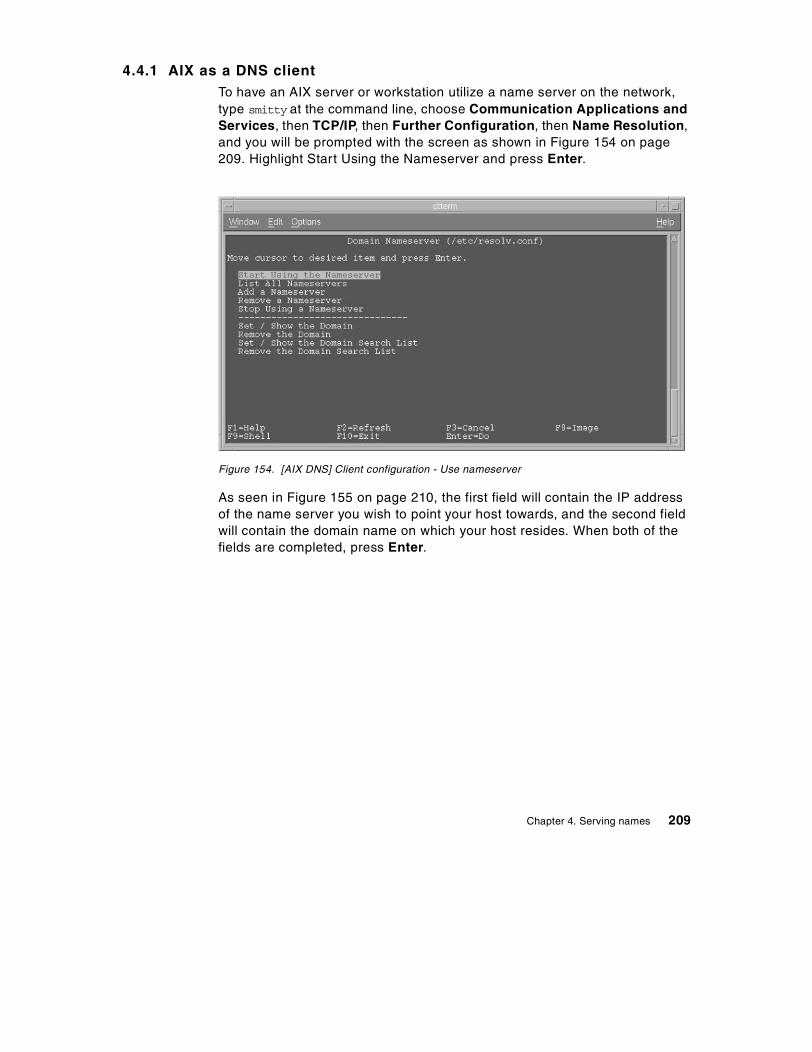
4.4.1 AIX as a DNS clientTo have an AIX server or workstation utilize a name server on the network,type smitty at the command line, choose Communication Applications andServices, then TCP/IP, then Further Configuration, then Name Resolution,and you will be prompted with the screen as shown in Figure 154 on page209. Highlight Start Using the Nameserver and press Enter.
Figure 154. [AIX DNS] Client configuration - Use nameserver
As seen in Figure 155 on page 210, the first field will contain the IP addressof the name server you wish to point your host towards, and the second fieldwill contain the domain name on which your host resides. When both of thefields are completed, press Enter.
Chapter 4. Serving names 209

Figure 155. [AIX DNS] Client configuration - Specifying the nameserver
After the command has completed successfully, press F3 twice to exit, andyou will be returned to the Domain Nameserver smit screen. As shown inFigure 156 on page 210, move the cursor down to Set / Show the DomainSearch List and press Enter.
Figure 156. [AIX DNS] Client configuration - Domain search list
210 Beyond DHCP - Work Your TCP/IP Internetwork with Dynamic IP
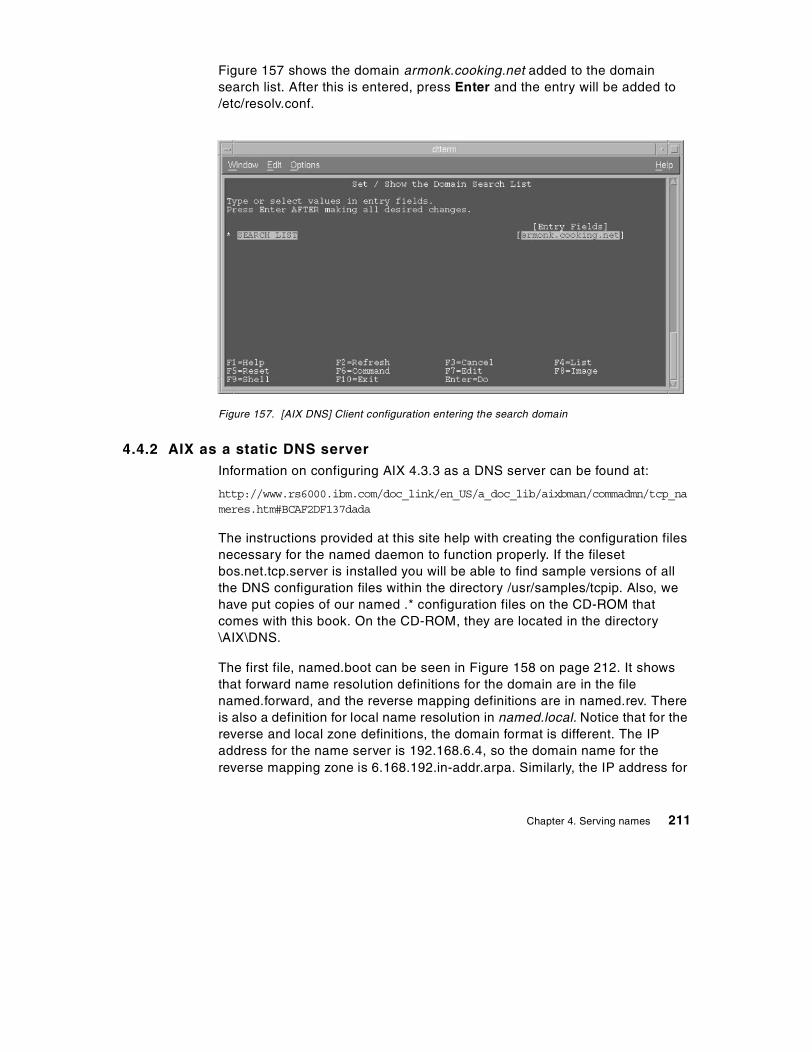
Figure 157 shows the domain armonk.cooking.net added to the domainsearch list. After this is entered, press Enter and the entry will be added to/etc/resolv.conf.
Figure 157. [AIX DNS] Client configuration entering the search domain
4.4.2 AIX as a static DNS serverInformation on configuring AIX 4.3.3 as a DNS server can be found at:
http://www.rs6000.ibm.com/doc_link/en_US/a_doc_lib/aixbman/commadmn/tcp_nameres.htm#BCAF2DF137dada
The instructions provided at this site help with creating the configuration filesnecessary for the named daemon to function properly. If the filesetbos.net.tcp.server is installed you will be able to find sample versions of allthe DNS configuration files within the directory /usr/samples/tcpip. Also, wehave put copies of our named .* configuration files on the CD-ROM thatcomes with this book. On the CD-ROM, they are located in the directory\AIX\DNS.
The first file, named.boot can be seen in Figure 158 on page 212. It showsthat forward name resolution definitions for the domain are in the filenamed.forward, and the reverse mapping definitions are in named.rev. Thereis also a definition for local name resolution in named.local. Notice that for thereverse and local zone definitions, the domain format is different. The IPaddress for the name server is 192.168.6.4, so the domain name for thereverse mapping zone is 6.168.192.in-addr.arpa. Similarly, the IP address for
Chapter 4. Serving names 211
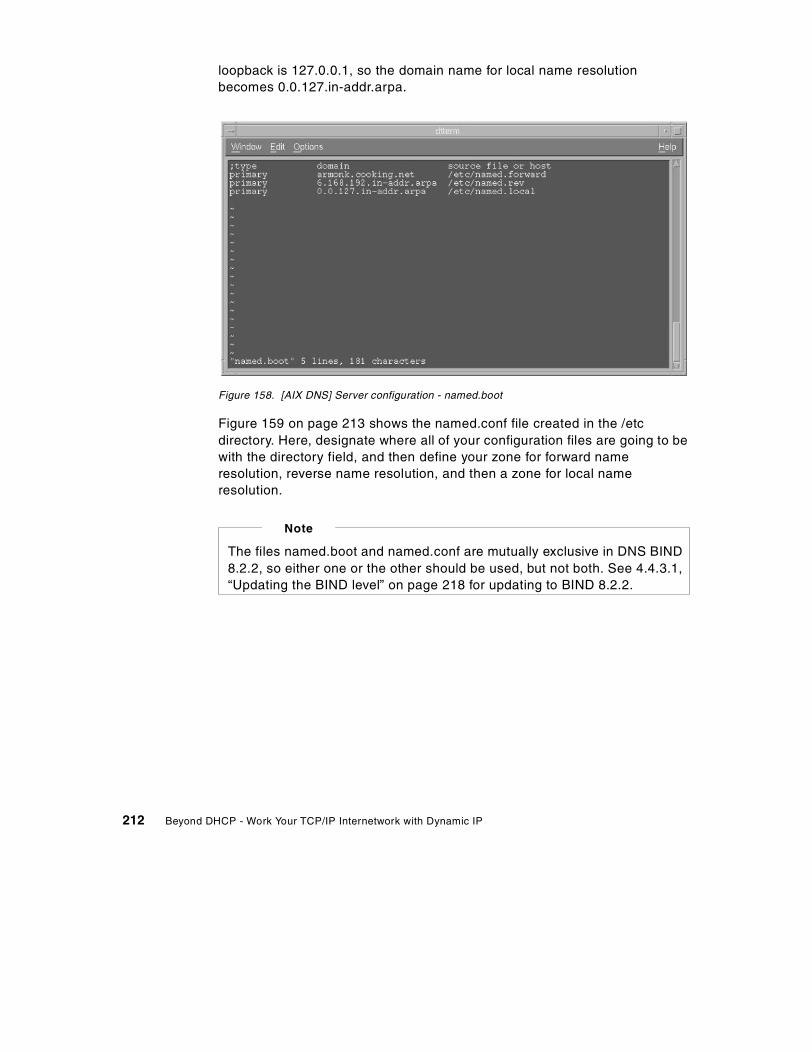
loopback is 127.0.0.1, so the domain name for local name resolutionbecomes 0.0.127.in-addr.arpa.
Figure 158. [AIX DNS] Server configuration - named.boot
Figure 159 on page 213 shows the named.conf file created in the /etcdirectory. Here, designate where all of your configuration files are going to bewith the directory field, and then define your zone for forward nameresolution, reverse name resolution, and then a zone for local nameresolution.
The files named.boot and named.conf are mutually exclusive in DNS BIND8.2.2, so either one or the other should be used, but not both. See 4.4.3.1,“Updating the BIND level” on page 218 for updating to BIND 8.2.2.
Note
212 Beyond DHCP - Work Your TCP/IP Internetwork with Dynamic IP
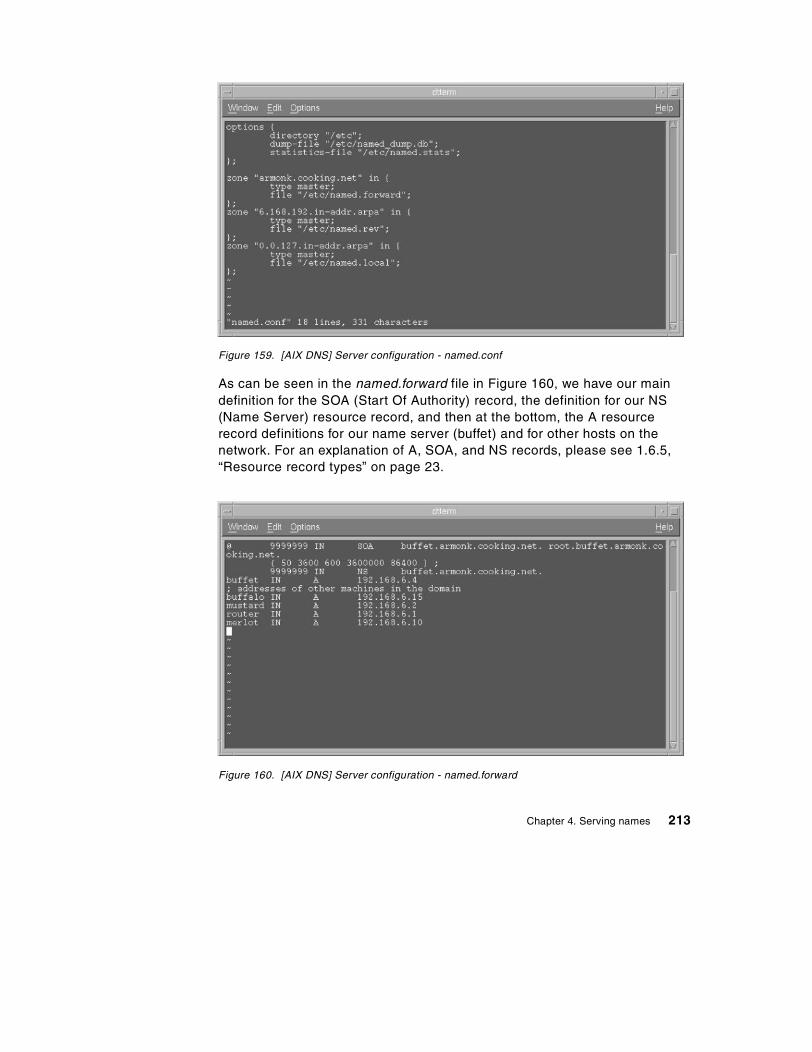
Figure 159. [AIX DNS] Server configuration - named.conf
As can be seen in the named.forward file in Figure 160, we have our maindefinition for the SOA (Start Of Authority) record, the definition for our NS(Name Server) resource record, and then at the bottom, the A resourcerecord definitions for our name server (buffet) and for other hosts on thenetwork. For an explanation of A, SOA, and NS records, please see 1.6.5,“Resource record types” on page 23.
Figure 160. [AIX DNS] Server configuration - named.forward
Chapter 4. Serving names 213
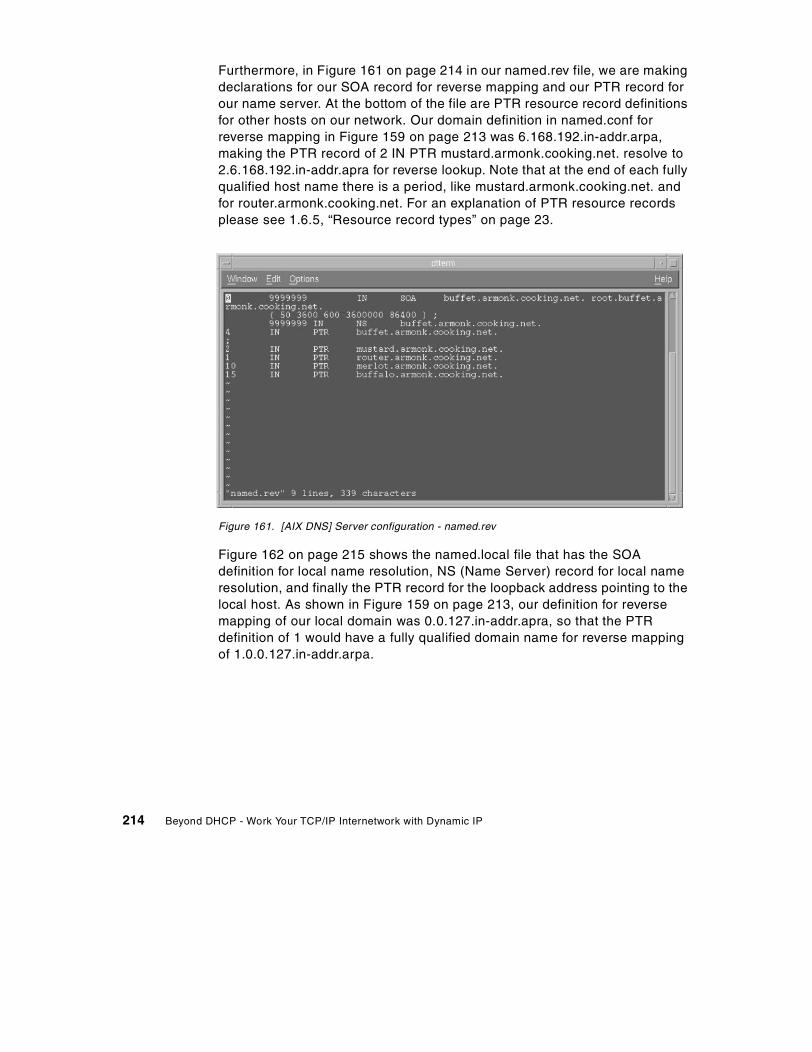
Furthermore, in Figure 161 on page 214 in our named.rev file, we are makingdeclarations for our SOA record for reverse mapping and our PTR record forour name server. At the bottom of the file are PTR resource record definitionsfor other hosts on our network. Our domain definition in named.conf forreverse mapping in Figure 159 on page 213 was 6.168.192.in-addr.arpa,making the PTR record of 2 IN PTR mustard.armonk.cooking.net. resolve to2.6.168.192.in-addr.apra for reverse lookup. Note that at the end of each fullyqualified host name there is a period, like mustard.armonk.cooking.net. andfor router.armonk.cooking.net. For an explanation of PTR resource recordsplease see 1.6.5, “Resource record types” on page 23.
Figure 161. [AIX DNS] Server configuration - named.rev
Figure 162 on page 215 shows the named.local file that has the SOAdefinition for local name resolution, NS (Name Server) record for local nameresolution, and finally the PTR record for the loopback address pointing to thelocal host. As shown in Figure 159 on page 213, our definition for reversemapping of our local domain was 0.0.127.in-addr.apra, so that the PTRdefinition of 1 would have a fully qualified domain name for reverse mappingof 1.0.0.127.in-addr.arpa.
214 Beyond DHCP - Work Your TCP/IP Internetwork with Dynamic IP
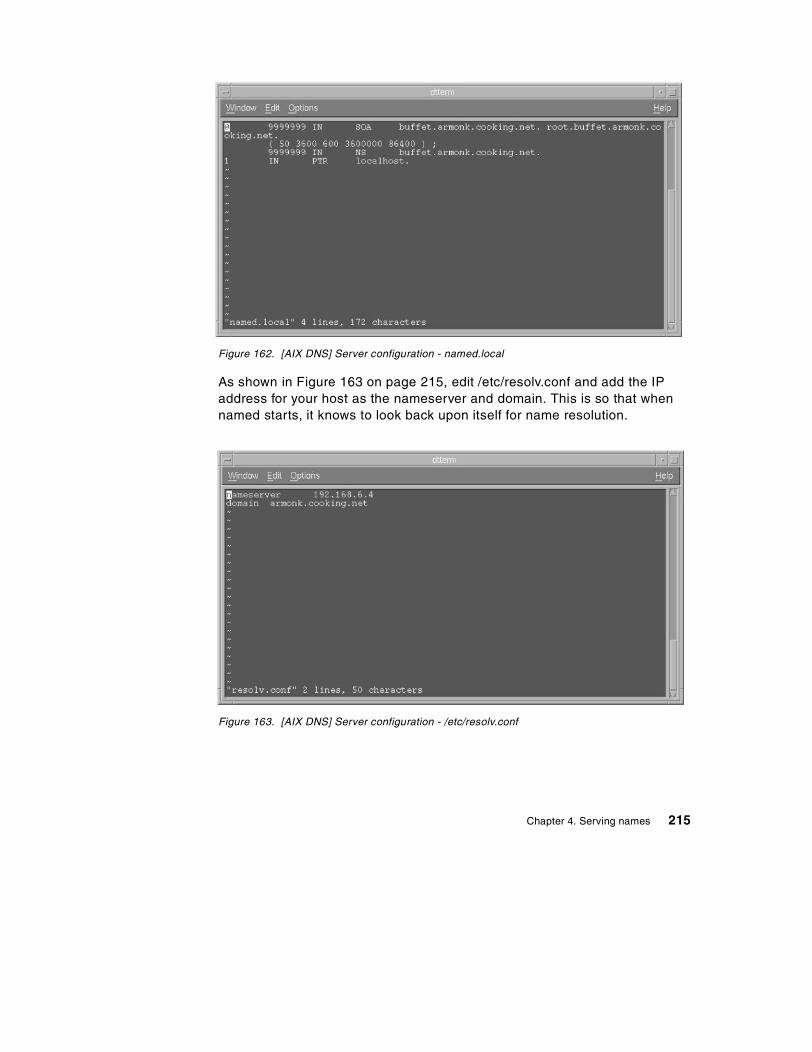
Figure 162. [AIX DNS] Server configuration - named.local
As shown in Figure 163 on page 215, edit /etc/resolv.conf and add the IPaddress for your host as the nameserver and domain. This is so that whennamed starts, it knows to look back upon itself for name resolution.
Figure 163. [AIX DNS] Server configuration - /etc/resolv.conf
Chapter 4. Serving names 215

After these files are configured, you can enter the command startsrc -s
named from the command line to start the named subsystem and enable theRS/6000 as a DNS server.
4.4.2.1 Using awk scripts to create DNS zone filesAs an alternative to creating the AIX DNS zone files manually, you can useawk scripts to create the named.forward and named.rev files. The stepsbelow describe how to do this:
1. Make sure your DNS hostname is set to the fully-qualified name. Forinstance, our DNS host is called buffet on domain armonk.cooking.net.Typing hostname on this system should return buffet.armonk.cooking.net. Ifit does not, type smit hostname to set the hostname to the fully-qualifiedname. This ensures that the domain information in the zone files iscomplete.
2. Create an /etc/hosts file on your DNS server. We will use the followinginformation to create the initial hosts file:192.168.6.1 router
192.168.6.2 mustard
192.168.6.10 merlot
192.168.6.15 buffalo
3. Now, go to the directory that contains the awk scripts. Type:cd /usr/samples/tcpip
4. Next, run the awk scripts. Run one script to create the named.forward file,and a second script to create the named.rev file:./hosts.awk /etc/hosts > /etc/named.forward
./addrs.awk /etc/hosts > /etc/named.rev
The hosts.awk script creates a zone file with the A records for our entriesin the hosts file we specified above. The addrs.awk file creates the PTRrecords for these same entries in the hosts file.
Make sure to erase the /etc/hosts file (or at least rename it) to avoid thechance that it might be referenced when the DNS server is resolving names.
Figure 164 on page 217 shows the named.forward file that results fromrunning the hosts.awk script, and Figure 165 on page 217 shows the
216 Beyond DHCP - Work Your TCP/IP Internetwork with Dynamic IP
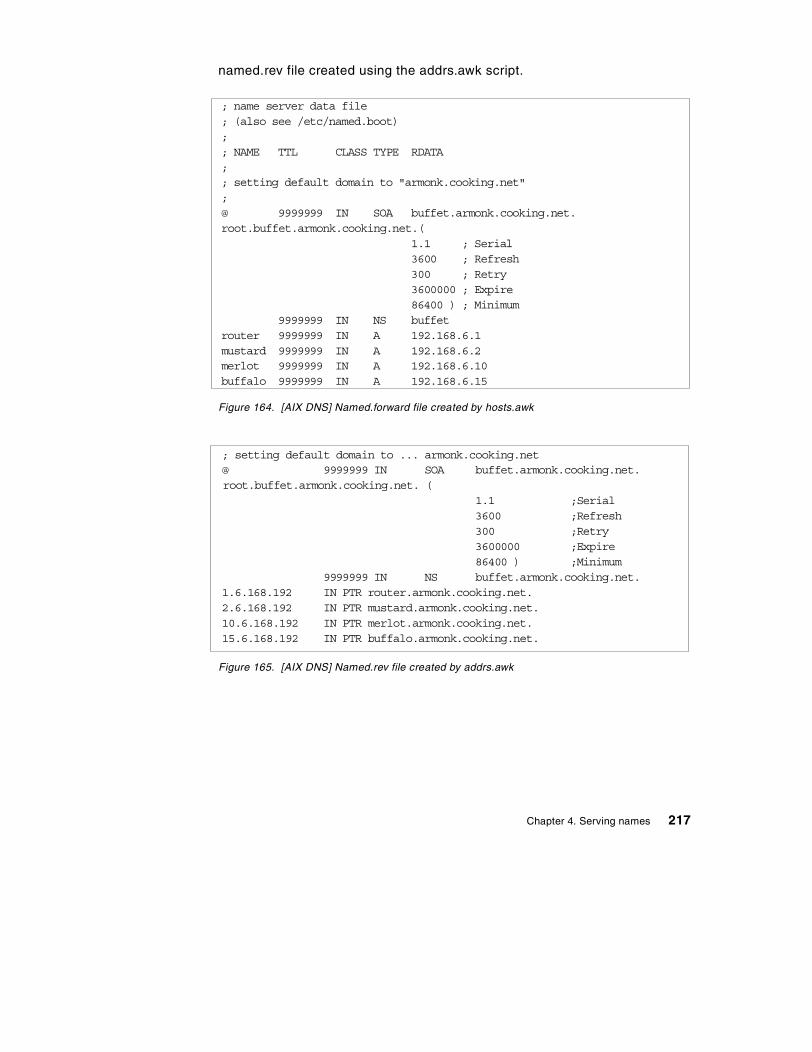
named.rev file created using the addrs.awk script.
Figure 164. [AIX DNS] Named.forward file created by hosts.awk
Figure 165. [AIX DNS] Named.rev file created by addrs.awk
; name server data file; (also see /etc/named.boot);; NAME TTL CLASS TYPE RDATA;; setting default domain to "armonk.cooking.net";@ 9999999 IN SOA buffet.armonk.cooking.net.root.buffet.armonk.cooking.net.(
1.1 ; Serial3600 ; Refresh300 ; Retry3600000 ; Expire86400 ) ; Minimum
9999999 IN NS buffetrouter 9999999 IN A 192.168.6.1mustard 9999999 IN A 192.168.6.2merlot 9999999 IN A 192.168.6.10buffalo 9999999 IN A 192.168.6.15
; setting default domain to ... armonk.cooking.net@ 9999999 IN SOA buffet.armonk.cooking.net.root.buffet.armonk.cooking.net. (
1.1 ;Serial3600 ;Refresh300 ;Retry3600000 ;Expire86400 ) ;Minimum
9999999 IN NS buffet.armonk.cooking.net.1.6.168.192 IN PTR router.armonk.cooking.net.2.6.168.192 IN PTR mustard.armonk.cooking.net.10.6.168.192 IN PTR merlot.armonk.cooking.net.15.6.168.192 IN PTR buffalo.armonk.cooking.net.
Chapter 4. Serving names 217
4.4.3 AIX as a DDNS server
In this section we discuss two DDNS scenarios on AIX. First, we will cover theconfiguration of DDNS allowing unsecured zone updates along withProxyArec so that our AIX DDNS server handles the updating of both PTRand A resource record updates for our DHCP clients. However, configuringthese zones in unsecured mode leaves our DDNS server open to IP spoofing.IP spoofing is when a hacker maps their IP address to pretend to be anotherdevice on your network.
To prevent a hacker from pretending to be our DDNS server and doing any Aand PTR resource record updates, configure your DDNS in controlled mode.Putting your DDNS in controlled mode requires an encryption key from yourDHCP server in order to perform A and PTR resource record updates.
4.4.3.1 Updating the BIND levelThe default installation of bos.net.tcp.server 4.3.3.0 installs the BIND 4.9.3version of the named daemon and it has been reported that this version ofnamed has issues with taking updates from nsupdate to dynamically updatezones. Therefore, your first step will be to bring the name server daemon upto BIND Version 8.2.2.
As can be seen in Figure 166 on page 219, you are in the /usr/sbin directorywhere the binary files for the named daemon are kept. Remove the existingnamed and named-xfer files and replace them by linking them with thenamed8 and named8-xfer binaries. This can be done with the followingcommands:
rm namedrm named-xferln -s named8 namedln -s named8-xfer named-xfer
This section has the following prerequisites:
1. Proper configuration of AIX as a DHCP server. This is covered in 2.4,“AIX as a DHCP server” on page 50.
2. Proper configuration of AIX as a static DNS server. This is covered in4.4.2, “AIX as a static DNS server” on page 211.
Note
218 Beyond DHCP - Work Your TCP/IP Internetwork with Dynamic IP
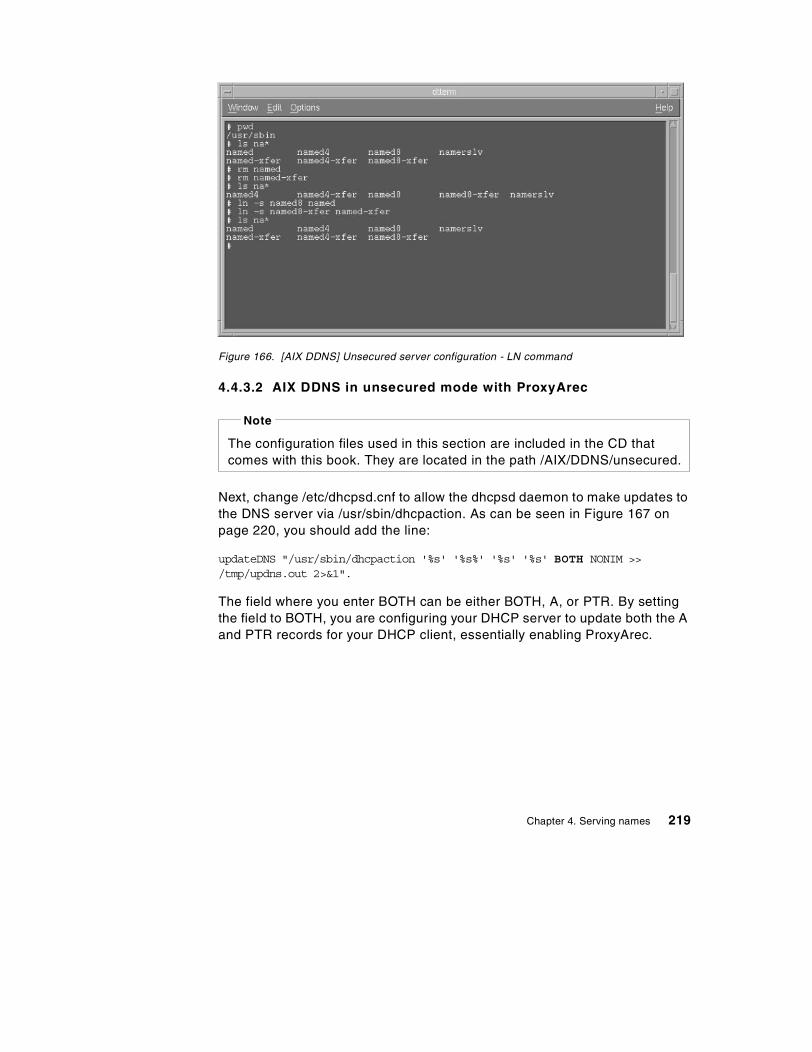
Figure 166. [AIX DDNS] Unsecured server configuration - LN command
4.4.3.2 AIX DDNS in unsecured mode with ProxyArec
Next, change /etc/dhcpsd.cnf to allow the dhcpsd daemon to make updates tothe DNS server via /usr/sbin/dhcpaction. As can be seen in Figure 167 onpage 220, you should add the line:
updateDNS "/usr/sbin/dhcpaction '%s' '%s%' '%s' '%s' BOTH NONIM >>/tmp/updns.out 2>&1".
The field where you enter BOTH can be either BOTH, A, or PTR. By settingthe field to BOTH, you are configuring your DHCP server to update both the Aand PTR records for your DHCP client, essentially enabling ProxyArec.
The configuration files used in this section are included in the CD thatcomes with this book. They are located in the path /AIX/DDNS/unsecured.
Note
Chapter 4. Serving names 219
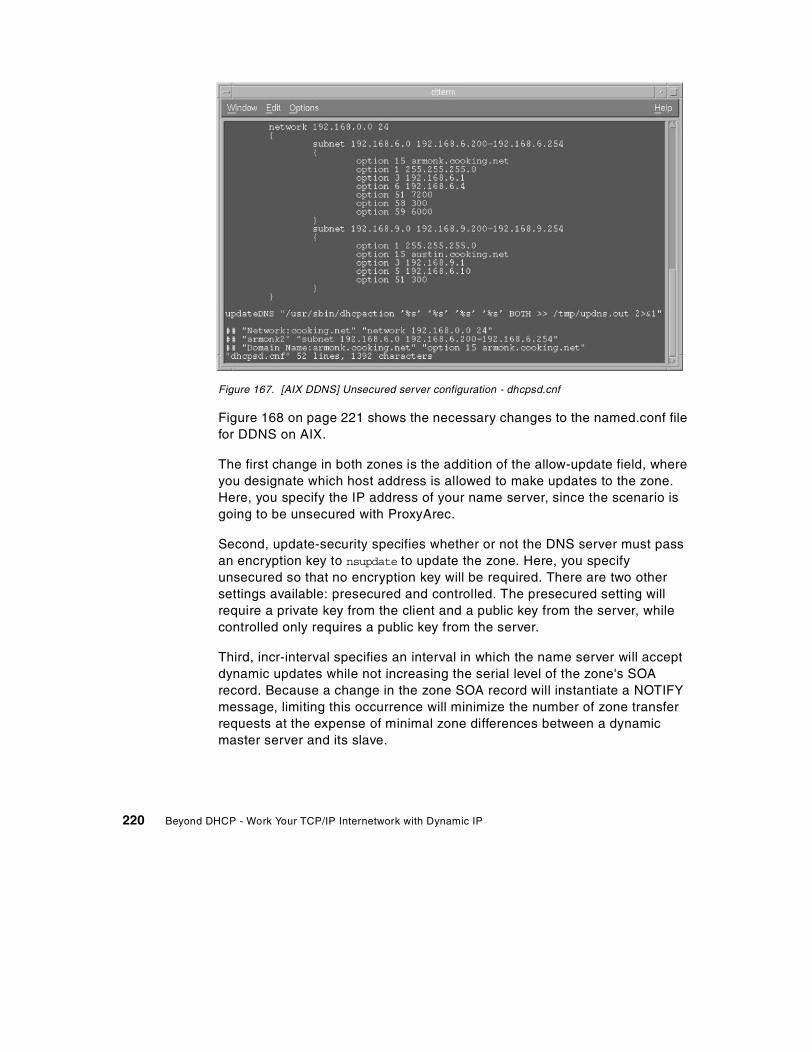
Figure 167. [AIX DDNS] Unsecured server configuration - dhcpsd.cnf
Figure 168 on page 221 shows the necessary changes to the named.conf filefor DDNS on AIX.
The first change in both zones is the addition of the allow-update field, whereyou designate which host address is allowed to make updates to the zone.Here, you specify the IP address of your name server, since the scenario isgoing to be unsecured with ProxyArec.
Second, update-security specifies whether or not the DNS server must passan encryption key to nsupdate to update the zone. Here, you specifyunsecured so that no encryption key will be required. There are two othersettings available: presecured and controlled. The presecured setting willrequire a private key from the client and a public key from the server, whilecontrolled only requires a public key from the server.
Third, incr-interval specifies an interval in which the name server will acceptdynamic updates while not increasing the serial level of the zone's SOArecord. Because a change in the zone SOA record will instantiate a NOTIFYmessage, limiting this occurrence will minimize the number of zone transferrequests at the expense of minimal zone differences between a dynamicmaster server and its slave.
220 Beyond DHCP - Work Your TCP/IP Internetwork with Dynamic IP
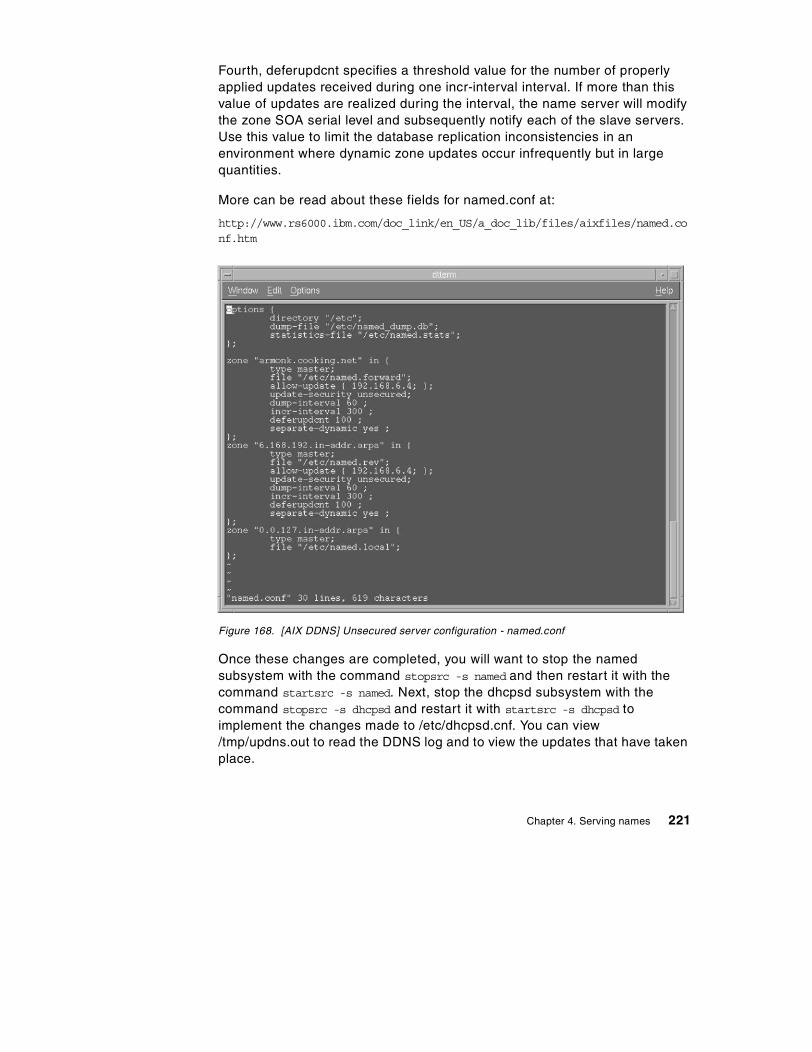
Fourth, deferupdcnt specifies a threshold value for the number of properlyapplied updates received during one incr-interval interval. If more than thisvalue of updates are realized during the interval, the name server will modifythe zone SOA serial level and subsequently notify each of the slave servers.Use this value to limit the database replication inconsistencies in anenvironment where dynamic zone updates occur infrequently but in largequantities.
More can be read about these fields for named.conf at:
http://www.rs6000.ibm.com/doc_link/en_US/a_doc_lib/files/aixfiles/named.conf.htm
Figure 168. [AIX DDNS] Unsecured server configuration - named.conf
Once these changes are completed, you will want to stop the namedsubsystem with the command stopsrc -s named and then restart it with thecommand startsrc -s named. Next, stop the dhcpsd subsystem with thecommand stopsrc -s dhcpsd and restart it with startsrc -s dhcpsd toimplement the changes made to /etc/dhcpsd.cnf. You can view/tmp/updns.out to read the DDNS log and to view the updates that have takenplace.
Chapter 4. Serving names 221

4.4.3.3 AIX DDNS in controlled mode with ProxyArec
The first step is to stop the named and dhcpsd subsystems. Do this using thestopsrc command, as illustrated in 4.4.3.2, “AIX DDNS in unsecured modewith ProxyArec” on page 219.
To configure our AIX DDNS server to function in controlled instead ofunsecured mode, change the update-security field in named.conf fromunsecured to controlled in both forward and reverse lookup zones. In Figure169 on page 222, you can see the changes made to /etc/named.conf.
Figure 169. [AIX DDNS] Controlled server configuration - named.conf
Next, generate the encryption key to be handled by the zone and passed tothe zones for updates by using the nsupdate command. This will be done withthe following command:
The configuration files used in this section are located on the CD-ROM thatcame with this redbook in the directory /AIX/DDNS/controlled.
Note
222 Beyond DHCP - Work Your TCP/IP Internetwork with Dynamic IP
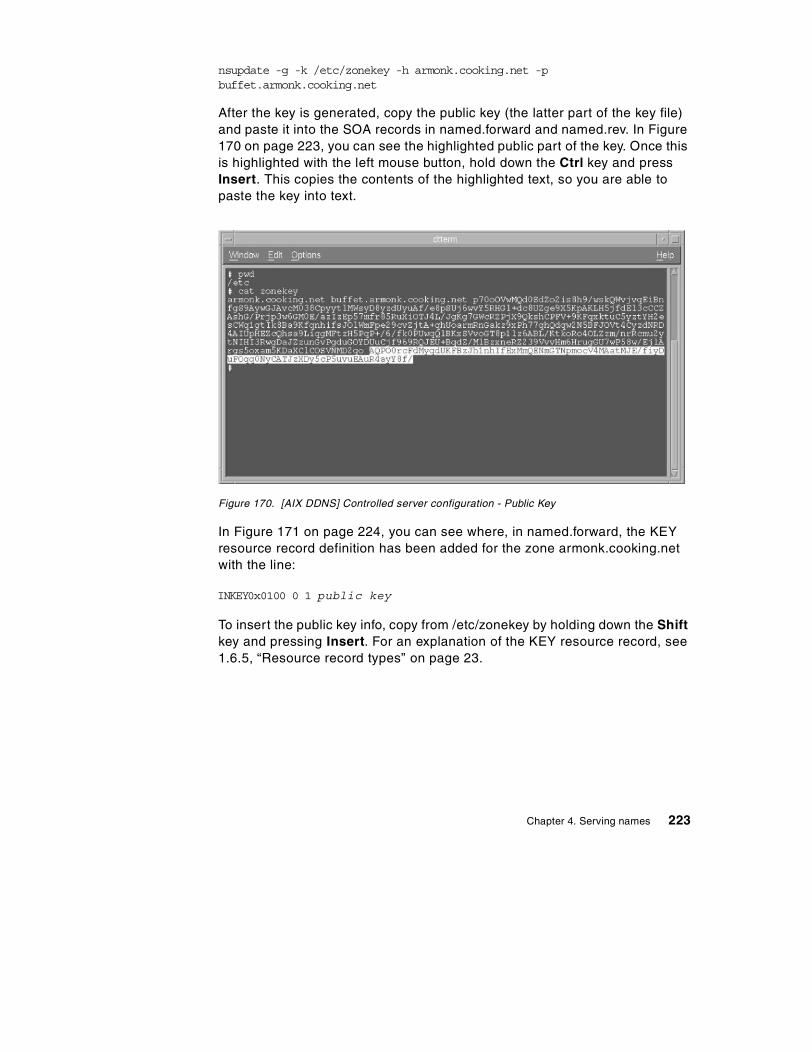
nsupdate -g -k /etc/zonekey -h armonk.cooking.net -pbuffet.armonk.cooking.net
After the key is generated, copy the public key (the latter part of the key file)and paste it into the SOA records in named.forward and named.rev. In Figure170 on page 223, you can see the highlighted public part of the key. Once thisis highlighted with the left mouse button, hold down the Ctrl key and pressInsert. This copies the contents of the highlighted text, so you are able topaste the key into text.
Figure 170. [AIX DDNS] Controlled server configuration - Public Key
In Figure 171 on page 224, you can see where, in named.forward, the KEYresource record definition has been added for the zone armonk.cooking.netwith the line:
INKEY0x0100 0 1 public key
To insert the public key info, copy from /etc/zonekey by holding down the Shiftkey and pressing Insert. For an explanation of the KEY resource record, see1.6.5, “Resource record types” on page 23.
Chapter 4. Serving names 223

Figure 171. [AIX DDNS] Controlled server configuration - named.forward
In Figure 172 on page 224, you can see that the same steps are repeated innamed.rev as were performed on named.forward.
Figure 172. [AIX DDNS] Controlled server configuration - named.rev
Finally, you will edit the calls to nsupdate that are made by/usr/sbin/dhcpaction. There are two occurrences of the nsupdate command inthe file you must edit. In Figure 173 on page 225, you can see where the flag
224 Beyond DHCP - Work Your TCP/IP Internetwork with Dynamic IP

-k /etc/zonekey was inserted into the call to nsupdate. There is anotheroccurrence of the nsupdate command later in the dhcpaction script that willhave to be changed as well.
Figure 173. [AIX DDNS] Controlled server configuration - /usr/sbin/dhcpaction
Now, you can restart the subsystems using the startsrc command asdiscussed in 4.4.3.2, “AIX DDNS in unsecured mode with ProxyArec” on page219. The named daemon will now accept dynamic updates from dhcpsd incontrolled mode.
Chapter 4. Serving names 225

226 Beyond DHCP - Work Your TCP/IP Internetwork with Dynamic IP
Chapter 5. Integrating file and print services
In this chapter, we show how to integrate your existing LANs into your TCP/IPnetwork. This chapter focuses on the legacy protocol NetBEUI, NetBIOSname servers, Microsoft WINS, and how to enable your clients to use theseservices. If you are interested in integrating printing and file sharing into yourTCP/IP network, then you should read this chapter.
5.1 NetBIOS, NetBEUI and TCPBEUI: What are they?
NetBIOS (Network Basic Input Output System) was originally developed bySytek Inc. for IBM to link a network operating system with specific hardware.NetBIOS offers LAN applications a variety of hooks to carry outinter-application communications and data transfer. Essentially, NetBIOS is away for application programs to talk to the network.
NetBEUI (NetBIOS Enhanced User Interface) is the original PC networkingprotocol and interface designed by IBM for OS/2 LAN Server/OS/2 WarpServer Version 4. This protocol was later adopted by Microsoft for theirnetworking products.
NetBEUI uses the IEEE standard 802.2 data link protocol. In addition toconnectionless communication, this protocol offers connection-oriented,guaranteed delivery of messages up to 64 Kb in length. Theconnection-oriented flavor of 802.2 exploits advanced windowing andacknowledgment efficiencies, and renders stellar performance when bothends of the connection are on the same LAN. When the connection spansmultiple LANs, the 802.2 protocol relies on Source Route Bridging orTransparent Bridging. NetBEUI can not be routed by an IP gateway.
Fortunately, the NetBIOS interface does not rely on any specific underlyingprotocol to connect systems together, and as such, it is adaptable toprotocols that allow packet forwarding, such as TCP/IP.
Because NetBEUI is not a routable protocol, it is a major limitation for agrowing company where routable protocols, such as TCP/IP, are gainingpopularity.
RFCs 1001 and 1002 describe the standard way to implement the NetBIOSservices on top of the Transmission Control Protocol (TCP) and UserDatagram Protocol (UDP). RFC 1001/1002 is not an encapsulation technique;it builds special packets and sends them out via UDP/IP and TCP/IP. NetBIOSover TCP/IP is known as NBT or TCPBEUI.
© Copyright IBM Corp. 1998, 2000 227
The IBM OS/2 Warp Server for e-business and Microsoft Windows NTimplement RFCs 1001 and 1002 in order to overcome the limitation ofNetBEUI. Figure 174 on page 229 shows how a workstation cancommunicate across an IP-only router with traditional TCP/IP hosts, as wellas with servers using the TCPBEUI protocol. The workstation can continue tocommunicate with local servers using NetBEUI.
TCPBEUI is translation, not encapsulation.
Once a NetBIOS session has been established, TCPBEUI will usesockets-send commands over a TCP connection to send NetBIOS sessiondata. TCPBEUI builds a 4 byte session header that precedes the actualuser data. Therefore, a NetBIOS chain send of 128 KB would have anoverhead of only 4 bytes.
Note
228 Beyond DHCP - Work Your TCP/IP Internetwork with Dynamic IP
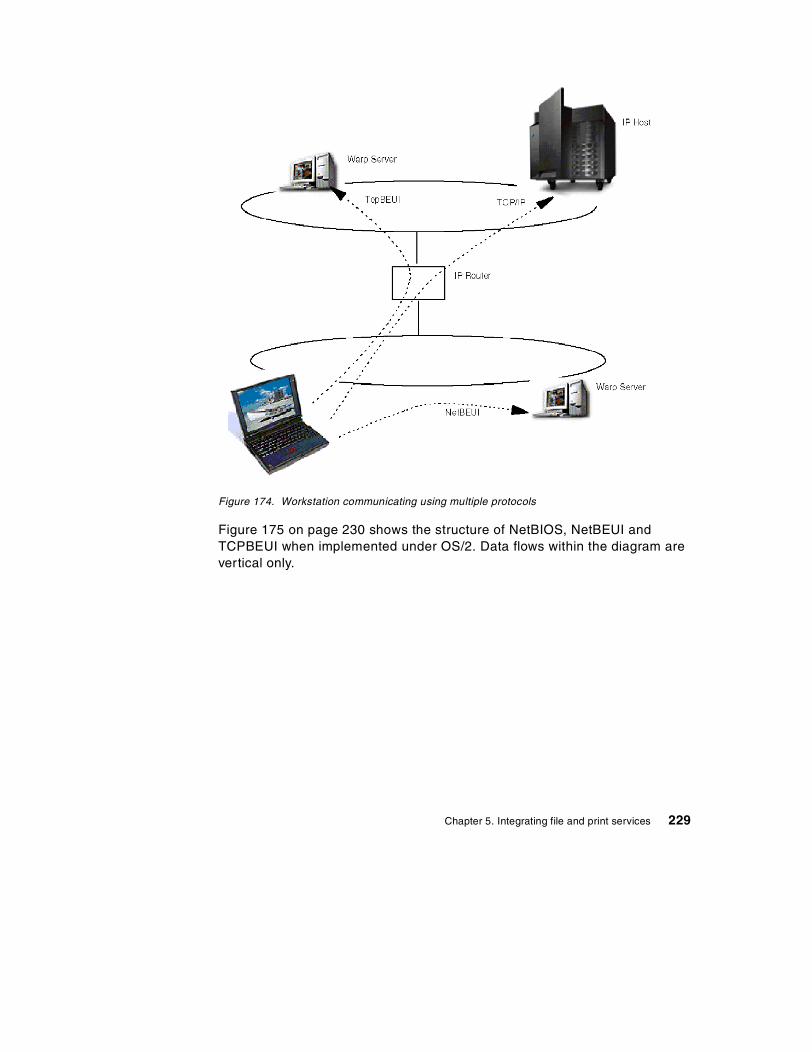
Figure 174. Workstation communicating using multiple protocols
Figure 175 on page 230 shows the structure of NetBIOS, NetBEUI andTCPBEUI when implemented under OS/2. Data flows within the diagram arevertical only.
Chapter 5. Integrating file and print services 229
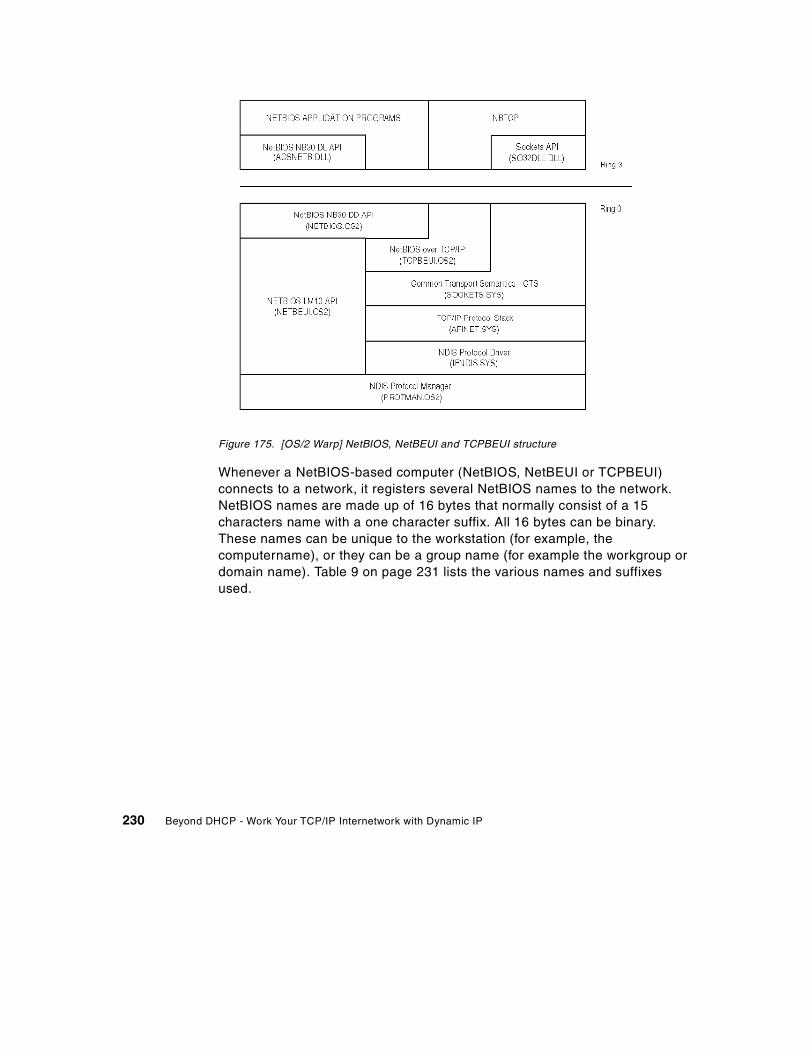
Figure 175. [OS/2 Warp] NetBIOS, NetBEUI and TCPBEUI structure
Whenever a NetBIOS-based computer (NetBIOS, NetBEUI or TCPBEUI)connects to a network, it registers several NetBIOS names to the network.NetBIOS names are made up of 16 bytes that normally consist of a 15characters name with a one character suffix. All 16 bytes can be binary.These names can be unique to the workstation (for example, thecomputername), or they can be a group name (for example the workgroup ordomain name). Table 9 on page 231 lists the various names and suffixesused.
230 Beyond DHCP - Work Your TCP/IP Internetwork with Dynamic IP
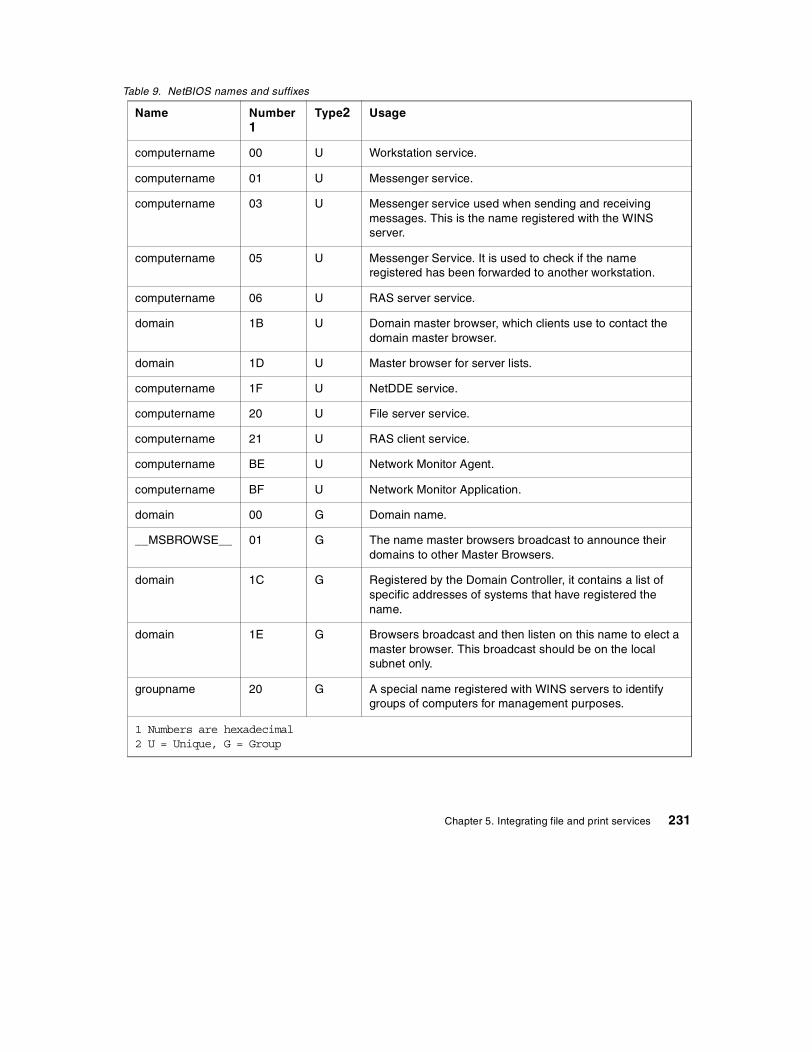
Table 9. NetBIOS names and suffixes
Name Number1
Type2 Usage
computername 00 U Workstation service.
computername 01 U Messenger service.
computername 03 U Messenger service used when sending and receivingmessages. This is the name registered with the WINSserver.
computername 05 U Messenger Service. It is used to check if the nameregistered has been forwarded to another workstation.
computername 06 U RAS server service.
domain 1B U Domain master browser, which clients use to contact thedomain master browser.
domain 1D U Master browser for server lists.
computername 1F U NetDDE service.
computername 20 U File server service.
computername 21 U RAS client service.
computername BE U Network Monitor Agent.
computername BF U Network Monitor Application.
domain 00 G Domain name.
__MSBROWSE__ 01 G The name master browsers broadcast to announce theirdomains to other Master Browsers.
domain 1C G Registered by the Domain Controller, it contains a list ofspecific addresses of systems that have registered thename.
domain 1E G Browsers broadcast and then listen on this name to elect amaster browser. This broadcast should be on the localsubnet only.
groupname 20 G A special name registered with WINS servers to identifygroups of computers for management purposes.
1 Numbers are hexadecimal2 U = Unique, G = Group
Chapter 5. Integrating file and print services 231
To communicate over TCPBEUI, two computers refer to one-another usingthese names. A problem occurs because they must somehow resolve theseNetBIOS names into IP addresses.
5.2 Resolving NetBIOS names to IP addresses
When the client connects to the server the client must resolve the server’sNetBIOS names. There are various ways to resolve NetBIOS names into IPaddresses.
The simplest method is to try broadcasting name queries and hope thecomputer you’re trying to communicate with responds in order to do theresolution. Computers running in this mode are said to be B-Node(Broadcast) clients.
A better method would be to have a server on the network that could do theNetBIOS name to IP addresses resolution for you. Such a server is known asa NetBIOS Name Server or NBNS. Microsoft uses WINS as a type of NBNS.Computers that are configured to use a NBNS are P-Node (Peer-to-Peer)clients. Broadcasting is never used by P-Node clients.
Finally, you could combine the modes to become either M-Node (Mixed) orH-Node (Hybrid) clients.
An M-Node client will attempt a name query broadcast first, and if that fails, itwill try to use the NBNS.
H-Node clients reverse the sequence used by M-Node clients, and willattempt to use the NBNS first. If that fails, it will try a name query broadcast.If an H-Node client detects that a NBNS has failed, it will continue to poll theNBNS (while using broadcasts), so that it knows when to switch back to usingthe NBNS. H-Node has generally replaced M-Node.
NetBIOS name servers will be covered in 5.4, “NetBIOS Name Servers(NBNS)” on page 253. Configuring clients to make use of the NBNS iscovered in 5.5, “P-Node, H-Node and M-Node clients” on page 257. In themeantime, we will look at how to enhance the performance of B-Node clientsby reducing the amount of broadcasts that they generate.
There is a new way of resolving a NetBIOS name to IP address, not using abroadcast or NetBIOS name server. This approach is discussed in 5.3, “Newway of using DNS with non-RFC-encoded name” on page 246.
232 Beyond DHCP - Work Your TCP/IP Internetwork with Dynamic IP

5.2.1 Enhancing B-Node clientsOperating as a B-Node client will work for you as long as all the routers andbridges within your network are configured to pass on broadcast traffic.However, generally they’re not, so computers will only be able tocommunicate with one another if they are located on the same subnet.
There are enhancements available to B-Node clients in order to work aroundthis limitation.
5.2.1.1 Enhancing DOS, Windows 3.11 and WfW clientsThe IBM DOS LAN Services (DLS) comes with a TCP/IP stack from NetworkTeleSystems that supports DHCP and TCPBEUI. Throughout this chapter,when we’re discussing DOS, Windows 3.11 or Windows for Workgroups(WfW)-based computers, we will assume that DLS is installed.
DLS also includes the PING utility for testing IP connectivity, and a utilitycalled NBUTIL to build a NetBIOS name to IP address resolution table.
The NBUTIL Utility ProgramThe NBUTIL utility program that comes with DLS allows you to create andmaintain a NetBIOS name to IP address table in memory.
Where:
? Displays a description of all command line options used withNBUTIL.
-a Adds a NetBIOS name/IP address pair to the NetBIOSname table.
<ipaddress> The IP address associated with the NetBIOS name you wantto add to the NetBIOS name table.
NBUTIL [-?]
[-a <ipaddress> <netbiosname>][-f <filename>][-l <number>][-x]
[-t]
[-s]
[-c]
[-w]
NBUTIL syntax
Chapter 5. Integrating file and print services 233
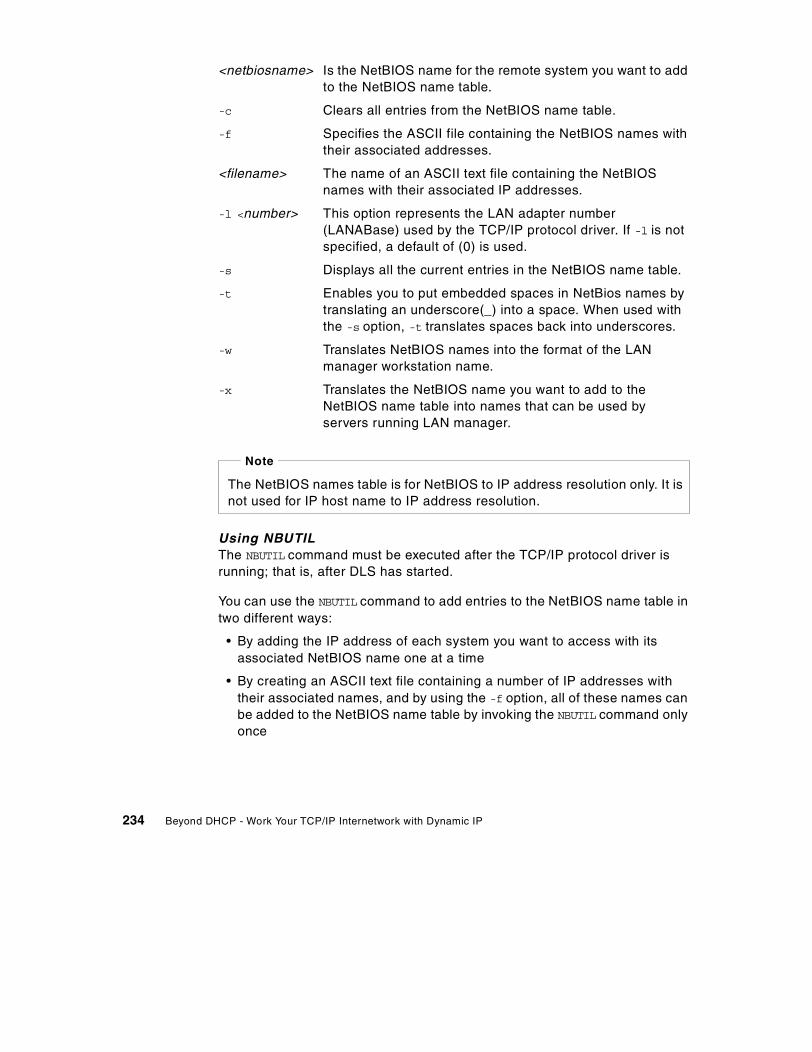
<netbiosname> Is the NetBIOS name for the remote system you want to addto the NetBIOS name table.
-c Clears all entries from the NetBIOS name table.
-f Specifies the ASCII file containing the NetBIOS names withtheir associated addresses.
<filename> The name of an ASCII text file containing the NetBIOSnames with their associated IP addresses.
-l <number> This option represents the LAN adapter number(LANABase) used by the TCP/IP protocol driver. If -l is notspecified, a default of (0) is used.
-s Displays all the current entries in the NetBIOS name table.
-t Enables you to put embedded spaces in NetBios names bytranslating an underscore(_) into a space. When used withthe -s option, -t translates spaces back into underscores.
-w Translates NetBIOS names into the format of the LANmanager workstation name.
-x Translates the NetBIOS name you want to add to theNetBIOS name table into names that can be used byservers running LAN manager.
Using NBUTILThe NBUTIL command must be executed after the TCP/IP protocol driver isrunning; that is, after DLS has started.
You can use the NBUTIL command to add entries to the NetBIOS name table intwo different ways:
• By adding the IP address of each system you want to access with itsassociated NetBIOS name one at a time
• By creating an ASCII text file containing a number of IP addresses withtheir associated names, and by using the -f option, all of these names canbe added to the NetBIOS name table by invoking the NBUTIL command onlyonce
The NetBIOS names table is for NetBIOS to IP address resolution only. It isnot used for IP host name to IP address resolution.
Note
234 Beyond DHCP - Work Your TCP/IP Internetwork with Dynamic IP
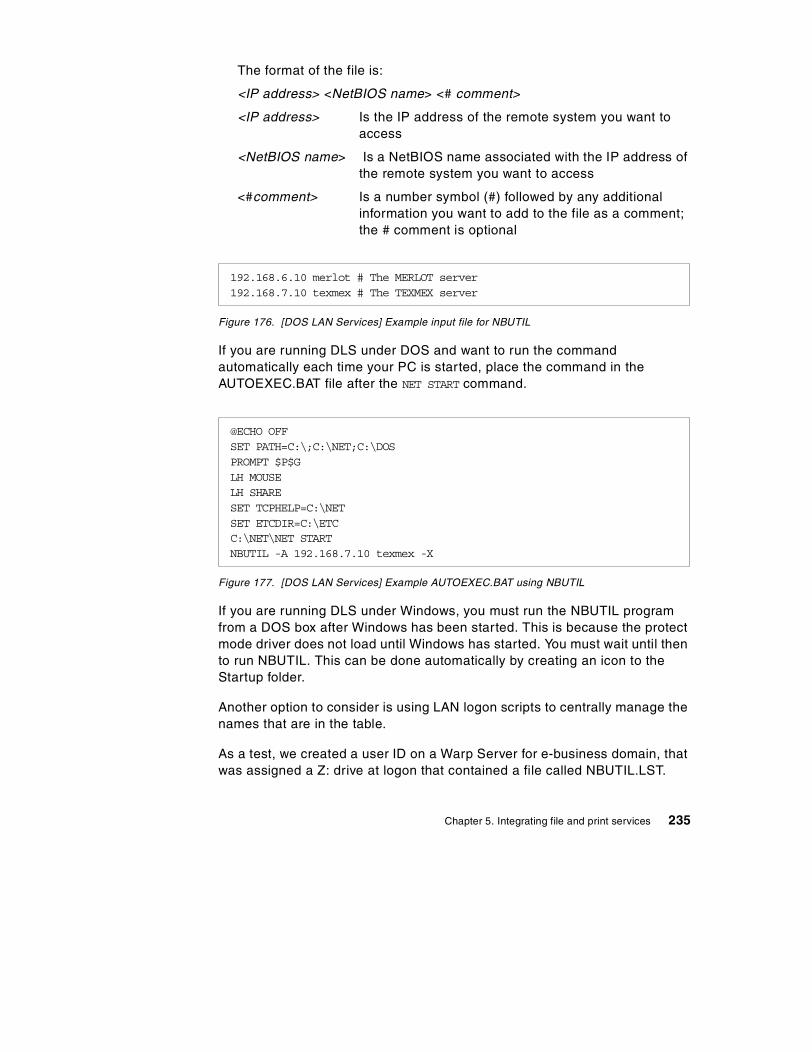
The format of the file is:
<IP address> <NetBIOS name> <# comment>
<IP address> Is the IP address of the remote system you want toaccess
<NetBIOS name> Is a NetBIOS name associated with the IP address ofthe remote system you want to access
<#comment> Is a number symbol (#) followed by any additionalinformation you want to add to the file as a comment;the # comment is optional
Figure 176. [DOS LAN Services] Example input file for NBUTIL
If you are running DLS under DOS and want to run the commandautomatically each time your PC is started, place the command in theAUTOEXEC.BAT file after the NET START command.
Figure 177. [DOS LAN Services] Example AUTOEXEC.BAT using NBUTIL
If you are running DLS under Windows, you must run the NBUTIL programfrom a DOS box after Windows has been started. This is because the protectmode driver does not load until Windows has started. You must wait until thento run NBUTIL. This can be done automatically by creating an icon to theStartup folder.
Another option to consider is using LAN logon scripts to centrally manage thenames that are in the table.
As a test, we created a user ID on a Warp Server for e-business domain, thatwas assigned a Z: drive at logon that contained a file called NBUTIL.LST.
192.168.6.10 merlot # The MERLOT server192.168.7.10 texmex # The TEXMEX server
@ECHO OFFSET PATH=C:\;C:\NET;C:\DOSPROMPT $P$GLH MOUSELH SHARESET TCPHELP=C:\NETSET ETCDIR=C:\ETCC:\NET\NET STARTNBUTIL -A 192.168.7.10 texmex -X
Chapter 5. Integrating file and print services 235
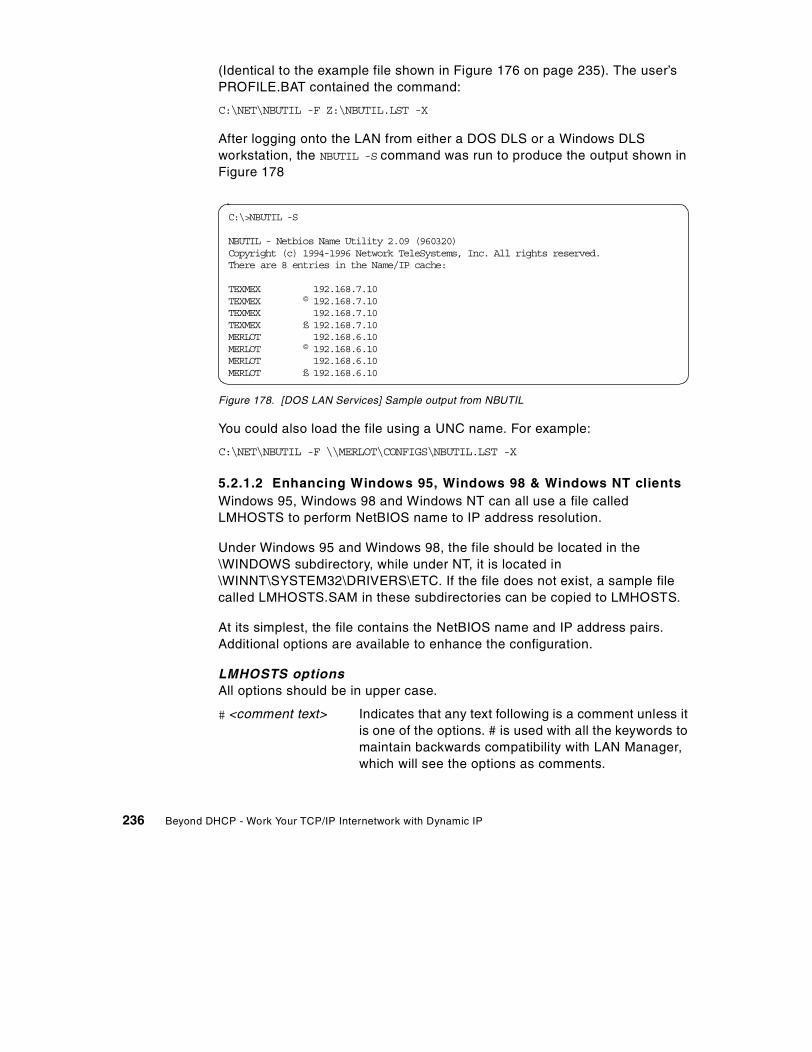
(Identical to the example file shown in Figure 176 on page 235). The user’sPROFILE.BAT contained the command:
C:\NET\NBUTIL -F Z:\NBUTIL.LST -X
After logging onto the LAN from either a DOS DLS or a Windows DLSworkstation, the NBUTIL -S command was run to produce the output shown inFigure 178
Figure 178. [DOS LAN Services] Sample output from NBUTIL
You could also load the file using a UNC name. For example:
C:\NET\NBUTIL -F \\MERLOT\CONFIGS\NBUTIL.LST -X
5.2.1.2 Enhancing Windows 95, Windows 98 & Windows NT clientsWindows 95, Windows 98 and Windows NT can all use a file calledLMHOSTS to perform NetBIOS name to IP address resolution.
Under Windows 95 and Windows 98, the file should be located in the\WINDOWS subdirectory, while under NT, it is located in\WINNT\SYSTEM32\DRIVERS\ETC. If the file does not exist, a sample filecalled LMHOSTS.SAM in these subdirectories can be copied to LMHOSTS.
At its simplest, the file contains the NetBIOS name and IP address pairs.Additional options are available to enhance the configuration.
LMHOSTS optionsAll options should be in upper case.
# <comment text> Indicates that any text following is a comment unless itis one of the options. # is used with all the keywords tomaintain backwards compatibility with LAN Manager,which will see the options as comments.
C:\>NBUTIL -S
NBUTIL - Netbios Name Utility 2.09 (960320)Copyright (c) 1994-1996 Network TeleSystems, Inc. All rights reserved.There are 8 entries in the Name/IP cache:
TEXMEX 192.168.7.10TEXMEX © 192.168.7.10TEXMEX 192.168.7.10TEXMEX ß 192.168.7.10MERLOT 192.168.6.10MERLOT © 192.168.6.10MERLOT 192.168.6.10MERLOT ß 192.168.6.10
236 Beyond DHCP - Work Your TCP/IP Internetwork with Dynamic IP
#PRE Specifies that the address should be pre-loaded intothe name cache. The LMHOSTS file is used only aftera WINS query and a broadcast have both failed, andthese searches are attempted only if the name is notalready in the cache.
#DOM:<domain name> This option is needed for all servers that validatelogon requests. All computers in the domain will needone of these entries for each domain controller in thedomain. Note that #PRE must be before #DOM.
#NOFNR Do not use Directed Name Queries (DNS). Someversions of LAN Manager cannot handle NetBIOSDNS requests and return an error.
#BEGIN_INCLUDE
#INCLUDE <other_file>#INCLUDE <other_file>
#END_INCLUDE Include LMHOSTS definitions from other files. Theother file may be remote. (Remember, the computermust be able to resolve the name of the remotecomputer before it can use a remote file.)
#BEGIN_ALTERNATE#INCLUDE <other_file>#INCLUDE <other_file>
#END_ALTERNATE Defines a list of alternate locations for an additionalLMHOSTS file to be included. The first additional fileread successfully will be used.
#MH Associates a NetBIOS name with multiple IPaddresses (For example, a server with two or moreNICs). The NetBIOS name can be associated with upto a maximum of 25 different IP addresses.
Figure 179 on page 238 shows a sample LMHOSTS file for a computer thatcan participate in two domains (REDMOND and BELLVUE). Using the#BEGIN_ALTERNATE option, an additional LMHOSTS configuration file isloaded from either the PIE or HOTDOG server (The first one successfully
Note
The name cache and the LMHOSTS file are read sequentially, so add themost frequently accessed computer names to the top of the LMHOSTS file,with the #PRE entries at the end of the file. Once entries have been loadedinto the cache, they do not need be accessed again in the file.
Chapter 5. Integrating file and print services 237
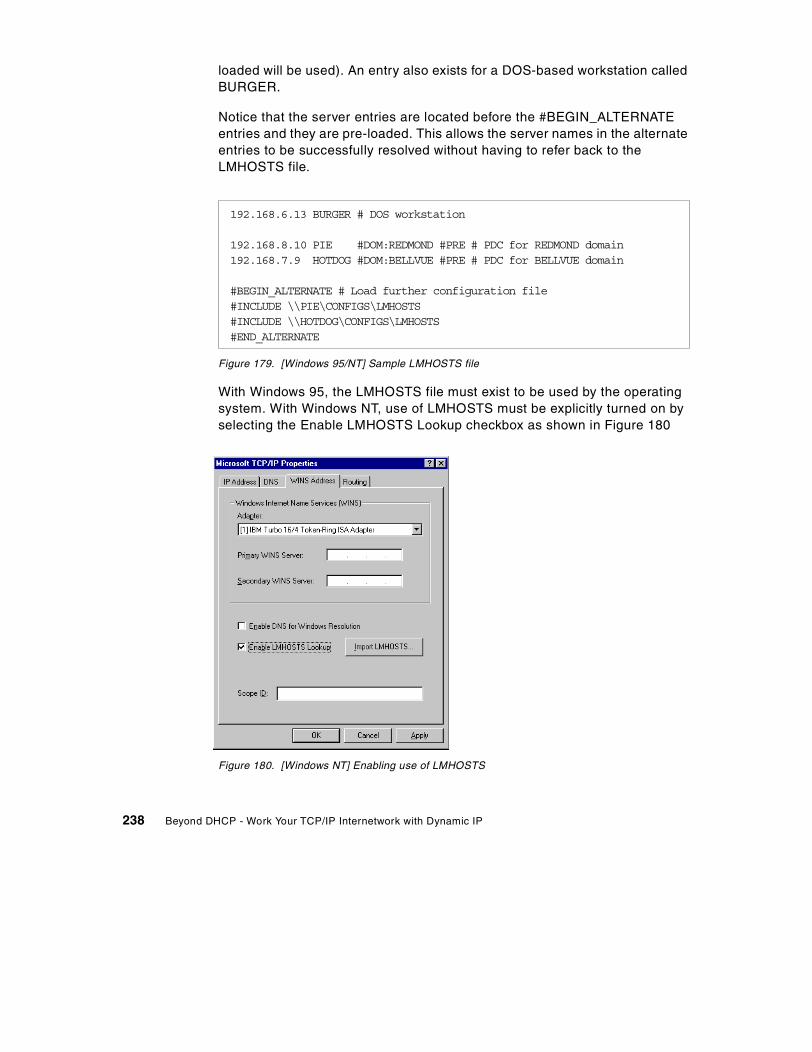
loaded will be used). An entry also exists for a DOS-based workstation calledBURGER.
Notice that the server entries are located before the #BEGIN_ALTERNATEentries and they are pre-loaded. This allows the server names in the alternateentries to be successfully resolved without having to refer back to theLMHOSTS file.
Figure 179. [Windows 95/NT] Sample LMHOSTS file
With Windows 95, the LMHOSTS file must exist to be used by the operatingsystem. With Windows NT, use of LMHOSTS must be explicitly turned on byselecting the Enable LMHOSTS Lookup checkbox as shown in Figure 180
Figure 180. [Windows NT] Enabling use of LMHOSTS
192.168.6.13 BURGER # DOS workstation
192.168.8.10 PIE #DOM:REDMOND #PRE # PDC for REDMOND domain192.168.7.9 HOTDOG #DOM:BELLVUE #PRE # PDC for BELLVUE domain
#BEGIN_ALTERNATE # Load further configuration file#INCLUDE \\PIE\CONFIGS\LMHOSTS#INCLUDE \\HOTDOG\CONFIGS\LMHOSTS#END_ALTERNATE
238 Beyond DHCP - Work Your TCP/IP Internetwork with Dynamic IP
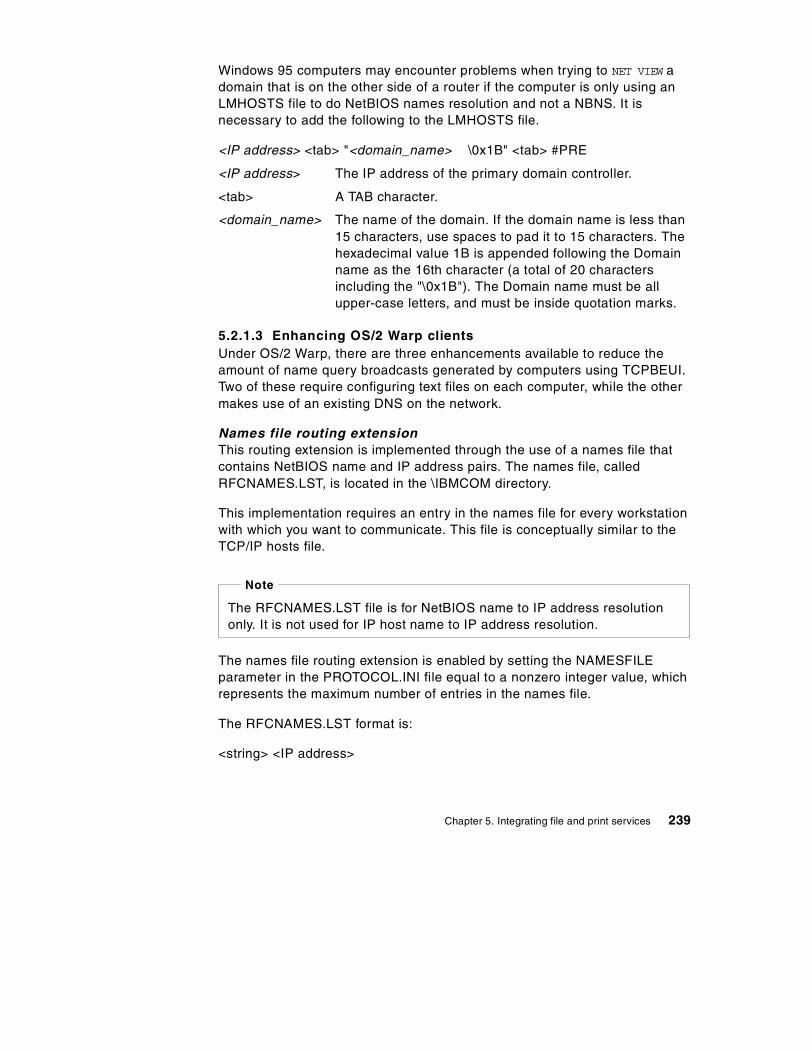
Windows 95 computers may encounter problems when trying to NET VIEW adomain that is on the other side of a router if the computer is only using anLMHOSTS file to do NetBIOS names resolution and not a NBNS. It isnecessary to add the following to the LMHOSTS file.
<IP address> <tab> "<domain_name> \0x1B" <tab> #PRE
<IP address> The IP address of the primary domain controller.
<tab> A TAB character.
<domain_name> The name of the domain. If the domain name is less than15 characters, use spaces to pad it to 15 characters. Thehexadecimal value 1B is appended following the Domainname as the 16th character (a total of 20 charactersincluding the "\0x1B"). The Domain name must be allupper-case letters, and must be inside quotation marks.
5.2.1.3 Enhancing OS/2 Warp clientsUnder OS/2 Warp, there are three enhancements available to reduce theamount of name query broadcasts generated by computers using TCPBEUI.Two of these require configuring text files on each computer, while the othermakes use of an existing DNS on the network.
Names file routing extensionThis routing extension is implemented through the use of a names file thatcontains NetBIOS name and IP address pairs. The names file, calledRFCNAMES.LST, is located in the \IBMCOM directory.
This implementation requires an entry in the names file for every workstationwith which you want to communicate. This file is conceptually similar to theTCP/IP hosts file.
The names file routing extension is enabled by setting the NAMESFILEparameter in the PROTOCOL.INI file equal to a nonzero integer value, whichrepresents the maximum number of entries in the names file.
The RFCNAMES.LST format is:
<string> <IP address>
The RFCNAMES.LST file is for NetBIOS name to IP address resolutiononly. It is not used for IP host name to IP address resolution.
Note
Chapter 5. Integrating file and print services 239
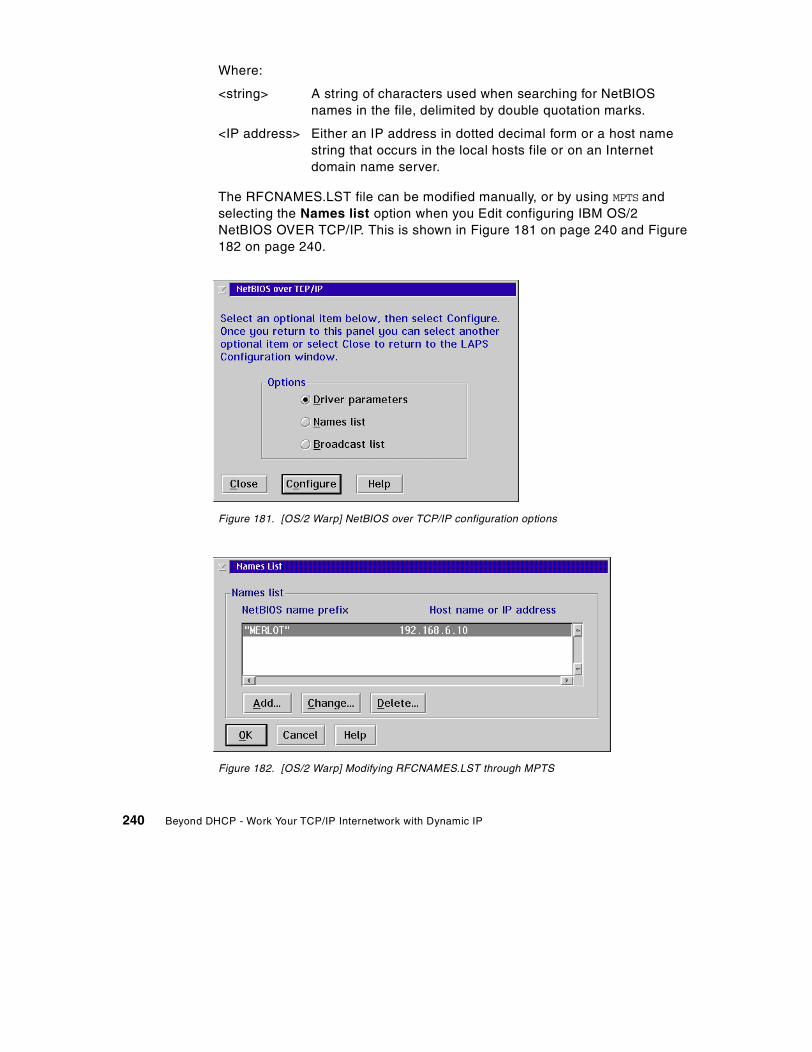
Where:
<string> A string of characters used when searching for NetBIOSnames in the file, delimited by double quotation marks.
<IP address> Either an IP address in dotted decimal form or a host namestring that occurs in the local hosts file or on an Internetdomain name server.
The RFCNAMES.LST file can be modified manually, or by using MPTS andselecting the Names list option when you Edit configuring IBM OS/2NetBIOS OVER TCP/IP. This is shown in Figure 181 on page 240 and Figure182 on page 240.
Figure 181. [OS/2 Warp] NetBIOS over TCP/IP configuration options
Figure 182. [OS/2 Warp] Modifying RFCNAMES.LST through MPTS
240 Beyond DHCP - Work Your TCP/IP Internetwork with Dynamic IP
The advantage of using a names file is the reduction of name querybroadcasts. Before the computer broadcasts to the network for NetBIOSname to IP address resolution, it searches this local file. The search is doneby checking each names file entry up to the length of the entry. Due to thesearch technique used, the order of entries in the names file is important.
If an address in the file is given as a host name string, it is resolved to an IPaddress by looking it up in the local hosts file or by querying the Internetdomain name server. The host name string must, therefore, be in the sameform here as it is in the hosts file or on the domain name server.
For an OS/2 Warp Server environment, the requesters need a names file withthe computer name, IP address and domain name IP address of each serverthey contact. The servers need the computer name and IP address for eachrequester that contacts them. The computer name and domain names arefound in the IBMLAN.INI files on these machines.
Broadcast file routing extensionThis routing extension is implemented through the use of a broadcast file thatcontains the IP addresses of other subnets. A TCP/IP broadcast is limited toone subnet unless other subnet addresses are included in the broadcast file.
The broadcast file, named RFCBCST.LST, is located in the \IBMCOMdirectory. It contains a list of host names (such as merlot), host IP addresses(such as 192.168.6.10) or subnet broadcast addresses (such as192.168.6.255). The file is read once at startup and each valid address isadded to the set of destination addresses for broadcast packets. Any host ornetwork accessible by these addresses becomes part of the local NetBIOSbroadcast domain; that is, they receive all name lookup and registrationpackets, as well as all broadcast and group NetBIOS datagrams. Theseaddresses can be on other networks and accessed through the appropriaterouter or bridge by the IBM TCP/IP program. The remote node is treated as ifit were a node on the local network.
Each line of the broadcast file is either an IP address in dotted decimalnotation or a host name string that occurs in either the local hosts file used bythe IBM TCP/IP program or on an Internet domain name server. The hostname string must be in the same form here as it is in the hosts file or on thedomain name server.
Again, the broadcast list may be edited manually or through MPTS.
Chapter 5. Integrating file and print services 241
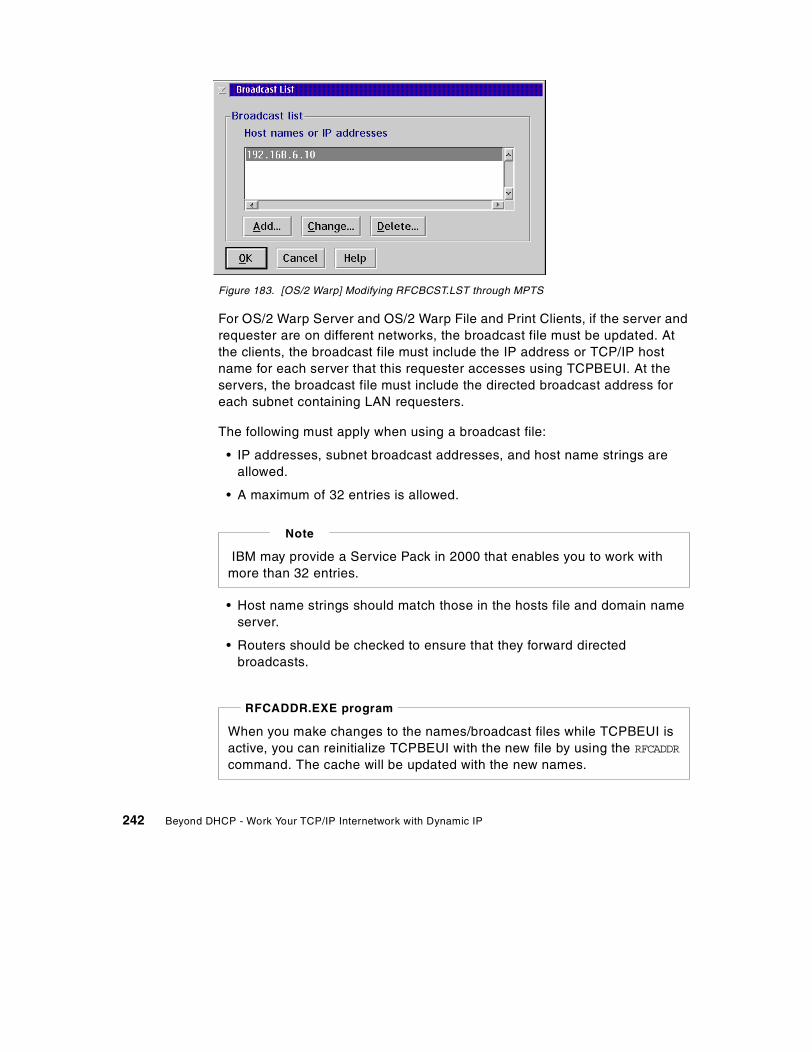
Figure 183. [OS/2 Warp] Modifying RFCBCST.LST through MPTS
For OS/2 Warp Server and OS/2 Warp File and Print Clients, if the server andrequester are on different networks, the broadcast file must be updated. Atthe clients, the broadcast file must include the IP address or TCP/IP hostname for each server that this requester accesses using TCPBEUI. At theservers, the broadcast file must include the directed broadcast address foreach subnet containing LAN requesters.
The following must apply when using a broadcast file:
• IP addresses, subnet broadcast addresses, and host name strings areallowed.
• A maximum of 32 entries is allowed.
• Host name strings should match those in the hosts file and domain nameserver.
• Routers should be checked to ensure that they forward directedbroadcasts.
IBM may provide a Service Pack in 2000 that enables you to work withmore than 32 entries.
Note
When you make changes to the names/broadcast files while TCPBEUI isactive, you can reinitialize TCPBEUI with the new file by using the RFCADDR
command. The cache will be updated with the new names.
RFCADDR.EXE program
242 Beyond DHCP - Work Your TCP/IP Internetwork with Dynamic IP
Domain Name Server (DNS) routing extensionThis routing extension uses the TCP/IP Domain Name Server (DNS), to storeNetBIOS names and IP address pairs, so that a TCPBEUI client can obtainthe IP address of another workstation from it. This extension requires that theworkstations already have an IP name and address registered on the DNS.The network administrator then enters the NetBIOS name and the IP addressof every TCPBEUI workstation into the DNS.
To enable the use of the Domain Name Server routing extension, you need toset the DOMAINSCOPE parameter in the PROTOCOL.INI file equal to yourTCP/IP domain name. For example:
DOMAINSCOPE=austin.cooking.net
If the names file search fails, the domain scope string, if specified, isappended to the encoded NetBIOS name. The new host name string is thenused to resolve the NetBIOS name to an IP address by looking up the namein the local TCP/IP hosts file or by querying the DNS. If the DNS knows thename, it sends back the IP address to the NetBIOS over TCP/IP program.
The advantage of this implementation is that you have a central repository ofall NetBIOS names. However, you have to update your DNS with NetBIOSnames that are in an encoded format. An encoded format is necessarybecause NetBIOS names can be 16 bytes of any bit pattern, but the domainname server only accepts a limited character set. The TCPBEUI programencodes them into the 32-byte, reversible, half-ASCII format that is specifiedin RFCs 1001/1002.
You can use the MAPNAME.EXE utility to encode NetBIOS names.MAPNAME is supplied in the \APPLETS\MPTSAPLT.ZIP file on MPTSdiskette 5.
Where:
<input> Either filename.LST or filename.RFC NetBIOS name; maximum of16 characters for a NetBIOS name, and 32 characters for a RFCname
Name can be any char.+ \xDD in any order, surrounded by "[]",D is a hex digit (\xDD = one char.)
MAPNAME <input> /FDBLxx
MAPNAME syntax
Chapter 5. Integrating file and print services 243
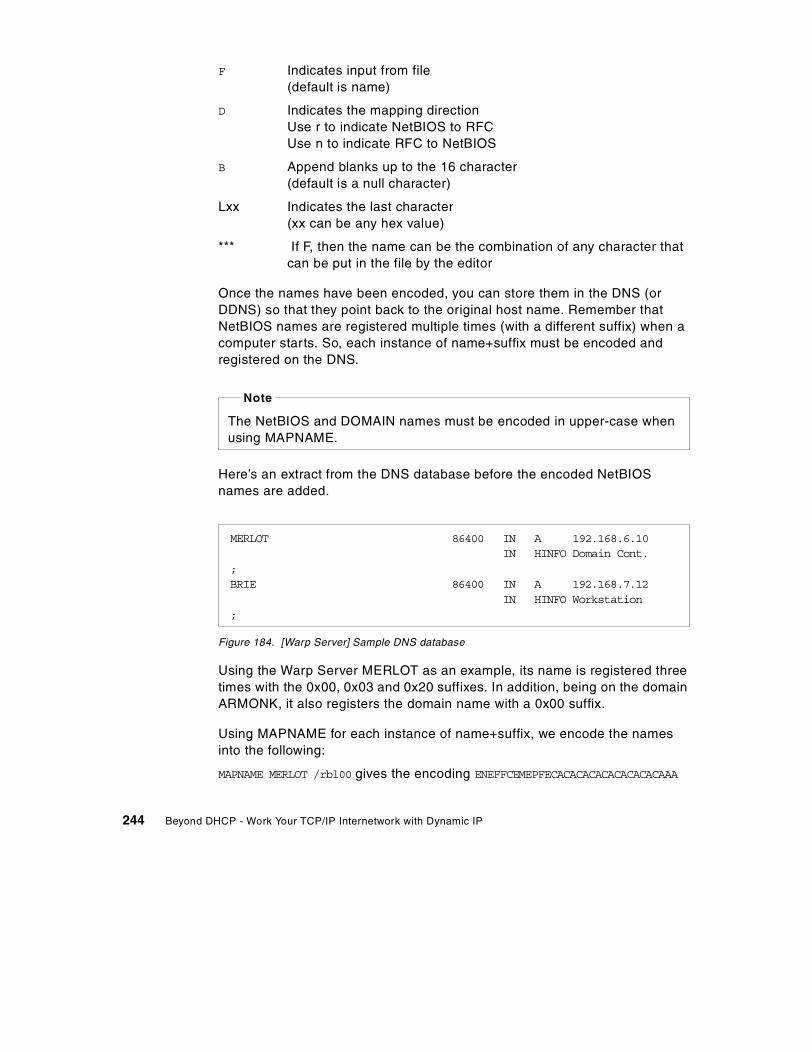
F Indicates input from file(default is name)
D Indicates the mapping directionUse r to indicate NetBIOS to RFCUse n to indicate RFC to NetBIOS
B Append blanks up to the 16 character(default is a null character)
Lxx Indicates the last character(xx can be any hex value)
*** If F, then the name can be the combination of any character thatcan be put in the file by the editor
Once the names have been encoded, you can store them in the DNS (orDDNS) so that they point back to the original host name. Remember thatNetBIOS names are registered multiple times (with a different suffix) when acomputer starts. So, each instance of name+suffix must be encoded andregistered on the DNS.
Here’s an extract from the DNS database before the encoded NetBIOSnames are added.
Figure 184. [Warp Server] Sample DNS database
Using the Warp Server MERLOT as an example, its name is registered threetimes with the 0x00, 0x03 and 0x20 suffixes. In addition, being on the domainARMONK, it also registers the domain name with a 0x00 suffix.
Using MAPNAME for each instance of name+suffix, we encode the namesinto the following:
MAPNAME MERLOT /rbl00 gives the encoding ENEFFCEMEPFECACACACACACACACACAAA
The NetBIOS and DOMAIN names must be encoded in upper-case whenusing MAPNAME.
Note
MERLOT 86400 IN A 192.168.6.10IN HINFO Domain Cont.
;BRIE 86400 IN A 192.168.7.12
IN HINFO Workstation;
244 Beyond DHCP - Work Your TCP/IP Internetwork with Dynamic IP

MAPNAME MERLOT /rbl03 gives the encoding ENEFFCEMEPFECACACACACACACACACAAD
MAPNAME MERLOT /rbl20 gives the encoding ENEFFCEMEPFECACACACACACACACACACA
MAPNAME ARMONK /rbl00 gives the encoding EBFCENEPEOELCACACACACACACACACAAA
Workstations, on the other hand, would normally register their names threetimes. They would register the NetBIOS name with the 0x00 and the 0x03suffixes. Usually, they would also register the domain name with the 0x00suffix as well, but seeing as this encoded name is already registered on theDNS, it cannot be registered again.
Using MAPNAME for the workstation BRIE, we encode the following:
MAPNAME BRIE /rbl00 gives the encoding ECFCEJEFCACACACACACACACACACACAAA
MAPNAME BRIE /rbl03 gives the encoding ECFCEJEFCACACACACACACACACACACAAD
The encoded names can now be added to the DNS database and pointedback to the TCP/IP host name (Using CNAME), where the IP address isspecified. An extract from the new DNS database now looks like this:
Figure 185. [Warp Server for e-business] DNS database with encoded NetBIOS names
MERLOT 86400 IN A 192.168.6.10IN HINFO Domain Cont.
;ENEFFCEMEPFECACACACACACACACACAAA 86400 IN CNAME MERLOT
IN HINFO 0x00 suffix;ENEFFCEMEPFECACACACACACACACACAAD 86400 IN CNAME MERLOT
IN HINFO 0x03 suffix;ENEFFCEMEPFECACACACACACACACACACA 86400 IN CNAME MERLOT
IN HINFO 0x20 suffix;EBFCENEPEOELCACACACACACACACACAAA 86400 IN CNAME MERLOT
IN HINFO Domain 0x00;BRIE 86400 IN A 192.168.7.12
IN HINFO Workstation;ECFCEJEFCACACACACACACACACACACAAA 86400 IN CNAME BRIE
IN HINFO 0x00 suffix;ECFCEJEFCACACACACACACACACACACAAD 86400 IN CNAME BRIE
IN HINFO 0x03 suffix
Chapter 5. Integrating file and print services 245
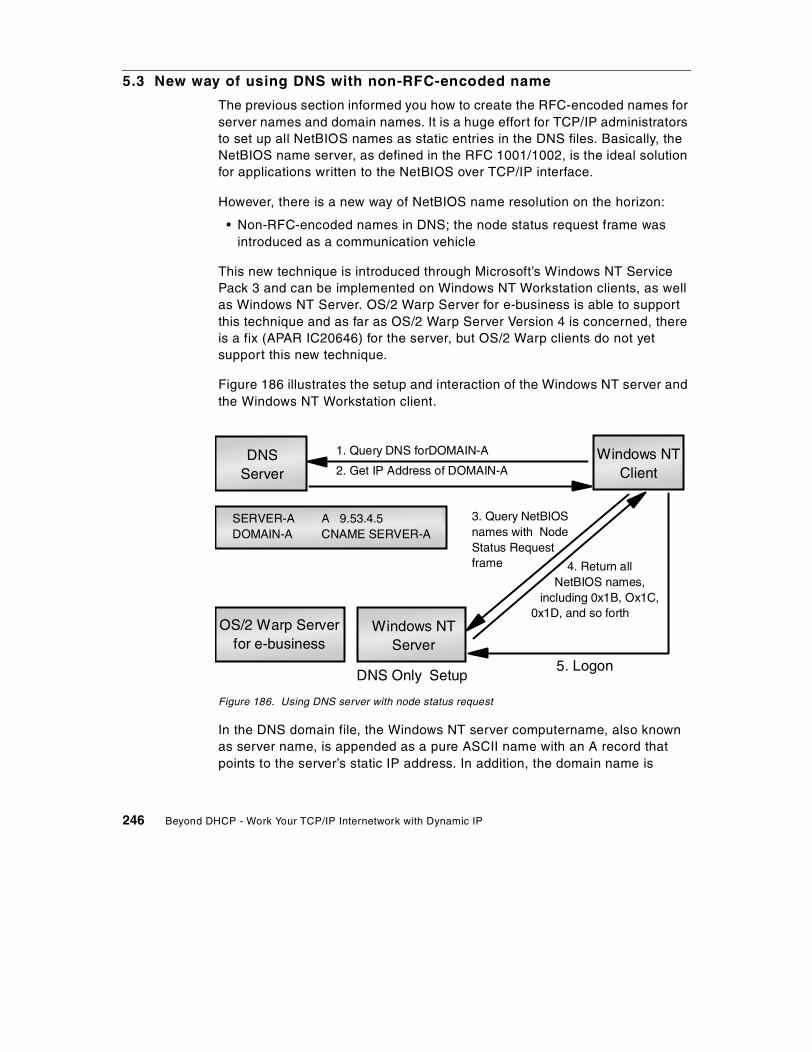
5.3 New way of using DNS with non-RFC-encoded name
The previous section informed you how to create the RFC-encoded names forserver names and domain names. It is a huge effort for TCP/IP administratorsto set up all NetBIOS names as static entries in the DNS files. Basically, theNetBIOS name server, as defined in the RFC 1001/1002, is the ideal solutionfor applications written to the NetBIOS over TCP/IP interface.
However, there is a new way of NetBIOS name resolution on the horizon:
• Non-RFC-encoded names in DNS; the node status request frame wasintroduced as a communication vehicle
This new technique is introduced through Microsoft’s Windows NT ServicePack 3 and can be implemented on Windows NT Workstation clients, as wellas Windows NT Server. OS/2 Warp Server for e-business is able to supportthis technique and as far as OS/2 Warp Server Version 4 is concerned, thereis a fix (APAR IC20646) for the server, but OS/2 Warp clients do not yetsupport this new technique.
Figure 186 illustrates the setup and interaction of the Windows NT server andthe Windows NT Workstation client.
Figure 186. Using DNS server with node status request
In the DNS domain file, the Windows NT server computername, also knownas server name, is appended as a pure ASCII name with an A record thatpoints to the server’s static IP address. In addition, the domain name is
DNSServer
Windows NTClient
SERVER-A A 9.53.4.5DOMAIN-A CNAME SERVER-A
OS/2 Warp Serverfor e-business
Windows NTServer
1. Query DNS forDOMAIN-A
2. Get IP Address of DOMAIN-A
DNS Only Setup
3. Query NetBIOSnames with NodeStatus Requestframe 4. Return all
NetBIOS names,including 0x1B, Ox1C,
0x1D, and so forth
5. Logon
246 Beyond DHCP - Work Your TCP/IP Internetwork with Dynamic IP
included with an alias, CNAME, to the server’s name. The entries to the DNSdomain file would look like the following two lines:
SERVER-A IN A 9.53.4.5DOMAIN-A IN CNAME SERVER-A.
The logon sequence would use the following steps:
1. The Windows NT Workstation client queries the DNS server for hostnameDOMAIN-A.
2. The DNS server returns the information that DOMAIN-A is the alias toSERVER-A. The Windows NT Workstation client receives the IP addressof the Windows NT Server.
3. Since the Windows NT Workstation client is not sure whether or not thetarget IP address is really a NetBIOS node that has certain NetBIOSnames registered, it sends a RFC frame to the received IP address (whichis the Windows NT Server). This frame is called Node Status request andpasses along a resource record name of * (asterisk).
4. Windows NT Server responds to the Node Status request by sending acomplete list of NetBIOS names registered in the node.
5. Now the Windows NT Workstation client selects the target IP address thathas a correct server name and domain name, then it starts the logonsequence through a SMB session.
This technique might be called DNS-Only or Use of non-RFC-encoded namesNetBIOS names resolution, but it actually is a combination of DNS nameresolution and the Node Status Request frame defined in the RFC1001/1002. Neither Windows NT Server nor Windows NT Workstation clientuse WINS in this case. The TCP/IP properties are set up as shown in Figure187 on page 248 and Figure 188 on page 249.
Chapter 5. Integrating file and print services 247
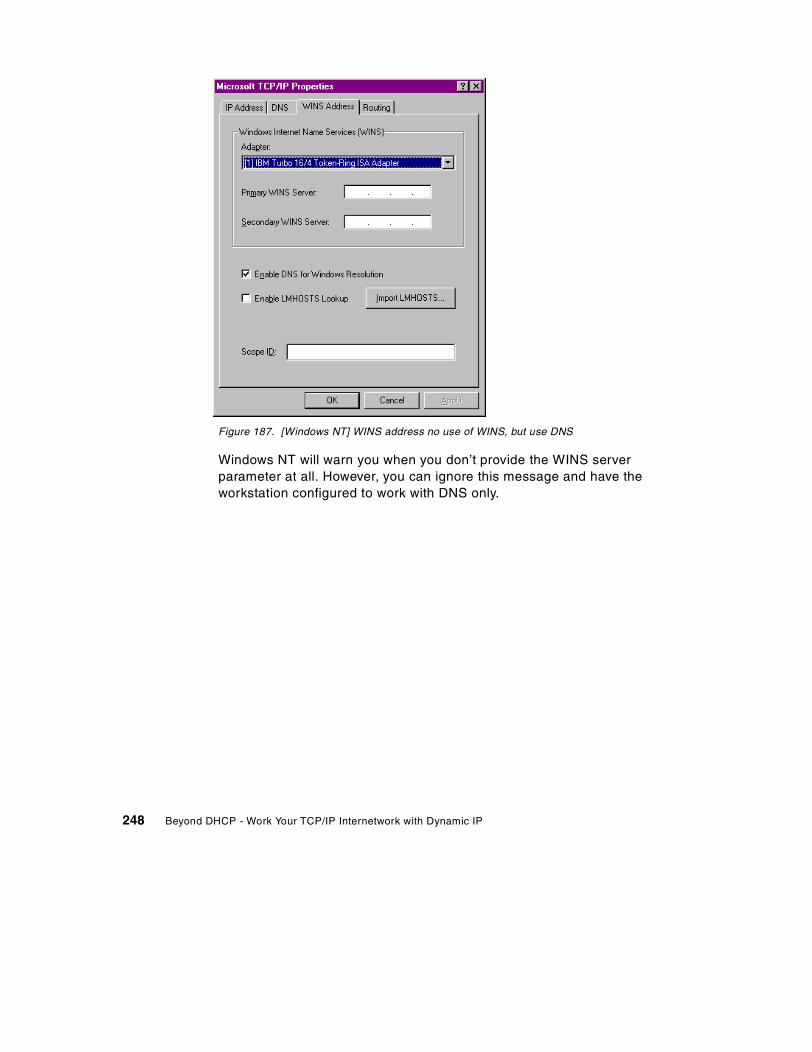
Figure 187. [Windows NT] WINS address no use of WINS, but use DNS
Windows NT will warn you when you don’t provide the WINS serverparameter at all. However, you can ignore this message and have theworkstation configured to work with DNS only.
248 Beyond DHCP - Work Your TCP/IP Internetwork with Dynamic IP

Figure 188. [Windows NT] TCP/IP Property - DNS settings
Figure 189 on page 250 shows the two IP frames, a packet 49 sent from aWindows NT workstation with service pack 3 carrying a Node Status requestframe with a questioned name *, and a packet 50 frame that was sent backfrom a Windows NT Server showing all registered NetBIOS names and statuson the node.
The questioned name *(asterisk), followed by 15 bytes of null (0x00)characters, is actually translated into the RFC-encoded name that results in acharacter string of CKAAAAAAAAAAAAAAAAAAAAAAAAAAAAAA in thetrace data.
Chapter 5. Integrating file and print services 249

Figure 189. [Windows NT] Packet trace - Node status request
Packet 49: IP, 9.3.1.138 -> 9.3.1.188Source IP: 9.3.1.138 , Destination IP: 9.3.1.188Version: 04, IP header length: 05 (32 bit words)Service type: 0: Precedence: 0, Delay: Norm, Throug: Norm, Reliab: NormPROTOCOL: [17] UDP
UDP, [137] -> [137]Source port: [137] , Destination port: [137]
TCPIP NETBIOS (name service)Operation: [0] NAME QUERY REQUEST, Flags: Unicast,Transaction ID: 0803Header Counts: QD: 1, AN: 0, NS: 0, AR: 0Request Name: *Request type: NODE STATUS REQUEST
RAW PACKET LISTING:0000 18 40 00 04 AC EC 35 D0 80 00 83 F4 6B 13 06 40 .@..¬ì5D.ôk..@0010 40 31 40 10 AA AA 03 00 00 00 08 00 45 00 00 4E @1@.ªª......E..N0020 81 29 00 00 20 11 04 2B 09 03 01 8A 09 03 01 BC ).. ..+......¿0030 00 89 00 89 00 3A A2 E0 08 03 00 00 00 01 00 00 ...:¢à........0040 00 00 00 00 20 43 4B 41 41 41 41 41 41 41 41 41 .... CKAAAAAAAAA0050 41 41 41 41 41 41 41 41 41 41 41 41 41 41 41 41 AAAAAAAAAAAAAAAA0060 41 41 41 41 41 00 00 21 00 01 AAAAA..!..
---------------------------------------------------------------
Packet 50: IP, 9.3.1.188 -> 9.3.1.138Source IP: 9.3.1.188 , Destination IP: 9.3.1.138Version: 04, IP header length: 05 (32 bit words)Service type: 0: Precedence: 0, Delay: Norm, Throug: Norm, Reliab: NormPROTOCOL: [17] UDP
UDP, [137] -> [137]Source port: [137] , Destination port: [137]
TCPIP NETBIOS (name service)Operation: [0] NAME QUERY RESPONSE, Flags: Unicast,Transaction ID: 0803Header Counts: QD: 0, AN: 1, NS: 0, AR: 0Resource Record Name: *Request type: NODE STATUS RESOURCE RECORD
Data0000 54 53 4F 4E 54 30 30 20 20 20 20 20 20 20 00 44 TSONT00 .D0010 00 49 54 53 4F 41 55 53 4E 54 20 20 20 20 20 20 .ITSOAUSNT0020 00 C4 00 49 54 53 4F 4E 54 30 30 20 20 20 20 20 .Ä.ITSONT000030 20 20 20 44 00 49 54 53 4F 41 55 53 4E 54 20 20 D.ITSOAUSNT0040 20 20 20 20 1C C4 00 49 54 53 4F 41 55 53 4E 54 .Ä.ITSOAUSNT0050 20 20 20 20 20 20 1B 44 00 49 54 53 4F 41 55 53 .D.ITSOAUS0060 4E 54 20 20 20 20 20 20 1E C4 00 49 54 53 4F 4E NT .Ä.ITSON0070 54 30 30 20 20 20 20 20 20 20 03 44 00 49 54 53 T00 .D.ITS0080 4F 41 55 53 4E 54 20 20 20 20 20 20 1D 44 00 01 OAUSNT .D..0090 02 5F 5F 4D 53 42 52 4F 57 53 45 5F 5F 02 01 C4 .__MSBROWSE__..Ä00A0 00 49 4E 65 74 7E 53 65 72 76 69 63 65 73 20 20 .INet~Services00B0 1C C4 00 49 53 7E 49 54 53 4F 4E 54 30 30 00 00 .Ä.IS~ITSONT00..00C0 00 00 00 44 00 49 54 53 4F 4E 54 30 30 20 20 20 ...D.ITSONT0000D0 20 20 20 20 01 44 00 41 44 4D 49 4E 49 53 54 52 .D.ADMINISTR00E0 41 54 4F 52 20 20 03 44 00 00 04 AC EC 35 D0 00 ATOR .D...¬ì5D.00F0 00 00 00 00 00 00 00 00 00 00 00 00 00 00 00 00 ................0100 00 00 00 00 00 00 00 00 00 00 00 00 00 00 00 00 ................0110 00 00 00 00 00 00 00 2B C3 80 B0 3E C3 80 14 2C .......+ð>Ã.,0120 C3 80 0F 00 01 00 00 00 00 00 00 00 00 00 00 00 Ã..............0130 00 00 00 00 00 00 00 00 00 00 00 00 00 00 00 00 ................0140 00 00 00 00 00 00 00 00 00 .........
250 Beyond DHCP - Work Your TCP/IP Internetwork with Dynamic IP
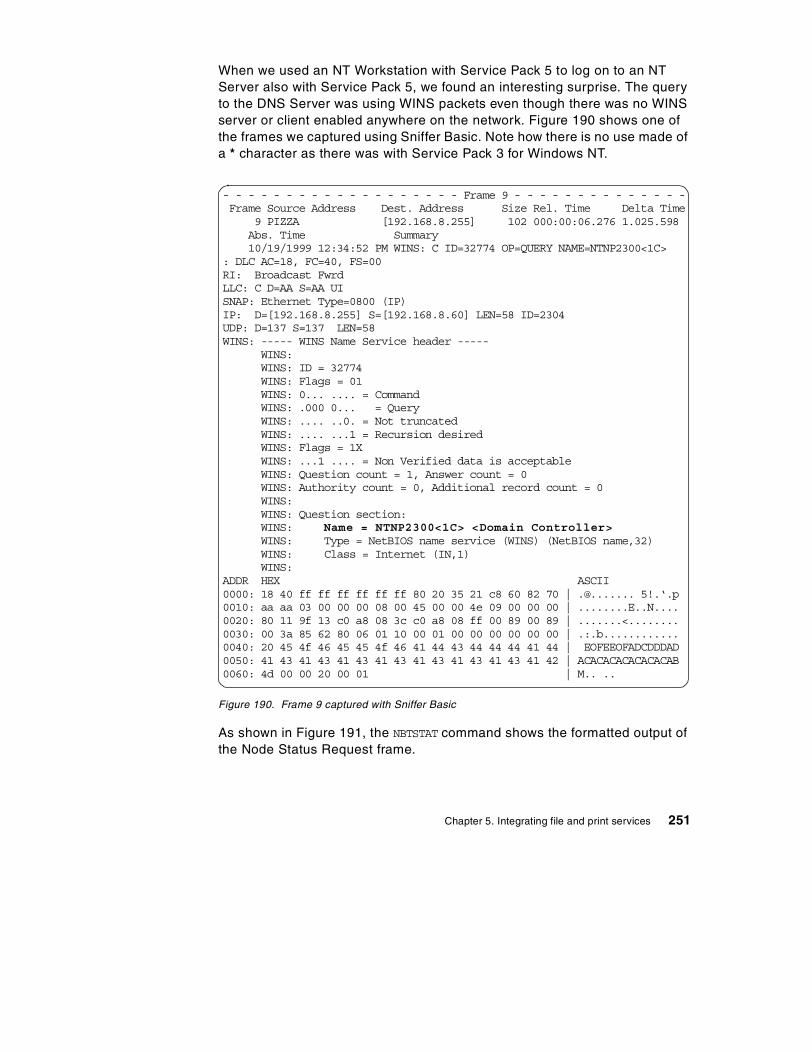
When we used an NT Workstation with Service Pack 5 to log on to an NTServer also with Service Pack 5, we found an interesting surprise. The queryto the DNS Server was using WINS packets even though there was no WINSserver or client enabled anywhere on the network. Figure 190 shows one ofthe frames we captured using Sniffer Basic. Note how there is no use made ofa * character as there was with Service Pack 3 for Windows NT.
Figure 190. Frame 9 captured with Sniffer Basic
As shown in Figure 191, the NBTSTAT command shows the formatted output ofthe Node Status Request frame.
- - - - - - - - - - - - - - - - - - - Frame 9 - - - - - - - - - - - - - -Frame Source Address Dest. Address Size Rel. Time Delta Time
9 PIZZA [192.168.8.255] 102 000:00:06.276 1.025.598Abs. Time Summary10/19/1999 12:34:52 PM WINS: C ID=32774 OP=QUERY NAME=NTNP2300<1C>
: DLC AC=18, FC=40, FS=00RI: Broadcast FwrdLLC: C D=AA S=AA UISNAP: Ethernet Type=0800 (IP)IP: D=[192.168.8.255] S=[192.168.8.60] LEN=58 ID=2304UDP: D=137 S=137 LEN=58WINS: ----- WINS Name Service header -----
WINS:WINS: ID = 32774WINS: Flags = 01WINS: 0... .... = CommandWINS: .000 0... = QueryWINS: .... ..0. = Not truncatedWINS: .... ...1 = Recursion desiredWINS: Flags = 1XWINS: ...1 .... = Non Verified data is acceptableWINS: Question count = 1, Answer count = 0WINS: Authority count = 0, Additional record count = 0WINS:WINS: Question section:WINS: Name = NTNP2300<1C> <Domain Controller>WINS: Type = NetBIOS name service (WINS) (NetBIOS name,32)WINS: Class = Internet (IN,1)WINS:
ADDR HEX ASCII0000: 18 40 ff ff ff ff ff ff 80 20 35 21 c8 60 82 70 | .@....... 5!.‘.p0010: aa aa 03 00 00 00 08 00 45 00 00 4e 09 00 00 00 | ........E..N....0020: 80 11 9f 13 c0 a8 08 3c c0 a8 08 ff 00 89 00 89 | .......<........0030: 00 3a 85 62 80 06 01 10 00 01 00 00 00 00 00 00 | .:.b............0040: 20 45 4f 46 45 45 4f 46 41 44 43 44 44 44 41 44 | EOFEEOFADCDDDAD0050: 41 43 41 43 41 43 41 43 41 43 41 43 41 43 41 42 | ACACACACACACACAB0060: 4d 00 00 20 00 01 | M.. ..
Chapter 5. Integrating file and print services 251
Figure 191. [Windows NT] NBTSTAT output
The CIFS (Common Internet File System) protocol as defined in the IETFdraft, is supposed to extend the Internet to support the SMB (ServerMessage Block) file sharing protocol over the Internet. The idea of CIFS isthe same as illustrated before:
• Non-RFC-encoded names in DNS
• Node Status request frame as communications vehicle
To make CIFS work properly, the name of *SMBSERVER followed by the blanksmust not be used as a NetBIOS name by servers or workstations in anetwork. Using CIFS, clients do not have knowledge of server names ordomain names. All SMB servers should respond to the *SMBSERVER name butnot through a network broadcast. Clients are able to check whether or not aparticular TCP/IP host is an SMB server.
The CIFS Internet draft is located on the Internet at the following Web site:
http://search.ietf.org/internet-drafts/draft-leach-cifs-v1-spec-02.txt
However, due inactivity this draft has expired, as can be seen whenconsulting the following Web site: http://www.cifs.com/spec.html
This is still in informational status. There is a common belief that CIFS wouldlack security and that authentication logic is not strong enough on the publicInternet. In addition to CIFS, remote administration and the networkneighborhood browser protocol are discussed.
C:\>NBTSTAT -A 192.168.8.60
NetBIOS Remote Machine Name Table
Name Type Status---------------------------------------------PIZZA <00> UNIQUE RegisteredNTNP2300 <00> GROUP RegisteredPIZZA <03> UNIQUE RegisteredPIZZA <20> UNIQUE RegisteredNTNP2300 <1E> GROUP RegisteredADMINISTRATOR <03> UNIQUE Registered
MAC Address = 00-20-35-21-C8-60
252 Beyond DHCP - Work Your TCP/IP Internetwork with Dynamic IP
5.4 NetBIOS Name Servers (NBNS)
It would be much simpler if, instead of having to manually maintainconfiguration files on each computer, we could ask a NBNS to resolve theNetBIOS name to an IP address for us.
We will look at two types of NBNS. The first is WINS from Microsoft, thesecond is Shadow IPserver from Network TeleSystems.
5.4.1 Microsoft WINSWINS is Microsoft’s implementation of NBNS. WINS only supports Microsoft'sproprietary clients with its implementation of native NetBIOS and NetBIOSover TCP/IP
5.4.1.1 How WINS worksEach Microsoft client needs to be configured with the IP address of a primaryWINS server, and optionally with the IP address of a secondary WINS server.
Whenever a client (configured to use TCPBEUI and WINS) starts, it willattempt to register its NetBIOS name and IP address with the primary WINSserver. The registration occurs when services or applications are started (forexample, Workstation or Messenger), and is sent directly to the primaryWINS server. If the name is not already registered to another client, theserver responds with a message detailing the NetBIOS name that has beenregistered, and the Name Time to Live (TTL).
If after attempting three times to register its name with the primary server andfailing, the client will attempt to register its name using the secondary server.If the secondary server also fails to respond, the client will revert tobroadcasting in order to register its name.
The name registrations are made on a temporary basis, and the client isresponsible for maintaining the lease of the registered name.
At one-eighths of the TTL, the client will attempt to refresh its nameregistration with the primary WINS server. If the client does not receive aresponse from the server, it will continue to attempt to refresh the registrationevery two minutes until half the TTL has expired. At this point, it will repeatthe procedure, but this time using the secondary WINS server.
With WINS enabled, the client acts as an H-Node client for name registration.For resolution, it is H-Node with a few modifications. The sequence used by aWINS client for name resolution is:
Chapter 5. Integrating file and print services 253

• Check to see if it is the local machine name.
• Check the cache. (Any resolved name is placed in a cache for 10 minutes)
• Try to use the primary WINS server. (Use the secondary server if theprimary does not answer after three attempts.)
• Try a name query broadcast.
• Check the LMHOSTS file (if the computer is configured to use LMHOSTS).
• Try the HOSTS file.
• Try the DNS.
5.4.1.2 System requirements for WINSTable 10 details the minimum system requirements to implement a WINSserver.
Table 10. WINS hardware and software requirements
5.4.1.3 Installing a WINS server(This procedure assumes that Windows NT has previously been installed,and that the TCP/IP connectivity on the network is working)
1. Click on the Start menu. Select Settings, then select Control Panel.
2. Double-click on the Network icon.
Type Details
Hardware requirements
Processor 80486-33 (Pentium recommended)
Hard drive 125 MB
Memory 16 MB (32 MB recommended)
Network adapter Any network adapter supported by Windows NT
Video VGA or above
Software requirements
Windows NT NT Server 4.0 with Service Pack 5
IP configuration IP addressSubnet maskDefault router(these can be allocated by DHCP, but statically assignedparameters are recommended)
254 Beyond DHCP - Work Your TCP/IP Internetwork with Dynamic IP

3. Now select the Services tab.
4. Select the Add button.
5. Select Windows Internet Name Service from the list.
6. Select the OK button.
7. The WINS service will be installed.
8. If you had a Service Pack installed on the server before you installed theWINS Server, then you must re-install the Service Pack.
9. You may optionally add static entries for non-WINS clients.
Non-WINS clients can be statically added so that WINS clients can resolvetheir name without having to maintain a LMHOSTS file.
10.You may also optionally set up a WINS proxy agent.
A WINS proxy agent extends the functions of a WINS server to non-WINSclients. When the proxy agent sees a name registration request, itforwards the request to a WINS server. The server verifies the name only,but does not register it. When the proxy agent sees a query to resolve aname, it forwards the query to the WINS server. The server responds tothe agent, who, in turn, returns the details to the client.
5.4.1.4 WINS limitationAccording to RFC 1001/1002, a NetBIOS name server should support allgroup names. WINS, however, only keeps a list of IP addresses for groupnames ending in 0x1C. Warp Server domains, however, are registered with a0x00 suffix, and, as such, are not stored by a WINS server. Therefore, whenan IBM client requests an IP address from WINS server, a broadcast address(an IP address of all ones) is returned. This makes it difficult for IBM clients tocommunicate across a routed network when using WINS as the NBNS.
5.4.2 Network TeleSystems Shadow IPserverShadow IPserver is a software system for managing name and addressassignments and host configuration information within a TCP/IP network.IPserver includes a robust set of network services offered throughstandards-based protocol interactions:
• DHCP (Dynamic Host Configuration Protocol) service
The IP addresses manually configured for primary and secondary WINSservers take precedence over those supplied as DHCP options.
Note
Chapter 5. Integrating file and print services 255

• DNS (Domain Name System) service
• NBNS (NetBIOS Name Server) and NBDD (NetBIOS DatagramDistributor) services
The Shadow IPserver NBNS service is an integrated NetBIOS name serverand datagram distributor. The IPserver NBNS service fully implements RFCs1001 and 1002. Additionally, Shadow IPserver’s NBNS service providesname resolution services similar to those provided by Microsoft WINS.
We used the NTS Shadow IPserver in our test networks as a fully integratedDHCP, DNS and NBNS/WINS server. For details on the installation ofIPserver and the configuration of its services, please refer to Part 6.4,“Dynamic IP with Network TeleSystems Shadow IPserver” on page 293.
The Shadow IPserver NBNS server supports both IBM and MicrosoftNetBIOS networks; the same NBNS server can be used with OS/2 Warp,DOS/Windows workstations with DOS LAN Services installed, Windows 95,and Windows NT workstations.
The idea of the NBNS is that instead of broadcasting the NetBIOS names tothe whole IP subnet, the names to be registered are sent to a NBNS server.The NBNS server then checks if the name is already in use, and if not, thename is registered. All the future queries to that name will be resolved withone single query to the NBNS.
To take full advantage of the your NetBIOS name server, you can use the IBMNeighborhood Browser Enabler, which is included as a service within WarpServer for e-business. The browser service allows the OS/2 DomainController to register the Microsoft network dependent NetBIOS names andacts as the domain master browser machine. See Part 5.6, “IBMNeighborhood Browser Enabler for Warp Server” on page 271 for informationon Neighborhood Browser Enabler.
To use the datagram distributor, both the NBNS server and TCP/IP clientstack must support datagram distribution, such as:
• OS/2 Warp Server with latest MPTS ServicePak
• OS/2 Warp 4
• DOS LAN Services (shipped with OS/2 Warp Server)
Note
256 Beyond DHCP - Work Your TCP/IP Internetwork with Dynamic IP
5.5 P-Node, H-Node and M-Node clients
After installing a NBNS, all the servers and clients running NetBIOS overTCP/IP need to be configured to use the NBNS server. Notice that serversand clients normally register their NetBIOS names when the requesterservices are started.
Clients can have the IP address of the NBNS manually coded, or they canreceive the address as options with their DHCP configuration.
5.5.1 Manually configuring clients to use an NBNSThe following information demonstrates how to manually configure a client tomake use of a NBNS.
5.5.1.1 DOS, Windows 3.1, and Windows for WorkgroupsTo have DOS and Windows clients running DLS communication with anNBNS (rather than using the NBUTIL utility), the \NET\PROTOCOL.INI filemust be modified with the addition of statements to the [NTS$NTSTS] (or[TCPPRO2]) sections.
Use a text editor such as EDIT or NOTEPAD to modify the PROTOCOL.INI toadd the following options
NODETYPE=H-Node
NBNSAddr=[NBNS_ipaddress]NBDGAddr=[NBDD_ipaddress]
Where:
[NBNS_ipaddress] Is the IP Address of the NBNS
[NBDD_ipaddress] Is the IP Address of the Datagram Distributor
Figure 192 on page 258 shows an extract from a PROTOCOL.INI file, with thestatements to support communications with a NBNS highlighted.
These statements cannot be added or configured through the DLSinstallation program.
Note
Chapter 5. Integrating file and print services 257
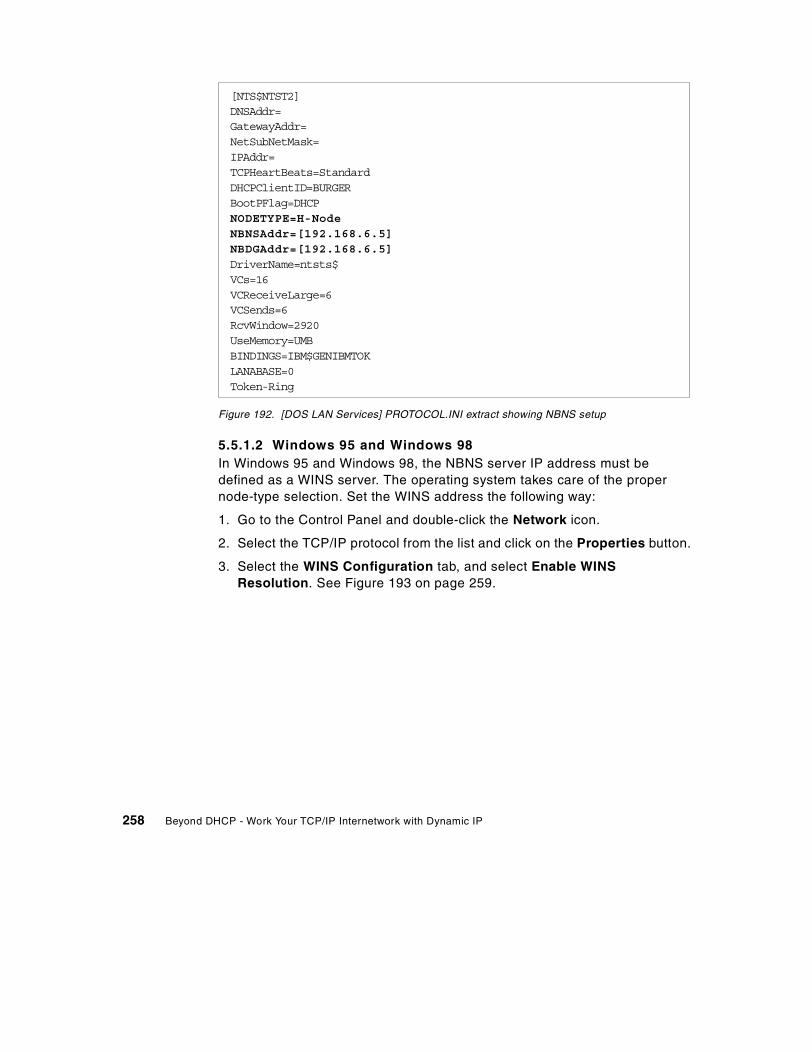
Figure 192. [DOS LAN Services] PROTOCOL.INI extract showing NBNS setup
5.5.1.2 Windows 95 and Windows 98In Windows 95 and Windows 98, the NBNS server IP address must bedefined as a WINS server. The operating system takes care of the propernode-type selection. Set the WINS address the following way:
1. Go to the Control Panel and double-click the Network icon.
2. Select the TCP/IP protocol from the list and click on the Properties button.
3. Select the WINS Configuration tab, and select Enable WINSResolution. See Figure 193 on page 259.
[NTS$NTST2]DNSAddr=GatewayAddr=NetSubNetMask=IPAddr=TCPHeartBeats=StandardDHCPClientID=BURGERBootPFlag=DHCPNODETYPE=H-NodeNBNSAddr=[192.168.6.5]NBDGAddr=[192.168.6.5]DriverName=ntsts$VCs=16VCReceiveLarge=6VCSends=6RcvWindow=2920UseMemory=UMBBINDINGS=IBM$GENIBMTOKLANABASE=0Token-Ring
258 Beyond DHCP - Work Your TCP/IP Internetwork with Dynamic IP
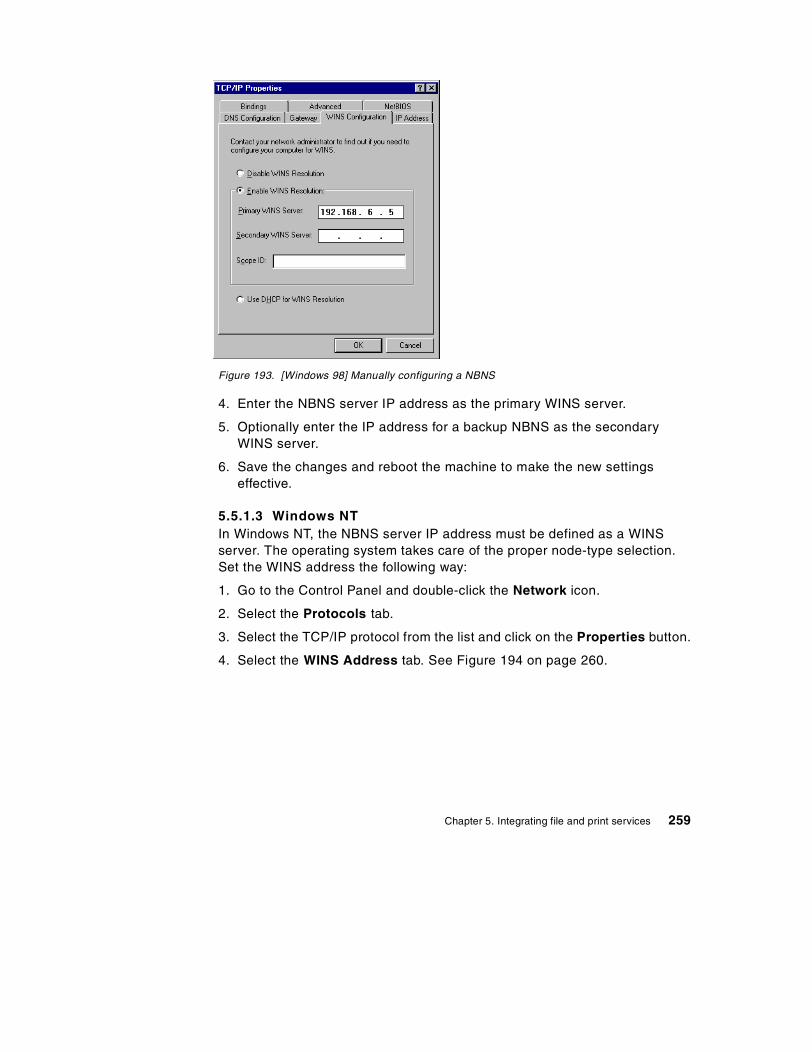
Figure 193. [Windows 98] Manually configuring a NBNS
4. Enter the NBNS server IP address as the primary WINS server.
5. Optionally enter the IP address for a backup NBNS as the secondaryWINS server.
6. Save the changes and reboot the machine to make the new settingseffective.
5.5.1.3 Windows NTIn Windows NT, the NBNS server IP address must be defined as a WINSserver. The operating system takes care of the proper node-type selection.Set the WINS address the following way:
1. Go to the Control Panel and double-click the Network icon.
2. Select the Protocols tab.
3. Select the TCP/IP protocol from the list and click on the Properties button.
4. Select the WINS Address tab. See Figure 194 on page 260.
Chapter 5. Integrating file and print services 259

Figure 194. [Windows NT] Manually configuring a NBNS
5. Enter the NBNS server IP address as the primary WINS server.
6. Optionally enter the IP address for a backup NBNS as the secondaryWINS server.
7. Save the changes and reboot the machine to make the new settingseffective.
5.5.1.4 OS/2 WarpIn order to have OS/2 Warp 4 clients communicate with a NetBIOS NameServer, you need to make changes to the default TCPBEUI settings. UsingMPTS (Multi-Protocol and Transport Services) follow the steps below:
1. From System Setup (Warp Center pull-down menu) select MPTS. You canalso open an OS/2 Window, and type MPTS at the command prompt.
2. Select Configure at the Multi-Protocol Transport Services window.
3. Select the radio button for LAN adapters and protocols (which is usuallyset by default) and select Configure.
4. In the Adapter and Protocol window, make sure the current configurationlist contains the IBM OS/2 NetBIOS over TCP/IP protocol. If IBM OS/2NetBIOS is listed, the number for IBM OS/2 NetBIOS over TCP/IP must be
260 Beyond DHCP - Work Your TCP/IP Internetwork with Dynamic IP
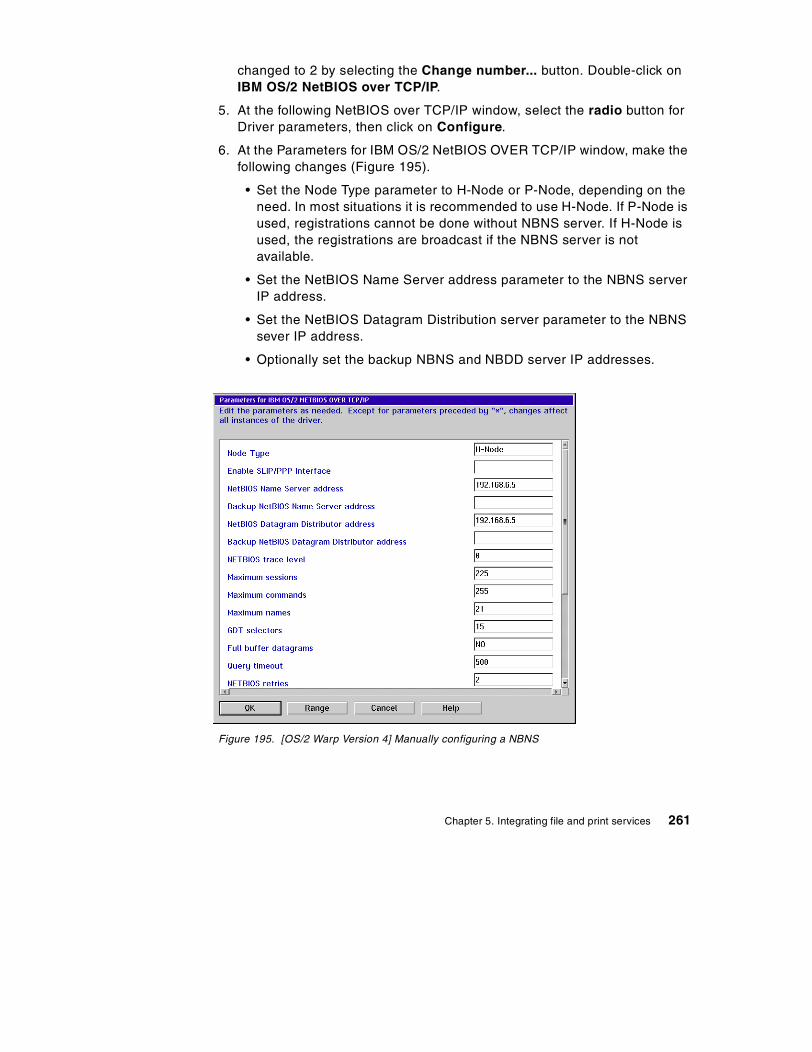
changed to 2 by selecting the Change number... button. Double-click onIBM OS/2 NetBIOS over TCP/IP.
5. At the following NetBIOS over TCP/IP window, select the radio button forDriver parameters, then click on Configure.
6. At the Parameters for IBM OS/2 NetBIOS OVER TCP/IP window, make thefollowing changes (Figure 195).
• Set the Node Type parameter to H-Node or P-Node, depending on theneed. In most situations it is recommended to use H-Node. If P-Node isused, registrations cannot be done without NBNS server. If H-Node isused, the registrations are broadcast if the NBNS server is notavailable.
• Set the NetBIOS Name Server address parameter to the NBNS serverIP address.
• Set the NetBIOS Datagram Distribution server parameter to the NBNSsever IP address.
• Optionally set the backup NBNS and NBDD server IP addresses.
Figure 195. [OS/2 Warp Version 4] Manually configuring a NBNS
Chapter 5. Integrating file and print services 261
7. Select OK, Close, OK, Close and Exit. Allow MPTS to update yourCONFIG.SYS, and click on Exit again. You will be informed that theconfig.sys was updated. Click on Ok. Click on Exit for the final time toclose MPTS.
8. To make the protocol changes active, you must reboot your workstation.
5.5.2 Dynamically configuring clients to use a NBNSA DHCP server is able to supply NBNS server information to DHCP clientsusing standard options. There are three options available to inform clients ofthe NBNS servers.
Option Description
044 NBNS The addresses of the primary and (optionally) the backupNBNS servers
045 NBDD The addresses of the primary and (optionally) the backupNetBIOS Datagram Distributor servers
046 Node type 0x1 = B-Node, 0x2 = P-Node, 0x4 = M-Node, 0x8 = H-Node
Note that pure WINS clients do not make use of a Datagram Distributorserver, so option 045 may not be required in your environment.
5.5.2.1 DOS, Windows 3.11 and Windows for WorkgroupsWith DLS installed, all that is required is to ensure that PROTOCOL.INI doesnot contain the NODETYPE, NBNSAddr and NBDGAddr parameters.
The computer will then use options 44, 45, and 46 when it receives them.
5.5.2.2 Windows 95 and Windows 98In Windows 95, the computer needs to be configured to use a returned NBNSIP address:
1. Go to the Control Panel and double-click the Network icon.
2. Select the TCP/IP protocol from the list and click the Properties button.
3. Select the IP Address tab and choose to Obtain an IP addressautomatically.
4. Click on the WINS Configuration tab and select Use DHCP for WINSResolution.
5. Click on OK to save the changes. Reboot the machine to make the newsettings active.
262 Beyond DHCP - Work Your TCP/IP Internetwork with Dynamic IP
5.5.2.3 Windows NTWith Windows NT, ensure that no WINS servers have been manuallyconfigured. Any manually configured NBNS servers have priority over NBNSIP addresses returned as DHCP options.
5.5.2.4 OS/2 WarpAt this point in time, OS/2 Warp Connect and OS/2 Warp 4 do not directlysupport options 44, 45, and 46. So, we looked into a workaround for thisproblem and came up with the following solution.
The solution uses two REXX scripts: SETNBNS.CMD and GETNBNS.CMD.
The SETNBNS script is run by the DHCP client when it receives the NBNSoptions. To do this, the \MPTN\ETC\DHCPCD.CFG file requires the followingentries:
option 44 exec "setnbns.cmd 44 %s"option 45 exec "setnbns.cmd 45 %s"option 46 exec "setnbns.cmd 46 %s"
When the options are received, SETNBNS creates a REXX queue, and placesthe parameters into the queue. Figure 196 on page 264, Figure 197 on page265, and Figure 198 on page 266 display SETNBNS.CMD.
Chapter 5. Integrating file and print services 263
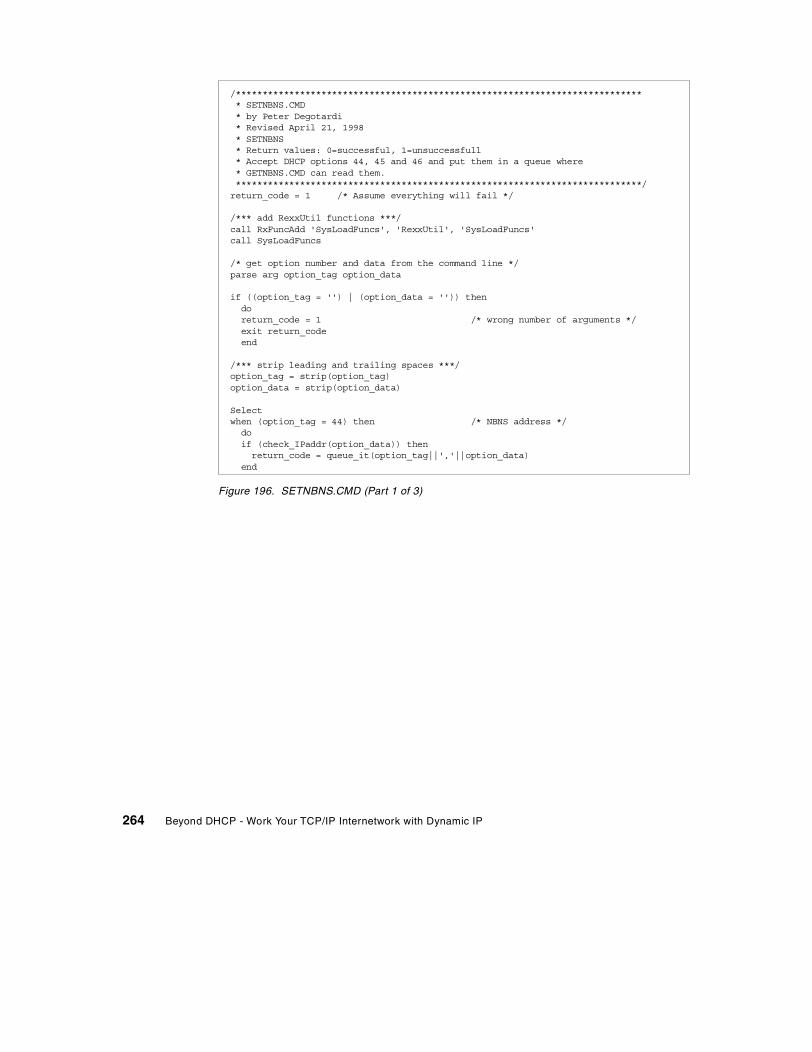
Figure 196. SETNBNS.CMD (Part 1 of 3)
/***************************************************************************** SETNBNS.CMD* by Peter Degotardi* Revised April 21, 1998* SETNBNS* Return values: 0=successful, 1=unsuccessfull* Accept DHCP options 44, 45 and 46 and put them in a queue where* GETNBNS.CMD can read them.****************************************************************************/return_code = 1 /* Assume everything will fail */
/*** add RexxUtil functions ***/call RxFuncAdd 'SysLoadFuncs', 'RexxUtil', 'SysLoadFuncs'call SysLoadFuncs
/* get option number and data from the command line */parse arg option_tag option_data
if ((option_tag = '') | (option_data = '')) thendoreturn_code = 1 /* wrong number of arguments */exit return_codeend
/*** strip leading and trailing spaces ***/option_tag = strip(option_tag)option_data = strip(option_data)
Selectwhen (option_tag = 44) then /* NBNS address */doif (check_IPaddr(option_data)) thenreturn_code = queue_it(option_tag||','||option_data)
end
264 Beyond DHCP - Work Your TCP/IP Internetwork with Dynamic IP
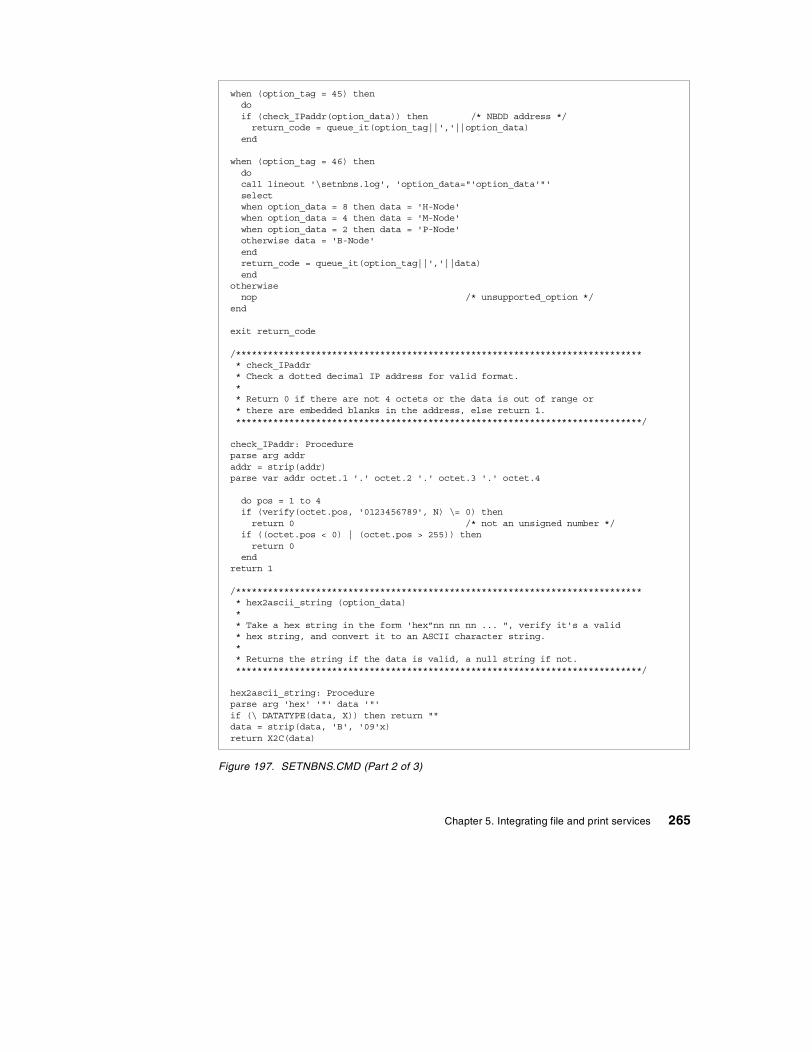
Figure 197. SETNBNS.CMD (Part 2 of 3)
when (option_tag = 45) thendoif (check_IPaddr(option_data)) then /* NBDD address */return_code = queue_it(option_tag||','||option_data)
end
when (option_tag = 46) thendocall lineout '\setnbns.log', 'option_data="'option_data'"'selectwhen option_data = 8 then data = 'H-Node'when option_data = 4 then data = 'M-Node'when option_data = 2 then data = 'P-Node'otherwise data = 'B-Node'endreturn_code = queue_it(option_tag||','||data)end
otherwisenop /* unsupported_option */
end
exit return_code
/***************************************************************************** check_IPaddr* Check a dotted decimal IP address for valid format.** Return 0 if there are not 4 octets or the data is out of range or* there are embedded blanks in the address, else return 1.****************************************************************************/
check_IPaddr: Procedureparse arg addraddr = strip(addr)parse var addr octet.1 '.' octet.2 '.' octet.3 '.' octet.4
do pos = 1 to 4if (verify(octet.pos, '0123456789', N) \= 0) thenreturn 0 /* not an unsigned number */
if ((octet.pos < 0) | (octet.pos > 255)) thenreturn 0
endreturn 1
/***************************************************************************** hex2ascii_string (option_data)** Take a hex string in the form 'hex”nn nn nn ... ", verify it's a valid* hex string, and convert it to an ASCII character string.** Returns the string if the data is valid, a null string if not.****************************************************************************/
hex2ascii_string: Procedureparse arg 'hex' '"' data '"'if (\ DATATYPE(data, X)) then return ""data = strip(data, 'B', '09'x)return X2C(data)
Chapter 5. Integrating file and print services 265
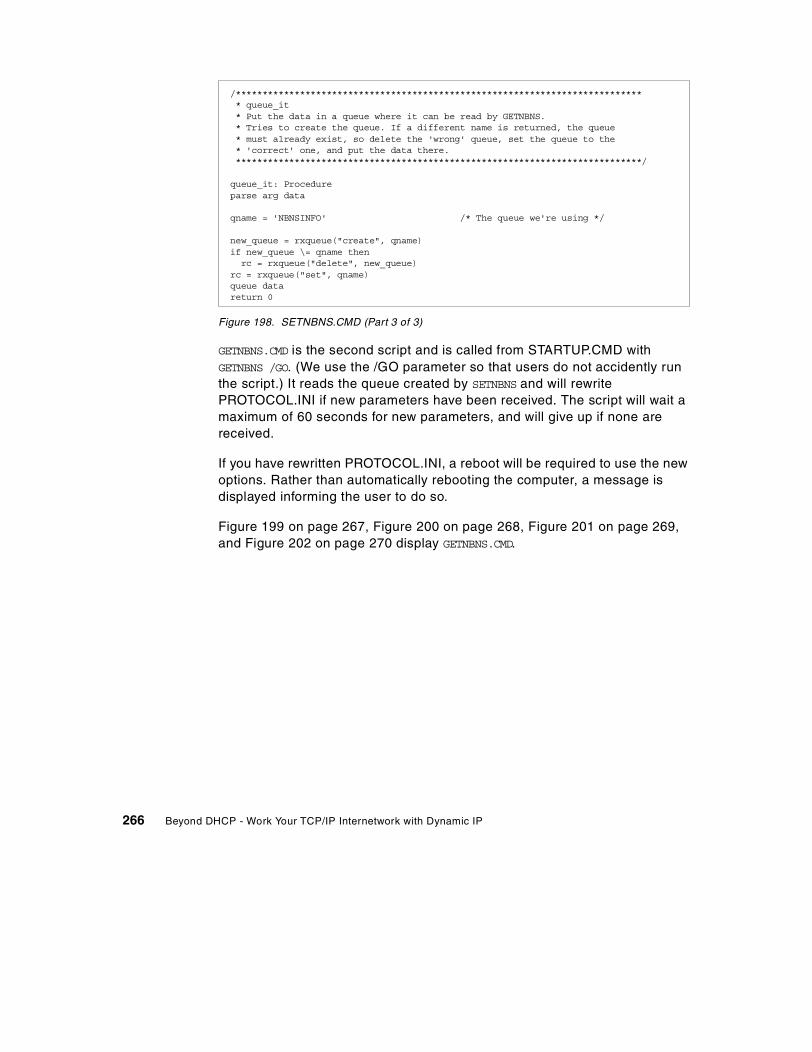
Figure 198. SETNBNS.CMD (Part 3 of 3)
GETNBNS.CMD is the second script and is called from STARTUP.CMD withGETNBNS /GO. (We use the /GO parameter so that users do not accidently runthe script.) It reads the queue created by SETNBNS and will rewritePROTOCOL.INI if new parameters have been received. The script will wait amaximum of 60 seconds for new parameters, and will give up if none arereceived.
If you have rewritten PROTOCOL.INI, a reboot will be required to use the newoptions. Rather than automatically rebooting the computer, a message isdisplayed informing the user to do so.
Figure 199 on page 267, Figure 200 on page 268, Figure 201 on page 269,and Figure 202 on page 270 display GETNBNS.CMD.
/***************************************************************************** queue_it* Put the data in a queue where it can be read by GETNBNS.* Tries to create the queue. If a different name is returned, the queue* must already exist, so delete the 'wrong' queue, set the queue to the* 'correct' one, and put the data there.****************************************************************************/
queue_it: Procedureparse arg data
qname = 'NBNSINFO' /* The queue we're using */
new_queue = rxqueue("create", qname)if new_queue \= qname thenrc = rxqueue("delete", new_queue)
rc = rxqueue("set", qname)queue datareturn 0
266 Beyond DHCP - Work Your TCP/IP Internetwork with Dynamic IP
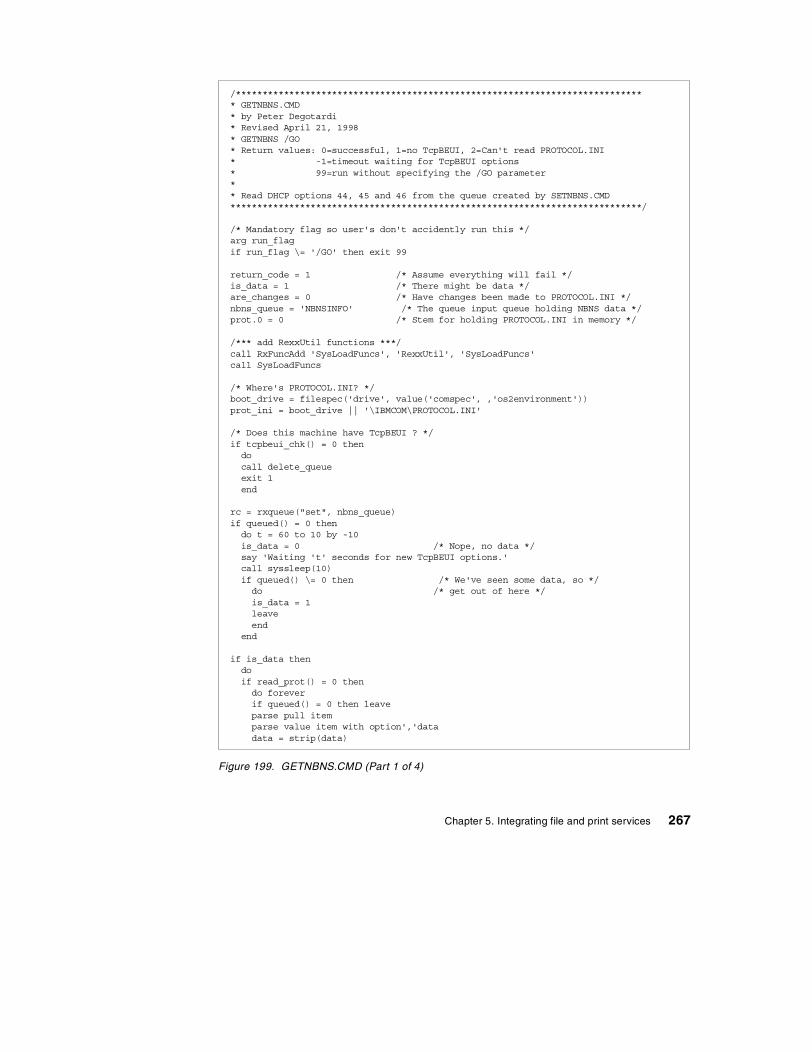
Figure 199. GETNBNS.CMD (Part 1 of 4)
/***************************************************************************** GETNBNS.CMD* by Peter Degotardi* Revised April 21, 1998* GETNBNS /GO* Return values: 0=successful, 1=no TcpBEUI, 2=Can't read PROTOCOL.INI* -1=timeout waiting for TcpBEUI options* 99=run without specifying the /GO parameter** Read DHCP options 44, 45 and 46 from the queue created by SETNBNS.CMD*****************************************************************************/
/* Mandatory flag so user's don't accidently run this */arg run_flagif run_flag \= '/GO' then exit 99
return_code = 1 /* Assume everything will fail */is_data = 1 /* There might be data */are_changes = 0 /* Have changes been made to PROTOCOL.INI */nbns_queue = 'NBNSINFO' /* The queue input queue holding NBNS data */prot.0 = 0 /* Stem for holding PROTOCOL.INI in memory */
/*** add RexxUtil functions ***/call RxFuncAdd 'SysLoadFuncs', 'RexxUtil', 'SysLoadFuncs'call SysLoadFuncs
/* Where's PROTOCOL.INI? */boot_drive = filespec('drive', value('comspec', ,'os2environment'))prot_ini = boot_drive || '\IBMCOM\PROTOCOL.INI'
/* Does this machine have TcpBEUI ? */if tcpbeui_chk() = 0 thendocall delete_queueexit 1end
rc = rxqueue("set", nbns_queue)if queued() = 0 thendo t = 60 to 10 by -10is_data = 0 /* Nope, no data */say 'Waiting 't' seconds for new TcpBEUI options.'call syssleep(10)if queued() \= 0 then /* We've seen some data, so */do /* get out of here */is_data = 1leaveend
end
if is_data thendoif read_prot() = 0 thendo foreverif queued() = 0 then leaveparse pull itemparse value item with option','datadata = strip(data)
Chapter 5. Integrating file and print services 267
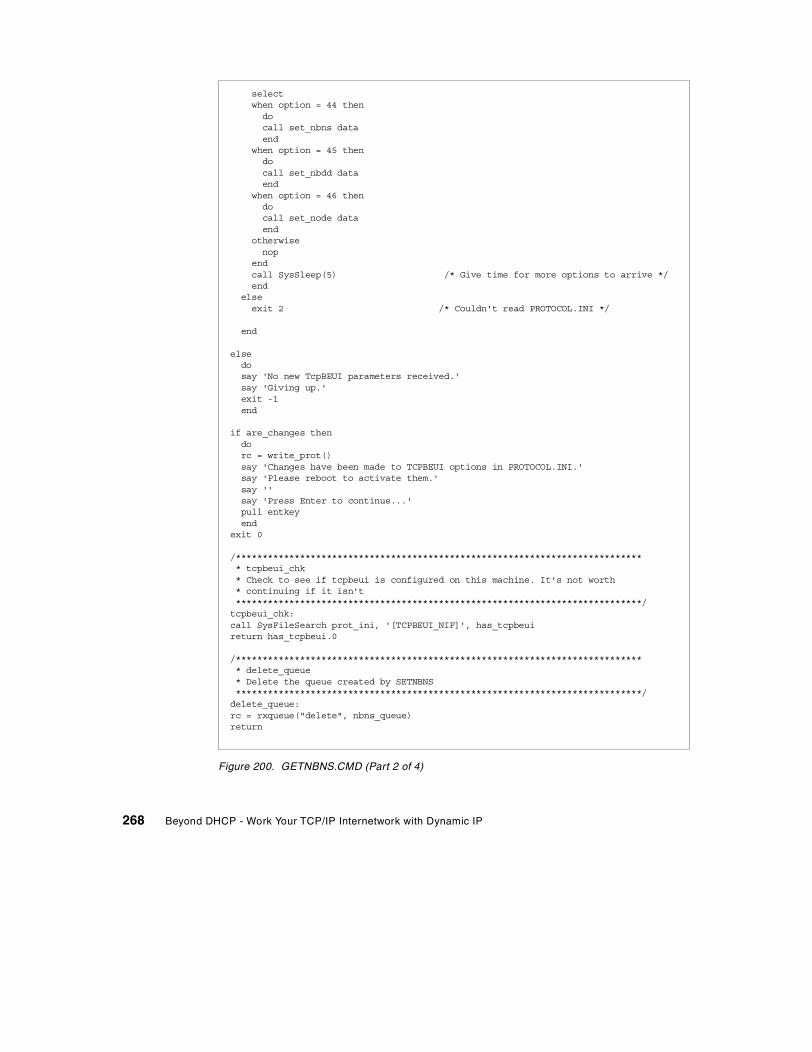
Figure 200. GETNBNS.CMD (Part 2 of 4)
selectwhen option = 44 thendocall set_nbns dataend
when option = 45 thendocall set_nbdd dataend
when option = 46 thendocall set_node dataend
otherwisenop
endcall SysSleep(5) /* Give time for more options to arrive */end
elseexit 2 /* Couldn't read PROTOCOL.INI */
end
elsedosay 'No new TcpBEUI parameters received.'say 'Giving up.'exit -1end
if are_changes thendorc = write_prot()say 'Changes have been made to TCPBEUI options in PROTOCOL.INI.'say 'Please reboot to activate them.'say ''say 'Press Enter to continue...'pull entkeyend
exit 0
/***************************************************************************** tcpbeui_chk* Check to see if tcpbeui is configured on this machine. It's not worth* continuing if it isn't****************************************************************************/tcpbeui_chk:call SysFileSearch prot_ini, '[TCPBEUI_NIF]', has_tcpbeuireturn has_tcpbeui.0
/***************************************************************************** delete_queue* Delete the queue created by SETNBNS****************************************************************************/delete_queue:rc = rxqueue("delete", nbns_queue)return
268 Beyond DHCP - Work Your TCP/IP Internetwork with Dynamic IP
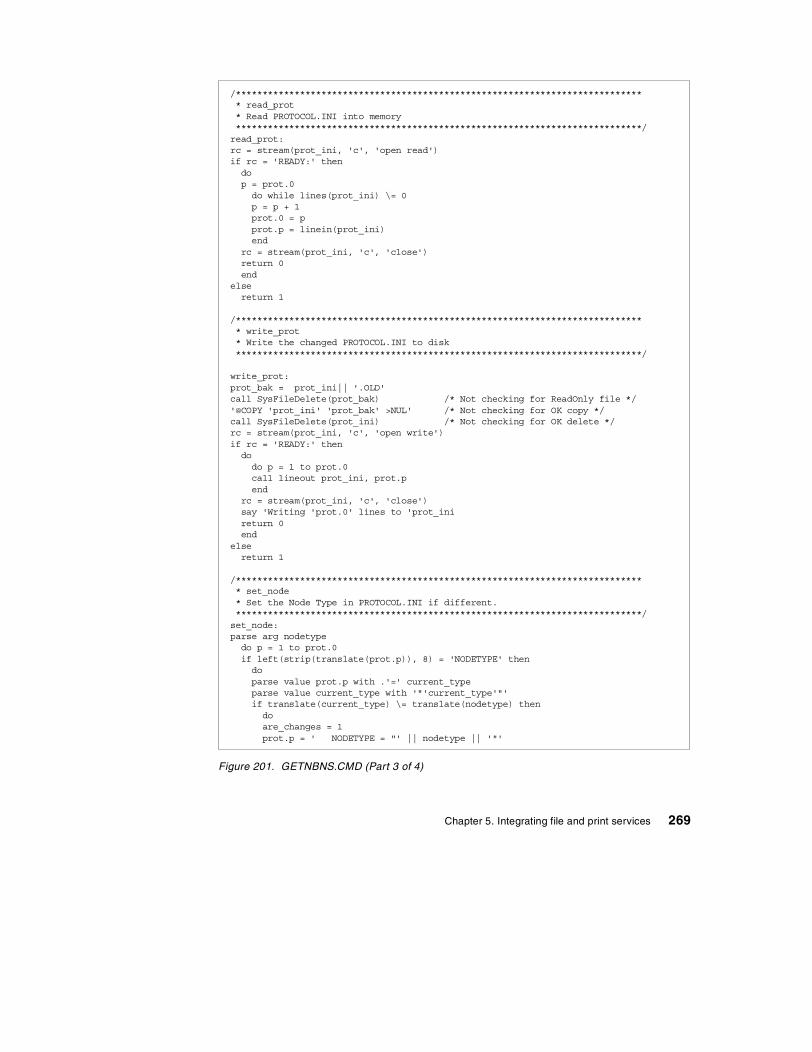
Figure 201. GETNBNS.CMD (Part 3 of 4)
/***************************************************************************** read_prot* Read PROTOCOL.INI into memory****************************************************************************/read_prot:rc = stream(prot_ini, 'c', 'open read')if rc = 'READY:' thendop = prot.0do while lines(prot_ini) \= 0p = p + 1prot.0 = pprot.p = linein(prot_ini)end
rc = stream(prot_ini, 'c', 'close')return 0end
elsereturn 1
/***************************************************************************** write_prot* Write the changed PROTOCOL.INI to disk****************************************************************************/
write_prot:prot_bak = prot_ini|| '.OLD'call SysFileDelete(prot_bak) /* Not checking for ReadOnly file */'@COPY 'prot_ini' 'prot_bak' >NUL' /* Not checking for OK copy */call SysFileDelete(prot_ini) /* Not checking for OK delete */rc = stream(prot_ini, 'c', 'open write')if rc = 'READY:' thendodo p = 1 to prot.0call lineout prot_ini, prot.pend
rc = stream(prot_ini, 'c', 'close')say 'Writing 'prot.0' lines to 'prot_inireturn 0end
elsereturn 1
/***************************************************************************** set_node* Set the Node Type in PROTOCOL.INI if different.****************************************************************************/set_node:parse arg nodetypedo p = 1 to prot.0if left(strip(translate(prot.p)), 8) = 'NODETYPE' thendoparse value prot.p with .'=' current_typeparse value current_type with '"'current_type'"'if translate(current_type) \= translate(nodetype) thendoare_changes = 1prot.p = ' NODETYPE = "' || nodetype || '"'
Chapter 5. Integrating file and print services 269
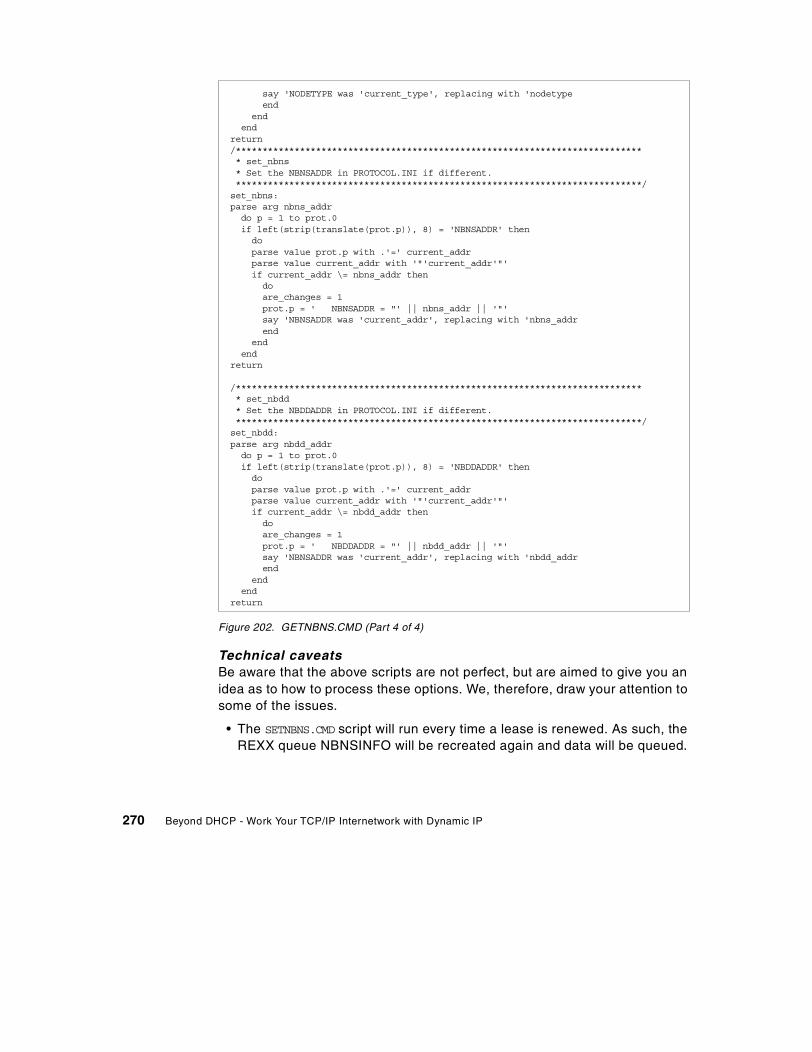
Figure 202. GETNBNS.CMD (Part 4 of 4)
Technical caveatsBe aware that the above scripts are not perfect, but are aimed to give you anidea as to how to process these options. We, therefore, draw your attention tosome of the issues.
• The SETNBNS.CMD script will run every time a lease is renewed. As such, theREXX queue NBNSINFO will be recreated again and data will be queued.
say 'NODETYPE was 'current_type', replacing with 'nodetypeend
endend
return/***************************************************************************** set_nbns* Set the NBNSADDR in PROTOCOL.INI if different.****************************************************************************/set_nbns:parse arg nbns_addrdo p = 1 to prot.0if left(strip(translate(prot.p)), 8) = 'NBNSADDR' thendoparse value prot.p with .'=' current_addrparse value current_addr with '"'current_addr'"'if current_addr \= nbns_addr thendoare_changes = 1prot.p = ' NBNSADDR = "' || nbns_addr || '"'say 'NBNSADDR was 'current_addr', replacing with 'nbns_addrend
endend
return
/***************************************************************************** set_nbdd* Set the NBDDADDR in PROTOCOL.INI if different.****************************************************************************/set_nbdd:parse arg nbdd_addrdo p = 1 to prot.0if left(strip(translate(prot.p)), 8) = 'NBDDADDR' thendoparse value prot.p with .'=' current_addrparse value current_addr with '"'current_addr'"'if current_addr \= nbdd_addr thendoare_changes = 1prot.p = ' NBDDADDR = "' || nbdd_addr || '"'say 'NBNSADDR was 'current_addr', replacing with 'nbdd_addrend
endend
return
270 Beyond DHCP - Work Your TCP/IP Internetwork with Dynamic IP
With a short lease time on a machine that is rarely restarted, you couldend up with a queue containing a large quantity of data.
• Unfortunately, sometimes when the OS/2 Workstation is booting up, thequeue is flushed before the OS/2 desktop starts up. So, GETNBNS.CMD doesnot have any parameters to update in the PROTOCOL.INI. However, when theTCP/IP lease expires and is renewed while the machine is up and working,SETNBNS.CMD will be re-run.Then GETNBNS.CMD /GO should be run again andthe PROTOCOL.INI will be updated if there is anything in the queue.
• Options 44 and 45 can contain multiple IP addresses and SETNBNS andGETNBNS cannot cope with this.
• Normally, the exec entries in DHCPCD.CFG for a REXX script would be:
option 44 exec "$setnbns.cmd 44 %s"
The $ parameter is used to force a 30 second wait so that REXX caninitialize. We found that by including the $ parameter, a 30 second waitwas introduced between each instance of SETNBNS running for each option,that is, a total of 90 seconds was required if all three options wereprocessed. With this delay, GETNBNS only saw the first option queued.Without the $ parameter, SETNBNS and GETNBNS worked correctly.
• Error handling could be greatly improved. As you can see from thecomments in GETNBNS, the backup/deletion/re-writing of PROTOCOL.INIcould be improved.
• GETNBNS can be run from the Startup folder, but be aware that the user maynot see the message that a restart is required.
• If the user chooses not to reboot, they may not be able to log onto theLAN.
5.6 IBM Neighborhood Browser Enabler for Warp Server
IBM Neighborhood Browser Enabler for OS/2 Warp Server, now included inOS/2 Warp Server for e-business, enables greater interoperability betweenMicrosoft clients and OS/2 Warp Servers.
5.6.1 OverviewThe Neighborhood Browser Enabler enables your OS/2 Warp Server tofunction as a master browser for Windows 95, Windows 98 and Windows NTclients. If you are using Windows 95, Windows 98, or Windows NT clients inan OS/2 Warp Server domain, and have not started the NeighborhoodBrowser Enabler, then you have to set up one master browser per segment tobe able to browse OS/2 Warp Server domain resources from Windows 95,
Chapter 5. Integrating file and print services 271
Windows 98, and Windows NT. The master browser workstation has to be upand running all the time.
We recommend enabling the Neighborhood Browser Enabler on the domaincontroller machine. Start it on any OS/2 Warp Server for e-business machine,one master browser at a time. Starting Neighborhood Browser Enabler onmore than one server reduces the network traffic between the master browserand the clients. All the other servers running the Neighborhood BrowserEnabler service are backup browsers. For performance considerations, it isrecommended to enable Neighborhood Browser Enablers for every 20servers in the domain. Depending on the installation, this figure may vary.
5.6.2 Installing neighborhood browser enablerThe following sections describe the installation and configuration of the IBMNeighborhood Browser Enabler on OS/2 Warp Server for e-business andOS/2 Warp Server Version 4.
5.6.2.1 OS/2 Warp Server for e-businessThe Neighborhood Browser Enabler is installed with a LAN server during theinstallation process of OS/2 Warp Server for e-business.
The browser service does not start automatically when the server service isstarted.
The IBMLAN.INI file contains a new section:
[browser]maintainserverlist = YESquiet= No
It also adds a new service called BROWSER in the SRVSERVICES line, andit extends the path to a new executable in the [services] section, namely:browser = services\browser.exe
5.6.2.2 For OS/2 Warp Server Version 4To install the Neighborhood Browser Enabler on OS/2 Warp Server Version 4,follow these steps:
1. Download the Neighborhood Browser Enabler as a ZIP file from the IBMSoftware Choice at:
http://service.software.ibm.com/asd-bin/doc/index.htm
(This is a free download.)
272 Beyond DHCP - Work Your TCP/IP Internetwork with Dynamic IP
2. From an OS/2 Window on your Warp Server, create a temporary directory,and copy the downloaded ZIP file into it.
3. Unzip the package to the directory by using PKUNZIP2:
PKUNZIP2 BRINST.ZIP
4. Read the README.1ST file.
5. If the Server is running, stop it by entering the command:
NET STOP SERVER
6. Enter the command:
BRINST
This will install new files into their appropriate directories:
\IBMLAN\SERVICES\BROWSER.EXE\IBMLAN\NETLIB\BROWSE32.DLL\IBMLAN\NETLIB\BROWSE16.DLL
Depending on the service level, selected base LAN Server modules arebacked up, then newer versions are installed:
\IBMLAN\SERVICES\NETSERVR.EXE\IBMLAN\SERVICES\NETSVINI.EXE\IBMLAN\NETPROG\NETWKSTA.200\IBM386FS\HPFS386.IFS\MUGLIB\DLL\NETAPI32.DLL
Note: The file \MUGLIB\DLL\NETAPI32.DLL is replaced only on OS/2 WarpServer SMP IP08500.
7. A reboot may be necessary depending on LAN Server's service level.
The Neighborhood Browser Enabler installation program copies the browserfiles to the appropriate directories after backing up the existing IBMLAN.INIfile to IBMLAN.IBR, backing up some LAN server components, and finallymodifying the IBMLAN.INI file so that the browser service starts automaticallywhen the server service is started.
The updated IBMLAN.INI file contains a new section:
[browser]maintainserverlist = auto
It also adds a new service called BROWSER in the SRVSERVICES line, andit extends the path to a new executable in the [services] section, namely:browser = services\browser.exe
Chapter 5. Integrating file and print services 273
5.6.3 Starting and stopping the Neighborhood Browser EnablerYou can start the Neighborhood Browser Enabler service at any time byissuing the command:
NET START BROWSER
Or, stop the service by using the command:
NET STOP BROWSER
You may also stop and start the Neighborhood Browser Enabler servicethrough the LAN Server Administration GUI (select LAN ServerAdministration => Local Workstation => Services => Browser => Start orStop).
When the Neighborhood Browser Enabler is running on the OS/2 WarpServer for e-business domain controller machine, the domain controller alsorecognizes and answers to NetBIOS name types used by Microsoft networksbut not by IBM networks. These types include domain controller, domainmaster browser, master browser, and browser service elections. In caseswhere Microsoft Windows clients are attached to the network, we recommendstarting the Neighborhood Browser Enabler and using the appropriate IBMNetworks Client for Windows.
5.7 AIX Fast Connect
AIX Fast Connect 2.1 allows an RS/6000 to function as a file or print server toWindows 95/98/NT and OS/2 clients. In this section we will cover somescenarios where we tested Fast Connect with some DHCP settings. For moreinformation on the implementation and function of Fast Connect, see theredbook titled AIX and Windows NT: Solutions for Interoperability,SG24-5102.
5.7.1 Fast Connect on static server with dynamic clientIn our lab, we set up an RS/6000 Model 43P with AIX 4.3.3 as a Fast Connectand DHCP server. We set up a Windows NT workstation to obtain DHCPlease from our RS/6000 and then define a mapped network drive to theRS/6000. Then, using the command ipconfig /release, we had our WindowsNT workstation release its DHCP lease. After that we executed the commandstopsrc -s dhcpsd on the RS/6000 to stop DHCP server services, and thenstarted DHCP services on an NTS Shadow IP server. Finally, we had ourWindows NT workstation obtain a new lease from the Shadow IP server and,without fail, we still had connectivity to our drive space defined on the FastConnect server. In addition, we were able to define new network drive space.
274 Beyond DHCP - Work Your TCP/IP Internetwork with Dynamic IP
For client concerns, DHCP and Fast Connect services do not interfere withone another and there are no DHCP concerns with a static Fast Connectserver and dynamic Windows clients.
5.7.2 Fast Connect on a dynamic server with dynamic clientWhen we ran Fast Connect server on an AIX DHCP client we ran intodifficulties. We had our AIX system get a DHCP lease and IP address of192.168.6.201 and then started the Fast Connect server and defined drivespace on that server from a Windows NT client. Then, we released our DHCPlease on the AIX Fast Connect server, got a new lease with a new IP addressof 192.168.6.50, and then tried to view the Fast Connect server in the MapNetwork Drive menu on the Windows NT client. While trying to view the FastConnect server on the new IP lease, the Windows NT client hung and we hadto end the task. However, stopping and starting the Fast Connect server, andtherefore having it listen on a valid IP address, solved the problem and clientswere now able to connect to the Fast Connect server without fail.
In the event that you are going to run Fast Connect on an AIX DHCP client,we recommend that the DHCP client reserve its IP address on the DHCPserver, run the Fast Connect server on static IP, or be prepared to restart FastConnect services in the event the lease expires on your AIX DHCP client.
Chapter 5. Integrating file and print services 275

276 Beyond DHCP - Work Your TCP/IP Internetwork with Dynamic IP

Chapter 6. Expanding your network
Planning and installing a simple DHCP and DDNS network is not a difficulttask. However, when we need more DHCP servers or more (D)DNS servers,there are many complex design issues. We discuss multiple subnets, multipleDHCP servers, address pool management, DHCP relay agents, combinationof a static DNS and DDNS, a mix of NT DNS and OS/2 Warp Server DDNS,and AIX DDNS. If your network is growing, you will want to read this chapter.
6.1 Multiple subnets
There are several reasons why you would divide your TCP/IP network withsubnets. Assume a small company, HIC Corp., had been using one floor ofthe office building downtown, and now the company expands one more floor.If the newly added floor is next to the original floor, they might just extend theLAN so that a bridge or repeater is enough to extend the TCP/IP network.However, if the LAN utilization is already high, they may want to use a routerto physically divide the two LANs, thus giving two subnets, one for eachphysical floor of the building where they have a group of machines on thenetwork. Furthermore, in scenarios where you are setting up large numbersof workstations in a vast complex, you may want to subdivide the workstationgroups, either by floor or by area, by their subnet, to make the IP topologyresemble the physical layout of your LAN more closely.
6.1.1 Static and dynamic routing between subnetsRouting is the process of choosing a network path on which to transferpackets. A router is a device that is (usually) connected to two or morenetworks and is responsible for transferring data from one network to another.
In order to perform routing, a router has to maintain a map of what subnetsare on the network and where it should send data so that it can reach itsdestination. There are two ways of maintaining this list:
• The network administrator could manually configure the routing table oneach router. This is said to be static routing. Static routing is easy toadminister if your network is fairly small, but can become incrediblycomplex as your network continues to grow.
• The routers could talk amongst themselves to determine what subnets areon the network and how to get to them. Two common protocols used byrouters are Routing Information Protocol (RIP) and Open Shortest PathFirst (OSPF).
© Copyright IBM Corp. 1998, 2000 277
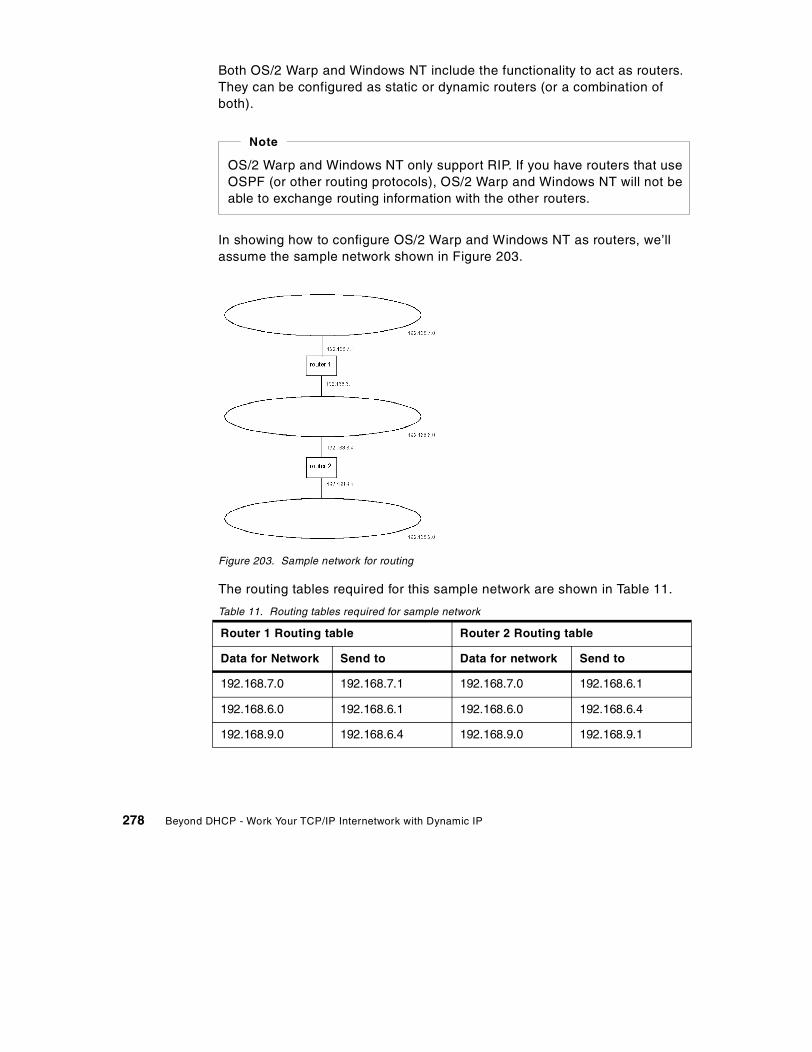
Both OS/2 Warp and Windows NT include the functionality to act as routers.They can be configured as static or dynamic routers (or a combination ofboth).
In showing how to configure OS/2 Warp and Windows NT as routers, we’llassume the sample network shown in Figure 203.
Figure 203. Sample network for routing
The routing tables required for this sample network are shown in Table 11.
Table 11. Routing tables required for sample network
Router 1 Routing table Router 2 Routing table
Data for Network Send to Data for network Send to
192.168.7.0 192.168.7.1 192.168.7.0 192.168.6.1
192.168.6.0 192.168.6.1 192.168.6.0 192.168.6.4
192.168.9.0 192.168.6.4 192.168.9.0 192.168.9.1
OS/2 Warp and Windows NT only support RIP. If you have routers that useOSPF (or other routing protocols), OS/2 Warp and Windows NT will not beable to exchange routing information with the other routers.
Note
278 Beyond DHCP - Work Your TCP/IP Internetwork with Dynamic IP
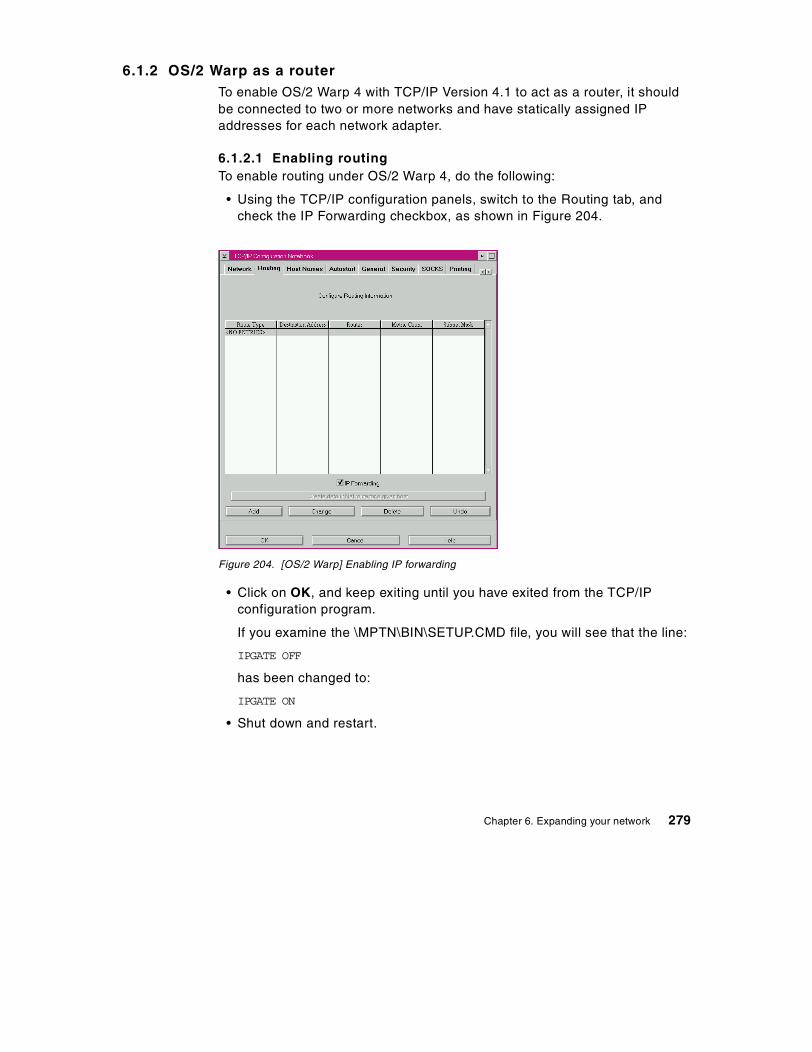
6.1.2 OS/2 Warp as a routerTo enable OS/2 Warp 4 with TCP/IP Version 4.1 to act as a router, it shouldbe connected to two or more networks and have statically assigned IPaddresses for each network adapter.
6.1.2.1 Enabling routingTo enable routing under OS/2 Warp 4, do the following:
• Using the TCP/IP configuration panels, switch to the Routing tab, andcheck the IP Forwarding checkbox, as shown in Figure 204.
Figure 204. [OS/2 Warp] Enabling IP forwarding
• Click on OK, and keep exiting until you have exited from the TCP/IPconfiguration program.
If you examine the \MPTN\BIN\SETUP.CMD file, you will see that the line:
IPGATE OFF
has been changed to:
IPGATE ON
• Shut down and restart.
Chapter 6. Expanding your network 279
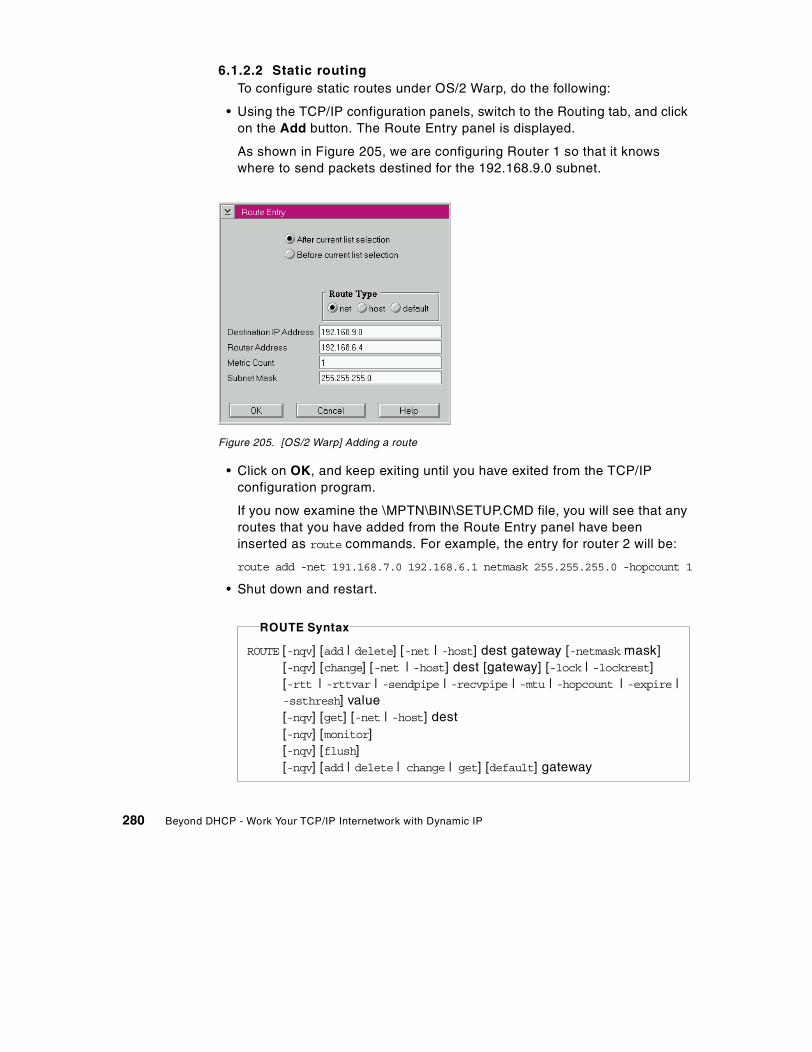
6.1.2.2 Static routingTo configure static routes under OS/2 Warp, do the following:
• Using the TCP/IP configuration panels, switch to the Routing tab, and clickon the Add button. The Route Entry panel is displayed.
As shown in Figure 205, we are configuring Router 1 so that it knowswhere to send packets destined for the 192.168.9.0 subnet.
Figure 205. [OS/2 Warp] Adding a route
• Click on OK, and keep exiting until you have exited from the TCP/IPconfiguration program.
If you now examine the \MPTN\BIN\SETUP.CMD file, you will see that anyroutes that you have added from the Route Entry panel have beeninserted as route commands. For example, the entry for router 2 will be:
route add -net 191.168.7.0 192.168.6.1 netmask 255.255.255.0 -hopcount 1
• Shut down and restart.
ROUTE [-nqv] [add | delete] [-net | -host] dest gateway [-netmask mask][-nqv] [change] [-net | -host] dest [gateway] [-lock | -lockrest][-rtt | -rttvar | -sendpipe | -recvpipe | -mtu | -hopcount | -expire |-ssthresh] value[-nqv] [get] [-net | -host] dest[-nqv] [monitor][-nqv] [flush][-nqv] [add | delete | change | get] [default] gateway
ROUTE Syntax
280 Beyond DHCP - Work Your TCP/IP Internetwork with Dynamic IP
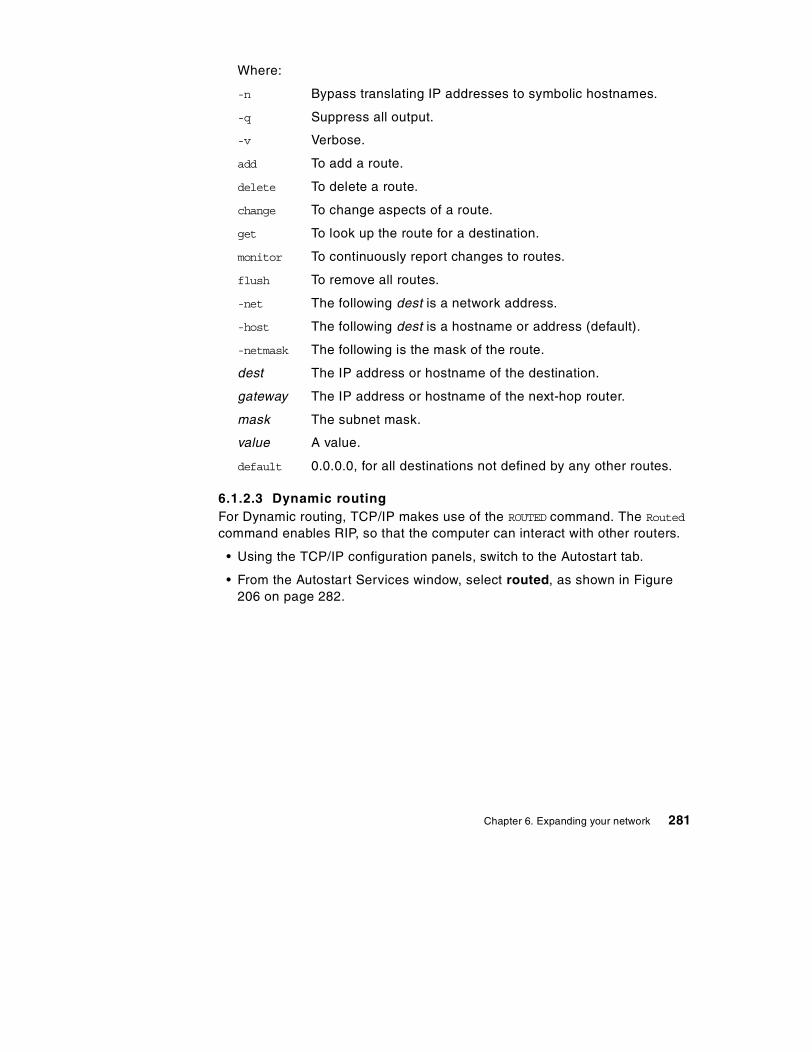
Where:
-n Bypass translating IP addresses to symbolic hostnames.
-q Suppress all output.
-v Verbose.
add To add a route.
delete To delete a route.
change To change aspects of a route.
get To look up the route for a destination.
monitor To continuously report changes to routes.
flush To remove all routes.
-net The following dest is a network address.
-host The following dest is a hostname or address (default).
-netmask The following is the mask of the route.
dest The IP address or hostname of the destination.
gateway The IP address or hostname of the next-hop router.
mask The subnet mask.
value A value.
default 0.0.0.0, for all destinations not defined by any other routes.
6.1.2.3 Dynamic routingFor Dynamic routing, TCP/IP makes use of the ROUTED command. The Routed
command enables RIP, so that the computer can interact with other routers.
• Using the TCP/IP configuration panels, switch to the Autostart tab.
• From the Autostart Services window, select routed, as shown in Figure206 on page 282.
Chapter 6. Expanding your network 281
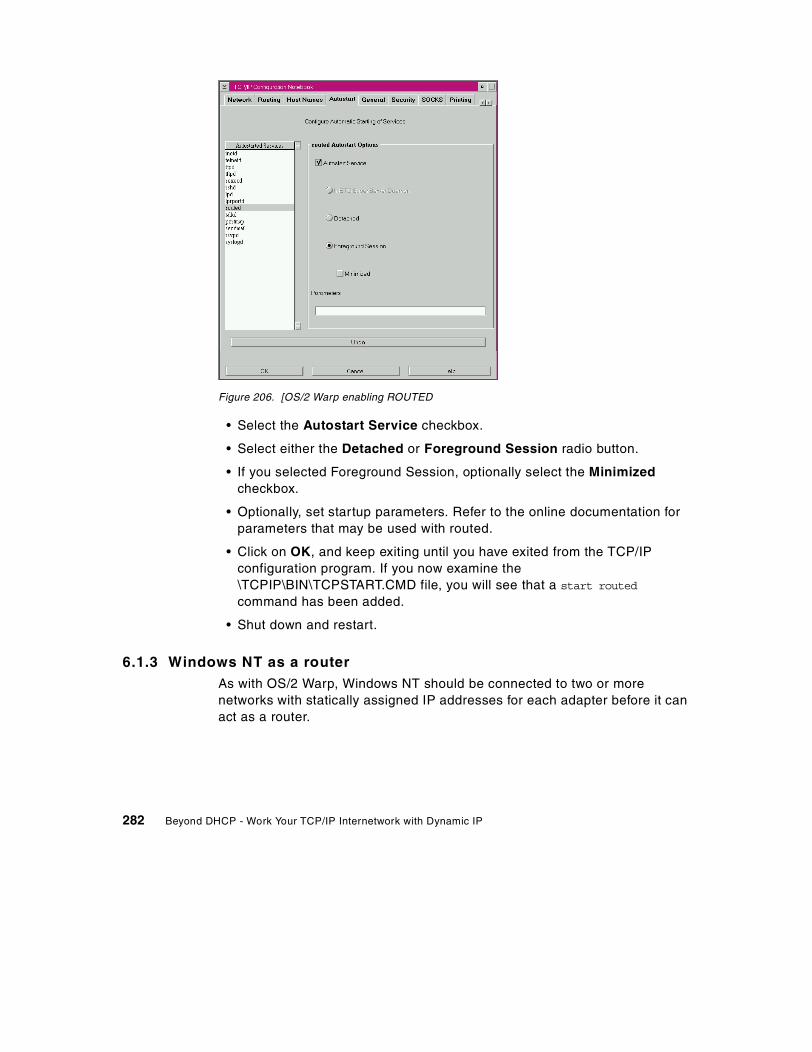
Figure 206. [OS/2 Warp enabling ROUTED
• Select the Autostart Service checkbox.
• Select either the Detached or Foreground Session radio button.
• If you selected Foreground Session, optionally select the Minimizedcheckbox.
• Optionally, set startup parameters. Refer to the online documentation forparameters that may be used with routed.
• Click on OK, and keep exiting until you have exited from the TCP/IPconfiguration program. If you now examine the\TCPIP\BIN\TCPSTART.CMD file, you will see that a start routed
command has been added.
• Shut down and restart.
6.1.3 Windows NT as a routerAs with OS/2 Warp, Windows NT should be connected to two or morenetworks with statically assigned IP addresses for each adapter before it canact as a router.
282 Beyond DHCP - Work Your TCP/IP Internetwork with Dynamic IP
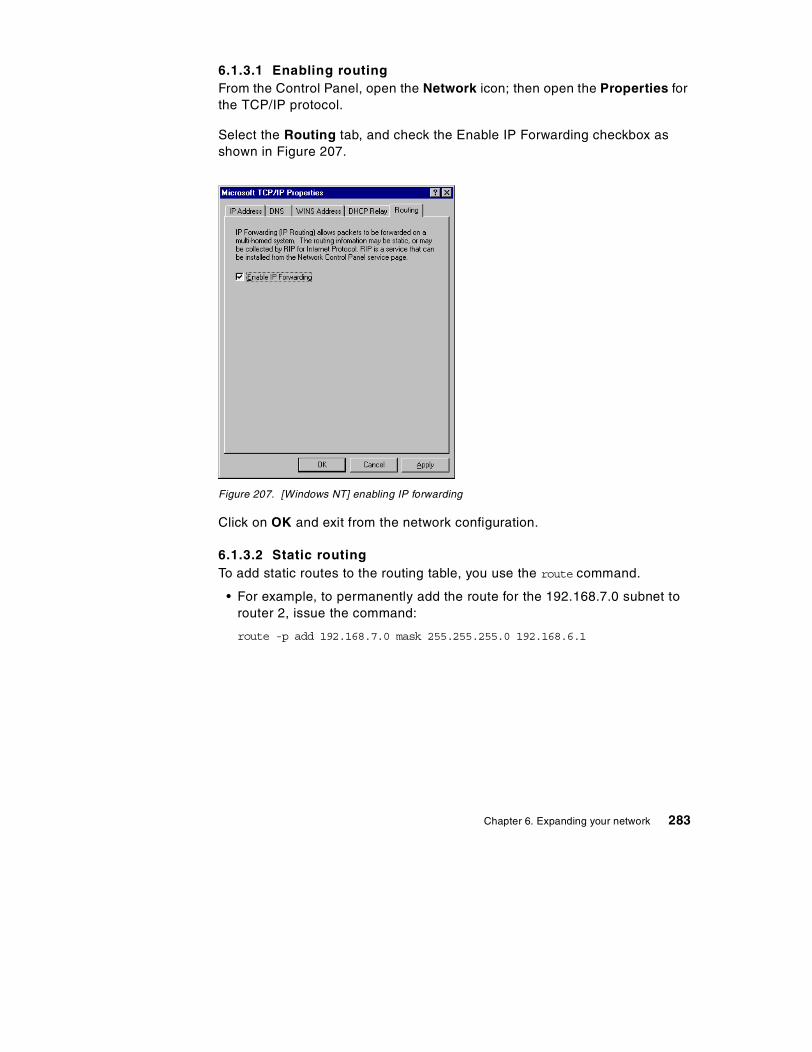
6.1.3.1 Enabling routingFrom the Control Panel, open the Network icon; then open the Properties forthe TCP/IP protocol.
Select the Routing tab, and check the Enable IP Forwarding checkbox asshown in Figure 207.
Figure 207. [Windows NT] enabling IP forwarding
Click on OK and exit from the network configuration.
6.1.3.2 Static routingTo add static routes to the routing table, you use the route command.
• For example, to permanently add the route for the 192.168.7.0 subnet torouter 2, issue the command:
route -p add 192.168.7.0 mask 255.255.255.0 192.168.6.1
Chapter 6. Expanding your network 283

Where:
-p Makes persistent changes; that is, changes are stored to theregistry
add Adds a route
delete Deletes a route
change Changes a route
network The destination subnet
mask The subnet mask
gateway Where to send packets destined for the subnet network
metric The cost of using this route
-f Flush the routing table
6.1.3.3 Dynamic routingTo perform dynamic routing, the RIP for Internet Protocol Service must beinstalled. This service comes as part of Windows NT Server.
1. Open the Network icon in the Control Panel, and on the Services tab,select Add. A list of available services will be displayed.
2. Scroll down the list, and select RIP for Internet Protocol (as shown inFigure 208 on page 285); then click OK.
ROUTE [-p] add network mask mask gateway metric metricdelete network gatewaychange network gatewayprint
-f
ROUTE syntax
284 Beyond DHCP - Work Your TCP/IP Internetwork with Dynamic IP
Figure 208. [Windows NT] installing the RIP for Internet Protocol service
• Keep exiting until you have exited from the network configuration.
• Shut down and restart.
6.2 Crossing routers
Once your TCP/IP network begins to grow, you will, for various reasons, splitthe network into multiple subnets that are connected through routers.
Routers generally filter out all broadcast traffic between subnets. With this inmind, you should remember that a workstation that is being configuredthrough DHCP is dependent on the DHCPDISCOVER and subsequentbroadcasts being seen by a DHCP server.
So, how do you make your DHCP clients work on one subnet when yourDHCP server is on another subnet and your broadcast traffic is being filtered?
The simplest option is to configure your router to pass on all broadcast traffic.This will work, but will introduce further problems as your network continuesto grow. Therefore, is not recommended.
A better method would be to have some type of device on the subnet remotefrom the DHCP server listening for DHCP broadcasts, and when it sees one,it forwards it directly to the DHCP server.
RFC1542 Clarifications and Extensions for the Bootstrap Protocol documentsthe methodology for implementing such a device. Although it was originallywritten with BOOTP in mind, it is valid for DHCP. A device that implementsthis type of forwarding is known as a DHCP Relay Agent (or a BOOTP Relay
Chapter 6. Expanding your network 285
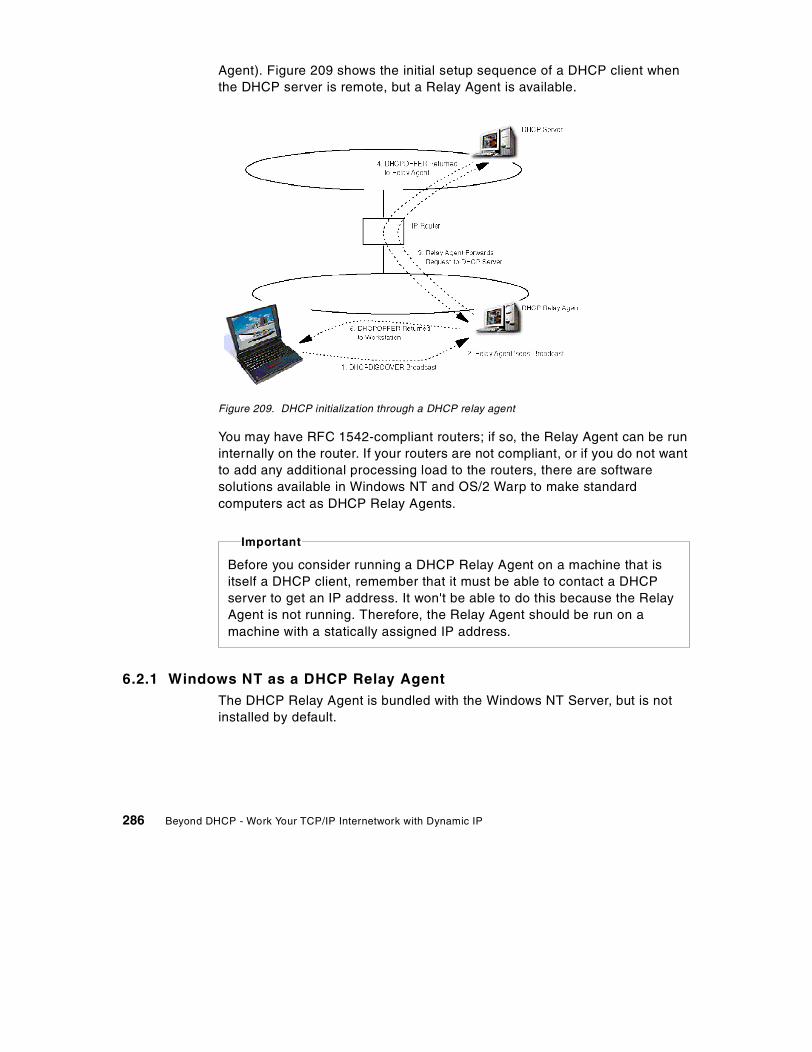
Agent). Figure 209 shows the initial setup sequence of a DHCP client whenthe DHCP server is remote, but a Relay Agent is available.
Figure 209. DHCP initialization through a DHCP relay agent
You may have RFC 1542-compliant routers; if so, the Relay Agent can be runinternally on the router. If your routers are not compliant, or if you do not wantto add any additional processing load to the routers, there are softwaresolutions available in Windows NT and OS/2 Warp to make standardcomputers act as DHCP Relay Agents.
6.2.1 Windows NT as a DHCP Relay AgentThe DHCP Relay Agent is bundled with the Windows NT Server, but is notinstalled by default.
Before you consider running a DHCP Relay Agent on a machine that isitself a DHCP client, remember that it must be able to contact a DHCPserver to get an IP address. It won't be able to do this because the RelayAgent is not running. Therefore, the Relay Agent should be run on amachine with a statically assigned IP address.
Important
286 Beyond DHCP - Work Your TCP/IP Internetwork with Dynamic IP
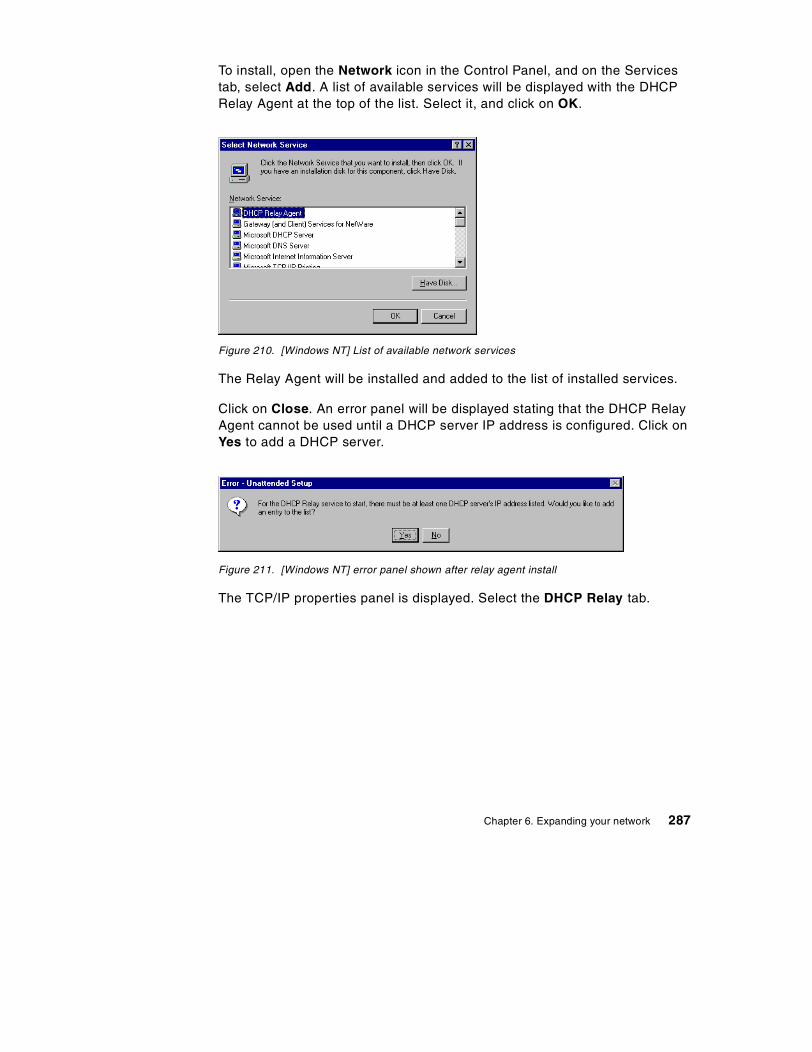
To install, open the Network icon in the Control Panel, and on the Servicestab, select Add. A list of available services will be displayed with the DHCPRelay Agent at the top of the list. Select it, and click on OK.
Figure 210. [Windows NT] List of available network services
The Relay Agent will be installed and added to the list of installed services.
Click on Close. An error panel will be displayed stating that the DHCP RelayAgent cannot be used until a DHCP server IP address is configured. Click onYes to add a DHCP server.
Figure 211. [Windows NT] error panel shown after relay agent install
The TCP/IP properties panel is displayed. Select the DHCP Relay tab.
Chapter 6. Expanding your network 287
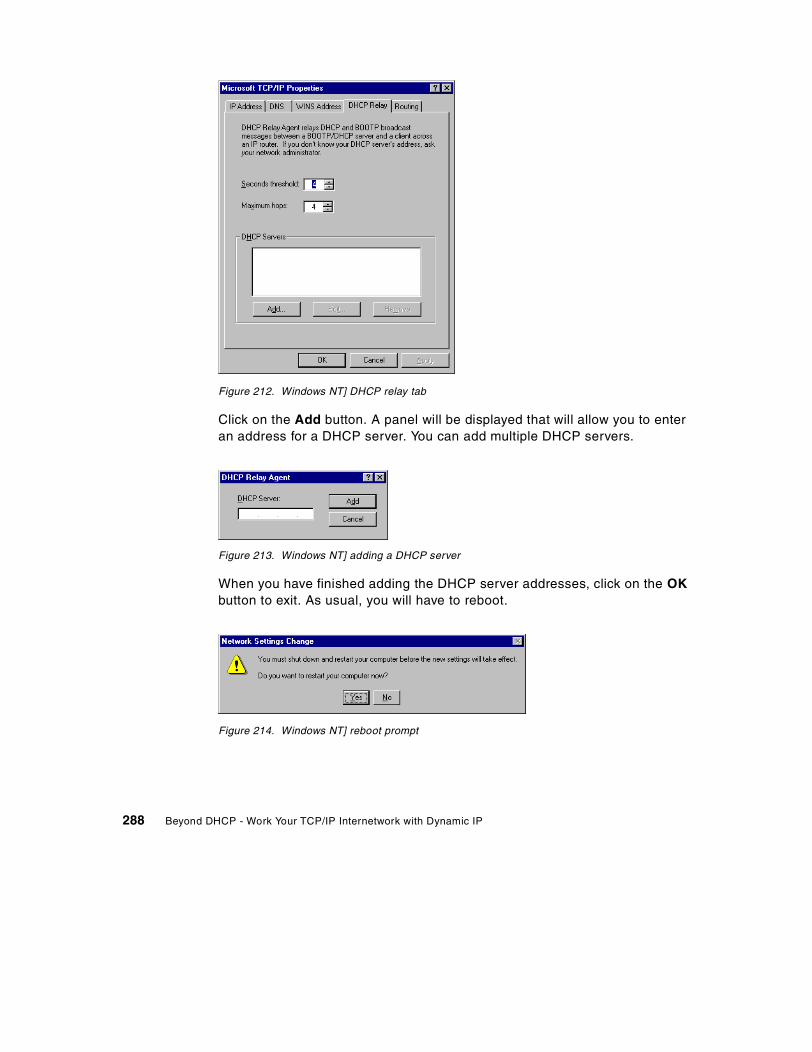
Figure 212. Windows NT] DHCP relay tab
Click on the Add button. A panel will be displayed that will allow you to enteran address for a DHCP server. You can add multiple DHCP servers.
Figure 213. Windows NT] adding a DHCP server
When you have finished adding the DHCP server addresses, click on the OKbutton to exit. As usual, you will have to reboot.
Figure 214. Windows NT] reboot prompt
288 Beyond DHCP - Work Your TCP/IP Internetwork with Dynamic IP
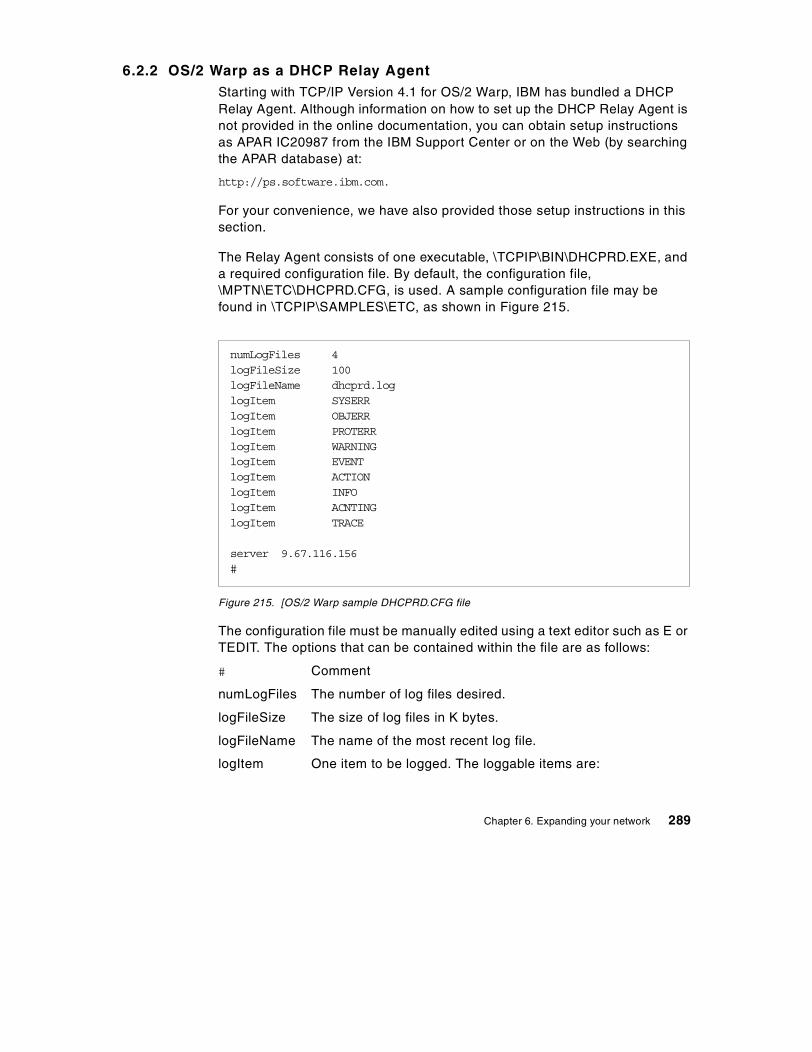
6.2.2 OS/2 Warp as a DHCP Relay AgentStarting with TCP/IP Version 4.1 for OS/2 Warp, IBM has bundled a DHCPRelay Agent. Although information on how to set up the DHCP Relay Agent isnot provided in the online documentation, you can obtain setup instructionsas APAR IC20987 from the IBM Support Center or on the Web (by searchingthe APAR database) at:
http://ps.software.ibm.com.
For your convenience, we have also provided those setup instructions in thissection.
The Relay Agent consists of one executable, \TCPIP\BIN\DHCPRD.EXE, anda required configuration file. By default, the configuration file,\MPTN\ETC\DHCPRD.CFG, is used. A sample configuration file may befound in \TCPIP\SAMPLES\ETC, as shown in Figure 215.
Figure 215. [OS/2 Warp sample DHCPRD.CFG file
The configuration file must be manually edited using a text editor such as E orTEDIT. The options that can be contained within the file are as follows:
# Comment
numLogFiles The number of log files desired.
logFileSize The size of log files in K bytes.
logFileName The name of the most recent log file.
logItem One item to be logged. The loggable items are:
numLogFiles 4logFileSize 100logFileName dhcprd.loglogItem SYSERRlogItem OBJERRlogItem PROTERRlogItem WARNINGlogItem EVENTlogItem ACTIONlogItem INFOlogItem ACNTINGlogItem TRACE
server 9.67.116.156#
Chapter 6. Expanding your network 289
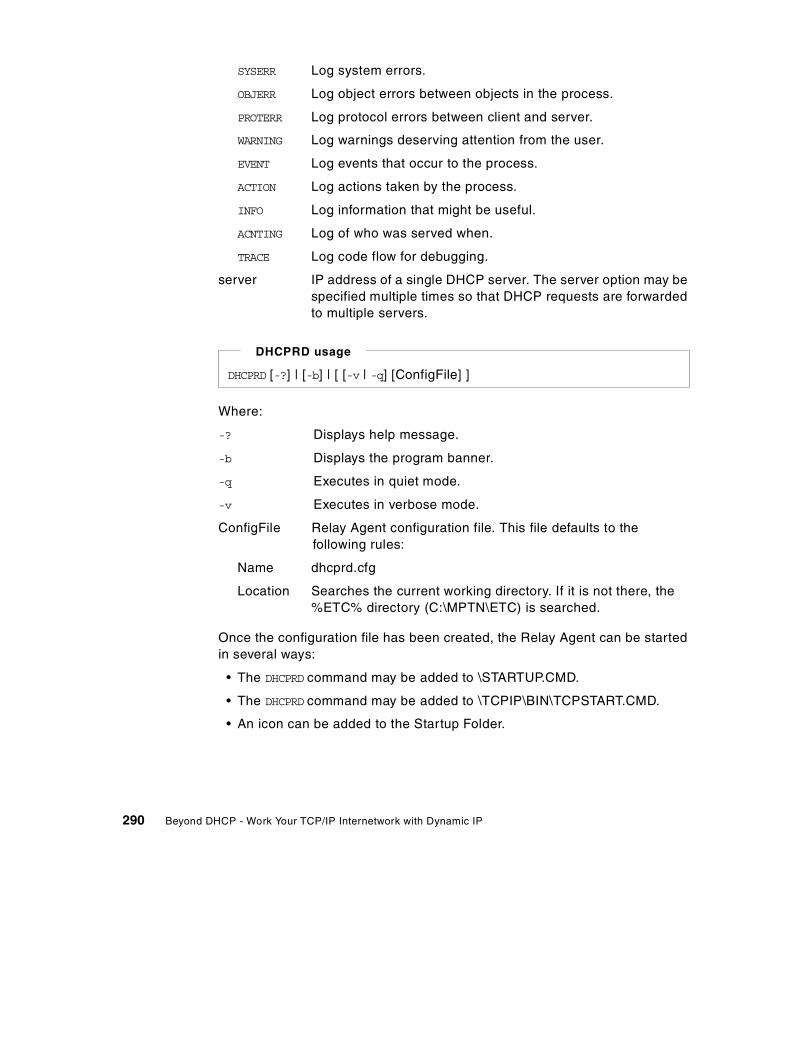
SYSERR Log system errors.
OBJERR Log object errors between objects in the process.
PROTERR Log protocol errors between client and server.
WARNING Log warnings deserving attention from the user.
EVENT Log events that occur to the process.
ACTION Log actions taken by the process.
INFO Log information that might be useful.
ACNTING Log of who was served when.
TRACE Log code flow for debugging.
server IP address of a single DHCP server. The server option may bespecified multiple times so that DHCP requests are forwardedto multiple servers.
Where:
-? Displays help message.
-b Displays the program banner.
-q Executes in quiet mode.
-v Executes in verbose mode.
ConfigFile Relay Agent configuration file. This file defaults to thefollowing rules:
Name dhcprd.cfg
Location Searches the current working directory. If it is not there, the%ETC% directory (C:\MPTN\ETC) is searched.
Once the configuration file has been created, the Relay Agent can be startedin several ways:
• The DHCPRD command may be added to \STARTUP.CMD.
• The DHCPRD command may be added to \TCPIP\BIN\TCPSTART.CMD.
• An icon can be added to the Startup Folder.
DHCPRD [-?] | [-b] | [ [-v | -q] [ConfigFile] ]
DHCPRD usage
290 Beyond DHCP - Work Your TCP/IP Internetwork with Dynamic IP
6.2.3 DHCP relay considerations
6.2.3.1 The broadcast flagDHCP includes a method whereby devices unable to receive a packet with aspecific IP address can ask the server or relay agent to use the broadcast IPaddress for replies (a flag set by the client in the requests). The definition ofDHCP states that implementations should honor this flag, but it doesn't saythey must. Some TCP/IP implementations used this flag, which meant thatRelay Agents and servers had to implement it.
A number of BOOTP Relay Agent implementations (for example, in routers)handled DHCP correctly except for this feature.
6.2.3.2 Virtual LANsSome virtual LAN (VLAN) schemes use a data packet's IP address to decidewhich virtual LAN a device is on. Depending on the capabilities of your DHCPserver, this can represent a significant challenge to your implementation.
DHCP servers and Relay Agents use their knowledge of what LAN the deviceis physically connected to in order to select the subnet number for thedevice's new IP address. Whereas, with switches, the subnet number sent bythe device is used to decide which virtual LAN to put the device on.
6.2.3.3 Multiple subnets on a single wireNetworks are sometimes configured so that one network segment hasmultiple subnets running on it. The DHCP server allocates addresses from apool that is defined for each subnet or network.
In this type of environment, unless the DHCP Relay Agent is able to indicatewhich subnet a device requesting an address belongs to (by indicating to theserver its own IP address for that subnet), or unless the server itself can beconfigured to cope with this environment, then you will probably not be able toimplement DHCP.
6.3 IP masquerading/network address translation
One way to combat an IP address shortage is to avoid assigning addresses inthe first place. Yet without an IP address, no system can communicate on aTCP/IP network.
IP masquerading allows you to share one IP address among several differentsystems while still providing reliable, full-function TCP/IP connections toevery host. This technique can be used to provide Internet service to morethan one computer using a single dial-up connection from an Internet Service
Chapter 6. Expanding your network 291
Provider (ISP), for example. Or, you may wish to link branch office systems toyour company’s network without assigning IP addresses from your company’smain address pool.
In fact, you still must assign an IP address to every host that needs tocommunicate on the TCP/IP network, but the IP addresses may be from aprivate network pool such as the Class A network 10. A masqueradinggateway accepts TCP/IP connection requests from these private hosts andtranslates them into requests originating from the IP address assigned to themasquerading gateway itself. Then, responses are automatically routed backto the correct host on the private network. As a result, a single IP address onone network can effectively serve several different hosts without requiringadditional IP address assignments on that same network.
InJoy from F/X Communications can provide IP masquerading services onyour network, perhaps in combination with Virtual Private Network (VPN)capabilities. (VPN can securely link intranets at different sites using the publicInternet.)
If you are making intermittent connections to the Internet, perhaps NetworkAddress Translation (NAT) is for you. For example, assume you have a smallnetwork at home, or you have a small office with light use of the Internet.There are a number of different products that allow you to share a modemover a regular telephone line or an ISDN line.
Sometimes NAT is referred to as IP masquerading, although NAT is a superset of IP Masquerading (the IP address does not actually change as it passesfrom one LAN/WAN to another through the masquerade software). Originally,NAT was suggested as a short-term solution to the problem of IP addressdepletion. In order to be assured of any-to-any communication in the Internet,all IP addresses have to be officially assigned by the Internet AssignedNumbers Authority (IANA). This is becoming increasingly difficult to achieve,because the number of available address ranges is now severely limited.Also, many organizations have, in the past, used locally assigned IPaddresses, not expecting to require Internet connectivity.
The idea of NAT is based on the fact that only a small part of the hosts in aprivate network are communicating outside of that network. So, if we candevise a technique to assign official addresses to hosts that are used onlywhen they need to communicate outside the private network, then only asmall number of official addresses are required.
This is what NAT does; it takes the IP address of an outgoing packet anddynamically translates it to an official address. For incoming packets, it
292 Beyond DHCP - Work Your TCP/IP Internetwork with Dynamic IP
translates the official address to an internal address. We now can use NAT fora solution for networks that have private address ranges or illegal addressesand want to communicate with hosts on the Internet.
In fact, by implementing a firewall, we have already circumvented part of theproblem. Clients that communicate on the Internet by using a proxy or socksserver do not expose their addresses to the Internet, so their addresses donot have to be translated anyway. However, when we do not want to use aproxy or sock server, or when proxy and socks are not possible, we can useNAT. For example, proxy and socks servers cannot be used for UDPconnections on some firewall products.
6.3.1 Translation mechanismFor each outgoing IP packet, the source address is checked by the NATconfiguration rules. If a rule matches the source address, the address istranslated to an official address from the address pool. The predefinedaddress pool contains the addresses that NAT may use for translation. Foreach incoming packet the destination address is checked to see if it is usedby NAT. When this is true the address is translated to the original unofficialaddress.
Many different products implement Network Address Translation or IPMasquerading. Often true NAT is available with firewall products. Oneinexpensive product for OS/2 for IP Masquerading is the INJOY dialer. It alsoprovides Dial On Demand. It can be used with modems over regular phonelines or ISDN.
For more information on IP masquerading with InJoy, please visit the Website:
http://www.fx.dk
6.4 Dynamic IP with Network TeleSystems Shadow IPserver
As your network continues to grow, you may find it beneficial to use dedicatedhardware or software to provide the functions of DHCP, DDNS, and NetBIOSname resolution. Network TeleSystems, (see http://www.nts.com) offersseveral solutions in this area. We employed their Shadow IPserver Version3.04o in our test networks to provide fully integrated DHCP, DNS, andNetBIOS name resolution services. We also used Network TeleSystemsIPmanager software for Windows to aid in the configuration and managementof the server.
Chapter 6. Expanding your network 293
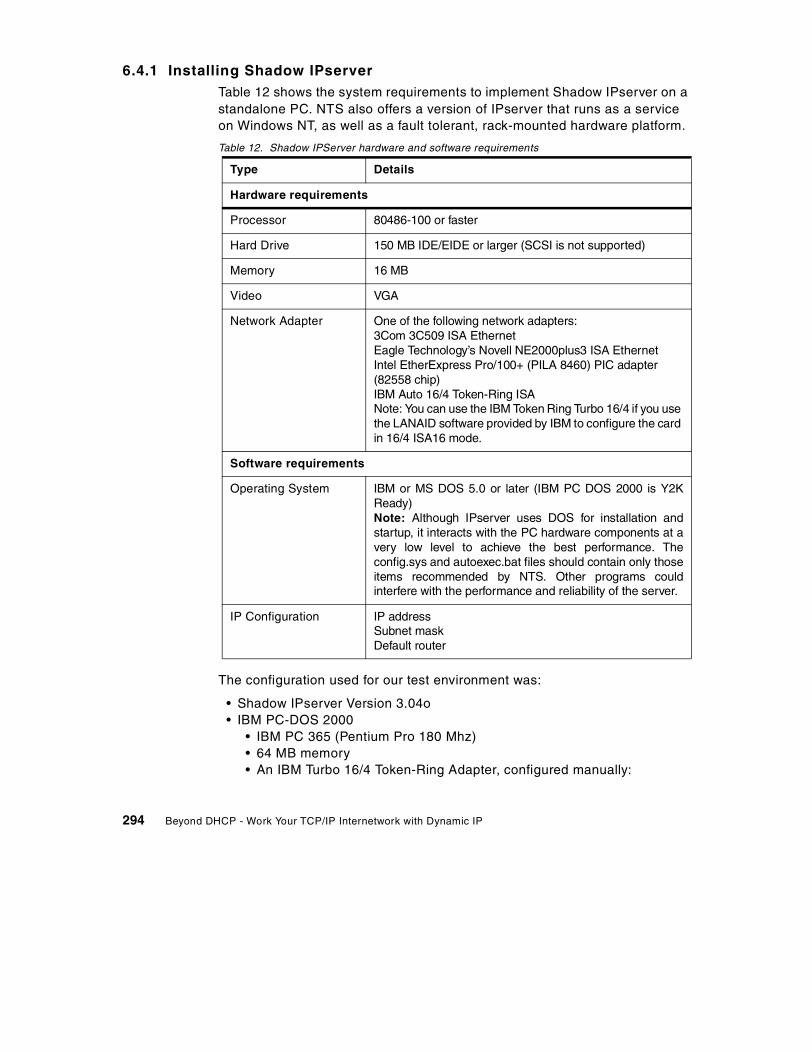
6.4.1 Installing Shadow IPserverTable 12 shows the system requirements to implement Shadow IPserver on astandalone PC. NTS also offers a version of IPserver that runs as a serviceon Windows NT, as well as a fault tolerant, rack-mounted hardware platform.
Table 12. Shadow IPServer hardware and software requirements
The configuration used for our test environment was:
• Shadow IPserver Version 3.04o• IBM PC-DOS 2000
• IBM PC 365 (Pentium Pro 180 Mhz)• 64 MB memory• An IBM Turbo 16/4 Token-Ring Adapter, configured manually:
Type Details
Hardware requirements
Processor 80486-100 or faster
Hard Drive 150 MB IDE/EIDE or larger (SCSI is not supported)
Memory 16 MB
Video VGA
Network Adapter One of the following network adapters:3Com 3C509 ISA EthernetEagle Technology’s Novell NE2000plus3 ISA EthernetIntel EtherExpress Pro/100+ (PILA 8460) PIC adapter(82558 chip)IBM Auto 16/4 Token-Ring ISANote: You can use the IBM Token Ring Turbo 16/4 if you usethe LANAID software provided by IBM to configure the cardin 16/4 ISA16 mode.
Software requirements
Operating System IBM or MS DOS 5.0 or later (IBM PC DOS 2000 is Y2KReady)Note: Although IPserver uses DOS for installation andstartup, it interacts with the PC hardware components at avery low level to achieve the best performance. Theconfig.sys and autoexec.bat files should contain only thoseitems recommended by NTS. Other programs couldinterfere with the performance and reliability of the server.
IP Configuration IP addressSubnet maskDefault router
294 Beyond DHCP - Work Your TCP/IP Internetwork with Dynamic IP
• 16 Mb/sec data rate• ROM address C800• IO port 0A20
6.4.2 Installation procedureThe IPserver installation program asks you for configuration information andcreates the NTS-SRVR.CFG file based on your input. To install IPserver,follow the steps below:
1. Ensure the machine you’ve selected to install Shadow IPserver on meetsthe following requirements:
1. Drive C: is your primary disk partition.
2. Drive C: must be formatted and installed with DOS.
3. IPserver requires HIMEM.SYS to be loaded via your CONFIG.SYS file.Advanced memory management programs like EMM386.EXE orRAMBOOST.EXE should not be used. If these files are being referredto within the CONFIG.SYS or AUTOEXEC.BAT files, the statementsmust be removed.
4. Check the PC's time and date to verify that they are correct. Changesmade after your server is running might affect its configuration. Refer to6.4.3, “IPserver configuration overview” on page 298 for details.
2. Place the Shadow Installation diskette into the PC's diskette drive.
3. Start the installation program by issuing the following command:
<drive letter>:\INSTALL
where <drive letter> is the drive that contains the installation diskette.
4. When prompted, enter the required information such as the IP addressyou’ve selected for the server, the subnet mask and the default routeraddress.
5. When prompted, select the appropriate network adapter and adaptersettings. You need to know the port address and memory range yournetwork adapter is using, as the installation program will ask for thisinformation. These parameters can also be changed later, and are locatedin the NTS-SRVR.CFG file in the C:\SHADOW directory.
At a minimum, the server needs to be configured with the correctparameters for the network adapter card, IP address and subnet mask,and default gateway. With these parameters configured you have theoption of using NTS’s IPmanager software, or a Java enabled browser toperform further configuration. The IPmanager program runs on Windows
Chapter 6. Expanding your network 295

and uses a graphical user interface to configure and monitor multipleservers.
During the installation of Shadow IPserver, you have the option of installing asample configuration. This is can be helpful if you’re learning how to configurethe product for the first time. For our installation, we did not install the sampleconfiguration.
At the completion of the installation program, you can review or change theinformation you entered by editing the NTS-SRVR.CFG file in theC:\SHADOW directory. Figure 216 on page 297 shows the NTS-SRVR.CFGwe file used in our test environment.
296 Beyond DHCP - Work Your TCP/IP Internetwork with Dynamic IP
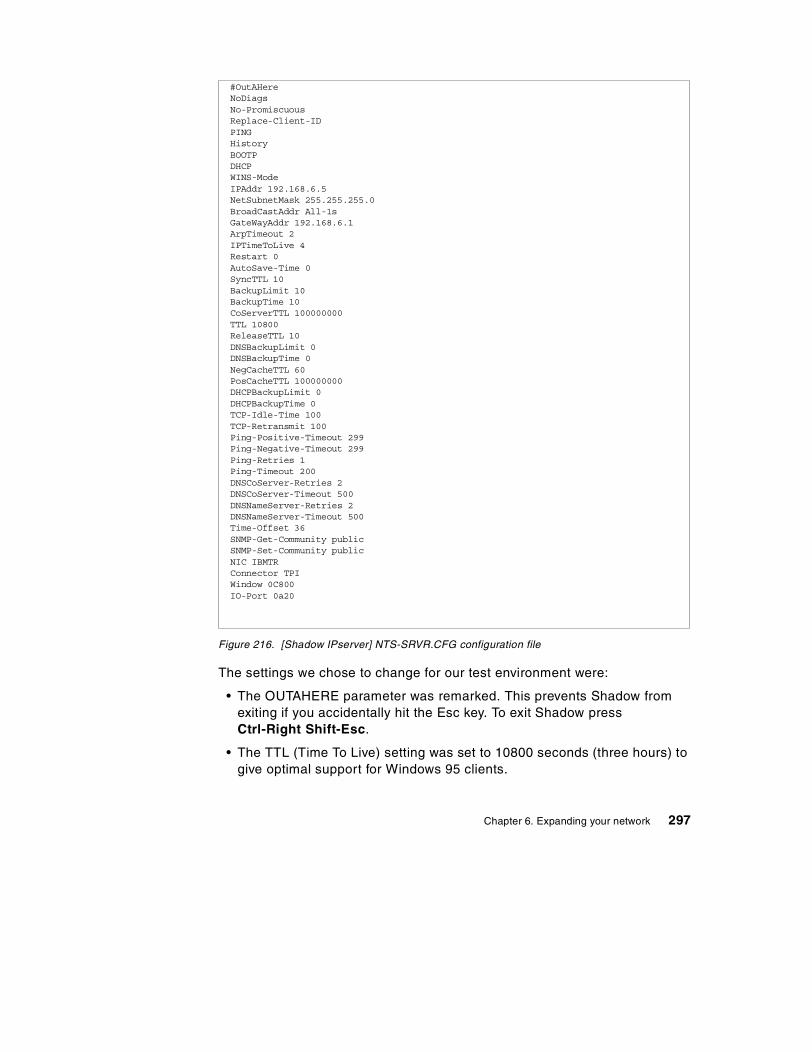
Figure 216. [Shadow IPserver] NTS-SRVR.CFG configuration file
The settings we chose to change for our test environment were:
• The OUTAHERE parameter was remarked. This prevents Shadow fromexiting if you accidentally hit the Esc key. To exit Shadow pressCtrl-Right Shift-Esc.
• The TTL (Time To Live) setting was set to 10800 seconds (three hours) togive optimal support for Windows 95 clients.
#OutAHereNoDiagsNo-PromiscuousReplace-Client-IDPINGHistoryBOOTPDHCPWINS-ModeIPAddr 192.168.6.5NetSubnetMask 255.255.255.0BroadCastAddr All-1sGateWayAddr 192.168.6.1ArpTimeout 2IPTimeToLive 4Restart 0AutoSave-Time 0SyncTTL 10BackupLimit 10BackupTime 10CoServerTTL 100000000TTL 10800ReleaseTTL 10DNSBackupLimit 0DNSBackupTime 0NegCacheTTL 60PosCacheTTL 100000000DHCPBackupLimit 0DHCPBackupTime 0TCP-Idle-Time 100TCP-Retransmit 100Ping-Positive-Timeout 299Ping-Negative-Timeout 299Ping-Retries 1Ping-Timeout 200DNSCoServer-Retries 2DNSCoServer-Timeout 500DNSNameServer-Retries 2DNSNameServer-Timeout 500Time-Offset 36SNMP-Get-Community publicSNMP-Set-Community publicNIC IBMTRConnector TPIWindow 0C800IO-Port 0a20
Chapter 6. Expanding your network 297
6. Check that the command NTS-SRVR was added to the AUTOEXEC.BAT fileto start IPserver. If you are using Shadow’s IPmanager software toconfigure your server you can start the server and proceed from the GUIscreens. If you prefer to edit the textual configuration files, continue withsteps 7 and 8.
7. Optionally, modify the NTS-SRVR.NBN file to add entries to the NBNSdatabase on the server at startup.
8. To manually configure DHCP and DDNS, modify the NTS-SRVR.DHC andNTS-SRVR.DNS files as required.
6.4.3 IPserver configuration overviewYou can configure IPserver by manually editing its textual configuration files,by using the management software (IPmanager), or both. When you useIPmanager, your configuration entries are stored in several save files, whichare read at server startup. These binary files also contain dynamic data thatthe server has learned while operational. IPserver can be configured tocreate the save files periodically, and always creates them as it shuts down.You can also cause the files to be created immediately when usingIPmanager.
If both textual configuration files and save files exist, IPserver uses the fileswith the latest time stamp. So, regardless of the method of configuration, theserver uses a combination of the manually entered configuration, and thedynamically learned information. For example, assume you install yourIPserver, and fully configure it via the textual configuration files. The first timeyou exit the server, the binary save files are created. These files will containboth your static configuration, and the dynamic information the server learnedfrom the network and other Shadow IPservers. When the server is restarted,the binary save files will have more recent time stamps than the text files, andwill be used to start the server.
If you want your IPserver to begin at an explicitly defined state each time it isstarted, you can inhibit the dynamic creation of save files by including theNOSAVE keyword in the NTS-SRVR.CFG file. You would also rename anyexisting binary save files, as the server still looks for them even if theNOSAVE keyword is present.
The textual configuration files are briefly described below. Sampleconfiguration screens using IPmanager can be found in 6.4.4, “Configuringthrough IPmanager” on page 299.
NTS-SRVR.CFG Contains basic system parameters, such as the server’sIP address, subnet mask, and default router. These basic
298 Beyond DHCP - Work Your TCP/IP Internetwork with Dynamic IP

parameters are required to enable management via theIPmanager program or Java. This file is created by theIPserver installation program. A sample file is shown inFigure 216 on page 297.
NTS-SRVR.DHC Contains the configuration for the DHCP service. This filemay not be present if you manage IPserver exclusivelywith IPmanager. NTS-DHC-.SAV is the correspondingbinary save file.
NTS-SRVR.DNS Contains the configuration for the DNS service.NTS-DNS-.SAV is the corresponding binary save file.
NTS-SRVR.NBN Contains the configuration for the NetBIOS Name Service.This file can be used to pre-load NetBIOS names into theNBNS database at startup. NTS-NBN-.SAV is thecorresponding binary save file.
NTS-SRVR.RUR Contains optional user IDs and passwords to authorizeread-only or full access from the IPmanager or Javaconfiguration programs. This file must be edited manually.
All of the textual configuration files follow a similar format and use keywordsalone or in combination with parameters to define the configuration. In all,over sixty different keywords can be used within these files. NTS provides fullproduct documentation in PDF format with its evaluation edition programs.These documents describe each keyword in detail, and can also be found onthe CD-ROM that accompanies this book.
6.4.4 Configuring through IPmanagerThe NTS IPmanager product runs on Windows 95/98/NT platforms, and isinstalled separately. It can be used to manage multiple IPservers via an IPconnection through your network.
In the following sections, we will use IPmanager for Windows to administerour Shadow IPserver as a DHCP, DDNS, and NBNS server.
After you install and launch IPmanager, a logon panel will be displayed,prompting you for a user name and password. The names and passwords areset by editing the NTS-SRVR.RUR file. You can specify read-only and fullaccess using multiple user IDs. The security features of IPserver are optional,but we recommended their use, as well as an appropriate measure ofphysical security around the server hardware. The Logon panel is shown inFigure 217 on page 300.
Chapter 6. Expanding your network 299
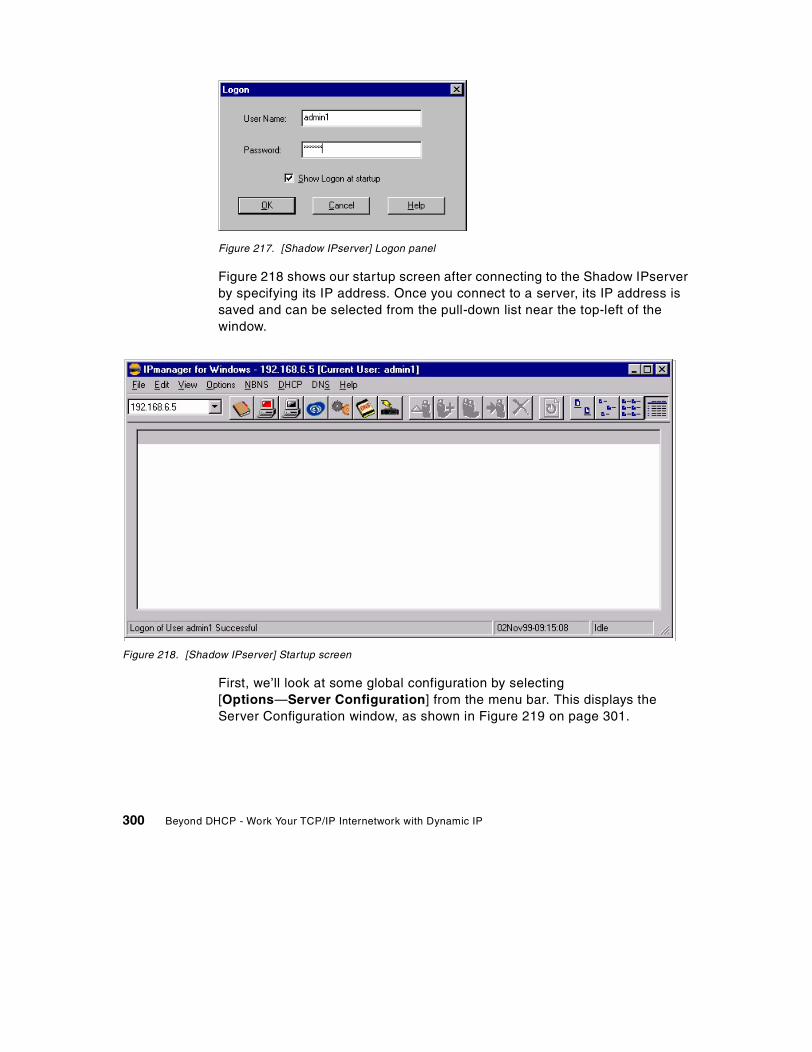
Figure 217. [Shadow IPserver] Logon panel
Figure 218 shows our startup screen after connecting to the Shadow IPserverby specifying its IP address. Once you connect to a server, its IP address issaved and can be selected from the pull-down list near the top-left of thewindow.
Figure 218. [Shadow IPserver] Startup screen
First, we’ll look at some global configuration by selecting[Options—Server Configuration] from the menu bar. This displays theServer Configuration window, as shown in Figure 219 on page 301.
300 Beyond DHCP - Work Your TCP/IP Internetwork with Dynamic IP
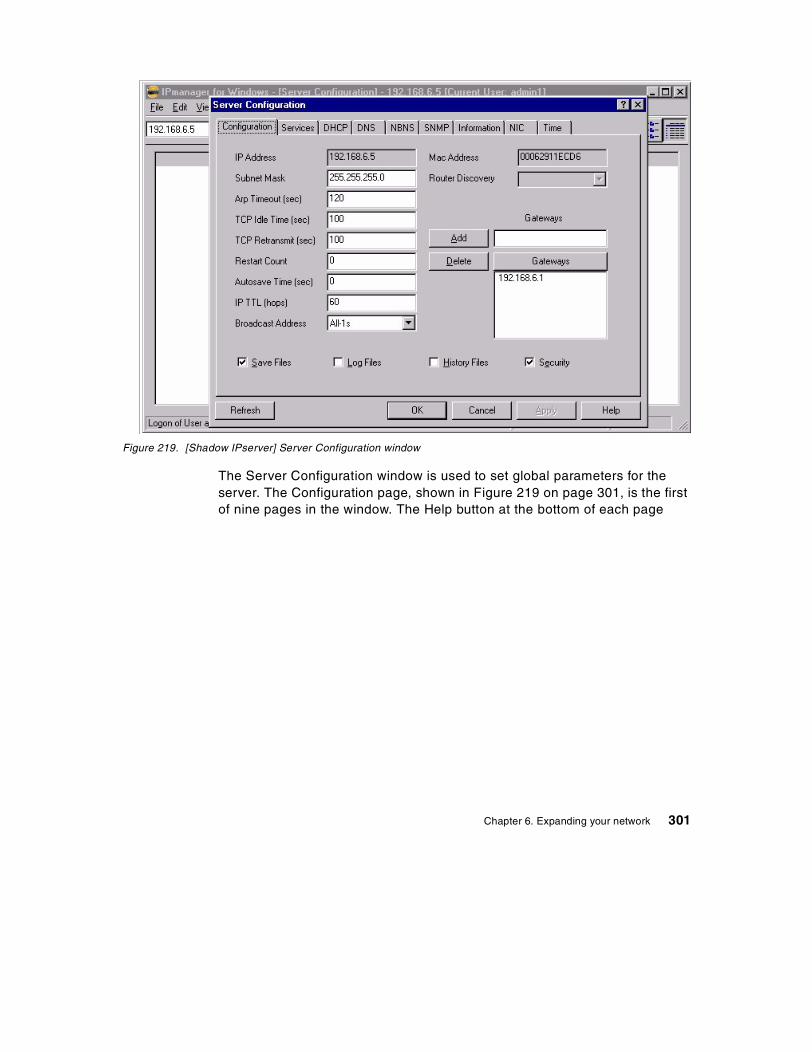
Figure 219. [Shadow IPserver] Server Configuration window
The Server Configuration window is used to set global parameters for theserver. The Configuration page, shown in Figure 219 on page 301, is the firstof nine pages in the window. The Help button at the bottom of each page
Chapter 6. Expanding your network 301

brings up comprehensive contextual information. The other pages in theServer Configuration window are described in Table 13.
Table 13. Shadow IPserver configuration pages
6.4.5 DHCP configurationIPserver lets you define multiple option sets that can contain one or manyDHCP configuration parameters. From the DHCP menu, select[Option Sets]. A window showing the currently configured option sets will bedisplayed. Figure 220 on page 303 shows the three option sets we created forour small test networks. They are named global, short lease, and long lease.
Page Description
Configuration Items specified here include the server IP address, mask andgateway information.
Services This page allows you to selectively enable or disable DHCP,DNS, or NBNS services individually, without disturbing theirconfiguration. Logging options are also specified here.
DHCP These pages specify global parameters for each service. Ifbackup or co-servers are being used, they are identified onthese pages. Parameters controlling the interaction betweenthis server and its peers or backups are specified here aswell.
DNS
NBNS
SNMP Simple Network Management Protocol community namesare specified here.
Information The build date of the IPserver software is displayed here,along with data on capacity and resource usage.
NIC Network adapter information such as IO address andmemory window can be seen here. Counters for packets sentand received are also displayed.
Time An address for a Network Time Protocol server can beentered here. If your using backup servers or co-servers, werecommend the use of this feature to keep all of your ShadowIPservers’ clocks in sync.
302 Beyond DHCP - Work Your TCP/IP Internetwork with Dynamic IP
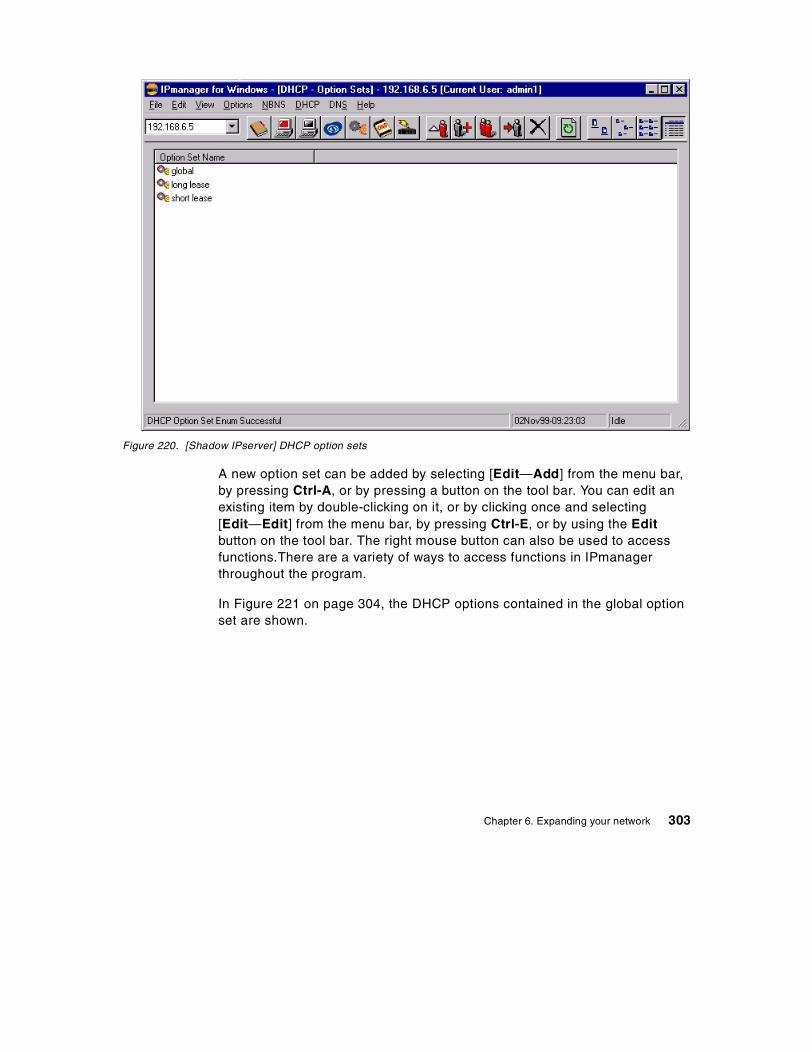
Figure 220. [Shadow IPserver] DHCP option sets
A new option set can be added by selecting [Edit—Add] from the menu bar,by pressing Ctrl-A, or by pressing a button on the tool bar. You can edit anexisting item by double-clicking on it, or by clicking once and selecting[Edit—Edit] from the menu bar, by pressing Ctrl-E, or by using the Editbutton on the tool bar. The right mouse button can also be used to accessfunctions.There are a variety of ways to access functions in IPmanagerthroughout the program.
In Figure 221 on page 304, the DHCP options contained in the global optionset are shown.
Chapter 6. Expanding your network 303
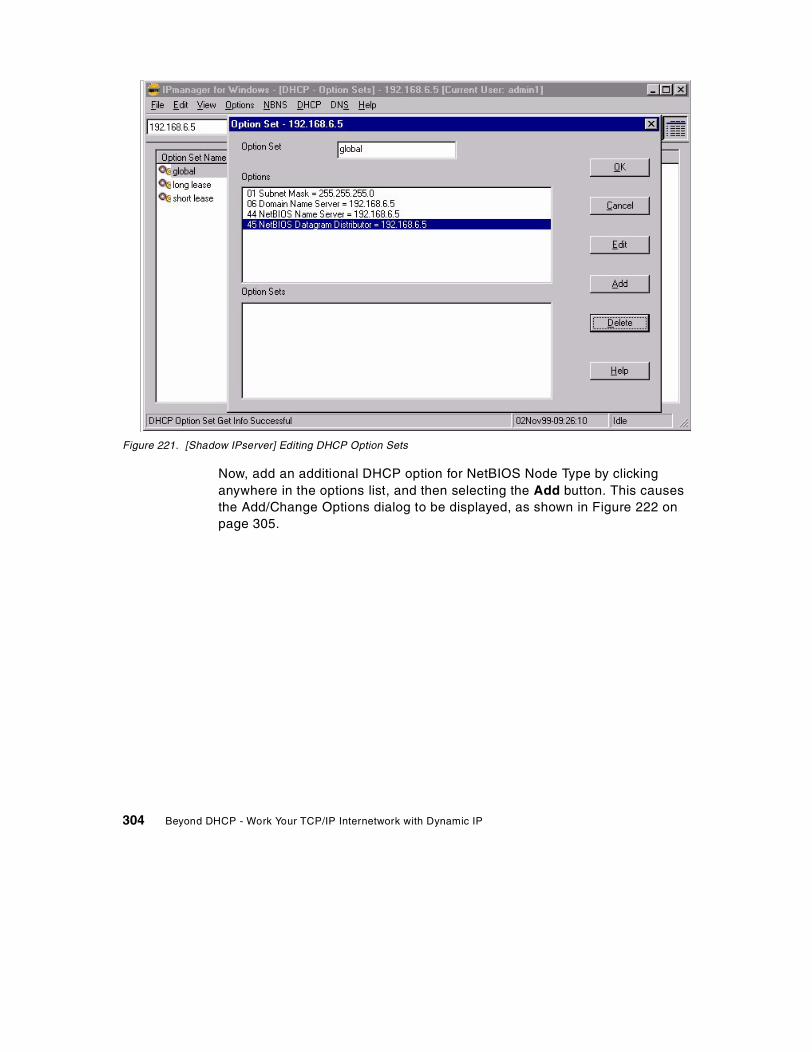
Figure 221. [Shadow IPserver] Editing DHCP Option Sets
Now, add an additional DHCP option for NetBIOS Node Type by clickinganywhere in the options list, and then selecting the Add button. This causesthe Add/Change Options dialog to be displayed, as shown in Figure 222 onpage 305.
304 Beyond DHCP - Work Your TCP/IP Internetwork with Dynamic IP
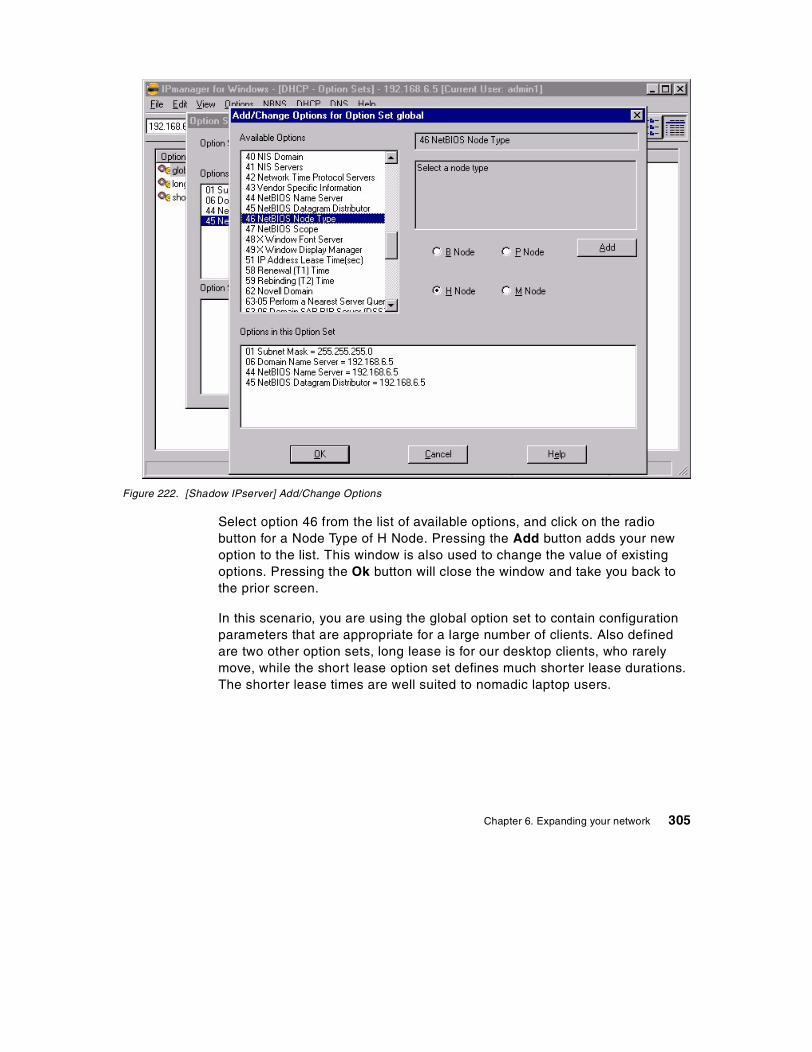
Figure 222. [Shadow IPserver] Add/Change Options
Select option 46 from the list of available options, and click on the radiobutton for a Node Type of H Node. Pressing the Add button adds your newoption to the list. This window is also used to change the value of existingoptions. Pressing the Ok button will close the window and take you back tothe prior screen.
In this scenario, you are using the global option set to contain configurationparameters that are appropriate for a large number of clients. Also definedare two other option sets, long lease is for our desktop clients, who rarelymove, while the short lease option set defines much shorter lease durations.The shorter lease times are well suited to nomadic laptop users.
Chapter 6. Expanding your network 305
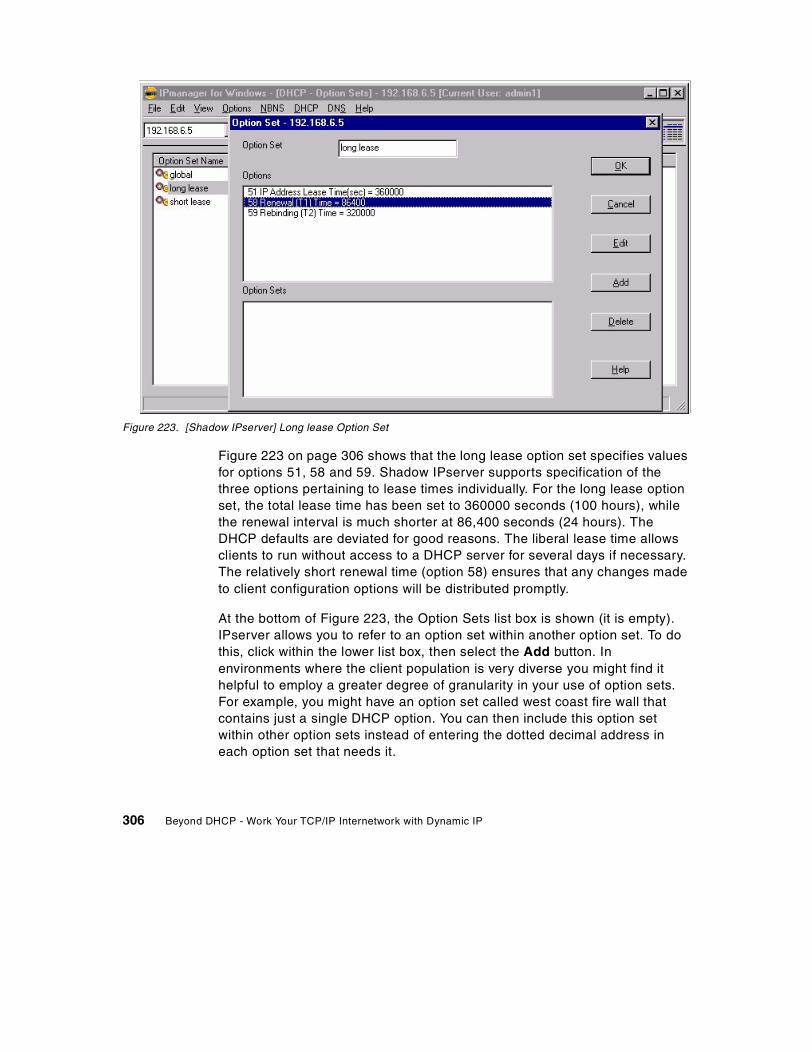
Figure 223. [Shadow IPserver] Long lease Option Set
Figure 223 on page 306 shows that the long lease option set specifies valuesfor options 51, 58 and 59. Shadow IPserver supports specification of thethree options pertaining to lease times individually. For the long lease optionset, the total lease time has been set to 360000 seconds (100 hours), whilethe renewal interval is much shorter at 86,400 seconds (24 hours). TheDHCP defaults are deviated for good reasons. The liberal lease time allowsclients to run without access to a DHCP server for several days if necessary.The relatively short renewal time (option 58) ensures that any changes madeto client configuration options will be distributed promptly.
At the bottom of Figure 223, the Option Sets list box is shown (it is empty).IPserver allows you to refer to an option set within another option set. To dothis, click within the lower list box, then select the Add button. Inenvironments where the client population is very diverse you might find ithelpful to employ a greater degree of granularity in your use of option sets.For example, you might have an option set called west coast fire wall thatcontains just a single DHCP option. You can then include this option setwithin other option sets instead of entering the dotted decimal address ineach option set that needs it.
306 Beyond DHCP - Work Your TCP/IP Internetwork with Dynamic IP
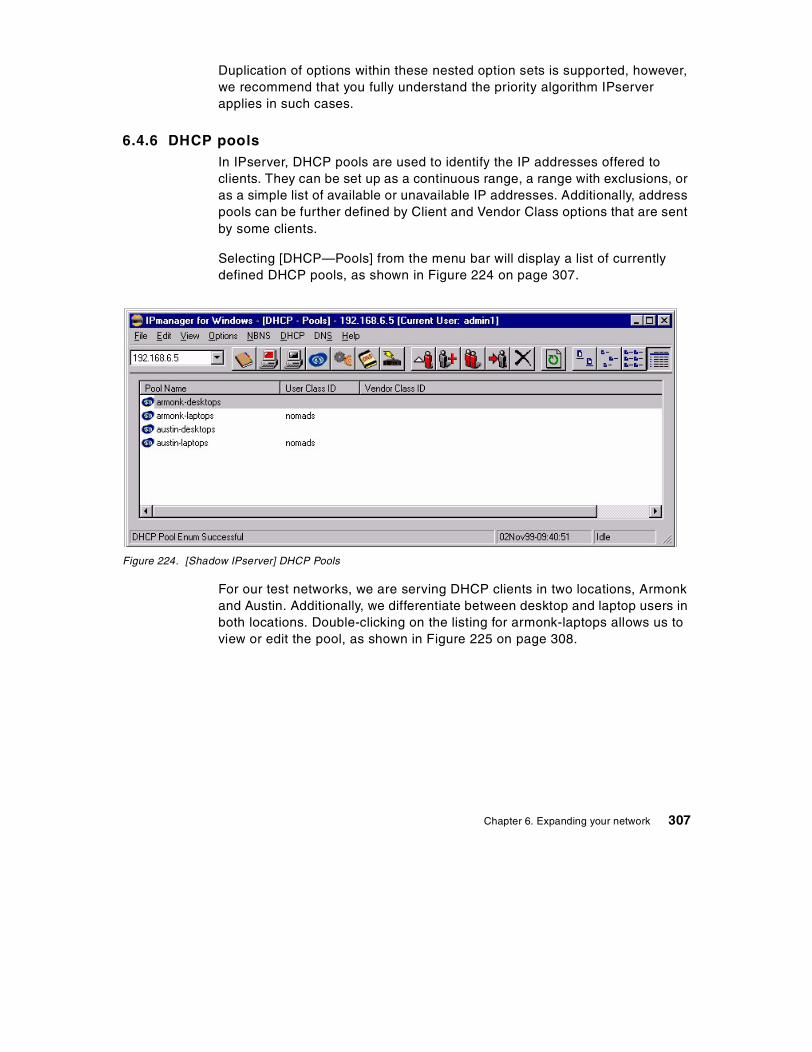
Duplication of options within these nested option sets is supported, however,we recommend that you fully understand the priority algorithm IPserverapplies in such cases.
6.4.6 DHCP poolsIn IPserver, DHCP pools are used to identify the IP addresses offered toclients. They can be set up as a continuous range, a range with exclusions, oras a simple list of available or unavailable IP addresses. Additionally, addresspools can be further defined by Client and Vendor Class options that are sentby some clients.
Selecting [DHCP—Pools] from the menu bar will display a list of currentlydefined DHCP pools, as shown in Figure 224 on page 307.
Figure 224. [Shadow IPserver] DHCP Pools
For our test networks, we are serving DHCP clients in two locations, Armonkand Austin. Additionally, we differentiate between desktop and laptop users inboth locations. Double-clicking on the listing for armonk-laptops allows us toview or edit the pool, as shown in Figure 225 on page 308.
Chapter 6. Expanding your network 307
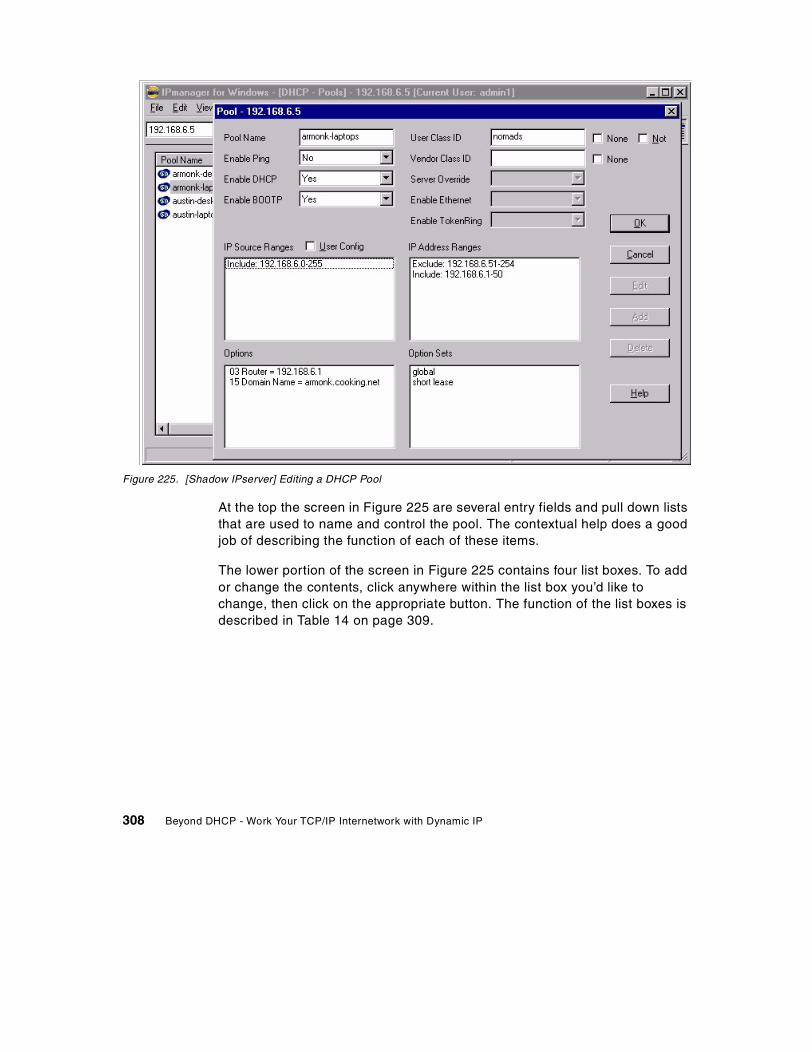
Figure 225. [Shadow IPserver] Editing a DHCP Pool
At the top the screen in Figure 225 are several entry fields and pull down liststhat are used to name and control the pool. The contextual help does a goodjob of describing the function of each of these items.
The lower portion of the screen in Figure 225 contains four list boxes. To addor change the contents, click anywhere within the list box you’d like tochange, then click on the appropriate button. The function of the list boxes isdescribed in Table 14 on page 309.
308 Beyond DHCP - Work Your TCP/IP Internetwork with Dynamic IP

Table 14. DHCP pool configuration items
As mentioned above, we defined two DHCP pools for each of our locations(Armonk and Austin), one pool for desktop clients and another for laptopclients. The desktop pools use the long-lease option sets, while the laptoppools use the short-lease option sets.
Our goal in doing this was to be able to efficiently administer our limitednumber of IP addresses by assigning a much shorter lease interval to laptopbased clients. To implement this plan, we made use of a DHCP option calledUser Class ID (option 77). However, we found that the Microsoft TCP/IP stackdoes not support this DHCP option. To get around this problem, we installedthe IPclient software product from Network TeleSystems on each laptop. TheIPclient software enhances but does not replace the Windows TCP/IP stack.The DHCP client in our OS/2 systems with TCP/IP Version 4.21 alreadysupported DHCP option 77, as did our AIX clients.
We were then able to configure all of our laptop clients to send the stringnomads as option 77 within their DHCP requests. We configured our DHCPpools that support our laptops by placing the string nomads in the User ClassID entry field, as seen at the top right of the screen in Figure 225 on page308. These actions resulted in our Shadow IPserver being able to configureour laptop clients differently than our desktop clients.
The Vendor Class ID option (66) can be implemented in a similar fashion, andis also shown in Figure 225 on page 308.
6.4.7 DHCP configurationsSelecting [DHCP => Configurations] from the menu bar will show currentand recently configured DHCP clients, as seen in Figure 226 on page 310.
IP source ranges Indicates the valid source subnet for these clients. This valueis calculated automatically, but can be overridden. This canbe useful in environments where the use of switching, VLANsor ELANs results in multiple IP subnets within the same MAClayer broadcast domain.
IP address ranges IP addresses can be listed individually or in ranges, with anymix of inclusion or exclusion.
Options Individual DHCP options that are used for this pool ofaddresses.
Option Sets DHCP options that are defined using the Option Setsfunctions in IPserver.
Chapter 6. Expanding your network 309
Figure 226. [Shadow IPserver] DHCP Configurations list
From this window, you can display details for a client’s configuration by doubleclicking on the desired entry. The details provided for each client include theincoming options and the list of requested options. Also listed are options theserver offered to the client, even if the client did not successfully complete theconfiguration process. This type of information is helpful to have, especially incomplex installations.
Individual configurations can also be used to setup reserved addresses for aclient. This is done when you need to ensure that a client receives the sameaddress each time it obtains a lease.
6.4.8 Shadow IPserver DNSIn our test network, Shadow IPserver was also configured to provide staticand dynamic DNS services. Selecting [DNS => DNS Entries] from the menubar on IPmanager displays a dynamic list of DNS information, as seen inFigure 227 on page 311.
310 Beyond DHCP - Work Your TCP/IP Internetwork with Dynamic IP
Figure 227. [Shadow IPserver] DNS entries
The left portion of the window contains a tree display of Internet namedomains in the network. In this case, we have expanded the tree to view DNSentries for “armonk.cooking.net”.
From this window you can display details, or edit individual entries. In Figure227, note that the entries for three hosts (merlot, router, and buffet) are static,while the other three (fillet, pizza, and wings) are dynamic. Static DNS entriescan be added by selecting [Edit—Add] from the menu bar. This brings up theAdd DNS record dialog, as shown in Figure 228 on page 312.
Chapter 6. Expanding your network 311
Figure 228. [Shadow IPserver] Add a DNS Record
In this case we are adding a type A DNS record for IP address 192.168.6.14,a host named gumbo. Note that other DNS record types can be added aswell, as we did with our merlot host. Merlot’s TXT and HINFO records can beseen in Figure 227 on page 311.
6.4.9 NetBIOS name servicesThe Shadow IPserver functions as an RFC1001/1002 NetBIOS Name Server,as well as a NetBIOS Datagram Distributor (although some clients do notexploit the latter function). We also used IPserver to provide Microsoft WINSresolution to our clients. The NBNS configuration we used is shown in Figure229 on page 313.
312 Beyond DHCP - Work Your TCP/IP Internetwork with Dynamic IP
Figure 229. [Shadow IPserver] NBNS Configuration
The NBNS function in Shadow IPserver learns of NetBIOS hosts on thenetwork dynamically, as shown in Figure 230 on page 314.
Chapter 6. Expanding your network 313

Figure 230. [Shadow IPserver] NBNS database display
This display lists the NetBIOS names, their type (group or unique) and thebroadcast configuration for the host. From this window you can also add staticentries for NBNS resolution by selecting [Edit—Add] from the menu bar.
6.4.10 Backing up your IPserver configurationOf course, once you have fully integrated IPserver into your network you willwant to protect your configuration efforts. If the server’s Save Files function isenabled, as shown in Figure 219 on page 301, the server will create the fileseach time it shuts down. So, one method of accomplishing a backup is tosimply shut down the server, and copy the binary save files to a diskette witha DOS command:
COPY C:\SHADOW\*.SAV A:\
You can also use IPmanager to import the server’s configuration and dynamicdata as shown in Figure 231 on page 315. This will produce textualconfiguration files that can be restored to the server at a later date. (Keep inmind that *.SAV files with a newer time stamp will override older configurationfiles, as described in Figure 6.4.3 on page 298.)
314 Beyond DHCP - Work Your TCP/IP Internetwork with Dynamic IP
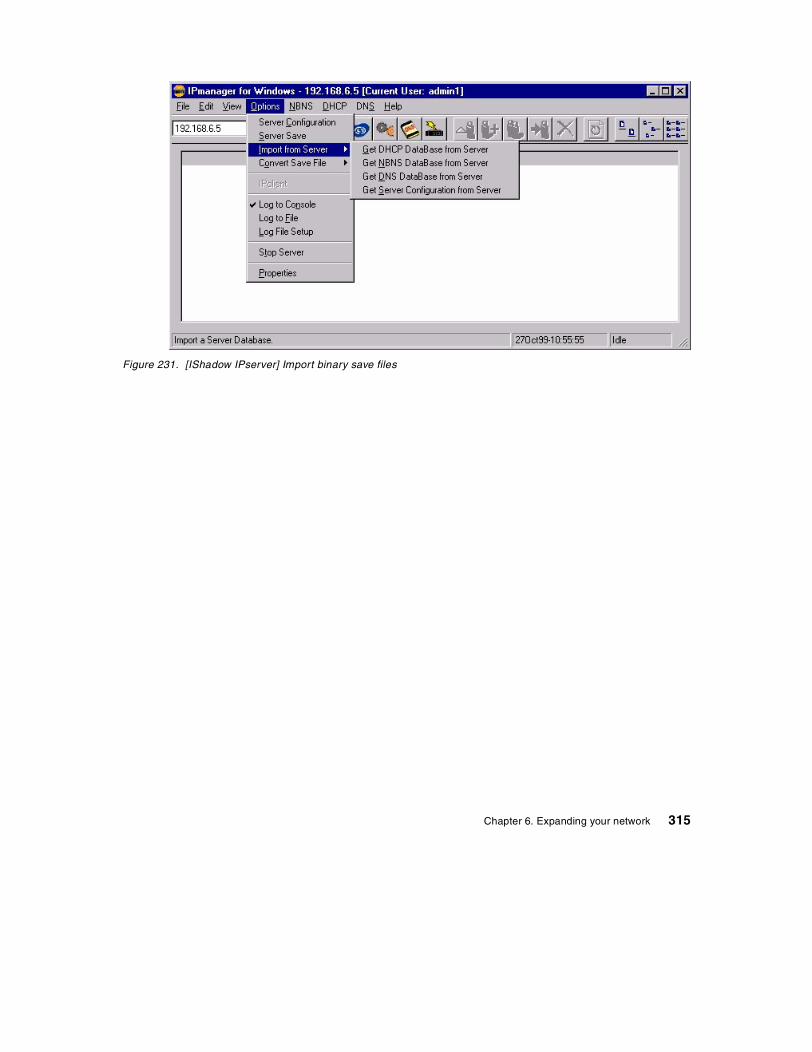
Figure 231. [IShadow IPserver] Import binary save files
Chapter 6. Expanding your network 315

316 Beyond DHCP - Work Your TCP/IP Internetwork with Dynamic IP
Chapter 7. Mobile users
If you're planning on supporting remote users or offices, this chapter will helpexplain PPP with dial-up or ISDN connections. We'll also demonstrate how toautomatically assign printers and display welcome messages as users roamfrom office to office.
7.1 PPP dial-up
PPP servers provide dial-up access to a TCP/IP network over modem, ISDN,or similar connections for remote users working away from the office.Sometimes these servers also link remote branch offices to the central office.Unfortunately, most PPP servers must be managed separately, and, whilethey can provide IP addresses to clients dynamically, they usually supplythose addresses out of separate, static tables maintained at each PPP server.Consequently, they do not integrate well with DHCP, and they can impose anextra burden on network managers.
However, IBM PPP services are included in OS/2 Warp Server for e-businessand can access a DHCP server to obtain addresses for remote users. (SeeFigure 232 on page 318 and Figure 233 on page 319.) DDNS services mayalso be used. By shifting the burden for address assignment back to theDHCP server(s), the IBM PPP server can prove a lot easier to administer.
© Copyright IBM Corp. 1998, 2000 317
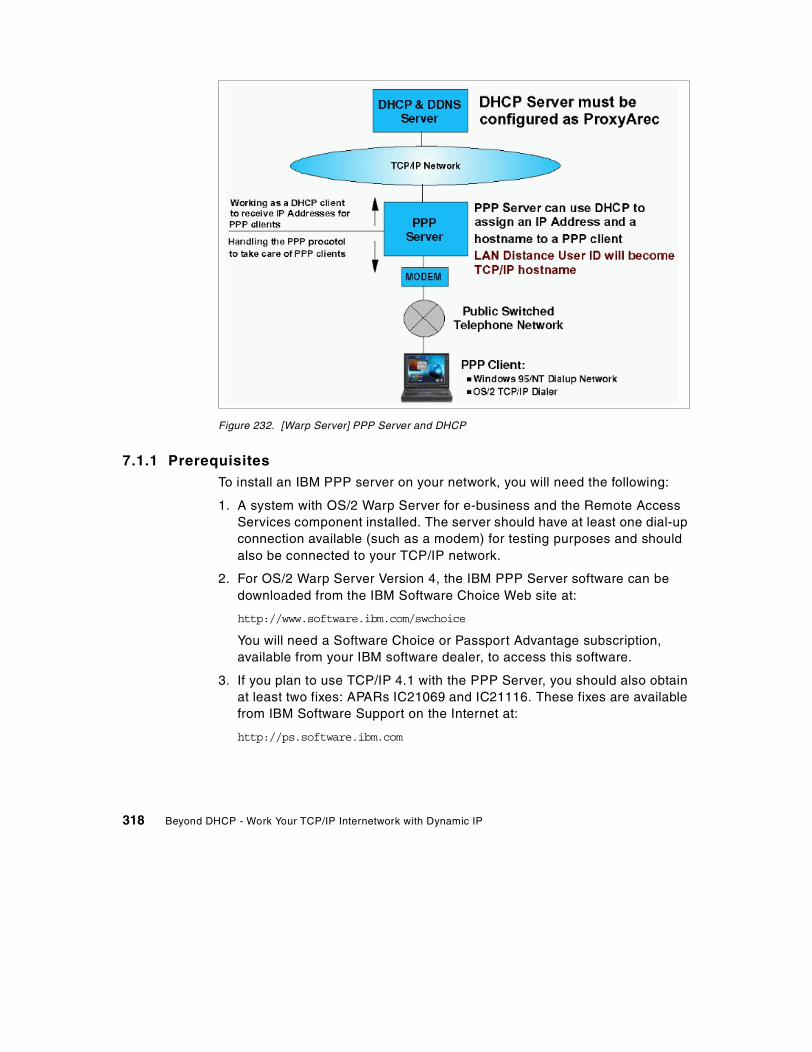
Figure 232. [Warp Server] PPP Server and DHCP
7.1.1 PrerequisitesTo install an IBM PPP server on your network, you will need the following:
1. A system with OS/2 Warp Server for e-business and the Remote AccessServices component installed. The server should have at least one dial-upconnection available (such as a modem) for testing purposes and shouldalso be connected to your TCP/IP network.
2. For OS/2 Warp Server Version 4, the IBM PPP Server software can bedownloaded from the IBM Software Choice Web site at:
http://www.software.ibm.com/swchoice
You will need a Software Choice or Passport Advantage subscription,available from your IBM software dealer, to access this software.
3. If you plan to use TCP/IP 4.1 with the PPP Server, you should also obtainat least two fixes: APARs IC21069 and IC21116. These fixes are availablefrom IBM Software Support on the Internet at:
http://ps.software.ibm.com
318 Beyond DHCP - Work Your TCP/IP Internetwork with Dynamic IP
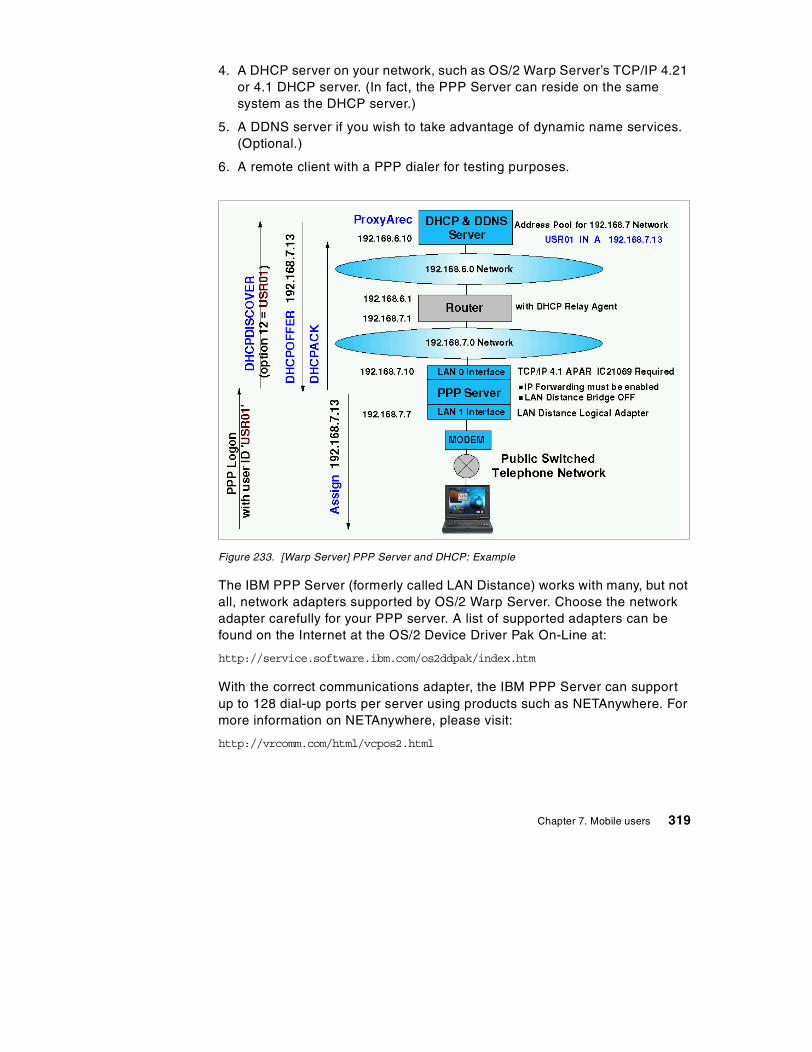
4. A DHCP server on your network, such as OS/2 Warp Server’s TCP/IP 4.21or 4.1 DHCP server. (In fact, the PPP Server can reside on the samesystem as the DHCP server.)
5. A DDNS server if you wish to take advantage of dynamic name services.(Optional.)
6. A remote client with a PPP dialer for testing purposes.
Figure 233. [Warp Server] PPP Server and DHCP: Example
The IBM PPP Server (formerly called LAN Distance) works with many, but notall, network adapters supported by OS/2 Warp Server. Choose the networkadapter carefully for your PPP server. A list of supported adapters can befound on the Internet at the OS/2 Device Driver Pak On-Line at:
http://service.software.ibm.com/os2ddpak/index.htm
With the correct communications adapter, the IBM PPP Server can supportup to 128 dial-up ports per server using products such as NETAnywhere. Formore information on NETAnywhere, please visit:
http://vrcomm.com/html/vcpos2.html
Chapter 7. Mobile users 319
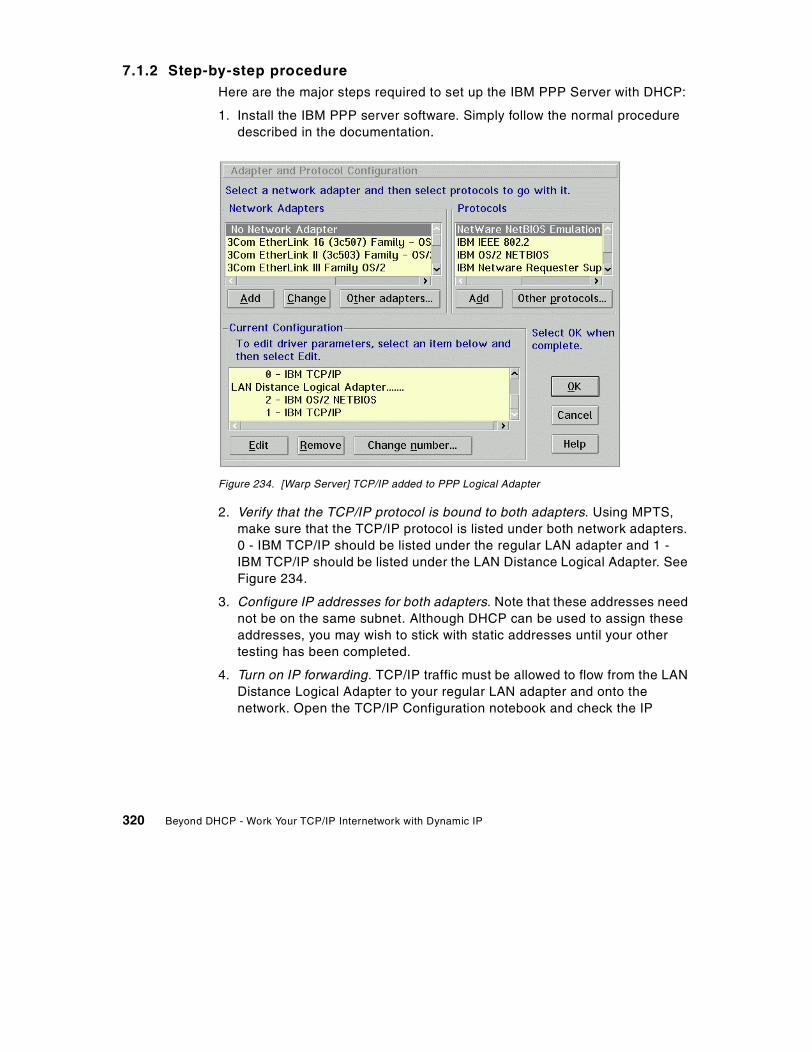
7.1.2 Step-by-step procedureHere are the major steps required to set up the IBM PPP Server with DHCP:
1. Install the IBM PPP server software. Simply follow the normal proceduredescribed in the documentation.
Figure 234. [Warp Server] TCP/IP added to PPP Logical Adapter
2. Verify that the TCP/IP protocol is bound to both adapters. Using MPTS,make sure that the TCP/IP protocol is listed under both network adapters.0 - IBM TCP/IP should be listed under the regular LAN adapter and 1 -IBM TCP/IP should be listed under the LAN Distance Logical Adapter. SeeFigure 234.
3. Configure IP addresses for both adapters. Note that these addresses neednot be on the same subnet. Although DHCP can be used to assign theseaddresses, you may wish to stick with static addresses until your othertesting has been completed.
4. Turn on IP forwarding. TCP/IP traffic must be allowed to flow from the LANDistance Logical Adapter to your regular LAN adapter and onto thenetwork. Open the TCP/IP Configuration notebook and check the IP
320 Beyond DHCP - Work Your TCP/IP Internetwork with Dynamic IP
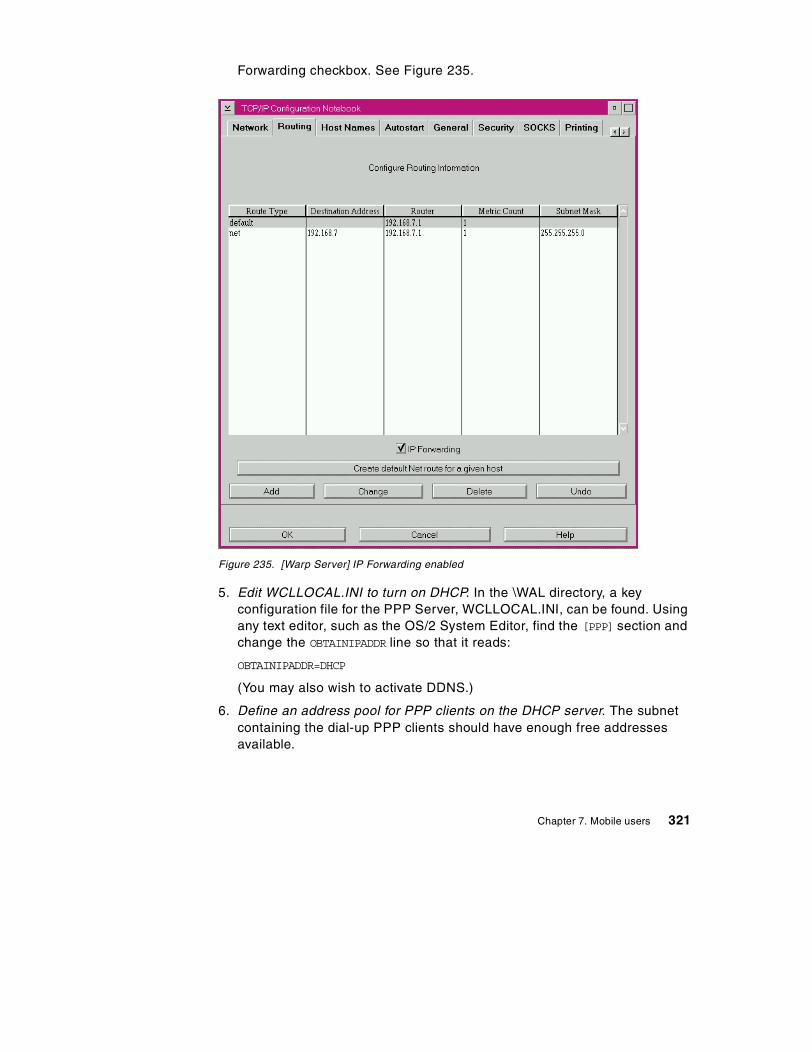
Forwarding checkbox. See Figure 235.
Figure 235. [Warp Server] IP Forwarding enabled
5. Edit WCLLOCAL.INI to turn on DHCP. In the \WAL directory, a keyconfiguration file for the PPP Server, WCLLOCAL.INI, can be found. Usingany text editor, such as the OS/2 System Editor, find the [PPP] section andchange the OBTAINIPADDR line so that it reads:
OBTAINIPADDR=DHCP
(You may also wish to activate DDNS.)
6. Define an address pool for PPP clients on the DHCP server. The subnetcontaining the dial-up PPP clients should have enough free addressesavailable.
Chapter 7. Mobile users 321
7. Define a PPP user. Start the IBM Remote Access program. Using thisgraphical program, define at least one PPP user for testing.
8. Add the PPP Server to the Startup folder. Drag a shadow of the IBMRemote Access program icon to the Startup folder to make sure that thePPP Server always starts up every time the server reboots.
9. Test the dial-up connection. Your dial-up PPP client should be able toconnect to the server, get an address assignment and communicate withother systems using the user ID and password you defined earlier.External modems on both ends can prove helpful since they provide statusindicators which can be used to monitor the progress of connections.
The online PPP Server reference guide includes more information ontroubleshooting your dial-up connections. In particular, you should pay closeattention to the routing tables and subnets you have implemented on yournetwork, since most common errors occur when dial-up clients do not haveproper routing to other systems on the network.
7.2 Roaming users
While we've seen how people can work at home through a dial-up PPPconnection and get access to the office TCP/IP network, it isn't the only placewhere dynamic network access may be needed. Many companies haveseveral different locations and workers who travel may need to connect from aremote office. It's important that they feel at home, getting not only IP addressinformation but also access to local network printers and any other resourcesparticular to that specific office. That way, travelers can work as quickly andeasily as possible.
Sales people, service personnel, executives, and many other professionalsmust work in several different locations from time to time, and many of themrely heavily on their notebook computers. Hotelling is also becomingcommonplace, with telephone systems and computing technologies thatallow employees to sit at any desk in the office. A dynamic IP network canhelp respond to these changing business needs. This section focuses onextending DHCP to help assign local printers, display a local message of theday, and otherwise provide simplified access to the network wherever aroaming user may be.
Additionally, you may require lease differentiation between laptop anddesktop computers, wishing to give laptop computers shorter lease timesthan desktop computers. See 6.4.6, “DHCP pools” on page 307 for adescription of how to accomplish this with NTS Shadow IP Server.
322 Beyond DHCP - Work Your TCP/IP Internetwork with Dynamic IP
For this section, we tested OS/2 Warp 4 on an IBM ThinkPad 760EDnotebook computer with the IBM PCMCIA Token-Ring Adapter. However, youmay adapt these scenarios to your own particular software, equipment, andnetwork. In fact, since almost every company has roaming users of one sortor another, we believe most readers ought to study this section carefully.
7.2.1 PrerequisitesTo provide services for roaming users, you will first need access to thefollowing resources:
1. A DHCP server (preferably with DDNS), such as OS/2 Warp Server. Werecommend you set a relatively short lease time (such as three minutes;three minutes is the shortest lease time allowed by the DHCP server) fortesting purposes.
2. A sample client system, with basic DHCP capabilities (and, if necessary,file/print services with TCPBEUI) working correctly.
3. Access to at least one other location, whether it's across the hall, anotherfloor, or in a different building. This location may be on a different subnet.
4. A Web server, such as Lotus Domino, for message of the day service.
5. A network printer, on a OS/2 Warp Server or NT domain, or as a TCP/IP(LPD) printer.
7.2.2 Automatic connection to file/print domainIf you primarily use traditional file and print services, reserving TCP/IP forWeb browsers and other applications, then you can use extended DHCPoptions to pass information on the local file/print domain to a roaming client.
7.2.2.1 AssumptionsFor now, we assume:
• A roaming user visits at least two different offices, floors, or other separatefile/print domains with a notebook computer running OS/2 Warp 4.
• The roaming user has an account on each domain (even a GUESTaccount) with default printer assignments.
• The domain controller and the client can use TCPBEUI to communicate.
• For simplicity, the domain controller is doubling as the print server, and theclient does not need to use TCPBEUI to communicate with any othersystems. In other words, only one TCPBEUI broadcast address is neededby the client.
• A NetBIOS name server, such as Shadow IPserver, is not available.
Chapter 7. Mobile users 323

Both the domain name and the IP address of the domain controller may varyfrom location to location.
7.2.2.2 DHCP server setupDHCP provides some standard options (44 to 47) for passingNetBIOS-related information to clients. However, none of these options seemappropriate given our assumptions. For example, there’s no explicit option toprovide the domain name to our client. While it’s possible to use a publishedDHCP option for something other than its specified use, we certainly don’trecommend the practice.
Instead, there are at least two ways to extend DHCP to provide this custominformation to each client. One way is to use Option 43 (Vendor SpecificInformation). Perhaps the best way, though, is to use any of the optionsalready set aside for custom use, options 128 through 254.
Although not universally accepted, many platforms have settled on specificpurposes for some of the DHCP options in this range. OS/2 Warp, forexample, may use options 200 to 208 to receive various extra TCP/IPparameters, such as the default SOCKS server address (Option 205).Consequently, these should be avoided as well when choosing your owncustom options.
324 Beyond DHCP - Work Your TCP/IP Internetwork with Dynamic IP
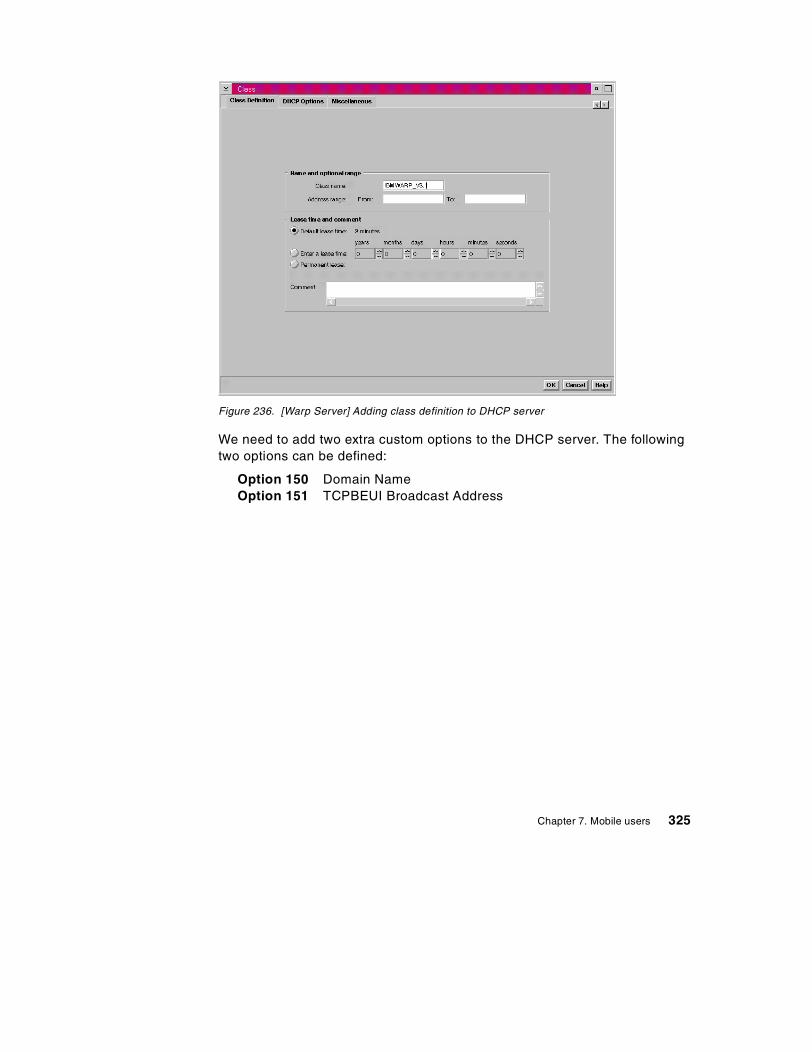
Figure 236. [Warp Server] Adding class definition to DHCP server
We need to add two extra custom options to the DHCP server. The followingtwo options can be defined:
Option 150 Domain NameOption 151 TCPBEUI Broadcast Address
Chapter 7. Mobile users 325
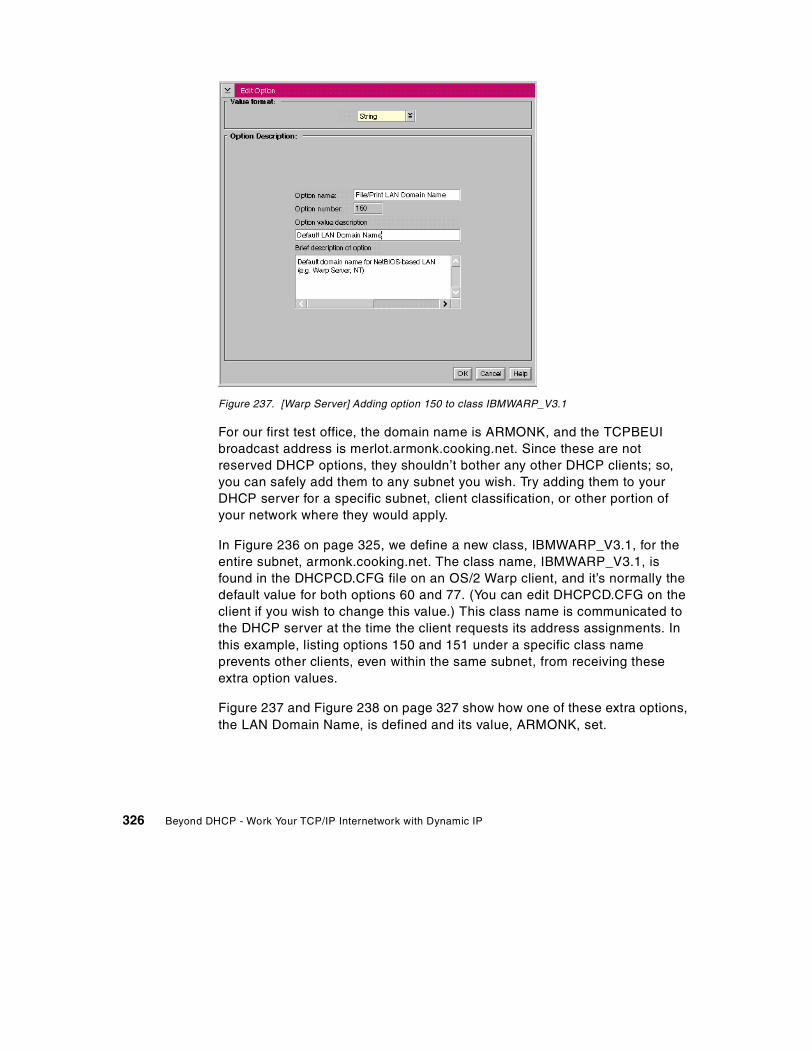
Figure 237. [Warp Server] Adding option 150 to class IBMWARP_V3.1
For our first test office, the domain name is ARMONK, and the TCPBEUIbroadcast address is merlot.armonk.cooking.net. Since these are notreserved DHCP options, they shouldn’t bother any other DHCP clients; so,you can safely add them to any subnet you wish. Try adding them to yourDHCP server for a specific subnet, client classification, or other portion ofyour network where they would apply.
In Figure 236 on page 325, we define a new class, IBMWARP_V3.1, for theentire subnet, armonk.cooking.net. The class name, IBMWARP_V3.1, isfound in the DHCPCD.CFG file on an OS/2 Warp client, and it’s normally thedefault value for both options 60 and 77. (You can edit DHCPCD.CFG on theclient if you wish to change this value.) This class name is communicated tothe DHCP server at the time the client requests its address assignments. Inthis example, listing options 150 and 151 under a specific class nameprevents other clients, even within the same subnet, from receiving theseextra option values.
Figure 237 and Figure 238 on page 327 show how one of these extra options,the LAN Domain Name, is defined and its value, ARMONK, set.
326 Beyond DHCP - Work Your TCP/IP Internetwork with Dynamic IP
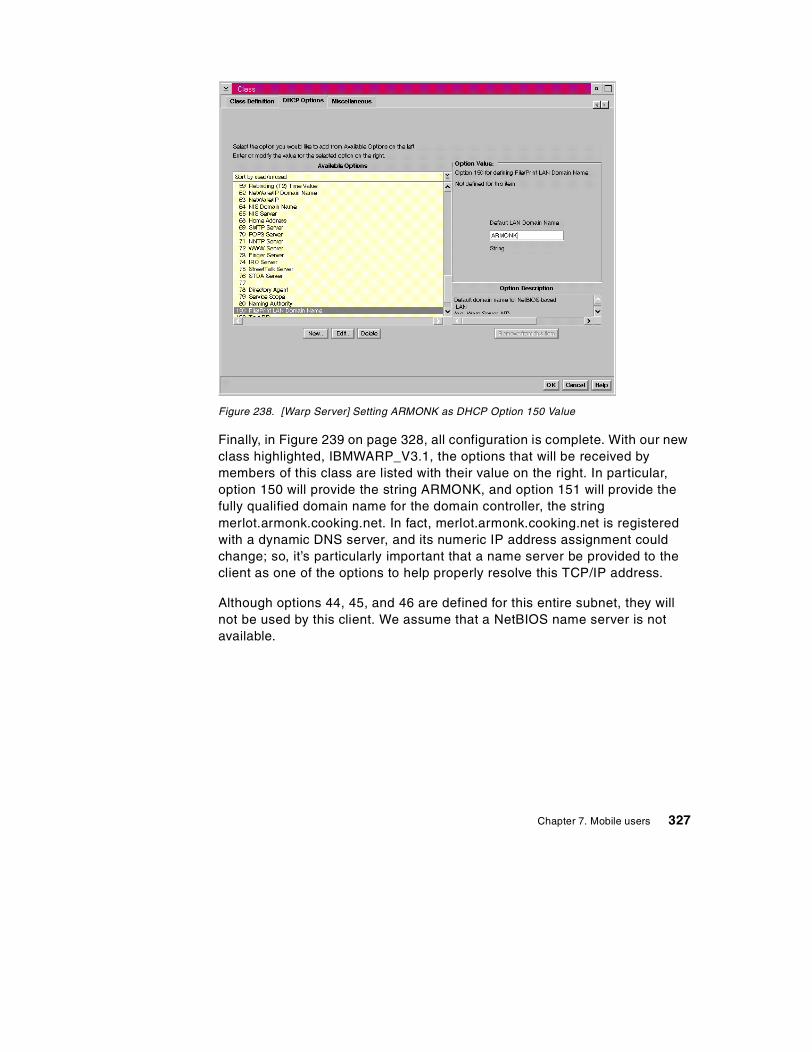
Figure 238. [Warp Server] Setting ARMONK as DHCP Option 150 Value
Finally, in Figure 239 on page 328, all configuration is complete. With our newclass highlighted, IBMWARP_V3.1, the options that will be received bymembers of this class are listed with their value on the right. In particular,option 150 will provide the string ARMONK, and option 151 will provide thefully qualified domain name for the domain controller, the stringmerlot.armonk.cooking.net. In fact, merlot.armonk.cooking.net is registeredwith a dynamic DNS server, and its numeric IP address assignment couldchange; so, it’s particularly important that a name server be provided to theclient as one of the options to help properly resolve this TCP/IP address.
Although options 44, 45, and 46 are defined for this entire subnet, they willnot be used by this client. We assume that a NetBIOS name server is notavailable.
Chapter 7. Mobile users 327
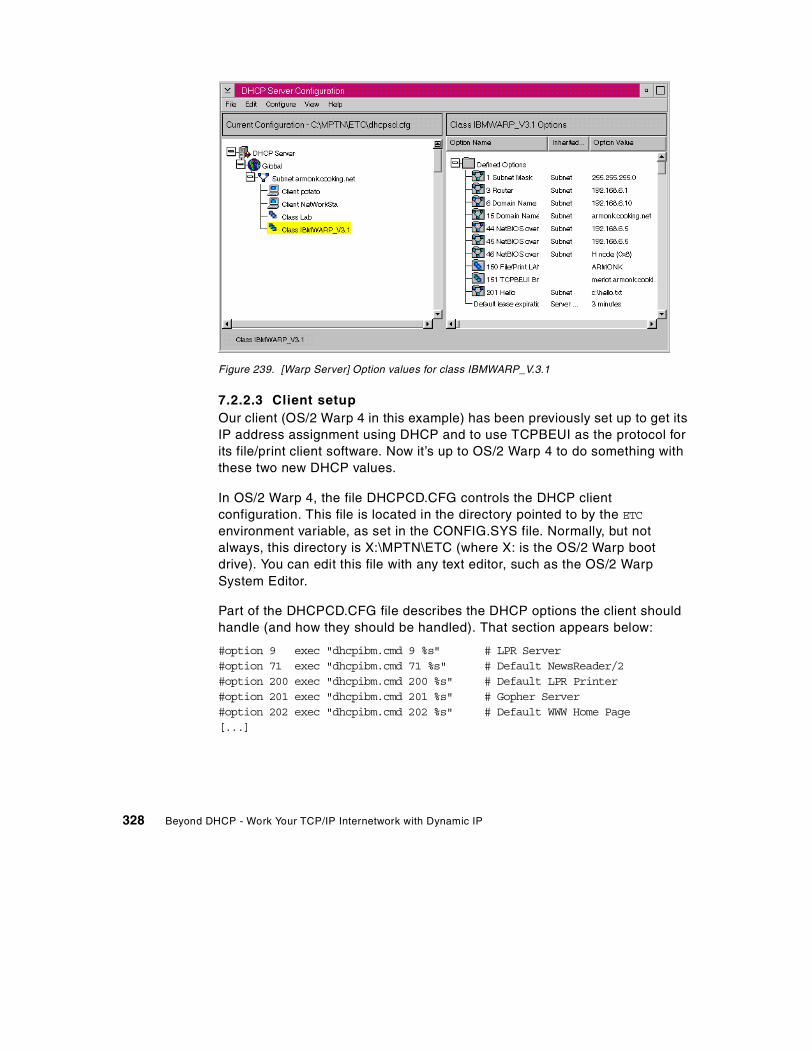
Figure 239. [Warp Server] Option values for class IBMWARP_V.3.1
7.2.2.3 Client setupOur client (OS/2 Warp 4 in this example) has been previously set up to get itsIP address assignment using DHCP and to use TCPBEUI as the protocol forits file/print client software. Now it’s up to OS/2 Warp 4 to do something withthese two new DHCP values.
In OS/2 Warp 4, the file DHCPCD.CFG controls the DHCP clientconfiguration. This file is located in the directory pointed to by the ETC
environment variable, as set in the CONFIG.SYS file. Normally, but notalways, this directory is X:\MPTN\ETC (where X: is the OS/2 Warp bootdrive). You can edit this file with any text editor, such as the OS/2 WarpSystem Editor.
Part of the DHCPCD.CFG file describes the DHCP options the client shouldhandle (and how they should be handled). That section appears below:
#option 9 exec "dhcpibm.cmd 9 %s" # LPR Server#option 71 exec "dhcpibm.cmd 71 %s" # Default NewsReader/2#option 200 exec "dhcpibm.cmd 200 %s" # Default LPR Printer#option 201 exec "dhcpibm.cmd 201 %s" # Gopher Server#option 202 exec "dhcpibm.cmd 202 %s" # Default WWW Home Page[...]
328 Beyond DHCP - Work Your TCP/IP Internetwork with Dynamic IP
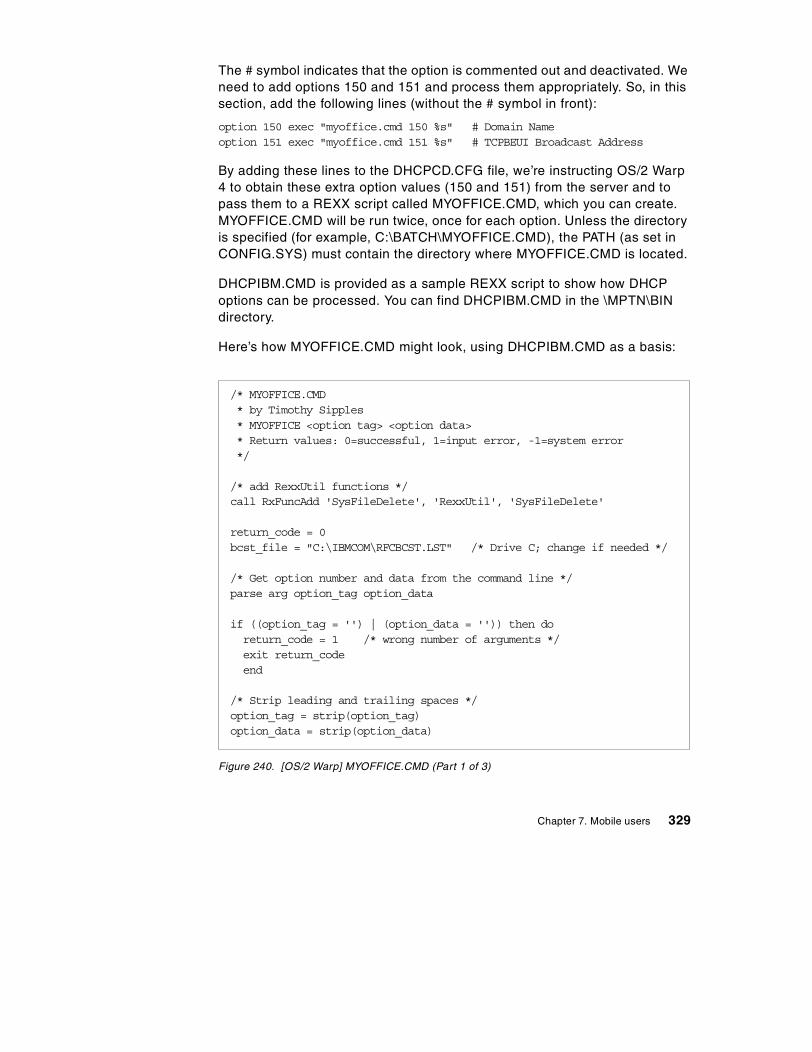
The # symbol indicates that the option is commented out and deactivated. Weneed to add options 150 and 151 and process them appropriately. So, in thissection, add the following lines (without the # symbol in front):
option 150 exec "myoffice.cmd 150 %s" # Domain Nameoption 151 exec "myoffice.cmd 151 %s" # TCPBEUI Broadcast Address
By adding these lines to the DHCPCD.CFG file, we’re instructing OS/2 Warp4 to obtain these extra option values (150 and 151) from the server and topass them to a REXX script called MYOFFICE.CMD, which you can create.MYOFFICE.CMD will be run twice, once for each option. Unless the directoryis specified (for example, C:\BATCH\MYOFFICE.CMD), the PATH (as set inCONFIG.SYS) must contain the directory where MYOFFICE.CMD is located.
DHCPIBM.CMD is provided as a sample REXX script to show how DHCPoptions can be processed. You can find DHCPIBM.CMD in the \MPTN\BINdirectory.
Here’s how MYOFFICE.CMD might look, using DHCPIBM.CMD as a basis:
Figure 240. [OS/2 Warp] MYOFFICE.CMD (Part 1 of 3)
/* MYOFFICE.CMD* by Timothy Sipples* MYOFFICE <option tag> <option data>* Return values: 0=successful, 1=input error, -1=system error*/
/* add RexxUtil functions */call RxFuncAdd 'SysFileDelete', 'RexxUtil', 'SysFileDelete'
return_code = 0bcst_file = "C:\IBMCOM\RFCBCST.LST" /* Drive C; change if needed */
/* Get option number and data from the command line */parse arg option_tag option_data
if ((option_tag = '') | (option_data = '')) then doreturn_code = 1 /* wrong number of arguments */exit return_codeend
/* Strip leading and trailing spaces */option_tag = strip(option_tag)option_data = strip(option_data)
Chapter 7. Mobile users 329
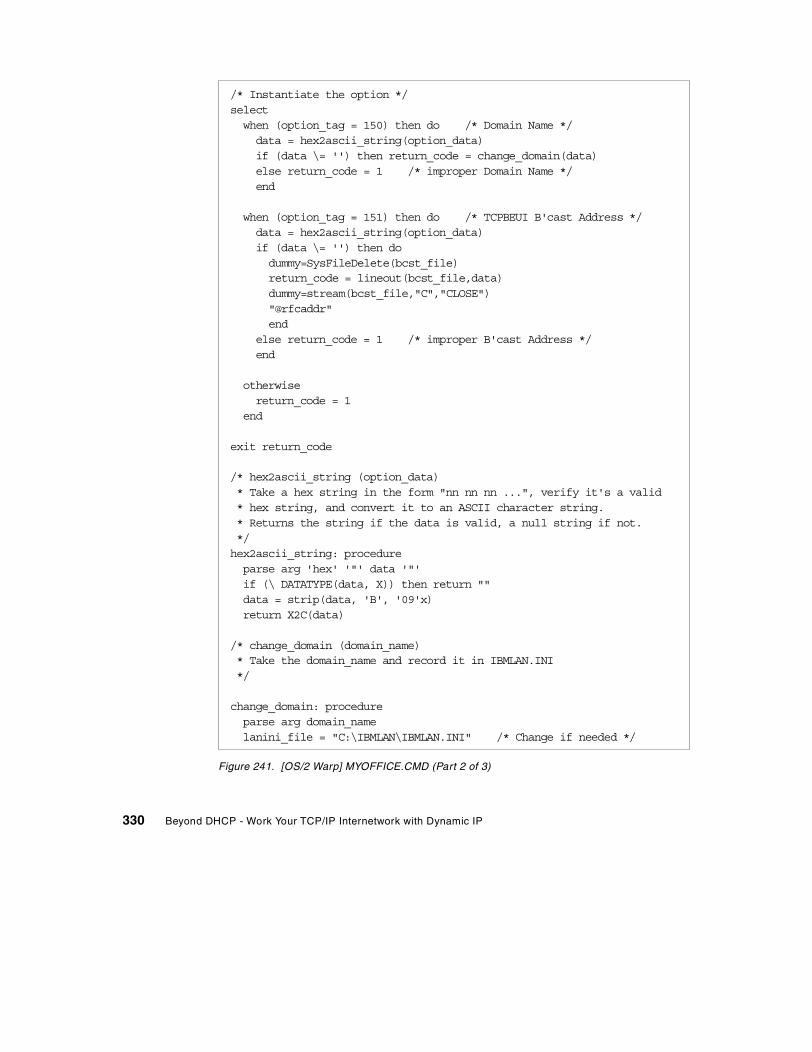
Figure 241. [OS/2 Warp] MYOFFICE.CMD (Part 2 of 3)
/* Instantiate the option */selectwhen (option_tag = 150) then do /* Domain Name */data = hex2ascii_string(option_data)if (data \= '') then return_code = change_domain(data)else return_code = 1 /* improper Domain Name */end
when (option_tag = 151) then do /* TCPBEUI B'cast Address */data = hex2ascii_string(option_data)if (data \= '') then dodummy=SysFileDelete(bcst_file)return_code = lineout(bcst_file,data)dummy=stream(bcst_file,"C","CLOSE")"@rfcaddr"end
else return_code = 1 /* improper B'cast Address */end
otherwisereturn_code = 1
end
exit return_code
/* hex2ascii_string (option_data)* Take a hex string in the form "nn nn nn ...", verify it's a valid* hex string, and convert it to an ASCII character string.* Returns the string if the data is valid, a null string if not.*/hex2ascii_string: procedureparse arg 'hex' '"' data '"'if (\ DATATYPE(data, X)) then return ""data = strip(data, 'B', '09'x)return X2C(data)
/* change_domain (domain_name)* Take the domain_name and record it in IBMLAN.INI*/
change_domain: procedureparse arg domain_namelanini_file = "C:\IBMLAN\IBMLAN.INI" /* Change if needed */
330 Beyond DHCP - Work Your TCP/IP Internetwork with Dynamic IP
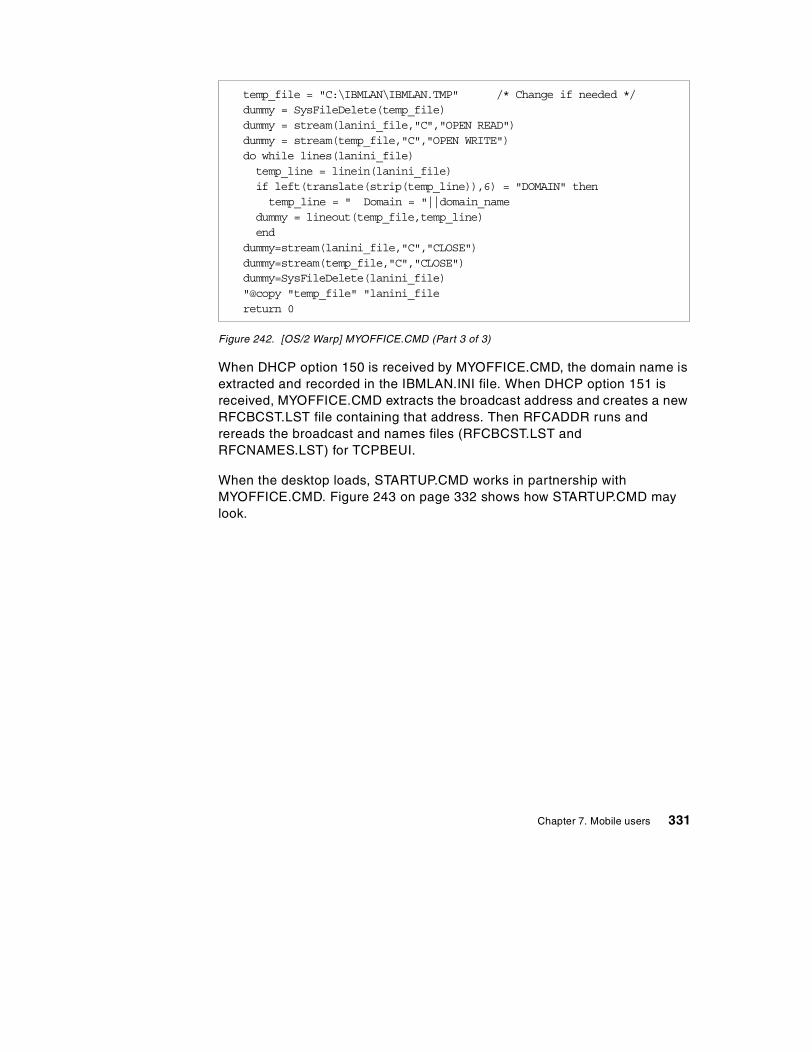
Figure 242. [OS/2 Warp] MYOFFICE.CMD (Part 3 of 3)
When DHCP option 150 is received by MYOFFICE.CMD, the domain name isextracted and recorded in the IBMLAN.INI file. When DHCP option 151 isreceived, MYOFFICE.CMD extracts the broadcast address and creates a newRFCBCST.LST file containing that address. Then RFCADDR runs andrereads the broadcast and names files (RFCBCST.LST andRFCNAMES.LST) for TCPBEUI.
When the desktop loads, STARTUP.CMD works in partnership withMYOFFICE.CMD. Figure 243 on page 332 shows how STARTUP.CMD maylook.
temp_file = "C:\IBMLAN\IBMLAN.TMP" /* Change if needed */dummy = SysFileDelete(temp_file)dummy = stream(lanini_file,"C","OPEN READ")dummy = stream(temp_file,"C","OPEN WRITE")do while lines(lanini_file)temp_line = linein(lanini_file)if left(translate(strip(temp_line)),6) = "DOMAIN" thentemp_line = " Domain = "||domain_name
dummy = lineout(temp_file,temp_line)end
dummy=stream(lanini_file,"C","CLOSE")dummy=stream(temp_file,"C","CLOSE")dummy=SysFileDelete(lanini_file)"@copy "temp_file" "lanini_filereturn 0
Chapter 7. Mobile users 331
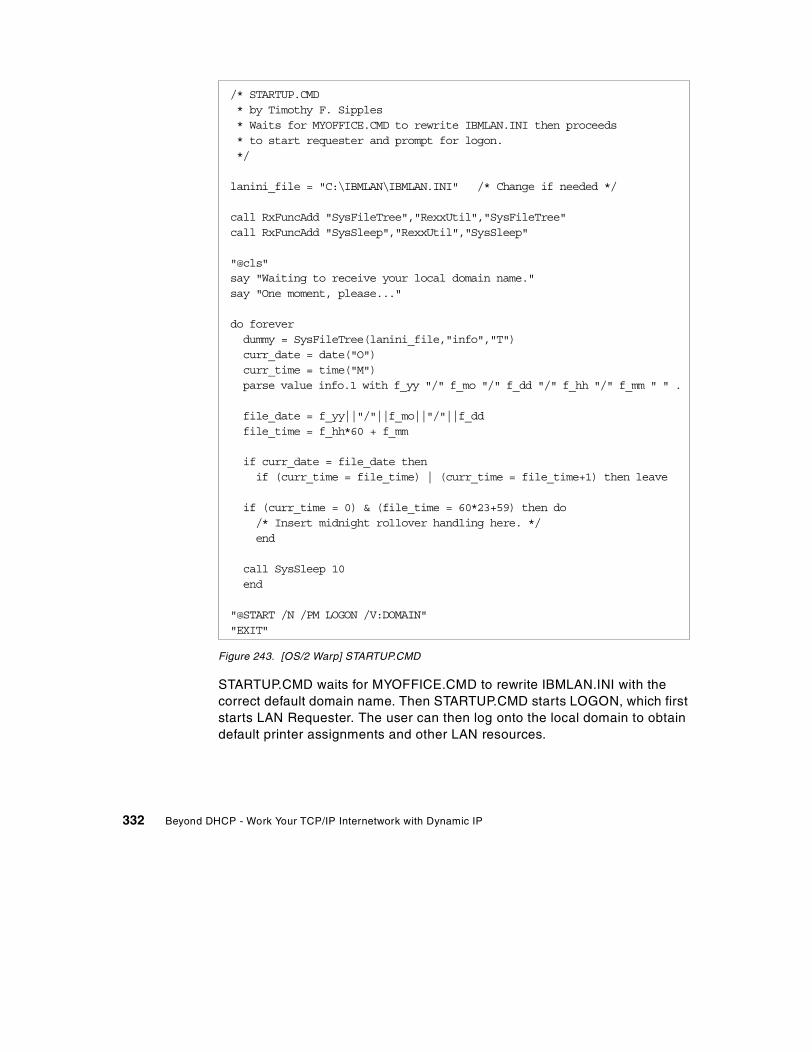
Figure 243. [OS/2 Warp] STARTUP.CMD
STARTUP.CMD waits for MYOFFICE.CMD to rewrite IBMLAN.INI with thecorrect default domain name. Then STARTUP.CMD starts LOGON, which firststarts LAN Requester. The user can then log onto the local domain to obtaindefault printer assignments and other LAN resources.
/* STARTUP.CMD* by Timothy F. Sipples* Waits for MYOFFICE.CMD to rewrite IBMLAN.INI then proceeds* to start requester and prompt for logon.*/
lanini_file = "C:\IBMLAN\IBMLAN.INI" /* Change if needed */
call RxFuncAdd "SysFileTree","RexxUtil","SysFileTree"call RxFuncAdd "SysSleep","RexxUtil","SysSleep"
"@cls"say "Waiting to receive your local domain name."say "One moment, please..."
do foreverdummy = SysFileTree(lanini_file,"info","T")curr_date = date("O")curr_time = time("M")parse value info.1 with f_yy "/" f_mo "/" f_dd "/" f_hh "/" f_mm " " .
file_date = f_yy||"/"||f_mo||"/"||f_ddfile_time = f_hh*60 + f_mm
if curr_date = file_date thenif (curr_time = file_time) | (curr_time = file_time+1) then leave
if (curr_time = 0) & (file_time = 60*23+59) then do/* Insert midnight rollover handling here. */end
call SysSleep 10end
"@START /N /PM LOGON /V:DOMAIN""EXIT"
332 Beyond DHCP - Work Your TCP/IP Internetwork with Dynamic IP
STARTUP.CMD knows that MYOFFICE.CMD has finished with IBMLAN.INI bycomparing the file date and time with the current date and time. If these twotimes differ by no more than one minute, MYOFFICE.CMD has likely done itswork, and the LAN Requester starts. If not, STARTUP.CMD keeps checkingevery 10 seconds. Since MYOFFICE.CMD could take up to a minute or moreto get the extra DHCP options, STARTUP.CMD warns the user with amessage, One moment, please....
7.2.2.4 Technical caveatsYou should view MYOFFICE.CMD and STARTUP.CMD as examples toillustrate the capabilities of DHCP in helping to support mobile users. Manypotential problems exist in both batch files. We would like to draw yourattention to a few of these issues:
• MYOFFICE.CMD runs with every lease renewal, once for each of the twonew DHCP options. If the lease period is short, then a lot of backgroundprocessing can take place, impacting performance. Also, tasks that requireuser input (such as LOGON) should not be started from MYOFFICE.CMDor any equivalent. If the lease time is two minutes, for example, then theuser would be prompted every two minutes to log onto the network. Usethe DHCP option handler to record option values in INI files, configurationfiles, and other locations. Use other batch files (such as STARTUP.CMD ora program started from the Startup folder) to act on these option values.
• We believe that it’s appropriate to delete RFCBCST.LST and rewrite thefile with each renewal. A more sophisticated version of MYOFFICE.CMDshould perhaps modify entries in RFCBCST.LST and RFCNAMES.LSTmore carefully, allowing the client to communicate with other systemsusing TCPBEUI. Or option 151 could be extended to provide a list of manynames and/or addresses, a poor man’s NetBIOS name server.
• Comparing the current date and time with the file date and time inSTARTUP.CMD is not the most elegant method of communication betweenMYOFFICE.CMD and STARTUP.CMD. You should consider using REXXqueues, for example, if you need to have the DHCP option handler alertanother one of your batch files that an event (receipt of the DHCP option)has occurred. Remember, however, that MYOFFICE.CMD runs for eachoption and for each lease renewal, so you should be careful not to keepadding to a REXX queue indefinitely to avoid running out of memory. Thebest approach might be to use a separate queue for each notification andto clean out each queue before use. (See 7.2.3, “Netscape Message of theDay service” on page 334, for an example.)
• Error handling could be substantially improved in these batch files, tocatch disk full errors, for example.
Chapter 7. Mobile users 333
• We used the fully qualified domain name merlot.armonk.cooking.net inoption 151. We discovered that enabling the OS/2 Warp SOCKS capabilityin the TCP/IP stack (SOCKS_FLAG on in the \MPTN\ETC\SOCKS.ENVfile) disrupted name resolution with the fully qualified name if the SOCKSserver was unreachable. You may wish to use the hostname only (merlotin this example) if you are also using DHCP to pass the standard domainname option and if the hostname alone can be resolved.
• In these batch files there’s no guarantee that option 151 handling will becomplete before the user attempts a logon. STARTUP.CMD could beenhanced to also check that RFCBCST.LST has been updated andRFCADDR has been run before starting LOGON. Again, REXX queuesmay help.
• Be aware that using the graphical setup programs in OS/2 Warp (such asthe TCP/IP Configuration Notebook or the Multiprotocol TransportServices Setup) can rewrite IBMLAN.INI, DHCPCD.CFG, and other criticalfiles. Make sure that any changes you make to these files in order tosupport enhanced DHCP option handling are not reversed or modifiedwhen you take advantage of the graphical setup programs.
• We do not necessarily recommend placing all the REXX programmingcode for enhanced DHCP option handling on every client. Instead, youmay wish to pass a single DHCP option to a client containing the latestversion of the REXX script(s) to be run. This bootstrap method can helpmake managing clients easier.
• Handling TCP/IP printers is also quite easy, and some example REXXscripting appears in DHCPIBM.CMD for the relevant DHCP options (9 and200).
7.2.3 Netscape Message of the Day serviceBased on the file/print example, it should also be possible to provide amessage of the day service to roaming clients and improve upon the methodsused previously. The DHCP server will pass a Web address (URL) to theclient as one of the options, and the client will start Netscape at bootup todisplay this message.
7.2.3.1 DHCP server setupAppendix D, “DHCP options (RFC 2132)” on page 457, lists the DHCPoptions and their purposes. While not officially part of the standard, DHCPoption 114 is listed as "Universal Resource Locator (URL)," and it seems tobe the most appropriate to pass a Web address to a client. Or, if you prefer,you may use one of the DHCP options strictly reserved for your own use,options 128 through 254.
334 Beyond DHCP - Work Your TCP/IP Internetwork with Dynamic IP
We added Option 114 with a value of:
http://merlot.armonk.cooking.net/siteinfo.html
to the same class and subnet as shown in 7.2.2.2, “DHCP server setup” onpage 324.
7.2.3.2 Web server setupWe opted to combine our DHCP server with our Lotus Domino Web server onthe same system, merlot.armonk.cooking.net. However, you may wish to haveone central Web server with all the message of the day Web pages available.For example, you might arrange your Web server to provide access to thefollowing URLs:
http://www.siteinfo.megahuge.com/chicagohttp://www.siteinfo.megahuge.com/newyorkhttp://www.siteinfo.megahuge.com/londonhttp://www.siteinfo.megahuge.com/peoria
depending on the location (class, subnet, and so forth) of the client.Assuming there’s enough capacity, managing one central Web server can beeasier.
However, in this simple example, our DHCP server doubles as our Webserver. We placed a test Web page (siteinfo.html) in the root directory of thisWeb server and verified that the Web page could be loaded across theTCP/IP network using a standard Web browser.
7.2.3.3 Client setupAgain, in this example, our OS/2 Warp 4 client correctly obtains its DHCPaddress assignment information from merlot.armonk.cooking.net. Also,Netscape for OS/2 Warp can properly load siteinfo.html from merlot. Now it’sup to the client to automatically display that Web page at startup, immediatelyafter receiving the DHCP option.
For this example, you should edit DHCPCD.CFG and add the following line:
option 114 exec "$mywebmsg.cmd %s" # Message of the day (URL)
MYWEBMSG.CMD is a REXX script located in some directory in the PATH.Unlike MYOFFICE.CMD in the previous example, which handled two DHCPoptions, MYWEBMSG.CMD just handles the contents of the single DHCPoption (114) passed to the client.
The $ means to wait 30 seconds before starting the REXX script to allowenough time for REXXINIT.DLL to start. REXXINIT.DLL allows REXX scripts
Chapter 7. Mobile users 335

to properly function. Alternatively, a & symbol can be used to specify aprogram that requires OS/2 Warp’s Presentation Manager. Without the $ or &symbols, OS/2 Warp’s DHCP client software will attempt to run the programimmediately upon receiving the option at bootup, possibly before the desktopis ready.
We made some significant improvements to the DHCP option handler,MYWEBMSG.CMD, in order to demonstrate a better way to handle delivery ofDHCP options dynamically. MYWEBMSG.CMD obtains the Web address andplaces it on a REXX queue called MYWEBMSG instead of recording it in afile.
Figure 244 on page 337 displays MYWEBMSG.CMD.
336 Beyond DHCP - Work Your TCP/IP Internetwork with Dynamic IP
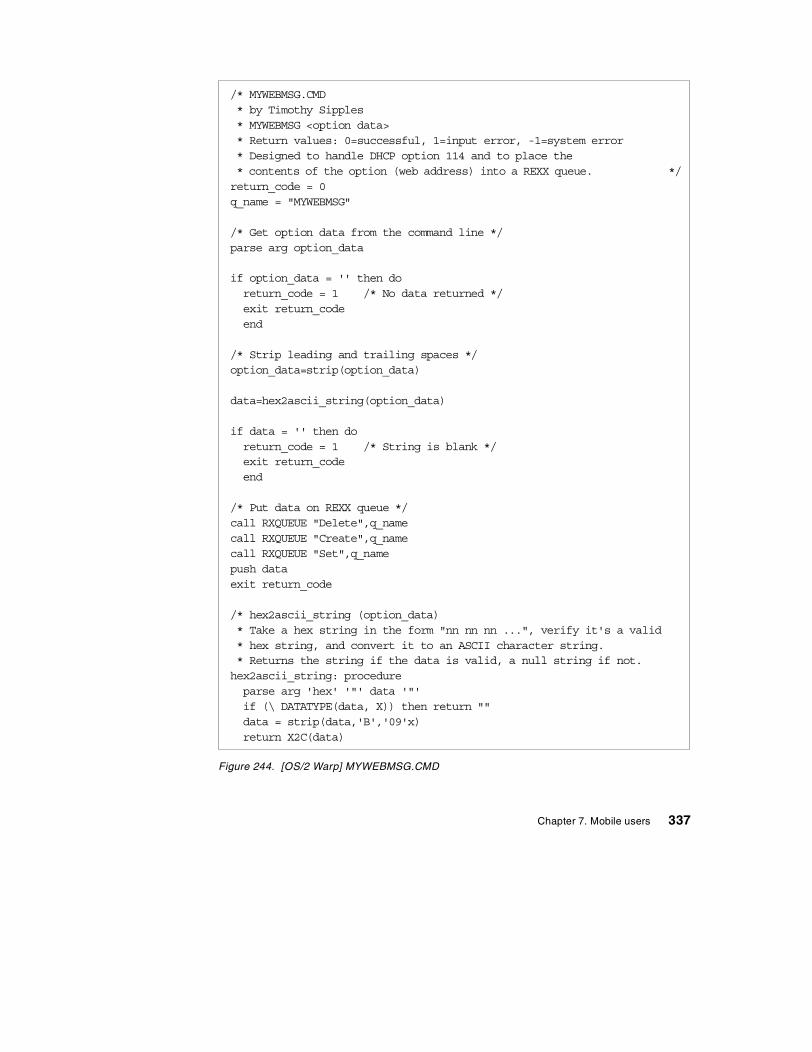
Figure 244. [OS/2 Warp] MYWEBMSG.CMD
/* MYWEBMSG.CMD* by Timothy Sipples* MYWEBMSG <option data>* Return values: 0=successful, 1=input error, -1=system error* Designed to handle DHCP option 114 and to place the* contents of the option (web address) into a REXX queue. */return_code = 0q_name = "MYWEBMSG"
/* Get option data from the command line */parse arg option_data
if option_data = '' then doreturn_code = 1 /* No data returned */exit return_codeend
/* Strip leading and trailing spaces */option_data=strip(option_data)
data=hex2ascii_string(option_data)
if data = '' then doreturn_code = 1 /* String is blank */exit return_codeend
/* Put data on REXX queue */call RXQUEUE "Delete",q_namecall RXQUEUE "Create",q_namecall RXQUEUE "Set",q_namepush dataexit return_code
/* hex2ascii_string (option_data)* Take a hex string in the form "nn nn nn ...", verify it's a valid* hex string, and convert it to an ASCII character string.* Returns the string if the data is valid, a null string if not.hex2ascii_string: procedureparse arg 'hex' '"' data '"'if (\ DATATYPE(data, X)) then return ""data = strip(data,'B','09'x)return X2C(data)
Chapter 7. Mobile users 337
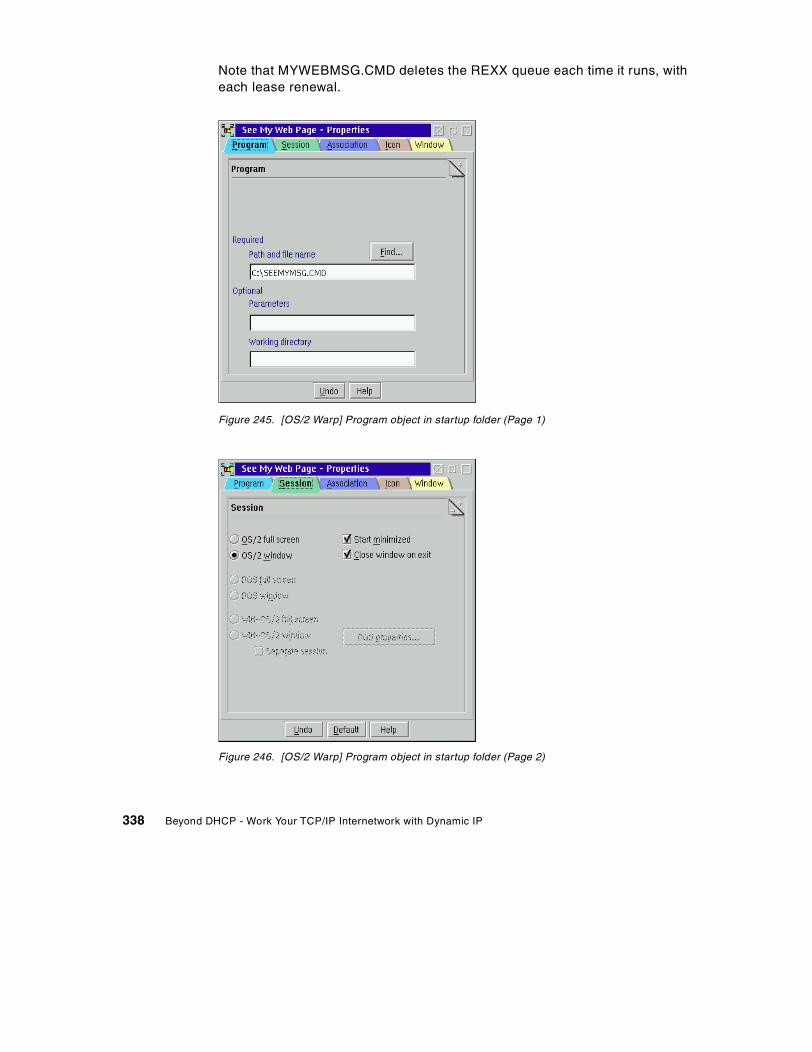
Note that MYWEBMSG.CMD deletes the REXX queue each time it runs, witheach lease renewal.
Figure 245. [OS/2 Warp] Program object in startup folder (Page 1)
Figure 246. [OS/2 Warp] Program object in startup folder (Page 2)
338 Beyond DHCP - Work Your TCP/IP Internetwork with Dynamic IP
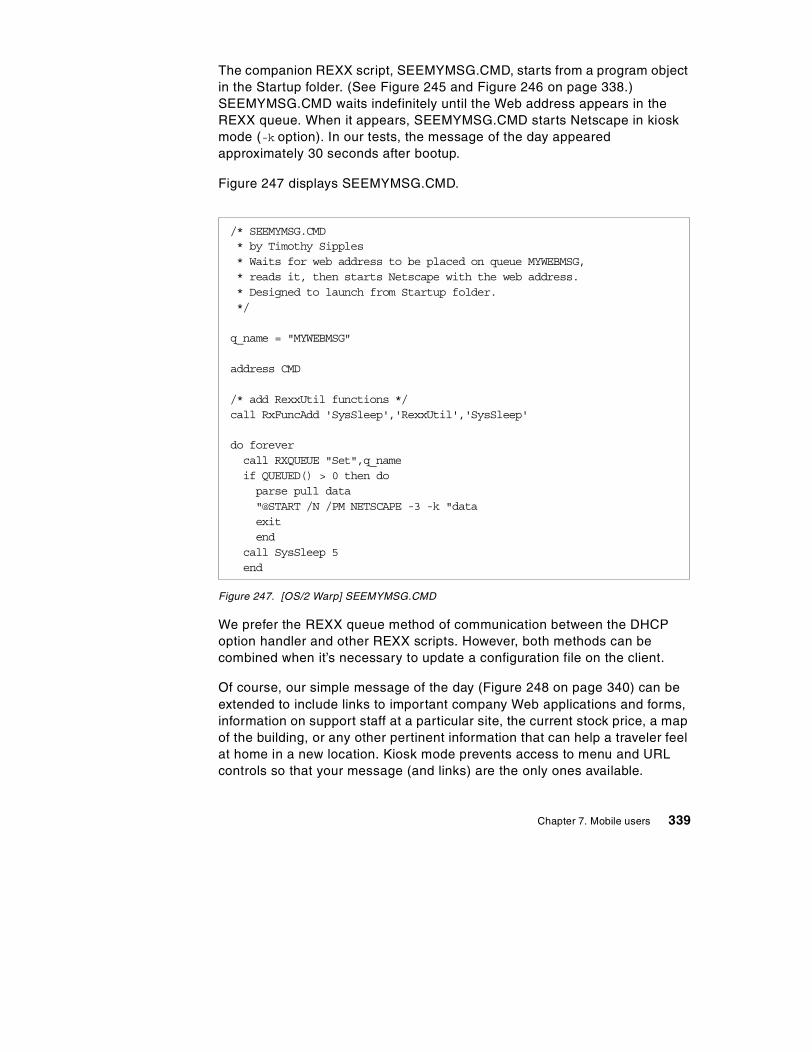
The companion REXX script, SEEMYMSG.CMD, starts from a program objectin the Startup folder. (See Figure 245 and Figure 246 on page 338.)SEEMYMSG.CMD waits indefinitely until the Web address appears in theREXX queue. When it appears, SEEMYMSG.CMD starts Netscape in kioskmode (-k option). In our tests, the message of the day appearedapproximately 30 seconds after bootup.
Figure 247 displays SEEMYMSG.CMD.
Figure 247. [OS/2 Warp] SEEMYMSG.CMD
We prefer the REXX queue method of communication between the DHCPoption handler and other REXX scripts. However, both methods can becombined when it’s necessary to update a configuration file on the client.
Of course, our simple message of the day (Figure 248 on page 340) can beextended to include links to important company Web applications and forms,information on support staff at a particular site, the current stock price, a mapof the building, or any other pertinent information that can help a traveler feelat home in a new location. Kiosk mode prevents access to menu and URLcontrols so that your message (and links) are the only ones available.
/* SEEMYMSG.CMD* by Timothy Sipples* Waits for web address to be placed on queue MYWEBMSG,* reads it, then starts Netscape with the web address.* Designed to launch from Startup folder.*/
q_name = "MYWEBMSG"
address CMD
/* add RexxUtil functions */call RxFuncAdd 'SysSleep','RexxUtil','SysSleep'
do forevercall RXQUEUE "Set",q_nameif QUEUED() > 0 then doparse pull data"@START /N /PM NETSCAPE -3 -k "dataexitend
call SysSleep 5end
Chapter 7. Mobile users 339
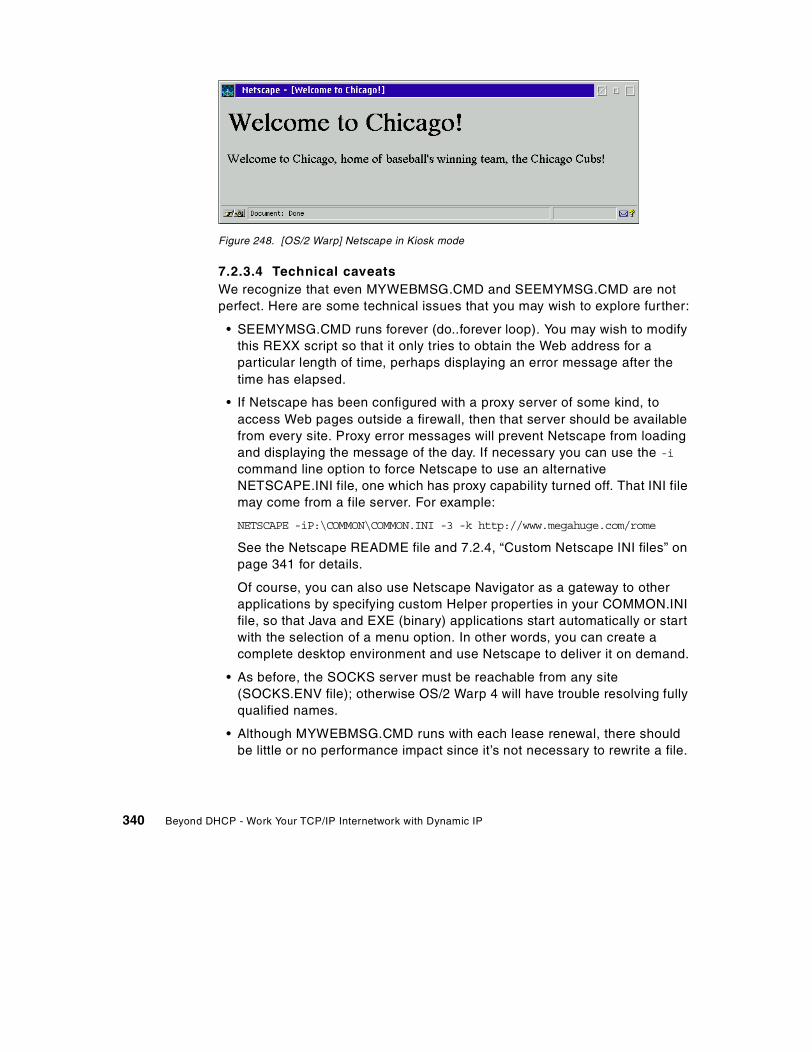
Figure 248. [OS/2 Warp] Netscape in Kiosk mode
7.2.3.4 Technical caveatsWe recognize that even MYWEBMSG.CMD and SEEMYMSG.CMD are notperfect. Here are some technical issues that you may wish to explore further:
• SEEMYMSG.CMD runs forever (do..forever loop). You may wish to modifythis REXX script so that it only tries to obtain the Web address for aparticular length of time, perhaps displaying an error message after thetime has elapsed.
• If Netscape has been configured with a proxy server of some kind, toaccess Web pages outside a firewall, then that server should be availablefrom every site. Proxy error messages will prevent Netscape from loadingand displaying the message of the day. If necessary you can use the -i
command line option to force Netscape to use an alternativeNETSCAPE.INI file, one which has proxy capability turned off. That INI filemay come from a file server. For example:
NETSCAPE -iP:\COMMON\COMMON.INI -3 -k http://www.megahuge.com/rome
See the Netscape README file and 7.2.4, “Custom Netscape INI files” onpage 341 for details.
Of course, you can also use Netscape Navigator as a gateway to otherapplications by specifying custom Helper properties in your COMMON.INIfile, so that Java and EXE (binary) applications start automatically or startwith the selection of a menu option. In other words, you can create acomplete desktop environment and use Netscape to deliver it on demand.
• As before, the SOCKS server must be reachable from any site(SOCKS.ENV file); otherwise OS/2 Warp 4 will have trouble resolving fullyqualified names.
• Although MYWEBMSG.CMD runs with each lease renewal, there shouldbe little or no performance impact since it’s not necessary to rewrite a file.
340 Beyond DHCP - Work Your TCP/IP Internetwork with Dynamic IP
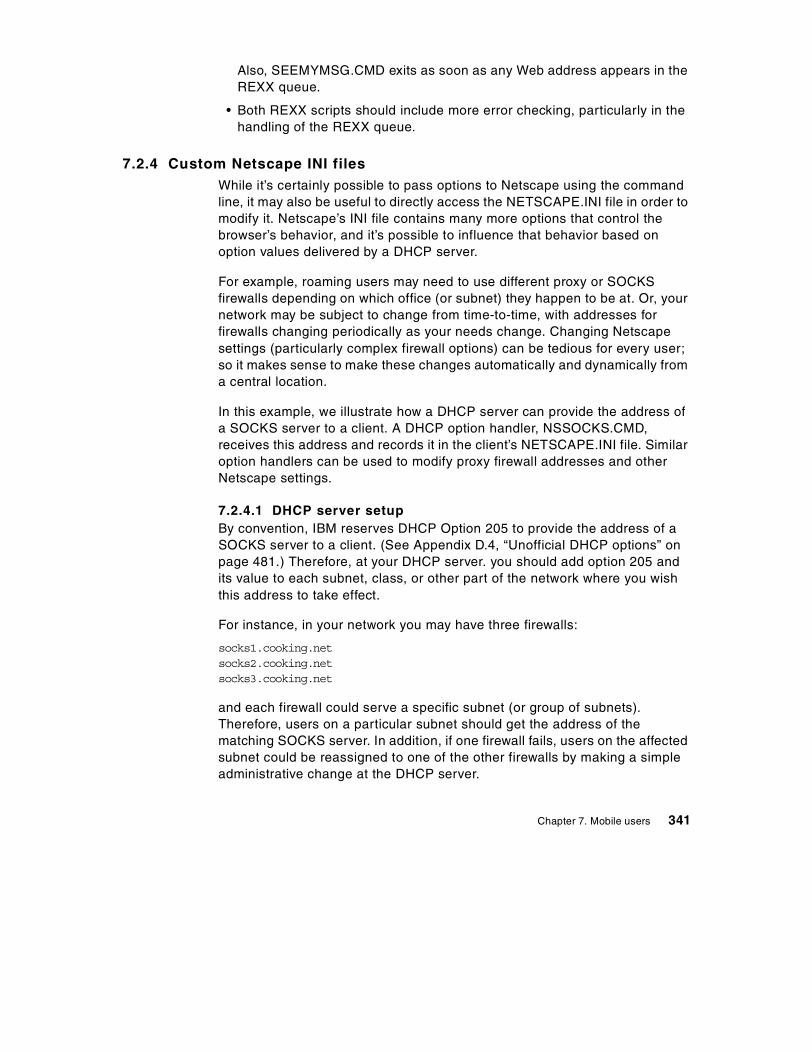
Also, SEEMYMSG.CMD exits as soon as any Web address appears in theREXX queue.
• Both REXX scripts should include more error checking, particularly in thehandling of the REXX queue.
7.2.4 Custom Netscape INI filesWhile it’s certainly possible to pass options to Netscape using the commandline, it may also be useful to directly access the NETSCAPE.INI file in order tomodify it. Netscape’s INI file contains many more options that control thebrowser’s behavior, and it’s possible to influence that behavior based onoption values delivered by a DHCP server.
For example, roaming users may need to use different proxy or SOCKSfirewalls depending on which office (or subnet) they happen to be at. Or, yournetwork may be subject to change from time-to-time, with addresses forfirewalls changing periodically as your needs change. Changing Netscapesettings (particularly complex firewall options) can be tedious for every user;so it makes sense to make these changes automatically and dynamically froma central location.
In this example, we illustrate how a DHCP server can provide the address ofa SOCKS server to a client. A DHCP option handler, NSSOCKS.CMD,receives this address and records it in the client’s NETSCAPE.INI file. Similaroption handlers can be used to modify proxy firewall addresses and otherNetscape settings.
7.2.4.1 DHCP server setupBy convention, IBM reserves DHCP Option 205 to provide the address of aSOCKS server to a client. (See Appendix D.4, “Unofficial DHCP options” onpage 481.) Therefore, at your DHCP server. you should add option 205 andits value to each subnet, class, or other part of the network where you wishthis address to take effect.
For instance, in your network you may have three firewalls:
socks1.cooking.netsocks2.cooking.netsocks3.cooking.net
and each firewall could serve a specific subnet (or group of subnets).Therefore, users on a particular subnet should get the address of thematching SOCKS server. In addition, if one firewall fails, users on the affectedsubnet could be reassigned to one of the other firewalls by making a simpleadministrative change at the DHCP server.
Chapter 7. Mobile users 341
Refer to 7.2.2.2, “DHCP server setup” on page 324, for information on how toadd a custom DHCP option value to the server.
7.2.4.2 Client setupFor this example, we again have a fully functioning OS/2 Warp 4 client withNetscape Navigator 2.02 for OS/2 Warp. The client can properly receiveregular DHCP address assignment information and can connect to thenetwork.
By default, Netscape Navigator stores its settings in the file NETSCAPE.INI,normally located in the same directory containing the other Netscapeprogram files, such as NETSCAPE.EXE. NETSCAPE.INI may be hidden (ormay have the system attribute set). You can remove these attributes by usingthe command:
ATTRIB -R -H -S C:\NETSCAPE\NETSCAPE.INI
assuming that you have installed Netscape in the C:\NETSCAPE directory.You may wish to change these file attributes for convenience before workingwith NETSCAPE.INI. You may also wish to make a backup copy ofNETSCAPE.INI before attempting to make changes to it.
In 7.2.3.3, “Client setup” on page 335, we showed how to install a customDHCP option handler. For this example, we again installed an option handleron the client, this time NSSOCKS.CMD for option 205. Add the following lineto DHCPCD.CFG:
option 205 exec "$nssocks.cmd %s" #SOCKS firewall server address
and place the following REXX script, NSSOCKS.CMD, somewhere in theclient’s PATH (see Figure 249 and Figure 250 on page 344):
342 Beyond DHCP - Work Your TCP/IP Internetwork with Dynamic IP
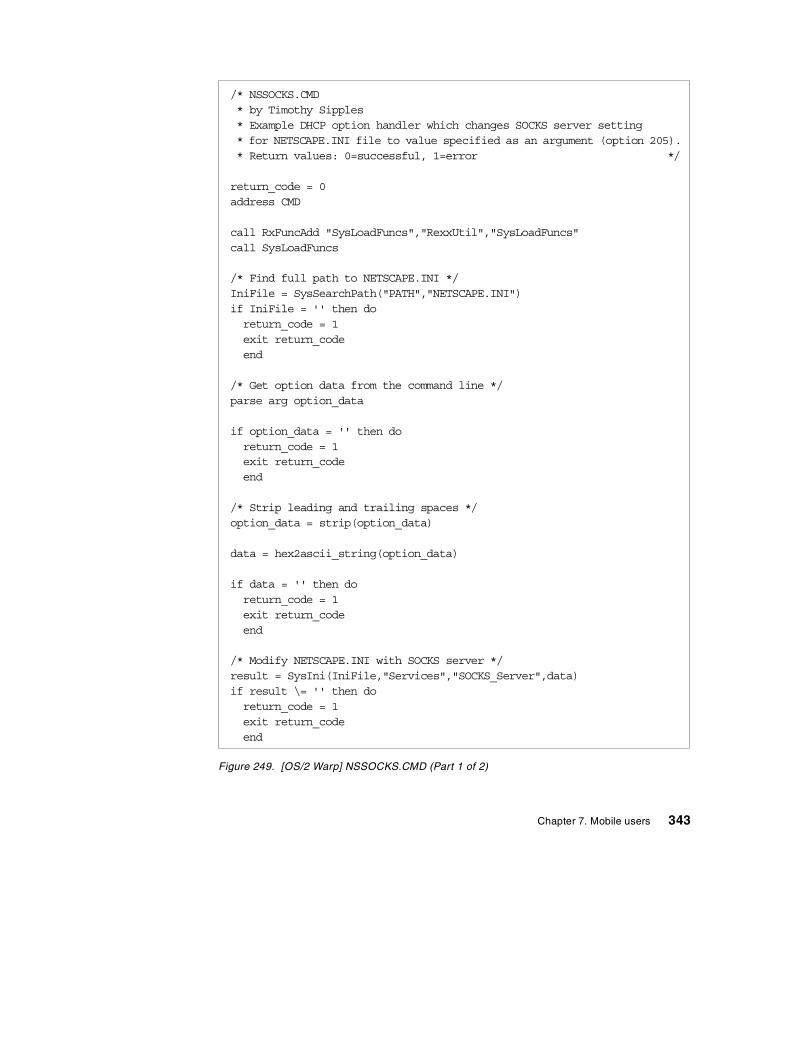
Figure 249. [OS/2 Warp] NSSOCKS.CMD (Part 1 of 2)
/* NSSOCKS.CMD* by Timothy Sipples* Example DHCP option handler which changes SOCKS server setting* for NETSCAPE.INI file to value specified as an argument (option 205).* Return values: 0=successful, 1=error */
return_code = 0address CMD
call RxFuncAdd "SysLoadFuncs","RexxUtil","SysLoadFuncs"call SysLoadFuncs
/* Find full path to NETSCAPE.INI */IniFile = SysSearchPath("PATH","NETSCAPE.INI")if IniFile = '' then doreturn_code = 1exit return_codeend
/* Get option data from the command line */parse arg option_data
if option_data = '' then doreturn_code = 1exit return_codeend
/* Strip leading and trailing spaces */option_data = strip(option_data)
data = hex2ascii_string(option_data)
if data = '' then doreturn_code = 1exit return_codeend
/* Modify NETSCAPE.INI with SOCKS server */result = SysIni(IniFile,"Services","SOCKS_Server",data)if result \= '' then doreturn_code = 1exit return_codeend
Chapter 7. Mobile users 343

Figure 250. [OS/2 Warp] NSSOCKS.CMD (Part 2 of 2)
NSSOCKS.CMD first searches the PATH to locate NETSCAPE.INI using theSysSearchPath function. The, the DHCP option value gets converted from itshexadecimal representation to a text string (such as socks2.cooking.net).Finally, NSSOCKS.CMD makes three changes to NETSCAPE.INI using theSysIni function.
7.2.4.3 Other Netscape INI SettingsYou can explore NETSCAPE.INI (or any other standard binary INI file used tostore application settings) by running REGEDIT2. REGEDIT2 ships withrecent IBM FixPaks for OS/2 Warp and OS/2 Warp Server.
result = SysIni(IniFile,"ProxyInformation","ProxyPref","ManualProxy")if result \= '' then doreturn_code = 1exit return_codeend
/* Set SOCKS server port to 1080 (assumed).* Note that 1080 (decimal) is 0438 (hex), which must be in reverse* byte order and padded with zeroes (8 digits) for the SysIni* function, as shown here. */result = SysIni(IniFile,"Services","SOCKS_ServerPort",x2c('38040000'))if result \= '' then doreturn_code = 1exit return_codeend
exit return_code
/* hex2ascii_string (option_data)* Take a hex string in the form "nn nn nn ...", verify it's a valid* hex string, and convert it to an ASCII character string.* Returns the string if the data is valid, a null string if not.*/hex2ascii_string: procedureparse arg 'hex' '"' data '"'if (\ DATATYPE(data, X)) then return ''data = strip(data,'B','09'x)return X2C(data)
344 Beyond DHCP - Work Your TCP/IP Internetwork with Dynamic IP
Note that the format of NETSCAPE.INI could change; so you should verifythat you are changing the correct settings if you upgrade your version ofNetscape Navigator.
Here’s a partial list of the Netscape settings you may wish to change usingDHCP option handlers. To change an INI file setting with REXX, use theSysIni function:
result = SysIni(IniFile,Application,Key,Value)
NETSCAPE.INI Settings (partial list)Application: ProxyInformation
Key: ProxyPref Value: NoProxy|ManualProxy|AutoProxyKey: AutoProxyUrl Value: (URL string)Key: FTP_Proxy Value: (URL string)Key: FTP_ProxyPort Value: (8X)Key: Gopher_Proxy Value: (URL string)Key: Gopher_ProxyPort Value: (8X)Key: HTTPS_Proxy Value: (URL string)Key: HTTPS_ProxyPort Value: (8X)Key: Http_Proxy Value: (URL string)Key: Http_ProxyPort Value: (8X)Key: No_Proxy Value: (string)Key: Wais_Proxy Value: (URL string)Key: Wais_ProxyPort Value: (8X)
Application: ServicesKey: SOCKS_Server Value: (URL string)Key: SOCKS_ServerPort Value: (8X)
8X = eight digit hexadecimal, reverse byte order
7.2.4.4 Technical caveatsNSSOCKS.CMD can be enhanced or extended in various ways:
• If you start Netscape Navigator before NSSOCKS.CMD completes itschanges to NETSCAPE.INI, then you could pick up old settings. Tryadding a REXX queue signalling method to your own DHCP option handlerlike the one shown in 7.2.3.3, “Client setup” on page 335. Also, oncerunning, Netscape Navigator may not pick up subsequent changes toNETSCAPE.INI, which may occur with each lease renewal.
• This approach can be used with WorkSpace On-Demand, assuming yourDHCP option handler has write permission to the appropriateNETSCAPE.INI file(s). Although NETSCAPE.INI files are stored on the fileserver, and although they can then be centrally managed, you may stillprefer to manage certain Netscape settings through your DHCP server
Chapter 7. Mobile users 345
instead. (In fact, the DHCP option handler could run on the file server, inthe background, updating every user’s NETSCAPE.INI file as needed.)
7.2.5 SummaryBy combining custom DHCP options, and providing sophisticated clienthandling of those options, you can help provide a friendly desktop for yourroaming users no matter where they happen to be. Consider using DHCP notjust to provide a basic network connection, but also to enrich the desktopexperience and to allow people to get to work more quickly and easily.
Although we’ve shown one specific type of client working with these customDHCP options, you may be able to adapt these techniques for other clients,assuming they support custom DHCP options. Having a scripting languageavailable, such as REXX or BASIC, can help make the task that much easier.
346 Beyond DHCP - Work Your TCP/IP Internetwork with Dynamic IP
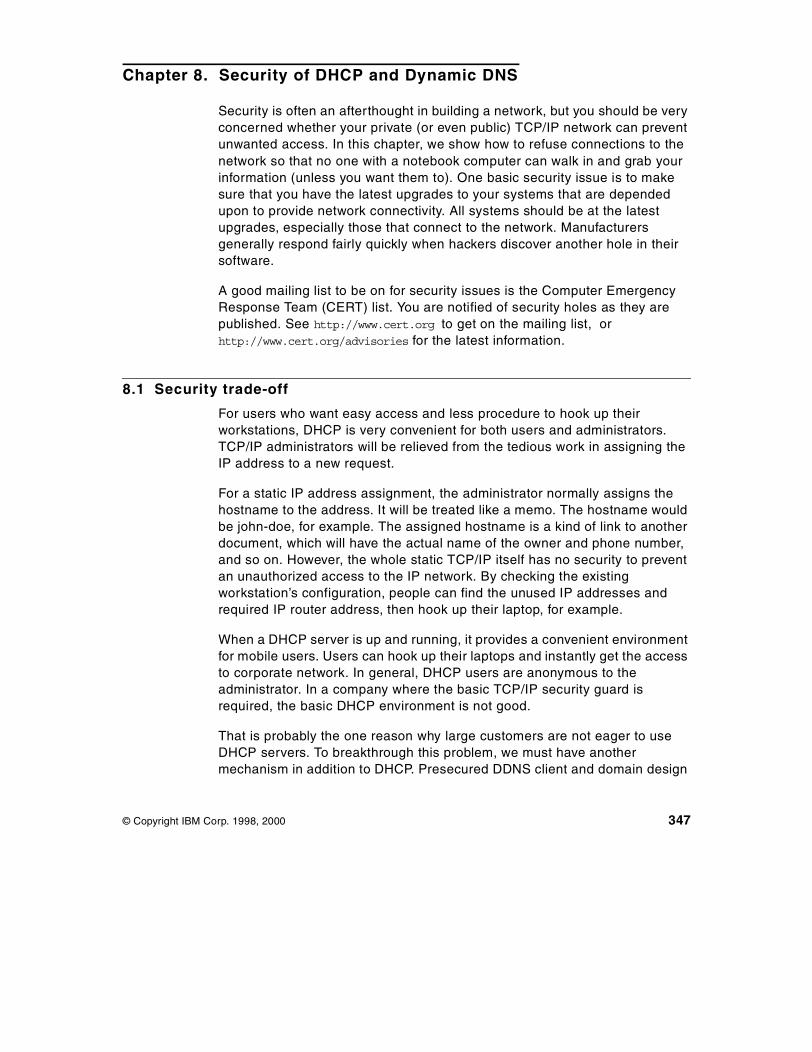
Chapter 8. Security of DHCP and Dynamic DNS
Security is often an afterthought in building a network, but you should be veryconcerned whether your private (or even public) TCP/IP network can preventunwanted access. In this chapter, we show how to refuse connections to thenetwork so that no one with a notebook computer can walk in and grab yourinformation (unless you want them to). One basic security issue is to makesure that you have the latest upgrades to your systems that are dependedupon to provide network connectivity. All systems should be at the latestupgrades, especially those that connect to the network. Manufacturersgenerally respond fairly quickly when hackers discover another hole in theirsoftware.
A good mailing list to be on for security issues is the Computer EmergencyResponse Team (CERT) list. You are notified of security holes as they arepublished. See http://www.cert.org to get on the mailing list, orhttp://www.cert.org/advisories for the latest information.
8.1 Security trade-off
For users who want easy access and less procedure to hook up theirworkstations, DHCP is very convenient for both users and administrators.TCP/IP administrators will be relieved from the tedious work in assigning theIP address to a new request.
For a static IP address assignment, the administrator normally assigns thehostname to the address. It will be treated like a memo. The hostname wouldbe john-doe, for example. The assigned hostname is a kind of link to anotherdocument, which will have the actual name of the owner and phone number,and so on. However, the whole static TCP/IP itself has no security to preventan unauthorized access to the IP network. By checking the existingworkstation’s configuration, people can find the unused IP addresses andrequired IP router address, then hook up their laptop, for example.
When a DHCP server is up and running, it provides a convenient environmentfor mobile users. Users can hook up their laptops and instantly get the accessto corporate network. In general, DHCP users are anonymous to theadministrator. In a company where the basic TCP/IP security guard isrequired, the basic DHCP environment is not good.
That is probably the one reason why large customers are not eager to useDHCP servers. To breakthrough this problem, we must have anothermechanism in addition to DHCP. Presecured DDNS client and domain design
© Copyright IBM Corp. 1998, 2000 347
is the answer to this security problem. The TCP/IP administrator might haveslightly more workload than the static IP, but the result would be a wellprotected dynamic IP network that is more secure.
8.2 RSA public key authentication system
Dynamic DNS, as defined in RFC 2137, uses an RSA public key/private keyauthentication system to secure the dynamic DNS update. A client has a setof keys stored on the hard disk. The key pair is dynamically generated by theclient program, NSUPDATE.EXE, or is generated by the administrator throughthe DDNS Administrator GUI called DDNS Server Administrator. Figure 251illustrates how the DNS dynamic update is protected with the digital signatureauthentication.
Figure 251. RSA public key authentication system
A client owns the hostname so it authenticates the A RR (Address ResourceRecord) in the DNS domain file. If the dynamic zone is created as a DynamicSecured one, clients can dynamically register A RR at any time. That meansthe client generates a RSA key pair once at startup time and sends aregistration request to a DNS server together with its public key (encoded)and its IP address. The important matter is that the client keeps the privatekey on a hard disk or a networked drive and it should not be exposed.
348 Beyond DHCP - Work Your TCP/IP Internetwork with Dynamic IP
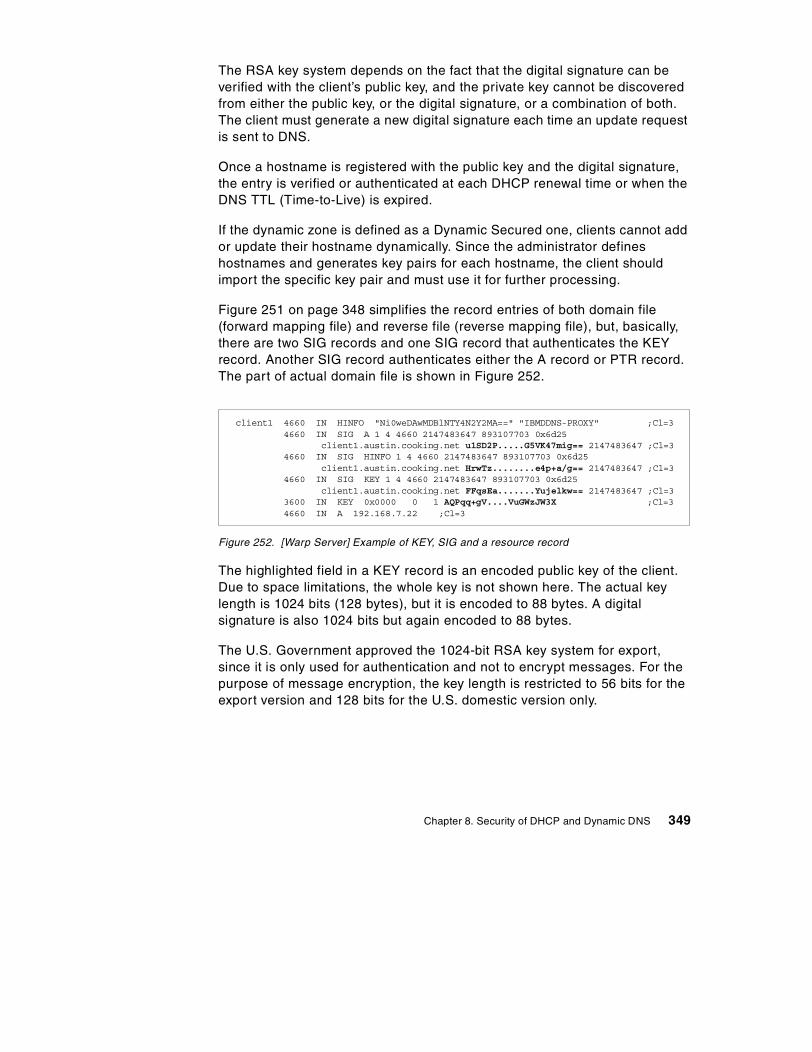
The RSA key system depends on the fact that the digital signature can beverified with the client’s public key, and the private key cannot be discoveredfrom either the public key, or the digital signature, or a combination of both.The client must generate a new digital signature each time an update requestis sent to DNS.
Once a hostname is registered with the public key and the digital signature,the entry is verified or authenticated at each DHCP renewal time or when theDNS TTL (Time-to-Live) is expired.
If the dynamic zone is defined as a Dynamic Secured one, clients cannot addor update their hostname dynamically. Since the administrator defineshostnames and generates key pairs for each hostname, the client shouldimport the specific key pair and must use it for further processing.
Figure 251 on page 348 simplifies the record entries of both domain file(forward mapping file) and reverse file (reverse mapping file), but, basically,there are two SIG records and one SIG record that authenticates the KEYrecord. Another SIG record authenticates either the A record or PTR record.The part of actual domain file is shown in Figure 252.
Figure 252. [Warp Server] Example of KEY, SIG and a resource record
The highlighted field in a KEY record is an encoded public key of the client.Due to space limitations, the whole key is not shown here. The actual keylength is 1024 bits (128 bytes), but it is encoded to 88 bytes. A digitalsignature is also 1024 bits but again encoded to 88 bytes.
The U.S. Government approved the 1024-bit RSA key system for export,since it is only used for authentication and not to encrypt messages. For thepurpose of message encryption, the key length is restricted to 56 bits for theexport version and 128 bits for the U.S. domestic version only.
client1 4660 IN HINFO "Ni0weDAwMDBlNTY4N2Y2MA==" "IBMDDNS-PROXY" ;Cl=34660 IN SIG A 1 4 4660 2147483647 893107703 0x6d25
client1.austin.cooking.net u1SD2P.....G5VK47mig== 2147483647 ;Cl=34660 IN SIG HINFO 1 4 4660 2147483647 893107703 0x6d25
client1.austin.cooking.net HrwTz........e4p+a/g== 2147483647 ;Cl=34660 IN SIG KEY 1 4 4660 2147483647 893107703 0x6d25
client1.austin.cooking.net FFqsEa.......Yujelkw== 2147483647 ;Cl=33600 IN KEY 0x0000 0 1 AQPqq+gV....VuGWzJW3X ;Cl=34660 IN A 192.168.7.22 ;Cl=3
Chapter 8. Security of DHCP and Dynamic DNS 349
We distinguish two different dynamic types of DNS zones:
• Dynamic secured
The dynamic secured zone provides a great deal for a zone. Once aclient’s hostname is dynamically registered in the DDNS database, it isprotected and cannot be taken over by another client. The workstation withthe DDNS client function can dynamically join the network and canregister its name. Because of that, the DNS zone is open for all clients.
The dynamic secured zone buys tremendous flexibility (given the goal ofan administratorless system) in that it requires no administratorintervention to have the DHCP clients registered, which is exactly the pointof DHCP. The only shortcoming of this concept is that a malicious clientcould create useless names, however, this shouldn’t have an undesirableeffect on the network.
Be aware of the fact that any DDNS client could perform the very firstregistration and then, suddenly, would own a hostname that mightotherwise be used for other server names.
• Dynamic presecured
If you are looking for the perfect secured DNS zone you need to look at aso-called dynamic presecured zone. Clients joining the presecureddomain must have the key pair generated by the administrator. This keythen can be distributed to the client through a networked drive, throughe-mail, or through a diskette. Using this method, there is no chance forclients to [unlawfully] join the DNS space. The administrator would haveperfect control over their DNS zone.
As for the client’s public key, it is not a secret one. It is intended to be knownby everyone. For example, the client’s public key can be retrieved through theNSLOOKUP interface. Figure 253 on page 351 shows an example of the NSLOOKUP
output that provides all the information of client1.austin.cooking.net.
350 Beyond DHCP - Work Your TCP/IP Internetwork with Dynamic IP
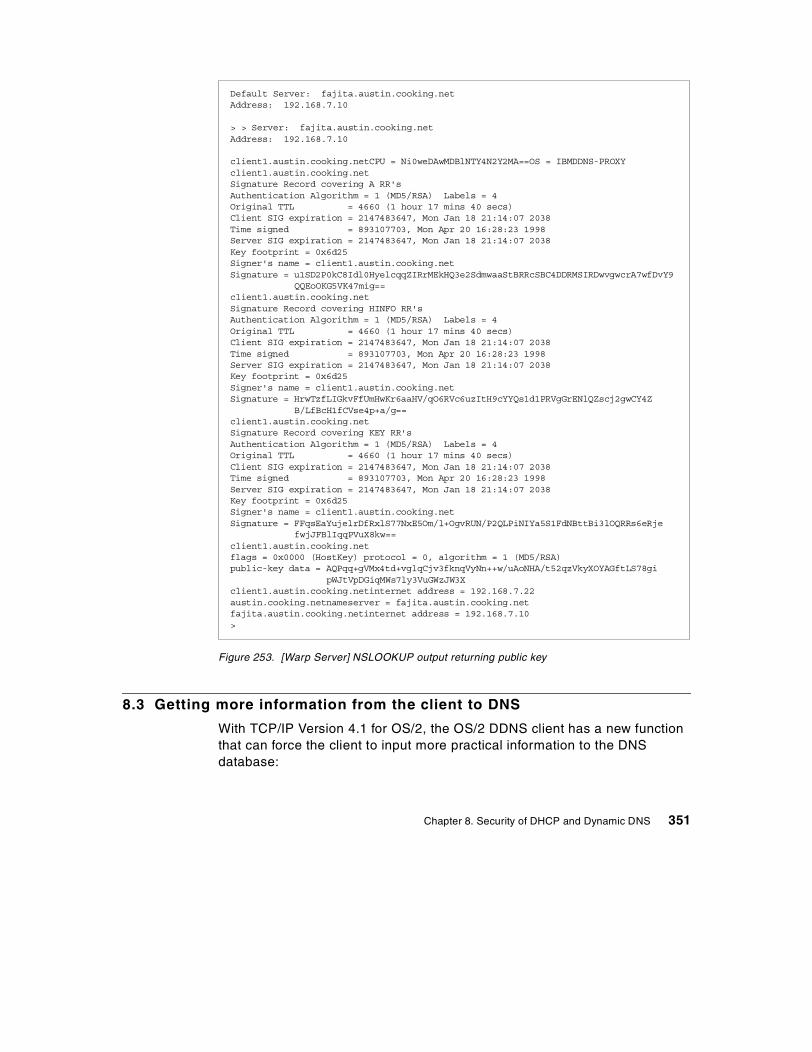
Figure 253. [Warp Server] NSLOOKUP output returning public key
8.3 Getting more information from the client to DNS
With TCP/IP Version 4.1 for OS/2, the OS/2 DDNS client has a new functionthat can force the client to input more practical information to the DNSdatabase:
Default Server: fajita.austin.cooking.netAddress: 192.168.7.10
> > Server: fajita.austin.cooking.netAddress: 192.168.7.10
client1.austin.cooking.netCPU = Ni0weDAwMDBlNTY4N2Y2MA==OS = IBMDDNS-PROXYclient1.austin.cooking.netSignature Record covering A RR'sAuthentication Algorithm = 1 (MD5/RSA) Labels = 4Original TTL = 4660 (1 hour 17 mins 40 secs)Client SIG expiration = 2147483647, Mon Jan 18 21:14:07 2038Time signed = 893107703, Mon Apr 20 16:28:23 1998Server SIG expiration = 2147483647, Mon Jan 18 21:14:07 2038Key footprint = 0x6d25Signer's name = client1.austin.cooking.netSignature = u1SD2P0kC8Idl0HyelcqqZIRrMEkHQ3e2SdmwaaStBRRcSBC4DDRMSIRDwvgwcrA7wfDvY9
QQEoOKG5VK47mig==client1.austin.cooking.netSignature Record covering HINFO RR'sAuthentication Algorithm = 1 (MD5/RSA) Labels = 4Original TTL = 4660 (1 hour 17 mins 40 secs)Client SIG expiration = 2147483647, Mon Jan 18 21:14:07 2038Time signed = 893107703, Mon Apr 20 16:28:23 1998Server SIG expiration = 2147483647, Mon Jan 18 21:14:07 2038Key footprint = 0x6d25Signer's name = client1.austin.cooking.netSignature = HrwTzfLIGkvFfUmHwKr6aaHV/qO6RVc6uzItH9cYYQs1d1PRVgGrENlQZscj2gwCY4Z
B/LfBcH1fCVse4p+a/g==client1.austin.cooking.netSignature Record covering KEY RR'sAuthentication Algorithm = 1 (MD5/RSA) Labels = 4Original TTL = 4660 (1 hour 17 mins 40 secs)Client SIG expiration = 2147483647, Mon Jan 18 21:14:07 2038Time signed = 893107703, Mon Apr 20 16:28:23 1998Server SIG expiration = 2147483647, Mon Jan 18 21:14:07 2038Key footprint = 0x6d25Signer's name = client1.austin.cooking.netSignature = FFqsEaYujelrDfRxlS77NxE5Om/l+OgvRUN/P2QLPiNIYa5S1FdNBttBi3lOQRRs6eRje
fwjJFBlIqqPVuX8kw==client1.austin.cooking.netflags = 0x0000 (HostKey) protocol = 0, algorithm = 1 (MD5/RSA)public-key data = AQPqq+gVMx4td+vglqCjv3fknqVyNn++w/uAoNHA/t52qzVkyXOYAGftLS78gi
pWJtVpDGiqMWs7ly3VuGWzJW3Xclient1.austin.cooking.netinternet address = 192.168.7.22austin.cooking.netnameserver = fajita.austin.cooking.netfajita.austin.cooking.netinternet address = 192.168.7.10>
Chapter 8. Security of DHCP and Dynamic DNS 351
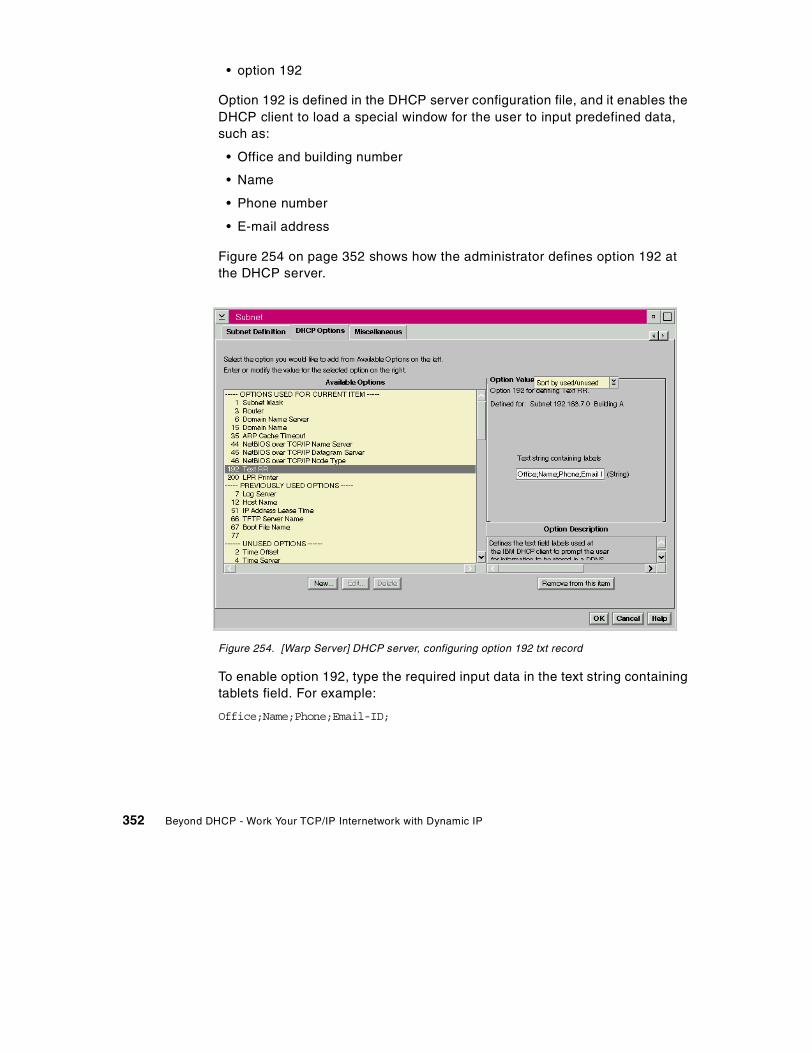
• option 192
Option 192 is defined in the DHCP server configuration file, and it enables theDHCP client to load a special window for the user to input predefined data,such as:
• Office and building number
• Name
• Phone number
• E-mail address
Figure 254 on page 352 shows how the administrator defines option 192 atthe DHCP server.
Figure 254. [Warp Server] DHCP server, configuring option 192 txt record
To enable option 192, type the required input data in the text string containingtablets field. For example:
Office;Name;Phone;Email-ID;
352 Beyond DHCP - Work Your TCP/IP Internetwork with Dynamic IP
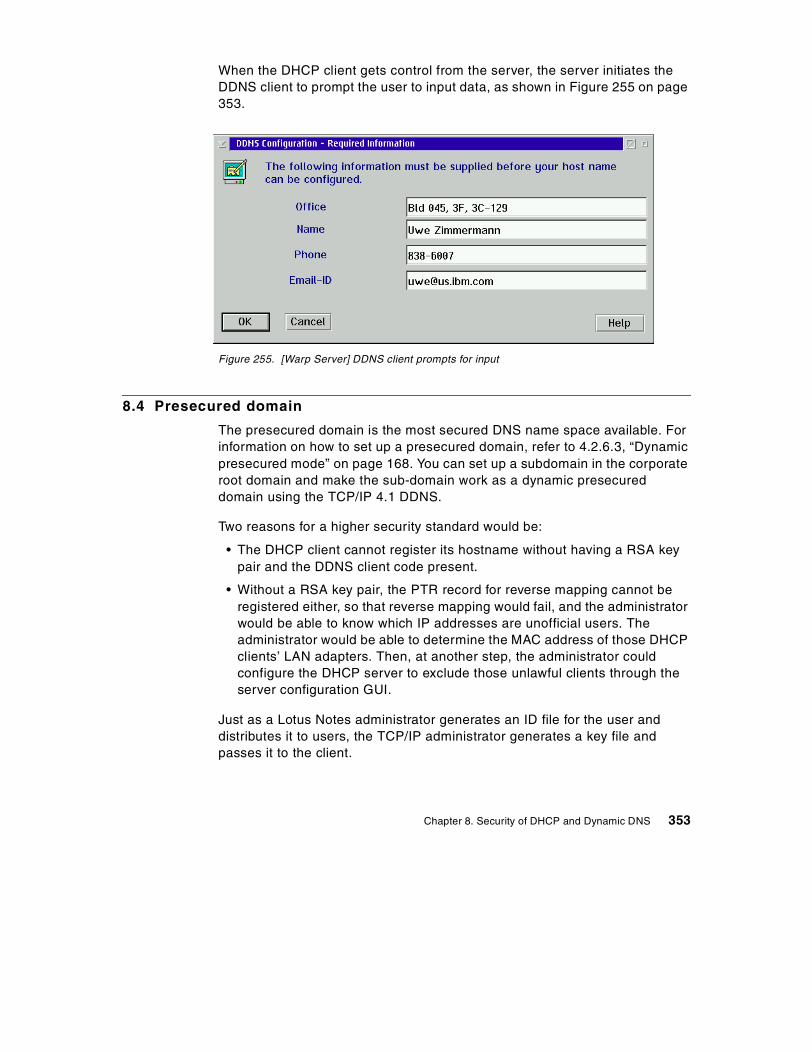
When the DHCP client gets control from the server, the server initiates theDDNS client to prompt the user to input data, as shown in Figure 255 on page353.
Figure 255. [Warp Server] DDNS client prompts for input
8.4 Presecured domain
The presecured domain is the most secured DNS name space available. Forinformation on how to set up a presecured domain, refer to 4.2.6.3, “Dynamicpresecured mode” on page 168. You can set up a subdomain in the corporateroot domain and make the sub-domain work as a dynamic presecureddomain using the TCP/IP 4.1 DDNS.
Two reasons for a higher security standard would be:
• The DHCP client cannot register its hostname without having a RSA keypair and the DDNS client code present.
• Without a RSA key pair, the PTR record for reverse mapping cannot beregistered either, so that reverse mapping would fail, and the administratorwould be able to know which IP addresses are unofficial users. Theadministrator would be able to determine the MAC address of those DHCPclients’ LAN adapters. Then, at another step, the administrator couldconfigure the DHCP server to exclude those unlawful clients through theserver configuration GUI.
Just as a Lotus Notes administrator generates an ID file for the user anddistributes it to users, the TCP/IP administrator generates a key file andpasses it to the client.
Chapter 8. Security of DHCP and Dynamic DNS 353

Figure 256. Presecured TCP/IP domain concept
Although the TCP/IP administrator would have a higher workload establishinga presecured domain in comparison to working with a static DNSenvironment, the presecured domain ensures a well-trusted DNS namespace, and it can reduce the total cost of administration.
The most reasonable implementation of a presecured domain is to combine itwith static DNS servers and create a kind of hybrid domain design, as shownin Figure 257 on page 355.
354 Beyond DHCP - Work Your TCP/IP Internetwork with Dynamic IP
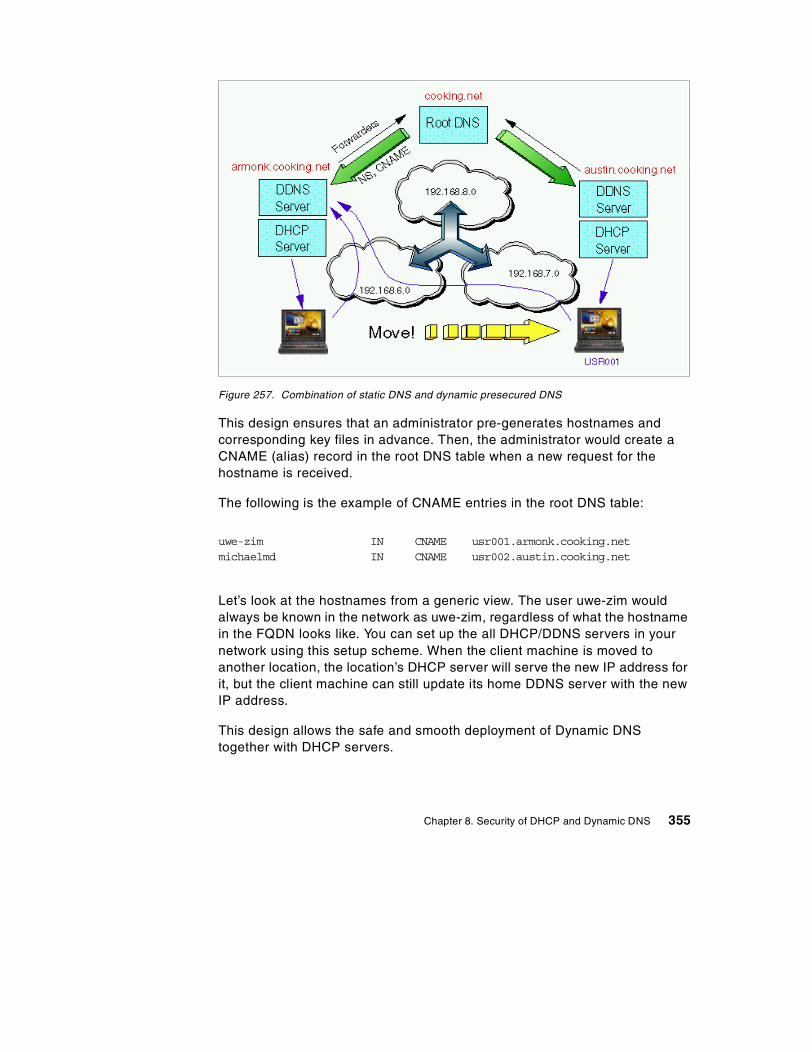
Figure 257. Combination of static DNS and dynamic presecured DNS
This design ensures that an administrator pre-generates hostnames andcorresponding key files in advance. Then, the administrator would create aCNAME (alias) record in the root DNS table when a new request for thehostname is received.
The following is the example of CNAME entries in the root DNS table:
uwe-zim IN CNAME usr001.armonk.cooking.netmichaelmd IN CNAME usr002.austin.cooking.net
Let’s look at the hostnames from a generic view. The user uwe-zim wouldalways be known in the network as uwe-zim, regardless of what the hostnamein the FQDN looks like. You can set up the all DHCP/DDNS servers in yournetwork using this setup scheme. When the client machine is moved toanother location, the location’s DHCP server will serve the new IP address forit, but the client machine can still update its home DDNS server with the newIP address.
This design allows the safe and smooth deployment of Dynamic DNStogether with DHCP servers.
Chapter 8. Security of DHCP and Dynamic DNS 355

8.5 ProxyArec consideration
The ProxyArec function is desired by the industry, and several companiesprovide products that embrace ProxyArec. ProxyArec is based on the IETFInternet draft called Interaction between DHCP and DNS. This draft can beand found on the Internet at the following Web site:
http://www.ietf.org/internet-drafts/draft-ietf-dhc-dhcp-dns-08.txt
The latest draft may have a newer number.
Besides the TCP/IP Version 4.1 DHCP and DDNS servers, we also testedNTS Shadow IPserver, which also provides a ProxyArec function. However,NTS Shadow IPserver does not support option 81, which tells the DHCPserver that a DHCP/DDNS client wants to register/update its A RR by itself;so the DHCP server would not perform the ProxyArec function to update theDDNS table. Option 81 is discussed in 8.5.1 on page 358.
When the DHCP server is configured to enable the A resource record updatein addition to the PTR resource record update, sometimes called a ProxyArecfunction, any DHCP client which carries the option 12 hostname will registerboth A RR and PTR RR. Since the DHCP server uses its own RSA key for allDDNS update requests, there is no authentication mechanism to validate thatthe client really is the client that has the original hostname.
However, the ProxyArec function in TCP/IP Version 4.1 for OS/2 DHCP serverprovides security. When the DHCPSD.CFG file in the \MPTN\ETCsubdirectory has the following statement, the client’s MAC address will beused to memorize the ownership of the A RR:
ProxyArec Protected
To disable the MAC address identification, the statement should be:
ProxyArec Standard
Then, the DHCP server will blindly update the A RR without comparing theMAC addresses at all.
From the DHCP Server Configuration GUI, the ProxyArec settings require youto complete two panels. First, you need to specify a domain name and aDDNS server IP address (or hostname) in the DHCP Server Parameterswindow, as shown in Figure 258 on page 357.
356 Beyond DHCP - Work Your TCP/IP Internetwork with Dynamic IP

Figure 258. [Warp Server] ProxyArec - Enable DHCP server to update A RR
The Global Parameters window, as shown in Figure 259, is the only placewhere you would enable ProxyArec. You must have a dynamic DNS server toenable dynamic A RR updates.
Figure 259. [Warp Server] Enable ProxyArec and option for protection
Chapter 8. Security of DHCP and Dynamic DNS 357
The question in Figure 259 on page 357 that says Automatically update DDNSA record on client’s behalf if requested? is defaulted to No. If you select Yesfrom the pull-down menu, the ProxyArec function is enabled. Anotherselection box (Verify client ID before performing update?) decides on the twomodes of ProxyArec:
• Standard
• Protected
To enable protected ProxyArec, select Yes from the pull-down menu.
Remember that the main purpose of the ProxyArec function is to supportnon-DDNS clients to dynamically register/update its hostnames wheresecurity is not a first priority. Configuring the DHCP server to use the client’sMAC address to protect unauthorized updates from a different client does notindicate security. Dynamic DNS name space is almost like a public space.Any DHCP client can register the hostname with the DHCP option 12.
Windows 95 and NT handle option 12 in a different way than OS/2. Eventhough the Windows 95/NT client was provided with a hostname in theTCP/IP DNS settings, the hostname is not used. Instead, the Computernamedefinition is used as option 12. This is a unique (proprietary) Microsoftimplementation of a hostname. Traditionally, the computer name, also knownas the NetBIOS name, is not controlled by the IS department or TCP/IPadministrators; so, there might be a chance that people use the samecomputername in a TCP/IP network, which usually results in duplicatednames. Duplicate names result in not opening LAN adapters.
For your information, WorkSpace On-Demand Release 1 uses the ProxyArecfunction when DDNS is required. IBM PPP server on top of Warp Server’sRemote Access Server also uses the ProxyArec, because it supportsnon-LAN distance clients, such as Windows 95 or Windows NT Workstation.
8.5.1 ProxyArec and option 81We don’t recommend having a ProxyArec DHCP server and standard DDNSclients in a same location because a DDNS client cannot use its own interfaceto the DDNS server. An RR will be owned by the DHCP server. However, insuch a situation, the OS/2 DHCP/DDNS client can use a special DHCPoption, which is option 81, which would disable the ProxyArec function for arequesting client.
Unfortunately, there is no graphical user interface where you could defineoption 81. You must manually add option 81 to the
358 Beyond DHCP - Work Your TCP/IP Internetwork with Dynamic IP
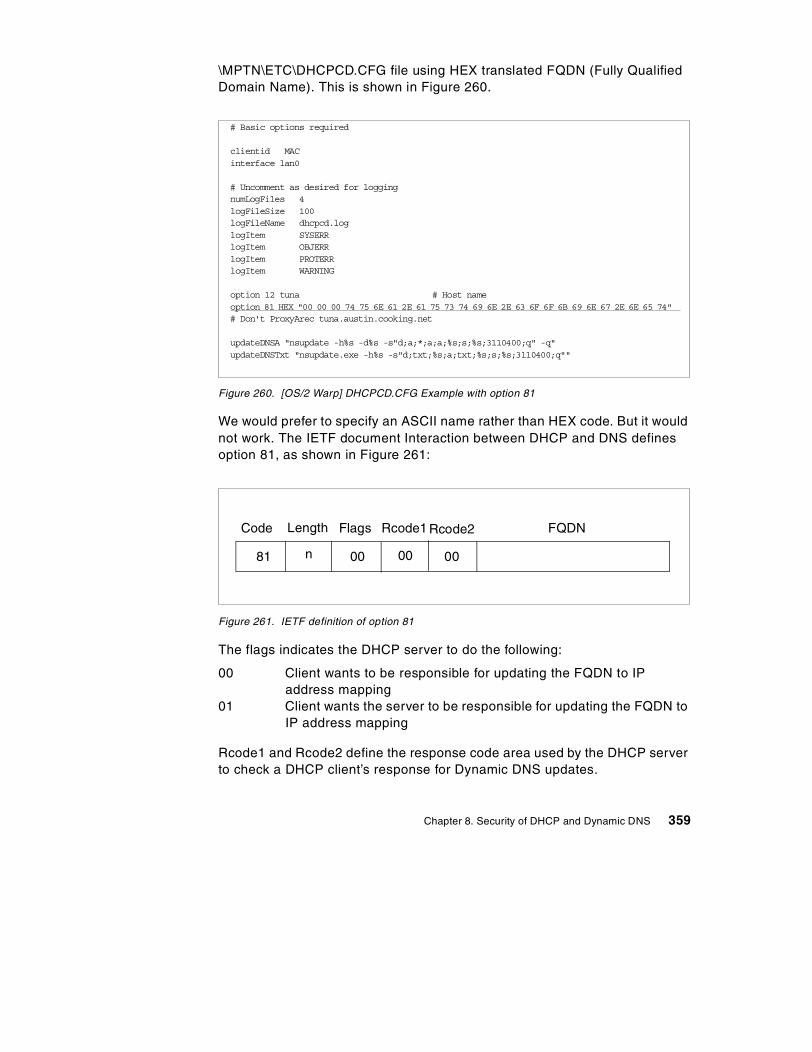
\MPTN\ETC\DHCPCD.CFG file using HEX translated FQDN (Fully QualifiedDomain Name). This is shown in Figure 260.
Figure 260. [OS/2 Warp] DHCPCD.CFG Example with option 81
We would prefer to specify an ASCII name rather than HEX code. But it wouldnot work. The IETF document Interaction between DHCP and DNS definesoption 81, as shown in Figure 261:
Figure 261. IETF definition of option 81
The flags indicates the DHCP server to do the following:
00 Client wants to be responsible for updating the FQDN to IPaddress mapping
01 Client wants the server to be responsible for updating the FQDN toIP address mapping
Rcode1 and Rcode2 define the response code area used by the DHCP serverto check a DHCP client’s response for Dynamic DNS updates.
# Basic options required
clientid MACinterface lan0
# Uncomment as desired for loggingnumLogFiles 4logFileSize 100logFileName dhcpcd.loglogItem SYSERRlogItem OBJERRlogItem PROTERRlogItem WARNING
option 12 tuna # Host nameoption 81 HEX "00 00 00 74 75 6E 61 2E 61 75 73 74 69 6E 2E 63 6F 6F 6B 69 6E 67 2E 6E 65 74"# Don't ProxyArec tuna.austin.cooking.net
updateDNSA "nsupdate -h%s -d%s -s"d;a;*;a;a;%s;s;%s;3110400;q" -q"updateDNSTxt "nsupdate.exe -h%s -s"d;txt;%s;a;txt;%s;s;%s;3110400;q""
Code Length Flags Rcode1 Rcode2 FQDN
81 n 00 00 00
Chapter 8. Security of DHCP and Dynamic DNS 359
8.6 Securing lease allocations
There is no one solution for controlling which clients can obtain a DHCP leasefrom a server, or if they should get a lease at all. However, there are somealternatives available to you:
• You can use classing (option 77) when configuring your address pools.Find an example on classing in Figure 237 on page 326.
Using classes requires you to visit each client and modify theirconfiguration. Once you have your classes established, only devices thatbelong to the class will be allocated a lease.
Be aware that not all clients can make use of option 77.
• At the server, you could allocate IP addresses to individual MACaddresses. This can be very labor intensive, but ensures that onlymachines with known MAC addresses will obtain a lease from a server.
• You may be able to find DHCP server software that allows you to list whichMAC addresses the server will accept. DHCP servers that supportroaming machines may be adapted to such use.
• If you want to ensure that clients are only served by a particular server,you could conceivably install one DHCP server per subnet. This is not agood solution, but if you choose to do this, ensure that your routers do notforward broadcast traffic, and that there is no DHCP Relay Agent on thesubnet.
This solution does not stop any malicious user from connecting to thenetwork and obtaining an IP address.
8.6.1 Preventing access to unauthorized devicesThis would have to be done using a mechanism other than DHCP. DHCPdoes not prevent other clients from using the addresses it is set to hand outnor can it distinguish between a computer's permanent MAC address and oneset by the computer's user. DHCP can impose no restrictions on what IPaddress can use a particular port nor can it control the IP address used byany client. You may be able to use classing to limit leases to only those clientsthat belong to a valid class.
8.6.2 Rogue DHCP serversIt is possible that a malicious or inexperienced user could create problems onyour network by setting up an unofficial DHCP server.
360 Beyond DHCP - Work Your TCP/IP Internetwork with Dynamic IP

The initial problem is that the server could pass out IP addresses alreadybelonging to some other computer. It is possible that you could end up withtwo or more devices ending up with the same IP address. The end result isproblems using the devices. These problems can be intermittent or thedevices may fail entirely, necessitating a restart.
Other problems are possible if the unofficial server gets a device to accept itslease offering, and then passes to the device its own (possibly incorrect)DHCP options. For example, if options 1 or 3 are incorrect, the device maynot be able to communicate with devices outside its own subnet (or in somecases, with devices on the same subnet)
Another scenario to consider is a device that loads its operating system overthe network using TFTP. If this device is directed to load a different file(possibly on a different server), it allows a perpetrator to take over the client.Given that boot parameters are often made to control many different thingsabout the computers' operation and communication, many other scenariosare just as serious.
Note that by using BOOTP you are exposed to the same vulnerabilities.
8.6.3 Connecting to Untrusted Networks - FirewallsThere may come a time when you want to connect your private intranet to anuntrusted network. What is an untrusted network? The biggest example is theglobal public Internet (maybe it is time to have your own local mail or Webserver rather than having your ISP host it for you). Another example may beone of your customers’ networks. Say you are a consulting firm who wants toprovide remote IS services for your clients. One way to do this is to connectyour two corporate networks together. You would not want all your customers,and whomever they have logged onto their networks to have access to allmachines on your private network. You probably want them to have access toyour Web server and not much else. However, you need access to machineson their network so that you can do the appropriate maintenance, upgrades,monitoring, and so forth, to perform your IS duties. There are many moreexamples of why you might want this kind of protected architecture betweenyour private intranet and other untrusted networks. This section will show youthe how-to more than the why do it. Be aware that there are more methods toconnect than the single one we are showing you.
To interconnect safely, you will need a firewall. A firewall is not a panacea forsecurity, and you should not treat it as such. A firewall can help providesecurity, but there are many more issues beyond the firewall to keep in mind.
Chapter 8. Security of DHCP and Dynamic DNS 361
Firewalls provide secure access from a company’s internal TCP/IP network tothe public Internet. Intruders are blocked and cannot access the internalnetwork from the public network without authorization. Internal users,however, can still access resources on the public Internet. In combination withgood security practices, firewalls can help keep private information on yournetwork secure.
Several vendors produce high quality, full-featured firewalls. Examplesinclude Checkpoint Firewall-1 for AIX, NT, HP-UX, and Solaris, IBM Firewallfor AIX and Windows NT, and LanOptics Guardian for OS/2 Warp andWindows NT. Alternatively, many firms opt to contract for firewall services withtheir network providers to avoid having to learn the specialized skills requiredto manage network security.
Most firewalls can support two proxy methods to mask internal client IPaddresses from the Internet. SOCKS is the most modern method, and it canprovide transparent access for all TCP/IP-based applications if the clientoperating system has a SOCKSified protocol stack. OS/2 Warp andWorkSpace On-Demand have built-in SOCKS support; third parties provideSOCKS extensions for Windows 95 and Windows NT clients. Practically allWeb browsers support SOCKS-based firewall access.
Proxy servers can also provide access to public sites through a firewall forinternal clients. However, proxy servers can only handle HTTP, FTP, andGopher protocols, so they are mainly of benefit to Web browsers. Cachingproxy servers, such as the IBM Web Traffic Express, can even cut down onnetwork traffic through the firewall by keeping frequently accessed Webpages and files on the proxy server itself. Web Traffic Express is now part ofthe IBM Websphere Performance Pack.
In principle, a proxy server, such as IBM Web Traffic Express or Domino GoWebserver, can be used as a simple firewall solution when some degree ofsecurity is needed. A proxy server performing that role on Warp Server, forexample, would need two network adapters (one for the internal network andone for the external network) and a proxy server software package installedand running. That server should have an IPGATE OFF command in its\MPTN\BIN\SETUP.CMD file so that TCP/IP traffic will not be forwarded fromone LAN adapter to the other. (Otherwise, an intruder could access internalsystems.) Also, it should not have any daemons running which may exposevulnerabilities. Nor should the proxy server have any LAN services bound tothe adapter handling external network access. Moreover, the proxy servershould not handle any requests from external users. Provided theseconditions can be met, a proxy server can act as a simple firewall. Note,however, that this solution will only keep client identity safe by retrieving
362 Beyond DHCP - Work Your TCP/IP Internetwork with Dynamic IP

information from the Web by proxy, and will not perform any of the advancedfirewall functions to allow you to scrutinize suspect information packets orkeep logs of all traffic passing to and from the Internet.
You may wish to download a 60-day evaluation version of IBM Web TrafficExpress to learn how to set up a caching proxy server. Please visit:
http://www.software.ibm.com/webservers/wte/index.htm
to obtain your own evaluation copy.
Naturally, commercial grade firewall products go well beyond simple proxyserver functions. For a full description of how to set up a firewall and institutegood security management, we recommend consulting a redbook specificallydevoted to firewall security, such as Check Point FireWall-1 on AIX ACookbook for Stand-Alone and High Availability, SG24-5492 or AComprehensive Guide to Virtual Private Networks, Vol.1: IBM Firewall, Serverand Client Solutions, SG24-5201.
8.6.4 Connecting through untrusted networks - VPNA virtual private network (VPN) utilizes IP tunneling to create an extension ofan enterprise's private intranet across a public network such as the Internet.VPNs securely convey information across the Internet connecting remoteusers, branch offices, and business partners into an extended corporatenetwork.
Internet Service Providers (ISPs) offer cost-effective access to the Internet(via direct lines or local telephone numbers), enabling companies to eliminatetheir current, expensive leased lines, long-distance calls, and toll-freetelephone numbers.
A 1997 VPN Research Report, by Infonetics Research, Inc., estimatessavings from 20% to 47% of wide area network (WAN) costs by replacingleased lines to remote sites with VPNs. And, for remote access VPNs,savings can be 60% to 80% of corporate remote access dial-up costs.Additionally, Internet access is available worldwide where other connectivityalternatives may not be available.
The technology to implement these virtual private networks, however, is justbecoming standardized. Some networking vendors today are offeringnon-standards-based VPN solutions that make it difficult for a company toincorporate all its employees and/or business partners/suppliers into anextended corporate network. However, VPN solutions based on Internet
Chapter 8. Security of DHCP and Dynamic DNS 363
Engineering Task Force (IETF) standards will provide support for the fullrange of VPN scenarios with more interoperability and expansion capabilities.
The key to maximizing the value of a VPN is the ability for companies toevolve their VPNs as their business needs change and to easily upgrade tofuture TCP/IP technology. Vendors who support a broad range of hardwareand software VPN products provide the flexibility to meet these requirements.VPN solutions today run mainly in the IPv4 environment, but it is importantthat they have the capability of being upgraded to IPv6 to remaininteroperable with your business partner's and/or supplier's VPN solutions.Perhaps equally critical is the ability to work with a vendor who understandsthe issues of deploying a VPN. The implementation of a successful VPNinvolves more than technology. The vendor's networking experience playsheavily into this equation.
For a more in depth discussion of VPN theory and implementation see theredbooks A Comprehensive Guide to Virtual Private Networks, Volume II: IBMNways Router Solutions, SG24-5234 or A Comprehensive Guide to VirtualPrivate Networks, Volume III: IBM Cross-Platform and Key ManagementSolutions, SG24-5309.
8.6.5 TFTP securityIf you decide to provide BOOTP services, remember that TFTP is inherentlyinsecure. In TCP/IP Version 4.1 for OS/2, you can specify which client IPaddresses have access to the TFTP directory. For example, our\MPTN\ETC\TFTPAUTH file contained the following lines:
C:\TFTPBOOT RO 192.168.6.17
C:\TMP RO 192.168.6.11
which means that the machines with the respective IP addresses have readonly access to the directories listed. Since you can preassign IP addressesbased on the machines MAC address, this is fairly safe.
In TCP/IP Version 4.21 for OS/2 you can specify either the client hostname orIP address when defining access for the TFTP directory. Clients may haveRead-Only Access or Read Write Access depending on the requirements.Please see Figure 58 on page 84, where we configured TFTP access for aspecific IP address. In “BOOTP” on page 79, we describe how to configurethe TFTP Daemon and its security features.
364 Beyond DHCP - Work Your TCP/IP Internetwork with Dynamic IP
Chapter 9. Reliability
"I can’t get on the network!"
Those six words should never be heard by a network manager. Yet withTCP/IP networks, they are, unfortunately, all too common.
This chapter focuses on how to make your TCP/IP network as reliable aspossible, with connections readily available and conflicts eliminated. Inparticular, we'll explain how to create fault tolerant TCP/IP address servers.
If your TCP/IP network does not need to be reliable, you can skip this chapter.
9.1 Battlefield questions
To design a network for reliability, you might think of your network as abattlefield. The goal is to assure that your messenger can travel from one endof the battlefield to another without getting blown up. In between are roads,bridges, highways, airways, rail lines, and other mechanisms used by yoursoldiers to communicate. If one (or more) of these conveyances gets blownup, your courier must still reach the destination.
In designing your network, you should ask yourself a series of What if?questions. What if the router shorts out? What if the DHCP server is buried bya mudslide? What if a remote office satellite link gets blocked because ofsunspots?
Then, when you have examined the What if? questions, there are some morequestions to answer:
• How likely are these events?
• How much reliability do I need? For whom?
• Where can I spend limited dollars to get the highest possible degree ofreliability?
• If a failure does occur, will I know about it? How fast can I respond?
• Do I regularly rehearse how to respond to failures?
• Do I have a written plan of action to handle network outages?
• Am I measuring the frequency and severity of network problems so I candetermine whether service improves?
© Copyright IBM Corp. 1998, 2000 365
If you’re doing your job, these questions never have permanent answers. Youshould always regularly reexamine these issues, even if your network runssmoothly.
9.2 Failure events
Datagrams can only travel across your network as long as every part of thelink works, from end-to-end. Your network can only be as reliable as theweakest link.
9.2.1 Severed connectionsOne obvious possible failure is a severed connection. Wires may be cut,cables inadvertently unplugged, or fiber optics dug up by a backhoe. IP caneasily reroute around such failures, provided another connection is available.An easy way to design redundancy into connections is to simply provide two(or more) separate lines or wires, preferably using different technologies.Another way is to structure the network as one unbroken ring (or circle). Ifone connection in the ring does break, traffic can still flow throughout thenetwork because all points are still connected.
The U.S. Federal Aviation Administration, for example, discovered that theirconnection redundancy failed, and air traffic control services were disruptedfor a time. (Fortunately, no one suffered any injury.) The FAA uses telephonelines to connect various facilities. These facilities each have multiple circuits,and switching equipment can quickly reroute network traffic over backupcircuits. However, the FAA granted a single long distance telephone companythe contract to connect their facilities. When the telephone company’s ownnetwork failed, the FAA had no backup, and the multiple circuits didn’t matter.Now, the FAA has contracted with a second long distance telephone companyto provide backup connections should they be needed.
In another example, PanAmSat’s Galaxy IV satellite suffered a catastrophicfailure in 1998. Amazingly, almost none of the U.S. paging services had anyimmediate backup satellite, so paging services were disrupted for days.Physicians, in particular, were hard hit, because they lost contact withhospitals and could not be called in by pager.
9.2.2 Facility lossFires, floods, earthquakes, hurricanes, power outages, and othercatastrophes can wreak havoc with a network by knocking out crucial servers,routers, bridges, switches, and other devices. Large parts of the Internet, for
366 Beyond DHCP - Work Your TCP/IP Internetwork with Dynamic IP
example, were disabled when the last San Francisco earthquake knockeddown some key buildings.
Many companies do not properly plan for these contingencies. Your networkmay be required to handle these events, so try to avoid placing all your vitalnetwork devices in one location.
An uninterruptable power supply (UPS), with a remote alerting mechanism,can help keep critical network systems up-and-running. However, backupelectrical power should be provided for all critical systems. It’s easy to forgetthat routers, bridges, concentrators, hubs, servers, switches, and even clientsall need backup power if they are to continue operating.
9.2.3 Router outagesSubnets in a TCP/IP network can quickly become cut off from the rest of anetwork if a router fails. These devices should be extremely reliable, andmany network designers choose dedicated pieces of industrial equipmentfrom vendors such as Cisco (or others) instead of less reliable PCs. Mostdedicated routers use special operating systems that help to facilitate theirspeed and reliability. Routers can also be installed in pairs.
9.2.4 DHCP server problemsDHCP can help provide added flexibility and convenience in managing aTCP/IP network. Static addresses can often conflict, locking systems out of anetwork. Also, static configurations can only be changed with a significantamount of work, making it difficult to deal with router outages, changes insubnet structures, and so forth. In other words, DHCP servers can actuallyhelp ensure reliability.
However, if a DHCP server fails, then a TCP/IP network can quickly run intotrouble. DHCP servers must be reliable. (See 9.3, “Redundancy and faulttolerance in DHCP” on page 369, for one way to ensure DHCP serverreliability.)
Failures of DHCP relay agents can also prevent new systems from joining aTCP/IP network. We recommend using DHCP relay agents sparingly. Instead,you may wish to have dedicated routers handle the task with BOOTP relaysas needed. If you do use DHCP relay agents, consider a more fault tolerantsolution, such as the one described later in this chapter.
Chapter 9. Reliability 367

9.2.5 Name server difficultiesWithout name servers, your users will have to resort to numeric IP addresses,effectively making your network useful only to the most savvy technicians.DNS servers must also be active and reachable at all times.
TCP/IP clients, including OS/2 Warp 4 and Windows 95, can readily accepttwo or more name server addresses. If the first name server can’t bereached, the client will attempt to contact the backup name server(s). Werecommend taking advantage of this simple feature and to use two (or more)name servers on your mission critical network.
Dynamic DNS servers, such as OS/2 Warp Server, also help minimizenetwork problems. For example, if an important Web server fails, its namecan be reassigned to another numeric IP address that much more quickly andeasily with a DDNS server. In fact, this secure update may be triggeredautomatically when a server failure has been detected by network alertingtools.
9.2.6 Other server vulnerabilitiesServer failures can prevent users from accessing important applications anddatabases. Technologies such as RAID can help cope with hard disk failures.Many vendors provide fault tolerant server solutions, including IBM. Storagemanagement software, such as the IBM ADSM, help send backup copies offiles across the network to off-site locations.
Yet with all these server technologies, it’s important to remember that mostfailures occur because of software problems. All the RAID storage in theworld won’t help if your server suffers from the dreaded blue screen. Someoperating systems can be vulnerable to failure, especially when intentionallyinduced. For example, in the late 1980s, Robert Morris at Cornell Universitydiscovered a security vulnerability in some versions of UNIX. He used thisvulnerability to spread a worm which quickly infected numerous systemsconnected to the Internet. For several hours, the Internet essentially groundto a halt as system managers attempted to address the problem. Many couldnot even log onto their own servers since the worm multiplied rapidly,consuming practically all the attention of the server’s processor(s). Morerecently, some versions of Windows NT have been vulnerable to attack usingping and/or Telnet.
You should keep close watch on your servers and regularly review softwarebug reports and other information in case others find additional problemswhich may affect you. Antivirus software, such as Norton Antivirus, may
368 Beyond DHCP - Work Your TCP/IP Internetwork with Dynamic IP
detect and eradicate PC viruses on your servers. (Viruses can also causenetwork problems.)
9.2.7 Client failuresMany network problems really relate to the fragility of traditional PC clients,which tend to break down all too often. It isn’t hard to delete an importanticon, modify a critical system file, or otherwise render a traditional PC unableto connect to the network. PC users then have to wait for time consumingrepairs to software, hardware, or both.
Various studies estimate the cost of managing a typical business PC (theannual total cost of ownership) at between $5,000 and $26,000. These costsappear to be rising despite (or perhaps because of) advances in technology.While that annual cost may be perfectly justified for many users, includingprogrammers, engineers, heavy office suite users, hobbyists, and others, thehigh cost is not necessarily attractive to everyone. Yet, the benefits of PCapplications, graphical user interfaces, and online help do make sense.
Many companies in the computing industry recognize these problems and areworking to solve them through network computing. True network computingsolutions provide most or all of the benefits of PC applications with a totalcost of ownership approaching that of a mainframe or UNIX terminal.Examples include network computers from IBM, Sun, Oracle, and others,Java, and the IBM WorkSpace On-Demand for Intel-compatible systems. Oneof the key benefits is that users can log on from any station on the networkand get access to individual documents, applications, and Web pages fromanywhere. Consequently, network computing can improve the reliability of thewhole network by providing access to it more often and with less complexity.
While some users do need the mainframe on a desk that the PC has become,we recommend seriously examining network computing solutions for manyusers. We also recommend implementing network computing solutions, evenfor PC users where they make sense, such as Web-delivered Javaapplications, to help promote reliability within your network.
9.3 Redundancy and fault tolerance in DHCP
DHCP servers must be reliable if the network is to be consistently available.As leases expire or users reboot their workstations, the impact from a DHCPserver outage can spread quickly. Eventually the entire network can grind to ahalt. Naturally, you should choose a reliable, robust and sturdy platform tohost your DHCP services. Thoughtful configuration and consistentadministration of DHCP services in your network are equally important.
Chapter 9. Reliability 369
RFC 2132 is the most current specification for DHCP function. However, itdoes not describe a means by which multiple DHCP servers cancooperatively administer addresses. With network access depending on theDHCP server, there is demand for this type of functionality. There arecurrently several software products on the market that use proprietary meansfor cooperative and redundant DHCP servers.
Additionally, the IETF’s dynamic host configuration work group has been quiteactive recently. They are working to define a failover specification that wouldalso achieve redundancy in DHCP servers. The latest draft available at thiswriting is draft-ietf-dhc-failover-05.txt.
9.3.1 The challenge of fault toleranceDHCP fault tolerance presents some challenges for both the currentlyavailable proprietary methods, as well as the proposed RFC standards.
Fault tolerant DHCP services can be provided in one of two ways:Cooperative redundancy involves multiple servers that assign resources fromthe same pool, concurrently or in a primary/standby configuration.Non-cooperative redundancy uses multiple servers and multiplenon-overlapping pools.
If two or more servers are to administer address from the same pool it isimportant that each is constantly aware of the other’s activities. So to ensurethe reliability of their interconnection, one might place the servers very closetogether in the network. However, this arrangement is in direct conflict withanother goal of redundancy, which encourages us to put some distancebetween redundant resources. With redundant servers far apart, we achievebetter availability to the clients if a network problem occurs.
9.3.2 Cooperative redundancyConsider the following scenario. A medium sized network has two DHCPservers cooperatively assigning configuration to clients. A fault occurs thatresults in a partitioning of the network. We now have two running, butdisconnected, networks. Fortunately, there is a DHCP server on eachnetwork, so at first glance it may seem that our clients are minimallyimpacted.
Now we have two groups of clients and DHCP servers, and a shared addresspool. Prior to the network partitioning, the servers were in constant contact.Each was aware of the other’s address assignment activity. Now thiscommunication can not take place. Depending on how the code is writtenwithin the DHCP servers, one of three things could happen next:
370 Beyond DHCP - Work Your TCP/IP Internetwork with Dynamic IP
• Because they can’t communicate with each other, both DHCP servers stopworking. All users are impacted.
• As a result of predetermined roles, one of the DHCP servers continues tofunction while the other stops. A portion of the users are impacted.
• Both DHCP servers assume that its partner has failed and both continueto assign addresses. No immediate impact to users occurs. But when thenetwork fault is repaired there is significant possibility of duplicate IPaddresses.
9.3.3 Non-cooperative redundancyIf you have plenty of available IP addresses for your network, you can easilyestablish a redundant and fault tolerant environment using multiple butindependent DHCP servers. The simple solution here is to divide an addresspool between multiple servers. That is, each server has a portion of anaddress pool that only it can assign. When one server fails, you lose only theability to assign the addresses it owns. As long as clients have connectivity toanother server, they can get a valid configuration.
This arrangement provides redundancy, yet does not require the DHCPservers to have knowledge of each other’s activity. Because of this they canbe advantageously positioned in the network and continue to function duringconnectivity faults. Of course, the downside to this method is the number of IPaddresses required.
The amount of extra addresses needed can be determined by dividing thetotal number of available addresses by the number of DHCP servers. Forexample, if you are assigning 100 IP addresses using four DHCP servers, 25addresses should be reserved for redundancy. A maximum 75 addresses maybe active at one time.
9.3.4 Standby DHCP server arrangementWhile it’s certainly possible to purchase packaged fault tolerant solutions,such as Vinca’s StandbyServer for OS/2 Warp(http://www.vinca.com/products/os2/os2_sbs.html) or an IBM AIX cluster (see9.4, “AIX features” on page 380), we thought it would be helpful to show asimple standby server solution using the features built into OS/2 Warp Serverfor e-business and TCP/IP Version 4.21 for OS/2. By understanding thebasics, you can quickly graduate to more sophisticated solutions if needed.
9.3.4.1 PrerequisitesTo implement a fault tolerant DHCP network you should have:
Chapter 9. Reliability 371

• Two systems running OS/2 Warp Server for e-business (with TCP/IP 4.21and its DHCP server software installed). One of these systems, thebackup, may be an older, slower 486, as long as it has just enoughperformance to keep the network up and running on an emergency basisshould the primary server fail.
• The backup DHCP server can, itself, be a DHCP client if it’s on the samesubnet as the primary. Otherwise, we assume your backup DHCP serverhas a static IP address assigned on another subnet.
• With multiple subnets, your router(s) should include active BOOTP relayagent(s), so that DHCP requests from clients will be handled by either theprimary or backup DHCP server as needed.
• For testing purposes, you may wish to have one DHCP client, of any type,available on the network.
We also assume that your primary DHCP server is up and running correctlyand that Boot Manager is installed.
Although optional, we recommend also installing OS/2 Warp Server’sNetfinity services (available through IBM Software Choice), at least on yourbackup server, to process alerts so that you can be notified if the primaryDHCP server fails.
9.3.4.2 Step-by-step procedure1. Enable REXECD and FTPD on the primary server. If REXECD is running
on the primary server, tasks can be started on the server from a remotesystem. Likewise, if FTPD is running on the primary server, then files canbe transferred to/from the server across the network using FTP. Naturally,you should password protect both of these services.
372 Beyond DHCP - Work Your TCP/IP Internetwork with Dynamic IP
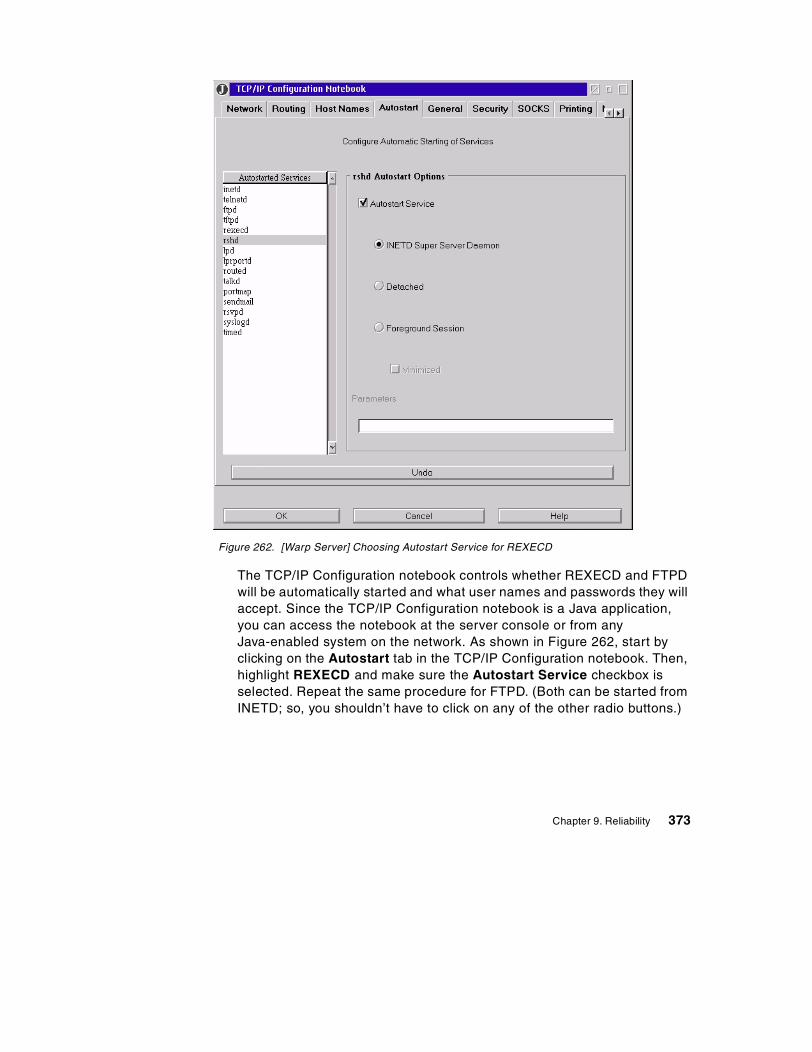
Figure 262. [Warp Server] Choosing Autostart Service for REXECD
The TCP/IP Configuration notebook controls whether REXECD and FTPDwill be automatically started and what user names and passwords they willaccept. Since the TCP/IP Configuration notebook is a Java application,you can access the notebook at the server console or from anyJava-enabled system on the network. As shown in Figure 262, start byclicking on the Autostart tab in the TCP/IP Configuration notebook. Then,highlight REXECD and make sure the Autostart Service checkbox isselected. Repeat the same procedure for FTPD. (Both can be started fromINETD; so, you shouldn’t have to click on any of the other radio buttons.)
Chapter 9. Reliability 373
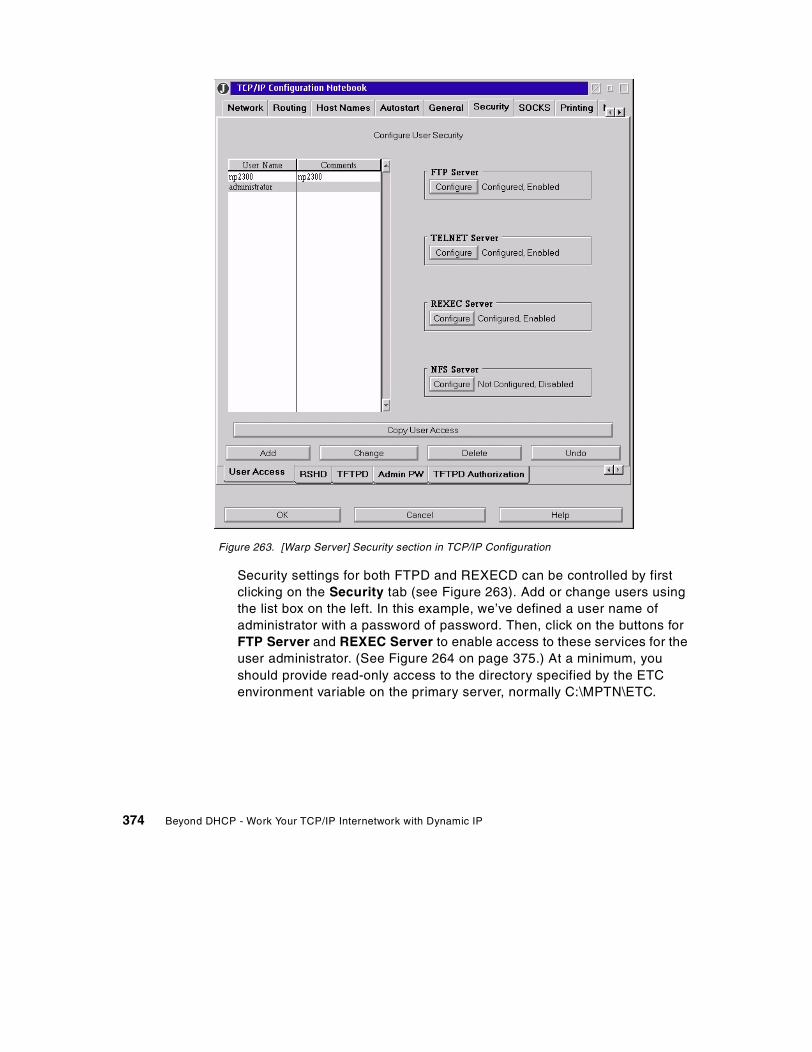
Figure 263. [Warp Server] Security section in TCP/IP Configuration
Security settings for both FTPD and REXECD can be controlled by firstclicking on the Security tab (see Figure 263). Add or change users usingthe list box on the left. In this example, we’ve defined a user name ofadministrator with a password of password. Then, click on the buttons forFTP Server and REXEC Server to enable access to these services for theuser administrator. (See Figure 264 on page 375.) At a minimum, youshould provide read-only access to the directory specified by the ETCenvironment variable on the primary server, normally C:\MPTN\ETC.
374 Beyond DHCP - Work Your TCP/IP Internetwork with Dynamic IP

Figure 264. [Warp Server] Configuring REXECD options
When you’ve finished making these changes, close the TCP/IPConfiguration notebook, save your changes, and restart the server.
When the server restarts, you may wish to verify that REXECD and FTPDare operating properly by accessing the server using FTP and REXECcommands at a client.
2. Copy FAILSAFE.CMD to the backup server and add to its Startup folder.FAILSAFE.CMD runs on the backup server and continuously monitors theprimary. You should add a program object to the backup server’s Startupfolder to automatically run FAILSAFE.CMD each time the backup serverboots.
Figure 265 and Figure 266 on page 377 display the REXX programFAILSAFE.CMD.
Chapter 9. Reliability 375
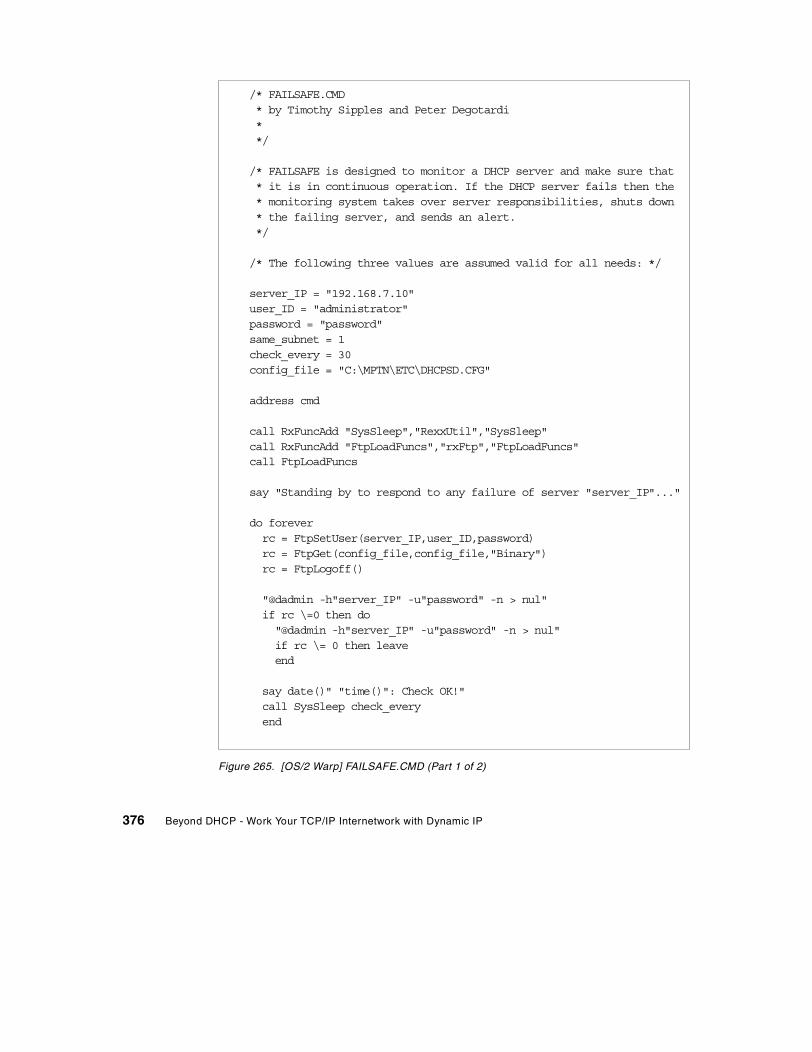
Figure 265. [OS/2 Warp] FAILSAFE.CMD (Part 1 of 2)
/* FAILSAFE.CMD* by Timothy Sipples and Peter Degotardi**/
/* FAILSAFE is designed to monitor a DHCP server and make sure that* it is in continuous operation. If the DHCP server fails then the* monitoring system takes over server responsibilities, shuts down* the failing server, and sends an alert.*/
/* The following three values are assumed valid for all needs: */
server_IP = "192.168.7.10"user_ID = "administrator"password = "password"same_subnet = 1check_every = 30config_file = "C:\MPTN\ETC\DHCPSD.CFG"
address cmd
call RxFuncAdd "SysSleep","RexxUtil","SysSleep"call RxFuncAdd "FtpLoadFuncs","rxFtp","FtpLoadFuncs"call FtpLoadFuncs
say "Standing by to respond to any failure of server "server_IP"..."
do foreverrc = FtpSetUser(server_IP,user_ID,password)rc = FtpGet(config_file,config_file,"Binary")rc = FtpLogoff()
"@dadmin -h"server_IP" -u"password" -n > nul"if rc \=0 then do"@dadmin -h"server_IP" -u"password" -n > nul"if rc \= 0 then leaveend
say date()" "time()": Check OK!"call SysSleep check_everyend
376 Beyond DHCP - Work Your TCP/IP Internetwork with Dynamic IP
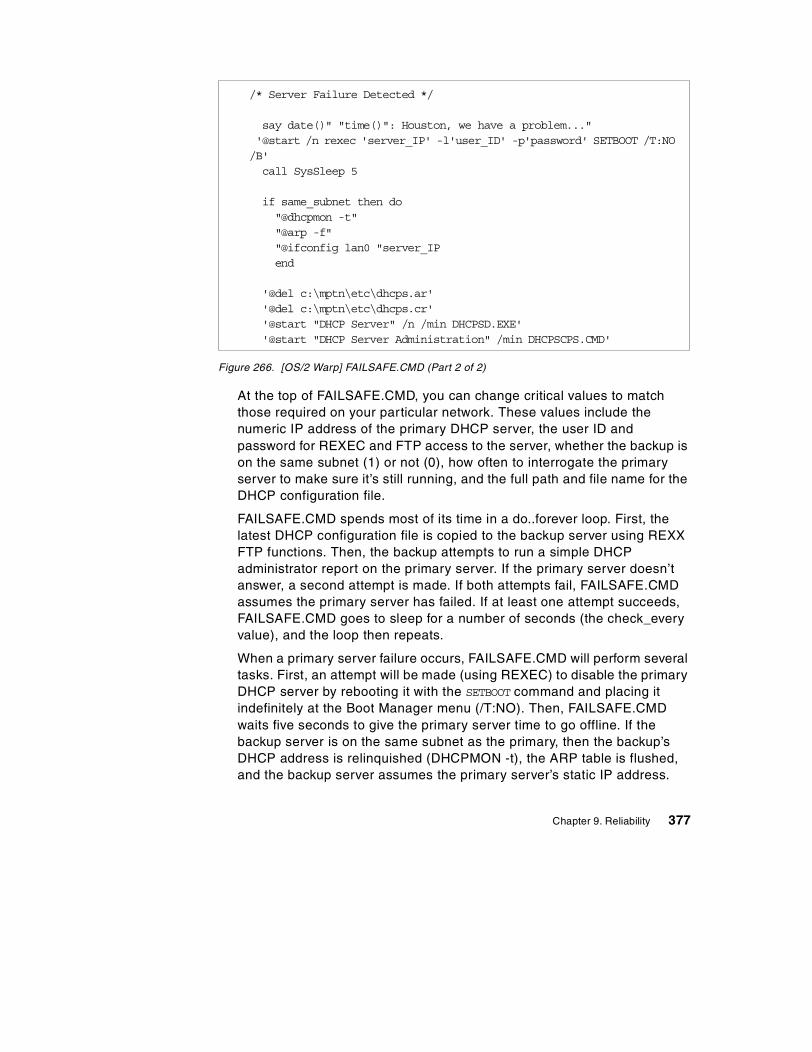
Figure 266. [OS/2 Warp] FAILSAFE.CMD (Part 2 of 2)
At the top of FAILSAFE.CMD, you can change critical values to matchthose required on your particular network. These values include thenumeric IP address of the primary DHCP server, the user ID andpassword for REXEC and FTP access to the server, whether the backup ison the same subnet (1) or not (0), how often to interrogate the primaryserver to make sure it’s still running, and the full path and file name for theDHCP configuration file.
FAILSAFE.CMD spends most of its time in a do..forever loop. First, thelatest DHCP configuration file is copied to the backup server using REXXFTP functions. Then, the backup attempts to run a simple DHCPadministrator report on the primary server. If the primary server doesn’tanswer, a second attempt is made. If both attempts fail, FAILSAFE.CMDassumes the primary server has failed. If at least one attempt succeeds,FAILSAFE.CMD goes to sleep for a number of seconds (the check_everyvalue), and the loop then repeats.
When a primary server failure occurs, FAILSAFE.CMD will perform severaltasks. First, an attempt will be made (using REXEC) to disable the primaryDHCP server by rebooting it with the SETBOOT command and placing itindefinitely at the Boot Manager menu (/T:NO). Then, FAILSAFE.CMDwaits five seconds to give the primary server time to go offline. If thebackup server is on the same subnet as the primary, then the backup’sDHCP address is relinquished (DHCPMON -t), the ARP table is flushed,and the backup server assumes the primary server’s static IP address.
/* Server Failure Detected */
say date()" "time()": Houston, we have a problem..."'@start /n rexec 'server_IP' -l'user_ID' -p'password' SETBOOT /T:NO/B'call SysSleep 5
if same_subnet then do"@dhcpmon -t""@arp -f""@ifconfig lan0 "server_IPend
'@del c:\mptn\etc\dhcps.ar''@del c:\mptn\etc\dhcps.cr''@start "DHCP Server" /n /min DHCPSD.EXE''@start "DHCP Server Administration" /min DHCPSCPS.CMD'
Chapter 9. Reliability 377

Finally, FAILSAFE.CMD deletes any old DHCP database files (DHCPS.ARand DHCPS.CR) then starts both DHCPSD.EXE (the DHCP server) andDHCPSCPS.CMD (the DHCP administration access task).
At some point in the primary server failure handling in this REXX script,you should add one or more lines to generate an alert to make sure youare notified by pager, e-mail, or autodialing modem that your primaryDHCP server has failed. Netfinity’s Alert Manager can help with this task.
Note that FAILSAFE.CMD generates on screen status messagesperiodically. You can log these status messages by redirecting the screenoutput of FAILSAFE.CMD to a file. For example, you could type in thecommand:
FAILSAFE > DHCPBACK.LOG
to capture these messages in the file DHCPBACK.LOG.
Although this approach employs relatively simple TCP/IP technology, itshould help provide some added reliability to your network.
9.3.4.3 Technical caveats• We have not included any mechanism for monitoring the backup DHCP
server to make sure it does not fail. Failure of the backup could leave yournetwork vulnerable, and you should be alerted should such a failure occur.You may wish to use Netfinity services on the backup server as amonitoring tool.
• We discovered that the backup server will not always start correctly if ituses the full database from the primary DHCP server. Therefore, the fulldatabase is not copied by FAILSAFE.CMD.
• Since we are not copying the full DHCP database from the primary serverto the backup, new clients attaching to the network when the backup hastaken over may receive an IP address assignment already in use byanother client. The client may have to reject several offers from the backupDHCP server until an available address is found. This process can delayfinal attachment to the network for new clients while the backup server isin charge.
• FAILSAFE.CMD does not include some necessary error checking. Forexample, you may wish to add error checking to the FTP file transfer. Wepurposely kept FAILSAFE.CMD short in order to more clearly demonstratethe basic concepts.
• A router or network connection failure, even a temporary one, could causethe backup DHCP server to activate. Therefore, it’s possible that both theprimary and backup DHCP servers could be simultaneously active. (If the
378 Beyond DHCP - Work Your TCP/IP Internetwork with Dynamic IP
primary DHCP server suddenly becomes unreachable, the SETBOOT
command will not be received by the primary, and it won’t shut down.) Thatshouldn’t cause any immediate problem, particularly if the networkconnection between the two subnets remains broken. Again, the goal issimply to preserve reasonable network access until the primary failure canbe remedied at a more convenient time.
• We have not included a standby DDNS server example, because werecommend that you simply provide each client (via DHCP) the IPaddresses of at least two name servers. Then, clients will automaticallyuse whichever name server is active. If for some reason you do need tomonitor your DDNS server(s), then you can use techniques similar tothose presented in this section, substituting a NSLOOKUP command forDADMIN.
• We recommend that you separate the primary and backup DHCP serversby some distance, perhaps placing them in separate offices. A fire, flood,or other mishap may only affect one of the two servers if they are not bothin the same place.
• Your DHCP servers, particularly your backup server, should be secured ina locked area. FAILSAFE.CMD contains the user name and password foraccessing your primary server in plain text. If an unauthorized persongains access to FAILSAFE.CMD, you could expose your primary DHCPserver to attack. If you cannot secure your backup DHCP server, youshould find some other way of providing FAILSAFE.CMD with the username and password information it needs to access the primary server.
• You may wish to relocate the FTP transfer of DHCPCD.CFG to a REXXscript running on the primary server and push the file to the backup serverperiodically instead of pulling it. That way the primary server can transmita new copy of the file only when it changes, cutting down on networktraffic. The backup server would then be running FTPD instead, furtherreducing the load on the primary server. Just make sure you manuallycopy the latest DHCPCD.CFG to the backup server before you startrunning FAILSAFE.CMD for the first time.
You could also use periodic FTP pushes to verify whether the backupserver has failed or not, then generate an alert at the primary server if thefile transfer does not succeed.
• One backup DHCP server could conceivably monitor more than oneprimary DHCP server with some careful additions to FAILSAFE.CMD.
• Resetting the IP address of the backup server to match the address of theprimary server can be dangerous if the primary server has not actuallyfailed. If your network hardware supports it, you may wish to have
Chapter 9. Reliability 379
FAILSAFE.CMD literally disable the port used by the primary server in theevent a failure is detected, to make it impossible for the primary server torejoin the network.
9.4 AIX features
You may wish to opt for AIX-based servers as your need for a large, reliable,and stable network continues to grow.
IBM AIX can be made fault-tolerant by including clustering technology, suchas High Availability Cluster Multi-Processing (HACMP). The redbook titledHACMP Enhanced Scalability Handbook, SC24-5328 is a good source ofinformation on this technology.
An example implementation of HACMP would include two AIX systemsrunning HACMP. Both have access to shared disks that contain DHCP andDNS data files. HACMP failover scripts on the secondary machine are writtento start DHCP and DNS servers in the event of a failure on the primarysystem.
9.5 Shadow IPserver features
Shadow IPserver is a product that is available as a software-only solution, orcombined with a rugged, fault tolerant hardware platform. IPserver can beexpanded into a cluster of peer servers to implement redundant DHCP,dynamic DNS, and NBNS services. The IPserver peers are independentservers that may be installed alongside each other or in different locations.Each server coordinates its activities with the other across the network.
The IPserver cluster architecture allows real-time data replication. Fullyredundant data distribution to multiple IPservers provides high reliability,tolerance of hardware failure, and the ability to balance the client load acrossmultiple servers. Please refer to Part 6.4, “Dynamic IP with NetworkTeleSystems Shadow IPserver” on page 293 for more information on ShadowIPserver.
380 Beyond DHCP - Work Your TCP/IP Internetwork with Dynamic IP

Chapter 10. Performance
If you're looking to boost the performance and capacity of your TCP/IPnetwork, this chapter should help. This chapter examines how to set leasetimes and minimize broadcast traffic, among other issues.
10.1 Leases
The lease time implemented in your network will vary depending on how yournetwork is configured, and by the nature of the clients that are attached to it.Here, we examine how you could determine what the lease time should be onyour network.
The lease time is the time that a DHCP client has to use the parameterssupplied to it by a DHCP server. The time itself is one of the parameterspassed. More information on the mechanics of DHCP leases can be found inSection 3.2, “The DHCP lease” on page 114.
10.1.1 Choosing a lease timeThere are no hard and fast rules for setting lease times. They can vary fromsite to site according to usage patterns, goals, service levels for the DHCPservers, and WAN stability.
In determining your optimum lease time, ask yourself these questions:
• Do I have more users than IP addresses?
For example, you may have many mobile users coming and going fromyour location. Each user that leaves your site can still have a valid lease.
• How many clients do I have?
If you have a fairly short lease time and a large number of clients, you maybegin to impact the performance of your DHCP server.
• How long will it take to repair or restart a failed DHCP server?
If a DHCP server fails, clients trying to obtain a lease will encounterproblems. Clients already active will have problems when their T2 timerexpires.
• Will I need to change IP parameters at the client?
Are there parameters that are likely to change that are needed by theclients to work correctly, such as a new default router?
• How reliable are WAN connections?
© Copyright IBM Corp. 1998, 2000 381
The affects of a WAN outage on a client are the same as if the DHCPserver itself has failed. The server may experience heavy loads when afailed WAN connection is reestablished and all the remote clients try toobtain leases.
• Will I need to reclaim addresses?
Will you need to get back IP addresses so they can be statically assignedto new hosts, such as a new router.
10.1.1.1 Example lease timesHere’s a list of example lease times, with the possible reasons you could usethem:
15 minutes Allows you to maximize available addresses when you have adynamic environment with lots of mobile users and, therefore, ashortage of IP addresses.
6 hours Allows you time to repair a failed DHCP server. (three hours)
12 hours Allows you to distribute new IP parameters and reclaim an IPaddresses overnight.
24 hours Allows clients to continue working in the morning if a DHCPserver has failed overnight.
3 days Appears to be Microsoft’s default value, so is used by manylocations.
6 days Allows clients to continue working on Monday morning if aDHCP server has failed over a weekend.
1 year If a client has not used the address for a year, they haveprobably left, and the address can be reused.
10.1.2 DHCP server differencesBased on the lease time that you specify, the DHCP server automaticallycalculates a renewal interval and a rebinding interval as suggested by theDHCP RFC. The renewal and rebinding options are described more fully in3.2.1, “Getting the lease” on page 114.
Make the lease time twice as long as any potential outage of the DHCPserver.
Remember that the longer the lease, the longer it takes for changes inDHCP options to reach the clients.
Recommendation
382 Beyond DHCP - Work Your TCP/IP Internetwork with Dynamic IP
Some server implementations allow greater control over these intervals byletting you specify them individually. If your server supports this function, yougain a greater latitude in updating client configuration. For example, you canspecify a lengthy total lease time to protect your clients from DHCP serveroutages, yet specify a lease renewal time that is much shorter, so thatupdated configuration options are distributed in a more timely fashion.
In our LAB environment we found that AIX, OS/2 and ShadowIP DHCPservers allowed us the flexibility to specify the three intervals independently.The Microsoft NT DHCP server only allows entry of the total lease time. Itcalculates the values for the renewing and rebinding options at 50% and87.5% of the total lease time, respectively.
10.1.3 Multiple leasesWith two or more DHCP servers on a network, clients that are moved around(for example, laptops) can end up with multiple and redundant leases.Consider a local network with two DHCP servers and a remote site alsoserved by those servers. A mobile client initially connects to the local networkand receives a lease from one of the two servers. It is then moved to theremote network without releasing the lease. Because this new location is on adifferent subnet, the client’s current IP address is not appropriate. It will thenreceive another address from the server, while still holding a valid lease onthe first address.
If the client is then moved back to the original network, it will attempt to usethe IP address from the second lease, which is not valid on this subnet. Atthis point the server might offer the client its original address, or the clientcould get a lease on a third address.
This problem can be eased by using only one DHCP server per network orlocation and also by using short lease times. If in your network, DHCPservers are maintained by individual departments, offices, or individuals withtheir own small address pools, they can find that their addresses are beingused by any device on the LAN that has been configured to use DHCP.
Another potential problem with using a decentralized method of DHCPadministration is the way some clients behave when switched betweennetworks. In Chapter 3 we discussed a scenario where a Windows client tookover 15 minutes to get a lease after being moved between networks. Pleaserefer to Part 3.4.4, “DHCPNAK” on page 126 for details of this commonproblem.
Chapter 10. Performance 383
In our test network we implemented a DHCP solution that was able todifferentiate our desktop clients from our laptop clients and configured thelaptops with much shorter lease times. Please refer to Part 6.4.6, “DHCPpools” on page 307 for information on our experience with the ShadowIPserver.
10.2 Monitoring and troubleshooting
Most TCP/IP implementations come with a few standard tools that can beused in monitoring and debugging your IP network. Alternatively, your coulduse third-party applications and dedicated analyzers to do this morethoroughly.
The following commands are included with most implementations of TCP/IPand can be used to check connectivity. The commands have beendocumented using TCP/IP Version 4.21 for OS/2. Their usage may vary withother operating systems.
10.2.1 The PING commandBy sending ICMP echo requests to specific IP addresses, PING (short forPacket Internet Groper) is used to verify connections between hosts.
Where:
-? Displays the syntax of the PING command
-d Turn debug on
-r Bypass the normal routing tables
-v Verbose output. Include all ICMP packets received
host A host’s name, IP address or broadcast address
size The size of data portion of the packet
packets The number of Echo Request packets to send
For example:
[C:\]PING banquet 56 2PING banquet.AUSTIN.COOKING.NET: 56 data bytes64 bytes from 192.168.6.1: icmp_seq=0. time=0. ms
PING [-?drv] host [size [packets]]
PING Syntax
384 Beyond DHCP - Work Your TCP/IP Internetwork with Dynamic IP
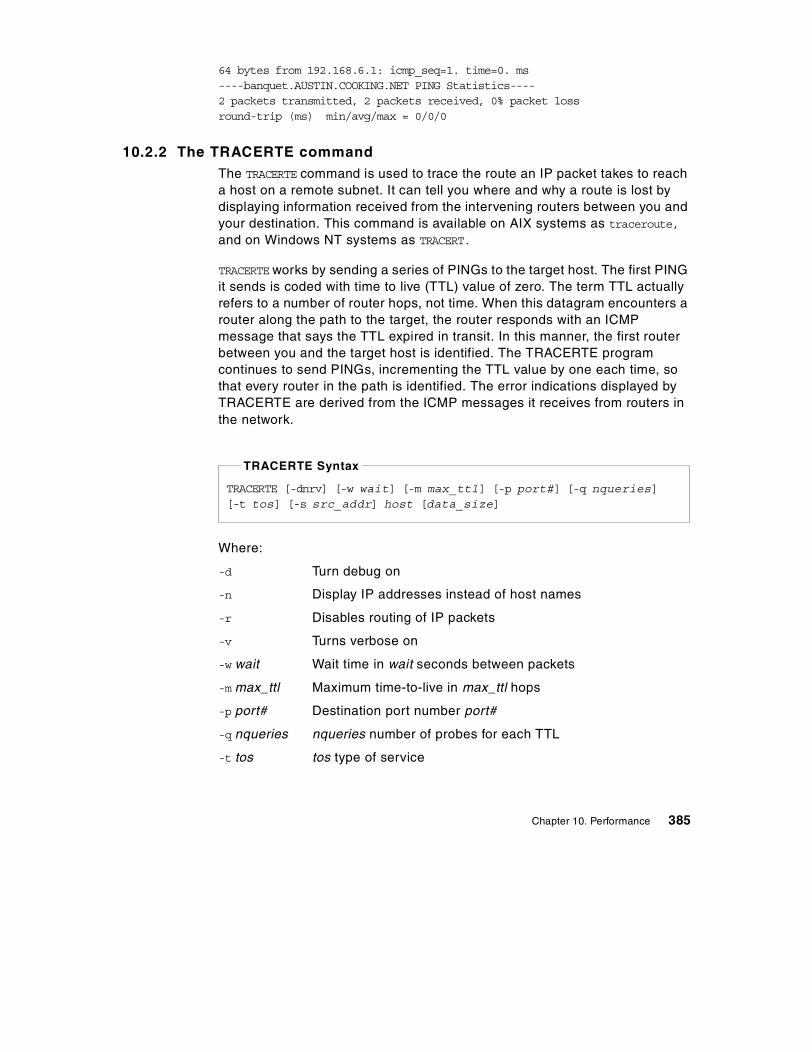
64 bytes from 192.168.6.1: icmp_seq=1. time=0. ms----banquet.AUSTIN.COOKING.NET PING Statistics----2 packets transmitted, 2 packets received, 0% packet lossround-trip (ms) min/avg/max = 0/0/0
10.2.2 The TRACERTE commandThe TRACERTE command is used to trace the route an IP packet takes to reacha host on a remote subnet. It can tell you where and why a route is lost bydisplaying information received from the intervening routers between you andyour destination. This command is available on AIX systems as traceroute,
and on Windows NT systems as TRACERT.
TRACERTEworks by sending a series of PINGs to the target host. The first PINGit sends is coded with time to live (TTL) value of zero. The term TTL actuallyrefers to a number of router hops, not time. When this datagram encounters arouter along the path to the target, the router responds with an ICMPmessage that says the TTL expired in transit. In this manner, the first routerbetween you and the target host is identified. The TRACERTE programcontinues to send PINGs, incrementing the TTL value by one each time, sothat every router in the path is identified. The error indications displayed byTRACERTE are derived from the ICMP messages it receives from routers inthe network.
Where:
-d Turn debug on
-n Display IP addresses instead of host names
-r Disables routing of IP packets
-v Turns verbose on
-w wait Wait time in wait seconds between packets
-m max_ttl Maximum time-to-live in max_ttl hops
-p port# Destination port number port#
-q nqueries nqueries number of probes for each TTL
-t tos tos type of service
TRACERTE [-dnrv] [-w wait] [-m max_ttl] [-p port#] [-q nqueries][-t tos] [-s src_addr] host [data_size]
TRACERTE Syntax
Chapter 10. Performance 385
-s src_addr Source IP address src_addr
host A host’s name or IP address
data_size The number of bytes of data used
For example:
[C:\]tracerte 192.168.7.10traceroute to 192.168.7.10 (192.168.7.10), 30 hops max, 38 byte packets1 192.168.6.1 (192.168.6.1) 0 ms 0 ms 10 ms2 brie (192.168.7.10) 0 ms 0 ms 0 ms
TRACERTE interprets ICMP messages received from routes and displays themin using these indicators:
! Port unreachable, connection refused
!N Network unreachable, no route to host
!H Host unreachable, no route to host
!P Protocol unreachable, connection refused
!F Message too big
!S No route to host
For example:
[C:\]tracerte 192.168.10.1traceroute to 192.168.10.1 (192.168.10.1), 30 hops max, 38 byte packets1 192.168.6.1 (192.168.6.1) 10 ms 10 ms 0 ms2 192.168.6.1 (192.168.6.1) 0 ms !H 0 ms !H 0 ms !H
This indicates that our default router, 192.168.6.1, has no routing informationto reach the host 192.168.10.1. While these indicators are somewhat cryptic,understanding their meaning can be quite valuable to your problemdetermination efforts. They give you a perspective of the network from aviewpoint within a router that may be many hops away.
10.2.3 The IPTRACE commandThe IPTRACE command is used to trace all packets received by and sent from anetwork interface. All data collected will be written to the IPTRACE.DMP filein the current directory. Depending on the platform, the dump file may bestored in a non-editable format. In OS/2, the IPFORMAT command is used toview the dump file. The text output from the IPFORMAT can be redirected to afile. Additionally, entering the command IPFORMAT -X will produce a binary filein Network General Sniffer format.
386 Beyond DHCP - Work Your TCP/IP Internetwork with Dynamic IP
In AIX, the IPREPORT command is used to examine the trace data.
Where:
-i Specifies that only IP packets should be traced
interface Specifies an interface to be traced
10.2.4 The ARP commandARP is a mechanism to dynamically map IP addresses to the MAC addressesof other network adapters in the same local subnet and then cache them inmemory for future reference. You can use the arp command to display andmanually maintain the ARP cache.
hostname A host’s name or IP address
-? Show the online help
-a Print all arp table entries
-f Flush all arp table entries
-d Delete arp table entry for the host hostname
-s Add arp table entry for the host hostname
temp Time out this entry if it is not used
pub Reply for other host
10.2.5 The NETSTAT commandThe NETSTAT command displays the network status of the local workstation. Itsupplies information about routing, TCP connections, UDP statistics, IPstatistics, memory buffers, and sockets.
IPTRACE [-i] [interface]
IPTRACE syntax
arp [-afds?] hostname [hardware_addr] [temp|pub]
arp syntax
NETSTAT [ -? ] [-acghilmnprstu]NETSTAT syntax
Chapter 10. Performance 387
Where:
a Displays addresses of network interfaces
c Displays ICMP statistics
g Displays IGMP statistics
h Displays the resolved host name
i Displays IP statistics
l Displays information about the socket that is listening
m Displays information about memory buffer usage
n Displays information about LAN interfaces
p Displays the contents of the ARP table
r Displays the routing tables
s Displays information about sockets
t Displays information about TCP connections
u Displays UDP statistics
For example, to dump the current routing table:
[C:\]NETSTAT -rdestination router netmask metric flags intrf
default 192.168.6.1 0.0.0.0 0 UGP lan0127.0.0.1 127.0.0.1 255.255.255.255 0 UH lo192.168.6 192.168.6.10 255.255.255.0 0 UC lan0192.168.7.10 192.168.6.1 255.255.255.255 0 UGHW3 lan0192.168.9.10 192.168.6.4 255.255.255.255 0 UGHDM lan0
10.2.6 The HOST commandThe HOST command is used to ask a DNS server to resolve hostnames to IPaddresses and vice versa.
hostname A host’s name or IP address.
The HOST command is a quick and easy tool to use on OS/2 and AIX systems,but is not available in the Windows NT environment. Here you can use theNSLOOKUP command.
HOST <hostname>
HOST syntax
388 Beyond DHCP - Work Your TCP/IP Internetwork with Dynamic IP
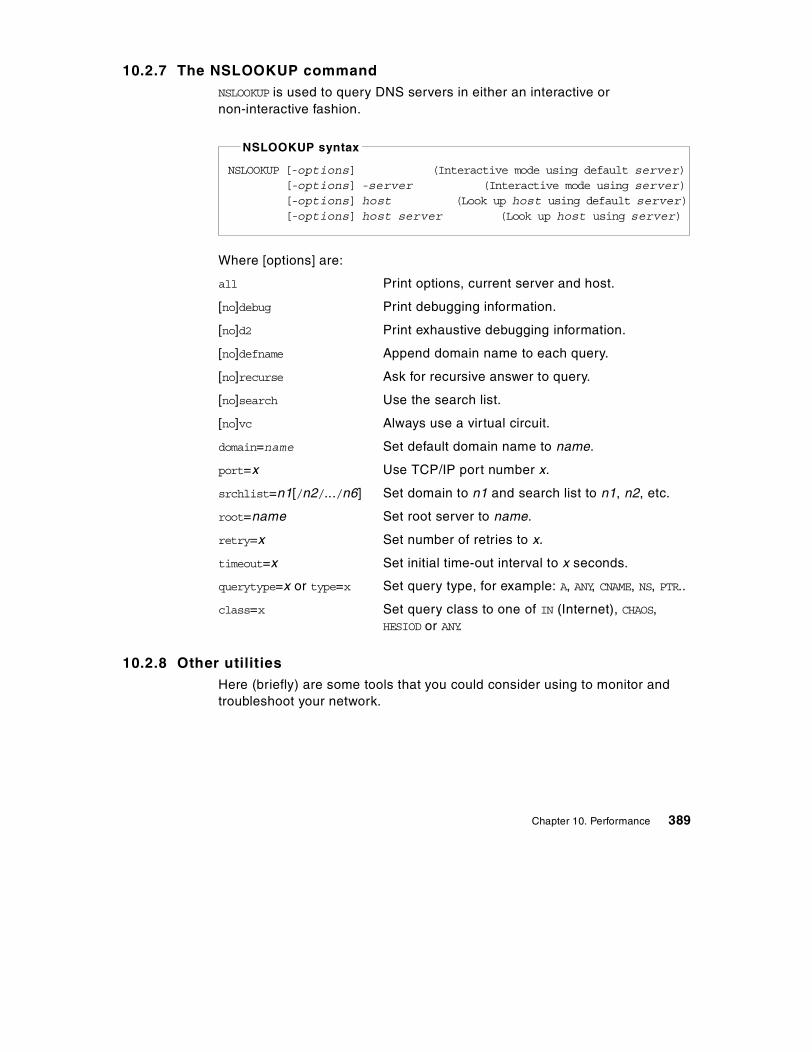
10.2.7 The NSLOOKUP commandNSLOOKUP is used to query DNS servers in either an interactive ornon-interactive fashion.
Where [options] are:
all Print options, current server and host.
[no]debug Print debugging information.
[no]d2 Print exhaustive debugging information.
[no]defname Append domain name to each query.
[no]recurse Ask for recursive answer to query.
[no]search Use the search list.
[no]vc Always use a virtual circuit.
domain=name Set default domain name to name.
port=x Use TCP/IP port number x.
srchlist=n1[/n2/.../n6] Set domain to n1 and search list to n1, n2, etc.
root=name Set root server to name.
retry=x Set number of retries to x.
timeout=x Set initial time-out interval to x seconds.
querytype=x or type=x Set query type, for example: A, ANY, CNAME, NS, PTR..
class=x Set query class to one of IN (Internet), CHAOS,HESIOD or ANY.
10.2.8 Other utilitiesHere (briefly) are some tools that you could consider using to monitor andtroubleshoot your network.
NSLOOKUP [-options] (Interactive mode using default server)[-options] -server (Interactive mode using server)[-options] host (Look up host using default server)[-options] host server (Look up host using server)
NSLOOKUP syntax
Chapter 10. Performance 389
10.2.8.1 NetfinityNetfinity Manager and Client Services for Netfinity Manager is not a tool foradministering TCP/IP. Rather, it is a systems management tool that allowsyou to monitor, manage and configure both local and remote systems.
Netfinity can be used over a variety of transport protocols such as TCP/IP,SNA and NetBIOS.
The Systems Monitor Service, part of Netfinity, allows you to collect statisticsfrom active systems. For example CPU, memory, disk and print usage can bemonitored. You can also use the Systems Monitor Service to collect TCP/IPstatistics.
See Appendix B.3, “Netfinity” on page 447 for information regarding runningNetfinity in a DHCP environment.
10.2.8.2 Third-party alternativesThere are many third-party network monitoring and analyzing tools available.These can range from software that can be run on existing PCs on thenetwork, to dedicated devices that attach directly to the network.
Current examples include:
• Fluke Corporation supplies several diagnostic solutions such asOneTouch, Enterprise LANMeter and Network Inspector.
• Hewlett Packard has its NetMetrix range.
• Network Associates has available the software-based Sniffer Basic andthe dedicated Sniffer Pro LAN.
10.3 Troubleshooting TCP/IP networks
Sooner or later, you will probably encounter problems on your network. Howquickly you can resolve these problems depends on your approach totroubleshooting. Here, we examine ways to debug your network using thecommands that come standard with most implementations of TCP/IP.
10.3.1 Prerequisites for troubleshootingIf you encounter connectivity problems with your network, it may take manysteps to find the problem, and hence the solution. When debugging a networkproblem, keep the following prerequisites in mind.
390 Beyond DHCP - Work Your TCP/IP Internetwork with Dynamic IP
10.3.1.1 Understand TCP/IPTo solve an IP related problem, it goes without saying that you have to have ahigh understanding of TCP/IP. TCP/IP is an open, multi-vendor protocol. Assuch, there is a lot of publicly available information – see your localbookstore.
10.3.1.2 Know your environmentAs a network administrator, you should know what equipment and systemshave been placed onto the network. Not only should you know whatequipment is out there, you should know and understand their role within thegreater whole.
10.3.1.3 Any information can helpAny symptom can be a clue to currently occurring problem, even if at firstglance it appears to be unrelated.
10.3.1.4 Don’t believe what people sayDon’t believe what people have told you until it has been verified. If thenetwork is able to provide telnet connectivity, it is a good way to get reliableinformation from a remote portion of your network.
10.3.1.5 You can be limited by the person on-siteYour current skill level can be attenuated by that of the person on the otherend of the phone. Unless you can talk them though your diagnosticprocedures, diagnosis may not start until you can actually get on-site.
10.3.1.6 Don’t hesitate to ask for helpToday’s network environment is increasingly complex and constantlychanging. Network administration and support staff are faced with the need toconstantly refresh their skills while being responsible for day-to-day issues aswell. If you encounter a network issue that is consuming an excessive amountof your resources, you may benefit from calling in some expertise fromoutside of your organization. IBM Global Services for example, can offerassistance from skilled and experienced professionals in a wide variety ofnetworking areas. The URL for the IBM Global Services Web site is:http://www.ibm.com/services/
10.3.2 A bottom-up approachBecause protocols are divided into several layers, and each layer’sconnectivity depends on the layer beneath it, it is therefore reasonable tostart diagnosing network problems from the bottom and work your way up.
Chapter 10. Performance 391
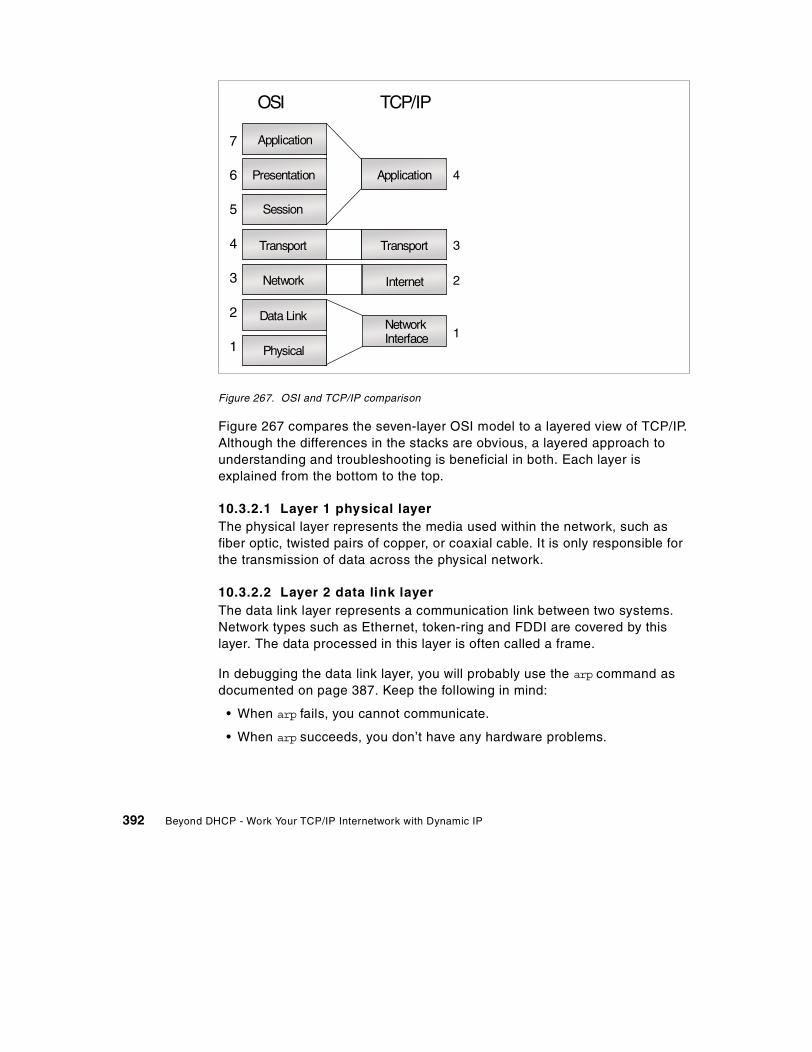
Figure 267. OSI and TCP/IP comparison
Figure 267 compares the seven-layer OSI model to a layered view of TCP/IP.Although the differences in the stacks are obvious, a layered approach tounderstanding and troubleshooting is beneficial in both. Each layer isexplained from the bottom to the top.
10.3.2.1 Layer 1 physical layerThe physical layer represents the media used within the network, such asfiber optic, twisted pairs of copper, or coaxial cable. It is only responsible forthe transmission of data across the physical network.
10.3.2.2 Layer 2 data link layerThe data link layer represents a communication link between two systems.Network types such as Ethernet, token-ring and FDDI are covered by thislayer. The data processed in this layer is often called a frame.
In debugging the data link layer, you will probably use the arp command asdocumented on page 387. Keep the following in mind:
• When arp fails, you cannot communicate.
• When arp succeeds, you don’t have any hardware problems.
7
6
5
4
3
2
1
ApplicationPresentation
Session
Transport
Network
Data Link
Physical
Application
Transport
Internet
NetworkInterface
OSI TCP/IP
4
3
2
1
392 Beyond DHCP - Work Your TCP/IP Internetwork with Dynamic IP
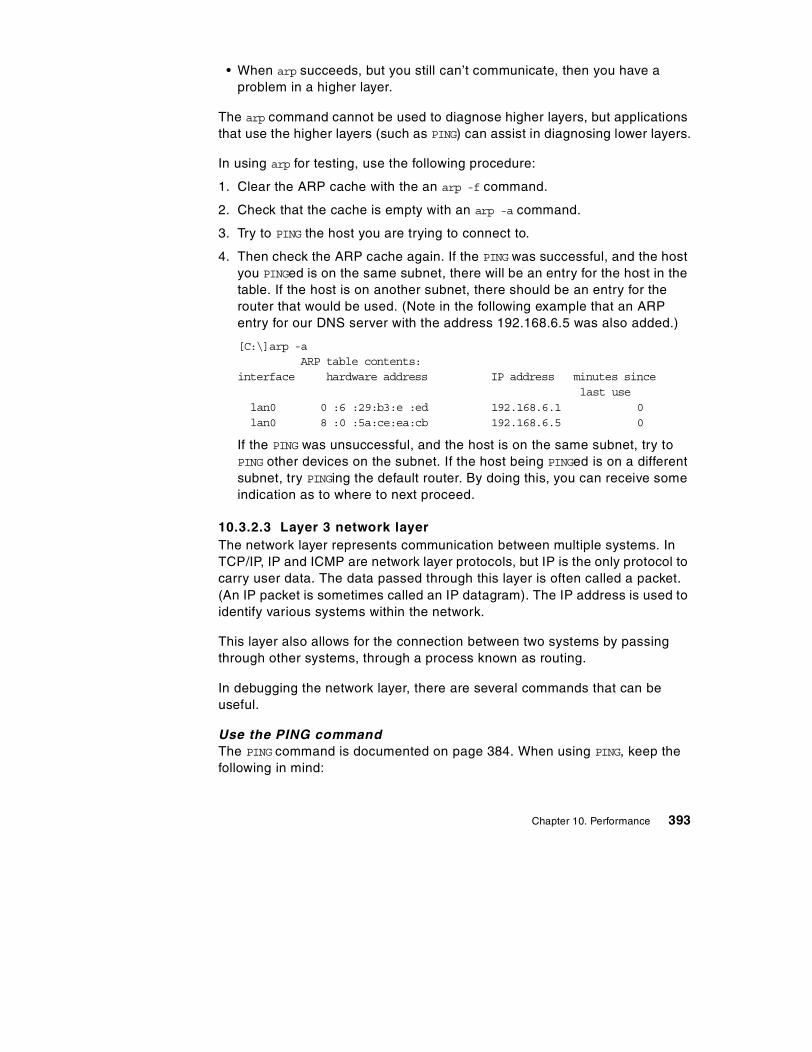
• When arp succeeds, but you still can’t communicate, then you have aproblem in a higher layer.
The arp command cannot be used to diagnose higher layers, but applicationsthat use the higher layers (such as PING) can assist in diagnosing lower layers.
In using arp for testing, use the following procedure:
1. Clear the ARP cache with the an arp -f command.
2. Check that the cache is empty with an arp -a command.
3. Try to PING the host you are trying to connect to.
4. Then check the ARP cache again. If the PING was successful, and the hostyou PINGed is on the same subnet, there will be an entry for the host in thetable. If the host is on another subnet, there should be an entry for therouter that would be used. (Note in the following example that an ARPentry for our DNS server with the address 192.168.6.5 was also added.)
[C:\]arp -aARP table contents:
interface hardware address IP address minutes sincelast use
lan0 0 :6 :29:b3:e :ed 192.168.6.1 0lan0 8 :0 :5a:ce:ea:cb 192.168.6.5 0
If the PING was unsuccessful, and the host is on the same subnet, try toPING other devices on the subnet. If the host being PINGed is on a differentsubnet, try PINGing the default router. By doing this, you can receive someindication as to where to next proceed.
10.3.2.3 Layer 3 network layerThe network layer represents communication between multiple systems. InTCP/IP, IP and ICMP are network layer protocols, but IP is the only protocol tocarry user data. The data passed through this layer is often called a packet.(An IP packet is sometimes called an IP datagram). The IP address is used toidentify various systems within the network.
This layer also allows for the connection between two systems by passingthrough other systems, through a process known as routing.
In debugging the network layer, there are several commands that can beuseful.
Use the PING commandThe PING command is documented on page 384. When using PING, keep thefollowing in mind:
Chapter 10. Performance 393

• When PING fails, you cannot communicate by using the IP protocol
• When PING succeeds you don’t have hardware or network configurationproblems.
• When PING succeeds, but communication still fails, there is an applicationproblem.
If you are cannot connect to a host, try the following PING sequence to helpdetermine where the problem lies:
1. PING the IP address 127.0.0.1 by issuing the command:
ping 127.0.0.1
As discussed in 1.2, “IP addresses” on page 2, 127.0.0.1 is the loopbackIP address. If you can successfully PING this address, then you haveproven that the IP stack on your host is working correctly.
2. PING your own IP address. A PING to your own address will physicallytransmit out onto the network. If the PING is successful, then you know thatyour network adapter is working.
3. PING the IP address of your default router. This will determine if yourdefault router is connected to the network, but not that it is workingcorrectly. It can also show if your subnet mask is correct.
4. PING an IP address of a host on the same subnet of the host you want toconnect to. This will determine if all routers between you and the host youwant to connect to are working correctly.
5. PING the IP address of the host you want to connect to.
In the above procedure, we have used IP addresses only because anyproblems in communicating with your name server, or mis-configurations inyour name server, can cause connectivity problems in general when you aretrying to connect by name.
In the following example, we are trying to PING the machine called hotdog:
[C:\]PING hotdog 56 2PING hotdog.AUSTIN.COOKING.NET: 56 data bytes
----hotdog.AUSTIN.COOKING.NET PING Statistics----2 packets transmitted, 0 packets received, 100% packet loss
As you can see, the PING command itself has failed, but the host name wassuccessfully resolved by the name server. This proves that the name server isworking, although the address supplied by the name server may notnecessarily be correct.
394 Beyond DHCP - Work Your TCP/IP Internetwork with Dynamic IP

The PING command is also an excellent means of identifying frame sizeissues in your network. Most implementations of the command allow you tospecify the size of the echo packet.
Use the TRACERTE commandIf, in step 4, if you could not PING any hosts on the remote subnet, you can usethe TRACERTE command as documented on page 385 to determine where andwhy data is being lost.
Use the NETSTAT commandUse the NETSTAT command as documented on page 387. In OS/2, useNETSTAT -i to check IP statistics, and NETSTAT -c to check ICMP statistics.Figure 268 on page 395 shows partial output from the NETSTAT -i command.
Figure 268. Output from NETSTAT -i
Look for unusual counters. If output packets discarded because no route could
be found is not zero, you have a routing problem somewhere. If NETSTAT -c
gives a high Source Quench count, the host you are talking to (or the routersyou are talking through) may be overloaded.
In Windows NT, use the netstat -s command to see statistics for all protocols,and for AIX, use netstat -p <protocol> to see statistics for a specific protocol,such as TCP or UDP.
[C:\]NETSTAT -itotal packets received 5548checksum bad 0packet too short 0not enough data 0ip header length < data size 0ip length < ip header length 0fragments received 0frags dropped (dups, out of space) 0fragments timed out 0packets forwarded 0packets rcvd for unreachable dest 0packets forwarded on same net 0Unknown/Unsupported protocol 2requests for transmission 4974lost packets due to no bufs, etc 0output packets discarded because no route could be found 0input packets delivered successfully to user-protocols 5546input packets with an unknown protocol 0output packets successfully fragmented 0output fragments created 0fragmentation failed 0successfully assembled packets 0Packets received with version !=4 0Raw ip packets generated 193
Chapter 10. Performance 395
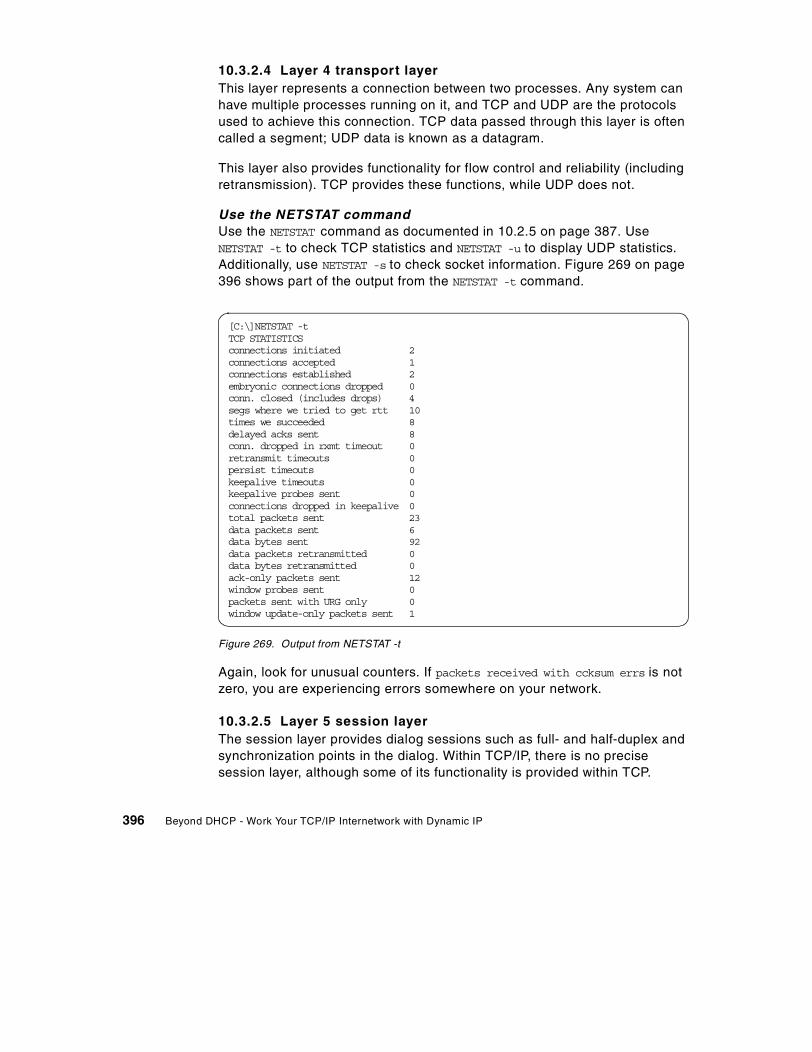
10.3.2.4 Layer 4 transport layerThis layer represents a connection between two processes. Any system canhave multiple processes running on it, and TCP and UDP are the protocolsused to achieve this connection. TCP data passed through this layer is oftencalled a segment; UDP data is known as a datagram.
This layer also provides functionality for flow control and reliability (includingretransmission). TCP provides these functions, while UDP does not.
Use the NETSTAT commandUse the NETSTAT command as documented in 10.2.5 on page 387. UseNETSTAT -t to check TCP statistics and NETSTAT -u to display UDP statistics.Additionally, use NETSTAT -s to check socket information. Figure 269 on page396 shows part of the output from the NETSTAT -t command.
Figure 269. Output from NETSTAT -t
Again, look for unusual counters. If packets received with ccksum errs is notzero, you are experiencing errors somewhere on your network.
10.3.2.5 Layer 5 session layerThe session layer provides dialog sessions such as full- and half-duplex andsynchronization points in the dialog. Within TCP/IP, there is no precisesession layer, although some of its functionality is provided within TCP.
[C:\]NETSTAT -tTCP STATISTICSconnections initiated 2connections accepted 1connections established 2embryonic connections dropped 0conn. closed (includes drops) 4segs where we tried to get rtt 10times we succeeded 8delayed acks sent 8conn. dropped in rxmt timeout 0retransmit timeouts 0persist timeouts 0keepalive timeouts 0keepalive probes sent 0connections dropped in keepalive 0total packets sent 23data packets sent 6data bytes sent 92data packets retransmitted 0data bytes retransmitted 0ack-only packets sent 12window probes sent 0packets sent with URG only 0window update-only packets sent 1
396 Beyond DHCP - Work Your TCP/IP Internetwork with Dynamic IP
10.3.2.6 Layer 6 presentation layerThe presentation layer provides for common data presentation betweenapplications. Within TCP/IP, there is no precise presentation layer.
10.3.2.7 Layer 7 application layerThe application layer represents the application entity, usually an applicationprogram.
When diagnosing DNS issues, there are two commands that are useful.
Use the HOST commandThe HOST command, as documented on page 388, is used to query a DNSserver and can be used to verify that your DNS configuration is correct. HOSTcan only be used for name to address and address to name resolution.
Use the NSLOOKUP commandThe NSLOOKUP command, as documented on page 389, is used to query a DNSserver and can be used to verify that your DNS configuration is correct.
You should also read the TCP/IP Command Reference in the TCP/IPInformation folder of Warp Server.
This section provides an overview of how to use NSLOOKUP. The informationpresented here should work for both OS/2 and many UNIX versions ofNSLOOKUP. All Windows-based versions of nslookup that we have seen are GUIprograms and have different (and varying) usage.
NSLOOKUP is a resolver that sends queries to name servers. This is the sametask that your browser has to do when locating a particular Web page (if youentered the server name rather than the server IP address). By default,NSLOOKUP performs recursive queries. See Figure 270 on page 398 for anexample of how a name server resolves a recursive query. Resolvers makerecursive queries, which cause the name server the most amount of work.Name servers themselves make non-recursive queries. You can configureNSLOOKUP to do non-recursive queries as well.
Chapter 10. Performance 397

Figure 270. Name resolution example
NSLOOKUP is a useful while you are configuring your name server(s) and alsofor troubleshooting certain issues after configuration. For example, pretendyou have configured one of your servers to provide zone transfers to only aspecified group of machines (for example, by using the secure_zones option). Itis probably prudent to use nslookup to try a zone transfer (using the ls
sub-command) from a machine other than the trusted machines, rather thanto wait for crackers to test your configuration for you. Most name servers, youwill find, will not pass you zone information for security reasons.
NSLOOKUP can be run interactively, or, if you have a single query, you can typethe query from the command line. When you start NSLOOKUP interactively, it isuseful to enter the command set all to remind you of your default settings(particularly your default name server, domain, and search list, if any). Tofinish an interactive session, type exit or press CTRL+Z (end of file on OS/2)or CTRL+D (end of file on UNIX). For extra help during an interactive session,type ? or help at the > prompt.
NSLOOKUP can be configured for recursive and non-recursive queries by usingthe set recur and set norecur subcommands. You can start the program sothat it uses the default name server, or you can direct it to use a specificname server for your session. The file %ETC%\RESOLV2 will contain thename of your default name server (if any), and your default domain. An
398 Beyond DHCP - Work Your TCP/IP Internetwork with Dynamic IP

example of %ETC%\RESOLV2 is shown below for a machine on ourarmonk.cooking.net subnet.
domain armonk.cooking.netnameserver 192.168.6.10
You could include the line options debug, which turns on debugging forNSLOOKUP. When you first start using NSLOOKUP, it may be useful to have debugon to better understand what is happening. With debug on (or d2), you will seeabout as much DNS information as you would see if you were using aprotocol analyzer. We are not using debug here because of the amount ofinformation it creates. We suggest that you use debug, though, while you arebecoming familiar with NSLOOKUP.
The NSLOOKUP syntax on page 389 shows how to specify a particular nameserver to use. For example:
NSLOOKUP - 192.168.7.10Server: fajita.austin.cooking.netAddress: 192.168.7.10> exit
This starts NSLOOKUP using the FAJITA name server, rather than our defaultname server merlot.armonk.cooking.net. This is useful when your defaultserver is not available due to network or other problems. You will know thereis a problem with your default name server if NSLOOKUP exits immediately withan error message indicating:
• Timed out
• No response from server
• Connection refused
• Server failure
• Default servers not available
If you do get errors like these, you probably want to start NSLOOKUP using adifferent name server until you can determine what is wrong that the defaultname server.
Do not confuse the previous errors with errors of the type:
• Nonexistent domain (host or domain is not known to name server)
• Query refused (often because of security settings at name server)
• Format error (possible error in NSLOOKUP or network packet error; the nameserver thinks request packet is an improper format)
Chapter 10. Performance 399
• No records (of the type you are requesting; change your querytype to any
and try again)
You can also redirect some NSLOOKUP output to a file. For example, when ininteractive mode if you wanted to create a file of all mail exchanger (MX)records (that is, mail hosts) for the domain armonk.cooking.net, you would dothe following commands (the t is for recordtype):
nslookupServer: fajita.armonk.cooking.netAddress: 192.168.6.10> ls -t MX armonk.cooking.net > mailhost.txt> view mailhost.txt
While records are still being read, you will see a series of # signs goingacross the screen; so you know something is happening. The view commandshows you the file as if you were using the more command (which is what viewuses). If you want to halt a long command, you can type CTRL+C during thecommand, which will bring you back to the > prompt. For example, if youentered the ls -t MX command on a large Internet domain, it could potentiallygenerate pages of information.
> ls -t any armonk.cooking.net
This would show all records for the domain, which would, of course, give evenmore information than just the MX records. The record types that you can showindividually are:
A Host name to IP address records.
ANY All records available from name server.
CNAME Canonical names for aliases. For example, we use ns-updates asan alias for the canonical name of fajita.armonk.cooking.net.Usually, you will see mail or www as an alias for the fully qualifieddomain name of the server the mail server or Web server runs on.
HINFO Host information.
KEY Public key information.
MB Mailbox information.
MINFO Mailbox or mail list information.
MX Mail exchanger.
NS Name server.
PTR IP address to host name records.
400 Beyond DHCP - Work Your TCP/IP Internetwork with Dynamic IP
SIG List records with expiration time and signature information such asA and KEY records.
SOA Domain’s start of authority.
TXT Text records.
UINFO User information. For example, it will sometimes contain contactinformation of responsible person for a particular server.
WKS Well-known services that the host advertises.
When you enter the querytype to nslookup sub-commands, remember thatthey are case insensitive. The ls sub-command causes zone transfers, andsome hosts will not allow that (for security or because of the extra workloadon the name server and network).
The set command is used when in the interactive mode to change defaultsettings. For example, it can be useful to do a set debug or set d2 (both ofwhich turn on debugging) so that you can see how the name resolution isoccurring when you make a query. You can change the default querytype for asingle command. For example, to show all name server records forarmonk.cooking.net domain, enter:
[C:\]NSLOOKUP -query=NS armonk.cooking.net
Server: fajita.armonk.cooking.netAddress: 192.168.6.10armonk.cooking.net nameserver = fajita.armonk.cooking.netarmonk.cooking.net nameserver = ns-updatefajita.armonk.cooking.net internet address = 192.168.6.10ns-update internet address = 192.168.6.10
Your default record query type can be set to NS as opposed to the default ofany records:
[C:\]NSLOOKUP -query=NSDefault Server: fajita.armonk.cooking.netAddress: 192.168.6.10>
The record types are discussed in more detail in 1.6.5, “Resource recordtypes” on page 23.
Note
Chapter 10. Performance 401
We are now in the interactive mode and can give more commands. To changeour default name server:
> set root=192.168.7.10>
To change our default querytype back to any:
> set q=any
We can abbreviate most sub-command arguments using the first uniquecharacter pattern of the name. Now we would be using the name server forour austin.cooking.net subnetwork. This could become confusing becauseour default domain is still armonk.cooking.net, so we might want to use asearch list to include both domains:
> set srchlist=austin.cooking.net/armonk.cooking.net>
Now, when the name resolution occurs, first austin.cooking.net will beappended to the name we are looking up, then armonk.cooking.net will beappended, then the name will be searched by itself with no appending. Forexample:
> jalapeno
Name resolution occurs as follows. When defname and search are both on(the default), NSLOOKUP uses the search list and successively appends eachname in the list to any host query not ending in a dot until the name resolutionis successful (jalapeno.austin.cooking.net and thenjalapeno.armonk.cooking.net would be searched). If no attempt is successful,NSLOOKUP tries the user-entered query as-is. If you do not want the search listto be used you can append a dot (.) to your command as follows:
> jalapeno.austin.cooking.net.
and then the name is used as is with no appending. Note that the nameresolution stops when an address is found. If search is off and defname is on,NSLOOKUP does not use the search list, but appends only the domain name(which is the first entry in the search list). Also, NSLOOKUP will only append thisdomain name to user queries that do not have dots in the name, (rather thannames which do not end in a dot, which was the case when search was on).
If defname is off, no domain is appended to the query. In this case, settingsearch/nosearch has no effect.
402 Beyond DHCP - Work Your TCP/IP Internetwork with Dynamic IP
10.4 Tuning TCP/IP networks
Tuning is an ongoing function in networking. Bandwidth and performance areconstantly monitored using fully implemented state of the art networkmanagement methods. New applications and hosts are introduced to theenvironment only after their network impact is fully understood. Change iscarefully controlled and is normally transparent to the end user.
10.4.1 An approach to tuning your networkIf you think the network environment described above sounds utopian, you’reright. In practice, we most often see network tuning efforts initiated as a resultof a network performance issue. Therefore, that is the approach we’ll focus onin this section.
10.4.1.1 Gather informationGather as much information as possible so that potential causes of yourproblem (in this case poor performance) can be found. Some questions to askyourself are:
• Do all applications suffer from poor performance?
• Do all operations within an application suffer from poor performance?
• Do all systems within the network suffer from poor performance?
• When did the problem begin?
• Is the problem intermittent?
• Are there any error messages on either the console or logged to a filesomewhere?
10.4.1.2 Understand your environmentYou have to know and understand the environment that you are dealing with.This includes all products – both hardware and software – and protocols thatactively use the network.
Check that all products are being used within specification. For example,most networking environments specify the maximum number of workstationsand maximum cable lengths that can be used in a network segment. Ifadditional workstations have been added to the network, this maximum mayhave been exceeded.
10.4.1.3 Is it really a problem?Are your users expecting too much? If they are used to loading files from alocal file server, they may start to complain that it’s too slow when
Chapter 10. Performance 403
downloading from the Internet. A T1 connection is not going to give the samethroughput as a 16 Mb token-ring.
10.4.1.4 Is it really a network function?Don’t forget that memory usage, disk, CPU, and I/O activity on both thesource and target hosts can influence performance. Before you delve deeplyinto the network, confirm that these resources are not constrained on yourhosts.
10.4.1.5 What do you want to achieve?Are you trying to achieve a better response time, or greater throughput ingeneral? Tuning the response time may entail tuning a particular applicationon a host, whereas to get better throughput, you might have to visit everyworkstation, host and router.
10.4.2 TCP/IP tuning parametersWhen tuning your network, there a several parameters that you may be ableto manipulate to enhance network performance. The ability to change theseparameters is dependent on the implementation of TCP/IP that you are using.
10.4.2.1 MTU and fragmentationThe Maximum Transfer Unit is a very important parameter. As TCP/IP worksin almost all situations without modifying the default MTU, the MTU is notoften tuned. By changing the MTU size, you can minimize the fragmentationthat occurs on a packet as it travels through your IP network.
Consider the following:
• When you are sending small packets, and there is no fragmentation:
• More packets have to be sent; so, there is an increased number of I/Ooperations to the network. This adds overhead.
• There is lower throughput.
• When you are sending large packets, and there is no fragmentation:
• Fewer packet have to be sent; so there is a reduced number of I/Ooperations to the network. This reduces overhead.
• There is higher throughput.
• When you are sending large packets, and there is fragmentation:
• More packets have to be sent because the original data has beenfragmented. This increases I/O operations to and from the network.
• There is lower throughput.
404 Beyond DHCP - Work Your TCP/IP Internetwork with Dynamic IP
• More packets must be transmitted to recover from lost data packets.
Given the above, we can see that we should set the MTU size to be as largeas possible so that a packet travelling through the network does not becomefragmented.
You can use the PING (see page 384) and TRACERTE (see page 385) commandsto determine the bottlenecks that occur on your network.
Use TRACERTE to determine the IP addresses of the routers between you andthe host you are connecting to. Then PING each IP address found with a rangeof packet sizes (use the same range for each address) and graph the results.Any bottlenecks with larger MTU sizes should be readily apparent.
Remember to make the MTU size on your workstation larger than the packetsizes you are using so that fragmentation does not occur before the datareaches the network.
To change the MTU size, you would usually use the IFCONFIG command,although some implementations of TCP/IP may use configuration files to holdthe MTU definition.
For example, under OS/2 you could issue the commands:
IFCONFIG lan0 downIFCONFIG lan0 mtu 4400IFCONFIG lan0 up
This will set the MTU size to 4400 bytes. Now issue the command:
NETSTAT -n
This will confirm that the change has been made.
Installations that use DHCP can easily change the MTU size for multiplehosts. It is BOOTP\DHCP option number 26.
10.4.2.2 TCP maximum segment sizeAs stated previously, a unit of TCP transmission is known as a segment. IPand UDP datagrams each have a maximum length of 65,536 bytes. A TCPsegment also has a maximum length, but it is determined when two systemsconnect. The maximum segment size or MSS is negotiated by both systemsto guarantee connectivity.
The MSS is calculated using the MTU as follows:
1. Calculate variable A.
Chapter 10. Performance 405
A = MTU - (TCP header size + IP header size)
2. Calculate variable B.
B = Socket Receive Buffer size / 2
3. The smaller of A and B is used as the effective MSS.
Now consider the following scenario. Your workstation is connected to atoken-ring network and communicates with hosts also attached to the ring. Toenhance performance, you are using a large MTU of 17960 bytes. Later, youhave to connect over a router to hosts attached to an Ethernet network. Toavoid fragmentation at the router you should set your MTU to 1500 bytes. Butnow you have an inefficiency when talking to hosts connected to thetoken-ring.
How do you resolve this problem? Some stacks have MTU discovery enabled,thereby bypassing the issue. If they don’t, you can use the -mtu option withthe ROUTE command. The -mtu option allows you to configure the MTU for eachroute, not just for each interface. It allows you to give a specific value to onlythe traffic that is passing through a router.
For example, we have workstations on our 192.168.6 token-ring network.They are using an MTU of 4400 bytes. If they need to connect to the192.168.9 Ethernet network, we could issue the command:
route add -net 192.168.9 192.168.6.4 -mtu 1500
Here, we are assuming that 192.168.6.4 is the router to the 192.168.9network. By adding this specific MTU size for traffic to the Ethernet network,we can now communicate efficiently with both local and remote hosts. OurMTU and MSS would are large, however, without fragmentation.
10.4.2.3 The IP queueIP keeps a queue for incoming IP datagrams. The queue is only used forreceiving datagrams, not sending.
Since routing is done at the IP layer, the IP queue is important in a systemconfigured as a router because it is used when passing datagrams from onenetwork to another. If a router receives a burst of IP datagrams, it is possiblefor the queue to overflow.
Many implementations of TCP/IP do not allow you to set the queue size. AIX,for example, does.
To set and check the IP queue:
406 Beyond DHCP - Work Your TCP/IP Internetwork with Dynamic IP
1. To check the current queue size, issue the command:
no -o ipqmaxlen
2. To set the IP queue length, issue the command:
no -o ipqmaxlen=x
Where x is the new size of the queue.
3. To check for IP queue overflows, issue the command:
netstat -p ip
The following is an extract from the output, with the counter we areinterested in highlighted:
...0 path MTU discovery memory allocation failures0 ipintrq overflows0 with illegal source
10.4.2.4 BuffersThe buffers are temporary data storage used to store data sent between anapplication and the network.
Some applications can set their buffer size (by using the setsockopt()
function), but generally you cannot modify the buffer size.
You can the buffers with the NETSTAT command.
NETSTAT -m displays details for memory buffer usage.
NETSTAT -c displays ICMP statistics. When looking at the ICMP statistics, lookfor high Source Quench counters.
If an ICMP Source Quench message is received from an router, it means thatthe router does not have the buffer space needed to queue the datagrams foroutput to the next network.
10.5 Bandwidth efficiency
While the easiest solution to network performance problems may be toprovide a faster connection, it’s not always the most practical. After all, it
A larger queue may require more CPU time to process; so don’t make it toolarge. If you must increase it, make the increments moderate.
Note
Chapter 10. Performance 407
might not be cost effective to link every remote user or office with a T3 line.Sometimes it pays to closely examine the amount and nature of the networktraffic flowing through your network connections to see if it’s possible to uselimited bandwidth more efficiently. Frankly, some applications just don’t dowell in a WAN environment. For example, if a client and server must seriallyinterchange a large number of packets to complete a transaction, the totaltime required from the user’s perspective can increase dramatically if there isany WAN connection between two hosts.
10.5.1 Broadcast trafficBe aware that your network may have multiple protocols running over it. Notall protocols are efficient in how they use the network. Some, like NetBEUI forexample, introduce a large quantity of broadcast traffic.
Your environment may use combined bridge/routers (brouters) to interconnectremote locations. If these connections are maintained over relatively slowWAN links, your WAN link may be swamped with broadcast traffic. In extremecases, connections that have timer-critical response times (for example SNA),may fail.
As we have seen in Chapter 5, “Integrating file and print services” on page227, it is possible to remove NetBEUI from your WAN connections entirely byimplementing TCPBEUI. You can choose to still use NetBEUI within the localnetwork where it is most efficient, but your WAN connections will have beenfreed up from carrying broadcast traffic.
10.5.2 RSVPUnfortunately, TCP/IP has not had any standard method of prioritizing trafficuntil quite recently. Yet, in the real world, bank transactions can be muchmore important than casual e-mail. Unfortunately, most TCP/IP networkscan’t tell the difference between high priority datagrams and lower priorityones; so the bandwidth gets split more or less evenly between competingusers.
RSVP (Resource ReSerVation Protocol) has been introduced as a way tosolve the problem. If your network application has been programmed to takeadvantage of RSVP, and if the routers enroute support RSVP, then TCP/IPdatagrams can be prioritized according to their relative importance.Datagrams for bank transactions can be tagged by the application as highpriority, while e-mail applications may tag their datagrams as lower priority.Intermediate network devices, such as routers, can then handle the traffic
408 Beyond DHCP - Work Your TCP/IP Internetwork with Dynamic IP
more intelligently, giving more bandwidth to the higher priority traffic asneeded.
There’s one major downside to RSVP, at least at this point in history: Manyapplications and network devices do not yet support this protocol extension.Hopefully the widespread adoption over time of IPv6 will help speed theimplementation of RSVP as well. Nonetheless, if you have control over yourown TCP/IP intranet, and you can take advantage of the RSVP programminginterfaces now becoming more and more common, you can design your ownnetwork and applications to take advantage of prioritizing. Doing so can helpyou avoid buying more high cost bandwidth.
RSVP is supported by IBM OS/2 TCP/IP Version 4.1 or later, and can run as astandalone service, or under the INETD super server. For more informationon RSVP, please consult the Online Information folder in OS/2 TCP/IP orIETF RFC 2205.
10.5.3 Communications serverAlthough TCP/IP has achieved tremendous popularity, it isn’t necessarily thebest protocol for all purposes. Other network protocols have particularstrengths and weaknesses. You can take advantage of the strengths of otherprotocols while still preserving the universal reach of TCP/IP on your network.
For example, IBM SNA protocols work particularly well over WANconnections. If your network consists of remote offices, perhaps linkedtogether with low bandwidth connections, then you may be able to improvethe performance of TCP/IP applications by encapsulating that traffic in SNAprotocols across the WAN. Benchmark results indicate that you can get moreTCP/IP traffic across low bandwidth LAN connections if it’s wrapped into SNAat one end and unwrapped at the other, particularly if you take advantage ofSNA’s end-to-end data compression.
The IBM SecureWay Communications Server, available for a variety ofplatforms from PCs (OS/2 Warp, Windows NT) to mainframes, can be placedat both ends of a WAN connection to encapsulate TCP/IP into SNA.
For more information on IBM SecureWay Communications Server, pleasevisit:
http://www.software.ibm.com/enetwork/commserver
Chapter 10. Performance 409

410 Beyond DHCP - Work Your TCP/IP Internetwork with Dynamic IP
Chapter 11. Managing your network
This chapter provides insight into how to respond to changes in your networkquickly and easily. Read how to make changes to your TCP/IP network fromany location, adding or deleting new users and connections as needed. Plus,we'll reveal how to generate reports that show how your network is beingused so you can keep close tabs on its performance and security.
11.1 Remote administration of DHCP and DDNS
Remote administration of the DHCP and DDNS servers can be accomplishedusing more than one method, and from more than one type of client platform.Since the administration programs are Java applications, these programs canbe run remotely with a little bit of extra work.
You have two options for remote administration:
• One method of remote administration can be accomplished without addingany extra software beyond what is delivered with OS/2 Warp Server fore-business and OS/2 Warp Version 4 (TCP/IP Version 4.21 is eitherincluded or can be installed). This method runs the Java-basedadministration programs remotely.
• Another method adds a Web server to the OS/2 Warp Server fore-business platform. We used Domino Go Webserver, but any Web serverthat supports mapping should work. Domino Go Webserver is available forfree download. If you want to use the Secure Sockets Layer Security, youwill have to register the product, but this is not mandatory.
We will describe both methods of setting up remote administration, as well asany problems we encountered in this process.
There are products available that allow you to administer TCP/IP services onyour company’s network across the world. QIP, from Lucent Technologies, isone of these products that allows the management and administration ofTCP/IP services on multiple platforms, including UNIX and Windows NT. TheQIP demo software is available fromhttp://www.lucent.com/ins/products/qip.html.
Before going any further, an explanation is in order. The administrationprograms for both OS/2 DHCP and DDNS are supplied as Java programs.The programs are compiled so that they can run as stand-alone programs oras applets from within a Java-enabled browser, or using an applet viewer.
© Copyright IBM Corp. 1998, 2000 411

11.1.1 No extra softwareWithout a Web server on the OS/2 Warp Server for e-business platform, youcan still remotely administer the DHCP/DDNS server by invoking similarscripts to those invoked locally on the server. The difference in the scripts isthat the paths used have to reflect the network drive as seen from the client.
We have included some modified command files that will run on OS/2 orWindows 95/98/NT with Java and REXX. REXX is shipped with OS/2 and isavailable for Windows platforms. You can also follow the instructions includedwith the TCP/IP product:
1. In the TCP/IP Information folder, double-click on TCP/IP Guide.
2. Search for JAVA and choose Installing the TCP/IP JAVA ConfigurationApplications on a Remote Workstation.
We tested those instructions on OS/2 Warp Version 4 and Windows 95, andthey worked well for us. The command files that run on the server (and arementioned in the online documentation) are as follows. Our rewritten scriptsadd a capital R to the front of the script names and they allow you to specifythe server you would like to administer. Note that in the case ofDHCPSCPC.CMD, the new name is RDHCPSCP.CMD (the final C is droppedin the name to keep an 8.3 file name).
• DHCP Server Administration
• DHCPSCPC.CMD
It represents the main GUI to configure the DHCP server.
• DHCP Server Administration
• DADMGUI.CMD
It shows DHCP server statistics and provides a function to reinitializethe DHCP server.
• DDNS Server Administration
• DDNSAPC.CMD
It represents the actual DDNS server configuration.
Here are the rewritten scripts that allow remote administration from an OS/2workstation using Netscape 4.61 and Java 1.1.8. If you are using Netscape4.61with Java 1.1.6 or later, you don’t need to turn off the Just In Timecompiler (JIT), which can be done by setting the JAVA_COMPILER environmentvariable to any value. See 11.1.2, “Using a Web server” on page 418 for moreinformation on Java-version-specific dependencies.
412 Beyond DHCP - Work Your TCP/IP Internetwork with Dynamic IP

The server drive that contains the following scripts would get mapped as anetwork drive for the client. The client will locally execute the rewritten scriptson that network drive.
Note: Lines that are longer than 80 characters, such as SET CLASSPATH, arewrapped to the next line.
RDDNSAPC.CMD is the rewritten DDNSAPC.CMD.
If installing Java Version 1.1.8 for OS/2, do not forget to extract the originalinstall file using the -di and -ov parameters.
Note
Chapter 11. Managing your network 413
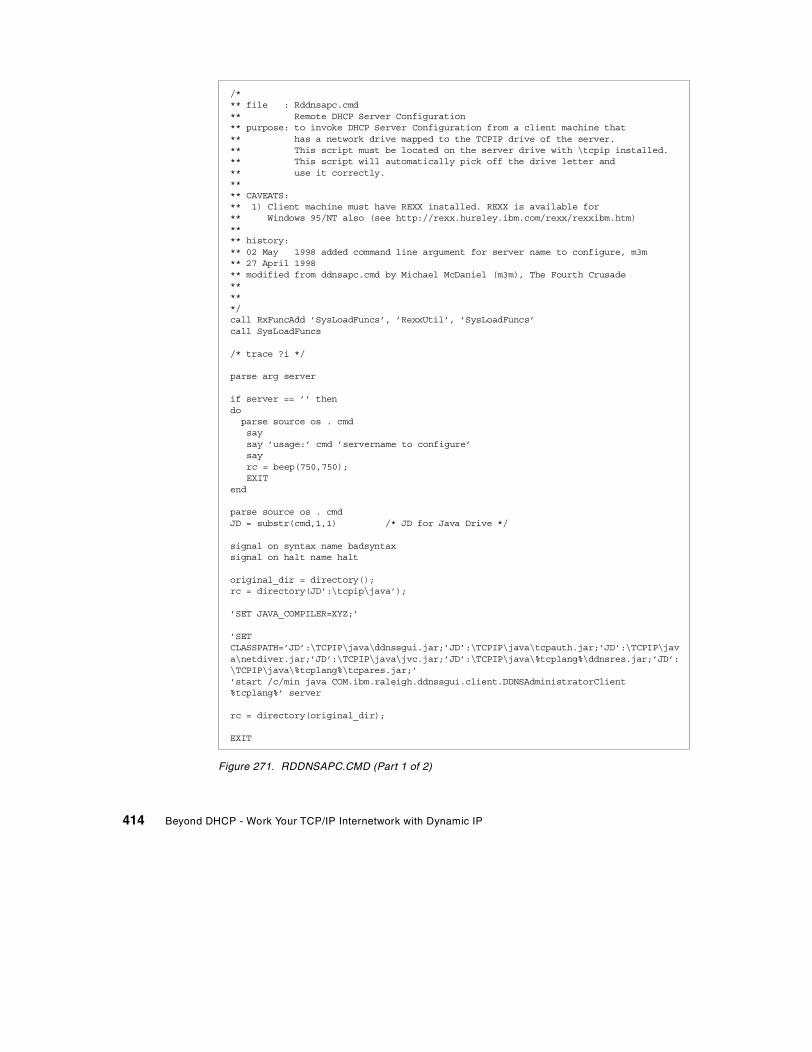
Figure 271. RDDNSAPC.CMD (Part 1 of 2)
/*** file : Rddnsapc.cmd** Remote DHCP Server Configuration** purpose: to invoke DHCP Server Configuration from a client machine that** has a network drive mapped to the TCPIP drive of the server.** This script must be located on the server drive with \tcpip installed.** This script will automatically pick off the drive letter and** use it correctly.**** CAVEATS:** 1) Client machine must have REXX installed. REXX is available for** Windows 95/NT also (see http://rexx.hursley.ibm.com/rexx/rexxibm.htm)**** history:** 02 May 1998 added command line argument for server name to configure, m3m** 27 April 1998** modified from ddnsapc.cmd by Michael McDaniel (m3m), The Fourth Crusade*****/call RxFuncAdd ’SysLoadFuncs’, ’RexxUtil’, ’SysLoadFuncs’call SysLoadFuncs
/* trace ?i */
parse arg server
if server == ’’ thendoparse source os . cmdsaysay ’usage:’ cmd ’servername to configure’sayrc = beep(750,750);EXIT
end
parse source os . cmdJD = substr(cmd,1,1) /* JD for Java Drive */
signal on syntax name badsyntaxsignal on halt name halt
original_dir = directory();rc = directory(JD’:\tcpip\java’);
’SET JAVA_COMPILER=XYZ;’
’SETCLASSPATH=’JD’:\TCPIP\java\ddnssgui.jar;’JD’:\TCPIP\java\tcpauth.jar;’JD’:\TCPIP\java\netdiver.jar;’JD’:\TCPIP\java\jvc.jar;’JD’:\TCPIP\java\%tcplang%\ddnsres.jar;’JD’:\TCPIP\java\%tcplang%\tcpares.jar;’’start /c/min java COM.ibm.raleigh.ddnssgui.client.DDNSAdministratorClient%tcplang%’ server
rc = directory(original_dir);
EXIT
414 Beyond DHCP - Work Your TCP/IP Internetwork with Dynamic IP
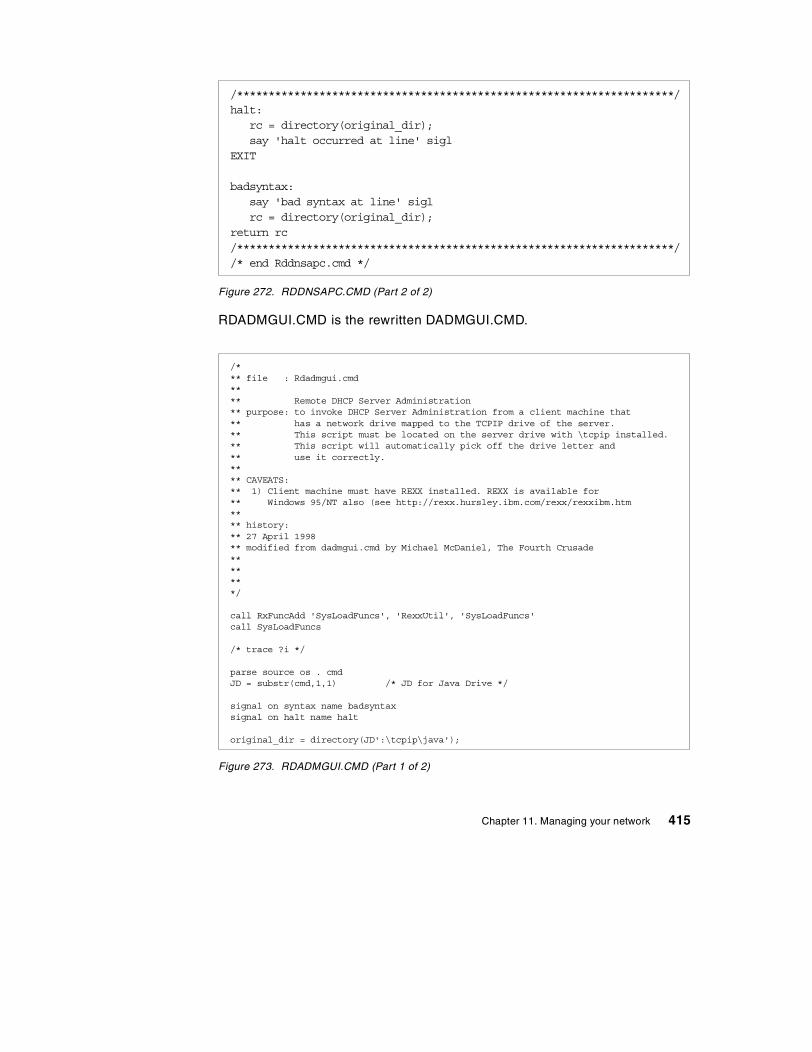
Figure 272. RDDNSAPC.CMD (Part 2 of 2)
RDADMGUI.CMD is the rewritten DADMGUI.CMD.
Figure 273. RDADMGUI.CMD (Part 1 of 2)
/*********************************************************************/halt:
rc = directory(original_dir);say 'halt occurred at line' sigl
EXIT
badsyntax:say 'bad syntax at line' siglrc = directory(original_dir);
return rc/*********************************************************************//* end Rddnsapc.cmd */
/*** file : Rdadmgui.cmd**** Remote DHCP Server Administration** purpose: to invoke DHCP Server Administration from a client machine that** has a network drive mapped to the TCPIP drive of the server.** This script must be located on the server drive with \tcpip installed.** This script will automatically pick off the drive letter and** use it correctly.**** CAVEATS:** 1) Client machine must have REXX installed. REXX is available for** Windows 95/NT also (see http://rexx.hursley.ibm.com/rexx/rexxibm.htm**** history:** 27 April 1998** modified from dadmgui.cmd by Michael McDaniel, The Fourth Crusade*******/
call RxFuncAdd 'SysLoadFuncs', 'RexxUtil', 'SysLoadFuncs'call SysLoadFuncs
/* trace ?i */
parse source os . cmdJD = substr(cmd,1,1) /* JD for Java Drive */
signal on syntax name badsyntaxsignal on halt name halt
original_dir = directory(JD':\tcpip\java');
Chapter 11. Managing your network 415
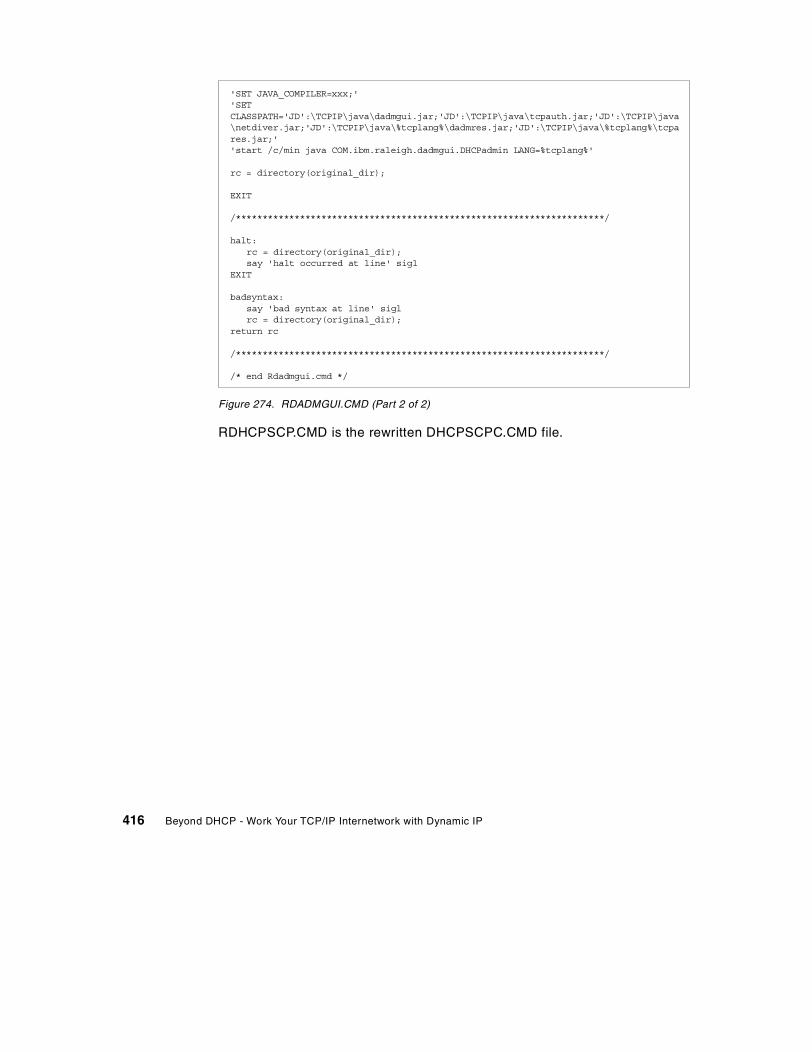
Figure 274. RDADMGUI.CMD (Part 2 of 2)
RDHCPSCP.CMD is the rewritten DHCPSCPC.CMD file.
'SET JAVA_COMPILER=xxx;''SETCLASSPATH='JD':\TCPIP\java\dadmgui.jar;'JD':\TCPIP\java\tcpauth.jar;'JD':\TCPIP\java\netdiver.jar;'JD':\TCPIP\java\%tcplang%\dadmres.jar;'JD':\TCPIP\java\%tcplang%\tcpares.jar;''start /c/min java COM.ibm.raleigh.dadmgui.DHCPadmin LANG=%tcplang%'
rc = directory(original_dir);
EXIT
/*********************************************************************/
halt:rc = directory(original_dir);say 'halt occurred at line' sigl
EXIT
badsyntax:say 'bad syntax at line' siglrc = directory(original_dir);
return rc
/*********************************************************************/
/* end Rdadmgui.cmd */
416 Beyond DHCP - Work Your TCP/IP Internetwork with Dynamic IP
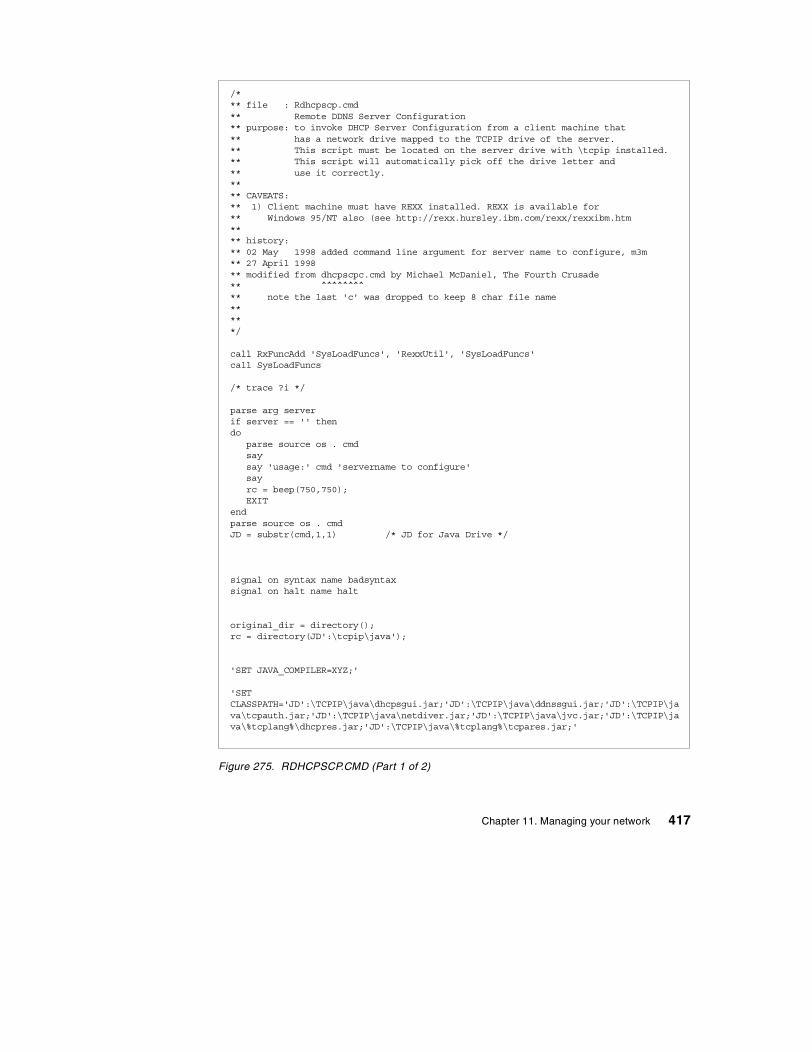
Figure 275. RDHCPSCP.CMD (Part 1 of 2)
/*** file : Rdhcpscp.cmd** Remote DDNS Server Configuration** purpose: to invoke DHCP Server Configuration from a client machine that** has a network drive mapped to the TCPIP drive of the server.** This script must be located on the server drive with \tcpip installed.** This script will automatically pick off the drive letter and** use it correctly.**** CAVEATS:** 1) Client machine must have REXX installed. REXX is available for** Windows 95/NT also (see http://rexx.hursley.ibm.com/rexx/rexxibm.htm**** history:** 02 May 1998 added command line argument for server name to configure, m3m** 27 April 1998** modified from dhcpscpc.cmd by Michael McDaniel, The Fourth Crusade** ^^^^^^^^** note the last 'c' was dropped to keep 8 char file name*****/
call RxFuncAdd 'SysLoadFuncs', 'RexxUtil', 'SysLoadFuncs'call SysLoadFuncs
/* trace ?i */
parse arg serverif server == '' thendo
parse source os . cmdsaysay 'usage:' cmd 'servername to configure'sayrc = beep(750,750);EXIT
endparse source os . cmdJD = substr(cmd,1,1) /* JD for Java Drive */
signal on syntax name badsyntaxsignal on halt name halt
original_dir = directory();rc = directory(JD':\tcpip\java');
'SET JAVA_COMPILER=XYZ;'
'SETCLASSPATH='JD':\TCPIP\java\dhcpsgui.jar;'JD':\TCPIP\java\ddnssgui.jar;'JD':\TCPIP\java\tcpauth.jar;'JD':\TCPIP\java\netdiver.jar;'JD':\TCPIP\java\jvc.jar;'JD':\TCPIP\java\%tcplang%\dhcpres.jar;'JD':\TCPIP\java\%tcplang%\tcpares.jar;'
Chapter 11. Managing your network 417
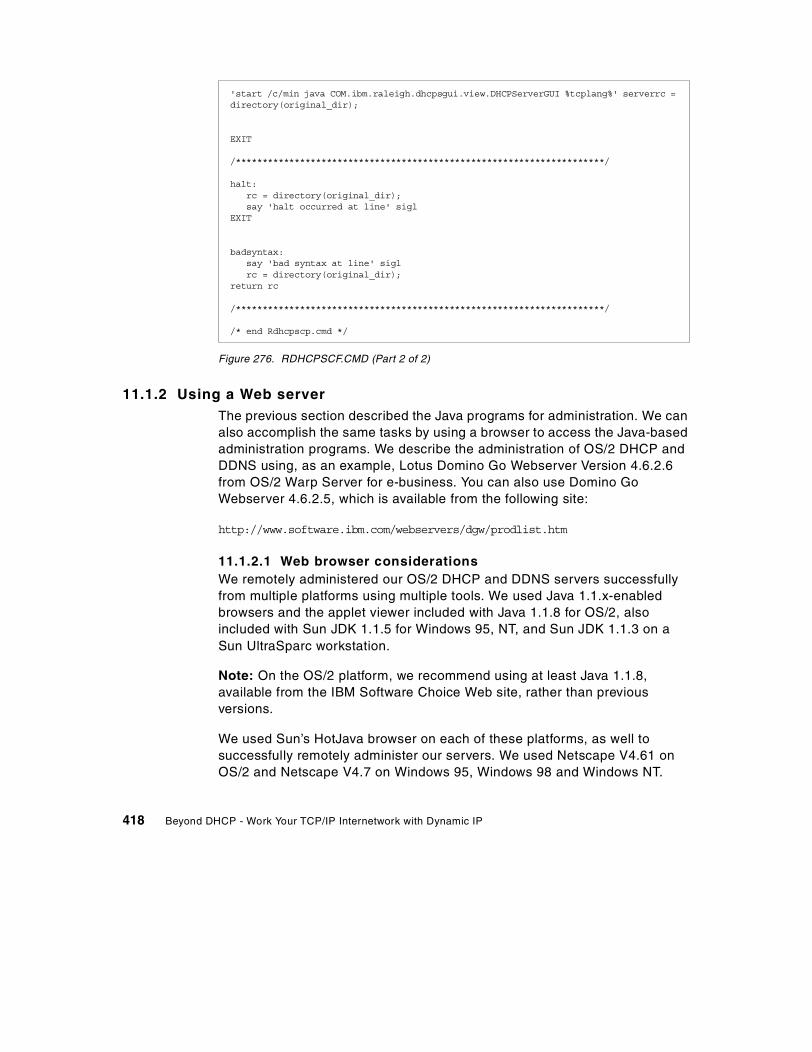
Figure 276. RDHCPSCF.CMD (Part 2 of 2)
11.1.2 Using a Web serverThe previous section described the Java programs for administration. We canalso accomplish the same tasks by using a browser to access the Java-basedadministration programs. We describe the administration of OS/2 DHCP andDDNS using, as an example, Lotus Domino Go Webserver Version 4.6.2.6from OS/2 Warp Server for e-business. You can also use Domino GoWebserver 4.6.2.5, which is available from the following site:
http://www.software.ibm.com/webservers/dgw/prodlist.htm
11.1.2.1 Web browser considerationsWe remotely administered our OS/2 DHCP and DDNS servers successfullyfrom multiple platforms using multiple tools. We used Java 1.1.x-enabledbrowsers and the applet viewer included with Java 1.1.8 for OS/2, alsoincluded with Sun JDK 1.1.5 for Windows 95, NT, and Sun JDK 1.1.3 on aSun UltraSparc workstation.
Note: On the OS/2 platform, we recommend using at least Java 1.1.8,available from the IBM Software Choice Web site, rather than previousversions.
We used Sun’s HotJava browser on each of these platforms, as well tosuccessfully remotely administer our servers. We used Netscape V4.61 onOS/2 and Netscape V4.7 on Windows 95, Windows 98 and Windows NT.
'start /c/min java COM.ibm.raleigh.dhcpsgui.view.DHCPServerGUI %tcplang%' serverrc =directory(original_dir);
EXIT
/*********************************************************************/
halt:rc = directory(original_dir);say 'halt occurred at line' sigl
EXIT
badsyntax:say 'bad syntax at line' siglrc = directory(original_dir);
return rc
/*********************************************************************/
/* end Rdhcpscp.cmd */
418 Beyond DHCP - Work Your TCP/IP Internetwork with Dynamic IP
This section tells you how to set up the server to enable remote managementusing either a browser or the applet viewer included with Sun’s JDKs.
Always remember to download the latest browser code available and to usethe latest JDKs available (assuming, of course, that you are not back-level forsome other specific reason).
At the time this publication was written, the following Netscape for OS/2browser configurations were possible:
• Netscape V4.61 (the latest revision from Software Choice) with Java 1.02(The Java version that comes with OS/2 Warp 4).
This configuration does not support remote configuration of TCP/IPVersion 4.1 or later for OS/2.
• Netscape V4.61 (the latest revision from Software Choice) with Java 1.1.4(along with the latest fixes for Java 1.1.4).
We recommend turning off the Just In Time (JIT) compiler. You can do thisby setting the environment variable, JAVA_COMPILER, to a nonsensevalue such as XYZ either in the CONFIG.SYS file, or temporarily from anOS/2 command line by typing the following commands:
SET JAVA_COMPILER=XYZNETSCAPE
This ensures Netscape will recognize that the JIT is turned off. If usingJava 1.1.4 for OS/2, you can obtain the latest fixes from the following FTPsite:
ftp://ftp.hursley.ibm.com/pub/java/fixes/os2/11/114
• Netscape V4.61 (the latest revision from Software Choice) with Java 1.1.8.
We recommend this configuration because it ensures the best results. Youdon’t need to turn off the Just In Time compiler.
By default, the following two scripts will be running when you start yourDDNS/DHCP server:
OS/2 Warp Server for e-business DHCP Server Administration does notfunction properly with Netscape Communicator. Communicator uses itsown standard classes, and not those of the installed Java version. Werecommend that you use Internet Explorer for DHCP Server Administration.Note that DDNS Server Administration works fine from NetscapeCommunicator.
DHCP Server Administration
Chapter 11. Managing your network 419
DDNSAPS.CMDDHCPSCPS.CMD
Both files reside in the \TCPIP\BIN directory. These are the scripts that allowremote configuration. Actually, if you can locally start the DDNS and DHCPconfiguration, then these two scripts are already running. When therespective script for the DDNS or DHCP servers is not running and you try(locally) to start the configuration program, you receive the following error:
Communication could not be established with the server.
11.1.2.2 Domino Go Webserver for OS/2The installation of Domino Go Webserver is not described here, but it isstraightforward and we selected all options during the installation. Make sureto write down the user ID and password you select to define during the install.
The configuration file for the Domino Go Webserver is\MPTN\ETC\HTTPD.CNF, and we suggest that you back up the original filebefore doing any configuration. You can modify the file directly, or you canstart your browser and use the GUI to configure Domino Go Webserver.Using the browser has the advantage of proving that the Domino GoWebserver is also running. At the server, enter the following Webserver URL:
http://localhost
You should get the Configuration and Administration Forms page. If not, enterthe following Webserver URL to see if that works:
http://localhost/admin-bin/cfgin/initial
If you are remote, replace localhost by the fully qualified domain name(FQDN) of the HTTP server.
You will be prompted to enter user ID and password you defined when youinstalled the Domino Go Webserver.
Presumably, you have the Configuration and Administration page now. Hereis how to configure Domino Go Webserver for DDNS and DHCP RemoteAdministration.
In our example, the following URL brings you to the Configuration andAdministration Forms:
http://merlot.armonk.cooking.net/admin
420 Beyond DHCP - Work Your TCP/IP Internetwork with Dynamic IP
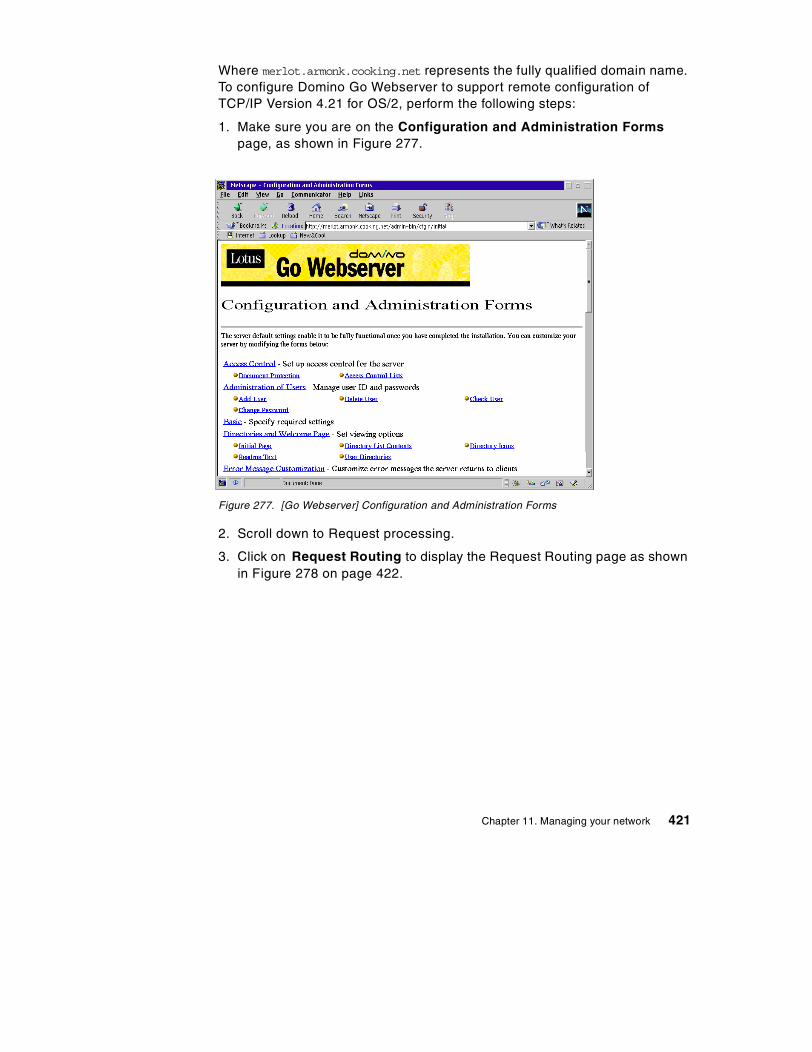
Where merlot.armonk.cooking.net represents the fully qualified domain name.To configure Domino Go Webserver to support remote configuration ofTCP/IP Version 4.21 for OS/2, perform the following steps:
1. Make sure you are on the Configuration and Administration Formspage, as shown in Figure 277.
Figure 277. [Go Webserver] Configuration and Administration Forms
2. Scroll down to Request processing.
3. Click on Request Routing to display the Request Routing page as shownin Figure 278 on page 422.
Chapter 11. Managing your network 421
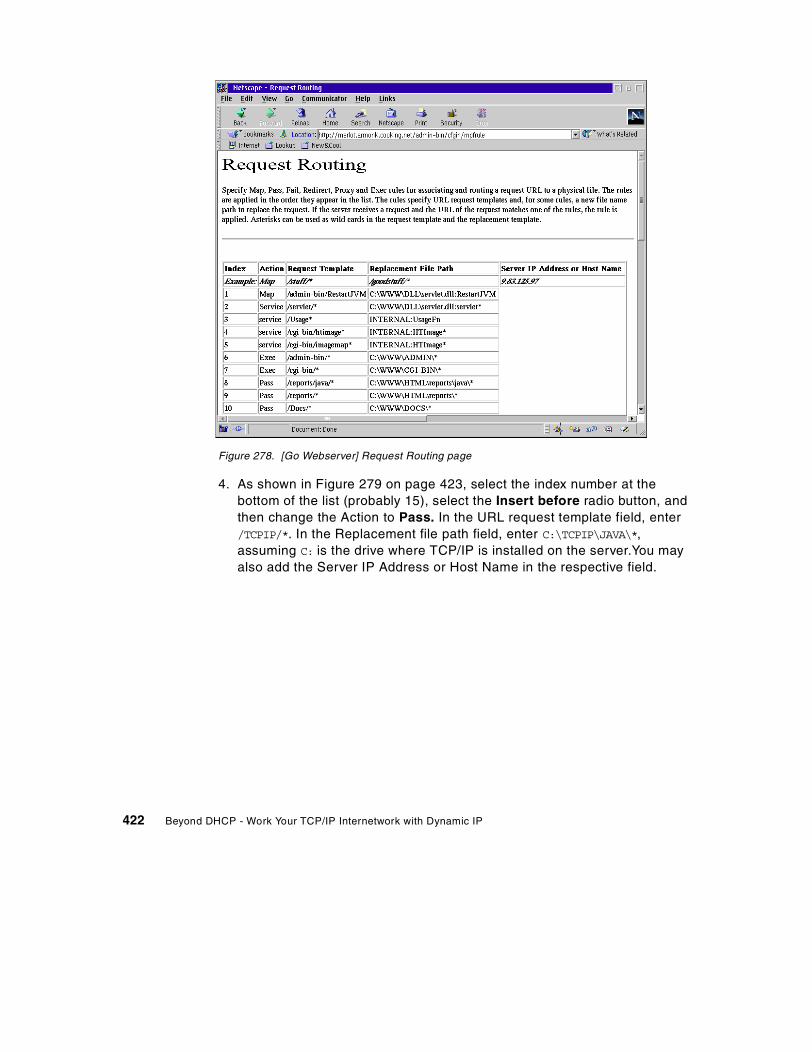
Figure 278. [Go Webserver] Request Routing page
4. As shown in Figure 279 on page 423, select the index number at thebottom of the list (probably 15), select the Insert before radio button, andthen change the Action to Pass. In the URL request template field, enter/TCPIP/*. In the Replacement file path field, enter C:\TCPIP\JAVA\*,assuming C: is the drive where TCP/IP is installed on the server.You mayalso add the Server IP Address or Host Name in the respective field.
422 Beyond DHCP - Work Your TCP/IP Internetwork with Dynamic IP
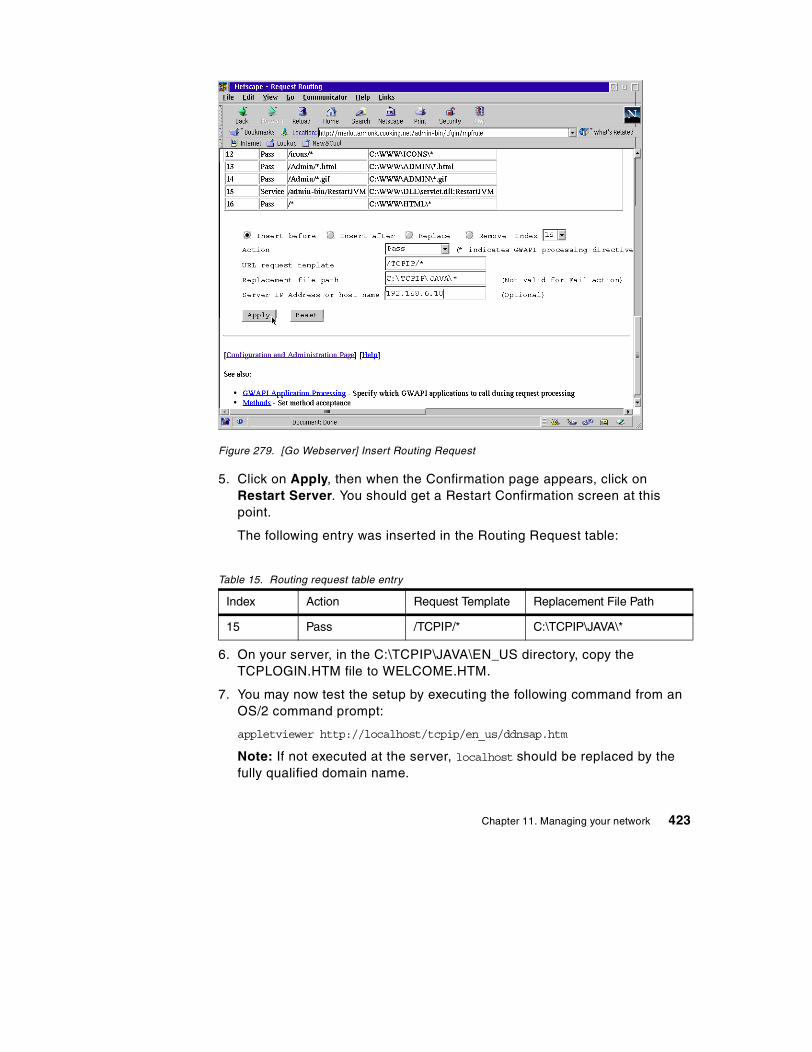
Figure 279. [Go Webserver] Insert Routing Request
5. Click on Apply, then when the Confirmation page appears, click onRestart Server. You should get a Restart Confirmation screen at thispoint.
The following entry was inserted in the Routing Request table:
Table 15. Routing request table entry
6. On your server, in the C:\TCPIP\JAVA\EN_US directory, copy theTCPLOGIN.HTM file to WELCOME.HTM.
7. You may now test the setup by executing the following command from anOS/2 command prompt:
appletviewer http://localhost/tcpip/en_us/ddnsap.htm
Note: If not executed at the server, localhost should be replaced by thefully qualified domain name.
Index Action Request Template Replacement File Path
15 Pass /TCPIP/* C:\TCPIP\JAVA\*
Chapter 11. Managing your network 423
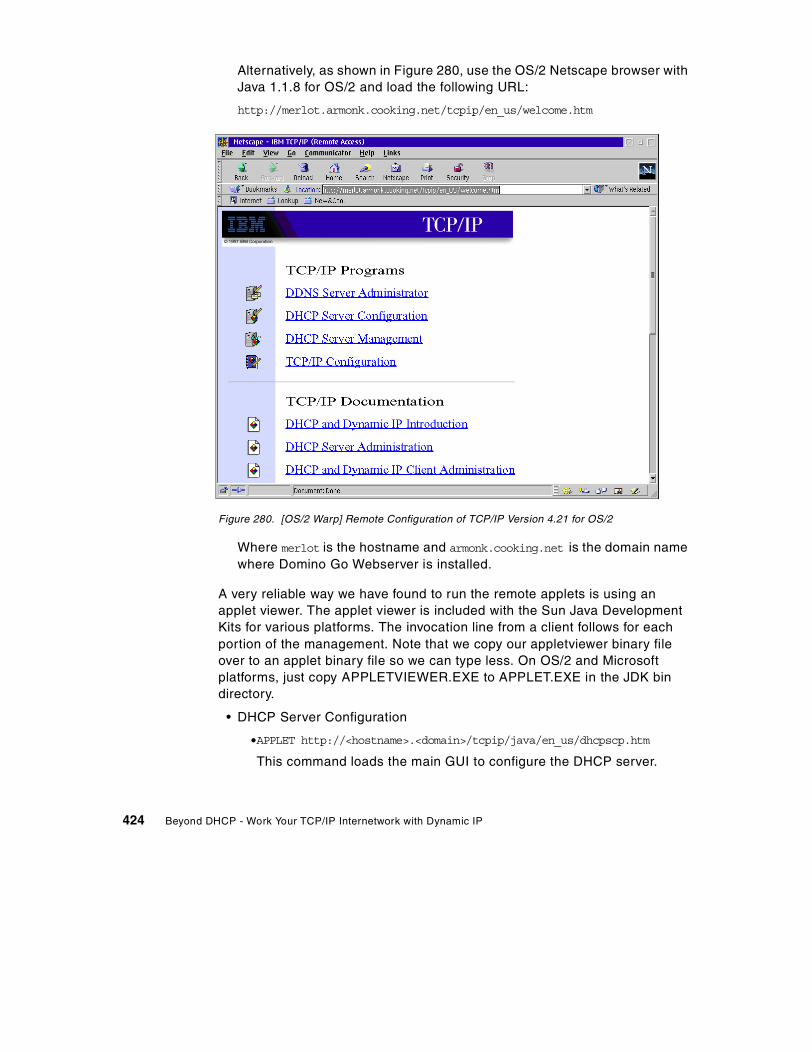
Alternatively, as shown in Figure 280, use the OS/2 Netscape browser withJava 1.1.8 for OS/2 and load the following URL:
http://merlot.armonk.cooking.net/tcpip/en_us/welcome.htm
Figure 280. [OS/2 Warp] Remote Configuration of TCP/IP Version 4.21 for OS/2
Where merlot is the hostname and armonk.cooking.net is the domain namewhere Domino Go Webserver is installed.
A very reliable way we have found to run the remote applets is using anapplet viewer. The applet viewer is included with the Sun Java DevelopmentKits for various platforms. The invocation line from a client follows for eachportion of the management. Note that we copy our appletviewer binary fileover to an applet binary file so we can type less. On OS/2 and Microsoftplatforms, just copy APPLETVIEWER.EXE to APPLET.EXE in the JDK bindirectory.
• DHCP Server Configuration
•APPLET http://<hostname>.<domain>/tcpip/java/en_us/dhcpscp.htm
This command loads the main GUI to configure the DHCP server.
424 Beyond DHCP - Work Your TCP/IP Internetwork with Dynamic IP
• DHCP Server Administration
•APPLET http://<hostname>.<domain>/tcpip/java/en_us/dadmgui.htm
This command shows server statistics and may also be used toreinitialize server.
• DDNS Server Administration
•APPLET http://<hostname>.<domain>/tcpip/java/en_us/ddnsap.htm
This command loads the DDNS server configuration program.
For browser-based management, we used Sun’s HotJava Version 1.1.2 andVersion 3.0 browser. We tested the HotJava browser on OS/2 Warp 4 usingJDK 1.1.4 (including fixes) and also on Windows 95 and NT using Sun’sJDK1.1.5 for Windows 95/NT. The other browsers were tested on OS/2 andWindows 95, 98, NT and 2000.
The good news is that once the Java management applets download to yourworkstation, the management application can run very fast. The managementapplets are quite large, though, and take some time to download.Unfortunately, the HotJava browser does not provide feedback as to how farinto the download you are; so patience is necessary. Once the appletsdownload, they communicate directly with applications on the server andbypass the Web server. The applications themselves do not have a busyindication; so, you will have to wait while the Java client applications arecommunicating with the server applications.
The times you can expect for applet downloads are included below. It did notseem to matter whether the applet was invoked from a browser or using theapplet viewer application; the download time was comparable for the sameplatform. Download speeds were comparable for the various platforms.Remember that these times were achieved on a 16 Mb/second token-ringnetwork. Scale your own times accordingly.
dhcpscp.htm - Seventeen seconds to get to the Start button, 45 seconds toget the initial notebook after you enter your password
dadmgui.htm - Eleven seconds to get to the Start button, two seconds to getto the main screen after you enter your password
ddnsap.htm - Twenty-four seconds to get to the Start button, 15 seconds toget to the initial notebook screen after you enter your password
Chapter 11. Managing your network 425
11.1.2.3 Lotus DominoIf you want to do remote administration from a Lotus Domino server, it is justas easy as from a Domino Go Webserver. You can have a Lotus Dominoserver on the same machine as your DHCP/DDNS server or on a differentmachine. If you have the option, we suggest you run your Domino server on adifferent machine for performance reasons. If you set it up like this, you willstill need a Web server on the DHCP/DDNS server to serve up the HTMLpages and Java applets. The Domino page would just be redirected to theother Web server. This configuration might occur if you already had anexternally accessible Domino server and you wanted to add remoteadministration for a new DHCP/DDNS server that you were configuring. Ineither case, the Domino configuration is similar, and we will cover both cases.We shall start with a newly installed Domino server and explain how to set upthe needed Domino database. If you already have a Web administrationdatabase configured, you may skip a few steps.
1. Start Domino Server Administration.
2. Click on [File — Database — New].
The server is Local and the title does not matter (we suggest Domino WebServer Configuration), but the File Name must be DOMCFG.NSF, andhighlight Domino Web Server Configuration for your template in the lowerhalf of the screen. Note that the file name will not be correct unless youtype it in yourself.
3. Click OK.
4. The next page that will come up is an About Domino Web ServerConfiguration. After reading it, just press Escape to get to the actualconfiguration page. You may want to slide the vertical bar, a little to theright so that you can read the configuration choices easily.
5. If your DHCP/DDNS servers are on the same machine, you will map yourURL to a directory. If your DHCP/DDNS servers are on a different machinewith a Web server installed, you will redirect your URL to another URL.Follow steps 4 to 5 from 11.1.2.2 on page 420, or steps 9 to 10 from thissection, according to your needs. Both sets of instructions start at theDomino Web Server Configuration page, which you can get to from thestart up configuration page by selecting [File => Database => Open] andchoosing the database.
6. Select [Create => Mapping URL=> Directory]. Skip the IP Address; fill inyour chosen comment and use the following information:
URL path: /TCPIP/*
Directory: C:\TCPIP\JAVA
426 Beyond DHCP - Work Your TCP/IP Internetwork with Dynamic IP
assuming TCP/IP is installed on the C: drive. Check that the Read radiobutton is set for Access.
7. Select [File => Save] and then [File => Close] to get back to the mainadministration screen.
8. Restart your Lotus Domino HTTP server (enter HTTP quit, load HTTP) orstart Domino, as the case may be. Test by entering the following addressin a Web browser:
http://server.domain/tcpip/en_US/tcplogin.htm
You should see the TCP/IP Administration page.
9. Select [Create => Redirection URL => URL]
10.Skip the IP Address; add your comment and fill in the following:
URL path: http://thisserver.domain/tcpadmin
Redirection URL: http://otherserver.domain/tcpip/en_US/tcplogin.htm
This presumes you set up the other DHCP/DDNS Web server asdescribed in Part 11.1.2, “Using a Web server” on page 418.
Chapter 11. Managing your network 427

428 Beyond DHCP - Work Your TCP/IP Internetwork with Dynamic IP
Appendix A. Creating DHCP boot diskettes
This appendix examines how to create bootable DOS and OS/2 Warpdiskettes which work with your dynamic TCP/IP network, so you can installWindows, or another kind of software, across the network to new PCs.
A.1 OS/2 Warp boot diskettes
Using three diskettes, you can start almost any PC with OS/2 Warp 4, attachit to the network using either a TCP/IP file system or FTP, and start copyingfiles to install OS/2 Warp 4 or other OS/2 Warp software to a new PC. Withthis technique, you can quickly and easily partition, reformat, and load harddisks with OS/2 Warp software across a Dynamic IP network.
This section describes how to create a set of boot diskettes to attach to thenetwork using DHCP. The major challenge with OS/2 Warp 4 is to find a wayto fit enough advanced TCP/IP networking software on just three diskettes.Using some compression tricks, a virtual disk, and a bit of ingenuity, you candesign your own set to work with just about any PC while still preserving theadvantages of a Dynamic IP network where addresses are availableon-the-fly.
A.1.1 Prerequisites
Before starting, you should have the following resources at your disposal:
• Four blank, formatted diskettes (1.44 MB 3.5 inch).
• Original IBM OS/2 Warp 4 CD-ROM.
• Installed OS/2 Warp 4 system with CD-ROM drive and diskette drive,where you can prepare the boot diskettes.
• Info-Zip’s Zip and UnZip utilities, or suitable equivalents, available on theInternet at:
ftp://ftp-os2.nmsu.edu/pub/os2/util/archiver
• If you are planning to use FTP to transfer files, a simple OS/2 Warp FTPutility such as GET105.ZIP, written by Keith Cotroneo, is available on theInternet at:
ftp://ftp-os2.nmsu.edu/pub/os2/apps/internet/ftp/client
• If not planning to use FTP, use another file system, such as the IBM NFSKit for OS/2 Warp TCP/IP (IBM Part No. 65G1255) or SRVIFS-IP by SamDetweiler (included on the CD-ROM accompanying this book).
© Copyright IBM Corp. 1998, 2000 429

• Server(s) able to provide appropriate file system and Dynamic IPcapabilities on the network, such as an FTP server.
• A client PC attached to the network and available for testing.
• If not provided with OS/2 Warp 4, driver files for the client network adapter,including a correct NIF file.
A.1.2 Step-by-step procedure
We assume that you have the OS/2 Warp 4 CD-ROM available in Drive X. Wealso assume that Drive A contains the diskettes you will be working on.Substitute the correct drive letters in the following steps if necessary.
1. Create basic OS/2 Warp 4 bootable diskettes. A utility called SEDISK isprovided on the OS/2 Warp 4 CD-ROM to help prepare diskettesappropriate to the particular type of system you plan to use. From theOS/2 Warp command line, type:
X:\CID\EXE\OS2\SEDISK /S:X:\OS2IMAGE /T:A: /P:36
The last part (/P:36) is optional. Our test system was an IBM ThinkPad760ED, and /P:36 adds PCMCIA support to the diskettes for this particularnotebook computer. The text file X:\SAMPLE.RSP lists other numericcodes available for many other notebook computers.
SEDISK will require three of your four diskettes. Label the first InstallationDiskette (Diskette 0), the second Diskette 1, and the third Diskette 2. Setthese diskettes aside.
2. Create a diskette with basic TCP/IP networking. A utility called THINLAPSis provided on the OS/2 Warp 4 CD-ROM to help add files necessary toattach to a network. From the OS/2 Warp command line, type:
X:\CID\IMG\MPTS\THINLAPS X:\CID\IMG\MPTS A: IBMTOKCS.NIF /TCPIP /DHCP
IBMTOKCS.NIF is the name of the NIF file for the IBM PCMCIAToken-Ring Adapter, the adapter installed in our ThinkPad 760ED. Youshould substitute the name of the NIF file for your network adapter. (TheNIF files are installed in the \IBMCOM\MACS directory on your OS/2 Warp4 system. You can view these with any text editor if you wish. Consult theonline Network Adapters and Protocol Services Guide if you wish to use aNIF file and driver that does not ship with OS/2 Warp 4.)
THINLAPS will ask you to reinsert Diskette 1 in order to modifyCONFIG.SYS as required. Label the fourth diskette Diskette 3 - NetworkFiles and set it aside.
3. Edit CONFIG.SYS on Diskette 1. Use TEDIT to make some changes toCONFIG.SYS. (You may wish to save a copy of the original in case you
430 Beyond DHCP - Work Your TCP/IP Internetwork with Dynamic IP

make a mistake.) Our CONFIG.SYS for the ThinkPad 760ED follows, andchanges are highlighted.
buffers=32iopl=yesmemman=swap,delayswapprotshell=CMD.EXE /K A:\STARTUP.CMDset os2_shell=cmd.exediskcache=64protectonly=yeslibpath=.;\;ifs=hpfs.ifs /c:64pauseonerror=nocodepage=850devinfo=kbd,us,keyboard.dcpdevinfo=scr,ega,vtbl850.dcpdevice=\dos.sysREM device=\mouse.sysset path=\;Z:\CMD;Z:\EXE;Z:\DLL;set dpath=\;Z:\CMD;Z:\EXE;set keys=onbasedev=ibmkbd.sysbasedev=ibm1flpy.addbasedev=ibm1s506.addbasedev=ibm2flpy.addbasedev=ibm2adsk.addbasedev=ibm2scsi.addbasedev=ibmint13.i13basedev=os2dasd.dmddevice=\testcfg.sysbasedev=xdfloppy.fltREM device=\refpart.sysREM device=\pmdd.sysREM set video_devices=vio_vgaREM set vio_vga=device(bvhvga)REM set copyfromfloppy=1BASEDEV=PCMCIA.SYSBASEDEV=IBM2SS04.SYSBASEDEV=IBM2SS14.SYSDEVICE=\VDISK.SYS 2000,,SET SAVECONNECT=1rem *** Start of ThinLAPS additions ***call=netbind.exerun=lanmsgex.exedevice=lanmsgdd.os2device=protman.os2 /I:a:\device=sockets.sys
Appendix A. Creating DHCP boot diskettes 431
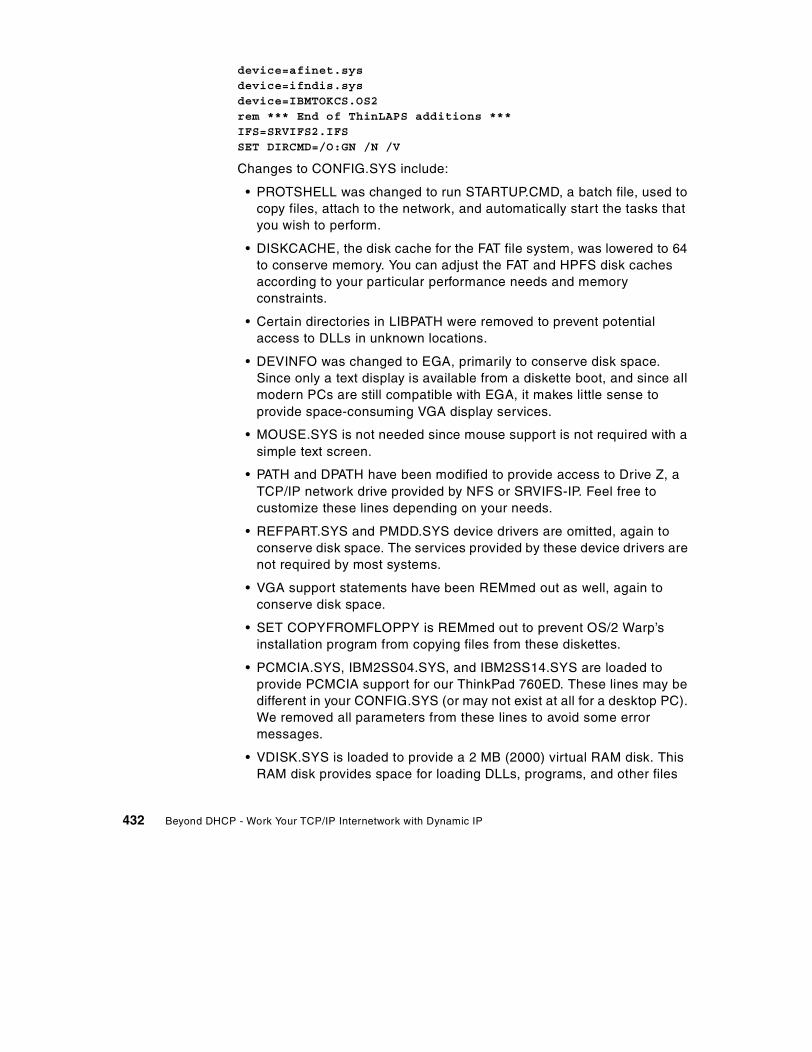
device=afinet.sysdevice=ifndis.sysdevice=IBMTOKCS.OS2rem *** End of ThinLAPS additions ***IFS=SRVIFS2.IFSSET DIRCMD=/O:GN /N /V
Changes to CONFIG.SYS include:
• PROTSHELL was changed to run STARTUP.CMD, a batch file, used tocopy files, attach to the network, and automatically start the tasks thatyou wish to perform.
• DISKCACHE, the disk cache for the FAT file system, was lowered to 64to conserve memory. You can adjust the FAT and HPFS disk cachesaccording to your particular performance needs and memoryconstraints.
• Certain directories in LIBPATH were removed to prevent potentialaccess to DLLs in unknown locations.
• DEVINFO was changed to EGA, primarily to conserve disk space.Since only a text display is available from a diskette boot, and since allmodern PCs are still compatible with EGA, it makes little sense toprovide space-consuming VGA display services.
• MOUSE.SYS is not needed since mouse support is not required with asimple text screen.
• PATH and DPATH have been modified to provide access to Drive Z, aTCP/IP network drive provided by NFS or SRVIFS-IP. Feel free tocustomize these lines depending on your needs.
• REFPART.SYS and PMDD.SYS device drivers are omitted, again toconserve disk space. The services provided by these device drivers arenot required by most systems.
• VGA support statements have been REMmed out as well, again toconserve disk space.
• SET COPYFROMFLOPPY is REMmed out to prevent OS/2 Warp’sinstallation program from copying files from these diskettes.
• PCMCIA.SYS, IBM2SS04.SYS, and IBM2SS14.SYS are loaded toprovide PCMCIA support for our ThinkPad 760ED. These lines may bedifferent in your CONFIG.SYS (or may not exist at all for a desktop PC).We removed all parameters from these lines to avoid some errormessages.
• VDISK.SYS is loaded to provide a 2 MB (2000) virtual RAM disk. ThisRAM disk provides space for loading DLLs, programs, and other files
432 Beyond DHCP - Work Your TCP/IP Internetwork with Dynamic IP

from compressed form on the diskette. It’s needed because we cannotexpect hard disk or network drive space during the boot process. Notethat VDISK.SYS uses the file OSO001.MSG in order to displaymessages during bootup. We do not have the space available on thediskettes to hold OSO001.MSG, so an error message is displayedduring bootup. However, VDISK still loads correctly.
• Some OS/2 Warp installation routines expect SET SAVECONNECT=1in order to provide a network connection after bootup.
• The section ThinLAPS additions in CONFIG.SYS has been modifiedslightly so that the connection to the TCP/IP network does not startright away. That process has been moved to a batch file calledSETUP.CMD, which is called from the STARTUP.CMD batch file.IBMTOKCS.OS2 is the device driver used for the IBM PCMCIAToken-Ring Adapter, and this line will be different for other networkadapters. Some releases of MPTS (Multiprotocol Transport Services)include AFLEAN.SYS. AFLEAN.SYS may be used instead ofAFINET.SYS in order to save space on the diskette.
• SRVIFS2.IFS, part of SRVIFS-IP, is loaded to provide a TCP/IP filesystem. You may elect to use NFS instead or omit this line entirely ifusing FTP.
• The SET DIRCMD line is entirely optional. It’s used here so that adirectory listing (DIR) is sorted alphabetically and formatted differently.
4. Delete unnecessary files on Diskette 2 and add necessary files fromDiskette 3. Diskette 2 (the third diskette) is the last diskette actually usedin the boot process. All the required networking files from Diskette 3,created by THINLAPS, need to be squeezed onto Diskette 2.
In order to properly merge these diskettes, try copying all the files onDiskettes 2 and 3 to a temporary directory on your hard disk. Delete,modify, and move the files in this working directory as needed. Here’s alisting of the files that should be on Diskette 2 when you’re done:
AFINET SYS 225479 8-11-96 10:05pBKSCALLS DLL 512 8-12-96 3:00aBMSCALLS DLL 512 8-12-96 3:02aBVHINIT DLL 10540 8-12-96 2:08aBVSCALLS DLL 512 8-12-96 2:59aCMD EXE 74640 8-09-96 12:15aCOUNTRY SYS 36185 8-09-96 12:29aDOS SYS 1142 12-04-95 11:22pDOSCALL1 DLL 123680 8-27-96 8:45aFILES EXE 482698 4-03-98 11:22aHPFS IFS 141378 8-13-96 11:17a
Appendix A. Creating DHCP boot diskettes 433
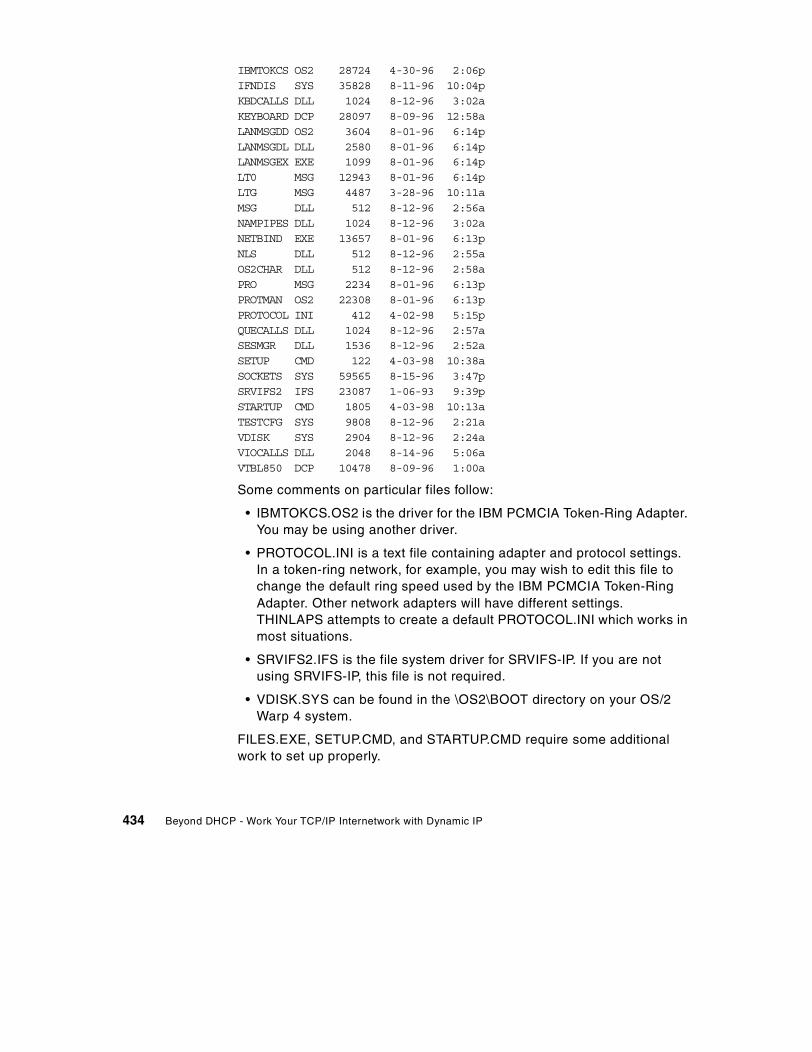
IBMTOKCS OS2 28724 4-30-96 2:06pIFNDIS SYS 35828 8-11-96 10:04pKBDCALLS DLL 1024 8-12-96 3:02aKEYBOARD DCP 28097 8-09-96 12:58aLANMSGDD OS2 3604 8-01-96 6:14pLANMSGDL DLL 2580 8-01-96 6:14pLANMSGEX EXE 1099 8-01-96 6:14pLT0 MSG 12943 8-01-96 6:14pLTG MSG 4487 3-28-96 10:11aMSG DLL 512 8-12-96 2:56aNAMPIPES DLL 1024 8-12-96 3:02aNETBIND EXE 13657 8-01-96 6:13pNLS DLL 512 8-12-96 2:55aOS2CHAR DLL 512 8-12-96 2:58aPRO MSG 2234 8-01-96 6:13pPROTMAN OS2 22308 8-01-96 6:13pPROTOCOL INI 412 4-02-98 5:15pQUECALLS DLL 1024 8-12-96 2:57aSESMGR DLL 1536 8-12-96 2:52aSETUP CMD 122 4-03-98 10:38aSOCKETS SYS 59565 8-15-96 3:47pSRVIFS2 IFS 23087 1-06-93 9:39pSTARTUP CMD 1805 4-03-98 10:13aTESTCFG SYS 9808 8-12-96 2:21aVDISK SYS 2904 8-12-96 2:24aVIOCALLS DLL 2048 8-14-96 5:06aVTBL850 DCP 10478 8-09-96 1:00a
Some comments on particular files follow:
• IBMTOKCS.OS2 is the driver for the IBM PCMCIA Token-Ring Adapter.You may be using another driver.
• PROTOCOL.INI is a text file containing adapter and protocol settings.In a token-ring network, for example, you may wish to edit this file tochange the default ring speed used by the IBM PCMCIA Token-RingAdapter. Other network adapters will have different settings.THINLAPS attempts to create a default PROTOCOL.INI which works inmost situations.
• SRVIFS2.IFS is the file system driver for SRVIFS-IP. If you are notusing SRVIFS-IP, this file is not required.
• VDISK.SYS can be found in the \OS2\BOOT directory on your OS/2Warp 4 system.
FILES.EXE, SETUP.CMD, and STARTUP.CMD require some additionalwork to set up properly.
434 Beyond DHCP - Work Your TCP/IP Internetwork with Dynamic IP

FILES.EXE is a self-extracting, compressed Zip file, containing the filesneeded to attach to the network. (We created FILES.EXE using Info-Zip’sZip and Zip2Exe utilities.) These files are extracted to the RAM diskcreated by VDISK.SYS during the boot process. Many of the remainingfiles on Diskettes 2 and 3 are contained in FILES.EXE, but not all. For ourThinkPad 760ED, we included the following files in FILES.EXE:
Archive: FILES.EXELength Size Ratio Date Name------ ---- ----- ---- ----
512 205 60% 08-12-96 ANSICALL.DLL19893 11872 40% 08-23-96 ARP.EXE11587 6346 45% 08-23-96 CNTRL.EXE168538 131892 22% 08-11-96 DHCPCD.EXE24710 19384 22% 08-11-96 DHCPSTRT.EXE
0 0 0% 04-02-98 ETC/13218 3619 73% 08-11-96 ETC/DHCPCD.CFG5451 2079 62% 08-11-96 ETC/PROTOCOL42725 9073 79% 08-11-96 ETC/SERVICES55296 27572 50% 01-10-98 GET.EXE9415 7731 18% 08-13-96 HARDERR.EXE17193 10234 41% 08-23-96 IFCONFIG.EXE24064 13180 45% 08-23-96 INETWAIT.EXE21812 16318 25% 08-12-96 NPXEMLTR.DLL35552 19216 46% 08-23-96 PING.EXE20671 12002 42% 08-23-96 ROUTE.EXE37842 15905 58% 08-23-96 SO32DLL.DLL9035 6266 31% 01-31-93 SRVATTCH.EXE21947 12813 42% 06-07-93 SRVRDR.EXE62289 30200 52% 08-23-96 TCP32DLL.DLL47279 24151 49% 08-23-96 TCPIPDLL.DLL34304 9344 73% 08-11-96 TCPMRI.DLL32288 17551 46% 08-23-96 TCPTIME.DLL9390 8330 11% 11-04-96 TEDIT.EXE14596 3053 79% 11-04-96 TEDIT.HLP------ ------ --- -------739607 418336 43% 25 files
Some of these files, in particular, deserve comment:
• GET.EXE is a simple FTP program we chose among the severalavailable on the Internet. It takes up very little space (just 27 KBcompressed) and can be used in batch files.
• PING.EXE is optional (but useful). We extracted PING.EXE fromX:\CID\IMG\MPTS\MPTN\BIN\BIN.ZIP.
• SRVATTCH.EXE and SRVRDR.EXE are part of SRVIFS-IP.
Appendix A. Creating DHCP boot diskettes 435
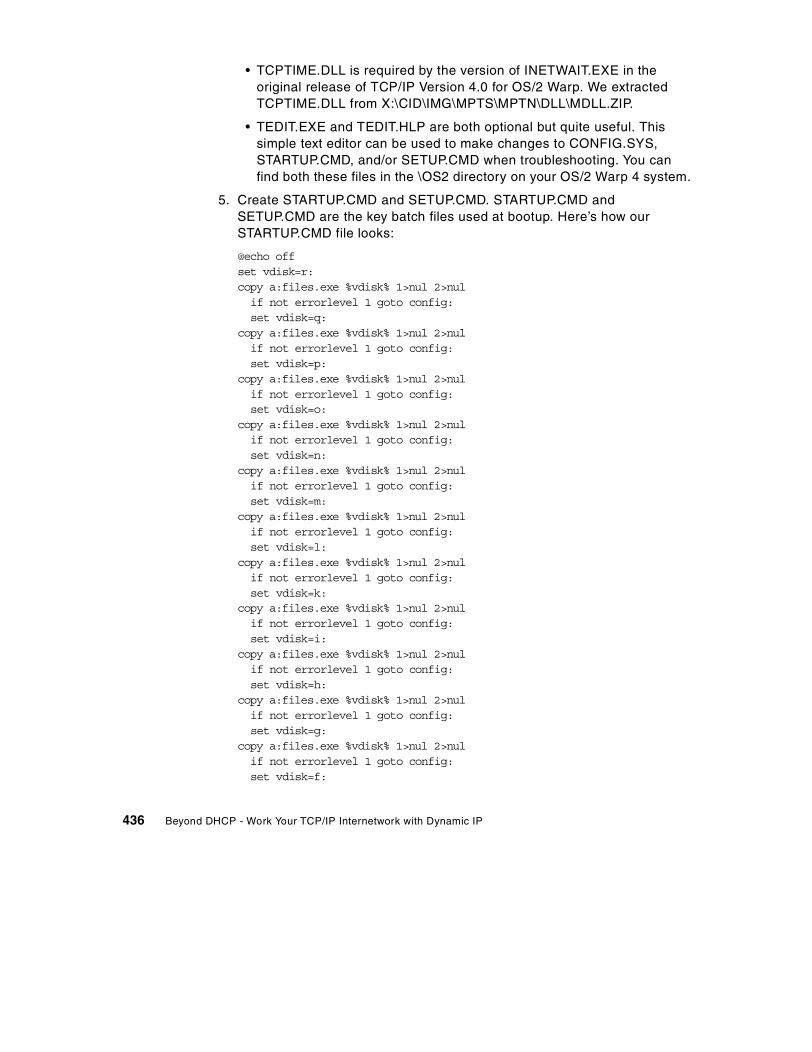
• TCPTIME.DLL is required by the version of INETWAIT.EXE in theoriginal release of TCP/IP Version 4.0 for OS/2 Warp. We extractedTCPTIME.DLL from X:\CID\IMG\MPTS\MPTN\DLL\MDLL.ZIP.
• TEDIT.EXE and TEDIT.HLP are both optional but quite useful. Thissimple text editor can be used to make changes to CONFIG.SYS,STARTUP.CMD, and/or SETUP.CMD when troubleshooting. You canfind both these files in the \OS2 directory on your OS/2 Warp 4 system.
5. Create STARTUP.CMD and SETUP.CMD. STARTUP.CMD andSETUP.CMD are the key batch files used at bootup. Here’s how ourSTARTUP.CMD file looks:
@echo offset vdisk=r:copy a:files.exe %vdisk% 1>nul 2>nulif not errorlevel 1 goto config:set vdisk=q:
copy a:files.exe %vdisk% 1>nul 2>nulif not errorlevel 1 goto config:set vdisk=p:
copy a:files.exe %vdisk% 1>nul 2>nulif not errorlevel 1 goto config:set vdisk=o:
copy a:files.exe %vdisk% 1>nul 2>nulif not errorlevel 1 goto config:set vdisk=n:
copy a:files.exe %vdisk% 1>nul 2>nulif not errorlevel 1 goto config:set vdisk=m:
copy a:files.exe %vdisk% 1>nul 2>nulif not errorlevel 1 goto config:set vdisk=l:
copy a:files.exe %vdisk% 1>nul 2>nulif not errorlevel 1 goto config:set vdisk=k:
copy a:files.exe %vdisk% 1>nul 2>nulif not errorlevel 1 goto config:set vdisk=i:
copy a:files.exe %vdisk% 1>nul 2>nulif not errorlevel 1 goto config:set vdisk=h:
copy a:files.exe %vdisk% 1>nul 2>nulif not errorlevel 1 goto config:set vdisk=g:
copy a:files.exe %vdisk% 1>nul 2>nulif not errorlevel 1 goto config:set vdisk=f:
436 Beyond DHCP - Work Your TCP/IP Internetwork with Dynamic IP

copy a:files.exe %vdisk% 1>nul 2>nulif not errorlevel 1 goto config:set vdisk=e:
copy a:files.exe %vdisk% 1>nul 2>nulif not errorlevel 1 goto config:set vdisk=d:
copy a:files.exe %vdisk% 1>nul 2>nulif not errorlevel 1 goto config:set vdisk=c:
copy a:files.exe %vdisk% 1>nul 2>nulif not errorlevel 1 goto config:goto error
:config%vdisk%copy a:\*.dllcopy a:\*.execopy a:\*.cmdset path=%vdisk%\;%path%set dpath=%vdisk%\;%dpath%set beginlibpath=%vdisk%\;a:\;filesdel files.exeif not exist setup.cmd goto end:call setupgoto end:
:errorEcho Error finding VDISK
:end
The first several lines in this batch file attempt to locate the RAM diskcreated with VDISK.SYS, starting with Drive R and working back to DriveC. Once located, all the necessary files from Diskette 2 are copied to theRAM disk. Some environment variables are set (to allow FILES.EXE andother programs to run properly); then FILES.EXE is run to extract thecompressed files inside. Finally, if SETUP.CMD exists, STARTUP.CMDcalls it.
SETUP.CMD is considerably shorter and looks like this:
SET ETC=%vdisk%\ETCDETACH CNTRL.EXEINETWAITDHCPSTRT -i lan0DETACH SRVRDR.EXESRVATTCH Z: \\192.168.6.12\TESTDRV
The first line sets the ETC environment variable, required by many TCP/IPapplications. The ETC directory contains critical configuration files. Then
Appendix A. Creating DHCP boot diskettes 437
CNTRL.EXE is started as a background task. INETWAIT runs (to wait forthe TCP/IP stack to initialize); then DHCP is started (to obtain addressinformation and connect to the network over "lan0," in this case the IBMPCMCIA Token-Ring Adapter).
The last two lines start SRVIFS-IP and create a network drive (Drive Z)from 192.168.6.12, a SRVIFS-IP server. (If a name server is available, andits address is returned by the DHCP server, the IP name can be specifiedinstead.) You may wish to use NFS, GET (FTP) or some other method toobtain additional files across the network. Any additional commands canbe added to this batch file as needed.
6. Test and verify your network connection. We’ve included a few programson these boot diskettes so you can troubleshoot your connection to thenetwork. These files include:
• LANTRAN.LOG will be created on Diskette 2 and will containinformation on whether the network adapter was able to attach to thenetwork. Use the information in this file to determine whether thenetwork adapter driver is functioning correctly and whetherPROTOCOL.INI is constructed properly.
• ARP.EXE lets you look up an IP address based on a network adapteraddress.
• IFCONFIG lets you determine the IP address assigned to the system.At the command line, after booting from these diskettes, type (inlowercase):
ifconfig lan0
• PING.EXE allows you to test the connection to a particular system. Itcan be particularly helpful when you’re installing both a new networkand a new set of PCs. You can test to see whether traffic is beingrouted correctly.
A.1.3 Notes on the step-by-step procedure
1. Try to use TEDIT when making changes to text files on the diskettes. TheOS/2 System Editor will create extended attributes for each text file youedit, and these extended attributes take up extra space. Extendedattributes are not required for boot diskettes.
2. Info-Zip’s Zip utility can accept the -9 option, resulting in the highestpossible degree of compression. Then the Zip2Exe utility can convert theZip file to FILES.EXE. We recommend using -9 to conserve as muchspace as possible. You should also use -r to properly store the files in theETC directory.
438 Beyond DHCP - Work Your TCP/IP Internetwork with Dynamic IP

3. While we opted to use OS/2 Warp files obtained from the original CD-ROMrelease, you may wish to use files for these boot diskettes from OS/2 WarpFixPaks and later versions of MPTS and TCP/IP. If so, there may bedependencies on certain DLLs that we have not included. Newer is notnecessarily better, however. Files tend to grow in size over time asfeatures are added.
4. SNIFFLE, part of the MPTS supplemental utilities, can be used to verifythe construction of a network adapter driver’s NIF file. See the onlineNetwork Adapters and Protocol Services Guide for details.
A.2 DOS boot diskettes
With DOS boot diskettes that can attach to a file server, such as Warp Serveror Windows NT, you can install many different software packages across thenetwork, including versions of Windows with DOS-based installationprograms.
This section describes how to create a pair of DOS boot diskettes that canprovide a PC with a TCP/IP (TCPBEUI) or NetBEUI-based file system and adynamically assigned IP address.
A.2.1 Prerequisites
These are the necessary prerequisites:
• Two blank, formatted diskettes (1.44 MB 3.5 inch)
• A workstation that has either BASIC or FULL DOS LAN Services (DLS)and IBM PC-DOS 2000 installed
• Server(s) able to provide appropriate file system and Dynamic IPcapabilities on the network, such as Warp Server
• A client PC attached to the network and available for testing
A.2.2 Step-by-step procedure
We will assume that you have DOS LAN Services installed on Drive C in the\NET subdirectory. We will also assume that Drive A will contain any diskettesyou will be working with. Substitute the correct drive letters in the followingsteps if necessary.
1. Create Diskette 1. Due to the size of DLS, we have to split the softwareacross two diskettes. Diskette 1 contains the files to boot the PC andinitialize the network adapter. It will also contain files that allow you topartition and format a hard drive and to edit files. Label this diskette DLS
Appendix A. Creating DHCP boot diskettes 439

Boot Diskette 1. It should be formatted under IBM PC-DOS 2000 using theFORMAT A: /S command, to create a bootable diskette.
Then copy the following files from the \DOS subdirectory to Diskette 1:
• EMM386.EXE• HIMEM.SYS• SETVER.EXE• SHARE.EXE• FORMAT.COM• FDISK.COM• E.EXE• E.EX• E.INI
Copy the following files from the \NET subdirectory to the diskette:
• DLSHELP.SYS• LT2.MSG• NTSTS.DOS• PROTMAN.DOS• IBMTOK.DOS
Our test system was an IBM ValuePoint with an IBM Token-Ring 16/4network adapter, so we copied the IBMTOK.DOS driver file. You may haveto copy a different driver depending on the type of network adapter youhave in your PC.
2. Create CONFIG.SYS in order to boot a new PC and partition its hard drivewithout having to wait for a network connection to be established. We cancreate a menu-based CONFIG.SYS on Diskette 1 as follows:
[MENU]MENUITEM=NETWORK, Connect to the networkMENUITEM=STANDALONE, No network connectionMENUDEFAULT=NETWORK,15
[COMMON]FILES=30BUFFERS=10DOS=HIGH,UMBDEVICE=A:\HIMEM.SYSDEVICE=C:\DOS\EMM386.EXE noems ram x=d800-e2ffDEVICEHIGH=C:\DOS\SETVER.EXE
[NETWORK]DEVICEHIGH=A:\PROTMAN.DOS /i:A:\DEVICEHIGH=A:\IBMTOK.DOS
440 Beyond DHCP - Work Your TCP/IP Internetwork with Dynamic IP
DEVICEHIGH=A:\NTSTS.DOSDEVICEHIGH=A:\DLSHELP.SYSLASTDRIVE=Z
[STANDALONE]
Remember to replace the DEVICEHIGH=A:\IBMTOK.DOS statement with thecorrect statement for your network adapter.
3. Create AUTOEXEC.BAT. Use the E text editor to create the followingAUTOEXEC.BAT file on Diskette 1:
SET PATH=A:\GOTO %CONFIG%:NETWORKSHARESET TCPHELP=A:\SET ETCDIR=A:\ECHO ................................ECHO Insert DLS Boot Disk 2 now, thenPAUSENET START:STANDALONE
4. Create PROTOCOL.INI. The following sample PROTOCOL.INI file is fromour IBM ValuePoint. You should copy the PROTOCOL.INI file from \NETsubdirectory to Diskette 1; then use E to modify the DHCPClientID=parameter (highlighted below):
[network.setup]version=0x3100netcard=ibm$genibmtok,1,IBM$GENIBMTOKtransport=nts$ntst2,NTS$NTST2transport=ibm$netbeui,IBM$NETBEUIlana0=ibm$genibmtok,1,nts$ntst2lana1=ibm$genibmtok,1,ibm$netbeui
[protman]DriverName=PROTMAN$PRIORITY=ibm$netbeui
[IBM$GENIBMTOK]ram=0xD800DriverName=IBMTOK$primary
[NTS$NTST2]DNSAddr=GatewayAddr=
Appendix A. Creating DHCP boot diskettes 441

NetSubNetMask=IPAddr=TCPHeartBeats=StandardDHCPClientID=BURGERBootPFlag=DHCPDriverName=ntsts$VCs=16VCReceiveLarge=6VCSends=6RcvWindow=2920UseMemory=UMBBINDINGS=IBM$GENIBMTOKLANABASE=0Token-Ring
[IBM$NETBEUI]DriverName=netbeui$SESSIONS=20NCBS=20BINDINGS=IBM$GENIBMTOKLANABASE=1
5. Create Diskette 2. Diskette 2 contains the files required to run DLS. Labelthis diskette DLS Boot Diskette 2.
Insert Diskette 2 and copy the following files from the \NET subdirectory tothe diskette:
• CMDS.EXE• CMDS16.EXE• NET.MSG• NET.EXE• NETH.MSG• NETXP.MSG• PING.EXE• PROTMAN.EXE
6. Create NETWORK.INI. The following sample NETWORK.INI file is fromour IBM ValuePoint. You should copy the NETWORK.INI file from the \NETsubdirectory to Diskette 2; then use E to modify the highlightedparameters as needed:
[network]computername=BURGERlanroot=A:\autostart=netbeui basicusername=USERIDdomain=ARMONK
442 Beyond DHCP - Work Your TCP/IP Internetwork with Dynamic IP

autologon=nolslogon=yesreconnect=nopasswordcaching=notimesync=no
[install]peer=nogui=nowindows=noprotocol=tcpnetrminidls=no **for minidls onlyinstalled=no **for minidls onlytarget=c:~WSRCLNT\ **for minidls only
[Password Lists]
7. Final configuration. To make Diskette 2 work correctly, you must copy theAUTOEXEC.BAT and COMMAND.COM files from Diskette 1. These filesshould be identical on both diskettes.
By having these two files on both diskettes, you will be able to removeDiskette 1 and replace it with Diskette 2 when the PAUSE statement inAUTOEXEC.BAT is executed. This allows DLS to start properly.
8. Testing. Boot the computer with Diskette 1 inserted. The following screenshould be displayed:
Option 1 will be highlighted and will be automatically selected after 15seconds. If selected, option 2 will exit directly to the DOS prompt.
When option 1 is selected, the network drivers will be loaded, and you willbe prompted to insert Diskette 2 and press any key to continue.
When this is done, DLS will be started and the DOS prompt will bedisplayed. Note that you are not logged onto the LAN.
PC DOS 2000 Startup Menu========================
1. Connect to the network2. No network connection
Enter a choice: Time remaining: 15
F5=Bypass startup files F8=Confirm each line of CONFIG.SYS and AUTOEXEC.BAT [N]
Appendix A. Creating DHCP boot diskettes 443
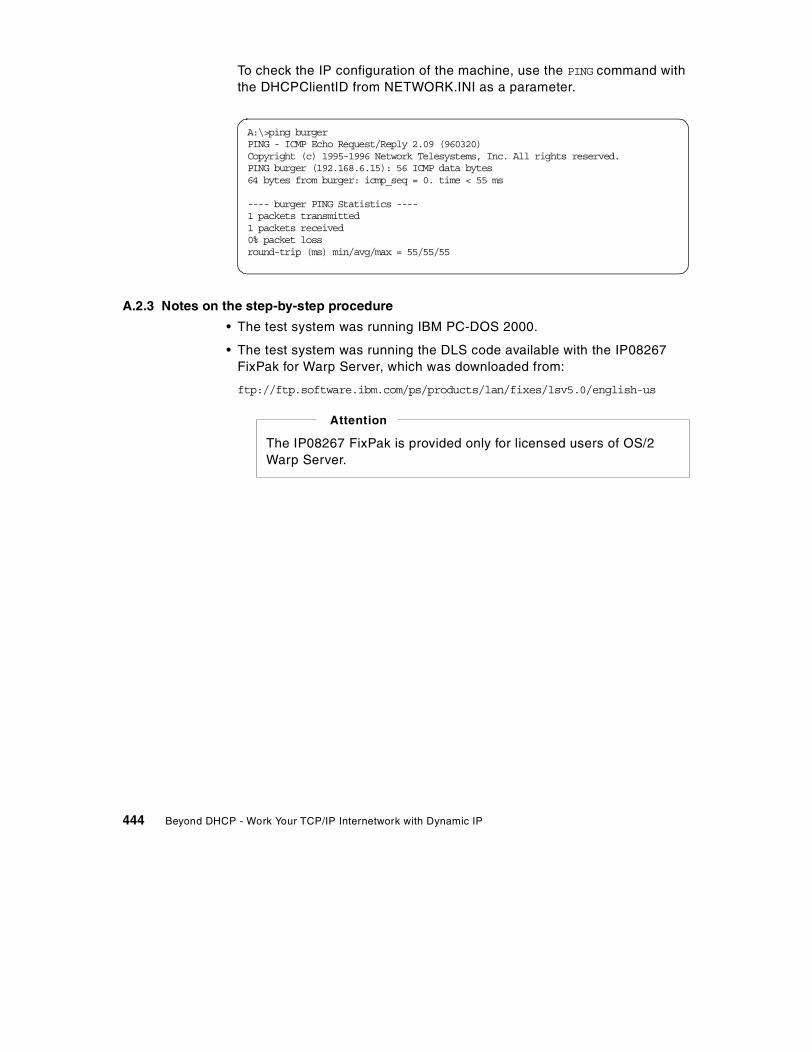
To check the IP configuration of the machine, use the PING command withthe DHCPClientID from NETWORK.INI as a parameter.
A.2.3 Notes on the step-by-step procedure
• The test system was running IBM PC-DOS 2000.
• The test system was running the DLS code available with the IP08267FixPak for Warp Server, which was downloaded from:
ftp://ftp.software.ibm.com/ps/products/lan/fixes/lsv5.0/english-us
A:\>ping burgerPING - ICMP Echo Request/Reply 2.09 (960320)Copyright (c) 1995-1996 Network Telesystems, Inc. All rights reserved.PING burger (192.168.6.15): 56 ICMP data bytes64 bytes from burger: icmp_seq = 0. time < 55 ms
---- burger PING Statistics ----1 packets transmitted1 packets received0% packet lossround-trip (ms) min/avg/max = 55/55/55
The IP08267 FixPak is provided only for licensed users of OS/2Warp Server.
Attention
444 Beyond DHCP - Work Your TCP/IP Internetwork with Dynamic IP
Appendix B. Application issues
This appendix describes some specific application issues you should beaware of when using DHCP and/or DDNS. Generally speaking, mostapplications should not have any problem running on a DHCP client machine.There are exceptions, however. We recommend that you consult withsoftware vendors to make sure that your TCP/IP applications work well on aDHCP client system. If necessary, you can configure your client machine witha static IP address if you must run a particular application.
Many applications (such as network management utilities) can be mucheasier to use with a Dynamic DNS server on the network if you do rely onDHCP. Otherwise, users may find it difficult to locate other systems on thenetwork.
We have tested several popular applications with DHCP and DDNStechnologies, and, while the overwhelming majority of applications have noproblems, we have found some minor difficulties with a few specificapplications. The following sections describe those problems.
B.1 DB2 Universal Database
Many network managers prefer to assign fixed IP addresses to major serversto prevent them from relying on other servers in order to function properly.Quite often, DB2 servers have fixed IP addresses.
However, the client version of DB2 may be installed on a workstation whichreceives its address assignment from a DHCP server. We found a problemwith DB2 UDB Version 6.1 on OS/2 Warp DHCP clients. To keep abreast ofDB2 technical information, you should visit the Web site:
http://www.software.ibm.com/data/db2/db2tech
To identify this problem, we installed the IBM DB2 Universal DatabasePersonal Edition on an OS/2 Warp Version 4 client. The INSTALL.TXT filewarns that the TCP/IP protocol stack will not be recognized on a DHCP client.In fact, DB2 itself seems to work well on such a client. We could only find oneproblem: The HTML online documentation system (NET.QUESTION) did notwork properly on an OS/2 DHCP client until we applied a fix to it. Here is howwe obtained the fix, and this is what it offers:
1. First, we needed to obtain the latest NetQ driver, which must not be earlierthan NQ990527.ZIP. This driver is, unfortunately, not delivered with FixPak
© Copyright IBM Corp. 1998, 2000 445
1 for DB2 UDB for OS/2 v6.1, but the latest driver may be downloadedfrom:
http://cognac.boeblingen.de.ibm.com/
The driver download area of this site is only accessible to registered users,so you must first register, and then, after receiving your user ID andpassword, you may download the driver.
2. NQ990527.ZIP does not change the NETQ.CFG file, and it hascommunication set to local not TCP/IP, using named pipes.
3. NETQINIT.EXE is no longer called, which means the TCP/IP NETQ.CFG fileis not created. If you require TCP/IP after the installation, then you maycall NETQINIT.EXE.
The FixPak 1 for DB2 UDB, which we referred to earlier, is available from:
http://www-4.ibm.com/software/data/db2/db2tech/version61.html
The Windows 95, Windows 98 and Windows NT versions of DB2 UDB nolonger contain the warning in INSTALL.TXT. We experienced no obviousproblems when installing or running DB2 UDB on a Windows 95, Windows 98or Windows NT DHCP client.
B.2 TME 10 Framework
TME 10 only needs to have the correct IP addresses for the TMR, in order towork properly. Currently, TME 10 has two ways to provide client support forDHCP: the UserLink/DHCP Service component of PC Agent and TMA (TivoliManaged Agent). If possible, you should use Tivoli’s TMA, since it providesnewer technology and will gradually replace the UserLink/DHCP Service.TMA, which many refer to as a thin client product, takes up very little diskspace.
The TMA design was intended for DHCP use, where users would shut downtheir machines, reboot later (maybe even the next day) and receive a new IPaddress. If an IP address changes on the TMA without warning, when aDHCP lease expires and a new one is acquired, then problems begin. Thishas been documented in APAR IX85877, and no patches have been releasedyet.
Generally, the Tivoli service, a daemon, runs on each managed client andserver attached to the network. As these daemons try to connect with oneanother, they must be able to map a system’s IP address to a valid hostname.This reverse mapping technique may not be available in a DHCP-only
446 Beyond DHCP - Work Your TCP/IP Internetwork with Dynamic IP
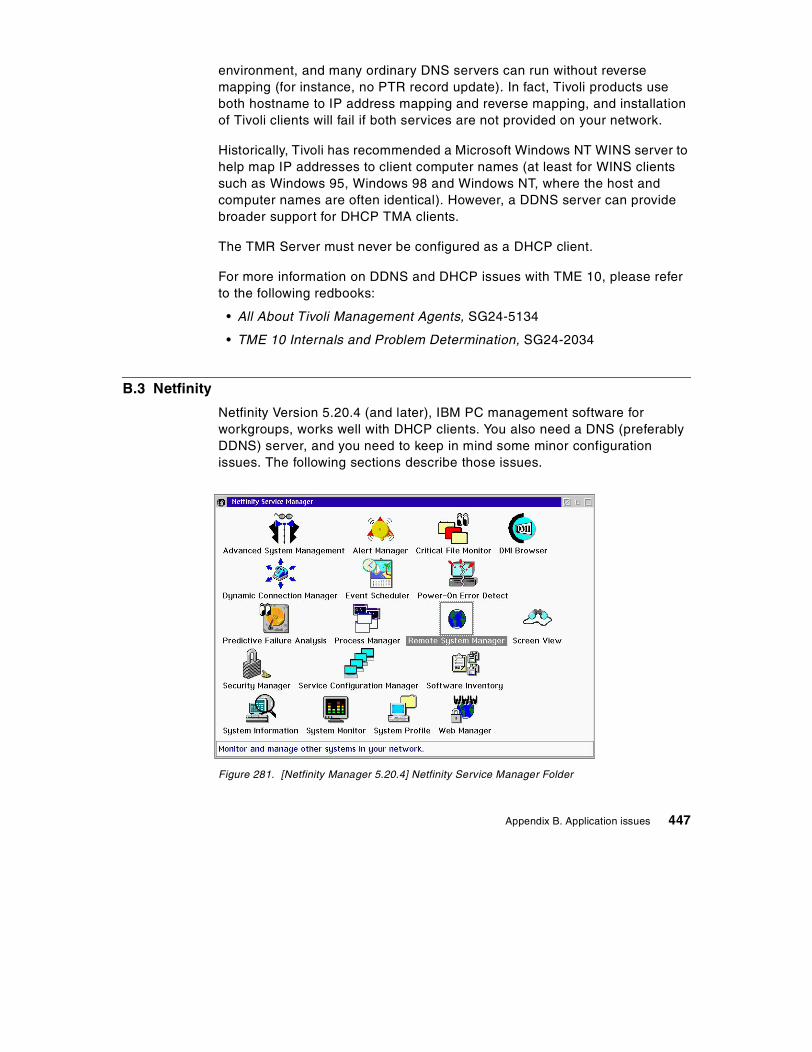
environment, and many ordinary DNS servers can run without reversemapping (for instance, no PTR record update). In fact, Tivoli products useboth hostname to IP address mapping and reverse mapping, and installationof Tivoli clients will fail if both services are not provided on your network.
Historically, Tivoli has recommended a Microsoft Windows NT WINS server tohelp map IP addresses to client computer names (at least for WINS clientssuch as Windows 95, Windows 98 and Windows NT, where the host andcomputer names are often identical). However, a DDNS server can providebroader support for DHCP TMA clients.
The TMR Server must never be configured as a DHCP client.
For more information on DDNS and DHCP issues with TME 10, please referto the following redbooks:
• All About Tivoli Management Agents, SG24-5134
• TME 10 Internals and Problem Determination, SG24-2034
B.3 Netfinity
Netfinity Version 5.20.4 (and later), IBM PC management software forworkgroups, works well with DHCP clients. You also need a DNS (preferablyDDNS) server, and you need to keep in mind some minor configurationissues. The following sections describe those issues.
Figure 281. [Netfinity Manager 5.20.4] Netfinity Service Manager Folder
Appendix B. Application issues 447
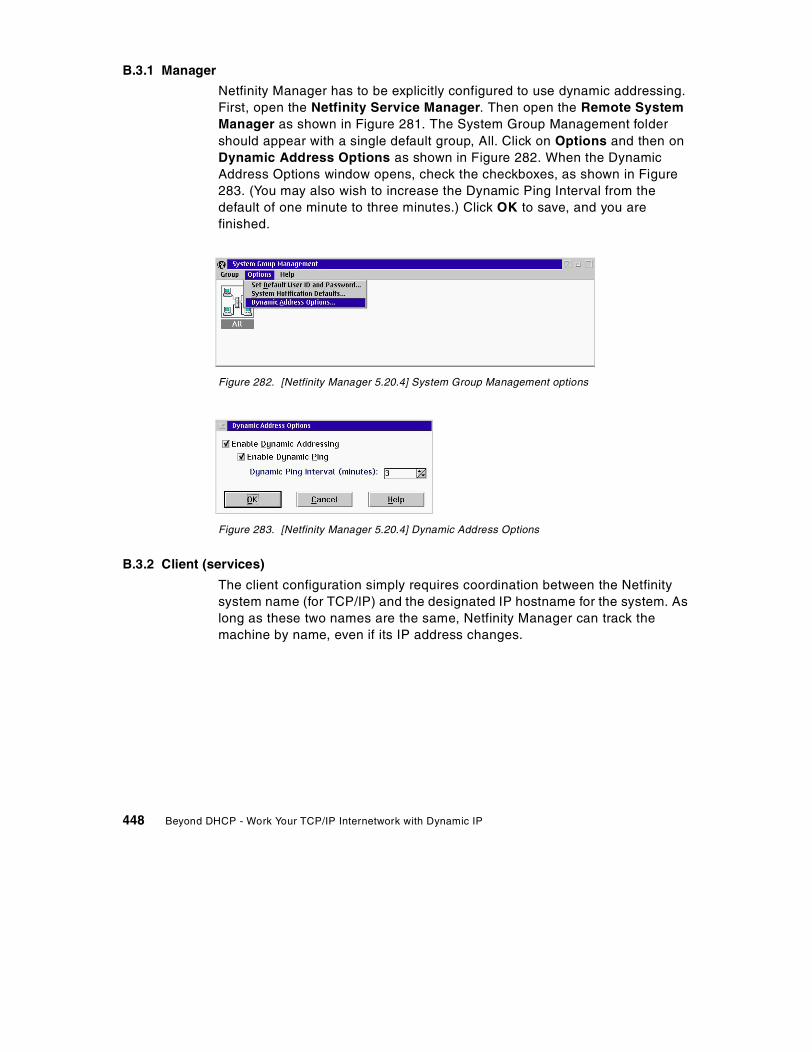
B.3.1 Manager
Netfinity Manager has to be explicitly configured to use dynamic addressing.First, open the Netfinity Service Manager. Then open the Remote SystemManager as shown in Figure 281. The System Group Management foldershould appear with a single default group, All. Click on Options and then onDynamic Address Options as shown in Figure 282. When the DynamicAddress Options window opens, check the checkboxes, as shown in Figure283. (You may also wish to increase the Dynamic Ping Interval from thedefault of one minute to three minutes.) Click OK to save, and you arefinished.
Figure 282. [Netfinity Manager 5.20.4] System Group Management options
Figure 283. [Netfinity Manager 5.20.4] Dynamic Address Options
B.3.2 Client (services)
The client configuration simply requires coordination between the Netfinitysystem name (for TCP/IP) and the designated IP hostname for the system. Aslong as these two names are the same, Netfinity Manager can track themachine by name, even if its IP address changes.
448 Beyond DHCP - Work Your TCP/IP Internetwork with Dynamic IP
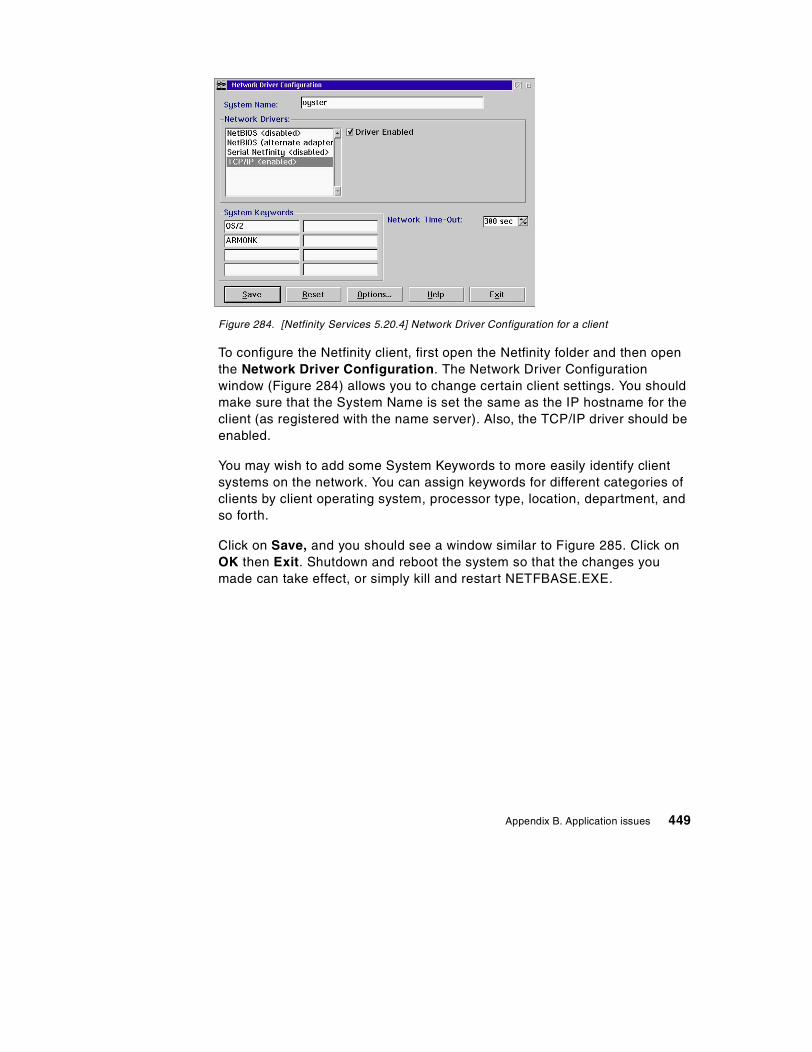
Figure 284. [Netfinity Services 5.20.4] Network Driver Configuration for a client
To configure the Netfinity client, first open the Netfinity folder and then openthe Network Driver Configuration. The Network Driver Configurationwindow (Figure 284) allows you to change certain client settings. You shouldmake sure that the System Name is set the same as the IP hostname for theclient (as registered with the name server). Also, the TCP/IP driver should beenabled.
You may wish to add some System Keywords to more easily identify clientsystems on the network. You can assign keywords for different categories ofclients by client operating system, processor type, location, department, andso forth.
Click on Save, and you should see a window similar to Figure 285. Click onOK then Exit. Shutdown and reboot the system so that the changes youmade can take effect, or simply kill and restart NETFBASE.EXE.
Appendix B. Application issues 449
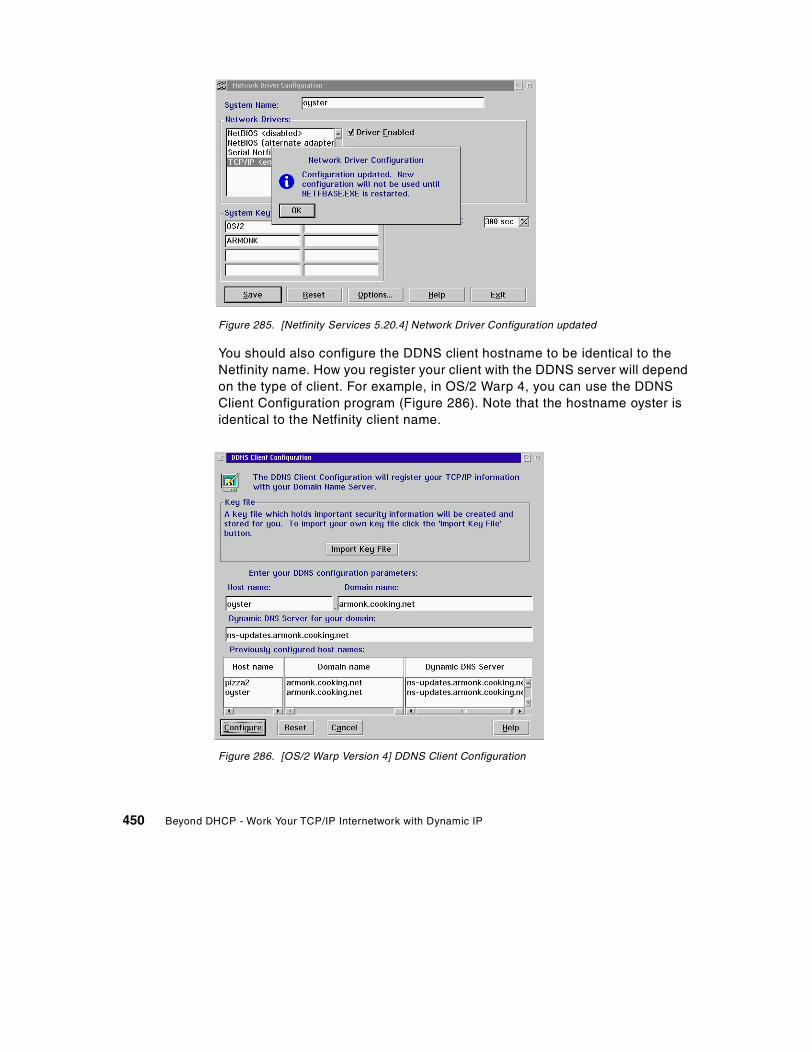
Figure 285. [Netfinity Services 5.20.4] Network Driver Configuration updated
You should also configure the DDNS client hostname to be identical to theNetfinity name. How you register your client with the DDNS server will dependon the type of client. For example, in OS/2 Warp 4, you can use the DDNSClient Configuration program (Figure 286). Note that the hostname oyster isidentical to the Netfinity client name.
Figure 286. [OS/2 Warp Version 4] DDNS Client Configuration
450 Beyond DHCP - Work Your TCP/IP Internetwork with Dynamic IP
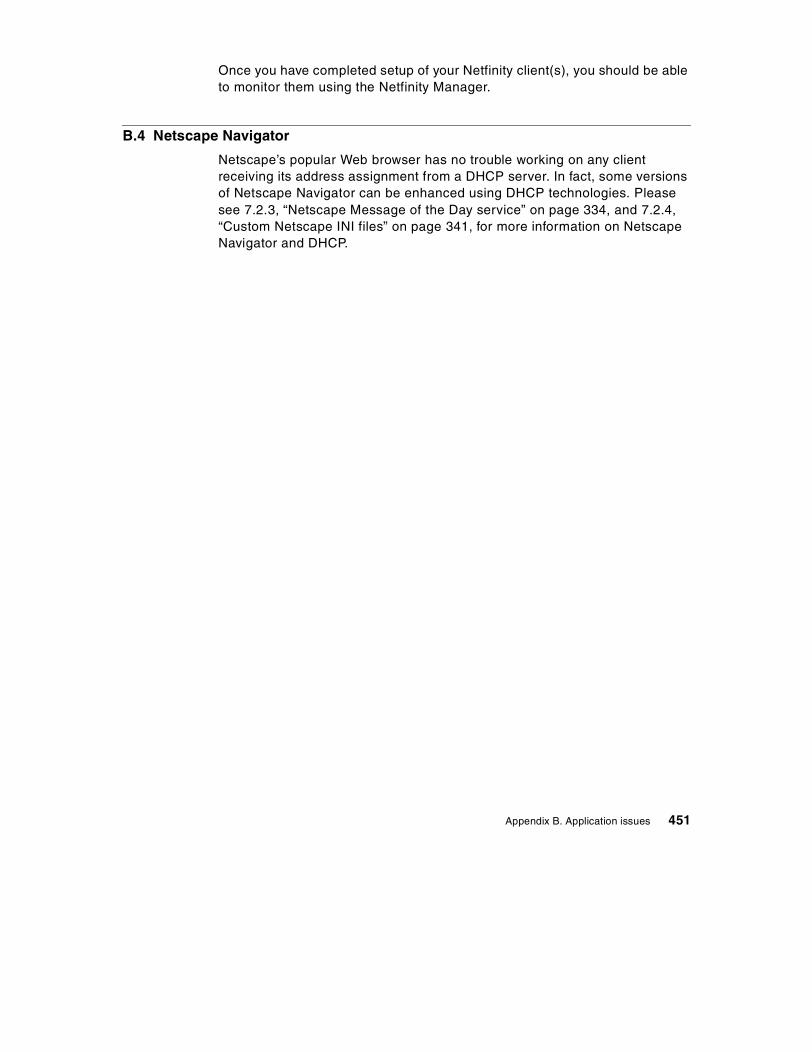
Once you have completed setup of your Netfinity client(s), you should be ableto monitor them using the Netfinity Manager.
B.4 Netscape Navigator
Netscape’s popular Web browser has no trouble working on any clientreceiving its address assignment from a DHCP server. In fact, some versionsof Netscape Navigator can be enhanced using DHCP technologies. Pleasesee 7.2.3, “Netscape Message of the Day service” on page 334, and 7.2.4,“Custom Netscape INI files” on page 341, for more information on NetscapeNavigator and DHCP.
Appendix B. Application issues 451

452 Beyond DHCP - Work Your TCP/IP Internetwork with Dynamic IP
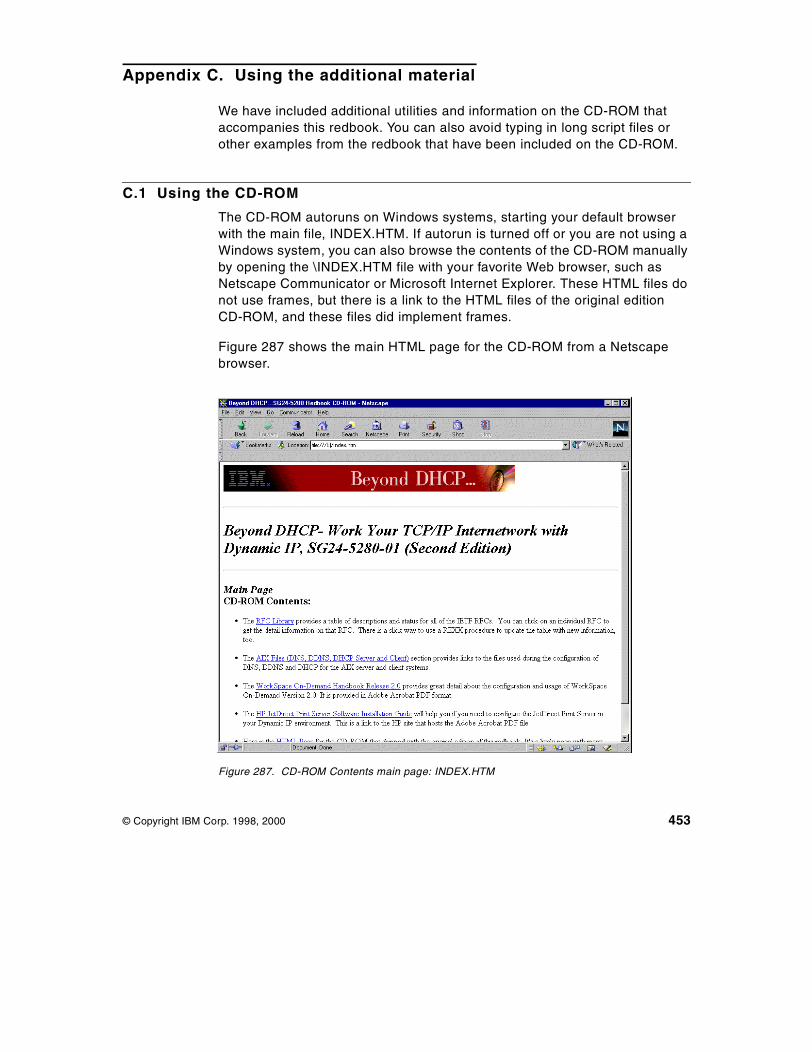
Appendix C. Using the additional material
We have included additional utilities and information on the CD-ROM thataccompanies this redbook. You can also avoid typing in long script files orother examples from the redbook that have been included on the CD-ROM.
C.1 Using the CD-ROM
The CD-ROM autoruns on Windows systems, starting your default browserwith the main file, INDEX.HTM. If autorun is turned off or you are not using aWindows system, you can also browse the contents of the CD-ROM manuallyby opening the \INDEX.HTM file with your favorite Web browser, such asNetscape Communicator or Microsoft Internet Explorer. These HTML files donot use frames, but there is a link to the HTML files of the original editionCD-ROM, and these files did implement frames.
Figure 287 shows the main HTML page for the CD-ROM from a Netscapebrowser.
Figure 287. CD-ROM Contents main page: INDEX.HTM
© Copyright IBM Corp. 1998, 2000 453

Note: The URL of file:///E|/INDEX.HTM in Figure 287 on page 453 representsa CD-ROM drive and directory.
C.2 Locating the additional material on the Internet
Some of the information on the CD-ROM associated with this redbook is alsoavailable in softcopy on the Internet from the IBM Redbooks Web server. Youcan go to the IBM Redbooks Web site at:
http://www.redbooks.ibm.com/
Select the Additional materials button on the left part of the page, then clickto display the directory listing. Select the SG245280 directory and you willsee selected files to download.
C.3 Second edition CD-ROM contents
This redbook is the second edition, and the following content have beenadded to the CD-ROM as follows:
• An RFC Library with documentation on all of the RFCs, with both summaryand detailed information, as well as a way to update the tables shown inthe pages.
• The AIX files for static DNS, DDNS and DHCP for the server and client.
• The WorkSpace On-Demand Version 2.0 Handbook in Acrobat ReaderPDF format.
• A link to the HP JetDirect Software Configuration Guide in Acrobat ReaderPDF format.
• A link to the CD-ROM contents of the original redbook, which aredescribed in the next section.
C.4 First edition CD-ROM contents
In addition to the content described above, there is a link to the HTML files forthe original CD-ROM. The contents of the original CD-ROM are as follows:
• A dynamic IP presentation in Lotus Freelance format
• The REXX scripts documented throughout the book
• Information to let you CID install a OS/2 Warp Server server from scratchcan be found in the \CID directory. Included is:
• A Client .CMD file to install a Warp Server server from scratch.
454 Beyond DHCP - Work Your TCP/IP Internetwork with Dynamic IP

• Response files for:• Java 1.1.4• OS/2 Warp Server File and Print Services (LAN Server 5)• MPTS 5.30• Netscape 2.02• OS/2 Version 3.x• TCP/IP Version 4.1 for OS/2• IP08506 CSD OS/2 Warp Server File and Print Services• FixPak 35 for OS/2 3.x
• Fixes and CSD’s included:• Fixes for JAVA 1.1.4• Fixes for MPTS 5.30• Fixes for TCP/IP 4.1• IP08506 CSD for OS/2 Warp Server File and Print Services (LAN
Server 5)• IP_8508 CSD for HPFS386• FixPak 35 for OS/2 Version 3.x
• Some useful Windows 95/NT network utilities
• AG NetTools -A collection of GUI-based tools for testing Internet andIP-based networks.
• CyberKit - Another collection of GUI-based tools for testing Internetand IP-based networks.
SockVer - Displays the version of Winsock you are using.
Appendix C. Using the additional material 455

456 Beyond DHCP - Work Your TCP/IP Internetwork with Dynamic IP

Appendix D. DHCP options (RFC 2132)
The Internet Engineering Task Force (IETF) publishes official documentsdescribing Internet standards, including DHCP. DHCP provides severaldifferent options. This appendix, based on RFC 2132, includes a list ofoptions 1-67, along with information on which options are supported bypopular server and client operating systems. Options 1-127 are consideredpublic options and are defined as Specification Required. RFC 2489describes options 128-254 that are site-specific options and are defined asPrivate Use. RFC 2489 also documents how to go about getting an option128-254 standardized.
DHCP provides a framework for passing configuration information to hosts ona TCP/IP network. Configuration parameters and other control informationare carried in tagged data items that are stored in the option field of theDHCP message. The data items themselves are also called options.
RFC 1497 was published previously and included vendor informationextensions. These extensions are also described in this appendix, and RFC1497 should now be considered obsolete. In addition, all the DHCP optionsdescribed here, except those specific to DHCP in Part D.3, “DHCP (only)options” on page 476, may be used as BOOTP vendor informationextensions.
For the latest, official list of DHCP options please visit:
ftp://ds.internic.net/rfc/rfc2132.txt
D.1 Introduction
DHCP options have the same format as the BOOTP vendor extensionsdefined in RFC 1497. Options may be fixed length or variable length. Alloptions begin with a tag octet, which uniquely identifies the option. Fixedlength options without data consist of only a tag octet. Only options 0 and 255are fixed length. All other options are variable length with a length octetfollowing the tag octet. The value of the length octet does not include the twooctets specifying the tag and length. The length octet is followed by (length)octets of data. With some variable length options the length field is a constantbut must still be specified. Any options defined in a future version of thisstandard must contain a length octet even if the length is fixed or zero.
Options containing NVT ASCII data should not include a trailing null.However, the receiver of such options must be prepared to delete trailing nulls
© Copyright IBM Corp. 1998, 2000 457
if they exist. The receiver must not require that a trailing null be included inthe data.
Option codes 128 to 254 (decimal) are reserved for your own use.
D.2 DHCP and BOOTP options
This section introduces all DHCP and BootP options that can be defined atthe DHCP server and delivered to requesting DHCP and BootP clients. Beaware that although most DHCP servers can deliver all options illustratedhere to requesting DHCP and BootP clients, there are platform-specificdependencies that determine whether or not requesting DHCP and BootPclients can actually make use of all delivered information.
D.2.1 Options 0 and 255: Pad and end
Originally described in RFC 1497, options 0 and 255 help provide vendorextensions to the DHCP standard.
Option 0, the pad option, can be used to cause subsequent fields to align onword boundaries. Its length is one octet. The end option, option 255, marksthe end of valid information in the vendor field. (Subsequent octets should befilled with pad options.) Its length is also one octet.
D.2.2 Option 1: Subnet mask
Option 1 specifies the client's subnet mask per RFC 950. If both the subnetmask and the router (option 3) are specified in a DHCP reply, the subnetmask option must be first.
The code for the subnet mask option is 1, and its length is 4 octets.
Code Length Subnet Mask+-----+-----+-----+-----+-----+-----+| 1 | 4 | m1 | m2 | m3 | m4 |+-----+-----+-----+-----+-----+-----+
D.2.3 Option 2: Time offset
The time offset field specifies the offset, in seconds, of the client's subnetfrom Coordinated Universal Time (UTC). The offset is expressed as a two'scomplement 32-bit integer. A positive offset indicates a location east of thezero meridian, and a negative offset indicates a location west of the zeromeridian.
458 Beyond DHCP - Work Your TCP/IP Internetwork with Dynamic IP

The code for the time offset option is 2, and its length is 4 octets.
Code Length Time Offset+-----+-----+-----+-----+-----+-----+| 1 | 4 | n1 | n2 | n3 | n4 |+-----+-----+-----+-----+-----+-----+
D.2.4 Option 3: Router
The router option specifies a list of IP addresses for routers on the client'ssubnet. Routers should be listed in order of preference.
The code for the router option is 3, and the minimum length for the routeroption is 4 octets. The length must always be a multiple of 4.
Code Length Address 1 Address 2 [...]+-----+-----+-----+-----+-----+-----+-----+-----+-----+| 3 | n | a1 | a2 | a3 | a4 | a1 | a2 | [...]+-----+-----+-----+-----+-----+-----+-----+-----+-----+
D.2.5 Option 4: Time server
The time server option specifies a list of RFC 868 time servers available tothe client. Servers should be listed in order of preference.
The code for the time server option is 4, and the minimum length for thisoption is 4 octets. The length must always be a multiple of 4.
Code Length Address 1 Address 2 [...]+-----+-----+-----+-----+-----+-----+-----+-----+-----+| 4 | n | a1 | a2 | a3 | a4 | a1 | a2 | [...]+-----+-----+-----+-----+-----+-----+-----+-----+-----+
D.2.6 Option 5: IEN 116 (Old) name server
The name server option specifies a list of IEN 116 name servers available tothe client. Servers should be listed in order of preference. (Option 5 isprovided for compatibility with old-style name servers. Use Option 6 formodern domain name servers.)
The code for the name server option is 5, and the minimum length for thisoption is 4 octets. The length must always be a multiple of 4.
Code Length Address 1 Address 2 [...]+-----+-----+-----+-----+-----+-----+-----+-----+-----+| 5 | n | a1 | a2 | a3 | a4 | a1 | a2 | [...]+-----+-----+-----+-----+-----+-----+-----+-----+-----+
Appendix D. DHCP options (RFC 2132) 459

D.2.7 Option 6: Domain name server
The domain name server option specifies a list of Domain Name System(RFC 1035) name servers available to the client. Servers should be listed inorder of preference.
The code for the domain name server option is 6, and the minimum length forthis option is 4 octets. The length must always be a multiple of 4.
Code Length Address 1 Address 2 [...]+-----+-----+-----+-----+-----+-----+-----+-----+-----+| 6 | n | a1 | a2 | a3 | a4 | a1 | a2 | [...]+-----+-----+-----+-----+-----+-----+-----+-----+-----+
D.2.8 Option 7: Log server
The log server option specifies a list of MIT-LCS UDP log servers available tothe client. Servers should be listed in order of preference.
The code for the log server option is 7, and the minimum length for this optionis 4 octets. The length must always be a multiple of 4.
Code Length Address 1 Address 2 [...]+-----+-----+-----+-----+-----+-----+-----+-----+-----+| 7 | n | a1 | a2 | a3 | a4 | a1 | a2 | [...]+-----+-----+-----+-----+-----+-----+-----+-----+-----+
D.2.9 Option 8: Cookie server
The cookie server option specifies a list of RFC 865 cookie servers availableto the client. Servers should be listed in order of preference.
The code for the log server option is 8, and the minimum length for this optionis 4 octets. The length must always be a multiple of 4.
Code Length Address 1 Address 2 [...]+-----+-----+-----+-----+-----+-----+-----+-----+-----+| 8 | n | a1 | a2 | a3 | a4 | a1 | a2 | [...]+-----+-----+-----+-----+-----+-----+-----+-----+-----+
D.2.10 Option 9: LPR server
The LPR server option specifies a list of RFC 1179 print servers available tothe client. Servers should be listed in order of preference.
460 Beyond DHCP - Work Your TCP/IP Internetwork with Dynamic IP

The code for the LPR server option is 9, and the minimum length for thisoption is 4 octets. The length must always be a multiple of 4.
Code Length Address 1 Address 2 [...]+-----+-----+-----+-----+-----+-----+-----+-----+-----+| 9 | n | a1 | a2 | a3 | a4 | a1 | a2 | [...]+-----+-----+-----+-----+-----+-----+-----+-----+-----+
D.2.11 Option 10: Impress server
Option 10 specifies a list of Imagen Impress servers available to the client.Servers should be listed in order of preference.
The code for the Impress server option is 10, and the minimum length for thisoption is 4 octets. The length must always be a multiple of 4.
Code Length Address 1 Address 2 [...]+-----+-----+-----+-----+-----+-----+-----+-----+-----+| 10 | n | a1 | a2 | a3 | a4 | a1 | a2 | [...]+-----+-----+-----+-----+-----+-----+-----+-----+-----+
D.2.12 Option 11: Resource location server
This option specifies a list of RFC 887 resource location servers available tothe client. Servers should be listed in order of preference.
The code for this option is 11, and the minimum length for this option is 4octets. The length must always be a multiple of 4.
Code Length Address 1 Address 2 [...]+-----+-----+-----+-----+-----+-----+-----+-----+-----+| 11 | n | a1 | a2 | a3 | a4 | a1 | a2 | [...]+-----+-----+-----+-----+-----+-----+-----+-----+-----+
D.2.13 Option 12: Host name
This option specifies the name of the client. The name may or may notinclude the full local domain name. (See D.2.16, “Option 15: Domain name”on page 462, for the preferred method of obtaining the domain name.)
RFC 1035 explains the restrictions concerning which characters can be usedin the host name.
The code for this option is 12, and its minimum length is 1.
Code Length Host Name+-----+-----+-----+-----+-----+-----+-----+-----+-----+| 12 | n | h1 | h2 | h3 | h4 | h5 | h6 | [...]+-----+-----+-----+-----+-----+-----+-----+-----+-----+
Appendix D. DHCP options (RFC 2132) 461

D.2.14 Option 13: Boot file size
This option specifies the length, in 512-octet blocks, of the default boot imagefile for the client. The file length is specified as an unsigned 16-bit integer.
The code for this option is 13, and its length is 2.
Code Length File Size+-----+-----+-----+-----+| 13 | 2 | l1 | l2 |+-----+-----+-----+-----+
D.2.15 Option 14: Merit dump file name
This option specifies the file name (with path) of a file where the client's coreimage should be dumped in the event the client crashes. The path isformatted as a string consisting of characters from the NVT ASCII characterset.
The code for this option is 14, and its minimum length is 1.
Code Length Dump Path/File Name+-----+-----+-----+-----+-----+-----+-----+| 14 | n | n1 | n2 | n3 | n4 | [...]+-----+-----+-----+-----+-----+-----+-----+
D.2.16 Option 15: Domain name
This option specifies the default domain name that the client should use whenresolving host names using the domain name system.
The code for this option is 15, and its minimum length is 1.
Code Length Domain Name+-----+-----+-----+-----+-----+-----+-----+| 15 | n | d1 | d2 | d3 | d4 | [...]+-----+-----+-----+-----+-----+-----+-----+
D.2.17 Option 16: Swap server
This specifies the IP address of the client's swap server.
The code for this option is 16, and its length is 4.
Code Length Swap Server Address+-----+-----+-----+-----+-----+-----+| 16 | n | a1 | a2 | a3 | a4 |+-----+-----+-----+-----+-----+-----+
462 Beyond DHCP - Work Your TCP/IP Internetwork with Dynamic IP

D.2.18 Option 17: Root path
This option specifies the path name that contains the client's root directory.The path is formatted as a string consisting of characters from the NVT ASCIIcharacter set.
The code for this option is 17, and its minimum length is 1.
Code Length Root Disk Pathname+-----+-----+-----+-----+-----+-----+-----+| 17 | n | n1 | n2 | n3 | n4 | [...]+-----+-----+-----+-----+-----+-----+-----+
D.2.19 Option 18: Extensions path
This option specifies the path and name of a file, retrievable through TFTP,which contains information to be interpreted in the same way as the 64-octetvendor extension field within the BOOTP response. The following exceptionsapply:
• The length of the file is not limited.
• All references to Tag 18 (instances of the BOOTP extensions path field)within the file are ignored.
The code for this option is 18, and its minimum length is 1.
Code Length Extensions Path/File Name+-----+-----+-----+-----+-----+-----+-----+| 18 | n | n1 | n2 | n3 | n4 | [...]+-----+-----+-----+-----+-----+-----+-----+
D.2.20 Option 19: IP forwarding enable/disable
This option specifies whether the client should configure its IP layer for packetforwarding. A value of 0 means disable IP forwarding, and a value of 1 meansenable IP forwarding.
The code for this option is 19, and its length is 1.
Code Length Value+-----+-----+-----+| 19 | 1 | n |+-----+-----+-----+
D.2.21 Option 20: Non-local source routing enable/disable
This option specifies whether the client should configure its IP layer to allowforwarding of datagrams with non-local source routes. A value of 0 means
Appendix D. DHCP options (RFC 2132) 463

disallow forwarding of such datagrams, and a value of 1 means allowforwarding.
The code for this option is 20, and its length is 1.
Code Length Value+-----+-----+-----+| 20 | 1 | n |+-----+-----+-----+
D.2.22 Option 21: Policy filter
This option specifies policy filters for non-local source routing. The filtersconsist of a list of IP addresses and masks that specify destination/maskpairs with which to filter incoming source routes.
Any source routed datagram whose next hop address does not match one ofthe filters should be discarded by the client.
The code for this option is 21, and the minimum length of this option is 8. Thelength must be a multiple of 8.
Code Length Address 1 Mask 1+-----+-----+-----+-----+-----+-----+-----+-----+-----+-----+| 21 | n | a1 | a2 | a3 | a4 | m1 | m2 | m3 | m4 |+-----+-----+-----+-----+-----+-----+-----+-----+-----+-----+
Address 2 Mask 2+-----+-----+-----+-----+-----+-----+-----+-----+-----+| a1 | a2 | a3 | a4 | m1 | m2 | m3 | m4 | [...]+-----+-----+-----+-----+-----+-----+-----+-----+-----+
D.2.23 Option 22: Maximum datagram reassembly size
This option specifies the maximum size datagram that the client should beprepared to reassemble. The size is specified as a 16-bit unsigned integer.The minimum legal value is 576.
The code for this option is 22, and its length is 2.
Code Length Size+-----+-----+-----+-----+| 22 | 2 | s1 | s2 |+-----+-----+-----+-----+
464 Beyond DHCP - Work Your TCP/IP Internetwork with Dynamic IP

D.2.24 Option 23: Default IP time-to-live
This option specifies the default time-to-live that the client should use foroutgoing datagrams. The TTL is specified as an octet with a value between 1and 255.
The code for this option is 23, and its length is 1.
Code Length TTL+-----+-----+-----+| 23 | 1 | ttl |+-----+-----+-----+
D.2.25 Option 24: Path MTU aging timeout
This option specifies the timeout (in seconds) to use when aging path MTUvalues discovered by the mechanism defined in RFC 1191. The timeout isspecified as a 32-bit unsigned integer.
The code for this option is 24, and its length is 4.
Code Length Timeout+-----+-----+-----+-----+-----+-----+| 24 | 4 | t1 | t2 | t3 | t4 |+-----+-----+-----+-----+-----+-----+
D.2.26 Option 25: Path MTU plateau table
This option specifies a table of MTU sizes to use when performing path MTUdiscovery as defined in RFC 1191. The table is formatted as a list of 16-bitunsigned integers, ordered from smallest to largest. The minimum MTU valuecannot be smaller than 68.
The code for this option is 25, and its minimum length is 2. The length mustbe a multiple of 2.
Code Length Size 1 Size 2+-----+-----+-----+-----+-----+-----+-----+| 25 | n | s1 | s2 | s1 | s2 | [...]+-----+-----+-----+-----+-----+-----+-----+
D.2.27 Option 26: Interface MTU
This option specifies the MTU to use for this interface. The MTU is specifiedas a 16-bit unsigned integer. The minimum legal value for the MTU is 68.
Appendix D. DHCP options (RFC 2132) 465

The code for this option is 26, and its length is 2.
Code Length MTU+-----+-----+-----+-----+| 26 | 2 | m1 | m2 |+-----+-----+-----+-----+
D.2.28 Option 27: All subnets are local
This option specifies whether or not the client may assume that all subnets ofthe IP network to which the client is connected use the same MTU as thesubnet of that network to which the client is directly connected. A value of 1indicates that all subnets share the same MTU. A value of 0 means that theclient should assume that some subnets of the directly connected networkmay have smaller MTUs.
The code for this option is 27, and its length is 1.
Code Length Value+-----+-----+-----+| 27 | 1 | n |+-----+-----+-----+
D.2.29 Option 28: Broadcast address
This option specifies the broadcast address in use on the client's subnet.
The code for this option is 28, and its length is 4.
Code Length Broadcast Address+-----+-----+-----+-----+-----+-----+| 28 | 4 | b1 | b2 | b3 | b4 |+-----+-----+-----+-----+-----+-----+
D.2.30 Option 29: Perform mask discovery
This option specifies whether or not the client should perform subnet maskdiscovery using ICMP. A value of 0 indicates that the client should not performmask discovery. A value of 1 means that the client should perform maskdiscovery.
The code for this option is 29, and its length is 1.
Code Length Value+-----+-----+-----+| 29 | 1 | n |+-----+-----+-----+
466 Beyond DHCP - Work Your TCP/IP Internetwork with Dynamic IP
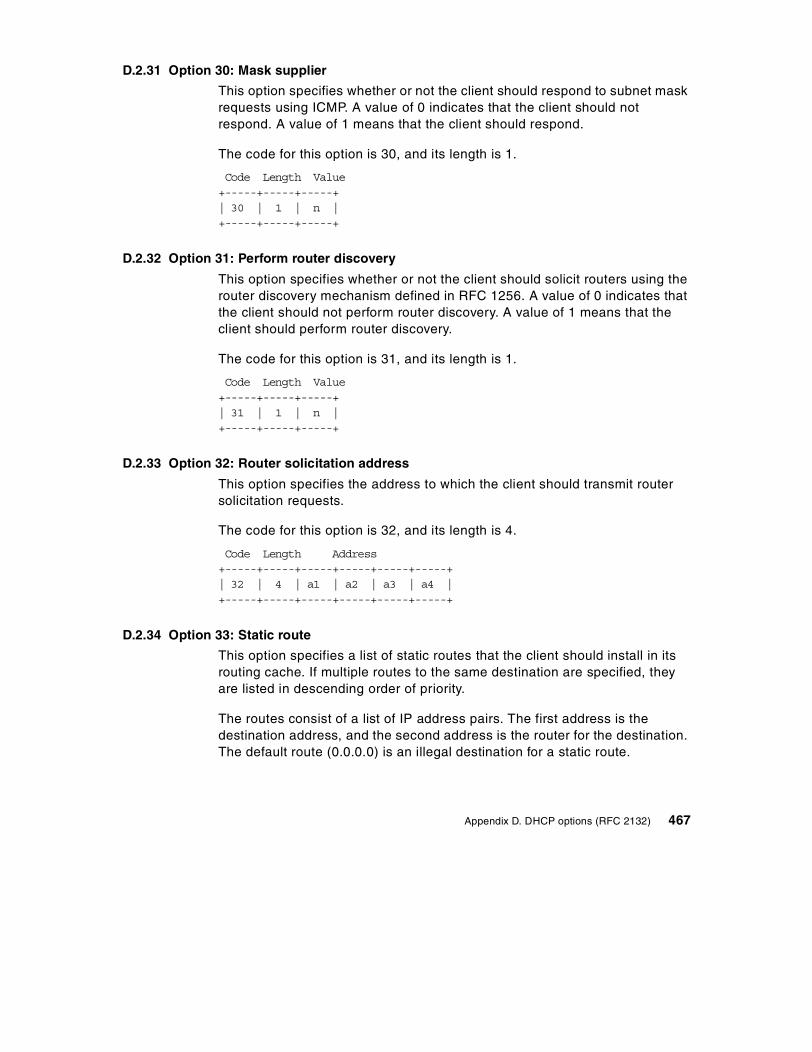
D.2.31 Option 30: Mask supplier
This option specifies whether or not the client should respond to subnet maskrequests using ICMP. A value of 0 indicates that the client should notrespond. A value of 1 means that the client should respond.
The code for this option is 30, and its length is 1.
Code Length Value+-----+-----+-----+| 30 | 1 | n |+-----+-----+-----+
D.2.32 Option 31: Perform router discovery
This option specifies whether or not the client should solicit routers using therouter discovery mechanism defined in RFC 1256. A value of 0 indicates thatthe client should not perform router discovery. A value of 1 means that theclient should perform router discovery.
The code for this option is 31, and its length is 1.
Code Length Value+-----+-----+-----+| 31 | 1 | n |+-----+-----+-----+
D.2.33 Option 32: Router solicitation address
This option specifies the address to which the client should transmit routersolicitation requests.
The code for this option is 32, and its length is 4.
Code Length Address+-----+-----+-----+-----+-----+-----+| 32 | 4 | a1 | a2 | a3 | a4 |+-----+-----+-----+-----+-----+-----+
D.2.34 Option 33: Static route
This option specifies a list of static routes that the client should install in itsrouting cache. If multiple routes to the same destination are specified, theyare listed in descending order of priority.
The routes consist of a list of IP address pairs. The first address is thedestination address, and the second address is the router for the destination.The default route (0.0.0.0) is an illegal destination for a static route.
Appendix D. DHCP options (RFC 2132) 467
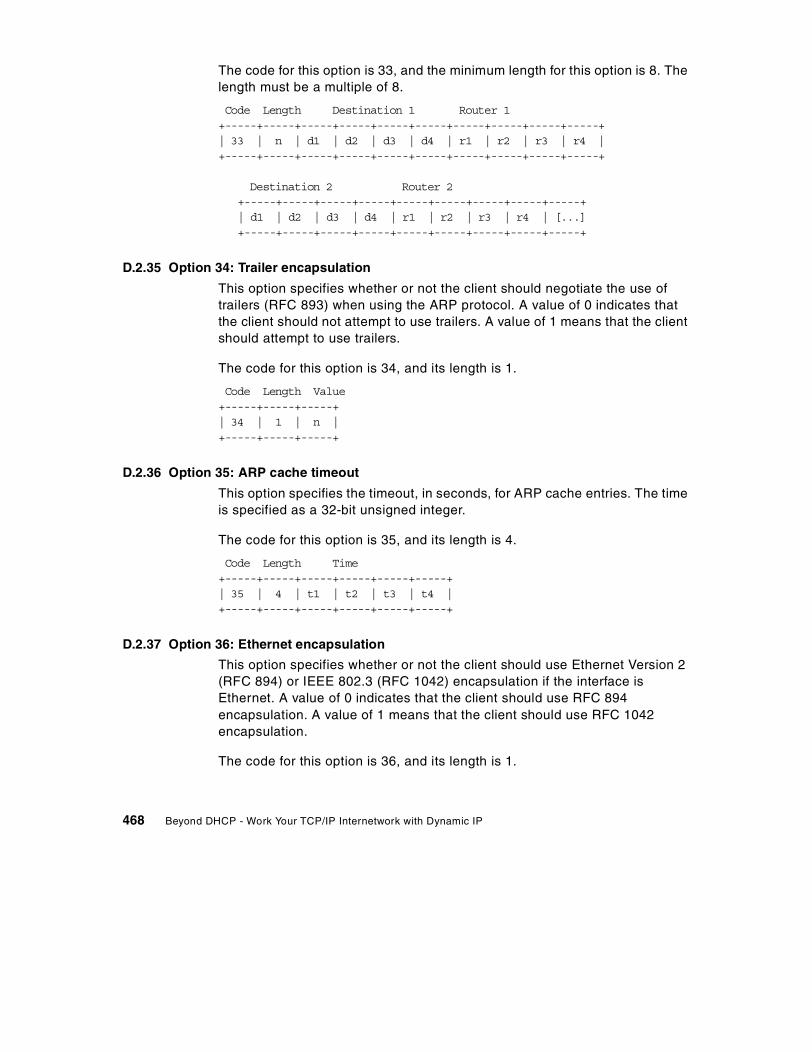
The code for this option is 33, and the minimum length for this option is 8. Thelength must be a multiple of 8.
Code Length Destination 1 Router 1+-----+-----+-----+-----+-----+-----+-----+-----+-----+-----+| 33 | n | d1 | d2 | d3 | d4 | r1 | r2 | r3 | r4 |+-----+-----+-----+-----+-----+-----+-----+-----+-----+-----+
Destination 2 Router 2+-----+-----+-----+-----+-----+-----+-----+-----+-----+| d1 | d2 | d3 | d4 | r1 | r2 | r3 | r4 | [...]+-----+-----+-----+-----+-----+-----+-----+-----+-----+
D.2.35 Option 34: Trailer encapsulation
This option specifies whether or not the client should negotiate the use oftrailers (RFC 893) when using the ARP protocol. A value of 0 indicates thatthe client should not attempt to use trailers. A value of 1 means that the clientshould attempt to use trailers.
The code for this option is 34, and its length is 1.
Code Length Value+-----+-----+-----+| 34 | 1 | n |+-----+-----+-----+
D.2.36 Option 35: ARP cache timeout
This option specifies the timeout, in seconds, for ARP cache entries. The timeis specified as a 32-bit unsigned integer.
The code for this option is 35, and its length is 4.
Code Length Time+-----+-----+-----+-----+-----+-----+| 35 | 4 | t1 | t2 | t3 | t4 |+-----+-----+-----+-----+-----+-----+
D.2.37 Option 36: Ethernet encapsulation
This option specifies whether or not the client should use Ethernet Version 2(RFC 894) or IEEE 802.3 (RFC 1042) encapsulation if the interface isEthernet. A value of 0 indicates that the client should use RFC 894encapsulation. A value of 1 means that the client should use RFC 1042encapsulation.
The code for this option is 36, and its length is 1.
468 Beyond DHCP - Work Your TCP/IP Internetwork with Dynamic IP
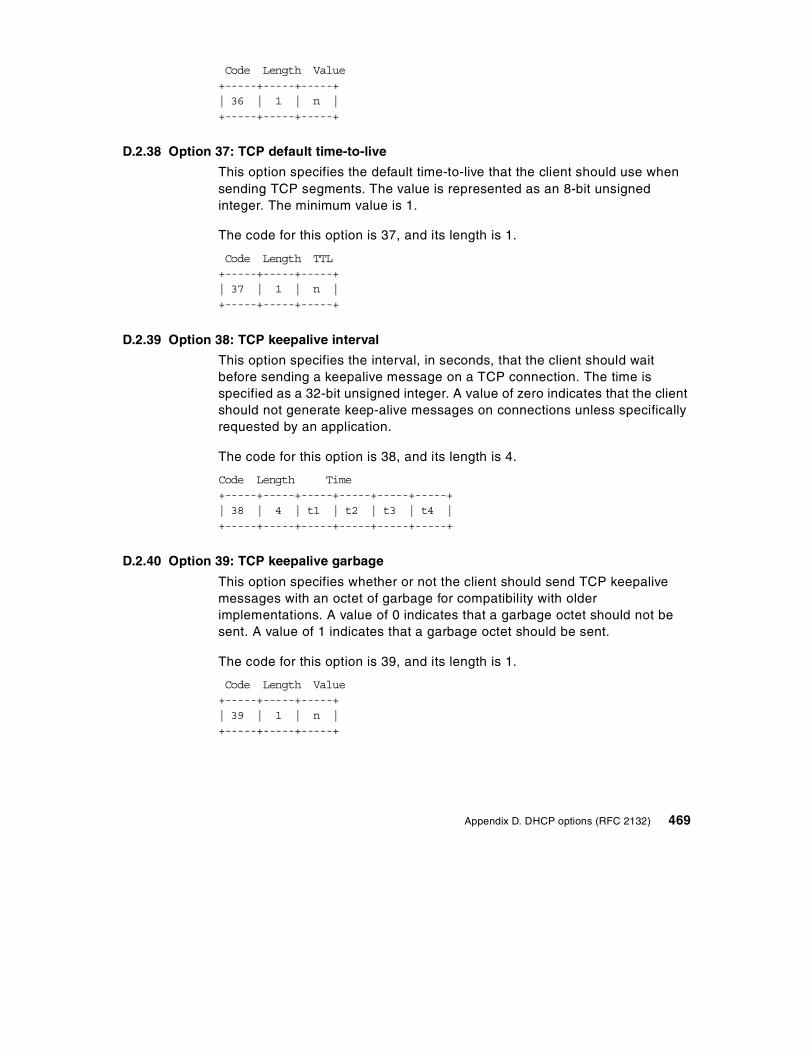
Code Length Value+-----+-----+-----+| 36 | 1 | n |+-----+-----+-----+
D.2.38 Option 37: TCP default time-to-live
This option specifies the default time-to-live that the client should use whensending TCP segments. The value is represented as an 8-bit unsignedinteger. The minimum value is 1.
The code for this option is 37, and its length is 1.
Code Length TTL+-----+-----+-----+| 37 | 1 | n |+-----+-----+-----+
D.2.39 Option 38: TCP keepalive interval
This option specifies the interval, in seconds, that the client should waitbefore sending a keepalive message on a TCP connection. The time isspecified as a 32-bit unsigned integer. A value of zero indicates that the clientshould not generate keep-alive messages on connections unless specificallyrequested by an application.
The code for this option is 38, and its length is 4.
Code Length Time+-----+-----+-----+-----+-----+-----+| 38 | 4 | t1 | t2 | t3 | t4 |+-----+-----+-----+-----+-----+-----+
D.2.40 Option 39: TCP keepalive garbage
This option specifies whether or not the client should send TCP keepalivemessages with an octet of garbage for compatibility with olderimplementations. A value of 0 indicates that a garbage octet should not besent. A value of 1 indicates that a garbage octet should be sent.
The code for this option is 39, and its length is 1.
Code Length Value+-----+-----+-----+| 39 | 1 | n |+-----+-----+-----+
Appendix D. DHCP options (RFC 2132) 469
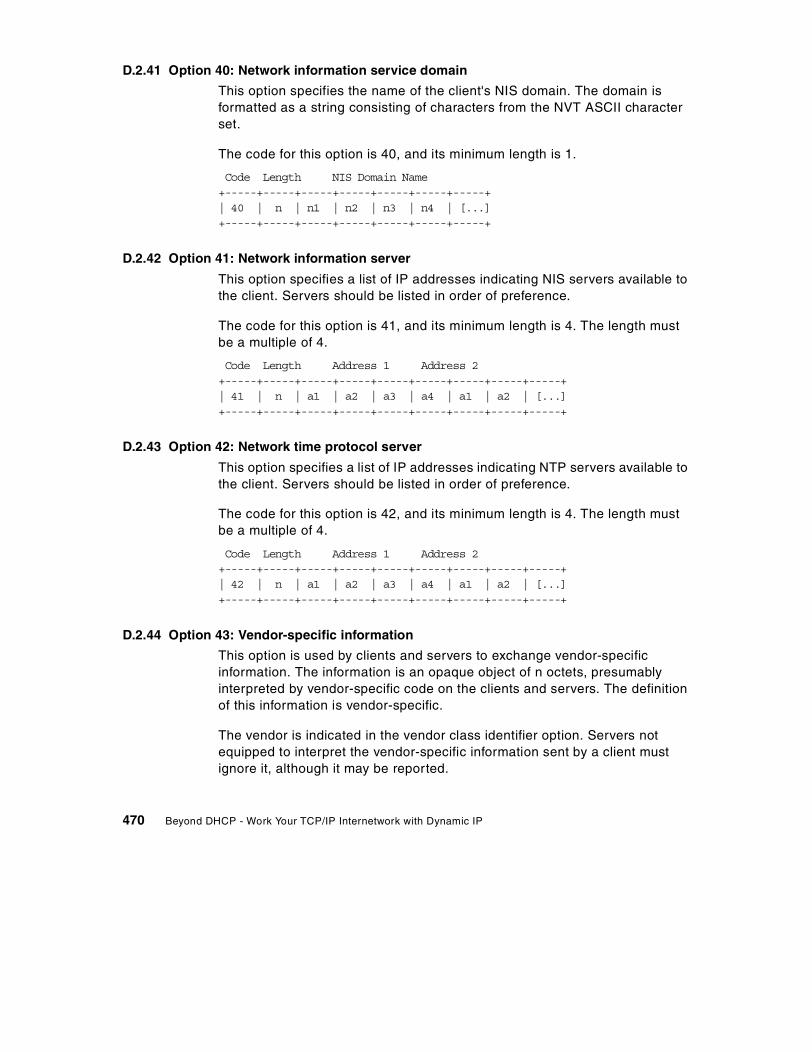
D.2.41 Option 40: Network information service domain
This option specifies the name of the client's NIS domain. The domain isformatted as a string consisting of characters from the NVT ASCII characterset.
The code for this option is 40, and its minimum length is 1.
Code Length NIS Domain Name+-----+-----+-----+-----+-----+-----+-----+| 40 | n | n1 | n2 | n3 | n4 | [...]+-----+-----+-----+-----+-----+-----+-----+
D.2.42 Option 41: Network information server
This option specifies a list of IP addresses indicating NIS servers available tothe client. Servers should be listed in order of preference.
The code for this option is 41, and its minimum length is 4. The length mustbe a multiple of 4.
Code Length Address 1 Address 2+-----+-----+-----+-----+-----+-----+-----+-----+-----+| 41 | n | a1 | a2 | a3 | a4 | a1 | a2 | [...]+-----+-----+-----+-----+-----+-----+-----+-----+-----+
D.2.43 Option 42: Network time protocol server
This option specifies a list of IP addresses indicating NTP servers available tothe client. Servers should be listed in order of preference.
The code for this option is 42, and its minimum length is 4. The length mustbe a multiple of 4.
Code Length Address 1 Address 2+-----+-----+-----+-----+-----+-----+-----+-----+-----+| 42 | n | a1 | a2 | a3 | a4 | a1 | a2 | [...]+-----+-----+-----+-----+-----+-----+-----+-----+-----+
D.2.44 Option 43: Vendor-specific information
This option is used by clients and servers to exchange vendor-specificinformation. The information is an opaque object of n octets, presumablyinterpreted by vendor-specific code on the clients and servers. The definitionof this information is vendor-specific.
The vendor is indicated in the vendor class identifier option. Servers notequipped to interpret the vendor-specific information sent by a client mustignore it, although it may be reported.
470 Beyond DHCP - Work Your TCP/IP Internetwork with Dynamic IP
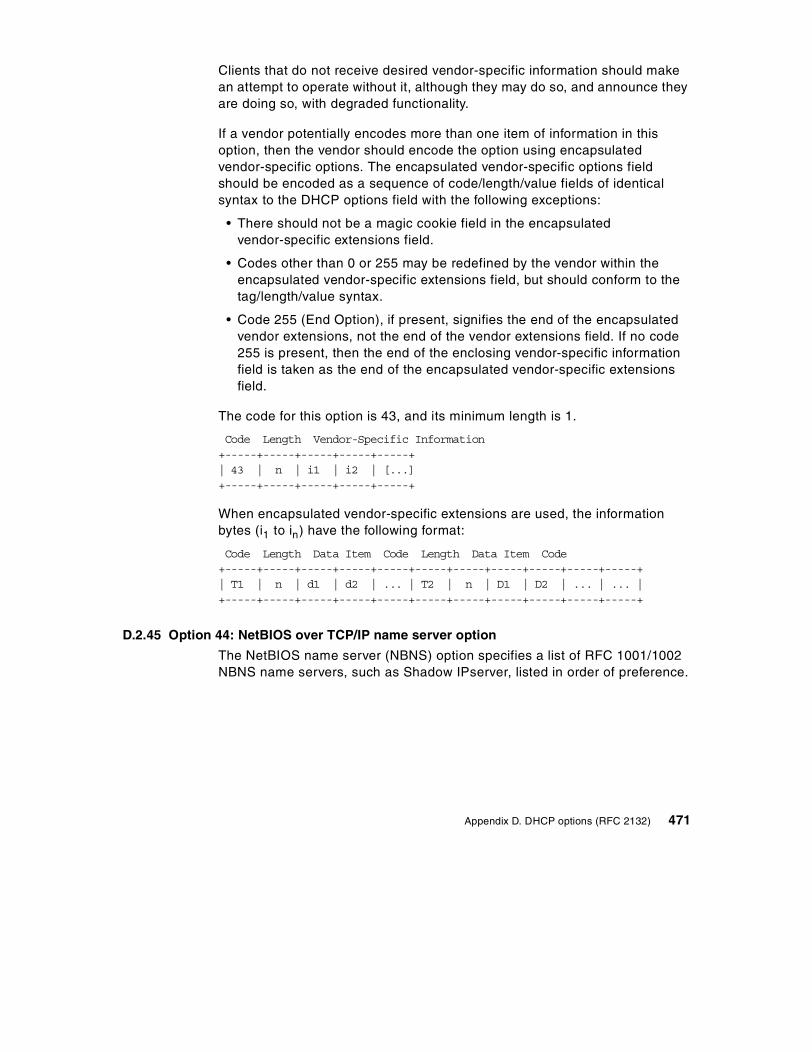
Clients that do not receive desired vendor-specific information should makean attempt to operate without it, although they may do so, and announce theyare doing so, with degraded functionality.
If a vendor potentially encodes more than one item of information in thisoption, then the vendor should encode the option using encapsulatedvendor-specific options. The encapsulated vendor-specific options fieldshould be encoded as a sequence of code/length/value fields of identicalsyntax to the DHCP options field with the following exceptions:
• There should not be a magic cookie field in the encapsulatedvendor-specific extensions field.
• Codes other than 0 or 255 may be redefined by the vendor within theencapsulated vendor-specific extensions field, but should conform to thetag/length/value syntax.
• Code 255 (End Option), if present, signifies the end of the encapsulatedvendor extensions, not the end of the vendor extensions field. If no code255 is present, then the end of the enclosing vendor-specific informationfield is taken as the end of the encapsulated vendor-specific extensionsfield.
The code for this option is 43, and its minimum length is 1.
Code Length Vendor-Specific Information+-----+-----+-----+-----+-----+| 43 | n | i1 | i2 | [...]+-----+-----+-----+-----+-----+
When encapsulated vendor-specific extensions are used, the informationbytes (i1 to in) have the following format:
Code Length Data Item Code Length Data Item Code+-----+-----+-----+-----+-----+-----+-----+-----+-----+-----+-----+| T1 | n | d1 | d2 | ... | T2 | n | D1 | D2 | ... | ... |+-----+-----+-----+-----+-----+-----+-----+-----+-----+-----+-----+
D.2.45 Option 44: NetBIOS over TCP/IP name server option
The NetBIOS name server (NBNS) option specifies a list of RFC 1001/1002NBNS name servers, such as Shadow IPserver, listed in order of preference.
Appendix D. DHCP options (RFC 2132) 471

The code for this option is 44, and the minimum length of the option is 4octets. The length must always be a multiple of four.
Code Length Address 1 Address 2+-----+-----+-----+-----+-----+-----+-----+-----+-----+-----+-----+| 44 | n | a1 | a2 | a3 | a4 | b1 | b2 | b3 | b4 | [...]+-----+-----+-----+-----+-----+-----+-----+-----+-----+-----+-----+
D.2.46 Option 45: NetBIOS over TCP/IP datagram distribution server
The NetBIOS datagram distribution server (NBDD) option specifies a list ofRFC 1001/1002 NBDD servers listed in order of preference.
The code for this option is 45, and the minimum length of the option is 4octets. The length must always be a multiple of four.
Code Length Address 1 Address 2+-----+-----+-----+-----+-----+-----+-----+-----+-----+-----+-----+| 45 | n | a1 | a2 | a3 | a4 | b1 | b2 | b3 | b4 | [...]+-----+-----+-----+-----+-----+-----+-----+-----+-----+-----+-----+
D.2.47 Option 46: NetBIOS over TCP/IP node type
The NetBIOS node type option allows NetBIOS over TCP/IP clients to beconfigured as described in RFC 1001/1002. The value is specified as a singleoctet that identifies the client type as follows:
Value (Hex) Node Type----- ---------01 B-node02 P-node04 M-node08 H-node
The code for this option is 46, and the length of this option is always 1.
Code Length Node Type+-----+-----+-----------+| 46 | 1 | See Above |+-----+-----+-----------+
D.2.48 Option 47: NetBIOS over TCP/IP scope
This option specifies the NetBIOS over TCP/IP scope parameter for the clientas described in RFC 1001/1002. (Certain restrictions on the characters thatcan be used may apply.)
472 Beyond DHCP - Work Your TCP/IP Internetwork with Dynamic IP
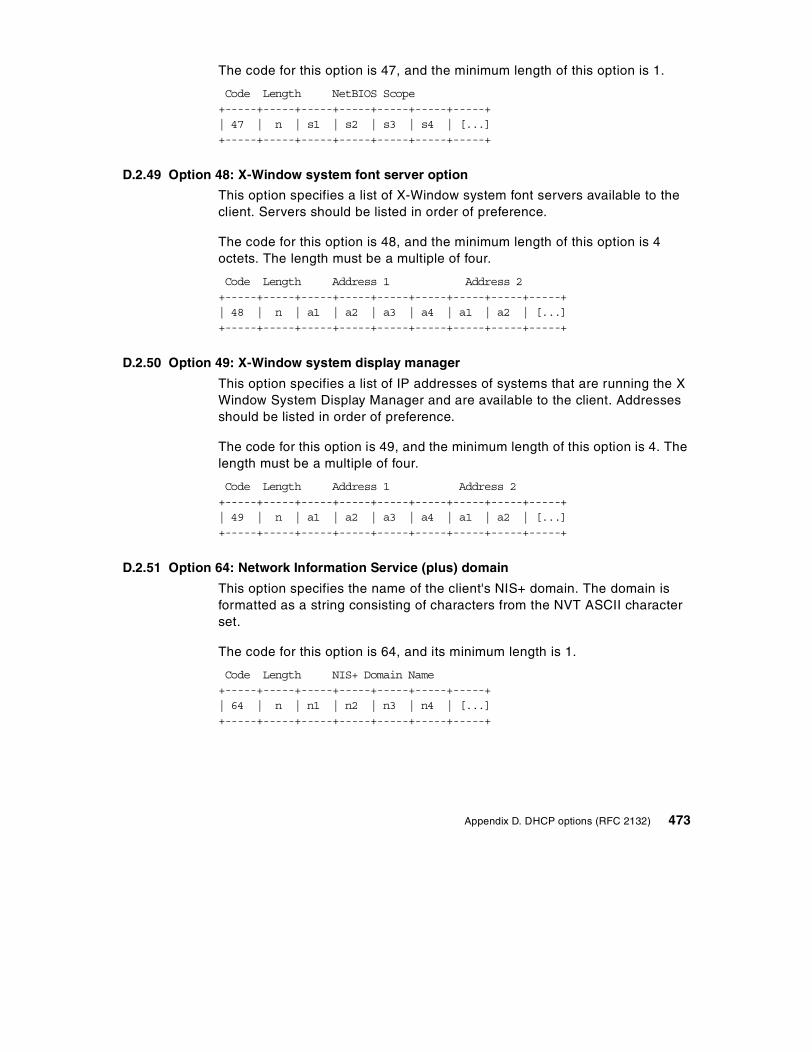
The code for this option is 47, and the minimum length of this option is 1.
Code Length NetBIOS Scope+-----+-----+-----+-----+-----+-----+-----+| 47 | n | s1 | s2 | s3 | s4 | [...]+-----+-----+-----+-----+-----+-----+-----+
D.2.49 Option 48: X-Window system font server option
This option specifies a list of X-Window system font servers available to theclient. Servers should be listed in order of preference.
The code for this option is 48, and the minimum length of this option is 4octets. The length must be a multiple of four.
Code Length Address 1 Address 2+-----+-----+-----+-----+-----+-----+-----+-----+-----+| 48 | n | a1 | a2 | a3 | a4 | a1 | a2 | [...]+-----+-----+-----+-----+-----+-----+-----+-----+-----+
D.2.50 Option 49: X-Window system display manager
This option specifies a list of IP addresses of systems that are running the XWindow System Display Manager and are available to the client. Addressesshould be listed in order of preference.
The code for this option is 49, and the minimum length of this option is 4. Thelength must be a multiple of four.
Code Length Address 1 Address 2+-----+-----+-----+-----+-----+-----+-----+-----+-----+| 49 | n | a1 | a2 | a3 | a4 | a1 | a2 | [...]+-----+-----+-----+-----+-----+-----+-----+-----+-----+
D.2.51 Option 64: Network Information Service (plus) domain
This option specifies the name of the client's NIS+ domain. The domain isformatted as a string consisting of characters from the NVT ASCII characterset.
The code for this option is 64, and its minimum length is 1.
Code Length NIS+ Domain Name+-----+-----+-----+-----+-----+-----+-----+| 64 | n | n1 | n2 | n3 | n4 | [...]+-----+-----+-----+-----+-----+-----+-----+
Appendix D. DHCP options (RFC 2132) 473
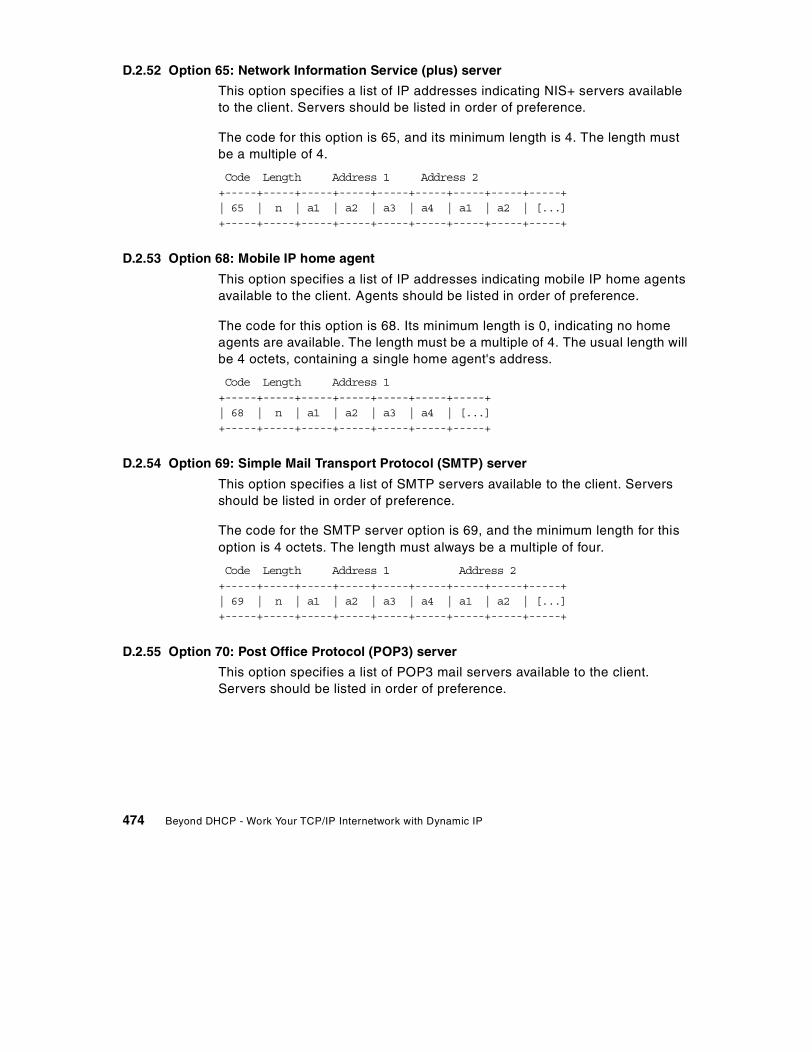
D.2.52 Option 65: Network Information Service (plus) server
This option specifies a list of IP addresses indicating NIS+ servers availableto the client. Servers should be listed in order of preference.
The code for this option is 65, and its minimum length is 4. The length mustbe a multiple of 4.
Code Length Address 1 Address 2+-----+-----+-----+-----+-----+-----+-----+-----+-----+| 65 | n | a1 | a2 | a3 | a4 | a1 | a2 | [...]+-----+-----+-----+-----+-----+-----+-----+-----+-----+
D.2.53 Option 68: Mobile IP home agent
This option specifies a list of IP addresses indicating mobile IP home agentsavailable to the client. Agents should be listed in order of preference.
The code for this option is 68. Its minimum length is 0, indicating no homeagents are available. The length must be a multiple of 4. The usual length willbe 4 octets, containing a single home agent's address.
Code Length Address 1+-----+-----+-----+-----+-----+-----+-----+| 68 | n | a1 | a2 | a3 | a4 | [...]+-----+-----+-----+-----+-----+-----+-----+
D.2.54 Option 69: Simple Mail Transport Protocol (SMTP) server
This option specifies a list of SMTP servers available to the client. Serversshould be listed in order of preference.
The code for the SMTP server option is 69, and the minimum length for thisoption is 4 octets. The length must always be a multiple of four.
Code Length Address 1 Address 2+-----+-----+-----+-----+-----+-----+-----+-----+-----+| 69 | n | a1 | a2 | a3 | a4 | a1 | a2 | [...]+-----+-----+-----+-----+-----+-----+-----+-----+-----+
D.2.55 Option 70: Post Office Protocol (POP3) server
This option specifies a list of POP3 mail servers available to the client.Servers should be listed in order of preference.
474 Beyond DHCP - Work Your TCP/IP Internetwork with Dynamic IP
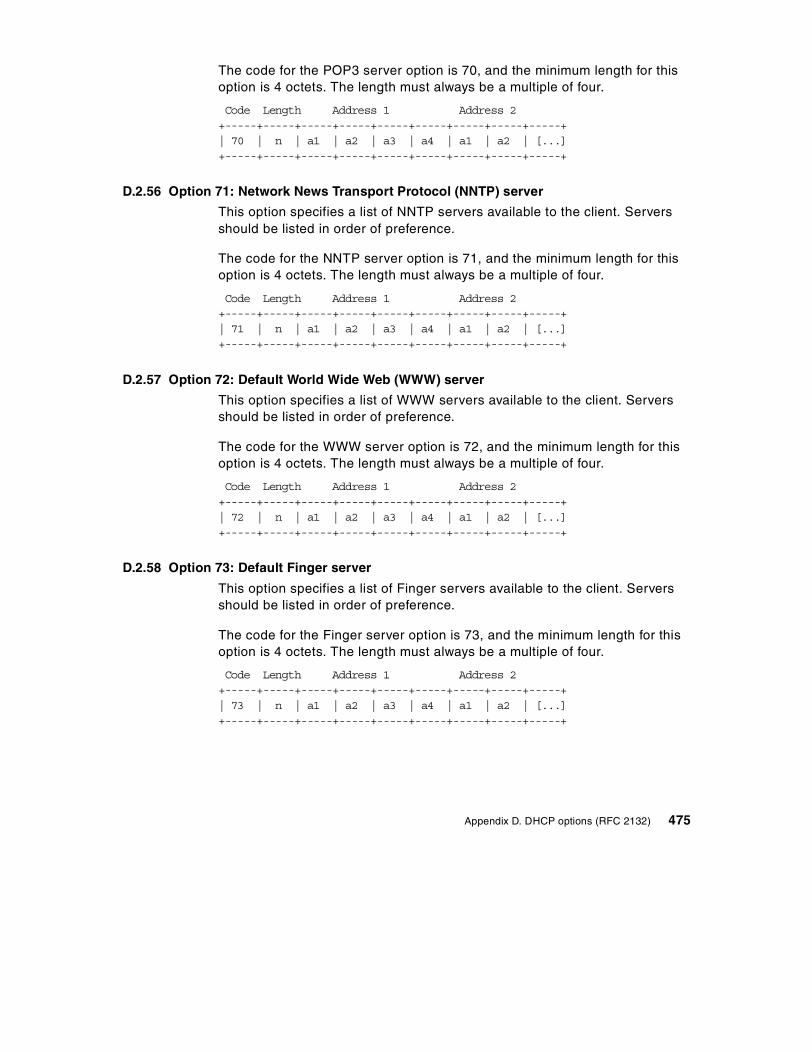
The code for the POP3 server option is 70, and the minimum length for thisoption is 4 octets. The length must always be a multiple of four.
Code Length Address 1 Address 2+-----+-----+-----+-----+-----+-----+-----+-----+-----+| 70 | n | a1 | a2 | a3 | a4 | a1 | a2 | [...]+-----+-----+-----+-----+-----+-----+-----+-----+-----+
D.2.56 Option 71: Network News Transport Protocol (NNTP) server
This option specifies a list of NNTP servers available to the client. Serversshould be listed in order of preference.
The code for the NNTP server option is 71, and the minimum length for thisoption is 4 octets. The length must always be a multiple of four.
Code Length Address 1 Address 2+-----+-----+-----+-----+-----+-----+-----+-----+-----+| 71 | n | a1 | a2 | a3 | a4 | a1 | a2 | [...]+-----+-----+-----+-----+-----+-----+-----+-----+-----+
D.2.57 Option 72: Default World Wide Web (WWW) server
This option specifies a list of WWW servers available to the client. Serversshould be listed in order of preference.
The code for the WWW server option is 72, and the minimum length for thisoption is 4 octets. The length must always be a multiple of four.
Code Length Address 1 Address 2+-----+-----+-----+-----+-----+-----+-----+-----+-----+| 72 | n | a1 | a2 | a3 | a4 | a1 | a2 | [...]+-----+-----+-----+-----+-----+-----+-----+-----+-----+
D.2.58 Option 73: Default Finger server
This option specifies a list of Finger servers available to the client. Serversshould be listed in order of preference.
The code for the Finger server option is 73, and the minimum length for thisoption is 4 octets. The length must always be a multiple of four.
Code Length Address 1 Address 2+-----+-----+-----+-----+-----+-----+-----+-----+-----+| 73 | n | a1 | a2 | a3 | a4 | a1 | a2 | [...]+-----+-----+-----+-----+-----+-----+-----+-----+-----+
Appendix D. DHCP options (RFC 2132) 475
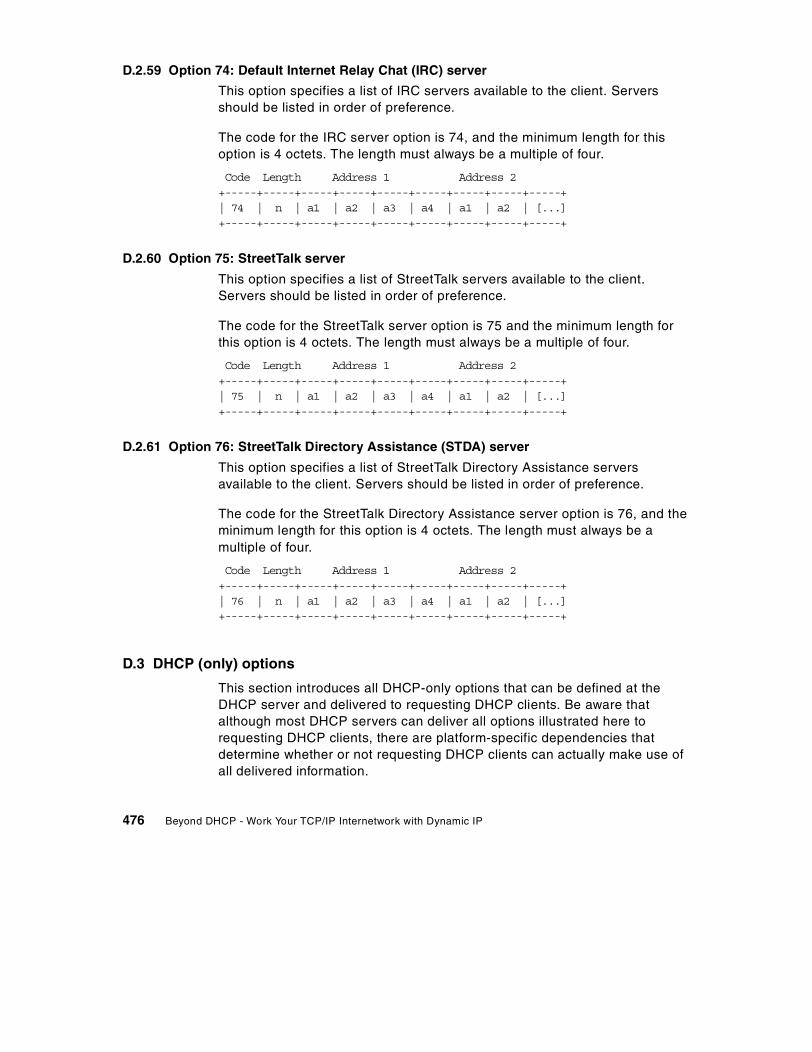
D.2.59 Option 74: Default Internet Relay Chat (IRC) server
This option specifies a list of IRC servers available to the client. Serversshould be listed in order of preference.
The code for the IRC server option is 74, and the minimum length for thisoption is 4 octets. The length must always be a multiple of four.
Code Length Address 1 Address 2+-----+-----+-----+-----+-----+-----+-----+-----+-----+| 74 | n | a1 | a2 | a3 | a4 | a1 | a2 | [...]+-----+-----+-----+-----+-----+-----+-----+-----+-----+
D.2.60 Option 75: StreetTalk server
This option specifies a list of StreetTalk servers available to the client.Servers should be listed in order of preference.
The code for the StreetTalk server option is 75 and the minimum length forthis option is 4 octets. The length must always be a multiple of four.
Code Length Address 1 Address 2+-----+-----+-----+-----+-----+-----+-----+-----+-----+| 75 | n | a1 | a2 | a3 | a4 | a1 | a2 | [...]+-----+-----+-----+-----+-----+-----+-----+-----+-----+
D.2.61 Option 76: StreetTalk Directory Assistance (STDA) server
This option specifies a list of StreetTalk Directory Assistance serversavailable to the client. Servers should be listed in order of preference.
The code for the StreetTalk Directory Assistance server option is 76, and theminimum length for this option is 4 octets. The length must always be amultiple of four.
Code Length Address 1 Address 2+-----+-----+-----+-----+-----+-----+-----+-----+-----+| 76 | n | a1 | a2 | a3 | a4 | a1 | a2 | [...]+-----+-----+-----+-----+-----+-----+-----+-----+-----+
D.3 DHCP (only) options
This section introduces all DHCP-only options that can be defined at theDHCP server and delivered to requesting DHCP clients. Be aware thatalthough most DHCP servers can deliver all options illustrated here torequesting DHCP clients, there are platform-specific dependencies thatdetermine whether or not requesting DHCP clients can actually make use ofall delivered information.
476 Beyond DHCP - Work Your TCP/IP Internetwork with Dynamic IP
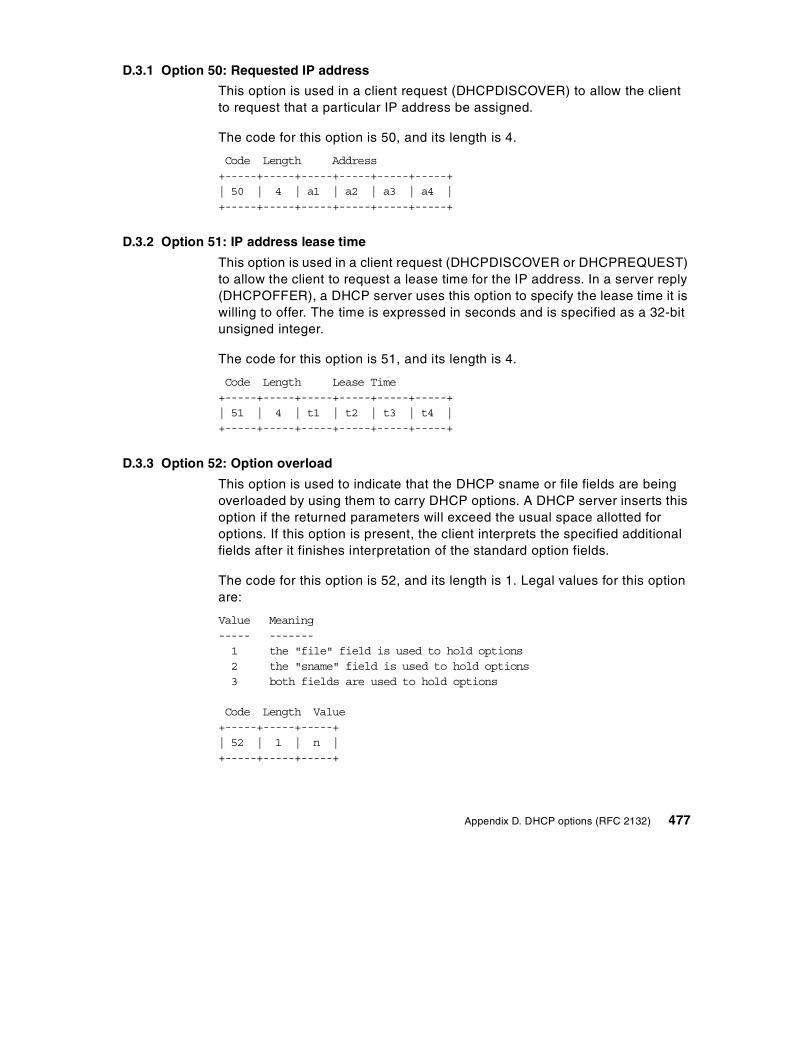
D.3.1 Option 50: Requested IP address
This option is used in a client request (DHCPDISCOVER) to allow the clientto request that a particular IP address be assigned.
The code for this option is 50, and its length is 4.
Code Length Address+-----+-----+-----+-----+-----+-----+| 50 | 4 | a1 | a2 | a3 | a4 |+-----+-----+-----+-----+-----+-----+
D.3.2 Option 51: IP address lease time
This option is used in a client request (DHCPDISCOVER or DHCPREQUEST)to allow the client to request a lease time for the IP address. In a server reply(DHCPOFFER), a DHCP server uses this option to specify the lease time it iswilling to offer. The time is expressed in seconds and is specified as a 32-bitunsigned integer.
The code for this option is 51, and its length is 4.
Code Length Lease Time+-----+-----+-----+-----+-----+-----+| 51 | 4 | t1 | t2 | t3 | t4 |+-----+-----+-----+-----+-----+-----+
D.3.3 Option 52: Option overload
This option is used to indicate that the DHCP sname or file fields are beingoverloaded by using them to carry DHCP options. A DHCP server inserts thisoption if the returned parameters will exceed the usual space allotted foroptions. If this option is present, the client interprets the specified additionalfields after it finishes interpretation of the standard option fields.
The code for this option is 52, and its length is 1. Legal values for this optionare:
Value Meaning----- -------1 the "file" field is used to hold options2 the "sname" field is used to hold options3 both fields are used to hold options
Code Length Value+-----+-----+-----+| 52 | 1 | n |+-----+-----+-----+
Appendix D. DHCP options (RFC 2132) 477
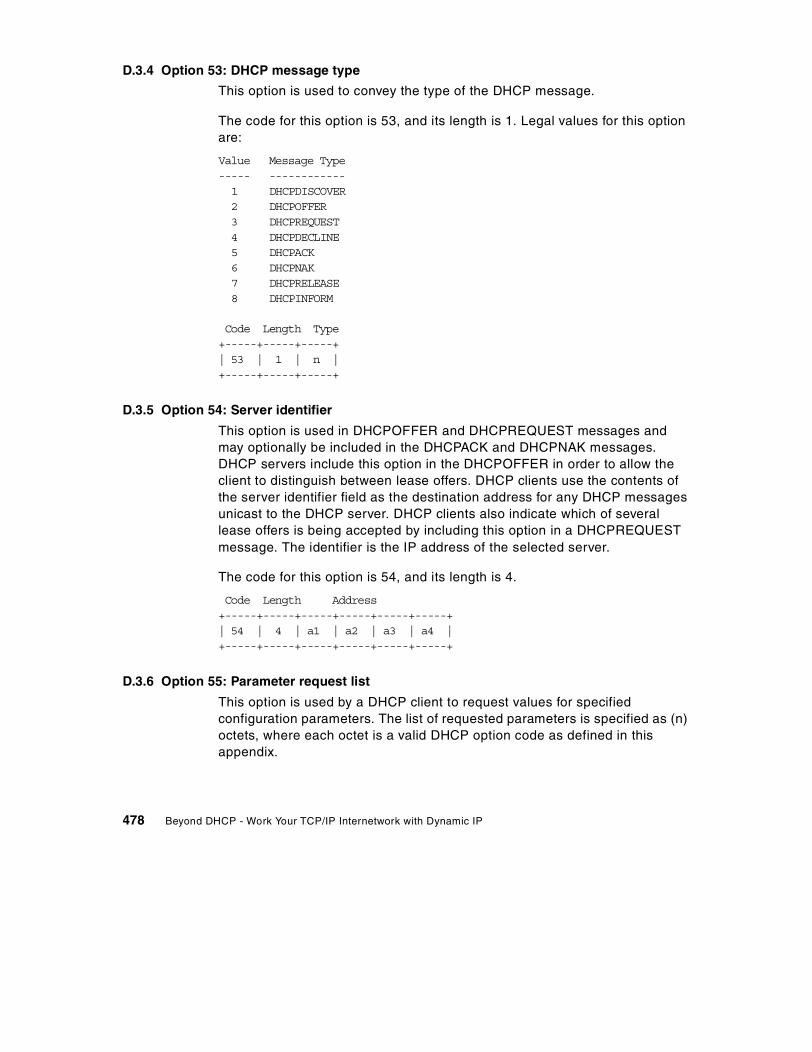
D.3.4 Option 53: DHCP message type
This option is used to convey the type of the DHCP message.
The code for this option is 53, and its length is 1. Legal values for this optionare:
Value Message Type----- ------------1 DHCPDISCOVER2 DHCPOFFER3 DHCPREQUEST4 DHCPDECLINE5 DHCPACK6 DHCPNAK7 DHCPRELEASE8 DHCPINFORM
Code Length Type+-----+-----+-----+| 53 | 1 | n |+-----+-----+-----+
D.3.5 Option 54: Server identifier
This option is used in DHCPOFFER and DHCPREQUEST messages andmay optionally be included in the DHCPACK and DHCPNAK messages.DHCP servers include this option in the DHCPOFFER in order to allow theclient to distinguish between lease offers. DHCP clients use the contents ofthe server identifier field as the destination address for any DHCP messagesunicast to the DHCP server. DHCP clients also indicate which of severallease offers is being accepted by including this option in a DHCPREQUESTmessage. The identifier is the IP address of the selected server.
The code for this option is 54, and its length is 4.
Code Length Address+-----+-----+-----+-----+-----+-----+| 54 | 4 | a1 | a2 | a3 | a4 |+-----+-----+-----+-----+-----+-----+
D.3.6 Option 55: Parameter request list
This option is used by a DHCP client to request values for specifiedconfiguration parameters. The list of requested parameters is specified as (n)octets, where each octet is a valid DHCP option code as defined in thisappendix.
478 Beyond DHCP - Work Your TCP/IP Internetwork with Dynamic IP
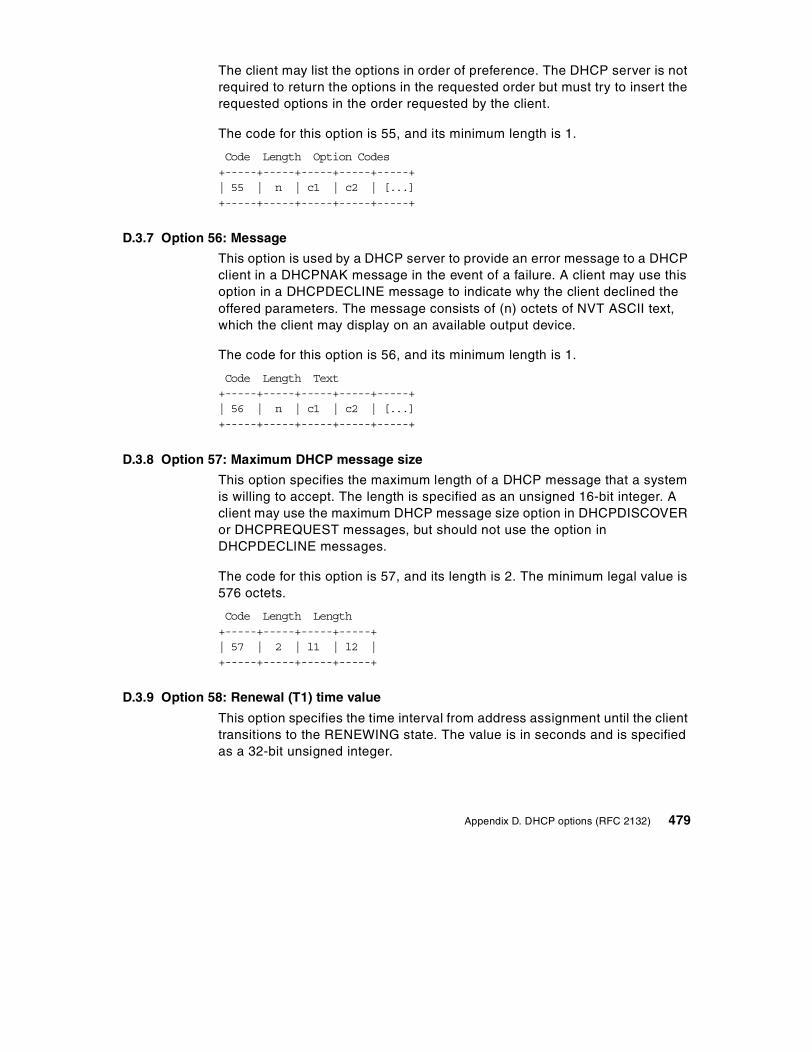
The client may list the options in order of preference. The DHCP server is notrequired to return the options in the requested order but must try to insert therequested options in the order requested by the client.
The code for this option is 55, and its minimum length is 1.
Code Length Option Codes+-----+-----+-----+-----+-----+| 55 | n | c1 | c2 | [...]+-----+-----+-----+-----+-----+
D.3.7 Option 56: Message
This option is used by a DHCP server to provide an error message to a DHCPclient in a DHCPNAK message in the event of a failure. A client may use thisoption in a DHCPDECLINE message to indicate why the client declined theoffered parameters. The message consists of (n) octets of NVT ASCII text,which the client may display on an available output device.
The code for this option is 56, and its minimum length is 1.
Code Length Text+-----+-----+-----+-----+-----+| 56 | n | c1 | c2 | [...]+-----+-----+-----+-----+-----+
D.3.8 Option 57: Maximum DHCP message size
This option specifies the maximum length of a DHCP message that a systemis willing to accept. The length is specified as an unsigned 16-bit integer. Aclient may use the maximum DHCP message size option in DHCPDISCOVERor DHCPREQUEST messages, but should not use the option inDHCPDECLINE messages.
The code for this option is 57, and its length is 2. The minimum legal value is576 octets.
Code Length Length+-----+-----+-----+-----+| 57 | 2 | l1 | l2 |+-----+-----+-----+-----+
D.3.9 Option 58: Renewal (T1) time value
This option specifies the time interval from address assignment until the clienttransitions to the RENEWING state. The value is in seconds and is specifiedas a 32-bit unsigned integer.
Appendix D. DHCP options (RFC 2132) 479
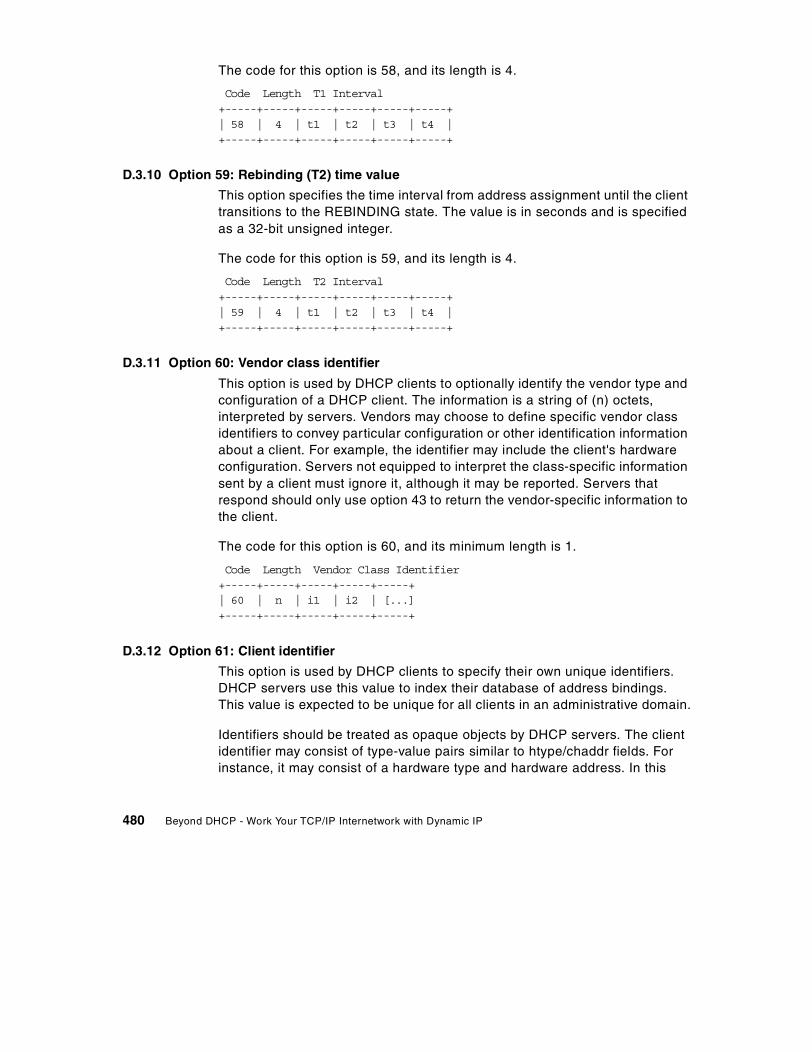
The code for this option is 58, and its length is 4.
Code Length T1 Interval+-----+-----+-----+-----+-----+-----+| 58 | 4 | t1 | t2 | t3 | t4 |+-----+-----+-----+-----+-----+-----+
D.3.10 Option 59: Rebinding (T2) time value
This option specifies the time interval from address assignment until the clienttransitions to the REBINDING state. The value is in seconds and is specifiedas a 32-bit unsigned integer.
The code for this option is 59, and its length is 4.
Code Length T2 Interval+-----+-----+-----+-----+-----+-----+| 59 | 4 | t1 | t2 | t3 | t4 |+-----+-----+-----+-----+-----+-----+
D.3.11 Option 60: Vendor class identifier
This option is used by DHCP clients to optionally identify the vendor type andconfiguration of a DHCP client. The information is a string of (n) octets,interpreted by servers. Vendors may choose to define specific vendor classidentifiers to convey particular configuration or other identification informationabout a client. For example, the identifier may include the client's hardwareconfiguration. Servers not equipped to interpret the class-specific informationsent by a client must ignore it, although it may be reported. Servers thatrespond should only use option 43 to return the vendor-specific information tothe client.
The code for this option is 60, and its minimum length is 1.
Code Length Vendor Class Identifier+-----+-----+-----+-----+-----+| 60 | n | i1 | i2 | [...]+-----+-----+-----+-----+-----+
D.3.12 Option 61: Client identifier
This option is used by DHCP clients to specify their own unique identifiers.DHCP servers use this value to index their database of address bindings.This value is expected to be unique for all clients in an administrative domain.
Identifiers should be treated as opaque objects by DHCP servers. The clientidentifier may consist of type-value pairs similar to htype/chaddr fields. Forinstance, it may consist of a hardware type and hardware address. In this
480 Beyond DHCP - Work Your TCP/IP Internetwork with Dynamic IP

case, the type field should be a defined ARP hardware type. A hardware typeof 0 (zero) should be used when the value field contains an identifier otherthan a hardware address (for instance, a fully qualified domain name).
For correct identification of clients, each client's identifier must be uniqueamong the identifiers used on the subnet to which the client is attached.Vendors and system administrators are responsible for choosing identifiersthat meet this requirement for uniqueness.
The code for this option is 61, and its minimum length is 2.
Code Length Type Client Identifier+-----+-----+-----+-----+-----+-----+| 61 | n | t1 | i1 | i2 | [...]+-----+-----+-----+-----+-----+-----+
D.3.13 Option 66: TFTP server name
This option is used to identify a TFTP server when the sname field in theDHCP header has been used for DHCP options.
The code for this option is 66, and its minimum length is 1.
Code Length TFTP server+-----+-----+-----+-----+-----+-----+| 66 | n | c1 | c2 | c3 | [...]+-----+-----+-----+-----+-----+-----+
D.3.14 Option 67: Boot file name
This option is used to identify a boot file when the file field in the DHCPheader has been used for DHCP options.
The code for this option is 67, and its minimum length is 1.
Code Length Boot File Name+-----+-----+-----+-----+-----+-----+| 67 | n | c1 | c2 | c3 | [...]+-----+-----+-----+-----+-----+-----+
D.4 Unofficial DHCP options
Several additional options, while not yet part of the official RFC 2132standard, have achieved some degree of popularity and are in common use.If you are interested in the latest inventory of unofficially assigned DHCPoptions, the list is available on the Internet at:
ftp://ftp.isi.edu/in-notes/iana/assignments
Appendix D. DHCP options (RFC 2132) 481
Option Description62 NetWare/IP Domain Name63 NetWare/IP Suboptions77 User Class78 Directory Agent Information79 Service Location Agent Scope80 Naming Authority81 Client Fully Qualified Domain Name82 Agent Circuit ID83 Agent Remote ID84 Agent Subnet Mask85 Novell Directory Services Servers86 Novell Directory Services Tree Name87 Novell Directory Services Context88 IEEE 1003.1 POSIX Timezone89 Fully Qualified Domain Name90 Authentication91 Banyan Vines TCP/IP Server92 Server Selection93 Client System Architecture94 Client Network Device Interface95 Lightweight Directory Access Protocol (LDAP)96 IPv6 Transitions97 UUID/GUID-based Client Identifier100 Printer Name101 Multicast Scope102 Start Time103 Multicast Time-to-Live104 Multicast Block Size105 Client Port106 Cookie107 Multicast Scope List108 Swap Path109 Autonomous System Number (ASN)110 IPX Compatibility111 Served IP Range112 NetInfo Parent Server Address113 NetInfo Parent Server Tag114 Universal Resource Locator (URL)115 DHCP Failover Protocol126 Extension127 Extension
482 Beyond DHCP - Work Your TCP/IP Internetwork with Dynamic IP

By convention, OS/2 Warp (and likely other IBM products) may use additionalDHCP options in the 200 to 208 range. You may wish to use these sameoption numbers for the same purposes, even on non-IBM platforms.
200 Default LPR Printer201 Default Gopher Server202 Default WWW Home Page203 Default WWW Proxy Gateway204 Default WWW News Server205 Default SOCKS Server206 NFS Mount Points207 Default X Font Servers208 X Display Manager Servers
D.5 Options supported by popular operating systems
This section provides information about strengths and weaknesses someDHCP servers and DHCP clients encounter.
D.5.1 Servers
OS/2 Warp Server, AIX, Shadow IPserver, and Windows NT Server can serveany and all DHCP options to clients. However, it appears that it is not possibleto alter Option 1 in at least some releases of Windows NT Server in order toassign a subnet mask to a client which is not identical to the server’s ownsubnet mask.
OS/2 Warp Server and AIX tend to provide the most flexibility in definingaddress pools.
D.5.2 Clients
OS/2 Warp and WorkSpace On-Demand support all DHCP options, andDHCP option handlers are provided for most of the standard DHCP options.Others can be interpreted and acted upon by the client using custom optionhandlers. (See 7.2, “Roaming users” on page 322 for some examples.)
Windows 95 and Windows NT support a more limited set of options, notably1, 3, 6, 44, 46, and 47. Third-party products may be required to intercept andhandle less commonly used DHCP options.
Appendix D. DHCP options (RFC 2132) 483

484 Beyond DHCP - Work Your TCP/IP Internetwork with Dynamic IP
Appendix E. Special notices
This publication is intended to help TCP/IP network operators establish asolid foundation for future growth without undue expense. Enterprise networkstaff will appreciate the sections exploring high-end technologies, includingNetwork TeleSystems’ Shadow IPserver, IBM Communications Server, andUNIX platforms. All network managers should find the authors’ advice onsecurity well worth reading.
References in this publication to IBM products, programs or services do notimply that IBM intends to make these available in all countries in which IBMoperates. Any reference to an IBM product, program, or service is notintended to state or imply that only IBM's product, program, or service may beused. Any functionally equivalent program that does not infringe any of IBM'sintellectual property rights may be used instead of the IBM product, programor service.
Information in this book was developed in conjunction with use of theequipment specified, and is limited in application to those specific hardwareand software products and levels.
IBM may have patents or pending patent applications covering subject matterin this document. The furnishing of this document does not give you anylicense to these patents. You can send license inquiries, in writing, to the IBMDirector of Licensing, IBM Corporation, North Castle Drive, Armonk, NY10504-1785.
Licensees of this program who wish to have information about it for thepurpose of enabling: (i) the exchange of information between independentlycreated programs and other programs (including this one) and (ii) the mutualuse of the information which has been exchanged, should contact IBMCorporation, Dept. 600A, Mail Drop 1329, Somers, NY 10589 USA.
Such information may be available, subject to appropriate terms andconditions, including in some cases, payment of a fee.
The information contained in this document has not been submitted to anyformal IBM test and is distributed AS IS. The information about non-IBM("vendor") products in this manual has been supplied by the vendor and IBMassumes no responsibility for its accuracy or completeness. The use of thisinformation or the implementation of any of these techniques is a customerresponsibility and depends on the customer's ability to evaluate and integratethem into the customer's operational environment. While each item may havebeen reviewed by IBM for accuracy in a specific situation, there is no
© Copyright IBM Corp. 1998, 2000 485
guarantee that the same or similar results will be obtained elsewhere.Customers attempting to adapt these techniques to their own environmentsdo so at their own risk.
Any pointers in this publication to external Web sites are provided forconvenience only and do not in any manner serve as an endorsement ofthese Web sites.
Any performance data contained in this document was determined in acontrolled environment, and therefore, the results that may be obtained inother operating environments may vary significantly. Users of this documentshould verify the applicable data for their specific environment.
This document contains examples of data and reports used in daily businessoperations. To illustrate them as completely as possible, the examplescontain the names of individuals, companies, brands, and products. All ofthese names are fictitious and any similarity to the names and addressesused by an actual business enterprise is entirely coincidental.
Reference to PTF numbers that have not been released through the normaldistribution process does not imply general availability. The purpose ofincluding these reference numbers is to alert IBM customers to specificinformation relative to the implementation of the PTF when it becomesavailable to each customer according to the normal IBM PTF distributionprocess.
The following terms are trademarks of the International Business MachinesCorporation in the United States and/or other countries:
The following terms are trademarks of other companies:
Tivoli, Manage. Anything. Anywhere.,The Power To Manage., Anything.Anywhere.,TME, NetView, Cross-Site, Tivoli Ready, Tivoli Certified, PlanetTivoli, and Tivoli Enterprise are trademarks or registered trademarks of TivoliSystems Inc., an IBM company, in the United States, other countries, or both.
AS/400 ATCT DB2eNetwork IBMLAN Distance NetfinityNetfinity Manager Network StationNway OS/2Presentation Manager RS/6000SecureWay SPSystem/390 ThinkPadXT 400
486 Beyond DHCP - Work Your TCP/IP Internetwork with Dynamic IP

In Denmark, Tivoli is a trademark licensed from Kjøbenhavns Sommer - TivoliA/S.
C-bus is a trademark of Corollary, Inc. in the United States and/or othercountries.
Java and all Java-based trademarks and logos are trademarks or registeredtrademarks of Sun Microsystems, Inc. in the United States and/or othercountries.
Microsoft, Windows, Windows NT, and the Windows logo are trademarks ofMicrosoft Corporation in the United States and/or other countries.
PC Direct is a trademark of Ziff Communications Company in the UnitedStates and/or other countries and is used by IBM Corporation under license.
ActionMedia, LANDesk, MMX, Pentium and ProShare are trademarks of IntelCorporation in the United States and/or other countries.
UNIX is a registered trademark in the United States and other countrieslicensed exclusively through The Open Group.
SET and the SET logo are trademarks owned by SET Secure ElectronicTransaction LLC.
Other company, product, and service names may be trademarks or servicemarks of others.
Appendix E. Special notices 487

488 Beyond DHCP - Work Your TCP/IP Internetwork with Dynamic IP
Appendix F. Related publications
The publications listed in this section are considered particularly suitable for amore detailed discussion of the topics covered in this redbook.
F.1 IBM Redbooks publications
For information on ordering these publications see “How to get IBMRedbooks” on page 495.
• OS/2 Warp Server, Windows NT, and NetWare: A Network OperatingSystem Study , SG24-4786
• AIX and Windows NT: Solutions for Interoperability, SG24-5102
• WorkSpace On-Demand Handbook Release 2.0, SG24-5117
• WorkSpace On-Demand 2.0 Feature for Windows Clients, SG24-5396
• AS/400 TCP/IP Autoconfiguration: DNS and DHCP Support, SG24-5147
• A Comprehensive Guide to Virtual Private Networks, Vol.1: IBM Firewall,Server and Client Solutions, SG24-5201
• TCP/IP Tutorial and Technical Overview, GG24-3376
• Using IBM Firewall 3.1 for AIX, SG24-2577
• Check Point FireWall-1 on AIX A Cookbook for Stand-Alone and HighAvailability, SG24-5492
• A Comprehensive Guide to Virtual Private Networks, Volume II: IBMNways Router Solutions, SG24-5234
• A Comprehensive Guide to Virtual Private Networks, Volume III: IBMCross-Platform and Key Management Solutions, SG24-5309
• All About Tivoli Management Agents, SG24-5134
• TME 10 Internals and Problem Determination, SG24-2034
• Learning Practical TCP/IP for AIX v3.2/v4.1 Users: Hints and Tips forDebugging and Tuning, SG24-4381
• HACMP Enhanced Scalability Handbook, SC24-5328
• IBM TCP/IP Performance Tuning Guide, SC31-7188
The following publications are available in softcopy format athttp://www.redbooks.ibm.com/ and may be available in hardcopy format atwww.fatbrain.com:
© Copyright IBM Corp. 1998, 2000 489
• Network Clients for OS/2 Warp Server: OS/2 Warp4, DOS/Windows,Windows 95/NT, and Apple Macintosh, SG24-2009
• The OS/2 Warp 4 CID Software Distribution Guide, SG24-2010
• The OS/2 Warp 4 CID Rapid Deployment Tools Migration and InstallationScenarios, SG24-2012
• TCP/IP Implementation in an OS/2 Warp Environment, SG24-4730
F.2 IBM Redbooks collections
Redbooks are also available on the following CD-ROMs. Click the CD-ROMsbutton at http://www.redbooks.ibm.com/ for information about all the CD-ROMsoffered, updates and formats.
F.3 Other resources
These publications are also relevant as further information sources:
• Internetworking with TCP/IP, Volume I, Principles, Protocols andArchitecture, third edition, Prentice-Hall, Inc., ISBN 0-13-216987-8
• TCP/IP Tutorial and Technical Overview, Prentice-Hall, Inc., ISBN0-13-460858-5
• IPng and the TCP/IP Protocols, John Wiley & Sons, Inc., ISBN0-471-13088-5
• Communications for Cooperating Systems - OSI, SNA and TCP/IP,Addison-Wesley Publishing Company, Inc., ISBN 0-201-50775-7
• DNS and BIND, O’Reilly & Associates, ISBN 1-56592-236-0
CD-ROM Title Collection KitNumber
System/390 Redbooks Collection SK2T-2177Networking and Systems Management Redbooks Collection SK2T-6022Transaction Processing and Data Management Redbooks Collection SK2T-8038Lotus Redbooks Collection SK2T-8039Tivoli Redbooks Collection SK2T-8044
AS/400 Redbooks Collection SK2T-2849Netfinity Hardware and Software Redbooks Collection SK2T-8046RS/6000 Redbooks Collection (BkMgr) SK2T-8040RS/6000 Redbooks Collection (PDF Format) SK2T-8043Application Development Redbooks Collection SK2T-8037IBM Enterprise Storage and Systems Management Solutions SK3T-3694
490 Beyond DHCP - Work Your TCP/IP Internetwork with Dynamic IP
• Sendmail (Nutshell Handbook), O’Reilly & Associates, ISBN1-56592-222-0
• Internetworking with Microsoft TCP/IP in Microsoft Windows NT 4.0,Microsoft 0871B
• TCP/IP Architecture, Protocols and Implementation with IP v6 and IPSecurity, McGraw-Hill, 0-07-021389-5
• Inside TCP/IP Third Edition, New Riders, 1-56205-74-6
• Mastering TCP/IP for NT Server, Sybex, 0-7821-2123-3
• DNS and BIND, 2nd Edition; O’Reilly & Associates,ISBN: 1-56592-236-0
• RFC 1034 Domain Names - Concepts and Facilities
• RFC 1035 Domain Names - Implementation and Specification
F.4 Referenced Web sites
• IBM Software Choice:
http://www.ibm.com/software/os/warp/swchoice/http://www.software.ibm.com/swchoice
• IBM Software Support:
http://ps.software.ibm.com
• IBM PC-DOS 2000:
http://www.software.ibm.com/os/dos
• IBM Global Services:
http://www.ibm.com/services/
• IBM SecureWay Communications Server:
http://www.software.ibm.com/enetwork/commserver
• IBM OS/2 Warp Device Driver Pak On-Line:
http://service.software.ibm.com/os2ddpak/index.htm
• IBM Hursley Labs (Java fixes):
ftp://ftp.hursley.ibm.comftp://ftp.hursley.ibm.com/pub/java/fixes/os2/11/114
• http://www.redbooks.ibm.com
• http://www.thursby.com
• http://www.redhat.com/corp/support/manuals/index.html
• http://www.redhat.com/community/user_groups.html
Appendix F. Related publications 491
• Software for implementing Windows with IBM Dynamic IP Client:
http://techsupport.service.ibm.com/asd-bin/doc/en_us/win95cl/f-feat.htm
• IBM OS2PopS Home Page:
http://www.raleigh.ibm.com/misc/os2pops
• IBM Web Traffic Express (evaluation version):
http://www.software.ibm.com/webserver/wte/index.htm
• Information on configuring AIX 4.3.3 as a DNS server:
http://www.rs6000.ibm.com/doc_link/en_US/a_doc_lib/aixbman/commadmn/tcp_nameres.htm#BCAF2DF137dada
• Domino Go Webserver:
http://www.software.ibm.com/webservers/dgw/prodlist.htm
• Information on named.conf:
http://www.rs6000.ibm.com/doc_link/en_US/a_doc_lib/files/aixfiles/named.conf.htm
• CIFS Internet draft:
http://search.ietf.org/internet-drafts/draft-leach-cifs-v1-spec-02.txthttp://www.cifs.com/spec.html
• Neighborhood Browser Enabler for OS/2 Warp Server Version 4:
http://service.software.ibm.com/asd-bin/doc/index.htm
• F/X Communications (InJoy, InJoy Connect, and Tunnel/2):
http://www.fx.dk
• Network TeleSystems (Shadow IPserver):
http://www.nts.com/
• Information on NETAnywhere:
http://vrcomm.com/html/vcpos2.html
• Computer Emergency Respose Team (CERT):
http://www.cert.orghttp://www.cert.org/advisories
• Interaction between DHCP and DNS:
http://www.ietf.org/internet-drafts/draft-ietf-dhc-dhcp-dns-08.txt
• Vinca’s StandbyServer for OS/2 Warp:
http://www.vinca.com/products/os2/os2_sbs.html
• HP JetDirect Print Server Software Installation Guide:
492 Beyond DHCP - Work Your TCP/IP Internetwork with Dynamic IP
http://www.hp.com/cposupport/manindex/jd600t_en_man.html
• QIP demo software:
http://www.lucent.com/ins/products/qip.html
• "Hobbes" OS/2 Warp Program Library:
ftp://ftp-os2.nmsu.edu/pub/os2/util/archiverftp://ftp-os2.nmsu.edu/pub/os2/apps/internet/ftp/client
• IP08267 FixPak for Warp Server:
ftp://ftp.software.ibm.com/ps/products/lan/fixes/lsv5.0/english-us
• IBM DB2 Universal Database Information and Support:
http://www.software.ibm.com/datahttp://www.software.ibm.com/data/db2/db2techhttp://www-4.ibm.com/software/data/db2db2tech/version61.html
• DHCP options:
ftp://ds.internic.net/rfc/rfc/rfc2142.txt
• Unofficial DHCP options:
ftp://ftp.isi.edu/in-notes/iana/assignments
• Institute of Electrical and Electronics Engineers:
http://www.ieee.org
• Internet Engineering Task Force:
http://www.ietf.org
F.5 Useful Web and FTP sites
• There are more than 2,500 RFCs today. For those readers who want tokeep up-to-date with the latest advances in TCP/IP, the ever-increasingnumber of RFCs and Internet Drafts (IDs), published by the non-profitInternet Engineering Task Force, are the best sources. RFCs can beviewed on the Internet at:
http://www.rfc-editor.org/
• The DHCP Frequently Asked Questions List:
http://web.syr.edu/~jmwobus/comfaqs/dhcp.faq.html
• IBM REXX Information (including versions for Windows 95 and NT):
http://rexx.hursley.ibm.com/rexx/rexxibm.htm
• IBM Network Computing Software Updates:
http://ps.boulder.ibm.com/pbin-usa-ps/getobj.pl?/pdocs-usa/softupd.html
Appendix F. Related publications 493
• Internet Engineering Task Force RFCs:
http://www.rfc-editor.org/
• IBM OS/2 Warp TCP/IP V4.1 Stack Updates Page:
http://ps.software.ibm.com
• "Hobbes" OS/2 Warp Program Library:
ftp://ftp-os2.nmsu.edu/pub/os2
• Internet Software Consortium:
http://www.isc.com/
• Info-ZIP’s Home Page:
http://www.cdrom.com/pub/infozip
• Checkpoint Software:
http://www.checkpoint.com/
• The Fourth Crusade:
http://www.fourthcrusade.com
• Association for Computing Machinery:
http://www.acm.org
• LanOptics Corporation (provider of firewalls and more; OS/2 Warp versionavailable upon request):
http://www.lanoptics.com
• Opera Software (Web browser):
http://www.operasoft.com
• To reduce network traffic for everyone else, IBM employees should use thefollowing internal Web addresses.
IBM Network Computing Software Updates:
http://os2service.austin.ibm.com
494 Beyond DHCP - Work Your TCP/IP Internetwork with Dynamic IP

How to get IBM Redbooks
This section explains how both customers and IBM employees can find out about IBM Redbooks,redpieces, and CD-ROMs. A form for ordering books and CD-ROMs by fax or e-mail is also provided.
• Redbooks Web Site http://www.redbooks.ibm.com/
Search for, view, download, or order hardcopy/CD-ROM Redbooks from the Redbooks Web site.Also read redpieces and download additional materials (code samples or diskette/CD-ROM images)from this Redbooks site.
Redpieces are Redbooks in progress; not all Redbooks become redpieces and sometimes just a fewchapters will be published this way. The intent is to get the information out much quicker than theformal publishing process allows.
• E-mail Orders
Send orders by e-mail including information from the IBM Redbooks fax order form to:
• Telephone Orders
• Fax Orders
This information was current at the time of publication, but is continually subject to change. The latestinformation may be found at the Redbooks Web site.
In United StatesOutside North America
e-mail [email protected] information is in the “How to Order” section at this site:http://www.elink.ibmlink.ibm.com/pbl/pbl
United States (toll free)Canada (toll free)Outside North America
1-800-879-27551-800-IBM-4YOUCountry coordinator phone number is in the “How to Order”section at this site:http://www.elink.ibmlink.ibm.com/pbl/pbl
United States (toll free)CanadaOutside North America
1-800-445-92691-403-267-4455Fax phone number is in the “How to Order” section at this site:http://www.elink.ibmlink.ibm.com/pbl/pbl
IBM employees may register for information on workshops, residencies, and Redbooks by accessingthe IBM Intranet Web site at http://w3.itso.ibm.com/ and clicking the ITSO Mailing List button.Look in the Materials repository for workshops, presentations, papers, and Web pages developedand written by the ITSO technical professionals; click the Additional Materials button. Employees mayaccess MyNews at http://w3.ibm.com/ for redbook, residency, and workshop announcements.
IBM Intranet for Employees
© Copyright IBM Corp. 1998, 2000 495
IBM Redbooks fax order form
Please send me the following:
We accept American Express, Diners, Eurocard, Master Card, and Visa. Payment by credit card notavailable in all countries. Signature mandatory for credit card payment.
Title Order Number Quantity
First name Last name
Company
Address
City Postal code
Telephone number Telefax number VAT number
Invoice to customer number
Country
Credit card number
Credit card expiration date SignatureCard issued to
496 Beyond DHCP - Work Your TCP/IP Internetwork with Dynamic IP
Glossary and abbreviations
ACM. Association for Computing Machinery.Professional organization of computingacademics and other experts. Seehttp://www.acm.org on the Internet.
ADSL. Asynchronous Digital Subscriber Line.Method of providing high-speed data transferover standard copper telephone wiring. Typicallyoffers higher performance than ISDN.
AFS. Andrew File System. One of three popularnetwork file systems, originating with UNIX, toprovide file and disk sharing across a TCP/IPnetwork. See also DFS and NFS.
AIX. IBM UNIX-compatible operating system forthe RS/6000 line of workstations and servers.
ANSI. American National Standards Institute.Group which promulgates several differenttechnical standards, including the popular ANSIterminal emulation standard.
APAR. A documented problem in an IBMproduct, normally one for which a patch or otherfix is available.
AppleTalk. Network protocol used primarily toconnect computers and devices produced byApple Computer. AppleTalk is based on theISO/OSI Reference Model and incorporates theSPX protocol.
ARP. Address Resolution Protocol. A protocolused between routers and nodes to determinethe MAC or OSI physical layer address when theNetwork layer (IP) address is known.
AS/400. Application System/400. An IBM line ofmidrange computing systems, popular forline-of-business applications.
ASCII. American Standard Code for InformationInterchange. A standard correspondencebetween alphanumeric and control characters,and (normally) 7-bit binary values (0 to 127). Forexample, code 65 is defined as the uppercaseletter A in the ASCII table. Facilitatescommunication between different computersystems. Other common character set
© Copyright IBM Corp. 1998, 2000
definitions include Unicode (16-bit) andEBCIDIC (8-bit).
ATM. Asynchronous Transfer Mode. It is ahigh-speed (155 - 622 Mbps) communicationstransport facility capable of carrying voice, data,and video signaling.
BCP. Best Common Practice. An article bywhich the IETF community can define and ratifythe Internet community's best current thinkingon a statement of principle or on what isbelieved to be the best way to perform someoperations or IETF process function.
Binary. Having two components or possiblestates. Usually represented by a code of zerosand ones.
Boot Manager. Included with IBM OS/2 Warpproducts and PowerQuest’s Partition Magicsoftware. Presents a menu on startup whichallows a PC user to choose which operatingsystem (OS/2 Warp, Windows 95, DOS,Windows NT, and so on) to run among thoseinstalled.
BootP. Bootstrap Protocol. An early method ofproviding IP address information from a centralserver based on a client’s network adapteraddress. See also DHCP.
Bridge. A network relay that reads, buffers, andforwards datagrams from one part of a networkto another. As a result, the two parts of anetwork act as one. Bridges operate at theDatalink layer of the OSI Model, or moreprecisely, at the Media Access Control (MAC)sublayer. See also Filter.
Broadcast. A transmission of a message (suchas a packet or frame) sent to all nodes on anetwork rather than to a specific station.
Brouter. A single device which acts as both abridge and a router.
BSD. Berkeley Standard Distribution, a versionof UNIX.
497

Byte. Short for binary digit eight. A unit ofinformation consisting of usually eight bits. Onebyte is sometimes referred as one octet.
Cable Modem. A device used to allow acomputer to communicate over cable televisioncoaxial wiring, usually to provide high-speedInternet service.
CGI. Common Gateway Interface, a standardmechanism used to pass data collected by a Webserver to a server-based application and receiveback any results, often used for "intelligent" Webpages, such as order entry forms and credit cardprocessing.
Chooser. The application used on the Macintoshto access AppleShare network services.
CIFS. Common Internet File System protocol.
CPSR. Computer Professionals for SocialResponsibility. See http://www.cpsr.org on theInternet.
CSD. Corrective Service Diskette(s). Collection ofprogram fixes issued periodically for IBMsoftware products. Also known as Service Packs.
Daemon. A task that runs in the background,usually to provide some kind of network serviceto clients. For example, FTPD stands for FTPDaemon.
Datagram. A packet of information transmittedacross a computer network consisting of aheader and one or more bytes of actual datarequiring no response or acknowledgment.
DDNS. Dynamic Domain Name System. See alsoDNS.
DCE. Distributed Computing Environment. TheOpen Software Foundation’s TCP/IP-basedprotocols for security, DFS, and distributedapplications (RPC).
DFS. Distributed File System. One of threepopular network file systems, originating withUNIX, to provide file and disk sharing across aTCP/IP network. Part of the Open SoftwareFoundation’s DCE. See also AFS and NFS.
DHCP. The Dynamic Host Configuration Protocolserver provides IP addresses and IP
configuration information to IP address-requesting workstations.
DLS. DOS LAN Services. IBM product for PCsrunning DOS and/or Windows 3.x. Providesnetwork connection capabilities for file and printersharing. Also provides network protocol support,including DHCP and basic TCP/IP services.Included with Warp Server.
Domain. On the Internet, a domain is a part ofthe naming hierarchy. The domain name is asequence of names (separated by periods) thatidentify host sites. The leftmost part of a domainname is the most specific, and the part on theright is the most general.
DNS. The Domain Name System (DNS) is ahierarchical, distributed method of organizingsystems and network names on the Internet.DNS administratively groups hosts (systems) intoa hierarchy of authority that allows addressingand other information to be widely distributed andmaintained. A big advantage of DNS is that usingit eliminates dependence on acentrally-maintained file that maps host names toIP addresses.
DOS. Disk Operating System. The softwareprograms that control the operation of thecomputer and the movement of informationthroughout the computer system. Althoughoperating systems known as DOS have beenproduced for other systems, most people knowDOS as one of the popular operating systems forthe PC. First introduced in 1981 by Microsoft andIBM, the newest version is called IBM PC-DOS2000. Seehttp://www.software.ibm.com/os/dos for moreinformation.
Duplex. Pertaining to simultaneous two-wayindependent data transmission in both directions(as in full duplex).
E-mail. Electronic mail (e-mail) is the mostpopular Internet application, and the driving forcebehind the Internet’s rapid growth.
Ethernet. LAN datalink protocol developed by aconsortium of vendors, later standardized asIEEE 802.3 with a few modifications. (For manyapplications, users have not adopted all the IEEE
498 Beyond DHCP - Work Your TCP/IP Internetwork with Dynamic IP
802.3 differences.) Ethernet 802.3 can now berun on two types of coaxial cable as well as onmulti-mode fiber and unshielded twisted-paircables. The raw rate of data transmission istypically 10 megabits/second.
Extranet. Using Internet technologies (such asWeb, Java, and TCP/IP) to link an internalcompany network with networks operated byvendors, suppliers, company partners, andothers, usually with at least some security. Seealso Internet and intranet.
Fast Ethernet. A nickname for the 100 Mbpsversion of IEEE 802.3.
FDDI. Fiber Distributed Data Interface (100 Mbpsfiber optic LAN).
File. A sequence of bytes stored on a secondarystorage medium, such as floppy disk or hard disk.
Filter. A network device or agent (program)designed to separate data, signals, or material inaccordance with specified criteria.
Firewall. Generic term for a sophisticated filterdesigned to connect a private network (intranet)to a public network (Internet) in a secure way.See also SOCKS and Proxy.
FTP. The File Transfer Protocol is part of theTCP/IP protocol suite that is used to transfer filesbetween any two computers, provided theysupport FTP. The two computers do not have tobe running the same operating system.
FQDN. Fully Qualified Domain Name. Includeshostname plus domain name.
Gigabit Ethernet. Refers to Ethernettechnologies promising 1000 Mbps rawtransmission speed.
GUI. Graphical User Interface. A GUI usesgraphic representations of commands and/or amenu format to display commands that the usermay execute with a mouse or similar device.
Host. Any computer attached to a TCP/IPnetwork that is remotely accessible through anaddress.
HPFS. High Performance File System, part ofOS/2 Warp. The 32-bit version of this file systemis called HPFS386.
HTML. The HyperText Markup Language is thestandard language that the Web uses for creatingand recognizing hypermedia documents. Webdocuments are most often written in HTML andnormally have an .html or .htm extension.
HTTP. HyperText Transport Protocol, the methodused by Web browsers to retrieve Web pagesfrom a Web server across a TCP/IP network.
Hub. A central point, or terminus, for networkconnections or wiring.
Hyperlink. Words, phrases, images, orcharacters highlighted in bold or underlinedindicate connections in a given document toinformation within another document.
Hypermedia. Hypermedia is the name for richlyformatted documents containing a variety ofinformation types, such as textual, image, video,and audio. These information types are easilyfound through hyperlinks.
Hypertext. Hypertext allows users to move fromone site or place in a document to another.Hypertext links in World Wide Web documentslink the user from terms in one document to thesite referenced in the original document.
IBM. International Business Machines.
ICMP. The Internet Control Message Protocol isused for error reporting and recovery, and is arequired component of any IP implementation.Described by RFC 792.
Icon. A graphical picture used to represent anapplication, folder, file, disk drive, or printer.
IDE. Integrated Drive Electronics. This is astandard interface for a hard disk drive orCD-ROM drive. An IDE bus can be identified byits 40-pin connector, as opposed to the 50-pinconnector of a SCSI bus.
IEEE. Institute of Electrical and ElectronicEngineers. A professional ANSI-accredited bodyof scientists and engineers based in the UnitedStates. See http://www.ieee.org on theInternet.
499
IEEE 802. The set of IEEE standards for thedefinition of LAN protocols.
IEEE 802.2. An IEEE standard describing theparts of all IEEE LAN datalink protocols that arecommon.
IEEE 802.3. An IEEE standard for LANs (animproved version of Ethernet). See also Ethernet.
IEEE 802.5. An IEEE standard for token-ringLANs. There are three types: 4 Mbps, 16 Mbps,and 100 Mbps. See also Token-Ring.
IETF. Internet Engineering Task Force, a groupresponsible for defining protocols in the TCP/IPfamily for use on the Internet. Seehttp://www.ietf.org on the Internet.
IFS. Installable File System, a program used tomanage file storage on disks and other storagedevices. The program can be added or removedfrom an operating system to change its filestorage behavior. For example, installable filesystems on OS/2 Warp include HPFS, HPFS386,NFS, CD-ROM, and others.
IGMP. Internet Group Management Protocol,maps IP addresses to hardware addresses on anetwork. Also allows routers to check hosts tosee if they are interested in participating inmulticasts.
IMAP. Internet Message Access Protocol, usedprimarily for TCP/IP-based e-mail applications.
Internet. The worldwide public network linkingcomputers using TCP/IP, Java, and otherstandard networking technologies. Began in theU.S. as a result of collaboration between theDepartment of Defense, research institutions,and universities. See also extranet and intranet.
Intranet. A private network established entirelywithin a company or other organization based onInternet technologies. See also extranet andInternet.
IP. Internet Protocol, the basic protocol of TCP/IPand of the Internet. IP is the OSI layer 3 routedprotocol used to transmit packetized informationon a TCP/IP network.
IP Address. Each host in the network is assigneda unique IP address for each network connection
(installed network adapters). The IP address isused to identify packet source and destinationhost.
IPv6. Internet Protocol Version 6, described byRFCs 1883 through 1887.
IPX. A network protocol developed by Novell foruse with its NetWare products.
IRC. Internet Relay Chat. A mechanism forproviding live messages across a TCP/IPnetwork, to allow individuals to converse ingroups.
ISDN. Integrated Services Digital Network. Adigital telephone service used for high speedInternet access and voice services. Deliveredover standard copper telephone wiring. See alsoADSL.
ISP. Internet Service Providers are companiesthat provide an Internet connection foreducational institutions, individuals, companies,and organizations.
ITSO. International Technical SupportOrganization, part of IBM Corp. Seehttp://www.redbooks.ibm.com for moreinformation.
Java. Java is a general-purpose concurrentobject-oriented programming language. Its syntaxis similar to C and C++, but it omits many of thefeatures that make C and C++ complex,confusing, and unsafe. Java was initiallydeveloped to address the problems of buildingsoftware for networked consumer devices. It wasdesigned to support multiple host architecturesand to allow secure delivery of softwarecomponents. To meet these requirements,compiled Java code had to survive transportacross networks, operate on any client, andassure the client that it was safe to run. With Javaas the extension language to HTML, a Webbrowser is no longer limited to a fixed set ofcapabilities. Programmers can write an appletonce and it will run on any machine, anywhere.
JVM. The Java Virtual Machine is thecornerstone of Sun’s Java programminglanguage. It is the component of the Javatechnology responsible for Java’s cross-platform
500 Beyond DHCP - Work Your TCP/IP Internetwork with Dynamic IP

delivery, the small size of compiled code, andJava’s ability to protect users from maliciousprograms. It is an environment provided for anyconventional operating system (such as UNIX,OS/2 Warp, or Windows) designed to run Javaapplications and applets. (Native Java machinesrun Java bytecode directly, without interpretationor translation.) The JVM knows nothing of theJava programming language, only of a particularfile format, the class file format. A class filecontains JVM instructions (or bytecodes) and asymbol table, as well as other ancillaryinformation. Java is a trademark of SunMicrosystems. Consequently a "Java" virtualmachine has passed JavaSoft compliancetesting. See also applet.
LAN. A Local Area Network is a group ofcomputers running specialized communicationssoftware, and joined through an external datapath. A LAN will cover a small geographic area,usually no larger than a single building. Thecomputers have a direct high-speed connectionbetween all workstations and servers, and sharehardware resources and data files.
Linux. UNIX-compatible operating systemoriginally developed by Linus Torvalds.
LPD. Line Printer Daemon, a server-basedapplication designed to act as a print server onTCP/IP networks.
LPR. A TCP/IP-based application which canforward print jobs to any LPD server.
LSM. IBM LAN Server for Macintosh.
MAC. Media Access Control, pertaining tonetwork adapters.
MD5. Message Digest 5. See RSA MD5.
Modem. Modem is an abbreviation formodulator/demodulator. A modem is a peripheraldevice that permits all sort of computers toreceive and transmit data in digital format acrossvoice-oriented communications links, such astelephone lines.
MSS. Maximum Segment Size, the maximum sizeof a TCP segment.
MTU. Maximum Transmission Unit, the size of anIP datagram.
Multicast. Network traffic intended to be receivedby more than one system (but not necessarilyevery system, as would a broadcast).
NBDD. NetBIOS Datagram Distributor.
NBNS. NetBIOS Name Server. ResolvesNetBIOS names to IP addresses eliminatingtypical NetBIOS broadcast traffic.
NC. Network Computer or Network Computing.
NDIS. Network Driver Interface Specification, astandard used to create drivers for networkadapters.
NetBEUI. NetBIOS Extended User Interface. Thisis a non-routable transport protocol written to theNetBIOS interface. It usually implies NetBIOSover NetBEUI.
NetBIOS. NetBIOS is a standard programminginterface (API) for the development of distributedapplications. It can run over different transportprotocols, such as NetBEUI, TCP/IP, or IPX/SPX.
NETBT. Microsoft’s term for NetBIOS overTCP/IP. IBM calls it TCPBEUI.
NIC. 1.) Network Interface Card (networkadapter). 2.) Network Information Center. Themost famous one on the Internet is the InterNIC,which is where new domain names areregistered.
NFS. Network File System. One of three popularnetwork file systems, originating with UNIX, toprovide file and disk sharing across a TCP/IPnetwork. See also AFS and DFS.
NNTP. The Network News Transport Protocoldefines the distribution, inquiry, and retrieval ofnews articles on the Internet from TCP/IP sites.
NT. Microsoft operating system (Windows NT).
NTP. Network Time Protocol. It is the protocolthat assures accurate local time keeping withreference to radio and atomic clocks located onthe Internet.
NVRAM. Nonvolatile Random Access Memory.Normally, information stored in RAM will be lost
501
without continuous electrical power, but NVRAMcan hold such information intact even withoutexternal power. The IBM Network Stationcontains some NVRAM used to store bootparameters.
NVT. Network Virtual Terminal, as in NVT ASCII.Defined by Military Standard 1782, whichspecifies a standard form for ASCIIrepresentation and for certain othercharacteristics of a simple terminal. See alsoASCII.
ODI. Open Datalink Interface, a driverspecification used primarily with Novell networks.
OS/2. Operating System/2. IBM operating systemfor the PC.
OSI. Open Systems Interconnection. To supportinternational standardization of networkterminology and protocols, the InternationalStandards Organization (ISO) proposed areference model of open systemsinterconnection.
OSI Reference Model. The OSI model providesa standard means of describing the data flow in anetwork and how it is managed:7 Application Layer6 Presentation Layer5 Session Layer4 Transport Layer3 Network Layer2 Data Link Layer1 Physical Layer
OSI layer 1. The Physical Layer. It is the lowest ofthe seven defined layers of the generalizednetwork architecture. It defines the transmissionof bits over a communication channel, ensuringthat 1s and 0s are recognized as such.
OSI layer 2. The Data Link Layer. It providesmethodologies for transforming the new physicallayer link into a channel that appears free oferrors to the network layer (the next higher layer).The data link layer accomplishes this by splittingthe input or data stream provided in the physicallayer into data frames that are transmittedsequentially as messages and by processing theacknowledgment (ACK) frames sent back overthe channel by the receiver.
OSI layer 3. The Network Layer. It acceptsmessages of data frames from the transmittinghost, converts the messages to packets, androutes the packets to their destination.
OSI layer 4. The Transport Layer. It accepts datafrom the session layer (the next layer up, which isthe human user’s interface to the network), splitsthis data into smaller units, passes these unitsdown to the network layer, and ensures that allthe pieces arrive at the destination in correctorder. The transport layer is a true end-to-endprocess.
OSI layer 5. The Session Layer. It is the user’sinterface into the network through which the userestablishes a connection with a process onanother distant machine. Once the connection isestablished, the session layer manages theend-to-end dialog in an orderly manner,supplementing the application-oriented userfunctions to the data units provided by thetransport layer.
OSI layer 6. The Presentation Layer. Its protocolsformat the data to meet the needs of differentcomputers, terminals, or presentation media inthe user’s end-to-end communications. Theprotocols at this layer may also provide dataencryption for security purposes in transmissionover networks, or data compression for efficiencyand economy.
OSI layer 7. The Application Layer. It specifiesthe protocols for the user’s intended interactionwith the distant computer, including suchapplications as database access, documentinterchange, or financial transactions.
OSPF. Open Shortest Path First routing protocol,which is the fastest and most efficient routingprotocol. Routers are calculated based on realperformance and are dynamically adjusted if aroute becomes congested. See also RIP.
Packet. A unit of data transmitted at the OSInetwork layer; or any addressed segment of datatransmitted on a network.
Peer. A system connected to a network thatcommunicates more or less on equal terms withanother system on the network, usually providingbasic file and print sharing. Clients, unlike peers,
502 Beyond DHCP - Work Your TCP/IP Internetwork with Dynamic IP
generally must depend on servers for vitalfunctions. In other words, peers can alternatelybehave as both clients and servers in a network.
Ping. Packet Internet Groper. A program used totest accessibility of destinations by sending theman ICMP echo request and waiting for a reply.
PM. Presentation Manager. Graphical subsystemfor displaying windows, icons, and other GUIcomponents on IBM OS/2 Warp operatingsystem.
POP. The Post Office Protocol is one of mailexchange protocols.
PPP. Point-to-Point Protocol. The successor ofthe SLIP protocol, PPP allows a computer to usea regular telephone line and a modem to make IPconnections. PPP can also carry other routableprotocols such as IPX.
Protocol. The rules by which two networkdevices trade information in order tocommunicate. Must include rules about a lot ofmundane detail, as well as rules about how torecover from a lot of unusual communicationproblems. Thus, the rules can be quitecomplicated.
Proxy. An agent which can forward requests toanother part of the network on behalf of clients,returning any results. Most often used to allowWeb browsers to access public Web sites beyonda firewall.
PTF. Program Temporary Fix, issued by IBM tocorrect a defect in an IBM software product.
QOS. Quality Of Service. Typically a specifiedbandwidth or timeliness of delivery of packets.Controlled load reservation has a specified datarate, whereas guaranteed reservation additionallyhas an upper bound on delivery time.
RARP. The Reverse Address Resolution Protocolis used to map the MAC, or hardware address, toa host’s IP, or software address.
RedHat. One of two major vendors supplyingcommercial versions of Linux. See alsoSlackware.
Requester. A LAN client that requests file andprint services from a server such as OS/2 WarpServer.
REXX. Restructured EXtended eXecutorlanguage. Computer programming and scriptinglanguage developed by Mike Cowlishaw of IBM.Provided as a standard part of most IBMoperating systems. Available for nearly alloperating systems.
RFC. Request for Comments. Refers todocuments published by the Internet EngineeringTask Force (IETF) that have achieved at leastsome degree of standardization. RFCs describevarious TCP/IP protocol standards.
RIP. Routing Information Protocol. This protocolallows routers to exchange routing details on anetwork. Using RIP, routers can create andmaintain a database, or routing table, of currentinformation. Workstations can query the nearestrouter to determine the fastest route to a distantnetwork by broadcasting a RIP request package.Routers send periodic RIP broadcast packetswith current information to keep all routers on theinternetwork synchronized.
RIPL. Remote Initial Program Load. Method ofobtaining boot software across a network to starta PC or other computer, often one without a diskdrive.
Router. A network relay that uses a protocolbeyond the datalink protocol to route trafficbetween LANs and other network links.
Routing Protocol. A protocol sent betweenrouters by which routers exchange information onhow to route to various parts of the network.TCP/IP includes several routing protocols suchas RIP, EGP, BGP, OSPF, and dual IS-IS.
RPC. Remote Procedure Call.
RSA MD5. Rivest-Shamir-Aleman algorithmMessage Digest 5.
RSVP. Resource ReSerVation Protocol. Aprotocol to reserve quality of service (QOS) for adata stream. See 10.5.2, “RSVP” on page 408.
SCSI. Small Computer Systems Interface. Ahigh-speed interface bus used for disk drives,
503
tape drives, scanners, printers, CD-ROM drives,digital cameras, and other devices. Available inseveral versions including SCSI-I, SCSI-II (FastSCSI), Wide (16-bit data path) and UltraWide.
Segment. Effectively a TCP datagram.
ServicePaks. See CSD.
Slackware. One of two major vendors supplyingcommercial versions of Linux. See also RedHat.
SLIP. Serial Line (or Link) Internet Protocol.Method used to provide a TCP/IP connectionover serial connections, such as dial-up modems.See also PPP.
SMTP. Simple Mail Transport Protocol, designedto send e-mail across a TCP/IP network.
SNMP. The Simple Network ManagementProtocol is one of the most comprehensive toolsavailable for TCP/IP network management. Itoperates through conversations between SNMPagents and management systems. The SNMPmanagement system can collect statistics fromand modify configuration parameters on agents.
SOCKS. A technique used on a TCP/IP networkto provide secure access through a firewall formost TCP/IP-based applications.
Solaris. Sun’s version of the UNIX operatingsystem.
Spam. Unsolicited e-mail, usually sent to hugenumbers of people. Also a brand of canned meat,trademark of Hormel.
SPX. A network protocol created by Novell foruse with NetWare products.
SrvIFS. A simple file system created by IBM.Used primarily to distribute software to PCsbooted from OS/2 Warp diskettes. See also IFS.
Stack. The collection of drivers, APIs, and otherfiles used to implement a network protocol on acomputer, as in a TCP/IP protocol stack.
Subnet. The primary reason to divide a networkinto subnets is network performance andavailable bandwidth. Without separate networks,each transmission would be broadcast across theentire internetwork, waiting for the destination
system to respond. Routers divide, as well asprovide communications between the networks.
Switch. A network device used to alter or changenetwork connections, often to help boostperformance.
TCP. The Transmission Control Protocol definesconnection-oriented, or reliable, transport. Seealso UDP.
TCPBEUI. IBM NetBIOS over TCP/IPimplementation.
TCP/IP. Transmission Control Protocol/InternetProtocol. The Internet is based on TCP/IPnetwork protocols.
TFTP. The Trivial File Transfer Protocol is part ofthe TCP/IP protocol suite that is used to transferfiles between any two computers, provided theysupport TFTP. Unlike FTP, TFTP does not use anuser ID to ensure proper access rights. However,a password can be set optionally in many TCP/IPimplementations.
Token-Ring. People often use the term"Token-Ring" to designate IEEE 802.5. In themore general sense of the term, a token ring is atype of LAN that has stations wired in a ring,where each station constantly passes a specialmessage (a token) on to the next. Whicheversystem has the token can send a message.
UBE. Unsolicited Bulk e-mail. (See Spam)
UCE. Unsolicited Commercial e-mail. (SeeSpam)
UDP. The User Datagram Protocol is a transportprotocol in the Internet suite of protocols. Itprovides a connectionless, or unreliable,transport.
UNC. Universal Naming Convention. A methodused to name network resources onNetBIOS-based file and print sharing systems,such as Warp Server.
UNIX. Operating system originally developed byAT&T’s Bell Labs. Historically one of the mostpopular operating systems used to developInternet and TCP/IP technologies.
504 Beyond DHCP - Work Your TCP/IP Internetwork with Dynamic IP

URL. The Universal Resource Locator is thepathname of a document on the Internet. URLscan be absolute or relative. An absolute URLconsists of a prefix denoting a method (http forWeb sites, gopher for gophers, ftp for FTP sites,and so forth). The prefix is followed by a colonand two slashes (://), and an address. Theaddress consists of a domain name followed by aslash and a pathname (or username@domainname for mailto). The last part is optional.
505

506 Beyond DHCP - Work Your TCP/IP Internetwork with Dynamic IP

Index
AA record
record updates 23AIX 40, 102, 277, 371, 380, 406
Configuring DHCP server 50DDNS 218DHCP and BOOTP 62DHCP client options missing 89dhcpsconf 50DNS 211DNS client 209DNS server 208Firewall 362HACMP 380Name serving 208Start DHCP server (smit dhcpsd) 63X-windows 51
AIX commandsnsupdate 222, 224
generate zone key 223AIX DDNS
controlled mode 222KEY resource record 223
AIX filesdhcpaction 224named.conf 222named.forward 223named.rev 224
alias names 13Apple Macintosh 40, 77ARP 387authoritative 17authoritative name server 20, 21
BBIND 150, 178BIND 8.1.1 157, 159B-Node 232, 233
enhancing DOS, Windows 3.1, and Windows forWorkgroups 233enhancing OS/2 Warp 239enhancing Windows 95/NT clients 236
BOOTP 10, 79, 85, 86, 90, 91, 110, 117, 285, 361,367, 457BOOTP relay agent 285
© Copyright IBM Corp. 1998, 2000
BOUND 114broadcast 232, 241, 291, 408
Ccaching-only name server 20CIFS 252Class A 3, 6, 8Class B 4, 6, 8, 9Class C 4, 7, 8, 9, 44Class D 4Class Determination 5Class E 4CNAME
resource record 24Commands
APPLET.EXE 424APPLETVIEWER.EXE 424ARP 387control-panel 90DADMGUI.CMD 412DADMIN 41, 85, 193, 379DDNSAPC.CMD 412DDNSAPS.CMD 420DDNSCFG.EXE 166, 172, 199, 200, 204, 207,208DDNSZONE 178DETACH 108DHCPMON 68, 70DHCPRD.EXE 289dhcpsconf 52DHCPSCPC.CMD 412DHCPSCPS.CMD 420DHCPSD.EXE 378grep 62HOST 177, 388, 397IBMDYNIP.EXE 143, 145, 147ifconfig 92, 100, 405IPCONFIG 74, 76, 145IPFORMAT 386IPGATE 279, 362IPREPORT 387IPTRACE 386kill 63LPR 110MAPNAME.EXE 243NBTSTAT 251NBUTIL 233, 235
507

NETSTAT 195, 387, 395, 396, 405NSLOOKUP 177, 389, 397, 399PING 99, 233, 384, 393refresh 63REGEDIT2 344RFCADDR.EXE 242, 331route 101, 280, 283, 406SEDISK 430SETBOOT 377shutdown 92smit 63startsrc 63startx 90stopsrc 63TCPCFG 69, 201TCPCFG2 67, 80, 161, 198, 204TEDIT 430THINLAPS 430touch 101TRACERTE 385, 395, 405WINIPCFG 72, 147, 148
computername 231, 358
DDADMIN 41Daemons
DHCPRD 290FTPD 34, 372INETD 86, 373LPD 108LPRPORTD 108portmapper 86REXECD 372ROUTED 281syslog 80TELNETD 34TFTP 86
datagram 2datagram distributor 256, 262datagrams
NetBIOS 241DB2 445
UDB Version 6.1 445DDNS 104, 150, 319, 348
AIX 218AIX pre-requisites 208Dynamic Presecured Domain (in OS/2 Warp 4)203
Dynamic Presecured Domain (in Windows 95)147Dynamic Presecured Mode 154, 168, 350Dynamic Secured Mode 154, 162, 350ns-updates 166, 172ProxyArec 155, 159, 176, 356PTR records 168, 175Windows client 131WINS 131
DDNS ParameterDDNSAdministratorClient 183deferUpdCnt 183incrTime 183keyToSec 183notify 180notify.add 180notify.delayTime 180notify.remove 180notify.retryNumber 180notify.retryTime 180reverseMapping 183safeWrite 181sepDynStatic 182sigDEL 181sigDEL.time 181timeSync 181timeSync.toSecondaries 181ttlSet 182ttlSet.value 182
delegation 16DHCP 29, 42, 90, 91, 285, 319
Basics 113Client states 113Lease
Eviction 116Rebinding 115Renewing 115
Messages 118DHCPDISCOVER 118DHCPOFFER 120DHCPREQUEST 122
see also dynamic IPStates
BOUND 114INIT 114INIT-REBOOT 114REBINDING 114RENEWING 114SELECTING 114
508 Beyond DHCP - Work Your TCP/IP Internetwork with Dynamic IP

DHCP Boot Diskettes 429DHCP Clients 64
AIX 86options missing 89
Apple Macintosh 77DOS 92Hewlett-Packard Laser Jet 4000 105IBM Network Station 79IBM WorkSpace On-Demand 102Linux 90OS/2 Warp 4 64Sun 99Windows 2000 75Windows 3.1 92Windows 95 72Windows 98 72Windows for Workgroups 92Windows NT Workstation 73
DHCP Monitor 68, 201, 203DHCP Options 136
Option 001 49Option 003 45Option 006 45, 136, 166, 174Option 009 328Option 012 358Option 015 37, 45, 136, 166, 174Option 044 140, 262, 327Option 045 262, 327Option 046 140, 262, 327Option 069 190Option 070 191Option 071 328Option 077 360Option 081 358Option 114 334, 335Option 150 325, 329Option 151 325, 329Option 192 24, 352Option 200 328Option 200-208 324Option 201 328Option 202 328Option 205 324, 341, 342Options 001-208 457
DHCP relay agent 285, 360DHCP Server 64DHCP Servers
AIX 50OS/2 Warp Server for e-business 30
Windows NT 43DHCPCD.INI 90DHCPDISCOVER 118, 285DHCPOFFER 120DHCPREQUEST 122dhcpsd
subsystem 222digital signature 152, 153DLS 92, 97, 233DNS 13, 18, 19, 42
AIX 211AIX client 208, 209AIX server 208AIX server configuration 211name services 12name system 12primary 160servers 12static 13translating 12Windows client 131Windows NT 131Windows NT limitations 131
DNS name space 14, 21domain 14, 16, 20, 231
child 21parent 21primary 160, 163, 169reverse 134
domain namefully qualified name 13
domain name system 16DOMAINSCOPE 243Domino Go 411Domino Go Webserver 411, 420, 426DOS 40, 92DOS LAN Services 92dynamic addres
assign 11dynamic IP 29
BOOTP Clients 84DHCP 29DHCP Clients 64, 67, 72, 73, 75DHCP Manager 45DHCP Options 44, 47, 82
see also DHCP OptionsDHCP Server 35, 84, 102DHCP server 30, 44DHCPDISCOVER 285
509

Dynamic IP Client95/98/NT pre-requisites 143
Eencryption
keypublic 223
Ethernet 91, 100
FFeature Installer 31, 64, 66Files
AUTOEXEC.BAT 235, 295, 443cache.dns 140CONFIG.SYS 34, 262, 430DDNS.DAT 153, 205dhcp.hme0 101DHCPCD.CFG 207, 263, 326, 328, 334, 359DHCPRD.CFG 289DHCPS.AR 378DHCPS.CR 378DHCPSD.CFG 36, 356dhcpsd.cnf 50, 60, 61DHCPSD.LOG 39DNSEXT.CFG 178DNSF0000.DOM 184DNSF0000.STA 184hme0.dhc 101hostname.hme0 101HOSTS 42, 162, 166, 169, 254HTTPD.CNF 420IBMLAN.INI 241, 332IBMTOKCS.NIF 430LANTRAN.LOG 438LMHOSTS 236, 254masterfile.cnf 59MPTSTART.CMD 31NAMED.BOOT 184NAMED.BT 184NBUTIL.LST 235NETSCAPE.INI 341, 344, 345NETWORK.INI 97, 442NSUPDATE.LOG 177NTS-SRVR.CFG 295, 298NTS-SRVR.DHC 298, 299NTS-SRVR.DNS 298, 299NTS-SRVR.NBN 298, 299NTS-SRVR.RUR 299
PROTOCOL.INI 243, 257, 262, 434RESOLV2 398RFCBCST.LST 241, 331, 334RFCNAMES.LST 239, 331RHOSTS 42SENDMAIL.CF 186, 187, 188SENDMAIL.UML 189SETUP.CMD 31, 34, 279, 280, 362SOCKS.ENV 334, 340STARTUP.CMD 331TCPSTART.CMD 31, 282TFTPAUTH 364TFTPPAUTH 83WCLLOCAL.INI 321
firewall 22, 25, 341, 361Firewalls
protection 25proxy and SOCKS 25VPN 25
FixPak 30, 344forward mapping 132forwarder 22FQDN 355, 359, 420fully qualified domain name 12
Ggateway 9groupname 231
HHACMP 380Hewlett-Packard 41, 105HINFO
resource record 24see also name server
H-Node 232, 261HOST 388, 397host 8host name 12hostname 34, 53, 134
IIBM Network Station 40, 79, 85IBM OS/2 NetBIOS OVER TCP/IP 240IBMWARP_V3.1 326, 327IEEE 802.2 data link protocol 227INIT 114
510 Beyond DHCP - Work Your TCP/IP Internetwork with Dynamic IP

INIT-REBOOT 114InJoy
IP masquerading 292internal root 21Internet 22, 150, 284
root server 15intranet 22, 25, 361IP address 10, 15, 42, 150, 166, 169, 174, 177,242, 360IP datagram
MTU 27IP masquerading 291IP packet 293IPTRACE 386, 387
JJava 31, 35, 64, 66, 340, 412JDK 424, 425JetDirect 105JIT 412
KKEY
AIX DDNS resource records 223resource record 24see also name server
Keyfile 24
LLAN 27LAN interface 0 33, 67, 69LAN Requester 332lease 41, 46, 68, 360, 381lease time
choosing the right one 381examples 382multiple leases 383Rule-of-Thumb 382
Linux 40, 90LMHOSTS 237localhost 34, 420lookup 241loopback 5, 34Lotus Domino 426
MMAC 82, 353, 356, 360
mailrouting 15
mediaAIX 208
M-Node 232MPTS 31, 66, 240, 241, 260MSBROWSE 231MTU 26, 404, 405MX
resource record 23see also name server
Nname server 16, 29
authoritative 20caching-only 20child 20dynamic 22firewall 22forwarder 22master 19non-authoritative 20parent 20parent and child 20primary 19record types 23
A 24, 150, 151, 165, 171, 246, 348, 356,400CNAME 24, 185, 245, 247, 355, 400HINFO 24, 245, 400KEY 24, 153, 154, 185, 349, 400MB 400MINFO 400MX 23, 185, 186, 193, 400NS 23, 141, 185, 400PTR 24, 135, 150, 151, 158, 160, 165, 167,171, 174, 353, 356, 400, 447RP 24RR 24, 348, 356SIG 349, 401SOA 23, 141, 185, 401TXT 24, 184, 401UINFO 401WKS 401
root 21secondary 19zone transfer 20
Name serving
511

AIX 208name space 16, 136named
subsystem 222NAT
IP masquerading 293NBNS 27, 51
Configuring DOS, Windows 3.1, and Windowsfor Workgroups 257Configuring OS/2 Warp 260Configuring Windows 95 258Configuring Windows NT 259see NetBIOS name server 232
NC 86Neighborhood Browser Enabler 271, 272NET commands
NET START 235NET START BROWSER 274NET START DHCPSERVER 45NET START DNS 133NET START WINS 137NET STOP BROWSER 274NET STOP SERVER 273
NET.QUESTION 445NETAnywhere 319NetBIOS name resolution 246NetBIOS name server 227, 323, 327Netfinity Client 448NetFinity Manager 390NetFinity Server 447NetFinity Service Manager 448Netscape 31, 64, 66, 196, 334, 418NetScape Navigator 418Netscape Navigator 451NETSTAT 387, 395, 396Network Address Translation 292NFS and Windows NT 85Node Status request 246, 249Non-RFC-encoded names 246, 252NS
resource record 23see also name server
NSLOOKUP 350, 379, 389, 397, 399NSUPDATE 144, 146, 148, 151, 348ns-updates 165, 172NT
see also Windows NT 43NVRAM 86
OOS/2 Warp 4 40, 49, 64, 67, 198, 201, 203, 323,335, 429
DHCP relay agent 289NBNS Parameter
NBDD 261NBNS 261
router enablement 279OS/2 Warp Server 102, 246, 256, 277, 319
Configuring DDNS Dynamic Presecured Mode169Configuring DDNS Dynamic Secured Mode162Configuring DHCP 35DDNS Security 153DDNS updates requests 154DHCP Clients 64DHCP server 30Dynamic DNS (DDNS) 150Dynamic DNS Clients 198Dynamic Presecured Mode 159Dynamic Secured Mode 159Neighborhood Browser Enabler 256NSUPDATE 151ns-updates 166, 172ProxyArec 155, 176Remote IPL 207Routing 33TCP/IP Administrator Password 32
OS/2 Warp Server for e-businessInstalling DDNS server 161Installing DHCP server 30Neighborhood Browser Enabler 274
OS2POPS 186, 196
Pparent and child name server 20password for OS/2 TCP/IP administrator 32Peer Services 93PING 384, 405P-Node 232, 261PPP clients 321PPP dialer 319PPP Dial-Up 317PPP Server 318
OS/2 Warp Server 318primary name server 19private network 22
512 Beyond DHCP - Work Your TCP/IP Internetwork with Dynamic IP

protect mode redirector 96Protocols
ARP 2, 27, 387, 388, 393BOOTP 79, 84FTP 26, 362HTTP 26, 362ICMP 2, 26, 384, 388IEEE 802.2 27IGMP 2, 27, 388IMAP 26IP 2, 26IPv6 26IPX 27NBT 227NetBEUI 27, 93, 227, 229, 408NetBIOS 27, 93, 227, 229NetBIOS over TCP/IP 227NNTP 26non-routable 227OSPF 277POP 26POP3 186PPP 27, 317RARP 2, 27, 105RIP 277, 281, 284routable 227RSVP 408SLIP 27SMB 247, 252SMTP 26, 186, 188, 195SNMP 26TCP 2TCP/IP 227TCPBEUI 93, 227, 229, 239, 242, 323, 408
sockets-send commands 228translation 228
TFTP 80, 81, 361UDP 2, 227, 388UDP/IP 227
proxyIP masquerading 293
ProxyArec 23, 155, 356, 358dial-in 23Option 81 considerations 358Protected 358Standard 358
PTRrecord update 22resource record 24
see also name serverpublic key 153public-private key 156
RREBINDING 114RedHat Linux 90Redirector 96Relay Agents 118Remote administration 411Remote IPL 102RENEWING 114resource record
A 24reverse mapping 132, 134, 171REXX 104REXX Commands
DHCPIBM.CMD 329FAILSAFE.CMD 375GETNBNS.CMD 263, 266, 271MYOFFICE.CMD 329MYWEBMSG.CMD 335, 336NSSOCKS.CMD 341, 342RDADMGUI.CMD 415RDDNSAPC.CMD 413RDHCPSCP.CMD 416SEEMYMSG.CMD 339SETNBNS.CMD 263, 266, 270
RFC 27RFC-encoded name 246, 249root name server 21router 9, 29, 277routing table 10, 278RP
resource record 24see also name server
RRresource record 24see also name server
RSA 150, 153, 154, 3531024-bit key 349128-bit key 34956-bit key 349public/private key pair 348
RSVP 408
SScope 46, 49
513

secondary name server 19Security 347
TFTP 364SELECTING 114Service Pack 5 43Shadow IPserver 255, 356, 380
Installing and Configuring 295OUTAHERE parameter 297
SNA 408, 409Sniffer 117, 119, 121, 123, 125, 127, 129SOA
resource record 23see also name server
sockets 26SOCKS 25, 34, 324, 334, 340, 341, 362socks
IP masquerading 293Software Choice 30, 64, 272, 318, 418subdomain 14, 16, 17, 20subnet 6, 37, 174, 242, 277, 291subnet mask 7, 29, 49subnetting 9subsystem
dhcpsd 222named 222
suffix0x00 2440x03 2440x20 244
Sun JDK 418Sun Microsystems 99Sun Microsystems Solaris 40Supernetting 9
TTCP/IP 31
setting Admin password in OS/2 32TCP/IP Version 4.21 64Telnet 105, 106TFTP and Windows NT 85Tivoli 446
TMA 446TME 10 446TMR Server 447
Tivoli Managed Agent 446TMA 446token-ring 91, 100TRACERTE 385, 395
Troubleshooting 390T-Sig 157, 159TTL 253, 349TXT
resource record 24see also name server
Uunique domain name 15UNIX 398untrusted network 22URL 334
translation 12
Vvirtual redirector 96VPN 25, 363
WWAN 381, 408Warp Server
See OS/2 Warp ServerWeb Server 418Windows 2000 40, 75Windows 3.1 40, 92, 233Windows 95 40, 49, 72, 143, 150, 196, 236, 358
Modifying the registry 149Windows 95/98
DNS client configuration 142Windows 98 40, 72, 236Windows for Workgroups 40, 92, 233Windows NT 40, 49, 73, 75, 85, 102, 131, 246,358
Configuring DHCP 45DHCP relay agent 286DHCP server 131DNS (static) 131DNS client configuration 142Firewall 362Installing DHCP 43Installing DNS 132Node Status request 247router enablement 282WINS 131, 136
WINS 131, 227, 231, 248, 253, 258configuration 137DNS integration 136
514 Beyond DHCP - Work Your TCP/IP Internetwork with Dynamic IP

installation 137Windows Internet Naming Service 131
workload 19WorkSpace On-Demand 40, 102, 206, 358, 362
Zzone 19, 132, 350
primary 134zone key 165zone of authority 16zone transfer 19, 20
515

516 Beyond DHCP - Work Your TCP/IP Internetwork with Dynamic IP
© Copyright IBM Corp. 1998, 2000 517
IBM Redbooks evaluation
Beyond DHCP - Work Your TCP/IP Internetwork with Dynamic IPSG24-5280-01
Your feedback is very important to help us maintain the quality of IBM Redbooks. Please complete thisquestionnaire and return it using one of the following methods:
• Use the online evaluation form found at http://www.redbooks.ibm.com/• Fax this form to: USA International Access Code + 1 914 432 8264• Send your comments in an Internet note to [email protected]
Which of the following best describes you?_ Customer _ Business Partner _ Solution Developer _ IBM employee_ None of the above
Please rate your overall satisfaction with this book using the scale:(1 = very good, 2 = good, 3 = average, 4 = poor, 5 = very poor)
Overall Satisfaction __________
Please answer the following questions:
Was this redbook published in time for your needs? Yes___ No___
If no, please explain:
What other Redbooks would you like to see published?
Comments/Suggestions: (THANK YOU FOR YOUR FEEDBACK!)

Printed in the U.S.A.
SG24-5280-01
Beyond
DH
CP
-W
orkY
our
TC
P/IP
Internetwork
with
Dynam
icIP
SG
24-5280-01
®