Genie Manual
434
November 2019
-
Upload
khangminh22 -
Category
Documents
-
view
2 -
download
0
Transcript of Genie Manual
November 2019

Table of ContentsGenie Manual
© 2005-2019 Genie Solutions Pty Ltd I
Table of Contents
Part I Introduction 2
................................................................................................................................... 31 Keyboard Shortcuts
Part II Backups 8
................................................................................................................................... 91 Historical Genie Backups
................................................................................................................................... 102 Genie Automated Backup
................................................................................................................................... 133 Restoring A Backup
......................................................................................................................................................... 13Server - Data Corruption
......................................................................................................................................................... 17Solo - Reference
Part III Menus Overview 24
................................................................................................................................... 241 The File Menu
................................................................................................................................... 272 The Open Menu
................................................................................................................................... 343 The Records Menu
................................................................................................................................... 364 The Billing Menu
................................................................................................................................... 395 The Patients Menu
................................................................................................................................... 446 The Appts Menu
................................................................................................................................... 487 The Special Menu
Part IV Setting Up Genie 54
................................................................................................................................... 541 Practice Preferences
......................................................................................................................................................... 54The Practice Details Tab
......................................................................................................................................................... 56The Miscellaneous Tab
......................................................................................................................................................... 58The Practice Letterhead Tab
......................................................................................................................................................... 61The Images and Attachments Tab
......................................................................................................................................................... 62The Clinical Tab
......................................................................................................................................................... 63Carrier Identifiers
................................................................................................................................... 632 User Preferences
......................................................................................................................................................... 64The Details Tab
......................................................................................................................................................... 65The General Tab
......................................................................................................................................................... 67The Clinical Tab
......................................................................................................................................................... 69The Correspondence Tab
......................................................................................................................................................... 71The Practice Sites Tab
......................................................................................................................................................... 72The Security Tab
......................................................................................................................................................... 73The ECLIPSE Tab
................................................................................................................................... 733 Bank Accounts
................................................................................................................................... 744 Printing Preferences
......................................................................................................................................................... 76Troubleshooting
Part V The Reception Module 78
................................................................................................................................... 781 Appointments
......................................................................................................................................................... 78Appointment Preferences
.................................................................................................................................................. 78The Main Tab
.................................................................................................................................................. 81The Appearance Tab
.................................................................................................................................................. 84The Column Order and Rooms Tab
......................................................................................................................................................... 85Using The Appointment Book

Table of ContentsGenie Manual
© 2005-2019 Genie Solutions Pty LtdII
.................................................................................................................................................. 88Appointment Views
.................................................................................................................................................. 90Appointment Scheduler
.................................................................................................................................................. 93Adding An Appointment
.................................................................................................................................................. 95Editing An Appointment
.................................................................................................................................................. 95Appointment Types
.................................................................................................................................................. 99Appointment Status
.................................................................................................................................................. 100Edit Patient
.................................................................................................................................................. 103Moving/Copying Appointments
.................................................................................................................................................. 104Deleting/Restoring Appointments
.................................................................................................................................................. 106Cancellation List
.................................................................................................................................................. 107Finding an Appointment
.................................................................................................................................................. 108Double booking an Appointment time
.................................................................................................................................................. 109Repeating Appointments
.................................................................................................................................................. 111Printing Appointment Book
.................................................................................................................................................. 113Linking a Procedure to an Appointment
......................................................................................................................................................... 116Appointment Reminders
.................................................................................................................................................. 116Genie SMS Reminders
.................................................................................................................................................. 126Email Reminders
................................................................................................................................... 1262 Theatre Lists
......................................................................................................................................................... 127Set Up
......................................................................................................................................................... 129Printing a Theatre List
......................................................................................................................................................... 130Preop Notifications Check
................................................................................................................................... 1313 Invoicing
......................................................................................................................................................... 131Account Holders
......................................................................................................................................................... 132Account Holders for Organisations
......................................................................................................................................................... 134Medicare and DVA Account Holder Records
......................................................................................................................................................... 134Creating an Invoice
......................................................................................................................................................... 136Invoicing an Organisation
......................................................................................................................................................... 137Invoicing Workcover
......................................................................................................................................................... 142Adding Items to an Invoice
......................................................................................................................................................... 144Other Item Information
......................................................................................................................................................... 145Searching the Fee Schedule
......................................................................................................................................................... 146Selecting the Practice
......................................................................................................................................................... 146Selecting the Site of Service
......................................................................................................................................................... 147Multiple Procedure & Diagnostic Rules
......................................................................................................................................................... 148Known Gap Amounts
......................................................................................................................................................... 149Assistant's Fees
......................................................................................................................................................... 151Invoice Memos
......................................................................................................................................................... 153Setting/Increasing Private Fees
......................................................................................................................................................... 155Adding and Editing Billing Items
......................................................................................................................................................... 156Updating Fee Schedules
......................................................................................................................................................... 156Checking Appointments Have Been Billed
......................................................................................................................................................... 157Invoicing from the Patient List
......................................................................................................................................................... 157Deferring Invoices
................................................................................................................................... 1574 Receipting
......................................................................................................................................................... 157Receipting Directly from an Invoice
......................................................................................................................................................... 159Receipting an Existing Invoice for a Patient
......................................................................................................................................................... 161Paying the Gap
......................................................................................................................................................... 161Receipting an Existing Invoice for an Organisation
................................................................................................................................... 1625 Discounts
......................................................................................................................................................... 163Applying when Invoicing
......................................................................................................................................................... 165Applying when Receipting
......................................................................................................................................................... 165Reversing a Discount
......................................................................................................................................................... 167Modifying a Discount
................................................................................................................................... 1686 Deposits

Table of ContentsGenie Manual
© 2005-2019 Genie Solutions Pty Ltd III
......................................................................................................................................................... 168Accepting A Deposit
......................................................................................................................................................... 168Deleting A Deposit
......................................................................................................................................................... 169Using A Deposit
................................................................................................................................... 1717 Quotes
......................................................................................................................................................... 172Preparing Quotes
......................................................................................................................................................... 175Printing a Quote
......................................................................................................................................................... 175Creating Quote Templates
......................................................................................................................................................... 178Invoicing Directly From A Quote
................................................................................................................................... 1798 Private Health Fund Fees
................................................................................................................................... 1829 Account History
......................................................................................................................................................... 183Reprinting an Invoice or Receipt
......................................................................................................................................................... 184Printing a Statement
......................................................................................................................................................... 184Print Report
......................................................................................................................................................... 184Finding A Batch
......................................................................................................................................................... 184Itemised Receipt
......................................................................................................................................................... 185Modifying an Invoice
......................................................................................................................................................... 186Modifying an Item
......................................................................................................................................................... 186Changing the Account Holder or Patient
......................................................................................................................................................... 187Deleting an Invoice
......................................................................................................................................................... 187Applying a Credit to an Invoice
......................................................................................................................................................... 188Deleting a Payment
......................................................................................................................................................... 188Using a Dummy Bank Account (Refunding a Payment)
................................................................................................................................... 18910 Banking
................................................................................................................................... 19011 Manual Batching
......................................................................................................................................................... 191Creating a New Batch
......................................................................................................................................................... 193Receipting a Batch
................................................................................................................................... 19512 Online Claiming Installation
......................................................................................................................................................... 195Install/Upgrade Genie
......................................................................................................................................................... 196Install HIC Online - Windows
......................................................................................................................................................... 197Install HIC Online - Macintosh
......................................................................................................................................................... 199Configure Genie
......................................................................................................................................................... 200Create the PSI Store
................................................................................................................................... 20113 Using Medicare Online
......................................................................................................................................................... 202Bulk Bill and DVA Claims
.................................................................................................................................................. 202Creating a New Transmission
.................................................................................................................................................. 204Retrieving Reports for the Claim
.................................................................................................................................................. 205Reviewing Exceptions for a claim
.................................................................................................................................................. 207Receipting Claim Payments
......................................................................................................................................................... 207Patient Claims
.................................................................................................................................................. 208Invoicing
.................................................................................................................................................. 208No Payment/Gap Paid By Patient
.................................................................................................................................................. 209Patient Paid Full Amount
.................................................................................................................................................. 210Transmitting Batched Claims
.................................................................................................................................................. 211"Post-Invoice" Claiming and Deleting
......................................................................................................................................................... 212Online Patient Verification
.................................................................................................................................................. 213Using Online Verification
......................................................................................................................................................... 215Updating Certificates
................................................................................................................................... 21814 Troubleshooting Online Claiming
................................................................................................................................... 21815 Referral/Reply Letters (Patient Correspondence)
......................................................................................................................................................... 222Setting up the Default Template
......................................................................................................................................................... 222Setting up the 4D Write Area
......................................................................................................................................................... 223Adding New Templates
......................................................................................................................................................... 224Fields & Expressions Tabs
......................................................................................................................................................... 227Editing Templates

Table of ContentsGenie Manual
© 2005-2019 Genie Solutions Pty LtdIV
......................................................................................................................................................... 228Reviewing Correspondence
......................................................................................................................................................... 229Importing Remotely Typed Letters
......................................................................................................................................................... 231Macros
......................................................................................................................................................... 232Transcription Services
.................................................................................................................................................. 232Exporting Demographics
.................................................................................................................................................. 233Importing Returned Letters
................................................................................................................................... 23416 Electronic Correspondence (Sending via 3rd Party)
......................................................................................................................................................... 235Writing the Letter
......................................................................................................................................................... 235Checking Imported Letters
......................................................................................................................................................... 2403rd Party Providers
................................................................................................................................... 24117 Letter Templates
......................................................................................................................................................... 242Merged Letters
.................................................................................................................................................. 242Setting up the 4D Write Area
.................................................................................................................................................. 243Creating the Letter
.................................................................................................................................................. 244Saving/Deleting the Template
.................................................................................................................................................. 246Printing Merged Letters
................................................................................................................................... 24618 Recalls
......................................................................................................................................................... 246Creating a Generic Recall Template
......................................................................................................................................................... 247Recalls Due
......................................................................................................................................................... 249Flagging of Patient Record
......................................................................................................................................................... 250Printing the Recall List
......................................................................................................................................................... 251Pathology/Radiology Recalls (Investigation Action List)
................................................................................................................................... 25219 Scanning
......................................................................................................................................................... 253ImagePro
.................................................................................................................................................. 253Configuring ImagePro
.................................................................................................................................................. 256Using ImagePro
................................................................................................................................... 25920 Tasks
................................................................................................................................... 26121 Labels
Part VI Clinical 264
................................................................................................................................... 2651 The Main Page
......................................................................................................................................................... 267Using the Contact List
......................................................................................................................................................... 268Using the Display Area
................................................................................................................................... 2702 The Other Page
......................................................................................................................................................... 271Vaccinations
.................................................................................................................................................. 272Editing Vaccines and Vaccine Sets
.................................................................................................................................................. 273Transmitting to AIR
................................................................................................................................... 2733 Consultation Notes
................................................................................................................................... 2794 Drawing Module
................................................................................................................................... 2825 The Tools Menu
................................................................................................................................... 2896 Specifying a Fee to Charge
................................................................................................................................... 2907 Prescribing
......................................................................................................................................................... 290Prescription Display
......................................................................................................................................................... 292Button Description
......................................................................................................................................................... 294Adding a New Prescription
......................................................................................................................................................... 298Searching Prescriptions
......................................................................................................................................................... 300Printing Prescriptions to Multiple Patients
......................................................................................................................................................... 301Medication Sets
......................................................................................................................................................... 303NPS Documents
.................................................................................................................................................. 303NPS RADAR Document
.................................................................................................................................................. 307NPS PILs Documents
.................................................................................................................................................. 307Updating NPS Documents
.................................................................................................................................................. 308Submission of Usage Statistics

Table of ContentsGenie Manual
© 2005-2019 Genie Solutions Pty Ltd V
................................................................................................................................... 3098 Recalls
................................................................................................................................... 3109 Checklists
......................................................................................................................................................... 311Creating a Checklist
......................................................................................................................................................... 314Using Checklists
......................................................................................................................................................... 316Editing Checklists
......................................................................................................................................................... 317Uploading/Downloading Checklists
................................................................................................................................... 31810 Pathology and Radiology
......................................................................................................................................................... 319Ordering Pathology
......................................................................................................................................................... 322Ordering Radiology
......................................................................................................................................................... 325Importing Downloaded Results
......................................................................................................................................................... 326The Downloaded Results List
......................................................................................................................................................... 327Matching and Linking Results to Patients
................................................................................................................................... 33111 Reviewing Correspondence
................................................................................................................................... 33212 Procedures
......................................................................................................................................................... 333Adding a Procedure
......................................................................................................................................................... 335Pending Procedures
......................................................................................................................................................... 337The Procedure Window
......................................................................................................................................................... 339Procedure Templates
......................................................................................................................................................... 340Printing an Audit Report
......................................................................................................................................................... 341Conversion Ratios
................................................................................................................................... 34313 Images
......................................................................................................................................................... 343Attaching Images
......................................................................................................................................................... 345Viewing Images
................................................................................................................................... 34814 Offsite Logging
......................................................................................................................................................... 349Copying the Data File from the Server
......................................................................................................................................................... 350Running an Offsite Log
......................................................................................................................................................... 352Importing Logs
......................................................................................................................................................... 352Features List
......................................................................................................................................................... 354Database Replication
................................................................................................................................... 35915 Synchronising With Outlook/iCal
Part VII Practice Management 364
................................................................................................................................... 3641 Maintenance and Reports
......................................................................................................................................................... 364The General Page
......................................................................................................................................................... 367The Daily Page
......................................................................................................................................................... 369The Monthly Page
......................................................................................................................................................... 373The Practice Analysis Page
......................................................................................................................................................... 378The Administrator Page
......................................................................................................................................................... 380Other Reports Page
......................................................................................................................................................... 382The Disease Coding Page
................................................................................................................................... 3832 Security
......................................................................................................................................................... 383Add/Delete Users
......................................................................................................................................................... 384User Access
......................................................................................................................................................... 385Edit Groups
......................................................................................................................................................... 389Passwords
................................................................................................................................... 3913 Updates
......................................................................................................................................................... 392Automated 'Special Menu' Update
......................................................................................................................................................... 394Manual Web Update
......................................................................................................................................................... 395Updating for Offsite Logging
................................................................................................................................... 3964 Archiving
................................................................................................................................... 3985 Queries & Searches
......................................................................................................................................................... 398The Query Editor
......................................................................................................................................................... 400Simple Queries

Table of ContentsGenie Manual
© 2005-2019 Genie Solutions Pty LtdVI
......................................................................................................................................................... 402Wild Card Searches
......................................................................................................................................................... 402Searching Across Related Tables
......................................................................................................................................................... 403Saving a Query for Reuse
......................................................................................................................................................... 404ICPC/ICD10, Consult & Prescription Searches
......................................................................................................................................................... 407Searching Attachments/Images
................................................................................................................................... 4076 Quick Reports
......................................................................................................................................................... 408Report Builder
......................................................................................................................................................... 416Saving/Loading Reports
................................................................................................................................... 4177 Email
......................................................................................................................................................... 417Setup
Index 421

Part
IIntroduction

Introduction: Genie Manual
© 2005-2019 Genie Solutions Pty Ltd2
1 Introduction
Important: This manual is now a legacy document, and will no longer be updated. For the most up-to-date information about Genie's features and how to use them, please see the Genie Knowledgebase onour website. This manual will remain as a reference for older versions of Genie; if there is anyinformation you are unable to find, please let our support team know.
Conventions
We have used a number of font conventions to make it easier to determine whether we are talking about abutton, a menu item, a field etc. These are:
Menu Items look like this Open > AppointmentsFile paths look like this /Applications/Genie/Genie.app Buttons look like this Create DefaultFields look like this Patient SurnameNotes look like this This is important. Please read!
Where keyboard shortcuts have been documented, we have used the Windows terminology. Macintosh userswill need to translate the documented key to the Macintosh equivalent, as described below:
Windows Macintosh
Alt Option
Ctrl Command (The Apple Key)
Dates and Times
When used on a network, Genie uses the date and time set on the server computer. If the date and timeshowing in the Appointment Book is incorrect, the only possible cause is that the date and time is set incorrectlyon the server. Make sure that you have set the AM and PM time correctly when setting the time on the server.

Introduction: Keyboard ShortcutsGenie Manual
© 2005-2019 Genie Solutions Pty Ltd 3
1.1 Keyboard Shortcuts
Keyboard shortcuts are key combinations on your keyboard that help you maximise your efficiency in Genie.Throughout this manual, you will see keyboard combinations highlighted in blue, e.g. 'Press Ctrl+N to create anew patient record.'
Date Fields
The following keyboard shortcuts can be used for quickly jumping between dates when presented with a datefield. To use these shortcuts, simply click into the date field and press the relevant button on the keyboard.
Change date to today T
Go forward a day +
Go back a day -
Change date to beginning of week W
Change date to end of week K
Change date to beginning of month M
Change date to end of month H
Change date to start of year Y
Change date to end of year R
Display a calendar C
General
OK or Save Button Enter or Return
Cancel Button Escape
Removing an Item from a Drop-down Menu Alt - select
Wildcard Character for searches (to represent one ofmany characters)
@
Select/deselect a checkbox Spacebar
Quit the Program Ctrl + Q

Introduction: Keyboard ShortcutsGenie Manual
© 2005-2019 Genie Solutions Pty Ltd4
Appointments
Open Appointments Ctrl + J
Find Appointment Ctrl + F
Find Appointments for Patient Ctrl + G
New Patient Ctrl + N
Go To Today Ctrl + T
Open Patient Demographics Window Ctrl + E
Open Clinical Window Ctrl + K
Delete Appointments Ctrl + D
Toggle View Ctrl + Y
Print Ctrl + P
Put in Waiting Room Ctrl + M
Invoice Ctrl + I
Receipt Ctrl + R
View Account History Ctrl + H
Print Blank DB4 Ctrl + L
Select a Letter Template Ctrl + Shift + T
Move to Different Dr's View Alt + Right Arrow/Left Arrow
Open a Doctor's Preferences Alt - Click on Name Tab
Move an Appointment Alt - Click and Drag
Patient List
Open Patient List Ctrl + O
Find Patient Ctrl + F
New Patient Ctrl + N
Show All Patients Ctrl + G
Open Patient Demographics Window Ctrl + E
Delete Record Ctrl + D
Print Patient List Ctrl + P
Sort a Column Click on Header
Select All Ctrl + A
Select Multiple Contiguous Records Shift + Click
Select Multiple Non-Contiguous Records Ctrl + Click
Invoice Ctrl + I
Receipt Ctrl + R
Account History Ctrl + H
Search with Query Editor Ctrl + S
Select a Letter Template Ctrl + Shift/Cmd+ T

Introduction: Keyboard ShortcutsGenie Manual
© 2005-2019 Genie Solutions Pty Ltd 5
Invoice Window
Add New Item Ctrl + N
Self Ctrl + 1
Bulk Bill Ctrl + 2
DVA Ctrl + 3
Workcover Ctrl + 4
Other Ctrl + 5
Health Fund Ctrl + 6
Select Provider in New Item Window Up/Down Arrow Keys
Use Health Fund Schedule Ctrl + P
Clinical Window - General
Open Patient Demographics Window Ctrl + E
Pathology Request Ctrl + L
Radiology Request Ctrl + U
Create a Letter Ctrl + R
Select a Letter Template Ctrl + Shift + T
Open Images Window Ctrl + I
Move to next/previous page Alt + R Arrow/L Arrow
Create a New Task Ctrl + T
Clinical Window - Summary Page
Add a Prescription Ctrl + M
Print Selected Prescription(s) Ctrl + P
Delete Selected Prescription(s) Ctrl + D
Add Medication without doses Alt - Click on Add button
Select/deselect all prescriptions Alt - Click on Print button
Back-date a prescription Alt+Ctrl - Click Print button
Clinical Window - Notes Page
Delete Selected Item Ctrl + D
Toggle between windows Ctrl + Z
Pathology & Radiology
Match Ctrl + M
Link Ctrl + L
Unlink Ctrl + U
Print Ctrl + P
Edit Patient Ctrl + E


Part
IIBackups

Backups: Genie Manual
© 2005-2019 Genie Solutions Pty Ltd8
2 BackupsBackups are vital to your practice and should be taken very seriously. The most computer literate person in yourpractice should be in charge of the backups because although it is generally simple to set up and manage, theimplications of not understanding or maintaining the process can be devastating.
Note: Genie Solutions will not implement any automated backup procedures on your computer. This isbecause we cannot physically check that these procedures continue to work correctly. If you would liketo use automated backups, you must learn how to do it yourself so that you can recognise and resolveany problems, should they arise.
What is a Backup?
A backup is a copy of your important information that is:
1. Geographically remote from the original, and2. Able to be re-installed onto another computer.
What to Backup?
All your important data is stored in the Genie data file while all your scanned images are stored in the Imagesfolder. The following files and folders must be included in your backup procedure:
Genie.4DDGenie.4DIndxGenie.MatchGenie.4DSyncData Genie.4DSyncHeaderImages folderHandouts folder (If you have handouts in Open > Patient Handouts)
Where are the Genie data files?
These files and folders are located directly in your Genie folder either on your computer (for single users) or theserver computer (for networked users). By default this is:
Mac: /Applications/Genie/Windows: C:\Genie\
Note: Know where your data files are at all times. If Genie is installed in a different location other thanthe default location, then we cannot tell you where your data is located.
When to backup?
Ideally, you should have serial backups. That is, you should have backups for each day of the previous week,and then one historical backup (see Historical Genie Backups) for each week. It is important to be able to lookat the state of your data file at various times in the past because it may be some time before you realise that arecord is missing or that the data file has become corrupted. If you overwrite each day’s backup, you will losethis ability.
Let’s be brutally honest...
It has been said that there are two kinds of people in the world: Those who have lost data and those who areabout to.
It is possible for the Genie data file to become irreparably damaged.It is possible that the entire data file can be lost (e.g. a hard drive failure).
You are responsible for the safe-keeping of your data file.You are responsible for ensuring that backups are taking place and that they are completing successfully.
Backups: Genie Manual
© 2005-2019 Genie Solutions Pty Ltd 9
Genie does not move the data file. Ever.If the data file cannot be found in the Genie folder, then someone has moved it from this location.In fact, Genie expects the data file to be in the same folder as the application. If it is not, you will get a alertwhen you open Genie, asking you to identify the location of the data file.
Note: Do not move the Genie folder from its default install location (i.e. the Applications folder onMacintosh, or the root of the selected drive (e.g. C:\) on Windows). If you cannot find your data file, wedon’t know where it is. We only know where it should be, not where it has been moved to.
Priorities
As in medical practice, disasters are usually the result of a string of minor, unrecognised mistakes.
Do not be complacent. When it comes to backups, paranoia is the correct state of mind.Learn how to burn a CD, or how to use a USB/removable hard drive.Backups need to be geographically remote from the original to be effective. If there is a fire at the practice, itwill destroy the backup sitting on your desk as well as your computers.If at any stage you cannot find your data file or if a backup does not appear to be running, tell someoneimmediately.Carefully read the prompts that appear on your screen.There is no reason to create a new data file.When asked if you would like to overwrite an existing file, triple check that this is actually what you want to do.Always backup before an update as a precaution in case something happens during the update process.Make sure you are backing up the data file, not the Genie application. There is no point in backing up theGenie application as it can be re-installed at any time.If you are not sure about backups or do not want to manage your backups, consult an IT company.Check your backups frequently. If you need to revert to a backup, and that backup has been failing, there isnothing that we can do.
2.1 Historical Genie Backups
As well as performing backups for emergencies, you should also create regular historical backups of your dataand application files. Historical backups allow you to have snapshots of your data at different times in the past. This is essential if you are keeping computerised consultation notes, but still a very good idea even if you arenot. It is also useful in the event that you have to look at what your data file looked like several years ago. The historical backup must contain everything you need to open the data file. For example, if you want to opena data file from two years ago, you will need to open it in the same version of Genie that you were using twoyears ago. On a Macintosh computer, you should archive the following:
Genie – the single user application (lamp with black cord)Genie.4DDGenie.4DIndxGenie.MatchGenie.4DSyncData Genie.4DSyncHeaderImages folder
On a Windows computer, you should archive the following:The Solo Application Folder from within the Genie folder.Genie.4DDGenie.4DIndxGenie.MatchGenie.4DSyncData Genie.4DSyncHeaderImages folder

Backups: Historical Genie BackupsGenie Manual
© 2005-2019 Genie Solutions Pty Ltd10
Once you have made an historical copy of your data file, make sure you are able to open the data file and verifythat it contains the information that you expect. This way you can be assured that if you need to review the datain the future that you can open it successfully.
Burning these files to a read only CD (CD-R), dating, signing and witnessing it will make it as medico-legally validas possible.
Note: You should write on CDs using only specialised pens made for this purpose as using an oil basedpen or biro can render the CD unreadable, defeating the purpose of archiving the data.
2.2 Genie Automated Backup
The Genie Automated Backup is an automated backup process that is inbuilt into the Genie Server application. This process, once configured, will make a copy of your Genie data file (i.e. Genie.4DD) and save it as a Geniebackup file (i.e. Genie[XXXX].4BK, where 'XXXX' represents the backup run number) in the location that youspecify. For example, Genie[0001.4BK]; Genie[0002].4BK. As the configuration process takes place in theGenie Server application, the Genie Automated Backup process is not available for Genie single users.
Although this is an automated process, you should check to make sure that the backups are occurring correctlyand the data that is contained is valid.
Note: This process only takes a back up of your Genie data file. You must use a separate, externalbackup procedure to backup your Images folder.
Due to the nature of this procedure, the most computer literate person in your practice should follow theseinstructions. While simple to follow, the implications of getting this wrong can be devastating.
To configure your Genie Automated Backup, in the Genie Server application:
1. Go to File > Backup.... In the Backup window, click on the Database properties... button.
Backups: Genie Automated BackupGenie Manual
© 2005-2019 Genie Solutions Pty Ltd 11
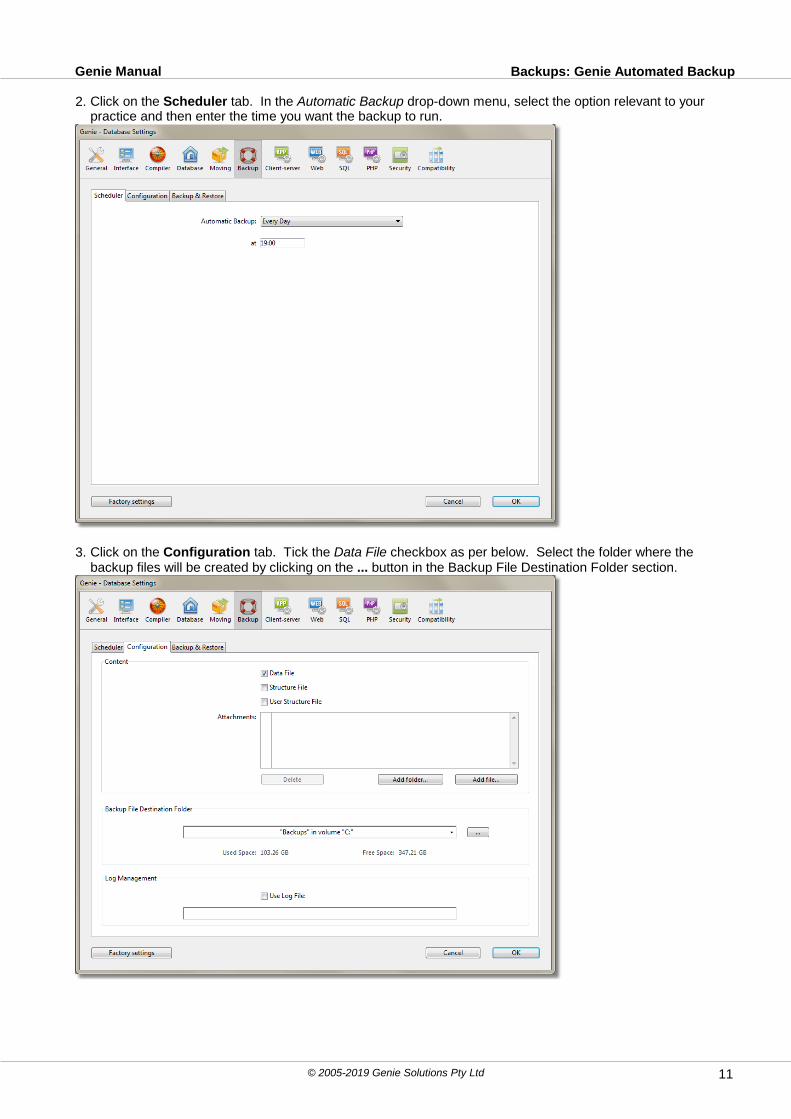
2. Click on the Scheduler tab. In the Automatic Backup drop-down menu, select the option relevant to yourpractice and then enter the time you want the backup to run.
3. Click on the Configuration tab. Tick the Data File checkbox as per below. Select the folder where thebackup files will be created by clicking on the ... button in the Backup File Destination Folder section.

Backups: Genie Automated BackupGenie Manual
© 2005-2019 Genie Solutions Pty Ltd12
4. The Browse for Folder window will appear. Navigate to and select the relevant folder, then click OK.
5. Click on the Backup & Restore tab. The settings shown below are suitable for most practices.
6. Click on the OK button to save these settings.7. In the Backup window, click on the Backup button to start the initial backup. A progress window will appear
indicating that a backup is in progress.8. Once this process has completed, you will be returned to the 4D Server Administration window.

Backups: Genie Automated BackupGenie Manual
© 2005-2019 Genie Solutions Pty Ltd 13
9. In the 4D Server Administration window, click on the Maintenance tab to see when the last backup occurred,and when will the next backup take place.
Note: The Genie Server application must be running at the specified time in order for the automatedbackup to take place.
2.3 Restoring A Backup
There are several reasons why you would restore a backup. These include:
To revert to a previous backup in the event that your current data file has become corrupt or damaged.To verify that your backup process is effective.To review the data as it was at the time of the backup.
The process that you take to restore a backup depends on if you are using your own external backup process orthe Genie Automated Backups.
2.3.1 Server - Data Corruption
The following process should be run if you are no longer able to access your live data file as it has becomedamaged or corrupt.
Note: If you wish to restore a backup to test your backup process or for references purposes only,please refer to the Solo - Reference section.
Restoring from an External Backup
The process for restoring a backup made by a third party program involves replacing the current, live data fileswith the backup data files. The data files are:
Genie.4DDGenie.4DIndxGenie.MatchGenie.4DSyncData Genie.4DSyncHeader

Backups: Restoring A BackupGenie Manual
© 2005-2019 Genie Solutions Pty Ltd14
To restore from an external backup:
1. Quit out of the Genie Server application.2. Navigate to the location of your live data file. By default this is:
Mac: /Applications/Genie/Windows: C:\Genie\
3. Either move the live data files to a temporary location (e.g. desktop) or rename them (e.g. Genie1.4DD). Note: It is recommend that you do not delete the live data files until you are certain the backup data hasbeen restored successfully.
4. Copy the data files from your backup location and paste these files into the Genie folder.5. Double-click on the Genie Solo application and immediately press and hold the Alt key on your keyboard.6. When the ‘You pressed the “Alt” key’ window appears, select Select another data file and click Continue.
7. Navigate to the Genie folder.8. Select the Genie.4DD file and click Open.
9. Thoroughly check your data file to make sure that it contains the data you require.10. Close Genie Solo, open Genie Server and reconnect the clients.11. Delete the old data file that you moved to a different location or renamed.
Backups: Restoring A BackupGenie Manual
© 2005-2019 Genie Solutions Pty Ltd 15
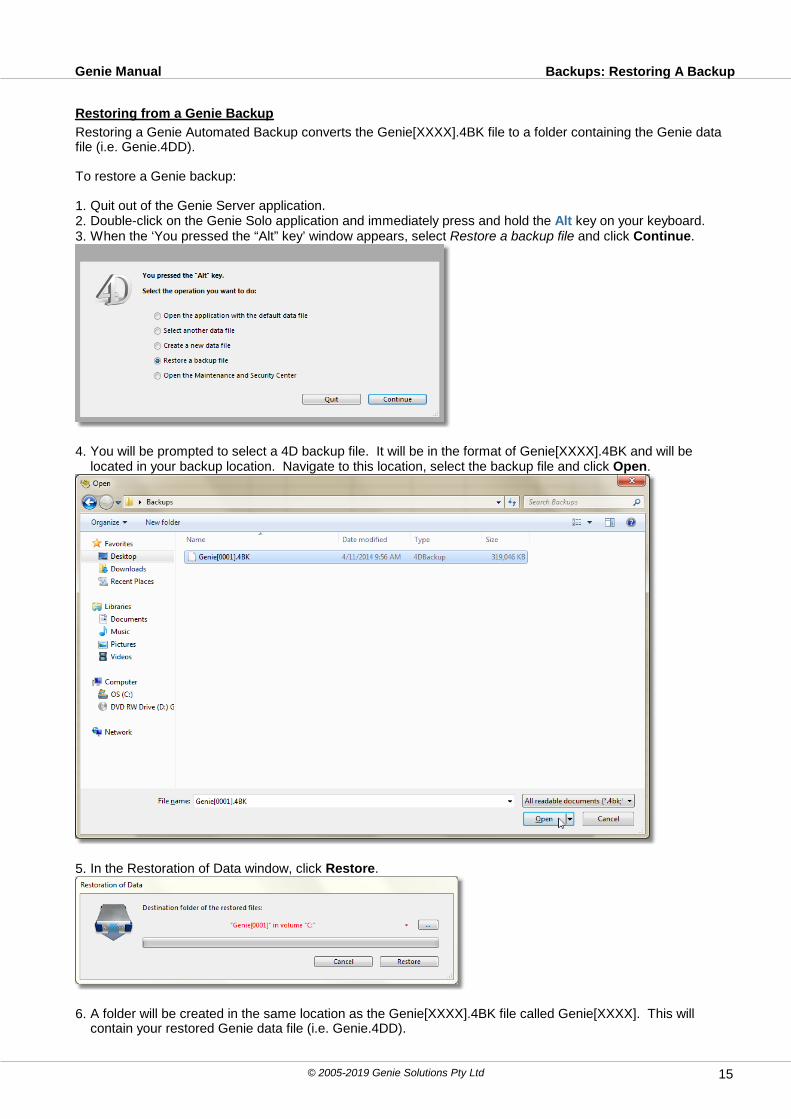
Restoring from a Genie Backup
Restoring a Genie Automated Backup converts the Genie[XXXX].4BK file to a folder containing the Genie datafile (i.e. Genie.4DD).
To restore a Genie backup:
1. Quit out of the Genie Server application.2. Double-click on the Genie Solo application and immediately press and hold the Alt key on your keyboard.3. When the ‘You pressed the “Alt” key’ window appears, select Restore a backup file and click Continue.
4. You will be prompted to select a 4D backup file. It will be in the format of Genie[XXXX].4BK and will belocated in your backup location. Navigate to this location, select the backup file and click Open.
5. In the Restoration of Data window, click Restore.
6. A folder will be created in the same location as the Genie[XXXX].4BK file called Genie[XXXX]. This willcontain your restored Genie data file (i.e. Genie.4DD).
Backups: Restoring A BackupGenie Manual
© 2005-2019 Genie Solutions Pty Ltd16
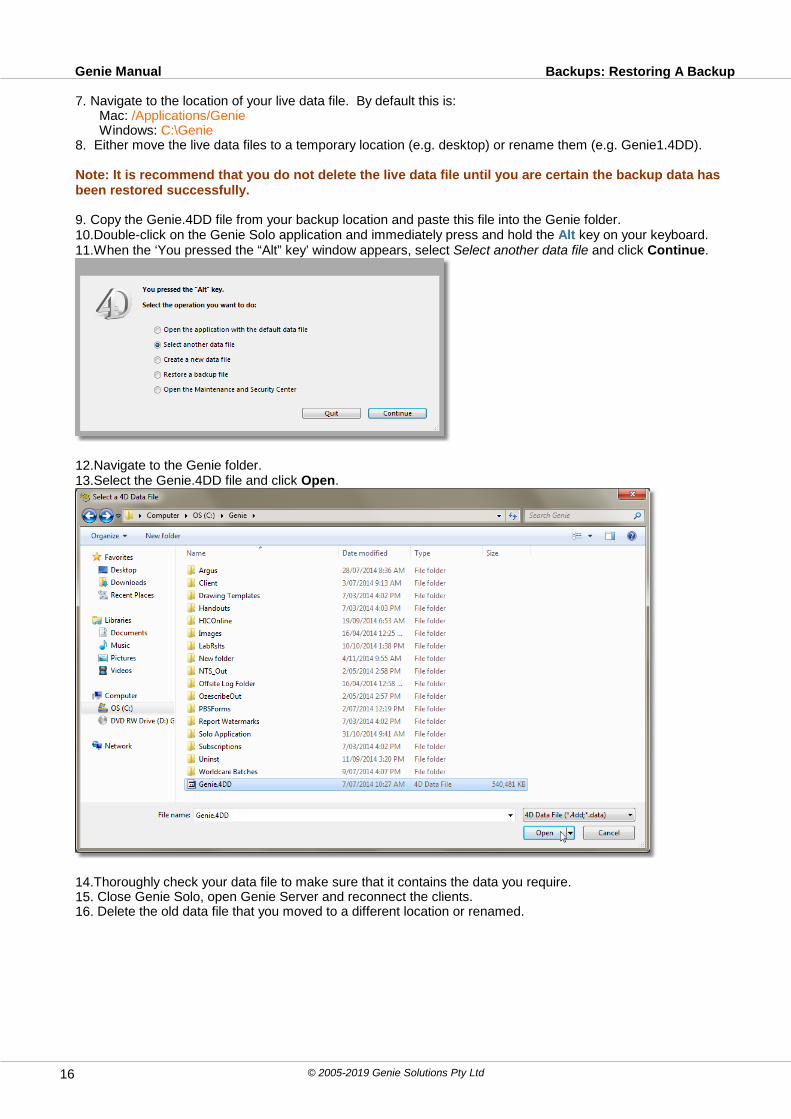
7. Navigate to the location of your live data file. By default this is:Mac: /Applications/GenieWindows: C:\Genie
8. Either move the live data files to a temporary location (e.g. desktop) or rename them (e.g. Genie1.4DD).
Note: It is recommend that you do not delete the live data file until you are certain the backup data hasbeen restored successfully.
9. Copy the Genie.4DD file from your backup location and paste this file into the Genie folder.10.Double-click on the Genie Solo application and immediately press and hold the Alt key on your keyboard.11.When the ‘You pressed the “Alt” key’ window appears, select Select another data file and click Continue.
12.Navigate to the Genie folder.13.Select the Genie.4DD file and click Open.
14.Thoroughly check your data file to make sure that it contains the data you require.15. Close Genie Solo, open Genie Server and reconnect the clients.16. Delete the old data file that you moved to a different location or renamed.
Backups: Restoring A BackupGenie Manual
© 2005-2019 Genie Solutions Pty Ltd 17
2.3.2 Solo - Reference
The following process should be run as a way to reference information from a backup or to make sure that yourbackup procedure is working correctly.
Note: If you are restoring a backup as your data has become damaged or corrupt and needs to bereplaced, please refer to the Server - Data Corruption section.
Restoring from an External Backup
The process for restoring a backup made by a third party program involves replacing the current data files withthe backup data files. The data files are:
Genie.4DDGenie.4DIndxGenie.MatchGenie.4DSyncData Genie.4DSyncHeader
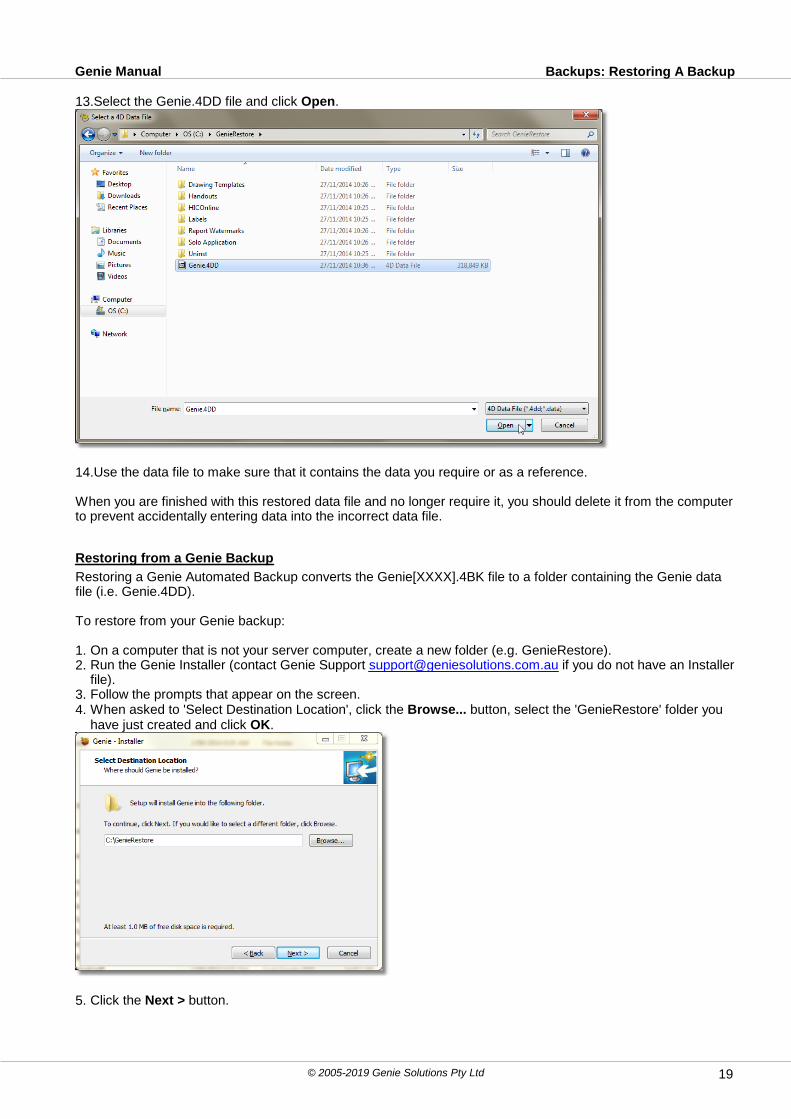
To restore from your external backup:
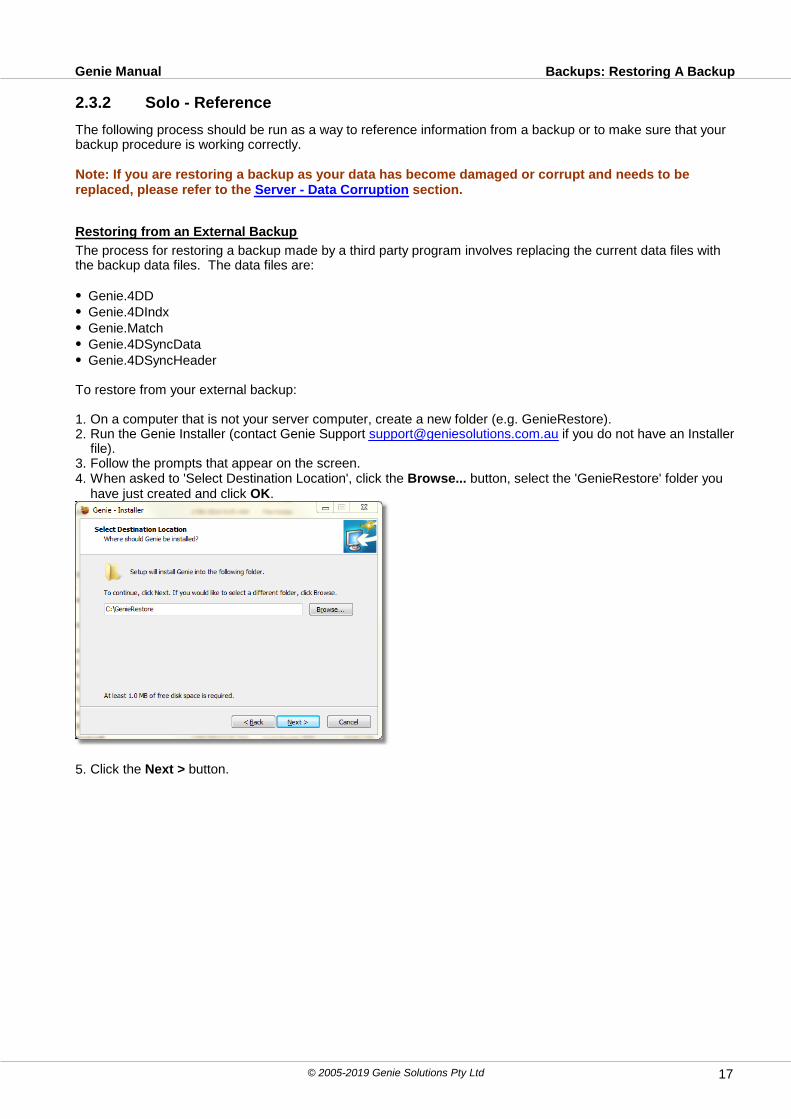
1. On a computer that is not your server computer, create a new folder (e.g. GenieRestore).2. Run the Genie Installer (contact Genie Support [email protected] if you do not have an Installer
file).3. Follow the prompts that appear on the screen.4. When asked to 'Select Destination Location', click the Browse... button, select the 'GenieRestore' folder you
have just created and click OK.
5. Click the Next > button.
Backups: Restoring A BackupGenie Manual
© 2005-2019 Genie Solutions Pty Ltd18
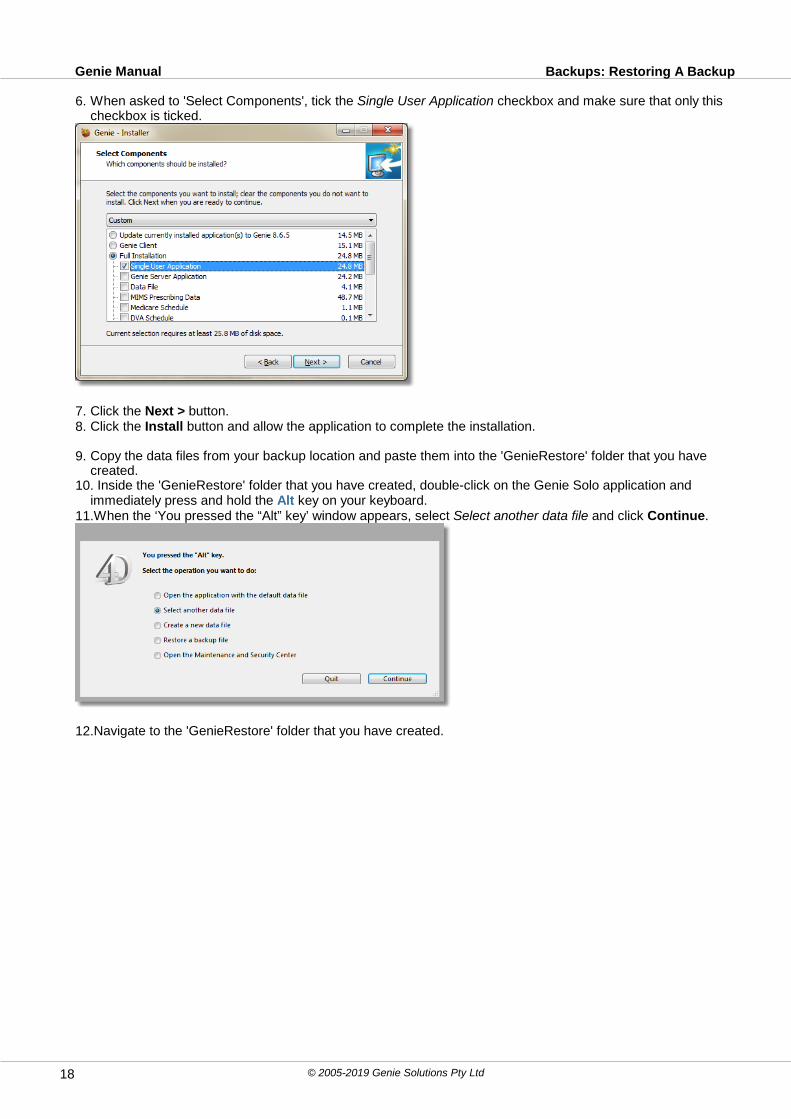
6. When asked to 'Select Components', tick the Single User Application checkbox and make sure that only thischeckbox is ticked.
7. Click the Next > button.8. Click the Install button and allow the application to complete the installation.
9. Copy the data files from your backup location and paste them into the 'GenieRestore' folder that you havecreated.
10. Inside the 'GenieRestore' folder that you have created, double-click on the Genie Solo application andimmediately press and hold the Alt key on your keyboard.
11.When the ‘You pressed the “Alt” key’ window appears, select Select another data file and click Continue.
12.Navigate to the 'GenieRestore' folder that you have created.
Backups: Restoring A BackupGenie Manual
© 2005-2019 Genie Solutions Pty Ltd 19
13.Select the Genie.4DD file and click Open.
14.Use the data file to make sure that it contains the data you require or as a reference.
When you are finished with this restored data file and no longer require it, you should delete it from the computerto prevent accidentally entering data into the incorrect data file.
Restoring from a Genie Backup
Restoring a Genie Automated Backup converts the Genie[XXXX].4BK file to a folder containing the Genie datafile (i.e. Genie.4DD).
To restore from your Genie backup:
1. On a computer that is not your server computer, create a new folder (e.g. GenieRestore).2. Run the Genie Installer (contact Genie Support [email protected] if you do not have an Installer
file).3. Follow the prompts that appear on the screen.4. When asked to 'Select Destination Location', click the Browse... button, select the 'GenieRestore' folder you
have just created and click OK.
5. Click the Next > button.

Backups: Restoring A BackupGenie Manual
© 2005-2019 Genie Solutions Pty Ltd20
6. When asked to 'Select Components', tick the Single User Application checkbox and make sure that only thischeckbox is ticked.
7. Click the Next > button.8. Click the Install button and allow the application to complete the installation.
9. Inside the 'GenieRestore' folder that you have created, double-click on the Genie Solo application andimmediately press and hold the Alt key on your keyboard.
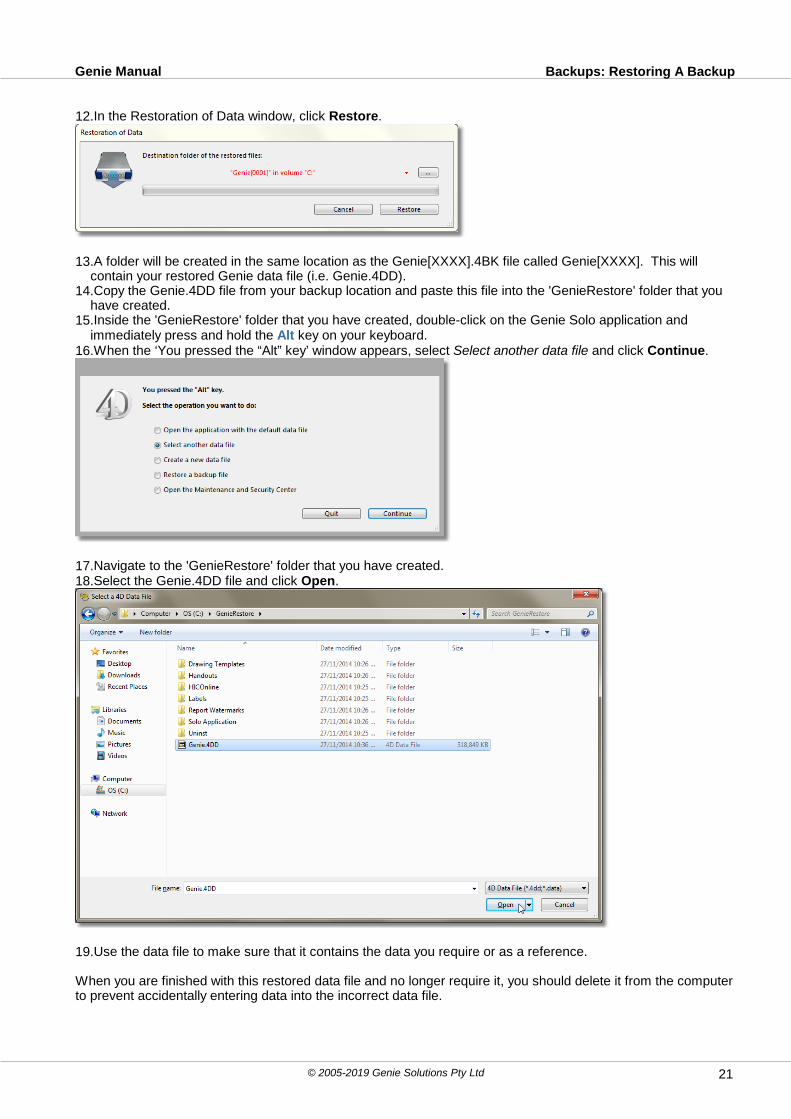
10.When the ‘You pressed the “Alt” key’ window appears, select Restore a Backup and click Continue.
11.You will be prompted to select a 4D backup file. It will be in the format of Genie[XXXX].4BK and will belocated in your backup folder location. Navigate to this location, select the backup file and click Open.
Backups: Restoring A BackupGenie Manual
© 2005-2019 Genie Solutions Pty Ltd 21
12.In the Restoration of Data window, click Restore.
13.A folder will be created in the same location as the Genie[XXXX].4BK file called Genie[XXXX]. This willcontain your restored Genie data file (i.e. Genie.4DD).
14.Copy the Genie.4DD file from your backup location and paste this file into the 'GenieRestore' folder that youhave created.
15.Inside the 'GenieRestore' folder that you have created, double-click on the Genie Solo application andimmediately press and hold the Alt key on your keyboard.
16.When the ‘You pressed the “Alt” key’ window appears, select Select another data file and click Continue.
17.Navigate to the 'GenieRestore' folder that you have created.18.Select the Genie.4DD file and click Open.
19.Use the data file to make sure that it contains the data you require or as a reference.
When you are finished with this restored data file and no longer require it, you should delete it from the computerto prevent accidentally entering data into the incorrect data file.


Part
IIIMenus Overview

Menus Overview: Genie Manual
© 2005-2019 Genie Solutions Pty Ltd24
3 Menus OverviewThe following section outlines the function of each of the main menus within Genie.
3.1 The File Menu
HelpThis opens the Genie contextual help window. The contextual help window draws on the online manual from theGenie website, so you will need an active internet connection to access this. The contextual help feature will tryto provide you with an appropriate link to the manual relative to the window you currently have open in Genie.
Clicking on the address line at the bottom of the window opens the link to the Genie manual in your defaultbrowser. This will only work for the first page you opened when going to File > Help. Browsing in the contextualHelp window then clicking on the address line will not open the currently viewed page.
Only one Help window will open at a time. If the Help window is already open and you select it from the Filemenu again, the displayed page will change to the relevant Help page.
MIMS Information
Displays the currently installed version of MIMS and the MIMS disclaimer. It also contains information on how tocontact MIMS to subscribe to this service, as well as a link to the price list available on their website.
Contact Genie SupportSelecting this option opens a window allowing you to contact Genie Support through Genie directly. You have theoption to Save to Disk so you can attach your request as a TXT file in an email program outside of Genie, Emailthe request directly from Genie (provided that you have the Genie Email module set up), or Print this informationand fax it to the support desk.
Menus Overview: The File MenuGenie Manual
© 2005-2019 Genie Solutions Pty Ltd 25
This contact method can be used to submit feature requests and general queries. Alternatively, if you tick I amexperiencing a problem with Genie, you will be presented with additional options that allow you to provideinformation about the issue you are experiencing.
Note: This is the preferred method for contacting the Genie support team as Genie automaticallygathers information about the operating system and version of Genie you are using.
User Preferences
Opens the preferences record for the user currently logged in. See User Preferences for more information.
All User Preferences
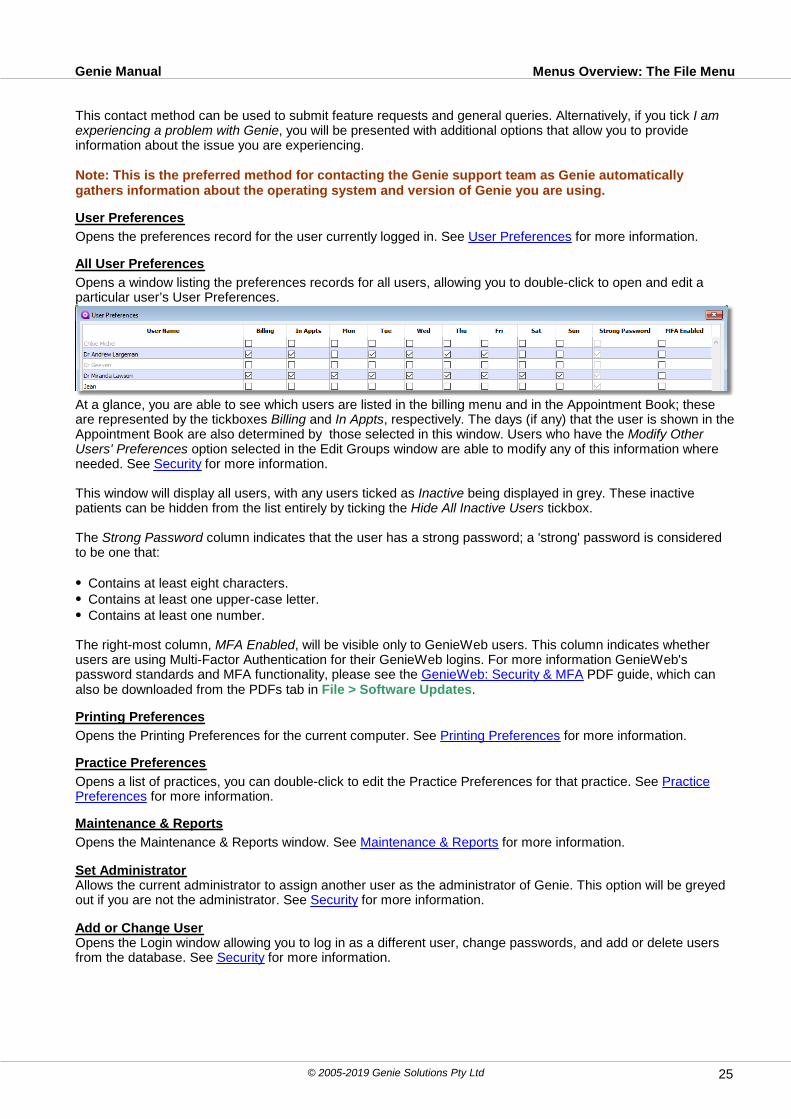
Opens a window listing the preferences records for all users, allowing you to double-click to open and edit aparticular user’s User Preferences.
At a glance, you are able to see which users are listed in the billing menu and in the Appointment Book; theseare represented by the tickboxes Billing and In Appts, respectively. The days (if any) that the user is shown in theAppointment Book are also determined by those selected in this window. Users who have the Modify OtherUsers' Preferences option selected in the Edit Groups window are able to modify any of this information whereneeded. See Security for more information.
This window will display all users, with any users ticked as Inactive being displayed in grey. These inactivepatients can be hidden from the list entirely by ticking the Hide All Inactive Users tickbox.
The Strong Password column indicates that the user has a strong password; a 'strong' password is consideredto be one that:
Contains at least eight characters.Contains at least one upper-case letter.Contains at least one number.
The right-most column, MFA Enabled, will be visible only to GenieWeb users. This column indicates whetherusers are using Multi-Factor Authentication for their GenieWeb logins. For more information GenieWeb'spassword standards and MFA functionality, please see the GenieWeb: Security & MFA PDF guide, which canalso be downloaded from the PDFs tab in File > Software Updates.
Printing Preferences
Opens the Printing Preferences for the current computer. See Printing Preferences for more information.
Practice Preferences
Opens a list of practices, you can double-click to edit the Practice Preferences for that practice. See PracticePreferences for more information.
Maintenance & Reports
Opens the Maintenance & Reports window. See Maintenance & Reports for more information.
Set AdministratorAllows the current administrator to assign another user as the administrator of Genie. This option will be greyedout if you are not the administrator. See Security for more information.
Add or Change UserOpens the Login window allowing you to log in as a different user, change passwords, and add or delete usersfrom the database. See Security for more information.

Menus Overview: The File MenuGenie Manual
© 2005-2019 Genie Solutions Pty Ltd26
Change PracticeThis item will be enabled if you have more than one Practice Preferences record. It allows you to change toanother practice so that you can use its settings (such as the letterhead) if you would like to create invoicesunder a different practice name. Changing to a different practice only effects the computer you are using. Otherusers on the network will be unaffected.
Quick Reports
Quick Reports allow you to search the Genie database to compile specific reports which you can print, export orpreview. See Quick Reports for more information.
Import and ExportPlease contact Genie Support ([email protected]) for further assistance.
Connections
Allows the setup of automatic exchange of new and modified demographic data with other applications. See Connections (Online Manual only).
Execute CommandThis opens a window that allows you to enter lines of code to manipulate data in your database.
Note: This should only be used under instruction from the Genie Support desk.
Start Offsite LoggingCan be used to manually start offsite logging. See Offsite Logging for more information.
Import Offsite Log
Used to manually import Offsite Logs, if required. See Offsite Logging for more information.
RegisterAllows you to register Genie by entering a registration code supplied by the support desk.
Set Practice TypeThis allows you to specify the type of practice. Genie will automatically displays different information and switchon some features and functions required by that type of practice.
Quit (Windows only) (Ctrl+Q)Quits Genie. Clicking the red cross in the top right of the screen is NOT recommended, as it does not allow thedatabase exit routines to run.
Note: Disable Main Window Close Box in the General tab of User Preferences prevents you from quittingGenie via the red cross completely; it is recommended that you have this preference selected to avoidexceeding your simultaneous users limit.
The Quit option is not listed in the File Menu on a Mac, to quit Genie on a Mac:Select Quit from the Genie Client menu i.e. Genie Client > Quit Select Quit from the Genie menu i.e. Genie > Quit

Menus Overview: The Open MenuGenie Manual
© 2005-2019 Genie Solutions Pty Ltd 27
3.2 The Open Menu
Patients (Ctrl+O)
This will open the Patients List; inactive patients are displayed in grey, flagged patients are displayed in red.Right-clicking on a patient's name in this window will display a drop-down menu allowing you to quickly performcommon tasks (e.g. open the Patient Demographics window, copy their name for pasting into the AppointmentBook, invoice or receipt a patient, SMS the patient, or open their Clinical Window). To print a list of patients, seethe Report Builder section.
Appointments (Ctrl+J)
Opens the Appointment Book. For more information, please refer to the Appointments section.
Address Book (Ctrl+B)Holds all your contact information for Specialists and GPs.
The Copy Selected Record button allows you to create a new Address Book record that contains the samedetails as another doctor in your Address Book. It will copy all details except for the selected doctor's name andprovider number; this includes their correspondence information. This could be useful for practices that haveseveral doctors with the same address details.
The Export Selected Records button allows you to export selected records in your Address Book to eitherOutlook or Apple's Address Book application. You have the option to export only email addresses or all theinformation.
The Merge button allows you to merge two Address Book records. Highlight the two records and click on Merge.
The Specialty... drop-down menu allows you to view all providers in your Address Book with a particular specialty(e.g. Anaesthetist).
The Text Search button allows you to perform a free text search for any word or phrase contained anywhere in
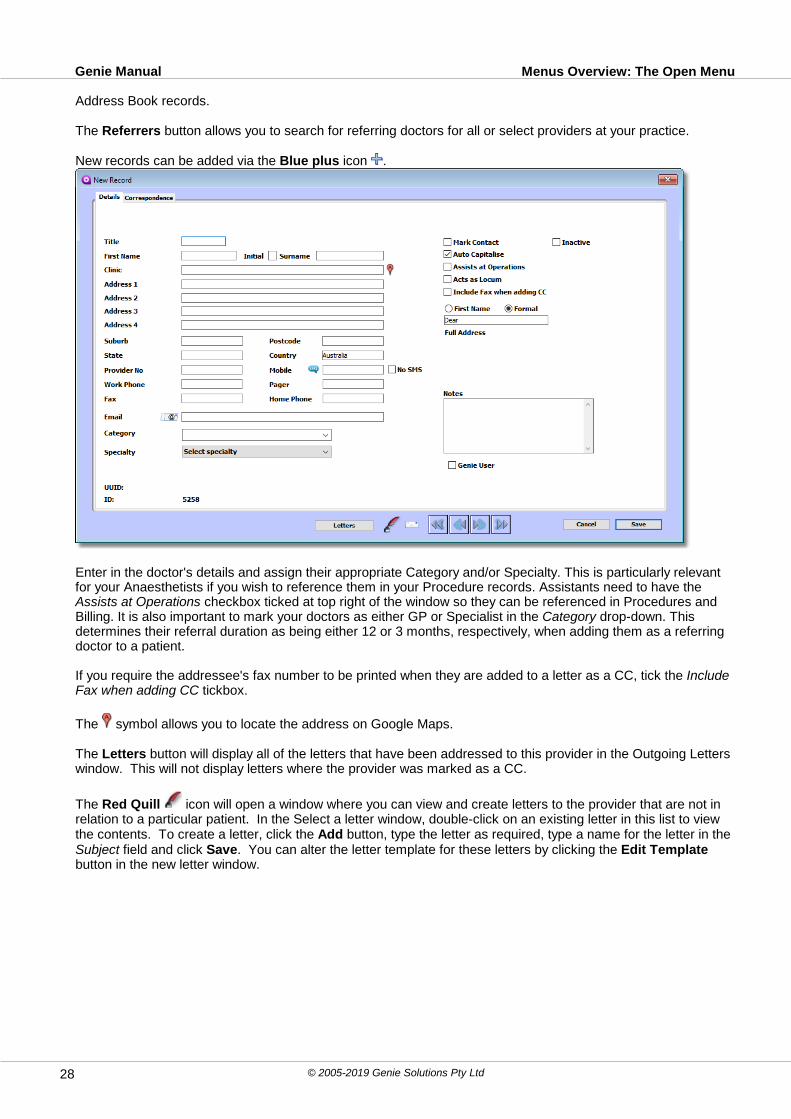
Menus Overview: The Open MenuGenie Manual
© 2005-2019 Genie Solutions Pty Ltd28
Address Book records.
The Referrers button allows you to search for referring doctors for all or select providers at your practice.
New records can be added via the Blue plus icon .
Enter in the doctor's details and assign their appropriate Category and/or Specialty. This is particularly relevantfor your Anaesthetists if you wish to reference them in your Procedure records. Assistants need to have the Assists at Operations checkbox ticked at top right of the window so they can be referenced in Procedures andBilling. It is also important to mark your doctors as either GP or Specialist in the Category drop-down. Thisdetermines their referral duration as being either 12 or 3 months, respectively, when adding them as a referringdoctor to a patient.
If you require the addressee's fax number to be printed when they are added to a letter as a CC, tick the IncludeFax when adding CC tickbox.
The symbol allows you to locate the address on Google Maps.
The Letters button will display all of the letters that have been addressed to this provider in the Outgoing Letterswindow. This will not display letters where the provider was marked as a CC.
The Red Quill icon will open a window where you can view and create letters to the provider that are not inrelation to a particular patient. In the Select a letter window, double-click on an existing letter in this list to viewthe contents. To create a letter, click the Add button, type the letter as required, type a name for the letter in theSubject field and click Save. You can alter the letter template for these letters by clicking the Edit Templatebutton in the new letter window.
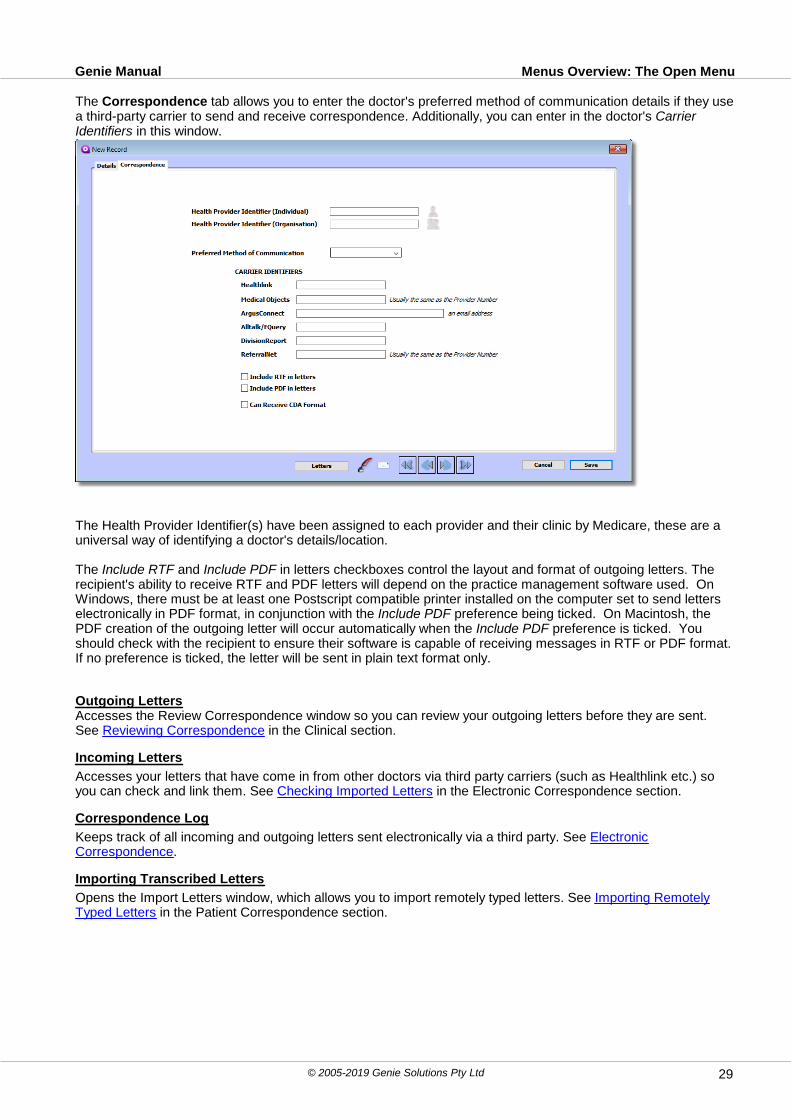
Menus Overview: The Open MenuGenie Manual
© 2005-2019 Genie Solutions Pty Ltd 29
The Correspondence tab allows you to enter the doctor's preferred method of communication details if they usea third-party carrier to send and receive correspondence. Additionally, you can enter in the doctor's CarrierIdentifiers in this window.
The Health Provider Identifier(s) have been assigned to each provider and their clinic by Medicare, these are auniversal way of identifying a doctor's details/location.
The Include RTF and Include PDF in letters checkboxes control the layout and format of outgoing letters. Therecipient's ability to receive RTF and PDF letters will depend on the practice management software used. OnWindows, there must be at least one Postscript compatible printer installed on the computer set to send letterselectronically in PDF format, in conjunction with the Include PDF preference being ticked. On Macintosh, thePDF creation of the outgoing letter will occur automatically when the Include PDF preference is ticked. Youshould check with the recipient to ensure their software is capable of receiving messages in RTF or PDF format.If no preference is ticked, the letter will be sent in plain text format only.
Outgoing LettersAccesses the Review Correspondence window so you can review your outgoing letters before they are sent.See Reviewing Correspondence in the Clinical section.
Incoming Letters
Accesses your letters that have come in from other doctors via third party carriers (such as Healthlink etc.) soyou can check and link them. See Checking Imported Letters in the Electronic Correspondence section.
Correspondence Log
Keeps track of all incoming and outgoing letters sent electronically via a third party. See ElectronicCorrespondence.
Importing Transcribed Letters
Opens the Import Letters window, which allows you to import remotely typed letters. See Importing RemotelyTyped Letters in the Patient Correspondence section.

Menus Overview: The Open MenuGenie Manual
© 2005-2019 Genie Solutions Pty Ltd30
Scans for Review
Allows the electronic review of batch scanned documents/images. When linking a scanned image to a patient'sfile, you can right-click in the To be Reviewed By column to assign a reviewer.
This will create an entry in the Scans for Review section (Open > Scans for Review).
Providers can then tick Reviewed, or right-click in the Redirect To column to redirect to another provider.Whenever there are scans waiting, you will see Scans to Review as an entry in the navigation palette.
Tasks
Tasks allow you to communicate internally with other users. For more information see Tasks in the ReceptionModule.
Opens the Genie email module. For information on using Email within Genie, please refer to the Email section.
Procedures
Displays a list of patients who have a procedure created for them. For more information on Procedures, pleaserefer to the Procedures chapter.
EmployersDisplays a list of all Employers recorded for patients.
These records are usually created via WorkCover claims. For more information, refer to Invoicing WorkCover.
Account HoldersOpens up the Account Holders window.
This displays a list of all patients and organisations who have had an Account created for them. Before a patient,Health Fund or Organisation can be billed, they must have an Account Holder record. Double-clicking a record
(or clicking the icon to create a new record) will allow you to modify the account holder's contact details, aswell as configure them for BPAY and WorkCover Online (if applicable).
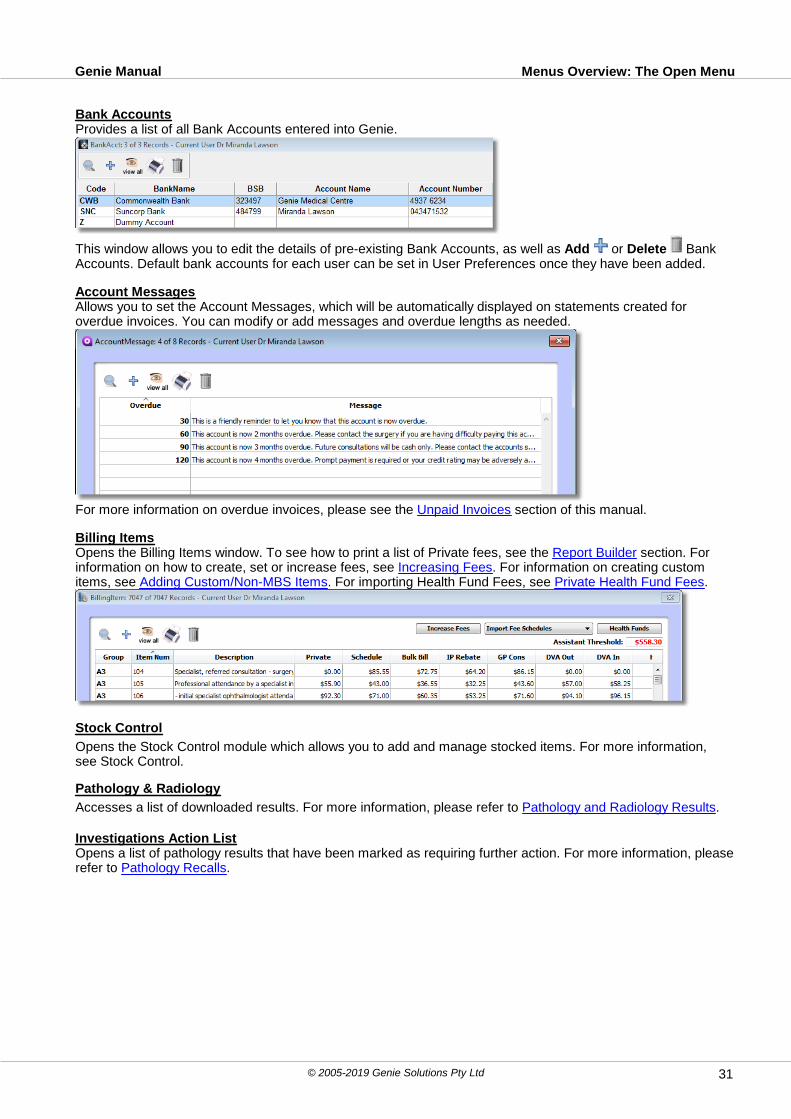
Menus Overview: The Open MenuGenie Manual
© 2005-2019 Genie Solutions Pty Ltd 31
Bank AccountsProvides a list of all Bank Accounts entered into Genie.
This window allows you to edit the details of pre-existing Bank Accounts, as well as Add or Delete BankAccounts. Default bank accounts for each user can be set in User Preferences once they have been added.
Account MessagesAllows you to set the Account Messages, which will be automatically displayed on statements created foroverdue invoices. You can modify or add messages and overdue lengths as needed.
For more information on overdue invoices, please see the Unpaid Invoices section of this manual.
Billing ItemsOpens the Billing Items window. To see how to print a list of Private fees, see the Report Builder section. Forinformation on how to create, set or increase fees, see Increasing Fees. For information on creating customitems, see Adding Custom/Non-MBS Items. For importing Health Fund Fees, see Private Health Fund Fees.
Stock Control
Opens the Stock Control module which allows you to add and manage stocked items. For more information,see Stock Control.
Pathology & Radiology
Accesses a list of downloaded results. For more information, please refer to Pathology and Radiology Results. Investigations Action ListOpens a list of pathology results that have been marked as requiring further action. For more information, pleaserefer to Pathology Recalls.
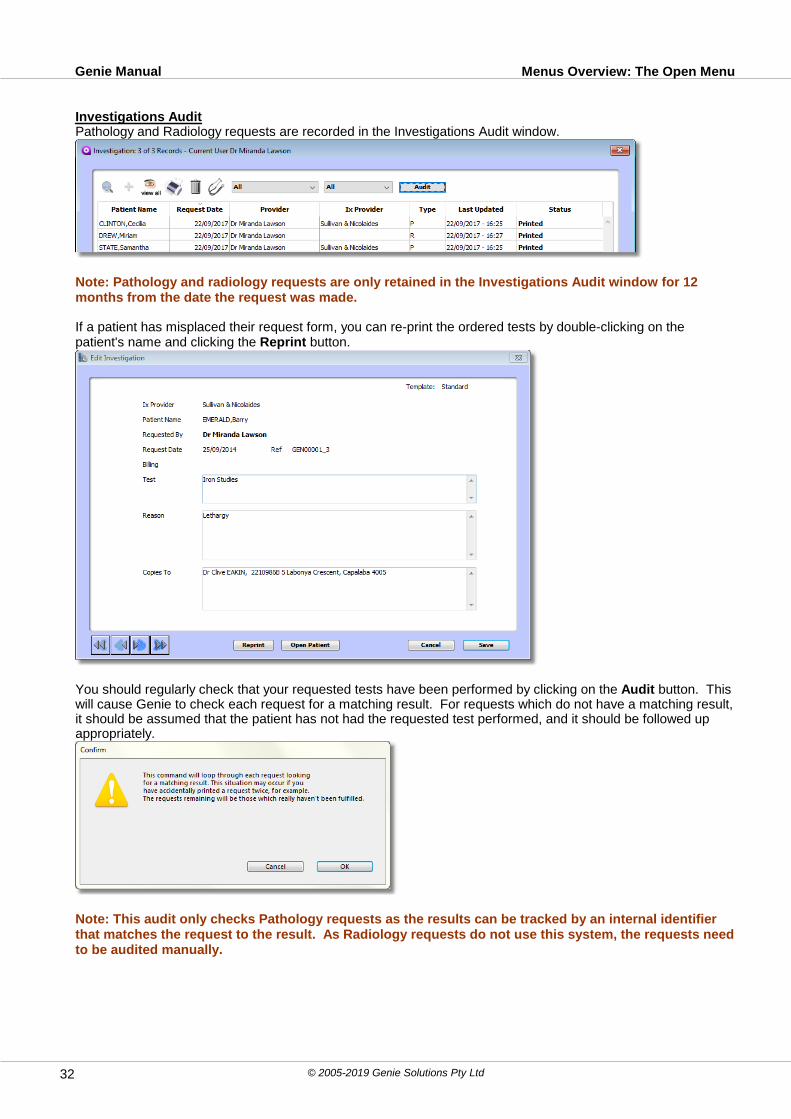
Menus Overview: The Open MenuGenie Manual
© 2005-2019 Genie Solutions Pty Ltd32
Investigations AuditPathology and Radiology requests are recorded in the Investigations Audit window.
Note: Pathology and radiology requests are only retained in the Investigations Audit window for 12months from the date the request was made.
If a patient has misplaced their request form, you can re-print the ordered tests by double-clicking on thepatient's name and clicking the Reprint button.
You should regularly check that your requested tests have been performed by clicking on the Audit button. Thiswill cause Genie to check each request for a matching result. For requests which do not have a matching result,it should be assumed that the patient has not had the requested test performed, and it should be followed upappropriately.
Note: This audit only checks Pathology requests as the results can be tracked by an internal identifierthat matches the request to the result. As Radiology requests do not use this system, the requests needto be audited manually.
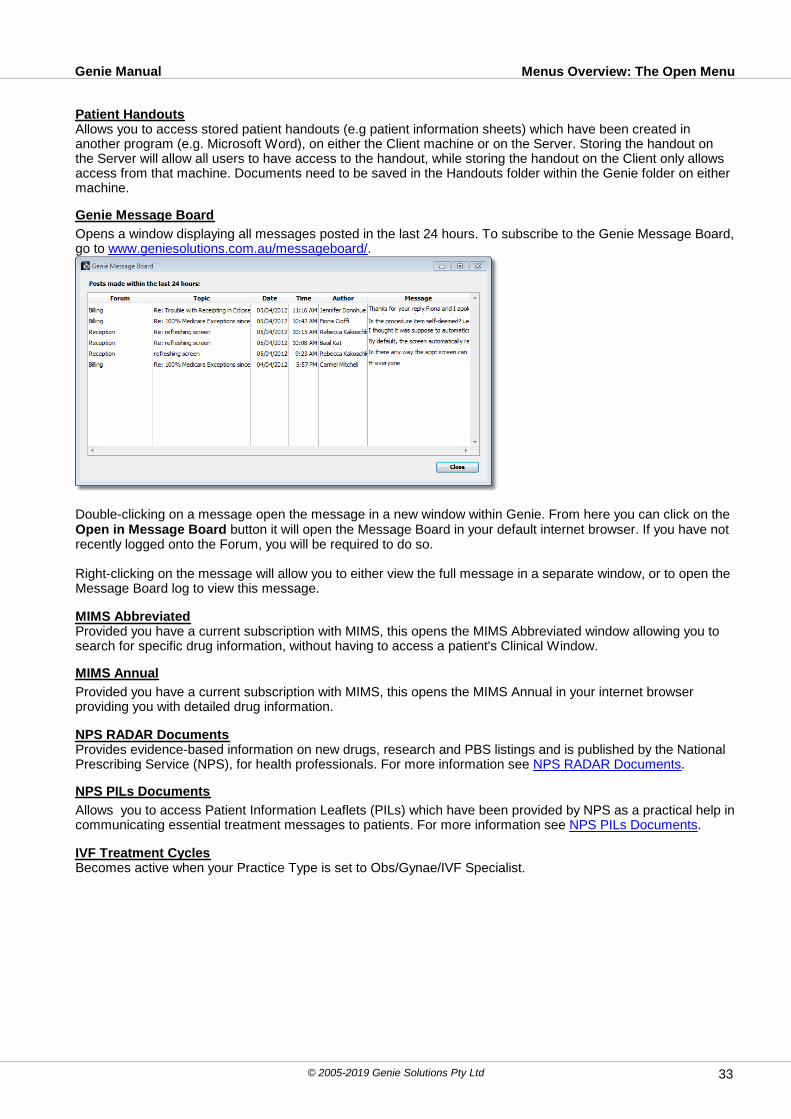
Menus Overview: The Open MenuGenie Manual
© 2005-2019 Genie Solutions Pty Ltd 33
Patient HandoutsAllows you to access stored patient handouts (e.g patient information sheets) which have been created inanother program (e.g. Microsoft Word), on either the Client machine or on the Server. Storing the handout onthe Server will allow all users to have access to the handout, while storing the handout on the Client only allowsaccess from that machine. Documents need to be saved in the Handouts folder within the Genie folder on eithermachine.
Genie Message Board
Opens a window displaying all messages posted in the last 24 hours. To subscribe to the Genie Message Board,go to www.geniesolutions.com.au/messageboard/.
Double-clicking on a message open the message in a new window within Genie. From here you can click on the Open in Message Board button it will open the Message Board in your default internet browser. If you have notrecently logged onto the Forum, you will be required to do so.
Right-clicking on the message will allow you to either view the full message in a separate window, or to open theMessage Board log to view this message.
MIMS AbbreviatedProvided you have a current subscription with MIMS, this opens the MIMS Abbreviated window allowing you tosearch for specific drug information, without having to access a patient's Clinical Window.
MIMS Annual
Provided you have a current subscription with MIMS, this opens the MIMS Annual in your internet browserproviding you with detailed drug information.
NPS RADAR DocumentsProvides evidence-based information on new drugs, research and PBS listings and is published by the NationalPrescribing Service (NPS), for health professionals. For more information see NPS RADAR Documents.
NPS PILs Documents
Allows you to access Patient Information Leaflets (PILs) which have been provided by NPS as a practical help incommunicating essential treatment messages to patients. For more information see NPS PILs Documents.
IVF Treatment CyclesBecomes active when your Practice Type is set to Obs/Gynae/IVF Specialist.
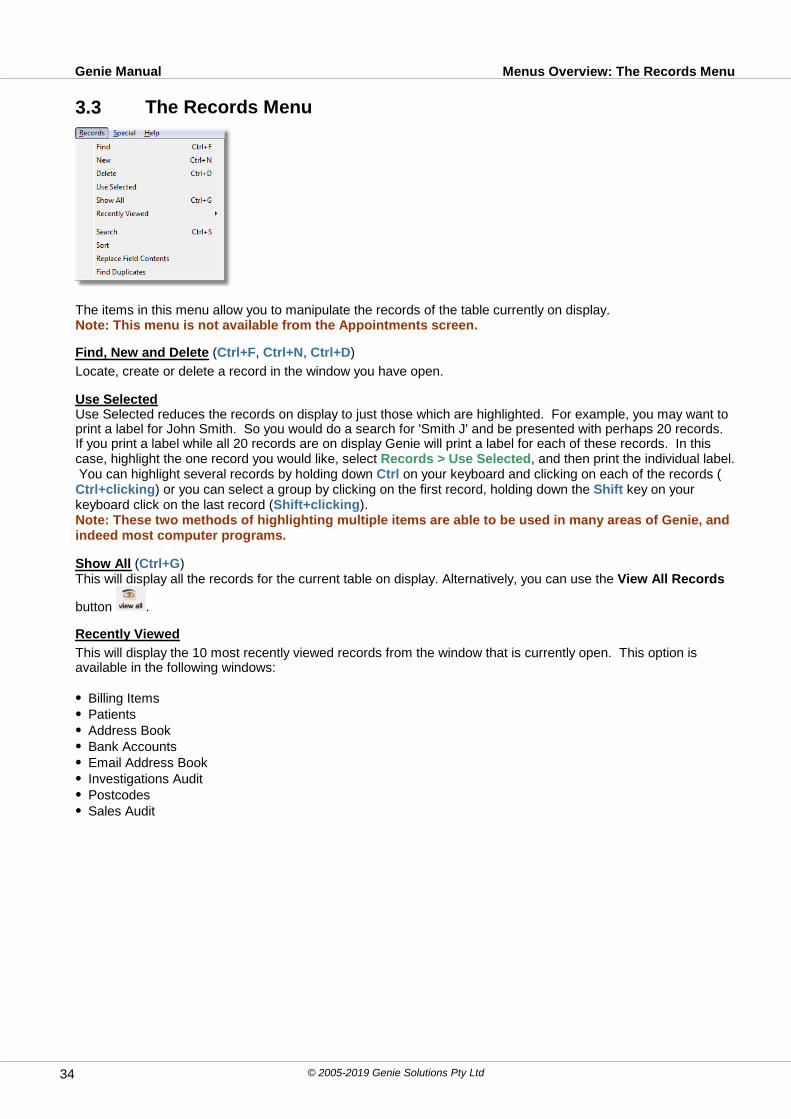
Menus Overview: The Records MenuGenie Manual
© 2005-2019 Genie Solutions Pty Ltd34
3.3 The Records Menu
The items in this menu allow you to manipulate the records of the table currently on display.Note: This menu is not available from the Appointments screen.
Find, New and Delete (Ctrl+F, Ctrl+N, Ctrl+D)
Locate, create or delete a record in the window you have open.
Use SelectedUse Selected reduces the records on display to just those which are highlighted. For example, you may want toprint a label for John Smith. So you would do a search for 'Smith J' and be presented with perhaps 20 records. If you print a label while all 20 records are on display Genie will print a label for each of these records. In thiscase, highlight the one record you would like, select Records > Use Selected, and then print the individual label. You can highlight several records by holding down Ctrl on your keyboard and clicking on each of the records (Ctrl+clicking) or you can select a group by clicking on the first record, holding down the Shift key on yourkeyboard click on the last record (Shift+clicking). Note: These two methods of highlighting multiple items are able to be used in many areas of Genie, andindeed most computer programs.
Show All (Ctrl+G)This will display all the records for the current table on display. Alternatively, you can use the View All Records
button .
Recently Viewed
This will display the 10 most recently viewed records from the window that is currently open. This option isavailable in the following windows:
Billing ItemsPatientsAddress BookBank AccountsEmail Address BookInvestigations AuditPostcodesSales Audit

Menus Overview: The Records MenuGenie Manual
© 2005-2019 Genie Solutions Pty Ltd 35
Clicking on either the Show All option or one of the options numbered 1 to 10 will show the relevant record/s inthe window.
The recently viewed items are user specific and will be cleared upon switching users, as well as each time thatthe Genie application is quit.
Replace Field ContentsAllows you to replace the contents, or part of the contents, of any field in all of the records currently on display.This can be a very useful, but dangerous feature and should be used with care. Only the Administrator hasaccess to this feature and should contact Genie Support if they wish to use it.
Search (Ctrl+S)
Allows you to make very precise and/or complex searches of your data. The Query Editor allows you to do asearch on the relevant table depending on which window you have open in Genie. See the chapter on Queries &Searches for more information on searches.
Sort
Sort allows you to perform multiple sorts on the records displayed. To perform a simple sort, you can click on thecolumns in the window e.g.by Date of Birth, click on the DOB header in the Patients list.
Find DuplicatesThis allows you to find duplicate patient or Address Book records. You might use this after converting data fromanother program where duplicate records may have been created.
Example: Find duplicate patient records
We will search on the Surname, First Name and DOB fields.1. Click on the View All button to display all the records in the database.Note: If you have very large patient database, it is recommended you do this in sections. You could firstfind all those patients whose surname begins with 'A' for example.2. Select Records > Find Duplicates to open the window shown here.
3. Select Surname from the drop-down menu, then click on the Search button. This will display all records wheremore than one patient has the same surname. If you started with 10,000 records you’ll probably still haveabout 8,000 records on display.
4. Repeat the above steps using the First Name and DOB fields to progressively narrow the search. Whenfinished, if there are any duplicate records in the database they will be displayed on screen.
5. Highlight the relevant records and merge them using the Patients > Merge Patients menu item. Only tworecords can be merged at a time.
See the chapter on The Patients Menu for more information for more information on merging.

Menus Overview: The Billing MenuGenie Manual
© 2005-2019 Genie Solutions Pty Ltd36
3.4 The Billing Menu
Invoice (Ctrl+I)
Allows you to create an invoice for a patient or organisation. See the chapter on Invoicing for more information.
Receipt (Ctrl+R)Allows you to receipt a payment for a patient or organisation. See the chapter on Receipting for moreinformation.
Receipt by Invoice NumberThis allows you to receipt by searching for the invoice number rather than first finding the correct patient oraccount holder.
Receipt by BPAY Reference Number
Allows you to enter an account holder's BPAY CRN to receipt any outstanding debts for that account holder.
Account History (Ctrl+H)Allows you open the account history for a patient or organisation. See the chapter on Account History for moreinformation.
Quick HistoryThis will display a list of all items billed to the highlighted patient during the past two years, including the numberof times it has been billed and the date it was last billed. This is useful for checking Medicare item numberswhich are only permitted to be billed a certain number of times in any two year period.
IMC Invoice Wizard (Ctrl+Shift+I)
This allows you to create an invoice for ECLIPSE (online health fund claiming for inpatient services). This willonly be available to practices who have registered for ECLIPSE. To register for ECLIPSE, contact GenieSolutions. Those registered will have received a separate ECLIPSE manual at their install/training for ECLIPSEor you can access it through Special > Software Updates in the PDFs tab.
Accept DepositAllows you to accept deposits for a selected patient. See the chapter on Accepting a Deposit for moreinformation.
List DepositsAllows you to view all deposits that have been accepted and have not yet been applied to an invoice.

Menus Overview: The Billing MenuGenie Manual
© 2005-2019 Genie Solutions Pty Ltd 37
From this window you can modify the message that prints at the bottom of the deposit receipt by clicking on the Edit Receipt Message button, editing the message and clicking OK. To return to the default message,Alt+click on the Edit Receipt Message button. If you have macros enabled (see Macros), you can select themfrom the Macros drop-down menu.
Print Blank DB4 (Ctrl+L)Prints a blank DB4 form for the highlighted patient. This allows the doctor to fill in the item number to chargeduring or after the consult, and the patient can sign the form. This does not create any billing records in Genie.The invoice to Medicare would still need to be added to Genie at a later time. Since you already have a signedDB4, you would deselect the Medicare DB4 checkbox in Printing Preferences (File > Printing Preferences) toavoid printing out an unnecessary extra DB4 form.
Print Blank DB4 with Invoice (Ctrl+U)Prints a blank DB4 form and also creates the invoice. The invoice will have no items on it until the doctor selectsthe item and ticks the box to Fill Blank DB4 in the window that comes up when they save out of the ClinicalWindow. For more information on how this works see Specifying a Fee to Charge in the Clinical section.
If the doctor does not use this feature, you would select Billing > Fill Blank DB4 Forms to enter the itemnumber to be charged, as per whatever the doctor has written on the blank DB4.
Fill Blank DB4 Forms
Used in conjunction with 'Print Blank DB4 with Invoice', as described above. Selecting this option will open a listof all invoices awaiting entry of an item number. Double-click on each item to open and enter the item number.Only one item number can be entered from this window.
Print Pathology DB4This prints a pathology DB4 form to be sent to the pathology lab. For example, for a specimen request so thatthe lab has a signed DB4 form for the patient.

Menus Overview: The Billing MenuGenie Manual
© 2005-2019 Genie Solutions Pty Ltd38
Edit Account TypesAllows you to edit the Account Types available for assigning to patients' accounts.
Account types that cannot be edited are greyed out, however, all other account types names are editable.
In addition to editing existing account types, it is possible to create new account types by clicking on the Addbutton and entering the new account type name. In the example below, we have used the doctor's initials tocreate an account type for the private fee (s)he charges.
Once you have created the new account type, you should use the Increase Fees function to set the fees.
Note: You should ensure that no one is attempting to do any billing when you attempt to make changesto account types.
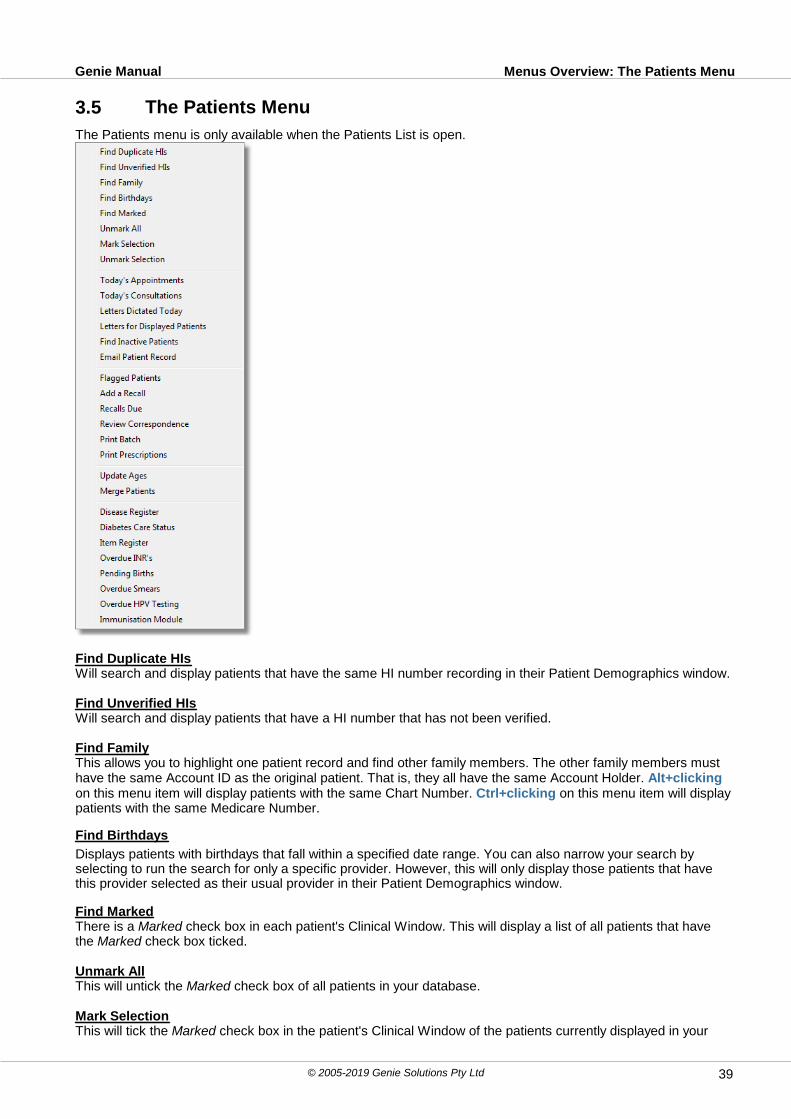
Menus Overview: The Patients MenuGenie Manual
© 2005-2019 Genie Solutions Pty Ltd 39
3.5 The Patients Menu
The Patients menu is only available when the Patients List is open.
Find Duplicate HIsWill search and display patients that have the same HI number recording in their Patient Demographics window.
Find Unverified HIsWill search and display patients that have a HI number that has not been verified.
Find FamilyThis allows you to highlight one patient record and find other family members. The other family members musthave the same Account ID as the original patient. That is, they all have the same Account Holder. Alt+clickingon this menu item will display patients with the same Chart Number. Ctrl+clicking on this menu item will displaypatients with the same Medicare Number.
Find Birthdays
Displays patients with birthdays that fall within a specified date range. You can also narrow your search byselecting to run the search for only a specific provider. However, this will only display those patients that havethis provider selected as their usual provider in their Patient Demographics window.
Find MarkedThere is a Marked check box in each patient's Clinical Window. This will display a list of all patients that havethe Marked check box ticked.
Unmark AllThis will untick the Marked check box of all patients in your database.
Mark SelectionThis will tick the Marked check box in the patient's Clinical Window of the patients currently displayed in your

Menus Overview: The Patients MenuGenie Manual
© 2005-2019 Genie Solutions Pty Ltd40
Patients List. This will give the Marked field a value of TRUE for the displayed records.
You can select the patients that you wish to mark by highlighting them and using the Record > Use Selectedfunction. This can be useful when performing searches that require multiple searches on the patient database.You can search for the marked patients when performing a search by selecting 'Marked', 'is equal to', 'True'. Note: Before using the Marked field as a Search parameter, you should first perform an unmark records(Patients > Unmark All) in case there are records already marked from a previous search.
Unmark SelectionThis will untick the Marked check box in the patient's Clinical Window of the patients currently displayed in yourPatients List.
Todays AppointmentsDisplays a list of patients who have an appointment on a date specified by you. You can also narrow your searchby selecting to run the search for only a specific provider. You can also choose to only display procedures only.This list can be used to aid in typing reply letters.
Todays ConsultationsDisplays a list of patients who have consultation records on a date or date range specified by you. You can alsonarrow your search by selecting to run the search for only a specific provider.
The next window displays a list of patients with the date of the last letter to their referring doctor, if applicable.
The Letter Dictated box will be ticked if the doctor ticked this in the Add Consult window (see AddingConsultation Notes). This window also displays whether the letter has been Reviewed/Printed (see ReviewingCorrespondence) and whether it has been sent successfully via a third party, if applicable. Clicking on thePatients List button will display these records in the Patients List, allowing you to examine each one, if desired.
Letters Dictated TodayDisplays a list of patients who have had a consultation and a letter dictated (as governed by the Letter Dictatedbox being ticked in the consultation note) on the date specified. This aids in management of typing dictated replyletters.
Letters for Displayed Patients
Opens the Outgoing Letters window displaying any letters for the patients listed in the Patients List.

Menus Overview: The Patients MenuGenie Manual
© 2005-2019 Genie Solutions Pty Ltd 41
Find Inactive PatientsThis will find all patients not seen within a certain time period (according to the Last Seen date) and allow you tomark them as inactive. See Archiving for more information.
Note: If they are subsequently invoiced, they will be automatically activated again. Making them inactivewill prevent recalls and merged letters being sent to them.
Email Patient Record
Note: The Email Module must be configured in Genie in order for you to be able to email patient records.
This item allows you to email the Clinical Window contents of the highlighted patient to another Genie user aslong as you have them in your Address Book. It will create an email in Genie’s email module’s Outbox with asubject of “Genie Transfer*-Record of X”.When the intended recipient downloads the email into Genie, theattachments are automatically moved into a folder called 'Export' within the Genie folder.
If you are the recipient of an email with a subject such as the above, you can import the patient record byopening the Patients list, selecting File > Import, and clicking on the Genie Format button.
If you have downloaded the email into another email program, you can still import the patient record by creatinga folder called 'Export' in the Genie folder, and then saving the attachments into this folder. This method couldbe used as part of a referral to a specialist, or to transfer a patient record from one data file to a remote data fileused by someone in the same practice.
Limitations:The transfer can only be made between two Genie data files. It does not work with other software programs.The procedure doesn’t check for a pre-existing record when importing the email attachments, so you couldend up with duplicated patient records.
Flagged PatientsDisplays all patients who have been flagged, whether or not they are currently overdue for their flagged visit.
Right-clicking on a patient will give you the option to unflag them or to access their Clinical Window. Highlightingthe patient(s) and clicking on the Display in Patients List button will display them in the Patients List.
Add a Recall
Allows you to add a recall for the highlighted patient. See the chapter on Recalls for information.
Recalls DueDisplays all recalls that are due. See the chapter on Recalls for information.
Review CorrespondenceOpens the Outgoing Letters window. See the chapter on Review Correspondence for information.
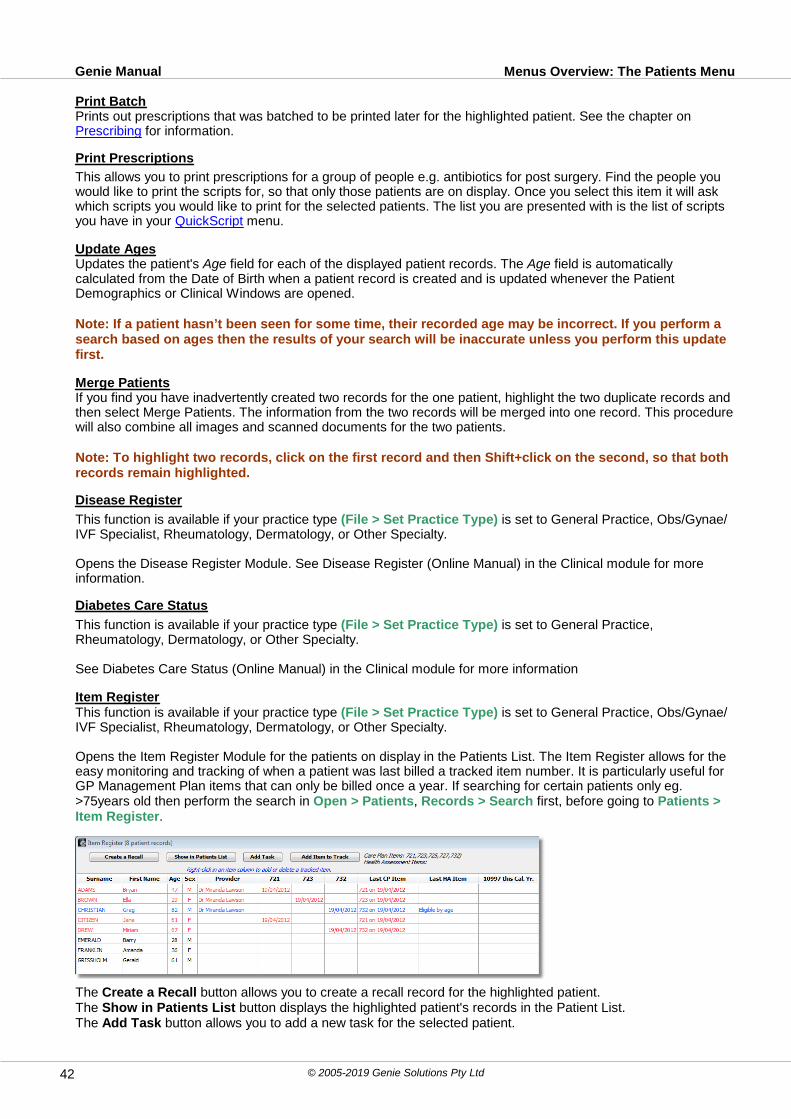
Menus Overview: The Patients MenuGenie Manual
© 2005-2019 Genie Solutions Pty Ltd42
Print Batch Prints out prescriptions that was batched to be printed later for the highlighted patient. See the chapter on Prescribing for information.
Print Prescriptions
This allows you to print prescriptions for a group of people e.g. antibiotics for post surgery. Find the people youwould like to print the scripts for, so that only those patients are on display. Once you select this item it will askwhich scripts you would like to print for the selected patients. The list you are presented with is the list of scriptsyou have in your QuickScript menu.
Update AgesUpdates the patient's Age field for each of the displayed patient records. The Age field is automaticallycalculated from the Date of Birth when a patient record is created and is updated whenever the PatientDemographics or Clinical Windows are opened.
Note: If a patient hasn’t been seen for some time, their recorded age may be incorrect. If you perform asearch based on ages then the results of your search will be inaccurate unless you perform this updatefirst.
Merge PatientsIf you find you have inadvertently created two records for the one patient, highlight the two duplicate records andthen select Merge Patients. The information from the two records will be merged into one record. This procedurewill also combine all images and scanned documents for the two patients.
Note: To highlight two records, click on the first record and then Shift+click on the second, so that bothrecords remain highlighted.
Disease Register
This function is available if your practice type (File > Set Practice Type) is set to General Practice, Obs/Gynae/IVF Specialist, Rheumatology, Dermatology, or Other Specialty.
Opens the Disease Register Module. See Disease Register (Online Manual) in the Clinical module for moreinformation.
Diabetes Care Status
This function is available if your practice type (File > Set Practice Type) is set to General Practice,Rheumatology, Dermatology, or Other Specialty.
See Diabetes Care Status (Online Manual) in the Clinical module for more information
Item RegisterThis function is available if your practice type (File > Set Practice Type) is set to General Practice, Obs/Gynae/IVF Specialist, Rheumatology, Dermatology, or Other Specialty.
Opens the Item Register Module for the patients on display in the Patients List. The Item Register allows for theeasy monitoring and tracking of when a patient was last billed a tracked item number. It is particularly useful forGP Management Plan items that can only be billed once a year. If searching for certain patients only eg.>75years old then perform the search in Open > Patients, Records > Search first, before going to Patients >Item Register.
The Create a Recall button allows you to create a recall record for the highlighted patient.The Show in Patients List button displays the highlighted patient's records in the Patient List.The Add Task button allows you to add a new task for the selected patient.

Menus Overview: The Patients MenuGenie Manual
© 2005-2019 Genie Solutions Pty Ltd 43
The Add Item to Track button allows you to add item numbers to the Register in order for them to be tracked.
Alternatively, you can right-click in the column of an item number and add or delete items.
The date provided for each tracked item number refers to the last time this item number was billed to thatpatient. The Item Register is particularly useful for allowing you to quickly see when a particular patient was lastbilled that item number. Right-clicking in the Provider column will give you the option to change the UsualProvider for this patient.
Overdue INRsThis function is available if your practice type (File > Set Practice Type) is set to General Practice or Obs/Gynae/IVF Specialist.
Displays a list of patients that are overdue for their INR. This is determined by the date that is entered in the NextTest date field in the INR Control window in the Clinical Window (Tools > INR Control).
Pending BirthsThis function is available if your practice type (File > Set Practice Type) is set to General Practice or Obs/Gynae/IVF Specialist. See The Pending Births List in the Obstetrics History section for more information.
Overdue SmearsThis function is available if your practice type (File > Set Practice Type) is set to General Practice or Obs/Gynae/IVF Specialist.
Displays all female patients aged between 20 and 70 (exclusive), who have not been marked as Inactive, andwho have not been marked as Don't Recall for smears in the Clinical Window, and who have not had a recordedpap smear in the past 2 years. For Pap Smears that need to be recalled more frequently than every two years,use the Recall system.Note: This function is available if you are either downloading pap smear results electronically, ormanually entering the dates of pap smears in the Clinical Window.
Overdue HPV Testing
This function is available if your practice type (File > Set Practice Type) is set to General Practice or Obs/Gynae/IVF Specialist.
Selecting this option will produce a prompt asking you to select which patients you would like to display. Geniewill either display all female patients between 25 and 74 (inclusive) who are overdue for HPV testing; or allfemale patients between 70 and 74 (inclusive), as they are eligible for their exit test.
Ticking the Don't Recall for HPV checkbox in a patient's Clinical window will cause Genie to omit that patientfrom both displayed lists.

Menus Overview: The Patients MenuGenie Manual
© 2005-2019 Genie Solutions Pty Ltd44
Immunisation ModuleThis function is available if your practice type (File > Set Practice Type) is set to General Practice.
This opens the Immunisation window allows you to produce a manual ACIR report. For further information onACIR online, see ACIR Immunisations in the Practice Management section.
Orthopaedic Score Analysis
This function is available if your practice type (File > Set Practice Type) is set to Orthopaedic Surgery.
Allows you to search for patients in a period of time who have a specific Score Type.
3.6 The Appts Menu
The Appts menu is only available when the Appointment Book is open.
Appointment Preferences
Allows you to set your preferences for the Appointment Book. See Appointment Preferences.
Sync with Outlook and iCal
Genie's Appointment Book, Tasks List and Address Book can be synchronised with Apple's iCal and Address

Menus Overview: The Appts MenuGenie Manual
© 2005-2019 Genie Solutions Pty Ltd 45
Book applications, or with Outlook on a Windows computer. As these applications can be either published to theweb, or subsequently synced to a PDA, it is possible for you to access your appointments and To Do lists fromanywhere; synchronisation can occur in both directions. That is, an appointment created or modified in iCal orOutlook is subsequently created or modified in Genie. For more information please refer to the Synchronisingwith iCal/Outlook section in the Clinical module.
Transcription Export and BDT ExportOpens the window which allows you to export documents to be typed by Global Transcription Services, NTSTranscription, Ozescribe, Syberscribe, Pacific Solutions, Medical TranscriptionPlus, AnsellMT, ProfessionalTranscription Solutions or BDT. For more information on these services, please refer to Transcription Servicessection.
Find Appointment (Ctrl+F)Allows you to search for a specific patient, and locate all of their past and future appointments.
This is a useful feature if you would like to find out if a particular patient has an upcoming appointment to see adoctor, as well as allowing you to see when they last had an appointment. If the patient is a new patient that hasyet to be entered into the database, ie. has a non-patient appointment in brown text, then you can still search thisby entering the name in the Notes field of the search box.

Menus Overview: The Appts MenuGenie Manual
© 2005-2019 Genie Solutions Pty Ltd46
Find Appointments for Patient (Ctrl+G)
Locates all appointments for the selected patient in the Appointment Book.
New Patient
Opens a new Patient Demographics window.
Copy PatientCopies the surname, address and account holder details of the highlighted patient into a new PatientDemographics window. This is used to create new records for multiple members of the same family as it savesyou from having to re-enter demographic information (providing that they all share the same address, etc).
Change DateAllows you to change the date of the highlighted patient's appointment. For more information, please refer to Moving/Copying Appointments.
Deleted AppointmentsAllows you to view deleted appointments from the past 7 days and restore any appointments that may have beeninadvertently deleted. For more information, please refer to Deleting/Undeleting Appointments.
Appts Type ReportProduces a printed report by Appointment Type for any given day or period of time.The report produces a numerical count of each appointment type where the appointment cell contains either apatient or non-patient appointment. This can also be accessed by going into File > Maintenance & Reports,and clicking on the Other Reports tab, then Alt+clicking on Appointments Report.
Check Forward ReferralsThis allows you to check that future appointments in a specified time frame have valid referrals.
Check Missing InvoicesThis will check that all appointments for the specified date range (unless marked as DNA or Cancelled) have aninvoice in their Account History with the corresponding date of service.
Check Missing ConsultsThis will check that all appointments for the day have either a) a consultation record with notes entered into the History field or b) an antenatal visit recorded in their current pregnancy record.
SMS Reminders (Ctrl+Shift+S)Allows you to send an SMS reminder to patients regarding their appointment times. Please refer to AppointmentReminders for the setup and use of this function.
Get SMS Replies (Ctrl+Shift+G)Prompts Genie to search for any replies to previously sent SMS reminders. Any replies will then appear in the Confirmed column of the doctor's individual tab in the Appointment Book.
Toggle SMS Replies (Ctrl+Shift+Y)Can be used in the 'All' view of the Appointment Book to toggle between the patient's name and their SMS reply.
Email Reminders
Allows you to send an email reminder to patients regarding their appointment times. Please refer to AppointmentReminders for the setup and use of this function.
Pending ProceduresDisplays a list of all patients with Procedures that have not yet been linked to an appointment time.
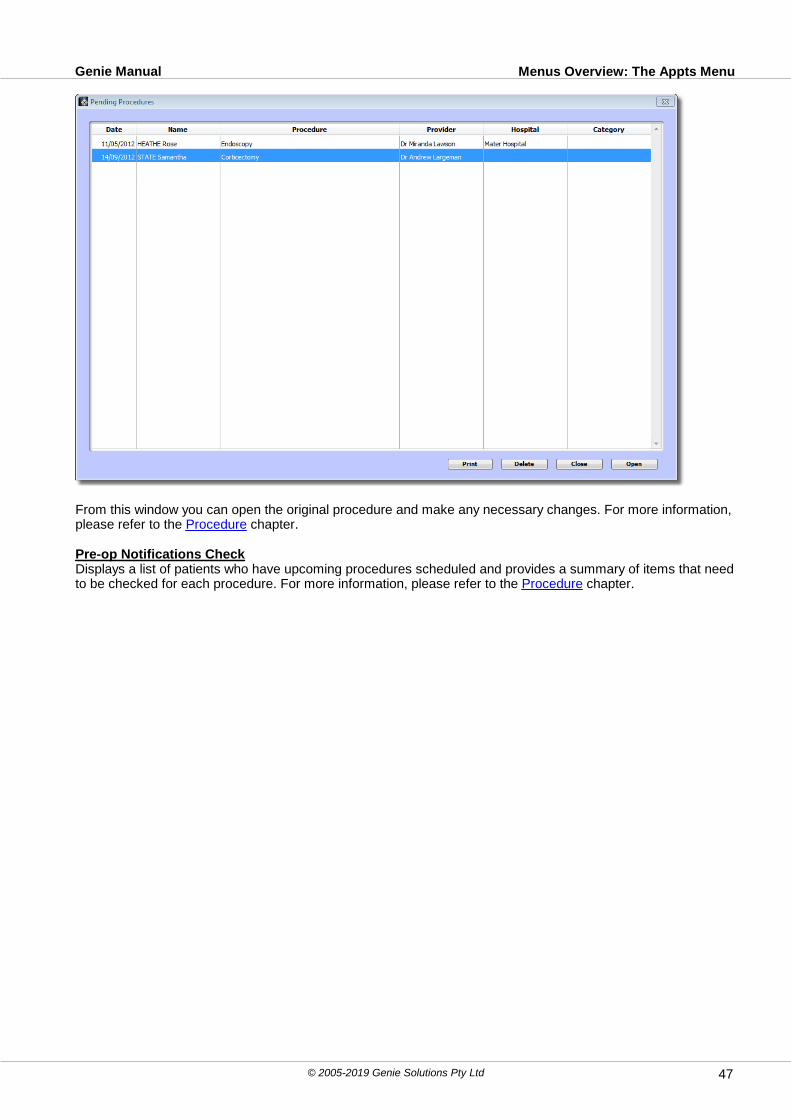
Menus Overview: The Appts MenuGenie Manual
© 2005-2019 Genie Solutions Pty Ltd 47
From this window you can open the original procedure and make any necessary changes. For more information,please refer to the Procedure chapter.
Pre-op Notifications CheckDisplays a list of patients who have upcoming procedures scheduled and provides a summary of items that needto be checked for each procedure. For more information, please refer to the Procedure chapter.

Menus Overview: The Appts MenuGenie Manual
© 2005-2019 Genie Solutions Pty Ltd48
Print Theatre ListPrints a list of patients booked in for procedures with a specific hospital and provider. For more informationplease refer to Printing Theatre Lists.
Waiting for CancellationDisplays a list of patients with their status marked as Waiting for Cancellation. For more information, please referto Cancellation List.
Add a RecallAllows you to add a recall for the patient selected. For more information, refer to the Recalls chapter.
Recalls DueProvides a list of patients with recalls overdue or due within 30 days. For more information, refer to the Recallschapter.
Review CorrespondenceOpens up the Patient Correspondence window. This can also be accessed via the Appointment Book, using the
Patient Correspondence icon . For more information on reviewing correspondence, please refer toReviewing Correspondence.
Pending BirthsThis function is available if your practice type (File > Set Practice Type) is set to General Practice or Obs/Gynae/IVF Specialist. See The Pending Births List in the Obstetrics History section for more information.
3.7 The Special Menu
ImagePro Control (Ctrl+S)
Opens the ImagePro Control window. For more information, please refer to the ImagePro chapter.
Software UpdatesConnects you to the Genie Web Server to check what updates are available relevant to your state, operatingsystem and Genie version. When you first open the Software Updates window, a message will appear statingthat it is checking for updates. It may take some time for the updates list to load as your computer iscommunicating with our web server. Once the list has loaded, if an update that you require is not listed it meansit is not yet available for your state, operating system or Genie version.
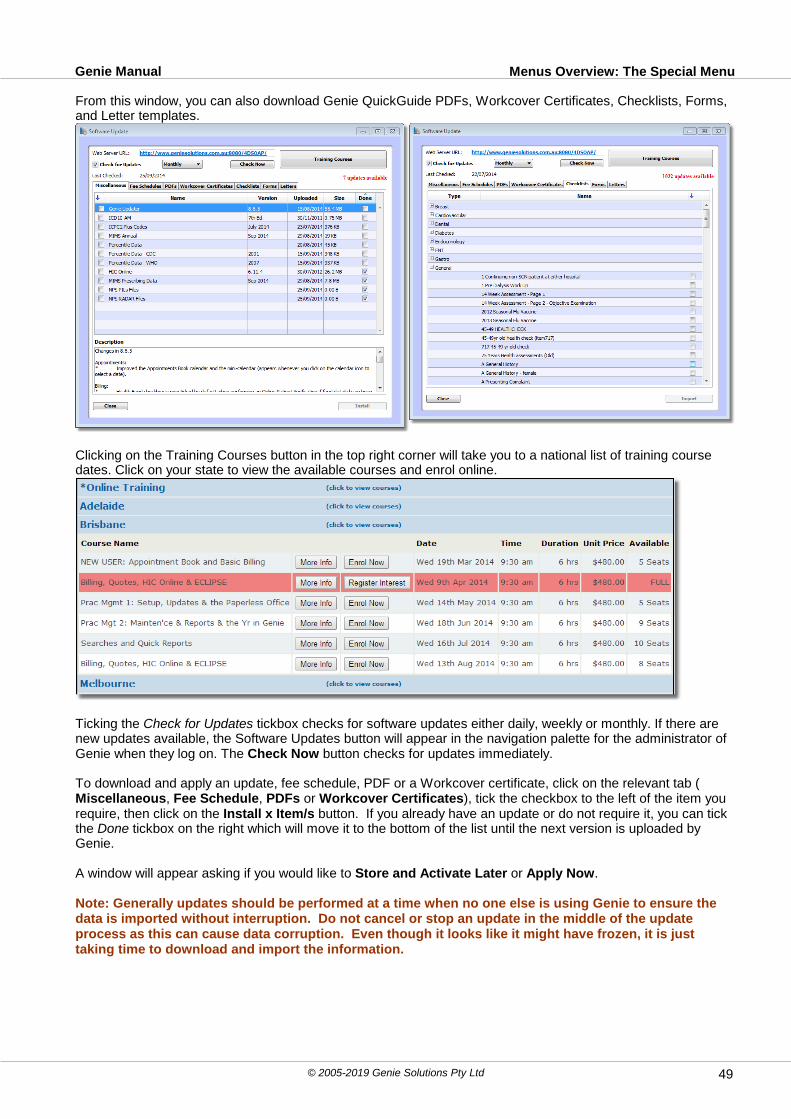
Menus Overview: The Special MenuGenie Manual
© 2005-2019 Genie Solutions Pty Ltd 49
From this window, you can also download Genie QuickGuide PDFs, Workcover Certificates, Checklists, Forms,and Letter templates.
Clicking on the Training Courses button in the top right corner will take you to a national list of training coursedates. Click on your state to view the available courses and enrol online.
Ticking the Check for Updates tickbox checks for software updates either daily, weekly or monthly. If there arenew updates available, the Software Updates button will appear in the navigation palette for the administrator ofGenie when they log on. The Check Now button checks for updates immediately.
To download and apply an update, fee schedule, PDF or a Workcover certificate, click on the relevant tab (Miscellaneous, Fee Schedule, PDFs or Workcover Certificates), tick the checkbox to the left of the item yourequire, then click on the Install x Item/s button. If you already have an update or do not require it, you can tickthe Done tickbox on the right which will move it to the bottom of the list until the next version is uploaded byGenie.
A window will appear asking if you would like to Store and Activate Later or Apply Now.
Note: Generally updates should be performed at a time when no one else is using Genie to ensure thedata is imported without interruption. Do not cancel or stop an update in the middle of the updateprocess as this can cause data corruption. Even though it looks like it might have frozen, it is justtaking time to download and import the information.
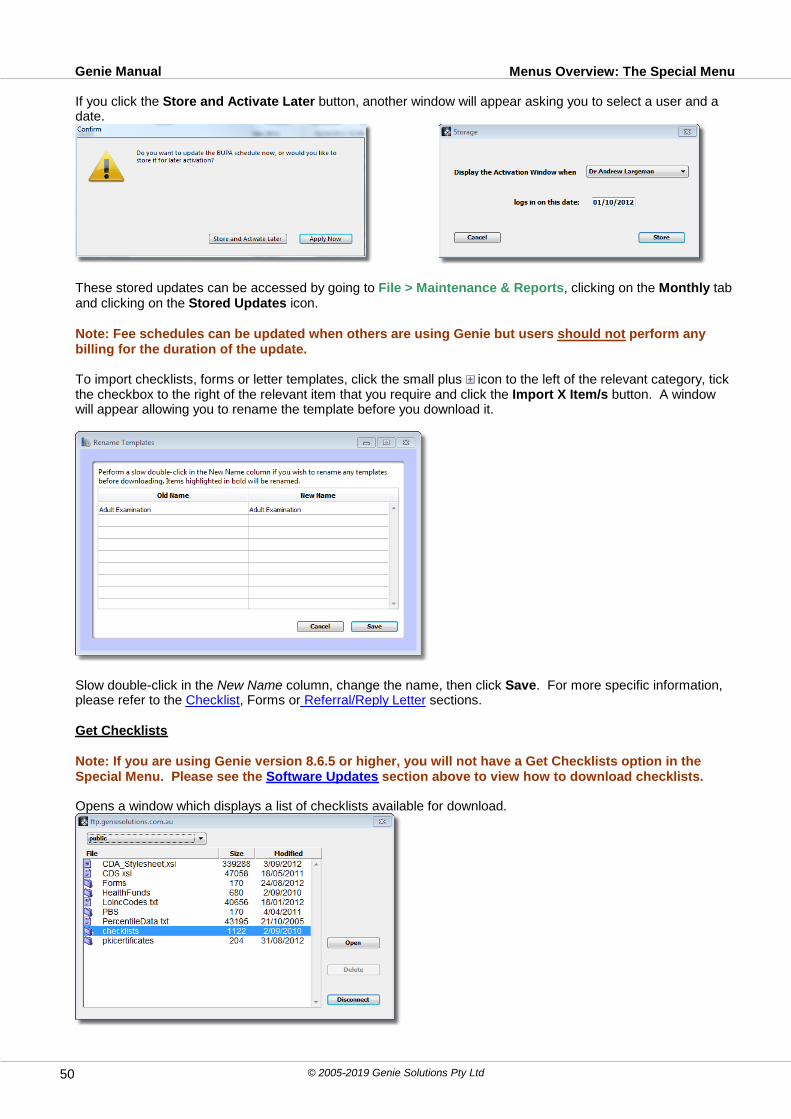
Menus Overview: The Special MenuGenie Manual
© 2005-2019 Genie Solutions Pty Ltd50
If you click the Store and Activate Later button, another window will appear asking you to select a user and adate.
These stored updates can be accessed by going to File > Maintenance & Reports, clicking on the Monthly taband clicking on the Stored Updates icon.
Note: Fee schedules can be updated when others are using Genie but users should not perform anybilling for the duration of the update.
To import checklists, forms or letter templates, click the small plus icon to the left of the relevant category, tickthe checkbox to the right of the relevant item that you require and click the Import X Item/s button. A windowwill appear allowing you to rename the template before you download it.
Slow double-click in the New Name column, change the name, then click Save. For more specific information,please refer to the Checklist, Forms or Referral/Reply Letter sections.
Get Checklists
Note: If you are using Genie version 8.6.5 or higher, you will not have a Get Checklists option in theSpecial Menu. Please see the Software Updates section above to view how to download checklists.
Opens a window which displays a list of checklists available for download.

Menus Overview: The Special MenuGenie Manual
© 2005-2019 Genie Solutions Pty Ltd 51
Double-click on the Checklist folder, and select the Checklist you wish to download.
This then makes the Checklist available for use in a patient's Clinical Window. For more information, pleaserefer to the Checklists section.
Update Genie Registration
Allows for online registration of the Genie Software. When your registration is due, select this option and you willbe presented with a Registration window. Click on the Register button and your registration will be renewed (thisis provided your registration fees have been paid).
Purchase SMS Credits
Takes you to the Genie Online Shop to purchase SMS credits for SMS Appointment Reminders. These will beallocated for use straight away.
Genie Snacks
This feature is available for users on version 8.6.5 or higher. It opens the Genie Snacks window so that you canreview information regarding new features and program changes in subsequent versions of Genie. The firsttime you open Genie after updating, this window will appear:
If you do not have time to view the changes, click the Remind Me Later option, which will open this window thenext time you log into Genie. Alternatively, you can disable this prompt by clicking the Do Not Show option.The Hide Until Next Update button is selected by default and will hide the Genie Snack window until a newupdate is applied or it is accessed via Special > Genie Snacks.
Menus Overview: The Special MenuGenie Manual
© 2005-2019 Genie Solutions Pty Ltd52
Clicking on a row below the version number will display information about the change or added feature. Clickingon the Open in External Browser button will open the highlighted change in your default web browser.
Genie Web SiteTakes you directly to the Genie website.
Note: If this menu item, or the Online Manual menu item below does not do anything when selected, thisprobably means that your default web browser has issues with Genie. To rectify this, you will need tochange your default web browser.
Online ManualOpens the online version of the Genie Manual.
Random Tip
Displays random tips to let you learn something new about Genie.
Training Courses
Takes you to our online booking system for the small group training sessions available across Australia.
Remote Support
For use under instruction from Genie Solutions Support.
Onsite Visit Request
Takes you to our online booking system for customised onsite training with a Genie trainer.

Part
IVSetting Up Genie
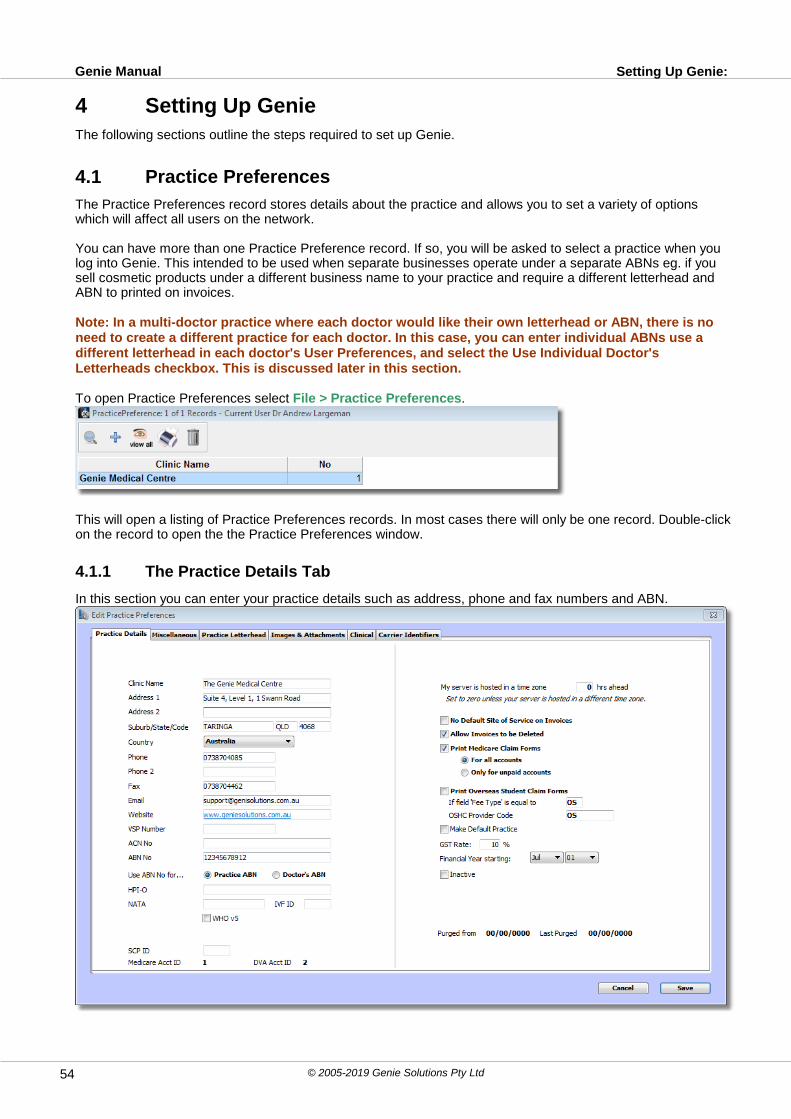
Setting Up Genie: Genie Manual
© 2005-2019 Genie Solutions Pty Ltd54
4 Setting Up GenieThe following sections outline the steps required to set up Genie.
4.1 Practice Preferences
The Practice Preferences record stores details about the practice and allows you to set a variety of optionswhich will affect all users on the network.
You can have more than one Practice Preference record. If so, you will be asked to select a practice when youlog into Genie. This intended to be used when separate businesses operate under a separate ABNs eg. if yousell cosmetic products under a different business name to your practice and require a different letterhead andABN to printed on invoices.
Note: In a multi-doctor practice where each doctor would like their own letterhead or ABN, there is noneed to create a different practice for each doctor. In this case, you can enter individual ABNs use adifferent letterhead in each doctor's User Preferences, and select the Use Individual Doctor'sLetterheads checkbox. This is discussed later in this section.
To open Practice Preferences select File > Practice Preferences.
This will open a listing of Practice Preferences records. In most cases there will only be one record. Double-clickon the record to open the the Practice Preferences window.
4.1.1 The Practice Details Tab
In this section you can enter your practice details such as address, phone and fax numbers and ABN.

Setting Up Genie: Practice PreferencesGenie Manual
© 2005-2019 Genie Solutions Pty Ltd 55
VSP NumberVaccination Service Provider number.
ACN Number
If you are a registered Company then enter your ACN here.
ABN NumberIf you practice as a solo practitioner or a partnership, you should select the Practice ABN radio button. If yourpractice is an associateship, you should select the Doctor's ABN radio button. Genie will then use the ABNnumber in each doctor's User Preferences on invoices.
NATA & IVF IDUsed in IVF clinics. Practice Type set to Obs/Gynae/IVF.
SCP IDRequired for practices who perform pathology services for which there is an associated MBS item number. Leave this blank if not relevant.
HPI-OHealthcare Provider Identifier – Organisation. Required for eHealth purposes.
Medicare Acct IDDisplays the account ID for Medicare.
DVA Acct IDDisplays the account ID for DVA.
My server is hosted in a time zone x hrs ahead
This is used if your server is hosted in a different time zone. It will adjust the appointment book and service timesappropriately.
No Default Site of Service on Invoices
Forces the users to select a site of service when invoicing, to avoid billing to the wrong provider number for aprovider that has multiple sites of service.
Allow Invoices To Be DeletedOnly the Administrator can tick this option. If this is not ticked, the Delete button will not work in the AccountHistory window.
Print Medicare Claim FormsIf you select this option, Genie will ask if you would like to print a claim form for the patient whenever you invoicea patient privately. These are the claim forms that the patient would usually fill in at their local Medicare office,NOT DB4 claim forms for bulk-billed patients. To get a supply of these forms (A4/landscape), please contactyour Medicare office. You would normally select the Only for Unpaid Accounts radio button. If the patient hasfully paid the account, they do not need a claim form.
Please ensure that you are using the current version of Medicare Claim Form. The version on the bottom righthand side of the form is shown as: PC-1.06.08.10.
Make Default Practice
Allows you to select which of the practices in this list is the default practice. This option will only appear forpractices that are not marked as the default.
Print Overseas Student Claim FormsThis option is for University Medical Centres. It prints the appropriate claim form for an invoice for overseasstudents. The fields below this option allow you to specify the Fee Type and Worldcare Provider Code thatprompt Genie to print these forms.
GST RateEnter the GST rate to apply to items selected as GST applicable.
Financial Year Starting
All financial reports created on a 'This financial year' or 'Last financial year' basis will be calculated using thetimeframe entered here.
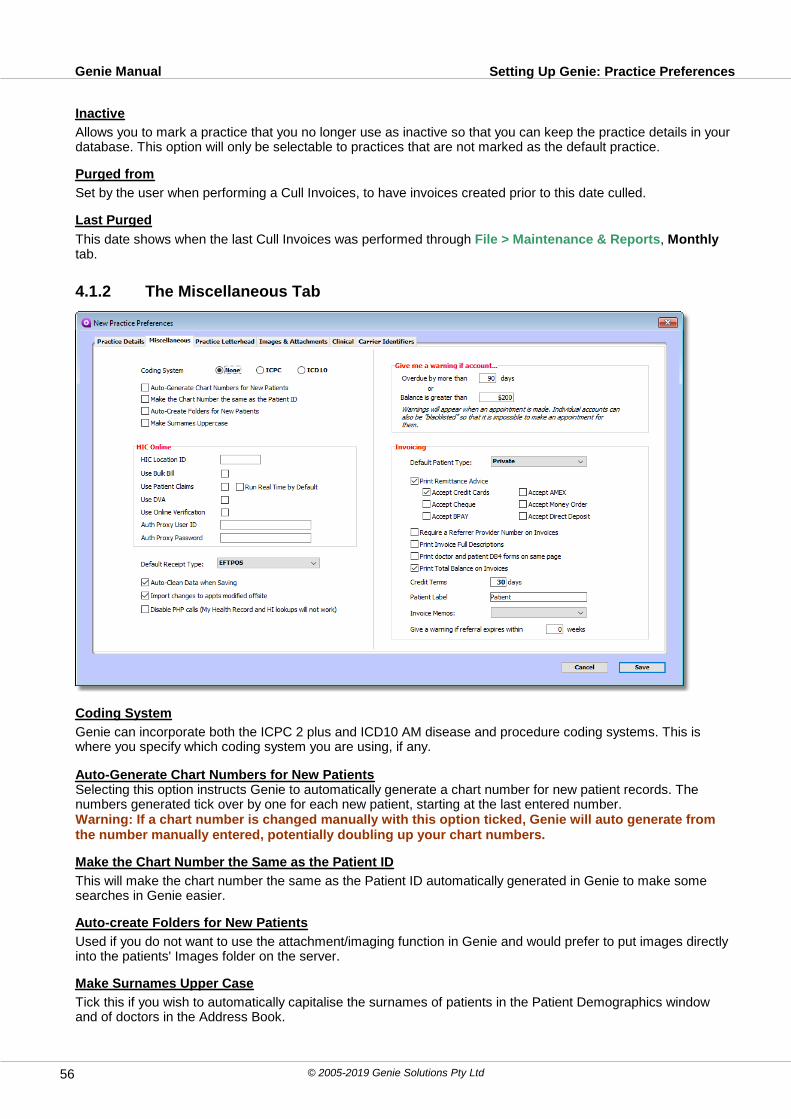
Setting Up Genie: Practice PreferencesGenie Manual
© 2005-2019 Genie Solutions Pty Ltd56
Inactive
Allows you to mark a practice that you no longer use as inactive so that you can keep the practice details in yourdatabase. This option will only be selectable to practices that are not marked as the default practice.
Purged from
Set by the user when performing a Cull Invoices, to have invoices created prior to this date culled.
Last Purged
This date shows when the last Cull Invoices was performed through File > Maintenance & Reports, Monthlytab.
4.1.2 The Miscellaneous Tab
Coding System
Genie can incorporate both the ICPC 2 plus and ICD10 AM disease and procedure coding systems. This iswhere you specify which coding system you are using, if any.
Auto-Generate Chart Numbers for New PatientsSelecting this option instructs Genie to automatically generate a chart number for new patient records. Thenumbers generated tick over by one for each new patient, starting at the last entered number.Warning: If a chart number is changed manually with this option ticked, Genie will auto generate fromthe number manually entered, potentially doubling up your chart numbers.
Make the Chart Number the Same as the Patient ID
This will make the chart number the same as the Patient ID automatically generated in Genie to make somesearches in Genie easier.
Auto-create Folders for New Patients
Used if you do not want to use the attachment/imaging function in Genie and would prefer to put images directlyinto the patients' Images folder on the server.
Make Surnames Upper Case
Tick this if you wish to automatically capitalise the surnames of patients in the Patient Demographics windowand of doctors in the Address Book.

Setting Up Genie: Practice PreferencesGenie Manual
© 2005-2019 Genie Solutions Pty Ltd 57
HIC Location IDThis is the ID that Medicare Australia uses to identify you when using HIC Online. It is also your Genie customerreference number that you will be asked to provide when using Genie Solutions Support. It is displayed in bluetext the top right hand corner of your appointment book.Use Bulk Bill - tick if you would like to use online bulk bill claiming.Use Patient Claims - tick if you would like to use online patient claiming. Run Real Time By Default - this willcreate an online session at the time of receipting a patient claim. See Patient Claims.Use DVA - tick if you would like to use online DVA claiming.Use Online Verification - tick if you would like to verify patients details online with HIC.Auth Proxy User ID & Password - used if you login to a proxy server before accessing the internet. Forinformation on how to set up the proxy server for HIC online transmissions, see HIC Online Installation - Set Upfor a Proxy Server (Online Manual).
Default Receipt TypeWhen receipting direct from an invoice this will allocate the payment amount to the type selected, e.g. if themajority of your payments are made by EFTPOS then you would select this as your default receipt type.
Auto-Clean Data when Saving
This performs the same function as the Cleanup Database in Maintenance & Reports except that it happenstransparently at the moment each record is saved. The performance impact should be negligible but it can beturned off just in case it does impact very busy practices.Note: As this should reduce the incidence of index and database corruption, it is highly recommendedthat you select this option.
Import changes to appts modified offsite
This allows/disallows the importation of changes made offsite to existing appointments. An example of thiswould be the doctor going offsite to a nursing home, and making additional appointments in offsite logging modewhile (s)he is there. This is allowed by default. If you don't want appointment modifications made offsite to bechanged in the main data file, you should untick this option. For more information on offsite logging, please seethe Offsite Logging chapter in this manual.
Give me a warning if account...In this section you can specify an overdue amount or an overdue number of days, after which Genie gives you awarning when an appointment is made. The warning consists of a dollar sign inserted in front of the patient'sname in the Appointment Book. This gives you an opportunity to address the overdue account while you havethe patient on the phone.
Default Patient TypeThis is the Account Type that you would like to be automatically applied to new patient records e.g. if you mostlyprivate bill, select private or AMA. If you mostly bulk-bill, select Bulk Bill. You can always change the patient's Account Type drop-down when completing their new record.
Print Remittance Advice
This checkbox allows you to toggle whether the remittance advice panel appears at the bottom of printedinvoices. The six checkboxes below this dictate which payment methods appear on the remittance advice:
Selecting Accept BPAY will print the BPAY Biller Code specified for the doctor's default bank account (formore information, see the Bank Accounts section of this manual), as well as the BPAY CRN specified in theaccount holder's record (Open > Account Holders). Selecting Accept Direct Deposit will print the Account Name, BSB, and Account Number specified for thedoctor's default bank account.The other options print as checkboxes in the remittance advice section for the patient to complete themselves.
Require a Referrer Provider Number on Invoices
Ticking this prevents you from creating an invoice where the referring doctor has no provider number entered intheir Address Book entry. If ticked, the user will be prompted to enter a valid provider number when invoicingpatients with this referring doctor. Note: This check will always be performed for Online Claiming.
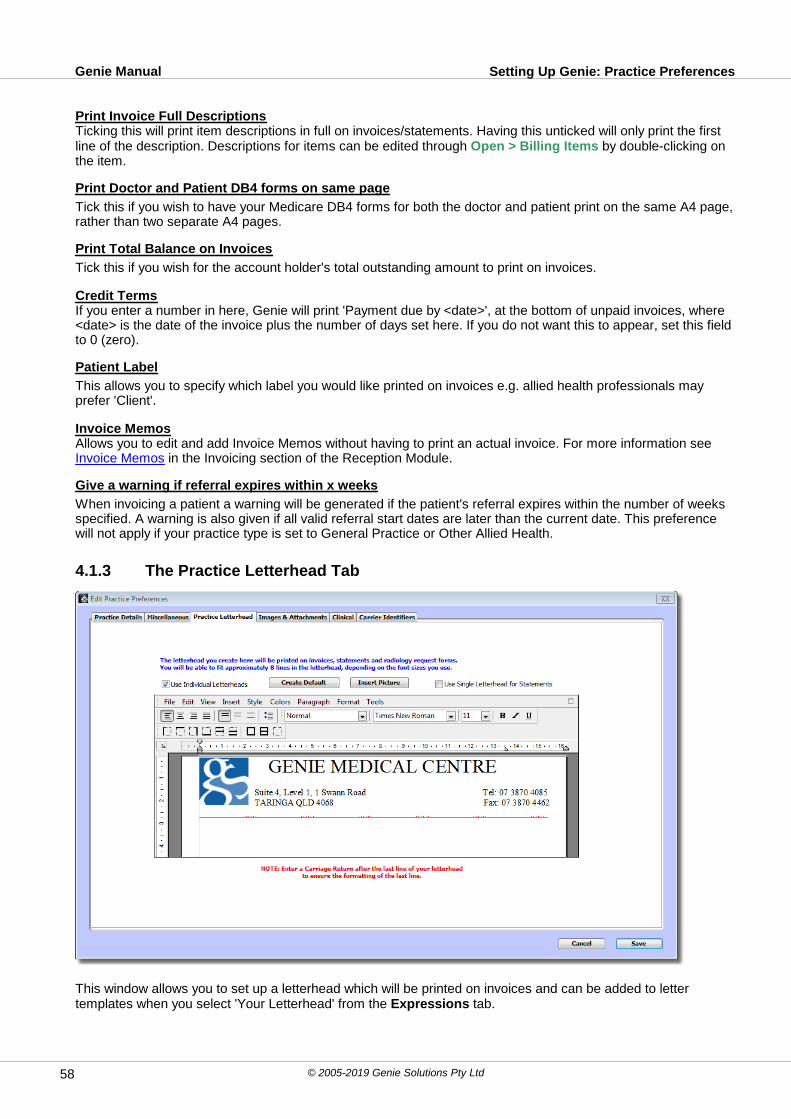
Setting Up Genie: Practice PreferencesGenie Manual
© 2005-2019 Genie Solutions Pty Ltd58
Print Invoice Full DescriptionsTicking this will print item descriptions in full on invoices/statements. Having this unticked will only print the firstline of the description. Descriptions for items can be edited through Open > Billing Items by double-clicking onthe item.
Print Doctor and Patient DB4 forms on same page
Tick this if you wish to have your Medicare DB4 forms for both the doctor and patient print on the same A4 page,rather than two separate A4 pages.
Print Total Balance on Invoices
Tick this if you wish for the account holder's total outstanding amount to print on invoices.
Credit TermsIf you enter a number in here, Genie will print 'Payment due by <date>', at the bottom of unpaid invoices, where<date> is the date of the invoice plus the number of days set here. If you do not want this to appear, set this fieldto 0 (zero).
Patient Label
This allows you to specify which label you would like printed on invoices e.g. allied health professionals mayprefer 'Client'.
Invoice MemosAllows you to edit and add Invoice Memos without having to print an actual invoice. For more information see Invoice Memos in the Invoicing section of the Reception Module.
Give a warning if referral expires within x weeks
When invoicing a patient a warning will be generated if the patient's referral expires within the number of weeksspecified. A warning is also given if all valid referral start dates are later than the current date. This preferencewill not apply if your practice type is set to General Practice or Other Allied Health.
4.1.3 The Practice Letterhead Tab
This window allows you to set up a letterhead which will be printed on invoices and can be added to lettertemplates when you select 'Your Letterhead' from the Expressions tab.

Setting Up Genie: Practice PreferencesGenie Manual
© 2005-2019 Genie Solutions Pty Ltd 59
If each doctor in the practice would like to have a different letterhead, select the Use Individual Letterheadscheckbox, and set up the letterheads in their User Preferences. When printing overdue statements from UnpaidInvoices in Maintenance & Reports, if you would prefer just this letterhead to print, rather than separatestatements printing for the separate practices billed, then tick Use Single Letterhead for Statements.
Note: Genie can fit approximately 8 lines onto an invoice letterhead, depending on font size. If you findyour letterhead is being truncated on invoices, you will have to either reduce the font size or cut back onthe number of lines.
You can click on the Create Default button to create a default letterhead which you can then edit.
The Insert Picture button allows you to insert a picture from your picture library. If you do not already have apicture in your library, import an image from your hard drive by clicking the Add button in the window below.
Then click on the Browse button in the window below.

Setting Up Genie: Practice PreferencesGenie Manual
© 2005-2019 Genie Solutions Pty Ltd60
Select the picture which you have already created or scanned onto your hard drive.
Deleting a Corrupted Letterhead
Sometimes the letterhead can become corrupted. The symptoms of this are that Genie is unable to printinvoices and x-ray requests. We rarely encounter this problem, and it usually only occurs on Macintoshcomputers. However, if this does occur, the letterhead can be cleared by holding down Alt whilst selecting File >Practice Preferences. You can then open the record and rebuild the letterhead.
If you are using individual doctor's letterheads i.e. the Letterhead from each doctor’s User Preferences, clearthese letterheads by holding down Alt whilst selecting File > User Preferences.
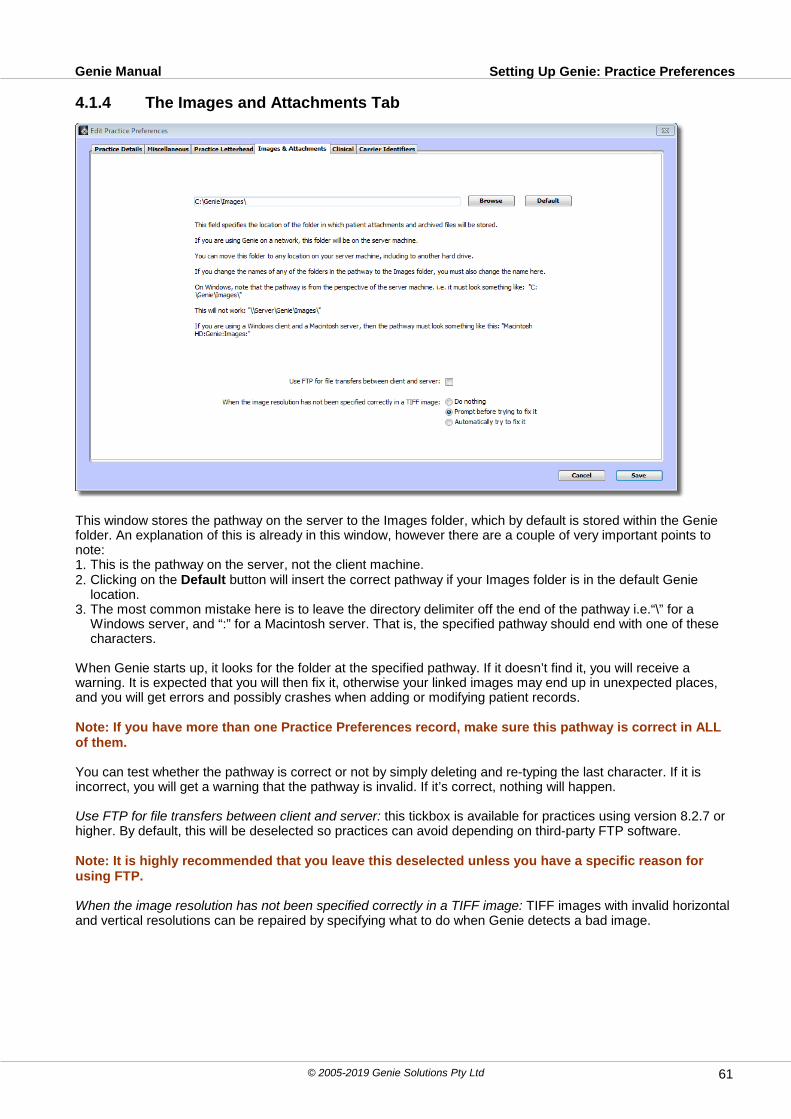
Setting Up Genie: Practice PreferencesGenie Manual
© 2005-2019 Genie Solutions Pty Ltd 61
4.1.4 The Images and Attachments Tab
This window stores the pathway on the server to the Images folder, which by default is stored within the Geniefolder. An explanation of this is already in this window, however there are a couple of very important points tonote:1. This is the pathway on the server, not the client machine.2. Clicking on the Default button will insert the correct pathway if your Images folder is in the default Genie
location.3. The most common mistake here is to leave the directory delimiter off the end of the pathway i.e.“\” for a
Windows server, and “:” for a Macintosh server. That is, the specified pathway should end with one of thesecharacters.
When Genie starts up, it looks for the folder at the specified pathway. If it doesn’t find it, you will receive awarning. It is expected that you will then fix it, otherwise your linked images may end up in unexpected places,and you will get errors and possibly crashes when adding or modifying patient records.
Note: If you have more than one Practice Preferences record, make sure this pathway is correct in ALLof them.
You can test whether the pathway is correct or not by simply deleting and re-typing the last character. If it isincorrect, you will get a warning that the pathway is invalid. If it’s correct, nothing will happen.
Use FTP for file transfers between client and server: this tickbox is available for practices using version 8.2.7 orhigher. By default, this will be deselected so practices can avoid depending on third-party FTP software.
Note: It is highly recommended that you leave this deselected unless you have a specific reason forusing FTP.
When the image resolution has not been specified correctly in a TIFF image: TIFF images with invalid horizontaland vertical resolutions can be repaired by specifying what to do when Genie detects a bad image.
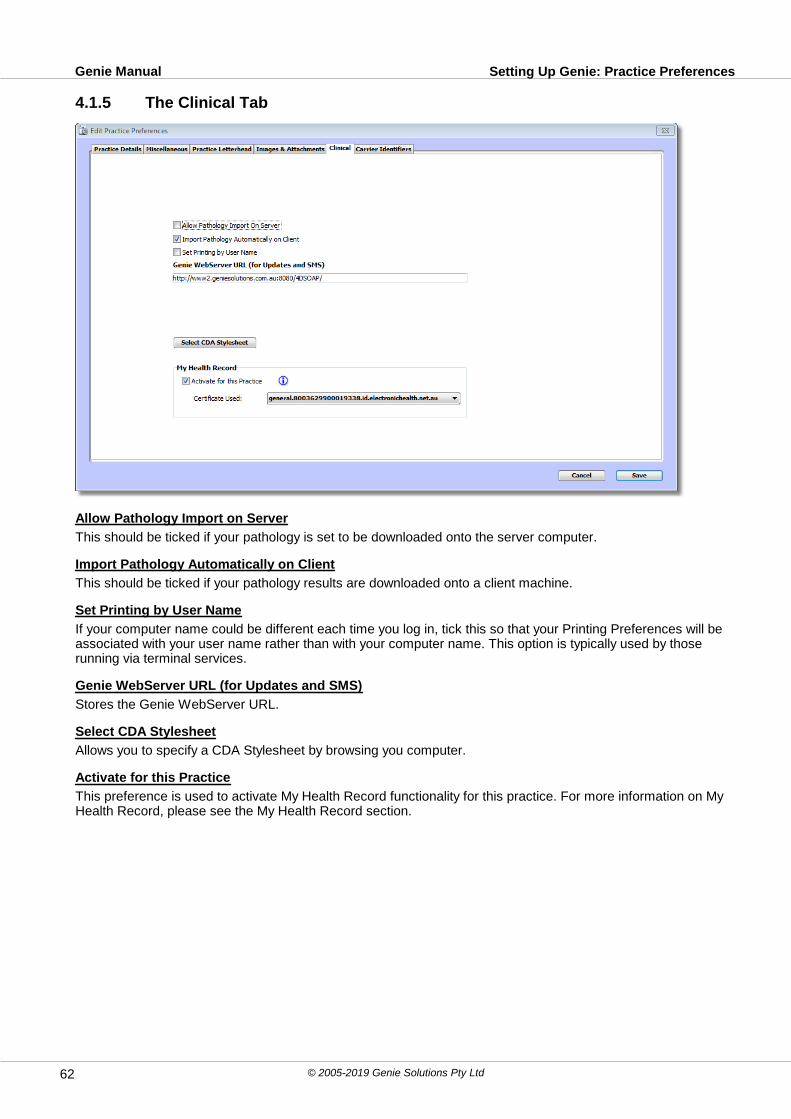
Setting Up Genie: Practice PreferencesGenie Manual
© 2005-2019 Genie Solutions Pty Ltd62
4.1.5 The Clinical Tab
Allow Pathology Import on Server
This should be ticked if your pathology is set to be downloaded onto the server computer.
Import Pathology Automatically on Client
This should be ticked if your pathology results are downloaded onto a client machine.
Set Printing by User Name
If your computer name could be different each time you log in, tick this so that your Printing Preferences will beassociated with your user name rather than with your computer name. This option is typically used by thoserunning via terminal services.
Genie WebServer URL (for Updates and SMS)
Stores the Genie WebServer URL.
Select CDA Stylesheet
Allows you to specify a CDA Stylesheet by browsing you computer.
Activate for this Practice
This preference is used to activate My Health Record functionality for this practice. For more information on MyHealth Record, please see the My Health Record section.

Setting Up Genie: Practice PreferencesGenie Manual
© 2005-2019 Genie Solutions Pty Ltd 63
4.1.6 Carrier Identifiers
If you are sending and receiving correspondence electronically using either EQuery, or DivisionReport, enter theCarrier Identifier assigned to you by this provider in the corresponding field on this screen. See ElectronicCorrespondence (Sending via 3rd Party) for further configuration information.
Import RTF letters to 4D write relates to Argus letters that are sent in RTF format rather than PIT or HL7, soneed to be attached to the patient chart rather than imported into 4D Write letter writer. Ticking this MAY allowthe conversion of the RTF files into 4D Write. They will come in via Open > Incoming Letters, but if they displayas blank letters untick this option and revert to attaching them as an image in the patients chart.
Export Argus Letters as HL7 relates to the format that Argus letters are sent in. Currently letters are sent viaArgus in PIT format. In order to send letters in HL7 format in the future, Argus need to make some changes tothe program on a site by site basis. Once Argus have made this change to your Genie system, this tick boxshould be checked. Otherwise, it should be left unticked allowing letters to continue being sent in PIT format.
Note: As of Genie version 8.8.2, all Argus letters are sent in HL7 format, so this checkbox is not visible.
Create a Task When Importing a Letter will send a task notification when a new letter is imported in Genie. IfGenie is able to identify the recipient of the letter, the task will be sent to that user. Where Genie can notestablish the recipient, the task will be sent to the Administrator.
Alltalk/EQuery and DivisonReport allow you to enter your respective carrier identifiers.
4.2 User Preferences
Note: To add/delete a user, see Add/Delete Users in the Practice Management Module. Each Genie user in your database has their own preferences record. This allows you to customise yourpractice's workflow according to users' responsibilities; for example, allowing different preferences for differentdoctors in a multi-doctor practice, or allowing receptionists to switch off some of the clinical preferences such aspap smear warnings. It also allows each doctor to have their own letterhead if they wish. To open your own preferences record, select File > User Preferences. To open another user's preferences, select File > All User Preferences, and double-click on their name.
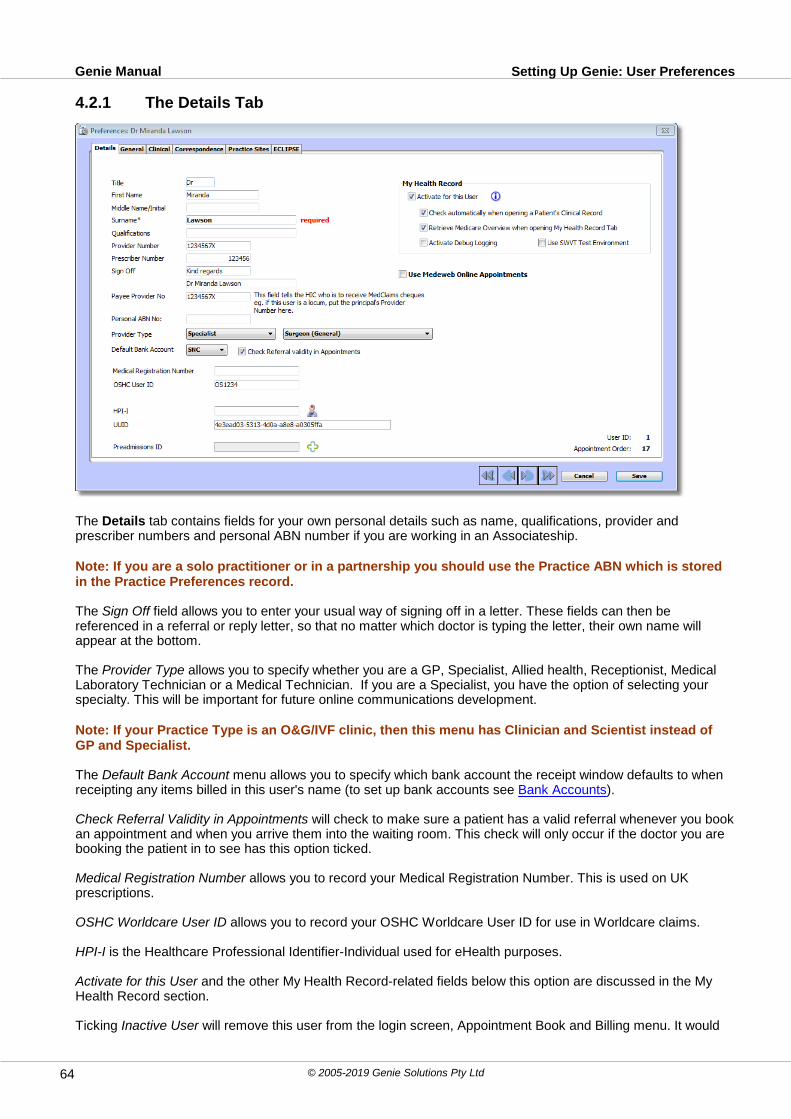
Setting Up Genie: User PreferencesGenie Manual
© 2005-2019 Genie Solutions Pty Ltd64
4.2.1 The Details Tab
The Details tab contains fields for your own personal details such as name, qualifications, provider andprescriber numbers and personal ABN number if you are working in an Associateship.
Note: If you are a solo practitioner or in a partnership you should use the Practice ABN which is storedin the Practice Preferences record.
The Sign Off field allows you to enter your usual way of signing off in a letter. These fields can then bereferenced in a referral or reply letter, so that no matter which doctor is typing the letter, their own name willappear at the bottom.
The Provider Type allows you to specify whether you are a GP, Specialist, Allied health, Receptionist, MedicalLaboratory Technician or a Medical Technician. If you are a Specialist, you have the option of selecting yourspecialty. This will be important for future online communications development.
Note: If your Practice Type is an O&G/IVF clinic, then this menu has Clinician and Scientist instead ofGP and Specialist.
The Default Bank Account menu allows you to specify which bank account the receipt window defaults to whenreceipting any items billed in this user's name (to set up bank accounts see Bank Accounts).
Check Referral Validity in Appointments will check to make sure a patient has a valid referral whenever you bookan appointment and when you arrive them into the waiting room. This check will only occur if the doctor you arebooking the patient in to see has this option ticked.
Medical Registration Number allows you to record your Medical Registration Number. This is used on UKprescriptions.
OSHC Worldcare User ID allows you to record your OSHC Worldcare User ID for use in Worldcare claims.
HPI-I is the Healthcare Professional Identifier-Individual used for eHealth purposes.
Activate for this User and the other My Health Record-related fields below this option are discussed in the MyHealth Record section.
Ticking Inactive User will remove this user from the login screen, Appointment Book and Billing menu. It would

Setting Up Genie: User PreferencesGenie Manual
© 2005-2019 Genie Solutions Pty Ltd 65
be used if a user is going to be away for an extended period of time but intend on returning to the practice. Toreactivate the user simply untick this box. This box is only visible when you have used File > All UserPreferences to access a different user's preferences; it is not visible when you are in your own preferences.
4.2.2 The General Tab
General
Having Auto Capitalise ticked will result in the first letter of words in fields in the Patient Demographics windowbeing automatically capitalised.
Monitor the Genie Message Board will provide you with an alert in the navigation palette when a new message isposted on the Forum. To subscribe to the message board go to www.geniesolutions.com.au.
Position of Navigation Palette. The Navigation Palette allows you to keep track of what windows you have openin Genie and alert you to any outstanding Tasks, Results, Letters etc. This makes for quick navigation aroundGenie.
Open Patients List at Startup. If you are a solo practitioner or do not use the Appointment Book, then selectingthis option will open the Patients List rather than the Appointment Book when Genie is launched.
Display Patient Mugshots allows you to display a picture of the patient when you open either their PatientDemographics window, or their Clinical Window. The picture needs to be attached to the patient's ClinicalWindow via the Image Browser, assigning it a type of 'Mugshot' (see Viewing Images).
Create a separate email account for me creates an email account for this user as the default when using theGenie Email module (see Email module).
Confirm Quit gives an extra confirmation box when quitting out of Genie.
Setting Up Genie: User PreferencesGenie Manual
© 2005-2019 Genie Solutions Pty Ltd66
Disable Main Window Close Box (Windows only) prevents the user from accidentally quitting out of Genie byclicking the red cross of the main Genie window.
Note: It is recommended that you tick this preference. Using the red cross to quit Genie can result in aphantom user on your network, this can result in an error message stating that there are 'too manyusers logged in'. Contact Genie Support via phone or email to rectify this problem.
Maximise Windows Intelligently will increase the size of the windows within Genie while maintaining the correctplacement of the navigation palette.
Use Custom Forms Workcover Certificates allows you to use Workcover certificates that have been downloadedfrom Special > Software Updates (see Software Updates). This option is only available for users on Genieversion 8.6.5 or higher. If this option is unticked, the Workcover certificates programmed into Genie will beused. For information on how to add certificates, see Add Workcover Claim.
Display Patient Memo for X seconds Allows you to determine how long a patient's red memo box will remain ondisplay when booking in an appointment. Setting this preference to zero will turn it off completely.
Default Item No: This is the item number which will appear as the default to be charged when you save out of theClinical Window from the Appointment Book. You should enter your most commonly used item number so that itis ticked by default. If you would like the items to charge box to appear but not have an item ticked by default,enter a zero into this field. Leave this field blank to prevent the items to charge box from appearing.
Use Large Clinical Window. If your screen resolution is set to 1280x754 or higher in the display properties ofyour computer, then you can take advantage of the larger Clinical Window (See Clinical).
Open Clinical Window to Notes Page. Selecting this option instructs Genie to open to the Notes tab of theClinical Window rather than the Summary tab, if you are not using the large Clinical Window.
Use Small Font For Drop Down Lists. This is for those who have extensive drop-down menus for CurrentProblems and Past History, for example, so the whole menu can be seen.
Remind Me To Start Offsite Logging. Selecting this option will prompt you to start offsite logging whenever youopen this database with the single-user version of Genie. See the Offsite Logging Chapter for more information.
Appointments
Don't send SMS reminders for my appointments refers to the Genie SMS Reminders process which allows SMSreminders to be automatically sent to patients at a specified time prior to their appointment. If you do not wantthis process to run for your patients, tick this option.
I do not bill inpatient services through the appointment book. Ticking this box will prevent the display of the dialogbox asking whether an invoice is to be Inpatient or Outpatient when billing from the Appointment book. Thiswould be relevant to a General Practitioner who would not usually be billing for inpatient services or a Specialistwho may only bill for inpatient work from the Patient List or directly from the procedure.
Play sound when a patient arrives. Ticking this preference for a provider will cause a sound to play when apatient appointment in that provider's column has its Status changed to In Waiting Room. The drop-down menuto the right of this tickbox allows you to select the sound you wish Genie to play.
Show Me In the Appointment Book creates a column for this User Name in the Appointment Book. De-selectingit will remove this user's column. Ticking the days that this user works will display this user's column in theappointment book for those days only.
Appt Interval This option allows you to have a different appointment interval to the default interval set inAppointment Preferences.
Note: This only has an effect when you are in your own personal view of the Appointment Book. Ifeverybody has the same interval, you should set this to Use Global.
Invoicing
Show Me In the Billing Menu must be selected if you are a provider of services, otherwise your name will notappear in the Provider drop-down menu contained in the Add Item to Invoice window.

Setting Up Genie: User PreferencesGenie Manual
© 2005-2019 Genie Solutions Pty Ltd 67
Warn me of Future Dated Services. Ticking this means that Genie will alert you if you enter a service date on aninvoice that is in the future.This should be ticked for non clinical staff that do the billing to be sure they do not billan invoice that is future dated by mistake, e.g. invoicing from a future appointment instead of today's.
Use Type-Ahead When Billing means that Genie will try to predict the complete item number you are enteringprovided the item number is ticked as Display In List of Commonly Used Items in the Billing Items record.
HIC Online / PKI
Tick Use iKeys to Sign Claims if you use individual iKeys to sign claims.Tick Check for Expiring PKI Certificates if you would like to be notified when your certificates are due to expire.
Assistant Billing
Allows you to modify the Invoice Message that appears on any invoices that have an assist fee added using theInclude Asst's Fee button. Clicking on Default will use the default Invoice Message.
Copy Menus
Clicking this button will display a list of all users in Genie. You can copy menus such as Current Problems, PastHistory, and QuickScript from the user you select to the current user preferences.
4.2.3 The Clinical Tab
Prescriptions
Print Medication List on Scripts. Selecting this option sets the checkbox for printing the patient’s medication listwhenever a prescription is printed to ON by default (see Clinical).
Print Certificate on Scripts. As for Print Medications above but for a Medical Certificate
Use Meal Times for Scripts. Selecting this option will change the way you specify dosage and frequency forprescriptions. Existing prescriptions will continue to print with the current dose and frequency until you fill in thenew dosage fields. This is not an option which you should frequently change back and forth. Decide on themethod you wish to use and then continue with it. This option is doctor specific, so if you share patients withother doctors in your practice, you should ALL decide on one method or the other.
Allow sending of Healthshare Fact Sheets when Prescribing. This option allows the sending of Healthshare factsheets whenever a patient is prescribed a particular drug for the first time. For more information, see the Addinga New Prescription section under Clinical.

Setting Up Genie: User PreferencesGenie Manual
© 2005-2019 Genie Solutions Pty Ltd68
Enable NPS RADAR Alert. If you have the NPS RADAR documents installed, a summary is displayed for thefirst three times that a new RADAR drug is prescribed. When this checkbox is ticked, the user will be shown apop up alert for all relevant drugs up to 3 times while prescribing them.
Record Anonymous NPS Usage Data. If this option is selected, the NPS usage data of this particular user will berecorded in the database using an anonymous unique identifier.
When a new NPS Version is available. This option will become available if you have Enable NPS RADAR Alertticked. This allows you to specify in the drop-down menu what you would like to do if an update of the NPSdocuments become available. You have the option to either: Install Automatically, Prompt Before Installing, orNever Install. It is still possible to update the NPS documents manually via Special > Software Updates.
Access MIMS Annual via the internet. This accesses MIMS Annual documents via our Web Server rather thanvia the local machine, meaning that the MIMS Annual will no longer need to be installed or updated on eachclient machine as it is updated on our Web Server by us.
Interaction Checking. If you are using MIMS for prescribing, you can set the level of drug interaction checkinghere. Level 3 is usually the best compromise. If you set it to Level 0, it will warn you of just about everything, andyou may become de-sensitised to the warnings.
Electronic Transfer of Prescriptions
If you are registered with MediSecure for the Electronic Transfer of Prescriptions, enter in the details as per theinstructions below the Host URL field. At the time of printing the script, an electronic copy is sent to theMediSecure database. The script will also print with a barcode which the pharmacist will scan upon receiving theprescription from the patient. This will then allow the pharmacist, if also registered with MediSecure, to downloadthe details of the prescription from the MediSecure database.
If you are registered with eRx for the Electronic Transfer of Prescriptions, enter in the details as per theinstructions below the eRx Host Platform field. At the time of printing the script, an electronic copy is sent to theeRx database. The script will also print with a barcode which the pharmacist will scan upon receiving theprescription from the patient. This will then allow the pharmacist, if also registered with eRx, to download thedetails of the prescription from the eRx database.
Pathology & Radiology
Extract Path Results from PIT Format. Selecting this checkbox instructs Genie to attempt to extract individualresults from PIT-formatted files, and insert them into a Consultation record so that they can be graphed. Thisonly works for some pathology providers, depending on how they present the results. If you are gettingnonsensical results in consultation records you should deselect this checkbox.
Move to Action List after linking. Select this if you would like to use the Pathology Action List for dealing withpathology and radiology results. (See Pathology Recalls).
Check for Missing Run Numbers. If this is selected, Genie will check for missing pathology results whenever thePathology & Radiology window is opened. If a run is missing Genie will warn you about it for 30 days. It isexpected that you would contact the lab and request them to send the missing run again. You can switch off thiswarning, however this is not recommended.
Bulk Bill Pathology. Selecting this will instruct Genie to automatically mark the Bulk-Bill option on printedpathology requests.Note:The patient must have a valid Medicare Number for this to work.
Copy Results to Interested Parties enters the patients interested parties into the CC section of Pathology &Radiology requests.
Offer to store INR Results provides a prompt to save INR results into the INR Control after they have beenimported. INR Control is accessed through the Tools menu in the Clinical Window of the patient.
Offer to store TFT Results prompts you to save imported TFT results into the Thyroid Control. Thyroid Control isaccessed through the Tools Menu in the Clinical Window of the patient.
Prompts
Do Not Show Prompts Window. prevents the red prompt window from being displayed in the Clinical Window.

Setting Up Genie: User PreferencesGenie Manual
© 2005-2019 Genie Solutions Pty Ltd 69
Pap Smear & Mammogram Alert. Selecting this option gives you a warning if a pap smear/mammogram has notbeen recorded whenever you open the Clinical Window of a female between 20 and 70 and who has not beenmarked as having had a hysterectomy in their Past History provided they are not marked as Don't Recall in theirClinical Window.
Overdue Recalls Alert warns you if there are any overdue recalls for a patient.
Warn of pathology results received within the last. If you enter a number of days here, Genie will give you awarning if there are any results received within that time frame when opening the Clinical Window.
Other Warnings. Depending on the age and sex of the patient, Genie will warn if you have not checked a varietyof the parameters stored in the Consults Parameters, e.g. BP, Weight,Height, Cholesterol, PSA.
Synchronising
You can choose to synchronise your appointments and tasks to and from Outlook/iCal or one way only bychoosing the appropriate radio button. You would choose one way if you don't want appointments deleted fromGenie to be reinstated when you next synchronise from Outlook/iCal. For more information on synchronisingsee Synchronising With iCal/Outlook in the Clinical section.
Synchronise the Address Book. Tick this if you wish to Synchronise your Address Book (See Synchronising withiCal/Outloook in the Clinical Module).
Tick 'Only synchronise those with an email address' if you wish to only synchronise address book entries whichhave an email address.
4.2.4 The Correspondence Tab
Correspondence
Save Word Letters as Attachments. This option should be ticked if the user prefers to type in Word rather thandirectly in Genie's letter writer. An explanation of using Word through the referral/reply template can be found inthe Button Description section of Referral/Reply Letters. Once the letter is reimported into Genie using the red Win the Referral/Reply letter it will actually be saved as an attachment rather than as Correspondence Out. This isto avoid any issues with Word crashing Genie on some occasions.

Setting Up Genie: User PreferencesGenie Manual
© 2005-2019 Genie Solutions Pty Ltd70
Make Letters Undeletable when Reviewed. Having this ticked prevents letters from being deleted after they havebeen marked as Reviewed by the Doctor.
Default Zoom in 4D Write Areas. When opened, all letters will automatically be zoomed to this percentage of theletter area. This includes the contact display area in the Add Consult window.
Electronic Correspondence
Mark Letters 'Ready to Send' when Reviewed' indicates that once letters have been ticked as Reviewed, theywill be marked as Ready to Send for the third party carrier software to send on to the recipient. This option isbest suited to clinicians who review their letters once typed by a secretary or typist.Mark Letters 'Ready to Send Immediately'' indicates that letters will be ready to send to the third party carriersoftware once created and saved. This option is best suited to clinicians who create their own letters.
ReferralNet ID. ReferralNet is a third party provider for sending correspondence electronically. Enter theirindividual identifier here if you are signed up to use them.
Letterhead
If you are in a multi-doctor practice and each doctor would like to have their own letterhead, this is where youcan set up your individual letterhead. By default, Genie uses the letterhead set up in your Practice Preferencesrecord (File > Practice Preferences). However, if you select the 'Use Individual Letterheads' checkbox inPractice Preferences, then Genie will use the letterhead of whichever doctor is the Provider of a billed service.Note: You can copy the letterhead already set in Practice Preferences.
You can also insert pictures or logos in the letterhead (see Practice Preferences).
Note: Genie allows approximately eight lines worth of text in the letterhead. If you find that yourletterhead is being truncated when printing invoices, then you will have to reduce the size of it here byeither reducing the font size or reducing the number of lines.
Deleting a Corrupted Letterhead
Sometimes the Letterhead can become corrupted. The symptoms of this are that Genie is unable to printinvoices and x-ray requests. We rarely encounter this problem, and usually only on Macintosh computers,however if this does occur, the letterhead can be cleared by holding down Alt whilst selecting File > UserPreferences. You can then open the record and rebuild the letterhead.
The Copy from Practice Preferences button allows you to copy your existing Preferences Letterhead.
The Insert Picture button works in the same way as it does in the Practice Letterhead section. This allows youto insert pictures into your letterhead.

Setting Up Genie: User PreferencesGenie Manual
© 2005-2019 Genie Solutions Pty Ltd 71
4.2.5 The Practice Sites Tab
If you work in multiple locations with different provider numbers, this is where you can set up your extra sites.
To add a new site, click on the Blue Plus button. This will open a window allowing you to enter the name ofthe site, your provider number at this location, LSPN and facility ID (if applicable).
The Default Site for which practice? drop-down menu allows you to choose which site of service will be selectedby default when you invoice a patient. If you would prefer for there not to be a default site, meaning it would needto be selected for each invoice, then you would need to tick No Default Site of Service on Invoices in the PracticeDetails tab of the Practice Preferences.
The Inactive checkbox allows you to make this site of service inactive if you no longer practice at this location.Making a site of service inactive means that it will no longer be able to be selected from relevant windows (i.e.Invoicing window) but you can retain a record of this information in your data file.
Once all this information has been entered, click OK to save.
If you have accidentally created a site and would like to remove it, click the Delete button.
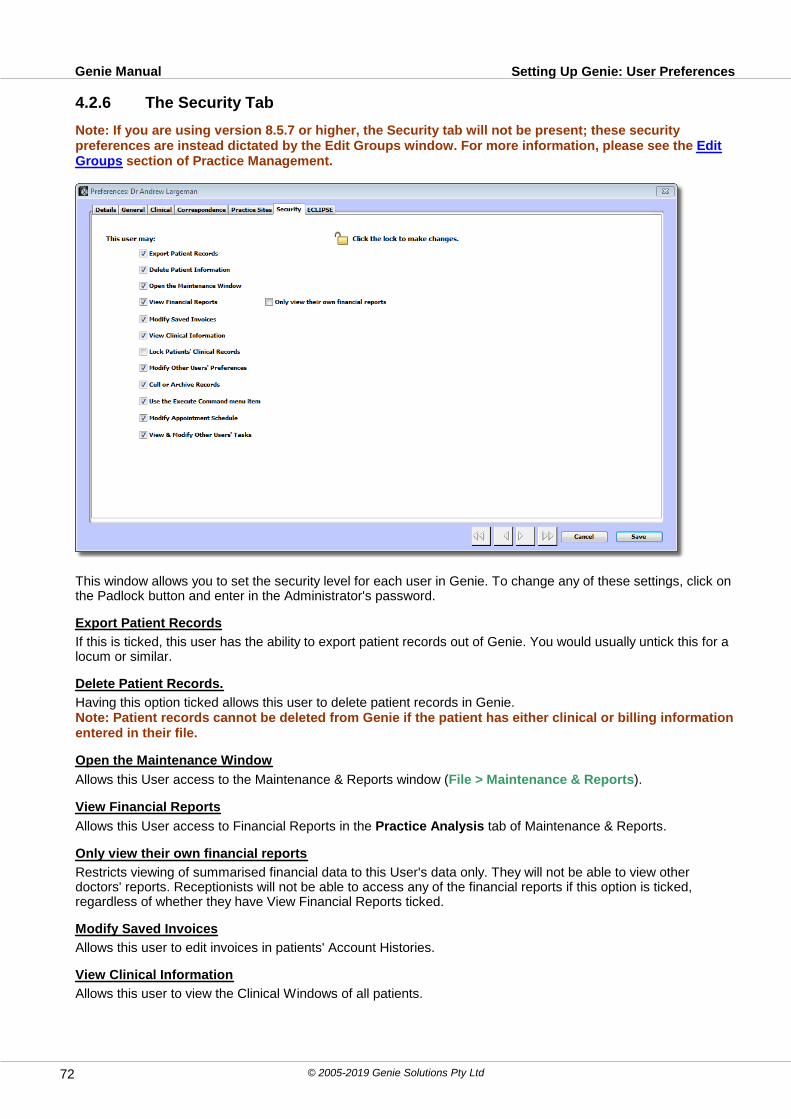
Setting Up Genie: User PreferencesGenie Manual
© 2005-2019 Genie Solutions Pty Ltd72
4.2.6 The Security Tab
Note: If you are using version 8.5.7 or higher, the Security tab will not be present; these securitypreferences are instead dictated by the Edit Groups window. For more information, please see the EditGroups section of Practice Management.
This window allows you to set the security level for each user in Genie. To change any of these settings, click onthe Padlock button and enter in the Administrator's password.
Export Patient Records
If this is ticked, this user has the ability to export patient records out of Genie. You would usually untick this for alocum or similar.
Delete Patient Records.
Having this option ticked allows this user to delete patient records in Genie. Note: Patient records cannot be deleted from Genie if the patient has either clinical or billing informationentered in their file.
Open the Maintenance Window
Allows this User access to the Maintenance & Reports window (File > Maintenance & Reports).
View Financial Reports
Allows this User access to Financial Reports in the Practice Analysis tab of Maintenance & Reports.
Only view their own financial reports
Restricts viewing of summarised financial data to this User's data only. They will not be able to view otherdoctors' reports. Receptionists will not be able to access any of the financial reports if this option is ticked,regardless of whether they have View Financial Reports ticked.
Modify Saved Invoices
Allows this user to edit invoices in patients' Account Histories.
View Clinical Information
Allows this user to view the Clinical Windows of all patients.

Setting Up Genie: User PreferencesGenie Manual
© 2005-2019 Genie Solutions Pty Ltd 73
Lock Patients' Clinical Records
Provides the user with the ability to lock patients' Clinical Windows to all other users. The record will only be ableto be unlocked by this user's password. See Edit Patient.
Modify Other User's Preferences
Allows this user to make modifications to other User Preferences records.
Cull or Archive Records
Allows this user to cull and/or archive records in Genie
Use the Execute Command menu item
Allows this user to access the Execute Command window (File > Execute Command). The Execute Commandwindow is only used under instruction
Modify Appointment Schedule
Allows this user to make changes to the Appointment Schedule. See Appointment Scheduler.
View & Modify Other Users' Tasks
Allows this user to see and make modifications to other users' tasks in Open > Tasks. See Tasks for moreinformation.
4.2.7 The ECLIPSE Tab
This tab will be activated when your practice is registered for ECLIPSE online health fund inpatient claiming andwill list all Health Funds configured within Genie. The list of funds allows you to define the Payee ID and Claimtype for each fund (for the selected provider only). For more information, please see the ECLIPSE Manualprovided at your ECLIPSE install or download it via Special > Software Updates, PDFs tab.
For more information on purchasing ECLIPSE and using it with Genie, please see the ECLIPSE Informationpage on the Genie website.
4.3 Bank Accounts
Before you can receipt, you must have at least one bank account record. You can add, modify and delete bankaccount records by selecting Open > Bank Accounts, which will open the window below:
Each bank account must have a unique Bank Code, which can be up to 3 characters in length. This code can beanything you choose, e.g.“NAB” for the National Australia Bank. In a multi-doctor practice, where each doctorhas their own account, you can make each code the initials of the relevant doctor.
If you plan on using BPAY to accept payments into this account, enter the BPAY Biller Code in this window. The
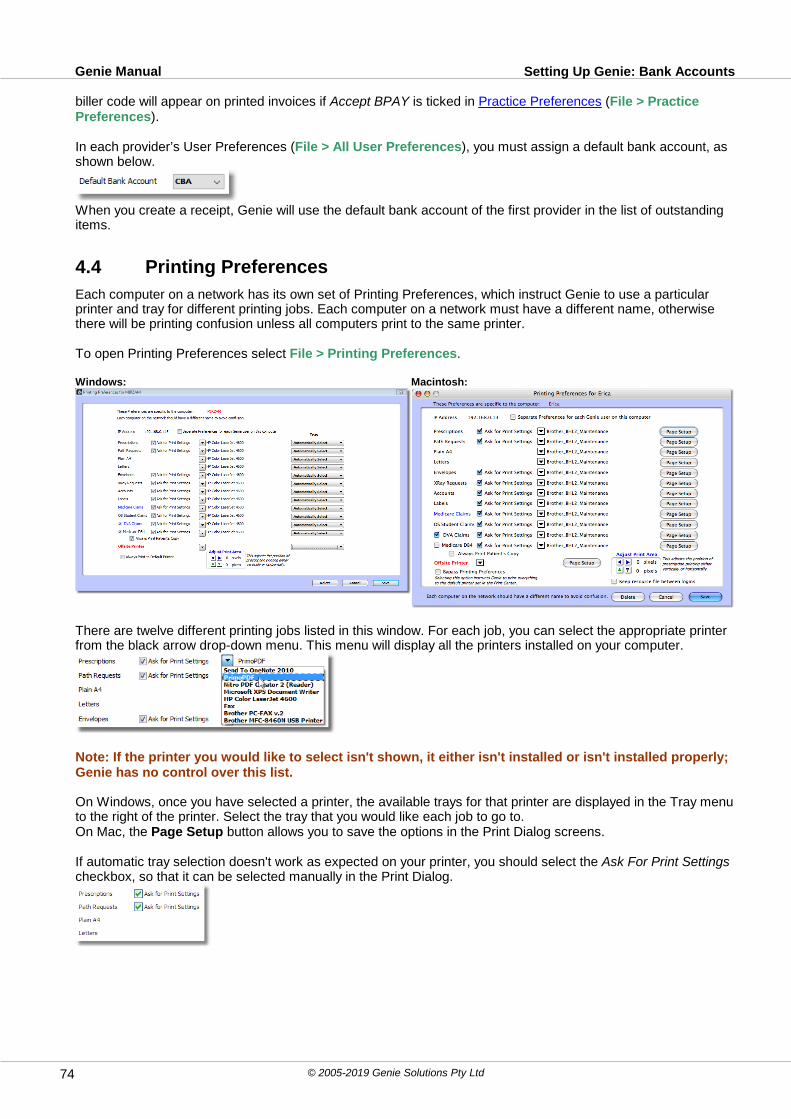
Setting Up Genie: Bank AccountsGenie Manual
© 2005-2019 Genie Solutions Pty Ltd74
biller code will appear on printed invoices if Accept BPAY is ticked in Practice Preferences (File > PracticePreferences).
In each provider’s User Preferences (File > All User Preferences), you must assign a default bank account, asshown below.
When you create a receipt, Genie will use the default bank account of the first provider in the list of outstandingitems.
4.4 Printing Preferences
Each computer on a network has its own set of Printing Preferences, which instruct Genie to use a particularprinter and tray for different printing jobs. Each computer on a network must have a different name, otherwisethere will be printing confusion unless all computers print to the same printer.
To open Printing Preferences select File > Printing Preferences.
Windows: Macintosh:
There are twelve different printing jobs listed in this window. For each job, you can select the appropriate printerfrom the black arrow drop-down menu. This menu will display all the printers installed on your computer.
Note: If the printer you would like to select isn't shown, it either isn't installed or isn't installed properly;Genie has no control over this list.
On Windows, once you have selected a printer, the available trays for that printer are displayed in the Tray menuto the right of the printer. Select the tray that you would like each job to go to.On Mac, the Page Setup button allows you to save the options in the Print Dialog screens.
If automatic tray selection doesn't work as expected on your printer, you should select the Ask For Print Settingscheckbox, so that it can be selected manually in the Print Dialog.

Setting Up Genie: Printing PreferencesGenie Manual
© 2005-2019 Genie Solutions Pty Ltd 75
The Print Dialog is the window that usually appears when printing in which you can change printers, set thetrays, set the number of copies etc.
If you don't select this option, Genie will simply print immediately to the selected printer. Plain A4 and Letters willalways open the Print Dialog when printing, therefore this option is not available for these documents.
Note: If you would like to select Ask for Print Settings for all types of documents at the same time,Alt+click on the first checkbox and Genie will automatically select all of them.
If you only use the one printer then you can select the Always Print to Default Printer checkbox and haveeverything print to your default printer. This makes printing a little faster because Genie doesn't have toreference the Printing Preferences to print.
Keep resource file between logins, if left unticked, will automatically delete the Genie.res file from the 4DPreferences folder when quitting the client to ensure that updated resources (e.g. version number and date, etc)are downloaded from the server when the server is updated. If you do not wish for this to occur then tick theoption to keep the resource file.
Separate Preferences for each Genie user on this computer only refers to people who are using TerminalServices.
Medicare DB4, should only be ticked if you are using HIC Online.
You can have the DVA Claims ticked if using either manual batching or HIC Online.
Adjusting the Print Area
The four green and blue arrows at the bottom left of this window are used to adjust the position of printed text onprescriptions, this does NOT apply to any other document types.
As each printer has different default margins, you may need to adjust the positioning for prescriptions in order forthem to print in the correct position on their pre-printed sheets.
Deleting the Printing Preferences
Occasionally, the Printing Preferences record may become corrupted and printing may be affected. In this case,the record can be deleted by going to File > Printing Preferences and clicking on the Delete button down thebottom of this window.
Note: If you have a particularly complex printing setup, it is recommended that you take note of yourprinter and tray selection prior to deleting this record.
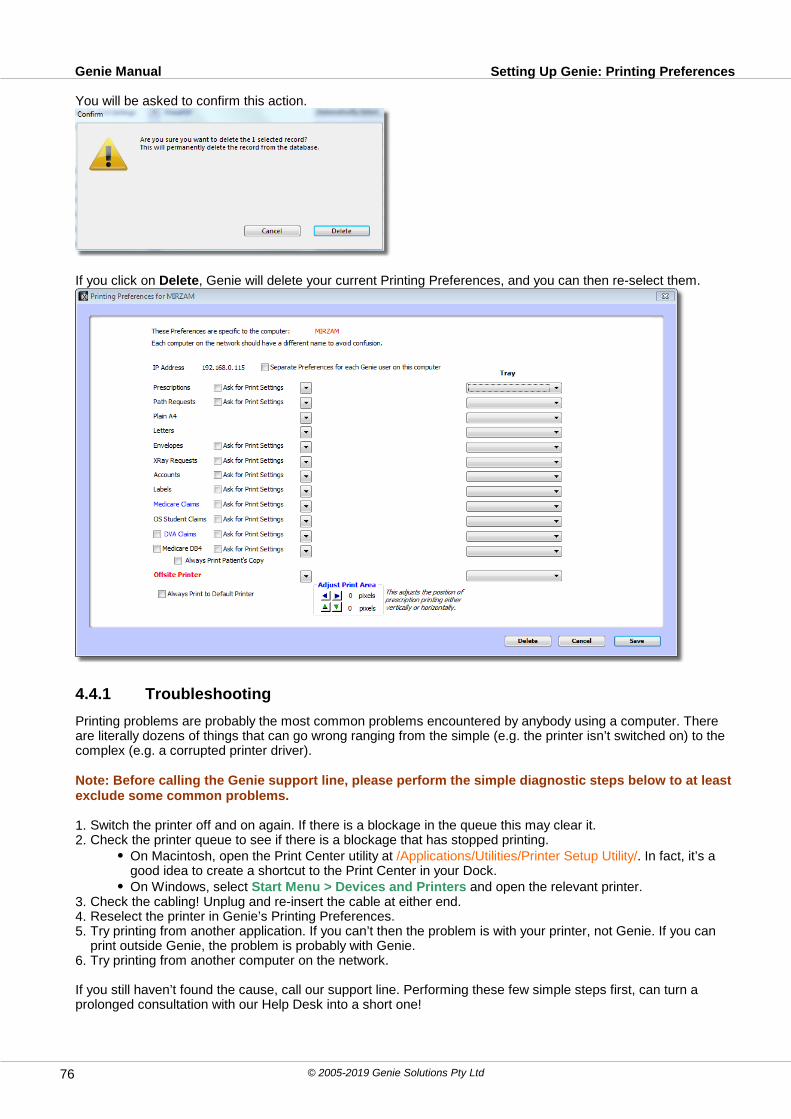
Setting Up Genie: Printing PreferencesGenie Manual
© 2005-2019 Genie Solutions Pty Ltd76
You will be asked to confirm this action.
If you click on Delete, Genie will delete your current Printing Preferences, and you can then re-select them.
4.4.1 Troubleshooting
Printing problems are probably the most common problems encountered by anybody using a computer. Thereare literally dozens of things that can go wrong ranging from the simple (e.g. the printer isn’t switched on) to thecomplex (e.g. a corrupted printer driver).
Note: Before calling the Genie support line, please perform the simple diagnostic steps below to at leastexclude some common problems.
1. Switch the printer off and on again. If there is a blockage in the queue this may clear it.2. Check the printer queue to see if there is a blockage that has stopped printing.
On Macintosh, open the Print Center utility at /Applications/Utilities/Printer Setup Utility/. In fact, it’s agood idea to create a shortcut to the Print Center in your Dock. On Windows, select Start Menu > Devices and Printers and open the relevant printer.
3. Check the cabling! Unplug and re-insert the cable at either end.4. Reselect the printer in Genie’s Printing Preferences.5. Try printing from another application. If you can’t then the problem is with your printer, not Genie. If you can
print outside Genie, the problem is probably with Genie.6. Try printing from another computer on the network.
If you still haven’t found the cause, call our support line. Performing these few simple steps first, can turn aprolonged consultation with our Help Desk into a short one!
Part
VThe Reception Module
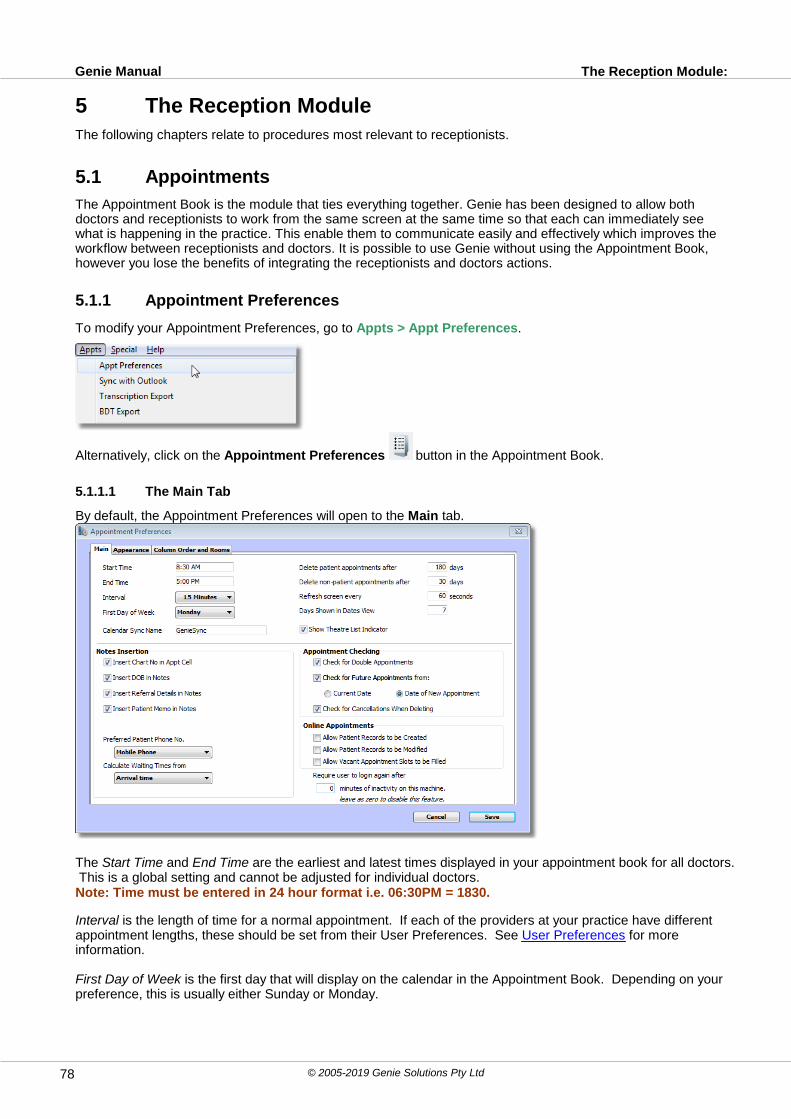
The Reception Module: Genie Manual
© 2005-2019 Genie Solutions Pty Ltd78
5 The Reception ModuleThe following chapters relate to procedures most relevant to receptionists.
5.1 Appointments
The Appointment Book is the module that ties everything together. Genie has been designed to allow bothdoctors and receptionists to work from the same screen at the same time so that each can immediately seewhat is happening in the practice. This enable them to communicate easily and effectively which improves theworkflow between receptionists and doctors. It is possible to use Genie without using the Appointment Book,however you lose the benefits of integrating the receptionists and doctors actions.
5.1.1 Appointment Preferences
To modify your Appointment Preferences, go to Appts > Appt Preferences.
Alternatively, click on the Appointment Preferences button in the Appointment Book.
5.1.1.1 The Main Tab
By default, the Appointment Preferences will open to the Main tab.
The Start Time and End Time are the earliest and latest times displayed in your appointment book for all doctors. This is a global setting and cannot be adjusted for individual doctors.Note: Time must be entered in 24 hour format i.e. 06:30PM = 1830.
Interval is the length of time for a normal appointment. If each of the providers at your practice have differentappointment lengths, these should be set from their User Preferences. See User Preferences for moreinformation.
First Day of Week is the first day that will display on the calendar in the Appointment Book. Depending on yourpreference, this is usually either Sunday or Monday.

The Reception Module: AppointmentsGenie Manual
© 2005-2019 Genie Solutions Pty Ltd 79
Calendar Sync Name is used for syncing with iCal/Outlook. By default this will be GenieSync. For moreinformation, see Synchronising With Outlook/iCal.
Delete Patient Appointments After X Days specifies how long you would like to keep a patient appointmentrecord in the Appointment Book. Most practices set this to 180 days (6 months). Setting it to 9999 days willresult in appointments effectively never being deleted. However, keeping appointments indefinitely can causeslowness in the Appointment Book. Each time you click a date in the appointment book, Genie must searchthrough all appointment records in the database to find the appointments for that specific day. If you doexperience slowness, then we would recommend changing the number of days to a lower number.
When the first client machine quits out of Genie for the day, a message will appear asking if you would like toclear out your old appointments now. Clicking OK will delete appointments that are older than the number ofdays that you have specified.
This is one of the reasons why client computers should quit out of Genie at the end of the day, even if youchoose to leave the Genie Server running.Note: Only the record in the Appointment Book is deleted. All billing and clinical records are retained.
Delete Non-Patient Appointments After X Days works in the same way as the Delete Patient Appointments AfterX Days, however it only applies to non-patient appointments (e.g. 'Pharmaceutical Rep Lunch') and appointmenttypes that do not have a patient appointment booked over them.
Refresh Screen Every X Seconds instructs Genie to display changes which may have been made on anothercomputer on the network at this specified interval. This setting is not relevant for single users. Therecommended refresh setting is 60 seconds; the minimum allowed setting is 30 seconds.Note: You can force a screen refresh at any time by clicking on the TODAY button above the calendar inthe Appointment Book. If the doctor is relying on having patients marked as 'In Waiting Room', theyshould click on the TODAY button at the end of each appointment to see if another patient is waiting.
Days Shown in Dates View allows you to specify the number of days you would like displayed when viewing theappointment book in date view (see Appointment Views). This would usually be the number of days in yourworking week. The larger this value is, the slower your Appointment Book may be.
Show Theatre List Indicator allows you to manually indicate the status of the theatre list for an individual provideron a particular day. Ticking the checkbox in the appointment book will allow you to cycle between: No ListToday, Slots Available and List Full.
The selected day will then be displayed in the calendar as green (if Slots Available is selected) or pink (if List Fullis selected).
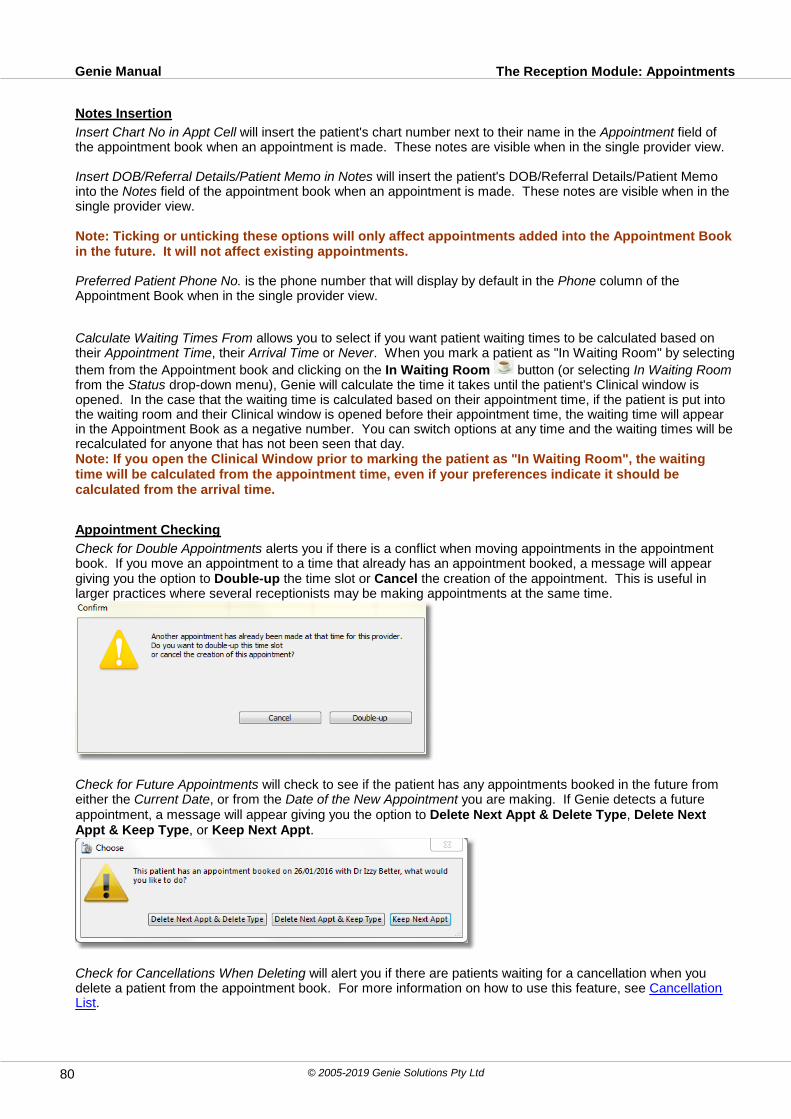
The Reception Module: AppointmentsGenie Manual
© 2005-2019 Genie Solutions Pty Ltd80
Notes Insertion
Insert Chart No in Appt Cell will insert the patient's chart number next to their name in the Appointment field ofthe appointment book when an appointment is made. These notes are visible when in the single provider view.
Insert DOB/Referral Details/Patient Memo in Notes will insert the patient's DOB/Referral Details/Patient Memointo the Notes field of the appointment book when an appointment is made. These notes are visible when in thesingle provider view.
Note: Ticking or unticking these options will only affect appointments added into the Appointment Bookin the future. It will not affect existing appointments.
Preferred Patient Phone No. is the phone number that will display by default in the Phone column of theAppointment Book when in the single provider view.
Calculate Waiting Times From allows you to select if you want patient waiting times to be calculated based ontheir Appointment Time, their Arrival Time or Never. When you mark a patient as "In Waiting Room" by selecting
them from the Appointment book and clicking on the In Waiting Room button (or selecting In Waiting Roomfrom the Status drop-down menu), Genie will calculate the time it takes until the patient's Clinical window isopened. In the case that the waiting time is calculated based on their appointment time, if the patient is put intothe waiting room and their Clinical window is opened before their appointment time, the waiting time will appearin the Appointment Book as a negative number. You can switch options at any time and the waiting times will berecalculated for anyone that has not been seen that day.Note: If you open the Clinical Window prior to marking the patient as "In Waiting Room", the waitingtime will be calculated from the appointment time, even if your preferences indicate it should becalculated from the arrival time.
Appointment Checking
Check for Double Appointments alerts you if there is a conflict when moving appointments in the appointmentbook. If you move an appointment to a time that already has an appointment booked, a message will appeargiving you the option to Double-up the time slot or Cancel the creation of the appointment. This is useful inlarger practices where several receptionists may be making appointments at the same time.
Check for Future Appointments will check to see if the patient has any appointments booked in the future fromeither the Current Date, or from the Date of the New Appointment you are making. If Genie detects a futureappointment, a message will appear giving you the option to Delete Next Appt & Delete Type, Delete NextAppt & Keep Type, or Keep Next Appt.
Check for Cancellations When Deleting will alert you if there are patients waiting for a cancellation when youdelete a patient from the appointment book. For more information on how to use this feature, see CancellationList.
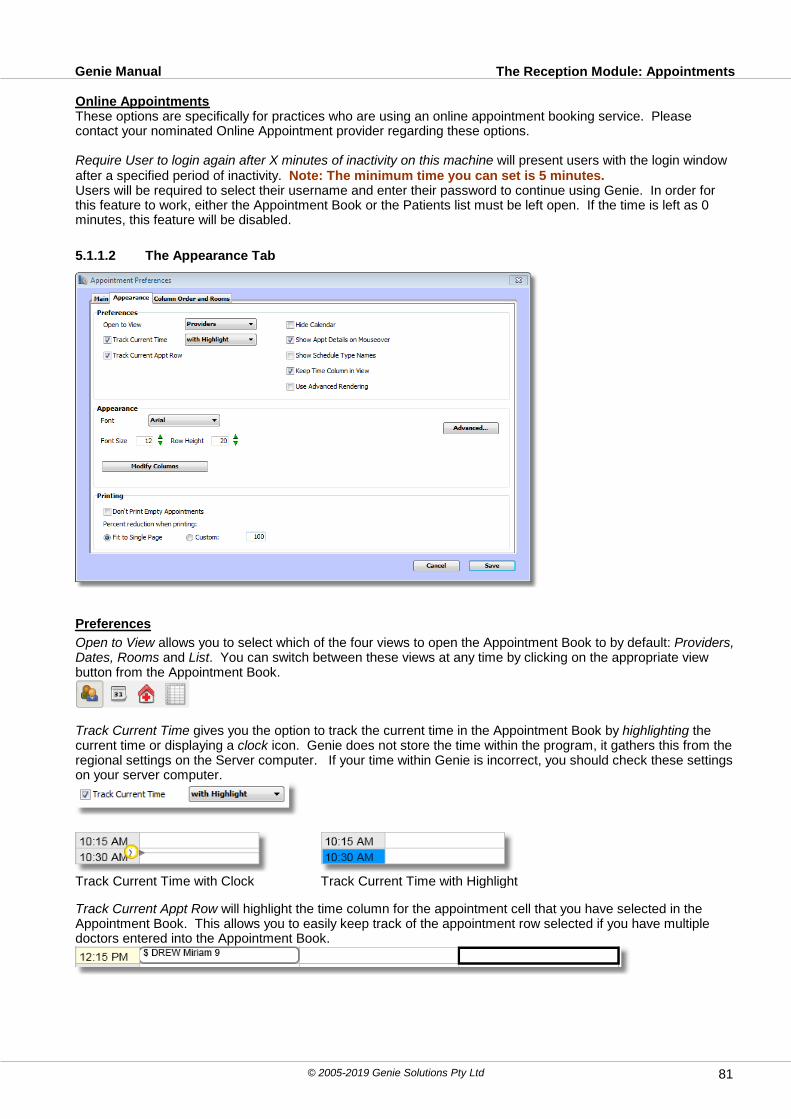
The Reception Module: AppointmentsGenie Manual
© 2005-2019 Genie Solutions Pty Ltd 81
Online Appointments These options are specifically for practices who are using an online appointment booking service. Pleasecontact your nominated Online Appointment provider regarding these options.
Require User to login again after X minutes of inactivity on this machine will present users with the login windowafter a specified period of inactivity. Note: The minimum time you can set is 5 minutes.Users will be required to select their username and enter their password to continue using Genie. In order forthis feature to work, either the Appointment Book or the Patients list must be left open. If the time is left as 0minutes, this feature will be disabled.
5.1.1.2 The Appearance Tab
Preferences
Open to View allows you to select which of the four views to open the Appointment Book to by default: Providers,Dates, Rooms and List. You can switch between these views at any time by clicking on the appropriate viewbutton from the Appointment Book.
Track Current Time gives you the option to track the current time in the Appointment Book by highlighting thecurrent time or displaying a clock icon. Genie does not store the time within the program, it gathers this from theregional settings on the Server computer. If your time within Genie is incorrect, you should check these settingson your server computer.
Track Current Time with Clock Track Current Time with Highlight
Track Current Appt Row will highlight the time column for the appointment cell that you have selected in theAppointment Book. This allows you to easily keep track of the appointment row selected if you have multipledoctors entered into the Appointment Book.
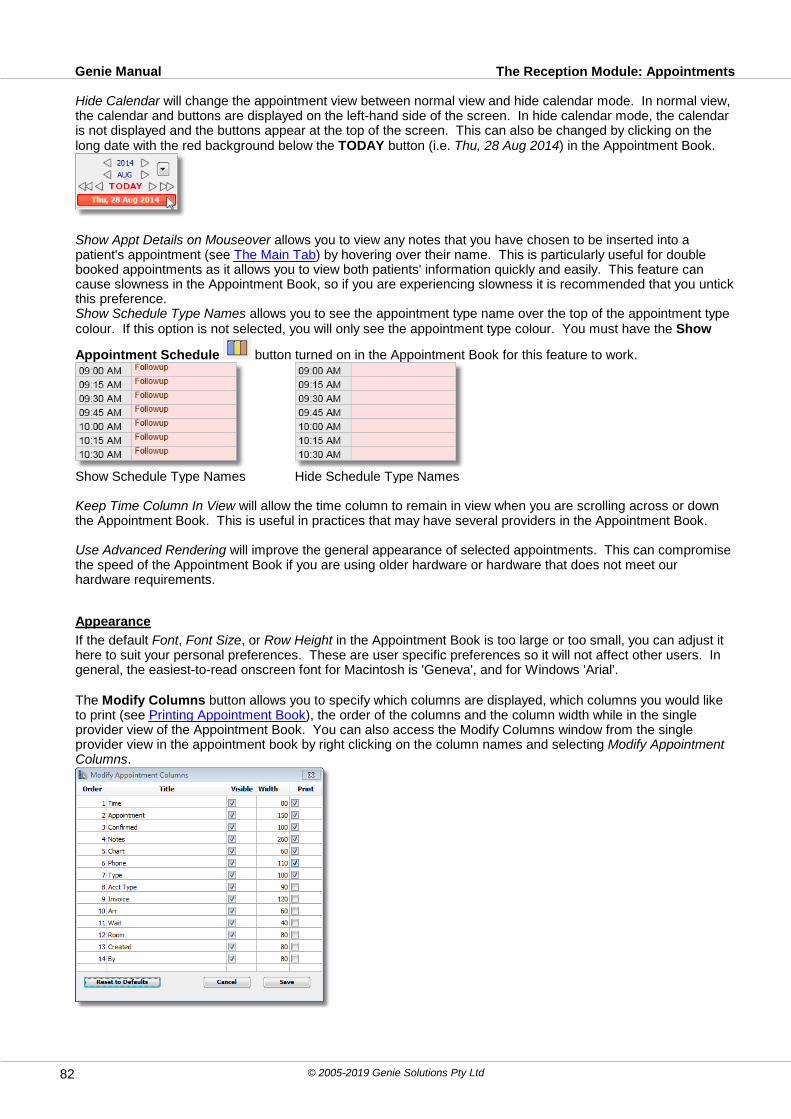
The Reception Module: AppointmentsGenie Manual
© 2005-2019 Genie Solutions Pty Ltd82
Hide Calendar will change the appointment view between normal view and hide calendar mode. In normal view,the calendar and buttons are displayed on the left-hand side of the screen. In hide calendar mode, the calendaris not displayed and the buttons appear at the top of the screen. This can also be changed by clicking on thelong date with the red background below the TODAY button (i.e. Thu, 28 Aug 2014) in the Appointment Book.
Show Appt Details on Mouseover allows you to view any notes that you have chosen to be inserted into apatient's appointment (see The Main Tab) by hovering over their name. This is particularly useful for doublebooked appointments as it allows you to view both patients' information quickly and easily. This feature cancause slowness in the Appointment Book, so if you are experiencing slowness it is recommended that you untickthis preference.Show Schedule Type Names allows you to see the appointment type name over the top of the appointment typecolour. If this option is not selected, you will only see the appointment type colour. You must have the Show
Appointment Schedule button turned on in the Appointment Book for this feature to work.
Show Schedule Type Names Hide Schedule Type Names
Keep Time Column In View will allow the time column to remain in view when you are scrolling across or downthe Appointment Book. This is useful in practices that may have several providers in the Appointment Book.
Use Advanced Rendering will improve the general appearance of selected appointments. This can compromisethe speed of the Appointment Book if you are using older hardware or hardware that does not meet ourhardware requirements.
Appearance
If the default Font, Font Size, or Row Height in the Appointment Book is too large or too small, you can adjust ithere to suit your personal preferences. These are user specific preferences so it will not affect other users. Ingeneral, the easiest-to-read onscreen font for Macintosh is 'Geneva', and for Windows 'Arial'.
The Modify Columns button allows you to specify which columns are displayed, which columns you would liketo print (see Printing Appointment Book), the order of the columns and the column width while in the singleprovider view of the Appointment Book. You can also access the Modify Columns window from the singleprovider view in the appointment book by right clicking on the column names and selecting Modify AppointmentColumns.
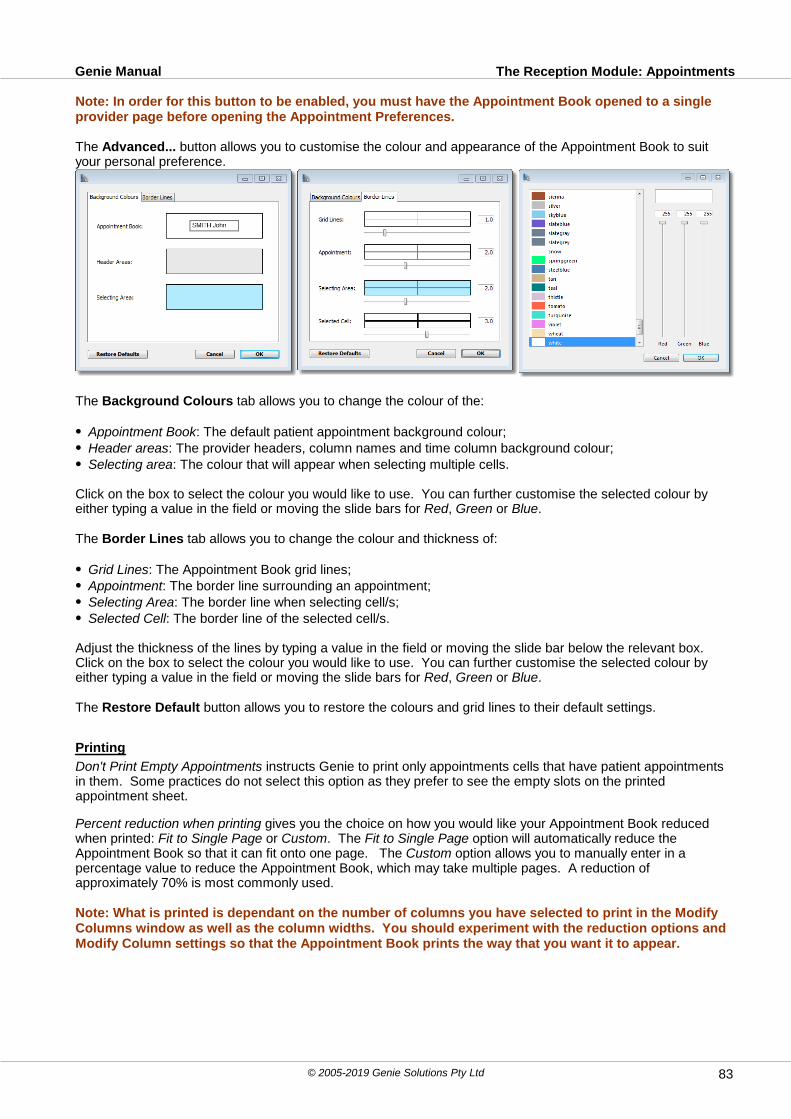
The Reception Module: AppointmentsGenie Manual
© 2005-2019 Genie Solutions Pty Ltd 83
Note: In order for this button to be enabled, you must have the Appointment Book opened to a singleprovider page before opening the Appointment Preferences.
The Advanced... button allows you to customise the colour and appearance of the Appointment Book to suityour personal preference.
The Background Colours tab allows you to change the colour of the:
Appointment Book: The default patient appointment background colour;Header areas: The provider headers, column names and time column background colour;Selecting area: The colour that will appear when selecting multiple cells.
Click on the box to select the colour you would like to use. You can further customise the selected colour byeither typing a value in the field or moving the slide bars for Red, Green or Blue.
The Border Lines tab allows you to change the colour and thickness of:
Grid Lines: The Appointment Book grid lines; Appointment: The border line surrounding an appointment; Selecting Area: The border line when selecting cell/s;Selected Cell: The border line of the selected cell/s.
Adjust the thickness of the lines by typing a value in the field or moving the slide bar below the relevant box. Click on the box to select the colour you would like to use. You can further customise the selected colour byeither typing a value in the field or moving the slide bars for Red, Green or Blue.
The Restore Default button allows you to restore the colours and grid lines to their default settings.
Printing
Don't Print Empty Appointments instructs Genie to print only appointments cells that have patient appointmentsin them. Some practices do not select this option as they prefer to see the empty slots on the printedappointment sheet.
Percent reduction when printing gives you the choice on how you would like your Appointment Book reducedwhen printed: Fit to Single Page or Custom. The Fit to Single Page option will automatically reduce theAppointment Book so that it can fit onto one page. The Custom option allows you to manually enter in apercentage value to reduce the Appointment Book, which may take multiple pages. A reduction ofapproximately 70% is most commonly used.
Note: What is printed is dependant on the number of columns you have selected to print in the ModifyColumns window as well as the column widths. You should experiment with the reduction options andModify Column settings so that the Appointment Book prints the way that you want it to appear.
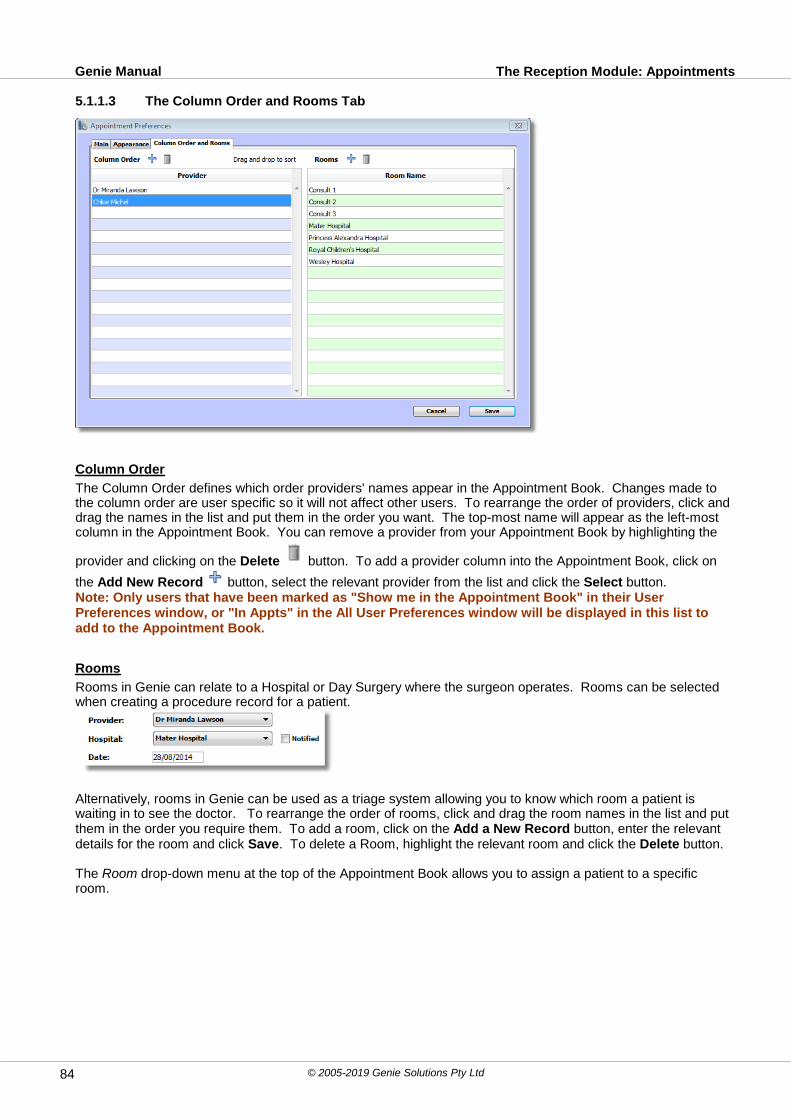
The Reception Module: AppointmentsGenie Manual
© 2005-2019 Genie Solutions Pty Ltd84
5.1.1.3 The Column Order and Rooms Tab
Column Order
The Column Order defines which order providers' names appear in the Appointment Book. Changes made tothe column order are user specific so it will not affect other users. To rearrange the order of providers, click anddrag the names in the list and put them in the order you want. The top-most name will appear as the left-mostcolumn in the Appointment Book. You can remove a provider from your Appointment Book by highlighting the
provider and clicking on the Delete button. To add a provider column into the Appointment Book, click on
the Add New Record button, select the relevant provider from the list and click the Select button. Note: Only users that have been marked as "Show me in the Appointment Book" in their UserPreferences window, or "In Appts" in the All User Preferences window will be displayed in this list toadd to the Appointment Book.
Rooms
Rooms in Genie can relate to a Hospital or Day Surgery where the surgeon operates. Rooms can be selectedwhen creating a procedure record for a patient.
Alternatively, rooms in Genie can be used as a triage system allowing you to know which room a patient iswaiting in to see the doctor. To rearrange the order of rooms, click and drag the room names in the list and putthem in the order you require them. To add a room, click on the Add a New Record button, enter the relevantdetails for the room and click Save. To delete a Room, highlight the relevant room and click the Delete button.
The Room drop-down menu at the top of the Appointment Book allows you to assign a patient to a specificroom.
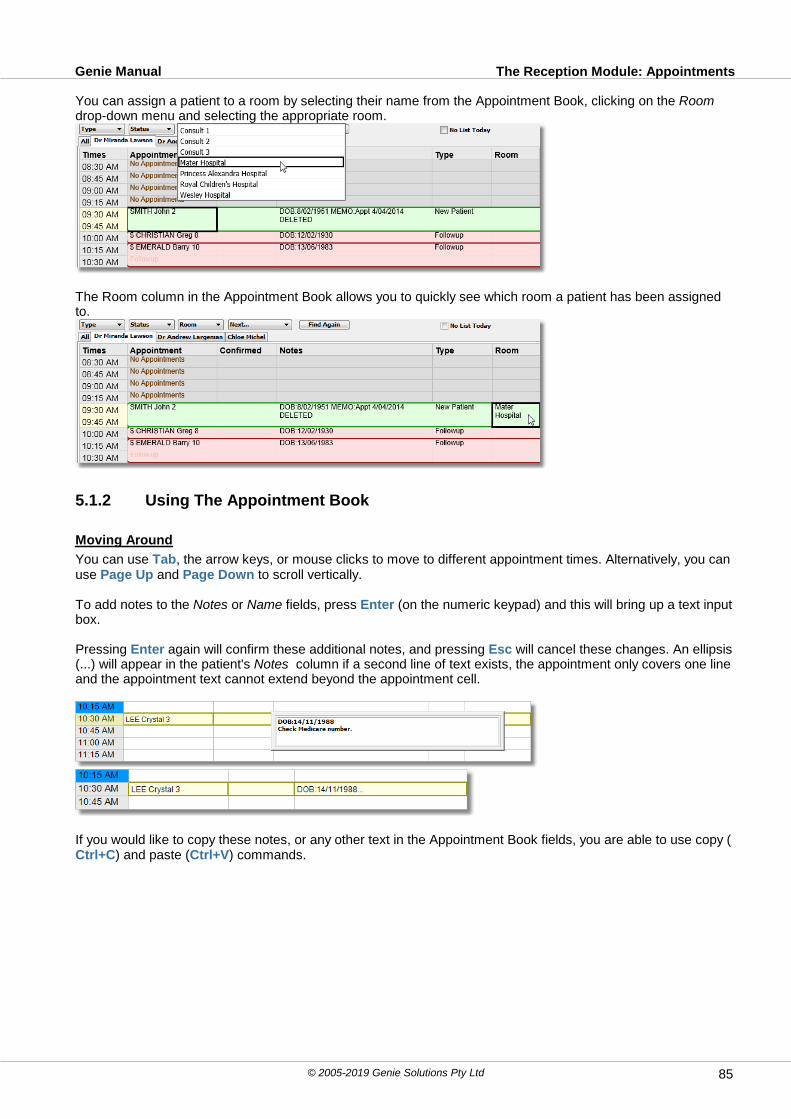
The Reception Module: AppointmentsGenie Manual
© 2005-2019 Genie Solutions Pty Ltd 85
You can assign a patient to a room by selecting their name from the Appointment Book, clicking on the Roomdrop-down menu and selecting the appropriate room.
The Room column in the Appointment Book allows you to quickly see which room a patient has been assignedto.
5.1.2 Using The Appointment Book
Moving Around
You can use Tab, the arrow keys, or mouse clicks to move to different appointment times. Alternatively, you canuse Page Up and Page Down to scroll vertically.
To add notes to the Notes or Name fields, press Enter (on the numeric keypad) and this will bring up a text inputbox.
Pressing Enter again will confirm these additional notes, and pressing Esc will cancel these changes. An ellipsis(...) will appear in the patient's Notes column if a second line of text exists, the appointment only covers one lineand the appointment text cannot extend beyond the appointment cell.
If you would like to copy these notes, or any other text in the Appointment Book fields, you are able to use copy (Ctrl+C) and paste (Ctrl+V) commands.

The Reception Module: AppointmentsGenie Manual
© 2005-2019 Genie Solutions Pty Ltd86
Button Description
Note: Each of these buttons will be described in more detail in subsequent sections.
The calendar allows you to skip forward and backward for both the year and the month. If you click on the monthname, a drop-down list of all months will appear allowing you to jump to the required month. The arrows oneither side of TODAY allow you to skip forward or backwards by either one day or one week respectively. Thelittle arrow button in the calendar allows you to skip forward the selected number of weeks from today's date.Holding down Alt and clicking on this arrow will allow you to skip forward the required number of weeks from adate other than today's date.
The HELP button opens up the Genie manual as a PDF document. Alt+clicking on this buttonwill open the web-based Genie manual in your default internet browser.
Opens up the Appointment preferences window. See Appointment Preferences.
Opens up the Referral/Reply letter window. See Referral/Reply Letters.
Opens a New Patient window. See Adding An Appointment.
Opens the Edit Patient window. See Edit Patient.
Opens the Merged Letter Templates window. See Merged Letter Templates.
Opens the Labels module. See Labels.
Allows you to make an appointment for another family member, provided they have the same accountholder in their demographic window. See Account Holders.
Marks the patient as In Waiting Room.
Allows you to toggle the Names and Notes display in the Appointment Book. See Appointment Views.
Used to create Repeating Patient Appointments. See Repeating Appointments.
Opens the Procedure window. See Procedures.
Opens the patient's Clinical Window. See Clinical module.
Allows you delete patient and non-patient appointments.

The Reception Module: AppointmentsGenie Manual
© 2005-2019 Genie Solutions Pty Ltd 87
Creates a 'quick invoice'. Prints an invoice for the item number selected from the drop-down list ofcommonly used items. See Specifying a Fee to Charge.
Prints the Appointment Book. See Printing Appointment Book.
Opens up the Invoice window. See Creating an Invoice.
Allows you to Show or Hide Appointments. The colours will disappear when not displaying theappointments.
Allows you to Show or Hide the Appointment Schedule. The colours will disappear when not displayingthe schedule. See Appointment Scheduler.
The Show/Hide views determine what information appears in the Appointment Book.
Show AppointmentsHide Schedule
Show AppointmentsShow Schedule
Hide AppointmentsShow Schedule
Opens the Recalls Due window. See Recalls.
Opens the Patient Correspondence window. See Reviewing Correspondence.
The box underneath the Appointment Book buttons is a text box allowing you to add notes.
Pressing Tab, or Enter (on the numerical keypad), or simply clicking away from the box will confirm the textentry made.
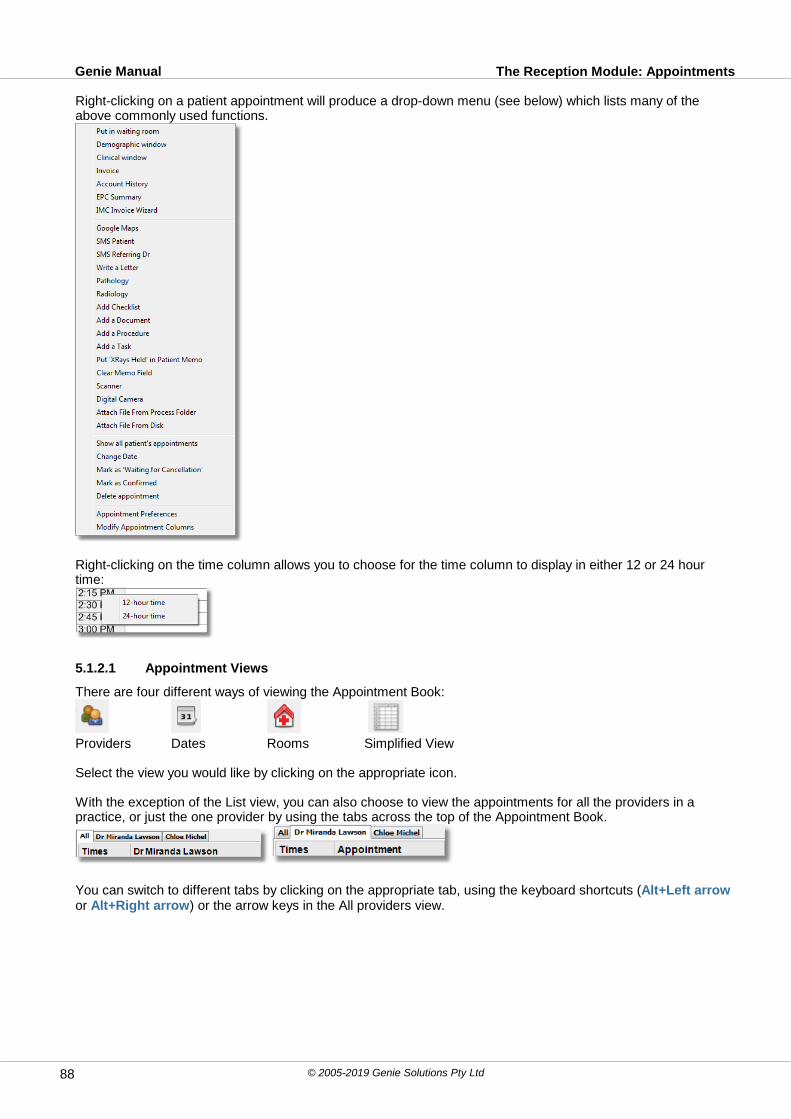
The Reception Module: AppointmentsGenie Manual
© 2005-2019 Genie Solutions Pty Ltd88
Right-clicking on a patient appointment will produce a drop-down menu (see below) which lists many of theabove commonly used functions.
Right-clicking on the time column allows you to choose for the time column to display in either 12 or 24 hourtime:
5.1.2.1 Appointment Views
There are four different ways of viewing the Appointment Book:
Providers Dates Rooms Simplified View
Select the view you would like by clicking on the appropriate icon.
With the exception of the List view, you can also choose to view the appointments for all the providers in apractice, or just the one provider by using the tabs across the top of the Appointment Book.
You can switch to different tabs by clicking on the appropriate tab, using the keyboard shortcuts (Alt+Left arrowor Alt+Right arrow) or the arrow keys in the All providers view.
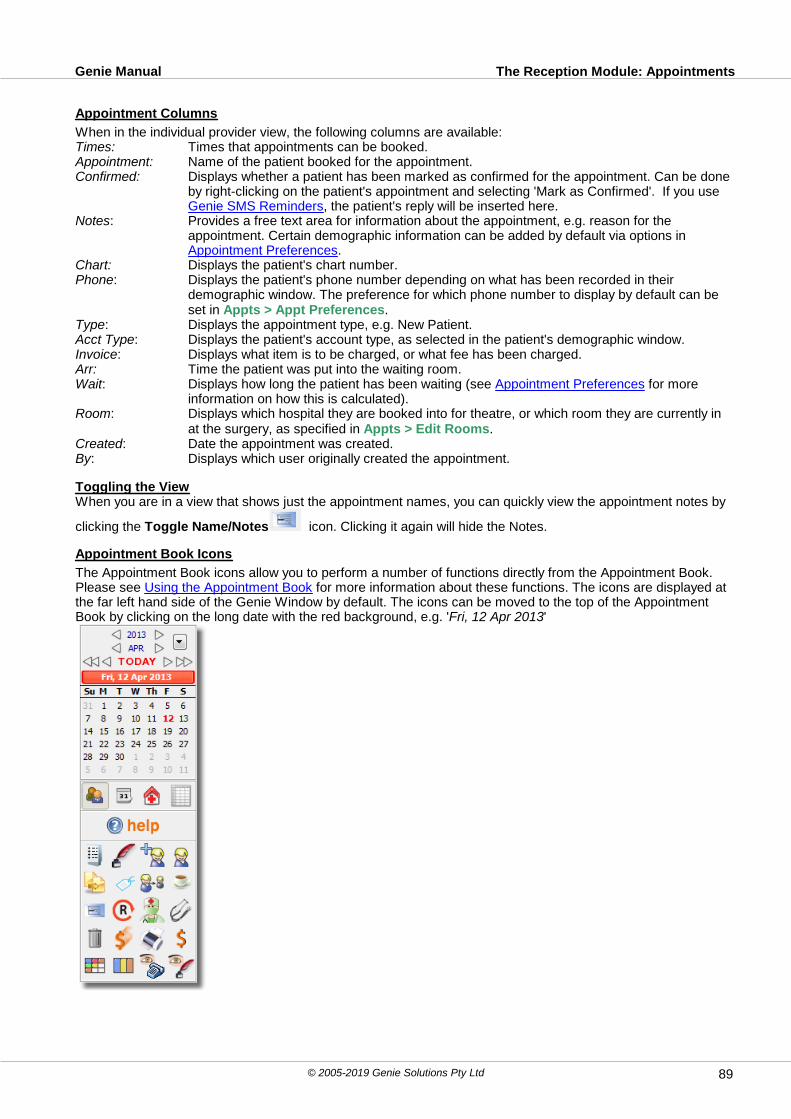
The Reception Module: AppointmentsGenie Manual
© 2005-2019 Genie Solutions Pty Ltd 89
Appointment Columns
When in the individual provider view, the following columns are available:Times: Times that appointments can be booked.Appointment: Name of the patient booked for the appointment.Confirmed: Displays whether a patient has been marked as confirmed for the appointment. Can be done
by right-clicking on the patient's appointment and selecting 'Mark as Confirmed'. If you use Genie SMS Reminders, the patient's reply will be inserted here.
Notes: Provides a free text area for information about the appointment, e.g. reason for theappointment. Certain demographic information can be added by default via options inAppointment Preferences.
Chart: Displays the patient's chart number.Phone: Displays the patient's phone number depending on what has been recorded in their
demographic window. The preference for which phone number to display by default can beset in Appts > Appt Preferences.
Type: Displays the appointment type, e.g. New Patient.Acct Type: Displays the patient's account type, as selected in the patient's demographic window.Invoice: Displays what item is to be charged, or what fee has been charged.Arr: Time the patient was put into the waiting room.Wait: Displays how long the patient has been waiting (see Appointment Preferences for more
information on how this is calculated).Room: Displays which hospital they are booked into for theatre, or which room they are currently in
at the surgery, as specified in Appts > Edit Rooms.Created: Date the appointment was created.By: Displays which user originally created the appointment.
Toggling the ViewWhen you are in a view that shows just the appointment names, you can quickly view the appointment notes by
clicking the Toggle Name/Notes icon. Clicking it again will hide the Notes.
Appointment Book Icons
The Appointment Book icons allow you to perform a number of functions directly from the Appointment Book.Please see Using the Appointment Book for more information about these functions. The icons are displayed atthe far left hand side of the Genie Window by default. The icons can be moved to the top of the AppointmentBook by clicking on the long date with the red background, e.g. 'Fri, 12 Apr 2013'

The Reception Module: AppointmentsGenie Manual
© 2005-2019 Genie Solutions Pty Ltd90
Adjusting Column Widths
The slider at the bottom of the icons region on the left of the window is used to adjust various column sizes,depending on which view you are in.
Providers View - All: Each provider’s column is resized.Dates and Rooms Views: Each date or room column is resized.Providers/Grid View - Individual: The slider bar is not present because each column can be adjustedindividually by using the Modify Appointment Columns option obtained by right-clicking on the column headerdirectly, right-clicking on the Appointment Book and selecting Modify Appointment Columns from the drop-downmenu or in the Appointment Preferences under the Appearance tab.
You can then type the width you require by slow double-clicking in the width column of the column that you wouldlike to adjust. The measurement is in pixels, therefore trial and error must used until you get the width yourequire on screen.
Note: These preferences are unique to each machine on the network.
Navigation Palette
You have the choice of having the navigation palette either at the bottom or at the right of your screen throughyour User Preferences, File > User Preferences, General tab.
This will keep track of all the windows you have open in Genie and alert you to any outstanding tasks, resultsetc.
5.1.2.2 Appointment Scheduler
The Appointment Scheduler is used to document a doctor's ongoing schedule e.g. a four-weekly rotating roster.The Appointment Scheduler can only be accessed if:
Your security preferences allow you to Modify Appointment Schedule. For more information on securitysettings, please see the Security chapter.

The Reception Module: AppointmentsGenie Manual
© 2005-2019 Genie Solutions Pty Ltd 91
Your Appointment Book is set to Hide Appointments and Show Scheduler .
Follow the steps below to set up each block of the schedule.
1. Select the type that applies to the block.
2. Select the block of time by clicking and dragging within the Appointment Book.
3. Complete the details in the Scheduler box that appears:Date/Times: this defaults at the date and times you have clicked and dragged on, but can be changedif you have made a mistake.Duration: this defaults at the duration you have clicked and dragged, this can be changed in thiswindow.Provider: the provider you have created the schedule for, this cannot be changed in this window.Repeating: this will default on Non-repeating, you can change this depending on your needs.End date: this does not have to be specified, but can be if you need a precise end date.Room: usually only specified if this block will be used as a theatre list as this will enter the Hospitalinto the procedure record when booking patients and attaching a procedure.Type: the type you have chosen prior to clicking and dragging.
More information on these options is found below.
4. Clicking Save will allocate the schedule to the Appointment Book.
Editing Appointment Schedule
To edit a schedule, you must have Hide Appointments and Show Scheduler modes enabled . Right-click on the schedule that you have created, and you will be presented with the options to either EditAppointment schedule or Delete appointment schedule.
Note: Where a provider has a one-off change to their schedule (eg. a conference), you should make thischange using appointment types (see Appointment Types.) You cannot put a schedule over anotherschedule.
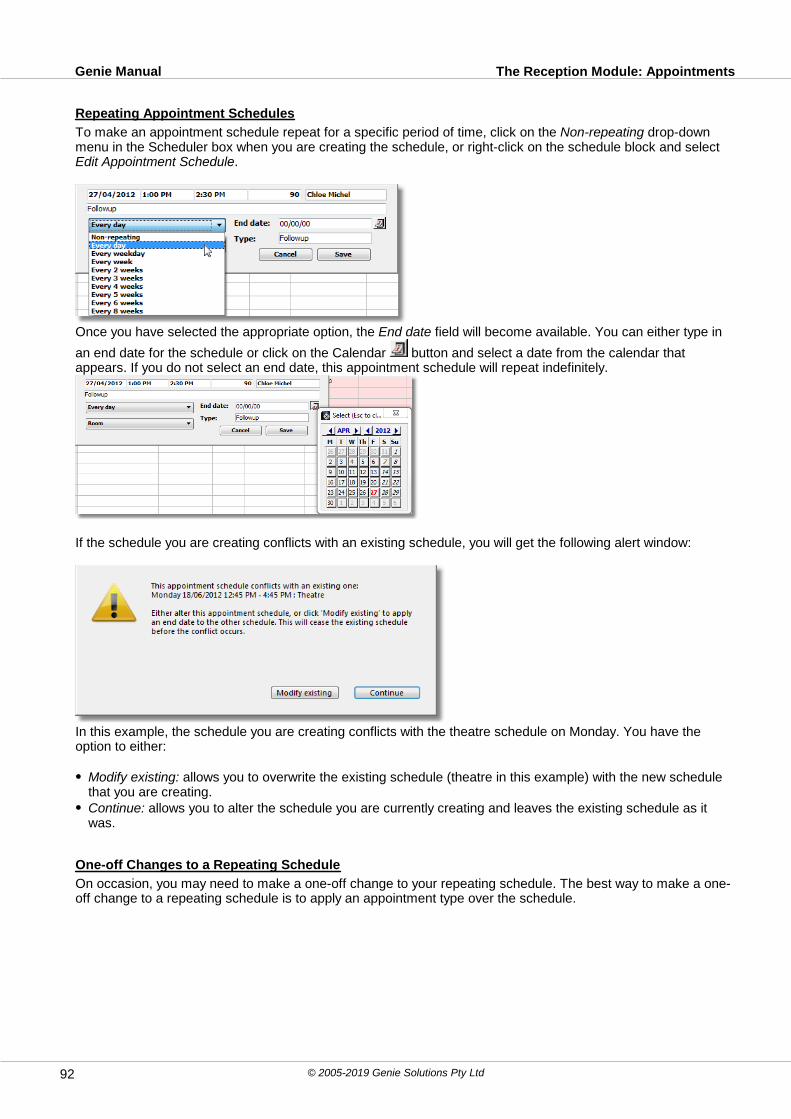
The Reception Module: AppointmentsGenie Manual
© 2005-2019 Genie Solutions Pty Ltd92
Repeating Appointment Schedules
To make an appointment schedule repeat for a specific period of time, click on the Non-repeating drop-downmenu in the Scheduler box when you are creating the schedule, or right-click on the schedule block and select Edit Appointment Schedule.
Once you have selected the appropriate option, the End date field will become available. You can either type in
an end date for the schedule or click on the Calendar button and select a date from the calendar thatappears. If you do not select an end date, this appointment schedule will repeat indefinitely.
If the schedule you are creating conflicts with an existing schedule, you will get the following alert window:
In this example, the schedule you are creating conflicts with the theatre schedule on Monday. You have theoption to either:
Modify existing: allows you to overwrite the existing schedule (theatre in this example) with the new schedulethat you are creating.Continue: allows you to alter the schedule you are currently creating and leaves the existing schedule as itwas.
One-off Changes to a Repeating Schedule
On occasion, you may need to make a one-off change to your repeating schedule. The best way to make a one-off change to a repeating schedule is to apply an appointment type over the schedule.

The Reception Module: AppointmentsGenie Manual
© 2005-2019 Genie Solutions Pty Ltd 93
In the example below, the doctor usually breaks for lunch at 12PM.
If the doctor needs to work through lunch and start theatre early one day, highlight all of the lunch cells andselect Theatre from the Type drop-down menu at the top of the appointment book.
Using this method avoids modifying future instances of the schedule.
5.1.2.3 Adding An Appointment
There are two ways to book a patient appointment:1. For a single appointment, simply click on the cell at the time you would like to book the appointment, and starttyping a few letters of the patient's surname.2. For a longer appointment, simply click and hold the mouse in the cell where you would like to start theappointment and drag down to highlight all cells required for the appointment. Start typing a few letters of thepatient's surname.
When you start typing a box will appear over the appointment time. You can search for a particular patient inyour database by including a few letters of their surname and their first name. This can be done in two ways:
Enter a space after the first few letters of the surname and then type the first few letters of the patient's Firstname. Eg.“smi jo ” to search for John Smith. Enter a comma after the first few letters of the surname and then type the first few letters of the patient's Firstname. Eg. 'smi,jo' to search for John Smith.
This window also allows you to change the date, start and finish time and duration of the appointment as well asthe appointment type, if required. It also displays the provider that this appointment is for.
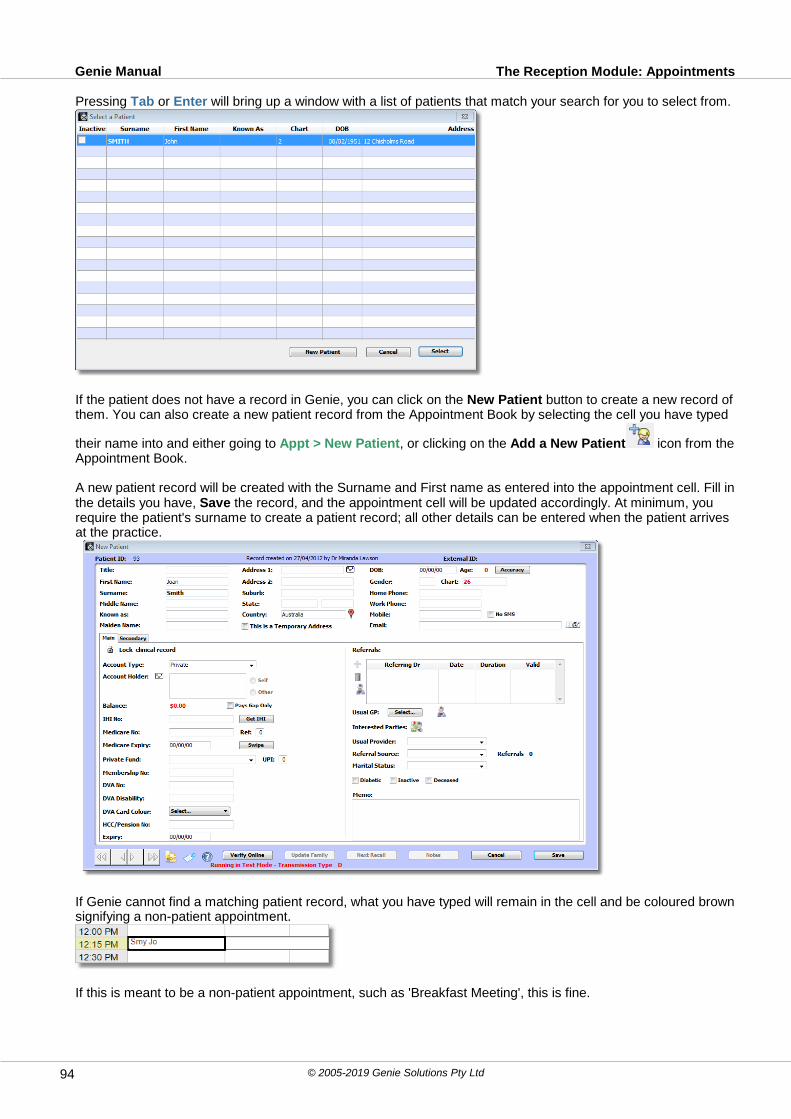
The Reception Module: AppointmentsGenie Manual
© 2005-2019 Genie Solutions Pty Ltd94
Pressing Tab or Enter will bring up a window with a list of patients that match your search for you to select from.
If the patient does not have a record in Genie, you can click on the New Patient button to create a new record ofthem. You can also create a new patient record from the Appointment Book by selecting the cell you have typed
their name into and either going to Appt > New Patient, or clicking on the Add a New Patient icon from theAppointment Book.
A new patient record will be created with the Surname and First name as entered into the appointment cell. Fill inthe details you have, Save the record, and the appointment cell will be updated accordingly. At minimum, yourequire the patient's surname to create a patient record; all other details can be entered when the patient arrivesat the practice.
If Genie cannot find a matching patient record, what you have typed will remain in the cell and be coloured brownsignifying a non-patient appointment.
If this is meant to be a non-patient appointment, such as 'Breakfast Meeting', this is fine.
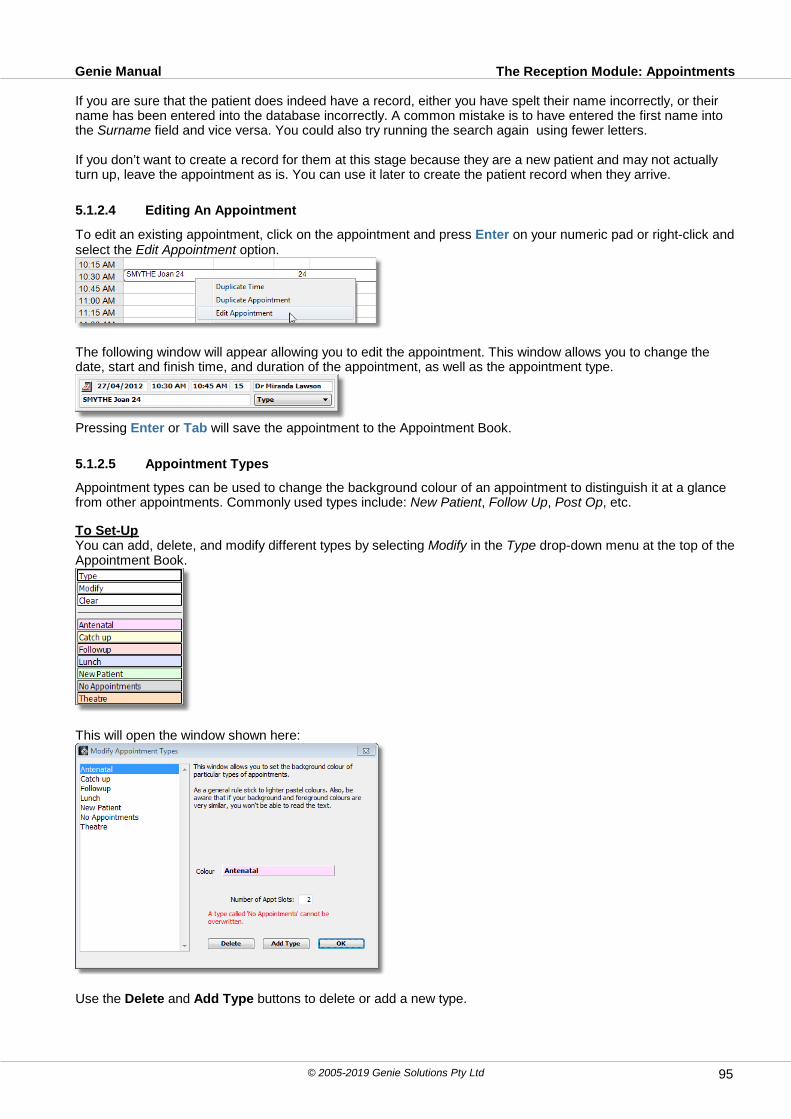
The Reception Module: AppointmentsGenie Manual
© 2005-2019 Genie Solutions Pty Ltd 95
If you are sure that the patient does indeed have a record, either you have spelt their name incorrectly, or theirname has been entered into the database incorrectly. A common mistake is to have entered the first name intothe Surname field and vice versa. You could also try running the search again using fewer letters.
If you don’t want to create a record for them at this stage because they are a new patient and may not actuallyturn up, leave the appointment as is. You can use it later to create the patient record when they arrive.
5.1.2.4 Editing An Appointment
To edit an existing appointment, click on the appointment and press Enter on your numeric pad or right-click andselect the Edit Appointment option.
The following window will appear allowing you to edit the appointment. This window allows you to change thedate, start and finish time, and duration of the appointment, as well as the appointment type.
Pressing Enter or Tab will save the appointment to the Appointment Book.
5.1.2.5 Appointment Types
Appointment types can be used to change the background colour of an appointment to distinguish it at a glancefrom other appointments. Commonly used types include: New Patient, Follow Up, Post Op, etc.
To Set-UpYou can add, delete, and modify different types by selecting Modify in the Type drop-down menu at the top of theAppointment Book.
This will open the window shown here:
Use the Delete and Add Type buttons to delete or add a new type.

The Reception Module: AppointmentsGenie Manual
© 2005-2019 Genie Solutions Pty Ltd96
To edit an appointment type name, double-click on it in the list and you will be presented with a Rename prompt.
Note: Renaming a type will do so for all past and future occurrences of the type.
To set the background colour for a type, select it from the list on the left-hand side and click on its name next tothe word Colour. This will open a colour grid where you can select any colour you wish. It is sensible to keepyour colours light, and quite distinct from the colours of your patient statuses; if you have a background coloursimilar to your patient status, your text will be very hard to read.
You can specify how many appointment slots a particular type uses when it is applied to a patient appointmentby typing in the Number of Appt Slots box. e.g. New Patient appointments take two slots. This will not preventusers from manually adjusting these appointments to less than the minimum two slots, but it will ensure Geniedefaults to two slots.
If you set up a type called exactly 'No Appointments', patients will not be able to be booked over this type.
If you create a type called exactly 'Antenatal', and apply it to a patient appointment, the gestation displays in theappointment cell provided the patient has a pregnancy record in their Clinical Window.
Using Types
Once you have set up your types there are two ways to use them1. To organise your patients2. To make temporary adjustments to the Appointment Schedule

The Reception Module: AppointmentsGenie Manual
© 2005-2019 Genie Solutions Pty Ltd 97
1. To Organise your Patients
You can organise your patients using types to allow you to see which Patients are New, for Follow-up, etc. TheAppointment Book will display the appointments using the assigned colours for the different types.
To allocate a type to a patient appointment, highlight the required appointment, and select the type from the Type drop-down menu.
This will apply this type's designated duration and change the background colour of the appointment. Theduration of the appointment will only be extended if the type's default duration is longer than the appointment; itwill not reduce the duration if the appointment is longer than the type.
If you highlight multiple cells and apply a type, the cells will be grouped together and the duration of theappointment will be extended to cover the highlighted cells. The appointment will only be for the duration of thecells selected even if the number of slots for this type is longer than what cells are selected.
If you would like to change the duration for this particular appointment after you've typed the appointment, youcan edit this in the same way you would edit an appointment schedule.

The Reception Module: AppointmentsGenie Manual
© 2005-2019 Genie Solutions Pty Ltd98
Right-click on the appointment, select Edit Appointment and either type the required times in the Start and Endtime fields or type the number of minutes in the field next the End time.
Highlighting a typed appointment and clicking on the Clear option in the drop-down menu will remove the typefrom that patient's appointment. However, if the appointment was spread across several appointment slots, it willkeep the same duration and you must adjust this accordingly.
2. To Make Temporary Changes to the Appointment Schedule
Types can also be used to mark changes to the doctor's schedule. It is most commonly used in instances wherethere is a change to the doctor's usual Schedule (eg. Holidays or one-off Theatre sessions). See AppointmentScheduler for setting up the Appointment Book to display the doctor's usual schedule. Example: The doctor has agreed to operate on a particular Monday from 1pm to 5pm where he usually has NoAppointments. Highlight the cells from 1pm to 5pm (Figure 1) and select the type you have set up from the typemenu, e.g Theatre (Figure 2). This will change the colour of these cells and patients can now be booked in thesetime slots.
Figure 1
Figure 2
If this is a temporary change to doctor's schedule that repeats (eg.the doctor has agreed to operate over thenext three Mondays), this change can be set to repeat (see Repeating Appointments).
Appointment Type Report
An Appointment Type report can be generated through Appts > Appts Type Report. This report will show howmany patients of each type have been booked in a given time period and for a specific provider.

The Reception Module: AppointmentsGenie Manual
© 2005-2019 Genie Solutions Pty Ltd 99
It can also report on non-patient appointment types by clicking on the Non-Patient Appointments tab.
5.1.2.6 Appointment Status
Appointments can be marked as having a particular status to indicate the patient's progress through the practice.This status is reflected in the colour of the text of the appointment.
Patient Appointment Non-Patient Appointment In Waiting Room
Ready to Invoice Invoiced File Out
Waiting for Cancellation In With Doctor
For example the default colour for a patient appointment is black, a non-patient appointment is brown. When the
patient is added to the Waiting Room by clicking on the Coffee Cup icon, the status is automaticallychanged to red for In Waiting Room. You can quickly check what each colour represents by clicking on theStatus drop-down menu. To manually change the Status of an appointment simply select the status from theStatus drop-down menu.
The eight status items which are installed with Genie are used by the program for various tasks, and thereforecannot be deleted.
You can modify the original eight statuses' colours, and add or delete any new items you wish by selecting Modify in the Status drop-down menu. This window behaves in the same way as the Appointment Type window(see Appointment Types).
Note: If you double-click on a patient that has a status of Ready to Invoice it will open an invoice for thepatients. If you double-click on a patient that has a status of 'In Waiting Room' it will open the patient'sClinical Window. Double-clicking on a 'Non-Patient Appointment' will allow you to edit the appointment.Double-clicking on all other appointment statuses will open the patient's demographic window.

The Reception Module: AppointmentsGenie Manual
© 2005-2019 Genie Solutions Pty Ltd100
5.1.2.7 Edit Patient
The Edit Patient window can be accessed from the following places in Genie:• The Appointment Book• The Patient Clinical Window• The Patients ListTo bring up the Edit Patient window, click once on the desired entry and then click on the small Edit Patient icon
.
The Edit Patient window allows you to make any required changes and adjustments to the patient's demographicdetails.
The Envelope button next to the patient's address and the account holder details allows you to print anenvelope displaying the patient's or the account holder's address respectively. Additionally you can also chooseto include a return address on these envelopes.
The symbol allows you to locate the address on Google Maps in your default internet browser.
The Email button allows you to enter the patient's email address. This allows you to then email this patient.
The Lock clinical record padlock allows a record to be locked for use by one provider only. Access to the lockedpatient's file will require the password of the user who locked the record initially. A record is locked or unlockedby clicking on the picture of the lock.
The Account Type governs what fees are charged by default when invoicing this patient.
An account holder record must be created in order to invoice a patient by clicking either the Self or Other radiobutton (see Account Holders). This must be an individual; it cannot be an organisation. The account holder canbe changed at the time of invoicing to be that of an organisation or Medicare etc.
The Swipe button can be used in conjunction with a card reader to enter a patient's Medicare details. Click onthe button then swipe the card and it will enter the patients Medicare Number and Expiry Date. It can also beused in the Appointment Book, click into an appointment cell, then swipe the card and this will make anappointment for this patient.
Referral details can be added by clicking on the small Blue plus button next to the Referring Dr table whichdisplays a search box for the Address Book. The doctor must have a record in your Address Book to be addedas a referring doctor (see the Address Book section). The Referring doctor address details can be edited via the
small Doctor icon , and the referring doctor can be deleted via the Garbage can icon .

The Reception Module: AppointmentsGenie Manual
© 2005-2019 Genie Solutions Pty Ltd 101
To edit or change the Referral period, double-click on the Referring doctor's name in the Referring Dr column.
The Usual GP button allows you to add in the doctor the patient usually sees as their GP, if it is different to theirreferring doctor. The doctor must have a record in your address book to be added as a usual GP (see theAddress Book section). To remove a doctor as a usual GP, Alt+click the Select... button.
The Interested Parties button allows you to view the interested parties for this patient. You can add ordelete doctors that are records in your address book to this list.
The Usual Provider is the provider that the patient usually sees at your practice. This can be useful forgenerating reports for specific providers' patients.
Referral Source can be used for statistics on what advertising media has worked the best (eg. Radio, YellowPages, Magazine Ad etc) using the Referral Source Report in File > Maintenance & Reports, PracticeAnalysis tab. If you mark the Referral Source as Existing Patient, you will be prompted to choose which patientin your database referred this patient. This will then keep a tally in the referring patient's demographic window ofthe number of patients they have referred.
Making a patient as Inactive or Deceased will prevent them from appearing in most searches and will preventmerged letters from being printed for the patient. The Deceased marker will also prevent you from bookingappointments for that patient.
The Memo field allows for brief entries, such as patient reminders like 'Collect Xrays'. Such reminders will thenappear in a red Memo box the next time the patient is booked in for an appointment, or the next time they aremarked as In Waiting Room. The length of time that this memo is displayed for can be adjusted in your UserPreferences in the General tab.
Verify Online will be available if you use Online Claiming. It verifies the patient information you have in Geniewith that held at Medicare Australia, and will let you know if there is any differing information. This helps preventpatient information-based rejections in Online Claiming. See Using Online Verification for more information.
The Update Family button allows you to automatically update the demographic details (i.e. home address andhome phone number) of all patients that share the same Account ID number ie. by the parent having Selfselected in their account holder box and all others in the family having Other selected with the parent being theaccount holder.
The Notes button allows you to make extended, progressive notes on the patient, if required. These are storedin the patient's Clinical Window as a Document. If a patient has a Primary Note entered, the Notes button willdisplay in red text with an asterisks (Windows) or just *Notes (Macs).
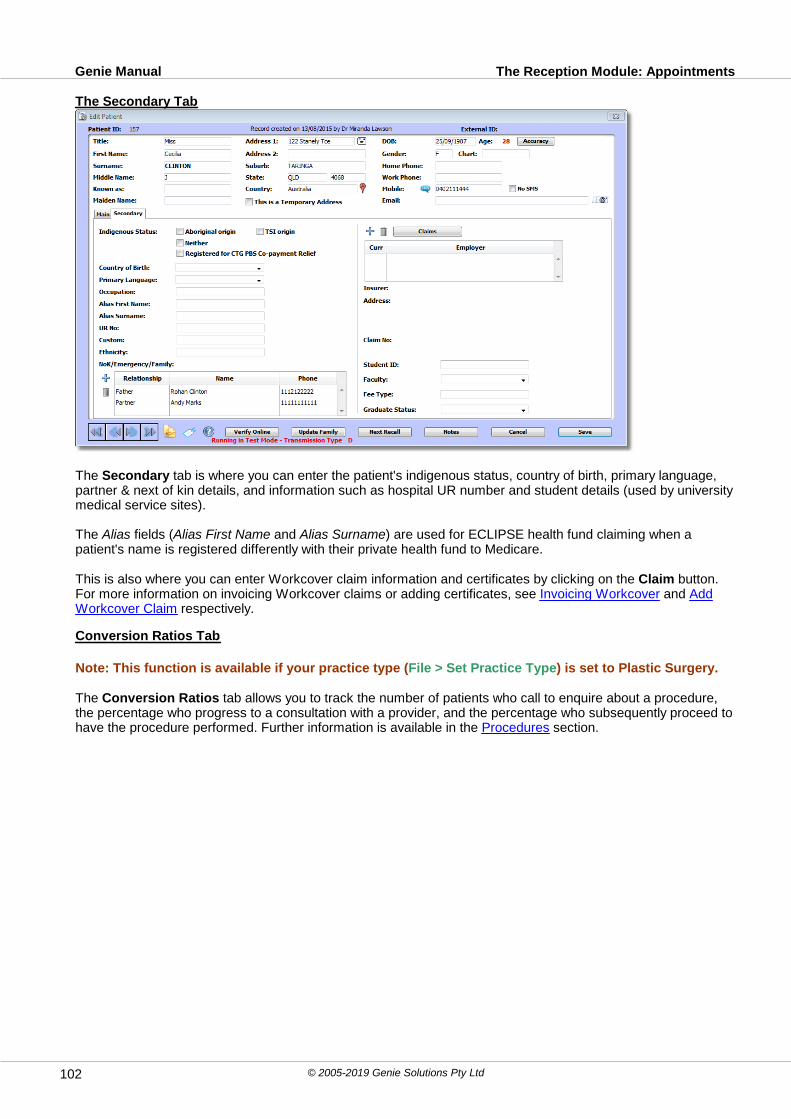
The Reception Module: AppointmentsGenie Manual
© 2005-2019 Genie Solutions Pty Ltd102
The Secondary Tab
The Secondary tab is where you can enter the patient's indigenous status, country of birth, primary language,partner & next of kin details, and information such as hospital UR number and student details (used by universitymedical service sites).
The Alias fields (Alias First Name and Alias Surname) are used for ECLIPSE health fund claiming when apatient's name is registered differently with their private health fund to Medicare.
This is also where you can enter Workcover claim information and certificates by clicking on the Claim button.For more information on invoicing Workcover claims or adding certificates, see Invoicing Workcover and AddWorkcover Claim respectively.
Conversion Ratios Tab
Note: This function is available if your practice type (File > Set Practice Type) is set to Plastic Surgery.
The Conversion Ratios tab allows you to track the number of patients who call to enquire about a procedure,the percentage who progress to a consultation with a provider, and the percentage who subsequently proceed tohave the procedure performed. Further information is available in the Procedures section.
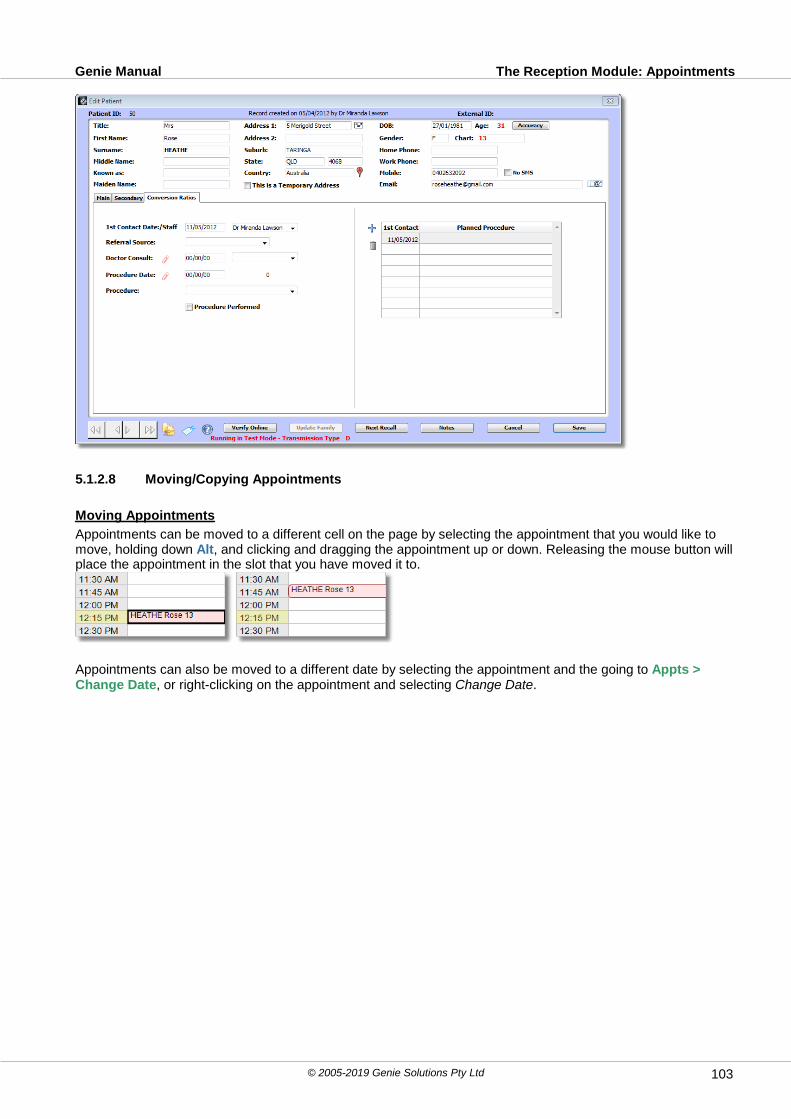
The Reception Module: AppointmentsGenie Manual
© 2005-2019 Genie Solutions Pty Ltd 103
5.1.2.8 Moving/Copying Appointments
Moving Appointments
Appointments can be moved to a different cell on the page by selecting the appointment that you would like tomove, holding down Alt, and clicking and dragging the appointment up or down. Releasing the mouse button willplace the appointment in the slot that you have moved it to.
Appointments can also be moved to a different date by selecting the appointment and the going to Appts >Change Date, or right-clicking on the appointment and selecting Change Date.

The Reception Module: AppointmentsGenie Manual
© 2005-2019 Genie Solutions Pty Ltd104
This will open the window below allowing you to change the appointment to another Provider, Date, and/or Time.
Copying appointmentsAppointments can be copied and pasted into another cell, either on the same day or on another day. To do this,you can use the keyboard shortcuts for copying and pasting i.e. Ctrl+C and Ctrl+V respectively.
Note: Attached procedures will not be copied if you use this method. If the appointment has an attachedprocedure, you MUST use the Change Date function described above.
5.1.2.9 Deleting/Restoring Appointments
Deleting Appointments
Highlight the appointment or appointments to delete and then either click on the Garbage can icon , pressDelete on your keyboard or Ctrl+D.
If the appointment is linked to a patient, you will be asked to confirm the deletion from the Appointment Book ormark the appointment as Did Not Arrive or Cancelled by Patient. Ticking either of these options will allow you tocreate a consultation note in the patient's Clinical Window and/or insert a patient memo for future reference.These Did Not Arrive and Cancelled by Patient options will not delete the patient's appointment from theAppointment Book, so a further deletion using Just Delete it is necessary, if required. If you tick Just Delete itand Make a consultation note, this will delete the appointment from the Appointment Book as well as make aconsultation note in the patient's Clinical Window.
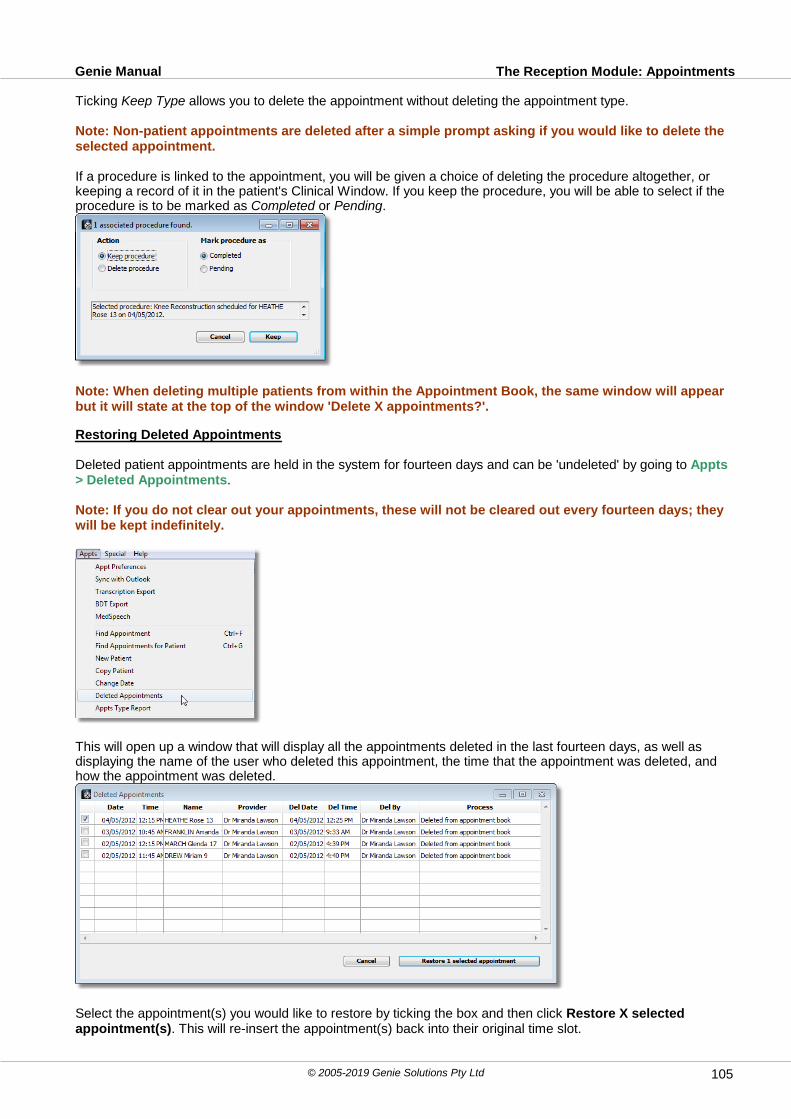
The Reception Module: AppointmentsGenie Manual
© 2005-2019 Genie Solutions Pty Ltd 105
Ticking Keep Type allows you to delete the appointment without deleting the appointment type.
Note: Non-patient appointments are deleted after a simple prompt asking if you would like to delete theselected appointment.
If a procedure is linked to the appointment, you will be given a choice of deleting the procedure altogether, orkeeping a record of it in the patient's Clinical Window. If you keep the procedure, you will be able to select if theprocedure is to be marked as Completed or Pending.
Note: When deleting multiple patients from within the Appointment Book, the same window will appearbut it will state at the top of the window 'Delete X appointments?'.
Restoring Deleted Appointments
Deleted patient appointments are held in the system for fourteen days and can be 'undeleted' by going to Appts> Deleted Appointments.
Note: If you do not clear out your appointments, these will not be cleared out every fourteen days; theywill be kept indefinitely.
This will open up a window that will display all the appointments deleted in the last fourteen days, as well asdisplaying the name of the user who deleted this appointment, the time that the appointment was deleted, andhow the appointment was deleted.
Select the appointment(s) you would like to restore by ticking the box and then click Restore X selectedappointment(s). This will re-insert the appointment(s) back into their original time slot.

The Reception Module: AppointmentsGenie Manual
© 2005-2019 Genie Solutions Pty Ltd106
Note: If there is already another appointment in this time slot, the appointments will be double booked.
5.1.2.10 Cancellation List
The cancellation list allows you to place patients who request an appointment with a specific doctor, but areunable to get an appointment straight away, on a list.
To place patients on the cancellation list, firstly go into Appts > Appointment Preferences and make sure thatyou have Check for Cancellations when Deleting ticked.
To Use Waiting for Cancellation
1. When a patient phones for an appointment, and can't get one on the required day, book them in for a futureappointment.2. Make this patient's appointment Status 'Waiting for Cancellation' by clicking on the Status drop-down menu.
3. The next time you delete a patient appointment you will be provided with the following window:
4. Select the patient from the above list that you would like to book into the freed appointment slot and click OK.5. This will insert the selected patient into the nominated appointment slot.
You can sort the list of patients waiting for a cancellation by clicking the Type drop-down menu. This will displayall patients on the waiting list with the selected type applied to their appointment.
To view the cancellation list at any time, go to Appts > Waiting for Cancellation. From this window you candelete any future appointments by clicking on the Delete Future Appts button, show the patients in the patientslist by clicking on the Show in Patients List button, and print this list this list by clicking on the Print button.
To remove a patient from the Cancellation List, double-click the patient's name in the list. Genie will take you tothe patient's currently-booked appointment. Change the status of the appointment back to 'Patient Appointment'to ensure that they no longer appear in the Cancellation List.

The Reception Module: AppointmentsGenie Manual
© 2005-2019 Genie Solutions Pty Ltd 107
5.1.2.11 Finding an Appointment
Pressing Ctrl+F will allow you to search for a specific patient, and locate all of their past and futureappointments.
Pressing Ctrl+G will search for past and future appointments for the selected patient in the Appointment Book.You can also get to this window by right-clicking on the patient's appointment and selecting Show All Patient'sAppointments.
This is a useful feature if you would like to find out if a particular patient has an upcoming appointment to see adoctor, or to see when they last had an appointment. If the patient is a new patient who is yet to be entered intothe database (ie. has a non-patient appointment in brown text), you can still search this by entering the name inthe Notes field of the search box.
Clicking the Print button will give you the option to print just the future appointments for the patient and/or just acertain type of appointment. In the below example it would print all future Followup appointments for the patient.

The Reception Module: AppointmentsGenie Manual
© 2005-2019 Genie Solutions Pty Ltd108
Using the Next... button at the top of the Appointment Book will allow you to search for the next availableappointment for either a specific doctor, or a specific type of appointment.
Note: When accessed from the All Providers view, selecting a type will show the next availableappointment of that type with any doctor. If you would like to search for a particular type with aparticular doctor, ensure you access this from their single provider view.
To find a type of a specific duration, for example a thirty minute Followup appointment, hold down Alt whileselecting the Type in the Next drop-down will prompt you for the minutes duration of the slot you are looking for.
If the first available appointment located is not suitable, use the Find Again button to move to the next availableappointment for either that doctor, or appointment type. To find a previous appointment for the selectedappointment type, hold down Ctrl and click on the Find Again button. Holding down Shift and clicking on theFind Again button finds all available appointment type slots in a selected time period, and allows you to book thepatient in from the same window.
5.1.2.12 Double booking an Appointment time
To make a double booking you can:
1. Hold Shift while dragging out a new appointment duration over the existing appointment.2. Double-click on the time in the appointment time column and an appointment box will appear allowing you tomake the second appointment.
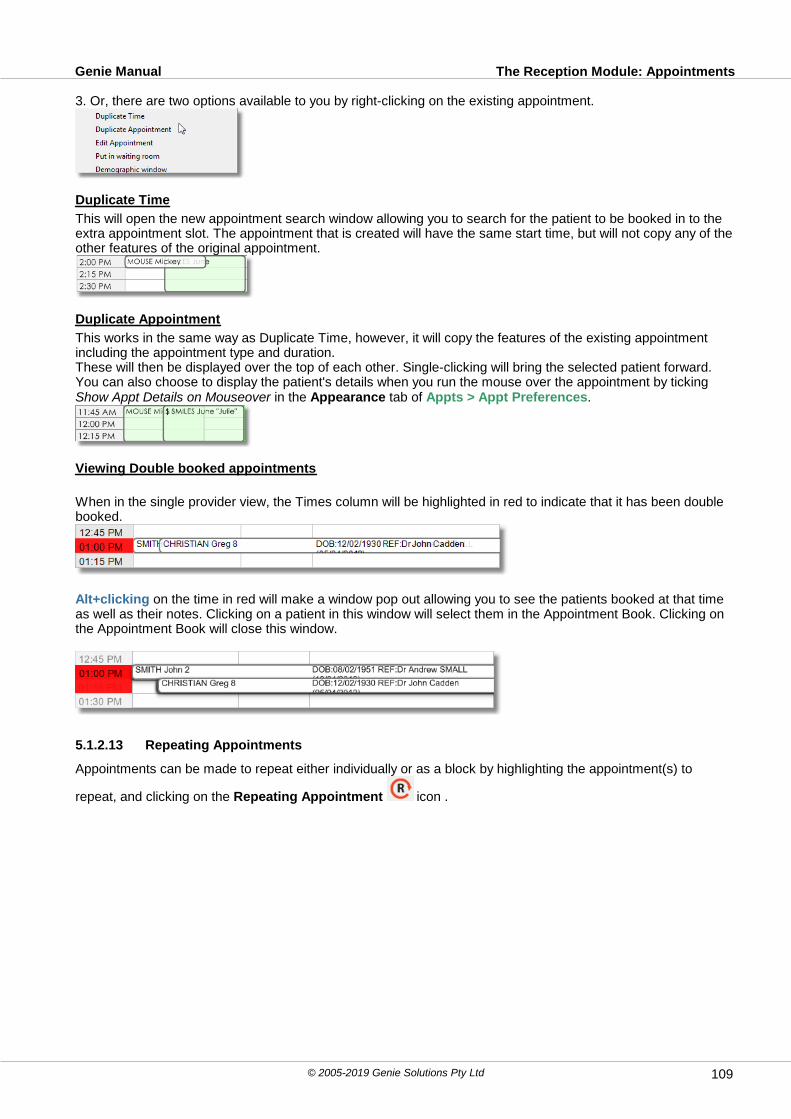
The Reception Module: AppointmentsGenie Manual
© 2005-2019 Genie Solutions Pty Ltd 109
3. Or, there are two options available to you by right-clicking on the existing appointment.
Duplicate Time
This will open the new appointment search window allowing you to search for the patient to be booked in to theextra appointment slot. The appointment that is created will have the same start time, but will not copy any of theother features of the original appointment.
Duplicate Appointment
This works in the same way as Duplicate Time, however, it will copy the features of the existing appointmentincluding the appointment type and duration.These will then be displayed over the top of each other. Single-clicking will bring the selected patient forward. You can also choose to display the patient's details when you run the mouse over the appointment by ticking Show Appt Details on Mouseover in the Appearance tab of Appts > Appt Preferences.
Viewing Double booked appointments
When in the single provider view, the Times column will be highlighted in red to indicate that it has been doublebooked.
Alt+clicking on the time in red will make a window pop out allowing you to see the patients booked at that timeas well as their notes. Clicking on a patient in this window will select them in the Appointment Book. Clicking onthe Appointment Book will close this window.
5.1.2.13 Repeating Appointments
Appointments can be made to repeat either individually or as a block by highlighting the appointment(s) to
repeat, and clicking on the Repeating Appointment icon .

The Reception Module: AppointmentsGenie Manual
© 2005-2019 Genie Solutions Pty Ltd110
This will display the window below:
Select the desired repeating interval from the Repeat drop-down menu. You can then either enter the number oftimes you would like the appointment to repeat in the field provided, or type an end date in the End Date field.
The Calendar button is also available to select a date. Once you have selected these, press the Save
button. Clicking on the question mark button will open up the Genie manual to the section on repeatingappointments.
Rules:1. Patient appointments are never overwritten by a repeating non-patient appointment.2. Non-patient appointments are always overwritten by another repeating non-patient appointment.
'Add', 'Add All, 'Replace', 'Replace All', 'Skip' or 'Skip All'.'Add' will add another appointment at the same time (double book the time).'Add All' will add another appointment for ALL conflicting patient appointments.'Replace' will replace the existing appointment with the new appointment.'Replace All' will replace ALL future conflicting patient appointments.'Skip' will not add another appointment at the same time and the existing on is left untouched.'Skip All' will not add another appointment at the same time and will leave ALL future patient
appointments untouched.4). Days that the provider does not appear in the Appointment Book are automatically skipped.
Example: You have a breakfast meeting on the first Monday of each month.
1. Create a type called Breakfast Meeting, and go to the date of the next meeting and highlight the appointmentsslots required.2. Go to the Type drop-down menu and select 'Breakfast Meeting'. This will mark the selected cells as that type.

The Reception Module: AppointmentsGenie Manual
© 2005-2019 Genie Solutions Pty Ltd 111
3. With the cells still highlighted, click on the repeating drop-down menu. Select Every 4 Weeks from the drop-down menu, and enter 12 to make this appointment repeat for the next year. Alternatively, you can manually
enter an End Date where the repeating appointment will finish or click on the Calendar button to select adate.
Deleting Repeating Appointments
To delete a repeating appointment:
1. Highlight the appointment(s) and click on the Repeating Appointment icon .2. Select none from the Repeat drop-down menu, and click Save. This will delete all future instances of therepeating appointment.
3. Click on the Garbage can icon to delete the current instance of this appointment.
5.1.2.14 Printing Appointment Book
The Appointment Book can be printed in two formats:1. Printing appointments for all doctors2. Printing appointments for an individual doctor
The appointment schedule will only print if the Show Schedule Type Names option is ticked, and the Don't printempty appointments option is unticked in the Appearances tab of the Appointment Preferences (Appt > ApptPreferences).
Printing Appointments for all Doctors
1. Navigate to the day in the Appointment Book for which you would like to print the appointments.2. Select the All Tab.
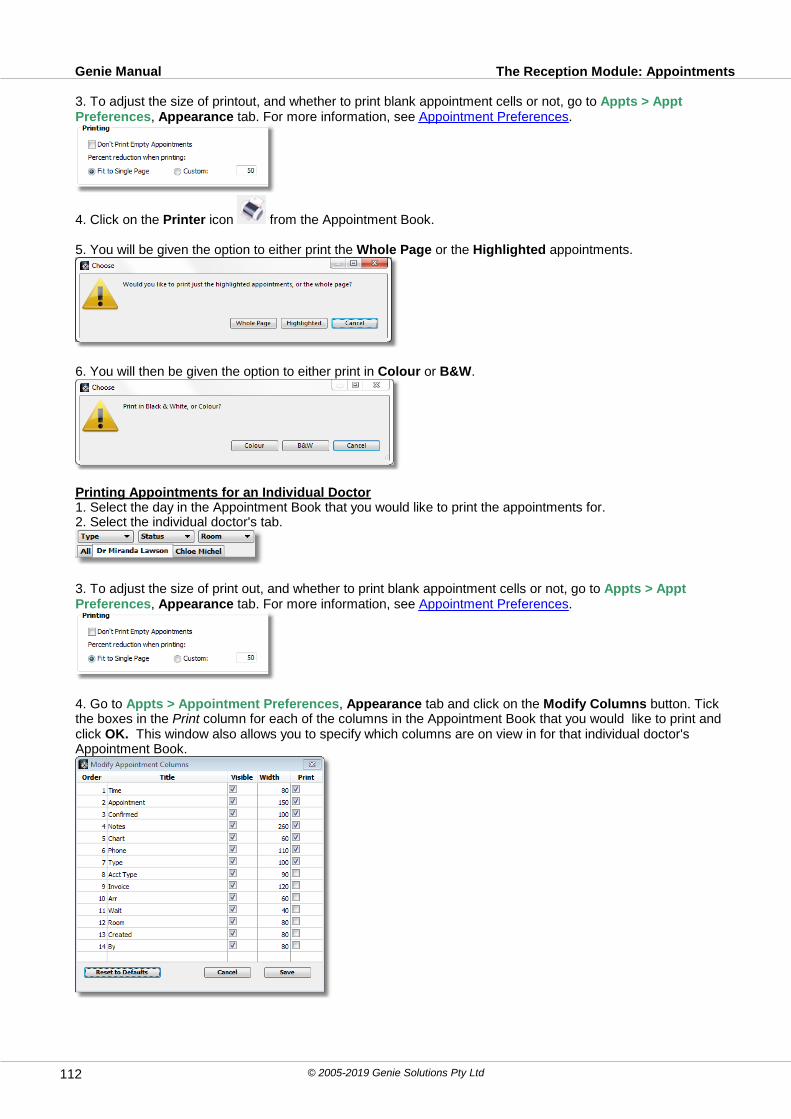
The Reception Module: AppointmentsGenie Manual
© 2005-2019 Genie Solutions Pty Ltd112
3. To adjust the size of printout, and whether to print blank appointment cells or not, go to Appts > ApptPreferences, Appearance tab. For more information, see Appointment Preferences.
4. Click on the Printer icon from the Appointment Book.
5. You will be given the option to either print the Whole Page or the Highlighted appointments.
6. You will then be given the option to either print in Colour or B&W.
Printing Appointments for an Individual Doctor1. Select the day in the Appointment Book that you would like to print the appointments for.2. Select the individual doctor's tab.
3. To adjust the size of print out, and whether to print blank appointment cells or not, go to Appts > ApptPreferences, Appearance tab. For more information, see Appointment Preferences.
4. Go to Appts > Appointment Preferences, Appearance tab and click on the Modify Columns button. Tickthe boxes in the Print column for each of the columns in the Appointment Book that you would like to print andclick OK. This window also allows you to specify which columns are on view in for that individual doctor'sAppointment Book.

The Reception Module: AppointmentsGenie Manual
© 2005-2019 Genie Solutions Pty Ltd 113
5. Click on the Printer icon from the Appointment Book.
6. You will be given the option to either print the Whole Page or the Highlighted appointments.
7. You will then be given the option to either print in Colour or B&W.
Note: Alt+clicking on the Printer icon will take a snapshot of the Appointment Book and open it in animage viewer program for you to print. The file location will also open in Windows Explorer/Mac Finder.
5.1.2.15 Linking a Procedure to an Appointment
This can be used for booking patients into surgery and printing theatre lists.
A procedure can be linked to a patient's appointment in two ways:1. If the procedure is created in the Appointment Book.2. If the procedure is created in the patient's Clinical Window.
Appointment book
1. Highlight the patient's name in the Appointment Book, and click on the Procedure icon .2. This will open up the Procedures window.
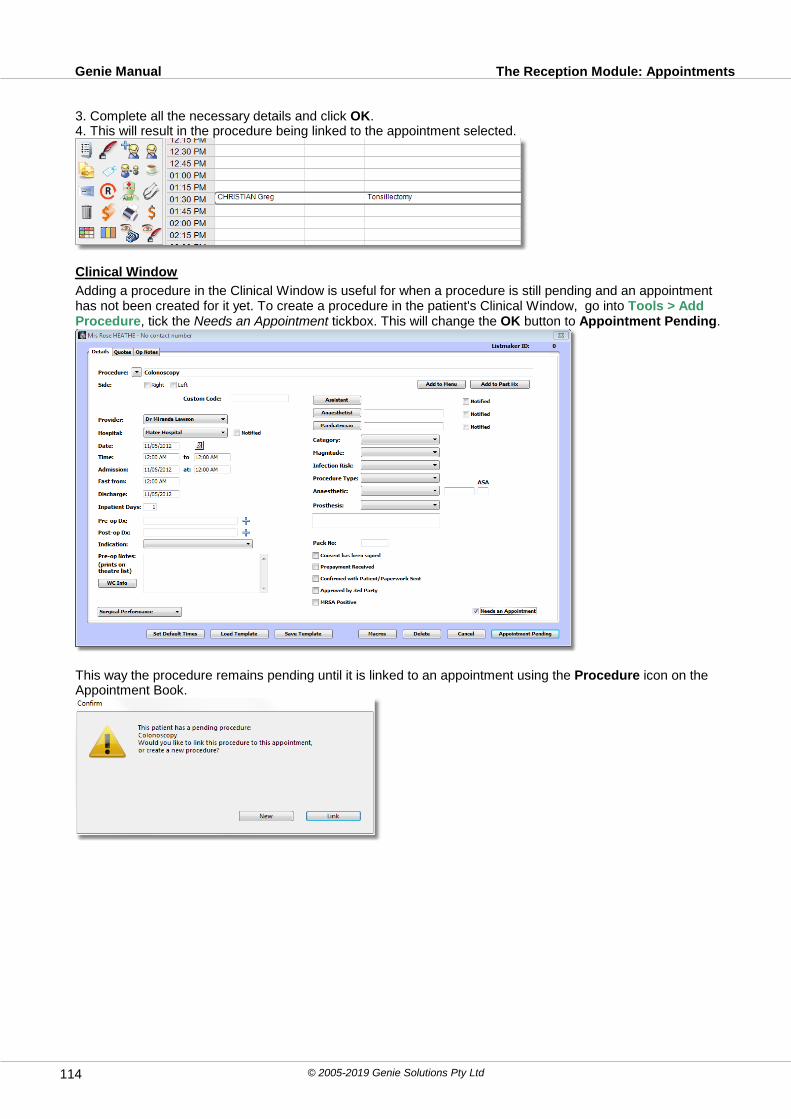
The Reception Module: AppointmentsGenie Manual
© 2005-2019 Genie Solutions Pty Ltd114
3. Complete all the necessary details and click OK.4. This will result in the procedure being linked to the appointment selected.
Clinical Window
Adding a procedure in the Clinical Window is useful for when a procedure is still pending and an appointmenthas not been created for it yet. To create a procedure in the patient's Clinical Window, go into Tools > AddProcedure, tick the Needs an Appointment tickbox. This will change the OK button to Appointment Pending.
This way the procedure remains pending until it is linked to an appointment using the Procedure icon on theAppointment Book.
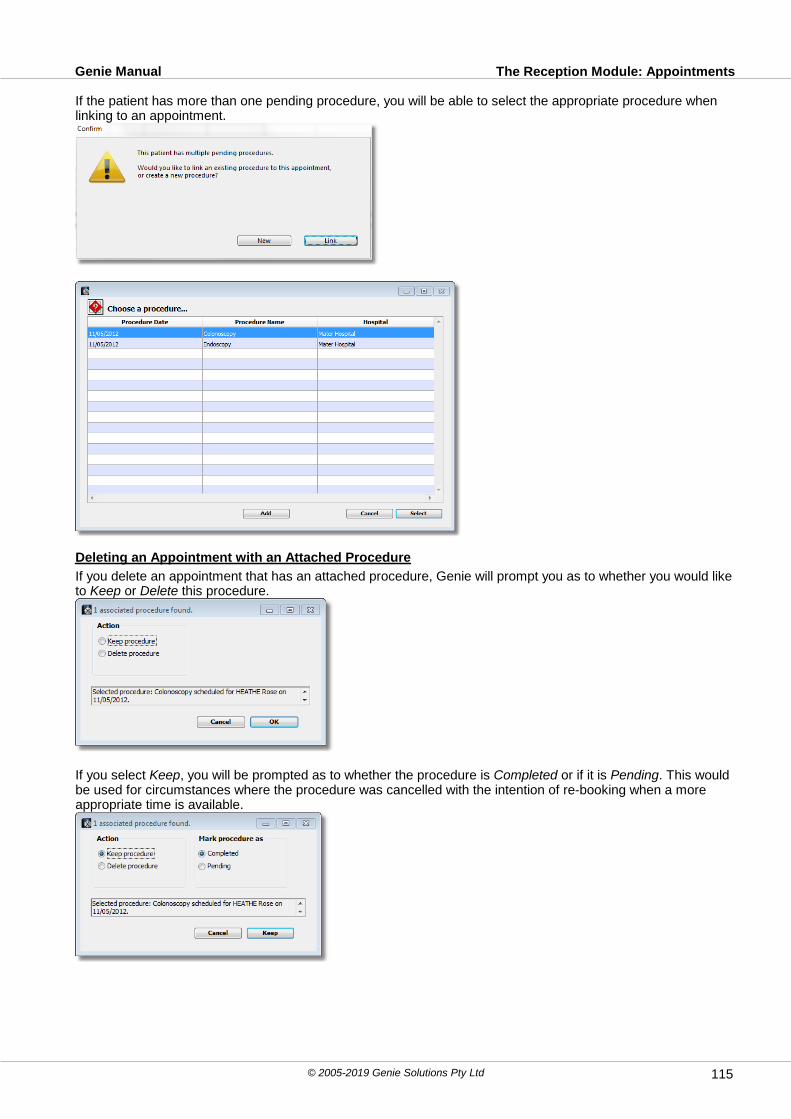
The Reception Module: AppointmentsGenie Manual
© 2005-2019 Genie Solutions Pty Ltd 115
If the patient has more than one pending procedure, you will be able to select the appropriate procedure whenlinking to an appointment.
Deleting an Appointment with an Attached Procedure
If you delete an appointment that has an attached procedure, Genie will prompt you as to whether you would liketo Keep or Delete this procedure.
If you select Keep, you will be prompted as to whether the procedure is Completed or if it is Pending. This wouldbe used for circumstances where the procedure was cancelled with the intention of re-booking when a moreappropriate time is available.
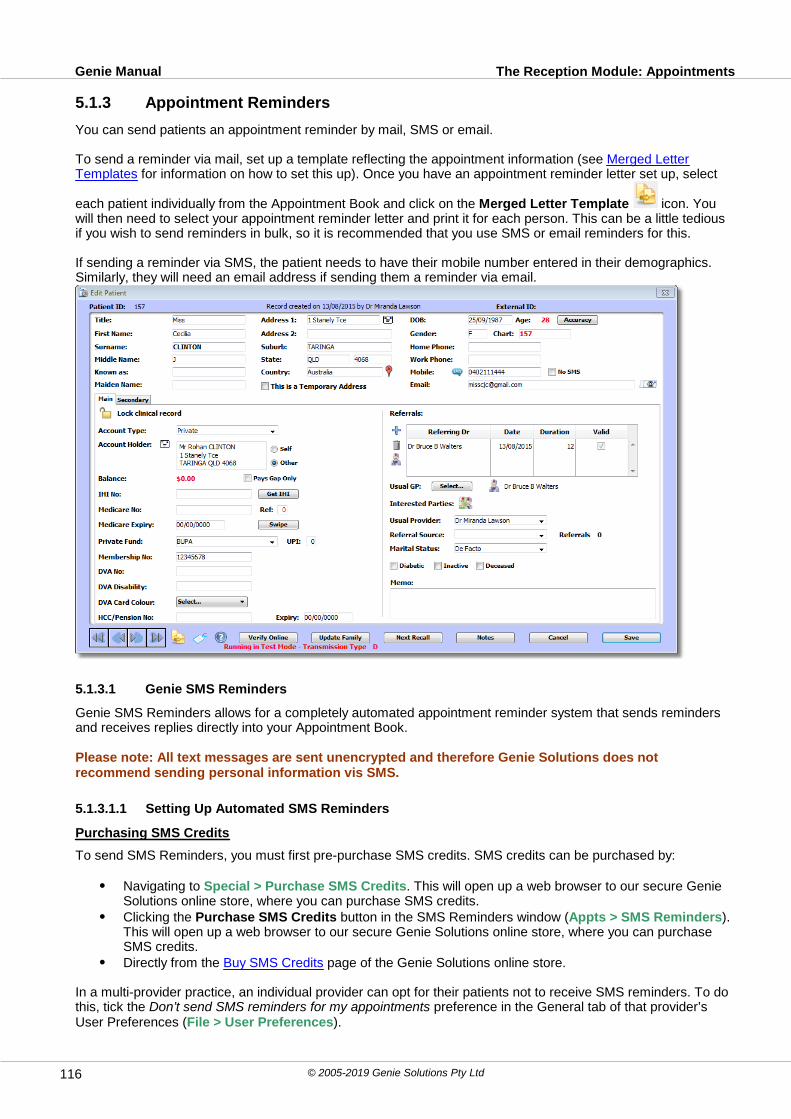
The Reception Module: AppointmentsGenie Manual
© 2005-2019 Genie Solutions Pty Ltd116
5.1.3 Appointment Reminders
You can send patients an appointment reminder by mail, SMS or email.
To send a reminder via mail, set up a template reflecting the appointment information (see Merged LetterTemplates for information on how to set this up). Once you have an appointment reminder letter set up, select
each patient individually from the Appointment Book and click on the Merged Letter Template icon. Youwill then need to select your appointment reminder letter and print it for each person. This can be a little tediousif you wish to send reminders in bulk, so it is recommended that you use SMS or email reminders for this.
If sending a reminder via SMS, the patient needs to have their mobile number entered in their demographics.Similarly, they will need an email address if sending them a reminder via email.
5.1.3.1 Genie SMS Reminders
Genie SMS Reminders allows for a completely automated appointment reminder system that sends remindersand receives replies directly into your Appointment Book.
Please note: All text messages are sent unencrypted and therefore Genie Solutions does notrecommend sending personal information vis SMS.
5.1.3.1.1 Setting Up Automated SMS Reminders
Purchasing SMS Credits
To send SMS Reminders, you must first pre-purchase SMS credits. SMS credits can be purchased by:
Navigating to Special > Purchase SMS Credits. This will open up a web browser to our secure GenieSolutions online store, where you can purchase SMS credits.Clicking the Purchase SMS Credits button in the SMS Reminders window (Appts > SMS Reminders).This will open up a web browser to our secure Genie Solutions online store, where you can purchaseSMS credits.Directly from the Buy SMS Credits page of the Genie Solutions online store.
In a multi-provider practice, an individual provider can opt for their patients not to receive SMS reminders. To dothis, tick the Don’t send SMS reminders for my appointments preference in the General tab of that provider’sUser Preferences (File > User Preferences).

The Reception Module: AppointmentsGenie Manual
© 2005-2019 Genie Solutions Pty Ltd 117
If a particular patient does not wish to receive SMS reminders, this can be done from the patient’sDemographics window by ticking the No SMS checkbox.
To configure the automated messages you wish to send, you will need to navigate to Appts > SMS Remindersand click the Setup button.
The Credits section
The Limit each SMS to drop-down allows you to specify how many credits Genie is able to spend on any givenmessage. Setting this to 2 Credits, 3 Credits, or Unlimited allows Genie to send ‘long’ SMS reminders thatexceed the previous 160-character limit. See 'Long' SMS Reminders for more information on the costing forsuch messages.
Send a task to the Administrator when credits drop below helps you manage your SMS credits by prompting theGenie Administrator to purchase more credits when they drop below a certain level.
Note: The above preferences are available as of Genie version 8.8.6. If you are using version 8.8.5 orbelow, messages will be cut off after the 160-character limit is reached, and will cost one (1) credit eachto send.
The Reminder Templates section
This area allows you to create the default message templates you would like to send. As of version 8.8.7, it ispossible to set multiple different SMS templates for each provider in the practice. To create or edit an SMStemplate for a provider, right click that doctor’s name in the Practitioners list on the left to open the Templateswindow.

The Reception Module: AppointmentsGenie Manual
© 2005-2019 Genie Solutions Pty Ltd118
Note: if you are using version 8.8.6 of Genie or earlier, you can set only one SMS template. This is donein the same way as below, however the interface will appear within the main SMS Setup window.
The drop-down menus at the top of this window allow you to select your preferred formatting for the providers’names and the appointment dates, respectively.
When creating the message, the following fields can be used to automatically populate certain information intoeach message:
<name> - populates the name of the provider into the message.<patientname> - populates the patient’s Known as or First Name information as per their Demographicswindow (v8.8.6 or above.)<date> - populates the date of the appointment.<time> - populates the time of the appointment.<room> - populates any Room information that has been applied to the appointment.<clinic> - populates the name of the clinic as set in File > Practice Preferences.<clinicphone> - populates the practice phone number as set in File > Practice Preferences (v8.8.6 orabove).
Note: The <clinic> and <clinicphone> fields will pull the information from the default practice if you havemore than one. See the Practice Preferences section for more information.
The Sample Message below the typing area will show how these fields will appear using example information.As you type, this sample message will update automatically, as will the display showing the number ofcharacters used. If you are using version 8.8.6 or above, this area will also show the number of credits themessage will cost to send.
Note: If you are not using Genie version 8.8.6 or above, messages above 160 characters will betruncated. The remainder of the message will not be sent, so it is important to keep the message withinthe 160 character limit. Remember to take into account the number of characters in the longestprovider’s name if you are in a multi-doctor practice.
‘Long' SMS Reminders
As of version 8.8.6, Genie is capable of sending 'long' SMS reminders. Instead of being cut off, longer messageswill cost more credits to send. How the number of credits used is calculated is outlined below.
Note: This functionality is opt-in. To send long messages, you must first enable them by increasingthe Limit each SMS to preference in the SMS Setup window. A setting of 1 Credit will keep the 160character limit in place.
A 'simple' SMS contains up to 160 characters. Any message below this 160-character limit will cost one (1) SMScredit to send.

The Reception Module: AppointmentsGenie Manual
© 2005-2019 Genie Solutions Pty Ltd 119
A 'long' SMS contains more than 160 characters. Each block of 153 characters, or part thereof, in a long SMScosts one (1) SMS credit to send (a 7 character overhead is required by the messaging provider to join theblocks). The rates for long SMS reminders are, therefore:
1-160 characters = 1 credit (a 'simple' SMS).161 – 306 characters = 2 credits (2 blocks of 153 characters).307 – 459 characters = 3 credits (3 blocks of 153 characters).etc.
Non-standard Characters
If your SMS Reminders include any non-standard characters that are not part of the Global System for Mobile(GSM) Standard, this will affect the way SMS credits are used. A 'simple' SMS contains up to 160 characters.Any message below this 160-character limit will cost one (1) SMS credit to send. If your SMS Reminders includeany non-standard characters, you will be limited to 70 characters per SMS Credit for the first credit. Thecharacter limit goes down to 67 if the entire message is more than 1 credit.
The rates for SMS Reminders with non-standard characters are therefore:
1-70 characters = 1 credit71-134 = 2 credits (2 blocks of 67)135-201 = 3 credits (3 blocks of 67) etc.
As of Genie 9.0.2, if your SMS Reminder template includes any non-standard characters you will receive aprompt identifying the non-standard character, as in the below screenshot.
The Auto-Replace button in the bottom right-hand corner of the window offers suggestions for replacements fornon-standard characters, as in the following screenshot.
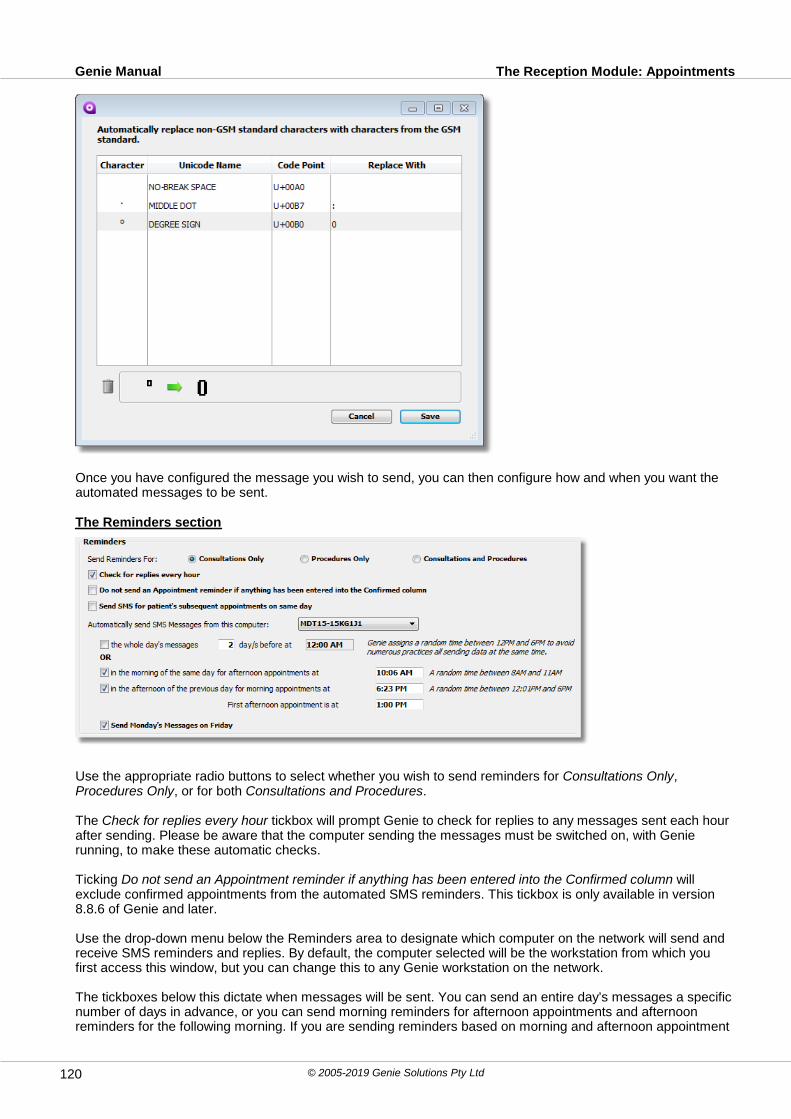
The Reception Module: AppointmentsGenie Manual
© 2005-2019 Genie Solutions Pty Ltd120
Once you have configured the message you wish to send, you can then configure how and when you want theautomated messages to be sent.
The Reminders section
Use the appropriate radio buttons to select whether you wish to send reminders for Consultations Only,Procedures Only, or for both Consultations and Procedures.
The Check for replies every hour tickbox will prompt Genie to check for replies to any messages sent each hourafter sending. Please be aware that the computer sending the messages must be switched on, with Genierunning, to make these automatic checks.
Ticking Do not send an Appointment reminder if anything has been entered into the Confirmed column willexclude confirmed appointments from the automated SMS reminders. This tickbox is only available in version8.8.6 of Genie and later.
Use the drop-down menu below the Reminders area to designate which computer on the network will send andreceive SMS reminders and replies. By default, the computer selected will be the workstation from which youfirst access this window, but you can change this to any Genie workstation on the network.
The tickboxes below this dictate when messages will be sent. You can send an entire day’s messages a specificnumber of days in advance, or you can send morning reminders for afternoon appointments and afternoonreminders for the following morning. If you are sending reminders based on morning and afternoon appointment

The Reception Module: AppointmentsGenie Manual
© 2005-2019 Genie Solutions Pty Ltd 121
times, you must set the First afternoon appointment is at field, so that Genie can differentiate between morningand afternoon appointments.
When you select one of the above scheduling options, Genie will automatically generate a random time for themessages to be sent. If you are not happy with the time selected, simply untick and re-tick the appropriate boxuntil a suitable time is generated. You may manually enter a time, however please be aware that messages senton the hour or half-hour can be delayed, as these are popular intervals for sites to transmit at.
Note: The computer designated for sending and receiving messages must be powered on, connected tothe Internet, and logged into Genie at the scheduled time. Otherwise, the messages will not betransmitted.
Finally, if you wish to avoid leaving a computer logged in over the weekend to send messages, tick the SendMonday’s Messages on Friday tickbox. Genie will then send any messages for Monday appointments on Fridayinstead.
Once you have finished configuring your automated reminders, click the OK button to save your settings andclose the Setup window.
5.1.3.1.2 Sending SMS Manually
SMS reminders and messages can be sent manually from different areas of Genie for different purposes.
Daily Reminders
To manually send SMS reminders for all appointments on a given day, navigate to that day in the appointmentbook, and then navigate to Appt > SMS Reminders to open the SMS Reminders window.
Note: The SMS Reminders window will look different if you are using version 8.8.5 of Genie or earlier.Prior to version 8.8.6, the appointments/patients in the window cannot be subdivided by provider, andcannot be sorted using the column headers.
In the top-right corner of the window, the number of remaining SMS credits will be displayed in red. If you areusing an earlier version of Genie, you will need to click the Show Remaining Msgs button to show this.
The Purchase SMS Credits button will take you to the Genie Solutions online store, allowing you to purchasemore credits when you are running low.
On the left, all providers visible in the appointment book for the selected day will be shown. Highlighting aprovider’s name will limit the patients shown to just those whom that provider is seeing. To display and messagepatients for multiple providers at once, hold the Ctrl key (Command on a Mac) and click each relevant provider to
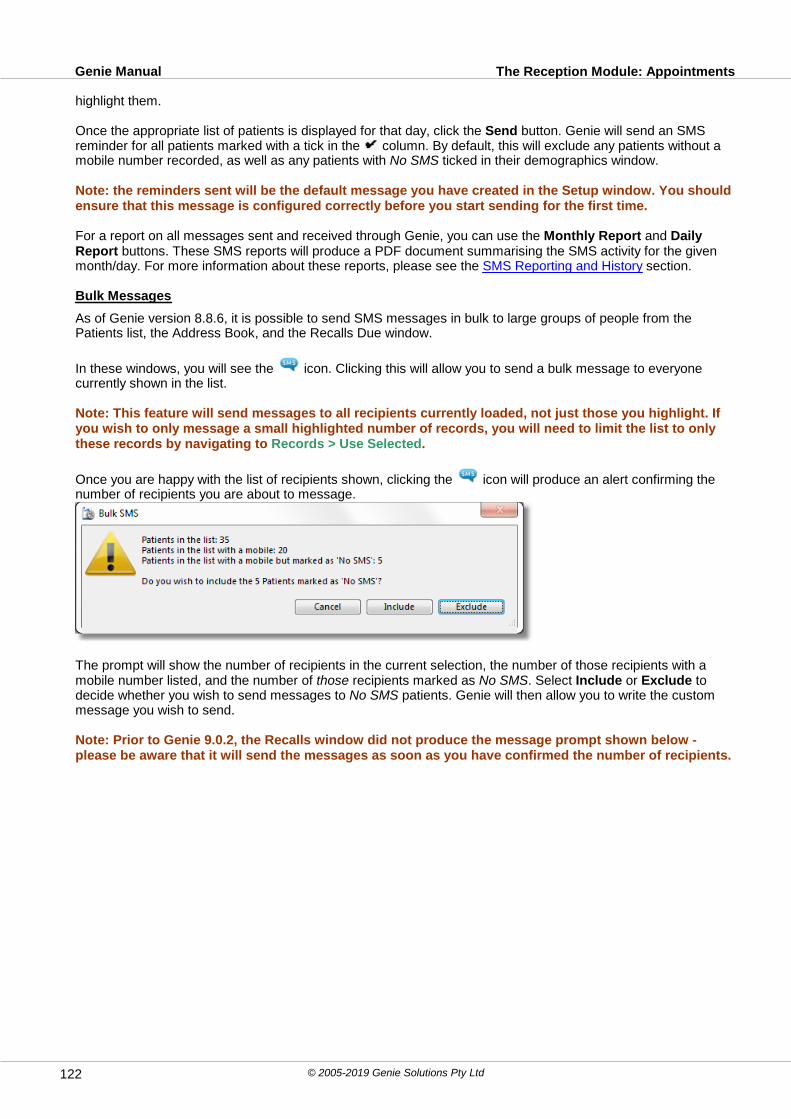
The Reception Module: AppointmentsGenie Manual
© 2005-2019 Genie Solutions Pty Ltd122
highlight them.
Once the appropriate list of patients is displayed for that day, click the Send button. Genie will send an SMSreminder for all patients marked with a tick in the column. By default, this will exclude any patients without amobile number recorded, as well as any patients with No SMS ticked in their demographics window.
Note: the reminders sent will be the default message you have created in the Setup window. You shouldensure that this message is configured correctly before you start sending for the first time.
For a report on all messages sent and received through Genie, you can use the Monthly Report and DailyReport buttons. These SMS reports will produce a PDF document summarising the SMS activity for the givenmonth/day. For more information about these reports, please see the SMS Reporting and History section.
Bulk Messages
As of Genie version 8.8.6, it is possible to send SMS messages in bulk to large groups of people from thePatients list, the Address Book, and the Recalls Due window.
In these windows, you will see the icon. Clicking this will allow you to send a bulk message to everyonecurrently shown in the list.
Note: This feature will send messages to all recipients currently loaded, not just those you highlight. Ifyou wish to only message a small highlighted number of records, you will need to limit the list to onlythese records by navigating to Records > Use Selected.
Once you are happy with the list of recipients shown, clicking the icon will produce an alert confirming thenumber of recipients you are about to message.
The prompt will show the number of recipients in the current selection, the number of those recipients with amobile number listed, and the number of those recipients marked as No SMS. Select Include or Exclude todecide whether you wish to send messages to No SMS patients. Genie will then allow you to write the custommessage you wish to send.
Note: Prior to Genie 9.0.2, the Recalls window did not produce the message prompt shown below -please be aware that it will send the messages as soon as you have confirmed the number of recipients.
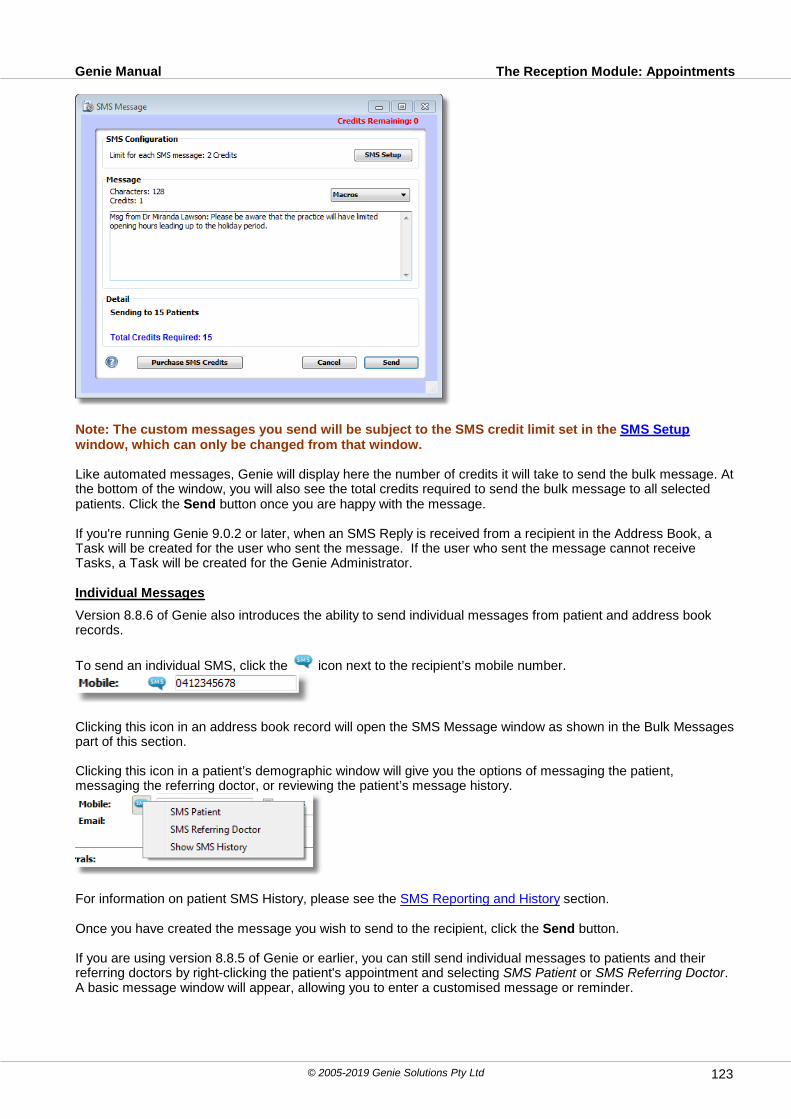
The Reception Module: AppointmentsGenie Manual
© 2005-2019 Genie Solutions Pty Ltd 123
Note: The custom messages you send will be subject to the SMS credit limit set in the SMS Setupwindow, which can only be changed from that window.
Like automated messages, Genie will display here the number of credits it will take to send the bulk message. Atthe bottom of the window, you will also see the total credits required to send the bulk message to all selectedpatients. Click the Send button once you are happy with the message.
If you're running Genie 9.0.2 or later, when an SMS Reply is received from a recipient in the Address Book, aTask will be created for the user who sent the message. If the user who sent the message cannot receiveTasks, a Task will be created for the Genie Administrator.
Individual Messages
Version 8.8.6 of Genie also introduces the ability to send individual messages from patient and address bookrecords.
To send an individual SMS, click the icon next to the recipient’s mobile number.
Clicking this icon in an address book record will open the SMS Message window as shown in the Bulk Messagespart of this section.
Clicking this icon in a patient’s demographic window will give you the options of messaging the patient,messaging the referring doctor, or reviewing the patient’s message history.
For information on patient SMS History, please see the SMS Reporting and History section.
Once you have created the message you wish to send to the recipient, click the Send button.
If you are using version 8.8.5 of Genie or earlier, you can still send individual messages to patients and theirreferring doctors by right-clicking the patient's appointment and selecting SMS Patient or SMS Referring Doctor.A basic message window will appear, allowing you to enter a customised message or reminder.
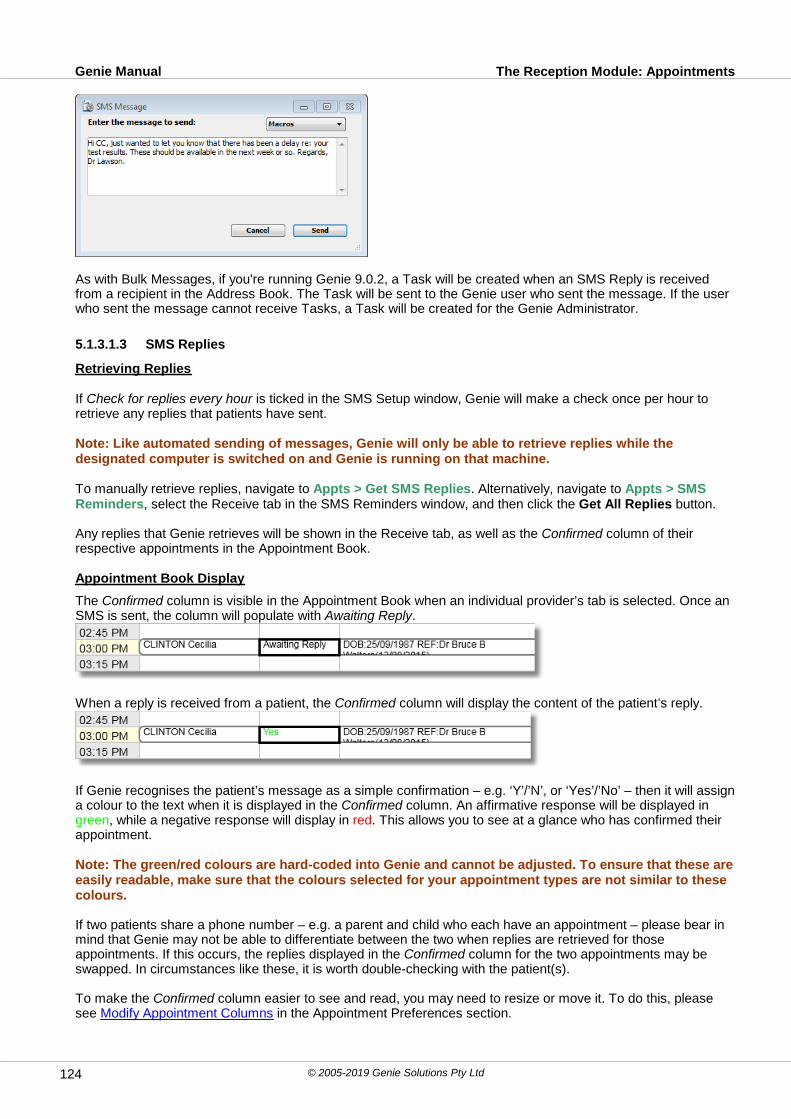
The Reception Module: AppointmentsGenie Manual
© 2005-2019 Genie Solutions Pty Ltd124
As with Bulk Messages, if you're running Genie 9.0.2, a Task will be created when an SMS Reply is receivedfrom a recipient in the Address Book. The Task will be sent to the Genie user who sent the message. If the userwho sent the message cannot receive Tasks, a Task will be created for the Genie Administrator.
5.1.3.1.3 SMS Replies
Retrieving Replies
If Check for replies every hour is ticked in the SMS Setup window, Genie will make a check once per hour toretrieve any replies that patients have sent.
Note: Like automated sending of messages, Genie will only be able to retrieve replies while thedesignated computer is switched on and Genie is running on that machine.
To manually retrieve replies, navigate to Appts > Get SMS Replies. Alternatively, navigate to Appts > SMSReminders, select the Receive tab in the SMS Reminders window, and then click the Get All Replies button.
Any replies that Genie retrieves will be shown in the Receive tab, as well as the Confirmed column of theirrespective appointments in the Appointment Book.
Appointment Book Display
The Confirmed column is visible in the Appointment Book when an individual provider’s tab is selected. Once anSMS is sent, the column will populate with Awaiting Reply.
When a reply is received from a patient, the Confirmed column will display the content of the patient’s reply.
If Genie recognises the patient’s message as a simple confirmation – e.g. ‘Y’/’N’, or ‘Yes’/’No’ – then it will assigna colour to the text when it is displayed in the Confirmed column. An affirmative response will be displayed ingreen, while a negative response will display in red. This allows you to see at a glance who has confirmed theirappointment.
Note: The green/red colours are hard-coded into Genie and cannot be adjusted. To ensure that these areeasily readable, make sure that the colours selected for your appointment types are not similar to thesecolours.
If two patients share a phone number – e.g. a parent and child who each have an appointment – please bear inmind that Genie may not be able to differentiate between the two when replies are retrieved for thoseappointments. If this occurs, the replies displayed in the Confirmed column for the two appointments may beswapped. In circumstances like these, it is worth double-checking with the patient(s).
To make the Confirmed column easier to see and read, you may need to resize or move it. To do this, pleasesee Modify Appointment Columns in the Appointment Preferences section.

The Reception Module: AppointmentsGenie Manual
© 2005-2019 Genie Solutions Pty Ltd 125
Toggle SMS Replies
It is also possible to display SMS replies in the appointment book when displaying all providers via the All tab. Todo this, navigate to Appts > Toggle SMS Replies. The patient names showing in the appointment book will bereplaced with any replies those patients have sent through.
Selecting Toggle SMS Replies again or clicking the TODAY button in the top-left of the Appointment Book willreturn the display to normal.
5.1.3.1.4 SMS Reporting and History
Daily and Monthly Reports
From the SMS Reminders window (Appts > SMS Reminders), Genie allows you to generate reports showing allmessages sent and received for a given day or month.
To generate these reports, click the Daily Report and Monthly Report buttons, respectively, at the bottom ofthe SMS Reminders window.
When generating the Monthly Report, Genie will give you the option of showing a quick summary – just thenumber of messages sent and received – or a detailed report, showing dates, times, recipients, and the contentof the messages. The Daily Report is always generated as a detailed report.
If you are using version 8.8.7 or above, the Monthly Report can also be subdivided by provider when generatingit.
SMS History
As of version 8.8.7, Genie records each patient’s SMS history within their demographic and clinical windows. To
access a patient’s SMS History, open their demographic or clinical window and click on the icon. A menu willappear showing the following options:
Select the Show SMS History option to open the SMS History window for this patient. This window shows allSMS correspondence between the patient and the practice.
Clicking the icon at the top of this window will allow you to send a new message from within the SMS Historywindow.
Clicking the icon produces a report summarising the patient’s SMS history, similar to the Daily and Monthly

The Reception Module: AppointmentsGenie Manual
© 2005-2019 Genie Solutions Pty Ltd126
reports.
Clicking the icon allows you to export the patient’s SMS history as a plain text file (.txt).
5.1.3.2 Email Reminders
It is necessary to set up your Genie Email Module if you would like to send email reminders. To send emailreminders to patients, go to the day of appointments you would like to send messages for and go to Appts >Email Reminders to open the following window:
This window will only display those patients with an email address in their Patient Demographics window. It willautomatically tick patients who have an email address and who have not already received an SMS reminder.The reason for this is that, if you send both an email and SMS reminder, then the patient may choose to reply tothe email, and ignore the SMS, in which case you will lose the automated benefit of an SMS Reply. For thisreason also, it is important that you send any SMS reminders before sending email reminders, because Geniecan tell if an SMS reminder has been sent, but is unable to tell if an email reminder has been sent.
Note: even if you aren’t using SMS Reminders, you can still use the Confirmed column in theAppointment Book. You can type directly into it, or right-click and select Mark as Confirmed.
You can choose to select only those appointments that have procedures linked to them by ticking the Procedures Only tickbox. You can also select if you would like to view patients for all providers or selectproviders by selecting the respective radio button.
5.2 Theatre Lists
To print a theatre list you must:1. Have Rooms set up in Genie2. Have entered in a Room (hospital) into the Procedure window.

The Reception Module: Theatre ListsGenie Manual
© 2005-2019 Genie Solutions Pty Ltd 127
5.2.1 Set Up
Setting Up Rooms
Rooms are essentially all the Hospitals/Day Surgeries where a doctor operates.These can be added via Appts > Appt Preferences > Column Order and Rooms
To add a room, click on the Blue plus button above the Rooms table. To delete a room, click on the Garbagecan button. You can drag rooms up and down the list to change the column order of the rooms in theAppointment Book.
Bookings for these hospitals can be viewed on the Appointment Book via the Hospital view.
Note: The 'Hospital' view just filters out the appointments that don't have a procedure attached, or don'thave a room specified, in the procedures window. It is not an independent Appointment Book. Anyappointments booked in this view will also show in the Provider and Dates view.
Checking for Double-bookings
If your room is only able to be used by one provider at one time (e.g. a private consulting suite), Genie can checkfor double-booked appointments.
To check for double-booked rooms, go into Appts > Appointment Preferences and click on the Column Orderand Rooms tab. Double-click on the relevant room this window and tick the Check for double-bookingscheckbox.

The Reception Module: Theatre ListsGenie Manual
© 2005-2019 Genie Solutions Pty Ltd128
Click on Save to finalise this change.
If a user attempts to allocate an appointment to this room when it is in use, they will receive the following prompt.
Selecting Double-up will double-book this appointment with the existing appointment. In the Rooms view for allproviders, you will now see the appointments overlapped.
Selecting Cancel will cancel your room allocation for this patient, allowing you to allocate an alternate room.

The Reception Module: Theatre ListsGenie Manual
© 2005-2019 Genie Solutions Pty Ltd 129
Selecting a Room (Hospital) in the Procedures Window
A patient will only appear on the theatre list if the hospital is specified in the Details tab of the Procedureswindow, which is then linked to that appointment.
5.2.2 Printing a Theatre List
To print a theatre list, go to the day of the surgery in the Appointment Book and select Appts > Print TheatreList.
You can choose whether you would like to print the whole theatre list, or just a specific time period as highlightedin the Appointment Book. You can change the Start Time by entering the appropriate start time in this field. Select the Provider and the Hospital as appropriate.
Print Times will print the times of the procedures as specified by the slot booked into in the Appointment Book.Print Number will print the order number next to the procedure.Print Nothing will just print the procedures in order without times or an order number.
Admission Date & Time will print the admission date and time for the procedure.Item Numbers will print the item numbers listed in the quote section.

The Reception Module: Theatre ListsGenie Manual
© 2005-2019 Genie Solutions Pty Ltd130
Referrer's Email will print the patient's referring doctor's email address.Referrer's Fax will print the patient's referring doctor's fax number.Mark as Final will put "FINAL" on the theatre list; otherwise it will be marked as "DRAFT."
Consent Status will print whether or not Consent has been signed, as determined by the tick box in the Detailstab of the Procedure window.Account Type will print if ticked, as specified in the patient's demographics window.Fasting Time will appear as specified in the Details tab of the Procedure window.NOK Details will print the patient's next of kin, as shown in the Secondary tab of the patient's demographicswindow.
Once you have done this, click on the Print button and the theatre list will be printed. If you would like to Emailthe theatre list, you can click on the Email button. This will email the list as a PDF document, provided you meetthe following requirements:
The Email module is set up in GenieThe hospital is listed in Open > Address Book with an email addressThe computer has Ghostscript installed (Windows only requirement)
Note: If the printed theatre list is incorrect, you may have failed to select a hospital for the procedure inthe Procedure record. Alternatively, you may not have linked a procedure to the appointment yet.
5.2.3 Preop Notifications Check
You can do a quick check the day before a theatre list to make sure that the Hospital and Assistant have beennotified.Select Appointments > Pre-op Notifications Check
The window below will open displaying a quick summary of items to check for each procedure.
For more information, please see the Procedures section.

The Reception Module: Theatre ListsGenie Manual
© 2005-2019 Genie Solutions Pty Ltd 131
5.3 Invoicing
Genie allows you to invoice and receipt patients and organisations. Invoices can either be single invoices orbatched invoices. Batched invoices are used for bulk-billed Medicare and DVA claims. You can also batch
invoices to other organisations, such as private health funds.
5.3.1 Account Holders
Before a patient or an organisation can be invoiced, they must have a record in the Account Holders list. The account holder for a patient is assigned in the Patient Demographics, you can enter this window from the
Appointment Book by clicking on the Edit Patient icon .
Clicking on the Self radio button in the middle left of this window makes the patient their own account holder,and creates a new record in the Account Holders table. Clicking the Other button allows you to make anotherpatient the account holder for this patient. This would usually be the parent or guardian of the patient. You musthave already created a patient record for the parent or guardian and assigned them to be their own accountholder.
IMPORTANT: THE ACCOUNT HOLDER FOR A PATIENT MUST BE ANOTHER HUMAN BEING. YOU MUSTNOT MAKE AN ORGANISATION THE ACCOUNT HOLDER EVEN IF THE PATIENT IS A DVA ORWORKCOVER PATIENT.
The majority of specialists would usually have all their patients marked as Self. GPs who are seeing the wholefamily would probably use the Other button to assign the head of the family to be the account holder. This willallow any changes made to the Head of Family record to be replicated to other family members, using the Update Family Button.
For Pediatricians and one-off child visits there is no need to create a patient record for the head of the family. Inthis case, click on the Self radio button to make the child their own account holder.
Then click on the account holder address window.
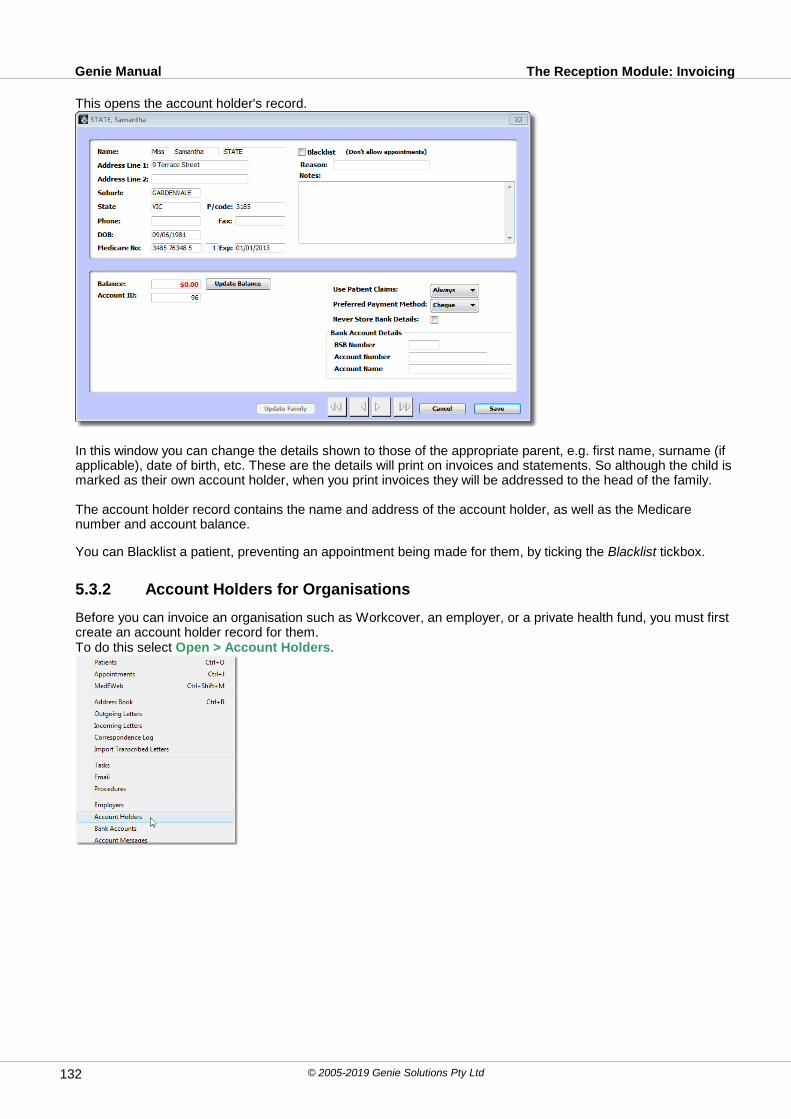
The Reception Module: InvoicingGenie Manual
© 2005-2019 Genie Solutions Pty Ltd132
This opens the account holder's record.
In this window you can change the details shown to those of the appropriate parent, e.g. first name, surname (ifapplicable), date of birth, etc. These are the details will print on invoices and statements. So although the child ismarked as their own account holder, when you print invoices they will be addressed to the head of the family.
The account holder record contains the name and address of the account holder, as well as the Medicarenumber and account balance.
You can Blacklist a patient, preventing an appointment being made for them, by ticking the Blacklist tickbox.
5.3.2 Account Holders for Organisations
Before you can invoice an organisation such as Workcover, an employer, or a private health fund, you must firstcreate an account holder record for them. To do this select Open > Account Holders.

The Reception Module: InvoicingGenie Manual
© 2005-2019 Genie Solutions Pty Ltd 133
The Account Holders list opens.
To create a new account holder, click on the Blue plus button . This will open the window below.
If you would like to batch the invoices for this organisation, tick the Batch Process Invoices tickbox. Batchprocessing means that instead of sending an individual invoice for each patient contact, the invoices are storedand printed as a batch perhaps weekly or monthly. The printed batch is a listing of all the invoices stored and can be forwarded with or without the individualinvoices attached, depending on the organisation's requirements. See the section on Batching later in thisChapter.
The Update Balance button can be used in situations in which a patient's account displays an outstandingbalance that you know is not valid. Clicking on the Update Balance button refreshes the account balance forthat account holder.
You can specify which fee schedule an organisation uses by selecting it from one of the two drop-down menusat the bottom right of the window.
From version 8.6.8, the WorkCover Online section will appear in the Account Holder window for allorganisations. For more information, please see WorkCover Online.
In summary:
Patient account holders are assigned in the Patient Demographics window. Other organisations are added in
Account Holders list (Open > Account Holders).

The Reception Module: InvoicingGenie Manual
© 2005-2019 Genie Solutions Pty Ltd134
5.3.3 Medicare and DVA Account Holder Records
The account holder records for Medicare and DVA are special cases. They should already be present in theAccount Holders list. The naming of these records is important. They must be named exactly 'Medicare' and'Dept of Veterans Affairs', respectively. Note that there is no full-stop after 'Dept', and no apostrophe in'Veterans'.
When Genie is launched, it searches for these two records, and stores their unique Account ID numbers in Practice Preferences, as shown below.
Note: You must not change the names of these two records, nor create new account holder records withthe same name.
Whenever you send an invoice to either of these records, they are automatically batched and a DB4 form isprinted instead of an ordinary invoice. If you would like to print a DB4 form, make sure you have Medicare DB4selected in Printing Preferences (File > Printing Preferences).
If you would like to send an ordinary invoice to the Dept of Veterans Affairs, you must create a new accountholder record and name it anything BUT 'Dept of Veterans Affairs' (e.g. DVA Reports).
When you would like to invoice to this account, click on the Other button in the Invoice window and search forthis record (see Invoicing an Organisation for more information).
5.3.4 Creating an Invoice
Invoices can be created from several places:1. The Appointment Book2. The Patients list3. The Account Holders list4. From within a Procedure record (based on the quote).
Creating an Invoice from the Appointment Book
Highlight the patient you would like to invoice in the Appointment Book.
Then either select Billing > Invoice or click on the Invoice icon , or right-click on the appointment, andselect the Invoice option.
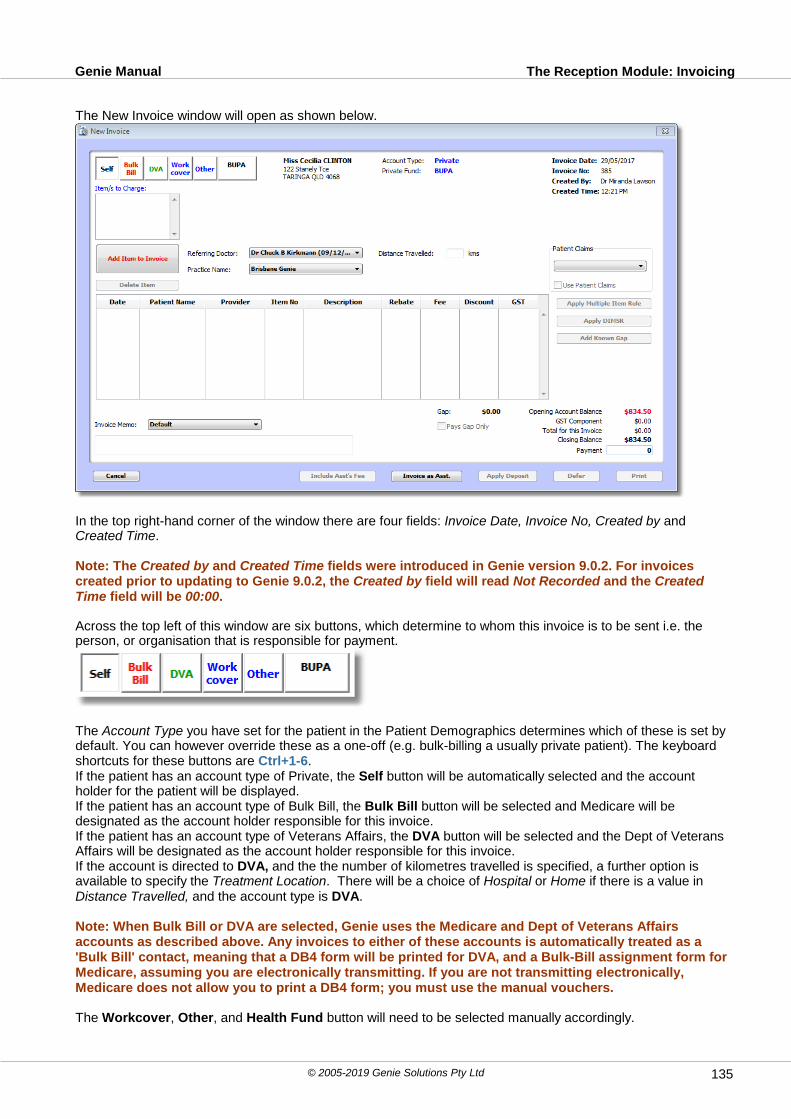
The Reception Module: InvoicingGenie Manual
© 2005-2019 Genie Solutions Pty Ltd 135
The New Invoice window will open as shown below.
In the top right-hand corner of the window there are four fields: Invoice Date, Invoice No, Created by andCreated Time.
Note: The Created by and Created Time fields were introduced in Genie version 9.0.2. For invoicescreated prior to updating to Genie 9.0.2, the Created by field will read Not Recorded and the CreatedTime field will be 00:00.
Across the top left of this window are six buttons, which determine to whom this invoice is to be sent i.e. theperson, or organisation that is responsible for payment.
The Account Type you have set for the patient in the Patient Demographics determines which of these is set bydefault. You can however override these as a one-off (e.g. bulk-billing a usually private patient). The keyboardshortcuts for these buttons are Ctrl+1-6. If the patient has an account type of Private, the Self button will be automatically selected and the accountholder for the patient will be displayed. If the patient has an account type of Bulk Bill, the Bulk Bill button will be selected and Medicare will bedesignated as the account holder responsible for this invoice. If the patient has an account type of Veterans Affairs, the DVA button will be selected and the Dept of VeteransAffairs will be designated as the account holder responsible for this invoice.If the account is directed to DVA, and the the number of kilometres travelled is specified, a further option isavailable to specify the Treatment Location. There will be a choice of Hospital or Home if there is a value inDistance Travelled, and the account type is DVA.
Note: When Bulk Bill or DVA are selected, Genie uses the Medicare and Dept of Veterans Affairsaccounts as described above. Any invoices to either of these accounts is automatically treated as a'Bulk Bill' contact, meaning that a DB4 form will be printed for DVA, and a Bulk-Bill assignment form forMedicare, assuming you are electronically transmitting. If you are not transmitting electronically,Medicare does not allow you to print a DB4 form; you must use the manual vouchers.
The Workcover, Other, and Health Fund button will need to be selected manually accordingly.
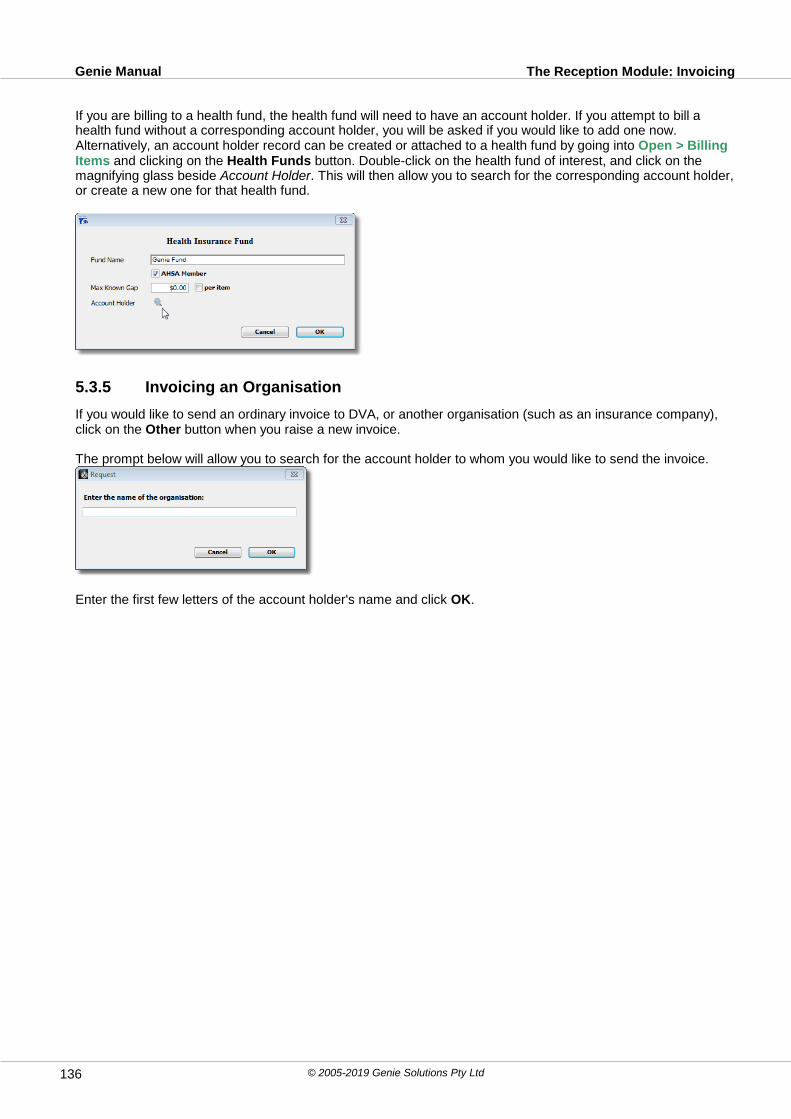
The Reception Module: InvoicingGenie Manual
© 2005-2019 Genie Solutions Pty Ltd136
If you are billing to a health fund, the health fund will need to have an account holder. If you attempt to bill ahealth fund without a corresponding account holder, you will be asked if you would like to add one now.Alternatively, an account holder record can be created or attached to a health fund by going into Open > BillingItems and clicking on the Health Funds button. Double-click on the health fund of interest, and click on themagnifying glass beside Account Holder. This will then allow you to search for the corresponding account holder,or create a new one for that health fund.
5.3.5 Invoicing an Organisation
If you would like to send an ordinary invoice to DVA, or another organisation (such as an insurance company),click on the Other button when you raise a new invoice.
The prompt below will allow you to search for the account holder to whom you would like to send the invoice.
Enter the first few letters of the account holder's name and click OK.
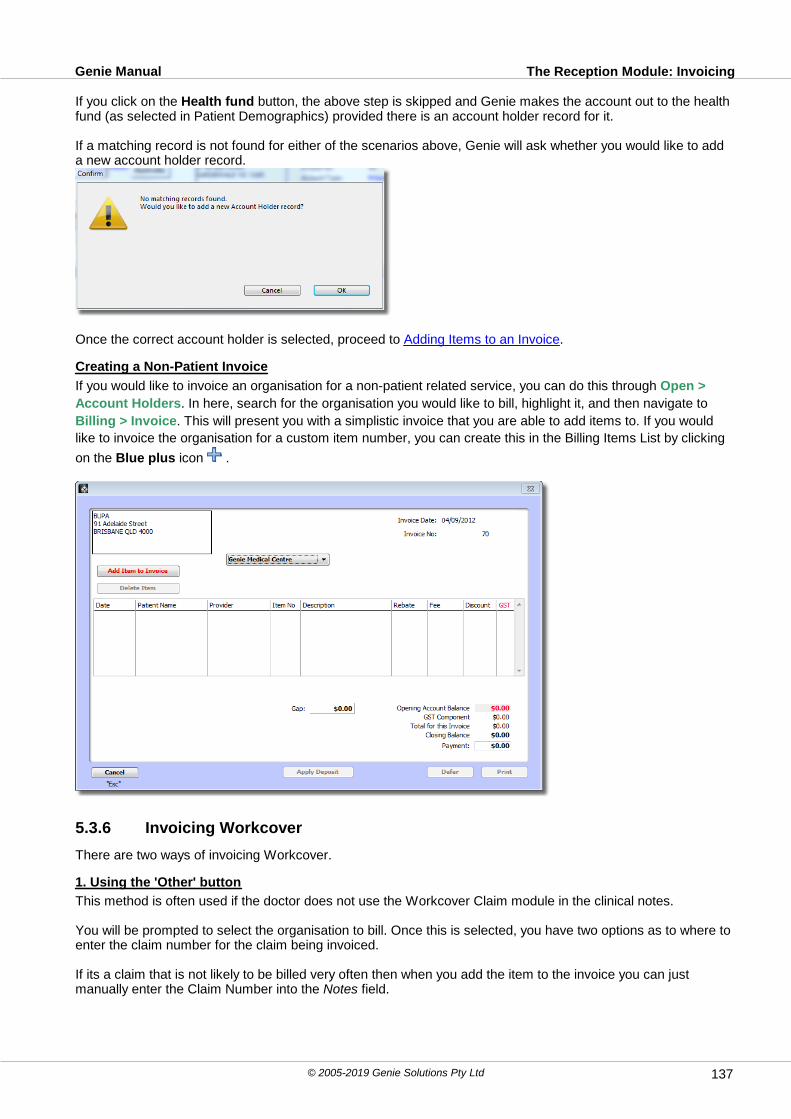
The Reception Module: InvoicingGenie Manual
© 2005-2019 Genie Solutions Pty Ltd 137
If you click on the Health fund button, the above step is skipped and Genie makes the account out to the healthfund (as selected in Patient Demographics) provided there is an account holder record for it.
If a matching record is not found for either of the scenarios above, Genie will ask whether you would like to adda new account holder record.
Once the correct account holder is selected, proceed to Adding Items to an Invoice.
Creating a Non-Patient Invoice
If you would like to invoice an organisation for a non-patient related service, you can do this through Open >
Account Holders. In here, search for the organisation you would like to bill, highlight it, and then navigate to
Billing > Invoice. This will present you with a simplistic invoice that you are able to add items to. If you would
like to invoice the organisation for a custom item number, you can create this in the Billing Items List by clicking
on the Blue plus icon .
5.3.6 Invoicing Workcover
There are two ways of invoicing Workcover.
1. Using the 'Other' button
This method is often used if the doctor does not use the Workcover Claim module in the clinical notes.
You will be prompted to select the organisation to bill. Once this is selected, you have two options as to where toenter the claim number for the claim being invoiced.
If its a claim that is not likely to be billed very often then when you add the item to the invoice you can justmanually enter the Claim Number into the Notes field.
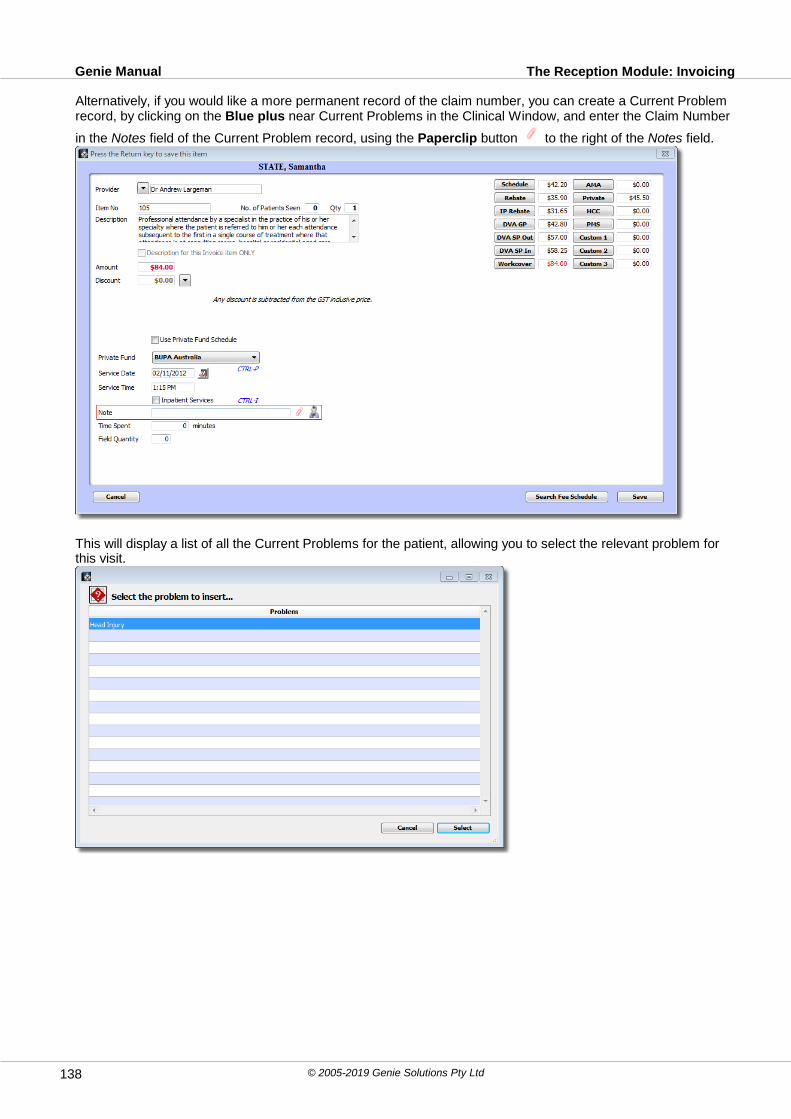
The Reception Module: InvoicingGenie Manual
© 2005-2019 Genie Solutions Pty Ltd138
Alternatively, if you would like a more permanent record of the claim number, you can create a Current Problemrecord, by clicking on the Blue plus near Current Problems in the Clinical Window, and enter the Claim Number
in the Notes field of the Current Problem record, using the Paperclip button to the right of the Notes field.
This will display a list of all the Current Problems for the patient, allowing you to select the relevant problem forthis visit.
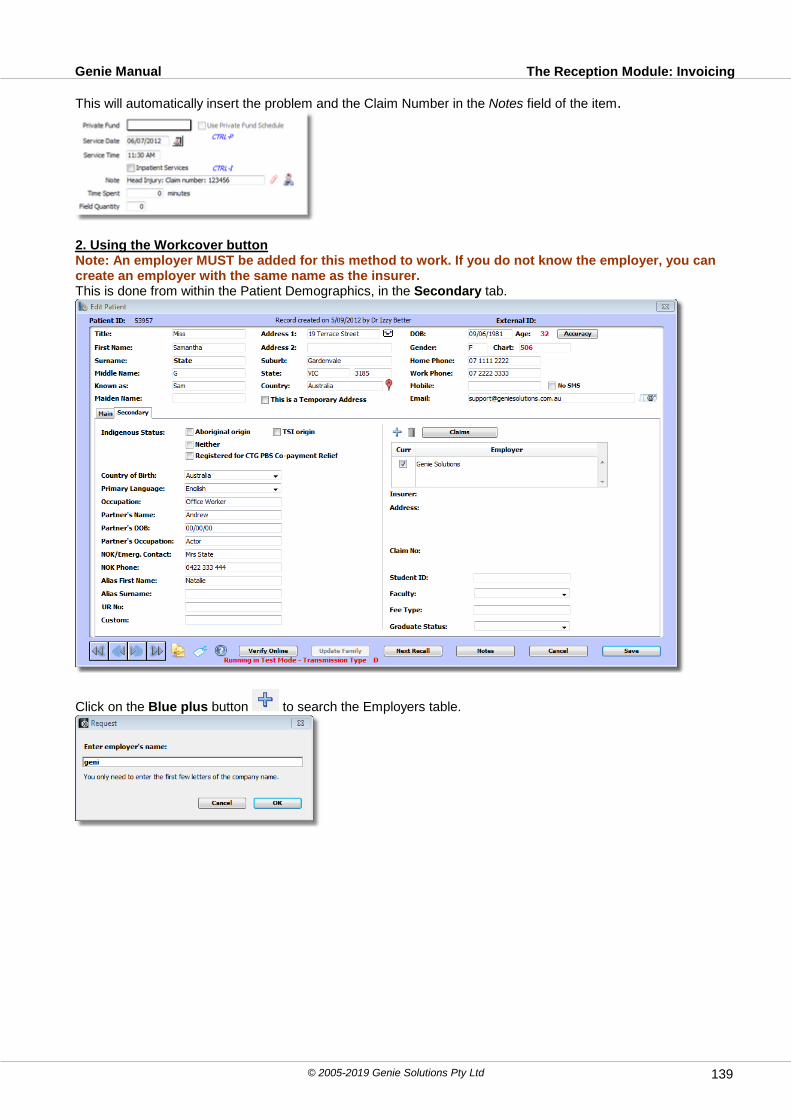
The Reception Module: InvoicingGenie Manual
© 2005-2019 Genie Solutions Pty Ltd 139
This will automatically insert the problem and the Claim Number in the Notes field of the item.
2. Using the Workcover buttonNote: An employer MUST be added for this method to work. If you do not know the employer, you cancreate an employer with the same name as the insurer.This is done from within the Patient Demographics, in the Secondary tab.
Click on the Blue plus button to search the Employers table.
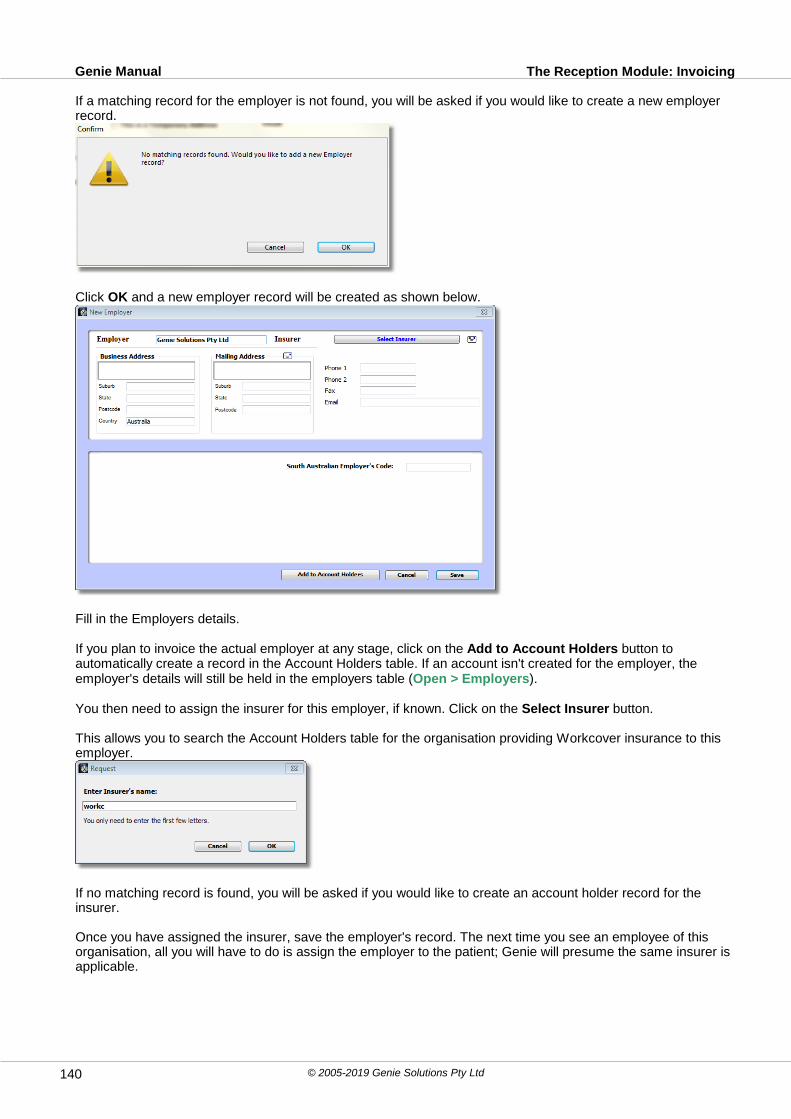
The Reception Module: InvoicingGenie Manual
© 2005-2019 Genie Solutions Pty Ltd140
If a matching record for the employer is not found, you will be asked if you would like to create a new employerrecord.
Click OK and a new employer record will be created as shown below.
Fill in the Employers details.
If you plan to invoice the actual employer at any stage, click on the Add to Account Holders button toautomatically create a record in the Account Holders table. If an account isn't created for the employer, theemployer's details will still be held in the employers table (Open > Employers).
You then need to assign the insurer for this employer, if known. Click on the Select Insurer button.
This allows you to search the Account Holders table for the organisation providing Workcover insurance to thisemployer.
If no matching record is found, you will be asked if you would like to create an account holder record for theinsurer.
Once you have assigned the insurer, save the employer's record. The next time you see an employee of thisorganisation, all you will have to do is assign the employer to the patient; Genie will presume the same insurer isapplicable.

The Reception Module: InvoicingGenie Manual
© 2005-2019 Genie Solutions Pty Ltd 141
The next step is to create a Workcover claim in the patient's Clinical Window. This is done using the Claimsbutton in the Employers area of the Patient Demographics window. Claims can also be added in the ClinicalWindow by the doctor, through the Tools menu, except where the Practice Type is set to Obstetrics orAnaesthetics.
or
Click Add and a new claim window will open as shown below.
Enter the Date and Time, the Injury and Cause and the Claim Number, if known. If an Employer has not alreadybeen assigned to the patient, you can do this from this window by clicking on the Select Employer button. Geniewill not allow you to save this until you have selected an employer.
If a case manager has been assigned to this claim, you can add them by using the Search Case Manager icon and searching your Address Book for the relevant person. If you have not added this person to the AddressBook, click OK and a prompt will appear asking if you would like to Add this person to your Address Book. Onceadded to this record, the case manager's email, phone, and fax details will be displayed in this window. You can
also edit their Address Book record from this window by clicking the Edit Case Manager icon.
Note: Once you have created a Workcover Claim, you cannot delete it from the Select a Claim window. Ifyou need to delete this, you must locate this claim in the patient's Clinical Window and click the Delete
icon above the Contact List to delete the claim.
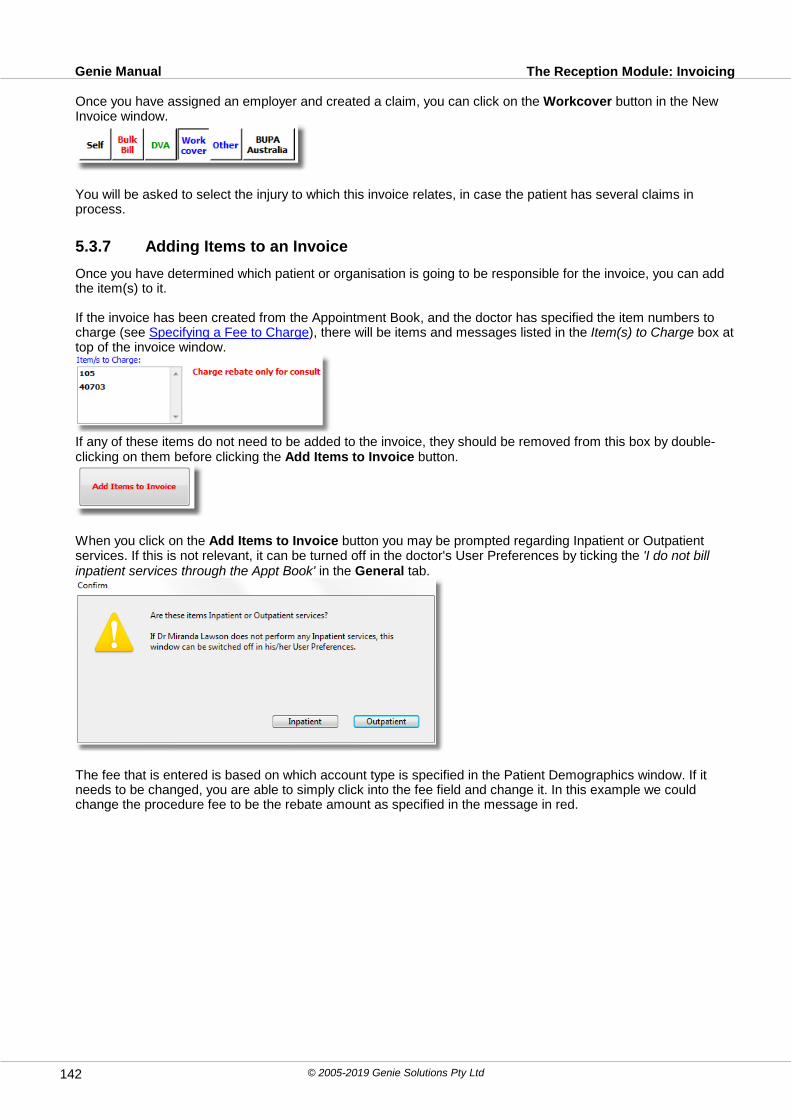
The Reception Module: InvoicingGenie Manual
© 2005-2019 Genie Solutions Pty Ltd142
Once you have assigned an employer and created a claim, you can click on the Workcover button in the NewInvoice window.
You will be asked to select the injury to which this invoice relates, in case the patient has several claims inprocess.
5.3.7 Adding Items to an Invoice
Once you have determined which patient or organisation is going to be responsible for the invoice, you can addthe item(s) to it.
If the invoice has been created from the Appointment Book, and the doctor has specified the item numbers tocharge (see Specifying a Fee to Charge), there will be items and messages listed in the Item(s) to Charge box attop of the invoice window.
If any of these items do not need to be added to the invoice, they should be removed from this box by double-clicking on them before clicking the Add Items to Invoice button.
When you click on the Add Items to Invoice button you may be prompted regarding Inpatient or Outpatientservices. If this is not relevant, it can be turned off in the doctor's User Preferences by ticking the 'I do not billinpatient services through the Appt Book' in the General tab.
The fee that is entered is based on which account type is specified in the Patient Demographics window. If itneeds to be changed, you are able to simply click into the fee field and change it. In this example we couldchange the procedure fee to be the rebate amount as specified in the message in red.

The Reception Module: InvoicingGenie Manual
© 2005-2019 Genie Solutions Pty Ltd 143
If you do not know the fee, you can double-click on the item which will bring up the item window with all the feeslisted at right. Clicking on the fee you would like will replace the current fee with this.
If you would like to add another item other than those specified in the Item(s) to Charge box, or the doctor hasnot specified the item(s) to charge, click on the Add Item to Invoice button to open a new item window like theabove. Enter the item number and press Tab. Genie will insert the appropriate fee for the account type of thepatient, depending on what is specified in the Patient Demographics, i.e. Private, AMA, Schedule etc.If the fee that populates is not the fee you would like to charge this time, simply click on the desired fee in topright of this window. If you do not want to charge any of these predetermined fees, you can highlight and replacethe fee in the Amount field.

The Reception Module: InvoicingGenie Manual
© 2005-2019 Genie Solutions Pty Ltd144
If any items require the No. of Patients Seen to be entered (such as hospital or home visits), you can enter this inthe field to the right of the item number. Similarly, if the item requires multiple quantities, these can be entered inthe Quantity field. This prevents you from having to enter the same item number multiple times.Note: when using Quantities, the Amount field will still display the amount per item not the total amountfor all quantities.
Once you are done, click on the Save button to add the item(s) to the invoice.
Inserting Private Fees on the FlyWhen you first start using Genie, the items in the Billing Items List will only have the Medicare Schedule andRebate fees filled in.
You can open the Billing Items List (Open > Billing Items) and insert your own private fees/descriptions at anytime, however you can also do this as you are creating invoices.
In the new item window note that the various fees are displayed on the right-hand side of this window.
You can click into these fields and enter your usual private fees. These will be saved so that the next time youinvoice this item the appropriate fee will be automatically inserted.
Similarly, you can change the text in the Description field either permanently by editing as appropriate and savingthe invoice, or just for this item by ticking the Description for this Invoice item ONLY.
Note: If you cancel the invoice, none of the above changes will be saved.
5.3.8 Other Item Information
You may sometimes need to modify or include extra information for the item.If the patient has a valid private health fund, the Use Private Fund Schedule tick box will be enabled. Clicking onthis tickbox will insert the fund's fee for this particular item.
Service Date
If you are invoicing for a service which occurred on a different day, you should change the Service Date to thecorrect date.
Service Time
The Service Time is automatically taken from the Appointment time. If the Service Time is significantly differentand it is important that it be recorded correctly (e.g. for a second visit on the same day), you must manuallychange the time of the service.If the service was an inpatient service then the Inpatient Services tickbox should be ticked. This will change therebate and gap amount to reflect the 75% Schedule Inpatient Rebate.
Notes
The Notes field prints on invoices and DB4 claim forms, and is transmitted through HIC Online. The mostcommon uses for this field are Workcover claim numbers, second visit on same day details, inpatient details, anoperative assistant's name and provider number, or noting whether the item is 'not normal aftercare'.

The Reception Module: InvoicingGenie Manual
© 2005-2019 Genie Solutions Pty Ltd 145
Time Spent
The Time Spent field does not have to be completed unless you have a specific need to record this. Medicarerequires this figure to be entered in increments of 15 minutes.
Medicare Online Over-rides
If you are using Medicare Online, you will need to ensure that the appropriate over-rides are selected. Theseoptions will appear when adding an item if you have selected Medicare or DVA at the top of the invoice, or if youare sending the invoice as a Patient Claim.
These should all be self-explanatory, however it is important to mark these appropriately or your claims may berejected (see the Using Medicare Online section of this manual for more information).
5.3.9 Searching the Fee Schedule
If you are unsure of which item number to charge, you can search Billing Items (Open > Billing Items) for an
appropriate item number by clicking on the Search Fee Schedule button at the bottom of the Add Item toInvoice window.
This will open a Search window allowing you to search on either the item number or description.
As an example, you would like to invoice a colonoscopy; you can’t remember the exact item number, but youknow that it starts with the numbers ‘3209’. You can enter ‘3209’ in the Item field of the Search window, this willlist all items beginning with ‘3209’.
If you do not know the item number at all, you can search for a word that you believe will be included in thedescription. In this case, we search for the word ‘colonoscopy’. If you simply enter ‘colonoscopy’, into the Description field, Genie will search Billing Items for a record where the Description field starts with ‘colonoscopy’– this is unlikely to find anything.
Instead, you are able to use the wildcard character, ’@’, before the word ‘colonoscopy’. When you search, thewildcard character can represent any one, or many characters. By searching for ‘@colonoscopy’, Genie will lookfor a billing item with ‘colonoscopy’ anywhere in its description.

The Reception Module: InvoicingGenie Manual
© 2005-2019 Genie Solutions Pty Ltd146
In this particular case it finds many matching records, select the item you would like to invoice and click on the OK button.
The selected item number will be inserted into the Item field of the new item window.
5.3.10 Selecting the Practice
Genie allows you to invoice from multiple practices by allowing multiple Practice Preferences, each with theirown address and letterhead (see Practice Preferences). If you bill from multiple practices, you should select theappropriate practice from the drop-down menu after adding items to an invoice.
This will insert the appropriate practice letterhead on the invoice.If you only have one Practice Preference record, you can ignore this drop-down menu.
5.3.11 Selecting the Site of Service
Below the Practice drop-down menu is the Site of Service drop-down menu.
This menu is unique to each provider in a practice. It is based on the practice sites specified in each provider's User Preferences (see The Practice Sites Tab). It is used when a provider has multiple different providernumbers for different practice sites.
This menu has no effect on the letterhead printed on the invoice. It does however change the Site of Service,and Provider Number printed on invoices, DB4s, and electronically transmitted claims.
Having separate practice sites is also useful for tracking income earned at these individual sites. If you have thesame provider number at every site, it is recommended that you consider having several practice sites for thisreason. A breakdown of these individual sites can be viewed in the Billing Vs Income Report by going into File >Maintenance & Reports, Practice Analysis tab, Billing Vs Income.

The Reception Module: InvoicingGenie Manual
© 2005-2019 Genie Solutions Pty Ltd 147
5.3.12 Multiple Procedure & Diagnostic Rules
Multiple Procedure Rules
When multiple procedural items are added to an invoice, Genie allows you to apply the Multiple Procedure Rule(MPR) to the items.
Items the MPR apply to should already be marked as such in Billing Items, as shown below.
The Multiple Procedure Rule Applies to This Item tickbox is automatically ticked when importing the MedicareSchedule. If it does not appear to be working correctly, you should open the item's record (Open > Billing Items), by double-clicking on this in the list and checking that this box is ticked.
When invoicing procedures, you should enter the full fee for each item. When the second procedural item hasbeen added, a new button will appear on the invoice window, as shown below.
Continue adding all the items to the invoice. When you are finished, click on the Apply Multiple Item Rulebutton.
Genie will work from the most expensive item down applying the multiple procedure rule.
Note: The rule is applied top to bottom according to the Medicare Schedule fees, NOT your private fees.If your private fees are disproportionate to the Medicare fees, you may find this working in a differentway than you expected.
You can specify which MPR to apply when billing an Organisation from the Account Holders list (Open >Account Holders).
The order the items are entered in does not matter; Genie will still work from the most expensive item down tothe least expensive item. It is important that you enter all items with their full fees before clicking on the Calculate Multiple Procedures button.
Note: If you are entering multiple procedural items that took place on different days, Genie will calculateeach day's items separately. This negates the need to create separate invoices for each day.
Diagnostic Rules
If the DIMSR (Diagnostic Imaging Multiple Service Rule), or MVUSSR (Multiple Vascular Ultrasound Services
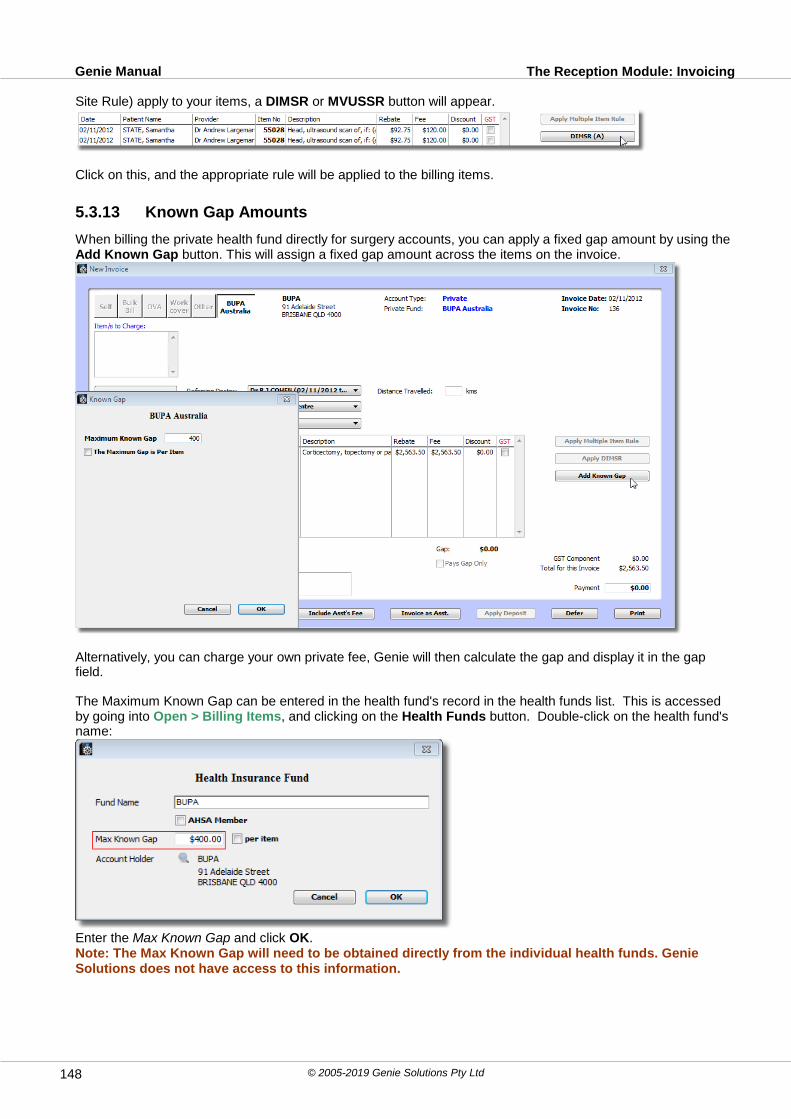
The Reception Module: InvoicingGenie Manual
© 2005-2019 Genie Solutions Pty Ltd148
Site Rule) apply to your items, a DIMSR or MVUSSR button will appear.
Click on this, and the appropriate rule will be applied to the billing items.
5.3.13 Known Gap Amounts
When billing the private health fund directly for surgery accounts, you can apply a fixed gap amount by using the Add Known Gap button. This will assign a fixed gap amount across the items on the invoice.
Alternatively, you can charge your own private fee, Genie will then calculate the gap and display it in the gapfield.
The Maximum Known Gap can be entered in the health fund's record in the health funds list. This is accessedby going into Open > Billing Items, and clicking on the Health Funds button. Double-click on the health fund'sname:
Enter the Max Known Gap and click OK.Note: The Max Known Gap will need to be obtained directly from the individual health funds. GenieSolutions does not have access to this information.

The Reception Module: InvoicingGenie Manual
© 2005-2019 Genie Solutions Pty Ltd 149
5.3.14 Assistant's Fees
Include Assistant's Fee
Genie allows you to add an assistant's fee to an invoice by clicking on the Include Assistant's Fee button.
Provisos:The Assistant Threshold must be set in Open > Billing ItemsAt least one of the items on the invoice must include the text '(Assist)' in the Description field, or have Assistant Billable ticked in the Billing Items record.If you add your own item numbers which you would like to attract an assistant's fee, it is important to tick Assistant Billable in the Billing Items record.The assistant must have a record in your Address Book (see The Open Menu Chapter).
When you click on the Include Assistant's Fee button you will be asked to find the provider in the AddressBook.
Enter the first few letters of the assistant's name, then press OK to search the Address Book and select theassistant.
Once you have selected the assistant, the window below will appear asking which method of fee calculation youwould like to use for the assistant.
The choices are: One Fifth of Surgeon's Fee, the Medicare Schedule, the DVA Inpatient fee, the Private FundFee (if the patient is privately insured and you have imported the fund's schedule, see Updating Fee Schedules),or your own private fee.
Select the fee to charge and click OK.
If the fee field for the Private Fund Fee is zero, the most likely cause is that there is no fee percentage (% Fee)entered for item 51303 in Open > Billing Items.

The Reception Module: InvoicingGenie Manual
© 2005-2019 Genie Solutions Pty Ltd150
The fee percentage should be imported for most of the funds automatically, however, you may need to manuallyadd the percentage in some cases. If this is the case, contact the fund directly for these figures as GenieSolutions does not have this information.
Invoice as Assistant
The Invoice as Asst. button is used when a doctor in your practice has acted as an assistant for a procedureand needs to create their own invoice for this.
You will first need to generate the invoice as normal, adding only the surgical items. Provisos:
The Assistant Threshold must be set in the Open > Billing Items windowAt least one of the items on the invoice must include the text '(Assist)' in the Description field, or haveAssistant Billable ticked in the Billing Items record.If you add your own item numbers which you would like to attract an assistant's fee, it is important to tick Assistant Billable in the Billing Items record.The surgeon who performed the procedure must have a record in your Address Book (see the Open MenuChapter).
When you click on the Invoice as Asst. button, you will be asked to search for the surgeon who performed theprocedure in your Address book.
Enter the first few letters of the surgeons name and press OK to search the Address Book and select thesurgeon.
Once you have selected the Surgeon, the window below will appear asking which method of fee calculation youwould like to use for the assistant's fee.
These choices are the same as when Including an Assistant's Fee (see Including Assistant's Fee above).
Select the fee to charge and click OK.
You will notice that the procedural item numbers have been replaced in the invoice by either item number 51300or 51303, depending on the aggregate fee of the procedure item numbers.

The Reception Module: InvoicingGenie Manual
© 2005-2019 Genie Solutions Pty Ltd 151
The surgeon's name, provider number (if recorded in their Address Book entry), and the item number, will all beinserted into the Notes field in the invoice.
5.3.15 Invoice Memos
Genie provides the ability to insert a memo at the bottom of printed invoices. You are able to have as manyinvoice memos as needed.
When the invoice window is opened Genie automatically inserts the default memo. You should leave the DefaultMemo blank, unless you would like a standard memo on every invoice.
To add a new memo, go to File > Practice Preferences and double-click the clinic name. Select theMiscellaneous tab, click on the drop-down menu at the bottom right of the window and select Add. Give thememo a name in the Title field, and enter the actual text in the Memo field.
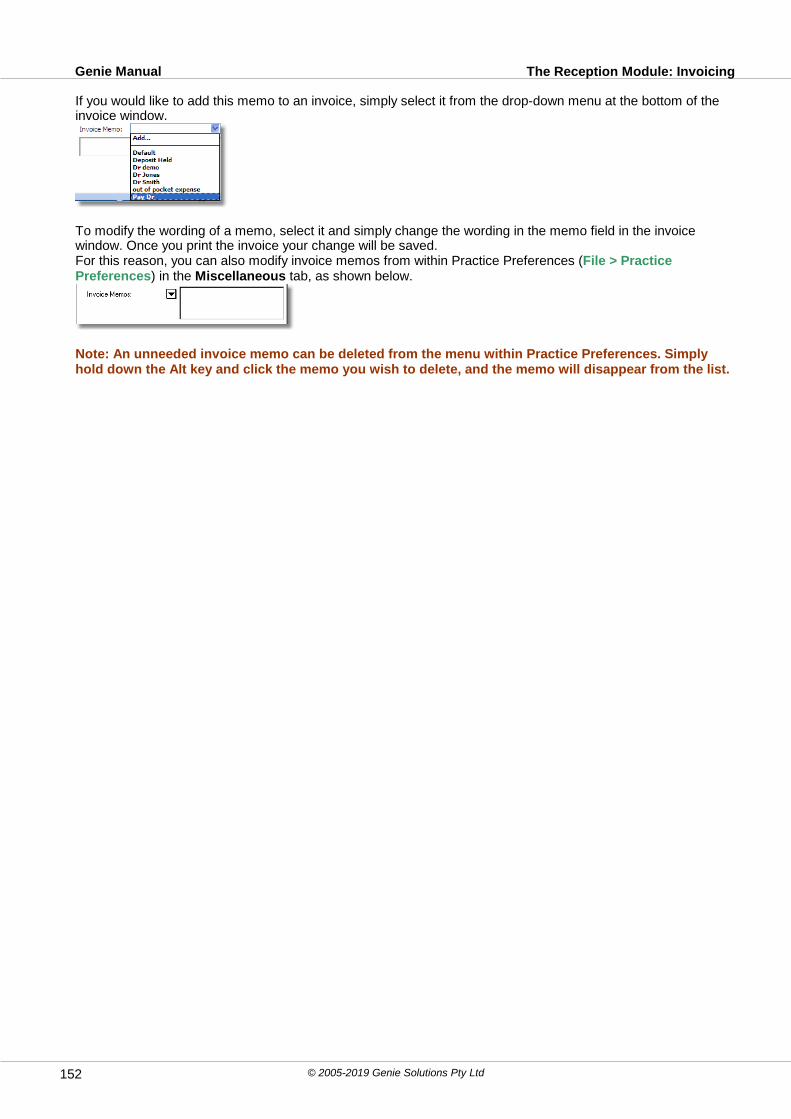
The Reception Module: InvoicingGenie Manual
© 2005-2019 Genie Solutions Pty Ltd152
If you would like to add this memo to an invoice, simply select it from the drop-down menu at the bottom of theinvoice window.
To modify the wording of a memo, select it and simply change the wording in the memo field in the invoicewindow. Once you print the invoice your change will be saved.For this reason, you can also modify invoice memos from within Practice Preferences (File > PracticePreferences) in the Miscellaneous tab, as shown below.
Note: An unneeded invoice memo can be deleted from the menu within Practice Preferences. Simplyhold down the Alt key and click the memo you wish to delete, and the memo will disappear from the list.
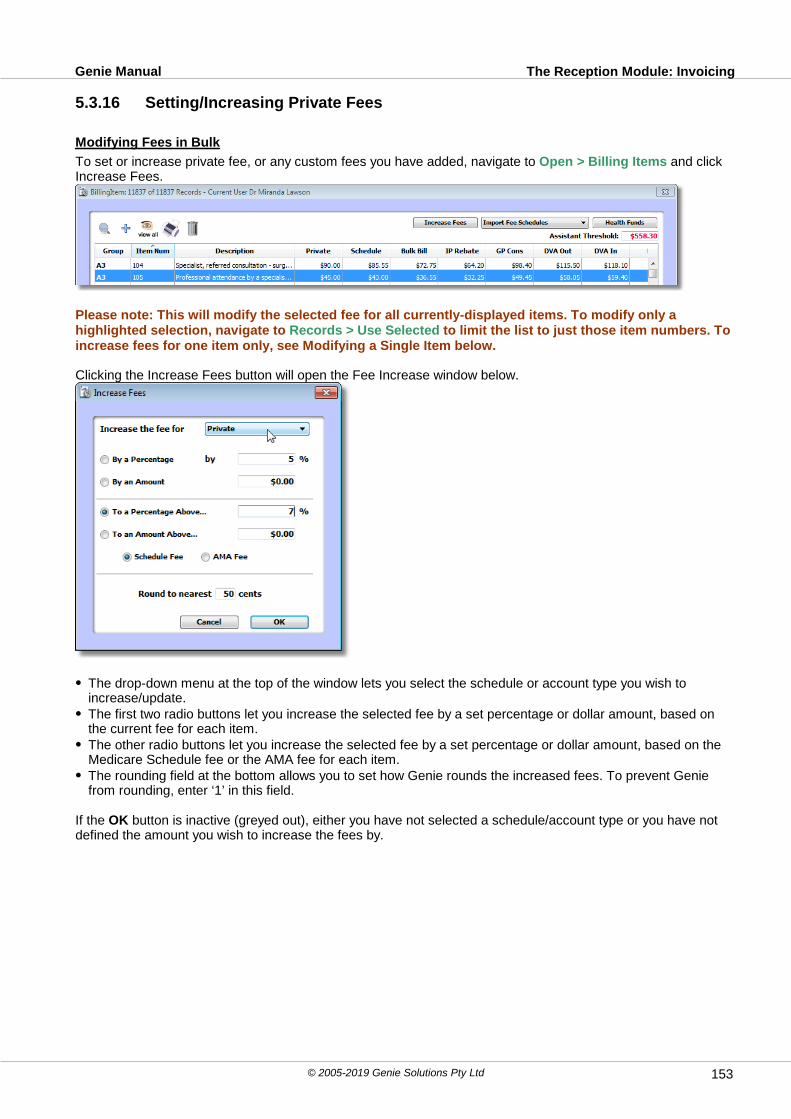
The Reception Module: InvoicingGenie Manual
© 2005-2019 Genie Solutions Pty Ltd 153
5.3.16 Setting/Increasing Private Fees
Modifying Fees in Bulk
To set or increase private fee, or any custom fees you have added, navigate to Open > Billing Items and clickIncrease Fees.
Please note: This will modify the selected fee for all currently-displayed items. To modify only ahighlighted selection, navigate to Records > Use Selected to limit the list to just those item numbers. Toincrease fees for one item only, see Modifying a Single Item below.
Clicking the Increase Fees button will open the Fee Increase window below.
The drop-down menu at the top of the window lets you select the schedule or account type you wish toincrease/update. The first two radio buttons let you increase the selected fee by a set percentage or dollar amount, based onthe current fee for each item. The other radio buttons let you increase the selected fee by a set percentage or dollar amount, based on theMedicare Schedule fee or the AMA fee for each item. The rounding field at the bottom allows you to set how Genie rounds the increased fees. To prevent Geniefrom rounding, enter ‘1’ in this field.
If the OK button is inactive (greyed out), either you have not selected a schedule/account type or you have notdefined the amount you wish to increase the fees by.

The Reception Module: InvoicingGenie Manual
© 2005-2019 Genie Solutions Pty Ltd154
Modifying a Single Item
To set or increase a particular fee for a single item only, simply double-click that item in the Billing Items windowto open the Editing Item window.
Please note: To ensure the integrity of your Medicare/DVA/ECLIPSE billing, you should only everincrease custom fees, such as Private fees, in this manner.
In the bottom-right, locate the fee/account type you wish to modify, and then slowly double-click on the dollaramount to edit it. Click Save to store the new fee.
For more information on modifying billing items in this window, please see the Adding and Editing Billing Itemssection.
Importing the AMA ScheduleTo import the AMA fee schedule, you will first need to download the schedule in .CSV format from the AMAwebsite. Then, follow the instructions in our Updating AMA Fees PDF guide. If using the paper version of thismanual, you can access this guide within Genie via Special > Software Updates > PDFs.
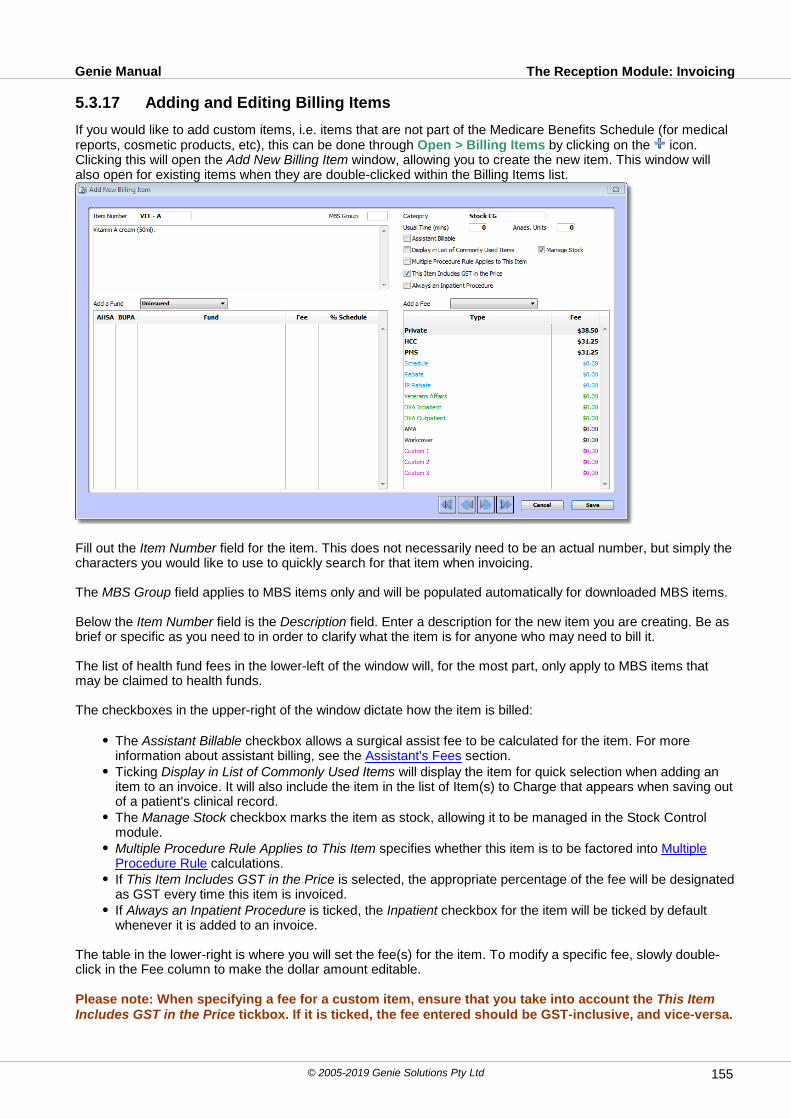
The Reception Module: InvoicingGenie Manual
© 2005-2019 Genie Solutions Pty Ltd 155
5.3.17 Adding and Editing Billing Items
If you would like to add custom items, i.e. items that are not part of the Medicare Benefits Schedule (for medicalreports, cosmetic products, etc), this can be done through Open > Billing Items by clicking on the icon.Clicking this will open the Add New Billing Item window, allowing you to create the new item. This window willalso open for existing items when they are double-clicked within the Billing Items list.
Fill out the Item Number field for the item. This does not necessarily need to be an actual number, but simply thecharacters you would like to use to quickly search for that item when invoicing.
The MBS Group field applies to MBS items only and will be populated automatically for downloaded MBS items.
Below the Item Number field is the Description field. Enter a description for the new item you are creating. Be asbrief or specific as you need to in order to clarify what the item is for anyone who may need to bill it.
The list of health fund fees in the lower-left of the window will, for the most part, only apply to MBS items thatmay be claimed to health funds.
The checkboxes in the upper-right of the window dictate how the item is billed:
The Assistant Billable checkbox allows a surgical assist fee to be calculated for the item. For moreinformation about assistant billing, see the Assistant's Fees section.Ticking Display in List of Commonly Used Items will display the item for quick selection when adding anitem to an invoice. It will also include the item in the list of Item(s) to Charge that appears when saving outof a patient's clinical record.The Manage Stock checkbox marks the item as stock, allowing it to be managed in the Stock Controlmodule. Multiple Procedure Rule Applies to This Item specifies whether this item is to be factored into MultipleProcedure Rule calculations.If This Item Includes GST in the Price is selected, the appropriate percentage of the fee will be designatedas GST every time this item is invoiced.If Always an Inpatient Procedure is ticked, the Inpatient checkbox for the item will be ticked by defaultwhenever it is added to an invoice.
The table in the lower-right is where you will set the fee(s) for the item. To modify a specific fee, slowly double-click in the Fee column to make the dollar amount editable.
Please note: When specifying a fee for a custom item, ensure that you take into account the This ItemIncludes GST in the Price tickbox. If it is ticked, the fee entered should be GST-inclusive, and vice-versa.
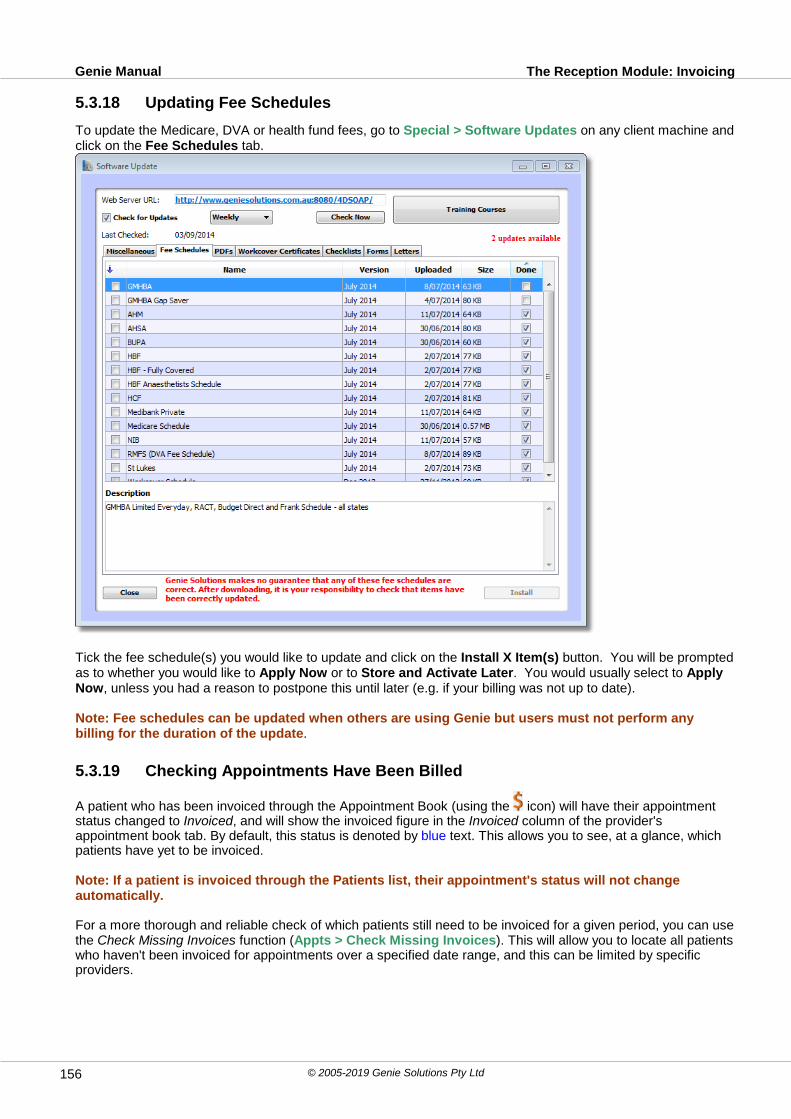
The Reception Module: InvoicingGenie Manual
© 2005-2019 Genie Solutions Pty Ltd156
5.3.18 Updating Fee Schedules
To update the Medicare, DVA or health fund fees, go to Special > Software Updates on any client machine andclick on the Fee Schedules tab.
Tick the fee schedule(s) you would like to update and click on the Install X Item(s) button. You will be promptedas to whether you would like to Apply Now or to Store and Activate Later. You would usually select to ApplyNow, unless you had a reason to postpone this until later (e.g. if your billing was not up to date).
Note: Fee schedules can be updated when others are using Genie but users must not perform anybilling for the duration of the update.
5.3.19 Checking Appointments Have Been Billed
A patient who has been invoiced through the Appointment Book (using the icon) will have their appointmentstatus changed to Invoiced, and will show the invoiced figure in the Invoiced column of the provider'sappointment book tab. By default, this status is denoted by blue text. This allows you to see, at a glance, whichpatients have yet to be invoiced.
Note: If a patient is invoiced through the Patients list, their appointment's status will not changeautomatically.
For a more thorough and reliable check of which patients still need to be invoiced for a given period, you can usethe Check Missing Invoices function (Appts > Check Missing Invoices). This will allow you to locate all patientswho haven't been invoiced for appointments over a specified date range, and this can be limited by specificproviders.
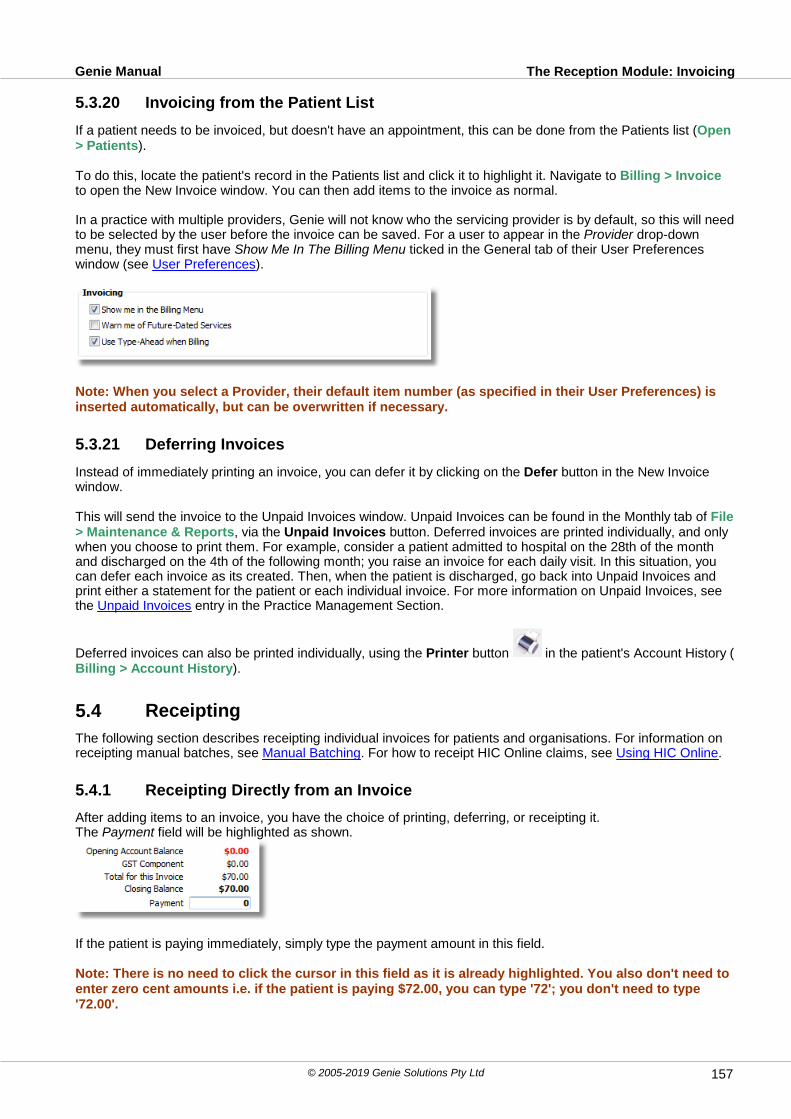
The Reception Module: InvoicingGenie Manual
© 2005-2019 Genie Solutions Pty Ltd 157
5.3.20 Invoicing from the Patient List
If a patient needs to be invoiced, but doesn't have an appointment, this can be done from the Patients list (Open> Patients).
To do this, locate the patient's record in the Patients list and click it to highlight it. Navigate to Billing > Invoiceto open the New Invoice window. You can then add items to the invoice as normal.
In a practice with multiple providers, Genie will not know who the servicing provider is by default, so this will needto be selected by the user before the invoice can be saved. For a user to appear in the Provider drop-downmenu, they must first have Show Me In The Billing Menu ticked in the General tab of their User Preferenceswindow (see User Preferences).
Note: When you select a Provider, their default item number (as specified in their User Preferences) isinserted automatically, but can be overwritten if necessary.
5.3.21 Deferring Invoices
Instead of immediately printing an invoice, you can defer it by clicking on the Defer button in the New Invoicewindow.
This will send the invoice to the Unpaid Invoices window. Unpaid Invoices can be found in the Monthly tab of File> Maintenance & Reports, via the Unpaid Invoices button. Deferred invoices are printed individually, and onlywhen you choose to print them. For example, consider a patient admitted to hospital on the 28th of the monthand discharged on the 4th of the following month; you raise an invoice for each daily visit. In this situation, youcan defer each invoice as its created. Then, when the patient is discharged, go back into Unpaid Invoices andprint either a statement for the patient or each individual invoice. For more information on Unpaid Invoices, seethe Unpaid Invoices entry in the Practice Management Section.
Deferred invoices can also be printed individually, using the Printer button in the patient's Account History (Billing > Account History).
5.4 Receipting
The following section describes receipting individual invoices for patients and organisations. For information onreceipting manual batches, see Manual Batching. For how to receipt HIC Online claims, see Using HIC Online.
5.4.1 Receipting Directly from an Invoice
After adding items to an invoice, you have the choice of printing, deferring, or receipting it.The Payment field will be highlighted as shown.
If the patient is paying immediately, simply type the payment amount in this field.
Note: There is no need to click the cursor in this field as it is already highlighted. You also don't need toenter zero cent amounts i.e. if the patient is paying $72.00, you can type '72'; you don't need to type'72.00'.

The Reception Module: ReceiptingGenie Manual
© 2005-2019 Genie Solutions Pty Ltd158
Click on the Receipt button.
The Receipt window will open as shown.
Genie defaults to the receipt type selected in the Miscellaneous tab of Practice Preferences (File > PracticePreferences and double-click the clinic name). The amount paid will already be applied to the invoiced item(s).This automatic application works the same way as the Auto-Fill function. If there are several items and you arenot receipting the full amount, Genie will allocate the payment to the first item number and work its way downuntil there is no more to be allocated.
If the patient is paying by the default receipt type, you can click on the Print button again to print the Invoice/Receipt.
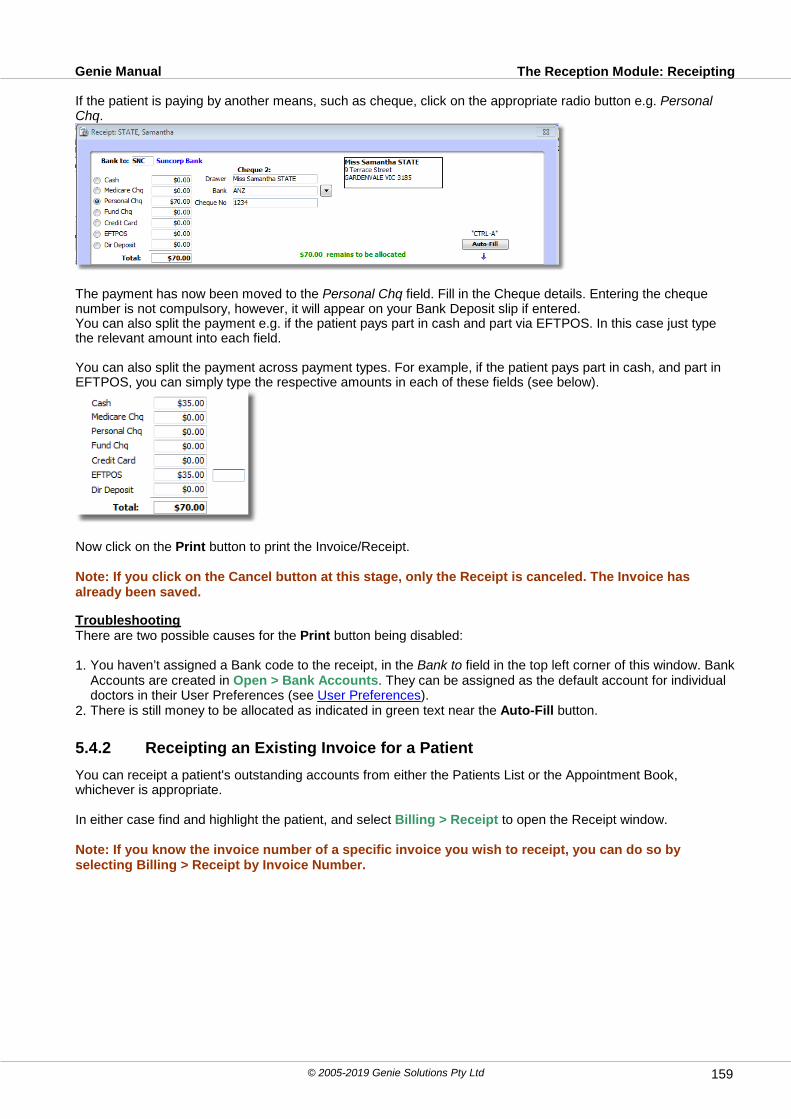
The Reception Module: ReceiptingGenie Manual
© 2005-2019 Genie Solutions Pty Ltd 159
If the patient is paying by another means, such as cheque, click on the appropriate radio button e.g. PersonalChq.
The payment has now been moved to the Personal Chq field. Fill in the Cheque details. Entering the chequenumber is not compulsory, however, it will appear on your Bank Deposit slip if entered.You can also split the payment e.g. if the patient pays part in cash and part via EFTPOS. In this case just typethe relevant amount into each field.
You can also split the payment across payment types. For example, if the patient pays part in cash, and part inEFTPOS, you can simply type the respective amounts in each of these fields (see below).
Now click on the Print button to print the Invoice/Receipt.
Note: If you click on the Cancel button at this stage, only the Receipt is canceled. The Invoice hasalready been saved.
TroubleshootingThere are two possible causes for the Print button being disabled:
1. You haven’t assigned a Bank code to the receipt, in the Bank to field in the top left corner of this window. BankAccounts are created in Open > Bank Accounts. They can be assigned as the default account for individualdoctors in their User Preferences (see User Preferences).
2. There is still money to be allocated as indicated in green text near the Auto-Fill button.
5.4.2 Receipting an Existing Invoice for a Patient
You can receipt a patient's outstanding accounts from either the Patients List or the Appointment Book,whichever is appropriate.
In either case find and highlight the patient, and select Billing > Receipt to open the Receipt window.
Note: If you know the invoice number of a specific invoice you wish to receipt, you can do so byselecting Billing > Receipt by Invoice Number.

The Reception Module: ReceiptingGenie Manual
© 2005-2019 Genie Solutions Pty Ltd160
The Receipt window will open as above, listing all outstanding items for the patient. Enter the total being paid inthe appropriate payment type box in the top left, and if the patient is paying for all outstanding items, simply clickon the Auto-Fill button to automatically allocate payment to all items. If the patient is not paying for alloutstanding items, you must manually allocate each payment against the appropriate item by clicking in the Payment field. If the patient is making a part payment, slow double-click in the Payment field to enter less thanthe full amount.
If you would like to edit the fee of an item, you can do this by slow double-clicking in the Fee field. Alternatively,you can double-click on the item to open the Edit Item window and make adjustments accordingly. To make anyedits in this window, first press the Edit button at the bottom of the window. Discounts can also be applied in thiswindow, or in the previous receipt window.
If a patient would like to pay for an outstanding account, but also needs to be issued with another invoice, youshould either:
Invoice and receipt them for today’s consultation, and then receipt the previous week’s,
orInvoice them for today’s consultation, and save the invoice un-receipted. You can then receipt today’s and theprevious week’s with one receipt.There is no way to invoice and receipt both debts in one step.
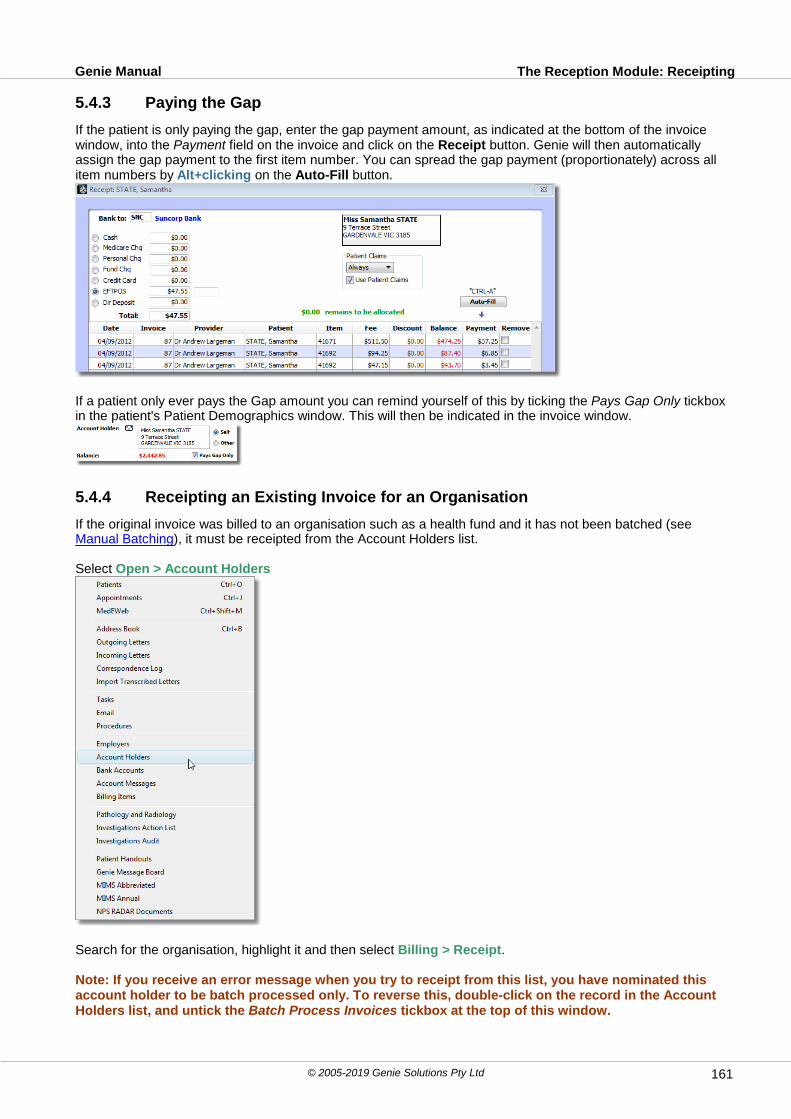
The Reception Module: ReceiptingGenie Manual
© 2005-2019 Genie Solutions Pty Ltd 161
5.4.3 Paying the Gap
If the patient is only paying the gap, enter the gap payment amount, as indicated at the bottom of the invoicewindow, into the Payment field on the invoice and click on the Receipt button. Genie will then automaticallyassign the gap payment to the first item number. You can spread the gap payment (proportionately) across allitem numbers by Alt+clicking on the Auto-Fill button.
If a patient only ever pays the Gap amount you can remind yourself of this by ticking the Pays Gap Only tickboxin the patient's Patient Demographics window. This will then be indicated in the invoice window.
5.4.4 Receipting an Existing Invoice for an Organisation
If the original invoice was billed to an organisation such as a health fund and it has not been batched (see Manual Batching), it must be receipted from the Account Holders list.
Select Open > Account Holders
Search for the organisation, highlight it and then select Billing > Receipt.
Note: If you receive an error message when you try to receipt from this list, you have nominated thisaccount holder to be batch processed only. To reverse this, double-click on the record in the AccountHolders list, and untick the Batch Process Invoices tickbox at the top of this window.

The Reception Module: ReceiptingGenie Manual
© 2005-2019 Genie Solutions Pty Ltd162
Fill in the total payment amount in the appropriate payment type field at top left of the Receipt window. To allocate the payment to the patients specified on the organisation's statement, simply click in the Paymentfield of each of the relevant patients. To assist with locating relevant patients, you are able to click on the Patientcolumn header to sort alphabetically.
5.5 Discounts
Discounts can be applied at the time of invoicing, receipting, or through the Account History window.
Discounts are recorded in the Payments section of the patient's Account History. They are also reflected in therelevant provider's Billing vs Income report (File > Maintenance & Reports > Practice Analysis).
The Daily Billing report (File > Maintenance & Reports > Daily) allows you to track discounts on a daily basis.

The Reception Module: DiscountsGenie Manual
© 2005-2019 Genie Solutions Pty Ltd 163
The Payments section in the Administrator tab of Maintenance & Reports allows you to show discounts fromany specified date range by clicking the Show Discounts button in the top of the window.
5.5.1 Applying when Invoicing
You can apply a discount whilst invoicing, either at the stage of adding an item or after an item has been added.
To apply a discount in the Add Item to Invoice window, select the provider and add an item number as usual.
You can then discount the item based on a percentage by clicking on the black drop-down arrow button.Alternatively, you can discount by a dollar amount by just typing the amount into the Discount field. If you enter apercentage discount, it is automatically converted into the appropriate dollar amount.
If you would like to apply a discount after you have added an item, click in the Discount column to choose the

The Reception Module: DiscountsGenie Manual
© 2005-2019 Genie Solutions Pty Ltd164
percentage you would like to discount. If you prefer to give a dollar discount amount, select Other from thisdrop-down list and type in the discount figure.
The 'Total for this Invoice' will display the discounted total.
If there is no payment, you can just click Print to print the unpaid invoice, otherwise enter in the payment amountand click Receipt
Clicking on Receipt will take you to the usual receipting window. In this window, you can enter a reason for thediscount (if you have not done this in the previous window), by right-clicking in the Discount column. An asterisknext to the discount amount indicates that you have not entered a reason for the discount. If a reason is notspecified, the discount will display the reason as Unspecified in the patient's Account History.

The Reception Module: DiscountsGenie Manual
© 2005-2019 Genie Solutions Pty Ltd 165
Selecting Edit Discount Reason will open a window allowing you to enter a reason for the discount.
You can permanently add this to your list of reasons by clicking on the little arrow above and selecting Add toMenu.
5.5.2 Applying when Receipting
You can apply a discount to an unpaid invoice at the time of receipting. You can do this in almost the same wayas applying a discount at the time of the invoice.
In the Receipt window, you will see the Discount column as it was in the Invoice window. Select the appropriatediscount percentage or dollar amount by selecting 'Other...'.
After selecting the amount you will be asked to enter in the reason for applying the discount. You can select asaved reason from the drop-down list, or you can type in a new reason.
You can permanently add this to your list of reasons by clicking on the little arrow above and selecting Add toMenu.
The balance owing will be adjusted to reflect the discount.
Receipt the amount as per usual.
5.5.3 Reversing a Discount
If a discount was applied incorrectly, or is no longer valid, you can reverse discounts through the patient'sAccount History (Billing > Account History).
Highlight the invoice in the left hand column to display the associated discount in the Payments section in thebottom of this window.

The Reception Module: DiscountsGenie Manual
© 2005-2019 Genie Solutions Pty Ltd166
Highlight the discount and click Delete.
You will be required to enter a reason for deleting the discount, this will be tracked in the Sales Audit.
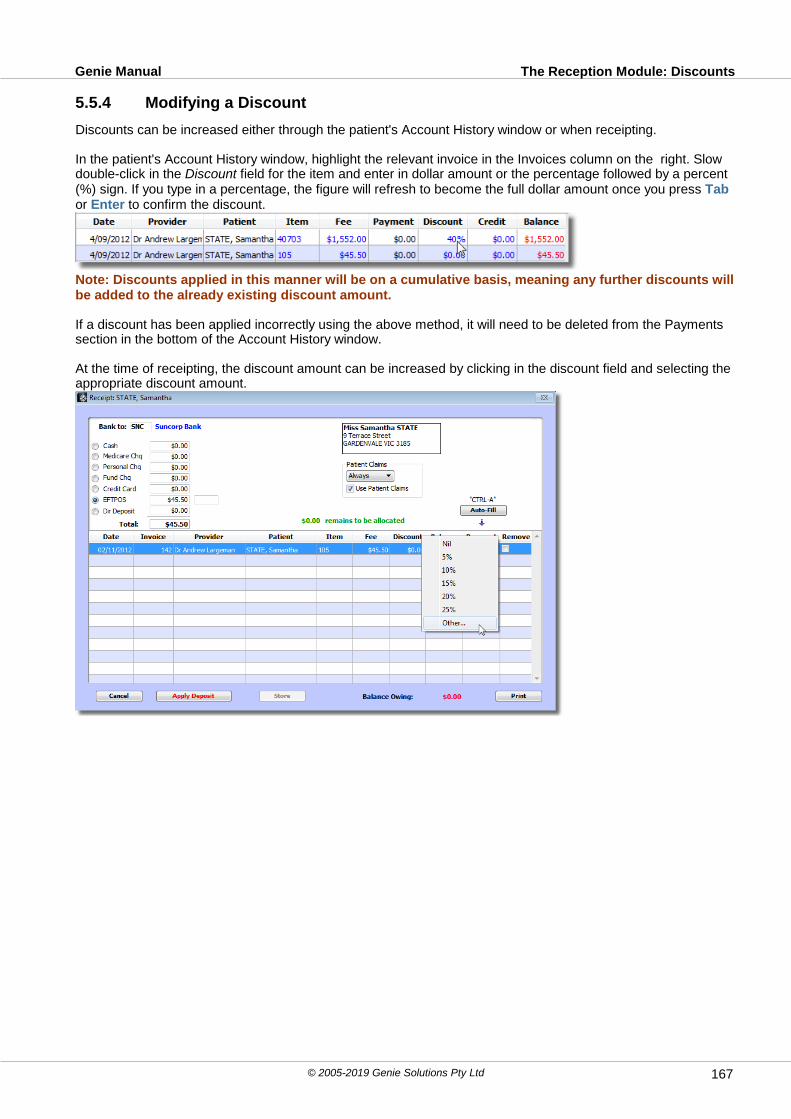
The Reception Module: DiscountsGenie Manual
© 2005-2019 Genie Solutions Pty Ltd 167
5.5.4 Modifying a Discount
Discounts can be increased either through the patient's Account History window or when receipting.
In the patient's Account History window, highlight the relevant invoice in the Invoices column on the right. Slowdouble-click in the Discount field for the item and enter in dollar amount or the percentage followed by a percent(%) sign. If you type in a percentage, the figure will refresh to become the full dollar amount once you press Tabor Enter to confirm the discount.
Note: Discounts applied in this manner will be on a cumulative basis, meaning any further discounts willbe added to the already existing discount amount.
If a discount has been applied incorrectly using the above method, it will need to be deleted from the Paymentssection in the bottom of the Account History window.
At the time of receipting, the discount amount can be increased by clicking in the discount field and selecting theappropriate discount amount.
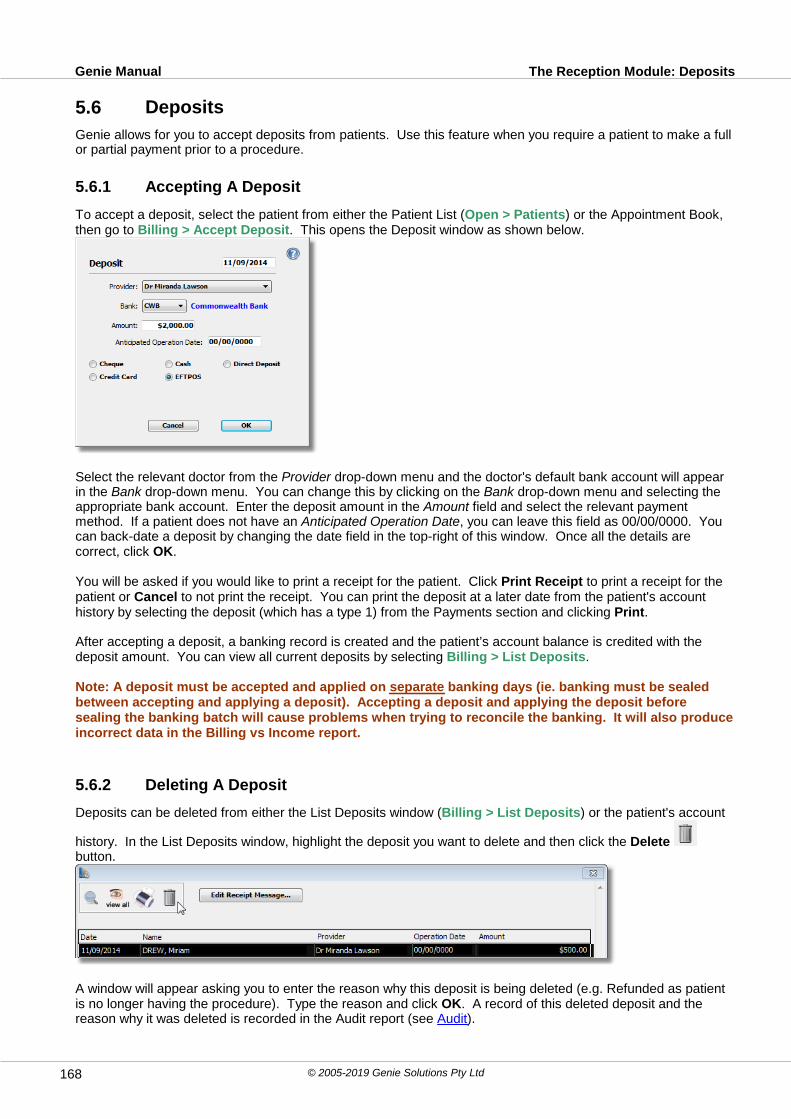
The Reception Module: DepositsGenie Manual
© 2005-2019 Genie Solutions Pty Ltd168
5.6 Deposits
Genie allows for you to accept deposits from patients. Use this feature when you require a patient to make a fullor partial payment prior to a procedure.
5.6.1 Accepting A Deposit
To accept a deposit, select the patient from either the Patient List (Open > Patients) or the Appointment Book,then go to Billing > Accept Deposit. This opens the Deposit window as shown below.
Select the relevant doctor from the Provider drop-down menu and the doctor's default bank account will appearin the Bank drop-down menu. You can change this by clicking on the Bank drop-down menu and selecting theappropriate bank account. Enter the deposit amount in the Amount field and select the relevant paymentmethod. If a patient does not have an Anticipated Operation Date, you can leave this field as 00/00/0000. Youcan back-date a deposit by changing the date field in the top-right of this window. Once all the details arecorrect, click OK.
You will be asked if you would like to print a receipt for the patient. Click Print Receipt to print a receipt for thepatient or Cancel to not print the receipt. You can print the deposit at a later date from the patient's accounthistory by selecting the deposit (which has a type 1) from the Payments section and clicking Print.
After accepting a deposit, a banking record is created and the patient’s account balance is credited with thedeposit amount. You can view all current deposits by selecting Billing > List Deposits.
Note: A deposit must be accepted and applied on separate banking days (ie. banking must be sealedbetween accepting and applying a deposit). Accepting a deposit and applying the deposit beforesealing the banking batch will cause problems when trying to reconcile the banking. It will also produceincorrect data in the Billing vs Income report.
5.6.2 Deleting A Deposit
Deposits can be deleted from either the List Deposits window (Billing > List Deposits) or the patient's account
history. In the List Deposits window, highlight the deposit you want to delete and then click the Delete button.
A window will appear asking you to enter the reason why this deposit is being deleted (e.g. Refunded as patientis no longer having the procedure). Type the reason and click OK. A record of this deleted deposit and thereason why it was deleted is recorded in the Audit report (see Audit).

The Reception Module: DepositsGenie Manual
© 2005-2019 Genie Solutions Pty Ltd 169
To delete a deposit from the patient's account history, highlight the deposit (which has a type of 1) from thePayments section and click the Delete button. Again you will be required to enter a reason as to why thisdeposit is being deleted.
Note: Deposits are recorded in the banking at the time of accepting the deposit, not at the time ofapplying it. If you delete a deposit before the banking has been sealed, there will be no record of thisdeposit in Genie. If you delete the deposit after the banking has been sealed, you will need to make anote in your external banking that this deposit was deleted, as once a banking batch has been sealed itcannot be changed.
5.6.3 Using A Deposit
Note: As noted in the Accepting A Deposit page, you must have sealed the deposit into a banking batchbefore using it.
You can apply an accepted deposit in the New Invoice window or the Receipt window. In both windows, if thereis a deposit stored for the patient, the Apply Deposit button will become available.

The Reception Module: DepositsGenie Manual
© 2005-2019 Genie Solutions Pty Ltd170
In the Invoice window, if you click the Print (or Receipt if you have entered a payment) button without using anaccepted deposit, a window will appear stating that there is a deposit for this patient and will ask if you would liketo use it on this invoice. Clicking I Don't Want to Use the Deposit will proceed with printing or receipting theinvoice. Clicking Cancel will allow you to return to the invoice and apply the deposit.
When you click on the Apply Deposit button while invoicing or receipting, a window will appear asking you toselect the deposit(s) for this patient that you want to apply to this invoice. Tick the check box(es) to the left of thedeposit(s) that you require and click OK.

The Reception Module: DepositsGenie Manual
© 2005-2019 Genie Solutions Pty Ltd 171
In the Invoice window, the sum of the selected deposit(s) will be entered into the Payments field as show below:
In the Receipt window, the sum of the selected deposit(s) will be entered into the payment type field that wasselected when the deposit was accepted. In the example below, it is entered into the EFTPOS field:
If the deposit amount is equal to the invoice amount, the invoice can be receipted and the invoice will be fullypaid.
If the deposit amount is less than the invoice amount (e.g deposit is $545.00 and the invoice is $595.00), you willfirst need to receipt the deposit amount and then receipt the remaining amount to be paid by the patient.
Note: The deposit amount and additional payment must be receipted separately so that Genie candistinguish between the deposit amount, which has already been sealed in a previous banking batch,and the additional payment which will appear on the current, unsealed banking batch.
If the deposit amount is more than the invoice amount, then the total amount of the invoice will be applied to theinvoice and the remainder of the deposit will be adjusted. This remaining deposit amount will remain in thepatient's account history and the List Deposit window until it is used for a future invoice or deleted.
5.7 Quotes
Quotes can be created for procedures that have already been booked, or procedures that are yet to be booked(i.e. Pending Procedures).
Procedures that have been booked can be accessed through the patients Clinical Window, or from theAppointment Book.
If a quote is required prior to booking in the procedure, the procedure can be added without an appointmentthrough the Tools menu (Tools > Add Procedure). For more information see Adding a Procedure.
In either situation, quotes are then prepared through the Quotes tab of the Procedure window.
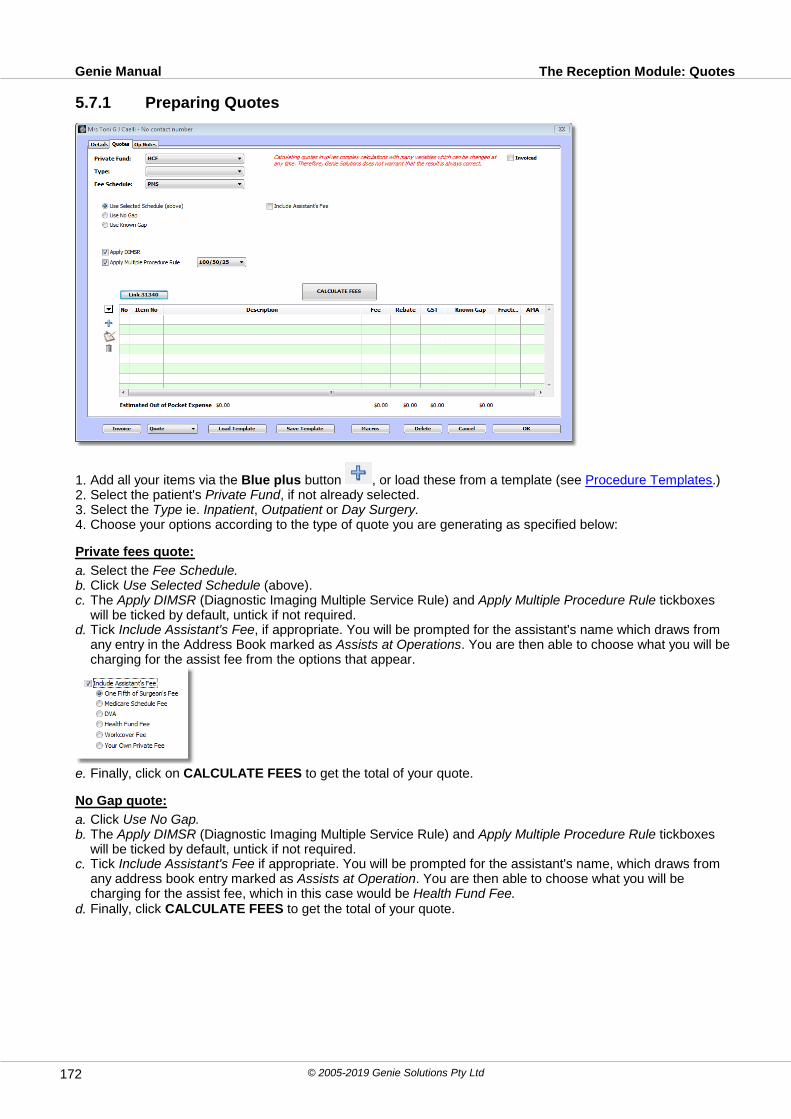
The Reception Module: QuotesGenie Manual
© 2005-2019 Genie Solutions Pty Ltd172
5.7.1 Preparing Quotes
1. Add all your items via the Blue plus button , or load these from a template (see Procedure Templates.)2. Select the patient's Private Fund, if not already selected.3. Select the Type ie. Inpatient, Outpatient or Day Surgery.4. Choose your options according to the type of quote you are generating as specified below:
Private fees quote:
a. Select the Fee Schedule.b. Click Use Selected Schedule (above).c. The Apply DIMSR (Diagnostic Imaging Multiple Service Rule) and Apply Multiple Procedure Rule tickboxes
will be ticked by default, untick if not required.d. Tick Include Assistant's Fee, if appropriate. You will be prompted for the assistant's name which draws from
any entry in the Address Book marked as Assists at Operations. You are then able to choose what you will becharging for the assist fee from the options that appear.
e. Finally, click on CALCULATE FEES to get the total of your quote.
No Gap quote:
a. Click Use No Gap.b. The Apply DIMSR (Diagnostic Imaging Multiple Service Rule) and Apply Multiple Procedure Rule tickboxes
will be ticked by default, untick if not required.c. Tick Include Assistant's Fee if appropriate. You will be prompted for the assistant's name, which draws from
any address book entry marked as Assists at Operation. You are then able to choose what you will becharging for the assist fee, which in this case would be Health Fund Fee.
d. Finally, click CALCULATE FEES to get the total of your quote.

The Reception Module: QuotesGenie Manual
© 2005-2019 Genie Solutions Pty Ltd 173
Known Gap quote – adding a total known gap to the quote:
a. Click Use Known Gap.b. Click Use Fund's Gap which will allow you then to put a total known gap to the quote.
c. The Maximum Known Gap can be entered into Open > Billing Items, Health Fund button by double-clickingon the fund name and entering the gap amount into the Max Gap Amount field. This is based on theagreement you have with each Health Fund.
d. The Apply DIMSR (Diagnostic Imaging Multiple Service Rule) and Apply Multiple Procedure Rule tickboxeswill be ticked by default, untick if not required.
e. Tick Include Assistant's Fee, if appropriate. You will be prompted for the assistant's name which draws fromany address book entry marked as Assists at Operations. You are then able to choose what you will becharging for the assist fee, which in this case would be Health Fund Fee.
f. Finally, click CALCULATE FEES to get the total of your quote.
Known Gap quote – adding a custom gap to the quote:
There may be times when you choose to charge a gap that is different to the maximum known gap as per youragreement with the health fund (eg. if you want to charge less than the maximum gap). For these situations,Genie allows you to charge a customisable gap. a. Click Use Known Gap.b. Click Use Custom Gap. You should note that the Use Fund's Gap field greys out.
c. Enter the custom gap amount and tick per item if applicable. d. The Apply DIMSR (Diagnostic Imaging Multiple Service Rule) and Apply Multiple Procedure Rule tickboxes
will be ticked by default, untick if not required. e. Tick Include Assistant's Fee, if appropriate. You will be prompted for the assistant's name which draws from
any address book entry marked as Assists at Operations. You are then able to choose what you will becharging for the assist fee.
f. Click CALCULATE FEES to get the total of your quote.
If the custom gap exceeds the maximum known gap for the health fund, you will receive a warning. You will beable to proceed with creating the quote, however the warning should serve as a prompt to confirm the details ofthe quote with the relevant health fund.
If the maximum known gap and custom gap are both set across the entire procedure (i.e. per item is unticked forboth), OR if maximum known gap for the health fund is set to apply the gap across the whole procedure (I.e notticked per item) but the custom gap is ticked to apply per item, you will receive the following warning if thecustom gap exceeds the maximum known gap:
If the maximum known gap for the health fund is ticked to apply the gap per item and the custom gap is ticked toapply across the whole procedure, OR if both the maximum known gap and the custom gap are both set peritem, you will receive the following warning if the custom gap exceeds the known gap, and the individual itemthat exceeds the maximum known gap will be highlighted in red.

The Reception Module: QuotesGenie Manual
© 2005-2019 Genie Solutions Pty Ltd174
Known Gap quote – using your own fees to determine the known gap:a. Select the Fee Schedule.b. Click Use Known Gap.c. Click Use Selected Schedule Above.d. The Apply DIMSR (Diagnostic Imaging Multiple Service Rule) and Apply Multiple Procedure Rule tickboxes
will be ticked by default, untick if not required.e. Tick Include Assistant's Fee, if appropriate. You will be prompted for the assistant's name which draws from
any address book entry marked as Assists at Operations. You are then able to choose what you will becharging for the assist fee.
f. Click CALCULATE FEES to get the total of your quote.
You can edit the automatically-inserted fees by placing the cursor in the Fee field and changing the fee.
To change the fee permanently, highlight the item and then click on the Edit button.
This will open the Billing Items record for that item, allowing you to edit the fee amount for private fees andhealth fund fees.
For information on importing health fund fee schedules, see Private Health Fund Fees.Note: The AMA Fee Schedule can be imported from the Billing Items window. You must contact the AMAand ask them to provide you with the schedule. Genie is not allowed to distribute this as the AMAwishes to limit access to AMA members only.
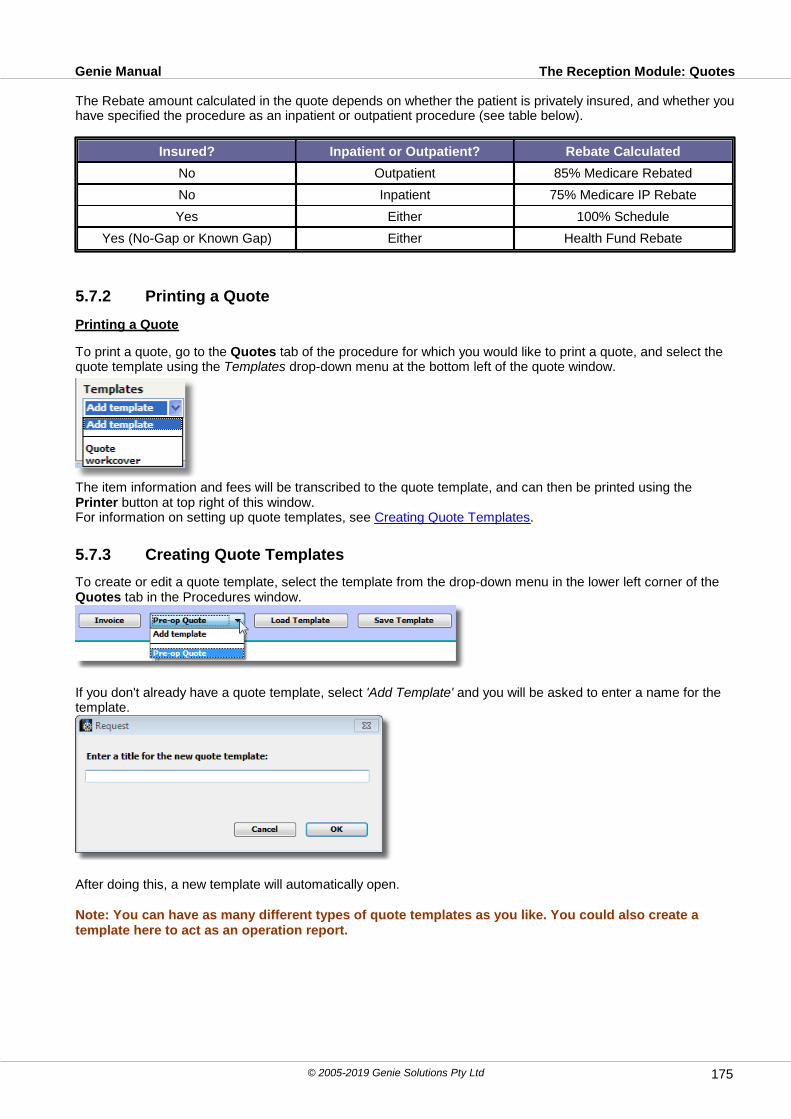
The Reception Module: QuotesGenie Manual
© 2005-2019 Genie Solutions Pty Ltd 175
The Rebate amount calculated in the quote depends on whether the patient is privately insured, and whether youhave specified the procedure as an inpatient or outpatient procedure (see table below).
Insured? Inpatient or Outpatient? Rebate Calculated
No Outpatient 85% Medicare Rebated
No Inpatient 75% Medicare IP Rebate
Yes Either 100% Schedule
Yes (No-Gap or Known Gap) Either Health Fund Rebate
5.7.2 Printing a Quote
Printing a Quote
To print a quote, go to the Quotes tab of the procedure for which you would like to print a quote, and select thequote template using the Templates drop-down menu at the bottom left of the quote window.
The item information and fees will be transcribed to the quote template, and can then be printed using the Printer button at top right of this window.For information on setting up quote templates, see Creating Quote Templates.
5.7.3 Creating Quote Templates
To create or edit a quote template, select the template from the drop-down menu in the lower left corner of the Quotes tab in the Procedures window.
If you don't already have a quote template, select 'Add Template' and you will be asked to enter a name for thetemplate.
After doing this, a new template will automatically open.
Note: You can have as many different types of quote templates as you like. You could also create atemplate here to act as an operation report.

The Reception Module: QuotesGenie Manual
© 2005-2019 Genie Solutions Pty Ltd176
When a new quote template is created, it includes the basic information about the procedure. This information isreferenced from the fields in the underlying procedure record.
You can see the references by clicking on the View References button .
This will display the template as shown below:
You can reference other fields in the procedure record, or the patient's record. For information on how to do this,please refer to the Fields & Expressions Tabs.
You are also able to add your own patient information to this template. For example, disclaimers aboutAnaesthetist and hospital fees, etc. Once you have typed this information into the template, save it by clicking onthe Save button.
Before you do this, you must let Genie know where to insert the actual quote information when you next openthis template. To do this, highlight all the text from 'Item No' down to the 'Out of Pocket Cost', as shown below:

The Reception Module: QuotesGenie Manual
© 2005-2019 Genie Solutions Pty Ltd 177
Then replace this section of the quote template with 'XXX', as seen below.
Click on the Save button .
Note: Don't save the template with the references showing otherwise it will print with the names of thereferences instead of the referenced information.
At the top of this window there are four tickboxes.
The Use for Quotes tickbox should already be ticked. This tells Genie to display this template in the drop-downmenu in the Procedure window.
You will probably want to also check the Save a Copy in Patient Correspondence tickbox. This will make a copyof this quote and save it in the patient's Clinical Window so that you have a record of what was actually quoted.This occurs when you print the record.If you aren't printing the record you can still save a copy in the Clinical Window by clicking the Copy to Patient
Record Without Printing button .

The Reception Module: QuotesGenie Manual
© 2005-2019 Genie Solutions Pty Ltd178
5.7.4 Invoicing Directly From A Quote
This would be used if there were no complications in surgery and the invoice is exactly as quoted.
Click on the Invoice button in the Quotes tab of the Procedure window and an invoice will be created with allitems and fees as in the quote.
Then assign the account holder (e.g. the health fund) and apply deposits as per usual.
If billing to a health fund, there must be a corresponding account holder. For information on how to attach anaccount holder to an organisation, please see Account Holders for Organisations.
If the quote is vastly different to what needs to be invoiced just invoice through the Billing menu (Billing >Invoice)

The Reception Module: Private Health Fund FeesGenie Manual
© 2005-2019 Genie Solutions Pty Ltd 179
5.8 Private Health Fund Fees
Genie comes with most health funds pre-loaded. If you would like to add any additional funds, you can do this in Open > Billing Items by clicking the Health Funds button.
To add a fund, click on the Add button. To delete a fund you will not use, or to delete duplicate entries of a fund,click on the Delete button. Existing funds can also be edited by double-clicking on the fund name in the list.
The Create Schedule button allows you to create schedules for those funds whose fees are a percentageabove (or below) the Medicare Schedule.
Updating Fees Online
Genie provides schedules for all the major private health funds. These schedules are available by going into Special > Software Updates and selecting the Fee Schedules tab. Tick the health fund(s) you would like toimport fees for, and click on the Install X item(s) button. You will receive a prompt asking whether you wouldlike to apply the update now or store it for later activation.
If you choose Apply Now, the fees will be updated across the network and ready to use immediately.

The Reception Module: Private Health Fund FeesGenie Manual
© 2005-2019 Genie Solutions Pty Ltd180
If you select Store and Activate Later, you will be prompted for a user and an activation date.
Genie will download and import into the relevant fund automatically if the health fund name is spelled exactly asit is displayed in Software Updates. If it is not, you will be prompted to choose which fund you would like toimport the fees for.
If you do not have an Internet connection at your practice, contact Genie Solutions for a Genie Update CD toupdate the fees manually.
Updating Fees Manually
To import a fee schedule downloaded from the Genie website or from another source like the AMA website,firstly select Open > Billing Items.
Click on the Import Fee Schedules drop-down and select Import AHSA Schedule to import the AHSA fees, orselect Import Other Schedules to import any other schedule.

The Reception Module: Private Health Fund FeesGenie Manual
© 2005-2019 Genie Solutions Pty Ltd 181
The window below will open asking you to identify the schedule you would like to import.
This list is made up of all the non-AHSA funds in your data file; any funds that have the AHSA tickbox ticked inthe health funds list will be omitted. If you have entered multiple different names for AXA, or any of these otherfunds, it is important to either clean up your list of funds first, or perform this import for each different name youhave used for a particular fund.
In this example we are going to import the AXA schedule.
Click Open and you will be instructed to open the AXA text file in the Health Funds folder.
Navigate to your Genie folder, double-click on Health Funds, then AXA, and open the file inside to commencethe import.
Note: Some funds, such as AHSA and AXA, have a different schedule for each state, so it is important toalso select the correct file for your state.
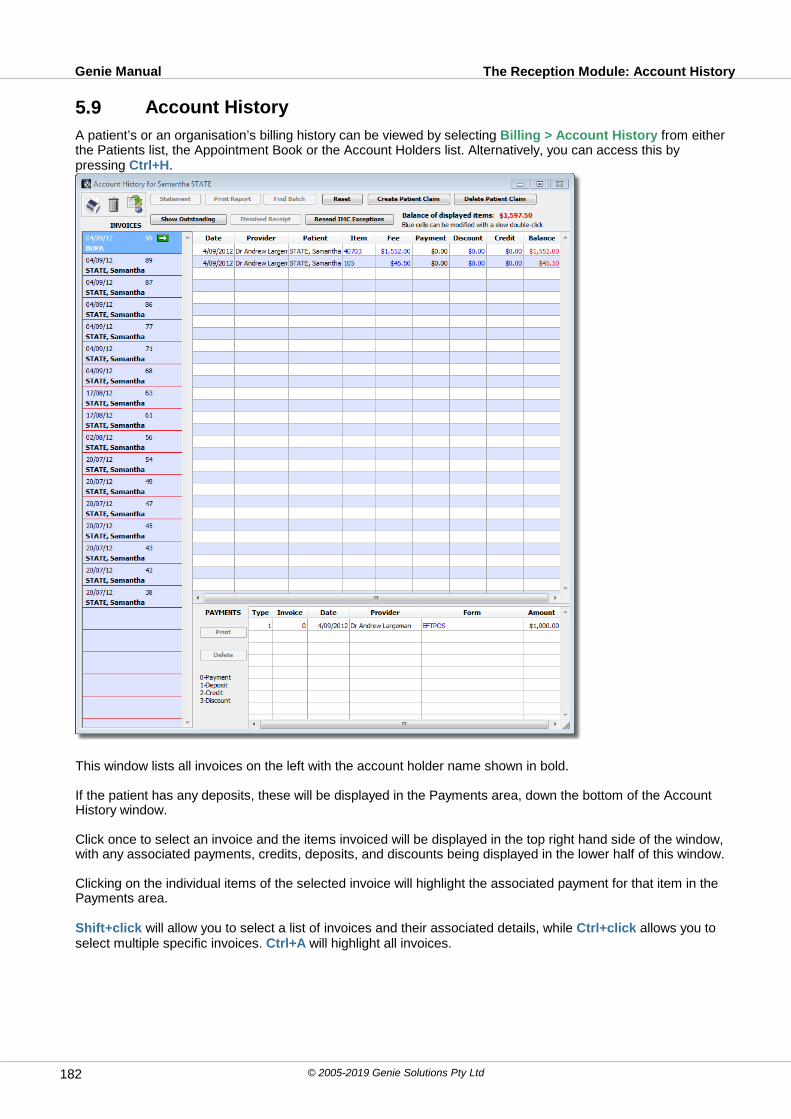
The Reception Module: Account HistoryGenie Manual
© 2005-2019 Genie Solutions Pty Ltd182
5.9 Account History
A patient’s or an organisation’s billing history can be viewed by selecting Billing > Account History from eitherthe Patients list, the Appointment Book or the Account Holders list. Alternatively, you can access this bypressing Ctrl+H.
This window lists all invoices on the left with the account holder name shown in bold.
If the patient has any deposits, these will be displayed in the Payments area, down the bottom of the AccountHistory window.
Click once to select an invoice and the items invoiced will be displayed in the top right hand side of the window,with any associated payments, credits, deposits, and discounts being displayed in the lower half of this window.
Clicking on the individual items of the selected invoice will highlight the associated payment for that item in thePayments area.
Shift+click will allow you to select a list of invoices and their associated details, while Ctrl+click allows you toselect multiple specific invoices. Ctrl+A will highlight all invoices.

The Reception Module: Account HistoryGenie Manual
© 2005-2019 Genie Solutions Pty Ltd 183
The Item, Fee, Discount and Credit columns can be modified by slow double-clicking to adjust the enteredamounts.
Note: The Discount and Credit columns work on a cumulative basis, i.e the amount entered will beadded to the existing amount.
You can view only unpaid invoices by clicking the Show Outstanding button.
In this window, you can use the buttons at the top to:Reprint invoicesPrint a statementOpen and modify an existing invoiceChange the account holder and/or the patient if an invoice has been billed to the wrong person or organisationModify invoiced itemsDelete invoices, payments and depositsApply a credit to invoiced items if they have been overcharged, or to write them off as a bad debt.
5.9.1 Reprinting an Invoice or Receipt
Reprinting an Invoice
Select the required invoice(s) from the left hand column of the Account History window and click on the Printerbutton
Note: Medicare and DVA items won't print unless you have selected the Medicare DB4 and DVA Claimstickboxes respectively in Printing Preferences.
Reprinting a Receipt
Select the invoice from the left hand column of the Account History window and then select the associatedpayment(s) in the Payments section. Click on the Printer button.

The Reception Module: Account HistoryGenie Manual
© 2005-2019 Genie Solutions Pty Ltd184
5.9.2 Printing a Statement
Highlight the relevant invoices on the left hand side of the Account History, and then highlight the items that youwould like to include in the statement on the right.
Click on the Statement button. (This button will not be available until you highlight the relevant items in the topright hand side of the Account History window).
You can highlight adjacent items by Shift+click, or non-adjacent items by Ctrl+clicking on each item.
Note: You are only able to highlight multiple invoices on the left hand side when they are for the sameaccount holder. If you highlight some items invoiced to Medicare, and some to the patient, you will notbe able to print a statement.
5.9.3 Print Report
The Print Report button prints out a report of all transactions related to the highlighted item(s).
Follow the same steps as in Printing a Statement.
5.9.4 Finding A Batch
The Find Batch button can be used to display all the items in a particular Medicare, DVA or other organisation'sbatch, assuming you have got to the Account History window from the Account Holders list for either Medicare,DVA or the organisation.
5.9.5 Itemised Receipt
You can print an itemised receipt by highlighting the required invoice in the Invoice column and clicking theItemised Receipt button. This will print a receipt detailing the method and date of any payments for thatparticular invoice.

The Reception Module: Account HistoryGenie Manual
© 2005-2019 Genie Solutions Pty Ltd 185
5.9.6 Modifying an Invoice
To modify an invoice, double-click on the invoice in the left hand column of the patient's account history.
This will display a form similar to the original invoice.
From here you can add and delete items from the invoice, alter the Referring Doctor, change the Site of Serviceor Practice as well as adding an Invoice Memo.
In this window you are able to:Add/Delete items from the invoiceSelect/Change the referring doctorChange the site of service or practiceAdd/Change the invoice memoEdit the individual item numbers in the Add Item to Invoice window (by double-clicking on an item.)

The Reception Module: Account HistoryGenie Manual
© 2005-2019 Genie Solutions Pty Ltd186
5.9.7 Modifying an Item
To change an actual item's details, either slow double-click in the item fee field or double-click on the item at thetop right of the Account History and the Edit Sale window will open.
In this window, you must first click on the Edit button before you can change anything. This is to prevent youfrom accidentally overwriting an entry.
You can:Change the Provider in case you have accidentally billed it under the wrong providerChange the Total Charge, as long as the invoice has not already been paid or the updated fee is greater thanthe amount paidChange the Item No if the wrong item number has been billed
Note: Changing the item number does not automatically change the fee as well. You must manuallyadjust the fee.
Change the No. of Patients (number of patients seen) if this was for a hospital or nursing home visitChange the Service Date and Service TimeChange whether this is an Inpatient ServiceIn the bottom left of this window is Batch No. If this item has been batched to Medicare, DVA or anotherorganisation, then the Batch number will be inserted here. Deleting the Batch number automatically removesthis item from the Batch.You can also enter a note into the Notes field e.g 'second visit', if you are manually batching.If you are using HIC Online (Medicare Online), a number of override options also appear in this windowrelating to inpatient services, same day services etc.
Once you have made the necessary changes click on the Save button to close this window.
Note: Changes made in this way create an audit record which can be traced back to the date and time ofthe change and the log-in name of the person making the changes (File > Maintenance & Reports:Administrator).
5.9.8 Changing the Account Holder or Patient
If an item has been billed to the wrong patient or account holder, highlight the invoice in the left hand column and
click on the Change the Account Holder or Patient button .

The Reception Module: Account HistoryGenie Manual
© 2005-2019 Genie Solutions Pty Ltd 187
This allows you to change either or both of these.
The changes are automatically made to any associated payments.Note: Changing the patient does not automatically change the account holder, ensure you change theaccount holder to the patient's name before changing the Current Patient.
5.9.9 Deleting an Invoice
It is possible to delete an invoice if the Allow Invoices to be Deleted tickbox is selected in the Practice Detailstab of Practice Preferences (File > Practice Preferences). This tickbox can only be selected by theAdministrator of Genie, or someone with access to this password.
Having this checked does increase the risk of fraud, however it can be very useful in those situations where atransaction has been processed by mistake.
Highlight the invoice on the left to be deleted. Click on the Garbage can button
You will then be asked to enter in a reason for deleting the invoice.
This reason will then be recorded in the Audit trail, along with the date and time of deletion, as well as the useraccount used to delete the invoice.
5.9.10 Applying a Credit to an Invoice
Credits should only be applied to an item to write off a bad debt. User error can generally be handled by editingthe invoice directly (see Modifying an Invoice and Modifying an Item). Note: DO NOT USE THIS TO RECEIPT INVOICES.
To apply a credit, slow double-click in the credit column of the item. This will highlight the existing zero, and allowyou enter the credit amount.
Once you have entered the credit, a prompt will appear asking you for the reason for this credit and your initials(this will default to "Bad Debt").
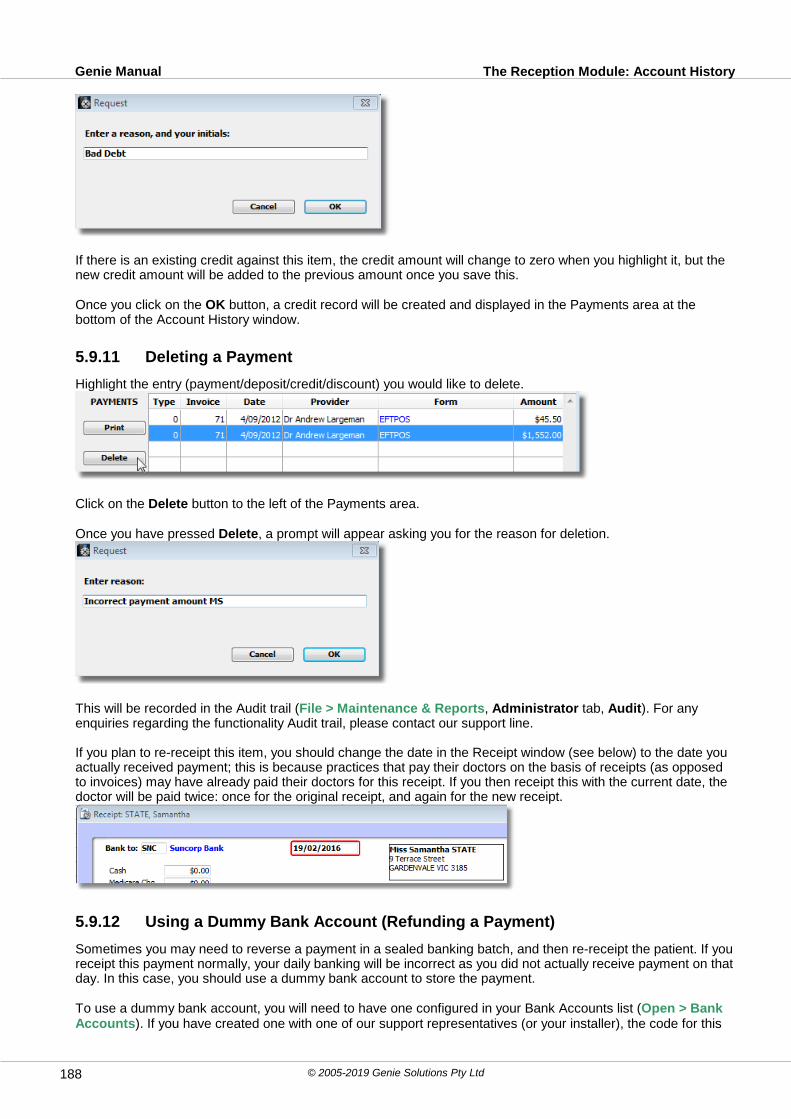
The Reception Module: Account HistoryGenie Manual
© 2005-2019 Genie Solutions Pty Ltd188
If there is an existing credit against this item, the credit amount will change to zero when you highlight it, but thenew credit amount will be added to the previous amount once you save this.
Once you click on the OK button, a credit record will be created and displayed in the Payments area at thebottom of the Account History window.
5.9.11 Deleting a Payment
Highlight the entry (payment/deposit/credit/discount) you would like to delete.
Click on the Delete button to the left of the Payments area.
Once you have pressed Delete, a prompt will appear asking you for the reason for deletion.
This will be recorded in the Audit trail (File > Maintenance & Reports, Administrator tab, Audit). For anyenquiries regarding the functionality Audit trail, please contact our support line.
If you plan to re-receipt this item, you should change the date in the Receipt window (see below) to the date youactually received payment; this is because practices that pay their doctors on the basis of receipts (as opposedto invoices) may have already paid their doctors for this receipt. If you then receipt this with the current date, thedoctor will be paid twice: once for the original receipt, and again for the new receipt.
5.9.12 Using a Dummy Bank Account (Refunding a Payment)
Sometimes you may need to reverse a payment in a sealed banking batch, and then re-receipt the patient. If youreceipt this payment normally, your daily banking will be incorrect as you did not actually receive payment on thatday. In this case, you should use a dummy bank account to store the payment.
To use a dummy bank account, you will need to have one configured in your Bank Accounts list (Open > BankAccounts). If you have created one with one of our support representatives (or your installer), the code for this

The Reception Module: Account HistoryGenie Manual
© 2005-2019 Genie Solutions Pty Ltd 189
will likely be Z. If you cannot see this in your bank accounts list, you are able to create one using the blue plus
button . For more details on creating bank accounts, see Bank Accounts in the Setting Up Genie section.
Note: As this is not a genuine bank account, you do not need to worry about adding any more detailthan the Bank Code (Z) and Bank Name (Dummy Account). The other fields can remain blank.
Assign the receipt to the Dummy Account by entering the code (Z) into the top left of the receipt window.
Once you have receipted the payment to the dummy account, you must seal the payment into in its own bankingbatch to separate it from your actual banking. To do this open the Daily Banking Report (File > Maintenanceand Reports > Daily) and select the code (Z) from the drop-down menu at the top of the window.
When this code is selected, only the dummy payment(s) will be displayed. Seal the batch as you normally would;your real banking report will be unaffected and correct.
5.10 Banking
To configure Bank Accounts, see the Bank Accounts section in Setting Up Genie.
To reconcile your banking at the end of the day go to File > Maintenance & Reports and click on the Daily tab.
Click on the Daily Banking Report button to view the current batch. By default, all unsealed bankingtransactions for all providers will be displayed.
Button Explanations
Please refer to the example situations in the next section for the practical use of these buttons.
Bank Code: Used to restrict transactions for one bank account. This would commonly be used in a multi-doctorpractice where different doctors have different bank codes.Start Date: Only used when you need to see transactions starting at a specific date. The default date displayedwill be the date of the earliest receipted transaction for the current banking batch.Show Totals: Gives the total of each payment type without detail.Print Payment & GST Report: If you bill GST, this shows the breakdown of GST in the batch. This is only usedif you bank GST separately.Reconcile: Used to mark the displayed transactions as reconciled. This allows you to separate reconciled andunreconciled transactions using the Show Unreconciled radio button.

The Reception Module: BankingGenie Manual
© 2005-2019 Genie Solutions Pty Ltd190
Seal this batch: Used to seal the current batch without printing the Banking Report. This process is irreversible.Show Until Date: Used to display only transactions prior to the specified date. This would commonly be usedwhen you come in on a Monday and find that the batch was not sealed on Friday. Entering Friday's date in theShow Until Date field will allow you to seal Friday's transactions without sealing Monday's transactions.Printer Button: once you have reconciled and you are ready to go to the bank, you can press this button to printthe Banking Report. This window will allow you to specify how many copies of this report you would like to print,and whether you would like to print EFTPOS separately. Once you have printed this, Genie will remind you toseal your banking.Print Order: These radio buttons dictate what order the banking records will appear in when the report isprinted. Under each separate tender, the records will appear in the order they were receipted or in alphabeticalorder by account holder, depending on your selection.
Note: To move forward and backward through your batches, click on the forward and backward arrowsat the top of the Banking Report window. It is important to note that Genie only retains 260 bankingbatches (this equates to creating one batch every weekday for one year). If you require banking totalsoutside that time period, please consult the Banking Summary in the Practice Analysis tab.
If You Bank Every Day
If you physically bank everyday, you simply need to click on the Print button in the top left of the this window.You will receive a prompt asking how many deposit slips you would like printed; usually, you would select two -one for the bank and one for your own records. There is also the option to print EFTPOS and direct deposits ona separate page. A separate report is generated for each bank code if you have more than one. Once you haveprinted this report, you should reconcile it against what you have in the till.
Note: If a receipt has been recorded as the wrong type e.g. a cheque instead of cash, you can double-click on the relevant bank record and correct this with the Payment Type drop-down menu. Do notchange this payment type in the Payments section of the Account History.
Once you have reconciled, click on the Seal This Batch button. This seals off the current batch so that anysubsequent receipts will go into the next batch.
If You Don’t Bank Every Day
If you don’t bank every day, but still would like to reconcile the till, follow the procedure detailed below.
On Day 1:Print the report and reconcile it with the till. Click on the Reconcile button to mark the displayed records ashaving been reconciled. Bundle the monies with the bank deposit slip
On Day 2:Click on the Show Unreconciled radio button to display everything that has been receipted since you reconciledon Day 1. Print the report and again reconcile with the till. Click on the Reconcile button again to mark therecords from Day 2 as reconciled. Bundle the monies with the bank deposit slip
Day 3 (Banking Day):Click on the Show Unreconciled radio button to display everything that has been receipted since you reconciledon Day 2. Print the report and again reconcile with the till. Click on the Show Entire Batch radio button to displayall receipts for Day 1, 2 and 3. Click on the Seal This Batch button. Take your three bundles of deposits to thebank.
If You Forget To SealClick Show Until Date, enter the date the banking was meant to be sealed, and click on Seal This Batch. If youthen close and reopen the banking report, only today's banking will be listed.
Note: This is NOT the GST report used for taxation purposes; this is located by going into File >Maintenance & Reports and clicking on the Practice Analysis tab.
5.11 Manual Batching
Manual batching of invoices is used for Medicare and DVA bulk-billing where HIC Online is not being used, or forprivate health funds and hospitals who may prefer to receive a weekly or monthly batch of invoices for servicesperformed.
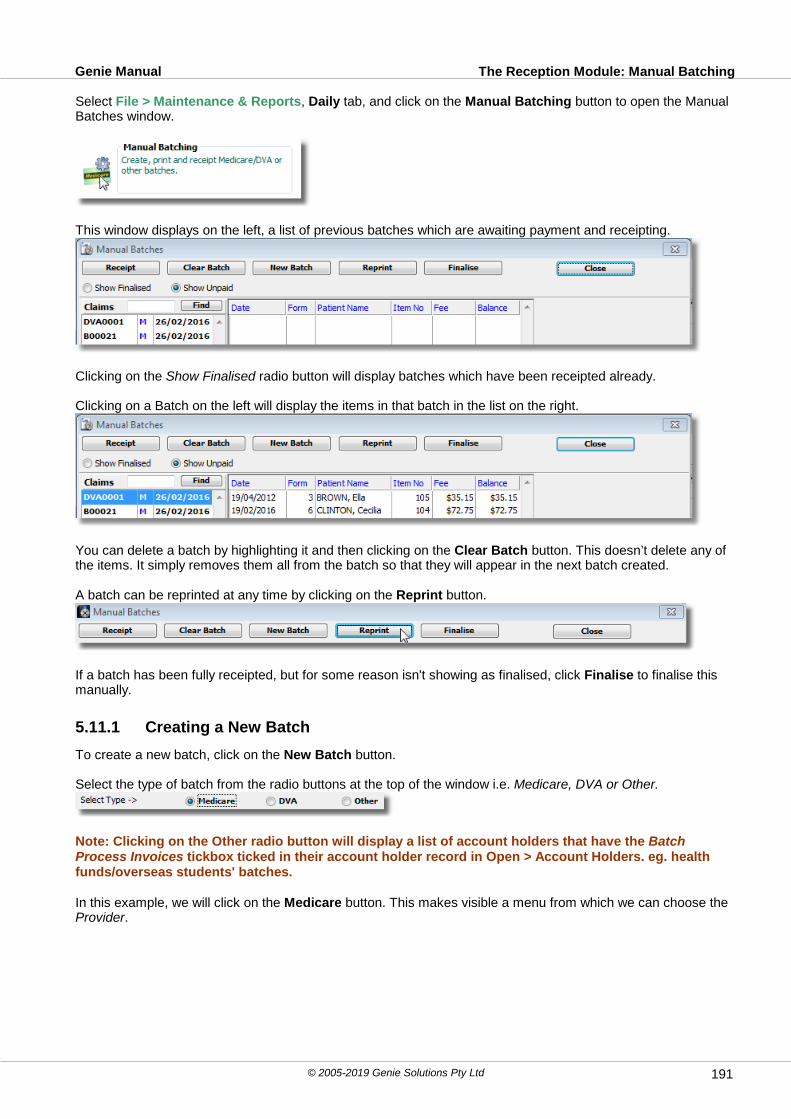
The Reception Module: Manual BatchingGenie Manual
© 2005-2019 Genie Solutions Pty Ltd 191
Select File > Maintenance & Reports, Daily tab, and click on the Manual Batching button to open the ManualBatches window.
This window displays on the left, a list of previous batches which are awaiting payment and receipting.
Clicking on the Show Finalised radio button will display batches which have been receipted already.
Clicking on a Batch on the left will display the items in that batch in the list on the right.
You can delete a batch by highlighting it and then clicking on the Clear Batch button. This doesn’t delete any ofthe items. It simply removes them all from the batch so that they will appear in the next batch created.
A batch can be reprinted at any time by clicking on the Reprint button.
If a batch has been fully receipted, but for some reason isn't showing as finalised, click Finalise to finalise thismanually.
5.11.1 Creating a New Batch
To create a new batch, click on the New Batch button.
Select the type of batch from the radio buttons at the top of the window i.e. Medicare, DVA or Other.
Note: Clicking on the Other radio button will display a list of account holders that have the BatchProcess Invoices tickbox ticked in their account holder record in Open > Account Holders. eg. healthfunds/overseas students' batches.
In this example, we will click on the Medicare button. This makes visible a menu from which we can choose theProvider.

The Reception Module: Manual BatchingGenie Manual
© 2005-2019 Genie Solutions Pty Ltd192
Once a provider is selected, a Select Site menu appears, in case there are multiple sites with different providernumbers.
Note: If you are creating a batch for Other, then this menu does not appear, as it isn’t necessary to splitthe batch into different sites.
Once a site is selected, a field for the Batch No becomes visible.
For Medicare and DVA it is a good idea to use the batch numbers on the DB1 manual batch headers sent to youby HIC, or you can make up your own batch numbers. It is a good idea to make the batch number consist of 2letters followed by 4 numbers, the first letter being the type of batch it is e.g. for a Medicare Batch use somethinglike 'MA0001'. Make the next batch 'MA0002' and so on.
This will avoid any conflicting batch numbers if you move to HIC Online, where the batch numbers areautomatically generated in the format of a single letter followed by 4 numbers.
Once you have entered a batch number, press Tab and you will notice that this batch number is applied to all theitems in this list.
If you are batching to Medibank Private, and you also do batches for Overseas Students, you will get an extraprompt:
If there are items that need to be withheld from this particular batch, highlight by holding Ctrl while selectingeach item, and then use the Remove Highlighted or Keep Highlighted buttons as appropriate. Any removed
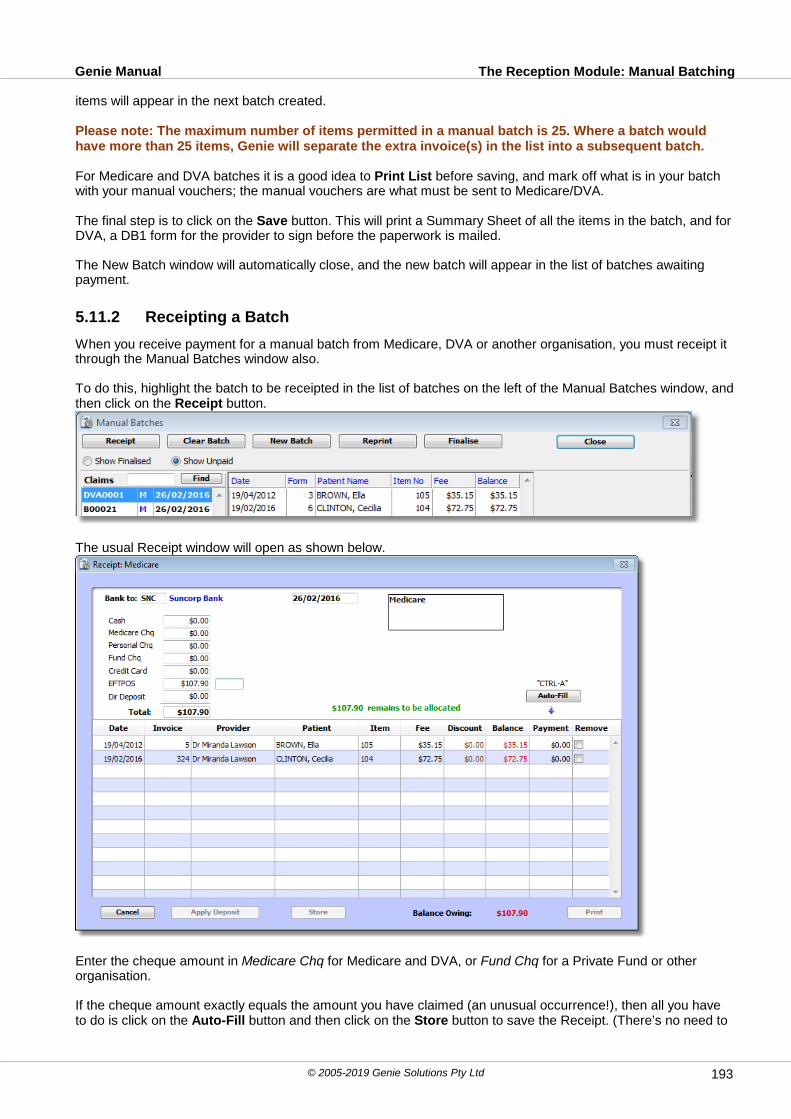
The Reception Module: Manual BatchingGenie Manual
© 2005-2019 Genie Solutions Pty Ltd 193
items will appear in the next batch created.
Please note: The maximum number of items permitted in a manual batch is 25. Where a batch wouldhave more than 25 items, Genie will separate the extra invoice(s) in the list into a subsequent batch.
For Medicare and DVA batches it is a good idea to Print List before saving, and mark off what is in your batchwith your manual vouchers; the manual vouchers are what must be sent to Medicare/DVA.
The final step is to click on the Save button. This will print a Summary Sheet of all the items in the batch, and forDVA, a DB1 form for the provider to sign before the paperwork is mailed.
The New Batch window will automatically close, and the new batch will appear in the list of batches awaitingpayment.
5.11.2 Receipting a Batch
When you receive payment for a manual batch from Medicare, DVA or another organisation, you must receipt itthrough the Manual Batches window also.
To do this, highlight the batch to be receipted in the list of batches on the left of the Manual Batches window, andthen click on the Receipt button.
The usual Receipt window will open as shown below.
Enter the cheque amount in Medicare Chq for Medicare and DVA, or Fund Chq for a Private Fund or otherorganisation.
If the cheque amount exactly equals the amount you have claimed (an unusual occurrence!), then all you haveto do is click on the Auto-Fill button and then click on the Store button to save the Receipt. (There’s no need to
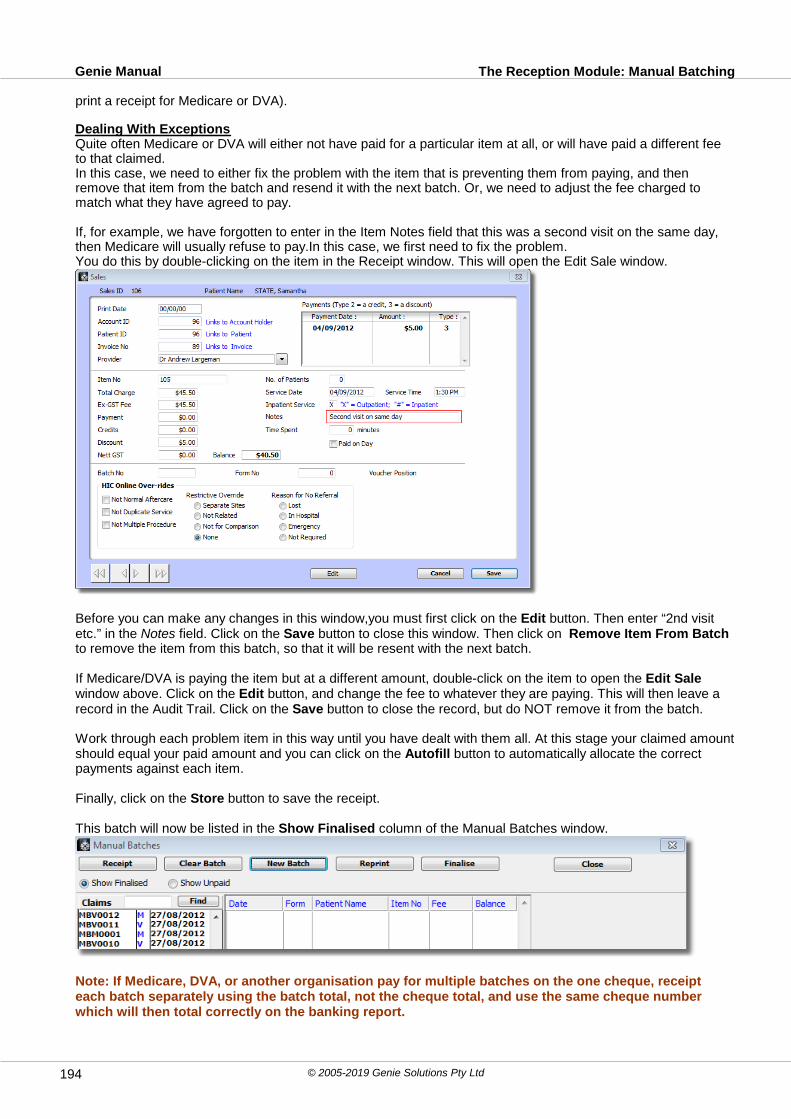
The Reception Module: Manual BatchingGenie Manual
© 2005-2019 Genie Solutions Pty Ltd194
print a receipt for Medicare or DVA).
Dealing With ExceptionsQuite often Medicare or DVA will either not have paid for a particular item at all, or will have paid a different feeto that claimed.In this case, we need to either fix the problem with the item that is preventing them from paying, and thenremove that item from the batch and resend it with the next batch. Or, we need to adjust the fee charged tomatch what they have agreed to pay.
If, for example, we have forgotten to enter in the Item Notes field that this was a second visit on the same day,then Medicare will usually refuse to pay.In this case, we first need to fix the problem.You do this by double-clicking on the item in the Receipt window. This will open the Edit Sale window.
Before you can make any changes in this window,you must first click on the Edit button. Then enter “2nd visitetc.” in the Notes field. Click on the Save button to close this window. Then click on Remove Item From Batchto remove the item from this batch, so that it will be resent with the next batch.
If Medicare/DVA is paying the item but at a different amount, double-click on the item to open the Edit Salewindow above. Click on the Edit button, and change the fee to whatever they are paying. This will then leave arecord in the Audit Trail. Click on the Save button to close the record, but do NOT remove it from the batch.
Work through each problem item in this way until you have dealt with them all. At this stage your claimed amountshould equal your paid amount and you can click on the Autofill button to automatically allocate the correctpayments against each item.
Finally, click on the Store button to save the receipt.
This batch will now be listed in the Show Finalised column of the Manual Batches window.
Note: If Medicare, DVA, or another organisation pay for multiple batches on the one cheque, receipteach batch separately using the batch total, not the cheque total, and use the same cheque numberwhich will then total correctly on the banking report.

The Reception Module: Online Claiming InstallationGenie Manual
© 2005-2019 Genie Solutions Pty Ltd 195
5.12 Online Claiming Installation
Note: Since October 2005, the HIC has operated under the name 'Medicare Australia'. We have retainedreferences to 'HIC' to maintain consistency with the program and familiarity with our users.
HIC Online is a facility which enables claims to be made directly to the HIC using secure transmissions over anInternet connection.
HIC Online provides the following functionality:• Bulk Bill• DVA• Patient Claims (both real-time and batched)• ACIR• Online patient Medicare verification• Online patient health fund transmissions through ECLIPSE (registered users only)
HIC Online relies on PKI (Public Key Infrastructure) technology to ensure all communications with the HIC areconducted securely and confidentially. The use of PKI guarantees that messages are sent from a known andtrusted source, cannot be read by anyone but their intended recipients, the contents haven’t been tampered within transit, and that the sender cannot dispute that they created and sent the message.
Note: HIC ONLINE VERSION 6.10.28 OR LATER IS REQUIRED IF JAVA VERSION 1.6 IS INSTALLED
In order to start using HIC Online you must:
Get a HIC location (minor) ID from Genie Solutions. If you are a registered Genie user you automaticallyhave one allocated. It is made up of 'GEN' followed by a five digit number. Check in the top right hand cornerof your Appointment Book if you are unsure.Register for Online Claiming with Medicare Australia and apply to for a Healthcare Location Certificate foryour practice. You may also apply for a Healthcare Individual Certificate for each provider although this isnot required to use HIC Online. If you would like to use them, Individual certificates should be requested oniKeys rather than SmartCards. You can obtain the necessary application forms at http://www.medicareaustralia.gov.au/provider/business/online/register/index.jsp or by calling 1800 700 199. If you areunsure about this process, call Medicare Australia clarify. The Location Certificate is provided on a CD. TheIndividual Certificates are provided on iKeys -small tokens - which plug into a USB port on your computer.Have your Genie software updated to allow use of HIC Online.
There are five steps to follow to ensure a successful installation. The steps should be performed in the followingorder (links have been provided to each relevant section:
1. Update Genie.2. Install the Mac or Windows HIC Online components through the Software Updates in the Special menu in
Genie. If you do not have an internet connection, you install these components from a recent Genie CD.3. Install the iKey Drivers (only if you are using individual certificates).4. Configure Genie for HIC Online use.5. Create the PSI Store in Genie.
Important: You must be logged in as both the administrator for the local machine, and as the Genieadministrator.
Note: If you are using an iKey, do not connect it to your computer yet. This will be done at a later stagein the process.
5.12.1 Install/Upgrade Genie
Before attempting to install the HIC Online components, it is recommended that you update to the latest versionof Genie. More information on this procedure can be found in the Updates section.
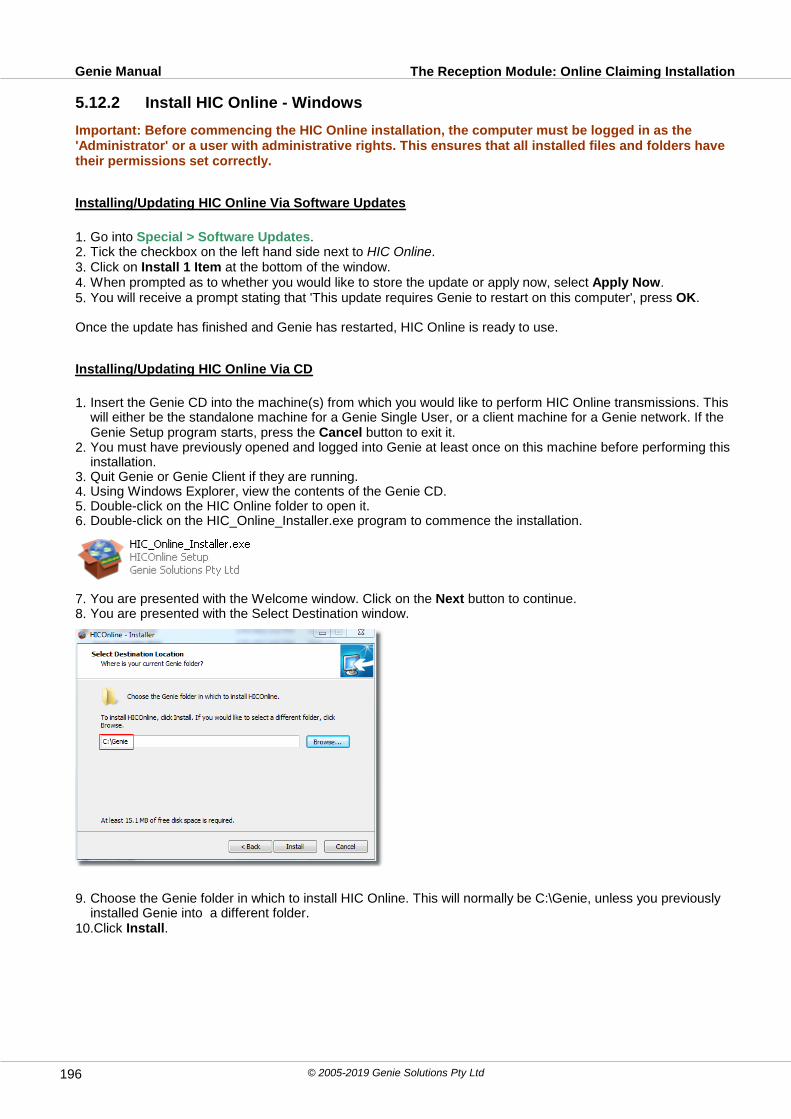
The Reception Module: Online Claiming InstallationGenie Manual
© 2005-2019 Genie Solutions Pty Ltd196
5.12.2 Install HIC Online - Windows
Important: Before commencing the HIC Online installation, the computer must be logged in as the'Administrator' or a user with administrative rights. This ensures that all installed files and folders havetheir permissions set correctly.
Installing/Updating HIC Online Via Software Updates
1. Go into Special > Software Updates.2. Tick the checkbox on the left hand side next to HIC Online.3. Click on Install 1 Item at the bottom of the window.4. When prompted as to whether you would like to store the update or apply now, select Apply Now.5. You will receive a prompt stating that 'This update requires Genie to restart on this computer', press OK.
Once the update has finished and Genie has restarted, HIC Online is ready to use.
Installing/Updating HIC Online Via CD
1. Insert the Genie CD into the machine(s) from which you would like to perform HIC Online transmissions. Thiswill either be the standalone machine for a Genie Single User, or a client machine for a Genie network. If theGenie Setup program starts, press the Cancel button to exit it.
2. You must have previously opened and logged into Genie at least once on this machine before performing thisinstallation.
3. Quit Genie or Genie Client if they are running.4. Using Windows Explorer, view the contents of the Genie CD.5. Double-click on the HIC Online folder to open it.6. Double-click on the HIC_Online_Installer.exe program to commence the installation.
7. You are presented with the Welcome window. Click on the Next button to continue.8. You are presented with the Select Destination window.
9. Choose the Genie folder in which to install HIC Online. This will normally be C:\Genie, unless you previouslyinstalled Genie into a different folder.
10.Click Install.
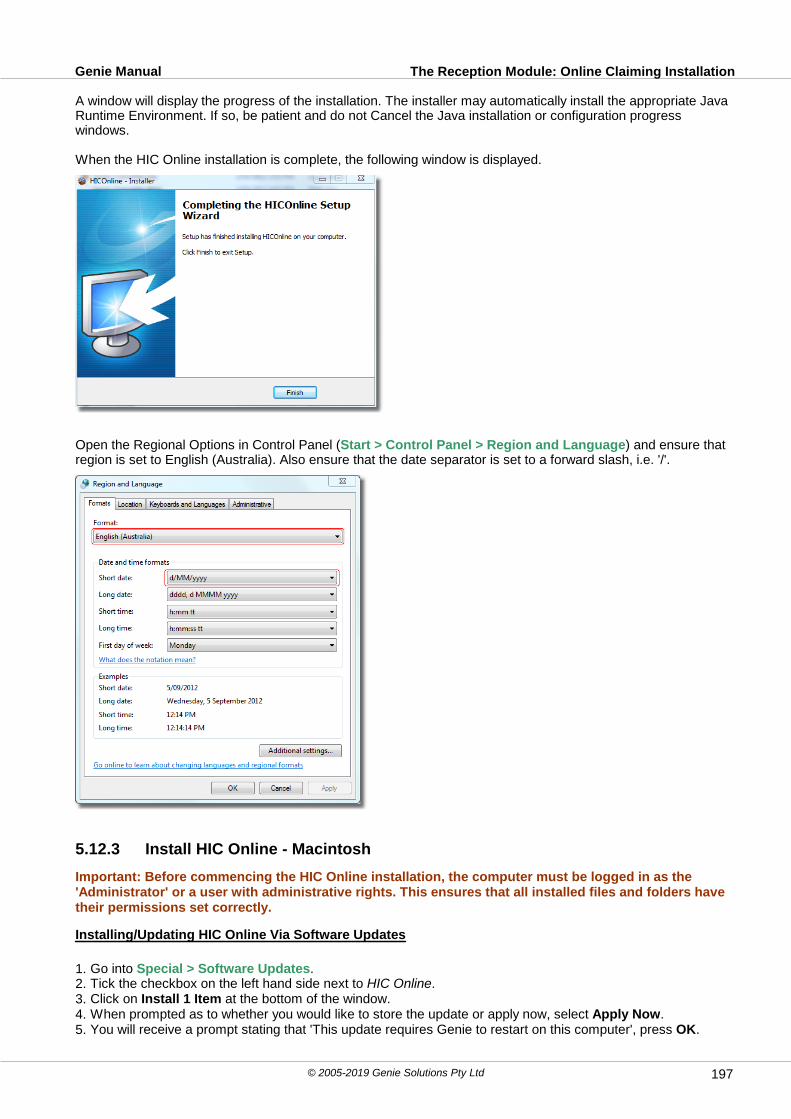
The Reception Module: Online Claiming InstallationGenie Manual
© 2005-2019 Genie Solutions Pty Ltd 197
A window will display the progress of the installation. The installer may automatically install the appropriate JavaRuntime Environment. If so, be patient and do not Cancel the Java installation or configuration progresswindows.
When the HIC Online installation is complete, the following window is displayed.
Open the Regional Options in Control Panel (Start > Control Panel > Region and Language) and ensure thatregion is set to English (Australia). Also ensure that the date separator is set to a forward slash, i.e. '/'.
5.12.3 Install HIC Online - Macintosh
Important: Before commencing the HIC Online installation, the computer must be logged in as the'Administrator' or a user with administrative rights. This ensures that all installed files and folders havetheir permissions set correctly.
Installing/Updating HIC Online Via Software Updates
1. Go into Special > Software Updates.2. Tick the checkbox on the left hand side next to HIC Online.3. Click on Install 1 Item at the bottom of the window.4. When prompted as to whether you would like to store the update or apply now, select Apply Now.5. You will receive a prompt stating that 'This update requires Genie to restart on this computer', press OK.
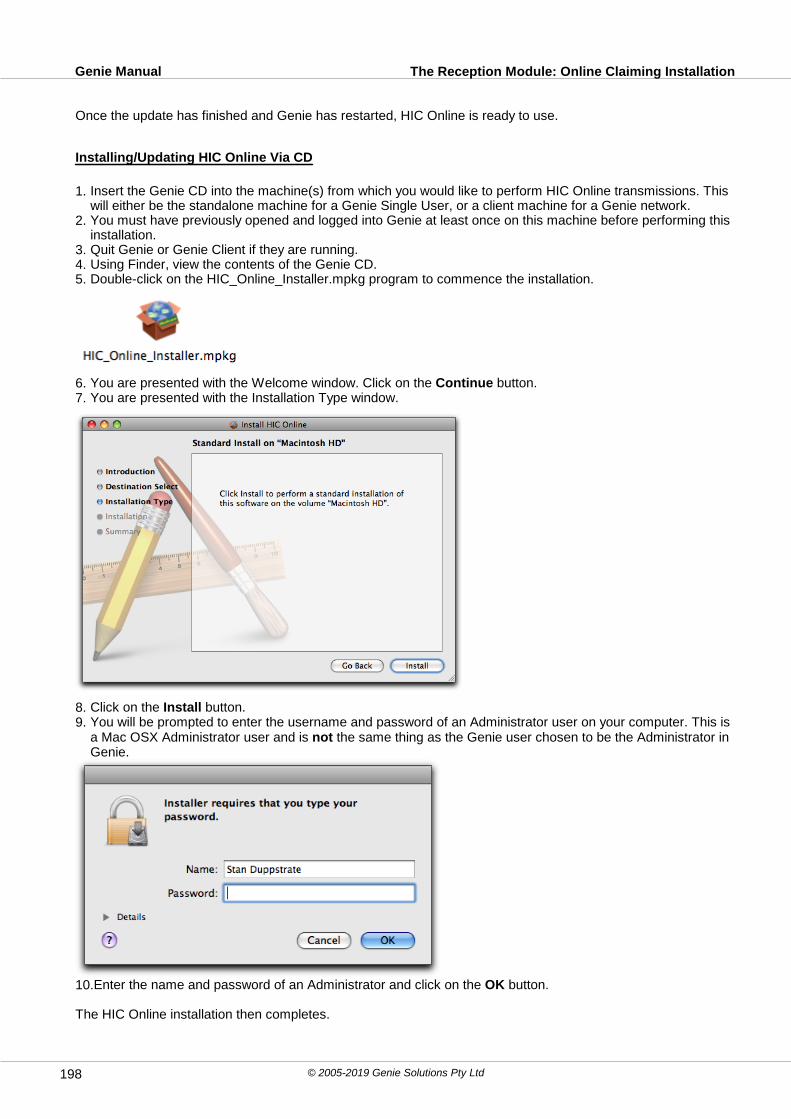
The Reception Module: Online Claiming InstallationGenie Manual
© 2005-2019 Genie Solutions Pty Ltd198
Once the update has finished and Genie has restarted, HIC Online is ready to use.
Installing/Updating HIC Online Via CD
1. Insert the Genie CD into the machine(s) from which you would like to perform HIC Online transmissions. Thiswill either be the standalone machine for a Genie Single User, or a client machine for a Genie network.
2. You must have previously opened and logged into Genie at least once on this machine before performing thisinstallation.
3. Quit Genie or Genie Client if they are running.4. Using Finder, view the contents of the Genie CD.5. Double-click on the HIC_Online_Installer.mpkg program to commence the installation.
6. You are presented with the Welcome window. Click on the Continue button.7. You are presented with the Installation Type window.
8. Click on the Install button.9. You will be prompted to enter the username and password of an Administrator user on your computer. This is
a Mac OSX Administrator user and is not the same thing as the Genie user chosen to be the Administrator inGenie.
10.Enter the name and password of an Administrator and click on the OK button.
The HIC Online installation then completes.

The Reception Module: Online Claiming InstallationGenie Manual
© 2005-2019 Genie Solutions Pty Ltd 199
Open the International Control Panel in System Preferences, click on the Formats tab and ensure that region isset to Australia. Also ensure that the date separator is set to a forward slash, i.e. '/'.
5.12.4 Configure Genie
Now that all of the required software has been installed, the next step is to configure Genie to use HIC Online.
Go to File > Practice Preferences and double-click the relevant clinic name, then click the Miscellaneous tab.
If you are a registered Genie user, your HIC Location ID (the same as your GEN number) should already beentered. Contact Genie Solutions if you are unsure of your HIC Location ID.
Tick the tickboxes to select the HIC Online functions you would like to use. If you will be doing Real-Time PatientClaims and would like to use this as the default (as opposed to Batched Patient Claims), tick the Run Real Timeby Default tickbox.
If you access the Internet through a proxy server that requires authentication, you can enter the User ID andPassword here. Otherwise leave these fields blank.
Save the Practice Preferences.
Note: If you have more than one location certificate, it will be necessary to create a Practice Preferencesrecord with a new HIC Location ID for each additional location certificate.
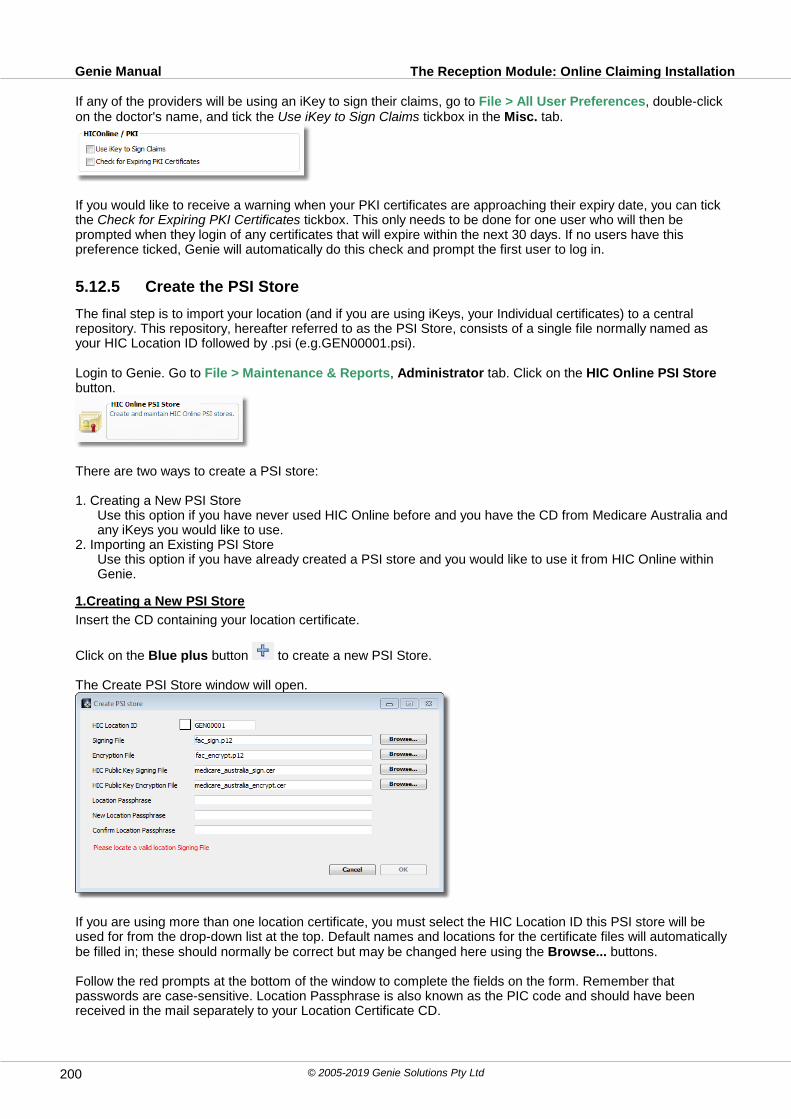
The Reception Module: Online Claiming InstallationGenie Manual
© 2005-2019 Genie Solutions Pty Ltd200
If any of the providers will be using an iKey to sign their claims, go to File > All User Preferences, double-clickon the doctor's name, and tick the Use iKey to Sign Claims tickbox in the Misc. tab.
If you would like to receive a warning when your PKI certificates are approaching their expiry date, you can tickthe Check for Expiring PKI Certificates tickbox. This only needs to be done for one user who will then beprompted when they login of any certificates that will expire within the next 30 days. If no users have thispreference ticked, Genie will automatically do this check and prompt the first user to log in.
5.12.5 Create the PSI Store
The final step is to import your location (and if you are using iKeys, your Individual certificates) to a centralrepository. This repository, hereafter referred to as the PSI Store, consists of a single file normally named asyour HIC Location ID followed by .psi (e.g.GEN00001.psi).
Login to Genie. Go to File > Maintenance & Reports, Administrator tab. Click on the HIC Online PSI Storebutton.
There are two ways to create a PSI store:
1. Creating a New PSI StoreUse this option if you have never used HIC Online before and you have the CD from Medicare Australia andany iKeys you would like to use.
2. Importing an Existing PSI StoreUse this option if you have already created a PSI store and you would like to use it from HIC Online withinGenie.
1.Creating a New PSI Store
Insert the CD containing your location certificate.
Click on the Blue plus button to create a new PSI Store.
The Create PSI Store window will open.
If you are using more than one location certificate, you must select the HIC Location ID this PSI store will beused for from the drop-down list at the top. Default names and locations for the certificate files will automaticallybe filled in; these should normally be correct but may be changed here using the Browse... buttons.
Follow the red prompts at the bottom of the window to complete the fields on the form. Remember thatpasswords are case-sensitive. Location Passphrase is also known as the PIC code and should have beenreceived in the mail separately to your Location Certificate CD.

The Reception Module: Online Claiming InstallationGenie Manual
© 2005-2019 Genie Solutions Pty Ltd 201
Once all of the fields have been successfully filled in, the OK button will be enabled. If it is not enabled, rectifythe problem identified by the red prompt at the bottom of the window.
Note: It is very important to type in the Location Passphrase correctly the first time, failure to do this cancause errors. If you suspect this has happened, please contact Genie support for further instructions.
Click on the OK button to create the new PSI store.
2. Importing an Existing PSI Store
Click on the PSI Store Import button .
The Import PSI Store window will open.
Follow the red prompts at the bottom of the window to complete the form. Once all of the fields have been filledin correctly, the OK button will be enabled. Click on the OK button to complete the import process.
Registering iKeys
In the PSI Store window, double-click on the PSI store you have just created. Using each of your iKeys in turn,ensure that the iKey is plugged in to your computer and click on the Register Token button. You will beprompted for your Individual Certificate passphrase which was supplied with each iKey.
Enter the passphrase and click on the OK button. Remember that the password is case-sensitive.
Once all iKeys have been registered, click on the Save button, then close the PSI Store list window.
5.13 Using Medicare Online
The following sections describe how to use Medicare Online for:
1. Bulk Bill and DVA claims2. Patient Claims3. Online Patient Verification
Note: In order to use Online Claiming you will need to install Medicare Online version 6.11.4 and JavaRuntime 5.0 or later.
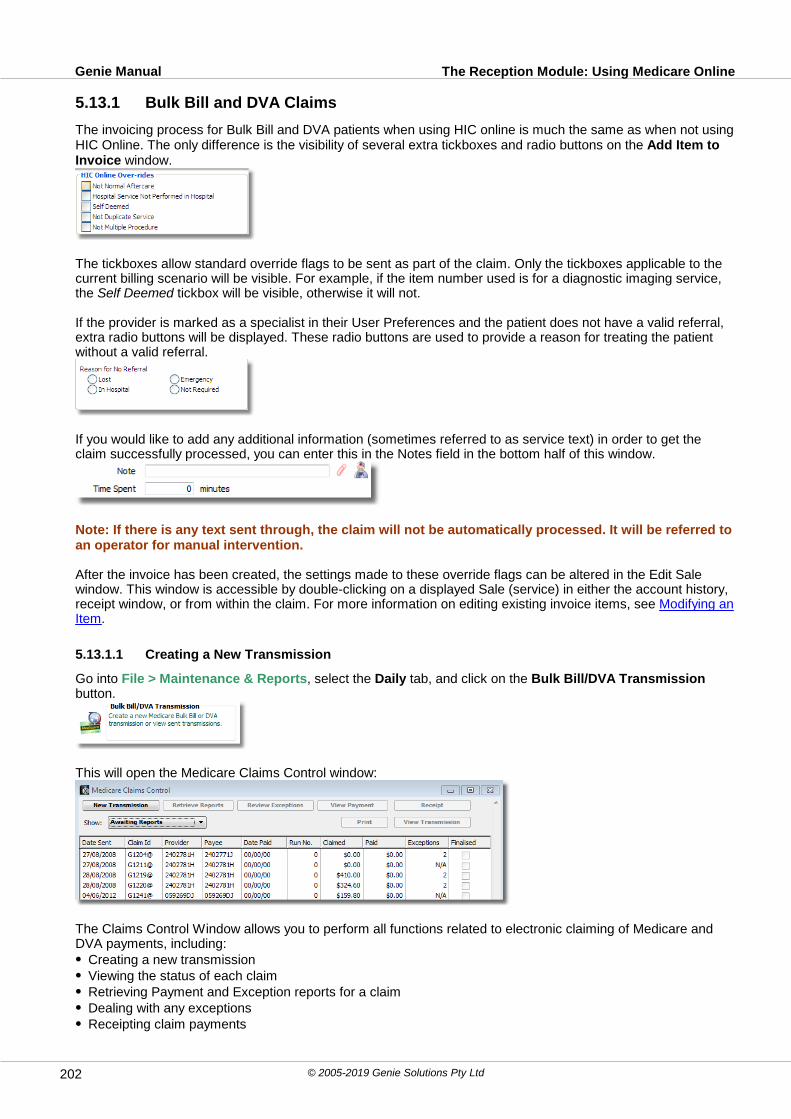
The Reception Module: Using Medicare OnlineGenie Manual
© 2005-2019 Genie Solutions Pty Ltd202
5.13.1 Bulk Bill and DVA Claims
The invoicing process for Bulk Bill and DVA patients when using HIC online is much the same as when not usingHIC Online. The only difference is the visibility of several extra tickboxes and radio buttons on the Add Item toInvoice window.
The tickboxes allow standard override flags to be sent as part of the claim. Only the tickboxes applicable to thecurrent billing scenario will be visible. For example, if the item number used is for a diagnostic imaging service,the Self Deemed tickbox will be visible, otherwise it will not.
If the provider is marked as a specialist in their User Preferences and the patient does not have a valid referral,extra radio buttons will be displayed. These radio buttons are used to provide a reason for treating the patientwithout a valid referral.
If you would like to add any additional information (sometimes referred to as service text) in order to get theclaim successfully processed, you can enter this in the Notes field in the bottom half of this window.
Note: If there is any text sent through, the claim will not be automatically processed. It will be referred toan operator for manual intervention.
After the invoice has been created, the settings made to these override flags can be altered in the Edit Salewindow. This window is accessible by double-clicking on a displayed Sale (service) in either the account history,receipt window, or from within the claim. For more information on editing existing invoice items, see Modifying anItem.
5.13.1.1 Creating a New Transmission
Go into File > Maintenance & Reports, select the Daily tab, and click on the Bulk Bill/DVA Transmissionbutton.
This will open the Medicare Claims Control window:
The Claims Control Window allows you to perform all functions related to electronic claiming of Medicare andDVA payments, including:
Creating a new transmissionViewing the status of each claimRetrieving Payment and Exception reports for a claimDealing with any exceptionsReceipting claim payments

The Reception Module: Using Medicare OnlineGenie Manual
© 2005-2019 Genie Solutions Pty Ltd 203
Printing claims
To create a new HIC Online transmission, click on the New Transmission button at the top left-hand corner ofthe Medicare Claims Control Window.
If the chosen provider uses an iKey to sign claims, the correct iKey must be used. If the wrong iKey is used, thetransmission creation will fail.
Separate claims must be created for each provider. The provider is chosen using the Provider drop-down list atthe top of the window. If a provider has more than one provider number, a separate claim must be created foreach provider number. The provider number is chosen using the Provider No drop-down list at the top of thewindow. If there are no items to be transmitted for a particular provider number, that number will not bedisplayed in the list. If only one provider number is available, the drop-down list will be greyed out and unable tobe changed. The Site of Service corresponding to the selected provider number will be listed in blue text underthe Provider No drop-down list.
Medicare or DVA services are specified using the Medicare/DVA radio buttons.
Claims are also required to be separated by Inpatient and Outpatient services and Pathology (only basicpathology is allowed), Diagnostic or Other services. Services for Inpatients or Outpatients are specified using therelevant radio buttons. Pathology/Diagnostic/Other items are specified using the appropriate radio button; theseradio buttons will only appear if these types of items have been billed.
Note: If the items you expected to see in this list are not visible, then you have either incorrectlyselected the radio buttons listed above, or they have already been batched; all applicable, non-batcheditems will be shown.
To remove a sale from the displayed list, highlight and click either the Remove Highlighted or KeepHighlighted button as appropriate. The removed sale(s) will then be included in the next new claim.
When satisfied with the list of sales to be included in the claim, click on the Create Transmission button.

The Reception Module: Using Medicare OnlineGenie Manual
© 2005-2019 Genie Solutions Pty Ltd204
After a short delay (approx. 5 -10 seconds) the message to be transmitted will be displayed in the Messagewindow.
The Transmit button will now be enabled at the bottom of the window. Clicking this button will send thismessage to the HIC for processing and return you to the Medicare Claims Control window.
Note: Once a claim has been sent, you cannot edit or delete the service details in the claim as thesechanges will not be reflected at Medicare Australia.
Printing Claims
Details of the services contained within a claim can be printed from the Medicare Claims Controls window byselecting the claim and clicking the Print button.
5.13.1.2 Retrieving Reports for the Claim
Once a claim has been transmitted, its status can be tracked in the Medicare Claims Control window; this isaccessed in File > Maintenance & Reports, Daily tab, Bulk Bill/DVA Transmission.
A claim can be in one of four states:1. Awaiting Reports: the claim has been submitted to Medicare, however, the payment and exception reports
have not been received.2. Exceptions to Review: one or more exceptions have been identified by Medicare; these must be dealt with
before further processing of the claim is allowed.3. Ready to Receipt: the payment report has been received and there are no outstanding exceptions for the
claim. The payment can now be receipted and the claim can be finalised.4. Finalised: the claim has been fully receipted.
Claims in each stage can be displayed by selecting the relevant stage from the Show drop-down list. This allowsyou separate claims by their stages, thus making it more simple to retrieve reports, deal with exceptions, andreceipt when necessary.
After being processed, two reports are produced for each claim:A Payment reportAn Exception report.
The payment report provides such information as the Date Paid, the Run Number and the Amount Paid.
The exception report provides details about any exceptions found in the claim. Examples of exceptions might be:The patient’s Medicare card issue number is out of dateThe amount claimed for the service is incorrect
The Reception Module: Using Medicare OnlineGenie Manual
© 2005-2019 Genie Solutions Pty Ltd 205
An additional service on the same day was not marked as a non-duplicate service, etc.
All exceptions for a claim should be dealt with (as described in the next section Reviewing Exceptions for aClaim) before attempting to receipt the claim.
Select Awaiting Reports from the Show drop-down list to list all claims that do not yet have a payment and/orexception report. Select the claim(s) you would like to retrieve payment and/or exception reports for byhighlighting them in the list (additional claims can be selected by Shift+clicking or Ctrl+clicking on them). Clickon the Retrieve Reports button.
Once the reports have been retrieved, the claim will be moved to either the Exceptions to Review list or, if theclaim did not have any exceptions, the Ready to Receipt list. If you are having trouble trying to retrieve reportsfor multiple claims at once, try only highlighting a maximum of five claims.
The Payment Report will fill in the Date Paid, Run No, and Paid columns on the Medicare Claims ControlWindow. The Exception Report will fill in the Exceptions column on the Medicare Claims Control window, i.e.change it from 'N/A' to a number.
Note: When retrieving reports, it is common for several claims to be paid with the one Payment Report.Therefore, claims that you have not selected may have their Payment Reports returned when retrievingreports for a different claim. The same is not true for Exception Reports, i.e. only the Exception Reports for those claims you haveselected when you click on the Retrieve Reports button will be returned. The result of this phenomenonis that you will likely end up with claims which have Payment Reports but do not have ExceptionReports. These claims will remain in the Awaiting Reports list until their Exception Reports areretrieved.
5.13.1.3 Reviewing Exceptions for a claim
A claim will only move into the Ready to Receipt area when all exceptions have been dealt with and deleted.
The number of exceptions for a claim is listed in the Exceptions column of the Medicare Claims Control window.If the number is 0, the claim has no exceptions. If the number is replaced with N/A, either the Exception Reporthas not yet been retrieved from the HIC, or it has been deleted for some reason. In either case, the ExceptionReport should be retrieved by clicking Retrieve Reports before proceeding.
Select Exceptions to Review from the Show drop-down list on the Medicare Claims Control window to list allclaims with exceptions. Highlight a claim in the list to view its exceptions; these exceptions must be dealt withone at a time.
Click on the Review Exceptions button. If this button is greyed out, it means that either the claim did not haveany exceptions (the Exceptions column will contain 0), the exception report has been deleted (the Exceptionscolumn will contain N/A), or that the Exception Report has not yet been retrieved (the Exceptions column willcontain N/A).
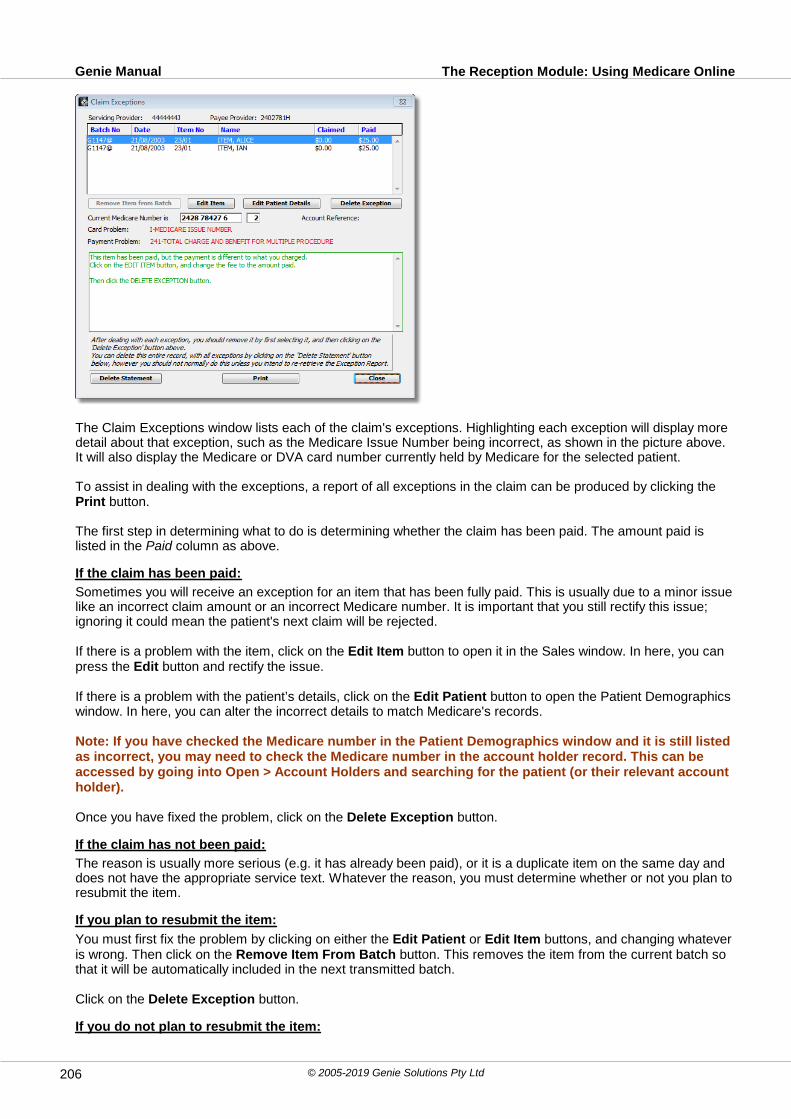
The Reception Module: Using Medicare OnlineGenie Manual
© 2005-2019 Genie Solutions Pty Ltd206
The Claim Exceptions window lists each of the claim's exceptions. Highlighting each exception will display moredetail about that exception, such as the Medicare Issue Number being incorrect, as shown in the picture above.It will also display the Medicare or DVA card number currently held by Medicare for the selected patient.
To assist in dealing with the exceptions, a report of all exceptions in the claim can be produced by clicking the Print button.
The first step in determining what to do is determining whether the claim has been paid. The amount paid islisted in the Paid column as above.
If the claim has been paid:
Sometimes you will receive an exception for an item that has been fully paid. This is usually due to a minor issuelike an incorrect claim amount or an incorrect Medicare number. It is important that you still rectify this issue;ignoring it could mean the patient's next claim will be rejected.
If there is a problem with the item, click on the Edit Item button to open it in the Sales window. In here, you canpress the Edit button and rectify the issue.
If there is a problem with the patient’s details, click on the Edit Patient button to open the Patient Demographicswindow. In here, you can alter the incorrect details to match Medicare's records.
Note: If you have checked the Medicare number in the Patient Demographics window and it is still listedas incorrect, you may need to check the Medicare number in the account holder record. This can beaccessed by going into Open > Account Holders and searching for the patient (or their relevant accountholder).
Once you have fixed the problem, click on the Delete Exception button.
If the claim has not been paid:
The reason is usually more serious (e.g. it has already been paid), or it is a duplicate item on the same day anddoes not have the appropriate service text. Whatever the reason, you must determine whether or not you plan toresubmit the item.
If you plan to resubmit the item:
You must first fix the problem by clicking on either the Edit Patient or Edit Item buttons, and changing whateveris wrong. Then click on the Remove Item From Batch button. This removes the item from the current batch sothat it will be automatically included in the next transmitted batch.
Click on the Delete Exception button.
If you do not plan to resubmit the item:
The Reception Module: Using Medicare OnlineGenie Manual
© 2005-2019 Genie Solutions Pty Ltd 207
In this case, there’s no point in editing anything; you can simply click on the Remove Item From Batch button,and then click on the Delete Exception button.
You can then go into the patient’s Account History and delete the relevant item’s invoice; it is important that youdo delete this from the Account History, if you do not, it will be included in the next transmitted batch.
In all cases, once you have taken the appropriate action, you should click on the Delete Exception button at thebottom of the window to indicate that the exception has been dealt with. You should not use the DeleteStatement button except in extreme circumstances, as this deletes all the displayed exceptions and so wouldrequire the exception report to be retrieved again from the HIC. The statement is deleted automatically once thelast exception has been deleted.
Once you have dealt with all the exceptions and the list is empty, click on the Close button at the bottom of thewindow to return to the Medicare Claims Control window.
If you accidentally delete all exceptions, or delete the statement, you can re-retrieve the exception report bypressing Retrieve Reports again; this will generate a prompt asking if you are sure you would like to proceed,you can confirm this and the claim will move back into Exceptions to Review.
5.13.1.4 Receipting Claim Payments
Once payment and exception reports have been received for a claim and all exceptions have been dealt with,the payment for the claim is ready to be receipted and the claim will move to the Ready to Receipt list.
Select Ready to Receipt from the Show drop-down list in the Medicare Claims Control window to list all claimsthat have payment reports and no outstanding exceptions. Select the individual claim to receipt by clicking onceon it in the list.
Note: The amounts listed in the Claimed and Paid columns for each claim in the Ready To Receiptsection MUST be equal. If they are not, you have not dealt with your exceptions correctly. Click RetrieveReports again and work through your exceptions again.
Click on the Receipt button. If this button is greyed out, it means that the claim has outstanding exceptions(check the Exceptions column in the list to make sure it is 0).
This will bring up the receipting window; make sure that the amount you are receipting matches the amount thatwas actually paid by Medicare.
Once a claim has been fully receipted, it is automatically finalised. Finalised claims can be viewed by selecting Finalised from the Show drop-down list.
If HIC has paid a batch (in full or part) manually, ie. sent you a paper statement of payment rather than an onlinereport, these can still be receipted by clicking the Receipt button. You will get an alert stating that there has notyet been a payment report received, or that the claimed amount does not match the paid amount as there maystill be outstanding exceptions; you can select OK when asked if you would still like to receipt, and proceed tothe receipt window where you can receipt the claim as appropriate.
5.13.2 Patient Claims
The Patient Claims function submits a patient’s claim directly to Medicare on behalf of the patient. It operates intwo modes:1. Store and Forward2. Real-Time
In Batched (Store-and-forward) mode, the claims are batched and transmitted to the HIC at a later time whenconvenient; this is similar to the way in which Bulk Bill and DVA claiming works. At the time the invoice or receiptis generated, the patient claim content is created and stored in the Genie database. At a later time, all of theclaims created can be batched up and transmitted to the HIC. In this mode, the Internet connection only needsto be available when the claims are transmitted.
In Real-Time mode, the patient claim is created and transmitted to the HIC at the time the invoice or receipt isgenerated. In this mode, the Internet connection must be available when the invoice or receipt is created. Thisremoves the need for batching claims at the end of the day, however, it will slow down the invoicing and
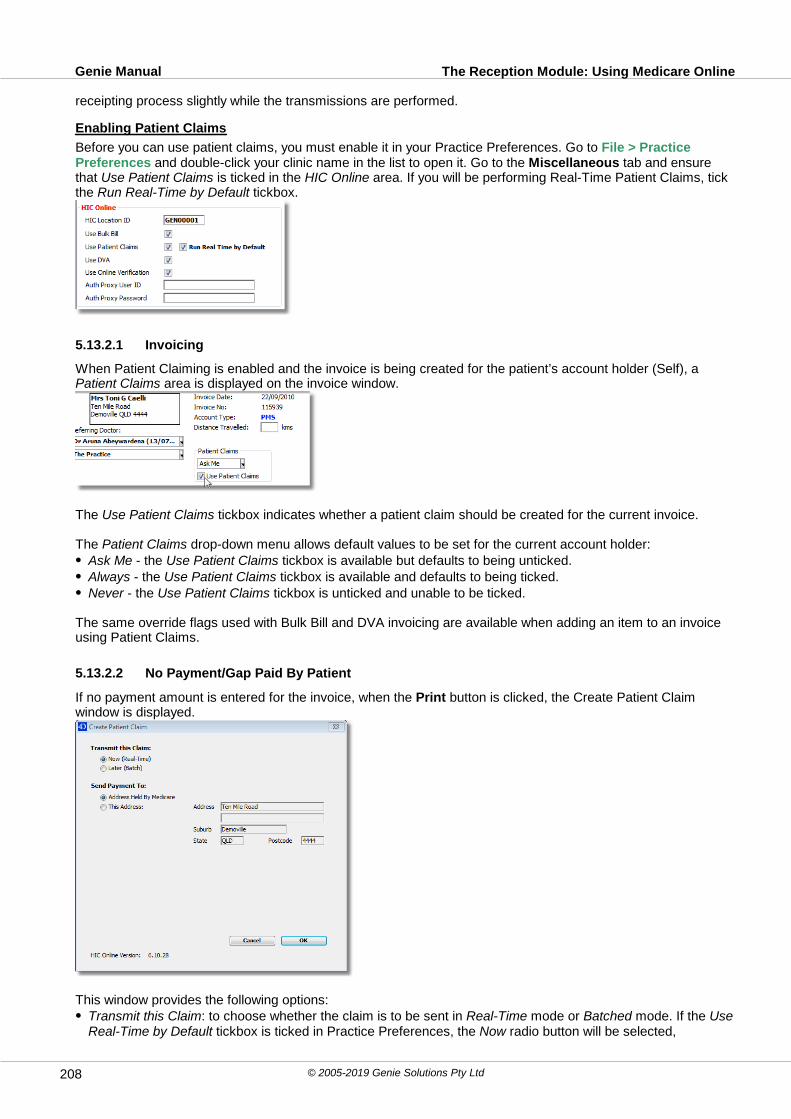
The Reception Module: Using Medicare OnlineGenie Manual
© 2005-2019 Genie Solutions Pty Ltd208
receipting process slightly while the transmissions are performed.
Enabling Patient Claims
Before you can use patient claims, you must enable it in your Practice Preferences. Go to File > PracticePreferences and double-click your clinic name in the list to open it. Go to the Miscellaneous tab and ensurethat Use Patient Claims is ticked in the HIC Online area. If you will be performing Real-Time Patient Claims, tickthe Run Real-Time by Default tickbox.
5.13.2.1 Invoicing
When Patient Claiming is enabled and the invoice is being created for the patient’s account holder (Self), a Patient Claims area is displayed on the invoice window.
The Use Patient Claims tickbox indicates whether a patient claim should be created for the current invoice.
The Patient Claims drop-down menu allows default values to be set for the current account holder:Ask Me - the Use Patient Claims tickbox is available but defaults to being unticked.Always - the Use Patient Claims tickbox is available and defaults to being ticked.Never - the Use Patient Claims tickbox is unticked and unable to be ticked.
The same override flags used with Bulk Bill and DVA invoicing are available when adding an item to an invoiceusing Patient Claims.
5.13.2.2 No Payment/Gap Paid By Patient
If no payment amount is entered for the invoice, when the Print button is clicked, the Create Patient Claimwindow is displayed.
This window provides the following options:Transmit this Claim: to choose whether the claim is to be sent in Real-Time mode or Batched mode. If the UseReal-Time by Default tickbox is ticked in Practice Preferences, the Now radio button will be selected,
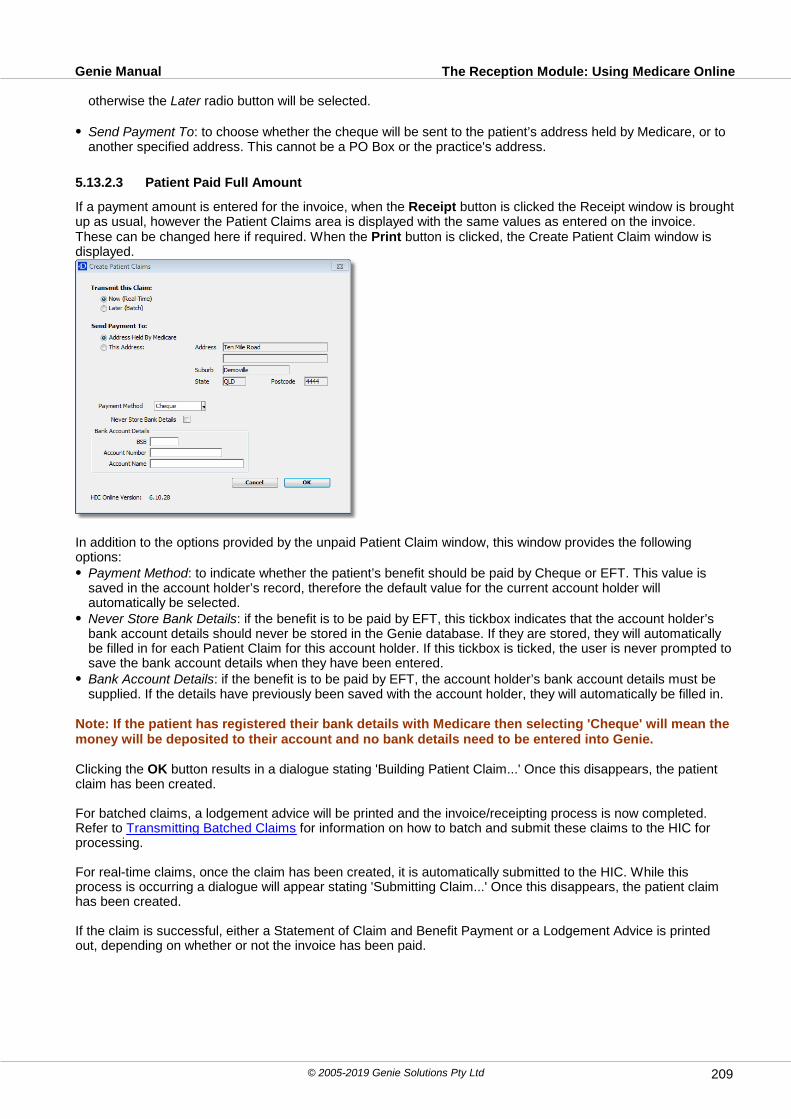
The Reception Module: Using Medicare OnlineGenie Manual
© 2005-2019 Genie Solutions Pty Ltd 209
otherwise the Later radio button will be selected.
Send Payment To: to choose whether the cheque will be sent to the patient’s address held by Medicare, or toanother specified address. This cannot be a PO Box or the practice's address.
5.13.2.3 Patient Paid Full Amount
If a payment amount is entered for the invoice, when the Receipt button is clicked the Receipt window is broughtup as usual, however the Patient Claims area is displayed with the same values as entered on the invoice.These can be changed here if required. When the Print button is clicked, the Create Patient Claim window isdisplayed.
In addition to the options provided by the unpaid Patient Claim window, this window provides the followingoptions:
Payment Method: to indicate whether the patient’s benefit should be paid by Cheque or EFT. This value issaved in the account holder’s record, therefore the default value for the current account holder willautomatically be selected.Never Store Bank Details: if the benefit is to be paid by EFT, this tickbox indicates that the account holder’sbank account details should never be stored in the Genie database. If they are stored, they will automaticallybe filled in for each Patient Claim for this account holder. If this tickbox is ticked, the user is never prompted tosave the bank account details when they have been entered.Bank Account Details: if the benefit is to be paid by EFT, the account holder’s bank account details must besupplied. If the details have previously been saved with the account holder, they will automatically be filled in.
Note: If the patient has registered their bank details with Medicare then selecting 'Cheque' will mean themoney will be deposited to their account and no bank details need to be entered into Genie.
Clicking the OK button results in a dialogue stating 'Building Patient Claim...' Once this disappears, the patientclaim has been created.
For batched claims, a lodgement advice will be printed and the invoice/receipting process is now completed.Refer to Transmitting Batched Claims for information on how to batch and submit these claims to the HIC forprocessing.
For real-time claims, once the claim has been created, it is automatically submitted to the HIC. While thisprocess is occurring a dialogue will appear stating 'Submitting Claim...' Once this disappears, the patient claimhas been created.
If the claim is successful, either a Statement of Claim and Benefit Payment or a Lodgement Advice is printedout, depending on whether or not the invoice has been paid.

The Reception Module: Using Medicare OnlineGenie Manual
© 2005-2019 Genie Solutions Pty Ltd210
If the claim is unsuccessful, the Patient Claim Errors window will be displayed.
This window lists all of the services which have generated errors. Clicking on a service will display thecorresponding error message in red. In the example displayed, the service has failed because the servicingprovider has not been registered for HIC Online.
Depending on the nature of the error, it may be appropriate to edit the Item, Patient, Claimant, or Providerdetails. Buttons are provided on this window to take you directly to the entity in question. If it is simply a matter ofthe patient or claimant’s Medicare Number or Individual Reference Number being incorrect, these can be easilyupdated to the values held by the HIC by clicking on the Update Patient and Update Claimant buttons.
Some errors may not be serious enough to cause the claim to be rejected. These errors have a Y in the Acceptable column. If all of the errors are acceptable, the Accept button will be enabled. Clicking the Acceptbutton will send the claim to the HIC for manual processing.
If all of the errors which have an N in the Acceptable column have been dealt with by editing the Item, Patient,Claimant or Provider details, the entire claim can be resubmitted by clicking the Resubmit button.
Clicking the Cancel button will return you to the Create Patient Claim window. If the problems cannot be rectifiedfrom here, click on the Cancel button to skip the patient claims process and print out a normal invoice or receipt.
5.13.2.4 Transmitting Batched Claims
Patient Claims created using the batched (Store-and-forward) method must be batched and transmitted to theHIC. This functionality is accessed with the Patient Claims Transmission button in the File > Maintenance &Reports, Daily tab.

The Reception Module: Using Medicare OnlineGenie Manual
© 2005-2019 Genie Solutions Pty Ltd 211
Clicking this button takes you to the Patient Claims Control window. To create a new transmission, click on the New Transmission button. This will open the New Patient Claim Transmission window.
This window lists all batched patient claims which have not yet been batched and submitted to Medicare. Ifnecessary, you can remove claims from the current transmission by clicking the Hold tickbox beside the claim.
When you are happy with the claims to be transmitted, click on the Create Transmission button. This will batchup to 30 of the displayed claims into a single transmission. When the transmission has been created, the Transmit button will be enabled at the bottom of the window and the message 'Transmission createdsuccessfully' will appear above it in blue.
Clicking the Transmit button will send the claim to Medicare for processing, and will return you to the PatientClaims Control window.
If for any reason a batched transmission needs to be deleted, select the transmission from the list on the left,and click on the Delete Transmission button. This will remove both the transmission and the claims within thetransmission.
5.13.2.5 "Post-Invoice" Claiming and Deleting
A Patient Claim can be created after a normal invoice or receipt has already been generated. This is achieved inthe Account History window. There are two buttons in this window: Create Patient Claim and Delete PatientClaim.
To create a new patient claim, select the item(s) that you would like to include in the claim, and click on the Create Patient Claim button. This will open the Create Patient Claim window and allow you proceed as youwould during the invoice or receipting process.
Same Day Deleting
If you would like to retract a real-time patient claim after it has been submitted to Medicare, select the item(s)
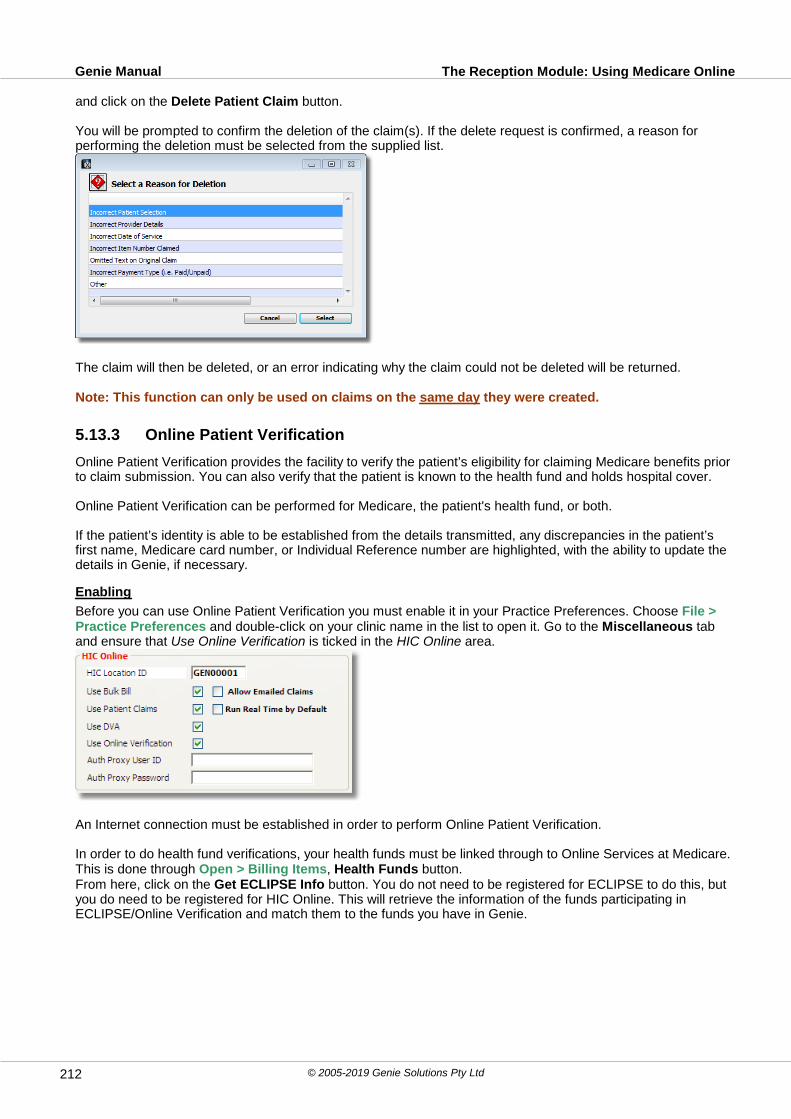
The Reception Module: Using Medicare OnlineGenie Manual
© 2005-2019 Genie Solutions Pty Ltd212
and click on the Delete Patient Claim button.
You will be prompted to confirm the deletion of the claim(s). If the delete request is confirmed, a reason forperforming the deletion must be selected from the supplied list.
The claim will then be deleted, or an error indicating why the claim could not be deleted will be returned.
Note: This function can only be used on claims on the same day they were created.
5.13.3 Online Patient Verification
Online Patient Verification provides the facility to verify the patient’s eligibility for claiming Medicare benefits priorto claim submission. You can also verify that the patient is known to the health fund and holds hospital cover.
Online Patient Verification can be performed for Medicare, the patient's health fund, or both.
If the patient’s identity is able to be established from the details transmitted, any discrepancies in the patient’sfirst name, Medicare card number, or Individual Reference number are highlighted, with the ability to update thedetails in Genie, if necessary.
Enabling
Before you can use Online Patient Verification you must enable it in your Practice Preferences. Choose File >Practice Preferences and double-click on your clinic name in the list to open it. Go to the Miscellaneous taband ensure that Use Online Verification is ticked in the HIC Online area.
An Internet connection must be established in order to perform Online Patient Verification.
In order to do health fund verifications, your health funds must be linked through to Online Services at Medicare.This is done through Open > Billing Items, Health Funds button. From here, click on the Get ECLIPSE Info button. You do not need to be registered for ECLIPSE to do this, butyou do need to be registered for HIC Online. This will retrieve the information of the funds participating inECLIPSE/Online Verification and match them to the funds you have in Genie.

The Reception Module: Using Medicare OnlineGenie Manual
© 2005-2019 Genie Solutions Pty Ltd 213
Funds that don't have an exact name match will appear in a list for you to match appropriately. This is done bydragging the fund from the Genie Fund list on the right and dropping it into the Link to Genie Fund column inalignment with the appropriate Eclipse fund.
Note: You can only link one Genie fund to one ECLIPSE fund, so if you have multiple entries for a fund,these will need to be consolidated into the one fund name.
5.13.3.1 Using Online Verification
To check a patient’s eligibility for Medicare or their health fund, open the patient’s Patient Demographics Windowand click on the Verify Online button at the bottom of the window.
The following window will appear, prompting you to choose the details to be checked.

The Reception Module: Using Medicare OnlineGenie Manual
© 2005-2019 Genie Solutions Pty Ltd214
Click OK, and you will be presented with a dialogue stating 'Checking Patient Eligibility...' Once this disappears,the verification is complete.
Medicare Verification
The request will return with one of the following responses:
1. The patient is eligible for Medicare.2. A message indicating that one or more of the patient’s Medicare number, Individual Reference number, orFirst Name do not match the values held by Medicare. In this case the value(s) held by Medicare are displayedin the message.
After clicking OK, you will be prompted to update the values held by Genie with those returned from Medicare.
If the patient’s first name is being updated, a prompt as to whether the value currently held in the First Namefield in Genie should be moved to the Known As name in Genie.
3. A message indicating that the patient could not be identified on the Medicare system from the details providedin Genie.
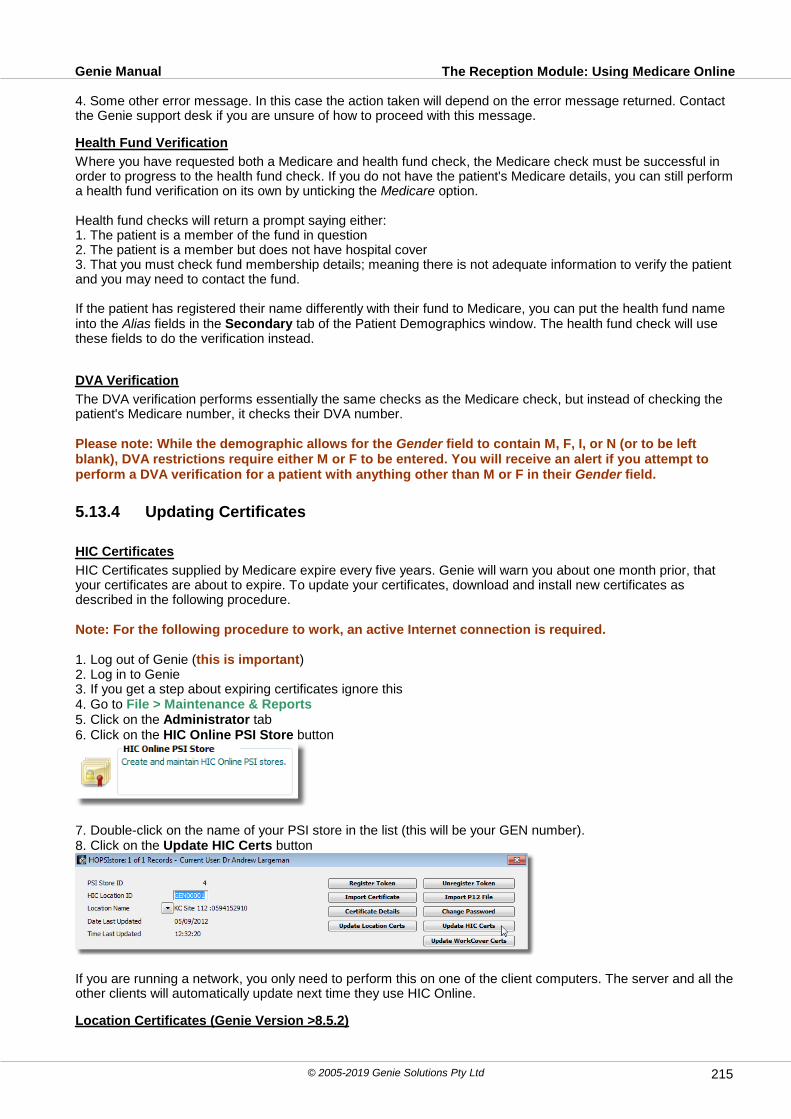
The Reception Module: Using Medicare OnlineGenie Manual
© 2005-2019 Genie Solutions Pty Ltd 215
4. Some other error message. In this case the action taken will depend on the error message returned. Contactthe Genie support desk if you are unsure of how to proceed with this message.
Health Fund Verification
Where you have requested both a Medicare and health fund check, the Medicare check must be successful inorder to progress to the health fund check. If you do not have the patient's Medicare details, you can still performa health fund verification on its own by unticking the Medicare option.
Health fund checks will return a prompt saying either:1. The patient is a member of the fund in question2. The patient is a member but does not have hospital cover3. That you must check fund membership details; meaning there is not adequate information to verify the patientand you may need to contact the fund.
If the patient has registered their name differently with their fund to Medicare, you can put the health fund nameinto the Alias fields in the Secondary tab of the Patient Demographics window. The health fund check will usethese fields to do the verification instead.
DVA Verification
The DVA verification performs essentially the same checks as the Medicare check, but instead of checking thepatient's Medicare number, it checks their DVA number.
Please note: While the demographic allows for the Gender field to contain M, F, I, or N (or to be leftblank), DVA restrictions require either M or F to be entered. You will receive an alert if you attempt toperform a DVA verification for a patient with anything other than M or F in their Gender field.
5.13.4 Updating Certificates
HIC Certificates
HIC Certificates supplied by Medicare expire every five years. Genie will warn you about one month prior, thatyour certificates are about to expire. To update your certificates, download and install new certificates asdescribed in the following procedure.
Note: For the following procedure to work, an active Internet connection is required. 1. Log out of Genie (this is important)2. Log in to Genie 3. If you get a step about expiring certificates ignore this4. Go to File > Maintenance & Reports5. Click on the Administrator tab6. Click on the HIC Online PSI Store button
7. Double-click on the name of your PSI store in the list (this will be your GEN number).8. Click on the Update HIC Certs button
If you are running a network, you only need to perform this on one of the client computers. The server and all theother clients will automatically update next time they use HIC Online.
Location Certificates (Genie Version >8.5.2)
The Reception Module: Using Medicare OnlineGenie Manual
© 2005-2019 Genie Solutions Pty Ltd216
If you are using Genie version 8.5.2 or higher, your location certificates will update automatically; you should notneed to follow the process below. However, if you are receiving a message stating that your certificates areexpiring, you can follow the steps below to manually update your certificates.
The Reception Module: Using Medicare OnlineGenie Manual
© 2005-2019 Genie Solutions Pty Ltd 217
Location Certificates (Genie Version <8.5.1)
Location Certificates expire every five years and can be sourced from the Medicare website. Before updatingyour Location Certificates, please ensure you are using Genie version 8.3.5 or higher. For information onupdating Genie please refer to the Updates section of this manual.
The following procedure only needs to be performed on one transmitting client machine. The other transmittingclients on your network will update the next time they log in.
1. Go to www.certificates-australia.com.au2. Click on Healthcare Directory on the left hand side.3. In the search box that comes up, type the RA number into the Surname/RA number field. If you are unsure of
your RA number, you will need to contact Medicare for these details.4. You will be presented with a 'Matching Certificates' page with two download buttons. You will need to press
each of these download buttons and save these files to your desktop.5. In Genie, go into File > Maintenance and Reports and click on the Administrator tab.6. Click on HIC Online PSI Store and double-click on your GEN number.7. Click on the Update Location Certificates button.8. Browse to each file on the desktop.
Perform an online verification of a patient's Medicare card to confirm HIC online has updated successfully. If thishas been successful, you will need to contact Genie support to have a support representative review your HIConline log files; these log files will confirm that your new certificates have been imported correctly, and that it issafe to delete your old certificates.

The Reception Module: Troubleshooting Online ClaimingGenie Manual
© 2005-2019 Genie Solutions Pty Ltd218
5.14 Troubleshooting Online Claiming
Diagnostic Self-Test
If you are experiencing problems trying to use HIC Online, the first thing to do is run the Diagnostic Self-test byclicking the Check HIC Online Installation button under the Administrator tab in File > Maintenance &Reports.
This will produce a text file which will identify any problems with your HIC Online installation and the suggestedcourse of action to remedy any such problems.
5.15 Referral/Reply Letters (Patient Correspondence)
This chapter deals with letters written regarding a patient to a provider in the Address Book, typically a referral toa specialist or a GP's letter back to a referring doctor.
Referral/reply letters can be created by clicking on the Red quill icon from either the Appointment Book, apatient’s Clinical Window, or the Patients List. Alternatively, you can use options in the Patients menu, whichtakes advantage of the Letters Dictated tickbox in the Add Consult window. See the Patients Menu.
If the selected patient does not have a valid referral or a usual GP in their demographics window, clicking on theRed quill icon will bring up the Search window, allowing you to search the Address Book for the recipient.
Enter the first few letters of whichever field is appropriate, then click OK. As this is only a search, you will notneed to fill in every field.
If you require a blank letter, just click OK without entering any search criteria.
Note: If you have already assigned a referring doctor to the patient, in the Patient Demographics (see Edit Patient) then this window does not appear, and the letter is automatically addressed to the referringdoctor. You can then readdress this to another provider, if desired (see notes on the Readdress Button.)
If a matching record is found in the Address Book, a new letter will open using the Default Template. Place yourcursor in the body of the template and type your letter. Print or Save the letter as appropriate.
Button Description
The Default Letter drop-down menu displays a list of letter templates available, and allows you to add newtemplates. If you have multiple specialists, each with their own Referral/Reply letter formatting preference, youcan create several templates. This will mean you are able to select these from the Template drop-down menubefore you begin typing. For more on adding new templates, please see, Adding New Templates.

The Reception Module: Referral/Reply Letters (Patient Correspondence)Genie Manual
© 2005-2019 Genie Solutions Pty Ltd 219
The From drop-down menu allows you to choose the doctor from whom the letter is being written.The names in the menu are those users who have the Show me in the Billing Menu tickbox in User Preferencesticked. If a receptionist is typing the letter, then (s)he needs to select the doctor before the letter can be saved.
The To field will be the heading of the letter, naturally it defaults to the addressee but can be changed withoutaffecting the letter itself. Please note that this will not readdress the letter, this is done using the readdress button(see below).
The Type drop-down menu allows you to assign the letter a type that will be seen by the receiving doctor when itis sent electronically. If you receive a letter electronically from a doctor that has specified the type, when you goto Open > Incoming Letters you will be able to see the letter type.
The Send Via 3rd Party tickbox allows you to send the letter securely via a 3rd party encryption program such asArgus or Healthlink. For more information on this please see Electronic Correspondence.
Prefers can be set in the addressee's Address Book entry. This is how the receiving doctor prefers to receivetheir letters.
Ready to Send is what will trigger a letter to be sent via the 3rd party selected. This allows for the letter to bereviewed etc before it is sent.
Sent from Genie and Delivery Acknowledged are in relation to 3rd party correspondence and whether the letterwas sent/received respectively.
The Reviewed tickbox would normally only be used by specialists that have someone else type the letter, andlater review it . The doctor would tick this box after reviewing the letter to let the receptionist know that it wasready to send.
The Printed tickbox is automatically checked when the letter is either printed, faxed or emailed.
The Flag for Followup tickbox is used for important referrals to ensure that the patient actually attends thespecialist appointment. When a reply letter is received, you would then check the Reply Received tickbox.To see how these tickboxes are used in practice, see Reviewing Correspondence.
Can't Delete will not allow the letter to be deleted at all from the database once saved. This is irreversible.
The Spellchecking tickbox provides an integrated spell checking facility into the letter writer. To check spelling atthe end of your document, select Tools > Spelling.
Learned words are stored in a dictionary file located within your 4D folder. This file is updated each time you Quit
out of Genie. If you would like to edit the dictionary, hold down the Alt key and click on the Info button besidethe Spellchecking tickbox. This will open the Edit Dictionary window, allowing you to add and remove words fromthe dictionary using the buttons on the right. Once you have done this, you will need to restart Genie on yourcomputer in order for the changes to take effect.

The Reception Module: Referral/Reply Letters (Patient Correspondence)Genie Manual
© 2005-2019 Genie Solutions Pty Ltd220
The CDA Dx button allows you to see why this letter cannot be sent in CDA format, if applicable. For moreinformation, please consult the Sending in CDA Format section of the web version of this manual. This can beaccessed from within Genie by going into Special > Genie Online Manual.
The Edit Template button will open the underlying template for this letter. This will allow you to make permanentchanges to the letter, affecting all future letters, not just the one in view.
Convert to Text allows you to manually edit an inserted reference (such as a slightly misspelled address) astext, i.e. without it highlighting and deleting the whole reference.
The Email icon creates an email in Genie’s built-in email client, and places it in the Outbox. If you haveentered an email address in the addressee’s record in the Address Book, the email will be sent the next time yousend or receive email. When a letter is emailed, any images that have been inserted are automatically sent asattachments to the email. For more detail on using email in Genie, see Email.
Note: If you would like your letters to keep their formatting when encrypted then select 'Send as RTFattachment' when prompted. This assumes the receiver can actually receive in RTF files.
The Label icons allow you to print sticky envelope labels for either the patient or the addressee.Genie’s built-in labels support A4 with 14 labels per sheet (ie. Avery 7x2), or the Dymo Labelwriter series. Formore information please see the Labels chapter.
The Envelope icon allows you to print an envelope for the Addressee and/or the CCs. When printing anenvelope, you have the option to print the following: return address details, the patient's name, and addressee's(or CC's) phone number, down the left hand side of the envelope.
On Windows machines, you are able to choose the envelope size (as seen above). On Macintosh machines, thisoption does not appear as you can set your envelope size in Printing Preferences (File > Printing Preferences)Page Setup button.
The Print icon will print the letter, defaulting to the printer which you have selected in the 'Letters' option ofFile > Printing Preferences.
The Full Page icon makes the 4D Write word processor open to full page to type if you wish. This alsoallows you to fax the letter using whatever fax software you have installed on your computer.
The Word icon will open the letter in Microsoft Word (you must have Word already installed on yourcomputer). This feature is for those people who prefer to use Word’s Autotype and AutoCorrect functions. Onceyou have finished writing the letter in Word, Save and Close the Word document and return to Genie.
Note: If would like to use this function it is recommended that you turn on the option to save lettersreimported from Word as attachments in the Correspondence tab of your User Preferences (File > UserPreferences).
You will notice that the Word icon is now coloured red. Clicking again on this button will import the Worddocument back into 4D Write with all formatting retained. If the import is successful, the Word document isautomatically deleted from your hard disk. It is temporarily stored in a folder called “Letters” within the Geniefolder.
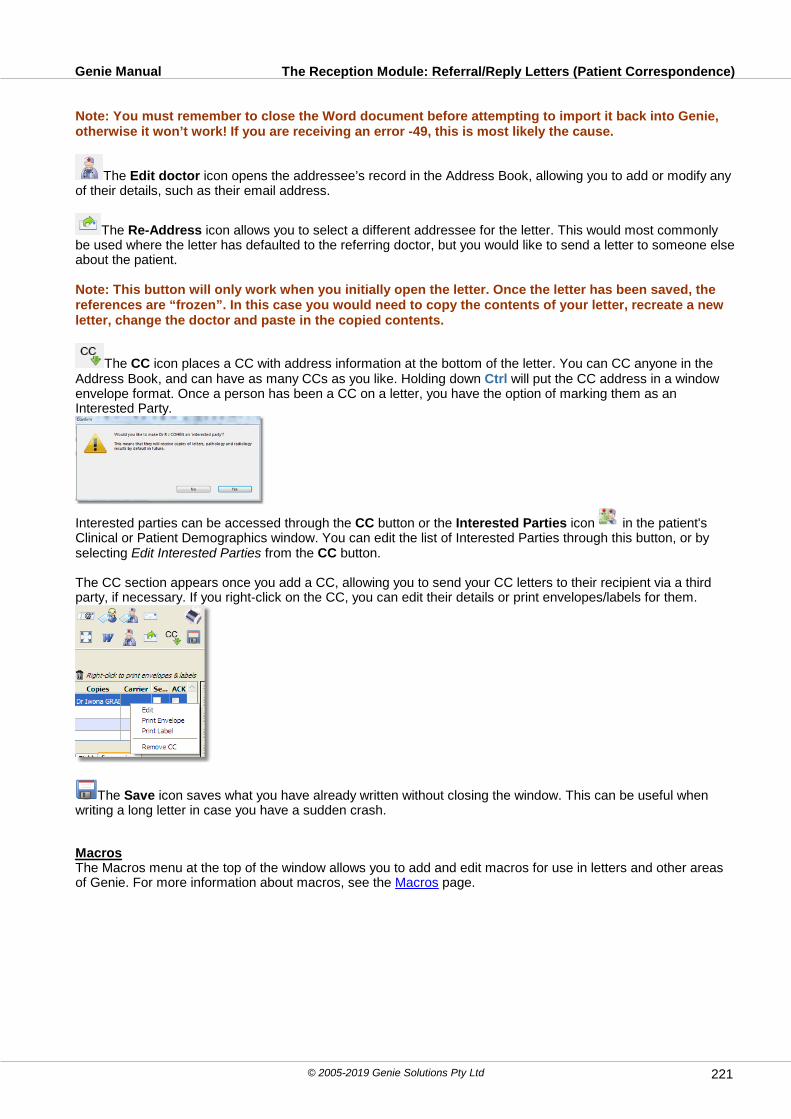
The Reception Module: Referral/Reply Letters (Patient Correspondence)Genie Manual
© 2005-2019 Genie Solutions Pty Ltd 221
Note: You must remember to close the Word document before attempting to import it back into Genie,otherwise it won’t work! If you are receiving an error -49, this is most likely the cause.
The Edit doctor icon opens the addressee’s record in the Address Book, allowing you to add or modify anyof their details, such as their email address.
The Re-Address icon allows you to select a different addressee for the letter. This would most commonlybe used where the letter has defaulted to the referring doctor, but you would like to send a letter to someone elseabout the patient.
Note: This button will only work when you initially open the letter. Once the letter has been saved, thereferences are “frozen”. In this case you would need to copy the contents of your letter, recreate a newletter, change the doctor and paste in the copied contents.
The CC icon places a CC with address information at the bottom of the letter. You can CC anyone in theAddress Book, and can have as many CCs as you like. Holding down Ctrl will put the CC address in a windowenvelope format. Once a person has been a CC on a letter, you have the option of marking them as anInterested Party.
Interested parties can be accessed through the CC button or the Interested Parties icon in the patient'sClinical or Patient Demographics window. You can edit the list of Interested Parties through this button, or byselecting Edit Interested Parties from the CC button.
The CC section appears once you add a CC, allowing you to send your CC letters to their recipient via a thirdparty, if necessary. If you right-click on the CC, you can edit their details or print envelopes/labels for them.
The Save icon saves what you have already written without closing the window. This can be useful whenwriting a long letter in case you have a sudden crash.
MacrosThe Macros menu at the top of the window allows you to add and edit macros for use in letters and other areasof Genie. For more information about macros, see the Macros page.

The Reception Module: Referral/Reply Letters (Patient Correspondence)Genie Manual
© 2005-2019 Genie Solutions Pty Ltd222
5.15.1 Setting up the Default Template
Whenever you create a new letter by clicking on the Red quill icon , Genie uses the template called 'DefaultLetter'. For convenience, your default template should be for the type of letter you most commonly write.Generally, for GPs it would be a referral letter and for specialists, a letter back to the referring doctor.
To edit this template, click on the Edit Template button. This will open a window like this:
Note: You cannot change the name from 'Default Letter'. You can, however, delete this template, inwhich case Genie will immediately recreate a fresh template called 'Default Letter'. This can be useful ifthe template ever becomes corrupted.
In the middle of the window is a Default button. Clicking this will wipe the current template and enter a defaulttemplate containing all the usual information you might need.
The DMMR button creates a Domiciliary Medication Management Referral template.
The Download button allows you to download some common referral templates from our Genie Web Server e.g. Vic Statewide Referral Form. For more information, see Adding New Templates.
The Duplicate drop-down menu allows you to copy an existing template in Genie. This is useful for creatingseveral templates with slight variations (e.g. referral letter with each doctor's own letterhead).
5.15.2 Setting up the 4D Write Area
It is a good idea to set the margins and page setup in your 'Default Letter' template as it is the basis for all newtemplates created.
All the menus described below are within the 4D Write window, not the main Genie menus at the top of thescreen. These are located above the 4D Write toolbar, as seen below:
First, select File > Page Setup and make sure the page size is set to A4, and the correct printer has beenselected.

The Reception Module: Referral/Reply Letters (Patient Correspondence)Genie Manual
© 2005-2019 Genie Solutions Pty Ltd 223
You can use the View menu to determine whether you would like to include headers and/or footers in your letter.Selecting Header or Footer from this menu will either tick, or untick this option.
Headers are a separate area at the top of a word processing document. These print on every page of a multi-page document, and are usually used for page numbering. Footers are a separate area at the bottom of thepage, and also print on every page of a multi-page document.
Finally, you should set the printable margins.The numbered scales along each side of the letter are called Rulers. If you place the cursor over the currentmargin setting, it will become a double-ended arrow as in the picture below.
You can now click and drag the margin left or right to suit. This has the effect of adjusting the width of the bodyof the letter. You can do the same for the other three sides of the template to adjust the left, right and bottommargins.
If you are using a header, clicking within the header area allows you to do the same to adjust the size of theheader.
Click Save to save the template.
5.15.3 Adding New Templates
To add a new letter template, select New Template from the Template drop-down menu.
This copies the Default Letter template into a new window. This is why it is important to get the page setup andmargins correct in the Default Letter template before adding new templates. Make the required changes to thecontent of the letter and use Fields and Expressions (please see Fields & Expressions Tab) so that patientspecific information can be automatically imported into the letter when you select a patient. When you are happywith the template, type a name for the template in the Title field and then click Save.
You can copy the contents an existing template (other than the 'Default Letter' template) in Genie by clicking onthe Duplicate drop-down menu and selecting the template you wish to copy. This will copy the contents of thetemplate you have selected so that you can make changes and save it as a new template. This is useful, forexample, if several doctors in the practice use the same template but use their own letterhead.
You can also download letter templates from our Genie Web Servers. To do this, click the Download button,click the small plus to the left of the category you require, tick the checkbox to the right of the letter that youwant and click the Import X Item/s button. A window will appear allowing you to rename the template beforeyou download it.
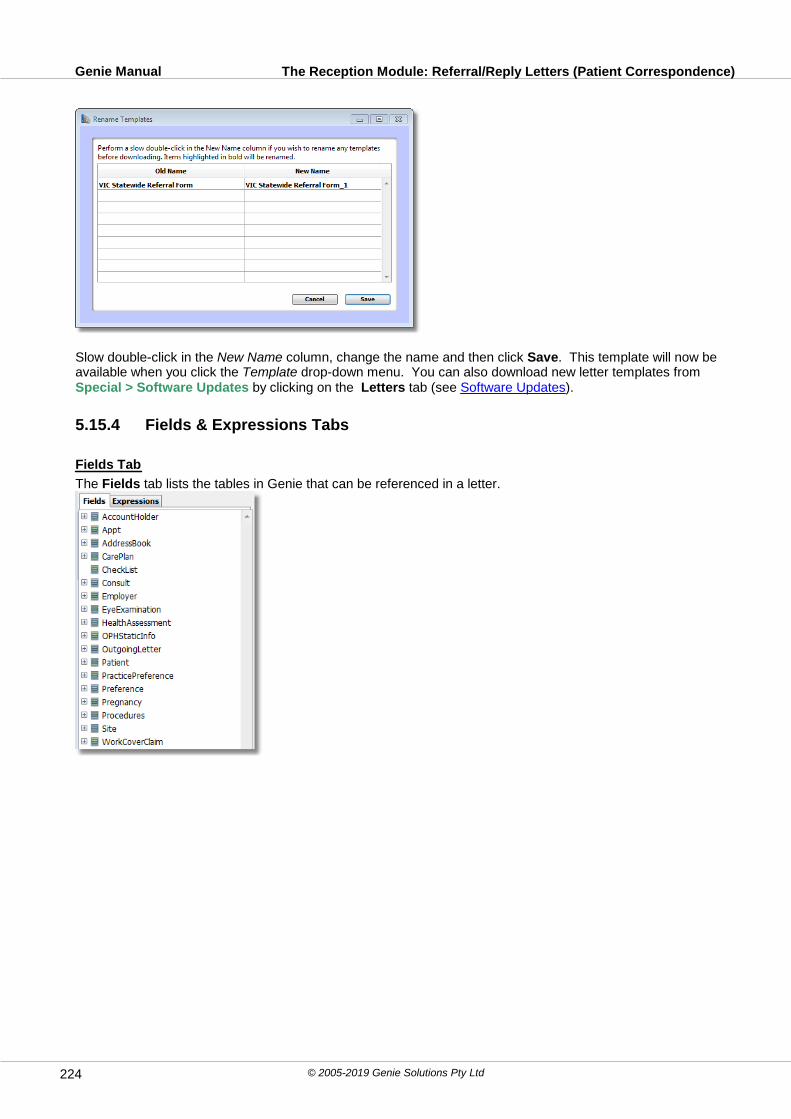
The Reception Module: Referral/Reply Letters (Patient Correspondence)Genie Manual
© 2005-2019 Genie Solutions Pty Ltd224
Slow double-click in the New Name column, change the name and then click Save. This template will now beavailable when you click the Template drop-down menu. You can also download new letter templates fromSpecial > Software Updates by clicking on the Letters tab (see Software Updates).
5.15.4 Fields & Expressions Tabs
Fields Tab
The Fields tab lists the tables in Genie that can be referenced in a letter.

The Reception Module: Referral/Reply Letters (Patient Correspondence)Genie Manual
© 2005-2019 Genie Solutions Pty Ltd 225
To view the individual fields within the tables, click on the Little plus button (or little arrow) to the left of thetable, then insert the field by double-clicking, or dragging and dropping into the template.
If you would like to insert a patient's DOB, expand the Patient table by clicking on the Little plus button (orlittle arrow) to the left of the word Patient. You can can then either drag and drop DOB into the template, or placethe cursor where you would like the field to be inserted in the template, and double-click on DOB.
If you would like to change the format of a field, double-click on it in the template and an Insert 4D Expressionwindow will come up with Format options on the right hand side.
Note: To use a particular Procedure/Consult/Checklist etc. from a patient's clinical record in the letter,double-click Load Procedure/Load Consultation/Load Checklist etc. in the Expressions tab and select therelevant record. If you do not select a specific record, Genie will reference the most recent one.
Expressions Tab
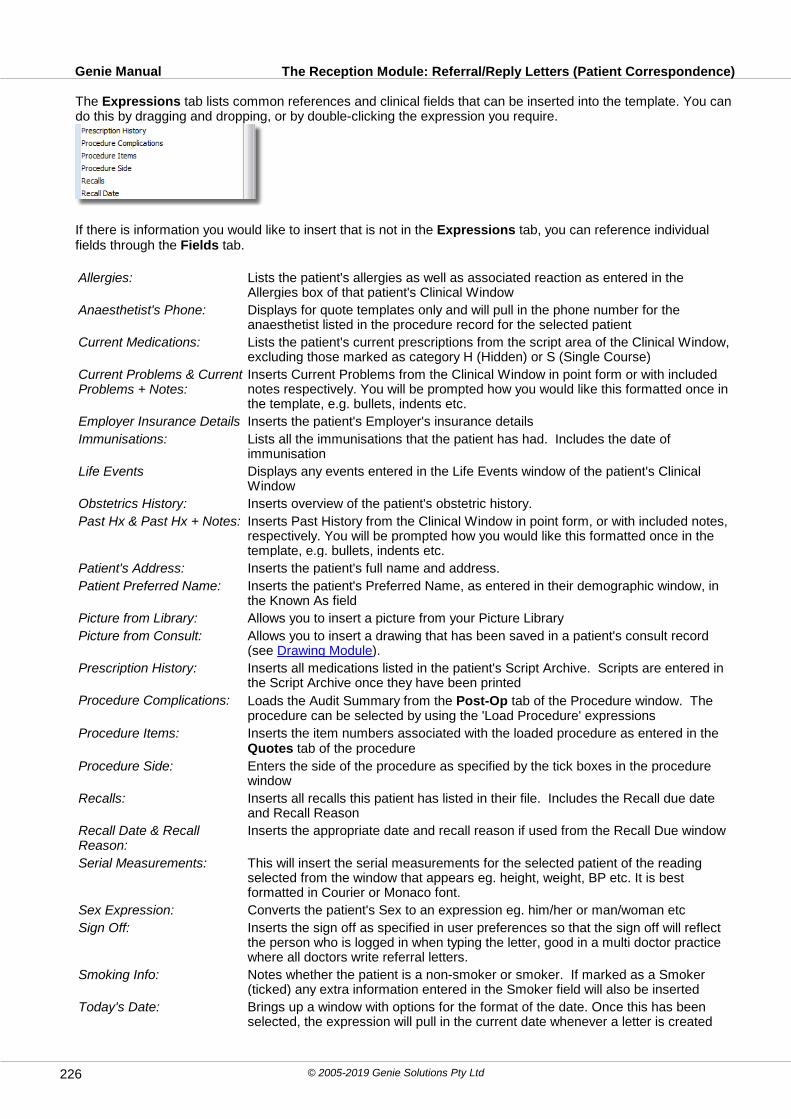
The Reception Module: Referral/Reply Letters (Patient Correspondence)Genie Manual
© 2005-2019 Genie Solutions Pty Ltd226
The Expressions tab lists common references and clinical fields that can be inserted into the template. You cando this by dragging and dropping, or by double-clicking the expression you require.
If there is information you would like to insert that is not in the Expressions tab, you can reference individualfields through the Fields tab.
Allergies: Lists the patient's allergies as well as associated reaction as entered in theAllergies box of that patient's Clinical Window
Anaesthetist's Phone: Displays for quote templates only and will pull in the phone number for theanaesthetist listed in the procedure record for the selected patient
Current Medications: Lists the patient's current prescriptions from the script area of the Clinical Window,excluding those marked as category H (Hidden) or S (Single Course)
Current Problems & CurrentProblems + Notes:
Inserts Current Problems from the Clinical Window in point form or with includednotes respectively. You will be prompted how you would like this formatted once inthe template, e.g. bullets, indents etc.
Employer Insurance Details Inserts the patient's Employer's insurance details
Immunisations: Lists all the immunisations that the patient has had. Includes the date ofimmunisation
Life Events Displays any events entered in the Life Events window of the patient's ClinicalWindow
Obstetrics History: Inserts overview of the patient's obstetric history.
Past Hx & Past Hx + Notes: Inserts Past History from the Clinical Window in point form, or with included notes,respectively. You will be prompted how you would like this formatted once in thetemplate, e.g. bullets, indents etc.
Patient's Address: Inserts the patient's full name and address.
Patient Preferred Name: Inserts the patient's Preferred Name, as entered in their demographic window, inthe Known As field
Picture from Library: Allows you to insert a picture from your Picture Library
Picture from Consult: Allows you to insert a drawing that has been saved in a patient's consult record(see Drawing Module).
Prescription History: Inserts all medications listed in the patient's Script Archive. Scripts are entered inthe Script Archive once they have been printed
Procedure Complications: Loads the Audit Summary from the Post-Op tab of the Procedure window. Theprocedure can be selected by using the 'Load Procedure' expressions
Procedure Items: Inserts the item numbers associated with the loaded procedure as entered in the Quotes tab of the procedure
Procedure Side: Enters the side of the procedure as specified by the tick boxes in the procedurewindow
Recalls: Inserts all recalls this patient has listed in their file. Includes the Recall due dateand Recall Reason
Recall Date & RecallReason:
Inserts the appropriate date and recall reason if used from the Recall Due window
Serial Measurements: This will insert the serial measurements for the selected patient of the readingselected from the window that appears eg. height, weight, BP etc. It is bestformatted in Courier or Monaco font.
Sex Expression: Converts the patient's Sex to an expression eg. him/her or man/woman etc
Sign Off: Inserts the sign off as specified in user preferences so that the sign off will reflectthe person who is logged in when typing the letter, good in a multi doctor practicewhere all doctors write referral letters.
Smoking Info: Notes whether the patient is a non-smoker or smoker. If marked as a Smoker(ticked) any extra information entered in the Smoker field will also be inserted
Today's Date: Brings up a window with options for the format of the date. Once this has beenselected, the expression will pull in the current date whenever a letter is created
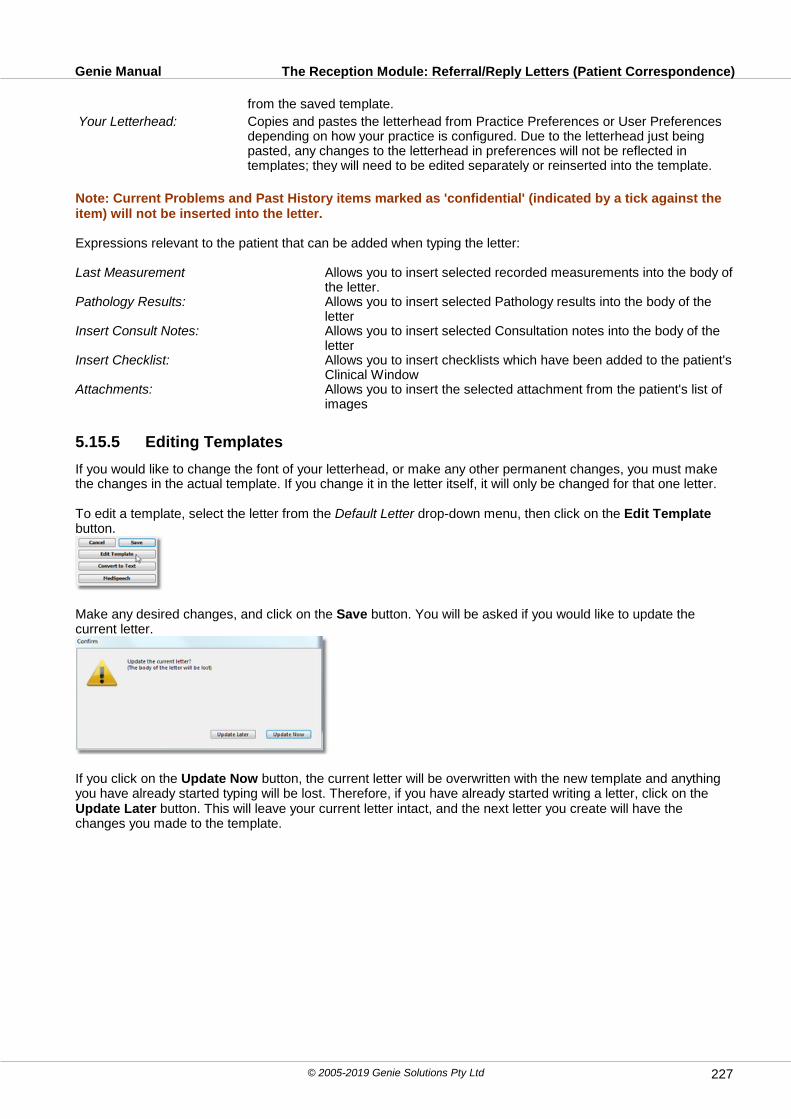
The Reception Module: Referral/Reply Letters (Patient Correspondence)Genie Manual
© 2005-2019 Genie Solutions Pty Ltd 227
from the saved template.
Your Letterhead: Copies and pastes the letterhead from Practice Preferences or User Preferencesdepending on how your practice is configured. Due to the letterhead just beingpasted, any changes to the letterhead in preferences will not be reflected intemplates; they will need to be edited separately or reinserted into the template.
Note: Current Problems and Past History items marked as 'confidential' (indicated by a tick against theitem) will not be inserted into the letter.
Expressions relevant to the patient that can be added when typing the letter:
Last Measurement Allows you to insert selected recorded measurements into the body ofthe letter.
Pathology Results: Allows you to insert selected Pathology results into the body of theletter
Insert Consult Notes: Allows you to insert selected Consultation notes into the body of theletter
Insert Checklist: Allows you to insert checklists which have been added to the patient'sClinical Window
Attachments: Allows you to insert the selected attachment from the patient's list ofimages
5.15.5 Editing Templates
If you would like to change the font of your letterhead, or make any other permanent changes, you must makethe changes in the actual template. If you change it in the letter itself, it will only be changed for that one letter.
To edit a template, select the letter from the Default Letter drop-down menu, then click on the Edit Templatebutton.
Make any desired changes, and click on the Save button. You will be asked if you would like to update thecurrent letter.
If you click on the Update Now button, the current letter will be overwritten with the new template and anythingyou have already started typing will be lost. Therefore, if you have already started writing a letter, click on the Update Later button. This will leave your current letter intact, and the next letter you create will have thechanges you made to the template.

The Reception Module: Referral/Reply Letters (Patient Correspondence)Genie Manual
© 2005-2019 Genie Solutions Pty Ltd228
5.15.6 Reviewing Correspondence
This is designed to allow doctors to review letters that have been typed, which can then be printed by thereceptionist.
To access letters that need to be reviewed or printed, click on the Letters to Review or Reviewed, Unprinted
buttons in the Navigation Palette or click on the Review Correspondence icon in the Appointment Book.Letters can also be accessed from Open > Outgoing Letters.
Outgoing Letters Window
To Be Reviewed will display all letters that have not been reviewed by the doctor, and those that have not yetbeen printed. To print reviewed letters select Reviewed but Unprinted, from the To Be Reviewed drop-downmenu.
The Method drop-down on this page displays the preferred method of communication for the addressee of theletter. You can display just those letters marked for a particular method by selecting it from the drop-down menu.For example, selecting Mail will display those letters to be printed and mailed.
Highlight all the letters you would like to print, and click on the Print button .
Letters to be faxed or emailed must be opened and sent individually.
Letters that need to be sent via a third party eg. Healthlink must be opened and ticked as Ready to Send.
Note: Eventually, all letters in Review Correspondence should end up in the 'Printed' section. Do notdelete letters from within Review Correspondence; deleting them from this window will delete theoriginal letter from the patient's Clinical Window. The letters displayed in Review Correspondence are not another copy of the letter from the patient's Clinical Window, it is the same letter, viewed from adifferent location. Trying to delete letters from with Review Correspondence will result in the followingwarning:
Reviewing Letters OffsiteLetters can be reviewed offsite in two ways. First, you can use Offsite Logging.

The Reception Module: Referral/Reply Letters (Patient Correspondence)Genie Manual
© 2005-2019 Genie Solutions Pty Ltd 229
Alternatively, clicking on the Word button in Review Correspondence will export any highlighted letters asWord documents.
They are placed in a folder called Letters Folder inside the Genie folder, on the local machine. If the Lettersfolder doesn't exist, Genie will automatically create it.
This folder can then be taken home on a laptop or external media device (e.g. USB, external hard drive). Thefollowing day, replace the Letters folder in the Genie folder, on the local machine that will import the letters,
open Review Correspondence and click on the Import button . This will import the Word documents with yourchanges, and replace the original 4D write documents. You will be asked if you would like the imported letters tobe marked as Reviewed.Once the import has finished, you will be asked if you would like to delete the Word documents in the Lettersfolder. You should agree to this, otherwise they will still be there the next time you do this, unless you deletethem manually.
5.15.7 Importing Remotely Typed Letters
If your letters are typed by a remote typist (i.e. someone not using Genie), Genie has the ability to import and linkthese letters to the correct patient.
The requirements for this are:the letters must be typed in Microsoft Word and saved in RTF format.each letter must be in its own document i.e. you can't have 10 different letters in the one Word document.the document must be saved using the following naming convention: Surname;FirstName;DOB (in the formatof DDMMYYYY), noting the semicolons between each piece of information. For example, a letter regardingJohn Smith, born on 4 July 1956 should be named: Smith;John;04071956. Alternatively, you can simply usethe Patient ID (if known by your typist).
Optionally, you can add the date of the letter to the end of this name, e.g. Smith;John;04071956;22092013. If thedate is not added, Genie will use the date of import as the date of the letter.
To import the letters, click on the Import Letters button in Review Correspondence or go to Open > ImportTranscribed Letters.
The first time you do this, you will be asked to identify the folder you have saved these letters in.
Click on the OK or Open button, and the Import Letters window will open, as shown below.
The document names are listed in the left-hand column. The patient to whom the corresponding documentsshould be linked are displayed in the second column.

The Reception Module: Referral/Reply Letters (Patient Correspondence)Genie Manual
© 2005-2019 Genie Solutions Pty Ltd230
Genie will attempt to match the correct patient record using the aforementioned naming conventions; either thePatient ID number or a 'Surname;FirstName;DOB' naming convention. If Genie cannot find a suitable match, thePatient column will be left empty.
In this case double-clicking in the Patient column for that letter produces a search window, allowing you tomanually locate the correct patient.
To add the addressee (which will be displayed as the title of the letter in the Contact list in the patient's ClinicalWindow), click once to view the letter and see who it was addressed to. Double-click to bring up the addressbook search window and find the correct doctor's record, which will then be inserted into the addressee column.Letters can also be sorted as to whether they are incoming i.e. from a Specialist (through Argus or similar), or
outgoing i.e. to a Specialist. Incoming letters will go into Correspondence In , and outgoing letters will go into
Correspondence Out .
Once you have correctly linked all the documents, click on the Import Letters button and Genie will import theletters, attaching them to the selected patient.
The letters which have successfully been imported will be automatically moved to a Processed folder within thedesignated Letters folder. Periodically, you should then manually delete these processed letters.
Importing Letterheads
Genie can't import logos or letterheads created in Word documents. Additionally, it can't import anything in aWord header. If you setup LetterheadLink template(s), you will be able to attach this to incomingcorrespondence when it is linked to the patients file.
Setup
1. Open a Referral/Reply letter via the Quill icon.2. Click on the drop-down menu that currently says Default Letter and select New Template.
3. Place your usual letterhead (including any logos) in the body of the letter, not in the header area. At the top ofthe window, name the template exactly: LetterheadLink.4. You can create additional letterhead templates, naming them LetterheadLink1, LetterheadLink2, and so on. This is useful in practices where each doctor has his or her own letterhead.
Note: The logos you insert must already be in your Picture Library. You can insert them into thetemplate using the Picture from Library expression in the Expressions Tab on the left hand side of thiswindow.

The Reception Module: Referral/Reply Letters (Patient Correspondence)Genie Manual
© 2005-2019 Genie Solutions Pty Ltd 231
When importing a letter through the Import Letters button in Review Correspondence, Genie will slot theinformation in your LetterheadLink template above the text that is imported from the Word document.
5.15.8 Macros
A macro is a text shortcut within Genie that can be used to quickly insert information when a short code is typed,in order to aid in faster note taking or transcription. The macro feature is available in Letters, Consults, SMSreminders, and certain fields in Pregnancies, IVF, Checklists, Tasks, Email, and Procedures.
Macros are user-defined and you can have as many as necessary, so they can be used to quickly insertcommonly-used information, such as long medication names that could otherwise be easily misspelled.
They can be added and modified through the Macros list. The list can be accessed through the Macros menu,which is accessible in any letter editing window - i.e. when editing a referral/reply letter or a merged letter - bynavigating to Macros > Edit Macros. It can also be accessed by clicking the Macros button at the bottom of theEdit Consult window.
Selecting either of these will open the Macros list, which will show any macros you currently have saved withinGenie.
To print a list of your macros for use as a quick reference, click the Print button.
To add a new macro, click the Add button. A window will appear allowing you to enter the text of the macro, andthe code you wish to use to trigger it. You can also use the Available to drop-down menu to specify a single userfor to whom this macro applies. If a user is selected from this menu, the macro will only work for that user; anyother user who types the same code will not trigger the macro.
The Reception Module: Referral/Reply Letters (Patient Correspondence)Genie Manual
© 2005-2019 Genie Solutions Pty Ltd232
Click the OK button to save the macro. It will then appear in the macros list.
Once a macro has been added, it can be triggered in macro-enabled writing areas of Genie by typing the codeand pressing the Space or Return/Enter key on your keyboard. The macro code will be replaced by theexpanded text instantly. In a consult window, the drop-down arrow above each text field contains a list ofavailable macros for easy selection as well.
If you currently use Spellcatcher or As-U-Type, you can import your existing macros by using the Import fromAs-U-Type button. This will give you instructions on how to first export your existing macros, ready to import intoGenie.
You can also have Genie automatically insert today's, tomorrow's, or yesterday's date. To do this, create amacro with any code and ensure that the Macro field displays the following text:<td> Today's Date<tm> Tomorrow's Date<yd> Yesterday's Date
5.15.9 Transcription Services
Genie is capable of exporting data for use by many transcription services, including: Global TranscriptionServices, NTS Transcription, Ozescribe, Syberscribe Pacific Solutions, Medical TranscriptionPlus, AnsellMT,Professional Transcription Solutions and BDT.
Once the nominated transcription service has typed the letters, you should be able to retrieve them as RTF files.The letters can then be imported into Genie and automatically linked to the correct patient record. The followingsections outline the export and import processes that facilitate this.
5.15.9.1 Exporting Demographics
Rather than having to dictate the patient and referring doctor’s demographic information for each letter, Geniecan export this information from the Appointment Book window for all appointments within a selected period.
To do this, select Appointments > Transcription Export

The Reception Module: Referral/Reply Letters (Patient Correspondence)Genie Manual
© 2005-2019 Genie Solutions Pty Ltd 233
The window below will be displayed.
Select which Transcription service you use from the drop-down menu. The default date range is for the previousfortnight, however, this can be changed if you prefer.In a multi-doctor practice, you can also select just a particular doctor.
If you would like, you can also choose to automate this process by clicking on the Automate button.
When you tick the Automatically Export Records tickbox, it will select every day of the week by default. If youwould like omit any day(s), simply untick the relevant tickbox. As per the red text, make sure the computer youhave nominated to do this automatic export is on and running Genie at the specified time.
Once you made your selections, click on the OK button to proceed with the export. Two files are exported:'Patients.txt' and 'Associates.txt'. They will be placed inside a folder named 'OzescribeOut', 'SyberscribeOut' or'NTS_Out' which will be automatically created inside your Genie folder.
The 'Patients.txt' file and the 'Associates.txt' file are not automatically deleted once they have been uploaded toOzescribe, Syberscribe or NTS. These will, however, be automatically overwritten each time you do this export.
Note: The same process applies for BDT Export (Appts > BDT Export) but you must highlight thepatients required for the export on a daily basis.
5.15.9.2 Importing Returned Letters
The letters created by Ozescribe will be named with either the patient's ID number, or be in the format of'Surname;FirstName;DOB'.
Note: The patient's ID number is the internally generated Patient ID field, displayed in the top left cornerof the Patient Demographics window. It is not the file or chart number which either you or Genie mayhave entered in the Chart field.
To import returned letters from either Ozescribe, Syberscribe, NTS or BDT, follow the steps outlined in ImportingRemotely Typed Letters
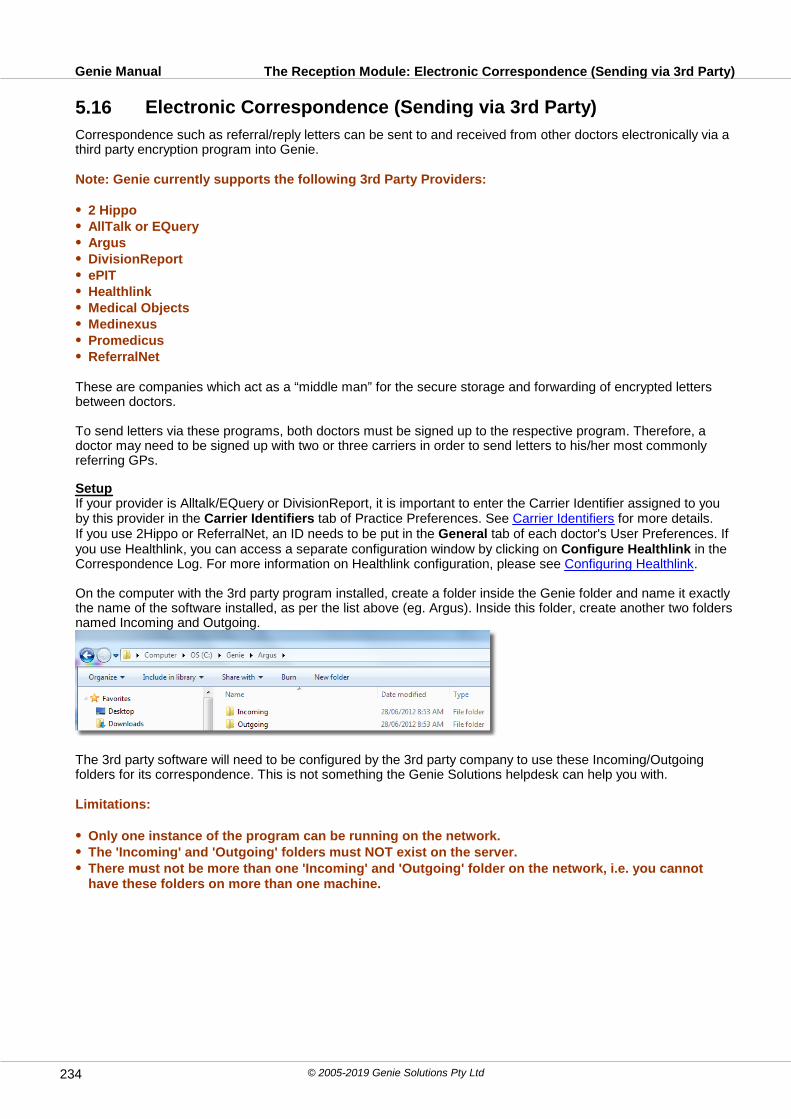
The Reception Module: Electronic Correspondence (Sending via 3rd Party)Genie Manual
© 2005-2019 Genie Solutions Pty Ltd234
5.16 Electronic Correspondence (Sending via 3rd Party)
Correspondence such as referral/reply letters can be sent to and received from other doctors electronically via athird party encryption program into Genie.
Note: Genie currently supports the following 3rd Party Providers:
2 HippoAllTalk or EQueryArgusDivisionReportePITHealthlinkMedical ObjectsMedinexusPromedicusReferralNet
These are companies which act as a “middle man” for the secure storage and forwarding of encrypted lettersbetween doctors.
To send letters via these programs, both doctors must be signed up to the respective program. Therefore, adoctor may need to be signed up with two or three carriers in order to send letters to his/her most commonlyreferring GPs.
SetupIf your provider is Alltalk/EQuery or DivisionReport, it is important to enter the Carrier Identifier assigned to youby this provider in the Carrier Identifiers tab of Practice Preferences. See Carrier Identifiers for more details.If you use 2Hippo or ReferralNet, an ID needs to be put in the General tab of each doctor's User Preferences. Ifyou use Healthlink, you can access a separate configuration window by clicking on Configure Healthlink in theCorrespondence Log. For more information on Healthlink configuration, please see Configuring Healthlink.
On the computer with the 3rd party program installed, create a folder inside the Genie folder and name it exactlythe name of the software installed, as per the list above (eg. Argus). Inside this folder, create another two foldersnamed Incoming and Outgoing.
The 3rd party software will need to be configured by the 3rd party company to use these Incoming/Outgoingfolders for its correspondence. This is not something the Genie Solutions helpdesk can help you with.
Limitations:
Only one instance of the program can be running on the network.The 'Incoming' and 'Outgoing' folders must NOT exist on the server.There must not be more than one 'Incoming' and 'Outgoing' folder on the network, i.e. you cannothave these folders on more than one machine.

The Reception Module: Electronic Correspondence (Sending via 3rd Party)Genie Manual
© 2005-2019 Genie Solutions Pty Ltd 235
5.16.1 Writing the Letter
After writing a letter you intend to send via 3rd party, tick the Send via 3rd Party tickbox. You will then need toselect the carrier from the drop-down menu (if it isn't already set in the recipient's Address Book record) andclick Save to save and close the letter.
Once the letter has been reviewed, tick the Ready to Send tickbox and save the letter. This will export the letterin HL7 format into the “Outgoing” folder that was set up previously.
Note: You can actually create the letter on any computer in the network, but it is only exported on thecomputer with the Outgoing folder.
Genie checks for any letters to be exported every five minutes, or by Ctrl+clicking on the Quill icon.
Note: The Delivery Acknowledged button is deliberately disabled. This is automatically ticked whenGenie receives an ACK back from the addressee.
CC letters can be sent electronically also, their Preferred Method of Communication just needs to be entered intheir Address Book entry. This can be done by right-clicking on the CC and selecting Edit.
Provided the Send tickbox is ticked, the letter will also be sent to the CC via the corresponding 3rd Party once itis saved.
You can still send CC letters via a 3rd party if the primary recipient does not have a 3rd party carrier. Tick the Send for the CC but leave the Send via 3rd Party unticked as this refers to the primary recipient only.
5.16.2 Checking Imported Letters
Genie also checks the Incoming folder for letters and delivery acknowledgements (ACKS) every five minutes. If itfinds a new letter, it will be imported into Genie automatically. Additionally, if the preference is set in the CarrierIdentifiers tab of Practice Preferences, a task will be sent to the Addressee of the letter. If Genie cannotdetermine who the Addressee is, the task will be sent to the Administrator of Genie.
To review any incoming letters, go to Open > Incoming Letters

The Reception Module: Electronic Correspondence (Sending via 3rd Party)Genie Manual
© 2005-2019 Genie Solutions Pty Ltd236
You can select letters to a certain doctor by selecting their name from the Doctor drop-down list. Double-click onthe first letter to begin reviewing.
Reviewing letters is very similar to checking your pathology and radiology results (see Matching & LinkingResults). Genie will try to Match the letter as best it can to someone in the database otherwise you can create aNew patient based on the information given in the letter. Once the letter is matched you can Link it to thepatient's Clinical Window and it will move to the next letter for linking.
The Open RTF button will only appear if the letter contains RTF format data. This button allows you to open theletter in an external viewer. Once linked to the patient, the letter can be open in an external viewer by right-clicking on the letter in the Contact List and selecting Open RTF or double-clicking on the result in the Contactlist and clicking the Open RTF button.
Rich Text Format (RTF) Letters
If the incoming letter is received in RTF format, the linking process is slightly different depending on whether youhave the Import RTF Letters to 4D Write ticked in Practice Preferences under the Carrier Identifiers tab.Ticking this MAY allow the conversion of the RTF files into 4D Write in which case they will go into Open >Incoming Letters and the above linking process will apply.
When the PIT file contains an RTF document, the process will be different depending on your preferences.
If you do not have Import RTF Letters to 4D Write ticked.1. A Patient gets created if it does not already exist in Genie.2. The Document gets imported as an Attachment straight onto the patient file (red paperclip - not blue quill)3. A task is generated (provided Create a task when importing a letter is ticked in the Carrier Identifiers tab of
Practice Preferences).4. There is NO Incoming Letter record generated.5. A record is generated into the Correspondence Log (Received).
If you do have Import RTF Letters to 4D Write ticked.1. The Document gets imported as an Incoming Letter. (When Linked, appears as a letter on the Patient file
(blue quill).2. A task is generated (provided Create a task when importing a letter is ticked in the Carrier Identifiers tab of
Practice Preferences).

The Reception Module: Electronic Correspondence (Sending via 3rd Party)Genie Manual
© 2005-2019 Genie Solutions Pty Ltd 237
3. A record is generated into the Correspondence Log (Received).
If letters come in blank or scrambled, untick Import RTF Letters to 4D Write and Genie will automatically attachthem to the patients chart as an image. In order to do this, Genie searches for the correct patient, by matchingsurname, first name and DOB with the information held within the incoming letter. If it doesn’t find a matchingpatient, it will create a new patient record using the information within the incoming letter. For more informationon the naming conventions required for Genie to automatically match a letter, please see the Automatic LinkingRequirements.
Correspondence Log
Genie also keeps a log of all outgoing and incoming letters, so that you can see exactly when and on whichcomputer any letter was imported or exported, and also whether it has been read yet or not. This is also how youcan find out which 3rd party carriers this machine exports/imports for, if any.
The Correspondence Log can be accessed via Open > Correspondence Log OR through ReviewCorrespondence by clicking the Correspondence Log button OR through File > Maintenance & Reports,Administrator tab.
To view more detail of an entry, simply double-click it.
Configuring Healthlink
In the Correspondence Log, you will also notice a button labelled Configure Healthlink. This button opens thewindow below.

The Reception Module: Electronic Correspondence (Sending via 3rd Party)Genie Manual
© 2005-2019 Genie Solutions Pty Ltd238
In this window, you are able to enter in your Identifier, Computer, and browse to your Config file. The Config Fileis usually found in the following locations:
Macintosh HD:HLINK:hms_config.xml (Mac)C:\HLINK\hms_config.xml (Windows)
Once you have entered these settings, press the Test button to test if these are correct.
Note: This test can only be performed on the machine on which the Healthlink program is installed; thismay be your server if you have a network.
Possible Error Messages
If the Identifier you have entered in this window does not match your XML file, you will be presented with themessage below.

The Reception Module: Electronic Correspondence (Sending via 3rd Party)Genie Manual
© 2005-2019 Genie Solutions Pty Ltd 239
In the above example, you can see the Identifier is listed 'genietst'. As per the red error message, the Config Fileis for the Identifier 'geniesol', so the Identifier in this window will need to be changed to match this.
If the file is not found at the location you have browsed to, you will receive the error message below.
This is able to be recitifed by browsing to the correct location, or typing the correct file path into the Config Filefield.
Note: If you have Healthlink installed on your server machine, you MUST type this file path in manuallyafter selecting the correct computer from the Computer drop-down menu.
If the correct settings have been entered, you will be presented with the window below upon pressing Test.

The Reception Module: Electronic Correspondence (Sending via 3rd Party)Genie Manual
© 2005-2019 Genie Solutions Pty Ltd240
You can now press Save, and your Healthlink configuration is complete.
5.16.3 3rd Party Providers
Company Address Phone Email Website
ArgusConnect Suite 4 Greenhill EnterpriseCentreUniversity DriveMt Helen Victoria 3350
(03) 90371000
Sales: [email protected]: [email protected]
www.argusconnect.com.au
DivisionReport Level 3660 Margaret StreetSydney NSW 2000
(02) 92909890
[email protected] www.cnshealth.com.au
eClinic 657 Nicholson StreetCarlton North VIC 3054
(03) 93814567
[email protected] www.eclinic.com.au
eQuery 2 Hunter StreetCranbourne VIC 3977
(03) 59957880
www.gippspath.com.au/equery.htm
2Hippo 1300 789828
[email protected] www.2hippo.com
Healthlink Geoff SayerPO Box 566Caringbah NSW 2229
1800 125036
www.healthlink.net
Medemail 1800 006818
www.medemail.com.au
Medical Objects P O Box 5048Maroochydore BC QLD4558
(07) 54566000
www.medical-objects.com.au
ProMedicus 450 Swan StreetRichmond VIC 3121
(03) 94298800
www.promedicus.com.au

The Reception Module: Letter TemplatesGenie Manual
© 2005-2019 Genie Solutions Pty Ltd 241
5.17 Letter Templates
Letter templates can be created or opened by clicking on the Merged Letter Templates button. ThisLetter Template window will display all your available letter templates and forms:
In this window, existing merged letter templates will be listed with a yellow page icon and existing custom
forms will be listed with a green page icon.
Print will print the highlighted letter template for the selected record/s.
Custom Form allows you to create a new form to add to this list. Right-clicking on this button will bring up amenu that will allow you to download forms created by other Genie users. For more information, see the FormsModule.
Merged Letter allows you to create a new letter template to add to this list. For more information, see MergedLetters.
Duplicate allows you to copy the currently selected letter template. This can be useful if you want to makeseveral letter templates that are similar but with slight variations. When you click Duplicate, you will beprompted to enter a new name for the duplicate template.
Add Category allows you to add a new category so that you can organise your letter templates. You can addexisting letter templates to a category by dragging and dropping the letter template into the relevant category. Templates can also be moved between categories by dragging and dropping the template from one category toanother.
Delete Item will delete the selected template or category. Templates that are inside a category when it isdeleted will be moved into the unspecified category at the top of the list.
Expand All will expand all categories in order to see all templates. To expand one category click on the littleplus button to the left of the category name or by double-clicking on the category.
Collapse All will collapse all categories so that you cannot see the templates.
Close will close the Letter Template window.
Open will open the selected letter template or form.

The Reception Module: Letter TemplatesGenie Manual
© 2005-2019 Genie Solutions Pty Ltd242
5.17.1 Merged Letters
Merged Letters are letters that are generally used to provide information to the patient or to another provider (e.g. change of practice details, consent form etc.). In general, they should not require addition information to beadded on a case-by-case basis. They are very similar to Referral/Reply letter templates (see Referral/ReplyLetters), except they do not link a patient with a provider in the Address Book.
The letter templates can be accessed from many different windows in Genie, including the:
Appointment BookPatient DemographicsClinical WindowPatients List*Address Book*Account Holders*
*Letters printed from the Patients List, Address Book or Account Holders List will print for all recordsdisplayed in the list, not just the highlighted records. To use only select records in the list, highlight therequired records and go to Records > Use Selected. Letters printed from the Appointment Book, thePatient Demographics or the Clinical Window will print the letter only for the selected patient.
5.17.1.1 Setting up the 4D Write Area
Before filling the body of the letter, it is a good idea to perform a few basic setup tasks.
All the menus described below are within the 4D Write window, not the main Genie menus at the top of thescreen. These are located above the 4D Write toolbar, as seen below:
First, select File > Page Setup and make sure the page size is set to A4, and the correct printer has beenselected.
You can use the View menu to determine whether you would like to include headers and/or footers in your letter.Selecting Header or Footer from this menu will either tick, or untick this option.
Headers are a separate area at the top of a word processing document. These print on every page of a multi-page document, and are usually used for page numbering. Footers are a separate area at the bottom of thepage, and also print on every page of a multi-page document.
Finally, you should set the printable margins.

The Reception Module: Letter TemplatesGenie Manual
© 2005-2019 Genie Solutions Pty Ltd 243
The numbered scales along each side of the letter are called Rulers. If you place the cursor over the currentmargin setting, it will become a double-ended arrow as in the picture below.
You can now click and drag the margin left or right to suit. This has the effect of adjusting the width of the bodyof the letter. You can do the same for the other three sides of the template to adjust the left, right and bottommargins.
If you are using a header, clicking within the header area allows you to do the same to adjust the size of theheader.
Click Save to save the template.
5.17.1.2 Creating the Letter
The actual letter can be created quite quickly using the Expressions tab. This allows you to insert variouspieces of data at the point where the cursor is flashing, by either double-clicking or dragging and dropping therequired Expression. For more information on what each expression will insert, refer to Referral/Reply Letters.
Let's run through how to set up a basic letter addressed to the patient.First, highlight Your Letterhead in the Expressions tab, and either double-click or drag and drop this expressioninto your letter. This inserts the Letterhead you have set up in either Practice Preferences, or your individualUser Preferences (File > Practice Preferences or File > User Preferences).
Press Enter to move down a line, then select Today's Date from the Expressions tab. The following window willappear, asking how you would like the date to be formatted.
Note: You can change the Date Format at any time by double-clicking on the Date on the page.
Move the cursor down another couple of lines, and select Patient's Address from the Expressions tab.Move the cursor down another couple of lines, then begin the actual letter. Type 'Dear '.Now you must reference the patient’s title and Surname, so that regardless of the patient we send the letter to,the letter will have their correct title and name e.g. 'Dear Mr Smith' or 'Dear Mrs Jones'. To do this we will need touse the Fields tab, to reference the Title field.
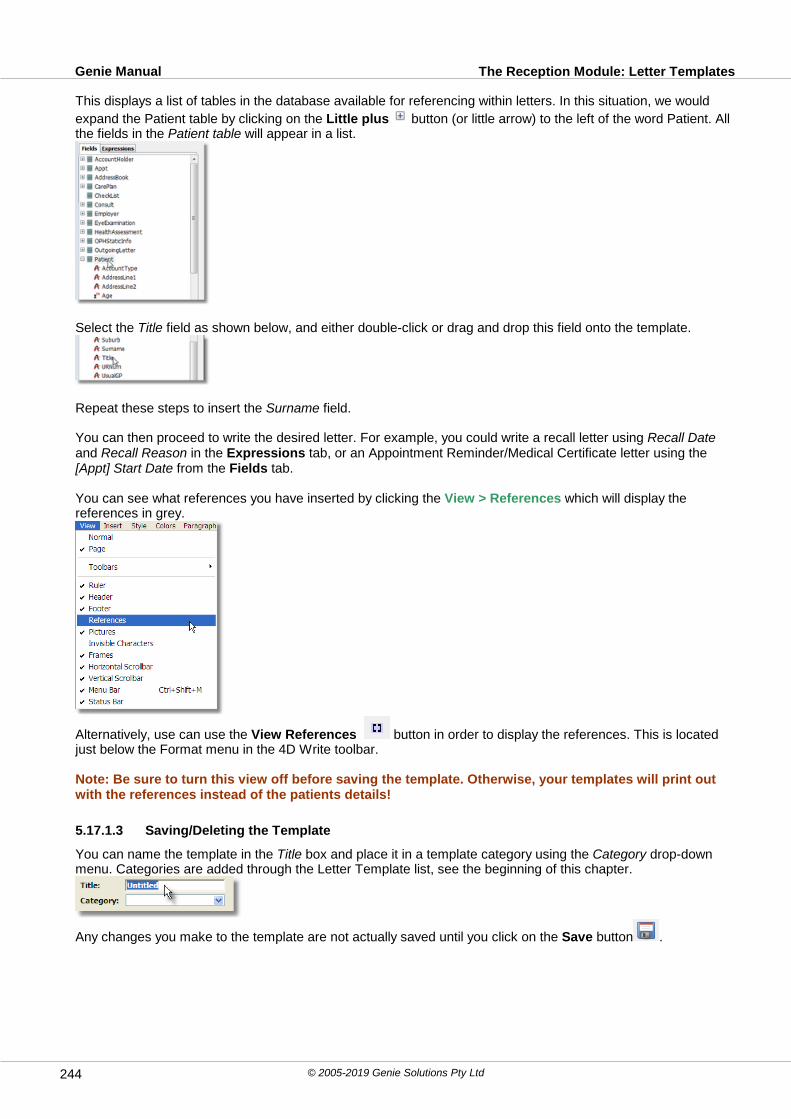
The Reception Module: Letter TemplatesGenie Manual
© 2005-2019 Genie Solutions Pty Ltd244
This displays a list of tables in the database available for referencing within letters. In this situation, we would
expand the Patient table by clicking on the Little plus button (or little arrow) to the left of the word Patient. Allthe fields in the Patient table will appear in a list.
Select the Title field as shown below, and either double-click or drag and drop this field onto the template.
Repeat these steps to insert the Surname field.
You can then proceed to write the desired letter. For example, you could write a recall letter using Recall Dateand Recall Reason in the Expressions tab, or an Appointment Reminder/Medical Certificate letter using the[Appt] Start Date from the Fields tab.
You can see what references you have inserted by clicking the View > References which will display thereferences in grey.
Alternatively, use can use the View References button in order to display the references. This is locatedjust below the Format menu in the 4D Write toolbar.
Note: Be sure to turn this view off before saving the template. Otherwise, your templates will print outwith the references instead of the patients details!
5.17.1.3 Saving/Deleting the Template
You can name the template in the Title box and place it in a template category using the Category drop-downmenu. Categories are added through the Letter Template list, see the beginning of this chapter.
Any changes you make to the template are not actually saved until you click on the Save button .

The Reception Module: Letter TemplatesGenie Manual
© 2005-2019 Genie Solutions Pty Ltd 245
You will then be provided with the following warning:
If you close the template via either the Close button, or the Close Window button , without clicking the savebutton first, none of the changes you have made to the template will be saved. This allows you to open andmake patient specific changes to a template without saving these changes for all future patient.
Saving A Copy In Patient Notes
If you would like to save a copy of the letter in the relevant patient’s Clinical Window after printing, select thetickbox Save a Copy in Clinical Record.
This would usually be done if the letter had medico-legal significance. In a year's time, you would still have anexact copy of what was mailed to the patient; the actual template may well have been modified, or even deletedduring this time.
The copy of the letter is created when the letter is actually printed, or emailed. If you were not actually printingthe letter but still wanted to create a copy in the patient’s record, you can click on the Copy Without Printing
button to the right of the Print button.
Creating a Consultation Note
Alternatively, you can choose to have a consultation record created with a note like “<Template Name> sent25/6/12” automatically inserted.To do this, select the Create a Consult after Printing tickbox.
Use for Quotes
Selecting the Use For Quotes tickbox will make this template available from within the Procedure window.However, you would normally create a quote template from within the procedure. See Creating Quote Templatesfor more details.
Deleting Templates
Templates can be deleted from your list of Templates by clicking the Delete Item button in the Letter Templateslist, for more information on this, see the beginning of this chapter.

The Reception Module: Letter TemplatesGenie Manual
© 2005-2019 Genie Solutions Pty Ltd246
5.17.1.4 Printing Merged Letters
Clicking on the Print button at the top right of the template window will print the template for the selected record(s).
If you are printing from a list (e.g. printing for one or more patients, account holders, or address book entries),you will be asked to confirm that you would like to print a letter for all of the displayed results. If you would onlylike to print to a selection of records in the list, highlight the records required and then go into Records > UseSelected.
Note: If any of the displayed patients have been marked as inactive or deceased, a letter will not beprinted for them.
5.18 Recalls
Recalls are setup either in the Clinical Window, through Patients > Add a Recall, or Appts > Add a Recall
For more information on adding Recalls, see Recalls in the Clinical Module.
5.18.1 Creating a Generic Recall Template
In order to print out the recalls when they fall due, you first need to create a Merged Letter Template. You canhave as many different types of letters as you like. For example, you may have a specific letter template for PapSmear recalls, and a different template for Fluvax recalls.
You can also create a generic recall letter which simply states the reason for the recall and the due date. Forinstructions on how to new merged letter templates, please refer to the Merged Letter Templates chapter.
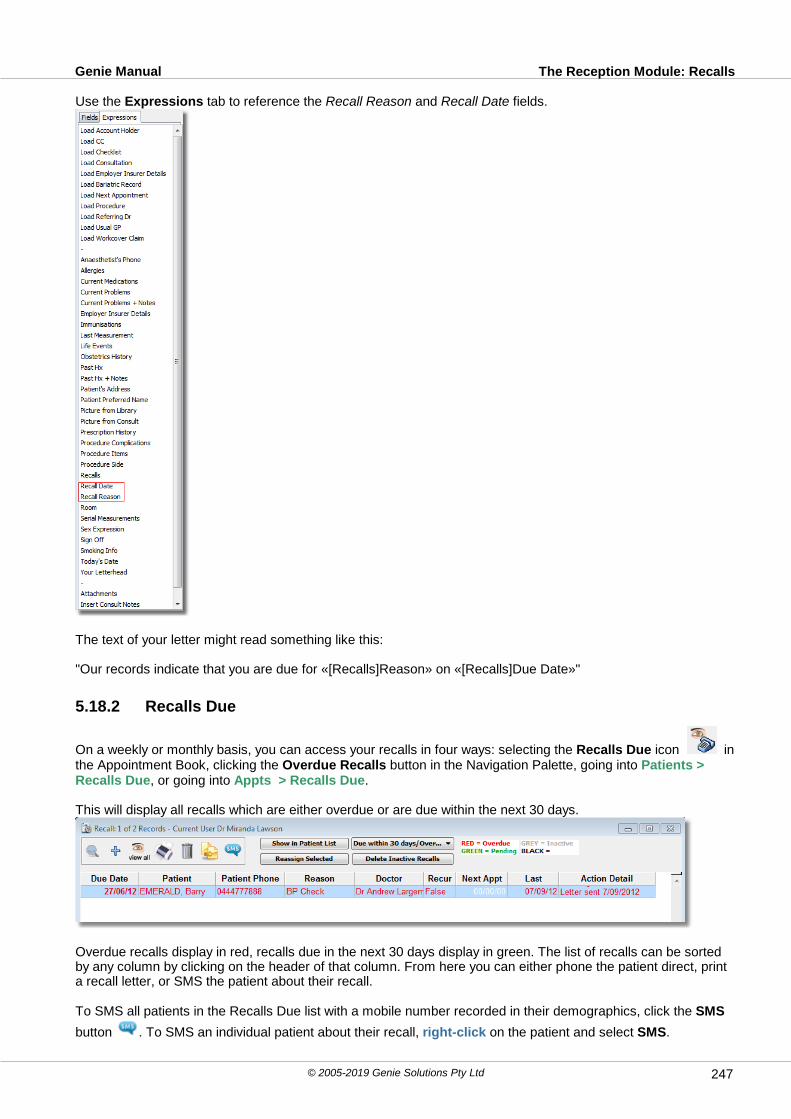
The Reception Module: RecallsGenie Manual
© 2005-2019 Genie Solutions Pty Ltd 247
Use the Expressions tab to reference the Recall Reason and Recall Date fields.
The text of your letter might read something like this:
"Our records indicate that you are due for «[Recalls]Reason» on «[Recalls]Due Date»"
5.18.2 Recalls Due
On a weekly or monthly basis, you can access your recalls in four ways: selecting the Recalls Due icon inthe Appointment Book, clicking the Overdue Recalls button in the Navigation Palette, going into Patients >Recalls Due, or going into Appts > Recalls Due.
This will display all recalls which are either overdue or are due within the next 30 days.
Overdue recalls display in red, recalls due in the next 30 days display in green. The list of recalls can be sortedby any column by clicking on the header of that column. From here you can either phone the patient direct, printa recall letter, or SMS the patient about their recall.
To SMS all patients in the Recalls Due list with a mobile number recorded in their demographics, click the SMS
button . To SMS an individual patient about their recall, right-click on the patient and select SMS.

The Reception Module: RecallsGenie Manual
© 2005-2019 Genie Solutions Pty Ltd248
If you click the SMS Button or SMS a patient individually, you can make any necessary adjustments to thedefault message in the subsequent SMS Message window.
To print a recall letter, highlight the required patients, and click on the Merged Letter Template button toselect the template you would like to use from the Letter Templates list.
This will open the selected template. Use the Printer button at the top right of the window to print a letter for allthe patients who were previously selected.

The Reception Module: RecallsGenie Manual
© 2005-2019 Genie Solutions Pty Ltd 249
Once printing has been completed, you will be asked if you would like to re-assign the recalls to their next duedate. If you click OK, then the non-recurring recalls will be marked as Completed. They are not actually deleted.Recurring recalls will be set to the next due date. If you don't automatically update the records when asked, youcan do this by clicking on the Reassign Selected button. After pressing this, you will be presented with theprompt below.
Note: Reassigning recalls results in the current recall being issued a new due date, it does not create aseparate record for the new recall.
You will then be prompted as to whether you would like to flag the patients record(s). For more information onthis see the next section on Flagging of Patient Record.
You can view all Completed recalls (i.e. printed, non-recurring recalls), at any time by selecting CompletedRecalls from the drop-down menu as shown.
The Last field will be marked with today's date (or the date the most recent recall action was taken) and theAction Details field will be marked as Letter Sent if a merged letter template was used, or SMS sent if the SMSoption was used. The Action Detail column can be edited manually by double-clicking on the recall and typinginto the appropriate fields. For example, if you had telephoned a patient and wanted to record this, you couldtype 'Spoke to pt on phone' and the current date into the Action Detail field.
Note: The Recalls Due section in Genie is used as a reminder system only. A recall is considered to becompleted in Genie when a reminder action is performed, NOT when the patient comes in for theirappointment. This is monitored through Flagging. See Flagging of Patient Record for more information.
5.18.3 Flagging of Patient Record
When recalls are reassigned, the patient record can get flagged if you accept the prompt to do so.
The Reception Module: RecallsGenie Manual
© 2005-2019 Genie Solutions Pty Ltd250
If the recall is currently overdue, then the Flagged Date is set to one week ahead. Otherwise, the Flagged Dateis set to one week after the recall due date.
When a user enters a flagged Clinical Window, they will be notified that it is flagged and for what reason.
After the Flagged date has passed, the user who assigned the recall will see the Overdue Patients notification inthe navigation palette.
By clicking on this button, the user can view all of their flagged patients. These flags will be displayed regardlessof whether they are generated by printing a recall or for another reason.
A list of Flagged patients for all providers can be viewed at anytime through Open > Patients and then Patients> Flagged Patients.
5.18.4 Printing the Recall List
To print the Recalls list, click on the Printer button. If you would like to only print a selection of records displayedin Recalls Due, highlight the required records, and go to Records > Use Selected from the menus above theRecalls window. This will remove from display any non highlighted records, allowing you to just print theselection.
Clicking the Printer button will open a pre-existing Quick Report template allowing you to print all the detailscontained in Recalls Due (e.g. Due Date, Patient, Pt Phone, Reason, etc). If you do not want to make any edits,you can simply click on the Print button and the list will print.
The Reception Module: RecallsGenie Manual
© 2005-2019 Genie Solutions Pty Ltd 251
5.18.5 Pathology/Radiology Recalls (Investigation Action List)
The Investigation Action List allows the receptionist or practice nurse to deal with results as requested by thereviewing doctor.This would normally be done once or twice per day. As each result is dealt with, it should be removed from thelist. As new results are reviewed by the doctor, they are added to the list, so this list is constantly 'rolling over'each day.
To open the Investigation Action List (as shown below), select Open > Investigations Action List.
The Action to be taken is noted in the Action column. If the action to be taken is marked as Recall, it will bemarked in red. All other actions are marked in green, or in black if No Action is required.
In the above example, the patient is to be recalled. The home phone number is listed, so you would normally callthe patient and make an appointment for them. You can open the patients demographics using the Edit Patient
button if you need any other information such as phone numbers.
To check whether the patient already has an appointment booked, click the Check Appts button. If noappointments are found, you can click on the Appointment Book button to open the Appointment Book.
Once you have made the appointment, click on the Remove From List button. Clicking this will result in thefollowing window:
Before you can click OK you must have entered at least your initials.The information entered into this window is saved with the result, so that you can look back at a later date andsee who spoke with the patient and what was done.Select the Patient has been notified of result tickbox if you have actually spoken with the patient.Because this is a recall, you will probably want to select the Flag Patient's Record tickbox if the reviewing doctorhas not already done so. Enter the date after which you would like Genie to warn you if the patient's recordremains flagged.In the Message Given or Action Taken field enter what you have either done or told the patient.
Click OK to remove this result from the list.
Note: You can select multiple results at once by highlighting them with Shift+click, or simply selectingall results. You can then move through the above window quickly without having to click on the'Remove From List button', or enter your initials for each result.
Instead of, or as well as, phoning the patient, you can use the Merged Letter Template button to send oneor many of the patients in the list a letter or email.
You can view the actual result by double-clicking on it in the list, assuming you have clinical privileges in the Security tab of your User Preferences.

The Reception Module: ScanningGenie Manual
© 2005-2019 Genie Solutions Pty Ltd252
5.19 Scanning
Genie can handle scanning in several ways. It can:
1. Scan directly to a patient's file using ImagePro (see Scanning Within Genie),2. Batch process multiple images that were scanned and stored in a holding folder outside of Genie (see Batch
Processing),3. Attach images scanned outside of Genie to individual patient files (see Attachments in the online Genie
manual). This is designed for practices that do minimal scanning.
The Folder Hierarchy
Genie does not store attached files in the data file. These attached files are stored in an Images folder and areference to this location is stored in the data file so that the files can be opened and viewed at any time. Bydefault, the Images folder is located in the Genie folder on the server computer. If you choose to have theImages folder in a different location, it will need to be specified in the Images & Attachments tab of PracticePreferences window (File > Practice Preferences).
If you are using Genie single user, Genie treats your computer as the 'server' and creates the Image folder in thesame way as a network. If you decided to upgrade to a network, you would need to copy the Images folder intothe Genie folder on the server and change the pathway stored in your Practice Preferences.
As Genie stores the files in a folder, it is necessary to build a folder hierarchy (i.e. folders within folders). Geniebuilds this folder hierarchy automatically and creates new folders when required. Folders labelled 'A' to 'Z' will becreated directly inside the Images folder. Inside these folders, each patient with attached files will have their ownfolder. The naming convention of these folders is their Surname, followed by their first name initial and theirPatient ID number. The Patient ID number is a unique number that is automatically generated whenever a newpatient record is created. It can be viewed in the top left corner of patient's Demographics window
Note: The Patient ID number should not be confused with the patient's Chart Number as the chartnumber is not a unique number.
In the screenshot above, the folder containing Vincent Lee’s images would be named 'LeeV41' and would befound at the following location on the server:
Windows: C:\Genie\Images\L\LeeV41\Mac: :Applications:Genie:Images:L:LeeV41
Any files that are placed in this folder can be opened from Vincent Lee's clinical record on any client computer. New files which are added to a patient record from a client machine are automatically copied to the patient’sfolder on the server.
If a folder for the patient does not already exist, you can click the Create All Patient Image Folders button inGeneral tab of the Maintenance & Reports window (File > Maintenance and Reports) to automatically create asubfolder for every patient in your database.
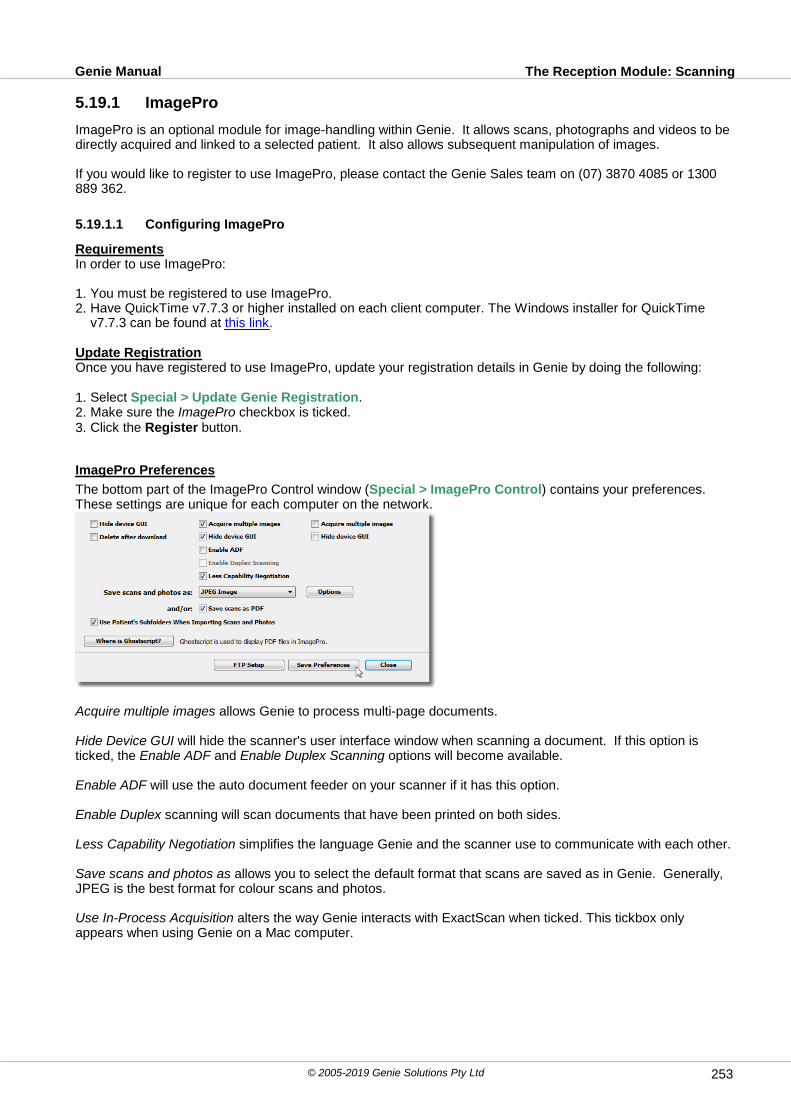
The Reception Module: ScanningGenie Manual
© 2005-2019 Genie Solutions Pty Ltd 253
5.19.1 ImagePro
ImagePro is an optional module for image-handling within Genie. It allows scans, photographs and videos to bedirectly acquired and linked to a selected patient. It also allows subsequent manipulation of images.
If you would like to register to use ImagePro, please contact the Genie Sales team on (07) 3870 4085 or 1300889 362.
5.19.1.1 Configuring ImagePro
RequirementsIn order to use ImagePro:
1. You must be registered to use ImagePro.2. Have QuickTime v7.7.3 or higher installed on each client computer. The Windows installer for QuickTime
v7.7.3 can be found at this link.
Update RegistrationOnce you have registered to use ImagePro, update your registration details in Genie by doing the following:
1. Select Special > Update Genie Registration.2. Make sure the ImagePro checkbox is ticked.3. Click the Register button.
ImagePro Preferences
The bottom part of the ImagePro Control window (Special > ImagePro Control) contains your preferences.These settings are unique for each computer on the network.
Acquire multiple images allows Genie to process multi-page documents.
Hide Device GUI will hide the scanner's user interface window when scanning a document. If this option isticked, the Enable ADF and Enable Duplex Scanning options will become available.
Enable ADF will use the auto document feeder on your scanner if it has this option.
Enable Duplex scanning will scan documents that have been printed on both sides.
Less Capability Negotiation simplifies the language Genie and the scanner use to communicate with each other.
Save scans and photos as allows you to select the default format that scans are saved as in Genie. Generally,JPEG is the best format for colour scans and photos.
Use In-Process Acquisition alters the way Genie interacts with ExactScan when ticked. This tickbox onlyappears when using Genie on a Mac computer.

The Reception Module: ScanningGenie Manual
© 2005-2019 Genie Solutions Pty Ltd254
The Option button allows you to set the quality of the images being scanned. Below is an example of the JPEGoptions:
The easiest way to set the quality is to specify the maximum file size in the Target Size field. It is recommendedthat images stay at 100 Kilobytes or less as larger, higher quality images will be slower to copy back and forthover a network.
Note: the Target Size is measured in Bytes. There are 1000 Bytes in 1 Kilobyte. Therefore 100 Kilobyteswould be 100,000 Bytes.
The Save scans as PDF checkbox allows you to save scans as PDF documents. If this option is ticked, it willoverride what is selected in the Save scans and photos as drop-down menu and will save all files as PDFdocuments.
If the Use Patient's Subfolders When Importing Scans and Photos option is selected, the window below willappear when scanning or adding an attachment, allowing you to select which of the patients sub folders youwould like the attachement to go into (e.g. Op Photos, Referrals etc.):
The Add Defaults button will add the default folders you have listed to this patient's image folder.
The Define Defaults button allows you to set default folders that can be added to any patient's image folder.
The Add One button allows you to add a new folder to this specific patient's image folder.
The None button will not add the images to any of the sub folders. It will add it directly in the patient's imagefolder.
The Select button will add the image to the highlighted folder.
For more information on adding sub folders, please refer to Viewing Images.
If you make any changes to the preferences, you must click the Save Preference button for the changes to takeeffect.
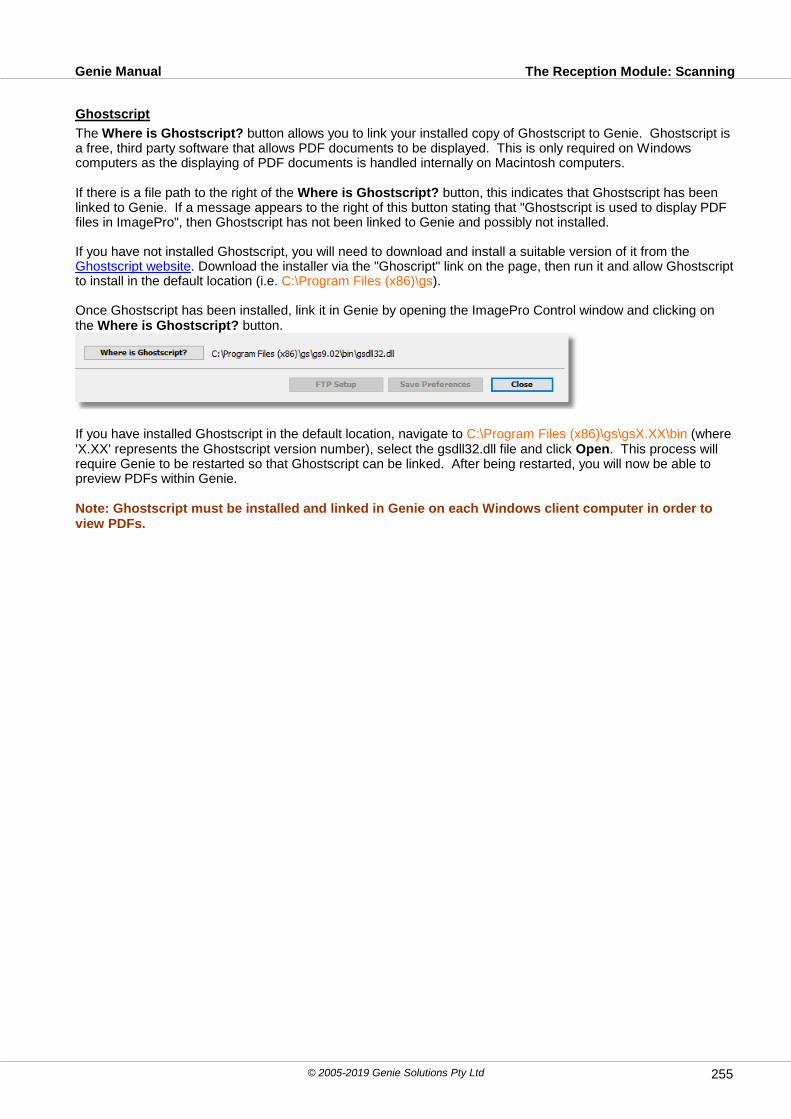
The Reception Module: ScanningGenie Manual
© 2005-2019 Genie Solutions Pty Ltd 255
Ghostscript
The Where is Ghostscript? button allows you to link your installed copy of Ghostscript to Genie. Ghostscript isa free, third party software that allows PDF documents to be displayed. This is only required on Windowscomputers as the displaying of PDF documents is handled internally on Macintosh computers.
If there is a file path to the right of the Where is Ghostscript? button, this indicates that Ghostscript has beenlinked to Genie. If a message appears to the right of this button stating that "Ghostscript is used to display PDFfiles in ImagePro", then Ghostscript has not been linked to Genie and possibly not installed.
If you have not installed Ghostscript, you will need to download and install a suitable version of it from the Ghostscript website. Download the installer via the "Ghoscript" link on the page, then run it and allow Ghostscriptto install in the default location (i.e. C:\Program Files (x86)\gs).
Once Ghostscript has been installed, link it in Genie by opening the ImagePro Control window and clicking onthe Where is Ghostscript? button.
If you have installed Ghostscript in the default location, navigate to C:\Program Files (x86)\gs\gsX.XX\bin (where'X.XX' represents the Ghostscript version number), select the gsdll32.dll file and click Open. This process willrequire Genie to be restarted so that Ghostscript can be linked. After being restarted, you will now be able topreview PDFs within Genie.
Note: Ghostscript must be installed and linked in Genie on each Windows client computer in order toview PDFs.
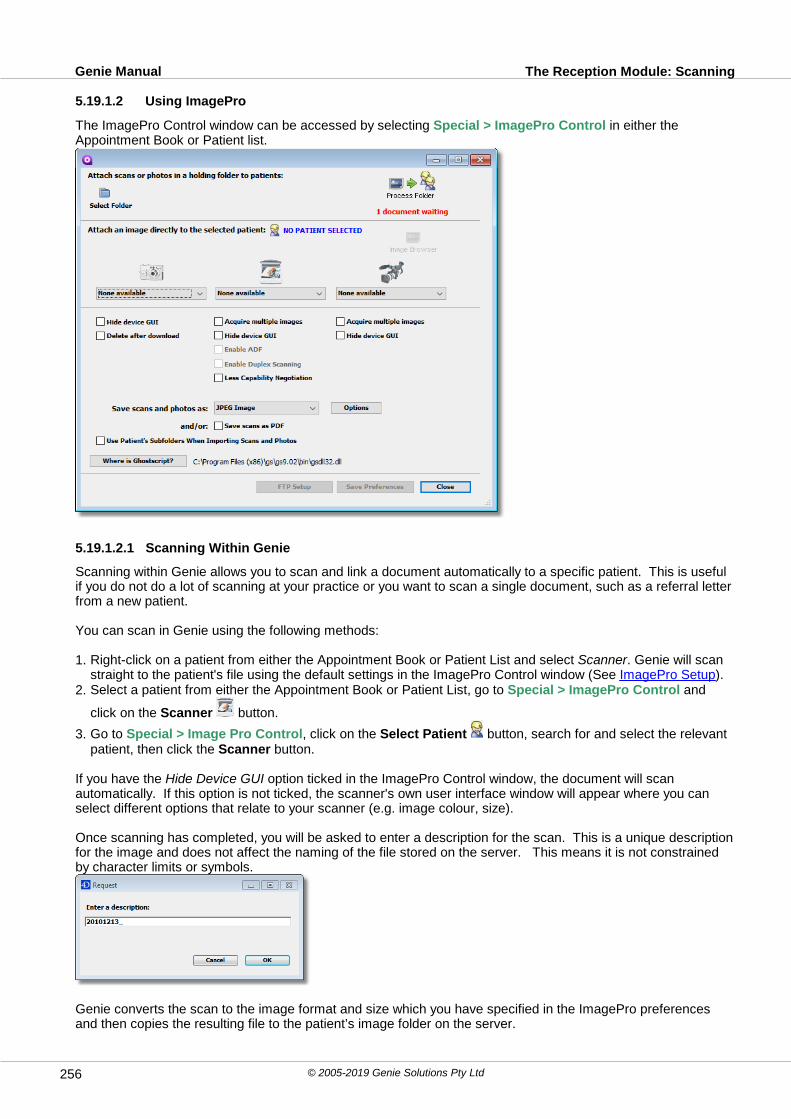
The Reception Module: ScanningGenie Manual
© 2005-2019 Genie Solutions Pty Ltd256
5.19.1.2 Using ImagePro
The ImagePro Control window can be accessed by selecting Special > ImagePro Control in either theAppointment Book or Patient list.
5.19.1.2.1 Scanning Within Genie
Scanning within Genie allows you to scan and link a document automatically to a specific patient. This is usefulif you do not do a lot of scanning at your practice or you want to scan a single document, such as a referral letterfrom a new patient.
You can scan in Genie using the following methods:
1. Right-click on a patient from either the Appointment Book or Patient List and select Scanner. Genie will scanstraight to the patient's file using the default settings in the ImagePro Control window (See ImagePro Setup).
2. Select a patient from either the Appointment Book or Patient List, go to Special > ImagePro Control and
click on the Scanner button.
3. Go to Special > Image Pro Control, click on the Select Patient button, search for and select the relevantpatient, then click the Scanner button.
If you have the Hide Device GUI option ticked in the ImagePro Control window, the document will scanautomatically. If this option is not ticked, the scanner's own user interface window will appear where you canselect different options that relate to your scanner (e.g. image colour, size).
Once scanning has completed, you will be asked to enter a description for the scan. This is a unique descriptionfor the image and does not affect the naming of the file stored on the server. This means it is not constrainedby character limits or symbols.
Genie converts the scan to the image format and size which you have specified in the ImagePro preferencesand then copies the resulting file to the patient’s image folder on the server.

The Reception Module: ScanningGenie Manual
© 2005-2019 Genie Solutions Pty Ltd 257
5.19.1.2.2 Batch Processing
If you have multiple documents for multiple patients to scan, the procedure outlined below is highlyrecommended and will yield considerable time savings.
Note: While this section has been written with scanning in mind, the procedure applies for other typesof documents such as photos, electronic faxes, PDFs etc.
Configuration
Note: Each client machine that will be scanning or processing (uploading) documents needs tocomplete these configuration steps:
1. Create a holding folder called something like 'Scanning' on a client machine. This can be anywhere on yourhard drive, the Desktop is usually convenient.
2. Set up your Scanner's Software to scan to this holding folder.3. In Genie, open Image Pro Control by going into Special > ImagePro Control.
4. Click on the Blue folder button in ImagePro Control, and select your holding folder. This directs Genie toyour newly scanned documents.
You can then scan your documents into the holding folder using your scanner's software outside Genie. Blackand white JPEG, PNG or TIFF, with a resolution of about 150 dpi are usually best at keeping your image sizebelow the desired 100KB.
Importing Scans
Once a bundle of documents have been scanned to the holding folder, the next step is importing them intoGenie so they can be accessed in the Clinical Window. You can import these into Genie as follows:
1. Click on the Process Folder button in the top right of the ImagePro Control window. This displays thecontents of the holding folder, as shown below:
The buttons at the top of this window allow you to apply filters to , draw and annotate on images ,
delete , and open the Image Browser for the highlighted patient image.
Preview Images needs to be ticked if you would like to be able to preview the images in the preview pane on theright.
Open Info Window When Processing will open the below info window for all images so further detail about theimage can be added when processing.

The Reception Module: ScanningGenie Manual
© 2005-2019 Genie Solutions Pty Ltd258
Use Patients Subfolders allows you to select which of the patients subfolders you would like an image to go intowhen processing the images. eg. Op Photos, Referrals etc. These are added through the patient's ImageBrowser.
For more information on adding subfolders refer to Viewing Images in the Clinical Module.
1. To view an image, click once on the name of the scan. You can zoom in on a scan simply by clicking on thedisplayed image, and zoom out by Shift-clicking. If the image will not display in the display area, simplydouble-click on the description of the image and it will open the image in a separate window.
2. To change the date of the image, (e.g. to the date of the referral letter) slow double-click in the Date column.You can right-click to change the date to today's date for one image or all images in the list.
3. To rename the image, slow double-click in the Description column. The name of an image is for displaypurposes only in Genie, it does not change the original name of the file on the Server. For this reason, imagescan be named using any type or amount of characters, and the same image name can be used for more thanone patient.
4. To attach a single image to a patient, double-click in the Patient column next to the image name. If you havemultiple images you need attach to the same patient, you can highlight the images using Ctrl+click orShift+click, then click on the Link to Patient button.
5. You will be presented with a Search window to allow you to specify the patient to whom the image(s) belongs.If you link an image to the wrong patient, you can unlink it by double-clicking on its name and choosing 'unlink'when prompted. This will allow you to then link this image to the correct patient.
If you right-click on the patient's name you can open their Clinical Window for reference.
6. Once you have linked the image to a patient, you can also mark it to be reviewed by a particular provider (thisis optional). To do this, right-click in the To be Reviewed By column to assign a reviewer.
7. Once you have finished assigning the scanned documents to the relevant patients, click on the Process xImages button. Genie will process each image, copying it to the appropriate patient folder on the server.
As the scanned documents are processed, Genie moves the original file into a folder called 'Processed', which isautomatically created within the holding folder. These can then be deleted manually if you wish.
If you selected a provider to review the scan, Genie will create an entry in the Scans for Review section (Open >Scans for Review).
Providers can then tick Reviewed simply by highlighting each scan to preview its contents. or right-click in theRedirect To column to redirect to another provider. Providers with clinical access (File > Edit Groups) can usethe drop-down menu at the top of the window to view scans for review by other users, however users may onlymark their own scans as Reviewed.
Whenever there are scans waiting, you will see Scans to Review as an entry in the navigation palette.
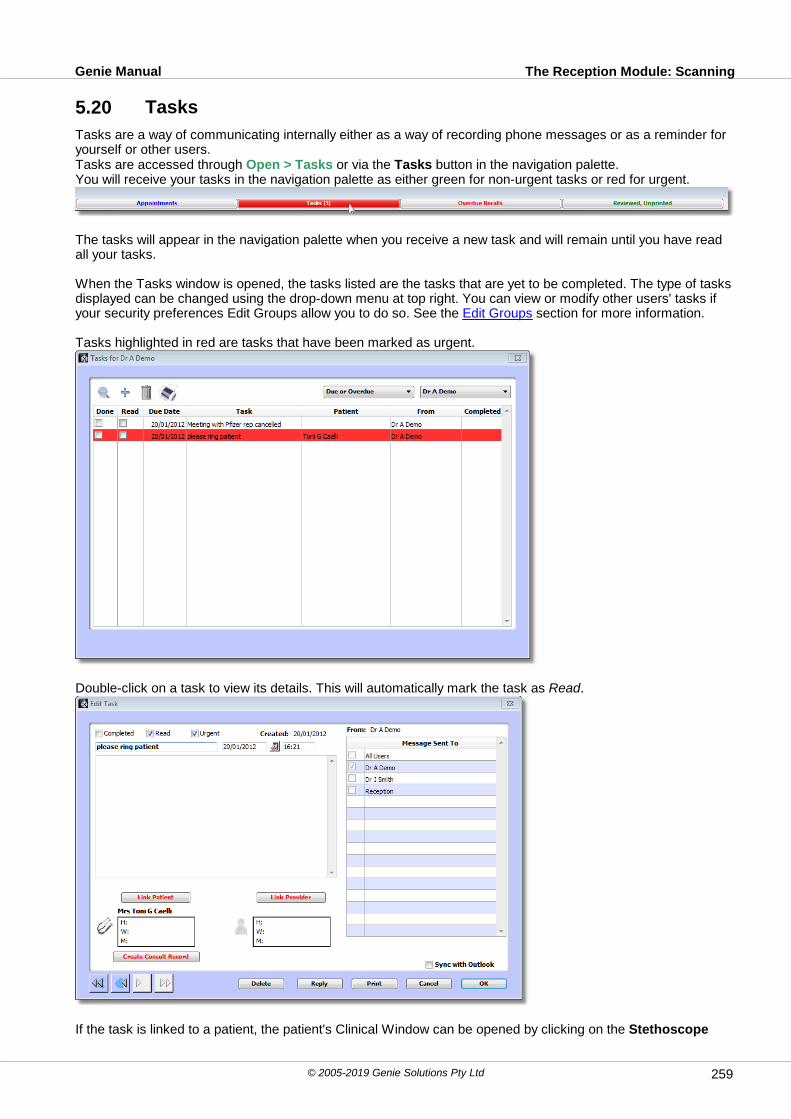
The Reception Module: ScanningGenie Manual
© 2005-2019 Genie Solutions Pty Ltd 259
5.20 Tasks
Tasks are a way of communicating internally either as a way of recording phone messages or as a reminder foryourself or other users.Tasks are accessed through Open > Tasks or via the Tasks button in the navigation palette.You will receive your tasks in the navigation palette as either green for non-urgent tasks or red for urgent.
The tasks will appear in the navigation palette when you receive a new task and will remain until you have readall your tasks.
When the Tasks window is opened, the tasks listed are the tasks that are yet to be completed. The type of tasksdisplayed can be changed using the drop-down menu at top right. You can view or modify other users' tasks ifyour security preferences Edit Groups allow you to do so. See the Edit Groups section for more information.
Tasks highlighted in red are tasks that have been marked as urgent.
Double-click on a task to view its details. This will automatically mark the task as Read.
If the task is linked to a patient, the patient's Clinical Window can be opened by clicking on the Stethoscope
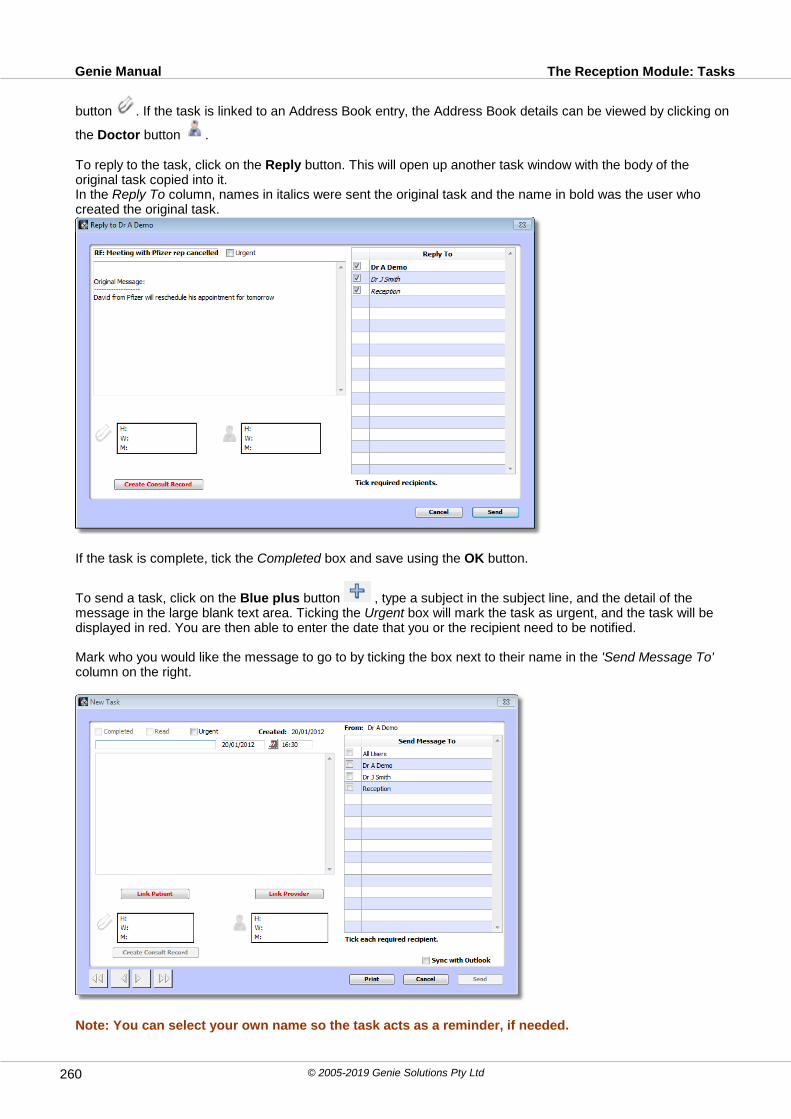
The Reception Module: TasksGenie Manual
© 2005-2019 Genie Solutions Pty Ltd260
button . If the task is linked to an Address Book entry, the Address Book details can be viewed by clicking on
the Doctor button .
To reply to the task, click on the Reply button. This will open up another task window with the body of theoriginal task copied into it. In the Reply To column, names in italics were sent the original task and the name in bold was the user whocreated the original task.
If the task is complete, tick the Completed box and save using the OK button.
To send a task, click on the Blue plus button , type a subject in the subject line, and the detail of themessage in the large blank text area. Ticking the Urgent box will mark the task as urgent, and the task will bedisplayed in red. You are then able to enter the date that you or the recipient need to be notified.
Mark who you would like the message to go to by ticking the box next to their name in the 'Send Message To'column on the right.
Note: You can select your own name so the task acts as a reminder, if needed.

The Reception Module: TasksGenie Manual
© 2005-2019 Genie Solutions Pty Ltd 261
If you are using Genie version 8.5.7 or higher, you will also be able to send tasks to groups of users. This featurewill be available for all groups with Send Tasks and Receive Tasks ticked.
For more information on using groups functionality in Genie, please see the Edit Groups section.
You can also link the task to a patient by either creating the task while in their Clinical Window (though Tools >Add Task), or clicking on the Link Patient button. This will keep a record of the task in the Tasks section of theOther tab in the Clinical Window. Similarly, the task can be linked to a person in the Address Book using theLink Provider button.
5.21 Labels
Labels can be printed from many windows within Genie; these include the Appointment Book, Patient List,
Account Holder List, Address Book and Patient Demographics. To print a label, press the Label button inone of these windows.
Clicking on the Label button with a patient selected in one of the above windows will cause a drop-down menu toappear. This menu will have the option Built-in Labels and any other templates you have ticked Display in Listfor. You can use Genie's Built-in Labels for Avery 7 x 2 or Dymo Labels.
Select the best suited label from the drop-down list at the top of this window, and select the relevant radio buttonout of Avery 7 x 2 or Dymo Labels. If you are using Dymo labels, ensure you have your Dymo printer selected forthe Labels entry in your Printing Preferences (File > Printing Preferences).
You are able to print up to 14 labels at a time by using the No of Labels drop-down menu. If you are using Averylabels, select your starting label by indenting it on the table in left. If you are using Dymo labels, select the correctsize from the Select size.. drop-down menu.
If you find that your labels are printing outside of the margins, use the Edit Template button to adjust themaccordingly. If you would like to adjust the entire label template, click and drag the mouse over the whole labeltemplate to highlight it, releasing the mouse once you have covered the template. The invisible references willnow be visible. You can nudge all fields left, right, up and down by pressing the arrow keys on your keyboard.You can save these changes by clicking the Disk button and closing out of this Edit Template window.
Once you have configured your labels, click on the Print button.
Display in List will add the selected label to the label drop-down menu so that this window can be bypassed infuture. You will not be able to select starting label or number of labels if you print directly from the label icon.


Part
VIClinical
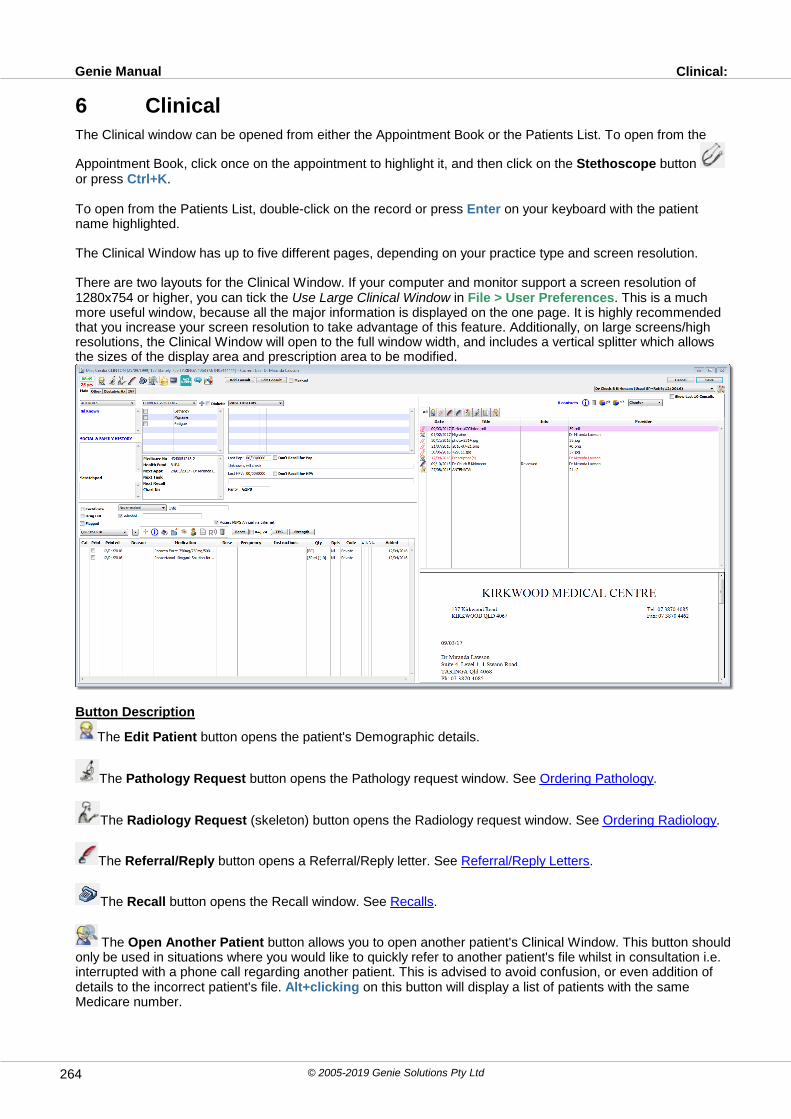
Clinical: Genie Manual
© 2005-2019 Genie Solutions Pty Ltd264
6 ClinicalThe Clinical window can be opened from either the Appointment Book or the Patients List. To open from the
Appointment Book, click once on the appointment to highlight it, and then click on the Stethoscope button or press Ctrl+K.
To open from the Patients List, double-click on the record or press Enter on your keyboard with the patientname highlighted.
The Clinical Window has up to five different pages, depending on your practice type and screen resolution.
There are two layouts for the Clinical Window. If your computer and monitor support a screen resolution of1280x754 or higher, you can tick the Use Large Clinical Window in File > User Preferences. This is a muchmore useful window, because all the major information is displayed on the one page. It is highly recommendedthat you increase your screen resolution to take advantage of this feature. Additionally, on large screens/highresolutions, the Clinical Window will open to the full window width, and includes a vertical splitter which allowsthe sizes of the display area and prescription area to be modified.
Button Description
The Edit Patient button opens the patient's Demographic details.
The Pathology Request button opens the Pathology request window. See Ordering Pathology.
The Radiology Request (skeleton) button opens the Radiology request window. See Ordering Radiology.
The Referral/Reply button opens a Referral/Reply letter. See Referral/Reply Letters.
The Recall button opens the Recall window. See Recalls.
The Open Another Patient button allows you to open another patient's Clinical Window. This button shouldonly be used in situations where you would like to quickly refer to another patient's file whilst in consultation i.e.interrupted with a phone call regarding another patient. This is advised to avoid confusion, or even addition ofdetails to the incorrect patient's file. Alt+clicking on this button will display a list of patients with the sameMedicare number.
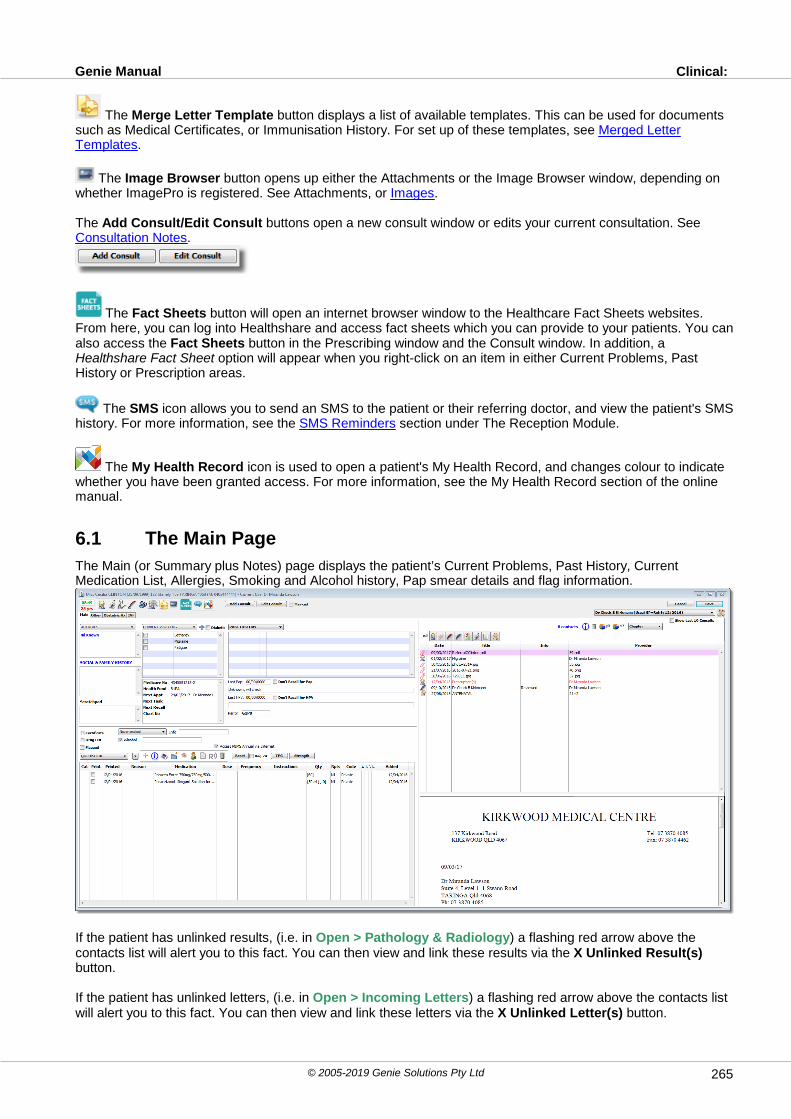
Clinical: Genie Manual
© 2005-2019 Genie Solutions Pty Ltd 265
The Merge Letter Template button displays a list of available templates. This can be used for documentssuch as Medical Certificates, or Immunisation History. For set up of these templates, see Merged LetterTemplates.
The Image Browser button opens up either the Attachments or the Image Browser window, depending onwhether ImagePro is registered. See Attachments, or Images.
The Add Consult/Edit Consult buttons open a new consult window or edits your current consultation. SeeConsultation Notes.
The Fact Sheets button will open an internet browser window to the Healthcare Fact Sheets websites.From here, you can log into Healthshare and access fact sheets which you can provide to your patients. You canalso access the Fact Sheets button in the Prescribing window and the Consult window. In addition, aHealthshare Fact Sheet option will appear when you right-click on an item in either Current Problems, PastHistory or Prescription areas.
The SMS icon allows you to send an SMS to the patient or their referring doctor, and view the patient's SMShistory. For more information, see the SMS Reminders section under The Reception Module.
The My Health Record icon is used to open a patient's My Health Record, and changes colour to indicatewhether you have been granted access. For more information, see the My Health Record section of the onlinemanual.
6.1 The Main Page
The Main (or Summary plus Notes) page displays the patient’s Current Problems, Past History, CurrentMedication List, Allergies, Smoking and Alcohol history, Pap smear details and flag information.
If the patient has unlinked results, (i.e. in Open > Pathology & Radiology) a flashing red arrow above thecontacts list will alert you to this fact. You can then view and link these results via the X Unlinked Result(s)button.
If the patient has unlinked letters, (i.e. in Open > Incoming Letters) a flashing red arrow above the contacts listwill alert you to this fact. You can then view and link these letters via the X Unlinked Letter(s) button.

Clinical: The Main PageGenie Manual
© 2005-2019 Genie Solutions Pty Ltd266
The Allergies field allows you to record any allergies that the patient may have, both Drug and Non-Drug. Drugallergies will appear in the field in red text, and Non-Drug allergies will appear in blue. Clicking the drop-downmenu above the field and selecting Add... will allow you to search for a drug. When you select a drug, Genie willask you whether you wish to add the drug to the Patient, or to the Choice List for quick selection in future. Non-drug allergies can be added by typing them in full into the search bar when clicking Add..., or by selecting Non-drug allergy from the drop-down menu.
Note: For sites not using MIMS, user-added drugs are added to the Allergies field as non-drug allergies.This means that Genie will not produce a warning for a user-added drugs when prescribing, even if thepatient is marked as allergic to that drug.
The Social & Family History field is a free text field in which you can enter any further information about thepatient's life that may affect their health or treatment.
The Scratchpad displays free text in red font only and is useful for information such as the patient'sphysiotherapist or other information that is pertinent to their care.
The Medicare No, Health Fund, Next Appt, Next Task, Next Recall and Chart No area displays relevantinformation for these fields. Double-clicking on the Next Appt, Next Task and Next Recall fields will take you tothe relevant area in Genie (e.g. double-clicking on Next Appt opens the future appointments window).
Adding/Deleting Current Problems/Past HistoryA Current Problem or Past History item can be added by clicking on the respective menu and selecting either:a). 'Add to Menu', which will be used for common problems that are likely to be used for other patients, ORb). 'New', which adds the problem only to that patient.The small Blue Plus button next to Current Problems also allows you to add a New problem to the currentpatient.
To delete Current Problems/Past History items from the patients record, double-click on the problem and usethe Delete button or right-clicking on a Current Problem, Past History or Allergies entry will display a shortcutpopup window
To delete problems from the list of Current Problems/Past History, select the relevant drop-down menu, holddown the ALT key and highlight the item to delete. Let go of your mouse, and let go of the ALT key.
Drag and Drop Features
The Current Problem and Past History list can be:1. Sorted by simply dragging and dropping each record into the position in which you would like it to permanentlyappear.2. Dragged and dropped between each other, to convert a Current Problem into a Past History for example.3. Dragged onto a prescription to set the reason for that medication.4. Dragged onto a consultation record to set the Primary Presenting Problem. If there is already a primary
presenting problem, this becomes a secondary presenting problem.
Pap Smears and HPV TestingThe Last Pap and Last HPV fields can be filled in automatically if you download electronic results. Alternatively,they can be filled in manually to stop warnings for overdue smears/tests appearing, and to mark the patient onthe Overdue Smears and Overdue HPV Testing lists (Patients > Overdue Smears/Overdue HPV Testing). Ifthe patient is not a regular of the practice, or no longer is required to be recalled for smears or HPV testing, youcan tick the Don't Recall for Pap/HPV tickboxes. For more information about using the Overdue Smears andOverdue HPV Testing lists, see The Patients Menu in the Menus Overview section.
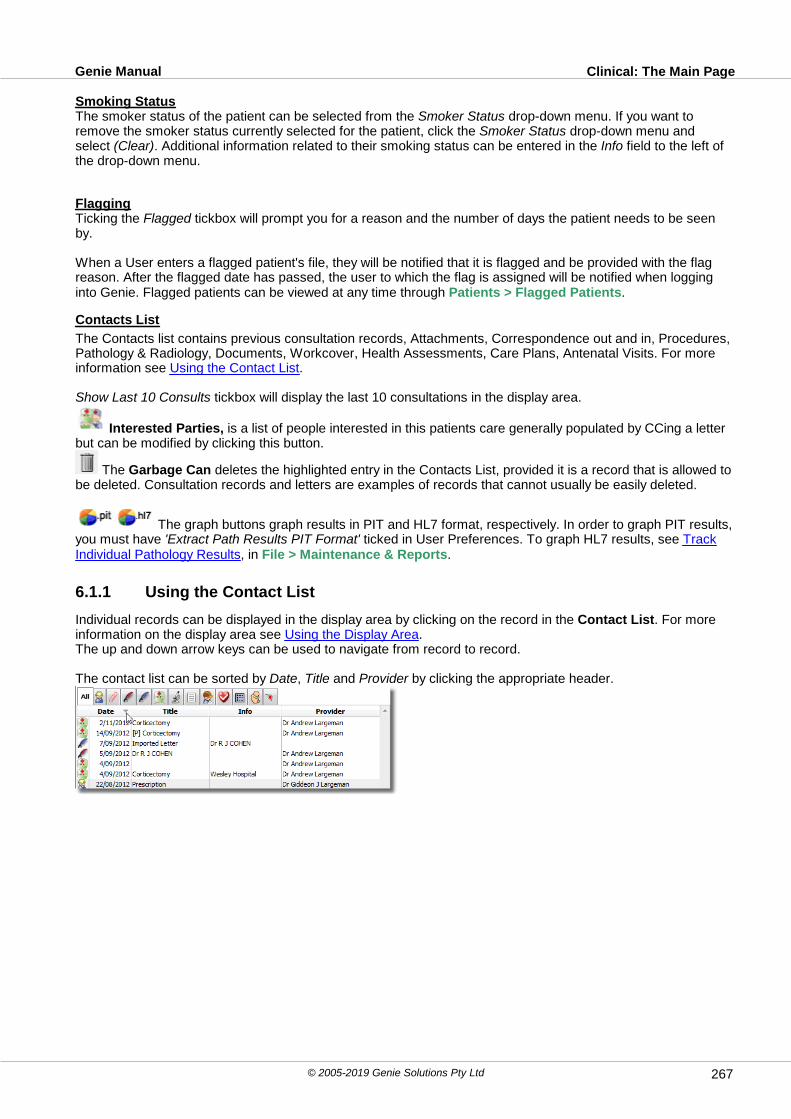
Clinical: The Main PageGenie Manual
© 2005-2019 Genie Solutions Pty Ltd 267
Smoking StatusThe smoker status of the patient can be selected from the Smoker Status drop-down menu. If you want toremove the smoker status currently selected for the patient, click the Smoker Status drop-down menu andselect (Clear). Additional information related to their smoking status can be entered in the Info field to the left ofthe drop-down menu.
FlaggingTicking the Flagged tickbox will prompt you for a reason and the number of days the patient needs to be seenby.
When a User enters a flagged patient's file, they will be notified that it is flagged and be provided with the flagreason. After the flagged date has passed, the user to which the flag is assigned will be notified when logginginto Genie. Flagged patients can be viewed at any time through Patients > Flagged Patients.
Contacts List
The Contacts list contains previous consultation records, Attachments, Correspondence out and in, Procedures,Pathology & Radiology, Documents, Workcover, Health Assessments, Care Plans, Antenatal Visits. For moreinformation see Using the Contact List.
Show Last 10 Consults tickbox will display the last 10 consultations in the display area.
Interested Parties, is a list of people interested in this patients care generally populated by CCing a letterbut can be modified by clicking this button.
The Garbage Can deletes the highlighted entry in the Contacts List, provided it is a record that is allowed tobe deleted. Consultation records and letters are examples of records that cannot usually be easily deleted.
The graph buttons graph results in PIT and HL7 format, respectively. In order to graph PIT results,you must have 'Extract Path Results PIT Format' ticked in User Preferences. To graph HL7 results, see TrackIndividual Pathology Results, in File > Maintenance & Reports.
6.1.1 Using the Contact List
Individual records can be displayed in the display area by clicking on the record in the Contact List. For moreinformation on the display area see Using the Display Area.The up and down arrow keys can be used to navigate from record to record.
The contact list can be sorted by Date, Title and Provider by clicking the appropriate header.
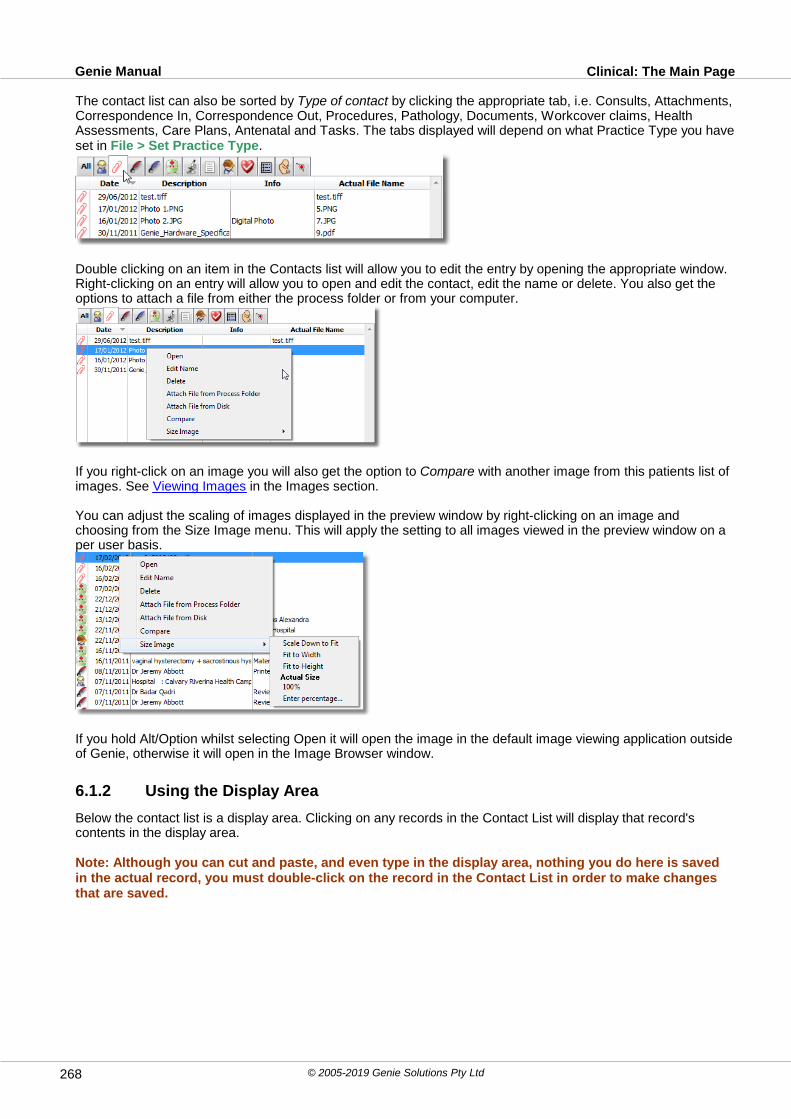
Clinical: The Main PageGenie Manual
© 2005-2019 Genie Solutions Pty Ltd268
The contact list can also be sorted by Type of contact by clicking the appropriate tab, i.e. Consults, Attachments,Correspondence In, Correspondence Out, Procedures, Pathology, Documents, Workcover claims, HealthAssessments, Care Plans, Antenatal and Tasks. The tabs displayed will depend on what Practice Type you haveset in File > Set Practice Type.
Double clicking on an item in the Contacts list will allow you to edit the entry by opening the appropriate window. Right-clicking on an entry will allow you to open and edit the contact, edit the name or delete. You also get theoptions to attach a file from either the process folder or from your computer.
If you right-click on an image you will also get the option to Compare with another image from this patients list ofimages. See Viewing Images in the Images section.
You can adjust the scaling of images displayed in the preview window by right-clicking on an image andchoosing from the Size Image menu. This will apply the setting to all images viewed in the preview window on aper user basis.
If you hold Alt/Option whilst selecting Open it will open the image in the default image viewing application outsideof Genie, otherwise it will open in the Image Browser window.
6.1.2 Using the Display Area
Below the contact list is a display area. Clicking on any records in the Contact List will display that record'scontents in the display area.
Note: Although you can cut and paste, and even type in the display area, nothing you do here is savedin the actual record, you must double-click on the record in the Contact List in order to make changesthat are saved.

Clinical: The Main PageGenie Manual
© 2005-2019 Genie Solutions Pty Ltd 269
Between the contact list and the display area is a splitter.
Dragging the splitter up or down will adjust the relative sizes of the contact list and display area. You will also findthese splitters above prescriptions and vertically between prescriptions and the display area.
Clicking on a Current Problem or Past History item displays the Notes field of the record, as well as allconsultation notes in which that problem has been set as one of the Presenting Problems.
Clicking on an allergy will display the reaction as typed in the Details field when adding the allergy.
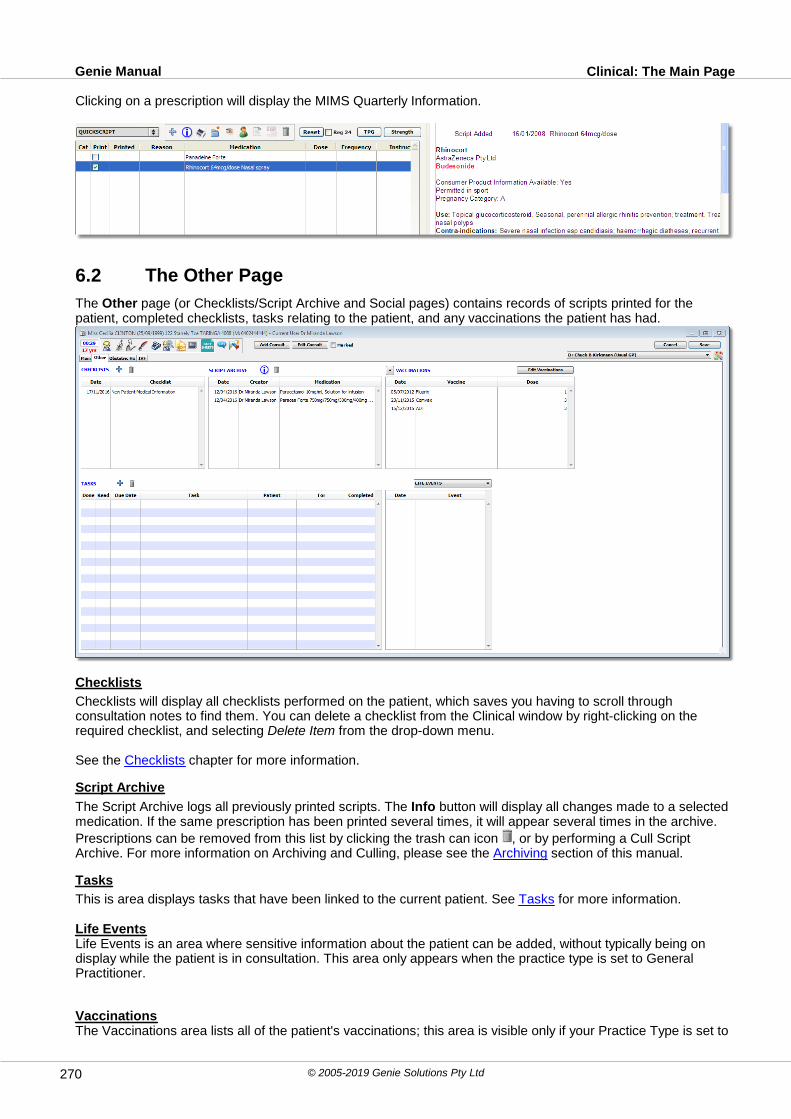
Clinical: The Main PageGenie Manual
© 2005-2019 Genie Solutions Pty Ltd270
Clicking on a prescription will display the MIMS Quarterly Information.
6.2 The Other Page
The Other page (or Checklists/Script Archive and Social pages) contains records of scripts printed for thepatient, completed checklists, tasks relating to the patient, and any vaccinations the patient has had.
Checklists
Checklists will display all checklists performed on the patient, which saves you having to scroll throughconsultation notes to find them. You can delete a checklist from the Clinical window by right-clicking on therequired checklist, and selecting Delete Item from the drop-down menu.
See the Checklists chapter for more information.
Script Archive
The Script Archive logs all previously printed scripts. The Info button will display all changes made to a selectedmedication. If the same prescription has been printed several times, it will appear several times in the archive.
Prescriptions can be removed from this list by clicking the trash can icon , or by performing a Cull ScriptArchive. For more information on Archiving and Culling, please see the Archiving section of this manual.
Tasks
This is area displays tasks that have been linked to the current patient. See Tasks for more information.
Life Events Life Events is an area where sensitive information about the patient can be added, without typically being ondisplay while the patient is in consultation. This area only appears when the practice type is set to GeneralPractitioner.
VaccinationsThe Vaccinations area lists all of the patient's vaccinations; this area is visible only if your Practice Type is set to

Clinical: The Other PageGenie Manual
© 2005-2019 Genie Solutions Pty Ltd 271
General Practice, Obs/Gynae, Plastic Surgery, Anaesthetics, or Other Specialty. For more information, see theVaccinations section.
6.2.1 Vaccinations
The Vaccinations area will list all vaccines administered to the patient. Detailed information about eachvaccination (e.g. Batch Number, Site Given, etc.) can be viewed by double-clicking on the vaccination.
To add a vaccine to a patient’s record, click on the Vaccinations drop-down menu and select the vaccination orvaccination set.
For information on how to create vaccine sets and keep the list of vaccines up-to-date, please see the EditingVaccines and Vaccine Sets section. When you select a vaccine or set (sets are denoted by * in the list), thewindow below will open for the vaccination(s) you are adding.
Ticking Transmit to AIR will allow the vaccination to be batched for transmission to AIR. Vaccinations can bebatched and transmitted via the AIR Immunisations window, accessible from the Daily tab in File >Maintenance and Reports. For more information, please see the Transmitting to AIR section.
The Add to Consult Notes button creates a consult record in the patient’s contact list showing that thevaccination was administered.
Once a vaccination has been saved to a patient’s record, it can be deleted by right-clicking it and selecting Delete Item.

Clinical: The Other PageGenie Manual
© 2005-2019 Genie Solutions Pty Ltd272
6.2.1.1 Editing Vaccines and Vaccine Sets
Click the Edit Vaccinations button in any patient’s clinical window to open the Edit Vaccines window. This willallow you to create and modify vaccine sets, and ensure that your list of vaccines is up to date.
Editing Vaccines
If a vaccine you need is not present in the current list, it can be added in two ways. To add the missing vaccinemanually, click the Add Vaccine button. A window will appear prompting you to enter a Vaccine Name, VaccineCode, and (if applicable) ICPC Code for the new vaccine. Enter this information and click Save to create thevaccine.
Please note: If you need to transmit the new vaccine to AIR, the correct Vaccine Code must be enteredin this window.
To download any new or missing vaccines automatically, click the Update button. Genie will check for anyupdates and add missing vaccines to the list as appropriate.
Any vaccine in the list on the left can be modified by double-clicking it, and deleted by highlighting it and clickingthe Delete Vaccine button.
Editing Vaccine Sets
Vaccine sets can be created for any groups of vaccines that need to be administered at the same time – forexample, to help you manage childhood immunisation schedules.
Click the Add Set button to create a new vaccine set. Genie will prompt you to enter a name for the set. Enter aname and click OK.
Once the set has been created, add vaccines to it by clicking and dragging them from the list on the left onto theappropriate set on the right. If you make a mistake, vaccines can be removed from a set by right-clicking the setand clicking the code of the vaccine you wish to remove.
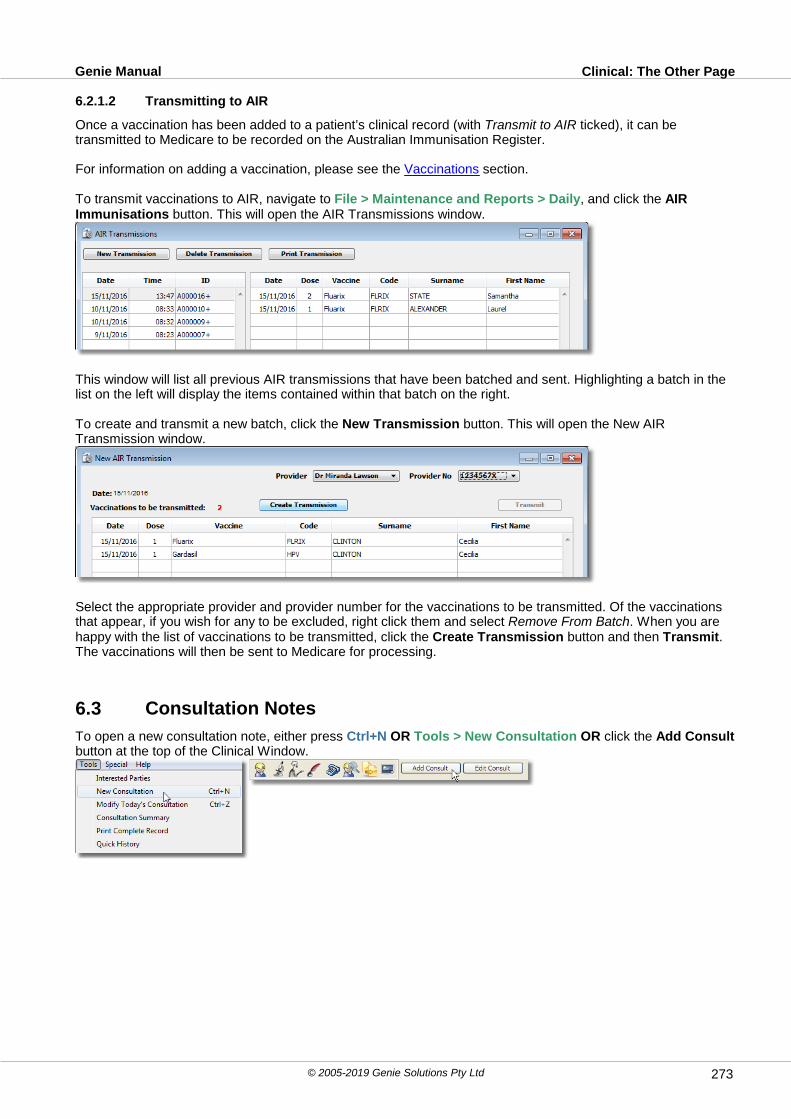
Clinical: The Other PageGenie Manual
© 2005-2019 Genie Solutions Pty Ltd 273
6.2.1.2 Transmitting to AIR
Once a vaccination has been added to a patient’s clinical record (with Transmit to AIR ticked), it can betransmitted to Medicare to be recorded on the Australian Immunisation Register.
For information on adding a vaccination, please see the Vaccinations section.
To transmit vaccinations to AIR, navigate to File > Maintenance and Reports > Daily, and click the AIRImmunisations button. This will open the AIR Transmissions window.
This window will list all previous AIR transmissions that have been batched and sent. Highlighting a batch in thelist on the left will display the items contained within that batch on the right.
To create and transmit a new batch, click the New Transmission button. This will open the New AIRTransmission window.
Select the appropriate provider and provider number for the vaccinations to be transmitted. Of the vaccinationsthat appear, if you wish for any to be excluded, right click them and select Remove From Batch. When you arehappy with the list of vaccinations to be transmitted, click the Create Transmission button and then Transmit.The vaccinations will then be sent to Medicare for processing.
6.3 Consultation Notes
To open a new consultation note, either press Ctrl+N OR Tools > New Consultation OR click the Add Consultbutton at the top of the Clinical Window.

Clinical: Consultation NotesGenie Manual
© 2005-2019 Genie Solutions Pty Ltd274
Once this window is displayed, you can resize it to suit your needs. Genie will remember this selection the nexttime you open an Add Consult window.
Presenting ProblemsPresenting Problems aid in searching and reporting consults, as well as providing you with headings for yourconsults in the Contact List.To enter the presenting problem(s), you can select the problem from the menu at the top left of the Consultwindow.
This menu can contain up to five sections:
1. Add to Menu 2. New Problem3. Current Problems4. Past History5. Previously used consultation reasons for any patient6. Previously used consultation reasons for this patient (if it is not already listed at 1, 2, 3, or 4 above)
User added items can be deleted by holding down Alt, selecting the Presenting Problem drop-down list andhighlighting the problem to delete. Let go of your mouse, let go of Alt.
You can add multiple problems for each consultation.If the problem you would like is not in this menu, select Add to menu... and enter in the name of the problem.If the problem is a rare or one-off problem, select New Problem which will add it only to that patient.
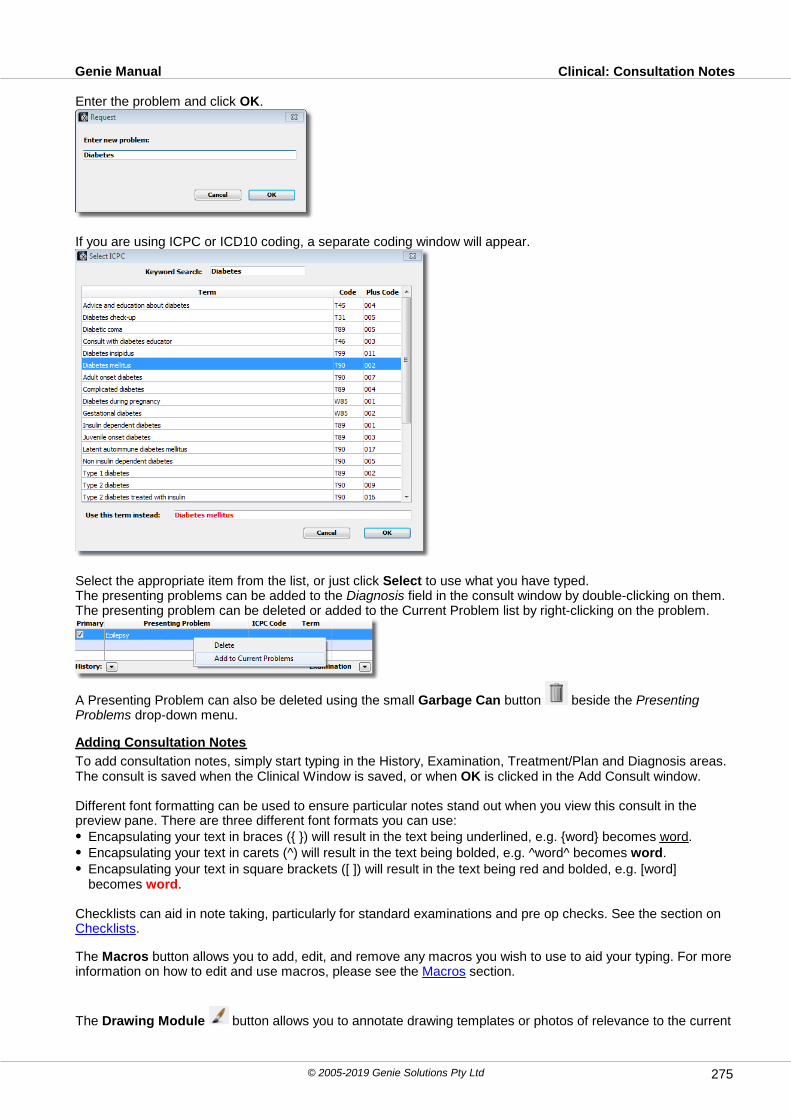
Clinical: Consultation NotesGenie Manual
© 2005-2019 Genie Solutions Pty Ltd 275
Enter the problem and click OK.
If you are using ICPC or ICD10 coding, a separate coding window will appear.
Select the appropriate item from the list, or just click Select to use what you have typed.The presenting problems can be added to the Diagnosis field in the consult window by double-clicking on them.The presenting problem can be deleted or added to the Current Problem list by right-clicking on the problem.
A Presenting Problem can also be deleted using the small Garbage Can button beside the PresentingProblems drop-down menu.
Adding Consultation Notes
To add consultation notes, simply start typing in the History, Examination, Treatment/Plan and Diagnosis areas.The consult is saved when the Clinical Window is saved, or when OK is clicked in the Add Consult window.
Different font formatting can be used to ensure particular notes stand out when you view this consult in thepreview pane. There are three different font formats you can use:
Encapsulating your text in braces ({ }) will result in the text being underlined, e.g. {word} becomes word.Encapsulating your text in carets (^) will result in the text being bolded, e.g. ^word^ becomes word.Encapsulating your text in square brackets ([ ]) will result in the text being red and bolded, e.g. [word]becomes word.
Checklists can aid in note taking, particularly for standard examinations and pre op checks. See the section on Checklists.
The Macros button allows you to add, edit, and remove any macros you wish to use to aid your typing. For moreinformation on how to edit and use macros, please see the Macros section.
The Drawing Module button allows you to annotate drawing templates or photos of relevance to the current
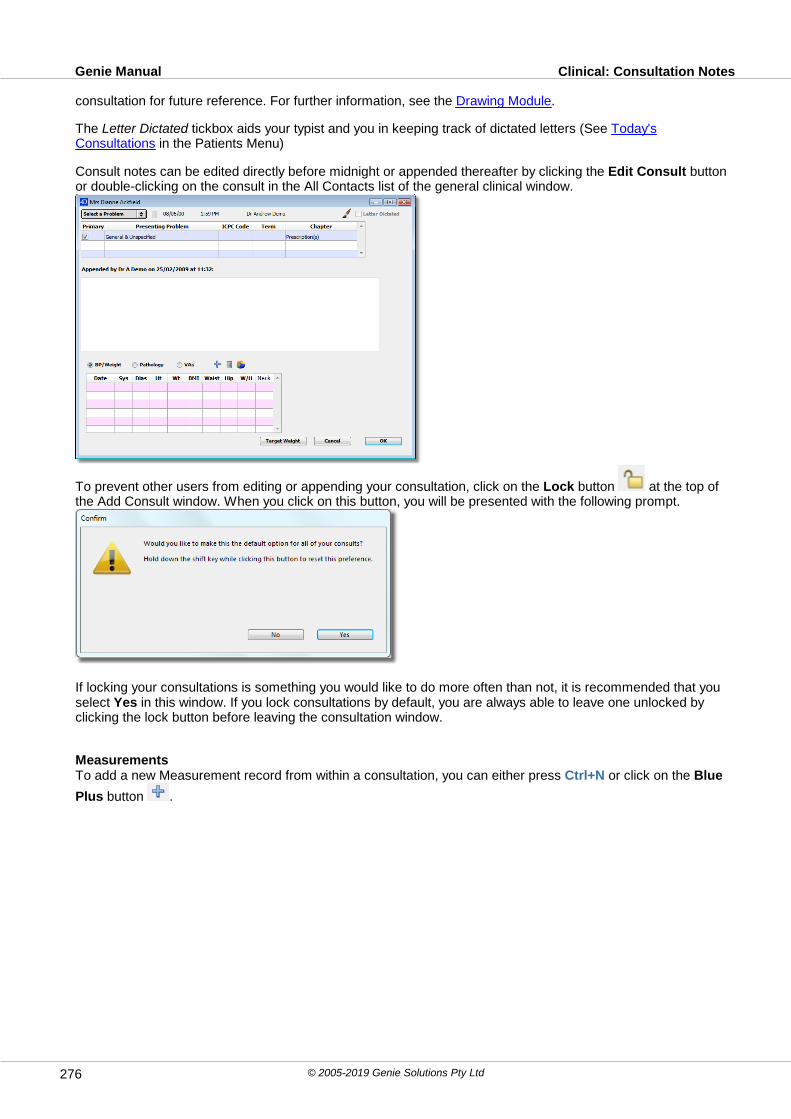
Clinical: Consultation NotesGenie Manual
© 2005-2019 Genie Solutions Pty Ltd276
consultation for future reference. For further information, see the Drawing Module.
The Letter Dictated tickbox aids your typist and you in keeping track of dictated letters (See Today'sConsultations in the Patients Menu)
Consult notes can be edited directly before midnight or appended thereafter by clicking the Edit Consult buttonor double-clicking on the consult in the All Contacts list of the general clinical window.
To prevent other users from editing or appending your consultation, click on the Lock button at the top ofthe Add Consult window. When you click on this button, you will be presented with the following prompt.
If locking your consultations is something you would like to do more often than not, it is recommended that youselect Yes in this window. If you lock consultations by default, you are always able to leave one unlocked byclicking the lock button before leaving the consultation window.
MeasurementsTo add a new Measurement record from within a consultation, you can either press Ctrl+N or click on the Blue
Plus button .
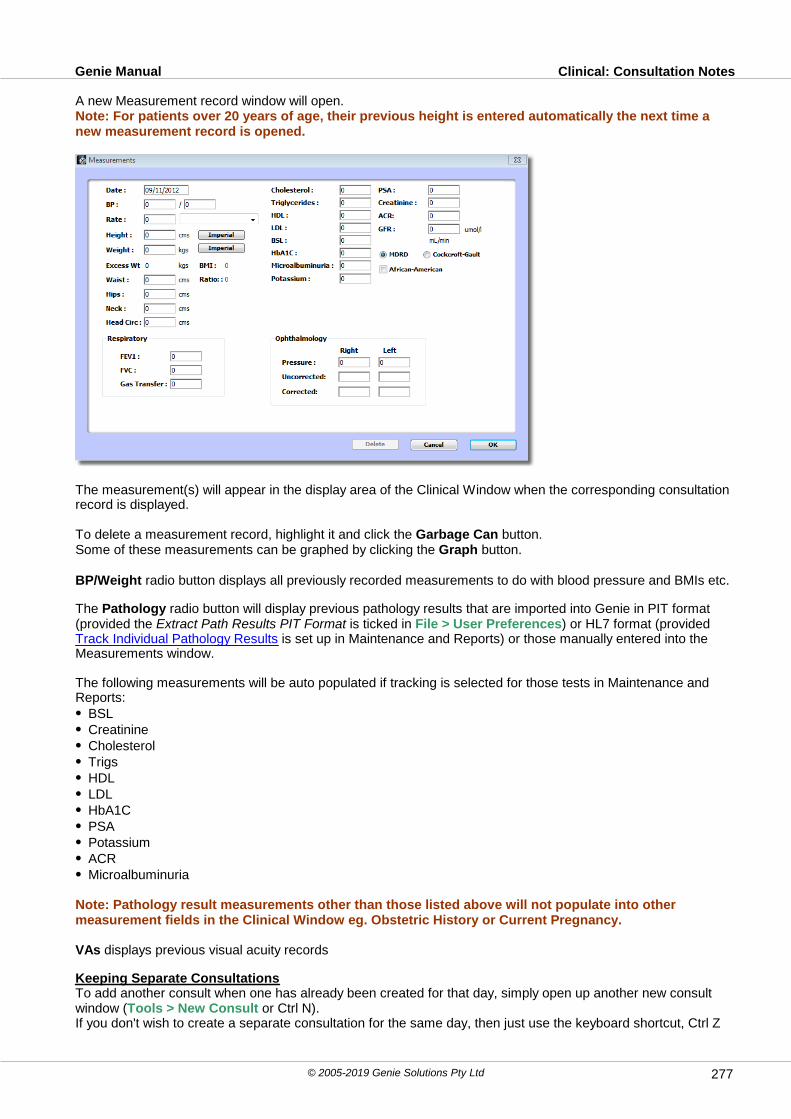
Clinical: Consultation NotesGenie Manual
© 2005-2019 Genie Solutions Pty Ltd 277
A new Measurement record window will open.Note: For patients over 20 years of age, their previous height is entered automatically the next time anew measurement record is opened.
The measurement(s) will appear in the display area of the Clinical Window when the corresponding consultationrecord is displayed.
To delete a measurement record, highlight it and click the Garbage Can button.Some of these measurements can be graphed by clicking the Graph button.
BP/Weight radio button displays all previously recorded measurements to do with blood pressure and BMIs etc.
The Pathology radio button will display previous pathology results that are imported into Genie in PIT format(provided the Extract Path Results PIT Format is ticked in File > User Preferences) or HL7 format (providedTrack Individual Pathology Results is set up in Maintenance and Reports) or those manually entered into theMeasurements window.
The following measurements will be auto populated if tracking is selected for those tests in Maintenance andReports:
BSLCreatinineCholesterolTrigsHDLLDLHbA1CPSAPotassiumACRMicroalbuminuria
Note: Pathology result measurements other than those listed above will not populate into othermeasurement fields in the Clinical Window eg. Obstetric History or Current Pregnancy.
VAs displays previous visual acuity records
Keeping Separate ConsultationsTo add another consult when one has already been created for that day, simply open up another new consultwindow (Tools > New Consult or Ctrl N). If you don't wish to create a separate consultation for the same day, then just use the keyboard shortcut, Ctrl Z

Clinical: Consultation NotesGenie Manual
© 2005-2019 Genie Solutions Pty Ltd278
or Tools > Modify Today's Consultation, or the Edit Consult button, as this will open up the existingconsultation window. It will create a new consultation if one doesn't already exist.
Viewing Consultation NotesConsultation notes can be viewed in the display area by clicking on the record, or several at a time byShift+clicking or Ctrl+clicking on the required consults.They can also be viewed according to their ICPC code. If you are using ICPC coding, a pop-up menu will appearabove the All Contact list. This codes display presenting problems by Chapter, allowing you to view allNeurological type consultations, for example.
Printing ConsultsOnce you have your required Consults or Pathology results highlighted and on display in the display area (by Ctrl+clicking or Shift+clicking the required consults), you can then print the display area by selecting File >Print or clicking the small Printer icon.
Deleting a ConsultTo delete a consult from the All Contacts List, highlight the required consult and then click on the Garbage Canicon. Or you can right-click and select Delete.Note: Before midnight of the day it is created, this will delete the consult altogether. After midnight theconsult isn't deleted per se, it is just hidden from the Contacts List.
Alt+clicking on the Garbage Can icon will display the deleted consults in the Contacts List. Alternatively, youcan print a Consultation Summary, Tools > Consultation Summary, which gives you the option to IncludeDeleted Consultations.
Checking Consults Have Been Created
You can check that you have made consultation notes for all appointments of a particular day by going to thatday in the appointment and selecting Appts > Check Missing Consults. This will check for a consultationrecord for the date selected and for notes typed into the History field. You must have typed notes into the Historyfield for this feature to work.

Clinical: Drawing ModuleGenie Manual
© 2005-2019 Genie Solutions Pty Ltd 279
6.4 Drawing Module
The Drawing Module can be accessed via the Paintbrush button in the Add Consult window or from thepatient Image Browser window. It provides tools to edit and draw on photos or on images stored as templates.
A single click on a template on the right hand side of the drawing window will preview the image underneath thetemplate list. You can then drag and drop the image from the preview into the drawing canvas for annotation inrelation to your current patient. You can drag more than one image onto the canvas for annotation.You can retrieve images from the patient's image folder by clicking on the Get Pictures from Patients Folder
button in the top right of the drawing window. The blue folder beside this allows you to browse for an imageanywhere on your machine to annotate.
If you choose an image that has not been referenced previously, you will receive the prompt below.
If this is an image you will only use for this patient (e.g. a photograph of this patient that you would like toannotate), select Patient. If this is an image you will use for many patients (e.g. a new image for generaliseduse), select Referenced.
Use the tools to the left of the canvas area to add text boxes, shapes and other features to the images.
Select/move images and objects Free draw

Clinical: Drawing ModuleGenie Manual
© 2005-2019 Genie Solutions Pty Ltd280
Draw straight lines Type text
Draw squares or rectangles Ellipse (Ctrl+click for circle)
Draw rounded rectangles Draw freehand filled area
Bullet circle stamp (usually used with anaudiogram template)
Bullet cross stamp (usually used with anaudiogram template)
Draw stitches, stitches will appear tighter andcloser together when drawn slowly.
Draw rashes
Annotate image (includes arrow from annotationto to image)
Flip horizontally (Ctrl+click to flip vertically)
Acquire image from camera Acquire image from scanner
Delete currently selected object
Alter line thickness and format. Clicking onthis will display the next button.
The line thickness and format selectiondisplayed when the line button is pressed.
These buttons are the line colour and fill colour,respectively.
These buttons are the draw objects transparentand draw objects filled, respectively. This applies to thedrawing of shapes.
This slider controls the opacity of theselected object. These buttons are the Save as an
Editable Template and Save as an Image in thePatient's Attachment Folder buttons, respectively.
Selecting Multiple Images
To select multiple images on the canvas, click the Selection tool and Shift+click each object. To select allobjects, click and drag to create a selection area over all objects. To move all selected objects together, hold Shift whilst dragging the selected objects across the canvas.
Modifying Images
To rotate an image Ctrl+click and drag on one of the blue selection markers.If an object is resizeable, one of the selection markers will be green which you can click and drag to resize
Right-clicking on an object will result in a menu.
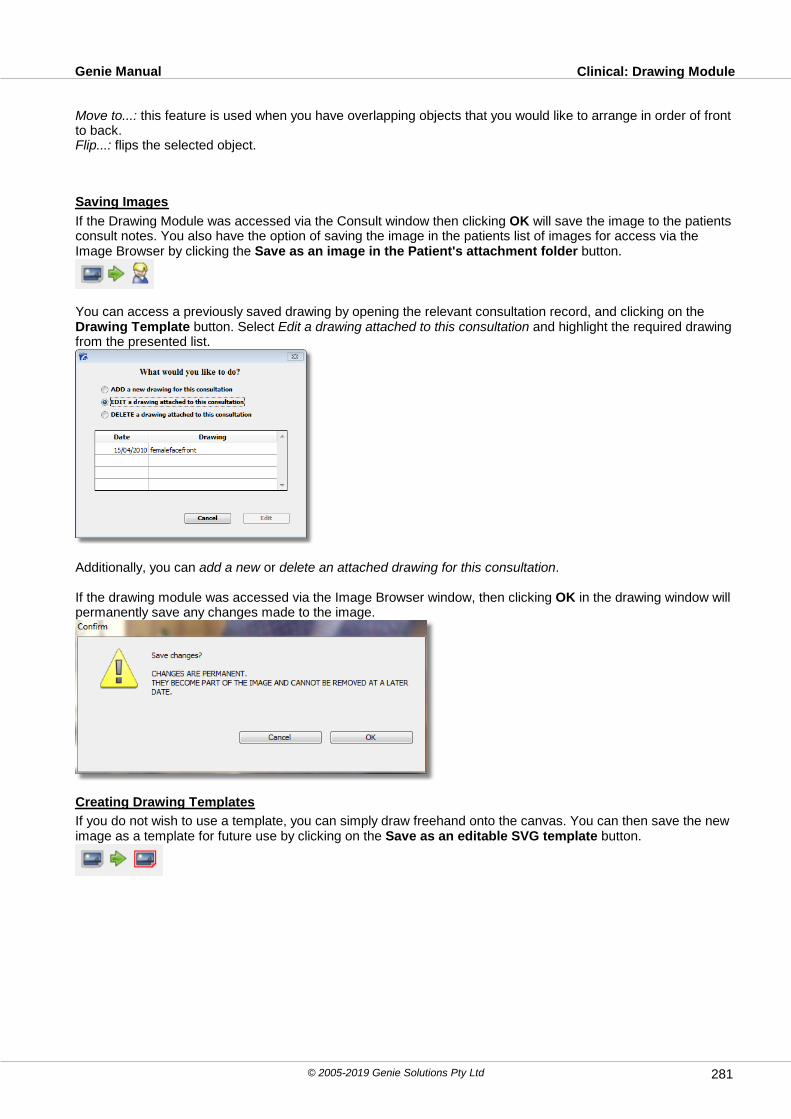
Clinical: Drawing ModuleGenie Manual
© 2005-2019 Genie Solutions Pty Ltd 281
Move to...: this feature is used when you have overlapping objects that you would like to arrange in order of frontto back.Flip...: flips the selected object.
Saving Images
If the Drawing Module was accessed via the Consult window then clicking OK will save the image to the patientsconsult notes. You also have the option of saving the image in the patients list of images for access via theImage Browser by clicking the Save as an image in the Patient's attachment folder button.
You can access a previously saved drawing by opening the relevant consultation record, and clicking on the Drawing Template button. Select Edit a drawing attached to this consultation and highlight the required drawingfrom the presented list.
Additionally, you can add a new or delete an attached drawing for this consultation.
If the drawing module was accessed via the Image Browser window, then clicking OK in the drawing window willpermanently save any changes made to the image.
Creating Drawing Templates
If you do not wish to use a template, you can simply draw freehand onto the canvas. You can then save the newimage as a template for future use by clicking on the Save as an editable SVG template button.

Clinical: Drawing ModuleGenie Manual
© 2005-2019 Genie Solutions Pty Ltd282
6.5 The Tools Menu
The options that are displayed in the Tools menu will depend on which Practice Type is set in File > SetPractice Type.
Below are the options for General Practice, which covers most options in the various practice types.
Interested PartiesOpens the list of all Interested Parties associated with this patient eg. referring doctor etc. This list can also be
accessed wherever you find the Two surgeons button .
New Consultation Ctrl+N
Opens a New Consultation window
Modify Today's Consultation Ctrl+ZAllows you to edit the existing consultation for the current day. If there is no consultation for the day, Genie willcreate a new one.
Consultation SummaryAllows you to print out a summary of the patient's consultations.

Clinical: The Tools MenuGenie Manual
© 2005-2019 Genie Solutions Pty Ltd 283
Print Complete RecordPrints out the Patient's complete clinical record. You will first be prompted as to which components of the ClinicalWindow you would like to print.
Note: If you have previously ticked the 'Don't show this window again' checkbox in this window, youcan Shift+click on Print Complete Record to revert to seeing this window each time.
Quick HistoryDisplays a list of all the item numbers which have been charged for this patient in the last two years.
Open Current Pregnancy Ctrl+Shift+P
Will open or start a new pregnancy for this patient. Only available if patient is marked as female and is over 12years old.

Clinical: The Tools MenuGenie Manual
© 2005-2019 Genie Solutions Pty Ltd284
Add Task Ctrl+TAllows you to assign a task as a reminder to yourself or another user about the current patient. This will be listedin the Other or Checklists/Script Archive tab of the Clinical Window.
You can print out tasks by selecting the Print button. (For more information on Tasks see the ReceptionModule).
Add ProcedureOpens up a Procedure window. For more information see the Procedures chapter.
Add Pathology ResultOpens a window that allows you to manually enter the details of a pathology result you have received.
Add DocumentOpens up a document window which allows you to enter free text. This document can then be accessed via the
Documents tab in the Clinical Window's contact list.
Add Workcover ClaimCreates a Workcover Claim. Workcover certificates can be generated from within this window by clicking on the
button. Alt+clicking on this button will allow you to use a certificate from a different state, for thosepracticing in border regions.
Workcover certificates can be downloaded into Genie from the Software Updates. Navigate to Special >Software Updates and select the Workcover certificates tab to view the certificates available for download. Ifthe certificate you require is not in this list, it means that it has not been made available to Genie Solutions fordissemination. If you have a copy of a new certificate, send it to the Genie support team so it can be uploadedto the Genie web server.
You will be able to use the downloaded certificates if:You have the option to Use Custom forms Workcover Certificates ticked in your User Preferences, and Your practice type is set to anything except Obs/Gynae/IVF Specialist or Anaesthetics.
To specify the doctor who is creating the certificate, click the Submitted by drop-down menu and select thedoctor. By default, the name that appears in this drop-down menu for a new claim will be the user who iscurrently logged in. For existing claims, it will be the last doctor selected in the Submitted by drop-down menufor this patient. Changing the doctor will not affect previously created certificates, only assign them to the newcertificate. Certificates created by doctors other than the selected doctor, will have their name appear next tothe certificate.

Clinical: The Tools MenuGenie Manual
© 2005-2019 Genie Solutions Pty Ltd 285
You can also use the Certificate drop-down menu to select a different state's certificate for any interstate claims,should you need to. If using custom forms certificates, you will need to follow the instructions above to downloadthe appropriate certificate for each state you may need to select from this list.
Previously created Workcover Certificates will be stored in this window, and are accessible by double-clicking onthe certificate details. Once printed, a record will appear under the certificate details with a printed date andtime. Double-clicking this line will display the printed certificate in your default image viewer. A copy of thecertificate is saved in .png format in the Workcover folder inside the patient's images folder. This enables you tokeep a record of what was printed and handed to the patient.If a certificate was printed in error or the details are not correct, it can be deleted by selecting the printed record
under the certificate details and clicking the Delete icon. This will delete the printed certificate but keep thecertificate information.
A preview of the printed certificate can also be viewed from the Clinical window by selecting the relevantWorkcover claim:
For more information on creating and invoicing Workcover claims, see Invoicing Workcover.

Clinical: The Tools MenuGenie Manual
© 2005-2019 Genie Solutions Pty Ltd286
LesionsOpens the Lesions module which allows for easier tracking of excisions of lesions and ordering/tracking ofhistopathology.
GP Managment PlansOpens up a GP Management Plan History where you can view past plans as well as create new ones.To add a new plan, click the New button. This opens up a GPMP Template window. Select your template usingthe Template drop-down menu, many of which can be downloaded by opening the Software Updates window (Special > Software Updates) and selecting the Letters tab. Alternatively, you can create your own using theNew Template option. The set up of these templates works in the same way as Referral/Reply Letters (PatientCorrespondence).
Add Care Plan (Old Method)
Creates old style Care Plans which are then accessed via the Care plans tab in the Clinical Window'scontact list.These have now been replaced by GP Management Plans.
Add Health AssessmentAllows you to create Health Assessments, covering areas such as Allied Health, Nutrition and Mental
functioning. Health assessments can be saved and then accessed via the Health assessments tab in theClinical Window's contact list.
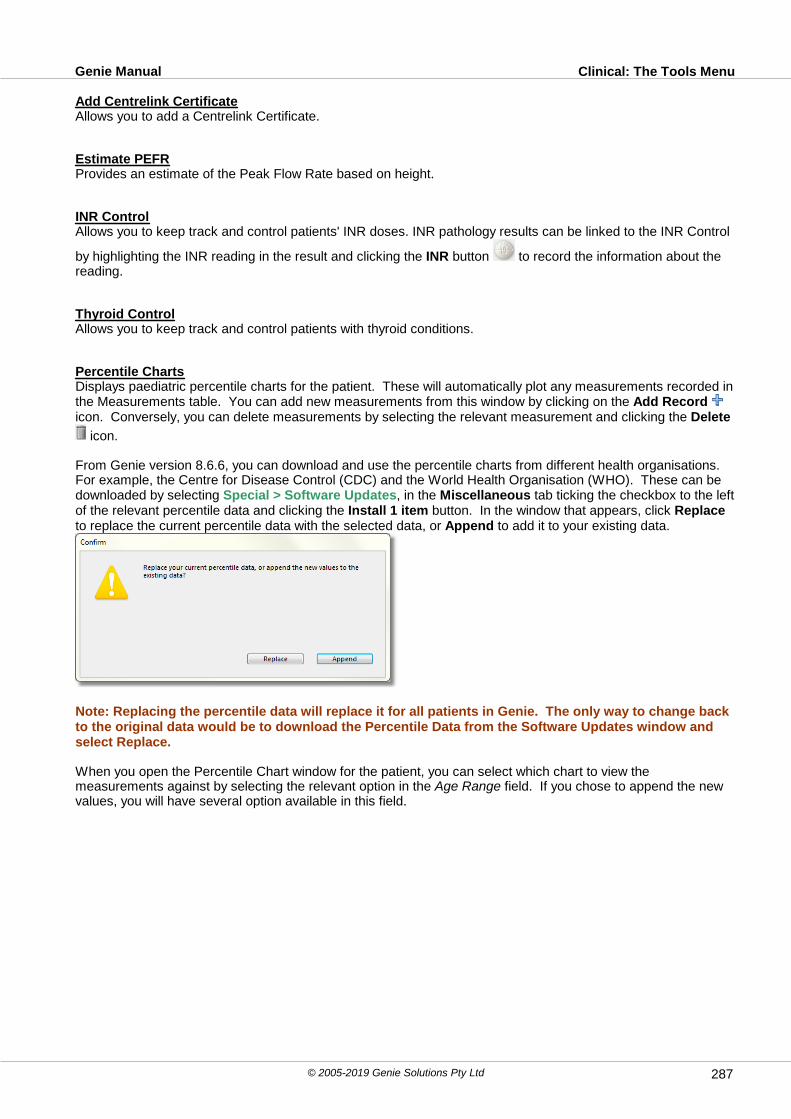
Clinical: The Tools MenuGenie Manual
© 2005-2019 Genie Solutions Pty Ltd 287
Add Centrelink CertificateAllows you to add a Centrelink Certificate.
Estimate PEFRProvides an estimate of the Peak Flow Rate based on height.
INR ControlAllows you to keep track and control patients' INR doses. INR pathology results can be linked to the INR Control
by highlighting the INR reading in the result and clicking the INR button to record the information about thereading.
Thyroid ControlAllows you to keep track and control patients with thyroid conditions.
Percentile ChartsDisplays paediatric percentile charts for the patient. These will automatically plot any measurements recorded inthe Measurements table. You can add new measurements from this window by clicking on the Add Record icon. Conversely, you can delete measurements by selecting the relevant measurement and clicking the Delete
icon.
From Genie version 8.6.6, you can download and use the percentile charts from different health organisations. For example, the Centre for Disease Control (CDC) and the World Health Organisation (WHO). These can bedownloaded by selecting Special > Software Updates, in the Miscellaneous tab ticking the checkbox to the leftof the relevant percentile data and clicking the Install 1 item button. In the window that appears, click Replaceto replace the current percentile data with the selected data, or Append to add it to your existing data.
Note: Replacing the percentile data will replace it for all patients in Genie. The only way to change backto the original data would be to download the Percentile Data from the Software Updates window andselect Replace.
When you open the Percentile Chart window for the patient, you can select which chart to view themeasurements against by selecting the relevant option in the Age Range field. If you chose to append the newvalues, you will have several option available in this field.

Clinical: The Tools MenuGenie Manual
© 2005-2019 Genie Solutions Pty Ltd288
Alcohol AuditOpens an Alcohol Disorders Identification Test. The results of the test are placed in the Treatment/Plan sectionof the consult window. This occurs even if you have not yet created a new consultation record. This also appliesfor the Mini Mental State Examination and the Aged Depression Scale.
Mini Mental StateOpens a Mini Mental State Examination. The outcome of this examination will be placed in the Treatment/Plansection of the consultation record.
Aged Depression Opens a Geriatric Depression Scale questionnaire.
PASI Scores
Opens Face, Hand & Foot/Whole Body PASI Scoring system for psoriasis.
DAS Scores
Opens DAS Scoring system for rheumatology.
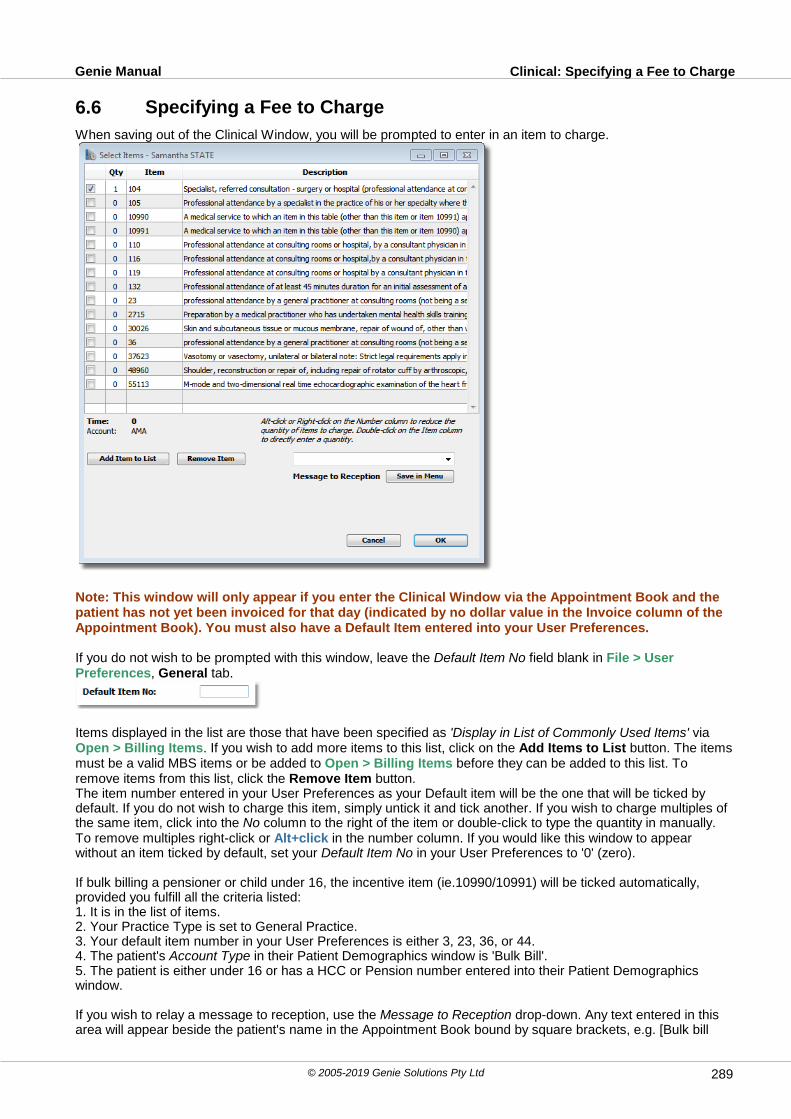
Clinical: Specifying a Fee to ChargeGenie Manual
© 2005-2019 Genie Solutions Pty Ltd 289
6.6 Specifying a Fee to Charge
When saving out of the Clinical Window, you will be prompted to enter in an item to charge.
Note: This window will only appear if you enter the Clinical Window via the Appointment Book and thepatient has not yet been invoiced for that day (indicated by no dollar value in the Invoice column of theAppointment Book). You must also have a Default Item entered into your User Preferences.
If you do not wish to be prompted with this window, leave the Default Item No field blank in File > UserPreferences, General tab.
Items displayed in the list are those that have been specified as 'Display in List of Commonly Used Items' viaOpen > Billing Items. If you wish to add more items to this list, click on the Add Items to List button. The itemsmust be a valid MBS items or be added to Open > Billing Items before they can be added to this list. Toremove items from this list, click the Remove Item button.The item number entered in your User Preferences as your Default item will be the one that will be ticked bydefault. If you do not wish to charge this item, simply untick it and tick another. If you wish to charge multiples ofthe same item, click into the No column to the right of the item or double-click to type the quantity in manually.To remove multiples right-click or Alt+click in the number column. If you would like this window to appearwithout an item ticked by default, set your Default Item No in your User Preferences to '0' (zero).
If bulk billing a pensioner or child under 16, the incentive item (ie.10990/10991) will be ticked automatically,provided you fulfill all the criteria listed:1. It is in the list of items.2. Your Practice Type is set to General Practice.3. Your default item number in your User Preferences is either 3, 23, 36, or 44.4. The patient's Account Type in their Patient Demographics window is 'Bulk Bill'.5. The patient is either under 16 or has a HCC or Pension number entered into their Patient Demographicswindow.
If you wish to relay a message to reception, use the Message to Reception drop-down. Any text entered in thisarea will appear beside the patient's name in the Appointment Book bound by square brackets, e.g. [Bulk bill

Clinical: Specifying a Fee to ChargeGenie Manual
© 2005-2019 Genie Solutions Pty Ltd290
please].If you wish to type or continue typing your clinical notes after the patient has left the consult, you can still specifythe item to charge by saving out of the file, and returning straight back in to type your notes.
6.7 Prescribing
MIMS Subscription
Genie uses prescribing data supplied by MIMS Australia. This is supplied via monthly download in Special >Software Updates in Genie to those users with a current MIMS Integrated subscription.
To subscribe to MIMS Integrated:Visit their website at http://www.mims.com.au, ORPhone MIMS on 1800 800 629.
If your MIMS subscription is more than 4 months out of date, you will be presented with the following window. Ifyou click the Delete MIMS button the MIMS database will be deleted, resulting in you no longer having access tothis information.
6.7.1 Prescription Display
The Prescription area is alongside and below the Quickscript drop-down menu. The column order in the prescription list can be changed by clicking on the title of the column and dragging torequired position. Column width can be adjusted by positioning the cursor on the divider between column titlesuntil a double arrow appears, then clicking and dragging the column to the desired width.
A single click on a medication in the list will display the MIMS Abbreviated information in the display area,provided you have the large patient window (see Clinical).
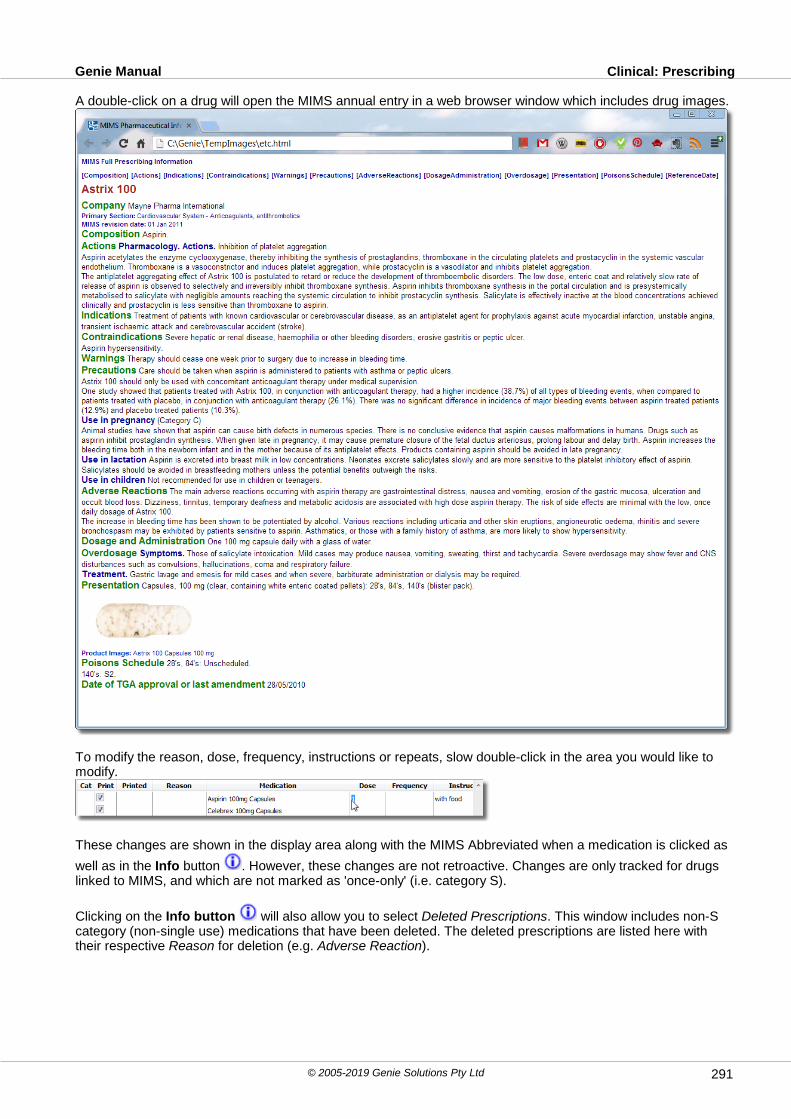
Clinical: PrescribingGenie Manual
© 2005-2019 Genie Solutions Pty Ltd 291
A double-click on a drug will open the MIMS annual entry in a web browser window which includes drug images.
To modify the reason, dose, frequency, instructions or repeats, slow double-click in the area you would like tomodify.
These changes are shown in the display area along with the MIMS Abbreviated when a medication is clicked as
well as in the Info button . However, these changes are not retroactive. Changes are only tracked for drugslinked to MIMS, and which are not marked as 'once-only' (i.e. category S).
Clicking on the Info button will also allow you to select Deleted Prescriptions. This window includes non-Scategory (non-single use) medications that have been deleted. The deleted prescriptions are listed here withtheir respective Reason for deletion (e.g. Adverse Reaction).
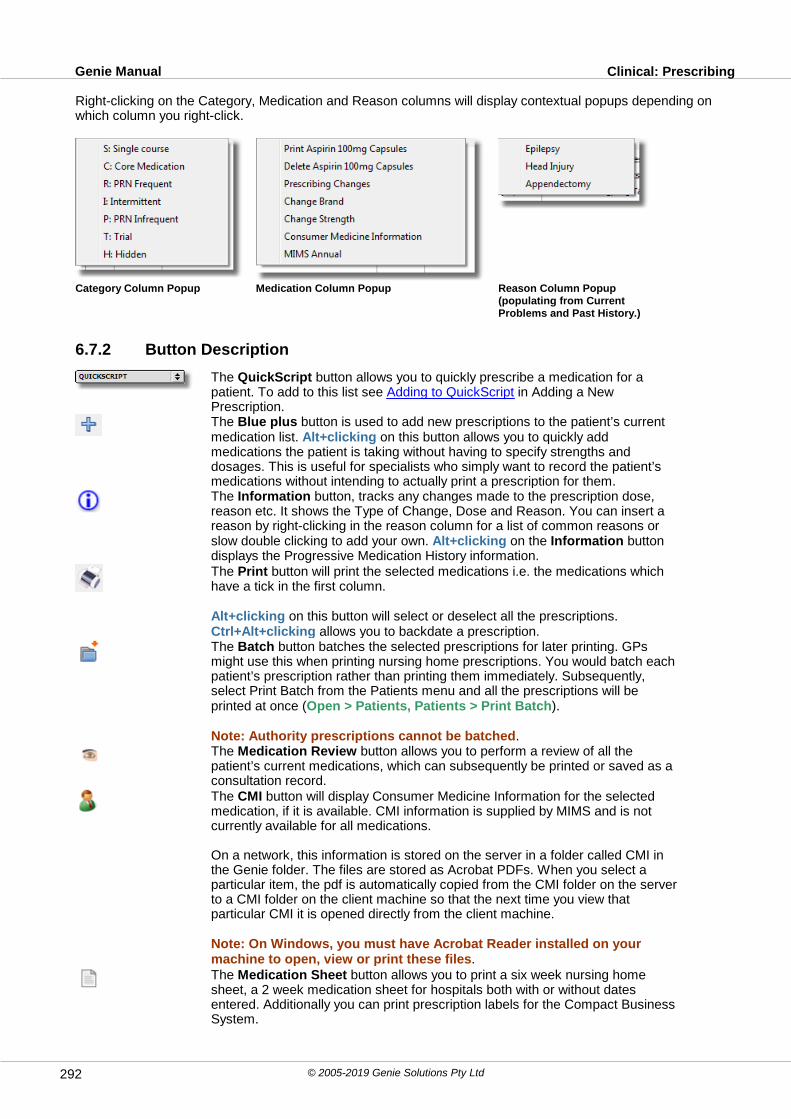
Clinical: PrescribingGenie Manual
© 2005-2019 Genie Solutions Pty Ltd292
Right-clicking on the Category, Medication and Reason columns will display contextual popups depending onwhich column you right-click.
Category Column Popup Medication Column Popup Reason Column Popup(populating from CurrentProblems and Past History.)
6.7.2 Button Description
The QuickScript button allows you to quickly prescribe a medication for apatient. To add to this list see Adding to QuickScript in Adding a NewPrescription.The Blue plus button is used to add new prescriptions to the patient’s currentmedication list. Alt+clicking on this button allows you to quickly addmedications the patient is taking without having to specify strengths anddosages. This is useful for specialists who simply want to record the patient’smedications without intending to actually print a prescription for them.The Information button, tracks any changes made to the prescription dose,reason etc. It shows the Type of Change, Dose and Reason. You can insert areason by right-clicking in the reason column for a list of common reasons orslow double clicking to add your own. Alt+clicking on the Information buttondisplays the Progressive Medication History information.The Print button will print the selected medications i.e. the medications whichhave a tick in the first column.
Alt+clicking on this button will select or deselect all the prescriptions.Ctrl+Alt+clicking allows you to backdate a prescription.The Batch button batches the selected prescriptions for later printing. GPsmight use this when printing nursing home prescriptions. You would batch eachpatient’s prescription rather than printing them immediately. Subsequently,select Print Batch from the Patients menu and all the prescriptions will beprinted at once (Open > Patients, Patients > Print Batch).
Note: Authority prescriptions cannot be batched.The Medication Review button allows you to perform a review of all thepatient’s current medications, which can subsequently be printed or saved as aconsultation record.The CMI button will display Consumer Medicine Information for the selectedmedication, if it is available. CMI information is supplied by MIMS and is notcurrently available for all medications.
On a network, this information is stored on the server in a folder called CMI inthe Genie folder. The files are stored as Acrobat PDFs. When you select aparticular item, the pdf is automatically copied from the CMI folder on the serverto a CMI folder on the client machine so that the next time you view thatparticular CMI it is opened directly from the client machine.
Note: On Windows, you must have Acrobat Reader installed on yourmachine to open, view or print these files.The Medication Sheet button allows you to print a six week nursing homesheet, a 2 week medication sheet for hospitals both with or without datesentered. Additionally you can print prescription labels for the Compact BusinessSystem.

Clinical: PrescribingGenie Manual
© 2005-2019 Genie Solutions Pty Ltd 293
Provided you have NPS RADAR Alert ticked in your User Preferences, thisbutton will become active when an NPS RADAR review is available for the drugyou have selected, as well as a RADAR summary popping up the first threetimes you prescribe a medication with a current NPS RADAR review. The NPSRADAR is updated either through the Special menu or through the Genie CDupdates.The Garbage can button will delete the selected medications. If only onemedication is selected there is no warning. If more than one medication isselected you will be asked to confirm the delete command. You can deletemultiple prescriptions at once by Shift+clicking or Ctrl+clicking andhighlighting the required prescriptions. When deleting a medication, you areasked for a reason but only if the medication is not 'once-only' (i.e. assigned acategory of 'S'), and it has previously been printed, otherwise it will be deletedimmediately. You can also choose to create a class allergy to this medicationwhen deleting the prescription. This reason can be accessed through the Info
button and the MIMS Quarterly display. If you re-prescribe a previouslydeleted medication, the old prescribing history, as well as the reason forstopping the medication will be displayed again.The Reset button can be used to restore the default prescription display if youhave re-arranged the columns for example.
Ticking the Reg 24 checkbox will print the Regulation 24 request onprescriptions i.e.“Regulation 24. Please dispense all repeats.”
The TPG button will display a list of generic equivalents for the selectedmedication, allowing you to change the current medication to the equivalentwithout having to delete and re-prescribe it.
The Strength button allows you to change the strength of the selectedprescription without having to delete and re-prescribe it.Checking the Certificate checkbox will print a sick certificate in the lower rightarea of the prescription. Checking the Drug List checkbox prints the list ofcurrent medications in the lower left area of the prescription.
Note: If you would like to print a certificate without actually printing aprescription, you can create a new drug called 'Certificate' and enter it inyour QuickScript menu. Then when you need a certificate 'Prescribe' thedrug called certificate and print! Alternatively, create your own sickcertificate using a merged letter template.

Clinical: PrescribingGenie Manual
© 2005-2019 Genie Solutions Pty Ltd294
6.7.3 Adding a New Prescription
Click on the Blue Plus button above the prescription list to open the new prescription window. Prescriptions canalso be added from within the Consult Window using the Add Script button.
Genie begins searching the MIMS database after the third letter has been typed in the search box at the top ofthe window. You can narrow the selection by continuing to type more of the drug name.
To prescribe one of the displayed drugs, firstly double-click or use the Up and Down keys to highlight thedesired drug. With this highlighted, press Enter or click on the Select button.
Dose, Frequency, Instructions
Once the medication has been selected, you can use the Dose fields to outline the dosage and frequency. Tofurther specify information about the medication's dose, frequency, and administration, enter this into the Instructions field. Anything entered into this field can be saved for future use by opening the drop-down menuand selecting Add to Menu. For some medications, the Instructions field may be filled automatically by the MIMSAbbrev.
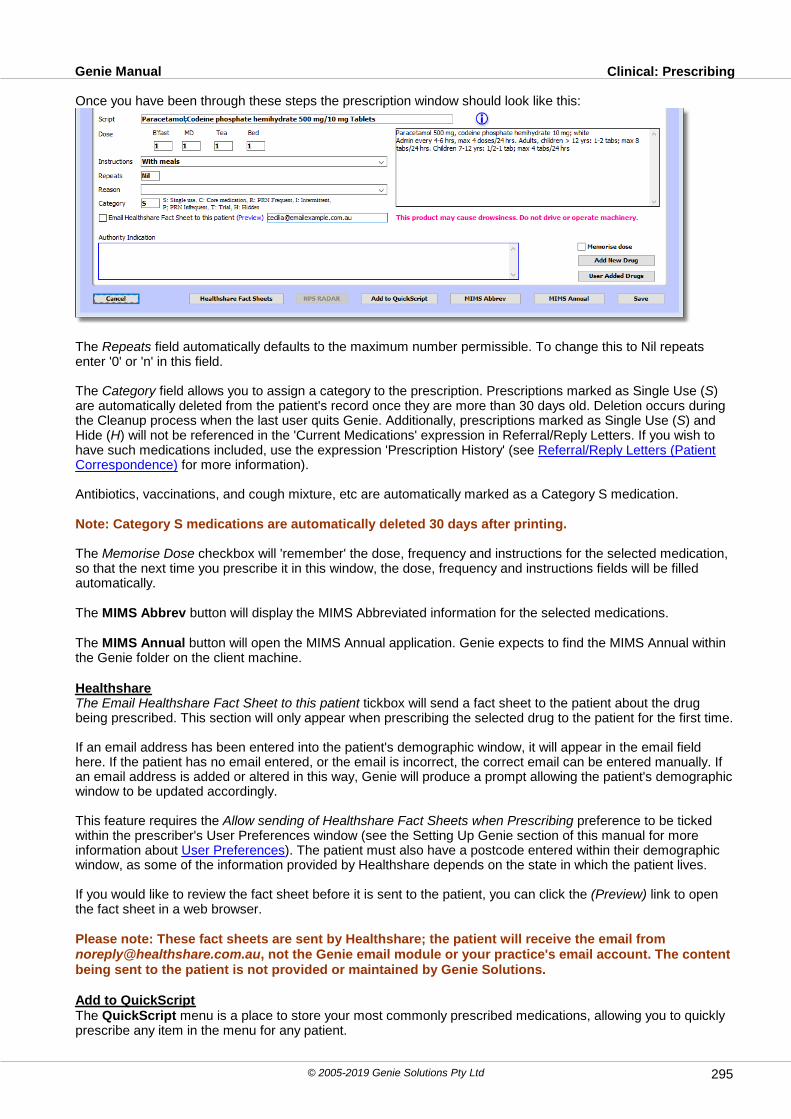
Clinical: PrescribingGenie Manual
© 2005-2019 Genie Solutions Pty Ltd 295
Once you have been through these steps the prescription window should look like this:
The Repeats field automatically defaults to the maximum number permissible. To change this to Nil repeatsenter '0' or 'n' in this field.
The Category field allows you to assign a category to the prescription. Prescriptions marked as Single Use (S)are automatically deleted from the patient's record once they are more than 30 days old. Deletion occurs duringthe Cleanup process when the last user quits Genie. Additionally, prescriptions marked as Single Use (S) andHide (H) will not be referenced in the 'Current Medications' expression in Referral/Reply Letters. If you wish tohave such medications included, use the expression 'Prescription History' (see Referral/Reply Letters (PatientCorrespondence) for more information).
Antibiotics, vaccinations, and cough mixture, etc are automatically marked as a Category S medication.
Note: Category S medications are automatically deleted 30 days after printing.
The Memorise Dose checkbox will 'remember' the dose, frequency and instructions for the selected medication,so that the next time you prescribe it in this window, the dose, frequency and instructions fields will be filledautomatically.
The MIMS Abbrev button will display the MIMS Abbreviated information for the selected medications.
The MIMS Annual button will open the MIMS Annual application. Genie expects to find the MIMS Annual withinthe Genie folder on the client machine.
HealthshareThe Email Healthshare Fact Sheet to this patient tickbox will send a fact sheet to the patient about the drugbeing prescribed. This section will only appear when prescribing the selected drug to the patient for the first time.
If an email address has been entered into the patient's demographic window, it will appear in the email fieldhere. If the patient has no email entered, or the email is incorrect, the correct email can be entered manually. Ifan email address is added or altered in this way, Genie will produce a prompt allowing the patient's demographicwindow to be updated accordingly.
This feature requires the Allow sending of Healthshare Fact Sheets when Prescribing preference to be tickedwithin the prescriber's User Preferences window (see the Setting Up Genie section of this manual for moreinformation about User Preferences). The patient must also have a postcode entered within their demographicwindow, as some of the information provided by Healthshare depends on the state in which the patient lives.
If you would like to review the fact sheet before it is sent to the patient, you can click the (Preview) link to openthe fact sheet in a web browser.
Please note: These fact sheets are sent by Healthshare; the patient will receive the email from [email protected], not the Genie email module or your practice's email account. The contentbeing sent to the patient is not provided or maintained by Genie Solutions.
Add to QuickScriptThe QuickScript menu is a place to store your most commonly prescribed medications, allowing you to quicklyprescribe any item in the menu for any patient.
Clinical: PrescribingGenie Manual
© 2005-2019 Genie Solutions Pty Ltd296
If you would like to add the selected medication, as well as the associated dose, frequency, and instructions,information to your QuickScript menu, click on the Add to QuickScript button.
When a QuickScript is added, information regarding the category and reason for the medication is saved.
Drug InteractionsOnce a drug is selected to be prescribed, provided it is part of the MIMS Prescribing data, Genie performs anallergy & drug interaction and pregnancy check. If an interaction with another drug in the patient's currentmedication list is found, the following window will be displayed.
This window contains an explanation of the interaction and indicates the severity. You can still prescribe themedication by clicking the Prescribe button. The Interaction Level can be set in your User Preferences. It rangesfrom 0 to 5, where 0 has all possible and potential interactions and 5 has no interaction checking at all. A levelof 3 is usually the best in practice. This covers Low, Moderate and High degrees of interaction, but does notinclude Unestablished interactions or those of No Clinical Significance. You can change the level of interactionchecking by clicking the Modify button at the top right of the new prescription window. This will open your UserPreferences (see User Preferences for more information). Click on the Clinical tab and set the level in here.
If the patient has been marked as allergic to the selected drug, or its class, an allergy warning will be displayed.
As with interaction warnings, you still have the ability to over-ride the warning by clicking on the Prescribebutton.
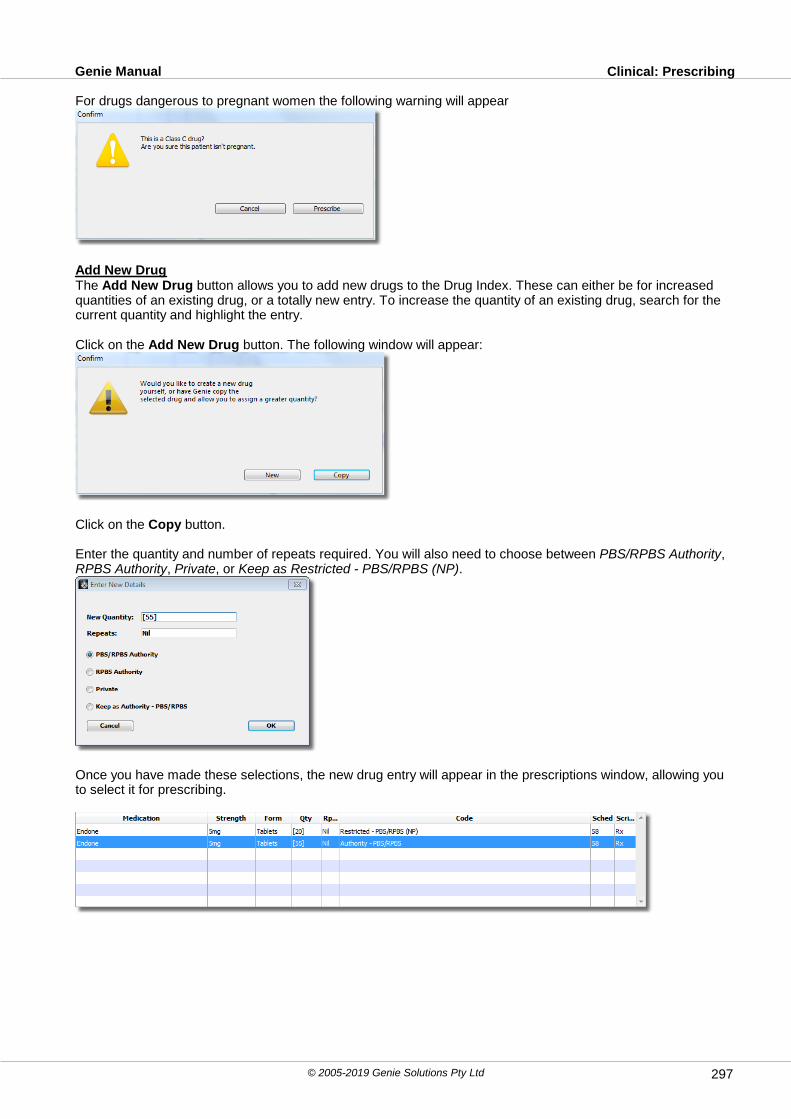
Clinical: PrescribingGenie Manual
© 2005-2019 Genie Solutions Pty Ltd 297
For drugs dangerous to pregnant women the following warning will appear
Add New DrugThe Add New Drug button allows you to add new drugs to the Drug Index. These can either be for increasedquantities of an existing drug, or a totally new entry. To increase the quantity of an existing drug, search for thecurrent quantity and highlight the entry.
Click on the Add New Drug button. The following window will appear:
Click on the Copy button.
Enter the quantity and number of repeats required. You will also need to choose between PBS/RPBS Authority,RPBS Authority, Private, or Keep as Restricted - PBS/RPBS (NP).
Once you have made these selections, the new drug entry will appear in the prescriptions window, allowing youto select it for prescribing.

Clinical: PrescribingGenie Manual
© 2005-2019 Genie Solutions Pty Ltd298
To add a totally new drug entry, click on the Add New Drug button. When asked if you would like to create aNew Drug or Copy an existing one, click the New button. The following window will appear:
Enter the details of the drug and click the Save button. You will then be able to search on this information in thenew prescriptions window.
User Added DrugsThe User Added Drugs button will display a list of drug entries added by users i.e. not supplied by MIMS
6.7.4 Searching Prescriptions
Genie allows you to quickly search the database for:
All patients taking a particular drug.All patients on two or more particular drugs.All patients on more than any particular number of drugs i.e. Polypharmacy.
For example, to search for all patients taking an ACE-Inhibitor:
Open the Patients list by selecting Open > Patients.
Click on the Rx button to open the following window.

Clinical: PrescribingGenie Manual
© 2005-2019 Genie Solutions Pty Ltd 299
This window allows you to search by Brand Name, Generic Name or Class. To search for ACE-Inhibitors, clickon the Class radio button and enter the Brand Name of any ACE-Inhibitor and click OK.
This will enter the Class to search for in the previous window as shown below:
Click OK, and all patients on an ACE-Inhibitor will be displayed.
Note: To display all patients NOT on an ACE-Inhibitor, tick the Find Exceptions checkbox.
You may then want to find all patients who are on the ACE-Inhibitor and Warfarin. To do this, click on the Rxbutton again. This time, click on the Generic radio button and enter Warfarin in the search field.
Tick the Search Current Selection Only checkbox. This tells Genie to only search amongst the list of patientsalready displayed.
You can use this function in combination with other searches. For example you may want to find all diabeticswho are NOT taking an ACE-Inhibitor. To do this you would first search for diabetics through Records > Search.Then do the ACE-Inhibitor search, ticking both the Search Current Selection Only and Find Exceptionscheckbox.
You can also limit the search only to those prescriptions which have been printed on or after a particular date.

Clinical: PrescribingGenie Manual
© 2005-2019 Genie Solutions Pty Ltd300
PolypharmacyIn this same window you can search for patients taking more than x number of prescriptions. To do this, click onthe Polypharmacy tab and enter the number of prescriptions in the search field.
Note: You can also limit this search to just the current selection patients.
6.7.5 Printing Prescriptions to Multiple Patients
In order to print a prescription (or multiple prescriptions) to more than one patient eg. post operative medicationto patients on a theatre list or Fluvax for over 65s, you first need to add the prescriptions required to yourQuickScript list (See Add to QuickScript). You would then search for the list of patients required. For postoperative medication for patients on a theatre list, you would go to Patients > Today's Appointments, selectthe day and the doctor and then tick Display Procedures Only.
Then select Patients > Print Prescriptions
You will be prompted to confirm the creation of scripts for the selected patients and regarding interactions.
Click OK.

Clinical: PrescribingGenie Manual
© 2005-2019 Genie Solutions Pty Ltd 301
Your QuickScript list will be displayed. Select the prescription(s) and click on OK.
The prescriptions will be created. You will then be prompted as to whether you wish to print them now or laterthrough Patients > Print Batch.
Note: You may want to also send a covering letter to these patients along with the prescription. In thiscase you can create a merged letter template for the currently displayed list of patients. See the MergedLetter Templates chapter for more information.
6.7.6 Medication Sets
Providers can now create Medication Sets; multiple prescriptions can be prescribed to a patient with just oneclick.
1. Go to a Patient's Clinical Window.
2. Add each item of the medication combination to their prescription list using the Blue plus button orQuickScript drop-down.
3. Once all of the medications are listed, click on the arrow button to the left of Quickscripts and select Edit Sets.
This will open the Medication Sets window. In here, you will see all of your Medication Sets listed in a pane onthe left hand side. Highlighting a set will display the medications it contains in the Prescriptions pane.

Clinical: PrescribingGenie Manual
© 2005-2019 Genie Solutions Pty Ltd302
5. To add a new Medication Set, click on the Blue plus button in this window, and enter a title for the set whenprompted.
6. Select the prescriptions to add to this Medication Set by selecting them from the grey drop-down menu.
7. Once completed, Close out of the Medication Sets window. The set(s) you have created will now be availablefor use with any patient.

Clinical: PrescribingGenie Manual
© 2005-2019 Genie Solutions Pty Ltd 303
6.7.7 NPS Documents
NPS Rational Assessment of Drugs and Research (RADAR) provides timely, independent, evidence-basedinformation on new drugs, research and Pharmaceutical Benefits Scheme (PBS) listings, to help healthprofessionals:
Assess how a new drug might (or might not) fit with current treatment,Understand how the drug compares with existing therapies,Understand why a drug has a particular PBS listing — if a drug is a Restricted Benefit or requires an Authority,the evidence for benefit and harm behind these restrictions is described,Be aware of key issues when prescribing new drugs.
NPS RADAR is published in line with updates to the Schedule of Pharmaceutical Benefits.
NPS Patient Information Leaflets (PILs) have been integrated into Genie to provide patient-relevant informationthat can be discussed during consultation and printed for the patient.
NPS usage statistics can be recorded with your permission as you access either RADAR or PILs. Once amonth, the following information is reported to NPS:
Names of the documents you viewed;How you accessed the documents (e.g. as a popup);When you viewed them, and for how long.
This data is submitted on a de-identified basis — in other words NPS will not be able to ascertain the identity ofthe person who submitted it.
6.7.7.1 NPS RADAR Document
The NPS RADAR Reviews are available through:
An easy-to-read, condensed 'Alert',A detailed review for a specific drug,A complete list of Reviews available in Genie.
NPS RADAR Alert
When a relevant drug is being prescribed to a patient (see Prescribing for more information), if the “Enable NPSRADAR Alert” option is ticked in the User Preferences the 'NPS RADAR Alert” window will appear. This windowdetails briefly the prescribing tips, safety notes and dosing information for this particular drug. This window willonly appear for the first three times a relevant drug is prescribed . The NPS RADAR Alert will remain active for12 months after publication.
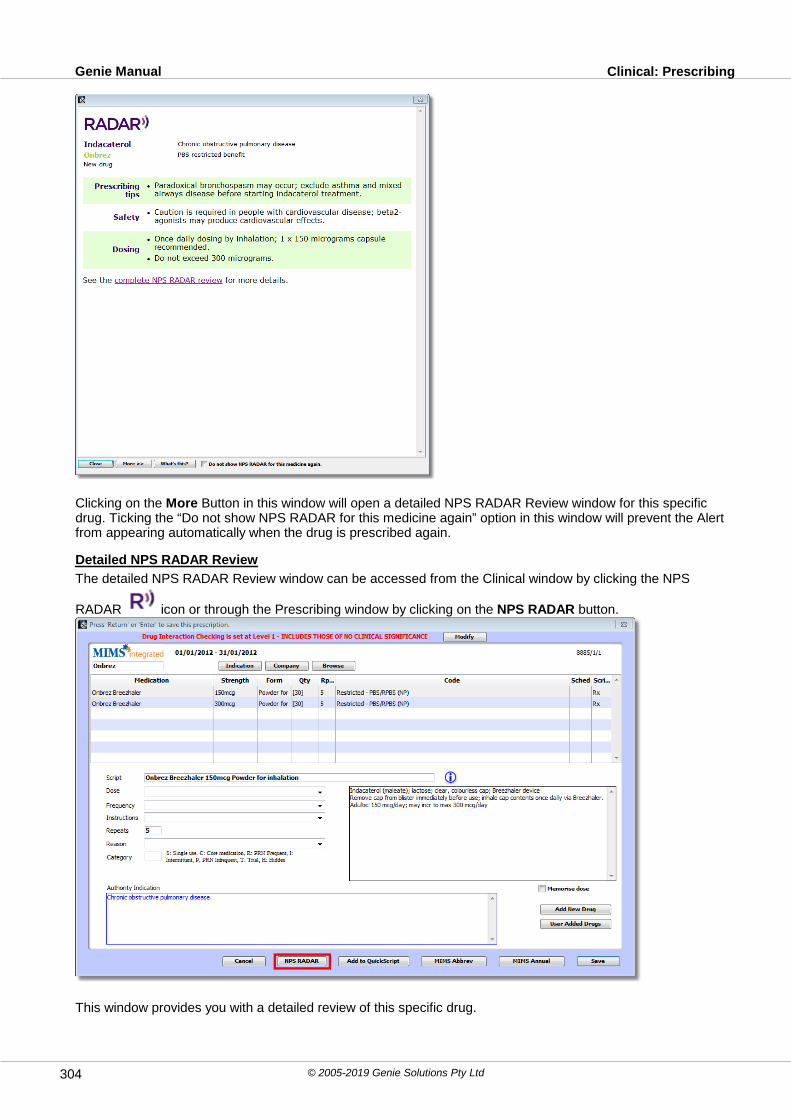
Clinical: PrescribingGenie Manual
© 2005-2019 Genie Solutions Pty Ltd304
Clicking on the More Button in this window will open a detailed NPS RADAR Review window for this specificdrug. Ticking the “Do not show NPS RADAR for this medicine again” option in this window will prevent the Alertfrom appearing automatically when the drug is prescribed again.
Detailed NPS RADAR Review
The detailed NPS RADAR Review window can be accessed from the Clinical window by clicking the NPS
RADAR icon or through the Prescribing window by clicking on the NPS RADAR button.
This window provides you with a detailed review of this specific drug.

Clinical: PrescribingGenie Manual
© 2005-2019 Genie Solutions Pty Ltd 305
NPS RADAR Documents
The complete list of NPS RADAR Documents can be accessed via Open > NPS RADAR Documents. Bydefault, the most recent RADAR reviews that currently have active popup alerts will be displayed in this window.RADAR reviews are current for 12 months.Double-clicking on an item in this list will display the relevantinformation in the preview window.
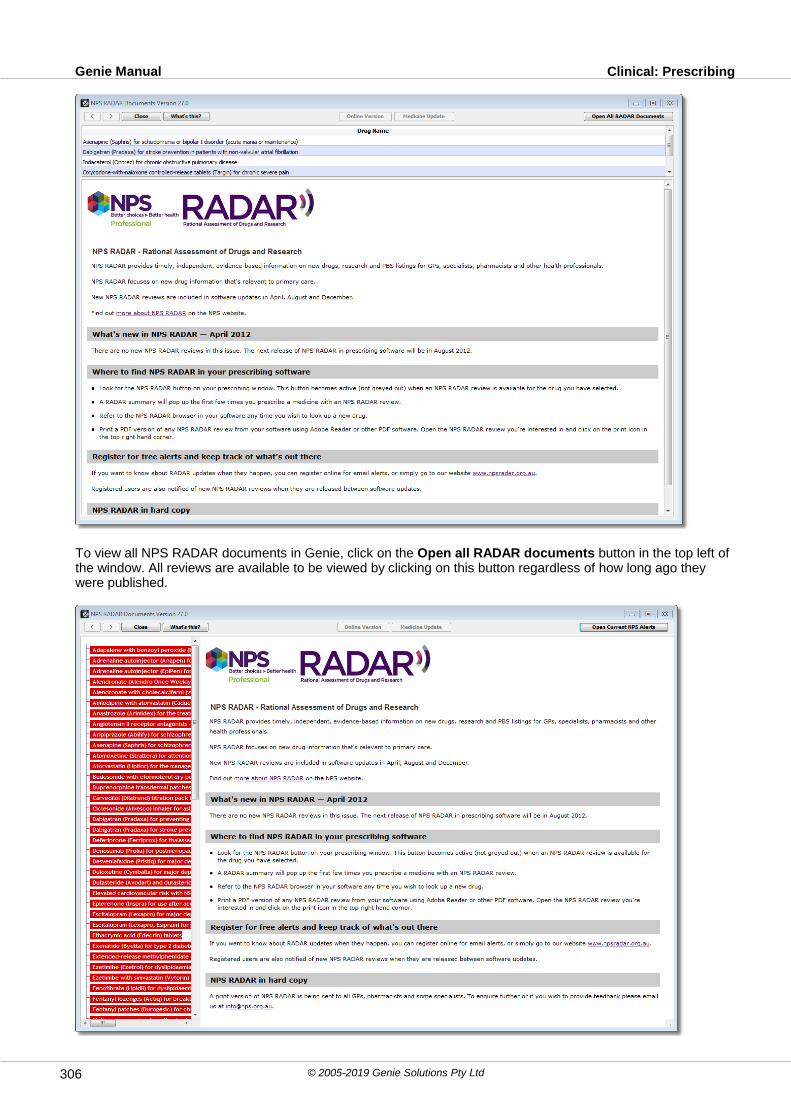
Clinical: PrescribingGenie Manual
© 2005-2019 Genie Solutions Pty Ltd306
To view all NPS RADAR documents in Genie, click on the Open all RADAR documents button in the top left ofthe window. All reviews are available to be viewed by clicking on this button regardless of how long ago theywere published.

Clinical: PrescribingGenie Manual
© 2005-2019 Genie Solutions Pty Ltd 307
You can also access the Online Version and the Medicine Update of the selected drug if the information wasmade available by NPS by clicking on the respective buttons at the top of the window. Medicine Updateprovides similar information to NPS RADAR, but in a format designed and written for patients and carers.
6.7.7.2 NPS PILs Documents
Patient information leaflets (PILs) are produced by NPS to assist health professionals in communicatingessential treatment messages to patients and are best used in conjunction with the patient consultation. Theycover a number of topics such as Chronic Obstructive Pulmonary Disease, Type 2 Diabetes, Upper RespiratoryTract Infections, and Antibiotics. They have been designed to be complementary to the Consumer MedicinesInformation (CMI) leaflets which contain specific information regarding a particular medication.
To access the NPS PILs documents, go to Open > NPS PILs Document. The PILs will appear as a list on theleft-hand side of the window. Double-clicking the document title will allow you to preview the document on theright-hand side of the window.
6.7.7.3 Updating NPS Documents
Automatic UpdateBy default, Genie will check regularly for updates to NPS documents, which are then downloaded automatically.NPS RADAR updates are checked/downloaded weekly, while NPS PILs are checked/download monthly. If anupdate is found, the following prompt will appear:

Clinical: PrescribingGenie Manual
© 2005-2019 Genie Solutions Pty Ltd308
If you would like Genie to remember your decision in the future – i.e. you would like Genie to always downloadany updates it finds, or you want it to never do so – tick the Remember my decision for further updates checkboxand click Yes or No as appropriate.
Once ticked, you can change this preference via the Clinical tab of the User Preferences window (File > UserPreferences).
Manual Update
NPS documents can be updated manually via the Software Updates window (Special > Software Updates).Tick the appropriate NPS download option and click Install X Item(s).
Save the downloaded files to the Genie folder on the server computer. Depending on the server platform, thedefault location for this folder will be:
Windows: C\Genie\ Macintosh: Macintosh HD:Applications:Genie
Once the files have been downloaded to the appropriate folder, Genie will prompt you to install them the nexttime it is launched.
If the Software Updates window is inaccessible for any reason, the NPS updates can be accessed from the Downloads section of the Genie website.
6.7.7.4 Submission of Usage Statistics
The first time you access any NPS document, either RADAR or PIL, you will be asked for permission to collectdata about your usage of NPS information. Data submitted to NPS includes the name of the documents youhave viewed, how the documents were accessed (e.g. as a popup), when you viewed the documents and forhow long.
You have the option to select:“Skip” - Allows you to not make a choice at this time. However, you will be asked each time an NPS
document is accessed until you choose to agree or not.“I agree” - You consent and information will be recorded and submitted monthly to NPS. .“I do not agree” - You do not consent and information will not be recorded or submitted to NPS.
If you change your mind, you can change your choice in the Clinical tab of the User Preferences window.

Clinical: RecallsGenie Manual
© 2005-2019 Genie Solutions Pty Ltd 309
6.8 Recalls
Recalls can be added from:
The Clinical Window, by clicking on the Recalls button .The Patients List, by selecting Patients > Add a Recall.The Appointment Book, by selecting Appts > Add a Recall or,The Pathology Action List window when linking pathology results.
When adding a recall from the Pathology & Radiology list, or from within the Clinical Window, a list of recalls
already in existence for that patient will be displayed.
Click on the Add button as shown above to create the new recall record, which will open the window below.
Note: If you are receiving an error message stating that you cannot create a recall from here, you havenot accessed recalls from the Pathology & Radiology window or Clinical Window.
In this window, you can enter the reason for the recall by either typing it into the Reason field, or by selecting it
Clinical: RecallsGenie Manual
© 2005-2019 Genie Solutions Pty Ltd310
from the drop-down menu to the left of this field. If you type a reason in manually, Genie will ask you whether youwish to add it to the list of recall reasons available from the drop-down menu. To remove a reason from this list,open the drop-down menu and Alt+click on the reason you wish to remove.
Enter the Due Date by specifying the number of months ahead, or by entering the actual date or if this is going tobe a recurring recall, select the Make This a Recurring Recall checkbox, and enter the frequency in months. Thiswill reassign the recall to its next due date after it is printed, so you do not have to keep adding the patient to therecall list. Click the Save button to save the record.
Flagging of Patient Record
When recalls are printed (see Printing Recalls in Reception Module), the patient record is automatically flagged.If the recall is currently overdue, then the Flagged Date is set to one week ahead. Otherwise, the Flagged Dateis set to one week after the recall is actually due.
When a User enters a flagged patient file, they will be notified that it is flagged and be provided with the flagreason. After the flagged date has passed, the user that the recall is assigned to will be notified by the OverduePatients notifier in the Navigation Palette. Flagged patients can be viewed at anytime through Patients >Flagged Patients in the Patients List (Open > Patients).
6.9 Checklists
Checklists within Genie are a method for creating your own unique forms for data collection. They can be usedto quickly and easily collect consultation notes, physical exams, pre-operative checks, and operation reports.
Below is an example checklist:
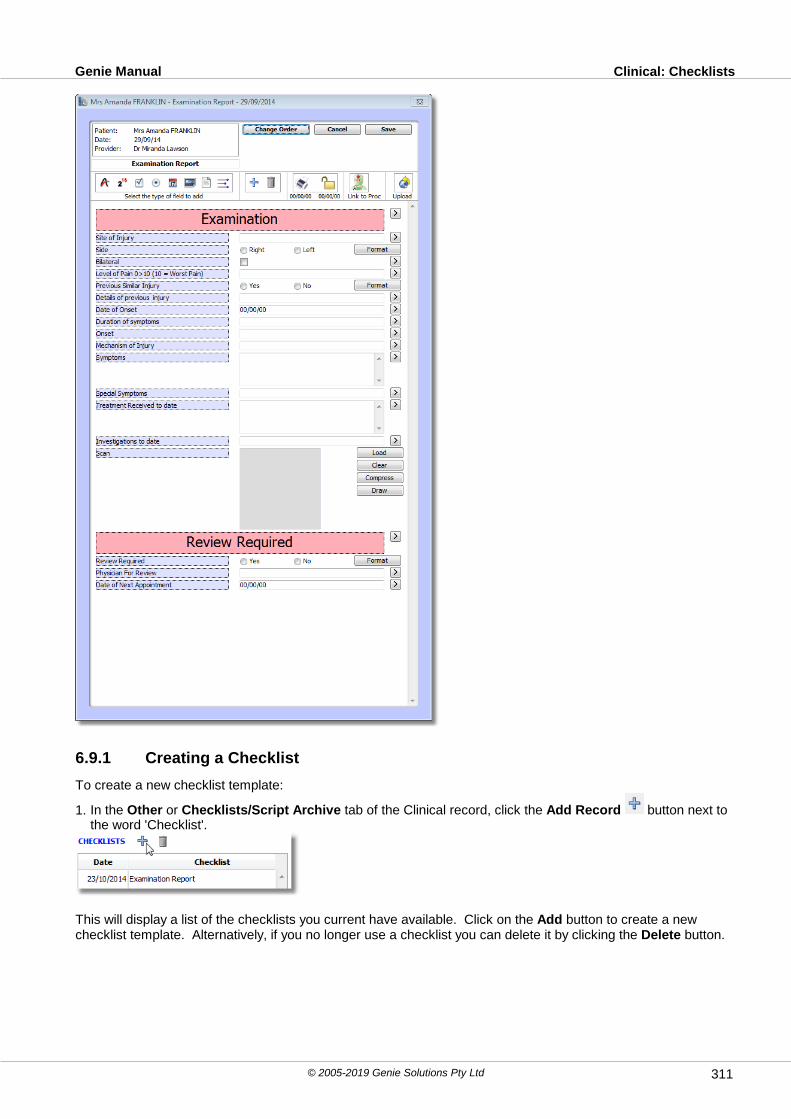
Clinical: ChecklistsGenie Manual
© 2005-2019 Genie Solutions Pty Ltd 311
6.9.1 Creating a Checklist
To create a new checklist template:
1. In the Other or Checklists/Script Archive tab of the Clinical record, click the Add Record button next tothe word 'Checklist'.
This will display a list of the checklists you current have available. Click on the Add button to create a newchecklist template. Alternatively, if you no longer use a checklist you can delete it by clicking the Delete button.

Clinical: ChecklistsGenie Manual
© 2005-2019 Genie Solutions Pty Ltd312
2. Enter a name for the checklist, then click OK.
3. The new template will be added to the list and should automatically be highlighted. Click the Select button toopen the newly created checklist.
4. To add a field, click on the required field button and then click the Add New Field to Checklist button.For example, to add a text field, click on the Text Field button, then click the Add New Field to Checklistbutton. The text field will now be added to the checklist.

Clinical: ChecklistsGenie Manual
© 2005-2019 Genie Solutions Pty Ltd 313
You can add the following fields to the checklist:
a) Text field
b) Number field
c) Checkbox
d) Radio button
e) Date field
f) Picture field
g) Large text field
h) Break heading
To remove a field from the checklist, click the Delete Field from Checklist button and select the field youwant to delete from the drop-down menu.
To change the name of the field label, click in the area with the blue background (e.g. Text 1) or pinkbackground for break headings, and then type the name that you require.
Clicking on the Menu button brings up a menu which allows you to select options to make data entry faster.
The Add to Menu option allows you to add options specific to that field so that it can be selected rather thantyped. Items can be removed from this list by holding down the Alt key on your keyboard and clicking on theitem you want to remove.
The Field Reference option allows you to select a Patient field so that patient specific information is automaticallyentered when this checklist is added to the patient's clinical record. Fields that contain a reference are colouredgreen and if you hover your mouse over the field, it will show you what field is being referenced (e.g. [Patient]FullName).
The Clear Field Reference clears information that is currently entered into the field.
If you add a Radio Button field, by default it displays the choice of “Yes” and “No”. This can be changed byclicking on the Format button, entering the relevant options in the Choice 1 and Choice 2 fields and clicking OK.
The Change Order button allows you to rearrange the order of the fields that appear in the checklist. Click anddrag the field into the required position and then click Save.

Clinical: ChecklistsGenie Manual
© 2005-2019 Genie Solutions Pty Ltd314
5. Once you are happy with how the checklist appears, click the Save button.
Note: The checklist will save the template and also save a copy of the checklist to the patient's clinicalrecord. If you do not want it to save to a real patient's record while you are creating the template, use atest patient in your database. Alternatively, you can delete the checklist from the patient's record by
selecting the checklist and clicking the Delete button in the Other or Checklists/Script Archive tab.
6.9.2 Using Checklists
Once the checklist template has been created, you can add it to a patient's record and enter information specificto that patient. Checklists can be added from three different places:
1. The Other or Checklists/Script Archive tab in the Clinical Window.2. The Add Consult window in the Clinical Window.3. The Op Notes tab within a Procedure record.
To add a checklist for a patient:
1. Click the Add Record button in the Clinical window or Procedure record, select the template that yourequire and click the Select button. From the Add Consult window, click the Checklist drop-down menu andselect the relevant checklist.
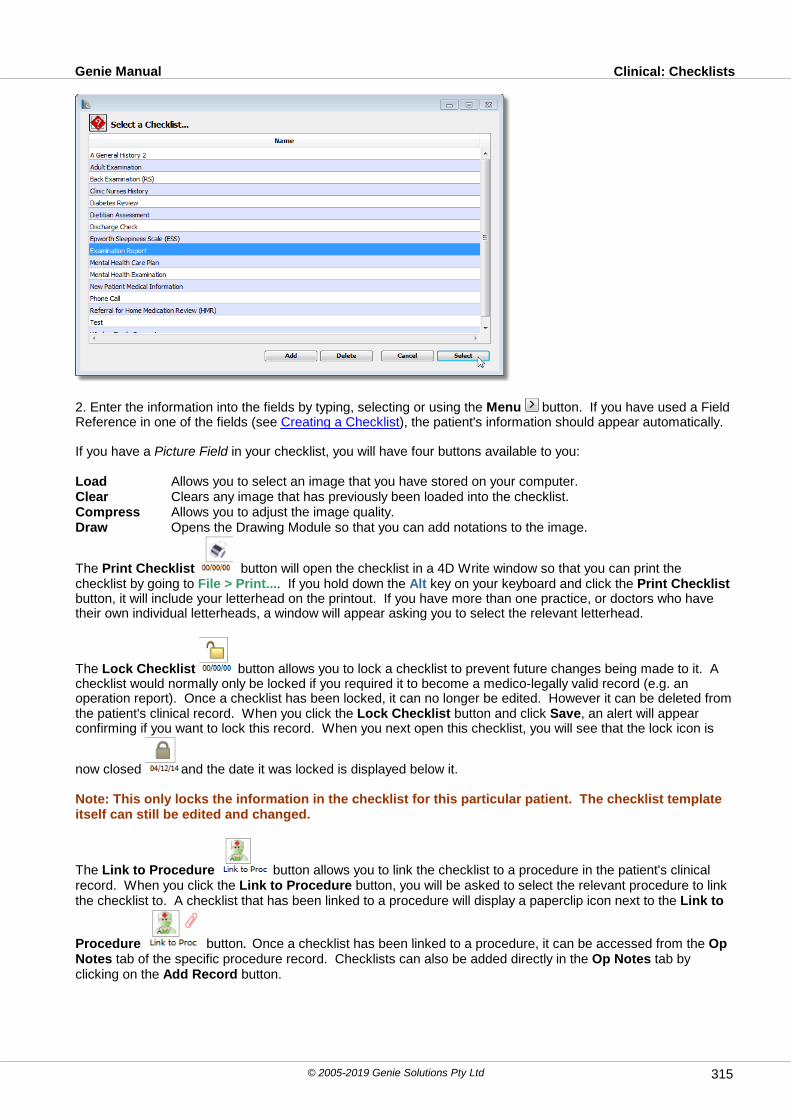
Clinical: ChecklistsGenie Manual
© 2005-2019 Genie Solutions Pty Ltd 315
2. Enter the information into the fields by typing, selecting or using the Menu button. If you have used a FieldReference in one of the fields (see Creating a Checklist), the patient's information should appear automatically.
If you have a Picture Field in your checklist, you will have four buttons available to you:
Load Allows you to select an image that you have stored on your computer.Clear Clears any image that has previously been loaded into the checklist.Compress Allows you to adjust the image quality.Draw Opens the Drawing Module so that you can add notations to the image.
The Print Checklist button will open the checklist in a 4D Write window so that you can print thechecklist by going to File > Print.... If you hold down the Alt key on your keyboard and click the Print Checklistbutton, it will include your letterhead on the printout. If you have more than one practice, or doctors who havetheir own individual letterheads, a window will appear asking you to select the relevant letterhead.
The Lock Checklist button allows you to lock a checklist to prevent future changes being made to it. Achecklist would normally only be locked if you required it to become a medico-legally valid record (e.g. anoperation report). Once a checklist has been locked, it can no longer be edited. However it can be deleted fromthe patient's clinical record. When you click the Lock Checklist button and click Save, an alert will appearconfirming if you want to lock this record. When you next open this checklist, you will see that the lock icon is
now closed and the date it was locked is displayed below it.
Note: This only locks the information in the checklist for this particular patient. The checklist templateitself can still be edited and changed.
The Link to Procedure button allows you to link the checklist to a procedure in the patient's clinicalrecord. When you click the Link to Procedure button, you will be asked to select the relevant procedure to linkthe checklist to. A checklist that has been linked to a procedure will display a paperclip icon next to the Link to
Procedure button. Once a checklist has been linked to a procedure, it can be accessed from the OpNotes tab of the specific procedure record. Checklists can also be added directly in the Op Notes tab byclicking on the Add Record button.
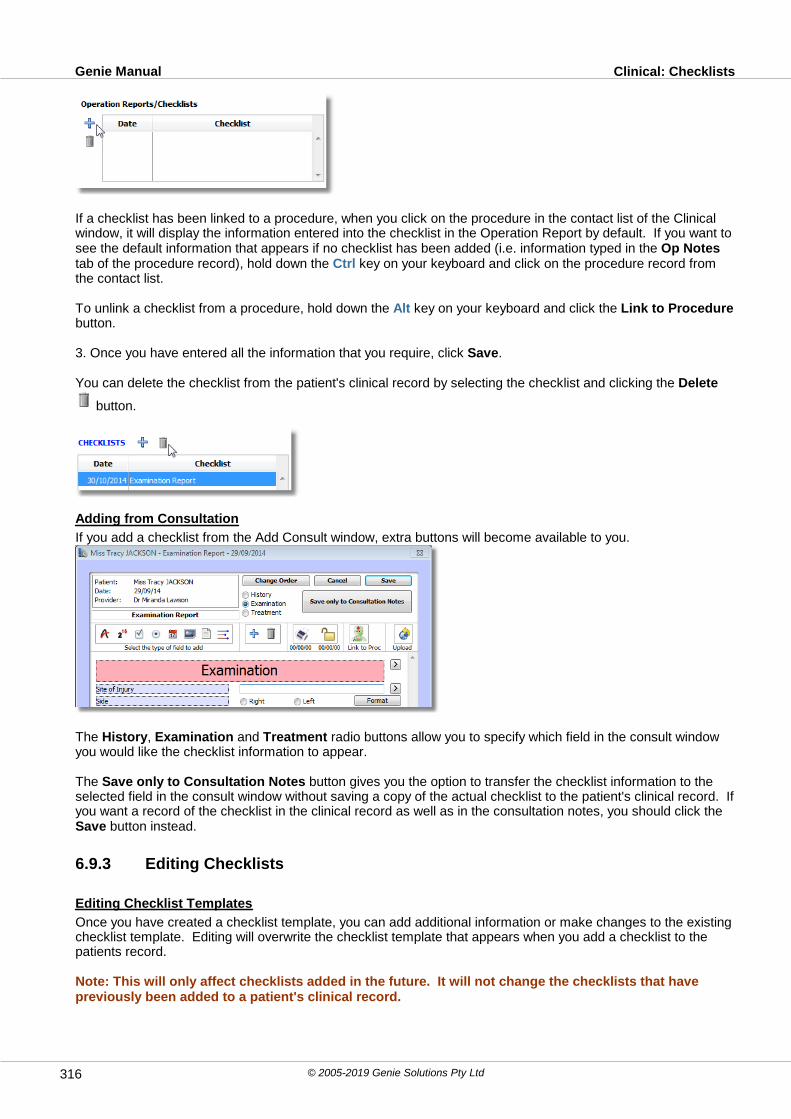
Clinical: ChecklistsGenie Manual
© 2005-2019 Genie Solutions Pty Ltd316
If a checklist has been linked to a procedure, when you click on the procedure in the contact list of the Clinicalwindow, it will display the information entered into the checklist in the Operation Report by default. If you want tosee the default information that appears if no checklist has been added (i.e. information typed in the Op Notestab of the procedure record), hold down the Ctrl key on your keyboard and click on the procedure record fromthe contact list.
To unlink a checklist from a procedure, hold down the Alt key on your keyboard and click the Link to Procedurebutton.
3. Once you have entered all the information that you require, click Save.
You can delete the checklist from the patient's clinical record by selecting the checklist and clicking the Delete
button.
Adding from Consultation
If you add a checklist from the Add Consult window, extra buttons will become available to you.
The History, Examination and Treatment radio buttons allow you to specify which field in the consult windowyou would like the checklist information to appear.
The Save only to Consultation Notes button gives you the option to transfer the checklist information to theselected field in the consult window without saving a copy of the actual checklist to the patient's clinical record. Ifyou want a record of the checklist in the clinical record as well as in the consultation notes, you should click the Save button instead.
6.9.3 Editing Checklists
Editing Checklist Templates
Once you have created a checklist template, you can add additional information or make changes to the existingchecklist template. Editing will overwrite the checklist template that appears when you add a checklist to thepatients record.
Note: This will only affect checklists added in the future. It will not change the checklists that havepreviously been added to a patient's clinical record.
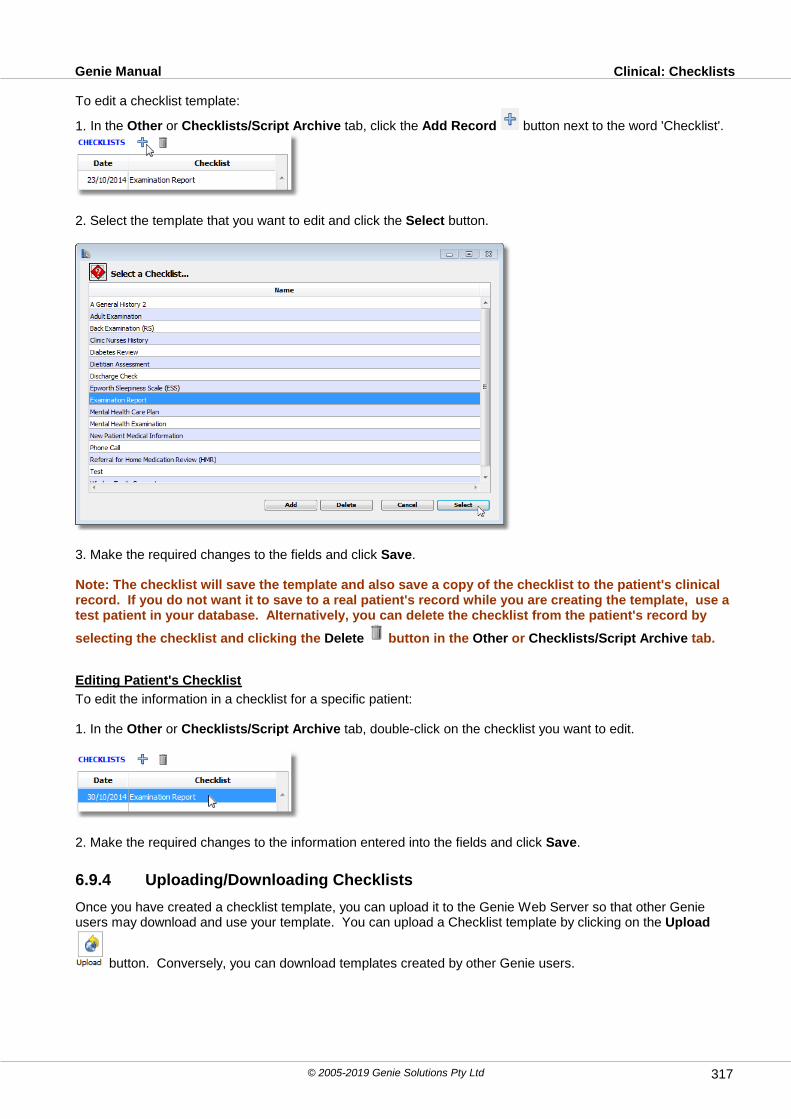
Clinical: ChecklistsGenie Manual
© 2005-2019 Genie Solutions Pty Ltd 317
To edit a checklist template:
1. In the Other or Checklists/Script Archive tab, click the Add Record button next to the word 'Checklist'.
2. Select the template that you want to edit and click the Select button.
3. Make the required changes to the fields and click Save.
Note: The checklist will save the template and also save a copy of the checklist to the patient's clinicalrecord. If you do not want it to save to a real patient's record while you are creating the template, use atest patient in your database. Alternatively, you can delete the checklist from the patient's record by
selecting the checklist and clicking the Delete button in the Other or Checklists/Script Archive tab.
Editing Patient's Checklist
To edit the information in a checklist for a specific patient:
1. In the Other or Checklists/Script Archive tab, double-click on the checklist you want to edit.
2. Make the required changes to the information entered into the fields and click Save.
6.9.4 Uploading/Downloading Checklists
Once you have created a checklist template, you can upload it to the Genie Web Server so that other Genieusers may download and use your template. You can upload a Checklist template by clicking on the Upload
button. Conversely, you can download templates created by other Genie users.

Clinical: ChecklistsGenie Manual
© 2005-2019 Genie Solutions Pty Ltd318
Genie version 8.6.4 and below:
Go to Special > Get Checklists. This will open the Checklist window where checklists are grouped underspecialties. Click the small plus icon to the left of the relevant speciality, double-click on the checklist youwould like, type a name for the checklist in the window that appears and click OK. This checklist will now be
available in the list of checklists when you click the Add Record button.
Genie version 8.6.5 and above:
Go to Special > Software Updates and click on the Checklists tab. Click the small plus to the left of thecategory you require, tick the checkbox to the right of the checklist that you want and click the Import X Item/sbutton. A window will appear allowing you to rename the template before you download it.
To change the name, slow double-click in the New Name column, type the name and then click Save. This
checklist will now be available in the list of checklists when you click the Add Record button.
Note: These checklists are created by other Genie users so they may not be accurate or contain anyinformation as they may have been inadvertently uploaded. Genie Solutions does its best to minimisethese 'blank' checklists on the Genie FTP Site but cannot always guarantee that there will not be any.
6.10 Pathology and Radiology
Set Up
You must contact your Pathology and Radiology providers to set up their company specific software and tosupply you with their computerised request forms. The download software should ideally be installed on a clientmachine. However if this is not feasible, it can be installed on the server.The directory into which downloaded results should be deposited is the LabRslts folder within the Genie folder:
On Windows the pathway will usually be: C:\Genie\LabRslts\On Macintosh the pathway will usually be:/Applications/Genie/LabRslts/
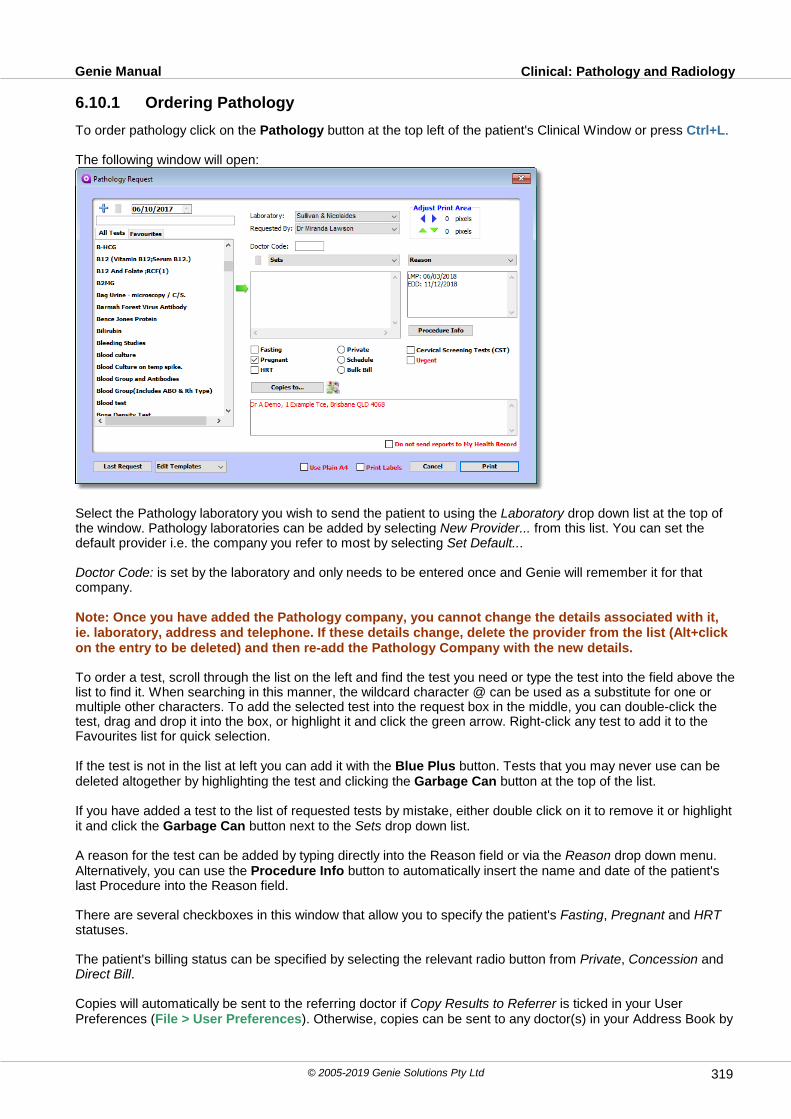
Clinical: Pathology and RadiologyGenie Manual
© 2005-2019 Genie Solutions Pty Ltd 319
6.10.1 Ordering Pathology
To order pathology click on the Pathology button at the top left of the patient's Clinical Window or press Ctrl+L.
The following window will open:
Select the Pathology laboratory you wish to send the patient to using the Laboratory drop down list at the top ofthe window. Pathology laboratories can be added by selecting New Provider... from this list. You can set thedefault provider i.e. the company you refer to most by selecting Set Default...
Doctor Code: is set by the laboratory and only needs to be entered once and Genie will remember it for thatcompany.
Note: Once you have added the Pathology company, you cannot change the details associated with it,ie. laboratory, address and telephone. If these details change, delete the provider from the list (Alt+clickon the entry to be deleted) and then re-add the Pathology Company with the new details.
To order a test, scroll through the list on the left and find the test you need or type the test into the field above thelist to find it. When searching in this manner, the wildcard character @ can be used as a substitute for one ormultiple other characters. To add the selected test into the request box in the middle, you can double-click thetest, drag and drop it into the box, or highlight it and click the green arrow. Right-click any test to add it to theFavourites list for quick selection.
If the test is not in the list at left you can add it with the Blue Plus button. Tests that you may never use can bedeleted altogether by highlighting the test and clicking the Garbage Can button at the top of the list.
If you have added a test to the list of requested tests by mistake, either double click on it to remove it or highlightit and click the Garbage Can button next to the Sets drop down list.
A reason for the test can be added by typing directly into the Reason field or via the Reason drop down menu.Alternatively, you can use the Procedure Info button to automatically insert the name and date of the patient'slast Procedure into the Reason field.
There are several checkboxes in this window that allow you to specify the patient's Fasting, Pregnant and HRTstatuses.
The patient's billing status can be specified by selecting the relevant radio button from Private, Concession andDirect Bill.
Copies will automatically be sent to the referring doctor if Copy Results to Referrer is ticked in your UserPreferences (File > User Preferences). Otherwise, copies can be sent to any doctor(s) in your Address Book by

Clinical: Pathology and RadiologyGenie Manual
© 2005-2019 Genie Solutions Pty Ltd320
clicking the Copies to... button.
Ticking Do not send reports to My Health Record allows the patient to opt out of having their Pathology reportsuploaded to their My Health Record.
If your pathology stationary has labels on it, tick the Print Labels tickbox which will format the request to print thepatient information on these labels.
If the investigations being requested are Cervical Screening Tests (CST), tick this checkbox. Doing so will openthe window below, allowing you to specify relevant information about the investigation(s).
Creating Pathology SetsFor commonly ordered sets of tests you can create a Pathology Set so you will only need to select the Set fromthe Sets drop down list and it will slot in the appropriate tests you have set up. There are quite a few default Setsalready set up in the drop down list which can be deleted or modified as appropriate.
To create a set, drag all required tests for the set into the request box. Select Save Set... from the Sets dropdown list and give the Set a name as prompted.
Reprinting Request FormsRequest forms can be reprinted using the Last Request button in the request window or through Open >Investigations Audit. In Investigations Audit, find the request that needs to be reprinted, double click to openthe request window and click the Reprint button at the bottom of this window.
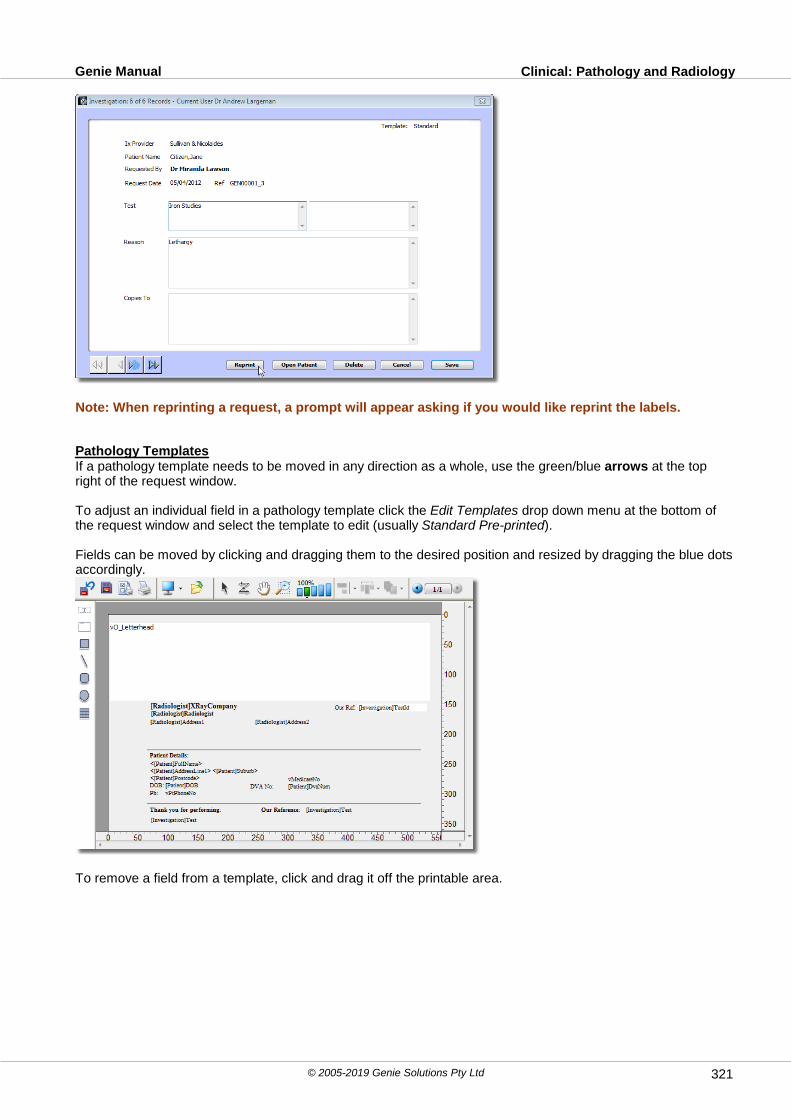
Clinical: Pathology and RadiologyGenie Manual
© 2005-2019 Genie Solutions Pty Ltd 321
Note: When reprinting a request, a prompt will appear asking if you would like reprint the labels.
Pathology TemplatesIf a pathology template needs to be moved in any direction as a whole, use the green/blue arrows at the topright of the request window.
To adjust an individual field in a pathology template click the Edit Templates drop down menu at the bottom ofthe request window and select the template to edit (usually Standard Pre-printed).
Fields can be moved by clicking and dragging them to the desired position and resized by dragging the blue dotsaccordingly.
To remove a field from a template, click and drag it off the printable area.

Clinical: Pathology and RadiologyGenie Manual
© 2005-2019 Genie Solutions Pty Ltd322
To edit the Text Properties in a field, double click and a Properties list will appear with options to adjust the Styleand Size etc. of the text.
Be sure to Save the Template before closing using the Save button . The previously saved template can be
restored by clicking the Revert button .
6.10.2 Ordering Radiology
To order radiology, click the Radiology request button in the patient's Clinical Window. This will open thewindow below.
Select the Radiology company you would like to use in the drop-down list under the Date field (in the exampleabove, QML is selected). Radiology companies can be added by selecting New Provider... from this list. You canset the default provider i.e. the company you refer to most by selecting Set Default...
Note: Once you have added the Radiology company, you cannot change the details associated with it,ie. Company name, address and Radiologist. If these details change, delete the provider from the list(Alt+click on the entry to be deleted) and then re-add the Radiology company with the new details.

Clinical: Pathology and RadiologyGenie Manual
© 2005-2019 Genie Solutions Pty Ltd 323
Select the print template you wish to use from the Use Template drop-down list. Plain A4 is the most commonlyused otherwise Custom templates in the Edit Templates drop-down can be used for your common radiologyproviders. See Radiology Templates below. Using a particular template with a radiology provider associates thattemplate with that provider. Therefore, if you use Plain A4 for QML this time, Genie will automatically select PlainA4 next time.
To order a test from the list of tests at left either scroll through and find the test you need, or alternatively typethe test into the blank box at the top of the list to find it. You can double-click the required test to move it into therequest box in the middle of the window, or you can drag and drop the test into the request box.
Double-click (or drag and drop) the region required from the list at right, as above, which will place it in therequest box after the test ordered. You can also type additional information into the request box eg. left or right,by simply clicking into the box and typing what is required.
If the test or region is not in the list you can add it with the Blue Plus button. Tests or regions that you may neveruse can be deleted altogether by highlighting the test or region and clicking the Garbage Can button at the topof the list. Alternatively, you can simply highlight and press Delete on your keyboard.
The Procedure Info and Workcover Info buttons allow you to add information from either or both of theserecords into the Reason field.
Copies will automatically be sent to the referring doctor if Copy Results to Referrer is ticked in your UserPreferences (File > User Preferences). Otherwise, copies can be sent to any doctor(s) in your Address Book byclicking on the Copies to... button.
Ticking Do not send reports to My Health Record allows the patient to opt out of having their Radiology reportsuploaded to their My Health Record.
Reprinting Request FormsRequest forms can be reprinted through Open > Investigations Audit. Find the request that needs to bereprinted, double-click to open the request window and click the Reprint button at the bottom of this window.
Radiology TemplatesUnlike pathology companies, radiology companies do not have a standard pre-printed form (except in Victoriaand South Australia). This means that templates need to be set up or created to suit the radiology companiesthat you use. Genie comes with some default radiology templates in the Edit Templates drop-down menu thatyou can use and customise. You can also create new radiology templates if you use multiple companies withdifferent pre-printed request forms.
Note: If a radiology company does not use a pre-printed form, using the Plain A4 template will print therequest details with your letterhead.
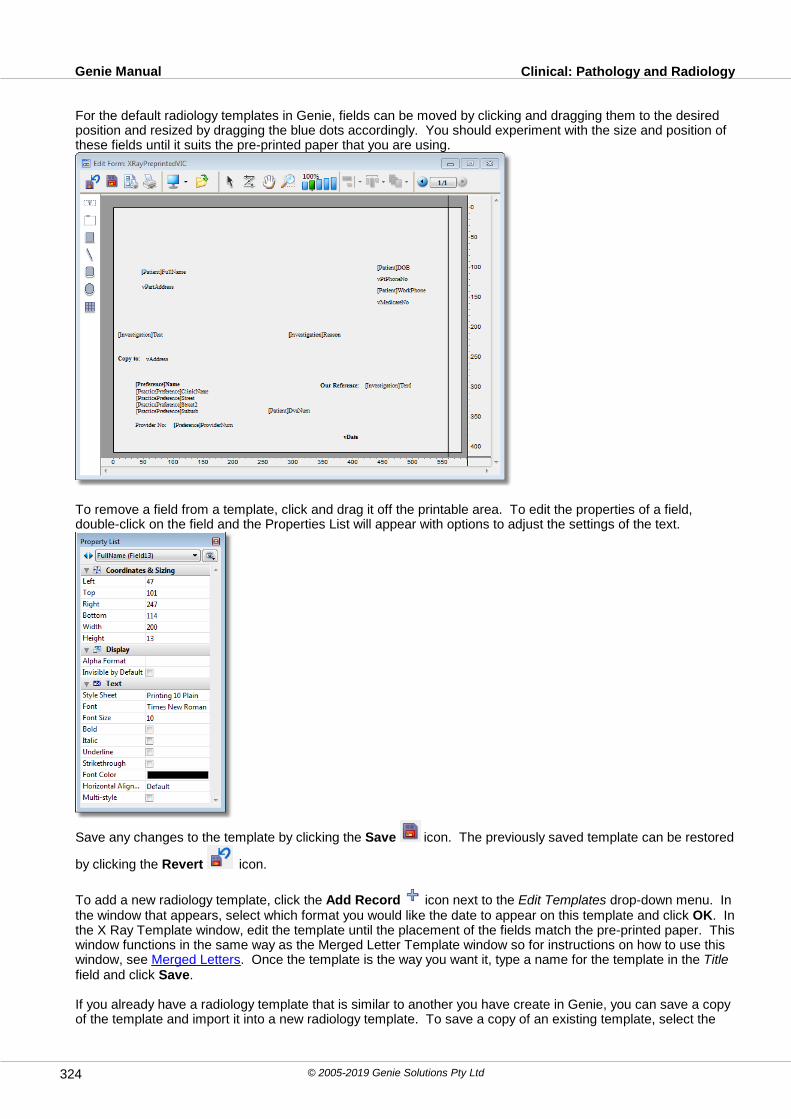
Clinical: Pathology and RadiologyGenie Manual
© 2005-2019 Genie Solutions Pty Ltd324
For the default radiology templates in Genie, fields can be moved by clicking and dragging them to the desiredposition and resized by dragging the blue dots accordingly. You should experiment with the size and position ofthese fields until it suits the pre-printed paper that you are using.
To remove a field from a template, click and drag it off the printable area. To edit the properties of a field,double-click on the field and the Properties List will appear with options to adjust the settings of the text.
Save any changes to the template by clicking the Save icon. The previously saved template can be restored
by clicking the Revert icon.
To add a new radiology template, click the Add Record icon next to the Edit Templates drop-down menu. Inthe window that appears, select which format you would like the date to appear on this template and click OK. Inthe X Ray Template window, edit the template until the placement of the fields match the pre-printed paper. Thiswindow functions in the same way as the Merged Letter Template window so for instructions on how to use thiswindow, see Merged Letters. Once the template is the way you want it, type a name for the template in the Titlefield and click Save.
If you already have a radiology template that is similar to another you have create in Genie, you can save a copyof the template and import it into a new radiology template. To save a copy of an existing template, select the

Clinical: Pathology and RadiologyGenie Manual
© 2005-2019 Genie Solutions Pty Ltd 325
template from the Edit Templates drop-down menu, above the template area, select File > Save As... andnavigate to a familiar location on your computer. Give the template a name and then click Save. The templatewill be saved in 4W7 format.
To import this into a new template, in the Radiology Request window, click the Add Record button, above thetemplate area select File > Open, navigate to the location that you saved the template, select it and click Open.You can now edit the template until it suits the pre-printed paper. Once the template is the way you want it, typea name for the template in the Title field and click Save.
6.10.3 Importing Downloaded Results
Results are downloaded into the LabRslts folder by the respective laboratory's software. From this folder, theseresult files can then be imported into Genie automatically (or manually, if need be).
If results are set to download to a Client, tick 'Import Pathology automatically on a Client' in Practice Preferences(File > Practice Preferences, Clinical tab). If they are set to download on the server, then Genie can import theresults automatically by ticking 'Allow Pathology Import On Server'.
If you would prefer to do the import manually, go to Open > Pathology and Radiology on the client machinethat has the laboratories' download software on it. If there are any new result files to import, the Import windowwill open as shown below.
All results will be ticked by default, if you wish to import only a few of the results listed you can click the DeselectAll button and tick just the required result.
Click the Import button and Genie will import the downloaded files into the database. Once the import is finishedthese results can be accessed by anybody on the network.
Troubleshooting
If Genie finds any problems with the downloaded file, you will receive a message saying that the file is not a validresults file. Usually this is because it has not been decrypted, is not actually a results file at all, or there is aproblem with the PIT/HL7 formatting from the laboratory. Although HL7 is a 'standard', it is a very loosely definedand interpreted standard and some laboratories may format results in ways that Genie does not expect. Anyinvalid results will go into the folder named 'Invalid Results' in the LabRslts folder.If you are experiencing problems automatically importing results, the above Import window can be opened from
the Downloaded Results list (Open > Pathology and Radiology) by clicking on the Import button . Resultsthat are imported to the server can be retrieved from the server by clicking the Retrieve From Server button.This will copy any results in the LabRslts folder on the server to the local LabRslts folder. If the retrieval issuccessful, the copied results are also placed into a folder called 'ArchivedResults' inside the Genie folder on theserver, in case you would like to try importing them again.

Clinical: Pathology and RadiologyGenie Manual
© 2005-2019 Genie Solutions Pty Ltd326
6.10.4 The Downloaded Results List
The Downloaded Results list (Open > Pathology & Radiology) displays all Unlinked results for all providers bydefault. This list can also be accessed from the Results to Review button in the Navigation Palette.
The Find button allows you to search the entire results list by Surname, First name or test name.
The Print button allows you to print out the list of displayed results in QuickReport format (For moreinformation see QuickReports).
The Info button will display the run numbers received by each laboratory for the last 30 days. Use thisbutton if you receive a message that you are missing a run number. Check to see if the run number really ismissing. If it is, you should call the lab and ask them to resend it.
The Import button will open the Import window and display the contents of the LabRslts folder on thiscomputer.
The Delete button will delete the highlighted results. Note: Deleting a result will permanently delete the result from your data file, this includes the patient'sClinical Window, so use this button with caution!
The Doctor menu allows you to select just your own results for linking. This menu is built when the window is firstopened. If your name isn't here, you don't have any results to view.Note: There may be several variations in the formatting of the providers' names in this list. This is due tovariations between Laboratories in the way the providers' names are recorded. If you would likeconsistency, contact each Laboratory and request your desired format.
The Linked popup menu allows you to quickly shift between displaying Linked, Unlinked or All results.
The Result popup menu allows you to quickly shift between displaying Normal, Abnormal or All results.Note: It is the Laboratory that marks a result as Normal or Abnormal. Not all labs do so. If you disagreewith how the result is marked, speak to the laboratory responsible.
The Last column refers to whether or not the result is the last result in a group of ordered results. That is, if youorder a FBC and TFT's, the FBC might come back first and will be marked as 'N', meaning it is not the last resultfor the group ordered. When the TFT comes back it should be marked as 'Y'.Note: Again, if the Last is marked as 'Y' but you know it is not, speak to the laboratory responsible asGenie has no control over this.
The Hide Results on Hold checkbox is used to hide from the display area those results which have been put onhold. This would usually be used by Specialists where they may receive results ordered as a copy from thereferring GP. The results may arrive well before the patient does, so the results can be put on hold until thepatient turns up.
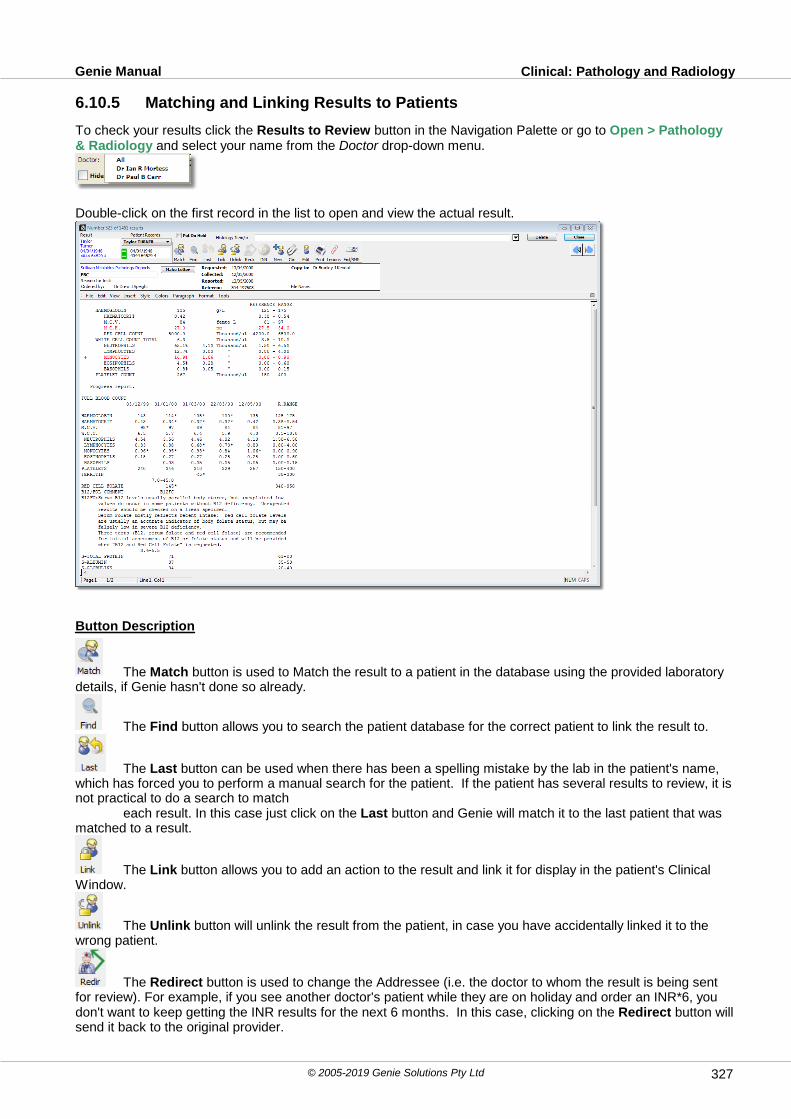
Clinical: Pathology and RadiologyGenie Manual
© 2005-2019 Genie Solutions Pty Ltd 327
6.10.5 Matching and Linking Results to Patients
To check your results click the Results to Review button in the Navigation Palette or go to Open > Pathology& Radiology and select your name from the Doctor drop-down menu.
Double-click on the first record in the list to open and view the actual result.
Button Description
The Match button is used to Match the result to a patient in the database using the provided laboratorydetails, if Genie hasn't done so already.
The Find button allows you to search the patient database for the correct patient to link the result to.
The Last button can be used when there has been a spelling mistake by the lab in the patient's name,which has forced you to perform a manual search for the patient. If the patient has several results to review, it isnot practical to do a search to match
each result. In this case just click on the Last button and Genie will match it to the last patient that wasmatched to a result.
The Link button allows you to add an action to the result and link it for display in the patient's ClinicalWindow.
The Unlink button will unlink the result from the patient, in case you have accidentally linked it to thewrong patient.
The Redirect button is used to change the Addressee (i.e. the doctor to whom the result is being sentfor review). For example, if you see another doctor's patient while they are on holiday and order an INR*6, youdon't want to keep getting the INR results for the next 6 months. In this case, clicking on the Redirect button willsend it back to the original provider.

Clinical: Pathology and RadiologyGenie Manual
© 2005-2019 Genie Solutions Pty Ltd328
The INR button allows you to keep track of a patients INR control which is accessed through the Toolsmenu in the clinical window for the patient.
The New button allows you to add the patient into your database if they do not already exist.
The Clinical button opens the patient's clinical window.
The Edit button opens the patient's demographic window.
The Print button prints the result.
The Lesions button allows you to link this result to the lesions module which is accessed through Tools> Lesions in the patients clinical window.
The Email/SMS button allows you to email or SMS the result to the patient provided the patient has anemail address or mobile phone number entered in their demographic window.
Note: The shortcuts for these buttons can be found in Keyboard Shortcuts.
The Previous Record and Next Record buttons allow you to Navigate between results.
The Make Letter button allows you to convert the result into a letter. Once you click this button and then clickthe Link button, a window will appear asking if you would like to convert this result to an IncomingCorrespondence record for this patient. Clicking Yes will link this result in the patient clinical record as anincoming letter. Clicking No, Leave as Result will leave it as a result and link it in the patients clinical record asa result.
The Open RTF button allows you to open the result/letter in an external viewer. This button will only appear ifthe result/letter contains RTF format data. Once linked to the patient, the result/letter can be opened in anexternal viewer by right-clicking on the result/letter in the Contact List and selecting Open RTF or double-clickingon the result in the Contact list and clicking the Open RTF button.
Matching and Linking Results
The information in blue text in the Results field is the patient's demographic information as held by thelaboratory. The information in the Patient Records field is the information that Genie has found best matchesthe laboratory information. The Genie search is made on Surname and the first 3 letters of the First Name.
If one patient record found:If BOTH the Medicare No AND the DOB don’t match, then Genie assumes that this is the wrong patient with thesame name, and so then searches just by DOB.
If more than one patients found:Genie searches the found records for a matching DOB. If it doesn’t find any match, it puts all matches in thedrop down menu above the Genie information box and prompts you that there is more than one possible match.

Clinical: Pathology and RadiologyGenie Manual
© 2005-2019 Genie Solutions Pty Ltd 329
No patients found:Genie does a second search by DOB and the last 3 letters of the surname. If it doesn't find a good match, thenno patient information will be displayed.
In the screenshot above it has found a matching patient record in the database, however there is a mismatchwith the Medicare number. When this happens, you can simply drag the Medicare number from the lab'sinformation onto the Medicare number of the Genie database to automatically update the Genie data. You cando the same with the address and Date of Birth, assuming you are happy that the laboratory information iscorrect.
If Genie has not found an automatic match when the result is displayed, you should click on the Match button to search again. If it still doesn't find a match, you can search for the patient in your database by using
the Find button .
As with all searches, the less you type in, the more likely you are to find the correct record, particularly if there isa spelling mistake in the name. You could also just search on the First name if you suspect the Surname hasbeen spelt incorrectly.If you still cannot find the patient in your database then you can create a new patient record with the laboratory
information using the New button . Be judicious about creating a new patient record. This is an excellentway of creating duplicate patient records.

Clinical: Pathology and RadiologyGenie Manual
© 2005-2019 Genie Solutions Pty Ltd330
Once you have a good match, click on the Link button
If you get the below message it means that either the Address, DOB, or Medicare Number do not match asindicated by the red sign.
If you click Link, rather then Cancel and fixing the problem, then a memo will automatically be created in thepatients demographics to 'Check Address' or to check whichever of the three is incorrect.
The Action List Window
This window appears after clicking the Link button within a result and allows you to select the action to be storedwith the result for medico-legal purposes.
You can Add and Delete action items from the list using the buttons to the left of the list itself. You can also re-sort the list by dragging and dropping items within the list.The Alternative message field allows for free text entries, up to 80 characters in length, which may only berelevant to the current result and you do not wish to keep in the list. You can also change the Normal/Abnormal marking if you disagree with the lab's classification.
The patients next appointment, if they have one, will automatically be displayed in red at the top of the window,noting the doctor they are booked in to see, date and time of this appointment.
The Add to Action List checkbox is checked by default if you have selected the Move to Action List after linkingcheckbox in your User Preferences (File > User Preferences ). The result will be moved to the Action List (Open > Investigations Action List) after linking so that the receptionist/practice nurse can go through the

Clinical: Pathology and RadiologyGenie Manual
© 2005-2019 Genie Solutions Pty Ltd 331
Action List taking whatever action necessary for each result (see Pathology Recalls (Investigation Action List) formore information). You can tell that the requested action has been taken if there is an [N] in Notification columnof the Contacts list in the patient's Clinical Window.
If you don't use the Action List deselect the abovementioned checkbox in your User Preferences.
If the This is a Pap Smear Result checkbox is ticked, a Select smear result... drop down menu will appeardirectly below. This smear result and the test date is then automatically inserted into the Last Pap field in thepatient's Clinical Window. The checkbox will be ticked automatically if Genie finds the words 'smear' or'endocervical' within the result text.
If the This is a HPV Result checkbox is ticked, a Select HPV result... drop down menu will appear directly below.This HPV result and the test date is then automatically inserted into the Last HPV field in the patient's ClinicalWindow.
The Flag Patient's Record checkbox is used when you would like to ensure that a recalled patient actually getsseen within a certain period of time. If the flag is not removed from the Clinical Window, usually done when theClinical Window is accessed when the patient presents, then Genie will warn you once the due date has passedwith the Overdue Patients button in the Navigation Palette.
The Create Task button allows you to create a task for the patient regarding the pathology result. When thetask window opens, the title of the task contains the words 'Path result' and the patients name. The body of thetask contains the name of the pathology tests and the test date. Additionally, this task is automatically linked fordisplay in the patient's Clinical Window.
The Create Recall button allows you to create a proper Recall record rather than just asking the receptionist torecall now in the Action List. You would usually do this when the recall isn't urgent but you would like to repeatthe test in 3 months for example.
Click the Link button to link this result to the patient.
Genie will then display the next result in the list until you reach the last one.
Incorrectly Linked Results
If you have linked a Pathology/Radiology Result to the wrong patient, you can unlink this result and then link theresult to the correct patient by going to Open > Pathology and Radiology and using the Magnifying Glass to
find the patient with the incorrectly linked result. Double click on the result and click on the Unlink button.The result can now be linked to the correct patient using the Match and then Link button.
6.11 Reviewing Correspondence
This option is used by providers that review letters typed by another staff member.
When the current user has letters waiting to be reviewed, a Letters to Review button will appear in theNavigation Palette.
Alternatively, you can click on the Review Correspondence icon in the Appointment Book, or go into Open > Outgoing Letters.
In a multi-doctor practice, select your own name from the 'From' drop down menu, to display only letters from

Clinical: Reviewing CorrespondenceGenie Manual
© 2005-2019 Genie Solutions Pty Ltd332
yourself.
Double-click on the first letter in the list to open the letter. Once you have reviewed and/or corrected the letter,click the Reviewed checkbox.
This will then automatically move you to the next letter in the list. You are able to manually navigate around thelist by using the arrow buttons at the top of this window.
Once you have finished reviewing the letters, you can print them, fax them, email them, or leave them for yourreceptionist as per the instructions in Reviewing Correspondence in the Reception Module of this manual.
Reviewing Letters OffsiteLetters can be reviewed offsite in two ways. First, you can use Offsite Logging. Alternatively, clicking on the
Word button will export any highlighted letters as Word documents.
They are placed in a folder called 'Letters Folder' inside the Genie folder on the local machine. If the Lettersfolder doesn't exist, Genie will automatically create it.This folder can then be taken home on a USB or other portable media device. The following day, replace theLetters folder in the Genie folder, on the local machine that will import the letters, open the Correspondence
window and click on the Import button .
This will import the Word documents with any changes, and replace the original 4D write documents. You will beasked if you would like the imported letters to be marked as having been reviewed. Click Yes.Once the import has finished, you will be asked if you would like to delete the Word documents in the Lettersfolder. You should agree to this, otherwise they will still be there the next time you do this procedure unless youdelete them manually in the meantime.
6.12 Procedures
This chapter deals with the management of Procedure records, including Quotes and Operation reports.

Clinical: ProceduresGenie Manual
© 2005-2019 Genie Solutions Pty Ltd 333
6.12.1 Adding a Procedure
Procedures can be added from either the patient’s Clinical Window or the Appointment Book.
Adding a Procedure from the Clinical Window
In the Clinical Window, the procedure is added by going into Tools > Add Procedure.
Note: The current date is entered and the time defaults to 12:00 AM.
There are two reasons why a Procedure would be created from the Clinical Window.
1. You are performing a minor procedure such as an excision on the day and you would like to record the fact. Inthis case, you would deselect the Needs an Appointment checkbox, at the bottom right hand side of the screenand just save the record by clicking OK.
2. You have seen the patient and decided that they need an operation at some time in the future:
a) If you know when you are going to perform the operation, you would enter a date and time, tick the Needs an
Appointment checkbox, and then click on the Make Appointment button.
This will automatically create an appointment for the patient with the procedure already linked, on the stated dateand time.
b) If you don’t know when the procedure will take place (e.g. the patient has to first arrange time off work), youwould leave the time field blank, tick the Needs an Appointment checkbox, and then click the AppointmentPending button. This will mark the Procedure as a Pending Procedure and will place a [P] in front of theprocedure name in the Contact List (for more information see Pending Procedures).
Adding a Procedure from the Appointment Book
To add a procedure record from the Appointment Book (i.e. book a patient into theatre, highlight the patient’s
appointment and click on the Procedure button .

Clinical: ProceduresGenie Manual
© 2005-2019 Genie Solutions Pty Ltd334
This will create a new Procedure record. If the appointment already has a procedure linked to it, the existingProcedure record will open.
Note: The Date and Time fields have been taken from the appointment date and time. If the appointmentis subsequently moved to a different date or time, these fields will be updated automatically. Ifnecessary, you can manually adjust the time of the procedure by simply clicking in this field andentering the appropriate time. This wont move the procedure from the current appointment spot.
Completed Procedures
When patients have had many procedures, it may become difficult to see the major procedures in your ContactList at a glance. You can copy any past procedure over to the Past History list by simply dragging it from theContact List into the Past History box.

Clinical: ProceduresGenie Manual
© 2005-2019 Genie Solutions Pty Ltd 335
6.12.2 Pending Procedures
Pending Procedures can be viewed from the Appointment Book by going into Appts > Pending Procedures.
This opens a window listing all current Pending Procedures
If you now have a date and time for the procedure, double-click on the procedure to open it. Once you haveentered a date and time, the Save button will change to Make Appointment. Click on this button and theappointment will be made automatically.
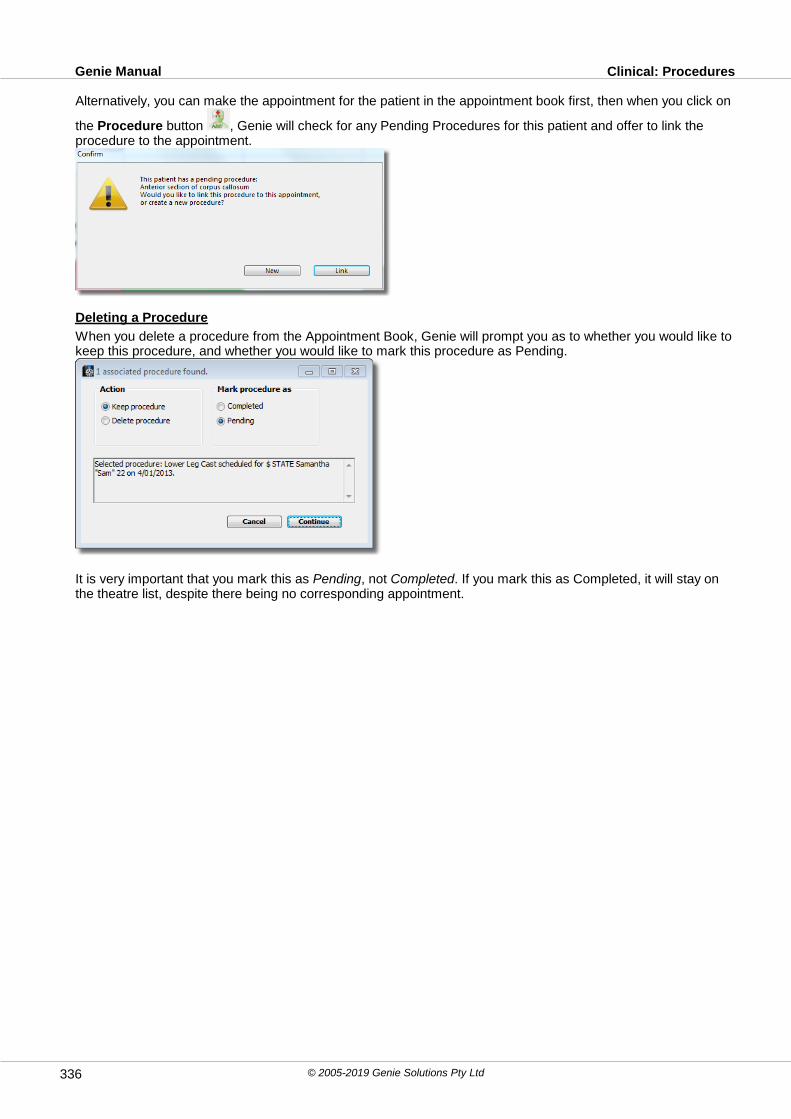
Clinical: ProceduresGenie Manual
© 2005-2019 Genie Solutions Pty Ltd336
Alternatively, you can make the appointment for the patient in the appointment book first, then when you click on
the Procedure button , Genie will check for any Pending Procedures for this patient and offer to link theprocedure to the appointment.
Deleting a Procedure
When you delete a procedure from the Appointment Book, Genie will prompt you as to whether you would like tokeep this procedure, and whether you would like to mark this procedure as Pending.
It is very important that you mark this as Pending, not Completed. If you mark this as Completed, it will stay onthe theatre list, despite there being no corresponding appointment.

Clinical: ProceduresGenie Manual
© 2005-2019 Genie Solutions Pty Ltd 337
6.12.3 The Procedure Window
The Details Tab
Enter the name of the procedure by simply typing it into the Procedure field, or selecting it from the drop-downmenu. If you are using ICD10 or ICPC coding, enter a keyword which best describes the procedure. If thisprocedure involves multiple operations, just enter the major one, and type the remaining procedures in as freetext.
You can build a list of your common Procedures by clicking on the Add To Menu button. This will add theProcedure name to the drop-down menu to the left of the Procedure field.
The Add to Past Hx button will add this procedure to the patient's past history list in their Clinical Window.
The Left or Right tickboxes allow you to specify which side of the body the procedure pertains to.
The Provider's name will be filled when booking a Procedure into the Appointment Book, or if the record iscreated by the provider themselves.
The Hospital drop-down list is determined by the 'Rooms' entered in Genie. See Theatre Lists for moreinformation on setting up rooms in Genie. A Hospital must be assigned in order for the procedure to be includedand printed on the theatre list.
Pre and Post-op diagnoses can also be entered.
Clicking on the Blue Plus sign button to the right of Pre or Post-Op Diagnosis will add the diagnosis to thepatient's Current Problems list.
Clicking on the WC Info button allows you to select the relevant Workcover claim and inserts into the Pre-OpNotes field the claim number, injury date, employer and insurer details.
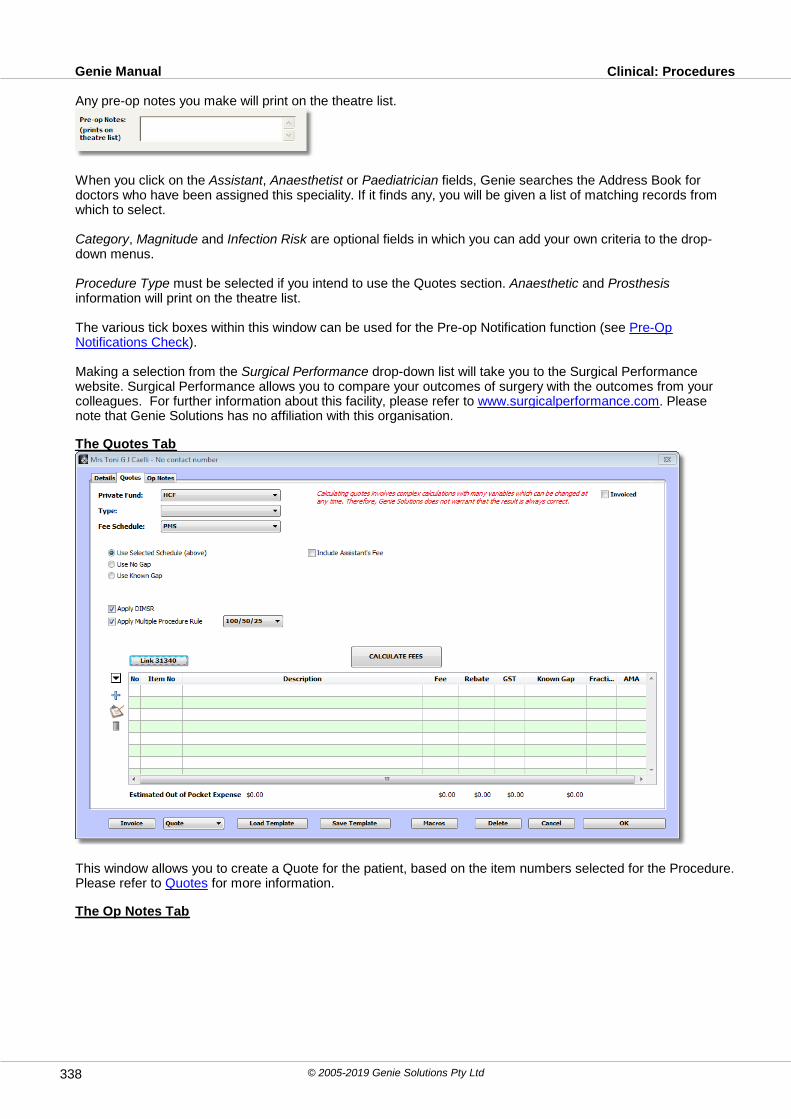
Clinical: ProceduresGenie Manual
© 2005-2019 Genie Solutions Pty Ltd338
Any pre-op notes you make will print on the theatre list.
When you click on the Assistant, Anaesthetist or Paediatrician fields, Genie searches the Address Book fordoctors who have been assigned this speciality. If it finds any, you will be given a list of matching records fromwhich to select.
Category, Magnitude and Infection Risk are optional fields in which you can add your own criteria to the drop-down menus.
Procedure Type must be selected if you intend to use the Quotes section. Anaesthetic and Prosthesisinformation will print on the theatre list.
The various tick boxes within this window can be used for the Pre-op Notification function (see Pre-OpNotifications Check).
Making a selection from the Surgical Performance drop-down list will take you to the Surgical Performancewebsite. Surgical Performance allows you to compare your outcomes of surgery with the outcomes from yourcolleagues. For further information about this facility, please refer to www.surgicalperformance.com. Pleasenote that Genie Solutions has no affiliation with this organisation.
The Quotes Tab
This window allows you to create a Quote for the patient, based on the item numbers selected for the Procedure.Please refer to Quotes for more information.
The Op Notes Tab

Clinical: ProceduresGenie Manual
© 2005-2019 Genie Solutions Pty Ltd 339
Findings, Technique and Post-op information can be entered in this window.
As these notes are generally the same for the specified procedure, they can be saved along with other relevantinformation into a template.
For more information on creating templates, see the Procedure Templates.
In the upper right section of this window you can add a checklist for this procedure. These could be used as apre-operative checklist or as the actual operation report. For more information, see Checklists.
There are a range of checkboxes covering a variety of common complications in order to record procedureaudits. Some are general such as post-op infection, others are speciality-specific such as 'T-zone Breakdown'for Plastic Surgeons and 'Bile Leak' for general surgeons.
When you tick a checkbox, note that a summary of complications is entered into the Audit Summary field. This isso that this field can be referenced in a post-op letter to a referring GP. e.g. 'Operation was performed,complicated by...'
As well as the supplied complications, you can add any other complications using the Other Complicationsmenu.
The Procedure Audit itself is accessed through Open > Procedures, Audit Report button.
6.12.4 Procedure Templates
Generally, procedures will be performed in the same manner, with the same billing outcomes. For this reasonmany of the entries in the Procedure window can be saved using the Save Template button.
The fields that are saved on the template include:

Clinical: ProceduresGenie Manual
© 2005-2019 Genie Solutions Pty Ltd340
Procedure NamePre-op diagnosisPost-op diagnosisIndicationsPre-op notesChecklistsItem NumbersOp Notes
Enter all information required for your template in any or all of the above fields and then click Save Template.When linking this procedure to a patient in the future, the template can then be selected via the Load Templatebutton.
Note: When creating templates, it is best to create them with a test patient to ensure no clinicalinformation is inadvertently saved into the template.
6.12.5 Printing an Audit Report
To print the actual Audit Report, select Open > Procedures.
This opens a list of all Procedures performed, sorted by date.
Click on the Audit Report button.
The window below will open, allowing you to set the parameters of the report.
The items to check are on the left. You can deselect any irrelevant items.

Clinical: ProceduresGenie Manual
© 2005-2019 Genie Solutions Pty Ltd 341
You can choose between different providers across a range of dates. You can also do a report for all proceduresperformed or just for a specific operation, as well as either all hospitals or just for a specific hospital, making itpossible to compare infection rates for example. As well as reporting on the listed items, the audit will also reporton any user-added complications.
6.12.6 Conversion Ratios
Note: Conversions are currently only available if your Practice Type is set to 'Plastic Surgery'.
Conversion Ratios measure the number of patients who call to enquire about a procedure, the percentage whoprogress to a consultation with a provider, and the percentage who subsequently proceed to have the procedureperformed.
In the Patient Demographic screen, there is a tab labeled Conversions. This is used initially to record when apatient rings to make an appointment about a new procedure, or to enquire about a procedure and its costs. Thepatient would have to have a patient record in Genie in order to add the new Ratios record. This is done byclicking on the Blue Plus button.
This will enter the current date and current user in the 1st Contact Date/Staff fields.
If an appointment is made, and the patient arrives, you will be prompted to add this date and the provider fromthe appointment book into the Ratio record.
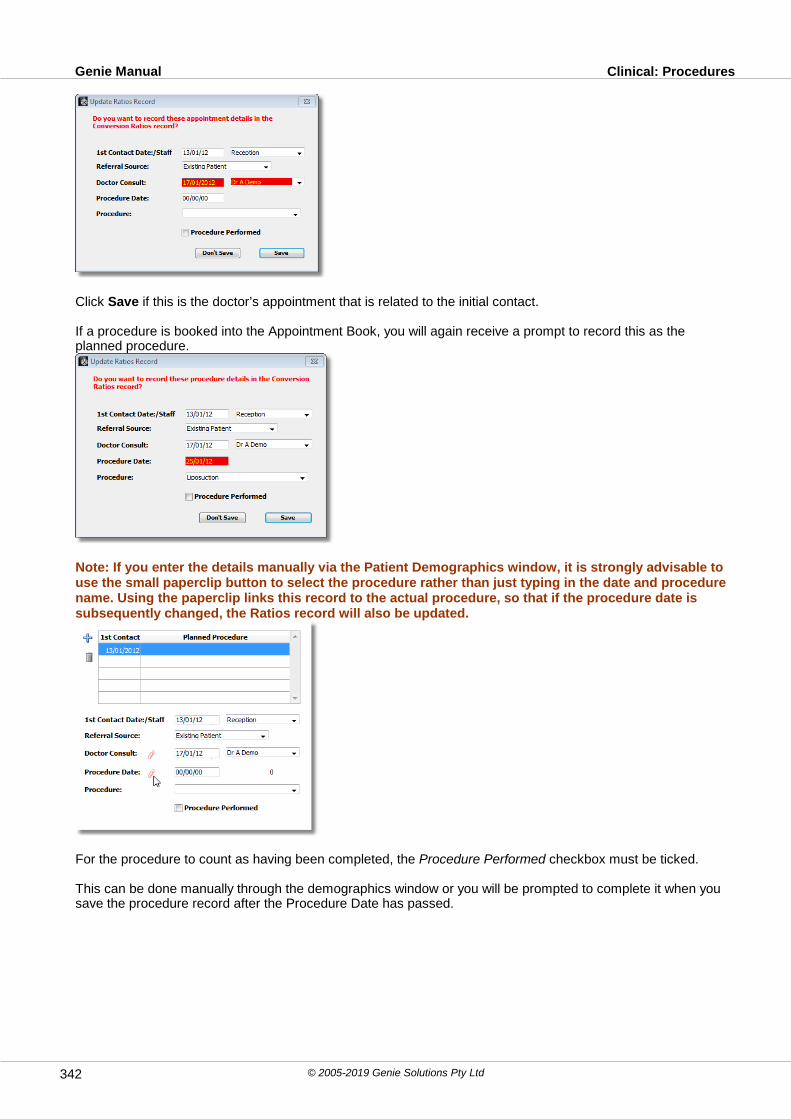
Clinical: ProceduresGenie Manual
© 2005-2019 Genie Solutions Pty Ltd342
Click Save if this is the doctor’s appointment that is related to the initial contact.
If a procedure is booked into the Appointment Book, you will again receive a prompt to record this as theplanned procedure.
Note: If you enter the details manually via the Patient Demographics window, it is strongly advisable touse the small paperclip button to select the procedure rather than just typing in the date and procedurename. Using the paperclip links this record to the actual procedure, so that if the procedure date issubsequently changed, the Ratios record will also be updated.
For the procedure to count as having been completed, the Procedure Performed checkbox must be ticked.
This can be done manually through the demographics window or you will be prompted to complete it when yousave the procedure record after the Procedure Date has passed.
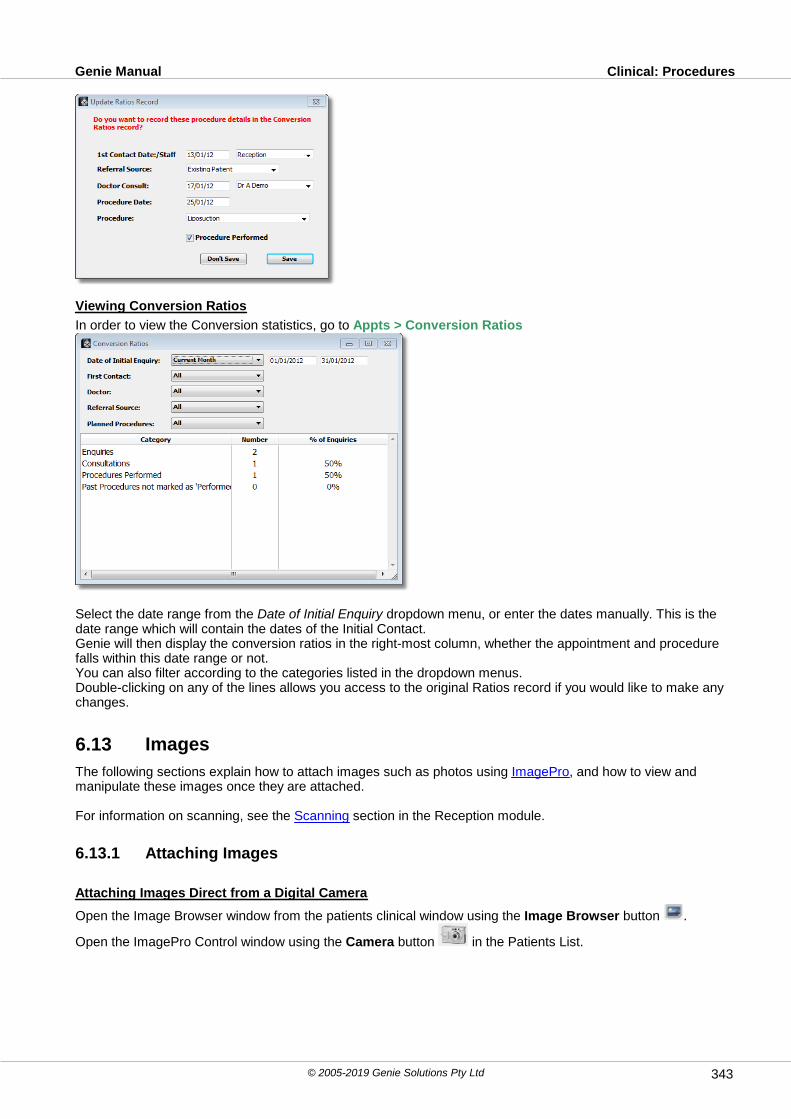
Clinical: ProceduresGenie Manual
© 2005-2019 Genie Solutions Pty Ltd 343
Viewing Conversion Ratios
In order to view the Conversion statistics, go to Appts > Conversion Ratios
Select the date range from the Date of Initial Enquiry dropdown menu, or enter the dates manually. This is thedate range which will contain the dates of the Initial Contact.Genie will then display the conversion ratios in the right-most column, whether the appointment and procedurefalls within this date range or not.You can also filter according to the categories listed in the dropdown menus.Double-clicking on any of the lines allows you access to the original Ratios record if you would like to make anychanges.
6.13 Images
The following sections explain how to attach images such as photos using ImagePro, and how to view andmanipulate these images once they are attached.
For information on scanning, see the Scanning section in the Reception module.
6.13.1 Attaching Images
Attaching Images Direct from a Digital Camera
Open the Image Browser window from the patients clinical window using the Image Browser button .
Open the ImagePro Control window using the Camera button in the Patients List.

Clinical: ImagesGenie Manual
© 2005-2019 Genie Solutions Pty Ltd344
Connect your camera to your computer and turn it on. Genie should recognise your camera in the drop downmenu as below. If not, you may need to install the camera driver using a CD that came with your camera.
Click on the Camera button and Genie will bring up a list of photos on your memory card. Ticking Hide DeviceGUI will prevent the camera software window from coming up, if desired. Highlight the images you would like toattach to this patient. If you would like to select multiple images, Shift+click or Ctrl+click on the images yourequire. Click OK. Genie will prompt you for a description for the image(s). For multiple images, Genie will namethe images: name_1, name_2, name_3 etc. If you have Delete after download ticked then the images will bedeleted from your camera after they have been successfully imported into the patient's Clinical Window. It is bestto take photos in VGA or email mode to keep them at a reasonable size. The quality will still be adequate forviewing purposes, it is only if you are going to print the photo bigger than 6x4 that you need higher resolution.VGA/email will be a size setting on your camera itself.Note: If Genie and your scanner are not communicating correctly, it is recommended you try ticking thesetting Less Capability Negotiation. This setting simplifies the language Genie and the scanner use andmay rectify your problem.
Attaching Images from File
Images can be attached to a patient's Clinical Window from a number of places within Genie.
1. Via Image Browser
Open the Image Browser window from the patient's Clinical Window using the Image Browser button .
Click the Blue Plus button at the top left of the Image Browser window.
This will open a Browse window allowing you to navigate to where the images are stored. Select the image youwish to attach and click OK. Note: Images can only be attached one at a time.
These images will need to be named before attaching or renamed using the Rename button once attached.
2. Via Appointment BookRight-clicking on a patient in the Appointment Book will provide you with the option to perform many commonfunctions in Genie, including Attach File From Disk or Attach File From Process Folder.

Clinical: ImagesGenie Manual
© 2005-2019 Genie Solutions Pty Ltd 345
Attach File From Disk will open a Browse window for you to select the image to attach. Attach File From ProcessFolder will open the holding folder specified in your ImagePro Control window (Special > ImagePro Control).
3. Via Patients ListRight-clicking on a patient from the Open > Patients list will provide you with a similar list to above, allowing youto Attach File From Disk or Attach File From Process Folder.
4. Via the Contacts List in a Patient's Clinical WindowOpening a patient's Clinical Window and right-clicking on any entry in the Contacts List will also allow provideyou with the option to Attach File From Disk or Attach File From Process Folder.
6.13.2 Viewing Images
The Image Browser window displays the contents of the selected patient's images folder on the server.
It can be opened where you see this button .
Button Description
The Blue Plus button allows you to add an image stored on your hard disk to the selectedpatient's folder.

Clinical: ImagesGenie Manual
© 2005-2019 Genie Solutions Pty Ltd346
The Filter Image button allows you to apply a variety of changes to an image such as Contrast,Brightness, Hue, Saturation and RGB Balance.
The Information button opens a window which stores information about the image, includingthe size, camera information, type and source of the picture. If you assign the Type as 'Mugshot'and have the Display Patient Mugshot option ticked in File > User Preferences, this photo willbe displayed when the patient's demographics or clinical window is opened.
You can also assign up to three keywords so that you can subsequently find everybody forwhom you have a photo of a melanoma for example (see Search for Attachments and Images)
The Rename button allows you to rename the image.
The Paintbrush button opens the image in the drawing module, allowing you to draw on andannotate the image. See Drawing Module.Note: These changes actually become part of the image and therefore are permanent.You cannot subsequently delete your annotations.
The Garbage Can button will delete the image permanently from the server. Note: If the selected item is a document rather than an image, all the above buttons willbe disabled except for the Delete and Rename buttons.
The Acrobat button will open a selected PDF in Acrobat Reader.
The Synchronise button synchronises the records held in Genie with the actual file present inthe patient's folder on the server. Synchronising you images can be useful if images have beenadded or removed from the patient's folder on the server, and this is not reflected in their Geniefolder.
The Multi-Page TIFF button opens a window where you can drag and drop images and thencombine them into a single TIFF file. The output file is very large, so this is not a very practicalidea.
The created TIFF file is automatically placed in the same folder as the original files. The originalfiles are untouched. If you would like to delete them, you must do so manually.Note: You can't drag items from the Album list. To combine album images, you first needto click the Use Album button and then drag the desired files to the Multi-TIFF window.
Organising ImagesThe Image Browser window allows you to organise patient images and attachments into a folder hierarchy eg.Pre-op and Post-op folders. Folders can be added or deleted, and images dragged into them. Doing this actuallycreates the folders on the server machine and moves the images around on the server.
To add or delete folders, click on the Blue Plus icon, or the Garbage Can icon, see below.
At the top of the Image Browser window is a button which will display the name of the current patient. Clicking onthis button opens a Search window, allowing you to quickly switch to another patient's folder. This could beparticularly handy when setting up albums. See Creating Albums below for more information.
To view a single image:

Clinical: ImagesGenie Manual
© 2005-2019 Genie Solutions Pty Ltd 347
Click once on the image. This copies it from the server to the TempImages folder on the client.Note: In order to view PDF documents on Windows, you must download and install Ghostscript. Pleasesee Installing Ghostscript for further details.
To view multiple images on the one page:
Click on the folder containing the images you would like to view, then click on the View Contents button.
In this window you can sort the pictures by dragging and dropping them into the required position, as well as setthe number of columns and the number of images per page that you wish to have on display, by using theColumns slider bar and Images per Page slider bar respectively.
Using the Forward and Back arrows will allow you to move to the next set of images on display. Additionally, youcan skip to a specific picture by right-clicking on the 'showing 1 to 2 of x images' and selecting the image thatyou wish to view.
Right-clicking on the image allows for the rotation of the selected image.
Clicking on the Printer button will allow you to print the images contained in this window. The Patients name,DOB, current date and file descriptions will be included on this print out. If there is an image on display that youdon't wish to print, select the image and click the delete button on your keyboard. This will only remove theimage from the current display, it DOES NOT delete the image from the patient's folder.
The Deselect Picture is designed for Window machines as it allows you to deselect pictures which are currentlyhighlighted, and difficult to view due to the inverting of colours.
To compare images side by side:Right-click on the primary image and select Compare.
A split window will appear with a drop down box allowing you to select the 2nd image you wish to use in the'Comparison'. The images will then display side by side.
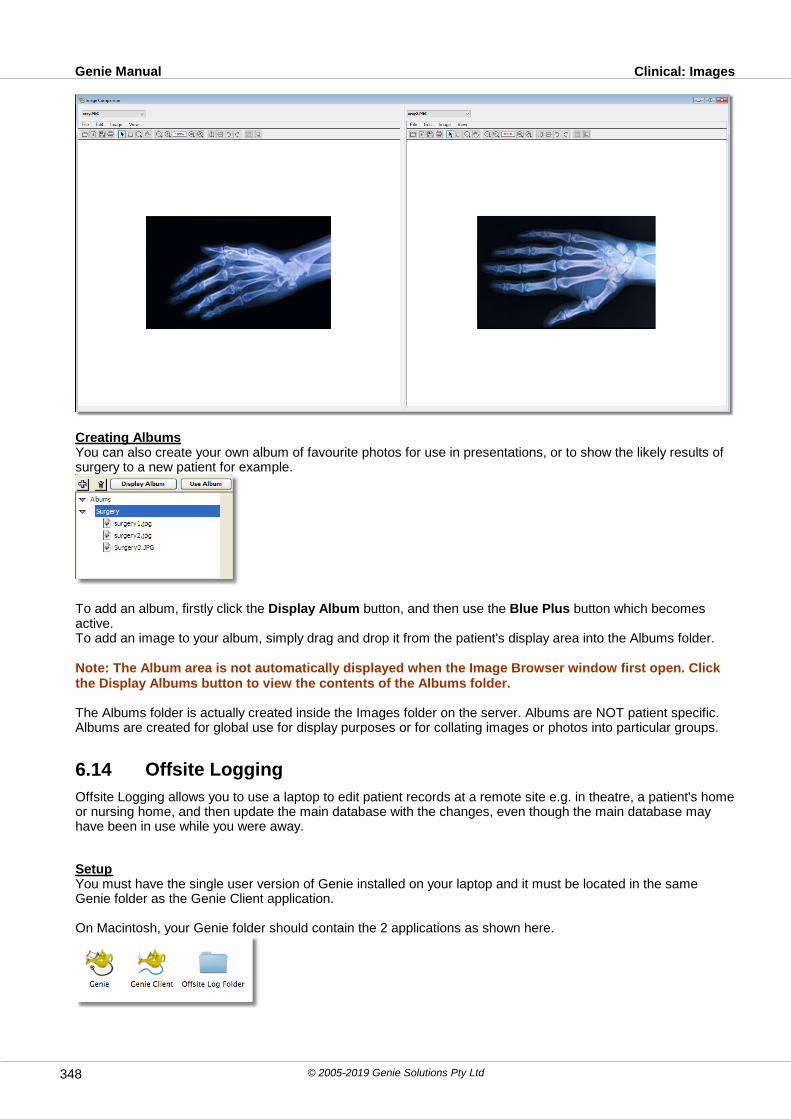
Clinical: ImagesGenie Manual
© 2005-2019 Genie Solutions Pty Ltd348
Creating AlbumsYou can also create your own album of favourite photos for use in presentations, or to show the likely results ofsurgery to a new patient for example.
To add an album, firstly click the Display Album button, and then use the Blue Plus button which becomesactive.To add an image to your album, simply drag and drop it from the patient's display area into the Albums folder.
Note: The Album area is not automatically displayed when the Image Browser window first open. Clickthe Display Albums button to view the contents of the Albums folder.
The Albums folder is actually created inside the Images folder on the server. Albums are NOT patient specific.Albums are created for global use for display purposes or for collating images or photos into particular groups.
6.14 Offsite Logging
Offsite Logging allows you to use a laptop to edit patient records at a remote site e.g. in theatre, a patient's homeor nursing home, and then update the main database with the changes, even though the main database mayhave been in use while you were away.
SetupYou must have the single user version of Genie installed on your laptop and it must be located in the sameGenie folder as the Genie Client application.
On Macintosh, your Genie folder should contain the 2 applications as shown here.

Clinical: Offsite LoggingGenie Manual
© 2005-2019 Genie Solutions Pty Ltd 349
On Windows, your Genie folder should contain the folders shown here.
The Offsite Log Folder is automatically created the first time you begin offsite logging.
The version of Genie Solo on your laptop must be the same as the version of Genie Client. When you updateGenie on your server, you must also update Genie Solo on your laptop before attempting any offsite logging. Forinformation on how to do this, see Updating for Offsite Logging in the Updates section of this manual.
Note: Do not attempt to import logs created in an older version of Genie. If you try to import a logcreated with an older version, you may get unexpected results, if it works at all.
Before copying the data file from the server, go to File > User Preferences, General tab and make sure that
the Remind me to Start Offsite Logging checkbox is selected.
This will prompt you to start offsite logging each time you log in to Genie Solo on your laptop.
6.14.1 Copying the Data File from the Server
Note: If you are using Genie version 8.5.9 or later, it is possible to use the Database Replication toolinstead of the copy data script. This feature does not require your Genie server application to be closed,and may be preferable for large practices that cannot make time to close the server application. Formore information, please see the Database Replication section at the end of this chapter.
Each time you go to use offsite logging you will first need to take a copy of the data file (Genie.4DD) andoptionally the Images folder, if you wish to view images offsite, from the Genie folder on your server machine tothe Genie folder on your laptop. If you do not have a fresh copy of the data file then the offsite log will not work.
Before attempting to copy your data from the server to your laptop YOU MUST QUIT THE GENIE SERVERAPPLICATION. Macintosh Operating System will not allow a file that is in use to be copied so if you attempt todo this, you will usually get an error message saying that you do not have enough privileges to perform therequested action. However, Windows operating systems do allow you to copy a file while it is in use so it is veryimportant to ensure Genie Server is closed to make sure that the data file is not active and to prevent datacorruption while it is copying.
The files can be copied manually across the network or a copy data script can be created in order to do this foryou. If you would like to copy the files manually but are unsure of how to do this, you must contact your ITrepresentative.
Creating a Data Copy Script
Note: In most cases this will work but if it doesn't, it will be necessary to speak to your IT representative(not Genie) about setting up a script manually. Genie Solutions will not set up or support third party fileand folder synchronisation programs (eg. RSynch, SilverKeeper etc). The installation and configurationof these programs is solely the responsibility of the practice concerned or their nominated ITrepresentative.
In File > Maintenance & Reports, Administrator tab, you will find the icon below.
Clicking on this will bring up a window where you are able to navigate to your Genie folder on the server usingthe Browse button.
If you would like to be able to view scanned images while you are offsite, tick Copy any new images. If you arerequired to enter a username and password when you connect to your server across the network then you canstore it in this window by ticking the Store your username and password tick box. If you do not want to store your
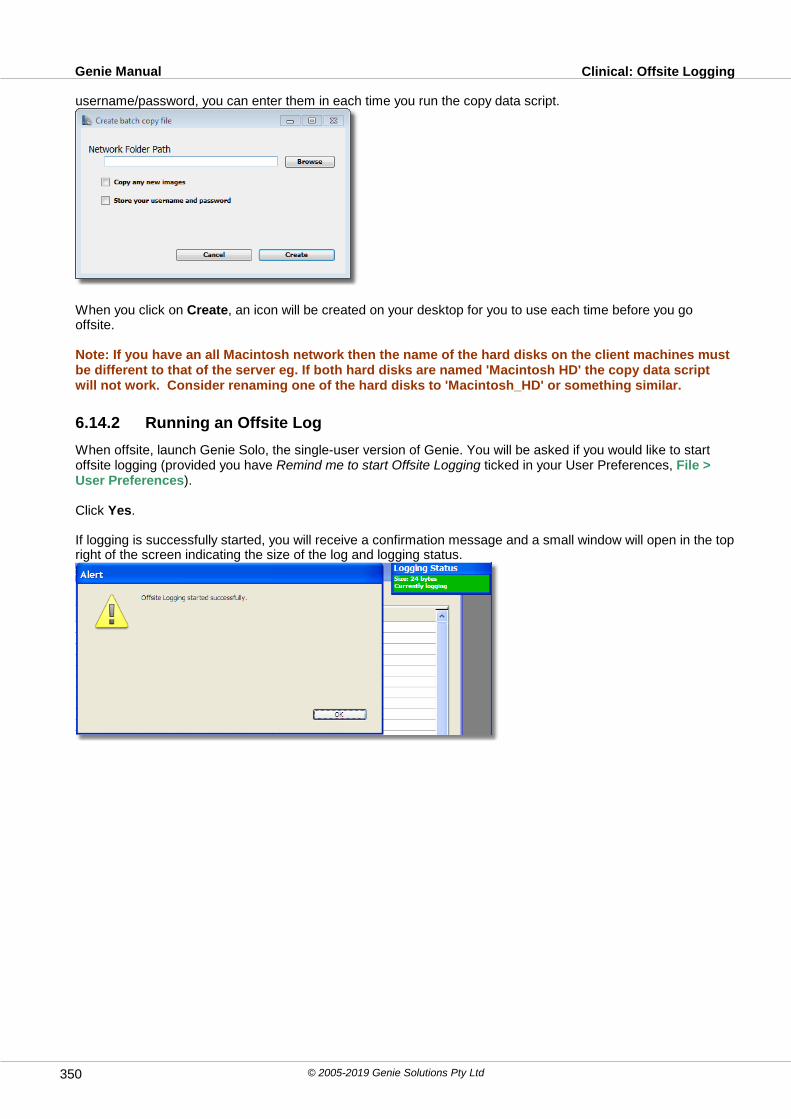
Clinical: Offsite LoggingGenie Manual
© 2005-2019 Genie Solutions Pty Ltd350
username/password, you can enter them in each time you run the copy data script.
When you click on Create, an icon will be created on your desktop for you to use each time before you gooffsite.
Note: If you have an all Macintosh network then the name of the hard disks on the client machines mustbe different to that of the server eg. If both hard disks are named 'Macintosh HD' the copy data scriptwill not work. Consider renaming one of the hard disks to 'Macintosh_HD' or something similar.
6.14.2 Running an Offsite Log
When offsite, launch Genie Solo, the single-user version of Genie. You will be asked if you would like to startoffsite logging (provided you have Remind me to start Offsite Logging ticked in your User Preferences, File >User Preferences).
Click Yes.
If logging is successfully started, you will receive a confirmation message and a small window will open in the topright of the screen indicating the size of the log and logging status.

Clinical: Offsite LoggingGenie Manual
© 2005-2019 Genie Solutions Pty Ltd 351
If Genie is unable to start offsite logging, you will receive an error message that logging has not started. Theusual reason for failure is that the network and single user versions of Genie have different version numbers, orthat you haven't taken a fresh copy of the data file. In either of these cases you will not be able to use offsitelogging unless the problems are rectified.
When the offsite logging process begins, Genie creates a text file in the Offsite Log Folder, which is in the Geniefolder on the laptop. This file is named using the current date and time, in the format of year, month, day, hour,minutes, seconds. For example, the log file shown here was created on 26/10/2005 at 11:10:43.
This is so that you can easily find a log from a particular day, and secondly, so that when a number of logs areimported back into the main database, they are imported in the correct chronological order. Note: The log file is just a text file. It can be opened and examined with any word processor.
You should keep an eye on the logging status window to ensure that logging doesn't stop for any reason. Youcan re-commence logging if necessary by selecting File > Start Offsite Logging. To stop offsite logging, QuitGenie (File > Quit). You can log as many sessions as you like before the data is imported back into the maindatabase.
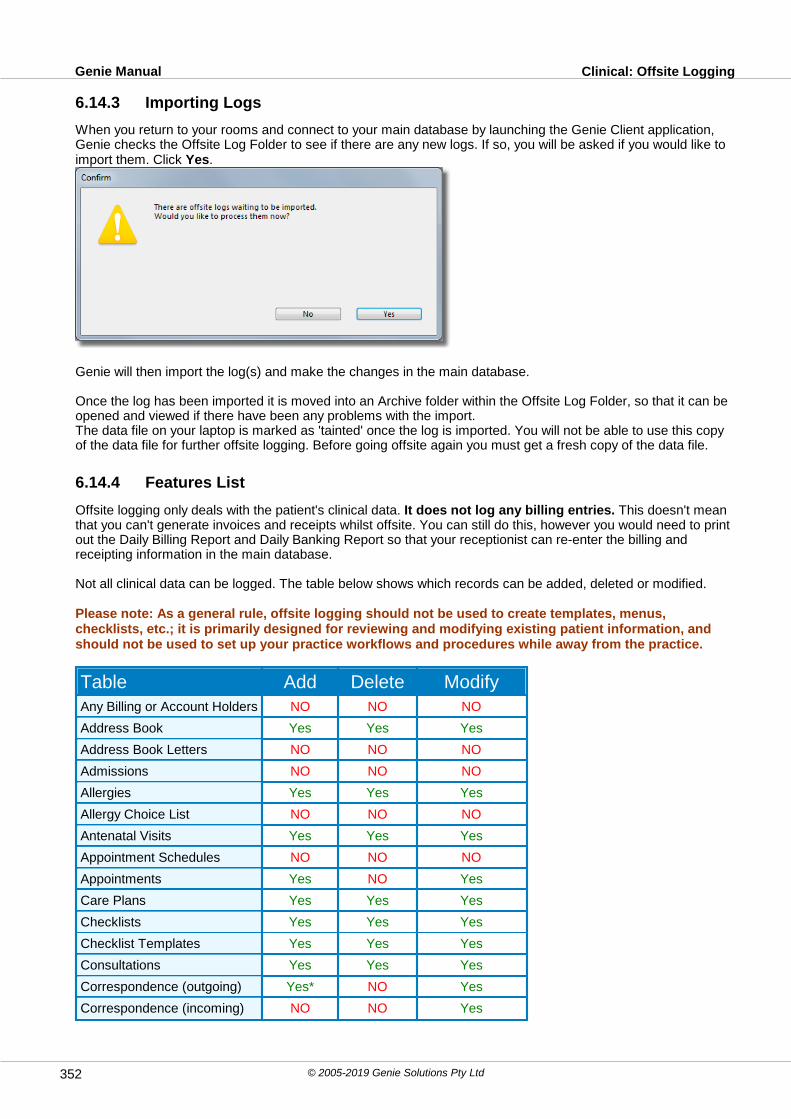
Clinical: Offsite LoggingGenie Manual
© 2005-2019 Genie Solutions Pty Ltd352
6.14.3 Importing Logs
When you return to your rooms and connect to your main database by launching the Genie Client application,Genie checks the Offsite Log Folder to see if there are any new logs. If so, you will be asked if you would like toimport them. Click Yes.
Genie will then import the log(s) and make the changes in the main database.
Once the log has been imported it is moved into an Archive folder within the Offsite Log Folder, so that it can beopened and viewed if there have been any problems with the import.The data file on your laptop is marked as 'tainted' once the log is imported. You will not be able to use this copyof the data file for further offsite logging. Before going offsite again you must get a fresh copy of the data file.
6.14.4 Features List
Offsite logging only deals with the patient's clinical data. It does not log any billing entries. This doesn't meanthat you can't generate invoices and receipts whilst offsite. You can still do this, however you would need to printout the Daily Billing Report and Daily Banking Report so that your receptionist can re-enter the billing andreceipting information in the main database.
Not all clinical data can be logged. The table below shows which records can be added, deleted or modified.
Please note: As a general rule, offsite logging should not be used to create templates, menus,checklists, etc.; it is primarily designed for reviewing and modifying existing patient information, andshould not be used to set up your practice workflows and procedures while away from the practice.
Table Add Delete ModifyAny Billing or Account Holders NO NO NO
Address Book Yes Yes Yes
Address Book Letters NO NO NO
Admissions NO NO NO
Allergies Yes Yes Yes
Allergy Choice List NO NO NO
Antenatal Visits Yes Yes Yes
Appointment Schedules NO NO NO
Appointments Yes NO Yes
Care Plans Yes Yes Yes
Checklists Yes Yes Yes
Checklist Templates Yes Yes Yes
Consultations Yes Yes Yes
Correspondence (outgoing) Yes* NO Yes
Correspondence (incoming) NO NO Yes

Clinical: Offsite LoggingGenie Manual
© 2005-2019 Genie Solutions Pty Ltd 353
Current Problems Yes Yes Yes
Documents (not letters) Yes Yes Yes
Drawings NO NO NO
Email NO NO NO
Email Addresses NO NO NO
Employers NO NO NO
Eye Examinations NO NO NO
Flagging Patients Yes Yes Yes
Health Assessments Yes Yes Yes
Healthshare Yes*** Yes*** Yes***
Images & Attachments NO NO NO
INR Control NO NO NO
Interested Parties Yes Yes Yes
IVF NO NO NO
Journals NO NO NO
Laboratory Doctor Codes NO NO NO
Labels NO NO NO
Laboratories NO NO NO
LASIK Post-op NO NO NO
Lesions Yes Yes Yes
Letterheads NO NO NO
Letter Templates NO NO NO
Library Pictures NO NO NO
Life Events Yes Yes Yes
Lookup Lists, e.g. Dosage NO NO NO
Macros NO NO NO
Measurements Yes Yes Yes
Medication Reviews NO NO NO
My Health Record Information NO NO NO
Obstetric History Yes Yes Yes
Orthopaedic Scores Yes Yes Yes
Past History Yes Yes Yes
Pathology/RadiologyRequests
NO Yes NO
Pathology Results NO Yes Yes (ie. Link)
Pathology Tests List NO NO NO
Patient Demographics Yes1 NO NO
Postcode Lookups NO NO NO
Practice Preferences NO NO NO
Pregnancies Yes Yes Yes
Prescriptions Yes Yes Yes
Printing Preferences NO NO NO
Procedures Yes** Yes Yes
Procedure Complications NO NO NO

Clinical: Offsite LoggingGenie Manual
© 2005-2019 Genie Solutions Pty Ltd354
Procedure Items Yes Yes Yes
Procedure Templates NO NO NO
QuickReports NO NO NO
QuickScript List NO NO NO
Radiologists NO NO NO
Recalls Yes Yes Yes
Referrals Yes Yes Yes
Rooms NO NO NO
Social & Family History Yes1 NO NO
Sites of Service NO NO NO
Tasks Yes Yes Yes
Thyroid Control NO NO NO
User Preferences NO NO NO
Vaccinations Yes Yes Yes
Vaccine List NO NO NO
Workcover Claims Yes Yes Yes
Workcover Certificates NO NO NO
*CCs on letters are not logged and will need to be reinserted in the main database. They will be noted at thebottom of the letter but will not be recognised by Genie as a CC until reselected.
** Pending procedures linked to appointments made during offsite logging will need to be re-linked toappointments once the logs imported into the main data file. Procedures created directly from appointments willbe imported, however.
*** To use Healthshare while offsite, the offsite computer must be connected to the Internet.
Notes: 1. New patient records can only be added from Open > Patients. New patients cannot be added from theAppointment Book. Existing demographic information cannot be changed - only new information addedto an empty field in the demographic window will be logged.
2. Changes made to appointments will only be logged if 'Import changes to appts modified offsite' isticked in File > Practice Preferences > Miscellaneous. Please note: this will still not affect anyappointment schedules that have been created or modified while offsite; these will not be logged.
3. If Appointment Types are created while Offsite Logging, it is important to re-create the AppointmentType name when back on the network. The previously selected Appointment Type colour will beautomatically assigned to this Type when re-created.
4. Any Merged Letter Templates or Referral/Reply Letter Templates that are created offsite should besaved to disk using the File > Save As... option in the template area. Then when back on the maindatabase, imported by selecting File > Open in a New Template.
AS A GENERAL RULE YOU SHOULD NOT BE USING OFFSITE LOGGING TO CREATE ANY SORT OFTEMPLATES, MENUS, CHECKLISTS AS THEY WILL NOT BE LOGGED. OFFSITE LOGGING IS FOREDITING EXISTING PATIENT INFORMATION.
6.14.5 Database Replication
Database replication allows for the synchronisation of data from the server to a laptop for use offsite, without the
need for an internet connection. Database replication does not require a separate script to copy the data from
the server, or for the Genie Server application to be closed while the replication is taking place.
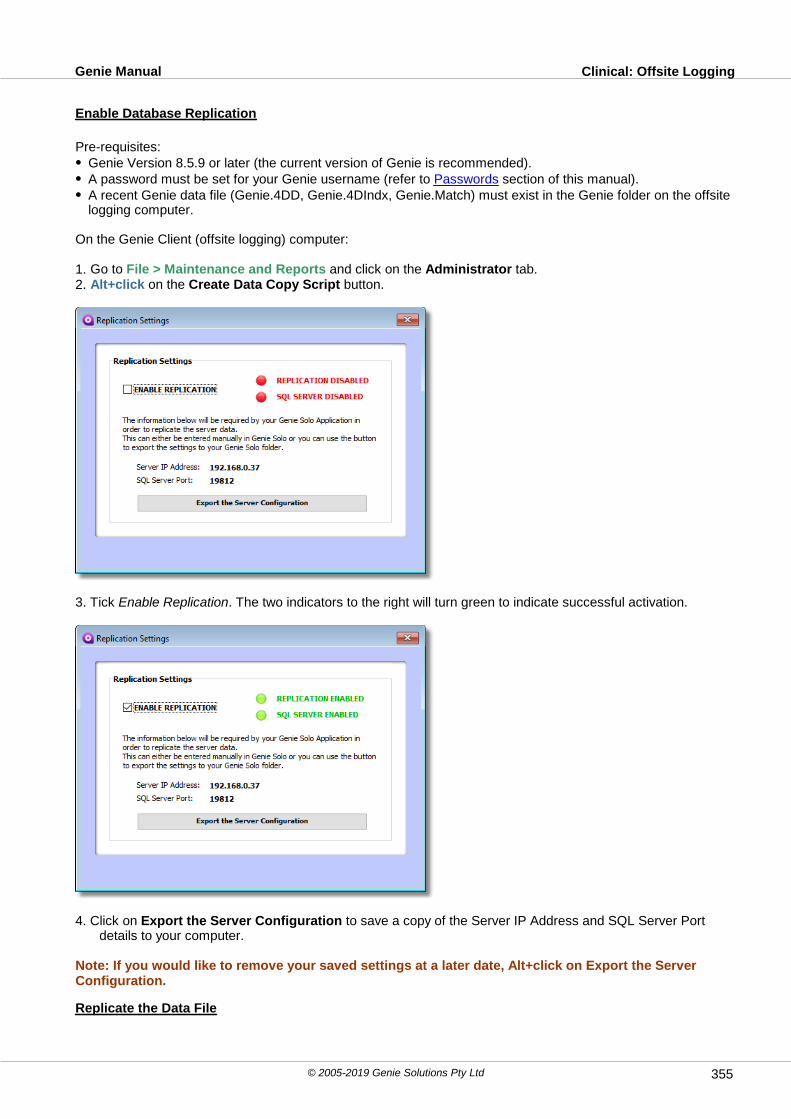
Clinical: Offsite LoggingGenie Manual
© 2005-2019 Genie Solutions Pty Ltd 355
Enable Database Replication
Pre-requisites:Genie Version 8.5.9 or later (the current version of Genie is recommended).A password must be set for your Genie username (refer to Passwords section of this manual).A recent Genie data file (Genie.4DD, Genie.4DIndx, Genie.Match) must exist in the Genie folder on the offsitelogging computer.
On the Genie Client (offsite logging) computer:
1. Go to File > Maintenance and Reports and click on the Administrator tab.2. Alt+click on the Create Data Copy Script button.
3. Tick Enable Replication. The two indicators to the right will turn green to indicate successful activation.
4. Click on Export the Server Configuration to save a copy of the Server IP Address and SQL Server Portdetails to your computer.
Note: If you would like to remove your saved settings at a later date, Alt+click on Export the ServerConfiguration.
Replicate the Data File

Clinical: Offsite LoggingGenie Manual
© 2005-2019 Genie Solutions Pty Ltd356
Once the replication settings have been configured and saved above, quit Genie Client and launch Genie Soloon the offsite-logging computer. The replication step must be performed before leaving the rooms to commenceoffsite logging.
Note: It is not compulsory to close Genie client at this stage. If you need to continue to work in Genieclient while copying the data in Genie Solo, you are able to do so.
1. Provided you have an active network connection and you have not replicated the database in the last 30minutes, you will automatically be prompted to start replication.
Click on Yes to open the Replication Wizard.
2. The Genie server SQL Settings will be listed if you chose the Export the Server Configuration option at Step6 above. If the Server SQL Settings are blank, enter the Genie Server IP Address as shown in Genie Client, Help > About Genie Client. Enter the Genie Server SQL Port as 19812.
Note: The username and password are not stored as a security measure.
3. Click the Test Server button to test the connection.
4. If the details you have entered are correct, you will be presented with a message ‘The SQL Server StartedSuccessfully.’ You can then proceed to Step 5. If the details are incorrect, you will be presented with severalerrors regarding your SQL server and the prompt below.
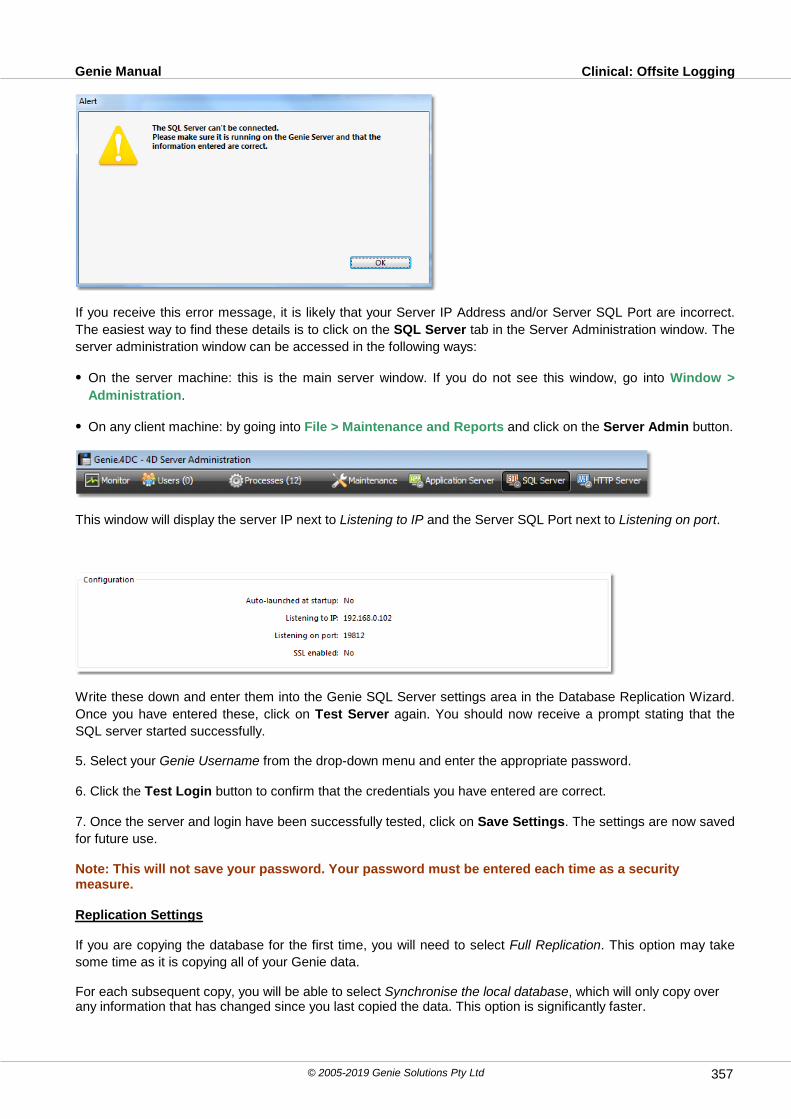
Clinical: Offsite LoggingGenie Manual
© 2005-2019 Genie Solutions Pty Ltd 357
If you receive this error message, it is likely that your Server IP Address and/or Server SQL Port are incorrect.
The easiest way to find these details is to click on the SQL Server tab in the Server Administration window. The
server administration window can be accessed in the following ways:
On the server machine: this is the main server window. If you do not see this window, go into Window >
Administration.
On any client machine: by going into File > Maintenance and Reports and click on the Server Admin button.
This window will display the server IP next to Listening to IP and the Server SQL Port next to Listening on port.
Write these down and enter them into the Genie SQL Server settings area in the Database Replication Wizard.
Once you have entered these, click on Test Server again. You should now receive a prompt stating that the
SQL server started successfully.
5. Select your Genie Username from the drop-down menu and enter the appropriate password.
6. Click the Test Login button to confirm that the credentials you have entered are correct.
7. Once the server and login have been successfully tested, click on Save Settings. The settings are now saved
for future use.
Note: This will not save your password. Your password must be entered each time as a securitymeasure.
Replication Settings
If you are copying the database for the first time, you will need to select Full Replication. This option may take
some time as it is copying all of your Genie data.
For each subsequent copy, you will be able to select Synchronise the local database, which will only copy overany information that has changed since you last copied the data. This option is significantly faster.

Clinical: Offsite LoggingGenie Manual
© 2005-2019 Genie Solutions Pty Ltd358
Image Folder Settings
If you are copying the images for the first time, All will be selected automatically. This option will copy the entireImages folder from the server. Depending on the size of your images folder, this may take quite some time.
Note: It is possible to take a manual copy of your images folder (via USB or other external media device)and place this in the Genie folder on your laptop. This can make the data replication process faster;however, we always recommend using the Replication Wizard as it is more reliable.
Once you have done the initial copy (or if you have manually copied your images), you will be able to select New,which will only copy any new images that have been added/modified since you last copied the data. This optionis significantly faster.
If there is no requirement to access images and attachments offsite, select None.
Start the Replication
Click on Start Replication at the bottom of this window. If you have selected Full Replication, you will bepresented with the following window.
Click Yes to confirm and start the replication. During the replication, you will see a number of flashing windowsas shown.
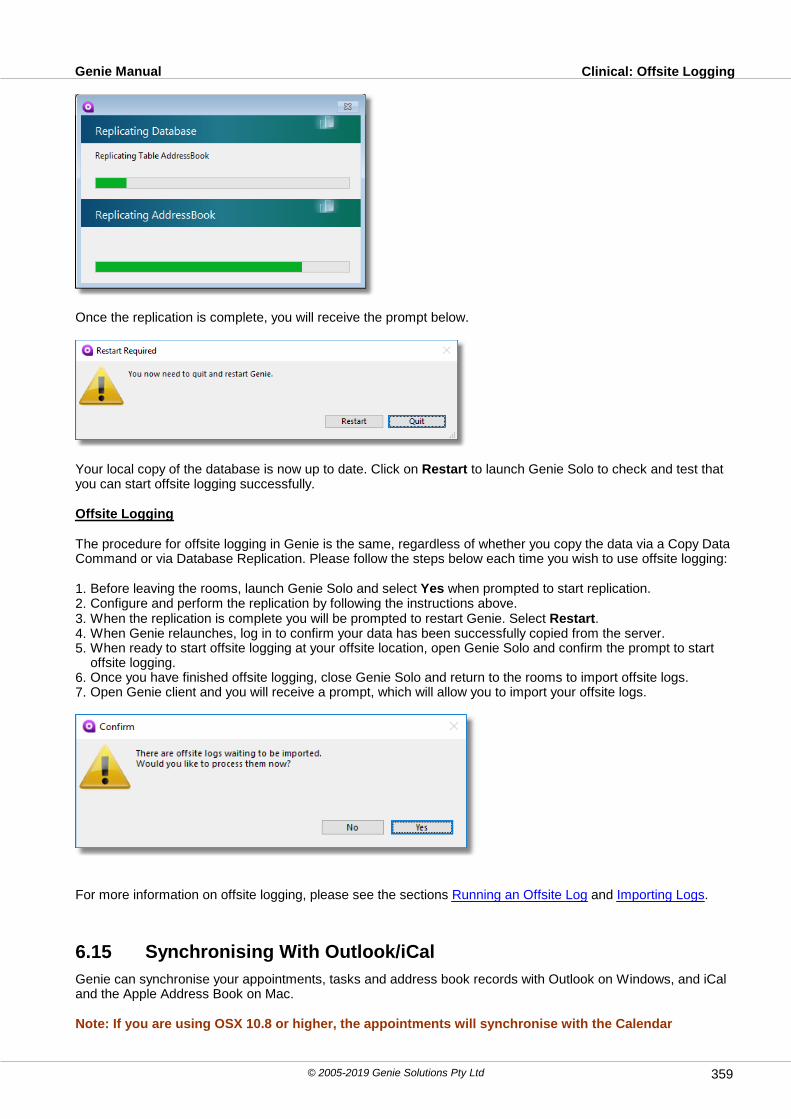
Clinical: Offsite LoggingGenie Manual
© 2005-2019 Genie Solutions Pty Ltd 359
Once the replication is complete, you will receive the prompt below.
Your local copy of the database is now up to date. Click on Restart to launch Genie Solo to check and test thatyou can start offsite logging successfully.
Offsite Logging
The procedure for offsite logging in Genie is the same, regardless of whether you copy the data via a Copy DataCommand or via Database Replication. Please follow the steps below each time you wish to use offsite logging:
1. Before leaving the rooms, launch Genie Solo and select Yes when prompted to start replication.2. Configure and perform the replication by following the instructions above.3. When the replication is complete you will be prompted to restart Genie. Select Restart.4. When Genie relaunches, log in to confirm your data has been successfully copied from the server.5. When ready to start offsite logging at your offsite location, open Genie Solo and confirm the prompt to start
offsite logging.6. Once you have finished offsite logging, close Genie Solo and return to the rooms to import offsite logs.7. Open Genie client and you will receive a prompt, which will allow you to import your offsite logs.
For more information on offsite logging, please see the sections Running an Offsite Log and Importing Logs.
6.15 Synchronising With Outlook/iCal
Genie can synchronise your appointments, tasks and address book records with Outlook on Windows, and iCaland the Apple Address Book on Mac.
Note: If you are using OSX 10.8 or higher, the appointments will synchronise with the Calendar
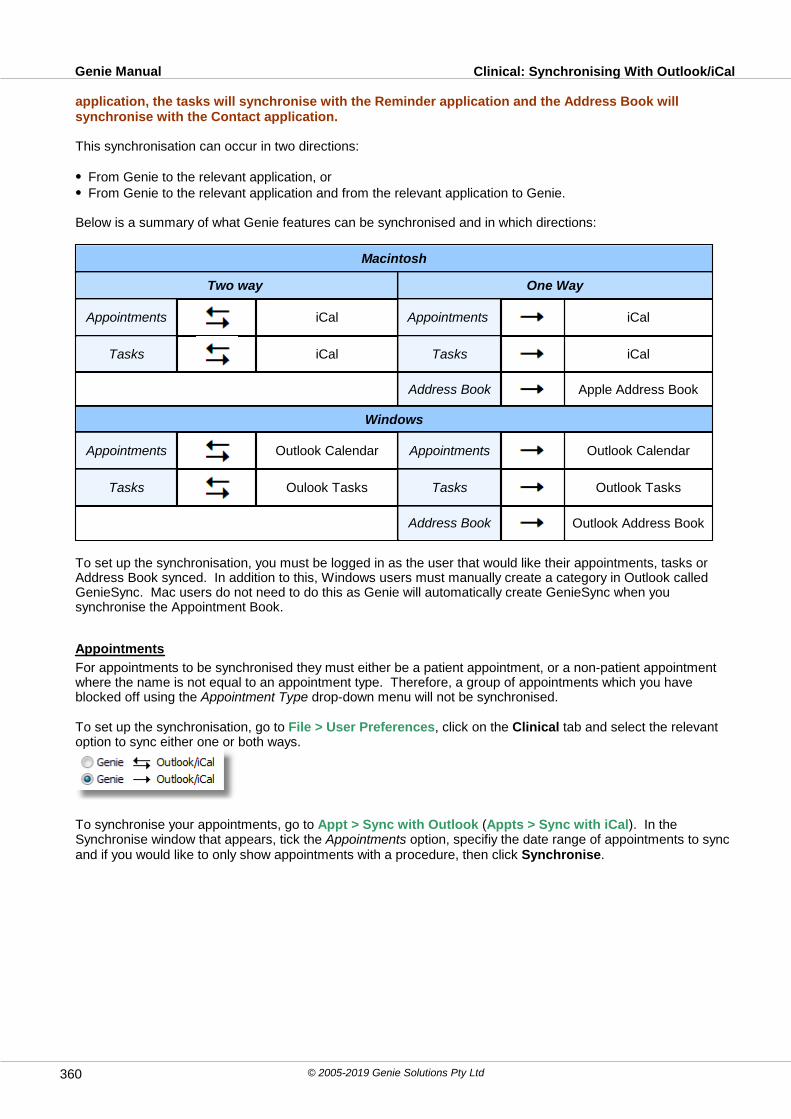
Clinical: Synchronising With Outlook/iCalGenie Manual
© 2005-2019 Genie Solutions Pty Ltd360
application, the tasks will synchronise with the Reminder application and the Address Book willsynchronise with the Contact application.
This synchronisation can occur in two directions:
From Genie to the relevant application, or From Genie to the relevant application and from the relevant application to Genie.
Below is a summary of what Genie features can be synchronised and in which directions:
Macintosh
Two way One Way
Appointments iCal Appointments iCal
Tasks iCal Tasks iCal
Address Book Apple Address Book
Windows
Appointments Outlook Calendar Appointments Outlook Calendar
Tasks Oulook Tasks Tasks Outlook Tasks
Address Book Outlook Address Book
To set up the synchronisation, you must be logged in as the user that would like their appointments, tasks orAddress Book synced. In addition to this, Windows users must manually create a category in Outlook calledGenieSync. Mac users do not need to do this as Genie will automatically create GenieSync when yousynchronise the Appointment Book.
Appointments
For appointments to be synchronised they must either be a patient appointment, or a non-patient appointmentwhere the name is not equal to an appointment type. Therefore, a group of appointments which you haveblocked off using the Appointment Type drop-down menu will not be synchronised.
To set up the synchronisation, go to File > User Preferences, click on the Clinical tab and select the relevantoption to sync either one or both ways.
To synchronise your appointments, go to Appt > Sync with Outlook (Appts > Sync with iCal). In theSynchronise window that appears, tick the Appointments option, specifiy the date range of appointments to syncand if you would like to only show appointments with a procedure, then click Synchronise.
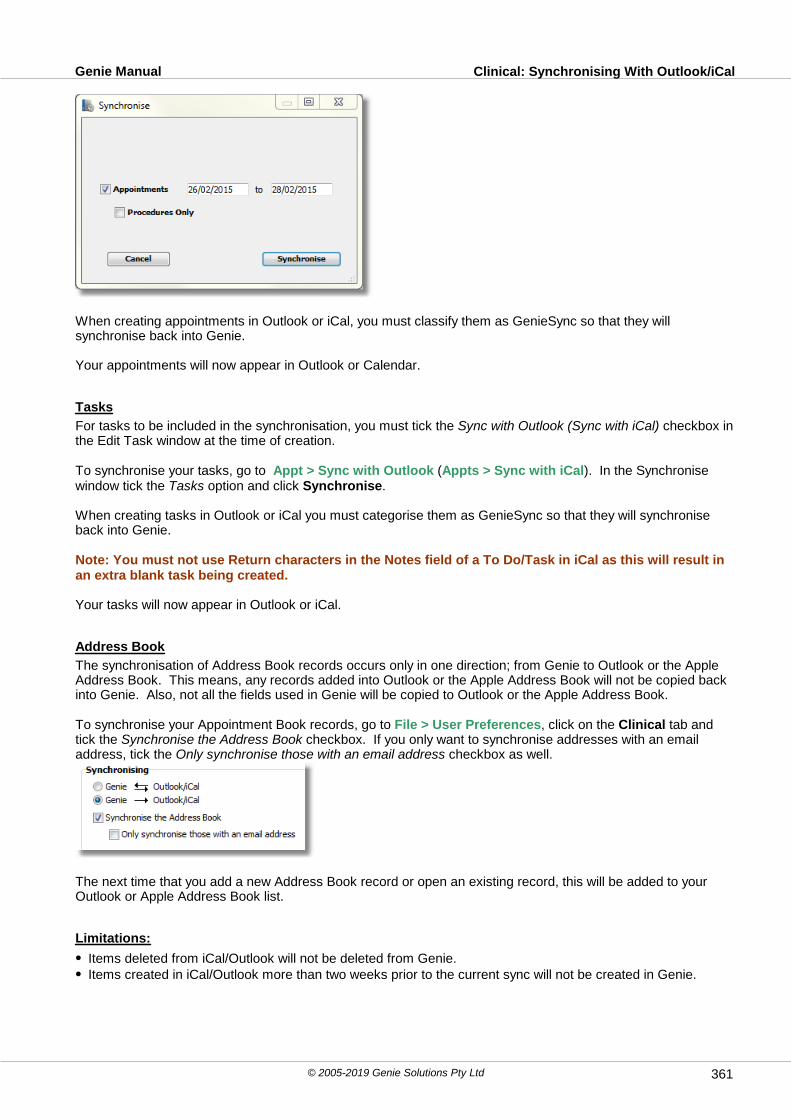
Clinical: Synchronising With Outlook/iCalGenie Manual
© 2005-2019 Genie Solutions Pty Ltd 361
When creating appointments in Outlook or iCal, you must classify them as GenieSync so that they willsynchronise back into Genie.
Your appointments will now appear in Outlook or Calendar.
Tasks
For tasks to be included in the synchronisation, you must tick the Sync with Outlook (Sync with iCal) checkbox inthe Edit Task window at the time of creation.
To synchronise your tasks, go to Appt > Sync with Outlook (Appts > Sync with iCal). In the Synchronisewindow tick the Tasks option and click Synchronise.
When creating tasks in Outlook or iCal you must categorise them as GenieSync so that they will synchroniseback into Genie.
Note: You must not use Return characters in the Notes field of a To Do/Task in iCal as this will result inan extra blank task being created.
Your tasks will now appear in Outlook or iCal.
Address Book
The synchronisation of Address Book records occurs only in one direction; from Genie to Outlook or the AppleAddress Book. This means, any records added into Outlook or the Apple Address Book will not be copied backinto Genie. Also, not all the fields used in Genie will be copied to Outlook or the Apple Address Book.
To synchronise your Appointment Book records, go to File > User Preferences, click on the Clinical tab andtick the Synchronise the Address Book checkbox. If you only want to synchronise addresses with an emailaddress, tick the Only synchronise those with an email address checkbox as well.
The next time that you add a new Address Book record or open an existing record, this will be added to yourOutlook or Apple Address Book list.
Limitations:
Items deleted from iCal/Outlook will not be deleted from Genie.Items created in iCal/Outlook more than two weeks prior to the current sync will not be created in Genie.


Part
VIIPractice Management

Practice Management: Genie Manual
© 2005-2019 Genie Solutions Pty Ltd364
7 Practice ManagementThe following sections are most relevant to Practice Managers.
Maintenance and Reports
This section contains data maintenance routines that maintain the database and can fix many data issues. It also has multiple Practice Management reports such as doctors' earnings and items billed. Monthly tasks such as overdue accounts are also performed through Maintenance and Reports.
Archiving
This section explains how best to maintain your data and keep it at a minimal size.
Queries and Searches
This section describes how to perform basic and more complex searches on your data that go beyond thoseoutlined in Maintenance and Reports.
Quick Reports
This section takes searches to the next level and produces reports that can pull information from multiple tablesin the database.
This section explains the setup and use of the basic email program in Genie that can be used to emailcorrespondence and attach incoming emails to patients files. Note: This email system is a legacy feature and is not intended to replace Outlook Express or AppleMail.
7.1 Maintenance and Reports
Maintenance and Reports is accessed via File > Maintenance & Reports.
7.1.1 The General Page
Postcodes
Lists all the postcodes that have been entered into Genie.
Import/Export Quick ReportsThis allows you to export or import QuickReport templates that have been created in Genie. This is useful if youwant to use a template that another Genie user has created, or vice versa. When you click the Import/Export

Practice Management: Maintenance and ReportsGenie Manual
© 2005-2019 Genie Solutions Pty Ltd 365
Quick Reports icon you will be asked if you want to export or import a Quick Report.
Clicking the Export button will prompt you to select the template from your data file to export. This will be savedin the Genie folder of the computer you are using as two files: the QuickReport itself (e.g. Future Appointments)and a 4QR resource file (e.g. Future Appointments.4QR). You will only need to use the QuickReport file. Youcan then attach this file to an email and send it to another user.
Clicking the Import button will allow you select the QuickReport to import into your data file. In the window thatappears, navigate to the location where you have saved the QuickReport file, select the file and click Open. Thistemplate will now be available when you go to File > QuickReports and click Load.
Note: The name of the QuickReport will be the same as it is in the data file. Changing the name of the filewill not change the name of the QuickReport once it is imported.
Track Individual Pathology ResultsThis allows you to specify which results to individually track if your laboratory is sending results in HL7 format,rather than PIT format. This feature will only work if:1. Your local laboratory is transmitting results in HL7 format, AND2. Your local laboratory is using the universal LOINC codes to identify specific tests.Some laboratories do not transmit the universal LOINC code. If this feature is not working for you, then speakwith your local laboratory. It is not possible for Genie to include each laboratories codes.
If you select any tests in this window, then a separate record will be created at a time of importation. This recordwill contain the numeric value of the result, which can then be graphed for each patient who has had this testperformed.You can select or deselect tests at any time, however, while a test is deselected, any results coming in will notbe stored so as to be able to be graphed.If a test is selected, relevant results will only be able to be graphed from the date of selection. In short, thisfunction is NOT retrospective.Space Consideration: Bear in mind that a separate record will be created for every specific result thatyou select. For example, if you select creatinine, glucose, cholestrol & triglycerides to be tracked, thenFOUR separate records will be created with every E/LFT you perform, as well as the main result record.
Although this is well within Genie's capabilities, backups and data file rebuilds may take longer to perform. Sincethe only advantage to this feature is the ability to graph specific results you should ONLY TRACK TESTSWHICH WOULD BE MEANINGFUL OR USEFUL AS A GRAPH.
Delete 4D PreferencesDeletes your 4D Preferences folder and its contents, this can help solve a number of problems. After you clickthe button, Genie will automatically quit on your computer, delete the 4D Preferences folder, and then restartGenie.
Reset ID NumbersClicking on this icon resets the counters used to generate unique IDs in Genie. This can be used if you get a'failure to save non-unique data' error.
Client-Server Timeouts
Opens the Network Timeout Settings window. In this window, three slider bars can be altered to decrease thelikelihood of being disconnected in Genie.
Normal Operation: Controls the timeout between the client and server computer during normal operations (e.g.navigating the appointment book, entering clinical information). This can be increased if you are experiencingdropouts during normal use.
Long-Running Commands: Controls the timeout during long running commands (i.e. processes that havebeen previously susceptible to timeouts). This can be increased if you are experiencing dropouts whentransmitting HIC online transmissions.
Idle Connections: Controls the timeout for DB4D and SQL connections. These connections are different toapplication connections in that transmissions are not constant. If your intermediate routing device (router,

Practice Management: Maintenance and ReportsGenie Manual
© 2005-2019 Genie Solutions Pty Ltd366
firewall, wireless access point etc) has a shorter timeout than this setting, it may identify and close theseconnections. As the connection has not been closed by Genie itself, Genie will then attempt to reuse thisconnection and encounter an issue. This can be decreased to ensure Genie closes the connection before yourrouter or firewall interferes.
For more information about any of these three sliders, click on the Information button to the left of therelevant slider.
Note: Any changes made in this window will take effect the next time the Genie server application isrestarted.
Create All Patient Image Folders
Creates a folder on the server for each patient in which to store their images and attachments. This is used ifyou do not use ImagePro or attachments in Genie and prefer to attach files to patients directly into their folder onthe server.
Audit Patient ImagesEnsures that references have been correctly created for the actual contents of the patients' images. This worksin a similar manner to the Synchronise button in a patient's Image Browser except that it does this for everypatient. IT DOES NOT DELETE IMAGES, it only deletes any invalid references to images that no longer exist onthe server or creates references for new images. ImagePro should do this on its own, but in somecircumstances it does not.Note: This needs to be run in the Single User mode, on the Server and may take considerable time,depending on the number of patients and images.
Rebuild Indices/Rebuild Data FileThe rebuild indices function will rebuild all indices in the data file and can resolve many data corruptionproblems. Alt+clicking on the Rebuild Indices icon will rebuild the data file by exporting and then importing allrecords. This process can take a long time to complete but it is gentler and produces a better result than otherrepair options. However, you must shut down Genie Server and log into Genie Solo on your server to run thisprocess. The rebuild data file should only be performed at the instruction of Genie staff.
Clean Up Data FileExamines every field of every record in the database and repairs any invalid values. Both this and a rebuildindices can be done on occasion as maintenance to help prevent data corruption.
Server Admin Window (Genie Client Only)
Opens the Genie Server administration window on the server.
Maintenance & Security Centre (Genie Solo Only)
Opens the 4D Maintenance & Security Centre to allow for data repair and compacting.
Genie Web (Genie Client Only)
Opens the GenieWeb control and monitoring window. See GenieWeb Control Window for more information.

Practice Management: Maintenance and ReportsGenie Manual
© 2005-2019 Genie Solutions Pty Ltd 367
7.1.2 The Daily Page
Daily Billing Report
The Daily Billing Report lists all the items invoiced on a particular day.
The report can be printed by clicking on the Printer icon. In a multi-doctor practice you can select the Provider todisplay just that doctor's billing for the day. The Show Reversals checkbox allows you to display or hide credits.To view the billing for previous days click the date arrows or select the date in the popup calendar.
Note: If you view billing from previous days, then the Payment column does not necessarily correspondto what was actually received on the day the invoice was created. The Payment column is showing whathas been receipted against the item at any time since it was originally invoiced.
Daily Banking Report
See Banking in the Reception Module for information.
Daily Transaction ReportThe Daily Transaction Report displays all transactions for that day including invoices, receipts, credits andreversals. This report can display all transactions or just transactions involving a particular doctor. Individualprovider reports will also include any assistant fees.

Practice Management: Maintenance and ReportsGenie Manual
© 2005-2019 Genie Solutions Pty Ltd368
Manual Batching
Please see the Manual Batching chapter for more information.
Bulk Bill/DVA TransmissionPlease see Bulk Bill and DVA Claims for more information.
Patient Claims TransmissionPlease see Patient Claims for more information.
Eclipse IMC Transmission
See separate Eclipse manual for further information. This would have been provided at the time of your EclipseInstall. Alternatively, it can be accessed via Special > Software Updates > PDFs.
ACIR ImmunisationsAllows you to create transmissions for sending Immunisation records to AIR. For information on how to record,manage, and transmit vaccinations, please see Vaccinations.
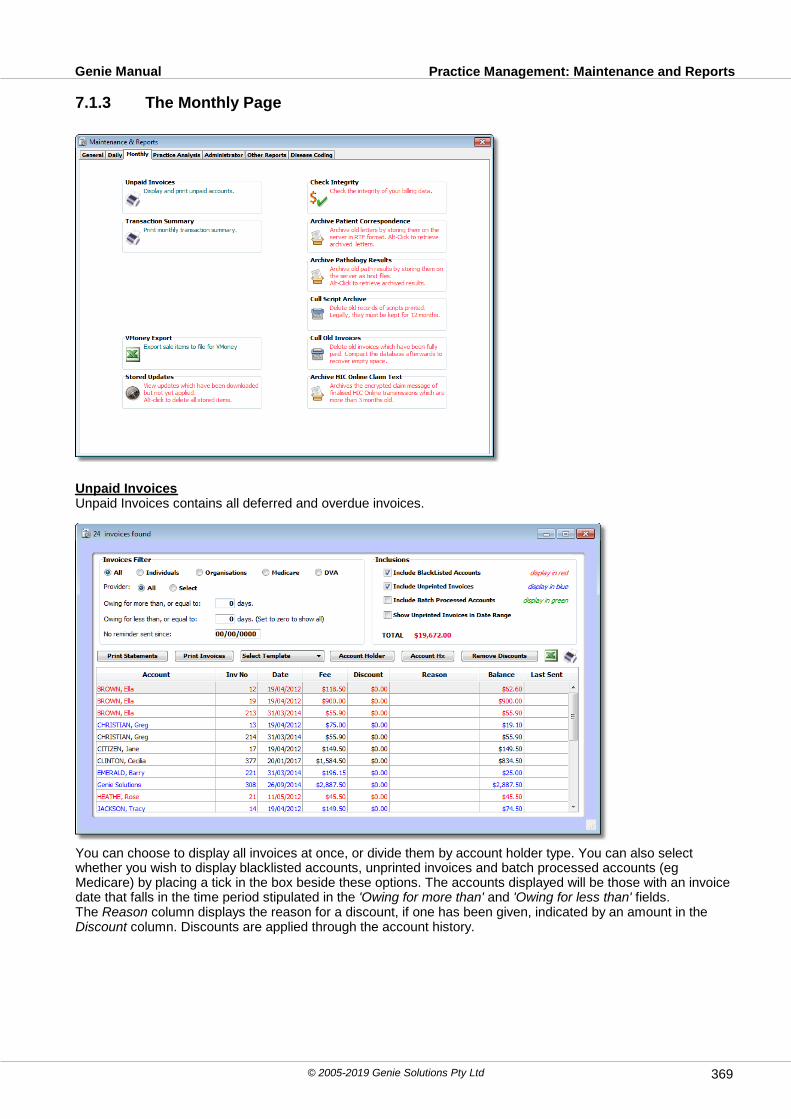
Practice Management: Maintenance and ReportsGenie Manual
© 2005-2019 Genie Solutions Pty Ltd 369
7.1.3 The Monthly Page
Unpaid InvoicesUnpaid Invoices contains all deferred and overdue invoices.
You can choose to display all invoices at once, or divide them by account holder type. You can also selectwhether you wish to display blacklisted accounts, unprinted invoices and batch processed accounts (egMedicare) by placing a tick in the box beside these options. The accounts displayed will be those with an invoicedate that falls in the time period stipulated in the 'Owing for more than' and 'Owing for less than' fields. The Reason column displays the reason for a discount, if one has been given, indicated by an amount in theDiscount column. Discounts are applied through the account history.
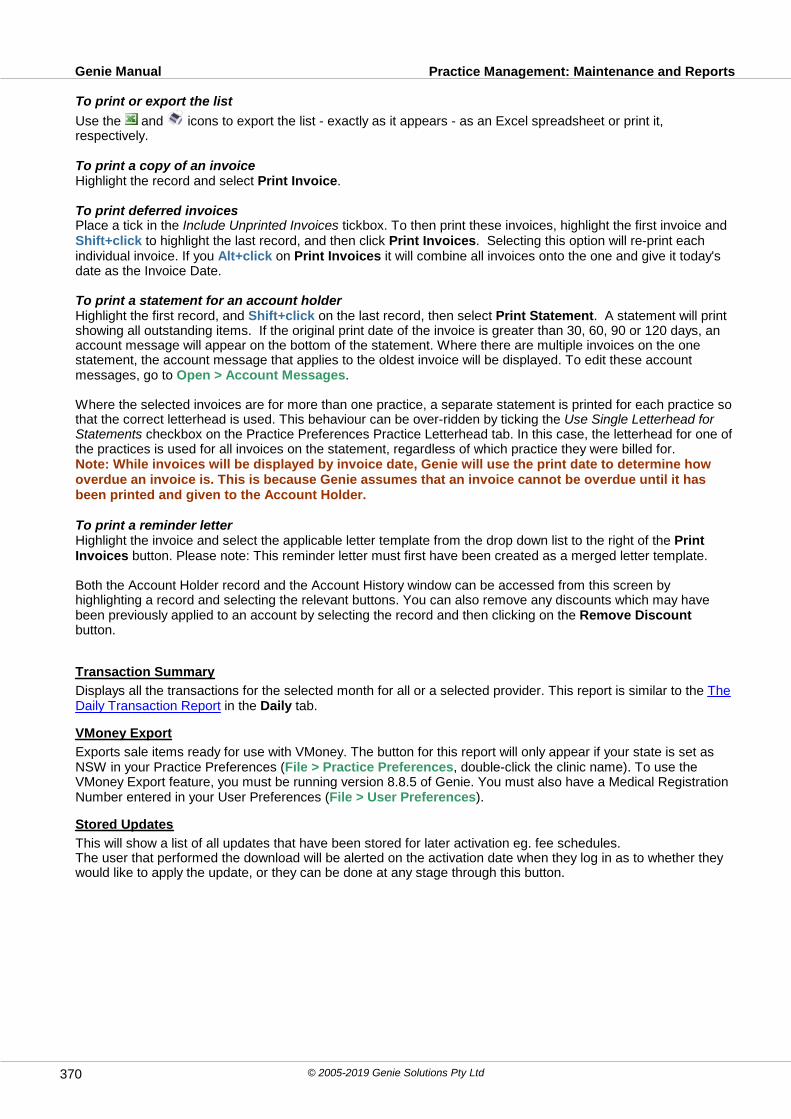
Practice Management: Maintenance and ReportsGenie Manual
© 2005-2019 Genie Solutions Pty Ltd370
To print or export the list
Use the and icons to export the list - exactly as it appears - as an Excel spreadsheet or print it,respectively.
To print a copy of an invoiceHighlight the record and select Print Invoice.
To print deferred invoicesPlace a tick in the Include Unprinted Invoices tickbox. To then print these invoices, highlight the first invoice andShift+click to highlight the last record, and then click Print Invoices. Selecting this option will re-print eachindividual invoice. If you Alt+click on Print Invoices it will combine all invoices onto the one and give it today'sdate as the Invoice Date.
To print a statement for an account holderHighlight the first record, and Shift+click on the last record, then select Print Statement. A statement will printshowing all outstanding items. If the original print date of the invoice is greater than 30, 60, 90 or 120 days, anaccount message will appear on the bottom of the statement. Where there are multiple invoices on the onestatement, the account message that applies to the oldest invoice will be displayed. To edit these accountmessages, go to Open > Account Messages.
Where the selected invoices are for more than one practice, a separate statement is printed for each practice sothat the correct letterhead is used. This behaviour can be over-ridden by ticking the Use Single Letterhead forStatements checkbox on the Practice Preferences Practice Letterhead tab. In this case, the letterhead for one ofthe practices is used for all invoices on the statement, regardless of which practice they were billed for.Note: While invoices will be displayed by invoice date, Genie will use the print date to determine howoverdue an invoice is. This is because Genie assumes that an invoice cannot be overdue until it hasbeen printed and given to the Account Holder.
To print a reminder letterHighlight the invoice and select the applicable letter template from the drop down list to the right of the PrintInvoices button. Please note: This reminder letter must first have been created as a merged letter template.
Both the Account Holder record and the Account History window can be accessed from this screen byhighlighting a record and selecting the relevant buttons. You can also remove any discounts which may havebeen previously applied to an account by selecting the record and then clicking on the Remove Discountbutton.
Transaction Summary
Displays all the transactions for the selected month for all or a selected provider. This report is similar to the TheDaily Transaction Report in the Daily tab.
VMoney Export
Exports sale items ready for use with VMoney. The button for this report will only appear if your state is set asNSW in your Practice Preferences (File > Practice Preferences, double-click the clinic name). To use theVMoney Export feature, you must be running version 8.8.5 of Genie. You must also have a Medical RegistrationNumber entered in your User Preferences (File > User Preferences).
Stored Updates
This will show a list of all updates that have been stored for later activation eg. fee schedules.The user that performed the download will be alerted on the activation date when they log in as to whether theywould like to apply the update, or they can be done at any stage through this button.
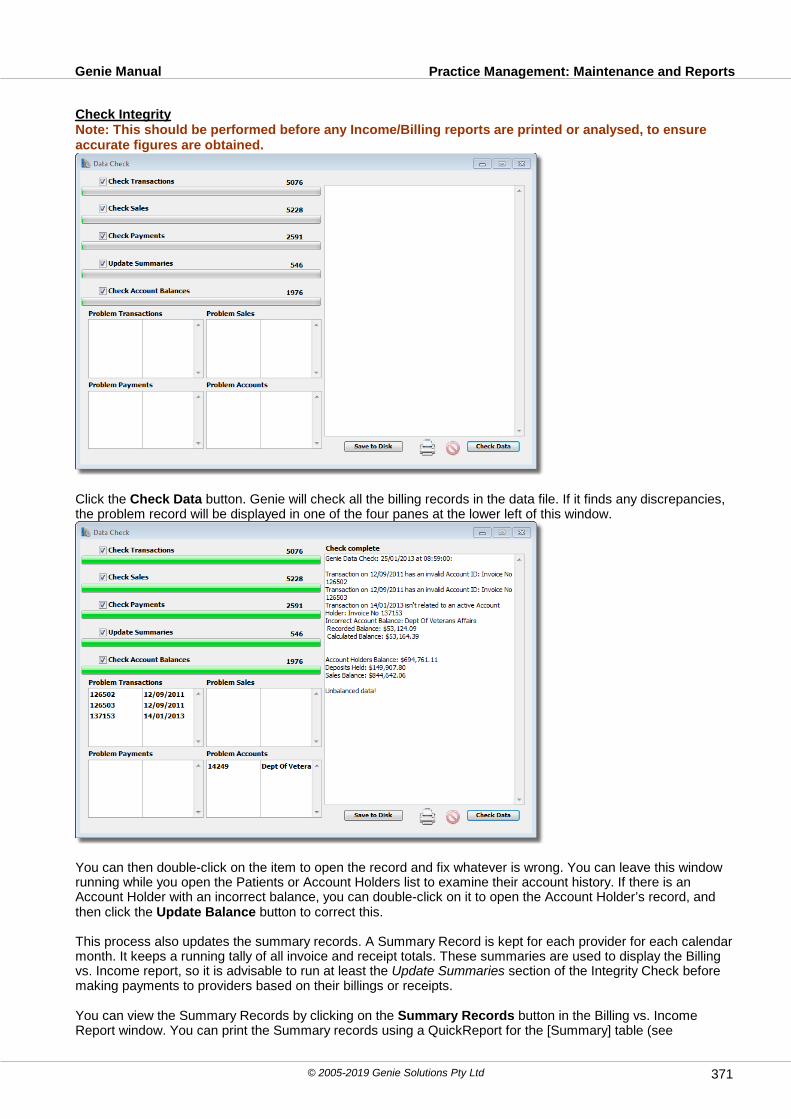
Practice Management: Maintenance and ReportsGenie Manual
© 2005-2019 Genie Solutions Pty Ltd 371
Check IntegrityNote: This should be performed before any Income/Billing reports are printed or analysed, to ensureaccurate figures are obtained.
Click the Check Data button. Genie will check all the billing records in the data file. If it finds any discrepancies,the problem record will be displayed in one of the four panes at the lower left of this window.
You can then double-click on the item to open the record and fix whatever is wrong. You can leave this windowrunning while you open the Patients or Account Holders list to examine their account history. If there is anAccount Holder with an incorrect balance, you can double-click on it to open the Account Holder’s record, andthen click the Update Balance button to correct this.
This process also updates the summary records. A Summary Record is kept for each provider for each calendarmonth. It keeps a running tally of all invoice and receipt totals. These summaries are used to display the Billingvs. Income report, so it is advisable to run at least the Update Summaries section of the Integrity Check beforemaking payments to providers based on their billings or receipts.
You can view the Summary Records by clicking on the Summary Records button in the Billing vs. IncomeReport window. You can print the Summary records using a QuickReport for the [Summary] table (see

Practice Management: Maintenance and ReportsGenie Manual
© 2005-2019 Genie Solutions Pty Ltd372
QuickReports for more information).
Archive Patient CorrespondenceArchives old letters by storing them in the patients images folder on the server in RTF format. You will beprompted for the cut off limit once you click the Garbage can button. See the Archiving chapter for moreinformation on this and Archiving Pathology Results.
Archive Pathology ResultsArchives old pathology results by storing them in the patients images folder on the server as text files. You willbe prompted for the cut off limit once you click the Garbage can button.
Cull Script Archive
Deletes patients' script archives in the Clinical Window from the database. You will be prompted for the cut offlimit once you click the Garbage can button. The Script Archive is a table containing copies of every prescription printed. It is a legal requirement that a copyof all printed prescriptions be retained for 12 months (24 months in some states). After that you can delete themto free up space in the database. Note that this does not delete any of the prescriptions in the patient's currentmedication list.
Cull Old InvoicesDeletes old invoices which have been fully paid. Afterwards the database will be compacted to recover emptyspace.
Archive HIC Online Claim TextArchives the encrypted claim message of finalised HIC Online transmissions which are more than 3 months old.Archived transmissions are stored in Genie\HICOnline\ArchivedTransmissions.
Note: Patient records are Archived through Open > Patients, Patients > Cull Records. See The PatientsMenu for more detail.

Practice Management: Maintenance and ReportsGenie Manual
© 2005-2019 Genie Solutions Pty Ltd 373
7.1.4 The Practice Analysis Page
Billing vs Income ReportThis is the main report in Genie and is the one that should be used for determining providers’ pays/dividends.You can specify any date period you like by selecting one of the set date options, or by selecting Custom Date,which allows you to enter any date range you like. You can specify whether the report should be divided byprovider or month.
For each provider in the practice, this report will detail billing and receipts, including GST totals.Note: The GST amount indicated in the Billing vs Income report may vary when compared to GSTamounts in other reports in Genie, over the same period of time (i.e. the GST in banking report). This isdue to the fact that if an account which includes GST is deleted, and the Banking batch in which it iscontained is sealed, then the Banking report GST amount is not updated to reflect this deletion, whereasthe GST reported in the Billing vs Income report is.
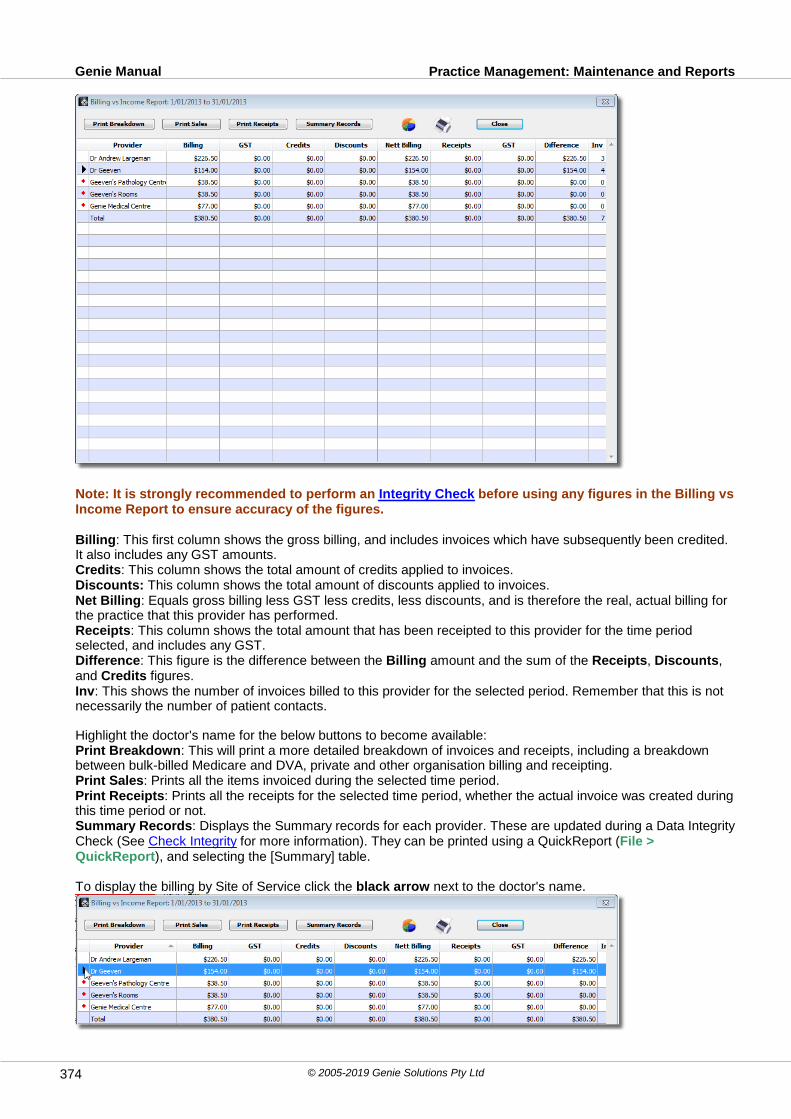
Practice Management: Maintenance and ReportsGenie Manual
© 2005-2019 Genie Solutions Pty Ltd374
Note: It is strongly recommended to perform an Integrity Check before using any figures in the Billing vsIncome Report to ensure accuracy of the figures.
Billing: This first column shows the gross billing, and includes invoices which have subsequently been credited.It also includes any GST amounts.Credits: This column shows the total amount of credits applied to invoices.Discounts: This column shows the total amount of discounts applied to invoices.Net Billing: Equals gross billing less GST less credits, less discounts, and is therefore the real, actual billing forthe practice that this provider has performed.Receipts: This column shows the total amount that has been receipted to this provider for the time periodselected, and includes any GST.Difference: This figure is the difference between the Billing amount and the sum of the Receipts, Discounts,and Credits figures.Inv: This shows the number of invoices billed to this provider for the selected period. Remember that this is notnecessarily the number of patient contacts.
Highlight the doctor's name for the below buttons to become available:Print Breakdown: This will print a more detailed breakdown of invoices and receipts, including a breakdownbetween bulk-billed Medicare and DVA, private and other organisation billing and receipting.Print Sales: Prints all the items invoiced during the selected time period.Print Receipts: Prints all the receipts for the selected time period, whether the actual invoice was created duringthis time period or not.Summary Records: Displays the Summary records for each provider. These are updated during a Data IntegrityCheck (See Check Integrity for more information). They can be printed using a QuickReport (File >QuickReport), and selecting the [Summary] table.
To display the billing by Site of Service click the black arrow next to the doctor's name.

Practice Management: Maintenance and ReportsGenie Manual
© 2005-2019 Genie Solutions Pty Ltd 375
Printing the Billing vs Income Report
Use the Printer button to print and the Graph button to graph the Billing v Income report.
Item ReportThis report displays the number, total value and average fee for either all items, or a selection of item numbersduring a specified time period.
For example, to find all procedure items starting with '155' click on the Select button and enter '155', then pressthe Tab key. Genie performs a wildcard search and finds all items beginning with '155'.
To find which patients have actually been charged for these item numbers, highlight the item(s) you would like toinclude, and click the Display Patients button as shown below.
The total of fees charged for all item numbers may not necessarily be the same as shown in the Billing vsIncome report. This is because, if you create an invoice for an item worth $100, then fully credit it because it wasbilled to the wrong patient, then that item will not be included in the Item Report and the total will be $100 lessthan the total in the Billing vs Income report.This is deliberate, because otherwise the number of times that itemhas been billed would be incorrect, and the average fee would be skewed downwards.
Items can also be subtotaled by Category or Time. The total time is calculated as the Usual Time field for eachbilling item (as per Open > Billing Items), multiplied by Qty column. Category is taken from the Categoryentered for the item in Open > Billing Items.
The report can be exported to Excel using the green X icon at the top of the window.
Paid on the DayThis report displays the percentage of income which is actually paid on the day. It may be useful if a discount isoffered for payment on the day, in which case you can see if it has had the desired effect.
Patient TypeThis displays a breakdown of invoicing by patient type. This is determined by the Account Type selected in the
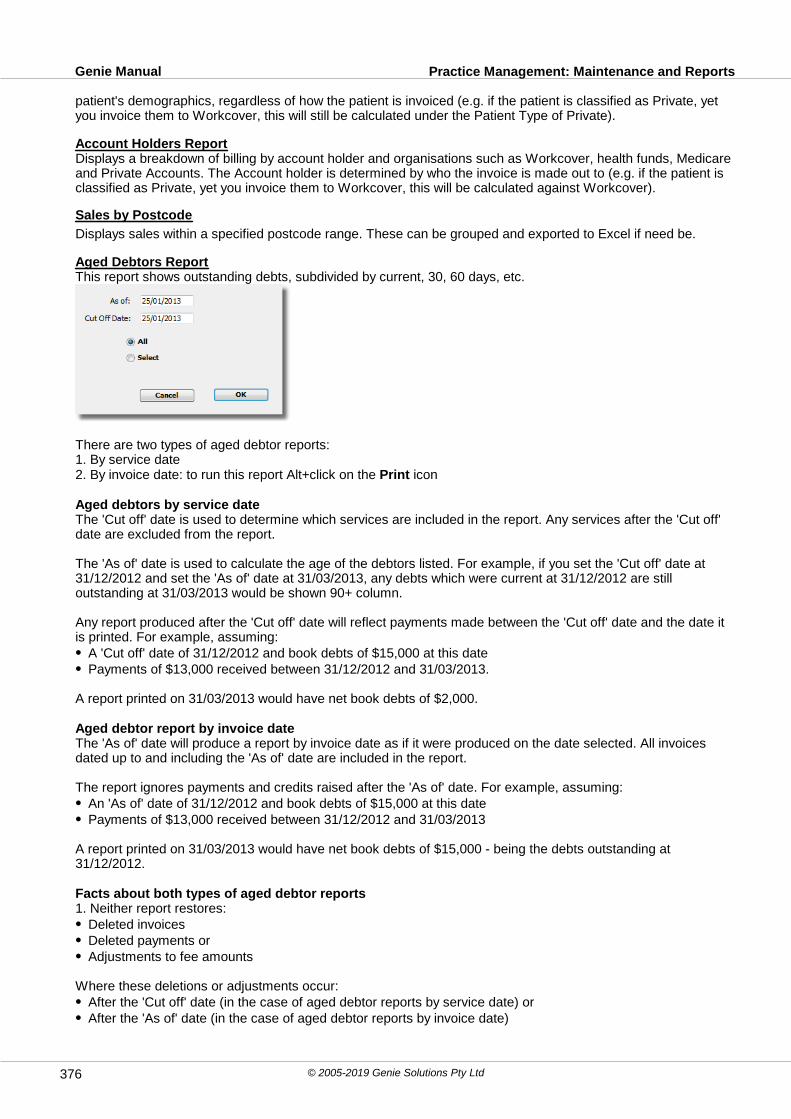
Practice Management: Maintenance and ReportsGenie Manual
© 2005-2019 Genie Solutions Pty Ltd376
patient's demographics, regardless of how the patient is invoiced (e.g. if the patient is classified as Private, yetyou invoice them to Workcover, this will still be calculated under the Patient Type of Private).
Account Holders ReportDisplays a breakdown of billing by account holder and organisations such as Workcover, health funds, Medicareand Private Accounts. The Account holder is determined by who the invoice is made out to (e.g. if the patient isclassified as Private, yet you invoice them to Workcover, this will be calculated against Workcover).
Sales by Postcode
Displays sales within a specified postcode range. These can be grouped and exported to Excel if need be.
Aged Debtors ReportThis report shows outstanding debts, subdivided by current, 30, 60 days, etc.
There are two types of aged debtor reports:1. By service date2. By invoice date: to run this report Alt+click on the Print icon
Aged debtors by service dateThe 'Cut off' date is used to determine which services are included in the report. Any services after the 'Cut off'date are excluded from the report.
The 'As of' date is used to calculate the age of the debtors listed. For example, if you set the 'Cut off' date at31/12/2012 and set the 'As of' date at 31/03/2013, any debts which were current at 31/12/2012 are stilloutstanding at 31/03/2013 would be shown 90+ column.
Any report produced after the 'Cut off' date will reflect payments made between the 'Cut off' date and the date itis printed. For example, assuming:
A 'Cut off' date of 31/12/2012 and book debts of $15,000 at this datePayments of $13,000 received between 31/12/2012 and 31/03/2013.
A report printed on 31/03/2013 would have net book debts of $2,000.
Aged debtor report by invoice dateThe 'As of' date will produce a report by invoice date as if it were produced on the date selected. All invoicesdated up to and including the 'As of' date are included in the report.
The report ignores payments and credits raised after the 'As of' date. For example, assuming:An 'As of' date of 31/12/2012 and book debts of $15,000 at this datePayments of $13,000 received between 31/12/2012 and 31/03/2013
A report printed on 31/03/2013 would have net book debts of $15,000 - being the debts outstanding at31/12/2012.
Facts about both types of aged debtor reports1. Neither report restores:
Deleted invoicesDeleted payments orAdjustments to fee amounts
Where these deletions or adjustments occur:After the 'Cut off' date (in the case of aged debtor reports by service date) orAfter the 'As of' date (in the case of aged debtor reports by invoice date)
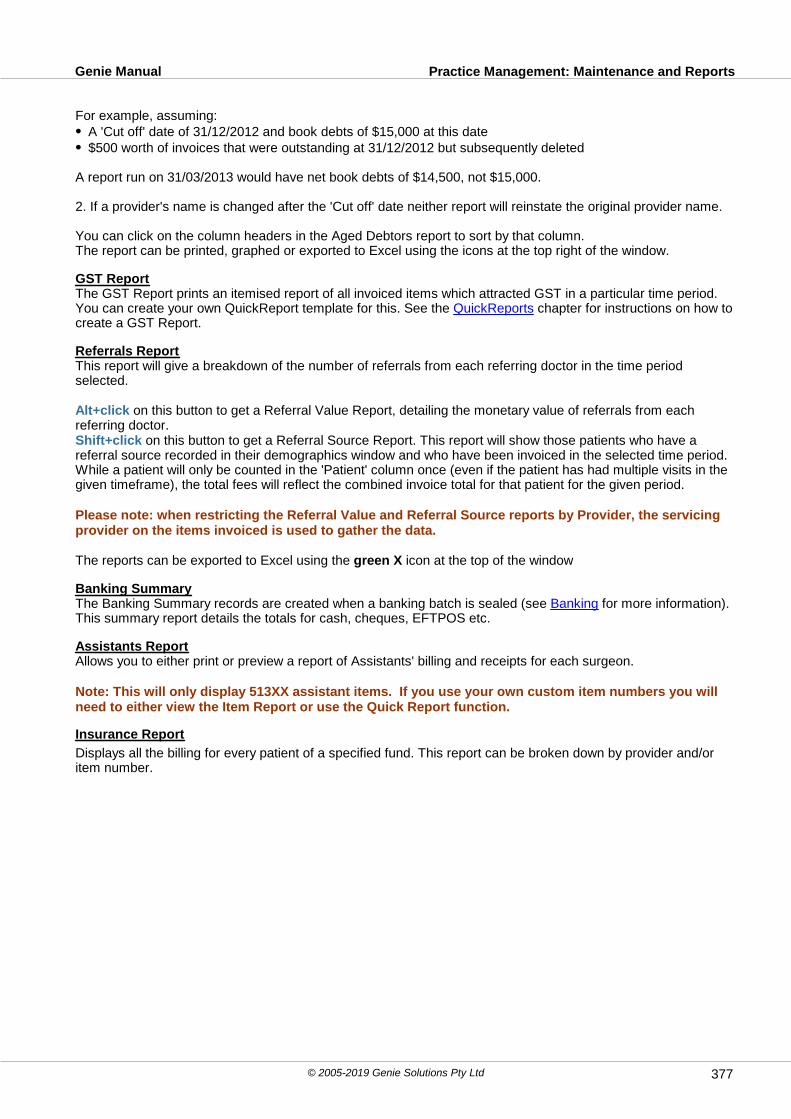
Practice Management: Maintenance and ReportsGenie Manual
© 2005-2019 Genie Solutions Pty Ltd 377
For example, assuming:A 'Cut off' date of 31/12/2012 and book debts of $15,000 at this date$500 worth of invoices that were outstanding at 31/12/2012 but subsequently deleted
A report run on 31/03/2013 would have net book debts of $14,500, not $15,000.
2. If a provider's name is changed after the 'Cut off' date neither report will reinstate the original provider name.
You can click on the column headers in the Aged Debtors report to sort by that column.The report can be printed, graphed or exported to Excel using the icons at the top right of the window.
GST ReportThe GST Report prints an itemised report of all invoiced items which attracted GST in a particular time period.You can create your own QuickReport template for this. See the QuickReports chapter for instructions on how tocreate a GST Report.
Referrals ReportThis report will give a breakdown of the number of referrals from each referring doctor in the time periodselected.
Alt+click on this button to get a Referral Value Report, detailing the monetary value of referrals from eachreferring doctor.Shift+click on this button to get a Referral Source Report. This report will show those patients who have areferral source recorded in their demographics window and who have been invoiced in the selected time period.While a patient will only be counted in the 'Patient' column once (even if the patient has had multiple visits in thegiven timeframe), the total fees will reflect the combined invoice total for that patient for the given period.
Please note: when restricting the Referral Value and Referral Source reports by Provider, the servicingprovider on the items invoiced is used to gather the data.
The reports can be exported to Excel using the green X icon at the top of the window
Banking SummaryThe Banking Summary records are created when a banking batch is sealed (see Banking for more information).This summary report details the totals for cash, cheques, EFTPOS etc.
Assistants ReportAllows you to either print or preview a report of Assistants' billing and receipts for each surgeon.
Note: This will only display 513XX assistant items. If you use your own custom item numbers you willneed to either view the Item Report or use the Quick Report function.
Insurance Report
Displays all the billing for every patient of a specified fund. This report can be broken down by provider and/oritem number.
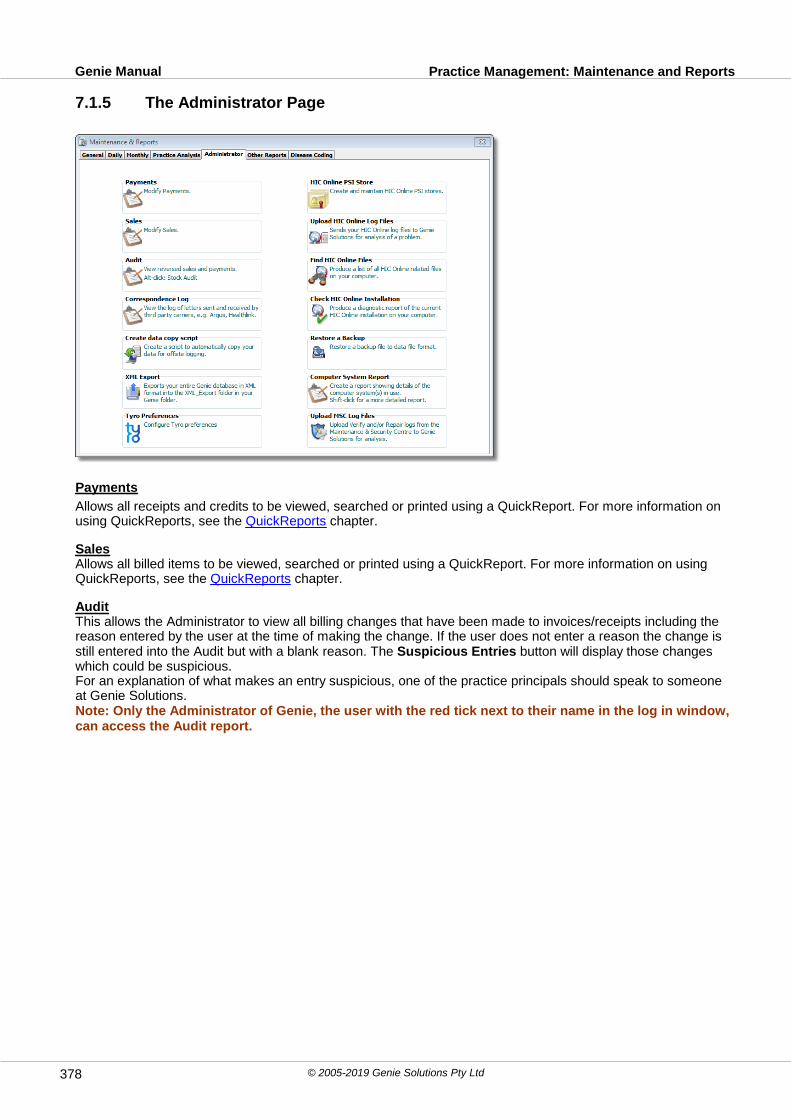
Practice Management: Maintenance and ReportsGenie Manual
© 2005-2019 Genie Solutions Pty Ltd378
7.1.5 The Administrator Page
Payments
Allows all receipts and credits to be viewed, searched or printed using a QuickReport. For more information onusing QuickReports, see the QuickReports chapter.
SalesAllows all billed items to be viewed, searched or printed using a QuickReport. For more information on usingQuickReports, see the QuickReports chapter.
AuditThis allows the Administrator to view all billing changes that have been made to invoices/receipts including thereason entered by the user at the time of making the change. If the user does not enter a reason the change isstill entered into the Audit but with a blank reason. The Suspicious Entries button will display those changeswhich could be suspicious.For an explanation of what makes an entry suspicious, one of the practice principals should speak to someoneat Genie Solutions.Note: Only the Administrator of Genie, the user with the red tick next to their name in the log in window,can access the Audit report.
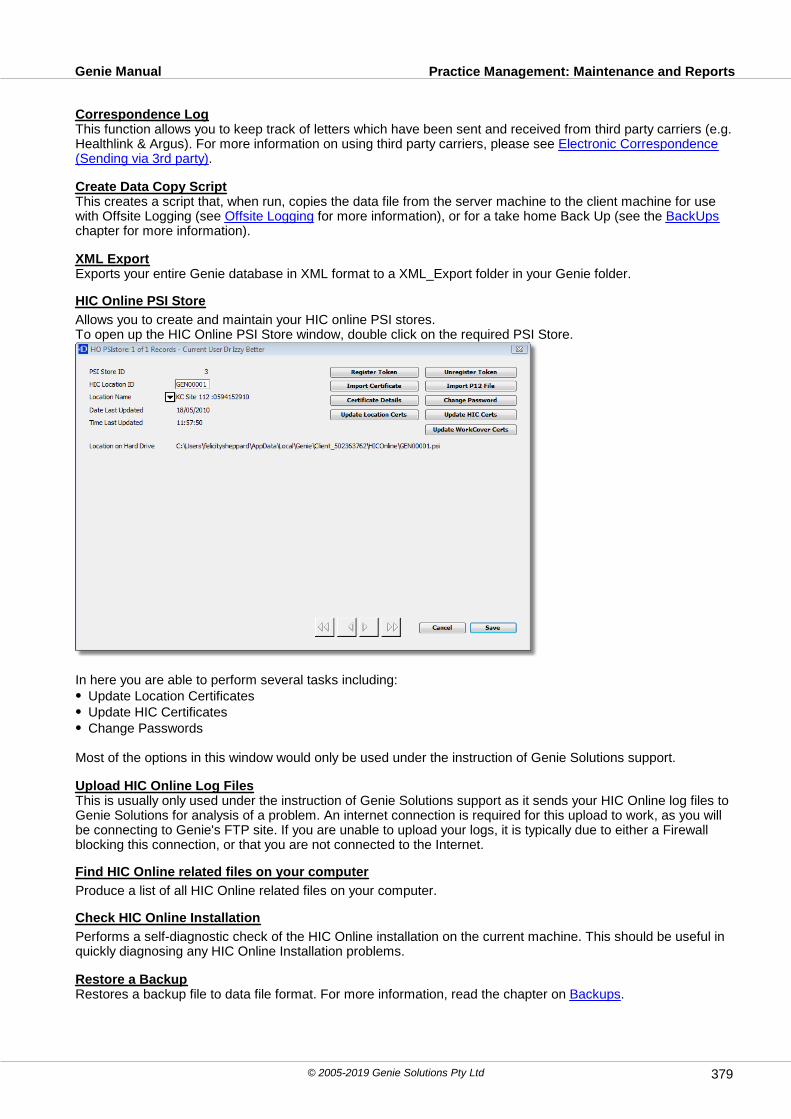
Practice Management: Maintenance and ReportsGenie Manual
© 2005-2019 Genie Solutions Pty Ltd 379
Correspondence LogThis function allows you to keep track of letters which have been sent and received from third party carriers (e.g.Healthlink & Argus). For more information on using third party carriers, please see Electronic Correspondence(Sending via 3rd party).
Create Data Copy ScriptThis creates a script that, when run, copies the data file from the server machine to the client machine for usewith Offsite Logging (see Offsite Logging for more information), or for a take home Back Up (see the BackUpschapter for more information).
XML ExportExports your entire Genie database in XML format to a XML_Export folder in your Genie folder.
HIC Online PSI Store
Allows you to create and maintain your HIC online PSI stores.To open up the HIC Online PSI Store window, double click on the required PSI Store.
In here you are able to perform several tasks including:Update Location CertificatesUpdate HIC CertificatesChange Passwords
Most of the options in this window would only be used under the instruction of Genie Solutions support.
Upload HIC Online Log FilesThis is usually only used under the instruction of Genie Solutions support as it sends your HIC Online log files toGenie Solutions for analysis of a problem. An internet connection is required for this upload to work, as you willbe connecting to Genie's FTP site. If you are unable to upload your logs, it is typically due to either a Firewallblocking this connection, or that you are not connected to the Internet.
Find HIC Online related files on your computer
Produce a list of all HIC Online related files on your computer.
Check HIC Online Installation
Performs a self-diagnostic check of the HIC Online installation on the current machine. This should be useful inquickly diagnosing any HIC Online Installation problems.
Restore a BackupRestores a backup file to data file format. For more information, read the chapter on Backups.

Practice Management: Maintenance and ReportsGenie Manual
© 2005-2019 Genie Solutions Pty Ltd380
Computer System Report
This utility displays information about the operating system, processor and RAM on the current workstation andthe server. Shift+clicking will present you with a more detailed report.
Tyro Preferences
As of version 8.8.6, Genie is capable of integrating with the Tyro payment system.
Please note: The Tyro Preferences button will be accessible only to those users with the appropriatesecurity preference enabled in File > Edit Groups.
In order to pair your Tyro terminal(s) with the computers in your practice, you will need to contact Tyro customerservice.
For existing Tyro users who wish to integrate their terminals with Genie, contact Tyro customer service by phoneon 1300 966 639, or by email via [email protected]
For users who wish to purchase Tyro for use with Genie, contact Tyro sales by phone on 02 8907 1717, or byemail via [email protected]
Upload MSC Log Files
This button allows you to transmit any log files generated by data maintenance procedures - such as a verify -directly to Genie Support. For this most part, you will only use this button under the instruction of a GenieSupport staff member or technician.
7.1.6 Other Reports Page
\
APCC ReportThis is for doctors that are part of the Australian Primary Care Collaboratives incentive. It creates the reportingrequired on patients with IHD, AMI and Diabetes. All instructions on how to use the report accurately arecontained within the report window.
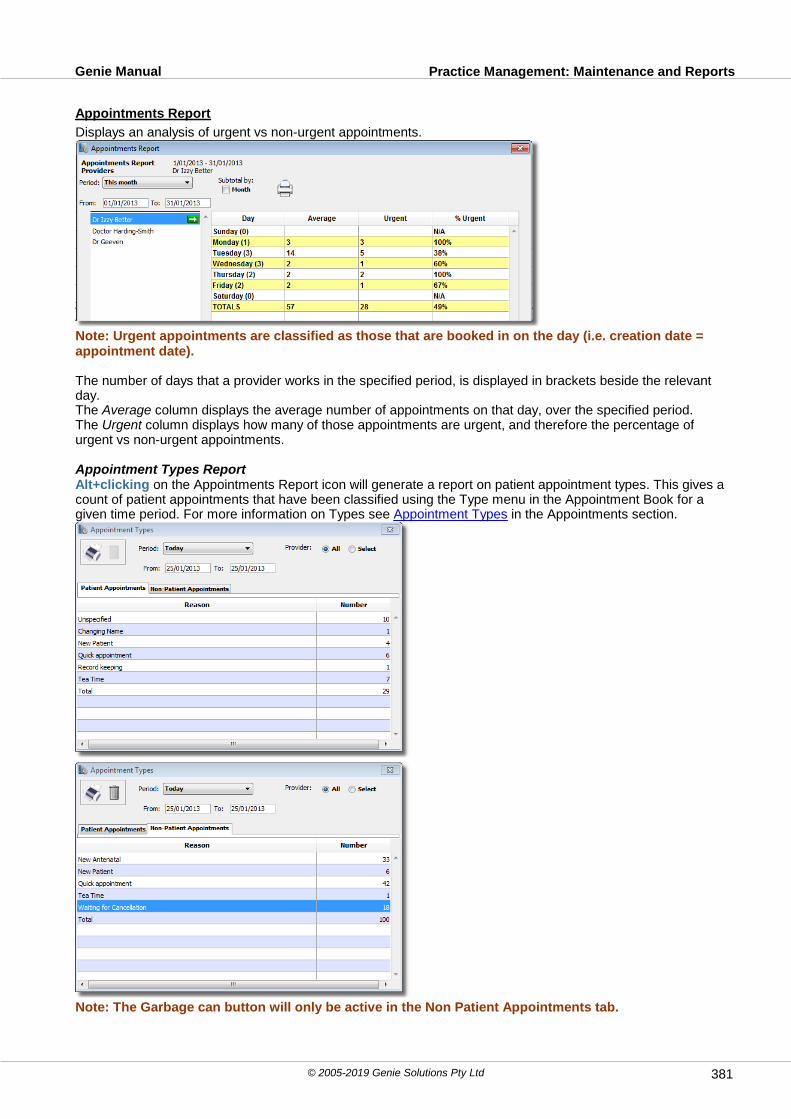
Practice Management: Maintenance and ReportsGenie Manual
© 2005-2019 Genie Solutions Pty Ltd 381
Appointments Report
Displays an analysis of urgent vs non-urgent appointments.
Note: Urgent appointments are classified as those that are booked in on the day (i.e. creation date =appointment date).
The number of days that a provider works in the specified period, is displayed in brackets beside the relevantday.The Average column displays the average number of appointments on that day, over the specified period.The Urgent column displays how many of those appointments are urgent, and therefore the percentage ofurgent vs non-urgent appointments.
Appointment Types ReportAlt+clicking on the Appointments Report icon will generate a report on patient appointment types. This gives acount of patient appointments that have been classified using the Type menu in the Appointment Book for agiven time period. For more information on Types see Appointment Types in the Appointments section.
Note: The Garbage can button will only be active in the Non Patient Appointments tab.
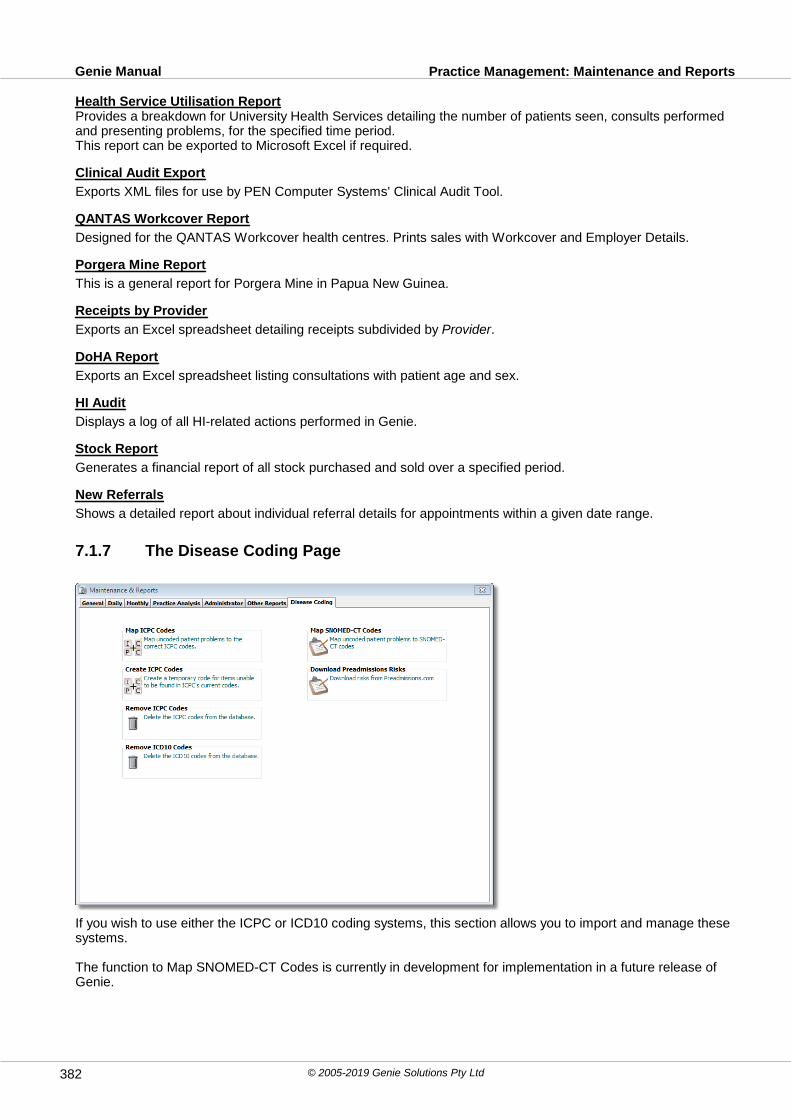
Practice Management: Maintenance and ReportsGenie Manual
© 2005-2019 Genie Solutions Pty Ltd382
Health Service Utilisation ReportProvides a breakdown for University Health Services detailing the number of patients seen, consults performedand presenting problems, for the specified time period.This report can be exported to Microsoft Excel if required.
Clinical Audit Export
Exports XML files for use by PEN Computer Systems' Clinical Audit Tool.
QANTAS Workcover Report
Designed for the QANTAS Workcover health centres. Prints sales with Workcover and Employer Details.
Porgera Mine Report
This is a general report for Porgera Mine in Papua New Guinea.
Receipts by Provider
Exports an Excel spreadsheet detailing receipts subdivided by Provider.
DoHA Report
Exports an Excel spreadsheet listing consultations with patient age and sex.
HI Audit
Displays a log of all HI-related actions performed in Genie.
Stock Report
Generates a financial report of all stock purchased and sold over a specified period.
New Referrals
Shows a detailed report about individual referral details for appointments within a given date range.
7.1.7 The Disease Coding Page
If you wish to use either the ICPC or ICD10 coding systems, this section allows you to import and manage thesesystems.
The function to Map SNOMED-CT Codes is currently in development for implementation in a future release ofGenie.
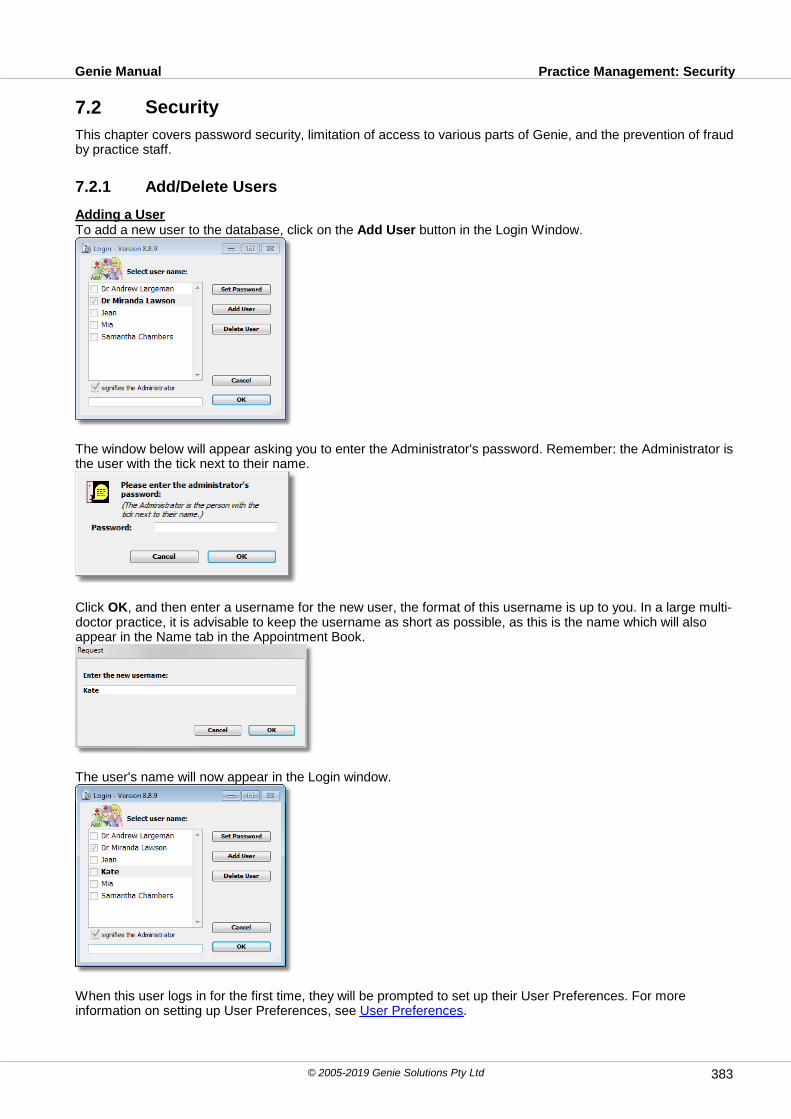
Practice Management: SecurityGenie Manual
© 2005-2019 Genie Solutions Pty Ltd 383
7.2 Security
This chapter covers password security, limitation of access to various parts of Genie, and the prevention of fraudby practice staff.
7.2.1 Add/Delete Users
Adding a UserTo add a new user to the database, click on the Add User button in the Login Window.
The window below will appear asking you to enter the Administrator's password. Remember: the Administrator isthe user with the tick next to their name.
Click OK, and then enter a username for the new user, the format of this username is up to you. In a large multi-doctor practice, it is advisable to keep the username as short as possible, as this is the name which will alsoappear in the Name tab in the Appointment Book.
The user's name will now appear in the Login window.
When this user logs in for the first time, they will be prompted to set up their User Preferences. For moreinformation on setting up User Preferences, see User Preferences.
Practice Management: SecurityGenie Manual
© 2005-2019 Genie Solutions Pty Ltd384
Marking Users as Inactive
Even if a user leaves the practice, we do not recommend deleting users from Genie outright. Doing so will causeall of their appointments, both past and future, to be deleted from the Genie database. This will also include anyprocedures associated with those appointments.
In order to retain information associated with a user after that user leaves, you should simply mark that user as Inactive. This will prevent that user from appearing in the login window, the appointment book, or any billingmenus, whilst still keeping their data intact.
To mark a user as Inactive, open up their User Preferences window by navigating to File > All UserPreferences, and double-clicking their name. Tick the Inactive User tickbox in the top-right of the window, andthen click the Save button to close the window. The user will then no longer be visible in most areas of Genie.To make the user active again, simply untick the Inactive User tickbox.
Deleting a User
If absolutely necessary, you can also delete a user from the Login window by highlighting the user you would liketo delete, and then clicking on the Delete User button.
Again, the Administrator must enter their password in order to delete a user.
7.2.2 User Access
The Administrator
The Administrator has the highest level of security. Only one user can be the Administrator. Typically this wouldbe one of the principals, or a trusted practice manager.
Only the Administrator can perform the following functions:Assign someone else to be the Administrator.View the Audit Trail of modified invoices and receipts.Password-protect certain actions and preferences throughout Genie.Add and delete new users.
Other Privilege Levels
Security privileges for all users (including the Administrator) can be dictated via Edit Groups window (File > EditGroups). See the Edit Groups section for more information.
Please note: If you are using version 8.5.6 of Genie or earlier, these security preferences can be foundwithin the Security tab of each user's User Preferences (File > User Preferences). For more information,please see the User Preferences section under Setting Up Genie.

Practice Management: SecurityGenie Manual
© 2005-2019 Genie Solutions Pty Ltd 385
7.2.3 Edit Groups
The Edit Groups window allows you to set security privileges for different staff members, letting you define roleseasily through Genie itself. If you are using version 8.5.6 or below, these privileges must be set in the Securitytab of the user preferences. For more information, see the Security tab section of Setting Up Genie.
To configure and modify these security settings, navigate into File > Edit Groups.
Setting Up Groups
From installation, this window will contain a group called Default, which contains the minimum security settings.
These will be the settings enabled for all users in the practice until they are added to a specific group.
You can see users’ permissions for different areas in Genie by clicking on the General , Financial and
Patient tabs.
In addition to the Administrators and Default groups, you can add as many specific groups as you require. These
groups give users additional privileges; each user has the Default group’s privileges plus their own group’s
privileges. In this example, we can see the users in the Administrators group have ticks in almost all
preferences.

Practice Management: SecurityGenie Manual
© 2005-2019 Genie Solutions Pty Ltd386
To view their combined permissions, click on the icon. When you click on this icon, the Capabilities list will
display their effective permissions. We can now see that Dr Largeman has full permissions in Genie.
To return to the normal display, click on the Effective permissions button again. In this view, you can add orsubtract any permissions from these users by ticking or unticking their respective boxes. To tick all checkboxesunder a heading, Alt+click on the first item.
You can add any other users to this group by clicking on the Blue plus button at the top of the Members list.
You can remove any of these users by highlighting their name and clicking on the Garbage bin button.
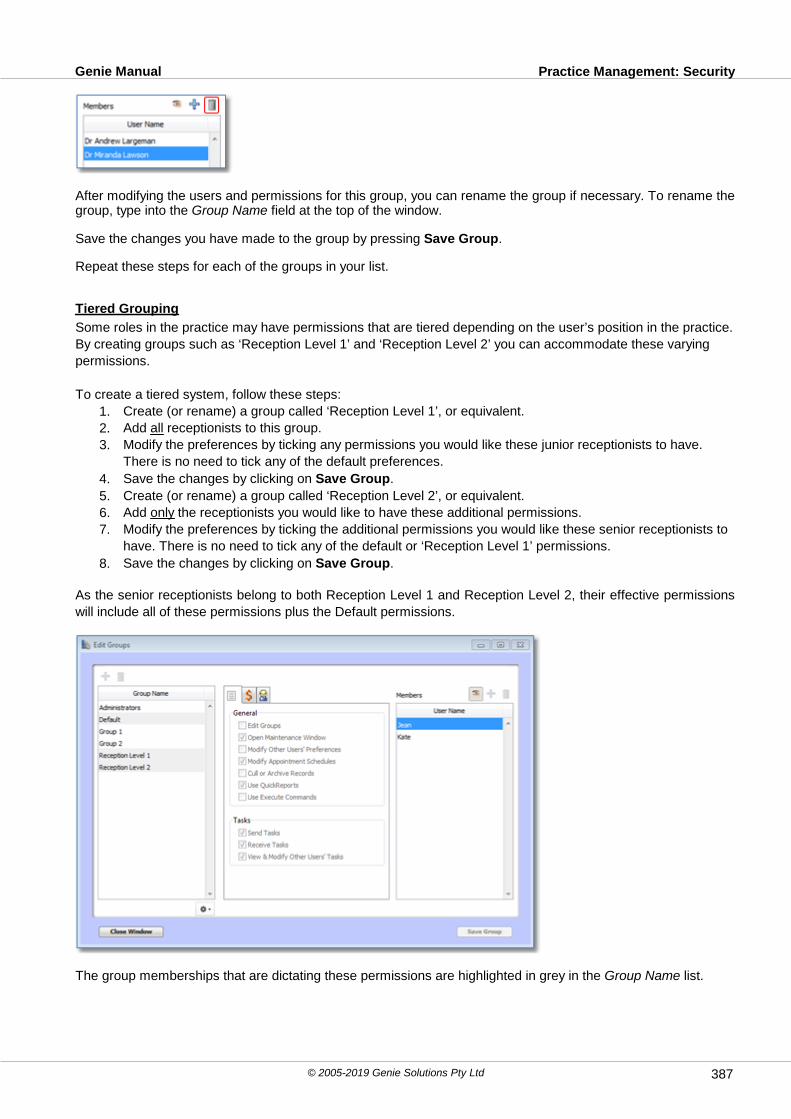
Practice Management: SecurityGenie Manual
© 2005-2019 Genie Solutions Pty Ltd 387
After modifying the users and permissions for this group, you can rename the group if necessary. To rename thegroup, type into the Group Name field at the top of the window.
Save the changes you have made to the group by pressing Save Group.
Repeat these steps for each of the groups in your list.
Tiered Grouping
Some roles in the practice may have permissions that are tiered depending on the user’s position in the practice.
By creating groups such as ‘Reception Level 1’ and ‘Reception Level 2’ you can accommodate these varying
permissions.
To create a tiered system, follow these steps:
1. Create (or rename) a group called ‘Reception Level 1’, or equivalent.
2. Add all receptionists to this group.
3. Modify the preferences by ticking any permissions you would like these junior receptionists to have.
There is no need to tick any of the default preferences.
4. Save the changes by clicking on Save Group.
5. Create (or rename) a group called ‘Reception Level 2’, or equivalent.
6. Add only the receptionists you would like to have these additional permissions.
7. Modify the preferences by ticking the additional permissions you would like these senior receptionists to
have. There is no need to tick any of the default or ‘Reception Level 1’ permissions.
8. Save the changes by clicking on Save Group.
As the senior receptionists belong to both Reception Level 1 and Reception Level 2, their effective permissions
will include all of these permissions plus the Default permissions.
The group memberships that are dictating these permissions are highlighted in grey in the Group Name list.
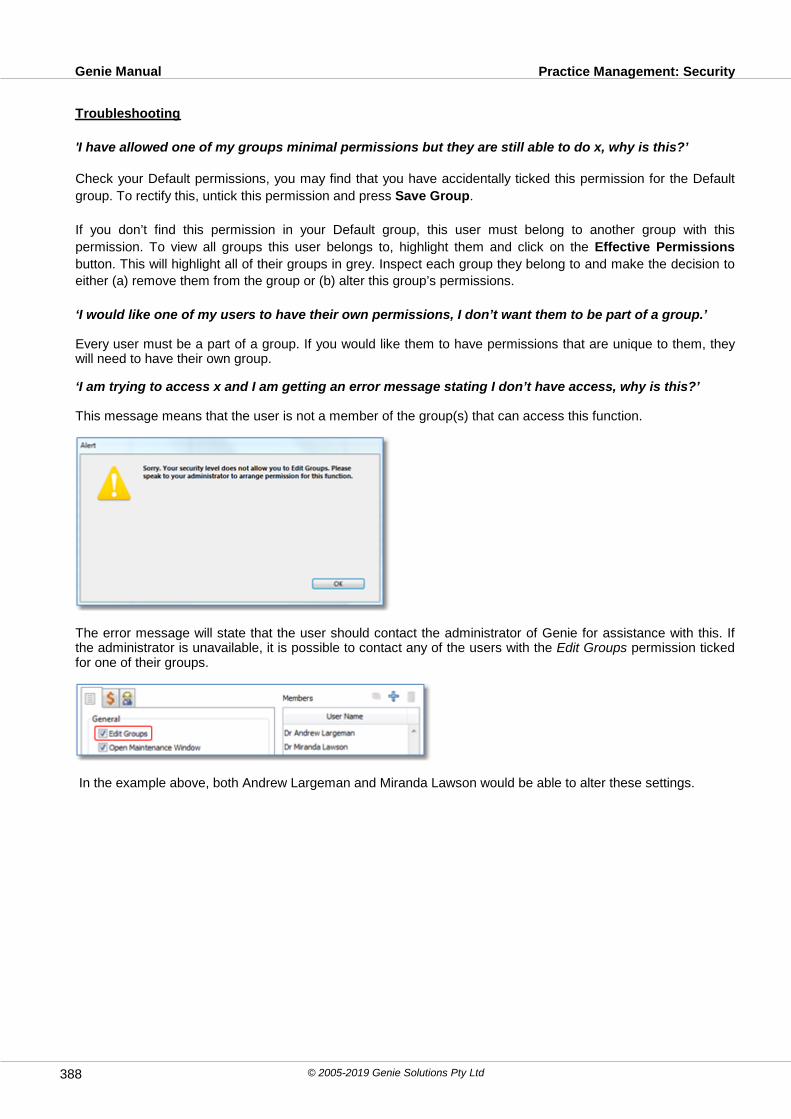
Practice Management: SecurityGenie Manual
© 2005-2019 Genie Solutions Pty Ltd388
Troubleshooting
'I have allowed one of my groups minimal permissions but they are still able to do x, why is this?’
Check your Default permissions, you may find that you have accidentally ticked this permission for the Default
group. To rectify this, untick this permission and press Save Group.
If you don’t find this permission in your Default group, this user must belong to another group with this
permission. To view all groups this user belongs to, highlight them and click on the Effective Permissions
button. This will highlight all of their groups in grey. Inspect each group they belong to and make the decision to
either (a) remove them from the group or (b) alter this group’s permissions.
‘I would like one of my users to have their own permissions, I don’t want them to be part of a group.’
Every user must be a part of a group. If you would like them to have permissions that are unique to them, theywill need to have their own group.
‘I am trying to access x and I am getting an error message stating I don’t have access, why is this?’
This message means that the user is not a member of the group(s) that can access this function.
The error message will state that the user should contact the administrator of Genie for assistance with this. Ifthe administrator is unavailable, it is possible to contact any of the users with the Edit Groups permission tickedfor one of their groups.
In the example above, both Andrew Largeman and Miranda Lawson would be able to alter these settings.

Practice Management: SecurityGenie Manual
© 2005-2019 Genie Solutions Pty Ltd 389
7.2.4 Passwords
It is strongly recommended that every user have their own password, preferably known only to them, andperhaps the Administrator. This is to ensure that in a large practice with several reception staff, nobody else canchange invoices and receipts under another name.Note: It is especially important for the Administrator to have a password and change it regularly. TheAdministrator will presumably be either an owner of the practice or a trusted receptionist or practicemanager.
When choosing your password, make sure it isn’t something obvious like “password”, your name, a familymember, or your dog’s name. Ideally, it should be a random mixture of letters and numbers, or else an easilyremembered word with suitable letters replaced by numbers e.g.“genie” becomes “g3n13”.You should also change your password regularly.
Passwords can be created or modified in the Login window. You can do this either at the time of login or byselecting File > Add or Change User.
In the Login window, highlight your name, and then click on the Set Password button.
The window below will open.
If you are creating a password for the first time, leave the first field blank, otherwise enter your current passwordin the Old Password field. Enter your new password in the New Password and Re-enter New Password fields.Click OK.Now, whenever you login you must highlight your name and then enter the password in the bottom field of theLogin window.
As of Genie version 8.8.7, there are compulsory password complexity requirements for GenieWeb users. While

Practice Management: SecurityGenie Manual
© 2005-2019 Genie Solutions Pty Ltd390
these are only compulsory for GenieWeb users, we strongly encourage that all Genie passwords adhere tothese standards to ensure that all user accounts are secure. The requirements state that passwords must:
Be at least eight characters in length.
Contain at least one upper-case letter.
Contain at least one number.
When modifying or adding a password in version 8.8.7 or above, Genie will prompt you to ensure that yourpassword meets the above requirements.
Forgotten your Password?
The licensee of the practice must contact Genie Support by phone to reset the password of a staff member. Thisis a non-negotiable security policy.

Practice Management: SecurityGenie Manual
© 2005-2019 Genie Solutions Pty Ltd 391
7.3 Updates
There are multiple ways of updating Genie to the latest version. The method you use to update will depend onyour current Genie version and the version to which you are updating.
As a general rule, here are the methods you will need for the possible update circumstances:
Type of update What this means How to update
Minor
A minor update is one where only thelast number of the Genie version isdifferent. For example, updating
from version 8.8.2 to version 8.8.7.
Either of the methods outlined in the following sections - ‘Special Menu’ Update or Manual Web Update.
Moderate
A moderate update is one where themiddle number of the Genie version
changes. For example, updating fromversion 8.7.2 to version 8.8.7.
Manual Web Update only
Major
A major update where the first numberof the Genie version changes. For
example, updating from version 7.8.6 to version 9.0.6.
As this is a major update that requires a dataconversion (among other steps), this update must
only be performed after reading the full instructionsand requirements available on the Genie Upgrade
page of the Genie website. If you have any questionsabout the conversion and update process, please
contact Genie support.
If you aren’t sure which update method to use, feel free to contact our support team via phone (1300 889 362) oremail ([email protected]) and we will be happy to assist you.
Prerequisites
There are four main prerequisites that must be met before performing an update of any kind:
1. All users must be logged out of Genie. As part of the update process, the Genie Server application willclose and restart, preventing user access until this has completed. Given this, it is good practice to runupdates outside of business hours to minimise disruption.
2. A backup of the Genie data must be taken. Verify that you can restore the backup if need be.3. Any offsite logs generated on offsite laptops must be imported beforehand. Any outstanding logs will be
incompatible with the updated data, and the information will need to be manually re-entered if this is notdone.
4. The all computers must meet the current Genie hardware and operating system requirements, asoutlined in the Genie Hardware Specifications PDF guide. If using the paper version of this manual, youcan access this guide within Genie via Special > Software Updates > PDFs.
Do not carry out any updates until the above prerequisites have been met.
Important update notifications
In the event that an important update is available or required for your current version of Genie - i.e. to rectify abug or other issue - Genie will produce an alert. This alert will appear upon login under these specificcircumstances:
The user is the Genie administrator.The alert has not already been acknowledged.The current Genie version date is older than the alert date.
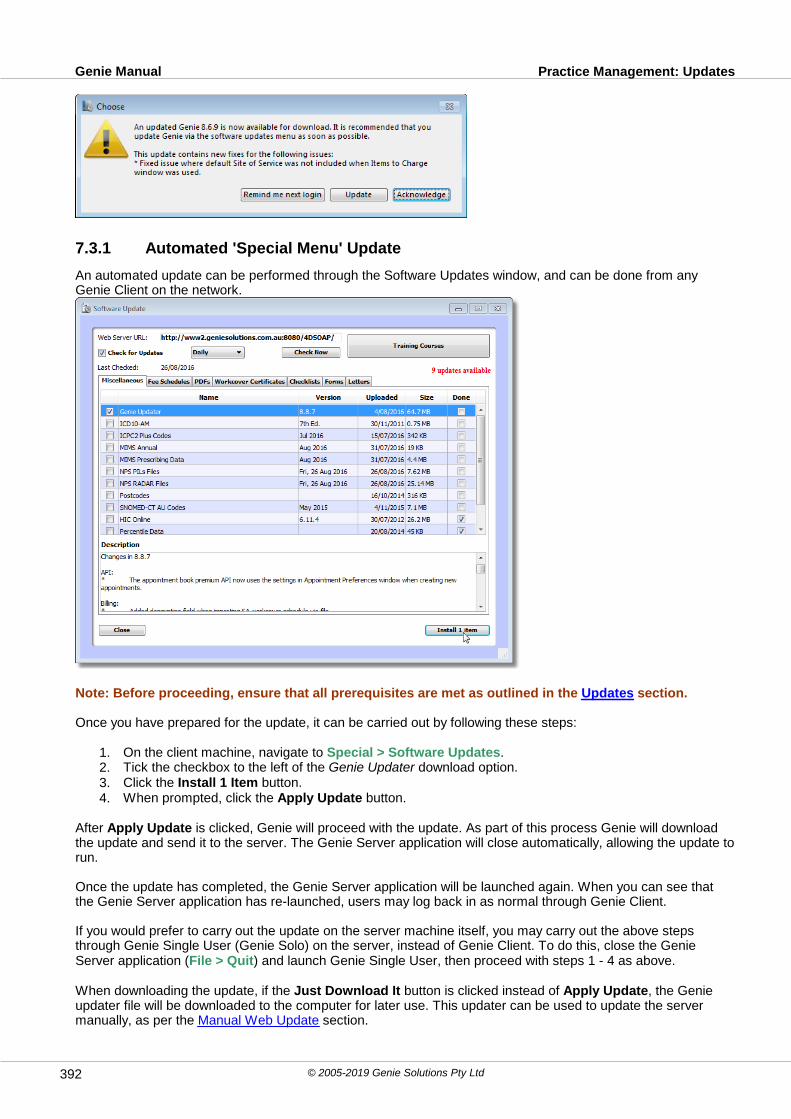
Practice Management: UpdatesGenie Manual
© 2005-2019 Genie Solutions Pty Ltd392
7.3.1 Automated 'Special Menu' Update
An automated update can be performed through the Software Updates window, and can be done from anyGenie Client on the network.
Note: Before proceeding, ensure that all prerequisites are met as outlined in the Updates section.
Once you have prepared for the update, it can be carried out by following these steps:
1. On the client machine, navigate to Special > Software Updates.2. Tick the checkbox to the left of the Genie Updater download option.3. Click the Install 1 Item button.4. When prompted, click the Apply Update button.
After Apply Update is clicked, Genie will proceed with the update. As part of this process Genie will downloadthe update and send it to the server. The Genie Server application will close automatically, allowing the update torun. Once the update has completed, the Genie Server application will be launched again. When you can see thatthe Genie Server application has re-launched, users may log back in as normal through Genie Client.
If you would prefer to carry out the update on the server machine itself, you may carry out the above stepsthrough Genie Single User (Genie Solo) on the server, instead of Genie Client. To do this, close the GenieServer application (File > Quit) and launch Genie Single User, then proceed with steps 1 - 4 as above.
When downloading the update, if the Just Download It button is clicked instead of Apply Update, the Genieupdater file will be downloaded to the computer for later use. This updater can be used to update the servermanually, as per the Manual Web Update section.
Practice Management: UpdatesGenie Manual
© 2005-2019 Genie Solutions Pty Ltd 393
Finally, if any users in the practice use offsite logging, make sure that Genie Single User on their offsite laptop(s)is updated accordingly. See Updating for Offsite Logging for more information.

Practice Management: UpdatesGenie Manual
© 2005-2019 Genie Solutions Pty Ltd394
7.3.2 Manual Web Update
A manual web update is carried out by downloading a specific installer or updater file, and running this on theserver computer. Note: Before proceeding, ensure that all prerequisites are met as outlined in the Updates section.
To perform an update of this type, you will need to first download the appropriate updater. There are three waysto get the file you need:
If you simply need the latest version of the Genie software, navigate to the Downloads page of theGenie website and download the appropriate installer for your server platform (i.e. Windows or Mac).Take note of your Genie version before downloading, as older versions may be incompatible with thelisted updater.If you attempt an update via the Special Menu as per the previous instructions, the Software Updateswindow may direct you to a separate Genie webpage. This means that your older version of Genierequires a manual update; the updater can be downloaded from the page that opens.If you are currently using an older version, Genie may require a specific upgrade path to get to the latestversion. In this case, a Genie support staff member may need to provide you with a direct link to theinstaller you need. If you aren’t sure whether your intended update requires a specific upgrade path, feelfree to contact our support team via phone (1300 889 362) or email ([email protected])and we will be happy to assist you.
Once you have the appropriate updater or installer file, ensure that the file is accessible from the servercomputer, either by downloading the file onto that computer, or by saving it in a shared location on the networkthat the server can access.
Then, carry out the update by following these steps:
1. Close the Genie Server application (File > Quit).2. Double-click the downloaded updater file.3. Follow the prompts in the updater to proceed with the update. If you have been provided with an
installer, rather than an updater, you will be prompted to select the components to install; select the Update currently installed application(s) option.
4. Allow the updater to run to completion.5. Open Genie Single User (Genie Solo) via the lamp icon with the black cord.6. Log in as normal and click Update, if/when you are prompted.7. Close Genie Single User (File > Quit).8. Re-launch the Genie Server application.
Once the Genie Server application is running again, the update is complete. If you have been providedinstructions to perform a further update to get to the latest version, proceed with those to continue. Otherwise,users may now log back in via Genie Client as normal.
If any users in the practice use offsite logging, make sure that Genie Single User on their offsite laptop(s) isupdated accordingly. See Updating for Offsite Logging for more information.

Practice Management: UpdatesGenie Manual
© 2005-2019 Genie Solutions Pty Ltd 395
7.3.3 Updating for Offsite Logging
To continue using offsite logging following an update, the Genie Single User (Genie Solo) application on anyoffsite laptops must also be updated.
If the laptop is the same platform as the server computer (i.e. both computers are Windows, or both are Mac),connect the laptop to the network and log into Genie Single User. Genie will detect that the Genie version on thelaptop is different to the Genie version on the network, and the user will receive the following prompt:
Click the Update button to update Genie Single User.
If the laptop is a different platform to the server computer (i.e. one is Windows, and the other is Mac), then youwill need to update Genie Single User separately. How you update Genie Single User in this situation will dependon how you updated Genie on your network.
If you performed the update through Special > Software Updates, you can update Genie Single Useron the laptop in the same way. See the 'Special Menu' Update section for more information.If you were required to perform a web update using a downloaded updater file, you will need to updateGenie Single User on the laptop in the same way, by downloading the updater file appropriate for thelaptop’s platform. See the Manual Web Update section for more information.
Practice Management: UpdatesGenie Manual
© 2005-2019 Genie Solutions Pty Ltd396
7.4 Archiving
Over time, Genie's data file will grow in size as new records are added. In a busy, multi-doctor practice it cangrow to a significant size. This is particularly so if you are downloading pathology results electronically, and/orwriting many letters. Unlike scanned images, which are stored externally to your data file, pathology and lettersare imported into your data file, thus adding to its size. There is no limit to the amount of data you can store but acompact data file will always perform better and make routine maintenance and emergency jobs like compactingor recovering a damaged data file less time consuming.
Before Archiving
There are a couple of things to do before performing an archive:
1. Before archiving any results or letters, it is recommended that you perform a backup as outlined in the Backupsection.
2. Make sure you have enough room on your hard drive to hold the archived data. As a guide, ensure you haveat least the size of your data file available as free space on your hard drive.
Performing the Archive Routines
Genie provides the ability to archive both downloaded pathology results and patient correspondence. Theseroutines are performed in the Maintenance & Reports window (File > Maintenance & Reports).
Archiving can be performed on a client machine, or by using the single-user version of Genie on the server.There is no speed difference between the two. However, if you are archiving many records, the process may bequite lengthy. You won’t be able to do anything else on this machine while the archiving is in progress, and therest of the network will run slowly. For this reason, it is recommended that you perform the Archiving process atnon-peak times only.
To perform an archive routine:To archive old letters, click on the Archive Patient Correspondence button. You will be prompted as to the
cutoff limit in months. A search will then be made for old letters and you will be asked to confirm that youwould like to archive them. Click the Archive button to proceed.To archive pathology results, click the Archive Pathology Results button. You will be prompted as to the
cutoff limit in months. A search will then be made for old letters and you will be asked to confirm that youwould like to archive them. Click the Archive button to proceed.
What Actually Happens
Genie loops through each record to be archived, and creates a folder in each patients images folder on theserver called either “Archived Results” or “Archived Letters”. Inside this folder, a file is created containing theactual archived data. For this reason it is VERY IMPORTANT TO BACK UP YOUR IMAGES FOLDER!
If you are archiving pathology results, a plain text file is created. The name of this file is made up of the uniqueID number of the result and the name of the actual test. For example, if you are archiving a FBC result for JohnSmith, the pathway on the server would look something like this:...Genie\Images\S\SmithJ1234\Archived Results\423-FBC.TXT
If you are archiving patient correspondence, the file containing the letter is created in Rich Text Format (RTF), sothat the formatting of the letter is preserved, and so it can subsequently be opened by any word processor. Thename of this file is made up of the unique ID number of the letter and the Title or Addressee. For example, thepathway would look something like this:...Genie\Images\S\SmithJ1234\Archived Letters\789-Dr Peter Jackson.RTF Note: The naming of these files is very important, because this is how Genie finds them to allow you toview them again. YOU MUST NOT CHANGE THE FILE NAME.
Viewing Archived Files
Once a file has been archived, it is still quickly and easily accessible from within Genie. The archive processdoesn’t delete the original record. It only extracts the data which is taking up the space.
The record is still in Genie with all the information about who ordered the result, the date, the test name etc. Inthe case of letters, it is only the body of the letter which is archived. Dates and Addressees are still present withthe original record. If you wish to view a letter or result which has previously been archived, simply click on it inthe Contact List of the patient’s Clinical Window as you normally would. Genie recognises that the letter hasbeen archived and asks the server to retrieve it. The whole process is totally transparent.

Practice Management: ArchivingGenie Manual
© 2005-2019 Genie Solutions Pty Ltd 397
Note: When you open an archived letter or result, it becomes “de-archived”. That is, the content will staywithin the data file until you next run the archiving procedure.
Compacting the Data File
After archiving results and/or letters, the data file does NOT automatically shrink in size, you will need tocompact your data file to recover the space gained. Make sure everyone is logged off the network beforecontinuing, as it requires Genie Server to be run in maintenance mode.
Accessing the Maintenance and Security Centre via Genie Server1. Go to your server machine and open Genie Server.2. Go into Help > Maintenance & Security Centre.
Accessing the Maintenance and Security Centre via Genie Solo1. Go to your server machine and close Genie Server by going to File > Quit (Windows) or Genie Server > Quit
Genie Server (Macintosh).2. Enter ‘0’ into the ‘Disconnect From Server In’ message and click on OK.3. Open Genie Solo.4. Go to File > Maintenance and Reports > Maintenance & Security Centre.
Compacting the Data1. Click on the Compact tab to the left.2. Select the Compact records and indexes icon.
3. You will be prompted that Genie Server will now run in maintenance mode. Accept this prompt.4. If the process was successful, you will be presented with the following window:
5. As indicated, the current data file will now be compacted and the previous data files will be located in C:/Genie/Replaced Files (Windows) or Applications:Genie:Replaced Files (Macintosh).
6. Close the Maintenance & Security window by going to File > Quit (Windows) or Genie Server > Quit GenieServer (Mac).
7. Reopen the Genie Server program as per usual.8. If you receive any errors or red crosses alongside the Compact records and indexes button during the
compacting process, please contact Genie Solutions for further assistance.

Practice Management: ArchivingGenie Manual
© 2005-2019 Genie Solutions Pty Ltd398
Archiving Patient Records
Archiving of patient records does not delete the patient records from the database but just marks them asinactive so they no longer come up in basic searches and on recall lists etc.This is done through Open > Patients, Patients > Find Inactive Patients. This will then prompt you as to thecut off date of when the patient was last seen eg. patients not seen in the last 24 months.
This search is made using the Last Seen field. This field is given the value of the current date whenever theClinical Window is opened and saved, or the patient is invoiced.
If any patient records are found, Genie will offer to mark them as Inactive in their demographic window.
Either way a list of the patients found in the search will be displayed allowing you to delete them if desired. It isnot possible to delete patient records with attached consultation notes or any billing. Therefore, you can highlightthem all by selecting Edit > Select All, and then click on the Garbage Can icon and Genie will only delete thosepatient records which have no billing or notes attached.Note: Genie will NEVER delete the records automatically.
7.5 Queries & Searches
Genie allows you to make very precise and/or complex searches of your data. The following section outlines theuse of Queries and Searches in Genie.
7.5.1 The Query Editor
A database is comprised of a series of tables; within each of these tables are fields. For example, the Patienttable within the Genie database is comprised of fields from the Patient Demographics window, such as DOB andAddress etc. The Query Editor is the window to your practice database and all of its tables and fields. Using theQuery Editor, you can search a single table in the database or build complex searches across multiple tables.
The Query Editor is accessed by selecting Records > Search from whichever window you have open in Genie,allowing you to do a search on the relevant table.
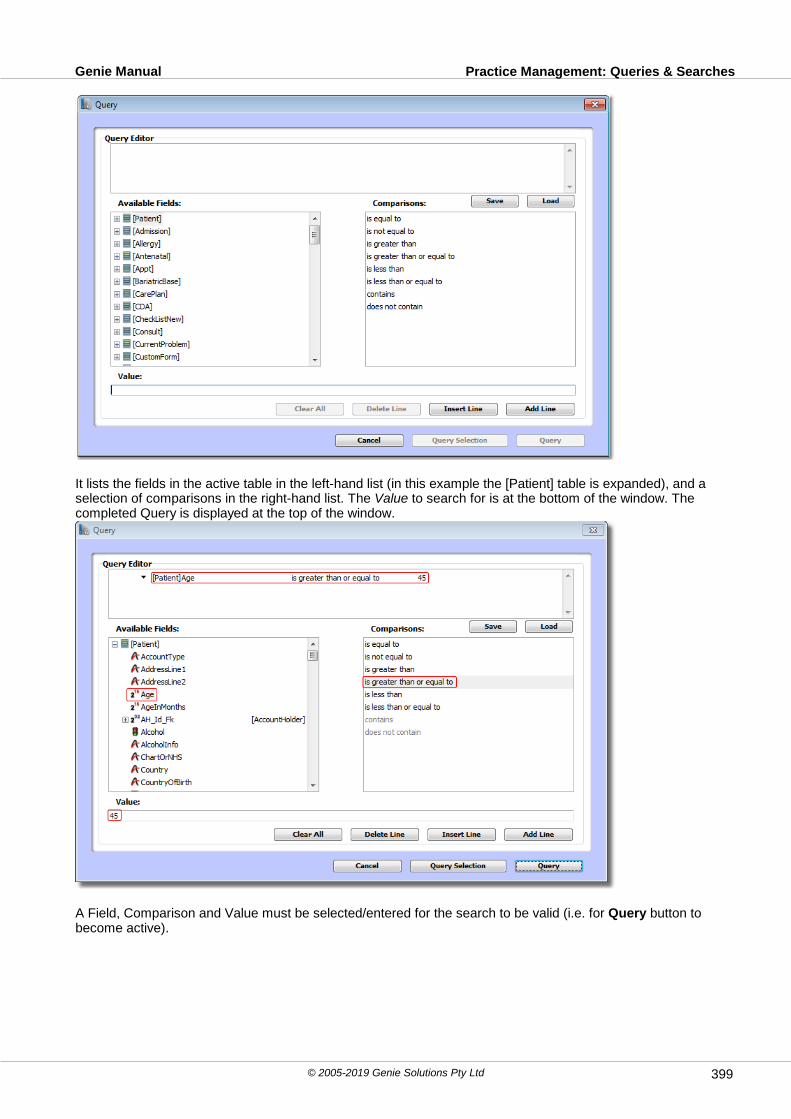
Practice Management: Queries & SearchesGenie Manual
© 2005-2019 Genie Solutions Pty Ltd 399
It lists the fields in the active table in the left-hand list (in this example the [Patient] table is expanded), and aselection of comparisons in the right-hand list. The Value to search for is at the bottom of the window. Thecompleted Query is displayed at the top of the window.
A Field, Comparison and Value must be selected/entered for the search to be valid (i.e. for Query button tobecome active).

Practice Management: Queries & SearchesGenie Manual
© 2005-2019 Genie Solutions Pty Ltd400
Once a query has been built, there are two ways to perform the search:1. Query
Clicking on Query will search through all the records in the table(s) you are querying.2. Query Selection
Clicking on Query Selection will search through the currently displayed selection of records. This is useful ifyou would like to perform multiple queries to refine your search.
7.5.2 Simple Queries
The following examples highlight typical searches that are possible within one database table e.g. the Patienttable. They do not necessarily reflect the sorts of searches you would perform but more the ways in which youcan manipulate the Query Editor.
Note: Searches based on patient age can be skewed if the ages have not been recently updated throughthe Patients List. For more information on updating ages, please see The Patients Menu.
Example 1: Find all patients aged 45.
1. Select Open > Patients. 2. Click OK to get rid of the Search window if it appears.3. Select Records > Search.4. Expand the [Patient] table by clicking on the little plus button .5. Click on the Age field in the field list on the left. 6. Click on is equal to in the comparisons list on the right.7. Type '45' in the Value field. The window should now look like this:
Note: The upper pane contains the finished query. If you are unsure whether you have entered theinformation correctly, you can read this to verify your current line and any previous lines, whereapplicable.
8. Click the Query button. (The Query button will remain disabled until you have entered a valid query.)
All the patients aged 45 will be displayed.
Example 2: Find all male patients aged between 45 and 50.
1. Select Open > Patients. 2. Click OK to get rid of the Search window if it appears.3. Select Records > Search.4. Expand the [Patient] table by clicking on the little plus button .5. Click on the Age field in the field list on the left. 6. Click on is greater than or equal to in the comparisons list on the right.

Practice Management: Queries & SearchesGenie Manual
© 2005-2019 Genie Solutions Pty Ltd 401
7. Type '45' in the Value field. 8. Click on the Add Line button. 9. Click on the Age field again in the field list on the left. 10.Click on is less than or equal to in the comparisons list on the right 11.Type '50' in the Value field. 12.Click on the Add Line button. 13.Click on the Sex field in the field list on the left. 14.Click on is equal to in the comparisons list on the right 15.Type 'M' in the Value field. 16.Click the Query button.
All males aged between 45 and 50 (inclusive) will be displayed.
Example 3: Find every patient aged between 45 and 50 whose first name is either 'John' or 'Jon'.
After performing the search in Example 2:1. Select Records > Search.2. Expand the [Patient] table by clicking on the little plus button .3. Click on the First Name field in the field list on the left. 4. Click on is equal to in the comparisons list on the right 5. Type 'John' in the Value field. 6. Click on the Add Line button. 7. Click the drop-down to the left of the new line and select Or. 8. Click on the First Name field again in the field list on the left. 9. Click on is equal to in the comparisons list on the right 10.Type 'Jon' in the Value field. 11.Click the Query Selection button, which will search only the list of patients aged between 45 and 50 rather
than the whole database.
Example 4: Find every patient whose first name is 'John' who lives on 'Main' Street.
1. Select Open > Patients.2. Click OK to get rid of the Search window if it appears.3. Select Records > Search.4. Expand the [Patient] table by clicking on the little plus button . 5. Click on the First Name field in the field list on the left. 6. Click on is equal to in the comparisons list on the right 7. Type 'John' in the Value field. 8. Click on the Add Line button. 9. Click on the Address Line 1 field in the field list on the left. 10.Click on contains in the comparisons list on the right

Practice Management: Queries & SearchesGenie Manual
© 2005-2019 Genie Solutions Pty Ltd402
11.Type 'Main' in the Value field. 12.Click the Query button.
Example 5: Find every patient whose first name is 'John' who doesn't live on Main Street.
1. Select Open > Patients. 2. Click OK to get rid of the Search window if it appears. 3. Select Records > Search.4. Expand the [Patient] table by clicking on the little plus button .5. Click on the First Name field in the field list on the left. 6. Click on is equal to in the comparisons list on the right 7. Type 'John' in the Value field. 8. Click on the Add Line button. 9. Click the drop-down to the left of the new line and select Except. 10.Click on the Address Line 1 field in the field list on the left. 11.Click on contains in the comparisons list on the right 12.Type 'Main' in the Value field. 13.Click the Query button.
7.5.3 Wild Card Searches
The wildcard character @ is used as a substitute for one or multiple other characters.Note: The wildcard character can be used instead of the 'contains' comparison in the Query Editor.
Example 1: Find all patients whose surname begins with 'Smi'
1. Select Open > Patients. 2. Click OK to get rid of the Search window if it appears.3. Select Records > Search. 4. Click on the Surname field in the field list on the left. 5. Click on 'is equal to' in the comparisons list on the right 6. Type 'smi@' in the Value field. 7. Click the Query button.
This would find all the Smiths, Smithsons, Smileys etc
Example 2: Find all patients whose surname contains 'Smi'
1. Select Open > Patients. 2. Click OK to get rid of the Search window if it appears.3. Select Records > Search. 4. Click on the Surname field in the field list on the left. 5. Click on 'is equal to' in the comparisons list on the right 6. Type '@smi@' in the Value field. 7. Click the Query button.
This would find all the Smiths, Smithsons, Smileys etc as in the previous example, but would also find theArrowsmith, Goldsmith and Cosmic families.
7.5.4 Searching Across Related Tables
The following examples demonstrate how to create searches within Genie across related tables.
Example 1: Find all males who have asthma
1. Select Open > Patients. 2. Click OK to get rid of the Search window if it appears.3. Select Records > Search. 4. Click on the Sex field in the field list on the left. 5. Click on 'is equal to' in the comparisons list on the right 6. Type 'm' in the Value field. 7. Click on the Add Line button. 8. Click on the triangle or plus (+) to the left of the [Current Problems] table to expand it to show the fields in the
Current Problems table. 9. Click on the Problem field. 10.Click on 'contains' in the comparisons list on the right

Practice Management: Queries & SearchesGenie Manual
© 2005-2019 Genie Solutions Pty Ltd 403
11.Type 'asthma' in the Value field. 12.Click the Query button.
Note: This assumes that you have actually entered a Current Problem using the term 'asthma' in thepatient's clinical entries. Using disease coding such as ICPC or ICD10 can get around this problem. Formore information, read the chapter on Disease Coding.
Other tables related to the patients table, meaning you can search across them in the same search, are: Admissions AllergiesAppointmentsCare Plans Checklists Consultation Problems Current ProblemsDownloaded Results Health Assessments IVF Treatment Cycles Life Events Obstetric HistoryPast History Patient Correspondence Pregnancies PrescriptionsProcedures Recalls Script Archive Vaccinations Workcover Claims
7.5.5 Saving a Query for Reuse
If you have built a complex query, you can store it for future use by saving it to your computer.
To do this:
1. Build your query in the Query Editor window as outlined in the previous examples.

Practice Management: Queries & SearchesGenie Manual
© 2005-2019 Genie Solutions Pty Ltd404
2. Click the Save button near the top of the Query Editor window
3. Save it somewhere you can easily retrieve it again later e.g. you might want to create a folder named 'SearchTemplates' inside the Genie folder and save all your search templates into here.
4. Specify a name for the template
When you would like to use the same search again, click the Load button and open your previously savedtemplate and then just click Query.
7.5.6 ICPC/ICD10, Consult & Prescription Searches
The Open > Patients window gives you access to some quick and easy search methods to search your clinicaldatabase.
If you have ICPC2-Plus or ICD10-AM codes installed, searches are easier, faster and more accurate. You cancheck which codes you use, if any by looking in File > Practice Preferences, double-clicking the clinic name,and selecting the Miscellaneous tab.
The Search Consults button allows you to search your Presenting Problems, for example, how manypatients have presented for 'dysmenorrhea' as shown below:

Practice Management: Queries & SearchesGenie Manual
© 2005-2019 Genie Solutions Pty Ltd 405
The Search by medications button allows you to search your prescriptions on Brand, Generic name, Classand Polypharmacy. Example 2 below, shows how to use this.To perform an ICPC/ICD10 search, open the Patients List (Open > Patients) and click on the ICPC Search
button .
This will display the ICPC or ICD10 search screen, depending on which coding system you are using.
Example 1 - ICPC search: Patients over the age of 40 with Insulin Dependent Diabetes
1. Select the Current Problems table from the Table to Search drop down menu in the top left of the screen.2. In the Keyword Search field, begin to enter 'diabetes'. You will notice that the word will auto-complete.3. Press the Tab key on your keyboard. This will display all the relevant conditions and terms in a hierarchical list
on the right, with major topics and subtopics. 4. In this case we are searching on the major topic of 'Diabetes, Insulin Dependent'. 5. In the Age Range fields, enter '40' for the bottom end of the range and '120' for the top end. This will ensure
everyone over 40 is accounted for.
6. Clicking the Query button will search the entire database of patients.
The list of patients over the age of 40 who have insulin dependent diabetes will be displayed in a patient list.
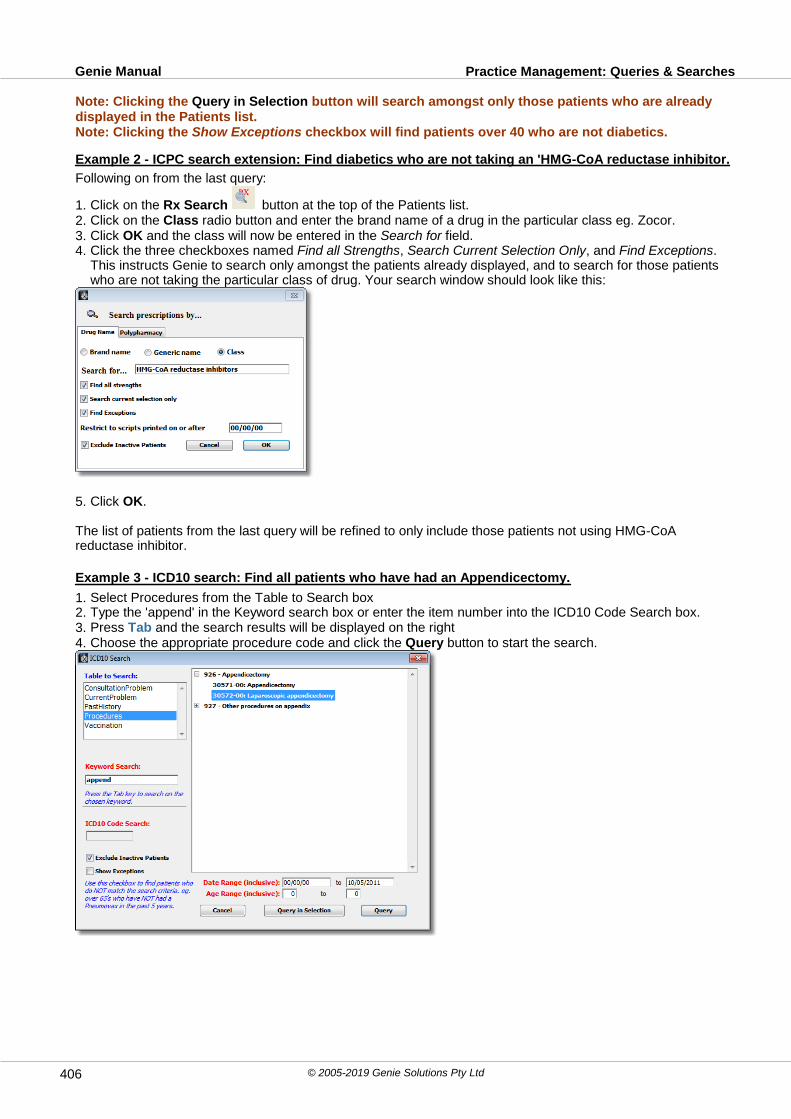
Practice Management: Queries & SearchesGenie Manual
© 2005-2019 Genie Solutions Pty Ltd406
Note: Clicking the Query in Selection button will search amongst only those patients who are alreadydisplayed in the Patients list. Note: Clicking the Show Exceptions checkbox will find patients over 40 who are not diabetics.
Example 2 - ICPC search extension: Find diabetics who are not taking an 'HMG-CoA reductase inhibitor.
Following on from the last query:
1. Click on the Rx Search button at the top of the Patients list. 2. Click on the Class radio button and enter the brand name of a drug in the particular class eg. Zocor. 3. Click OK and the class will now be entered in the Search for field.4. Click the three checkboxes named Find all Strengths, Search Current Selection Only, and Find Exceptions.
This instructs Genie to search only amongst the patients already displayed, and to search for those patientswho are not taking the particular class of drug. Your search window should look like this:
5. Click OK.
The list of patients from the last query will be refined to only include those patients not using HMG-CoAreductase inhibitor.
Example 3 - ICD10 search: Find all patients who have had an Appendicectomy. 1. Select Procedures from the Table to Search box2. Type the 'append' in the Keyword search box or enter the item number into the ICD10 Code Search box.3. Press Tab and the search results will be displayed on the right4. Choose the appropriate procedure code and click the Query button to start the search.

Practice Management: Queries & SearchesGenie Manual
© 2005-2019 Genie Solutions Pty Ltd 407
7.5.7 Searching Attachments/Images
Images can be searched using the Search Attachments and Images button in Open > Patients. It ispossible to search images added within a certain date range or images tagged with a particular keyword usingthe Info button in the Image Browser, as examples. The keyword search may be useful in a scenario where youwish to find all patients who have an image tagged with a keyword of 'melanoma', for example. To do this:1. Go to Open > Patients2. Cancel the search window if it appears3. Click on the Search for attachments and Images icon
4. In the 'Attachments' window that appears, type the relevant keyword into the 'keyword' field (for example,'melanoma') and click on the Query button
This will display all patients who have an image that has been tagged with that particular keyword.
7.6 Quick Reports
Quick Reports allow you to customise the display/printout of your complex searches in a variety of ways.
To access the Quick Reports screen, select File > Quick Reports. This will open the Report Builder window.
There are 6 tabs in the Report Builder that can be used to customise your report.

Practice Management: Quick ReportsGenie Manual
© 2005-2019 Genie Solutions Pty Ltd408
1. Table2. Columns3. Groups4. Formats5. Styles6. Layout
The Header Text field allows you to specify a title that will appear on the top of the printed report.
Along the bottom of the Report Builder, are several buttons that are accessible from all tabs. Their functions areoutlined below:Load: Allows you to load a previously saved report.Save: Saves a report for later use.Export: Allows the data to be exported to various file formats. These are:
ASCII TextEXCEL SpreadsheetHTML
Preview: Allows you to preview the report before printing.Print: Prints the report.Page Setup: Allows you to set your paper size and orientation.
7.6.1 Report Builder
The easiest way to learn how to use the Report Builder is to run through a few examples.
Example 1: Print a list of all patients aged 65 and over
Firstly, you would need to perform the search to get the group of records/patients that you would like to include inyour report. This is done through the Table tab in File > Quick Reports.
The Table Tab
The Table tab displays a list of all Tables in the database. This is where you select the primary table to besearched (e.g. [Patient]) and then perform your search using the Query button. If you wanted to print a list of allrecords in that table then just click Load All Records and then go on to the Columns tab to begin building yourreport. Some common tables you might search would be the [Consult] table for anything described in the consultwindow or [Procedure] for a report on the number of procedures performed etc.

Practice Management: Quick ReportsGenie Manual
© 2005-2019 Genie Solutions Pty Ltd 409
In our example we would select the [Patient] table in the Tables tab, click the Query button and search for allpatients aged 65 and over. For information on how to do this search refer to the Queries and Searches Chapter
The Columns Tab
The Columns tab is where you select the columns that you would like included in the report.
To add a column, double-click on the field in the list on the left and it will be transferred to the list on the right.Alternatively, you can drag and drop a field from left to right. To remove a field from the Report Columns list, drag and drop it from right to left. To change the order of the columns, drag and drop the fields within the list on the right, the top field will be thefirst column and the bottom field will be the last.

Practice Management: Quick ReportsGenie Manual
© 2005-2019 Genie Solutions Pty Ltd410
You will find any associated/linked tables within the list, in this example, the Patient table is also related (linked)to the AccountHolder table, so we can also include fields from the AccountHolder table. To expand theAccountHolder table, click on the Little plus button . You can then drag in any AccountHolder fields you wouldlike to include in the report. In the example below, we have dragged the Balance field from inside the AccountHolder table.
The Groups Tab
Grouping is similar to sorting. To have a report sorted by a column, either chronologically or alphabetically, selectthe column on the left then tick the Group Column Data checkbox. In this example we will sort the recordsalphabetically by Surname.

Practice Management: Quick ReportsGenie Manual
© 2005-2019 Genie Solutions Pty Ltd 411
Note: You can sort in either Ascending order (usual) or Descending order.
The Repeat Value Every Row checkbox ensures that the value for every record is printed. ie. instead of: it will print as: Smith Amy Smith Amy
Bill Smith BillCharles Smith Charles
The Show Group Subtotals checkbox would add the number (count, sum or other, depending on what is chosenin the Formats Tab) of each particular value to the report. i.e. it would tell you that there were 30 Smiths, 4Smitheys and 1 Smitherton etc.Note: Subtotals will only show for a column after a mechanism is chosen in the Formats tab (ie. Sum,Average, Min, Max, Count)
The Subtotals on Separate Pages creates a new page for each new value in the selected column.
The Hide Detail checkbox hides the details of the report. e.g.Smith: 30Smithey: 4Smitherton: 1
The Show Grand Totals checkbox displays the grand total for the selected columns at the bottom of the report.
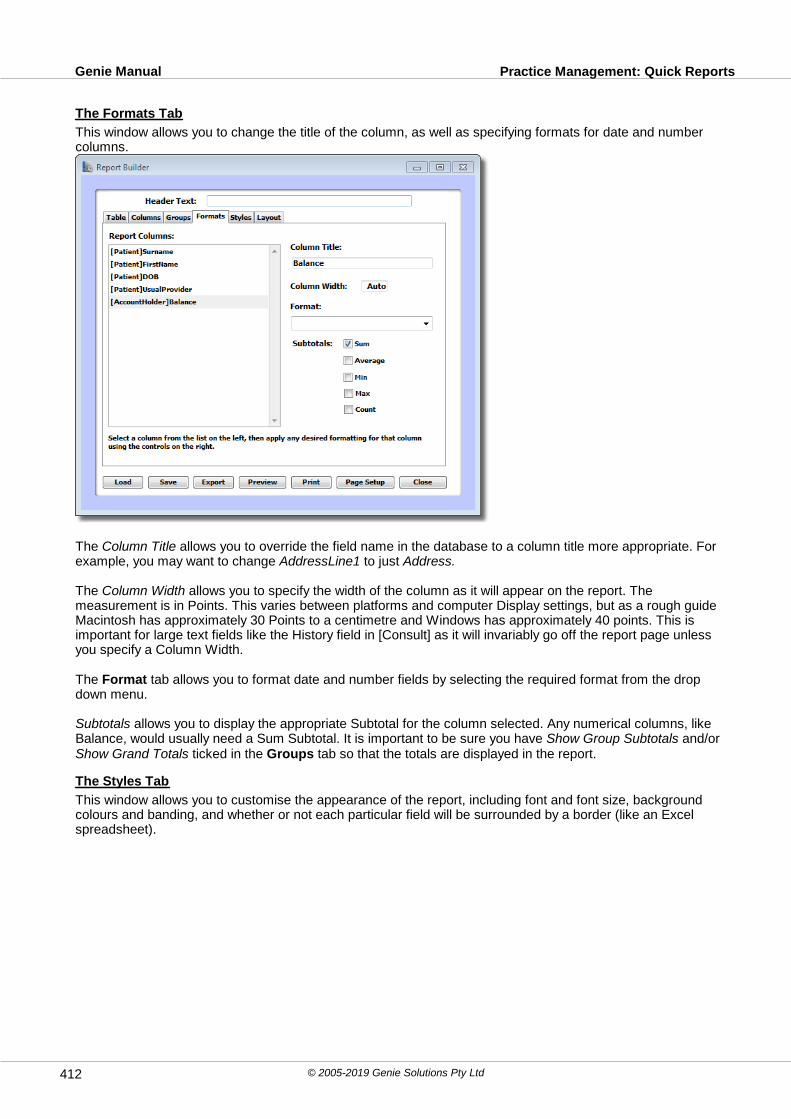
Practice Management: Quick ReportsGenie Manual
© 2005-2019 Genie Solutions Pty Ltd412
The Formats Tab
This window allows you to change the title of the column, as well as specifying formats for date and numbercolumns.
The Column Title allows you to override the field name in the database to a column title more appropriate. Forexample, you may want to change AddressLine1 to just Address.
The Column Width allows you to specify the width of the column as it will appear on the report. Themeasurement is in Points. This varies between platforms and computer Display settings, but as a rough guideMacintosh has approximately 30 Points to a centimetre and Windows has approximately 40 points. This isimportant for large text fields like the History field in [Consult] as it will invariably go off the report page unlessyou specify a Column Width.
The Format tab allows you to format date and number fields by selecting the required format from the dropdown menu.
Subtotals allows you to display the appropriate Subtotal for the column selected. Any numerical columns, likeBalance, would usually need a Sum Subtotal. It is important to be sure you have Show Group Subtotals and/orShow Grand Totals ticked in the Groups tab so that the totals are displayed in the report.
The Styles Tab
This window allows you to customise the appearance of the report, including font and font size, backgroundcolours and banding, and whether or not each particular field will be surrounded by a border (like an Excelspreadsheet).
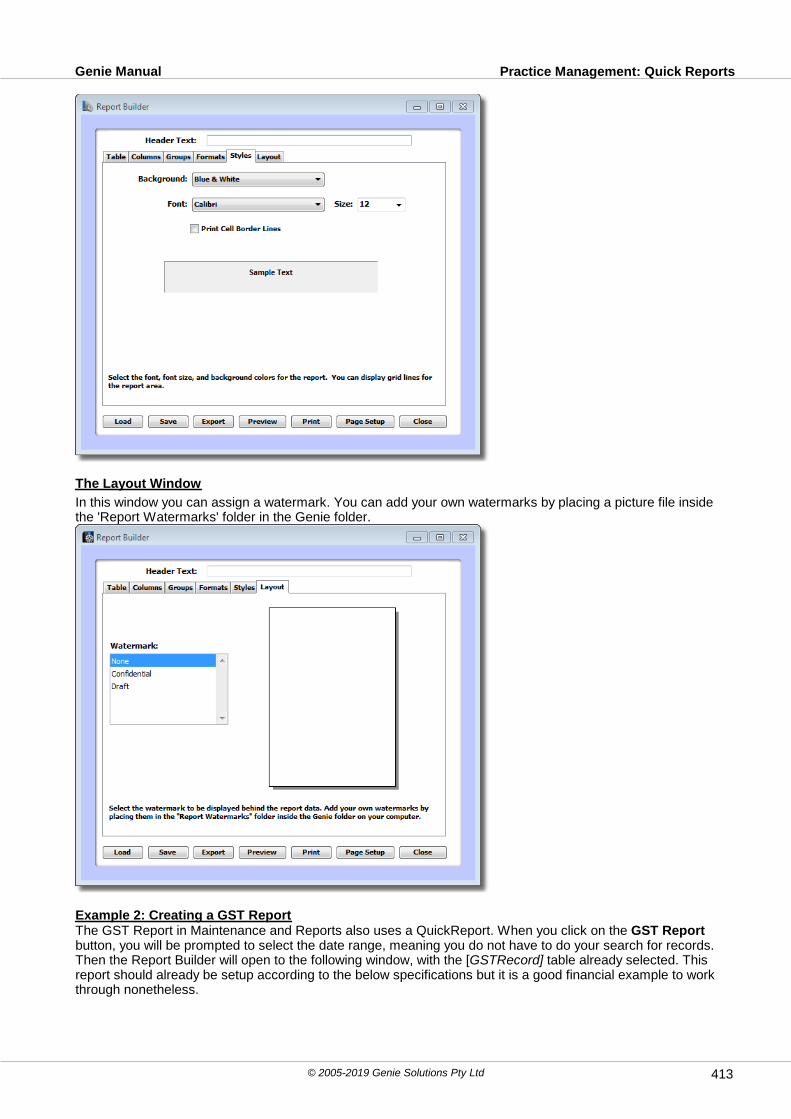
Practice Management: Quick ReportsGenie Manual
© 2005-2019 Genie Solutions Pty Ltd 413
The Layout Window
In this window you can assign a watermark. You can add your own watermarks by placing a picture file insidethe 'Report Watermarks' folder in the Genie folder.
Example 2: Creating a GST ReportThe GST Report in Maintenance and Reports also uses a QuickReport. When you click on the GST Reportbutton, you will be prompted to select the date range, meaning you do not have to do your search for records.Then the Report Builder will open to the following window, with the [GSTRecord] table already selected. Thisreport should already be setup according to the below specifications but it is a good financial example to workthrough nonetheless.

Practice Management: Quick ReportsGenie Manual
© 2005-2019 Genie Solutions Pty Ltd414
Click the Columns tab and select the fields as shown.Note: In addition to the [GST Record] table, you also have access to the [AccountHolder], [Sale] and[Address Book] tables.

Practice Management: Quick ReportsGenie Manual
© 2005-2019 Genie Solutions Pty Ltd 415
Click on the Groups tab and set it up to look like this.
Note: The Provider column is grouped so that the report will split the GST between providers and theTransaction Date column is grouped so it will sort the dates chronologically.
Selecting the Show Group Subtotals, when [GSTRecord] Provider is selected, and Show Grand Totals willsubtotal each Provider's GST and give a Grand Total at the end of the report.
Click the Formats tab and set up like this
Note: If you do not select Sum for GST Billed and GST Received then these subtotals will not show upon the report.
Give your report a name and Save it, this way when you next go to print a GST Report through Maintenance andReports all you will need to do is Print it!

Practice Management: Quick ReportsGenie Manual
© 2005-2019 Genie Solutions Pty Ltd416
Example 3: Printing a List of your Private FeesClicking on the Print icon in many of the windows in genie will open a report builder, this example demonstratesthis.
Select Open > Billing Items and search (Records > Search) for all items where Private Fee field is 'not equalto zero' or 'is greater than zero'.Click on the Print button to open the Report Builder and create a report like the following.
The Columns tab
The Groups tab
The Formats tab
Because the Description field contains a lot of text, we want to limit its width to about 300 points or so.You can now print your private fees!
7.6.2 Saving/Loading Reports
Saving a Template
Reports can be saved as a template so you don't have to set up the tabs each time you perform the samesearch.Once you have your report setup, click on the Save button at the bottom of the QuickReport window. You will beprompted to give the report a name. If there is already another report with the same name, you will be asked ifyou would like to overwrite that template or you can cancel this prompt to give the report a different name. YourQuickReport template is then saved within the data file so that it is available to all other computers on thenetwork.
If the [Patient] example, used in the Report Builder section (Example 1), was saved then the next time you clickon the Print button in the Patients List that report would automatically open or if you have created more than onetemplate for the Patient table, you will first be prompted for which template to use. Select the template and clickthe Open button.
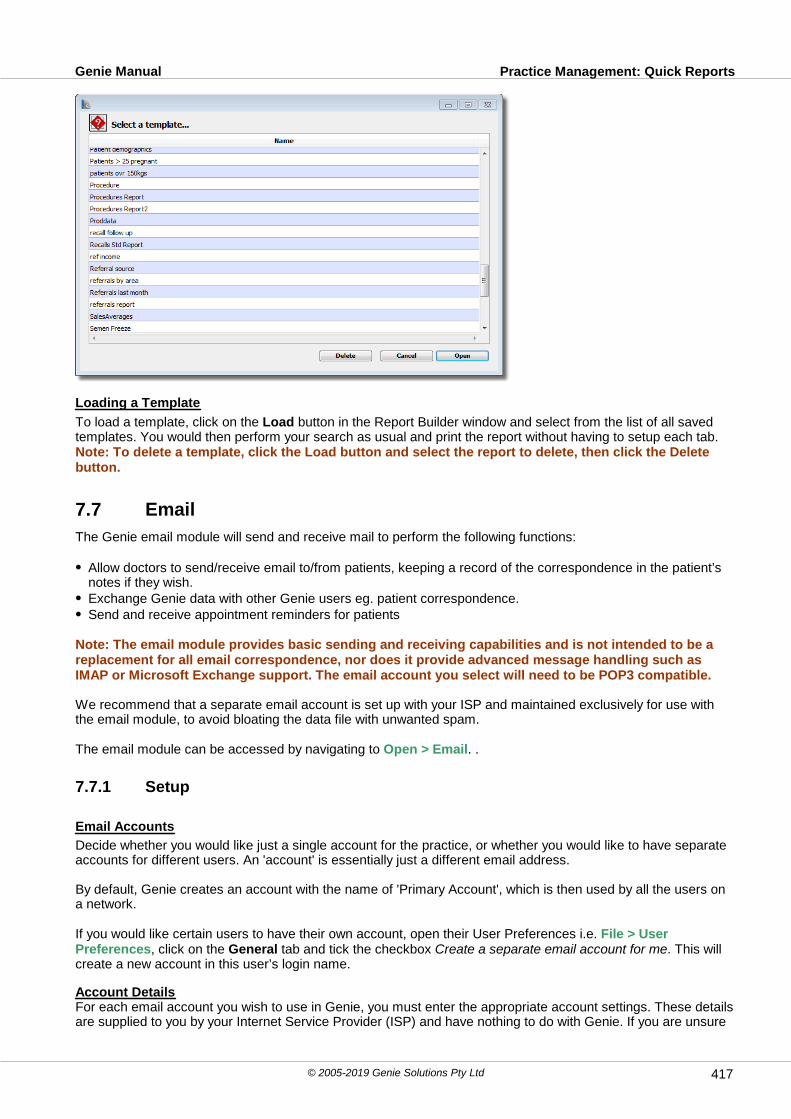
Practice Management: Quick ReportsGenie Manual
© 2005-2019 Genie Solutions Pty Ltd 417
Loading a Template
To load a template, click on the Load button in the Report Builder window and select from the list of all savedtemplates. You would then perform your search as usual and print the report without having to setup each tab.Note: To delete a template, click the Load button and select the report to delete, then click the Deletebutton.
7.7 Email
The Genie email module will send and receive mail to perform the following functions:
Allow doctors to send/receive email to/from patients, keeping a record of the correspondence in the patient’snotes if they wish.Exchange Genie data with other Genie users eg. patient correspondence.Send and receive appointment reminders for patients
Note: The email module provides basic sending and receiving capabilities and is not intended to be areplacement for all email correspondence, nor does it provide advanced message handling such asIMAP or Microsoft Exchange support. The email account you select will need to be POP3 compatible.
We recommend that a separate email account is set up with your ISP and maintained exclusively for use withthe email module, to avoid bloating the data file with unwanted spam.
The email module can be accessed by navigating to Open > Email. .
7.7.1 Setup
Email Accounts
Decide whether you would like just a single account for the practice, or whether you would like to have separateaccounts for different users. An 'account' is essentially just a different email address.
By default, Genie creates an account with the name of 'Primary Account', which is then used by all the users ona network.
If you would like certain users to have their own account, open their User Preferences i.e. File > UserPreferences, click on the General tab and tick the checkbox Create a separate email account for me. This willcreate a new account in this user’s login name.
Account DetailsFor each email account you wish to use in Genie, you must enter the appropriate account settings. These detailsare supplied to you by your Internet Service Provider (ISP) and have nothing to do with Genie. If you are unsure

Practice Management: EmailGenie Manual
© 2005-2019 Genie Solutions Pty Ltd418
of them, copy them from your regular email program’s preferences. If not, contact your ISP to find out thesedetails. To configure an email account:
1. Go to Open > Email.
2. Select the account you wish to setup by clicking on the Accounts button in the top right-hand corner ofthe window.
3. Click on the Preferences button .4. The Preferences window will appear. Information about the contents of each page of this window appear
below:
Account Tab
Fill in your account details in the window shown below. Use the example text to the right of the fields as a guide.
Note: The Incoming Server commonly takes the form of either “mail.host.com” or “pop.host.com”. TheOutgoing Server commonly takes the form of either “mail.host.com” or “smtp.host.com”.
The Use Authentication tickbox should be ticked if you authenticate your username and password when sendingmail.
The 'Signature' is a customisable footer that you can choose to attach to all outgoing email from this account.Typically, it would hold your name and other contact details, such as phone and fax numbers.
Detail Tab

Practice Management: EmailGenie Manual
© 2005-2019 Genie Solutions Pty Ltd 419
By default, once Genie has downloaded an email from your ISP, it is deleted from the ISP’s server. However, ifyou tick the Leave messages on server after download checkbox, then Genie will delete them when you nextperform a download after the specified number of days.Note: It is recommended to tick this box so you can also download the messages into another emailprogram eg. Outlook Express or Apple Mail, as it is not generally recommended to use the Genie emailas your primary email program due to its simplicity.
When messages first arrive in the inbox, they are displayed in bold. Once you click on them, they are marked asread after the specified number of seconds, and then display in plain text.
If you find that there are messages downloaded into your other email program, but are not downloading intoGenie email when you click Get Mail, then click the Reset Retrieved Msg IDs.
In this window, you can also specify that messages in your 'Sent' and 'Deleted' folders can be automaticallydeleted after a specified number of days. Deletion of these records occurs when you close the Email window.Only messages in the currently used Account are deleted, so if you have multiple Accounts but never openthem, these old messages will never be deleted automatically.
Advanced Tab
This tab allows you to override the default mail server ports. You shouldn’t have to change the default POP3 andSMTP Port numbers unless your ISP tells you that they use different ports. Clicking on the Default button will setthe port number to what is default for your system.
The Account Password field can be used to prevent other users from accessing this window and accidentallychanging your details.
Entering Email Addresses
Before you can send an email to someone else, you must have their email address recorded. Genie keeps emailaddresses in a separate table in the database. However, whenever you enter an email address into the AddressBook (Open > Address Book) or the Patient Demographics window, Genie automatically creates an entry forthat person in the Email Address table.
If you would like to add, modify or delete an email address, click on the Address Book button .
You should also add your own name and email address, to allow you to send a test message, as detailed below.
Send a Test Message
To make sure you have entered your email account details correctly, you should send a test message toyourself.

Practice Management: EmailGenie Manual
© 2005-2019 Genie Solutions Pty Ltd420
1. Click on the New button to create a new email.2. In the search bar next to the word To:, start typing your First or Surname, and a popup will appear displaying
any matching email addresses.
Use the mouse or press the Enter key to select the record you would like. If you have performed this correctly,your name should now be displayed in the To: field.Note: Only the Enter on your numeric keyboard will allow you to select a record place of using themouse. The cursor should now be in the Subject area. Enter a subject like “Test”, then press the Tab key on your
keyboard to move to the body of the message. Type a few lines in the body, then click the Send Now button.
Assuming you are already connected to the Internet, Genie should send the message. If you get an errormessage, read it carefully. It will frequently tell you what the problem is e.g. an incorrect account password, oraccount login name.
If the message has been sent successfully, wait a few moments and then click on the Get Mail button. Thewindow below will appear:
Clicking on the Send and Receive icons will switch these options on and off. Because we don’t actually haveanything to send at the moment, click on the Send icon to switch it off, then click the OK button to retrieve anymessages on your ISP’s server.
The test message you just sent should now be in your Inbox.
IndexGenie Manual
© 2005-2019 Genie Solutions Pty Ltd 421
Index
- A -ABN 55, 64
Account History 182Applying Credit 187
Changing Account Holder/Patient 186
Deleting a Payment 188
Deleting Invoice 187
Editing/Modifyig Invoices 185
Find Batch 184
Itemized Receipt 184
Modifying an Item 186
Print Report 184
Print Statement 184
Refunds 188
Reprinting a Receipt 183
Reprinting an Invoice 183
Account Holders 30DVA 134
Medicare 134
Organisations 132
Patient 131
Account Holders Report 376
Account Messages 31
Account Warnings 57
ACIR 44
Add User 383
Address Book 27
Administrator (Setting) 25, 384
Aged Debtors Report 376
Alcohol Audit 288
AMA Fees (Importing) 154
Applying Credit 187
Appointments 78Adding/Making 93
Button Description 85
Cancellation List 106
Change Date 46, 103
Check Forward Referrals 46
Copying 104
Delete 104
Double Booking 108
Fill Down 46
Finding 45
Interval 78
Linking Procedure 113
Moving 103
Preferences 78
Printing 83, 111
Repeating 109
Status 99
Today's 40
Types 95
Undelete 105
Views 88
Appts Menu 44
Archiving 396Cut Off Limits 56
Pathology Results 372
Patient Correspondence 372
Assistant Fee 149, 172
Assistants Report 377
Attaching Documents, Scans & Images 343With ImagePro 256, 343
Audit - Billing 378
Audit - Patient Images 366
Audit - Surgical 340
- B -Backups 8
Automated Backup 10
Restoring a Backup 13, 379
Banking 189Default Bank Account 64
Setting Up Bank Accounts 30
Banking Summary 377
Billing Items 31
Billing Menu 36
Billing V Income Report 373
Blacklisted Accounts 132
Bug Reports 24
Bulk Bill/DVA Transmissions 202, 368
- C -Cancellation List 106
Care Plans (see GP Management Plans) 286
Centrelink Certificates 286
Change Practice 25
Change User 25
Chart Numbers 56
Check Integrity 371
Checklists 310Create 311
Download 50
Clean Up Data File 366
Clinic Name 54
Clinical Module 264
IndexGenie Manual
© 2005-2019 Genie Solutions Pty Ltd422
Clinical Module 264Button Description 264
Clinical Window - Overview 264
Consultation Notes 273Adding 276
Deleting 278
Drawing Module 275
Editing 276
Fee to Charge 289
Keeping Separate Consults 277
Measurements 276
Presenting Problem 274
Printing 278, 282
Viewing 278
Consultation Summary 282
Consumer Medicine Information 292
Conversion Ratios 102, 341
Copy Patient 46
Correspondence Log 379
Create Data Copy Script 379
Credit Terms 58
Cull Invoices 372
Cull Records 41
Culling Limits 56
- D -Daily Billing Report 367
Daily Transaction Report 367
Data Maintenance 366, 371
DB4's 37
Default Bank Account 64
Default Patient Type 57
Default Receipt Type 57
Delete 4D Preferences 365
Delete User 383
Deleted Sales/Payments Audit 378
Deposits 168Accepting 168
Applying 169
Deleting 168
List 36
Diagrams 275
Dictated Letters 40
DMMR template 222
Doctors Income 373
Documents - Adding 284
Drawing Module 275
Drug Interactions 296
Duplicate Records 35, 42
DVA Account ID 55
- E -Edit Account Types 37
Edit Patient 100
Electronic Correspondence (Sending via 3rd Party) 234
Checking Imported Letters 235
Set Up 234
Using 235
Email (Setup) 417Letters 220
Patient Records 41
Employers 31
Estimate PEFR 287
Export Quickreport Templates 364
Exporting Genie Data 26
- F -Families - Creating 131
Finding 39
Making Appointments 86
Feature Requests 24
File Menu 24
Flagging Patient Records 41, 249, 267
- G -Genie Online Manual 52
Geriatric Depression Scale 288
GP Management Plans 286
GST 55Report 377
- H -Health Assessments 286
Health Fund Fees 179
Health Services Utilisation Report 381
HealthLink 234Checking Imported Letters 235
Configuring 237
Using 235
HIC Online 201Archive HIConline Claim Text 372
Bulk Bill & DVA Claims 202
Creating Transmissions 202
Installation 195
Location ID 56
Online Patient Verification 212
Patient Claims 207, 368
IndexGenie Manual
© 2005-2019 Genie Solutions Pty Ltd 423
HIC Online 201PSI Store 379
Receipting 207
Retrieving Reports 204
Reviewing Exceptions 205
Troubleshooting 218
Updating Certificates 215
Uploading HIC Logs 379
HL7 Tracking Pathology Results 365
- I -ICD10 Codes 382
Searches 404
ICPC Coding 382Searches 404
ImagePro 48, 253Synchronise Images 346
Using 256, 343
Viewing Images 345
Images Attaching 343
Creating Albums 348
Searching 343, 345, 348
Viewing 345
Immunisations 270ACIR Reporting 44
Import Offsite Logs 352
Import Quickreport Templates 364
Importing Genie Data 26
Importing Letters 229
Inactive Patients 41
Increasing Private Fees 153
INR Control 287
Integrity Check 371
Investigation Action List 31
Investigation Audit 32
Invoice Memos 58, 151
Invoicing 131Adding Items 142
Assistant's Fees 149
Changing Incorrect Account Holder/Patient 186
Creating 134
Deferring 157
Deleting 55, 187
Editing 185
Item Information 144
Memos 58, 151
Multiple Procedure Rule 147
Notes 144
Organisations 136
Patients without Appts 157
Reprinting 183
Searching Items 145
Selecting Practice 146
Selecting Site 146
Service Date 144
Service Time 144
Storing 157
Time Spent 144
Workcover 137
Item Number (Default) 66
Item Report 375
Itemised Receipt 184
IVF Treatment Cycles 33
- K -Keyboard Shortcuts 3
- L -Labels 261
Laboratory Demographics 26
Lesion Module 285
Letter Templates (see also Merged Letter Templates) 241
Letterhead - Practice 58
Letters (see also Referral/Reply Letters) 218
Location ID 56
LSPN 71
- M -Macros 221, 275
Maintenance & Reports 364
Manual - Genie 52
Manual Batching 190Creating a Batch 191
Dealing with Exceptions 194
Receipting 193
Marking Patients 39
Measurements 276
Medicare Account ID 55
Medicare Claim Forms 55
Merged Letter Templates 241Creating Letter 243
Printing 246
Quote Templates 175
Saving 244
Setting Up 242
Merging Patients 42
MIMS 33, 290
IndexGenie Manual
© 2005-2019 Genie Solutions Pty Ltd424
MIMS 33, 290Disclaimer 364
Mini Mental State Exam 288
Modify Today's Consultation 282
Multiple Procedure Rule 147
- N -NATA Number 55
New Consultation 282
NPCC Report 380
NPS RADAR 33, 293
Nursing Home Sheet 292
- O -Offsite Logging 348
Copying Data File 349
Import Logs 352
Limitations 352
Setup 348
Starting 26
Using 350
Online Claiming 201
Online Patient Verification 212
Open Menu 27
Overdue Accounts 57, 376
Overdue INR 43
Overdue Smears 43
Overseas Students Print Claim Form 55
Ozescribe & Syberscribe 232
- P -Paid on Day 375
Pap Smears - Adding 266Overdue 43
Passwords 389
Pathology 318Add 284
Audit 32
Creating Sets 320
Graphing 267
Investigations Action List 251
Ordering 319
Recalls 251
Reprinting Request Forms 320
Request Template 321
Results 325
Tracking 276, 365
Patient Claims 207, 368
Patient Correspondence (See Referral/Reply Letters) 218
Patient Handouts 33
Patient Type 375
Patients Menu 39
Payment Report 378
Pending Deliveries 43, 48
Percentile Charts 287
PIT Results 267, 277
Practice Details 54
Practice Letterhead 58
Practice Management Module 364
Practice Management Reports 373
Practice Sites 71
Practice Type 26
Pre-Op Notification Check 130
Prescriber Number 64
Prescriptions 290Adding Drugs 297
Adding Script to Patient 294
Button Description 292
Display 290
Editing 291
Interactions 296
Polypharmacy 299
Printing 292, 300
QuickScripts 295
Searching 298
User Added Drug 298
Printing Complete Clinical Record 282
Printing Preferences 74Troubleshooting 76
Private Health Funds Fees 179
Procedures 332Adding 284, 333
Audit 338, 340
Booking 113
Details Tab 337
Op-Notes Tab 338
Pending 46, 335
Post-Op Notes Tab 338
Pre-op Notifications 130, 337
Pre-op Tab 337
Quote Tab 338
Quotes 171
Templates 339
Theatre Lists 126
Provider Number 64
Provider Type 64

IndexGenie Manual
© 2005-2019 Genie Solutions Pty Ltd 425
- Q -Queries & Searches 398
Query Editor 398
Quick History (Billing) 36, 283
Quick Reports 407
QuickScript 295
Quitting 26
Quotes 171Invoicing from 178
Preparing 172
Printing 175
Templates 175
- R -Radiology 318
Audit 32
Ordering 322
Recalls 251
Reprinting Request Form 323
Request Templates 323
Results 325
Readdressbutton3 221
Rebuild Indices 366
Recalls - Adding 246, 309Flagging Patient Record 249
Overdue INR's 43
Overdue Smears 43
Pathology/Radiology 251
Printing 247, 250
Templates 246
Receipting 157By Invoice Number 36
Default Receipt Type 57
Deleting 188
Existing Invoice for Patient 159
From an Invoice 157
Incorrect Payment Type 190
Organisation 161
Paying the Gap 161
Troubleshooting 159
Reception Module 78
Records Menu 34
Referral Report 377
Referral/Reply Letters 218Button Description 218
Default Template Set Up 222
Editing Templates 227
Electronic Correspondence (Sending via 3rdParty) 234
Importing Letters 229, 233
New Template 223
Reviewing Letters 228, 331
Reviewing Letters - Offsite 228, 332
Registering Genie 26
Remittance Advice 57
Remove an Item from a Drop-down menu 3
Replacing Field Entries 35
Reporting 367, 369, 373
Reset ID Numbers 365
Reviewing Letters 228, 331Offsite 228, 332
- S -Sales Report 378
Scanning 252With ImagePro 256
SCP ID 55
Searches 398ICPC & ICD10 Searches 404
Security 383Edit Groups 385
Setting/Increasing Private Fees On the Fly 144, 153
Shortcuts 3
Show All Records 34
Sign Off Field 64
Software Updates 48, 391
Special Menu 48
Specifying Fee to Charge 289
Stored Accounts 369
Syberscribe 232
Synchronise Images 346
- T -Tasks 259
Theatre Lists 126Printing 129
Set Up 127
Thyroid Control 287
Today's Consultation 40
Tools Menu 282
Track Pathology Results - HL7 365
Transaction Report (Daily) 367
Transcription Services 232
Troubleshooting - Network HIC Online 218
Printing 76

IndexGenie Manual
© 2005-2019 Genie Solutions Pty Ltd426
- U -Update Ages 42
Updates 391Fees 179
Genie Software 392
User Levels 384
Using Highlighted Entries in a List 34
- V -Vaccinations 270
VSP Number 54
- W -Web Update 394
Website 52
Workcover 137Certificates 284