Enterprise Vault™ Discovery Accelerator Administrator's Guide
257
Enterprise Vault™ Discovery Accelerator Administrator's Guide 12.5
-
Upload
khangminh22 -
Category
Documents
-
view
2 -
download
0
Transcript of Enterprise Vault™ Discovery Accelerator Administrator's Guide

Enterprise Vault™Discovery AcceleratorAdministrator's Guide
12.5

Enterprise Vault™ Discovery Accelerator:Administrator's Guide
Last updated: 2019-10-21.
Legal NoticeCopyright © 2019 Veritas Technologies LLC. All rights reserved.
Veritas, the Veritas Logo, Enterprise Vault, Compliance Accelerator, and Discovery Acceleratorare trademarks or registered trademarks of Veritas Technologies LLC or its affiliates in theU.S. and other countries. Other names may be trademarks of their respective owners.
This product may contain third-party software for which Veritas is required to provide attributionto the third party ("Third-party Programs"). Some of the Third-party Programs are availableunder open source or free software licenses. The License Agreement accompanying theSoftware does not alter any rights or obligations you may have under those open source orfree software licenses. Refer to the Third-party Legal Notices document accompanying thisVeritas product or available at:
https://www.veritas.com/about/legal/license-agreements
The product described in this document is distributed under licenses restricting its use, copying,distribution, and decompilation/reverse engineering. No part of this document may bereproduced in any form by anymeans without prior written authorization of Veritas TechnologiesLLC and its licensors, if any.
THE DOCUMENTATION IS PROVIDED "AS IS" AND ALL EXPRESS OR IMPLIEDCONDITIONS, REPRESENTATIONS AND WARRANTIES, INCLUDING ANY IMPLIEDWARRANTY OF MERCHANTABILITY, FITNESS FOR A PARTICULAR PURPOSE ORNON-INFRINGEMENT, ARE DISCLAIMED, EXCEPT TO THE EXTENT THAT SUCHDISCLAIMERS ARE HELD TO BE LEGALLY INVALID. VERITAS TECHNOLOGIES LLCSHALL NOT BE LIABLE FOR INCIDENTAL OR CONSEQUENTIAL DAMAGES INCONNECTION WITH THE FURNISHING, PERFORMANCE, OR USE OF THISDOCUMENTATION. THE INFORMATION CONTAINED IN THIS DOCUMENTATION ISSUBJECT TO CHANGE WITHOUT NOTICE.
The Licensed Software and Documentation are deemed to be commercial computer softwareas defined in FAR 12.212 and subject to restricted rights as defined in FAR Section 52.227-19"Commercial Computer Software - Restricted Rights" and DFARS 227.7202, et seq."Commercial Computer Software and Commercial Computer Software Documentation," asapplicable, and any successor regulations, whether delivered by Veritas as on-premises orhosted services. Any use, modification, reproduction release, performance, display or disclosureof the Licensed Software and Documentation by the U.S. Government shall be solely inaccordance with the terms of this Agreement.

Veritas Technologies LLC500 E Middlefield RoadMountain View, CA 94043
https://www.veritas.com
Technical SupportTechnical Support maintains support centers globally. All support services will be deliveredin accordance with your support agreement and the then-current enterprise technical supportpolicies. For information about our support offerings and how to contact Technical Support,visit our website:
https://www.veritas.com/support
You can manage your Veritas account information at the following URL:
https://my.veritas.com
If you have questions regarding an existing support agreement, please email the supportagreement administration team for your region as follows:
[email protected] (except Japan)
Before you contact Technical Support, run the Veritas Quick Assist (VQA) tool to make surethat you have satisfied the system requirements that are listed in your product documentation.You can download VQA from the following article on the Veritas Support website:
https://www.veritas.com/support/en_US/vqa
DocumentationMake sure that you have the current version of the documentation. Each document displaysthe date of the last update on page 2. The latest documentation is available on the Veritaswebsite:
https://www.veritas.com/docs/100040095
Documentation feedbackYour feedback is important to us. Suggest improvements or report errors or omissions to thedocumentation. Include the document title, document version, chapter title, and section titleof the text on which you are reporting. Send feedback to:
You can also see documentation information or ask a question on the Veritas community site:
https://www.veritas.com/community

Chapter 1 Introducing Discovery Accelerator ............................... 11
Key features of Discovery Accelerator .............................................. 11About the Discovery Accelerator components ..................................... 12The Discovery Accelerator process .................................................. 12About the deduplication feature in Discovery Accelerator ...................... 14Product documentation .................................................................. 15
White papers on the Veritas Support website ............................... 15Discovery Accelerator training modules ....................................... 16
Chapter 2 Introducing the Discovery Accelerator client ............. 17About the Discovery Accelerator client .............................................. 17Opening the Discovery Accelerator client .......................................... 17Finding your way around the Discovery Accelerator client ..................... 19
Chapter 3 Setting up and assigning roles ...................................... 22
About the predefined Discovery Accelerator roles ............................... 22About the Discovery Accelerator permissions ..................................... 24
About the facility to allow or deny permissions .............................. 28Creating Discovery Accelerator roles ................................................ 28Editing the properties of Discovery Accelerator roles ............................ 30Assigning Discovery Accelerator roles to users ................................... 30Deleting Discovery Accelerator roles ................................................ 31
Chapter 4 Working with cases ........................................................... 33
About Discovery Accelerator cases .................................................. 33Opening new Discovery Accelerator cases ........................................ 34Checking the progress of Discovery Accelerator cases ......................... 36Implementing analytics in Discovery Accelerator cases ........................ 38
Enabling a Discovery Accelerator case for analytics ...................... 38Monitoring the progress of analytics data collection ....................... 40Pausing and resuming analytics on a Discovery Accelerator case
..................................................................................... 42Speeding up analytics data collection in low-bandwidth
environments .................................................................. 43
Contents

Disabling analytics on a Discovery Accelerator case ...................... 43Deleting Discovery Accelerator cases ............................................... 43
Chapter 5 Setting up review marks and tags ................................ 45
About review marks ...................................................................... 45Creating review marks ................................................................... 46How retained marks work ............................................................... 48Editing review marks ..................................................................... 48Customizing the reviewmarks that are associated with individual cases
........................................................................................... 49Creating tags ............................................................................... 50Creating tag groups ...................................................................... 51
Creating a single-choice tag group ............................................. 52Creating a multiple-choice tag group .......................................... 53
Chapter 6 Using rules to mark and tag items automatically........................................................................................... 55
About analytics rules ..................................................................... 55Creating analytics rules ................................................................. 56
About the search attributes ....................................................... 59About the operators ................................................................ 69About SQL Server stopwords .................................................... 72
Overriding manual categorization ..................................................... 72Editing analytics rules .................................................................... 73Changing the priority levels of marking rules ...................................... 73About tagging rules ....................................................................... 74Manually editing queries in analytics rule definition language (RDL)
........................................................................................... 75Using parentheses to set Boolean precedence in analytics RDL
..................................................................................... 75Using stemming in analytics RDL ............................................... 76Specifying custodian and target values in analytics RDL ................. 77
Deleting analytics rules .................................................................. 78
Chapter 7 Using Custodian Manager .............................................. 79About Custodian Manager .............................................................. 79Guidelines on using Custodian Manager ........................................... 80Setting up custodians .................................................................... 81Setting up custodian groups ........................................................... 82Setting up custom custodian attributes .............................................. 83Setting the primary custodian attribute .............................................. 84
5Contents

Specifying the user account under which to synchronize custodians........................................................................................... 85
Synchronizing with entire Active Directory domains and Domino servers........................................................................................... 86
Setting the configuration options for Custodian Manager ...................... 87
Chapter 8 Searching for items ........................................................... 89
About searching with Discovery Accelerator ....................................... 89Limitations on searching certain types of Skype for Business
content ........................................................................... 90Creating and running Discovery Accelerator searches .......................... 90About the search criteria options ...................................................... 93Guidelines on conducting effective searches .................................... 103Pausing and resuming Discovery Accelerator searches ...................... 103About the Monitor Searches tab ..................................................... 104Selecting the archives in which to search ......................................... 106Specifying the details of custom search attributes .............................. 108Restricting search results to correspond to Compliance Accelerator
departments ........................................................................ 112Defining email targets with Address Manager ................................... 114
Setting up targets ................................................................. 114Adding targets to target groups ................................................ 115
Building Discovery Accelerator search schedules .............................. 117Setting up new search schedules ............................................. 117Examples of recurring search schedules .................................... 119
Setting up custom message types .................................................. 120Using Discovery Accelerator to search archived Skype for Business
content ............................................................................... 121
Chapter 9 Manually reviewing items .............................................. 122
About reviewing with Discovery Accelerator ..................................... 122Limitations on reviewing certain types of Skype for Business
content ......................................................................... 123About the Review pane ................................................................ 123Filtering the items in the Review pane ............................................. 129Searching within the review set ...................................................... 133
Conducting quick searches ..................................................... 134Conducting advanced searches ............................................... 135
Finding all items in the same conversation ....................................... 138Assigning review marks and tags to items ........................................ 139Adding comments to items ............................................................ 140Viewing the history of items .......................................................... 141
6Contents

Displaying printable versions of items ............................................. 142Downloading the original versions of items ....................................... 142Copying the item list to the Clipboard .............................................. 142Deleting items from Enterprise Vault archives ................................... 143
Limitations on reviewing items after you have deleted them ........... 144Changing how the Review pane looks ............................................. 144Setting your Review pane preferences ............................................ 145
Chapter 10 Working with research folders ..................................... 148
About research folders ................................................................. 148Creating research folders ............................................................. 149Editing the properties of research folders ......................................... 150Copying items to research folders .................................................. 151Reviewing the items in research folders ........................................... 151Exporting items from research folders ............................................. 152Giving other users access to your research folders ............................ 153Removing items from research folders ............................................ 153Converting research folders into cases ............................................ 154Deleting folders .......................................................................... 154
Chapter 11 Exporting and producing items .................................... 156
About exporting and producing items .............................................. 156Limitations on exporting certain types of content ......................... 156
How exporting differs from producing .............................................. 157Performing an export or production run ........................................... 157
How to decrypt RMS-protected items ........................................ 162About the limits on the number of simultaneous export and production
runs ................................................................................... 164Identifying the archives that contain duplicates of a specific item .......... 164How to optimize export and production runs ..................................... 166Making the export IDs or Bates numbers visible in Microsoft Outlook
.......................................................................................... 166
Chapter 12 Creating and viewing reports ....................................... 168
About the Discovery Accelerator reports .......................................... 168Creating Discovery Accelerator reports ........................................... 168Available Discovery Accelerator reports ........................................... 169
Archive Source report ............................................................ 170Case History report ............................................................... 171Export Run Duplicates report .................................................. 173Item Detail report .................................................................. 174
7Contents

Legal Holds report ................................................................ 175Production Run report ............................................................ 177Production Run Duplicates report ............................................. 178Productions report ................................................................ 179Searches report .................................................................... 180Security report ..................................................................... 181
Viewing existing reports ............................................................... 182Deleting reports .......................................................................... 183About viewing Discovery Accelerator datasets using the OData web
service ............................................................................... 183Available Discovery Accelerator datasets ................................... 184Accessing the Discovery Accelerator datasets ............................ 185Using the OData service with Microsoft Excel ............................. 185Using the OData service with Microsoft SQL Server Reporting
Services (SSRS) ............................................................ 187
Appendix A Customizing Discovery Accelerator ........................... 189
Setting Discovery Accelerator system configuration options ................. 189Ad Hoc Searches configuration options ..................................... 191Analytics Conversation Analysis configuration options .................. 192Analytics Data Collection configuration options ........................... 192API configuration options ........................................................ 192Auditing configuration options .................................................. 193Diagnostics configuration options ............................................. 194Document Conversion configuration options ............................... 195Export/production configuration options ..................................... 195General configuration options .................................................. 199Home Page configuration options ............................................. 201Item Prefetch Cache configuration options ................................. 201Item Prefetch Cache (Advanced) configuration options ................. 204Legal Hold configuration options .............................................. 206Policy Integration configuration options ..................................... 207Privileged Delete configuration options ...................................... 208Profile Synchronization configuration options .............................. 208Reviewing configuration options .............................................. 210Search configuration options ................................................... 212Security configuration options .................................................. 218System configuration options .................................................. 218Vault Directory Synchronization configuration options ................... 220
Customizing the columns in the Review pane ................................... 222
8Contents

Appendix B Importing configuration data from an XML file.......................................................................................... 225
About importing configuration data ................................................. 225Sample XML files ........................................................................ 225Format of the Dataload.xml file ...................................................... 226Format of the dataload XML file for Custodian Manager ...................... 227Importing the configuration data ..................................................... 227About the ImportExport command .................................................. 228
ImportExport syntax .............................................................. 228Examples of ImportExport commands ....................................... 230
Appendix C Enterprise Vault properties for use in DiscoveryAccelerator searches ................................................ 232
About the Enterprise Vault search properties .................................... 232System properties ....................................................................... 233Custom Enterprise Vault properties ................................................ 240Custom Enterprise Vault properties for File System Archiving items
.......................................................................................... 242Custom Enterprise Vault properties for SharePoint items .................... 242Custom Enterprise Vault properties for Compliance
Accelerator-processed items ................................................... 243Custom properties for use by policy management software ................. 244Custom properties for Enterprise Vault SMTP Archiving ...................... 245
Appendix D Troubleshooting ................................................................ 246
A security warning may appear when you preview certain items in theReview pane of the Discovery Accelerator client ......................... 247
Display issues when you run the Discovery Accelerator client inWindows 8 or later ................................................................ 247
Display issues when you open a Discovery Accelerator website inInternet Explorer 10 or later .................................................... 247
Vault stores not displayed in the Discovery Accelerator client ............... 247Discovery Accelerator searches return unexpected results .................. 248Full-text search indexing is disabled by default in SQL Server .............. 248Errors when exporting items from Discovery Accelerator ..................... 249TNEF-encoded attachments to Internet Mail (.eml) messages may not
be readable after you export the messages from a review set.......................................................................................... 250
Synchronization errors after you rename the SQL Server computer.......................................................................................... 251
9Contents

Performance counter errors when the Accelerator Manager servicestarts .................................................................................. 251
SQL Service Broker warning when restoring a customer database toa different server .................................................................. 252
Issues with Custodian Manager ..................................................... 252Custodian Manager lets you synchronize multiple custodians with
the same Active Directory account ..................................... 252Custodian Manager does not list the members of a custodian
group after you delete the group and then restore it bysynchronizing with Active Directory ..................................... 253
If a custodian belongs to one Active Directory domain but is amember of a group in a second domain, Custodian Managermay not update the custodian's details when it synchronizeswith the second domain ................................................... 253
Custodian Manager fails to synchronize with Domino LDAP usersand groups whose names contain certain double-bytecharacters ..................................................................... 253
Issues with Discovery Accelerator reports ........................................ 254Prompt to install SQL Server when printing a report for the first
time ............................................................................. 254Reports that you export as CSVmay not open properly in Microsoft
Excel ............................................................................ 255Garbled Japanese characters when exporting reports in Acrobat
format .......................................................................... 256Troubleshooting OData errors ................................................. 256
Troubleshooting Privileged Delete failures ....................................... 257
10Contents

Introducing DiscoveryAccelerator
This chapter includes the following topics:
■ Key features of Discovery Accelerator
■ About the Discovery Accelerator components
■ The Discovery Accelerator process
■ About the deduplication feature in Discovery Accelerator
■ Product documentation
Key features of Discovery AcceleratorDiscovery Accelerator is an electronic discovery and review system that integrateswith Enterprise Vault services and archives. Discovery Accelerator lets authorizedusers search for, retrieve and preserve, analyze, review, mark, and export or produceemails, documents, and other electronic items for lead counsel examination orcourt-ready production—rapidly and in a cost-effective manner.
Using attorneys and external counsel to review large numbers of items is costly.With Discovery Accelerator, you can create a hierarchy of reviewers for a discoveryaction or case, with different levels of reviewers able to assign certain review marks.In this way, paralegal staff and non-legal staff can perform an initial review of searchand collection results and leave only the privileged, relevant, or questionable itemsfor counsel. Optionally, you can then produce the relevant items with an appropriateBates number or else simply export them from Discovery Accelerator in variousformats.
1Chapter

About the Discovery Accelerator componentsTable 1-1 lists the primary Discovery Accelerator components.
Table 1-1 The Discovery Accelerator components
NotesComponent
The client is used by Discovery Accelerator administratorsto set up and manage the system and by reviewers to accessthe items that they are to mark.
Discovery Accelerator client
This website lets you set up multiple Discovery Acceleratordatabases in which to store your data.
Accelerator Manager website
This service handles the requests from the DiscoveryAccelerator client and works with the Enterprise Vaultcomponents to access archives, perform searches, and soon.
Enterprise Vault AcceleratorManager service
The customer database is a SQL database in which DiscoveryAccelerator stores details of cases, user roles, search results,review marks and tags, and more.
You can set up multiple customer databases.
Customer database
The configuration database is a SQL database that specifiesthe location of the customer databases and stores details ofthe SQL Server, database files, and log files to use.
Configuration database
This website lets you store the details of the custodians(individual employees) and custodian groups for which youwant to search with Discovery Accelerator. A custodian groupis any collection of employees, such as Windows or Dominogroups and distribution lists, Active Directory or Domino LDAPsearches, and Active Directory containers.
Custodian Manager website(optional)
This website lets you use the Discovery Accelerator API tointegrate third-party tools with the software, and therebyretrieve data from or export it to a Discovery Acceleratorcustomer database.
For more information on the Discovery Accelerator API,contact Veritas Support.
Discovery Accelerator APIwebsite (optional)
The Discovery Accelerator processFigure 1-1 provides an overview of the steps in the discovery process.
12Introducing Discovery AcceleratorAbout the Discovery Accelerator components

Figure 1-1 Steps in the Discovery Accelerator process
Search archives tofind items
Search results
Unreviewed items
Accept results for review
Export orproduce items
Audit ofreviewactivity
Review Analytics
EnterpriseVaultarchives
Reviewed items
You typically perform the steps in the Discovery Accelerator process in the followingorder:
■ The Discovery Accelerator system administrator sets up a case.All the messages and files that relate to the case are already stored in EnterpriseVault archives. Typically, mailbox archives are journal mailbox archives, but youcan include individual user mailboxes in searches. You can also search publicfolder, file system, and SharePoint archives.
■ A user with search permissions creates a search of journal mailboxes and filesystem archives.The searches that you create with Discovery Accelerator are highly configurable.The criteria that you specify can include words and phrases to search for, dateranges, message size and type, author and recipient details, attachment details,and more.
13Introducing Discovery AcceleratorThe Discovery Accelerator process

■ When the search finishes, the user who ran the search can check that the resultsare as expected. If the user chooses to accept the results, Discovery Acceleratoradds them to the case review set.
■ The administrator assigns the items in the case review set to reviewers so thatthey can view and mark them.Optionally, the administrator can choose to enable analytics on the case. Thisfacility provides additional analyses of the metadata and content of items thatare collected in the case. Among the extra benefits that analytics provides arethe options to do the following:
■ Set up rules by which Discovery Accelerator automatically marks orcategorizes the items that it adds to the case. Classifying large numbers ofitems without much human intervention ultimately results in better and smallerreview sets for manual review.
■ Examine and review entire conversation threads in one view.
■ Conduct quick or advanced searches within the items in a case.These facilities deliver a new review experience that is known asGuided Review.
■ Themarked items are published in a suitable form. The available formats includePST, Domino NSF database, HTML, MSG, and ZIP.You can choose to produce or export the items. The production processgenerates a Bates number for each item. This process also locks the item tostop reviewers from changing the mark that is assigned to it. The export processdoes not generate a Bates number for an item or lock the item, so reviewerscan continue to work on it.
About the deduplication feature in DiscoveryAccelerator
Discovery Accelerator provides a deduplication feature. The purpose of this featureis to minimize review, export, and production times by letting you identify and excludesimilar items and duplicate items. Discovery Accelerator considers items to besimilar when they have the same metadata properties, such as author displaynames, subjects, and number of attachments. Duplicate items have exactly thesame content as well as the same metadata properties. The option to identify andexclude duplicate items is available only in cases that you have enabled for analytics.This is not true of similar items, however, which you can identify and exclude in allcases.
14Introducing Discovery AcceleratorAbout the deduplication feature in Discovery Accelerator
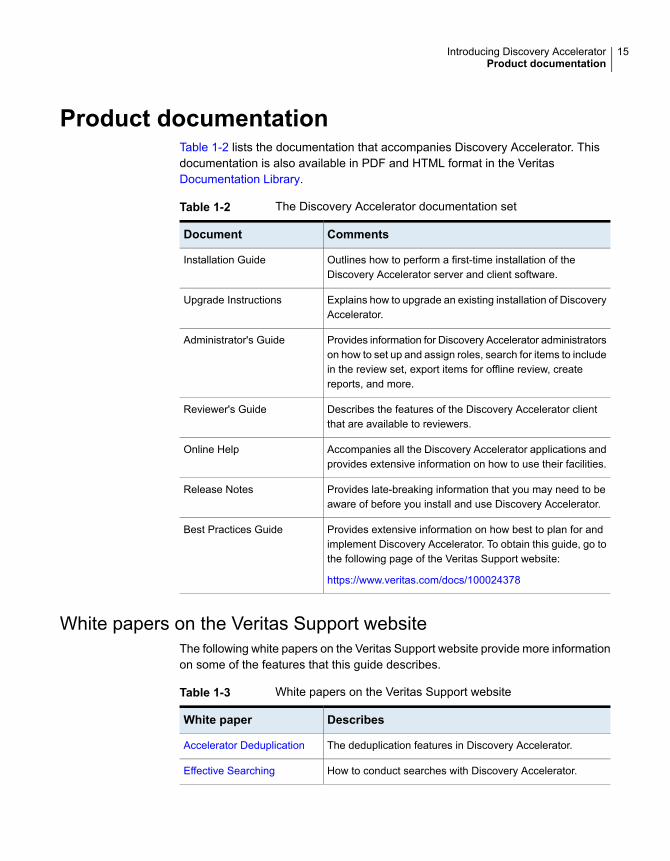
Product documentationTable 1-2 lists the documentation that accompanies Discovery Accelerator. Thisdocumentation is also available in PDF and HTML format in the VeritasDocumentation Library.
Table 1-2 The Discovery Accelerator documentation set
CommentsDocument
Outlines how to perform a first-time installation of theDiscovery Accelerator server and client software.
Installation Guide
Explains how to upgrade an existing installation of DiscoveryAccelerator.
Upgrade Instructions
Provides information for Discovery Accelerator administratorson how to set up and assign roles, search for items to includein the review set, export items for offline review, createreports, and more.
Administrator's Guide
Describes the features of the Discovery Accelerator clientthat are available to reviewers.
Reviewer's Guide
Accompanies all the Discovery Accelerator applications andprovides extensive information on how to use their facilities.
Online Help
Provides late-breaking information that you may need to beaware of before you install and use Discovery Accelerator.
Release Notes
Provides extensive information on how best to plan for andimplement Discovery Accelerator. To obtain this guide, go tothe following page of the Veritas Support website:
https://www.veritas.com/docs/100024378
Best Practices Guide
White papers on the Veritas Support websiteThe following white papers on the Veritas Support website provide more informationon some of the features that this guide describes.
Table 1-3 White papers on the Veritas Support website
DescribesWhite paper
The deduplication features in Discovery Accelerator.Accelerator Deduplication
How to conduct searches with Discovery Accelerator.Effective Searching
15Introducing Discovery AcceleratorProduct documentation

Table 1-3 White papers on the Veritas Support website (continued)
DescribesWhite paper
The features and tools that are available to DiscoveryAccelerator reviewers.
Effective Reviewing
How to create custom Discovery Accelerator reports usingthe Open Data (OData) protocol.
Best Practices for EnhancedAccelerator Reporting
Discovery Accelerator training modulesVeritas Education Services provides comprehensive training for DiscoveryAccelerator, from basic administration to advanced topics and troubleshooting.Training is available in a variety of formats, including classroom-based and virtualtraining.
For more information on Discovery Accelerator training, curriculum paths, andcertification options, see https://www.veritas.com/services/education-services.
16Introducing Discovery AcceleratorProduct documentation

Introducing the DiscoveryAccelerator client
This chapter includes the following topics:
■ About the Discovery Accelerator client
■ Opening the Discovery Accelerator client
■ Finding your way around the Discovery Accelerator client
About the Discovery Accelerator clientThe client is a feature-rich Windows application with which Discovery Acceleratorusers can add marks and comments to the items that they review. In addition,administrators can use the Discovery Accelerator client to administer and customizethe application. The role to which a Discovery Accelerator user has been assigneddetermines the features of the client that each user can access.
You performmost of the activities that are described in this guide with the DiscoveryAccelerator client.
Opening the Discovery Accelerator clientNote the following:
■ If you use the Discovery Accelerator client a lot, you may want to create ashortcut for it on the Windows desktop.
■ If you want to run the Discovery Accelerator client on a Windows 8/8.1/10computer then, for optimum performance, we recommend that you run it inWindows 7 orWindows XP compatibility mode. See theWindows documentationfor guidelines on how to do this.
2Chapter

To open the Discovery Accelerator client
1 Click the shortcut for the Discovery Accelerator client.
After a fewmoments, theSelect a Discovery Accelerator instance to connectto dialog box appears.
2 In the Server box, type the name or IP address of the computer on which theDiscovery Accelerator server software is running.
You can type the IP address in either IPv4 or IPv6 format.
3 In the Instance box, select the Discovery Accelerator instance (customerdatabase) that you want to access. Click the down arrow at the right of the boxto list the available instances.
Each instance stores the details of a set of cases that you want to review. Italso stores the associated user roles, search results, research folders, andmore. Therefore, you may have multiple instances from which to choose.
4 ClearAsk every time the application is opened if you always want to connectto the same instance without first displaying the Select a DiscoveryAccelerator instance to connect to dialog box.
5 Click Connect.
After a few moments, the home page of the Discovery Accelerator clientappears.
18Introducing the Discovery Accelerator clientOpening the Discovery Accelerator client

To close the Discovery Accelerator client
◆ Click the close button in the upper-right corner of the window.
Finding your way around the DiscoveryAccelerator client
In the Discovery Accelerator client, the roles to which you have been assigneddetermine the features that you can access. Table 2-1 describes the features thatusers with the most permissive roles can access. Discovery Acceleratoradministrators can assign multiple different roles to users and change thepermissions that are associated with the roles.
Table 2-1 Primary tabs in the Discovery Accelerator client
DescriptionTabIcon
This tab provides a headline view of the status of the activitiesthat you perform in Discovery Accelerator. It also gives you quickaccess to the activities that you are likely to perform frequentlywith Discovery Accelerator.
Home
This tab lets you view the items in the review set and assignmarks and comments to them.
Review
This tab lets you set up research folders where you can workprivately on the items that interest you without generatingadditional work for other Discovery Accelerator reviewers.
Research
This tab lets you open and manage cases. You can also enableanalytics on your cases so that you can perform additionalanalyses of the metadata and content of the items that you havecollected in them.
Cases
This tab lets you set up email targets, which you can include inthe criteria of a Discovery Accelerator search. A target is ashorthand way of specifying all the email addresses of anemployee so that you do not need to enter them all when youset up a search.
The tab also provides a link to the Custodian Manager website,where you can specify the details of custodians and custodiangroups for which you want to search with Discovery Accelerator.
Custodians
19Introducing the Discovery Accelerator clientFinding your way around the Discovery Accelerator client

Table 2-1 Primary tabs in the Discovery Accelerator client (continued)
DescriptionTabIcon
This tab lets you generate reports on various aspects ofDiscovery Accelerator, including the progress of reviewers andtheir roles and responsibilities.
Reports
This tab lets you monitor the status of all Discovery Acceleratorsearches and pause or resubmit them as necessary.
Monitor
This tab provides access to a range of commonly usedadministrative facilities. The options that are available when youclick this tab may include the following:
■ Roles. Set up and amend the roles that you can assign tousers to manage their access to Discovery Acceleratorfacilities.
■ Role Assignment. Assign Discovery Accelerator roles tousers.
■ Marks. Set up and edit the marks that reviewers can applyto each item to indicate whether it is relevant to the case.
■ Tags. Define secondary sets of marks, called tags, whichreviewers can apply to items in the review set.
■ Archives. Customize the list of Enterprise Vault archives inwhich Discovery Accelerator searches for items.You can also choose to hide selected vault stores from caseadministrators so that they cannot conduct searches of thearchives in those vault stores.
Application
20Introducing the Discovery Accelerator clientFinding your way around the Discovery Accelerator client
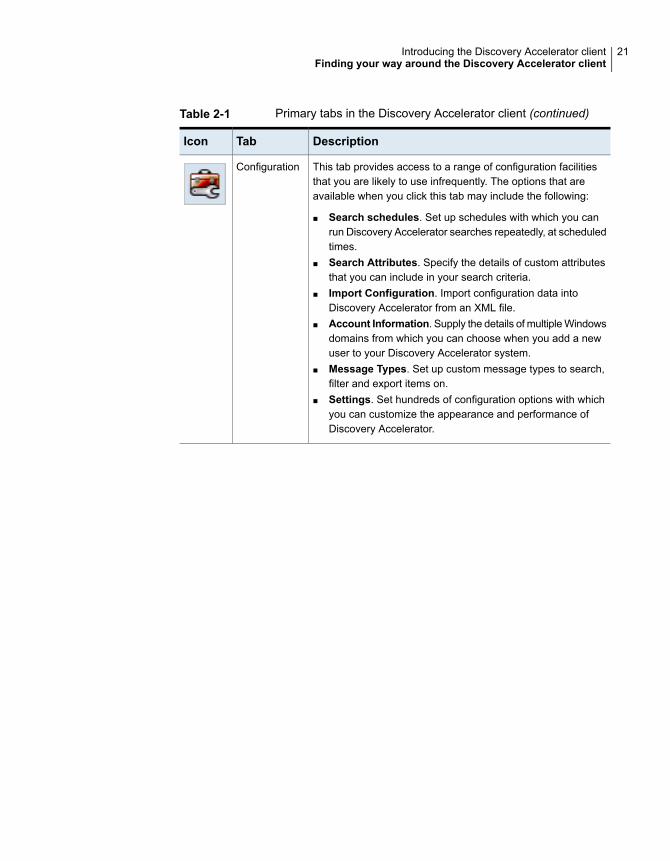
Table 2-1 Primary tabs in the Discovery Accelerator client (continued)
DescriptionTabIcon
This tab provides access to a range of configuration facilitiesthat you are likely to use infrequently. The options that areavailable when you click this tab may include the following:
■ Search schedules. Set up schedules with which you canrun Discovery Accelerator searches repeatedly, at scheduledtimes.
■ Search Attributes. Specify the details of custom attributesthat you can include in your search criteria.
■ Import Configuration. Import configuration data intoDiscovery Accelerator from an XML file.
■ Account Information. Supply the details of multipleWindowsdomains from which you can choose when you add a newuser to your Discovery Accelerator system.
■ Message Types. Set up custom message types to search,filter and export items on.
■ Settings. Set hundreds of configuration options with whichyou can customize the appearance and performance ofDiscovery Accelerator.
Configuration
21Introducing the Discovery Accelerator clientFinding your way around the Discovery Accelerator client

Setting up and assigningroles
This chapter includes the following topics:
■ About the predefined Discovery Accelerator roles
■ About the Discovery Accelerator permissions
■ Creating Discovery Accelerator roles
■ Editing the properties of Discovery Accelerator roles
■ Assigning Discovery Accelerator roles to users
■ Deleting Discovery Accelerator roles
About the predefined Discovery Accelerator rolesYou assign roles to users to determine what they can access and the activities thatthey can perform in Discovery Accelerator. Some roles are effective at the applicationlevel, across the entire Discovery Accelerator system, whereas others apply at thecase level or folder level only.
When a case is created, only its owner can access it. Other users do not see thecase until the owner grants at least one permission that is related to it. DiscoveryAccelerator roles provide a logical way to group multiple specific permissionsaccording to job function.
Table 3-1 describes the predefined roles that come with Discovery Accelerator. Ifnone of these roles precisely meets your needs, you can create your own.
3Chapter

Table 3-1 Predefined roles
Default permissionsDescriptionRole
■ Configure Case Properties.■ Role Assignment.
This role lets you performadministrative activities within aspecific case. These activitiesinclude casemanagement and roleassignment.
Case Administrator
■ Create and Configure Cases.■ Export Configuration Data.■ Import Configuration Data.■ Manage Administration
Security.■ Manage Archives.■ Manage Global Target and
Target Groups.■ Manage Marks.■ Manage Message Types.■ Manage Roles.■ Manage Schedules.■ Manage Search Attributes.■ Modify System Configuration.■ Monitor Search.■ View System Configuration.
This role lets you perform alladministrative activities withinDiscovery Accelerator. You cancreate and manage cases, assignapplication-wide roles to users, andimport configuration data fromXMLfiles.
Discovery SystemAdmin
■ Search.This role lets you search for newitems to add to a research folder.
Folder CaptureMessages
■ Production.This role lets you export or produceitems from a research folder foroffline review.
Folder Export
■ Assign.■ Configure Folder Properties.■ Delete Folder.■ Manage Analytics.■ Manage Automatic
Categorization.■ Production.■ Review.■ Role Assignment.■ Search.
This role lets you search for newitems to add to a research folder,review them, and export or producethem for offline review.
You can also give other usersaccess to your folder so that theycan participate in the reviewprocess.
Folder Full Control
23Setting up and assigning rolesAbout the predefined Discovery Accelerator roles

Table 3-1 Predefined roles (continued)
Default permissionsDescriptionRole
■ Review.This role lets you review and markthe items in a research folder.
Folder Review
■ Privileged Delete.■ Review.■ Search.■ Search Preview.■ Select Archives in Search.■ View Reports.
This role lets you search, preview,review, and delete items from theEnterprise Vault archives, and viewreports.
RegulatoryReviewer
About the Discovery Accelerator permissionsThe following tables provide more information on the permissions that you canassociate with user roles.
Table 3-2 Application permissions
DescriptionPermission
Select the vault stores and archives to use whenyou conduct a search in a research folder.
Allow Archive Selection in ResearchFolder
Copy the items from a research folder to the casereview set.
Copy Research Items
Create new cases and assign owners to them, andedit the properties of existing cases.
Create and Configure Cases
Set up research folders that are not linked to anycase.
Create Research Folder
Delete the selected cases and all the objects thatare associated with them (case-specific searches,user folders, targets and target groups, and so on).
Delete Case
Use the ImportExport command-line utility to exportconfiguration data from the Discovery Acceleratordatabase to an XML file.
See “About the ImportExport command”on page 228.
Export Configuration Data
Export the items in a research folder for offlinereview.
Export Research Items
24Setting up and assigning rolesAbout the Discovery Accelerator permissions

Table 3-2 Application permissions (continued)
DescriptionPermission
Load configuration data into the DiscoveryAccelerator database from an XML file, and viewthe import log.
Import Configuration Data
Assign application-wide roles to users. However,application administrators cannot assign case rolesto users, as only case administrators can assignthese roles.
Manage Administration Security
Customize the list of Enterprise Vault archives inwhich Discovery Accelerator searches for items.You can also choose to hide selected vault storesfrom case administrators so that they cannotconduct searches of the archives in those vaultstores.
Manage Archives
Create, edit, and delete application-wide targetsand target groups. These provide a shorthand wayto supply multiple email addresses when you definethe criteria for a search.
Manage Global Target and TargetGroups
Create and edit the marks that are available to allcases. However, this permission does not giveaccess to the marks that are created in a case.
Manage Marks
Add and remove application and case roles, andselect the permissions to assign to each role.
Manage Roles
Create, edit, and delete schedules, with which youcan define when a future search or recurrentsearch is to run.
Manage Schedules
Make additional, customized attributes availablefor searches.
Manage Search Attributes
Change the Discovery Accelerator systemproperties. You can also customize theappearance, performance, and functionality ofDiscovery Accelerator.
Modify System Configuration
25Setting up and assigning rolesAbout the Discovery Accelerator permissions

Table 3-2 Application permissions (continued)
DescriptionPermission
Monitor the status of searches across all casesand pause and resubmit searches, even if you donot normally have access to the associated cases.However, you cannot view the search criteria orthe results of the searches unless you normallyhave access permission.
Monitor Search
Convert a research folder into a case.Promote Research to Case
View the Discovery Accelerator system propertiesand configuration options that determine theappearance, performance, and functionality of theapplication.
View System Configuration
Table 3-3 Case and folder permissions
DescriptionPermission
Assign the items in the case or research folder toindividual reviewers.
Assign
Change the properties of a case, such as its name,status, and owner.
Configure Case Properties
Change the properties of folder, such as its nameand export location.
Configure Folder Properties
Delete the current case and all the objects that areassociated with it (case-specific searches, userfolders, targets and target groups, and so on).
Delete Case
Delete the research folders in which users havestored items for review.
Delete Folder
Enable or disable the analytics feature in a caseor folder. You can also pause or resume analytics.
Manage Analytics
Set the list of archives in which to search.Manage Archives
Create, edit, and delete the analytics rules by whichDiscovery Accelerator applies marks and tags toitems automatically.
Manage Automatic Categorization
Place holds on the items in a case to prevent usersfrom deleting them.
Manage Legal Holds
26Setting up and assigning rolesAbout the Discovery Accelerator permissions

Table 3-3 Case and folder permissions (continued)
DescriptionPermission
Select the review marks, tags, and tag groups thatare available to reviewers in a case or researchfolder.
Manage Marks/Tags
Create, edit, and delete the email targets and targetgroups that you can include in the criteria of asearch.
Manage Targets
Possess the full research permissions to create,edit, and delete research folders, search for itemsto store in those folders, and review those items.
Perform Ad Hoc Searches
Delete items from the Enterprise Vault archives solong as the items are not on legal hold.
Privileged Delete
Undertake export runs and production runs.Production
Review items and assign marks and comments tothem.
Review
Assign roles to users in a case.Role Assignment
Undertake searches for items to store in the reviewset.
Search
Preview the results of a search before you acceptthem. This permission requires the Searchpermission.
Search Preview
Choose certain archives in which to search whenyou define the criteria for a case-level orfolder-level search. Without this permission, youmust search all the archives in the vault storesselected for the case when you create and runsearches. This permission requires the Searchpermission.
Select Archives in Search
View a summary of reviewer activity on the homepage of the Discovery Accelerator client.
Show Reviewer Summaries On HomePage
Create and view reports.View Reports
27Setting up and assigning rolesAbout the Discovery Accelerator permissions

About the facility to allow or deny permissionsAs well as selecting the permissions that you want to associate with a role, you canalso choose to deny certain permissions to users who occupy the role. By denyingthe permissions, you stop users from acquiring them when they are assigned toother roles that do allow the permissions.
For example, suppose that you want to prevent some users from accessing all thefacilities in the Discovery Accelerator client except for the search facility. To achievethis, you would assign the users to a role in which you have set the Search andSearch Preview permissions to Allow, but you have set all the other permissionsto Deny. Even if the users are assigned to other roles that grant them additionalpermissions, they cannot exercise them; the Deny permissions take precedence.
Some predefined roles have permissions that you cannot revoke because they arefundamental to the roles. For example, you cannot set the Role Assignmentpermission for the Case Administrator role to Deny. In the Role Details pane of theDiscovery Accelerator client, these permissions are dimmed to show that you cannotchange them.
Creating Discovery Accelerator rolesIf none of the predefined roles provides the exact set of permissions that you wantto assign to users, you can create your own roles.
You must have the Manage Roles permission to create roles. By default, users withthe role of Discovery System Admin have this permission.
28Setting up and assigning rolesCreating Discovery Accelerator roles

To create a role
1 Click the Application tab in the Discovery Accelerator client, and then clickthe Roles tab.
2 Click New at the top of the window.
The Role Details pane appears.
3 In the right pane, type a unique name and an optional description for the role.
The role name can contain up to 50 characters. The description can containup to 250 characters.
29Setting up and assigning rolesCreating Discovery Accelerator roles

4 In the Scope box, choose whether to make the permissions that are associatedwith the role effective throughout the application or at the case level only.Application roles grant permissions that are related to the overall structure andconfiguration of the entire customer database. Case roles grant permissionsthat are specific to the associated cases.
Users with application roles can only perform tasks in a specific case if theyhave been assigned the appropriate roles in that case. To perform tasks inmore than one case, the users must be assigned the appropriate role in everycase that they need to access.
The selection that you make determines the permissions that are available.
5 Choose the permissions to associate with the role.
See “About the Discovery Accelerator permissions” on page 24.
6 Click Save.
Editing the properties of Discovery Acceleratorroles
You can change the permissions that are associated with any Discovery Acceleratorrole. If you have created any custom roles, you can also rename them and changetheir descriptions. However, you cannot rename any predefined role.
You must have the Manage Roles permission to edit a role. By default, users withthe role of Discovery System Admin have this permission.
To edit the properties of a Discovery Accelerator role
1 Click the Application tab in the Discovery Accelerator client, and then clickthe Roles tab.
2 In the left pane, click the role that you want to edit.
3 In the right pane, change the role name and description, if necessary, andchoose the permissions to associate with the role.
The role name must be unique and can contain up to 50 characters. Thedescription can contain up to 250 characters.
4 Click Save.
Assigning Discovery Accelerator roles to usersYou assign roles to employees or employee groups to determine what they canaccess and the tasks that they can perform in Discovery Accelerator.
30Setting up and assigning rolesEditing the properties of Discovery Accelerator roles

Youmust have the application permission Manage Administration Security to assignan application-wide role to a user. You require the case permission Role Assignmentto assign a case-specific role. By default, Discovery System Admin users have thefirst permission, whereas Case Administrator users in a case have the second. Ifyou have yet to open any cases, you must do so before you can assign roles to theusers in those cases.
See “Opening new Discovery Accelerator cases” on page 34.
To assign a role to a user
1 Do one of the following:
■ To assign an application role, click the Application tab in the DiscoveryAccelerator client, and then click the Role Assignment tab.
■ To assign a case role, click the Cases tab and then click the required casein the left pane. Then click the Role Assignment tab.If Discovery Accelerator lists a lot of cases, you can filter the list with thefields at the top of the pane. As well as filtering the cases by name, youcan choose whether to list any research folders that are associated withthem.
2 Click the name of the user to whom you want to assign a role.
If the user does not appear in the list, click Add at the top of the pane and thenselect the user to add to it.
3 In the right pane, do one of the following:
■ Click Add to assign a new role.
■ Click Remove to remove the selected role.
4 Click Save.
Deleting Discovery Accelerator rolesWhen you have no further use for a role, you can delete it. If you delete a role whileit is assigned to someone, that person retains the permissions associated with therole. Check for and remove the role assignment before you delete the role.
Note the following points before you proceed:
■ You can delete custom roles only, and not the predefined roles.
■ You must have the Manage Roles permission to delete a role. By default, userswith the role of Discovery System Admin have this permission.
31Setting up and assigning rolesDeleting Discovery Accelerator roles

To delete a role
1 Click the Application tab in the Discovery Accelerator client, and then clickthe Roles tab.
2 In the left pane, click the role that you want to delete.
3 Click Delete.
4 Click Delete again to confirm that you want to proceed.
32Setting up and assigning rolesDeleting Discovery Accelerator roles

Working with casesThis chapter includes the following topics:
■ About Discovery Accelerator cases
■ Opening new Discovery Accelerator cases
■ Checking the progress of Discovery Accelerator cases
■ Implementing analytics in Discovery Accelerator cases
■ Deleting Discovery Accelerator cases
About Discovery Accelerator casesEverything that is related to a discovery action, including user permissions, itemreviewers, the marking scheme, the tagging scheme, searches, analyses, and theset of items to be reviewed, is grouped in a case. Within a single DiscoveryAccelerator system, reviewers can work on multiple cases at the same time.
Discovery Accelerator provides an additional option with which you can enableanalytics on a case or a research folder. This option provides additional analysesof the metadata and content of items that are collected in the case.
Any new cases that you create with Discovery Accelerator 10.0.1 or later complywith the U.S. government's Federal Information Processing Standards (FIPS) forencoding and encrypting data. This is also true of any cases that you created witholder and non-FIPS-compliant versions of Discovery Accelerator, provided that youdid not enable analytics in these cases. If you have enabled analytics in these oldcases then, after you upgrade to Discovery Accelerator 10.0.1 or later, you canmake the cases FIPS-compliant by disabling analytics and then reenabling it.
4Chapter

Opening new Discovery Accelerator casesYou must have the Create and Configure Cases permission to open new cases.By default, only users with the role of Discovery System Admin have this permission.
See “About the Discovery Accelerator permissions” on page 24.
To open a new Discovery Accelerator case
1 Click the Cases tab in the Discovery Accelerator client.
2 In the left pane, click All Cases.
3 Click New at the top of the window.
The case properties pane appears.
4 Set the properties of the case. The table below describes the available fields.
Case
Identifies the case. Choose a name that indicates the natureof the case or the client.
Name
Determines whether case administrators and reviewers canaccess the case (Open) or not (Closed).
Case Status
34Working with casesOpening new Discovery Accelerator cases

Specifies the Windows account of the user who is to havespecial privileges to manage the case. Click Select Ownerto choose the owner from a list. A case cannot have multipleowners.
If you change the name of the case owner, the original ownerstill retains administrative permissions. To prevent this, usethe Role Assignment facility in the case to remove theassigned roles from the original owner.
See “Assigning Discovery Accelerator roles to users”on page 30.
Owner
Legal Holds
When this option is selected, places a hold on the items inthe case so that users cannot delete them from the sourceEnterprise Vault archives.
You must have the Manage Legal Holds permission to placeholds on the items in a case. By default, all caseadministrators have this permission.
Put items on hold
Provides a space for you to describe why you have placedthe items on hold.
Reason
Shows whether Discovery Accelerator is currently applyinglegal holds in the case.
Status
Shows the total number of items in the case.Number of items
Shows the number of items that Discovery Accelerator hasplaced on hold.
Number of holds
Shows the number of items that Discovery Accelerator hastemporarily been unable to place on hold. By default,Discovery Accelerator makes two attempts to place an itemon hold each time it performs a legal hold scan.
Number of errors
Shows the number of items that Discovery Accelerator cannotplace on hold because they no longer exist in the sourceEnterprise Vault archives.
Number of items notfound
Shows the number of items that Discovery Accelerator hasyet to place on hold.
Remaining items
Contains some information messages on the progress thatDiscovery Accelerator has made in placing the items on hold.
Information
Production details
35Working with casesOpening new Discovery Accelerator cases

For each item that you export or produce, specifies thenumber of digits to use for the export number in its file name.The default is 6.
Size of the export ID
Specifies the export number to include in the file name of thenext item that you export or produce.
Next export number
For each item that you export or produce, specifies the textto use as a prefix in its file name. You may want to use lettersto identify the items in accordance with legal or companyconvention.
The prefix can contain up to 10 characters, but it cannotinclude space characters or symbols such as \ / * ? | < and>.
Prefix
Displays a preview of the next export ID.Show Example
Specifies the folder in which to store the items that you exportor produce. By default, this folder is C:\ on the server thatis running the Enterprise Vault Accelerator Manager service.To export the items to another computer, specify the path toa shared network drive, as in \\my_computer\exports.
The folder path can contain up to 100 characters.
Output folder
Search details
Specifies the vault stores in which to search for the itemsthat are relevant to the case. Select or clear the box next toeach vault store to include it in searches or exclude it fromsearches.
Searchable Vault Stores
5 Click Save.
Checking the progress of Discovery Acceleratorcases
After you have given users permission to review the items in a case, you canmonitortheir progress. Where appropriate, you can change the number of items that youhave assigned to the reviewers.
You must have the Assign permission in a case to monitor the progress thatreviewers have made and change their review assignments.
36Working with casesChecking the progress of Discovery Accelerator cases

To check the progress of a Discovery Accelerator case
1 Click the Cases tab in the Discovery Accelerator client.
2 In the left pane, click the case whose progress you want to check.
3 Click the Review Assignment tab.
The Review Assignment pane appears.
4 Assess the progress that the reviewers have made.
To change the number of items that are assigned to reviewers
1 In the Reviewers box in the Review Assignment tab, click the names of thereviewers for whom you want to change the number of assigned items.
To select multiple adjacent reviewers, click the first reviewer, and then holddown the Shift key and click the last reviewer. To select nonadjacent reviewers,click the first reviewer, and then hold down the Ctrl key and click additionalreviewers. To select all the reviewers, press Ctrl+A.
2 Do one or more of the following:
■ To assign all the unassigned and unmarked items equally between theselected reviewers, clickAuto-Assign Items and then clickAssign Items.
■ To assign a specific number of items to the selected reviewers, clickAssignn of m unassigned items in the right pane and then type the requirednumber of items.
37Working with casesChecking the progress of Discovery Accelerator cases

■ To assign items by category, such as one or more date ranges or one ormore tags that Discovery Accelerator has applied to the items, clickAssignby item attribute in the right pane and then select the required option.
■ To move a specific number of items from the selected reviewers to anotherreviewer or back to the case review set, click Move in the right pane andthen type the required number of items.
■ To remove all the items that you have assigned to the selected reviewersand return them to the case review set, clickRemove Assigned Items andthen click Remove Items.
3 Click Apply.
Implementing analytics in Discovery Acceleratorcases
The analytics feature lets you collect as much information about the items found ina case as possible. Discovery Accelerator stores this information in the customerdatabase, where it can exploit the full-text indexing functions of SQL Server. Withthe information stored and indexed, you can efficiently analyze it and determineexactly what is relevant.
A number of additional facilities become available in Discovery Accelerator after ithas collected and indexed the analytics data. You can do the following:
■ Set up rules by which Discovery Accelerator automatically marks or categorizesthe items that it adds to the case.See “About analytics rules” on page 55.
■ Conduct searches within specific items in a case.See “Searching within the review set” on page 133.
■ Examine and review entire conversation threads in one view.See “Finding all items in the same conversation” on page 138.
Enabling a Discovery Accelerator case for analyticsWhen you create a case, analytics is not enabled by default. The reason for this isthat you may need to provision and control the SQL Server resources that arenecessary for analytics, and these may not be immediately available. After youenable a case for analytics, case items including content, attachments, and itemmetadata such as subject, recipients and other attributes, are fetched into thecustomer database. If you have already built analytics rules for a case before youenable it, the automatic categorization of items begins soon after collection starts.
38Working with casesImplementing analytics in Discovery Accelerator cases

Before you enable a case for analytics, note the following:
■ You must have the Manage Analytics permission to enable analytics.
■ Enabling a case for analytics can significantly increase the size of the customerdatabase. We recommend that you review the information on this in the BestPractices Guide, which you can obtain from the following page of the VeritasSupport website:https://www.veritas.com/docs/100024378
■ You must assign the required SQL Server roles to the Vault Service account, ifyou have not already done so. See the Installation Guide for instructions.
■ The version of Discovery Accelerator with which you enable analytics in a casedetermines whether Discovery Accelerator uses FIPS-compliant algorithms toidentify and deduplicate the case items. (FIPS, or Federal Information ProcessingStandards, are U.S. government standards for encoding and encrypting data.)That is:
■ Cases in which you enable analytics with Discovery Accelerator 10.0.1 orlater are FIPS-compliant, even if you created them with an older andnon-FIPS-compliant version of Discovery Accelerator.
■ You can ensure FIPS compliance for any pre-10.0.1 cases in which youpreviously enabled analytics by disabling analytics and then reenabling itwith Discovery Accelerator 10.0.1 or later.
■ If the case is in a customer database that belongs to a SQL AlwaysOnavailability group, and you remove the database from the availability group,then you may experience issues when you subsequently try to re-enableanalytics in the case. For guidelines on how to resolve these issues, see thefollowing article on the Veritas Support website:https://www.veritas.com/docs/100022235
To enable a Discovery Accelerator case for analytics
1 Click the Cases tab in the Discovery Accelerator client.
2 In the left pane, select the case that you want to enable for analytics.
39Working with casesImplementing analytics in Discovery Accelerator cases

3 Click the Analytics tab.
The Analytics pane appears.
4 If you want to define any case-specific review marks or tags before you enablethe case for analytics, click the appropriate hyperlink and then enter the details.
See “About review marks” on page 45.
5 If you want to define any rules for automatically categorizing the items in thecase, click the Define rules hyperlink and then set up the required markingrules and tagging rules.
See “About analytics rules” on page 55.
6 Click Enable.
Initially, the case’s status changes to "Enabling analytics" while the collectionof data is prepared. Subsequently, the status changes to "Analytics enabled"and the collection and indexing of data and the automatic categorization ofitems begin.
Monitoring the progress of analytics data collectionAfter you have enabled a case or folder for analytics, you can monitor the progressthat Discovery Accelerator makes while it collects and analyses items. You can dothis by viewing the Analytics tab in the Discovery Accelerator client. Table 4-1describes the information that each area of this tab provides.
40Working with casesImplementing analytics in Discovery Accelerator cases
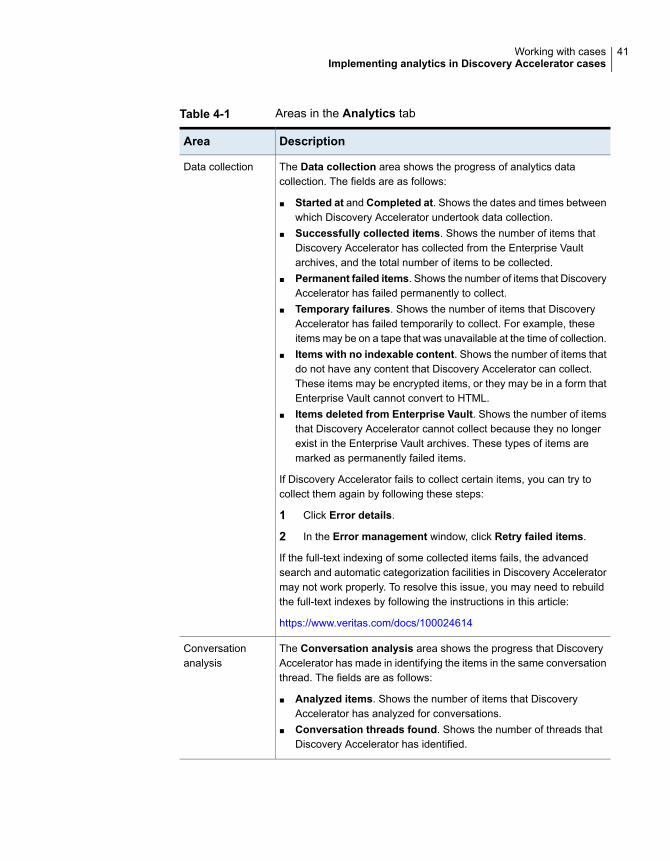
Table 4-1 Areas in the Analytics tab
DescriptionArea
The Data collection area shows the progress of analytics datacollection. The fields are as follows:
■ Started at and Completed at. Shows the dates and times betweenwhich Discovery Accelerator undertook data collection.
■ Successfully collected items. Shows the number of items thatDiscovery Accelerator has collected from the Enterprise Vaultarchives, and the total number of items to be collected.
■ Permanent failed items. Shows the number of items that DiscoveryAccelerator has failed permanently to collect.
■ Temporary failures. Shows the number of items that DiscoveryAccelerator has failed temporarily to collect. For example, theseitemsmay be on a tape that was unavailable at the time of collection.
■ Items with no indexable content. Shows the number of items thatdo not have any content that Discovery Accelerator can collect.These items may be encrypted items, or they may be in a form thatEnterprise Vault cannot convert to HTML.
■ Items deleted from Enterprise Vault. Shows the number of itemsthat Discovery Accelerator cannot collect because they no longerexist in the Enterprise Vault archives. These types of items aremarked as permanently failed items.
If Discovery Accelerator fails to collect certain items, you can try tocollect them again by following these steps:
1 Click Error details.
2 In the Error management window, click Retry failed items.
If the full-text indexing of some collected items fails, the advancedsearch and automatic categorization facilities in Discovery Acceleratormay not work properly. To resolve this issue, you may need to rebuildthe full-text indexes by following the instructions in this article:
https://www.veritas.com/docs/100024614
Data collection
The Conversation analysis area shows the progress that DiscoveryAccelerator has made in identifying the items in the same conversationthread. The fields are as follows:
■ Analyzed items. Shows the number of items that DiscoveryAccelerator has analyzed for conversations.
■ Conversation threads found. Shows the number of threads thatDiscovery Accelerator has identified.
Conversationanalysis
41Working with casesImplementing analytics in Discovery Accelerator cases

Table 4-1 Areas in the Analytics tab (continued)
DescriptionArea
Shows the number of marks and tags that you have defined for thecase or folder. Click the Define marks and Define tags hyperlinks toset up additional ones.
Marks and tags
The Automatic categorization area summarizes the progress thatDiscovery Accelerator has made in automatically categorizing the items.This process takes place in parallel with the collection of data, if youdefined analytics rules before you enabled the case or folder foranalytics. When Discovery Accelerator categorizes the items, the marksand tags that it applies are immediately available in the Review tab.
If the rules that you have created match too many or too few items, youcan change the rules to produce better results.
Discovery Accelerator lists marking rules and tagging rules separately.In both cases, Discovery Accelerator lists each rule’s name and actions,together with the number of items that the rule has categorized. In thecase of marking rules, Discovery Accelerator also shows the prioritylevel of each rule.
Note: After you enable a case or folder for analytics, there is a one-hourdelay before automatic categorization begins. So, the Automaticcategorization area can show that your rules have not marked ortagged any items, even after Discovery Accelerator has started to collectdata.
Automaticcategorization
Pausing and resuming analytics on a Discovery Accelerator caseAt any time, you can enable more than one case for analytics. Due to the largeamount of data collection and analysis that is required for multiple cases, it cantake a very long time to process all the enabled cases. You can pause analytics ona case-by-case basis if you want to speed up the collection of data on higher prioritycases. Later, you can resume analytics on these cases.
You must have the Manage Analytics permission to pause and resume analytics.
To pause and resume analytics on a Discovery Accelerator case
1 Click the Cases tab in the Discovery Accelerator client.
2 In theCases pane at the left, select the case that you want to pause or resume.
3 Click the Analytics tab.
4 Click Pause or Resume at the top of the tab, depending on what you want todo.
42Working with casesImplementing analytics in Discovery Accelerator cases

Speeding up analytics data collection in low-bandwidth environmentsWhen there are low-bandwidth connections (1GB or lower) between DiscoveryAccelerator and Enterprise Vault, and between Discovery Accelerator and SQLServer, the collection of analytics data can be slow due to high memory usage andservice restarts. If you know these connections to be slow, or if you experiencethese symptoms, you can take the following steps to speed up data collection.
To speed up analytics data collection in low-bandwidth environments
1 Pause the collection of analytics data.
2 Locate the AnalyticsIngesterTask.exe.config file in the DiscoveryAccelerator program folder.
3 Open the file in a text editor such as Windows Notepad.
4 Make the following configuration changes:
<add key="numECMThreads" value="1" />
<add key="maxThreadsPerVaultServer" value="1" />
<add key="numDBThreads" value="2" />
5 Save and close the file.
6 Resume the collection of analytics data.
Disabling analytics on a Discovery Accelerator caseAfter you disable analytics on a case, the marks and tags remain on the currentitems. However, any new items are not automatically categorized.
You must have the Manage Analytics permission to disable analytics.
To disable analytics on a Discovery Accelerator case
1 Click the Cases tab in the Discovery Accelerator client.
2 In the Cases pane at the left, select the case on which you want to disableanalytics.
3 Click the Analytics tab.
4 Click Disable.
Deleting Discovery Accelerator casesWhen you have no further use for a case, you may be able to delete it and all itsassociated objects. These objects include case-specific searches, research folders,and targets and target groups. Deleting a case also has the following consequences:
43Working with casesDeleting Discovery Accelerator cases

■ If you have enabled analytics on the case, Discovery Accelerator automaticallydisables it and deletes all the analytics information.
■ If you have placed legal holds on the items in the case, Discovery Acceleratorautomatically releases the holds on them.
However, before you delete a case in which you have implemented these features,the best practice is to disable analytics and wait for this process to complete, andthen release the legal holds and wait for this process to complete.
You must have the appropriate permissions to delete a case. Users with theapplication-wide Delete Case permission can delete any case in the system. Userswith the equivalent case-specific permission can delete cases in which they havethis permission.
To delete a Discovery Accelerator case
1 Click the Cases tab in the Discovery Accelerator client.
2 In the left pane, click All Cases.
3 Click one or more cases that you want to delete.
You can select multiple adjacent cases by holding down the Shift key whileclicking the first and last case in the range. To select multiple nonadjacentcases, hold down the Ctrl key while clicking the required cases. To select allthe cases, press Ctrl+A.
4 Click Delete.
5 Click Delete Cases to confirm that you want to proceed.
44Working with casesDeleting Discovery Accelerator cases

Setting up review marksand tags
This chapter includes the following topics:
■ About review marks
■ Creating review marks
■ How retained marks work
■ Editing review marks
■ Customizing the review marks that are associated with individual cases
■ Creating tags
■ Creating tag groups
About review marksWhen they check items, reviewers apply a mark to each item to indicate whetherit is relevant to the case. In a standard Discovery Accelerator installation, thepredefined marks are Relevant, Not Relevant, and Flagged, but you can modifythese marks and add new ones. You can also choose whether the items that aremarked in one case retain their marks when they appear in other cases.
Each mark has a status that is associated with it, such as Questioned or Reviewed.When you perform an export or production run, you can filter the items by their markor status, or by the name of the reviewer who marked them. For example, you canchoose to export only those items that reviewers have marked as Relevant.
Table 5-1 shows the statuses that Discovery Accelerator associates with the defaultreview marks.
5Chapter

Table 5-1 Default review marks and their associated statuses
Associated statusMark
ReviewedRelevant
ReviewedNot Relevant
QuestionedFlagged
The three available statuses (Pending, Questioned and Reviewed) are built intoDiscovery Accelerator, and you cannot modify them. Nor can you create newstatuses.
Creating review marksIf the predefined review marks do not precisely meet your needs, you can createnew ones. The predefined marks and any custom marks that you create comprisethe global set of review marks. This global set is available for use with all cases,but you can choose whether to use each mark on a case-by-case basis.
Caution: Be careful when creating new marks, as you cannot delete them afteryou have created them.
You must have the Manage Marks permission to create marks. By default, onlyusers with the role of Discovery System Admin have this permission.
To create a review mark
1 Click the Application tab in the Discovery Accelerator client, and then clickthe Marks tab.
2 Click New, and then clickMark. Alternatively, select an existing mark and thenclick Copy to create a new mark that is based on the properties of the old one.
The Mark Details pane appears.
46Setting up review marks and tagsCreating review marks

3 Type a name for the new mark and a description, if required.
The mark names appear as button labels at the bottom right of the Reviewpane, so it is advisable to keep them short. Discovery Accelerator displays thedescriptions as tool tips when you hover the mouse pointer over the markbuttons.
4 In the Status box, choose a status to associate with the mark.
All marks must be associated with a status, such as Questioned or Reviewed.You use the status to group items and so determine what is included in theproduction set.
5 In the Access Key box, type a shortcut key combination to associate with themark.
When reviewers press an access key combination, they can assign a specificmark to an item in the Review pane.
6 In the Roles box, select the default user roles with which to associate thereview mark. Users who occupy these roles can apply this mark to the itemsthat they review.
Later, you can refine the list of associated roles when you customize the marksthat are associated with an individual case.
7 If you want the mark to work across multiple cases, select Items retain thismark for use in other cases. When you select this option, the marks that you
47Setting up review marks and tagsCreating review marks

apply to an item in one case are also visible in other cases. You might typicallyselect this option for common, universal marks, such as one to denote junkmail.
Note that items do not retain their marks across multiple Discovery Acceleratorcustomer databases.
8 Click Apply.
How retained marks workDiscovery Accelerator keeps a master collection of all items that have ever beenaccepted into any case. When a reviewer marks an item then, depending on howyou defined that mark, the mark may apply just to the case or it may apply to thecase and also be copied to the master collection so that it can be used in othercases.
For example, you may want a mark that is called Spam to stay with items in themaster collection. If another search ever finds these items, they are already markedSpam and may not need to be reviewed again.
When you perform a new search and accept the results, Discovery Acceleratordoes the following for each item that you accept:
■ If the item has not been accepted before, Discovery Accelerator adds the itemto the master collection and creates a link from the case to it.
■ If the item has been accepted before, Discovery Accelerator creates a link fromthe case to the item in the master collection. It also checks for existing marks.If you choose to keep the existing marks when you accept the search results,Discovery Accelerator adds existing retained marks to the case. If you do notchoose to keep the existing marks, Discovery Accelerator removes them fromthe items in the case. However, it does not remove the existing marks from theitems in the master collection.
When a reviewer adds to an item a mark that has the property "Items retain thismark for use in other cases", that mark stays with the item in the master collectionso that it can be used in future cases. If the mark does not have this property, themark applies within the case but is not available to other cases.
Editing review marksYou can rename existing marks and change their descriptions, access keys, andassociated roles and statuses.
You must have the Manage Marks permission to edit marks. By default, only userswith the role of Discovery System Admin have this permission.
48Setting up review marks and tagsHow retained marks work

To edit a review mark
1 Click the Application tab in the Discovery Accelerator client, and then clickthe Marks tab.
2 In the left pane, click the name of the mark that you want to edit.
3 Enter the new details in the right pane.
4 Click Apply.
Customizing the reviewmarks that are associatedwith individual cases
By default, all the marks in your global set of review marks are associated withevery case. However, you can select the marks that are available for use in eachcase. You can also change the user roles that you have associated with each mark.
You must have the Manage Marks/Tags permission to customize the review marksthat are associated with a case.
To customize the review marks that are associated with an individual case
1 Click the Cases tab in the Discovery Accelerator client.
2 In the left pane, select the case for which you want to customize the reviewmarks.
If Discovery Accelerator lists a lot of cases, you can filter the list with the fieldsat the top of the pane. As well as filtering the cases by name, you can choosewhether to list any research folders that are associated with them.
3 Click the Marks tab.
4 Do one or more of the following:
■ To associate a new review mark with the case, click Add and then selectthe required mark in the Application Mark box at the right.
■ To change the user roles with which you have associated a review mark,click the mark name in the center pane. Then amend the details in theRoles box.
■ To dissociate a review mark from a case, click the mark name in the centerpane and then click Remove.
5 Click Apply.
49Setting up review marks and tagsCustomizing the review marks that are associated with individual cases

Creating tagsYou can also set up a secondary set of marks, called tags, which reviewers canassign to the items in a review set. In earlier versions of Discovery Accelerator,tags were called extra marks.
Tags differ from marks in that reviewers can assign multiple tags to an item, butthey can assign one mark only. In addition, a reviewer who assigns a mark to anitem also assigns the associated status to it. This is not the case with tags, whichdo not have an associated status.
You must have the application permission Manage Marks to create tags that areavailable for use in all cases. However, you require the permission ManageMarks/Tags in a case to create a tag that is available for use in that case only.
To create a tag
1 Do one of the following:
■ To create a tag that is available for use in all cases, click the Applicationtab in the Discovery Accelerator client, and then click the Tags tab.
■ To create a tag that is available for use in one case only, click the Casestab and then click the required case in the left pane. Then click the Tagstab.
2 Click New Tag. Alternatively, select an existing tag and then click Copy tocreate a new tag that is based on the properties of the old one.
The Tag Details pane appears.
50Setting up review marks and tagsCreating tags

3 Type a name for the new tag and a description, if required.
The tag names appear as options in a pop-up window at the bottom of theReview pane. Therefore, it is advisable to keep them short. DiscoveryAccelerator displays the descriptions as tool tips when you hover the mousepointer over the tag labels.
4 In the Access Key box, type a shortcut key combination to associate with thetag.
When reviewers press an access key combination, they can assign a specifictag to an item in the Review pane.
5 In the Roles box, select the default user roles with which to associate the tag.Users who occupy these roles can apply this tag to the items that they review.
6 Click Apply.
Creating tag groupsYou can group related tags into groups and present them in a list from whichreviewers can choose as they mark items. This facility is optional, but it offers anumber of benefits:
■ The number of tags that you can create is unlimited, and in theory reviewerscan have a hundred or more tags from which to choose. Grouping related tags
51Setting up review marks and tagsCreating tag groups

imposes some structure and makes display and selection less of an issue forthe reviewer.
■ Tag groups provide an indication of the use of the tags. For example, by groupingkey tags into a group that is called "Important Tags for Matter x", you offer aclue about the function of the tags.
■ You can use a tag group to present reviewers with a question, such as "Whichcustomer does this item apply to?", and then have them answer the questionby choosing between suitably labeled tags.
Two types of tag groups are available: single-choice groups and multiple-choicegroups.
Creating a single-choice tag groupReviewers can select one tag only from a single-choice group. For example, youmight use a single-choice group to ask the question "Is this item external email orinternal email?". As an item cannot be both, you might invite reviewers to choosebetween the two options by providing tags that are labeled "Internal" and "External".
A single-choice group contains the new tags that you define when you create thegroup. Unlike multiple-choice tag groups, you cannot assemble a single-choice taggroup from the existing tags in a case.
Youmust have the ManageMarks/Tags permission in a case to create single-choicetag groups.
To create a single-choice tag group
1 Click the Cases tab in the Discovery Accelerator client.
2 Click the required case in the left pane.
3 Click the Tags tab.
52Setting up review marks and tagsCreating tag groups

4 Click New Single Choice Tag Group.
The Single Choice Tag Group Details pane appears.
5 Type a name for the new tag group and a description, if required.
6 In the Values box, click New and then type the name of the first tag to includein the group.
7 Add more tags until the list is complete.
8 In the Roles box, select the default user roles with which to associate the taggroup. Users who occupy these roles can apply a tag to the items that theyreview.
9 Click Apply.
Creating a multiple-choice tag groupReviewers can select some or all of the tags in a multiple-choice group. For example,you might use a multiple-choice group to ask the question "What part of the car isthe item pertaining to?". This type of question can have multiple answers, and inthis case you might provide tags that are labeled "Brakes", "Tires", "Windshield",and so on.
You assemble a multiple-choice group from the existing tags in a case.
53Setting up review marks and tagsCreating tag groups

You must have the Manage Marks/Tags permission in a case to createmultiple-choice tag groups.
To create a multiple-choice tag group
1 Click the Cases tab in the Discovery Accelerator client.
2 Click the required case in the left pane.
3 Click the Tags tab.
4 Ensure that all the tags that you want to include in the group are listed in thecenter pane.
To create new tags, click New Tag and then enter the details of the new tag.If you previously created an application-level tag and want to add it to the case,click Add and then select the required tag.
5 Click New Tag Group.
The Tag Group Details pane appears.
6 Type a name for the new tag group and a description, if required.
7 In the Tags box, select the tags that you want to include in the group.
8 Click Apply.
54Setting up review marks and tagsCreating tag groups

Using rules to mark andtag items automatically
This chapter includes the following topics:
■ About analytics rules
■ Creating analytics rules
■ Overriding manual categorization
■ Editing analytics rules
■ Changing the priority levels of marking rules
■ About tagging rules
■ Manually editing queries in analytics rule definition language (RDL)
■ Deleting analytics rules
About analytics rulesWithin each case, you can create analytics rules to identify the items that matchyour search criteria. You can also configure these rules to apply marks and tagsautomatically to the matched items. This lets you automatically categorize the itemsthat match your criteria, before you manually review them in the Review pane.
All the indexed mail attributes and the content of each message are searchable inthe analytics rules that you create. For example, you can automatically classify allthe messages that are based on attributes such as the name of the sender, or wordsthat are present in the subject lines of the messages. Each case can have manyrules, and each rule can have multiple conditions.
6Chapter

Similarly, when you delete or disable a rule, new processing begins and removesmarks and tags from the items that the rules previously categorized.
Note the following:
■ You must have the Manage Automatic Categorization permission to build andmanage analytics rules.
■ You must ensure that the SQL Server Agent service is running if you want touse analytics rules to mark or tag items automatically.
Creating analytics rulesIf you know the search criteria that you want to use, you can define rules for a casebefore you enable it for analytics. Then, when you enable analytics, data collectionand indexing begins and rule actions are applied in parallel to mark and tag thematching items. You can also create and edit rules after you have enabled a casefor analytics. In this instance, the new rules start marking and tagging matchingitems immediately.
To create an analytics rule
1 Click the Cases tab in the Discovery Accelerator client.
2 In the Cases pane at the left, select the case for which you want to create therule.
3 Click the Rule Builder tab.
4 Click New at the top of the tab. Alternatively, to create a rule that is based onan existing rule, click the rule in theMarking rules area or Tagging rules areaand then click Copy.
The Rule details pane appears.
56Using rules to mark and tag items automaticallyCreating analytics rules

5 Type a name and description for the rule.
6 Select Rule enabled unless you want to disable the rule until a future time.
7 In the Rule conditions area, define one or more conditions that an item mustmeet to match the rule. Every rule must have at least one condition.
To define the conditions, proceed as follows:
■ In the Select attribute drop-down list, choose an attribute of the items forwhich to search. For example, choose Subject if you want to search thesubject lines of items.See “About the search attributes” on page 59.
■ In the next drop-down list, choose an operator to apply to the selectedattribute. For example, if you have set the attribute to Subject, you canchoose the Contains operator to search for those items whose subject linescontain certain words.See “About the operators” on page 69.
■ Set the required value for the attribute. For example, when the attribute isSubject and the operator is Contains, you can type Secret to search forthose items whose subject lines contain this word. Note the following:
57Using rules to mark and tag items automaticallyCreating analytics rules

■ The search string cannot contain any punctuation characters other thanthe underscore character.
■ You can append an asterisk (*) as a wildcard character to the end ofthe search string.
■ SQL Server does not index commonly occurring words such as "the"and "and", so Discovery Accelerator ignores these words when itencounters them in a search string. You can override this behavior byediting the SQL Server stopword file.See “About SQL Server stopwords” on page 72.
■ If you set the attribute to Subject, Content, or Subject or Content, choosewhether to turn search stemming on or off.Stemming lets you match the words that derive from the word that youspecify. For example, the word "run" matches "running" and "ran". Youcannot use wildcard characters in conditions that use stemming.
■ Click the + button to save the condition and add another one, if required.You define the relationship between two conditions with theAnd/Or buttons.And denotes that an itemmust match both conditions, whereasOr denotesthat the item can match one condition but not the other.
■ If you want to remove a condition, click the - button at the right of its row.
As you add conditions, they appear in theRule query area. When you becomefamiliar with the query language, you can construct more complex queries byediting the syntax manually.
See “Manually editing queries in analytics rule definition language (RDL)”on page 75.
8 If you have defined one or more custodians or custodian groups with CustodianManager, use the fields in the Rule condition settings area to specify howto search for them. In each case, you can choose to search email addresses,display names, or both. For custodian groups, you can choose to expand thedistribution lists of the groups to include their members in your searches, ratherthan just the list names and email addresses.
Note: Discovery Accelerator does not expand the distribution lists when youuse the Near operator with the attributes Subject, Content, Subject or Content,Author, To, CC, BCC, and Author or Recipients.
The conditions that you enter in the Rule conditions settings area use thecustodian information that is available at the time that you build the rule. Thisinformation is not updated unless you edit the rule again. For example, whenyou create a rule and select the option Expand distribution list to include
58Using rules to mark and tag items automaticallyCreating analytics rules
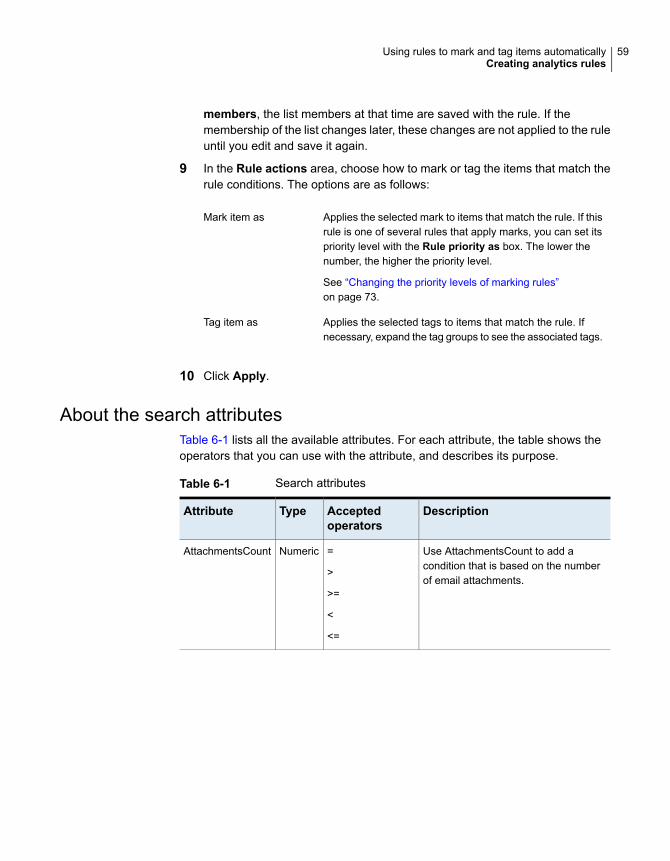
members, the list members at that time are saved with the rule. If themembership of the list changes later, these changes are not applied to the ruleuntil you edit and save it again.
9 In the Rule actions area, choose how to mark or tag the items that match therule conditions. The options are as follows:
Applies the selected mark to items that match the rule. If thisrule is one of several rules that apply marks, you can set itspriority level with the Rule priority as box. The lower thenumber, the higher the priority level.
See “Changing the priority levels of marking rules”on page 73.
Mark item as
Applies the selected tags to items that match the rule. Ifnecessary, expand the tag groups to see the associated tags.
Tag item as
10 Click Apply.
About the search attributesTable 6-1 lists all the available attributes. For each attribute, the table shows theoperators that you can use with the attribute, and describes its purpose.
Table 6-1 Search attributes
DescriptionAcceptedoperators
TypeAttribute
Use AttachmentsCount to add acondition that is based on the numberof email attachments.
=
>
>=
<
<=
NumericAttachmentsCount
59Using rules to mark and tag items automaticallyCreating analytics rules

Table 6-1 Search attributes (continued)
DescriptionAcceptedoperators
TypeAttribute
Use Author to add a condition that isbased on the email’s sender.
Enclose full names in double quotationmarks ("). You can also type first names,last names, or middle namesindividually.
Values that correspond to targets (T:),target groups (TG:), custodians (C:), andcustodian groups (CG:) must be on aseparate line. Prefixes such as T: andTG: must be in upper case.
Identify custodians by their primaryattribute values, and custodian groups,targets, and target groups by theirdisplay names.
CONTAINS
ANYOF
NOT CONTAINS
NOT ANYOF
StringAuthor
AuthorOrRecipients is a compositeattribute that lets you add a conditionthat is based on senders and recipientsin any of the following attributes:
■ From■ To■ CC■ BCC
Enclose full names in double quotationmarks ("). You can also type first names,last names, or middle namesindividually.
Values that correspond to targets (T:),target groups (TG:), custodians (C:), andcustodian groups (CG:) must be on aseparate line. Prefixes such as T: andTG: must be in upper case.
Identify custodians by their primaryattribute values, and custodian groups,targets, and target groups by theirdisplay names.
CONTAINS
ANYOF
NOT CONTAINS
NOT ANYOF
StringAuthorOrRecipients
60Using rules to mark and tag items automaticallyCreating analytics rules

Table 6-1 Search attributes (continued)
DescriptionAcceptedoperators
TypeAttribute
Use BCC to add a condition that isbased on the email’s BCC recipients.
Enclose full names in double quotationmarks ("). You can also type first names,last names, or middle namesindividually.
Values that correspond to targets (T:),target groups (TG:), custodians (C:), andcustodian groups (CG:) must be on aseparate line. Prefixes such as T: andTG: must be in upper case.
Identify custodians by their primaryattribute values, and custodian groups,targets, and target groups by theirdisplay names.
CONTAINS
ANYOF
ALLOF
NOT CONTAINS
NOT ALLOF
NOT ANYOF
StringBCC
Use CC to add a condition that is basedon the email’s CC recipients.
Enclose full names in double quotationmarks ("). You can also type first names,last names, or middle namesindividually.
Values that correspond to targets (T:),target groups (TG:), custodians (C:), andcustodian groups (CG:) must be on aseparate line. Prefixes such as T: andTG: must be in upper case.
Identify custodians by their primaryattribute values, and custodian groups,targets, and target groups by theirdisplay names.
CONTAINS
ANYOF
ALLOF
NOT CONTAINS
NOT ALLOF
NOT ANYOF
StringCC
61Using rules to mark and tag items automaticallyCreating analytics rules

Table 6-1 Search attributes (continued)
DescriptionAcceptedoperators
TypeAttribute
Use Content to add a condition that isbased on a string in the body of theemail, or in the file’s content.
Enclose any phrases in double quotationmarks ("). For all the accepted operatorsexcept NEAR, you can choose to turnsearch stemming on or off. DiscoveryAccelerator does not expand distributionlists when you use the NEAR operator,even if you select the option to do soelsewhere in the rule builder.
Values that correspond to targets (T:),target groups (TG:), custodians (C:), andcustodian groups (CG:) must be on aseparate line. Prefixes such as T: andTG: must be in upper case.
Identify custodians by their primaryattribute values, and custodian groups,targets, and target groups by theirdisplay names.
CONTAINS
ANYOF
ALLOF
NEAR
NOT CONTAINS
NOT ALLOF
NOT ANYOF
StringContent
62Using rules to mark and tag items automaticallyCreating analytics rules

Table 6-1 Search attributes (continued)
DescriptionAcceptedoperators
TypeAttribute
Use Custom to add a condition that isbased on any custom attributes createdduring archiving. Enter the name of thecustom attribute before you select anoperator and enter the search string.
For example:
Custom.Veritas.MyAttributeCONTAINS "Veritas"
Enclose phrases in double quotationmarks ("). If you select the ANYOF orNOTANYOF operator, you can separatemultiple values with commas.
Values that correspond to targets (T:),target groups (TG:), custodians (C:), andcustodian groups (CG:) must be on aseparate line. Prefixes such as T: andTG: must be in upper case.
Identify custodians by their primaryattribute values, and custodian groups,targets, and target groups by theirdisplay names.
=
NOT =
CONTAINS
ANYOF
ALLOF
NOT CONTAINS
NOT ALLOF
NOT ANYOF
StringCustom
Use Direction to add a condition that isbased on the direction of the email.Acceptable values are:
■ Internal■ External Inbound■ External Outbound■ Not Specified
=
ANYOF
NOT =
NOT ANYOF
ListDirection
63Using rules to mark and tag items automaticallyCreating analytics rules

Table 6-1 Search attributes (continued)
DescriptionAcceptedoperators
TypeAttribute
Use FileExtension to add a conditionthat is based on email extension typeand file types. Enter multiple file typesas a list. For example:
DOC PDF MSG
Enclose phrases in double quotationmarks ("). If you select the ANYOF orNOTANYOF operator, you can separatemultiple values with commas.
ANYOF
CONTAINS
NOT ANYOF
NOT CONTAINS
StringFileExtension
Use Importance to add a condition thatis based on the email’s importancesetting. Acceptable values are:
■ Low■ Normal■ High
=
ANYOF
NOT =
NOT ANYOF
ListImportance
Use MailDate to add a condition that isbased on the date the email wasreceived, and on the modified date ofemail’s attachments.
When you use the BETWEEN and theNOT BETWEEN operators, you mustspecify start and end dates.
=
>
>=
<
<=
BETWEEN
NOT BETWEEN
DateMailDate
Use MessageClass to add a conditionthat is based on the email’s MAPImessage class setting. For example:
IPM.Note.
Enclose phrases in double quotationmarks ("). If you select the ANYOF orNOTANYOF operator, you can separatemultiple values with commas.
ANYOF
CONTAINS
NOT ANYOF
NOT CONTAINS
StringMessageClass
64Using rules to mark and tag items automaticallyCreating analytics rules

Table 6-1 Search attributes (continued)
DescriptionAcceptedoperators
TypeAttribute
Use MessageType to add a conditionthat is based on the email’s type.Acceptable values are:
■ Bloomberg■ Domino Mail■ Exchange Mail■ Fax■ File■ IMAP■ Instant Messaging■ SharePoint■ SMTP Mail■ Social
=
ANYOF
NOT =
NOT ANYOF
ListMessageType
Use to ModifiedDate to add a conditionthat is based on the date the email orfile was last modified.
When you use the BETWEEN and theNOT BETWEEN operators, you mustspecify start and end dates.
=
>
>=
<
<=
BETWEEN
NOT BETWEEN
DateModifiedDate
Use OriginalLocation to add a conditionthat is based on the original location ofthe email or file. For example:
■ Inbox■ Sent items■ \\server\share\Sales
Enclose phrases in double quotationmarks ("). If you select the ANYOF orNOTANYOF operator, you can separatemultiple values with commas.
ANYOF
CONTAINS
NOT ANYOF
NOT CONTAINS
StringOriginalLocation
65Using rules to mark and tag items automaticallyCreating analytics rules

Table 6-1 Search attributes (continued)
DescriptionAcceptedoperators
TypeAttribute
Recipients is a composite attribute thatlets you add a condition that is basedon recipients in any of the followingattributes:
■ To■ CC■ BCC
Values that correspond to targets (T:),target groups (TG:), custodians (C:), andcustodian groups (CG:) must be on aseparate line. Prefixes such as T: andTG: must be in upper case.
CONTAINS
ANYOF
NOT CONTAINS
NOT ANYOF
StringRecipients
Use RetentionCategoryDisplayName toadd a condition that is based on theretention categories under which theitem was archived. For example:
General retention category
CONTAINS
NOT CONTAINS
StringRetentionCategoryDisplayName
Use RetentionExpiryDate to add acondition that is based on the date theemail or file is due to expire. Theretention category under which the itemwas archived determines the expirydate.
When you use the BETWEEN and theNOT BETWEEN operators, you mustspecify start and end dates.
=
>
>=
<
<=
BETWEEN
NOT BETWEEN
DateRetentionExpiryDate
Use Sensitivity to add a condition thatis based on the sensitivity of the email.Acceptable values are:
■ Normal■ Personal■ Private■ Confidential
=
ANYOF
NOT =
ListSensitivity
66Using rules to mark and tag items automaticallyCreating analytics rules

Table 6-1 Search attributes (continued)
DescriptionAcceptedoperators
TypeAttribute
Use Size to add a condition that is basedon the size of the email or file.
=
>
>=
<
<=
NumericSize
Use Subject to add a condition that isbased on strings in the email’s subject,and in file names.
Enclose any phrases in double quotationmarks ("). For all the accepted operatorsexcept NEAR, you can choose to turnsearch stemming on or off. DiscoveryAccelerator does not expand distributionlists when you use the NEAR operator,even if you select the option to do soelsewhere in the rule builder.
Values that correspond to targets (T:),target groups (TG:), custodians (C:), andcustodian groups (CG:) must be on aseparate line. Prefixes such as T: andTG: must be in upper case.
Identify custodians by their primaryattribute values, and custodian groups,targets, and target groups by theirdisplay names.
CONTAINS
ALLOF
ANYOF
NEAR
NOT CONTAINS
NOT ALLOF
NOT ANYOF
StringSubject
67Using rules to mark and tag items automaticallyCreating analytics rules

Table 6-1 Search attributes (continued)
DescriptionAcceptedoperators
TypeAttribute
SubjectOrContent is a compositeattribute that lets you add a conditionthat is based on strings in either of thefollowing attributes:
■ Subject■ Body
This attribute is also used to match usingstrings in a file’s name or content.
Enclose any phrases in double quotationmarks ("). For all the accepted operatorsexcept NEAR, you can choose to turnsearch stemming on or off. DiscoveryAccelerator does not expand distributionlists when you use the NEAR operator,even if you select the option to do soelsewhere in the rule builder.
Values that correspond to targets (T:),target groups (TG:), custodians (C:), andcustodian groups (CG:) must be on aseparate line. Prefixes such as T: andTG: must be in upper case.
Identify custodians by their primaryattribute values, and custodian groups,targets, and target groups by theirdisplay names.
CONTAINS
ALLOF
ANYOF
NEAR
NOT CONTAINS
NOT ALLOF
NOT ANYOF
StringSubjectOrContent
68Using rules to mark and tag items automaticallyCreating analytics rules

Table 6-1 Search attributes (continued)
DescriptionAcceptedoperators
TypeAttribute
Use To to add a condition that is basedon the email’s recipients.
Enclose full names in double quotationmarks ("). You can also type first names,last names, or middle namesindividually.
Values that correspond to targets (T:),target groups (TG:), custodians (C:), andcustodian groups (CG:) must be on aseparate line. Prefixes such as T: andTG: must be in upper case.
Identify custodians by their primaryattribute values, and custodian groups,targets, and target groups by theirdisplay names.
CONTAINS
ANYOF
ALLOF
NOT CONTAINS
NOT ALLOF
NOT ANYOF
StringTo
About the operatorsThe operators fall into the following categories:
■ Single-value operators, which accept one search value only
■ Multiple-value operators, which accept several search values
Table 6-2 lists all the single-value operators that are available.
Table 6-2 Single-value operators
DescriptionOperator
Use for numbers, dates, and lists. For example:
AttachmentsCount = 2
=, NOT =
Use for numbers and dates.<, <=, >, >=
69Using rules to mark and tag items automaticallyCreating analytics rules

Table 6-2 Single-value operators (continued)
DescriptionOperator
Use for strings. Wildcards are allowed in the search values.
Example 1:
Subject CONTAINS 'james'
This search matches all the items that contain the exact word"james" in the subject.
Example 2:
Subject CONTAINS 'james*'
This search matches both "A quick hello from James" and"A quick hello from Jamestown".
You cannot use a wildcard character at the start of a searchstring.
CONTAINS,NOTCONTAINS
Table 6-3 lists all the multiple-value operators that are available.
Table 6-3 Multiple-value operators
DescriptionOperator
Use for strings.
Searches match items that contain (or do not contain) all thevalues you supply. For example:
CC ALLOF '[email protected] [email protected]'
This search matches only items that contain both addressesin the CC field.
Wildcards are supported.
ALLOF, NOT ALLOF
Use for strings.
Searches match items that contain (or do not contain) anyof the values you supply. For example:
CC ANYOF '[email protected] [email protected]'
This search matches items that contain one of the addresses,or both addresses in the CC field.
Wildcards are supported.
ANYOF, NOT ANYOF
70Using rules to mark and tag items automaticallyCreating analytics rules

Table 6-3 Multiple-value operators (continued)
DescriptionOperator
Use for dates. For example:
MailDate BETWEEN "01/05/2010","31/05/2010"
You must place the earlier date before the later date.
BETWEEN, NOT BETWEEN
Use for strings.
Searches match items where the words that you specify arewithin 50 words of each other. For example:
Content NEAR 'contract money'
This search matches items where the words "contract" and"money" are fewer than 50 words apart in the body text.
See “Guidelines on using the NEAR operator condition inDiscovery Accelerator rules” on page 71.
NEAR
The syntax for searches that contain multiple-value operators is, for example:
attribute operator 'value1
"John Doe"
value3
T:Jane Smith'
Each custodian or target value must be on a separate line.
Guidelines on using the NEAR operator condition inDiscovery Accelerator rulesThere are a number of guidelines that you must observe when you use the NEARoperator condition in a rule.
■ Youmust specify more than one value as input for the NEAR operator condition.
■ If you combine a condition that uses a NEAR operator with one or more otherconditions, you can join the NEAR operator condition to the preceding andfollowing conditions with an AND logical operator only—not an OR operator.For example, consider the following rule:
Subject contains 'Veritas'
AND
Content Near 'Veritas Investment'
AND
MailDate = '17/03/2010'
71Using rules to mark and tag items automaticallyCreating analytics rules

OR
Importance = 'Normal'
You cannot insert an OR operator between the Subject and Content conditions,or between the Content and MailDate conditions. However, it is acceptable toinsert an OR condition between the MailDate and Importance conditions.
■ When a rule contains multiple NEAR operator conditions, they must all use thesame search attribute (Subject, Content, or SubjectOrContent). For example,in a rule that contains two NEAR operator conditions, you cannot set the attributeof one condition to Subject and the other to Content.
■ You cannot insert brackets in a rule condition that uses a NEAR operator.
■ When a rule contains multiple NEAR operator conditions, and the search valuesthat you specify are in different languages, the language of the first NEARoperator condition determines the language in which Discovery Acceleratorconducts all the searches in the rule.
About SQL Server stopwordsTo prevent a full-text index from becoming bloated, SQL Server has a mechanismthat discards commonly occurring words such as "the" and "and". These discardedwords are called stopwords. During index creation, the SQL full-text engine omitsstopwords from the full-text index, and consequently you cannot search for themby using Discovery Accelerator. For example, a search for the phrase "the lazydog" returns results where the phrase "one lazy dog" matches.
You can override this behavior by editing the SQL Server stopword file. The followingarticle in the Microsoft Knowledge Base describe how to do this:
https://msdn.microsoft.com/library/ms142551.aspx
Note that the stopwords are common to all full-text catalogs in the SQL instance.
Overriding manual categorizationBy default, analytics rules do not categorize the items that the rule conditions matchif the items have already been marked or tagged manually in the Review pane. Youcan use the override this behavior, however, and allow the rule engine to categorizeall items that match the conditions.
72Using rules to mark and tag items automaticallyOverriding manual categorization

Note: Use the override manual categorization feature with caution. You should useit only to override incorrect marks and tags that reviewers have applied manually.With this option enabled, you must also wait until automatic categorization iscomplete before you manually mark or tag any items on the case.
To override manual categorization
1 Click the Cases tab in the Discovery Accelerator client.
2 In the Cases pane at the left, select the case for which you want to overridemanual categorization.
3 Click the Rule Builder tab.
4 Click Override Manual Categorization near the top of the tab.
This feature remains in operation until the rule engine has completed its runbased on all the current rules. When it has completed its processing, theoverride manual categorization feature is automatically turned off again.
Editing analytics rulesYou can edit an existing rule to change its search criteria or disable it temporarily.
To edit an analytics rule
1 Click the Cases tab in the Discovery Accelerator client.
2 In the Cases pane at the left, select the case in which you want to edit the rule.
3 Click the Rule Builder tab.
4 In the Marking rules area or Tagging rules area, click the rule that you wantto edit.
5 Make the required changes to the rule. For example, if you want to disable therule temporarily, clear Rule enabled in the Rule details area.
6 Click Apply.
Changing the priority levels of marking rulesEach marking rule has a priority level, which you assign when you create it. Whenthe rule with the highest priority marks an item, no rule with a lower priority canmark the same item. Even if the conditions on the rule with the lower priority valuewould match the item, it is excluded from automatic categorization under this rule.
73Using rules to mark and tag items automaticallyEditing analytics rules

Rules that you have configured to apply both marks and tags to items also have apriority level. After a rule that applies both marks and tags has automaticallycategorized items, lower priority rules cannot categorize the items.
To change the priority level of a marking rule
1 Click the Cases tab in the Discovery Accelerator client.
2 In the Cases pane at the left, select the case in which you want to change thepriority level of a rule.
3 Click the Rule Builder tab.
4 In the Marking rules area, select the rule whose priority you want to change.
5 Click the up or down arrow next to the rule until it has the correct priority.
6 Click Apply.
About tagging rulesTagging rules behave differently from marking rules. Tagging rules do not have apriority level, and any number of tagging rules can match one item. However, whena tagging rule applies a tag from a single-choice tag group, no other rule can thenapply a tag from the same group.
When you disable a tagging rule that has applied tags from single-choice tag groups,the rule engine removes the tags, and may apply tags from single-choice groupsconfigured in other rules. If you turn on the first tagging rule again, it is possible forthe rule engine to produce different results from those that existed before youdisabled the rule.
For example, suppose that you have the following tag groups:
■ Single-choice group called SS1 contains tags called TagA and TagB.
■ Single-choice group called SS2 contains tags called TagY and TagZ.
Two tagging rules are configured to apply tags from these single-choice groups:
■ Rule1 applies TagA and TagY.
74Using rules to mark and tag items automaticallyAbout tagging rules

■ Rule2 applies TagB and TagZ.
There are 100 items that match the criteria of both rules. In this case, the rule engineprocesses Rule1 and applies TagA and TagY to the 100 items. Although the itemsalso match the criteria in Rule2, the rule engine does not apply TagB and TagZ tothe 100 items because they are already tagged by other tags from both thesingle-choice tag groups.
If you disable Rule1, the rule engine first removes TagA and TagY from the items,and then applies TagB and TagZ under Rule2. If you turn on Rule1 again, TagBand TagZ remain on the 100 items. The rule engine cannot now apply TagA andTagY because the 100 items are already tagged by other tags from both thesingle-choice tag groups.
Manually editing queries in analytics ruledefinition language (RDL)
The rules that you build in the Rule conditions area of the Rule Builder tab aredisplayed in the analytics rule definition language (RDL) in the Rule query area.When you become familiar with the syntax of rule definition language, you candirectly edit the queries. This lets you create rules that are not possible in the visualrule builder.
Note:When you have manually edited a query and saved it, you can no longer usethe visual query builder to edit the same rule.
Using parentheses to set Boolean precedence in analytics RDLYou can use parentheses to set Boolean precedence in your rules. Consider a casein which you want to mark or tag the items that match these conditions:
■ The sender is John Doe or the recipient is Jane Smith.
■ The email subject must contain the word Veritas.
To match these items, one user might use the visual rule builder to construct thefollowing rule:
Author CONTAINS '"John Doe"'
OR
To CONTAINS '"Jane Smith"'
AND
Subject CONTAINS 'Secret'
75Using rules to mark and tag items automaticallyManually editing queries in analytics rule definition language (RDL)

However, another user might construct the rule differently, and produce this result:
To CONTAINS '"Jane Smith"'
AND
Subject CONTAINS 'Secret'
OR
Author CONTAINS '"John Doe"'
In both cases, it is unclear what results are produced when the rule engine processesthe rules. To ensure that your rules produce the results that you want, write themdirectly in RDL and use parentheses to group the conditions that belong together.The parentheses ensure that related conditions are evaluated as you intend, andit is clear what your intentions are. For example:
(
Author CONTAINS '"John Doe"'
OR
To CONTAINS '"Jane Smith"'
)
AND
Subject CONTAINS 'Secret'
Using stemming in analytics RDLYou can use stemming when you search the Subject, Content or SubjectOrContentattributes. Use the following syntax:
attribute {STEM} operator value
Note: You cannot use wildcard characters in rule conditions that use stemming.
Any phrase values that you add to your searches should be enclosed in doublequotation marks. For example:
subject contains "the purchase order"
In RDL, complex search values must be enclosed in double quotation marks. Forexample:
SubjectOrContent AllOf
'
"the purchase order"
Stock Investment
'
76Using rules to mark and tag items automaticallyManually editing queries in analytics rule definition language (RDL)

In this case, the query matches the items that contain "the purchase order", "stock",and "investment" in the subject or body.
Specifying custodian and target values in analytics RDLTable 6-4 shows the format in which you must specify any custodian values ortarget values in a manually-edited analytics rule.
Table 6-4 How to specify custodian values and target values in analyticsRDL
ExampleWhat to typeItem
C:11:E12345C:ID:primary_attribute_valueCustodian
CG:3:Employees-ALLCG:ID:display_nameCustodian group
T:4:Jane SmithT:ID:display_nameTarget
TG:23:VIP - ExecutivesTG:ID:display_nameTarget group
When the primary attribute value for a custodian contains an apostrophe, you mustprecede the apostrophe with a backslash (\). For example, if the primary attributevalue is "Sean O'Casey", you might add it to an analytics rule like this:
Author CONTAINS 'C:8:Sean O\'Casey'
After you click Edit Query in theRule query area of theRule Builder tab, a LaunchTarget Picker button appears at the right of the area. Click this button to selectand enter the required custodian value or target value in the correct format.Alternatively, you can use this method to obtain the required ID value of thecustodian or target, as Figure 6-1 shows.
Figure 6-1 Using the Target Picker to obtain the ID value of a custodian ortarget
77Using rules to mark and tag items automaticallyManually editing queries in analytics rule definition language (RDL)

Deleting analytics rulesIf you want to stop a rule from processing, you can delete it.
To delete an analytics rule
1 Click the Cases tab in the Discovery Accelerator client.
2 In the Cases pane at the left, select the case from which you want to deletethe rule.
3 Click the Rule Builder tab.
4 In the Marking rules area or Tagging rules area, click the rule that you wantto delete.
5 Click Delete.
6 Click OK to confirm that you want to delete the rule.
78Using rules to mark and tag items automaticallyDeleting analytics rules

Using CustodianManagerThis chapter includes the following topics:
■ About Custodian Manager
■ Guidelines on using Custodian Manager
■ Setting up custodians
■ Setting up custodian groups
■ Setting up custom custodian attributes
■ Setting the primary custodian attribute
■ Specifying the user account under which to synchronize custodians
■ Synchronizing with entire Active Directory domains and Domino servers
■ Setting the configuration options for Custodian Manager
About Custodian ManagerCustodian Manager lets you submit the details of custodians and custodian groupsfor which you want to search when you conduct a Discovery Accelerator search. Acustodian is an individual employee, whereas a custodian group is any collectionof employees. Some examples of possible custodian groups are NT groups,distribution lists, Active Directory containers, Domino LDAP queries, and Dominogroups.
After you have submitted a few details of a custodian or group in CustodianManager,you can synchronize themwith an external source like Active Directory or a DominoLDAP directory. This process keeps the data in Custodian Manager up-to-date andlets you retrieve additional information about the custodian or group from the externalsource.
7Chapter

Custodian Manager also lets you assign additional, custom attributes to custodiansand custodian groups. Use these attributes to filter the list of custodians and groupsfor which to search in Discovery Accelerator. For example, you can create a customattribute called "Cost Center 1", assign it to the custodians who belong to the costcenter, and then pick the attribute when you define your search targets withDiscovery Accelerator.
Note: If the data that you want to add to Custodian Manager already exists and isconvertible to XML format, you can import it into Discovery Accelerator from anXML file.
See “About importing configuration data” on page 225.
To start Custodian Manager from the Windows desktop
◆ Open your web browser and go to the following location:
http://server_name/EVBACustodianManager
Where server_name is the name of the server on which you installed theDiscovery Accelerator server software.
To start Custodian Manager from the Discovery Accelerator client
1 Click the Custodians tab in the Discovery Accelerator client, and then clickthe Custodian Manager tab.
2 Click the Click here to open Custodian Manager web site hyperlink.
Guidelines on using Custodian ManagerFor the best results when running Custodian Manager, note the following:
■ Use the hyperlinks to navigate from page to page rather than shortcut keys orthe buttons in the browser toolbar. In particular, click the OK and Close buttonsat the bottom of most pages to close a page and return to the previous page.Do not press the Backspace key or click the Back button in the toolbar.
■ Click the Veritas Enterprise Vault Custodian Manager banner at the top ofany page to return to the home page.
■ In most cases, you can reload the current page by right-clicking it and thenselecting Refresh. Clicking the Refresh button in the browser toolbar displaysthe home page of Custodian Manager.
■ If Custodian Manager finds an error when it validates the information that youhave entered in a page, it displays an exclamation point. To view informationon the error, hover the mouse pointer over the exclamation point.
80Using Custodian ManagerGuidelines on using Custodian Manager

Setting up custodiansYou can enter a few custodian details and then populate the rest by synchronizingwith the corresponding Active Directory or Domino LDAP directory account.
To set up a custodian
1 In the Custodian Manager home page, click Custodians.
2 In the Custodian Management page, click New Custodian.
3 In the Create Custodian page, type the employee's name and the correspondingdisplay name.
4 In the Organization section, type the company details for the employee.Complete the boxes as follows:
Specifies the custodian's job title.Title
Identifies the custodian's department within the company.Department
Your company policy should specify how this box is used. Forexample, the start date can indicate when the employee joinedthe company.
Start Date
As with the start date, your company policy should specify howthis box is used. For example, the end date can indicate when theemployee left the company. This date is important for preservingaccurate system information.
End Date
If your company's administration or finance department issueseach employee with a unique company ID, you can enter it here.
Employee ID
These names aremandatory if you want to synchronize informationwith either Active Directory or a Domino LDAP directory. Enter thename in the form domain\login_name, or click Browse to displaya list of accounts and then select the one for this employee. Bothnames are optional but, if you want to associate a Windowsaccount with a Domino account, you must set both.
Username andDomino Username
5 If you have set up any custom attribute values to assign to your custodians,add them in the Custom Attributes area.
Click Add to select from a list of predefined attribute values or, for the attributesthat accept free text values, type the value in the box. You can remove anexisting value from an attribute by clicking Remove.
81Using Custodian ManagerSetting up custodians

6 In the Automatically Synchronize Properties section, specify whetherregularly to update the custodian details with values in the associatedWindowsor Domino user account. This section is unavailable until you enter a user namein the Organization section.
By default, Discovery Accelerator synchronizes custodians and groups everyeight hours and every time the Discovery Accelerator service starts. To changethis schedule, click Settings in the Custodian Manager home page, selectProfile Synchronization in the drop-down list, and then set the requiredsynchronization interval.
7 In the Email Display Name Addresses section, list the display names thatare currently associated with the custodian's email addresses.
8 In the Email Addresses section, type all the email addresses associated withthe custodian—one address per line. If you search for the items that were sentto or from this custodian, Discovery Accelerator includes all the listed addressesin the search. To ensure that you capture all the relevant items, remember toadd old email addresses.
9 Click OK.
Setting up custodian groupsAs well as setting up custodians, you can set up custodian groups and synchronizethem with a variety of source groups, including the following:
■ Windows and Domino groups and distribution lists
■ Active Directory and Domino LDAP searches
■ Active Directory containers
Using custodian groups helps to simplify the management of custodians. Bysynchronizing a custodian group with a Windows or Domino user group, you canset up multiple custodians automatically.
If you want to synchronize the custodian group with a Domino group or distributionlist, enable the following Domino LDAP attributes for anonymous access in DominoAdministrator:
■ cn
■ dominocertificate
■ maildomain
■ member
82Using Custodian ManagerSetting up custodian groups

■ objectclass
See the Domino documentation for instructions on how to enable the attributes foranonymous access.
To set up a custodian group
1 In the Custodian Manager home page, click Custodian Groups.
2 In the Custodian Groups Management page, click New Custodian Group.
3 Complete the fields in the Create Group page, and then click OK.
Setting up custom custodian attributesCustodian Manager automatically synchronizes a number of standard custodianattributes with the corresponding values in an external source like Active Directory.These standard attributes include the custodian's first and last names, department,and start and end dates. If you want to synchronize any additional attributes, youcan define custom attributes and map them to the corresponding attributes in theexternal source.
To set up a custom custodian attribute
1 In the Custodian Manager home page, click Custodian Attributes.
2 In the Custodian Attributes page, click New Custodian Attribute.
3 In the Custom Custodian Attribute page, type the name and an optionaldescription for the attribute.
4 If you want to make the attribute visible when you add or edit the details of acustodian, select Display this attribute on the custodian details page. Ifyou do not mark an attribute as visible then it does not appear on these pages,and you cannot assign it to your custodians.
5 Select Set as primary attribute if you want to make this attribute the primaryattribute with which to identify custodians in the Discovery Accelerator client.When client users define the criteria for a search or analytics rule, they cannominate custodians for whom to search by specifying the primary attributevalues.
Every custodian must have a value for the primary attribute, and every valuemust be unique.
6 In the Synchronize box, specify the details of the attribute in Active Directoryor a Domino LDAP directory with which to synchronize the new attribute.
7 If you chose to synchronize the attribute with attributes in both Active Directoryand a Domino LDAP directory, select which of the two sources has priority.
83Using Custodian ManagerSetting up custom custodian attributes

8 If you want to enter a free-text value for the attribute instead of choosing froma list of supplied values, select Allow free text values to be entered.
9 To add or modify the values from which to choose when setting the attributein the custodian properties pages, do the following:
■ To add a new value, click New Value and then type the required name anddescription.
■ To list any existing attribute values, type the name or partial name of thevalue in the Find box. You can also click Download All Attribute Valuesto make a comma-separated value (CSV) file that lists the values.
■ To edit an existing value, click Edit at the right of the row and then makethe required changes. Custodian Manager automatically updates theproperties of any custodian to which you assigned the value.
■ To delete an existing value, click Delete at the right of the row. CustodianManager automatically removes the value from the properties of anycustodian to which you assigned it.
10 Click OK.
Setting the primary custodian attributeWhen Discovery Accelerator client users define the criteria for a search or analyticsrule, they can nominate the custodians for whom to search by specifying the primaryattribute values. For example, the default primary attribute is Display Name, so auser who creates a search nominates the target custodians by specifying theirDisplay Names. Every custodian must have a value for the primary attribute, andevery value must be unique.
If you prefer to search for custodians by an attribute other than Display Name, youcan set a different attribute as the primary. Note that the Display Name andEmployee ID attributes are the only standard custodian attributes that you can setas the primary attribute. However, you can set any custom attribute as the primaryattribute.
To set the primary custodian attribute
1 In the Custodian Manager home page, click Custodian Attributes.
2 In the Custodian Attributes page, click the name of the attribute that you wantto set as the primary attribute.
3 In the Custodian Attribute page, select Set as primary attribute.
4 Click OK to confirm that you want to set the new attribute as the primaryattribute.
84Using Custodian ManagerSetting the primary custodian attribute

5 ClickOK to save the change that you have made and go back to the CustodianAttributes page.
6 Restart the Enterprise Vault Accelerator Manager service on all DiscoveryAccelerator servers.
7 Instruct all Discovery Accelerator client users to restart the client software.
Specifying the user account under which tosynchronize custodians
By default, Custodian Manager uses the account under which the AcceleratorManager service is running when it synchronizes custodians and custodian groupswith the corresponding Active Directory accounts. If you prefer, you can nominatea different account on a per-domain basis.
The nominated synchronization account must have certain permissions in ActiveDirectory. For guidelines on how to assign these permissions, see the InstallationGuide.
To specify the user account under which to synchronize custodians
1 In the Custodian Manager home page, click Synchronization Accounts.
2 In the Synchronization Accounts page, click New Account.
3 In the Synchronization Account page, type the NetBIOS name of the ActiveDirectory domain with which you want to synchronize.
4 Specify the user account under which to perform Active Directory access forthe domain. The nominated account must have certain permissions to querythe Active Directory domain.
ClickCheck Account to verify that the nominated user account has the requiredpermissions.
5 If your environment has multiple domain controllers and you want to specifythe preferred one for Custodian Manager to contact, type its fully qualifieddomain name in the Preferred domain controller box.
The following occurs when you specify a preferred domain controller:
■ Custodian Manager contacts the preferred domain controller and performsan initial, full synchronization with the Active Directory domain. It thencontacts this domain controller for subsequent, incremental synchronizationruns.
■ If the preferred domain controller is unavailable, Custodian Manager waitsfor a specified period before it attempts another, full synchronization with
85Using Custodian ManagerSpecifying the user account under which to synchronize custodians

the same domain controller. The delay period is set by the ProfileSynchronization option "Time to wait before full synchronization (hours)",which you can access by clicking Settings in the CustodianManager homepage. By default, it is 36 hours.See “Setting the configuration options for Custodian Manager” on page 87.
■ If Custodian Manager still cannot contact the preferred domain controller,it contacts the next available controller and performs a full synchronization.For subsequent synchronization runs, Custodian Manager first tries toperform a full synchronization with the preferred controller. However, if thisserver is unavailable, Custodian Manager performs an incrementalsynchronization with the last-used controller.
The following occurs when you do not specify a preferred domain controller:
■ Custodian Manager contacts the first available domain controller andperforms an initial, full synchronization with the Active Directory domain.
■ For subsequent, incremental synchronization runs, Custodian Managercontacts the domain controller that it used for the initial, full synchronization.However, if this domain controller is unavailable, Custodian Managercontacts the next available domain controller and performs a fullsynchronization. Then it uses the new domain controller for subsequent,incremental synchronization runs, unless it too becomes unavailable. Inthis case, the process goes back to the beginning: Custodian Managercontacts the next available domain controller and performs a fullsynchronization.
6 Enter any DNS fully qualified domain names that you want to map to theNetBIOS name.
7 Click OK.
Synchronizing with entire Active Directorydomains and Domino servers
You can instruct Custodian Manager to create custodians and custodian groupsautomatically for every user and group that it finds.
To synchronizeCustodianManagerwith anActive Directory domain or Dominoserver
1 In the Custodian Manager home page, click Directory Synchronization.
2 In the Directory Synchronization page, clickNew Directory Synchronization.
86Using Custodian ManagerSynchronizing with entire Active Directory domains and Domino servers

3 Choose whether to synchronize Custodian Manager with an Active Directorydomain or Domino server. Then type the name of the required domain or server.
4 Select Enable synchronization.
5 Do one of the following, depending on whether you want Custodian Managerto synchronize with some or all of the containers in the nominated domain orserver:
■ To synchronize with all the containers, clickWhole Domain/Server andthen optionally choose to synchronize with mail-enabled users ormail-enabled groups only.
■ To synchronize with selected containers only, click The followingcontainers and then click Add a container to supply the container details.
If you select Synchronize mail enabled groups & members only, and notSynchronizemail enabled users as well, the synchronization process updatesthe Custodian Manager records to reflect the following changes only:
■ The addition of a member to a group
■ The removal of a member from a group
■ Any changes to the LDAP properties of a group
Select Synchronize mail enabled users if you also want to update theCustodian Manager records to reflect any changes to the LDAP properties ofgroup members.
6 Click OK.
Setting the configuration options for CustodianManager
Many aspects of Custodian Manager are configurable. For example, you can specifythe following:
■ The frequency with which Custodian Manager synchronizes custodian detailswith the corresponding Active Directory or Domino LDAP directory accounts.
■ The number of days that Custodian Manager should wait before it marks asdeactivated a custodian for whom no Active Directory or Domino LDAP directoryaccount is available.
■ Whether to delete the email addresses associated with a custodian before yousynchronize the custodian with the corresponding Active Directory or DominoLDAP directory account.
87Using Custodian ManagerSetting the configuration options for Custodian Manager

To set the system configuration options for Custodian Manager
1 In the Custodian Manager home page, click Settings.
2 In the Settings for box in the Settings page, click the category of settings thatyou want to customize.
You can configure general Custodian Manager options (General). You canalso control how Custodian Manager synchronizes the custodians with thecorresponding Active Directory or Domino LDAP directory accounts (ProfileSynchronization).
3 For each option whose value you want to change, do the following in the orderlisted:
■ Click Edit at the right of the row.
■ Set the required value.
■ Click OK at the right of the row.
4 When you have set all the required options, click OK at the bottom of the pageto return to the previous page.
5 If necessary, restart the Enterprise Vault Accelerator Manager service to putyour changes into effect.
88Using Custodian ManagerSetting the configuration options for Custodian Manager

Searching for itemsThis chapter includes the following topics:
■ About searching with Discovery Accelerator
■ Creating and running Discovery Accelerator searches
■ About the search criteria options
■ Guidelines on conducting effective searches
■ Pausing and resuming Discovery Accelerator searches
■ About the Monitor Searches tab
■ Selecting the archives in which to search
■ Specifying the details of custom search attributes
■ Restricting search results to correspond to Compliance Accelerator departments
■ Defining email targets with Address Manager
■ Building Discovery Accelerator search schedules
■ Setting up custom message types
■ Using Discovery Accelerator to search archived Skype for Business content
About searching with Discovery AcceleratorWhen you have created a case or folder, you must search for information to includein it. This process involves the following activities:
■ Running one or more searches on the relevant vault stores for suitableinformation. Discovery Accelerator offers a wide range of search criteria from
8Chapter

which to choose: words and phrases to look for, date ranges, message size,author and recipient addresses, and more.
■ Studying the search results to assess their suitability, and then either acceptingor rejecting the results.
■ Searching again, until you have amassed all the information that you need.
When you are happy with the search results, you then go on to review the itemsthat you have found.
You can build search schedules if you want to run searches at set times or set uprecurrent searches that run automatically. You can also customize the list ofEnterprise Vault archives in which Discovery Accelerator searches for items.
If you want to search for particular message senders or recipients, you can storetheir email addresses in Address Manager. When you next define the criteria for asearch, you can select the users from a list.
Limitations on searching certain types of Skype for Business contentEnterprise Vault 12.2 and later provides the facility to archive Skype for Businessinstant messaging and conferencing communications. Enterprise Vault archiveseach of these communications as an individual email (.eml) file that, in DiscoveryAccelerator, has a message type of Instant Messaging.
Skype for Business communications can include whiteboards and polls that usersshare during a conference. The content of these two conference features is storedin a Microsoft-proprietary XML format, which Enterprise Vault cannot index. As aresult, you cannot use the facilities in either Enterprise Vault or Discovery Acceleratorto search the text content of these items.
Creating and running Discovery Acceleratorsearches
You must have the Search permission in a case or folder to create and run a searchin it. If you have the Search Preview permission, you can preview the results of asearch before you accept them.
To create and run a Discovery Accelerator search
1 Do one of the following:
■ To create a search that runs in a case, click the Cases tab in the DiscoveryAccelerator client and then click the required case in the left pane.
90Searching for itemsCreating and running Discovery Accelerator searches

■ To create a search that runs in a research folder, click the Research tabin the Discovery Accelerator client and then click the required folder in theleft pane.
If Discovery Accelerator lists a lot of cases and folders, you can filter the listwith the fields at the top of the pane.
2 Click the Searches tab.
3 Click New Search.
The search properties pane appears.
4 If you are creating a search that runs in a research folder, and you clicked AllResearch in the left pane, Discovery Accelerator prompts you to select a casewith which to associate the search. Make your selection, and then click Search.
5 Enter the required search criteria.
See “About the search criteria options” on page 93.
91Searching for itemsCreating and running Discovery Accelerator searches

6 Click Save to start an immediate search or queue a scheduled search to startautomatically at the appointed time.
Discovery Accelerator displays a preview list as soon as it finds a search result.You can immediately begin to read items from the preview display, and, ifnecessary, stop a search that does not return the results that you expect. Thenyou can refine the search criteria and perform the search again.
The Search Details pane provides the following information:
Shows the name of the archive that Discovery Accelerator hassearched.
Archive
Provides the ID of the volume that holds the archive.Volume
Indicates the type of vault store that contains the archive.Vault Store
Shows the current status of the search in each archive.Status
Shows the amount of time that Discovery Accelerator has takento search each archive.
Duration
Shows the number of items in each archive that match the searchcriteria.
Hits
Provides details of any errors that occurred.Information
You can filter the list of archives by selecting an option in the Show list. Forexample, you can filter the archives to show the top 2000 archives by hits, orall archives with a status of "Error". To download the search details as acomma-separated value (CSV) file, click Download Search Details for AllArchives.
7 When the search has completed, choose whether to accept or reject the results.Note the following:
■ Discovery Accelerator does not add the captured items to the review setuntil you accept the search results. If you did not select Automaticallyaccept search results, you must manually accept or reject the results.
■ The options to assign a default mark and reviewer to the search resultsapply only to newly discovered items. If the search results include itemsthat you have previously captured and added to the review set, these itemsretain their assigned marks and reviewers.The option to keep existing marks applies only to those items to whichreviewers have already assigned marks in another case.
92Searching for itemsCreating and running Discovery Accelerator searches

■ If you reject the results of a search, Discovery Accelerator deletes the searchand results from the database. However, it leaves the actual items in thearchives.
■ It is important that search results make sense because, after you acceptthe search, you cannot undo it.
About the search criteria optionsDiscovery Accelerator groups the search criteria options into multiple sections,which are described below. Click the arrow icons at the right to expand or collapsethe sections.
When you construct a search that contains multiple options, pay attention to howeach option interacts with the others in the search properties pane. DiscoveryAccelerator links all the selected options together with Boolean AND operatorsrather than OR operators. For example, suppose that you construct a search whosecriteria include the following:
■ A data range in the Date range section
■ A search term in the Search terms section
■ A file extension in the Attachments section
The search results contain only those items that match all the search criteria.Discovery Accelerator ignores any items that match some of the search criteriaoptions but not others.
The search properties pane has the following sections:
■ Search section
■ Date range section
■ Search terms section
■ Archives section
■ Attachments section
■ Miscellaneous section
■ Policies section
■ Custom attributes section
Search sectionThe Search section identifies the search and specifies when it runs.
93Searching for itemsAbout the search criteria options

Identifies the case or research folder in which the searchruns. When the folder is not linked to any case, "MyResearch" appears.
Context
Specifies a name for the search, such as "Daily MessageCapture (London)".
Name
Lets you select an existing search as the basis on which toset the criteria for the new search.
Based on Search
If displayed, lets you select a location in which to save theresults. Select New folder in <Context> in the drop-downlist if you want to specify the details of a new folder in whichto save the results.
This option is available only when you create a search in afolder that is not linked to any case (you have selected "MyResearch" in the left pane).
Save results in
Specifies whether the search runs immediately or at ascheduled time. If you select Scheduled, you can specify aperiod during which the search is to run. You can also choosefrom one of a number of existing schedules.
See “Building Discovery Accelerator search schedules”on page 117.
Search Type
Specifies whether to add the search results to the review setautomatically. This option may be useful for any provensearches that you intend to run on a regular basis. If youselect Automatically accept search results, you cannotreject the results and change the search criteria. Werecommend that you clear Automatically accept searchresults until you have tested that the search returns theexpected results.
A search that returns an error from any archive is notautomatically accepted, regardless of this setting.
Automatically accept searchresults
Specifies whether the search results can include the itemsthat you have previously captured and added to this case'sreview set. This option does not apply to the items that youhave previously included in the review sets for other cases.
For an immediate search or scheduled search, werecommend that you select this box to ensure that the resultsinclude the items that may already be in review from othersearches.
Include items already inreview
94Searching for itemsAbout the search criteria options

Date range sectionThe Date range section lets you search for items according to when they were sentor received.
Limits the search to items that were sent or received duringthe selected period. The date ranges are relative to when thesearch runs, which is today in the case of an immediatesearch.
Youmay find these options useful when creating a scheduled,recurrent search that runs once every day, week, two weeks,or four weeks. For example, if the search runs once a week,select Last 7 days to limit the range to the days since thesearch last ran.
Today / Yesterday / Last 7days / Last 14 days / Last 28days
Lets you search the items that were sent or received duringa longer or more specific period than the other date rangeoptions permit. To enter a date, click the options at the rightof the From and To boxes and then select the required date.Enter the time in the format hh:mm, using the 24-hour clock.Unlike the other date range boxes, a specific date rangeremains static and not relative to when the search runs.
Select Use Historical Information for Custodians andCustodian Groups to use both the current information andhistorical information for custodians and custodian groups inthe search. If you clear this option, Discovery Acceleratoruses only the current set of custodians, groups, and emailaddresses. Any users or groups whose names or emailaddresses have changed, or who have been deactivated forsome reason, are excluded from the search.
Specific date range
For a scheduled search only, lets you search the new itemsthat have arrived since the last time you ran the search. Thisoption is similar to options such as Today and Yesterday.However, it lets you set an explicit start date for the first runof the search.
By default, this option searches from the date of the last run(or the start date for the first search) to the current day minus1 (that is, up to yesterday).
Since search last ran
Search terms sectionThe Search terms section specifies the words or phrases for which DiscoveryAccelerator should search in items. Click Add search term to add each word orphrase for which you want to search. Note the following:
■ Discovery Accelerator searches are case-insensitive.
95Searching for itemsAbout the search criteria options

■ Regular expressions are not permitted.
■ To search for a phrase, enclose the words in quotation marks.For example, you can search for all items whose subject lines contain the phrase"organizational changes" by defining a search term like this one:
SUBJ: "organizational changes"
Discovery Accelerator considers the file names of message attachments to betheir subjects. So, the preceding search term finds both items that contain thephrase "organizational changes" in their subject lines and attachments that havethis phrase in their file names.
■ If you type multiple words on the same line, Discovery Accelerator finds all itemsthat contain any of the words or phrases on the line.Note that you must separate all the words in the search term with spaces. Thefollowing search term does not return the expected results because there is nospace between the words "changes" and "license"—and consequently DiscoveryAccelerator searches for items that contain one or more of the following words:"organizational", "changeslicense", and "agreements".
SUBJ: "organizational changes""license agreements"
Similarly, the search terms license;agreements and license; agreements
differ because, in the second case, a space follows the semicolon. The presenceof the space causes Discovery Accelerator to find the items that contain eitherword, whereas the absence of the space causes Discovery Accelerator to treatthe search term as a phrase.
■ Press the Return key in a search box to add another line to it. If you type multiplelines in a search box, chooseAny of orAll of in the left box to determine whetherOR or AND conditions connect the lines.
■ To add the details of email targets or custodians to the From box or To box,click the Targets and custodians button at the right of the box.
Note: If you specify as a target or custodian a Domino user whose details yousynchronize with a Domino directory, you must ensure that this user has anSMTP address defined in the Domino directory. Otherwise, the search fails tofind the matching items. Alternatively, you can search for such users by theirdisplay names.
96Searching for itemsAbout the search criteria options

■ Use the fields in theCustodianManager options area to specify how to searchfor custodians or custodian groups. You can choose to search email addresses,display names, or both email addresses and display names. If you select UseEmail Addresses and Display Names, a custodian or custodian group musthave either a matching email address or a matching display name to meet thesearch criteria; it does not need to have both.Select Includemember addresses for distribution lists if you want DiscoveryAccelerator to search not only the display name and email address of a custodiangroup but also the email addresses of all the members of the group.The conditions that you enter in the Custodian Manager options area use thecustodian information that is available at the time that you build the search. Thisinformation is not updated unless you edit the search again. For example, whenyou create a search and select the option Include member addresses fordistribution lists, the list members at that time are saved with the search. Ifthe membership of the list changes later, these changes are not applied to thesearch until you edit and save it again.
■ Place the plus sign (+) in front of a word or phrase to connect it to every otherword or phrase on the line with a Boolean AND condition. This sign instructsDiscovery Accelerator to treat the specified word or phrase as required criteria.For example, the following search string means "(server AND test) OR (groupAND test) OR (cluster AND test)":
[Any Of] server group +test cluster
In the following example, the search string means "(server AND test AND group)OR (cluster AND test AND group)"
[Any Of] server +group +test cluster
■ Place the minus sign (-) in front of a word or phrase to connect it to every otherword or phrase on the line with a Boolean ANDNOT condition. This sign instructsDiscovery Accelerator to exclude from the result set those results that matchthe other search criteria and contain the excluded term. For example, thefollowing search string means "(server AND NOT test) OR (group AND NOTtest) OR (cluster AND NOT test)":
[Any Of] server group -test cluster
In the following example, the search string means "(server AND cluster AND(group AND NOT test))":
[All Of] server
cluster
group -test
97Searching for itemsAbout the search criteria options

A search term cannot comprise an excluded word or phrase only. When youspecify such words or phrases, you must also specify a positive word or phrasethat you want to appear in the search results.
■ A search term cannot start with any of the following characters on any line:
= + - @
For example, "server -cluster" is a valid search term but "-cluster server" is not.
■ You can use an asterisk (*) wildcard to represent zero or more characters inyour search. Use a question mark (?) wildcard to represent any single character.A wildcard search always finds items that match your search criteria and thatwere archived in Enterprise Vault 10.0 or later. To ensure that the search resultsalso include items that Enterprise Vault 9.0 or earlier has archived, enter at leastthree other characters before the wildcard. For example, the following searchstring returns hits for the words "make", "maker", "making", "wonder","wondering", and so on:
[Any Of] mak*
Wonder*
You can include wildcard characters in the email addresses that you specify ina From box or To box. The following example finds items from users with anemail address that includes "acme.uk" or "acme.hk":
[Any Of] acme.?k
However, you cannot use either wildcard character after a special character,such as the ampersand (@). For example, the search string "@?cme.uk" doesnot produce the expected results.
■ Discovery Accelerator ignores any nonalphanumeric characters in the searchterm, except for those that have special significance, such as the plus sign,minus sign, and question mark.For example, a search for the term US@100 may find instances not only ofUS@100 but also ofUS 100 andUS$100. Including nonalphanumeric charactersin the search term may therefore return more results than you expect.
98Searching for itemsAbout the search criteria options

Archives section
Note: This feature is available only if you have the Select Archives in Searchpermission in the case.
See “About the Discovery Accelerator permissions” on page 24.
The feature is not available when you define the criteria for a scheduled search;you can use it when you set up immediate searches only.
The Archives section lets you restrict the scope of a case-level search or folder-levelsearch to certain archives only. By default, Discovery Accelerator searches all thearchives in the vault stores that you have selected for the case. However, this maybe undesirable and time-consuming if Discovery Accelerator must search manythousands of archives unnecessarily.
To select the archives in which to search
1 Click Search these archives.
2 Click the Archive Picker option at the right.
3 In the Select Archives dialog box, select the required archives.
You can select up to 5000 archives from the case-level archive list.
4 Click Apply.
Attachments sectionThe Attachments section lets you search for items with a certain number or type ofattachments.
Specifies the required number of attachments. The defaultoption, "Does not matter", means that the item can have zeroor more attachments. All the other options require you to typeone or two values that specify the required number ofattachments.
Number
99Searching for itemsAbout the search criteria options

Specifies the file name extensions of particular types ofattachments for which to search. Separate the extensionswith space characters. For example, type the following tosearch for items with HTML or Microsoft Excel fileattachments:
.htm .xls
This search option evaluates attachments by their file namesonly; it does not check their file type. For example, supposethat a user changes the file name extension of a .zip file to.zap and then sends the renamed file as an emailattachment. A Discovery Accelerator search for items thathave attachments with a .zip extension does not find theemail with the renamed attachment.
File extensions
The contents of some attachments may not be searchablebecause Enterprise Vault has not indexed them. In particular,file formats such as Fax and Voice do not have any indexablecontent.
Some Enterprise Vault registry entries prevent it from indexingthe contents of selected file types. For example, this is thecase with the ExcludedFileTypesFromConversion entry. Formore information, see the Enterprise Vault Registry Valuesguide.
For more information on how Discovery Accelerator conductssearches in which you have specified file name extensions,see the following article on the Veritas Support website:
https://www.veritas.com/docs/100008537
Miscellaneous sectionThe Miscellaneous section lets you search for items of a certain size and type orthat have the specified retention category.
Specifies the size in kilobytes of each item for which tosearch, as reported by the message store (Exchange,Domino, and so on). The item size includes the size of anyattachments.
Message size
Searches for items of the selected types.Message type
100Searching for itemsAbout the search criteria options

Lets you search for the unindexed items that do not normallyappear in the search results, such as binary files andencrypted mail items.
If you select this option, you must leave the Content fieldempty.
Include only non-indexeditems
Searches for items to which Enterprise Vault has assignedthe selected retention categories.
Retention category
Policies sectionThe Policies section lets you search for items according to the tags with which anyadditional policy management software has classified them.
Lets you search for the items that match certain classificationpolicies. There are several types of policies:
■ Inclusion. Any item that your policy management softwarehas classified for inclusion in the review set may be guiltyof the most serious offenses, such as swearing, racism,or insider trading. You would normally want to ensure thatthe items exhibiting any of these features were includedin your review set.
■ Exclusion. Spam items and newsletters are typicalexamples of the items that your policy managementsoftware may classify for exclusion from the review set.
■ Category. Your policy management software maycategorize the items that exhibit certain characteristics,such as containing Spanish text. This type of policyprovides no information on whether an item should beincluded in or excluded from the review set.
These policy types are not mutually exclusive. Your policymanagement software may apply multiple policies of differenttypes to the same item. However, note that inclusion policiesalways take precedence over the other types of policies.
Select the required policy type and then select the names ofthe policies for which you want to search. Alternatively, youcan select Custom as the policy type and then type thenames of one or more policies. Separate multiple policynames with commas, like this:
CustomPolicy1,CustomPolicy2
If you choose to search for multiple policies, the search resultswill contain items that match any one of the policies.
Policy
101Searching for itemsAbout the search criteria options

Lets you omit from the list those policies that are not in usein the current case.
Filter policies by current case
Custom attributes sectionThe Custom attributes section lets you search for the items that have the specifiedattributes. When Enterprise Vault processes an item, it populates a number of theitem's attributes with information and stores this information with the archived item.Some third-party software may also attach additional attribute information to items.If you know the name of an attribute that interests you, you can enter its detailshere as a custom attribute.
Note the following:
■ If you enter the details of several attributes, use the options in the Attributioninclusion box to determine whether the search results should match any of theattributes or all of them.
■ For attributes that accept string values, you can add the details of email targetsor custodians by clicking the Targets and custodians buttons at the right ofthe boxes.If you set Custodian Manager options to Use Email Addresses and DisplayNames, it is important to understand how Discovery Accelerator processes thedetails of any custodian that you enter in a custom attribute field. DiscoveryAccelerator links the custodian's email address to the display name with eithera Boolean AND operator or an OR operator, depending on what you choose inthe Operator box. For example, with Operator set to All, only items that matchboth the custodian's email address and the display namemeet the search criteria;an item that matches just one of these details does not meet the search criteria.Set Operator to Any to link the email address and display name with an ORoperator. Then any item that matches at least one detail (but not necessarilyboth) meets the search criteria.
■ To search for attribute information that third-party software has added to theX-Headers of SMTP items, add the prefix EVXHDR. to the name of the requiredattribute. For example:EVXHDR.X-CompanyIDThe attribute name and value are case-sensitive.
■ Do not enclose attribute values in quotation marks if you want to indicate thatthey are phrases. Instead, select Phrase as the operator for these attributes, ifyou have a choice. Alternatively, you can indicate that an attribute value is aphrase by replacing all the spaces with periods, as follows:sample.attribute.valueThis technique lets you specify multiple phrase values for the same customattribute. For example, consider the following attribute value:
102Searching for itemsAbout the search criteria options

Enterprise.Vault.Service.Account system DA.AdministratorThis value matches "Enterprise Vault Service Account", "system", and "DAAdministrator".
See “Specifying the details of custom search attributes” on page 108.
See “About the Enterprise Vault search properties” on page 232.
Guidelines on conducting effective searchesFor the best results when conducting searches, follow these guidelines:
■ Make searches precise. For example, include the author or recipient details, orspecify date ranges.
■ In the properties of the case, limit the number of searchable vault stores.
■ Only use wildcards when necessary, as they can severely affect performance.
■ Avoid overusing search terms. Thousands of terms can cause iterative searches.
■ Ensure that scheduled searches do not run at the same time as system backups.
■ Quickly accept or reject searches to avoid filling and slowing the database.
■ Test new searches in research folders, and then delete the folders as necessary.
For extensive information on how to conduct searches with Discovery Accelerator,see the Effective Searching white paper. This is available from the following pageof the Veritas Support website:
https://www.veritas.com/docs/100038089
Pausing and resuming Discovery Acceleratorsearches
If you have the required permission level, you can monitor the status of all DiscoveryAccelerator searches and pause or resubmit them as necessary. This is true evenif you do not normally have access to the cases with which the searches areassociated. However, you cannot view the search criteria or the results of thesearches unless you normally have access permission.
You must have the Monitor Search permission to pause and resume searches. Bydefault, users with the role of Discovery System Admin have this permission.
To pause or resume a search
1 Click the Monitor tab in the Discovery Accelerator client.
2 Do one or more of the following:
103Searching for itemsGuidelines on conducting effective searches

■ To view detailed status information on a search, click its name.
■ To pause or resubmit one or more searches, select the required searchesand then click Pause or Resubmit.
Note: If you pause a search that you are conducting over a wide date rangeor a large number of archives, Discovery Accelerator may take a little timeto halt it.
About the Monitor Searches tabThe Monitor Searches tab lets you view the status of the searches that you haveconducted. You can stop and pause searches that are still in progress, and resubmitfailed searches. As Table 8-1 shows, you can access the tab in several ways.
Table 8-1 How to access the Monitor Searches tab
Do thisTo view the status of
Click the Monitor tab in the Discovery Accelerator client.Searches that are running in allcases.
1 Click theCases tab in the Discovery Accelerator client.
2 Click the required case in the left pane.
3 Click Searches.
Searches that are running inone case only.
1 Click the Research tab in the Discovery Acceleratorclient.
2 In the left pane, click the required research folder, orclick All Research to view the status of searches inall the folders.
3 Click Searches.
Searches that are running inone or more research folders.
The Monitor Searches tab is divided into three panes:
■ The filter pane at the top lets you filter the searches by name, status, date, andtype. Select the required filter options and then click the Apply filter button atthe right. Click the button again to clear the filter options.
■ The center pane lists the searches that match the selected filter options. Theinformation that this pane provides varies, depending on the context in whichyou display the Monitor Searches tab.
104Searching for itemsAbout the Monitor Searches tab

Identifies the search.Name
If displayed, identifies the case or folder in which the searchhas run.
Case or Folder
Identifies the person who submitted the search.Submitter
Shows the date and time at which the search started.Run Date
Shows the number of items that match the search criteria.Hits
Shows the number of archives that Discovery Acceleratorhas searched.
Targeted Archives
Shows the status of the search.Status
Indicates the type of search.Search Type
If displayed, shows whether scheduled searches arecurrently enabled. When a search is not enabled, it doesnot run.
Enabled
■ When you click a search in the center pane, the bottom pane provides thefollowing information:
Shows the name of the archive that Discovery Acceleratorhas searched.
Archive
Provides the ID of the volume that holds the archive.Index Volume ID
Indicates the type of vault store that contains the archive.Vault Store
Shows the current status of the search in each archive.Status
Shows the amount of time that Discovery Accelerator hastaken to search each archive.
Duration
Shows the number of items in each archive that match thesearch criteria.
Hits
Provides details of any errors that occurred.Information
You can filter the list of archives by selecting an option in the Show list. Forexample, you can filter the archives to show the top 2000 archives by hits, orall archives with a status of "Error". To download the search details as acomma-separated value (CSV) file, click Download Search Details for AllArchives.
105Searching for itemsAbout the Monitor Searches tab

Selecting the archives in which to searchYou can customize the list of Enterprise Vault archives in which DiscoveryAccelerator searches for items. For example, there may be archives that you wantto exclude from any searches because they contain irrelevant material.
As well as setting the default, global list of archives, which are available to thesearches that you conduct in any case, you can customize the searchable archivesfor individual cases.
You must have the application permission Manage Archives to set the global listof archives, and the case permission Manage Archives to set a case-level archivelist.
Note: If you have the case-level permission Select Archives in Search, you canalso choose specific archives in which to search when you define the criteria for asearch. Restricting the scope of a search can greatly reduce the time that it takesto complete, especially if the case-level archive list contains many thousands ofarchives.
See “About the Discovery Accelerator permissions” on page 24.
To select the archives in which to search
1 Do one of the following:
■ To set the default list of archives that are available to all cases, click theApplication tab in the Discovery Accelerator client, and then click theArchives tab.
■ To set the list of archives in which to search for one case only, click theCases tab and then click the required case in the left pane. Then click theArchives tab.If Discovery Accelerator lists a lot of cases, you can filter the list with thefields at the top of the pane. As well as filtering the cases by name, youcan choose whether to list any research folders that are associated withthem.
2 Choose the archives in which to conduct searches.
106Searching for itemsSelecting the archives in which to search

Note:When many archives match the current selection and filter criteria,Discovery Accelerator may take some time to list them all. In thesecircumstances, Discovery Accelerator displays a prompt that advises you tochange the criteria in order to reduce the number of listed archives. You caneither do this or click Show All Archives to list all the archives. To stop theprompt from appearing each time you return to this pane during the currentsession, select Don't show again in this session before you click Show AllArchives.
By default, Discovery Accelerator displays the prompt when more than 50,000archives match the current criteria. To change this threshold, set theconfiguration option called "Display warning in Archives pane when number ofarchives to load exceeds this threshold".
See “General configuration options” on page 199.
Use the following techniques to include or exclude archives:
■ If you are setting the application-wide list of archives that are available toall cases, and you want to hide certain vault stores from case administrators,select Restrict which vault stores are available to all cases. Then, inthe Enabled column of the vault store list, select the vault stores that youwant to make visible and searchable. When a case administrator sets thelist of searchable archives for a case, only those archives that are in enabledvault stores are available for selection.If you restrict a vault store and then later remove the restriction, the vaultstore automatically becomes available to existing cases, where it is includedin new searches.
■ If you want to set the list of archives in which to search for one case only,select Customize searchable archives for this case.
107Searching for itemsSelecting the archives in which to search

■ Select or clear a vault store at the left to include its archives in searches orexclude them from searches.
■ Click a vault store at the left to list the associated archives at the right. Thenselect or clear the archives to include or exclude them.The Status column shows whether each archive has been copied, moved,or deleted as part of a Move Archive operation by the Enterprise Vaultadministrator.If Discovery Accelerator lists a large number of archives, you can filter thelist with the fields at the top of the right pane.
■ Select or clear the Archive Name box at the top of the right pane to includeor exclude all the available archives.
3 Click Save.
Specifying the details of custom search attributesWhen Enterprise Vault processes an item, it populates a number of the item'sproperties with information and stores this information with the archived item. Forexample, Enterprise Vault stores information about the retention category of eachitem and the number of attachments that it has. All this information is accessible inDiscovery Accelerator searches; in the Custom attributes section of the searchproperties pane, you can enter the names of the relevant properties as free-formattributes.
See “About the Enterprise Vault search properties” on page 232.
If you want to search repeatedly for certain property information, you can definethe property as a custom search attribute. Then the Custom attributes section ofthe search properties pane always contains a field in which you can enter therelevant property details.
You must have the Manage Search Attributes permission to specify the details ofa custom search attribute. By default, only users with the role of Discovery SystemAdmin have this permission.
To specify the details of a custom search attribute
1 Click the Configuration tab in the Discovery Accelerator client, and then clickthe Search Attributes tab.
2 Click New.
The Search attribute pane appears.
108Searching for itemsSpecifying the details of custom search attributes

3 In the Template list, select the attribute whose details you want to provide, orselect New Search Attribute to define the details of a new one.
The template attributes are as follows:
Searches for messages according to the date on whichEnterprise Vault archived them.
Archived Date
Searches for messages according to the category thatthe author has assigned to them.
Categories And Keywords
Searches for messages that have been indexed withthe specified conversation tracking identifier.
Conversation Tracking GUID
Searches for messages according to the date on whichtheir retention period expires.
Expiry Date
Searches for messages in the specified language.Languages
Searches for messages according to the date on whichthey were last modified.
Last Modified Date
Searches for messages that fall into a specific messageclass, such as IPM.Appointment or IPM.Contact.
Message Class
Searches for messages that are marked with a particularimportance level.
Message Importance
109Searching for itemsSpecifying the details of custom search attributes

Searches for messages according to whether the authorhas digitally signed or encrypted them.
Message Security
Searches for messages that are marked with a particularsensitivity level.
Message Sensitivity
Searches for messages that are scheduled for deletionin the specified number of days.
Number Of Days To Expiry
Searches for messages that have the specified numberof recipients.
Number Of Recipients
Searches for messages by their original identifier.Original Identifier
Searches for messages according to their original folderlocation, such as the Inbox or Drafts folder.
Original Location
Searches for messages according to the identifier thatis assigned to the saveset (.DVS) file.
Saveset Identifier
Searches for messages that are in all the folders towhich you have access.
Vault Permission
When you select an attribute, Discovery Accelerator automatically addspredefined values to the other boxes.
4 Check that the name, display name, and description are correct.
For an attribute that third-party software has added to the X-Headers of SMTPitems, add the prefix EVXHDR. to the attribute name. For example,EVXHDR.X-CompanyID.
5 In the Type list, select the user interface elements with which to present thecustom attribute options in Discovery Accelerator searches. This causesadditional boxes to appear with which you can set additional options.
The options are as follows:
A single-line box lets the user enter or edit short textstrings.
Single line
A multi-line text box lets the user enter or edit longstrings over several lines.
Multiple lines
110Searching for itemsSpecifying the details of custom search attributes

A check box is a square box that is selected or clearedto turn on or off an option. More than one check boxcan be selected.
If you intend to set up multiple check boxes for a customattribute, use the Column size box to specify thenumber of check boxes to group in a column. With asmall column size and several check boxes, there maybe more than one column per line. To display all thecheck boxes in a single row, set Column size to anumber equal to or more than the number of checkboxes.
To assign values to the check box options, click Newvalue and then type the names with which to label theoptions and their values. Select Selected to mark anoption as selected by default.
Checkboxes
With a radio button, you make a choice among a set ofmutually exclusive, related options. Users can chooseone and only one option. Use the Column size box toindicate how the options are to be grouped, and theValues area to assign values to the options. SelectSelected to mark an option as selected by default.
Radio buttons
With a list box, you can select from a set of values thatare presented in a list that is always visible.
If you select Multiple selection, you can hold downShift or Ctrl to select several items from the list box.Assign values to the entries in the list box by clickingNew value. Selected indicates the default value.
List box
A drop-down list is a closed version of a list box with anarrow next to it. Clicking the arrow opens the list.
Assign values to the entries in the list box by clickingNew value. Selected indicates the default value.
Drop down list box
Note the following:
■ When you specify the values to associate with custom attributes, enclosethe values in double quotation marks.
■ For some of the attribute types, you can choose operators with which toqualify the values. To select multiple operators, hold down Ctrl or Shift andthen click the required operators. For more information on the operators,see the Enterprise Vault API documentation.
111Searching for itemsSpecifying the details of custom search attributes

6 In the Data type drop-down list, specify the data format with which the valuesthat you assign to the custom attribute must conform. The options are String,Number, and Date.
7 Click Save.
Restricting search results to correspond toCompliance Accelerator departments
In Discovery Accelerator you can now restrict the searches to access informationspecific to the departments in Compliance Accelerator.
The Search Attributes template list now includes a predefined template that iscalled "Compliance Accelerator Department(s)". Use this template to associateselected Cases and Research Folders with the Departments in ComplianceAccelerator to run searches. This template lets you restrict the search to specificdepartments, thus ensuring that the search is faster and more refined.
Note that the indexing attribute of this template is 'KVSCA.Department'. If you havean existing search attribute with the indexing attribute 'KVSCA.Department' in aversion before Discovery Accelerator 12.5, it is automatically upgraded. All theCases and Research Folders are associated with all the departments listed in thisattribute to continue the existing behavior.
In Compliance Accelerator, a column that is called "Department ID" is added to theAll Departments node and All Exceptions node under the Departments tab,which displays the department identifier of the department and exception employee,respectively. You need this information to map specific Compliance Acceleratordepartments to specific Discovery Accelerator cases when you define the customattributes.
To configure Compliance Accelerator departments in the custom searchattributes
1 Click the Configuration tab in the Discovery Accelerator client, and then clickthe Search Attributes tab.
2 In the Template list, select Compliance Accelerator Department(s).
3 In the Type list, select Checkboxes.
4 In the Values section, do the following:
■ Enter the name and an ID of the department. To find the Department ID ofa specific department, click the Departments tab in the ComplianceAccelerator client. In the Departments pane at the left, click AllDepartments. The Summary tab displays the Department IDs for eachlisted department in the Department ID column.
112Searching for itemsRestricting search results to correspond to Compliance Accelerator departments

These department names are listed in the Custom attributes section ofthe search properties pane.
■ Specify the cases or research folders that you want to associate with thedepartment. You can use the picker to select the required option. The pickerdialog box displays either the list of cases or research folders. Cases aredisplayed by default. Note that the cases list includes only Open cases.
■ Select the check box in the Selected column if you want the departmentto be selected by default in the Custom attributes section of the searchproperties pane. You can choose to deselect any of the department nameswhen creating the search.
■ Select the check box in the Enforce selection column if you want to enforcethe selection of the department when you create the search. When you dothis, the department name is selected by default and the check box appearsgrayed out in theCustomAttributes section of the search properties pane.
5 Click Save.
To restrict search results based on Compliance Accelerator departments
1 Do one of the following:
■ To create a search that runs in a case, click the Cases tab in the DiscoveryAccelerator client and then click the required case in the left pane.
■ To create a search that runs in a research folder, click the Research tabin the Discovery Accelerator client and then click the required folder in theleft pane.
2 Click the Searches tab.
3 Click New Search.
4 If you are creating a search that runs in a research folder, and you clicked AllResearch in the left pane, Discovery Accelerator prompts you to select a casewith which to associate the search. Make your selection, and then click Search.
5 The Custom attributes section of the search properties pane displays thenames of the Compliance Accelerator departments that you have associatedwith this case or research folder. In the Compliance AcceleratorDepartment(s) option, select the departments that you want to restrict thesearch to.
6 Click Save to start an immediate search or queue a scheduled search to startautomatically at the appointed time.
113Searching for itemsRestricting search results to correspond to Compliance Accelerator departments

Defining email targets with Address ManagerAmong the criteria that you can define when you set up a search in DiscoveryAccelerator are the email addresses for which to look in items. If an employee hasmultiple email addresses then, to save you from having to enter them all wheneveryou set up a search, you can add them to a target entry in Address Manager. Thenyou can specify the target name in your search criteria as a shorthand way of listingall the associated addresses.
Target groups provide a way to collect a number of people under a group name.You can then use this name as a shorthand way of referring to the list of people.For example, you could create a target group called "Directors" and then add thenames of all the company directors to the group. When you create a search, youcan search for items that are sent to the target group Directors, instead of listingall their names individually. You can add a target to multiple target groups.
Unlike the custodians and custodian groups whose details you can supply throughthe Custodian Manager website, targets and target groups are not synchronizedwith an external source such as Active Directory.
You can set up targets and target groups at the application level, where they areavailable to all cases, and at the individual case level.
Setting up targetsDepending on the permissions that you have been granted, you can add anapplication-wide target (available in all cases) or a case-specific target.
You must have the Manage Global Target and Target Groups permission to addapplication-wide targets, and the Manage Targets permission to add case-specificor folder-specific targets.
To set up a target
1 Do one of the following:
■ To add an application-wide target, click theCustodians tab in the DiscoveryAccelerator client, and then click the Address Manager tab.
114Searching for itemsDefining email targets with Address Manager

■ To add a case-specific target, click theCases tab and then click the requiredcase in the left pane. Then click the Address Manager tab.
2 Click New Target at the top of the pane.
The New Target pane appears.
3 Type the first name and last name of the target.
The first name is optional, but the last name is mandatory.
4 If you want to amend how the target name appears in Discovery Accelerator,type the required name in the Display Name box.
5 In the Email addresses box, type all the email addresses of the target.
Type each address on a line of its own.
6 Click Save.
Adding targets to target groupsAfter you have set up a few targets, you can combine them in a group.
You must have the Manage Global Target and Target Groups permission to addtargets to application-wide target groups, and the Manage Targets permission toadd them to case-specific or folder-specific groups.
115Searching for itemsDefining email targets with Address Manager

To add targets to a target group
1 Do one of the following:
■ To add an application-wide target group, click the Custodians tab in theDiscovery Accelerator client, and then click the Address Manager tab.
■ To add a case-specific target group, click the Cases tab and then click therequired case in the left pane. Then click the Address Manager tab.
2 Click New Target Group at the top of the pane.
The New Target Group pane appears.
3 Type a name and optional description for the group.
4 Click Add, and then select the targets to include in the group.
Use the following techniques to select the targets:
■ To find all the names that contain certain characters, type those charactersin the Filter box and then click Find.To remove the filter, delete the characters that you typed in the Filter boxand then click Find again.
■ To select multiple adjacent targets, hold down the Shift key and click thefirst and last target in the range. To select multiple nonadjacent targets,hold down the Ctrl key and click the required targets.
116Searching for itemsDefining email targets with Address Manager

■ Press Ctrl+A to select all the names in the list.
Click OK when you have finished.
5 Click Save.
Building Discovery Accelerator search schedulesAs well as running searches immediately, you can schedule them to run at a futuretime. This facility may be desirable if, for example, you want to run an extensivesearch during an off-peak period, or you need to run the same search repeatedly.To create a scheduled search, you first define a search schedule and then selectit as one of the criteria of the search.
Note: The SQL Server Agent service is responsible for managing search schedules,so you must ensure that it is running. For instructions on how to configure the SQLServer Agent service, see the Installation Guide.
Setting up new search schedulesYou must have the Manage Schedules permission to set up new search schedules.By default, users with the application role of Discovery System Admin have thispermission.
117Searching for itemsBuilding Discovery Accelerator search schedules

To set up a new search schedule
1 Click the Configuration tab in the Discovery Accelerator client, and then clickthe Search Schedules tab.
2 Click New.
The Schedule Details pane appears.
3 Type a name and an optional description for the schedule.
4 Select Enabled so that the schedule is available for selection when you definethe criteria for a new search.
5 Select the required schedule type. The options are as follows:
Causes any searches that use this schedule to runimmediately after the SQL Server Agent service hasstarted.
Start when SQL server agentstarts
Causes any searches that use this schedule to runwhen the system is quiet. For more information onCPU idle schedules, see the information on schedulingjobs in the online Help for SQL Server ManagementStudio.
Start when CPU(s) are idle
118Searching for itemsBuilding Discovery Accelerator search schedules

Causes any searches that use this schedule to runonly once, at the time that you set in the schedule.When you select this option, several additional boxesappear. Click the On date box to select the requireddate. Enter the time in the At time box in the formathh:mm, using the 24-hour clock.
Once
Causes any searches that use this schedule to runautomatically at the interval that you specify in theschedule.
■ Occurs. Defines the interval in days, weeks, ormonths.
■ Daily frequency. Defines whether the scheduleruns once a day or several times a day, within agiven period.
■ Duration. Defines whether to restrict the scheduleto a particular period within given dates.
Recurring
In searches with a schedule type of Once or Recurring, the time that youspecify is the time on the Discovery Accelerator server rather than that on yourclient computer.
6 Click Save.
Examples of recurring search schedulesAny searches that use the following schedules run automatically at the interval thatyou specify in the schedule.
To create a schedule that runs once every day at 2 A.M. from now on
1 Select Daily, and enter 1 in the Every n day(s) box.
2 Select Occurs once at, and enter 02:00 in the (time) box.
3 Select No end date.
To create a schedule that runs every 3 hours on Mondays, between 9 A.M.and 6 P.M., for the period between March 1 and August 2
1 SelectWeekly and then select Mon.
2 Select Occurs every, and then enter 3 and select Hour(s).
3 Enter 09:00 in the Starting at box and 18:00 in the Ending at box.
4 Select March 1 for the start date and August 2 for the end date.
119Searching for itemsBuilding Discovery Accelerator search schedules

To create a schedule that runs at 9 P.M. on the first day of alternate monthsfrom now on
1 Select Monthly and Day, and enter 1 in the day box and 2 in the month(s)box.
2 Select Occurs once at, and enter 21:00 in the (time) box.
3 Select No end date.
Setting up custom message typesDiscovery Accelerator lets you search, filter, and export items for message typesBloomberg, Domino Mail, Exchange Mail, Fax, File, Instant Messaging, SharePoint,SMTP Mail, and Social. Other than these message types, you can set up custommessage types such as Facebook, Twitter and so on.
The Configuration tab in the Compliance Accelerator client includes a new tabthat is called Message Types that lets you add custom message types. Thesecustom message type names appear in the following places in the DiscoveryAccelerator client:
■ In the Review tab, under the Type facet in the Filter pane.
■ In the Cases tab, under the Message type option in the Miscellaneous sectionof the Searches pane.
■ In the Cases tab, under the Original source option in the Items Selection boxof the Export Details pane.
You must have the Manage Message Types permission to view theMessage Typetab in theConfiguration tab. By default, only users with the role of App Rule Admin,App User Admin and Compliance System Admin have this permission.
To set up custom message types
1 Click the Configuration tab in the Discovery Accelerator client, and then clickthe Message Types tab.
2 Click New.
3 In the Message Type Details pane type a name and value for the messagetype.
The name cannot contain any of the following characters:
\ / : * ? " < > |
4 Click Save.
120Searching for itemsSetting up custom message types

Using Discovery Accelerator to search archivedSkype for Business content
Discovery Accelerator can conduct searches of the Skype for Business conversationsthat Enterprise Vault has archived. However, to do this, Discovery Acceleratorrequires the Session Initiation Protocol (SIP) addresses of the Skype for Businessusers.
In environments where the SIP addresses of these users differ from their SMTPaddresses, or they have SIP addresses only, you must configure DiscoveryAccelerator to get the SIP addresses from Active Directory. Discovery Acceleratorcan get the addresses as part of its normal process to synchronize the user profileswith the corresponding Active Directory accounts.
To configure Discovery Accelerator to get SIP addresses fromActive Directory
1 On the Discovery Accelerator server, open the Accelerator Manager website(http://server_name/EVBAAdmin).
2 Click System Configuration at the bottom of the page.
3 In theGlobal Settings page, choose Profile Synchronization in the Settingsfor list.
4 Set the optionGet SIP addresseswhen synchronizingwith Active Directoryto On.
121Searching for itemsUsing Discovery Accelerator to search archived Skype for Business content

Manually reviewing itemsThis chapter includes the following topics:
■ About reviewing with Discovery Accelerator
■ About the Review pane
■ Filtering the items in the Review pane
■ Searching within the review set
■ Finding all items in the same conversation
■ Assigning review marks and tags to items
■ Adding comments to items
■ Viewing the history of items
■ Displaying printable versions of items
■ Downloading the original versions of items
■ Copying the item list to the Clipboard
■ Deleting items from Enterprise Vault archives
■ Changing how the Review pane looks
■ Setting your Review pane preferences
About reviewing with Discovery AcceleratorAfter you have performed a search and gathered together the potentially relevantitems, selected individuals can review the search results. These reviewers readeach item, select the appropriate status mark to assign to it, and add a comment
9Chapter

as necessary. Items can be reviewed more than once, and other reviewers can addmore comments or change the assigned mark.
Some items may have extra marks, called tags, from which you can choose. Thesetags are available at the bottom of the Review pane and are usually set up especiallyin response to questions from a judge.
You must have the Review permission to review items.
To access the Review pane
◆ Click the Review tab in the Discovery Accelerator client.
Limitations on reviewing certain types of Skype for Business contentEnterprise Vault 12.2 and later provides the facility to archive Skype for Businessinstant messaging and conferencing communications. Enterprise Vault archiveseach of these communications as an individual email (.eml) file that, in DiscoveryAccelerator, has a message type of Instant Messaging.
Skype for Business communications can include whiteboards and polls that usersshare during a conference. The content of these two conference features is storedin a Microsoft-proprietary XML format, which Enterprise Vault cannot index. Thisaffects how whiteboards and polls appear in the Review pane of DiscoveryAccelerator in the following ways:
■ The content of the items is stored in XML file attachments.
■ You cannot preview or display printable versions of whiteboards. For polls, youcan see the questions but not the responses to them.
About the Review paneThe Review pane lets you review and mark the items in a review set. The pane isdivided into the following areas:
123Manually reviewing itemsAbout the Review pane

Filter pane Header area
Item list Footer area Reading pane
The following sections describe each area of the Review pane. You can also readmore about them in the Effective Reviewing white paper.
The following sections describe the areas of the review pane:
■ Header area
■ Filter pane
■ Item list
■ Reading pane
■ Footer area
Header areaThe header area provides options for customizing the view and selecting differentitems to display.
124Manually reviewing itemsAbout the Review pane

Maximizes the Review pane by hiding the button bar acrossthe top of the Discovery Accelerator window. Click the buttonagain to restore the button bar.
Lets you view the items that you have copied to a researchfolder for further investigation.
See “About research folders” on page 148.
Lets you perform a search that is based on the currentlyselected item.
Sets your preferences for the Review pane.
See “Setting your Review pane preferences” on page 145.
Lets you hide or change the position of the Reading paneand set the size of the text to display in it.
View
Shows the number of items in the list that you have yet toreview.
Unreviewed
Shows the Discovery Accelerator ID of the highlighted item.If you know the ID of an item that you want to review, type ithere and then press the Enter key to display the item.
Item
Groups the items in the list by date, author, subject, or policyaction.
Display or hide the items in a group by clicking thedown-arrow or up-arrow button at the left.
Group
In lists where you have chosen not to group the items, letsyou sort the items by date, author, subject, or policy action.
Sort
125Manually reviewing itemsAbout the Review pane

Lets you hide or show duplicate items and similar items inthe review set. Discovery Accelerator considers items to beduplicates when they have exactly the same content. Theitems that Discovery Accelerator considers to be similar havethe same metadata properties, such as their author displaynames, subjects, and number of attachments.
The option to hide or show duplicate items is available onlyin cases that you have enabled for analytics. However, theoption to hide or show similar items is available in all cases,regardless of whether you have enabled them for analytics.
If you sort the items before you select an option in the Stackfield then, after you have selected the Stack option, the itemsmay no longer be in the original sort order. For example, thisis the case if you first choose to sort the items by the Authorcolumn and then select one of the Stack options.
For more information on the deduplication features inDiscovery Accelerator, see the Accelerator Deduplicationwhite paper.
Stack
Downloads the current item in its original form and opens itin the appropriate application. You can also download anitem by right-clicking the item and then clicking View original.
Shows or hides the hit highlighting navigation controls at thebottom of the Reading pane.
Finds all the items that share the same subject line as theselected item. This feature also generates a hierarchy viewfor Exchange mail items.
Sends the current item for printing.
Shows the mark that is assigned to the current item.Mark
Shows the status of the current item.Status
Filter paneThe filter pane provides a large number of criteria by which you can filter the itemsin the list. The number next to each filter option shows the number of matchingitems that Discovery Accelerator will add to the item list when you apply the selectedfilters.
See “Filtering the items in the Review pane” on page 129.
126Manually reviewing itemsAbout the Review pane

Item listThe item list shows the items in the review set that match the filter options you haveselected. Use the controls at the bottom of the list to page through the items andspecify the maximum number of items to list per page. Unreviewed items displayin bold text.
Any items that are colored blue are also in a research folder that is associated withthe case.
Note: Discovery Accelerator stores the date and time values for items asCoordinated Universal Time (UTC). However, in the item list and right-hand Previewpane, it converts these values according to your computer's local time zone setting.As a result, two Discovery Accelerator reviewers in different time zones may seedifferent dates and times for the same items.
This is the expected behavior, and it is identical to the way that applications likeMicrosoft Outlook show the dates and times of items.
Reading paneIf you click the Hit Highlighting Navigation button above the Reading pane, you canshow or hide the following navigation controls at the bottom right of the pane:
Displays the search keyword. If the search includes multiplewords, displays a drop-down list of the search keywords.
Shows the number of the highlighted word and the totalnumber of occurrences of the search keyword in the item.
n of m
Displays the previous occurrence of highlighted word.
Displays the next occurrence of highlighted word.
Closes the hit highlighting navigation controls.
The tabs at the bottom of the Reading pane have the following functions:
Displays an HTML preview of the current item.Preview
Shows the comments that reviewers have assigned to thecurrent item.
Comments
127Manually reviewing itemsAbout the Review pane

Displays the comment and audit history of the current item.History
Displays a printable version of the current item.Printable
Displays information on any holds that you have placed onthe current item to stops users from deleting it from theirEnterprise Vault archives.
Legal holds
Footer areaThe footer area provides facilities for navigating from one item to another andapplying marks and comments to those items.
Displays the first page of items for review.
Displays the previous page of items for review. Pressing thekey sequence Alt+z performs the same function.
Shows the number of the currently displayed page and thetotal number of pages. To go to a particular page, type itsnumber in the box and then press Enter.
n of m
Displays the next page of items for review. Pressing the keysequence Alt+x performs the same function.
Displays the last page of items for review.
Lets you type a comment to add to the selected items.
In the item list, the comment indicator symbol in theComment Present column indicates that one or morecomments have been added to the items.
Comment
Applies the required mark to the selected items.No mark/Relevant/Flagged/Not relevant
128Manually reviewing itemsAbout the Review pane

Provides additional options with which you can take thefollowing actions on the selected items.
Your role in Discovery Accelerator determines whether theseoptions are available.
Actions
Apply tags (secondary marks) to the selecteditems.
Tags differ from marks in that you can assignmultiple tags to an item, but you can assign onemark only. In addition, by assigning a mark to anitem, you also assign the associated status to it.This is not the case with tags, which do not havean associated status.
Accept the mark or tag with which DiscoveryAccelerator has automatically categorized theselected items.
Select a research folder in which to copy either theselected items or all the items in the current reviewset.
Delete one or more items from the review set orfrom the Enterprise Vault archives.
Filtering the items in the Review paneThe options at the left of the Review pane provide a large number of criteria withwhich you can filter the items for review.
129Manually reviewing itemsFiltering the items in the Review pane

To filter the items in the Review pane
1 In the Case drop-down list at the top of the filter pane, select the case or folderfor which you want to display the items in the review set.
2 In the Items drop-down list, select a group of items that you want to review.The options are as follows:
This option lets you reserve the specified number ofitems in the review set. Other reviewers cannot seethese items until you have finished work on them.
Temporary Assignment
This option lets you view all the items in the review set,even if they have been assigned to other reviewers.
You may duplicate the work of other reviewers if youuse this option. Therefore, we recommend that youselect this option only if there are no other reviewersworking alongside you, or you want to browse the itemswithout marking them.
All Items
This option lets you review any items that your caseadministrator has assigned to you.
My Items
3 If you have enabled analytics in the selected case, use the facilities in theSearch area to find items that match your specified criteria.
See “Searching within the review set” on page 133.
4 In the Filter section, select the facets (item classifications) that you want toapply. To show the available values, click the facet name or the arrow at theleft of the name.
The following table lists all the available facets in alphabetical order.
(Available only in cases that you have enabled foranalytics.) Selects items by the type of file that isattached to them.
Attachment type
Selects items by the name of the person who sent them.
In cases that you have enabled for analytics, you canalso select authors by their email addresses or domains.
Author
Selects items that Discovery Accelerator has capturedover the specified period.
Capture date
Selects items to which reviewers have added comments.Comment
130Manually reviewing itemsFiltering the items in the Review pane

Selects items by the date on which they were received.Date
Selects items that have traveled in the specifieddirection. The options are as follows:
■ Internal. Selects items where the author and allrecipients are internal to your organization.
■ External Inbound. Selects items where the author isexternal to your organization and at least onerecipient is internal.
■ External Outbound. Selects items where the authoris internal to your organization and at least onerecipient is external.
Direction
(Available only in cases that you have enabled foranalytics.) Selects items by the status of their retrievalfrom the Enterprise Vault archives into your DiscoveryAccelerator customer database.
Ingestion status
Select items by the reviewer who last assigned a markto them.
Last marked by
Selects items by their legal hold status in the case.Legal hold status
Select items by the mark that reviewers have assignedto them.
Mark
(Available only in cases that you have enabled foranalytics.) Selects items by the rule that you have usedto mark them automatically.
Marked by rule
Selects items by the number of attachments that theyhave.
Number ofattachments
Selects items by the status of their deletion from theEnterprise Vault archives. The options are as follows:
■ None. Selects items that have not be deleted fromthe archives.
■ Pending delete. Selects items that are queued fordeletion from the archives.
■ Failed to delete. Selects items that DiscoveryAccelerator has failed to delete.
■ Deleted successfully. Selects items that are deletedfrom the archives.
Privileged delete status
Selects items by the policy with which your policymanagement software has tagged them.
Policy
131Manually reviewing itemsFiltering the items in the Review pane

Selects items by the policy action with which your policymanagement software has tagged them. This action canbe one of the following:
■ Include (demands or suggests capture in the reviewset).
■ Exclude (precludes capture or advocates non-capturein the review set).
Policy action
(Available only in cases that you have enabled foranalytics.) Selects items by the names, email addresses,or domains of their recipients.
Recipient
Selects items based on their encryption status. Note thatnon-SMTP journal items are detected as Unknown.
RMS protected items
Selects items that one or more scheduled searches havecaptured.
Scheduled search
Selects items that one or more searches have captured.Search
Selects items by their size in kilobytes.Size (KBytes)
Selects items by their status, such as Pending orQuestioned.
Status
Select items by the tags that reviewers have assignedto them.
Tag
(Available only in cases that you have enabled foranalytics.) Selects items by the rule that you have usedto mark them automatically.
Tagged by rule
Selects items by their type.Type
Note the following:
■ Each facet value is a hyperlink that, when clicked, selects that value andimmediately filters the item list accordingly. Click the facet value again toremove it from the filter.If you have already selected one or more values within the same facet,clicking another one deselects the others. However, it does not affect anyvalues that you have selected within other facets.
■ The numbers next to the facet values show the number of matching items.After you apply the filter, Discovery Accelerator updates these numbers toshow how many of the items are now in the item list. For example, thevalues for the Author facet initially show the number of matching items in
132Manually reviewing itemsFiltering the items in the Review pane

the entire review set. If you then set the value of the Status facet toUnreviewed and apply this filter, the Author values are updated to showonly the number of unreviewed items for each author.Facet values that are shown in an italicized font do not have any matchingitems in the current item list.
■ When you select two or more values for a facet, Discovery Acceleratorlooks for items that match any of the values. For example, you can chooseto view all the items that have a status of Pending or Questioned by selectingboth values.When you select values for two or more different facets, DiscoveryAccelerator looks for items that match all the facets. For example, selectingthe status value Pending and the type value Exchange matches only thoseitems that have a status of Pending and a type of Exchange.
■ When a facet has a large number of possible values, Discovery Acceleratordisplays an abbreviated list of the most relevant values. You can add morevalues to the list by clicking the blue hyperlinks at the end of the list.
■ If you frequently use the same facet settings to filter the items in the Reviewpane, you can save them as a preset by clicking the Save button at theright of the Preset box. Then you can quickly apply the settings by selectingthe preset from the drop-down list.
■ You can apply marks to items by right-clicking the facet values. For example,to mark all the items by a particular author, right-click the author's name inthe list and then click Mark all items.
5 Click Apply at the top of the filter pane.
If you have used any feature that is only available in cases that are enabledfor analytics, you may see the message "Results may be incomplete due topartial ingestion". This occurs when the number of retrieved items is not thesame as the total number of items in the case. For example, some of the itemsin the case may have been deleted from Enterprise Vault before you enabledthe case for analytics.
Searching within the review setWhen a case has been enabled for analytics, the filter area at the left of the Reviewpane provides additional options with which you can conduct searches of the itemsin the review set. Two types of searches are available: quick search and advancedsearch.
133Manually reviewing itemsSearching within the review set

Figure 9-1 Quick and Advanced search tabs in the Review pane
Conducting quick searchesUse the quick search feature to specify one or more fields for which you want tosearch, such as From or Subject, and the required values.
The following table lists quick search features and gives examples of how you canuse them in your searches:
Table 9-1 Quick search features
ExamplesFeature
bill AND suebill OR bobbill AND NOT "bill smith"
Boolean operators
(bill OR sue) AND (bill OR bob)Brackets
stock NEAR priceNEAR operator
from:bob AND (subject:stock OR subject:"share price")Search scope
stock* OR share*Wildcards
To conduct a quick search
1 On the Quick tab in the Search area at the left of the Review pane, set thescope of the search. You can do either of the following:
134Manually reviewing itemsSearching within the review set

■ Choose the required message attribute in the Fields list. For example,choose Subject or content to search the subject lines and bodies of allthe items in the review set.
■ Type one of the following attribute keywords in the "Search within the case"field, and then follow it with a colon and the word or phrase for which tosearch: all, from, to, fromto, subject, content, subjcont. For example, typefrom:Bob to search for items whose author is Bob.
The second method of setting the search scope overrides the first.
2 If you have set the search scope by choosing an attribute in the Fields list,type the word or keyword for which to search in the "Search within the case"field.
3 Click Apply.
Note that you cannot save the criteria for a quick search. However, the Quicktab retains a history of recent searches that you have conducted. This historyis not specific to the case, but contains searches for all analytics-enabled cases.
Conducting advanced searchesThe advanced search feature lets you build complex searches that comprise multipleconditions. Unlike quick searches, you can save advanced searches for reuse.
135Manually reviewing itemsSearching within the review set

To conduct an advanced search
1 On the Advanced tab in the Search area at the left of the Review pane, clickNew search.
The Advanced search dialog box appears.
This dialog box has much in common with the visual rule builder with whichyou can construct analytics rules.
2 Type a name and description for the search.
3 In the Search builder area, define one or more conditions that an item mustmeet. To define the conditions, proceed as follows:
■ In the Select attribute drop-down list, choose an attribute of the items forwhich to search. For example, choose Subject if you want to search thesubject lines of items.See “About the search attributes” on page 59.
■ In the next drop-down list, choose an operator to apply to the selectedattribute. For example, if you have set the attribute to Subject, you canchoose the Contains operator to search for items whose subject lines containcertain words.See “About the operators” on page 69.
■ Set the required value for the attribute. For example, when the attribute isSubject and the operator is Contains, you can type Secret to search foritems whose subject lines contain this word. Note the following:
■ The search string cannot contain any punctuation characters other thanthe underscore character.
136Manually reviewing itemsSearching within the review set

■ You can append an asterisk (*) as a wildcard character to the end ofthe search string.
■ SQL Server does not index commonly occurring words such as "the"and "and", so Discovery Accelerator ignores these words when itencounters them in a search string. You can override this behavior byediting the SQL Server stopword file.See “About SQL Server stopwords” on page 72.
■ If you set the attribute to Subject, Content, or Subject or Content, choosewhether to turn search stemming on or off.Stemming lets you match words that derive from the word that you specify.For example, the word "run" matches "running" and "ran". You cannot usewildcard characters in conditions that use stemming.
■ Click the + button to save the condition and add another one, if required.For example, you may want to search for items whose Author field containsa nominated author and whose Subject field contains a specified string.You define the relationship between two conditions with theAnd/Or buttons.And denotes that an itemmust match both conditions, whereasOr denotesthat the item can match one condition but not the other.
■ If you want to remove a condition, click the - button at the right of its row.
As you add conditions, they appear in the Search query area. When youbecome familiar with the query language, you can construct more complexqueries by editing the syntax manually.
See “Manually editing queries in analytics rule definition language (RDL)”on page 75.
137Manually reviewing itemsSearching within the review set

4 If you have defined one or more custodians or custodian groups with CustodianManager, use the fields in the Search condition settings area to specify howto search for them. In each case, you can choose to search email addresses,display names, or both. For custodian groups, you can choose to expand thedistribution lists of the groups to include their members in your searches, ratherthan just the list names and email addresses.
Note: Discovery Accelerator does not expand the distribution lists when youuse the Near operator with the attributes Subject, Content, Subject or Content,Author, To, CC, BCC, and Author or Recipients.
The conditions that you enter in the Search conditions settings area use thecustodian information that is available at the time that you build the search.This information is not updated unless you edit the search again. For example,when you create a search and select the option Expand distribution list toinclude members, the list members at that time are saved with the search. Ifthe membership of the list changes later, these changes are not applied to thesearch until you edit and save it again.
5 Click Save, and then click Apply.
Finding all items in the same conversationIn those cases that are enabled for analytics, Discovery Accelerator analyzes theitems in the case as it retrieves the data. Once this analysis is complete, you caneasily find all the items that have the same subject line as the current one.
Conversation analysis is based primarily on the subject of the mail items, but alsoincludes other mail attributes that define a conversation. For the purpose ofconversation analysis, Discovery Accelerator normalizes mail subjects to removeprefixes that email clients have added. For example, RE:, Re:, Fwd:, and Antwort:are removed. After normalization, messages must have identical subjects forDiscovery Accelerator to consider them part of the same conversation.
For any messages that Outlook 2003 or later has generated, conversation analysiscan also construct a conversation hierarchy. Items from Outlook clients earlier thanOutlook 2003 are grouped in a flat list.
Conversation analysis may find many conversations with a frequently used emailsubject such as "Hello". In this case, the Conversation window shows all the resultsfrom multiple conversations, each with its own top-level item in the hierarchy. Theconversation can display up to 1,000 top-level items in the hierarchy.
138Manually reviewing itemsFinding all items in the same conversation

To find all items in the same conversation
1 In the Review pane, select an item for which you want to find all the relateditems.
2 Right-click the item, and then click View conversation.
Discovery Accelerator lists the related items in a separate Conversation window.This window sorts the items by sender or date and, where possible, by theirplace in the item hierarchy. Unreviewed items are shown in bold.
Note: The Conversationwindowmay not show all the items in a conversationuntil the retrieval of analytics data is complete for the case or folder. Even whenthe retrieval of analytics data is complete, Discovery Accelerator does notinclude in the results of conversation analysis any items for which it failed toretrieve such data.
3 Use the facilities in the Conversation window to process the items. Forexample, you can apply marks and tags to the items, display printable versions,and download or copy them.
Assigning review marks and tags to itemsAs part of the review process, you assign a status mark to each message to indicatethat you have reviewed it and have no concerns—or conversely, that you do havesome concerns, and therefore want to question the message.
As well as assigning marks to items, or as an alternative to assigning marks, youcan assign tags to the items. Tags differ from marks in two ways:
■ You can assign multiple tags to an item, but you can assign one mark only.
■ Assigning a tag to an item does not change its action status. This status onlychanges when you click one of the primary mark buttons, such as Relevant orFlagged.
In cases that are enabled for analytics, items may have been marked or tagged byanalytics rules. You can use the Review pane to accept the automatic categorizationon these items.
Tips:
■ In the item list, the headers of unreviewed items display in bold text.
■ You can quickly mark all the items that match a certain filter option byright-clicking that option in the left pane and then selecting the required mark.
139Manually reviewing itemsAssigning review marks and tags to items

■ If you right-click an item in the list view, you can access additional commandsfor bulk-marking the items in the review set.
To assign a review mark or tag to an item
1 In the Review pane, select the items that you want to mark.
To select multiple adjacent items, click the first item, and then hold down theShift key and click the last item. To select nonadjacent items, click the firstitem, and then hold down the Ctrl key and click additional items. To select allthe items, press Ctrl+A.
2 Do one or more of the following:
■ To apply a mark to the items, click the appropriate button at the bottomright of the pane.After a fewmoments, Discovery Accelerator changes the status of the itemsaccordingly.
■ To assign tags to the items, click the Tags button below the Reading pane,and then select the required values.
■ To accept the marks and tags that analytics rules have applied to the itemsin this case, click Actions at the bottom right of the pane, and then pointto Accept.
Adding comments to itemsAs well as assigning a review mark to an item, you can add a comment to it.
To add a comment to an item
1 In the Review pane, select one or more items to which you want to add acomment.
2 In the Comment box at the bottom of the pane, type a new comment.
3 Click the button at the right of the Comment box.
Discovery Accelerator displays a comment indicator in the Comment presentcolumn of the item list to show that you have added the comment.
Click the Comments tab at the bottom of the Reading pane to view thecomments assigned to an item. You can also customize the item list columnsto add a column that shows the comments on items.
140Manually reviewing itemsAdding comments to items

Viewing the history of itemsDiscovery Accelerator provides ready access to historical information on a selecteditem, such as the dates and times at which the reviewers assigned marks andcomments to it.
To view the history of an item
1 In the Review pane, select the item whose history you want to view.
2 Click the History tab at the bottom of the Reading pane.
Discovery Accelerator displays the following details:
■ The subject, date, and details of the sender and recipients.
■ The item type, such as Microsoft Exchange or Bloomberg, and its direction(Internal, ExternalInbound, or ExternalOutbound).
■ The case in which Discovery Accelerator captured the item.
■ When and how Discovery Accelerator captured the item.
■ The ID of the item within Discovery Accelerator.
■ The original location from which the item was archived.
■ The action status history of the item. This history identifies the reviewerswho displayed a preview or printable version of the item, downloaded theoriginal version of the item, or marked it, and the date and time at whichthey did so. If you are viewing the history of an item that you have copiedfrom the review set to a research folder, any events in the status history listthat are colored blue took place before you copied the item to the folder.
Note: You must set the configuration option "Log preview actions in itemhistory" to log when reviewers display previews or printable versions ofitems or download the items in their original form.
See “Reviewing configuration options” on page 210.
The action status history also includes the deletion status of the item:whether the item is queued for deletion from Enterprise Vault, has alreadybeen successfully deleted, or has failed deletion. In this last case, the statushistory shows the reason for the failure. The status history also shows thedate and time at which Discovery Accelerator logged the deletion status.
■ Any policy and policy action with which your policy management softwarehas tagged the item.
141Manually reviewing itemsViewing the history of items

■ For an SMTP item, any attribute information that Enterprise Vault has addedto its X-Headers.
Displaying printable versions of itemsYou can display the contents of items in a form that is suitable for printing.
To display a printable version of an item
1 In the Review pane, select the item that you want to print.
2 Click the Printable tab at the bottom of the Reading pane.
Discovery Accelerator displays a printable version of the item.
If you have deleted the item from the archives, Discovery Accelerator displaysits metadata but does not display its contents.
3 Click the Print button at the top of the Reading pane to send the item forprinting.
Downloading the original versions of itemsAs well as viewing an HTML rendering of an item, you can download it in its originalform to your computer. Note that downloaded items do not include any auditinformation, such as the comments that reviewers have assigned to them. If youwant to obtain both an item and its audit information, you must export it fromDiscovery Accelerator.
To download the original version of an item
◆ In the Review pane, do one of the following:
■ Click the item that you want to download and then click the View originalitem button above the Reading pane.
■ Right-click the item and then click View original.
Discovery Accelerator downloads the item to your computer and displays itusing the appropriate application.
Copying the item list to the ClipboardYou can copy one or all of the rows in the item list to the Windows Clipboard, andthen paste them into a spreadsheet application like Microsoft Excel. The copiedinformation includes additional information that Discovery Accelerator does notdisplay in the list, such as the Enterprise Vault saveset identity of each item.
142Manually reviewing itemsDisplaying printable versions of items

Regardless of whether you have chosen to hide some of the columns in the itemlist, all the information is copied.
To copy the item list to the Clipboard
1 In the Review pane, do one of the following:
■ To copy a single row in the item list, right-click it and then click Copy itemsdetails to clipboard.
■ To copy all the rows, first press Ctrl+A to select them all. Then right-clickand click Copy items details to clipboard.
2 Open the application in which you want to paste the information.
3 Paste the information in the normal way.
Deleting items from Enterprise Vault archivesIf you have the Privileged Delete permission, you can delete archived items fromEnterprise Vault. By default, only users with the role of Regulatory Reviewer havethis permission.
You may need to use Privileged Delete if, for example, you need to delete itemsfrom your archives to comply with data protection legislation such as the "right tobe forgotten". By fetching the items into a case review set and then marking themfor deletion, you can easily remove them from the archives.
You can delete selected items from the item list, all items from the review set, orall items by a particular author.
You can filter items in the review set on the basis of the status of deletion. This isuseful if you want to retrieve the list of items that Discovery Accelerator failed todelete and resubmit them for deletion.
To delete items from Enterprise Vault archives
1 In the Review pane, do one of the following:
■ To delete selected items, select these items in the item list, and then clickActions > Delete.To select multiple adjacent items, hold down the Shift key and click the firstand last item in the range. To select multiple, nonadjacent items, hold downthe Ctrl key and click the required items.
■ To delete all the items, right-click anywhere in the item list, and then clickDelete all n archived items from the set.
143Manually reviewing itemsDeleting items from Enterprise Vault archives

■ To delete all the items by a particular author, right-click any of the author’sitems in the item list, and then click Delete all archived items in this setfrom n.
2 Confirm that you want to delete the items.
An icon in theDeletion Status column of the item list shows the deletion statusof each item, as follows:
The item is queued for deletion from Enterprise Vault.
The item has been successfully deleted.
The item has failed deletion. You can view the failure reason in the History tab.
See “Troubleshooting Privileged Delete failures” on page 257.
Limitations on reviewing items after you have deleted themTable 9-2 shows the features that are available for use in the Review pane basedon the deletion status of the item.
Table 9-2 Features available in the Review pane after item deletion
Deleted successfullyPending deleteFeature
NoNoMark
NoYesPreview
NoNoAdd comments
YesYesView comments
NoYesDisplay printable version
NoNoDownload original version
These features work in a similar way in the Conversation window. Note that thesefeatures work as normal for items that have failed deletion.
Changing how the Review pane looksYou can customize the appearance of the Review pane to suit the way you workand help you find items quickly.
144Manually reviewing itemsChanging how the Review pane looks

Table 9-3 How to customize the Review pane
Do thisTo do this
Click theExpandReviewing Screen button abovethe item list.
Expand the Review pane to occupy theavailable space
Click View above the item list, and then point toReading Pane Layout and select the requiredposition.
You can position the Reading pane at the bottomor right of the main window, or detach it from themain window and display its contents in a newwindow.
Change the position of the Readingpane.
Click View above the item list, and then point toSize of Reading Pane Text and select therequired size.
Change the size of the text in theReading pane.
Right-click any column heading in the item list andthen point to Select columns and select thecolumns to hide or show. Then click Applychanges.
Hide or show columns in the item list.
Click a column heading in the item list to sort theitems by the entries in the column.
The direction of the arrow in the column headingindicates whether the entries are sorted inascending or descending order.
Sort the items in the item list.
Select the required option in theGroup box abovethe item list.
Display or hide the items in a group by clicking thearrow at the left of the group.
Group the items by date, author, subject,or policy action.
In the Page Size box below the item list, select therequired number of items.
Specify the maximum number of itemsto display per page.
Setting your Review pane preferencesDiscovery Accelerator provides extensive facilities with which you can customizethe appearance and operation of the Review pane.
To set your Review pane preferences
1 Click the Review Preferences button in the header area of the Review pane.
145Manually reviewing itemsSetting your Review pane preferences

The Review preferences dialog box appears.
2 Select your required options on the General tab. The options are as follows:
When selected, lets you proceed directly to the Reviewpane when you start Discovery Accelerator.
Go straight to review screenwhen application starts
When selected, applies the default filter options to theitems in the item list.
Apply default preset whenapplication starts
When selected, saves the current filter options as thedefault options for the Review pane.
On exit, save current presetsas default
When selected, causes Discovery Accelerator to displaythe next item in the list automatically when you mark anitem.
Move to next item aftermarking
Sets a limit on the number of items that you can displayin the Review pane.
Maximum number of items todisplay
3 Select your required options on the Display tab. The options are as follows:
Sets the font to use for all buttons and labels in theReview pane.
Font
Sets the font to use in the item list.Item list font
Sets the font to use in the Reading pane.Reading pane font
146Manually reviewing itemsSetting your Review pane preferences

Specifies whether Discovery Accelerator displays theitems in the list in a single-line layout or multiline layout.The multiline layout displays item information over twolines. The first line displays the sender, and the secondline displays the text from the Subject box of the itemheader.
If you select Automatic, Discovery Acceleratorautomatically switches to the multiline layout when thereis insufficient screen space to display a header in asingle line.
Item list display type
Turns on or off highlighting for search terms.Highlight search terms inreading pane
Determines what happens when you type characters inthe text input boxes in the Review pane, such as theComment box. When this option is selected, DiscoveryAccelerator displays the characters in a separate pop-upwindow as you type them. This lets you view all thecharacters at once, instead of hiding older charactersas you type new ones.
Use pop-up for text input
When selected, removes the text labels from the actionbuttons that are below the Preview pane.
Hide text on action buttons
When selected, provides additional information abovethe Preview pane on the location fromwhich the currentitem was archived.
Show original location inreading pane
4 Click OK.
147Manually reviewing itemsSetting your Review pane preferences

Working with researchfolders
This chapter includes the following topics:
■ About research folders
■ Creating research folders
■ Editing the properties of research folders
■ Copying items to research folders
■ Reviewing the items in research folders
■ Exporting items from research folders
■ Giving other users access to your research folders
■ Removing items from research folders
■ Converting research folders into cases
■ Deleting folders
About research foldersBy creating one or more research folders, you can work privately on the items thatinterest you without generating additional work for other reviewers. For example,suppose that you are pursuing an alleged instance of insider trading. Rather thanadd a large number of search results to the review set, where they are visible toother reviewers, you can conduct the searches from a research folder and storethe results there. Then you can review and mark the items in the normal way, orexport them for offline review.
10Chapter

Research folders provide almost the same functionality as cases. Like cases, youcan enable analytics on a folder. However, unlike cases, folders cannot place itemson legal hold. In addition, only application-wide marks and tags are available forselection when you mark the items in a folder.
Where necessary, you can give other users access to your research folders so thatthey can collaborate in the review process. The permissions that you grant theseusers determine whether they can export items from the folder, search for moreitems to add to it, and review and mark the items.
Creating research foldersDiscovery Accelerator provides several methods for creating folders. In addition tothe method described below, you can also create new folders when you define thecriteria for searches, accept the search results, and review items.
You must have the Create Research Folder permission to create a folder that isnot attached to any case. By default, this permission is not associated with anyrole.
To create a research folder
1 Click the Research tab in the Discovery Accelerator client.
2 In the left pane, click All Research.
149Working with research foldersCreating research folders

3 Click New at the top of the window.
The folder properties pane appears.
4 In the Name box, type a name for the folder.
5 In the Case box, select the case with which to associate the folder. You musthave the Perform Ad Hoc Searches permission in this case.
Alternatively, select <My Research> to create a folder that is not attached toany case.
6 Specify a location in which you want to store any items that you export fromthe folder.
7 If you have chosen to create a folder that is not attached to any case, selectthe vault stores in which to search for items. Select or clear the box next toeach vault store to include it in searches or exclude it from searches.
8 Click Save.
Editing the properties of research foldersIf you need to change the properties of a folder, you can do so by following theinstructions below. Note that if you rename someone else’s folder, you takeownership of that folder.
150Working with research foldersEditing the properties of research folders

To edit the properties of a research folder
1 Click the Research tab.
2 In the left pane, click the folder that you want to edit.
3 Click Properties.
4 Edit the folder as necessary.
5 Click Save.
Copying items to research foldersYou can copy items from the review set to a personal folder for further research.You can then review and mark the items, export them for offline review, search formore items that are related to the copied ones, and more.
You must have the Perform Ad Hoc Searches permission in the case to copy itemsfrom its review set to your folder. By default, users with the case role of Admin havethis permission.
To copy an item to a research folder
1 In the Review pane, select one or more items that you want to copy to a folder.
To select multiple adjacent items, click the first item, and then hold down theShift key and click the last item. To select nonadjacent items, click the firstitem, and then hold down the Ctrl key and click additional items. To select allthe items, press Ctrl+A.
2 Click Actions below the preview pane, and then point to Copy.
3 Select the destination folder to which you want to copy the items.
4 Choose to copy the selected items only or all the items in the review set.
5 Click Copy.
Reviewing the items in research foldersYou review the items in a folder in exactly the same way that you review the itemsin the review set.
You must have the Review permission in the folder to review the items in it. Bydefault, users with the Folder Full Control or Folder Review role have this permission.
To review the items in a research folder
1 Click the Research tab in the Discovery Accelerator client.
2 In the left pane, click the folder whose items you want to review.
151Working with research foldersCopying items to research folders

3 Click the Properties tab.
4 Click Go To Review.
5 In the Review pane, review the items as you normally would do.
See “About the Review pane” on page 123.
Exporting items from research foldersIf you want to review items offline or present them in evidence to a third party, youmust export them. You can export the items in several different formats, includingPST, Domino NSF database, HTML, MSG, and ZIP. If you export to HTML, youcan export review marking information along with each item.
Exporting does not affect the status of items, and you can continue to work on thosethat you have exported.
You must have the Export Research Items permission to export items from a folderthat is not linked to a case. When the folder is linked to a case, you must have theProduction permission in the folder to export items from it.
To export the items from a research folder
1 Click the Research tab in the Discovery Accelerator client.
2 In the left pane, click the folder from which you want to export some items.
3 Click the Export tab.
4 Click New.
5 Enter the required run details and filter information.
Discovery Accelerator exports items to a folder on the Discovery Acceleratorserver rather than to a folder on the computer where you are running the client.If you use the same output folder and export run name for multiple runs,Discovery Accelerator overwrites the report summary each time. It is thereforeadvisable to give each run a different name.
The output folder path can contain up to 100 characters.
6 Click Apply.
7 Click OK to export the specified number of items.
8 Wait a few moments for processing to finish, and then browse to the outputfolder on the Discovery Accelerator server to retrieve the exported items.
152Working with research foldersExporting items from research folders

Giving other users access to your researchfolders
You can give other users access to your folders by assigning roles to them. Forexample, anyone who wants to review and mark the items in a folder must havethe Review role in that folder. Other roles permit users to export items from thefolder and search for new items to add to it. The Full Control role combines all thesepermissions in one role.
You must have the Role Assignment permission in the folder to give other usersaccess to it. By default, users with the Folder Full Control role have this permission.
To give another user access to a research folder
1 Click the Research tab in the Discovery Accelerator client.
2 In the left pane, click the folder to which you want to give access.
3 Click the Role Assignment tab.
4 Click the name of the user to whom you want to assign a role.
If the user does not appear in the list, click Add at the top of the pane and thenselect the user to add to it.
5 In the right pane, do one of the following:
■ Click Add to assign a new role.
■ Click Remove to remove the selected role.
6 Click Save.
Removing items from research foldersWhen you have no further use for an item, you can remove it from your researchfolder.
To remove an item from a research folder
1 Click the Research tab in the Discovery Accelerator client.
2 In the left pane, click the folder from which you want to remove some items.
3 Click the Properties tab.
4 Click Go To Review.
153Working with research foldersGiving other users access to your research folders

5 In the Review pane, select one or more items that you want to remove.
To select multiple adjacent items, hold down the Shift key and click the firstand last item in the range. To select multiple, nonadjacent items, hold downthe Ctrl key and click the required items.
6 Click the Remove button below the preview pane.
7 Choose whether to remove the selected items only or all the items in the folder.
8 Click Delete.
Converting research folders into cases
Note: Only research folders that are not attached to existing cases are eligible forconversion into cases.
If you determine that the information in a research folder warrants a case, you canconvert the folder into one. This process automatically places all the items in thefolder on legal hold.
The newly created case complies with the U.S. government's Federal InformationProcessing Standards (FIPS) for encoding and encrypting data, if you usedDiscovery Accelerator 10.0.1 or later to make the source research folder. However,if you make a folder with an older and non-FIPS-compliant version of DiscoveryAccelerator and then convert it into a case with Discovery Accelerator 10.0.1 orlater, the case is not FIPS-compliant.
You must have the Promote Research To Case permission to convert a folder intoa case. By default, only users with the role of Discovery System Admin have thispermission.
To convert a research folder into a case
1 Click the Research tab in the Discovery Accelerator client.
2 In the left pane, click the folder that you want to convert into a case.
3 Click the Properties tab.
4 Click Promote to Case.
5 Click Promote to Case to confirm that you want to proceed.
Deleting foldersWhen you have no further use for a folder, you can delete it.
154Working with research foldersConverting research folders into cases

If you have enabled analytics on the folder, you must disable analytics separately.Otherwise, the associated analytics data remains on the SQL server. Folders thatare linked to a case must be disabled for analytics before you delete the case.
You must have the Delete Folder permission to delete a folder.
To delete a folder
1 Click the Research tab in the Discovery Accelerator client.
2 In the left pane, click All Research.
3 Choose one or more folders that you want to delete.
To select multiple adjacent folders, click the first folder, and then hold downthe Shift key and click the last folder. To select nonadjacent folders, click thefirst folder, and then hold down the Ctrl key and click additional folders. Toselect all the folders, press Ctrl+A.
4 Click Delete.
5 Click Delete folders to confirm that you want to proceed.
155Working with research foldersDeleting folders

Exporting and producingitems
This chapter includes the following topics:
■ About exporting and producing items
■ How exporting differs from producing
■ Performing an export or production run
■ About the limits on the number of simultaneous export and production runs
■ Identifying the archives that contain duplicates of a specific item
■ How to optimize export and production runs
■ Making the export IDs or Bates numbers visible in Microsoft Outlook
About exporting and producing itemsIf you want to review items offline or present them in evidence to a third party thenyou must export them from Discovery Accelerator. Discovery Accelerator supportsa number of file formats for exporting content. You can export all content in itsoriginal format or as an HTML rendering of the content.
Limitations on exporting certain types of contentNote the following limitations on exporting certain types of content as HTML:
■ Any embedded images in email messages may not display properly in HTMLexports of these messages. For the best results, we recommend that you exportmessages that contain embedded images in their original format or encapsulatedin a single Personal Folders (.pst) file.
11Chapter

■ Skype for Business communications can include whiteboards and polls thatusers share during a conference. The content of these two conference featuresis stored in a Microsoft-proprietary XML format, which Enterprise Vault cannotindex. As a result, when you export an HTML rendering of a whiteboard from aDiscovery Accelerator review set, its content is blank. Similarly, an HTML exportof a poll does not include the responses to the poll questions, but the questionsthemselves are included.
How exporting differs from producingExporting items is different from producing items in the following ways:
■ Discovery Accelerator locks produced items, but it does not lock exported items.
■ After you have exported an item, you can change the mark or status that youhave assigned to it. However, after you have produced an item, you cannotmark it or change its status (but you can still display it in the Review pane). Ifthe same item has been captured in another case, its status in that case remainsunaffected.
■ You can export individual items multiple times, but you can produce items onceonly.
In effect, the export feature provides a less formal way to copy items out of DiscoveryAccelerator for offline review.
You do not have to wait until the end of the reviewing process to carry out production;you can produce the items that you have reviewed at any time. You can then carryout productions of further items later, after they have been reviewed. If you use thesame output folder and production run name for multiple runs, Discovery Acceleratoroverwrites the report summary each time.
If you carry out a production run and then something goes wrong with the files thatyou have produced—for example, they are accidentally deleted—you can reproducethe items. However, once you have successfully produced items, you cannot undothe process.
Performing an export or production runIf you want to review items offline or present them in evidence to a third party, youmust export them from Discovery Accelerator. There are several output formatsfrom which to choose, including PST, Domino NSF database, HTML, MSG, andZIP. Export to HTML if you want to export both the item itself and its action statushistory. This history identifies the reviewers who displayed a preview or printable
157Exporting and producing itemsHow exporting differs from producing

version of the item, downloaded the original version of the item, or marked it, andthe date and time at which they did so.
As well as exporting the selected items, Discovery Accelerator also outputs somereports in HTML, plain-text, and XML formats. All three reports list the items thatyou have exported, and the HTML report provides hyperlinks to the items.
You must have the Production permission to produce or export items.
To perform an export or production run
1 Click the Cases tab in the Discovery Accelerator client.
2 In the left pane, click the case from which you want to export items.
If Discovery Accelerator lists a lot of cases, you can filter the list with the fieldsat the top of the pane. As well as filtering the cases by name, you can choosewhether to list any research folders that are associated with them.
3 Click the Export/Production tab.
4 Click New at the top of the window.
The Export Details pane appears.
5 In the Name box, type a name for the run.
158Exporting and producing itemsPerforming an export or production run

The name that you specify here becomes the name of the subfolder in whichDiscovery Accelerator stores the output from the run.
6 In the Output folder box, type the path to the folder on the DiscoveryAccelerator server in which you want to store the output from the run.
The folder path can contain up to 100 characters.
Discovery Accelerator places the output from the run in a subfolder of thenominated folder.
7 Choose whether to produce or export the selected items.
If you select Production, a Production Details box appears in which you canset the ID prefix and starting sequence number for the production. You mayhave set this when you created the case, but you can change it here. The prefixcan contain up to 10 characters, but it cannot include space characters orsymbols such as \ / * ? | < and >.
8 In the Items Selection box, choose the items that you want to export.
The options are as follows:
Specifies the ID of an individual item that you want toexport. To determine the ID of an item, view the item inthe Review pane.
Item ID
Selects items by their type, such as Microsoft Exchangeor Domino.
Original source
Selects items by the policy action with which your policymanagement software has tagged them.
This action can be one of the following: Inclusion(demands or suggests capture), Exclusion (precludescapture or advocates non-capture), and No Action (theitem is subject to normal random sampling).
Policy action
Specifies whether to export all the items in the reviewset or only those items that are assigned to you.
Items
Selects items that the specified search has captured.Search
Selects items by the mark that reviewers have assignedto them.
Mark
Selects items by the person who last assigned a reviewmark to them.
Last marked by
Selects items by their status, such as Pending,Questioned, or Reviewed.
Current status
159Exporting and producing itemsPerforming an export or production run

Selects items by the specific policy with which yourpolicy management software has tagged them.
Policy
9 In theOptions box, select Exclude duplicate items or Exclude similar items,if required. Discovery Accelerator considers items to be duplicates when theyhave exactly the same content. The items that Discovery Accelerator considersto be similar have the same metadata properties, such as their author displaynames, subjects, and number of attachments.
The option to exclude duplicate items is available only in cases that you haveenabled for analytics. The option to exclude similar items is available only incases that you have not enabled for analytics.
For more information on the deduplication features in Discovery Accelerator,see the Accelerator Deduplication white paper.
10 Select Include journal recipients in reports if you want the export reports toinclude recipient information from the journal envelope (P1) of Exchange orSMTP journal items. This lists all the recipients of each item, regardless of theirplacement in the To, CC and BCC fields.
Discovery Accelerator does not include recipient information from Dominojournal items.
11 Choose whether to export the items in their original format, as HTML, orcollected in a ZIP file.
■ If you click Original Type, you can choose to output items in their nativeformat: Microsoft Exchange items as individual MSG files, SMTP items asindividual EML files, and so on. Depending on the selected message types,you may also be able to encapsulate all the exported items in a singlePersonal Folders (PST) file.If you click PST, Discovery Accelerator displays some additional optionswith which you can set a password and a maximum roll-over size for thefile. The password can contain alphanumeric characters only. The defaultsize of each PST file is 600 MB, and it cannot exceed 20 GB.
160Exporting and producing itemsPerforming an export or production run

Note: If you have chosen to export IMAP (Internet Mail) or SMTP items,Discovery Accelerator always exports them as individual EML files insteadof adding them to the PST file. Discovery Accelerator places the EML filesin a subfolder of the output folder; for example,D:\EV\Discovery_Export\Messages\IMAP (Internet Mail) orD:\EV\Discovery_Export\Messages\SMTP.
The reason for this behavior is that EML files do not render properly inMicrosoft Outlook, unlike the other types of items that you can add to a PSTfile. To review the EML files, use an alternative email client that is capableof displaying a preview of their contents.
If the EML file is an RMS-protected item, you need to run the command-lineutility, EmlDecryptor.exe, to decrypt the item. See “How to decryptRMS-protected items” on page 162.
■ If you click HTML, Discovery Accelerator displays some additional optionswith which you can choose to include comments and action status history.This history identifies the reviewers who displayed a preview or printableversion of each item, downloaded the original version of the item, or markedit, and the date and time at which they did so.If the original version of the item is RMS-protected, make sure that youselect the Attachments check box when exporting the item. Otherwise,Discovery Accelerator exports only the cover note and not the actualdecrypted email message.
Note: You must set the configuration option "Log preview actions in itemhistory" to log when reviewers display previews or printable versions ofitems or download the items in their original form.
See “Reviewing configuration options” on page 210.
■ If you click Zip, you can set a maximum roll-over size for each ZIP file. Thedefault is 1024 MB (1 GB).You can export all types of items to a ZIP file. However, if you choose toexport Domino items, Discovery Accelerator collects them first into a DominoNSF database and then adds this to the ZIP file.If the EML file is an RMS-protected item, you need to run the command-lineutility, EmlDecryptor.exe, to decrypt the item. See “How to decryptRMS-protected items” on page 162.
12 In the Number of items to export box, type the required number of items.Note that Discovery Accelerator exports the oldest items. For example, if you
161Exporting and producing itemsPerforming an export or production run

choose to export 100 items, Discovery Accelerator exports the 100 oldest itemsthat match the selected options.
If you have chosen to exclude duplicate items or similar items, they do notcount towards the number of exported items. Discovery Accelerator exportsthe specified number of unique items only.
13 If you are exporting file system items or Domino items and want to make themread-only so that they cannot be changed or accidentally deleted, select ReadOnly.
14 Click Apply.
15 When the run has finished, open the output folder on the Discovery Acceleratorserver to retrieve the exported items. This folder also includes the reports thatlist the items that you have exported.
How to decrypt RMS-protected itemsDiscovery Accelerator exports RMS-protected SMTP journal items in the encryptedformat on the Discovery Accelerator server. You need to use the command-lineutility, EmlDecryptor.exe, to decrypt all RMS-protected items.
EmlDecryptor.exe decrypts the contents of the item, creates an unencryptedversion of the EML file, and stores it in a separate folder at the same location asthe source folder. EmlDecryptor.exe is installed as a part of the Enterprise VaultAPI Runtime or the Enterprise Vault services installation on the DiscoveryAccelerator server.
Before you run EmlDecryptor.exe, do the following:
■ Install the Active Directory Rights Management Services Client 2.1.
■ Confirm whether Discovery Accelerator has exported any RMS-protected itemsby generating an export or a production run report.
■ Ensure that the EmlDecryptor.exe and EmlDecryptor.ini files are located inthe Enterprise Vault API Runtime installation folder.
To use EmlDecryptor.exe to decrypt RMS-protected items
1 Use a text editor to edit the EmlDecryptor.ini file with the following details:
■ The licensing intranet URL of the rights management services (RMS) server.
■ The licensing extranet URL of the rights management services (RMS)server.
■ The unique application ID for the service principal in a tenant, which yourservice uses for interacting with Azure Rights Management Services.
162Exporting and producing itemsPerforming an export or production run

■ The globally unique identifier (GUID) of the tenant. The tenant ID is tied tothe Active Directory in Azure.
For example,
;This is the configuration file for the EmlDecryptor utility.
;EmlDecryptor.exe is a command-line utility, which decrypts
;all Azure RMS-protected SMTP emails available in the
;export/production location of the Discovery/Compliance
;Accelerator export/production run.
;All parameters in this ini file must be specified and should
;not be empty.
;The licensing intranet URL of the rights management services
;(RMS) server.
RMSIntranetUrl=https://<RMSLicensingIntranetUrl>
;The licensing extranet URL of the rights management services
;(RMS) server.
RMSExtranetUrl=https://<RMSLicensingExtranetUrl>
;The unique application ID for the service principal in a
;tenant, which your service uses for interacting with
;Azure Rights Management Services.
ApplicationPrincipalId=<ApplicationPrincipalId>
;The globally unique identifier (GUID) of the tenant. The
;tenant ID is tied to the Active Directory in Azure.
BposTenantId=<BposTenantId>
2 Log on to the Discovery Accelerator server as a Discovery Acceleratoradministrator.
3 Run EmlDecryptor.exe from the command line. For example,
c:\Program Files (x86)\Enterprise Vault>EmlDecryptor.exe
4 EmlDecryptor.exe prompts you to enter the following details:
■ <Source Directory Path>. Enter the location where the RMS-protectedSMTP emails are exported after the export run or the production run.
■ <Symmetric Key>. Enter the 256-bit AES symmetric key that is used toverify the application.
163Exporting and producing itemsPerforming an export or production run

EmlDecryptor.exe validates the provided information and starts the conversionprocess.
When EmlDecryptor.exe executes successfully, it stores the decrypted files alongwith a CSV report in a separate folder within the source directory path. For example,if the source directory path is C:\Discovery Accelerator Export\customer_name,the decrypted files and the CSV report are stored in theC:\ExportRun\customer_name_decrypted<DateTime> folder.
If you encounter any issues when running the EmlDecryptor.exe utility, enableDTrace on the utility and run it again.
About the limits on the number of simultaneousexport and production runs
By default, you can undertake up to four runs simultaneously. When you try toperform additional runs, Discovery Accelerator holds them in a queue until it hascompleted some of the active runs. Then it undertakes the additional runs in theorder in which you initiated them. If you need to perform a high-priority run whilethe maximum number of runs is already in progress, you can ask a DiscoveryAccelerator administrator to stop one of those runs so that yours can start.
Discovery Accelerator administrators can change the maximum number ofsimultaneous runs that it is possible to undertake by setting the followingExport/production configuration options:
■ Number of production threads per production run
■ Total number of production threads per customer
To access these configuration options, click theConfiguration tab in the DiscoveryAccelerator client, and then click the Settings tab. The maximum number ofsimultaneous runs that you can undertake is the "Total number of production threadsper customer" divided by the "Number of production threads per production run".
See “Export/production configuration options” on page 195.
Identifying the archives that contain duplicatesof a specific item
When you perform an export run or production run, you can choose to exclude anyduplicate items in the review set. If you want to identify all the archives that containduplicates of a specific item, you can do so by running a SQL query against theDiscovery Accelerator customer database.
164Exporting and producing itemsAbout the limits on the number of simultaneous export and production runs

To identify the archives that contain duplicates of a specific item
1 On the SQL Server computer, start SQL Server Management Studio.
2 In the left pane of the SQL Server Management Studio window, expand thetree until the required Discovery Accelerator customer database is visible.
3 Click the customer database, and then click New Query.
4 Enter the following query, and then click Execute:
Declare @ItemID nvarchar(50)
Declare @ProductionID int
Declare @DAID BigInt
Set @ItemID = 'Export ID or Bates number of item'
Set @ProductionID = ID of export or production run
SELECT @DAID = DiscoveredItemID
FROM tblProductionToDiscoveredItem
WHERE ProductionID = @ProductionID and ExportID = @ItemID
SELECT dbo.fx_GetDuplicateItemArchives(@DAID,@ProductionID)
As ArchiveList
Where:
Identifies the duplicate item. You can specify either the export ID (foran exported item) or the Bates number (for a produced item). Forexample:
Set @ItemID = '000622'
To determine the export ID or Bates number, check the details of theitem in the export or production report.
ItemID
Identifies the export or production run that contains the duplicate item.For example:
Set @ProductionID = 57
To determine the ID of the export or production run, look at thesummary information in the export or production report.
ProductionID
The query returns a list of the archives that contain duplicates of the specifieditem.
165Exporting and producing itemsIdentifying the archives that contain duplicates of a specific item

How to optimize export and production runsFor the best results when exporting or producing items, follow these guidelines:
■ Export to a high-speed drive that is located on the Discovery Accelerator server.
■ Avoid conducting multiple export runs at once. If this is unavoidable, store theoutput from each run on a different drive.
■ Export email messages in their original format, if you can. This is much fasterthan encapsulating the messages in a single Personal Folders (.pst) file.Only export items in HTML format when this is essential.
■ If the case review set includes Exchange journal messages that the EnterpriseVault SMTP Archiving feature has archived, select Exclude similar items tostop Discovery Accelerator from exporting multiple copies of some of themessages.
■ If an export fails for any reason, use the Re-try facility in preference to theRe-Export facility.
Making the export IDs or Bates numbers visiblein Microsoft Outlook
When you view exported or produced Personal Folders (.pst) files in MicrosoftOutlook, you may find it helpful to see the export ID or Bates number that DiscoveryAccelerator has assigned to each item. You can do this by adding a custom columnto the view in Outlook.
The configuration option that is called PST ExportID Column Name lets you setthe label for the custom column. The default label is Bate Number. (Note that thisis "Bate Number" rather than "Bates Number".)
See “Export/production configuration options” on page 195.
To make the export IDs or Bates numbers visible in Microsoft Outlook
1 Open the exported .pst file in Outlook.
2 Right-click the column headers in Outlook, and then click Field Chooser.
3 Click New.
4 In the Name box in the New Field dialog box, type Bate Number, and thenclick OK.
5 Close the Field Chooser dialog box.
6 Right-click the column headers in Outlook, and then click Customize CurrentView.
166Exporting and producing itemsHow to optimize export and production runs

7 Click Fields and then, in the Select available fields from list, selectUser-defined fields.
8 Add the Bate Number field to the list of displayed fields, and then click OKtwice to close the dialog boxes.
167Exporting and producing itemsMaking the export IDs or Bates numbers visible in Microsoft Outlook

Creating and viewingreports
This chapter includes the following topics:
■ About the Discovery Accelerator reports
■ Creating Discovery Accelerator reports
■ Available Discovery Accelerator reports
■ Viewing existing reports
■ Deleting reports
■ About viewing Discovery Accelerator datasets using the OData web service
About the Discovery Accelerator reportsDiscovery Accelerator provides extensive facilities for reporting on the details of acase and validating compliance with discovery requests.
Besides printing the reports, you can export them in a number of formats, includingXML, comma-separated values (CSV), Acrobat (PDF), web archive (MHTML),Excel, and TIFF.
Creating Discovery Accelerator reportsYou must have the View Reports permission to generate a new report. By default,most users with a case role have this permission.
12Chapter

To create a Discovery Accelerator report
1 Click the Reports tab in the Discovery Accelerator client.
2 Click New at the top left of the window.
3 In the Type box, select the type of report that you want to create.
See “Available Discovery Accelerator reports” on page 169.
In some instances, choosing a report type causes additional boxes to appearso that you can define the scope of the report.
4 In the Name box, type a unique name that contains up to 50 characters.
5 If required, type an optional description that contains up to 250 characters.
6 Set any remaining report parameters, and then click Apply.
7 When Discovery Accelerator has generated the report, double-click the reportname in the left pane to view it.
Available Discovery Accelerator reportsTable 12-1 describes the reports that accompany Discovery Accelerator.
Table 12-1 Available Discovery Accelerator reports
ShowsThis report
The Enterprise Vault archives in which you have conductedDiscovery Accelerator searches within a selected case.
See “Archive Source report” on page 170.
Archive Source report
Information on a selected Discovery Accelerator case,including the users who have access to the case and thesearches, reviews, and production runs that they haveconducted. The report also provides information on the itemsthat users have deleted from the Enterprise Vault archives.
See “Case History report” on page 171.
Case History report
The duplicate items that Discovery Accelerator has foundbecause you chose to enable deduplication when youconducted an export run.
See “Export Run Duplicates report” on page 173.
Export Run Duplicates report
The items in the selected case in various stages of reviewor deletion.
See “Item Detail report” on page 174.
Item Detail report
169Creating and viewing reportsAvailable Discovery Accelerator reports

Table 12-1 Available Discovery Accelerator reports (continued)
ShowsThis report
The items in the selected case on which DiscoveryAccelerator has placed a hold to stop them from being deletedfrom the Enterprise Vault archives.
See “Legal Holds report” on page 175.
Legal Holds report
The items in each production run and export run for a selectedcase.
See “Production Run report” on page 177.
Production Run report
The duplicate items that Discovery Accelerator has foundbecause you chose to enable deduplication when youconducted a production run.
See “Production Run Duplicates report” on page 178.
Production Run Duplicatesreport
The production runs that you have conducted for the selectedcase.
See “Productions report” on page 179.
Productions report
The live and accepted searches in the selected case.
See “Searches report” on page 180.
Searches report
The users who have access to the selected case, and theirassociated roles and permissions.
See “Security report” on page 181.
Security report
Archive Source reportThe Archive Source report provides information on the Enterprise Vault archivesin which you have conducted Discovery Accelerator searches within a selectedcase.
This report contains the following fields.
Table 12-2 Fields in the Archive Source report
ShowsThis field
The identifier that Enterprise Vault has assigned to thearchive.
Archive ID
The name of the Enterprise Vault archive.Archive Name
170Creating and viewing reportsAvailable Discovery Accelerator reports

Table 12-2 Fields in the Archive Source report (continued)
ShowsThis field
The vault store in which the archive is located.Vault Store
The number of hits that the search has generated.Hits In Archive
Whether or not the archive is available.Archive Status
The earliest date on which the items in the archive were sentand received.
Earliest Date in Archive
The latest date on which the items in the archive were sentand received.
Latest Date in Archive
Case History reportThe Case History report provides information on a selected Discovery Acceleratorcase, including the users who have access to the case and the searches, reviews,and production runs that they have conducted.
The Case History report provides information on a selected Discovery Acceleratorcase, including the users who have access to the case and the searches, reviews,and production runs that they have conducted. The report also provides informationon the items that users have deleted from the Enterprise Vault archives.
This report contains the following fields.
Table 12-3 Fields in the Case History report
ShowsThis field
Cases
The name that the creator of the case has assigned to it, andthe identifying number that Discovery Accelerator hasassigned to it.
Case Name/Number
The date on which the case was created.Case Creation Date
Whether the items in the case review set are on hold to stopusers from deleting them from their Enterprise Vault archives.
Legal Hold State
The number of items in the case review set.Total Items In Case
The number of items that you have produced for offlinereview.
Items Produced
171Creating and viewing reportsAvailable Discovery Accelerator reports

Table 12-3 Fields in the Case History report (continued)
ShowsThis field
The number of items that are in various stages of deletionfrom the archives.
Privileged Delete Requests
The users who have access to this case and their roles withinit.
Role/User Name
Searches
The date on which a search was run.Date Run
The name that the creator of the search has assigned to it.Search Name
The identifying number that Discovery Accelerator hasassigned to the search.
Search ID
The number of archives that Discovery Accelerator hassearched.
# of Archives
The progress of the search, expressed as a percentage value.Search Status
The number of hits that the search has generated.# of Hits
The number of items that the search has retrieved that noother search in the case has retrieved.
# of Unique Hits
Review
The number of items in the case review set that reviewershave yet to mark.
Items Unreviewed
The number of items in the case review set that reviewershave marked.
Items Reviewed
The number of items in the case review set that have a statusof Questioned.
Items Questioned
The number of items in the case review set that have a statusof Pending.
Items Pending
The number of items in the case review set that are currentlyassigned to reviewers for marking.
Items Assigned
The number of items in the case review set that are notcurrently assigned to reviewers for marking.
Items Unassigned
Production/Export History
The date on which the production or export was completed.Date of Production/Export
172Creating and viewing reportsAvailable Discovery Accelerator reports

Table 12-3 Fields in the Case History report (continued)
ShowsThis field
The name of the production run or export run.Production/Export Name
The identifying number that Discovery Accelerator hasassigned to the production run or export run.
Production/Export ID
The progress of the production run or export run, expressedas a percentage value.
Production/Export Status
The identifying numbers of the first and last items in theproduction run. -1 means None.
Begin ID/End ID
The number of items in the production run. -1 means None.Number of ItemsProduced/Exported
The name of the search with which you selected items forproduction.
Search Name
The name of the review mark with which you selected itemsfor production.
Mark
The path to the folder on the file system where you can findthe produced or exported items.
Location
Privileged Delete
The number of items in the case that are deleted from thearchives.
Items Deleted
The number of items in the case that failed to delete from thearchives.
Items Failed to Delete
The number of items in the case that are queued for deletionfrom the archives.
Items Pending Delete
Export Run Duplicates reportThe Export Run Duplicates report lists duplicate items that Discovery Acceleratorhas found because you chose to enable deduplication when you conducted anexport run.
This report contains the following fields.
173Creating and viewing reportsAvailable Discovery Accelerator reports

Table 12-4 Fields in the Export Run Duplicates report
ShowsThis field
The identifying number that Discovery Accelerator hasassigned to the duplicate item.
DAID
The identifying number of the item that this item duplicates.Duplicate of Exported DAID
The identifier of the saveset (.DVS) file that contains theduplicate item.
SSID
The identifier that Enterprise Vault has assigned to the archivein which the duplicate item is stored.
Archive ID
The name of the Enterprise Vault archive.Archive Name
The location in the user's mailbox from which the item wasarchived.
Location
The reviewer to whom this duplicate item was assigned.Latest Reviewer
The last comment that a reviewer has assigned to theduplicate item.
Latest Comment
The date on which the duplicate item was sent.Mail Date
The author of the duplicate item.Author
The recipients of the duplicate item. This may not be a fulllist because it can contain up to 256 characters only.
Recipients (truncated)
The subject line of the duplicate item.Subject
The searches that match this duplicate item.Searches
Item Detail reportThe Item Detail report provides information on the items in the selected case.
This report contains the following fields.
Table 12-5 Fields in the Item Detail report
ShowsThis field
The identifying number that Discovery Accelerator hasassigned to the item.
DAID
The identifier of the saveset (.DVS) file that contains the item.SSID
174Creating and viewing reportsAvailable Discovery Accelerator reports

Table 12-5 Fields in the Item Detail report (continued)
ShowsThis field
The identifier that Enterprise Vault has assigned to thearchive.
Archive ID
The name of the Enterprise Vault archive.Archive Name
The date on which the item was sent or received.Sent/Received Date
The email address of the person who sent the item.Author
The recipients of the item. This may not be a full list becauseit can contain up to 256 characters only.
Recipients (truncated)
The subject line of the item.Subject
The last mark that a reviewer has assigned to the item.Latest Mark
The last comment that a reviewer has assigned to the item.Latest Comment
The status of deletion of the item from the archive: successful,pending, or failed.
Item Deletion Status
The name of the Discovery Accelerator user who submittedthe deletion request.
Deleted By
Legal Holds reportThe Legal Holds report provides a summary of the items in the selected case onwhich Discovery Accelerator has placed a hold to stop them from being deletedfrom the Enterprise Vault archives. The report first shows details of the case andof the searches that you have conducted in it. The report then shows details of theheld items in the search results.
This report contains the following fields.
Table 12-6 Fields in the Legal Holds report
ShowsThis field
Case
The number of items in the case review set.Total Items
Whether the items in the case review set are on hold to stopusers from deleting them from their Enterprise Vault archives.
Legal Hold State
The ID of the legal hold on the case.Legal Hold Group ID
175Creating and viewing reportsAvailable Discovery Accelerator reports

Table 12-6 Fields in the Legal Holds report (continued)
ShowsThis field
The reason why the items in the case have been placed onhold.
Reason
The progress of the legal hold.Legal Hold Status
The number of items that Discovery Accelerator has placedon hold.
Total Items Held
The number of items that Discovery Accelerator cannot placeon hold.
Total # of Hold Errors
The number of items that have been deleted from theEnterprise Vault archives before Discovery Accelerator canplace them on hold.
Total # of Items Deleted
The number of archives in which items have been placed onhold.
Total Archives with ItemsHeld
Searches
The identifying number that Discovery Accelerator hasassigned to the search.
Search ID
The name that the creator of the search has assigned to it.Search Name
The date on which the search was run.Search Date
The total number of items that match the search criteria.Total Hits
The number of items that the search has retrieved that noother search in the case has retrieved.
Total Unique Items
The number of unique items that Discovery Accelerator hasplaced on hold.
Total Unique Items Held
The number of Enterprise Vault archives that the search hasqueried.
Total Archives
Archive Details
The identifier that Enterprise Vault has assigned to thearchive.
Archive ID
The name of the Enterprise Vault archive.Archive Name
The vault store in which the archive is located.Vault Store
The number of items on hold in the archive.# of Items on Hold
176Creating and viewing reportsAvailable Discovery Accelerator reports

Table 12-6 Fields in the Legal Holds report (continued)
ShowsThis field
The earliest date on which the items on hold were sent andreceived.
Earliest Date
The latest date on which the items on hold were sent andreceived.
Latest Date
Production Run reportThe Production Run report provides information on the items in each productionrun for a selected case.
This report contains the following fields.
Table 12-7 Fields in the Production Run report
ShowsThis field
The identifying Bates number or export number of the item.Bates ID/Export ID
The identifying number that Discovery Accelerator hasassigned to the item.
DAID
The identifier of the saveset (.DVS) file that contains the item.SSID
How far the production of this item has progressed.Status
The identifier that Enterprise Vault has assigned to the archivein which the item is stored.
Archive ID
The name of the Enterprise Vault archive.Archive Name
The location in the user's mailbox from which the item wasarchived.
Location
The number of items that Discovery Accelerator excludedfrom the production run because they are duplicates of orsimilar to other items.
Number of Duplicate orSimilar Items
The reviewer to whom this item was assigned.Latest Reviewer
The last comment that a reviewer has assigned to the item.Latest Comment
The date on which the item was sent.Mail Date
The author of the item.Author
177Creating and viewing reportsAvailable Discovery Accelerator reports

Table 12-7 Fields in the Production Run report (continued)
ShowsThis field
The recipients of the item. This may not be a full list becauseit can contain up to 256 characters only.
Recipients (truncated)
The subject line of the item.Subject
The searches that match this item.Searches
Production Run Duplicates reportThe Production Run Duplicates report lists duplicate items that Discovery Acceleratorhas found because you chose to enable deduplication when you conducted aproduction run.
This report contains the following fields.
Table 12-8 Fields in the Production Run Duplicates report
ShowsThis field
The identifying number that Discovery Accelerator hasassigned to the duplicate item.
DAID
The identifying number of the item that this item duplicates.Duplicate of Exported DAID
The identifier of the saveset (.DVS) file that contains theduplicate item.
SSID
The identifier that Enterprise Vault has assigned to the archivein which the duplicate item is stored.
Archive ID
The name of the Enterprise Vault archive.Archive Name
The location in the user's mailbox from which the item wasarchived.
Location
The reviewer to whom this duplicate item was assigned.Latest Reviewer
The last comment that a reviewer has assigned to theduplicate item.
Latest Comment
The date on which the duplicate item was sent.Mail Date
The author of the duplicate item.Author
The recipients of the duplicate item. This may not be a fulllist because it can contain up to 256 characters only.
Recipients (truncated)
178Creating and viewing reportsAvailable Discovery Accelerator reports

Table 12-8 Fields in the Production Run Duplicates report (continued)
ShowsThis field
The subject line of the duplicate item.Subject
The searches that match this duplicate item.Searches
Productions reportThe Productions report provides information on the production runs that you haveconducted for the selected case.
This report contains the following fields.
Table 12-9 Fields in the Productions report
ShowsThis field
The date and time at which the production was completed.Date
The name that the initiator of the production run has assignedto it.
Name
The identifying number that Discovery Accelerator hasassigned to the production.
Production ID
Whether this is a production run or export run.Type
The identifying numbers of the first and last items in theproduction. -1 means None.
Begin ID/End ID
The number of items in the production run or export run.Number of Items Produced
The name of the search with which you selected the itemsfor production or export.
Search Name
The name of the review mark with which you selected theitems for production or export.
Mark
The option for excluding duplicate or similar items that youselected when you defined the criteria for the production runor export run.
Exclude Items
The number of items in the production run or export run thatare duplicates of or similar to other items in the run.
Number of Duplicate orSimilar Items
Whether you have chosen to include recipient informationfrom the journal envelope of journal items.
Include Journal Recipients inReports
179Creating and viewing reportsAvailable Discovery Accelerator reports

Table 12-9 Fields in the Productions report (continued)
ShowsThis field
The path to the folder on the file system where you can findthe produced or exported items.
Production Location
Searches reportThe Searches report provides information on the live and accepted searches in theselected case.
This report contains the following fields.
Table 12-10 Fields in the Searches report
ShowsThis field
The date and time at which the search was run.Date
The name that the creator of the search has assigned to it.Click the name to display the criteria used for the search.
Search Name
The identifying number that Discovery Accelerator hasassigned to the search.
Search ID
The status of the search, such as Pending Acceptance, InProgress, Accepted, Failed, or Completed.
Status
The number of archives that Discovery Accelerator hassearched.
# of Archives
The progress of the search, expressed as a percentage value.Search Status
The number of items that match the search criteria.# of Hits
The number of found items that no other search in the casehas retrieved.
# of Unique Hits
The name of the Discovery Accelerator user who submittedthe search.
Submitted By
The following table lists the Search Criteria fields.
180Creating and viewing reportsAvailable Discovery Accelerator reports

Table 12-11 Search Criteria fields
ShowsThis field
The date range between which itemsmust be sent or receivedto match the search criteria.
Date Ranges
The recipients of the items.To
The senders of the items.From
The words or phrases for which to search in the subject linesof items.
Subject
The words or phrases for which to search in the messagebodies of items.
Content
The required number of attachments to items.Number of Attachments
The file name extensions of particular types of attachmentsfor which to search.
Attachment Type
The size of item for which to search.Message Size
The type of item for which to search.Message Type
The selected retention category that Enterprise Vault hasassigned to the items.
Retention Category
The selected policy type (Inclusion, Exclusion, or Category)with which third-party policy management software hastagged the items.
Policy Type
The specific policy with which the policy managementsoftware has tagged the items.
Policy
The filter applied in the search to sort by case.Filter Policies by Case
Security reportThe Security report provides information on the users who have access to theselected case, and their associated roles and permissions.
This report contains the following fields.
Table 12-12 Fields in the Security report
ShowsThis field
Security Details
181Creating and viewing reportsAvailable Discovery Accelerator reports
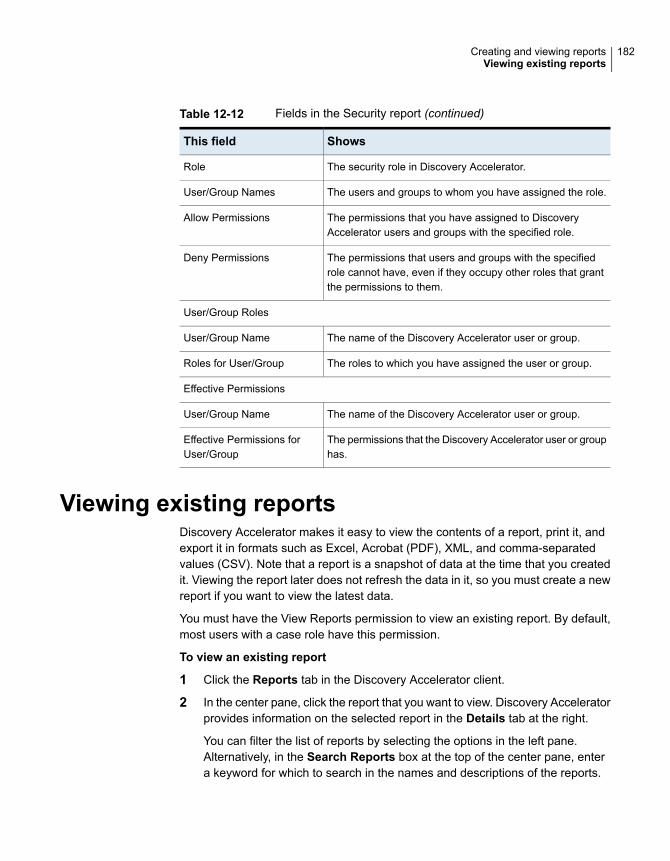
Table 12-12 Fields in the Security report (continued)
ShowsThis field
The security role in Discovery Accelerator.Role
The users and groups to whom you have assigned the role.User/Group Names
The permissions that you have assigned to DiscoveryAccelerator users and groups with the specified role.
Allow Permissions
The permissions that users and groups with the specifiedrole cannot have, even if they occupy other roles that grantthe permissions to them.
Deny Permissions
User/Group Roles
The name of the Discovery Accelerator user or group.User/Group Name
The roles to which you have assigned the user or group.Roles for User/Group
Effective Permissions
The name of the Discovery Accelerator user or group.User/Group Name
The permissions that the Discovery Accelerator user or grouphas.
Effective Permissions forUser/Group
Viewing existing reportsDiscovery Accelerator makes it easy to view the contents of a report, print it, andexport it in formats such as Excel, Acrobat (PDF), XML, and comma-separatedvalues (CSV). Note that a report is a snapshot of data at the time that you createdit. Viewing the report later does not refresh the data in it, so you must create a newreport if you want to view the latest data.
You must have the View Reports permission to view an existing report. By default,most users with a case role have this permission.
To view an existing report
1 Click the Reports tab in the Discovery Accelerator client.
2 In the center pane, click the report that you want to view. Discovery Acceleratorprovides information on the selected report in the Details tab at the right.
You can filter the list of reports by selecting the options in the left pane.Alternatively, in the Search Reports box at the top of the center pane, entera keyword for which to search in the names and descriptions of the reports.
182Creating and viewing reportsViewing existing reports

3 Click the Preview tab to display the contents of the report.
4 Do one or more of the following:
■ To page through the report, go to a specific page, find a specific word, oradjust the magnification level, click the navigation controls at the top of thepreview pane.
■ To export the report, select the required format and then click Export.Discovery Accelerator prompts you to choose a location for the report file.
■ To update the report contents, click Refresh.
■ To print the report, click Print and then select the printing options that youwant.
Deleting reportsWhen you have no further use for a report, you can delete it from DiscoveryAccelerator.
You must have the View Reports permission to delete a report. By default, mostusers with a case role have this permission.
Caution: You cannot recover reports that you accidentally delete.
To delete a report
1 Click the Reports tab in the Discovery Accelerator client.
2 In the left pane, click the report that you want to delete.
3 Click Delete Report at the top left of the window.
4 Click Yes to confirm that you want to delete the report.
About viewing Discovery Accelerator datasetsusing the OData web service
Apart from creating and viewing reports from the Discovery Accelerator client, youcan expose information from the Discovery Accelerator configuration and customerdatabases through the Open Data (OData) web service. You can use this informationwith any OData-compatible reporting tool to create reports as required. Examplesof such reporting tools include Excel/PowerQuery and Microsoft SQL ServerReporting Services (SSRS).
183Creating and viewing reportsDeleting reports

For extensive information on this facility, see the white paper Best Practices forEnhanced Accelerator Reporting.
Available Discovery Accelerator datasetsTable 12-13 describes the Discovery Accelerator datasets that you can view throughthe OData web service.
Table 12-13 Available Discovery Accelerator datasets
ShowsThis dataset
Information on the items in each case review set andthe number of items in various stages of review ordeletion.
CaseHistory
Information on all cases across all customer databases.Cases
Information on all customer databases.Customers
Information about the duplicate items that DiscoveryAccelerator found because you chose to enablededuplication when you conducted an export run.
ExportRunDuplicates
Information on all the items in one or all of the casesthat were associated with the specified customerdatabase.
ItemDetails
Details of legal holds in one or more archives.LegalHoldArchives
A summary of the items on which Discovery Acceleratorhas placed a hold to stop them from being deleted fromthe Enterprise Vault archives.
LegalHolds
Details of the searches that you have conducted for acase and details of the held items in the search results.
LegalHoldSearches
Information on the items in each production run for aselected case.
ProductionRun
Information about the duplicate items that DiscoveryAccelerator has found because you chose to enablededuplication when you conducted a production run.
ProductionRunDuplicates
184Creating and viewing reportsAbout viewing Discovery Accelerator datasets using the OData web service

Table 12-13 Available Discovery Accelerator datasets (continued)
ShowsThis dataset
Information on the production runs that were conductedfor the selected case.
Productions
Details of search criteria used in a particular search.SearchCriteria
Details of searches for a specific customer.SearchDetails
Information on one or all of the searches in a specifiedcase, or in all the cases in a specified customerdatabase.
Searches
Information on the users who have access to theselected case, and their associated roles andpermissions.
UserRolesAndPermissions
Accessing the Discovery Accelerator datasetsYou can access the datasets by typing the following addresses in the address barof your web browser. In each case, server_name is the name of the server on whichyou have installed the Discovery Accelerator server software.
■ To access a list of all the available datasets, type the following:http://server_name/DAReporting/OData
■ To access a list of all the available datasets together with all the fields includedin each dataset, type the following:http://server_name/DAReporting/OData/$metadata
■ To access a particular dataset, type the following:http://server_name/DAReporting/OData/dataset_name
Using the OData service with Microsoft ExcelThe following instructions are for using the OData service with the followingMicrosoftExcel versions:
■ Microsoft Excel 2010 and 2013Make sure that you have installed the Microsoft Power Query add-in for Excel.You can download the add-in from the following page of the Microsoft website:https://www.microsoft.com/download/details.aspx?id=39379
■ Microsoft Excel 2016, 2019 and O365
185Creating and viewing reportsAbout viewing Discovery Accelerator datasets using the OData web service

To use the OData service with Microsoft Excel 2010 and 2013
1 Open Microsoft Excel.
2 Create a new, blank workbook.
3 On the Power Query tab, in the Get External Data group, click From OtherSources, and then click From OData Data Feed.
4 In the OData Feed dialog box page, in the URL box, specify the websiteaddress for the data feed as follows:
http://server_name/DAReporting/OData/dataset_name(parameter=value)
For example:
http://da.mycompany.com/DAReporting/OData/CaseHistory(customerID=1005,caseID=5)
Note: Take care to specify the mandatory parameters that are required to viewthe dataset. Except for the Customers dataset, all the datasets have mandatoryparameters. For information on them, see the online Help for each dataset.
5 If you are prompted for your credentials, enter them and then log in. The QueryEditor opens.
6 In the Query Editor, view the records available for the dataset. Edit the queriesas required.
7 ClickClose & Load to import the dataset information in Excel in tabular format.
To use the OData service with Microsoft Excel 2016, 2019 and O365
1 Open Microsoft Excel.
2 Create a new, blank workbook.
3 On the Data tab, in the Get External Data group, click Get Data, click FromOther Sources, and then click From OData Data Feed.
186Creating and viewing reportsAbout viewing Discovery Accelerator datasets using the OData web service

4 In the OData Feed dialog box page, in the URL box, specify the websiteaddress for the data feed as follows:
http://server_name/DAReporting/OData/dataset_name(parameter=value)
For example:
http://da.mycompany.com/DAReporting/OData/CaseHistory(customerID=1005,caseID=5)
Note: Take care to specify the mandatory parameters that are required to viewthe dataset. Except for the Customers dataset, all the datasets have mandatoryparameters. For information on them, see the online Help for each dataset.
5 If you are prompted for your credentials, enter them and then log in. The QueryEditor opens.
6 In the Query Editor, view the records available for the dataset.
7 Transform the records by clicking on the Transform Data button. This will openthe Power Query Editor where you can edit the data to meet your needs. Notethat the original source remains unchanged.
8 ClickClose & Load to import the dataset information in Excel in tabular format.
Using the OData service with Microsoft SQL Server ReportingServices (SSRS)
The following instructions are for Microsoft SQL Server Reporting Services (SSRS).
To use the OData service with Microsoft SQL Server Reporting Services(SSRS)
1 Open Report Builder.
2 Add a new datasource as an XML connection type.
3 In the Connection string box, specify the URL for the data feed as follows:
http://server_name/DAReporting/OData/dataset_name(parameter=value)?$format=application/atom+xml
For example:
http://da.mycompany.com/DAReporting/OData/Cases(customerID=1)?$format=application/atom+xml
4 Provide credentials to connect to the data source.
5 Click OK.
187Creating and viewing reportsAbout viewing Discovery Accelerator datasets using the OData web service

6 Add the dataset using the above mentioned datasource.
7 Select Use a dataset embedded in my report.
8 Select the dataset from the list.
9 Set the query as follows:
<Query>
<ElementPath IgnoreNamespaces="true">
feed{}/entry{}/content{}/properties
</ElementPath>
</Query>
10 Click Refresh Fields.
11 Use the new dataset as reporting data for the SSRS report.
188Creating and viewing reportsAbout viewing Discovery Accelerator datasets using the OData web service

Customizing DiscoveryAccelerator
This appendix includes the following topics:
■ Setting Discovery Accelerator system configuration options
■ Customizing the columns in the Review pane
Setting Discovery Accelerator systemconfiguration options
Discovery Accelerator provides hundreds of configuration options with which youcan customize the appearance and performance of the application. Theseconfiguration options are grouped into categories, as Table A-1 explains.
Table A-1 Configuration settings by category
FunctionCategory
Configure the searches that users can initiate from their research folders.Ad Hoc Searches
Control how the analytics features in Discovery Accelerator handleitems in the same email conversation.
AnalyticsConversationAnalysis
Control how Discovery Accelerator collects analytics data for the itemsin a case.
Analytics DataCollection
Control how third-party tools may exchange data with your DiscoveryAccelerator database through the Discovery Accelerator applicationprogramming interface (API).
API
AAppendix

Table A-1 Configuration settings by category (continued)
FunctionCategory
Enable or disable the Discovery Accelerator troubleshooting facilities.Diagnostics
Customize the error messages that Discovery Accelerator displays inthe Review pane when it cannot open an item in the preview windowof that pane.
DocumentConversion
Configure the output when users export or produce items fromDiscoveryAccelerator for offline review.
Export/production
Configure general Discovery Accelerator options.General
Control the appearance of the Home page of Discovery Accelerator.Home Page
Configure the primary settings for the Discovery Accelerator prefetchcache mechanism. This mechanism is designed to speed up therendering of items in the Review pane.
Item PrefetchCache
Configure advanced settings for the prefetch cache mechanism.Item PrefetchCache (Advanced)
Configure the Discovery Accelerator Legal Hold mechanism. Thismechanism allows case administrators to prevent the documents andmessages in their cases from being deleted.
Legal Hold
Integrate Discovery Accelerator with your policy management softwareto better flag items for inclusion in or exclusion from the review set.
Policy Integration
Configure the deletion of items from the Enterprise Vault archives.Privileged Delete
Control how Discovery Accelerator synchronizes user profiles with thecorresponding Active Directory or Domino directory accounts.
ProfileSynchronization
Customize the appearance and functionality of the Review pane.Reviewing
Optimize the search features in Discovery Accelerator.Search
Choose whether to make the SQL Server sysadmin logon the creatorand owner of Discovery Accelerator search schedules.
Security
Record the dates on which you installed Enterprise Vault and began toarchive data, and more.
System
Configure when Discovery Accelerator synchronizes with the EnterpriseVault archives.
Vault DirectorySynchronization
190Customizing Discovery AcceleratorSetting Discovery Accelerator system configuration options

You must have the Modify System Configuration permission to change theconfiguration settings. By default, only users with the role of Discovery SystemAdmin have this permission.
To set Discovery Accelerator system configuration options
1 Click the Configuration tab in the Discovery Accelerator client, and then clickthe Settings tab.
2 Click the plus sign at the left of a section name to list the associated settings.
Alternatively, type some characters in the filter box at the top of the window tosearch for the configuration options that contain those characters. For example,type Colour to find all the options that contain this word in their names.
3 For each setting whose value you want to change, do the following in the orderlisted:
■ Click the value in the Value column.
■ Set the required value.
■ Click outside the Value column.
4 When you have set all the required options, click Save.
5 If you have changed any setting that has a tick in itsRestart Required column,restart the Enterprise Vault Accelerator Manager service on the DiscoveryAccelerator server to put your changes into effect.
Ad Hoc Searches configuration optionsUse these settings to configure the searches that users can initiate from the researchfolders that they have created.
Specifies the prefix to add to the names of ad-hocsearches that users save to the review set.
Ad-hoc search Pre-fix
Specifies whether users can delete the items froma folder search before they accept the search intothe review set. By default, Discovery Acceleratorlets users delete the items.
Allow hits to be deleted from an Ad-Hocsearch result
191Customizing Discovery AcceleratorSetting Discovery Accelerator system configuration options

Specifies whether reviewers can commit itemsfrom their research folders to the review set withoutalso committing the associated review marks andcomments. This option is only used if you select"Commit All Audit History When Committing AnItem". By default, Discovery Accelerator expectsusers to commit the marks and comments whenthey commit items to the review set.
Allow users to commit items withoutcommitting audit history
Specifies whether reviewers must commit the fullaudit history when committing items from theirpersonal folders to the review set. By default,Discovery Accelerator lets users choose theelements that they want to commit.
Commit All Audit History WhenCommitting An Item
Analytics Conversation Analysis configuration optionsUse these settings to control how the analytics features in Discovery Acceleratorhandle items in the same email conversation.
Specifies the prefixes that Discovery Acceleratorshould remove from the subject lines of items forthe purpose of conversation analysis. By default,Discovery Accelerator removes the followingprefixes:
RE:;FW:;FWD:;Reply:;REP:;RSVP:;SRC:;VS:;RPLY:;Antwort:;Aw:;Wg:;Wtr
Prefixes to remove during subjectnormalization
Analytics Data Collection configuration optionsUse these settings to control how Discovery Accelerator collects analytics data forthe items in a case.
Specifies the number of minutes that DiscoveryAccelerator should wait before it tries to collectanalytics data from an Enterprise Vault server thatwas previously unavailable. The default setting is50 minutes.
EV vault server not available wait period(minutes)
API configuration optionsUse these settings to control how third-party tools may exchange data with yourDiscovery Accelerator database through the Discovery Accelerator application
192Customizing Discovery AcceleratorSetting Discovery Accelerator system configuration options

programming interface (API). For more information on the Discovery AcceleratorAPI, contact Veritas Support.
Specifies whether to enable or disable access tothe Discovery Accelerator web service API. Bydefault, access is disabled, which means that noneof the API methods works.
API Enabled
Specifies the number of seconds that an APIcommand should wait before abandoning itsattempt to exchange data with the DiscoveryAccelerator customer database.
Database command timeout (seconds)
Specifies the Domino template (.ntf) file to usewith the GetItems API method.
Domino template file
Specifies a limit in bytes on the size of each chunkof item content that you can retrieve with theGetItem and GetItems API methods.
Maximum item chunk size (bytes)
Specifies a limit on the number of items for whichyou can retrieve information in one batch with theGetItemList API method.
Maximum item list chunk size
Specifies the location in which to store itemstemporarily when they are retrieved through theAPI. By default, the setting is blank, which meansthat the Windows %TEMP% folder is used. If youwant to specify an alternative folder, ensure thatthe Accelerator service account has fullpermissions on it. The folder must also have plentyof free space.
For performance reasons, exclude the temporarystorage area from on-access virus scanning.
Temporary storage area
Specifies the frequency in minutes with which topurge stale data from the temporary storage area.The default setting is 30 minutes.
Temporary storage area cleanup interval(minutes)
Auditing configuration optionsUse these settings to configure the auditing features in Discovery Accelerator.
193Customizing Discovery AcceleratorSetting Discovery Accelerator system configuration options

Specifies the frequency in minutes with which tocopy legacy audit data to dedicated audit tables inthe customer database. The following categoriesof data can comprise legacy data:
■ Data from earlier versions of DiscoveryAccelerator.
■ Data from a baseline operation to capture thecurrent state of Discovery Accelerator.
Enter a value in the range 15 to 1440, where 1440(one day) is the default value.
Legacy data migration frequency
Diagnostics configuration optionsUse these settings to enable or disable the Discovery Accelerator troubleshootingfacilities.
Specifies whether to report Discovery Acceleratorperformance data, which you can view with theWindows Performance Monitor utility.
Enable performance monitor
Specifies whether to record every server action inthe event log. Tracing to the event log applies toinformation events only, as Discovery Acceleratoralways records all error messages and warningmessages in the log.
Enable tracing
Specifies whether to generate deduplicationinformation files in a DeduplicationInfosubfolder of your Discovery Accelerator programfolder on the Discovery Accelerator server(typically, C:\Program Files(x86)\Enterprise Vault BusinessAccelerator\DeduplicationInfo). Thesededuplication information files, which are in plaintext and XML format, may assist the VeritasSupport team when dealing withdeduplication-related problems. By default, thissetting is cleared; Discovery Accelerator does notcreate the files.
Save deduplication information
194Customizing Discovery AcceleratorSetting Discovery Accelerator system configuration options

Specifies whether to generate search criteria filesin a SearchCriterias subfolder of yourDiscovery Accelerator program folder on theDiscovery Accelerator server. These files, whichare in plain text and XML format, may assist theVeritas Support team when dealing withsearch-related problems. By default, DiscoveryAccelerator does not create the files.
See “Discovery Accelerator searches returnunexpected results” on page 248.
Save Search Criteria
Specifies whether to save the XML files of theitems to commit to the database under a subfolderof the server. By default, Discovery Acceleratordoes not save the XML files.
Save XML Search Items To Commit
Specifies whether to generate search results files(one for each Enterprise Vault archive that issearched) in a SearchResults subfolder of yourDiscovery Accelerator program folder on theDiscovery Accelerator server. By default, DiscoveryAccelerator does not create the files.
Save XML Search Results
Document Conversion configuration optionsUse these settings to customize the error messages that the Review pane of theDiscovery Accelerator client may display.
Specify the error messages to display if DiscoveryAccelerator cannot display an item in the previewwindow of the Review pane. Each message cancontain up to 200 characters.
Conversion Errors
Export/production configuration optionsUse these settings to configure the output when users export or produce items fromDiscovery Accelerator for offline review.
195Customizing Discovery AcceleratorSetting Discovery Accelerator system configuration options

Specifies whether to add an identifying Batesnumber to the file name of each exported item thatEnterprise Vault has archived through File SystemArchiving (FSA).
The options are as follows:
■ 0. Omit the Bates number.■ 1. Add the Bates number to the start of the file
name. This option is the default option.■ 2. Append the Bates number to the end of the
file name.
Add Bate identifier to File Systemexports
Specifies whether to append a last-modified datestamp to the file name of each exported item thatEnterprise Vault has archived through File SystemArchiving (FSA). By default, Discovery Acceleratorappends the date stamp.
Always date stamp exported File Systemitems
Specifies the maximum number of attempts thatDiscovery Accelerator makes to repeat an exportrun that failed for any reason. Set the value to 0 tostop Discovery Accelerator from retrying the run.
Automatic retry: Maximum retries
Specifies the minimum delay in minutes betweenautomatic attempts to repeat a failed export orproduction run. By default, Discovery Acceleratorwaits five minutes between retries.
Note that Discovery Accelerator multiplies thisvalue by the number of retries. So, if this value is5, the delay between retries starts at five minutesand increases to 10, 15, and so on with subsequentretries.
Automatic retry: Minimum time betweenretries (minutes)
Specifies the file name extension of the files tocreate when exporting items for viewing outsideDiscovery Accelerator. For example, you wouldspecify .xls as the extension for export files inMicrosoft Excel format.
Custom conversion extension
Specifies the name of the template file to use whenexporting files in their custom format. For example,if you have created a template file for exportingitems in Microsoft Excel format, you can enterExcelReport.xslt as the file name.
Custom conversion file
196Customizing Discovery AcceleratorSetting Discovery Accelerator system configuration options

Specifies the default folder on the DiscoveryAccelerator server to use for exported items. If youdo not specify a default export folder, DiscoveryAccelerator uses the folder c:\DiscoveryAccelerator Export\customer_name.
The folder path can contain up to 100 characters.
Default export folder
Specifies the status that you want to set as thedefault current status when you perform an exportrun.
Type one of the following values:
■ 0. N/A■ 1. Pending■ 2. Reviewed■ 3. Questioned
Default Production status
Specifies whether to export PST and MSG files inUnicode (Outlook 2003 and later) format or ANSI(Outlook 97 through 2002) format. By default,Discovery Accelerator exports the items in Unicodeformat.
Default to Unicode for PST and MSG
Specifies the name of the file to use as a templatewhen exporting files to a Notes Database Template(NTF) file. The default file name is accelexp.ntf.
Domino Export Template
Specifies the name of the .id file that is used forlocal Domino authentication when exporting filesto an NTF file. The default file name isAccelerator.id.
Domino ID File
Specifies the password that is used for localDomino authentication when exporting files to anNTF file.
Domino Password
Specifies whether to enable or disable all exportingand production facilities. By default, DiscoveryAccelerator enables these facilities.
Enable Production threads
Lets you download, edit, and then upload an XSLstyle sheet. This style sheet serves as the templatefor all the export reports that Discovery Acceleratorgenerates in HTML format.
HTML conversion file
197Customizing Discovery AcceleratorSetting Discovery Accelerator system configuration options

Specifies the number of attempts that DiscoveryAccelerator makes to retrieve an item from anoffline device, such as a tape drive, before givingup. Enter a value between 1 and 1000, where thedefault is 120.
Maximum production retry for itemsstored on slow devices
Specifies the number of minutes that DiscoveryAccelerator waits between retry attempts whentrying to retrieve an item from an offline device.Enter a value between 1 and 300, where thedefault is 5.
Minimum number of minutes betweenretries for items stored on slow devices(min)
Specifies the number of threads that DiscoveryAccelerator assigns to generating reports of exportruns. The default is 5.
Number of production report threads
Specifies the number of threads in the SQLconnection pool that Discovery Accelerator assignsto each export or production run. Enter a value inthe range 1 to 25, where the default is 25.
See also the configuration setting "Total numberof production threads per customer".
To determine the maximum number of export orproduction runs that you can conductsimultaneously, divide the "Total number ofproduction threads per customer" by the "Numberof production threads per production run". Forexample, if you specify 100 for the first setting and25 for the second setting, you can conduct up tofour export or production runs simultaneously. Ifyou try to conduct further export or production runs,Discovery Accelerator holds them in a queue untilthe required number of threads is available.
Number of production threads perproduction run
Sets the order in which Discovery Accelerator liststhe searches when you set the criteria for an exportrun. You can choose to sort the searches by nameor by run date. By default, Discovery Acceleratorsorts the searches by name.
Production order Search by RunDate
198Customizing Discovery AcceleratorSetting Discovery Accelerator system configuration options

In Microsoft Outlook, specifies the label for thecolumn in which to show Discovery Acceleratorexport IDs. The default label is "Bate Number".When you export items fromDiscovery Acceleratoras a Personal Folders (.pst) file, and then importthis file into Outlook, the export IDs of the itemsappear in this column.
See “Making the export IDs or Bates numbersvisible in Microsoft Outlook” on page 166.
PST ExportID Column Name
Specifies the Outlook folder in which to place theitems after you import a Personal Folders (.pst)file that you exported from Discovery Accelerator.
PST Folder Name
Specifies the number of exported items to list ineach report file. The default is 25000.
Report chunk size
Specifies whether, when you undertake an exportrun, Discovery Accelerator prompts you to selecta PST version: Outlook 97-2002 (ANSI) or Outlook2003 (Unicode). By default, Discovery Acceleratordoes not display the prompt.
Show PST version option on export run
Specifies whether, when you initiate an export runor production run, Discovery Accelerator first opensthe Review pane. This facility lets you browse theitems before you proceed with the run. By default,Discovery Accelerator does not display the Reviewpane.
Show review page on export
Lets you download, edit, and then upload an XSLstyle sheet. This style sheet serves as the templatefor all the export reports that Discovery Acceleratorgenerates in tab-separated format.
TAB Conversion file
Specifies the maximum number of threads percustomer that Discovery Accelerator assigns whenit conducts export or production runs. Enter a valuebetween 50 and 1000, where the default is 100.
See also the configuration setting "Number ofproduction threads per production run".
Total number of production threads percustomer
General configuration optionsUse these settings to configure general Discovery Accelerator options.
199Customizing Discovery AcceleratorSetting Discovery Accelerator system configuration options

Specifies a threshold count for the number ofarchives to load in the Archives To Search paneof the Discovery Accelerator client. If the numberof archives that match the current selection andfilter criteria exceeds this threshold, a warningmessage prompts you to change the criteria andreduce the number of archives. Specify a value inthe range 50,000 to 200,000. The default is 50,000.
Display warning in Archives pane whennumber of archives to load exceeds thisthreshold
Specifies whether to deduplicate exported itemsand items that are in review. By default, with thissetting selected, Discovery Acceleratordeduplicates the items.
Enable deduplication
In areas of Discovery Accelerator where you selectan Active Directory account, specifies whether toshow any accounts whose names end with thecharacter $. By default, Discovery Acceleratorshows these accounts.
Hide Active Directory accounts endingwith '$' in account selector
When you filter items by search, specifies whetherto omit from the list those searches that failed tocapture any items. By default, DiscoveryAccelerator shows these searches.
List searches without sampled hits infilters
Specifies the maximum number of custodians orcustodian groups to list in theChoose custodiansand / or custodian groups dialog box. When youcreate a search, this is the dialog box in which youselect the custodians or custodian groups for whomyou want to search. By default, the dialog box listsa maximum of 5000 custodians or custodiangroups.
Maximum number of results to list in'Choose custodians and / or custodiangroups' dialog box
Specifies the order in which to display the first andlast names of employees. By default, the first nameprecedes the last name. You may want to clearthis option when working in countries where thenames are typically reversed, such as Japan.
Show First Name followed by Last Name
200Customizing Discovery AcceleratorSetting Discovery Accelerator system configuration options

In areas of Discovery Accelerator such as theReview pane, specifies whether to append thesample size to the name of each listed search. So,if a search has 200 hits, and your monitoring policyrequires you to add 10% of captured items to thereview set, Discovery Accelerator shows the searchas "My Search [20]".
By default, Discovery Accelerator shows thesample size.
Show search sample counts in filters
Home Page configuration optionsUse these settings to control the appearance of the Home page of DiscoveryAccelerator.
Sets a limit on the number of cases that users canchoose to list in the home page of the application.The default is 10.
Maximum number of cases to show onhome page
Sets a limit on the number of export runs thatDiscovery Accelerator can list in the home pageof the application. The default is 30.
Maximum number of exports to show onhome page
Sets a limit on the number of searches thatDiscovery Accelerator can list in the home pageof the application. The default is 30.
Maximum number of searches to showon home page
Specifies the maximum age of the data thatDiscovery Accelerator can display for tasks in thehome page of the application. The default is 30days.
Maximum task age (days) to show onhome page
Specifies whether to list individual research folderson the Discovery Accelerator home page. Bydefault, Discovery Accelerator lists the folders.
Show Folders on Home Page
Specifies whether reviewers can see the statisticsfor other reviewers on the home page of theapplication. By default, all reviewers can see thesestatistics.
Show Reviewers' statistics to reviewers
Item Prefetch Cache configuration optionsUse these settings to configure the Discovery Accelerator prefetch cachemechanism. This mechanism retrieves and caches items from the vault store duringa scheduled window every night, instead of retrieving each item when the user
201Customizing Discovery AcceleratorSetting Discovery Accelerator system configuration options

chooses to review it. The cache therefore helps to speed up the rendering of itemsin the Review pane. You can specify the size, location, and other characteristics ofthe cache.
To optimize performance in an environment where you review items very intensively,we recommend the following:
■ Use the fastest storage available and set aside a full partition so that there isno competition for I/O.
■ Set the maximum size within the cache to match the partition size.
■ Set the cache to 365 days before expiry.
■ Set the cache to retrieve the full items with HTML and MSG. If you do not needto export the items, you can choose to retrieve the items with HTML only.
The Item Prefetch Cache options are the more commonly used cache options. Youcan also set the Item Prefetch Cache (Advanced) options.
Specifies whether to enable or disable the prefetchcache. By default, Discovery Accelerator disablesthe cache. Therefore, prefetching does not occurand the cache is not used for item retrieval, evenif there are items in the cache. Only enable thecache for a Discovery Accelerator database inwhich you actively review items or where youconnect to slow storage for export runs.
We recommend that you do not enable the prefetchcache in any databases that you use primarily forlegal hold searches. This generates a lot ofunnecessary network traffic and consumes storagespace.
Note that the cache is either enabled or disabledfor an entire database.
Cache enabled
202Customizing Discovery AcceleratorSetting Discovery Accelerator system configuration options

Specifies the local path or network share path tothe folder in which to store the cache. Within thisfolder, Discovery Accelerator stores the prefetchedfiles in a subfolder that is calledAcceleratorPrefetch_CustomerId.
Note the following:
■ We recommend that you specify a local path,where possible. If you must specify a networkshare path, always use the UNC path ratherthan a mapped drive.
■ The folder must already exist; DiscoveryAccelerator does not create it.
■ In a hosting environment, multiple customersmust not share the same folder.
Cache location
Specifies the number of days for which items canremain in the cache before Discovery Acceleratorautomatically deletes them. The item age is basedon the creation time of the file in the cache, andnot the time that Discovery Accelerator capturedthe item or the time that the item was originallysent. The default age is 5 days.
Discovery Accelerator may remove an item fromthe cache earlier than the maximum item age if thecache becomes full.
Cache maximum item age (days)
Specifies the maximum size of the cache inmegabytes (MB). The default is 1000 MB. Thelarger the value of the "Cache maximum item age(days)" setting, the higher the cachemaximum sizemust be to accommodate the items.
Cache maximum size (Mbytes)
Specifies the time of day at which DiscoveryAccelerator stops prefetching items. The defaultis 05:00 A.M. Use this setting with "Startprefetching time of day" to determine the hours ofthe day that prefetching is active. Configuring aperiod during which caching does not occur letsyou undertake other maintenance activities duringthis period, such as performing Enterprise Vaultbackups.
To make prefetching active at all times, set thisoption and "Start prefetching time of day" to thesame time.
End prefetching time of day (server localtime)
203Customizing Discovery AcceleratorSetting Discovery Accelerator system configuration options

Specifies the time of day at which DiscoveryAccelerator starts to prefetch items. The default is20:00 P.M. Use this setting with "End prefetchingtime of day" to determine the hours of the day thatprefetching is active. Configuring a period duringwhich caching does not occur lets you undertakeother maintenance activities during this period,such as performing Enterprise Vault backups.
To make prefetching active at all times, set thisoption and "End prefetching time of day" to thesame time.
Start prefetching time of day (serverlocal time)
Item Prefetch Cache (Advanced) configuration optionsThese settings provide additional, advanced options for configuring the DiscoveryAccelerator prefetch cache functionality. Use these settings with the Item PrefetchCache options.
Specifies whether to encrypt files before they arestored in the cache. By default, DiscoveryAccelerator does not encrypt the cache.
Cache encrypted
Specifies the time of day at which DiscoveryAccelerator performs cache housekeeping(primarily removing old items). The default time is19:00 PM.
Cache purge time of day (server localtime)
Excludes from the cache those captured items thatare older than the specified number of days. Thedefault is 3 days. This setting only has an effectwhen prefetching is first turned on, or if it has beendisabled for some time and is then reenabled.
Maximum capture age (days)
Specifies the maximum number of times thatDiscovery Accelerator tries to prefetch an itembefore giving up. The default is 10.
Maximum item fetch attempts
Sets a limit on the size of items and parts of itemsthat Discovery Accelerator can prefetch. If an itemor part of an item exceeds this limit, it is ignored.The default is 10 MB. For example, DiscoveryAccelerator still prefetches an item that hasmultipleattachments, none of which is bigger than 10 MB,even though the combined size of the attachmentsmay greatly exceed the 10 MB limit.
Maximum item size to store in cache(bytes)
204Customizing Discovery AcceleratorSetting Discovery Accelerator system configuration options

Specifies the number of minutes that DiscoveryAccelerator waits between attempts to prefetchitems. The default is 30 minutes. Use this settingwith "Maximum item fetch attempts" to configureretry behavior for failed fetches.
Minimum time between item fetch retries(minutes)
Specifies whether to prefetch the attachments toitems. By default, Discovery Accelerator prefetchesattachments. Note that attachments of nested itemsare not prefetched.
Prefetch attachments
Specifies whether to render attachments as HTMLwhen prefetching them. By default, DiscoveryAccelerator prefetches attachments as HTML.
Prefetch attachments as HTML
Specifies whether to prefetch the items that usershave captured with an immediate, unscheduledsearch. By default, Discovery Accelerator does notprefetch these items.
Prefetch immediate search items
Specifies whether to prefetch items in their original,native format. By default, Discovery Acceleratordoes not prefetch the items in their native format.However, if your policy is to review items in theiroriginal format then you should enable this feature.
Prefetch Native format
Specifies whether to prefetch the items that usershave placed in personal folders through ad-hocsearches. By default, Discovery Acceleratorprefetches these items.
Prefetch research items
Specifies whether to prefetch the items that usershave captured with a scheduled search. By default,Discovery Accelerator prefetches the items.
Note that items are only prefetched when thesearch is accepted, so this option works best whenscheduled searches are set to auto-accept.
Prefetch scheduled search items
Specifies whether to prefetch the items that usershave captured with a search. You can furthercontrol this facility with the "Prefetch immediatesearch items" and "Prefetch scheduled searchitems" options. By default, Discovery Acceleratorprefetches the items.
Prefetch search items
205Customizing Discovery AcceleratorSetting Discovery Accelerator system configuration options
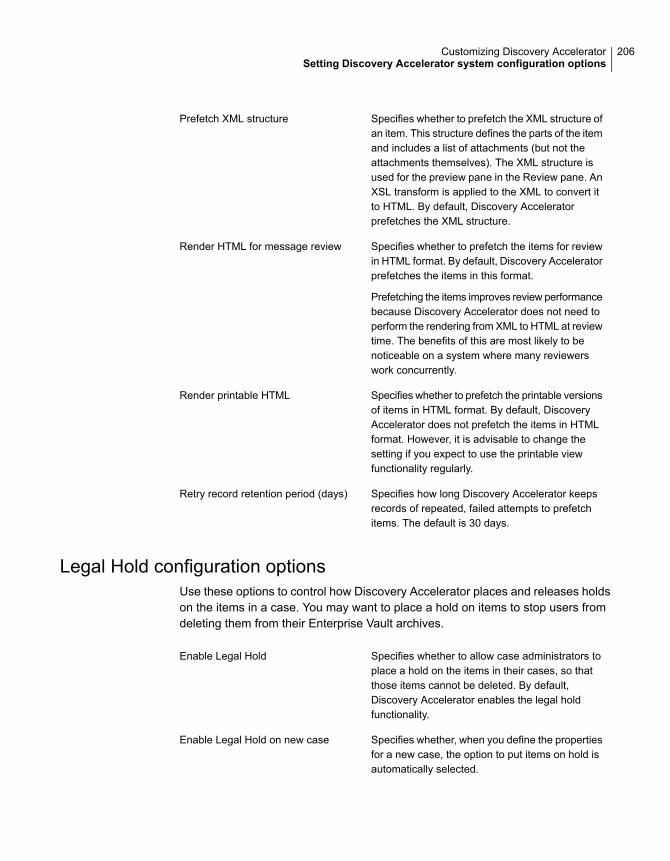
Specifies whether to prefetch the XML structure ofan item. This structure defines the parts of the itemand includes a list of attachments (but not theattachments themselves). The XML structure isused for the preview pane in the Review pane. AnXSL transform is applied to the XML to convert itto HTML. By default, Discovery Acceleratorprefetches the XML structure.
Prefetch XML structure
Specifies whether to prefetch the items for reviewin HTML format. By default, Discovery Acceleratorprefetches the items in this format.
Prefetching the items improves review performancebecause Discovery Accelerator does not need toperform the rendering from XML to HTML at reviewtime. The benefits of this are most likely to benoticeable on a system where many reviewerswork concurrently.
Render HTML for message review
Specifies whether to prefetch the printable versionsof items in HTML format. By default, DiscoveryAccelerator does not prefetch the items in HTMLformat. However, it is advisable to change thesetting if you expect to use the printable viewfunctionality regularly.
Render printable HTML
Specifies how long Discovery Accelerator keepsrecords of repeated, failed attempts to prefetchitems. The default is 30 days.
Retry record retention period (days)
Legal Hold configuration optionsUse these options to control how Discovery Accelerator places and releases holdson the items in a case. You may want to place a hold on items to stop users fromdeleting them from their Enterprise Vault archives.
Specifies whether to allow case administrators toplace a hold on the items in their cases, so thatthose items cannot be deleted. By default,Discovery Accelerator enables the legal holdfunctionality.
Enable Legal Hold
Specifies whether, when you define the propertiesfor a new case, the option to put items on hold isautomatically selected.
Enable Legal Hold on new case
206Customizing Discovery AcceleratorSetting Discovery Accelerator system configuration options

Specifies the frequency in seconds with whichDiscovery Accelerator checks for case items toplace on legal hold or release from hold. Thedefault frequency is 30 seconds.
Legal Hold thread checking period (sec)
Specifies the maximum number of times thatDiscovery Accelerator tries to place a legal holdon an item before giving up. The default numberis 2.
Maximum Legal Hold Retry
Specifies the number of threads with whichDiscovery Accelerator places or removes legalholds on items. The default number is 10.
Number of Legal Hold Threads
Specifies the maximum number of items to placeon hold concurrently. The default number is 1000.
Placing hold items Batch Size
Specifies the maximum number of items to releasefrom hold concurrently. The default number is1000.
Removing hold items Batch Size
Policy Integration configuration optionsUse these settings to integrate Discovery Accelerator with your policy managementsoftware to better flag items for inclusion in or exclusion from the review set.
When you preview an item that has no associatedpolicies in the Review pane, specifies whether toshow the Policy field above the item. By default,Discovery Accelerator hides this field when thereare no associated policies.
Always show policy display in reviewgrid
207Customizing Discovery AcceleratorSetting Discovery Accelerator system configuration options

When you preview an item in the Review pane,specifies the order in which to list the associatedpolicies in the banner above the item. Enter oneof the following values:
■ 0. The policies are not sorted.■ 1 (default). Discovery Accelerator first groups
the policies by policy type (inclusion, exclusion,and category) and then sorts themalphabetically within each type.
■ 2. The policies are sorted alphabetically,regardless of policy type.
Changing the sort order does not affect the itemsthat are already in the Accelerator database; onlynewly-added items are affected.
Sort Policies within type
Privileged Delete configuration optionsUse these settings to configure the deletion of items from the Enterprise Vaultarchives.
Specifies whether to start a background task todelete the items that are marked for deletion.
Enable privileged delete of archiveditems
Specifies the number of times that DiscoveryAccelerator should try to delete an item from anEnterprise Vault archive before giving up.
Maximum privileged delete retry
Specifies the number of threads assigned todeleting items from Enterprise Vault archives.
Number of privileged delete threads
Specifies the frequency in seconds with whichDiscovery Accelerator should check for items todelete from Enterprise Vault archives.
Privileged delete thread checking period(sec)
Profile Synchronization configuration optionsUse these settings to control how Discovery Accelerator synchronizes employeeprofiles with the corresponding Active Directory or Domino directory accounts.
Specifies a domain to add to a user nameautomatically when synchronizing employees withDomino accounts.
Default Domino domain when creatingprofiles
208Customizing Discovery AcceleratorSetting Discovery Accelerator system configuration options

Specifies the name of the default Domino LDAPserver to use when you browse for new users toadd to your Discovery Accelerator system.
Default Domino server when browsingfor users
Stops you from choosing any Domino LDAP serverother than the default server when you browse fornew users to your Discovery Accelerator system.By default, Discovery Accelerator lets you nominateany Domino server.
Force users to use the default Dominoserver when browsing for users
Specifies the number of threads that DiscoveryAccelerator employs when it synchronizesemployee profiles with the corresponding ActiveDirectory or Domino directory accounts. Enter avalue in the range 1 through 5, where the defaultis 1.
Number of synchronization threads
Specifies whether Discovery Accelerator deletesthe email addresses in an employee profile beforeit synchronizes the profile with Active Directory ora Domino directory. By default, DiscoveryAccelerator does not delete the addresses. Thisis because you may still want to perform searchesthat use old email addresses, or you may haveentered some additional email addressesmanually.
Discovery Accelerator does not delete the emailaddresses in the profile if synchronization fails forany reason.
Remove addresses that do not exist inDomino or Active Directory
Specifies the frequency in hours with whichDiscovery Accelerator synchronizes employeeprofiles with the corresponding Active Directory orDomino directory accounts. Enter a value in therange 1 through 24. The default is every eighthours and every time the Accelerator Managerservice starts.
Synchronization interval (hours)
Specifies whether Discovery Accelerator shouldattempt to synchronize employees and groups withthe corresponding Active Directory or Dominodirectory accounts. The default is to do so.
Synchronize profiles
209Customizing Discovery AcceleratorSetting Discovery Accelerator system configuration options

Specifies the number of minutes to wait after theAccelerator Manager service starts beforesynchronizing employees and groups with ActiveDirectory or a Domino directory. Enter a value inthe range 0 through 720. By default, the servicedoes not wait before synchronizing.
When service starts wait beforesynchronizing (minutes)
Reviewing configuration optionsUse these settings to configure the Review pane.
Specifies the default number of items to show inthe Review pane. Enter a value in the range 1through 1000, where the default is 100.
Default Page Size
Specifies how to show the available marks in theReview pane: as clickable options across thebottom of the page, or in a drop-down list. Bydefault, Discovery Accelerator shows the marksas clickable options rather than as options in adrop-down list.
Display Marking List
Specifies the path to the folder in which temporarilyto store the items that you retrieve by using theEnterprise Vault Content Management API. Bydefault, Discovery Accelerator uses the Windows%TEMP% folder.
Note the following:
■ We recommend that you specify a local path,where possible. If you must specify a networkshare path, always use the UNC path ratherthan a mapped drive.
■ The folder must already exist; DiscoveryAccelerator does not create it.
■ In a hosting environment, multiple customersmust not share the same folder.
ECM Temporary Storage Area
Specifies the frequency in minutes with which topurge stale data from the temporary storage area.The default value is five minutes.
ECM Temporary Storage Area CleanupInterval (Minutes)
210Customizing Discovery AcceleratorSetting Discovery Accelerator system configuration options

Provides a comma-separated list of the filteroptions that are not available to users in theReview pane. The available options are as follows:
author, authoraddress, authordomain, authorname,capturedate, commentid, direction, extension,ingestionstatus, legalstatus, maildate, markingid,markstatusid, numattachments, policyaction,policyid, recipientaddress, recipientdomain,recipientname, reviewerid, ruleid,scheduledsearchid, searchid, size, tagid, tagruleid,type.
Facets To Hide
Specifies the color with which to identify the itemsin a research folder that already exist in theassociated review set. The default color is blue.
Folder item colour when it exists in thereview set
Specifies the background color with which tohighlight instances of search terms in HTMLrenderings of items. You can enter a color name,such as “Yellow” (the default color), or ared-green-blue color value, such as “#FFFF00”.
Highlight Background Colour
Specifies the foreground color with which tohighlight instances of search terms in HTMLrenderings of items. You can enter a color name,such as “Black” (the default color), or ared-green-blue color value, such as “#000000”.
Highlight Foreground Colour
Specifies whether to enable or disable searchhighlighting in HTML renderings of items. Set thevalue to 1 (the default) if you want to highlightinstances of search terms in items, or to 0 todisable highlighting.
Hit Highlighting Type
Specifies whether to turn on or off the lock cleanupthread, which unlocks any items that have beenaccidentally left locked. For example, this may bethe case if a reviewer's computer or DiscoveryAccelerator client stops working during a reviewingsession. By default, the thread is turned on.
Item Unlocking Thread
Specifies the subject line to assign to those itemsthat do not have a subject line. The default is “NoTitle”.
Label for messages without a subject
211Customizing Discovery AcceleratorSetting Discovery Accelerator system configuration options

If set to true then, when a reviewer previews anitem in the Review pane, displays a printableversion of it, or downloads the original version ofthe item, causes Discovery Accelerator to log theaction in the item history. By default, DiscoveryAccelerator does not log these actions.
Even if you choose to log these actions for itemsin the Review pane, the Searches pane still allowsusers to preview the results of searches withouttheir actions being logged. If you want to preventthis, set the configuration option “Disable searchresults preview".
See “Search configuration options” on page 212.
Log preview actions in item history
Specifies the maximum number of items to list ona page within a review set. Enter a value between1 and 300, where the default is 300.
Maximum Page Size
Sets a limit on the number of items that users cantemporarily assign to themselves while they review.The default is 10000.
Maximum items user can temporarilyself-assign
Lets you download and upload an XML file withwhich to define the column layout in the Reviewpane for all users.
See “Customizing the columns in the Review pane”on page 222.
Review Grid File
Specifies the number of minutes of inactivity afterwhich a user's review set expires. The default valueis 120 minutes.
Review Set Expiry Time (Minutes)
Specifies whether to preprocess HTML itemsbefore review to remove any script that may causenavigation problems. By default, DiscoveryAccelerator preprocesses the items.
Sanitize HTML for review
Specifies the number of seconds within whichDiscovery Accelerator must build a review set orsort a review set before the process times out. Thedefault is 300.
Timeout for building or sorting reviewset (seconds)
Search configuration optionsUse these settings to optimize the search features in Discovery Accelerator.
212Customizing Discovery AcceleratorSetting Discovery Accelerator system configuration options

Specifies whether, when you set the criteria for anew search, you can choose to includepreviously-captured items in the search results. Bydefault, you have the option to do so.
Allow search and capture of existingitems
When you select a schedule to use when youdefine the criteria for a new search, you can selectSince last run in the Date range section. Thisoption instructs Discovery Accelerator to searchnew items that have arrived since you last ran thisscheduled search. In the Start box, you enter thedate to be taken as a starting point for the first runof the search.
By default, Since last run searches from the dateof the last run (or the Start date for the first search)to the current day minus 1 (that is, up to yesterday).If required, you can change this interval to searchto the current day minus n days. To use Since lastrun with any searches that run more than once aday, set the interval to 0.
Buffer Since Last Run
Specifies the tag with which Discovery Acceleratorprefixes custodian groups when you enter them inthe criteria for a new search. The default is CG.
Custodian Group Tag
Specifies the tag with which Discovery Acceleratorprefixes custodian names when you enter them inthe criteria for a new search. The default is C.
Custodian Tag
Specifies the custom search attributes to use inXML form.
Custom search attributes XML
If set to true, disables the preview of items in theResults tab of the Searches pane. By default,Discovery Accelerator does not stop users frompreviewing these items.
Disable search results preview
Specifies whether Discovery Accelerator shouldautomatically synchronize the index volumes foran archive when it encounters any unknown indexvolumes during a search. By default, DiscoveryAccelerator synchronizes the index volumesautomatically.
Enable automatic synchronization ofindex volumes
Specifies whether you can define custom searchattributes and select themwhen defining the criteriafor a search. By default, you can define and selectthese attributes.
Enable custom search attributes
213Customizing Discovery AcceleratorSetting Discovery Accelerator system configuration options

Specifies whether to enable or disable all searchfacilities. By default, Discovery Accelerator enablesthese facilities.
Enable Search Threads
Specifies whether the search of a particular archivereturns an error if its index is offline, rebuilding, orfailed. By default, Discovery Accelerator returnsan error in these circumstances.
Error search if index is rebuilding orfailed
Specifies whether the search of a particular archivereturns an error if its index has failed to index eitheran indexable archived item or the content of theitem. The default setting is false (not enabled).
Error search if missing items or content
Specifies whether the search of a particular archivereturns an error if its index must be rebuilt to handlefull-width characters correctly. The default settingis Off.
Error search if index requires widthnormalization
Specifies whether a search returns an error if noneof the targets resolves to an email address,resulting in an empty search.
Error search if no target resolves to anemail address
Specifies whether to mark as failed a search of amoved or copied archive, if the destination archiveis not included in the search. The default is False,which means that Discovery Accelerator producesa warning when searching such archives, but itdoes not mark them as failed.
Fail search of archive if archive hasbeen copied or moved
For areas of Discovery Accelerator that listsearches from which you can choose, specifiesthe maximum number of searches to include in thelist. The default is 250.
Maximum number of searches listed infilters
Specifies the number of times that DiscoveryAccelerator tries to search an archive before givingup. Enter a value in the range 1 through 50, wherethe default is 5.
Maximum Search Retries
Specifies the number of threads that are assignedto accepting search result sets. For example, thedefault setting of 5 means that no more than fivesearch results sets are accepted at a time. Entera value in the range 1 through 10.
Number of acceptance search Threads
214Customizing Discovery AcceleratorSetting Discovery Accelerator system configuration options

Specifies the number of threads that are assignedto deleting search result sets. For example, thedefault setting of 2 means that no more than twosearch results sets are deleted at a time. Enter avalue in the range 1 through 10.
Number of delete search Threads
Specifies the number of threads that are assignedto sampling search result sets. For example, thedefault setting of 5 means that no more than fivesearch results sets are sampled at a time. Enter avalue in the range 1 through 10.
Number of sampling search Threads
Specifies the number of threads that are assignedto searching archives per index server. Forexample, the default setting of 10 means that nomore than 10 archives are searched per EnterpriseVault server at a time. Enter a value in the range1 through 10.
Number of Vault search Threads
Specifies whether, when you click multiple itemsin the Review pane and then click Search,Discovery Accelerator lets you specify the searchcriteria for each of the selected items or only forthe first of the selected items.
Only allow 'Research this message' onthe first selected message
When set to True, improves performance byexcluding from a search those archives thatDiscovery Accelerator has determined do notcontain any items in the date range that you havespecified in your search criteria. The default settingis False, which means that Discovery Acceleratorsearches all the available archives, regardless ofwhether their contents fall within your specifieddate range or not.
Use this setting with "Synchronize thread checkingperiod (sec)", which is one of the Vault DirectorySynchronization configuration options. If you set"Optimize search based on oldest and youngestitems" to True, you must lower the setting for"Synchronize thread checking period (sec)" toensure that Discovery Accelerator does not runsearches against out-of-date data. For example,you can lower the setting to 3600 seconds (onehour).
Optimize search based on oldest andyoungest items
215Customizing Discovery AcceleratorSetting Discovery Accelerator system configuration options

When accepting the results of a search, specifieswhether to override the marks that are assignedto those items that already exist in the review set.Items that you have already produced are exempt.
Override marks when acceptingsearches
For items that have previously appeared in othercases, specifies whether to respect any explicitlyassigned marks but override all other marks.
Override Marks when acceptingsearches only If Not Marked
When accepting the results of a search, specifieswhether to override the reviewers that are assignedto those items that already exist in the review set.
Override Reviewers when acceptingsearches
When accepting the results of a search, specifieswhether to assign to a new reviewer only thoseitems that have not previously been assigned toother reviewers.
Override Reviewers when acceptingsearches only If Not Assigned
Specifies whether it is mandatory to enter thedesignated criteria before you can perform asearch. By default, these criteria are optional. Youmay want to make them mandatory to preventsearches from returning an overwhelming numberof results.
Require 'Author' / 'Content' / 'From Date'/ 'Recipients' / 'Subject' / 'To Date' to bespecified
Specifies the frequency in minutes with whichDiscovery Accelerator tries to access an EnterpriseVault Indexing service that is too busy to performa search. Enter a value in the range 1 through 300,where the default is 5.
Retry time when index service is busy(min)
Specifies the frequency in minutes with whichDiscovery Accelerator tries to access an EnterpriseVault Indexing service that is unavailable. Enter avalue in the range 1 through 300, where the defaultis 5.
Retry time when index service notrunning (min)
Specifies whether searches return the top-levelitems only. Setting this option to Off means that allfiles attached to the top-level items are displayedin search results.
Return only top messages in searchresults
For items that were archived using File SystemArchiving (FSA), specifies whether to show theSMTP message subject rather than the FSA filename in the Review pane.
Save SMTP subject rather than filename
216Customizing Discovery AcceleratorSetting Discovery Accelerator system configuration options

Specifies the frequency in seconds with whichDiscovery Accelerator refreshes the resultssummary page during a running search. Enter avalue in the range 1 through 300, where the defaultis 10.
Search result page refresh time
Specifies the maximum time in hours thatDiscovery Accelerator allows for searches tocomplete. The default is four hours.
Search timeout (hours)
Specifies the frequency in seconds with whichDiscovery Accelerator refreshes the Searches panefor a case. Enter a value in the range 1 through300, where the default is 20.
Searches page refresh time
Specifies whether users can access the Reviewpane while a search is in progress, so that theycan immediately start to review the items thatDiscovery Accelerator has found. By default,Discovery Accelerator permits this.
Show Search Result In Progress
Specifies the tag with which Discovery Acceleratorprefixes target groups when you enter them in thecriteria for a new search. The default is TG.
Target Group Tag
Specifies the tag with which Discovery Acceleratorprefixes target names when you enter them in thecriteria for a new search. The default is T.
Target Tag
Specifies the maximum number of search resultsworker threads that are allowed to run on thesystem. These threads handle the processing ofsearch results returned from the archive. Themaximum value is 5, and the default is 2.
Total number of search results workerthreads
Specifies the maximum number of search threadsthat are allowed to run on the system across allindex volumes. The maximum value is 500, andthe default is 100.
Total number of search threads
Optimizes performance for searches that returnmore than 50,000 results. By default, this optionis enabled.
Use sequence number for searches
Specifies the number of minutes that DiscoveryAccelerator waits at startup before synchronizingwith available index services. Enter a value in therange 0 through 300, where the default is 0.
When service starts, wait beforesynchronizing Index Services (minutes)
217Customizing Discovery AcceleratorSetting Discovery Accelerator system configuration options

Specifies the number of minutes that DiscoveryAccelerator waits at startup before searching thearchives for items. Enter a value in the range 0through 300, where the default is 0.
When service starts, wait before startingVault Searches (minutes)
Security configuration options
Specifies whether, when you select thepermissions that you want to associate with aDiscovery Accelerator role, you can also chooseto deny certain permissions to users who occupythe role. By denying the permissions, you stopusers from acquiring themwhen they are assignedto other roles that do allow the permissions. Theoption to deny permissions as well as allow themis enabled by default.
Show deny permissions for roles
When selected, makes the SQL Server sysadminlogon the creator and owner of DiscoveryAccelerator search schedules.
If you want to lock down your SQL Server instance,clear this setting and consult the following articleon the Veritas Support website for furtherinstructions:
https://www.veritas.com/docs/100038151
Use SQL Server SysAdmin Server Rolefor Schedules
System configuration optionsUse these options to record the dates on which you installed Enterprise Vault andbegan to archive data, configure the threads that Discovery Accelerator uses topause searches, and more.
218Customizing Discovery AcceleratorSetting Discovery Accelerator system configuration options

Specifies the date on which Enterprise Vaultarchived the oldest available data.
If the oldest archived item date and "EnterpriseVault V5 Installation Date" are the same then,when entering the criteria for a search, you canspecify the message type without also specifyinga start date. (Discovery Accelerator does not returnany pre-5.0 data.) However, if the oldest archiveditem date is earlier than the V5 installation date,you can only specify the message type if youspecify a start date that is on or after the V5installation date.
Enterprise Vault Oldest Archived ItemDate
Specifies the date on which you first installed orupgraded Enterprise Vault 5.0 or later.
Enterprise Vault V5 Installation Date
Identifies the application pool in which theAccelerator web applications are grouped.Application pools allow specific configurationsettings to be applied to groups of applications andto the worker processes that service thoseapplications. The default application pool isEVAcceleratorAppPool.
IIS Application Pool
Specifies the maximum number of searches thatyou can pause instantly. The default is 2.
Initial Pausing Queue Size
Specifies whether to include Public Folder vaultstores in searches. By default, DiscoveryAccelerator does not do this.
Include Public Folder Vault Stores
Specifies whether to include Microsoft SharePointPortal Server vault stores in searches. By default,Discovery Accelerator does not do this.
Include SPS Vault Stores
Specifies the number of threads that are assignedto pausing searches. Enter a value in the range 1through 10, where 1 is the default value.
Number Of Pause Search Threads
Specifies the total number of pause searchrequests that can be queued at once. Enter a valuein the range 10 through 100, where 10 is thedefault value.
Pause queue threshold
219Customizing Discovery AcceleratorSetting Discovery Accelerator system configuration options

Specifies the number of minutes that DiscoveryAccelerator waits at startup before it initializes thethreads that are assigned to pausing searches. Bydefault, Discovery Accelerator does not delaybefore it initializes the threads.
Pause Threads Delay
Specifies the number of seconds to wait beforestarting pause threads. The default is 5.
Search Pause Thread Checking Period(Sec)
Does not serve any function in the current versionof Discovery Accelerator. The option will beremoved from Discovery Accelerator in a laterrelease.
Show Vault Management Option
Vault Directory Synchronization configuration optionsUse these settings to configure when Discovery Accelerator synchronizes with theEnterprise Vault archives.
Specifies the frequency in minutes with which torun the archive registration/deregistration task. Thedefault is 60 minutes. To prevent the accidentaldeletion of Enterprise Vault archives whosecontents appear in the Discovery Acceleratorreview set or search results, this task registers aninterest in the archives. The task also discardsexisting archive registrations when they are nolonger required.
See also the options "Enable archive registrationtask" and "Discard existing archive registrationsafter you turn off 'Enable archive registration task'".
Archive registration/deregistration taskperiod (minutes)
Specifies the maximum number of Enterprise Vaultarchives to display on a single page during archiveselection. By default, Discovery Accelerator listsa maximum of 100 archives. If the number ofavailable archives exceeds the value that youspecify here, Discovery Accelerator displays someextra hyperlinks so that you can page through thearchives.
Archive selection page size
220Customizing Discovery AcceleratorSetting Discovery Accelerator system configuration options

Specifies whether, when a new vault store iscreated, Discovery Accelerator automaticallyincludes it in searches.
The options are as follows:
■ 1. New vault stores are never automaticallyenabled.
■ 2. New vault stores are always automaticallyenabled.
■ 3 (default value). New vault stores areautomatically enabled when all the other vaultstores in the same site are already enabled.
Automatically enable new Vault Storesin departments/cases
Specifies whether to keep or discard any existingarchive registrations if you choose to disable thearchive registration task. By default, EnterpriseVault keeps the existing archive registrations afteryou disable the task.
See also the options "Archive Registration taskperiod (minutes)" and "Archive registration/deregistration task period (minutes)".
Discard existing archive registrationsafter you turn off 'Enable archiveregistration task'
Specifies whether to enable or disable the archiveregistration task. By default, the task is enabled.If you disable it, a message prompts you to choosethe required setting for the option "Discard existingarchive registrations after you turn off 'Enablearchive registration task'".
See also the option "Archive Registration taskperiod (minutes)".
Enable archive registration task
Specifies whether, when a new Enterprise Vaultarchive is synchronized and added to a vault store,it is automatically included in the list of archives inwhich Discovery Accelerator can conduct searches.
The options are as follows:
■ 0. Do not enable new archives.■ 1 (default value). Enable new archives in the
application-wide list of archives that is availableto all cases.
■ 2. Enable new archives in the application-widelist of archives and in cases where the caseadministrator has customized the list ofsearchable archives.
Enable new archives for search
221Customizing Discovery AcceleratorSetting Discovery Accelerator system configuration options

Specifies whether to synchronize all the archiveswhen running a new search. By default, DiscoveryAccelerator does not synchronize all the archives.
Synchronize archives on search
Specifies whether to synchronize all the retentioncategories when running a new search. By default,Discovery Accelerator does not synchronize all theretention categories.
Synchronize Retention Categories onsearch
Specifies the frequency in seconds with whichDiscovery Accelerator synchronizes with theEnterprise Vault archives. The default is 21600(six hours). For best results, you may want tochange the synchronization period to 3600 (onehour).
The more frequently synchronization occurs, thegreater the load on the Discovery Acceleratordatabase. However, if the synchronization is notfrequent enough, Discovery Accelerator may takea long time to recognize new archives, vault stores,and retention categories.
Synchronize thread checking period(sec)
Specifies whether to synchronize the vault storeswhen displaying the properties page for a case.By default, Discovery Accelerator does notsynchronize the vault stores.
Synchronize Vault Stores when viewingDepartment/Case properties
Customizing the columns in the Review paneEach reviewer can hide or show columns in the item list of the Review pane byright-clicking the column header and then clicking Select Columns. The reviewercan also change the column order by dragging and dropping the column headers.However, the changes that a reviewer makes in these ways are available to thatreviewer only.
If you want to customize the column layout in the Review pane for all DiscoveryAccelerator users, you must set up an XML configuration file. Note that reviewerscan still change their column layout on the Review pane by using the Selectcolumns menu and drag and drop.
Table A-2 lists the columns that you can display and the name to use when yourefer to the column in the XML file.
222Customizing Discovery AcceleratorCustomizing the columns in the Review pane

Table A-2 How the column headers are identified in the XML file
Default visibilityName to use in XML fileColumn header inReview pane
TrueNeedCommittingModified
TrueAttachmentsAttachments
FalsePolicyActionPolicy action
TrueCommentPresentComment present
FalseItemDeletionStatusItem Deletion Status
TrueFromFrom
FalseToAll recipients
TrueSubjectSubject / Filename
TrueDateDate
TrueStatusAction status
FalseReviewerPrincipalNameLast reviewed by
TrueMessageTypeMessage type
FalseMessageDirectionMessage direction
FalseDiscoveredItemIDItem ID
FalseCommentComment
FalseCommentPrincipalNameLast comment by
FalseMarkMark
FalseTagSummaryTag summary
FalseKVSVaultNameArchive
FalseItemPathOriginal Location
To configure the default column layout in the Review pane
1 Click the Configuration tab in the Discovery Accelerator client, and then clickthe Settings tab.
2 Expand the Reviewing section to show the available options.
3 In the Review Grid File row, click Save as.
223Customizing Discovery AcceleratorCustomizing the columns in the Review pane

4 Select a location in which to store the review grid file.
5 Open the review grid file in a text editor such as Windows Notepad.
6 Edit the file as necessary, using the information at the start of the file to guideyou.
Each column that you want to display must have the attribute visible='true'.This is either because you have specified the attribute in the configuration fileor because the default setting for the column is true. The order of theconfiguration lines determines the left-to-right order of the columns in theReview pane.
The XML file must contain at least one configuration line between the<reviewgrid> and </reviewgrid> tags.
7 Save the file.
8 In the Review Grid File row on the System Configuration tab, click Browse.
9 Select the XML file that you want to import.
10 Click Open at the right of the row to save the changes that you have made.
11 Click Save at the bottom right of the window.
12 Start a new Discovery Accelerator session to see the column changes.
224Customizing Discovery AcceleratorCustomizing the columns in the Review pane

Importing configurationdata from an XML file
This appendix includes the following topics:
■ About importing configuration data
■ Sample XML files
■ Format of the Dataload.xml file
■ Format of the dataload XML file for Custodian Manager
■ Importing the configuration data
■ About the ImportExport command
About importing configuration dataAs part of the process of setting up Discovery Accelerator, you must enterconfiguration data on roles, users, cases, and so on. If this data already existsoutside Discovery Accelerator and is convertible to XML format, you can import itinto Discovery Accelerator from an XML file. Then you can quickly load largeamounts of configuration data that might otherwise be time-consuming to enter.
Sample XML filesThe Discovery Accelerator server software comes with a number of sample XMLfiles. These files reside in subfolders of the Discovery Accelerator program folder(typically C:\Program Files (x86)\Enterprise Vault Business Accelerator).
BAppendix

Table B-1 Sample XML files
FunctionResides in subfolderFile
Explains how to load case,target, and vault store data.
AcceleratorAdminWeb\Installation
Dataload.xml
Gives an example of how toload details of custodians,custodian groups, and customattributes for CustodianManager.
CustodianManagerWeb\Installation
DataloadCustodianManager.xml
Format of the Dataload.xml fileYou can use the Dataload.xml file with both Compliance Accelerator and DiscoveryAccelerator, so it contains some information that applies to both applications.However, the file is well documented and shows which sections apply to whichapplication.
Table B-2 Primary Discovery Accelerator sections in Dataload.xml file
DefinesSection
Vault stores available to all cases for searching.ApplicationVaultStore
Users to add to the system as administrators orreviewers, and the application administration roles toassign to them.
Employee
Targets and their email addresses. These are availablein all cases.
ApplicationTarget
Groups of targets. These are available in all cases.ApplicationTargetGroup
Cases. This section includes definitions of the following:
■ Case users■ Case roles that are assigned to individuals■ Vault stores for the case■ Case targets and target groups
Department
Custom search attributes.AttributeDefinition
The second part of the file describes each XML entry. The last part of the fileprovides sample entries for a Discovery Accelerator system.
226Importing configuration data from an XML fileFormat of the Dataload.xml file

If you use any non-ASCII characters in a dataload file, you must specify theappropriate encoding. For example, you can save a file that contains accentedEuropean characters in Unicode format or add the following at the start of the file:
<?xml version="1.0" encoding="iso-8859-1" ?>
Format of the dataload XML file for CustodianManager
Use the DataloadCustodianManager.xml file to load and update data for CustodianManager. Table B-3 describes the primary sections in this file.
Table B-3 Primary sections in DataloadCustodianManager.xml file
DefinesSection
Custom attributes of the Custodian Manager custodiansand custodian groups that you want to synchronize withan external source like Active Directory or a DominoLDAP directory.
See “Setting up custom custodian attributes” on page 83.
CustodianAttributeDefinition
Individual users for whom you want to search when youconduct a Discovery Accelerator search.
See “Setting up custodians” on page 81.
Custodian
Any collections of employees for whom you want tosearch when you conduct a Discovery Acceleratorsearch. These collections can include NT groups,distribution lists, Active Directory containers, DominoLDAP queries, and Domino groups.
See “Setting up custodian groups” on page 82.
CustodianGroup
Importing the configuration dataYou must have the Import Configuration Data permission to import configurationdata from an XML file. By default, users with the application role of Discovery SystemAdmin have this permission.
227Importing configuration data from an XML fileFormat of the dataload XML file for Custodian Manager

To import configuration data from an XML file
1 Click the Configuration tab in the Discovery Accelerator client, and then clickthe Import Configuration tab.
2 In the Configuration file box, type the full path to the XML file that you wantto import, or click Browse and then choose the file to import.
The path can contain up to 250 characters.
You can specify a UNC path or NTFS path to the file if it is stored on a remotecomputer. For example:
\\server2\EVBA\import.xml
3 If you want to clear the import information from previous imports before youproceed, select Clear log before import.
4 Click Import.
About the ImportExport commandThe ImportExport command provides a command-line alternative to the DiscoveryAccelerator client for importing data into a customer database. It also lets you exportthe data from the database to an XML file.
The command is installed in the Discovery Accelerator program folder on theDiscovery Accelerator server, together with a configuration file,ImportExport.exe.config.
You must have the Import Configuration Data permission to import data withImportExport, and the Export Configuration Data permission to export the data. Bydefault, users with the application role of System Admin have these permissions.
All newly imported cases comply with the U.S. government's Federal InformationProcessing Standards (FIPS).
Note: For the best results when using ImportExport on a computer in which UserAccount Control (UAC) is enabled, run the command with administrator privileges.Otherwise, youmay find that you cannot perform some operations with ImportExport,such as exporting data from a customer database to an XML file.
ImportExport syntaxImportExport.exe -F:FileName -C:CustomerID [-I] [-L:LogFile] [-O]
[-NoValidation] [-BypassService] [-LogToDB] [-LeaveDBLog]
[-ShowOnlyErrors] [-CommitOnceOnSuccess] [-?]
228Importing configuration data from an XML fileAbout the ImportExport command

Table B-4 describes the parameters that you can append to the command.
Table B-4 ImportExport command parameters
FunctionParameter
Identifies the XML file from which to import data or to whichthe data is to be exported.
-F:FileName
Identifies the Discovery Accelerator customer for which toimport or export data. If you run ImportExport without anyparameters then, when prompted for a customer ID, youcan type ? to list all the customer names and identifiers.
-C:CustomerID
Instructs the command to import configuration data intothe customer database from the XML file that you specifywith the -F parameter. Omit this parameter to export datato the specified XML file.
-I
Specifies the name of the log file. If you omit the path tothe file, the command creates it in the Discovery Acceleratorprogram folder on the Discovery Accelerator server.
-L:LogFile
Overwrites the output XML file and log file, if they exist. Ifyou omit this parameter, and the output and log files exist,the command displays an error message and stops.
-O
Accelerates the process of importing data from an XML fileby turning off XML validation. The command ignores thisparameter if you export data to a file.
-NoValidation
229Importing configuration data from an XML fileAbout the ImportExport command

Table B-4 ImportExport command parameters (continued)
FunctionParameter
Instructs the command to bypass the Enterprise VaultAccelerator Manager service and connect directly to thecustomer database. This may be necessary if youexperience out-of-memory problems when you try to importdata into or export data from a very large database.
To use this facility, you must ensure that:
■ You have access permissions to the customerdatabase.
■ The ImportExport.exe.config file specifies theSQL Server for the Discovery Accelerator database asthe DSN key. Each time you start the Enterprise VaultAccelerator Manager service, it automatically updatesthe DSN key value in this file to match the value that isspecified in the AcceleratorManager.exe.configand AcceleratorService.exe.config files. So,if you specify a different value in theImportExport.exe.config file, DiscoveryAccelerator overwrites it when you next start the service.
-BypassService
Writes the log messages to both the log file and thecustomer database.
-LogToDB
If you also specify the -LogToDB parameter, instructs thecommand to leave log information on previous imports andexports in the Discovery Accelerator database instead ofoverwriting it.
-LeaveDBLog
If you also specify the -LogToDB parameter, instructs thecommand to report error messages but not informationmessages.
-ShowOnlyErrors
Commits the data to the Discovery Accelerator databaseonly if the command imported it without error.
-CommitOnceOnSuccess
Displays the online Help information for the command.-?
Examples of ImportExport commandsThe following command imports unvalidated data from the file data.xml, which isin the folder C:\temp. The log file, import.log, contains error messages only, andthe command overwrites the previous contents of the log file as it imports the XMLdata.
230Importing configuration data from an XML fileAbout the ImportExport command
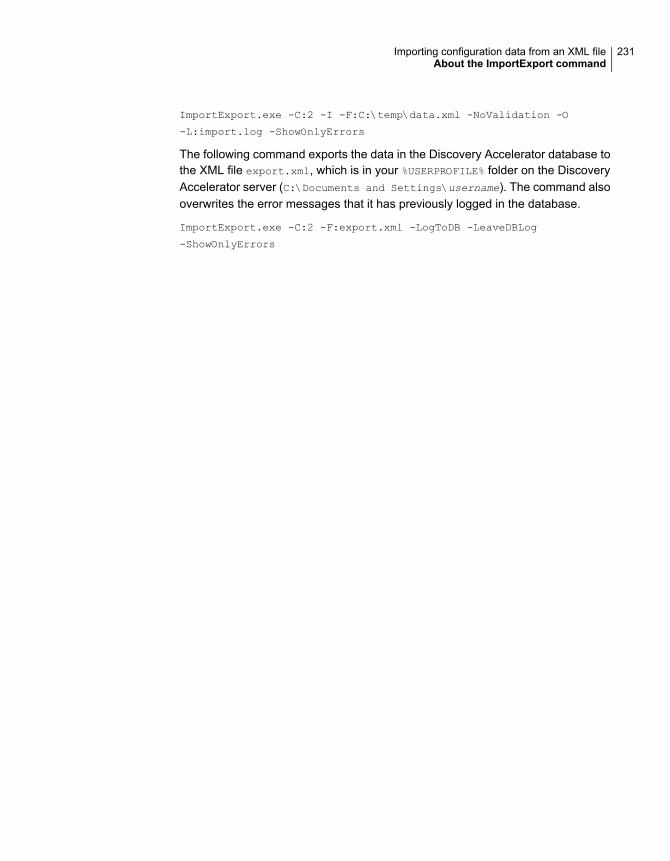
ImportExport.exe -C:2 -I -F:C:\temp\data.xml -NoValidation -O
-L:import.log -ShowOnlyErrors
The following command exports the data in the Discovery Accelerator database tothe XML file export.xml, which is in your %USERPROFILE% folder on the DiscoveryAccelerator server (C:\Documents and Settings\username). The command alsooverwrites the error messages that it has previously logged in the database.
ImportExport.exe -C:2 -F:export.xml -LogToDB -LeaveDBLog
-ShowOnlyErrors
231Importing configuration data from an XML fileAbout the ImportExport command

Enterprise Vault propertiesfor use in DiscoveryAccelerator searches
This appendix includes the following topics:
■ About the Enterprise Vault search properties
■ System properties
■ Custom Enterprise Vault properties
■ Custom Enterprise Vault properties for File System Archiving items
■ Custom Enterprise Vault properties for SharePoint items
■ Custom Enterprise Vault properties for Compliance Accelerator-processed items
■ Custom properties for use by policy management software
■ Custom properties for Enterprise Vault SMTP Archiving
About the Enterprise Vault search propertiesWhen Enterprise Vault processes an item, it populates a number of the item'sproperties with information and stores this information with the archived item. Thisinformation is accessible in Discovery Accelerator searches; in the Customattributes section of the search properties pane, you can enter the relevant propertydetails as free-form attributes.
The Enterprise Vault search properties fall into the following categories:
CAppendix

■ System properties, such as the author of an email message or the number ofattachments.
■ Custom Enterprise Vault properties, such as the type or direction of a message.
■ Custom properties for the items that Enterprise Vault for File System Archivinghas processed.
■ Custom properties for the items that Enterprise Vault for Microsoft SharePointhas processed.
■ Custom properties for the items that Compliance Accelerator has randomlysampled.
■ Custom properties for Enterprise Vault Data Classification Services.
■ Custom properties for Enterprise Vault SMTP Archiving.
Not all properties are present on every item.
System propertiesTable C-1 lists the system properties defined in Enterprise Vault.
Table C-1 Enterprise Vault system properties
DescriptionTypeProperty
The date on which the item was archived.Dateadat
The attachment number. Specify 0 for the top-level item.Numberanum
The display names of the author and, if appropriate, of theperson on whose behalf the item has been sent.
Stringaudn
The email addresses of the author and, if appropriate, of theperson on whose behalf the item has been sent.
Stringauea
The author's other email address.Stringauot
The author's SMTP email address. Combines the values ofproperties wrsm, frsm, and ppsm.
Stringausm
The author.Stringauth
233Enterprise Vault properties for use in Discovery Accelerator searchesSystem properties

Table C-1 Enterprise Vault system properties (continued)
DescriptionTypeProperty
The date on which the Veritas Information Classifier engineor File Classification Infrastructure engine classified the item.Blank if the item has not been classified.
Not supported by queries that target 32-bit volumes, and notadded retrospectively to items that Enterprise Vault 12.1 orearlier has classified. However, reclassifying the items usingEnterprise Vault 12.2 or later does add the property to them.
datecdat
The end date of an event, such as a calendar meeting.Datecend
The current location of the item. A sequence of folders.Stringclcn
The location of an event, such as a calendar meeting.Stringclon
The conversation tracking identifier, expressed as a32-character hexadecimal number. This is currently populatedfor MAPI and SMTP items only.
Stringcnid
The conversation tracking topic. This is currently populatedfor MAPI and SMTP items only.
Stringcntp
The original identifier for this component of the item.Stringcoid
The reason for missing content. The options are as follows:
■ 0. No reason available.■ 1. Content does not exist.■ 2. Content could not be obtained.■ 3. Content is (or appears to be) corrupt.■ 4. Not possible to convert content to suitable format.■ 5. Conversion of content failed (converter error).■ 6. Conversion of content timed out.■ 7. Content requires conversion but its data format is
excluded from conversion.■ 8. Content requires conversion but conversion bypass
has been set.■ 9. Content is encrypted.■ 10. Content requires conversion but converters are not
available, or have not been initialized.■ 11. Unable to add content to index.■ 12. Converters did not recognize the file type.■ 13. Conversion excluded for large files.■ 14. Conversion excluded for codepages we cannot detect.
Stringcomr
234Enterprise Vault properties for use in Discovery Accelerator searchesSystem properties

Table C-1 Enterprise Vault system properties (continued)
DescriptionTypeProperty
The content of the item (up to 128 characters, by default).Stringcont
The ID of either an extension content provider instance oran Enterprise Vault archiving task.
Stringcpid
The name of the extension content provider.Stringcpnm
The current retention category name (up to 32 characters).
May reflect the value that various Enterprise Vault features,such as classification, retention plans, and retention folders,have applied to the item.
Stringcrcn
The current retention category identifier (up to 112characters).
May reflect the value that various Enterprise Vault features,such as classification, retention plans, and retention folders,have applied to the item.
Stringcrct
Calendar recurrence exception.Integercrre
Calendar recurrence pattern.Stringcrrp
Calendar recurrence type.Integercrrt
The start date of an event, such as a calendar meeting.Datecsrt
Truncated custom index properties.Stringcupm
The created, sent, received, or archived date.Datedate
The data type of the item. For example, DOCX, XLSX, orMSG.
Stringdtyp
The expiry date for the item.
The property value may reflect the value applied to thearchive by a retention plan that overrides the item's retentioncategory.
Dateedat
The message flag status.Stringflag
The content fingerprint of the item. Can be used to find amatch on an attachment or document content.
Stringfpcn
235Enterprise Vault properties for use in Discovery Accelerator searchesSystem properties

Table C-1 Enterprise Vault system properties (continued)
DescriptionTypeProperty
The deduplication fingerprint of the item. Can be used to findan exact match of a message or a document. Wildcardsearches on this property are not supported.
Stringfpdd
FROM: Display/friendly name.Stringfrdn
FROM: Email address. Combines the values of propertiesfrsm and frot.
Stringfrea
The display/friendly name or email address.Stringfrom
FROM: Other email address.Stringfrot
FROM: SMTP e-mail address.Stringfrsm
The date on which Enterprise Vault indexed the item.Rebuilding an index volume causes Enterprise Vault to updatethe indexed date of the affected items.
Not supported by queries that target 32-bit volumes.
dateidat
The original identifier for the item. For example, SubmissionIdfor a sent message.
Stringiden
The message importance, expressed as a numeric value. 0= Low, 1 = Normal, and 2 = High.
Stringimpo
Whether Enterprise Vault has marked the item as a record(True) or not (False). For use with Capstone and otherapproaches to records management. Can be referenced byeither "isrecord" or "isrc".
Stringisrc
Message envelope: other author.Stringjaen
Message envelope: author. Only present for Exchange journalmessages. The property values include both email addressesand display names, where present.
Stringjrau
Message envelope: BCC: recipient.Stringjrbc
Message envelope: CC: recipient.Stringjrcc
Message envelope: recipient. Only present for Exchangejournal messages. The property values include both emailaddresses and display names, where present.
Stringjrcp
Message envelope: other recipient.Stringjren
236Enterprise Vault properties for use in Discovery Accelerator searchesSystem properties

Table C-1 Enterprise Vault system properties (continued)
DescriptionTypeProperty
Message envelope: FROM: recipient.Stringjrfm
Message envelope: PP: recipient.Stringjrpp
Message envelope: TO: recipient.Stringjrto
Categories/keywords.Stringkeys
The original location of the item. A sequence of folders.Stringlocn
The last-modified date of the item.Datemdat
The item's original MAPI message class (for example,IPM.Note).
Stringmsgc
Name. Display/friendly name. Combines the values ofproperties redn and audn.
Stringnadn
Name. Exchange email address. Combines the values ofproperties reea and auea.
Stringnaea
The display/friendly name or email address of the messageauthor or recipient.
Stringname
Name. Other email address. Combines the values ofproperties reot and auot.
Stringnaot
Name. SMTP email address. Combines the values ofproperties resm and ausm.
Stringnasm
The number of attachments.Numbernatc
The number of days to expiry for the item.
The property value may reflect the value applied to thearchive by a retention plan that overrides the item's retentioncategory.
Numberndte
The number of recipients.
This property counts a distribution list as one recipient,regardless of how many members the distribution list has.
Numbernrcp
PP. Display/friendly name.Stringppdn
PP. Exchange email address. Combines the values ofproperties ppsm and ppot.
Stringppea
237Enterprise Vault properties for use in Discovery Accelerator searchesSystem properties

Table C-1 Enterprise Vault system properties (continued)
DescriptionTypeProperty
The display/friendly name or email address of the person onwhose behalf a document has been written or a messagehas been sent.
Stringppgn
PP. Other email address.Stringppot
PP. SMTP email address.Stringppsm
The message priority, expressed as a numeric value. -1 =Low, 0 = Normal, and 1 = High.
Stringprio
The permission VaultIds for the item (up to 112 characters).Stringpvid
BCC: recipient.Stringrbcc
The display names of the BCC recipients.Stringrbdn
The email addresses of the BCC recipients.Stringrbea
BCC: recipient. Other email address.Stringrbot
BCC: recipient. SMTP email address.Stringrbsm
The original retention category identifier (up to 112characters).
Stringrcat
The display names of the CC recipients.Stringrcdn
The email addresses of the CC recipients.Stringrcea
The record ID of the item. For use with Capstone and otherapproaches to records management. Can be referenced byeither "recordid" or "rcid".
Stringrcid
CC: recipient. Other email address.Stringrcot
CC: recipient. SMTP email address.Stringrcsm
CC: recipient.Stringrecc
The display/friendly name or email address of the messagerecipient.
Stringrecp
Message recipient. Display/friendly name. Combines thevalues of properties rtdn, rcdn, rbdn, and rndn.
Stringredn
Message recipient. Email address. Combines the values ofproperties rtea, rcea, rbea, and rnea.
Stringreea
238Enterprise Vault properties for use in Discovery Accelerator searchesSystem properties

Table C-1 Enterprise Vault system properties (continued)
DescriptionTypeProperty
Message recipient. Other email address. Combines the valuesof properties rtot, rcot, rbot, and rnot.
Stringreot
Message recipient. SMTP email address. Combines thevalues of properties rtsm, rcsm, rbsm, and rnsm.
Stringresm
TO: recipient.Stringreto
Other envelope recipient. Display/friendly name.Stringrndn
Other envelope recipient. Email address. Combines thevalues of properties rnsm and rnot.
Stringrnea
Other envelope recipient. Other email address.Stringrnot
Other envelope recipient. SMTP email address.Stringrnsm
The retention start date/time.
Not supported by queries that target 32-bit volumes.
Datersdt
The display names of the TO recipients.Stringrtdn
The email addresses of the TO recipients.Stringrtea
TO: recipient. Other email address.Stringrtot
TO: recipient. SMTP email address.Stringrtsm
The record type of the item, such as permanent or temporary.For use with Capstone and other approaches to recordsmanagement. Can be referenced by either "recordtype" or"rtyp".
Stringrtyp
The message sensitivity, expressed as a numeric value. 0 =Normal, 1 = Personal, 2 = Private, and 3 = Confidential.
Stringsens
The size of the item in KB.Numbersize
The index sequence number, expressed as a 64-bit integer.Numbersnum
The saveset identifier of the item. Maximum of 72 characters.Wildcard searches on this property are not supported.
Stringssid
The subject/title.Stringsubj
The completion date of a task.Datetcdt
239Enterprise Vault properties for use in Discovery Accelerator searchesSystem properties

Table C-1 Enterprise Vault system properties (continued)
DescriptionTypeProperty
The due date of a task.Datetddt
The content of the item (cont) or its subject/title (subj).Stringtext
The status of a task. 0 = Not started, 1 = In progress, 2 =Completed, 3 = Paused, and 4 = Deferred.
Numbertsts
Veritas Information Classifier policy current version. Whetherthe Veritas Information Classifier has classified the item and,if so, whether it used the latest set of policies.
True = Classified using the latest set of policies, False =Classified using an older set of policies, and Blank = VeritasInformation Classifier has not classified the item.
Stringvpcv
Writer. Display/friendly name.Stringwrdn
Writer. Email address. Combines the values of propertieswrsm and wrot.
Stringwrea
Writer. Combines the values of properties wrdn, wrea, wrsm,and wrot.
Stringwrit
Writer. Other email address.Stringwrot
Writer. SMTP email address.Stringwrsm
Custom Enterprise Vault propertiesTable C-2 lists the custom properties that are defined in Enterprise Vault.
240Enterprise Vault properties for use in Discovery Accelerator searchesCustom Enterprise Vault properties

Table C-2 Custom Enterprise Vault properties
DescriptionTypeProperty
Provides the following details for an item thatEnterprise Vault's Move Archive feature hascopied:
■ The date and time at which the item wascopied.
■ The identifier of the source archive.■ The saveset identifier of the source item.
The format is as follows:
UTC_datetime_of_copy,source_archive_ID,source_item_Saveset_ID
If an archive has been moved several times,there is a value for each move.
StringVault.CopiedFrom
For journal messages, the journal type. Theoptions are as follows:
■ E2003■ E2007■ E2007ClearText■ E2007RMS
StringVault.JournalType
The message direction. The options are asfollows:
■ 0 - undefined■ 1 - internal (sender and all recipients are
internal)■ 2 - external-in (sender is external, one or
more recipients are internal)■ 3 - external-out (sender is external, one
or more recipients are external)
StringVault.MsgDirection
The message type. The options are asfollows:
■ Bloomberg■ DXL■ EXCH■ FAX.vendor■ IM.vendor■ SMTP
StringVault.MsgType
241Enterprise Vault properties for use in Discovery Accelerator searchesCustom Enterprise Vault properties

Custom Enterprise Vault properties for FileSystem Archiving items
Table C-3 lists the custom properties that are defined in Enterprise Vault for FileSystem Archiving items.
Table C-3 Custom Enterprise Vault properties for File System Archivingitems
DescriptionTypeProperty
An indicator that the item was imported fromthe legacy archiving application, Veritas DataLifecycle Management (DLM). This iscurrently only populated with the string"Imported".
StringEVFSADLMImport.DLM
The original name of the file at the point thatEnterprise Vault archived it.
StringEVFSA.OriginalFileName
CustomEnterprise Vault properties for SharePointitems
Table C-4 lists the custom properties that are defined in Enterprise Vault forSharePoint items.
Some of these properties are similar to certain Enterprise Vault system properties.For example, the SharePoint property, "EVSP.Title", is similar to the EnterpriseVault system property, "subj". However, the Enterprise Vault system property maynot hold the expected information for some SharePoint items, such as social contentitems. For this reason, you should use the custom SharePoint index propertiesinstead of the equivalent Enterprise Vault system properties when searchingSharePoint archives.
Table C-4 Custom Enterprise Vault properties for SharePoint items
DescriptionTypeProperty
A list of names of all the attachments to thisitem. This property applies to social contentonly, except for Wikis.
StringEVSP.AttachmentName
The check-in comment.StringEVSP.Comment
242Enterprise Vault properties for use in Discovery Accelerator searchesCustom Enterprise Vault properties for File System Archiving items

Table C-4 Custom Enterprise Vault properties for SharePoint items(continued)
DescriptionTypeProperty
The date of creation of the item. This propertyapplies to social content only.
StringEVSP.Created
The domain name (Windows account name)of the document author.
StringEVSP.CreatedBy
The identifier of the SharePoint document.StringEVSP.DocId
The display name of the document editor.StringEVSP.Editor
The date on which the item was last modified.This property applies to social content only.
StringEVSP.Modified
The domain name (Windows account name)of the document editor.
StringEVSP.ModifiedBy
The program identifier for the item.StringEVSP.ProgId
The name of the SharePoint site.StringEVSP.Site
The identifier of the SharePoint site.StringEVSP.SiteId
The URL of the SharePoint site.StringEVSP.SiteUrl
The title of the SharePoint document.StringEVSP.Title
The GUID that uniquely identifies the item.StringEVSP.UniqueId
The version of the SharePoint document.StringEVSP.Version
Whether the item has attachments: true orfalse. This property applies to social contentonly, except for Wikis.
StringEVSPP.Attachments
The display name of the archived item.StringEVSPP.display_name
Customer configurable properties. AnySharePoint property.
StringEVSPP.SharePoint_property_name
Custom Enterprise Vault properties forCompliance Accelerator-processed items
Table C-5 lists the custom properties that are defined in Enterprise Vault for theitems that Compliance Accelerator has randomly sampled.
243Enterprise Vault properties for use in Discovery Accelerator searchesCustom Enterprise Vault properties for Compliance Accelerator-processed items

Table C-5 Custom Enterprise Vault properties for ComplianceAccelerator-processed items
DescriptionTypeProperty
Combines the values of propertiesKVSCA.DeptAuthor and KVSCA.DeptRecips.
StringKVSCA.Department
The set of Compliance AcceleratorDepartment IDs of which the item's author isa member.
StringKVSCA.DeptAuthor
The set of Compliance AcceleratorDepartment IDs of which the item's recipientsare members.
StringKVSCA.DeptRecips
The overall action that should be taken on anitem; the sum result of all the applied policies.The defined values are as follows:
■ NOACTION■ EXCLUDE■ INCLUDE
StringVault.PolicyAction
Custom properties for use by policymanagementsoftware
Table C-6 lists the custom properties that certain policy management applications,such as Enterprise Vault Data Classification Services, may use.
(Data Classification Services is an older, add-on classification technology thatcombines various components of Veritas Enterprise Vault and Symantec Data LossPrevention. It is different from the classification feature that is described here.)
Table C-6 Custom properties for use by policy management software
DescriptionTypeProperty
Policies that do not affect capture either way;they only categorize items.
Stringevtag.category
Policies that either preclude capture oradvocate non-capture in the review set.
Stringevtag.exclusion
Policies that either demand or suggestcapture.
Stringevtag.inclusion
244Enterprise Vault properties for use in Discovery Accelerator searchesCustom properties for use by policy management software

Custom properties for Enterprise Vault SMTPArchiving
Table C-7 lists the custom properties that third-party applications can add to SMTPmessages to override the policy and target settings in Enterprise Vault SMTPArchiving. For more information on these properties, see the Setting up SMTPArchiving guide.
Table C-7 Custom properties for Enterprise Vault SMTP Archiving
DescriptionTypeProperty
The identifier of the archive in which to storethe message.
StringEVXHDR.X-Kvs-ArchiveId
One or more properties for Enterprise Vaultto index.
StringEVXHDR.X-Kvs-IndexData
The message type. This overrides the valueof the Vault.MsgType property, whichEnterprise Vault SMTP Archiving sets toSMTP.mail by default.
StringEVXHDR.X-Kvs-MessageType
The folder in the content source where themessage resides.
StringEVXHDR.X-Kvs-OriginalLocation
The ID of the retention category to assign tothe message.
StringEVXHDR.X-Kvs-RetentionCategory
245Enterprise Vault properties for use in Discovery Accelerator searchesCustom properties for Enterprise Vault SMTP Archiving

TroubleshootingThis appendix includes the following topics:
■ A security warning may appear when you preview certain items in the Reviewpane of the Discovery Accelerator client
■ Display issues when you run the Discovery Accelerator client in Windows 8 orlater
■ Display issues when you open a Discovery Accelerator website in InternetExplorer 10 or later
■ Vault stores not displayed in the Discovery Accelerator client
■ Discovery Accelerator searches return unexpected results
■ Full-text search indexing is disabled by default in SQL Server
■ Errors when exporting items from Discovery Accelerator
■ TNEF-encoded attachments to Internet Mail (.eml) messages may not bereadable after you export the messages from a review set
■ Synchronization errors after you rename the SQL Server computer
■ Performance counter errors when the Accelerator Manager service starts
■ SQL Service Broker warning when restoring a customer database to a differentserver
■ Issues with Custodian Manager
■ Issues with Discovery Accelerator reports
■ Troubleshooting Privileged Delete failures
DAppendix

A security warningmay appear when you previewcertain items in the Review pane of the DiscoveryAccelerator client
The followingmessagemay appear in the Review pane of the Discovery Acceleratorclient when you try to display an HTML preview of certain items:
Content within this application coming from the
website listed below is being blocked by Internet
Explorer Enhanced Security Configuration.
about:security_AcceleratorClient.Exe
To resolve the issue, add about:security_AcceleratorClient.Exe to the Localintranet zone or Trusted sites zone in your web browser.
Display issues when you run the DiscoveryAccelerator client in Windows 8 or later
You may experience display issues in certain areas of the Discovery Acceleratorclient when you run it in Windows 8 or later. If you experience these issues, youcan work around them by running the client in compatibility mode for Windows 7or Windows XP (Service Pack 3).
Display issues when you open a DiscoveryAccelerator website in Internet Explorer 10 or later
The Accelerator Manager, Custodian Manager, and Discovery Accelerator APIwebsites may not display correctly when you open them in Internet Explorer 10 orlater. If you experience this issue, you can work around it by adding the addressesto the Local Intranet security zone. See the online Help for Internet Explorer forinstructions.
Vault stores not displayed in the DiscoveryAccelerator client
In those areas of the Discovery Accelerator client where you can select the vaultstores in which to conduct searches, the absence of vault stores may indicate that
247TroubleshootingA security warningmay appear when you preview certain items in the Review pane of the Discovery Accelerator
client

the Enterprise Vault Directory service is not running. If this is the case, try thefollowing:
■ Start the Enterprise Vault Directory service, if it is not running.
■ Ensure that the same version of Enterprise Vault is running on the DiscoveryAccelerator and Enterprise Vault servers.
■ In the Accelerator Manager website, check that the Directory DNS aliasinformation for the Discovery Accelerator customer database is correct.
Discovery Accelerator searches returnunexpected results
Veritas Support may request a search criteria file if you report a problem withsearches that return unexpected results.
To generate the search criteria file
1 Click the Configuration tab in the Discovery Accelerator client, and then clickthe Settings tab.
2 Expand the Diagnostics section to show the available options.
3 In the Save Search Criteria row, select the option in the Value column.
4 Click Save.
5 Restart the Enterprise Vault Accelerator Manager service on the DiscoveryAccelerator server.
6 Rerun the searches.
On the Discovery Accelerator server, Discovery Accelerator creates a file thatis called Criteria_SearchID.txt in the SearchCriterias subfolder of theDiscovery Accelerator program folder. If the folder contains several files, youcan identify the associated searches by hovering the mouse pointer over thesearch names in the Discovery Accelerator client.
Full-text search indexing is disabled by default inSQL Server
Recent versions of SQL Server do not perform full-text search indexing by default.In consequence, the analytics features in Discovery Accelerator, such as automaticcategorization and search within a case review set, may not work properly. To usefull-text search indexing, you must configure the SQL Full-text Filter DaemonLauncher service appropriately.
248TroubleshootingDiscovery Accelerator searches return unexpected results

To enable full-text search indexing in SQL Server
1 On your SQL Server computer, double-click the Administrative Tools appletin Control Panel.
2 Double-click Services.
3 Right-click SQL Full-text Filter Daemon Launcher, and then click Properties.
4 Change the startup type to Manual, and then click OK.
5 See the following article on the Microsoft website for guidelines on how to setthe service account for full-text search:
http://msdn.microsoft.com/library/ms345189.aspx
Errors when exporting items from DiscoveryAccelerator
If you receive the following error message when you export items, the version ofthe file mapisvc.inf on the Discovery Accelerator server may be incorrect.
Error Failed to write the file:
The EVPSTAPI COM object has not been initialized
To fix MAPI problems
1 InWindows Explorer, browse to the %windir%\system32 folder on the DiscoveryAccelerator server.
2 Double-click fixmapi.exe to run the MAPI repair tool. Note that this tool doesnot appear to do anything when you run it.
3 Restart the Discovery Accelerator server.
4 Test whether the problem has been fixed.
249TroubleshootingErrors when exporting items from Discovery Accelerator

If you cannot fix the problem by running fixmapi.exe
1 In the %windir%\system32 folder on the Discovery Accelerator server, renamethe existing mapisvc.inf file.
2 Copy the version of mapisvc.inf that comes with Microsoft Outlook to the%windir%\system32 folder. This version is typically in the following folder:
C:\Program Files\Common Files\System\MSMAPI\locale_ID
Where locale_ID is the numeric identifier for your locale. The following tablelists some common locale identifiers.
1037Hebrew2052Chinese Simplified
1040Italian1028Chinese Traditional
1041Japanese1030Danish
2070Portuguese1043Dutch
3082Spanish1033English U.S.
1053Swedish1036French
1031German
3 Restart the Discovery Accelerator server.
TNEF-encoded attachments to Internet Mail (.eml)messages may not be readable after you exportthe messages from a review set
After you export Internet Mail (.eml) messages in their original form from a casereview set, the contents of any TNEF-encoded attachments to the messages maynot be readable.
TNEF-encoded attachments are commonly created by dragging and dropping afile into an Outlook mailbox folder. They are usually named winmail.dat.
250TroubleshootingTNEF-encoded attachments to Internet Mail (.eml) messagesmay not be readable after you export themessages
from a review set

Synchronization errors after you rename the SQLServer computer
If you rename the SQL Server computer, the following message may appear in theevent log of the Discovery Accelerator server when the Discovery Acceleratordatabase synchronizes with SQL Server:
Cannot add, update, or delete a job (or its steps or schedules)
that originated from an MSX server. The job was not saved.
For more information on this problem and guidelines on how to resolve it, see thefollowing article in the Microsoft Knowledge Base:
http://support.microsoft.com/?kbid=281642
You may also be able to fix the problem by running a script on the SQL Servercomputer.
To fix synchronization errors by running a SQL script
1 Connect to your SQL Server with Query Analyzer.
2 Type the following command to access the msdb database:
USE msdb
3 Run the following script:
DECLARE @srv sysname SET @srv = CAST(SERVERPROPERTY('server_name')
AS sysname) UPDATE sysjobs SET originating_server = @srv
Where you must replace server_name with the new name of your SQL Servercomputer.
Performance counter errors when the AcceleratorManager service starts
When the Enterprise Vault Accelerator Manager service starts, the following errormessages may appear in the event log of the Discovery Accelerator server:
Event Type: Error
Event Source: Accelerator Manager
Event Category: None
Event ID: 41978
Description: APP ATM - Error: deleting Performance Counters
Description: Input string was not in a correct format.
251TroubleshootingSynchronization errors after you rename the SQL Server computer

Event Type:Error
Event Source:Accelerator Manager
Event Category: None
Event ID: 41980
Description: APP ATM - Error: Creating Performance Counters
Description: Input string was not in a correct format.
For more information on this problem and guidelines on how to resolve it, see thefollowing article in the Microsoft Knowledge Base:
http://support.microsoft.com/?kbid=300956
SQL Service Broker warning when restoring acustomer database to a different server
SQL Server may record the following warning message in the event log if you restorea Discovery Accelerator customer database to a different server than that on whichit originally resided:
Service Broker needs to access the master key in the database
'database_name'. Error code:25. The master key
has to exist and the service master key encryption is required.
You can suppress this warning message by using the following SQL Servercommand to create a master key for the database:
CREATE MASTER KEY ENCRYPTION BY PASSWORD = 'password'
For more information, see the following article on the Microsoft website:
https://msdn.microsoft.com/library/aa337551.aspx
Issues with Custodian ManagerThis section describes some issues that you may experience when you useCustodian Manager.
Custodian Manager lets you synchronize multiple custodians withthe same Active Directory account
Custodian Manager permits you to set up multiple custodians whose details aresynchronized with the same Active Directory account. This can lead to unpredictableresults when synchronization occurs.
252TroubleshootingSQL Service Broker warning when restoring a customer database to a different server

For the best results, ensure that each custodian is synchronized with a uniqueActive Directory account.
Custodian Manager does not list the members of a custodian groupafter you delete the group and then restore it by synchronizing withActive Directory
After you delete a custodian group and then resynchronize Custodian Managerwith the Active Directory domain that was the source for the group, it reappears inCustodian Manager. However, the custodians who belong to the group are notlisted anymore.
To work around this issue, go to the properties page for the custodian group andclick Synchronize Now to force an immediate update of the group and its members.
If a custodian belongs to one Active Directory domain but is a memberof a group in a second domain, Custodian Manager may not updatethe custodian's details when it synchronizes with the second domain
When both of the following conditions apply, Custodian Manager does not updatethe details of a custodian as part of a scheduled, incremental synchronization withan Active Directory domain:
■ The custodian belongs to a different domain than the one with which CustodianManager is synchronizing, but is a member of a group in that domain.
■ Custodian Manager is not configured to synchronize with the domain to whichthe custodian belongs.
To work around this issue, ensure that Custodian Manager synchronizes with thedomain to which the custodian belongs. Alternatively, in the DirectorySynchronization page, click Synchronize Now to synchronize Custodian Managerimmediately with all the listed Active Directory domains.
Custodian Manager fails to synchronize with Domino LDAP usersand groups whose names contain certain double-byte characters
The Custodian Manager website lets you set up custodians and custodian groupsby entering a few details and then populating the rest by synchronizing with anexternal source, such as Active Directory or a Domino LDAP directory. However,when synchronizing with a Domino LDAP directory, this facility may not work forusers and groups whose names contain certain double-byte characters. In particular,accented characters like ǎ can cause the issue to arise. This issue does not affectActive Directory synchronizations.
253TroubleshootingIssues with Custodian Manager

For each Domino user or group with which Custodian Manager fails to synchronize,the following Error event is recorded in the Veritas Enterprise Vault log:
Source: Accelerator AD Synchronizer
Event ID: 34
Task Category: None
Level: Error
Keywords: Classic
Description:
APP AT - Customer ID: 5 - An error occurred in
ProfileSynchroniser::SynchroniseEmployeeProfile
while retrieving properties. System.Exception:
Domino User has invalid format ...
This issue arises because IBM Domino does not support LDAP searches for useror group names that contain double-byte characters. To work around the issue,ensure that the user and group names in IBM Domino contain supported charactersonly. The following article on the IBM website provides guidelines on how best toname the parts of an IBM Domino system:
https://www.ibm.com/support/knowledgecenter/en/SSKTMJ_9.0.1/admin/plan_dominonamingrequirements_c.html
Issues with Discovery Accelerator reportsA number of issues can arise when you generate, print, or export reports from theDiscovery Accelerator client.
Prompt to install SQL Server when printing a report for the first timeWhen you print a report for the first time from the Discovery Accelerator client, aSecurity Warning window prompts you to install Microsoft SQL Server. This is aknown issue in Microsoft SQL Server Reporting Services, which requires you todownload an ActiveX control for client-side printing of reports. To resolve this issue,configure the security settings in your web browser so that you can install therequired control.
To change the security settings in Internet Explorer
1 In Microsoft Internet Explorer, click Tools > Internet Options.
2 Click the Security tab.
3 Select the Trusted sites zone, and then click Sites.
4 Type the URL of the SQL reporting server.
254TroubleshootingIssues with Discovery Accelerator reports

5 Click Add, and then click Close.
6 Click the Custom level button.
7 Scroll to the ActiveX controls and plug-ins node.
8 Click Enable for Download signed ActiveX controls, and then click OK.
Reports that you export as CSV may not open properly in MicrosoftExcel
By default, SQL Reporting Services exports CSV files with Unicode encoding ratherthan ANSI encoding. The data in a Unicode-encoded CSV file does not tabulateproperly when you open it in Microsoft Excel.
To work around this problem
1 Locate the file rsreportserver.config in the SQL Reporting Servicesinstallation folder.
2 Open the file in a text editor such as Windows Notepad.
3 Comment out the following text block by enclosing it in the marks <!-- and -->:
<Extension Name="CSV" Type="Microsoft.ReportingServices.Rendering.
CsvRenderer.CsvReport, Microsoft.ReportingServices.CsvRendering"/>
4 Add the following text block:
<Extension Name="CSV" Type="Microsoft.ReportingServices.Rendering.
CsvRenderer.CsvReport, Microsoft.ReportingServices.CsvRendering">
<Configuration>
<DeviceInfo>
<Encoding>ASCII</Encoding>
</DeviceInfo>
</Configuration>
</Extension>
5 Save and close the file.
After you have edited the configuration file, SQL Reporting Services ignoresany Unicode characters that were stored in the initial report.
255TroubleshootingIssues with Discovery Accelerator reports

Garbled Japanese characters when exporting reports in Acrobatformat
If the Japanese characters in a Discovery Accelerator report are garbled when youexport it in Acrobat (PDF) format, you may be able to resolve the problem by takingthe following steps:
■ Ensure that you have installed the supplemental files for East Asian languageson the SQL reporting server. To install the files, open Regional and LanguageOptions in Control Panel and then, on the Languages tab, select Install filesfor East Asian languages.
■ Install version 5.00 or later of the MS Gothic font on the SQL reporting server.This version is supplied with most recent versions of Windows.
Troubleshooting OData errorsTable D-1 describes the errors that you may see when accessing the DiscoveryAccelerator datasets along with the appropriate HTTP error status code.
Table D-1 Error messages and HTTP codes
DescriptionMessage textHTTP code
The dataset that you want to accessdoes not have any information.
In the SearchCriteria dataset, you maysee this error if the search ID does notbelong to the case ID specified in thequery.
Content for this dataset is notavailable.
204
The format of the OData URL may beincorrect.
Invalid request format.400
You do not have the requiredpermissions to access the dataset.
Access denied. You do nothave permission to view thisdataset.
401
An internal error was encountered whenretrieving information for the specifieddataset.
An exception occurred whengetting dataset information.
501
256TroubleshootingIssues with Discovery Accelerator reports

Troubleshooting Privileged Delete failuresTable D-2 lists the failure reasons that you may see in the item history when youuse the Privileged Delete feature to delete an item from an Enterprise Vault archivealong with the actions that you can take to resolve them.
Table D-2 Failure reasons and actions
ActionFailure reason
Verify whether the archive or vault store isdeleted from Enterprise Vault.
Archive or vault store does not exist.
Upgrade the server to Enterprise Vault 12.3or later.
Cannot delete the item. The item is stored onan older version of Enterprise Vault.
Verify whether the item has been put on holdor stored on a device from which it is notpossible to delete items.
Deletion is not permitted. The item is either onlegal hold or stored on a compliance device.
Check whether the Enterprise VaultAccelerator Manager service account hassufficient permissions on the archive towhich the item belongs.
Enterprise Vault Accelerator Service accounthas insufficient permissions to delete itemsfrom the archive.
Contact your Enterprise Vault administratorfor help.
Invalid parameters passed to the EnterpriseVault API.
Verify whether the item has already beendeleted from the archive.
Item not found.
Wait and retry later.Unexpected error returned by the EnterpriseVault API. Error: {0:X}
Set the configuration option “Maximumprivileged delete retry” to increase thenumber of times that Discovery Acceleratorshould try to delete the item from theEnterprise Vault archive.
See “Privileged Delete configuration options”on page 208.
Enterprise Vault is not running.
Or:
Enterprise Vault is temporarily unable toprocess the request. The server is busy, orhas insufficient resources, or is only able toread data due to ongoing backups. Wait andretry later.
Or:
The Enterprise Vault server encountered aninternal error.
257TroubleshootingTroubleshooting Privileged Delete failures