
Egyptian Coil Bracelet - Instructables.com
14
http://www.instructables.com/id/Egyptian-Coil-Bracelet/ Home Sign Up! Browse Community Submit All Art Craft Food Games Green Home Kids Life Music Offbeat Outdoors Pets Photo Ride Science Tech Egyptian Coil Bracelet by hay_jumper on February 10, 2008 Table of Contents Egyptian Coil Bracelet . . . . . . . . . . . . . . . . . . . . . . . . . . . . . . . . . . . . . . . . . . . . . . . . . . . . . . . . . . . . . . . . . . . . . . . . . . . . . . . . . . . . . . . . . . . . . . . . . . . . . . . . . . 1 Intro: Egyptian Coil Bracelet . . . . . . . . . . . . . . . . . . . . . . . . . . . . . . . . . . . . . . . . . . . . . . . . . . . . . . . . . . . . . . . . . . . . . . . . . . . . . . . . . . . . . . . . . . . . . . . . . . 2 Step 1: Tools and Materials . . . . . . . . . . . . . . . . . . . . . . . . . . . . . . . . . . . . . . . . . . . . . . . . . . . . . . . . . . . . . . . . . . . . . . . . . . . . . . . . . . . . . . . . . . . . . . . . . . . 6 Step 2: Cut Wire To Size . . . . . . . . . . . . . . . . . . . . . . . . . . . . . . . . . . . . . . . . . . . . . . . . . . . . . . . . . . . . . . . . . . . . . . . . . . . . . . . . . . . . . . . . . . . . . . . . . . . . . 7 Step 3: Form Links . . . . . . . . . . . . . . . . . . . . . . . . . . . . . . . . . . . . . . . . . . . . . . . . . . . . . . . . . . . . . . . . . . . . . . . . . . . . . . . . . . . . . . . . . . . . . . . . . . . . . . . . . 7 Step 4: Repeat and Assemble . . . . . . . . . . . . . . . . . . . . . . . . . . . . . . . . . . . . . . . . . . . . . . . . . . . . . . . . . . . . . . . . . . . . . . . . . . . . . . . . . . . . . . . . . . . . . . . . . 8 Step 5: The Clasp . . . . . . . . . . . . . . . . . . . . . . . . . . . . . . . . . . . . . . . . . . . . . . . . . . . . . . . . . . . . . . . . . . . . . . . . . . . . . . . . . . . . . . . . . . . . . . . . . . . . . . . . . . 10 Step 6: Ta Daa! . . . . . . . . . . . . . . . . . . . . . . . . . . . . . . . . . . . . . . . . . . . . . . . . . . . . . . . . . . . . . . . . . . . . . . . . . . . . . . . . . . . . . . . . . . . . . . . . . . . . . . . . . . . . 12 Related Instructables . . . . . . . . . . . . . . . . . . . . . . . . . . . . . . . . . . . . . . . . . . . . . . . . . . . . . . . . . . . . . . . . . . . . . . . . . . . . . . . . . . . . . . . . . . . . . . . . . . . . . . . . 12 Comments . . . . . . . . . . . . . . . . . . . . . . . . . . . . . . . . . . . . . . . . . . . . . . . . . . . . . . . . . . . . . . . . . . . . . . . . . . . . . . . . . . . . . . . . . . . . . . . . . . . . . . . . . . . . . . . . 13
-
Upload
khangminh22 -
Category
Documents
-
view
1 -
download
0
Transcript of Egyptian Coil Bracelet - Instructables.com

http://www.instructables.com/id/Egyptian-Coil-Bracelet/
Home Sign Up! Browse Community Submit
All Art Craft Food Games Green Home Kids Life Music Offbeat Outdoors Pets Photo Ride Science Tech
Egyptian Coil Braceletby hay_jumper on February 10, 2008
Table of Contents
Egyptian Coil Bracelet . . . . . . . . . . . . . . . . . . . . . . . . . . . . . . . . . . . . . . . . . . . . . . . . . . . . . . . . . . . . . . . . . . . . . . . . . . . . . . . . . . . . . . . . . . . . . . . . . . . . . . . . . . 1
Intro: Egyptian Coil Bracelet . . . . . . . . . . . . . . . . . . . . . . . . . . . . . . . . . . . . . . . . . . . . . . . . . . . . . . . . . . . . . . . . . . . . . . . . . . . . . . . . . . . . . . . . . . . . . . . . . . 2
Step 1: Tools and Materials . . . . . . . . . . . . . . . . . . . . . . . . . . . . . . . . . . . . . . . . . . . . . . . . . . . . . . . . . . . . . . . . . . . . . . . . . . . . . . . . . . . . . . . . . . . . . . . . . . . 6
Step 2: Cut Wire To Size . . . . . . . . . . . . . . . . . . . . . . . . . . . . . . . . . . . . . . . . . . . . . . . . . . . . . . . . . . . . . . . . . . . . . . . . . . . . . . . . . . . . . . . . . . . . . . . . . . . . . 7
Step 3: Form Links . . . . . . . . . . . . . . . . . . . . . . . . . . . . . . . . . . . . . . . . . . . . . . . . . . . . . . . . . . . . . . . . . . . . . . . . . . . . . . . . . . . . . . . . . . . . . . . . . . . . . . . . . 7
Step 4: Repeat and Assemble . . . . . . . . . . . . . . . . . . . . . . . . . . . . . . . . . . . . . . . . . . . . . . . . . . . . . . . . . . . . . . . . . . . . . . . . . . . . . . . . . . . . . . . . . . . . . . . . . 8
Step 5: The Clasp . . . . . . . . . . . . . . . . . . . . . . . . . . . . . . . . . . . . . . . . . . . . . . . . . . . . . . . . . . . . . . . . . . . . . . . . . . . . . . . . . . . . . . . . . . . . . . . . . . . . . . . . . . 10
Step 6: Ta Daa! . . . . . . . . . . . . . . . . . . . . . . . . . . . . . . . . . . . . . . . . . . . . . . . . . . . . . . . . . . . . . . . . . . . . . . . . . . . . . . . . . . . . . . . . . . . . . . . . . . . . . . . . . . . . 12
Related Instructables . . . . . . . . . . . . . . . . . . . . . . . . . . . . . . . . . . . . . . . . . . . . . . . . . . . . . . . . . . . . . . . . . . . . . . . . . . . . . . . . . . . . . . . . . . . . . . . . . . . . . . . . 12
Comments . . . . . . . . . . . . . . . . . . . . . . . . . . . . . . . . . . . . . . . . . . . . . . . . . . . . . . . . . . . . . . . . . . . . . . . . . . . . . . . . . . . . . . . . . . . . . . . . . . . . . . . . . . . . . . . . 13

http://www.instructables.com/id/Egyptian-Coil-Bracelet/
Author:hay_jumperI too enjoy the satisfaction of creating.
Intro: Egyptian Coil BraceletThis is a simple chain that requires very few tools. Bonus points for recycling wire!
Image Notes1. Approximately 6 inches
Image Notes1. Vise not necessary.2. Begin the coil with round nose pliers.
http://www.instructables.com/id/Egyptian-Coil-Bracelet/
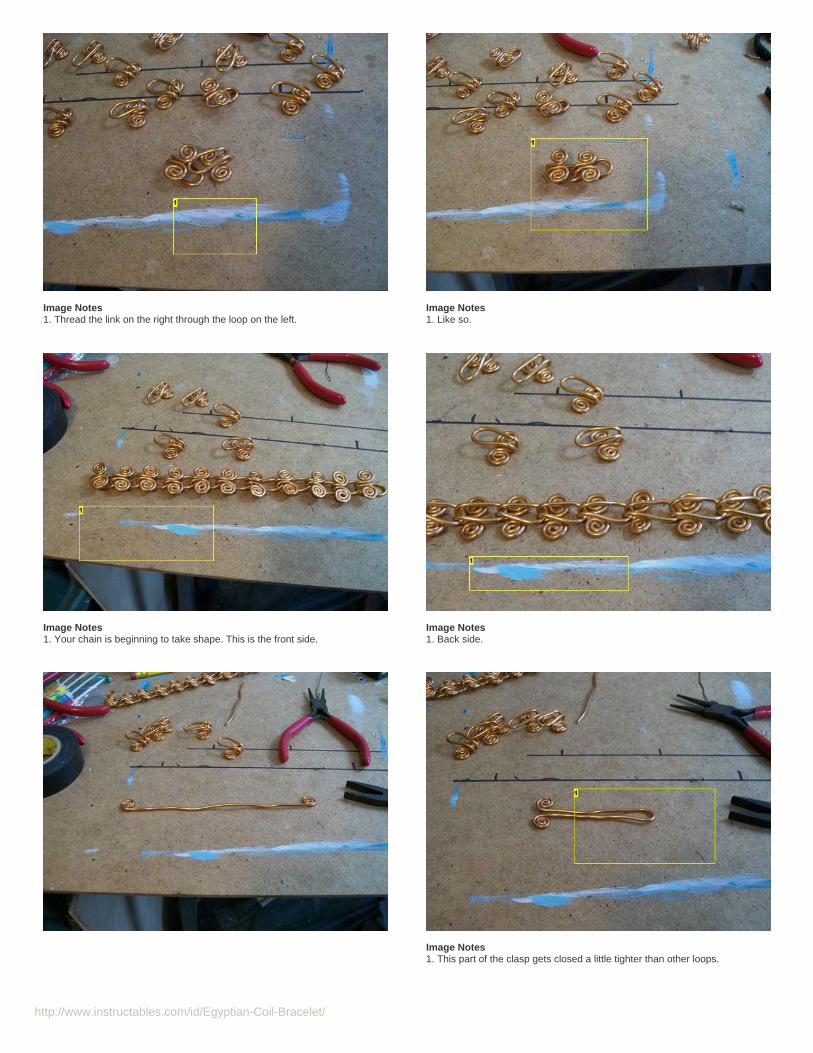
Image Notes1. Thread the link on the right through the loop on the left.
Image Notes1. Like so.
Image Notes1. Your chain is beginning to take shape. This is the front side.
Image Notes1. Back side.
Image Notes1. This part of the clasp gets closed a little tighter than other loops.
http://www.instructables.com/id/Egyptian-Coil-Bracelet/
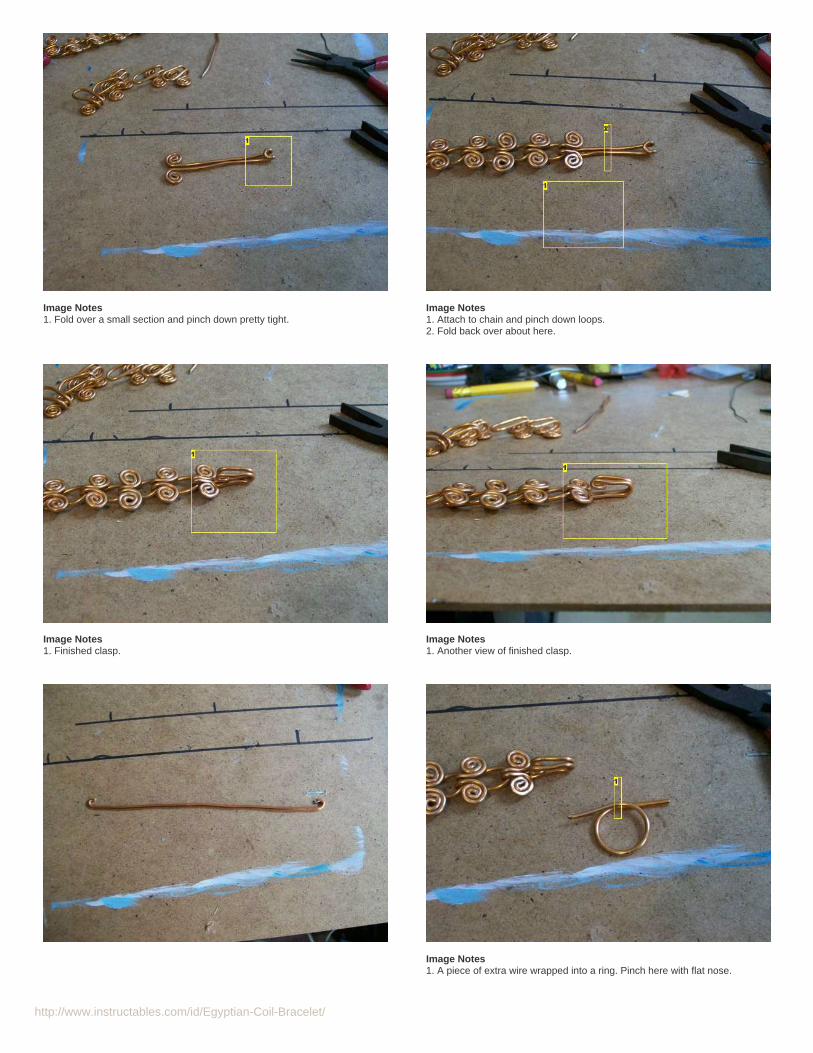
Image Notes1. Fold over a small section and pinch down pretty tight.
Image Notes1. Attach to chain and pinch down loops.2. Fold back over about here.
Image Notes1. Finished clasp.
Image Notes1. Another view of finished clasp.
Image Notes1. A piece of extra wire wrapped into a ring. Pinch here with flat nose.

http://www.instructables.com/id/Egyptian-Coil-Bracelet/
Image Notes1. Bend extra bits around the other side of ring. Snip off extra and pinch downtight.
Image Notes1. Like so.
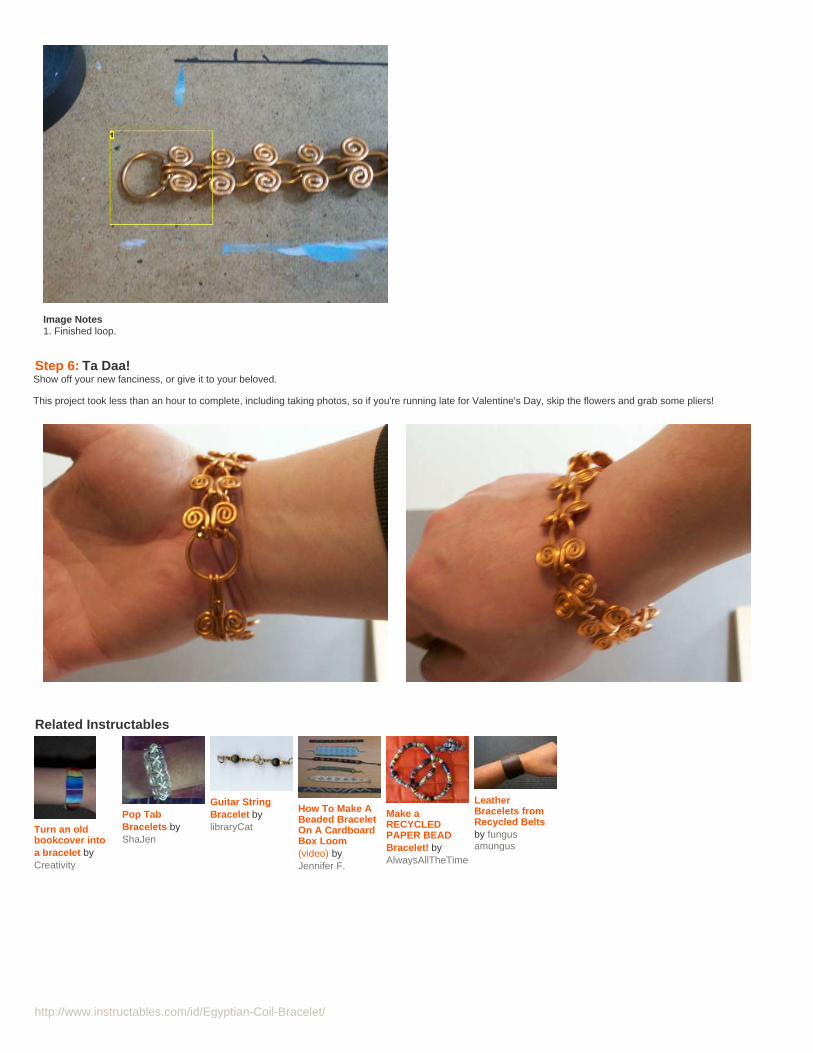
Image Notes1. Finished loop.
Image Notes1. Squish with flat nose pliers.
Image Notes1. Continue rolling coil.
Image Notes1. Use round nose to bend coils together.

http://www.instructables.com/id/Egyptian-Coil-Bracelet/
Image Notes1. Grip with flat nose and bend loop around.
Image Notes1. Your link will now look like this.
Image Notes1. Oh the tedium! Actually, doing it like this will save you a lot of time in the end.
Step 1: Tools and MaterialsAt the very least, you will need a pair of pliers with a set of cutters. It this demonstration I am using a pair of snips, round nose- and flat nose pliers. I also use a jeweler'sring mandrel in the end, but anything round will work.
You will also need wire. I'm using 12 guage aluminum wire that I dug out of my scrap bin. You could use any type or size, however.
http://www.instructables.com/id/Egyptian-Coil-Bracelet/
Image Notes1. Approximately 6 inches
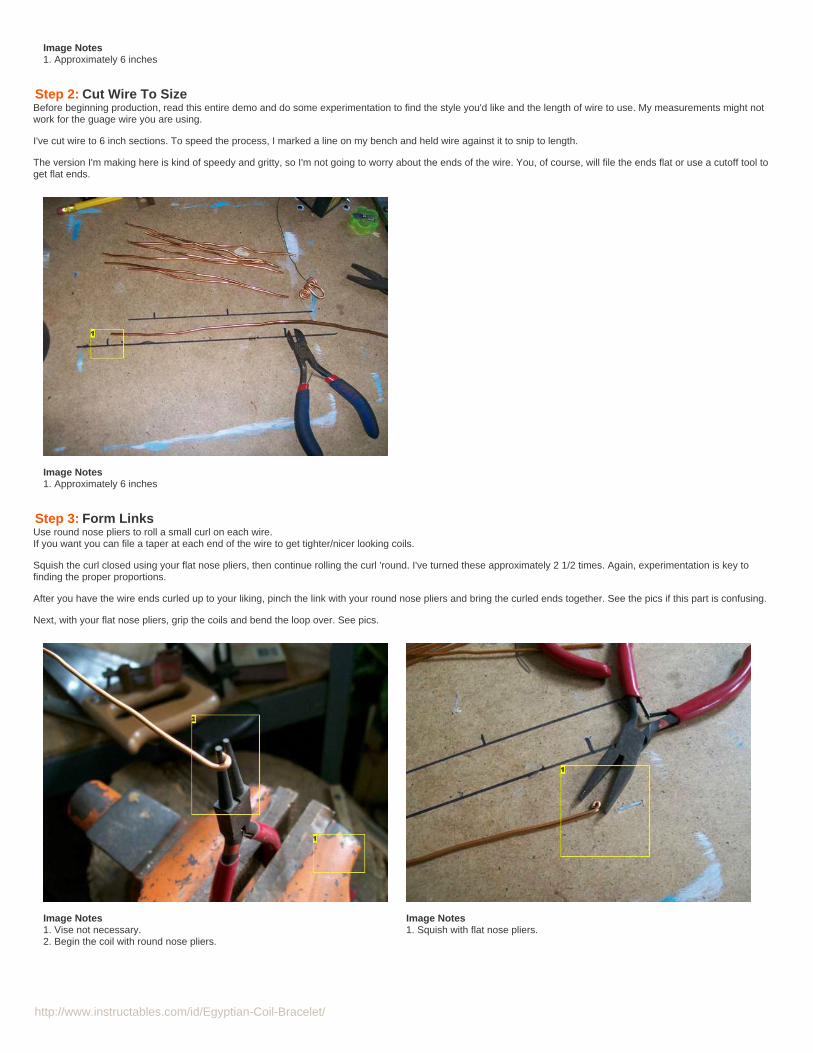
Step 2: Cut Wire To SizeBefore beginning production, read this entire demo and do some experimentation to find the style you'd like and the length of wire to use. My measurements might notwork for the guage wire you are using.
I've cut wire to 6 inch sections. To speed the process, I marked a line on my bench and held wire against it to snip to length.
The version I'm making here is kind of speedy and gritty, so I'm not going to worry about the ends of the wire. You, of course, will file the ends flat or use a cutoff tool toget flat ends.
Image Notes1. Approximately 6 inches
Step 3: Form LinksUse round nose pliers to roll a small curl on each wire.If you want you can file a taper at each end of the wire to get tighter/nicer looking coils.
Squish the curl closed using your flat nose pliers, then continue rolling the curl 'round. I've turned these approximately 2 1/2 times. Again, experimentation is key tofinding the proper proportions.
After you have the wire ends curled up to your liking, pinch the link with your round nose pliers and bring the curled ends together. See the pics if this part is confusing.
Next, with your flat nose pliers, grip the coils and bend the loop over. See pics.
Image Notes1. Vise not necessary.2. Begin the coil with round nose pliers.
Image Notes1. Squish with flat nose pliers.

http://www.instructables.com/id/Egyptian-Coil-Bracelet/
Image Notes1. Continue rolling coil.
Image Notes1. Use round nose to bend coils together.
Image Notes1. Grip with flat nose and bend loop around.
Image Notes1. Your link will now look like this.
Step 4: Repeat and AssembleThis process goes a lot faster if you do each step throughout each piece: rather than forming each link completely, do one step to all the links at once, then move to thenext step.
After you have all your pieces formed, begin assembling the chain. Take one link and thread the loop through the loop of another link. Continue this until you haveenough chain. See the pics if this is confusing. Once you have the links threaded through, bend the coils down to seal the next link in place, but not so tight as to restrictits movement. Do this to all the links EXCEPT the ones on each end, we will need those for the clasp assembly in the next step.

http://www.instructables.com/id/Egyptian-Coil-Bracelet/
Image Notes1. Oh the tedium! Actually, doing it like this will save you a lot of time in the end.
Image Notes1. Thread the link on the right through the loop on the left.
Image Notes1. Like so.
Image Notes1. Your chain is beginning to take shape. This is the front side.
Image Notes1. Back side.

http://www.instructables.com/id/Egyptian-Coil-Bracelet/
Step 5: The ClaspCut a piece of wire that is longer than your links. In this case I cut it at about 8 inches.
Form as any other link, but pinch the loop a little tighter that the links. Fold the very end of the loop over on itself, and attach this to the chain. Fold the loop over again atabout halfway. Pinch down the coils on that end. See pics if this is confusing.
Take a bit of leftover wire and bend it around something of suitable diameter. Where the loop crosses itself, grip with your flat nose pliers. Fold the ends of each wire overthe other side and wrap around, Snip off any excess and wrap tightly around the link.
Thread this ring onto the opposite end of the chain, and pinch down the loops over the section where the ring closes.
See pics for illustration.
Image Notes1. Finished clasp.
Image Notes1. Finished loop.
Image Notes1. This part of the clasp gets closed a little tighter than other loops.

http://www.instructables.com/id/Egyptian-Coil-Bracelet/
Image Notes1. Fold over a small section and pinch down pretty tight.
Image Notes1. Attach to chain and pinch down loops.2. Fold back over about here.
Image Notes1. Another view of finished clasp.
Image Notes1. A piece of extra wire wrapped into a ring. Pinch here with flat nose.
Image Notes1. Bend extra bits around the other side of ring. Snip off extra and pinch downtight.
Image Notes1. Like so.
http://www.instructables.com/id/Egyptian-Coil-Bracelet/
Image Notes1. Finished loop.
Step 6: Ta Daa!Show off your new fanciness, or give it to your beloved.
This project took less than an hour to complete, including taking photos, so if you're running late for Valentine's Day, skip the flowers and grab some pliers!
Related Instructables
Turn an oldbookcover intoa bracelet byCreativity
Pop TabBracelets byShaJen
Guitar StringBracelet bylibraryCat
How To Make ABeaded BraceletOn A CardboardBox Loom(video) byJennifer F.
Make aRECYCLEDPAPER BEADBracelet! byAlwaysAllTheTimeCrafting
LeatherBracelets fromRecycled Beltsby fungusamungus

http://www.instructables.com/id/Egyptian-Coil-Bracelet/
Comments
21 comments Add Comment
dollywild says: Nov 27, 2010. 12:46 AM REPLYMade one! Used 18 ga craft wire. Changed the clasp, a little. I found it easier to bend the wire in half at th start, other wise I had trouble figuring out wherethe middle was. I also work hardened my wire by tapping it with a hammer on a hard surface- this made it stiffer and less likely to bend out of shape withwear. Thanks for the great Instructable!
grooooovy says: Sep 5, 2010. 1:11 PM REPLYThis looks amazing
Taoiseach says: Aug 28, 2010. 10:11 AM REPLYWho knew you could make such beautiful jewlery out of parts from an oven? Fantastic Instructable.
Sagi says: May 25, 2010. 10:01 AM REPLY?BEAUTIFUL!?
Charm2bsure says: Sep 27, 2009. 12:04 PM REPLYAs long as the links are consistently the same size, this bracelet will look okay. I'm not crazy about huge clasps for it, but with this size wire it's pretty difficultto form anything smaller. I make this same bracelet in 18 gauge wire and keep the tops of the links almost invisible so that each link appears to be invisiblylinked to the next. I used a swan clasp on mine, but I need to figure out something else more masculine for the guys. Charm
cutekitten says: Apr 25, 2009. 7:44 PM REPLYvery cool
noesc says: Sep 22, 2008. 10:41 AM REPLYThis was really neat, I have to make this one! Looks like it was made from an old woman in a hut inside a native village or something. Kudos to youhay_jumper! /noesc
TippyStClair says: Aug 26, 2008. 12:39 PM REPLYExcellent! Good Xmas gifts. I'm going to start now. Thanx... :}
mspark400 says: Aug 26, 2008. 12:12 PM REPLYsweet just made one and it looks great and is a hit with the ladies! I have been making chainmaille jewelry as well as wire weaving for several years and thisis an example of great design! cheers, mspark400
Madrigorne says: Mar 5, 2008. 7:52 AM REPLYYou can spray the links with a polyurethane or acrylic coating to keep the wrist from greening up - or possible metal breakout. I think this is beautiful.
ERNesbitt says: Feb 10, 2008. 9:18 PM REPLYGreat! My wife made me swear that I wouldn't buy her anything for Valentine's day this year (She hates Valentaine's day, and it's one of my favoriteholidays). I have some copper wire in the basement and an electroplating machine. I'll just plate before final assembly.
hay_jumper says: Feb 11, 2008. 7:47 PM REPLYPlease please please post your electroplating instructable right now . I'm not even kidding. I could use it Right Now.
ERNesbitt says: Feb 12, 2008. 9:35 AM REPLYSorry, I can't be of much help... I actually have a machine and the appropriate chemicals with the metals already dissolved. My mother is a jewler. Ifthis link helps , it's one on basic electroplating, but unfortunately copper dissolves with a pretty weak acid and some current. You need some nastychemicals to plate with gold.
hay_jumper says: Feb 12, 2008. 6:30 PM REPLYThanks! I had missed that one! Actually I need to plate a copper piece in copper, so this will help. I had tried spent pickle to copper plate the silversolder seams on the piece, but apparently the acid was a little too weak. Your link gave me some good ideas though...
http://www.instructables.com/id/Egyptian-Coil-Bracelet/?utm_source=pdf&utm_campaign=comments#DISCUSS
http://www.instructables.com/id/Egyptian-Coil-Bracelet/?utm_source=pdf&utm_campaign=comments#DISCUSS
http://www.instructables.com/id/Egyptian-Coil-Bracelet/?utm_source=pdf&utm_campaign=comments#DISCUSS
http://www.instructables.com/id/Egyptian-Coil-Bracelet/?utm_source=pdf&utm_campaign=comments#DISCUSS
http://www.instructables.com/id/Egyptian-Coil-Bracelet/?utm_source=pdf&utm_campaign=comments#DISCUSS
http://www.instructables.com/id/Egyptian-Coil-Bracelet/?utm_source=pdf&utm_campaign=comments#DISCUSS
http://www.instructables.com/id/Egyptian-Coil-Bracelet/?utm_source=pdf&utm_campaign=comments#DISCUSS
http://www.instructables.com/id/Egyptian-Coil-Bracelet/?utm_source=pdf&utm_campaign=comments#DISCUSS
http://www.instructables.com/id/Egyptian-Coil-Bracelet/?utm_source=pdf&utm_campaign=comments#DISCUSS
http://www.instructables.com/id/Egyptian-Coil-Bracelet/?utm_source=pdf&utm_campaign=comments#DISCUSS
http://www.instructables.com/id/Egyptian-Coil-Bracelet/?utm_source=pdf&utm_campaign=comments#DISCUSS
http://www.instructables.com/id/Egyptian-Coil-Bracelet/?utm_source=pdf&utm_campaign=comments#DISCUSS

http://www.instructables.com/id/Egyptian-Coil-Bracelet/
rupamagic says: Feb 12, 2008. 10:15 AM REPLYFabulous instructable, thanks! Really nice looking bracelet too! I used to play with jewelry a lot, but it's been a while. That's going on my list of "things to doonce I unpack" since all my jewelry supplies (wire and pliers included) are who-knows-where at the moment. I got my kitchen and sewing stuff out so far... Ihope this is the inspiration I need to get more.
largejunglecat says: Feb 11, 2008. 11:13 AM REPLYThis is a cool project and very well documented! My only worry is that it will turn her wrist green =(
Wait, is that why this is categorized under craft & *green*? =P
hay_jumper says: Feb 11, 2008. 7:24 PM REPLYThanks! I tried to make it easy to replicate.
Many people are allergic to ANY metal, so caveat emptor. Hopefully, you know your valentine well enough to determine if this is suitable!
This looks like copper, but it is aluminum. It came from the scrap bin, so I have no idea why it may have been plated.
You could use a more skin-friendly alloy like sterling or stainless, if you wanted to sell a kidney to pay for it. Your beloved may view that act in highregard.
I think this is loose enough that it wouldn't have time to sit on the skin and scale. My very first experiment into this was copper in a necklace that I woreall the time. Only on the most humid days would my neck discolor at all, and I got stopped on the street all the time by people saying "Where DID you getthat necklace?!?"
"under craft & *green*? =P" -why I oughtta...!
TraumaComet says: Feb 11, 2008. 8:18 AM REPLYThis is really neat! Great idea!
Spint180 says: Feb 10, 2008. 4:25 PM REPLYGreat instructable! Im making diy valentine presents this year so this will help a ton.
jaysbob says: Feb 10, 2008. 2:19 PM REPLYooo neato! any problems with things getting bent out of shape or coming loose? I'll definitely have to try this though.
hay_jumper says: Feb 10, 2008. 3:21 PM REPLYOoh. Good point. I forgot to mention: You can hammer the coils and loops before bending the link in half. That will work-harden the metal a bit and makeit less likely to get bent out of shape, plus, it looks pretty cool with a hammer texture.
http://www.instructables.com/id/Egyptian-Coil-Bracelet/?utm_source=pdf&utm_campaign=comments#DISCUSS
http://www.instructables.com/id/Egyptian-Coil-Bracelet/?utm_source=pdf&utm_campaign=comments#DISCUSS
http://www.instructables.com/id/Egyptian-Coil-Bracelet/?utm_source=pdf&utm_campaign=comments#DISCUSS
http://www.instructables.com/id/Egyptian-Coil-Bracelet/?utm_source=pdf&utm_campaign=comments#DISCUSS
http://www.instructables.com/id/Egyptian-Coil-Bracelet/?utm_source=pdf&utm_campaign=comments#DISCUSS