How to Construct a Simple Boat - Instructables.com
29
http://www.instructables.com/id/How-to-Construct-a-Simple-Boat/ Home Sign Up! Browse Community Submit All Art Craft Food Games Green Home Kids Life Music Offbeat Outdoors Pets Photo Ride Science Tech How to Construct a Simple Boat by notjustsomeone on June 10, 2008 Table of Contents How to Construct a Simple Boat . . . . . . . . . . . . . . . . . . . . . . . . . . . . . . . . . . . . . . . . . . . . . . . . . . . . . . . . . . . . . . . . . . . . . . . . . . . . . . . . . . . . . . . . . . . . . . . . . . . 1 Intro: How to Construct a Simple Boat . . . . . . . . . . . . . . . . . . . . . . . . . . . . . . . . . . . . . . . . . . . . . . . . . . . . . . . . . . . . . . . . . . . . . . . . . . . . . . . . . . . . . . . . . . . 2 Step 1: Materials . . . . . . . . . . . . . . . . . . . . . . . . . . . . . . . . . . . . . . . . . . . . . . . . . . . . . . . . . . . . . . . . . . . . . . . . . . . . . . . . . . . . . . . . . . . . . . . . . . . . . . . . . . . 2 Step 2: Forming the Sides . . . . . . . . . . . . . . . . . . . . . . . . . . . . . . . . . . . . . . . . . . . . . . . . . . . . . . . . . . . . . . . . . . . . . . . . . . . . . . . . . . . . . . . . . . . . . . . . . . . . 4 Step 3: Placing the Ends . . . . . . . . . . . . . . . . . . . . . . . . . . . . . . . . . . . . . . . . . . . . . . . . . . . . . . . . . . . . . . . . . . . . . . . . . . . . . . . . . . . . . . . . . . . . . . . . . . . . . 5 Step 4: Planking and Keelson . . . . . . . . . . . . . . . . . . . . . . . . . . . . . . . . . . . . . . . . . . . . . . . . . . . . . . . . . . . . . . . . . . . . . . . . . . . . . . . . . . . . . . . . . . . . . . . . . 7 Step 5: Seats . . . . . . . . . . . . . . . . . . . . . . . . . . . . . . . . . . . . . . . . . . . . . . . . . . . . . . . . . . . . . . . . . . . . . . . . . . . . . . . . . . . . . . . . . . . . . . . . . . . . . . . . . . . . . 8 Step 6: Caulking . . . . . . . . . . . . . . . . . . . . . . . . . . . . . . . . . . . . . . . . . . . . . . . . . . . . . . . . . . . . . . . . . . . . . . . . . . . . . . . . . . . . . . . . . . . . . . . . . . . . . . . . . . . 9 Step 7: Painting . . . . . . . . . . . . . . . . . . . . . . . . . . . . . . . . . . . . . . . . . . . . . . . . . . . . . . . . . . . . . . . . . . . . . . . . . . . . . . . . . . . . . . . . . . . . . . . . . . . . . . . . . . . . 11 Step 8: Check Your Seams . . . . . . . . . . . . . . . . . . . . . . . . . . . . . . . . . . . . . . . . . . . . . . . . . . . . . . . . . . . . . . . . . . . . . . . . . . . . . . . . . . . . . . . . . . . . . . . . . . . 11 Step 9: Launch It . . . . . . . . . . . . . . . . . . . . . . . . . . . . . . . . . . . . . . . . . . . . . . . . . . . . . . . . . . . . . . . . . . . . . . . . . . . . . . . . . . . . . . . . . . . . . . . . . . . . . . . . . . . 13 Step 10: Oars . . . . . . . . . . . . . . . . . . . . . . . . . . . . . . . . . . . . . . . . . . . . . . . . . . . . . . . . . . . . . . . . . . . . . . . . . . . . . . . . . . . . . . . . . . . . . . . . . . . . . . . . . . . . . 14 Step 11: Sailing . . . . . . . . . . . . . . . . . . . . . . . . . . . . . . . . . . . . . . . . . . . . . . . . . . . . . . . . . . . . . . . . . . . . . . . . . . . . . . . . . . . . . . . . . . . . . . . . . . . . . . . . . . . . 18 Step 12: Evolve . . . . . . . . . . . . . . . . . . . . . . . . . . . . . . . . . . . . . . . . . . . . . . . . . . . . . . . . . . . . . . . . . . . . . . . . . . . . . . . . . . . . . . . . . . . . . . . . . . . . . . . . . . . . 22 Related Instructables . . . . . . . . . . . . . . . . . . . . . . . . . . . . . . . . . . . . . . . . . . . . . . . . . . . . . . . . . . . . . . . . . . . . . . . . . . . . . . . . . . . . . . . . . . . . . . . . . . . . . . . . 25 Comments . . . . . . . . . . . . . . . . . . . . . . . . . . . . . . . . . . . . . . . . . . . . . . . . . . . . . . . . . . . . . . . . . . . . . . . . . . . . . . . . . . . . . . . . . . . . . . . . . . . . . . . . . . . . . . . . 25
-
Upload
khangminh22 -
Category
Documents
-
view
3 -
download
0
Transcript of How to Construct a Simple Boat - Instructables.com

http://www.instructables.com/id/How-to-Construct-a-Simple-Boat/
Home Sign Up! Browse Community Submit
All Art Craft Food Games Green Home Kids Life Music Offbeat Outdoors Pets Photo Ride Science Tech
How to Construct a Simple Boatby notjustsomeone on June 10, 2008
Table of Contents
How to Construct a Simple Boat . . . . . . . . . . . . . . . . . . . . . . . . . . . . . . . . . . . . . . . . . . . . . . . . . . . . . . . . . . . . . . . . . . . . . . . . . . . . . . . . . . . . . . . . . . . . . . . . . . . 1
Intro: How to Construct a Simple Boat . . . . . . . . . . . . . . . . . . . . . . . . . . . . . . . . . . . . . . . . . . . . . . . . . . . . . . . . . . . . . . . . . . . . . . . . . . . . . . . . . . . . . . . . . . . 2
Step 1: Materials . . . . . . . . . . . . . . . . . . . . . . . . . . . . . . . . . . . . . . . . . . . . . . . . . . . . . . . . . . . . . . . . . . . . . . . . . . . . . . . . . . . . . . . . . . . . . . . . . . . . . . . . . . . 2
Step 2: Forming the Sides . . . . . . . . . . . . . . . . . . . . . . . . . . . . . . . . . . . . . . . . . . . . . . . . . . . . . . . . . . . . . . . . . . . . . . . . . . . . . . . . . . . . . . . . . . . . . . . . . . . . 4
Step 3: Placing the Ends . . . . . . . . . . . . . . . . . . . . . . . . . . . . . . . . . . . . . . . . . . . . . . . . . . . . . . . . . . . . . . . . . . . . . . . . . . . . . . . . . . . . . . . . . . . . . . . . . . . . . 5
Step 4: Planking and Keelson . . . . . . . . . . . . . . . . . . . . . . . . . . . . . . . . . . . . . . . . . . . . . . . . . . . . . . . . . . . . . . . . . . . . . . . . . . . . . . . . . . . . . . . . . . . . . . . . . 7
Step 5: Seats . . . . . . . . . . . . . . . . . . . . . . . . . . . . . . . . . . . . . . . . . . . . . . . . . . . . . . . . . . . . . . . . . . . . . . . . . . . . . . . . . . . . . . . . . . . . . . . . . . . . . . . . . . . . . 8
Step 6: Caulking . . . . . . . . . . . . . . . . . . . . . . . . . . . . . . . . . . . . . . . . . . . . . . . . . . . . . . . . . . . . . . . . . . . . . . . . . . . . . . . . . . . . . . . . . . . . . . . . . . . . . . . . . . . 9
Step 7: Painting . . . . . . . . . . . . . . . . . . . . . . . . . . . . . . . . . . . . . . . . . . . . . . . . . . . . . . . . . . . . . . . . . . . . . . . . . . . . . . . . . . . . . . . . . . . . . . . . . . . . . . . . . . . . 11
Step 8: Check Your Seams . . . . . . . . . . . . . . . . . . . . . . . . . . . . . . . . . . . . . . . . . . . . . . . . . . . . . . . . . . . . . . . . . . . . . . . . . . . . . . . . . . . . . . . . . . . . . . . . . . . 11
Step 9: Launch It . . . . . . . . . . . . . . . . . . . . . . . . . . . . . . . . . . . . . . . . . . . . . . . . . . . . . . . . . . . . . . . . . . . . . . . . . . . . . . . . . . . . . . . . . . . . . . . . . . . . . . . . . . . 13
Step 10: Oars . . . . . . . . . . . . . . . . . . . . . . . . . . . . . . . . . . . . . . . . . . . . . . . . . . . . . . . . . . . . . . . . . . . . . . . . . . . . . . . . . . . . . . . . . . . . . . . . . . . . . . . . . . . . . 14
Step 11: Sailing . . . . . . . . . . . . . . . . . . . . . . . . . . . . . . . . . . . . . . . . . . . . . . . . . . . . . . . . . . . . . . . . . . . . . . . . . . . . . . . . . . . . . . . . . . . . . . . . . . . . . . . . . . . . 18
Step 12: Evolve . . . . . . . . . . . . . . . . . . . . . . . . . . . . . . . . . . . . . . . . . . . . . . . . . . . . . . . . . . . . . . . . . . . . . . . . . . . . . . . . . . . . . . . . . . . . . . . . . . . . . . . . . . . . 22
Related Instructables . . . . . . . . . . . . . . . . . . . . . . . . . . . . . . . . . . . . . . . . . . . . . . . . . . . . . . . . . . . . . . . . . . . . . . . . . . . . . . . . . . . . . . . . . . . . . . . . . . . . . . . . 25
Comments . . . . . . . . . . . . . . . . . . . . . . . . . . . . . . . . . . . . . . . . . . . . . . . . . . . . . . . . . . . . . . . . . . . . . . . . . . . . . . . . . . . . . . . . . . . . . . . . . . . . . . . . . . . . . . . . 25

http://www.instructables.com/id/How-to-Construct-a-Simple-Boat/
Intro: How to Construct a Simple BoatYes indeed, it is possible to build a boat without fiberglass or epoxy.I can hear you now, those that gasp in horror at such a notion, but believe you me it works.
This instructable demonstrates the simple construction of a scow. While all construction details are drawn from others plans and instructions the overall shape is my ownmaking.Most scows have straight sides, resembling a box, mine however has curved sides, making the process of building only slightly more difficult.
Step 1: MaterialsThe instructions given may, in places, not correspond to the actual boat that I made. I took several sets of instructions and used my discretion to combine them into myproject. The intent of this instructable is to pass on knowledge in order that you yourself may be able to construct something of your own. So in places I may inject orsuppliment some information or process that I may have not used but that would be beneficial to those reading this instructable.
On to the stuff you'll need:Prices change every day so I'm not going to list any.
Wood, pine or cedar may be used throught except where noted. I got my lumber from Home Depot.
- sides. 2 peices as clear of knots or defects as possible. mine were 10 feet long pine 10 inches wide.
- planking. (goes on the bottom) do the math, at 10 feet long you'll have to cover a little over 120 inches for this project and it's a good idea to buy a little extra. take acalculator when you buy your lumber. 6 inches seems to be the preferred width for bottom planking but 5 or 8 inches will do just as well. They should be about 3/4 of aninch thick and at least 4 inches longer than your boat will be wide. Also with these you want them to be as free of knots as possible.I bought some cedar fencing boards that were on sale, they were 5/8 of an inch thick and 8 inches wide and 6 feet long. so needing to cover 120 inches with 8 inch wideboards means I needed 15 boards. Because my boat is only 3 feet wide and tapers to 2 feet at the ends I had a few leftover boards.
- keelson. (this will go inside on the bottom) it needs to be longer than the sides because it will be curved. the one I bought was a pine 1x5 12 feet long
- middle seat. a pine board supported by cleats. you'll need a board 3/4 to an inch thick and around 6 inches wide or wider. Also two peices 12 to 18 inches long andabout 2 inches wide for the seat to rest on.
- end seats or decks. just use leftover planking, or buy extra, to cover the topside of the ends with 2 boards each.
- ends. 2 peices of oak an inch thick and 6 inches wide will be needed. They should be as long as you want your boat to be wide, minus the thickness of both sides. Youmay also choose to cover these with another peice of cedar or pine.
- forming brace. (This is needed if you intend to curve the sides as I did. If you're just going to leave the sides straight you don't need this) Ideally use a peice of hardwoodas wide as the sides and as long as the boat will be wide. I, however, just used some pine scraps that were long enough.
- knees. (if your boat has straight sides skip this) these are peices that will go into the corners to add strength. you'll need 4 peices of 3"x3" oak about an inch thick.
- Oars. (assuming you make your own) there are plenty of instructions on these so I won't provide one.
http://www.bateau.com/free/simple_oars.html
http://www.instantboats.com/oarmaking.htm
http://www.users.zetnet.co.uk/cbrown/pdlemk.htm
http://www.wcha.org/paddles/
http://www.diybob.com/oars.htm
http://www.outdoorlife.com/article.jsp?ID=21009548&typeID=663&categoryID=0
http://www.woodcentral.com/cgi-bin/readarticle.pl?dir=smalser&file=articles_425.shtml
http://www.amateurboatbuilding.com/articles/howto/oars/oars.html
http://www.nfdc.net/home/cbdb/barquito%208.htm
Tools, others help immensely but these will get the job done.
- tape measure.
http://www.instructables.com/id/How-to-Construct-a-Simple-Boat/
- saw. a simple hand saw will work
- plane. you can usually find a little one at hardware stores fairly cheap
- hammer.
- 2 peices of rope. at least 6 feet long
- paint brush.
- metal putty knife or flathead screwdriver
Other Supplies
- paint. You could go the expensive route and use marine grade and anti-fouling bottom paint. But face it, this is a cheap boat. Exterior latex house paint will do just aswell. Two coats of white exteroir latex primer followed by at least one coat of your preferred color is enough. A dull grey, lead color, is suggested for the inside and adarker color of your choice for the outside.You'll also need a small can of white oil-based paint for caulking.
- paint thinner.
- caulking. for those of us that don't live in a boatyard this is actually just cotton that will be wedged in the seams of the boat. This can be procured from marine supplystores or you could just go down to Walmart and get Peaches and Creme brand worsted weight cotton yarn in whatever color you choose (it won't matter you can't seeit).
- putty. The instructions I looked at said to putty over the seams but were otherwise inspecific about what that was. I just used some wood filer from the hardware storebecause I didn't know better at the time. On further research I would suggest roof calking, the black tar-like stuff. you can find it in a tube or sometimes in a big gooeybucket.
- saw horses. three words people; convient working height. you can do all this on the ground but it's much easier on your back if you lift the boat up about 3 feet.
- 5d (pronounced five penny) galvanized nails. about a pound and a half should be enough. I just bought a box.
I think I covered all the basics but if I missed something it'll show up in one of the steps.
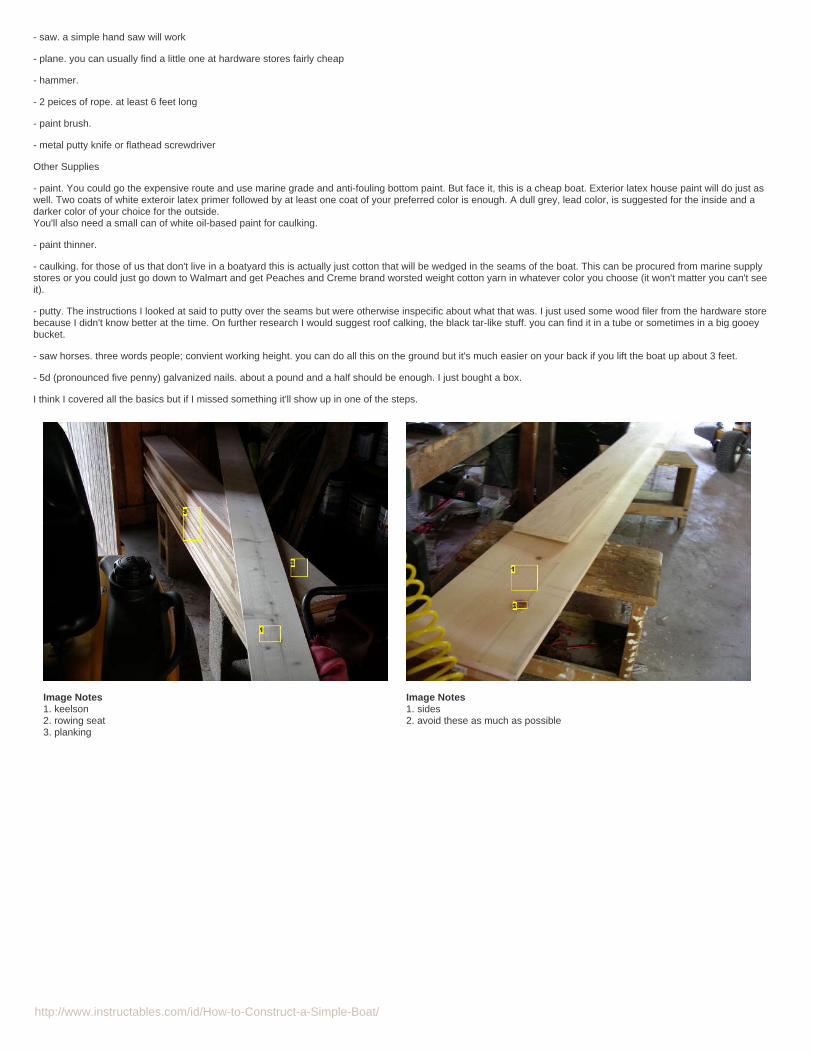
Image Notes1. keelson2. rowing seat3. planking
Image Notes1. sides2. avoid these as much as possible

http://www.instructables.com/id/How-to-Construct-a-Simple-Boat/
Step 2: Forming the SidesStart by shaping the sides.
To taper the ends measure 2 to 2 and a half feet from each end and mark it. Then measure how wide you want your ends to be and connect your marks.Usually the ends are the same width, about 4 inches.Clamping the peices together helps to ensure both will be identical, which is important.Once the ends are tapered take the plane and round off the edges to a smooth, gradual curve. If you don't it will make the keelson much harder to put in.
I made my ends kinda different. The bow is only 3 inches wide and the taper starts 2 feet from the end. The stern is 6 inches wide and the taper also starts 2 feet from theend of the board.
Image Notes1. 3 inches for the bow2. 6 inches for the stern3. Ideally these would be free from any knots and completely heartwood.
Image Notes1. cutoff mark

http://www.instructables.com/id/How-to-Construct-a-Simple-Boat/
Image Notes1. not entirely necessairy but helps so you don't put big divots in your wood.2. round off the sharp corner to a nice gradual curve
Step 3: Placing the EndsIf the sides of your boat are straight just nail them on and square up the boat before planking.
If the sides will be curved first mark the center of each side, then nail the brace in place. remember to leave the nail heads sticking up so you can take them out easily.
make two loops out of the rope and fit them about a foot over each end.Starting with the stern first put something, a pipe or scrap peice of wood, into the loop and twist until the distance between the two peices is just enough for the end to fitin. nail it.Leave the rope on the stern and then tighten down the one on the bow, nail that one in place too.
Once the ends are nailed in place mark the inside of a corner on a peice of paper (or use a bevel gauge). Check all corners to make sure they're the same. If they'redifferent you're ends aren't square and you need to adjust it. Make sure one side is stationary and move the other forward or back until the angle at the ends are thesame. There are more complex and better ways to square a box, but this will work. Once every corner has the same angle cut out the knees from oak or a similarhardwood and nail them in place, flush with the top of the boat.
Once the knees are on you can probablly take the ropes off, but I waited until after the first peice of planking went on.
Image Notes1. originally I was going to make it 4 feet wide but after setting it up changed mymind and shortened it to 3 feet. Which worked out well as it fits better in the backof my truck.
Image Notes1. can leave little notches in the wood, to avoid this wrap with a towel first2. make sure it has something to rest against. the last thing you want is a peiceof metal or wood flying back at you.

http://www.instructables.com/id/How-to-Construct-a-Simple-Boat/
Image Notes1. don't twist both sides at the same time, but both ropes need to be on beforeyou start.
Image Notes1. Make sure the end sticks up so you can bevel it correctly. It should makecontact with the planking over the whole surface2. cracks are bad, don't do this
Image Notes1. you can make it pretty by cutting it into a sort of curvy L shape, but these aregetting covered up so I didn't care.

http://www.instructables.com/id/How-to-Construct-a-Simple-Boat/
Step 4: Planking and KeelsonFirst place the keelson.If you haven't done so already make a notch in the brace just wide and deep enough for the keelson.Mark the center of each end to ensure the keelson gets centered. Then nail through the stern into the keelson to secure it in place. Bend the other end down to the bowand mark where it needs to be cut and the angle the cut needs to be. After cutting nail it in place.
If it's too rigid to bend where you need it, try soaking a towel in boiling water and placing that on the board for a few munites and trying to bend again. This may have tobe repeated several time before it works.If that doesn't work or you're afraid of burning yourself you could just cut a kerf, or several, in the board. A kerf is a shallow, less than half the thickness of the board, cuton the same side you want the bend: if you want to bend it up cut on the top of the board right where the bend will be, if you're bending it down cut on the bottom of theboard. (I hope that made sense)
Once the keelson is in place start planking.
Start at one end and work over to the other. Cut the board about 4 inches longer than it needs to be and nail it onto the edges of the sides, and the bow and stern forthose peices that go over them. Also nail into the keelson, staggering the pattern as you go. Three or four nails at each joint is plenty.Once the bottom is on the nails in the keelson will need to be clinched. If you don't have the proper tools and someone to help you can just hammer the nails down, or toget rid of the points you can take a pair of pliers and bend the tip about 70 degrees and then hammer the nail down back into the board.
Image Notes1. chisel it out to just the thickness of the keelson, so it will be flush with thebottom. and remember not to nail the planking to the form.
Image Notes1. the ends overhang from the sides an average of 2 inches. This helps not tosplit the ends while nailing and ensures a uniform edge once you cut it all off.2. The boards I bought for the planking had this goofy upper edge, make sure toaccount for things like this when deciding how much lumber you need to buy.3. stay hydrated on hot days.
Image Notes1. stagger the nails in the keelson as you go to avoid causing splitting in the theplanking.2. Knots in planking are bad, try to avoid them.
Image Notes1. much faster than a handsaw. also easier to make mistakes with.2. these rough edges need to be smoothed down. A beltsander would be greatbut a plane will do the job.3. As you can see some of my boards were thicker than others. I wasn't worriedabout it for this project, but it would look much better and be faster if you makesure everything is the same thickness.

http://www.instructables.com/id/How-to-Construct-a-Simple-Boat/
Image Notes1. If you just use two boards like I did it's easiest to take the bottom one outwhen you get halfway on the planking. I just took out the nails and slid it just outof reach of the nails comming through the keelson.2. nails ready to be clinched.3. measure everything at least twice, espically when working with dimensionallumber. I forgot and made the sides 6 inches when the endpeice was only 5 and3/4 wide. It could easily have been fixed but I chose to leave it.
Step 5: SeatsFirst make the bow and stern seats, or decks if you'd prefer to call them. This is done with the same boards you used for planking the bottom and in the same manner.Put two boards on each end.
For the middle seat, the one to row from, first put in cleats for it to rest on. These should be about 2 inches wide and about a foot long. Place them approximately whereyou want the seat to go and then nail them in the same manner the keelson was (or just use screws).If you're not sure where you'll need the seat you can make your cleats about 2 feet long and place them a little forward of the center of the boat. Cut the seat to fit in thecenter as you can always cut it further to fit closer to the end of the boat.
Image Notes1. a fast and easy, but pretty bad job of clinching the nails
Image Notes1. center of boat, bow is to the left.2. for the seat to fit here it'll have to be cut. you may find that two seats will bepreferable if you often row by yourself and with others in the boat.

http://www.instructables.com/id/How-to-Construct-a-Simple-Boat/
Step 6: CaulkingOnce your boat actually looks like a boat, it needs to be made watertight. If you made all your joints nice and tight you may not even need to caulk the boat as the woodwill swell and seal everything up once it gets wet. But if you're like most people you'll need some extra help.Now some people may be shaking their heads saying "you'll never be able to stop water from getting in without epoxy, fiberglass and lots of resin."
Actually all it takes is some cotton and putty. The putty will keep the water out until the cotton swells, the cotton will keep the water out until the wood swells
The simplest and surest way to do this is to just put flanel strips soaked in paint between every edge when putting the planking on.
But then you'd miss out on actually caulking a boat.To do this you need some caulking cotton.The easiest stuff for me to get is some 4-ply worsted weight 100% cotton yarn from walmart (peaches and creme brand), I've read about professional boatbuilders thatuse it, so if it's good enough for them...Once you've got that some people will try to tell you you need a couple different size caulking irons and a special mallet and try to sell you some other specialized nauticalboat building tools. For one small boat, especially a scow, you simply don't need any of that. You can caulk the whole thing with a thin flathead screwdriver, but since youneed it for the putty anyway a metal putty knife will work better.Take a peice of yarn a bit longer than the seam and start forcing it into the gap at one end. Push it about halfway through and then move across the seam trying to getthe same depth all the way. If the gap is wider than the yarn simply fold the yarn onto itself and twist it a bit, then force that down the same as you did before.
After caulking the seams will need to be payed (or saturated with thinned, oil-based, paint). To do this get a small can of oil-based paint and thin it 10 to 20% with somemineral spirts or turpentine. Just brush this into the seams with a thin, short-bristled brush.Another way of doing this would be to take a plastic "Dawn" dish soap bottle, a cork to fit it, and some 1/4 inch copper tubing and make a paint applicator. Just drill a holein the cork for the tube, the tubing should be long enough to go almost all the way to the bottom of the bottle, put the tube in the cork and bend it about 90 degrees, thenhammer the end down so there's just a slit for the paint to escape out of and file the edges down to about 1/16 of an inch thick. Then just fill the bottle with thinned paintand you've got a great applicator for future boats.
Then all the seams need to be puttied. Traditionally this is a mixture of whiting (calcium carbonate) and linseed oil or just boiled pitch. I'd try roofing caulk, the black tar-like stuff. I, completely ignorant of all this at the time of building, simply used wood putty. I may yet have to rip out all my caulking and start over, we'll see with time.
If you know you'll want to caulk the boat you can leave a 1/16 inch gap between each board when planking.
Due to some rough handling of the boat, I sprung a leak. To fix it I tried using putty made with whiting and linseed oil. The encyclopedia britanica describes whiting puttylike so:Whiting putty of a high grade consists of 85 to 90 percent whiting blended with 10 to 15 percent boiled linseed oil. Prepared putty should roll freely in the hands withoutexuding oil.My first mix was probablly a little too gooey, but having fixed that I decided to recaulk all the other joints just in case. I found that it's a bit easier to mix in a shallow bowl orpaper plate. you'll know it's the right consistancy when you can roll it in a ball freely but if you let it sit in your hand it sticks.
Image Notes1. about half way into the gap. you don't want to push it all the way through2. make sure all the nails are countersunk and putty over them as well.
Image Notes1. thinned paint, maybe not thin enough2. cotton caulking

http://www.instructables.com/id/How-to-Construct-a-Simple-Boat/
Image Notes1. I didn't have any mineral spirits (paint thinner) so I just used turpentine to thinthe paint for the caulking2. I recently noticed that whiting is pretty easy to find. I got this from the paintsection of Ace Hardware. Most lumberyard/building centers around also carry it.3. this putty knife has a blunt end and a pointed one, it makes a pretty handy toolto clean out the seams as well as force the cotton in and apply the putty.4. Peaches and Creme 4-ply worsted-weight 100% cotton yarn from Walmart.5. oil based
Image Notes1. some whiting
Image Notes

http://www.instructables.com/id/How-to-Construct-a-Simple-Boat/
1. it's not the most acurate measure but it works. 9 parts whiting and 1 part linseedoil will give you a good product.
Image Notes1. it should be just stiff enough to slice off a chunck.2. it's best to only work with a little at a time
Step 7: PaintingUsing a primer give the boat two thick coats inside and out. Then paint the inside a light color that won't reflect too much light, a dull grey works well but doesn't alwayslook great. A slightly off-white color will work as well. Then paint the outside a darker color. To give it more appeal change colors or paint a stripe at the waterline, orwhere you think the waterline will be.
Instead of painting the rowing seat I finished it with linseed oil.
Image Notes1. primered and ready for the topcoat2. I've already got a leak, some paint seeped through from the inside.
Image Notes1. rowing seat
Step 8: Check Your SeamsNext you need to make sure you don't have any serious leaks.If you live near a river or lake or other calm body of water that you can put your boat in without anyone bothering it just launch it and leave it for a couple days. It may sinkbut after a couple days in the water the seams should have swelled up making it water tight. If it did sink pull it out of the water, empty it and launch it again checking forleaks.
If you don't have easy access to water you can just take it outside and set it up on sawhorses or cinderblocks, make sure it's well supported so the planking doesn't pullaway from the sides under the weight of the water. Then fill it half full of water (or enough to cover all your seams). It will probablly leak a bit the first few days but after thethird if water is still leaking out mark where it's comming from, dry out the boat and seal those spots by recaulking them. then repeat the process until you've got a soundboat.

http://www.instructables.com/id/How-to-Construct-a-Simple-Boat/
Image Notes1. neighborhoods largest birdbath.
Image Notes1. I didn't have any mineral spirits (paint thinner) so I just used turpentine to thinthe paint for the caulking2. I recently noticed that whiting is pretty easy to find. I got this from the paintsection of Ace Hardware. Most lumberyard/building centers around also carry it.3. this putty knife has a blunt end and a pointed one, it makes a pretty handy toolto clean out the seams as well as force the cotton in and apply the putty.4. Peaches and Creme 4-ply worsted-weight 100% cotton yarn from Walmart.5. oil based
Image Notes1. Clean out the seam very well before trying to recaulk it.

http://www.instructables.com/id/How-to-Construct-a-Simple-Boat/
Image Notes1. this goofy putty knife is good for ripping out the old caulking
Image Notes1. Abuse
Step 9: Launch ItOnce everything's ship shape as far as the hull goes, launch your boat. If you haven't made your oars yet, just borrow a paddle. Take it out to see if your seat is whereyou want it. Take on a passenger, if any are willing, and see how it handles with weight in differing positions. Stay out for longer than just a float check, make sure to payattention for any leaks.
Image Notes1. This is a good place for rowing, but just to paddle I moved the seat back a
Image Notes1. Ninnescah river. well, it's more of a stream most of the year.

http://www.instructables.com/id/How-to-Construct-a-Simple-Boat/
good 18 inches.2. bow
Image Notes1. My first passenger.
Image Notes1. Painter line in the bow. it's about 10 feet long.
Image Notes1. In most states a life jacket is required to be in the boat, best not to get acitation on the first trial.2. this is a rat's nest, don't do this. coil the line and stow it under the bow, it onlytakes a few seconds.
Image Notes1. Dry bag for the camera, just in case. Not that I had any worries.2. Wear appropriate shoes, water will find it's way in one way or another,espically if you've got a pet with you.
Step 10: Oarsmake some oars and attach them to your boat. Direction and tips for this can be found in step 1. If you live near any sort of marine or boat supply store just go pick upsome oarlocks.
Attach them to your boat and row it.
Some sites to check out for making your own oarlocks:
http://www.nfdc.net/home/cbdb/barquito%208.htm
http://www.mcallen.lib.tx.us/staff/gm/dhboatp5.htm
http://www.duckworksmagazine.com/05/columns/rob/2/index.cfm
The oars I made are pretty ugly but they work great. I just carved them out of two 2x4's. If you make oars out of lumber like this it's best to use one long peice to cut themout of rather than two. The blades on the oars are narrow and long, while it may be rather slow to start a heavy boat they're not much different than conventional oarsonce you get going. Also they don't cause as much overall strain, letting you cover long distances with less effort.
The overall design of the oarlocks, as far as I can tell, is attributed to Phil Bolger, though I have read vague referances to "fishermen" having more or less pioneeredthem. who knows. Anyway, they're pretty much just a block of wood attached to the sides with a bolt in it and a peice of rope to attach the oars. The rope should have aloop in both ends and to keep it from comming off I used a fender washer near the head of the bolt. The oars should fit tightly in the rope loops, with just enough slack toallow you to rotate them, or feather, as you row. It doesn't really matter if the oars are in front of or behind the bolt while rowing, however, it's best to have them behind,

http://www.instructables.com/id/How-to-Construct-a-Simple-Boat/
where as you row they strain against the rope, because if you should need to let them go they'll just rotate and trail alongside the boat.
Image Notes1. I cut down my seat to shift further back while paddling so instead of makinganother seat for rowing I added these little support blocks.2. the oars are about 8 feet long and fit perfectly inside the boat.
Image Notes1. mark where every cut will need to be made on all sides of the board, just toavoid mistakes.
Image Notes1. It's hard to tell in the picture, but I began rounding the shaft and the handles.

http://www.instructables.com/id/How-to-Construct-a-Simple-Boat/
Image Notes1. Used a jigsaw or Saber-Saw to rough out the handle and shaft.
Image Notes1. another ongoing project
Image Notes1. more or less smoothed and lightly sanded.

http://www.instructables.com/id/How-to-Construct-a-Simple-Boat/
Image Notes1. I didn't want them taking up too much room so I put a nail in the end andsuspended them for varnishing. Use spar varnish and follow the directions on thecan.
Image Notes1. This stick of walnut was just lying around the shop so I used it. It wouldprobablly be better to use something larger.2. Use clear lumber, not stuff with knots or other defects in it.3. These are just some salvaged bolts I had, eventually they'll get replacedbefore they rust completely.4. I drilled a small hole so I wouldn't need more than just the one nut to hold thebolt on. This only works in very hard woods.
Image Notes1. A shorter bolt would probablly work better, but would hinder the movement ofthe oar.2. use stainless or brass hardware.
Image Notes1. Fender washers are large and have a small opening for the bolt.2. A manila grommet with waxed twine wrapped in the center.

http://www.instructables.com/id/How-to-Construct-a-Simple-Boat/
Step 11: SailingI finally finished a sail for this boat. It's a small spritsail around 40sq feet.http://www.instructables.com/id/The_Handsewn_Spritsl/
I put in a mast step and partner about 25 inches from the bow. The mast and sprit are both about 1 and 3/4 inches in diameter. I cut them out of a pine 2x4, they're bothjust under 9 feet in length. I made two small cleats for the main outhaul and the sheet, and one really small one that goes on the sprit to control the snotter. I don't haveanything specifically for the brail line, for now I just run it back to the cleat for the sheet. I'll probablly make a side-mounted daggerboard just to keep things simple, but fornow I made a curde daggerboard/leeboard out of waferboard. It'll help decide where the daggerboard will eventually go. For now I'm just using a paddle to steer with butI'm considering a rudder, we'll see.
Image Notes1. I live in such a small town that this picture made frontpage news in the localpaper.2. for anyone that can tell, yes I was going to windward and having a pretty hardtime of it. the lake I was sailing on is so small that if the wind blows hard enoughfrom directly east or west it's nearly impossible to make those directions bytacking.

http://www.instructables.com/id/How-to-Construct-a-Simple-Boat/
Image Notes1. To let the sprit rotate around the mast, this prussik knot is tied with a ring in it.2. The sprit rests here3. This is just excess I didn't want to cut off.4. you can either take this down to a cleat or make a cleat on the sprit.
Image Notes1. mast step.2. mast partner

http://www.instructables.com/id/How-to-Construct-a-Simple-Boat/
Image Notes1. mast head
Image Notes1. mast foot, rounded and slightly tapered
Image Notes1. Sprit head, tapered to fit in sail becket.
Image Notes1. Goes on the top of the mast.2. main outhaul goes through this ring3. one end of the brail line is attached to the ring, then through the brail eyelet, tothis pulley, and then down to a cleat.
Image Notes1. foot of sprit
Image Notes1. Leather to protect the mast and to ease rotation.

http://www.instructables.com/id/How-to-Construct-a-Simple-Boat/
2. Upholstery tacks3. A wax-grease type lubricant
Image Notes1. Ugly little cleat
Image Notes1. A bit goofey looking, but extremely effective.
Image Notes1. the tiny cleat on the sprit
Image Notes1. I've found the brail line most effective with the sprit passing underneath it.
Image Notes

http://www.instructables.com/id/How-to-Construct-a-Simple-Boat/
1. main outhaul (raises the sail)2. bow line
Image Notes1. jam-cleat in use
Image Notes1. Waferboard does not react well to water. This is a very temporary solution if youdon't want to wait to go sailing.
Step 12: EvolveEventually I did make a barndoor-type rudder with a steering yoke rather than a fixed tiller, it turned out to be too small. I also added a shallow keel, a 2x4 bolted throughthe keelson. My original 2x4 mast had a knot in it and snapped in half one day, luckily I hadn't put the boat in the water yet. So I made another one, this type called acooper's mast , it's mostly hollow, made from clear pine with oak caps. A new sprit was made from laminating two peices of pine together and rounding it, a groovesecures the peak instead of a point and an extra 12 or so inches extends beyond the peak so a flag may be flown. Lastly I rigged a type of traveler to control the foot ofthe sail using eye-bolts in the rear deck.

http://www.instructables.com/id/How-to-Construct-a-Simple-Boat/
Image Notes1. A slightly larger sail made from vastly inferior materials than my last sail.
Image Notes1. makeshift keel
Image Notes1. The new hole I drilled in the mast partner was a bit excessive so I leathered thistoo to fill in the space.2. bottom cap of mast
Image Notes1. new cleat for the sprit, bolted through with the nuts countersunk.2. leather to prevent wear from the mast.

http://www.instructables.com/id/How-to-Construct-a-Simple-Boat/
Image Notes1. The new hole I drilled in the mast partner was a bit excessive so I leathered thistoo to fill in the space.2. bottom cap of mast
Image Notes1. I made the bottom of the rudder about even with the keel so I wouldn't have toremove it for transporting, but it's too small to be effective in good winds.2. regular door hinges were used with a block to distance it from the hull, whichallows the rudder to swing freely.

http://www.instructables.com/id/How-to-Construct-a-Simple-Boat/
Image Notes1. lead weight2. wooden anchor inspired by a picture on this website:http://www.strandingsmuseum.dk/uk-version/marin-arch-uk/tranqebar/engelsk.htm3. I used it once on a very muddy bottom, it dragged a bit at first but eventually itdid hold fast for an afternoon of fishing.
Image Notes1. stainless steel carrage bolts to hold on the keel.
Related Instructables
The HandsewnSprits'l bynotjustsomeone Sailing Canoe
Chapter X:Maiden Voyageby TimAnderson
AThird Hand forSailing or OtherThings by WadeTarzia
Construction ofTwo PortugueseStyle Dinghies(Small Boats) byrook999
Cozy BoatEpisode 2: ANew Skin byTimAnderson
filming boat bycesar harada
Comments
50 comments Add Comment view all 69 comments
Zeppelinfreak says: Feb 15, 2011. 8:07 PM REPLYHow tall was the mast?
notjustsomeone says: Mar 6, 2011. 8:53 PM REPLYBecause the rig used was a sprit sail, the mast was equal to or just shorter than the length of the boat. If you intend to use another rig, you may chooseto alter the mast height and consider standing rigging.
Zeppelinfreak says: Feb 15, 2011. 8:06 PM REPLYWhat was your original mast made of?
notjustsomeone says: Mar 6, 2011. 8:50 PM REPLYAs stated in the instructable the first mast, that broke, was cut and shaped out of a 2x4.
Zeppelinfreak says: Feb 13, 2011. 6:47 PM REPLYI also am wondering if you need a gaff when using a triangular sail or can you just tie a rope to the head and hoist it that way?

http://www.instructables.com/id/How-to-Construct-a-Simple-Boat/
notjustsomeone says: Mar 6, 2011. 8:49 PM REPLYYou should look into the different types of sails and rigging before asking questions that don't make sense.
Zeppelinfreak says: Feb 13, 2011. 5:26 PM REPLYHow do you licence a homemade boat with the DMV?
notjustsomeone says: Mar 6, 2011. 8:44 PM REPLYyou'll have to check your local regulations. for a craft of this type it may not even be necessiary.
Zeppelinfreak says: Feb 14, 2011. 3:52 PM REPLYDid you use that cotton for your sails?
awsomenesskid says: Dec 3, 2009. 12:57 PM REPLYi love this little boat, and i want to make one, but living in britain thers not many lakes or rivers i can use, an i have to sail in the sea, and launch from asurfing beach, what modifications would you recomend, also i am only a teenager so im gunna have to build this thing on whatever money i get fromchristmas, any suggestions on cheapening it up?
zigzagchris says: Nov 8, 2010. 11:53 AM REPLYexact same situation as me, have u found good plans?
notjustsomeone says: Dec 3, 2009. 9:53 PM REPLYThe basic hull design of this boat was intended for rivers and calm lakes, I wouldn't suggest taking this into the ocean, not saying the modificationscouldn't be made, but it would increase the cost of builfing it. For something along the same lines of construction I'd suggest a sharpie or dory, check outthis book for similar boats that may be better suited for your purposes.
For launching in surf I'd go with more of a canoe-type craft, maybe a proa or catamaran.
theexpert says: Oct 8, 2010. 7:04 PM REPLYone mod you may want to do is angle the bottom for compartments so it can go in rocky waters without to much fear of sinking and you could use them asstorage to but you have to angle the bottom but thats not to hard to do
LePyro says: Nov 29, 2009. 11:37 AM REPLYWOW! I am STRONGLY sonsidering building this boat, just some questions, 1. What is the weight capacity on the scow? 2. Can regular "window" caulkingbe used? and 3. What is the total time and cost for this build?
Thanx a bunchLePyro...
notjustsomeone says: Nov 29, 2009. 9:11 PM REPLYAs far as the actual weight capacity, I have no idea, nor have I calculated it's displacement. Personally, I would hesitate to put any more than 800lbs in it,ever.
No, don't use window caulking, use roof-cauling, the black tarry stuff.
For the non-siling version construction shouldn't exceed a week or two maxium. You should be able to knock up the boat in one day, the rest is paintingand water-testing. Additional time may be needed if you rig it for sailing. I didn't include costs because of the wide variability of lumber and hardwareprices, however, you can expect to spend $200-$300. Of course, the cost can go up or down depending on where you get your materials and theirquality.
Metalcaster14 says: Aug 12, 2009. 1:43 PM REPLYhmmm... good instructable but unless I missed it, it seems like you didn't give appropriate credit to D.C. Beard and his book. Pretty much anything novel fromthe boat came form the book. Especially the snotter. I've never heard of it outside of the American Boy's Handy Book . But any way you did a good job ofputting it to a more modern context with more detail.
dadadata says: Oct 12, 2009. 7:34 AM REPLYSee http://www.friend.ly.net/users/dadadata/short/sci_am/scow_1876.html.
If Dan Beard was "Paddlefast" then this was published in 1876.
P'fast then went on to describe other boats:
http://www.friend.ly.net/users/dadadata/short/sci_am/skiff_1876.html for example.
As for the "snotter," that predates Dan Beard by centuries. There are a dozen or so ways to rig a snotter. Not to be confused with skinning a cat.

http://www.instructables.com/id/How-to-Construct-a-Simple-Boat/
notjustsomeone says: Aug 12, 2009. 9:30 PM REPLYThat is undoubtably where I got the idea, I don't know if I reference it in the instructable, but I certainly did before constructing the little boat. If you likedthe short section on simple boats from that book you should check out http://www.archive.org/details/boatbuildingboat00bear .
The American Boy's Handy Book is excelent and I think every young american boy should have a copy. Another author from about the same time periodworth mentioning is A. Russell Bond. I think their work, along with many others, inspired an entire generation. I wish more current authors wouldencourage and motivate older children to use the simple skills and tools available to them to build purposeful things. For example I reciently bought acopy of "The Dangerous Book for Boys" by Conn and Hal Iggulden as a gift. I was rather dissapointed by it's concentration on "culture". It seemed tocome off emphasizing observing rather than doing and leaving everything to someone older and more experienced. Anyway, I'm digressing, but do checkout their work and by all means share it with your children.
rowerwet says: Aug 2, 2009. 8:53 PM REPLYfor the "modern" version of this boat, built with ply, and polyurethane construction adhesive (in a tube like caulk), that will weigh much less and not getheavier with water, go to [email protected]. free plans, many different lengths and sizes all quick and easy, with sails, oars, or paddles, agreat group of builders, and the designer Gavin Atkin who monitors the site and will answer your questions. I have built two of these boats so far, and moremay be on the way.
rbodell says: Jul 9, 2009. 12:38 PM REPLYWhen you assemble the Pieces, put "Liquid Nails" construction adhesive on all joining surfaces before fastening them. There won't be any leaks at all.
ANDY! says: Jul 17, 2009. 12:07 PM REPLYDONT, i heard it sucks. use expoxy.
rbodell says: Jul 19, 2009. 8:36 PM REPLYYou HEARD, I built 17 boats with it.
ANDY! says: Jul 23, 2009. 11:20 AM REPLYWhatever
rbodell says: Jul 19, 2009. 8:41 PM REPLYYes epoxy is better, but the idea here is to build a boat WITHOUT resine.
ANDY! says: Jul 23, 2009. 11:19 AM REPLYI built mine in a day. I didn't buildit sturdt enough so the bottom fell out. Must try again.
Eternal_Tristan says: Aug 21, 2008. 12:48 PM REPLYCould you use a large sheet of plywood in place of the planks? Seems like this would reduce the amount of caulking required. Very nice project. I'll have totry making a boat one of these days. I like your simple plan. Thanks!
rbodell says: Jul 19, 2009. 8:44 PM REPLYPlywood doesn't swell like planks do so the sealing would not be as good between the bottom and sides..
notjustsomeone says: Aug 21, 2008. 8:33 PM REPLYya, you could use plywood for the planking, it'd probablly be best to scarf it together unless you can find a 12' sheet.
bassmasta1010 says: Jun 11, 2009. 5:54 AM REPLYthen again plywood goes crazy if it gets wet.......so make sure to seal it GOOD
zerrodach says: Jul 6, 2009. 7:30 PM REPLYhow much does the completed boat weigh?
notjustsomeone says: Jul 10, 2009. 11:25 AM REPLYI would guess that just finished it weighs a bit over 150lbs, but probablly more like 200-250 after it's set in the water.

http://www.instructables.com/id/How-to-Construct-a-Simple-Boat/
ajpyro95 says: Jun 20, 2009. 9:33 AM REPLYis it possible to use an outboard with one of these if you didnt put the flat bits on top at the bow ?
notjustsomeone says: Jun 20, 2009. 6:05 PM REPLYYes, but I wouldn't recommend it. When you get up to speed the boat will deffinately plane high enough but when moving slower, espically in a chop, thelow sides and blunt bow tend to go through waves instead of over them.
ajpyro95 says: Jun 21, 2009. 4:26 AM REPLYok thx
bassmasta1010 says: May 6, 2009. 4:28 PM REPLYit would look awesome if you just clear coated it...it would give that natural look
notjustsomeone says: May 6, 2009. 6:41 PM REPLYwell, I didn't do a great job with my joints so paint helps disguise some of the flaws.but if you want a natural look, you don't have to paint it at all. throw itin the water and let it soak for a couple days and you've got a rough-but-seaworthy boat. If you're a bit more worried about protecting the boat just give ita coat or two of linseed oil and call it good. for a real "natural" boat with character check out www.backwater.org/Boats/Klondike/Klondike.htm
ert says: Apr 15, 2009. 9:09 PM REPLYthat is awesome!!!!!!!!!!!!!!!!!!!!!!!!!!!!!
MisterMissanthrope says: Jan 31, 2009. 1:56 AM REPLYmy friend has the book where that image is from, i always wanted to do this but never got around to it, sigh, maybe someday.
notjustsomeone says: Jan 31, 2009. 2:52 PM REPLYWhat book? and could I get a digital scan of it? you really should do this, it's simple, fun, and only takes a couple days.
MisterMissanthrope says: Feb 1, 2009. 1:15 AM REPLYPretty sure its something like "### things for boys to do" im not sure though, ill ask him, also see if he'd be willing to digitize it.
stevetc99 says: Feb 14, 2009. 11:27 AM REPLYThe American Boys' Handy Book
Pornostache says: Sep 4, 2008. 5:41 PM REPLYNot bad. I would have bought a box of drywall screws. Nails are a boat builders enemy! Also I would have at least used wood glue, or silicone for all of yourjoints. I would suggest epoxy on the bottom at least but epoxy is REALLY expensive and i agree that on a boat of this type it is not necessary. My first boatwas stitch and glue and i spent over $400 on fiberglass and epoxy to hold together $100 worth of lumber. My second one I used $40 worth of lumber toaccomplish the same thing.
If you wanted a better mating of the edges of the floor boards you could run them through a table saw beveling all the edges at matching angles i.e.
/_/ -> /_/ -> /_
The increased surface area of the joints and the fact that they are cut on a blade at identical angles gives for a better/stronger mating, provided its a flatbottom boat. The other, easier, slightly more expensive option is to use plywood for the bottom. ALWAYS REMEMBER!!! FEWER SEAMS = FEWER LEAKS
gamnoparts says: Jan 29, 2009. 7:16 PM REPLYFWIW, drywall screws are not a good idea. They tend to torque off the heads if you're trying to screw 2 pcs of wood together (they're designed to hold upthe construction equivalent to chalk). Better off w/ woodscrews. Although, you should use some short enough to not go through the backside. It's mucheasier to not have to bend them over . . . ;) It floats, therefore it's a good boat. Nice job.
Pornostache says: Jan 30, 2009. 8:38 AM REPLYi've never taken the head off a drywall screw, but i always set the torque on my drill. More often than not i also use a lot of wood glue so the screwsare acting more as clamps than as anything structural.

http://www.instructables.com/id/How-to-Construct-a-Simple-Boat/
Pornostache says: Sep 9, 2008. 12:57 PM REPLYOne thing i really do love about this boat is its vintage quality, using older building methods. A woodworkers boat. That and it really is simple. Awesome!
darus67 says: Aug 20, 2008. 4:27 PM REPLYNice work. I'm curious why you didn't use a single large piece of plywood for the bottom instead of individual planks. That wouldn't require caulking all ofthose seams. I built a similar boat a number of years ago using plywood, lumber, house paint, and construction adhesive from Home Depot. There were anumber of surprised spectators when it didn't sink. Do a Google search for "bolger brick" and you'll find numerous examples of the design I built.
notjustsomeone says: Aug 21, 2008. 11:37 AM REPLYThis project was about learning, I plan to make larger more complicated boats in the future and a plywood rectangle isn't a step in the direction I want togo. But if you're into really simple, cheap boats of that kind and a community to share it with I would recommend www.pdracer.com
mikethemac says: Jul 8, 2008. 10:57 AM REPLYlike too se some more" real boatbouilding"
notjustsomeone says: Jul 8, 2008. 3:23 PM REPLYI'm not sure what you're talking about, but perhaps if you work on your spelling and sentence construction we can find some kind of comperhension.
Ferrite says: Aug 18, 2008. 1:35 PM REPLYlol
view all 69 comments