Constructing a Medium Sized Biogas Plant ... - Instructables.com
29
http://www.instructables.com/id/Constructing-a-Medium-Sized-Biogas-Plant-Using-Kit/ Food Living Outside Play Technology Workshop Constructing a Medium Sized Biogas Plant Using Kitchen Waste by antoniraj on September 19, 2014 Table of Contents Constructing a Medium Sized Biogas Plant Using Kitchen Waste . . . . . . . . . . . . . . . . . . . . . . . . . . . . . . . . . . . . . . . . . . . . . . . . . . . . . . . . . . . . . . . . . . . . . . . . . . 1 Intro: Constructing a Medium Sized Biogas Plant Using Kitchen Waste . . . . . . . . . . . . . . . . . . . . . . . . . . . . . . . . . . . . . . . . . . . . . . . . . . . . . . . . . . . . . . . . . . 2 Step 1: Selection of Tanks . . . . . . . . . . . . . . . . . . . . . . . . . . . . . . . . . . . . . . . . . . . . . . . . . . . . . . . . . . . . . . . . . . . . . . . . . . . . . . . . . . . . . . . . . . . . . . . . . . . . 2 Step 2: Other Materials Required . . . . . . . . . . . . . . . . . . . . . . . . . . . . . . . . . . . . . . . . . . . . . . . . . . . . . . . . . . . . . . . . . . . . . . . . . . . . . . . . . . . . . . . . . . . . . . . 3 Step 3: Adhesives Used . . . . . . . . . . . . . . . . . . . . . . . . . . . . . . . . . . . . . . . . . . . . . . . . . . . . . . . . . . . . . . . . . . . . . . . . . . . . . . . . . . . . . . . . . . . . . . . . . . . . . 5 Step 4: Tools Required . . . . . . . . . . . . . . . . . . . . . . . . . . . . . . . . . . . . . . . . . . . . . . . . . . . . . . . . . . . . . . . . . . . . . . . . . . . . . . . . . . . . . . . . . . . . . . . . . . . . . . 6 Step 5: Preparation of Gas Holder Tank . . . . . . . . . . . . . . . . . . . . . . . . . . . . . . . . . . . . . . . . . . . . . . . . . . . . . . . . . . . . . . . . . . . . . . . . . . . . . . . . . . . . . . . . . . 8 Step 6: Preparation of Digester Tank . . . . . . . . . . . . . . . . . . . . . . . . . . . . . . . . . . . . . . . . . . . . . . . . . . . . . . . . . . . . . . . . . . . . . . . . . . . . . . . . . . . . . . . . . . . . 9 Step 7: Fixing the Feed Pipe to the Digester Tank . . . . . . . . . . . . . . . . . . . . . . . . . . . . . . . . . . . . . . . . . . . . . . . . . . . . . . . . . . . . . . . . . . . . . . . . . . . . . . . . . . 11 Step 8: Fixing Slurry Outlet Pipe With The Digester Tank . . . . . . . . . . . . . . . . . . . . . . . . . . . . . . . . . . . . . . . . . . . . . . . . . . . . . . . . . . . . . . . . . . . . . . . . . . . . . 14 Step 9: Fixing The Guides Over Digester for the Movement of Gas Holder Tank . . . . . . . . . . . . . . . . . . . . . . . . . . . . . . . . . . . . . . . . . . . . . . . . . . . . . . . . . . . . 16 Step 10: Providing Guide Support on the Gas Holder Tank . . . . . . . . . . . . . . . . . . . . . . . . . . . . . . . . . . . . . . . . . . . . . . . . . . . . . . . . . . . . . . . . . . . . . . . . . . . 17 Step 11: Preparation of Gas Pipes . . . . . . . . . . . . . . . . . . . . . . . . . . . . . . . . . . . . . . . . . . . . . . . . . . . . . . . . . . . . . . . . . . . . . . . . . . . . . . . . . . . . . . . . . . . . . . 18 Step 12: Fixing Gas Outlet from the Gas Holder Tank . . . . . . . . . . . . . . . . . . . . . . . . . . . . . . . . . . . . . . . . . . . . . . . . . . . . . . . . . . . . . . . . . . . . . . . . . . . . . . . 20 Step 13: Placing Tank and Fixing Slurry Outlet Pipe . . . . . . . . . . . . . . . . . . . . . . . . . . . . . . . . . . . . . . . . . . . . . . . . . . . . . . . . . . . . . . . . . . . . . . . . . . . . . . . . . 22 Step 14: Fixing the Waste Feed Pipe . . . . . . . . . . . . . . . . . . . . . . . . . . . . . . . . . . . . . . . . . . . . . . . . . . . . . . . . . . . . . . . . . . . . . . . . . . . . . . . . . . . . . . . . . . . . 23 Step 15: Place the Gas Holder Tank and Finish . . . . . . . . . . . . . . . . . . . . . . . . . . . . . . . . . . . . . . . . . . . . . . . . . . . . . . . . . . . . . . . . . . . . . . . . . . . . . . . . . . . . 25 Step 16: Feeding the Biogas Plant for the First Time . . . . . . . . . . . . . . . . . . . . . . . . . . . . . . . . . . . . . . . . . . . . . . . . . . . . . . . . . . . . . . . . . . . . . . . . . . . . . . . . 25 Step 17: My Keynote Address On Biogas and Panchagavya . . . . . . . . . . . . . . . . . . . . . . . . . . . . . . . . . . . . . . . . . . . . . . . . . . . . . . . . . . . . . . . . . . . . . . . . . . 27 Related Instructables . . . . . . . . . . . . . . . . . . . . . . . . . . . . . . . . . . . . . . . . . . . . . . . . . . . . . . . . . . . . . . . . . . . . . . . . . . . . . . . . . . . . . . . . . . . . . . . . . . . . . . . . 29 Advertisements . . . . . . . . . . . . . . . . . . . . . . . . . . . . . . . . . . . . . . . . . . . . . . . . . . . . . . . . . . . . . . . . . . . . . . . . . . . . . . . . . . . . . . . . . . . . . . . . . . . . . . . . . . . . . . . 29 Comments . . . . . . . . . . . . . . . . . . . . . . . . . . . . . . . . . . . . . . . . . . . . . . . . . . . . . . . . . . . . . . . . . . . . . . . . . . . . . . . . . . . . . . . . . . . . . . . . . . . . . . . . . . . . . . . . 29
-
Upload
khangminh22 -
Category
Documents
-
view
1 -
download
0
Transcript of Constructing a Medium Sized Biogas Plant ... - Instructables.com

http://www.instructables.com/id/Constructing-a-Medium-Sized-Biogas-Plant-Using-Kit/
Food Living Outside Play Technology Workshop
Constructing a Medium Sized Biogas Plant Using Kitchen Wasteby antoniraj on September 19, 2014
Table of Contents
Constructing a Medium Sized Biogas Plant Using Kitchen Waste . . . . . . . . . . . . . . . . . . . . . . . . . . . . . . . . . . . . . . . . . . . . . . . . . . . . . . . . . . . . . . . . . . . . . . . . . . 1
Intro: Constructing a Medium Sized Biogas Plant Using Kitchen Waste . . . . . . . . . . . . . . . . . . . . . . . . . . . . . . . . . . . . . . . . . . . . . . . . . . . . . . . . . . . . . . . . . . 2
Step 1: Selection of Tanks . . . . . . . . . . . . . . . . . . . . . . . . . . . . . . . . . . . . . . . . . . . . . . . . . . . . . . . . . . . . . . . . . . . . . . . . . . . . . . . . . . . . . . . . . . . . . . . . . . . . 2
Step 2: Other Materials Required . . . . . . . . . . . . . . . . . . . . . . . . . . . . . . . . . . . . . . . . . . . . . . . . . . . . . . . . . . . . . . . . . . . . . . . . . . . . . . . . . . . . . . . . . . . . . . . 3
Step 3: Adhesives Used . . . . . . . . . . . . . . . . . . . . . . . . . . . . . . . . . . . . . . . . . . . . . . . . . . . . . . . . . . . . . . . . . . . . . . . . . . . . . . . . . . . . . . . . . . . . . . . . . . . . . 5
Step 4: Tools Required . . . . . . . . . . . . . . . . . . . . . . . . . . . . . . . . . . . . . . . . . . . . . . . . . . . . . . . . . . . . . . . . . . . . . . . . . . . . . . . . . . . . . . . . . . . . . . . . . . . . . . 6
Step 5: Preparation of Gas Holder Tank . . . . . . . . . . . . . . . . . . . . . . . . . . . . . . . . . . . . . . . . . . . . . . . . . . . . . . . . . . . . . . . . . . . . . . . . . . . . . . . . . . . . . . . . . . 8
Step 6: Preparation of Digester Tank . . . . . . . . . . . . . . . . . . . . . . . . . . . . . . . . . . . . . . . . . . . . . . . . . . . . . . . . . . . . . . . . . . . . . . . . . . . . . . . . . . . . . . . . . . . . 9
Step 7: Fixing the Feed Pipe to the Digester Tank . . . . . . . . . . . . . . . . . . . . . . . . . . . . . . . . . . . . . . . . . . . . . . . . . . . . . . . . . . . . . . . . . . . . . . . . . . . . . . . . . . 11
Step 8: Fixing Slurry Outlet Pipe With The Digester Tank . . . . . . . . . . . . . . . . . . . . . . . . . . . . . . . . . . . . . . . . . . . . . . . . . . . . . . . . . . . . . . . . . . . . . . . . . . . . . 14
Step 9: Fixing The Guides Over Digester for the Movement of Gas Holder Tank . . . . . . . . . . . . . . . . . . . . . . . . . . . . . . . . . . . . . . . . . . . . . . . . . . . . . . . . . . . . 16
Step 10: Providing Guide Support on the Gas Holder Tank . . . . . . . . . . . . . . . . . . . . . . . . . . . . . . . . . . . . . . . . . . . . . . . . . . . . . . . . . . . . . . . . . . . . . . . . . . . 17
Step 11: Preparation of Gas Pipes . . . . . . . . . . . . . . . . . . . . . . . . . . . . . . . . . . . . . . . . . . . . . . . . . . . . . . . . . . . . . . . . . . . . . . . . . . . . . . . . . . . . . . . . . . . . . . 18
Step 12: Fixing Gas Outlet from the Gas Holder Tank . . . . . . . . . . . . . . . . . . . . . . . . . . . . . . . . . . . . . . . . . . . . . . . . . . . . . . . . . . . . . . . . . . . . . . . . . . . . . . . 20
Step 13: Placing Tank and Fixing Slurry Outlet Pipe . . . . . . . . . . . . . . . . . . . . . . . . . . . . . . . . . . . . . . . . . . . . . . . . . . . . . . . . . . . . . . . . . . . . . . . . . . . . . . . . . 22
Step 14: Fixing the Waste Feed Pipe . . . . . . . . . . . . . . . . . . . . . . . . . . . . . . . . . . . . . . . . . . . . . . . . . . . . . . . . . . . . . . . . . . . . . . . . . . . . . . . . . . . . . . . . . . . . 23
Step 15: Place the Gas Holder Tank and Finish . . . . . . . . . . . . . . . . . . . . . . . . . . . . . . . . . . . . . . . . . . . . . . . . . . . . . . . . . . . . . . . . . . . . . . . . . . . . . . . . . . . . 25
Step 16: Feeding the Biogas Plant for the First Time . . . . . . . . . . . . . . . . . . . . . . . . . . . . . . . . . . . . . . . . . . . . . . . . . . . . . . . . . . . . . . . . . . . . . . . . . . . . . . . . 25
Step 17: My Keynote Address On Biogas and Panchagavya . . . . . . . . . . . . . . . . . . . . . . . . . . . . . . . . . . . . . . . . . . . . . . . . . . . . . . . . . . . . . . . . . . . . . . . . . . 27
Related Instructables . . . . . . . . . . . . . . . . . . . . . . . . . . . . . . . . . . . . . . . . . . . . . . . . . . . . . . . . . . . . . . . . . . . . . . . . . . . . . . . . . . . . . . . . . . . . . . . . . . . . . . . . 29
Advertisements . . . . . . . . . . . . . . . . . . . . . . . . . . . . . . . . . . . . . . . . . . . . . . . . . . . . . . . . . . . . . . . . . . . . . . . . . . . . . . . . . . . . . . . . . . . . . . . . . . . . . . . . . . . . . . . 29
Comments . . . . . . . . . . . . . . . . . . . . . . . . . . . . . . . . . . . . . . . . . . . . . . . . . . . . . . . . . . . . . . . . . . . . . . . . . . . . . . . . . . . . . . . . . . . . . . . . . . . . . . . . . . . . . . . . 29
http://www.instructables.com/id/Constructing-a-Medium-Sized-Biogas-Plant-Using-Kit/
Author:antonirajI like to make things more simple with easily available resources. My favorite quote: A human being should be able to change a diaper, plan an invasion,butcher a hog, conn a ship, design a building, write a sonnet, balance accounts, build a wall, set a bone, comfort the dying, take orders, give orders,cooperate, act alone, solve equations, analyze a new problem, pitch manure, program a computer,cook a tasty meal, fight efficiently, and die gallantly.Specialization is for insects.! - Robert A. Heinlein
Intro: Constructing a Medium Sized Biogas Plant Using Kitchen WasteLong back I have posted an instructable on how to construct prototype of a Biogas plant, using 50 liter capacity tank as digester, which you can see here :http://www.instructables.com/id/Bio-gas-plant-usin...
That was my first instructable and people are still commenting and asking me for guidance on Biogas plants for home use and for demonstration at schools & colleges. Ihave replied and mailed guidelines to almost all of the queries and I hope that helped them in their quest for building their Biogas plant.
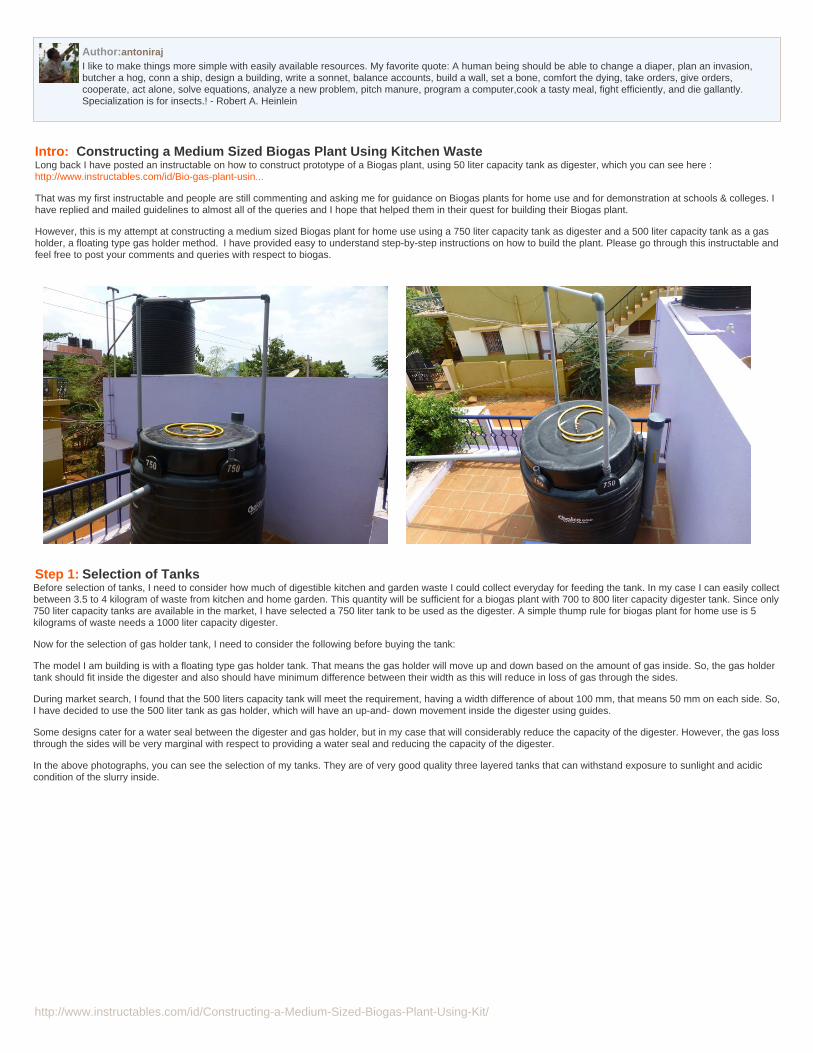
However, this is my attempt at constructing a medium sized Biogas plant for home use using a 750 liter capacity tank as digester and a 500 liter capacity tank as a gasholder, a floating type gas holder method. I have provided easy to understand step-by-step instructions on how to build the plant. Please go through this instructable andfeel free to post your comments and queries with respect to biogas.
Step 1: Selection of TanksBefore selection of tanks, I need to consider how much of digestible kitchen and garden waste I could collect everyday for feeding the tank. In my case I can easily collectbetween 3.5 to 4 kilogram of waste from kitchen and home garden. This quantity will be sufficient for a biogas plant with 700 to 800 liter capacity digester tank. Since only750 liter capacity tanks are available in the market, I have selected a 750 liter tank to be used as the digester. A simple thump rule for biogas plant for home use is 5kilograms of waste needs a 1000 liter capacity digester.
Now for the selection of gas holder tank, I need to consider the following before buying the tank:
The model I am building is with a floating type gas holder tank. That means the gas holder will move up and down based on the amount of gas inside. So, the gas holdertank should fit inside the digester and also should have minimum difference between their width as this will reduce in loss of gas through the sides.
During market search, I found that the 500 liters capacity tank will meet the requirement, having a width difference of about 100 mm, that means 50 mm on each side. So,I have decided to use the 500 liter tank as gas holder, which will have an up-and- down movement inside the digester using guides.
Some designs cater for a water seal between the digester and gas holder, but in my case that will considerably reduce the capacity of the digester. However, the gas lossthrough the sides will be very marginal with respect to providing a water seal and reducing the capacity of the digester.
In the above photographs, you can see the selection of my tanks. They are of very good quality three layered tanks that can withstand exposure to sunlight and acidiccondition of the slurry inside.
http://www.instructables.com/id/Constructing-a-Medium-Sized-Biogas-Plant-Using-Kit/
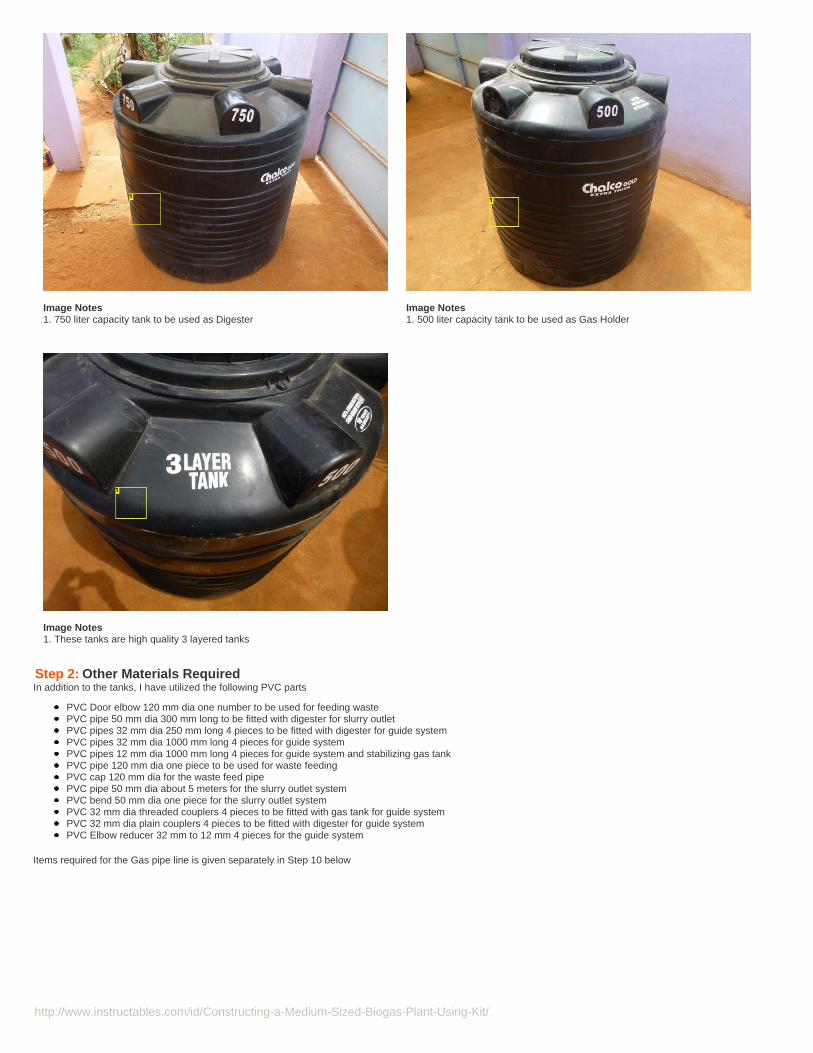
Image Notes1. 750 liter capacity tank to be used as Digester
Image Notes1. 500 liter capacity tank to be used as Gas Holder
Image Notes1. These tanks are high quality 3 layered tanks
Step 2: Other Materials RequiredIn addition to the tanks, I have utilized the following PVC parts
PVC Door elbow 120 mm dia one number to be used for feeding wastePVC pipe 50 mm dia 300 mm long to be fitted with digester for slurry outletPVC pipes 32 mm dia 250 mm long 4 pieces to be fitted with digester for guide systemPVC pipes 32 mm dia 1000 mm long 4 pieces for guide systemPVC pipes 12 mm dia 1000 mm long 4 pieces for guide system and stabilizing gas tankPVC pipe 120 mm dia one piece to be used for waste feedingPVC cap 120 mm dia for the waste feed pipePVC pipe 50 mm dia about 5 meters for the slurry outlet systemPVC bend 50 mm dia one piece for the slurry outlet systemPVC 32 mm dia threaded couplers 4 pieces to be fitted with gas tank for guide systemPVC 32 mm dia plain couplers 4 pieces to be fitted with digester for guide systemPVC Elbow reducer 32 mm to 12 mm 4 pieces for the guide system
Items required for the Gas pipe line is given separately in Step 10 below
http://www.instructables.com/id/Constructing-a-Medium-Sized-Biogas-Plant-Using-Kit/
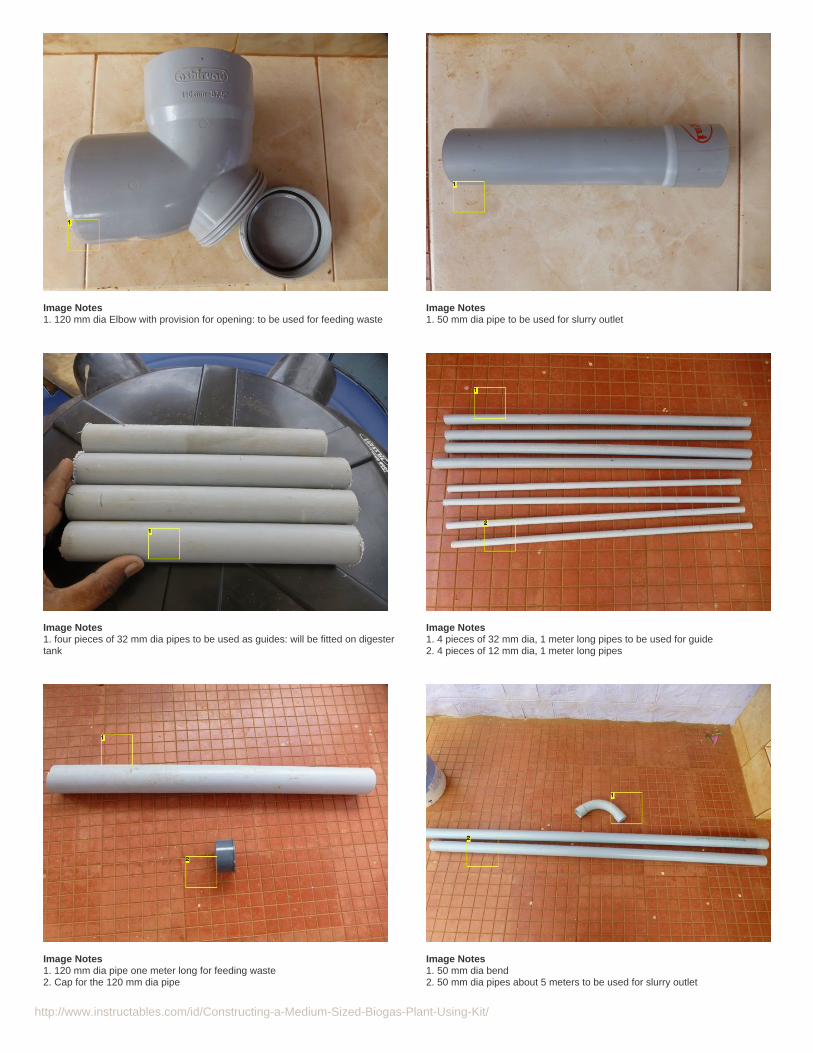
Image Notes1. 120 mm dia Elbow with provision for opening: to be used for feeding waste
Image Notes1. 50 mm dia pipe to be used for slurry outlet
Image Notes1. four pieces of 32 mm dia pipes to be used as guides: will be fitted on digestertank
Image Notes1. 4 pieces of 32 mm dia, 1 meter long pipes to be used for guide2. 4 pieces of 12 mm dia, 1 meter long pipes
Image Notes1. 120 mm dia pipe one meter long for feeding waste2. Cap for the 120 mm dia pipe
Image Notes1. 50 mm dia bend2. 50 mm dia pipes about 5 meters to be used for slurry outlet
http://www.instructables.com/id/Constructing-a-Medium-Sized-Biogas-Plant-Using-Kit/
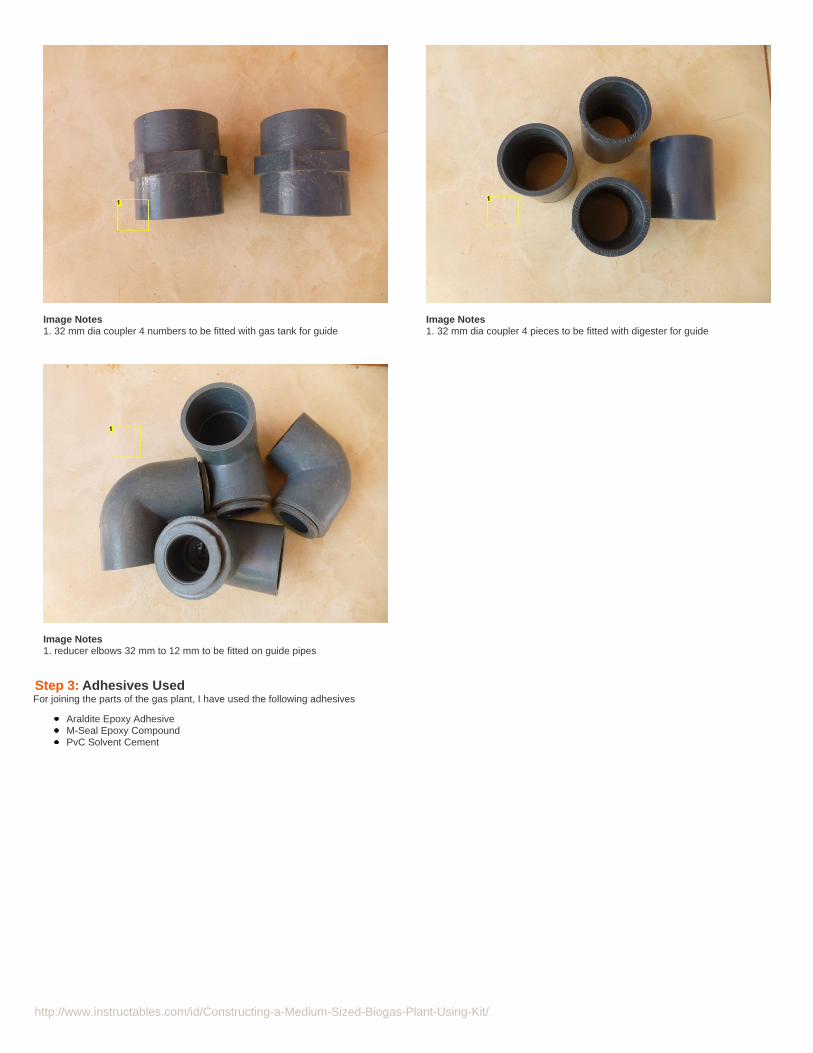
Image Notes1. 32 mm dia coupler 4 numbers to be fitted with gas tank for guide
Image Notes1. 32 mm dia coupler 4 pieces to be fitted with digester for guide
Image Notes1. reducer elbows 32 mm to 12 mm to be fitted on guide pipes
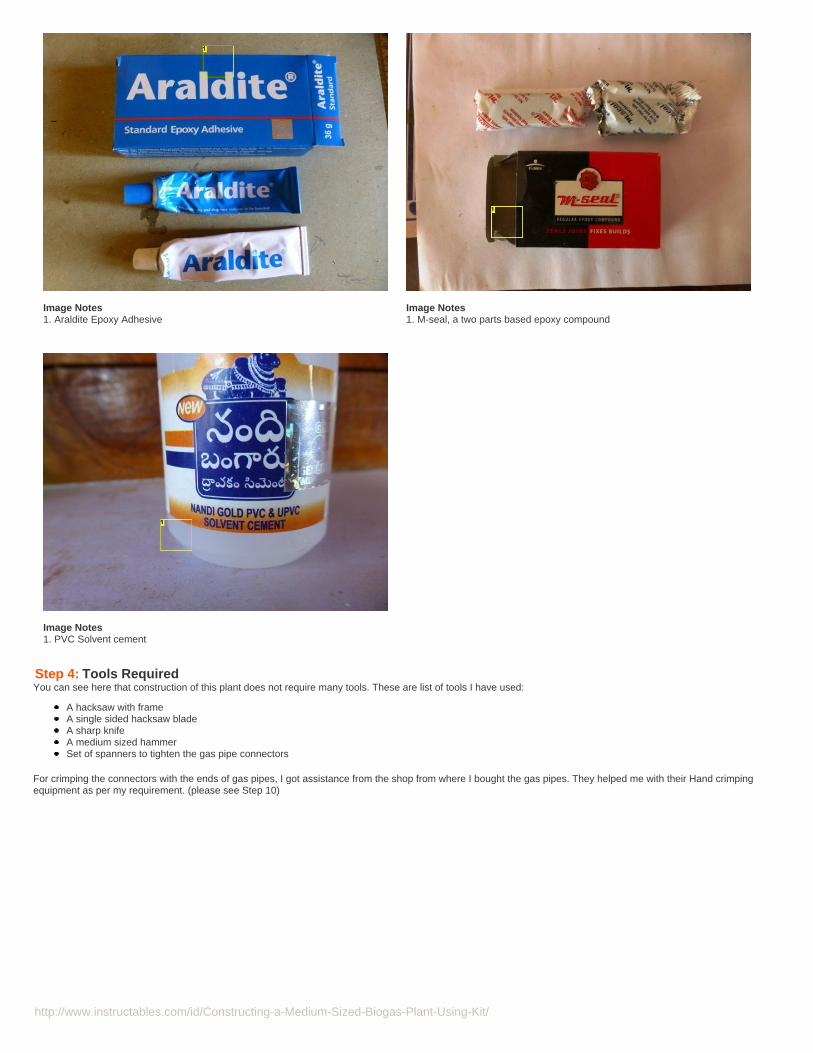
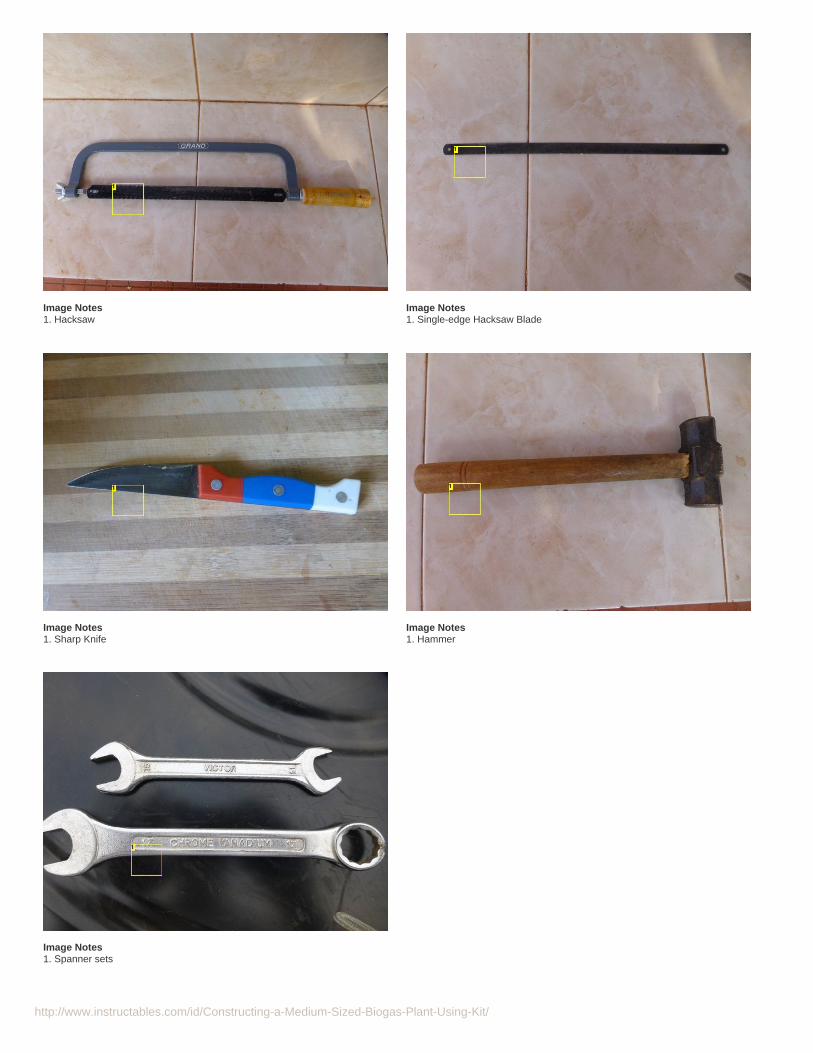
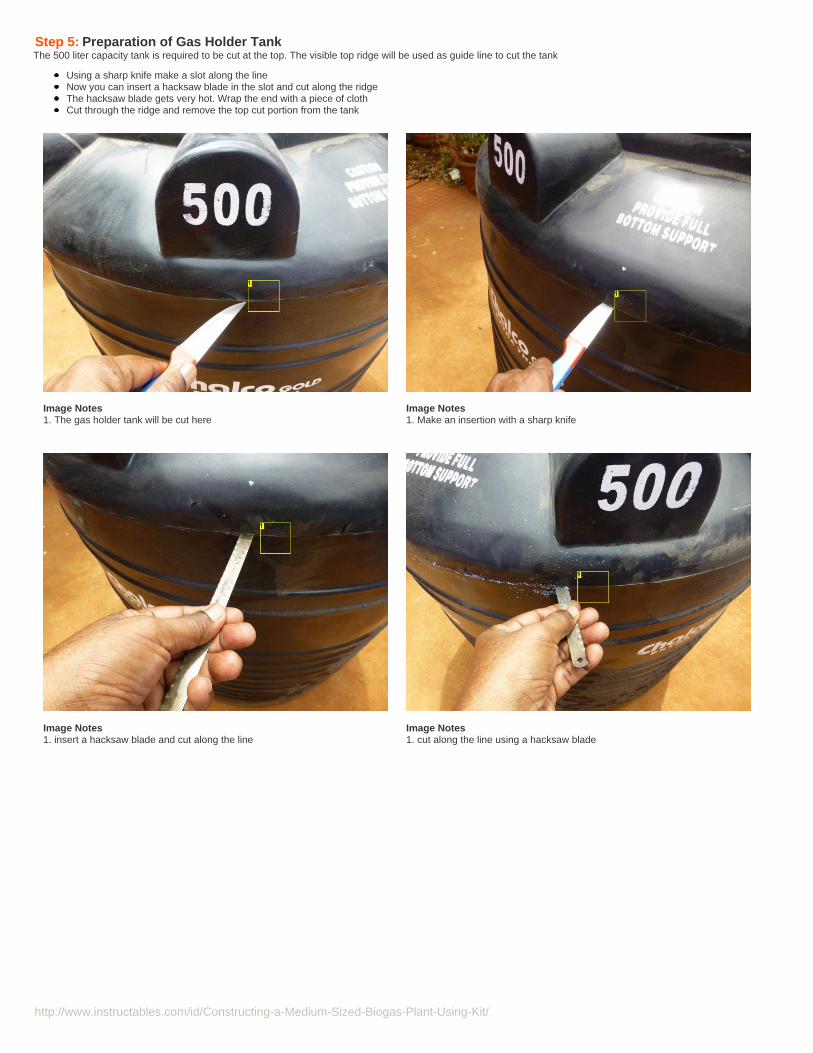
Step 3: Adhesives UsedFor joining the parts of the gas plant, I have used the following adhesives
Araldite Epoxy AdhesiveM-Seal Epoxy CompoundPvC Solvent Cement
http://www.instructables.com/id/Constructing-a-Medium-Sized-Biogas-Plant-Using-Kit/
Image Notes1. Araldite Epoxy Adhesive
Image Notes1. M-seal, a two parts based epoxy compound
Image Notes1. PVC Solvent cement
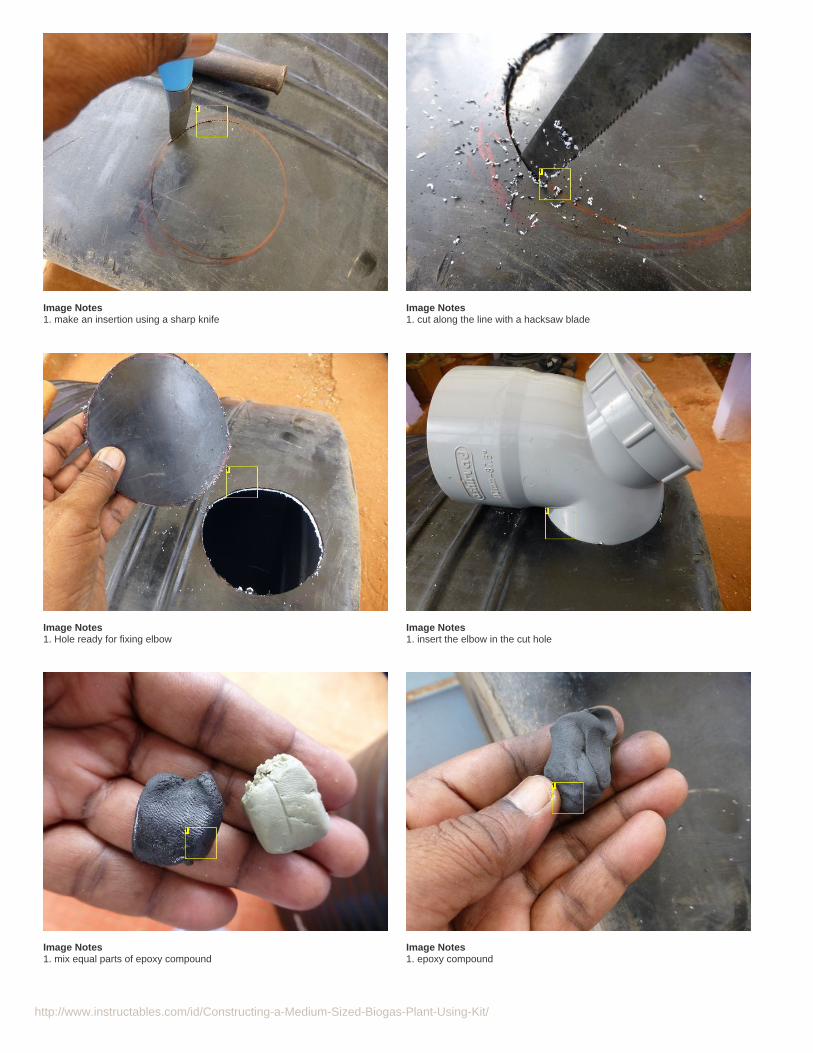
Step 4: Tools RequiredYou can see here that construction of this plant does not require many tools. These are list of tools I have used:
A hacksaw with frameA single sided hacksaw bladeA sharp knifeA medium sized hammerSet of spanners to tighten the gas pipe connectors
For crimping the connectors with the ends of gas pipes, I got assistance from the shop from where I bought the gas pipes. They helped me with their Hand crimpingequipment as per my requirement. (please see Step 10)
http://www.instructables.com/id/Constructing-a-Medium-Sized-Biogas-Plant-Using-Kit/
Image Notes1. Hacksaw
Image Notes1. Single-edge Hacksaw Blade
Image Notes1. Sharp Knife
Image Notes1. Hammer
Image Notes1. Spanner sets
http://www.instructables.com/id/Constructing-a-Medium-Sized-Biogas-Plant-Using-Kit/
Step 5: Preparation of Gas Holder TankThe 500 liter capacity tank is required to be cut at the top. The visible top ridge will be used as guide line to cut the tank
Using a sharp knife make a slot along the lineNow you can insert a hacksaw blade in the slot and cut along the ridgeThe hacksaw blade gets very hot. Wrap the end with a piece of clothCut through the ridge and remove the top cut portion from the tank
Image Notes1. The gas holder tank will be cut here
Image Notes1. Make an insertion with a sharp knife
Image Notes1. insert a hacksaw blade and cut along the line
Image Notes1. cut along the line using a hacksaw blade

http://www.instructables.com/id/Constructing-a-Medium-Sized-Biogas-Plant-Using-Kit/
Image Notes1. wrap the hacksaw blade in a piece of cloth as it gets very hot
Image Notes1. Top portion of the 500 liter tank removed
Image Notes1. To be used as Gas holder tank
Step 6: Preparation of Digester TankThe top portion of the digester tank also needs to be cut and removed. However, the width of cutting should be just enough for the free movement of gas tank
Place the removed top portion of gas holder on top of digester tankLeave about 20 mm on all sides and mark the guide line for cuttingUsing a hacksaw, cut slots on top of projected portion of digester tankNow use a hacksaw blade to cut along the guide line and remove the topFinish the cut edges with sand paper

http://www.instructables.com/id/Constructing-a-Medium-Sized-Biogas-Plant-Using-Kit/
Image Notes1. place the cut top portion of 500 liter tank over the 750 liter tank
Image Notes1. Approximately mark the line for cutting the 750 liter tank
Image Notes1. cut on top of projected portions of 750 liter tank
Image Notes1. use a hacksaw blade to cut all around the 750 liter tank
Image Notes1. wrap a piece of cloth over the hacksaw blade as it gets very hot
Image Notes1. Top portion of 750 liter tank removed. This will be used as Digester tank

http://www.instructables.com/id/Constructing-a-Medium-Sized-Biogas-Plant-Using-Kit/
Image Notes1. clean the cut edges using a piece of sand paper
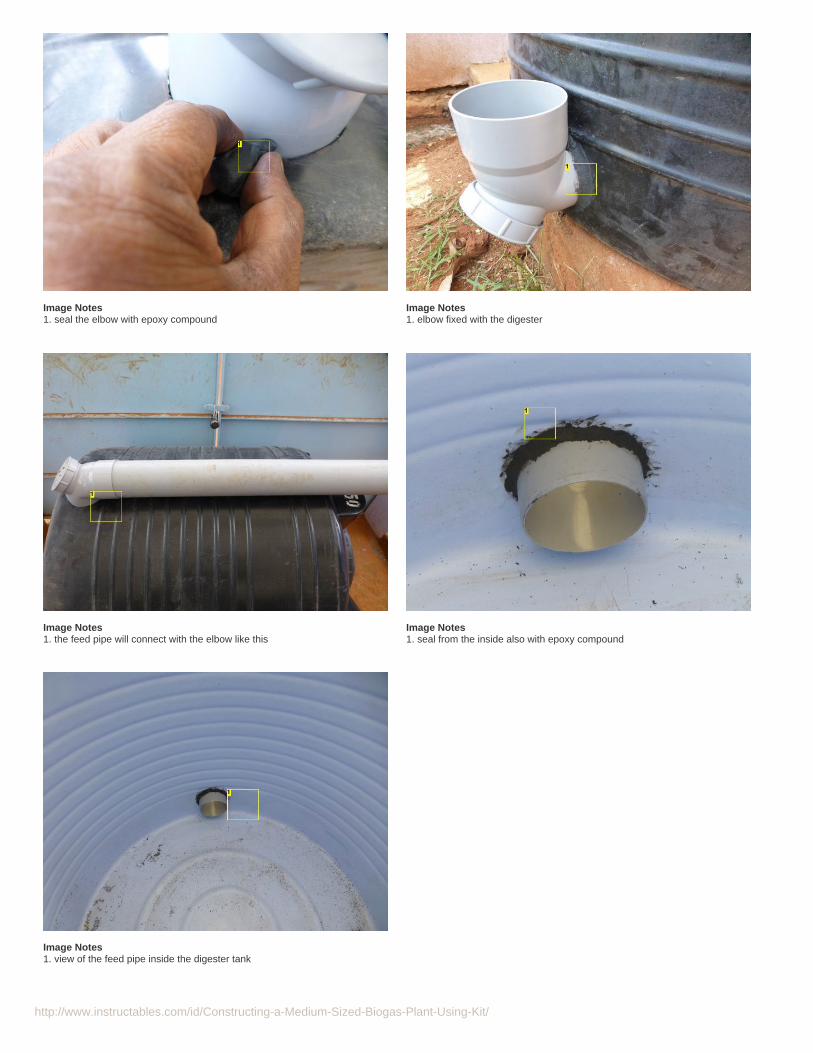
Step 7: Fixing the Feed Pipe to the Digester TankThe 120 mm dia door elbow need to be fixed at the bottom of the digester tank
Place the elbow and mark the cutting linemake a slot along the line with a sharp knifeInsert the hacksaw blade in the slot and cut along the guide lineInsert the Elbow in placeSeal with M-seal epoxy compound on both outer and inner sides of the tank
Image Notes1. 100 mm dia elbow to be used for feeding the digester
Image Notes1. mark the outline to be cut
http://www.instructables.com/id/Constructing-a-Medium-Sized-Biogas-Plant-Using-Kit/
Image Notes1. make an insertion using a sharp knife
Image Notes1. cut along the line with a hacksaw blade
Image Notes1. Hole ready for fixing elbow
Image Notes1. insert the elbow in the cut hole
Image Notes1. mix equal parts of epoxy compound
Image Notes1. epoxy compound
http://www.instructables.com/id/Constructing-a-Medium-Sized-Biogas-Plant-Using-Kit/
Image Notes1. seal the elbow with epoxy compound
Image Notes1. elbow fixed with the digester
Image Notes1. the feed pipe will connect with the elbow like this
Image Notes1. seal from the inside also with epoxy compound
Image Notes1. view of the feed pipe inside the digester tank
http://www.instructables.com/id/Constructing-a-Medium-Sized-Biogas-Plant-Using-Kit/
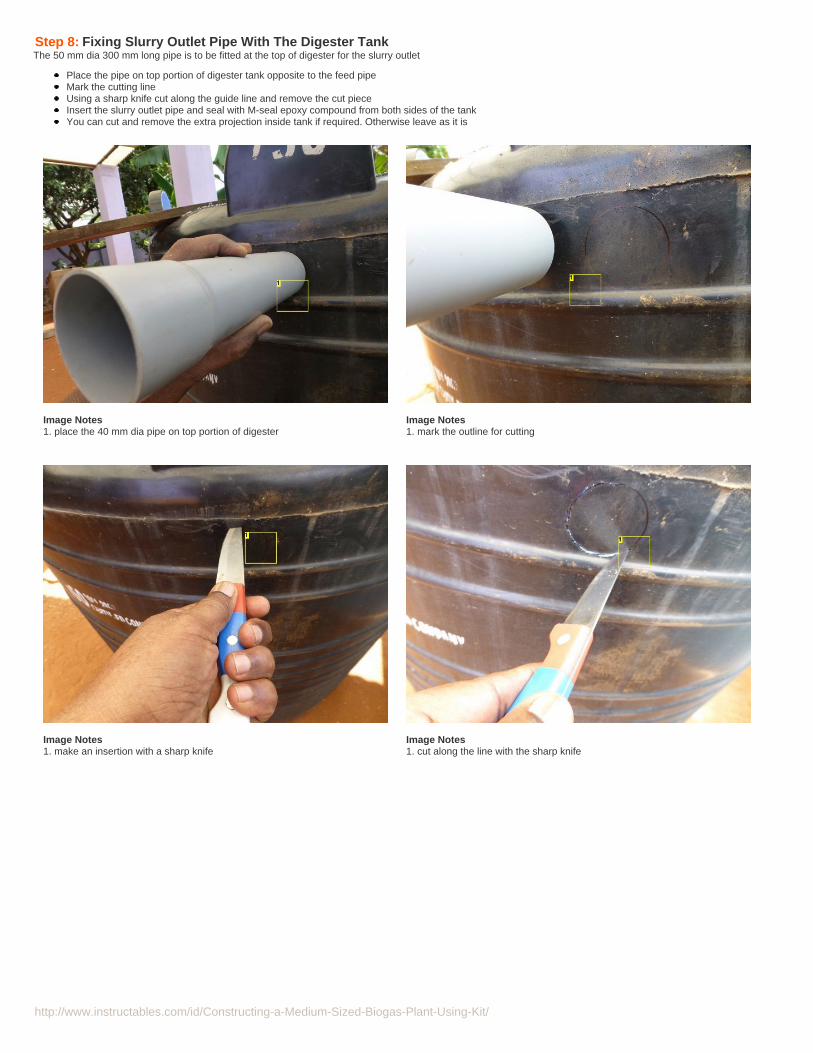
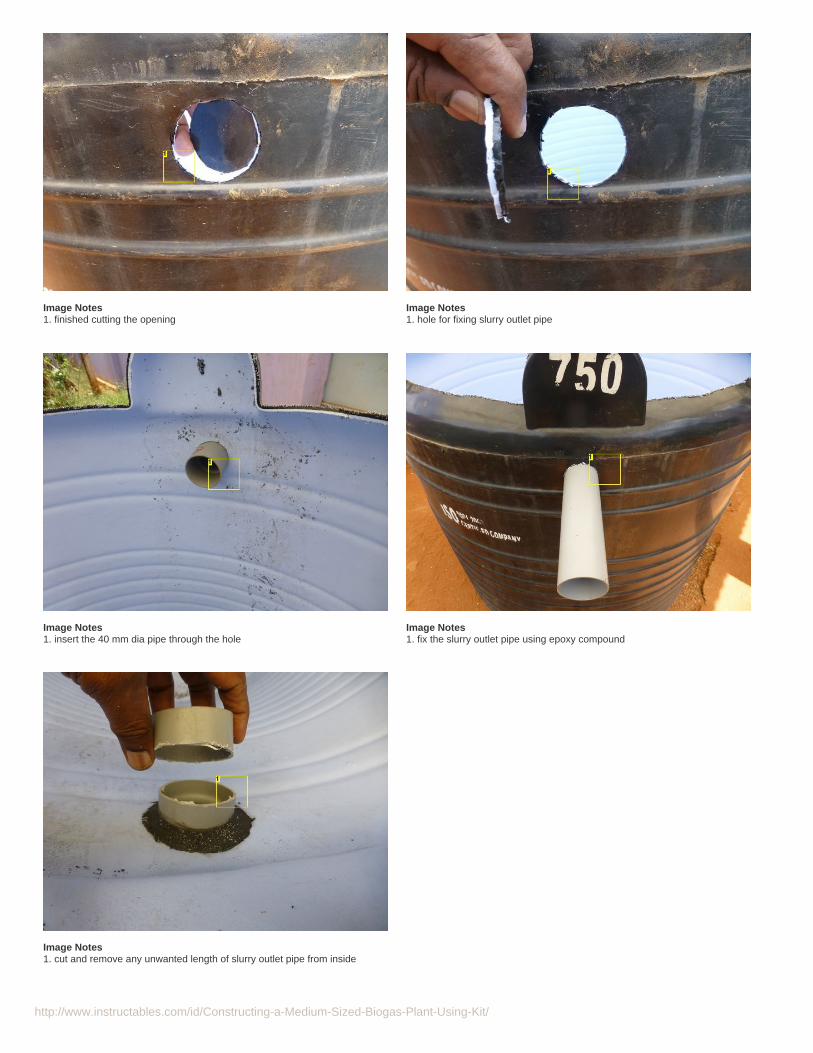
Step 8: Fixing Slurry Outlet Pipe With The Digester TankThe 50 mm dia 300 mm long pipe is to be fitted at the top of digester for the slurry outlet
Place the pipe on top portion of digester tank opposite to the feed pipeMark the cutting lineUsing a sharp knife cut along the guide line and remove the cut pieceInsert the slurry outlet pipe and seal with M-seal epoxy compound from both sides of the tankYou can cut and remove the extra projection inside tank if required. Otherwise leave as it is
Image Notes1. place the 40 mm dia pipe on top portion of digester
Image Notes1. mark the outline for cutting
Image Notes1. make an insertion with a sharp knife
Image Notes1. cut along the line with the sharp knife
http://www.instructables.com/id/Constructing-a-Medium-Sized-Biogas-Plant-Using-Kit/
Image Notes1. finished cutting the opening
Image Notes1. hole for fixing slurry outlet pipe
Image Notes1. insert the 40 mm dia pipe through the hole
Image Notes1. fix the slurry outlet pipe using epoxy compound
Image Notes1. cut and remove any unwanted length of slurry outlet pipe from inside

http://www.instructables.com/id/Constructing-a-Medium-Sized-Biogas-Plant-Using-Kit/
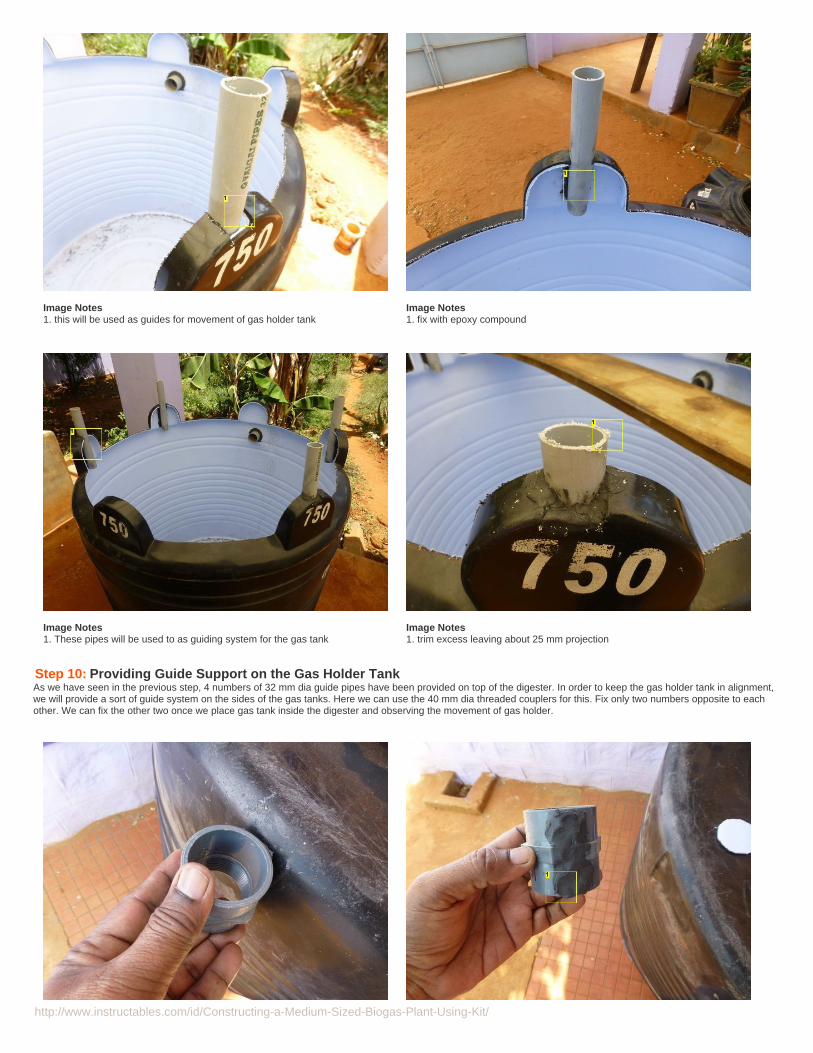
Step 9: Fixing The Guides Over Digester for the Movement of Gas Holder TankSome sort of guides are to be provided for the easy up-and-down movement of gas holder tank. We will use the 250 mm long 32 mm dia pipes for this.There are sixprojected portions on top of the digester. The slurry outlet pipe and waste input pipe are in alignment with two them opposite to each other. Leaving these two we will fix32 mm pipes on other four projections. These pipes will be extended after placing the gas holder tank.
Place the 32 mm dia pipe on top of projections and make a markUsing a hacksaw cut and removea square portion of the marked area.Insert 32 mm dia pipes on all these cut portions and fix with M-seal epoxy compoundAfter the compound is cured cut and remove excess leaving about 25 mm projection
Image Notes1. mark the outline of 32 mm dia pipe on top of extended portion
Image Notes1. A slot to be made here
Image Notes1. cut with a hacksaw
Image Notes1. place the 32 mm dia pipe
http://www.instructables.com/id/Constructing-a-Medium-Sized-Biogas-Plant-Using-Kit/
Image Notes1. this will be used as guides for movement of gas holder tank
Image Notes1. fix with epoxy compound
Image Notes1. These pipes will be used to as guiding system for the gas tank
Image Notes1. trim excess leaving about 25 mm projection
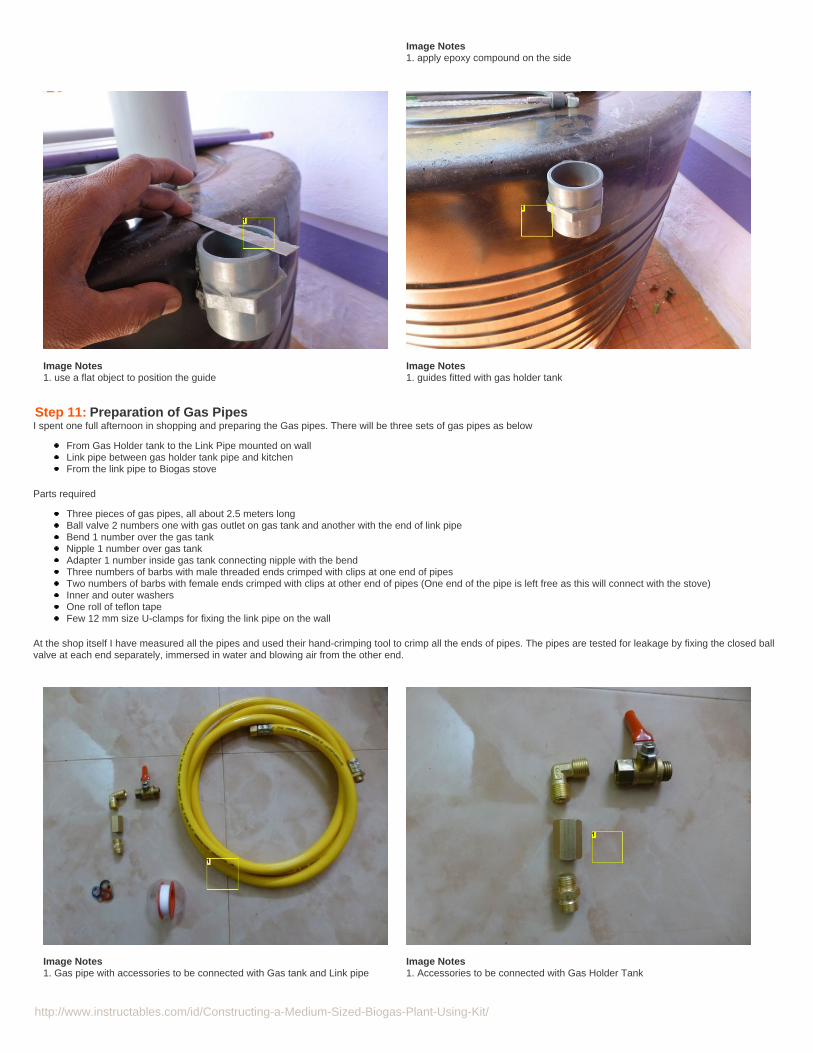
Step 10: Providing Guide Support on the Gas Holder TankAs we have seen in the previous step, 4 numbers of 32 mm dia guide pipes have been provided on top of the digester. In order to keep the gas holder tank in alignment,we will provide a sort of guide system on the sides of the gas tanks. Here we can use the 40 mm dia threaded couplers for this. Fix only two numbers opposite to eachother. We can fix the other two once we place gas tank inside the digester and observing the movement of gas holder.
http://www.instructables.com/id/Constructing-a-Medium-Sized-Biogas-Plant-Using-Kit/
Image Notes1. apply epoxy compound on the side
Image Notes1. use a flat object to position the guide
Image Notes1. guides fitted with gas holder tank
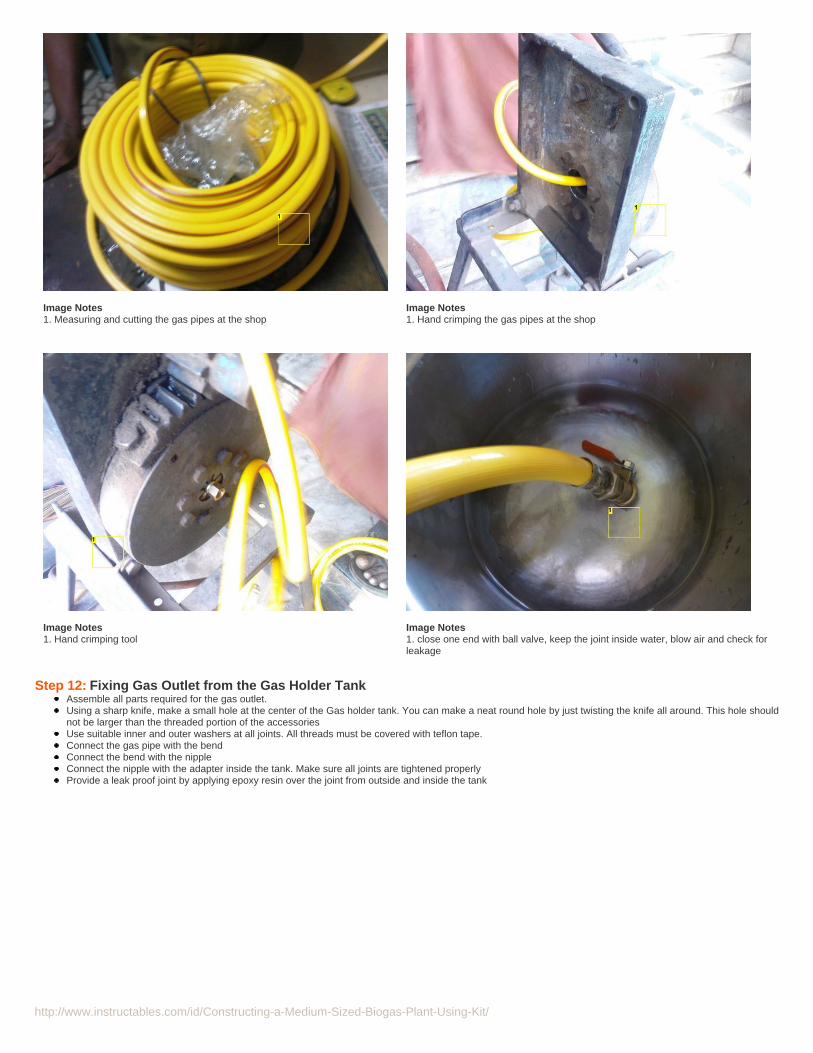
Step 11: Preparation of Gas PipesI spent one full afternoon in shopping and preparing the Gas pipes. There will be three sets of gas pipes as below
From Gas Holder tank to the Link Pipe mounted on wallLink pipe between gas holder tank pipe and kitchenFrom the link pipe to Biogas stove
Parts required
Three pieces of gas pipes, all about 2.5 meters longBall valve 2 numbers one with gas outlet on gas tank and another with the end of link pipeBend 1 number over the gas tankNipple 1 number over gas tankAdapter 1 number inside gas tank connecting nipple with the bendThree numbers of barbs with male threaded ends crimped with clips at one end of pipesTwo numbers of barbs with female ends crimped with clips at other end of pipes (One end of the pipe is left free as this will connect with the stove)Inner and outer washersOne roll of teflon tapeFew 12 mm size U-clamps for fixing the link pipe on the wall
At the shop itself I have measured all the pipes and used their hand-crimping tool to crimp all the ends of pipes. The pipes are tested for leakage by fixing the closed ballvalve at each end separately, immersed in water and blowing air from the other end.
Image Notes1. Gas pipe with accessories to be connected with Gas tank and Link pipe
Image Notes1. Accessories to be connected with Gas Holder Tank

http://www.instructables.com/id/Constructing-a-Medium-Sized-Biogas-Plant-Using-Kit/
Image Notes1. Link pipe, both ends crimped with a ball valve
Image Notes1. Gas pipe to be used from link pipe to Stove
Image Notes1. All three sets of gas pipes with accessories
Image Notes1. inner and outer washers for the gas pipe connection
Image Notes1. A roll of teflon tape
Image Notes1. Clamps for fixing gas pipe on the wall
http://www.instructables.com/id/Constructing-a-Medium-Sized-Biogas-Plant-Using-Kit/
Image Notes1. Measuring and cutting the gas pipes at the shop
Image Notes1. Hand crimping the gas pipes at the shop
Image Notes1. Hand crimping tool
Image Notes1. close one end with ball valve, keep the joint inside water, blow air and check forleakage
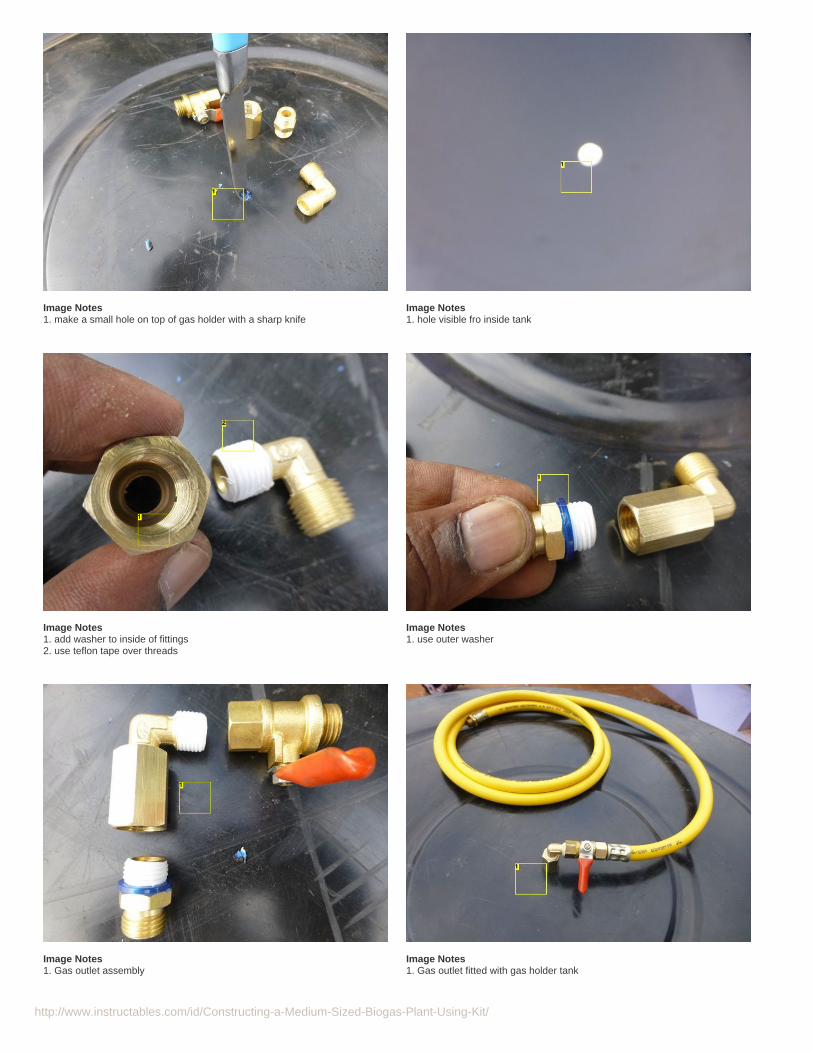
Step 12: Fixing Gas Outlet from the Gas Holder TankAssemble all parts required for the gas outlet.Using a sharp knife, make a small hole at the center of the Gas holder tank. You can make a neat round hole by just twisting the knife all around. This hole shouldnot be larger than the threaded portion of the accessoriesUse suitable inner and outer washers at all joints. All threads must be covered with teflon tape.Connect the gas pipe with the bendConnect the bend with the nippleConnect the nipple with the adapter inside the tank. Make sure all joints are tightened properlyProvide a leak proof joint by applying epoxy resin over the joint from outside and inside the tank
http://www.instructables.com/id/Constructing-a-Medium-Sized-Biogas-Plant-Using-Kit/
Image Notes1. make a small hole on top of gas holder with a sharp knife
Image Notes1. hole visible fro inside tank
Image Notes1. add washer to inside of fittings2. use teflon tape over threads
Image Notes1. use outer washer
Image Notes1. Gas outlet assembly
Image Notes1. Gas outlet fitted with gas holder tank
http://www.instructables.com/id/Constructing-a-Medium-Sized-Biogas-Plant-Using-Kit/
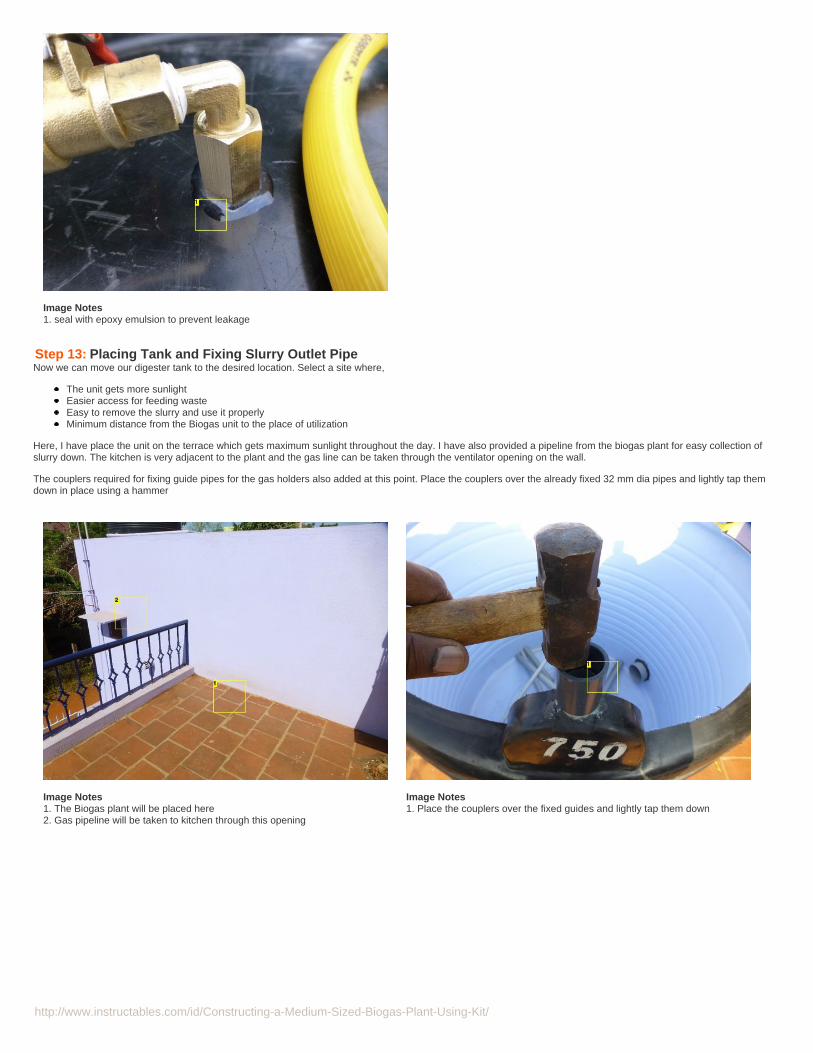
Image Notes1. seal with epoxy emulsion to prevent leakage
Step 13: Placing Tank and Fixing Slurry Outlet PipeNow we can move our digester tank to the desired location. Select a site where,
The unit gets more sunlightEasier access for feeding wasteEasy to remove the slurry and use it properlyMinimum distance from the Biogas unit to the place of utilization
Here, I have place the unit on the terrace which gets maximum sunlight throughout the day. I have also provided a pipeline from the biogas plant for easy collection ofslurry down. The kitchen is very adjacent to the plant and the gas line can be taken through the ventilator opening on the wall.
The couplers required for fixing guide pipes for the gas holders also added at this point. Place the couplers over the already fixed 32 mm dia pipes and lightly tap themdown in place using a hammer
Image Notes1. The Biogas plant will be placed here2. Gas pipeline will be taken to kitchen through this opening
Image Notes1. Place the couplers over the fixed guides and lightly tap them down

http://www.instructables.com/id/Constructing-a-Medium-Sized-Biogas-Plant-Using-Kit/
Image Notes1. Digester tank ready for the Gas holder tank2. 32 mm couplers added on all four guide points
Image Notes1. Place the tank in position2. Attach the slurry outlet pipe line
Image Notes1. The slurry can be collected down and used in the home garden
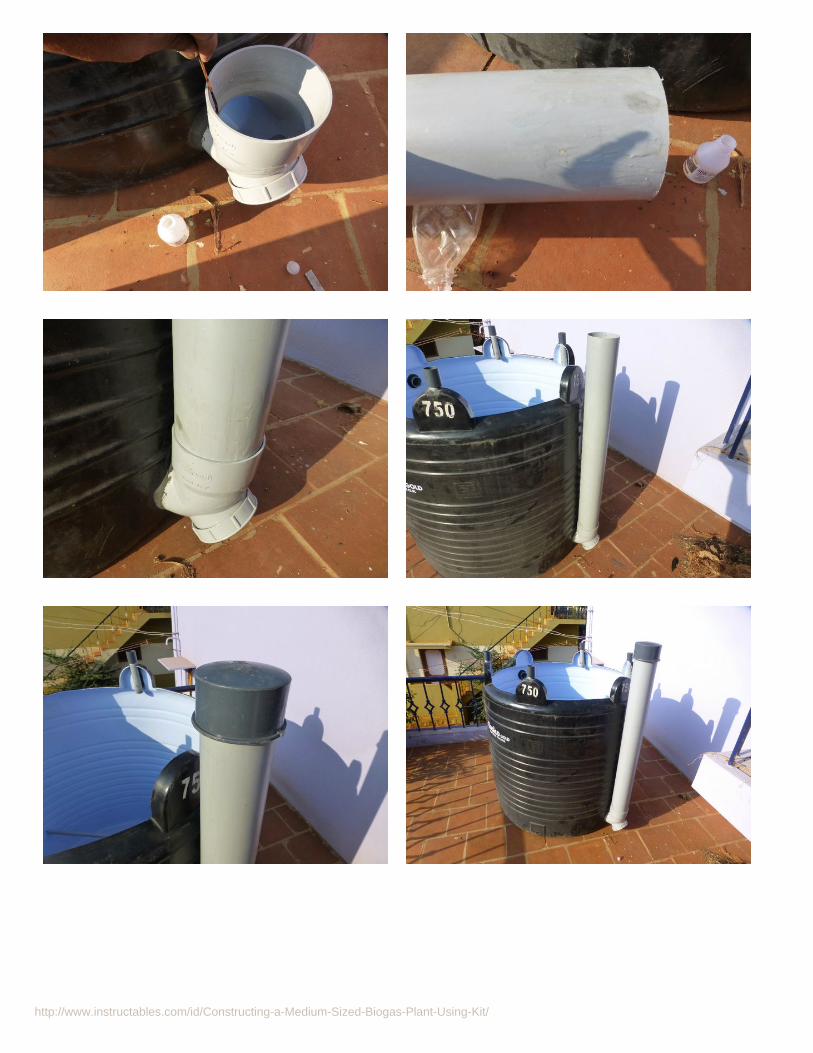
Step 14: Fixing the Waste Feed PipeClean the inner surface of door elbow and bottom outer surface 120 mm dia waste feed pipeApply PVC solvent cement over both the cleaned surfacesJoin them together immediately before the solvent cement dries outPlace the cap on top of the feed pipe
http://www.instructables.com/id/Constructing-a-Medium-Sized-Biogas-Plant-Using-Kit/
http://www.instructables.com/id/Constructing-a-Medium-Sized-Biogas-Plant-Using-Kit/
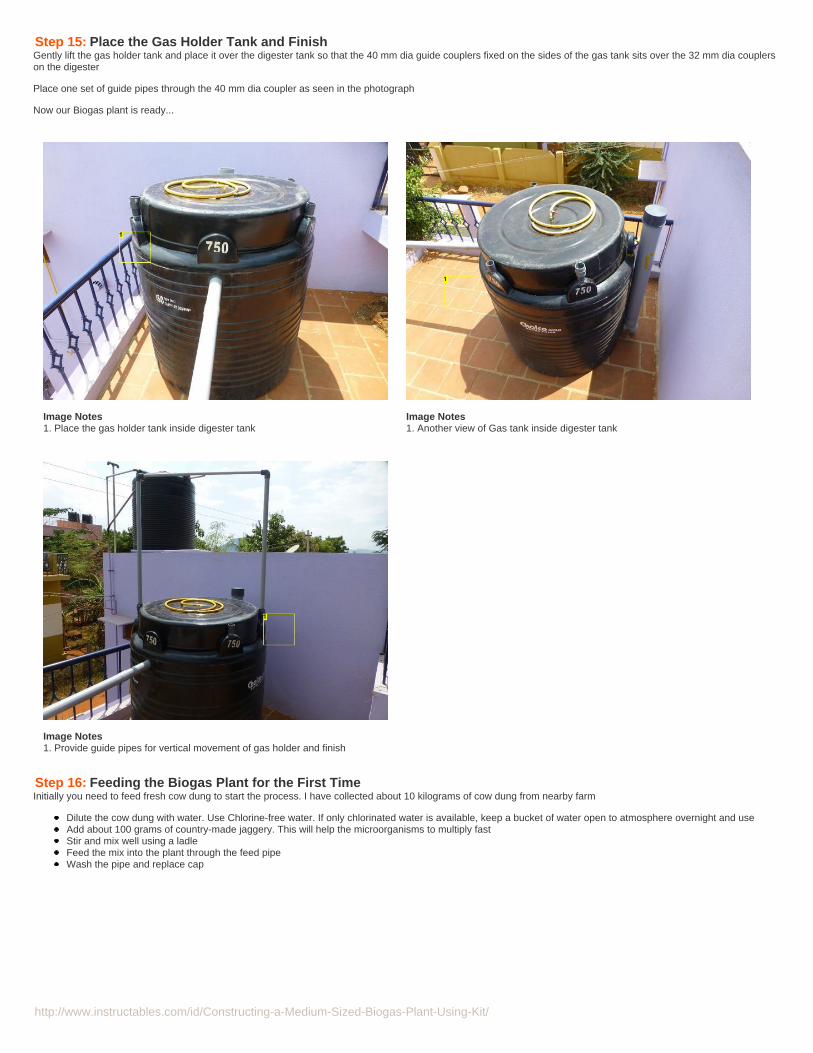
Step 15: Place the Gas Holder Tank and FinishGently lift the gas holder tank and place it over the digester tank so that the 40 mm dia guide couplers fixed on the sides of the gas tank sits over the 32 mm dia couplerson the digester
Place one set of guide pipes through the 40 mm dia coupler as seen in the photograph
Now our Biogas plant is ready...
Image Notes1. Place the gas holder tank inside digester tank
Image Notes1. Another view of Gas tank inside digester tank
Image Notes1. Provide guide pipes for vertical movement of gas holder and finish
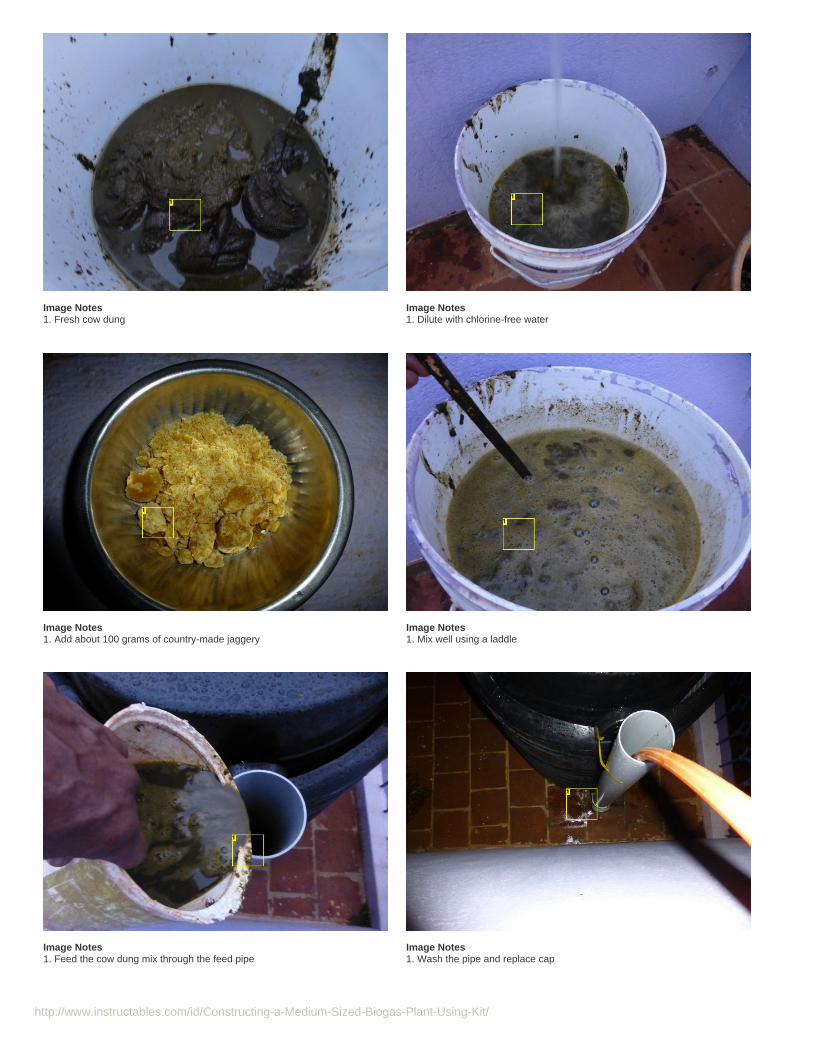
Step 16: Feeding the Biogas Plant for the First TimeInitially you need to feed fresh cow dung to start the process. I have collected about 10 kilograms of cow dung from nearby farm
Dilute the cow dung with water. Use Chlorine-free water. If only chlorinated water is available, keep a bucket of water open to atmosphere overnight and useAdd about 100 grams of country-made jaggery. This will help the microorganisms to multiply fastStir and mix well using a ladleFeed the mix into the plant through the feed pipeWash the pipe and replace cap
http://www.instructables.com/id/Constructing-a-Medium-Sized-Biogas-Plant-Using-Kit/
Image Notes1. Fresh cow dung
Image Notes1. Dilute with chlorine-free water
Image Notes1. Add about 100 grams of country-made jaggery
Image Notes1. Mix well using a laddle
Image Notes1. Feed the cow dung mix through the feed pipe
Image Notes1. Wash the pipe and replace cap
http://www.instructables.com/id/Constructing-a-Medium-Sized-Biogas-Plant-Using-Kit/
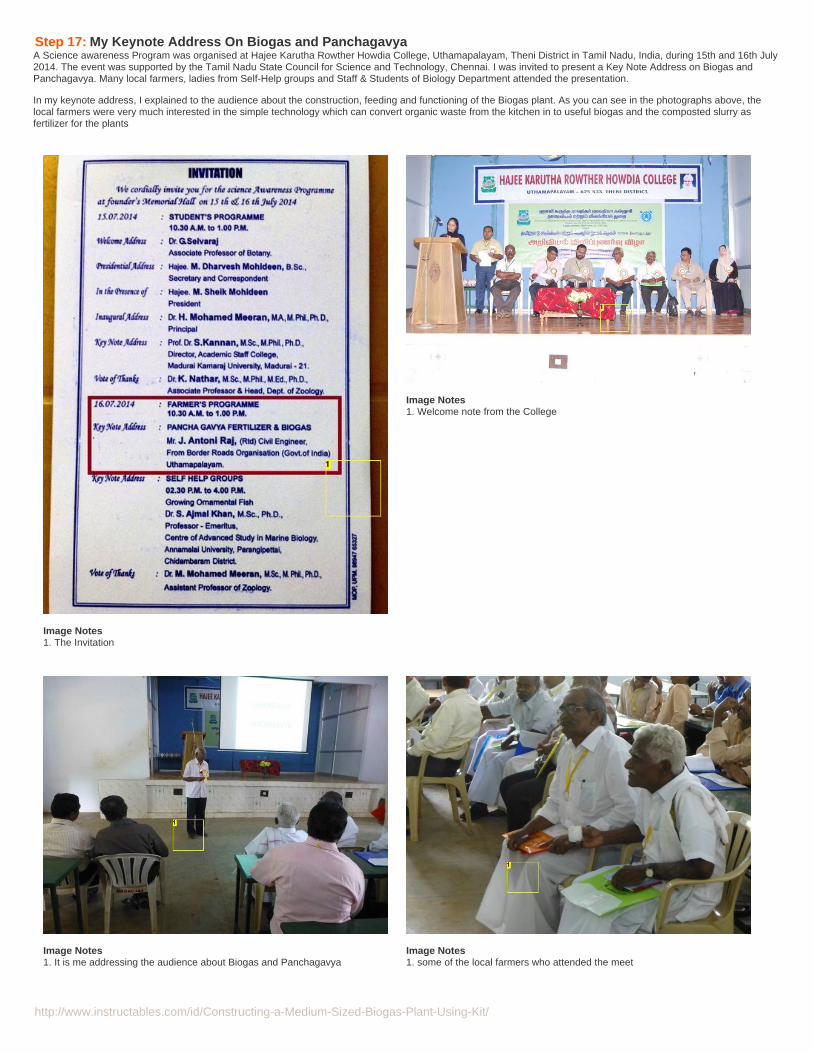
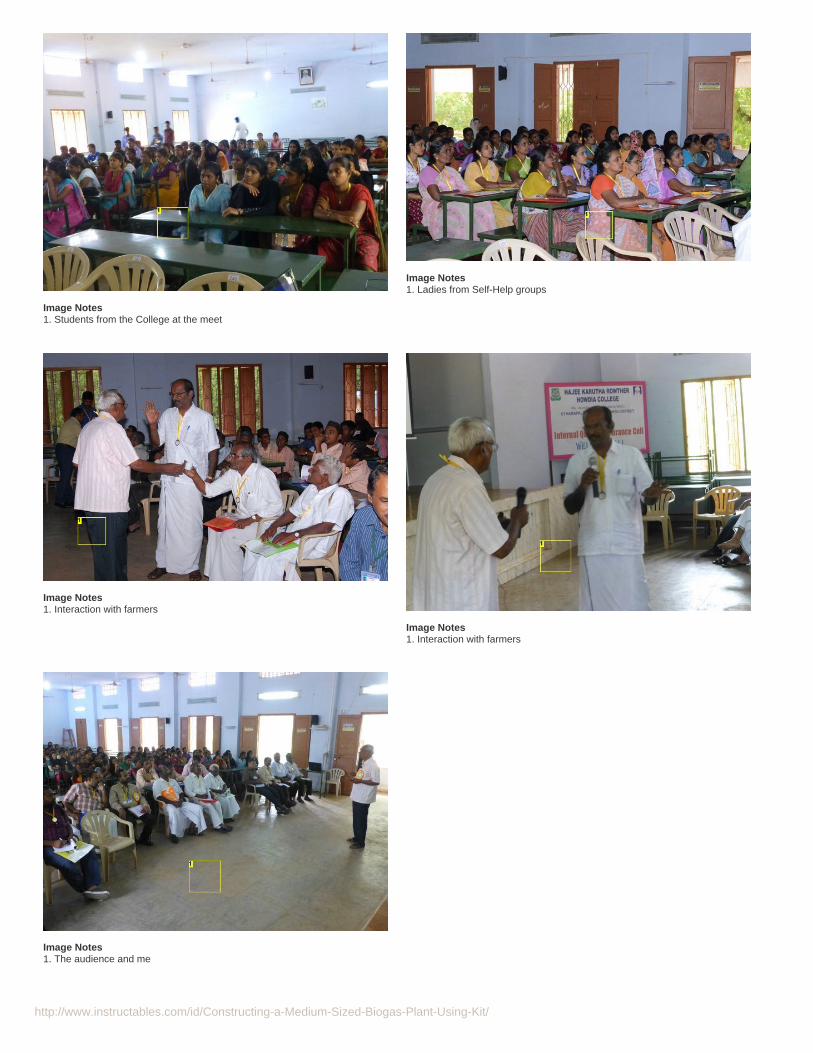
Step 17: My Keynote Address On Biogas and PanchagavyaA Science awareness Program was organised at Hajee Karutha Rowther Howdia College, Uthamapalayam, Theni District in Tamil Nadu, India, during 15th and 16th July2014. The event was supported by the Tamil Nadu State Council for Science and Technology, Chennai. I was invited to present a Key Note Address on Biogas andPanchagavya. Many local farmers, ladies from Self-Help groups and Staff & Students of Biology Department attended the presentation.
In my keynote address, I explained to the audience about the construction, feeding and functioning of the Biogas plant. As you can see in the photographs above, thelocal farmers were very much interested in the simple technology which can convert organic waste from the kitchen in to useful biogas and the composted slurry asfertilizer for the plants
Image Notes1. The Invitation
Image Notes1. Welcome note from the College
Image Notes1. It is me addressing the audience about Biogas and Panchagavya
Image Notes1. some of the local farmers who attended the meet
http://www.instructables.com/id/Constructing-a-Medium-Sized-Biogas-Plant-Using-Kit/
Image Notes1. Students from the College at the meet
Image Notes1. Ladies from Self-Help groups
Image Notes1. Interaction with farmers
Image Notes1. Interaction with farmers
Image Notes1. The audience and me
http://www.instructables.com/id/Constructing-a-Medium-Sized-Biogas-Plant-Using-Kit/
Related Instructables
Mini Bio-gasplant using foodwaste,decomposableorganic materialand kitchenwaste byantoniraj
Turning WasteInto CheapEnergy (TWICE)(video) byearth1st
Biogas at home-Cheap and Easyby ChitlangeSahas
by TecwynTwmffat
Living aGreener MoreEnergy EfficientLife bytashiandmo
HackerspaceEarthship(HAESH):HomemadeEnvironmentalControl LifeSupport System(E.C.L.S.S.) byhaeshproject
Advertisements
Comments
4 comments Add Comment
carlos66ba says: Sep 22, 2014. 7:48 AM REPLYThis is very nice, thank you! A couple of questions:
1) What do you feed the digester? What type of materials work best and how often you have to feed it?
2) How much gas does it produce?
3) Have you monitored the pressure inside the container also?
antoniraj says: Sep 22, 2014. 8:12 AM REPLYthank you very much...
Regarding your questions, I will be adding more steps to this instructable shortly, once gas formation starts in the tank. today only I added cow dungslurry to the digester. kindly bear with me for a few days
Tater Zoid says: Sep 22, 2014. 5:42 AM REPLYThis is awesome.
antoniraj says: Sep 22, 2014. 7:16 AM REPLYthank you...