eB Information Manager - Bentley Communities
248
eB Information Manager SELECTseries 4 Implementation Guide D006573 Last Updated: December 19, 2013
-
Upload
khangminh22 -
Category
Documents
-
view
0 -
download
0
Transcript of eB Information Manager - Bentley Communities

eB Information ManagerSELECTseries 4
Implementation Guide
D006573Last Updated: December 19, 2013


Notices
TrademarkBentley and the “B” Bentley logo are either registered or unregistered trademarks or service marks ofBentley Systems, Incorporated, or one of its direct or indirect wholly-owned subsidiaries.Other brands and product names are trademarks of their respective owners.
CopyrightCopyright © 2013 Bentley Systems, Incorporated.eB, Copyright © 2013 Bentley Systems, Incorporated.All Rights Reserved.Including software, file formats, and audiovisual displays; may only be used pursuant to applicablesoftware license agreement; contains confidential and proprietary information of Bentley Systems,Incorporated and/or third parties which is protected by copyright and trade secret law and may not beprovided or otherwise made available without proper authorization.
Restricted Rights LegendIf this software is acquired for or on behalf of the United States of America, its agencies and/orinstrumentalities (“U.S. Government”), it is provided with restricted rights. This software andaccompanying documentation are “commercial computer software” and “commercial computersoftware documentation”, respectively, pursuant to 48 C.F.R. 12.212 and 227.7202, and “restrictedcomputer software” pursuant to 48 C.F.R. 52.227-19(a), as applicable. Use, modification, reproduction,release, performance, display or disclosure of this software and accompanying documentation by theU.S. Government are subject to restrictions as set forth in this Agreement and pursuant to 48 C.F.R.12.212, 52.227-19, 227.7202, and 1852.227-86, as applicable.Contractor/Manufacturer is Bentley Systems, Incorporated, 685 Stockton Drive, Exton, PA 19341-0678.Unpublished - rights reserved under the Copyright Laws of the United States and International treaties.
eB Information Manager 3 Implementation Guide

NoticesRestricted Rights Legend
This page intentionally left blank
eB Information Manager 4 Implementation Guide
Table of Contents
Chapter 1: eB Installation Worksheet ................................................................................... 9
Chapter 2: Database Creation and Setup ............................................................................13Supported Databases ..............................................................................................................................................................................13Setting Up SQL Server for eB ...............................................................................................................................................................13
Creating a New SQL Server Database for eB ..................................................................................................................14Create a Login ID for the Database .................................................................................................................................... 14Enable Remote Connections (if required) ...................................................................................................................... 15
Setting Up Oracle for eB ........................................................................................................................................................................ 16The Oracle Database Server ..................................................................................................................................................16The Oracle Client ........................................................................................................................................................................17Oracle User Permissions .........................................................................................................................................................18Configuring Oracle Full Text Retrieval ............................................................................................................................19
Chapter 3: eB Core Server Configuration ............................................................................ 23Before You Install or Upgrade eB Core Server ............................................................................................................................ 23To Install eB Core Server ...................................................................................................................................................................... 25Activating Your Product ........................................................................................................................................................................29
Using the Product Activation Wizard ............................................................................................................................... 29Setting Up a Community and Configuring eB Services ............................................................................................................ 31
To Create a Datasource ........................................................................................................................................................... 32To Create a Community ......................................................................................................................................................... 36To Create a Storage Device ...................................................................................................................................................38To Create a Repository ...........................................................................................................................................................41To Create a Document Class in eB Director .................................................................................................................. 43Configuring the Services on This Computer .................................................................................................................. 45Configuring Server Printing .................................................................................................................................................. 56
Installing Additional Database Files and Other Components on the eB Core Server Computer ........................... 67To Install the eB Engineering Designer Database Files on the eB Application Server ................................68To Install eB Event Tracking Manager (ETM) on the eB Application Server .................................................. 68To Update a Datasource in Order To Deploy Newly Installed Database Files ................................................ 69
Chapter 4: eB Director Installation ..................................................................................... 71Before You Install or Upgrade eB Director ................................................................................................................................... 71To Install eB Director ............................................................................................................................................................................. 71To Launch eB Director and Log In to a Community .................................................................................................................. 73Chapter 5: eB Web Server Configuration ............................................................................ 75Before You Install or Upgrade eB Web Applications ............................................................................................................... 75To Install eB Web Applications .......................................................................................................................................................... 76To Create a New Virtual Directory and Enable the Web Plug-ins You Want To Use .................................................. 78Integrating Brava with eB Web Server ........................................................................................................................................... 83
Modifying the web.config File for Brava Integration ................................................................................................. 84Brava Viewer Options in web.config ................................................................................................................................. 84
Installing and Deploying Additional Web Plug-ins ....................................................................................................................88
eB Information Manager 5 Implementation Guide

To Install the eB Change Package Web Plug-in ............................................................................................................ 88To Install the eB Engineering Designer Web Plug-in .................................................................................................89To Install the eB Event Tracking Manager Web Plug-in ...........................................................................................91To Deploy a Newly Installed Web Plug-in to Your Existing Virtual Directory ................................................92
Configuring Visual Navigator ..............................................................................................................................................................93Chapter 6: eB Engineering Designer Installation ..................................................................97Before You Install or Upgrade eB Engineering Designer ........................................................................................................97To Install eB Engineering Designer ..................................................................................................................................................97Chapter 7: eB CAD-Connect Installation ............................................................................ 101Before You Install or Upgrade eB CAD-Connect .......................................................................................................................101To Install eB CAD-Connect .................................................................................................................................................................101Installation Configuration .................................................................................................................................................................104
MicroStation (All supported versions) .........................................................................................................................104AutoCAD 2009-2012 ............................................................................................................................................................ 105eB CAD-Connect Configuration Application ...............................................................................................................105
Manual CAD Application Configuration ......................................................................................................................................106Manually Configuring MicroStation to Load and Run eB CAD-Connect ..........................................................107Manually Configuring AutoCAD to Load and Run eB CAD-Connect ..................................................................108
Configuring eB Web for Launch to eB CAD-Connect ..............................................................................................................111Required Changes to web.config .....................................................................................................................................111Detailed Launch Setting Descriptions ...........................................................................................................................114
Chapter 8: eB Asset Painter Installation ............................................................................ 117To Install eB Asset Painter ................................................................................................................................................................ 117Possible Additional Configuration ................................................................................................................................................. 118
Additional Configuration if MicroStation and eB Core Server Are Not on the Same NetworkDomain ........................................................................................................................................................................................ 118Additional Configuration if eB Core Server Is Not on the Network Domain .................................................119
Chapter 9: Integrating eB with ProjectWise .......................................................................121Planning Your Configuration ............................................................................................................................................................121Creating a Dedicated User in ProjectWise Administrator for eB ......................................................................................122Installing the eB ProjectWise Connector and Additional ProjectWise Software .......................................................123
To Install the eB ProjectWise Connector ......................................................................................................................123To Install ProjectWise Database Files on a 32-bit eB Application Server ......................................................125Installing ProjectWise Explorer and ProjectWise Gateway Service ................................................................. 125Configuring ProjectWise Gateway Service's dmskrnl.cfg File .............................................................................126
Configuring ProjectWise Integration Settings in eB System Management Console .................................................127To Deploy the ProjectWise Database Package ...........................................................................................................128To Activate the eB Work Queue Service and ProjectWise Queue Engine for Your Community ...........128To Add ProjectWise Datasources to Your Community ...........................................................................................130To Create a ProjectWise Storage Device and Repository ...................................................................................... 132
Configuring ProjectWise Synchronization and Attribute Mapping in eB Director ...................................................135ProjectWise Objects in eB .................................................................................................................................................. 135Synchronization Overview ................................................................................................................................................. 136Registering Documents ....................................................................................................................................................... 137Automatic Document Registration ..................................................................................................................................139Preventing Duplicates ...........................................................................................................................................................140Mapping ProjectWise Attributes ......................................................................................................................................140
eB Information Manager 6 Implementation Guide
Security on ProjectWise Objects in eB ...........................................................................................................................143Deleted Objects ....................................................................................................................................................................... 143Running ProjectWise Reports ........................................................................................................................................... 144
Chapter 10: Integrating eB with Microsoft® SharePoint® ..................................................147Supported SharePoint Versions ...................................................................................................................................................... 147Upgrading from Previous Versions of eB ....................................................................................................................................148
To Retract an Existing Solution in SharePoint ........................................................................................................... 148Planning Your Configuration ............................................................................................................................................................149To Install the eB SharePoint Service, Web Solution, and Database Files ...................................................................... 151To Install SharePoint 2010 Database Files on a 32-bit eB Application Server ...........................................................155Deploying the Web Solution and Activating Web Features ................................................................................................ 156
To Add ebapplicationpages.wsp to the SharePoint Farm Solution Store .......................................................156To Deploy ebapplicationpages.wsp ................................................................................................................................ 156To Activate eB Web Features .............................................................................................................................................158
Configuring a Community and Repository in eB System Management Console ........................................................160To Create a Community That Points to a SharePoint-Enabled Datasource ...................................................160To Configure a Community to Use the eB SharePoint Service on This Computer ......................................160To Add a SharePoint Web Application to a Community ........................................................................................ 161To Create a Storage Device and an HTTP Repository for SharePoint ..............................................................165Settings Scopes for Web Applications, Sites, and Document Libraries .......................................................... 167
Configuring the Community in eB Director for SharePoint Integration ........................................................................169To Enable SharePoint Relationships in Layout Editor ........................................................................................... 171Document Library Synchronization Options .............................................................................................................172Template Resolution ............................................................................................................................................................ 176
Enabling eB SharePoint References on the eB Web Server ................................................................................................ 177eB Information Management System .......................................................................................................................................... 177
Register SharePoint Files with eB .................................................................................................................................. 178eB Document Property Management ............................................................................................................................179
eB Explorer Web Part ......................................................................................................................................................................... 182User Interface View ...............................................................................................................................................................184Explorer View ..........................................................................................................................................................................185Document Class View ...........................................................................................................................................................186Site Class View ........................................................................................................................................................................ 186
eB SharePoint Connection Services 2010 Features ...............................................................................................................187Federated OpenSearch ........................................................................................................................................................ 188Kerberos Authentication and Delegation ....................................................................................................................200File Copy Service Configuration ...................................................................................................................................... 204
Troubleshooting ................................................................................................................................................................................... 221Troubleshooting eB Explorer Web Part .......................................................................................................................221Troubleshooting eB SharePoint Connection Services ........................................................................................... 223
Order Transmittal Template ........................................................................................................................................................... 224Chapter 11: eB SSRS Data Provider Configuration ............................................................. 227Installing eB SSRS Data Provider ....................................................................................................................................................228
To Install eB SSRS Data Provider ..................................................................................................................................... 228To Create a Report Using the eB Data Model ............................................................................................................................ 229Chapter 12: eB SSIS Components Configuration ................................................................ 233Planning Your Configuration ............................................................................................................................................................233Before You Install eB SSIS Components ...................................................................................................................................... 234
eB Information Manager 7 Implementation Guide

To Install eB SSIS Components ........................................................................................................................................................234To Deploy the StagedImport Database Package ...................................................................................................................... 237To Add the eB SSIS Engines and Activate the eB Work Queue Service ..........................................................................238To Activate the Bentley Data Quality Server License .............................................................................................................241To Add the eB SSIS Components to Business Intelligence Design Studio .....................................................................243Installing the ACE OLE DB 12.0 Provider (optional) ..............................................................................................................246
eB Information Manager 8 Implementation Guide
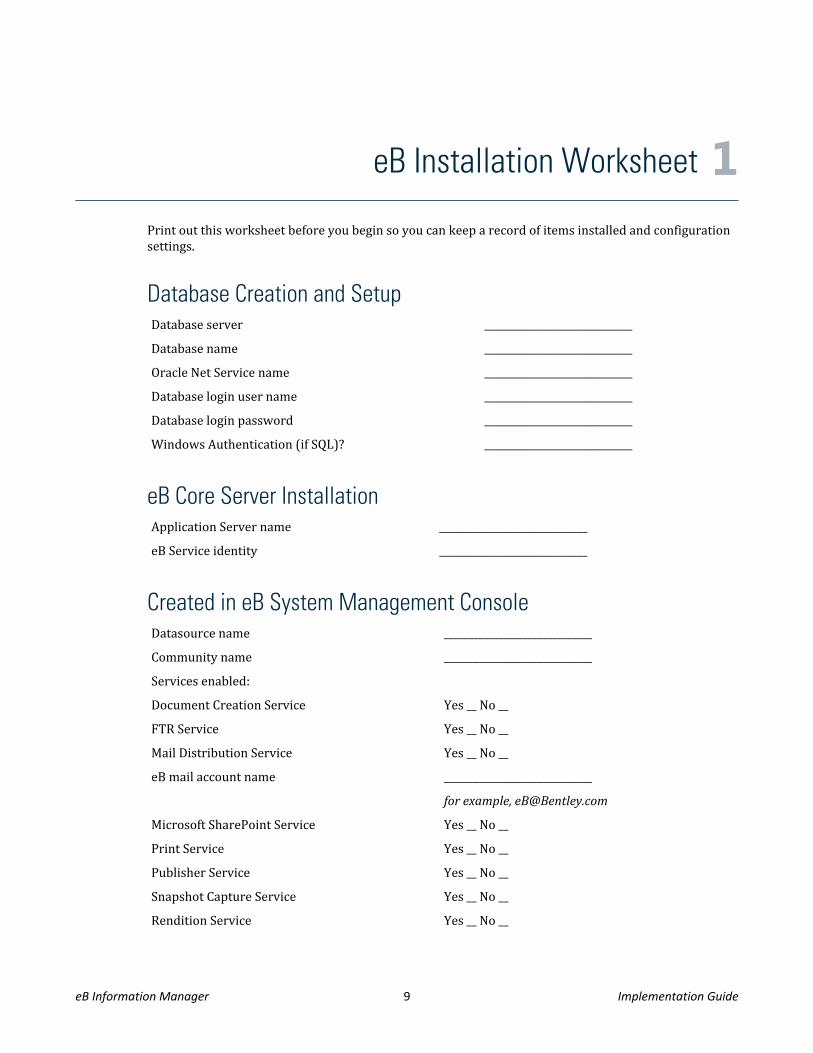
eB Installation Worksheet 1Print out this worksheet before you begin so you can keep a record of items installed and configurationsettings.
Database Creation and SetupDatabase server ______________________________Database name ______________________________Oracle Net Service name ______________________________Database login user name ______________________________Database login password ______________________________Windows Authentication (if SQL)? ______________________________
eB Core Server InstallationApplication Server name ______________________________eB Service identity ______________________________
Created in eB System Management ConsoleDatasource name ______________________________Community name ______________________________Services enabled:Document Creation Service Yes __ No __FTR Service Yes __ No __Mail Distribution Service Yes __ No __eB mail account name ______________________________
for example, [email protected]
Microsoft SharePoint Service Yes __ No __Print Service Yes __ No __Publisher Service Yes __ No __Snapshot Capture Service Yes __ No __Rendition Service Yes __ No __
eB Information Manager 9 Implementation Guide
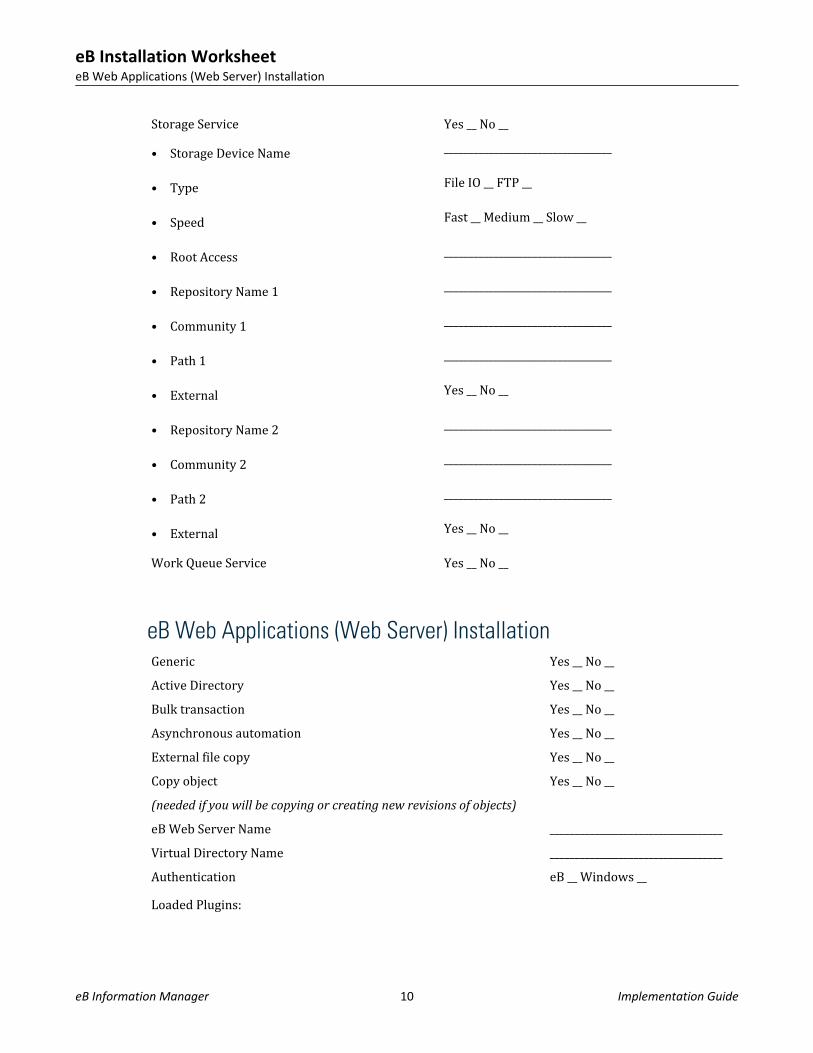
Storage Service Yes __ No __• Storage Device Name __________________________________
• Type File IO __ FTP __
• Speed Fast __ Medium __ Slow __
• Root Access __________________________________
• Repository Name 1 __________________________________
• Community 1 __________________________________
• Path 1 __________________________________
• External Yes __ No __
• Repository Name 2 __________________________________
• Community 2 __________________________________
• Path 2 __________________________________
• External Yes __ No __
Work Queue Service Yes __ No __
eB Web Applications (Web Server) InstallationGeneric Yes __ No __Active Directory Yes __ No __Bulk transaction Yes __ No __Asynchronous automation Yes __ No __External file copy Yes __ No __Copy object(needed if you will be copying or creating new revisions of objects)
Yes __ No __
eB Web Server Name ___________________________________Virtual Directory Name ___________________________________Authentication eB __ Windows __Loaded Plugins:
eB Installation WorksheeteB Web Applications (Web Server) Installation
eB Information Manager 10 Implementation Guide

eB Products:• eB Event Tracking Manager Yes __ No __
• eB Document Manager Yes __ No __
• eB Item Manager Yes __ No __
eB Options:• Bulk Import and Export Yes __ No __
• Change Management Yes __ No __
• Data Administration Tools Yes __ No __
• User Directory Yes __ No __
• Document Distribution Yes __ No __
• Document Preparation Yes __ No __
• eB SharePoint References Yes __ No __
• ProjectWise Yes __ No __
• Publish eB information for distribution… Yes __ No __
• Quick Link URLs Yes __ No __
• Records Management Yes __ No __
• Subscriptions Yes __ No __
• User Preference Admin Yes __ No __
• Work Management Yes __ No __
eB Engineering Designer:• Change Packages Yes __ No __
• Object Comparison Yes __ No __
• Tag Display Yes __ No __
eB Performance Improvement Options:• eB Book of Knowledge Yes __ No __
eB Installation WorksheeteB Web Applications (Web Server) Installation
eB Information Manager 11 Implementation Guide

• Survey Wizards Yes __ No __
eB ProjectWise Connection Services InstallationProjectWise server name ______________________________Datasource ______________________________Projects/Folders enabled ______________________________
eB SharePoint Connection Services InstallationSharePoint server name ______________________________Web Application description ______________________________Web Application URL ______________________________
eB Installation WorksheeteB ProjectWise Connection Services Installation
eB Information Manager 12 Implementation Guide
Database Creation and Setup 2This chapter is for:
• Database administrators (DBA's)
Supported DatabasesYou can use either an Oracle or a SQL Server database with eB.The following versions are supported:• SQL Server 2008 R2 SP2• SQL Server 2008 SP3• SQL Server 2005 SP4• Oracle Database 11g (11.2.0.3.0)• Oracle Database 10g (10.2.0.5)Note: Microsoft SQL Server 2000 is no longer supported.If you are using SQL Server, read the instructions in the following section, Setting Up SQL Server for eB.If you are using Oracle, read the instructions in the section, Setting Up Oracle for eB on page 16.
Setting Up SQL Server for eBThis section discusses the database configuration required if you plan to use a SQL Server database witheB.Note: It is assumed that you have already performed the following steps:1. Installed a supported version of Microsoft SQL Server using the default options for all prompts
EXCEPT when prompted.2. Enabled Mixed Mode Authentication during the install.3. If using SQL Server 2005 SP2, you also need to install the following patch: http://
support.microsoft.com/kb/916002
Important: Perform all installations logged on as a member of the domain, with at least Administratorrights to Windows Server 2003/2008, and preferably with Domain Administrator rights.
eB Information Manager 13 Implementation Guide
Creating a New SQL Server Database for eB
1. Open SQL Server Management Studio (Start > All Programs > Microsoft SQL Server 2005/2008 >SQL Server Management Studio). and log in when prompted.
2. In the Object Explorer, under <SQLServer_computer_name>, right-click the Databases folder andselect New Database.The Database Properties dialog opens.
3. Do the following:a. In the Database Name field, enter a name for the database. (Make sure you also write this name in
the Database name field of the eB installation worksheet.)b. Use the Path column to change the location of the database if needed, otherwise accept the
default paths.c. In the Autogrowth column for the log file, set the transaction logs to be 15 to 25% of the data file;
add more space if the log files are kept after the transaction is complete, for recovery purposes.d. Click OK to create the database.
Note: An empty eB database takes 40 MB of data. As the size of data depends on the amount ofdocuments, associations, and index data used at a site, the best method for sizing is data from a testor training database configured to your site's specifications. If this is not possible, a small database of100 to 200 MB will have enough space so that sizing can be accomplished at a later date.
4. Right-click the new database and select Properties.5. In the Database Properties dialog, select the Options page and make sure the following settings have
these values set:• Auto Create Statistics - True• Auto Update Statistics - True• ANSI NULL Default - False• ANSI Nulls Enabled - False• Quoted Identifiers Enabled - True• Database Read-Only - FalseNote: Recovery mode can be changed if necessary.
6. Click OK to save any changes.
Create a Login ID for the Database
You can access the database using either Windows authentication or a SQL Server Login ID.1. Open SQL Server Management Studio (Start > All Programs > Microsoft SQL Server 2005/2008 >
SQL Server Management Studio). and log in when prompted.2. In the Object Explorer, under <SQLServer_computer_name>, expand the Security folder.3. Right-click the Logins folder and select New Login.
The Login - New Properties dialog opens.4. Select the General page and do the following:
Database Creation and SetupSetting Up SQL Server for eB
eB Information Manager 14 Implementation Guide

a. In the Login name field, enter the name of the SQL Server user. (Make sure you also write thisname in the Database login username field of the eB installation worksheet.)
b. Select Windows authentication or SQL Server authentication, depending on the type of loginyou are creating. If you select SQL Server authentication, enter a password in the Passwordand Confirm Password fields. (Make sure you also write this password in the Database loginpassword field of the eB installation worksheet.)
c. From the Default database list, select the new eB database (this should be the same databasenoted in the Database name field of the eB installation worksheet).
d. From the Default language list, select the language of the user.5. Select the Server Roles page and note the following:
• The Public role is not displayed, but is automatically on for every user and cannot be revoked.• The setupadmin role (or sysadmin) is only required when configuring FTR — when a link is
created between SQL Server and the Indexing Service. Once this is done, the role should beturned off.
6. Select the User Mappings page and do the following:a. In the Users mapped to this login list, click the check box next to the new eB database.b. In the Database role membership for database_name list, click the check box next to db
owner.7. Click OK.
Note: Bentley recommends that you set the db owner database role. This makes the user the owner ofthe eB database and lets them change the database as required. If the database administrator resistsassigning the db owner database role to the user, then:1. At a minimum, set the db datareader and db datawriter database roles for the user.2. To be able to run the database update scripts, the user who will be doing this in eB System
Management Console needs to have db datareader, db datawriter, and db ddladmin databaseroles.
3. Grant this user EXECUTE permission to the eB database:a. Open the Properties dialog for the eB database.b. Click the Permissions page.c. In the Users or Roles list, select the user.d. In the Explicit permissions for <selected_user> list, select the Execute permission and click
the Grant check box.The EXECUTE permission gives the user permission to execute procedures, do selected statements,inserts, deletes, and so on with the data. Without this permission you cannot even login because eBalready needs to write data at this point. If this permission is not set you will get a message like this:The EXECUTE permission was denied on the object 'ebp_logon', database 'eB', schema 'dbo'.
Enable Remote Connections (if required)
Note: By default, SQL Server 2005/2008 Express, Evaluation, and Developer editions allow local clientconnections only. Enterprise, Standard, and Workgroup editions also listen for remote clientconnections over TCP/IP.
Database Creation and SetupSetting Up SQL Server for eB
eB Information Manager 15 Implementation Guide
1. Open SQL Server Configuration Manager (StartAll ProgramsMicrosoft SQL Server2005/2008Configuration ToolsSQL Server Configuration Manager).
2. Do one of the following:In SQL Server 2008, expand SQL Server Network Configuration.orIn SQL Server 2005, expand SQL Server 2005 Network Configuration.
3. Select Protocols for MSSQLSERVER.4. Make sure that your required protocol is enabled, usually TCP/IP.
Setting Up Oracle for eBThis section discusses the database configuration required if you plan to use an Oracle database with eB.
The Oracle Database Server
It is recommended that the database be installed onto a dedicated Oracle Server. For eB to connect, theOracle Client must be installed on the eB Core Server computer.Although not a requirement, it may be decided that eB will be installed into a separate databaseinstance. eB's requirements of Oracle components installed on the database server are minimal.Therefore the eB Oracle database can typically be installed in a way to match that of any corporatepolicy that database administrators may follow. For example, eB can be configured to use dedicatedtable spaces if preferred.A default installation of Oracle will ensure all the required Oracle components exist. However, if you willbe making use of the FTR (Full Text Retrieval) functionality, you will also need to install the Oracle Textcomponents on the database server. This can be found by selecting the Show all components,including required dependencies check box, and then expanding the Oracle Database header.
Database Creation and SetupSetting Up Oracle for eB
eB Information Manager 16 Implementation Guide
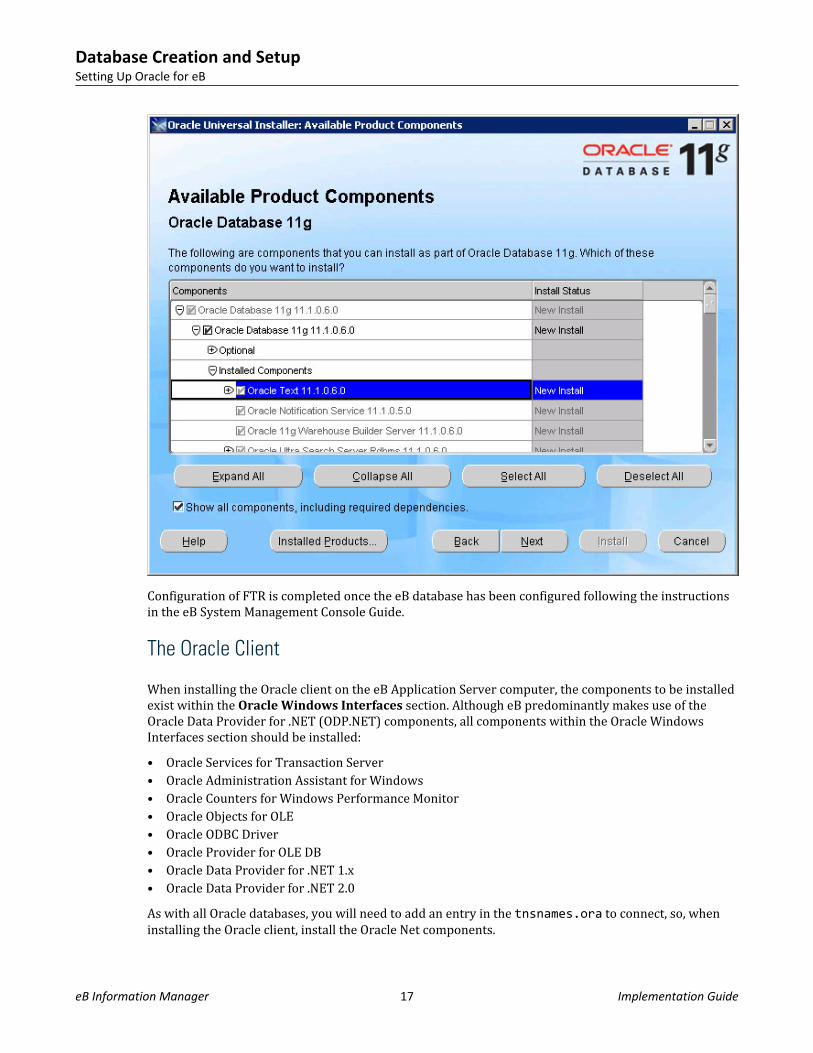
Configuration of FTR is completed once the eB database has been configured following the instructionsin the eB System Management Console Guide.
The Oracle Client
When installing the Oracle client on the eB Application Server computer, the components to be installedexist within the Oracle Windows Interfaces section. Although eB predominantly makes use of theOracle Data Provider for .NET (ODP.NET) components, all components within the Oracle WindowsInterfaces section should be installed:• Oracle Services for Transaction Server• Oracle Administration Assistant for Windows• Oracle Counters for Windows Performance Monitor• Oracle Objects for OLE• Oracle ODBC Driver• Oracle Provider for OLE DB• Oracle Data Provider for .NET 1.x• Oracle Data Provider for .NET 2.0As with all Oracle databases, you will need to add an entry in the tnsnames.ora to connect, so, wheninstalling the Oracle client, install the Oracle Net components.
Database Creation and SetupSetting Up Oracle for eB
eB Information Manager 17 Implementation Guide
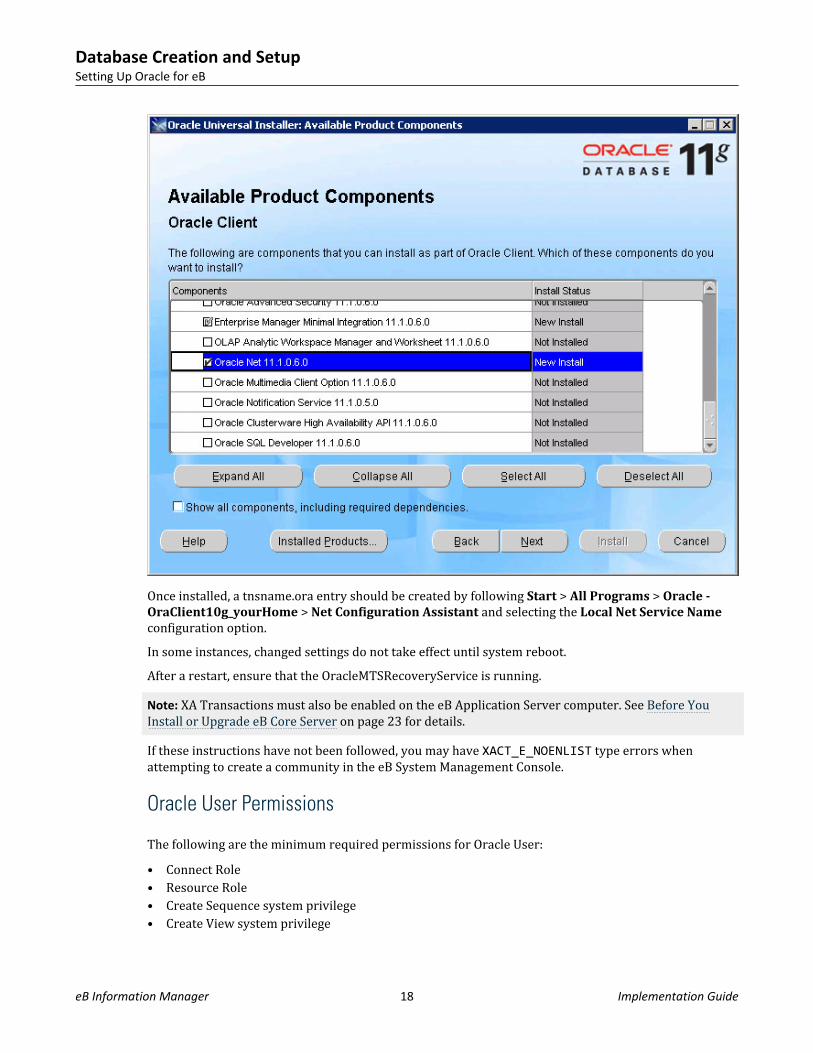
Once installed, a tnsname.ora entry should be created by following Start > All Programs > Oracle -OraClient10g_yourHome > Net Configuration Assistant and selecting the Local Net Service Nameconfiguration option.In some instances, changed settings do not take effect until system reboot.After a restart, ensure that the OracleMTSRecoveryService is running.Note: XA Transactions must also be enabled on the eB Application Server computer. See Before YouInstall or Upgrade eB Core Server on page 23 for details.If these instructions have not been followed, you may have XACT_E_NOENLIST type errors whenattempting to create a community in the eB System Management Console.
Oracle User Permissions
The following are the minimum required permissions for Oracle User:• Connect Role• Resource Role• Create Sequence system privilege• Create View system privilege
Database Creation and SetupSetting Up Oracle for eB
eB Information Manager 18 Implementation Guide
Configuring Oracle Full Text Retrieval
After the eB database has been created through the eB System Management Console, can you configureFTR.1. Rerun the database scripts if Oracle Text was not installed previously. The required indexes cannot
be created unless it is installed. (You will get an error in the database log saying that the“oracle_ftr_files_idx1” index cannot be created if Oracle Text is not installed.)
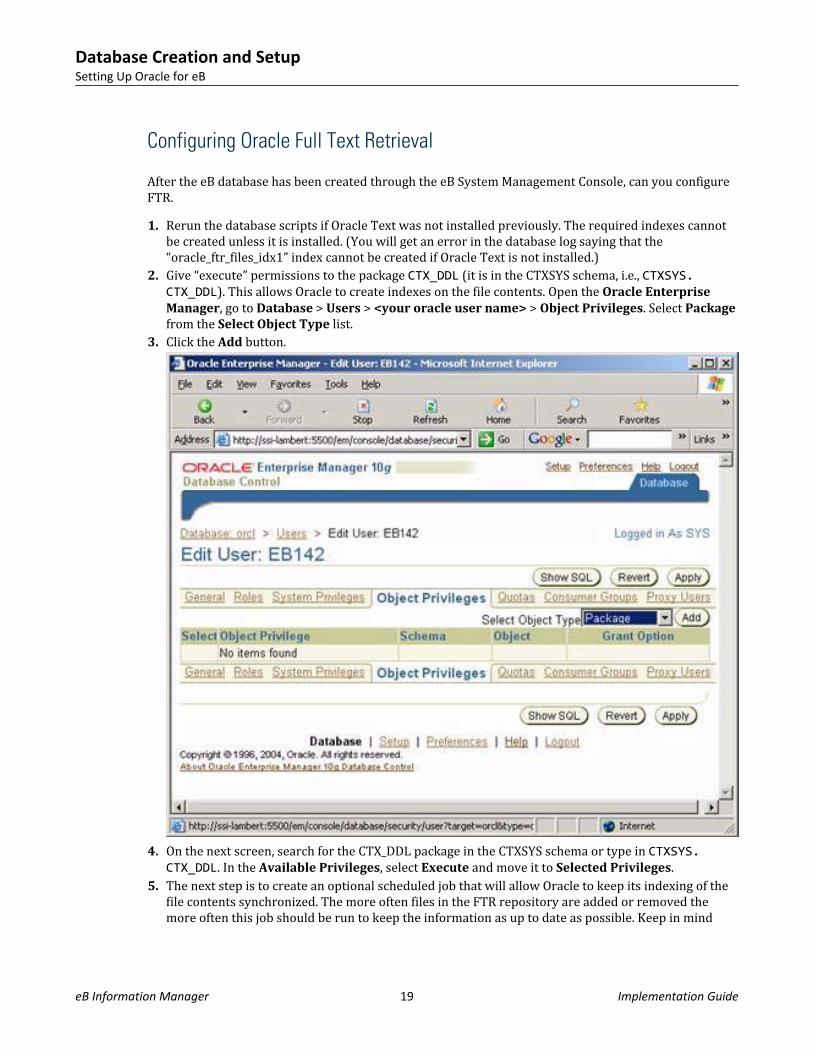
2. Give “execute” permissions to the package CTX_DDL (it is in the CTXSYS schema, i.e., CTXSYS.CTX_DDL). This allows Oracle to create indexes on the file contents. Open the Oracle EnterpriseManager, go to Database > Users > <your oracle user name> > Object Privileges. Select Packagefrom the Select Object Type list.
3. Click the Add button.
4. On the next screen, search for the CTX_DDL package in the CTXSYS schema or type in CTXSYS.CTX_DDL. In the Available Privileges, select Execute and move it to Selected Privileges.
5. The next step is to create an optional scheduled job that will allow Oracle to keep its indexing of thefile contents synchronized. The more often files in the FTR repository are added or removed themore often this job should be run to keep the information as up to date as possible. Keep in mind
Database Creation and SetupSetting Up Oracle for eB
eB Information Manager 19 Implementation Guide
that this may be a CPU-intensive job, so a balance of performance against up-to-date indexes must bemaintained.
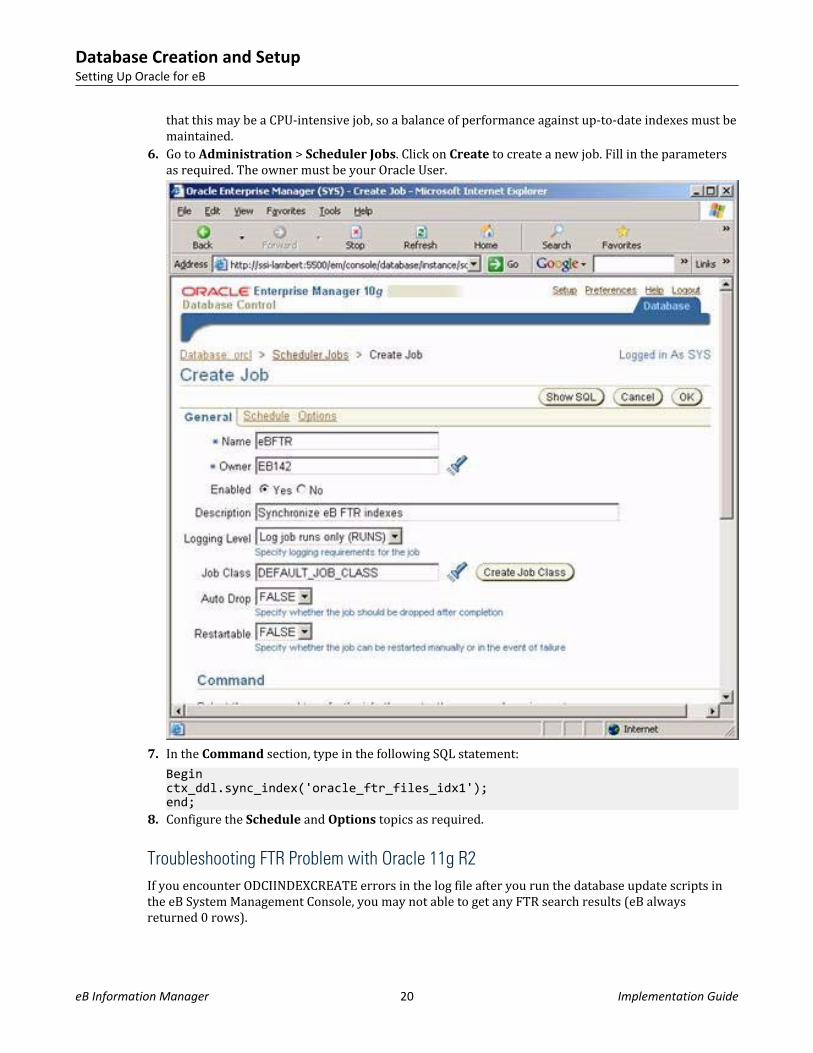
6. Go to Administration > Scheduler Jobs. Click on Create to create a new job. Fill in the parametersas required. The owner must be your Oracle User.
7. In the Command section, type in the following SQL statement:Beginctx_ddl.sync_index('oracle_ftr_files_idx1');end;
8. Configure the Schedule and Options topics as required.
Troubleshooting FTR Problem with Oracle 11g R2If you encounter ODCIINDEXCREATE errors in the log file after you run the database update scripts inthe eB System Management Console, you may not able to get any FTR search results (eB alwaysreturned 0 rows).
Database Creation and SetupSetting Up Oracle for eB
eB Information Manager 20 Implementation Guide
The following steps are needed:1. Determine if the ability to use an Oracle Text URL datastore is already granted to a database role.2. Start SQL*Plus and connect to the database as SYS specifying the SYSDBA role. For example:
On Windows:SYSTEM_DRIVE:\ sqlplus /nologSQL> CONNECT SYS as SYSDBA
Enter password: SYS_passwordorOn UNIX and Linux:$ sqlplus /nologSQL> CONNECT SYS as SYSDBA
Enter password: SYS_password3. Run the following command:
SELECT par_value FROM ctxsys.ctx_parameters WHERE par_name ='FILE_ACCESS_ROLE';
This returns either NULL or the database role that is granted the ability to use an Oracle Text URLdatastore.If no value is returned by step 3, create a new database role as shown in the following example:CREATE ROLE APEX_URL_DATASTORE_ROLE;
4. Grant this role to the database user APEX_040000 with the following statement:GRANT APEX_URL_DATASTORE_ROLE to APEX_040000;
If step 3 returned a value, use this database role name instead of the example:APEX_URL_DATASTORE_ROLE.
Lastly, if step 3 did not return a value, use the Oracle Text API to grant permission to the newlycreated database role with the following statement:EXEC ctxsys.ctx_adm.set_parameter('file_access_role','APEX_URL_DATASTORE_ROLE');
More information can be found at:• Section 2.2.4.2 of http://docs.oracle.com/cd/B28359_01/text.111/b28304/cdatadic.htm#i1006637• http://www.utoug.org/i/doc/sec009.htm
Database Creation and SetupSetting Up Oracle for eB
eB Information Manager 21 Implementation Guide

Database Creation and SetupSetting Up Oracle for eB
This page intentionally left blank
eB Information Manager 22 Implementation Guide
eB Core Server Configuration 3This chapter is for:
• IT managersThis chapter assumes:
• An Oracle or SQL Server database has already been configured for eB (see Database Creation andSetup on page 13)
eB Application Server is the primary server in eB. The eB Core Server installer includes the eBApplication Server, database files, many individual eB services, and the eB System Management Consolewhich is used to create datasources and communities and manage eB services. You can perform acomplete installation to install all of these items on the same computer. You can also use the same eBCore Server installer to install individual items on other computers and set up a distributed eBenvironment.
Before You Install or Upgrade eB Core Server1. See the eB readme (readme_eb_information_manager.chm) for a list of supported operating
systems and other system requirements for this module.2. If you have an older version eB Core Server / eB Application Server installed on this computer, you
need to uninstall the previously installed version of eB Core Server and any other eB applicationsyou installed from that version, then restart your computer.Settings you configure in eB System Management Console are automatically saved to XMLconfiguration files in a hidden local system folder. The location of these files depends on the versionof Windows you are using:Windows Server 2008 C:\ProgramData\Enterprise Informatics\eB
Windows Server 2003 C:\Documents and Settings\All Users\Enterprise Informatics\eB
These configuration files are intentionally not removed when you uninstall eB Core Server.Therefore, when you finally install the new version of eB Core Server and open eB SystemManagement Console, eB System Management Console finds the local configuration files and loadsthe settings in them.
3. Make the following changes to your Windows Server 2008 or Windows Server 2003 default settings.a. To get started, open the dialog that contains these settings.
If using Windows Server 2008:
i. Open the Component Services window.ii. Expand Console Root > Component Services > Computers > My Computer > Distributed
Transaction Coordinator > Local DTC.
eB Information Manager 23 Implementation Guide
iii. Right-click Local DTC and select Properties.iv. In the Local DTC Properties dialog, select the Security tab.If using Windows Server 2003:
i. Open the Component Services window.ii. Expand Console Root > Component Services > Computers > My Computer.
iii. Right-click My Computer and select Properties.iv. Select the MSDTC tab and click Security Configuration.
The Security Configuration dialog opens.Now adjust the following settings, which are the same in both Windows Server 2008 andWindows Server 2003.
b. Make sure that the Network DTC Access and Allow Remote Clients security settings areenabled.
c. In the Transaction Manager Communication section:a. Make sure the Allow Inbound and Allow Outbound settings are both enabled.b. If eB Core Server and the database server are on the same computer, set Mutual
Authentication Required.c. If eB Core Server and the database server are on separate computers, then set Mutual
Authentication Required on the eB Core Server computer, and set either Incoming CallerAuthentication Required or No Authentication Required on the database server.
d. If your server is part of a cluster server, then set Incoming Caller Authentication Required.e. Also, you must set No Authentication Required when:
• The network access is between two domains that do not have a mutual trust configured.• The network access is between computers that are members of a workgroup.
d. Make sure that the Enable XA Transactions setting is enabled.e. Click OK to save your changes.f. If you use Windows Firewall to help protect your server, you must add the Distributed
Transaction Coordinator service to the exception list in the Windows Firewall settings.4. Make sure both .NET Framework 3.5 SP1 and .NET Framework 4.0 are installed.5. Install Windows Identity Foundation (WIF), KB974405 (delivered with eB if needed,
under ...\Support Files\Redistributables\WindowsIdentityFramework).6. If using Oracle, install the required Oracle Client on this computer.7. Installing eB Core Server on a domain controller IS NOT RECOMMENDED, for best practice security
reasons. If you decide to install on a domain controller nevertheless, the eB services must run as alocal system account.
8. Perform the installation logged on as a member of the domain with Administrator rights to the localcomputer. During installation, you will be prompted to specify the identity (user name andpassword) of the user under which the services on this computer will run. This is referred to as theservice identity. It is recommended that a dedicated domain user account be created for this purpose,whose password is set never to expire. This can be the same user account as the person performingthe installation. As well as Administrator rights, the user under which the services run must alsohave Log on as a service rights (this is set in the computer's local security policy settings -Administrative Tools > Local Security Policy > Security Settings > Local Policies > User RightsAssignments).
eB Core Server ConfigurationBefore You Install or Upgrade eB Core Server
eB Information Manager 24 Implementation Guide
Attention: If you are restoring a database and repository onto a new server, please contact Bentleysupport and request document number SAN03027, “Creating an eB Test Environment”.
To Install eB Core Server1. Browse to this folder in Windows Explorer:
...\Server Installation\eB Core Server2. Double-click the appropriate MSI file for the version of Windows you are running:
If using 32-bit Windows eB Core Server (x86).msi
If using 64-bit Windows eB Core Server (x64).msi
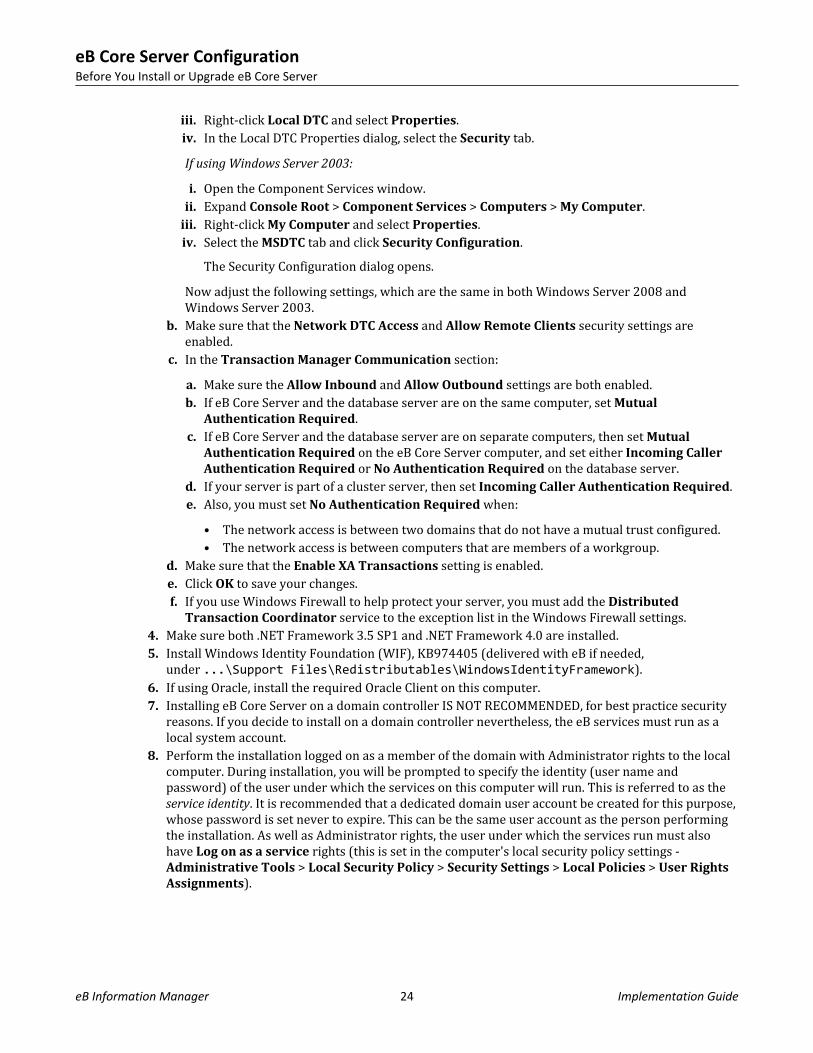
3. When the Setup Wizard opens, click Next.
4. When the License Agreement page opens, accept the agreement and click Next.The Custom Setup page opens, showing you the features that can be installed, and the location towhich the product will be installed.
eB Core Server ConfigurationTo Install eB Core Server
eB Information Manager 25 Implementation Guide
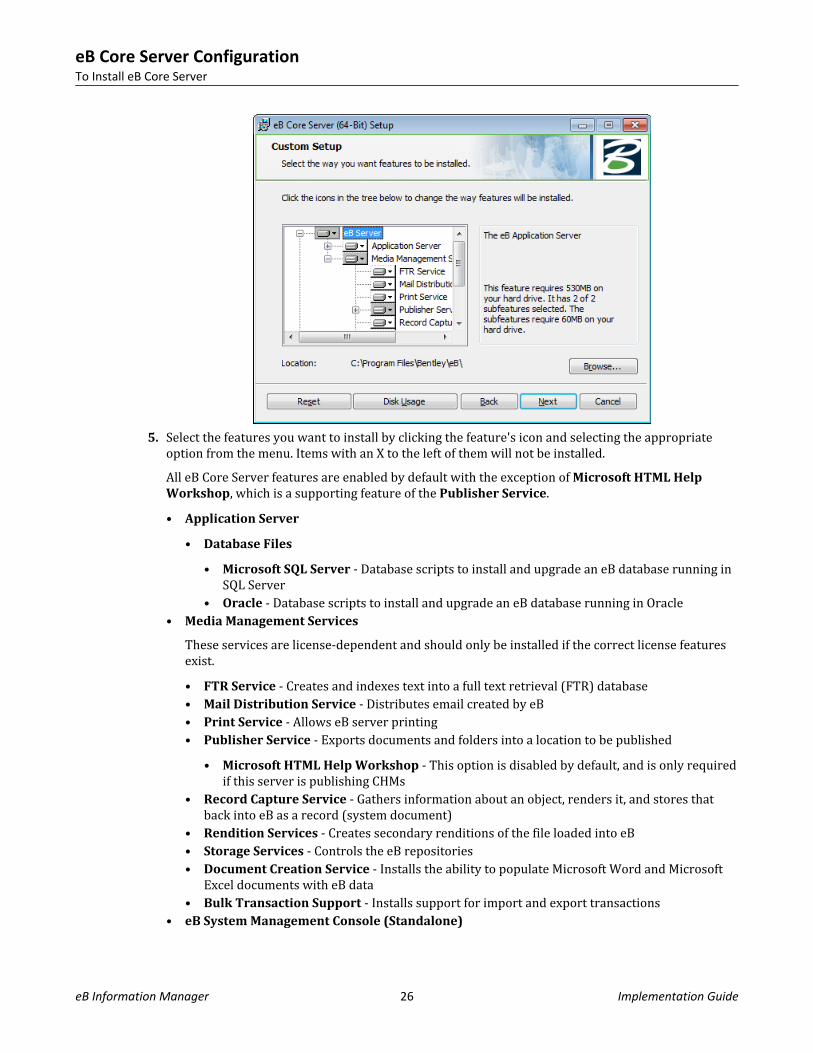
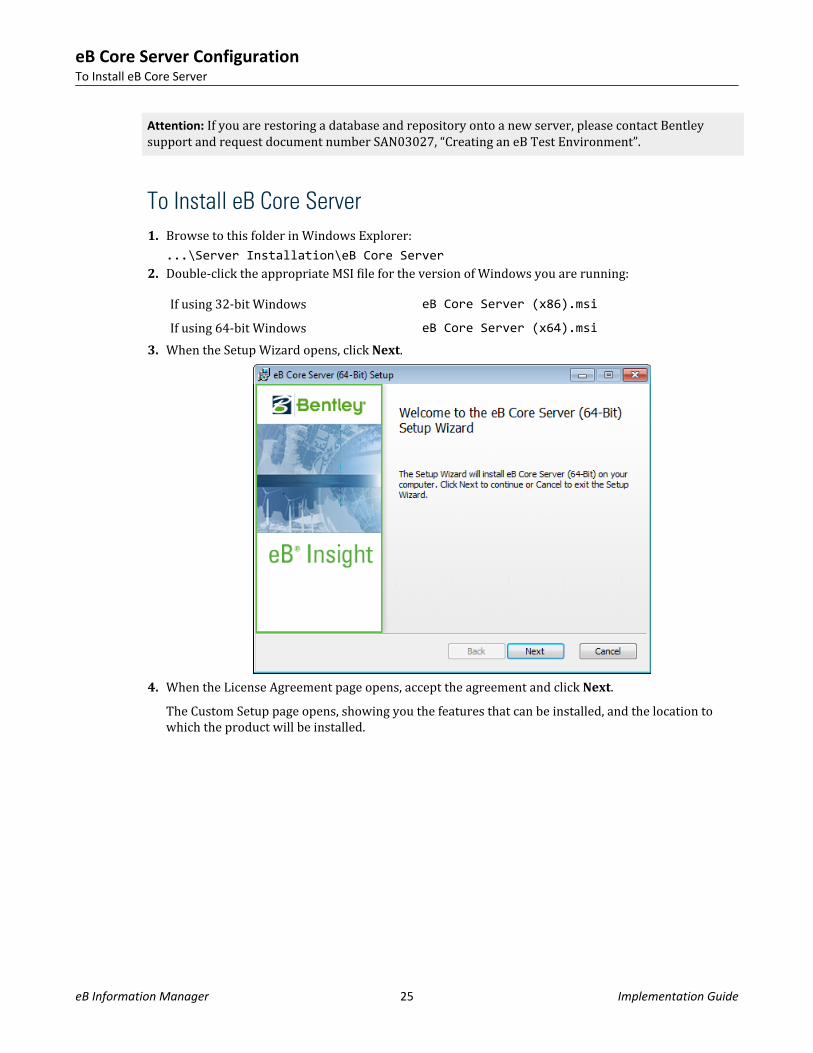
5. Select the features you want to install by clicking the feature's icon and selecting the appropriateoption from the menu. Items with an X to the left of them will not be installed.All eB Core Server features are enabled by default with the exception of Microsoft HTML HelpWorkshop, which is a supporting feature of the Publisher Service.• Application Server
• Database Files
• Microsoft SQL Server - Database scripts to install and upgrade an eB database running inSQL Server
• Oracle - Database scripts to install and upgrade an eB database running in Oracle• Media Management Services
These services are license-dependent and should only be installed if the correct license featuresexist.• FTR Service - Creates and indexes text into a full text retrieval (FTR) database• Mail Distribution Service - Distributes email created by eB• Print Service - Allows eB server printing• Publisher Service - Exports documents and folders into a location to be published
• Microsoft HTML Help Workshop - This option is disabled by default, and is only requiredif this server is publishing CHMs
• Record Capture Service - Gathers information about an object, renders it, and stores thatback into eB as a record (system document)
• Rendition Services - Creates secondary renditions of the file loaded into eB• Storage Services - Controls the eB repositories• Document Creation Service - Installs the ability to populate Microsoft Word and Microsoft
Excel documents with eB data• Bulk Transaction Support - Installs support for import and export transactions
• eB System Management Console (Standalone)
eB Core Server ConfigurationTo Install eB Core Server
eB Information Manager 26 Implementation Guide
eB System Management Console automatically gets installed when the Application Serverfeature is installed, so this option does not need to be turned on in most cases. This Standaloneoption, which is turned off by default, only needs to be turned on if you are using the eB CoreServer installer to install eB System Management Console by itself on another computer.
6. Accept the default installation location, or click the Browse button to change it.The default installation location is C:\Program Files\Bentley\eB.
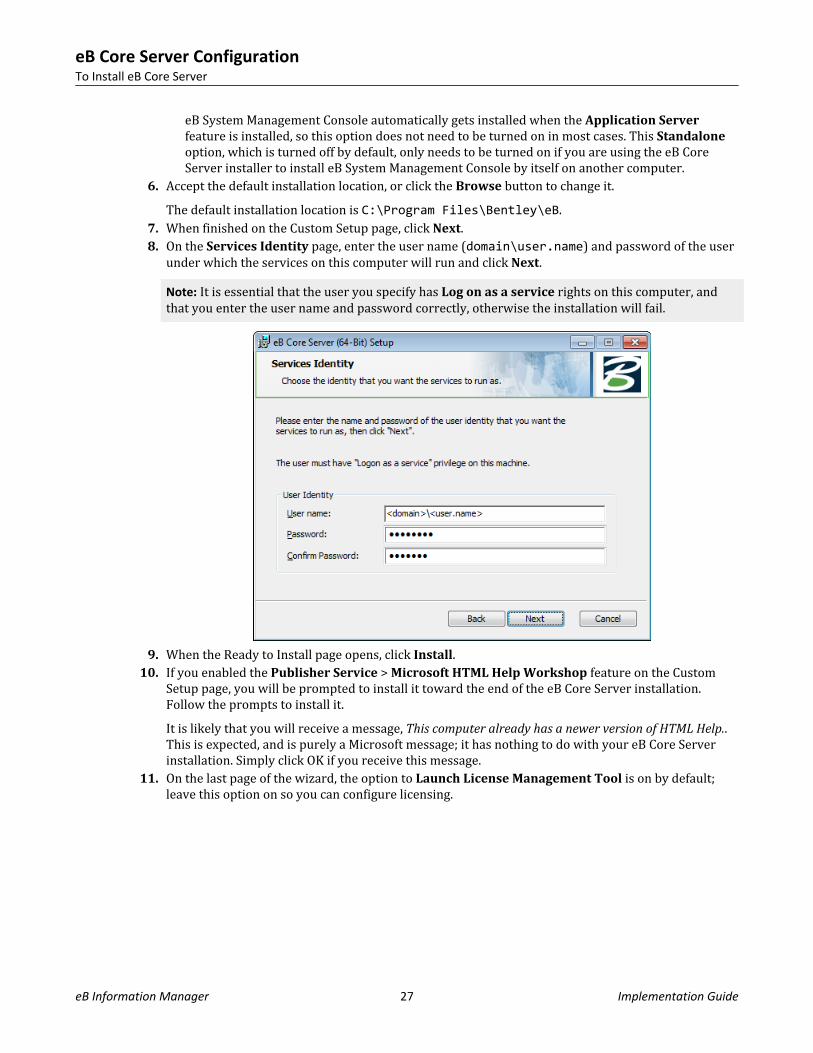
7. When finished on the Custom Setup page, click Next.8. On the Services Identity page, enter the user name (domain\user.name) and password of the user
under which the services on this computer will run and click Next.Note: It is essential that the user you specify has Log on as a service rights on this computer, andthat you enter the user name and password correctly, otherwise the installation will fail.
9. When the Ready to Install page opens, click Install.10. If you enabled the Publisher Service > Microsoft HTML Help Workshop feature on the Custom
Setup page, you will be prompted to install it toward the end of the eB Core Server installation.Follow the prompts to install it.It is likely that you will receive a message, This computer already has a newer version of HTML Help..This is expected, and is purely a Microsoft message; it has nothing to do with your eB Core Serverinstallation. Simply click OK if you receive this message.
11. On the last page of the wizard, the option to Launch License Management Tool is on by default;leave this option on so you can configure licensing.
eB Core Server ConfigurationTo Install eB Core Server
eB Information Manager 27 Implementation Guide
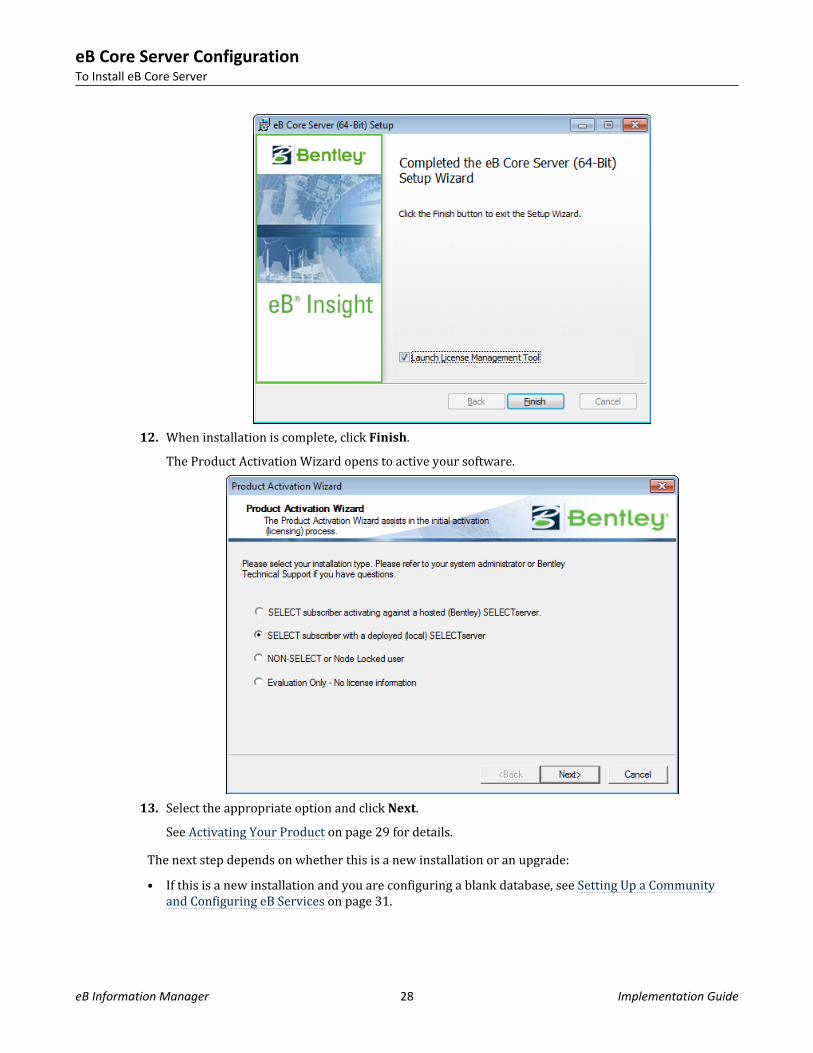
12. When installation is complete, click Finish.The Product Activation Wizard opens to active your software.
13. Select the appropriate option and click Next.See Activating Your Product on page 29 for details.
The next step depends on whether this is a new installation or an upgrade:• If this is a new installation and you are configuring a blank database, see Setting Up a Community
and Configuring eB Services on page 31.
eB Core Server ConfigurationTo Install eB Core Server
eB Information Manager 28 Implementation Guide

• If this is an upgrade, open eB System Management Console. All of your previous datasource andcommunity settings will be available, just make sure you run the upgrade scripts on the database.For details, see To Create a Datasource on page 32 and skip down to the steps where it talks aboutupdating the database.
Activating Your ProductProduct activation is achieved by connecting to a SELECTserver, receiving verification that yourSELECTserver Name and Activation Key are correct, and successfully posting usage logs. Productactivation is not the same as checking out a license. This section describes how to configure eBInformation Manager for activation. After initial configuration, eB Information Manager automaticallyand transparently tries to activate each time it runs, and runs unconstrained for a period of 30 daysafter its last successful activation. However, if activation is unsuccessful for a period of 30 days, eBInformation Manager reports license expired exceptions until the license is successfully activated again.Product activation is typically configured directly after installation of eB Core Server, but can be donelater through the Licensing node in eB System Management Console. The Licensing node also showsthe current status of each eB license. Licenses that are not activated are grayed out.
Using the Product Activation Wizard
The Product Activation Wizard is designed to step users through the product activation process. After aproduct is installed, you must obtain a license and then activate that license. Obtaining the license aloneis not enough to complete the process. This wizard eliminates the confusion and makes it clear thatobtaining a license and activating a product are two essential steps.The Product Activation Wizard opens automatically at the end of the product installation process.The first screen of the Product Activation Wizard offers these product activation options:• SELECT subscriber activating against a hosted (Bentley) SELECTserver• SELECT subscriber with a deployed (local) SELECTserver• NON-SELECT or Node Locked user• Evaluation Only - No license information
The wizard steps you through the activation process based on the options selected.
SELECT Subscriber Activating Against a Hosted (Bentley) SELECTserverIf you are activating against a hosted (Bentley) SELECTserver, the Server Name is pre-populated but youmust provide the proper Activation Key provided by the Bentley Sales Support Center (http://www.bentley.com/en-US/Services/Bentley+Sales+Support.htm).1. Select SELECT subscriber activating against a hosted (Bentley) SELECTserver and click Next.
The Activating against a SELECTserver page opens.2. Enter the site activation key in the Site Activation Key field.3. If you are using HTTPS, turn on HTTPS (SSL).4. If you are using a proxy server to connect to the SELECTserver, click the Proxy button and fill in the
Proxy Server information, then click OK.5. Click Test Connection to verify the connection to the SELECTserver.
eB Core Server ConfigurationActivating Your Product
eB Information Manager 29 Implementation Guide

6. Click Next.The Country of Use page opens.
7. Select the country where you will be using this product and click Next.The Wizard Selections page displays the information provided on the previous pages.
8. Review the information and click Finish to activate the product.
SELECT Subscriber with a Deployed (local) SELECTserverIf you are activating against a local SELECTserver, you must provide the proper Server Name andActivation Key. The Server Name and Activation Key, along with any proxy configuration information,can be obtained from your Site Administrator.1. Select SELECT subscribers with a deployed (local) SELECTserver and click Next.
The Activating against a SELECTserver page opens.2. Enter the name of the server in the Server Name field.3. Enter the site activation key in the Site Activation Key field.4. If you are using HTTPS, turn on HTTPS (SSL).5. If you are using a proxy server to connect to the SELECTserver, click the Proxy button and fill in the
Proxy Server information, then click OK.6. Click Test Connection to verify the connection to the SELECTserver.7. Click Next.
The Country of Use page opens.8. Select the country where you will be using this product and click Next.
The Wizard Selections page displays the information provided on the previous pages.9. Review the information and click Finish to activate the product.
NON-SELECT or Node Locked UserIf you are not a Bentley SELECT subscriber and you are activating your product, you are presented withthree options:
I have a license file ready to import1. Enter the path to your license file (or Browse to the location of your license file) in the License File
field.2. Click Next.
The Wizard Selections page displays the information provided on the previous pages.3. Review the information and click Finish to activate the product.
I have an activation key1. Enter the site activation key in the Site Activation Key field.2. If you are using HTTPS, turn on HTTPS (SSL).3. If you are using a proxy server to connect to the SELECTserver, click the Proxy button and fill in the
Proxy Server information, then click OK.4. Click Test Connection to verify the connection to the SELECTserver.5. Click Next.
eB Core Server ConfigurationActivating Your Product
eB Information Manager 30 Implementation Guide
The Check out license now? page displays.6. Enter your email address in the Email Address field.7. Select the product to be activated (if not pre-populated) in the Product Name field.8. Enter the product version number (if not pre-populated) in the Product Version field.9. Click Next.
The Country of Use page opens.10. Select the country where you will be using this product and click Next.
The Wizard Selections page displays the information provided on the previous pages.11. Review the information and click Finish to activate the product.
I do not have any license information1. The product will run in evaluation mode.2. Click Go To Bentley.com to request activation information.
Evaluation Only - No License Information1. The product will run in evaluation mode.2. Click Go To Bentley.com to request activation information.
Setting Up a Community and Configuring eB ServicesNow that you have set up the database and installed eB Core Server, the next step is to create andconfigure an eB community.System level community configuration is performed in eB System Management Console which isdelivered with eB Core Server. Generally speaking, once the system is configured using eB SystemManagement Console you then move on to eB Director, which is a separate client installation, toconfigure community data.While it is beyond the scope of this document to discuss all possible configuration items in eB SystemManagement Console and eB Director, this section discusses how to complete the following tasks, withthe goal of getting a basic, usable eB community up and running:• Create a datasource - eB System Management Console
This is your connection from the eB Application Server to the database.• Create a community - eB System Management Console
The community points to a specific datasource on a specific eB Application Server, and is what userslog in to, to access documents and data.
• Create a storage device and a repository for the community - eB System Management ConsoleThe repository is where files that get added to a community are stored.
• Create document classes - eB DirectorDocument classes are required to create documents in the community. Document classes must alsoexist in order to configure FTR in eB System Management Console.
• Activate services for the community - eB System Management Console
eB Core Server ConfigurationSetting Up a Community and Configuring eB Services
eB Information Manager 31 Implementation Guide
Each eB service performs a specific function, but your community may not need to use all of theavailable services. After creating the community, you need to activate which of the available servicesrunning on the eB Core Server computer you want to serve your community.
Note: The sections that follow are reproduced from eB System Management Console and eB Directordocumentation.• For complete documentation about using eB System Management Console, see the eB System
Management Console Guide.• For complete documentation about using eB Director, see the eB Administration Guide and also the
eB Director User Guide.
To Create a Datasource
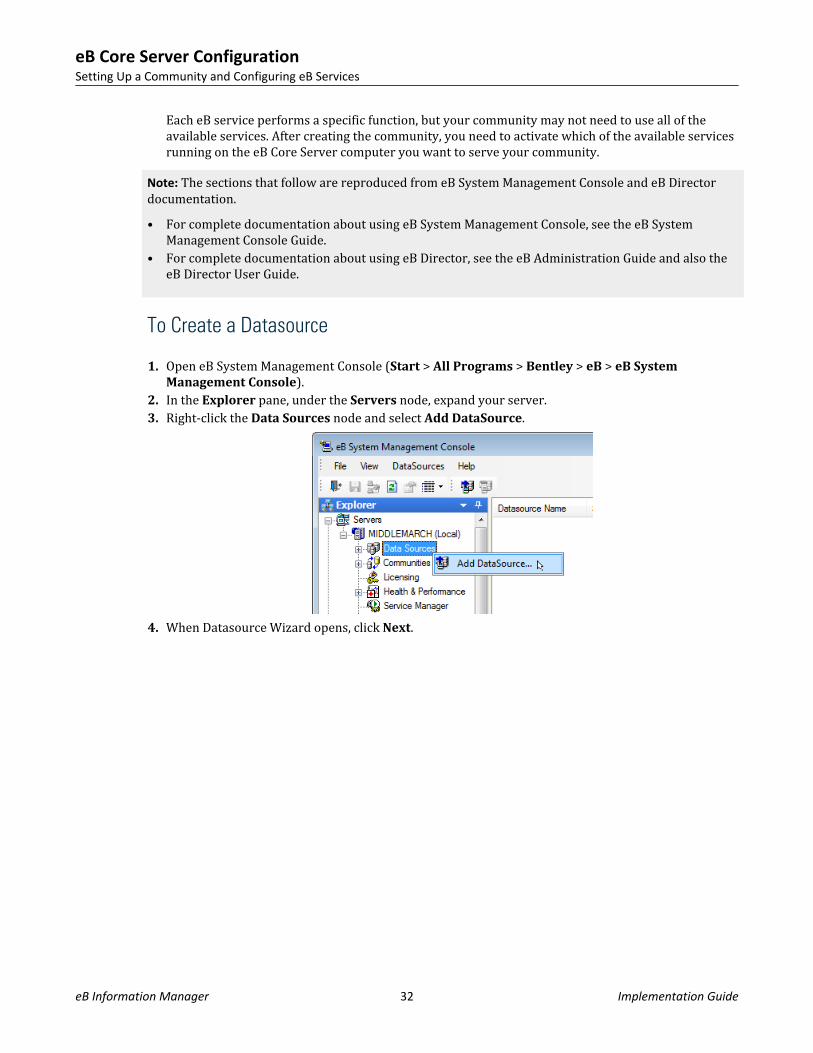
1. Open eB System Management Console (Start > All Programs > Bentley > eB > eB SystemManagement Console).
2. In the Explorer pane, under the Servers node, expand your server.3. Right-click the Data Sources node and select Add DataSource.
4. When Datasource Wizard opens, click Next.
eB Core Server ConfigurationSetting Up a Community and Configuring eB Services
eB Information Manager 32 Implementation Guide

5. On the Select Database Type page, select the driver (Microsoft SQL Server or Oracle) that matchesyour database and click Next.
(The Microsoft SQL Server driver is always listed; the Oracle driver only appears if Oracle clientsoftware is installed on this computer.)The pages that open next depend on which driver you selected.
6. Do one of the following:If you selected the SQL Server driver:• On the Select Server page, in the Database Server field, enter the name of or select the
computer on which SQL Server is installed (or select (Local) if SQL Server is installed on thiscomputer) and click Next.
eB Core Server ConfigurationSetting Up a Community and Configuring eB Services
eB Information Manager 33 Implementation Guide

• On the Login Information page, enter the user name and password of the database account usedto log in to the selected SQL Server instance, or if database account is a Windows account selectUse Windows Authentication, and click Next.
• On the Select Database page, select the database you created for eB and click Next.orIf you selected the Oracle driver:• On the Select Server page, in the Host String field, enter the local net service name (from the
tnsnames.ora file) that connects to your Oracle instance and click Next.• On the Login Information page, enter the user name and password of the database account used
to log in to Oracle and click Next.7. On the eB Data Source Name page, enter a name for the new eB datasource and click Next.
The name of the selected database is automatically supplied as the default name for the datasource.You can keep these names the same, or you can enter a new name for the datasource.
8. On the Ready page, click Finish.
9. On the Finished page, click Close.
eB Core Server ConfigurationSetting Up a Community and Configuring eB Services
eB Information Manager 34 Implementation Guide
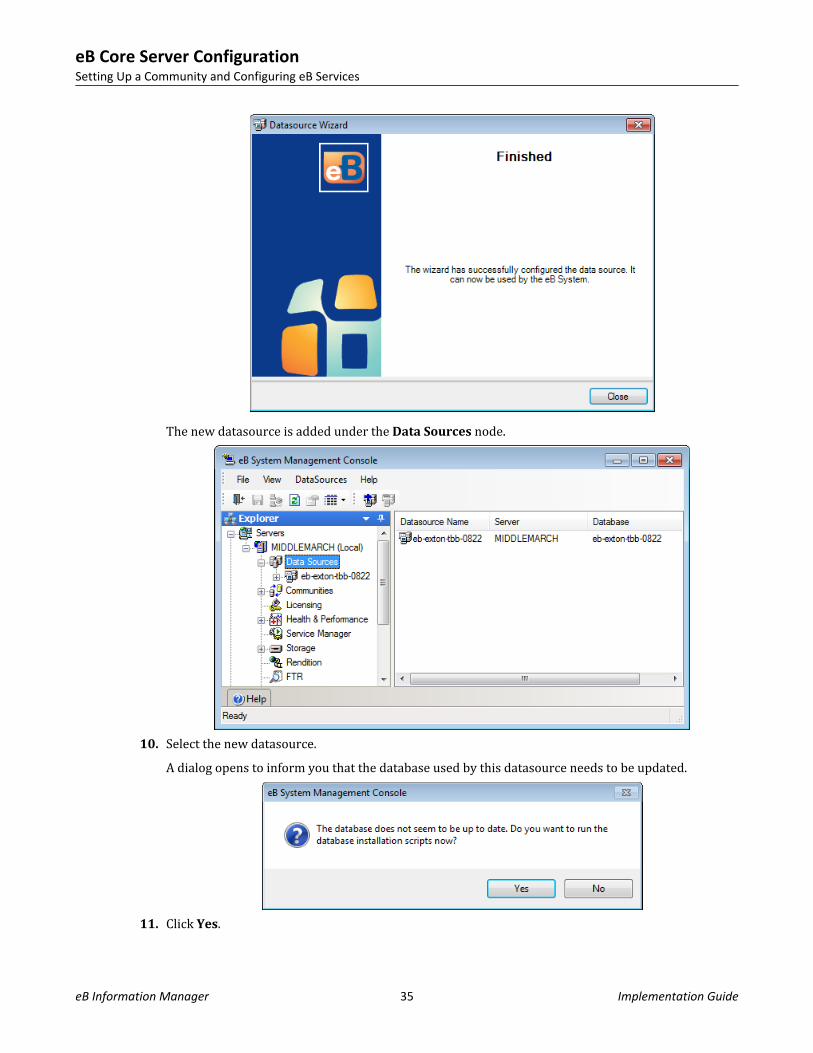
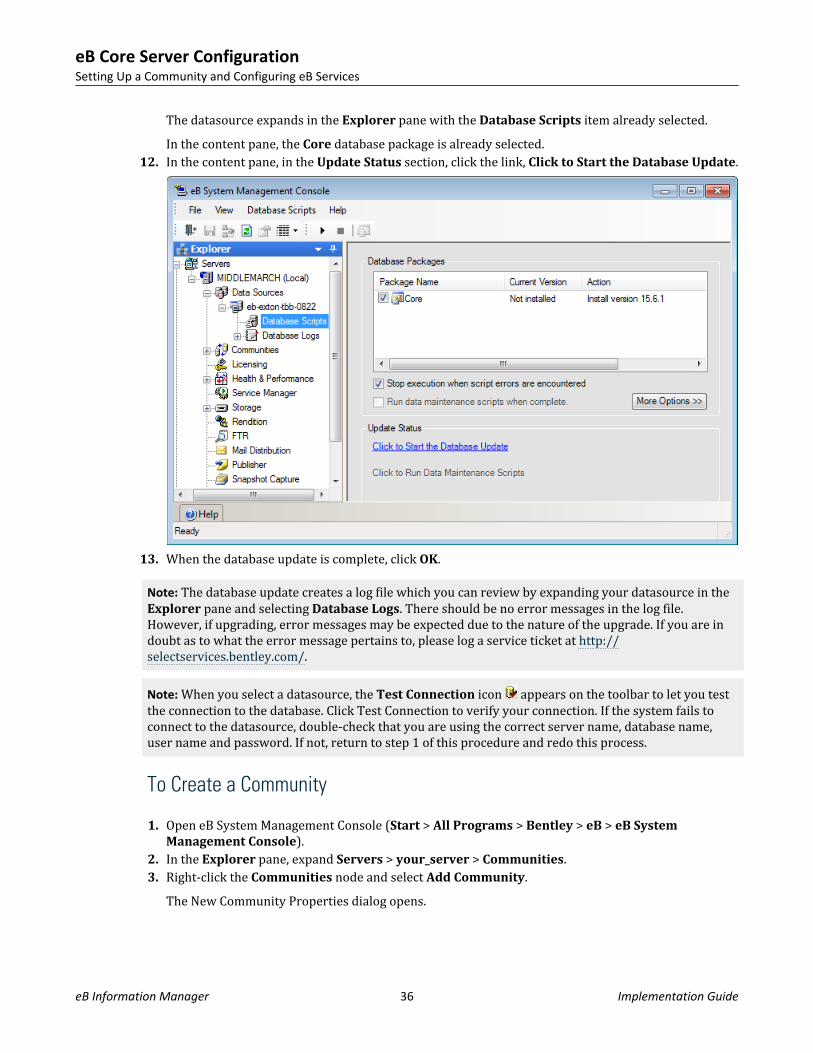
The new datasource is added under the Data Sources node.
10. Select the new datasource.A dialog opens to inform you that the database used by this datasource needs to be updated.
11. Click Yes.
eB Core Server ConfigurationSetting Up a Community and Configuring eB Services
eB Information Manager 35 Implementation Guide
The datasource expands in the Explorer pane with the Database Scripts item already selected.In the content pane, the Core database package is already selected.
12. In the content pane, in the Update Status section, click the link, Click to Start the Database Update.
13. When the database update is complete, click OK.
Note: The database update creates a log file which you can review by expanding your datasource in theExplorer pane and selecting Database Logs. There should be no error messages in the log file.However, if upgrading, error messages may be expected due to the nature of the upgrade. If you are indoubt as to what the error message pertains to, please log a service ticket at http://selectservices.bentley.com/.
Note: When you select a datasource, the Test Connection icon appears on the toolbar to let you testthe connection to the database. Click Test Connection to verify your connection. If the system fails toconnect to the datasource, double-check that you are using the correct server name, database name,user name and password. If not, return to step 1 of this procedure and redo this process.
To Create a Community
1. Open eB System Management Console (Start > All Programs > Bentley > eB > eB SystemManagement Console).
2. In the Explorer pane, expand Servers > your_server > Communities.3. Right-click the Communities node and select Add Community.
The New Community Properties dialog opens.
eB Core Server ConfigurationSetting Up a Community and Configuring eB Services
eB Information Manager 36 Implementation Guide
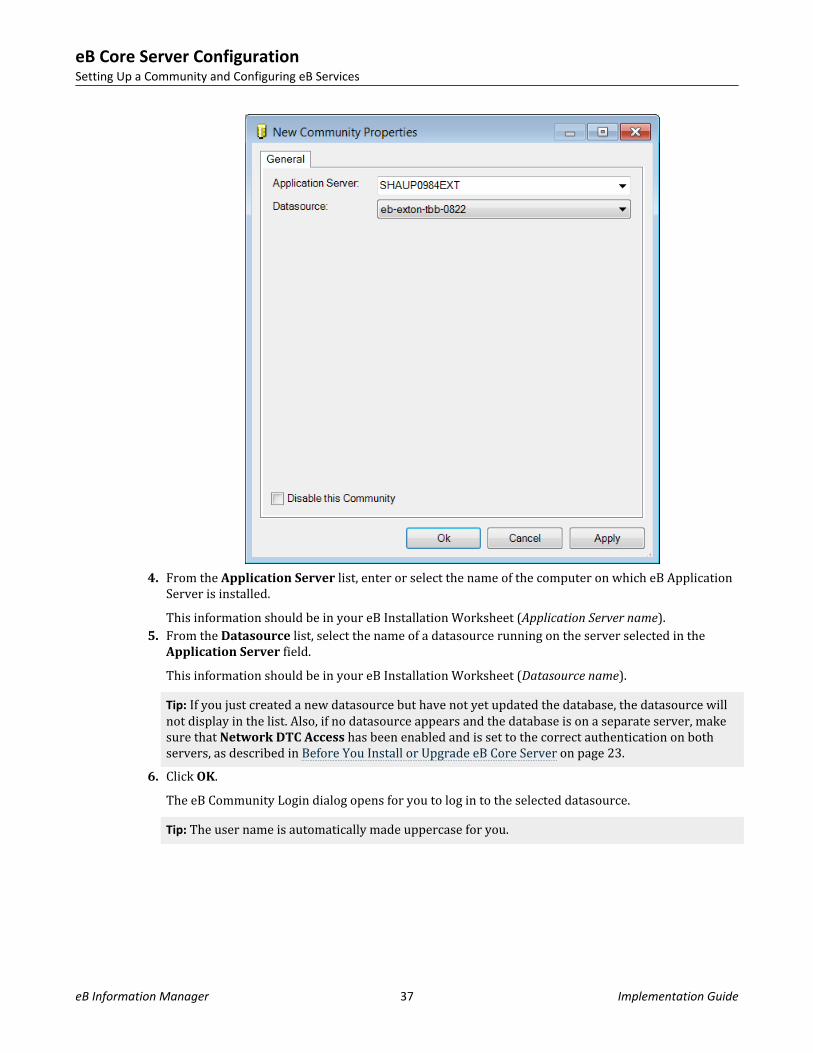
4. From the Application Server list, enter or select the name of the computer on which eB ApplicationServer is installed.This information should be in your eB Installation Worksheet (Application Server name).
5. From the Datasource list, select the name of a datasource running on the server selected in theApplication Server field.This information should be in your eB Installation Worksheet (Datasource name).Tip: If you just created a new datasource but have not yet updated the database, the datasource willnot display in the list. Also, if no datasource appears and the database is on a separate server, makesure that Network DTC Access has been enabled and is set to the correct authentication on bothservers, as described in Before You Install or Upgrade eB Core Server on page 23.
6. Click OK.The eB Community Login dialog opens for you to log in to the selected datasource.Tip: The user name is automatically made uppercase for you.
eB Core Server ConfigurationSetting Up a Community and Configuring eB Services
eB Information Manager 37 Implementation Guide
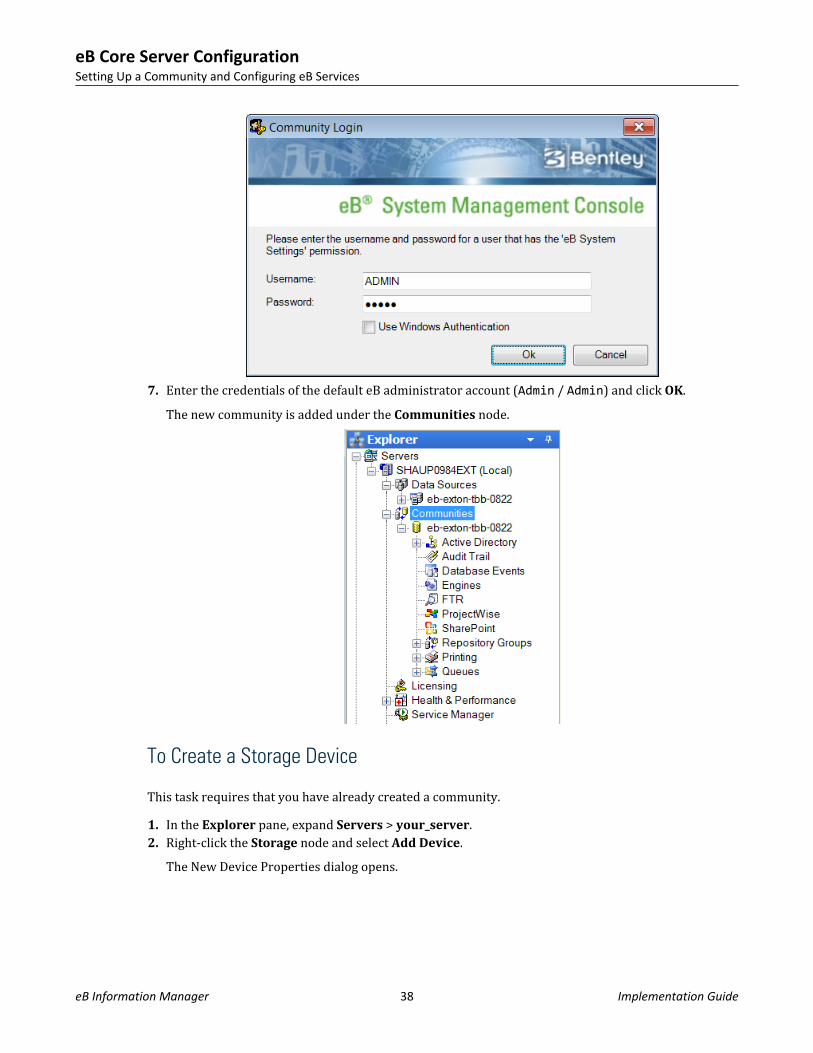
7. Enter the credentials of the default eB administrator account (Admin / Admin) and click OK.The new community is added under the Communities node.
To Create a Storage Device
This task requires that you have already created a community.1. In the Explorer pane, expand Servers > your_server.2. Right-click the Storage node and select Add Device.
The New Device Properties dialog opens.
eB Core Server ConfigurationSetting Up a Community and Configuring eB Services
eB Information Manager 38 Implementation Guide
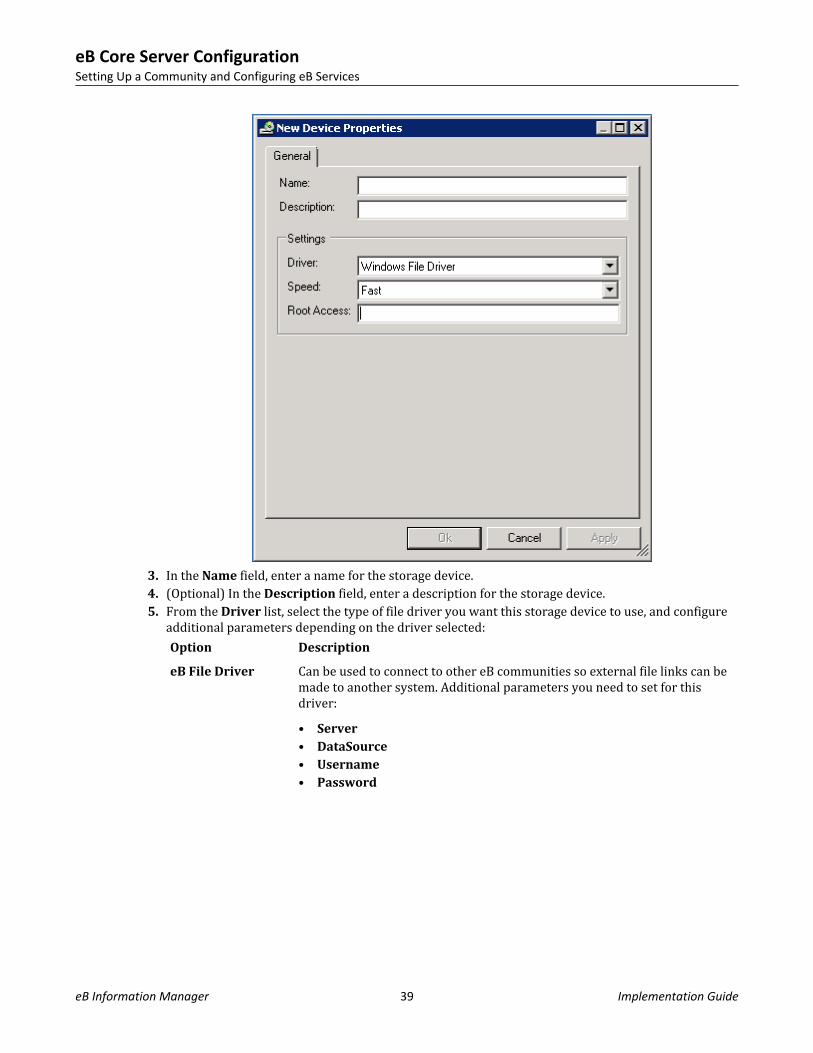
3. In the Name field, enter a name for the storage device.4. (Optional) In the Description field, enter a description for the storage device.5. From the Driver list, select the type of file driver you want this storage device to use, and configure
additional parameters depending on the driver selected:Option Description
eB File Driver Can be used to connect to other eB communities so external file links can bemade to another system. Additional parameters you need to set for thisdriver:• Server• DataSource• Username• Password
eB Core Server ConfigurationSetting Up a Community and Configuring eB Services
eB Information Manager 39 Implementation Guide
Option Description
FTP File Driver Used if the mechanism for copying files between the eB Application Serverand repository is to be FTP (File Transfer Protocol). This is a commonconfiguration if the repository resides on a non-Windows computer (such asUNIX).• FTP Server• User ID• Password• Port
HTTP File Driver Used if the mechanism for copying files between the eB Application Serverand repository is to be HTTP (Hypertext Transfer Protocol.)• Username• Password
ProjectWise FileDriver
This driver is only available if you install the eB ProjectWise Connector. See Integrating eB with ProjectWise on page 121 for details.
Windows FileDriver
Used if the storage device points to a logical drive whereby normal Windowsread/writes are processed. This driver has no additional configurationparameters.
Windows FileDriver with SecureDelete
Used if the storage device points to a logical drive whereby normal Windowsread/writes are processed. Deleted files will have their data overwritten toprevent recovery by any file recovery software. This driver has no additionalconfiguration parameters.
6. From the Speed list, select a response time for the selected file driver. For example, optical isconsidered slow and local magnetic disks are considered fast.
7. In the Root Access field, enter a location on the file storage server where you want this device topoint to.The location can be a folder on the local computer or a remote computer. If the folder is local, theformat can be a logical path (for example, C:\eBStorage) or a UNC path (for example,\\Server_name\eBStorages). If the folder is on a remote computer, you must use a UNC path. Ifthe folder does not exist yet, eB will prompt you to create it when you click OK. If you choose not tolet eB create the folder for you, you will need to create the folder manually before objects can beadded to eB.
8. Click OK.
eB Core Server ConfigurationSetting Up a Community and Configuring eB Services
eB Information Manager 40 Implementation Guide
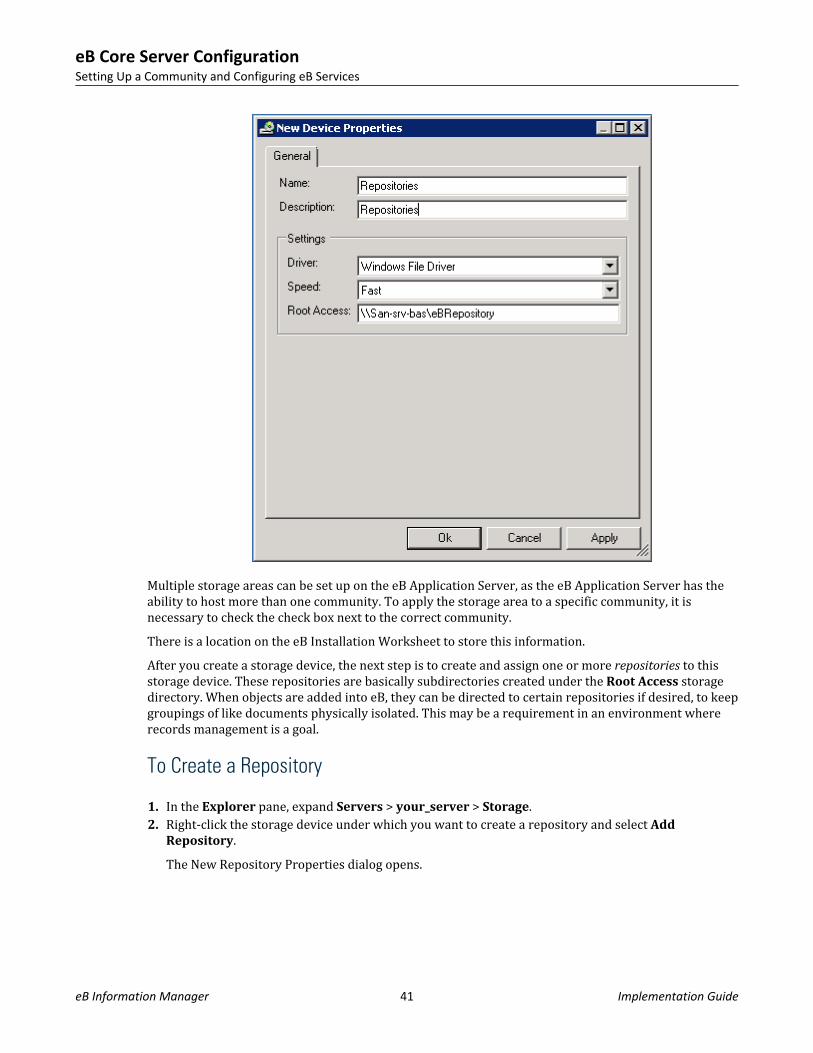
Multiple storage areas can be set up on the eB Application Server, as the eB Application Server has theability to host more than one community. To apply the storage area to a specific community, it isnecessary to check the check box next to the correct community.There is a location on the eB Installation Worksheet to store this information.After you create a storage device, the next step is to create and assign one or more repositories to thisstorage device. These repositories are basically subdirectories created under the Root Access storagedirectory. When objects are added into eB, they can be directed to certain repositories if desired, to keepgroupings of like documents physically isolated. This may be a requirement in an environment whererecords management is a goal.
To Create a Repository
1. In the Explorer pane, expand Servers > your_server > Storage.2. Right-click the storage device under which you want to create a repository and select Add
Repository.The New Repository Properties dialog opens.
eB Core Server ConfigurationSetting Up a Community and Configuring eB Services
eB Information Manager 41 Implementation Guide
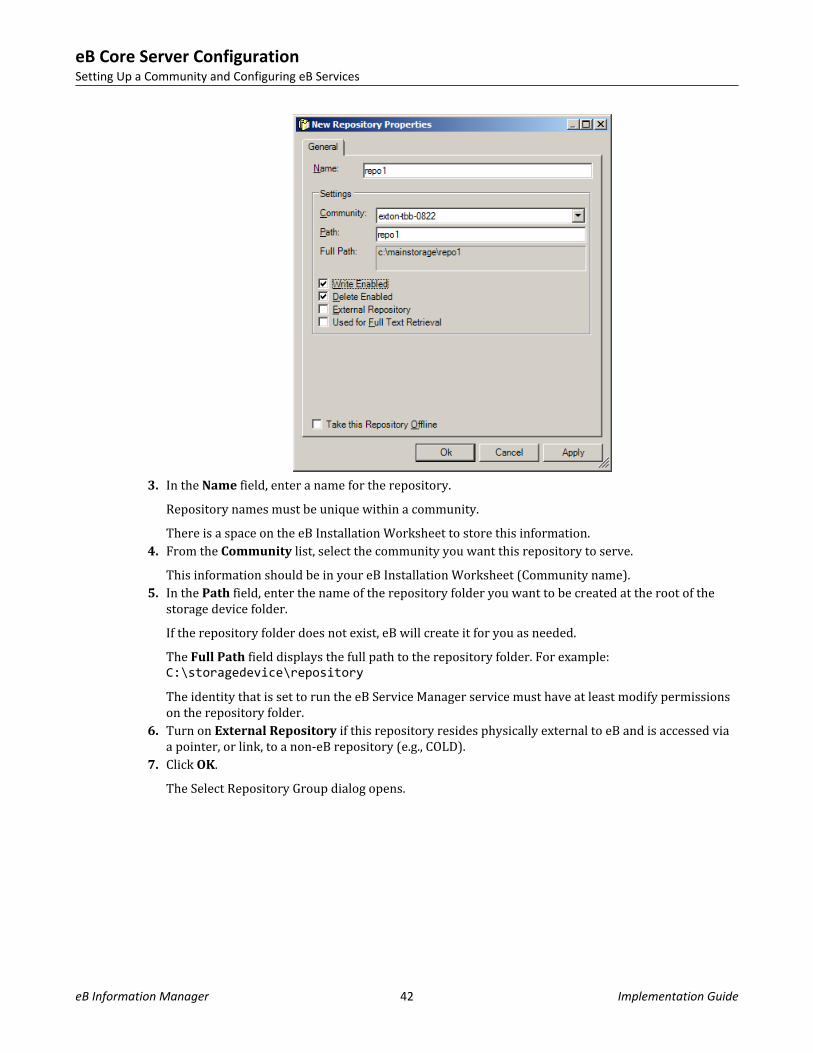
3. In the Name field, enter a name for the repository.Repository names must be unique within a community.There is a space on the eB Installation Worksheet to store this information.
4. From the Community list, select the community you want this repository to serve.This information should be in your eB Installation Worksheet (Community name).
5. In the Path field, enter the name of the repository folder you want to be created at the root of thestorage device folder.If the repository folder does not exist, eB will create it for you as needed.The Full Path field displays the full path to the repository folder. For example:C:\storagedevice\repository
The identity that is set to run the eB Service Manager service must have at least modify permissionson the repository folder.
6. Turn on External Repository if this repository resides physically external to eB and is accessed viaa pointer, or link, to a non-eB repository (e.g., COLD).
7. Click OK.The Select Repository Group dialog opens.
eB Core Server ConfigurationSetting Up a Community and Configuring eB Services
eB Information Manager 42 Implementation Guide
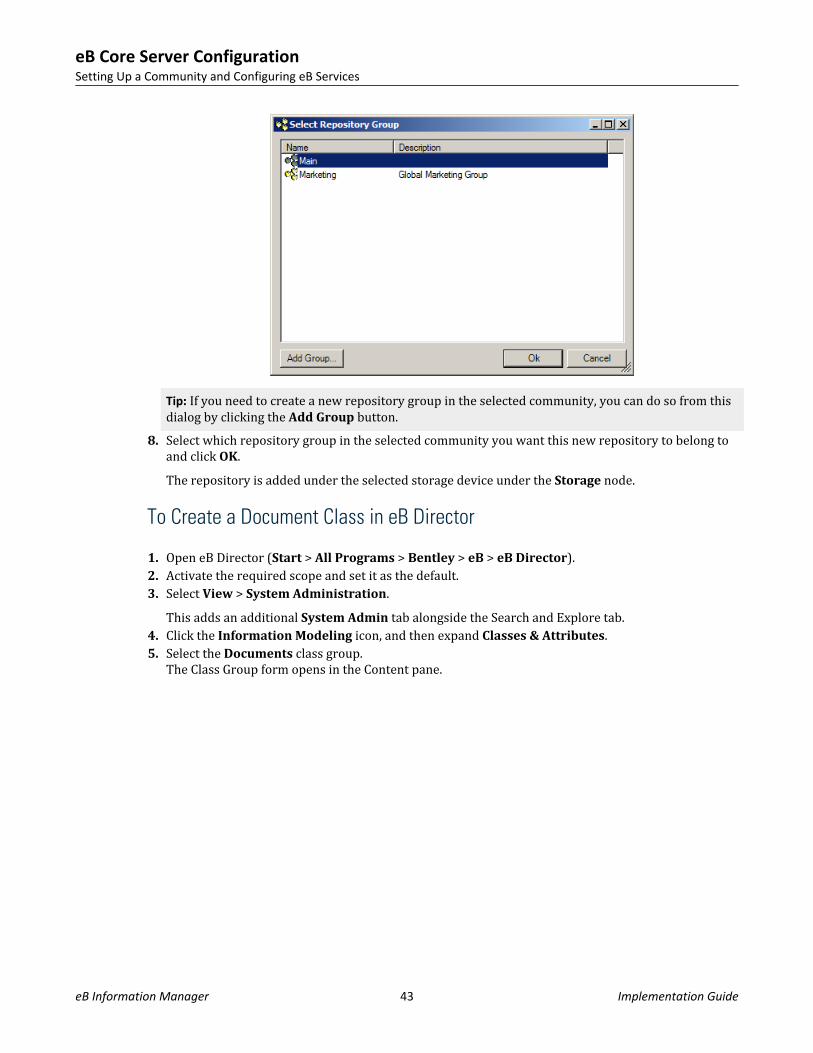
Tip: If you need to create a new repository group in the selected community, you can do so from thisdialog by clicking the Add Group button.
8. Select which repository group in the selected community you want this new repository to belong toand click OK.The repository is added under the selected storage device under the Storage node.
To Create a Document Class in eB Director
1. Open eB Director (Start > All Programs > Bentley > eB > eB Director).2. Activate the required scope and set it as the default.3. Select View > System Administration.
This adds an additional System Admin tab alongside the Search and Explore tab.4. Click the Information Modeling icon, and then expand Classes & Attributes.5. Select the Documents class group.
The Class Group form opens in the Content pane.
eB Core Server ConfigurationSetting Up a Community and Configuring eB Services
eB Information Manager 43 Implementation Guide
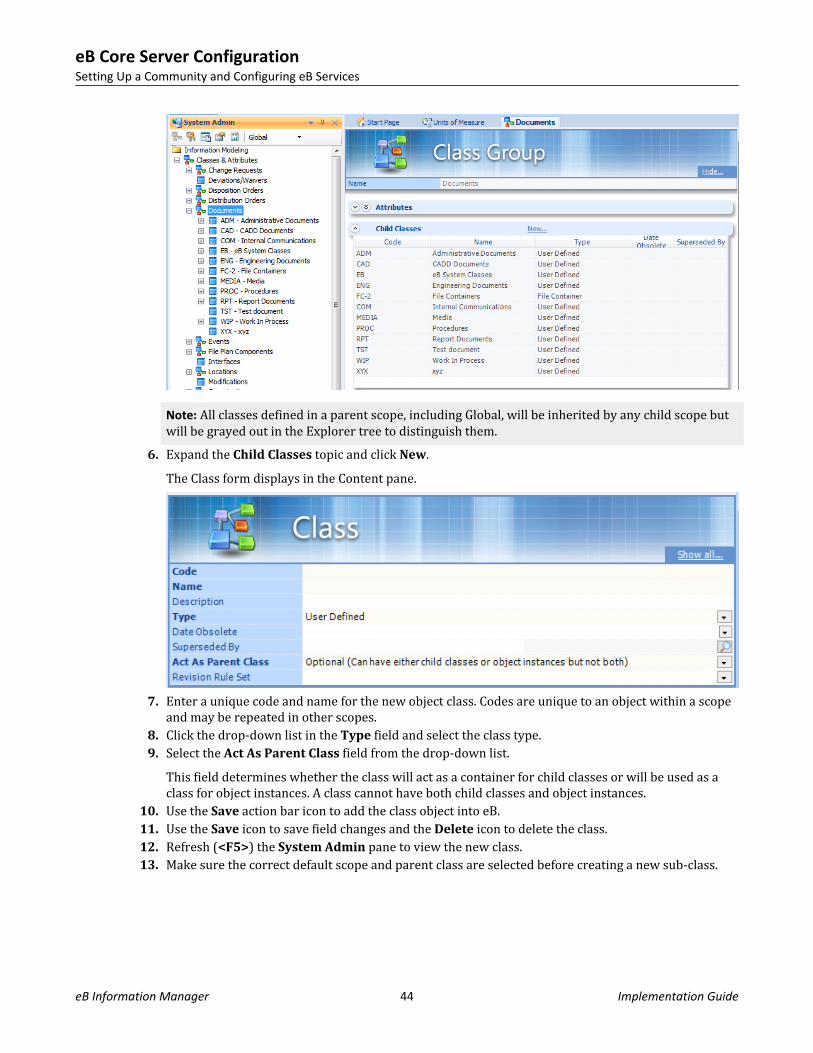
Note: All classes defined in a parent scope, including Global, will be inherited by any child scope butwill be grayed out in the Explorer tree to distinguish them.
6. Expand the Child Classes topic and click New.The Class form displays in the Content pane.
7. Enter a unique code and name for the new object class. Codes are unique to an object within a scopeand may be repeated in other scopes.
8. Click the drop-down list in the Type field and select the class type.9. Select the Act As Parent Class field from the drop-down list.
This field determines whether the class will act as a container for child classes or will be used as aclass for object instances. A class cannot have both child classes and object instances.
10. Use the Save action bar icon to add the class object into eB.11. Use the Save icon to save field changes and the Delete icon to delete the class.12. Refresh (<F5>) the System Admin pane to view the new class.13. Make sure the correct default scope and parent class are selected before creating a new sub-class.
eB Core Server ConfigurationSetting Up a Community and Configuring eB Services
eB Information Manager 44 Implementation Guide
Configuring the Services on This Computer
In addition to the eB Application Server, the eB Core Server installer by default installs many additionaleB services. These services are managed in eB System Management Console.The basic status and properties of these services are managed through the Service Manager node.There is also a dedicated node for each service, where you can select which communities are served bythat service running on that computer:• eB Storage Service - Storage node• eB Rendition Service - Rendition node• eB Print Service - Print node• eB FTR Service - FTR node• eB Mail Distribution Service - Mail Distribution node• eB Publishing Service - Publisher node• eB Snapshot Capture Service - Snapshot Capture node• eB Document Creation Service - Document Creation node• eB Work Queue Service - Work Queue nodeWhen you select one of these nodes, the content pane displays a list of available communities (theCommunities Served list). There is a check box next to each community in the list. If the check box ischecked, it means this service running on this computer is activated for (is available for serving) thiscommunity.For most of these services, all you need to do is check the check box next to any community you want tobe served by that service. When you check the check box, you will be prompted to log in to thatcommunity. Some nodes, which are discussed below, require additional settings.
Configuring the eB Mail Distribution ServiceThere are occasions when eB users need to be emailed, for example to inform them of impending workwithin a workflow scenario. At such time, eB connects to an email server that distributes the emails. Forthis to work, you must configure the community in the Mail Distribution node to point to an emailserver.1. Select the Mail Distribution node.2. In the Communities Served list, check the check box for a community and log in when prompted, or
right-click a community that is already checked and select Properties.The Properties dialog opens for that community.
eB Core Server ConfigurationSetting Up a Community and Configuring eB Services
eB Information Manager 45 Implementation Guide
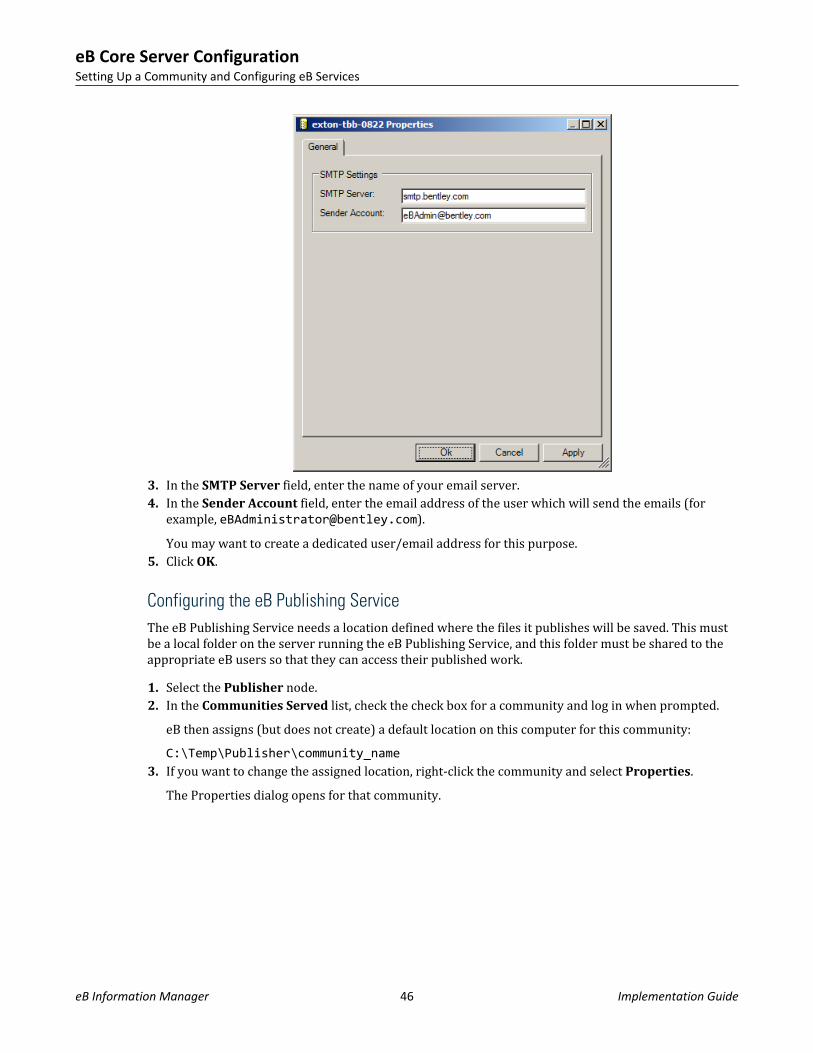
3. In the SMTP Server field, enter the name of your email server.4. In the Sender Account field, enter the email address of the user which will send the emails (for
example, [email protected]).You may want to create a dedicated user/email address for this purpose.
5. Click OK.
Configuring the eB Publishing ServiceThe eB Publishing Service needs a location defined where the files it publishes will be saved. This mustbe a local folder on the server running the eB Publishing Service, and this folder must be shared to theappropriate eB users so that they can access their published work.1. Select the Publisher node.2. In the Communities Served list, check the check box for a community and log in when prompted.
eB then assigns (but does not create) a default location on this computer for this community:C:\Temp\Publisher\community_name
3. If you want to change the assigned location, right-click the community and select Properties.The Properties dialog opens for that community.
eB Core Server ConfigurationSetting Up a Community and Configuring eB Services
eB Information Manager 46 Implementation Guide
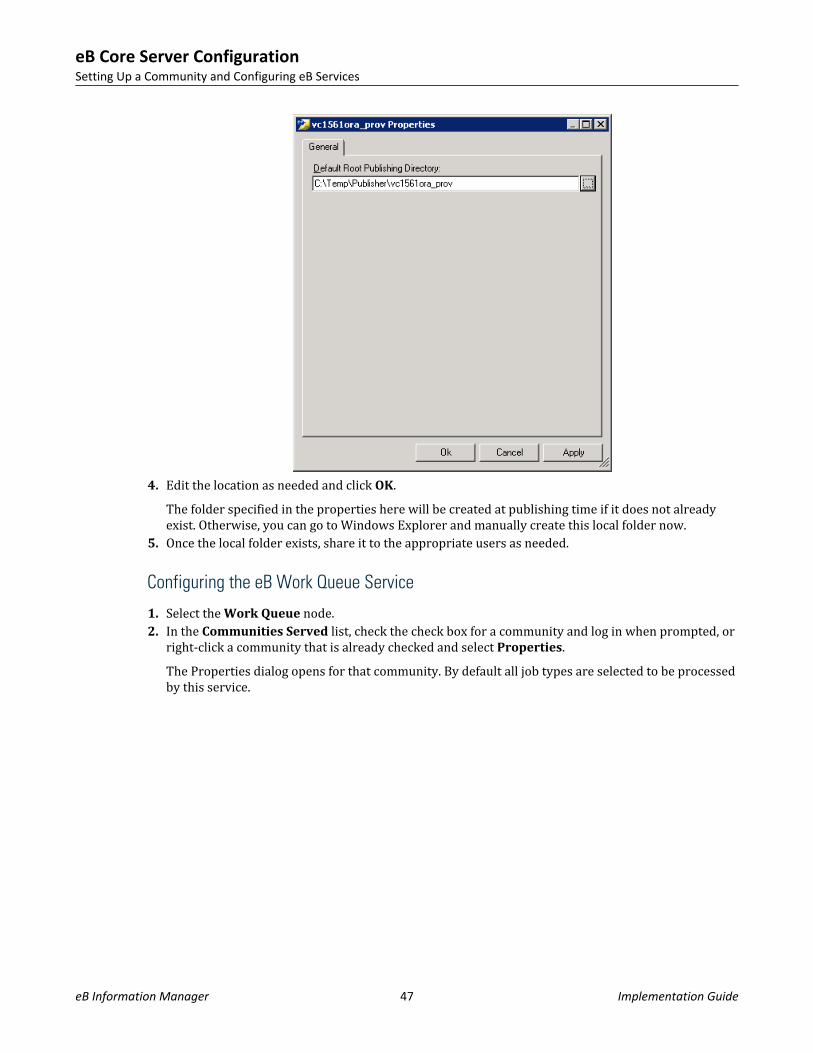
4. Edit the location as needed and click OK.The folder specified in the properties here will be created at publishing time if it does not alreadyexist. Otherwise, you can go to Windows Explorer and manually create this local folder now.
5. Once the local folder exists, share it to the appropriate users as needed.
Configuring the eB Work Queue Service
1. Select the Work Queue node.2. In the Communities Served list, check the check box for a community and log in when prompted, or
right-click a community that is already checked and select Properties.The Properties dialog opens for that community. By default all job types are selected to be processedby this service.
eB Core Server ConfigurationSetting Up a Community and Configuring eB Services
eB Information Manager 47 Implementation Guide
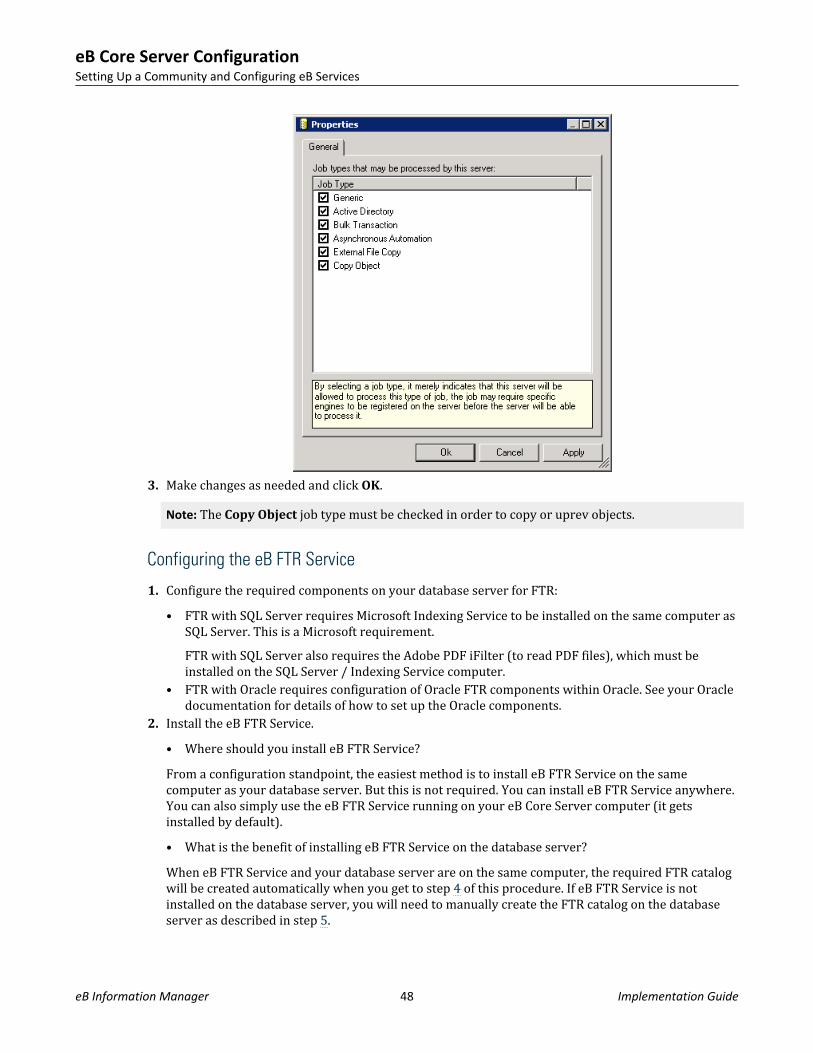
3. Make changes as needed and click OK.Note: The Copy Object job type must be checked in order to copy or uprev objects.
Configuring the eB FTR Service
1. Configure the required components on your database server for FTR:• FTR with SQL Server requires Microsoft Indexing Service to be installed on the same computer as
SQL Server. This is a Microsoft requirement.FTR with SQL Server also requires the Adobe PDF iFilter (to read PDF files), which must beinstalled on the SQL Server / Indexing Service computer.
• FTR with Oracle requires configuration of Oracle FTR components within Oracle. See your Oracledocumentation for details of how to set up the Oracle components.
2. Install the eB FTR Service.• Where should you install eB FTR Service?From a configuration standpoint, the easiest method is to install eB FTR Service on the samecomputer as your database server. But this is not required. You can install eB FTR Service anywhere.You can also simply use the eB FTR Service running on your eB Core Server computer (it getsinstalled by default).• What is the benefit of installing eB FTR Service on the database server?When eB FTR Service and your database server are on the same computer, the required FTR catalogwill be created automatically when you get to step 4 of this procedure. If eB FTR Service is notinstalled on the database server, you will need to manually create the FTR catalog on the databaseserver as described in step 5.
eB Core Server ConfigurationSetting Up a Community and Configuring eB Services
eB Information Manager 48 Implementation Guide
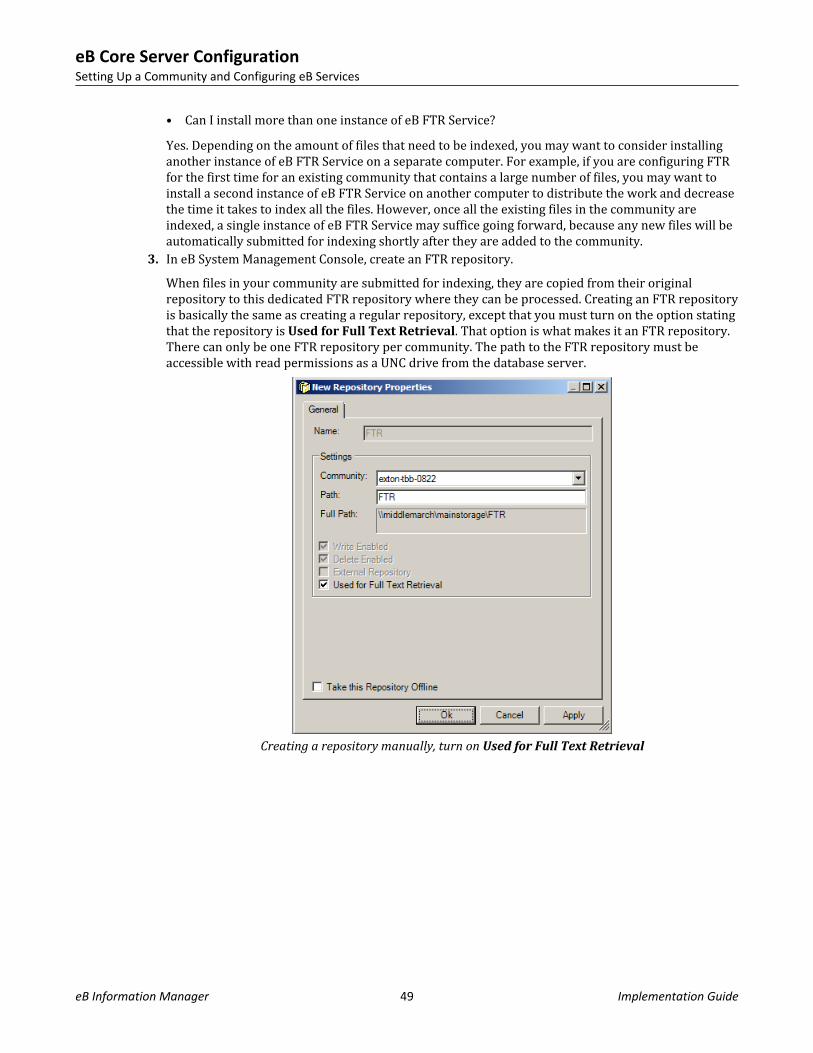
• Can I install more than one instance of eB FTR Service?Yes. Depending on the amount of files that need to be indexed, you may want to consider installinganother instance of eB FTR Service on a separate computer. For example, if you are configuring FTRfor the first time for an existing community that contains a large number of files, you may want toinstall a second instance of eB FTR Service on another computer to distribute the work and decreasethe time it takes to index all the files. However, once all the existing files in the community areindexed, a single instance of eB FTR Service may suffice going forward, because any new files will beautomatically submitted for indexing shortly after they are added to the community.
3. In eB System Management Console, create an FTR repository.When files in your community are submitted for indexing, they are copied from their originalrepository to this dedicated FTR repository where they can be processed. Creating an FTR repositoryis basically the same as creating a regular repository, except that you must turn on the option statingthat the repository is Used for Full Text Retrieval. That option is what makes it an FTR repository.There can only be one FTR repository per community. The path to the FTR repository must beaccessible with read permissions as a UNC drive from the database server.
Creating a repository manually, turn on Used for Full Text Retrieval
eB Core Server ConfigurationSetting Up a Community and Configuring eB Services
eB Information Manager 49 Implementation Guide

Creating a repository using the Storage Wizard, turn on Repository will be used for Full TextRetrieval
4. In eB System Management Console, activate the eB FTR Service for your community and if possible,create the FTR catalog.a. In the Explorer pane, under the Servers node, expand your server.b. Select the main FTR node.c. In the Communities Served list, check the check box next to your community.
The FTR Properties dialog opens.
eB Core Server ConfigurationSetting Up a Community and Configuring eB Services
eB Information Manager 50 Implementation Guide
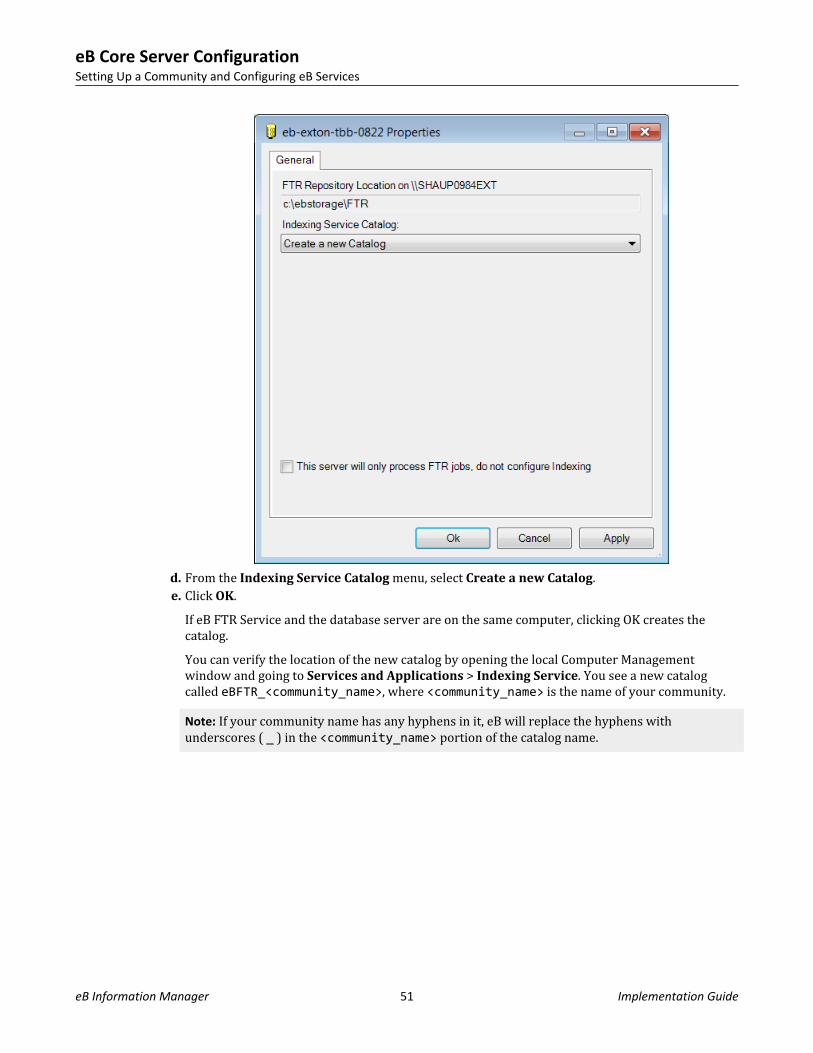
d. From the Indexing Service Catalog menu, select Create a new Catalog.e. Click OK.
If eB FTR Service and the database server are on the same computer, clicking OK creates thecatalog.You can verify the location of the new catalog by opening the local Computer Managementwindow and going to Services and Applications > Indexing Service. You see a new catalogcalled eBFTR_<community_name>, where <community_name> is the name of your community.Note: If your community name has any hyphens in it, eB will replace the hyphens withunderscores ( _ ) in the <community_name> portion of the catalog name.
eB Core Server ConfigurationSetting Up a Community and Configuring eB Services
eB Information Manager 51 Implementation Guide
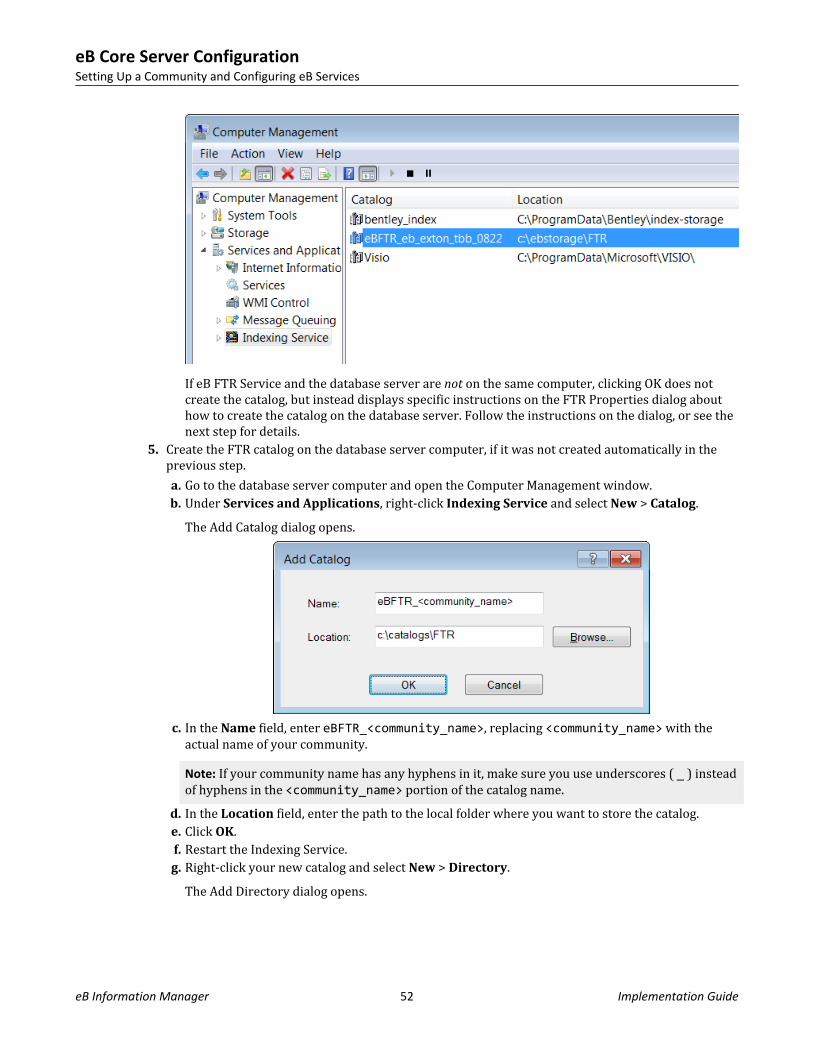
If eB FTR Service and the database server are not on the same computer, clicking OK does notcreate the catalog, but instead displays specific instructions on the FTR Properties dialog abouthow to create the catalog on the database server. Follow the instructions on the dialog, or see thenext step for details.
5. Create the FTR catalog on the database server computer, if it was not created automatically in theprevious step.a. Go to the database server computer and open the Computer Management window.b. Under Services and Applications, right-click Indexing Service and select New > Catalog.
The Add Catalog dialog opens.
c. In the Name field, enter eBFTR_<community_name>, replacing <community_name> with theactual name of your community.Note: If your community name has any hyphens in it, make sure you use underscores ( _ ) insteadof hyphens in the <community_name> portion of the catalog name.
d. In the Location field, enter the path to the local folder where you want to store the catalog.e. Click OK.f. Restart the Indexing Service.g. Right-click your new catalog and select New > Directory.
The Add Directory dialog opens.
eB Core Server ConfigurationSetting Up a Community and Configuring eB Services
eB Information Manager 52 Implementation Guide
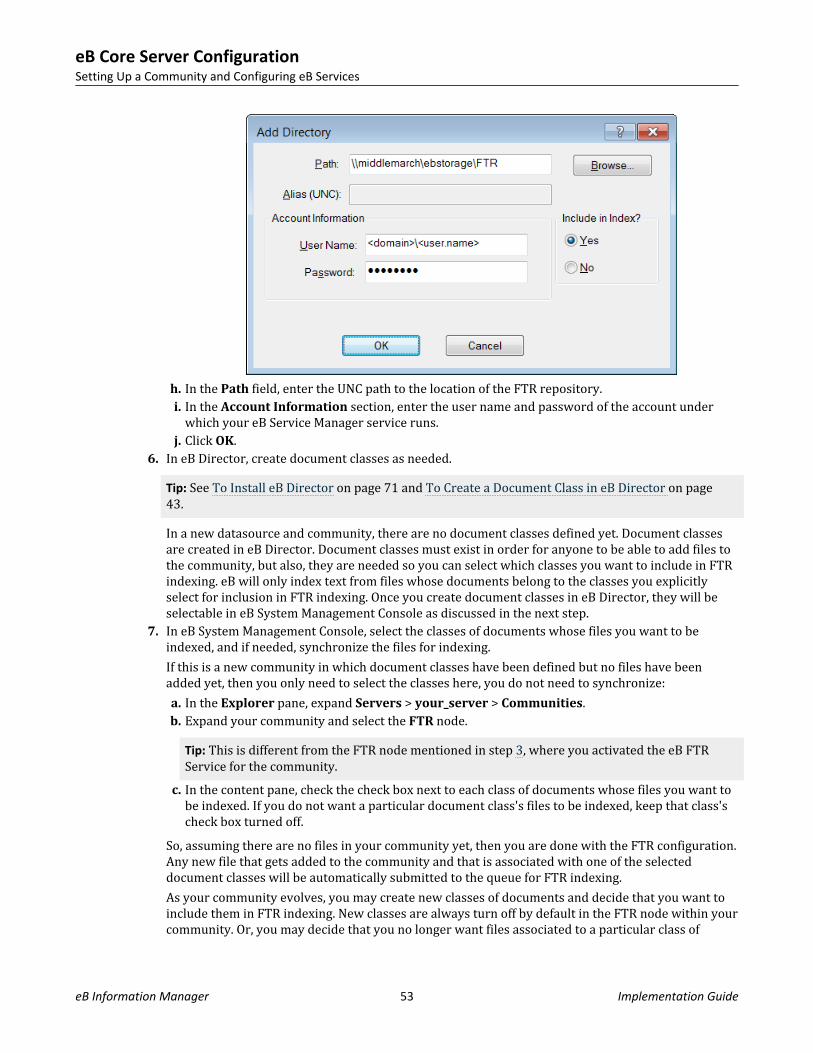
h. In the Path field, enter the UNC path to the location of the FTR repository.i. In the Account Information section, enter the user name and password of the account under
which your eB Service Manager service runs.j. Click OK.
6. In eB Director, create document classes as needed.Tip: See To Install eB Director on page 71 and To Create a Document Class in eB Director on page43.In a new datasource and community, there are no document classes defined yet. Document classesare created in eB Director. Document classes must exist in order for anyone to be able to add files tothe community, but also, they are needed so you can select which classes you want to include in FTRindexing. eB will only index text from files whose documents belong to the classes you explicitlyselect for inclusion in FTR indexing. Once you create document classes in eB Director, they will beselectable in eB System Management Console as discussed in the next step.
7. In eB System Management Console, select the classes of documents whose files you want to beindexed, and if needed, synchronize the files for indexing.If this is a new community in which document classes have been defined but no files have beenadded yet, then you only need to select the classes here, you do not need to synchronize:a. In the Explorer pane, expand Servers > your_server > Communities.b. Expand your community and select the FTR node.
Tip: This is different from the FTR node mentioned in step 3, where you activated the eB FTRService for the community.
c. In the content pane, check the check box next to each class of documents whose files you want tobe indexed. If you do not want a particular document class's files to be indexed, keep that class'scheck box turned off.
So, assuming there are no files in your community yet, then you are done with the FTR configuration.Any new file that gets added to the community and that is associated with one of the selecteddocument classes will be automatically submitted to the queue for FTR indexing.As your community evolves, you may create new classes of documents and decide that you want toinclude them in FTR indexing. New classes are always turn off by default in the FTR node within yourcommunity. Or, you may decide that you no longer want files associated to a particular class of
eB Core Server ConfigurationSetting Up a Community and Configuring eB Services
eB Information Manager 53 Implementation Guide
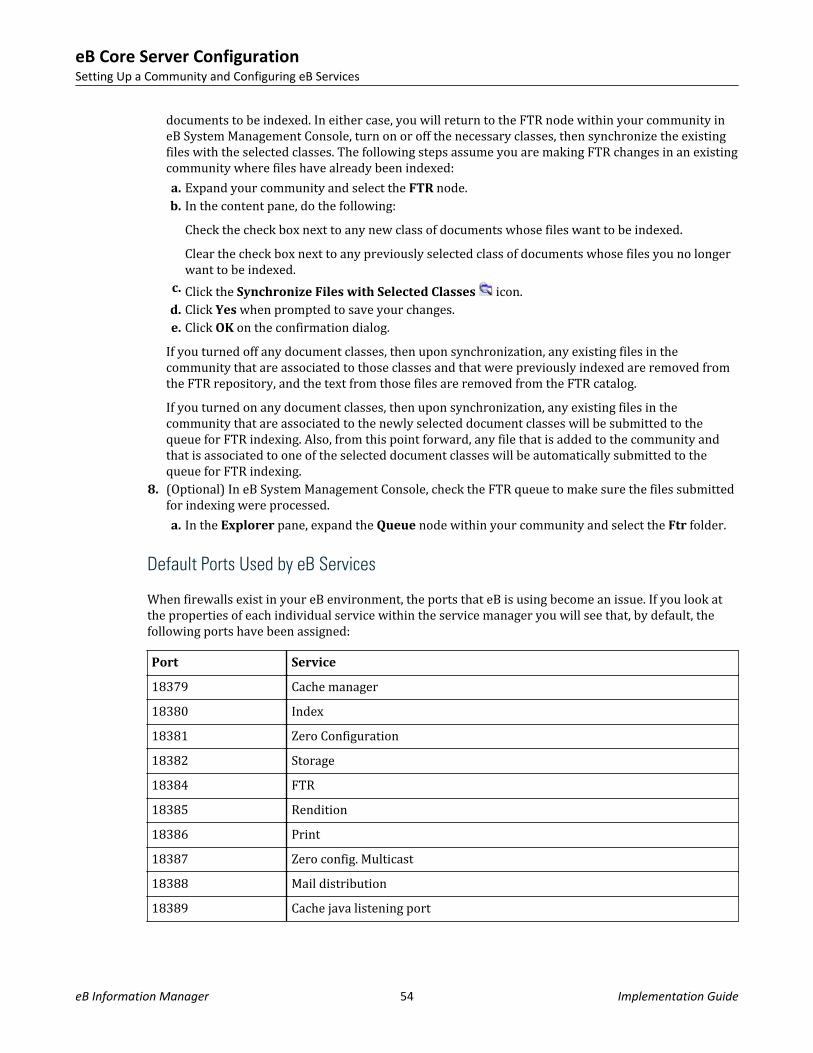
documents to be indexed. In either case, you will return to the FTR node within your community ineB System Management Console, turn on or off the necessary classes, then synchronize the existingfiles with the selected classes. The following steps assume you are making FTR changes in an existingcommunity where files have already been indexed:a. Expand your community and select the FTR node.b. In the content pane, do the following:
Check the check box next to any new class of documents whose files want to be indexed.Clear the check box next to any previously selected class of documents whose files you no longerwant to be indexed.
c. Click the Synchronize Files with Selected Classes icon.d. Click Yes when prompted to save your changes.e. Click OK on the confirmation dialog.
If you turned off any document classes, then upon synchronization, any existing files in thecommunity that are associated to those classes and that were previously indexed are removed fromthe FTR repository, and the text from those files are removed from the FTR catalog.If you turned on any document classes, then upon synchronization, any existing files in thecommunity that are associated to the newly selected document classes will be submitted to thequeue for FTR indexing. Also, from this point forward, any file that is added to the community andthat is associated to one of the selected document classes will be automatically submitted to thequeue for FTR indexing.
8. (Optional) In eB System Management Console, check the FTR queue to make sure the files submittedfor indexing were processed.a. In the Explorer pane, expand the Queue node within your community and select the Ftr folder.
Default Ports Used by eB Services
When firewalls exist in your eB environment, the ports that eB is using become an issue. If you look atthe properties of each individual service within the service manager you will see that, by default, thefollowing ports have been assigned:Port Service
18379 Cache manager18380 Index18381 Zero Configuration18382 Storage18384 FTR18385 Rendition18386 Print18387 Zero config. Multicast18388 Mail distribution18389 Cache java listening port
eB Core Server ConfigurationSetting Up a Community and Configuring eB Services
eB Information Manager 54 Implementation Guide
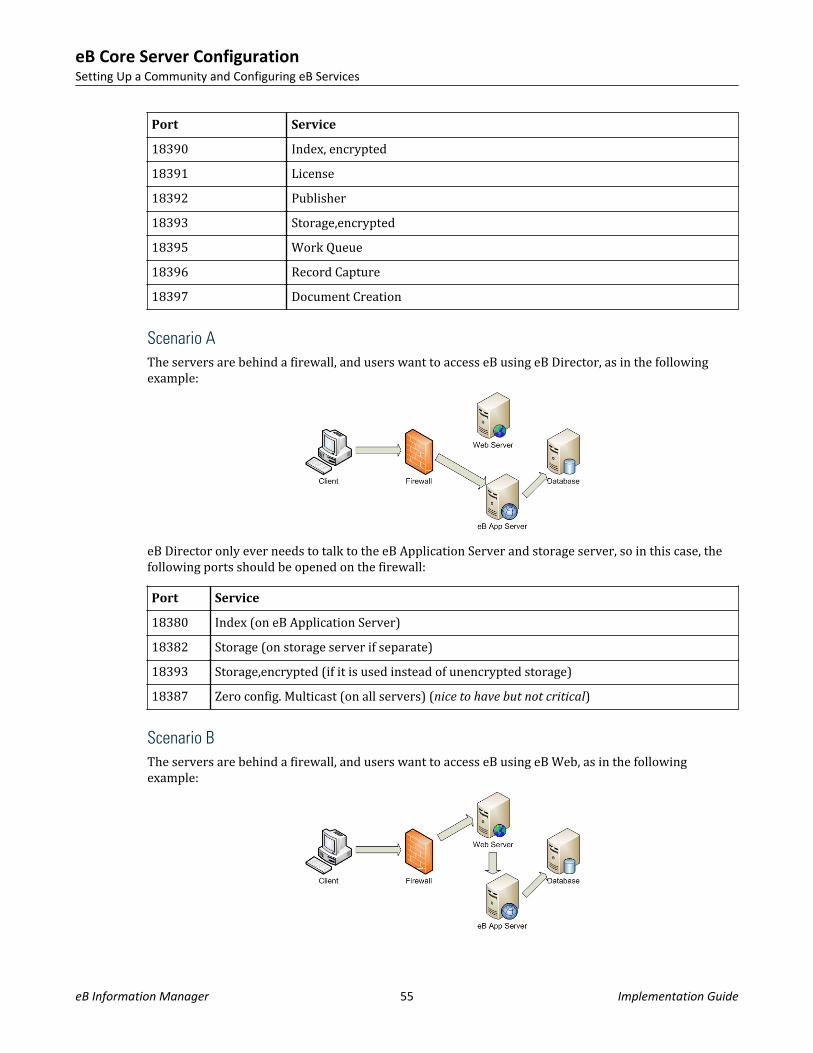
Port Service
18390 Index, encrypted18391 License18392 Publisher18393 Storage,encrypted18395 Work Queue18396 Record Capture18397 Document Creation
Scenario AThe servers are behind a firewall, and users want to access eB using eB Director, as in the followingexample:
eB Director only ever needs to talk to the eB Application Server and storage server, so in this case, thefollowing ports should be opened on the firewall:Port Service
18380 Index (on eB Application Server)18382 Storage (on storage server if separate)18393 Storage,encrypted (if it is used instead of unencrypted storage)18387 Zero config. Multicast (on all servers) (nice to have but not critical)
Scenario BThe servers are behind a firewall, and users want to access eB using eB Web, as in the followingexample:
eB Core Server ConfigurationSetting Up a Community and Configuring eB Services
eB Information Manager 55 Implementation Guide
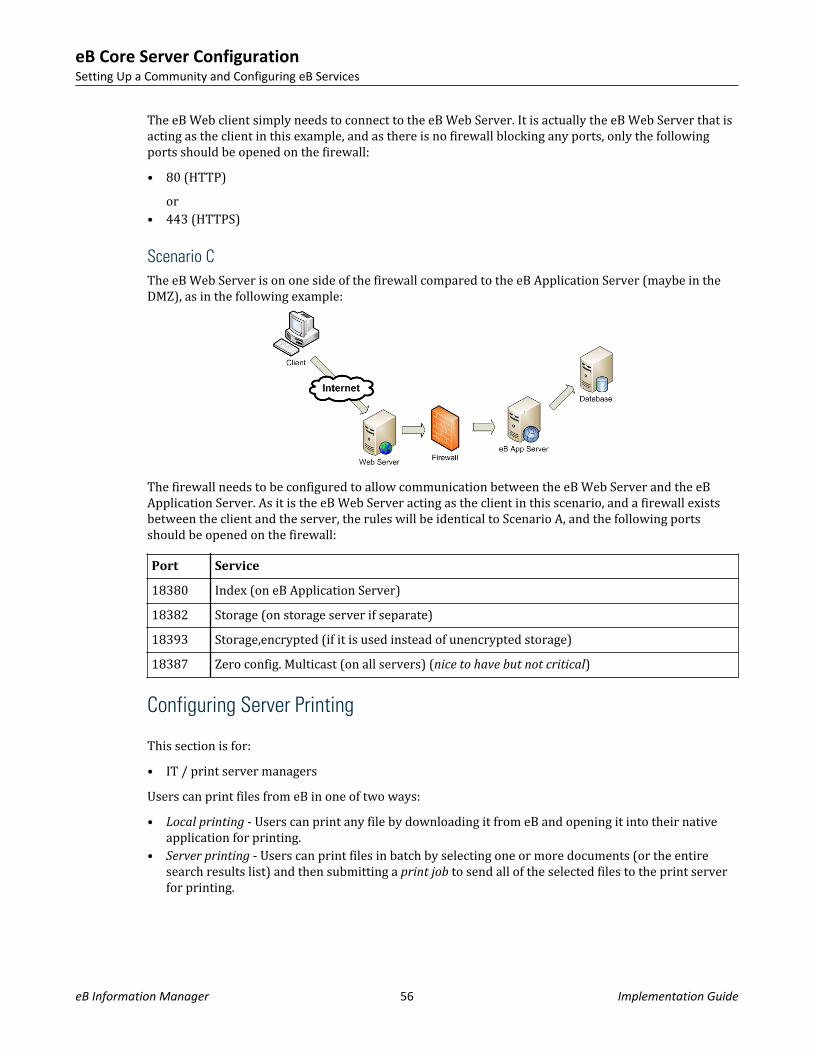
The eB Web client simply needs to connect to the eB Web Server. It is actually the eB Web Server that isacting as the client in this example, and as there is no firewall blocking any ports, only the followingports should be opened on the firewall:• 80 (HTTP)
or• 443 (HTTPS)
Scenario CThe eB Web Server is on one side of the firewall compared to the eB Application Server (maybe in theDMZ), as in the following example:
The firewall needs to be configured to allow communication between the eB Web Server and the eBApplication Server. As it is the eB Web Server acting as the client in this scenario, and a firewall existsbetween the client and the server, the rules will be identical to Scenario A, and the following portsshould be opened on the firewall:Port Service
18380 Index (on eB Application Server)18382 Storage (on storage server if separate)18393 Storage,encrypted (if it is used instead of unencrypted storage)18387 Zero config. Multicast (on all servers) (nice to have but not critical)
Configuring Server Printing
This section is for:• IT / print server managersUsers can print files from eB in one of two ways:• Local printing - Users can print any file by downloading it from eB and opening it into their native
application for printing.• Server printing - Users can print files in batch by selecting one or more documents (or the entire
search results list) and then submitting a print job to send all of the selected files to the print serverfor printing.
eB Core Server ConfigurationSetting Up a Community and Configuring eB Services
eB Information Manager 56 Implementation Guide

Note: To be able to submit a server print job, eB users require the User Information/Server Printingpermission.When a user submits a print job, they select a template with predefined instructions for how and whereto print the selected files. The template is defined in eB System Management Console.The rest of this section describes how to configure server printing.Configuration:1. Install the following items on each of your print servers:
• eB Print Service (Print Service option in the eB Core Server installer)• Bulk Transaction Support (Bulk Transaction Support option in the eB Core Server installer)• ProjectWise InterPlot ServerorInstall all of the items above on another computer, and then install your printers' print drivers onthat computer
2. In eB System Management Console do the following:• Add one or more printers (see To Add a Printer to a Community on page 58)
In this step you select an existing printer that is running on a computer where eB Print Service,Bulk Transaction Support, and ProjectWise InterPlot Server are installed and running.
• Create one or more print templates (see To Add a Print Template to a Community on page 59)Each template points to a printer you added in the previous step, and defines various printsettings.
• Activate eB Print Service (see To Activate eB Print Service for Your Community on page 65)3. There is a setting in eB Director called Engine to use for Rendition and Server Printing. In a new
datasource/community, this setting is automatically set to Interplot, and there is nothing you needto do. However if your datasource was upgraded from an earlier version, this setting will be set tothe old rendition engine, Spicer. If that is the case, you need to change the setting to Interplot. Thissetting can be found in eB Director by going to System Admin > System Defaults > General >Engine to use for Rendition and Server Printing.
When creating the template, you can configure the template to force users to use specific print settings(such as paper size or orientation), or you can configure the template to use the selected printer'sdefault settings and allow users to override them if they want. You can also set up custom watermarks,headers, and footers in the template which will be automatically applied to the printed output.General server printing workflow:1. Submit - A user submits a server print job.2. Queue - The print job goes to the print queue.3. Service - eB Print Service gets the job from the queue and sends the files to ProjectWise InterPlot
Server for processing.4. InterPlot - ProjectWise InterPlot Server processes the files and sends the processed files to the print
driver.5. Driver - The print driver sends the processed files to the printer.6. Printer - The printer prints out the processed files.When a user submits a print job, eB looks at the selected template's defined print settings (also calledthe template demands) and compares them to the actual printer's capabilities. eB also looks at the
eB Core Server ConfigurationSetting Up a Community and Configuring eB Services
eB Information Manager 57 Implementation Guide
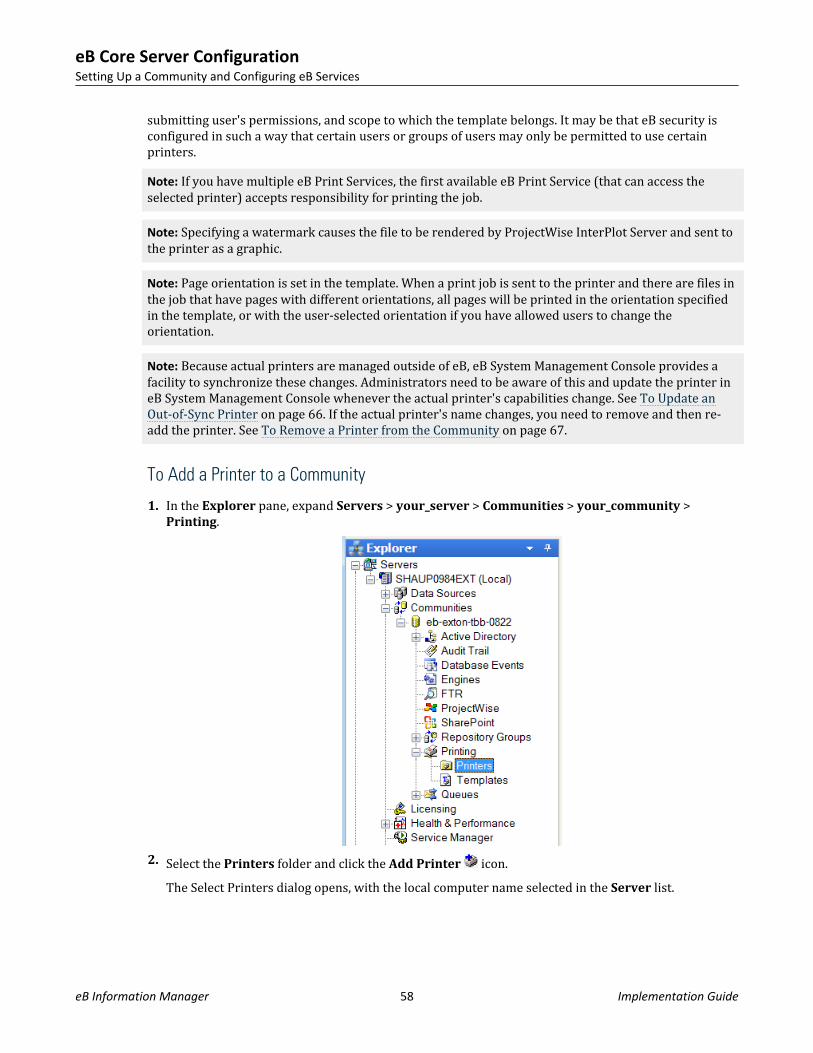
submitting user's permissions, and scope to which the template belongs. It may be that eB security isconfigured in such a way that certain users or groups of users may only be permitted to use certainprinters.Note: If you have multiple eB Print Services, the first available eB Print Service (that can access theselected printer) accepts responsibility for printing the job.
Note: Specifying a watermark causes the file to be rendered by ProjectWise InterPlot Server and sent tothe printer as a graphic.
Note: Page orientation is set in the template. When a print job is sent to the printer and there are files inthe job that have pages with different orientations, all pages will be printed in the orientation specifiedin the template, or with the user-selected orientation if you have allowed users to change theorientation.
Note: Because actual printers are managed outside of eB, eB System Management Console provides afacility to synchronize these changes. Administrators need to be aware of this and update the printer ineB System Management Console whenever the actual printer's capabilities change. See To Update anOut-of-Sync Printer on page 66. If the actual printer's name changes, you need to remove and then re-add the printer. See To Remove a Printer from the Community on page 67.
To Add a Printer to a Community
1. In the Explorer pane, expand Servers > your_server > Communities > your_community >Printing.
2. Select the Printers folder and click the Add Printer icon.The Select Printers dialog opens, with the local computer name selected in the Server list.
eB Core Server ConfigurationSetting Up a Community and Configuring eB Services
eB Information Manager 58 Implementation Guide

3. Do one of the following:If the local computer contains the printer(s) you need, then leave the local computer name selectedin the Server list.orIf you want to select a printer running on another computer, then select your print server from theServer list, or just enter the name of the print server computer in the text field.Note: Whatever server you select here, eB Print Service must already be installed on that computerand the service must be running (started).The Available Printers list shows the printers running on the selected server that are available tothe user account under which eB Service Manager is running on that computer. This user account isspecified during eB Core Server installation, and can be changed later through the local Serviceswindow if needed. This should be a domain user account with administrative rights on the computer.
4. Select a printer from the list and click OK.
To Add a Print Template to a Community
1. In the Explorer pane, expand Servers > your_server > Communities > your_community >Printing.
eB Core Server ConfigurationSetting Up a Community and Configuring eB Services
eB Information Manager 59 Implementation Guide
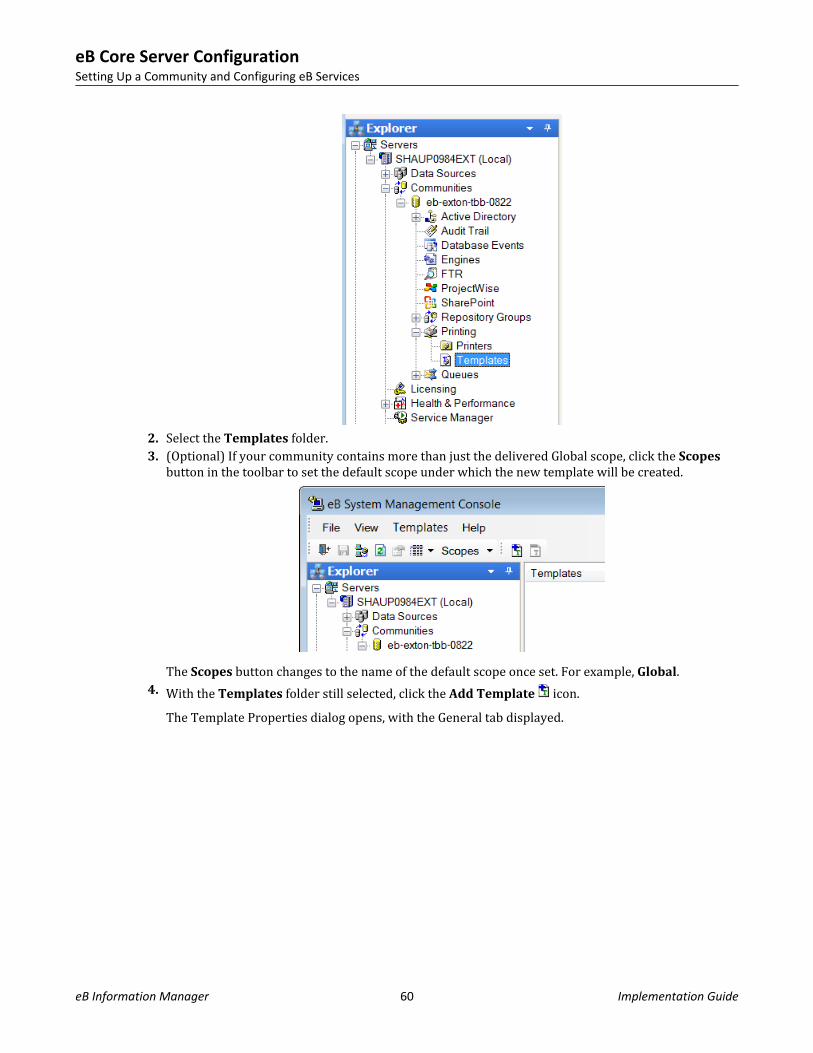
2. Select the Templates folder.3. (Optional) If your community contains more than just the delivered Global scope, click the Scopes
button in the toolbar to set the default scope under which the new template will be created.
The Scopes button changes to the name of the default scope once set. For example, Global.4. With the Templates folder still selected, click the Add Template icon.
The Template Properties dialog opens, with the General tab displayed.
eB Core Server ConfigurationSetting Up a Community and Configuring eB Services
eB Information Manager 60 Implementation Guide
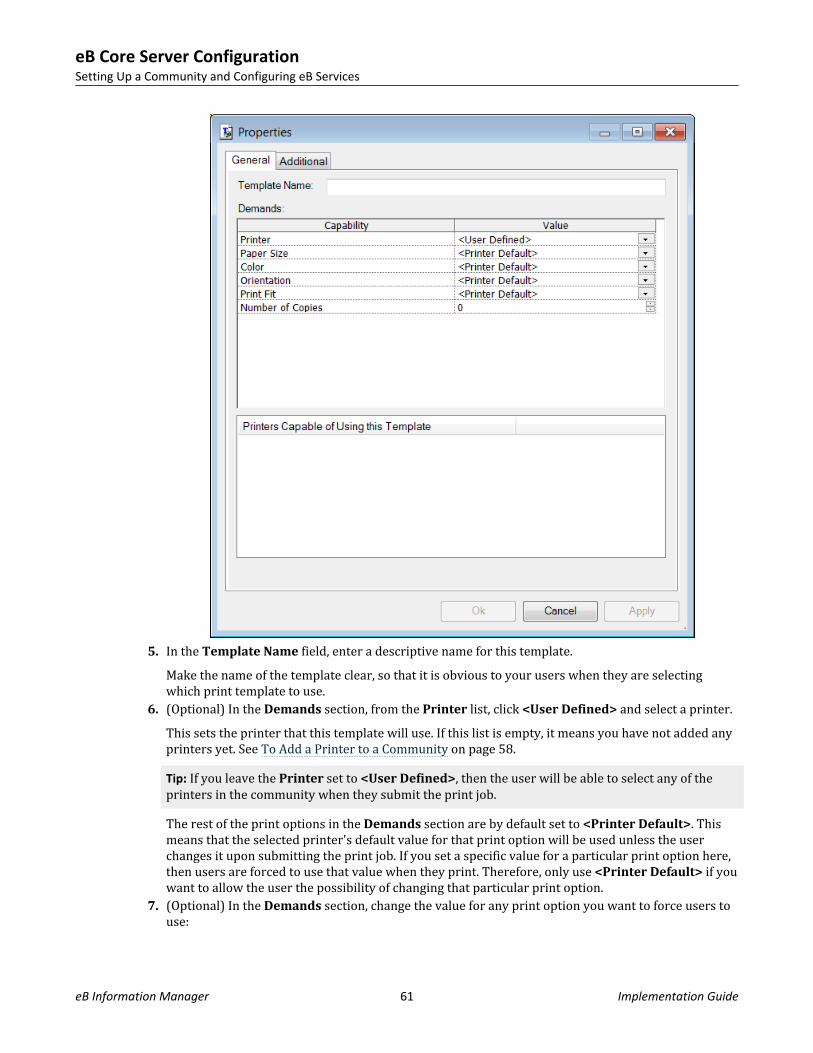
5. In the Template Name field, enter a descriptive name for this template.Make the name of the template clear, so that it is obvious to your users when they are selectingwhich print template to use.
6. (Optional) In the Demands section, from the Printer list, click <User Defined> and select a printer.This sets the printer that this template will use. If this list is empty, it means you have not added anyprinters yet. See To Add a Printer to a Community on page 58.Tip: If you leave the Printer set to <User Defined>, then the user will be able to select any of theprinters in the community when they submit the print job.The rest of the print options in the Demands section are by default set to <Printer Default>. Thismeans that the selected printer's default value for that print option will be used unless the userchanges it upon submitting the print job. If you set a specific value for a particular print option here,then users are forced to use that value when they print. Therefore, only use <Printer Default> if youwant to allow the user the possibility of changing that particular print option.
7. (Optional) In the Demands section, change the value for any print option you want to force users touse:
eB Core Server ConfigurationSetting Up a Community and Configuring eB Services
eB Information Manager 61 Implementation Guide
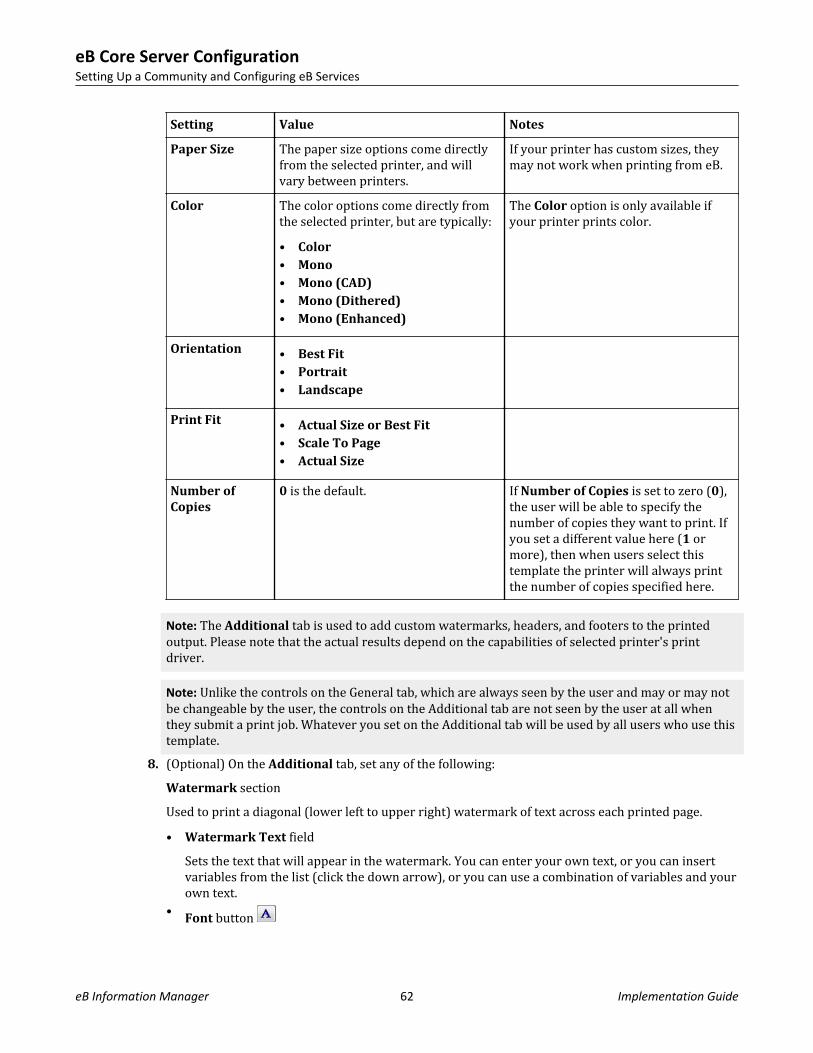
Setting Value Notes
Paper Size The paper size options come directlyfrom the selected printer, and willvary between printers.
If your printer has custom sizes, theymay not work when printing from eB.
Color The color options come directly fromthe selected printer, but are typically:• Color• Mono• Mono (CAD)• Mono (Dithered)• Mono (Enhanced)
The Color option is only available ifyour printer prints color.
Orientation • Best Fit• Portrait• Landscape
Print Fit • Actual Size or Best Fit• Scale To Page• Actual Size
Number ofCopies
0 is the default. If Number of Copies is set to zero (0),the user will be able to specify thenumber of copies they want to print. Ifyou set a different value here (1 ormore), then when users select thistemplate the printer will always printthe number of copies specified here.
Note: The Additional tab is used to add custom watermarks, headers, and footers to the printedoutput. Please note that the actual results depend on the capabilities of selected printer's printdriver.
Note: Unlike the controls on the General tab, which are always seen by the user and may or may notbe changeable by the user, the controls on the Additional tab are not seen by the user at all whenthey submit a print job. Whatever you set on the Additional tab will be used by all users who use thistemplate.
8. (Optional) On the Additional tab, set any of the following:Watermark sectionUsed to print a diagonal (lower left to upper right) watermark of text across each printed page.• Watermark Text field
Sets the text that will appear in the watermark. You can enter your own text, or you can insertvariables from the list (click the down arrow), or you can use a combination of variables and yourown text.
• Font button
eB Core Server ConfigurationSetting Up a Community and Configuring eB Services
eB Information Manager 62 Implementation Guide
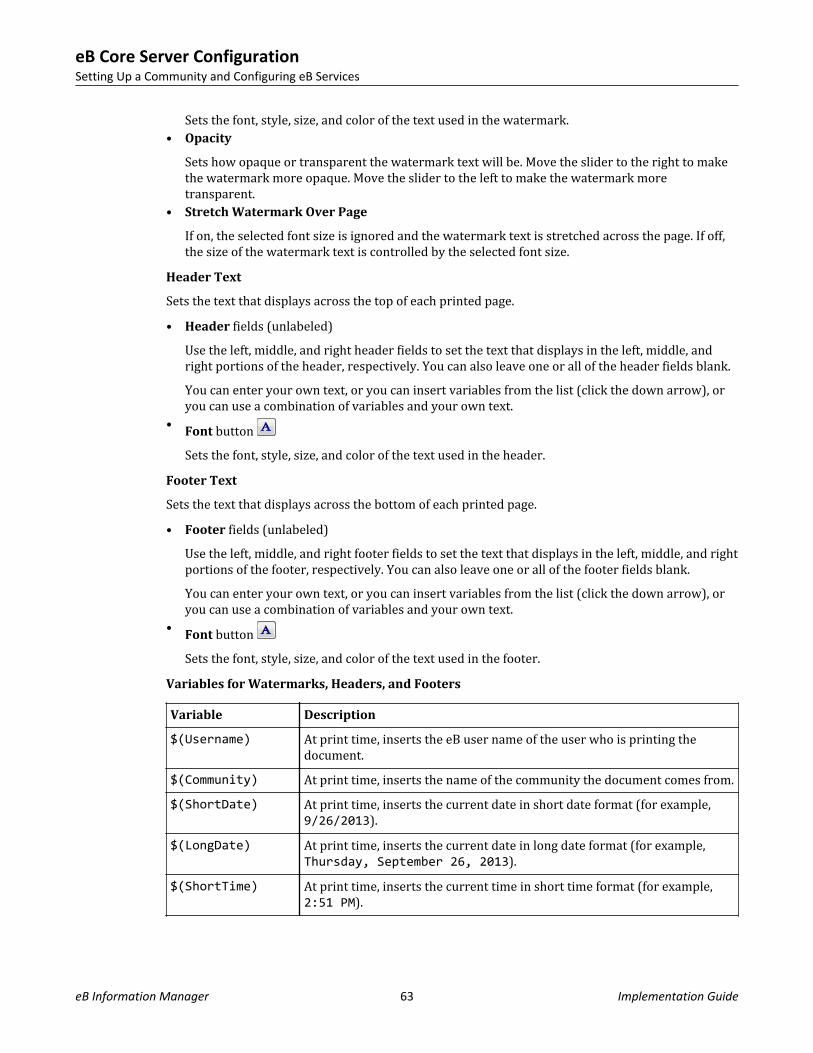
Sets the font, style, size, and color of the text used in the watermark.• Opacity
Sets how opaque or transparent the watermark text will be. Move the slider to the right to makethe watermark more opaque. Move the slider to the left to make the watermark moretransparent.
• Stretch Watermark Over Page
If on, the selected font size is ignored and the watermark text is stretched across the page. If off,the size of the watermark text is controlled by the selected font size.
Header Text
Sets the text that displays across the top of each printed page.• Header fields (unlabeled)
Use the left, middle, and right header fields to set the text that displays in the left, middle, andright portions of the header, respectively. You can also leave one or all of the header fields blank.You can enter your own text, or you can insert variables from the list (click the down arrow), oryou can use a combination of variables and your own text.
• Font button Sets the font, style, size, and color of the text used in the header.
Footer Text
Sets the text that displays across the bottom of each printed page.• Footer fields (unlabeled)
Use the left, middle, and right footer fields to set the text that displays in the left, middle, and rightportions of the footer, respectively. You can also leave one or all of the footer fields blank.You can enter your own text, or you can insert variables from the list (click the down arrow), oryou can use a combination of variables and your own text.
• Font button Sets the font, style, size, and color of the text used in the footer.
Variables for Watermarks, Headers, and Footers
Variable Description
$(Username) At print time, inserts the eB user name of the user who is printing thedocument.
$(Community) At print time, inserts the name of the community the document comes from.$(ShortDate) At print time, inserts the current date in short date format (for example,
9/26/2013).$(LongDate) At print time, inserts the current date in long date format (for example,
Thursday, September 26, 2013).$(ShortTime) At print time, inserts the current time in short time format (for example,
2:51 PM).
eB Core Server ConfigurationSetting Up a Community and Configuring eB Services
eB Information Manager 63 Implementation Guide

Variable Description
$(LongTime) At print time, inserts the current time in long time format (for example,2:51:55 PM).
$(DocumentTitle) At print time, inserts the eB document title of the document that is beingprinted.
$(DocumentNumber) At print time, inserts the number (<prefix> <middle> <revision>) of thedocument that is being printed (for example, SAN01238 1.0).
CTB File Settings
Used to specify a default AutoCAD color table file (CTB) to use for printing DWG files, when userssubmit server print jobs that contain DWG files. The CTB file must be stored in a document in eB.To specify a default CTB file, do the following:a. In the Code field, specify the document number of the document that contains the CTB file.b. Use Latest (revision) is on by default; if the CTB file you want is stored in an earlier revision of
the document, turn off Use Latest and specify which revision of the document you want to use inthe Revision field.
c. Finally, select a CTB file from the Default CTB File list.9. Click OK.
eB Core Server ConfigurationSetting Up a Community and Configuring eB Services
eB Information Manager 64 Implementation Guide
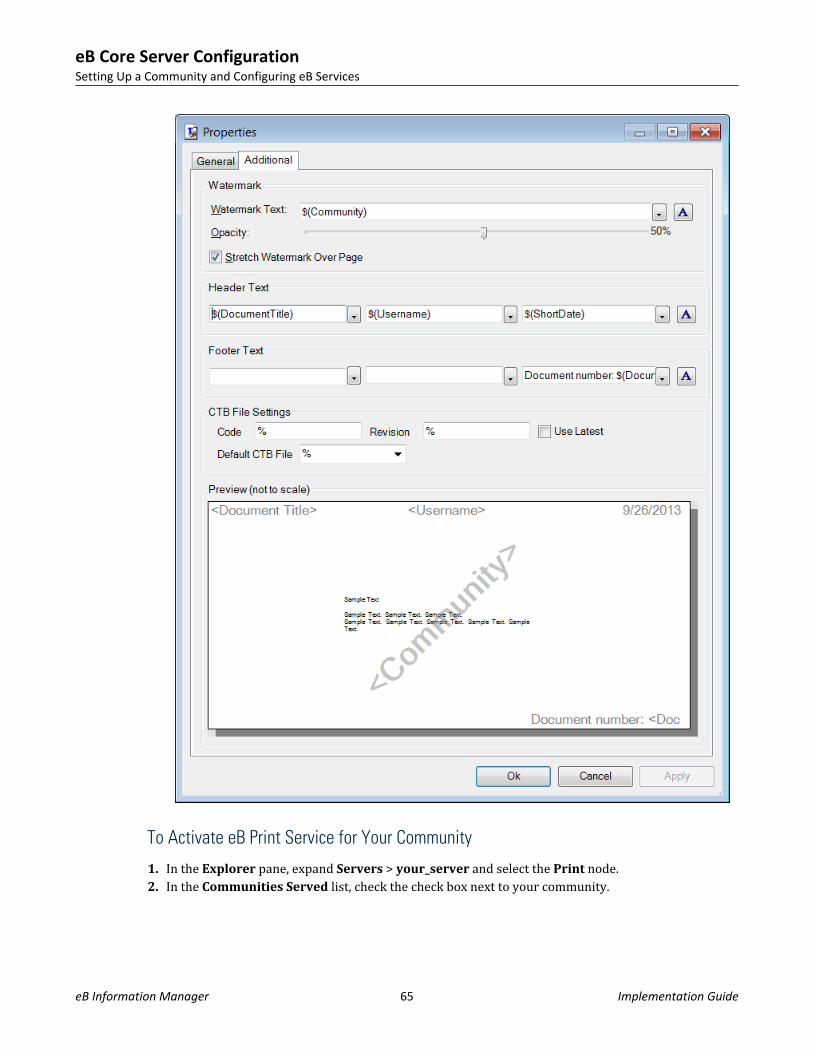
To Activate eB Print Service for Your Community
1. In the Explorer pane, expand Servers > your_server and select the Print node.2. In the Communities Served list, check the check box next to your community.
eB Core Server ConfigurationSetting Up a Community and Configuring eB Services
eB Information Manager 65 Implementation Guide
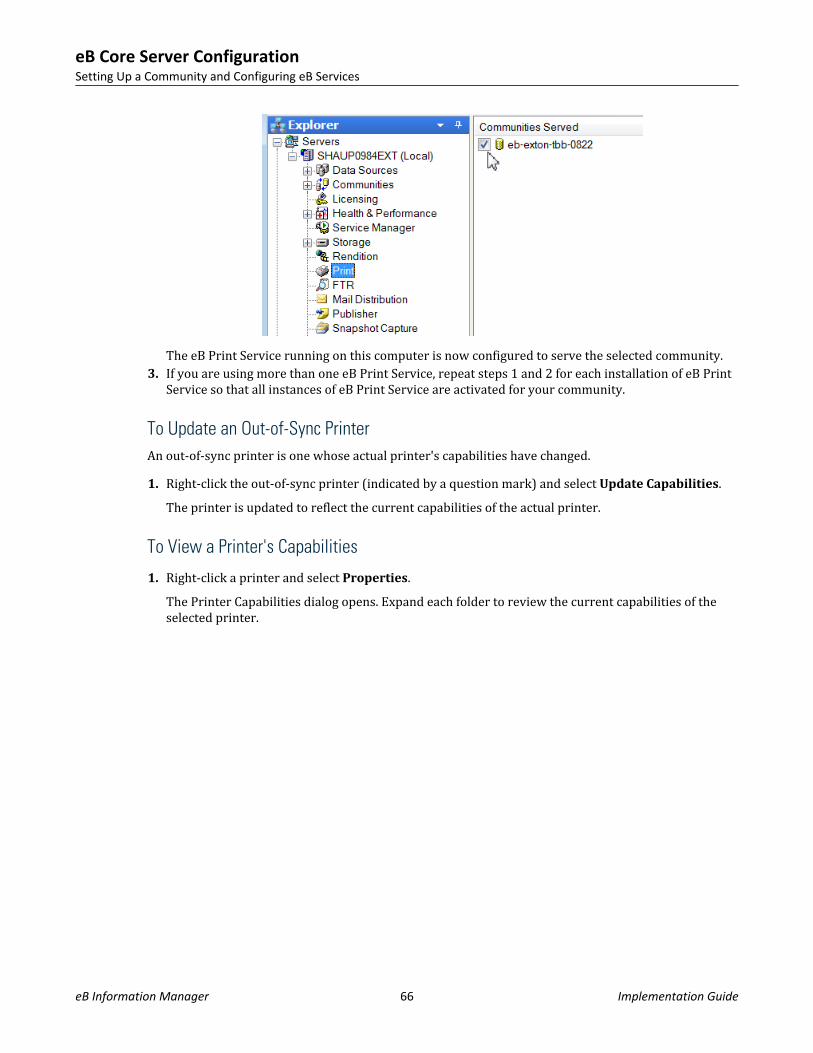
The eB Print Service running on this computer is now configured to serve the selected community.3. If you are using more than one eB Print Service, repeat steps 1 and 2 for each installation of eB Print
Service so that all instances of eB Print Service are activated for your community.
To Update an Out-of-Sync PrinterAn out-of-sync printer is one whose actual printer's capabilities have changed.1. Right-click the out-of-sync printer (indicated by a question mark) and select Update Capabilities.
The printer is updated to reflect the current capabilities of the actual printer.
To View a Printer's Capabilities
1. Right-click a printer and select Properties.The Printer Capabilities dialog opens. Expand each folder to review the current capabilities of theselected printer.
eB Core Server ConfigurationSetting Up a Community and Configuring eB Services
eB Information Manager 66 Implementation Guide
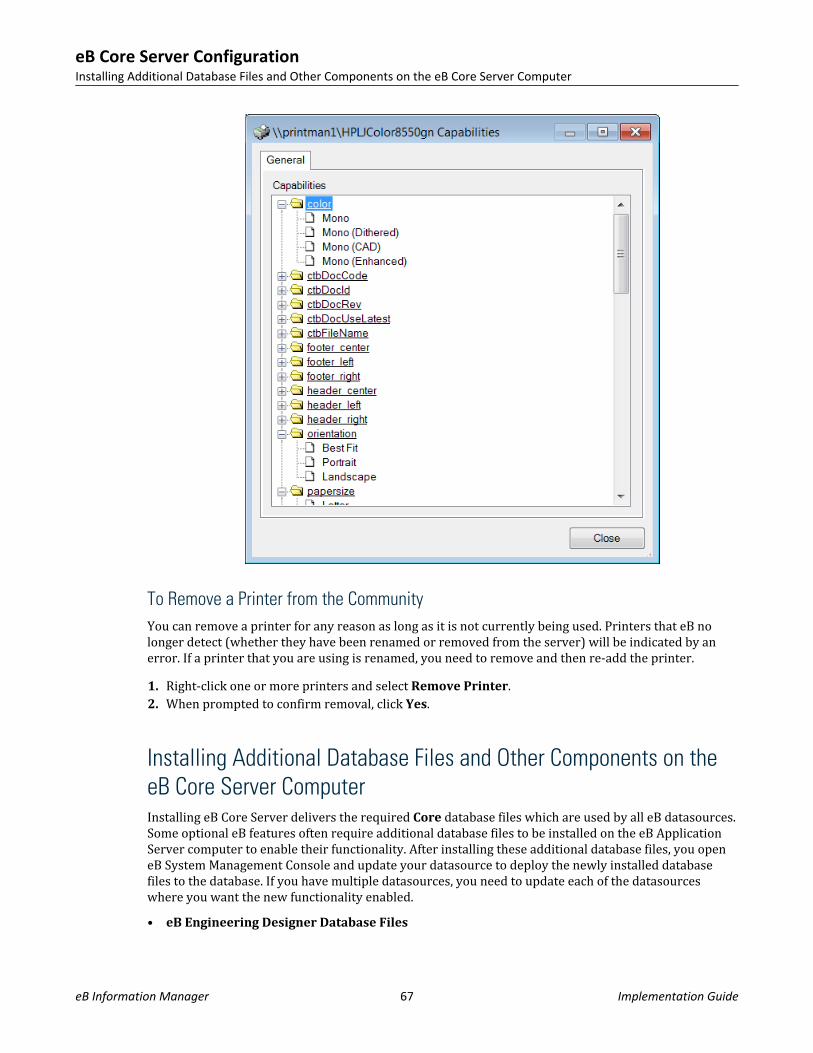
To Remove a Printer from the CommunityYou can remove a printer for any reason as long as it is not currently being used. Printers that eB nolonger detect (whether they have been renamed or removed from the server) will be indicated by anerror. If a printer that you are using is renamed, you need to remove and then re-add the printer.1. Right-click one or more printers and select Remove Printer.2. When prompted to confirm removal, click Yes.
Installing Additional Database Files and Other Components on theeB Core Server ComputerInstalling eB Core Server delivers the required Core database files which are used by all eB datasources.Some optional eB features often require additional database files to be installed on the eB ApplicationServer computer to enable their functionality. After installing these additional database files, you openeB System Management Console and update your datasource to deploy the newly installed databasefiles to the database. If you have multiple datasources, you need to update each of the datasourceswhere you want the new functionality enabled.• eB Engineering Designer Database Files
eB Core Server ConfigurationInstalling Additional Database Files and Other Components on the eB Core Server Computer
eB Information Manager 67 Implementation Guide

eB Engineering Designer and the eB Engineering Designer Web Plug-in are both optionalcomponents of eB. Before either one can be used, you must first install the eB Engineering Designerdatabase files and then deploy them to the datasources where you want to enable this functionality.
• eB Event Tracking Manager
Corrective action, performance improvement and similar initiatives are common in the nuclear powerindustry. Each company has their own methods of dealing with these initiatives, but their objectivesare similar. eB Event Tracking Manager (formerly eB Corrective Action Program) is a tool to helpachieve these initiatives. eB Event Tracking Manager comprises database event handlers, storedprocedures, and functions which add event types to eB including condition reports, correctiveactions, observations, and benchmarking. eB Event Tracking Manager does not require additionaldatabase files.
• eB ProjectWise Database Files
When integrating eB with ProjectWise, part of the configuration involves installing the necessarydatabase files on the eB Application Server computer and then updating the datasources that youwant to integrate with ProjectWise. See Integrating eB with ProjectWise on page 121 for completeconfiguration details.
• eB SharePoint Database Files
When integrating eB with SharePoint, part of the configuration involves installing the necessarydatabase files on the eB Application Server computer and then updating the datasources that youwant to integrate with SharePoint. See Integrating eB with Microsoft SharePoint on page 147 forcomplete configuration details.
To Install the eB Engineering Designer Database Files on the eB ApplicationServer
1. Browse to this folder in Windows Explorer:...\Server Installation\eB Engineering Designer Database Files
2. Double-click the appropriate MSI file for the version of Windows you are running:32-bit Windows eB Engineering Designer Database Files (x86).msi
64-bit Windows eB Engineering Designer Database Files (x64).msi
3. When the Setup Wizard opens, click Next.4. When the License Agreement page opens, accept the agreement and click Next.5. When the Ready to Install page opens, click Install.6. When installation is complete, click Finish.The next step is to update your datasource to use these database files. See To Update a Datasource inOrder To Deploy Newly Installed Database Files on page 69.
To Install eB Event Tracking Manager (ETM) on the eB Application Server
1. Browse to this folder in Windows Explorer:...\Server Installation\eB ETM
2. Double-click the appropriate MSI file for the version of Windows you are running:
eB Core Server ConfigurationInstalling Additional Database Files and Other Components on the eB Core Server Computer
eB Information Manager 68 Implementation Guide
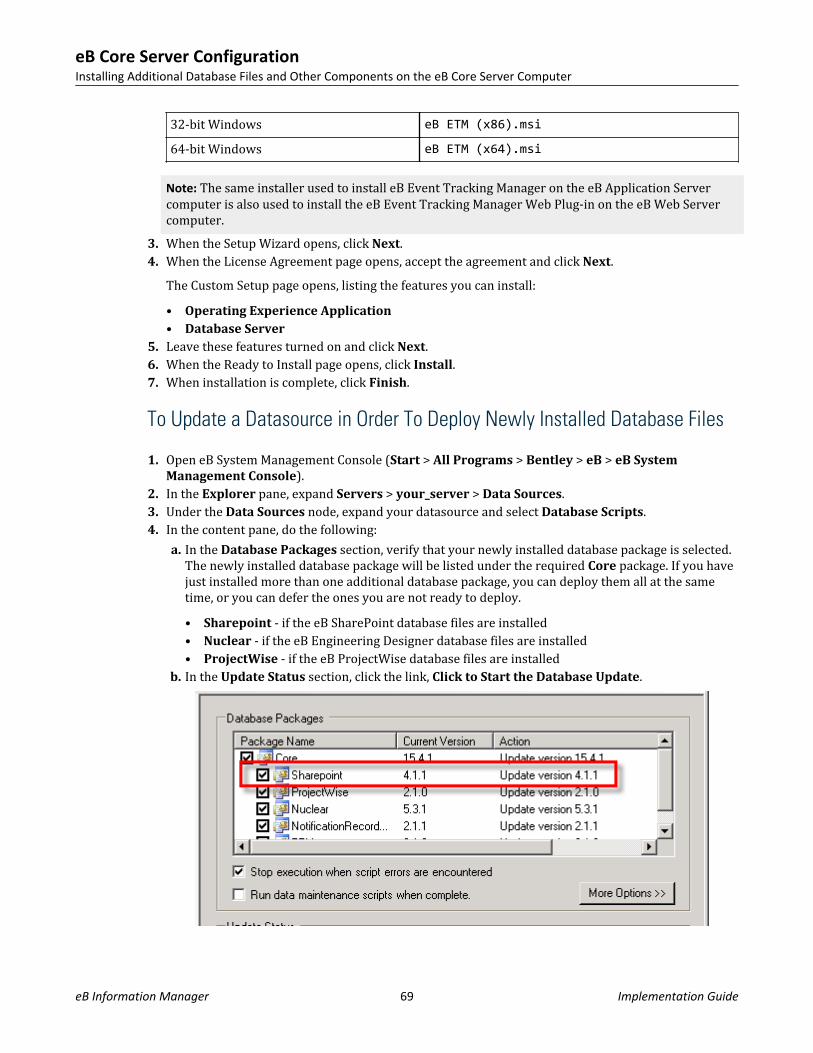
32-bit Windows eB ETM (x86).msi
64-bit Windows eB ETM (x64).msi
Note: The same installer used to install eB Event Tracking Manager on the eB Application Servercomputer is also used to install the eB Event Tracking Manager Web Plug-in on the eB Web Servercomputer.
3. When the Setup Wizard opens, click Next.4. When the License Agreement page opens, accept the agreement and click Next.
The Custom Setup page opens, listing the features you can install:• Operating Experience Application• Database Server
5. Leave these features turned on and click Next.6. When the Ready to Install page opens, click Install.7. When installation is complete, click Finish.
To Update a Datasource in Order To Deploy Newly Installed Database Files
1. Open eB System Management Console (Start > All Programs > Bentley > eB > eB SystemManagement Console).
2. In the Explorer pane, expand Servers > your_server > Data Sources.3. Under the Data Sources node, expand your datasource and select Database Scripts.4. In the content pane, do the following:
a. In the Database Packages section, verify that your newly installed database package is selected.The newly installed database package will be listed under the required Core package. If you havejust installed more than one additional database package, you can deploy them all at the sametime, or you can defer the ones you are not ready to deploy.• Sharepoint - if the eB SharePoint database files are installed• Nuclear - if the eB Engineering Designer database files are installed• ProjectWise - if the eB ProjectWise database files are installed
b. In the Update Status section, click the link, Click to Start the Database Update.
eB Core Server ConfigurationInstalling Additional Database Files and Other Components on the eB Core Server Computer
eB Information Manager 69 Implementation Guide

5. When the database update is complete, click OK.
eB Core Server ConfigurationInstalling Additional Database Files and Other Components on the eB Core Server Computer
eB Information Manager 70 Implementation Guide

eB Director Installation 4This chapter is for:
• People who install or distribute client applications at your siteThis chapter assumes:
• eB Application Server is already installed and configured on this or another computer (see eB CoreServer Configuration on page 23)
eB Director is a client application used to perform both administrative and user functions in eB.Administrators use eB Director to configure existing eB communities, while users use it to create andmaintain data about all eB objects. (Communities themselves are created in the eB System ManagementConsole, which gets installed with eB Core Server.)eB Layout Editor is also installed through the eB Director installer.
Before You Install or Upgrade eB Director1. See the eB readme (readme_eb_information_manager.chm) for a list of supported operating
systems and other system requirements for this module.2. If you have an older version of eB Director installed, you need to uninstall it first and then restart
your computer.3. Make sure Microsoft .NET Framework 3.5 SP1 is installed.4. Install Windows Identity Foundation (WIF), KB974405 (delivered with eB if needed,
under ...\Support Files\Redistributables\WindowsIdentityFramework).5. Install Brava! Desktop 7.1, if you want to view eB files without having to install their native
application.
To Install eB DirectorImportant: Perform all installations logged on as a member of the domain, with Administrator rights tothe local computer.
1. Browse to this folder in Windows Explorer:...\Client Installation\eB Director
2. Double-click this MSI file:eB Director (x86).msi
3. When the Setup Wizard opens, click Next.
eB Information Manager 71 Implementation Guide
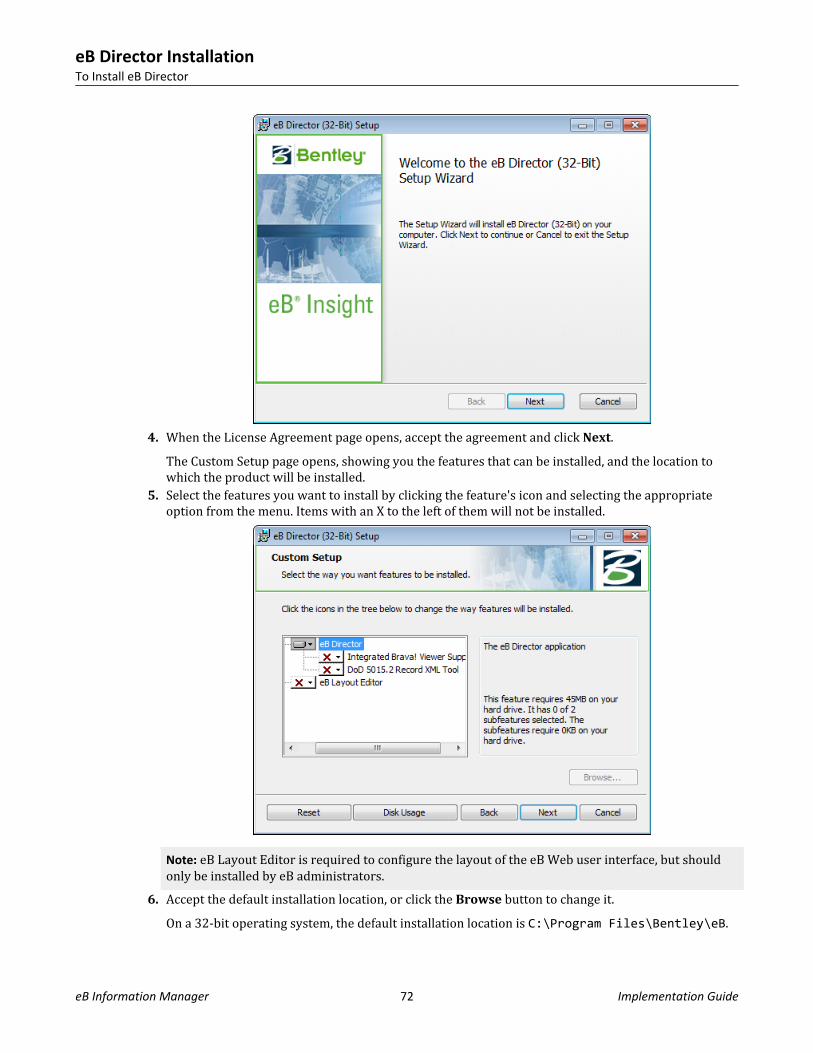
4. When the License Agreement page opens, accept the agreement and click Next.The Custom Setup page opens, showing you the features that can be installed, and the location towhich the product will be installed.
5. Select the features you want to install by clicking the feature's icon and selecting the appropriateoption from the menu. Items with an X to the left of them will not be installed.
Note: eB Layout Editor is required to configure the layout of the eB Web user interface, but shouldonly be installed by eB administrators.
6. Accept the default installation location, or click the Browse button to change it.On a 32-bit operating system, the default installation location is C:\Program Files\Bentley\eB.
eB Director InstallationTo Install eB Director
eB Information Manager 72 Implementation Guide
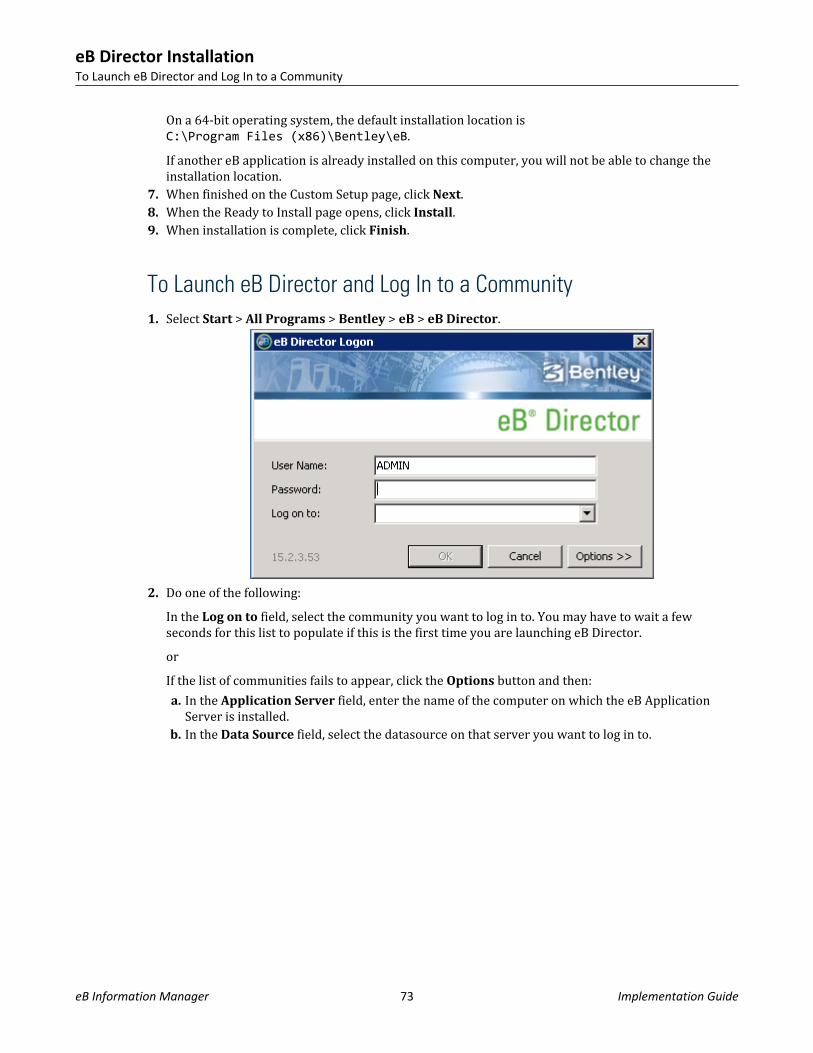
On a 64-bit operating system, the default installation location isC:\Program Files (x86)\Bentley\eB.If another eB application is already installed on this computer, you will not be able to change theinstallation location.
7. When finished on the Custom Setup page, click Next.8. When the Ready to Install page opens, click Install.9. When installation is complete, click Finish.
To Launch eB Director and Log In to a Community1. Select Start > All Programs > Bentley > eB > eB Director.
2. Do one of the following:In the Log on to field, select the community you want to log in to. You may have to wait a fewseconds for this list to populate if this is the first time you are launching eB Director.orIf the list of communities fails to appear, click the Options button and then:a. In the Application Server field, enter the name of the computer on which the eB Application
Server is installed.b. In the Data Source field, select the datasource on that server you want to log in to.
eB Director InstallationTo Launch eB Director and Log In to a Community
eB Information Manager 73 Implementation Guide
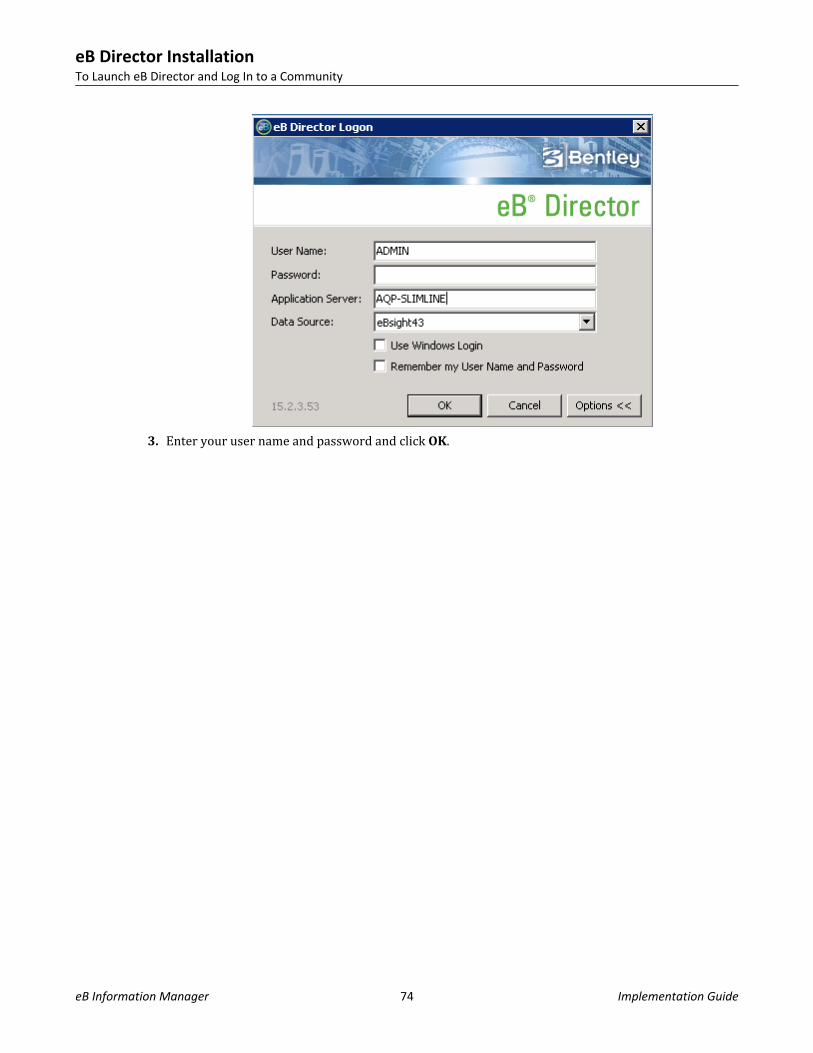
3. Enter your user name and password and click OK.
eB Director InstallationTo Launch eB Director and Log In to a Community
eB Information Manager 74 Implementation Guide

eB Web Server Configuration 5This chapter is for:
• IIS administratorsThis chapter assumes:
• eB Application Server is already installed and configured on another computer (see eB Core ServerConfiguration on page 23)
eB Web Server provides users with web access to eB communities and supports connections from botheB Web users and CAD-Connect users. Users connect to eB Web Server, which in turn connects to eBApplication Server.To configure eB Web Server, first you install eB Web Applications, which delivers a default set of plug-ins. Each plug-in contains specific eB functionality. After you install eB Web Applications, you create thewebsite users connect to by creating a virtual directory in IIS and enabling the plug-ins containing thefunctionality you want to expose to your users. You can create multiple virtual directories if needed, forexample, to expose different functionality to different users. You can also install and enable additionalweb plug-ins, beyond those which are included in the eB Web Applications installation (for example, theeB Engineering Designer Web Plug-in is a separate installation).Note: The same virtual directory can be used for both eB Web users and CAD-Connect users. However, ifyou have the eB Engineering Designer Web Plug-in enabled in your virtual directory (for eB Web users),it will cause various errors when CAD-Connect users try to use the eB Browser within CAD-Connect. Insuch cases, it is recommended that you create a separate virtual directory just for CAD-Connect users,and do not enable the eB Engineering Designer Web Plug-in in that virtual directory.
Before You Install or Upgrade eB Web Applications1. See the eB readme (readme_eb_information_manager.chm) for a list of supported operating
systems and other system requirements for this module.2. If you have an older version of eB Web Applications installed, you need to uninstall it first, as well as
any eB Web plug-ins, then restart your computer.If you are upgrading from v14.5.x or later you will be able to update existing virtual directories. Ifyou are upgrading from versions prior to v14.5.x, you will need to delete your existing virtualdirectory and create a new one.
3. Make sure Microsoft .NET Framework 3.5 SP1 is installed.4. Change your default IIS settings in Windows Server 2008 or Windows Server 2003 in order to enable
dynamic content.If using Windows Server 2008:
a. Open Server Manager and make sure the Web Server (IIS) role and the following role services areenabled:
eB Information Manager 75 Implementation Guide
• Web Server
• Common HTTP Features
• Static Content• Default Document• HTTP Errors
• Application Development
• ASP.NET• .NET Extensibility• ISAPI Extensions• ISAPI Filters
• Health and Diagnostics
• HTTP Logging - (recommended, but not required)• Security
• Windows Authentication - (required for eB users to log in with Windows accounts)• Management Tools
• IIS Management Console
If using Windows Server 2003:
a. Open the Windows Components Wizard (Control Panel > Add/Remove Programs > Add/Remove Windows Components) and make sure the following settings are enabled:• Application Server (and click Details to enable more settings)
• ASP.NET• Enable network COM+ access• Enable network DTC access• Internet Information Services (IIS) (and click Details to enable more settings)
• Internet Information Services Manager• World Wide Web Service (and click Details to enable more settings)
• World Wide Web Serviceb. After the above settings are enabled, open Internet Information Services (IIS) Manager, select
Web Service Extensions, and make sure that ASP.NET is set to Allowed.5. Make sure the IIS user has write permission to C:\WINNT\TEMP.6. Install Windows Identity Foundation (WIF), KB974405 (delivered with eB if needed,
under ...\Support Files\Redistributables\WindowsIdentityFramework).Note: Generally speaking, all the eB Web user needs is a supported web browser. See the eB readme forspecific versions. Internet Explorer 8 or 9 is recommended for full support of eB Web features, includingfeatures that use ActiveX. All other supported browsers will have limited functionality.
To Install eB Web Applications1. Browse to this folder in Windows Explorer:
eB Web Server ConfigurationTo Install eB Web Applications
eB Information Manager 76 Implementation Guide
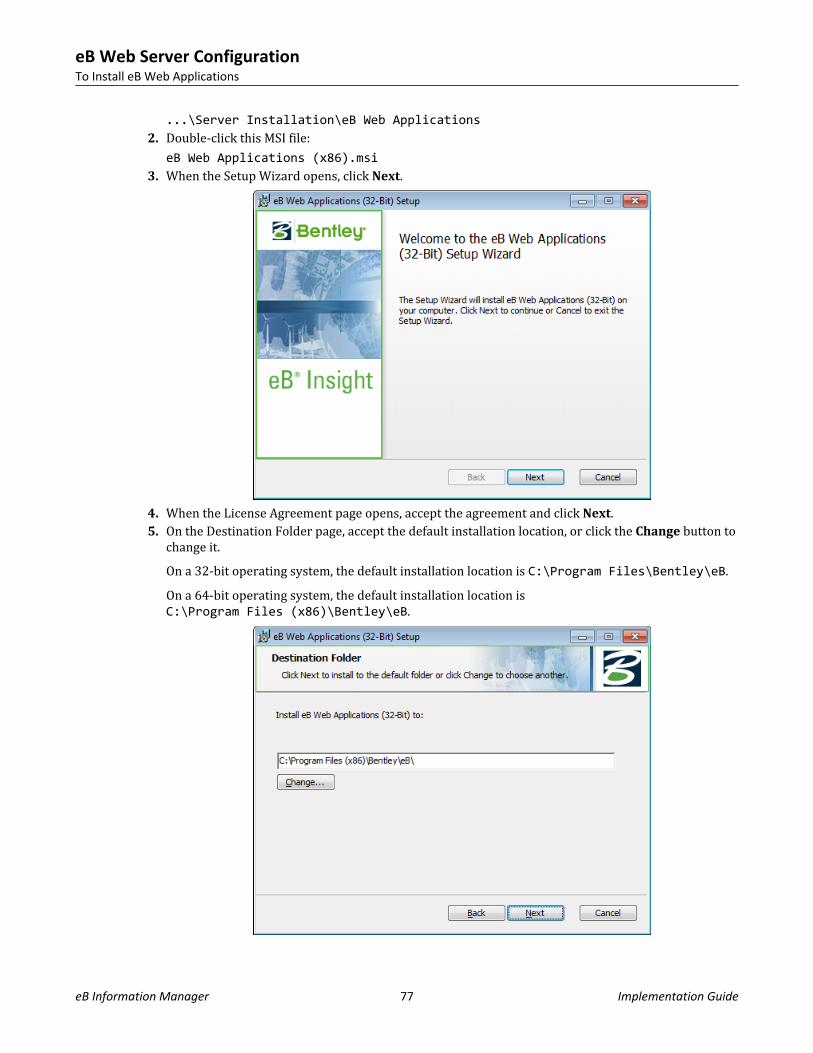
...\Server Installation\eB Web Applications2. Double-click this MSI file:
eB Web Applications (x86).msi3. When the Setup Wizard opens, click Next.
4. When the License Agreement page opens, accept the agreement and click Next.5. On the Destination Folder page, accept the default installation location, or click the Change button to
change it.On a 32-bit operating system, the default installation location is C:\Program Files\Bentley\eB.On a 64-bit operating system, the default installation location isC:\Program Files (x86)\Bentley\eB.
eB Web Server ConfigurationTo Install eB Web Applications
eB Information Manager 77 Implementation Guide
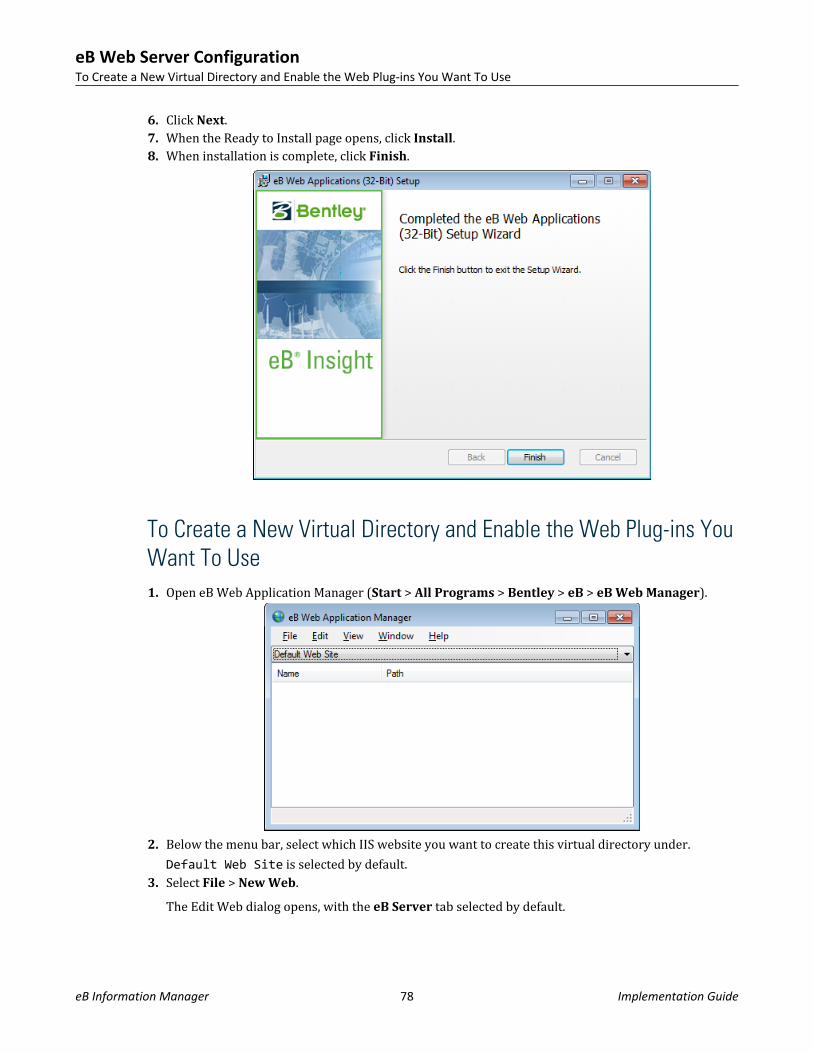
6. Click Next.7. When the Ready to Install page opens, click Install.8. When installation is complete, click Finish.
To Create a New Virtual Directory and Enable the Web Plug-ins YouWant To Use1. Open eB Web Application Manager (Start > All Programs > Bentley > eB > eB Web Manager).
2. Below the menu bar, select which IIS website you want to create this virtual directory under.Default Web Site is selected by default.
3. Select File > New Web.The Edit Web dialog opens, with the eB Server tab selected by default.
eB Web Server ConfigurationTo Create a New Virtual Directory and Enable the Web Plug-ins You Want To Use
eB Information Manager 78 Implementation Guide
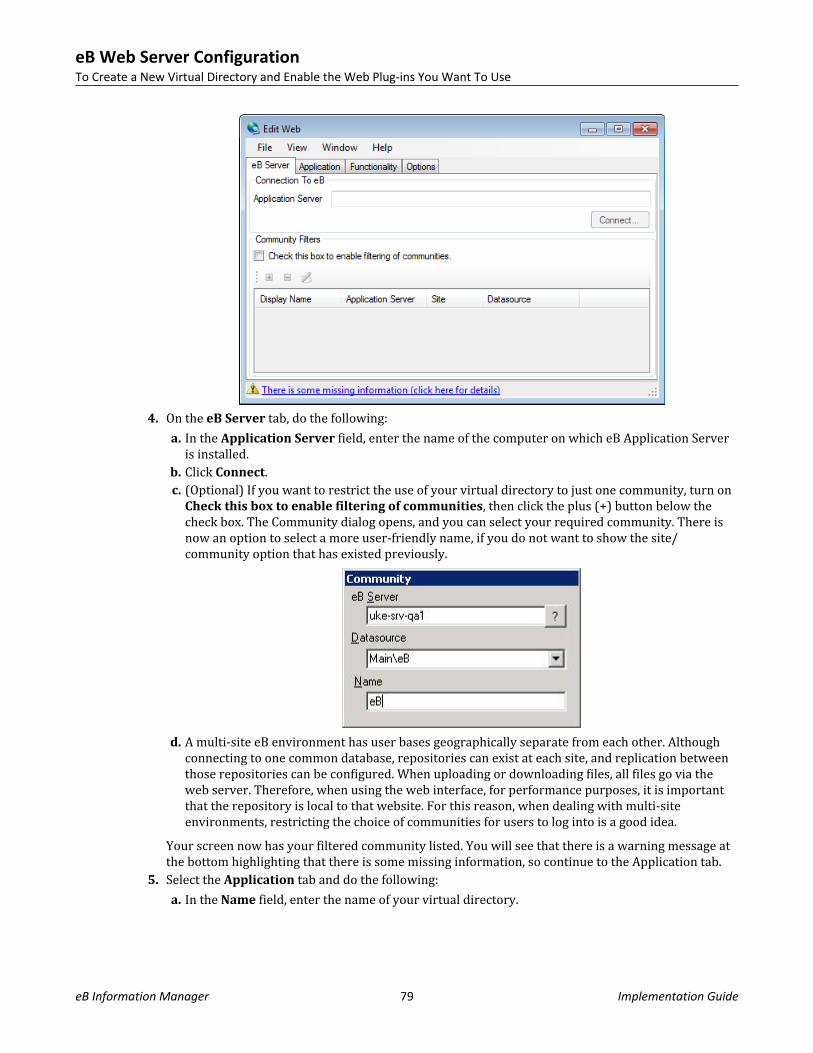
4. On the eB Server tab, do the following:a. In the Application Server field, enter the name of the computer on which eB Application Server
is installed.b. Click Connect.c. (Optional) If you want to restrict the use of your virtual directory to just one community, turn on
Check this box to enable filtering of communities, then click the plus (+) button below thecheck box. The Community dialog opens, and you can select your required community. There isnow an option to select a more user-friendly name, if you do not want to show the site/community option that has existed previously.
d. A multi-site eB environment has user bases geographically separate from each other. Althoughconnecting to one common database, repositories can exist at each site, and replication betweenthose repositories can be configured. When uploading or downloading files, all files go via theweb server. Therefore, when using the web interface, for performance purposes, it is importantthat the repository is local to that website. For this reason, when dealing with multi-siteenvironments, restricting the choice of communities for users to log into is a good idea.
Your screen now has your filtered community listed. You will see that there is a warning message atthe bottom highlighting that there is some missing information, so continue to the Application tab.
5. Select the Application tab and do the following:a. In the Name field, enter the name of your virtual directory.
eB Web Server ConfigurationTo Create a New Virtual Directory and Enable the Web Plug-ins You Want To Use
eB Information Manager 79 Implementation Guide
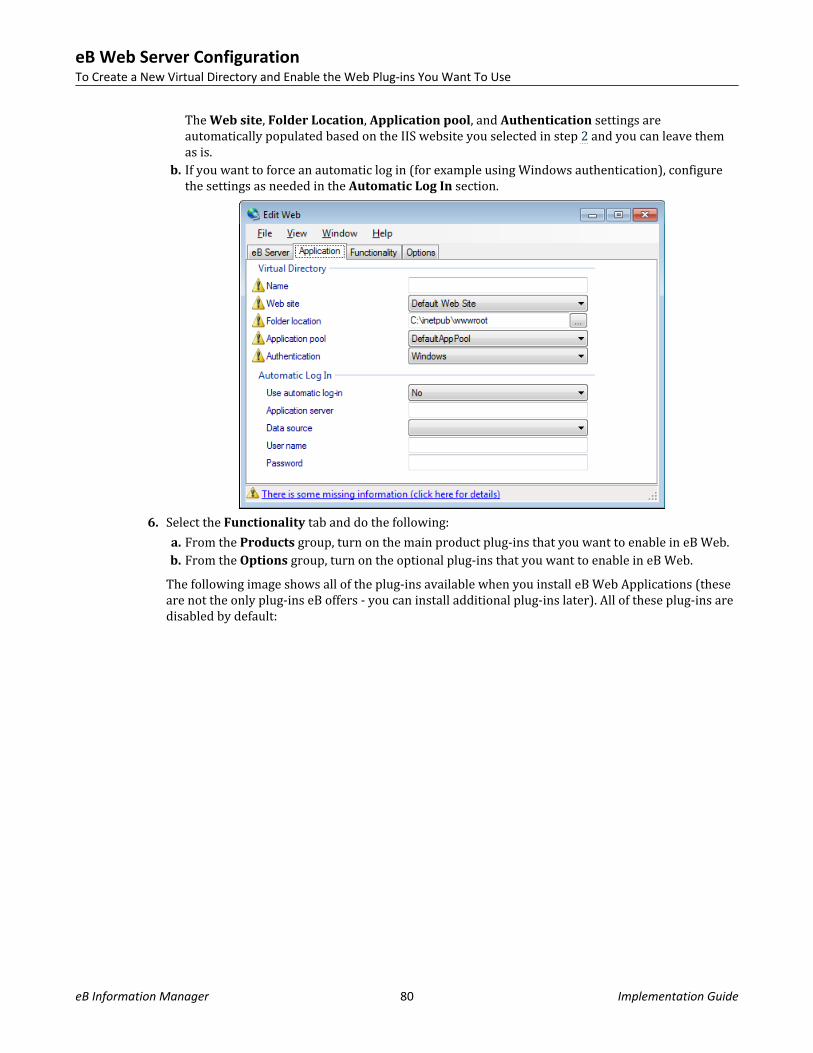
The Web site, Folder Location, Application pool, and Authentication settings areautomatically populated based on the IIS website you selected in step 2 and you can leave themas is.
b. If you want to force an automatic log in (for example using Windows authentication), configurethe settings as needed in the Automatic Log In section.
6. Select the Functionality tab and do the following:a. From the Products group, turn on the main product plug-ins that you want to enable in eB Web.b. From the Options group, turn on the optional plug-ins that you want to enable in eB Web.
The following image shows all of the plug-ins available when you install eB Web Applications (theseare not the only plug-ins eB offers - you can install additional plug-ins later). All of these plug-ins aredisabled by default:
eB Web Server ConfigurationTo Create a New Virtual Directory and Enable the Web Plug-ins You Want To Use
eB Information Manager 80 Implementation Guide
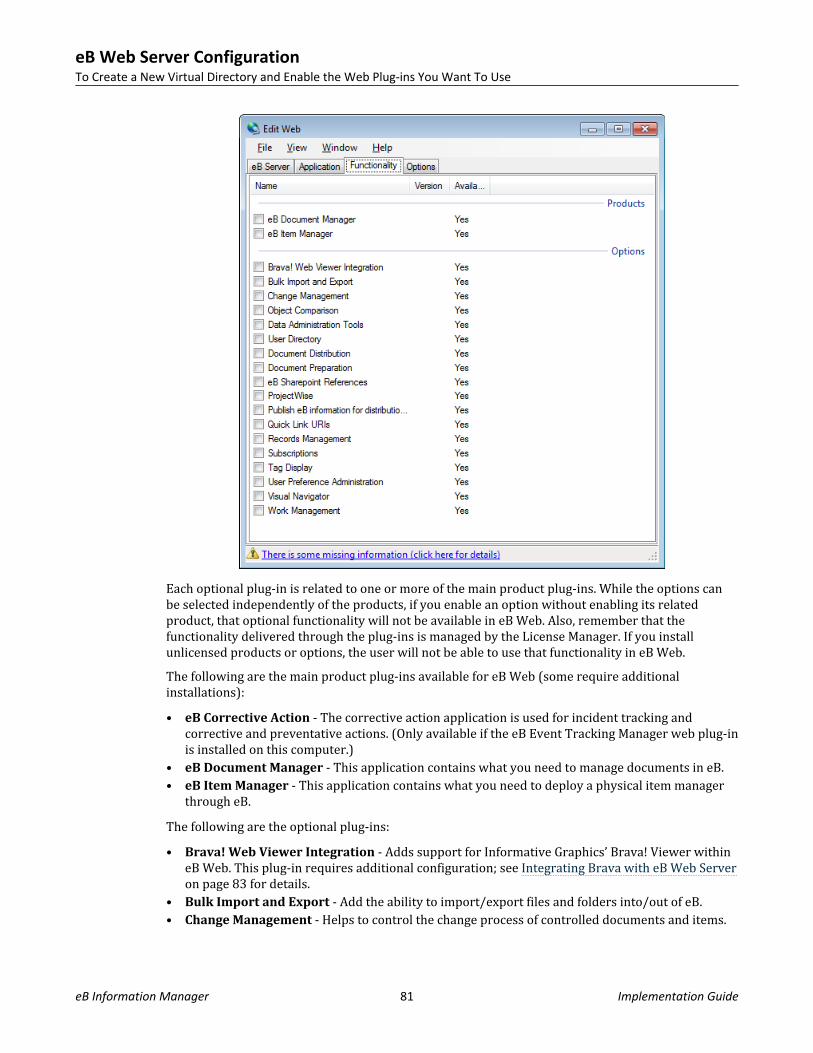
Each optional plug-in is related to one or more of the main product plug-ins. While the options canbe selected independently of the products, if you enable an option without enabling its relatedproduct, that optional functionality will not be available in eB Web. Also, remember that thefunctionality delivered through the plug-ins is managed by the License Manager. If you installunlicensed products or options, the user will not be able to use that functionality in eB Web.The following are the main product plug-ins available for eB Web (some require additionalinstallations):• eB Corrective Action - The corrective action application is used for incident tracking and
corrective and preventative actions. (Only available if the eB Event Tracking Manager web plug-inis installed on this computer.)
• eB Document Manager - This application contains what you need to manage documents in eB.• eB Item Manager - This application contains what you need to deploy a physical item manager
through eB.The following are the optional plug-ins:• Brava! Web Viewer Integration - Adds support for Informative Graphics’ Brava! Viewer within
eB Web. This plug-in requires additional configuration; see Integrating Brava with eB Web Serveron page 83 for details.
• Bulk Import and Export - Add the ability to import/export files and folders into/out of eB.• Change Management - Helps to control the change process of controlled documents and items.
eB Web Server ConfigurationTo Create a New Virtual Directory and Enable the Web Plug-ins You Want To Use
eB Information Manager 81 Implementation Guide

• Change Packages - The change package application allows users to create a package of changesthat is intended to be released for construction simultaneously. (Only available if the eB ChangePackage web plug-in is installed on this computer.)
• Object Comparison - Add the ability to compare eB objects, such as different versions ofdocuments.
• Data Administration Tools - Adds administration features to the website.• User Directory - Adds a directory screen which allows the user to search for people and
organizations.• Document Distribution - Adds the ability to manage distribution of documents to customers
and stakeholders.• Document Preparation - Adds the ability to generate Microsoft Office documents from eB data.• Document Design - Provides document creation capabilities using a wizard. (Only available if
the eB Engineering Designer web plug-ins are installed on this computer.)• eB SharePoint References - Adds the ability to reference documents stored within Microsoft
SharePoint.• eB Book of Knowledge - The Book of Knowledge application lets users collect, review, relate and
approve valuable information as part of their daily business. (Only available if the eB EventTracking Manager web plug-in is installed on this computer.)
• Physical Item Design - Provides physical item creation capabilities using a wizard. (Onlyavailable if the eB Engineering Designer web plug-ins are installed on this computer.)
• ProjectWise - Allows connection between eB and ProjectWise datasources.• Publish eB information for distribution - Adds the ability to publish folder structures to
compiled help files (CHM).• Quick Link URIs - Create quick links to eB objects by specifying their identifying number and
other properties.• Records Management - Adds the ability to control document records through the use of file
plans.• Subscriptions - Provides the ability to subscribe to documents and receive e-mails when events
occur to them.• Survey Wizards - Survey wizards provide the ability to create, collect, review and approve
surveys. (Only available if the eB Event Tracking Manager web plug-in is installed on thiscomputer.)
• Tag Display - Add the ability to view Tag Data and associated relationships• Tag Design and Operations - Provides tag creation and editing capabilities. (Only available if the
eB Engineering Designer web plug-ins are installed on this computer.)• User Preference Administration - Under User Preferences, users can create and update
personal and application wide settings in order to tailor various applications’ behavior.• Virtual Item Group Design - Provides virtual item group creation capabilities using a wizard.
(Only available if the eB Engineering Designer web plug-ins are installed on this computer.)• Visual Navigator - Visual Navigator lets eB Web users view and navigate i-models stored in eB.
Visual Navigator requires additional configuration, beyond enabling this plug-in. See ConfiguringVisual Navigator on page 93 for details.
• Work Management - Adds the ability to plan and organize processes through work orders andtasks.
After configuring the Functionality tab, the warning message stating that there is missinginformation disappears. You can now continue to the Options tab to view or change the defaultoptions.
7. Select the Options tab and review the following:
eB Web Server ConfigurationTo Create a New Virtual Directory and Enable the Web Plug-ins You Want To Use
eB Information Manager 82 Implementation Guide
• Enforce completion of required fields - If set to Yes, property editors will require that userscomplete all of the fields marked "required" before they can save property edits.
• Hide properties that are empty - If set to Yes, property displays hide properties that are notassigned a value.
• Hide relationships that are empty - If set to Yes, relationship displays omit relationships thathave no objects assigned to them.
• URL templates for map links - The template URL which will be used to create links that show anaddress on a map.
• URL template for e-mail address links - The template URL which will be used to create links foremail addresses. Leave this field blank if the website is exposed to the public internet.
• URL template for VOIP calls - Sets the template URL which will be used to create links fortelephone numbers. If you do not have a SIP/VOIP system, or the website is exposed to the publicinternet, leave this field blank.
• Override for eB control version - Use this setting to specify a version number that overrides thecurrent framework version. Do not do this unless you know what it does.
8. When finished with the configuration, click the link at the bottom of the dialog that says, Ready toinstall (click here to start).The eB Web Applications are deployed to the new virtual directory.Tip: If necessary, you can create multiple virtual directories with different plug-ins, connecting to thesame database, so that end-users with different roles only see plug-ins that they require.
Note: eB Engineering Designer functionality can be made available in eB Web through additionalinstallation and configuration. See To Install the eB Engineering Designer Web Plug-in on page 89 fordetails.
Integrating Brava with eB Web ServerThe Brava Web Viewer Integration plug-in adds support for using Informative Graphics' Brava!viewer within eB Web.The following server-side configuration is required:1. Make sure you have Brava! Enterprise 7.1 installed, ActiveX version only (Java, Flash, and HTML
versions are not supported). You can install Brava on the eB Web Server computer or on anothercomputer. If you do install Brava on another computer, make sure the Brava and eB Web Servercomputers are on the same domain.
2. Enable the Brava Web Viewer Integration plug-in in the virtual directory on the eB Web Server(see To Create a New Virtual Directory and Enable the Web Plug-ins You Want To Use on page 78).
3. The Brava Enterprise installation creates a website. Enter the URL of this website in the eB WebServer's web.config file (see Modifying the web.config File for Brava Integration on page 84).
On the client-side, no configuration is required. The first time you attempt to view a file in Brava fromeB Web, you will be prompted to download the Brava Viewer ActiveX Control. You must havepermissions to install ActiveX controls in order to download the Brava Viewer ActiveX Control. Also,while eB Web supports various browsers, only Internet Explorer 8 and 9 are supported when using theBrava viewer in eB Web.
eB Web Server ConfigurationIntegrating Brava with eB Web Server
eB Information Manager 83 Implementation Guide
Note: This document does not describe any part of the Brava Enterprise installation, and assumes thatBrava Enterprise is already installed and working. Any licenses required by Brava are to be obtained bythe user directly from Informative Graphics. Any support issues arising from the Brava viewer itself arehandled by Informative Graphics.
Modifying the web.config File for Brava Integration
After deploying the eB Web Applications with the Brava! Web Viewer Integration plug-in enabled, youmust go to the deployed virtual directory and modify the BravaUrl setting in the web.config file. Thisis required.1. Open the web.config file in a text editor using one of the following methods:
If you are using Windows Server 2003, or Windows Server 2008 without User Account Control(UAC), simply locate the web.config file and double-click it.orIf you are using Windows Server 2008 or later and are using UAC, you will need to open an instanceof Notepad in Administrator mode. Once Notepad is open, use File > Open to locate the web.configfile and open it. (You cannot drag the file to the Notepad window when it is launched inadministrator mode.)
2. Locate this section of the file:<setting name="BravaUrl" serializeAs="String"> <value></value> <!-- Insert URL of Brava! server here --></setting>
3. Inside the <value> </value> element, enter the URL of the Brava Viewer's virtual directory.For example:<value>http://qa-eb/BravaViewer</value>
Note: There cannot be any spaces before or after the URL in the <value> element (for example,<value> http://qa-eb/BravaViewer </value> is not acceptable). Also, the URL cannot end ina forward slash ( / ). Either of these things will cause an error when a user tries to view a file in theBrava viewer from eB Web.
4. Save and close the web.config file.
Brava Viewer Options in web.config
The eB Web Server's web.config file (located in the deployed virtual directory) contains the followingBrava settings that affect the behavior of the Brava viewer in eB Web.
Warning: The BravaCabVer and BravaClsId settings below are system settings thatshould not be modified unless (in the future) you need to use a version of Brava that wasnot available at the time eB SELECTseries 4 was released. Contact Bentley ProfessionalServices for assistance if you need to modify either of these settings.
eB Web Server ConfigurationIntegrating Brava with eB Web Server
eB Information Manager 84 Implementation Guide
BravaCabVerSets the version of Brava that the integration will use. The version in this case is a comma separatednumber. By default, the version is set to Brava 7.1 (7,0,1,18).
Warning: Because eB Web SELECTseries 4 only supports Brava 7.1, you do not need tomodify this setting. You would only need to modify the current value if you upgraded theversion of Brava in the future. Contact Bentley Professional Services for assistance if youhave a need to modify this setting in the future.
<setting name="BravaCabVer" serializeAs="String"> <value>7,0,1,18</value></setting>
BravaClsIdInformative Graphics uses different COM class IDs (CLSID) for different versions of Brava, therefore thissetting is used to set the CLSID that the page specifies when creating the Brava control. By default, thissetting specifies the CLSID associated with Brava 7.1.
Warning: Because eB Web SELECTseries 4 only supports Brava 7.1, you do not need tomodify this setting. You would only need to modify the current value if you upgraded theversion of Brava in the future. Contact Bentley Professional Services for assistance if youhave a need to modify this setting in the future.
<setting name="BravaClsId" serializeAs="String"> <value>56505FCF-9DB3-49B4-BA5F-BE3AAE44CF2E</value></setting>
BravaUrlSets the URL of the Brava integration server. The URL should not end in a / and should have nowhitespace around it.<setting name="BravaUrl" serializeAs="String"> <value>http://myserver/BravaViewer</value> <!-- Insert url of Brava! server here --></setting>
Important: This is the only Brava setting in the web.config file that you are required to edit in order toconfigure integration. This is documented in the previous section, Modifying the web.config File forBrava Integration on page 84
EnableCompareSets whether or not users can compare files using the Brava viewer. If set to true (the default), userscan compare files with Brava. If set to false, the option to compare files is hidden.<setting name="EnableCompare" serializeAs="String"> <value>true</value></setting>
eB Web Server ConfigurationIntegrating Brava with eB Web Server
eB Information Manager 85 Implementation Guide
EnableConsolidateTakeOwnershipSets whether or not a user who is reviewing markups has automatic rights to consolidate markupscreated by other users. By default the consolidation option will not allow a user to consolidate markupsthat they do not own. This option makes all of the markups automatically belong to the current user sothey can be consolidated easily. Set this option to true to enable automatic ownership, the default isfalse. Contrast this option with EnableMarkupChangeOwner.<setting name="EnableConsolidateTakeOwnership" serializeAs="String"> <value>false</value></setting>
EnableMarkupSets whether or not users can markup files using the Brava viewer. If set to true (the default), theannotate option is available in Brava (assuming that the user also has Markup rights). If set to false,the annotate option is hidden.<setting name="EnableMarkup" serializeAs="String"> <value>false</value></setting>
EnableMarkupChangeOwnerSets whether or not any user can change the ownership of a markup element while in consolidate mode.When this setting is disabled (set to false, which is the default), a user cannot consolidate markupsthat were created by other users. When this setting is enabled (set to true) users can take ownership ofsuch markups by <Shift>+clicking the element. Contrast this feature withEnableConsolidateTakeOwnership.<setting name="EnableMarkupChangeOwner" serializeAs="String"> <value>true</value></setting>
ExportCopySets the document copy that files published from Brava are saved into. If the copy does not exist at thetime of publishing, it will be created with the specified name.<setting name="ExportCopy" serializeAs="String"> <value>PUBLISHED</value></setting>
ExportNameFormatSets the template of the file name that is published from Brava when using the publish option. Ifmultiple exports are performed the file name gets a numeric count automatically appended to it so thereis no overlap of file names. The name should contain the code {0} to indicate where the file name of thefile being marked up is inserted.<setting name="ExportNameFormat" serializeAs="String"> <value>Reviewed Files - {0}</value></setting>
eB Web Server ConfigurationIntegrating Brava with eB Web Server
eB Information Manager 86 Implementation Guide
IgnoreFileTypesThis list is where you add the file extensions that you want to prevent from being viewed in Brava. If afile has one of these extensions, the user will not see the View file in Brava! menu option whenselecting it. Enter each file extension with a dot (.htm) and separated by a comma.By default, HTM, HTML, and XML extensions are included in the list.<setting name="IgnoreFileTypes" serializeAs="String"> <value>.htm,.html,.xml</value></setting>
MarkupNameFormatSets the name of the markup copy that is created in eB. This must contain the code {0} which is used toinsert the markup name given by the user.<setting name="MarkupNameFormat" serializeAs="String"> <value>MARKUP - {0}</value></setting>
MarkupSecurityGroupSets the name of the security group that is assigned to the markup file when it is created. The markupgroup specifies what security settings are applied when files are accessed. The person that created amarkup is also allowed view and modify rights on the markup. If you need to specify multiple groups,separate each group name with a semicolon.<setting name="MarkupSecurityGroup" serializeAs="String"> <value>Markup Reviewers</value></setting>
TextFileTypeThis list is where you add the file extensions that will trigger text compare mode in Brava instead of thedefault image compare mode.By default, DOC, DOCX, TXT, and PDF extensions are included in the list.You should only add text-type files to this list, for which image compare mode is not appropriate. Entereach file extension with a dot (.htm) and separated by a comma.<setting name="TextFileType" serializeAs="String"> <value>.doc,.docx,.txt,.pdf</value></setting>
WatermarkSets the watermark of text that will appear over the image while it is being displayed in the Bravaviewer. You can enter any text you want here. You can also insert any of the following variables:• $(filename) - The name of file being viewed.• $(code) - The prefix of the document containing the file.• $(title) - The title of the document containing the file.• $(class) - The code of the class of the document containing the file.
eB Web Server ConfigurationIntegrating Brava with eB Web Server
eB Information Manager 87 Implementation Guide

• $(username) - The name of the person who is viewing the file.<setting name="Watermark" serializeAs="String"> <value>My Files - $(title)</value></setting>
Installing and Deploying Additional Web Plug-insThere are several optional eB components that you can install on the eB Web Server computer (thecomputer where eB Web Applications is installed) to enable functionality in eB Web. First you install thecomponents, then you deploy them to your virtual directory.• eB Change Package Web Plug-in - Adds support for creating, displaying, and managing change
packages in eB Web, along with document change notices and markups. The eB Change Package WebPlug-in displays tag relationships and prototypes. (Tag prototypes are created in the eB EngineeringDesigner client application.)
• eB Engineering Designer Web Plug-in - Adds support for creating and editing tags in eB Web. Italso adds the ability to create documents, physical items, and virtual items in eB Web.
• eB Event Tracking Manager Web Plug-in - Adds support for event tracking functionality in eBWeb.
To Install the eB Change Package Web Plug-in
The following installation assumes:• eB Web Applications is already installed on this computer• eB Engineering Designer database files have already been installed on the eB Application Server
computer (see To Install the eB Engineering Designer Database Files on the eB Application Server onpage 68)
1. Browse to this folder in Windows Explorer:...\Server Installation\eB Change Package Plug-In
2. Double-click this MSI file:eB Change Package Plug-In (x86).msi
3. When the Setup Wizard opens, click Next.
eB Web Server ConfigurationInstalling and Deploying Additional Web Plug-ins
eB Information Manager 88 Implementation Guide

4. When the License Agreement page opens, accept the agreement and click Next.5. When the Ready to Install page opens, click Install.6. When installation is complete, click Finish.
To Install the eB Engineering Designer Web Plug-in
The following installation assumes:• eB Web Applications is already installed on this computer• eB Engineering Designer database files have already been installed on the eB Application Server
computer (see To Install the eB Engineering Designer Database Files on the eB Application Server onpage 68)
1. Browse to this folder in Windows Explorer:...\Server Installation\eB Engineering Designer Web Plug-Ins
2. Double-click this MSI file:eB Engineering Designer Web Plug-Ins (x86).msi
3. When the Setup Wizard opens, click Next.
eB Web Server ConfigurationInstalling and Deploying Additional Web Plug-ins
eB Information Manager 89 Implementation Guide
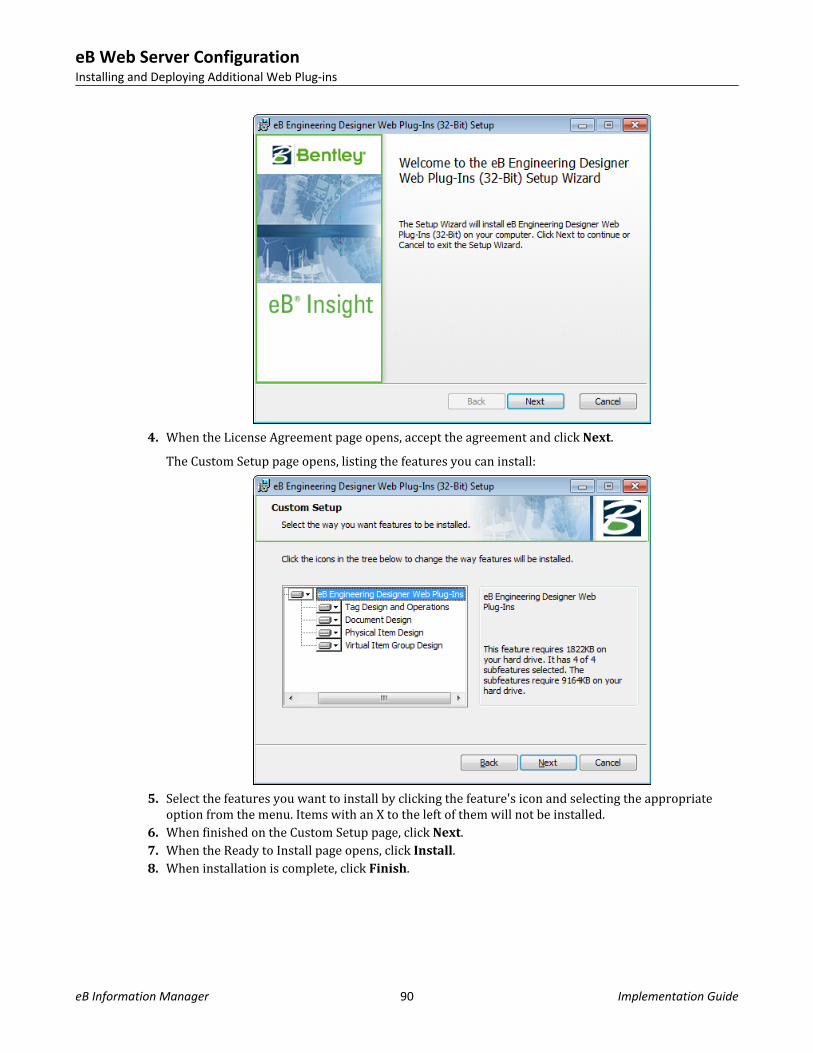
4. When the License Agreement page opens, accept the agreement and click Next.The Custom Setup page opens, listing the features you can install:
5. Select the features you want to install by clicking the feature's icon and selecting the appropriateoption from the menu. Items with an X to the left of them will not be installed.
6. When finished on the Custom Setup page, click Next.7. When the Ready to Install page opens, click Install.8. When installation is complete, click Finish.
eB Web Server ConfigurationInstalling and Deploying Additional Web Plug-ins
eB Information Manager 90 Implementation Guide
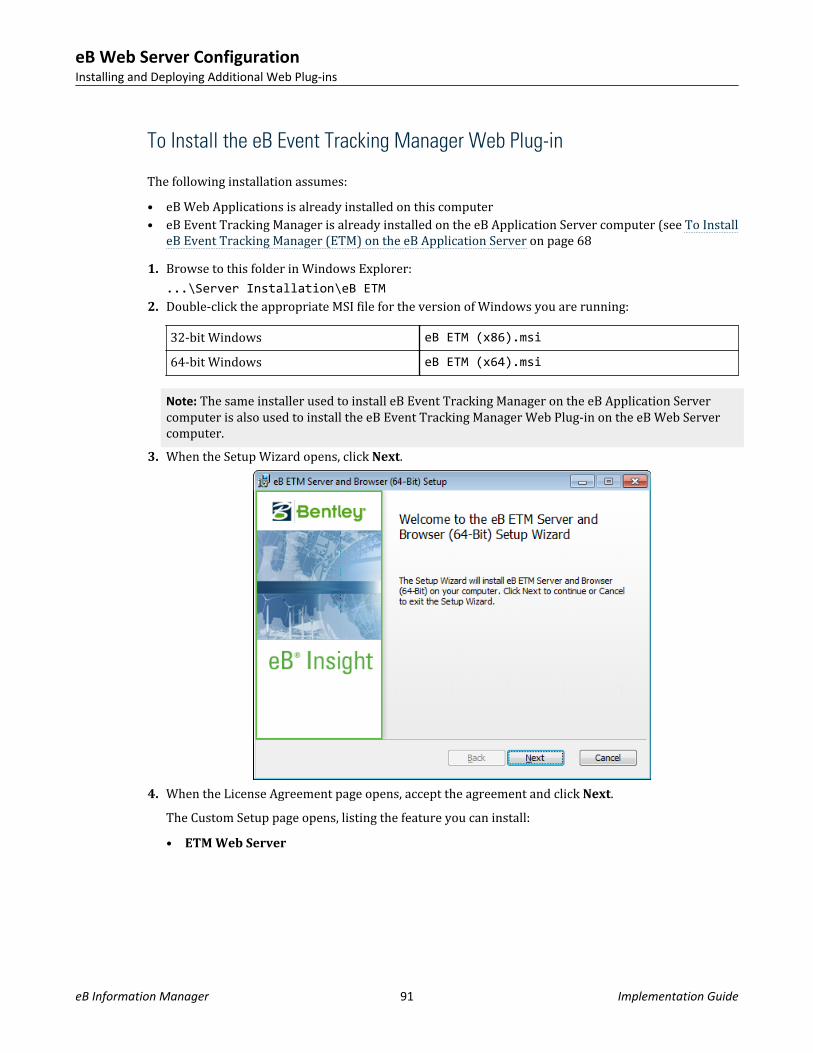
To Install the eB Event Tracking Manager Web Plug-in
The following installation assumes:• eB Web Applications is already installed on this computer• eB Event Tracking Manager is already installed on the eB Application Server computer (see To Install
eB Event Tracking Manager (ETM) on the eB Application Server on page 681. Browse to this folder in Windows Explorer:
...\Server Installation\eB ETM2. Double-click the appropriate MSI file for the version of Windows you are running:
32-bit Windows eB ETM (x86).msi
64-bit Windows eB ETM (x64).msi
Note: The same installer used to install eB Event Tracking Manager on the eB Application Servercomputer is also used to install the eB Event Tracking Manager Web Plug-in on the eB Web Servercomputer.
3. When the Setup Wizard opens, click Next.
4. When the License Agreement page opens, accept the agreement and click Next.The Custom Setup page opens, listing the feature you can install:• ETM Web Server
eB Web Server ConfigurationInstalling and Deploying Additional Web Plug-ins
eB Information Manager 91 Implementation Guide
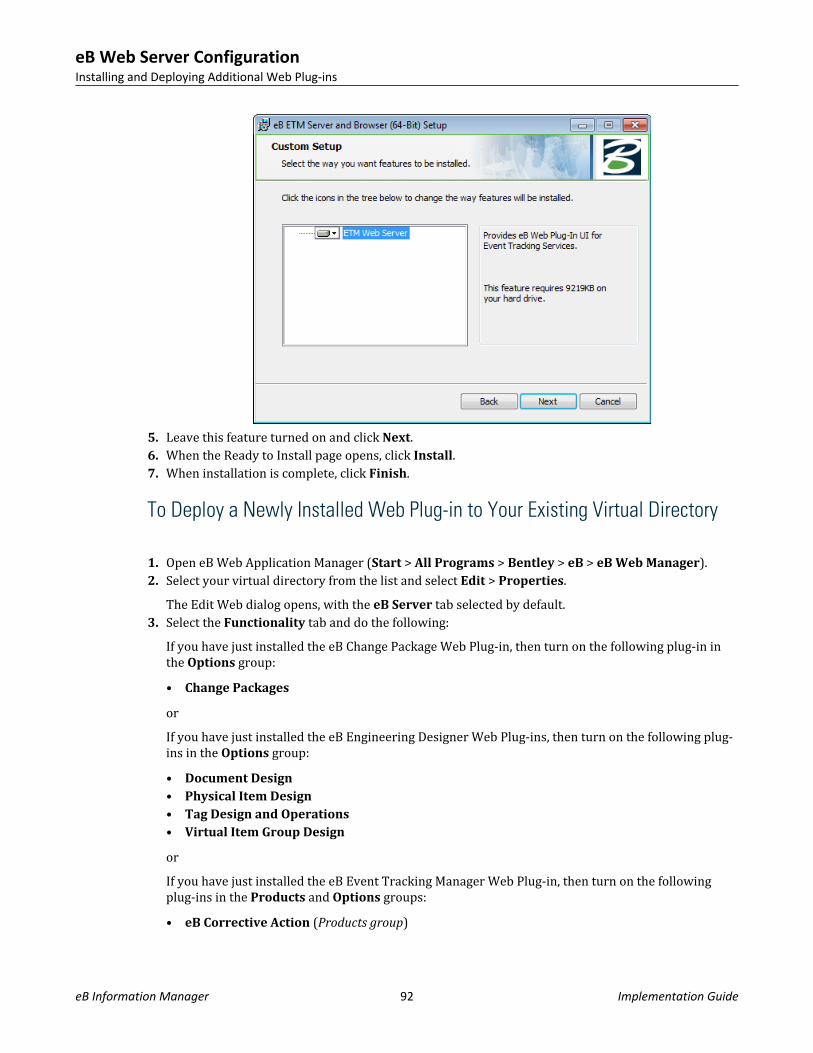
5. Leave this feature turned on and click Next.6. When the Ready to Install page opens, click Install.7. When installation is complete, click Finish.
To Deploy a Newly Installed Web Plug-in to Your Existing Virtual Directory
1. Open eB Web Application Manager (Start > All Programs > Bentley > eB > eB Web Manager).2. Select your virtual directory from the list and select Edit > Properties.
The Edit Web dialog opens, with the eB Server tab selected by default.3. Select the Functionality tab and do the following:
If you have just installed the eB Change Package Web Plug-in, then turn on the following plug-in inthe Options group:• Change Packages
orIf you have just installed the eB Engineering Designer Web Plug-ins, then turn on the following plug-ins in the Options group:• Document Design• Physical Item Design• Tag Design and Operations• Virtual Item Group Design
orIf you have just installed the eB Event Tracking Manager Web Plug-in, then turn on the followingplug-ins in the Products and Options groups:• eB Corrective Action (Products group)
eB Web Server ConfigurationInstalling and Deploying Additional Web Plug-ins
eB Information Manager 92 Implementation Guide

• eB Book of Knowledge (Options group)• Survey Wizards (Options group)
4. Click the Ready to install (click here to start) link at the bottom of the dialog.5. When the deployment is complete, click OK.
Configuring Visual NavigatorVisual Navigator lets eB Web users view and navigate i-models stored in eB.In order for Visual Navigator to work in a meaningful way, the following modeling requirements mustbe met:1. In order to navigate from a tag to an i-model, the tag must be related to a document containing the i-
model.2. Every i-model used must contain EC attribute data for items it contains. An i-model lacking custom
EC data is not usable.3. For a truly unique mapping of tags, the eB attribute value defined for the tag must be unique in the
eB database and the EC attribute for the tag must be unique in the i-model being viewed. (The tagcan exist in multiple i-models, but it must be unique within the context of each i-model.)
To get started, the first thing you need to do is enable the Visual Navigator plug-in on the eB WebServer. See To Create a New Virtual Directory and Enable the Web Plug-ins You Want To Use on page 78for details.Next, you need to map tags. Visual Navigator assumes that there is a relationship between the tags inyour community and the tags within the i-models in your community. The mapping of tags is configuredin following XML file, which gets installed when you enable the Visual Navigator plug-in:[eB web root virtual directory]\PlugIns\VisualNavigator\App_Data\VisualNavigationMapping.xml
VisualNavigationMapping.xml Format
• Root node: businessKeysThis node contains all of the business key definitions for Visual Navigator and can have multipleBusinessKey children.
• BusinessKey nodesThese nodes contain all the data used to create a custom mapping scheme. All of the data needed forthe mapping is stored in seven attributes, described below.• iModelAuthor
This required attribute allows Visual Navigator to identify the mapping scheme to use on a per-document basis. Visual Navigator checks the eB document for an attribute namedVisualNavigatorAuthoringTool. (This is a new document attribute that you manually createin eB Director, under the Documents class group (set the Type to Character). Once the attributeexists, users can define the value of this attribute on documents as needed.) If the document'sVisualNavigatorAuthoringTool attribute value is populated, then the BusinessKey whoseiModelAuthor attribute value matches the value of the document'sVisualNavigatorAuthoringTool attribute will be used. If no match is found (or if the attributedoes not exist, or if it exists but the attribute value on the document is not populated), then the
eB Web Server ConfigurationConfiguring Visual Navigator
eB Information Manager 93 Implementation Guide

BusinessKey whose iModelAuthor attribute value is set to "default" is used. If no match isfound and "default" does not exist, then the first listed BusinessKey is used.
• eBAttribute
This required attribute represents the name of the eB tag attribute to use to map tags in eB totags in an i-model. The intrinsic attributes "Code" and "Name" can be used. If one of those valuesis not used, Visual Navigator interprets the attribute as a custom eB attribute defined in theGlobal scope.
• ECAttribute
The name of the EC tag attribute, as defined on tags in the i-model, to use for mapping eB tags toi-model tags.
• UseClassNames
If "true", Visual Navigator will assume that the class name for eB tags matches the EC classnames for tags in the i-model. This is the optimal configuration, as it will enable faster queries inthe i-model. If "false", all queries for tags in the i-model will be performed without using theclass name. This will result in slower queries, but is necessary for configurations where the eBclass names do no match the EC class names.
• ECSchemaName
Name of the schema in the i-model that controls how mapped tag attributes are defined. Definingthis attribute also allows for faster queries in the i-model, but is not required.
• RenderingMode
Controls how i-models will be rendered in Visual Navigator. If no option is specified, the controldefaults to SMOOTHSHADE. Possible values are:• WIREFRAME• CROSSSECTION• WIREMESH• HIDDENLINE• SOLIDFILL• CONSTANTSHADE• SMOOTHSHADE• PHONG• RAYTRACE• RENDER_WIREFRAME• RADIOSITY• PARTICLE_TRACE• RENDER_LUXOLOGY
Note: Not all rendering modes are supported by all i-models. If an unsupported mode is chosen,the control will revert to a default mode that is supported.
• HighlightColor
Sets the color used when an item is highlighted in the i-model. The format is a 6-digit hexadecimalRGB value (“RRGGBB”).
Here is an example of how a typical data-mapping implementation may look:<businesskeys> <BusinessKey iModelAuthor="default"
eB Web Server ConfigurationConfiguring Visual Navigator
eB Information Manager 94 Implementation Guide
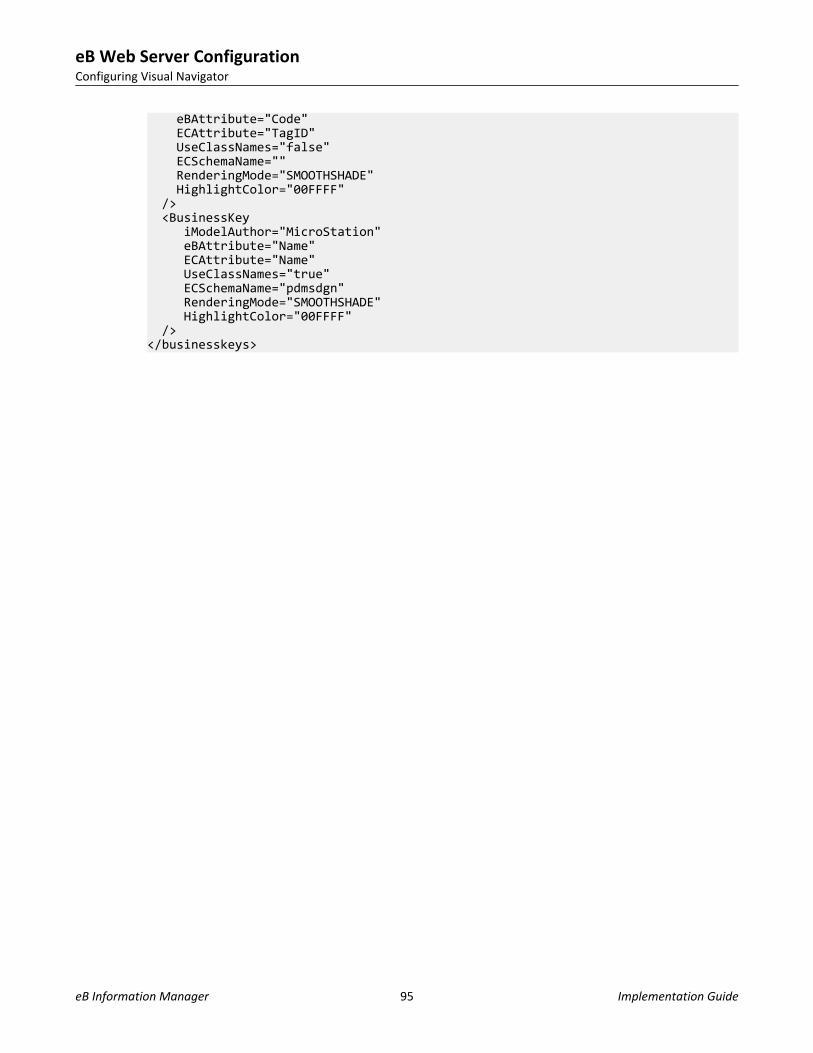
eBAttribute="Code" ECAttribute="TagID" UseClassNames="false" ECSchemaName="" RenderingMode="SMOOTHSHADE" HighlightColor="00FFFF" /> <BusinessKey iModelAuthor="MicroStation" eBAttribute="Name" ECAttribute="Name" UseClassNames="true" ECSchemaName="pdmsdgn" RenderingMode="SMOOTHSHADE" HighlightColor="00FFFF" /></businesskeys>
eB Web Server ConfigurationConfiguring Visual Navigator
eB Information Manager 95 Implementation Guide

eB Web Server ConfigurationConfiguring Visual Navigator
This page intentionally left blank
eB Information Manager 96 Implementation Guide

eB Engineering Designer Installation 6This chapter is for:
• People who install or distribute client applications at your siteThis chapter assumes:
• eB Application Server is already installed and configured on another computer (see eB Core ServerConfiguration on page 23)
• eB Engineering Designer database files have already been installed on the eB Application Servercomputer (see To Install the eB Engineering Designer Database Files on the eB Application Server onpage 68)
eB Engineering Designer is a desktop application used to view and maintain engineering-focusedinformation including engineering documentation such as drawings, procedures, manuals. eBEngineering Designer users can participate in engineering change processes, view engineering dataincluding tags, equipment and documentation.
Before You Install or Upgrade eB Engineering Designer1. See the eB readme (readme_eb_information_manager.chm) for a list of supported operating
systems and other system requirements for this module.2. If you have an older version of eB Engineering Designer installed, uninstall it first.3. Make sure Microsoft .NET Framework 3.5 SP1 is installed.4. Install Brava! Desktop 7.1, if you want to view eB files without having to install their native
application.
To Install eB Engineering Designer1. Browse to this folder in Windows Explorer:
...\Client Installation\eB Engineering Designer2. Double-click this MSI file:
eB Engineering Designer (x86).msi3. When the Setup Wizard opens, click Next.
eB Information Manager 97 Implementation Guide
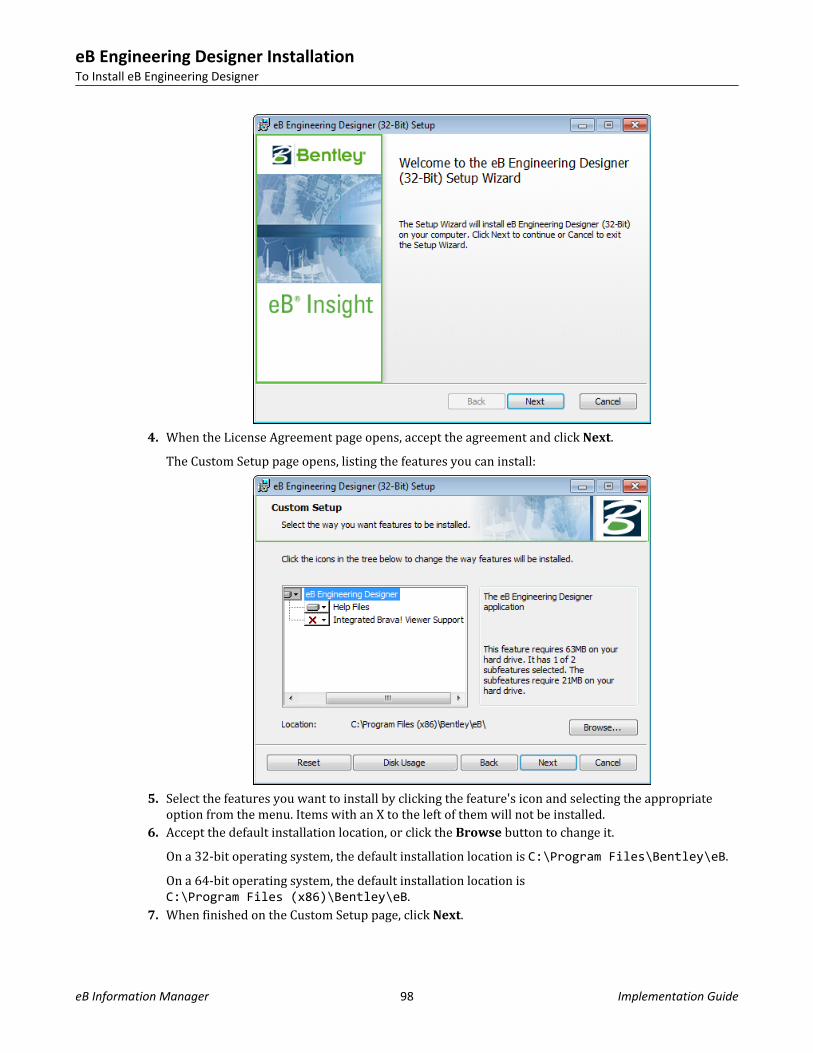
4. When the License Agreement page opens, accept the agreement and click Next.The Custom Setup page opens, listing the features you can install:
5. Select the features you want to install by clicking the feature's icon and selecting the appropriateoption from the menu. Items with an X to the left of them will not be installed.
6. Accept the default installation location, or click the Browse button to change it.On a 32-bit operating system, the default installation location is C:\Program Files\Bentley\eB.On a 64-bit operating system, the default installation location isC:\Program Files (x86)\Bentley\eB.
7. When finished on the Custom Setup page, click Next.
eB Engineering Designer InstallationTo Install eB Engineering Designer
eB Information Manager 98 Implementation Guide

8. When the Ready to Install page opens, click Install.9. When installation is complete, click Finish.
eB Engineering Designer InstallationTo Install eB Engineering Designer
eB Information Manager 99 Implementation Guide

eB Engineering Designer InstallationTo Install eB Engineering Designer
This page intentionally left blank
eB Information Manager 100 Implementation Guide

eB CAD-Connect Installation 7This chapter is for:
• People who install or distribute client applications at your siteThis chapter assumes:
• An eB Web Server is already configured on another computer in your system (see eB Web ServerConfiguration on page 75)
• You already have a supported version of MicroStation or AutoCAD installed on this computereB CAD-Connect is used to integrate MicroStation and AutoCAD with eB. eB CAD-Connect exposes the eBsystem functionality most commonly required by CAD users within their familiar CAD environment.Most eB CAD-Connect users will never need to use other eB modules. This version of eB CAD-Connectprovides support for MicroStation V8i (SELECTseries 1 and 2) and AutoCAD versions 2009 to 2012.
Before You Install or Upgrade eB CAD-Connect1. See the eB readme (readme_eb_information_manager.chm) for a list of supported operating
systems and other system requirements for this module.2. If you have an older version of eB CAD-Connect installed, uninstall it first.3. Make sure Microsoft .NET Framework 3.5 SP1 is installed.4. Make sure you have a supported version of MicroStation or AutoCAD installed.
This version supports:• MicroStation V8i (SELECTseries 1 and 2)• AutoCAD 2009 to 2012
5. If using a 64-bit version of AutoCAD, you must also install the 64-bit eB Web Client Controls on yourcomputer:...\Client Installation\eB Web Client Controls\eB Web Client Controls(x64).msi
This can be performed before or after installing eB CAD-Connect.
To Install eB CAD-Connect1. Browse to this folder in Windows Explorer:
...\Client Installation\eB CAD Connect2. Double-click this MSI file:
eB CAD Connect (x86).msi3. When the Setup Wizard opens, click Next.
eB Information Manager 101 Implementation Guide
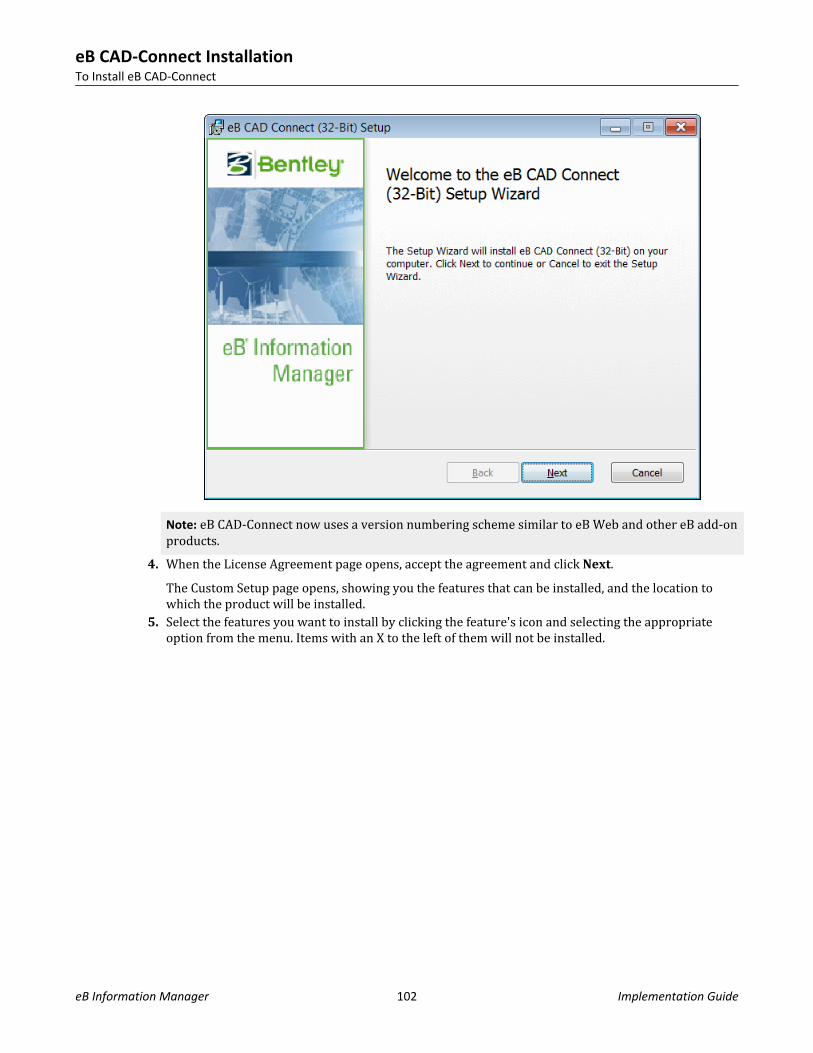
Note: eB CAD-Connect now uses a version numbering scheme similar to eB Web and other eB add-onproducts.
4. When the License Agreement page opens, accept the agreement and click Next.The Custom Setup page opens, showing you the features that can be installed, and the location towhich the product will be installed.
5. Select the features you want to install by clicking the feature's icon and selecting the appropriateoption from the menu. Items with an X to the left of them will not be installed.
eB CAD-Connect InstallationTo Install eB CAD-Connect
eB Information Manager 102 Implementation Guide
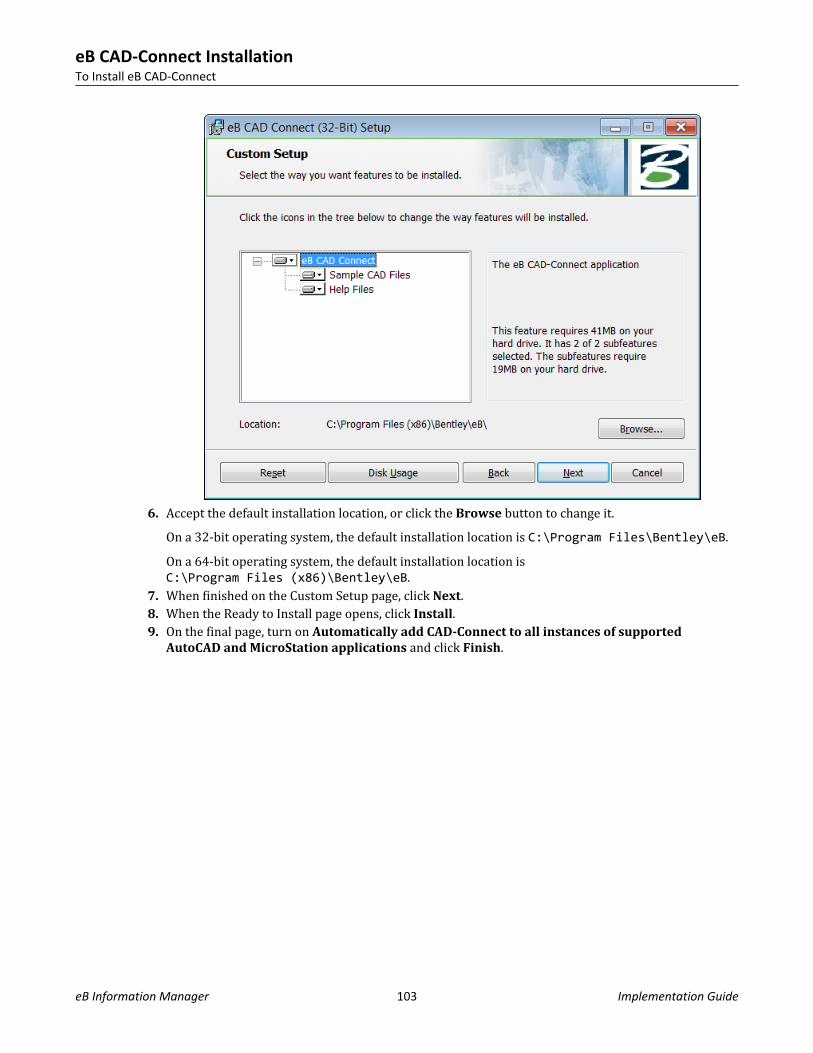
6. Accept the default installation location, or click the Browse button to change it.On a 32-bit operating system, the default installation location is C:\Program Files\Bentley\eB.On a 64-bit operating system, the default installation location isC:\Program Files (x86)\Bentley\eB.
7. When finished on the Custom Setup page, click Next.8. When the Ready to Install page opens, click Install.9. On the final page, turn on Automatically add CAD-Connect to all instances of supported
AutoCAD and MicroStation applications and click Finish.
eB CAD-Connect InstallationTo Install eB CAD-Connect
eB Information Manager 103 Implementation Guide
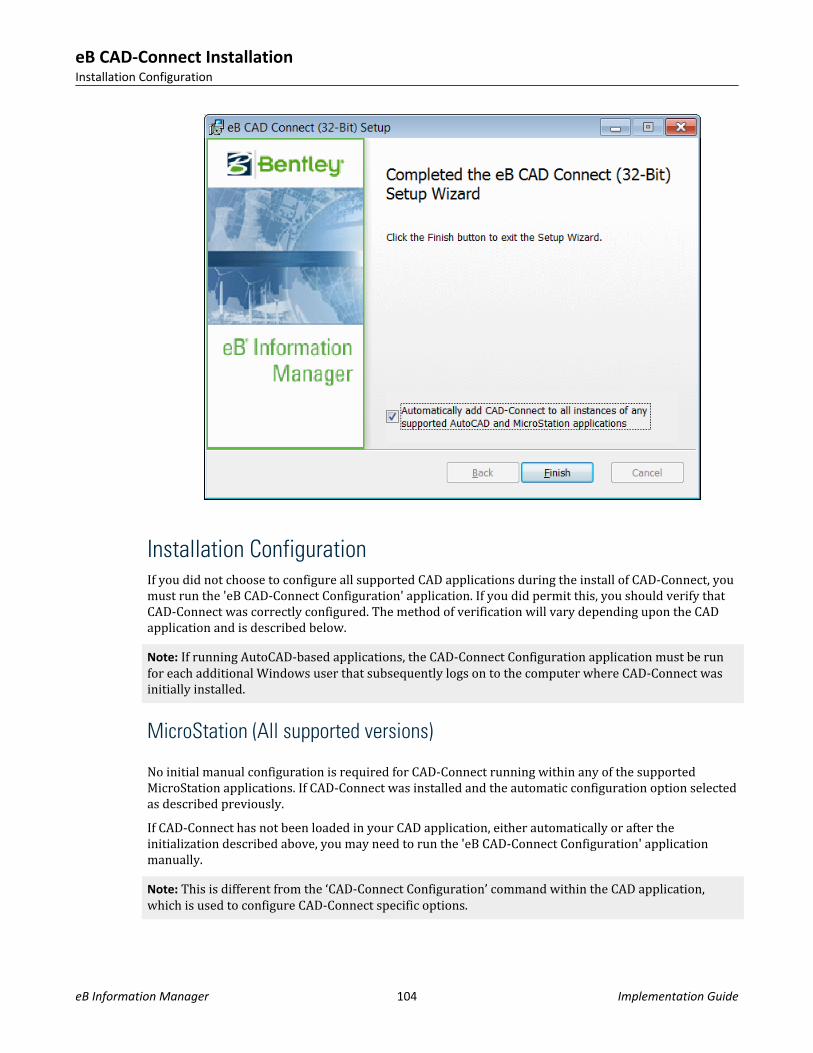
Installation ConfigurationIf you did not choose to configure all supported CAD applications during the install of CAD-Connect, youmust run the 'eB CAD-Connect Configuration' application. If you did permit this, you should verify thatCAD-Connect was correctly configured. The method of verification will vary depending upon the CADapplication and is described below.Note: If running AutoCAD-based applications, the CAD-Connect Configuration application must be runfor each additional Windows user that subsequently logs on to the computer where CAD-Connect wasinitially installed.
MicroStation (All supported versions)
No initial manual configuration is required for CAD-Connect running within any of the supportedMicroStation applications. If CAD-Connect was installed and the automatic configuration option selectedas described previously.If CAD-Connect has not been loaded in your CAD application, either automatically or after theinitialization described above, you may need to run the 'eB CAD-Connect Configuration' applicationmanually.Note: This is different from the ‘CAD-Connect Configuration’ command within the CAD application,which is used to configure CAD-Connect specific options.
eB CAD-Connect InstallationInstallation Configuration
eB Information Manager 104 Implementation Guide
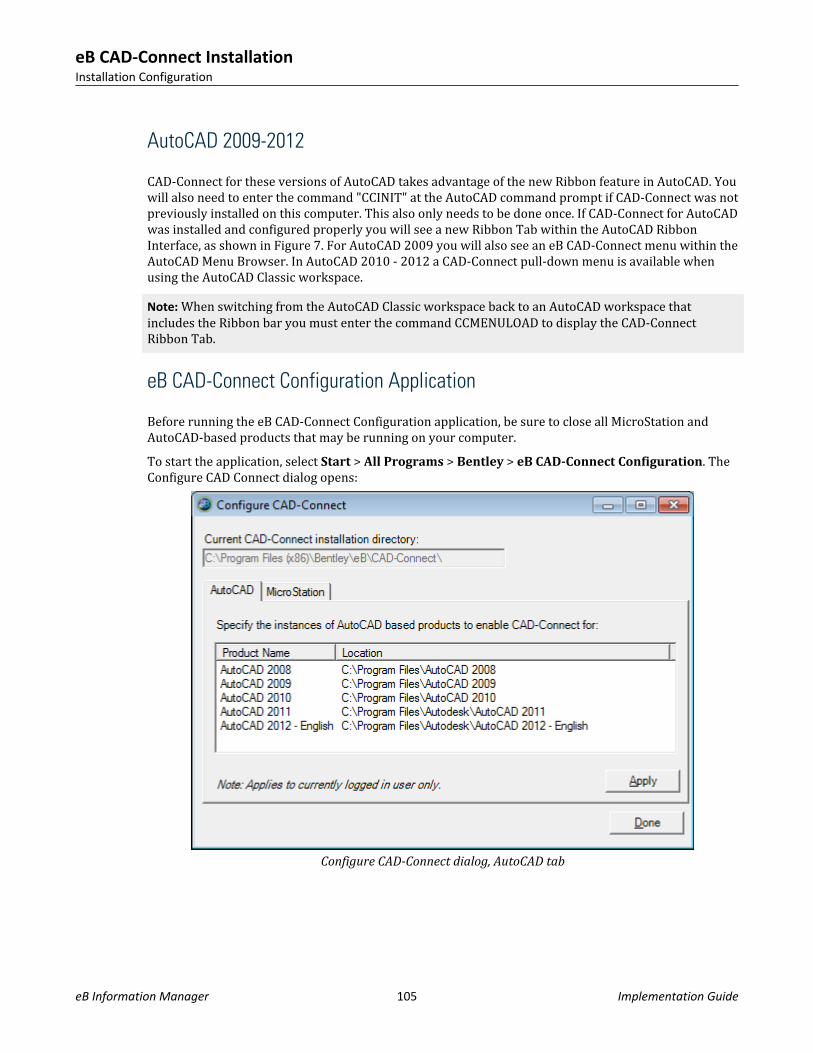
AutoCAD 2009-2012
CAD-Connect for these versions of AutoCAD takes advantage of the new Ribbon feature in AutoCAD. Youwill also need to enter the command "CCINIT" at the AutoCAD command prompt if CAD-Connect was notpreviously installed on this computer. This also only needs to be done once. If CAD-Connect for AutoCADwas installed and configured properly you will see a new Ribbon Tab within the AutoCAD RibbonInterface, as shown in Figure 7. For AutoCAD 2009 you will also see an eB CAD-Connect menu within theAutoCAD Menu Browser. In AutoCAD 2010 - 2012 a CAD-Connect pull-down menu is available whenusing the AutoCAD Classic workspace.Note: When switching from the AutoCAD Classic workspace back to an AutoCAD workspace thatincludes the Ribbon bar you must enter the command CCMENULOAD to display the CAD-ConnectRibbon Tab.
eB CAD-Connect Configuration Application
Before running the eB CAD-Connect Configuration application, be sure to close all MicroStation andAutoCAD-based products that may be running on your computer.To start the application, select Start > All Programs > Bentley > eB CAD-Connect Configuration. TheConfigure CAD Connect dialog opens:
Configure CAD-Connect dialog, AutoCAD tab
eB CAD-Connect InstallationInstallation Configuration
eB Information Manager 105 Implementation Guide
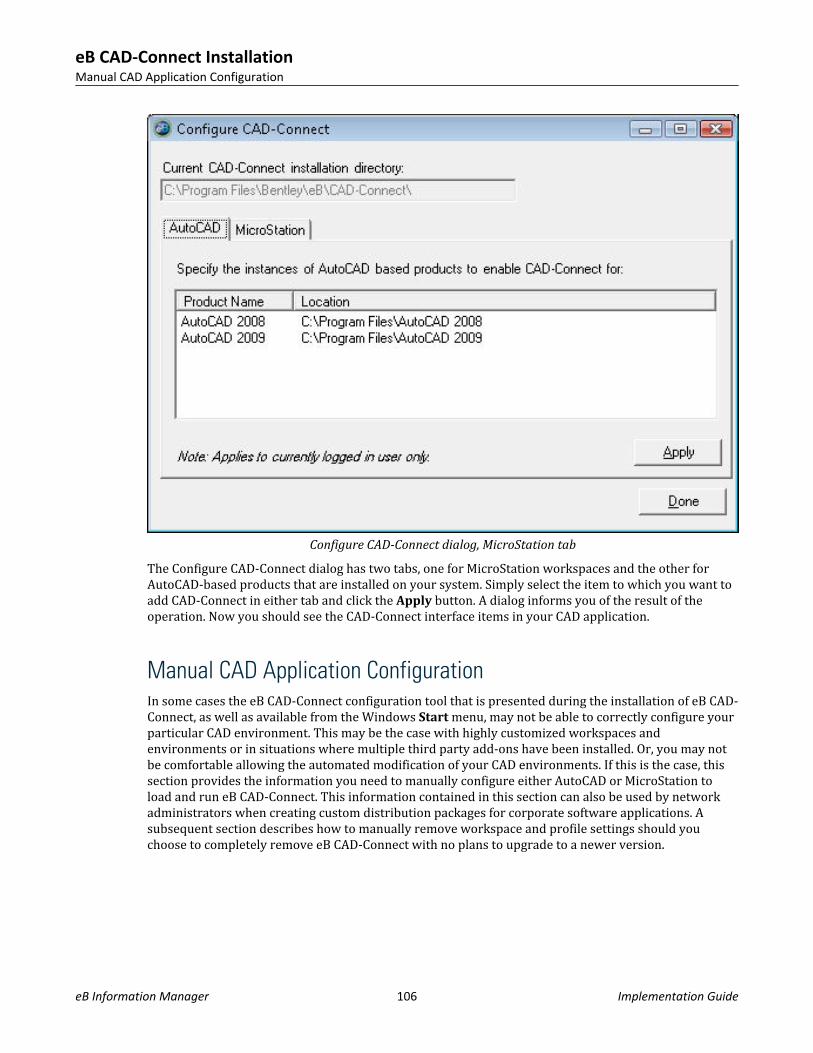
Configure CAD-Connect dialog, MicroStation tab
The Configure CAD-Connect dialog has two tabs, one for MicroStation workspaces and the other forAutoCAD-based products that are installed on your system. Simply select the item to which you want toadd CAD-Connect in either tab and click the Apply button. A dialog informs you of the result of theoperation. Now you should see the CAD-Connect interface items in your CAD application.
Manual CAD Application ConfigurationIn some cases the eB CAD-Connect configuration tool that is presented during the installation of eB CAD-Connect, as well as available from the Windows Start menu, may not be able to correctly configure yourparticular CAD environment. This may be the case with highly customized workspaces andenvironments or in situations where multiple third party add-ons have been installed. Or, you may notbe comfortable allowing the automated modification of your CAD environments. If this is the case, thissection provides the information you need to manually configure either AutoCAD or MicroStation toload and run eB CAD-Connect. This information contained in this section can also be used by networkadministrators when creating custom distribution packages for corporate software applications. Asubsequent section describes how to manually remove workspace and profile settings should youchoose to completely remove eB CAD-Connect with no plans to upgrade to a newer version.
eB CAD-Connect InstallationManual CAD Application Configuration
eB Information Manager 106 Implementation Guide
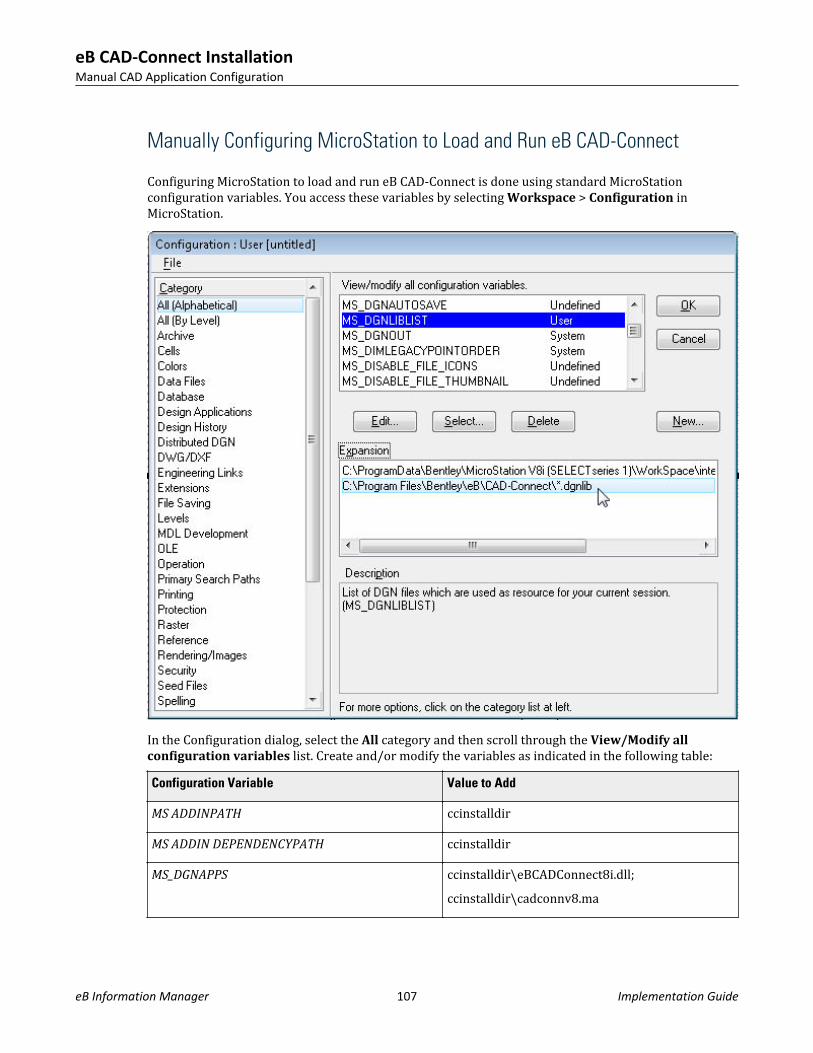
Manually Configuring MicroStation to Load and Run eB CAD-Connect
Configuring MicroStation to load and run eB CAD-Connect is done using standard MicroStationconfiguration variables. You access these variables by selecting Workspace > Configuration inMicroStation.
In the Configuration dialog, select the All category and then scroll through the View/Modify allconfiguration variables list. Create and/or modify the variables as indicated in the following table:Configuration Variable Value to Add
MS ADDINPATH ccinstalldirMS ADDIN DEPENDENCYPATH ccinstalldirMS_DGNAPPS ccinstalldir\eBCADConnect8i.dll;
ccinstalldir\cadconnv8.ma
eB CAD-Connect InstallationManual CAD Application Configuration
eB Information Manager 107 Implementation Guide
Configuration Variable Value to Add
MS_DGNLIBLIST ccinstalldir\*.dgnlibMS_LIBRARY_PATH ccinstalldir\MS_ICONRSCLIST ccinstalldir\*.rscMS_MDLAPPS ccinstalldir/MS_PLTCFG_PATH ccinstalldir\MS PRINTDEF PATH ccinstalldir\MS_RFDIR Add your configured CAD-Connect reference file
directory to this list of directories.
Where the above table indicates ccinstalldir, set the full directory path where you installed eB CAD-Connect. The default is C:\Program Files\Bentley\eB\CADConnect for 32-bit systems andC:\Program Files (x86)\Bentley\eB\CAD-Connect for 64-bit systems.The above configuration variables are stored in .UCF files and can also be modified directly. For moreinformation, see the MicroStation documentation. An example of the settings that are automaticallyadded to the .UCF file specified when running the eB CAD-Connect configuration tool are listed below:MS_LIBRARY_PATH > C:/Program Files/Bentley/eB/CAD-Connect/MS_DGNAPPS > C:/Program Files/Bentley/eB/CAD-Connect/eBCADConnect8i.dllMS_DGNAPPS > C:/Program Files/Bentley/eB/CAD-Connect/cadconnv8.maMS_RFDIR > C:/eBCadRefs/MS_PLTCFG_PATH > C:/Program Files/Bentley/eB/CAD-Connect/MS_PRINTDEF_PATH > C:/Program Files/Bentley/eB/CAD-Connect/MS_ADDINPATH > C:/Program Files/Bentley/eB/CAD-Connect/MS_ADDIN_DEPENDENCYPATH > C:/Program Files/Bentley/eB/CAD-Connect/MS_DGNLIBLIST > C:/Program Files/Bentley/eB/CAD-Connect/*.dgnlibMS_ICONRSCLIST > C:/Program Files/Bentley/eB/CAD-Connect/*.rscMS_MDLAPPS > C:/Program Files/Bentley/eB/CAD-Connect/
Warning: Use caution when modifying .UCF files. Incorrect configuration of these .UCF filescould result in the failure of MicroStation to load other third party applications.
Manual MicroStation Configuration RemovalWhen upgrading eB CAD-Connect to the newest version, the preceding configuration is automaticallyupdated to reflect the requirements of the latest version. If you decide to uninstall eB CAD-Connect fromyour MicroStation environment and do not plan on upgrading, you will need to manually remove theabove configuration variable values to avoid missing eB CAD-Connect application errors.
Manually Configuring AutoCAD to Load and Run eB CAD-Connect
This section is for advanced system administrators as it involves modifying the Windows Registry.
eB CAD-Connect InstallationManual CAD Application Configuration
eB Information Manager 108 Implementation Guide
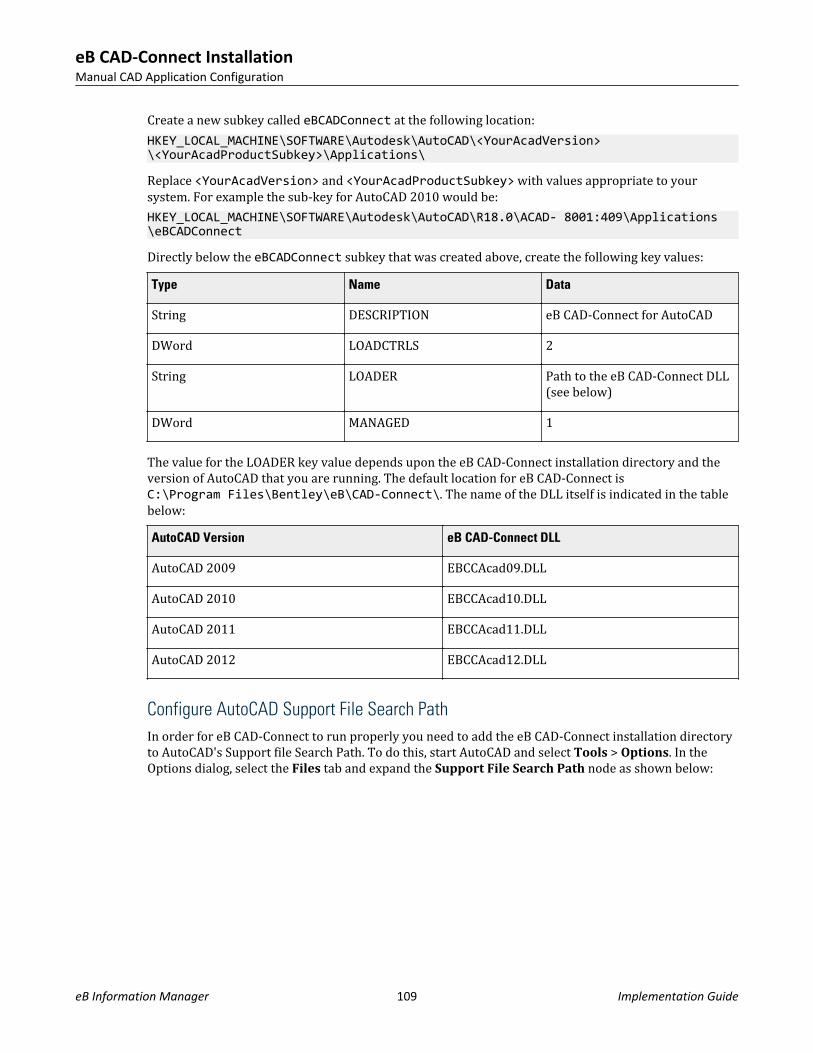
Create a new subkey called eBCADConnect at the following location:HKEY_LOCAL_MACHINE\SOFTWARE\Autodesk\AutoCAD\<YourAcadVersion>\<YourAcadProductSubkey>\Applications\
Replace <YourAcadVersion> and <YourAcadProductSubkey> with values appropriate to yoursystem. For example the sub-key for AutoCAD 2010 would be:HKEY_LOCAL_MACHINE\SOFTWARE\Autodesk\AutoCAD\R18.0\ACAD- 8001:409\Applications\eBCADConnect
Directly below the eBCADConnect subkey that was created above, create the following key values:Type Name Data
String DESCRIPTION eB CAD-Connect for AutoCADDWord LOADCTRLS 2String LOADER Path to the eB CAD-Connect DLL
(see below)DWord MANAGED 1
The value for the LOADER key value depends upon the eB CAD-Connect installation directory and theversion of AutoCAD that you are running. The default location for eB CAD-Connect isC:\Program Files\Bentley\eB\CAD-Connect\. The name of the DLL itself is indicated in the tablebelow:AutoCAD Version eB CAD-Connect DLL
AutoCAD 2009 EBCCAcad09.DLLAutoCAD 2010 EBCCAcad10.DLLAutoCAD 2011 EBCCAcad11.DLLAutoCAD 2012 EBCCAcad12.DLL
Configure AutoCAD Support File Search PathIn order for eB CAD-Connect to run properly you need to add the eB CAD-Connect installation directoryto AutoCAD's Support file Search Path. To do this, start AutoCAD and select Tools > Options. In theOptions dialog, select the Files tab and expand the Support File Search Path node as shown below:
eB CAD-Connect InstallationManual CAD Application Configuration
eB Information Manager 109 Implementation Guide
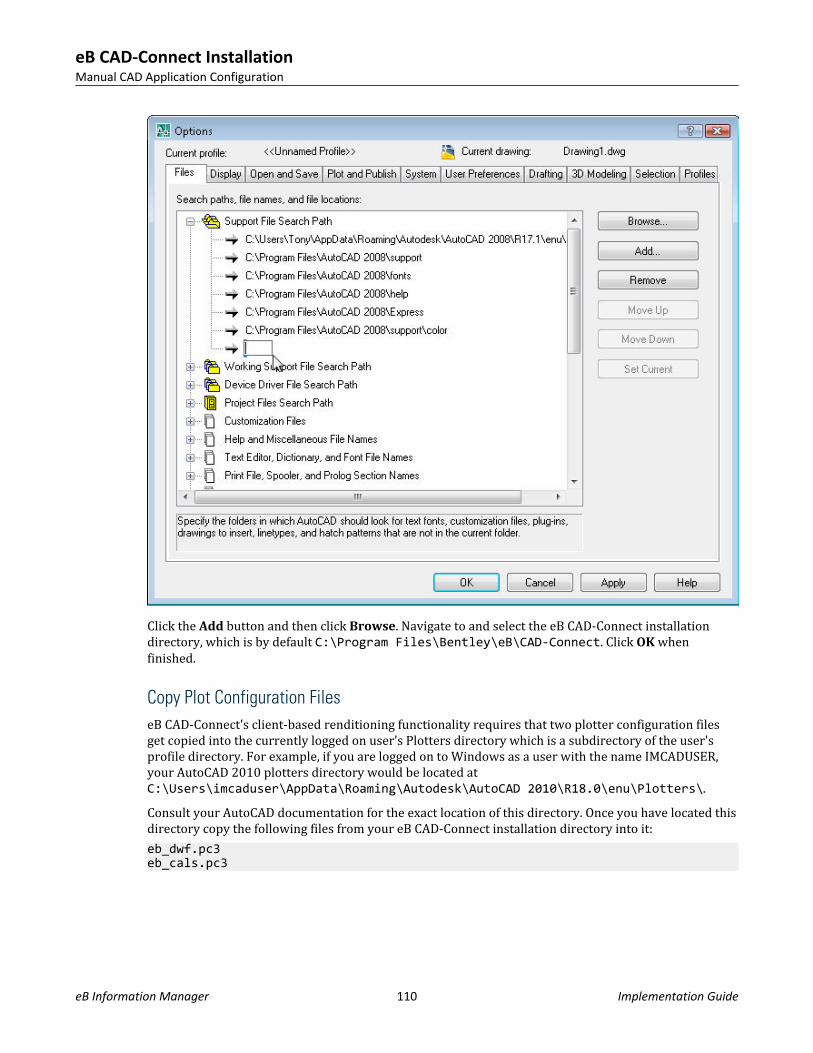
Click the Add button and then click Browse. Navigate to and select the eB CAD-Connect installationdirectory, which is by default C:\Program Files\Bentley\eB\CAD-Connect. Click OK whenfinished.
Copy Plot Configuration FileseB CAD-Connect's client-based renditioning functionality requires that two plotter configuration filesget copied into the currently logged on user’s Plotters directory which is a subdirectory of the user'sprofile directory. For example, if you are logged on to Windows as a user with the name IMCADUSER,your AutoCAD 2010 plotters directory would be located atC:\Users\imcaduser\AppData\Roaming\Autodesk\AutoCAD 2010\R18.0\enu\Plotters\.Consult your AutoCAD documentation for the exact location of this directory. Once you have located thisdirectory copy the following files from your eB CAD-Connect installation directory into it:eb_dwf.pc3eb_cals.pc3
eB CAD-Connect InstallationManual CAD Application Configuration
eB Information Manager 110 Implementation Guide
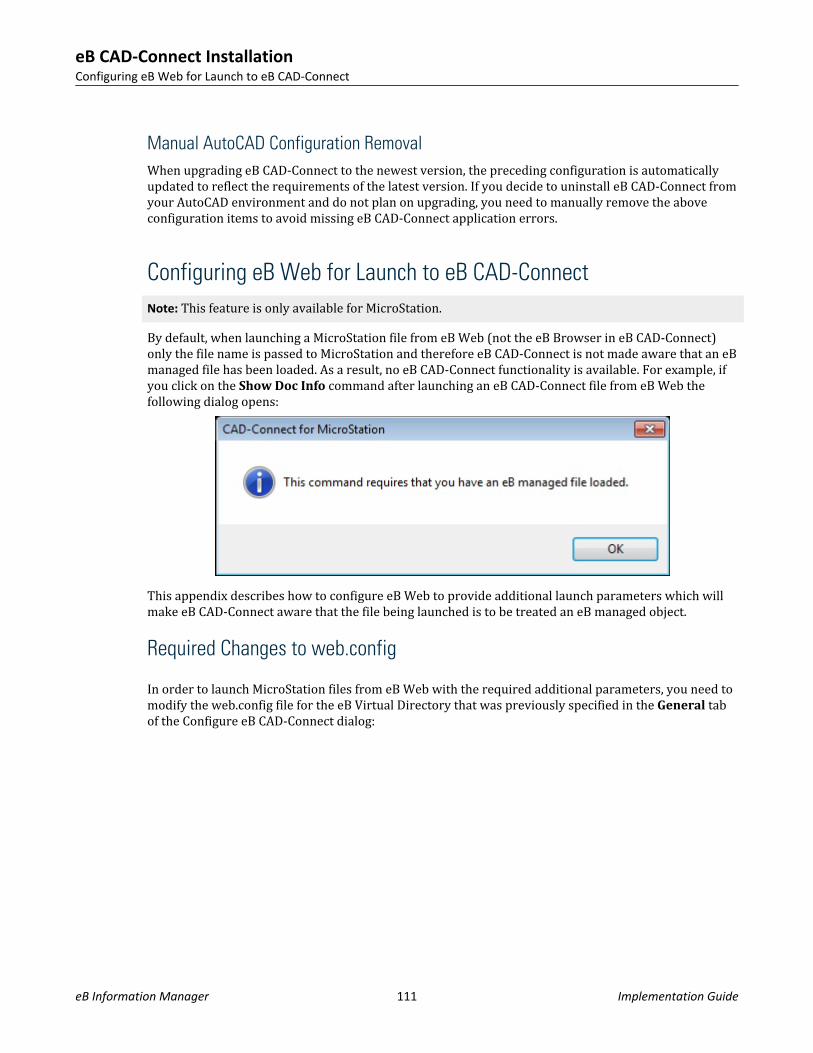
Manual AutoCAD Configuration RemovalWhen upgrading eB CAD-Connect to the newest version, the preceding configuration is automaticallyupdated to reflect the requirements of the latest version. If you decide to uninstall eB CAD-Connect fromyour AutoCAD environment and do not plan on upgrading, you need to manually remove the aboveconfiguration items to avoid missing eB CAD-Connect application errors.
Configuring eB Web for Launch to eB CAD-ConnectNote: This feature is only available for MicroStation.By default, when launching a MicroStation file from eB Web (not the eB Browser in eB CAD-Connect)only the file name is passed to MicroStation and therefore eB CAD-Connect is not made aware that an eBmanaged file has been loaded. As a result, no eB CAD-Connect functionality is available. For example, ifyou click on the Show Doc Info command after launching an eB CAD-Connect file from eB Web thefollowing dialog opens:
This appendix describes how to configure eB Web to provide additional launch parameters which willmake eB CAD-Connect aware that the file being launched is to be treated an eB managed object.
Required Changes to web.config
In order to launch MicroStation files from eB Web with the required additional parameters, you need tomodify the web.config file for the eB Virtual Directory that was previously specified in the General tabof the Configure eB CAD-Connect dialog:
eB CAD-Connect InstallationConfiguring eB Web for Launch to eB CAD-Connect
eB Information Manager 111 Implementation Guide
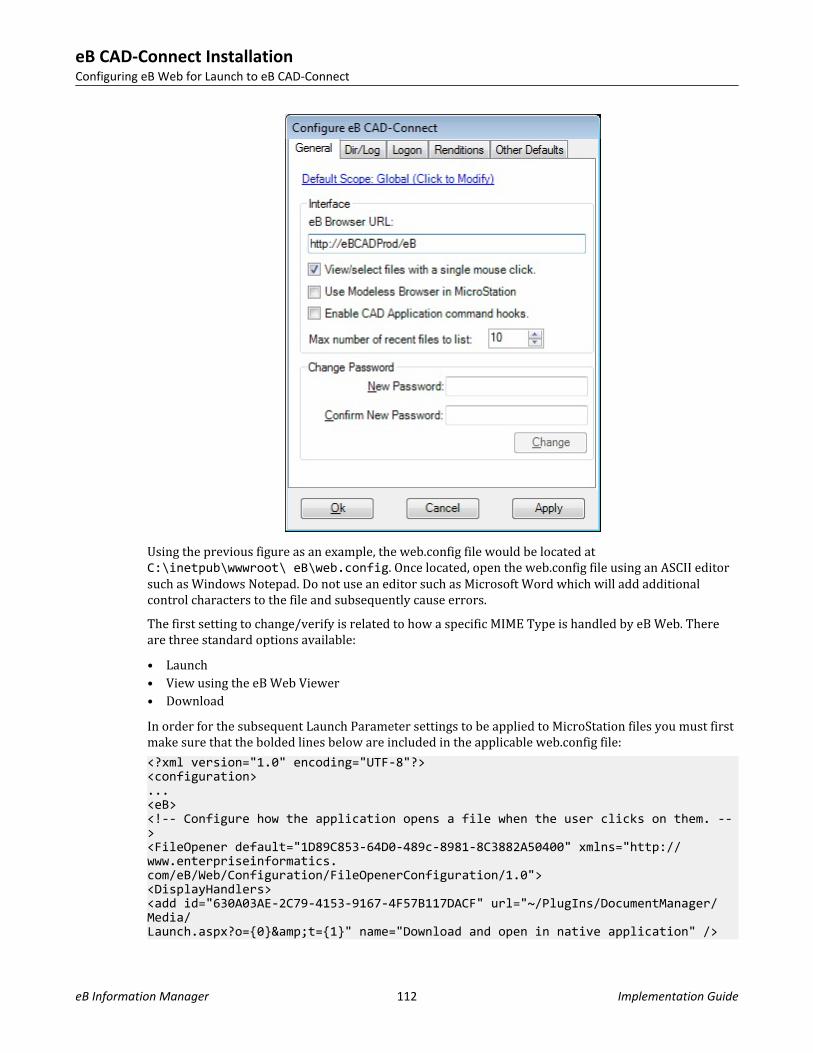
Using the previous figure as an example, the web.config file would be located atC:\inetpub\wwwroot\ eB\web.config. Once located, open the web.config file using an ASCII editorsuch as Windows Notepad. Do not use an editor such as Microsoft Word which will add additionalcontrol characters to the file and subsequently cause errors.The first setting to change/verify is related to how a specific MIME Type is handled by eB Web. Thereare three standard options available:• Launch• View using the eB Web Viewer• DownloadIn order for the subsequent Launch Parameter settings to be applied to MicroStation files you must firstmake sure that the bolded lines below are included in the applicable web.config file:<?xml version="1.0" encoding="UTF-8"?><configuration>...<eB><!-- Configure how the application opens a file when the user clicks on them. --><FileOpener default="1D89C853-64D0-489c-8981-8C3882A50400" xmlns="http://www.enterpriseinformatics.com/eB/Web/Configuration/FileOpenerConfiguration/1.0"><DisplayHandlers><add id="630A03AE-2C79-4153-9167-4F57B117DACF" url="~/PlugIns/DocumentManager/Media/Launch.aspx?o={0}&t={1}" name="Download and open in native application" />
eB CAD-Connect InstallationConfiguring eB Web for Launch to eB CAD-Connect
eB Information Manager 112 Implementation Guide
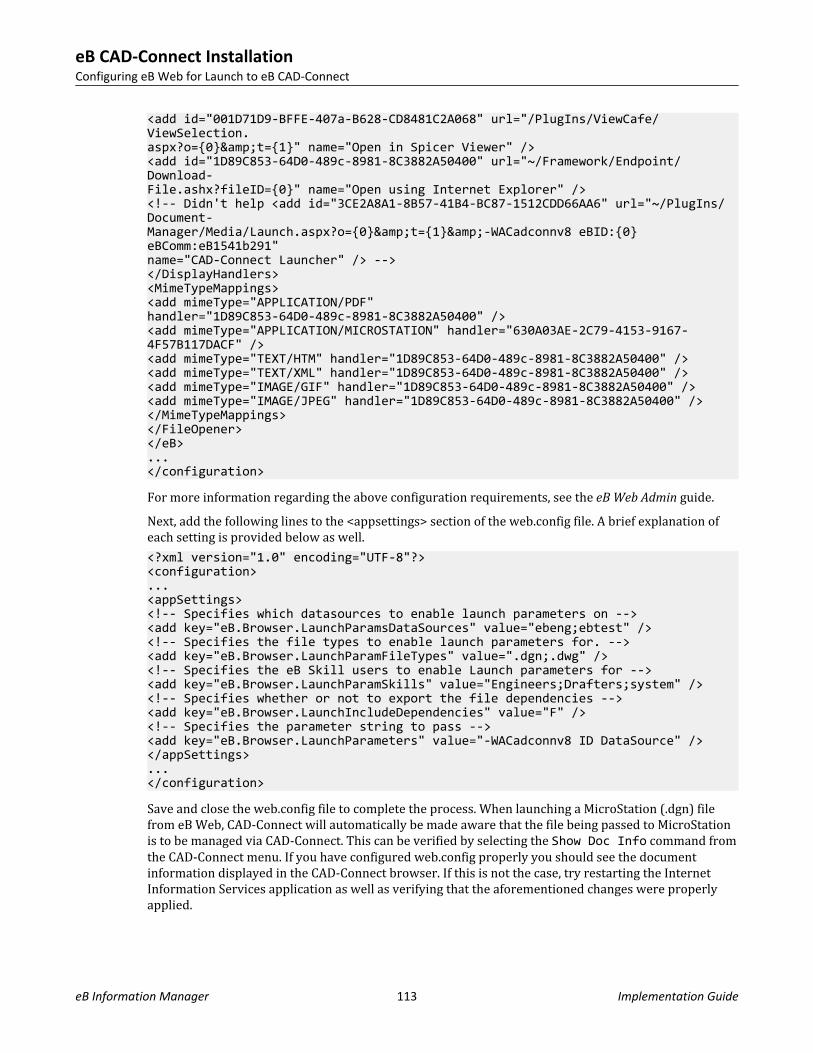
<add id="001D71D9-BFFE-407a-B628-CD8481C2A068" url="/PlugIns/ViewCafe/ViewSelection.aspx?o={0}&t={1}" name="Open in Spicer Viewer" /><add id="1D89C853-64D0-489c-8981-8C3882A50400" url="~/Framework/Endpoint/Download-File.ashx?fileID={0}" name="Open using Internet Explorer" /><!-- Didn't help <add id="3CE2A8A1-8B57-41B4-BC87-1512CDD66AA6" url="~/PlugIns/Document-Manager/Media/Launch.aspx?o={0}&t={1}&-WACadconnv8 eBID:{0} eBComm:eB1541b291"name="CAD-Connect Launcher" /> --></DisplayHandlers><MimeTypeMappings><add mimeType="APPLICATION/PDF" handler="1D89C853-64D0-489c-8981-8C3882A50400" /><add mimeType="APPLICATION/MICROSTATION" handler="630A03AE-2C79-4153-9167-4F57B117DACF" /><add mimeType="TEXT/HTM" handler="1D89C853-64D0-489c-8981-8C3882A50400" /><add mimeType="TEXT/XML" handler="1D89C853-64D0-489c-8981-8C3882A50400" /><add mimeType="IMAGE/GIF" handler="1D89C853-64D0-489c-8981-8C3882A50400" /><add mimeType="IMAGE/JPEG" handler="1D89C853-64D0-489c-8981-8C3882A50400" /></MimeTypeMappings></FileOpener></eB>...</configuration>
For more information regarding the above configuration requirements, see the eB Web Admin guide.Next, add the following lines to the <appsettings> section of the web.config file. A brief explanation ofeach setting is provided below as well.<?xml version="1.0" encoding="UTF-8"?><configuration>...<appSettings><!-- Specifies which datasources to enable launch parameters on --><add key="eB.Browser.LaunchParamsDataSources" value="ebeng;ebtest" /><!-- Specifies the file types to enable launch parameters for. --><add key="eB.Browser.LaunchParamFileTypes" value=".dgn;.dwg" /><!-- Specifies the eB Skill users to enable Launch parameters for --><add key="eB.Browser.LaunchParamSkills" value="Engineers;Drafters;system" /><!-- Specifies whether or not to export the file dependencies --><add key="eB.Browser.LaunchIncludeDependencies" value="F" /><!-- Specifies the parameter string to pass --><add key="eB.Browser.LaunchParameters" value="-WACadconnv8 ID DataSource" /></appSettings>...</configuration>
Save and close the web.config file to complete the process. When launching a MicroStation (.dgn) filefrom eB Web, CAD-Connect will automatically be made aware that the file being passed to MicroStationis to be managed via CAD-Connect. This can be verified by selecting the Show Doc Info command fromthe CAD-Connect menu. If you have configured web.config properly you should see the documentinformation displayed in the CAD-Connect browser. If this is not the case, try restarting the InternetInformation Services application as well as verifying that the aforementioned changes were properlyapplied.
eB CAD-Connect InstallationConfiguring eB Web for Launch to eB CAD-Connect
eB Information Manager 113 Implementation Guide
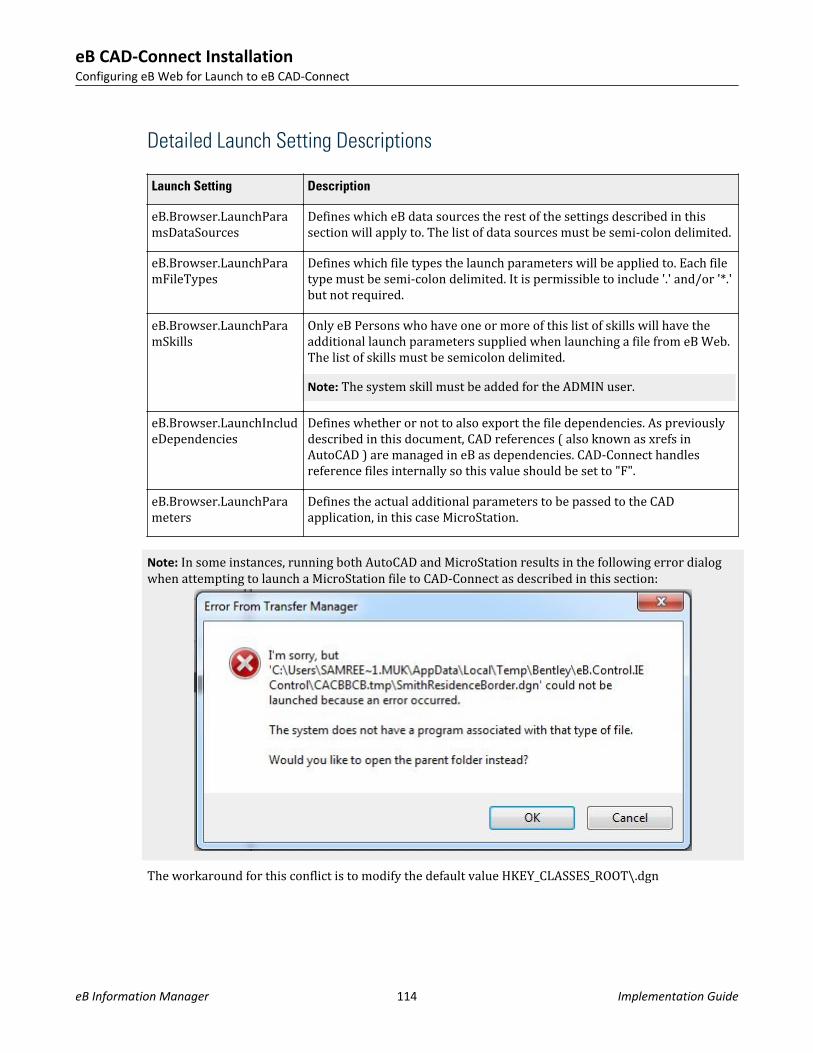
Detailed Launch Setting Descriptions
Launch Setting Description
eB.Browser.LaunchParamsDataSources
Defines which eB data sources the rest of the settings described in thissection will apply to. The list of data sources must be semi-colon delimited.
eB.Browser.LaunchParamFileTypes
Defines which file types the launch parameters will be applied to. Each filetype must be semi-colon delimited. It is permissible to include '.' and/or '*.'but not required.
eB.Browser.LaunchParamSkills
Only eB Persons who have one or more of this list of skills will have theadditional launch parameters supplied when launching a file from eB Web.The list of skills must be semicolon delimited.Note: The system skill must be added for the ADMIN user.
eB.Browser.LaunchIncludeDependencies
Defines whether or not to also export the file dependencies. As previouslydescribed in this document, CAD references ( also known as xrefs inAutoCAD ) are managed in eB as dependencies. CAD-Connect handlesreference files internally so this value should be set to "F".
eB.Browser.LaunchParameters
Defines the actual additional parameters to be passed to the CADapplication, in this case MicroStation.
Note: In some instances, running both AutoCAD and MicroStation results in the following error dialogwhen attempting to launch a MicroStation file to CAD-Connect as described in this section:
The workaround for this conflict is to modify the default value HKEY_CLASSES_ROOT\.dgn
eB CAD-Connect InstallationConfiguring eB Web for Launch to eB CAD-Connect
eB Information Manager 114 Implementation Guide
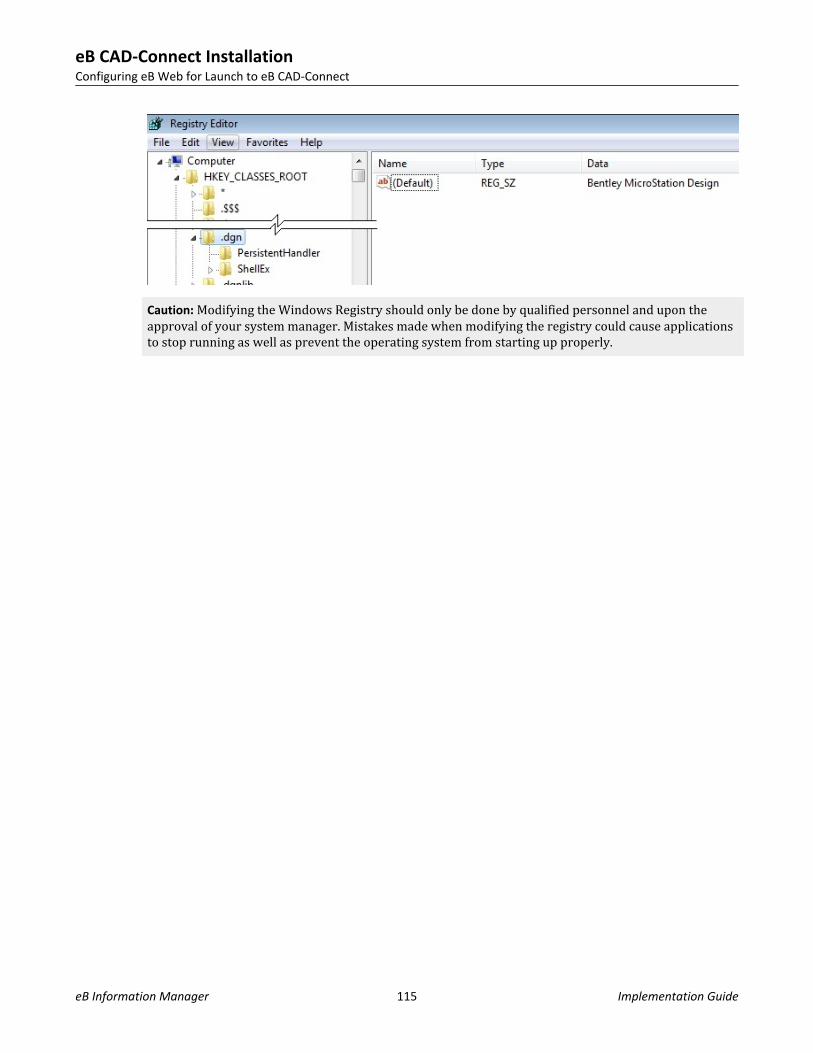
Caution: Modifying the Windows Registry should only be done by qualified personnel and upon theapproval of your system manager. Mistakes made when modifying the registry could cause applicationsto stop running as well as prevent the operating system from starting up properly.
eB CAD-Connect InstallationConfiguring eB Web for Launch to eB CAD-Connect
eB Information Manager 115 Implementation Guide

eB CAD-Connect InstallationConfiguring eB Web for Launch to eB CAD-Connect
This page intentionally left blank
eB Information Manager 116 Implementation Guide
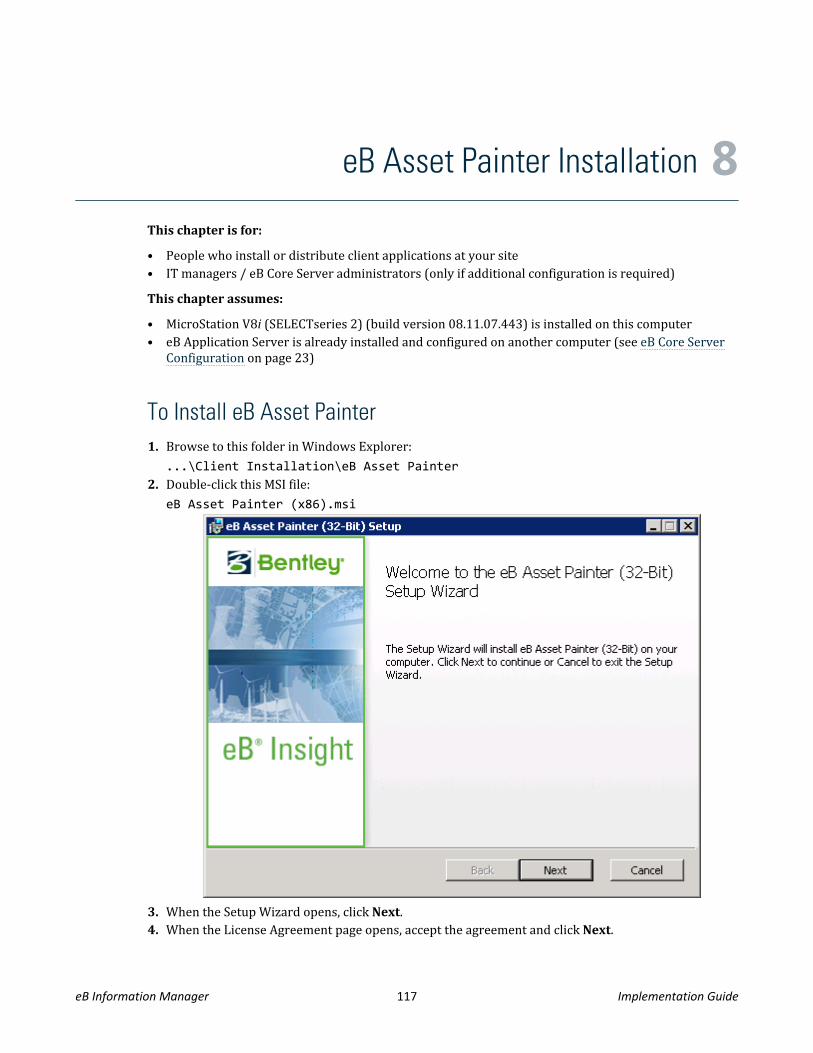
eB Asset Painter Installation 8This chapter is for:
• People who install or distribute client applications at your site• IT managers / eB Core Server administrators (only if additional configuration is required)This chapter assumes:
• MicroStation V8i (SELECTseries 2) (build version 08.11.07.443) is installed on this computer• eB Application Server is already installed and configured on another computer (see eB Core Server
Configuration on page 23)
To Install eB Asset Painter1. Browse to this folder in Windows Explorer:
...\Client Installation\eB Asset Painter2. Double-click this MSI file:
eB Asset Painter (x86).msi
3. When the Setup Wizard opens, click Next.4. When the License Agreement page opens, accept the agreement and click Next.
eB Information Manager 117 Implementation Guide
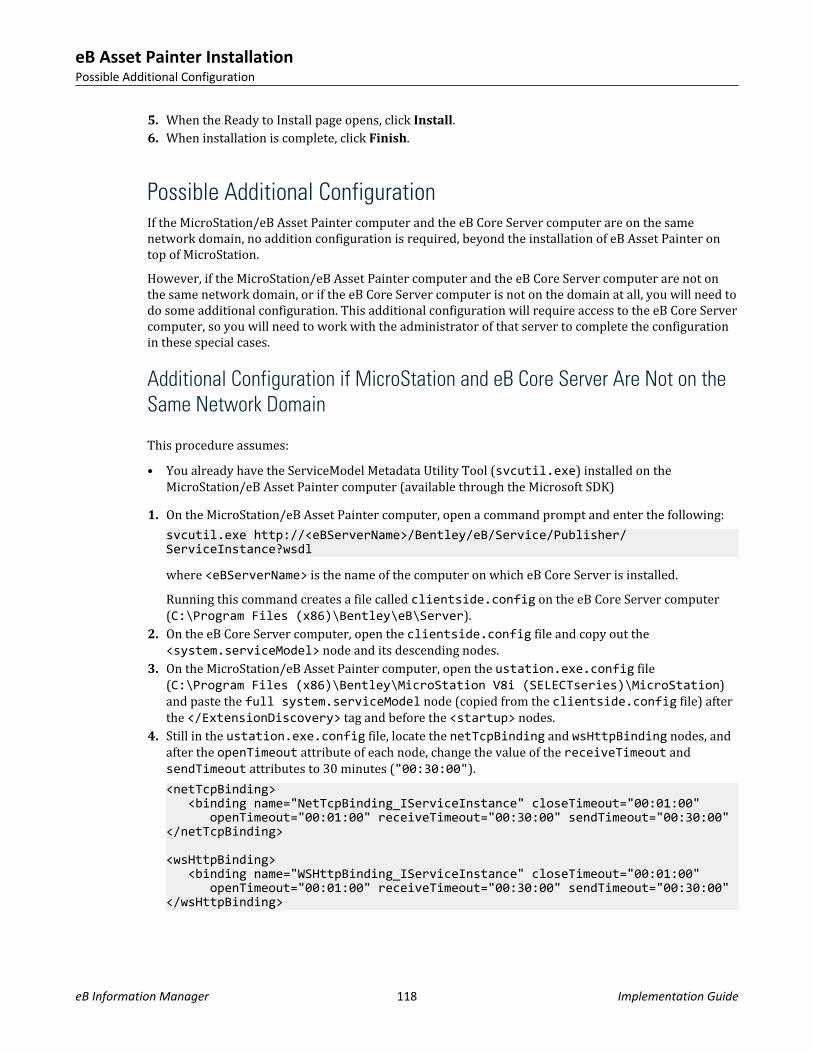
5. When the Ready to Install page opens, click Install.6. When installation is complete, click Finish.
Possible Additional ConfigurationIf the MicroStation/eB Asset Painter computer and the eB Core Server computer are on the samenetwork domain, no addition configuration is required, beyond the installation of eB Asset Painter ontop of MicroStation.However, if the MicroStation/eB Asset Painter computer and the eB Core Server computer are not onthe same network domain, or if the eB Core Server computer is not on the domain at all, you will need todo some additional configuration. This additional configuration will require access to the eB Core Servercomputer, so you will need to work with the administrator of that server to complete the configurationin these special cases.
Additional Configuration if MicroStation and eB Core Server Are Not on theSame Network Domain
This procedure assumes:• You already have the ServiceModel Metadata Utility Tool (svcutil.exe) installed on the
MicroStation/eB Asset Painter computer (available through the Microsoft SDK)1. On the MicroStation/eB Asset Painter computer, open a command prompt and enter the following:
svcutil.exe http://<eBServerName>/Bentley/eB/Service/Publisher/ServiceInstance?wsdl
where <eBServerName> is the name of the computer on which eB Core Server is installed.Running this command creates a file called clientside.config on the eB Core Server computer(C:\Program Files (x86)\Bentley\eB\Server).
2. On the eB Core Server computer, open the clientside.config file and copy out the<system.serviceModel> node and its descending nodes.
3. On the MicroStation/eB Asset Painter computer, open the ustation.exe.config file(C:\Program Files (x86)\Bentley\MicroStation V8i (SELECTseries)\MicroStation)and paste the full system.serviceModel node (copied from the clientside.config file) afterthe </ExtensionDiscovery> tag and before the <startup> nodes.
4. Still in the ustation.exe.config file, locate the netTcpBinding and wsHttpBinding nodes, andafter the openTimeout attribute of each node, change the value of the receiveTimeout andsendTimeout attributes to 30 minutes ("00:30:00").<netTcpBinding> <binding name="NetTcpBinding_IServiceInstance" closeTimeout="00:01:00" openTimeout="00:01:00" receiveTimeout="00:30:00" sendTimeout="00:30:00"</netTcpBinding>
<wsHttpBinding> <binding name="WSHttpBinding_IServiceInstance" closeTimeout="00:01:00" openTimeout="00:01:00" receiveTimeout="00:30:00" sendTimeout="00:30:00"</wsHttpBinding>
eB Asset Painter InstallationPossible Additional Configuration
eB Information Manager 118 Implementation Guide
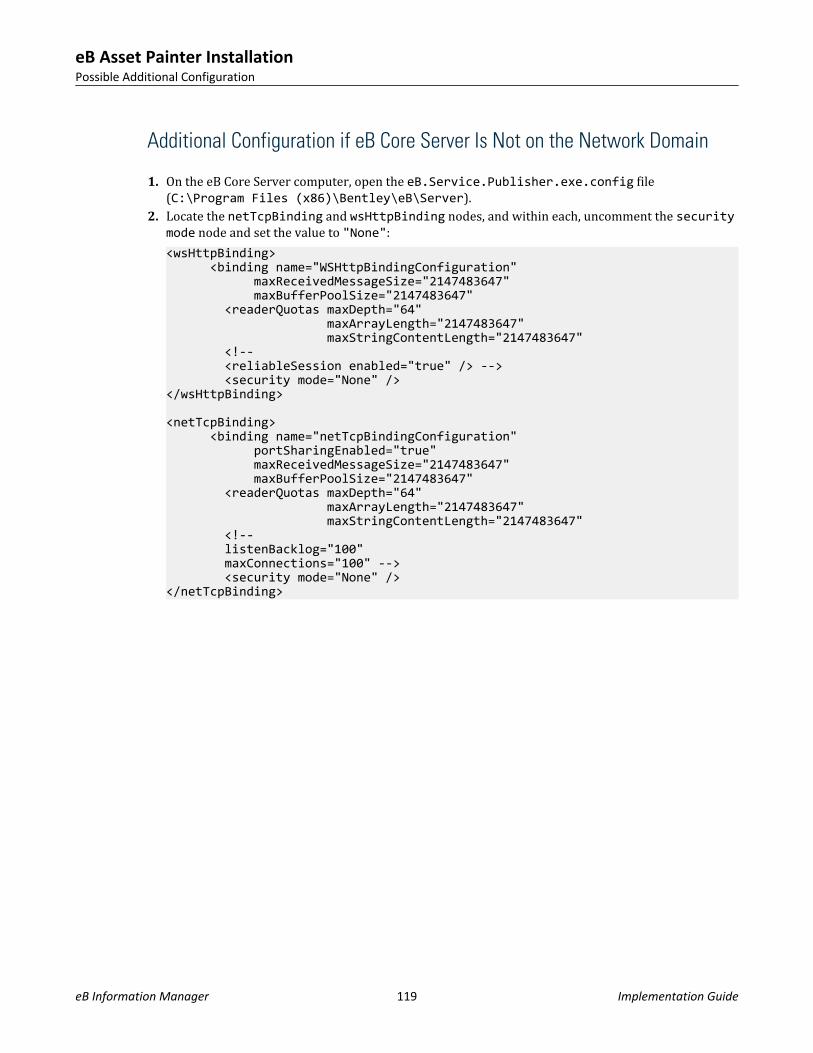
Additional Configuration if eB Core Server Is Not on the Network Domain
1. On the eB Core Server computer, open the eB.Service.Publisher.exe.config file(C:\Program Files (x86)\Bentley\eB\Server).
2. Locate the netTcpBinding and wsHttpBinding nodes, and within each, uncomment the securitymode node and set the value to "None":<wsHttpBinding> <binding name="WSHttpBindingConfiguration" maxReceivedMessageSize="2147483647" maxBufferPoolSize="2147483647" <readerQuotas maxDepth="64" maxArrayLength="2147483647" maxStringContentLength="2147483647" <!-- <reliableSession enabled="true" /> --> <security mode="None" /></wsHttpBinding>
<netTcpBinding> <binding name="netTcpBindingConfiguration" portSharingEnabled="true" maxReceivedMessageSize="2147483647" maxBufferPoolSize="2147483647" <readerQuotas maxDepth="64" maxArrayLength="2147483647" maxStringContentLength="2147483647" <!-- listenBacklog="100" maxConnections="100" --> <security mode="None" /></netTcpBinding>
eB Asset Painter InstallationPossible Additional Configuration
eB Information Manager 119 Implementation Guide

eB Asset Painter InstallationPossible Additional Configuration
This page intentionally left blank
eB Information Manager 120 Implementation Guide
Integrating eB with ProjectWise 9This chapter is for:
• IT managers• eB system administrators• ProjectWise administratorsThis chapter assumes:
• You already have operational eB and ProjectWise environments.eB integration with ProjectWise is used to create eB documents based on ProjectWise documents.Integration monitors selected folders in a ProjectWise datasource, and then based on yoursynchronization settings either references or moves the documents in those folders into eB. Whendocuments are referenced into eB, synchronizing the document in eB will keep it up to date with theoriginal, linked document in ProjectWise. When documents are moved into eB, the original document isdeleted from ProjectWise.Transferring ProjectWise documents to eB is the responsibility of the eB Work Queue Service.ProjectWise jobs are added to the work queue, and the eB Work Queue Service that is responsible forprocessing those ProjectWise jobs is called upon. eB Work Queue Service works in conjunction with theeB Storage Service, which requires an external ProjectWise storage device and repository that points tothe ProjectWise datasource where the original documents come from.
Planning Your ConfigurationeB delivers the following required components for ProjectWise integration:• Queue Engine - Selecting this option installs the ProjectWise queue engine that is required by the eB
Work Queue Service to run ProjectWise integration jobs. This option requires eB Work QueueService, however if eB Work Queue Service is not already installed on the computer, then the eBProjectWise Connector installer will also install that service for you when you select this option.
• Storage Driver - Selecting this option installs the ProjectWise file driver that is required by the eBStorage Service to create the external ProjectWise storage device that points to the ProjectWisedatasource you will be pulling documents from. This option requires eB Storage Service, however ifeB Storage Service is not already installed on the computer, then the eB ProjectWise Connectorinstaller will also install that service for you when you select this option.
• eB ProjectWise Database Files - Selecting this option installs the database files required forProjectWise integration. This component must be installed on an existing eB Application Server (eBCore Server) computer.
These components are delivered through one of two MSI installers. The first installer contain all of therequired components, whereas the second installer only contains the database files:• eB ProjectWise Connector (x64).msi - can install all components on a 64-bit Windows
computer
eB Information Manager 121 Implementation Guide

• eB ProjectWise Database Files (x86).msi - can only install the database files on a 32-bitWindows computer
There are three basic ways you can setup the connector:1. Method A: Install the connector on the eB Core Server computer
This requires that you install the following on an existing eB Core Server computer:• eB ProjectWise Connector (all components)• ProjectWise Explorer• ProjectWise Gateway ServiceIn this configuration, the required eB services (eB Work Queue Service and eB Storage Service) willalready be installed, so the eB ProjectWise Connector installer will only install the additional eBcomponents (those mentioned above) required for ProjectWise integration.
2. Method B: Install the connector on a dedicated serverThis requires that you install the following on the same computer:• eB ProjectWise Connector (Queue Engine and Storage Driver)• ProjectWise Explorer• ProjectWise Gateway ServiceIn this configuration, the eB ProjectWise Connector will install the required eB services (eB WorkQueue Service and eB Storage Service), assuming they are not already installed.This configuration also requires that you install the following on an existing eB Core Servercomputer:• eB ProjectWise Connector (eB ProjectWise database files only)
3. Method C: Install the connector on the ProjectWise Integration Server computerThis requires you to install the following on an existing ProjectWise Integration Server computer:• eB ProjectWise Connector (Queue Engine and Storage Driver)• ProjectWise ExplorerIn this configuration, the eB ProjectWise Connector will install the required eB services (eB WorkQueue Service and eB Storage Service), assuming they are not already installed.This also requires that you install the following on an existing eB Core Server computer:• eB ProjectWise Connector (eB ProjectWise database files only)
Note: Whenever you install the connector on a computer where no eB services are currently installed,the eB ProjectWise Connector installer installs the required services, as well as eB System ManagementConsole so that you can manage the services directly from that computer.
Creating a Dedicated User in ProjectWise Administrator for eBIn ProjectWise Administrator, in each ProjectWise datasource you want to integrate with, you need tocreate a dedicated user called “eBConnector” with the following permissions:• View Access to all ProjectWise folders• Full Access (except Change permissions) to ProjectWise documents - including Delete
Integrating eB with ProjectWiseCreating a Dedicated User in ProjectWise Administrator for eB
eB Information Manager 122 Implementation Guide
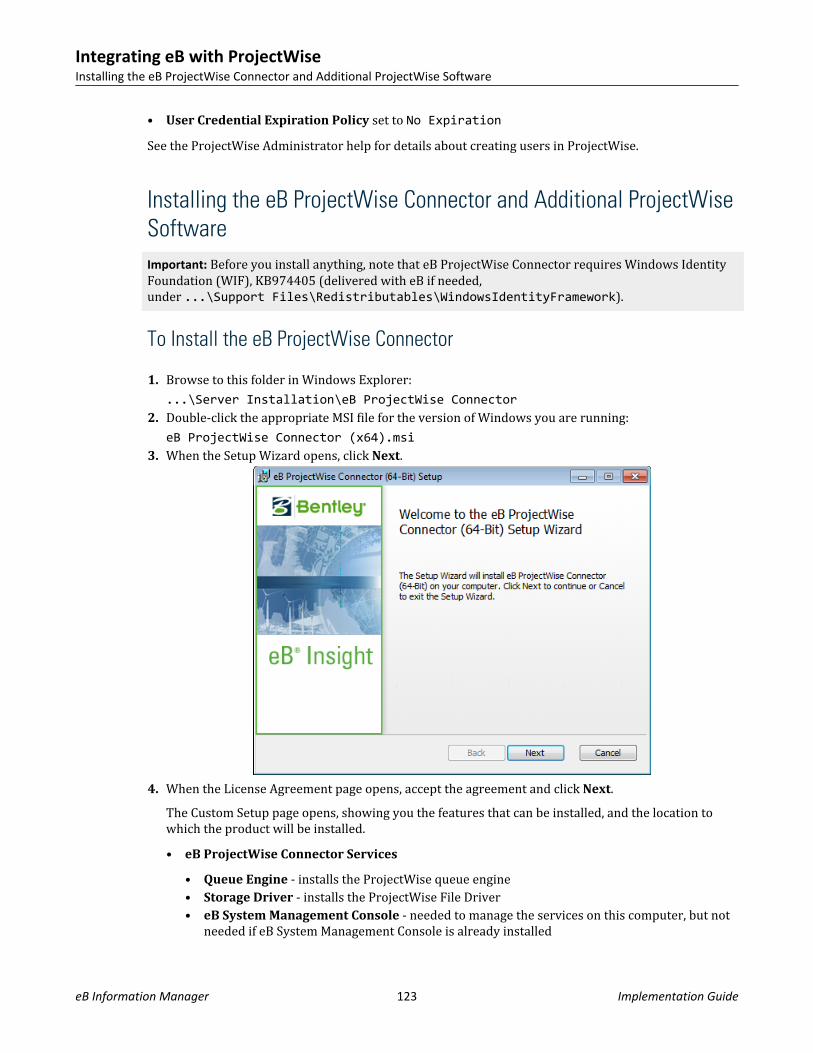
• User Credential Expiration Policy set to No ExpirationSee the ProjectWise Administrator help for details about creating users in ProjectWise.
Installing the eB ProjectWise Connector and Additional ProjectWiseSoftwareImportant: Before you install anything, note that eB ProjectWise Connector requires Windows IdentityFoundation (WIF), KB974405 (delivered with eB if needed,under ...\Support Files\Redistributables\WindowsIdentityFramework).
To Install the eB ProjectWise Connector
1. Browse to this folder in Windows Explorer:...\Server Installation\eB ProjectWise Connector
2. Double-click the appropriate MSI file for the version of Windows you are running:eB ProjectWise Connector (x64).msi
3. When the Setup Wizard opens, click Next.
4. When the License Agreement page opens, accept the agreement and click Next.The Custom Setup page opens, showing you the features that can be installed, and the location towhich the product will be installed.• eB ProjectWise Connector Services
• Queue Engine - installs the ProjectWise queue engine• Storage Driver - installs the ProjectWise File Driver• eB System Management Console - needed to manage the services on this computer, but not
needed if eB System Management Console is already installed
Integrating eB with ProjectWiseInstalling the eB ProjectWise Connector and Additional ProjectWise Software
eB Information Manager 123 Implementation Guide
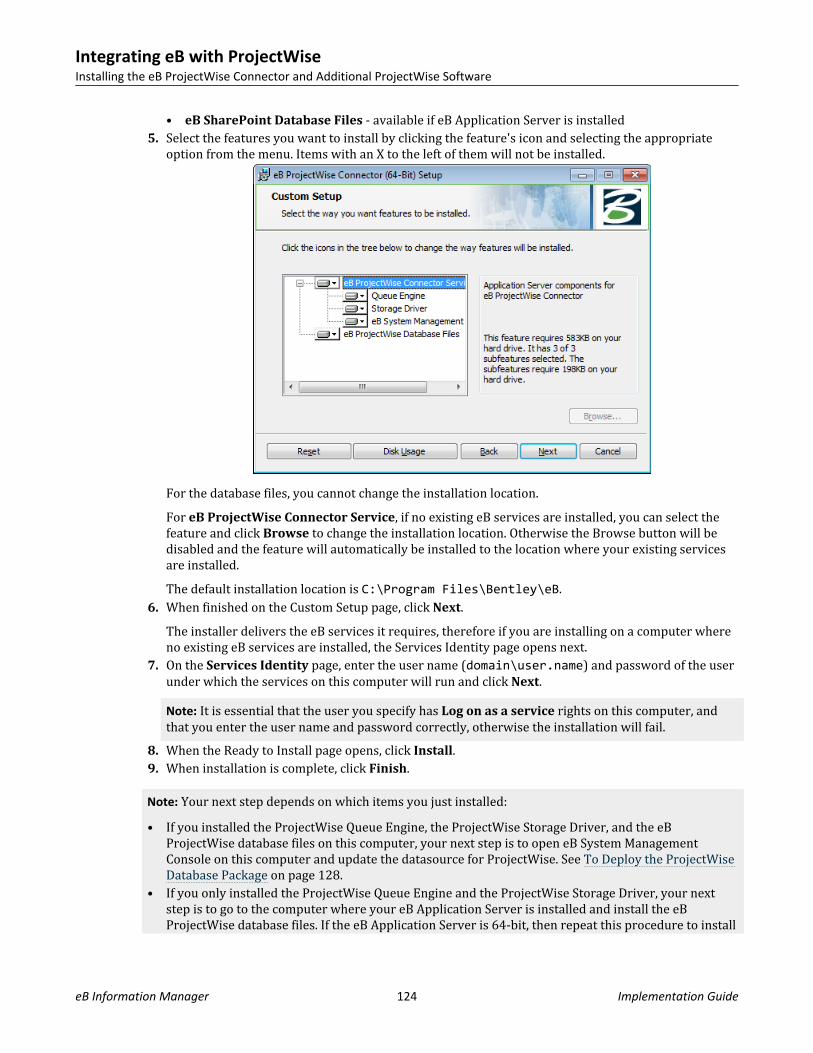
• eB SharePoint Database Files - available if eB Application Server is installed5. Select the features you want to install by clicking the feature's icon and selecting the appropriate
option from the menu. Items with an X to the left of them will not be installed.
For the database files, you cannot change the installation location.For eB ProjectWise Connector Service, if no existing eB services are installed, you can select thefeature and click Browse to change the installation location. Otherwise the Browse button will bedisabled and the feature will automatically be installed to the location where your existing servicesare installed.The default installation location is C:\Program Files\Bentley\eB.
6. When finished on the Custom Setup page, click Next.The installer delivers the eB services it requires, therefore if you are installing on a computer whereno existing eB services are installed, the Services Identity page opens next.
7. On the Services Identity page, enter the user name (domain\user.name) and password of the userunder which the services on this computer will run and click Next.Note: It is essential that the user you specify has Log on as a service rights on this computer, andthat you enter the user name and password correctly, otherwise the installation will fail.
8. When the Ready to Install page opens, click Install.9. When installation is complete, click Finish.
Note: Your next step depends on which items you just installed:• If you installed the ProjectWise Queue Engine, the ProjectWise Storage Driver, and the eB
ProjectWise database files on this computer, your next step is to open eB System ManagementConsole on this computer and update the datasource for ProjectWise. See To Deploy the ProjectWiseDatabase Package on page 128.
• If you only installed the ProjectWise Queue Engine and the ProjectWise Storage Driver, your nextstep is to go to the computer where your eB Application Server is installed and install the eBProjectWise database files. If the eB Application Server is 64-bit, then repeat this procedure to install
Integrating eB with ProjectWiseInstalling the eB ProjectWise Connector and Additional ProjectWise Software
eB Information Manager 124 Implementation Guide
the 64-bit database files. If the eB Application Server is 32-bit, see To Install ProjectWise DatabaseFiles on a 32-bit eB Application Server on page 125. After the database files are installed, your nextstep is to open eB System Management Console on the eB Application Server computer and updatethe datasource for ProjectWise (see To Deploy the ProjectWise Database Package on page 128).
• If you only installed the eB ProjectWise database files on this computer, your next step is to open eBSystem Management Console on this computer and update the datasource for ProjectWise (see ToDeploy the ProjectWise Database Package on page 128). After that, go to the computer where youwant to install the ProjectWise Queue Engine and ProjectWise Storage Driver and repeat thisprocedure.
To Install ProjectWise Database Files on a 32-bit eB Application Server
This procedure assumes you have a 32-bit eB Application Server installed on this computer, and thatyou have already installed the eB ProjectWise Connector (that is, the ProjectWise queue engine and filedriver) on another computer.1. Browse to this folder in Windows Explorer:
...\Server Installation\eB ProjectWise Connector2. Double-click this MSI file:
eB ProjectWise Database Files (x86).msi3. When the Setup Wizard opens, click Next.4. When the License Agreement page opens, accept the agreement and click Next.5. When the Ready to Install page opens, click Install.6. When installation is complete, click Finish.The next step is to update your datasource to use these database files. See To Update a Datasource inOrder To Deploy Newly Installed Database Files on page 69.
Installing ProjectWise Explorer and ProjectWise Gateway Service
eB integration with ProjectWise assumes an existing, operational ProjectWise system. Depending onhow you choose to configure the integration, you may or may not need to install additional ProjectWisesoftware, beyond what is already installed as part of your ProjectWise system.For example, in the section, Planning Your Configuration on page 121, it discusses three possiblelocations you can install the ProjectWise Queue Engine and the ProjectWise Storage Driver componentsof the eB ProjectWise Connector. You can install them:• on the eB Core Server
or• on a dedicated server
or• on the ProjectWise Integration ServerIf you choose to install these eB ProjectWise Connector components on the eB Core Server or on adedicated server, then you also need to install ProjectWise Explorer and ProjectWise Gateway Serviceon those computers. (Specifically, the eB Work Queue Service / ProjectWise Queue Engine requires
Integrating eB with ProjectWiseInstalling the eB ProjectWise Connector and Additional ProjectWise Software
eB Information Manager 125 Implementation Guide
ProjectWise Explorer and ProjectWise Gateway Service, while the eB Storage Service / ProjectWiseStorage Driver only requires ProjectWise Explorer.)On the other hand, if you choose to install these eB ProjectWise Connector components on theProjectWise Integration Server, then the only additional ProjectWise software you need to install on thiscomputer is ProjectWise Explorer (which may be there already, depending on how that server wasoriginally configured).Accept the default options when installing ProjectWise Explorer and ProjectWise Gateway Service.Complete installation instructions are detailed in the ProjectWise Implementation Guide (PDF) that isdelivered with the ProjectWise Server Setups download package, which you can download from BentleySELECT downloads.Tip: On the final page of the ProjectWise Gateway Service installer, do not turn on the option to LaunchLicence Management Tool, as ProjectWise Gateway Service does not require a license.
Note: When installing ProjectWise Gateway Service on Windows Server 2008, the installerautomatically adds the default ProjectWise broadcasting and listening ports (5799 and 5800,respectively) to the Windows Firewall exception list on that computer. When installing on WindowsServer 2003, you need to add these ports manually. See the ProjectWise Gateway Service Configurationchapter of the ProjectWise Implementation Guide for details.
Configuring ProjectWise Gateway Service's dmskrnl.cfg File
ProjectWise datasources exist on the ProjectWise Integration Server computer. In the context of eBintegration, ProjectWise Gateway Service is used to provide eB Work Queue Service with a list ofspecific datasources it can connect to. Configuration is done through ProjectWise Gateway Service'sdmskrnl.cfg file.Note: ProjectWise Gateway Service is not required, and you can skip this section, if the eB ProjectWiseConnector is installed directly on the ProjectWise Integration Server containing the datasources youwant to connect to. In that case, all of the local ProjectWise Integration Server's datasources wouldautomatically be available to the eB Work Queue Service.1. On the computer where ProjectWise Gateway Service is installed, launch a text editor using elevated
privileges (Run as administrator).2. In the text editor, open the ProjectWise Gateway Service's dmskrnl.cfg file.
The default location of this file is: C:\Program Files\Bentley\ProjectWise\bin3. Scroll to the end of the file. You should see this section at the very bottom of the file:
; -----------------------------------------------------------;; END EXAMPLE CONFIGURATIONS;; -----------------------------------------------------------
4. Below this, add the following section for the first ProjectWise datasource you want this ProjectWiseGateway Service to provide a connection to:[db0]Description=<ProjectWise_datasource_name>Server=<ProjectWise_Integration_Server_computer_name>
Integrating eB with ProjectWiseInstalling the eB ProjectWise Connector and Additional ProjectWise Software
eB Information Manager 126 Implementation Guide

Important: Every ProjectWise datasource has both an internal name and an external display name.Sometimes these names are the same. In this context, replace <ProjectWise_datasource_name>above with the internal datasource name.If you need this ProjectWise Gateway Service to provide a connection to another datasource, addanother section for that datasource, incrementing the number in the [db#] line by 1, so that theentire section now looks like this:; -----------------------------------------------------------;; END EXAMPLE CONFIGURATIONS;; -----------------------------------------------------------
[db0]Description=<ProjectWise_datasource_name>Server=<ProjectWise_Integration_Server_computer_name>
[db1]Description=<ProjectWise_datasource_name>Server=<ProjectWise_Integration_Server_computer_name>
Add additional sections for each datasource you want to provide a connection to.Note: Each section above can point to a different ProjectWise Integration Server, allowing eB tointegrate with different datasources on different servers.
5. Now scroll back up in the file until you find this section:;Comma separated list of databases, which are defined below.;Databases=db0,db1
6. Uncomment the Databases= line (remove the semi-colon), and make sure the databases listed afterthe = character match the datasource sections that you just configured at the bottom of the file.For example, if you configured three datasources sections at the bottom of the file ([db0], [db1],and [db2]), then you would configure the databases in this section to look like this:;Comma separated list of databases, which are defined below.Databases=db0,db1,db2
Note: Only the databases you expose on the Databases= line will show up in the list of availabledatasources you can connect to in eB System Management Console.
7. Save and close the dmskrnl.cfg file.8. Open the local Services window and restart the ProjectWise Gateway Service.
Configuring ProjectWise Integration Settings in eB SystemManagement ConsoleThe following configuration is required in eB System Management Console for ProjectWise integration:1. Update the eB datasource for ProjectWise - see To Deploy the ProjectWise Database Package on page
1282. Activate the ProjectWise Queue Engine - see To Activate the eB Work Queue Service and ProjectWise
Queue Engine for Your Community on page 128
Integrating eB with ProjectWiseConfiguring ProjectWise Integration Settings in eB System Management Console
eB Information Manager 127 Implementation Guide
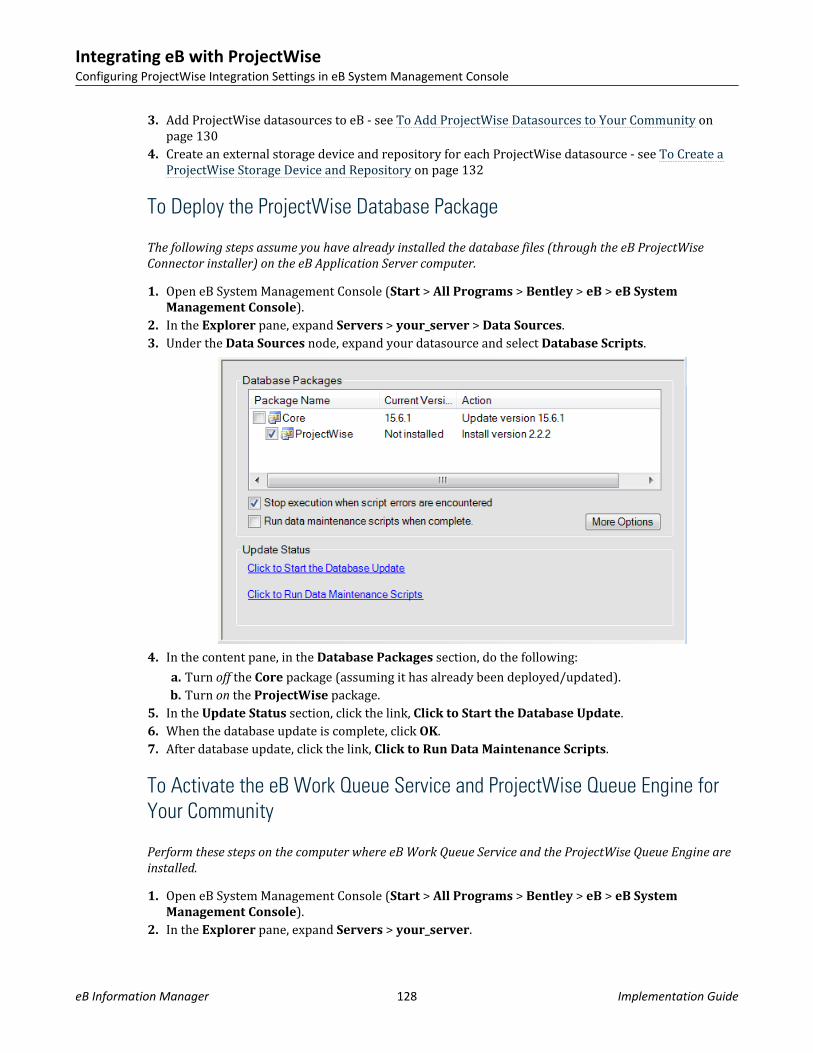
3. Add ProjectWise datasources to eB - see To Add ProjectWise Datasources to Your Community onpage 130
4. Create an external storage device and repository for each ProjectWise datasource - see To Create aProjectWise Storage Device and Repository on page 132
To Deploy the ProjectWise Database Package
The following steps assume you have already installed the database files (through the eB ProjectWiseConnector installer) on the eB Application Server computer.
1. Open eB System Management Console (Start > All Programs > Bentley > eB > eB SystemManagement Console).
2. In the Explorer pane, expand Servers > your_server > Data Sources.3. Under the Data Sources node, expand your datasource and select Database Scripts.
4. In the content pane, in the Database Packages section, do the following:a. Turn off the Core package (assuming it has already been deployed/updated).b. Turn on the ProjectWise package.
5. In the Update Status section, click the link, Click to Start the Database Update.6. When the database update is complete, click OK.7. After database update, click the link, Click to Run Data Maintenance Scripts.
To Activate the eB Work Queue Service and ProjectWise Queue Engine forYour Community
Perform these steps on the computer where eB Work Queue Service and the ProjectWise Queue Engine areinstalled.
1. Open eB System Management Console (Start > All Programs > Bentley > eB > eB SystemManagement Console).
2. In the Explorer pane, expand Servers > your_server.
Integrating eB with ProjectWiseConfiguring ProjectWise Integration Settings in eB System Management Console
eB Information Manager 128 Implementation Guide
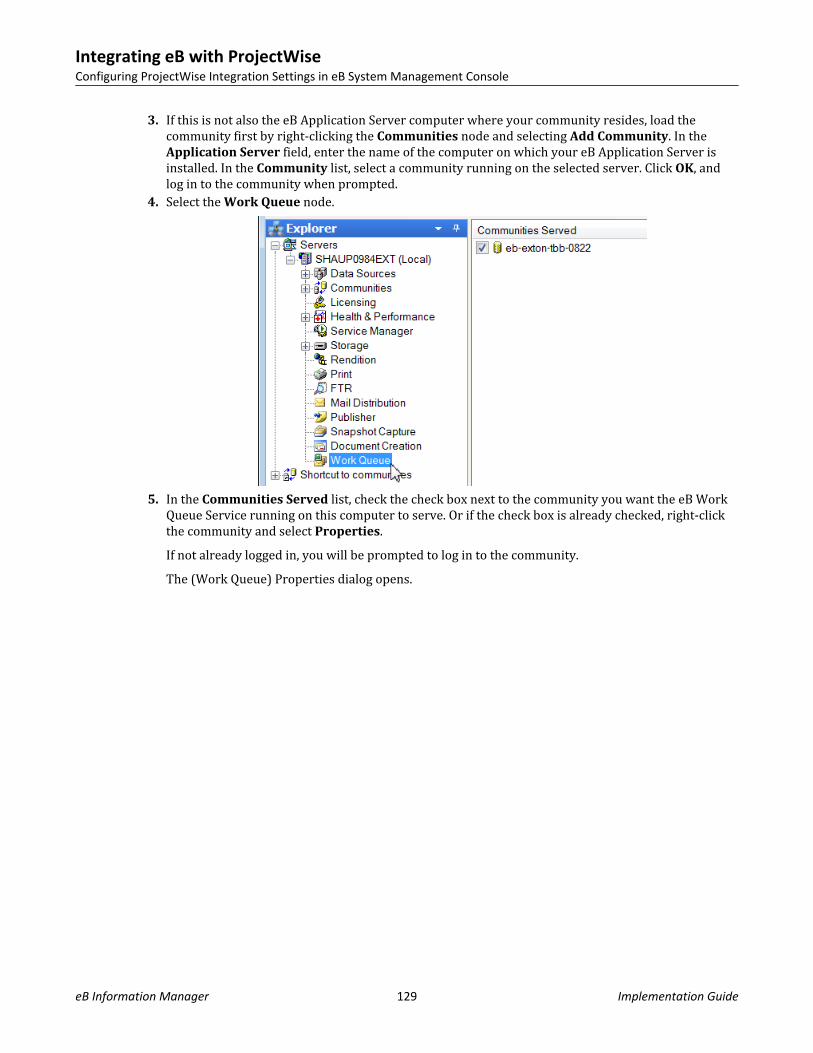
3. If this is not also the eB Application Server computer where your community resides, load thecommunity first by right-clicking the Communities node and selecting Add Community. In theApplication Server field, enter the name of the computer on which your eB Application Server isinstalled. In the Community list, select a community running on the selected server. Click OK, andlog in to the community when prompted.
4. Select the Work Queue node.
5. In the Communities Served list, check the check box next to the community you want the eB WorkQueue Service running on this computer to serve. Or if the check box is already checked, right-clickthe community and select Properties.If not already logged in, you will be prompted to log in to the community.The (Work Queue) Properties dialog opens.
Integrating eB with ProjectWiseConfiguring ProjectWise Integration Settings in eB System Management Console
eB Information Manager 129 Implementation Guide
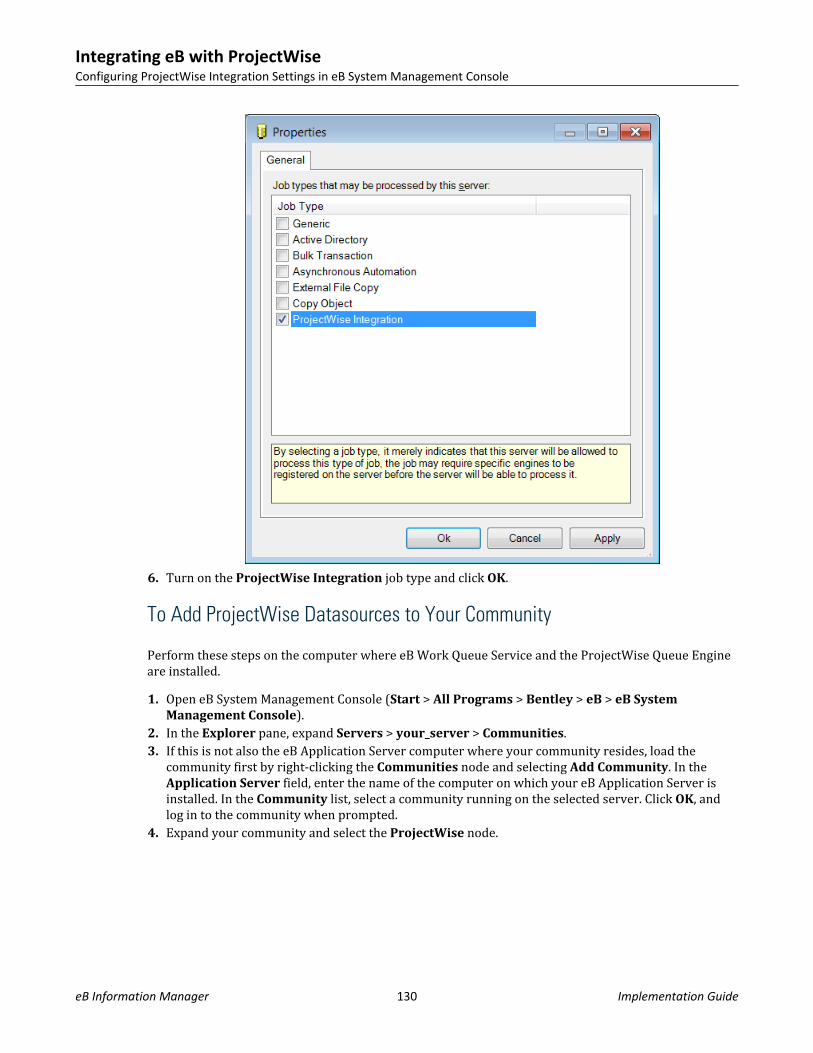
6. Turn on the ProjectWise Integration job type and click OK.
To Add ProjectWise Datasources to Your Community
Perform these steps on the computer where eB Work Queue Service and the ProjectWise Queue Engineare installed.1. Open eB System Management Console (Start > All Programs > Bentley > eB > eB System
Management Console).2. In the Explorer pane, expand Servers > your_server > Communities.3. If this is not also the eB Application Server computer where your community resides, load the
community first by right-clicking the Communities node and selecting Add Community. In theApplication Server field, enter the name of the computer on which your eB Application Server isinstalled. In the Community list, select a community running on the selected server. Click OK, andlog in to the community when prompted.
4. Expand your community and select the ProjectWise node.
Integrating eB with ProjectWiseConfiguring ProjectWise Integration Settings in eB System Management Console
eB Information Manager 130 Implementation Guide
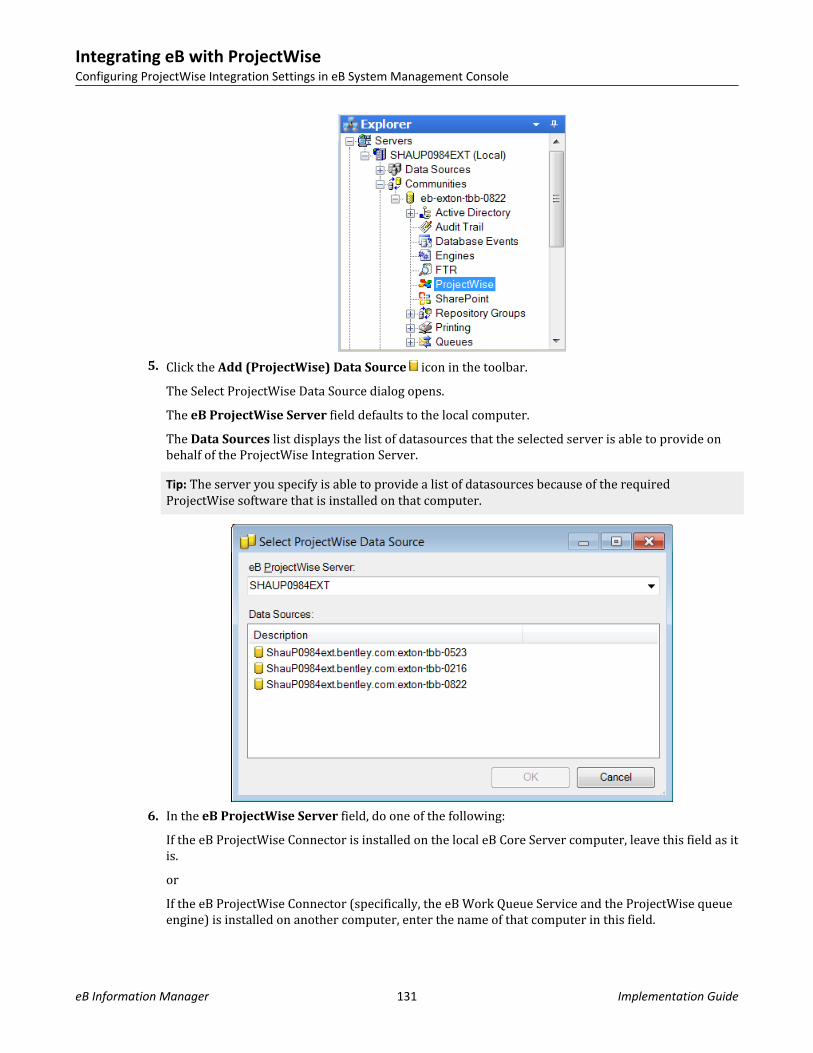
5. Click the Add (ProjectWise) Data Source icon in the toolbar.The Select ProjectWise Data Source dialog opens.The eB ProjectWise Server field defaults to the local computer.The Data Sources list displays the list of datasources that the selected server is able to provide onbehalf of the ProjectWise Integration Server.Tip: The server you specify is able to provide a list of datasources because of the requiredProjectWise software that is installed on that computer.
6. In the eB ProjectWise Server field, do one of the following:If the eB ProjectWise Connector is installed on the local eB Core Server computer, leave this field as itis.orIf the eB ProjectWise Connector (specifically, the eB Work Queue Service and the ProjectWise queueengine) is installed on another computer, enter the name of that computer in this field.
Integrating eB with ProjectWiseConfiguring ProjectWise Integration Settings in eB System Management Console
eB Information Manager 131 Implementation Guide
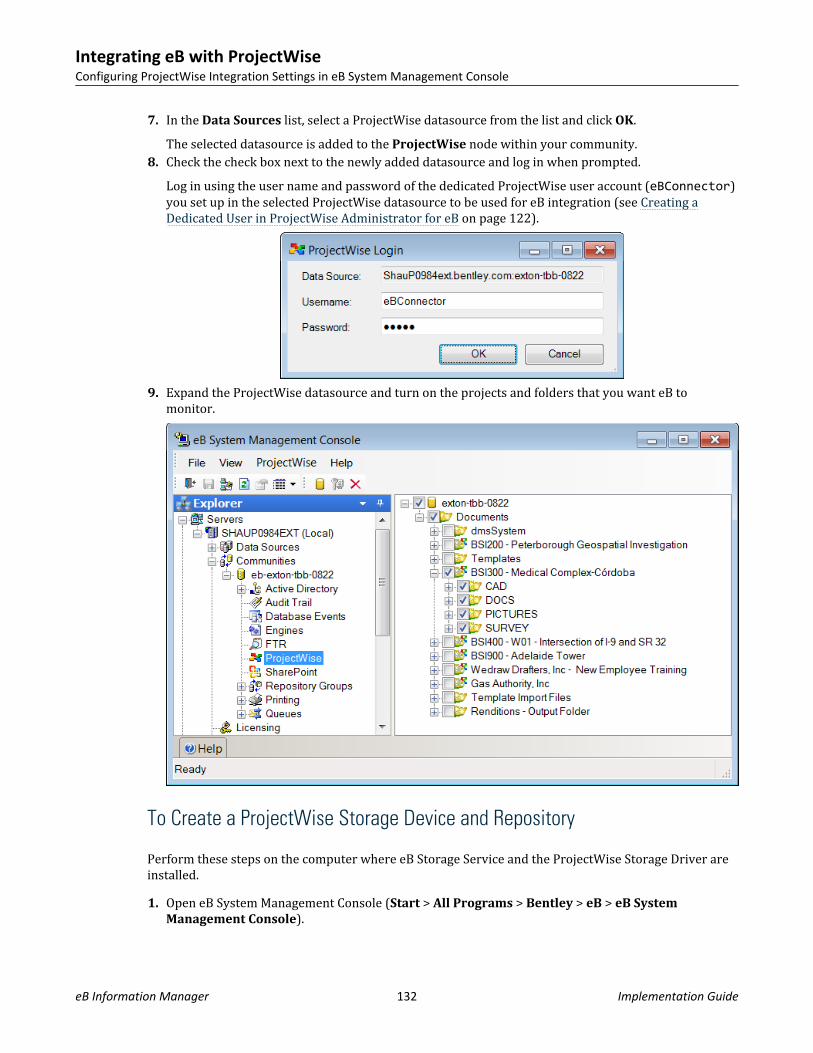
7. In the Data Sources list, select a ProjectWise datasource from the list and click OK.The selected datasource is added to the ProjectWise node within your community.
8. Check the check box next to the newly added datasource and log in when prompted.Log in using the user name and password of the dedicated ProjectWise user account (eBConnector)you set up in the selected ProjectWise datasource to be used for eB integration (see Creating aDedicated User in ProjectWise Administrator for eB on page 122).
9. Expand the ProjectWise datasource and turn on the projects and folders that you want eB tomonitor.
To Create a ProjectWise Storage Device and Repository
Perform these steps on the computer where eB Storage Service and the ProjectWise Storage Driver areinstalled.1. Open eB System Management Console (Start > All Programs > Bentley > eB > eB System
Management Console).
Integrating eB with ProjectWiseConfiguring ProjectWise Integration Settings in eB System Management Console
eB Information Manager 132 Implementation Guide

2. In the Explorer pane, expand Servers > your_server.3. If this is not also the eB Application Server computer where your community resides, load the
community first by right-clicking the Communities node and selecting Add Community. In theApplication Server field, enter the name of the computer on which your eB Application Server isinstalled. In the Community list, select a community running on the selected server. Click OK, andlog in to the community when prompted.
4. Create an external storage device for each ProjectWise datasource you added to the community.a. Right-click the Storage node and select Add Device.b. In the New Device Properties dialog, set the following:
• Name: Enter a name for this storage device.• Description: Enter a description for this storage device. If you leave this field blank, the
system will automatically make the description the same as the device name.• Driver: Select ProjectWise File Driver.• Speed: Select Fast.• Root Access: Enter pw://server:datasource, where server is the name of the computer
on which ProjectWise Integration Server is installed and datasource is the name theProjectWise datasource on that server that this storage device relates to.
• Server: Enter the name of the computer on which ProjectWise Gateway Service is installed.• Datasource: Enter the name of the ProjectWise datasource this storage device relates to. This
will be the same datasource name specified in the Root Access field.• Username: Enter the name of the dedicated user (“eBConnector”) you created in the specified
ProjectWise datasource• Password: Enter the password for the specified user.
c. Click OK.
Integrating eB with ProjectWiseConfiguring ProjectWise Integration Settings in eB System Management Console
eB Information Manager 133 Implementation Guide
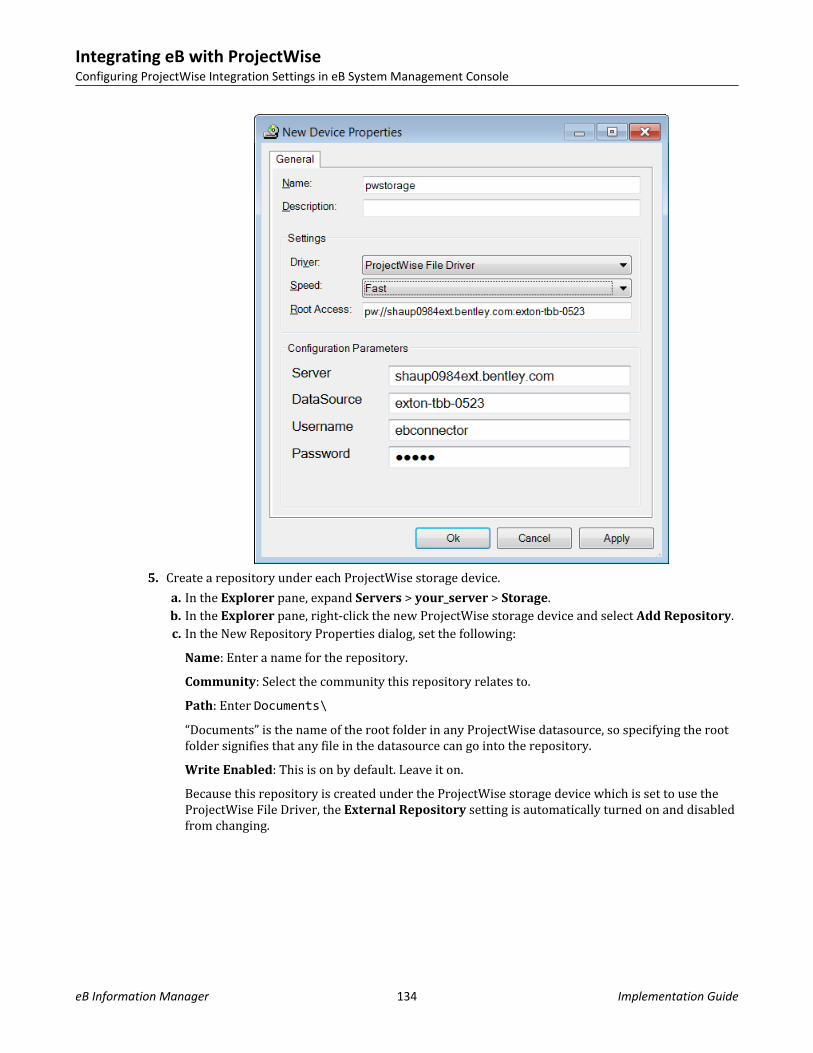
5. Create a repository under each ProjectWise storage device.a. In the Explorer pane, expand Servers > your_server > Storage.b. In the Explorer pane, right-click the new ProjectWise storage device and select Add Repository.c. In the New Repository Properties dialog, set the following:
Name: Enter a name for the repository.Community: Select the community this repository relates to.Path: Enter Documents\“Documents” is the name of the root folder in any ProjectWise datasource, so specifying the rootfolder signifies that any file in the datasource can go into the repository.Write Enabled: This is on by default. Leave it on.Because this repository is created under the ProjectWise storage device which is set to use theProjectWise File Driver, the External Repository setting is automatically turned on and disabledfrom changing.
Integrating eB with ProjectWiseConfiguring ProjectWise Integration Settings in eB System Management Console
eB Information Manager 134 Implementation Guide
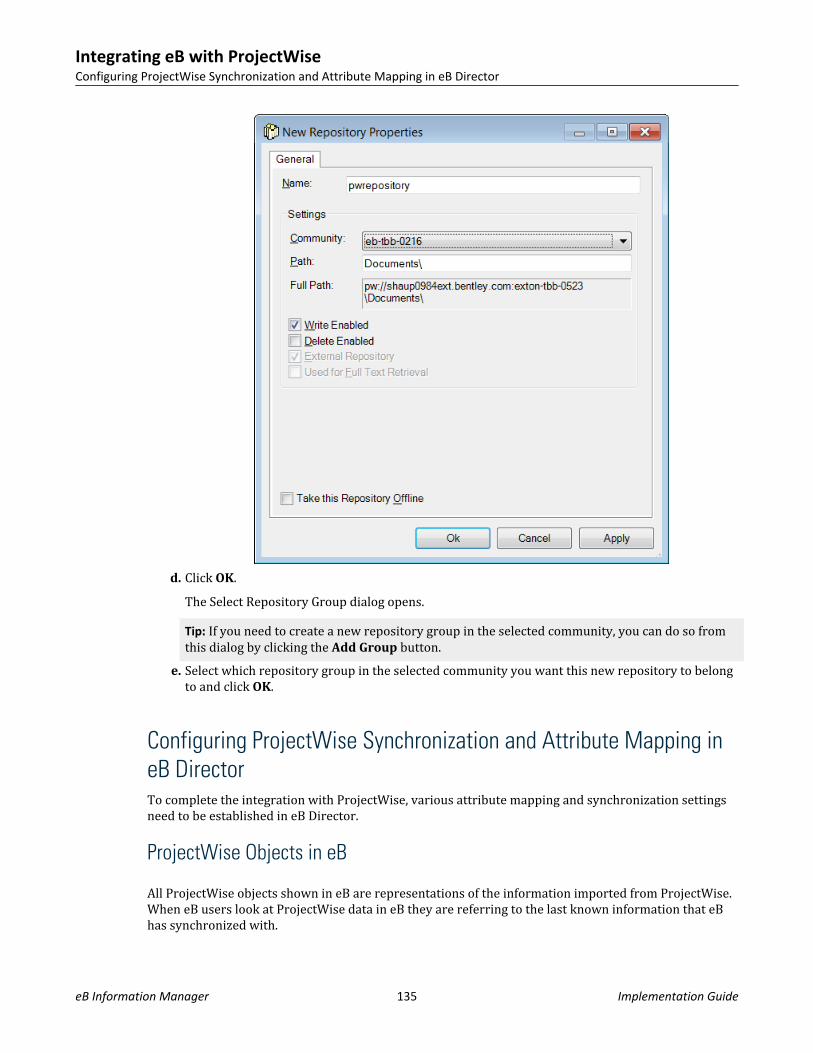
d. Click OK.The Select Repository Group dialog opens.Tip: If you need to create a new repository group in the selected community, you can do so fromthis dialog by clicking the Add Group button.
e. Select which repository group in the selected community you want this new repository to belongto and click OK.
Configuring ProjectWise Synchronization and Attribute Mapping ineB DirectorTo complete the integration with ProjectWise, various attribute mapping and synchronization settingsneed to be established in eB Director.
ProjectWise Objects in eB
All ProjectWise objects shown in eB are representations of the information imported from ProjectWise.When eB users look at ProjectWise data in eB they are referring to the last known information that eBhas synchronized with.
Integrating eB with ProjectWiseConfiguring ProjectWise Synchronization and Attribute Mapping in eB Director
eB Information Manager 135 Implementation Guide
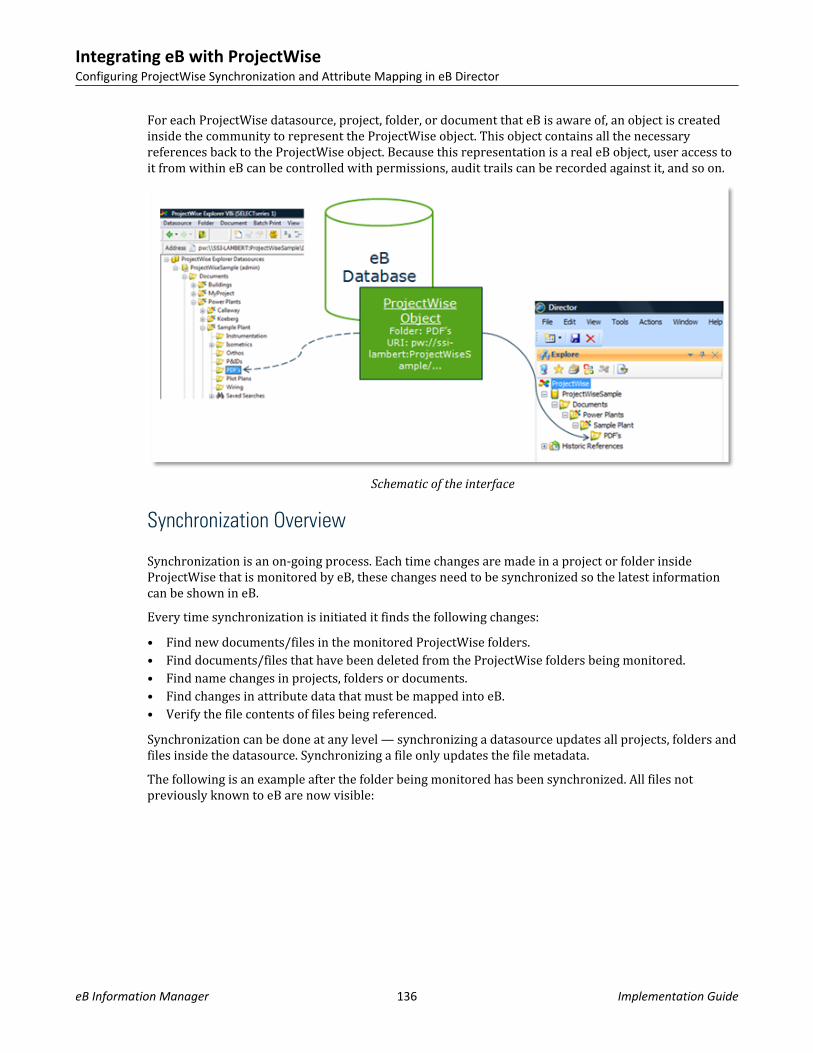
For each ProjectWise datasource, project, folder, or document that eB is aware of, an object is createdinside the community to represent the ProjectWise object. This object contains all the necessaryreferences back to the ProjectWise object. Because this representation is a real eB object, user access toit from within eB can be controlled with permissions, audit trails can be recorded against it, and so on.
Schematic of the interface
Synchronization Overview
Synchronization is an on-going process. Each time changes are made in a project or folder insideProjectWise that is monitored by eB, these changes need to be synchronized so the latest informationcan be shown in eB.Every time synchronization is initiated it finds the following changes:• Find new documents/files in the monitored ProjectWise folders.• Find documents/files that have been deleted from the ProjectWise folders being monitored.• Find name changes in projects, folders or documents.• Find changes in attribute data that must be mapped into eB.• Verify the file contents of files being referenced.Synchronization can be done at any level — synchronizing a datasource updates all projects, folders andfiles inside the datasource. Synchronizing a file only updates the file metadata.The following is an example after the folder being monitored has been synchronized. All files notpreviously known to eB are now visible:
Integrating eB with ProjectWiseConfiguring ProjectWise Synchronization and Attribute Mapping in eB Director
eB Information Manager 136 Implementation Guide
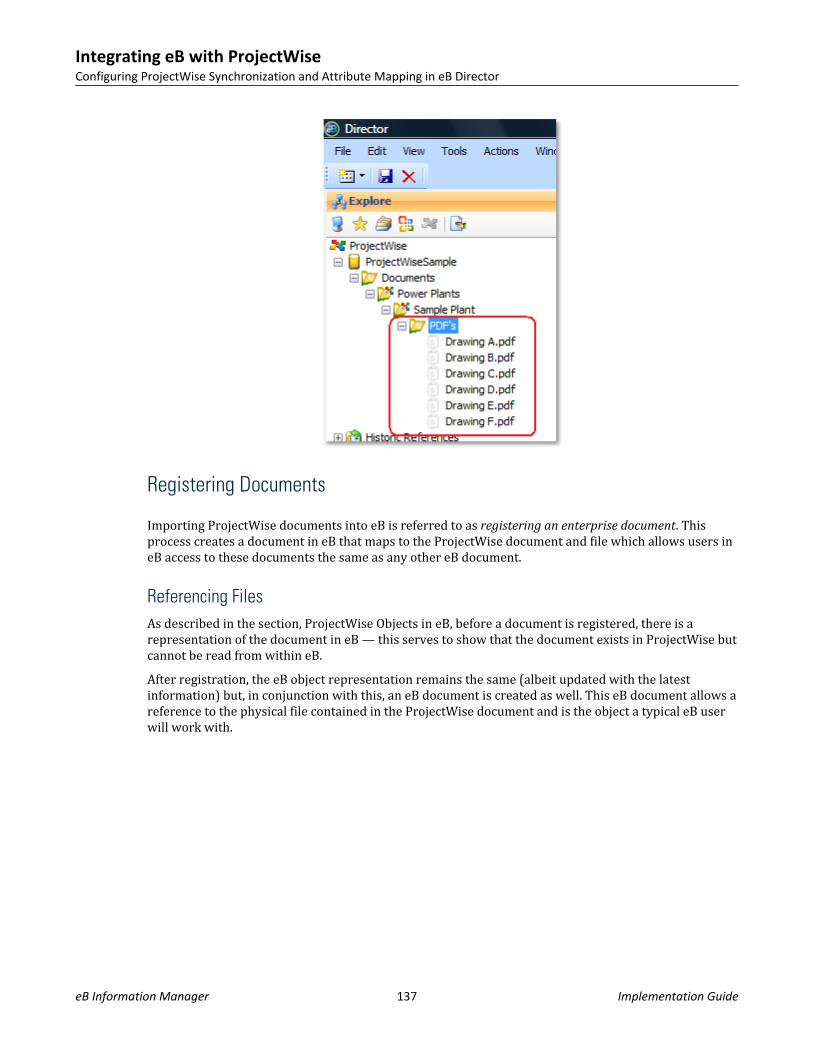
Registering Documents
Importing ProjectWise documents into eB is referred to as registering an enterprise document. Thisprocess creates a document in eB that maps to the ProjectWise document and file which allows users ineB access to these documents the same as any other eB document.
Referencing FilesAs described in the section, ProjectWise Objects in eB, before a document is registered, there is arepresentation of the document in eB — this serves to show that the document exists in ProjectWise butcannot be read from within eB.After registration, the eB object representation remains the same (albeit updated with the latestinformation) but, in conjunction with this, an eB document is created as well. This eB document allows areference to the physical file contained in the ProjectWise document and is the object a typical eB userwill work with.
Integrating eB with ProjectWiseConfiguring ProjectWise Synchronization and Attribute Mapping in eB Director
eB Information Manager 137 Implementation Guide
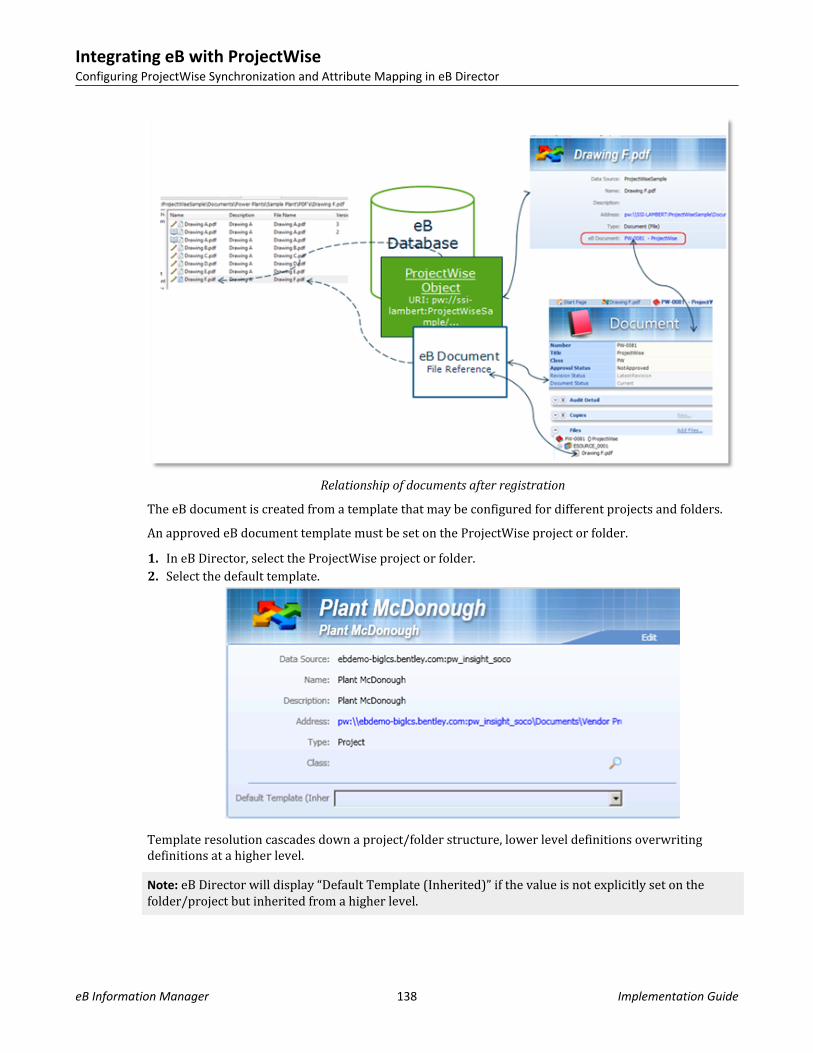
Relationship of documents after registration
The eB document is created from a template that may be configured for different projects and folders.An approved eB document template must be set on the ProjectWise project or folder.1. In eB Director, select the ProjectWise project or folder.2. Select the default template.
Template resolution cascades down a project/folder structure, lower level definitions overwritingdefinitions at a higher level.Note: eB Director will display “Default Template (Inherited)” if the value is not explicitly set on thefolder/project but inherited from a higher level.
Integrating eB with ProjectWiseConfiguring ProjectWise Synchronization and Attribute Mapping in eB Director
eB Information Manager 138 Implementation Guide
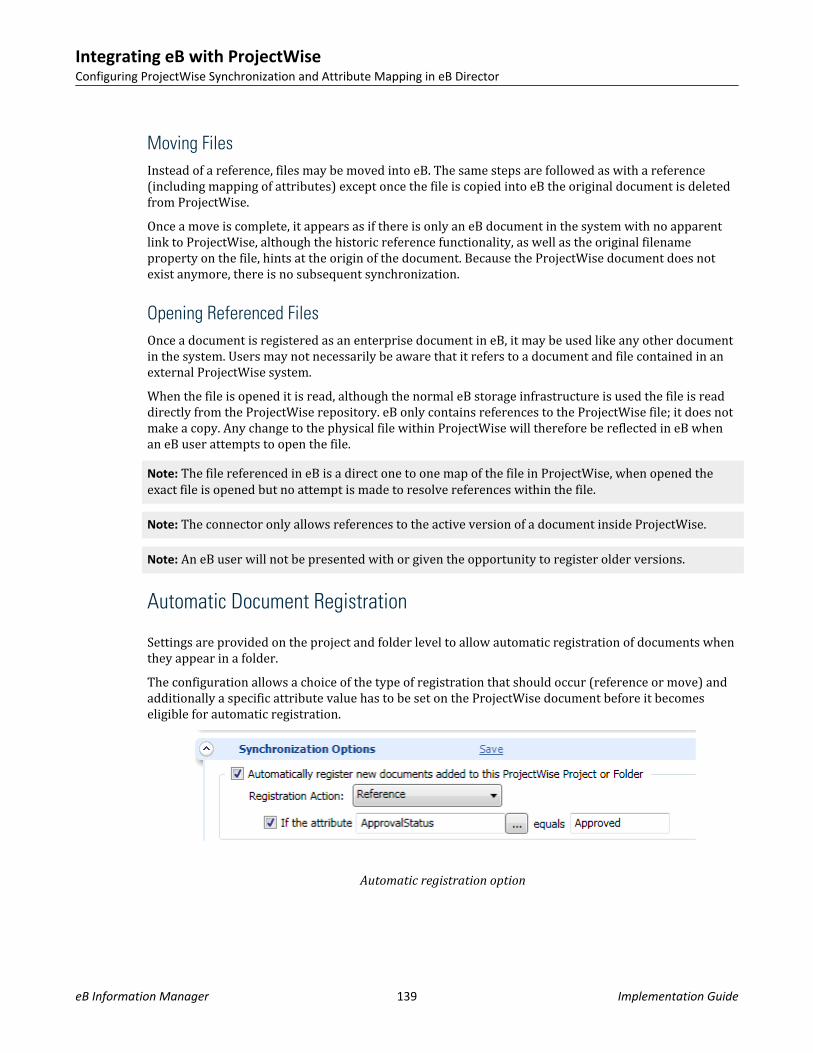
Moving FilesInstead of a reference, files may be moved into eB. The same steps are followed as with a reference(including mapping of attributes) except once the file is copied into eB the original document is deletedfrom ProjectWise.Once a move is complete, it appears as if there is only an eB document in the system with no apparentlink to ProjectWise, although the historic reference functionality, as well as the original filenameproperty on the file, hints at the origin of the document. Because the ProjectWise document does notexist anymore, there is no subsequent synchronization.
Opening Referenced FilesOnce a document is registered as an enterprise document in eB, it may be used like any other documentin the system. Users may not necessarily be aware that it refers to a document and file contained in anexternal ProjectWise system.When the file is opened it is read, although the normal eB storage infrastructure is used the file is readdirectly from the ProjectWise repository. eB only contains references to the ProjectWise file; it does notmake a copy. Any change to the physical file within ProjectWise will therefore be reflected in eB whenan eB user attempts to open the file.Note: The file referenced in eB is a direct one to one map of the file in ProjectWise, when opened theexact file is opened but no attempt is made to resolve references within the file.
Note: The connector only allows references to the active version of a document inside ProjectWise.
Note: An eB user will not be presented with or given the opportunity to register older versions.
Automatic Document Registration
Settings are provided on the project and folder level to allow automatic registration of documents whenthey appear in a folder.The configuration allows a choice of the type of registration that should occur (reference or move) andadditionally a specific attribute value has to be set on the ProjectWise document before it becomeseligible for automatic registration.
Automatic registration option
Integrating eB with ProjectWiseConfiguring ProjectWise Synchronization and Attribute Mapping in eB Director
eB Information Manager 139 Implementation Guide
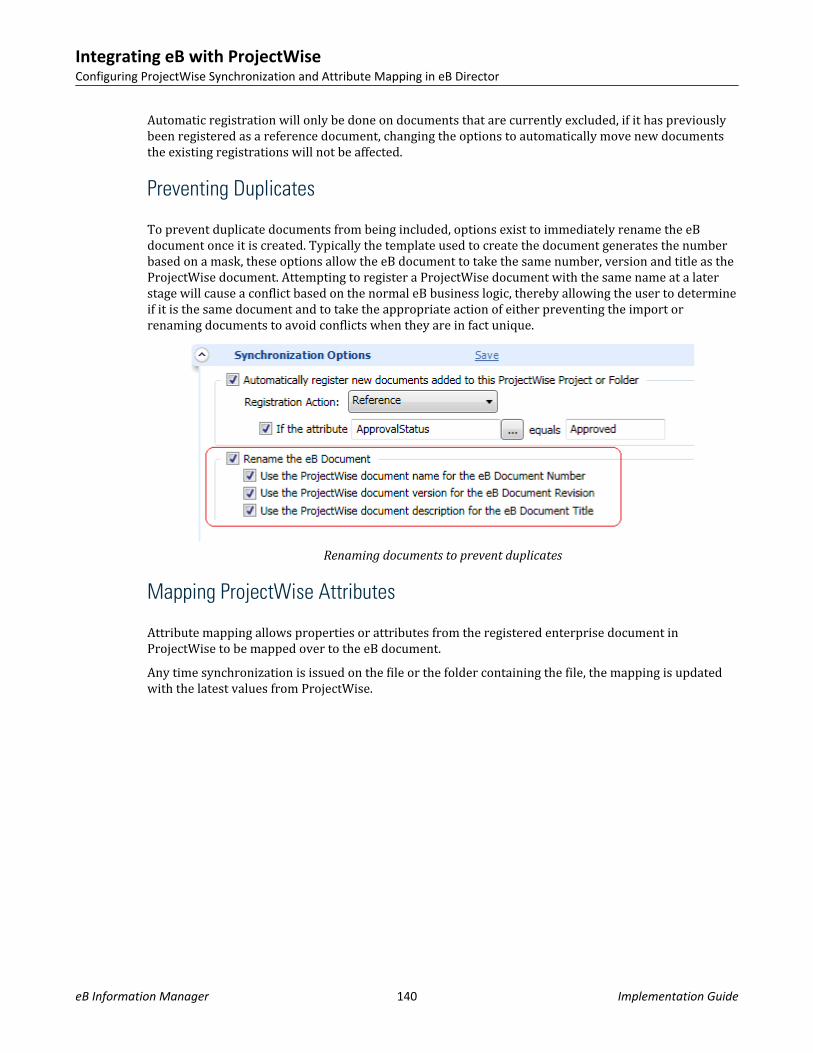
Automatic registration will only be done on documents that are currently excluded, if it has previouslybeen registered as a reference document, changing the options to automatically move new documentsthe existing registrations will not be affected.
Preventing Duplicates
To prevent duplicate documents from being included, options exist to immediately rename the eBdocument once it is created. Typically the template used to create the document generates the numberbased on a mask, these options allow the eB document to take the same number, version and title as theProjectWise document. Attempting to register a ProjectWise document with the same name at a laterstage will cause a conflict based on the normal eB business logic, thereby allowing the user to determineif it is the same document and to take the appropriate action of either preventing the import orrenaming documents to avoid conflicts when they are in fact unique.
Renaming documents to prevent duplicates
Mapping ProjectWise Attributes
Attribute mapping allows properties or attributes from the registered enterprise document inProjectWise to be mapped over to the eB document.Any time synchronization is issued on the file or the folder containing the file, the mapping is updatedwith the latest values from ProjectWise.
Integrating eB with ProjectWiseConfiguring ProjectWise Synchronization and Attribute Mapping in eB Director
eB Information Manager 140 Implementation Guide
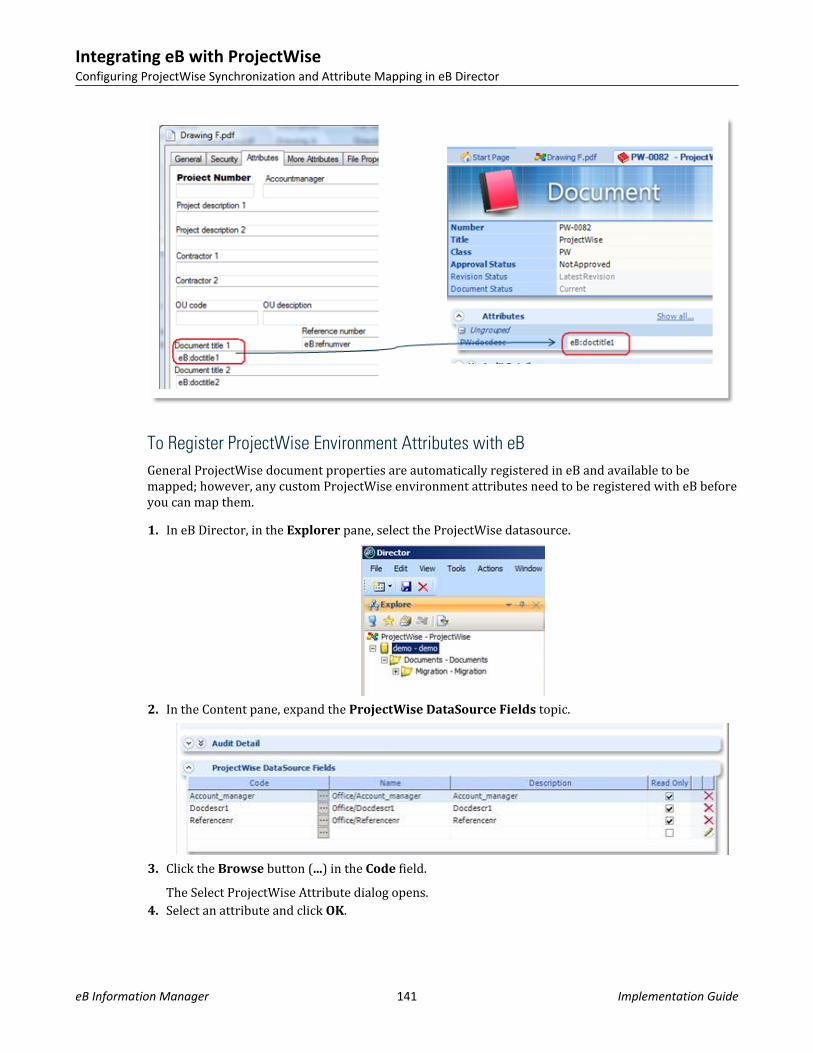
To Register ProjectWise Environment Attributes with eBGeneral ProjectWise document properties are automatically registered in eB and available to bemapped; however, any custom ProjectWise environment attributes need to be registered with eB beforeyou can map them.1. In eB Director, in the Explorer pane, select the ProjectWise datasource.
2. In the Content pane, expand the ProjectWise DataSource Fields topic.
3. Click the Browse button (...) in the Code field.The Select ProjectWise Attribute dialog opens.
4. Select an attribute and click OK.
Integrating eB with ProjectWiseConfiguring ProjectWise Synchronization and Attribute Mapping in eB Director
eB Information Manager 141 Implementation Guide
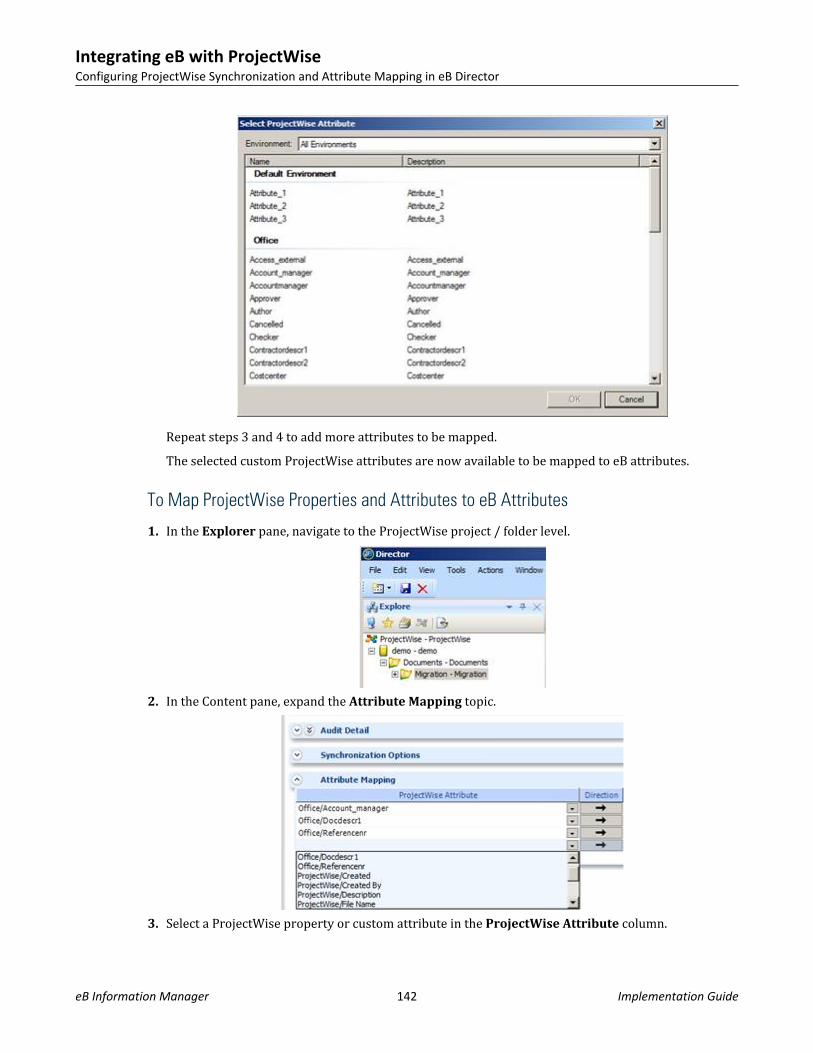
Repeat steps 3 and 4 to add more attributes to be mapped.The selected custom ProjectWise attributes are now available to be mapped to eB attributes.
To Map ProjectWise Properties and Attributes to eB Attributes
1. In the Explorer pane, navigate to the ProjectWise project / folder level.
2. In the Content pane, expand the Attribute Mapping topic.
3. Select a ProjectWise property or custom attribute in the ProjectWise Attribute column.
Integrating eB with ProjectWiseConfiguring ProjectWise Synchronization and Attribute Mapping in eB Director
eB Information Manager 142 Implementation Guide

4. Select an eB attribute in the eB Attribute column.5. Click the Save icon.
Repeat steps 3 to 5 to map more attributes.
Security on ProjectWise Objects in eB
When eB users access any ProjectWise object or attempt to open a referenced file, the security asconfigured on the objects inside eB determines the level of control the eB user has over the object. Noattempt is made to map the eB user to a user that exists in ProjectWise to determine if that user shouldhave access to the object inside ProjectWise. The eB users that work with the eB documents createdwhen registering ProjectWise documents may not even be users in ProjectWise.The eB service requires credentials to ProjectWise that allows it access to all the projects and foldersthat must be monitored.
Security across the interfaces
Additional eB permissions exist to determine which eB users have access to any of the ProjectWisefunctionality (for example, to allow synchronization, or for the registration of documents); it can behidden completely if not appropriate for some user groups.
Deleted Objects
When objects are deleted from a monitored ProjectWise folder, in most cases the references can simplybe removed from eB. Usually the referenced object will however be marked as historic and will beaccessible from eB until a decision is made to remove the record from eB if it serves no purpose.
Integrating eB with ProjectWiseConfiguring ProjectWise Synchronization and Attribute Mapping in eB Director
eB Information Manager 143 Implementation Guide
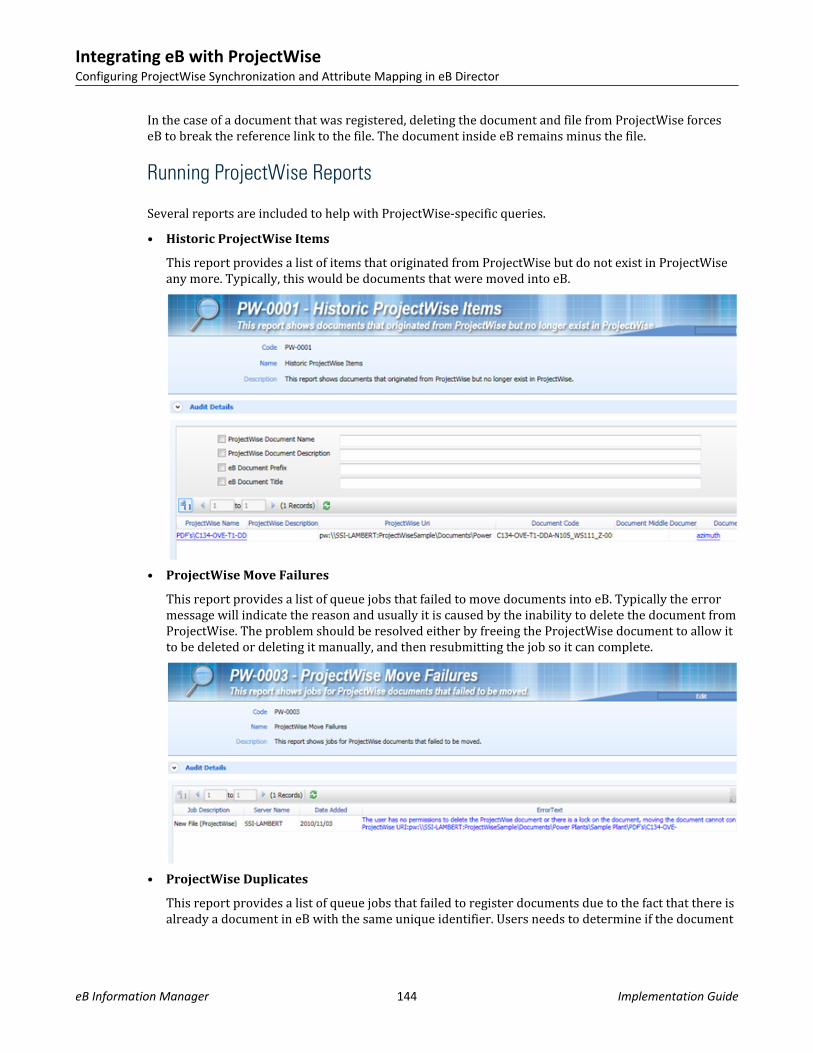
In the case of a document that was registered, deleting the document and file from ProjectWise forceseB to break the reference link to the file. The document inside eB remains minus the file.
Running ProjectWise Reports
Several reports are included to help with ProjectWise-specific queries.• Historic ProjectWise Items
This report provides a list of items that originated from ProjectWise but do not exist in ProjectWiseany more. Typically, this would be documents that were moved into eB.
• ProjectWise Move Failures
This report provides a list of queue jobs that failed to move documents into eB. Typically the errormessage will indicate the reason and usually it is caused by the inability to delete the document fromProjectWise. The problem should be resolved either by freeing the ProjectWise document to allow itto be deleted or deleting it manually, and then resubmitting the job so it can complete.
• ProjectWise Duplicates
This report provides a list of queue jobs that failed to register documents due to the fact that there isalready a document in eB with the same unique identifier. Users needs to determine if the document
Integrating eB with ProjectWiseConfiguring ProjectWise Synchronization and Attribute Mapping in eB Director
eB Information Manager 144 Implementation Guide
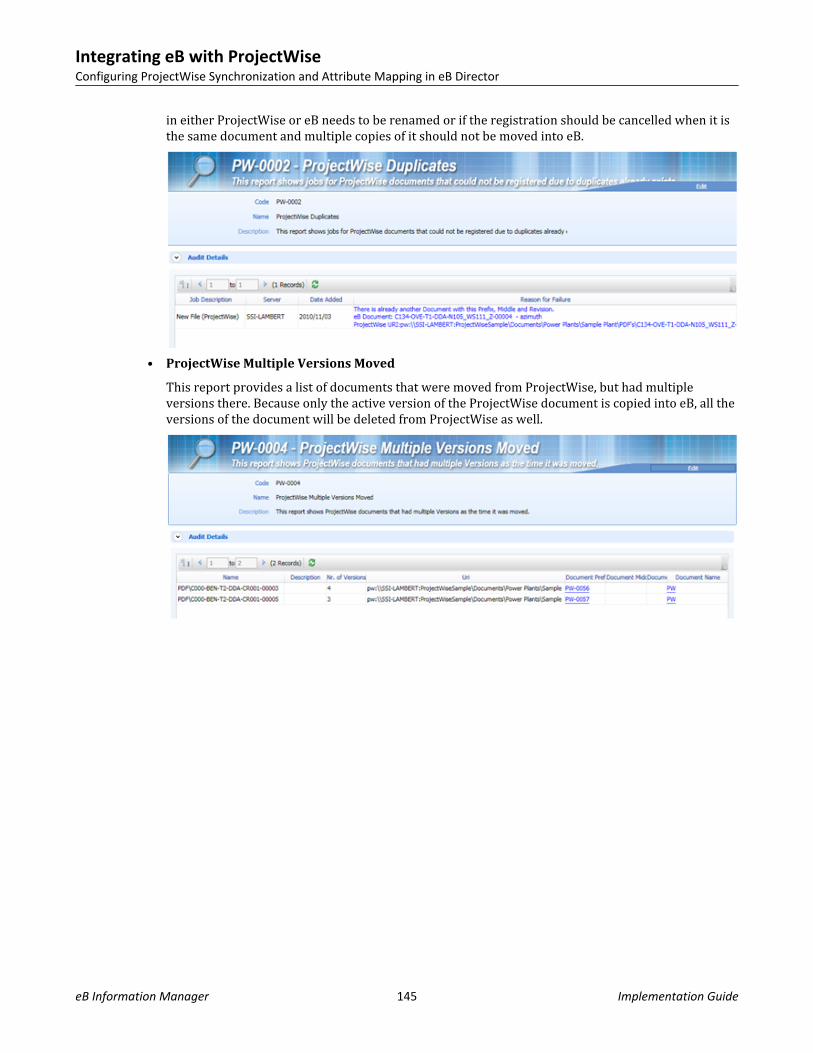
in either ProjectWise or eB needs to be renamed or if the registration should be cancelled when it isthe same document and multiple copies of it should not be moved into eB.
• ProjectWise Multiple Versions Moved
This report provides a list of documents that were moved from ProjectWise, but had multipleversions there. Because only the active version of the ProjectWise document is copied into eB, all theversions of the document will be deleted from ProjectWise as well.
Integrating eB with ProjectWiseConfiguring ProjectWise Synchronization and Attribute Mapping in eB Director
eB Information Manager 145 Implementation Guide

Integrating eB with ProjectWiseConfiguring ProjectWise Synchronization and Attribute Mapping in eB Director
This page intentionally left blank
eB Information Manager 146 Implementation Guide
Integrating eB with Microsoft® SharePoint® 10This chapter is for:
• IIS administrators• SharePoint administrators• eB system administratorsThis chapter assumes:
• You already have operational eB and SharePoint environments.Integration with Microsoft® SharePoint® lets you add eB documents to SharePoint, and converselyregister SharePoint files with eB.
Supported SharePoint VersionseB supports integration with SharePoint 2010 and 2007.You can use:• Microsoft SharePoint Server 2010 (Standard or Enterprise)• Microsoft SharePoint Foundation 2010• Microsoft Office SharePoint Server 2007 SP1• Windows SharePoint Services 3.0 SP1Depending on what eB functionality you are using with SharePoint, only certain versions of SharePointare supported:eB functionality Requires
eB OpenSearch • Microsoft SharePoint Server 2010 (Standard or Enterprise)• SharePoint search service• At least one SharePoint site with Kerberos authentication (required if eB
permissions linked to the Windows user are to be passed through to eB whensearching)
eB Copy Service Either:• Microsoft SharePoint Server 2010 (Standard or Enterprise)• Microsoft SharePoint Foundation 2010
Note: Only Microsoft SharePoint Server 2010 (Standard or Enterprise) includes the Federated Searchfeature which is used in the eB OpenSearch functionality.
eB Information Manager 147 Implementation Guide
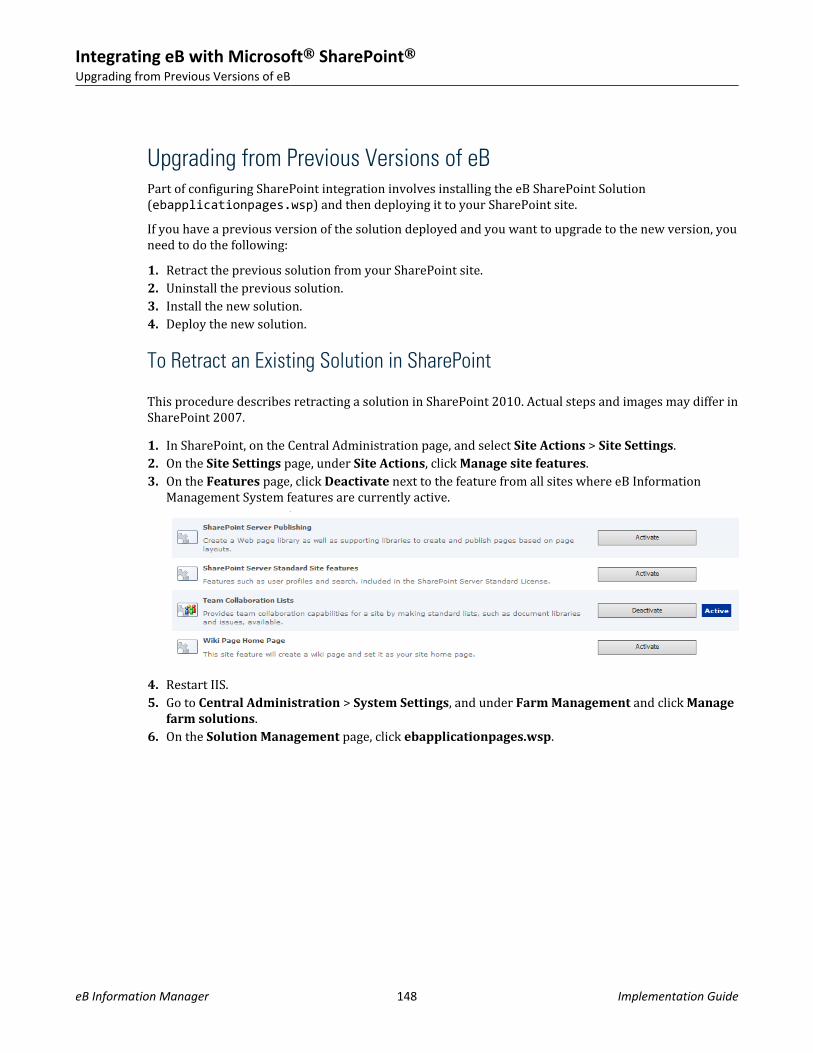
Upgrading from Previous Versions of eBPart of configuring SharePoint integration involves installing the eB SharePoint Solution(ebapplicationpages.wsp) and then deploying it to your SharePoint site.If you have a previous version of the solution deployed and you want to upgrade to the new version, youneed to do the following:1. Retract the previous solution from your SharePoint site.2. Uninstall the previous solution.3. Install the new solution.4. Deploy the new solution.
To Retract an Existing Solution in SharePoint
This procedure describes retracting a solution in SharePoint 2010. Actual steps and images may differ inSharePoint 2007.1. In SharePoint, on the Central Administration page, and select Site Actions > Site Settings.2. On the Site Settings page, under Site Actions, click Manage site features.3. On the Features page, click Deactivate next to the feature from all sites where eB Information
Management System features are currently active.
4. Restart IIS.5. Go to Central Administration > System Settings, and under Farm Management and click Manage
farm solutions.6. On the Solution Management page, click ebapplicationpages.wsp.
Integrating eB with Microsoft® SharePoint®Upgrading from Previous Versions of eB
eB Information Manager 148 Implementation Guide
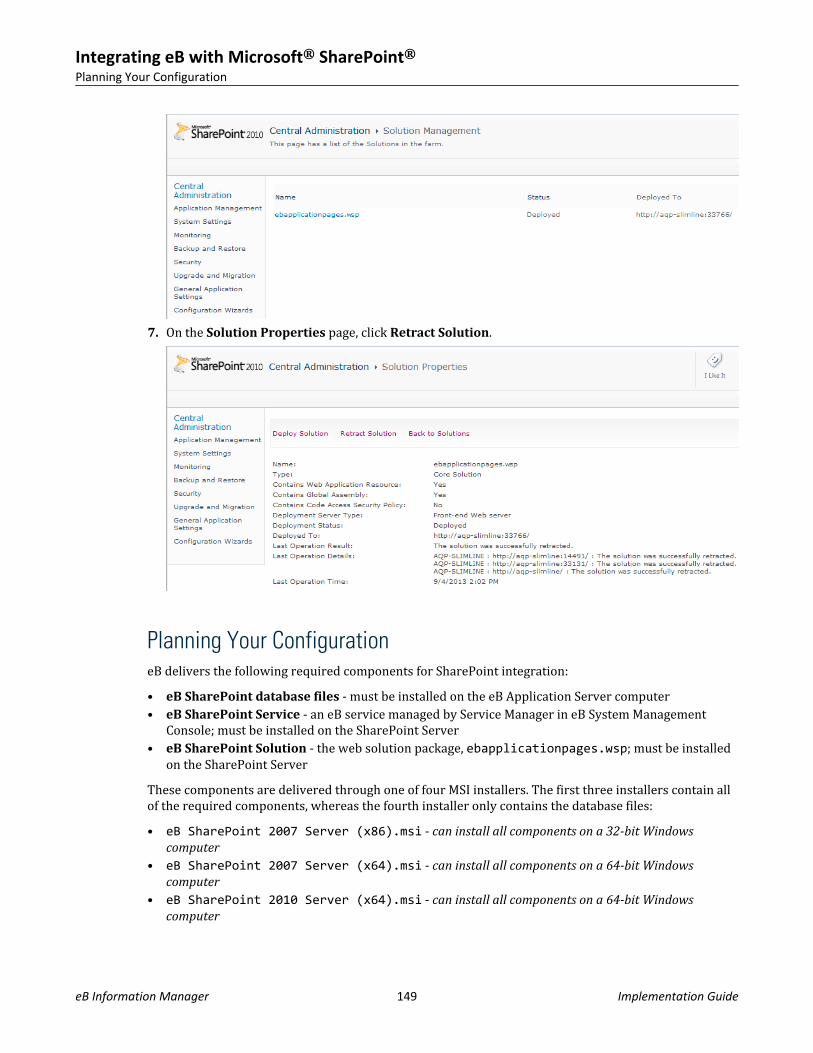
7. On the Solution Properties page, click Retract Solution.
Planning Your ConfigurationeB delivers the following required components for SharePoint integration:• eB SharePoint database files - must be installed on the eB Application Server computer• eB SharePoint Service - an eB service managed by Service Manager in eB System Management
Console; must be installed on the SharePoint Server• eB SharePoint Solution - the web solution package, ebapplicationpages.wsp; must be installed
on the SharePoint ServerThese components are delivered through one of four MSI installers. The first three installers contain allof the required components, whereas the fourth installer only contains the database files:• eB SharePoint 2007 Server (x86).msi - can install all components on a 32-bit Windows
computer• eB SharePoint 2007 Server (x64).msi - can install all components on a 64-bit Windows
computer• eB SharePoint 2010 Server (x64).msi - can install all components on a 64-bit Windows
computer
Integrating eB with Microsoft® SharePoint®Planning Your Configuration
eB Information Manager 149 Implementation Guide
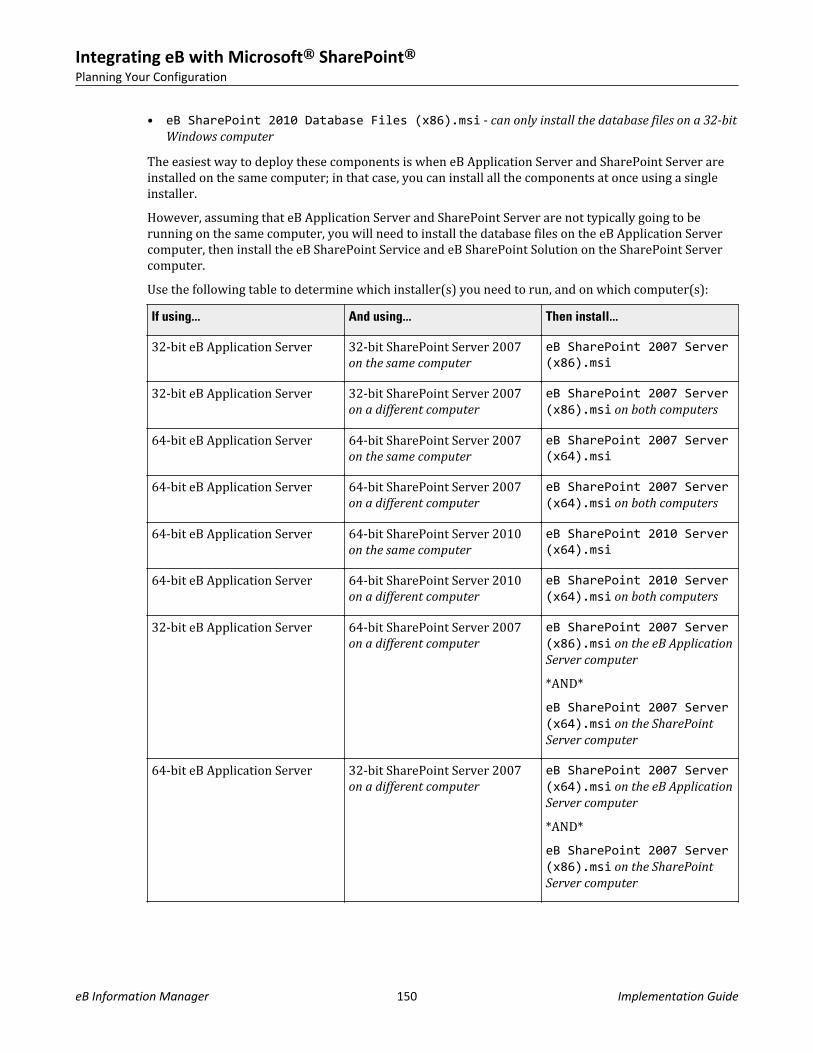
• eB SharePoint 2010 Database Files (x86).msi - can only install the database files on a 32-bitWindows computer
The easiest way to deploy these components is when eB Application Server and SharePoint Server areinstalled on the same computer; in that case, you can install all the components at once using a singleinstaller.However, assuming that eB Application Server and SharePoint Server are not typically going to berunning on the same computer, you will need to install the database files on the eB Application Servercomputer, then install the eB SharePoint Service and eB SharePoint Solution on the SharePoint Servercomputer.Use the following table to determine which installer(s) you need to run, and on which computer(s):If using... And using... Then install...
32-bit eB Application Server 32-bit SharePoint Server 2007on the same computer
eB SharePoint 2007 Server(x86).msi
32-bit eB Application Server 32-bit SharePoint Server 2007on a different computer
eB SharePoint 2007 Server(x86).msi on both computers
64-bit eB Application Server 64-bit SharePoint Server 2007on the same computer
eB SharePoint 2007 Server(x64).msi
64-bit eB Application Server 64-bit SharePoint Server 2007on a different computer
eB SharePoint 2007 Server(x64).msi on both computers
64-bit eB Application Server 64-bit SharePoint Server 2010on the same computer
eB SharePoint 2010 Server(x64).msi
64-bit eB Application Server 64-bit SharePoint Server 2010on a different computer
eB SharePoint 2010 Server(x64).msi on both computers
32-bit eB Application Server 64-bit SharePoint Server 2007on a different computer
eB SharePoint 2007 Server(x86).msi on the eB ApplicationServer computer
*AND*eB SharePoint 2007 Server(x64).msi on the SharePointServer computer
64-bit eB Application Server 32-bit SharePoint Server 2007on a different computer
eB SharePoint 2007 Server(x64).msi on the eB ApplicationServer computer
*AND*eB SharePoint 2007 Server(x86).msi on the SharePointServer computer
Integrating eB with Microsoft® SharePoint®Planning Your Configuration
eB Information Manager 150 Implementation Guide
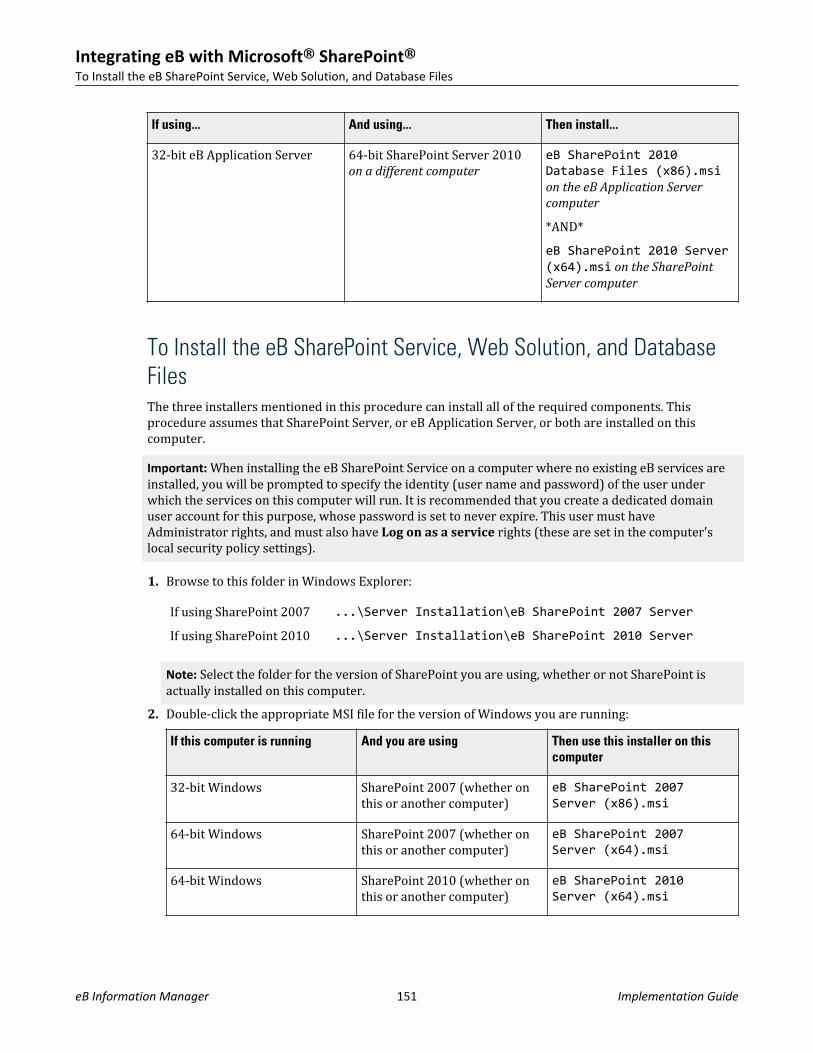
If using... And using... Then install...
32-bit eB Application Server 64-bit SharePoint Server 2010on a different computer
eB SharePoint 2010Database Files (x86).msion the eB Application Servercomputer
*AND*eB SharePoint 2010 Server(x64).msi on the SharePointServer computer
To Install the eB SharePoint Service, Web Solution, and DatabaseFilesThe three installers mentioned in this procedure can install all of the required components. Thisprocedure assumes that SharePoint Server, or eB Application Server, or both are installed on thiscomputer.Important: When installing the eB SharePoint Service on a computer where no existing eB services areinstalled, you will be prompted to specify the identity (user name and password) of the user underwhich the services on this computer will run. It is recommended that you create a dedicated domainuser account for this purpose, whose password is set to never expire. This user must haveAdministrator rights, and must also have Log on as a service rights (these are set in the computer'slocal security policy settings).
1. Browse to this folder in Windows Explorer:If using SharePoint 2007 ...\Server Installation\eB SharePoint 2007 Server
If using SharePoint 2010 ...\Server Installation\eB SharePoint 2010 Server
Note: Select the folder for the version of SharePoint you are using, whether or not SharePoint isactually installed on this computer.
2. Double-click the appropriate MSI file for the version of Windows you are running:If this computer is running And you are using Then use this installer on this
computer
32-bit Windows SharePoint 2007 (whether onthis or another computer)
eB SharePoint 2007Server (x86).msi
64-bit Windows SharePoint 2007 (whether onthis or another computer)
eB SharePoint 2007Server (x64).msi
64-bit Windows SharePoint 2010 (whether onthis or another computer)
eB SharePoint 2010Server (x64).msi
Integrating eB with Microsoft® SharePoint®To Install the eB SharePoint Service, Web Solution, and Database Files
eB Information Manager 151 Implementation Guide
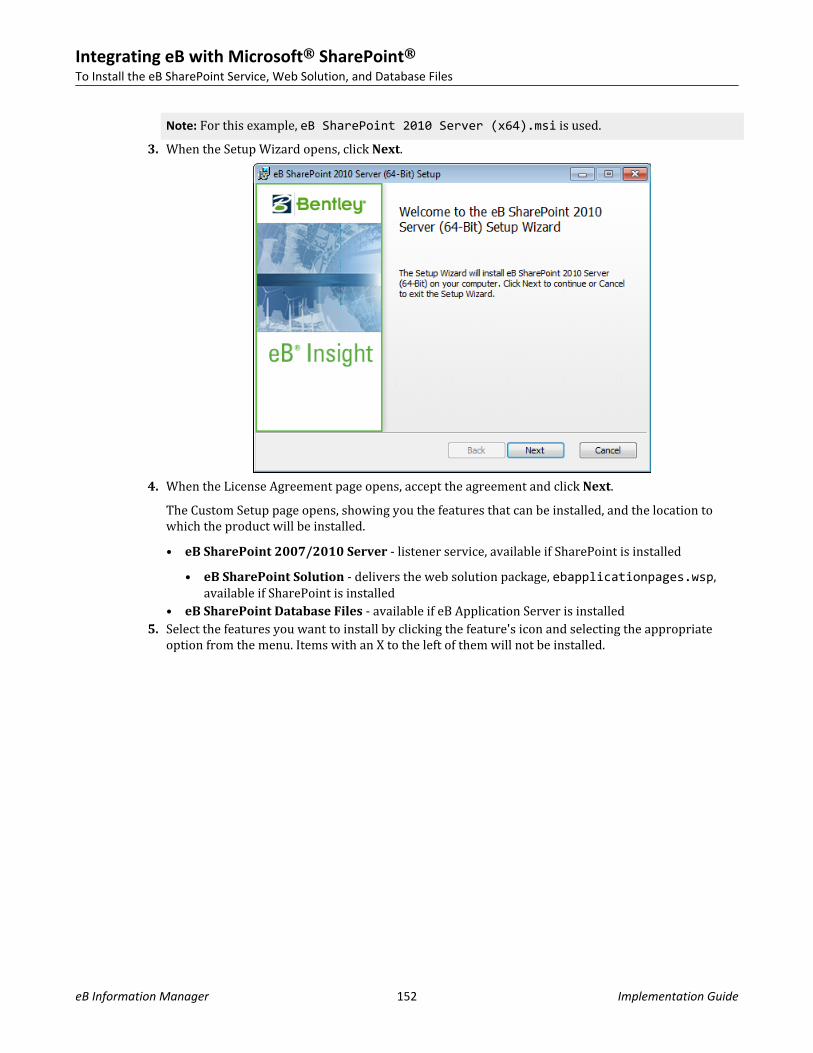
Note: For this example, eB SharePoint 2010 Server (x64).msi is used.3. When the Setup Wizard opens, click Next.
4. When the License Agreement page opens, accept the agreement and click Next.The Custom Setup page opens, showing you the features that can be installed, and the location towhich the product will be installed.• eB SharePoint 2007/2010 Server - listener service, available if SharePoint is installed
• eB SharePoint Solution - delivers the web solution package, ebapplicationpages.wsp,available if SharePoint is installed
• eB SharePoint Database Files - available if eB Application Server is installed5. Select the features you want to install by clicking the feature's icon and selecting the appropriate
option from the menu. Items with an X to the left of them will not be installed.
Integrating eB with Microsoft® SharePoint®To Install the eB SharePoint Service, Web Solution, and Database Files
eB Information Manager 152 Implementation Guide
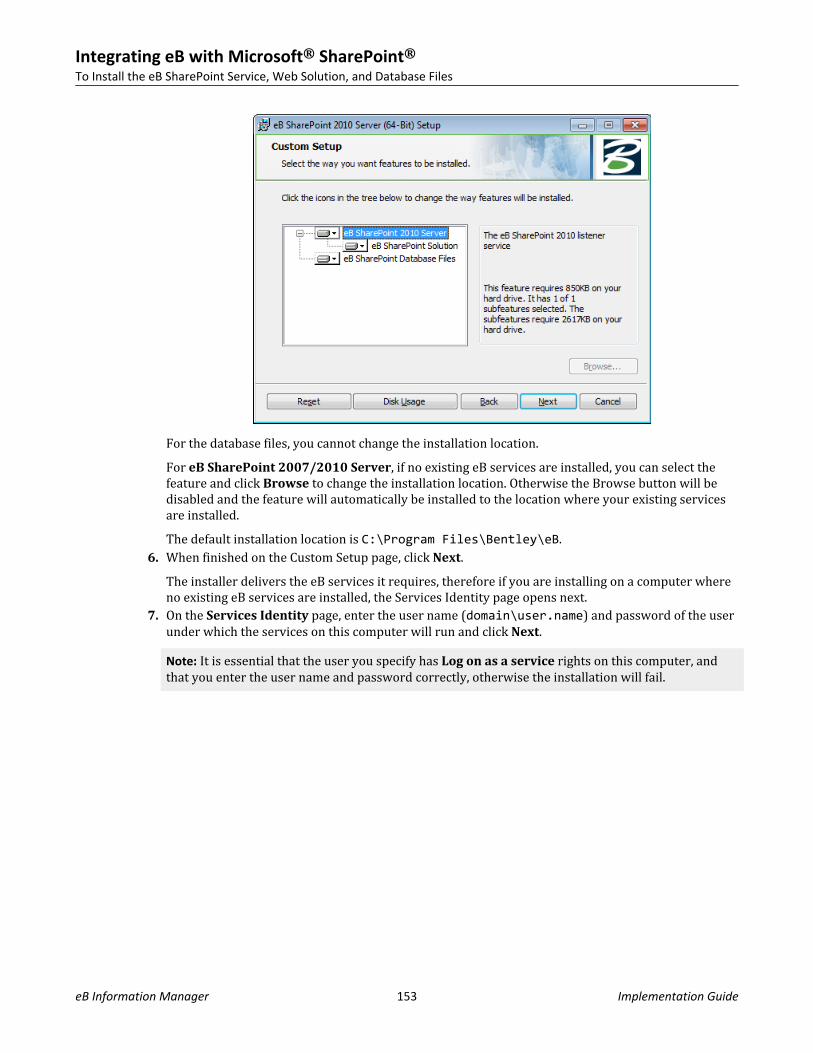
For the database files, you cannot change the installation location.For eB SharePoint 2007/2010 Server, if no existing eB services are installed, you can select thefeature and click Browse to change the installation location. Otherwise the Browse button will bedisabled and the feature will automatically be installed to the location where your existing servicesare installed.The default installation location is C:\Program Files\Bentley\eB.
6. When finished on the Custom Setup page, click Next.The installer delivers the eB services it requires, therefore if you are installing on a computer whereno existing eB services are installed, the Services Identity page opens next.
7. On the Services Identity page, enter the user name (domain\user.name) and password of the userunder which the services on this computer will run and click Next.Note: It is essential that the user you specify has Log on as a service rights on this computer, andthat you enter the user name and password correctly, otherwise the installation will fail.
Integrating eB with Microsoft® SharePoint®To Install the eB SharePoint Service, Web Solution, and Database Files
eB Information Manager 153 Implementation Guide
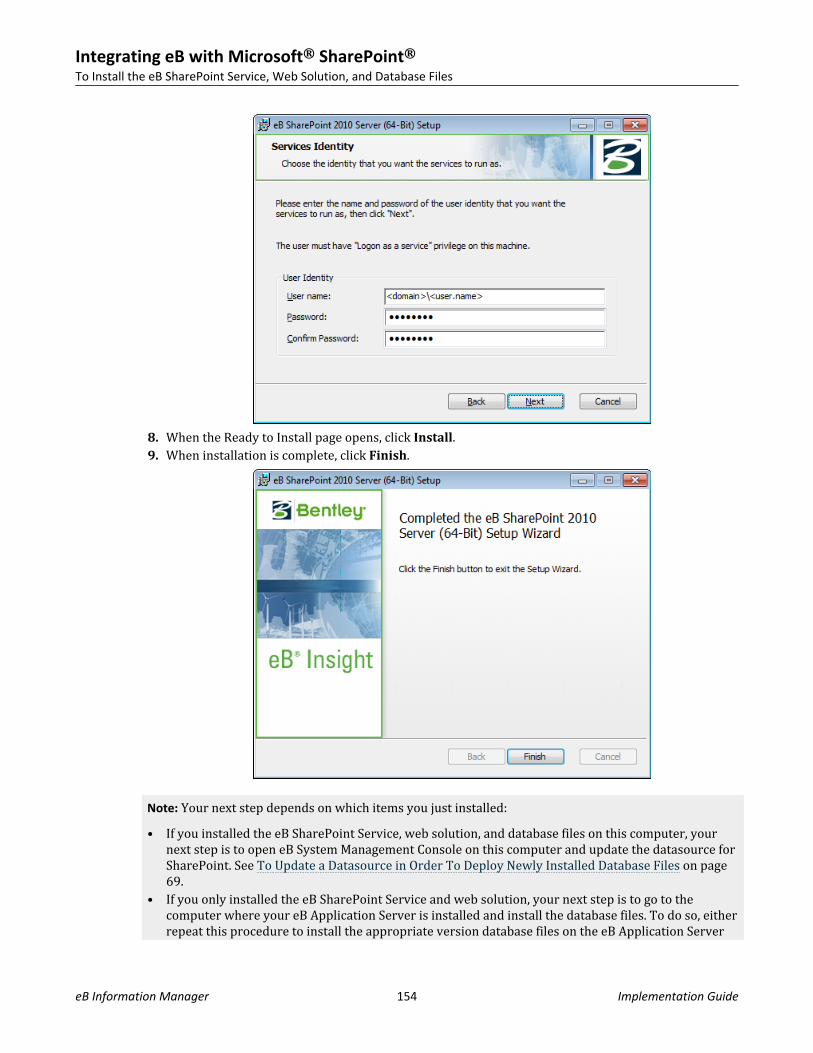
8. When the Ready to Install page opens, click Install.9. When installation is complete, click Finish.
Note: Your next step depends on which items you just installed:• If you installed the eB SharePoint Service, web solution, and database files on this computer, your
next step is to open eB System Management Console on this computer and update the datasource forSharePoint. See To Update a Datasource in Order To Deploy Newly Installed Database Files on page69.
• If you only installed the eB SharePoint Service and web solution, your next step is to go to thecomputer where your eB Application Server is installed and install the database files. To do so, eitherrepeat this procedure to install the appropriate version database files on the eB Application Server
Integrating eB with Microsoft® SharePoint®To Install the eB SharePoint Service, Web Solution, and Database Files
eB Information Manager 154 Implementation Guide
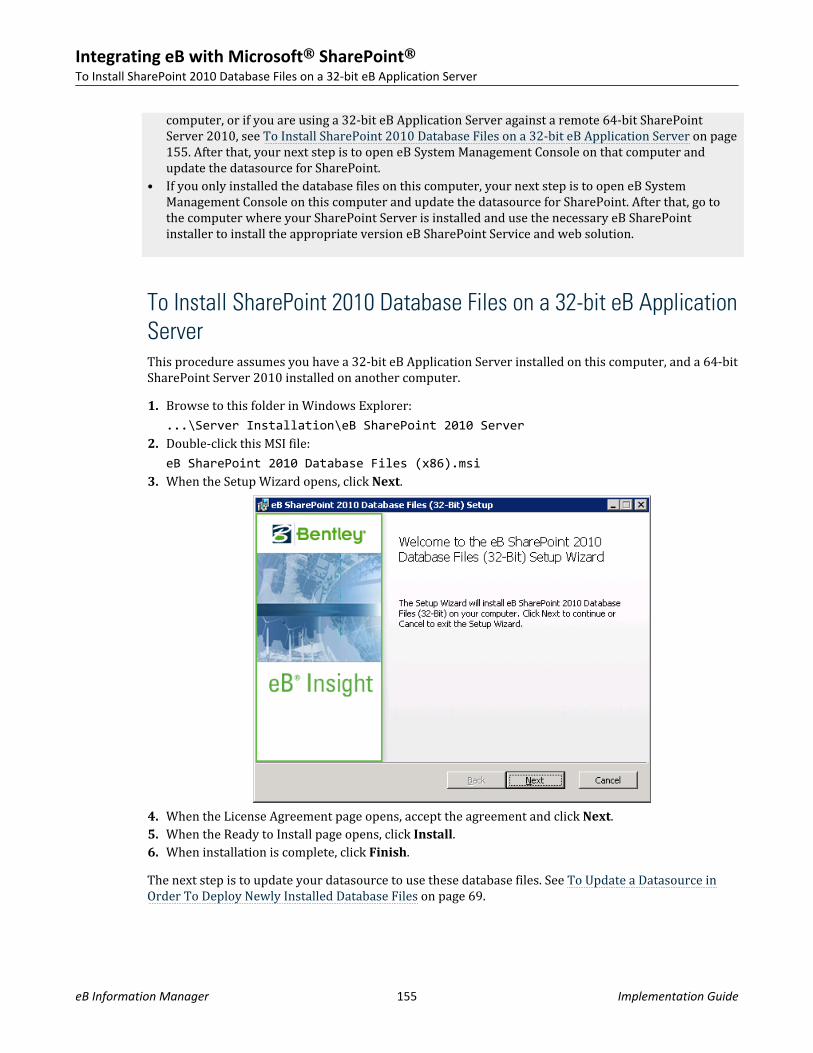
computer, or if you are using a 32-bit eB Application Server against a remote 64-bit SharePointServer 2010, see To Install SharePoint 2010 Database Files on a 32-bit eB Application Server on page155. After that, your next step is to open eB System Management Console on that computer andupdate the datasource for SharePoint.
• If you only installed the database files on this computer, your next step is to open eB SystemManagement Console on this computer and update the datasource for SharePoint. After that, go tothe computer where your SharePoint Server is installed and use the necessary eB SharePointinstaller to install the appropriate version eB SharePoint Service and web solution.
To Install SharePoint 2010 Database Files on a 32-bit eB ApplicationServerThis procedure assumes you have a 32-bit eB Application Server installed on this computer, and a 64-bitSharePoint Server 2010 installed on another computer.1. Browse to this folder in Windows Explorer:
...\Server Installation\eB SharePoint 2010 Server2. Double-click this MSI file:
eB SharePoint 2010 Database Files (x86).msi3. When the Setup Wizard opens, click Next.
4. When the License Agreement page opens, accept the agreement and click Next.5. When the Ready to Install page opens, click Install.6. When installation is complete, click Finish.The next step is to update your datasource to use these database files. See To Update a Datasource inOrder To Deploy Newly Installed Database Files on page 69.
Integrating eB with Microsoft® SharePoint®To Install SharePoint 2010 Database Files on a 32-bit eB Application Server
eB Information Manager 155 Implementation Guide
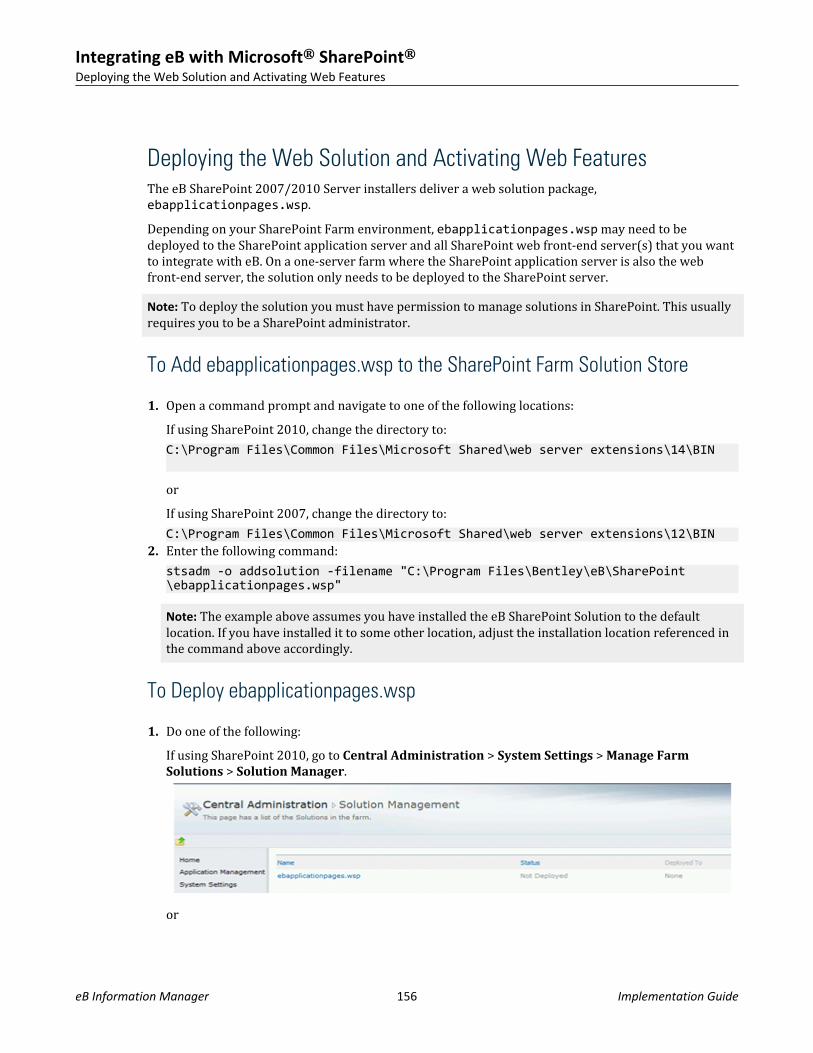
Deploying the Web Solution and Activating Web FeaturesThe eB SharePoint 2007/2010 Server installers deliver a web solution package,ebapplicationpages.wsp.Depending on your SharePoint Farm environment, ebapplicationpages.wsp may need to bedeployed to the SharePoint application server and all SharePoint web front-end server(s) that you wantto integrate with eB. On a one-server farm where the SharePoint application server is also the webfront-end server, the solution only needs to be deployed to the SharePoint server.Note: To deploy the solution you must have permission to manage solutions in SharePoint. This usuallyrequires you to be a SharePoint administrator.
To Add ebapplicationpages.wsp to the SharePoint Farm Solution Store
1. Open a command prompt and navigate to one of the following locations:If using SharePoint 2010, change the directory to:C:\Program Files\Common Files\Microsoft Shared\web server extensions\14\BIN
orIf using SharePoint 2007, change the directory to:C:\Program Files\Common Files\Microsoft Shared\web server extensions\12\BIN
2. Enter the following command:stsadm -o addsolution -filename "C:\Program Files\Bentley\eB\SharePoint\ebapplicationpages.wsp"
Note: The example above assumes you have installed the eB SharePoint Solution to the defaultlocation. If you have installed it to some other location, adjust the installation location referenced inthe command above accordingly.
To Deploy ebapplicationpages.wsp
1. Do one of the following:If using SharePoint 2010, go to Central Administration > System Settings > Manage FarmSolutions > Solution Manager.
or
Integrating eB with Microsoft® SharePoint®Deploying the Web Solution and Activating Web Features
eB Information Manager 156 Implementation Guide
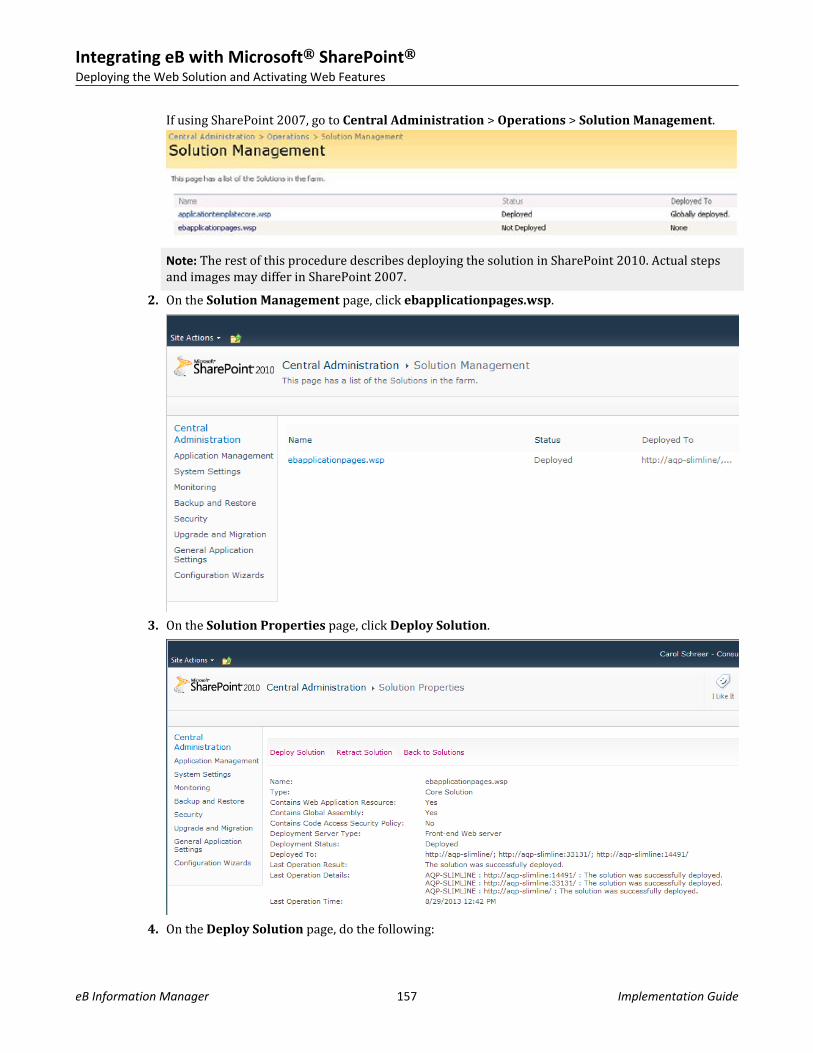
If using SharePoint 2007, go to Central Administration > Operations > Solution Management.
Note: The rest of this procedure describes deploying the solution in SharePoint 2010. Actual stepsand images may differ in SharePoint 2007.
2. On the Solution Management page, click ebapplicationpages.wsp.
3. On the Solution Properties page, click Deploy Solution.
4. On the Deploy Solution page, do the following:
Integrating eB with Microsoft® SharePoint®Deploying the Web Solution and Activating Web Features
eB Information Manager 157 Implementation Guide
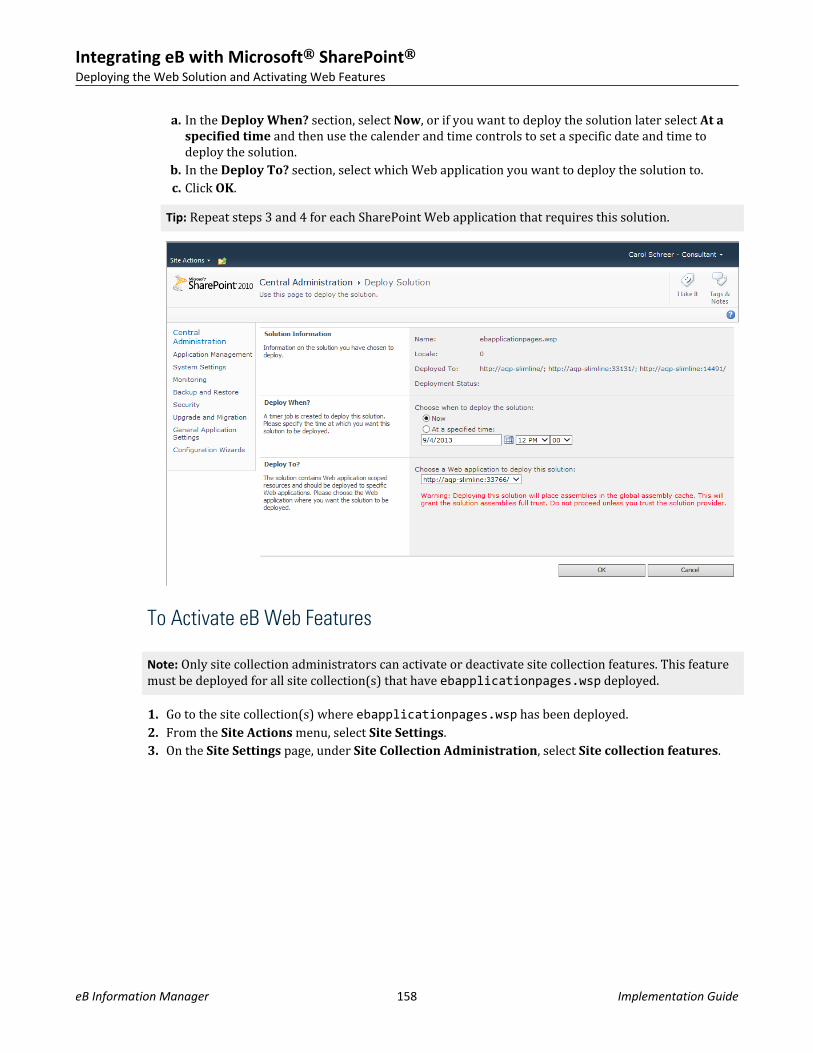
a. In the Deploy When? section, select Now, or if you want to deploy the solution later select At aspecified time and then use the calender and time controls to set a specific date and time todeploy the solution.
b. In the Deploy To? section, select which Web application you want to deploy the solution to.c. Click OK.
Tip: Repeat steps 3 and 4 for each SharePoint Web application that requires this solution.
To Activate eB Web Features
Note: Only site collection administrators can activate or deactivate site collection features. This featuremust be deployed for all site collection(s) that have ebapplicationpages.wsp deployed.
1. Go to the site collection(s) where ebapplicationpages.wsp has been deployed.2. From the Site Actions menu, select Site Settings.3. On the Site Settings page, under Site Collection Administration, select Site collection features.
Integrating eB with Microsoft® SharePoint®Deploying the Web Solution and Activating Web Features
eB Information Manager 158 Implementation Guide
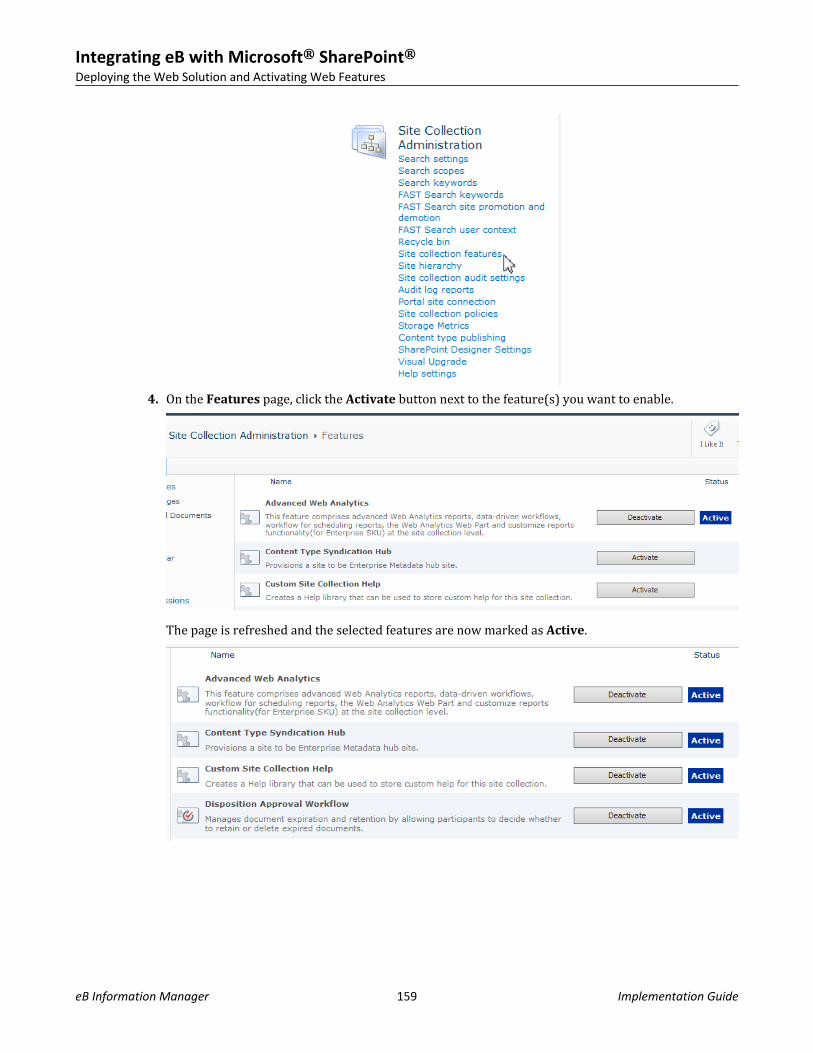
4. On the Features page, click the Activate button next to the feature(s) you want to enable.
The page is refreshed and the selected features are now marked as Active.
Integrating eB with Microsoft® SharePoint®Deploying the Web Solution and Activating Web Features
eB Information Manager 159 Implementation Guide
Configuring a Community and Repository in eB SystemManagement ConsoleOnce a web application has been created or extended and the site collection created, you can nowconfigure a community and a repository in eB System Management Console.The following procedures must be performed on the SharePoint Server computer where you installedthe eB SharePoint Service.
To Create a Community That Points to a SharePoint-Enabled Datasource
Create a community on this computer that points to an eB Application Server computer where the eBSharePoint database files are installed and to a datasource on that computer that has been updated touse those database files.Note: This procedure assumes the eB Application Server and SharePoint Server are installed onseparate computers. You can skip this procedure if they are installed on the same computer.
1. Open eB System Management Console (Start > All Programs > Bentley > eB > eB SystemManagement Console).
2. In the Explorer pane, expand Servers > your_server > Communities.3. Right-click the Communities node and select Add Community.
The New Community Properties dialog opens.4. From the Application Server list, enter or select the name of the eB Application Server computer
where the eB SharePoint database files are installed.5. From the Datasource list, select a datasource on that server that has been updated to use the eB
SharePoint database files.6. Click OK.Repeat this procedure as needed to create additional communities on this computer that point to otherSharePoint-enabled datasources on the eB Application Server computer.
To Configure a Community to Use the eB SharePoint Service on ThisComputer
1. Open eB System Management Console (Start > All Programs > Bentley > eB > eB SystemManagement Console).
2. In the Explorer pane, go to Servers > your server > SharePoint.3. Select the SharePoint node, then in the Communities Served list, check the check box next to the
each community you want to be served by the eB SharePoint Service on this computer.4. Log in to the selected community, if prompted.
Integrating eB with Microsoft® SharePoint®Configuring a Community and Repository in eB System Management Console
eB Information Manager 160 Implementation Guide
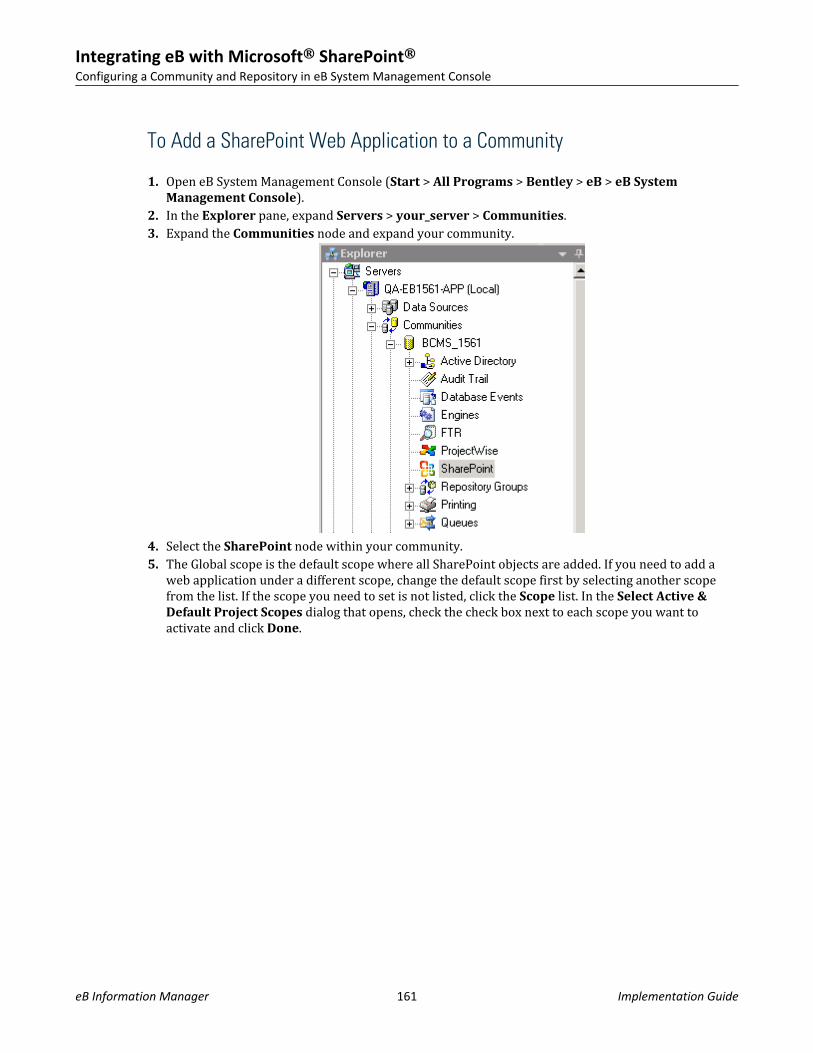
To Add a SharePoint Web Application to a Community
1. Open eB System Management Console (Start > All Programs > Bentley > eB > eB SystemManagement Console).
2. In the Explorer pane, expand Servers > your_server > Communities.3. Expand the Communities node and expand your community.
4. Select the SharePoint node within your community.5. The Global scope is the default scope where all SharePoint objects are added. If you need to add a
web application under a different scope, change the default scope first by selecting another scopefrom the list. If the scope you need to set is not listed, click the Scope list. In the Select Active &Default Project Scopes dialog that opens, check the check box next to each scope you want toactivate and click Done.
Integrating eB with Microsoft® SharePoint®Configuring a Community and Repository in eB System Management Console
eB Information Manager 161 Implementation Guide

6.Click the Add Web Application icon in the toolbar.A globe icon is attached to your cursor.
7. Click anywhere inside the content pane.The Select SharePoint Web Application dialog opens for you to select the SharePoint Server wherethe eB SharePoint Service is installed.
Integrating eB with Microsoft® SharePoint®Configuring a Community and Repository in eB System Management Console
eB Information Manager 162 Implementation Guide
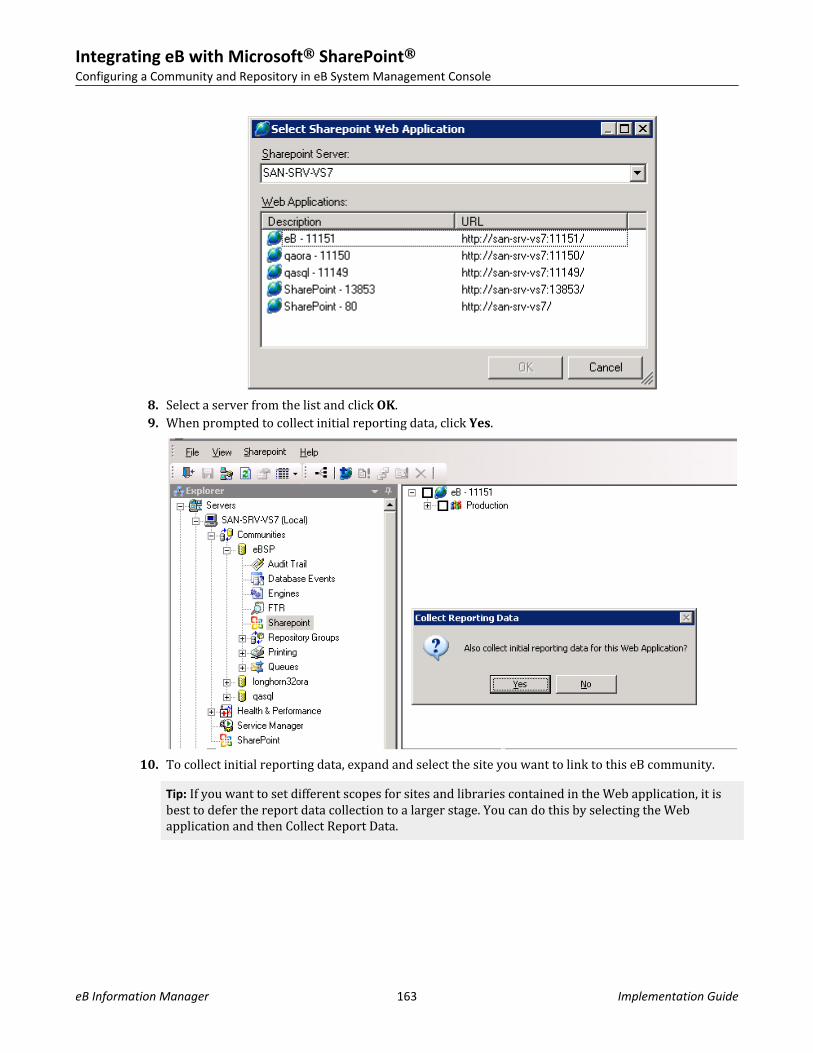
8. Select a server from the list and click OK.9. When prompted to collect initial reporting data, click Yes.
10. To collect initial reporting data, expand and select the site you want to link to this eB community.Tip: If you want to set different scopes for sites and libraries contained in the Web application, it isbest to defer the report data collection to a larger stage. You can do this by selecting the Webapplication and then Collect Report Data.
Integrating eB with Microsoft® SharePoint®Configuring a Community and Repository in eB System Management Console
eB Information Manager 163 Implementation Guide
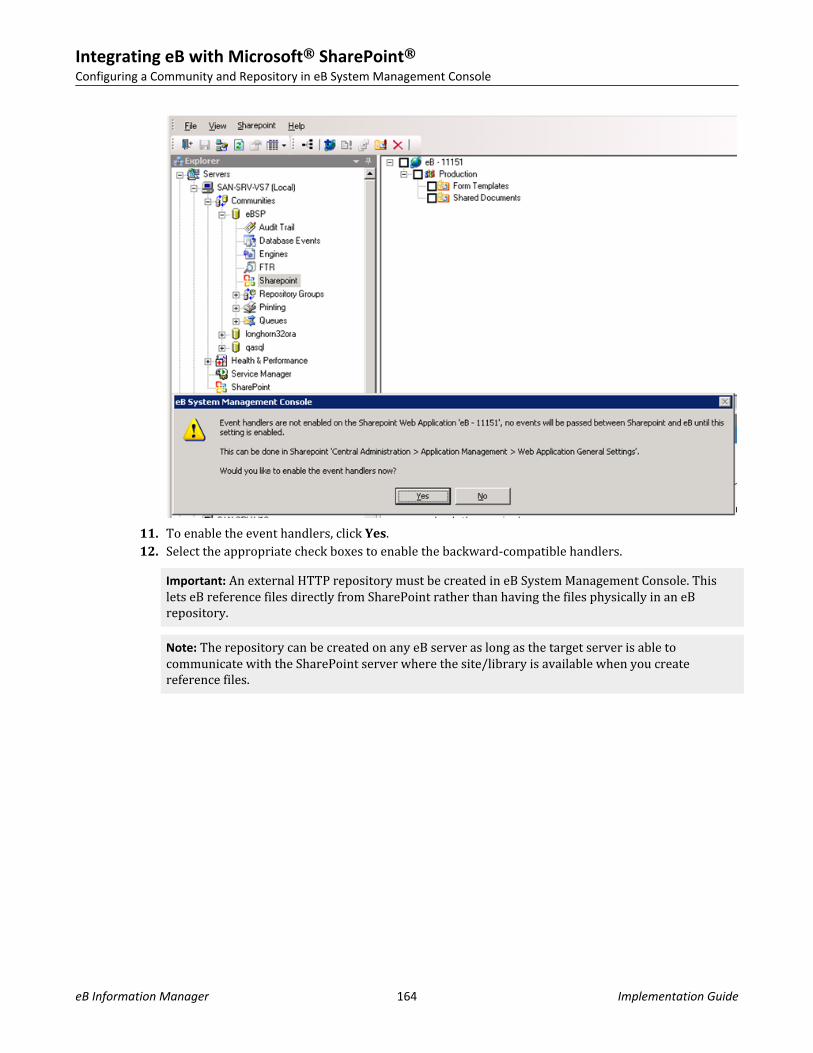
11. To enable the event handlers, click Yes.12. Select the appropriate check boxes to enable the backward-compatible handlers.
Important: An external HTTP repository must be created in eB System Management Console. Thislets eB reference files directly from SharePoint rather than having the files physically in an eBrepository.
Note: The repository can be created on any eB server as long as the target server is able tocommunicate with the SharePoint server where the site/library is available when you createreference files.
Integrating eB with Microsoft® SharePoint®Configuring a Community and Repository in eB System Management Console
eB Information Manager 164 Implementation Guide
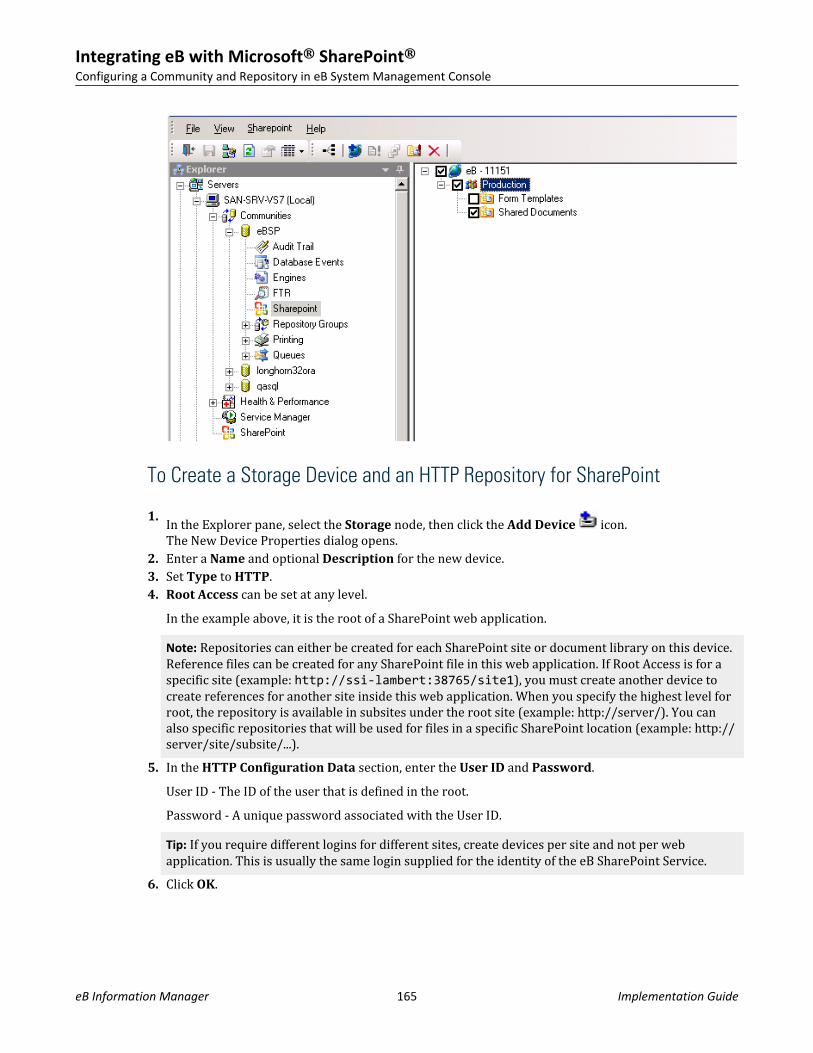
To Create a Storage Device and an HTTP Repository for SharePoint
1. In the Explorer pane, select the Storage node, then click the Add Device icon.The New Device Properties dialog opens.
2. Enter a Name and optional Description for the new device.3. Set Type to HTTP.4. Root Access can be set at any level.
In the example above, it is the root of a SharePoint web application.Note: Repositories can either be created for each SharePoint site or document library on this device.Reference files can be created for any SharePoint file in this web application. If Root Access is for aspecific site (example: http://ssi-lambert:38765/site1), you must create another device tocreate references for another site inside this web application. When you specify the highest level forroot, the repository is available in subsites under the root site (example: http://server/). You canalso specific repositories that will be used for files in a specific SharePoint location (example: http://server/site/subsite/...).
5. In the HTTP Configuration Data section, enter the User ID and Password.User ID - The ID of the user that is defined in the root.Password - A unique password associated with the User ID.Tip: If you require different logins for different sites, create devices per site and not per webapplication. This is usually the same login supplied for the identity of the eB SharePoint Service.
6. Click OK.
Integrating eB with Microsoft® SharePoint®Configuring a Community and Repository in eB System Management Console
eB Information Manager 165 Implementation Guide
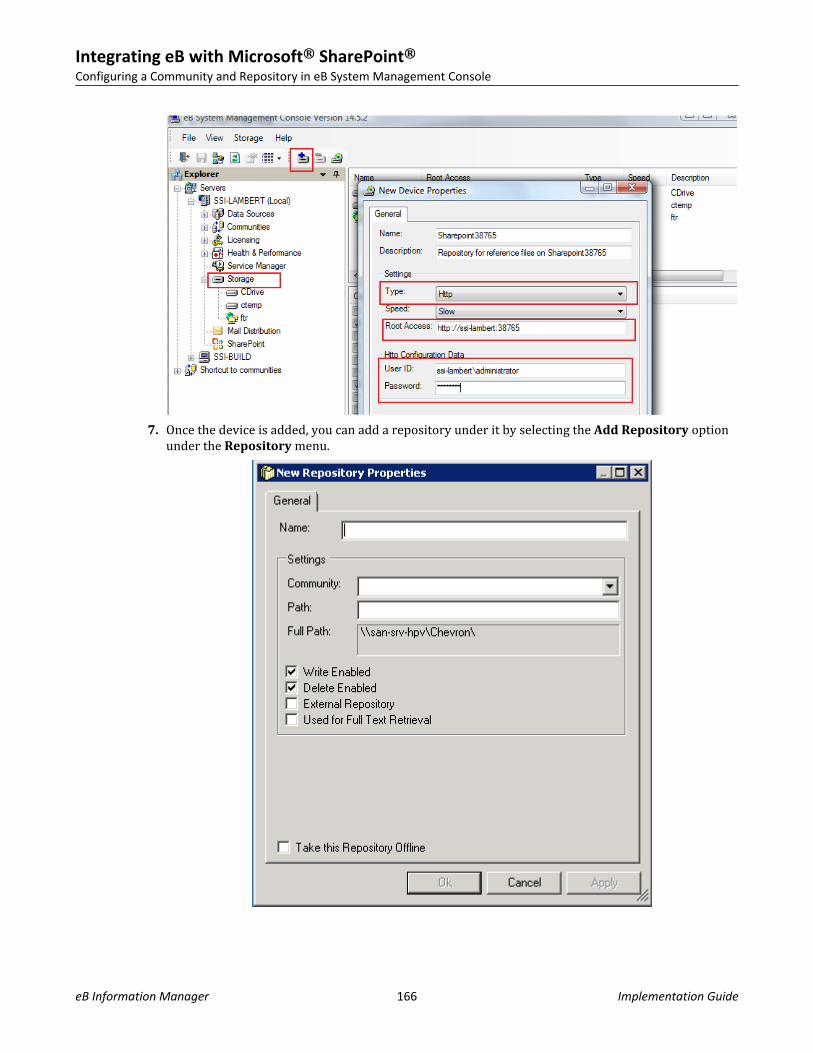
7. Once the device is added, you can add a repository under it by selecting the Add Repository optionunder the Repository menu.
Integrating eB with Microsoft® SharePoint®Configuring a Community and Repository in eB System Management Console
eB Information Manager 166 Implementation Guide
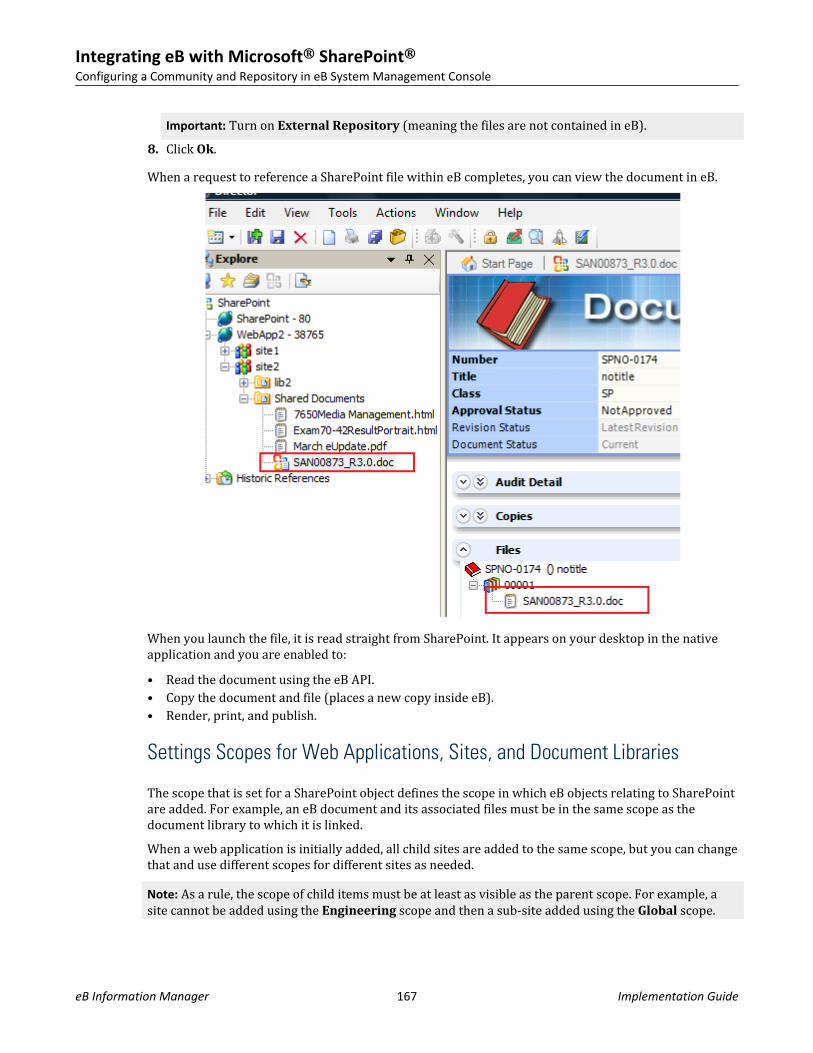
Important: Turn on External Repository (meaning the files are not contained in eB).8. Click Ok.When a request to reference a SharePoint file within eB completes, you can view the document in eB.
When you launch the file, it is read straight from SharePoint. It appears on your desktop in the nativeapplication and you are enabled to:• Read the document using the eB API.• Copy the document and file (places a new copy inside eB).• Render, print, and publish.
Settings Scopes for Web Applications, Sites, and Document Libraries
The scope that is set for a SharePoint object defines the scope in which eB objects relating to SharePointare added. For example, an eB document and its associated files must be in the same scope as thedocument library to which it is linked.When a web application is initially added, all child sites are added to the same scope, but you can changethat and use different scopes for different sites as needed.Note: As a rule, the scope of child items must be at least as visible as the parent scope. For example, asite cannot be added using the Engineering scope and then a sub-site added using the Global scope.
Integrating eB with Microsoft® SharePoint®Configuring a Community and Repository in eB System Management Console
eB Information Manager 167 Implementation Guide
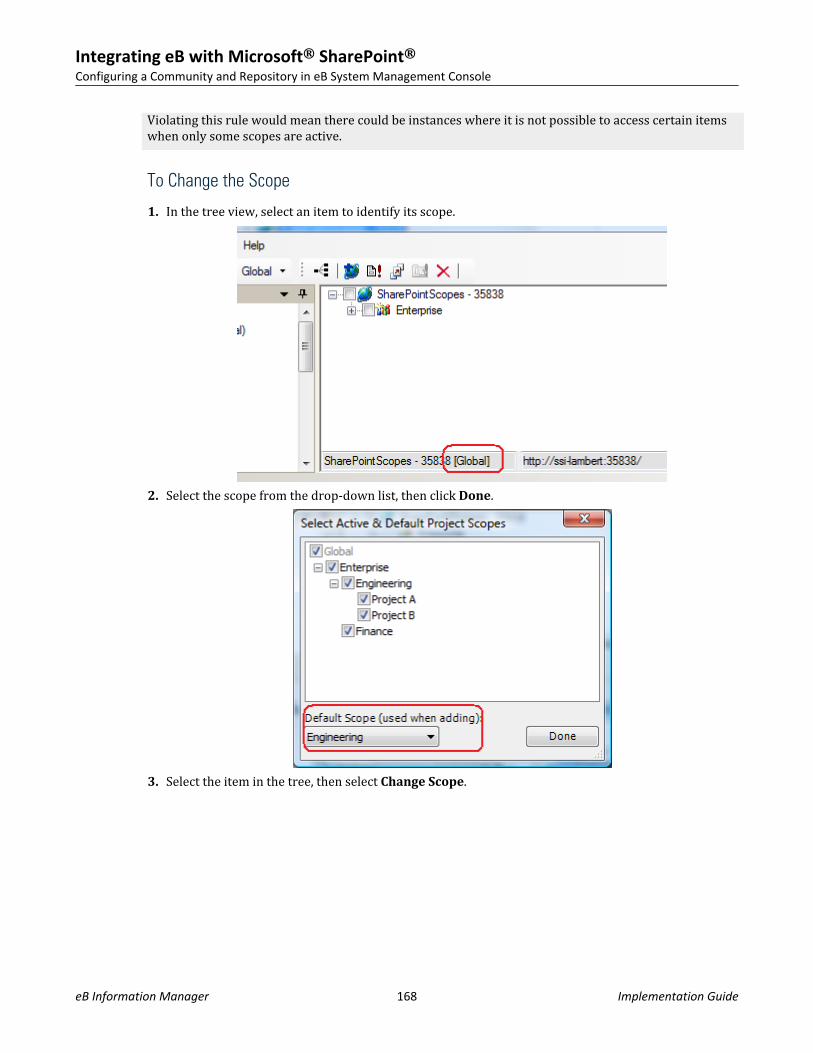
Violating this rule would mean there could be instances where it is not possible to access certain itemswhen only some scopes are active.
To Change the Scope
1. In the tree view, select an item to identify its scope.
2. Select the scope from the drop-down list, then click Done.
3. Select the item in the tree, then select Change Scope.
Integrating eB with Microsoft® SharePoint®Configuring a Community and Repository in eB System Management Console
eB Information Manager 168 Implementation Guide
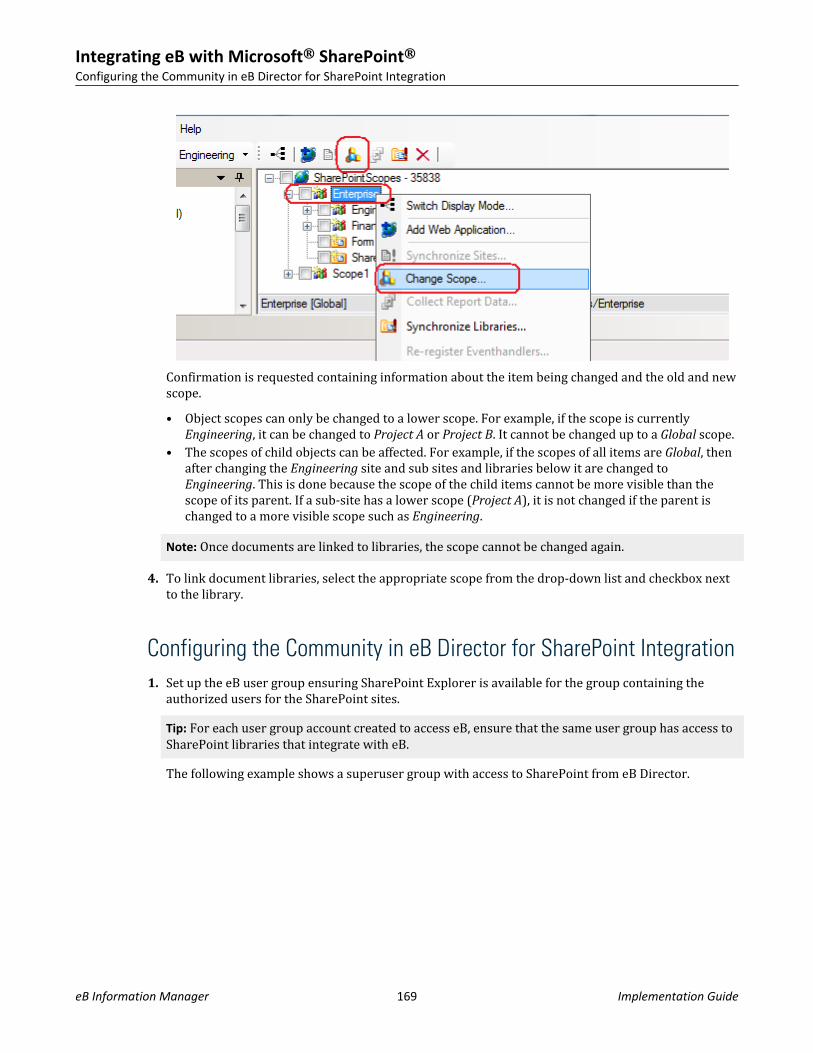
Confirmation is requested containing information about the item being changed and the old and newscope.• Object scopes can only be changed to a lower scope. For example, if the scope is currently
Engineering, it can be changed to Project A or Project B. It cannot be changed up to a Global scope.• The scopes of child objects can be affected. For example, if the scopes of all items are Global, then
after changing the Engineering site and sub sites and libraries below it are changed toEngineering. This is done because the scope of the child items cannot be more visible than thescope of its parent. If a sub-site has a lower scope (Project A), it is not changed if the parent ischanged to a more visible scope such as Engineering.
Note: Once documents are linked to libraries, the scope cannot be changed again.
4. To link document libraries, select the appropriate scope from the drop-down list and checkbox nextto the library.
Configuring the Community in eB Director for SharePoint Integration1. Set up the eB user group ensuring SharePoint Explorer is available for the group containing the
authorized users for the SharePoint sites.Tip: For each user group account created to access eB, ensure that the same user group has access toSharePoint libraries that integrate with eB.The following example shows a superuser group with access to SharePoint from eB Director.
Integrating eB with Microsoft® SharePoint®Configuring the Community in eB Director for SharePoint Integration
eB Information Manager 169 Implementation Guide
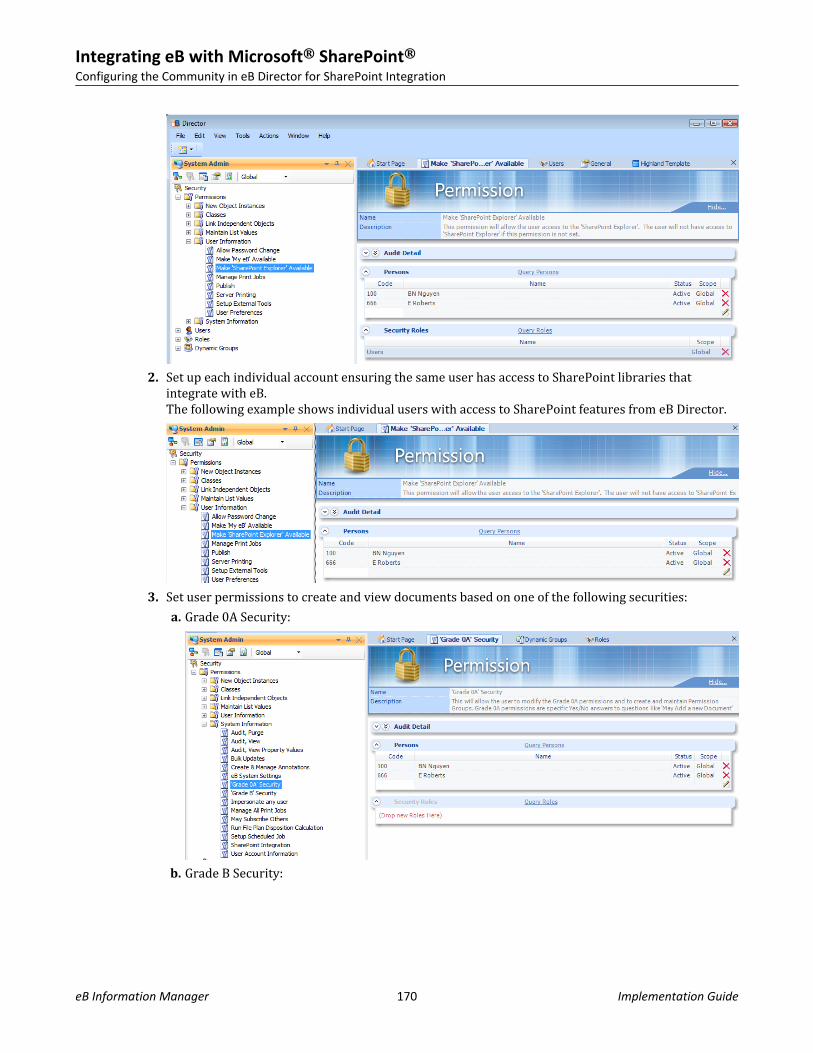
2. Set up each individual account ensuring the same user has access to SharePoint libraries thatintegrate with eB.The following example shows individual users with access to SharePoint features from eB Director.
3. Set user permissions to create and view documents based on one of the following securities:a. Grade 0A Security:
b. Grade B Security:
Integrating eB with Microsoft® SharePoint®Configuring the Community in eB Director for SharePoint Integration
eB Information Manager 170 Implementation Guide
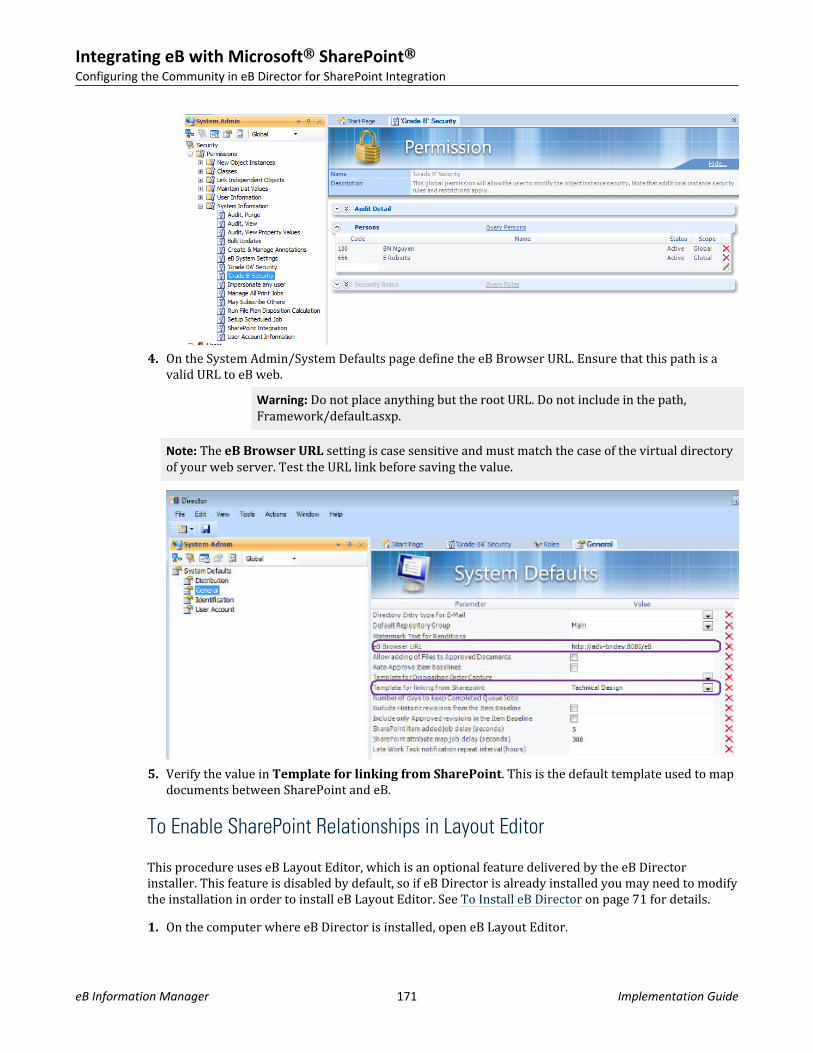
4. On the System Admin/System Defaults page define the eB Browser URL. Ensure that this path is avalid URL to eB web.
Warning: Do not place anything but the root URL. Do not include in the path,Framework/default.asxp.
Note: The eB Browser URL setting is case sensitive and must match the case of the virtual directoryof your web server. Test the URL link before saving the value.
5. Verify the value in Template for linking from SharePoint. This is the default template used to mapdocuments between SharePoint and eB.
To Enable SharePoint Relationships in Layout Editor
This procedure uses eB Layout Editor, which is an optional feature delivered by the eB Directorinstaller. This feature is disabled by default, so if eB Director is already installed you may need to modifythe installation in order to install eB Layout Editor. See To Install eB Director on page 71 for details.1. On the computer where eB Director is installed, open eB Layout Editor.
Integrating eB with Microsoft® SharePoint®Configuring the Community in eB Director for SharePoint Integration
eB Information Manager 171 Implementation Guide
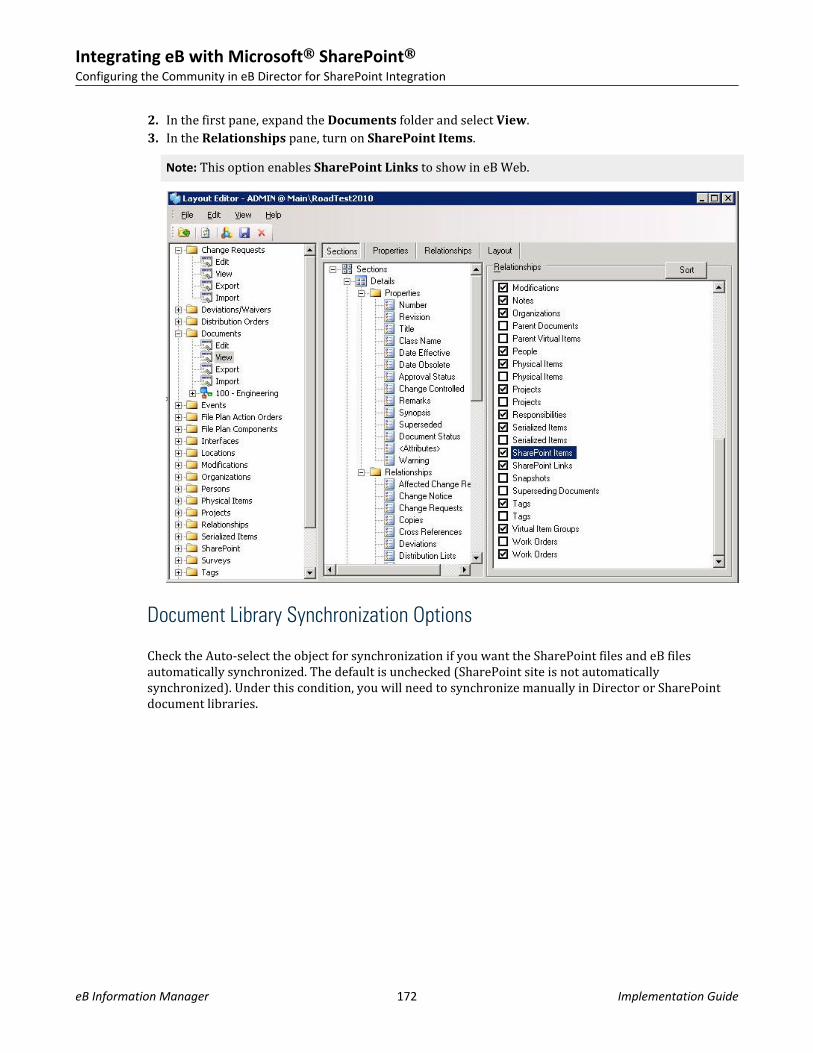
2. In the first pane, expand the Documents folder and select View.3. In the Relationships pane, turn on SharePoint Items.
Note: This option enables SharePoint Links to show in eB Web.
Document Library Synchronization Options
Check the Auto-select the object for synchronization if you want the SharePoint files and eB filesautomatically synchronized. The default is unchecked (SharePoint site is not automaticallysynchronized). Under this condition, you will need to synchronize manually in Director or SharePointdocument libraries.
Integrating eB with Microsoft® SharePoint®Configuring the Community in eB Director for SharePoint Integration
eB Information Manager 172 Implementation Guide
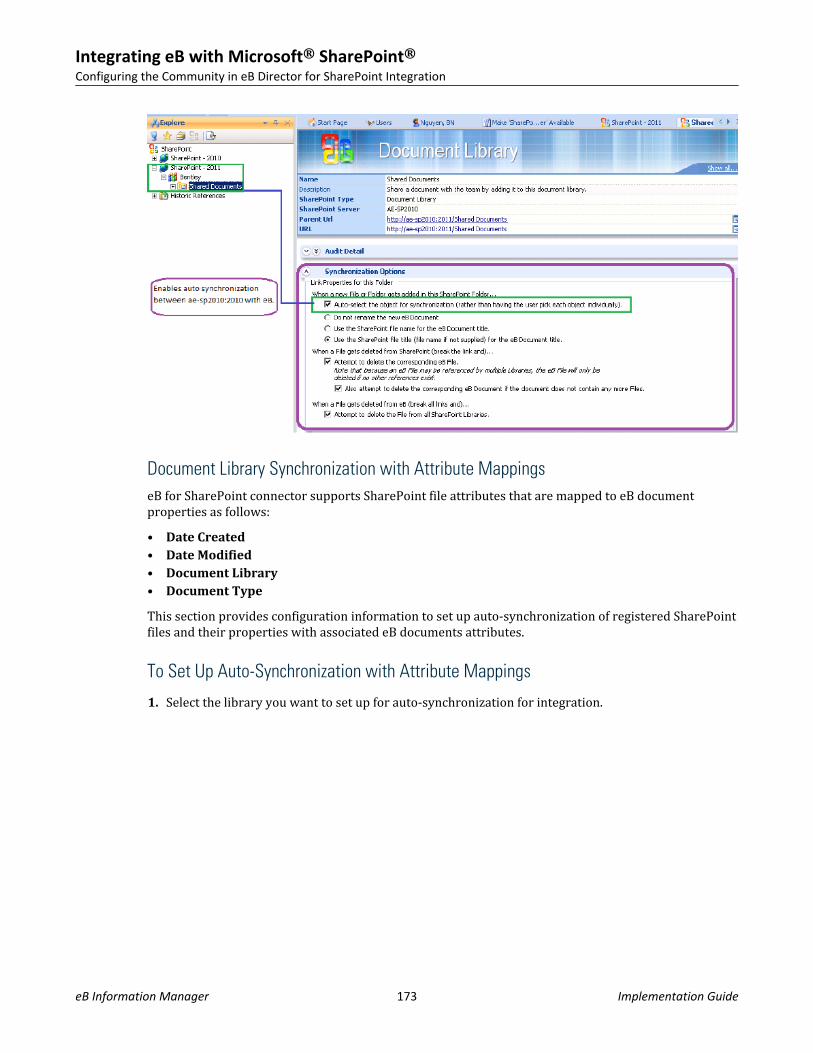
Document Library Synchronization with Attribute MappingseB for SharePoint connector supports SharePoint file attributes that are mapped to eB documentproperties as follows:• Date Created• Date Modified• Document Library• Document Type
This section provides configuration information to set up auto-synchronization of registered SharePointfiles and their properties with associated eB documents attributes.
To Set Up Auto-Synchronization with Attribute Mappings
1. Select the library you want to set up for auto-synchronization for integration.
Integrating eB with Microsoft® SharePoint®Configuring the Community in eB Director for SharePoint Integration
eB Information Manager 173 Implementation Guide
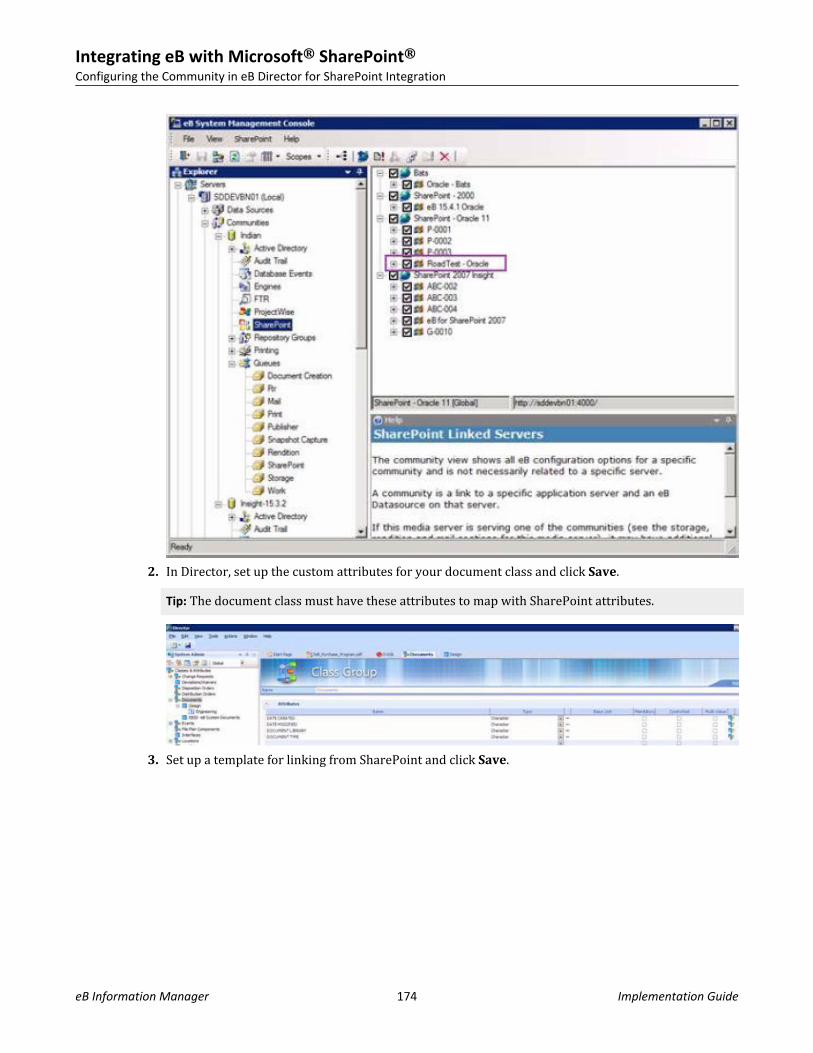
2. In Director, set up the custom attributes for your document class and click Save.Tip: The document class must have these attributes to map with SharePoint attributes.
3. Set up a template for linking from SharePoint and click Save.
Integrating eB with Microsoft® SharePoint®Configuring the Community in eB Director for SharePoint Integration
eB Information Manager 174 Implementation Guide
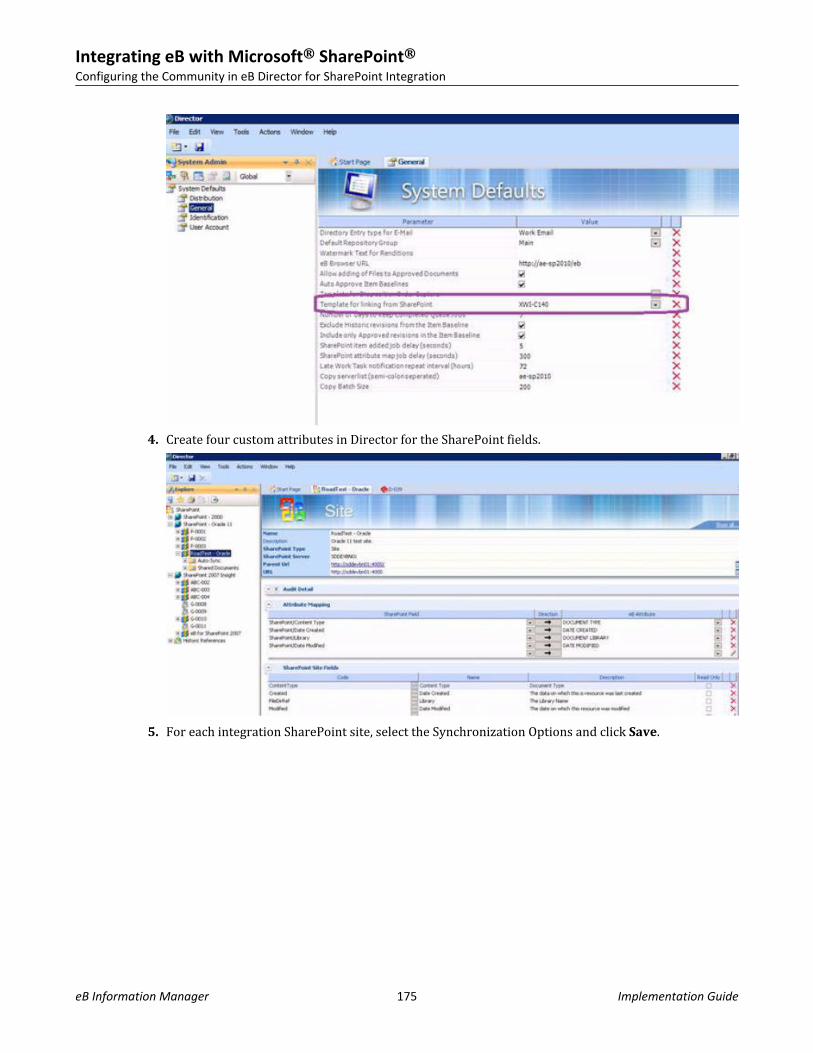
4. Create four custom attributes in Director for the SharePoint fields.
5. For each integration SharePoint site, select the Synchronization Options and click Save.
Integrating eB with Microsoft® SharePoint®Configuring the Community in eB Director for SharePoint Integration
eB Information Manager 175 Implementation Guide
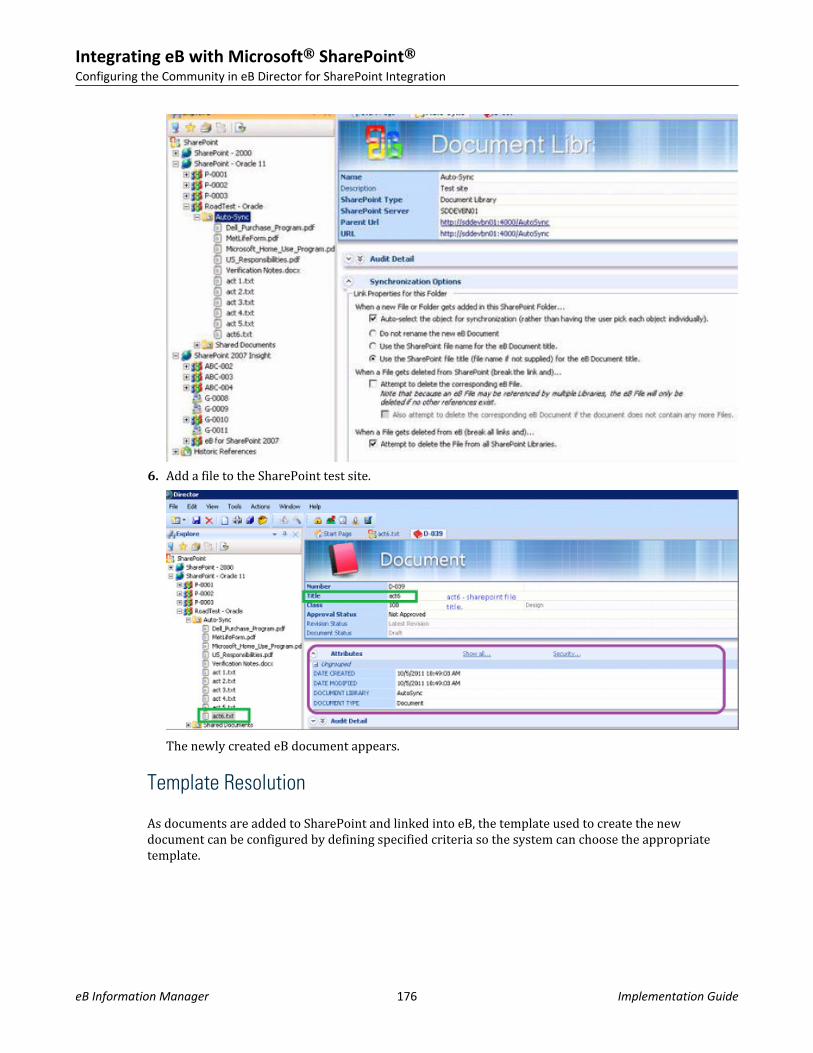
6. Add a file to the SharePoint test site.
The newly created eB document appears.
Template Resolution
As documents are added to SharePoint and linked into eB, the template used to create the newdocument can be configured by defining specified criteria so the system can choose the appropriatetemplate.
Integrating eB with Microsoft® SharePoint®Configuring the Community in eB Director for SharePoint Integration
eB Information Manager 176 Implementation Guide

Enabling eB SharePoint References on the eB Web ServerOn the computer where eB Web Applications is installed, make sure that the eB Sharepoint Referencesplug-in is enabled in the virtual directory for your existing eB Web website.1. Open eB Web Application Manager (Start > All Programs > Bentley > eB > eB Web Manager).2. Select your virtual directory from the list and select Edit > Properties.
The Edit Web dialog opens, with the eB Server tab selected by default.3. On the Functionality tab, turn on eB Sharepoint References.4. Click the Ready to install (click here to start) link at the bottom of the dialog.
eB Information Management SystemThe Information Management System feature is implemented and installed at the Site Collection level.eB Information Management System functionality provides the ability to register SharePoint files witheB and manage document properties once identified in eB.
Integrating eB with Microsoft® SharePoint®Enabling eB SharePoint References on the eB Web Server
eB Information Manager 177 Implementation Guide
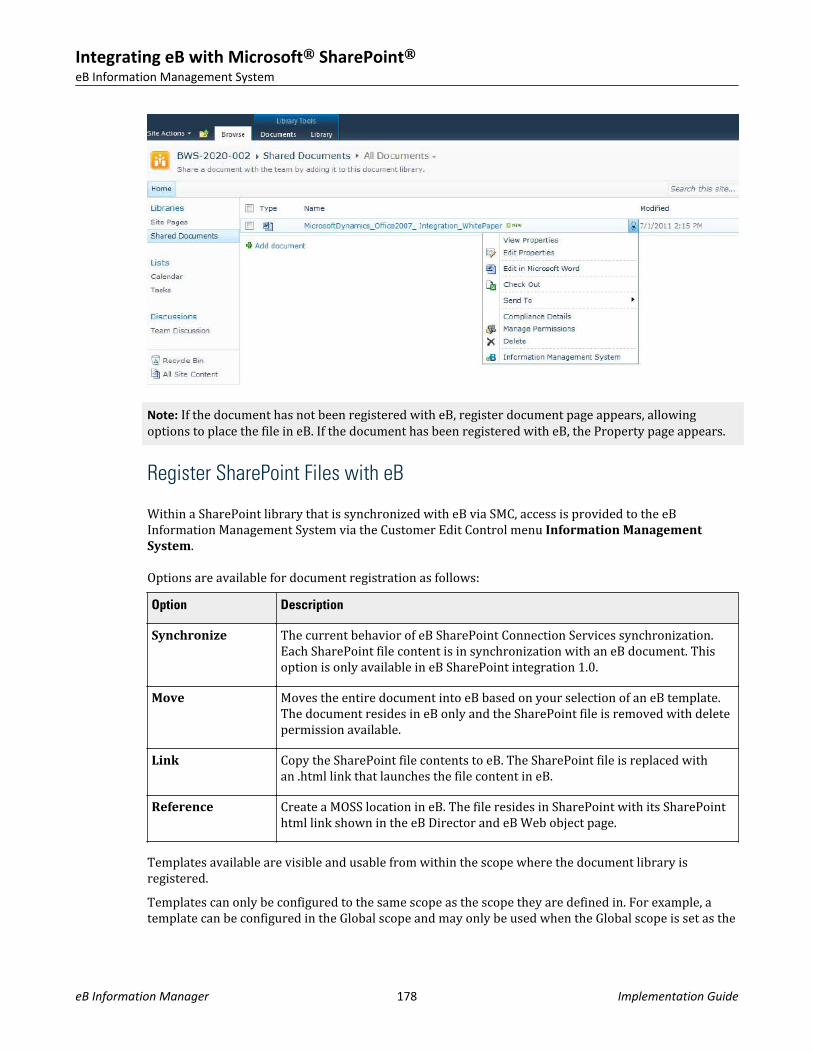
Note: If the document has not been registered with eB, register document page appears, allowingoptions to place the file in eB. If the document has been registered with eB, the Property page appears.
Register SharePoint Files with eB
Within a SharePoint library that is synchronized with eB via SMC, access is provided to the eBInformation Management System via the Customer Edit Control menu Information ManagementSystem.
Options are available for document registration as follows:Option Description
Synchronize The current behavior of eB SharePoint Connection Services synchronization.Each SharePoint file content is in synchronization with an eB document. Thisoption is only available in eB SharePoint integration 1.0.
Move Moves the entire document into eB based on your selection of an eB template.The document resides in eB only and the SharePoint file is removed with deletepermission available.
Link Copy the SharePoint file contents to eB. The SharePoint file is replaced withan .html link that launches the file content in eB.
Reference Create a MOSS location in eB. The file resides in SharePoint with its SharePointhtml link shown in the eB Director and eB Web object page.
Templates available are visible and usable from within the scope where the document library isregistered.Templates can only be configured to the same scope as the scope they are defined in. For example, atemplate can be configured in the Global scope and may only be used when the Global scope is set as the
Integrating eB with Microsoft® SharePoint®eB Information Management System
eB Information Manager 178 Implementation Guide
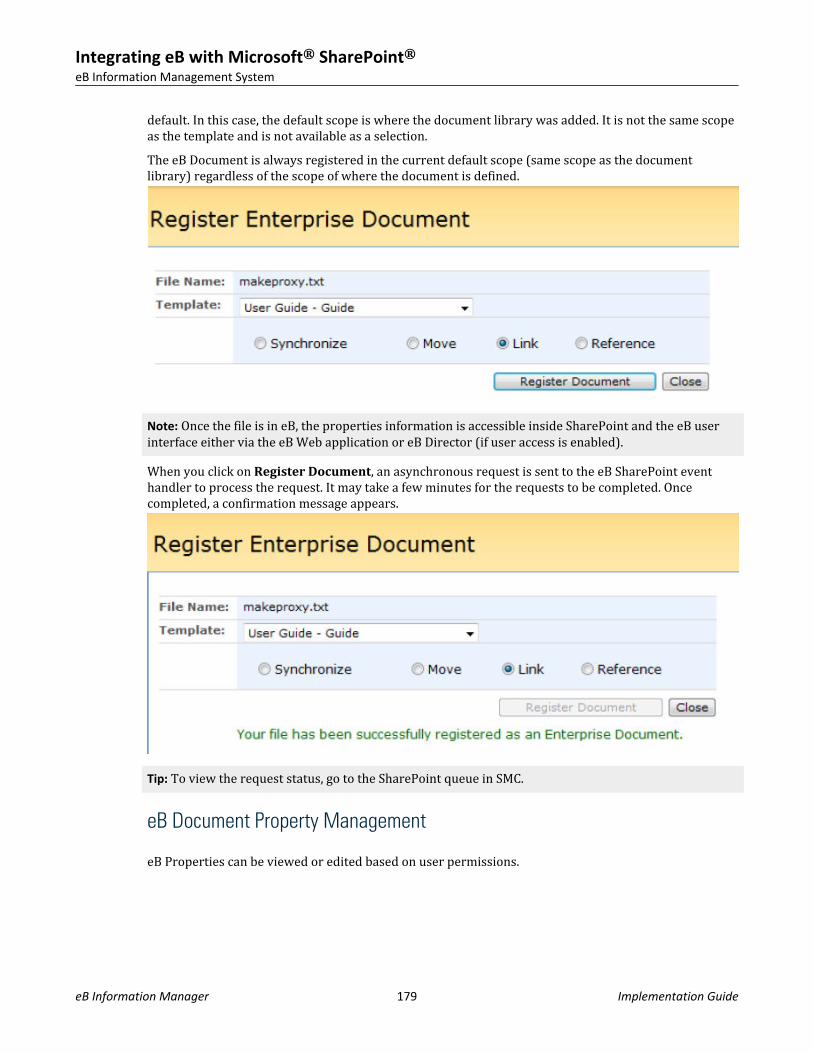
default. In this case, the default scope is where the document library was added. It is not the same scopeas the template and is not available as a selection.The eB Document is always registered in the current default scope (same scope as the documentlibrary) regardless of the scope of where the document is defined.
Note: Once the file is in eB, the properties information is accessible inside SharePoint and the eB userinterface either via the eB Web application or eB Director (if user access is enabled).When you click on Register Document, an asynchronous request is sent to the eB SharePoint eventhandler to process the request. It may take a few minutes for the requests to be completed. Oncecompleted, a confirmation message appears.
Tip: To view the request status, go to the SharePoint queue in SMC.
eB Document Property Management
eB Properties can be viewed or edited based on user permissions.
Integrating eB with Microsoft® SharePoint®eB Information Management System
eB Information Manager 179 Implementation Guide

View eB PropertiesWhen eB finds the SharePoint file GUI in eB, it returns the object information from eB in the ViewEnterprise Document Properties page.
Integrating eB with Microsoft® SharePoint®eB Information Management System
eB Information Manager 180 Implementation Guide
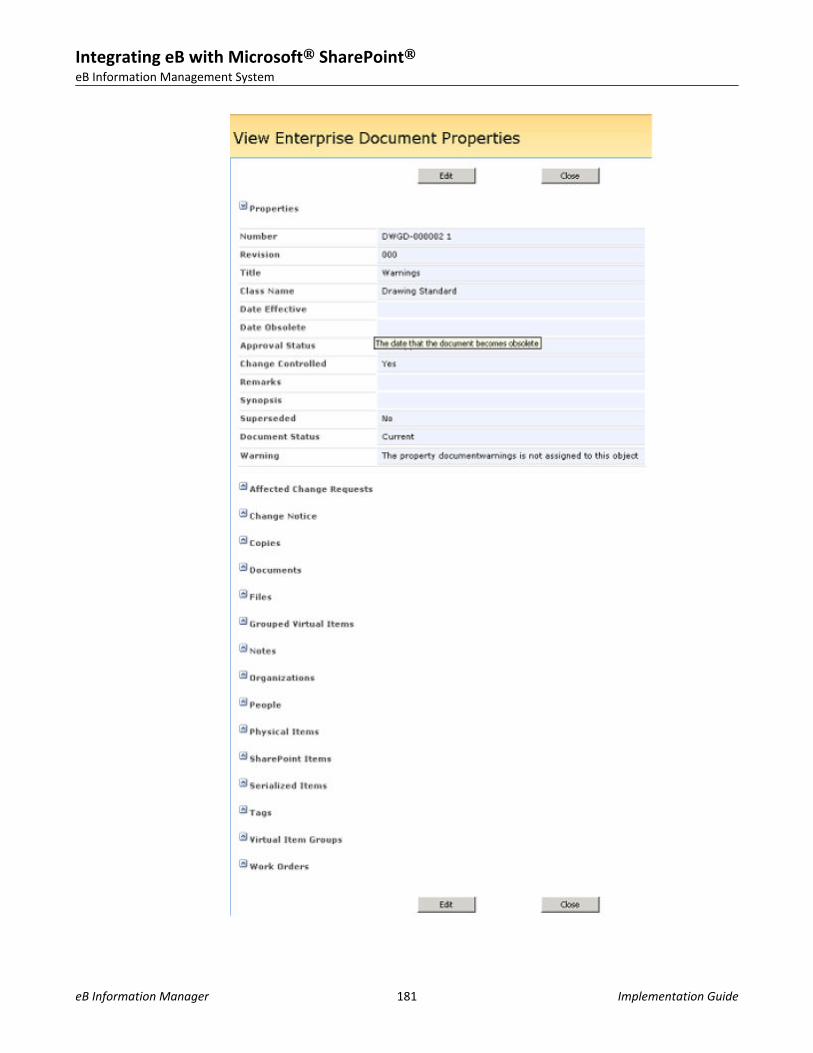
Integrating eB with Microsoft® SharePoint®eB Information Management System
eB Information Manager 181 Implementation Guide
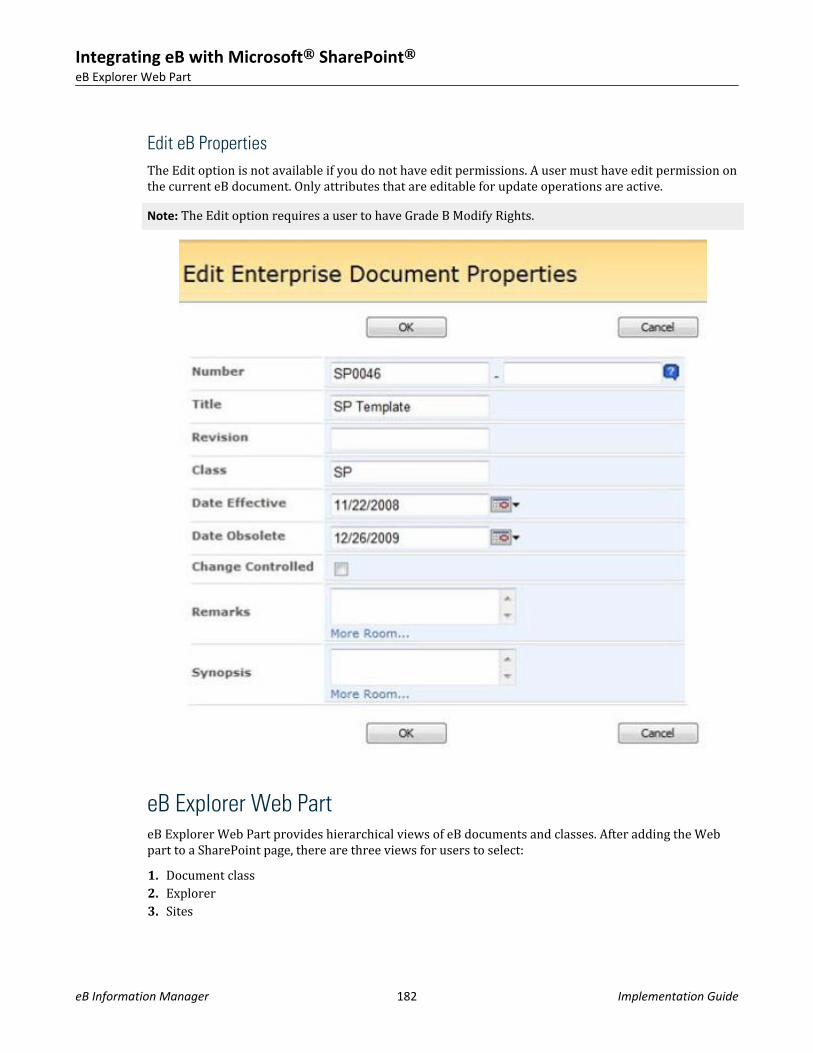
Edit eB PropertiesThe Edit option is not available if you do not have edit permissions. A user must have edit permission onthe current eB document. Only attributes that are editable for update operations are active.Note: The Edit option requires a user to have Grade B Modify Rights.
eB Explorer Web ParteB Explorer Web Part provides hierarchical views of eB documents and classes. After adding the Webpart to a SharePoint page, there are three views for users to select:1. Document class2. Explorer3. Sites
Integrating eB with Microsoft® SharePoint®eB Explorer Web Part
eB Information Manager 182 Implementation Guide
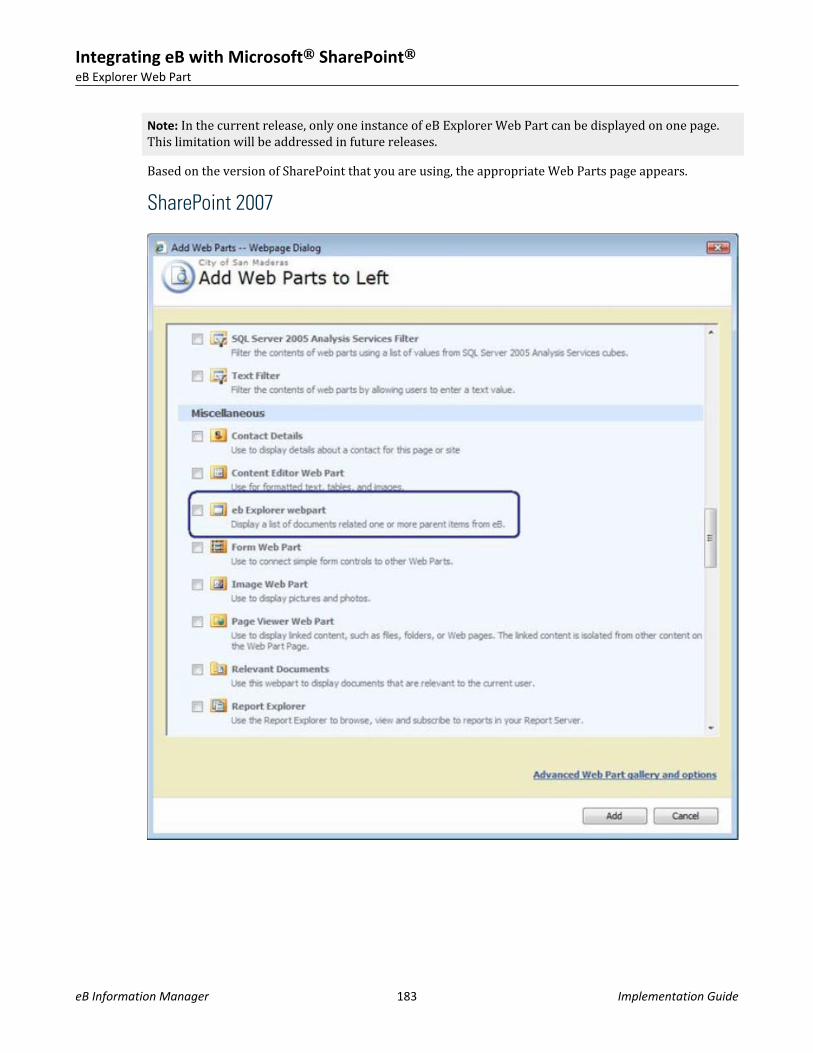
Note: In the current release, only one instance of eB Explorer Web Part can be displayed on one page.This limitation will be addressed in future releases.Based on the version of SharePoint that you are using, the appropriate Web Parts page appears.
SharePoint 2007
Integrating eB with Microsoft® SharePoint®eB Explorer Web Part
eB Information Manager 183 Implementation Guide

SharePoint 2010
User Interface View
Once you have added the eB Tree Explorer Web Part, the default view appears. This is the sameExplorer view as seen in eB Web.
Integrating eB with Microsoft® SharePoint®eB Explorer Web Part
eB Information Manager 184 Implementation Guide
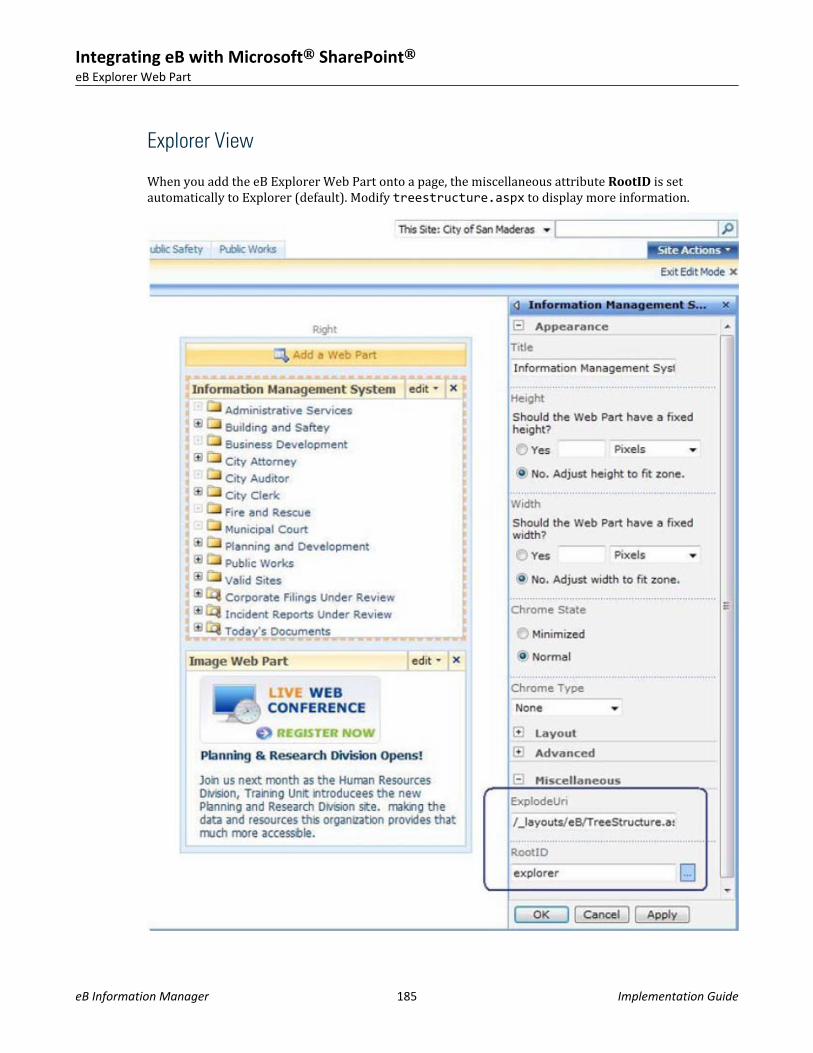
Explorer View
When you add the eB Explorer Web Part onto a page, the miscellaneous attribute RootID is setautomatically to Explorer (default). Modify treestructure.aspx to display more information.
Integrating eB with Microsoft® SharePoint®eB Explorer Web Part
eB Information Manager 185 Implementation Guide
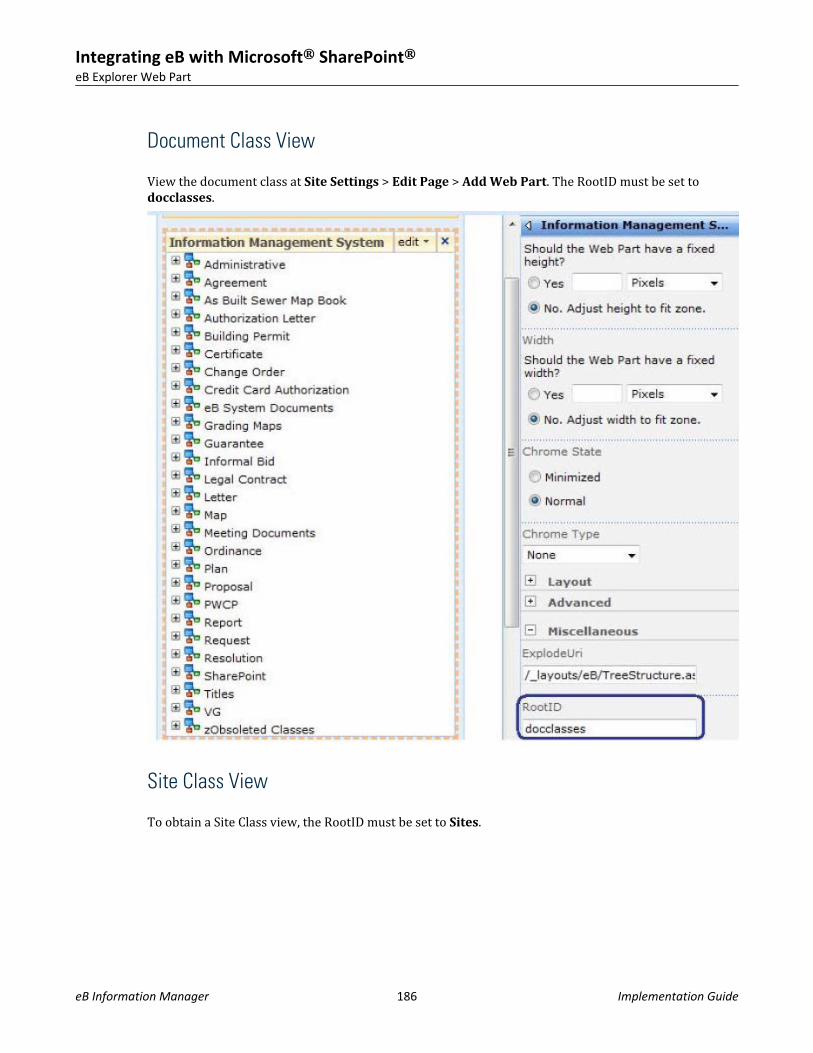
Document Class View
View the document class at Site Settings > Edit Page > Add Web Part. The RootID must be set todocclasses.
Site Class View
To obtain a Site Class view, the RootID must be set to Sites.
Integrating eB with Microsoft® SharePoint®eB Explorer Web Part
eB Information Manager 186 Implementation Guide
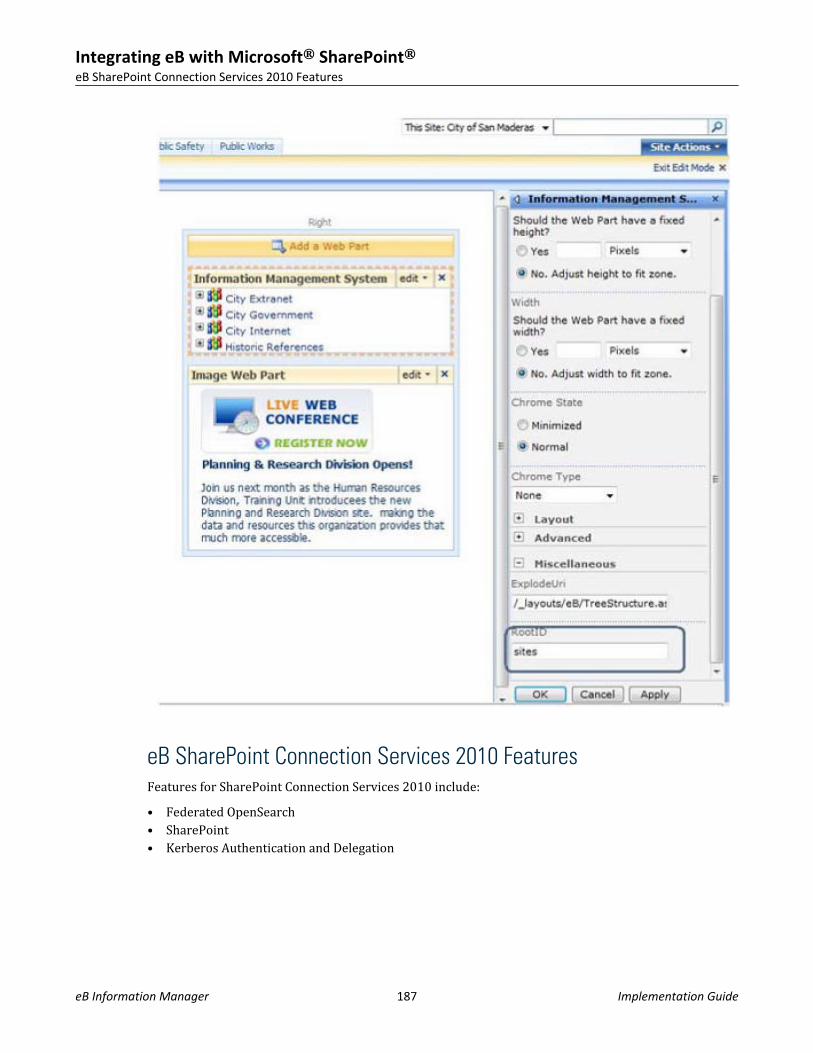
eB SharePoint Connection Services 2010 FeaturesFeatures for SharePoint Connection Services 2010 include:• Federated OpenSearch• SharePoint• Kerberos Authentication and Delegation
Integrating eB with Microsoft® SharePoint®eB SharePoint Connection Services 2010 Features
eB Information Manager 187 Implementation Guide
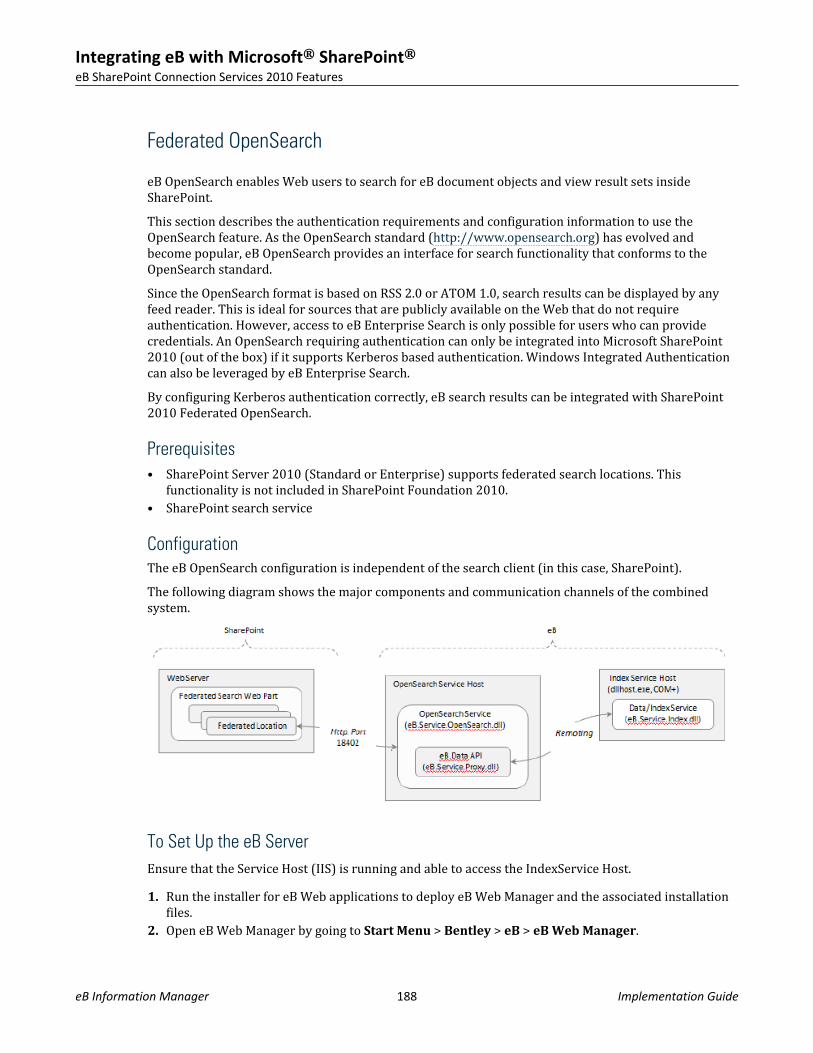
Federated OpenSearch
eB OpenSearch enables Web users to search for eB document objects and view result sets insideSharePoint.This section describes the authentication requirements and configuration information to use theOpenSearch feature. As the OpenSearch standard (http://www.opensearch.org) has evolved andbecome popular, eB OpenSearch provides an interface for search functionality that conforms to theOpenSearch standard.Since the OpenSearch format is based on RSS 2.0 or ATOM 1.0, search results can be displayed by anyfeed reader. This is ideal for sources that are publicly available on the Web that do not requireauthentication. However, access to eB Enterprise Search is only possible for users who can providecredentials. An OpenSearch requiring authentication can only be integrated into Microsoft SharePoint2010 (out of the box) if it supports Kerberos based authentication. Windows Integrated Authenticationcan also be leveraged by eB Enterprise Search.By configuring Kerberos authentication correctly, eB search results can be integrated with SharePoint2010 Federated OpenSearch.
Prerequisites• SharePoint Server 2010 (Standard or Enterprise) supports federated search locations. This
functionality is not included in SharePoint Foundation 2010.• SharePoint search service
ConfigurationThe eB OpenSearch configuration is independent of the search client (in this case, SharePoint).The following diagram shows the major components and communication channels of the combinedsystem.
To Set Up the eB ServerEnsure that the Service Host (IIS) is running and able to access the IndexService Host.1. Run the installer for eB Web applications to deploy eB Web Manager and the associated installation
files.2. Open eB Web Manager by going to Start Menu > Bentley > eB > eB Web Manager.
Integrating eB with Microsoft® SharePoint®eB SharePoint Connection Services 2010 Features
eB Information Manager 188 Implementation Guide

This deployment application creates a virtual directory in the above path.3. Create a new service endpoint by selecting File > New Service Endpoint.
The Edit Service Endpoint page appears.4. In the Endpoint editor type in a unique name for the new virtual directory and ensure the
authentication is set to eB.
Integrating eB with Microsoft® SharePoint®eB SharePoint Connection Services 2010 Features
eB Information Manager 189 Implementation Guide

Tip: If you need to run the endpoint in a particular IIS application pool, you can specify it here.
Note: The warning at the bottom of the page tells you there is missing information even if all thefields are filled in.
5. Select the Functionality tab.6. Select eB OpenSearch EndPoint.
Note: The warning at the bottom of the page changes to a green button with a new link Ready toinstall (click here to start) .
7. Click Ready to Install to deploy the virtual directory.
Integrating eB with Microsoft® SharePoint®eB SharePoint Connection Services 2010 Features
eB Information Manager 190 Implementation Guide
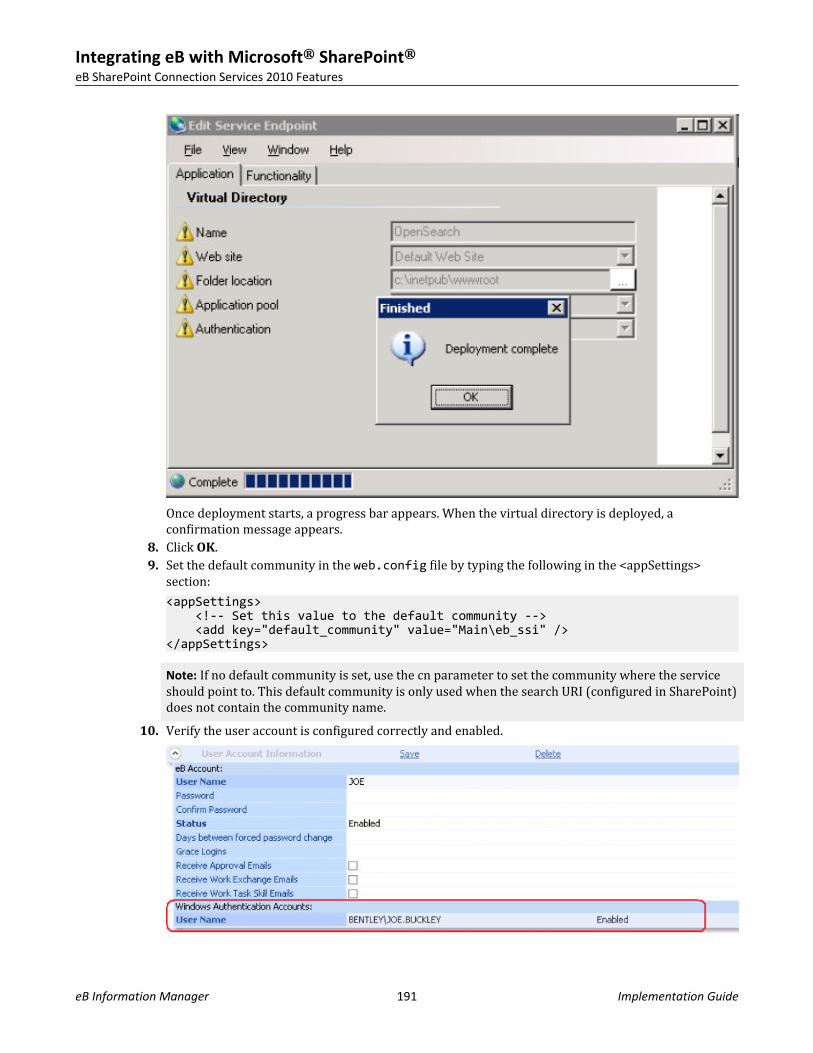
Once deployment starts, a progress bar appears. When the virtual directory is deployed, aconfirmation message appears.
8. Click OK.9. Set the default community in the web.config file by typing the following in the <appSettings>
section:<appSettings> <!-- Set this value to the default community --> <add key="default_community" value="Main\eb_ssi" /></appSettings>
Note: If no default community is set, use the cn parameter to set the community where the serviceshould point to. This default community is only used when the search URI (configured in SharePoint)does not contain the community name.
10. Verify the user account is configured correctly and enabled.
Integrating eB with Microsoft® SharePoint®eB SharePoint Connection Services 2010 Features
eB Information Manager 191 Implementation Guide
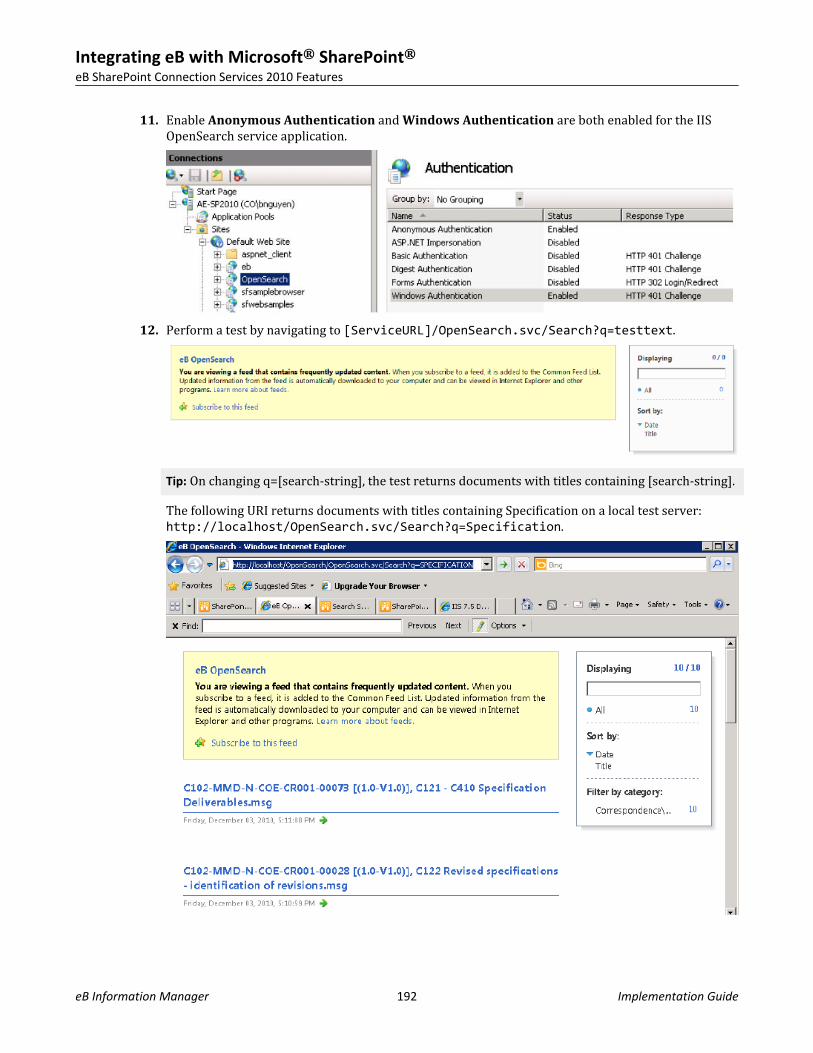
11. Enable Anonymous Authentication and Windows Authentication are both enabled for the IISOpenSearch service application.
12. Perform a test by navigating to [ServiceURL]/OpenSearch.svc/Search?q=testtext.
Tip: On changing q=[search-string], the test returns documents with titles containing [search-string].The following URI returns documents with titles containing Specification on a local test server:http://localhost/OpenSearch.svc/Search?q=Specification.
Integrating eB with Microsoft® SharePoint®eB SharePoint Connection Services 2010 Features
eB Information Manager 192 Implementation Guide
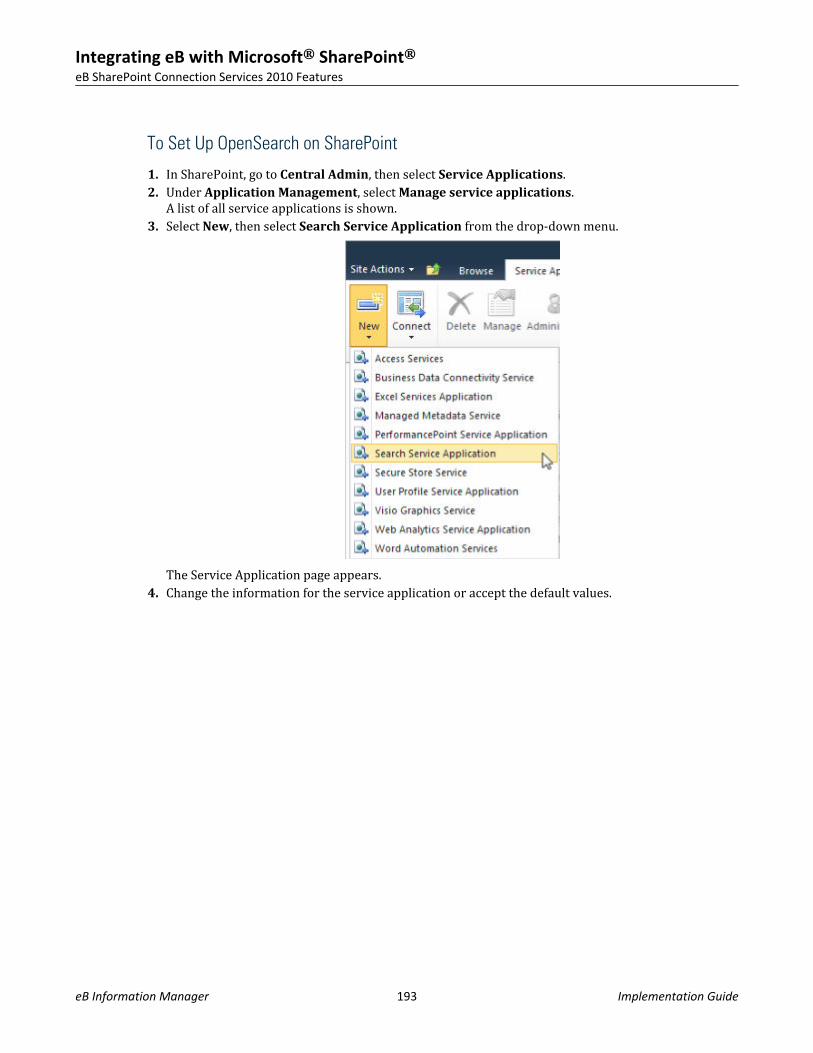
To Set Up OpenSearch on SharePoint
1. In SharePoint, go to Central Admin, then select Service Applications.2. Under Application Management, select Manage service applications.
A list of all service applications is shown.3. Select New, then select Search Service Application from the drop-down menu.
The Service Application page appears.4. Change the information for the service application or accept the default values.
Integrating eB with Microsoft® SharePoint®eB SharePoint Connection Services 2010 Features
eB Information Manager 193 Implementation Guide
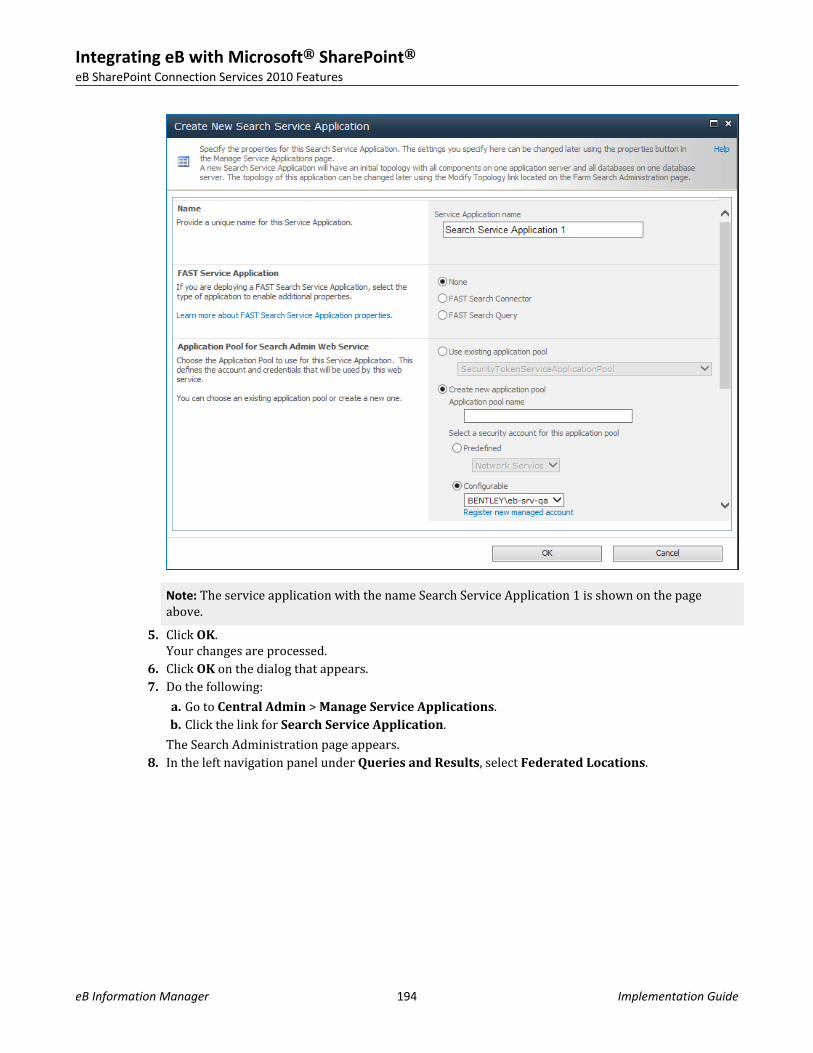
Note: The service application with the name Search Service Application 1 is shown on the pageabove.
5. Click OK.Your changes are processed.
6. Click OK on the dialog that appears.7. Do the following:
a. Go to Central Admin > Manage Service Applications.b. Click the link for Search Service Application.
The Search Administration page appears.8. In the left navigation panel under Queries and Results, select Federated Locations.
Integrating eB with Microsoft® SharePoint®eB SharePoint Connection Services 2010 Features
eB Information Manager 194 Implementation Guide
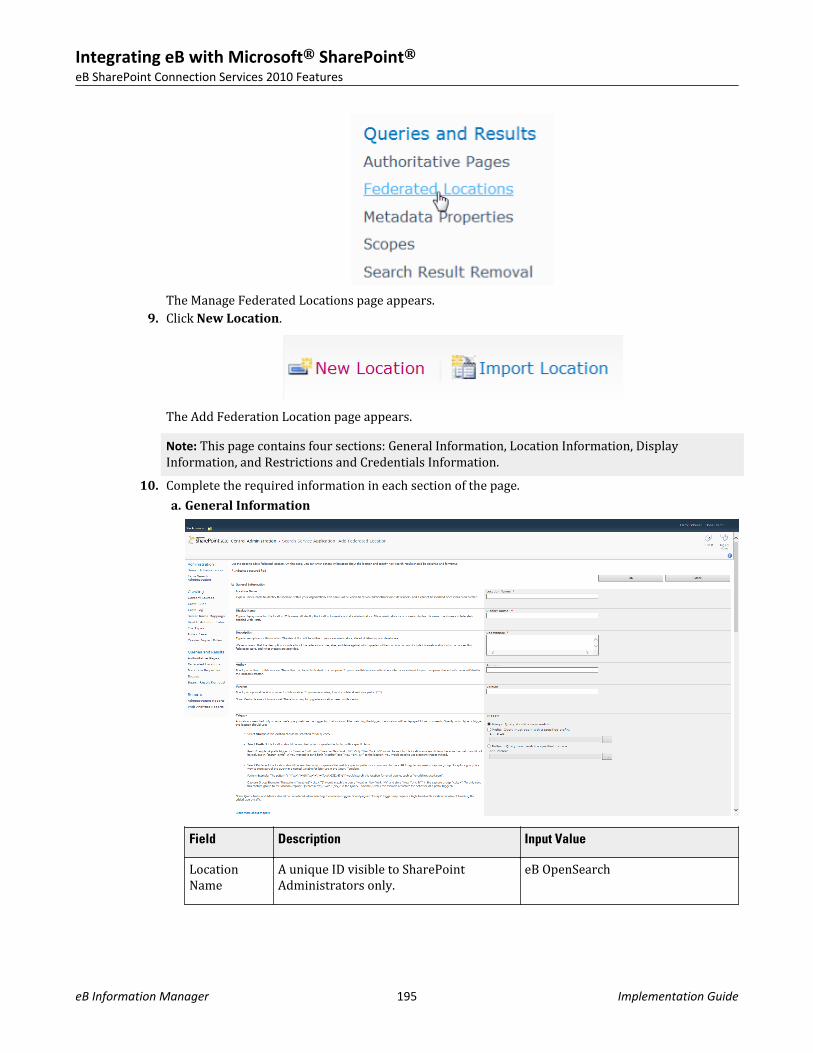
The Manage Federated Locations page appears.9. Click New Location.
The Add Federation Location page appears.Note: This page contains four sections: General Information, Location Information, DisplayInformation, and Restrictions and Credentials Information.
10. Complete the required information in each section of the page.a. General Information
Field Description Input Value
LocationName
A unique ID visible to SharePointAdministrators only.
eB OpenSearch
Integrating eB with Microsoft® SharePoint®eB SharePoint Connection Services 2010 Features
eB Information Manager 195 Implementation Guide

Field Description Input Value
Display Name A name that is visible to a user that adds aFederated Results Web Part to a page.
eB OpenSearch
Description Description shown when an option fromthe Web part is selected.
Search objects within eB
Author Author for this location. Bentley.com, eB InsightDevelopment Team
Version Version number for this location. 1.0Trigger Specifies if Web part will fire on certain
queries.Always (Query should match)
b. Location Information
Configure the location information by location type and query template.
Field Description Input Value
LocationType
The search protocol. Required. Select the OpenSearch 1.0/1.1 radiobutton.
Integrating eB with Microsoft® SharePoint®eB SharePoint Connection Services 2010 Features
eB Information Manager 196 Implementation Guide
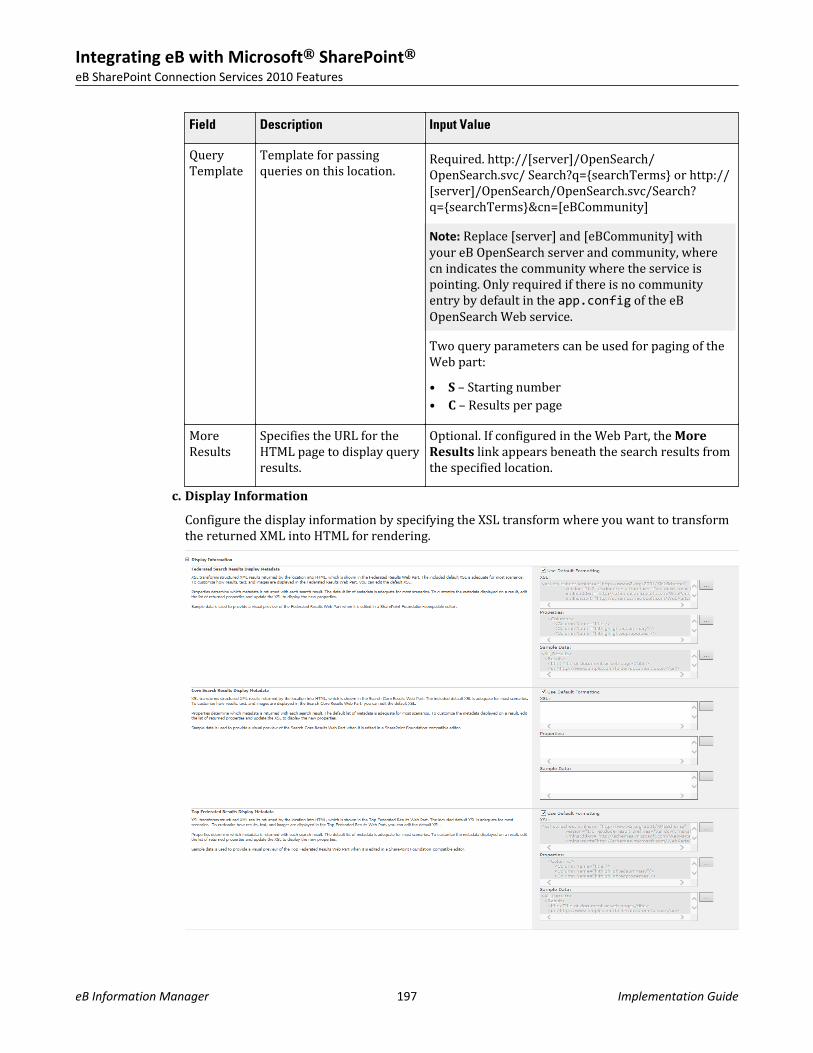
Field Description Input Value
QueryTemplate
Template for passingqueries on this location. Required. http://[server]/OpenSearch/
OpenSearch.svc/ Search?q={searchTerms} or http://[server]/OpenSearch/OpenSearch.svc/Search?q={searchTerms}&cn=[eBCommunity]Note: Replace [server] and [eBCommunity] withyour eB OpenSearch server and community, wherecn indicates the community where the service ispointing. Only required if there is no communityentry by default in the app.config of the eBOpenSearch Web service.Two query parameters can be used for paging of theWeb part:• S – Starting number• C – Results per page
MoreResults
Specifies the URL for theHTML page to display queryresults.
Optional. If configured in the Web Part, the MoreResults link appears beneath the search results fromthe specified location.
c. Display Information
Configure the display information by specifying the XSL transform where you want to transformthe returned XML into HTML for rendering.
Integrating eB with Microsoft® SharePoint®eB SharePoint Connection Services 2010 Features
eB Information Manager 197 Implementation Guide
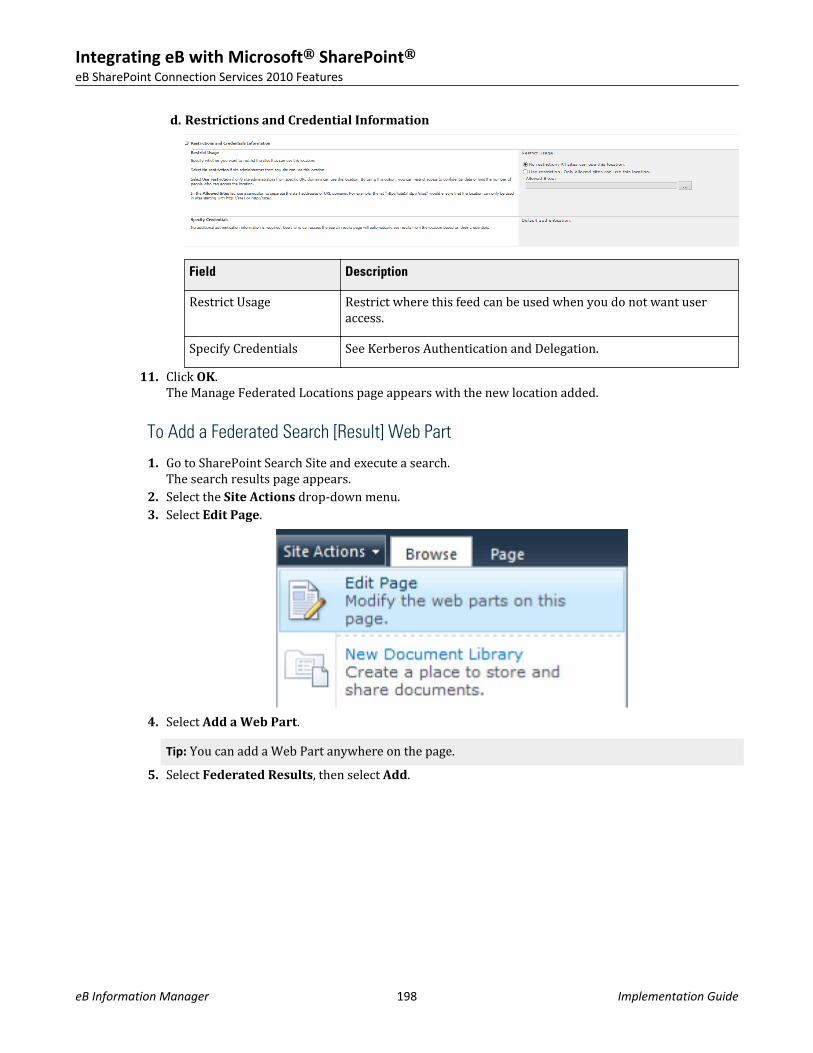
d. Restrictions and Credential Information
Field Description
Restrict Usage Restrict where this feed can be used when you do not want useraccess.
Specify Credentials See Kerberos Authentication and Delegation.11. Click OK.
The Manage Federated Locations page appears with the new location added.
To Add a Federated Search [Result] Web Part
1. Go to SharePoint Search Site and execute a search.The search results page appears.
2. Select the Site Actions drop-down menu.3. Select Edit Page.
4. Select Add a Web Part.Tip: You can add a Web Part anywhere on the page.
5. Select Federated Results, then select Add.
Integrating eB with Microsoft® SharePoint®eB SharePoint Connection Services 2010 Features
eB Information Manager 198 Implementation Guide
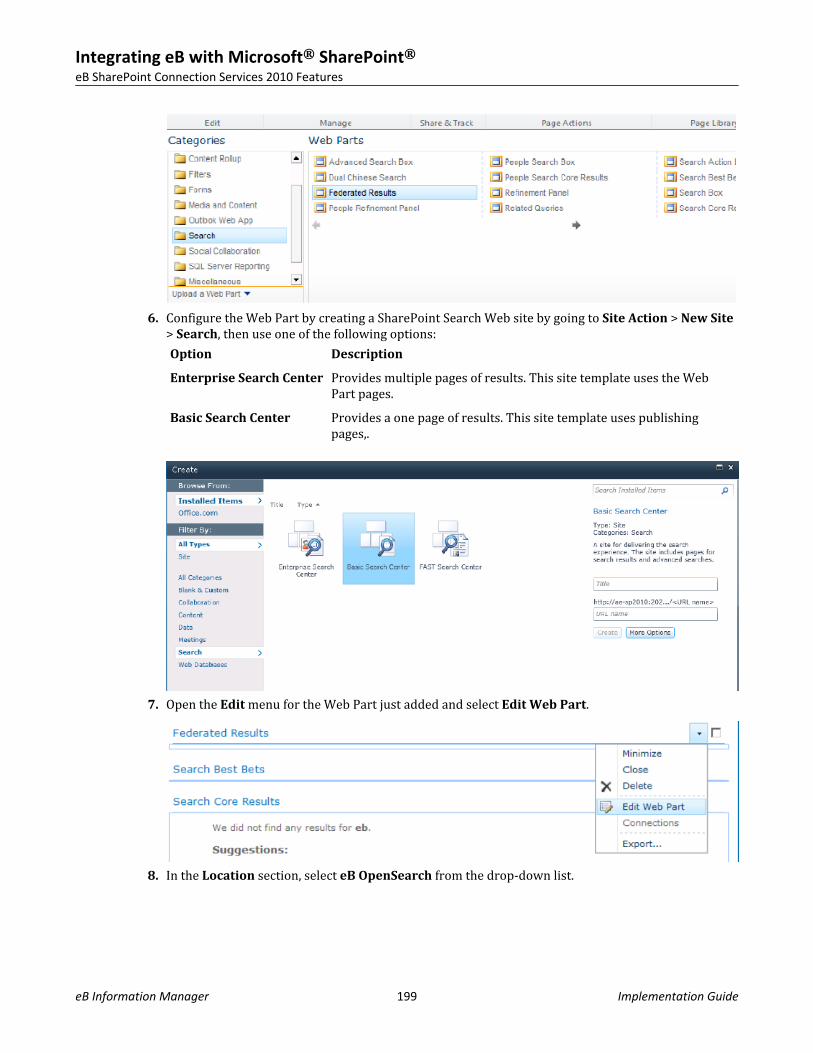
6. Configure the Web Part by creating a SharePoint Search Web site by going to Site Action > New Site> Search, then use one of the following options:Option Description
Enterprise Search Center Provides multiple pages of results. This site template uses the WebPart pages.
Basic Search Center Provides a one page of results. This site template uses publishingpages,.
7. Open the Edit menu for the Web Part just added and select Edit Web Part.
8. In the Location section, select eB OpenSearch from the drop-down list.
Integrating eB with Microsoft® SharePoint®eB SharePoint Connection Services 2010 Features
eB Information Manager 199 Implementation Guide
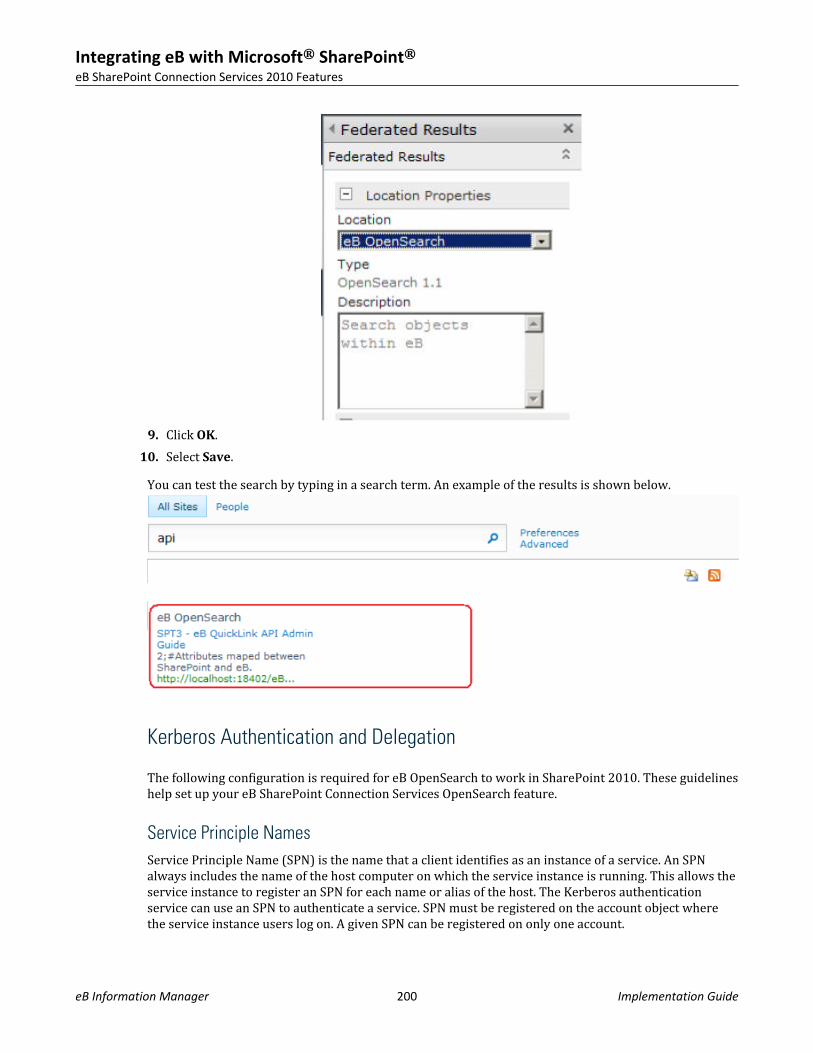
9. Click OK.10. Select Save.
You can test the search by typing in a search term. An example of the results is shown below.
Kerberos Authentication and Delegation
The following configuration is required for eB OpenSearch to work in SharePoint 2010. These guidelineshelp set up your eB SharePoint Connection Services OpenSearch feature.
Service Principle NamesService Principle Name (SPN) is the name that a client identifies as an instance of a service. An SPNalways includes the name of the host computer on which the service instance is running. This allows theservice instance to register an SPN for each name or alias of the host. The Kerberos authenticationservice can use an SPN to authenticate a service. SPN must be registered on the account object wherethe service instance users log on. A given SPN can be registered on only one account.
Integrating eB with Microsoft® SharePoint®eB SharePoint Connection Services 2010 Features
eB Information Manager 200 Implementation Guide
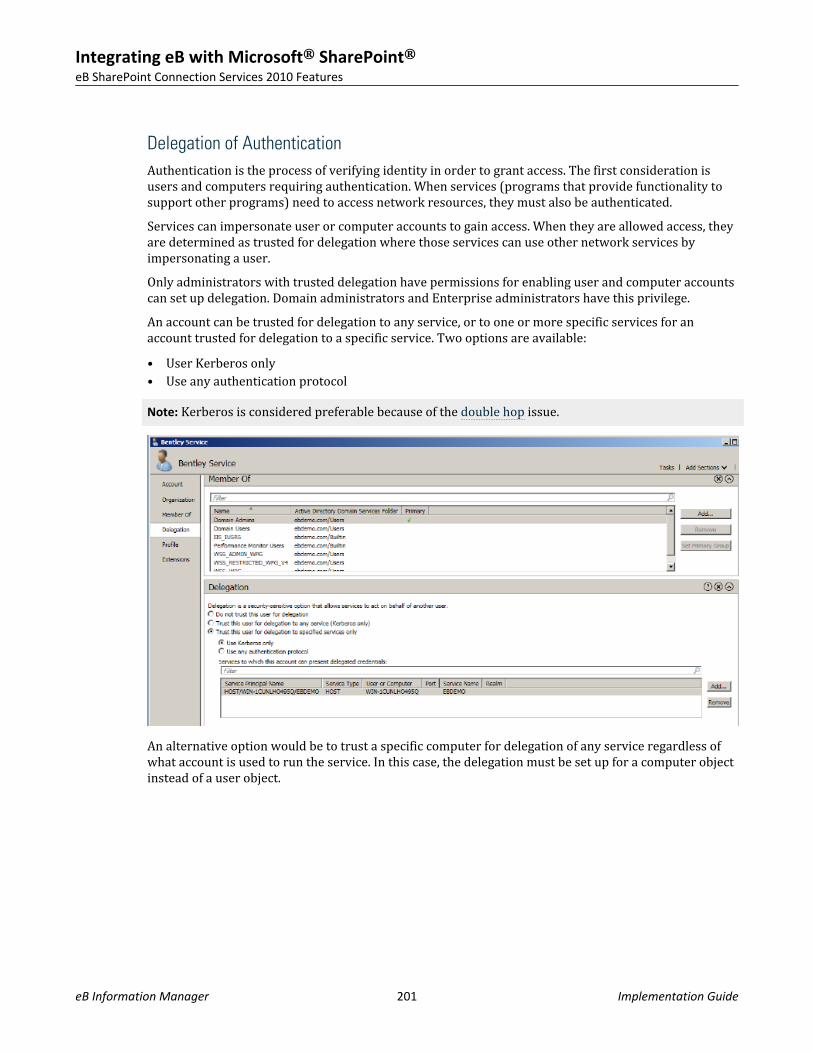
Delegation of AuthenticationAuthentication is the process of verifying identity in order to grant access. The first consideration isusers and computers requiring authentication. When services (programs that provide functionality tosupport other programs) need to access network resources, they must also be authenticated.Services can impersonate user or computer accounts to gain access. When they are allowed access, theyare determined as trusted for delegation where those services can use other network services byimpersonating a user.Only administrators with trusted delegation have permissions for enabling user and computer accountscan set up delegation. Domain administrators and Enterprise administrators have this privilege.An account can be trusted for delegation to any service, or to one or more specific services for anaccount trusted for delegation to a specific service. Two options are available:• User Kerberos only• Use any authentication protocolNote: Kerberos is considered preferable because of the double hop issue.
An alternative option would be to trust a specific computer for delegation of any service regardless ofwhat account is used to run the service. In this case, the delegation must be set up for a computer objectinstead of a user object.
Integrating eB with Microsoft® SharePoint®eB SharePoint Connection Services 2010 Features
eB Information Manager 201 Implementation Guide

Two different levels of granularity can be set up for delegation as:• an account for any service run on any computer• an account for specific service(s) by SPNs• a computer for any service run by any account• a computer for specific service(s) by SPNsNote: The local system and network service accounts can delegate any service by default.
Kerberos Double HopKerberos double hop is a term used to describe a method of maintaining the client's Kerberosauthentication credentials over two or more connections. In this way, a server can retain a user'scredentials and act on behalf of the user in further connections to other servers.The Kerberos Ticket Granting Ticket (TGT) is the user's identity. When this ticket is passed along withthe service ticket, a second service can reuse the Kerberos TGT to request other service tickets to makeuse of other service resources on the network.There are restrictions on Kerberos double hop. The service account needs to be trusted for delegation.Source and target servers must be in the same forest or there must be a forest level trust betweenforests, and the fist level service account must be in the trusted forest root.
How it Works in OpenSearchThe following diagram shows a Kerberos double hop scenario.
Integrating eB with Microsoft® SharePoint®eB SharePoint Connection Services 2010 Features
eB Information Manager 202 Implementation Guide
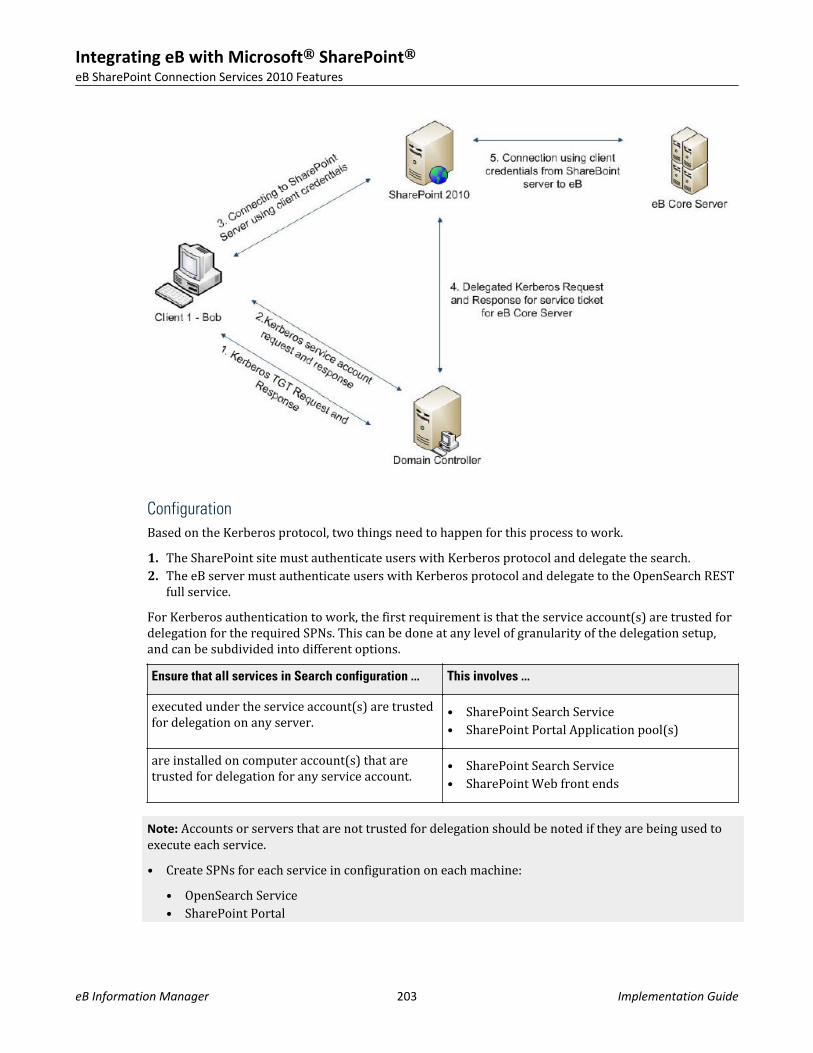
ConfigurationBased on the Kerberos protocol, two things need to happen for this process to work.1. The SharePoint site must authenticate users with Kerberos protocol and delegate the search.2. The eB server must authenticate users with Kerberos protocol and delegate to the OpenSearch REST
full service.For Kerberos authentication to work, the first requirement is that the service account(s) are trusted fordelegation for the required SPNs. This can be done at any level of granularity of the delegation setup,and can be subdivided into different options.Ensure that all services in Search configuration ... This involves ...
executed under the service account(s) are trustedfor delegation on any server. • SharePoint Search Service
• SharePoint Portal Application pool(s)are installed on computer account(s) that aretrusted for delegation for any service account. • SharePoint Search Service
• SharePoint Web front ends
Note: Accounts or servers that are not trusted for delegation should be noted if they are being used toexecute each service.• Create SPNs for each service in configuration on each machine:
• OpenSearch Service• SharePoint Portal
Integrating eB with Microsoft® SharePoint®eB SharePoint Connection Services 2010 Features
eB Information Manager 203 Implementation Guide
• SharePoint Search service• Set up delegation for each account for the relevant SPN.
File Copy Service Configuration
SharePoint 2010 allows an eB user to extract files from eB and copy them onto a shared drive, enablingnon-eB users access. These files can also be exported into a single location so they can be copied ontoDVDs, etc.This functionality has not been expanded so files can be exported out of eB and copied into a SharePointsite. It is designed so that SharePoint site can be totally separate from the eB server and even exist in adifferent domain (example, as part of a cloud deployment).There are three options for exporting files to a specified location:1. Get All Files from basket2. Get All Files from distribution order/transmittal3. Issue Electronic Files from distribution order/transmittal
eB App Server PrerequisitesTo make use of the three options above, the following eB Services must be enabled:• Publisher• Work Queue• Snapshot• Document Creation• Mail
SharePoint Server PrerequisitesThe following eB Servers are required installation:• Microsoft SharePoint 2010 (SharePoint 2007 is not supported)• From the eB installation CD, SharePoint 2010 ServerNote: It is required that the Work Queue for eB Services has been started.The identify selected for eB Service Manager Services on the SharePoint Server in the cloud requires thefollowing:• Local Admin Permissions• SharePoint Farm Admin Permissions• Contribute Permissions on the individual sites• SQL Server Database Owner permissions on the SharePoint_Config database and any SharePoint
Content databasesNote: It is critical for the above permissions to be set correctly. If they are not, the Copy service willfail. The SharePoint structure and site information will not be displayed in eB Web.
Integrating eB with Microsoft® SharePoint®eB SharePoint Connection Services 2010 Features
eB Information Manager 204 Implementation Guide
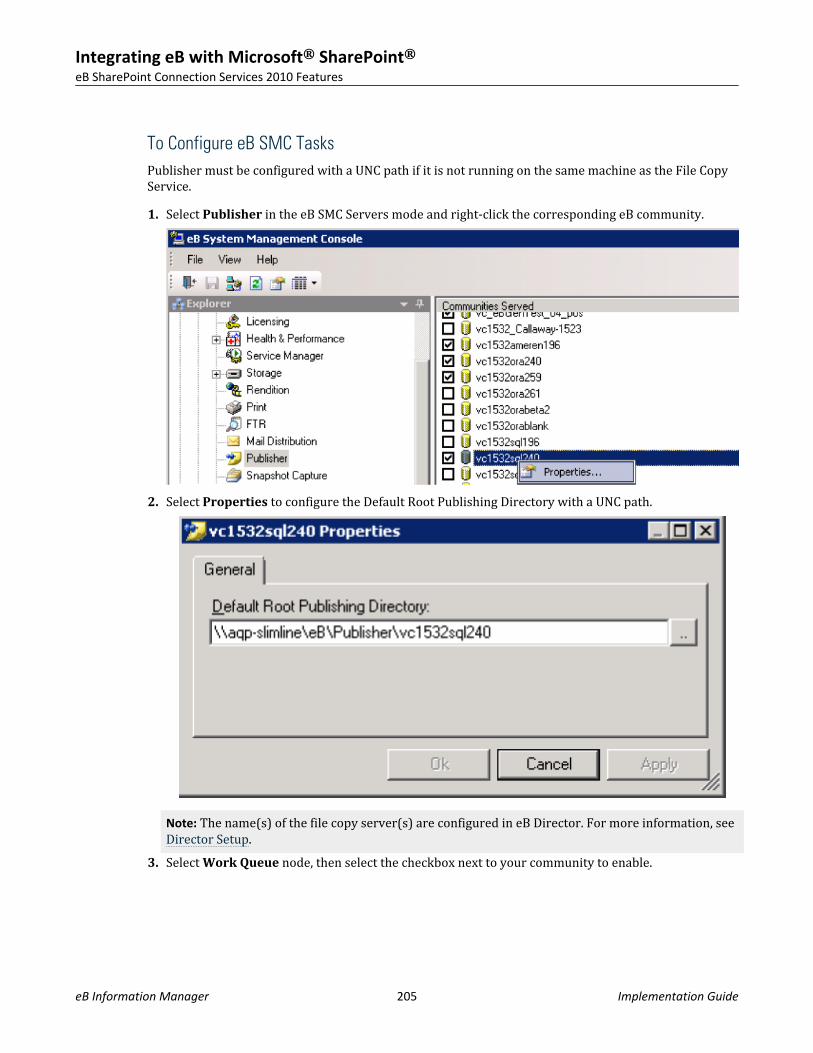
To Configure eB SMC TasksPublisher must be configured with a UNC path if it is not running on the same machine as the File CopyService.1. Select Publisher in the eB SMC Servers mode and right-click the corresponding eB community.
2. Select Properties to configure the Default Root Publishing Directory with a UNC path.
Note: The name(s) of the file copy server(s) are configured in eB Director. For more information, see Director Setup.
3. Select Work Queue node, then select the checkbox next to your community to enable.
Integrating eB with Microsoft® SharePoint®eB SharePoint Connection Services 2010 Features
eB Information Manager 205 Implementation Guide
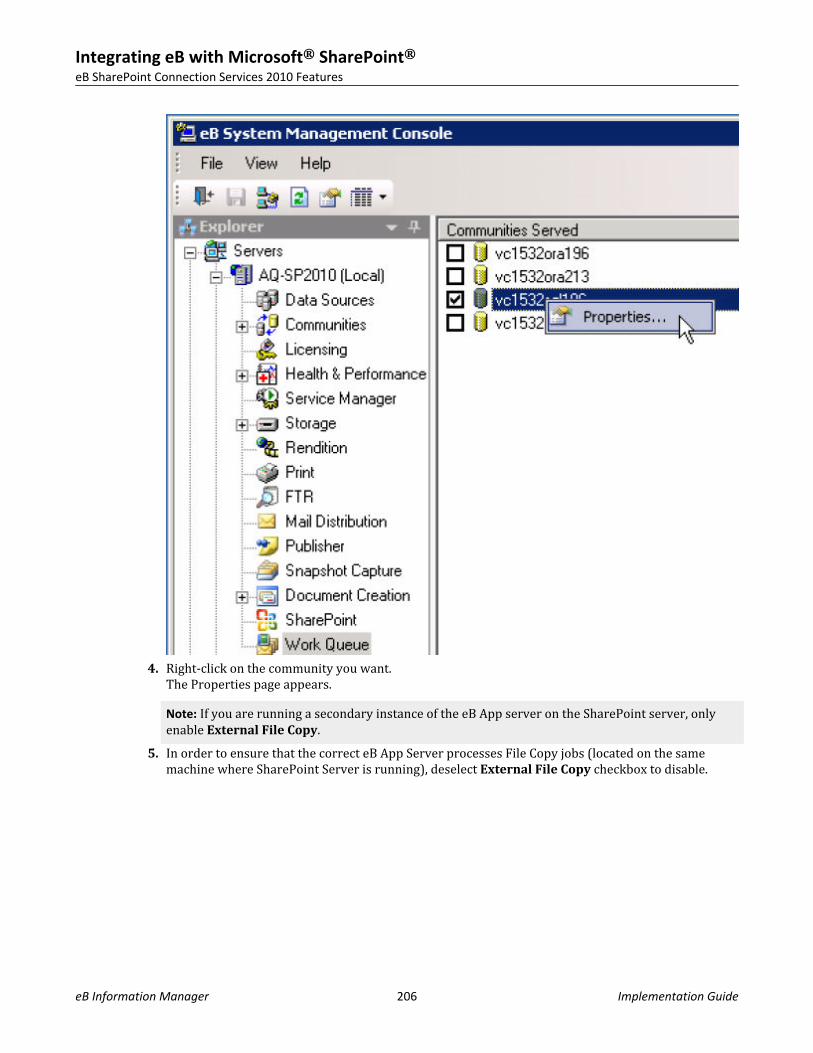
4. Right-click on the community you want.The Properties page appears.Note: If you are running a secondary instance of the eB App server on the SharePoint server, onlyenable External File Copy.
5. In order to ensure that the correct eB App Server processes File Copy jobs (located on the samemachine where SharePoint Server is running), deselect External File Copy checkbox to disable.
Integrating eB with Microsoft® SharePoint®eB SharePoint Connection Services 2010 Features
eB Information Manager 206 Implementation Guide
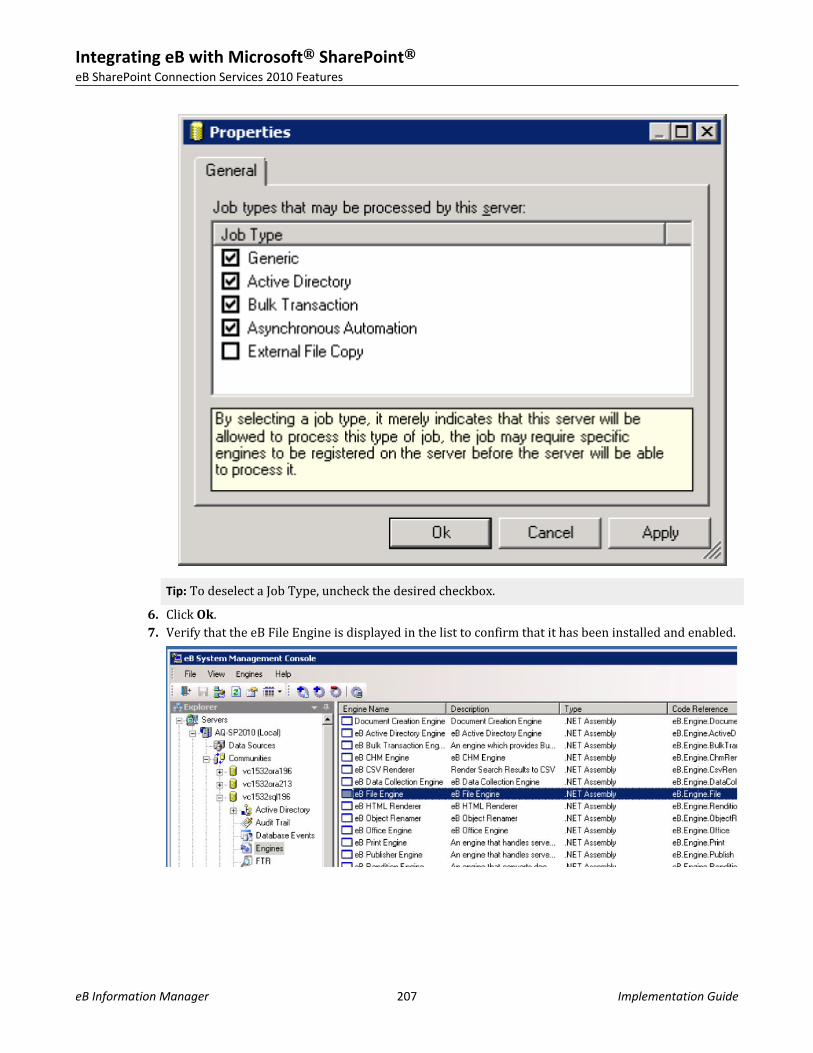
Tip: To deselect a Job Type, uncheck the desired checkbox.6. Click Ok.7. Verify that the eB File Engine is displayed in the list to confirm that it has been installed and enabled.
Integrating eB with Microsoft® SharePoint®eB SharePoint Connection Services 2010 Features
eB Information Manager 207 Implementation Guide

To Configure eB Director Tasks
1. Select F8 > System Defaults > General.Note: The Copy servers are the server computers running the eB File Engine. For more information,see SMC Configuration Tasks.
2. Add the names of the servers, separated by semi-colons.
3. Verify that you have specified a Directory Type (with set values) for email.
4. Select View > System Administration.5. Select General.6. Select any available email address shown in the Value list.
Integrating eB with Microsoft® SharePoint®eB SharePoint Connection Services 2010 Features
eB Information Manager 208 Implementation Guide
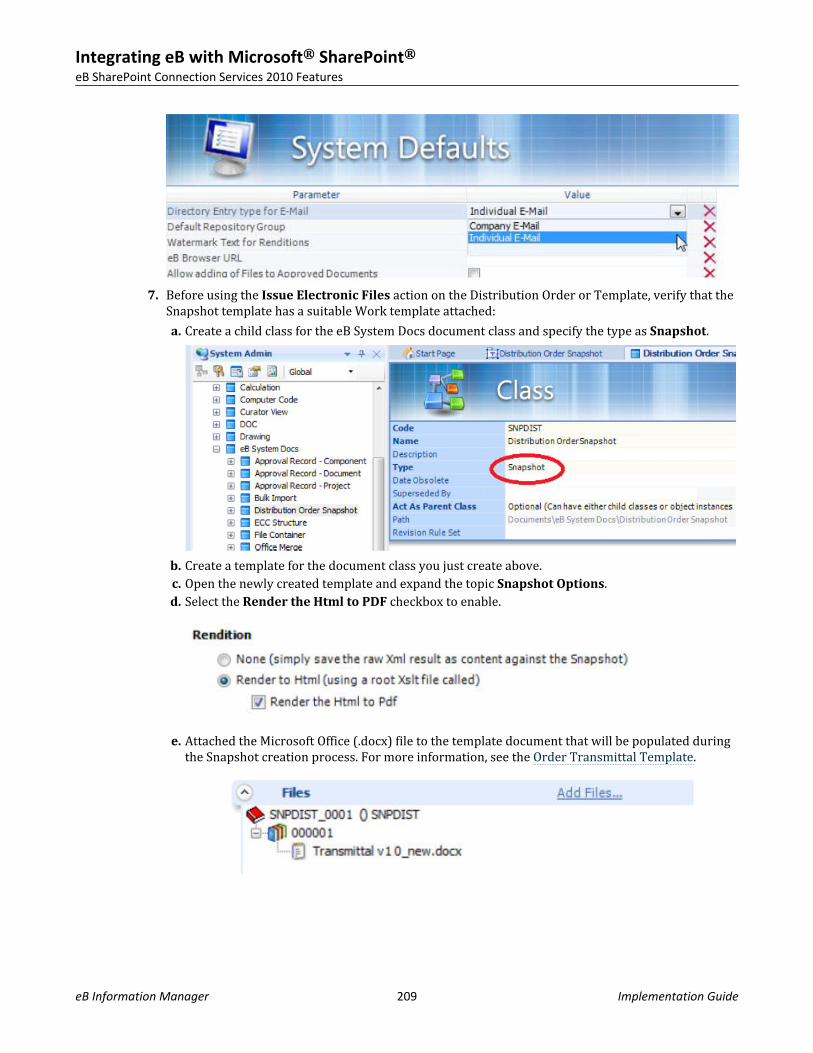
7. Before using the Issue Electronic Files action on the Distribution Order or Template, verify that theSnapshot template has a suitable Work template attached:a. Create a child class for the eB System Docs document class and specify the type as Snapshot.
b. Create a template for the document class you just create above.c. Open the newly created template and expand the topic Snapshot Options.d. Select the Render the Html to PDF checkbox to enable.
e. Attached the Microsoft Office (.docx) file to the template document that will be populated duringthe Snapshot creation process. For more information, see the Order Transmittal Template.
Integrating eB with Microsoft® SharePoint®eB SharePoint Connection Services 2010 Features
eB Information Manager 209 Implementation Guide
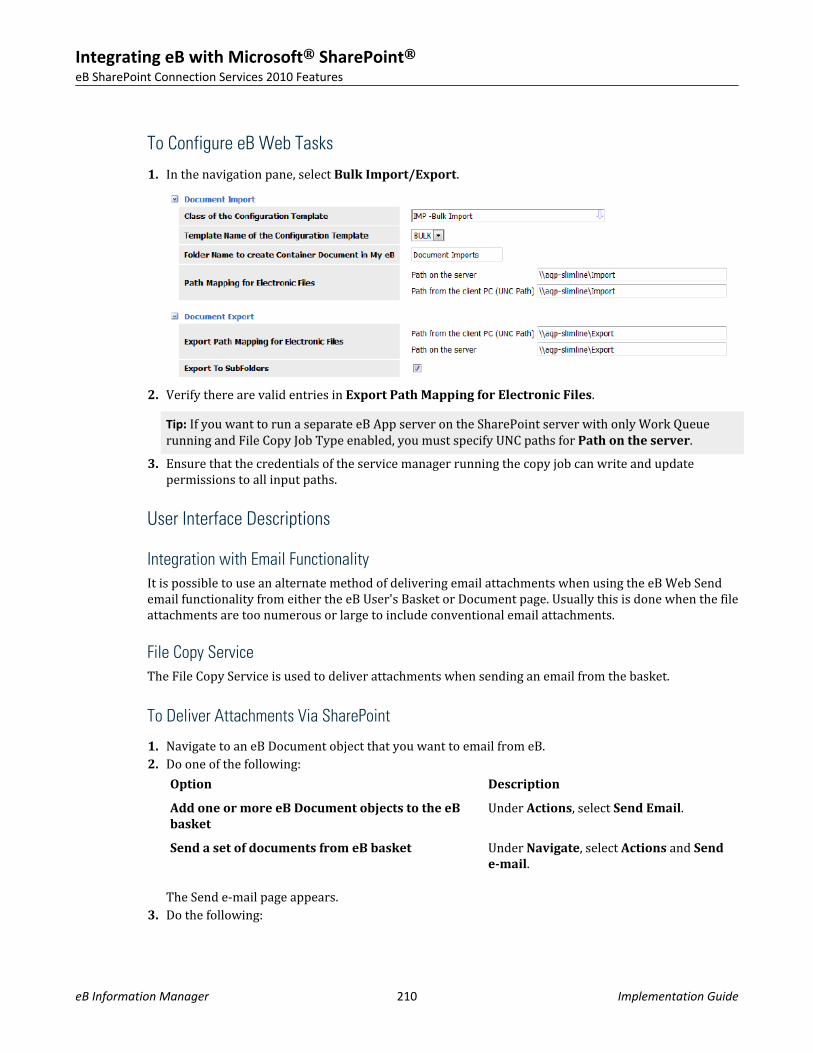
To Configure eB Web Tasks
1. In the navigation pane, select Bulk Import/Export.
2. Verify there are valid entries in Export Path Mapping for Electronic Files.Tip: If you want to run a separate eB App server on the SharePoint server with only Work Queuerunning and File Copy Job Type enabled, you must specify UNC paths for Path on the server.
3. Ensure that the credentials of the service manager running the copy job can write and updatepermissions to all input paths.
User Interface Descriptions
Integration with Email FunctionalityIt is possible to use an alternate method of delivering email attachments when using the eB Web Sendemail functionality from either the eB User's Basket or Document page. Usually this is done when the fileattachments are too numerous or large to include conventional email attachments.
File Copy ServiceThe File Copy Service is used to deliver attachments when sending an email from the basket.
To Deliver Attachments Via SharePoint
1. Navigate to an eB Document object that you want to email from eB.2. Do one of the following:
Option Description
Add one or more eB Document objects to the eBbasket
Under Actions, select Send Email.
Send a set of documents from eB basket Under Navigate, select Actions and Sende-mail.
The Send e-mail page appears.3. Do the following:
Integrating eB with Microsoft® SharePoint®eB SharePoint Connection Services 2010 Features
eB Information Manager 210 Implementation Guide
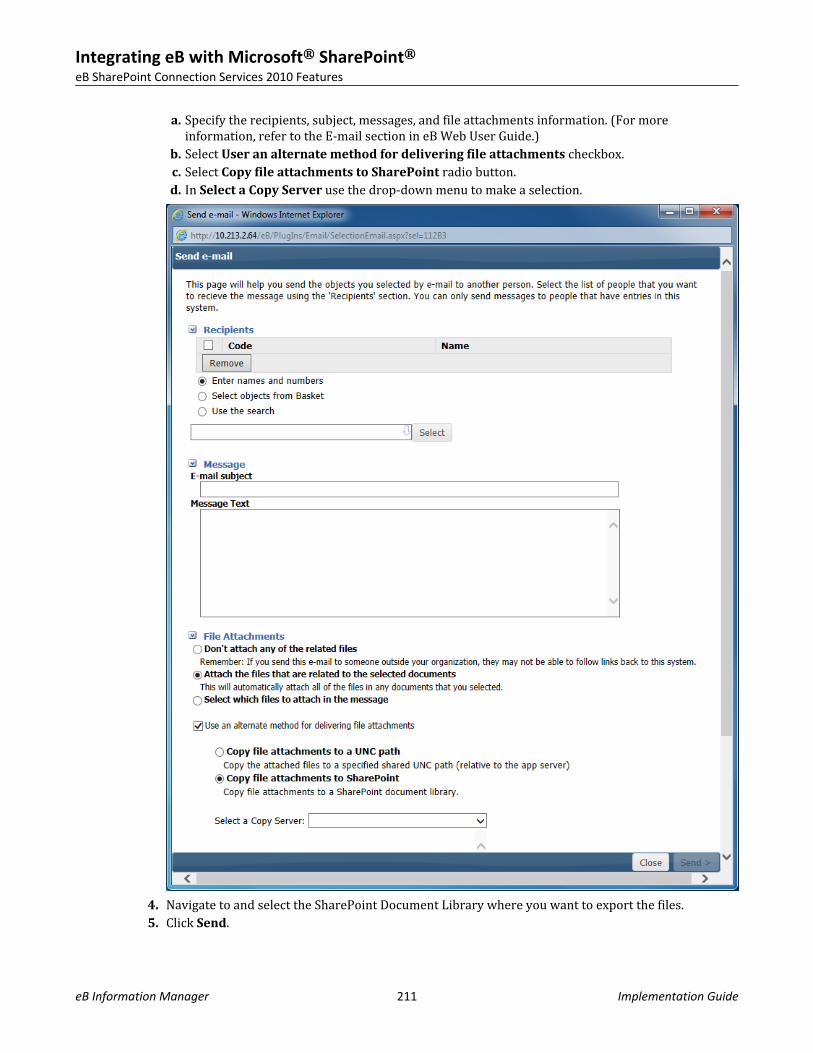
a. Specify the recipients, subject, messages, and file attachments information. (For moreinformation, refer to the E-mail section in eB Web User Guide.)
b. Select User an alternate method for delivering file attachments checkbox.c. Select Copy file attachments to SharePoint radio button.d. In Select a Copy Server use the drop-down menu to make a selection.
4. Navigate to and select the SharePoint Document Library where you want to export the files.5. Click Send.
Integrating eB with Microsoft® SharePoint®eB SharePoint Connection Services 2010 Features
eB Information Manager 211 Implementation Guide

The email body includes the final location of the attachment(s).
To Deliver Attachments Via a Shared UNC Path
1. Navigate to an eB Document object that you want to email form eB.2. Do one of the following:
Option Description
Add one or more eB Document objects to the eBbasket
Under Actions, select Send Email.
Send a set of documents from eB basket Under Navigate, select Actions and Sende-mail.
The Send e-mail page appears.3. Do the following:
a. Specify the recipients, subject, messages, and file attachments information. (For moreinformation, refer to the E-mail section in eB Web User Guide.)
b. Select Use an alternate method for delivering file attachments checkbox.c. Select Copy file attachments to a UNC path radio button.d. In Select a Copy Server use the drop-down menu to make a selection.
Integrating eB with Microsoft® SharePoint®eB SharePoint Connection Services 2010 Features
eB Information Manager 212 Implementation Guide
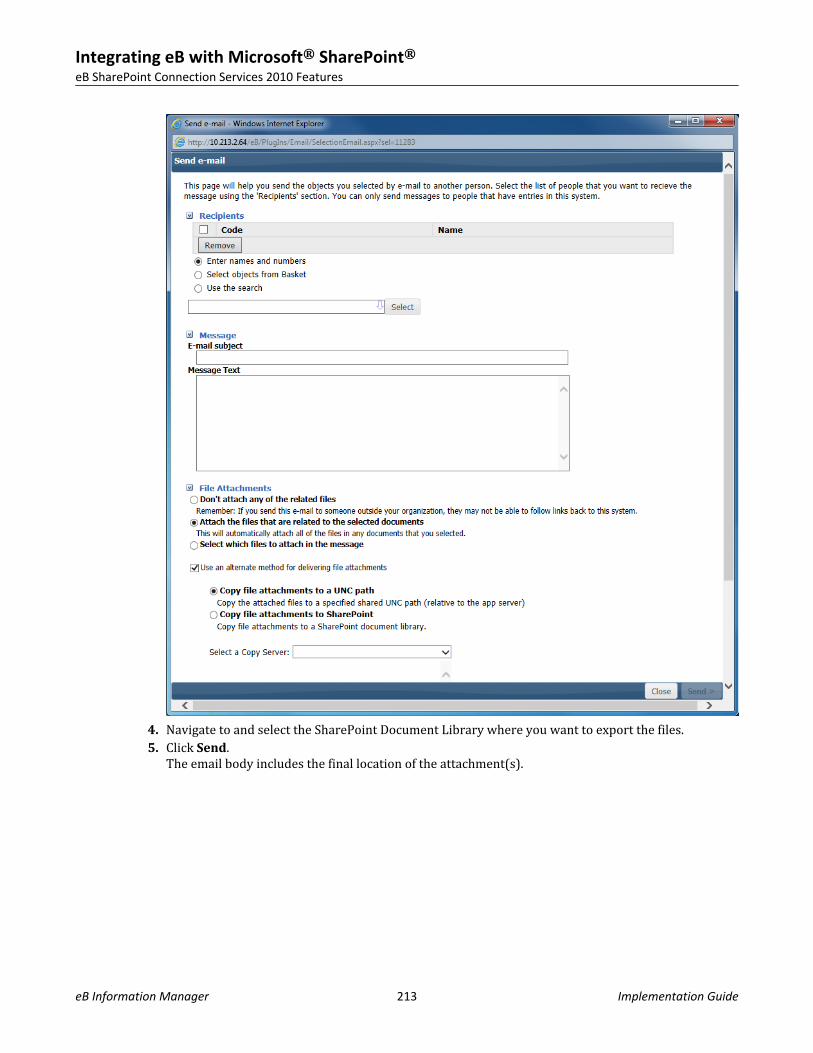
4. Navigate to and select the SharePoint Document Library where you want to export the files.5. Click Send.
The email body includes the final location of the attachment(s).
Integrating eB with Microsoft® SharePoint®eB SharePoint Connection Services 2010 Features
eB Information Manager 213 Implementation Guide
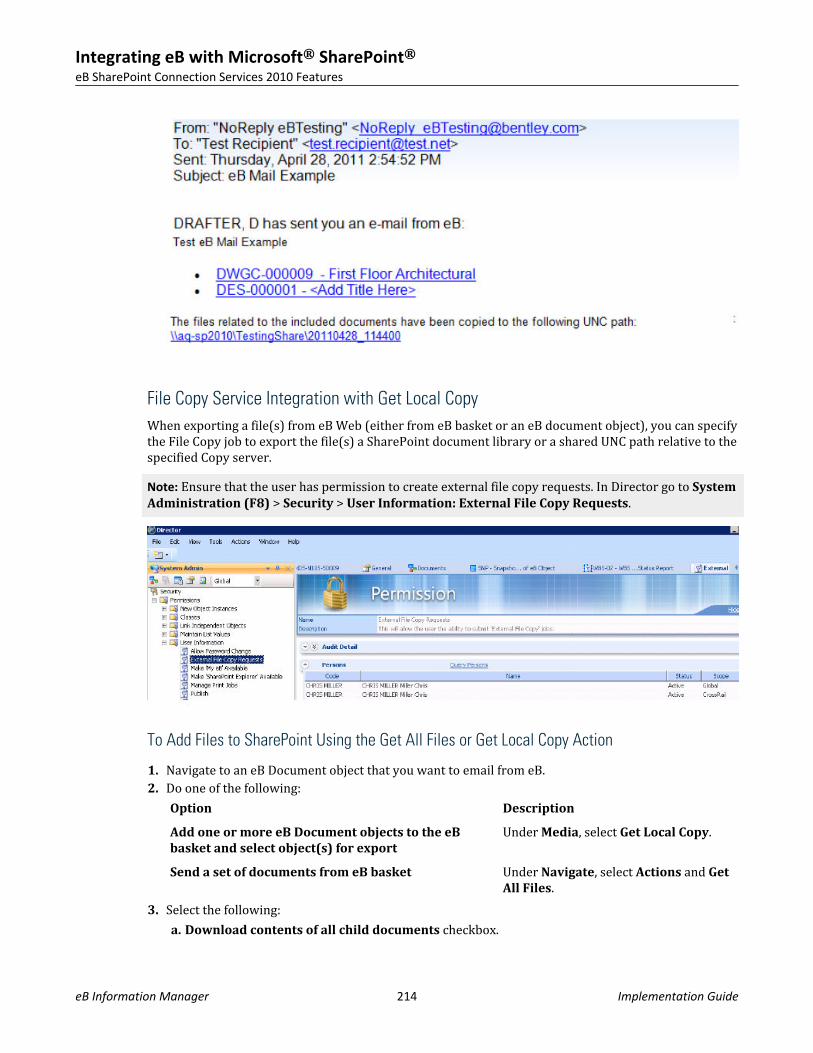
File Copy Service Integration with Get Local CopyWhen exporting a file(s) from eB Web (either from eB basket or an eB document object), you can specifythe File Copy job to export the file(s) a SharePoint document library or a shared UNC path relative to thespecified Copy server.Note: Ensure that the user has permission to create external file copy requests. In Director go to SystemAdministration (F8) > Security > User Information: External File Copy Requests.
To Add Files to SharePoint Using the Get All Files or Get Local Copy Action
1. Navigate to an eB Document object that you want to email from eB.2. Do one of the following:
Option Description
Add one or more eB Document objects to the eBbasket and select object(s) for export
Under Media, select Get Local Copy.
Send a set of documents from eB basket Under Navigate, select Actions and GetAll Files.
3. Select the following:a. Download contents of all child documents checkbox.
Integrating eB with Microsoft® SharePoint®eB SharePoint Connection Services 2010 Features
eB Information Manager 214 Implementation Guide
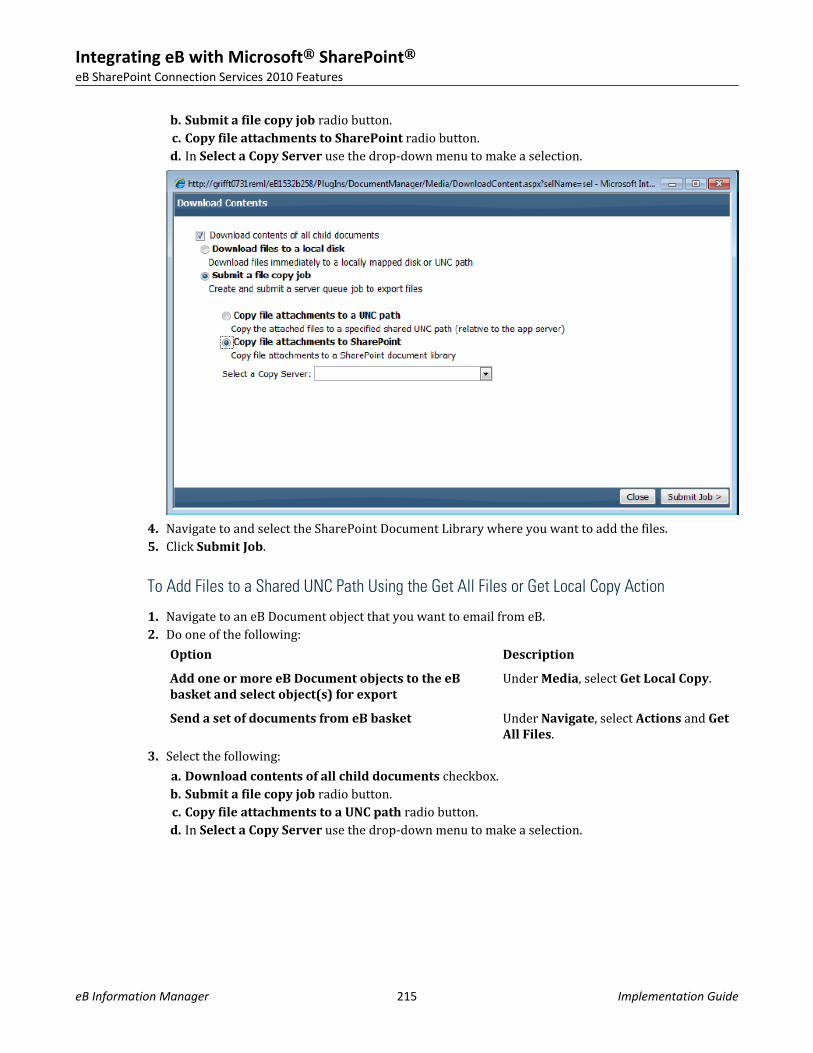
b. Submit a file copy job radio button.c. Copy file attachments to SharePoint radio button.d. In Select a Copy Server use the drop-down menu to make a selection.
4. Navigate to and select the SharePoint Document Library where you want to add the files.5. Click Submit Job.
To Add Files to a Shared UNC Path Using the Get All Files or Get Local Copy Action
1. Navigate to an eB Document object that you want to email from eB.2. Do one of the following:
Option Description
Add one or more eB Document objects to the eBbasket and select object(s) for export
Under Media, select Get Local Copy.
Send a set of documents from eB basket Under Navigate, select Actions and GetAll Files.
3. Select the following:a. Download contents of all child documents checkbox.b. Submit a file copy job radio button.c. Copy file attachments to a UNC path radio button.d. In Select a Copy Server use the drop-down menu to make a selection.
Integrating eB with Microsoft® SharePoint®eB SharePoint Connection Services 2010 Features
eB Information Manager 215 Implementation Guide
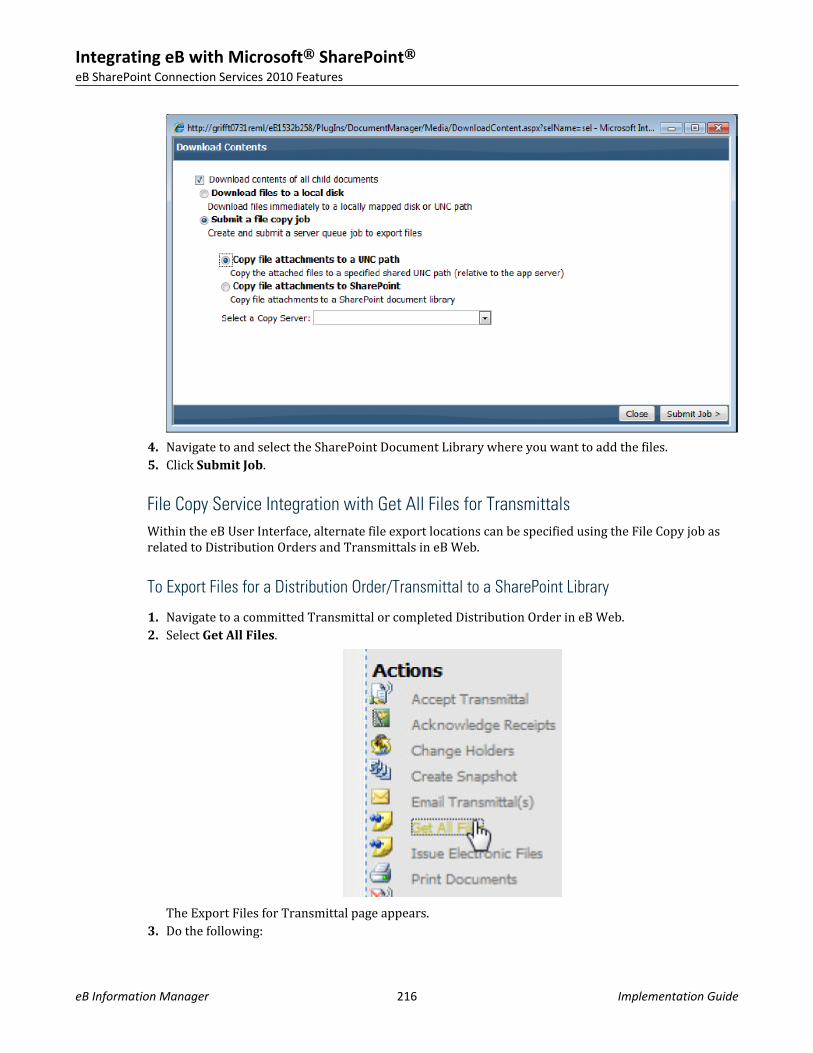
4. Navigate to and select the SharePoint Document Library where you want to add the files.5. Click Submit Job.
File Copy Service Integration with Get All Files for TransmittalsWithin the eB User Interface, alternate file export locations can be specified using the File Copy job asrelated to Distribution Orders and Transmittals in eB Web.
To Export Files for a Distribution Order/Transmittal to a SharePoint Library
1. Navigate to a committed Transmittal or completed Distribution Order in eB Web.2. Select Get All Files.
The Export Files for Transmittal page appears.3. Do the following:
Integrating eB with Microsoft® SharePoint®eB SharePoint Connection Services 2010 Features
eB Information Manager 216 Implementation Guide
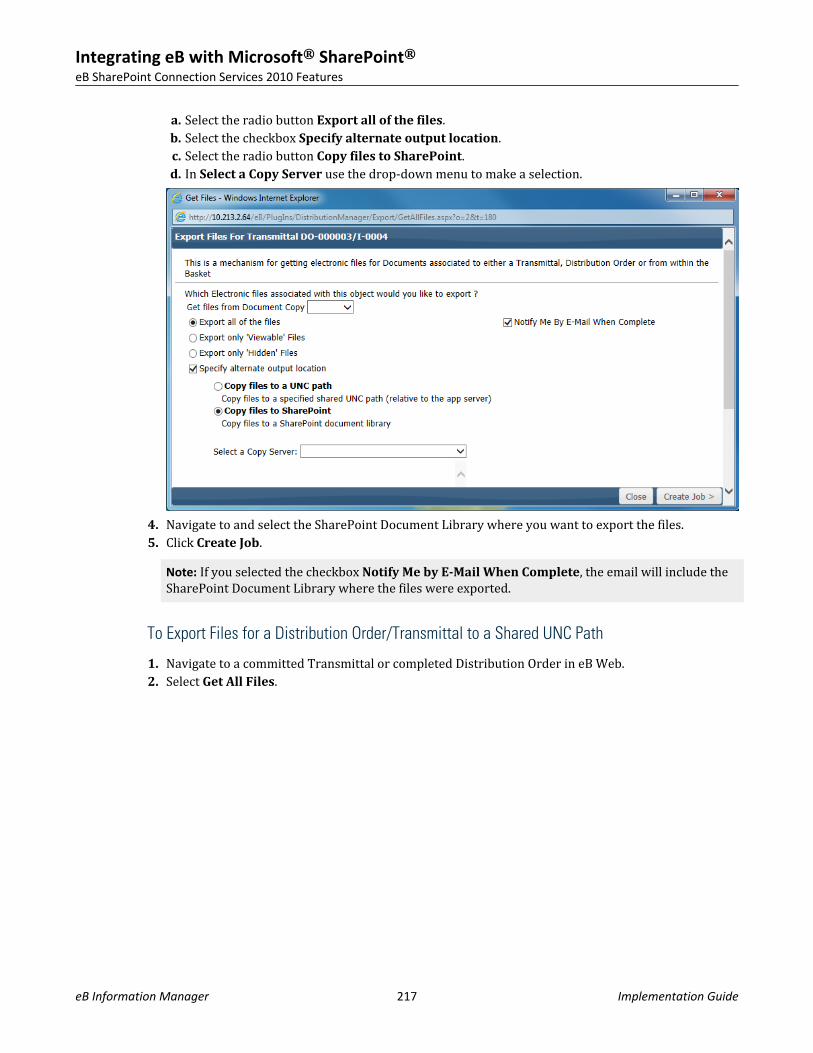
a. Select the radio button Export all of the files.b. Select the checkbox Specify alternate output location.c. Select the radio button Copy files to SharePoint.d. In Select a Copy Server use the drop-down menu to make a selection.
4. Navigate to and select the SharePoint Document Library where you want to export the files.5. Click Create Job.
Note: If you selected the checkbox Notify Me by E-Mail When Complete, the email will include theSharePoint Document Library where the files were exported.
To Export Files for a Distribution Order/Transmittal to a Shared UNC Path
1. Navigate to a committed Transmittal or completed Distribution Order in eB Web.2. Select Get All Files.
Integrating eB with Microsoft® SharePoint®eB SharePoint Connection Services 2010 Features
eB Information Manager 217 Implementation Guide
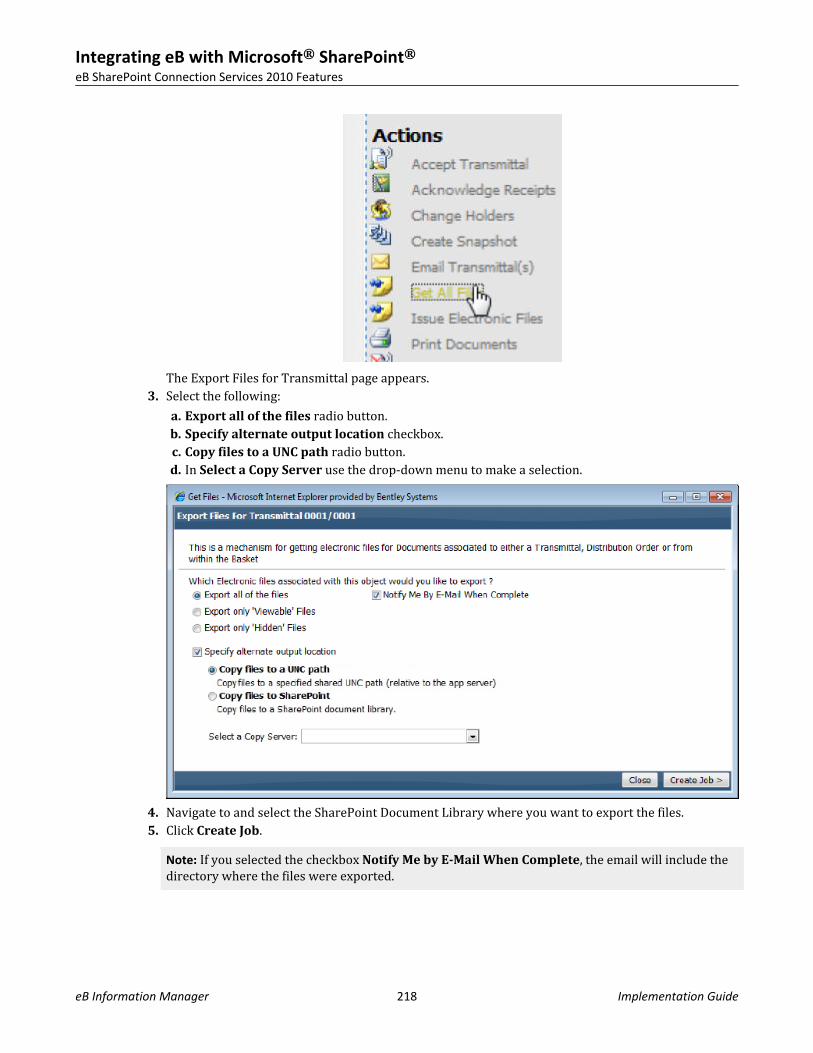
The Export Files for Transmittal page appears.3. Select the following:
a. Export all of the files radio button.b. Specify alternate output location checkbox.c. Copy files to a UNC path radio button.d. In Select a Copy Server use the drop-down menu to make a selection.
4. Navigate to and select the SharePoint Document Library where you want to export the files.5. Click Create Job.
Note: If you selected the checkbox Notify Me by E-Mail When Complete, the email will include thedirectory where the files were exported.
Integrating eB with Microsoft® SharePoint®eB SharePoint Connection Services 2010 Features
eB Information Manager 218 Implementation Guide
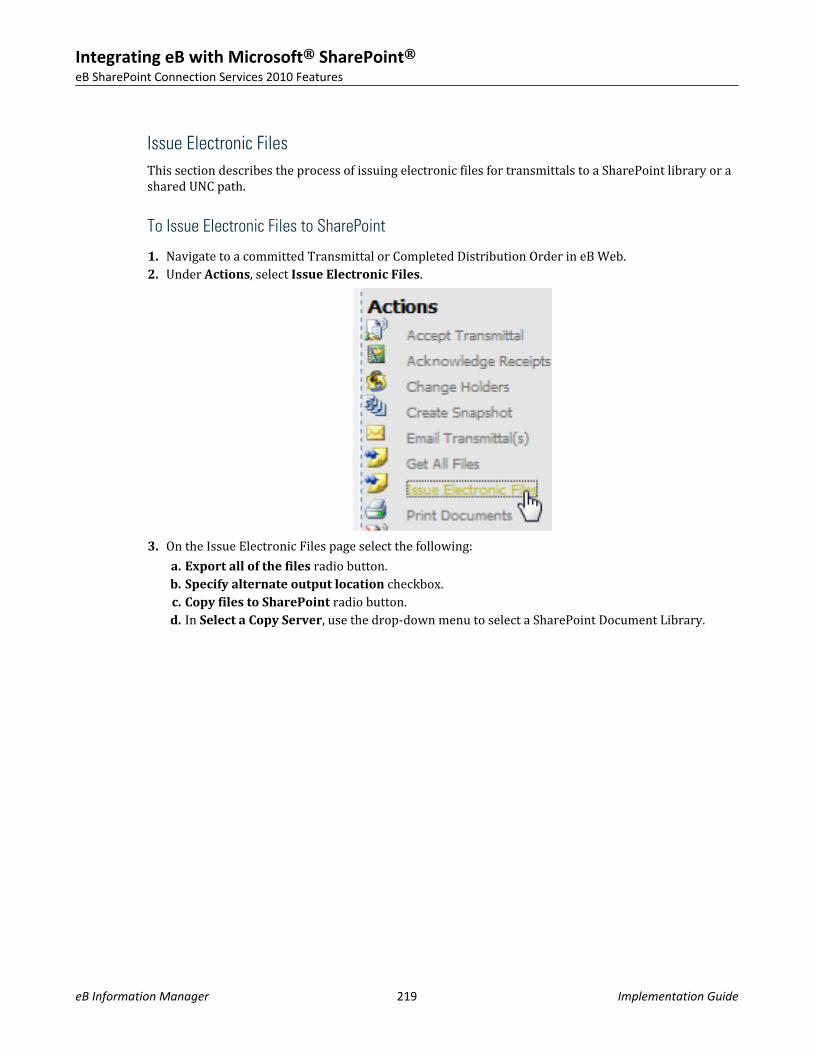
Issue Electronic FilesThis section describes the process of issuing electronic files for transmittals to a SharePoint library or ashared UNC path.
To Issue Electronic Files to SharePoint
1. Navigate to a committed Transmittal or Completed Distribution Order in eB Web.2. Under Actions, select Issue Electronic Files.
3. On the Issue Electronic Files page select the following:a. Export all of the files radio button.b. Specify alternate output location checkbox.c. Copy files to SharePoint radio button.d. In Select a Copy Server, use the drop-down menu to select a SharePoint Document Library.
Integrating eB with Microsoft® SharePoint®eB SharePoint Connection Services 2010 Features
eB Information Manager 219 Implementation Guide
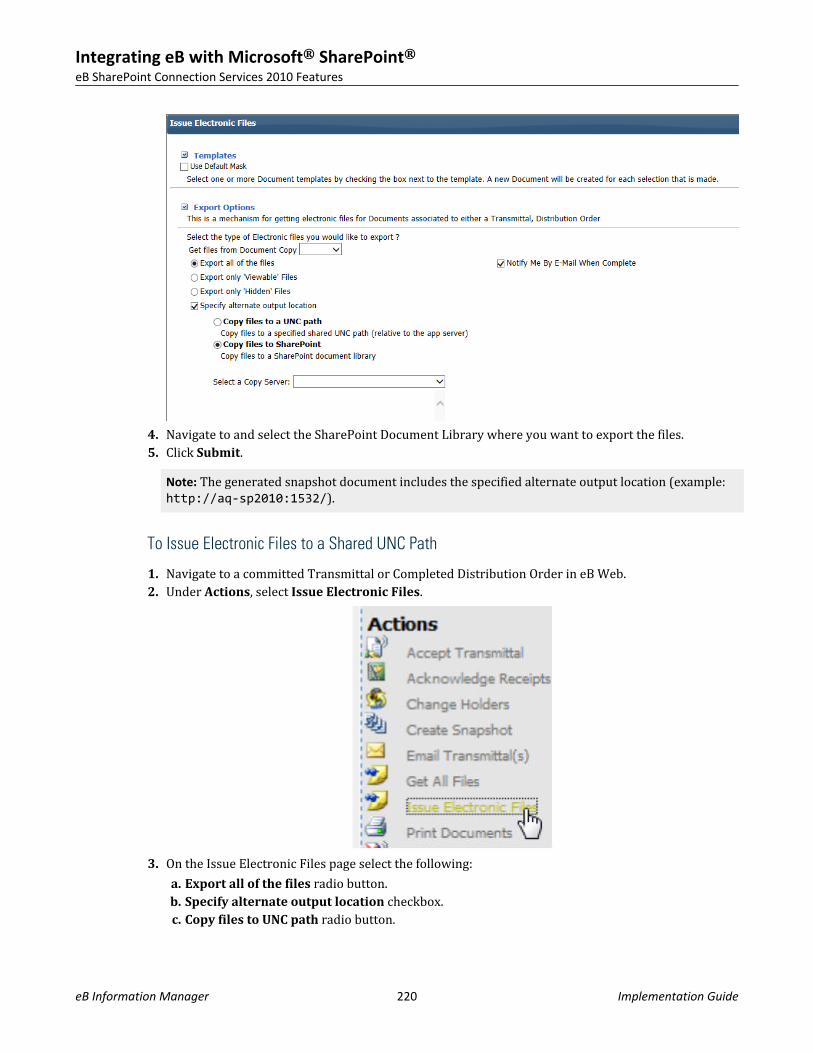
4. Navigate to and select the SharePoint Document Library where you want to export the files.5. Click Submit.
Note: The generated snapshot document includes the specified alternate output location (example:http://aq-sp2010:1532/).
To Issue Electronic Files to a Shared UNC Path
1. Navigate to a committed Transmittal or Completed Distribution Order in eB Web.2. Under Actions, select Issue Electronic Files.
3. On the Issue Electronic Files page select the following:a. Export all of the files radio button.b. Specify alternate output location checkbox.c. Copy files to UNC path radio button.
Integrating eB with Microsoft® SharePoint®eB SharePoint Connection Services 2010 Features
eB Information Manager 220 Implementation Guide
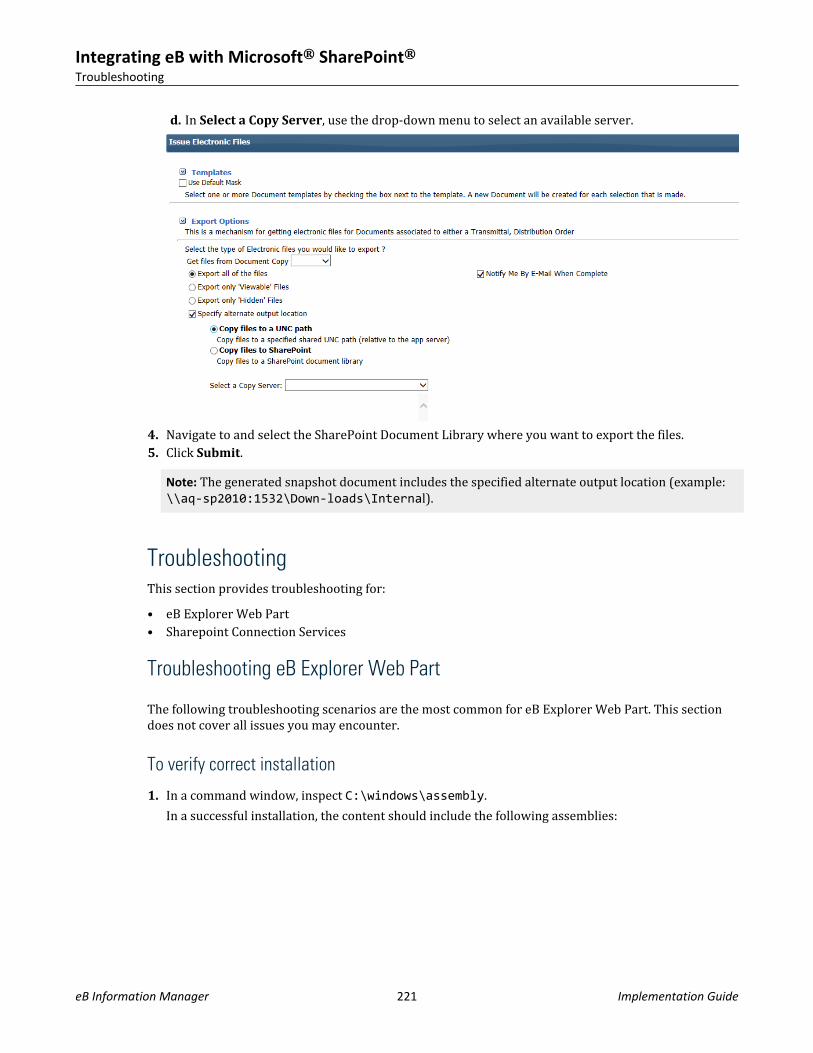
d. In Select a Copy Server, use the drop-down menu to select an available server.
4. Navigate to and select the SharePoint Document Library where you want to export the files.5. Click Submit.
Note: The generated snapshot document includes the specified alternate output location (example:\\aq-sp2010:1532\Down-loads\Internal).
TroubleshootingThis section provides troubleshooting for:• eB Explorer Web Part• Sharepoint Connection Services
Troubleshooting eB Explorer Web Part
The following troubleshooting scenarios are the most common for eB Explorer Web Part. This sectiondoes not cover all issues you may encounter.
To verify correct installation
1. In a command window, inspect C:\windows\assembly.In a successful installation, the content should include the following assemblies:
Integrating eB with Microsoft® SharePoint®Troubleshooting
eB Information Manager 221 Implementation Guide
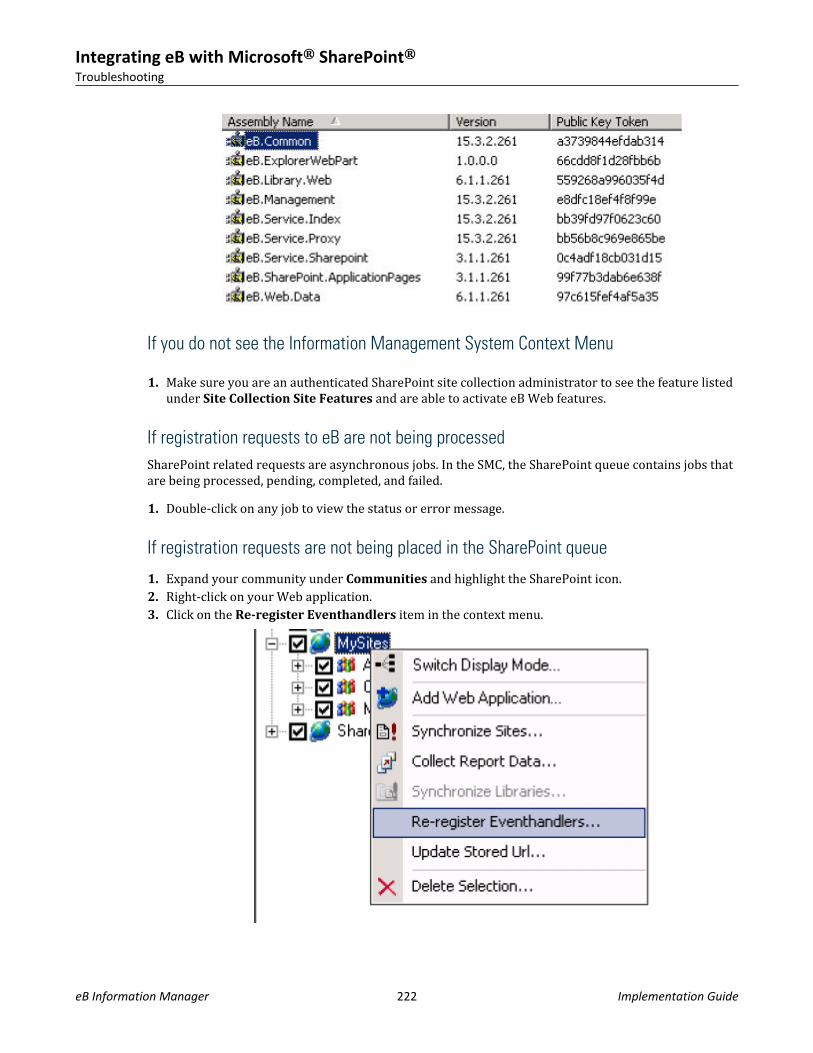
If you do not see the Information Management System Context Menu
1. Make sure you are an authenticated SharePoint site collection administrator to see the feature listedunder Site Collection Site Features and are able to activate eB Web features.
If registration requests to eB are not being processedSharePoint related requests are asynchronous jobs. In the SMC, the SharePoint queue contains jobs thatare being processed, pending, completed, and failed.1. Double-click on any job to view the status or error message.
If registration requests are not being placed in the SharePoint queue
1. Expand your community under Communities and highlight the SharePoint icon.2. Right-click on your Web application.3. Click on the Re-register Eventhandlers item in the context menu.
Integrating eB with Microsoft® SharePoint®Troubleshooting
eB Information Manager 222 Implementation Guide
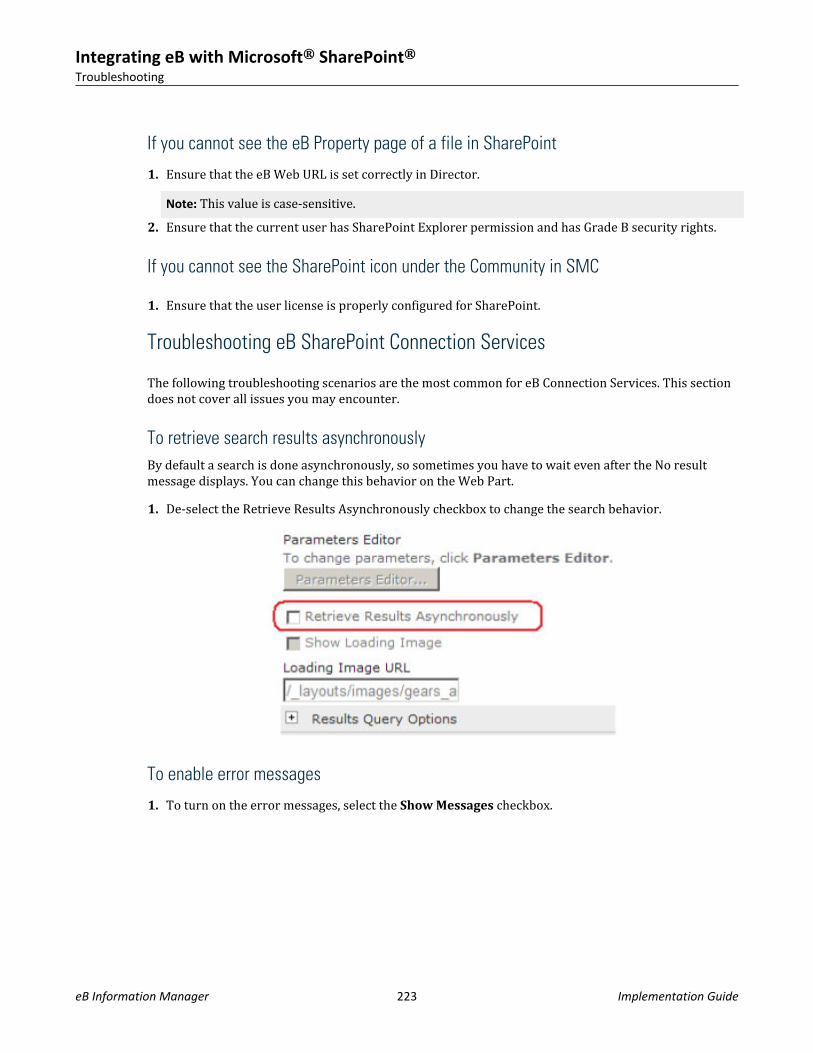
If you cannot see the eB Property page of a file in SharePoint
1. Ensure that the eB Web URL is set correctly in Director.Note: This value is case-sensitive.
2. Ensure that the current user has SharePoint Explorer permission and has Grade B security rights.
If you cannot see the SharePoint icon under the Community in SMC
1. Ensure that the user license is properly configured for SharePoint.
Troubleshooting eB SharePoint Connection Services
The following troubleshooting scenarios are the most common for eB Connection Services. This sectiondoes not cover all issues you may encounter.
To retrieve search results asynchronouslyBy default a search is done asynchronously, so sometimes you have to wait even after the No resultmessage displays. You can change this behavior on the Web Part.1. De-select the Retrieve Results Asynchronously checkbox to change the search behavior.
To enable error messages
1. To turn on the error messages, select the Show Messages checkbox.
Integrating eB with Microsoft® SharePoint®Troubleshooting
eB Information Manager 223 Implementation Guide
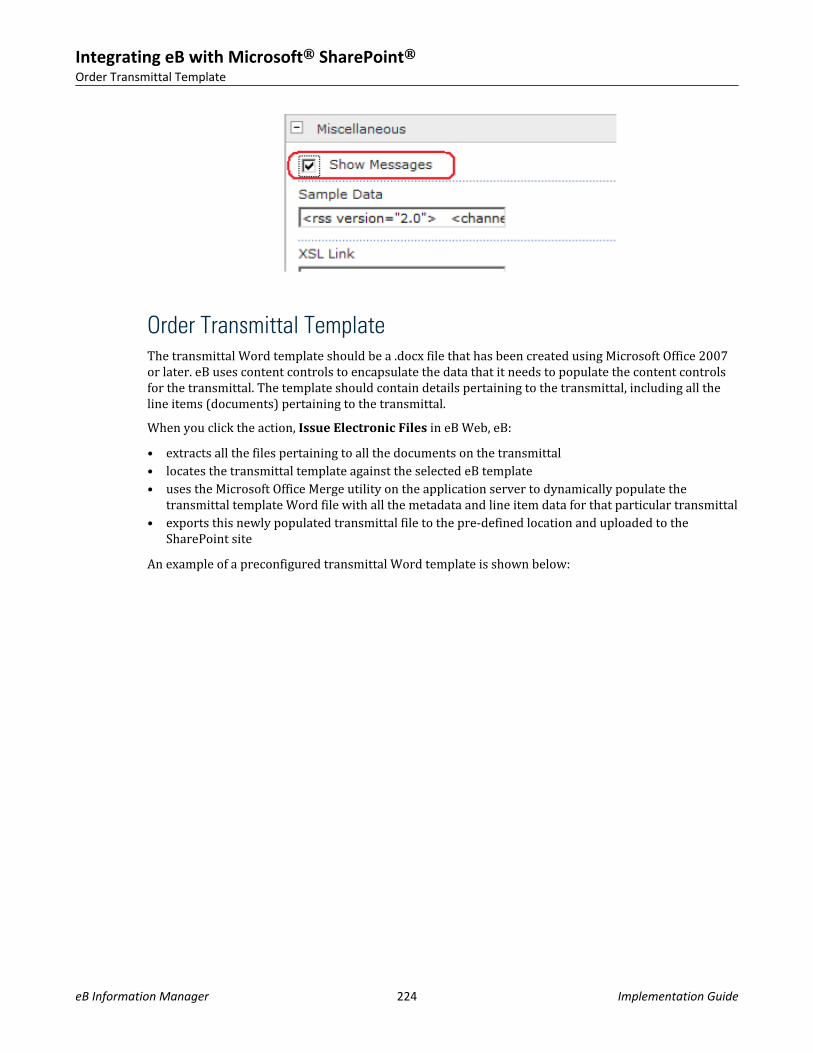
Order Transmittal TemplateThe transmittal Word template should be a .docx file that has been created using Microsoft Office 2007or later. eB uses content controls to encapsulate the data that it needs to populate the content controlsfor the transmittal. The template should contain details pertaining to the transmittal, including all theline items (documents) pertaining to the transmittal.When you click the action, Issue Electronic Files in eB Web, eB:• extracts all the files pertaining to all the documents on the transmittal• locates the transmittal template against the selected eB template• uses the Microsoft Office Merge utility on the application server to dynamically populate the
transmittal template Word file with all the metadata and line item data for that particular transmittal• exports this newly populated transmittal file to the pre-defined location and uploaded to the
SharePoint siteAn example of a preconfigured transmittal Word template is shown below:
Integrating eB with Microsoft® SharePoint®Order Transmittal Template
eB Information Manager 224 Implementation Guide
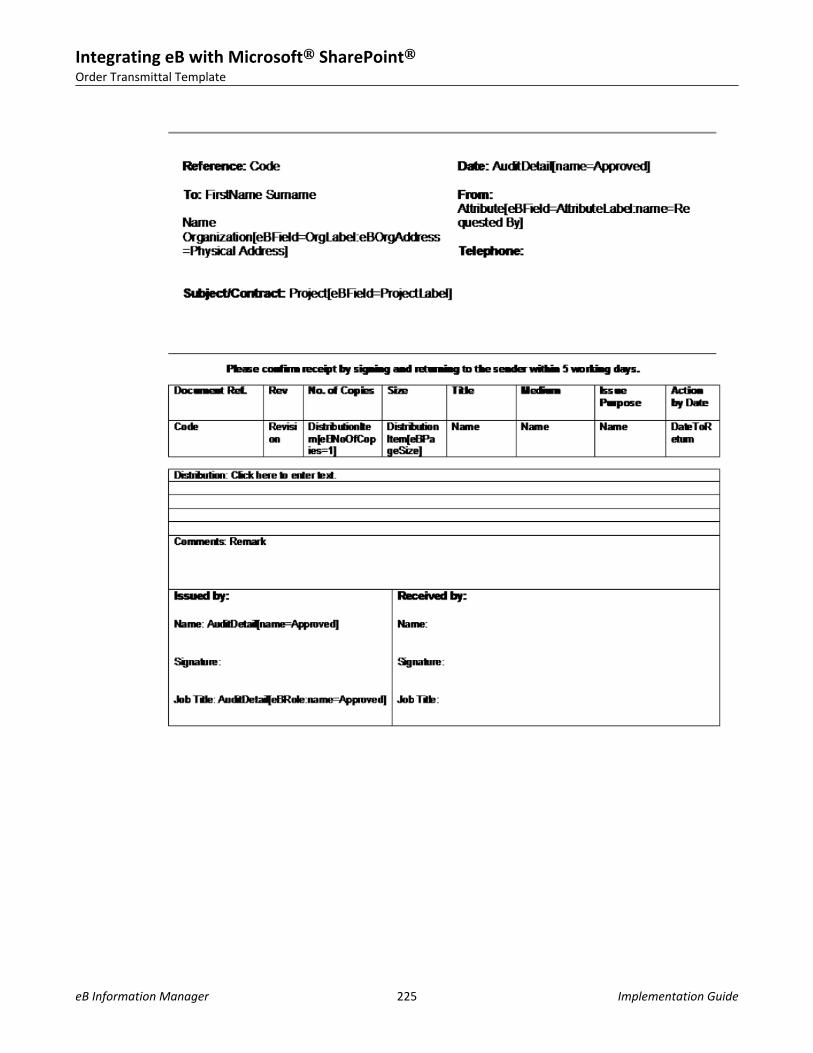
Integrating eB with Microsoft® SharePoint®Order Transmittal Template
eB Information Manager 225 Implementation Guide

Integrating eB with Microsoft® SharePoint®Order Transmittal Template
This page intentionally left blank
eB Information Manager 226 Implementation Guide
eB SSRS Data Provider Configuration 11The eB SSRS Data Provider installer is a standalone package that is used to install:• eB Reporting Service Extensions Data• eB Reporting Service Extension Query DesignersThe installer allows the eB Query Language to be used as an extension to the Microsoft SQL ServerReport Server and Visual Studio Report Designer.The eB SSRS Data Provider installer supports the following operating systems:• Clients: Windows 7, Windows Vista• Servers: Windows Server 2008, Windows Server 2008 R2, Windows Server 2003The eB SSRS Data Provider installer supports the following SQL Server databases:• SQL Server 2008 R2, SQL Server 2008, SQL Server 2005Both client and server components support multi-processor environments. The 32-bit installer,eB SSRS DataProvider (x86).msi, can support up to 32 processors. The 64-bit installer,eB SSRS DataProvider (x64).msi, can support up to 256 processors.It should be noted that, by design, the installer for both the Windows Server 2008 (R2) and Windows 7operating systems need elevated privileges as they are required to modify protected resources.The eB SSRS Data Provider installer supports SSRS installations that exist on multi-drives, but it doesnot support multi-instances of SSRS.This product requires your SQL Server instance to have the exact name of MSSQLSERVER. If you do nothave a SQL Server instance with this exact name, the installer will report that you do not have MicrosoftSQL Server Reporting Services installed. It makes this determination by looking for the followingregistry values and file:• Registry Key: HKEY_LOCAL_MACHINE\SOFTWARE\Microsoft SQL Server\Instance Names\RS
Value Name: MSSQLSERVERThis value is represented as <RS Instance Name> below
• Registry Key: HKEY_LOCAL_MACHINE\SOFTWARE\Microsoft SQL Server\<RS Instance Name>\Setup
Value Name: SqlProgramDirThis value is represented as <SQL Server Installation Path> below
• Looks for file at:<SQL Server Installation Path>\<RS Instance Name>\Reporting Services\ReportServer\rsreportserver.config
eB Information Manager 227 Implementation Guide
Installing eB SSRS Data ProviderThe eB SSRS Data Provider installer initially checks that a valid instance of Microsoft SQL ServerReporting Services or Visual Studio with Business Intelligence Studio is installed. If neither of thesecomponents is available the following message is reported to the user:Please ensure that Microsoft SQL Server Reporting Services or Visual Studio Report Designer is installedbefore installing this component
At this point the installation is terminated. If either or both of the above are installed on the machine,the eB SSRS Data Provider installer installs the eB Data Extension making it available for the ReportServer and/or Report Designer.During the installation, the installer inserts an <Extension> entry into rsreportserver.config andRSReportDesigner.config, and inserts a <CodeGroup> entry into rssrvpolicy.config andRSPreviewPolicy.config. Those two entries will be removed if users subsequently uninstall eB SSRSData Provider.<Extension Name="eB Data Model" Type="eB.ReportingServices.Extensions.Data.Connection, eB.ReportingServices.Extensions.Data">
<CodeGroup class="UnionCodeGroup" version="1" PermissionSetName="FullTrust" Name="eBDataModel" Description="This code group grants full trust to eB Reporting Services extensions.">
The following information details the changes made to the keys described above to make the eB datamodel extension available to SQL Server Reporting Services.<Extension Name="eB Data Model" Type="eB.ReportingServices.Extensions.Data.Connection, eB.ReportingServices.Extensions.Data">
<CodeGroup class="UnionCodeGroup" version="1" PermissionSetName="FullTrust" Name="eBDataModel" Description="This code group grants full trust to eB Reporting Services extensions.">
The eB SSRS Data Provider is a data processing extension and as such must be installed on both clientand server locations. When the client and server are the same computer, only that computer needs theinstallation. However, the server and client may well be separate computers—when the Visual Studiocomponent (Business Intelligence Development Studio) is used to design reports on a client computerbut the Reporting Services (SSRS) are on another (server) computer—in that case the eB SSRS DataProvider must be installed at both locations.
To Install eB SSRS Data Provider
1. Browse to this folder in Windows Explorer:...\Server Installation\eB SSRS Data Provider
2. Double-click the appropriate MSI file for the version of Windows you are running:32-bit Windows eB SSRS Data Provider (x86).msi
64-bit Windows eB SSRS Data Provider (x64).msi
eB SSRS Data Provider ConfigurationInstalling eB SSRS Data Provider
eB Information Manager 228 Implementation Guide
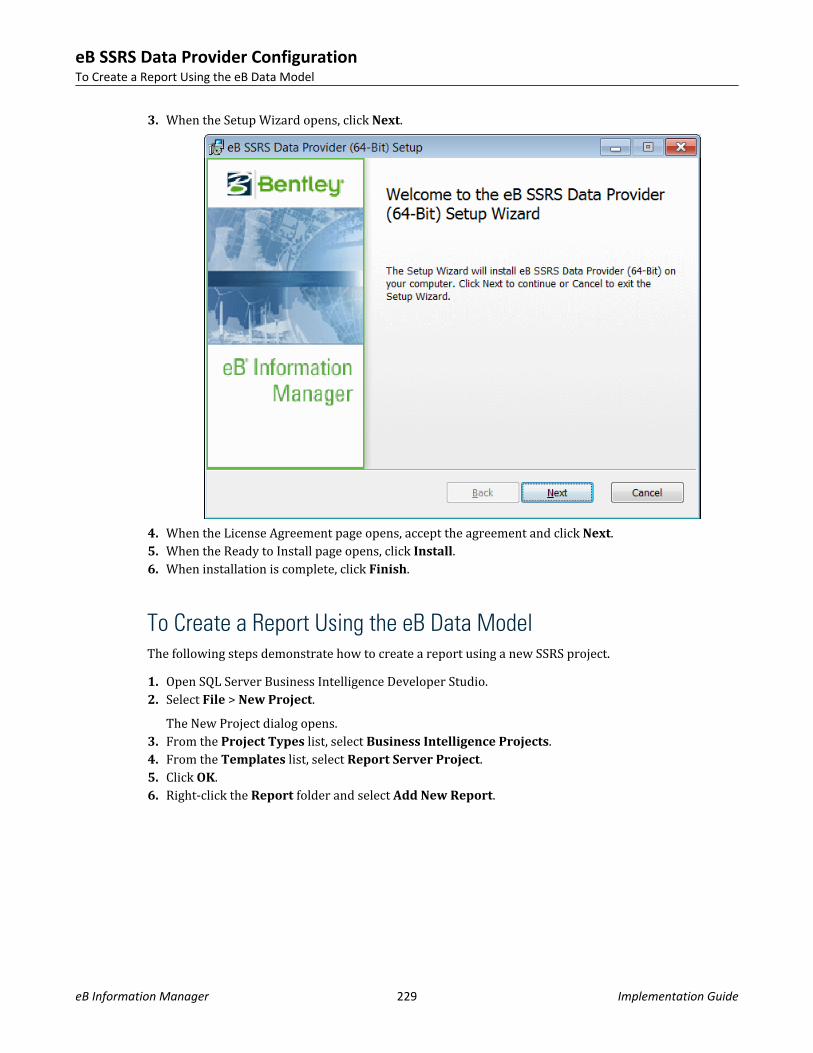
3. When the Setup Wizard opens, click Next.
4. When the License Agreement page opens, accept the agreement and click Next.5. When the Ready to Install page opens, click Install.6. When installation is complete, click Finish.
To Create a Report Using the eB Data ModelThe following steps demonstrate how to create a report using a new SSRS project.1. Open SQL Server Business Intelligence Developer Studio.2. Select File > New Project.
The New Project dialog opens.3. From the Project Types list, select Business Intelligence Projects.4. From the Templates list, select Report Server Project.5. Click OK.6. Right-click the Report folder and select Add New Report.
eB SSRS Data Provider ConfigurationTo Create a Report Using the eB Data Model
eB Information Manager 229 Implementation Guide
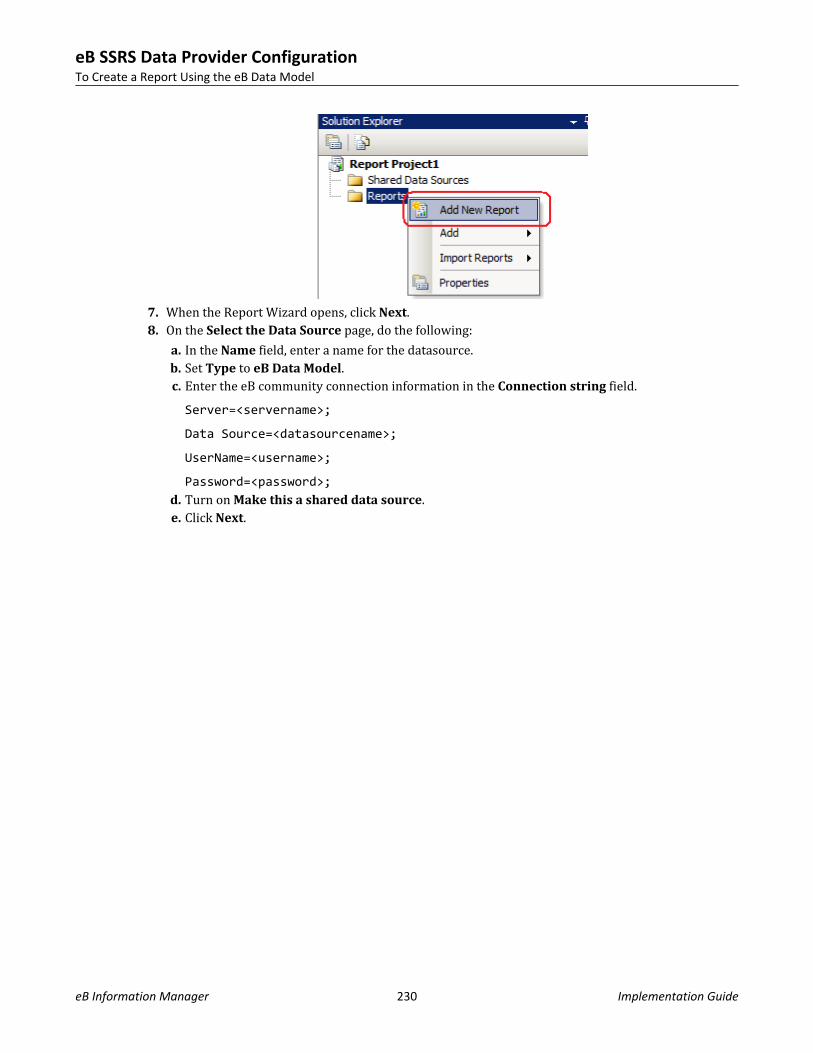
7. When the Report Wizard opens, click Next.8. On the Select the Data Source page, do the following:
a. In the Name field, enter a name for the datasource.b. Set Type to eB Data Model.c. Enter the eB community connection information in the Connection string field.Server=<servername>;
Data Source=<datasourcename>;
UserName=<username>;
Password=<password>;d. Turn on Make this a shared data source.e. Click Next.
eB SSRS Data Provider ConfigurationTo Create a Report Using the eB Data Model
eB Information Manager 230 Implementation Guide
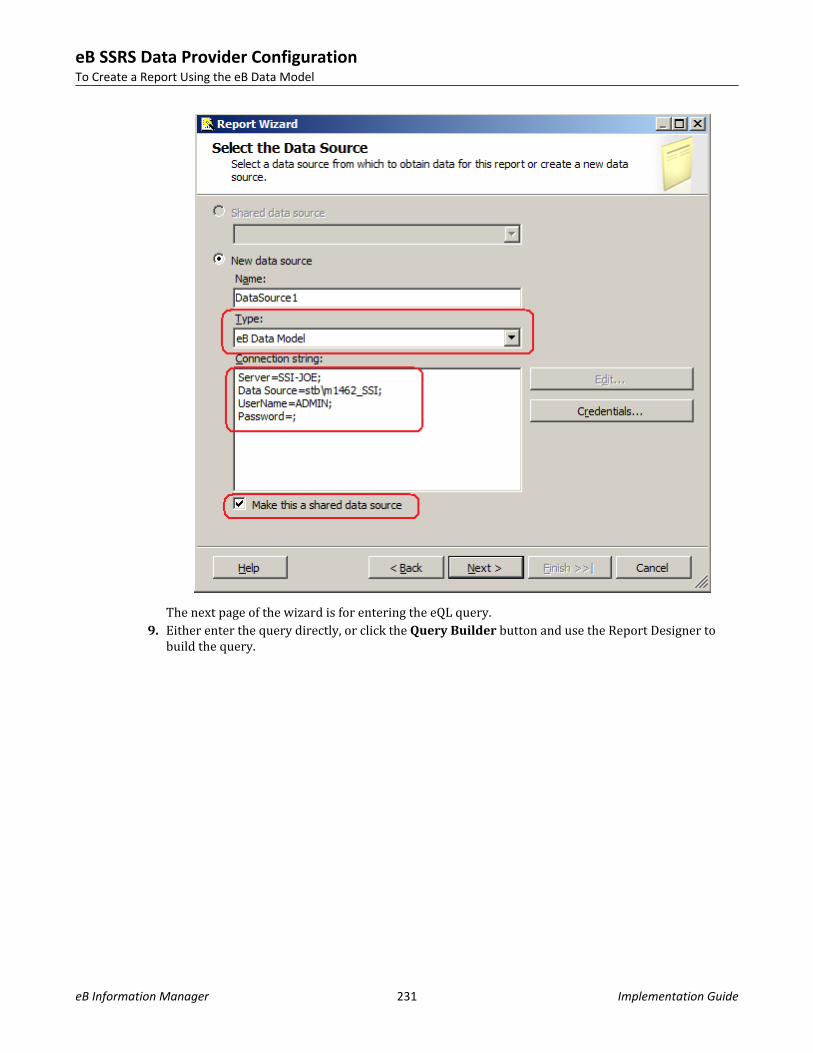
The next page of the wizard is for entering the eQL query.9. Either enter the query directly, or click the Query Builder button and use the Report Designer to
build the query.
eB SSRS Data Provider ConfigurationTo Create a Report Using the eB Data Model
eB Information Manager 231 Implementation Guide
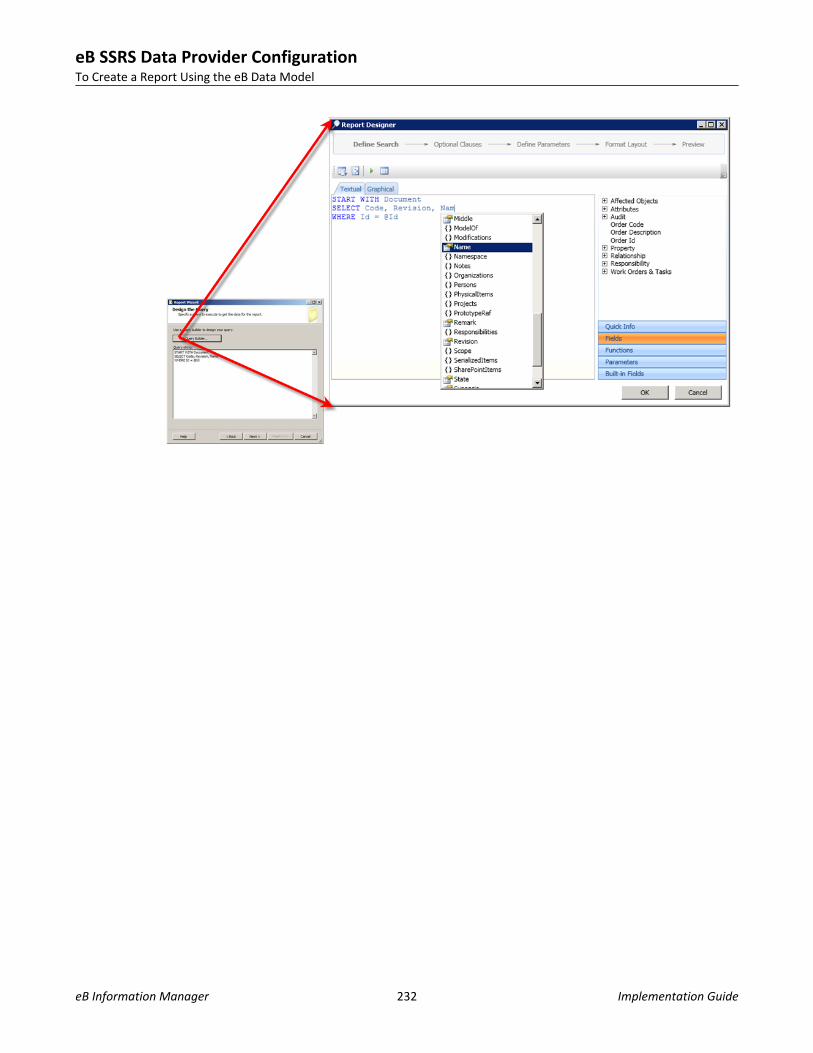
eB SSRS Data Provider ConfigurationTo Create a Report Using the eB Data Model
eB Information Manager 232 Implementation Guide

eB SSIS Components Configuration 12This chapter is for:
• IT managers• database administrators• Bentley Professional ServiceseB SSIS Components provides a method for client administrators and professional services to createrepeatable, secure data loads from both i-models and external data sources into eB.This chapter provides instructions for installing the eB SSIS Components required to import/updatedata in eB using SQL Server Integration Services.
Planning Your ConfigurationSQL Server Integration Services (SSIS) uses tasks to perform units of work in support of the extraction,transformation, and loading of data. The eB SSIS Components installer delivers the followingcomponents:• eB SSIS Integration - This component must be installed on a computer where SQL Server
Integration Services is installed. This option requires eB Work Queue Service, however if eB WorkQueue Service is not already installed on the computer, then the eB SSIS Components installer willalso install that service for you when you select this option.eB SSIS Integration includes the following items:• eB SSIS Components (32-bit and 64 bit):
• eB Connection Manager• Import Staged eB Data Task• Extract XML from i-model Task• Bentley Data Parser Component
• Execute SSIS Package Engine• Import Staged File Engine
• Staged Import Database Package - This component must be installed on an existing eB ApplicationServer (eB Core Server) computer.
These components are delivered through one of two MSI installers:• eB SSIS Components (x64).msi - can install all components on a 64-bit Windows computer• eB SSIS Components (x86).msi - can install all components on a 32-bit Windows computer
The easiest way to deploy these components is when eB Application Server and SQL Server IntegrationServices are installed on the same computer; in that case, you can install all the components at onceusing a single installer. However, if eB Application Server and SQL Server Integration Services are not onthe same computer, you will need to install the database files on the eB Application Server computer,then install the eB SSIS Integration component on the SQL Server Integration Services computer.
eB Information Manager 233 Implementation Guide

Before You Install eB SSIS Components1. Install SQL Server Integration Services (SSIS) 2008/2008 R2 on the computer you plan to install the
eB SSIS Integration components.Integration Services is an option of the SQL Server installer. For details, see http://msdn.microsoft.com/en-us/library/ms143731(SQL.105).aspxOn a 64-bit computer, you should install both the 32-bit and 64 bit-version of SQL Server IntegrationServices. The reason is that some SQL Server Integration Services components will only run in 32-bitmode. You could install only the 64-bit version, but you would be unable to use the 32-bitcomponents such as the Excel Datasource Component. All eB SSIS Components will run in 32-bit or64-bit mode.
2. Make sure the SQL Agent Service is running on the primary eB database server, which may or maynot be where SQL Server Integration Services is installed.This is required for the Import Staged eB Data Task to work. You will not be able to import data viaSSIS without this task and these services running.
Note: The installer will restart all eB services running on the computer.
To Install eB SSIS Components1. Browse to this folder in Windows Explorer:
...\Server Installation\eB SSIS Components2. Double-click the appropriate MSI file for the version of Windows you are running:
If using 32-bit Windows eB SSIS Components (x86).msi
If using 64-bit Windows eB SSIS Components (x64).msi
Note: The 64-bit installer will install both the 32-bit and 64-bit eB SSIS components if it detects thatboth the 32-bit and 64-bit version of SSIS are installed.
3. When the Setup Wizard opens, click Next.
eB SSIS Components ConfigurationBefore You Install eB SSIS Components
eB Information Manager 234 Implementation Guide

4. When the License Agreement page opens, accept the agreement and click Next.5. When the Custom Setup page opens, click Next.
eB SSIS Components ConfigurationTo Install eB SSIS Components
eB Information Manager 235 Implementation Guide
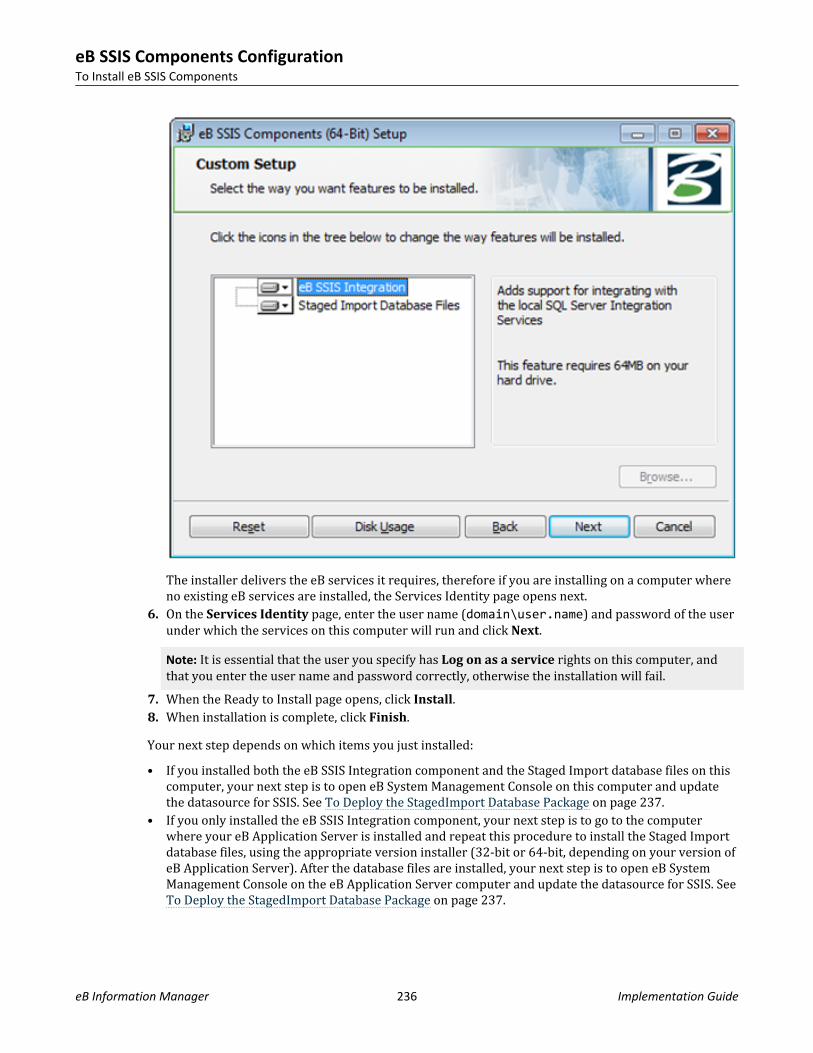
The installer delivers the eB services it requires, therefore if you are installing on a computer whereno existing eB services are installed, the Services Identity page opens next.
6. On the Services Identity page, enter the user name (domain\user.name) and password of the userunder which the services on this computer will run and click Next.Note: It is essential that the user you specify has Log on as a service rights on this computer, andthat you enter the user name and password correctly, otherwise the installation will fail.
7. When the Ready to Install page opens, click Install.8. When installation is complete, click Finish.Your next step depends on which items you just installed:• If you installed both the eB SSIS Integration component and the Staged Import database files on this
computer, your next step is to open eB System Management Console on this computer and updatethe datasource for SSIS. See To Deploy the StagedImport Database Package on page 237.
• If you only installed the eB SSIS Integration component, your next step is to go to the computerwhere your eB Application Server is installed and repeat this procedure to install the Staged Importdatabase files, using the appropriate version installer (32-bit or 64-bit, depending on your version ofeB Application Server). After the database files are installed, your next step is to open eB SystemManagement Console on the eB Application Server computer and update the datasource for SSIS. See To Deploy the StagedImport Database Package on page 237.
eB SSIS Components ConfigurationTo Install eB SSIS Components
eB Information Manager 236 Implementation Guide
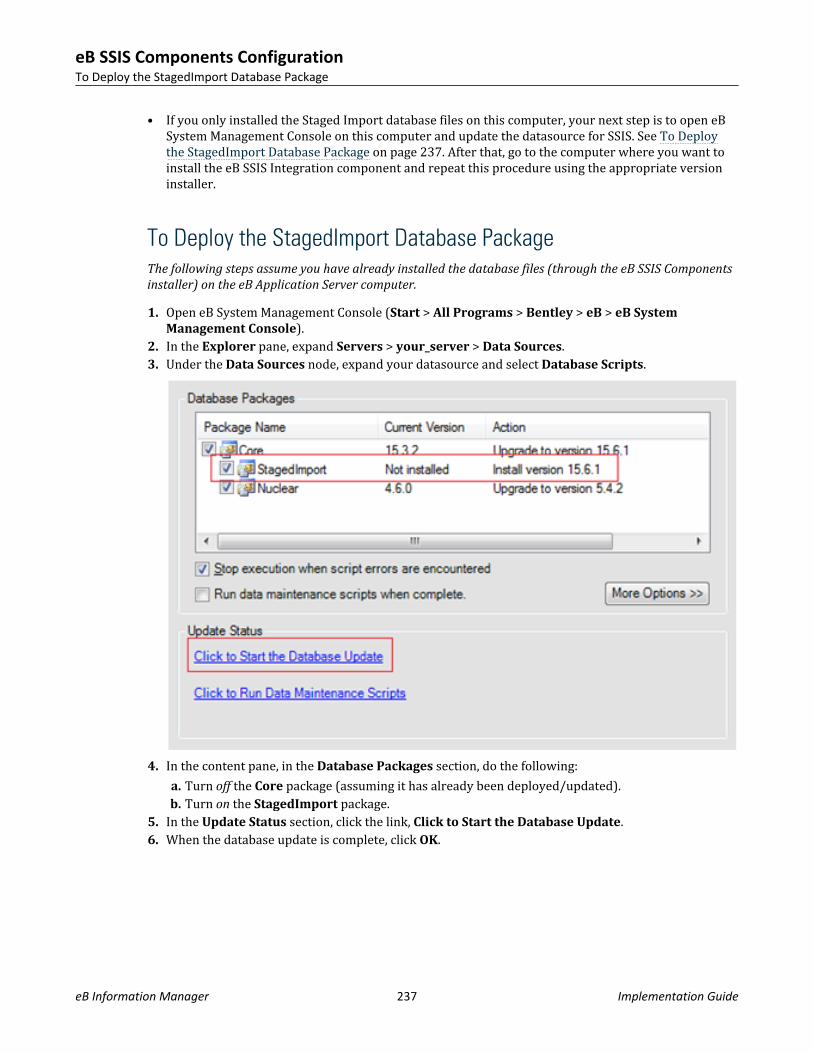
• If you only installed the Staged Import database files on this computer, your next step is to open eBSystem Management Console on this computer and update the datasource for SSIS. See To Deploythe StagedImport Database Package on page 237. After that, go to the computer where you want toinstall the eB SSIS Integration component and repeat this procedure using the appropriate versioninstaller.
To Deploy the StagedImport Database PackageThe following steps assume you have already installed the database files (through the eB SSIS Componentsinstaller) on the eB Application Server computer.
1. Open eB System Management Console (Start > All Programs > Bentley > eB > eB SystemManagement Console).
2. In the Explorer pane, expand Servers > your_server > Data Sources.3. Under the Data Sources node, expand your datasource and select Database Scripts.
4. In the content pane, in the Database Packages section, do the following:a. Turn off the Core package (assuming it has already been deployed/updated).b. Turn on the StagedImport package.
5. In the Update Status section, click the link, Click to Start the Database Update.6. When the database update is complete, click OK.
eB SSIS Components ConfigurationTo Deploy the StagedImport Database Package
eB Information Manager 237 Implementation Guide
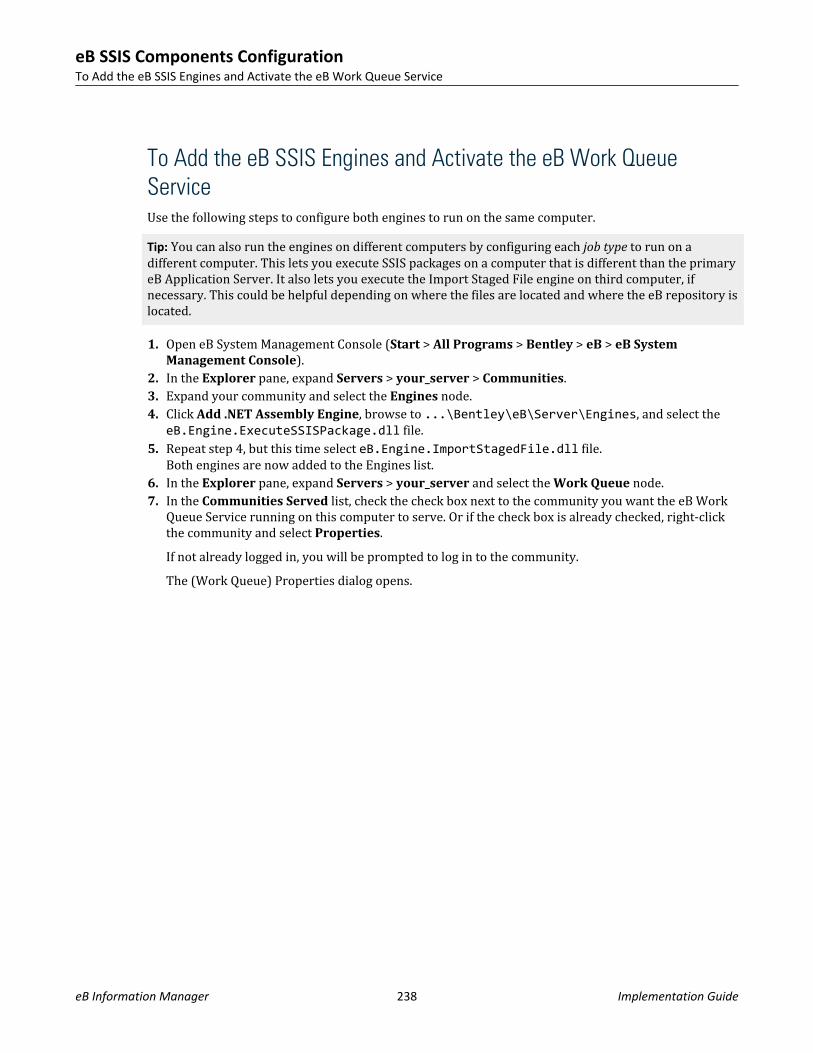
To Add the eB SSIS Engines and Activate the eB Work QueueServiceUse the following steps to configure both engines to run on the same computer.Tip: You can also run the engines on different computers by configuring each job type to run on adifferent computer. This lets you execute SSIS packages on a computer that is different than the primaryeB Application Server. It also lets you execute the Import Staged File engine on third computer, ifnecessary. This could be helpful depending on where the files are located and where the eB repository islocated.
1. Open eB System Management Console (Start > All Programs > Bentley > eB > eB SystemManagement Console).
2. In the Explorer pane, expand Servers > your_server > Communities.3. Expand your community and select the Engines node.4. Click Add .NET Assembly Engine, browse to ...\Bentley\eB\Server\Engines, and select the
eB.Engine.ExecuteSSISPackage.dll file.5. Repeat step 4, but this time select eB.Engine.ImportStagedFile.dll file.
Both engines are now added to the Engines list.6. In the Explorer pane, expand Servers > your_server and select the Work Queue node.7. In the Communities Served list, check the check box next to the community you want the eB Work
Queue Service running on this computer to serve. Or if the check box is already checked, right-clickthe community and select Properties.If not already logged in, you will be prompted to log in to the community.The (Work Queue) Properties dialog opens.
eB SSIS Components ConfigurationTo Add the eB SSIS Engines and Activate the eB Work Queue Service
eB Information Manager 238 Implementation Guide
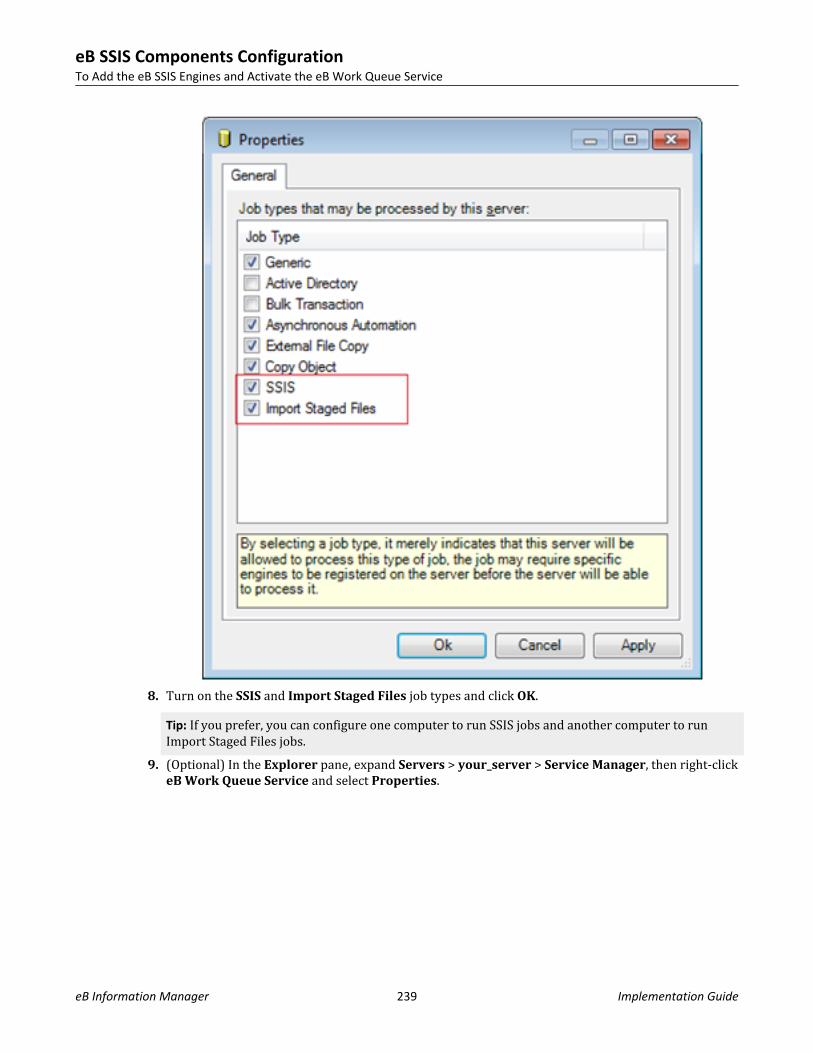
8. Turn on the SSIS and Import Staged Files job types and click OK.Tip: If you prefer, you can configure one computer to run SSIS jobs and another computer to runImport Staged Files jobs.
9. (Optional) In the Explorer pane, expand Servers > your_server > Service Manager, then right-clickeB Work Queue Service and select Properties.
eB SSIS Components ConfigurationTo Add the eB SSIS Engines and Activate the eB Work Queue Service
eB Information Manager 239 Implementation Guide
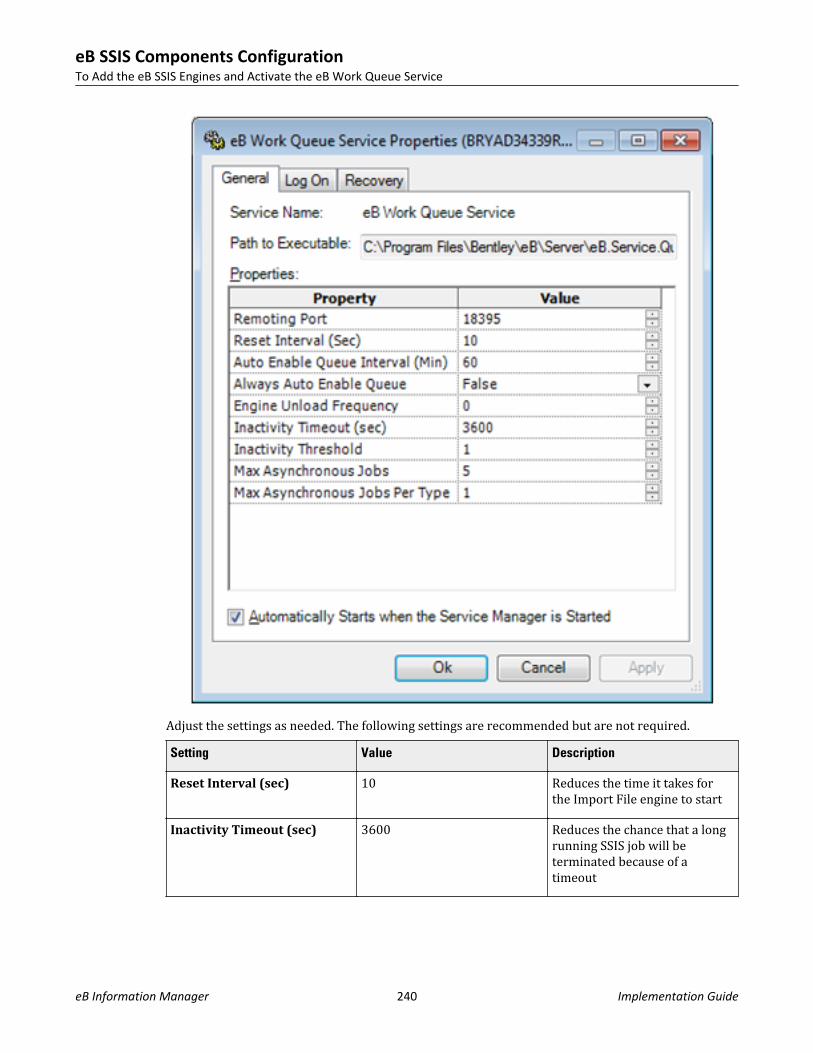
Adjust the settings as needed. The following settings are recommended but are not required.Setting Value Description
Reset Interval (sec) 10 Reduces the time it takes forthe Import File engine to start
Inactivity Timeout (sec) 3600 Reduces the chance that a longrunning SSIS job will beterminated because of atimeout
eB SSIS Components ConfigurationTo Add the eB SSIS Engines and Activate the eB Work Queue Service
eB Information Manager 240 Implementation Guide

Setting Value Description
Inactivity Threshold 1 Reduces the chance that a longrunning SSIS job will beterminated because of atimeout
Max Asynchronous Jobs 5 Any value greater than 2 willallow an SSIS job and ImportFile job to run at the same time
To Activate the Bentley Data Quality Server LicenseYou can skip this procedure if the Bentley Data Quality Server license is already activated.1. Open eB System Management Console (Start > All Programs > Bentley > eB > eB System
Management Console).2. In the Explorer pane, expand Servers > your_server and select the Licensing node.3. Click the License Management Tool link.
The License Management Tool dialog opens.
eB SSIS Components ConfigurationTo Activate the Bentley Data Quality Server License
eB Information Manager 241 Implementation Guide
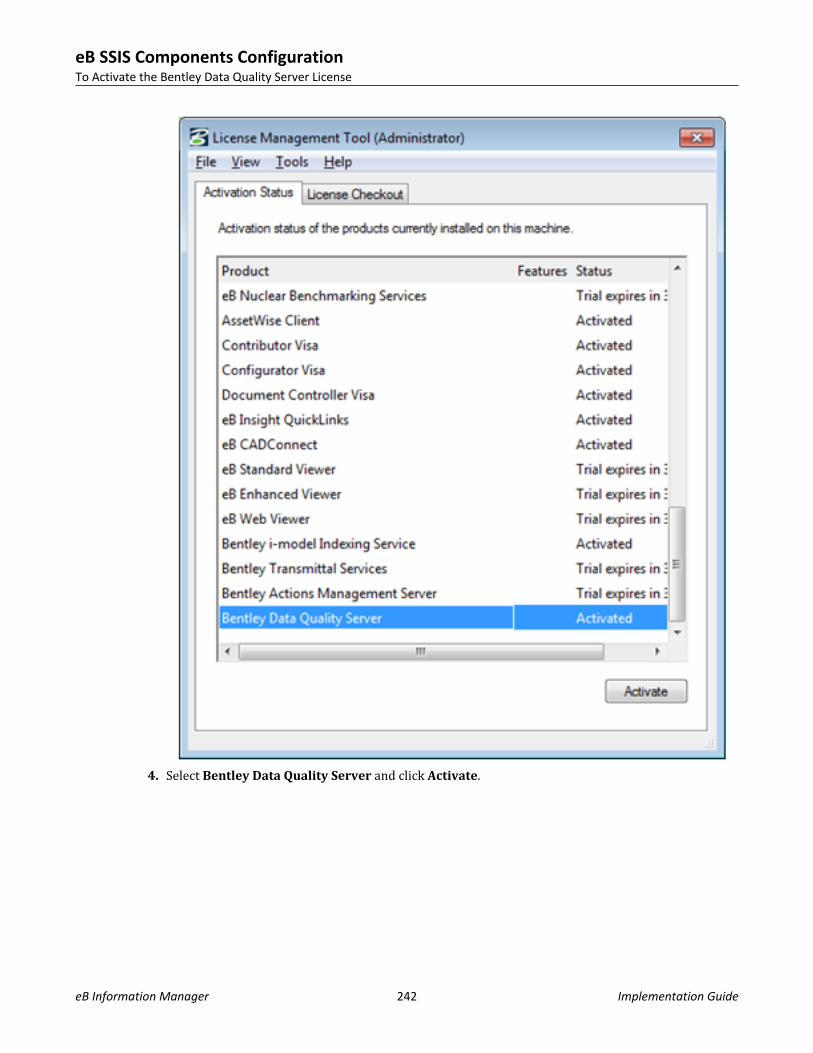
4. Select Bentley Data Quality Server and click Activate.
eB SSIS Components ConfigurationTo Activate the Bentley Data Quality Server License
eB Information Manager 242 Implementation Guide
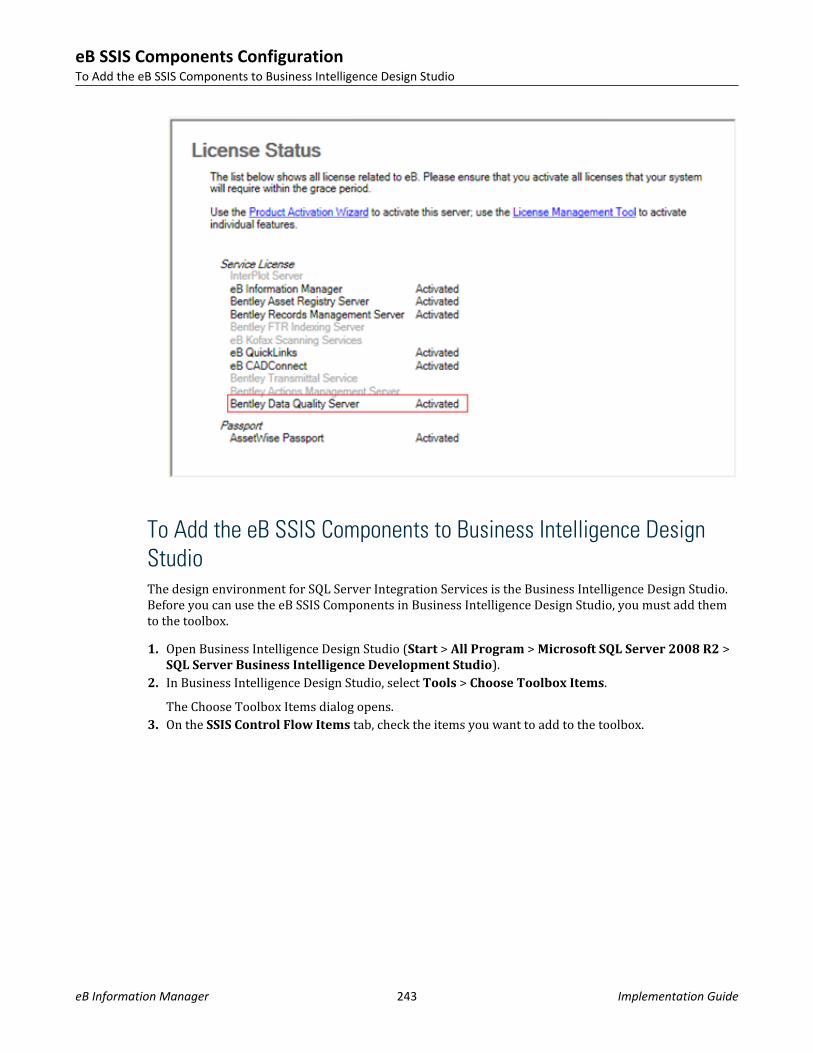
To Add the eB SSIS Components to Business Intelligence DesignStudioThe design environment for SQL Server Integration Services is the Business Intelligence Design Studio.Before you can use the eB SSIS Components in Business Intelligence Design Studio, you must add themto the toolbox.1. Open Business Intelligence Design Studio (Start > All Program > Microsoft SQL Server 2008 R2 >
SQL Server Business Intelligence Development Studio).2. In Business Intelligence Design Studio, select Tools > Choose Toolbox Items.
The Choose Toolbox Items dialog opens.3. On the SSIS Control Flow Items tab, check the items you want to add to the toolbox.
eB SSIS Components ConfigurationTo Add the eB SSIS Components to Business Intelligence Design Studio
eB Information Manager 243 Implementation Guide

4. On the SSIS Data Flow Items tab, check the items you want to add to the toolbox.
eB SSIS Components ConfigurationTo Add the eB SSIS Components to Business Intelligence Design Studio
eB Information Manager 244 Implementation Guide
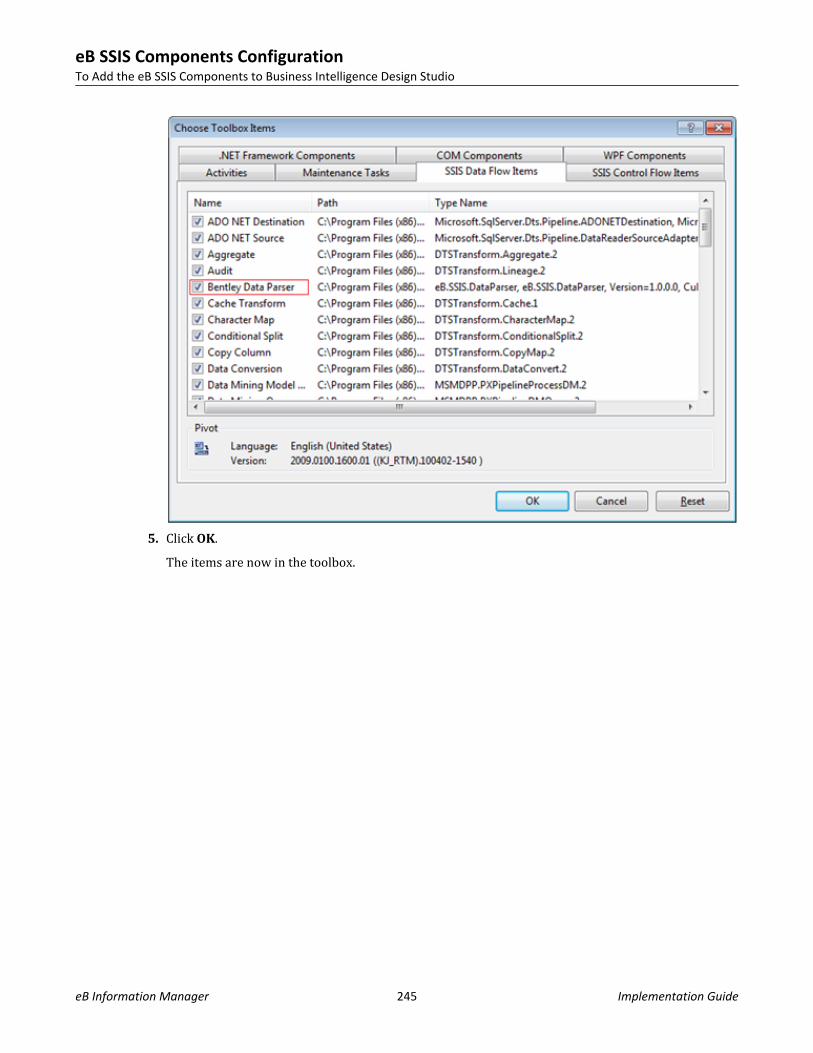
5. Click OK.The items are now in the toolbox.
eB SSIS Components ConfigurationTo Add the eB SSIS Components to Business Intelligence Design Studio
eB Information Manager 245 Implementation Guide
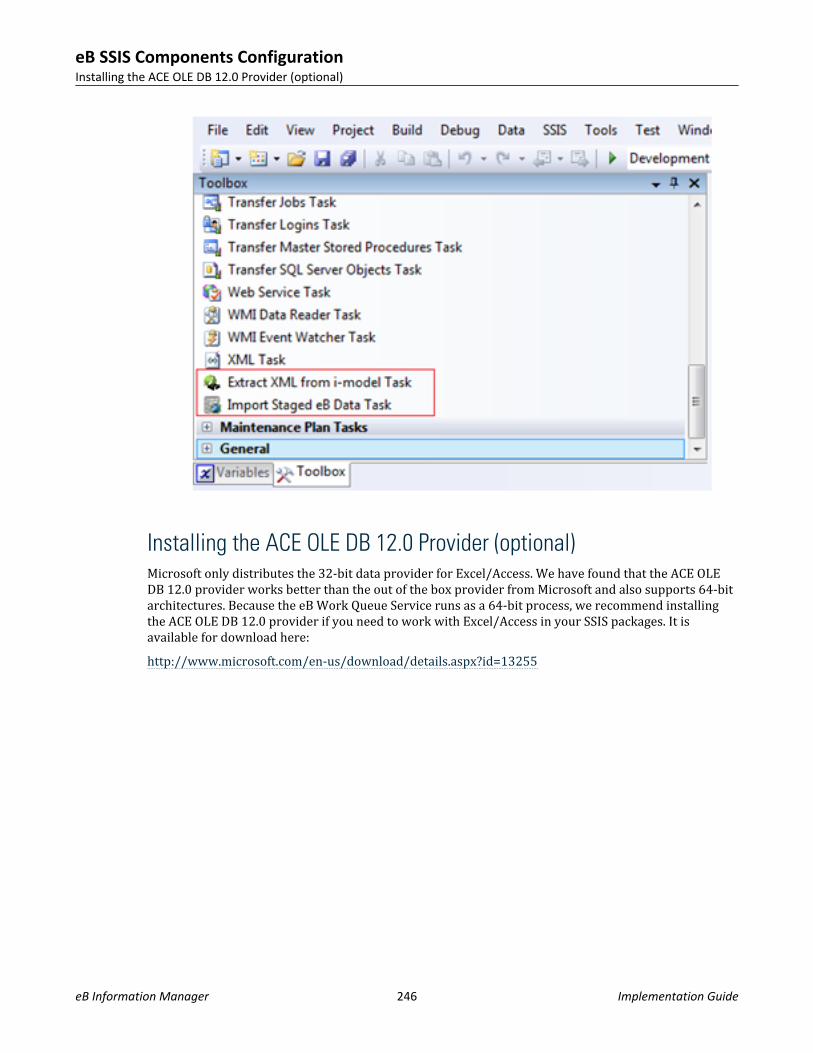
Installing the ACE OLE DB 12.0 Provider (optional)Microsoft only distributes the 32-bit data provider for Excel/Access. We have found that the ACE OLEDB 12.0 provider works better than the out of the box provider from Microsoft and also supports 64-bitarchitectures. Because the eB Work Queue Service runs as a 64-bit process, we recommend installingthe ACE OLE DB 12.0 provider if you need to work with Excel/Access in your SSIS packages. It isavailable for download here:http://www.microsoft.com/en-us/download/details.aspx?id=13255
eB SSIS Components ConfigurationInstalling the ACE OLE DB 12.0 Provider (optional)
eB Information Manager 246 Implementation Guide

Index
AActivate Product 29Add Printer 58Attributes
map ProjectWise 142mapping ProjectWise 140
ProjectWisemapping attributes
140register ProjectWise 141
AutoCAD 105
BBrava Options 84–87
CCAD-Connect Installation 101Capabilities, out-of-sync printer
66Community
configure to use SharePoint161
create 36Configuration 104Configuration Application 105Create Virtual Directory 78
DDeploy Database Files 69Deploy eB Web Applications 78Device 38dmskrnl.cfg 126Dynamic Content (IIS) 75
EeB Asset Painter Installation
117eB CAD-Connect
manually configure 108eB Change Package Web Plug-in
Install 68, 71, 75, 88, 89, 91,97, 117
eB Change Package Web Plug-inInstallation 88
eB Director Installation 71eB Engineering Designer
Installation 97eB Engineering Designer Web
Plug-inInstall 68, 71, 75, 88, 89, 91,
97, 117eB Engineering Designer Web
Plug-in Installation 88,89
eB Event Tracking ManagerInstallation 68
eB Event Tracking ManagerWeb Plug-in Installation91
eB Layout Editor Installation 71eB Print Service 56eB SharePoint Installers 149eB SharePoint References 177eB SSIS Components 233eB SSRS Data Provider 227eB Web Applications
Installation 75ebapplicationpages.wsp
add 156error messages 223
FFile Copy 216for SharePoint objects 167
IIIS Settings for eB Web Server
75
Index Term 177Install
eB Asset Painter 117eB Change Package Web
Plug-in 88eB Director 71eB Engineering Designer 97eB Engineering Designer
Web Plug-in 89eB Event Tracking Manager
68eB Event Tracking Manager
Web Plug-in 91eB Layout Editor 71eB Web Applications 75
InstallationCAD-Connect 101
KKerberos 200
LLaunch setting 114Layout Editor
settings for SharePoint 171Licensing 29
MMap ProjectWise Attributes 142Media Services 45MicroStation
manually configure 107
OOpenSearch
configuration 188Oracle User Permissions 18
eB Information Manager 247 Implementation Guide

PPorts 54–56Ports, ProjectWise 125Print Template 59Print Templates 56Printer
capabilities 66out-of-sync 66remove 67update 66
Printer, Add 58Product Activation 29Product Activation Wizard 29ProjectWise
database files 125deleted objects 143document registration 139duplicates 140Map Attributes 142object security 143register environment
attributes 141ProjectWise Database Files 128,
237ProjectWise File Driver 132ProjectWise Integration
eB System ManagementConsole settings 123
ProjectWise Ports 125ProjectWise Queue Engine 128
ProjectWise Reports 144ProjectWise Repository 132
QQueue Engine, ProjectWise 128
RRegister ProjectWise
Environment Attributes141
Reports 144Repository 41
SScopes 167SharePoint
troubleshooting 223add 156configure a community for
161ebapplicationpages.wsp
148, 156Layout Editor settings 171scopes 167Web solution 156
SharePoint Integration 147SharePoint Versions 147Storage Device 38
svcutil.exe 118
TTemplate, Print 59Troubleshooting 221, 223
UUpdate Datasource
for ProjectWise 128, 237Update Datasource/Database 69Upgrade
eB Core Server 23eB Director 71eB Web Applications 75
User Interface 210
VVirtual Directory
adding plug-ins 92Visual Navigator
mapping configuration 93VisualNavigationMapping.xml
93
Wweb.config
Brava options 84–87
eB Information Manager 248 Implementation Guide