e-info Installation Guide
11
e-info Installation Guide Last Update: 7/25/13 © Digital Gateway, Inc. All rights reserved Page 1
-
Upload
khangminh22 -
Category
Documents
-
view
0 -
download
0
Transcript of e-info Installation Guide

e-info Installation Guide
Last Update: 7/25/13 © Digital Gateway, Inc. All rights reserved Page 1
Overview e-info is an add-on product to e-automate that you may use to offer your customers controlled access to their account information in your e-automate database as well as controlled access to limited e-automate functionality. With e-info, your customers can view their equipment, order supplies, request service calls, enter meters, view their account history, schedule to pay invoices with CC or ACH account, and view their service history. Your customers have this access through a web site you provide them. Before you install e-info there are a few requirements that are essential to your e-info installation. Installing e-info requires you have Internet Information Services (IIS) 7 or greater installed on your web server. We do not support IIS 6 or lower. You must have .NET v4.0 Framework (Web Installer) loaded on your machine before installing e-info. Some computers may come with .NET v4.0 Framework, but this is not what you need. You must have the .NET 4.0 Framework (Web Installer). The .NET 4.0 Framework (Web Installer) can be found on Microsoft’s Download Center. You must secure the following three pieces of information before beginning the e-info installation process. • Database server name • e-admin full access password • e-automate company database name Digital Gateway recommends installing e-info on a web server that does not have your e-automate database to minimize security risks.
Installing the .NET 4.0 Framework (Web Installer) 1. Go to www.microsoft.com. 2. Click Downloads from the menu located at the top of the page. 3. From the dropdown menu, click on Download Center.
Last Update: 7/25/13 © Digital Gateway, Inc. All rights reserved Page 2

4. Once in the Download Center search for .Net v4.0 Framework Web Installer. 5. Click on the option labeled Microsoft .NET Framework 4 (Web Installer).
The option to download the installer for Microsoft .NET Framework 4 (Web Installer)
Last Update: 7/25/13 © Digital Gateway, Inc. All rights reserved Page 3

6. Download the installer and install the application.
Installing e-info on the Web Server 1. Verify you have installed Microsoft. V4.0 .NET Framework (Web Installer). 2. Navigate to the location where you saved the e-info installer, e-infoWebSetup.exe. 3. Double-click on the e-infoWebSetup.exe file to launch the e-info installer.
4. In the Choose the component install options below window, check the e-info website checkbox.
5. If you want the installer to list every single file that copies to your computer with the e-info installation and provide a more detailed account of the installation, also check the Verbose install (not recommended). You must have both the e-info website and the Verbose
Last Update: 7/25/13 © Digital Gateway, Inc. All rights reserved Page 4

install (not recommended) checkboxes checked in order to execute the verbose installation. Note: The Verbose installation takes significantly more time to execute than the regular installation. This is due to the amount of extra information the Verbose installation provides.
6. Click [Next>>]. The Choose the file system install location below window.
7. In the Choose the file system install location below window you choose the location where you want to install the e-info components. If you want to install the e-info components in the default location, leave the path that is displayed in the Install path field. If you want to choose an alternate destination, click […] to navigate to your desired location and click [OK].
8. Click [Next>>]. The Click Finish to perform the listed actions window.
Last Update: 7/25/13 © Digital Gateway, Inc. All rights reserved Page 5

9. Click [Finish]. The End user license agreement window displays. 10. Read through the Software License Agreement. If you agree with the terms and conditions click
[Accept]. The Please supply the listed parameters window opens.
11. Enter the following information in the corresponding fields. Enter a valid network name for the database server: Name of the SQL server. Specify the e-automate company database: Company you want linked to e-info. Enter the system full access password (specified in e-admin) here: Full access password to your e-automate system that you entered when installing e-admin. Note: The information in these fields is saved in and can be accessed from the web.config file.
12. Click [OK] to begin the installation process.
Last Update: 7/25/13 © Digital Gateway, Inc. All rights reserved Page 6

13. You must now specify where you want to install the web site. Do one of the following. • If you want install the website to the existing website, do the following.
a. Select Add Virtual Directory to existing Website. b. In the Website field, select the desired website. c. Click [Next >]. The following window displays.
d. In the Name field, enter a name for the virtual directory. e. Click [Next]. The following window displays.
Last Update: 7/25/13 © Digital Gateway, Inc. All rights reserved Page 7
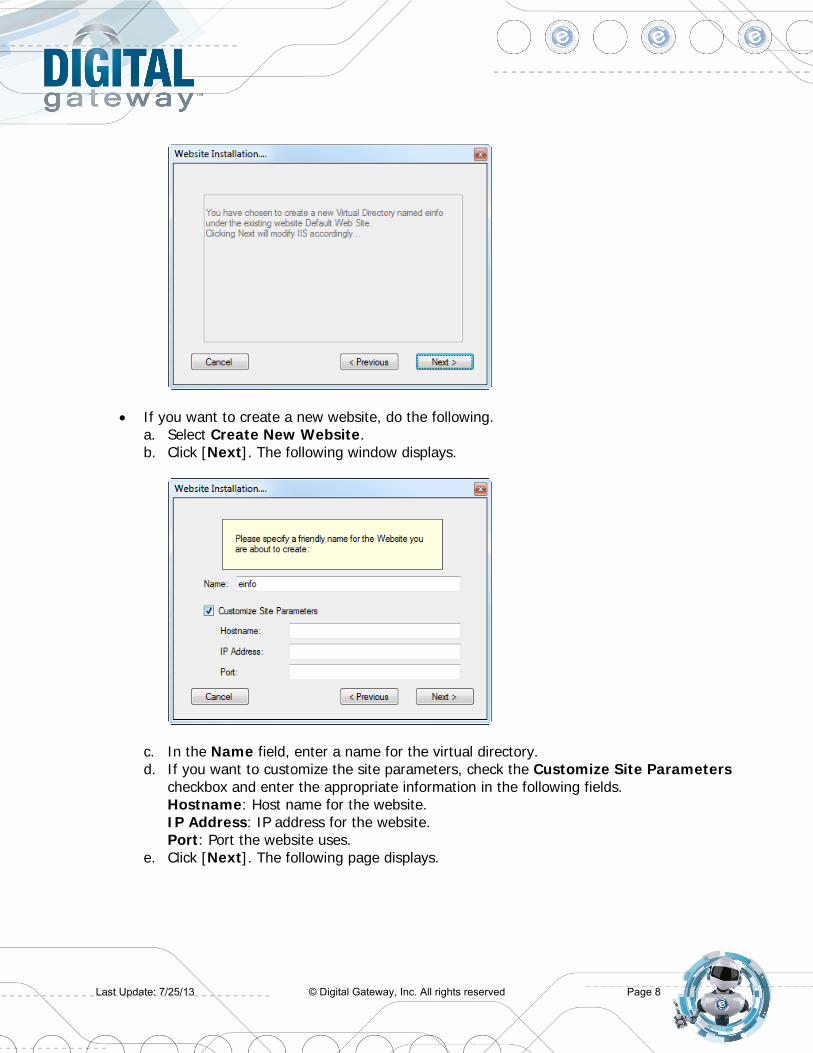
• If you want to create a new website, do the following. a. Select Create New Website. b. Click [Next]. The following window displays.
c. In the Name field, enter a name for the virtual directory. d. If you want to customize the site parameters, check the Customize Site Parameters
checkbox and enter the appropriate information in the following fields. Hostname: Host name for the website. IP Address: IP address for the website. Port: Port the website uses.
e. Click [Next]. The following page displays.
Last Update: 7/25/13 © Digital Gateway, Inc. All rights reserved Page 8

14. Click [Next >] to complete the installation process. The installation summary lists the progress of the install and informs you know whether or not the installation was successful and provides information on what failed, if the installation was unsuccessful. If you had selected the Verbose installation, this window lists every file that installs.
15. Click [Close] to exit the installer.
Configuring the .NET 4.0 Framework The e-info website uses the 'ASP .NET v4.0 Integrated' Application Pool. If the .NET 4.0 Framework has previously been installed or you install the .NET Framework before installing e-info, the system
Last Update: 7/25/13 © Digital Gateway, Inc. All rights reserved Page 9

should automatically configure properly. If you install e-info and then install the .NET 4.0 Framework, you must configure the system to use .NET Framework. To correctly configure .NET 4.0 Framework, do the following. 1. Obtain and install .NET 4.0 Framework. If you do not know where to get the installer, ask your
IT professional. 2. After you have installed .Net v4.0 Framework, open the IIS Manager. 3. In the Connections pane, expand the server menu.
4. Select the website name.
5. In the Actions pane, click on Basic Settings…
Last Update: 7/25/13 © Digital Gateway, Inc. All rights reserved Page 10
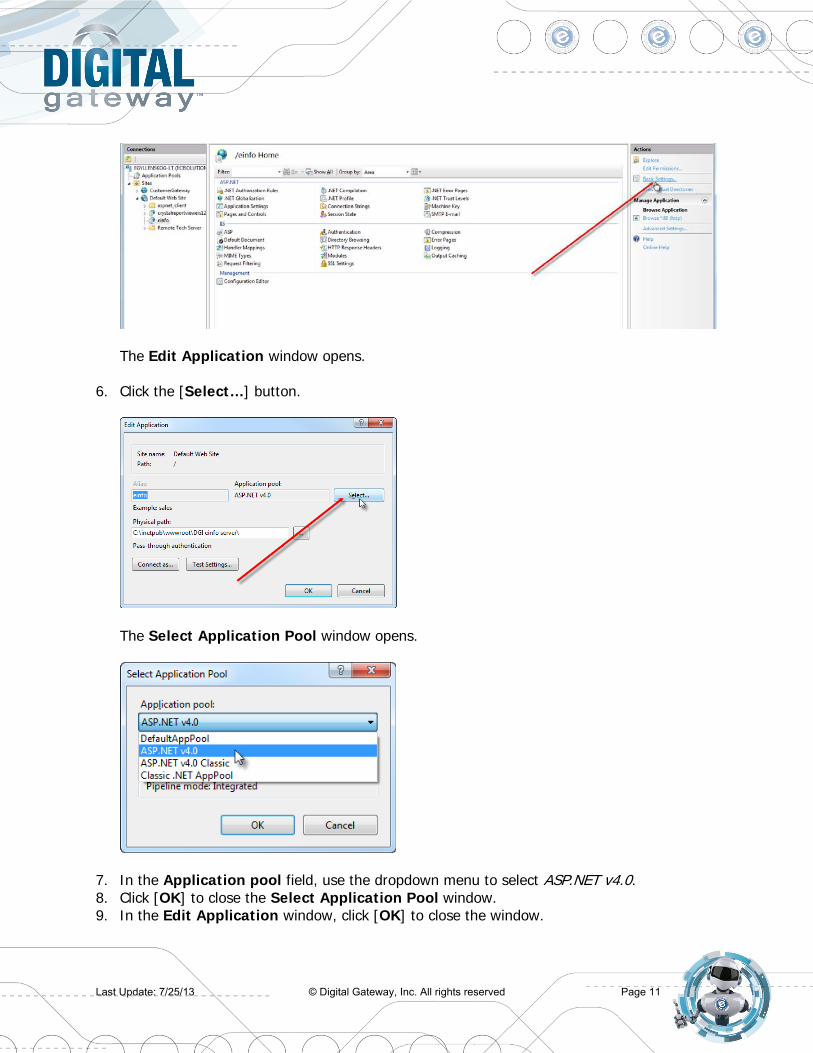
The Edit Application window opens.
6. Click the [Select…] button.
The Select Application Pool window opens.
7. In the Application pool field, use the dropdown menu to select ASP.NET v4.0. 8. Click [OK] to close the Select Application Pool window. 9. In the Edit Application window, click [OK] to close the window.
Last Update: 7/25/13 © Digital Gateway, Inc. All rights reserved Page 11