The Expendables: Community Organizations and Governance Dynamics in the Canadian Settlement Sector
Upload
khangminh22Category
view
2download
0
P5 PresentationArchitectural Engineering
Graduation studio
Design of a Community centre for the settlement
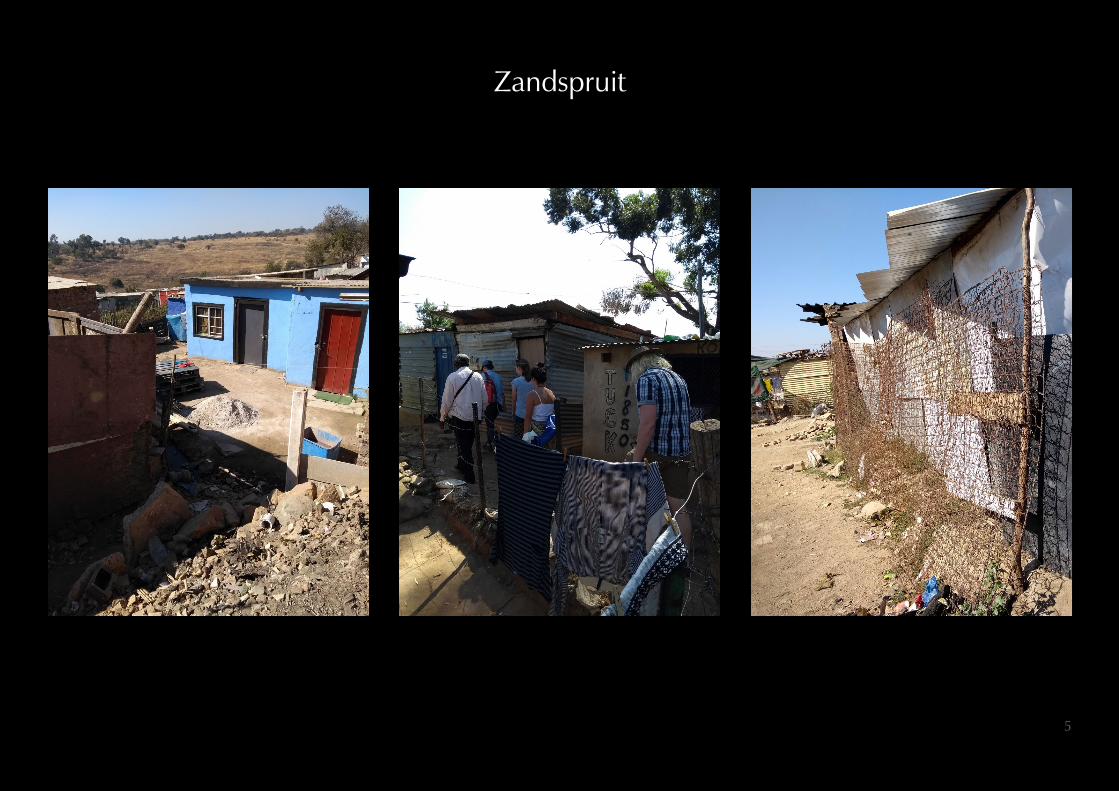
Zandspruit
Name: Denise StevensStudent nr: 42229701st mentor: Mo Smit2nd mentor: Marcel BilowDate: 24-01-2020

2
My trip to Southern Africa
Gauteng
Johannesburg

3
Volunteering
MultipleOrganizations

4
Pastor Emmanuel
5
Zandspruit

6
‘You would not survive one night in my house’

7
What could I do to help?

8
?

9
Creation of settlements
• Rural population

10
Creation of settlements
• Rural population migrates to the city

11
+ -
Creation of settlements
+ ++
+ - + -

12
• Difficulty with ownership of land or house
• Finding a job
• Difficult transition to middle class areas
• Noise disturbance
• Food insecurity
• Crowded
• Safety
• Bad living conditions
Problems of settlements

13
Problems of settlements
• Difficulty with ownership of land or house
• Finding a job
• Difficult transition to middle class areas
• Noise disturbance
• Food insecurity
• Crowded
• Safety
• Bad living conditions

14
Focus
? + +

15
Research
What is the potential of waste material in the process of upgrading a shack house?

16
Research
Paper, cardboard & plastic Paper & water Paper, cardboard & plastic

17
Research
INSPIRATION SHEETPlastic bottles
The South African population uses more than 3 million PET bottles a year, but only half of this amount is being recycled. A lot of plastic bottles are thrown away after just one use and end up on a landfill site. If you have plastic bottles but can’t or don’t want to recycle them, you can use them to improve or decorate your house.
Introduction
Insulation1.
2.
3.
4.
Why?Insulation makes the house warmer during winter and cooler during summer.
Tools needed
Tools
Additives
Time frame
Additional material
Ventilation
Materials needed
Take the plastic pieces and put it into the plastic bottles. Make sure to not put too much into one bottle. There still needs to be enough space left
Take a piece of cardboard, place the bottles on it and draw a circle around the cap. Cut out the circles
Take the cap from the bot-tle, place the neck through the opening and screw the cap back on. Repeat for all bottles
bottles - paper/plastic - cardboard
5.
6.By covering up the panels the insulation works even better
Cut out the rest of the carboard to fit around the bottles. Connect them together. The panel is finished. Repeat for whole house insulation
1.
2.
3.
4.
5.
6.
Why?Ventilating the house makes the house cooler when its warm. This panel can be placed in the win-dow frame when desired
Tools needed
Tools
Additives
Time frame
Additional material
Materials needed
bottles - cardboard
Collect a lot of bottles and cardboard that would fit in the window frame
Cut holes out the board for the bottles. Make sure to space them enough so the bottles fit
Cut the bottles in half with the knife
Cut away the top of the bottle caps
Mount the bottles on the board and screw the caps back on
7.The panel is finished and can be placed inside the window frame. It is important to place the big openings on the outside and the small openings on the inside
Table
Tools
Additives
Time frame
Additional material
Hand tools Small electric* Big machinery
None
Hours
None
Natural**
1 day
One
Chemical
Multiple days
Multiple* Drill machine, blender, shredder** Water, sugar, flower
INSPIRATION SHEETPlastic bottles
The South African population uses more than 3 million PET bottles a year, but only half of this amount is being recycled. A lot of plastic bottles are thrown away after just one use and end up on a landfill site. If you have plastic bottles but can’t or don’t want to recycle them, you can use them to improve or decorate your house.
Introduction Table
Gardening1.
2.
3.
4.
Why?Grow your own herbs and vegetables. Or use the hangers for plants to deco-rate the house or garden
Tools needed
Tools
Additives
Time frame
Additional material
Hand tools Small electric* Big machinery
None
Hours
None
Natural**
1 day
One
Chemical
Multiple days
Multiple
Tools
Additives
Time frame
Additional material
Lighting
Materials needed
* Drill machine, blender, shredder** Water, sugar, flower
Take a bottle and cut it in half. Repeat this step for a few bottles
Make 2 holes in the sides of the bottle pieces, big enough to fit a rope
Put a rope through one hole and make a knot at the end. Repeat for the other side. You can place as many bottle pieces onto a rope as you would like
bottles - rope - soil
5.
6.The hanger is done. Now place the soil and seeds into the bottles and hang it in a sunny place
Make a hole in the bottom of each bottle piece. This is either the bottom of the bottle or the cap
1.
2.
3.
4.
5.
6.
Why?To have light inside the house during the day without having to use electricity
Tools needed
Tools
Additives
Time frame
Additional material
Materials needed
bottles - sheets - glue - water
Take a sheet and cut out a hole the size of the plastic bottle. Then make small incisions in the rim
Push the bottle through the opening. Secure the bottle onto the sheet with the help of glue
Fill the bottle with water and a bit of bleach
Cut a hole in the roof the size of the bottle. Place the bottle with sheet onto the roof ansd secure with glue
The last step is securing the bottle cap with glue
7.The light is now finished and should make it lighter inside during the day
7.A lot of variations are possible with these materials This ‘Liter of Light’ is an open source design, initiated by the MyShelter Foundation
INSPIRATION SHEETCardboard
Cardboard is a material that is mostly used by offices and stores to pack objects, food etc. Cardboard can be brought to a recycle centre but can also be used for improving the house, f.i. making insulation panels or furniture.
Introduction
Insulation panel 1.
Why?Insulation makes the house warmer during winter and cooler during summer.
Tools needed
Tools
Additives
Time frame
Additional material
Furniture
Materials needed
Take the cardboard and draw measurements of how big you want the panels to be
Cut the cardboard and make undeep cuts where the cardboard needs to fold
Attach the sides onto the carboard with glue, nails or another material
cardboard - paper/plastic
The panels can be stacked to create an insulating wall
The panel is ready and can be loosely filled with paper shreds or plastic. Repeat the steps to create panels for the entire house
Why?If you need an extra stool or table, carboard is the ideal material to make this furniture in a fast and simple way
Tools needed
Tools
Additives
Time frame
Additional material
Materials needed
Cardboard
Take a piece of cardboard and draw two rectangles and a circle. make sure the rectangles have two small parts sticking out on the top to click the circle on in a later step
Cut out the pieces. Make incisions in the longitudinal direction till halfway. Make 4 incisions in the circle, matching the distance of the parts of the rectangles
Make the two rectangles slides into each other at the place of the incisions. This way a cross is formed
Place the circle on top and make sure it is secure and stable enough to sit on
The stool is finished.A lot of other furniture can be made in a simple way by using cardboard
Table
Tools
Additives
Time frame
Additional material
Hand tools Small electric* Big machinery
None
Hours
None
Natural**
1 day
One
Chemical
Multiple days
Multiple* Drill machine, blender, shredder** Water, sugar, flower
2.
3.
4.
5.
6. 6.
5.
4.
3.
2.
1.
INSPIRATION SHEETPaper
The material paper can be seen of one of the biggest types of waste generated in South Africa. This waste is produced by offices and private households. A lot of paper isn’t being reycled. Next to recycling, paper waste is a simple and perfect material to improve your house by using it as insulation.
Introduction Table
Insulation1.
Why?Insulation makes the house warmer during winter and cooler during summer.
Tools needed
Tools
Additives
Time frame
Additional material
Hand tools Small electric* Big machinery
None
Hours
None
Natural**
1 day
One
Chemical
Multiple days
Multiple
Tools
Additives
Time frame
Additional material
Insulation
Materials needed
* Drill machine, blender, shredder** Water, sugar, flower
Shred the paper into strips, by hand or with a paper shredder
Make the paper strips even smaller by hand or by using a scissor and put them in a bowl or bucket
Add water to the paper shreds and leave it to soak for some time
paper - water
Get the excess water out by using a sieve
Whilst still in the water, make the paper shreds smaller by ripping it with your hands or by using a blender
Tools needed
Tools
Additives
Time frame
Additional material
Materials needed
paper - water - plastic
Start with the paper pulp that can be created by following the steps on the left side of this page
Take an object that could function as a mold, like a brick (example uses a cake form) and cover with plastic
Take the paper pulp and press it on the mold. Make sure the layer is thick enough to give it strength and stability
Leave the mold to dry in the sun. Regularly check to see if it is already dry
When the mold is finished it can be filled with paper shreds as insulation
Repeat the steps for insu-lation for the entire house, and stack them like a wall
2.
3.
4.
5.
6.
7.
6.
5.
4.
3.
2.
1.
Why?Insulation makes the house warmer during winter and cooler during summer.
Leave the paper pulp to dry in the sun. After this it can be processed further or used as insulation filling in panels
7.
( )
INSPIRATION SHEETPaper
The material paper can be seen of one of the biggest types of waste generated in South Africa. This waste is produced by offices and private households. A lot of paper isn’t being reycled. Next to recycling, paper waste is a simple and perfect material to improve your house by using it as insulation.
Introduction Table
Insulation1.
Why?Insulation makes the house warmer during winter and cooler during summer.
Tools needed
Tools
Additives
Time frame
Additional material
Hand tools Small electric* Big machinery
None
Hours
None
Natural**
1 day
One
Chemical
Multiple days
Multiple
Tools
Additives
Time frame
Additional material
Insulation
Materials needed
* Drill machine, blender, shredder** Water, sugar, flower
Shred the paper into strips, by hand or with a paper shredder
Make the paper strips even smaller by hand or by using a scissor and put them in a bowl or bucket
Add water to the paper shreds and leave it to soak for some time
paper - water
Get the excess water out by using a sieve
Whilst still in the water, make the paper shreds smaller by ripping it with your hands or by using a blender
Tools needed
Tools
Additives
Time frame
Additional material
Materials needed
paper - water - plastic
Start with the paper pulp that can be created by following the steps on the left side of this page
Take an object that could function as a mold, like a sheet (example uses an oven tray) and cover with plastic
Take the paper pulp and press it on the mold. Make sure the layer is thick enough to give it strength and stability
Leave the mold to dry in the sun. Regularly check to see if it is already dry
When the mold is finished it can be filled with paper shreds as insulation
Repeat the steps for insu-lation for the entire house, and use it as boards
2.
3.
4.
5.
6.
7.
6.
5.
4.
3.
2.
1.
Why?Insulation makes the house warmer during winter and cooler during summer.
Leave the paper pulp to dry in the sun. After this it can be processed further or used as insulation filling in panels
7.
( )
INSPIRATION SHEETTires
As South Africa has a lot of cars driving around, the country also counts a lot of tires that are being thrown away. Stockpiles count millions of tires, to which about 10 million every year are added.The business of recycling these tires only just started. The tires can also be used to improve the house construction or as decoration like furniture.
Introduction Table
Furniture1.
Why?Easy to make furniture that could be used indoors and outdoors
Tools needed
Tools
Additives
Time frame
Additional material
Hand tools Small electric* Big machinery
None
Hours
None
Natural**
1 day
One
Chemical
Multiple days
Multiple
Tools
Additives
Time frame
Additional material
Construction
Materials needed
* Drill machine, blender, shredder** Water, sugar, flower
Collect a couple of tires. You need two or three to make a chair
Make 32 holes at the same distance of each other in the upper rim, big enough to fit the rope/elastic
Pull the elastic from the inside to the outside, mak-ing a knot in the end. Put the elastic from outside to inside 8 holes further
tires - rope/elastic
Repeat step 5, but change the direction a quarter turn. Go over the first elastic and under the second, making a braided pattern to make it strong enough
Make the elastic come out on the hole next to it and cross it over to the other side, place it outside in and repeat until you have 8 lines.
Why?Tires used for construc-tion of the house give it strength and the thickness makes a good insulation
Tools needed
Tools
Additives
Time frame
Additional material
Materials needed
tires - earth/soil
Collect a lot of tires to build the construction of the house
Place the first row of tires where you want the walls of the house to be
Fill up the tires with soil
Place a second row of tires on top of the first, creating a staggered pattern
From the second row onwards, place something in the bottom of each tire to prevent the soil from coming out
When the wall construction is ready, the tires can be covered with a finishing
2.
3.
4.
5.
6.7.
6.
5.
4.
3.
2.
1.
( )

18
Research
Paper pulp variations
Building construction

19
Plot in Zandspruit settlement
Creche
Plot
• Edge of settlement
• Next to childrens creche
• Plan for community serving function
N

20
Plot in Zandspruit settlement

21
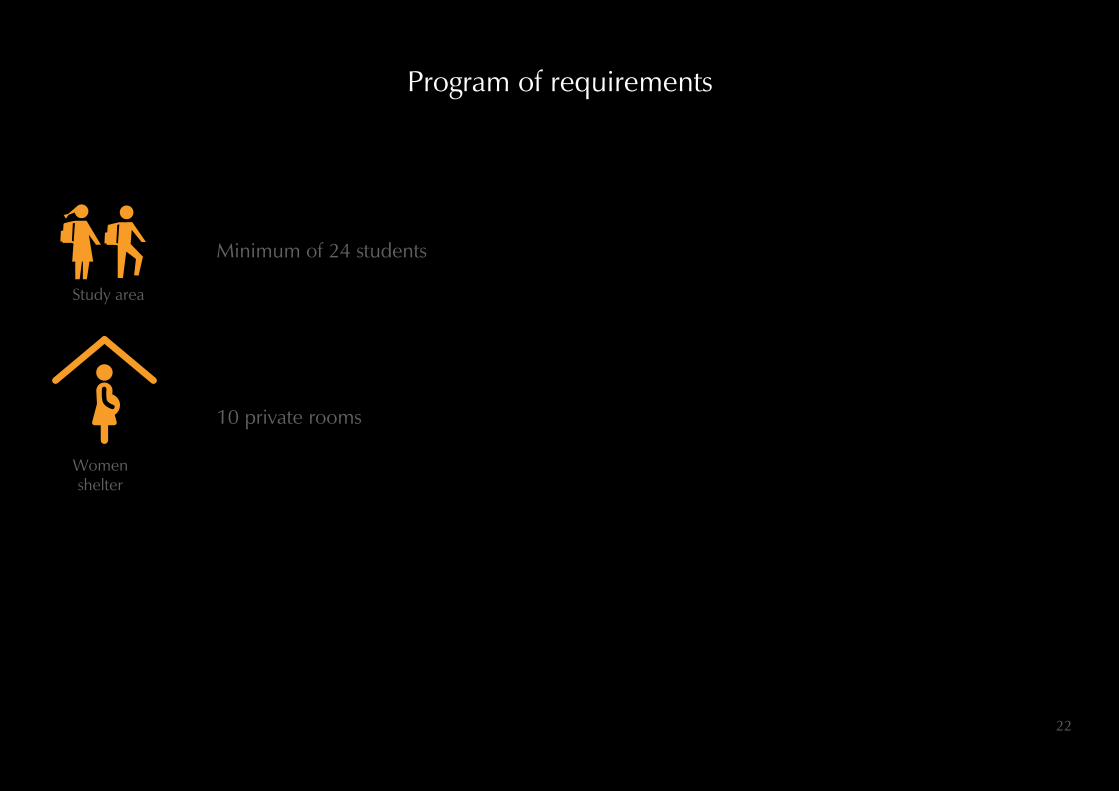
Program of requirements
Study area
Women shelter
Kitchen
Multifunctional room
Office
Minimum of 24 students
10 private rooms
Cooking for minimum 24 studentsHelping +- 30 families with food bags
For a minimum of 30/40 people
3 service workers during the day
Toilet
Total of 4 toilets
22
Program of requirements
Study area
Women shelter
Kitchen
Multifunctional room
Office
Minimum of 24 students
10 private rooms
Cooking for minimum 24 studentsHelping +- 30 families with food bags
For a minimum of 30/40 people
3 service workers during the day
Toilet
Total of 4 toilets

23
Program of requirements
Study area
Women shelter
Kitchen
Multifunctional room
Office
Minimum of 24 students
10 private rooms
Cooking for minimum 24 studentsHelping +- 30 families with food bags
For a minimum of 30/40 people
3 service workers during the day
Toilet
Total of 4 toilets

24
Program of requirements
Study area
Women shelter
Kitchen
Multifunctional room
Office
Minimum of 24 students
10 private rooms
Cooking for minimum 24 studentsHelping +- 30 families with food bags
For a minimum of 30/40 people
3 service workers during the day
Toilet
Total of 4 toilets
Study area
Women shelter
Kitchen
Multifunctional room
Office
Minimum of 24 students
10 private rooms
Cooking for minimum 24 studentsHelping +- 30 families with food bags
For a minimum of 30/40 people
3 service workers during the day
Toilet
Total of 4 toilets

25
Program of requirements
Study area
Women shelter
Kitchen
Multifunctional room
Office
Minimum of 24 students
10 private rooms
Cooking for minimum 24 studentsHelping +- 30 families with food bags
For a minimum of 30/40 people
3 service workers during the day
Toilet
Total of 4 toilets
Study area
Women shelter
Kitchen
Multifunctional room
Office
Minimum of 24 students
10 private rooms
Cooking for minimum 24 studentsHelping +- 30 families with food bags
For a minimum of 30/40 people
3 service workers during the day
Toilet
Total of 4 toilets

26
Problems of settlements
• Difficulty with ownership of land or house
• Finding a job
• Difficult transition to middle class areas
• Noise disturbance
• Food insecurity
• Crowded
• Safety
• Bad living conditions

27
3 Starting points
Design

28
Starting point 1
Community
Private plots• Open to community
• Closed to private plot

29
Public functions Private functions
Entrance
Bufferzone
Starting point 2
• Split between public and private functions
• Bufferzone in between
• Entrance at public side

30
1
764
2
853
Internal connection
Starting point 3
• Clear structure
• All rooms connected to central hallway

31
Final design

32
Meet the Zandspruit inhabitants
Willy - 31Community member
Irregular job as carpenterJust started to learn EnglishOwns a 9m2 shack

33
Lindiwe - 20Young mother
1 year old babyOut of desperation for money she started as a prostituteRents a 9m2 room
Meet the Zandspruit inhabitants

34
Thabiso - 16Student
Last year of schoolWalks to school everydayLives with mother and 2 siblingsin a one room house (18m2)
Meet the Zandspruit inhabitants

35
Martha - 43Community member
Works at the creche next door Depends on food collectionrents a 9m2 room
Meet the Zandspruit inhabitants

36
Design focus
Build by community Circularity
+ +
Program of requirements

37
Design focus
Build by community Circularity
+ +
Program of requirements

38
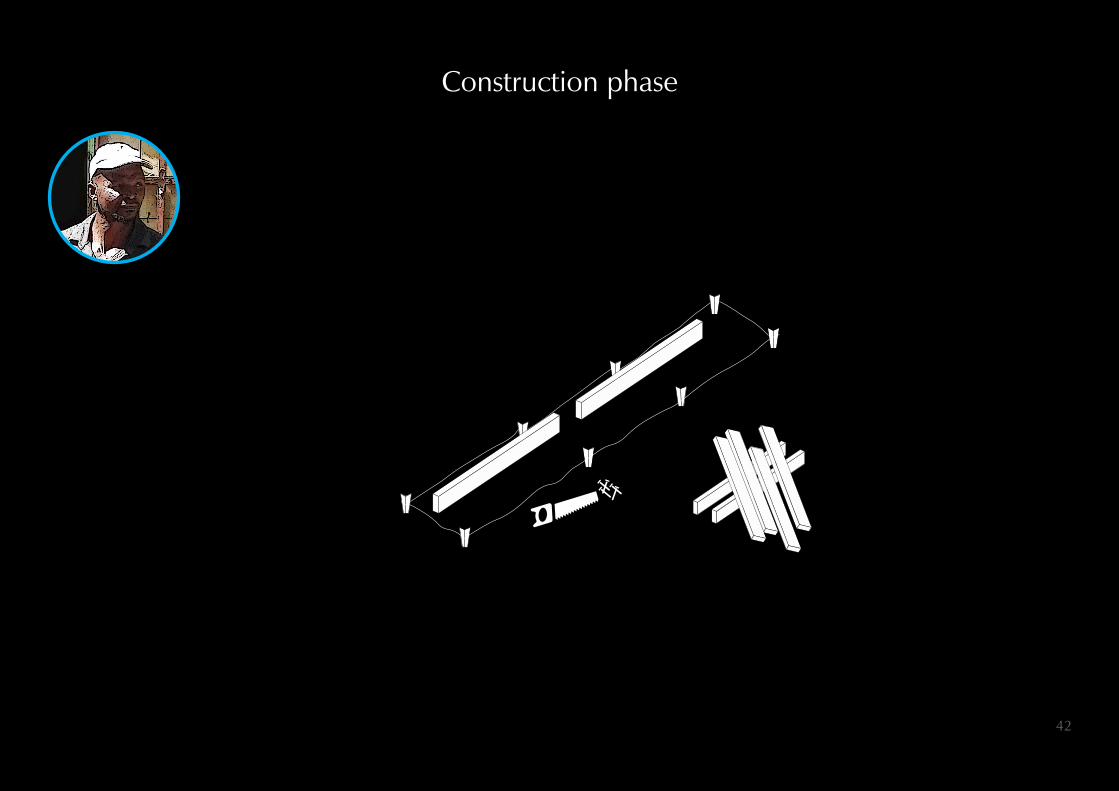
Manager Community Tools
+ +
Construction phase

39
Manager Community Tools
+ +
Construction phase

40
Manager Community Tools
+ +
Construction phase

41
Construction phase
10,65 m
1,65 m or 3,45 m
1m
Secondary beam
Beam
3 m or 4,05 m
Purlin
PRO
DU
CED
BY
AN
AU
TOD
ESK
STU
DEN
T VE
RSI
ON
PRODUCED BY AN AUTODESK STUDENT VERSION
PRO
DU
CED
BY A
N A
UTO
DESK
STUD
ENT VER
SION
PRODUCED BY AN AUTODESK STUDENT VERSION
PRO
DU
CED
BY
AN
AU
TOD
ESK
STU
DEN
T VE
RSI
ON
PRODUCED BY AN AUTODESK STUDENT VERSION
PRO
DU
CED
BY A
N A
UTO
DESK
STUD
ENT VER
SION
PRODUCED BY AN AUTODESK STUDENT VERSION
PRO
DU
CED
BY
AN
AU
TOD
ESK
STU
DEN
T VE
RSI
ON
PRODUCED BY AN AUTODESK STUDENT VERSION
PRO
DU
CED
BY A
N A
UTO
DESK
STUD
ENT VER
SION
PRODUCED BY AN AUTODESK STUDENT VERSION
PRO
DU
CED
BY
AN
AU
TOD
ESK
STU
DEN
T VE
RSI
ON
PRODUCED BY AN AUTODESK STUDENT VERSION
PRO
DU
CED
BY A
N A
UTO
DESK
STUD
ENT VER
SION
PRODUCED BY AN AUTODESK STUDENT VERSION
• Multiple wooden boards
• Minimum thickness of 15cm/4 layers
• Freedom in assembly
1m
Column
4,85 m
42
Construction phase

43
PRO
DU
CED
BY
AN
AU
TOD
ESK
STU
DEN
T VE
RSI
ON
PRODUCED BY AN AUTODESK STUDENT VERSION
PRO
DU
CED
BY A
N A
UTO
DESK
STUD
ENT VER
SION
PRODUCED BY AN AUTODESK STUDENT VERSION
PRO
DU
CED
BY
AN
AU
TOD
ESK
STU
DEN
T VE
RSI
ON
PRODUCED BY AN AUTODESK STUDENT VERSION
PRO
DU
CED
BY A
N A
UTO
DESK
STUD
ENT VER
SION
PRODUCED BY AN AUTODESK STUDENT VERSION
Modules
1,8m
10,8m 10,8m
3,6m
3,85m 3,85m

44
Multiplication of module

45
Multiplication of module

46
Multiplication of module

47
PRO
DU
CED
BY
AN
AU
TOD
ESK
STU
DEN
T VE
RSI
ON
PRODUCED BY AN AUTODESK STUDENT VERSION
PRO
DU
CED
BY A
N A
UTO
DESK
STUD
ENT VER
SION
PRODUCED BY AN AUTODESK STUDENT VERSION
PRO
DU
CED
BY
AN
AU
TOD
ESK
STU
DEN
T VE
RSI
ON
PRODUCED BY AN AUTODESK STUDENT VERSION
PRO
DU
CED
BY A
N A
UTO
DESK
STUD
ENT VER
SION
PRODUCED BY AN AUTODESK STUDENT VERSION
Modules
1,8m
10,8m 10,8m
3,6m
3,85m 3,85m

48
Wall finishing
?
• Variety of circular materials
• Continuation of earlier research

49
Circular materials

50
Choice of materials
?
?
?
• Public functions
• Inspiration
• Experimenting

51
Choice of materials
?• Private functions
• Peaceful
• Homely
• Insulation
?

52
0,8m
0,15m
1,2m
0,15m
0,8m 0,8m
0,15m
1,2m
0,8m
0,15m
Facade design concept

53
Wood(painted)
Window
Ventilation
Cover up(irregular sizes)
Facade design concept

54
North
South
West East
PRO
DU
CED
BY
AN
AU
TOD
ESK
STU
DEN
T VE
RSI
ON
PRODUCED BY AN AUTODESK STUDENT VERSION
PRODUCED BY AN AUTODESK STUDENT VERSION
PRO
DU
CED
BY
AN
AU
TOD
ESK
STU
DEN
T VE
RSI
ON
PRODUCED BY AN AUTODESK STUDENT VERSION
PRODUCED BY AN AUTODESK STUDENT VERSION
PRO
DU
CED
BY
AN
AU
TOD
ESK
STU
DEN
T VE
RSI
ON
PRODUCED BY AN AUTODESK STUDENT VERSION
PRODUCED BY AN AUTODESK STUDENT VERSION
PRO
DU
CED
BY
AN
AU
TOD
ESK
STU
DEN
T VE
RSI
ON
PRODUCED BY AN AUTODESK STUDENT VERSION
PRODUCED BY AN AUTODESK STUDENT VERSION
Facades

55
Wall finishing detail
• Continuation of earlier research
• Paper pulp for construction of glass bottle wall
• Experiment failed because of Dutch climate
Paper pulp
Glass bottle wall

56
Fence

57
0,8m
0,15m
1,2m
0,15m
0,8m
Height Greenery
1 year 3 years 5 years
3,1m
2,15m
0,8m
Fence concept

58
• Surrounding the entire plot
• Framework of wood and chickenwire or steel mesh
• Different types of plants, most locally found
• Infill lower part can change per garden
Fence

59
Floorplan
PRO
DU
CED
BY
AN
AU
TOD
ESK
STU
DEN
T VE
RSI
ON
PRODUCED BY AN AUTODESK STUDENT VERSION
PRODUCED BY AN AUTODESK STUDENT VERSION
Study area
Kitchen Office
StorageMultifunctional room
Workplace
Shelter
Green-house
Green-house
N

60
PRO
DU
CED
BY
AN
AU
TOD
ESK
STU
DEN
T VE
RSI
ON
PRODUCED BY AN AUTODESK STUDENT VERSION
PRODUCED BY AN AUTODESK STUDENT VERSION
Shelter
7. AM

61
Living room/kitchen at the shelter

62
Sun - winter situation
• Sun will warm up rooms
• Lot of natural (sun)light
• Entire morning and early afternoon

63
Sun - summer situation
PRO
DU
CED
BY
AN
AU
TOD
ESK
STU
DEN
T VE
RSI
ON
PRODUCED BY AN AUTODESK STUDENT VERSION
PRO
DU
CED
BY A
N A
UTO
DESK
STUD
ENT VER
SION
PRODUCED BY AN AUTODESK STUDENT VERSION
17.00
18.00
16.00
14.00 17.00
12.00
• Sun blocked during the day
• Enters rooms late afternoon
64
PRO
DU
CED
BY
AN
AU
TOD
ESK
STU
DEN
T VE
RSI
ON
PRODUCED BY AN AUTODESK STUDENT VERSION
PRODUCED BY AN AUTODESK STUDENT VERSION
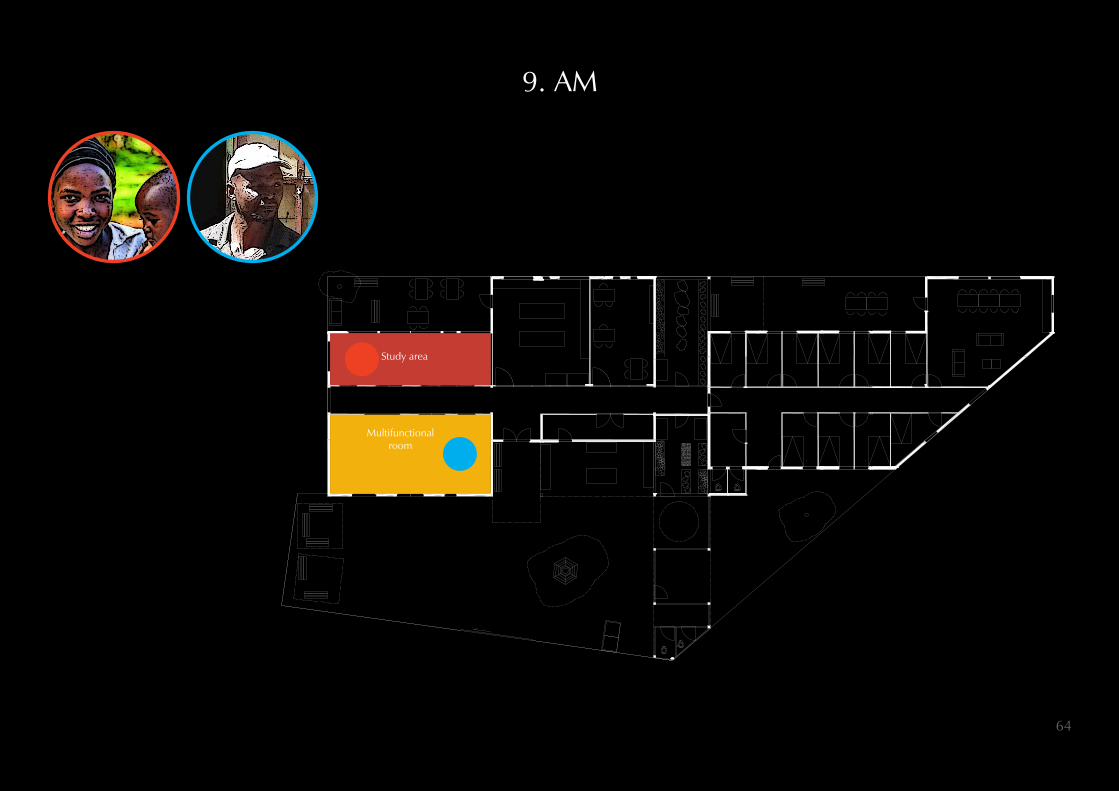
Study area
Multifunctional room
9. AM

65
Multifunctional room
• English lessons
• Workshops
• Practicing skills
• Parties
• Meetings

66
Ventilation

67
Ventilation

68
PRODUCED BY AN AUTODESK STUDENT VERSION
PRODUCED BY AN AUTODESK STUDENT VERSION
PRODUCED BY AN AUTODESK STUDENT VERSION
PRODUCED BY AN AUTODESK STUDENT VERSIONVentilation
• Sliding panels attached to beam
• Open or closed according to ventilation need
• Available in every room
• Netting above doors

69
12 PM
PRO
DU
CED
BY
AN
AU
TOD
ESK
STU
DEN
T VE
RSI
ON
PRODUCED BY AN AUTODESK STUDENT VERSION
PRODUCED BY AN AUTODESK STUDENT VERSION
Kitchen

70
Public garden

71
The kitchen

72
14.30
PRO
DU
CED
BY
AN
AU
TOD
ESK
STU
DEN
T VE
RSI
ON
PRODUCED BY AN AUTODESK STUDENT VERSION
PRODUCED BY AN AUTODESK STUDENT VERSION
Study area
WorkplaceGreen-house
Green-house
Kitchen

73
14.30

74
Workplace
• Tools available
• Making house improvements
• Practice different skills

75
16.00
PRO
DU
CED
BY
AN
AU
TOD
ESK
STU
DEN
T VE
RSI
ON
PRODUCED BY AN AUTODESK STUDENT VERSION
PRODUCED BY AN AUTODESK STUDENT VERSION
Study area
Shelter

76
16.00

77
17.30
PRO
DU
CED
BY
AN
AU
TOD
ESK
STU
DEN
T VE
RSI
ON
PRODUCED BY AN AUTODESK STUDENT VERSION
PRODUCED BY AN AUTODESK STUDENT VERSION
Kitchen
Shelter
Green-house
Green-house

78
• Students
• Young mothers
• (Un)employed community members
• Community members bringing waste/building materials
Centre
Centre
+
The positive change

79
• More graduates
• Mothers with stable life
• Higher employment rate
• Improvement of living conditions
• Lower rate of food insecurity
Centre
Centre
+The positive change

80
The next step

81
Summary design points
• Warmth in winter• Blocked sun in summer• Placement of functions
depending on sun
• Passive ventilation• Window openings• Hallway design
• Sustainable• Cheap materials
• Self sufficient as much as possible• Back up from municipal pipeline• Reuse of water
• Solarpanels• Natural heating by sun in winter• Natural light, less lightbulbs
• Large program of requirements• Clear structure• Lot of freedom through
construction

82
Water system
Hand basin
KitchenKitchen
Bathroom

83
&
Municipal pipeline
Water system
Copyright © 2022 FDOKUMEN