Deltek Costpoint® - Deltek Software Manager
79
Deltek Costpoint® Getting Started with Interface and User Basics March 28, 2016
-
Upload
khangminh22 -
Category
Documents
-
view
2 -
download
0
Transcript of Deltek Costpoint® - Deltek Software Manager

Deltek Costpoint® Getting Started with Interface and User Basics
March 28, 2016
While Deltek has attempted to verify that the information in this document is accurate and complete, some typographical or technical errors may exist. The recipient of this document is solely responsible for all decisions relating to or use of the information provided herein.
The information contained in this publication is effective as of the publication date below and is subject to change without notice.
This publication contains proprietary information that is protected by copyright. All rights are reserved. No part of this document may be reproduced or transmitted in any form or by any means, electronic or mechanical, or translated into another language, without the prior written consent of Deltek, Inc.
This edition published March 2016.
© 2016 Deltek, Inc.
Deltek’s software is also protected by copyright law and constitutes valuable confidential and proprietary information of Deltek, Inc. and its licensors. The Deltek software, and all related documentation, is provided for use only in accordance with the terms of the license agreement. Unauthorized reproduction or distribution of the program or any portion thereof could result in severe civil or criminal penalties.
All trademarks are the property of their respective owners.
Getting Started with Interface and User Basics ii
Contents Getting Started ................................................................................................................................. 1
Introducing Costpoint ....................................................................................................................... 2
Support Services ......................................................................................................................... 3
Costpoint User Interface Overview .................................................................................................. 4
Global Toolbars and Menu: ......................................................................................................... 4
Domains and Applications: .......................................................................................................... 4
Global Toolbars and Menus ............................................................................................................ 6
Global Menu ................................................................................................................................ 6
Global Toolbar ............................................................................................................................. 6
Navigation Toolbar .................................................................................................................... 10
Application Toolbar .................................................................................................................... 12
Global File Menu ....................................................................................................................... 15
Global Line Menu ...................................................................................................................... 18
Global Options Menu................................................................................................................. 19
Global Process Menu ................................................................................................................ 24
Global Workflow Menu .............................................................................................................. 25
Global Help Menu ...................................................................................................................... 26
Costpoint Domains and Applications ............................................................................................. 29
Domains .................................................................................................................................... 30
Modules ..................................................................................................................................... 31
Application Groups .................................................................................................................... 32
Applications ............................................................................................................................... 33
Ease of Access Features ............................................................................................................... 38
Lookup Feature ......................................................................................................................... 38
AutoComplete Feature .............................................................................................................. 38
Query Feature ........................................................................................................................... 39
Clone Record and Copy Record Feature .................................................................................. 41
User Preference Functions ............................................................................................................ 43
Change Default Period .............................................................................................................. 43
Maintain My Menu ..................................................................................................................... 43
Data Management Functions ........................................................................................................ 44
File Upload Manager ................................................................................................................. 44
Linked Content Files .................................................................................................................. 45
Content Data Fields Subtask .................................................................................................... 46
Save Files to the CMS............................................................................................................... 48
Getting Started with Interface and User Basics iii
Report Output Options ................................................................................................................... 49
System Printer ........................................................................................................................... 51
Password Management ................................................................................................................. 56
Generate Random Password .................................................................................................... 56
Change Password ..................................................................................................................... 57
Appendix A: If You Need Assistance ............................................................................................. 59
When to Call .............................................................................................................................. 59
Returning your call: Information on Deltek's call tracking system ............................................. 59
Who to Call ................................................................................................................................ 60
Deltek Web Site ......................................................................................................................... 60
Infrastructure Consulting Group .................................................................................................. 1
Appending B: Quick Reference Cards (QRC) ................................................................................. 3
Quick Reference Card – User Interface ...................................................................................... 4
Quick Reference Card – Shortcut Keys and Toolbar Icons ........................................................ 6
Quick Reference Card – Query and Lookup ............................................................................... 9
Quick Reference Cards – Views ............................................................................................... 11
Getting Started with Interface and User Basics iv

Getting Started
Getting Started Welcome to Deltek Costpoint, the industry-leading, integrated software solution for project-oriented enterprises.
The online help provides instructions for accessing Costpoint’s applications as well as descriptions of menus, toolbars, and other global features. You will also find information on logging on to Costpoint, accessing the database, printing reports, reviewing online help, and contacting Deltek Customer Care and other client services.
Deltek does not assume responsibility for providing training in the use of Microsoft Windows or Microsoft Internet Explorer. We have designed the Costpoint documentation with the assumption that you are familiar with basic Windows functions such as Cut, Copy, Paste, Undo, Exit, Save, and other basic commands.
Getting Started with Interface and User Basics 1
Introducing Costpoint
Introducing Costpoint Deltek Costpoint is the industry-leading Enterprise Resource Planning solution for government contractors and other project-driven organizations, including (but not limited to) the following industries:
Aerospace and defense
Architecture and design
Biotechnology
Computer services
Consulting services
Construction
Engineering
Environmental
Federal government
Government contracting
High technology
Laboratories
Make-to-order manufacturing
Non-profit institutions
Professional services
Public relations and marketing
Research and development
Shipbuilding and marine services
Software development
Systems integration
Technical services
These enterprises adopt Deltek Costpoint to improve their operational efficiency and profitability, and to meet the strict compliance and audit requirements of their customers, as well as government auditors, such as the Defense Contract Audit Agency (DCAA).
Deltek Costpoint offers an array of comprehensive capabilities that deliver game-changing results for your organization:
Financial Management
Project Accounting
Time and Labor Collection
Expense Management
Project Manufacturing
Material and Inventory Management
Procurement
Getting Started with Interface and User Basics 2
Introducing Costpoint
Budgeting and Planning
Human Resources and Payroll
Business Development
Performance Management
DCAA Compliance
These modules integrate seamlessly with specialized Costpoint modules in materials management, human resources, reporting tools, and electronic timekeeping.
Learn more about Costpoint Domains and Modules.
Support Services Deltek offers a variety of support services to help you implement and operate Costpoint:
Deltek Consulting: Take advantage of our on-site or remote consulting services to help with Costpoint implementation, data conversion, and other Costpoint-related needs.
Seminars: Keep pace with the changing technology landscape by enlisting in seminars that will provide you information in using Costpoint through the Deltek University.
Telephone Support: Call us when you need detailed, specific answers to your questions about using Costpoint.
Custom programming Tailor fit your applications according to your requirements.
General Assistance: Benefit from our comprehensive guidance in designing, procuring, and installing your database software, operating systems, and hardware.
Turnkey network installations Avail of our expertise in matching Costpoint to appropriate hardware and network architecture using pre-tested configurations and equipment.
Learn more about these Deltek services:
Customer Care
Infrastructure Consulting Group
Getting Started with Interface and User Basics 3
Costpoint User Interface Overview
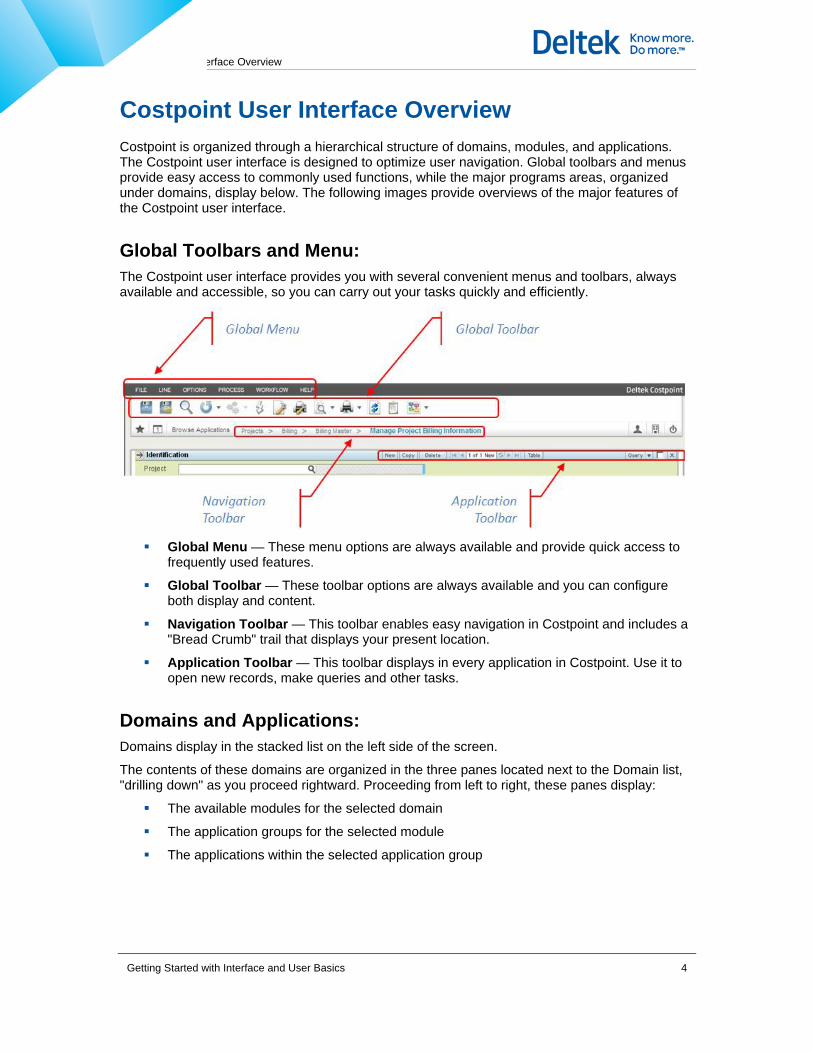
Costpoint User Interface Overview Costpoint is organized through a hierarchical structure of domains, modules, and applications. The Costpoint user interface is designed to optimize user navigation. Global toolbars and menus provide easy access to commonly used functions, while the major programs areas, organized under domains, display below. The following images provide overviews of the major features of the Costpoint user interface.
Global Toolbars and Menu: The Costpoint user interface provides you with several convenient menus and toolbars, always available and accessible, so you can carry out your tasks quickly and efficiently.
Global Menu — These menu options are always available and provide quick access to frequently used features.
Global Toolbar — These toolbar options are always available and you can configure both display and content.
Navigation Toolbar — This toolbar enables easy navigation in Costpoint and includes a "Bread Crumb" trail that displays your present location.
Application Toolbar — This toolbar displays in every application in Costpoint. Use it to open new records, make queries and other tasks.
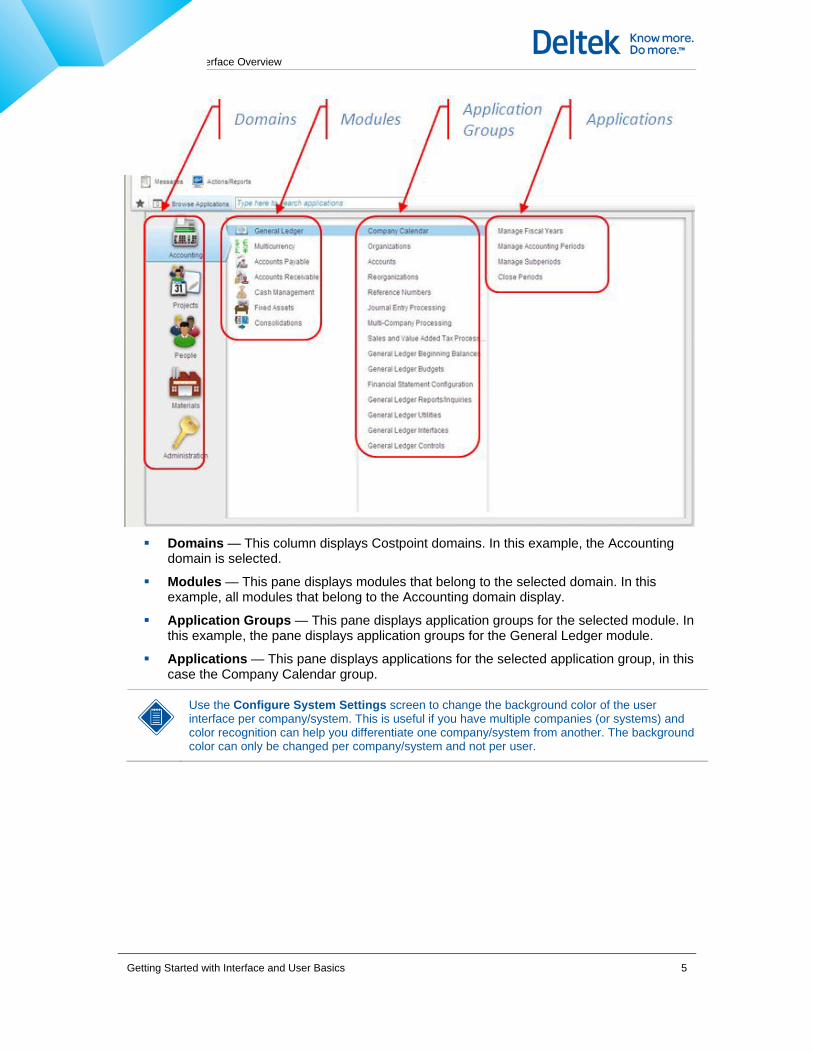
Domains and Applications: Domains display in the stacked list on the left side of the screen.
The contents of these domains are organized in the three panes located next to the Domain list, "drilling down" as you proceed rightward. Proceeding from left to right, these panes display:
The available modules for the selected domain
The application groups for the selected module
The applications within the selected application group
Getting Started with Interface and User Basics 4
Costpoint User Interface Overview
Domains — This column displays Costpoint domains. In this example, the Accounting domain is selected.
Modules — This pane displays modules that belong to the selected domain. In this example, all modules that belong to the Accounting domain display.
Application Groups — This pane displays application groups for the selected module. In this example, the pane displays application groups for the General Ledger module.
Applications — This pane displays applications for the selected application group, in this case the Company Calendar group.
Use the Configure System Settings screen to change the background color of the user interface per company/system. This is useful if you have multiple companies (or systems) and color recognition can help you differentiate one company/system from another. The background color can only be changed per company/system and not per user.
Getting Started with Interface and User Basics 5
Global Toolbars and Menus
Global Toolbars and Menus
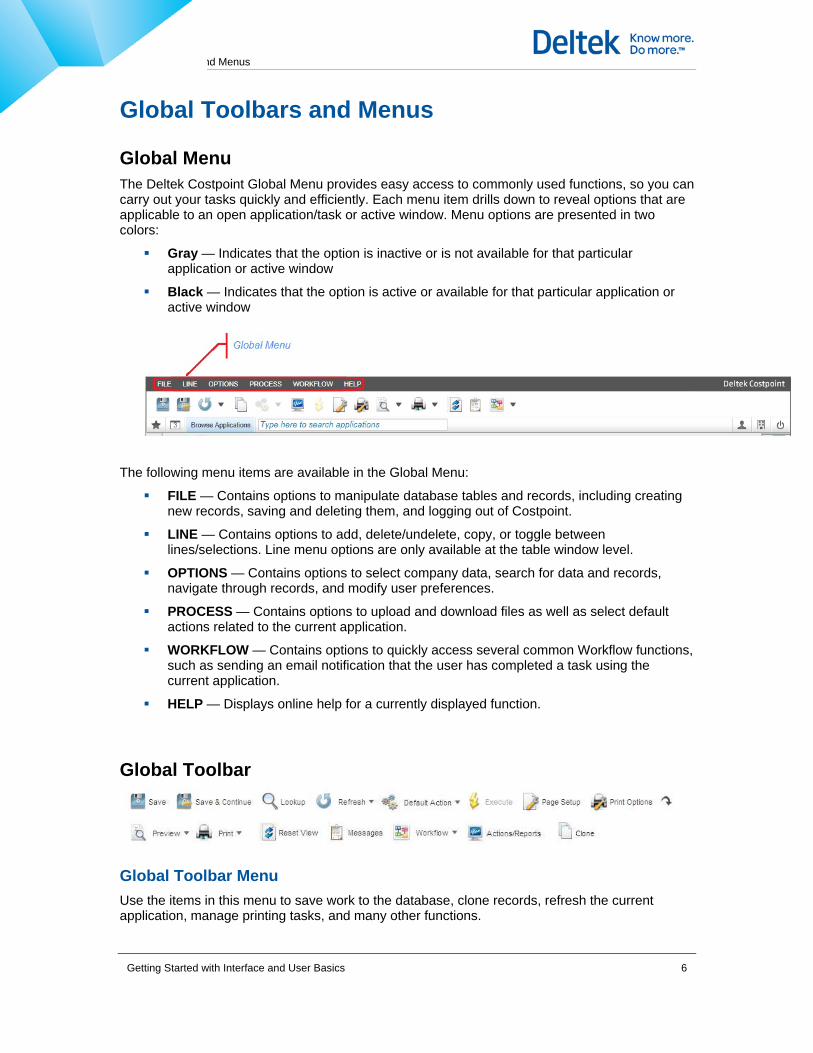
Global Menu The Deltek Costpoint Global Menu provides easy access to commonly used functions, so you can carry out your tasks quickly and efficiently. Each menu item drills down to reveal options that are applicable to an open application/task or active window. Menu options are presented in two colors:
Gray — Indicates that the option is inactive or is not available for that particular application or active window
Black — Indicates that the option is active or available for that particular application or active window
The following menu items are available in the Global Menu:
FILE — Contains options to manipulate database tables and records, including creating new records, saving and deleting them, and logging out of Costpoint.
LINE — Contains options to add, delete/undelete, copy, or toggle between lines/selections. Line menu options are only available at the table window level.
OPTIONS — Contains options to select company data, search for data and records, navigate through records, and modify user preferences.
PROCESS — Contains options to upload and download files as well as select default actions related to the current application.
WORKFLOW — Contains options to quickly access several common Workflow functions, such as sending an email notification that the user has completed a task using the current application.
HELP — Displays online help for a currently displayed function.
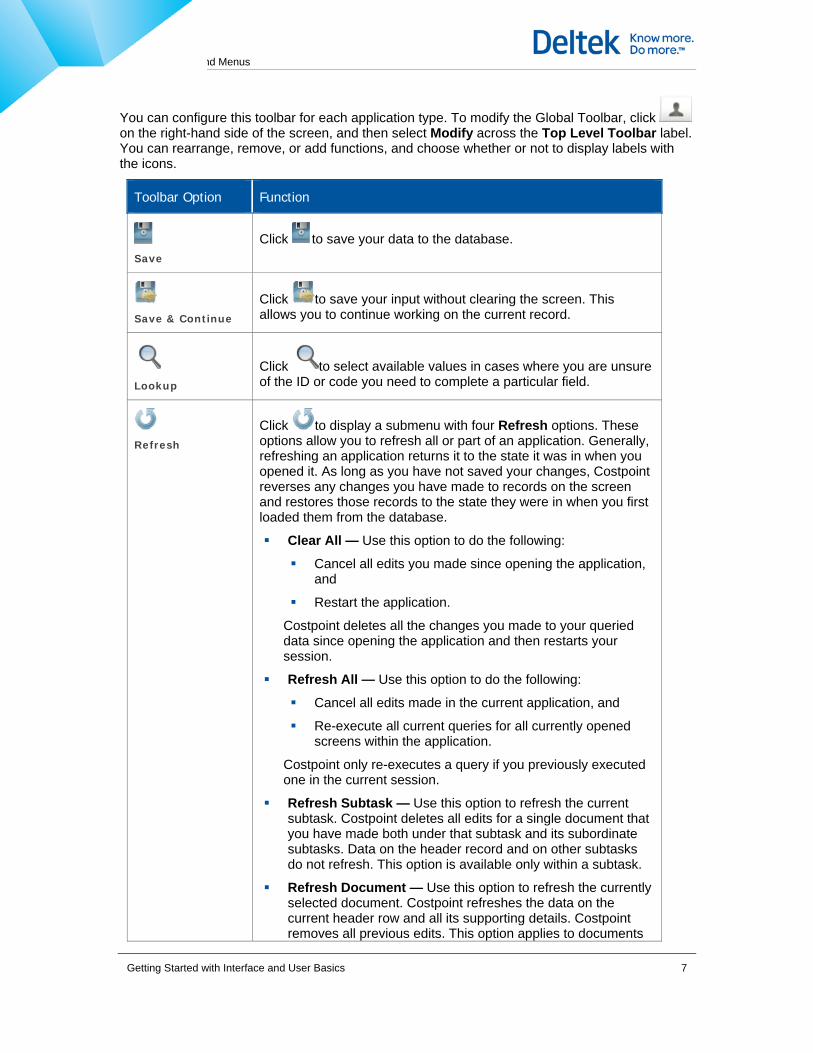
Global Toolbar
Global Toolbar Menu Use the items in this menu to save work to the database, clone records, refresh the current application, manage printing tasks, and many other functions.
Getting Started with Interface and User Basics 6
Global Toolbars and Menus
You can configure this toolbar for each application type. To modify the Global Toolbar, click on the right-hand side of the screen, and then select Modify across the Top Level Toolbar label. You can rearrange, remove, or add functions, and choose whether or not to display labels with the icons.
Toolbar Option Function
Save
Click to save your data to the database.
Save & Continue
Click to save your input without clearing the screen. This allows you to continue working on the current record.
Lookup
Click to select available values in cases where you are unsure of the ID or code you need to complete a particular field.
Refresh
Click to display a submenu with four Refresh options. These options allow you to refresh all or part of an application. Generally, refreshing an application returns it to the state it was in when you opened it. As long as you have not saved your changes, Costpoint reverses any changes you have made to records on the screen and restores those records to the state they were in when you first loaded them from the database.
Clear All — Use this option to do the following: Cancel all edits you made since opening the application,
and
Restart the application.
Costpoint deletes all the changes you made to your queried data since opening the application and then restarts your session.
Refresh All — Use this option to do the following:
Cancel all edits made in the current application, and
Re-execute all current queries for all currently opened screens within the application.
Costpoint only re-executes a query if you previously executed one in the current session.
Refresh Subtask — Use this option to refresh the current subtask. Costpoint deletes all edits for a single document that you have made both under that subtask and its subordinate subtasks. Data on the header record and on other subtasks do not refresh. This option is available only within a subtask.
Refresh Document — Use this option to refresh the currently selected document. Costpoint refreshes the data on the current header row and all its supporting details. Costpoint removes all previous edits. This option applies to documents
Getting Started with Interface and User Basics 7
Global Toolbars and Menus
Toolbar Option Function
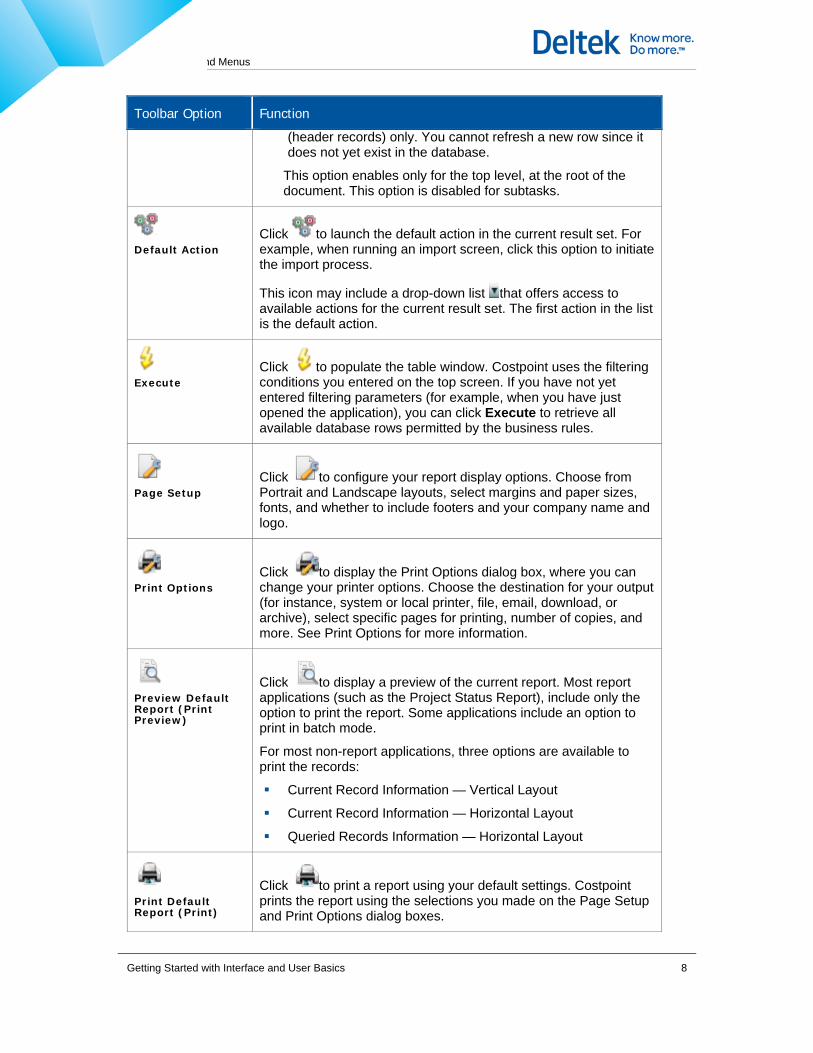
(header records) only. You cannot refresh a new row since it does not yet exist in the database.
This option enables only for the top level, at the root of the document. This option is disabled for subtasks.
Default Action
Click to launch the default action in the current result set. For example, when running an import screen, click this option to initiate the import process.
This icon may include a drop-down list that offers access to available actions for the current result set. The first action in the list is the default action.
Execute
Click to populate the table window. Costpoint uses the filtering conditions you entered on the top screen. If you have not yet entered filtering parameters (for example, when you have just opened the application), you can click Execute to retrieve all available database rows permitted by the business rules.
Page Setup
Click to configure your report display options. Choose from Portrait and Landscape layouts, select margins and paper sizes, fonts, and whether to include footers and your company name and logo.
Print Options
Click to display the Print Options dialog box, where you can change your printer options. Choose the destination for your output (for instance, system or local printer, file, email, download, or archive), select specific pages for printing, number of copies, and more. See Print Options for more information.
Preview Default Report (Print Preview)
Click to display a preview of the current report. Most report applications (such as the Project Status Report), include only the option to print the report. Some applications include an option to print in batch mode.
For most non-report applications, three options are available to print the records:
Current Record Information — Vertical Layout
Current Record Information — Horizontal Layout
Queried Records Information — Horizontal Layout
Print Default Report (Print)
Click to print a report using your default settings. Costpoint prints the report using the selections you made on the Page Setup and Print Options dialog boxes.
Getting Started with Interface and User Basics 8
Global Toolbars and Menus
Toolbar Option Function
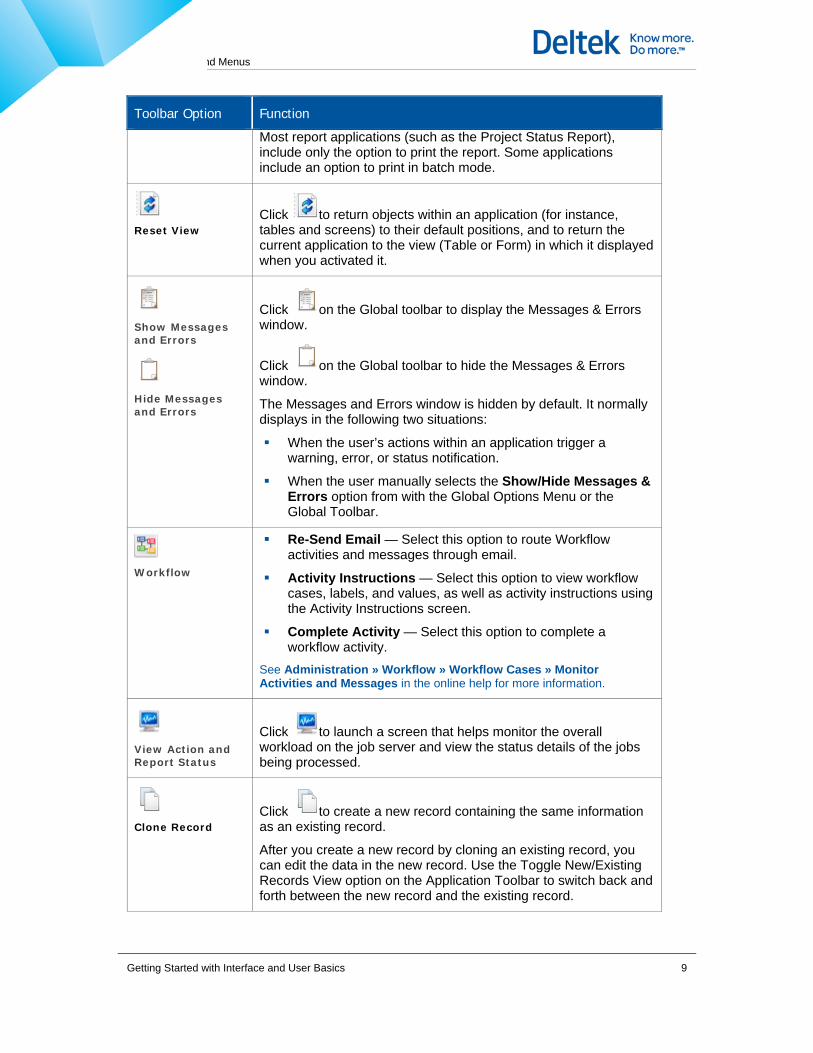
Most report applications (such as the Project Status Report), include only the option to print the report. Some applications include an option to print in batch mode.
Reset View
Click to return objects within an application (for instance, tables and screens) to their default positions, and to return the current application to the view (Table or Form) in which it displayed when you activated it.
Show Messages and Errors
Hide Messages and Errors
Click on the Global toolbar to display the Messages & Errors window.
Click on the Global toolbar to hide the Messages & Errors window.
The Messages and Errors window is hidden by default. It normally displays in the following two situations:
When the user’s actions within an application trigger a warning, error, or status notification.
When the user manually selects the Show/Hide Messages & Errors option from with the Global Options Menu or the Global Toolbar.
Workflow
Re-Send Email — Select this option to route Workflow activities and messages through email.
Activity Instructions — Select this option to view workflow cases, labels, and values, as well as activity instructions using the Activity Instructions screen.
Complete Activity — Select this option to complete a workflow activity.
See Administration » Workflow » Workflow Cases » Monitor Activities and Messages in the online help for more information.
View Action and Report Status
Click to launch a screen that helps monitor the overall workload on the job server and view the status details of the jobs being processed.
Clone Record
Click to create a new record containing the same information as an existing record.
After you create a new record by cloning an existing record, you can edit the data in the new record. Use the Toggle New/Existing Records View option on the Application Toolbar to switch back and forth between the new record and the existing record.
Getting Started with Interface and User Basics 9
Global Toolbars and Menus
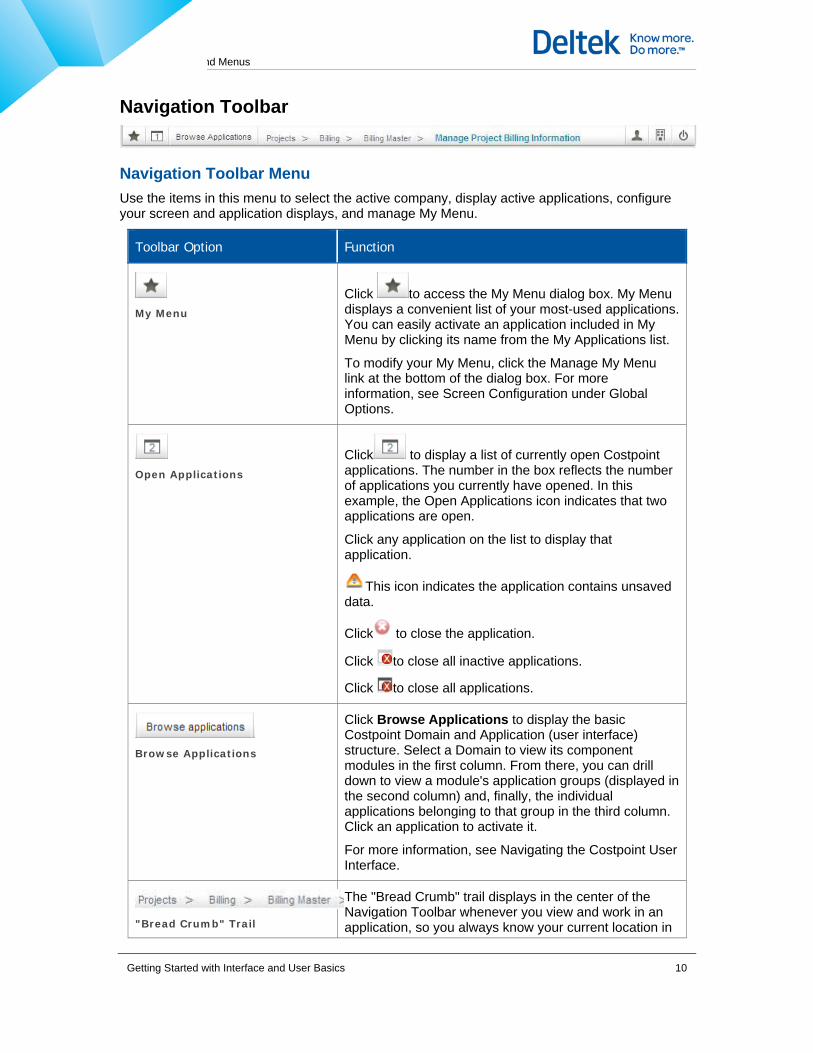
Navigation Toolbar
Navigation Toolbar Menu Use the items in this menu to select the active company, display active applications, configure your screen and application displays, and manage My Menu.
Toolbar Option Function
My Menu
Click to access the My Menu dialog box. My Menu displays a convenient list of your most-used applications. You can easily activate an application included in My Menu by clicking its name from the My Applications list.
To modify your My Menu, click the Manage My Menu link at the bottom of the dialog box. For more information, see Screen Configuration under Global Options.
Open Applications
Click to display a list of currently open Costpoint applications. The number in the box reflects the number of applications you currently have opened. In this example, the Open Applications icon indicates that two applications are open.
Click any application on the list to display that application.
This icon indicates the application contains unsaved data.
Click to close the application.
Click to close all inactive applications.
Click to close all applications.
Browse Applications
Click Browse Applications to display the basic Costpoint Domain and Application (user interface) structure. Select a Domain to view its component modules in the first column. From there, you can drill down to view a module's application groups (displayed in the second column) and, finally, the individual applications belonging to that group in the third column. Click an application to activate it.
For more information, see Navigating the Costpoint User Interface.
"Bread Crumb" Trail
The "Bread Crumb" trail displays in the center of the Navigation Toolbar whenever you view and work in an application, so you always know your current location in
Getting Started with Interface and User Basics 10
Global Toolbars and Menus
Toolbar Option Function
Costpoint, as well as the path you took to get there. The Bread Crumb trail also provides convenient navigation, since you can click any item in the trail (for example, a domain, module, or application group) to go to that location. As an example, you can click Billing to go directly back to the Billing module.
Screen Configuration
Click to modify displays for your Navigation Toolbar, current application layout, and My Menu.
Top-Level Toolbar — Click Modify to configure the Navigation toolbar. You can rearrange the display of function icons, as well as add or remove them. You can also choose whether to display function labels for the icons. Your configurations apply for each application type. For instance, if you configure the Navigation Toolbar in the Manage Project Billing Information application, that configuration will apply for all Data Entry applications in Costpoint.
The application type (for example, Processing, Data Entry, or Reporting) of the current application displays on the second line of this section.
Click Reset to return the toolbar display to the default setting.
Current Application Layout — Click Save to retain the current application display. For example, you might want a specific subtask to automatically display every time you access a particular application. You can also save the order of the columns for a particular table. Click Reset to revert to the default settings for this application.
My Menu — Click Manage to display the Configure User Preferences screen, where you can modify the contents of My Menu. From the My Menu Application List in the bottom left pane, click the column with the check adjacent to each application you wish to add to My Menu (CTRL+Click for multiple applications). And then click the Select button. The applications you selected display in the My Menu pane on the bottom right. To save your updated preferences, click File » Save from the
Global Menu, or click from the Global Toolbar.
Select Company
Click to display the Select Company dialog box. Available companies display in the drop-down list. Select the desired company and click the Change button. You
Getting Started with Interface and User Basics 11
Global Toolbars and Menus
Toolbar Option Function
can then access data for the designated company through My Menu or Browse Applications.
You must save database changes and exit all open applications for the current company before you can switch to another company.
Sign Out
Click to exit Costpoint.
Application Toolbar The table below describes Costpoint File menu functions, including available shortcut keystrokes.
Not all menu and toolbar functions are available for all applications. Functions that are unavailable for a given application do not display.
Application Toolbar The File menu contains items to manipulate database tables and records, including Save, Delete and Query.
Menu Option Function
New Record (F2)
Click to enter a new record on the screen in either Form or Table View.
Delete (CTRL+DEL)
Click to mark the current record for deletion from both the database and from the Query result set.
When you click for a record displayed in Table View, displays in the far left column for that record, while in Form View the displays on the upper left side corner of the application. This
indicates that Costpoint will delete the record the next time you save your work to the database. This menu option deletes everything currently on the main screen, including any subtask information. For screens with table windows, this feature deletes all rows on the table window. To delete only one row on a table window, click Delete in the Line menu.
Getting Started with Interface and User Basics 12
Global Toolbars and Menus
Menu Option Function
Undelete
Click to undo your most recent deletion.
For records displayed in Table View, Costpoint removes the "marked for deletion" indicator, , from the far left column for that record.
For records displayed in Form View, Costpoint removes the "marked for deletion" indicator, as well. This option only displays if there is a record marked for deletion. After you mark a particular record for deletion and then Save, you can no longer undelete that record.
Copy Record (CTRL+E)
Click Copy drop-down and select Copy Record to duplicate a record, but not its child records. Choose this option if you want to duplicate only one level of a record (at any level). The other available options are:
Copy Data to Insert into Excel — use this option to copy the record to Microsoft Excel.
Copy Data to Paste into New Record(s) — select this to copy the record as another parent record.
Paste Data — select this if you just copied a record and want to paste it as a new record.
Click to attach a document to the currently selected record.
Query (F11)
Click to populate an application with a result set of database records that are maintained by that application.
You can place filters on the query to limit the result set to those records meeting specified selection criteria.
For form-type maintenance screens, select Query to set up a data query and define parameters for your database search.
Use the Find tab to narrow your search.
Use the Sort tab to specify the order in which they should be sorted.
Click the Find button to display the result set.
You can also see saved queries on the Saved Queries tab.
See Query for more information.
Click to access this function from the toolbar.
First (CTRL+UP ARROW)
Click to retrieve and display the first record in the database. In Table View, this is the first row on the main screen or subtask.
Getting Started with Interface and User Basics 13
Global Toolbars and Menus
Menu Option Function
Previous (CTRL+LEFT ARROW)
Click to retrieve and display the prior record in the database. This would be the record immediately before the one currently displayed.
Next (CTRL+RIGHT ARROW)
Click to retrieve and display the next record in the database. This would be the record immediately following the one currently displayed.
Toggle View (ALT+T)
After you create a new record by cloning an existing record, use this option in Form View to switch back and forth between the new record and the existing record.
Last (CTRL+DOWN ARROW)
Click to retrieve and display the final record in the database. In Table View, this is the last row on the main screen or subtask.
Switch to Form View (CTRL+M)
Click to change the display format for the current record from Table View to Form View.
The Form View icon displays only when the current record displays in Table View.
Switch to Table View (CTRL+M)
Click to change the display format for the current record from Form View to Table View.
The Table View icon displays only when the current record displays in Form View.
Select This Record
Deselect This Record
Click to select the current record.
Click to deselect the current record.
These options display only in Form View.
Maximize
Click to maximize the size of the application screen.
Restore
Click to display the default size of the application screen.
Set Always on Top
Click to pin or constantly display a subtask of an application even if you use its parent or main screen.
Getting Started with Interface and User Basics 14
Global Toolbars and Menus
Menu Option Function
Click to view messages related to the current record or to send messages with attachments.
Close
Click to close the current Costpoint application. When you click Close from the Application Toolbar you will not exit Costpoint.
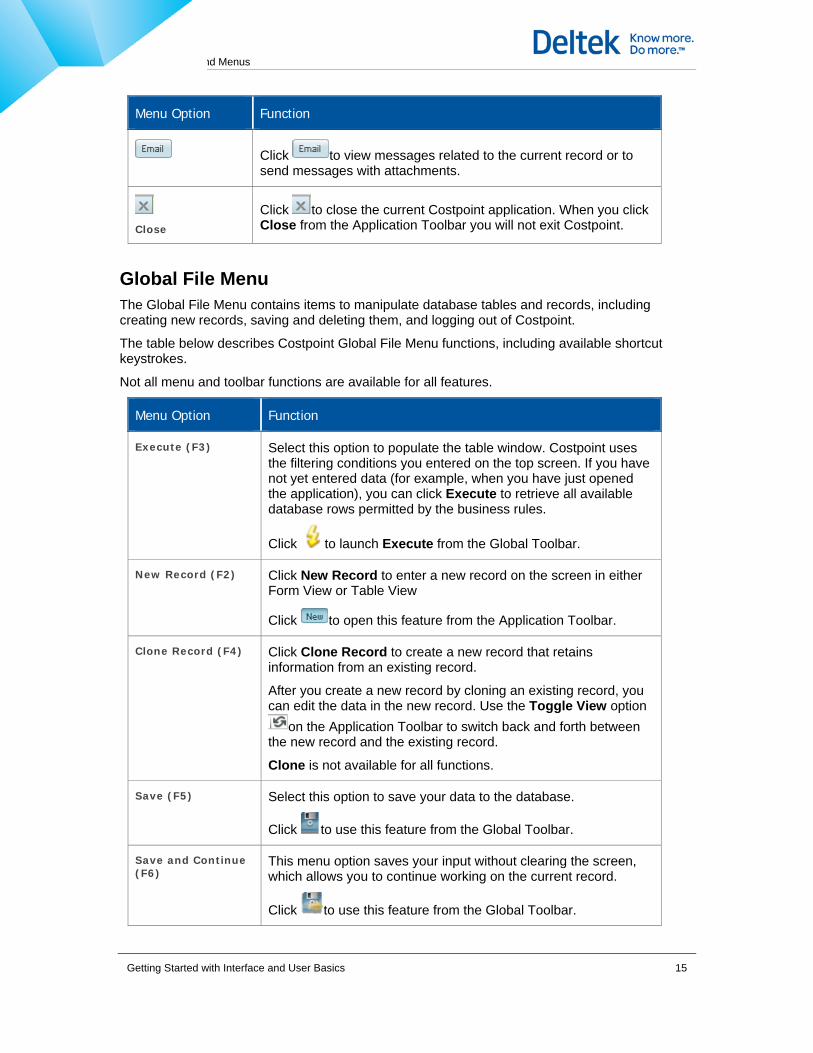
Global File Menu The Global File Menu contains items to manipulate database tables and records, including creating new records, saving and deleting them, and logging out of Costpoint.
The table below describes Costpoint Global File Menu functions, including available shortcut keystrokes.
Not all menu and toolbar functions are available for all features.
Menu Option Function
Execute (F3) Select this option to populate the table window. Costpoint uses the filtering conditions you entered on the top screen. If you have not yet entered data (for example, when you have just opened the application), you can click Execute to retrieve all available database rows permitted by the business rules.
Click to launch Execute from the Global Toolbar.
New Record (F2) Click New Record to enter a new record on the screen in either Form View or Table View
Click to open this feature from the Application Toolbar.
Clone Record (F4) Click Clone Record to create a new record that retains information from an existing record.
After you create a new record by cloning an existing record, you can edit the data in the new record. Use the Toggle View option
on the Application Toolbar to switch back and forth between the new record and the existing record.
Clone is not available for all functions.
Save (F5) Select this option to save your data to the database.
Click to use this feature from the Global Toolbar.
Save and Continue (F6)
This menu option saves your input without clearing the screen, which allows you to continue working on the current record.
Click to use this feature from the Global Toolbar.
Getting Started with Interface and User Basics 15
Global Toolbars and Menus
Menu Option Function
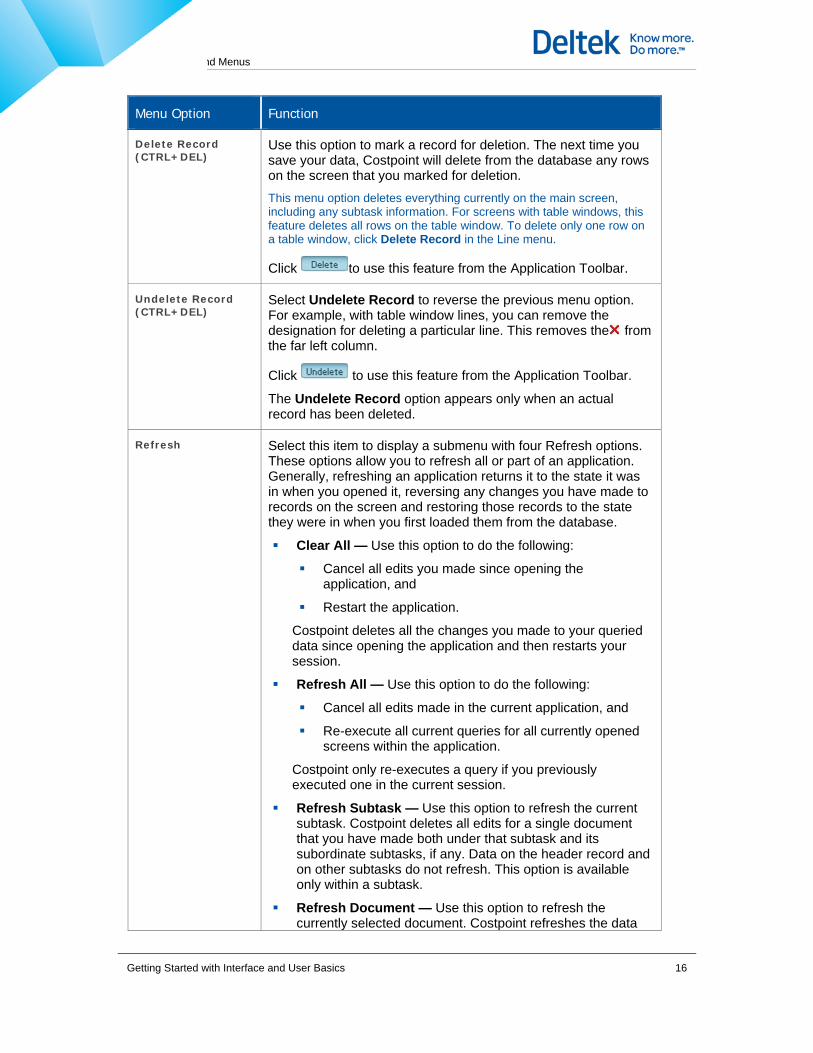
Delete Record (CTRL+DEL)
Use this option to mark a record for deletion. The next time you save your data, Costpoint will delete from the database any rows on the screen that you marked for deletion. This menu option deletes everything currently on the main screen, including any subtask information. For screens with table windows, this feature deletes all rows on the table window. To delete only one row on a table window, click Delete Record in the Line menu.
Click to use this feature from the Application Toolbar.
Undelete Record (CTRL+DEL)
Select Undelete Record to reverse the previous menu option. For example, with table window lines, you can remove the designation for deleting a particular line. This removes the from the far left column.
Click to use this feature from the Application Toolbar.
The Undelete Record option appears only when an actual record has been deleted.
Refresh Select this item to display a submenu with four Refresh options. These options allow you to refresh all or part of an application. Generally, refreshing an application returns it to the state it was in when you opened it, reversing any changes you have made to records on the screen and restoring those records to the state they were in when you first loaded them from the database.
Clear All — Use this option to do the following: Cancel all edits you made since opening the
application, and
Restart the application.
Costpoint deletes all the changes you made to your queried data since opening the application and then restarts your session.
Refresh All — Use this option to do the following:
Cancel all edits made in the current application, and
Re-execute all current queries for all currently opened screens within the application.
Costpoint only re-executes a query if you previously executed one in the current session.
Refresh Subtask — Use this option to refresh the current subtask. Costpoint deletes all edits for a single document that you have made both under that subtask and its subordinate subtasks, if any. Data on the header record and on other subtasks do not refresh. This option is available only within a subtask.
Refresh Document — Use this option to refresh the currently selected document. Costpoint refreshes the data
Getting Started with Interface and User Basics 16
Global Toolbars and Menus
Menu Option Function
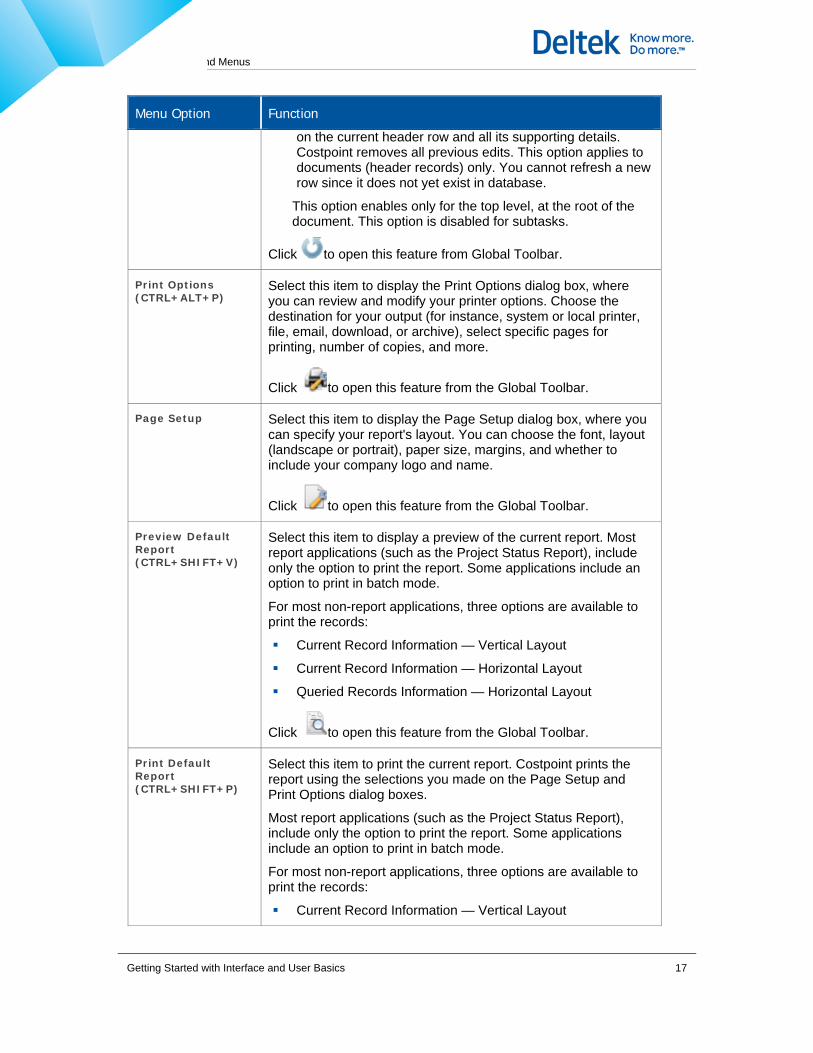
on the current header row and all its supporting details. Costpoint removes all previous edits. This option applies to documents (header records) only. You cannot refresh a new row since it does not yet exist in database.
This option enables only for the top level, at the root of the document. This option is disabled for subtasks.
Click to open this feature from Global Toolbar.
Print Options (CTRL+ALT+P)
Select this item to display the Print Options dialog box, where you can review and modify your printer options. Choose the destination for your output (for instance, system or local printer, file, email, download, or archive), select specific pages for printing, number of copies, and more.
Click to open this feature from the Global Toolbar.
Page Setup Select this item to display the Page Setup dialog box, where you can specify your report's layout. You can choose the font, layout (landscape or portrait), paper size, margins, and whether to include your company logo and name.
Click to open this feature from the Global Toolbar.
Preview Default Report (CTRL+SHIFT+V)
Select this item to display a preview of the current report. Most report applications (such as the Project Status Report), include only the option to print the report. Some applications include an option to print in batch mode.
For most non-report applications, three options are available to print the records:
Current Record Information — Vertical Layout
Current Record Information — Horizontal Layout
Queried Records Information — Horizontal Layout
Click to open this feature from the Global Toolbar.
Print Default Report (CTRL+SHIFT+P)
Select this item to print the current report. Costpoint prints the report using the selections you made on the Page Setup and Print Options dialog boxes.
Most report applications (such as the Project Status Report), include only the option to print the report. Some applications include an option to print in batch mode.
For most non-report applications, three options are available to print the records:
Current Record Information — Vertical Layout
Getting Started with Interface and User Basics 17
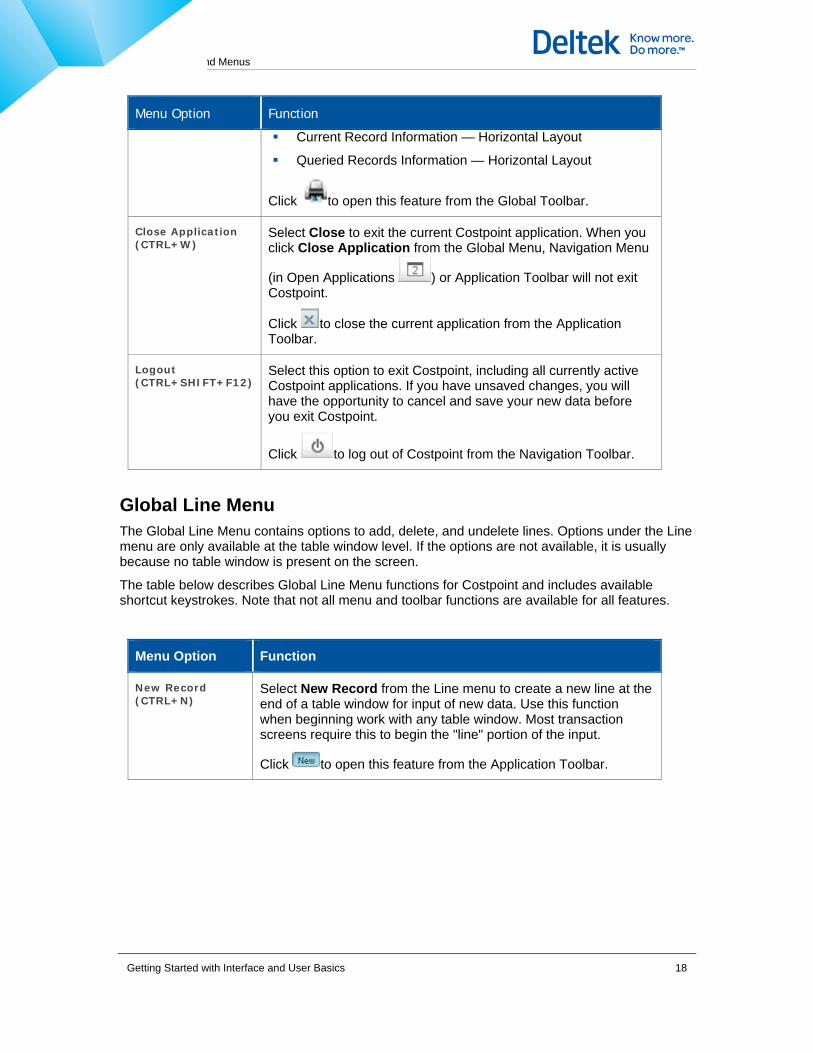
Global Toolbars and Menus
Menu Option Function
Current Record Information — Horizontal Layout
Queried Records Information — Horizontal Layout
Click to open this feature from the Global Toolbar.
Close Application (CTRL+W)
Select Close to exit the current Costpoint application. When you click Close Application from the Global Menu, Navigation Menu
(in Open Applications ) or Application Toolbar will not exit Costpoint.
Click to close the current application from the Application Toolbar.
Logout (CTRL+SHIFT+F12)
Select this option to exit Costpoint, including all currently active Costpoint applications. If you have unsaved changes, you will have the opportunity to cancel and save your new data before you exit Costpoint.
Click to log out of Costpoint from the Navigation Toolbar.
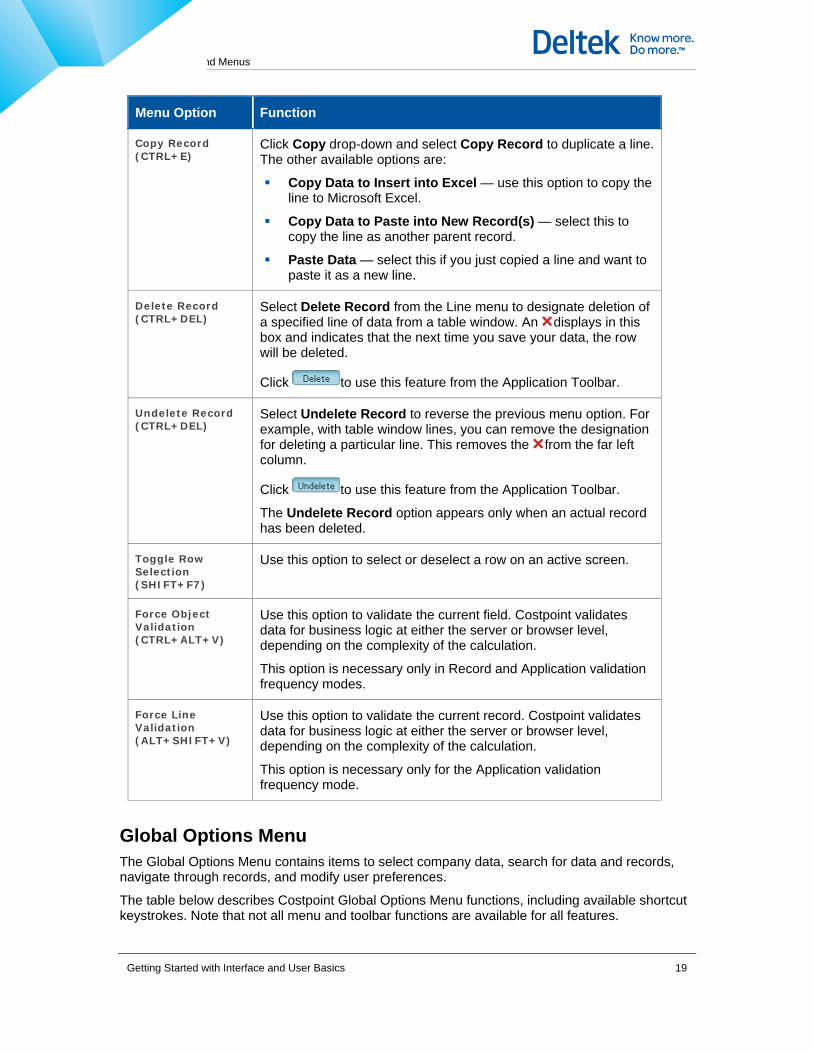
Global Line Menu The Global Line Menu contains options to add, delete, and undelete lines. Options under the Line menu are only available at the table window level. If the options are not available, it is usually because no table window is present on the screen.
The table below describes Global Line Menu functions for Costpoint and includes available shortcut keystrokes. Note that not all menu and toolbar functions are available for all features.
Menu Option Function
New Record (CTRL+N)
Select New Record from the Line menu to create a new line at the end of a table window for input of new data. Use this function when beginning work with any table window. Most transaction screens require this to begin the "line" portion of the input.
Click to open this feature from the Application Toolbar.
Getting Started with Interface and User Basics 18
Global Toolbars and Menus
Menu Option Function
Copy Record (CTRL+E)
Click Copy drop-down and select Copy Record to duplicate a line. The other available options are:
Copy Data to Insert into Excel — use this option to copy the line to Microsoft Excel.
Copy Data to Paste into New Record(s) — select this to copy the line as another parent record.
Paste Data — select this if you just copied a line and want to paste it as a new line.
Delete Record (CTRL+DEL)
Select Delete Record from the Line menu to designate deletion of a specified line of data from a table window. An displays in this box and indicates that the next time you save your data, the row will be deleted.
Click to use this feature from the Application Toolbar.
Undelete Record (CTRL+DEL)
Select Undelete Record to reverse the previous menu option. For example, with table window lines, you can remove the designation for deleting a particular line. This removes the from the far left column.
Click to use this feature from the Application Toolbar.
The Undelete Record option appears only when an actual record has been deleted.
Toggle Row Selection (SHIFT+F7)
Use this option to select or deselect a row on an active screen.
Force Object Validation (CTRL+ALT+V)
Use this option to validate the current field. Costpoint validates data for business logic at either the server or browser level, depending on the complexity of the calculation.
This option is necessary only in Record and Application validation frequency modes.
Force Line Validation (ALT+SHIFT+V)
Use this option to validate the current record. Costpoint validates data for business logic at either the server or browser level, depending on the complexity of the calculation.
This option is necessary only for the Application validation frequency mode.
Global Options Menu The Global Options Menu contains items to select company data, search for data and records, navigate through records, and modify user preferences.
The table below describes Costpoint Global Options Menu functions, including available shortcut keystrokes. Note that not all menu and toolbar functions are available for all features.
Getting Started with Interface and User Basics 19
Global Toolbars and Menus
Menu Option Function
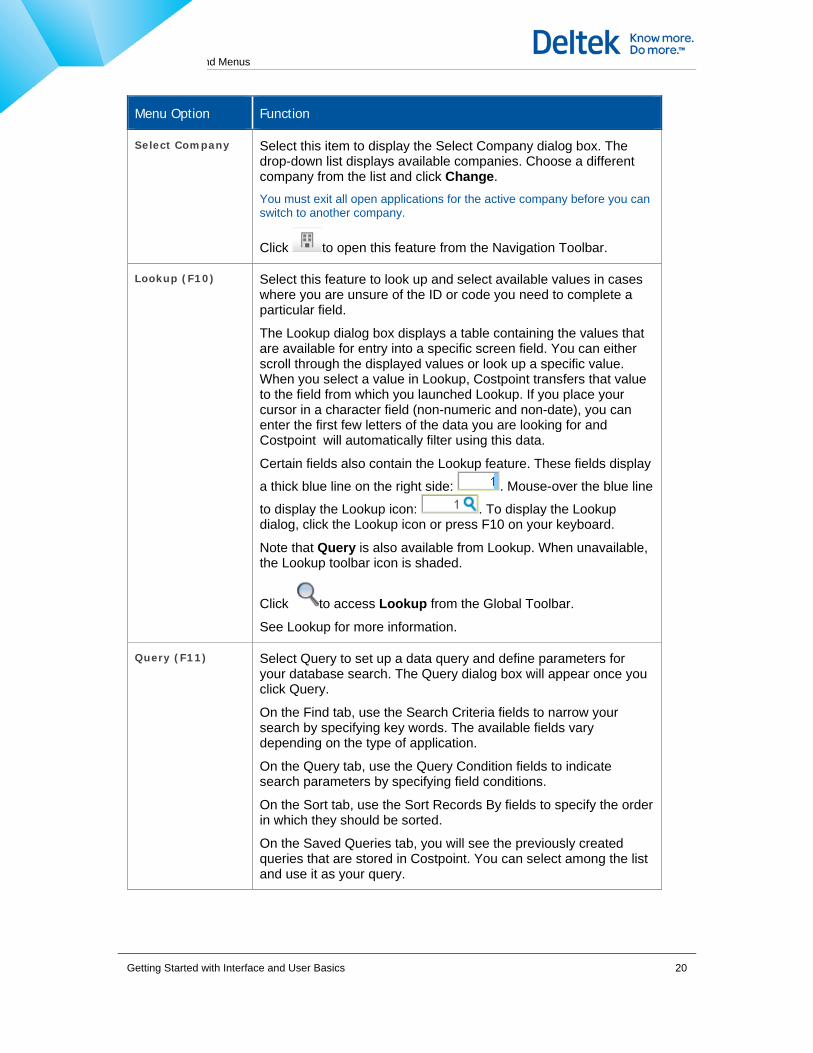
Select Company Select this item to display the Select Company dialog box. The drop-down list displays available companies. Choose a different company from the list and click Change. You must exit all open applications for the active company before you can switch to another company.
Click to open this feature from the Navigation Toolbar.
Lookup (F10) Select this feature to look up and select available values in cases where you are unsure of the ID or code you need to complete a particular field.
The Lookup dialog box displays a table containing the values that are available for entry into a specific screen field. You can either scroll through the displayed values or look up a specific value. When you select a value in Lookup, Costpoint transfers that value to the field from which you launched Lookup. If you place your cursor in a character field (non-numeric and non-date), you can enter the first few letters of the data you are looking for and Costpoint will automatically filter using this data.
Certain fields also contain the Lookup feature. These fields display
a thick blue line on the right side: . Mouse-over the blue line
to display the Lookup icon: . To display the Lookup dialog, click the Lookup icon or press F10 on your keyboard.
Note that Query is also available from Lookup. When unavailable, the Lookup toolbar icon is shaded.
Click to access Lookup from the Global Toolbar.
See Lookup for more information.
Query (F11) Select Query to set up a data query and define parameters for your database search. The Query dialog box will appear once you click Query.
On the Find tab, use the Search Criteria fields to narrow your search by specifying key words. The available fields vary depending on the type of application.
On the Query tab, use the Query Condition fields to indicate search parameters by specifying field conditions.
On the Sort tab, use the Sort Records By fields to specify the order in which they should be sorted.
On the Saved Queries tab, you will see the previously created queries that are stored in Costpoint. You can select among the list and use it as your query.
Getting Started with Interface and User Basics 20
Global Toolbars and Menus
Menu Option Function
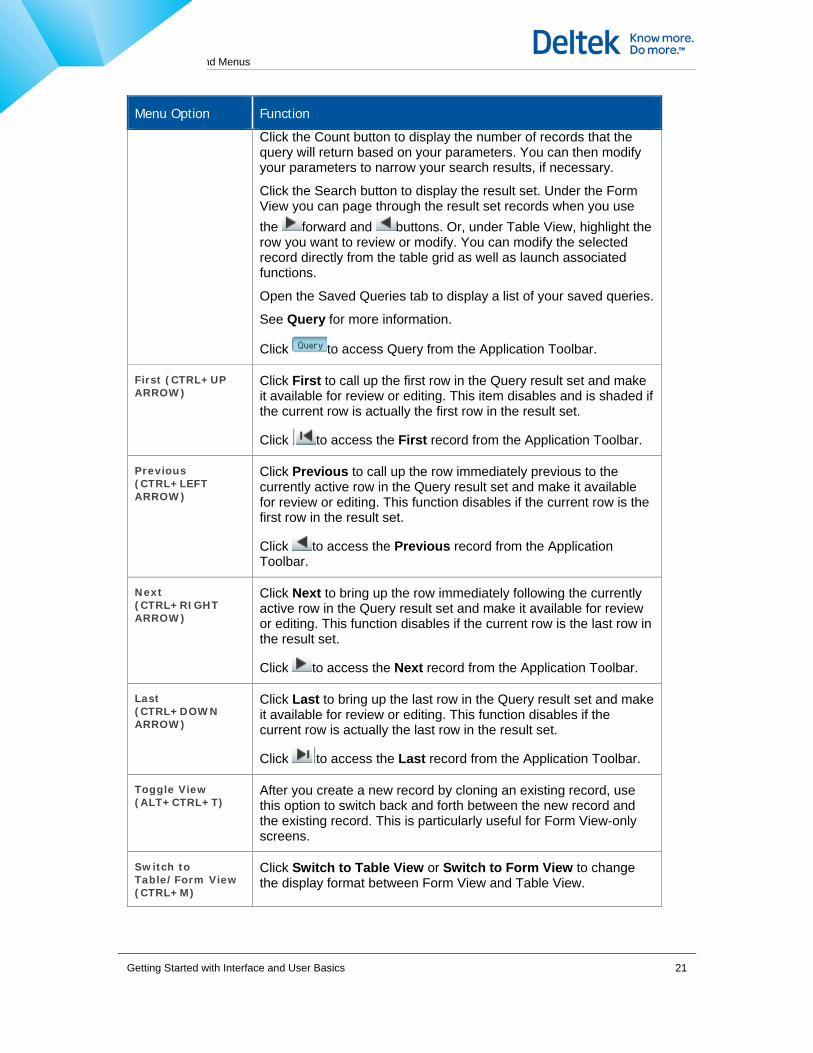
Click the Count button to display the number of records that the query will return based on your parameters. You can then modify your parameters to narrow your search results, if necessary.
Click the Search button to display the result set. Under the Form View you can page through the result set records when you use the forward and buttons. Or, under Table View, highlight the row you want to review or modify. You can modify the selected record directly from the table grid as well as launch associated functions.
Open the Saved Queries tab to display a list of your saved queries.
See Query for more information.
Click to access Query from the Application Toolbar.
First (CTRL+UP ARROW)
Click First to call up the first row in the Query result set and make it available for review or editing. This item disables and is shaded if the current row is actually the first row in the result set.
Click to access the First record from the Application Toolbar.
Previous (CTRL+LEFT ARROW)
Click Previous to call up the row immediately previous to the currently active row in the Query result set and make it available for review or editing. This function disables if the current row is the first row in the result set.
Click to access the Previous record from the Application Toolbar.
Next (CTRL+RIGHT ARROW)
Click Next to bring up the row immediately following the currently active row in the Query result set and make it available for review or editing. This function disables if the current row is the last row in the result set.
Click to access the Next record from the Application Toolbar.
Last (CTRL+DOWN ARROW)
Click Last to bring up the last row in the Query result set and make it available for review or editing. This function disables if the current row is actually the last row in the result set.
Click to access the Last record from the Application Toolbar.
Toggle View (ALT+CTRL+T)
After you create a new record by cloning an existing record, use this option to switch back and forth between the new record and the existing record. This is particularly useful for Form View-only screens.
Switch to Table/Form View (CTRL+M)
Click Switch to Table View or Switch to Form View to change the display format between Form View and Table View.
Getting Started with Interface and User Basics 21

Global Toolbars and Menus
Menu Option Function
In Table View, click from the Application Toolbar to switch to Form View.
In Form View, click from the Application Toolbar to switch to Table View.
Reset Default Positioning and View (SHIFT+ALT+Z)
Use this option to return objects within an application (for instance, tables, column headings and screens) to their default positions, and to return the current application to the view (Table or Form) in which it displayed when you activated it.
Screen Configuration
Click Screen Configuration to modify the layout of the current application and make changes to your Navigation Toolbar and My Menu.
Top-Level Toolbar — Click Modify to configure the Navigation Toolbar. You can rearrange the display of function icons, as well as add or remove them. You can also choose whether to display function labels for the icons. Your configurations apply for each application type. For instance, if you configure the Navigation Toolbar on the Manage Project Billing Information application, that configuration will apply for all Data Entry applications in Costpoint.
The application type (for example, Processing, Data Entry, or Reporting) of the current application displays on the second line of this section.
Click Reset to return the toolbar display to the default setting.
Current Application Layout — Click Save to retain the current application display. For example, you might want a particular subtask to display automatically every time you access a particular application. Click Reset to revert to the default settings for this application.
My Menu — Click Manage to display the Configure User Preferences screen, where you can modify the contents of My Menu. From the My Menu Application List in the bottom left pane, select the check box for each application you wish to add to My Menu. Then click the Select button. The applications you selected display in the My Menu pane on the bottom right. Click File » Save
from the Global Menu, or click from the Global Toolbar, to save your updated preferences.
Click from the Navigation Toolbar to access this feature.
User Preference This screen consists of areas of user preferences and information:
User Information — Review or modify your reporting company, password, default information, default delivery options, and phone.
Password Information — Review or modify your access password.
Getting Started with Interface and User Basics 22
Global Toolbars and Menus
Menu Option Function
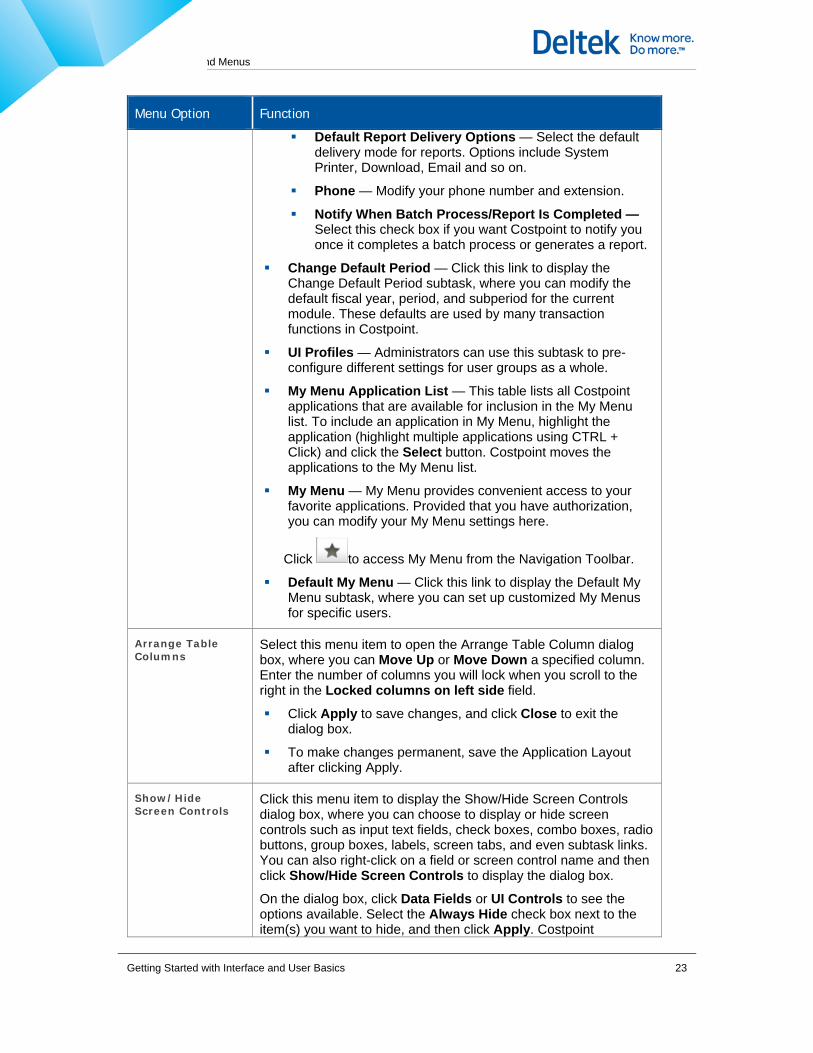
Default Report Delivery Options — Select the default delivery mode for reports. Options include System Printer, Download, Email and so on.
Phone — Modify your phone number and extension.
Notify When Batch Process/Report Is Completed — Select this check box if you want Costpoint to notify you once it completes a batch process or generates a report.
Change Default Period — Click this link to display the Change Default Period subtask, where you can modify the default fiscal year, period, and subperiod for the current module. These defaults are used by many transaction functions in Costpoint.
UI Profiles — Administrators can use this subtask to pre-configure different settings for user groups as a whole.
My Menu Application List — This table lists all Costpoint applications that are available for inclusion in the My Menu list. To include an application in My Menu, highlight the application (highlight multiple applications using CTRL + Click) and click the Select button. Costpoint moves the applications to the My Menu list.
My Menu — My Menu provides convenient access to your favorite applications. Provided that you have authorization, you can modify your My Menu settings here.
Click to access My Menu from the Navigation Toolbar.
Default My Menu — Click this link to display the Default My Menu subtask, where you can set up customized My Menus for specific users.
Arrange Table Columns
Select this menu item to open the Arrange Table Column dialog box, where you can Move Up or Move Down a specified column. Enter the number of columns you will lock when you scroll to the right in the Locked columns on left side field.
Click Apply to save changes, and click Close to exit the dialog box.
To make changes permanent, save the Application Layout after clicking Apply.
Show/Hide Screen Controls
Click this menu item to display the Show/Hide Screen Controls dialog box, where you can choose to display or hide screen controls such as input text fields, check boxes, combo boxes, radio buttons, group boxes, labels, screen tabs, and even subtask links. You can also right-click on a field or screen control name and then click Show/Hide Screen Controls to display the dialog box.
On the dialog box, click Data Fields or UI Controls to see the options available. Select the Always Hide check box next to the item(s) you want to hide, and then click Apply. Costpoint
Getting Started with Interface and User Basics 23
Global Toolbars and Menus
Menu Option Function
automatically hides the selected item(s) in Form and Table views. Click Close to exit the dialog box.
To make changes permanent, save the Application Layout after clicking Apply.
To display hidden fields, open the dialog box, clear the Always Hide check box, click Apply, and save the Application Layout.
Show/Hide Messages & Errors (SHIFT+F3)
Click this menu item to display or hide the Messages & Errors window at the bottom of the Navigation screen. This window is hidden by default. It normally displays in the following two situations:
When the user’s actions within an application trigger a warning, error, or status notification.
When the user manually selects the Show/Hide Messages & Errors option from with the Global Options Menu or the Global Toolbar.
Click from the Global Toolbar to display the Messages and Errors window.
Click from the Global Toolbar to hide the Messages and Errors window.
Next Application (CTRL+J)
Click Next Application to shift the display to the next open application. Costpoint shifts through the active applications in the order you opened them. This menu option is disabled if you have only one active application.
Next Window (CTRL+B)
Select Next Window to shift the display to the next window within the application.
Next Tab (CTRL+TAB)
Select this menu item to display the next tab for the current application. The tab order moves from left to right.
Attached Documents
Select this menu item to open a subtask that displays attached documents from Content Management system.
Attached Emails Select this menu item to open a subtask that displays attached emails from Content Management system.
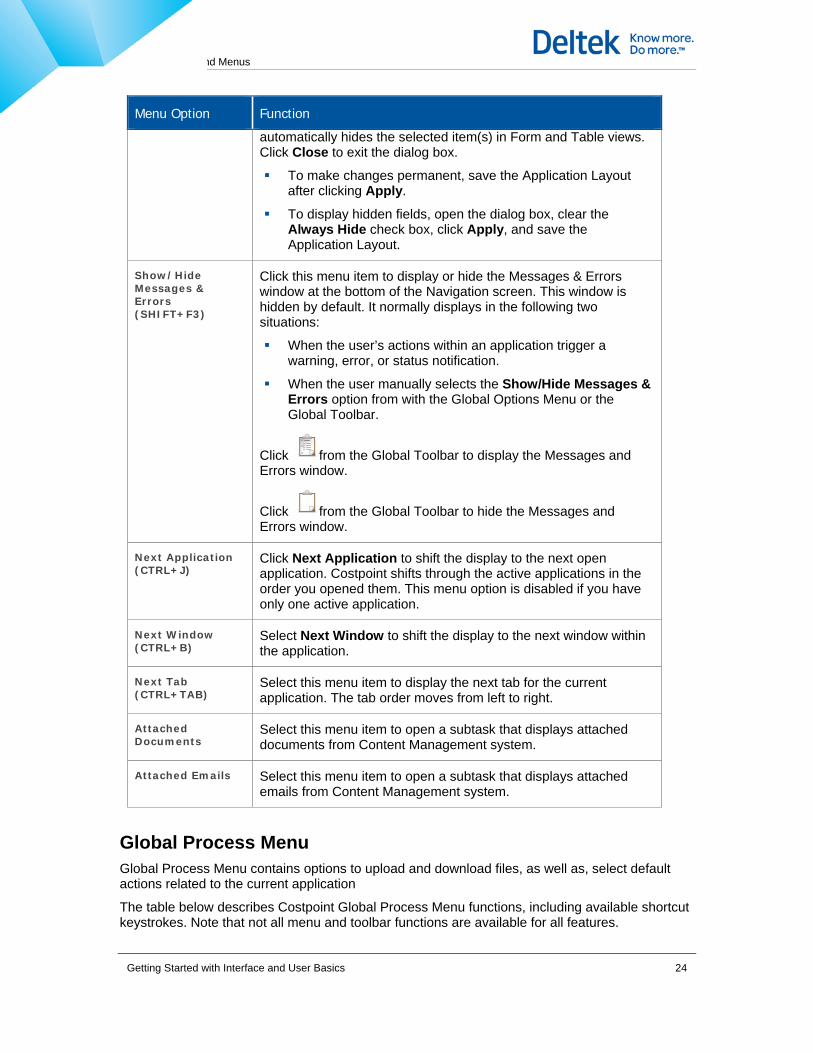
Global Process Menu Global Process Menu contains options to upload and download files, as well as, select default actions related to the current application
The table below describes Costpoint Global Process Menu functions, including available shortcut keystrokes. Note that not all menu and toolbar functions are available for all features.
Getting Started with Interface and User Basics 24
Global Toolbars and Menus
Menu Option Function
Action Menu Click Action Menu to display a submenu of available actions that you can launch for the current application.
Default Action (CTRL+SHIFT+R)
Click Default Action to launch the default action in the current result set. For example, when running an import screen, click this option to initiate the import process.
Click to launch the default action from the Global Toolbar menu. This icon may include a drop-down list that offers access to available actions for the current result set. The first item in the list is the default action.
View Action and Report Status
Click View Action and Report Status to launch a screen that helps monitor the overall workload on the job server and view the status details of the jobs being processed.
File Upload Click File Upload to display the File Upload Manager, where you can upload files to the Costpoint database.
Not all file types and sizes are eligible for upload.
File Download Click File Download to display a dialog box where you can select data files for download, including files from Deltek Time & Expense and Magnetic Media files. You can also use Query to find files for downloading.
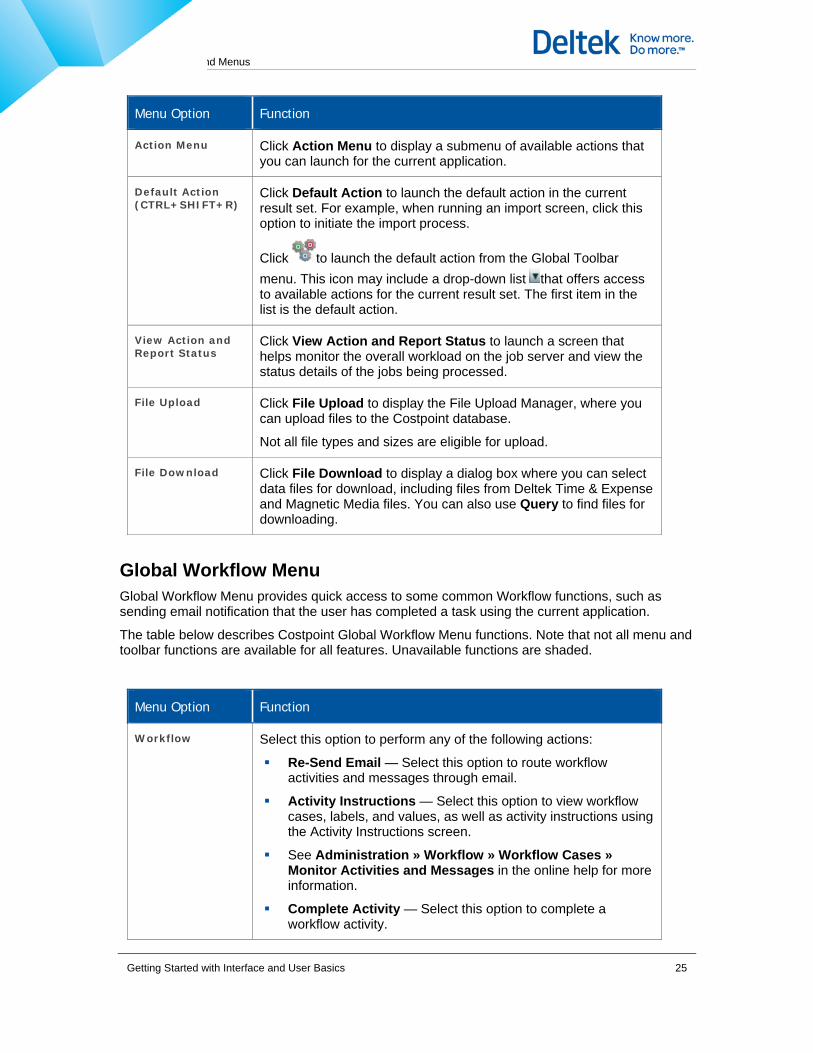
Global Workflow Menu Global Workflow Menu provides quick access to some common Workflow functions, such as sending email notification that the user has completed a task using the current application.
The table below describes Costpoint Global Workflow Menu functions. Note that not all menu and toolbar functions are available for all features. Unavailable functions are shaded.
Menu Option Function
Workflow Select this option to perform any of the following actions:
Re-Send Email — Select this option to route workflow activities and messages through email.
Activity Instructions — Select this option to view workflow cases, labels, and values, as well as activity instructions using the Activity Instructions screen.
See Administration » Workflow » Workflow Cases » Monitor Activities and Messages in the online help for more information.
Complete Activity — Select this option to complete a workflow activity.
Getting Started with Interface and User Basics 25
Global Toolbars and Menus
Menu Option Function
See Administration » Workflow » Workflow Cases » Monitor Activities and Messages in the online help for more information.
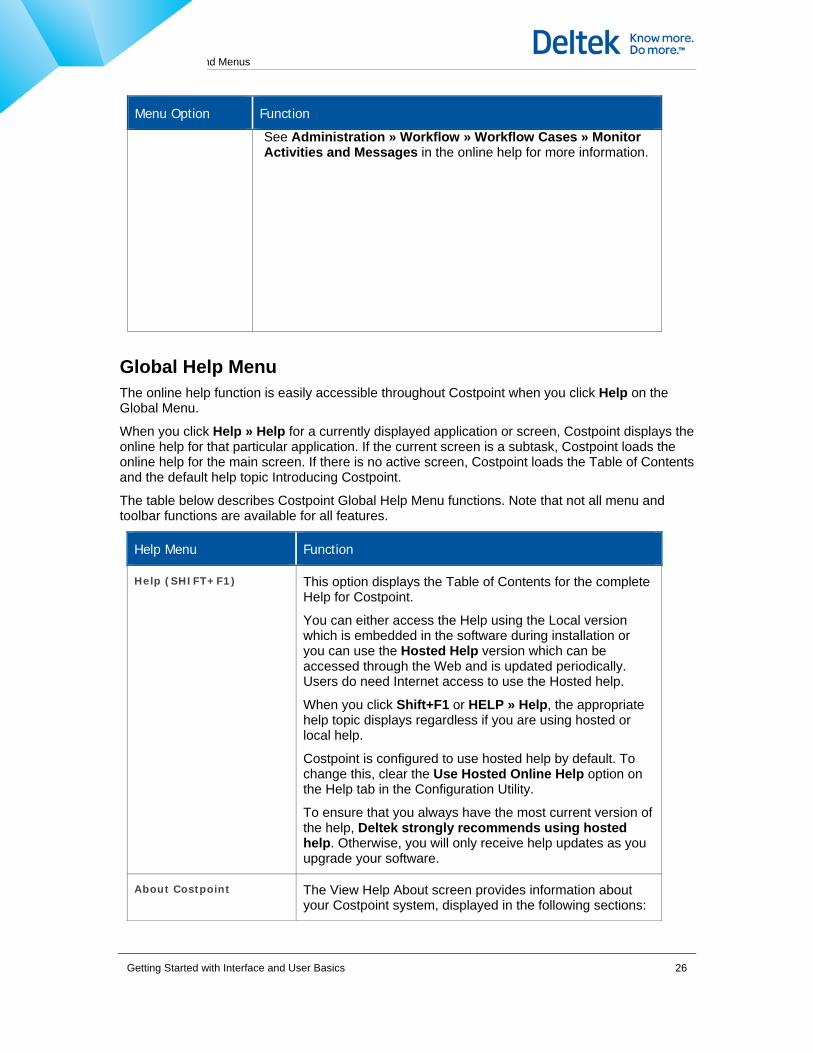
Global Help Menu The online help function is easily accessible throughout Costpoint when you click Help on the Global Menu.
When you click Help » Help for a currently displayed application or screen, Costpoint displays the online help for that particular application. If the current screen is a subtask, Costpoint loads the online help for the main screen. If there is no active screen, Costpoint loads the Table of Contents and the default help topic Introducing Costpoint.
The table below describes Costpoint Global Help Menu functions. Note that not all menu and toolbar functions are available for all features.
Help Menu Function
Help (SHIFT+F1) This option displays the Table of Contents for the complete Help for Costpoint.
You can either access the Help using the Local version which is embedded in the software during installation or you can use the Hosted Help version which can be accessed through the Web and is updated periodically. Users do need Internet access to use the Hosted help.
When you click Shift+F1 or HELP » Help, the appropriate help topic displays regardless if you are using hosted or local help.
Costpoint is configured to use hosted help by default. To change this, clear the Use Hosted Online Help option on the Help tab in the Configuration Utility.
To ensure that you always have the most current version of the help, Deltek strongly recommends using hosted help. Otherwise, you will only receive help updates as you upgrade your software.
About Costpoint The View Help About screen provides information about your Costpoint system, displayed in the following sections:
Getting Started with Interface and User Basics 26
Global Toolbars and Menus
Help Menu Function
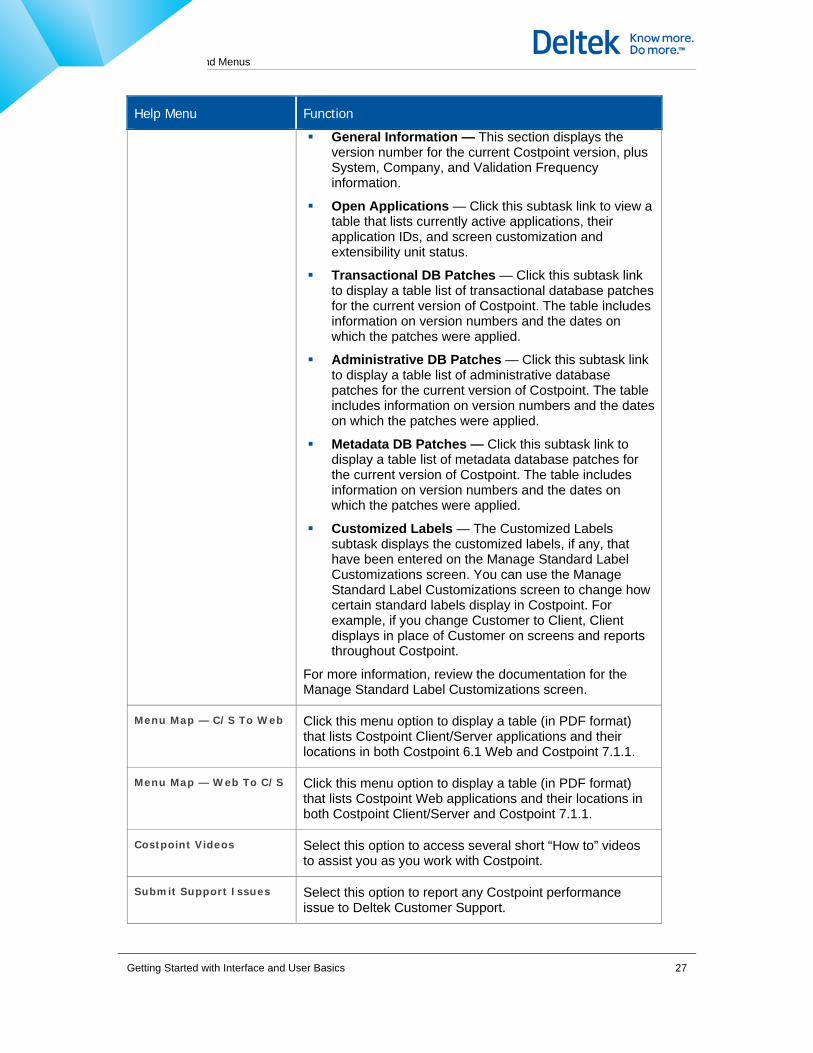
General Information — This section displays the version number for the current Costpoint version, plus System, Company, and Validation Frequency information.
Open Applications — Click this subtask link to view a table that lists currently active applications, their application IDs, and screen customization and extensibility unit status.
Transactional DB Patches — Click this subtask link to display a table list of transactional database patches for the current version of Costpoint. The table includes information on version numbers and the dates on which the patches were applied.
Administrative DB Patches — Click this subtask link to display a table list of administrative database patches for the current version of Costpoint. The table includes information on version numbers and the dates on which the patches were applied.
Metadata DB Patches — Click this subtask link to display a table list of metadata database patches for the current version of Costpoint. The table includes information on version numbers and the dates on which the patches were applied.
Customized Labels — The Customized Labels subtask displays the customized labels, if any, that have been entered on the Manage Standard Label Customizations screen. You can use the Manage Standard Label Customizations screen to change how certain standard labels display in Costpoint. For example, if you change Customer to Client, Client displays in place of Customer on screens and reports throughout Costpoint.
For more information, review the documentation for the Manage Standard Label Customizations screen.
Menu Map — C/S To Web Click this menu option to display a table (in PDF format) that lists Costpoint Client/Server applications and their locations in both Costpoint 6.1 Web and Costpoint 7.1.1.
Menu Map — Web To C/S Click this menu option to display a table (in PDF format) that lists Costpoint Web applications and their locations in both Costpoint Client/Server and Costpoint 7.1.1.
Costpoint Videos Select this option to access several short “How to” videos to assist you as you work with Costpoint.
Submit Support Issues Select this option to report any Costpoint performance issue to Deltek Customer Support.
Getting Started with Interface and User Basics 27
Global Toolbars and Menus
Search Help Topics Use the Table of Contents of the Help to search terms or topics within the Help system.
To search for help topics, do the following steps: 1. Click the Search button to find help topics that contain specific words or phrases.
2. Click Go to start the search.
3. Select the Highlight search results check box to highlight the instances of your search keywords in the help topics. You can also enter the number of search results you want to display.
Getting Started with Interface and User Basics 28
Costpoint Domains and Applications
Costpoint Domains and Applications Costpoint is organized into five program areas, or domains. The Navigation screen displays these domains in the stack on the left side. These domains are further categorized in a series of three panes. Starting from left to right, you can navigate from the highest-level program domain down to the desired application.
You can access the Navigation screen at any time by clicking Browse Applications on the Navigation Toolbar.
To navigate the Costpoint User Interface, follow these steps:
1. Select a Costpoint Domain — Click a domain to display its modules on the next pane.
2. Select a module — Click a module to display its application groups on the middle pane.
3. Select an application group — Click an application group to display its applications on the right-hand pane.
4. Select an application — Click an application to open it. For example, click Close Periods to open that application.
You only see those domains, modules, and applications to which you have access rights. If you have questions concerning access/permissions, please contact your administrator.
Searching for an application? Read more about Costpoint's Search feature.
Getting Started with Interface and User Basics 29
Costpoint Domains and Applications
Domains Data comprising Deltek Costpoint are categorized into domains. Domains represent the top level of the Costpoint hierarchy and always display in a stack on the left side of the Costpoint Navigation screen. When you click a domain, the modules for that domain display in the first pane to the immediate right of the domain list.
The availability of domains and options on your screen is determined by the products and add-ons that your company has licensed with Deltek.
There are five domains in Costpoint:
Accounting
Projects
People
Materials
Administration
Deltek Costpoint is organized by domains as displayed in the above pane.
Getting Started with Interface and User Basics 30
Costpoint Domains and Applications
To view the various modules that comprise a specific domain, click the domain.
Modules Each domain in Deltek Costpoint is subdivided into modules, which are displayed on the left pane next to the domain list. When you select a module, the list of application groups displays on the second pane.
In the example above, after the General Ledger module is selected from the left-hand pane, the General Ledger application groups (for example, Company Calendar, Organizations, Accounts) display in the next pane immediately to its right.
Getting Started with Interface and User Basics 31
Costpoint Domains and Applications
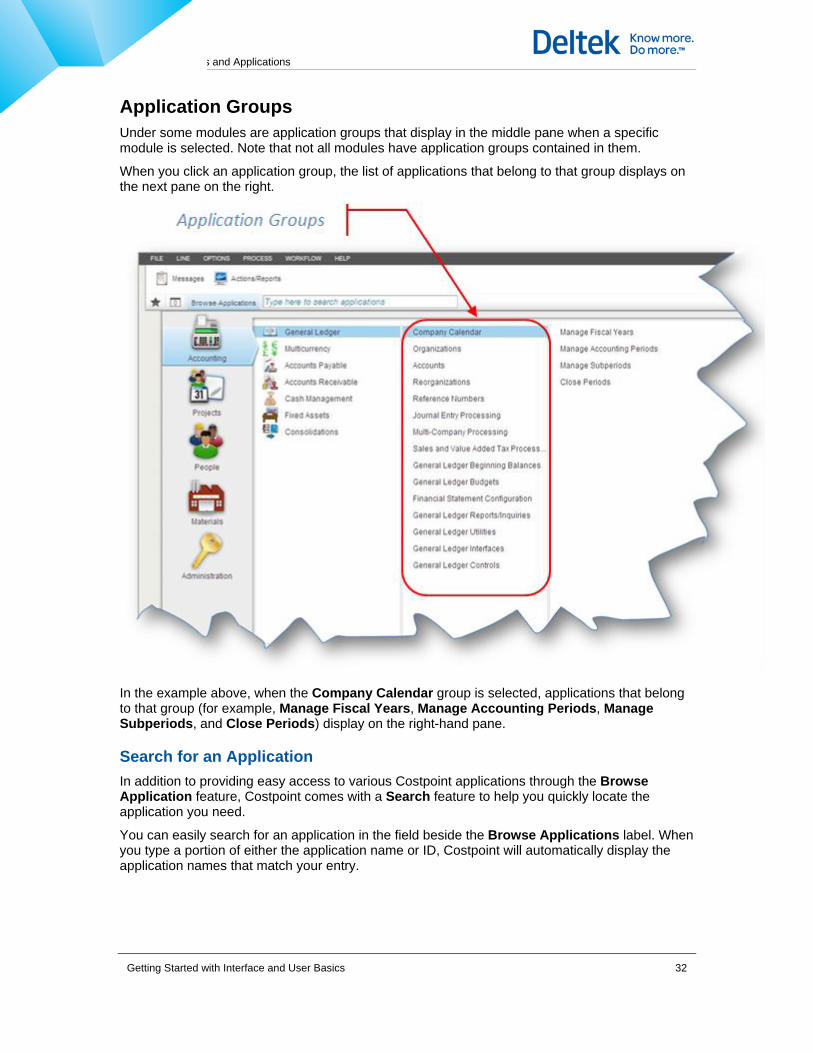
Application Groups Under some modules are application groups that display in the middle pane when a specific module is selected. Note that not all modules have application groups contained in them.
When you click an application group, the list of applications that belong to that group displays on the next pane on the right.
In the example above, when the Company Calendar group is selected, applications that belong to that group (for example, Manage Fiscal Years, Manage Accounting Periods, Manage Subperiods, and Close Periods) display on the right-hand pane.
Search for an Application In addition to providing easy access to various Costpoint applications through the Browse Application feature, Costpoint comes with a Search feature to help you quickly locate the application you need.
You can easily search for an application in the field beside the Browse Applications label. When you type a portion of either the application name or ID, Costpoint will automatically display the application names that match your entry.
Getting Started with Interface and User Basics 32
Costpoint Domains and Applications
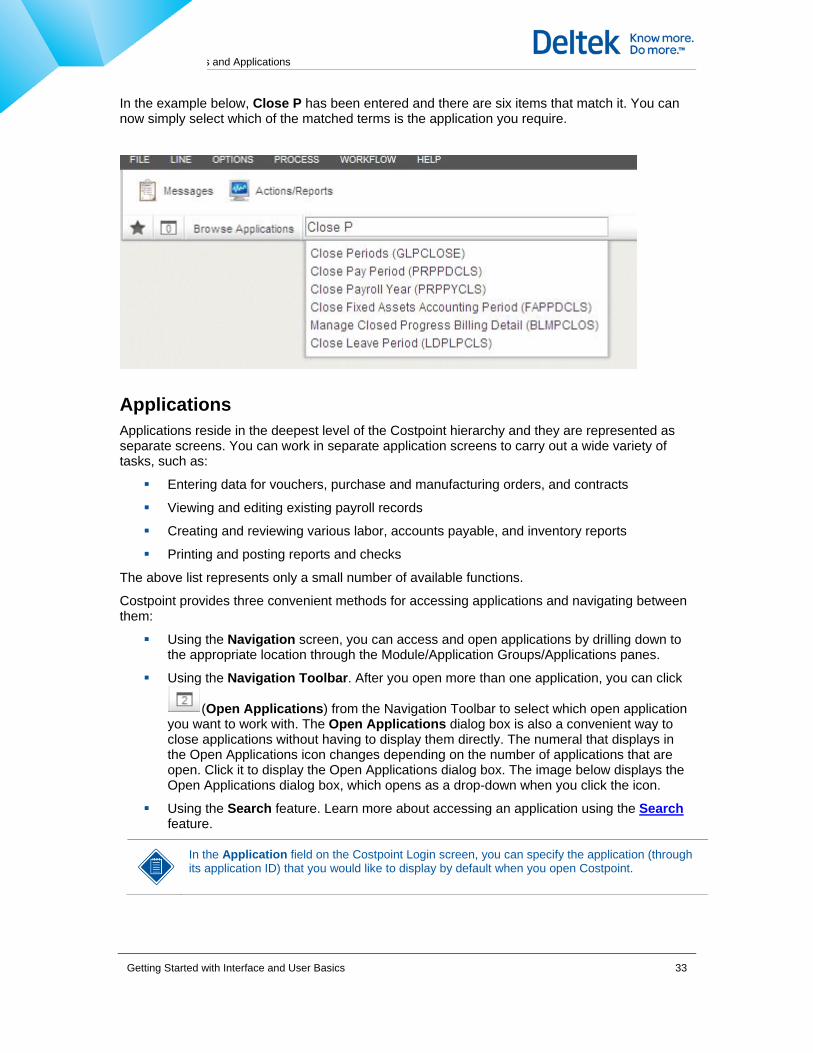
In the example below, Close P has been entered and there are six items that match it. You can now simply select which of the matched terms is the application you require.
Applications Applications reside in the deepest level of the Costpoint hierarchy and they are represented as separate screens. You can work in separate application screens to carry out a wide variety of tasks, such as:
Entering data for vouchers, purchase and manufacturing orders, and contracts
Viewing and editing existing payroll records
Creating and reviewing various labor, accounts payable, and inventory reports
Printing and posting reports and checks
The above list represents only a small number of available functions.
Costpoint provides three convenient methods for accessing applications and navigating between them:
Using the Navigation screen, you can access and open applications by drilling down to the appropriate location through the Module/Application Groups/Applications panes.
Using the Navigation Toolbar. After you open more than one application, you can click
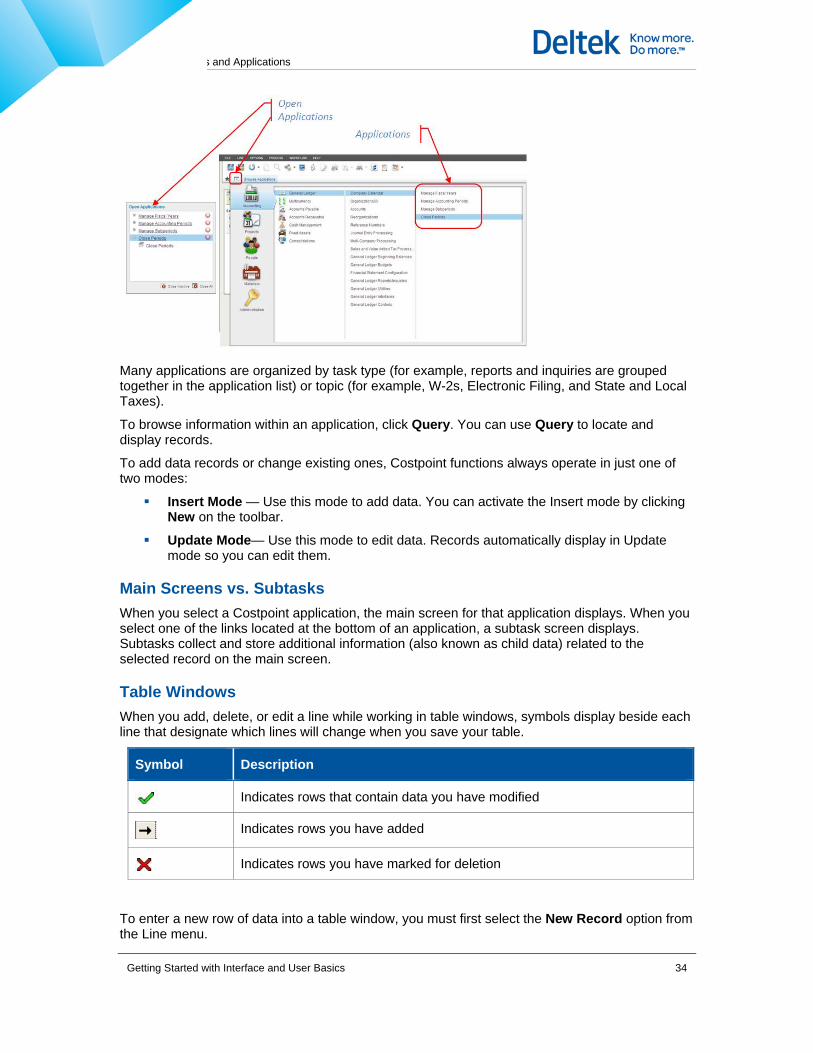
(Open Applications) from the Navigation Toolbar to select which open application you want to work with. The Open Applications dialog box is also a convenient way to close applications without having to display them directly. The numeral that displays in the Open Applications icon changes depending on the number of applications that are open. Click it to display the Open Applications dialog box. The image below displays the Open Applications dialog box, which opens as a drop-down when you click the icon.
Using the Search feature. Learn more about accessing an application using the Search feature.
In the Application field on the Costpoint Login screen, you can specify the application (through its application ID) that you would like to display by default when you open Costpoint.
Getting Started with Interface and User Basics 33
Costpoint Domains and Applications
Many applications are organized by task type (for example, reports and inquiries are grouped together in the application list) or topic (for example, W-2s, Electronic Filing, and State and Local Taxes).
To browse information within an application, click Query. You can use Query to locate and display records.
To add data records or change existing ones, Costpoint functions always operate in just one of two modes:
Insert Mode — Use this mode to add data. You can activate the Insert mode by clicking New on the toolbar.
Update Mode— Use this mode to edit data. Records automatically display in Update mode so you can edit them.
Main Screens vs. Subtasks When you select a Costpoint application, the main screen for that application displays. When you select one of the links located at the bottom of an application, a subtask screen displays. Subtasks collect and store additional information (also known as child data) related to the selected record on the main screen.
Table Windows When you add, delete, or edit a line while working in table windows, symbols display beside each line that designate which lines will change when you save your table.
Symbol Description
Indicates rows that contain data you have modified
Indicates rows you have added
Indicates rows you have marked for deletion
To enter a new row of data into a table window, you must first select the New Record option from the Line menu.
Getting Started with Interface and User Basics 34
Costpoint Domains and Applications
Find Values Within the Table
To find a value in a column, right-click the column heading and then click Find. On the dialog box, enter your search criteria and then click the Find button.
Replace Values in the Table
To replace a value in a column, right-click the column heading and then click Replace. In the dialog box, enter your replace condition(s) and then click one of these buttons:
Button Function
Replace Use this to replace a value on the current row you selected.
Replace&Find Use this to replace value(s) and find the next row that meets your replace condition(s)
Replace All Use this to replace all values in the column that matches your replace condition. You can use the Stop button to halt the replace process.
Find This is similar to the Find button that you see on the Find tab. Use it to search for a value.
Stop Use this to halt an ongoing replace process.
Lock/Unlock Columns
You can freeze a column when you scroll to the right when you apply the Lock Column feature.
To do this, right-click the column heading that you want to lock, and then click Lock Columns. You can unlock the column when you right-click its heading and click Unlock Columns.
Resize Columns To resize a column, on the column heading, hover to the right border of the column until a bi-directional arrow appears. Click and move the arrow to adjust the column size. You can also right-click the column heading and then click Resize Column. Click and move the bi-directional arrow that appears to adjust the column size.
Move Columns
To move a column, click the column heading and drag it to a certain position in the table. You can also right-click the column heading, click Move Column, and drag the column to a certain position in the table.
Sort Tables in Ascending Order To sort a column in ascending order (that is, from the lowest value to the highest), right-click the column heading to sort so you can see the sort options available. And then, click Sort Ascending.
For characters, an ascending order will be from A to Z.
For numeric digits, an ascending order is from the lowest number to the highest.
Getting Started with Interface and User Basics 35
Costpoint Domains and Applications
If both numeric digits and characters are in the list, numeric digits will be listed before characters.
Sort Tables in Descending Order
To sort a column in descending order (that is, from highest to lowest), right-click the column heading to sort so you can see the sort options available. And then, click Sort Descending.
For characters, a descending order will be from Z to A.
For numeric digits, a descending order is from the highest number to the lowest.
If both numeric digits and characters are in the list, characters will be listed before numeric digits.
Arrange Table Columns
You can change the order of the columns in a table window when you click and drag a column heading to a certain position in the table. Another way is to use the Arrange Table Columns dialog box. To open this, right-click any column heading and then click Arrange Table Columns. On the dialog box, arrange the order of the columns through the Move Up or Move Down buttons. Enter the number of columns you will lock when you scroll to the right in the Number of columns to fence field.
To return to the original positions of the column headings, click Options » Reset Default Positioning and View or press SHIFT+ALT+Z.
Show/Hide Screen Controls To show or hide columns, right-click the column heading and then click Show/Hide Screen Controls. On the dialog box, click Data Fields or UI Controls to see the options available. Select the Always Hide check box next to the item(s) you want to hide, and then click Apply. Costpoint automatically hides the selected item(s) from the table layout. Click Close to exit the dialog box.
To make changes permanent, save the Application Layout after clicking Apply.
To display hidden columns, open the dialog box, clear the Always Hide check box, click Apply, and save the Application Layout.
IDs and Codes
When creating IDs and codes or entering them in a field (for example a part ID), you should observe the following guidelines:
Never embed spaces in ID or Code fields.
Never embed single quotes (') in any field.
Letters within IDs and codes should all be upper case.
If you are unsure of an ID or code required for a particular field, you can use Lookup to search and select available values.
Segmented IDs
In certain fields (for instance, account, organization, project, reference number 1, reference number 2, alternate project reporting, and alternate organization), segment separators (periods or dashes) automatically display when you enter a value. These multi-level items are called "segmented ID" fields.
Getting Started with Interface and User Basics 36
Costpoint Domains and Applications
Range Options
Use Range Options to limit the scope of records you want to include in a report, process, or inquiry. The system-defined options are as follows.
Option Description
All This option allows you to choose all available records in a database table.
One This option allows you to choose one of the available records in a database table.
Range This option allows you to choose a specific range of records in a database table.
From Beginning This option allows you to define a range from the beginning of a database table to a selected ending record.
To End This option allows you to define a range from a specified beginning record to the end of the database table.
Non-Contiguous Range Select this check box on the main screen and then use the Non-Contiguous Ranges subtask to select a noncontiguous range of records (for example, projects or employees). This is different from using a regular range because you can include or exclude any records of your choice. You can enter more than one row.
Select/Delete (or Deselect)
Use the Select or Delete buttons when you make selections and transfer items between two table windows.
To move data in the top or left window to the bottom or right window, choose an item from the table window or top window and click the Select button.
To remove data in the right or bottom window, choose the item and click the Delete button.
OK
Click OK to save the current data and return to the previous screen.
Cancel
Click Cancel to remove your additions, changes, and deletions and return to the previous screen.
Logging Out of Costpoint
You can exit Costpoint when you click on the Navigation Toolbar, or when you click File » Log-Out from the Global Menu and/or press CTRL+SHIFT+F12.
Getting Started with Interface and User Basics 37
Ease of Access Features
Ease of Access Features Costpoint makes it easy for you to create new records and find the data that you need.
Lookup Feature Select this feature to look up and select available values in cases where you are unsure of the ID or code you need to complete a particular field.
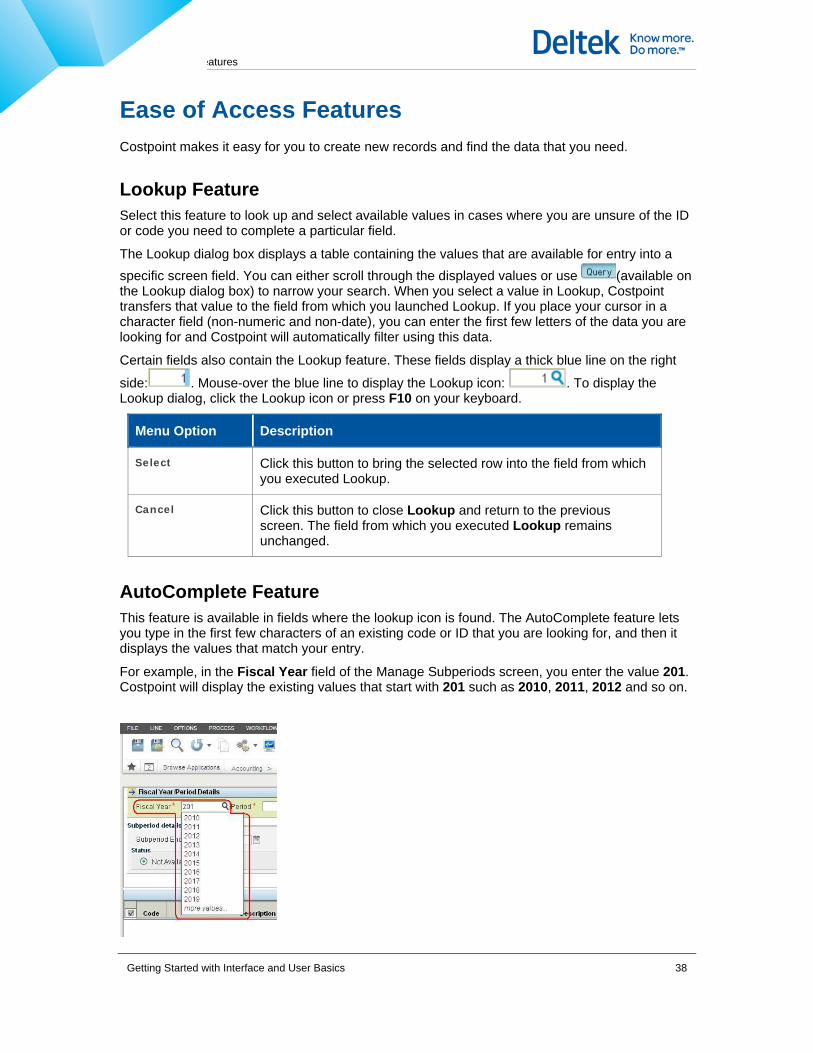
The Lookup dialog box displays a table containing the values that are available for entry into a specific screen field. You can either scroll through the displayed values or use (available on the Lookup dialog box) to narrow your search. When you select a value in Lookup, Costpoint transfers that value to the field from which you launched Lookup. If you place your cursor in a character field (non-numeric and non-date), you can enter the first few letters of the data you are looking for and Costpoint will automatically filter using this data.
Certain fields also contain the Lookup feature. These fields display a thick blue line on the right
side: . Mouse-over the blue line to display the Lookup icon: . To display the Lookup dialog, click the Lookup icon or press F10 on your keyboard.
Menu Option Description
Select Click this button to bring the selected row into the field from which you executed Lookup.
Cancel Click this button to close Lookup and return to the previous screen. The field from which you executed Lookup remains unchanged.
AutoComplete Feature This feature is available in fields where the lookup icon is found. The AutoComplete feature lets you type in the first few characters of an existing code or ID that you are looking for, and then it displays the values that match your entry.
For example, in the Fiscal Year field of the Manage Subperiods screen, you enter the value 201. Costpoint will display the existing values that start with 201 such as 2010, 2011, 2012 and so on.
Getting Started with Interface and User Basics 38
Ease of Access Features
Query Feature Use Query to define search parameters for data records maintained by the present application. Query is available in form-type maintenance applications.
Using the fields on the Search Criteria group box, specify the parameters for your record search.
Find Tab
Search Criteria
Using the fields in this section, select a search criteria to narrow your search. You can enter information in one or all fields; however, the more parameters you enter, the narrower your search results.
The search criteria vary depending on both the application and the type of record for which you are searching for (for example, whether you are looking up an employee, voucher, or project). The search criteria vary by type of application. As an example of how Query search criteria works, we can look at the Manage Employee Information application. For this application, among the criteria available are Employee and Displayed Name. For both of these items, select from the center drop-down list one of the following relational parameters:
Is equal to
Begins with
Contains
In the corresponding fields on the right, enter values (partial names, letters, and/or numbers) that match the Employee and/or Displayed Name you are searching for.
To further narrow your search, in the third row, Status is, you can select from the drop-down list on the right one of the following options:
Active
Family Medical Leave
Inactive
Inactive Accruing Leave
After you enter or modify a parameter, click to preview the number of records Costpoint will return based on your current parameters.
Queries work in this way across applications, and include the following options:
Query Tab The Query Tab contains additional parameters for your search.
Query Condition
In this section you can enter additional parameters. For example, on the Manage Employee Information screen, some of the parameters included are the following:
Adjusted Hire Date
Birth Date
City
Contractor
Getting Started with Interface and User Basics 39
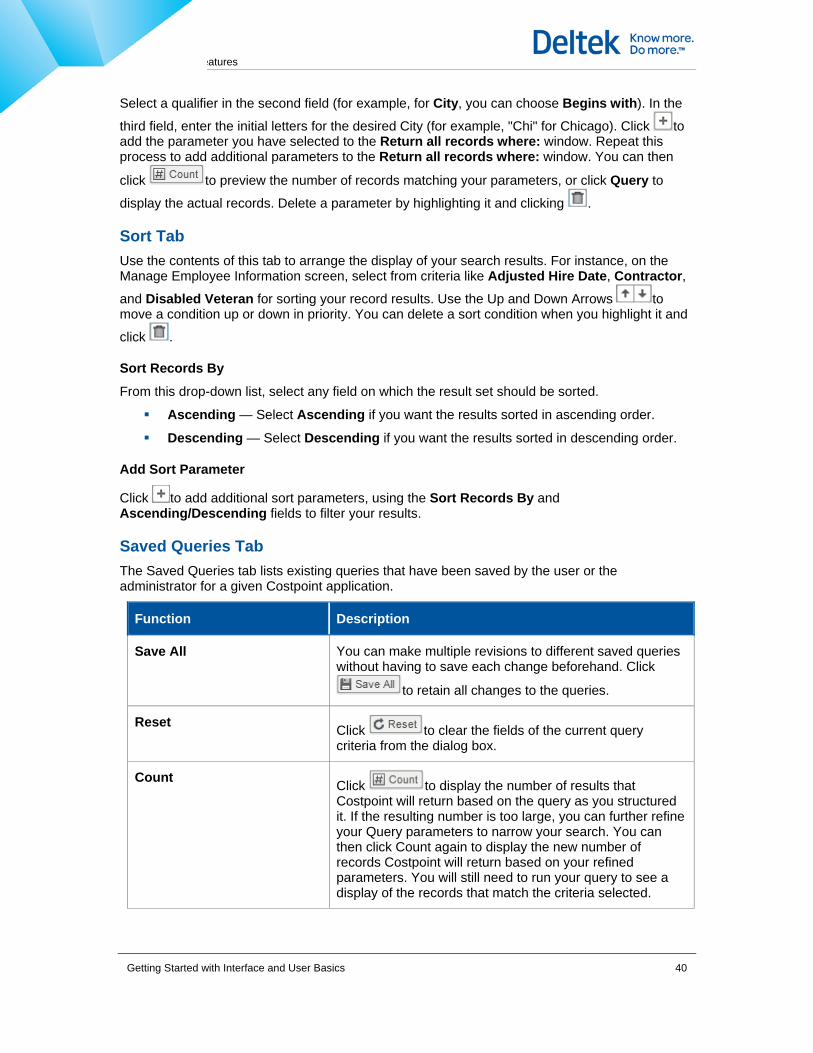
Ease of Access Features
Select a qualifier in the second field (for example, for City, you can choose Begins with). In the
third field, enter the initial letters for the desired City (for example, "Chi" for Chicago). Click to add the parameter you have selected to the Return all records where: window. Repeat this process to add additional parameters to the Return all records where: window. You can then
click to preview the number of records matching your parameters, or click Query to
display the actual records. Delete a parameter by highlighting it and clicking .
Sort Tab Use the contents of this tab to arrange the display of your search results. For instance, on the Manage Employee Information screen, select from criteria like Adjusted Hire Date, Contractor, and Disabled Veteran for sorting your record results. Use the Up and Down Arrows to move a condition up or down in priority. You can delete a sort condition when you highlight it and
click .
Sort Records By
From this drop-down list, select any field on which the result set should be sorted.
Ascending — Select Ascending if you want the results sorted in ascending order.
Descending — Select Descending if you want the results sorted in descending order.
Add Sort Parameter
Click to add additional sort parameters, using the Sort Records By and Ascending/Descending fields to filter your results.
Saved Queries Tab The Saved Queries tab lists existing queries that have been saved by the user or the administrator for a given Costpoint application.
Function Description
Save All You can make multiple revisions to different saved queries without having to save each change beforehand. Click
to retain all changes to the queries.
Reset Click to clear the fields of the current query criteria from the dialog box.
Count Click to display the number of results that Costpoint will return based on the query as you structured it. If the resulting number is too large, you can further refine your Query parameters to narrow your search. You can then click Count again to display the new number of records Costpoint will return based on your refined parameters. You will still need to run your query to see a display of the records that match the criteria selected.
Getting Started with Interface and User Basics 40
Ease of Access Features
Function Description
Save Query Click to display the Save Query dialog box and assign a Query ID and Query Name of your present query and retain it for later use.
Reset Click to clear the fields of the current query criteria from the dialog box.
Find or Query Click the Find or Query button to initiate the data search based on the parameters you entered. If the query returns more than one record, Costpoint displays the search results in a table. If the query returns just one record, that record displays in form view format.
Close Click the Close button to exit the Query dialog box.
Clone Record and Copy Record Feature Use the Clone Record or Copy Record feature to create a new record that contains information from an existing record. The differences of these two features are their availability that depends on the types of records that will be copied. They are not available for all functions.
Use the Clone Record feature when you copy records that have a header (parent) and detail (child) information.
Use the Copy Record feature when you copy data that involves just a single record or "child" rows. This is generally used when copying report parameters such as the Print Account List.
After you use clone or copy, the new record displays containing the data you copied except for the key which you must provide.
To clone information, complete the following steps:
1. Open the application where you want to copy a particular record.
2. Once you have opened the application screen, search for the record that you want to copy. You can use Query to search for it.
3. When the selected record is displayed, select File » Clone Record to copy the record.
4. Enter primary key(s) and any other information that you want to change.
5. Click Save to save the cloned record.
To copy a line, complete the following steps:
1. Open the application where you want to copy a particular line.
2. Once you have opened the application screen, search for the record that you want to copy. You can use Query in the table window to search for it.
3. When the selected line is displayed, select it and go to Line » Copy Record or click the Copy drop-down on the table window and select Copy Record. The other options in the Copy button are:
Getting Started with Interface and User Basics 41
Ease of Access Features
Copy Function Description
Copy Data to Insert into Excel
Use this option to copy the line to Microsoft Excel.
Copy Data to Paste into New Record(s)
Select this to copy the line into another parent record.
Paste Data Select this if you just copied a line and want to paste it on the table window.
4. Enter primary key(s) and any other information that you want to change.
5. Click Save to save the copied record.
You can select Save and Continue after you enter your changes on the screen.
After you create a new record by cloning an existing record, use Toggle View to switch back and forth between the new record and the existing record. This is particularly useful for Form View-only screens.
Getting Started with Interface and User Basics 42
User Preference Functions
User Preference Functions
Change Default Period To access this screen, go to the Options » User Preferences. On the User Preferences screen, click the Change Default Period link. You can use this feature to change your default fiscal year, period, and subperiod for the current module. These items are automatically preloaded in most Costpoint transaction functions. If you enter a different timeframe on a transaction screen, you will temporarily override the module's default period until:
You enter even another timeframe on a transaction screen
You select this menu option and change the default period, or
You exit Costpoint
When you bring Costpoint back up, the default period reverts to the values that you last entered on this screen.
You do not have to enter a Fiscal Year/period/subperiod combination if you prefer not to.
The available timeframe options are as follows.
Timeframe Description
Fiscal Year This field's Lookup has the fiscal years that are currently open (that is, fiscal years with currently open periods and subperiods). Select a fiscal year from the Lookup, or leave the field blank if the Period and Subperiod are both to remain zero.
Period This field's Lookup has the open accounting periods that are currently open (that is, accounting periods with currently open subperiods). Select a period from the Lookup, or enter a zero if the Fiscal Year is blank.
Subperiod This field's Lookup has the subperiods that are currently open. Select a subperiod from the list, or enter a zero if the Fiscal Year is blank.
Maintain My Menu Use this feature to create the user's My Menu, which is a custom user menu. This menu item enables if the user has been authorized to change MyMenu. See Manage Users in the online help for more information.
Getting Started with Interface and User Basics 43
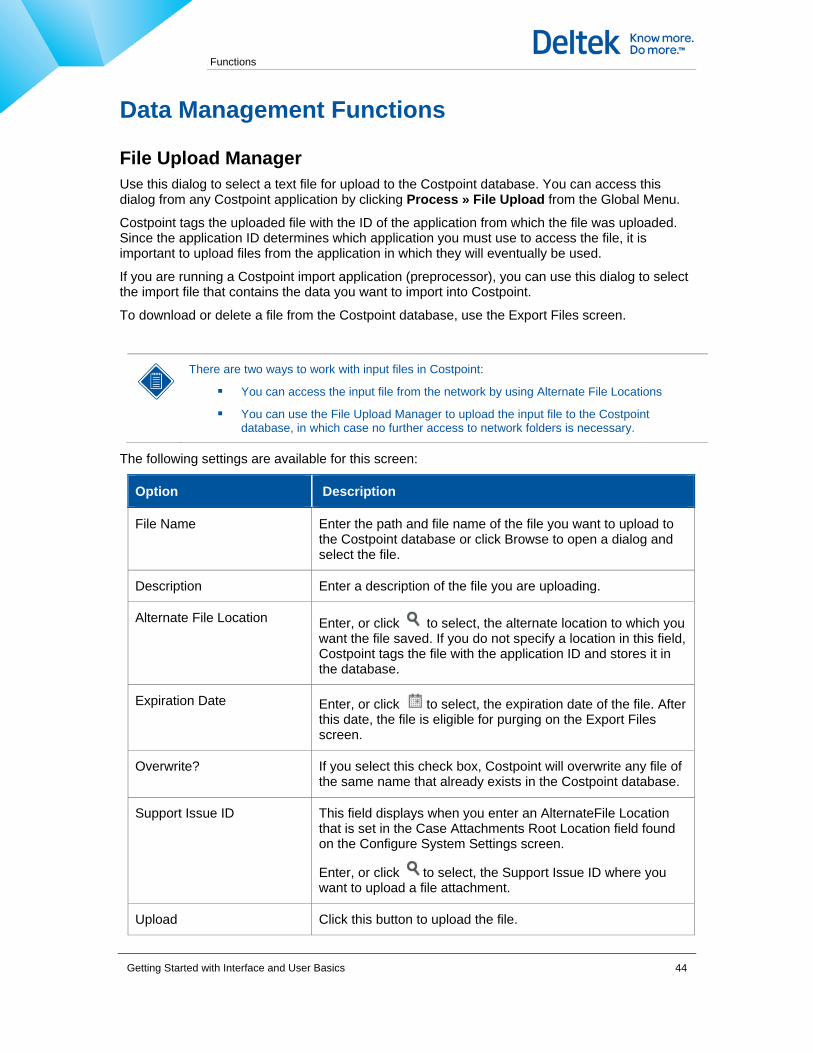
Data Management Functions
Data Management Functions
File Upload Manager Use this dialog to select a text file for upload to the Costpoint database. You can access this dialog from any Costpoint application by clicking Process » File Upload from the Global Menu.
Costpoint tags the uploaded file with the ID of the application from which the file was uploaded. Since the application ID determines which application you must use to access the file, it is important to upload files from the application in which they will eventually be used.
If you are running a Costpoint import application (preprocessor), you can use this dialog to select the import file that contains the data you want to import into Costpoint.
To download or delete a file from the Costpoint database, use the Export Files screen.
There are two ways to work with input files in Costpoint:
You can access the input file from the network by using Alternate File Locations
You can use the File Upload Manager to upload the input file to the Costpoint database, in which case no further access to network folders is necessary.
The following settings are available for this screen:
Option Description
File Name Enter the path and file name of the file you want to upload to the Costpoint database or click Browse to open a dialog and select the file.
Description Enter a description of the file you are uploading.
Alternate File Location Enter, or click to select, the alternate location to which you want the file saved. If you do not specify a location in this field, Costpoint tags the file with the application ID and stores it in the database.
Expiration Date Enter, or click to select, the expiration date of the file. After this date, the file is eligible for purging on the Export Files screen.
Overwrite? If you select this check box, Costpoint will overwrite any file of the same name that already exists in the Costpoint database.
Support Issue ID This field displays when you enter an AlternateFile Location that is set in the Case Attachments Root Location field found on the Configure System Settings screen.
Enter, or click to select, the Support Issue ID where you want to upload a file attachment.
Upload Click this button to upload the file.
Getting Started with Interface and User Basics 44
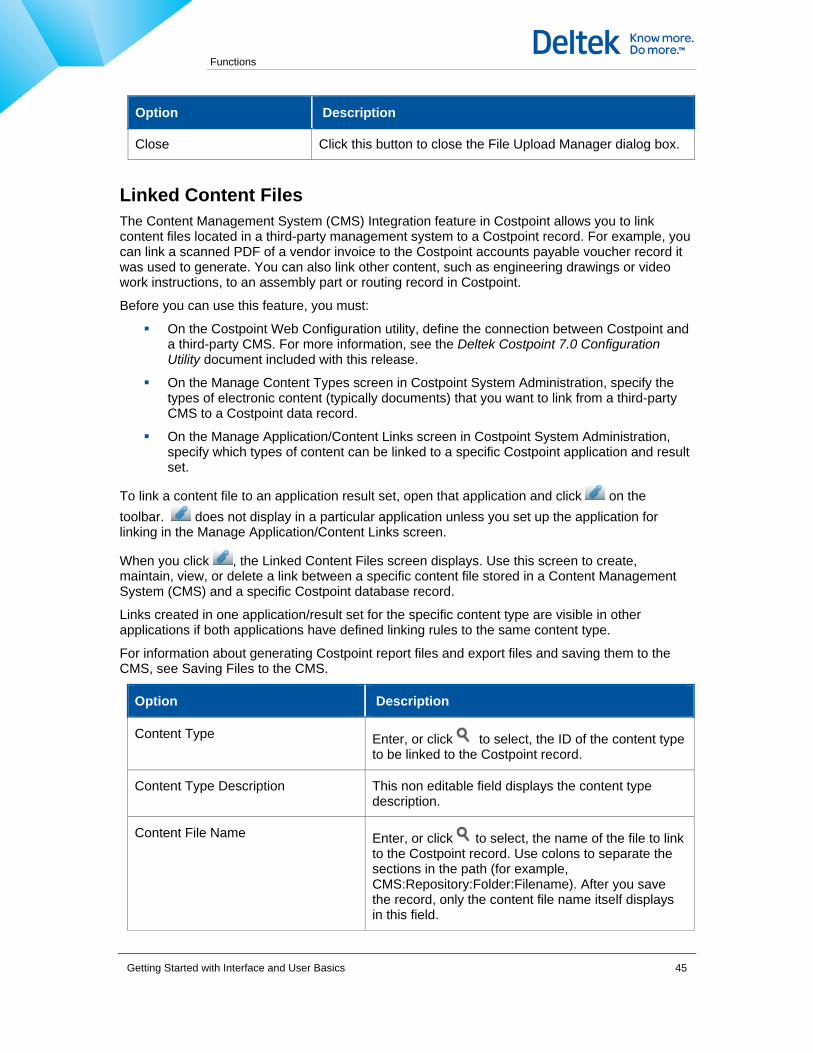
Data Management Functions
Option Description
Close Click this button to close the File Upload Manager dialog box.
Linked Content Files The Content Management System (CMS) Integration feature in Costpoint allows you to link content files located in a third-party management system to a Costpoint record. For example, you can link a scanned PDF of a vendor invoice to the Costpoint accounts payable voucher record it was used to generate. You can also link other content, such as engineering drawings or video work instructions, to an assembly part or routing record in Costpoint.
Before you can use this feature, you must:
On the Costpoint Web Configuration utility, define the connection between Costpoint and a third-party CMS. For more information, see the Deltek Costpoint 7.0 Configuration Utility document included with this release.
On the Manage Content Types screen in Costpoint System Administration, specify the types of electronic content (typically documents) that you want to link from a third-party CMS to a Costpoint data record.
On the Manage Application/Content Links screen in Costpoint System Administration, specify which types of content can be linked to a specific Costpoint application and result set.
To link a content file to an application result set, open that application and click on the toolbar. does not display in a particular application unless you set up the application for linking in the Manage Application/Content Links screen.
When you click , the Linked Content Files screen displays. Use this screen to create, maintain, view, or delete a link between a specific content file stored in a Content Management System (CMS) and a specific Costpoint database record.
Links created in one application/result set for the specific content type are visible in other applications if both applications have defined linking rules to the same content type.
For information about generating Costpoint report files and export files and saving them to the CMS, see Saving Files to the CMS.
Option Description
Content Type Enter, or click to select, the ID of the content type to be linked to the Costpoint record.
Content Type Description This non editable field displays the content type description.
Content File Name Enter, or click to select, the name of the file to link to the Costpoint record. Use colons to separate the sections in the path (for example, CMS:Repository:Folder:Filename). After you save the record, only the content file name itself displays in this field.
Getting Started with Interface and User Basics 45
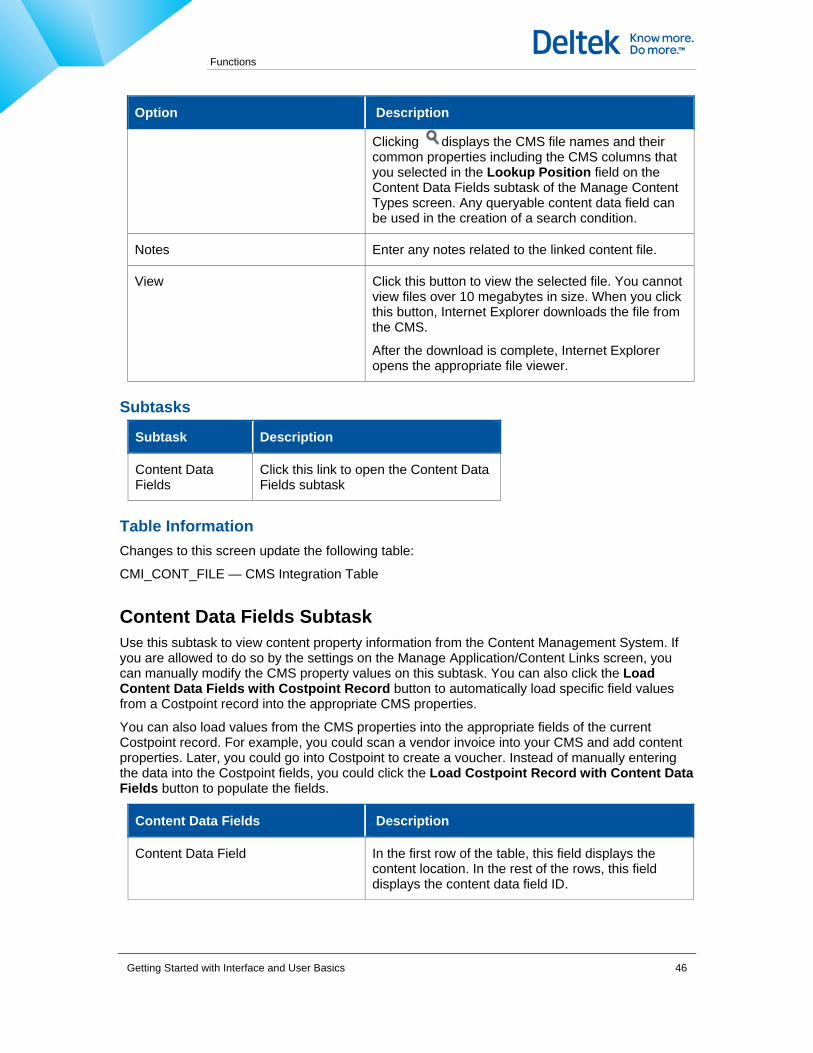
Data Management Functions
Option Description
Clicking displays the CMS file names and their common properties including the CMS columns that you selected in the Lookup Position field on the Content Data Fields subtask of the Manage Content Types screen. Any queryable content data field can be used in the creation of a search condition.
Notes Enter any notes related to the linked content file.
View Click this button to view the selected file. You cannot view files over 10 megabytes in size. When you click this button, Internet Explorer downloads the file from the CMS.
After the download is complete, Internet Explorer opens the appropriate file viewer.
Subtasks
Subtask Description
Content Data Fields
Click this link to open the Content Data Fields subtask
Table Information Changes to this screen update the following table:
CMI_CONT_FILE — CMS Integration Table
Content Data Fields Subtask Use this subtask to view content property information from the Content Management System. If you are allowed to do so by the settings on the Manage Application/Content Links screen, you can manually modify the CMS property values on this subtask. You can also click the Load Content Data Fields with Costpoint Record button to automatically load specific field values from a Costpoint record into the appropriate CMS properties.
You can also load values from the CMS properties into the appropriate fields of the current Costpoint record. For example, you could scan a vendor invoice into your CMS and add content properties. Later, you could go into Costpoint to create a voucher. Instead of manually entering the data into the Costpoint fields, you could click the Load Costpoint Record with Content Data Fields button to populate the fields.
Content Data Fields Description
Content Data Field In the first row of the table, this field displays the content location. In the rest of the rows, this field displays the content data field ID.
Getting Started with Interface and User Basics 46
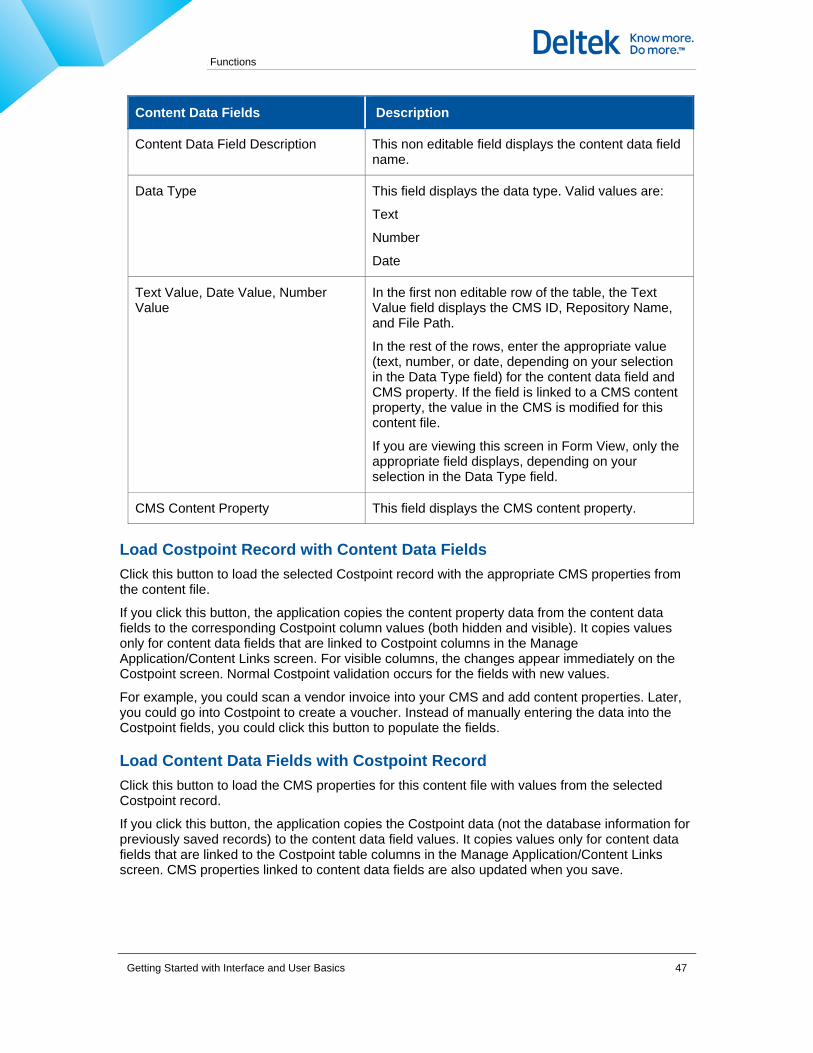
Data Management Functions
Content Data Fields Description
Content Data Field Description This non editable field displays the content data field name.
Data Type This field displays the data type. Valid values are:
Text
Number
Date
Text Value, Date Value, Number Value
In the first non editable row of the table, the Text Value field displays the CMS ID, Repository Name, and File Path.
In the rest of the rows, enter the appropriate value (text, number, or date, depending on your selection in the Data Type field) for the content data field and CMS property. If the field is linked to a CMS content property, the value in the CMS is modified for this content file.
If you are viewing this screen in Form View, only the appropriate field displays, depending on your selection in the Data Type field.
CMS Content Property This field displays the CMS content property.
Load Costpoint Record with Content Data Fields Click this button to load the selected Costpoint record with the appropriate CMS properties from the content file.
If you click this button, the application copies the content property data from the content data fields to the corresponding Costpoint column values (both hidden and visible). It copies values only for content data fields that are linked to Costpoint columns in the Manage Application/Content Links screen. For visible columns, the changes appear immediately on the Costpoint screen. Normal Costpoint validation occurs for the fields with new values.
For example, you could scan a vendor invoice into your CMS and add content properties. Later, you could go into Costpoint to create a voucher. Instead of manually entering the data into the Costpoint fields, you could click this button to populate the fields.
Load Content Data Fields with Costpoint Record Click this button to load the CMS properties for this content file with values from the selected Costpoint record.
If you click this button, the application copies the Costpoint data (not the database information for previously saved records) to the content data field values. It copies values only for content data fields that are linked to the Costpoint table columns in the Manage Application/Content Links screen. CMS properties linked to content data fields are also updated when you save.
Getting Started with Interface and User Basics 47
Data Management Functions
Table Information Changes to this screen update the following tables:
CMI_CONT_FILE
CMI_CONT_FILE_FLD
Save Files to the CMS You can use the Manage Alternate File Locations screen to link an alternate file location to a specific content type for a given CMS. After you link the alternate file location to a content type, you can generate Costpoint report files and export files and save them to the CMS.
To generate a report file and export it to a CMS, complete the following steps:
1. On the screen, set the parameters for your report.
2. From the menu, click File » Print Options, or click (Print Options icon) on the toolbar.
3. Select the Print to File check box.
4. On the File Options tab, select the File Type, and enter the File Name.
5. In the Alternate File Location field, enter, or click to select, the CMS to which you want to export the report file.
6. Click OK.
7. Click . The application generates the report file and saves it to the CMS.
To generate an export file and save it to a CMS, complete the following steps:
1. On the screen, set the parameters for your export file.
2. In the File Location field (the name used in most screens), enter, or click to select, the CMS to which you want to save the export file. Clicking displays the alternate file locations you set up for the content type on the Manage Alternate File Locations screen.
3. Click . The application generates the export file and saves it to the CMS.
Getting Started with Interface and User Basics 48

Report Output Options
Report Output Options Costpoint 7 gives you a variety of choices for printing your reports. You can:
Print to a printer attached to your network
Print to a file
Download the report as a file
Print to a file and email it
Archive your report for future viewing
Print to a local printer
Click to open the Print Options dialog box and select options for printing. This dialog box has the following tabs:
System printer — If you select the System Printer delivery option check box, use this tab to select the network printer you want to use and other options.
File Options — If you select the Print to File or Download delivery option check boxes, use this tab to select the format of the file you want to create and other options.
Email — If you select the Email delivery option check box, use this tab to enter the email information.
Archive — If you selected the Archive delivery option check box, use this tab to save your report for later printing.
Identification Use the fields in this block to create a new parameter ID or to retrieve a previously saved parameter ID. A parameter ID represents a set of screen selection parameters. After you have saved a parameter ID and its related parameters, you can retrieve them using Query.
You can use the retrieved parameters to produce reports and run processes more efficiently and with greater consistency. The saved parameters are also useful and necessary when you want to run the process as part of a batch job. Many users save a unique set of parameters for each different way they run a report or process. When you select a previously saved parameter ID or parameter description, the associated saved screen selection parameters automatically display as selection defaults. The page setup and print options are also included in the saved parameter ID if there are any. You can change any of the associated selection defaults as necessary.
Parameter ID
Enter, or click to select, a parameter ID of up to 15 alphanumeric characters. Choose characters for your parameter ID that help identify the type of selections you made in the screen, such as PERIOD or QUARTERLY.
When you save your record, all the selections made in the screen are stored with the parameter ID. Later, you can retrieve the parameter using Query.
You can use the parameter to run the process more efficiently because you can select the parameter ID with its previously defined screen selections. After the default selections display in the screen, you can override the defaults.
Getting Started with Interface and User Basics 49
Report Output Options
Description
Enter, or click to select, a parameter description of up to 30 alphanumeric characters.
Delivery Options Use this group box to select the delivery option for your report.
The Print to File and Download options have nearly the same function, but you cannot send your report to the process server if you select Download.
System Printer
Select this check box to send the report to a printer attached to your local network. If you select this check box, the System Printer tab is available. Use this tab to select which printer you want to use and other options. Use the Manage System Printers screen to set up printers for use in Costpoint.
This check box is not available unless the report category to which this report belongs has the Allow System Printer check box selected on the Manage Report Categories screen.
Print to File
Select this check box to print your report to a file. If you select this check box, you can use the File Options tab to select which file format you want to use and specify the location.
This check box is not available unless the report category to which this report belongs has the Allow Print to File check box selected on the Manage Report Categories screen.
Download
Select this check box to save your report to a file on your computer. If you select this check box,
you can use the File Options tab to select which file format you want to use. When you click , a dialog box displays that you can use to select the location. If you select this check box, you cannot send this report to the process server.
This check box is not available unless the report category to which this report belongs has the Allow Local Printer/Download check box selected on the Manage Report Categories screen.
Select this check box to email the report, which is included as a file attachment. Use the File Options tab to select the file format and the Email tab to enter the email information. If your email address is set up on the Workflow tab of the Manage Users screen, the email is sent from your email address. Otherwise, the email is sent from the workflow email address (for example, workflow@<company name>.com).
This check box is not available unless the report category to which this report belongs has the Allow Email check box selected on the Manage Report Categories screen.
Archive Select this check box to archive your report. Use the Archive tab to enter ID information for your archive and specify how long you want it kept. To print an archived report, use the Print Archived Reports screen.
Getting Started with Interface and User Basics 50
Report Output Options
This check box is not available unless the report category to which this report belongs has the Allow Archive check box selected on the Manage Report Categories screen.
Local Printer
Select this check box to send your report to a local printer. A local printer is a printer that is attached directly to your computer. If you select this check box, the Submit Batch Job check box is not available. To find out how to set up a local printer, see Setting Up and Using a Local Printer.
This check box is not available unless the report category to which this report belongs has the Allow Local Printer/Download check box selected on the Manage Report Categories screen.
Queueing
Submit Batch Job Select this check box to submit your report as a batch job to the process server. If you select the Download or Local Printer check boxes, this check box is unavailable.
Document Locale
Locale Use this drop-down list to select your report locale. The locale determines how report data is formatted in terms of language, numbers, and date/time preferences. Locales are set up by your company.
Pages
All
Select this check box to print all the pages in the report. If you do not select this check box, you must enter the pages you want to print in the Pages field.
Pages
Enter the page number you want to print. Separate page numbers with commas, and indicate ranges with a dash. For example, enter 1, 4, 10-12 to print pages 1, 4, 10, 11, and 12.
Print Cover Page
Select this check box to print the report's cover page.
System Printer If you selected the System Printer delivery option check box, use this tab to select the network printer you want to use and other options.
Printer
Printer
Use the drop-down list to select the printer you want to use. The printers that display in the list are those that have been set up for you or your user group on the Manage System Printers screen.
Getting Started with Interface and User Basics 51
Report Output Options
Name
This field displays the name of the Printer you selected.
Resolution
Use the drop-down list to select the printer resolution you want to use. Resolution is expressed in terms of dots per inch (dpi). Generally, the more dots, the sharper the print. However, the default resolution is acceptable for most purposes. The selections in this drop-down list depend on the Printer selected.
Scale Use the drop-down list to adjust the scale of your report, making it larger or smaller.
For best printing results, it is very important not to scale the report content to page. Costpoint reports are designed and implemented to have precise page layout and margins. This means that the ideal print out is achieved when the report data is printed as is, without scaling.
Depending on your version of Adobe or Acrobat Reader, you need to set the following options:
Page Scaling = None or
Page Sizing & Handling = Actual Size
Color Printing Select this check box to enable printing in color if your printer is color capable.
Paper Source
Use this drop-down list to select the paper source.
Print on Both Sides
Use the drop-down list to make a selection. Valid options are:
SIMPLEX — Select this option to print only on one side of the paper.
HORIZONTAL — Select this option for landscape printing.
VERTICAL — Select this option for portrait printing.
Printer Type This field displays the type of printer you selected. This is usually the brand name and model.
Location
This field displays the printer's location. The location is assigned when the printer is set up on the Actuate server.
Setting Up and Using a Local Printer
To set up and use a local printer, complete the following steps:
1. On the Printing Defaults tab of the Manage Users screen, select the Local Printer/Download check box in the Delivery Options Enabled for this User group box for your Costpoint user ID. If you do not have access to the Manage Users screen, contact your System Administrator.
Getting Started with Interface and User Basics 52
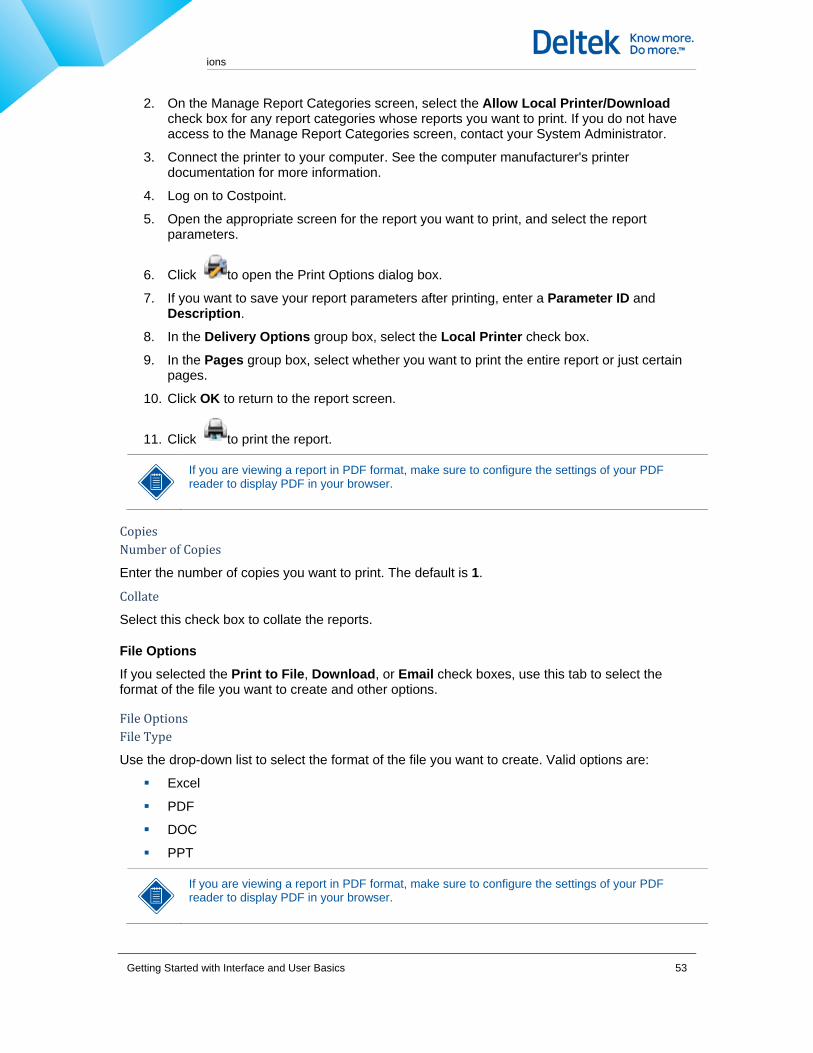
Report Output Options
2. On the Manage Report Categories screen, select the Allow Local Printer/Download check box for any report categories whose reports you want to print. If you do not have access to the Manage Report Categories screen, contact your System Administrator.
3. Connect the printer to your computer. See the computer manufacturer's printer documentation for more information.
4. Log on to Costpoint.
5. Open the appropriate screen for the report you want to print, and select the report parameters.
6. Click to open the Print Options dialog box.
7. If you want to save your report parameters after printing, enter a Parameter ID and Description.
8. In the Delivery Options group box, select the Local Printer check box.
9. In the Pages group box, select whether you want to print the entire report or just certain pages.
10. Click OK to return to the report screen.
11. Click to print the report.
If you are viewing a report in PDF format, make sure to configure the settings of your PDF reader to display PDF in your browser.
Copies Number of Copies
Enter the number of copies you want to print. The default is 1.
Collate
Select this check box to collate the reports.
File Options If you selected the Print to File, Download, or Email check boxes, use this tab to select the format of the file you want to create and other options.
File Options File Type
Use the drop-down list to select the format of the file you want to create. Valid options are:
Excel
DOC
PPT
If you are viewing a report in PDF format, make sure to configure the settings of your PDF reader to display PDF in your browser.
Getting Started with Interface and User Basics 53
Report Output Options
File Name
Enter the name of the file, or click and enter the name.
Alternate File Location
Enter, or click to select, the location to which you want the file saved.
If you selected the Email check box, use this tab to email the report as a file. If your email address is set up on the Workflow tab of the Manage Users screen, the email is sent from your email address. Otherwise, the email is sent from the workflow email address (for example, workflow@<company name>.com).
Use the File Options tab to select the format of the file and provide a name.
After you enter the email information, click OK and then click on the main screen to create the report as a file and send the email.
Email To
Enter the email address of the recipient.
Cc
Enter the email address of any secondary recipients.
Subject
Enter a subject for the email.
Additional Attachments
Click (icon) to add an additional attachment. Enter the File Name and Location in the table.
Text
Enter the text of the email.
Archive If you selected the Archive check box, use this tab to save your report for later viewing. To print an archived report, use the Print Archived Reports screen.
You cannot archive a report unless the report category to which the report belongs has the Allow Archive check box selected on the Manage Report Categories screen.
Your System Administrator may have disabled certain fields on this tab, indicating that your company has chosen to enforce its own archive rules. Contact your System Administrator for more information.
Archive Archive ID
Enter the ID of the archive.
Getting Started with Interface and User Basics 54
Report Output Options
Description
Enter a description for the archive.
Never Delete
If you select this check box, this archive is stored permanently. Costpoint will not delete it.
Delete When Older Than
Select this option to have Costpoint delete the archive when it reaches a certain age. In the two fields to the right, enter the age that the archive must reach before Costpoint deletes it. In the first field, enter the number of units of days, weeks, months, or years after which this report is deleted. In the second field, use the drop-down list to select the unit. For example, you could enter 12 in the first field and select Weeks in the second. The archive would be deleted when it is 12 weeks old.
Delete After
Select this option to have Costpoint delete the archive after a certain date. In the field to the right, enter, or click to select, the date after which Costpoint deletes the archive.
Getting Started with Interface and User Basics 55
Password Management
Password Management
Generate Random Password This convenient Web-only function enables your system administrator to assign temporary passwords to single or multiple users. Costpoint generates temporary passwords based on the Costpoint password complexity policy as defined in the Change Password function.
Costpoint electronically notifies users via email, which is sent to individual users only. Your system administrator does not know the password.
The randomly generated password assigned to each user is temporary. The user must change it after logging in.
Requirements for Random Password Generation
Prior to enabling Random Password Generation, you must do the following: 1. Set up the email server information in the Company Settings block of the Configure System
Settings screen.
2. Enter the Email Name (address) for the end user in the Workflow tab of the Manage Users screen.
3. Set the Authentication Method for the user to either Costpoint Database or Windows Domain & Costpoint Database as defined in the Authentication tab of the Manage Users screen.
Generate a Random Password
To generate a random password for selected users, complete the following steps:
1. After meeting the requirements for random password generation (see list above), open the Manage Users screen and click to identify any users who require a random password.
2. Click to view a list of employees.
3. Select the user(s) who require a random password. Click in the box before the user's name or use CTRL+Click to select multiple names.
4. Click or right-click anywhere on the screen. The Generate Random Password icon displays.
5. Click to generate random passwords for the selected users.
6. When prompted to generate a new password for selected users, click OK.
If no users have been selected, Costpoint generates a new password for ALL queried users.
Costpoint generates random passwords and emails them to users. No one other than the individual user sees the password. Costpoint prompts the user to change the password at the next login.
Getting Started with Interface and User Basics 56
Password Management
Auto Generate Random Password If edits or changes to the user's information are not required, use the Generate Random Password procedure described above. If, however, edits or changes are the main purpose of the session, you can generate a random password at the same time by selecting Generate Random Password, which automatically triggers password generation after you save the user information. This method is designed especially for creating new users.
To generate random passwords automatically for new or existing users, do one of the following:
When creating a new user, select the Generate Random Password check box on the Authentication tab of the Manage Users screen. When you save the information for the new user, Costpoint sends an email containing the random password and clears the check box.
When changing information for an existing user, you can also select Generate Random Password to generate a random password and send an email after you save the updated information. To prevent future (unwanted) generation of random passwords, Costpoint then automatically clears the check box.
Change Password Use this feature to change your Costpoint password.
The password must contain at least eight characters.
Old Password Enter your current password.
New Password Enter your new password.
Costpoint uses the following password validations:
New passwords cannot be the same as the old password.
New passwords must match their Verification entry.
Passwords can contain alphanumeric characters and all special characters on the keyboard (!,#,$,%,&,(,),*,+,-,<,=,>,?,@,[,],^,_,{,},~).
If Allow Reusing of Passwords check box is clear in Administration » System Administration » System Administration Controls » Configure System Settings, the application checks the User Password History Table to determine whether the password has already been used.
The password must begin with a letter.
The password cannot contain any of the following:
First name
Last name
First and last name
User ID
Getting Started with Interface and User Basics 57
Password Management
Employee ID
The word "password"
The password must meet the password complexity specified in Corporate Settings, which you access when you go to Administration » System Administration » System Administration Controls » Configure System Settings.
Verification Enter your new password again, exactly as it appears in the New Password field.
Getting Started with Interface and User Basics 58
Appendix A: If You Need Assistance
Appendix A: If You Need Assistance Our trained Costpoint support staff personnel are always available for ongoing phone support. If you require on-site support, we are happy to schedule our next available general or technical consultant.
When to Call We encourage you to call whenever you encounter a problem or question that Costpoint documentation cannot contribute to resolving. For maximum efficiency, we recommend appointing one person in your company, or in each department, to be your firm's local Costpoint 'expert.' All questions should be first addressed to your local Costpoint authority. If your expert cannot resolve the problem, then he or she should contact us.
Select regular, extended, or emergency support, based on when you need to call.
Regular Support The telephone number for Costpoint Customer Care is 877-457-7765 (877-HLP-PROJ).
Costpoint support lines are open during the following hours:
Monday - Friday: 8:00 a.m. to 10:00 p.m. Eastern Standard Time
Friday: 8:00 a.m. to 6:00 p.m. Eastern Standard Time
Saturday: 9:00 a.m. to 5:00 p.m. Eastern Standard Time
Emergency Support If you think that you may need additional technical support, you can call the Customer Support department at 877.457.7765 (877.HLP.PROJ).
The Emergency Support hours are:
Monday - Thursday: 10:00 p.m. until 7:00 a.m. Eastern Standard Time.
Friday from 10:00 p.m. to Saturday 9:00 a.m.
Saturday from 5:00 p.m. until Monday 7:00 a.m. Eastern Standard Time.
Holidays on which Deltek Customer Support offices are closed are as follows:
New Year's Day
Memorial Day
Independence Day (July 4)
Labor Day
Thanksgiving
Christmas Day
Returning your call: Information on Deltek's call tracking system In handling support calls, Deltek strives to minimize your waiting time. Instead of requiring you to wait on the line until support personnel become available, Deltek's team of Support Receptionists log you in to our call-tracking system. You do not need to explain your problem to the Support Receptionists (they do not have the skills necessary to resolve your issue). You can call at
Getting Started with Interface and User Basics 59
Appendix A: If You Need Assistance
877.457.7765 (877.HLP.PROJ). The Support Receptionist will ask you for the following information:
Your Contact ID (or Client ID)
Your name and phone number
The product you are calling about
Whether your call is general or technical in nature
A brief description of your problem
When you call, we log you in to our online call-tracking system, where your call is immediately visible to our support staff. We prioritize calls in the order received and track our response times. With the exception of calls flagged as Urgent, which we move to the top of the queue, we strive to contact all callers in one hour or less.
In some cases, you may already be working with someone on an issue and can only follow up with that person. Please ask for that person by name. You should be aware, however, that since your consultant may not be immediately available, your call might not be returned as quickly.
Once you place your call to Deltek, inform your receptionist that you are expecting a call from us. If you are not available when we call back, we will leave a message or voice mail to inform you that we returned your call. Your call remains in the call-tracking queue but moves to the end, as though you had just placed the call. Our return call process begins again, and our call tracking system records each attempt we make to reach you.
Who to Call We offer three types of customer support. Please specify the type you need when you leave your message. The support types are:
General Support — Most questions fall into this category. These include all Costpoint setup and operation questions and other issues that do not fit into any of the categories listed below. The support representatives handling these inquiries are experienced, management-level accountants. You can also provide your Support Receptionist with a one- or two-word description that might help direct your call, for example: "Pools/Urgent,"or "A/P Reconciliation."
Technical Support — You should request this type of support if you received an error message or are having difficulty installing a software update. If technical problems arise in the Materials Management area, you should ask your Support Receptionist to place your case in the Technical Support queue. If you are unsure which type of support you need, ask for General Support.
Materials Management — Questions relating to the Materials Management folder (which includes the Product Definition, Bills of Material, Routings, Engineering Change Notices, Procurement Planning, Purchasing, Receiving, Inventory, Production Control, Sales Order Entry, Material Requirements Planning, Materials Estimating, and Master Production Scheduling modules) should be identified as "Materials Management General."
Deltek Web Site Via the Deltek Customer Care Connect Web site, you can do the following:
Download the latest versions of your Deltek products
Search Deltek's knowledge base
Getting Started with Interface and User Basics 60
Appendix A: If You Need Assistance
Display or download product information, such as release notes, user guides, technical information, and white papers
Submit a support case and check on its progress
Transfer requested files to a Customer Care analyst
Access information on enhancement error corrections and other technical issues
Subscribe to Deltek communications about your products and services
Receive alerts of new Deltek releases and hot fixes
You can also submit comments, error reports, and non-urgent support questions. Because Internet communication and response times can vary, you should not use the Customer Care Connect Web site for urgent support questions; please call our telephone support number instead.
To access the client support programs and information on our Web site, you must first register to receive the login and password for this area. You can register through Online Client Registration on our main Web page. You need to submit the following information for your company:
Deltek support ID
Contact information, including business address and, most importantly, email address
Software/platform information
Getting Started with Interface and User Basics 61
Appendix A: If You Need Assistance
Infrastructure Consulting Group The Infrastructure Consulting group provides a broad range of services to assist Costpoint users both in making their initial transition to a Costpoint 7 Web architecture and also in maximizing the potential of this architecture over time.
General Costpoint Services Multiple environment deployment and configuration
Remote user configuration
Technical planning and reviews
Hardware requirements analysis and selection
Deployment planning and testing
Client configuration and management
Customized security setup and administration
Networks & Connectivity File and network operating system selection, optimization, and management
Server-specific optimization
Connectivity issue identification and resolution
Relational Databases Database selection, tuning, and optimization
Multiple database implementation and management
Systems Integration Packages The Deltek Infrastructure Consulting group offers standard turnkey configurations with turnkey installation, configuration, and support options. We encourage you to take advantage of our expertise in matching Costpoint to appropriate hardware and network configuration.
Deltek systems integrators are highly trained experts. In addition to recommending complete client/server configurations that best match your needs and resources, our consultants can:
Getting Started with Interface and User Basics 1
Appendix A: If You Need Assistance
Improve the performance of your existing computing infrastructure, or
Supply expert input for your own design and implementation planning.
Single-sourcing with Deltek means the convenience of making just one call for support, no matter what type of system help you require.
Getting Started with Interface and User Basics 2
Appending B: Quick Reference Cards (QRC)
Appending B: Quick Reference Cards (QRC) A Quick Reference Card displays summary information about a system feature or screen. The following are the QRCs for Costpoint:
QRC for User Interface
QRC for Shortcut Keys and Toolbar Icons and Buttons
QRC for Query and Lookup
QRC for Views
The QRCs are available at the Appendix section of this document.
Getting Started with Interface and User Basics 3
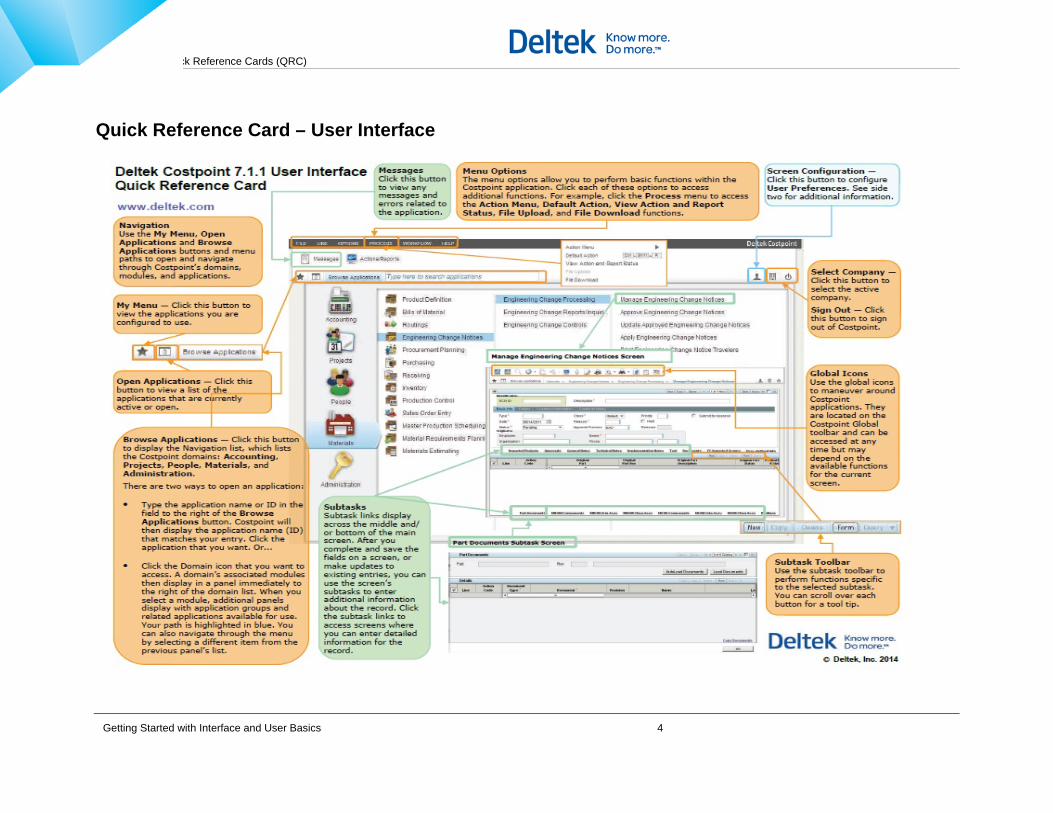
Appending B: Quick Reference Cards (QRC)
Quick Reference Card – User Interface
Getting Started with Interface and User Basics 4
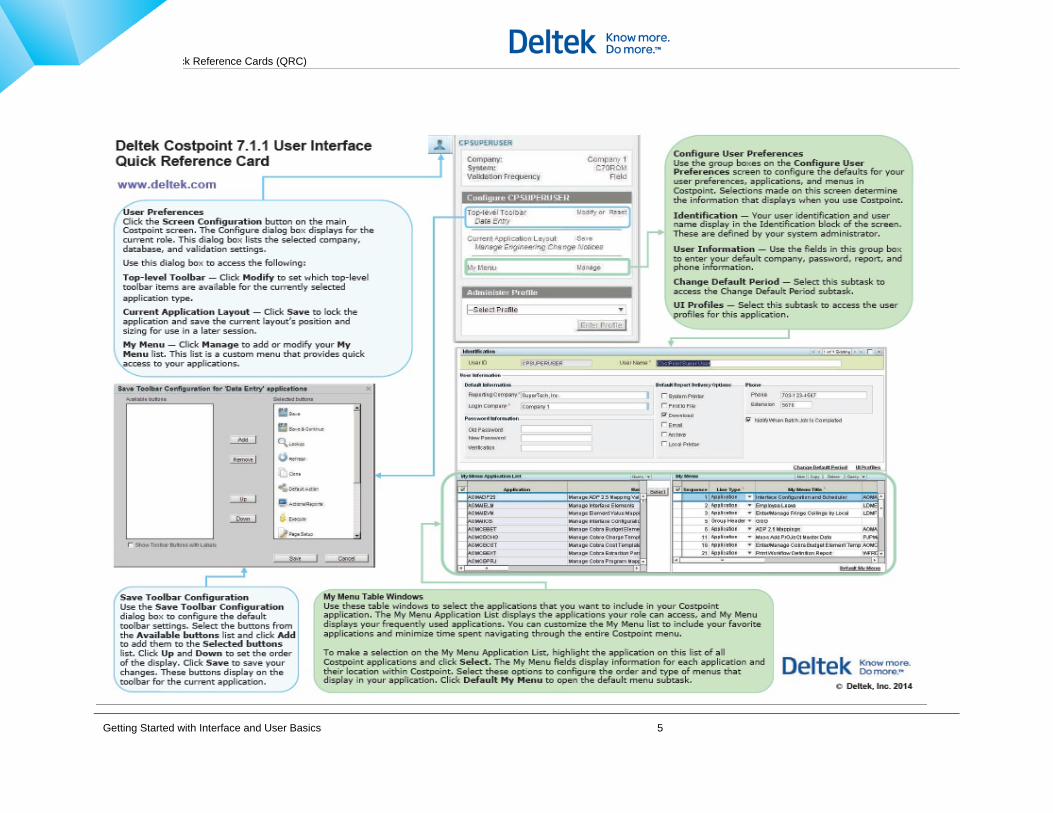
Appending B: Quick Reference Cards (QRC)
Getting Started with Interface and User Basics 5
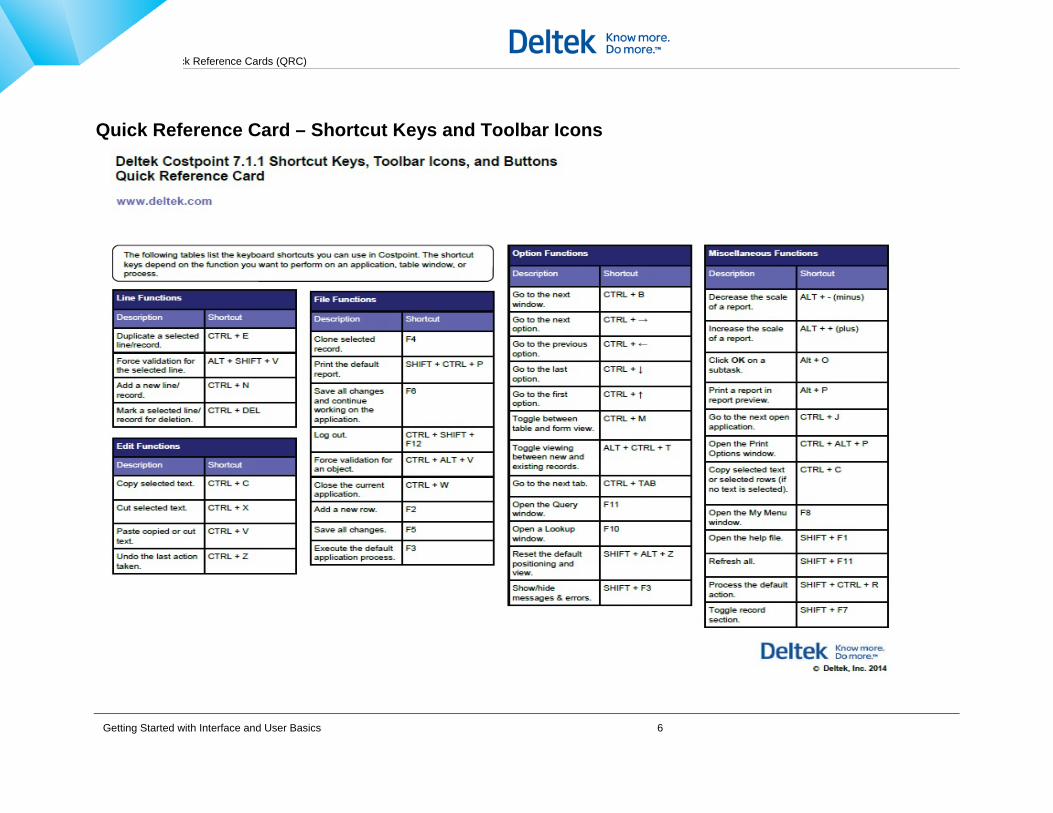
Appending B: Quick Reference Cards (QRC)
Quick Reference Card – Shortcut Keys and Toolbar Icons
Getting Started with Interface and User Basics 6
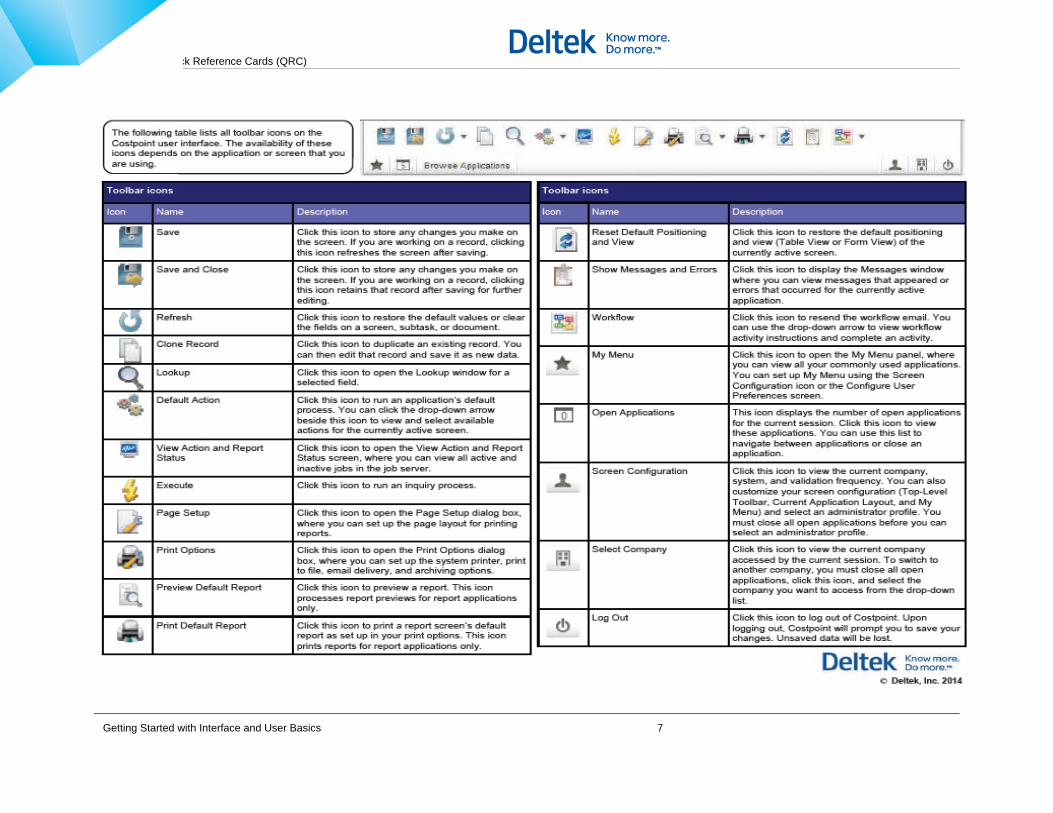
Appending B: Quick Reference Cards (QRC)
Getting Started with Interface and User Basics 7
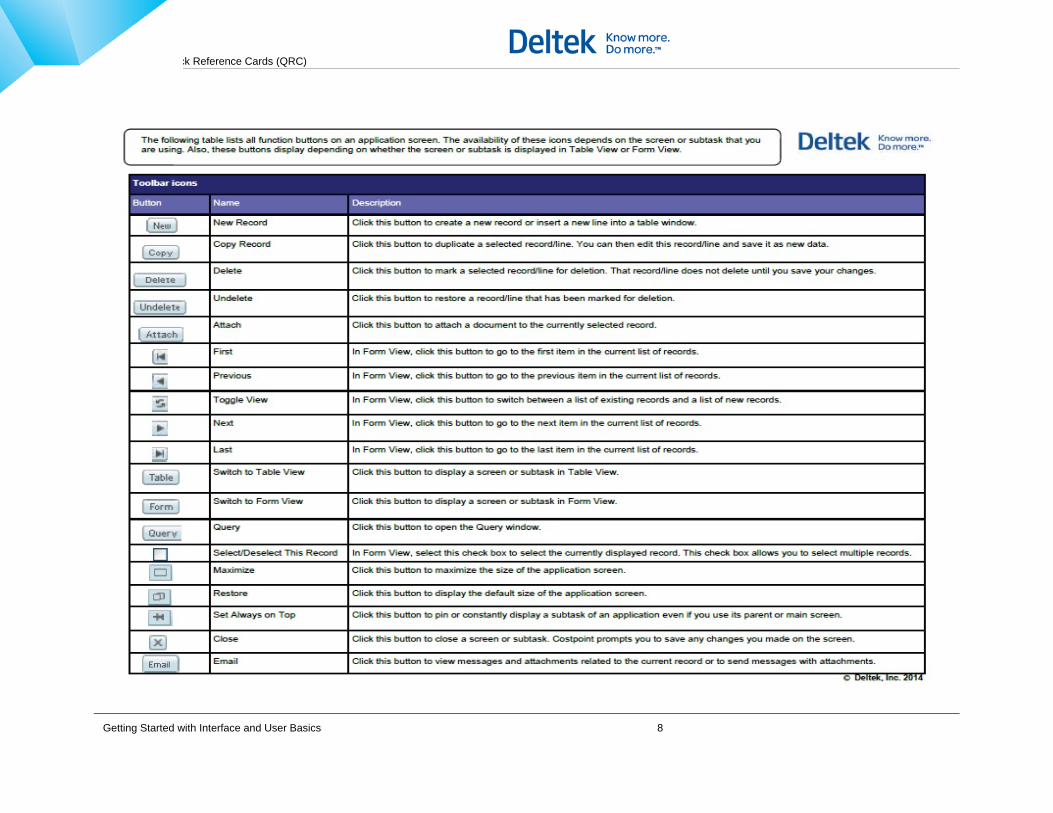
Appending B: Quick Reference Cards (QRC)
Getting Started with Interface and User Basics 8
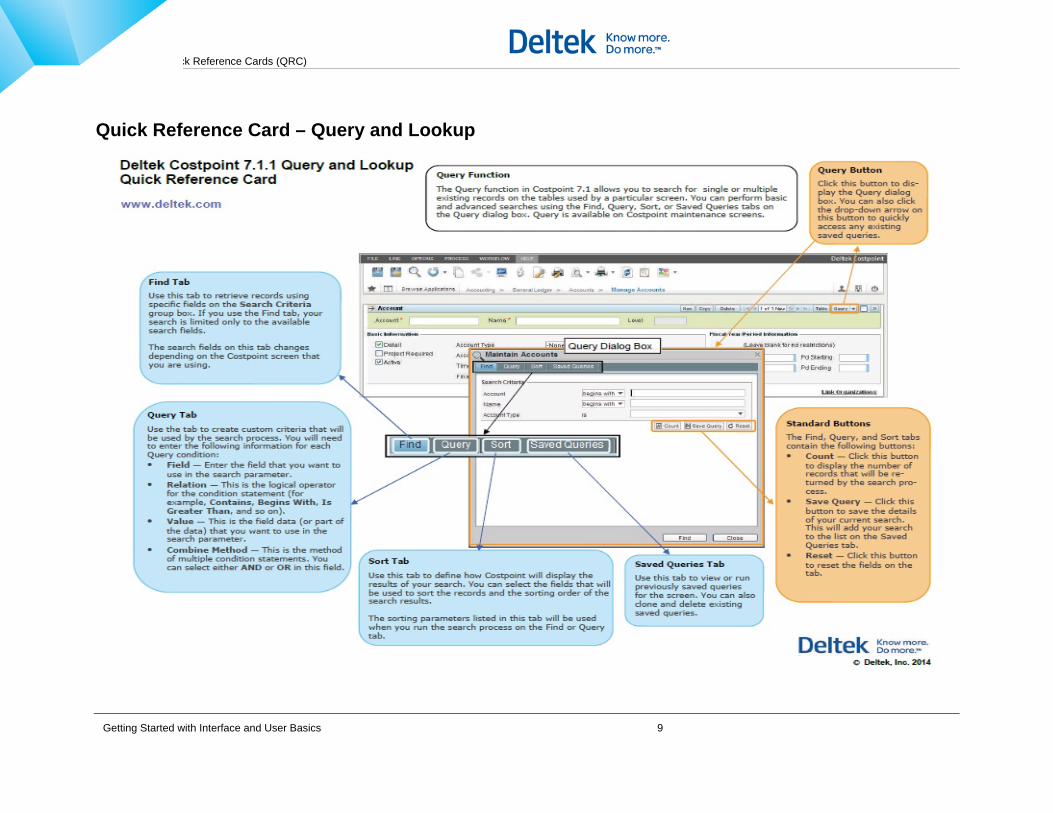
Appending B: Quick Reference Cards (QRC)
Quick Reference Card – Query and Lookup
Getting Started with Interface and User Basics 9

Appending B: Quick Reference Cards (QRC)
Getting Started with Interface and User Basics 10
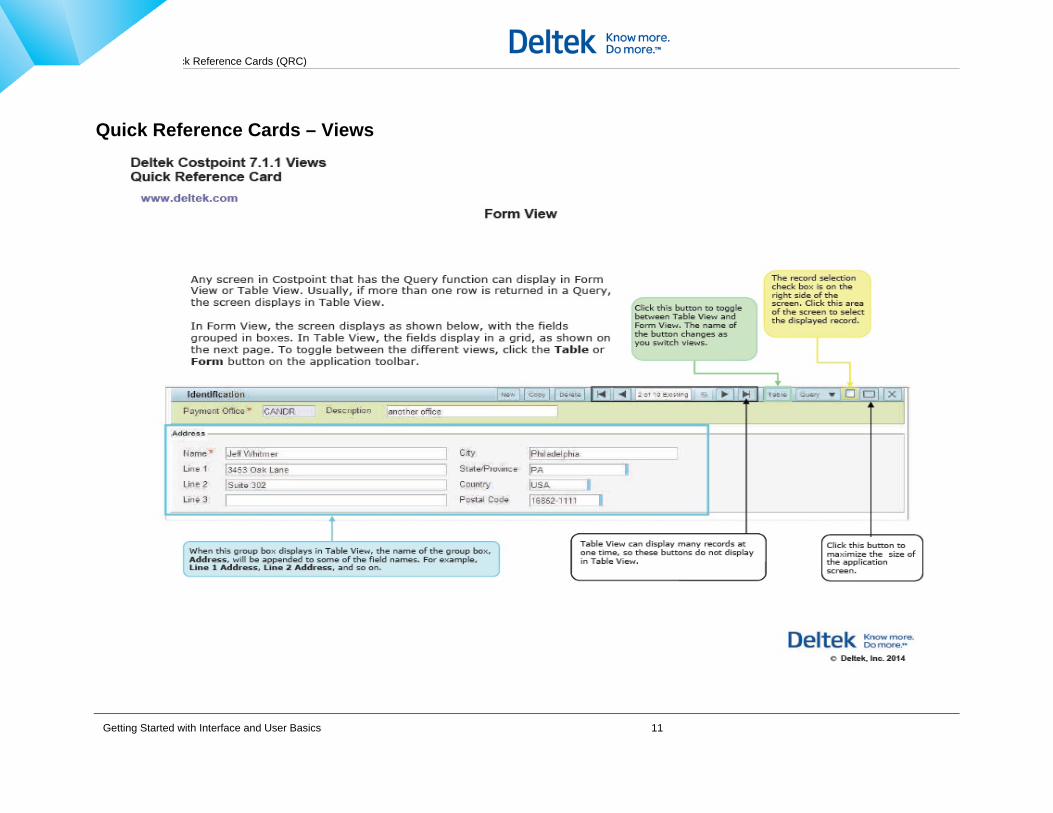
Appending B: Quick Reference Cards (QRC)
Quick Reference Cards – Views
Getting Started with Interface and User Basics 11
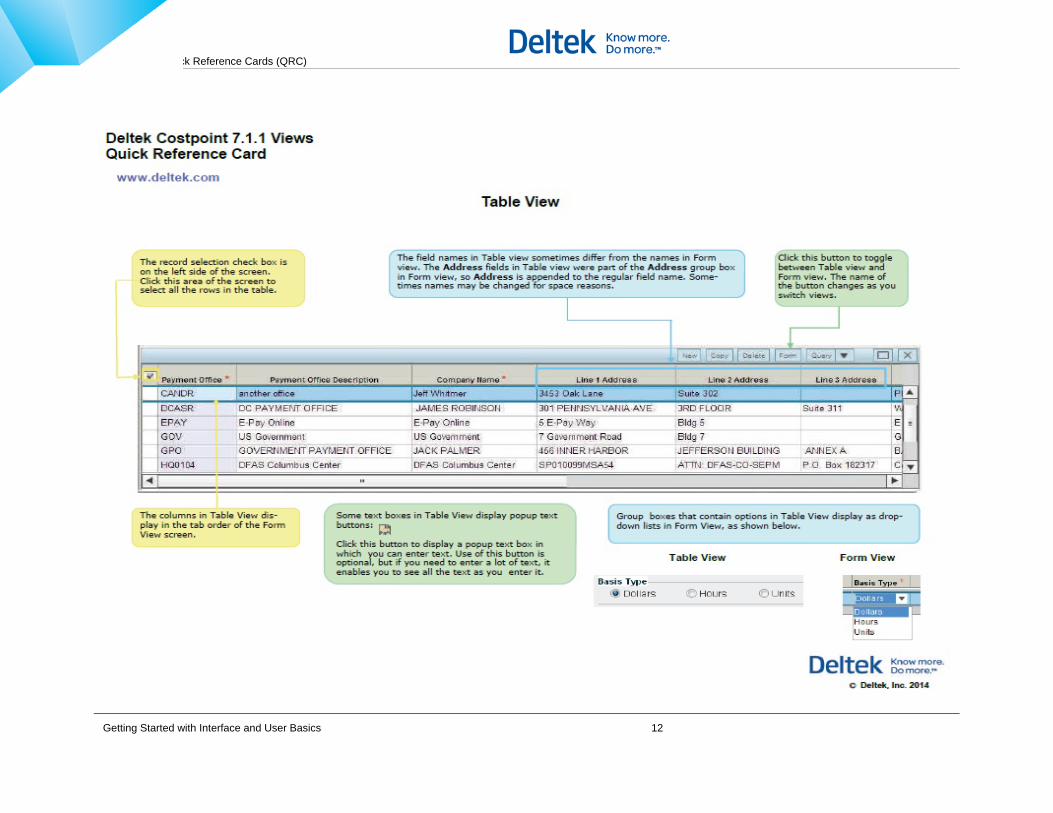
Appending B: Quick Reference Cards (QRC)
Getting Started with Interface and User Basics 12
Appending B: Quick Reference Cards (QRC)
Getting Started with Interface and User Basics 13

Deltek is the leading global provider of enterprise software and information solutions for professional services firms, government contractors, and government agencies. For decades, we have delivered actionable insight that empowers our customers to unlock their business potential. Over 14,000 organizations and 1.8 million users in approximately 80 countries around the world rely on Deltek to research and identify opportunities, win new business, optimize resource, streamline operations, and deliver more profitable projects. Deltek – Know more. Do more.®
deltek.com


![Mission Manager[1]](https://static.fdokumen.com/doc/165x107/6313fe215cba183dbf075a68/mission-manager1.jpg)