
Deltek Costpoint® Manufacturing Execution 1.0
440
Deltek Costpoint® Manufacturing Execution 1.0 Thin-Client Configuration Guide: Basics April 8, 2014
-
Upload
khangminh22 -
Category
Documents
-
view
0 -
download
0
Transcript of Deltek Costpoint® Manufacturing Execution 1.0

Deltek Costpoint® Manufacturing Execution 1.0 Thin-Client Configuration Guide: Basics
April 8, 2014

Thin-Client Configuration Guide: Basics ii
While Deltek has attempted to verify that the information in this document is accurate and complete, some typographical or technical errors may exist. The recipient of this document is solely responsible for all decisions relating to or use of the information provided herein.
The information contained in this publication is effective as of the publication date below and is subject to change without notice.
This publication contains proprietary information that is protected by copyright. All rights are reserved. No part of this document may be reproduced or transmitted in any form or by any means, electronic or mechanical, or translated into another language, without the prior written consent of Deltek, Inc.
This edition published April 2014.
© 2014 Deltek, Inc.
Deltek’s software is also protected by copyright law and constitutes valuable confidential and proprietary information of Deltek, Inc. and its licensors. The Deltek software, and all related documentation, is provided for use only in accordance with the terms of the license agreement. Unauthorized reproduction or distribution of the program or any portion thereof could result in severe civil or criminal penalties.
All trademarks are the property of their respective owners.

Thin-Client Configuration Guide: Basics iii
Contents About Costpoint Manufacturing Execution ...................................................................................... 8
Components ................................................................................................................................ 8
Functions ..................................................................................................................................... 9
About This Guide ........................................................................................................................... 11
Audience ................................................................................................................................... 11
Typographical Conventions ....................................................................................................... 11
Notes, Tips, Cautions, and References .................................................................................... 12 If You Need Assistance ................................................................................................................. 13
Customer Services .................................................................................................................... 13
Customer Care Connect Site .................................................................................................... 13
Additional Documentation ......................................................................................................... 14
Overview ........................................................................................................................................ 17 Assumptions and Constraints ................................................................................................... 17
Web-specific Constraints .......................................................................................................... 19
FAQs ......................................................................................................................................... 19
Configuration Components ....................................................................................................... 20
Thin-Client System Variables .................................................................................................... 21
Database Connections .............................................................................................................. 23 Acceptable Characters .............................................................................................................. 23
Local Ini File ................................................................................................................................... 25
[Startup] ..................................................................................................................................... 25
[BootStrapTableOwners] ........................................................................................................... 30
[SubstitutionText] ....................................................................................................................... 30
[IniLibOverrides] ........................................................................................................................ 31 [GlobalParameters] ................................................................................................................... 34
Automatic External Calls ........................................................................................................... 35
The Initialization Library ................................................................................................................. 36
Record Structure ....................................................................................................................... 36
Initialization Library History ....................................................................................................... 38 Displaying an Initialization Library Record ................................................................................ 39
Create an Initialization Library Record ...................................................................................... 40
Import an Initialization Library Record ....................................................................................... 40
Export an Initialization Library Record ...................................................................................... 41
Edit an Initialization Library Record ........................................................................................... 42
Delete an Initialization Library Record ...................................................................................... 43

Thin-Client Configuration Guide: Basics iv
Printing in Costpoint MES ......................................................................................................... 43
Print a Report of a Library Record ............................................................................................ 43
Local Library Caching................................................................................................................ 45
[Common] Properties ................................................................................................................ 48 Design Mode ............................................................................................................................. 71
The SQL Library ............................................................................................................................ 72
Record Format .......................................................................................................................... 72
Valid Syntax and Parsing .......................................................................................................... 72
Oracle Hints ............................................................................................................................... 76
SQL Library History ................................................................................................................... 76 Create an SQL Statement ......................................................................................................... 77
Edit an SQL Statement.............................................................................................................. 78
Delete an SQL Statement ......................................................................................................... 78
Export SQL Library Entries ....................................................................................................... 78
Run an SQL Statement ............................................................................................................. 80 Local Library Cache .................................................................................................................. 82
The UDV Library ............................................................................................................................ 83
UDV Library History ................................................................................................................... 84
UDV Properties ......................................................................................................................... 84
Controls ..................................................................................................................................... 85
Data Sources and Data Connections ........................................................................................ 90 UDV Development Guidelines .................................................................................................. 91
Create a UDV ............................................................................................................................ 92
Edit a UDV ................................................................................................................................. 97
Delete a UDV ............................................................................................................................ 99
Export UDV Library Entries ....................................................................................................... 99
Multirecord Transaction ........................................................................................................... 101 Group Transaction ................................................................................................................... 102
Input Matrix UDVs ................................................................................................................... 103
Fill Wizards .............................................................................................................................. 126
Scripted UDVs ......................................................................................................................... 127
Calculated Fields ..................................................................................................................... 146 File Upload .............................................................................................................................. 148
More Info UDVs Win ............................................................................................................. 155
Display UDVs in Dialog Boxes ................................................................................................ 157
Input UDVs and Multimedia Authoring .................................................................................... 158
Hypertext Controls ................................................................................................................... 158
Thin-Client Configuration Guide: Basics v
Memo Controls and RTF Mode ............................................................................................... 162
Graph Controls ........................................................................................................................ 163
Grid Gauges ............................................................................................................................ 166
Grid Sorting ............................................................................................................................. 168 Field-Defined Hyperlinks in Grids ............................................................................................ 170
List Controls ............................................................................................................................ 171
Lookup Lists ............................................................................................................................ 173
Radio Button and Check Box Controls.................................................................................... 182
UDV-Launched Other Commands ........................................................................................... 184
Grid Attributes ......................................................................................................................... 198 Edit Masks and Picture Masks ................................................................................................ 201
Multiuse Input UDVs................................................................................................................ 206
Auxiliary UDVs Win/Web ...................................................................................................... 207
Single Transaction Logon ....................................................................................................... 211
Disabling In-Memory UDV Caching ........................................................................................ 211
Copying Input UDV Field Values ............................................................................................. 212
UDV Property Overrrides ........................................................................................................ 212
Expression-Evaluated Defaults ............................................................................................... 214 Passing UDV Params in a Command Event ........................................................................... 215
Forcing Edit Fields to Visible ................................................................................................... 215
Read/Write of Related Fields .................................................................................................. 215
Consolidated Queries in Embedded UDVs ............................................................................. 215
Configuring Consolidated Queries for UDVs ........................................................................... 216
The Local Library Cache ......................................................................................................... 216 Session Events ............................................................................................................................ 217
The Shell and User Interface ....................................................................................................... 219
User Preferences .................................................................................................................... 221
Menu........................................................................................................................................ 229
Enabling/Disabling Window Controls ...................................................................................... 237
Touchscreen Mode .................................................................................................................. 237 The Dispatch Tool Window and Dispatch Lists .................................................................................. 242
Legacy Dispatch List ................................................................................................................ 242
Configuring the Dispatch Window Interface Win/Web.......................................................... 242
User Groups ............................................................................................................................ 245
Dispatch Lists .......................................................................................................................... 245
Tabs ......................................................................................................................................... 251

Thin-Client Configuration Guide: Basics vi
Window-Launched Other Commands ..................................................................................... 253
List Queries ............................................................................................................................. 260
Multidocument-Type Dispatch Lists ......................................................................................... 263
Explorer Grids ......................................................................................................................... 265 The Graphical Dispatch Manager ............................................................................................ 268
Tag-Defined Hyperlinks in Grids .............................................................................................. 275
Browser-like Combobox .......................................................................................................... 277
Instruction Windows .................................................................................................................... 278
Step 1: The Scope Query ........................................................................................................ 278
Step 2: Key Columns and Subqueries .................................................................................... 280 Step 3: Sublevel Stored Procedures ....................................................................................... 280
Step 4: The Parent Text Assembly Procedure ........................................................................ 312
Step 5: Text Interface SQL Statements ................................................................................... 312
Step 6: Column-Specific Scope Properties ............................................................................. 314
Step 7: Mode Characteristics .................................................................................................. 318 Step 8: Window Behavior ........................................................................................................ 329
Multilanguage Display ................................................................................................................. 342
How Multilanguage Display Works — Windows ...................................................................... 342
Multilanguage Constraints - Windows ..................................................................................... 343
Configuration Components - Windows .................................................................................... 343
The Oracle NLS_LANG Parameter - Windows ....................................................................... 345 The PL/SQL Developer Unicode Enabled Setting - Windows ................................................. 347
Client Machine Locale and Region Settings — Windows ....................................................... 348
The Onscreen Keyboard — Windows ..................................................................................... 349
Unicode-Supporting Fonts — Windows ................................................................................... 350
Application Fonts — Windows ................................................................................................. 351
Display Languages — Windows ............................................................................................. 351 Standard Text Database Tables — Windows ........................................................................... 352
The EmbedSelectSql Property — Windows............................................................................ 353
Adding a Language to the Standard Text Window — Windows ............................................... 356
Adding a Language to an Instruction Window — Windows .................................................... 357
Enabling Multilanguage Display — Windows .......................................................................... 357 Portable Object Files — Windows ........................................................................................... 358
Appendix A: Reserved Variables and Functions .............................................................................. 360
Appendix B: UDV Properties ........................................................................................................... 384
UDV Properties ....................................................................................................................... 384
Appendix C: Hypertext Markup Tags ............................................................................................... 416

Thin-Client Configuration Guide: Basics vii
<A HREF=”...”> Tags ............................................................................................................... 416
Other Tags ............................................................................................................................... 418
Common Markup Tag Mistakes .............................................................................................. 421
Appendix D: Costpoint Manufacturing Execution Reserved SQL IDs ............................................... 423 Reserved SQL IDs .................................................................................................................. 423
Appendix E: Core SQL Statements .................................................................................................. 428
Appendix F: Command Line Options .................................................................................................. 433
Appendix G: Frequently Asked Questions & Common Ta sks ........................................................... 437
Unsupported File Formats ........................................................................................................ 437
Configure a UDV Command to Call the Windows Shell with Arguments ................................. 437

About Costpoint Manufacturing Execution
Thin-Client Configuration Guide: Basics 8
About Costpoint Manufacturing Execution Deltek Costpoint Manufacturing Execution (MES) is an Operation Process Management system designed to manage work and quality processes for manufacturing, repair, maintenance, and overhaul of highly engineered complex products. Costpoint Manufacturing Execution streamlines processes for all planning and production personnel and provides complete quality management and device history, starting with component inspection and continuing through manufacturing, inspection, and aftermarket service of the product.
The diagram below illustrates the different software components in the Costpoint Manufacturing Execution suite of products.
Components The following sections explain the different Costpoint MES components.
Thin-Client The Thin-Client is one of the client deployment options in the Costpoint MES software suite. It is designed to provide several functionality and performance enhancements over the web browser option and is required, for example, for certain advanced geographical process planning functionality in Costpoint MES. The Thin-Client is designed specifically for use with Costpoint MES and requires the application and database server components.
Web Publisher This Web Publisher is a Web server application designed to prepare the presentation of information from Costpoint MES to a Web server client. For example, the Web Publisher is used to deliver supplier portal functionality for Costpoint MES through a Web browser interface. Costpoint MES supports several Web browsers—including Microsoft’s Internet Explorer. Refer to
About Costpoint Manufacturing Execution
Thin-Client Configuration Guide: Basics 9
the documentation for the Costpoint MES Web Publisher for more information on supported Web Browsers and operating system requirements.
Application The Costpoint MES application is composed of several application components that are deployed on a JEE (Java Platform, Enterprise Edition) application server. It contains the functional business logic of Costpoint MES; interfaces to the database and presentation layers; and the Business Integration Services that are used to receive and send queries and transactions to the internal or external applications.
Database The Costpoint MES database is used to persistently store configuration and transactional data in Costpoint MES. It has supported deployments for Oracle and SQL Server database servers.
Remote Cache Server The Remote Cache Server is an optional component that is used at remote network locations in a globally distributed landscape to improve performance in the display of large multimedia and CAD (Computer-aided Design) files. It can greatly improve performance where several clients will share large files within a remote location that is subject to a latency or bandwidth bottleneck in a WAN (Wide Area Network).
Report Server The Report Server is an optional component that improves delivery performance to the Thin-Client for reports at remote locations that are subject to latency or bandwidth bottleneck in a WAN.
Refer to the respective Costpoint MES installation guide for instructions on installing each software component on client, application, or database server machines.
Functions Costpoint MES supports the following major process functions:
Process Engineering and Planning – Costpoint MES enables the creation, update and enhancement of detailed online work instructions for building, inspecting, maintaining, and servicing a product. In addition to a text narrative, work instructions can contain illustrations, 3D models, drawings, videos, and requirements for certifications, data collections and buyoffs. Instructions can also contain lists of required material, parts and resources—such as tools and skills. Process planners can specify critical work sequences and inspection points in the work process.
Process Execution – Costpoint MES enables technicians to sign on to jobs, follow clear online instructions, and perform required data collections without wasting time and searching for information. Inspectors consult the automated callboard, enter required data, and verify work online. Supervisory tools include reports and graphical management of job dispatch priorities and assignment of resources with real-time visibility of constraints and hold conditions.
Process Assurance and Improvement – Costpoint MES provides a mechanism for responding to unplanned events and discrepancies in planned process instructions and specifications. Discrepancies are documented and instantly routed to the appropriate personnel for disposition. Disposition instructions can be inserted to the original work
About Costpoint Manufacturing Execution
Thin-Client Configuration Guide: Basics 10
order into a supplemental work order. Defects and non-conformances are tracked by serial-controlled or lot-controlled products whose history is inherited by higher-level assemblies. Analytical quality metrics and corrective action provide continuous improvement of work processes. Costpoint MES provides functionality that easily meets the most stringent process management requirements specified by ISO, FAA, FDA, DoD, and DOE.
Maintenance and Repair – Key functions of Costpoint MES are combined to accomplish consistent, on-time delivery of maintenance and repair services. Costpoint MES lets process planners define tasks, task groupings, and work instructions to accommodate a wide range of maintenance services, and to efficiently incorporate directives and bulletins. Inspectors are also provided with the means to easily create and resolve findings, to insert non-routine tasks on-the-fly, and to gain customer approval of approved non-routine work via the Web. This also gives maintenance managers the ability monitor work in real time while noting constraints flagged by inspectors and mechanics. Delivery of services is also ensured to be on-time.

About This Guide
Thin-Client Configuration Guide: Basics 11
About This Guide This is the Basic Configuration Guide of the Costpoint MES Configuration Guide series. It contains information on basic Costpoint MES screens as well as configuring settings and preferences. Other configuration guides include the following:
Costpoint MES Multimedia Windows, Security, and Additional Functions Configuration Guide
Costpoint MES Report Designer Configuration Guide
This manual contains information on how implementers can configure the Windows Thin-Client and Web Express Client launches of Costpoint MES. In this manual, ‘configuration’ is defined as the international organization or manipulation of software and/or hardware elements to effect a change in the basic appearance or functionality of the Costpoint MES software suite. This definition is extended to include the requirement that configuration maintain the ability to upgrade the software according to Deltek-created update scripts. Any change to the software or hardware that disrupts the ability to upgrade via an upgrade script, or prevents satisfactory operation after update, is defined as ‘customization,’ not ‘configuration.’
Audience This configuration guide is intended for users who will be implementing customer-specific requirements at the Thin-Client and Web Express Client software installations. It is assumed that the reader of this manual has knowledge of SQL, MS Windows, and the capabilities of the Thin-Client software application.
Typographical Conventions This manual uses the following text, keyboard, and code conventions:
Item Convention Example
Screen controls (buttons, menu options, and so on)
Bold text Click Logoff to end the session.
Sequential menu options Bold text separated by a ‘»’ Click File » New » Custom.
Keys in text Uppercase text The DELETE key does not back out the record.
Key combinations Uppercase text separated by a plus (+) symbol
Use the escape sequence SHIFT+F4 only when necessary.
Code examples Courier text [StartUp]
;Directory where framework modules are kept.
Command Syntax: Courier text ipconfig/all
Text to be entered as shown
Uppercase text RPAD()
Variables and parameters Italicized lowercase text RPAD (string,length)

About This Guide
Thin-Client Configuration Guide: Basics 12
Optional items Italicized lowercase text, enclosed in square brackets
RPAD (string,length [,’set’])
Alternative items Separated by a vertical bar ...OFF | ON...
Notes, Tips, Cautions, and References Note, tip, reference, and caution icons indicate specific types of information as shown in the following examples.
Notes provide supplementary explanations of the preceding text and can also indicate restrictions and conditions of which you need to be aware.
References point to other sections in the current document or other sources for additional information about a certain subject.
Tips suggest ways you can save time and steps, or why particular capabilities of the software are especially useful.
Cautions indicate instances where a certain action can lead to loss of data or damage to equipment.
If You Need Assistance
Thin-Client Configuration Guide: Basics 13
If You Need Assistance If you need assistance installing, implementing, or using Deltek Costpoint Manufacturing Execution, Deltek makes a wealth of information and expertise readily available to you.
Customer Services For over 20 years, Deltek has maintained close relationships with client firms, helping with their problems, listening to their needs, and getting to know their individual business environments. A full range of customer services has grown out of this close contact, including the following:
Extensive self-support options through the Customer Care Connect Web portal.
Phone and email support from Customer Care analysts
Technical services
Consulting services
Custom programming
Classroom, on-site, and Web-based training
Find out more about these and other services from the Customer Care Connect site.
Customer Care Connect Site The Deltek Customer Care Connect site is a support Web portal for Deltek customers who purchase an Ongoing Support Plan (OSP).
The following are some of the many options you have at the Customer Care Connect site:
Download the latest versions of your Deltek products
Search Deltek’s knowledge base
Ask questions, exchange ideas, and share knowledge with other Deltek customers through the Deltek Connect Customer Forums
Display or download product information, such as release notes, user guides, technical information, and white papers
Submit a support case and check on its progress
Transfer requested files to a Customer Care analyst
Use Quick Chat to submit a question to a Customer Care analyst online
Subscribe to Deltek communications about your Deltek products and services
Receive alerts of new Deltek releases and hot fixes
If you need assistance using the Customer Care Connect site, the online help available on the site provides answers for most questions

If You Need Assistance
Thin-Client Configuration Guide: Basics 14
Access Customer Care Connect
To access the Customer Care Connect site, complete the following steps:
1. Go to http://support.deltek.com.
2. Enter your Customer Care Connect Username and Password.
3. Click Log In.
If you do not have a username and password for the Customer Care Connect site, contact your firm’s Deltek Costpoint Manufacturing Execution Administrator.
If you forget your username or password, you can click the Account Assistance button on the login screen for help.
Additional Documentation The following table lists the additional Deltek documentation available for this release. Except where noted, all the user guides and quick reference guides listed in this table are available for download from the Deltek Customer Care Connect site.
Installation Guides
Document Name Description
Deltek Costpoint Manufacturing Execution 1.0 Thin-Client Installation Guide
This document provides instructions on how to install the Costpoint Manufacturing Execution Thin-Client application on a client computer.
Deltek Costpoint Manufacturing Execution 1.0 System Manager Installation Guide
This document provides instructions on how to install the System Manager application on a client computer and information about Application Access Management settings.
Deltek Costpoint Manufacturing Execution 1.0 Business Application Installation Guide
This document provides instructions on how to install, configure, text, and troubleshoot Costpoint Manufacturing Execution on a JEE server.
Deltek Costpoint Manufacturing Execution 1.0 Database Installation Guide for Oracle
This document provides instructions on how to install the Costpoint Manufacturing Execution database on an Oracle server.
Deltek Costpoint Manufacturing Execution 1.0 Database Installation Guide for SQL Server
This document provides instructions on how to install the Costpoint Manufacturing Execution database on an SQL Server.
If You Need Assistance
Thin-Client Configuration Guide: Basics 15
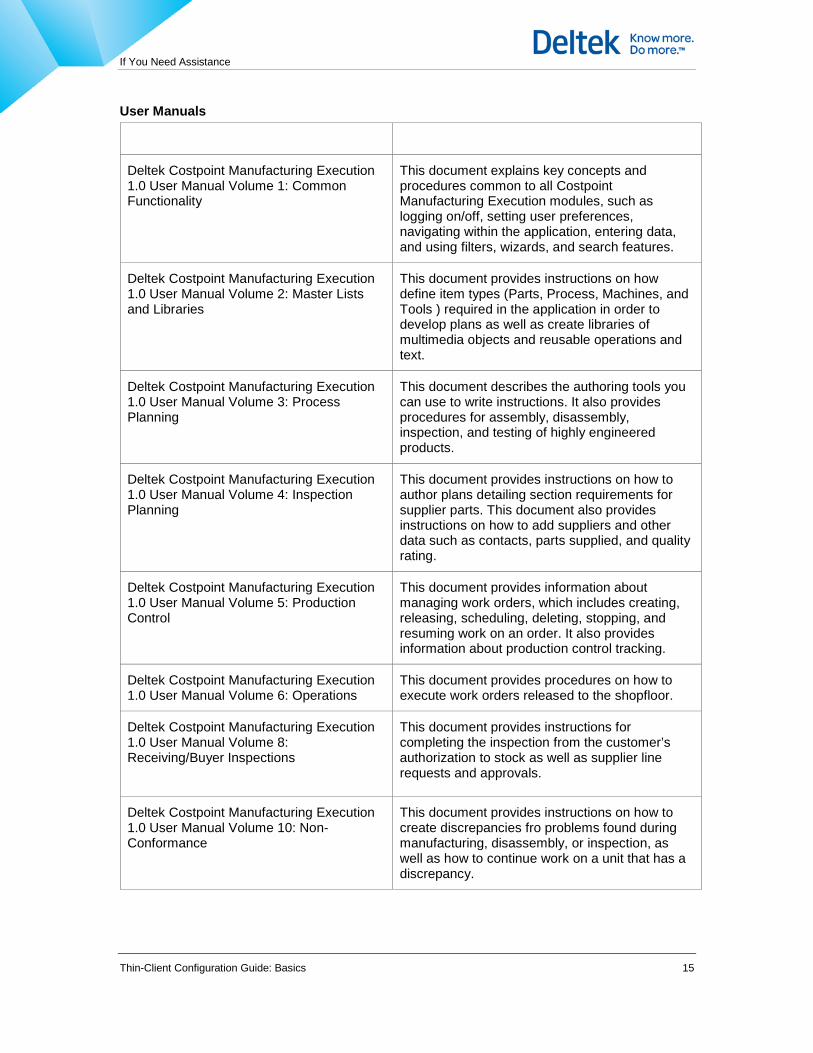
User Manuals
Document Name Description
Deltek Costpoint Manufacturing Execution 1.0 User Manual Volume 1: Common Functionality
This document explains key concepts and procedures common to all Costpoint Manufacturing Execution modules, such as logging on/off, setting user preferences, navigating within the application, entering data, and using filters, wizards, and search features.
Deltek Costpoint Manufacturing Execution 1.0 User Manual Volume 2: Master Lists and Libraries
This document provides instructions on how define item types (Parts, Process, Machines, and Tools ) required in the application in order to develop plans as well as create libraries of multimedia objects and reusable operations and text.
Deltek Costpoint Manufacturing Execution 1.0 User Manual Volume 3: Process Planning
This document describes the authoring tools you can use to write instructions. It also provides procedures for assembly, disassembly, inspection, and testing of highly engineered products.
Deltek Costpoint Manufacturing Execution 1.0 User Manual Volume 4: Inspection Planning
This document provides instructions on how to author plans detailing section requirements for supplier parts. This document also provides instructions on how to add suppliers and other data such as contacts, parts supplied, and quality rating.
Deltek Costpoint Manufacturing Execution 1.0 User Manual Volume 5: Production Control
This document provides information about managing work orders, which includes creating, releasing, scheduling, deleting, stopping, and resuming work on an order. It also provides information about production control tracking.
Deltek Costpoint Manufacturing Execution 1.0 User Manual Volume 6: Operations
This document provides procedures on how to execute work orders released to the shopfloor.
Deltek Costpoint Manufacturing Execution 1.0 User Manual Volume 8: Receiving/Buyer Inspections
This document provides instructions for completing the inspection from the customer’s authorization to stock as well as supplier line requests and approvals.
Deltek Costpoint Manufacturing Execution 1.0 User Manual Volume 10: Non- Conformance
This document provides instructions on how to create discrepancies fro problems found during manufacturing, disassembly, or inspection, as well as how to continue work on a unit that has a discrepancy.
If You Need Assistance
Thin-Client Configuration Guide: Basics 16
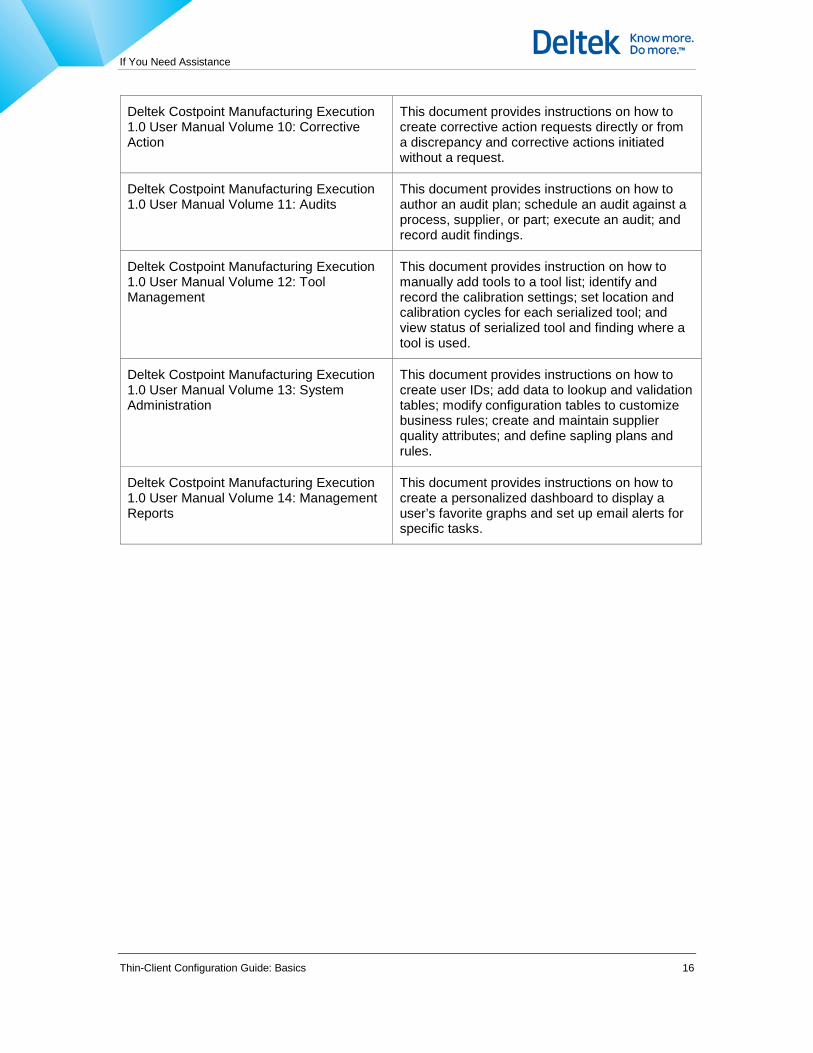
Deltek Costpoint Manufacturing Execution 1.0 User Manual Volume 10: Corrective Action
This document provides instructions on how to create corrective action requests directly or from a discrepancy and corrective actions initiated without a request.
Deltek Costpoint Manufacturing Execution 1.0 User Manual Volume 11: Audits
This document provides instructions on how to author an audit plan; schedule an audit against a process, supplier, or part; execute an audit; and record audit findings.
Deltek Costpoint Manufacturing Execution 1.0 User Manual Volume 12: Tool Management
This document provides instruction on how to manually add tools to a tool list; identify and record the calibration settings; set location and calibration cycles for each serialized tool; and view status of serialized tool and finding where a tool is used.
Deltek Costpoint Manufacturing Execution 1.0 User Manual Volume 13: System Administration
This document provides instructions on how to create user IDs; add data to lookup and validation tables; modify configuration tables to customize business rules; create and maintain supplier quality attributes; and define sapling plans and rules.
Deltek Costpoint Manufacturing Execution 1.0 User Manual Volume 14: Management Reports
This document provides instructions on how to create a personalized dashboard to display a user’s favorite graphs and set up email alerts for specific tasks.
Overview
Thin-Client Configuration Guide: Basics 17
Overview This section gives you an overview of what to expect when configuring the Thin-Client or Web Express Client.
Assumptions and Constraints The implementation of any site is based on—and constrained by—the following set of assumptions:
All business rules are enforced using Oracle triggers, stored procedures, and referential integrity constraints. Business rule violations are surfaced using Oracle exceptions. Failed attempts to post display a message to the user.
All screen layouts and interface-level program flow descriptions are conceptual and are used strictly to help convey functional requirements.
All updates occur through the Oracle RDBMS.
Costpoint MES requires that discrete serialized data collection points be collected in tables designed for data collection, not for free-form text.
Any requirements to standardize the look or function across sites are applicable only in cases where underlying data model is consistent across all sites.
A single-user login provides all user validation for the session until the user logs off.
The term ‘redlining’ is always used loosely to describe editing in general. Costpoint MES does not emulate the literal ‘pen and ink’ metaphor, which is practiced in a paper-based system. Specifically, all use of the term ‘redline’ in this document means ‘modify’ or ‘edit.’
Database transactions that fail result in an error message. Successful transactions employ passive confirmation (i.e., the absence of an error message).
Costpoint MES does not provide a means of redefining program flow. For example, the customer cannot place a dialog box between the Edit button of a UDV (user-defined view) and the update dialog box that it calls.
Update UDVs cannot invoke another UDV.
Access and communication to legacy and foreign systems that have not been specifically defined are assumed to be achievable by launching a third-party software client program (e.g., the 320 emulation program running on the same platform as Costpoint MES).
Costpoint MES does not incorporate any flashing indicators.
Costpoint MES does not provide a means of creating menus. However, the drop-down lists from an Ellipsis (…) button in a UDV are configurable.
Undo is always achieved by re-querying/refreshing the data before a save to the database. Changes that are saved to the database cannot be undone.
All sorts must be defined explicitly through configuration.
For Window Client, Costpoint MES provides a means of defining simple tubular reports. It also provides an interface to third-party reporting tools through the use of external calls. Creation of basic reports is part of the implementation process. Ongoing report maintenance is the responsibility of the customer.
For the Thin-Client, Costpoint MES provides the ability to print the information in the current screen view. It does not provide a global print capability. A reporting tool interface

Overview
Thin-Client Configuration Guide: Basics 18
using third-party reporting software allows users to create and print reports using capabilities beyond those of Costpoint MES.
Dispatch list data pages can be parameterized only for the focused record in the dispatch list.
Instruction data pages can be parameterized only to the work order level.
For the Thin-Client, multiple selection/transaction is possible only within a single tubular/grid data control.
Barcode and magnetic strip reader capabilities are limited to those that can be achieved using a keyboard wedge. These devices provide a shortcut to standard keyboard characters to save the user some typing. No custom interfaces will be incorporated, except to augment the logon process.
Cut, copy, and paste of all text is limited to ASCII, Text that is cut or copied from any external software product that contains special characters or embedded markup cannot be pasted into Costpoint MES controls.
For the Thin-Client, cut, copy and paste of raster graphics is supported in selected image controls within Costpoint MES.
For the Thin-Client, the Slide Editor does not support cut, copy, and paste operations for an application outside of Costpoint MES.
Copying of data records is achieved through the use of Oracle-stored procedures and is configured through UDVs.
A Costpoint MES configuration applies to all users at a site. A particular user does not have a personal configuration.
Display of data is limited to what is achievable through SQL Select statements from Oracle.
Visual controls—including data display controls (fields) and drop-down menu choices—cannot be created or disabled based on data values. Exception: For the Thin-Client, the hypertext construction process allows for the use of data values to determine the display controls to be embedded in hypertext.
For the Thin-Client, sort selections are predefined in the configuration of the dispatch list. However, the scope of a dispatch list can be temporarily narrowed by the end-user through use of the Filter dialog box to create a simple filter condition. For example, Callboard Type = ‘Electrical’ and Dept = ‘XYZ.’
Communication to support organizations—such as Tooling and Inventory Control—that manage their work in a system or database outside of Costpoint MES is done through the email system or through the Notification Dispatch window, which allows posting of a hypertext message to different callboard/queue types.
Callboard tasks are rerouted by changing the destination queue.
Costpoint MES interfaces with standard email systems that support SMTP (Simple Mail Transfer Protocol)—such as Microsoft. Internal Costpoint MES communication mechanisms do not emulate email and are not a replacement for an email system.
For the Thin-Client, video capture, document scanning, and audio/voice recording capabilities are supported, but require additional software and hardware.
For the Thin-Client, switching Costpoint MES between databases and/or configurations requires that the application be shut down and restarted. For the Web Express Client, selecting a new domain requires that the current session be terminated.
Overview
Thin-Client Configuration Guide: Basics 19
For the Thin-Client, spellchecking is available for hypertext instructions authoring. It will be done on demand on the selected operation text. Spellchecking is not a means to filter usage of particular words. A specific security privilege is required to add words to the dictionary.
For the Thin-Client, the display font size must be set to Small Fonts (Control Panel » Display » Properties » Font Size) in order to display Costpoint MES labels and captions correctly.
The Costpoint MES client application is designed to operate using nominal Windows settings and Internet Explorer 5.5 and above, unless otherwise noted.
UDV fields do not support values with leading and trailing spaces. Any leading or trailing spaces are removed.
For the Thin-Client and Web Express Client, objects have the same conceptual names, but are many times implemented differently. Therefore, exact mirroring of behavior or capabilities is not guaranteed. For example, in the Thin-Client, a tool window is an actual Windows window, but in the Web Express Client, the window is an image in the Internet Explorer browser.
Web-specific Constraints The Web Express Client supports a subset of the full Thin-Client functionality. The following points show specific assumptions and constraints for the Web Express Client configurations.
No feature, system variable, SQL library entry, UDV property, or any other configuration component should be assumed to be supported.
Configurations that run successfully in the Thin-Client should not be interpreted as being supported in the Web Express Client. Therefore, any configuration component that runs successfully in the Thin-Client, but does not run in the Web Express Client, does not constitute an anomaly.
The absence of a given configuration component (e.g., a property) from a list of unsupported components does not imply support for that component.
The successful run of a statement using an unsupported configuration component is purely by chance. Later releases will almost certainly raise errors. In any case, the successful run of an unsupported configuration item does not constitute Web Express Client support of that configuration component.
Because different configuration components are supported in different contexts, al configurations should be pre-tested in the Web Express Client itself. When testing configurations, all usage scenarios should be tested to verify conformance—or to correct non-conformance—before launch of the Web Express Client configuration.
Although Deltek makes every effort to ensure that the information contained in this manual is complete and correct in every regard, it makes not warranty, express or implied, or assumes any legal liability or responsibility for the accuracy, completeness, or usefulness of any information contained herein.
FAQs This section contains frequently asked questions about Costpoint MES.

Overview
Thin-Client Configuration Guide: Basics 20
Why doesn’t the Thin-Client conform to all Windows standards? Costpoint MES attempts to conform to Microsoft Windows standard behavior. But even Microsoft cannot adhere to its own standards for all applications and versions over time. The places where Costpoint MES has departed from Windows behavior are unintentional—being based on the specific needs of Costpoint MES customers—and for the most part, are well known and well understood. That being said, Deltek welcomes suggestions, especially when they can be introduced as optional through configuration.
Why are Windows buttons grayed-out? A grayed-out button indicates that the button has been previously disabled. Most disabling is done through configuration in order to limit actions in a specific context or to limit actions of specific users. For example, if a user does not have the proper privilege to edit information in a window, the Edit button will be grayed-out.
Why is the Thin-Client Exit button not the standard X button? The main reason that the Costpoint MES Exit button is not the X button is because Exit and X buttons perform two different functions: The Exit button closes the entire Costpoint MES application while the X button closes a single window.
Configuration Components Configuration of Costpoint MES is controlled by the following components:
Startup (LOCAL.INI) file (one for each domain for the Web Express Client)
Initialization Library
SQL Library
UDV Library
The Initialization Library is accessed using a text editor while the SQL Library and UDV Library are accessed using tools in the Costpoint MES System Manager. The following sections describe each configuration component and the System Manager.
Local Ini File The Local.INI file is a Microsoft Windows file in the standard format, keyword = value.
The following table lists the differences between the startup file(s) for the Thin-Client and Web Express Client.
INI File Thin-Client Web Express Client
Local.INI Contains information for starting the Thin-Client application.
Can reside either on the client hardware or in an application server.
Contains information that monitors database requests/activity.
Can reside in the server hardware or on a network drive accessible by services. The path is specified in the domain—usually in the Administration directory.
Additional INI files None. Domain-specific INI file – Points a domain to the Web Express Publisher software. It is

Overview
Thin-Client Configuration Guide: Basics 21
INI File Thin-Client Web Express Client
named according to the DbAlias value entered for the domain on installation. The can only be one INI file per domain.
WebMonitor.INI – Initializes the Web Monitor service.
For more information, see the Web Express Publisher Installation Guide.
Initialization Library The Initialization Library is a database table whose records contain first-level and second-level configuration information. Values in a single record initialize the entire application, determining the appearance, content, modes (viewing and editing), and data sources of all windows. The Initialization Library record also determines such things as hypertext links to multimedia objects. For the Thin-Client, it also determines the availability of third-party tools and modules through User Exits. The Initialization Library is part of the database and resides in the database server.
SQL Library The SQL Library is a database table whose records contain SQL statements. These statements constitute one of the main methods of carrying out client business rules. Statements—mostly Select, Insert, Update, and Delete—retrieve, store, and manipulate information on the database.
UDV Library The UDV Library is a database table that contains a collection of user-defined views. Since a UDV is essentially a customized screen interface that displays and manipulates specific database information, the UDV Library plays a significant role in configuration. Page tabs, embedded buyoffs, and embedded data collections are typical examples of UDVs.
System Manager The System Manager is an administrative tool used to access and manage the above configuration components. It is used in conjunction with RDBMS (Rational Database Management System) desktop tools and product utilities to implement and maintain the client configuration. The System Manager is an executable file (SFCFG32.EXE) that typically resides in the Costpoint MES directory or, in release 5.0.2.0 or later, in the System Manager subdirectory.
Thin-Client System Variables Costpoint MES consists essentially of a ‘front-end’ and ‘back end’ as shown in the following table.
Component Thin-Client Web Express Client
Front end An executable file that displays and manipulates information
A custom HTTP server service that manipulates information and renders Web pages
Back end The database that organizes and houses most displayed data. The database consists of two main areas:
Overview
Thin-Client Configuration Guide: Basics 22
Component Thin-Client Web Express Client
The Thin-Client – Database objects that enable the basic operation of the parent application and support any additional applications and modules. The Thin-Client cannot be changed.
The Foundation – Database objects that directly enabled additional applications and modules. The Foundation comprises the configurable portion of the database. It may be tailored to meet customer requirements by adding the Foundation database object definitions.
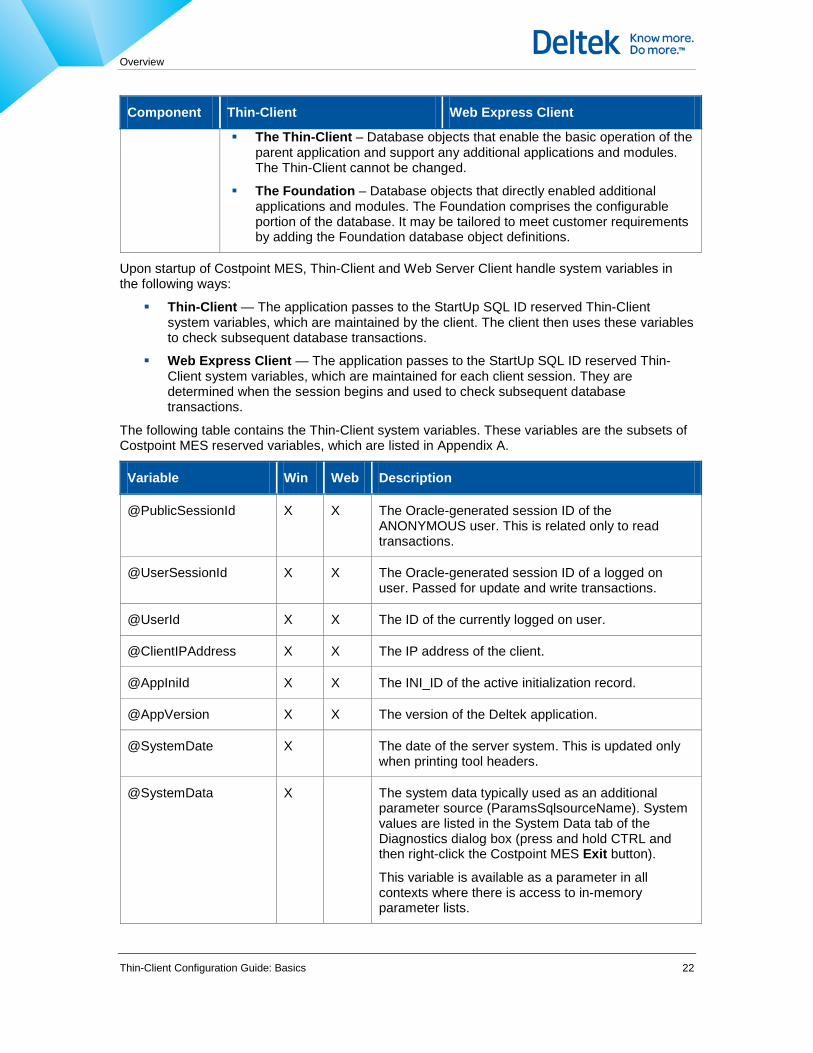
Upon startup of Costpoint MES, Thin-Client and Web Server Client handle system variables in the following ways:
Thin-Client — The application passes to the StartUp SQL ID reserved Thin-Client system variables, which are maintained by the client. The client then uses these variables to check subsequent database transactions.
Web Express Client — The application passes to the StartUp SQL ID reserved Thin-Client system variables, which are maintained for each client session. They are determined when the session begins and used to check subsequent database transactions.
The following table contains the Thin-Client system variables. These variables are the subsets of Costpoint MES reserved variables, which are listed in Appendix A.
Variable Win Web Description
@PublicSessionId X X The Oracle-generated session ID of the ANONYMOUS user. This is related only to read transactions.
@UserSessionId X X The Oracle-generated session ID of a logged on user. Passed for update and write transactions.
@UserId X X The ID of the currently logged on user.
@ClientIPAddress X X The IP address of the client.
@AppIniId X X The INI_ID of the active initialization record.
@AppVersion X X The version of the Deltek application.
@SystemDate X The date of the server system. This is updated only when printing tool headers.
@SystemData X The system data typically used as an additional parameter source (ParamsSqlsourceName). System values are listed in the System Data tab of the Diagnostics dialog box (press and hold CTRL and then right-click the Costpoint MES Exit button).
This variable is available as a parameter in all contexts where there is access to in-memory parameter lists.

Overview
Thin-Client Configuration Guide: Basics 23
Variable Win Web Description
@SID X The Oracle SID (system identifier). The identifier of the Oracle instance.
@FrameworkDbVersion X Version of the framework database.
Database Connections When a user starts Costpoint MES and logs on, there are actually two Oracle sessions established with the database: the ANONYMOUS connection (the background user) and the logged-on user connection (the foreground user).
The following table lists the reasons and differences between these sessions for the Thin-Client and Web Express Client.
Connection Thin-Client Web Express Client
ANONYMOUS This maintains application context across changes of the foreground user.
The queries that supply data to all the controls in the GUI must be associated with a database connection that maintains presentation/context data during a user change.
When an auto-logoff occurs because of inactivity, the ANONYMOUS session remains open.
This maintains compatibility with the Thin-Client.
When an auto-logoff occurs because of inactivity, the entire Costpoint MES session terminates.
Logged-on user This performs transactions against the database according to the logged-on user ID.
When an auto-logoff occurs because of inactivity, the foreground user is logged off.
This maintains compatibility with the Thin-Client.
When an auto-logoff occurs because of inactivity, the entire Costpoint MES session terminates.
Acceptable Characters The following sections contain information about acceptable characters in specific context.
Path Statements Path statements refer to any valid Windows path and can include the following characters:
Alphanumeric characters (uppercase/lowercase A-Z and digits 0-9)
Space

Overview
Thin-Client Configuration Guide: Basics 24
Unless otherwise specified, path statements cannot include the following characters:
Tilde (~)
Comma (,)
Colon (:)
Semicolon (;)
The drive designation can contain a colon. Other parts of the path (directory and file names) cannot contain a colon.
Key Fields and Data Fields As of Thin-Client 4.1, all key fields (database column names) can include any character except the equal sign (=), single quotation mark (‘), and double quotation mark (“)
All data fields (database table values) can include any character. However, in some contexts such as list filters and control data (block markers and tags containing reference data), single (‘) and double (“) quotation marks are not supported.
User names and passwords can contain the following characters:
Colon (:)
Comma (,)
Slash (/)
At symbol (@)
When using a data value that contains special characters (e.g., parentheses), enclose the value in single quotation marks to avoid parsing errors. For example, when attempting to invoke a side note, the following type error appears because the TOOL_NO value contains parentheses.
Parsing for SideNotes text failed for tag info: -->LinkInvoke(SideNotes(GET_OP_TOOL_DATCOL(ORDER_ID=9146,OPER_KEY=4427,STEP_KEY=-1,TOOL_NO=CRIMPER KIT (4 DIES)),’@Caption=CRIMPER KIT(4 DIES)’))<--
The complete link should appear as follows:
LinkInvoke(SideNotes(GET_OP_TOOL_DATCOL(ORDER_ID=9146,OPER_KEY=4427,STEP_KEY=-1,TOOL_NO=’CRIMPER KIT (4 DIES)’),’@Caption=CRIMPER KIT(4 DIES)’))
Costpoint MES does not support field values containing leading and trailing space characters. Entry of leading/trailing spaces may cause unpredictable behavior.
Configuration Data Acceptable characters for configuration data (as in an Initialization Library record) are defined on an individual property basis. For guidelines, see specific procedures.

Local Ini File
Thin-Client Configuration Guide: Basics 25
Local Ini File The Local Ini file contains the minimum site-specific information needed to start Costpoint MES and connect to the database. It is a Microsoft Windows INI file in the standard format, usually named CostpointMES.INI. By default, it is located in the directory where Costpoint MES is installed.
For the Thin-Client, the startup file can reside either on the client hardware in a server. In most cases, the application and database should not reside in the same hardware.
The Web Express Publisher has three types of INI files: the Local Ini file (usually WebExpress.INI), the domain-specific INI file(s), and the Web Monitor INI file (WebMonitor.INI). These files are described in detail in the Web Express Publisher Installation Guide. The remainder of this chapter contains information about the Local Ini file for the Thin-Client only.
The Local Ini file contains the following sections:
[Startup]
[BootStrapTableOwners]
[SubstitutionText]
[IniLibOverrides]
[GlobalParameters]
[Startup] The [Startup] section defines path and alias information for connection to the database.
Startup Properties
Property Win Web Description
PathToFrameWork X This (required) parameter shows the path and directory in which the Thin-Client modules (SDFat32.DLL, SFXChg32.DLL, etc.) reside.
As a reminder, the path declaration cannot contain a colon (:), semicolon (;), comma (,), or tilde (~).
DbAlias X X This (required) parameter defines the Oracle alias (as defined in TNSNAMES.ORA or an Oracle Names server) used to access the database.
GetSqlQuery X X This parameter defines the master query Costpoint MES uses to access the SQL Library and execute any SQL statement. This basically identifies the name of the SQL Library table.
Syntax: GetSqlQuery=select * from SQLLibraryTable where SQL_ID =:SQL_ID

Local Ini File
Thin-Client Configuration Guide: Basics 26
Property Win Web Description
Where:
SQLLibraryTable is the name of the SQL Library table.
ValidTableOwners X This parameter specifies database table owner(s). It is used to identify tables belonging to a specific Costpoint MES database—mainly in cases where multiple databases run in a single instance. NOTE: This property, along with ValidFunctionOwners and ValidStoredProcOwners, is optionally bundled into the single SchemaOwner property. If SchemaOwner is defined, Costpoint MES ignores ValidTableOwners.
ValidFunctionOwners X This parameter specifies database function owner(s). It is used to identify functions belonging to a specific Costpoint MES database—mainly in cases where multiple databases run in a single instance. NOTE: This property, along with ValidFunctionOwners and ValidStoredProcOwners, is optionally bundled into the single SchemaOwner property. If SchemaOwner is defined, Costpoint MES ignores ValidFunctionOwners.
ValidStoredProcOwners X This parameter specifies database stored procedure owner(s). It is used to identify stored procedures belonging to a specific Costpoint MES database—mainly in cases where multiple databases run in a single instance. NOTE: This property, along with ValidTableOwners and ValidFunctionOwners, is optionally bundled into the single SchemaOwner property. If SchemaOwner is defined, Costpoint MES ignores ValidStoredProcOwners.
If you specify this value, but still get an error when attempting to open a tool in the System Manager, grant access to the DBA_OBJECTS view to PUBLIC. Also, GRANT SELECT on DBA_OBJECTS to PUBLIC.
SchemaOwner X X This parameter specifies the single database owner of tables, stored procedures, and functions. If this parameter is defined, Costpoint MES ignores ValidTableOwners, ValidFunctionOwners, and ValidStoredProcOwners.

Local Ini File
Thin-Client Configuration Guide: Basics 27
Property Win Web Description
Ini_Id X X This (required) parameter the Initialization Library record to be used to initialize the application after startup.
PublicUserName X X This parameter specifies the default user name required to access Costpoint MES. This defaults to ANONYMOUS.
PublicPassword X X This parameter specifies the default user password required to access Costpoint MES. This defaults to ANONYMOUS.
Win: You can encrypt this password with the Local Ini Editor tool. Web: you can encrypt and hide this password in the Windows Registry using the Domain Manager. For more information on encryption, see the Costpoint MES Express Client Installation Guide.
PublicDbAlias X X This parameter specifies the default database alias.
For the Web Express Client, this value must be the same as DbAlias.
FullyQualifiedDbObjects X X When enabled (On or 1), this parameter improves the speed and flexibility of schema owner prefix logic. This requires that all tables, stored procedures, and functions defined in the SQL library be prefixed with a value defined in the [SubstitutionSql] section of the Initialization Library record.
Off or 0 – Disabled
On or 1 – Enabled (default) NOTE: In previous Thin-Client releases, this property is in the [Common] section of the Initialization Library record.
RptMemFile X X This parameter allows configuration of Rave report processing to occur using an external temporary file. The user can specify a filename or pass @UserTemp to the RptMemFile parameter. @UserTemp will use the Windows Temp directory. Setting RptMemFile to blank will cause the report to be process in memory.
UserNameCharCase X X The User Authentication dialog box can support mix-case input and allows the use of case-sensitive user names.
ForceUpper – This variable converts all

Local Ini File
Thin-Client Configuration Guide: Basics 28
Property Win Web Description
enter characters to uppercase.
ForceLower – This variable converts all entered characters to lowercase.
AsIs – This variable leaves entered characters as is.
Character case settings affect both the foreground/logged-on user and background/public user for connection logic and command line logon parameters. NOTE: Oracle will not support mixed-case user names and passwords until the 11g release. Until that time, direct client-server connections cannot take advantage of mixed case logon.
PasswordCharCase X X The User Authentication dialog box can support mix-case input and allows the use of case-sensitive passwords.
ForceUpper – This variable converts all enter characters to uppercase. This id the default for direct client-server connections.
ForceLower – This variable converts all entered characters to lowercase.
AsIs – This variable leaves entered characters as is. This is the default for multi-tier connections.
Character case settings affect hex-encoded or decrypted password. NOTE: Oracle will not support mixed-case user names and passwords until the 11g release. Until that time, direct client-server connections cannot take advantage of mixed case logon.
General. Advanced External User Authentication
For multi-tier implementations, the Thin-Client can now authenticate users externally through the advanced DLL interface. On startup, the Tin-Client looks for a customer-defined external authentication DLL, which acquires an authentication token for the currently logged-on user. This token is returned to the Thin-client and appended to each HTTP request passed to the middle-tier application. A customer-defined middle-tier servlet extracts, interprets, and acts on the token.
ExtAuthDLL X ExtauthDLL = <DLLFilename>
DLLFilename is the name of the customer-defined DLL.
ExtAuthInCfg X ExtAuthInCfg = <AnyStringInAnyForm>
AnyStringInAnyForm is a string in any format that is passed to the called DLL.

Local Ini File
Thin-Client Configuration Guide: Basics 29
Property Win Web Description
ExtAuthBufSize X ExtAuthBufSize = <IntegerValue>
IntegerValue is the size, in bytes, of the authentication buffer that will be loaded with the authentication token. The default is 100000.
ExtAuthReqCfg X ExtAuthReqCfg = <Method>
Method is the method used to marshal the authentication content.
The DLL must export a function named Initialize, which creates and loads the external authentication buffer with the authentication token, as in the following example: Function Initialize (Params: PChar;ReturnPChar:pChar; var ReturnLength:LongInt):WORD; stdcall;
Where:
ReturnPChar is a pointer to the contents of the allocated buffer (of size ExtAuthBufSize) before the procedure runs.
ReturnLength indicates the actual size of the returned content.
This call must return 1 (loading of Windows Client should continue) or (loading should be canceled without raising any prompts or records.
KillOrphanSessionsEnabled X When the client is re-launched, this checks for connection artifacts in the local store and kills those threads at the server with a special method published at the middle-tier application. The default is True. The local store is determined by the @UserTemp variable.
SingleDatabaseConnection X Boolean. True enables the single database connection for both SQL selects and transactions. This setting is required for security reasons when Security Groups is enabled in the middle-tier.
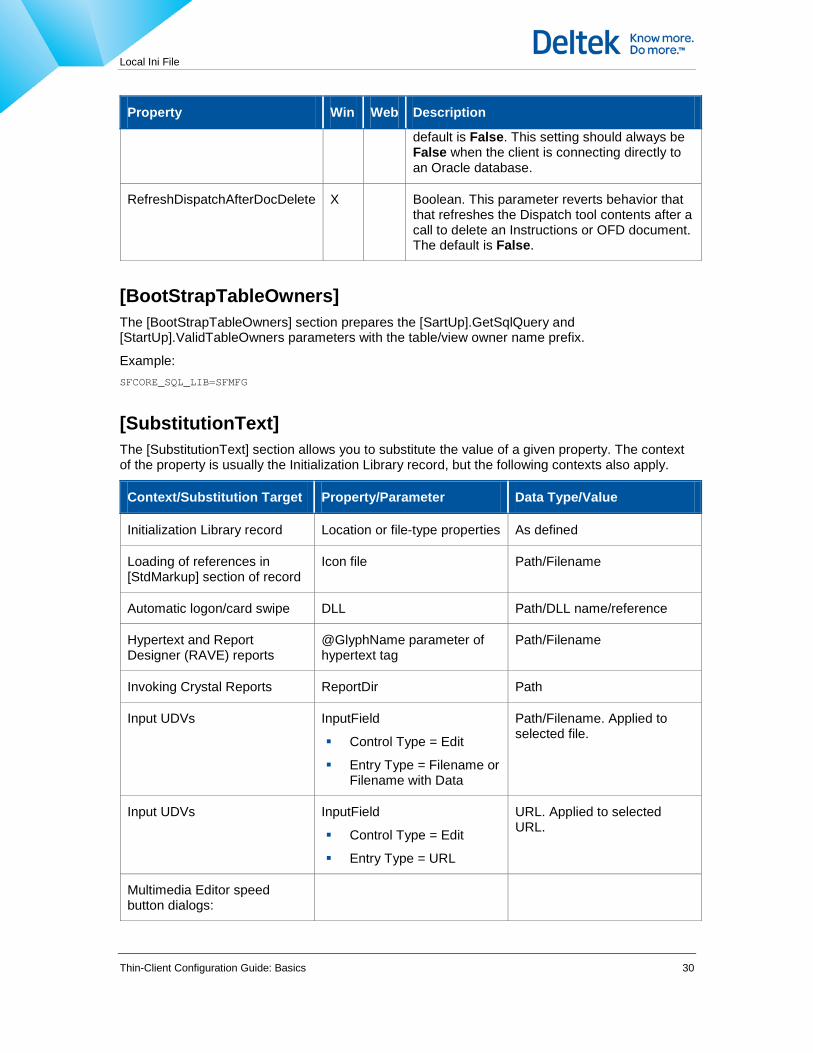
RefreshDispatchAfterDocDelete X Boolean. This parameter reverts the behavior that refreshes the Dispatch tool contents after a call to delete to delete an Instructions or OFD document.
SingleDatabaseConnection X Boolean. Dingle database connection for both SQL selects and transactions. This setting is required for security reasons when Security Groups is enabled in the middle-tier. The
Local Ini File
Thin-Client Configuration Guide: Basics 30
Property Win Web Description
default is False. This setting should always be False when the client is connecting directly to an Oracle database.
RefreshDispatchAfterDocDelete X Boolean. This parameter reverts behavior that that refreshes the Dispatch tool contents after a call to delete an Instructions or OFD document. The default is False.
[BootStrapTableOwners] The [BootStrapTableOwners] section prepares the [SartUp].GetSqlQuery and [StartUp].ValidTableOwners parameters with the table/view owner name prefix.
Example: SFCORE_SQL_LIB=SFMFG
[SubstitutionText] The [SubstitutionText] section allows you to substitute the value of a given property. The context of the property is usually the Initialization Library record, but the following contexts also apply.
Context/Substitution Target Property/Parameter Data Type/Value
Initialization Library record Location or file-type properties As defined
Loading of references in [StdMarkup] section of record
Icon file Path/Filename
Automatic logon/card swipe DLL Path/DLL name/reference
Hypertext and Report Designer (RAVE) reports
@GlyphName parameter of hypertext tag
Path/Filename
Invoking Crystal Reports ReportDir Path
Input UDVs InputField
Control Type = Edit
Entry Type = Filename or Filename with Data
Path/Filename. Applied to selected file.
Input UDVs InputField
Control Type = Edit
Entry Type = URL
URL. Applied to selected URL.
Multimedia Editor speed button dialogs:

Local Ini File
Thin-Client Configuration Guide: Basics 31
Context/Substitution Target Property/Parameter Data Type/Value
Import from File
FTP File Source
Web Address
Path/Filename
Path/Filename
URL
Path/Filename
Path/Filename
URL
Slide/Annotations window @Location parameter Path/Filename
Object Manager: Loading of file into multimedia microviewer via the Preview button.
Filename Path/Filename
Substitute Multimedia Default Requirement: Requires files imported into slides from a path listed in substitution text.
Path/Filename Path/Filename
Substitute a given SQL ID with a literal statement and also use an expression in that statement.
Each entry follows this format: Variable=Value.
Example: [SubstitutionText] CommonDir=c:\test ReportDir=c:\Crystal
The [SubstitutionText] section can appear in both the Local Ini file and the Initialization Library record. If a duplicate entry appears in the startup file and Initialization Library record, the Local Ini file entry takes precedence.
[IniLibOverrides] The [IniLibOverrides] section contains entries that override specific properties of the controlling Initialization Library record, but only in cases where the AAC (Application Access Control) Method for the Costpoint MES Section is set to None.
When the Thin-Client starts up, the startup routine reads each entry in the [IniLibOverrides] section of the INI file. These values override specific values—or specific unsigned values—as the Initialization Library record loads.
All entries in the [IniLibOverrides] section follow a keyword=value format. There are two types of entries:
INI Lib property-based entries – In these entries, the keyword matches a property name in the Initialization Library record. The value of the override property simply replaces the value of the same property in the Initialization Library method.
Override-only entries – In these entries, the keyword is a property name that appears only in the [IniLibOverrides] section. The value of the override property can affect multiple property values or properties not found in the Initialization Library record. (See Override-Only Entries.)

Local Ini File
Thin-Client Configuration Guide: Basics 32
INI Lib Property-Based Entries An INI Lib property-based entry is an entry whose keyword matches a property in the Initialization Library record. For this type of entry, you can override a single property instance or all property instances as follows:
Single instance – Thin-Client overrides a single instance when you provide a specific property path (i.e., the Initialization Library section, subsection(s), and property name).
All instances – The-Client overrides all instances of the property when you provide only the property name.
In the following example, the MultiLineTabs property will be overridden only once, for the Process Planning window View Mode (because the entry contains the specific property path. The LoadTextOnDemandEnabled property will be overridden in every instance in which it appears in the record (because the entry contains no path). And the AutoRefresh property will be disabled only for the MFI_1003151 UDV (because the entry contains the specific property path). [IniLibOverrides]
Instructions.PrPlgInstructions.Modes.ViewModes.View.MultiLineTabs=1 LoadTextOnDemandEnabled=1 UdvPropertyOverrides.MF1_1003151.PropertyValues=AutoRefresh=arDisabled
Override-Only Entries An override-only entry is an entry whose keyword does not match a property name in the Initialization Library record. This may be because one or more properties are affected, or a property is affected inly in a specific way.
Override-Only Entries
Override Entry/Syntax Description
Common.SyncClientAndServer
When using different time zones for the client and server machines, this entry synchronizes the client and server DST start dates according to the Windows Locale setting of the client machine.
<PropLevel1>.<PropLevel2>.<PropLevel_n>#<ListIndex>=<NewValue>
Each PropLevel is a property name constituting the property path of the list element, and ListIndex is the count corresponding to the position of the element in the list (where the initial element is 1).
This entry modifies elements in certain list types—such as tabs.
Example: [IniLibOverrides]
StdText.Tabs.#4=Test - Used in Orders~ ActivateUDV:MFI_2011181~200~~~False~True
In the above example, the fourth tab of the Standard Text window will display according to the parameters shown to the right of the equal sign (=). NOTE: If the ListIndex value is greater than the count of the elements in the list, the defined value is added to the end of the list.
Common.RtfPasteCharConversi ons=<name1>=<value1>,<nam e2>=<value2>,...
This entry globally disables tab alerts if they have been configured through Status Sql Id, The RtfPasteCharConversions setting in the common section of the INI Lib provides a way to handle unsupported characters included in the clipboard content which is pasted into Costpoint MES RTF control. This setting maps unsupported characters—such as Unicode characters—into any other character that is supported.

Local Ini File
Thin-Client Configuration Guide: Basics 33
Override Entry/Syntax Description
The logic looks for &#<name>; in the pasted RTF content and replaces it with &#<value>;.
The following example demonstrates syntax for mapping Unicode right single quotation mark, and left and right double quotation marks to ASCII equivalents. Common.RtfPasteCharConversions=8217=39,8220=34,8221=34
The conversions shown in this example happen by default, but can be overridden or expanded using this method.
Common.AutoRefreshOverride=<AutoRefreshValue>
This entry globally overrides any high-level AutoRefresh value for UDVs.
This override is meant to be used during development to improve response times that would ordinarily be longer under certain AutoRefresh values—notably RefreshAndRelocate.
Example: Common.AutoRefreshOverride=Refresh
Common.UdvAutoShortListThreshold
<integer record count /default=20>
If the lookup record count is less than UdvAutoShortListthreshold and there is only one column—including hidden columns—in the select, then the simple short list combo box or drop-down list is displayed.
If the lookup record is less than UdvAutoShortListthreshold and there are multiple columns—including hidden columns—in the select, then the simplified multi-column drop-down list is displayed. In this case, only the grid portion of the standard long lookup dialog box is displayed. Also, the row indicator column is removed and any item can be selected by pressing ENTER or by clicking it. Otherwise, all behavior is the same as the long lookup.
Common.UdvAutoSimplifiedL ongListThreshold
<integer record count / default=20>
See previous property for the description.
Common.UdvCenterLeftPositio nedCaptions
True or False. The default is False. This entry top-aligns left-positioned (CaptionPos=cpLeft) display UDV Memo and List control captions that were centered vertically in previous product versions.
Common.UdvResumeInitialTra nsactionTypeEnabled=Yes/ No
In reference to a UDV in a scripted UDV container, this entry causes the Transaction Type value to revert to its original value if it has been overridden by the UDVTransaction property of the UDV statement. Reversion to the original transaction type takes place as the user clicks Previous or proceeds to the next statement.
See “Scripted UDVs” and the UDV UdvTransaction property in Table 5-16, “Scripted UDV Statement Properties.”
Common.UdvAbortTransaction Enabled=True/False
This entry controls the availability of an Abort button in Input UDVs that appears after a configurable length of time. When the button is clicked, a confirmation dialog box displays to confirm that the user wants to abort the currently executing transaction. The default value is True.
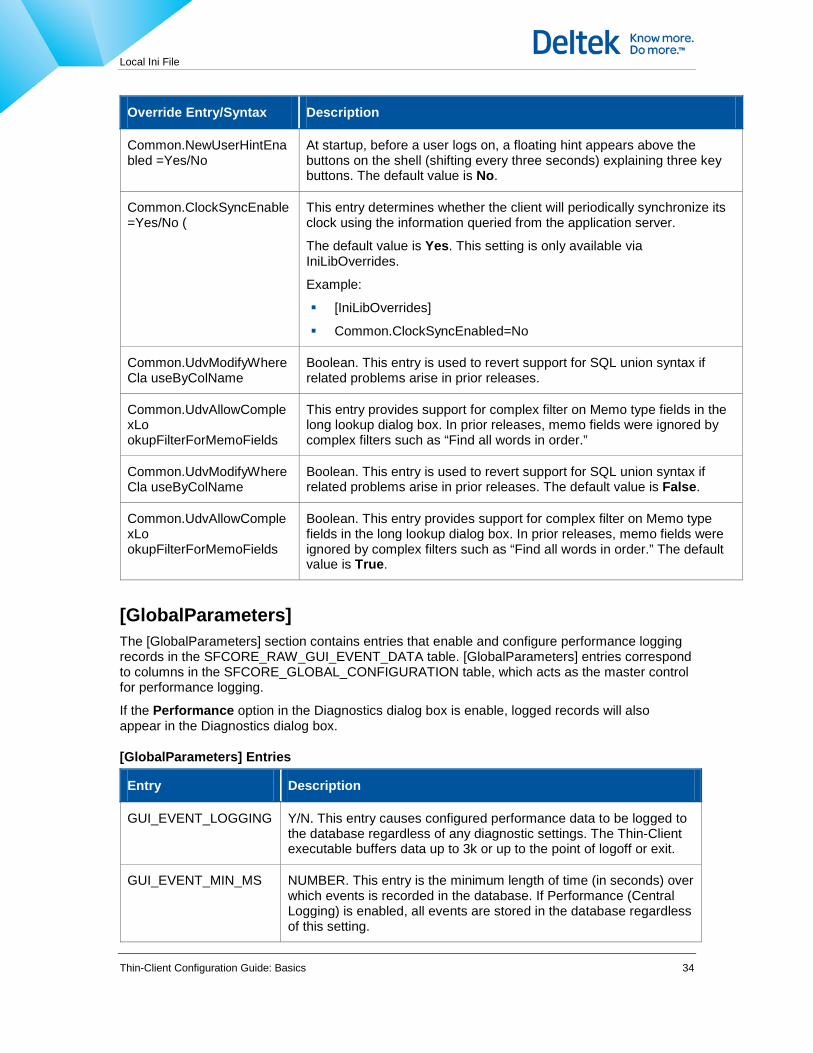
Local Ini File
Thin-Client Configuration Guide: Basics 34
Override Entry/Syntax Description
Common.NewUserHintEnabled =Yes/No
At startup, before a user logs on, a floating hint appears above the buttons on the shell (shifting every three seconds) explaining three key buttons. The default value is No.
Common.ClockSyncEnable=Yes/No (
This entry determines whether the client will periodically synchronize its clock using the information queried from the application server.
The default value is Yes. This setting is only available via IniLibOverrides.
Example:
[IniLibOverrides]
Common.ClockSyncEnabled=No
Common.UdvModifyWhereCla useByColName
Boolean. This entry is used to revert support for SQL union syntax if related problems arise in prior releases.
Common.UdvAllowComplexLo okupFilterForMemoFields
This entry provides support for complex filter on Memo type fields in the long lookup dialog box. In prior releases, memo fields were ignored by complex filters such as “Find all words in order.”
Common.UdvModifyWhereCla useByColName
Boolean. This entry is used to revert support for SQL union syntax if related problems arise in prior releases. The default value is False.
Common.UdvAllowComplexLo okupFilterForMemoFields
Boolean. This entry provides support for complex filter on Memo type fields in the long lookup dialog box. In prior releases, memo fields were ignored by complex filters such as “Find all words in order.” The default value is True.
[GlobalParameters] The [GlobalParameters] section contains entries that enable and configure performance logging records in the SFCORE_RAW_GUI_EVENT_DATA table. [GlobalParameters] entries correspond to columns in the SFCORE_GLOBAL_CONFIGURATION table, which acts as the master control for performance logging.
If the Performance option in the Diagnostics dialog box is enable, logged records will also appear in the Diagnostics dialog box.
[GlobalParameters] Entries
Entry Description
GUI_EVENT_LOGGING Y/N. This entry causes configured performance data to be logged to the database regardless of any diagnostic settings. The Thin-Client executable buffers data up to 3k or up to the point of logoff or exit.
GUI_EVENT_MIN_MS NUMBER. This entry is the minimum length of time (in seconds) over which events is recorded in the database. If Performance (Central Logging) is enabled, all events are stored in the database regardless of this setting.

Local Ini File
Thin-Client Configuration Guide: Basics 35
Entry Description
GUI_EVENT_TYPES This entry is the semicolon-delimited list of event types to be logged. Phase 1 event types are Sqlid, Invoke, Login, Logoff, and ClientDP. A blank or asterisk (*) value logs all types.
The ClientDP event type records information for each LocateRecord activity.
Example: GUI_EVENT_TYPES=Sqlid;Invoke;Login;ClientDP
or GUI_EVENT_TYPES=*
Example: [GlobalParameters] GUI_EVENT_LOGGING=Y GUI_EVENT_MIN_MS=40 GUI_EVENT_TYPES=*
All global parameters are stored in the SFCORE_GLOBAL_CONFIGURATION table. If on startup, the query of this table fails, the Thin-Client uses the [GlobalParameters] section of the INI file.
Automatic External Calls For every DLL that Costpoint MES loads, it makes two automatic calls to two entry points: Initialize and CleanUp. The intent of these calls is to allow a site to create corresponding entry points that perform one-time operations at startup and/or termination of the DLL. For example, the Initialize entry point may contain a routine to open a new log file on the startup of the DLL, and the CleanUp point may contain a routine to close the log file on termination.
If, after loading a DLL and querying its contents, Costpoint MES finds the Initialize entry point, it immediately makes the Initialize call. Similarly, on shutdown, if it has found the CleanUp entry point, it makes the CleanUp call. If Costpoint MES does not find the Initialize and/or CleanUp entry points, it continues and/or shuts down normally.
To take advantage of automatic Initialize and CleanUp external calls, create a DLL with Initialize and CleanUp entry points. Then, define the DLL in the [ExternalLibraries] and [ExternalFunctions] section of the Initialization Library.
All user exit DLLs use the calling convention defined by the UserExitDllCallingConvention property in the [Common] section of the Initialization Library record. Values are:
FASTCALL – This value provides the best performance for Delphi and C. This is the default value.
STDCALLS – This value provides compatibility with many other languages, such as Visual Basic.

The Initialization Library
Thin-Client Configuration Guide: Basics 36
The Initialization Library This chapter explains the structure of an Initialization Library record and describes the Initialization Library tool, the interface through which you create and change Initialization Library records.
The Initialization Library is a database table (SFCORE_INI_LIB) that contains first- and second-level configuration information. Values in a single record initialize the entire application, determining the appearance, content, modes (viewing and editing), and data sources of all windows. The Initialization Library record also determines such things as hypertext links to images, slides, videos, and the availability of third-party tools and modules through User Exits. The Initialization Library is part of the database and resides in the database server.
In terms of sequence, CostpointMES.ini bootstraps the application and connects to the database. It then points (through the Ini_Id variable) to a specific record in the Initialization Library, which sets the initial state and functionality of the application in minute detail. After initialization, the main configuration influence comes from the SQL and UDV Libraries.
Clients receive the Costpoint MES application with a baseline Initialization Library record. This record already contains all the sections and properties needed to configure the application. You simply change those properties to ones that initialize the application in accordance with the client’s requirements.
Record Structure This section describes the structure of a single Initialization Library record. This is for information only, because in most cases you will use the Initialization Library tool to create and maintain records—and the tool automatically structures each record for you.
A single Initialization Library record is identified by the following fields:
Ini Id – This field contains the name of the Initialization library record.
Type – This is an open field that designates the kind of statement. There are no set types.
Desc – This field describes the statement or its area of application.
Each Initialization Library record is comprised of sections, which group information into categories. Each section in turn is comprised of section properties and indented structures.
Section properties define functions or characteristics that can be described by a single entry. For example, the name of the Costpoint MES dictionary can be described by a single property entry called DictionaryName.
Indented structures define functions or characteristics that have multiple types and/or levels of configurable properties.
For example, a text block has multiple types of configurable properties—caption, links, embedded UDVs, etc.—and these types in turn have configurable properties—UDV caption, UDV ID, etc. Indented structures are meant to contain hierarchically related configuration information, and to present it in an easily readable format.
A single record in the Initialization Library has the following structure: [Section]
<SectionProperty_1>=<Value>

The Initialization Library
Thin-Client Configuration Guide: Basics 37
<SectionProperty_2>=<Value>
<SectionProperty_n>=<Value>
[Section]
<IndentedStructure_1>
<Level-1Property_1>=<Value>
<Level-1Substructure_1>
<Level-2Property_1>=<Value>
<Level-2Substructure_1>
<IndentedStructure_2>
<Level-1Property_1>=<Value>
<Level-1Substructure_1>
<Level-2Property_1>=<Value>
<Level-2Substructure_1>
Sections can occur in any order and section properties and indented structures can also occur in any order.
Rules for Initialization Library Record Entries The following table lists the format and rules for each type of entry in an Initialization Library record.
Entry Type Format Rules
Section [SectionName] Starting position = column 1.
Name must be enclosed in square brackets [like this].
Section Property SectionPropertyName=Value Starting position = column 1.
Indented Structure IndentedStuctureName Starting position = column 1.
Level-1 Property Level_1PropertyName=Value Value Starting position is indented one position from the indented structure to which it applies.
Level-1 Substructure
Level_1SubstructureName Starting position is indented one position from the indented structure to which it applies.
Level-2 Property Level_2PropertyName=Value Starting position is indented one position from the substructure to which it applies.
Level-2 Substructure
Level_2SubstructureName Starting position is indented one position from the substructure to which it applies.

The Initialization Library
Thin-Client Configuration Guide: Basics 38
Entry Type Format Rules
Comment ;This is a comment. Starting position = column 1.
First character must be a semicolon (;)
Value and Name Rules The following table lists rules for values and names.
Value Rules Name Rules
Can be any literal value.
Cannot include leading or trailing spaces.
Are terminated by a CR.
Cannot include spaces or any type of punctuation.
Are not case-sensitive, but it’s a good idea to use initial caps to flag separate words.
When assigned variables, are not followed by spaces (there is no space between the name and the equal sign).
In reference to sections and indented structures, can appear in any order.
Should not be used more than once. Redundant names will result in unpredictable behavior.
Initialization Library History The history of a given Initialization Library record is available to Admin users through the SFCORE_INI_LIB_HIST database table. This table keeps a record of all Initialization Library changes, which are captured through a row-level trigger on the SFCORE_INI_LIB table. This behavior triggers on any UPDATE or DELETE action, makes a copy of the row data as it existed prior to the change, and stores it in the SFCORE_INI_LIB_HIST table.
Each historical record is assigned a unique identifier (HIST_ID). The record identifies the user who made the change (HIST_UPDT_USERID), the time the change was made (HIST_TIME_STAMP), and the action (UPDATE or DELETE) associated with the change (HIST_ACTION).
Columns in the SFCORE_INI_LIB Table The following table lists the columns in the SFCORE_INI_LIB table.
Column Name Null? Data Type
INI_ID NOT NULL VARCHAR2(40)
INI_ID_DISPL NOT NULL VARCHAR2(32)
UPDT_USERID NOT NULL VARCHAR2(30)
TIME_STAMP NOT NULL DATE

The Initialization Library
Thin-Client Configuration Guide: Basics 39
Column Name Null? Data Type
TYPE VARCHAR2(32)
DESCRIPTION VARCHAR2(200)
INI_TEXT CLOB
INI_DATA BLOB
INI_DATA_KEY RAW(32)
Columns in the SFCORE_INI_LIB_HIST Table The following table lists the columns in the SFCORE_INI_LIB_HIST table.
Column Name Null? Data Type
HIST_ID NOT NULL NUMBER
HIST_USERID NOT NULL VARCHAR2(30)
HIST_TIME_STAMP NOT NULL DATE
HIST_ACTION NOT NULL VARCHAR2(20)
INI_ID VARCHAR2(40)
UPDT_USERID VARCHAR2(30)
TIME_STAMP DATE
INI_ID_DISPL VARCHAR2(32)
TYPE VARCHAR2(32)
DESCRIPTION VARCHAR2(200)
INI_TEXT CLOB
INI_DATA BLOB
INI_DATA_KEY RAW(32)
Displaying an Initialization Library Record You display and work with Initialization Library records in the Initialization Library Editor in the System Manager.
Use any of the following methods to display a record. It is assumed that you have launched the Initialization Library tool and are connected to the desired database. For more information, see the Costpoint MES System Manager.

The Initialization Library
Thin-Client Configuration Guide: Basics 40
In the Initialization Library tool window, click the down arrow of the Go To field and then select the record that you want to display.
Click and then select the record from the Object Manager. The record appears in the Initialization Library window.
Create an Initialization Library Record The best way to create a new Initialization Library record is to copy an existing record (perform a Save As function) and edit it.
You can also create a new record from scratch. When you create the record from scratch (using the New button), the tool uses the current template, inserting default values where applicable. This new record requires further configuration to be usable
To create an Initialization Library Record by copying, complete the following steps:
1. Display the record to copy and then click Save As in the Structured Editor tab. The Save As Ini dialog box appears.
2. Edit the ID, Desc, Type, and Folder fields as needed and then click OK. The Go To, Ini Id, and Desc fields in the Initialization Library window display the values of the new record.
3. Edit the record as needed and then click Save.
To create an Initialization Library Record from scratch, complete the following steps:
1. Click New in the Structured Editor tab. The New Ini Id dialog box appears.
2. Enter the appropriate values in the ID, Desc, Type, and Folder fields and then click OK. The Go To, Ini Id, and Desc fields in the Initialization Library window display the values of the new record.
3. Edit/configure the record as needed and then click Save.
Import an Initialization Library Record Importing an Initialization Library record is usually done to copy it from another database. This loads the record into the Initialization Library. To use the record, Costpoint MES must point to it through the Ini_Id variable in the Local Ini file. For more information on the Local Ini file, see “The Local Ini File.”
To import an Initialization Library record, complete the following steps:
1. Click New. The New Ini Id dialog box appears.
2. Enter the appropriate values in the ID, Desc, Type, and Folder fields and then click OK. The Go To, Ini Id, and Desc fields in the Initialization Library window display the values of the new record.
3. Click Import and then select the initialization text file to import.
4. Edit the record as needed and then click Save.
To load INI library contents directly from a file, use the following syntax from the INI file: [StartUp]
Ini_Id=@GetFromFile(<local file name>)

The Initialization Library
Thin-Client Configuration Guide: Basics 41
Example: [StartUp]
Ini_Id=@GetFromFile(c:\dvlp\b32\SFFND_4200.txt)
Export an Initialization Library Record You can export an Initialization Library using any of the following methods:
To a file with a .Ini extension
To a script with a .Sql extension
Export a Record to a File Exporting an Initialization Library record to a file is usually done to copy it to another database. You must save the file with an .INI extension so that Costpoint MES recognizes it when you attempt to import it to the target database.
To export an INI record to a file, complete the following steps:
1. Display the record to export and then click . The Save As dialog box appears.
2. Enter the name of the report file in the File name field and make sure that the extension is .INI.
3. Set the destination folder in the in the Save In drop-down list and then click Save.
Exporting a Record to a SQL Script Exporting an Initialization Library record to a script file enables you to populate a target database with that record. The script is actually a Notepad file with a .SQL extension. You run the resultant script in the Script Runner tool (see “Running a SQL Script”).
To export an INI record to an SQL script, complete the following steps:
1. Display the record to export and then click . The Export Ini Lib dialog box appears.
2. Change the path and name of the script file as needed in the Export to field—or click Select a Filename and then select the path of the filename of the script file.
If you save to an existing SQL script file, the export function appends the selected records to the existing file.
If the file in the Export to field already exists, but you do not want to append statements to this file, click Delete. When you save, the export function creates a new file.
3. If needed, hold CTRL and then click additional records to copy to the script file.
If you have selected multiple records and want to create individual script files, select the Create Individual file Using Object ID check box. The automatically generated file name is a hyphenated combination of the INI record name and the object ID.
4. Click to generate the script file.
5. Click to view the script file.

The Initialization Library
Thin-Client Configuration Guide: Basics 42
Edit an Initialization Library Record Editing an existing Initialization Library record consists of four basic tasks:
Adding a property
Changing an existing property value
Reordering entries in a property list
Deleting entries in a property list.
In the following procedures, the word ‘property’ refers to any defining entry in the record, regardless of its hierarchic position in the section tree.
To add a property record, complete the following steps:
1. Display the record in which to add property and then click Edit.
2. In the tree pane, double-click the section in which to add the property—or right-click and then choose Expand Branch. The tree expands to show existing section properties. Any bracketed entry of the [InserPropertyName] form indicates that you can add a property or additional instances of a property at that position.
3. Click the desired insertion property. The corresponding default values or empty value fields appear in the right-hand pane. In cases where a property contains complicated data and substructures, the program prompts you for only a high-level name. (After you specify the name, default values and empty value fields for lower-level properties appear.) In other cases, you can define several values all at once.
4. Click the appropriate Add button.
Add buttons are context-sensitive. For example, the Add to Tab List button appears when you are adding tabs to a list—Dispatch, ListGroups, Process Planning Dispatch, Lists, List1, Tabs, etc.
To change a property value, complete the following steps:
1. Display the record in which to change a property value and then click Edit.
2. In the tree pane, double-click the section in which to change the property value. The tree expands to show existing section properties.
3. Click the property to change. The corresponding values and comments appear in the right-hand panes.
4. In the right-hand pane, change or enter new values as needed.
To reorder entries in a property list, complete the following steps:
1. Display the record to edit and then click Edit.
2. In the tree pane, navigate to and then select the property list to reorder.
3. Select the entry to reposition and then click Move Entry Up or Move Entry Down in the right-hand pane. The order of properties in the tree is reflected in the user interface. For example, the order of entries under the OtherCommands property calls out the order of items on the Other Commands menu.
To delete an entry in a property list, complete the following steps:

The Initialization Library
Thin-Client Configuration Guide: Basics 43
1. Display the record to edit and then click Edit.
2. In the tree pane, navigate to and then select the property list that contains the entry to delete.
3. Select the entry to delete and then click Delete This Entry in the right-hand pane.
Delete an Initialization Library Record The following procedure assumes that you have launched the Initialization Library tool and are connected to the desired database.
To delete an Initialization Library record, complete the following steps:
1. Display the record to delete and then click Delete.
2. Click OK to confirm the deletion.
Printing in Costpoint MES Printing from Costpoint MES—including screen print functions, tabular reports, chart and graph reports, and RAVE reports—uses standard Windows printers, as installed and available on the workstation where the Thin-Client is running. Costpoint MES supports printing labels on standard Windows raster printers—including bar codes. If the selected label printer has a direct raster print option with a standard Windows print driver, it can support printing labels using the Report Designer capabilities, including bar coded data.
Printing to special purpose printers which do not utilize standard Windows raster printer drivers can be accomplished in one of several ways, depending on the capabilities and requirements of the specific printers and the application. The Thin-Client can be configured to launch a printer driver or utility that accepts command-line parameters and passing data parameters on the command line as required by the specific printing application. It can also be configured to launch a connecting DLL that is programmed to interface to a DLL provided for a printer.
Print a Report of a Library Record The Structured Editor tab of the Initialization Library tool window contains a Print icon ( ) that allows you to print all or part of an Initialization Library record. You can use this feature to create a summary or detailed report of the record. You can send the report to a printer or to a file. Multiple print options allow you to print or suppress such things as comments, UDV thumbnails or images, core SQL Library entries, and stored procedures.

The Initialization Library
Thin-Client Configuration Guide: Basics 44
Initialization Library Print Options
Option Description
Print Current Selection Select this option to print the currently selected entry in the tree.
Print Entire Record Select this option to print the entire, currently displayed, Initialization Library record.
Do Not Print UDVs Select this option to disable printing UDVs in any form.
Print UDV Thumbnails Select this option to print a thumbnail image of any UDVs.
Print Small UDV Images Select this option to print a small image of any UDVs.
Print Large UDV Images Select this option to print a larger image of any UDVs.
Show Indented Spaces as Dots
Select this check box to display any intended spaces with a dot (for each space).
Include Comments Select this check box to include comments (any lines beginning with a semicolon). Comments are italicized.
Print Core SQL Lib Entries Select this check box to print any SQL statements of type CORE.
Expand SQL Lib Entries Select this check box to print the entire SQL statement.
Expand UDVs Select this check box to print the SQL sources and transactions

The Initialization Library
Thin-Client Configuration Guide: Basics 45
Option Description
associated with the UDV, as well as the input UDV.
Print SQL entries at the End Select this check box to print all SQL statements at the end of the library record.
Print UDV entries at the End Select this check box to print all UDV entries at the end of the library record.
List All Referenced SQL Ids Select this check box to list all referenced SQL IDs.
Print Stored Procedures Select this check box to print all stored procedures.
Write to text file Select this option to write the file to the path and file name in the
neighboring field. Click to display a dialog box that allows you to select a filename or location.
To print a report of an Initialization Library record, complete the following steps:
1. Display the record on which to create a report and then click . The Print Options dialog box appears.
2. Select the appropriate options.
To save the report as a file, click and then select a filename or location.
3. Click OK. The tool prints the report to the default printer or to the specified file.
Local Library Caching You can cache Initialization, UDV, and SQL Library records on the client to considerable speed up startup and runtime response, especially in WAN environments. Local caching of this type was originally limited to Initialization Library records, but now applies to UDV and SQL Libraries as well.
You can now use caching in a single home directory used for multiple database connections. This is because the file name now identifies the database instance, ensuring connection to the proper cache.
For UDVs only, the Thin-Client also automatically creates an in-memory cache that speeds performance by fetching UDVs from memory instead of the database. During testing, you may want to turn off this cache to immediately verify UDV changes. For more information, see “Disabling In-Memory UDV Caching.”
The Local Library Cache is enabled by two properties in the Local Ini file (not the Initialization Library record):
LocalConfigCacheEnabled — This property enables (True) or disables (False) caching for all libraries (Initialization, UDV, and SQL).
PathToLocalCfgCache — This property specifies the location of the cache.

The Initialization Library
Thin-Client Configuration Guide: Basics 46
Archive File Names On the local machine, the Local Library Cache consists of three archive files at the PathToLocalCfgCache location. The CacheAlias element of the file name identifies the database instance:
CostpointMESCache-<CacheAlias>.rs — This file archives compressed Initialization Library records.
CostpointMESUDVCache-<CacheAlias>.rs — This file archives compressed UDV Library records.
CostpointMESSQLCache-<CacheAlias>.rs — This file archives compressed SQL Library records.
The CacheAlias value is the first dot (.) element of the Oracle DB alias. If the DB alias is dvlp3200.Deltek.com, the cache names are as follows:
CostpointMESCache-dvlp3200.rs
CostpointMESSQLCache-dvlp3200.rs
CostpointMESUDVCache-dvlp3200.rs
How Local Library Caching Works Win/Web In general, for all library records, the action that populates the local cache with a given record is a failed search for that record. This causes the cache routine to fetch the record from the database, and then to compress a copy of the record in the appropriate archive file, where it is then available for a future call.
For the Initialization Library only, local caching is supported by two cache-associated columns in the SFCORE_INI_LIB table. Whenever an Initialization Library record is saved, a compressed copy of the record is stored in one column, and the corresponding MD5 digest is stored in the other. The storage format is saved in ZLib’s Deflate format. The prior BWT compression is still supported for backward compatibility. Comparison of the MD5 value of the cached record with that of the database record allows the Thin-Client to see if the database record has been updated.
For the Initialization Library, local caching works like this:
When local caching is enabled (LocalConfigCacheEnabled = True) on startup, the CostpointMESCache-<CacheAlias>.rs archive file in the local cache location is checked for the appropriate INI record.
If startup finds the record, it expands it, creates an MD5 digest, and compares it to the MD5 digest of the corresponding record in the database. If values match, startup launches the Thin-Client with the cached record. This is what happens when a cached record is the same version as the database version.
If startup finds the record, but local and database MD5 values do not match, it expands the corresponding database record, launches the Thin-Client with it, and sends an updated and compressed copy to the cache. This is what happens when a cached record is not the same version as the database version, because the database version has been updated.
If startup does not find the record at all, it expands the corresponding database record, launches the Thin-Client with it, and sends a compressed copy to the local cache. This is what happens the first time the LocalConfigCacheEnabled property appears in the Local Ini file—and the cache is empty—or when startup calls an uncached record.

The Initialization Library
Thin-Client Configuration Guide: Basics 47
For the UDV and SQL Libraries, local caching works like this:
When local caching is enabled (LocalConfigCacheEnabled = True) and the Thin-Client starts up, the cache routine immediately checks the dates of all cached UDV/SQL records against the Update timestamps of the corresponding records in the database. If any dates do not match, the Thin-Client purges the cached counterpart.
When the Thin-Client calls any UDV or SQL Library entry, it checks the appropriate archive file (CostpointMESUDVCache-<CacheAlias>.rs or CostpointMESSQLCache-<CacheAlias>.rs) in the local cache location for that record:
If the Thin-Client finds the record, it expands and loads it.
If the Thin-Client does not find the record, it loads the corresponding database record and sends a compressed copy to the local cache.
The following table lists startup and runtime actions for Initializaion, UDV, and SQL Library records based on the presence and value of the PathToLocalCfgCache property in the Local Ini file. All actions assume that LocalConfigCacheEnabled is True.
Startup Actions Based on the PathToLocalCfgCache Value
Value Startup Action
Property not present
or
[Blank]
This is the default value. The Thin-Client looks for the archive and compressed record in the Costpoint MES home directory.
@UserTemp The Thin-Client looks for the archive and compressed record in the logged-on user’s Temp directory which is defined as follows:
The path specified by the TMP environment variable.
The path specified by the TEMP environment variable, if TMP is not defined.
The current directory, if both TMP and TEMP are not defined. When serving the client from a common location, TMP or TEMP should be defined. Per email you forwarded to me 8/18/09
[Path] The Thin-Client looks for the archive and compressed record in the designated directory. Example: C:\Production\Shift3\.
Configuring the Local Library Cache You configure the Library cache by inserting the LocalConfigCacheEnabled property in the Local Ini file (or WebExpress.INI file). You do not need to add the PathToLocalCfgCache property if you want the Thin-Client to establish the cache in the Costpoint MES home directory.
To configure the Local Library Cache, complete the following steps:
1. Display the Local Ini Editor in the System Manager.
2. Click . The Open dialog box appears.
3. Navigate to the INI file and then click Open. The file appears in the Local Ini Editor window.

The Initialization Library
Thin-Client Configuration Guide: Basics 48
4. In the [Startup] section, insert the LocalConfigCacheEnabled property and set it to True. If you want to establish the cache in the Costpoint MES home directory, this completes the cache configuration.
5. To establish the cache in the user’s Temp directory, insert the PathToLocalCfgCache property and set it equal to @Temp.
Or, to locate the cache in a directory other than the Costpoint MES home directory or the user’s Temp directory, insert the PathToLocalCfgCache property and set it equal to the desired directory path. Example: C:\Production\Shift3\.
6. Save the file.
Disabling the Local Cache on the Command Line If you have a cache enabled through the Local Ini file, you can disable it through the /xl (XL) switch on the command line.
[Common] Properties The [Common] section of an Initialization Library record typically contains global properties that affect all areas or functions in Costpoint MES. These properties are listed here because some may not be explained in a specific context elsewhere in the manual. Any property that is explained elsewhere contains a cross reference in the right-hand column.
The following table lists all [Common] properties and the deployment type—Thin-Client (Win) or Web Express Client (Web)—that supports the property. Unsupported properties are simply ignored.
All property names are one word, without spaces even though some are written over two lines due to space considerations.
[Common] Properties in an Initialization Library Record
Property Win Web Data Type/Description
PathToStdMarkUp X X String. The path to the directory containing icons used in hypertext.
Default = @CommonDir\Ico
See “Markup Icons”
ScreenBottomMargin X Number. The space in pixels between the bottom of the Thin-Client window and the bottom of the screen. Allows room for launchers, etc.
Default = -1
Minimum = 0
Maximum = 100
-1 value sets the margin equal to the height of the Windows task bar. This value is applied only when the task bar is aligned horizontally.

The Initialization Library
Thin-Client Configuration Guide: Basics 49
Property Win Web Data Type/Description
ApplicationWidth X Number. The width component in pixels determining the resolution at which screen controls will display. Along with ApplicationHeight, causes screen controls to display at the specified resolution, regardless of the resolution at which they were created.
Default = 1024
A zero or blank value defaults to 1024.
You can override this value with the following Ini file override:
[IniLibOverrides]
ommon.ApplicationWidth=1024
ApplicationHeight X Number. The height component in pixels determining the resolution at which screen controls will display. Along with ApplicationHeight, causes screen controls to display at the specified resolution, regardless of the resolution at which they were created.
Default = 768
A zero or blank value defaults to 768.
You can override this value with the following Ini file override:
[IniLibOverrides]
ommon.ApplicationHeight=768
DualMonitor X Off/0, On/1. When enabled (On/1), extends the desktop across two monitors (dual monitors). The Thin-Client can span both monitors or display on the left monitor only or the right monitor only.
Default = 0ff/0
DispatchEnabled=True;
DualMonitor=Left
ApplicationWidth=1024
ApplicationHeight=768
NOTES:
Screen width and resolution settings must be the same for both monitors.
This property supports the use of only two monitors even if the video card can handle more.
This feature requires that the left monitor be the primary monitor in your Windows O/S configuration.
SmallScreenPercent X Number. The width in percent of a tool window in the Narrow mode. Used in conjunction with the Tool Window Size button in the shell.
Default = 25

The Initialization Library
Thin-Client Configuration Guide: Basics 50
Property Win Web Data Type/Description
Minimum = 10
Maximum = 90
See DefaultToolWindow- Width under “Configuring the Dispatch Window Interface.”
UserScreenWidth X Number. Typical user's screen width in pixels. Used to show rulers in the Multimedia Editor, etc.
Default = 1024
Minimum = 500
Maximum = 10000
UserScreenHeight X Number. Typical user's screen height in pixels. Used to show rulers in the Multimedia Editor, etc.
Default = 768
Minimum = 400
Maximum = 10000
HistoryMenuSize X Number. Number of entries kept in the tool history menu.
Default = 6
Minimum = 3
Maximum = 20
ColorTheme X Picklist. A unifying color scheme for the Costpoint MES application and System Manager.
Any secondary color, indicated after a dash, designates the contrasting color of a control in the middle area of the screen, for example a Dispatch list. The Pad color is the soft yellow tone of a legal pad.
Gray (default)
Silver
Turquoise
Turquoise-Pad
Turquoise-Silver
SeaGreen
SeaGreen - Silver
Blue
Blue - Silver
Blue - Pad
Slate

The Initialization Library
Thin-Client Configuration Guide: Basics 51
Property Win Web Data Type/Description
Slate - Silver
Slate - Pad
Violet
Violet - Slate
Violet - Thistle
Violet- Silver
Violet - Pad
Thistle
Thistle - Pad
Thistle- Silver
Thistle - Slate
UdvControlCacheEnabled
X Boolean. Disables cache UDV controls in memory. Default is true.
UdvControlCacheMaxCount
X Numeric. Cache size for each UDV ID. No default value.
GlobalTextAttributes X For any single attribute, when enabled (On/1), causes user-interface text to display the enabled attribute. At this time, there is a single attribute: Bold.
ThumbnailSize X Picklist. The size of a thumbnail in square pixels.
Small = 64 (Default)
Medium = 128
Large = 192
FitHotLinkImage X Off/0, On/1. When enabled (On/1), scales images to the largest proportional width and height when a link is clicked.
Default = 0ff/0
OptimizedHypertextScrolling
X Off/0, On/1. When enabled (On/1), scrolls hypertext without updating/ displaying any embedded UDVs or graphics (as of release 7100) until they are scrolled into view.
Default = On/1
See “Optimizing Scrolling”
HypertextRtfBevel X Off/0, On/1. When enabled (On/1), enables the 3D appearance of an RTF control by beveling the control border.
Default = 0ff/0
GetParamSourceValue X Boolean. Restores behavior for unquoted values used in

The Initialization Library
Thin-Client Configuration Guide: Basics 52
Property Win Web Data Type/Description
HandleQuotes expression function @GetParamSourceValue(). This setting is used when the param name argument does not distinguish between param name reference and the literal value.
Default = False
HypertextUdvControlsFlat
X Off/0, On/1. When enabled (On/1), displays the controls in any embedded UDV without borders, giving the UDV a flat, 2D appearance.
Additionally, it is also possible to achieve the 2D appearance for UDVs which are not embedded in hypertext using the Flat attribute in the UDV Editor.
HypertextUdvNavigatorsVisible
Yes/No. Default behavior for the availability of hypertext UDV navigator controls. This setting can be overridden in the User Preference dialog via the Show Hypertext Udv Navigators check box.
Default = No
HypertextPasteRefTextEnabled
Enables an option in the hypertext Insert Text local menu to paste standard text as a copy rather than by reference.
HypertextBubbleTextMaxWidth
A global setting for the maximum width of hyperlink bubble text.
Default = 600.
IMForceTransExpression
X Any standard Costpoint MES expression. All UDV context and row transaction parameters are provided for expression evaluation.
Provides a way to force an update on a particular record in an input matrix.
Only applied when the expression returns true. If IMForceTransExpression is not defined, IMForceTransaction is applied for all rows. Use of IMForceTransExpression may impact performance in proportion to the number of rows.
Example = IMForceTransExpression: COMP_REF_DES='R1'
Default = False
ExecOnLoadOrMoveAsSideNote
X Determines whether the ExecOnLoad or ExecOnMove flag invokes to a side note instead of invoking the Slide tool window.
SlideInvokeInScope X Off/0, On/1.
Sets global default behavior which determines whether slides are displayed in a side panel or in the standalone Slide tool window. Actual behavior is affected by the
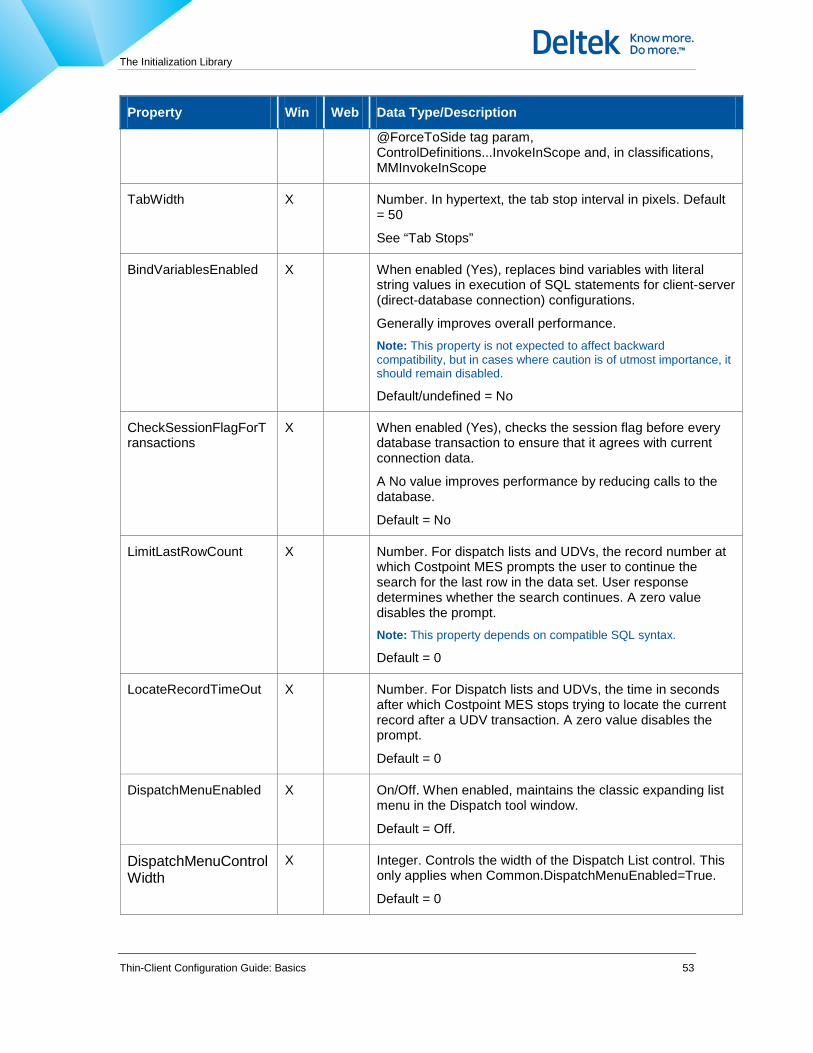
The Initialization Library
Thin-Client Configuration Guide: Basics 53
Property Win Web Data Type/Description
@ForceToSide tag param, ControlDefinitions...InvokeInScope and, in classifications, MMInvokeInScope
TabWidth X Number. In hypertext, the tab stop interval in pixels. Default = 50
See “Tab Stops”
BindVariablesEnabled X When enabled (Yes), replaces bind variables with literal string values in execution of SQL statements for client-server (direct-database connection) configurations.
Generally improves overall performance. Note: This property is not expected to affect backward compatibility, but in cases where caution is of utmost importance, it should remain disabled.
Default/undefined = No
CheckSessionFlagForTransactions
X When enabled (Yes), checks the session flag before every database transaction to ensure that it agrees with current connection data.
A No value improves performance by reducing calls to the database.
Default = No
LimitLastRowCount X Number. For dispatch lists and UDVs, the record number at which Costpoint MES prompts the user to continue the search for the last row in the data set. User response determines whether the search continues. A zero value disables the prompt. Note: This property depends on compatible SQL syntax.
Default = 0
LocateRecordTimeOut X Number. For Dispatch lists and UDVs, the time in seconds after which Costpoint MES stops trying to locate the current record after a UDV transaction. A zero value disables the prompt.
Default = 0
DispatchMenuEnabled X On/Off. When enabled, maintains the classic expanding list menu in the Dispatch tool window.
Default = Off.
DispatchMenuControlWidth
X Integer. Controls the width of the Dispatch List control. This only applies when Common.DispatchMenuEnabled=True.
Default = 0
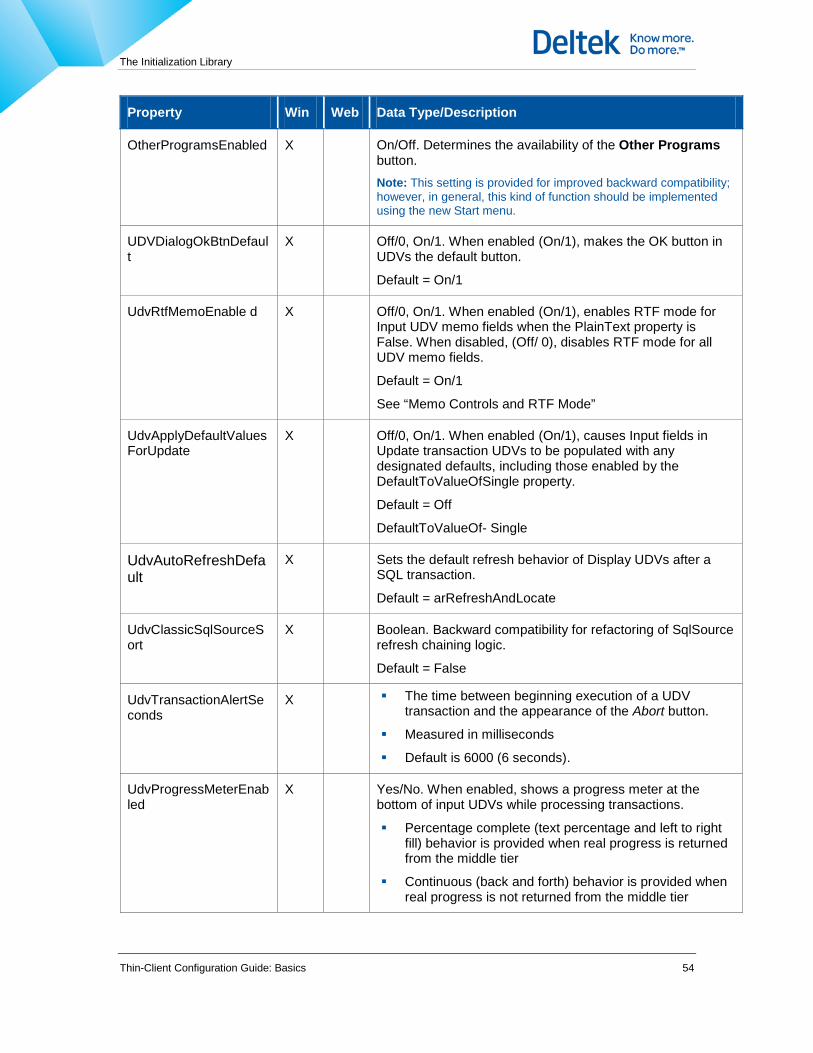
The Initialization Library
Thin-Client Configuration Guide: Basics 54
Property Win Web Data Type/Description
OtherProgramsEnabled X On/Off. Determines the availability of the Other Programs button. Note: This setting is provided for improved backward compatibility; however, in general, this kind of function should be implemented using the new Start menu.
UDVDialogOkBtnDefault
X Off/0, On/1. When enabled (On/1), makes the OK button in UDVs the default button.
Default = On/1
UdvRtfMemoEnable d X Off/0, On/1. When enabled (On/1), enables RTF mode for Input UDV memo fields when the PlainText property is False. When disabled, (Off/ 0), disables RTF mode for all UDV memo fields.
Default = On/1
See “Memo Controls and RTF Mode”
UdvApplyDefaultValuesForUpdate
X Off/0, On/1. When enabled (On/1), causes Input fields in Update transaction UDVs to be populated with any designated defaults, including those enabled by the DefaultToValueOfSingle property.
Default = Off
DefaultToValueOf- Single
UdvAutoRefreshDefault
X Sets the default refresh behavior of Display UDVs after a SQL transaction.
Default = arRefreshAndLocate
UdvClassicSqlSourceSort
X Boolean. Backward compatibility for refactoring of SqlSource refresh chaining logic.
Default = False
UdvTransactionAlertSeconds
X The time between beginning execution of a UDV transaction and the appearance of the Abort button.
Measured in milliseconds
Default is 6000 (6 seconds).
UdvProgressMeterEnabled
X Yes/No. When enabled, shows a progress meter at the bottom of input UDVs while processing transactions.
Percentage complete (text percentage and left to right fill) behavior is provided when real progress is returned from the middle tier
Continuous (back and forth) behavior is provided when real progress is not returned from the middle tier

The Initialization Library
Thin-Client Configuration Guide: Basics 55
Property Win Web Data Type/Description
UdvShortListLimit X For Input Fields configured as short lookup lists, the maximum number of entries in the dropdown list. If actual entries exceed this number, the list is truncated at the maximum value.
Default = 1000
See “Lookup Lists” and “Short Lookup Lists”
UdvEmptyGridDisplay X Determines the alternate appearance of grids which contain no records.
Common.UdvEmptyGridDisplay possible values:
egdShow - Show the empty grid
egdMessage - Display the message "> No data"
If not defined in the Ini Lib record, the behavior defaults to egdMessage. This setting only affects embedded grids.
UdvFitLastGridColEnabled
X Boolean. Prevents the last column of an input matrix from being cropped.
Default = False
Note that when any column is too narrow to fully display the contained data, a popup menu is displayed with following commands:
Extend Column
Copy to Clipboard
Open in dialog
RequiredLogonLocalReAuthentication
X When enabled (0n), for UDVs that have the RequireLogon property enabled, reauthenticates the logged-on user with the originally entered password—when the UserID matches that of the current user—without checking the database.
In cases where this property is not enabled (Off), or where it is enabled, but the UserID does not match that of the logged-on user, . authentication is performed by calling the standard middle tier or database authentication logic.
Default = Off
See “Single-Transaction Logon”
DisplayGridRowHeight X Sets the row height in pixels for display grids. Default=-1.
Supercedes behavior resulting from the use of Ini Lib setting AdjustmentFactor.
InputMatrixRowHeight X Sets the row height in pixels for input matrix.
Default = -1
Supercedes behavior resulting from the use of Ini Lib setting

The Initialization Library
Thin-Client Configuration Guide: Basics 56
Property Win Web Data Type/Description
AdjustmentFactor.
OptionalCommandParams
X Off/0, On/1. When enabled (On/1), provides backward compatibility in command-enabling logic by allowing optional command parameters. In 6.0/ 7.0 and later releases, optional parameters are specifically called out with the nullok attribute as follows: Params:
ORDER_ID = :ORDER_ID,
OPER_KEY = :OPER_KEY,
STEP_KEY = :STEP_KEY,
ITEM_ID = :PLND_ITEM_ID,nullok
REF_DES = :REF_DES,nullok
Note: Enabling this property can cause command-enabling logic to improperly enable a command when multiple sources provide a partial parameter set. This can also happen in cases where parameters are progressively selected, as in Scripted UDVs.
See “How Other Commands Work” and “Check Explicit Command Parameters”
NonStdGridShiftClick X Off/0, On/1. When enabled (On/1), in a Display UDV, causes a Shift-click on any row to toggle the Selected attribute (selects an unselected row and deselects a selected row). When disabled (Off/0), causes selection of a range of rows between a selected row and the Shift-clicked row.
Default = Off
NavigatorMoveButtonsVisible
X Off/0, On/1. When enabled (On/1)— and when First, Last, Previous, and Next buttons have been configured as VisibleButtons in a Display UDV— causes First, Last, Previous, and Next buttons to be visible. When disabled (Off/0), overrides the VisibleButtons settings for movement buttons, causing First, Last, Previous, and Next buttons to be hidden.
Default = On
MainNavigatorMoveButtonsVisible
Yes/No. Provides a way to optionally hide main tool window record navigation buttons.
Default = No
RaisedEmbeddedGridHeaders
Yes/No. Provides configuration and user preference support for gradient appearance of embedded grid headers.
Default = No
UdvNavigatorScaleToHeight
X Off/0, On/1. When enabled (On/1), causes Navigator controls to grow vertically with the UDV height.
Default = On

The Initialization Library
Thin-Client Configuration Guide: Basics 57
Property Win Web Data Type/Description
ExportVisibleFieldsOnly Yes/No. Determines the default behavior of exported fields via the Print (CSV or Native) command. Yes means only visible fields are exported. No means all fields are exported.
Include In Export controls behavior on a field-by-field basis for UDV and Dispatch list SelectedFields configuration. Possible values are Default, True and False.
A value of Default (or when not previously set) causes behavior to follow the value of Common.ExportVisibleFieldsOnly which itself defaults to Yes.
LeftAlignToolbars When set to Yes, the Thin Client toolbars are automatically aligned to the left edge of the host window.
When set to No, toolbars can be located anywhere along the horizontal axis of the host.
Default = Yes
DisplayInputMatrixYNasCheckbox
X Off/0, On/1. When enabled (On/1), causes an Input Matrix field configured as a list with two possible values to display as a check box.
Default = On
See “Input Matrix UDVs.”
GridCheckboxSelectEnabled
X Off/0, On/1. When enabled, causes the first column of all grids to display a check box as a means to indicate whether or not the record is selected. This allows automatic selection of multiple records without having to Shift-click.
Clicking a cleared check box selects the corresponding record; clicking a selected check box deselects a record. Other columns continue to exhibit the default behavior where clicking selects a single record at a time.
Default = Off
InputMatrixPopupMaxColWidth
X Sets the threshold of cell contents width above which the popup editor button will appear.
Common.InputMatrixPopupMaxCol Width=-1/0/n
n = -1 means ignore.
n = 0 means any cell that doesn't display the entire cell contents.
n > 0 means any cell wherein length of string contents > n, or the UDV defined column width is greater than n.
Default is 30.
Does not appear in the case wherein any other cell button is explicitly configured, such as a lookup, dropdown or popup.

The Initialization Library
Thin-Client Configuration Guide: Basics 58
Property Win Web Data Type/Description
The popup dialog editor removes trailing control characters, such as CRLF, when closed.
If a cell button is present, and cell content is changed such that the size of content then fits, the cell button will still remain until the data is reloaded.
InputMatrixErrorMaxColWidth
X Sets the initial width of the error column width.
Common.InputMatrixErrorMaxColWi dth=<n pixels>
The default value is -1. A value of -1 indicates default behavior which is 100 pixels up to text width, not to exceed half of dialog width.
Use 0 to prevent display of the error column, noting that error text is always available in the flyover hint of the status column.
IniFileDigest X Prevents the use of alternate or unofficial INI files and settings. At runtime the client generates a digest of the current INI file and verifies that the runtime calculated digest matches the digest which is stored in the Ini Lib property value for IniFileDigest. More than one digest can be identified in the same IniFileDigest setting, using comma as a separator. This allows for support of transition to a new INI file via the Auto-Updater.
Reference value for IniFileDigest can be generated in the System Manager using the Local Ini Editor. Open the target INI file and then click on the Security tab to display a digest for the selected file.
To prevent the use of a previous Ini Lib - Ini File combination, insure that there is only one Ini Lib record in the database.
Value = <IniFileDigest Name>
Default = Blank
ExplicitDeleteConfirmationEnabled
X Off/0, On/1. When enabled, causes Costpoint MES to display a Confirm Delete dialog box in which the user must select either a confirmation or cancel before proceeding. Used to prevent users from deleting records when they mistakenly click the Delete tool bar button.
Default = On
PromptForPasteSpecialChars
Controls whether the user is given the choice to remove the special characters from pasted content.
Default=Yes
PathToSpellingDictionary
X String. The path to the directory containing dictionary files.
Default = @CommonDir
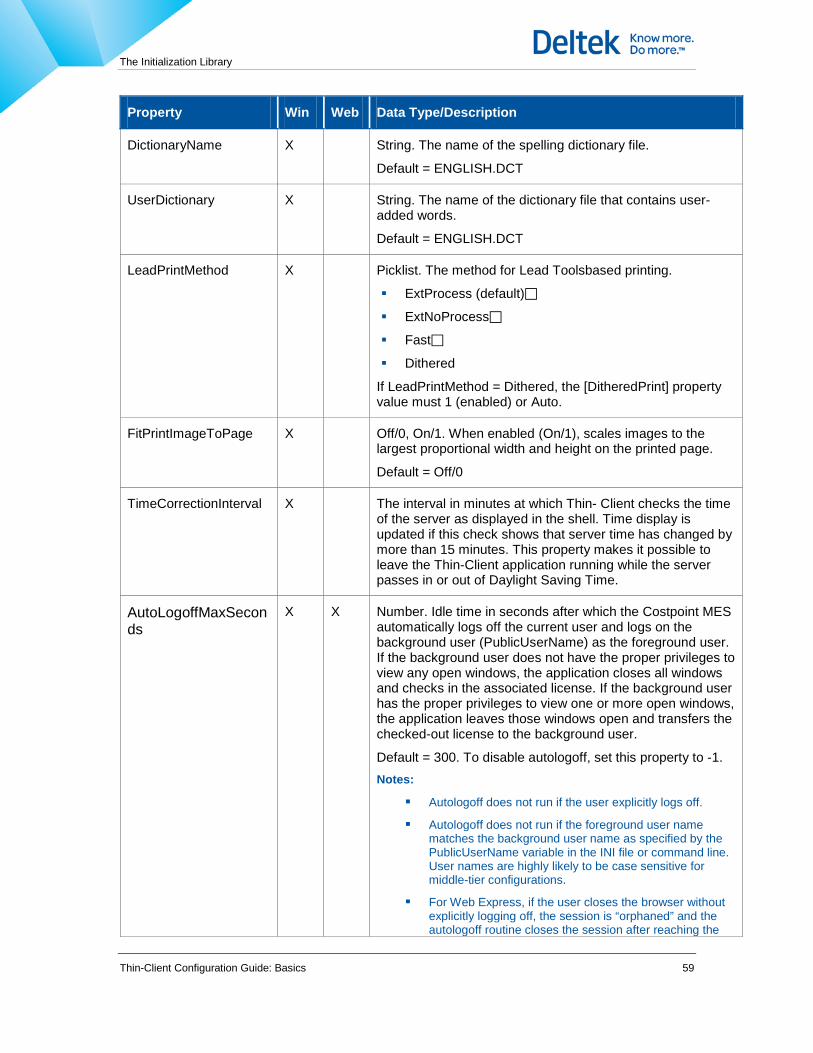
The Initialization Library
Thin-Client Configuration Guide: Basics 59
Property Win Web Data Type/Description
DictionaryName X String. The name of the spelling dictionary file.
Default = ENGLISH.DCT
UserDictionary X String. The name of the dictionary file that contains user-added words.
Default = ENGLISH.DCT
LeadPrintMethod X Picklist. The method for Lead Toolsbased printing.
ExtProcess (default)
ExtNoProcess
Fast
Dithered
If LeadPrintMethod = Dithered, the [DitheredPrint] property value must 1 (enabled) or Auto.
FitPrintImageToPage X Off/0, On/1. When enabled (On/1), scales images to the largest proportional width and height on the printed page.
Default = Off/0
TimeCorrectionInterval X The interval in minutes at which Thin- Client checks the time of the server as displayed in the shell. Time display is updated if this check shows that server time has changed by more than 15 minutes. This property makes it possible to leave the Thin-Client application running while the server passes in or out of Daylight Saving Time.
AutoLogoffMaxSeconds
X X Number. Idle time in seconds after which the Costpoint MES automatically logs off the current user and logs on the background user (PublicUserName) as the foreground user. If the background user does not have the proper privileges to view any open windows, the application closes all windows and checks in the associated license. If the background user has the proper privileges to view one or more open windows, the application leaves those windows open and transfers the checked-out license to the background user.
Default = 300. To disable autologoff, set this property to -1. Notes:
Autologoff does not run if the user explicitly logs off.
Autologoff does not run if the foreground user name matches the background user name as specified by the PublicUserName variable in the INI file or command line. User names are highly likely to be case sensitive for middle-tier configurations.
For Web Express, if the user closes the browser without explicitly logging off, the session is “orphaned” and the autologoff routine closes the session after reaching the
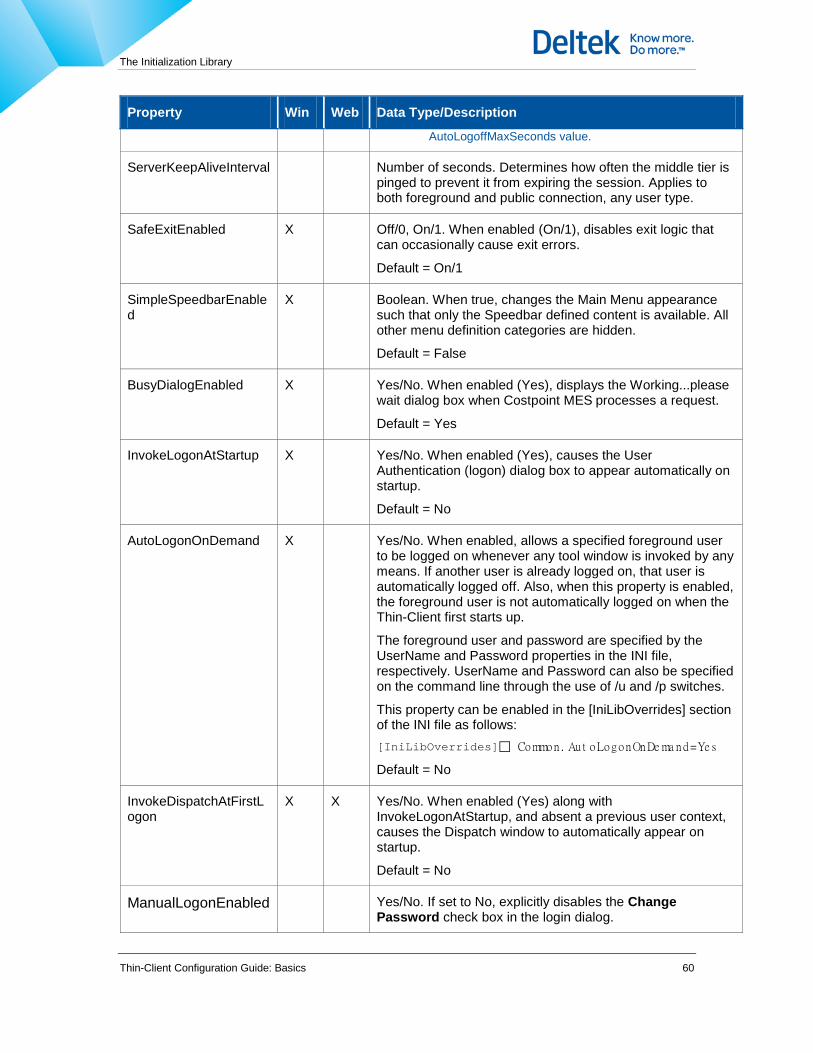
The Initialization Library
Thin-Client Configuration Guide: Basics 60
Property Win Web Data Type/Description
AutoLogoffMaxSeconds value.
ServerKeepAliveInterval Number of seconds. Determines how often the middle tier is pinged to prevent it from expiring the session. Applies to both foreground and public connection, any user type.
SafeExitEnabled X Off/0, On/1. When enabled (On/1), disables exit logic that can occasionally cause exit errors.
Default = On/1
SimpleSpeedbarEnabled
X Boolean. When true, changes the Main Menu appearance such that only the Speedbar defined content is available. All other menu definition categories are hidden.
Default = False
BusyDialogEnabled X Yes/No. When enabled (Yes), displays the Working...please wait dialog box when Costpoint MES processes a request.
Default = Yes
InvokeLogonAtStartup X Yes/No. When enabled (Yes), causes the User Authentication (logon) dialog box to appear automatically on startup.
Default = No
AutoLogonOnDemand X Yes/No. When enabled, allows a specified foreground user to be logged on whenever any tool window is invoked by any means. If another user is already logged on, that user is automatically logged off. Also, when this property is enabled, the foreground user is not automatically logged on when the Thin-Client first starts up.
The foreground user and password are specified by the UserName and Password properties in the INI file, respectively. UserName and Password can also be specified on the command line through the use of /u and /p switches.
This property can be enabled in the [IniLibOverrides] section of the INI file as follows: [IniLibOverrides] Common . Au t oLogonOnDe ma nd =Ye s
Default = No
InvokeDispatchAtFirstLogon
X X Yes/No. When enabled (Yes) along with InvokeLogonAtStartup, and absent a previous user context, causes the Dispatch window to automatically appear on startup.
Default = No
ManualLogonEnabled Yes/No. If set to No, explicitly disables the Change Password check box in the login dialog.
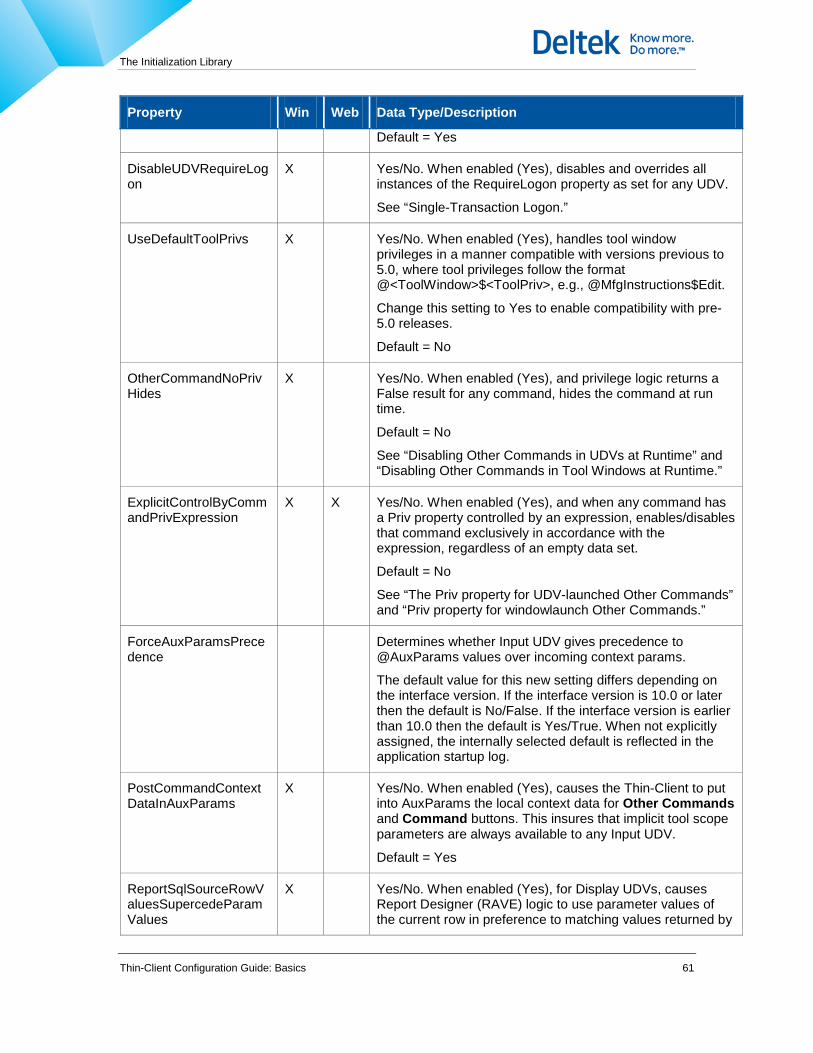
The Initialization Library
Thin-Client Configuration Guide: Basics 61
Property Win Web Data Type/Description
Default = Yes
DisableUDVRequireLogon
X Yes/No. When enabled (Yes), disables and overrides all instances of the RequireLogon property as set for any UDV.
See “Single-Transaction Logon.”
UseDefaultToolPrivs X Yes/No. When enabled (Yes), handles tool window privileges in a manner compatible with versions previous to 5.0, where tool privileges follow the format @<ToolWindow>$<ToolPriv>, e.g., @MfgInstructions$Edit.
Change this setting to Yes to enable compatibility with pre-5.0 releases.
Default = No
OtherCommandNoPrivHides
X Yes/No. When enabled (Yes), and privilege logic returns a False result for any command, hides the command at run time.
Default = No
See “Disabling Other Commands in UDVs at Runtime” and “Disabling Other Commands in Tool Windows at Runtime.”
ExplicitControlByCommandPrivExpression
X X Yes/No. When enabled (Yes), and when any command has a Priv property controlled by an expression, enables/disables that command exclusively in accordance with the expression, regardless of an empty data set.
Default = No
See “The Priv property for UDV-launched Other Commands” and “Priv property for windowlaunch Other Commands.”
ForceAuxParamsPrecedence
Determines whether Input UDV gives precedence to @AuxParams values over incoming context params.
The default value for this new setting differs depending on the interface version. If the interface version is 10.0 or later then the default is No/False. If the interface version is earlier than 10.0 then the default is Yes/True. When not explicitly assigned, the internally selected default is reflected in the application startup log.
PostCommandContextDataInAuxParams
X Yes/No. When enabled (Yes), causes the Thin-Client to put into AuxParams the local context data for Other Commands and Command buttons. This insures that implicit tool scope parameters are always available to any Input UDV.
Default = Yes
ReportSqlSourceRowValuesSupercedeParamValues
X Yes/No. When enabled (Yes), for Display UDVs, causes Report Designer (RAVE) logic to use parameter values of the current row in preference to matching values returned by
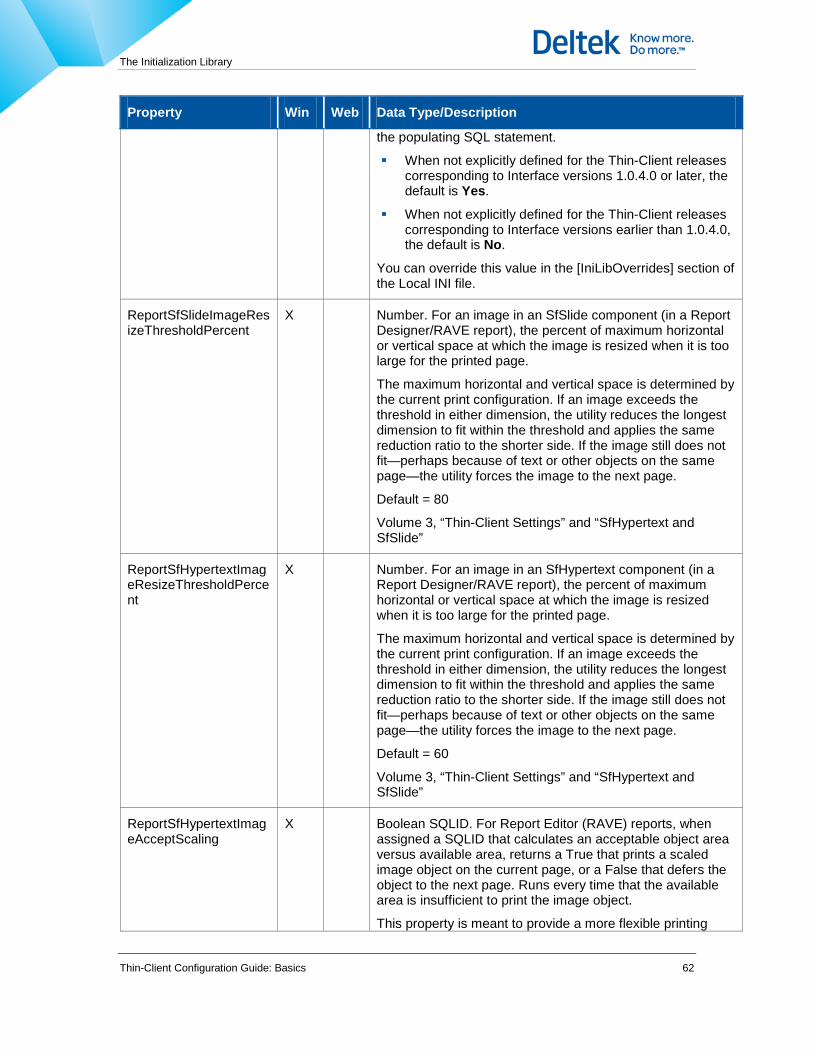
The Initialization Library
Thin-Client Configuration Guide: Basics 62
Property Win Web Data Type/Description
the populating SQL statement.
When not explicitly defined for the Thin-Client releases corresponding to Interface versions 1.0.4.0 or later, the default is Yes.
When not explicitly defined for the Thin-Client releases corresponding to Interface versions earlier than 1.0.4.0, the default is No.
You can override this value in the [IniLibOverrides] section of the Local INI file.
ReportSfSlideImageResizeThresholdPercent
X Number. For an image in an SfSlide component (in a Report Designer/RAVE report), the percent of maximum horizontal or vertical space at which the image is resized when it is too large for the printed page.
The maximum horizontal and vertical space is determined by the current print configuration. If an image exceeds the threshold in either dimension, the utility reduces the longest dimension to fit within the threshold and applies the same reduction ratio to the shorter side. If the image still does not fit—perhaps because of text or other objects on the same page—the utility forces the image to the next page.
Default = 80
Volume 3, “Thin-Client Settings” and “SfHypertext and SfSlide”
ReportSfHypertextImageResizeThresholdPercent
X Number. For an image in an SfHypertext component (in a Report Designer/RAVE report), the percent of maximum horizontal or vertical space at which the image is resized when it is too large for the printed page.
The maximum horizontal and vertical space is determined by the current print configuration. If an image exceeds the threshold in either dimension, the utility reduces the longest dimension to fit within the threshold and applies the same reduction ratio to the shorter side. If the image still does not fit—perhaps because of text or other objects on the same page—the utility forces the image to the next page.
Default = 60
Volume 3, “Thin-Client Settings” and “SfHypertext and SfSlide”
ReportSfHypertextImageAcceptScaling
X Boolean SQLID. For Report Editor (RAVE) reports, when assigned a SQLID that calculates an acceptable object area versus available area, returns a True that prints a scaled image object on the current page, or a False that defers the object to the next page. Runs every time that the available area is insufficient to print the image object.
This property is meant to provide a more flexible printing

The Initialization Library
Thin-Client Configuration Guide: Basics 63
Property Win Web Data Type/Description
option when default behavior does not provide the required result. (Default behavior prints the image on the current page if it is the first hypertext object for a record, e.g., text block, and defers it to the next page if it’s not.)
@ReportID – String. The ID of the report being printed.
@ImageID – String. The ID of the image object to be printed.
@Image – Height. Float. The height in inches of the image object.
@ImageWidth – Float. The width in inches of the image object.
@AvailHeight – Float. The height in inches of the available area on the current page.
@AvailWidth – Float. The width in inches of the available area on the current page.
@DeferCount – Integer. The number of times that printing of the image has been deferred. Allows printing attempts to stop at a specific count.
Volume 3, “Thin-Client Settings” and “SfHypertext and SfSlide”
ReportSfHypertextZebraBandingColor
X In work plan/order printouts, displays alternate row shading for data collections and buyoffs.
White effectively turns this feature off, since all rows will appear as the same color and therefore there is no shading. Selecting any other color causes shading to appear.
ReportSfHypertextShowGridLines
X In work plan/order printouts, displays data collections and buyoffs in a table with grid lines and headings.
This is a Y/N property; the default is N.
ReportSfHypertextDoGridWordwrap
X Yes/No. When enabled (Yes), any column in a printed data grid that has more data than can fit on one line of a cell will be word wrapped.
ReportExportOpenFile X Yes/No (default=No). Relates to the Export Report button in the report preview window. When set to Yes, an exported report will be opened by its associated application (i.e. a PDF export will typically open Acrobat Reader).
ConvertReportImageToJpeg
X Yes/No. When enabled (Yes), converts images to JPEG when processing Report Designer (RAVE) reports. Conversion saves memory, but may degrade images slightly and also increase processing time.
Default = No

The Initialization Library
Thin-Client Configuration Guide: Basics 64
Property Win Web Data Type/Description
UserContextEnabled X Yes/No. When enabled (Yes), stores user context data on logoff and on the next logon, asks the user if they want to retrieve that context data in order to restore the previous session as fully as possible.
Default = Yes Note: In pre-7010 releases, this property was called ReturnToContext. ReturnToContext still exists (see below), but it now sets the default behavior of the Return to Context function.
ReturnToContextEnabled
X Yes/No. When enabled (Yes), causes the Return to Context prompt to appear in the absence of a userselected preference.
Default = Yes
HintHidePause X Number. The time in milliseconds after which a hint disappears if the mouse has not moved.
Default = 10000
SerialPortConfiguration X Contains subproperties used to configure a dedicated COM port for serial port scanning.
SpecialVideoModes X Contains subproperties used to configure Touchscreen mode and to enlarge screen objects. See “Touchscreen Mode”
EditMasks X Contains subproperties used to configure edit masks for UDV input fields. See “Edit Masks and Picture Masks”
BarCodeHandling X Contains subproperties used to configure a keyboard wedge device and to configure scanning through both keyboard wedges and serial ports.
BarCodeScanMasks X Contains subproperties used to configure application-level scan masks.
ScanPriority X Yes/No. When enabled (Yes), compares scan input against an application-level mask first.
Default = Yes Note: At the tool level this property enables/disables application-level scanning when the tool window is active.
KeyFields X List. For Dispatch lists and UDVs, a master list of fields through which Costpoint MES can relocate the current record.
See “Relocation of the Current Record after Refresh.”
GlobalDataInfo X X List. For certain references to a specific column, substitutes a column name with a more user-recognizable string.
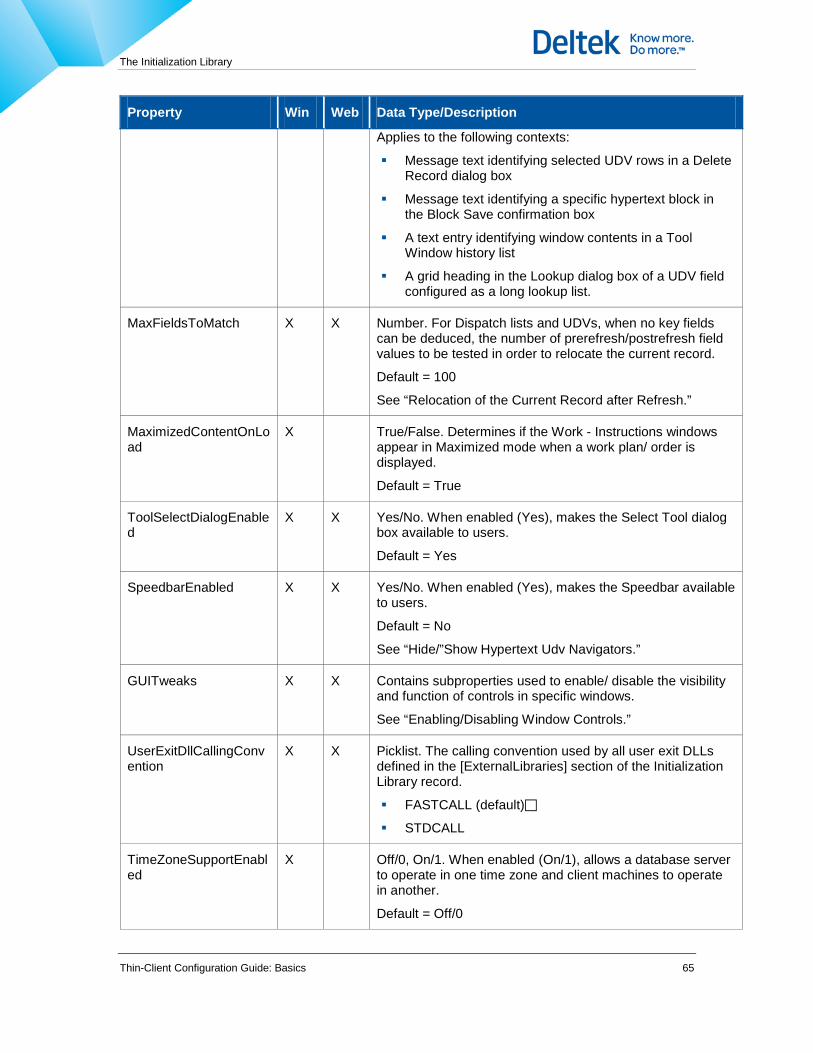
The Initialization Library
Thin-Client Configuration Guide: Basics 65
Property Win Web Data Type/Description
Applies to the following contexts:
Message text identifying selected UDV rows in a Delete Record dialog box
Message text identifying a specific hypertext block in the Block Save confirmation box
A text entry identifying window contents in a Tool Window history list
A grid heading in the Lookup dialog box of a UDV field configured as a long lookup list.
MaxFieldsToMatch X X Number. For Dispatch lists and UDVs, when no key fields can be deduced, the number of prerefresh/postrefresh field values to be tested in order to relocate the current record.
Default = 100
See “Relocation of the Current Record after Refresh.”
MaximizedContentOnLoad
X True/False. Determines if the Work - Instructions windows appear in Maximized mode when a work plan/ order is displayed.
Default = True
ToolSelectDialogEnabled
X X Yes/No. When enabled (Yes), makes the Select Tool dialog box available to users.
Default = Yes
SpeedbarEnabled X X Yes/No. When enabled (Yes), makes the Speedbar available to users.
Default = No
See “Hide/”Show Hypertext Udv Navigators.”
GUITweaks X X Contains subproperties used to enable/ disable the visibility and function of controls in specific windows.
See “Enabling/Disabling Window Controls.”
UserExitDllCallingConvention
X X Picklist. The calling convention used by all user exit DLLs defined in the [ExternalLibraries] section of the Initialization Library record.
FASTCALL (default)
STDCALL
TimeZoneSupportEnabled
X Off/0, On/1. When enabled (On/1), allows a database server to operate in one time zone and client machines to operate in another.
Default = Off/0

The Initialization Library
Thin-Client Configuration Guide: Basics 66
Property Win Web Data Type/Description
ChangeDisplayTimeZoneEnabled
X Off/0, On/1. When enabled (On/1), enables display of the Change Display Time Zone button, which displays the Change Time Zone for Display dialog box.
TimeZoneChangePriv X String. The privilege needed to change the Display time zone in the Change Time Zone for Display dialog box. Can be an expression/NOT expression derived by the following means:
Direct input of the desired value.
Use of a function whose returned value is compared to a True/False standard.
Direct return of a calculated value.
ServerTimeZone X Picklist. The time zone in which the server resides.
(GMT) Casablanca, Monrovia
(GMT) Greenwich Mean Time: Dublin, Edinburgh, Lisbon, London
(GMT+01:00) Amsterdam, Berlin, Bern, Rome, Stockholm, Vienna
(GMT+01:00) Belgrade, Bratislava, Budapest, Ljubljana, Prague
(GMT+01:00) Brussels, Copenhagen, Madrid, Paris
(GMT+01:00) Sarajevo, Skopje, Sofija, Vilnius, Warsaw, Zagreb
(GMT+01:00) West Central Africa
(GMT+02:00) Athens, Istanbul, Minsk
(GMT+02:00) Bucharest
(GMT+02:00) Cairo
(GMT+02:00) Harare, Pretoria
(GMT+02:00) Helsinki, Riga, Tallinn
(GMT+02:00) Jerusalem
(GMT+03:00) Baghdad
(GMT+03:00) Kuwait, Riyadh
(GMT+03:00) Moscow, St. Petersburg, Volgograd
(GMT+03:00) Nairobi
(GMT+03:30) Tehran
(GMT+04:00) Abu Dhabi, Muscat
(GMT+04:00) Baku, Tblisi, Yerevan
(GMT+04:30) Kabul

The Initialization Library
Thin-Client Configuration Guide: Basics 67
Property Win Web Data Type/Description
(GMT+05:00) Ekaterinburg
(GMT+05:00) Islamabad, Karachi, Tashkent
(GMT+05:30) Calcutta, Chennai, Mumbai, New Delhi
(GMT+05:45) Kathmandu
(GMT+06:00) Almaty, Novosibirsk
(GMT+06:00) Astana, Dhaka
(GMT+06:00) Sri Jayawardenepura
(GMT+06:30) Rangoon
(GMT+07:00) Bangkok, Hanoi, Jakarta
(GMT+07:00) Krasnoyarsk
(GMT+08:00) Beijing, Chongging, Hong Kong, Urumqi
(GMT+08:00) Irkutsk, Ulaan Bataar
(GMT+08:00) Kuala, Lumpur, Singapore
(GMT+08:00) Perth
(GMT+08:00) Taipei
(GMT+09:00) Osaka, Sapporo, Tokyo
(GMT+09:00) Seoul
(GMT+09:00) Yakutsk
(GMT+09:30) Adelaide
(GMT+09:30) Darwin
(GMT+10:00) Brisbane
(GMT+10:00) Canberra, Melbourne, Sydney
(GMT+10:00) Guam, Port Moresby
(GMT+10:00) Hobart
(GMT+10:00) Vladivostok
(GMT+11:00) Magadan, Solomon Is., New Caledonia
(GMT+12:00) Auckland, Wellington
(GMT+12:00) Fiji, Kamchatka, Marshall Is.
(GMT+13:00) Nuku’alofa
(GMT-01:00) Azores
(GMT-01:00) Cape Verde Is.
(GMT-02:00) Mid-Atlantic
(GMT-03:00) Brasilia
(GMT-03:00) Buenos Aires, Georgetown

The Initialization Library
Thin-Client Configuration Guide: Basics 68
Property Win Web Data Type/Description
GMT-03:00) Greenland
(GMT-03:30) Newfoundland
(GMT-04:00) Atlantic Time (Canada)
(GMT-04:00) Caracas, La Paz
(GMT-04:00) Santiago
(GMT-05:00) Bogota, Lima, Quito
(GMT-05:00) Eastern Time (US & Canada)
(GMT-05:00) Indiana (East)
(GMT-06:00) Central America
(GMT-06:00) Central Time (US & Canada)
(GMT-06:00) Mexico City
(GMT-06:00) Saskatchewan
(GMT-07:00) Arizona
(GMT-07:00) Mountain Time (US & Canada)
(GMT-08:00) Pacific Time (US & Canada); Tijuana
(GMT-09:00) Alaska
(GMT-10:00) Hawaii
(GMT-11:00) Midway Island, Samoa
(GMT-12:00) Eniwetok, Kwajalein
ServerApplyDaylight X Off/0, On/1. When enabled (On/1), indicates that the server observes Daylight Saving Time. The server enters DST according to the Windows Locale setting of the server machine. Note: In releases prior to 7.0.5.0, the server entered DST according to the Windows Locale setting of the client machine. To revert to synchronizing the client and server DST start dates, use the following Ini override (no spaces):
[IniLibOverrides] Common.S yncClie ntAnd ServerDaylightSavingsStart= Yes
Default = Off/0
EnforceCostpointMESDateFormat
X Off/0, On/1. When enabled (On/1), forces date and time entry to the following format: MM/DD/YYYY HH:MM:SS.
When EnforceSoluminaDateFormat is enabled, the pivot year for two digit dates is controlled by the new Ini Lib common.TwoDigitYearCenturyWindo w=<integer> setting.
TwoDigitYearCenturyWindow
X Determines what century is added to two-digit years when string dates are converted to numeric dates.The value of TwoDigitYearCenturyWindow, if it is nonzero, is subtracted from the current year to calculate the floating "pivot" prior to

The Initialization Library
Thin-Client Configuration Guide: Basics 69
Property Win Web Data Type/Description
which two-digit years are interpreted as falling in the next century. The default value is 50. When EnforceSoluminaDateFormat is not enabled, the pivot year for two digit dates is determined by Windows Regional Calendar Settings.
IgnoreRuntimeWindo wsFormatSettingsChange
X On/Off. Default value is Off.
Can prevent CostpointMES from adapting to changes in Windows Regional Settings as the client is loaded. May avoid some errors which occur when external applications modify Windows Regional Settings.
LocalObjectCacheEnabled
X Yes/No. When enabled (Yes), to improve speed, caches multimedia objects at the PathToLocalObjectCache location (see below) on the client machine.
PathToLocalObjectCache
X String. The path to the directory containing multimedia objects.
@UserTemp specifies the user’s temporary directory which is defined as follows:
The path specified by the TMP environment variable.
The path specified by the TEMP environment variable, if TMP is not defined.
The current directory, if both TMP and TEMP are not defined. When serving the client from a common location, TMP or TEMP should be defined. Per email you forwarded to me 8/18/09
LocalObjectCacheMaxKB
X Number. The maximum number in kilobytes to be used by the object cache when LocalObjectCacheEnabled = Yes.
MultiGridResizeEnabled X On/Off. Default value is On.
Set to Off to disable automatic embedded UDV grid control resizing for UDVs that contain more than one grid control. Note: That automatic embedded UDV grid control resizing is not applied for multiple grids which are side by side in the same UDV.
DiagnosticsPriv X All Ctrl-right-click diagnostic information is blocked unless the current user has the defined priv. If the priv is undefined, then the user has access to all diagnostics.
Example: Common.DiagnosticsPriv=Developer
AutomaticUpdates X Contains subproperties used to enable/ disable automatic updating of Thin- Client software on a local client.
MaxSessionEventStack X Defines the maximum number of session events on the

The Initialization Library
Thin-Client Configuration Guide: Basics 70
Property Win Web Data Type/Description
Size stack before the client raises a warning.
edgMessage

The Initialization Library
Thin-Client Configuration Guide: Basics 71
edgShow
Design Mode The following Ini properties are used to configure the use of the design mode for UDVs, as described in “Admin Level Configuration for UDVs.”
Property Description
MenuDesignPriv Required for the main menu configuration.
DefaultUserType Identifies the default User Type used to load In Place configuration data.

The SQL Library
Thin-Client Configuration Guide: Basics 72
The SQL Library The SQL Library is a database table (SFCORE_SQL_LIB) that contains SQL statements. These statements—mostly SELECT, EXEC, SKIP, INSERT, UPDATE, and DELETE—retrieve, store, and manipulate information in the database.
The SQL Library exerts configuration influence after initialization—during general use of the application. In terms of sequence, Startup.INI bootstraps the application and connects to the database. It then hands control (through the Ini_Id variable) to a specific record in the Initialization Library, which exerts total control as the application initializes. After initialization, the main configuration influence comes from the SQL and UDV Libraries.
Record Format Each record in the SQL Library is identified by the following fields.
SQL Id — This is the name of the SQL statement. This name follows standard Oracle naming conventions, which indicate that the names must not contain spaces.
Type — This is an open field that designates the kind of statement. There are no set types. Generally, a CORE type indicates a statement that is crucial to basic Costpoint MES operation and should not be modified. All other types are left up to the implementer’s discretion.
Reserved or core-type SQL IDs are grayed-out in any SQL ID edit field. Then can be inserted but not changed or deleted. The association statement, however, can be changed.
Desc — This describes the statement or its area of application.
The following is an example of an SQL statement.
SQL ID: ImageChangeParentId
Type: CORE
Desc: Image Manager
Statement: update IMAGE_FOLDER_ORG
set PARENT_FOLDER_ID=:PO,
PARENT_FOLDER_TYPE=:P1
where FOLDER_ID=:P2
You can create, edit, and run (test) statements using the SQL Library tool in the Costpoint MES System Manager.
Valid Syntax and Parsing The following rules apply to syntax and parsing:
SQL statements cannot contain nested tables and functions. The following statement contains a decode function nested in a substr function and will cause an ‘Invalid SQL Statement’ error:
select userid,
substr(decode(full_name,null,last_name||’,’||first_name,full_name),1,45)

The SQL Library
Thin-Client Configuration Guide: Basics 73
as Name
from sffnd_user
where userid not in (‘SFMFG’,’ANONYMOUS’)
and nvl(obsolete_record_flag,’N’) = ’N’
order by last_name, first_name
Unless otherwise stated, you must handle complex SQL SELECT statements (joins and unions) with a database view.
SQL union syntax with dynamic field validation is now supported. In prior releases, using the SQL union syntax in UDV lookup fields required the use of the @Filter where clause hint. SQL parsing in the Costpoint MES System Manager does not support every syntax case supported by Oracle.
SQL statements that run successfully in the Costpoint MES System Manager, in SQL*Plus, or any other third-party tool should not be interpreted as being supported in Costpoint MES. Therefore, any statement that runs in one of the above tools, but does not run in the application, does not constitute an anomaly.
The absence of a given syntax case from a list of unsupported cases does not imply support for that case.
The successful run of a statement using an unsupported syntax case is purely by chance. Later releases will almost certainly raise errors. In any case, the successful run of an unsupported case does not constitute Costpoint MES support of that case.
Because different syntax cases are supported in different contexts, all statements should be pretested in the application itself. For example, queries that are subject to a filter in a dialog box, or those that are subject to field validation in a UDV, are much more stringently parsed than queries in other parts of the application. When testing statements, runtime system diagnostics and error dialog boxes should be used to verify conformance—or to correct nonconformance—before deployment.
Basic SQL Statement Types
Statement Type
Returned Data
Description See
SELECT Cursor (paged)
Selects data from existing records. “SELECT Statements”
INSERT None Inserts new record(s). “INSERT, UPDATE, and DELETE Statements”
UPDATE None Updates data in existing record(s). “INSERT, UPDATE, and DELETE Statements”
DELETE None Deletes an existing record. “INSERT, UPDATE, and DELETE Statements”
EXEC Single record
Executes a stored proc to calculate values or select data from disparate sources.
“EXEC Statements”

The SQL Library
Thin-Client Configuration Guide: Basics 74
Statement Type
Returned Data
Description See
EXECQUERY Cursor (unpaged)
Executes a stored proc to calculate values or select data from disparate sources—and returns all rows of data at once.
“EXECQUERY Statements”
SELECT EXECQUERY
Cursor (unpaged)
Executes a stored proc to calculate values or select data from disparate sources, specifying the names of the columns that the EXECQUERY should return, and returns all rows of data at once.
“SELECT EXECQUERY Statements”
EXTFUNC Return string
When used with an EXEC statement in a Scripted UDV, calls an external function, which can be used to add data to @ScriptParams.
“EXTFUNC Statements”
SELECT Statements SELECT statements use the standard SELECT keyword to retrieve information from the database. They should be used in cases where data does not need to be calculated and where data can be obtained easily from few sources.
SELECT statements return a cursor of one or more records, which are typically paged 50 records at a time.
Basic Syntax SELECT Column_1, ...Column_n
FROM TableName
WHERE RowSelectionCriteria
INSERT, UPDATE, and DELETE Statements Statements using the standard INSERT, UPDATE, and DELETE keywords insert new records into, update existing records in, and delete existing records from the database, respectively.
These statements do not return data.
Basic Syntax—Insert INSERT INTO TableName VALUES (Value_1, ...Value_n)
Basic Syntax—Update UPDATE TableName
SET ColumnName=NewValue
WHERE ColumnName=ExistingValue
Basic Syntax—Delete DELETE FROM TableName
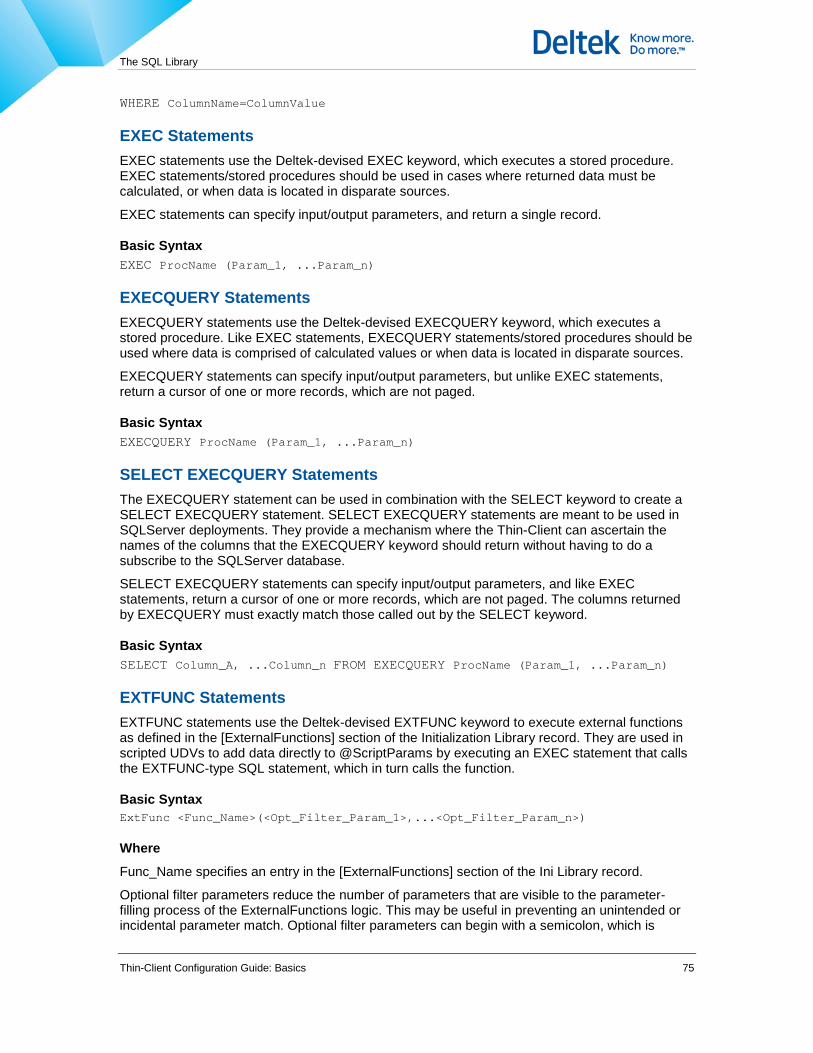
The SQL Library
Thin-Client Configuration Guide: Basics 75
WHERE ColumnName=ColumnValue
EXEC Statements EXEC statements use the Deltek-devised EXEC keyword, which executes a stored procedure. EXEC statements/stored procedures should be used in cases where returned data must be calculated, or when data is located in disparate sources.
EXEC statements can specify input/output parameters, and return a single record.
Basic Syntax EXEC ProcName (Param_1, ...Param_n)
EXECQUERY Statements EXECQUERY statements use the Deltek-devised EXECQUERY keyword, which executes a stored procedure. Like EXEC statements, EXECQUERY statements/stored procedures should be used where data is comprised of calculated values or when data is located in disparate sources.
EXECQUERY statements can specify input/output parameters, but unlike EXEC statements, return a cursor of one or more records, which are not paged.
Basic Syntax EXECQUERY ProcName (Param_1, ...Param_n)
SELECT EXECQUERY Statements The EXECQUERY statement can be used in combination with the SELECT keyword to create a SELECT EXECQUERY statement. SELECT EXECQUERY statements are meant to be used in SQLServer deployments. They provide a mechanism where the Thin-Client can ascertain the names of the columns that the EXECQUERY keyword should return without having to do a subscribe to the SQLServer database.
SELECT EXECQUERY statements can specify input/output parameters, and like EXEC statements, return a cursor of one or more records, which are not paged. The columns returned by EXECQUERY must exactly match those called out by the SELECT keyword.
Basic Syntax SELECT Column_A, ...Column_n FROM EXECQUERY ProcName (Param_1, ...Param_n)
EXTFUNC Statements EXTFUNC statements use the Deltek-devised EXTFUNC keyword to execute external functions as defined in the [ExternalFunctions] section of the Initialization Library record. They are used in scripted UDVs to add data directly to @ScriptParams by executing an EXEC statement that calls the EXTFUNC-type SQL statement, which in turn calls the function.
Basic Syntax ExtFunc <Func_Name>(<Opt_Filter_Param_1>,...<Opt_Filter_Param_n>)
Where
Func_Name specifies an entry in the [ExternalFunctions] section of the Ini Library record.
Optional filter parameters reduce the number of parameters that are visible to the parameter-filling process of the ExternalFunctions logic. This may be useful in preventing an unintended or incidental parameter match. Optional filter parameters can begin with a semicolon, which is
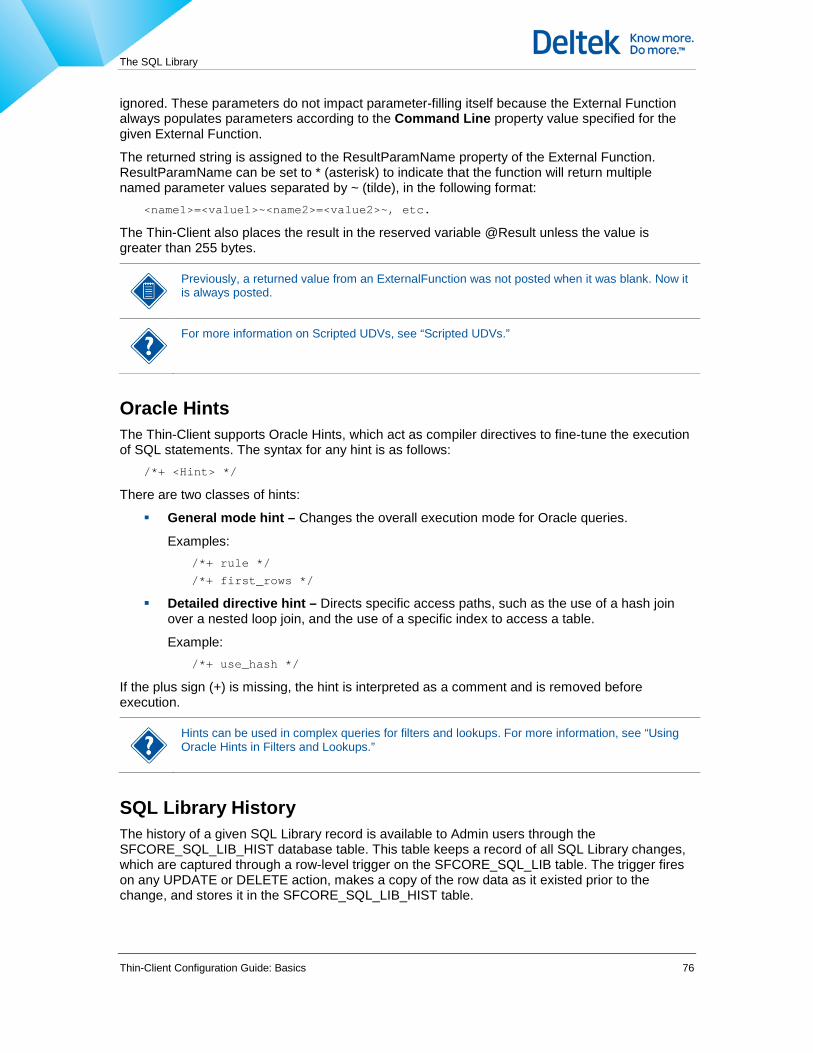
The SQL Library
Thin-Client Configuration Guide: Basics 76
ignored. These parameters do not impact parameter-filling itself because the External Function always populates parameters according to the Command Line property value specified for the given External Function.
The returned string is assigned to the ResultParamName property of the External Function. ResultParamName can be set to * (asterisk) to indicate that the function will return multiple named parameter values separated by ~ (tilde), in the following format:
<name1>=<value1>~<name2>=<value2>~, etc.
The Thin-Client also places the result in the reserved variable @Result unless the value is greater than 255 bytes.
Previously, a returned value from an ExternalFunction was not posted when it was blank. Now it is always posted.
For more information on Scripted UDVs, see “Scripted UDVs.”
Oracle Hints The Thin-Client supports Oracle Hints, which act as compiler directives to fine-tune the execution of SQL statements. The syntax for any hint is as follows:
/*+ <Hint> */
There are two classes of hints:
General mode hint – Changes the overall execution mode for Oracle queries.
Examples: /*+ rule */
/*+ first_rows */
Detailed directive hint – Directs specific access paths, such as the use of a hash join over a nested loop join, and the use of a specific index to access a table.
Example: /*+ use_hash */
If the plus sign (+) is missing, the hint is interpreted as a comment and is removed before execution.
Hints can be used in complex queries for filters and lookups. For more information, see “Using Oracle Hints in Filters and Lookups.”
SQL Library History The history of a given SQL Library record is available to Admin users through the SFCORE_SQL_LIB_HIST database table. This table keeps a record of all SQL Library changes, which are captured through a row-level trigger on the SFCORE_SQL_LIB table. The trigger fires on any UPDATE or DELETE action, makes a copy of the row data as it existed prior to the change, and stores it in the SFCORE_SQL_LIB_HIST table.
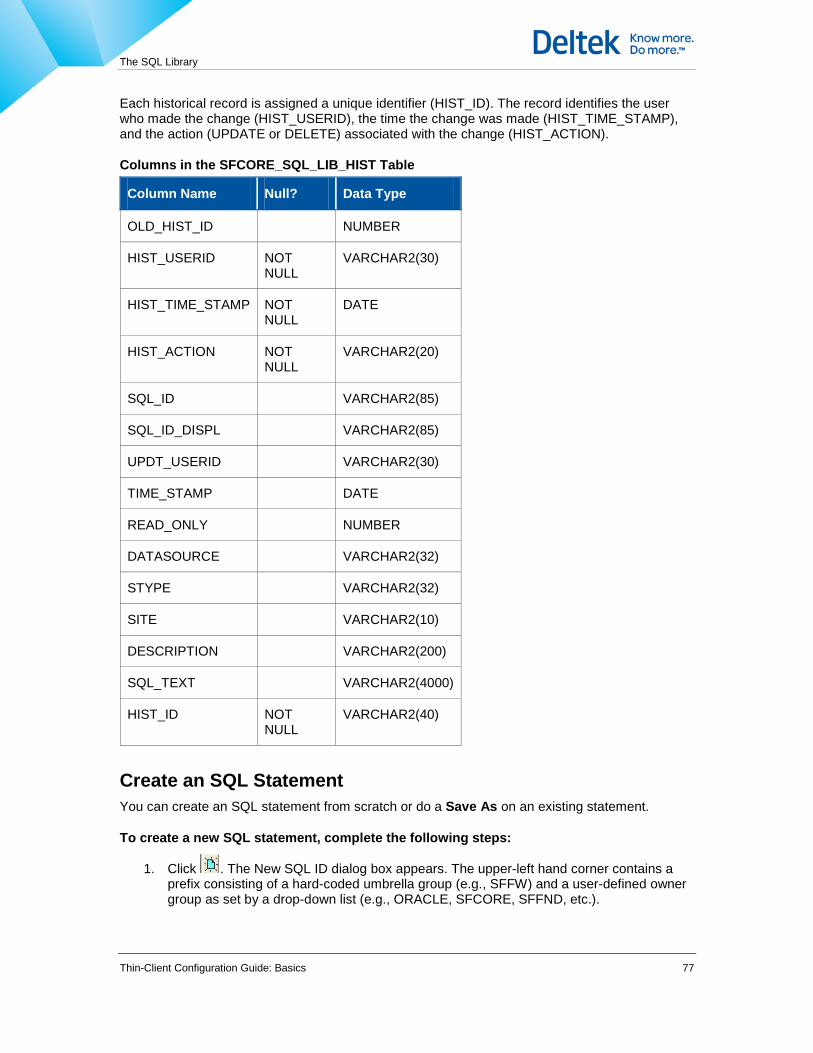
The SQL Library
Thin-Client Configuration Guide: Basics 77
Each historical record is assigned a unique identifier (HIST_ID). The record identifies the user who made the change (HIST_USERID), the time the change was made (HIST_TIME_STAMP), and the action (UPDATE or DELETE) associated with the change (HIST_ACTION).
Columns in the SFCORE_SQL_LIB_HIST Table
Column Name Null? Data Type
OLD_HIST_ID NUMBER
HIST_USERID NOT NULL
VARCHAR2(30)
HIST_TIME_STAMP NOT NULL
DATE
HIST_ACTION NOT NULL
VARCHAR2(20)
SQL_ID VARCHAR2(85)
SQL_ID_DISPL VARCHAR2(85)
UPDT_USERID VARCHAR2(30)
TIME_STAMP DATE
READ_ONLY NUMBER
DATASOURCE VARCHAR2(32)
STYPE VARCHAR2(32)
SITE VARCHAR2(10)
DESCRIPTION VARCHAR2(200)
SQL_TEXT VARCHAR2(4000)
HIST_ID NOT NULL
VARCHAR2(40)
Create an SQL Statement You can create an SQL statement from scratch or do a Save As on an existing statement.
To create a new SQL statement, complete the following steps:
1. Click . The New SQL ID dialog box appears. The upper-left hand corner contains a prefix consisting of a hard-coded umbrella group (e.g., SFFW) and a user-defined owner group as set by a drop-down list (e.g., ORACLE, SFCORE, SFFND, etc.).

The SQL Library
Thin-Client Configuration Guide: Basics 78
2. In the Owner Group drop-down list, select an owner group that this SQL ID with which this SQL ID will be associated.
3. Enter an ID, a description, and a type in the appropriate fields.
4. Click to select a folder and then click OK.The entered information populates the SQL ID, Type, and Desc fields of the SQL Lib window.
5. Enter the appropriate data in fields; enable check boxes and a User Type radio button as appropriate; and then write the statement itself.
6. Click Save.
To create an SQL statement from an existing statement, complete the following steps:
1. Use or the Go To field to display the statement from which to create the new statement and then click Save As. The New SQL ID dialog box appears.
2. Select and appropriate owner group and then enter an ID, description, and type in the appropriate fields.
3. Click to select a folder and then click OK.The entered information populates the SQL ID, Type, and Desc fields of the SQL Lib window.
4. Enter the appropriate data in fields; enable check boxes and a User Type radio button as appropriate; and then write the statement itself.
5. Click Save.
Edit an SQL Statement This section contains instructions on how to edit an SQL statement.
To Edit an SQL Statement, complete the following steps:
1. Use the navigator, , or the Go To field to display the statement to edit and then click Edit.
2. Edit the information as needed.
3. Click Save.
Delete an SQL Statement This section contains instructions on how to delete an SQL statement. You cannot delete CORE SQL IDs.
To delete an SQL statement, complete the following steps:
1. Use the navigation and/or search buttons to display the statement to delete and then click Delete. A message box asks you to confirm the deletion.
2. Click OK. The utility deletes the statement from the database.
Export SQL Library Entries To export SQL Library entries, use the Export SQL Lib dialog box to create a script file. When you run the script file against a target database, the script copies the SQL statements to the new database.

The SQL Library
Thin-Client Configuration Guide: Basics 79
Click in the SQL Library window to display the Export SQL Lib dialog box. If a statement is displayed in the SQL Library dialog box, only that statement is loaded for export.
If you select multiple SQL statements and select the Create Individual Files Using Object ID check box, you can create individual .sql files for each statement. The automatically generated text file name is a hyphenated combination of the SQL record name and the object ID.
Record Name Resulting Text File Name
MySql MySql-MF1_00011.Sql
Export SQL Lib Dialog Box Screen Controls
Screen Control Description
Export to This field displays the path and file name of the SQL script file to which
selected statements are copied. You can set this path using .
Select a Filename. Click this icon to display the SQL Script Filename dialog box and set the path and name of the SQL script file.
View. Click this icon to launch Notepad to view the specified SQL script file in the Export to field.
Delete. Click this icon to delete any existing SQL script file having the same file name as that in the Export to field. If you save an SQL script file, the export function appends the selected entries to the existing file.
Create individual Select this check box to export the selected record(s) to a text file, naming

The SQL Library
Thin-Client Configuration Guide: Basics 80
Screen Control Description
files using object ID
the file according to the record name and object ID: RecordName-ObjectId.sql.
For example: MySql—MF1_00011.sql
Refresh. Click this icon to refresh the window.
Search. Click this icon to display the Lookup dialog box and search for and select specific statements using text searches on the SQL ID.
Select Core IDs. Click this icon to select all CORE entries only.
Export. Click this icon to create the SQL script file or text file(s).
See “Exporting SQL Library Entries.”
To export an SQL Library entry to an SQL script file, complete the following steps:
1. Click in the SQL Library tool window. The Export SQL Lib dialog box appears.
2. Select the statements to export—or click and then search for specific statements in the Lookup dialog box that appears.
3. Change the path and name of the script file as needed in the Export to field—or click and then select the path and filename of the script file. If you save to an existing SQL script file, the export function appends the selected records to the existing file.
Click to view/preview the selected file in the Export to field.
Click if the selected file in the Export to field already exists but you do not want to append the statements to this file. When you save, the export function creates a new file.
Select the Create individual file using object ID check box if you have selected multiple records and want to create individual script files. The automatically generated filename is a hyphenated combination of the Ini record name and the SQL ID and object ID (e.g., MySql-MF1_00011.Sql.)
4. Click to generate the script file.
Click to view the script file.
Use the SQL Script Runner to run the script (see “Running a SQL Script”).
Run an SQL Statement Running an SQL statement tests it and displays the returned data set in a table view. You can run an SQL statement from two places:
The SQL Library Editor window

The SQL Library
Thin-Client Configuration Guide: Basics 81
The SQL Runner tool window
Both of the above tools are in the System Manager.
To run an SQL statement using the Run function in the SQL Lib tool window, complete the following steps:
1. Display the statement to run and then click . If you need to supply any parameters, a dialog box appears.
2. Enter the required information and the click Ok. The returned data set is displayed in a dialog box.
To run an SQL statement from the SQL Runner tool window, complete the following steps:
1. In the SQL Runner statement window, enter the statement to run.
2. Select check boxes as needed.
3. Click or press F8.
4. Enter any needed parameters and then click Ok. The returned data set appears in a dialog box.
To run another statement, delete the text in the Statement area and then repeat steps 1-4.
Run an SQL Script Running an SQL script allows a Costpoint MES administrator or system administrator to run routine database operations. Run SQL scripts in the SQL Script Runner window in the System Manager. The script runs against the currently connected database. The tool creates a temporary copy of the script file in order to run it. A log file records each executed SQL statement, but the temporary file records any errors. After correcting an error, you can start over from the original script or continue from the temporary file.
To run an SQL script, complete the following steps:
1. In the SQL Script Runner window, enter the script to run in the SQL In File field.
Use to display the filename of the script to run.
Use to view the file in Notepad.
2. Select the Stop when an error occurs check box as needed and then click .
Click the View button of the SQL Tmp File field to view errors.
Included Scripts Starting with Thin-Client release 4.1, the SQL tool can execute included (embedded) scripts that use a partial of fully-qualified path reference. The path reference can include Windows-style drive

The SQL Library
Thin-Client Configuration Guide: Basics 82
letters or UNC-style network references, and Windows- or UNIX-style slashes for compatibility with PL/SQL.
You can include a script in another script by prefixing the included script/path reference with an @ symbol (i.e., @/somedir/somescript.sql).
The referenced path must be accessible from the parent script calling directory. For example, when attempting to include the @/somdedir/somescript.sql script, the somedir directory must reside in the same directory as the parent script.
In the log file, Costpoint MES inserts comments denoting the position of the included script and its origin. See the following example:
/* Included from @/somedir/somescript.sql
...included code...
/* End included script @/somedir/somescript.sql
Local Library Cache You can cache initialization, UDV, and SQL Library records on the client. This speeds up startup and runtime response considerably—especially in WAN clients.
When you enable local caching, you enable it for all three libraries. Because the cache works almost identically for all libraries, it is explained only once in the Initialization Library chapter. For more information, see “Local Library Caching.”
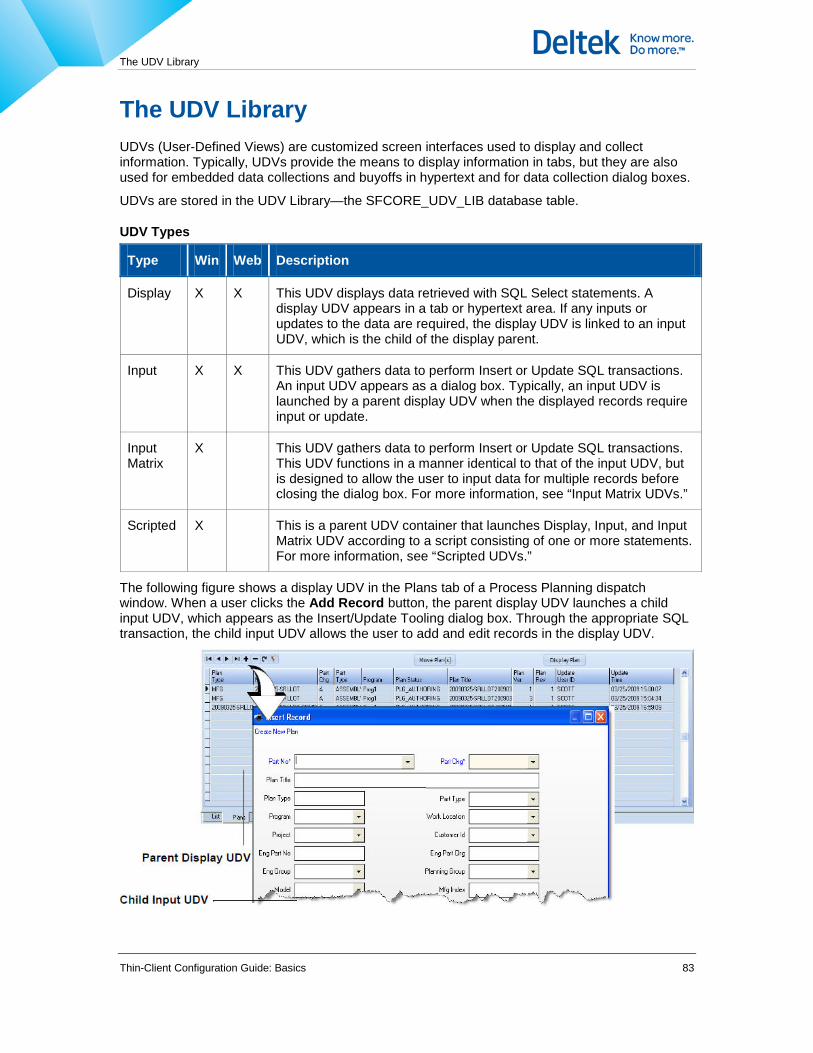
The UDV Library
Thin-Client Configuration Guide: Basics 83
The UDV Library UDVs (User-Defined Views) are customized screen interfaces used to display and collect information. Typically, UDVs provide the means to display information in tabs, but they are also used for embedded data collections and buyoffs in hypertext and for data collection dialog boxes.
UDVs are stored in the UDV Library—the SFCORE_UDV_LIB database table.
UDV Types
Type Win Web Description
Display X X This UDV displays data retrieved with SQL Select statements. A display UDV appears in a tab or hypertext area. If any inputs or updates to the data are required, the display UDV is linked to an input UDV, which is the child of the display parent.
Input X X This UDV gathers data to perform Insert or Update SQL transactions. An input UDV appears as a dialog box. Typically, an input UDV is launched by a parent display UDV when the displayed records require input or update.
Input Matrix
X This UDV gathers data to perform Insert or Update SQL transactions. This UDV functions in a manner identical to that of the input UDV, but is designed to allow the user to input data for multiple records before closing the dialog box. For more information, see “Input Matrix UDVs.”
Scripted X This is a parent UDV container that launches Display, Input, and Input Matrix UDV according to a script consisting of one or more statements. For more information, see “Scripted UDVs.”
The following figure shows a display UDV in the Plans tab of a Process Planning dispatch window. When a user clicks the Add Record button, the parent display UDV launches a child input UDV, which appears as the Insert/Update Tooling dialog box. Through the appropriate SQL transaction, the child input UDV allows the user to add and edit records in the display UDV.
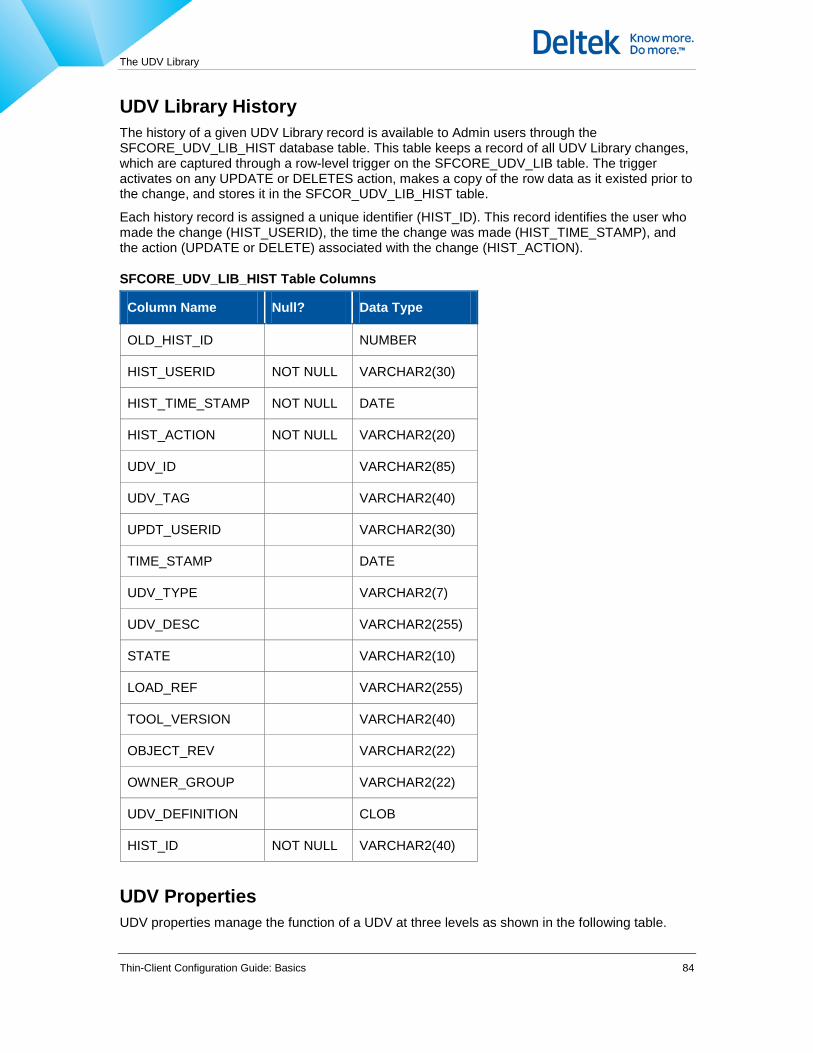
The UDV Library
Thin-Client Configuration Guide: Basics 84
UDV Library History The history of a given UDV Library record is available to Admin users through the SFCORE_UDV_LIB_HIST database table. This table keeps a record of all UDV Library changes, which are captured through a row-level trigger on the SFCORE_UDV_LIB table. The trigger activates on any UPDATE or DELETES action, makes a copy of the row data as it existed prior to the change, and stores it in the SFCOR_UDV_LIB_HIST table.
Each history record is assigned a unique identifier (HIST_ID). This record identifies the user who made the change (HIST_USERID), the time the change was made (HIST_TIME_STAMP), and the action (UPDATE or DELETE) associated with the change (HIST_ACTION).
SFCORE_UDV_LIB_HIST Table Columns
Column Name Null? Data Type
OLD_HIST_ID NUMBER
HIST_USERID NOT NULL VARCHAR2(30)
HIST_TIME_STAMP NOT NULL DATE
HIST_ACTION NOT NULL VARCHAR2(20)
UDV_ID VARCHAR2(85)
UDV_TAG VARCHAR2(40)
UPDT_USERID VARCHAR2(30)
TIME_STAMP DATE
UDV_TYPE VARCHAR2(7)
UDV_DESC VARCHAR2(255)
STATE VARCHAR2(10)
LOAD_REF VARCHAR2(255)
TOOL_VERSION VARCHAR2(40)
OBJECT_REV VARCHAR2(22)
OWNER_GROUP VARCHAR2(22)
UDV_DEFINITION CLOB
HIST_ID NOT NULL VARCHAR2(40)
UDV Properties UDV properties manage the function of a UDV at three levels as shown in the following table.

The UDV Library
Thin-Client Configuration Guide: Basics 85
UDV Property Types
Property Type Description
High-level This type manages the overall function of the UDV. Typically, a UDV has only a handful of high-level properties but contains many properties for each visual and nonvisual control.
Visual Control This type manages the behavior of visual controls.
Nonvisual Control This type manages the behavior of nonvisual controls.
High-level properties are listed in Appendix B, “UDV Properties.”
Visual and nonvisual properties are listed in Appendix B, “UDV Properties” and are also explained in the following sections.
Controls UDVs consist of visual and nonvisual controls. Visual controls define the appearance of the UDV while nonvisual controls manage the display and manipulation of data between the UDV, other data sources, and the database.
Internally, the difference between a display, input, and input matrix UDV is the kinds of controls they contain.
Visual Controls Visual controls display data from the database in display UDVs and provide areas of data collection in input and input matrix UDVs. The following table lists the visual control types and deployment type—Win (Thin-Client) or Web Express (Web)—that supports the control. Unsupported controls are ignored.
Visual Controls for Display and Input UDVs
Control Type Win Web Display UDV Description
Input UDV Description
Label X X A static text display object for identifying fields.
A static text display object for identifying fields. The functionality may be limited.
Edit X X A field that, when linked to an SQL source, displays text data.
A field that, when linked to an SQL transaction, can receive text data.
The maximum length of the input field is the length of the corresponding database column.

The UDV Library
Thin-Client Configuration Guide: Basics 86
Control Type Win Web Display UDV Description
Input UDV Description
Memo X X A large field that, when linked to an SQL source, displays text data.
A large field that, when linked to an SQL transaction, can receive text data.
The maximum length of the input field is the length of the corresponding database column.
Bevel X A box with a border that is used to visually group other controls.
NA
Grid X X A table that, when linked to an SQL source, displays records with several database fields.
NA
Navigator X X (Functionality may be limited.)
A set of buttons that, when linked to an SQL source, controls the display of a specific set of records and allows navigation to any record in the set.
NA
ParentNavigator X NA In cached transaction update UDVs, the set of navigation buttons that controls the display of a single record.
See “Input Matrix UDVs.”.
Command Button
X X (Functionality may be limited.)
A configurable button that can be used to launch other commands.
See “UDV-Launched Other Commands.”
NA
Hypertext Editor X X (Functionality may be limited.)
A smart text area that allows display and high-level editing of hypertext through a connection to a specific block ID.
See “Hypertext Controls.”
NA

The UDV Library
Thin-Client Configuration Guide: Basics 87
Control Type Win Web Display UDV Description
Input UDV Description
For Web Express, this control is treated like a hypertext field.
Hypertext Field X X (Functionality may be limited.)
A simple text area that displays hypertext.
See “Hypertext Controls.”
For Thin-Client, a text area that allows input and limited editing of hypertext.
See “Hypertext Controls.”
List X X A field that, when linked to an SQL source, displays a delimited list (one item on a line).
See “List Controls.”
A field that, when linked to an SQL transaction, can receive and process data in the form of a delimited list.
The maximum length of the input field is the length of the corresponding database column.
See “List Controls.”
Checkbox X NA A single check box that, when linked to an SQL transaction, can process data as an edit, list, or lookup control.
See “Radio Button and Check Box Controls.”
Checkbox Group X NA A group of two or more check boxes that, when linked to an SQL transaction, can process data as an edit, list, or lookup control.
See “Radio Button and Check Box Controls.”.
Radio Button Group
X NA A group of two or more radio buttons that, when linked to an SQL transaction, can process data as a n edit, list, or lookup control.
See “Radio Button and Check Box Controls.”

The UDV Library
Thin-Client Configuration Guide: Basics 88
Control Type Win Web Display UDV Description
Input UDV Description
Script Button X NA A button that allows the display of a special-purpose UDV without interrupting the sequence of a scripted UDV.
See “The Script Button.”
Graph X A field that, when linked to an SQL source and graph ID, displays a graph.
See “Graph Controls.”
NA
Multimedia Viewer
X A placeholder for a linked multimedia object.
NA
Speedometer A field that, when linked to an SQL source and graph ID, displays a graph.
See “Graph Controls.”
NA
Pie Chart A field that, when linked to an SQL source and graph ID, displays a graph.
See “Graph Controls.”
Level Indicator – 3 Color
A field that, when linked to an SQL source and graph ID, displays a graph.
See “Graph Controls.”
Level Indicator – LED
A field that, when linked to an SQL source and graph ID, displays a graph.
See “Graph Controls”
Each visual control has properties that govern its display. For a list and definition of these properties, see Appendix B, “UDV Properties.”.
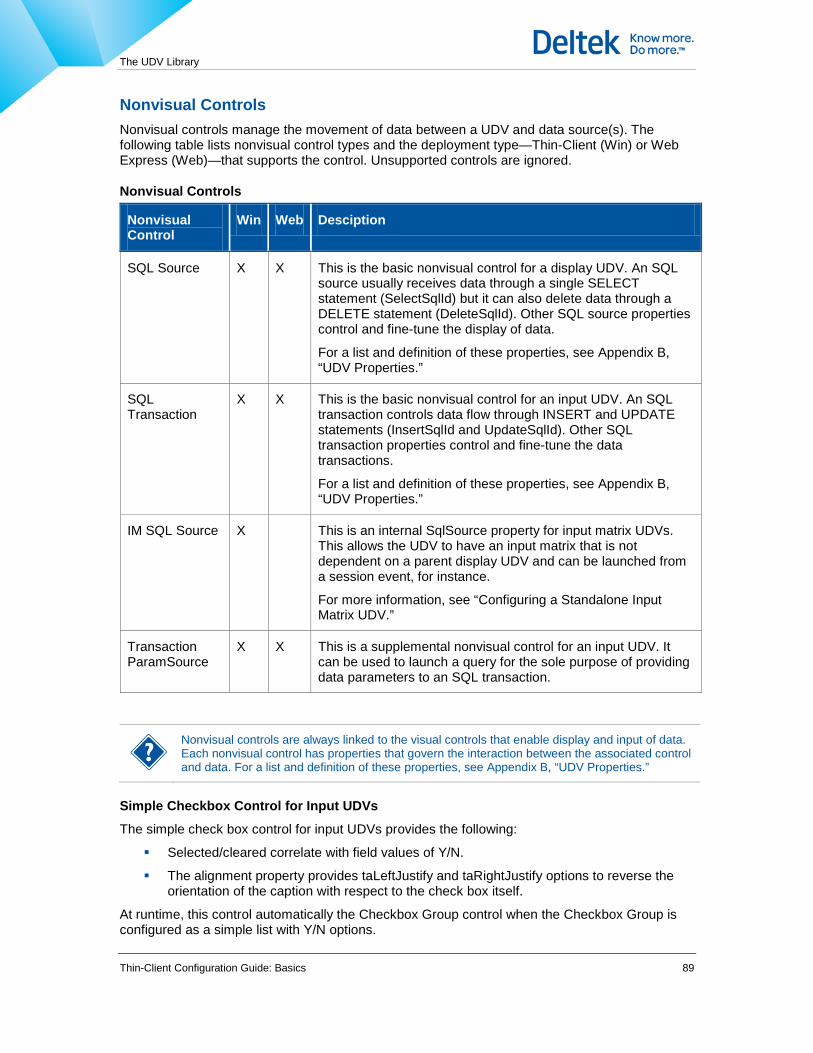
The UDV Library
Thin-Client Configuration Guide: Basics 89
Nonvisual Controls Nonvisual controls manage the movement of data between a UDV and data source(s). The following table lists nonvisual control types and the deployment type—Thin-Client (Win) or Web Express (Web)—that supports the control. Unsupported controls are ignored.
Nonvisual Controls
Nonvisual Control
Win Web Desciption
SQL Source X X This is the basic nonvisual control for a display UDV. An SQL source usually receives data through a single SELECT statement (SelectSqlId) but it can also delete data through a DELETE statement (DeleteSqlId). Other SQL source properties control and fine-tune the display of data.
For a list and definition of these properties, see Appendix B, “UDV Properties.”
SQL Transaction
X X This is the basic nonvisual control for an input UDV. An SQL transaction controls data flow through INSERT and UPDATE statements (InsertSqlId and UpdateSqlId). Other SQL transaction properties control and fine-tune the data transactions.
For a list and definition of these properties, see Appendix B, “UDV Properties.”
IM SQL Source X This is an internal SqlSource property for input matrix UDVs. This allows the UDV to have an input matrix that is not dependent on a parent display UDV and can be launched from a session event, for instance.
For more information, see “Configuring a Standalone Input Matrix UDV.”
Transaction ParamSource
X X This is a supplemental nonvisual control for an input UDV. It can be used to launch a query for the sole purpose of providing data parameters to an SQL transaction.
Nonvisual controls are always linked to the visual controls that enable display and input of data. Each nonvisual control has properties that govern the interaction between the associated control and data. For a list and definition of these properties, see Appendix B, “UDV Properties.”
Simple Checkbox Control for Input UDVs
The simple check box control for input UDVs provides the following:
Selected/cleared correlate with field values of Y/N.
The alignment property provides taLeftJustify and taRightJustify options to reverse the orientation of the caption with respect to the check box itself.
At runtime, this control automatically the Checkbox Group control when the Checkbox Group is configured as a simple list with Y/N options.

The UDV Library
Thin-Client Configuration Guide: Basics 90
Data Sources and Data Connections For a display UDV, the primary data source is the database, which is acted upon by the SelectSqlId property of the SQL source. For an input UDV, the primary data source is input from the user, which is controlled by the InputSqlId and UpdateSqlId properties. In order to fully function, however, UDVs must also receive data—such as parameters—from defined areas of memory and each other.
Published parameter memory is an area of memory that contains values that can be shared by different modules in Costpoint MES. A display UDV typically fetches from the published parameter memory data regarding the scope of records it can display. An input UDV, which may need parameters derived from the active query of a display UDV, typically fetches parameters needed to complete an SQL transaction. In this last case, the published parameter memory acts as the link that ties a display UDV to an input UDV.
The following figure shows the data interactions between a display UDV and an input UDV. The lower portion of the diagram shows the properties controlling each UDV. When Display UDV 1 is activated, the results of the SelectSqlId query results populate Display Fields 1 and 2. Display UDV 1 copies the query results to the published parameter memory and then invokes Input UDV 1 through its InputUDVId property. Input UDV 1 fetches the correct parameters from the published parameter memory through its ParamsSQLSourceName property. It then performs an SQL transaction using both published parameters and input from Input Fields 1 and 2. This is a typical case of a display UDV invoking an input UDV.

The UDV Library
Thin-Client Configuration Guide: Basics 91
UDV Development Guidelines This section contains guidelines on screen resolution and UDV sizing.
In general, a UDV must be designed with the resolution and dimensions of the display monitor in mind. Costpoint MES is designed to run on a monitor with 1024x768 screen resolution. If the display monitor has a lower resolution, if may cut off critical control elements of the UDV. In addition to the display monitor resolution, the actual area available to a UDV depends on its placement on the application. As a rule, the area available to an input UDV in a dialog box is that of the resolution minus the shell, window frame, and caption dimensions.

The UDV Library
Thin-Client Configuration Guide: Basics 92
UDVs must be designed for an optional screen width in the end-user application—either half halfscreen or fullscreen. Whenever the parent window is smaller than the width of the UDV, scroll bars will automatically appear in order to bring hidden columns into view.
A halfscreen UDV must be 499 pixels wide. A UDV designed for halfscreen mode means that all columns will be in view—without the aid of a horizontal bar—when the parent window is in halfscreen mode and fullscreen mode.
A fullscreen UDV must be 1010 pixels wide. A UDV designed for fullscreen mode means that all columns will be in view only when the parent window is also in fullscreen mode.
For any UDV, scroll bars will appear under the following conditions:
When any part of a visible control lies outside the area of the UDV boundary as defined by the high-level UDV’s height and width properties.
When the parent window is smaller than the width of the UDV.
Tab (data page) UDVs must be designed for halfscreen width and a height tab set by the Tab.Height property in the Initialization Library record (usually 200 or 300 pixels) If necessary, the UDVs can also be designed for fullscreen width.
The tab height is restricted in every tool window to prevent obscuring any other presentation components. Some experimentation may be necessary in cases where the UDV’s size needs to be as large as possible.
The runtime dimensions of display UDVs can be set by the high-level UDV Height and Width properties.
For more information, see Height and Width in “Appendix B, UDV Properties.”
Columns in display UDV grids and input matrix UDVs can be resized by double-clicking the column heading. This resizes the column to accommodate the longest string/data value for visible rows. Local menu options can also resize all columns or a single column.
The Web Express Client application displays inside a browser window and most likely will have much less display area than the Thin-Client. If you are creating UDVs that will be displayed in both the Web Express Client and Thin-Client, design them at a 900x600 resolution.
You can set the ApplicationWidth and ApplicationHeight properties to display controls at the required resolution—regardless of the resolution in which you develop them. See ApplicationWidth and ApplicationHeight in “[Common] Properties.”
Create a UDV There is no exact procedure for creating a UDV. As long as a step does not require a prerequisite, you can perform it in any order. The following order is thought to be the easiest.
Step 1: Map Out the UDV Before you create a UDV, map out the function, appearance, data sources, and data targets (where applicable). Prepare the following details:
UDV function including the data path
Required and existing SQL statements and parameters to carry out the function

The UDV Library
Thin-Client Configuration Guide: Basics 93
UDV appearance (position and appearance of visual controls)
Visual and nonvisual control links that tie fields to specific SQL statements
Step 2: Create UDV SQL Statements After you map out the UDV, crate any needed SQL statements that do not already exist. This is the most critical part of creating a UDV.
The minimal functional UDV is a display UDV that has an single SELECT statement that displays data. Depending on the required function, more complex UDVs may require statements to delete, update, or insert information into the database.
Although in most cases, you will use a SELECT statement to return a cursor, the SelectSqlId is one of the few places where you can also use a stored procedure as a query.
The following example shows a stored procedure called PWP_Dispatch_ProcQuery followed by the equivalent SELECT statement.
SqlId: PWP_Dispatch_ProcQuery
exec PROC_QUERY(PWP_ID,PWP_DESC)
create or replace procedure PROC_QUERY
(v_o_pwp_id out varchar2
,v_o_pwp_desc out varchar2)
as
BEGIN
v_o_pwp_id := 'Id out';
v_o_pwp_desc := 'Desc out';
END;
/
This stored procedure is the equivalent of the following SELECT statement. Select “Id_out” as pwp_id, “Desc_out” as pwp_desc from DUAL
SQL statements are stored in the SQL Library and maintained by the System Manager. For more information on the SQL Library and creating SQL statements, see “The SQL Library.”
Step 3: Create a Unique UDV Instance Creating a unique UDV instance means identifying a new UDV, assigning it to a specific folder in the Object Manager, and deciding what type of UDV it will be (display or input). The Oracle database sequence generator automatically assigns a UDV ID. Further configuration is covered in subsequent sections.
To create a UDV instance, complete the following steps:
1. Click New UDV. The New UDV dialog box appears.
2. Enter the appropriate data in the UDV Tag and Description fields and then select the UDV type from the UDV Type drop-down list.
3. Select an owner group with which this UDV will be associated in the Group field.

The UDV Library
Thin-Client Configuration Guide: Basics 94
4. Click to choose an appropriate folder in the Select UDV Folder dialog box and then click Ok.
5. Click Ok in the New UDV dialog box.
Step 4: Add and Position Visual Controls You can add visual controls using the Design tab.
To add visual controls, complete the following steps:
1. If the UDV is not already onscreen, click Object Manager in the UDV Editor, select the UDV to edit, and then click Accept.
2. Right-click the Design tab and then choose the visual control to add. The Object Name dialog box appears.
The Controls menu appears. Visual controls appear at the top of the list. For more information on controls and their associated properties, see Appendix B, “UDV Properties.”
3. Enter a name for the object and then click Ok. The control appears in the Design tab.
Deltek recommends that you name a visual object after the label that identifies it. For example, if an edit or memo label is User Name, the object name can be UserName also. Object names cannot contain spaces.
4. Repeat steps 1 to 4 to add visual controls as needed.
5. To position a control(s), select it/them and then use the appropriate buttons to move and group controls as needed.
Step 5: Add Nonvisual Controls You can add nonvisual controls on both the Design tab and Non-visual Controls tab.
To add nonvisual controls, complete the following steps:
1. If the UDV is not already onscreen, click Object Manager in the UDV Editor, select the UDV to edit, and then click Accept.
2. Right-click the Design tab and then choose the Insert SQL option (SQL Transaction, SQL Source, or ParamSource) to use. The Object Name dialog box appears.
The Controls menu appears. Visual controls appear at the top of the list. For more information on controls and their associated properties, see Appendix B, “UDV Properties.”
3. Enter a name for the object and then click Ok. The control appears in the Non-visual Controls list in the Non-Visual Controls tab.
Deltek recommends that you name the object after the primary SQL ID with which this control will be associated.
4. Repeat steps 1 to 4 to add nonvisual controls as needed.
The UDV Library
Thin-Client Configuration Guide: Basics 95
Step 6: Assign High-Level UDV Properties You can assign high-level properties in the Design tab. These properties control the overall function of the UDV.
To assign high-level UDV properties, complete the following steps:
1. If the UDV is not already onscreen, click Object Manager in the UDV Editor, select the UDV to edit, and then click Accept.
2. Click a noncontrol (empty) area of the Design tab. The corresponding properties appear in the Property panel. Or, you can click UDV Properties at the top-right corner of the Nonvisual Controls tab.
3. Change or set properties as needed. Refer to Appendix B, “UDV Properties.”
Step 7: Assign Visual Control Properties You can assign visual control properties in the Design tab. Visual control properties fine-tune the appearance of the UDV.
To assign visual control properties, complete the following steps:
1. If the UDV is not already onscreen, click Object Manager in the UDV Editor, select the UDV to edit, and then click Accept.
2. Select a visual control. The corresponding properties appear in the Property panel.
3. Change or set properties as needed. Refer to Appendix B, “UDV Properties.”
Some properties require that you activate the data so that you can set the property correctly. If you receive a message telling you that a data source must be active, you must first link the control (see “Step 9: Linking Visual and Nonvisual Controls”) and then activate the data so that you can set the property (see “Step 10: Activating Data Sources”).
Step 8: Assign Nonvisual Control Properties You can assign nonvisual control properties in the Non-Visual Controls tab. Nonvisual controls manage the passing of data between a UDV and a data source(s).
To assign nonvisual control properties, complete the following steps:
1. If the UDV is not already onscreen, click Object Manager in the UDV Editor, select the UDV to edit, and then click Accept.
2. Select a nonvisual control in the Non-Visual Controls tab. The corresponding properties appear in the Property panel.
3. Change or set properties as needed. Refer to Appendix B, “UDV Properties.”
If the control is a SQL Source that will populate params for another SQL Source, change PublishParams to True (for Web Express Client, publishing is automatic). If there is a related Input UDV, enter the InputUDVId value.
Step 9: Link Visual to Nonvisual Controls Linking visual controls to nonvisual controls allows the UDV to display and process data properly. Linking is always done through the visual control.

The UDV Library
Thin-Client Configuration Guide: Basics 96
To link visual controls to nonvisual controls, complete the following steps:
1. If the UDV is not already onscreen, click Object Manager in the UDV Editor, select the UDV to edit, and then click Accept.
2. Right-click a visual control and then choose Data Link. The Data Link dialog box appears.
3. Choose the SQL statement to operate through the visual control in the SQL Transaction drop-down list.
4. If you are linking an edit or a memo, select name of the field to operate through the visual control in the Data Field Name drop-down list.
Navigator and grid controls do not need the data field name because navigators work with records and grids rely on the SQL statement to specify fields.
Step 10: Activate Data Sources Several visual control properties (e.g., Highlighting) require that the UDV be populated with active data before you can change property values. If a required data source is not active, a warning dialog box appears. Activating the data allows the UDV to display actual data while remaining in design mode.
If the associated nonvisual controls (SQL statements) require parameters, you must provide the parameters in the TestParams property of the corresponding SQL source before you activate the data.
After you activate the data sources, you can change all visual component properties. For example, for the SelectFields property, you can select fields, format data, and specify column headers.
To activate data sources, complete the following steps:
1. If the UDV is not already onscreen, click Object Manager in the UDV Editor, select the UDV to edit, and then click Accept.
2. Click Data Active in the UDV Editor tool window or click Data » Active on the System Manager menu bar.
To deactivate data sources, click Data Inactive or click Data » Inactive from the utility menu.
If you have specified parameters for the TestParams property, you must remove them prior to releasing the UDV for production use. For more information, see “Step 13: Removing TestParams Values.”
Step 11: Preview and Test the UDV You can test a UDV by previewing it in the Preview tab.
If no parameters are needed or if you have specified them in the TestParams property, the UDV appears as it will appear when Costpoint MES is running.
If parameters are needed and have not been specified in the TestParams property, the utility removes the WHERE clause and displays the configured functionality.
The UDV Library
Thin-Client Configuration Guide: Basics 97
To test a UDV, complete the following steps:
1. If the UDV is not already onscreen, click Object Manager in the UDV Editor, select the UDV to edit, and then click Accept.
2. Click the Preview tab.
3. Click another tab to exit test mode and return to design mode.
Step 12: Save the UDV To save a UDV, click Save or click UDV » Save in the System Manager. When you sage a UDV, the utility time stamps the sage operation and notes the version of the UDV editor. Later, if you modify that UDV using an editor whose version is earlier than that of the one used to create the UDV, the utility asks you to verify that you want to save changes performed with the earlier editor.
Step 13: Remove TestParams Values If you have specified values in the TestParams property in order to activate data sources and configure visual controls, you must clear each value before the UDV is officially released. To do this, access the TestParams property for each SQL source and transaction and then remove the associated field names and values. To access the TestParams property, see “Step 8: Assigning Nonvisual Control Properties.”
Edit a UDV After you create and save a UDV, you can change its settings except for the UDV type (display or input), which is permanent.
To display a UDV for viewing and editing, complete the following steps:
1. Click Object Manager in the UDV Editor tool window. The Object Manager appears.
2. Browse for the UDV to display and the click Accept. The UDV appears in the design tab.
Check UDV When you edit a UDV, (i.e., add or remove new fields), you can check it to make sure the orphaned configuration data has been properly cleaned up. You can do this using the Check UDV feature of the design tab.

The UDV Library
Thin-Client Configuration Guide: Basics 98
When you run a UDV check, the System Manager checks the UDV for errors.
If there are no errors, such as double data links, no error message appears.
If there are errors, an error message containing diagnostic information appears.
Admin Level Configuration for UDVs You can graphically configure UDVs using Costpoint MES in Design Mode. This allows you to
To move or resize UDV fields in Design Mode, complete the following steps:
1. Open Costpoint MES and then display the desired UDV.
2. Right-click a blank area of the UDV and then choose Design Mode from the context menu.
3. Use any of the following methods to edit fields:
Drag and drop a UDV field to a new location.
Select a field and then drag any of the handles to resize a UDV field.
4. When you are done, right-click a blank area of the UDV and then choose Exit Design Mode and save from the context menu.
To display or hide UDV fields in Design Mode, complete the following steps:
1. Open Costpoint MES and then display the desired UDV.
2. Right-click a blank area of the UDV and then choose Design Mode from the context menu.
3. Right-click a blank area of the UDV and then choose Choose Discrete Fields from the context menu. The Choose Fields dialog box appears.
4. Select the check boxes next to the fields to display in the UDV. Fields with cleared check boxes will be hidden in the UDV.
5. Click Ok.
6. When you are done, right-click a blank area of the UDV and then choose Exit Design Mode and save from the context menu.

The UDV Library
Thin-Client Configuration Guide: Basics 99
Design Mode data is linked to a data element identified as user type. Multiple versions of Design Mode data can be maintained and managed in the client Diagnostics dialog box in the Design Mode tab.
The new DesignMode.DefaultUserType IniLib property setting defines which user type is applied when the client application is launched. The default value of DefaultUserType is @Default.TheDefaultUserType is consistent throughout the application session.
Delete a UDV Deleting a UDV removes the UDV instance from the database.
To delete a UDV, complete the following steps:
1. Display the UDV to delete and then click Delete UDV. A verification message box appears.
2. Click Ok.
Export UDV Library Entries You can export UDV Library entries using the following methods:
Copy entries to another database
Copy entries to a text file
Both of these methods a done using in the UDV Library window. This opens the Export UDV dialog box. Only UDVs displayed in the dialog box can be loaded for export.
Export UDV Dialog Box Screen Controls
Screen Control Description
Export to This field displays the path and file name of the SQL script file to which
selected statements are copied. You can set this path using .
Select a Filename. Click this icon to display the SQL Script Filename dialog box and set the path and name of the SQL script file.
View. Click this icon to launch Notepad to view the specified SQL script file in the Export to field.
Delete. Click this icon to delete any existing SQL script file having the same file name as that in the Export to field. If you save an SQL script file, the export function appends the selected entries to the existing file.
Create individual files using object ID
Select this check box to export the selected record(s) to a text file, naming the file according to the record name and object ID: RecordName-ObjectId.sql.
For example: MySql—MF1_00011.sql

The UDV Library
Thin-Client Configuration Guide: Basics 100
Screen Control Description
Refresh. Click this icon to refresh the window.
Search. Click this icon to display the Lookup dialog box and search for and select specific statements using text searches on the UDV ID.
Select Core IDs. Click this icon to select all CORE entries only.
Export. Click this icon to create the SQL script file or text file(s).
See “Exporting Entries to Another Database” and “Exporting Entries to a Text File.”
Export UDV Library Entries to Another Database When you export one or more UDV Library entries to another database, the export function creates an SQL script containing selected UDVs. When you run this script in the selected database, the script copies the UDVs to the new database.
To export UDV Library entries to another database, complete the following steps:
1. Click Export in the UDV Library tool window. The Export UDV dialog box appears.
2. Select the UDVs to export in the Entries window—or click and search for specific UDVs by UDV ID.
3. Enter the path and filename of the export SQL script in the Export to field—or click and browse existing directories for the SQL script.
If you save to an existing SQL script file, the export function appends the selected UDV(s) to the existing file.
If the file already exists but you do not want to append statements to this file, click . When you save, the export function creates a new file.
4. Select the Delete entries with the same ID and Add reference to UDV in folders check boxes as necessary and then click .
5. Open the Run SQL Script tool and connect to the target database.
6. Run the SQL script you created. See “Running a SQL Script.”
Export UDV Library Entries to a Text File When you export one or more UDV Library entries to a text file, the System Manager creates one file for each selected entry. The filename of the text file is a hyphenated combination of the UDV record name and the object ID (e.g. UpdMechTypes-MF1_00483.Udv).
To export a UDV Library entry to a text file, complete the following steps:
1. Click Export in the UDV Library Editor window. The Export UDV dialog box appears.
The UDV Library
Thin-Client Configuration Guide: Basics 101
2. Select the UDVs to export in the Entries window—or click and search for specific UDVs by UDV ID.
3. Enter the path and filename of the text file in the Export to field—or click and browse existing directories for the text file.
4. Click .
Multirecord Transaction You can configure a display UDV so that the user can update multiple records at one time. For example, you want the user to be able to collect data for several parts in a single action.
Multirecord transactions are similar to cached transaction updates but differ in the following ways:
A multirecord transaction is a function of a display UDV. It is designed to quickly update one or two attributes of multiple records that are alike. When a user clicks Ok, the invoked input UDV executes a single SQL statement—containing identical parameters—against each selected record.
A cached transaction update is a function of an invoked input UDV. It is designed to quickly update many attributes of multiple records that are alike. When a user click Ok, the input UDV executes a single SQL statement—but with record-specific parameters—against each cached record. For more information on cached transaction updates, see “Input Matrix UDVs.”
You can configure multirecord transaction using any of the following methods:
Use the Edit button of the display UDV. For this type of update, you need to configure the input UDV only.
Use the Other Commands button (ellipsis button). For this type of update, you must configure both the display and input UDV.
In each case, when a user clicks Ok in the display UDV, Costpoint MES applies specific dialog box parameters to each selected record. If the BusyDialogenabled property in the [Common] section of the Initialization Library record is enabled, “Working…please wait” displays while Costpoint MES processes the transaction.
Before you configure a display UDV, make sure that you have done the following:
Launch the UDV editor and connect to the desired database.
Make sure that the display UDV containing the SQLSource already exists.
Make sure that an input UDV is already associated with the display UDV.
To configure a multirecord transaction using the Edit button, complete the following steps:
1. Open the display UDV to configure.
2. Display the referenced input UDV.
3. In the Non-visual Controls tab, select the SQL transaction name and then set the Multirecord Update property to True in the Property panel.
To configure a multirecords transaction using the Other Commands, complete the following steps:
1. Open the display UDV to configure.
The UDV Library
Thin-Client Configuration Guide: Basics 102
2. In the Non-visual controls tab, select the SQL source name and then click Other Commands in the Property panel. The Define Other Commands dialog box appears.
3. Click Add, enter the name of the new command in the dialog box that appears, and then press ENTER.
4. Select the Multirecord Transaction option in the Command Type area and then enter the corresponding input UDV ID in the Input UDV ID field.
5. Set the Transaction Type field to the appropriate transaction (Input or Update)
6. Display the referenced input UDV.
7. Select the SQL transaction name in the Non-visual Controls tab.
8. Set the Multirecord Update property to True in the Property panel.
Group Transaction You can configure a display UDV so that a user can select multiple records in a grid to change a single parameter (i.e. to update the status of multiple work plans). The group transaction calls column values identifying each selected record and passes them as a delimited list to a list control in the input UDV. The input UDV then executes a single transaction against each record in the list.
Before you configure a display UDV, make sure that you have done the following:
Launch the UDV editor and connect to the desired database.
Make sure that the display UDV containing the SQLSource already exists.
Make sure that an input UDV containing a list control already exists.
To configure a group transaction, complete the following steps:
1. Open the display UDV to configure
2. In the Non-visual controls tab, select the SQL source name and then click Other Commands in the Property panel. The Define Other Commands dialog box appears.
3. Click Add, enter the name of the new command in the dialog box that appears, and then press ENTER.
4. Select the Group Transaction option in the Command Type area and then enter the corresponding input UDV ID in the Input UDV ID field.
5. Set the Transaction Type field to the appropriate transaction (Input or Update)
6. Enter the name of the column that will identify each selected record in the List Field Name field. This value will constitute a single, delimited parameter that will populate the list control of the input UDV.
7. Enter the delimiter character that will separate values in the List Delimiter field. This character must match the delimiter defined for the list control in the input UDV.
Support for Images/Icons in Display UDV Grids You can use the @StdMarkup(<col-name or balnk>) function in the Display Source Field field of the UDV Maintenance SelectedFields dialog. Col-name references the column which contains a value that correlates to the name of an image in the Initialization Library’s StdMarkup section. If blank—as in @StdMarkup()—is used, the value of the current column is used to lookup the image in StdMarkup.
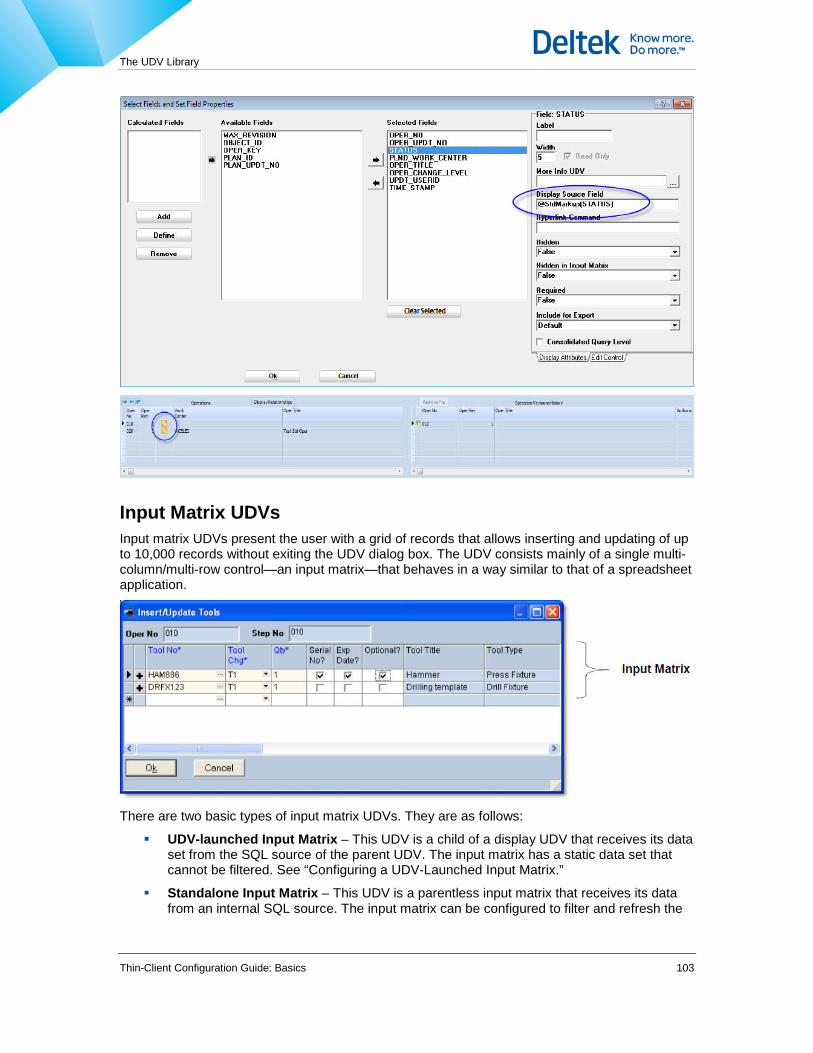
The UDV Library
Thin-Client Configuration Guide: Basics 103
Input Matrix UDVs Input matrix UDVs present the user with a grid of records that allows inserting and updating of up to 10,000 records without exiting the UDV dialog box. The UDV consists mainly of a single multi-column/multi-row control—an input matrix—that behaves in a way similar to that of a spreadsheet application.
There are two basic types of input matrix UDVs. They are as follows:
UDV-launched Input Matrix – This UDV is a child of a display UDV that receives its data set from the SQL source of the parent UDV. The input matrix has a static data set that cannot be filtered. See “Configuring a UDV-Launched Input Matrix.”
Standalone Input Matrix – This UDV is a parentless input matrix that receives its data from an internal SQL source. The input matrix can be configured to filter and refresh the

The UDV Library
Thin-Client Configuration Guide: Basics 104
data set. If an input matrix UDV is to be launched from a scripted UDV, it must be a standalone type. See “Configuring a Standalone Input Matrix UDV.”
All input matrix UDVs have two basic modes. Choose the appropriate mode based on the records in the input matrix. They are as follows:
Cached Transaction Mode – In this mode, data can be entered for multiple rows before it is committed to the database. There are either no dependencies or weak dependencies between rows.
Single Transaction Mode – In this mode, data can be entered for only a single row before it is committed to the database. There are strong dependencies between rows.
An input matrix UDV with memo cells contain an ellipsis button that, when clicked, opens a dialog box that displays the complete field value. This allows a user to fully view and edit the cell contents. See Figure 5-6 for sample input matrix view.
The following figure is an example of an input matrix with long text memo cells.
How an Input Matrix UDV Works An input matrix UDV is a modal dialog box with two main areas: the header area and the input matrix.
The header area consists of fields that are siblings to columns in the input matrix. These fields should contain the same value for every row. The following are the two types of header area:
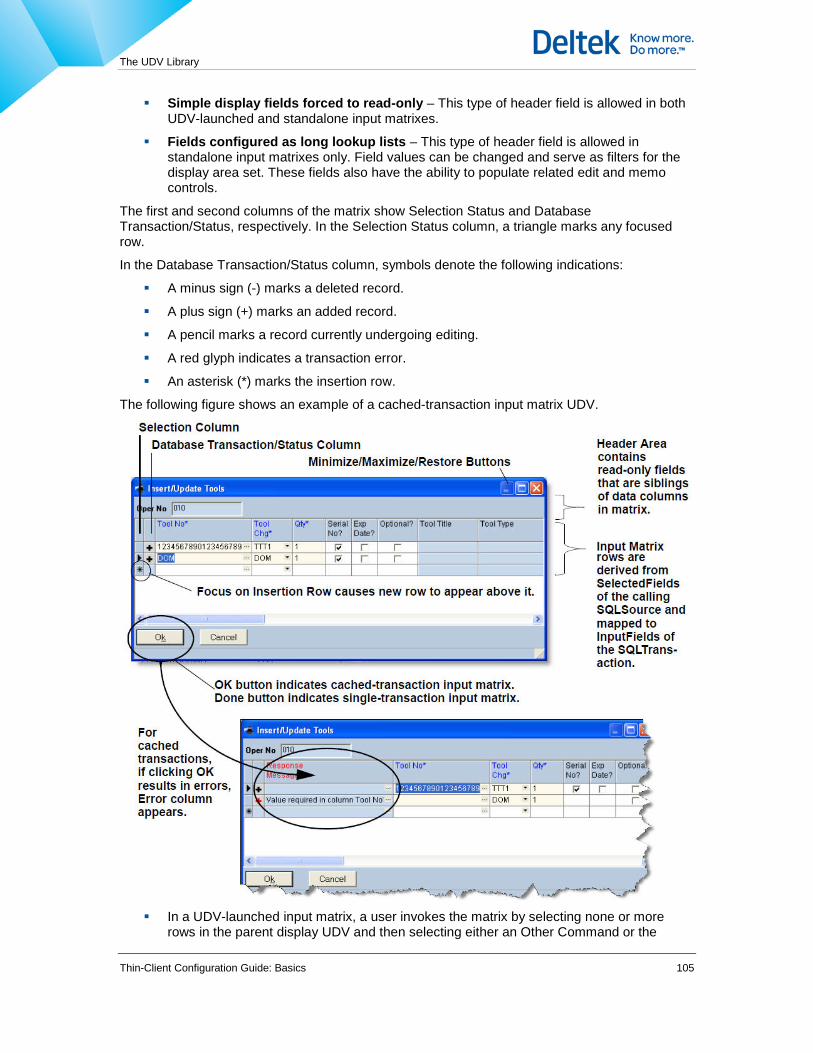
The UDV Library
Thin-Client Configuration Guide: Basics 105
Simple display fields forced to read-only – This type of header field is allowed in both UDV-launched and standalone input matrixes.
Fields configured as long lookup lists – This type of header field is allowed in standalone input matrixes only. Field values can be changed and serve as filters for the display area set. These fields also have the ability to populate related edit and memo controls.
The first and second columns of the matrix show Selection Status and Database Transaction/Status, respectively. In the Selection Status column, a triangle marks any focused row.
In the Database Transaction/Status column, symbols denote the following indications:
A minus sign (-) marks a deleted record.
A plus sign (+) marks an added record.
A pencil marks a record currently undergoing editing.
A red glyph indicates a transaction error.
An asterisk (*) marks the insertion row.
The following figure shows an example of a cached-transaction input matrix UDV.
In a UDV-launched input matrix, a user invokes the matrix by selecting none or more
rows in the parent display UDV and then selecting either an Other Command or the

The UDV Library
Thin-Client Configuration Guide: Basics 106
Insert, Edit, or Add/Delete button. If no rows are selected and and UpdateSqlId or DeleteSqlId is assigned, the input matrix loads all rows. If one or more rows are selected, the input matrix loads only the selected rows. The user then selects a configured command in the input matrix UDV.
In a standalone input matrix, the matrix is typically launched by a session event or from a Speed Bar button in the Shell. It appears with all rows as specified in the internal SQL source.
An input matrix works according to the following principles in both single transaction and cached transaction modes:
The number of columns and row order in the matrix is fixed and derived from the SelectedFields property of the SQL source. The matrix recognizes the Label and Width subproperties of the SelectedFields property and suppresses any column of the Hidden in Input Matrix property is enabled or evaluated as True when the value is an expression.
Double-clicking any column resizes the width to accommodate the largest string/data value in any visible record. Local menu options can also resize columns.
Columns are mapped to the SQLTransaction InputFields property for lookups, validation, default values, etc. All existing input UDV field attributes are supported.
In a standalone input matrix, if the header area contains filtering fields, selecting a new value in any field does the following:
Refresh the internal SQL source and displays a new data set.
Refresh any dependent SQL sources (i.e. any SQL source in which the WHERE clause has parameters in common with the filtering field).
Populates related controls.
Selecting a new value in any filter field performs the same logic as clicking Ok in cached-transaction UDVs or Done in single transaction UDVs.
The SQL source DeleteSqlId property deletes rows after a confirmation prompt.
The SQLTransaction UpdateSqlId property updates rows.
The SQLTransaction InsertSqlId property inserts a new row at the bottom of the grid only. Inserting a row between existing rows is not supported. On insert, default and PopulateForInsert values are copied from the previous rows.
Completed transaction cannot be undone.
Scan characters are passed to the control according to the high-level IMScanAction value. The values are as follows:
Value Description
saIMAccept Accepts scan into the current cell and remains positioned in the cell.
saIMOK Accepts scan into the current cell and performs the OK button action.
saIMTab Accepts scan into the current cell and moved one cell to the right.
saIMDown Accepts scan into the current cell and moves one cell down.
saIMIgnore Rejects scan data is the use of the scanner is not allowed.

The UDV Library
Thin-Client Configuration Guide: Basics 107
Value Description
saIMScanOnly Accepts scan into the current cell while ignoring keyboard input.
The matrix has the following behavior in single transaction mode only:
In a UDV-launched Input Matrix, the user invokes the matrix by selecting none or more rows in the parent Display UDV and then selecting either an Other Command or the Insert, Edit, or
Add/Edit/Delete button. If no rows are selected and an UpdateSqlId or DeleteSqlId is assigned (see below), the Input Matrix loads all rows. If one or more rows are selected, the Input Matrix loads only selected rows. The user then selects a configured command in the Input Matrix UDV.
In a standalone Input Matrix, the matrix is typically launched by a session event or from a Speed Bar button in the Shell. It appears with all rows as specified by the internal SQL Source.
The input matrix works according to the following principles in both Single Transaction and Cached Transaction modes:
The number of columns and row order in the matrix is fixed and derived from the SelectedFields property of the SQL Source. The matrix recognizes the Label and Width subproperties of the SelectedFields property and suppresses any column if the Hidden in Input Matrix subproperty is enabled or evaluated as True when the value is an expression.
Double-clicking any column resizes the width to accommodate the largest string/data value in any visible record. Local menu options can also resize columns.
Columns are mapped to the SQLTransaction InputFields property for lookups, validation, default values, etc. All existing Input UDV field attributes are supported.
In a standalone input matrix, if the header area contains filtering fields, selecting a new value in any field does the following:
Refreshes the internal SQL Source and displays a new data set.
Refreshes any dependent SQL Sources, i.e., any SQL Source in which the WHERE clause has parameters in common with the filtering field.
Populates related controls. Selecting a new value in any filter field performs the same logic as clicking the OK button in Cached-transaction UDVs, or the Done button in Single-transaction UDVs (see below).
The SQL Source DeleteSqlId property deletes rows after a confirmation prompt.
The SQLTransaction UpdateSqlId property updates rows.
The SQLTransaction InsertSqlId property inserts a new row at the bottom of the grid only (inserting a row between existing rows is not supported). On insert, default and PopulateForInsert values are copied from the previous row.
Completed transactions cannot be undone.
Scan characters are passed to the control according to the high-level IMScanAction value. Values are as follows:
saIMAccept Accepts scan into current cell and remains positioned in cell.
saIMOK Accepts scan into current cell and performs OK button action.
saIMTab Accepts scan into current cell and moves one cell to the right.
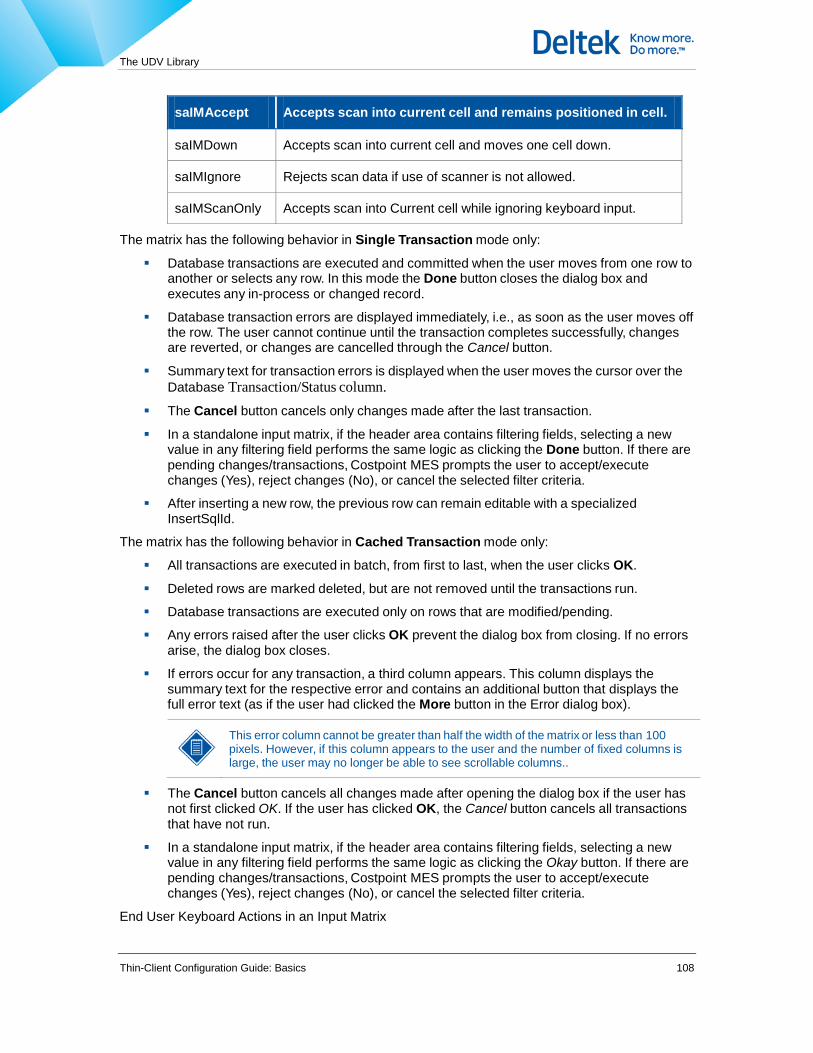
The UDV Library
Thin-Client Configuration Guide: Basics 108
saIMAccept Accepts scan into current cell and remains positioned in cell.
saIMDown Accepts scan into current cell and moves one cell down.
saIMIgnore Rejects scan data if use of scanner is not allowed.
saIMScanOnly Accepts scan into Current cell while ignoring keyboard input.
The matrix has the following behavior in Single Transaction mode only:
Database transactions are executed and committed when the user moves from one row to another or selects any row. In this mode the Done button closes the dialog box and executes any in-process or changed record.
Database transaction errors are displayed immediately, i.e., as soon as the user moves off the row. The user cannot continue until the transaction completes successfully, changes are reverted, or changes are cancelled through the Cancel button.
Summary text for transaction errors is displayed when the user moves the cursor over the Database Transaction/Status column.
The Cancel button cancels only changes made after the last transaction.
In a standalone input matrix, if the header area contains filtering fields, selecting a new value in any filtering field performs the same logic as clicking the Done button. If there are pending changes/transactions, Costpoint MES prompts the user to accept/execute changes (Yes), reject changes (No), or cancel the selected filter criteria.
After inserting a new row, the previous row can remain editable with a specialized InsertSqlId.
The matrix has the following behavior in Cached Transaction mode only:
All transactions are executed in batch, from first to last, when the user clicks OK.
Deleted rows are marked deleted, but are not removed until the transactions run.
Database transactions are executed only on rows that are modified/pending.
Any errors raised after the user clicks OK prevent the dialog box from closing. If no errors arise, the dialog box closes.
If errors occur for any transaction, a third column appears. This column displays the summary text for the respective error and contains an additional button that displays the full error text (as if the user had clicked the More button in the Error dialog box).
This error column cannot be greater than half the width of the matrix or less than 100 pixels. However, if this column appears to the user and the number of fixed columns is large, the user may no longer be able to see scrollable columns..
The Cancel button cancels all changes made after opening the dialog box if the user has not first clicked OK. If the user has clicked OK, the Cancel button cancels all transactions that have not run.
In a standalone input matrix, if the header area contains filtering fields, selecting a new value in any filtering field performs the same logic as clicking the Okay button. If there are pending changes/transactions, Costpoint MES prompts the user to accept/execute changes (Yes), reject changes (No), or cancel the selected filter criteria.
End User Keyboard Actions in an Input Matrix

The UDV Library
Thin-Client Configuration Guide: Basics 109
Command User Action Matrix Response
Select row Click leftmost column of row. Row is highlighted and triangle appears in the leftmost column of selected row.
Select multiple rows Click and drag leftmost column of contiguous rows.
Triangle appears in the leftmost column of selected rows.
Delete row Select row (see above) and select Delete on local menu or press [Ctrl]+[Del].
Single Transaction: Row is marked with minus sign in Database Transaction column and deleted after confirmation prompt when user focuses new row. Cached Transaction: Row is marked with minus sign, but not removed until user clicks OK and responds to confirmation prompt.
Insert/Add row Focus Insertion row (asterisked row) through any mouse or keyboard action.
New row appears above Insertion (*) row. New row contains default and PopulateForInsert values from previous row, and is marked with a plus (+) sign in Database Transaction column.
Edit data Type or insert new data in cell. Pencil glyph appears in Database
Transaction column.
Reset row values to previous values (pre transaction)
Select row (see above) and select Revert from local menu or press [Ctrl]+[T].
Row values are reset.
View transaction errors Single Transaction: Move cursor over Database Transaction column. Cached Transaction: Move cursor over third column/click error button.
Single Transaction: Summary text appears in bubble hint. Cached Transaction: Summary text appears in bubble hint. Cell button displays full error text.
View row diagnostics [Ctrl]-right-click on any column heading
Parameters values appear for the currently focused row.
Users can also use the local menu as shown in the following figure.

The UDV Library
Thin-Client Configuration Guide: Basics 110
When viewing Input Udv Matrices for simple UDVs, the Thin-Client automatically adjusts the dialog to fit the columns and rows (when possible) to remove generated excess whitespace around the records..
Local Menu Options for Input Matrixes
Menu Option User Action Matrix Response
Delete User selects row, right-clicks, and then selects Delete option
Single Transaction: Selected row is marked with minus sign in Database Transaction column and deleted after confirmation prompt when user focuses new row. Cached Transaction: Selected Row is marked with minus sign, but not removed until user clicks OK and responds to confirmation prompt.
Hide Row User selects row, right-clicks, and then selects Hide Row option
Selected row disappears from matrix, but remains in embedded Data Collection and also reappears when matrix is reopened.
Restore Original Values
User selects row, right-clicks, and then selects Restore Original Values option
Selected row values are reset to values that populated row when matrix first opened.
Undo User inputs a value in any cell, right- Typing or insertion is undone for current cell

The UDV Library
Thin-Client Configuration Guide: Basics 111
Menu Option User Action Matrix Response
clicks, and selects Undo option. only.
Freeze/ Unfreeze Row
User selects row, right-clicks, and then selects Freeze/Unfreeze Row option.
This option is a toggle.
Costpoint MES inserts red rule under row and fixes it and all other previous rows in place, causing them to be visible regardless of scrolling position.
When any rows are frozen, keyboard keys such as [Home] and [End] operate only on visible, unfrozen cells.
Freeze/ Unfreeze Column
User selects row, right-clicks, and then selects Freeze/Unfreeze Column option.
This option is a toggle.
Costpoint MES inserts red rule to the right of column and fixes it and all other previous columns in place, causing them to be visible regardless of scrolling position.
When any columns are frozen, keyboard keys such as [Home] and [End] operate only on visible, unfrozen cells.
This setting the overrides IMFixedColCount property of the UDV. Note: For cached transactions, if the user freezes many columns—or wide columns—and then an error column appears on hitting OK, scrollable rows may no longer be visible.
Size Column
Width to Data
User clicks in column and selects Size Column Width to Data option.
Selected column resizes to display largest visible text value.
Size All Columns to Data
User clicks anywhere in grid and selects Size All Columns to Data option.
All columns resize to display longest visible text values.
Reset Column Order and Widths
After having changed column widths by dragging the cursor, user right-clicks and selects Reset Column Order and Widths option
Columns order and column widths revert to default values. To reset column order and width in all grids, click the arrow in the User Id field of the shell, and then click the Clear Grid Settings button in the Change User Preferences dialog.
Resize/Move Columns
Set the following in Ini from
System manager:
Preferences.Grids.ResizePriv=RES
_PRIV
Preferences.Grids.MovePriv= MOVE_PRIV
These operations are enabled when the respective privs are undefined or the current user has the application priv defined by Preferences.AdminPriv
Hide/Show Response
User right-clicks in any cell and selects Hide/Show Response
Response Messages column appears next to first key column. If present, it disappears.

The UDV Library
Thin-Client Configuration Guide: Basics 112
Menu Option User Action Matrix Response
Messages Messages option.
This option is a toggle.
Copy Row Values
User selects row, right-clicks, and then selects Copy Row Values option
Values for selected row are copied to
Clipboard.
Pasted values are assigned to a cell according to the data-linked column name. Nonmatching column names are ignored.
Paste Row Values
Immediately after a Copy Row Values action, user selects target row, right-clicks, and then selects Paste Row Values option.
Row values are pasted in target row.
Pasted values are assigned to a cell according to the data-linked column name. Nonmatching column names are ignored.
Fill from Last Cell
User left clicks source cell, right clicks target cell in same row, and then selects Fill from Last Cell option.
Value from source cell is copied and assigned to all blank cells intervening between source and target cells.
Paste from Comma/Tab Delimited Data
User copies comma- and tab- delimited data string to clipboard (e.g., from Excel), right-clicks any cell, and selects Paste from Comma/ Tab Delimited Data option.
In Import-from-Clipboard action, row values are pasted ordinally (not according to column name) above insertion row. Read-only or protected cell values are ignored.
New rows are added as needed.
Export to File User selects Export to File option. Grid Export dialog box appears. After input of file location, matrix is saved as .Csv file.
Export Excel to Clipboard
User selects Export Excel to Clipboard.
Matrix is copied in Excel format to Clipboard.
Configuring a UDV-Launched Input Matrix A UDV-launched input matrix differs from a standalone input matrix in two ways:
The displayed data set is derived from the SQL Source of the parent Display UDV.
The header area of the matrix can contain only readonly fields, which cannot filter the displayed data set. (To create a standalone input matrix, which can filter the displayed data set, see “Configuring a Standalone Input Matrix UDV.”)
You can launch an Input Matrix from the Navigator in a Display UDV two basic ways:
From an Other Commands (Ellipsis) button
From an Insert and/or Edit button (as of Thin Client 4.1.8.0)
You cannot launch this type of Input Matrix from a Scripted UDV; you must use a standalone-type that contains an internal SqlSource.

The UDV Library
Thin-Client Configuration Guide: Basics 113
The following procedures show you how to configure a UDV-launched Input Matrix UDV and link it to the parent Display UDV. Procedures assume that the Display UDV already exists and the following steps have already been taken:
The Insert, Edit, or Other Commands button has been inserted in the Navigator of the Display UDV. In the case of an Other Command, you will configure the command after creating the Input Matrix.
The Display UDV has been linked to a SQL Source with the following property set:
SelectSqlId — The SQL ID of the SELECT statement producing the input matrix data set.
DeleteSqlId — The SQL ID of the statement that deletes a row of the input matrix.
SelectedFields — The name/column width/hide subproperties of individual columns in the input matrix. At this point, header columns can be hidden, or you can hide the fields when you link the Display UDV to the Input UDV.
PublishParams — True.
Procedures also assume that you have created the following properties for the SQLTransaction:
UpdateSqlId — The SQL ID of the statement that updates a row of the input matrix.
InsertSqlId — The SQL ID of the statement that inserts a new row in the input matrix.
When you insert a new row, the new row contains default and PopulateForInsert values from the previous row, and is marked with a plus (+) sign in Database Transaction column. You can make the previous row editable in Single Transaction mode (only) with a specialized SQL statement.
To configure a UDV-launched Input Matrix UDV, complete the following steps:
1. Create a new UDV instance and set the type to Input Matrix.
When you set the UDV type to Input Matrix, only the Header area displays on the Design and Preview tabs. The UDV editor does not display the input matrix control while you configure it.
2. In the Design tab, position the cursor in the beveled rectangle and left-click. High-level UDV properties appear in the Property panel.
3. Set the following properties as needed.
Caption The title of the Input Matrix dialog box.
DynamicFieldAttributes
Dynamically hides/unhides input UDV fields based on changes to field contents. When checked, it performs expression evaluation of the InputFields Hidden property whenever the user leaves any cell edit in an

The UDV Library
Thin-Client Configuration Guide: Basics 114
Caption The title of the Input Matrix dialog box.
input matrix. The params provided to the expression parser consist of transaction params plus instantaneous field contents, the latter of which have precedence.
IgnoreAuxParams By default, input UDVs merge the global param values from the @AuxParams param source into the context params list, i.e. into @ScriptParams. Uncheck IgnoreAuxParams to prevent this behavior.
IMAllowHeaderChanges
In an Input Matrix UDV, the IMAllowHeaderChanges checkbox property determines whether the user is able to change field values in the header area of the UDV. If this property is unchecked which is the default, then all of the fields in the header area are set to read-only.
IMAllowRowReedit
Controls re-editing of successfully completed row transactions. The default value is true. When set to false, the associated row is set to read- only and all fields are set to the read-only color after any successful transaction is executed. This applies to both ttSingleTransaction and ttCached.
IMBatchCommit When set to True, and when Transaction Type = ttCached, commits all changes in a single database transaction.
IMBatchTransactions
(This and nearby properties seem to be duplicated in CMv1_B_UDV.fm. If this is on purpose then please get my revisions from there!)
Batches individual EXECs in a single call to the MiddleTier. This speeds up performance when multiple rows are processed.
Middle tier support is reported to clients via call to method.
Client UDV must also set the new UDV property, IMBatchTransactions=True (Ideally, middle tier can execute the transactions using either method, by detecting the format of the incoming http content)
Batch transaction process optimization only occurs when all transactions in the group are of the same type, insert or update or delete. WIN-2993
IMBeginExecSqlId Provides a way to setup data for the entire group of transactions to be processed.
Executes just before performing the transaction for the first executed row in the Input Matrix.
Runs only once for each time the Input Matrix is called, i.e. if an error is raised by one or more of the row transactions and the user makes changes and re-executes the data via Okay, Next, etc., this sql does not execute again.
All SqlTransaction and row level values of the first executed row are provided as params to this transaction.
Reserved param @RowCount is automatically added to available transaction params.
When assigned, executes regardless of TransactionType; however, probably only useful for ttCachedTransaction.
Any outbound param values from this transaction are added to and will overwrite matching param values of every row transaction. These

The UDV Library
Thin-Client Configuration Guide: Basics 115
Caption The title of the Input Matrix dialog box.
outbound params values are also applied with precedence over ScriptParams and thus eventually to the values returned by the hosting UDV dialog. WIN-2663
IMBlankRowValue sHavePrecedence
Gives blank input matrix row values precedence over context params of the same name. The default is false.
IMDeleteSqlId For input matrix UDVs, this specifies a different delete Sql Id than the delete Sql Id identified on the associated SqlSource. If this value is blank, then the behavior reverts to prior, i.e. use the DeleteSqlId from the associated SqlSource. WIN-4326
IMDirtyFlagWhileLoading
Causes the row to be automatically put in the edit state when, for example, Default to Single changes the value in the cell from that which was initially loaded.
IMEndExecSqlId Can be used to perform cleanup after all rows transactions are processed or to submit session events for refresh, invoke, etc.
Executes immediately after performing the last executed row in the Input Matrix, and only if no errors are raised from the time of clicking Okay, Next, etc. (therefore, runs only once for each time the Input Matrix is called because the dialog is subsequently closed in this case).
All SqlTransaction and row level values of the last executed row are provided as params to this transaction
Reserved param @RowCount is automatically added to available transaction params
When assigned, executes only for TransactionType of ttCachedTransaction.
Any outbound param values from this transaction are added to and will overwrite matching param values from the outbound params provided by BeginExecSqlId. These outbound params values are also applied with precedence over ScriptParams and thus eventually to the values returned by the hosting UDV dialog. WIN-2663
IMFixedColCount On opening the UDV, the number of columns that are fixed/locked in place regardless of the scrolling position. Valid values are integers representing the total number of fixed columns starting from column 1. A value of -1 (minus one) disables the property.
When any columns are locked, keyboard keys such as [Home] and [End]
operate only on visible, unlocked cells.
This number is overridden by subsequent Unlock Column and Lock Column actions as initiated through the local menu of the UDV.
IMForceTransactions
The action to be taken against any unchanged rows/records:
ftFalse - Performs no action.
ftInsert - Performs an INSERT according to the InsertSqlId of the
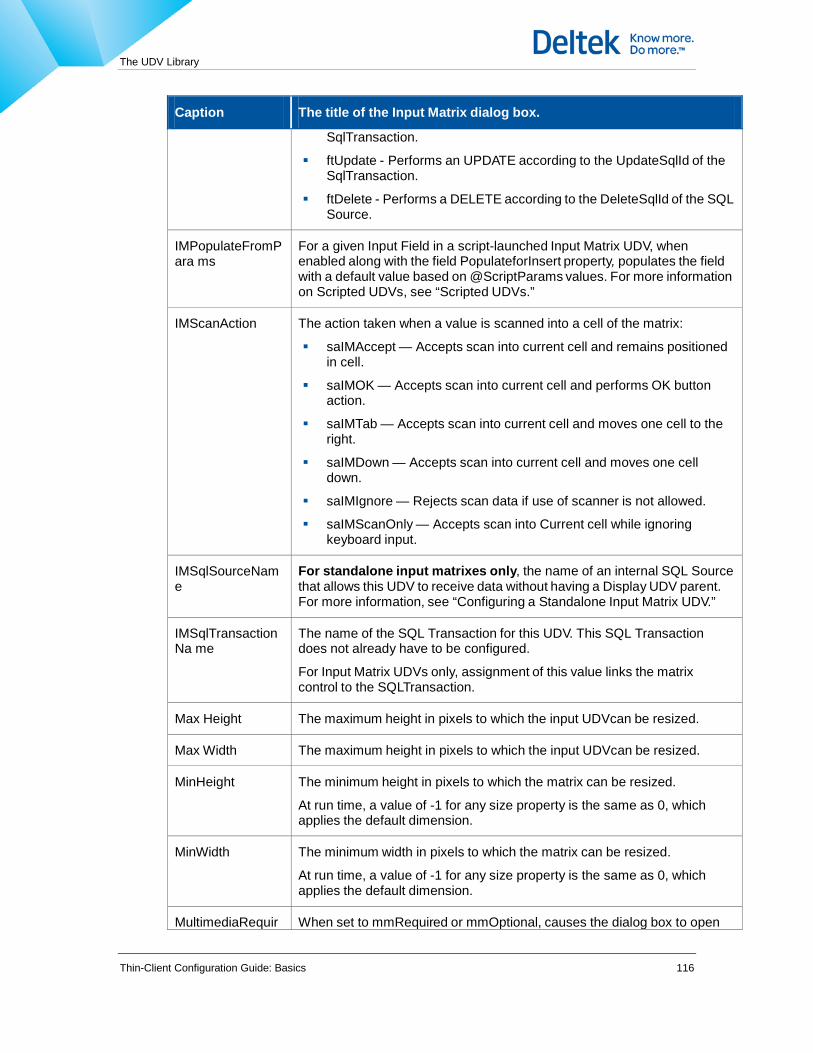
The UDV Library
Thin-Client Configuration Guide: Basics 116
Caption The title of the Input Matrix dialog box.
SqlTransaction.
ftUpdate - Performs an UPDATE according to the UpdateSqlId of the SqlTransaction.
ftDelete - Performs a DELETE according to the DeleteSqlId of the SQL Source.
IMPopulateFromPara ms
For a given Input Field in a script-launched Input Matrix UDV, when enabled along with the field PopulateforInsert property, populates the field with a default value based on @ScriptParams values. For more information on Scripted UDVs, see “Scripted UDVs.”
IMScanAction The action taken when a value is scanned into a cell of the matrix:
saIMAccept — Accepts scan into current cell and remains positioned in cell.
saIMOK — Accepts scan into current cell and performs OK button action.
saIMTab — Accepts scan into current cell and moves one cell to the right.
saIMDown — Accepts scan into current cell and moves one cell down.
saIMIgnore — Rejects scan data if use of scanner is not allowed.
saIMScanOnly — Accepts scan into Current cell while ignoring keyboard input.
IMSqlSourceName
For standalone input matrixes only, the name of an internal SQL Source that allows this UDV to receive data without having a Display UDV parent. For more information, see “Configuring a Standalone Input Matrix UDV.”
IMSqlTransactionNa me
The name of the SQL Transaction for this UDV. This SQL Transaction does not already have to be configured.
For Input Matrix UDVs only, assignment of this value links the matrix control to the SQLTransaction.
Max Height The maximum height in pixels to which the input UDVcan be resized.
Max Width The maximum height in pixels to which the input UDVcan be resized.
MinHeight The minimum height in pixels to which the matrix can be resized.
At run time, a value of -1 for any size property is the same as 0, which applies the default dimension.
MinWidth The minimum width in pixels to which the matrix can be resized.
At run time, a value of -1 for any size property is the same as 0, which applies the default dimension.
MultimediaRequir When set to mmRequired or mmOptional, causes the dialog box to open

The UDV Library
Thin-Client Configuration Guide: Basics 117
Caption The title of the Input Matrix dialog box.
ed with a multimedia authoring panel at the bottom.
RequireLogonExpr ession
When enabled (True), converts this UDV to a single-transaction logon UDV: On activation of the UDV, Costpoint MES presents a logon dialog box, requiring a second user to log on before completing the UDV transaction. Note: The [Common].DisableUDVRequireLogon property overrides all instances of the RequireLogon property.
TransactionType The mode in which the matrix operates, ttsingle for Single Transaction or ttCached for Cached Transaction. You can change the transaction type at any time. It affects end-user behavior, but not configuration.
4. In the Design tab, add edit controls to display header fields. As a reminder, these fields must correspond to columns that contain the same value for every row in the SQL Source/SelectedFields data set. Fields are automatically set to read-only. In the Display UDV, you will set these fields to Hide in Input Matrix.
5. Link header-field edit controls to the SQL Source of the Display UDV.
6. In the Non-visual Controls tab, add the SQLTransaction and properties as needed:
InputFields Columns/fields that appear in the input matrix. Notes
You can configure a column to support an RTF control. If [Common].DisplayInputMatrixYNasCheckbox is enabled, any column configured as a List Control Type and having 2 valid values will contain a check box.
InsertSqlId The SQL ID that inserts a new row at the bottom of the grid only.
The new row will contain default and PopulateForInsert values from the previous row.
In Single Transaction mode only, to make the previous/parent row editable after an insert transaction, in the Exec statement, suffix the key- value parameter with a bang character (!):
Exec do_insert(:DATA,:KEY!)
On executing the Insert transaction, the KEY! parameter causes the stored procedure to return the KEY value to the corresponding cell of the parent row.
UpdateSqlId The SQL ID that updates rows
To link the Input Matrix UDV to the parent Display UDV, complete the following steps:
1. Display the parent Display UDV.
2. If you are launching the Input Matrix as an Other Command, configure the Other Command using the UDV ID of the Input Matrix.
3. If you are launching the Input Matrix from an Insert or Edit button, in the Non-visual Controls tab, select the SQL Source and set the following properties as needed:
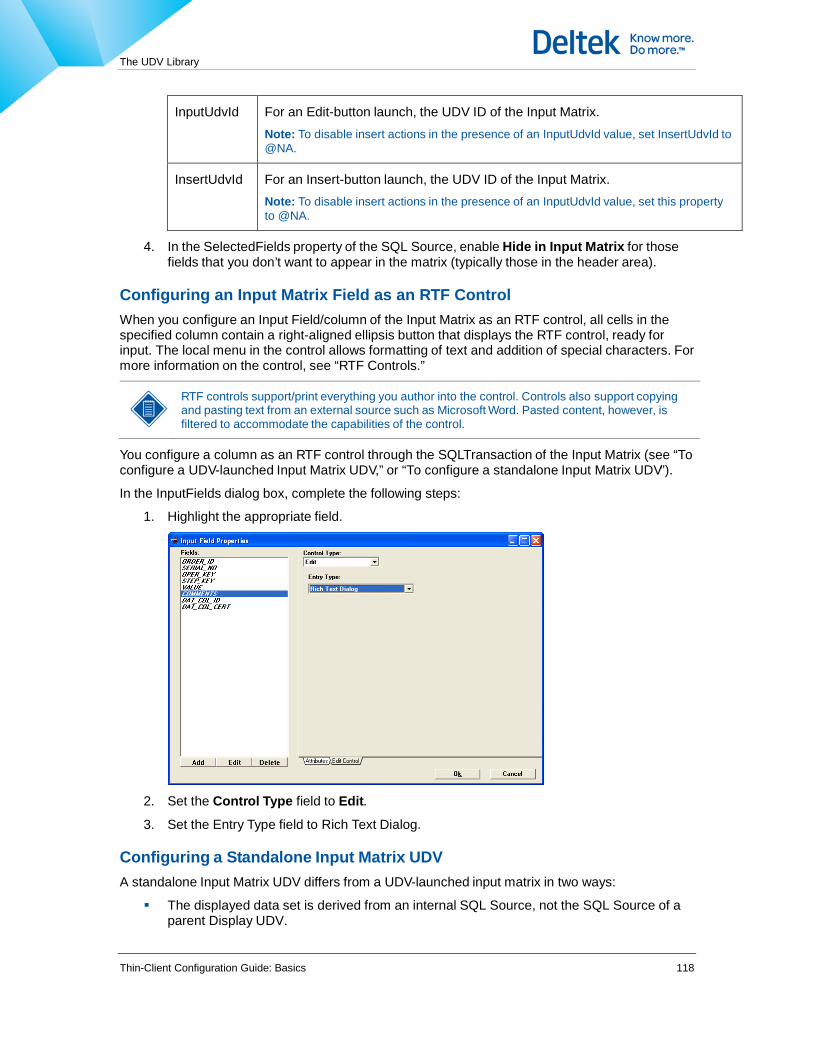
The UDV Library
Thin-Client Configuration Guide: Basics 118
InputUdvId For an Edit-button launch, the UDV ID of the Input Matrix. Note: To disable insert actions in the presence of an InputUdvId value, set InsertUdvId to @NA.
InsertUdvId For an Insert-button launch, the UDV ID of the Input Matrix. Note: To disable insert actions in the presence of an InputUdvId value, set this property to @NA.
4. In the SelectedFields property of the SQL Source, enable Hide in Input Matrix for those fields that you don’t want to appear in the matrix (typically those in the header area).
Configuring an Input Matrix Field as an RTF Control When you configure an Input Field/column of the Input Matrix as an RTF control, all cells in the specified column contain a right-aligned ellipsis button that displays the RTF control, ready for input. The local menu in the control allows formatting of text and addition of special characters. For more information on the control, see “RTF Controls.”
RTF controls support/print everything you author into the control. Controls also support copying and pasting text from an external source such as Microsoft Word. Pasted content, however, is filtered to accommodate the capabilities of the control.
You configure a column as an RTF control through the SQLTransaction of the Input Matrix (see “To configure a UDV-launched Input Matrix UDV,” or “To configure a standalone Input Matrix UDV”).
In the InputFields dialog box, complete the following steps:
1. Highlight the appropriate field.
2. Set the Control Type field to Edit.
3. Set the Entry Type field to Rich Text Dialog.
Configuring a Standalone Input Matrix UDV A standalone Input Matrix UDV differs from a UDV-launched input matrix in two ways:
The displayed data set is derived from an internal SQL Source, not the SQL Source of a parent Display UDV.

The UDV Library
Thin-Client Configuration Guide: Basics 119
The header area of the matrix can contain both readonly fields and fields configured as long lookups, which have the ability to filter the displayed data set.
Typically, a standalone input matrix is launched from a session event, a Speed Bar button, or from a Scripted UDV.
The following procedure shows you how to configure a standalone Input Matrix UDV. It assumes that you have created the following properties for the SQLTransaction:
UpdateSqlId — The SQL ID of the statement that updates a row of the input matrix.
InsertSqlId — The SQL ID of the statement that inserts a new row in the input matrix.
When you insert a new row, the new row contains default and PopulateForInsert values from the previous row, and is marked with a plus (+) sign in Database Transaction column. You can make the previous row editable in Single Transaction mode (only) with a specialized SQL statement.
To configure a standalone Input Matrix UDV, complete the following steps:
1. Create a new UDV instance and set the type to Input Matrix. See “Step 3: Creating a Unique UDV Instance.”
When you set the UDV type to Input Matrix, only the Header area displays on the Design and Preview tabs. The UDV editor does not display the input matrix control while you configure it.
2. In the Design tab, position the cursor in the beveled rectangle and left-click. High-level UDV properties appear in the Property panel.
3. Set the following properties as needed.
Caption The title of the Input Matrix dialog box.
AutoAccept Determines whether an input dialog box will be executed without user intervention.
AutoRefresh Not implemented for multirecord transactions. Updates a calling SQL Source on execution of the SQL Transaction:
arNoEffect. Leaves an existing AutoRefresh value as-is; has no effect on the SQL Source. Passed back as NoEffect. Meant to be used by a referenced UDV in a Scripted UDV to preserve the current values in ScriptParams.
arRefresh. Refreshes according to transaction results. Passed back as Refresh.
arRefreshAndLocate. Default. Focuses an inserted/updated

The UDV Library
Thin-Client Configuration Guide: Basics 120
Caption The title of the Input Matrix dialog box.
record based on transaction results. Passed back as RefreshAndLocate. Can be overridden by Ini Lib property Common.UdvAutoRefreshDefault.
arRefreshAndFilter. Refreshes and sorts according to the current filter.
Passed back as RefreshAndFilter. Causes depression of the Filter button; clicking the button then displays all records.If an error occurs, the refresh action reverts to arRefreshAndLocate.
The SQL Source statement must support filtering and the Filter button must be visible/enabled. If not, the button is disabled with the hint, “Filter not supported for this query.”
arRefreshAndHold. Focuses the originally focused record, regardless of transaction results. Passed back as RefreshAndHold.
arDisabled. Disables autorefresh.
arDefault. Resets the default value in [Common].UdvAutoRefresh
Default.
The current AutoRefresh setting is reported to UDV Diagnostics just before applying the new AutoRefresh value.
You can use the [UDVPropertyOverrides] section of the Ini Lib record to selectively modify an AutoRefresh value.
Example
UdvPropertyOverrides
<BO_udvid> Expression=True PropertyValues=AutoRefresh=arRefresh
You can also use the [IniLibOverrides] section of the Ini file to selectively modify an AutoRefresh value.
Example [IniLibOverrides] UdvPropertyOverrides.MF1_1003151. PropertyValues=AutoRefresh= arDisabled
CancelClearsSessionEvents
The current AutoRefresh setting is reported to UDV Diagnostics just before applying the new AutoRefresh value.
You can use the [UDVPropertyOverrides] section of the Ini Lib record to selectively modify an AutoRefresh value.
Example
UdvPropertyOverrides
<BO_udvid>
Expression=True
PropertyValues=AutoRefresh=arRefresh
You can also use the [IniLibOverrides] section of the Ini file to
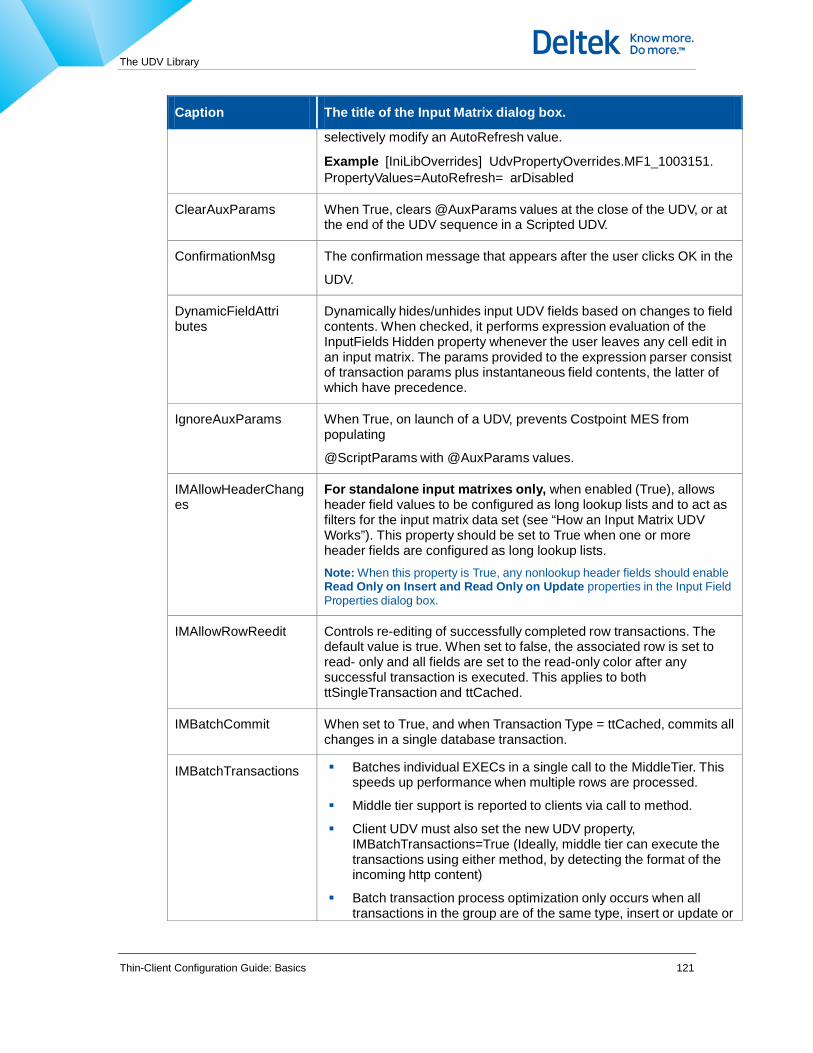
The UDV Library
Thin-Client Configuration Guide: Basics 121
Caption The title of the Input Matrix dialog box.
selectively modify an AutoRefresh value.
Example [IniLibOverrides] UdvPropertyOverrides.MF1_1003151. PropertyValues=AutoRefresh= arDisabled
ClearAuxParams When True, clears @AuxParams values at the close of the UDV, or at the end of the UDV sequence in a Scripted UDV.
ConfirmationMsg The confirmation message that appears after the user clicks OK in the
UDV.
DynamicFieldAttri butes
Dynamically hides/unhides input UDV fields based on changes to field contents. When checked, it performs expression evaluation of the InputFields Hidden property whenever the user leaves any cell edit in an input matrix. The params provided to the expression parser consist of transaction params plus instantaneous field contents, the latter of which have precedence.
IgnoreAuxParams When True, on launch of a UDV, prevents Costpoint MES from populating
@ScriptParams with @AuxParams values.
IMAllowHeaderChanges
For standalone input matrixes only, when enabled (True), allows header field values to be configured as long lookup lists and to act as filters for the input matrix data set (see “How an Input Matrix UDV Works”). This property should be set to True when one or more header fields are configured as long lookup lists. Note: When this property is True, any nonlookup header fields should enable Read Only on Insert and Read Only on Update properties in the Input Field Properties dialog box.
IMAllowRowReedit Controls re-editing of successfully completed row transactions. The default value is true. When set to false, the associated row is set to read- only and all fields are set to the read-only color after any successful transaction is executed. This applies to both ttSingleTransaction and ttCached.
IMBatchCommit When set to True, and when Transaction Type = ttCached, commits all changes in a single database transaction.
IMBatchTransactions Batches individual EXECs in a single call to the MiddleTier. This speeds up performance when multiple rows are processed.
Middle tier support is reported to clients via call to method.
Client UDV must also set the new UDV property, IMBatchTransactions=True (Ideally, middle tier can execute the transactions using either method, by detecting the format of the incoming http content)
Batch transaction process optimization only occurs when all transactions in the group are of the same type, insert or update or

The UDV Library
Thin-Client Configuration Guide: Basics 122
Caption The title of the Input Matrix dialog box.
delete.
IMBeginExecSqlId Provides a way to setup data for the entire group of transactions to be processed.
Executes just before performing the transaction for the first executed row in the Input Matrix.
Runs only once for each time the Input Matrix is called, i.e. if an error is raised by one or more of the row transactions and the user makes changes and re-executes the data via Okay, Next, etc., this sql does not execute again.
All SqlTransaction and row level values of the first executed row are provided as params to this transaction.
Reserved param @RowCount is automatically added to available transaction params.
When assigned, executes regardless of TransactionType; however, probably only useful for ttCachedTransaction.
Any outbound param values from this transaction are added to and will overwrite matching param values of every row transaction. These outbound params values are also applied with precedence over ScriptParams and thus eventually to the values returned by the hosting UDV dialog.
IMBlankRowValue sHavePrecedence
Gives blank input matrix row values precedence over context params of the same name. The default is false.
IMDirtyFlagWhile
Loading
Causes the row to be automatically put in the edit state when, for example, Default to Single changes the value in the cell from that which was initially loaded.
IMEndExecSqlId Can be used to perform cleanup after all rows transactions are processed or to submit session events for refresh, invoke, etc.
Executes immediately after performing the last executed row in the Input Matrix, and only if no errors are raised from the time of clicking Okay, Next, etc. (therefore, runs only once for each time the Input Matrix is called because the dialog is subsequently closed in this case).
All SqlTransaction and row level values of the last executed row are provided as params to this transaction
Reserved param @RowCount is automatically added to available transaction params
When assigned, executes only for TransactionType of ttCachedTransaction.
Any outbound param values from this transaction are added to and will
overwrite matching param values from the outbound params provided by BeginExecSqlId. These outbound params values are also applied

The UDV Library
Thin-Client Configuration Guide: Basics 123
Caption The title of the Input Matrix dialog box.
with precedence over ScriptParams and thus eventually to the values returned by the hosting UDV dialog.
IMFixedColCount On opening the UDV, the number of columns that are fixed/locked in place regardless of the scrolling position. Valid values are integers representing the total number of fixed columns starting from column 1. A value of -1 (minus one) disables the property.
When any columns are locked, keyboard keys such as [Home] and [End]
operate only on visible, unlocked cells.
This number is overridden by subsequent Unlock Column and Lock Column actions as initiated through the local menu of the UDV.
IMForceTransactio ns The action to be taken against any unchanged rows/records:
ftFalse — Performs no action.
ftInsert — Performs an INSERT according to the InsertSqlId of the SqlTransaction.
ftUpdate — Performs an UPDATE according to the UpdateSqlId of the SqlTransaction.
ftDelete — Performs a DELETE according to the DeleteSqlId of the SQL Source.
IMPopulateFromPa rams
For a given Input field in a script-launched Input Matrix UDV, when enabled along with the field PopulateforInsert property, populates the field with a default value based on @ScriptParams values.
IMScanAction The action taken when a value is scanned into a cell of the matrix:
saIMAccept — Accepts scan into current cell and remains positioned in cell.
saIMOK — Accepts scan into current cell and performs OK button action.
saIMTab — Accepts scan into current cell and moves one cell to the right.
saIMDown — Accepts scan into current cell and moves one cell down.
saIMIgnore — Rejects scan data if use of scanner is not allowed.
saIMScanOnly — Accepts scan into Current cell while ignoring keyboard input.
IMSqlSourceName For standalone input matrixes only, the name of the internal SQL Source that allows this UDV to receive data without having a Display UDV parent. Notes
If you have not created this yet, you can assign the name and configure the

The UDV Library
Thin-Client Configuration Guide: Basics 124
Caption The title of the Input Matrix dialog box.
SelectSqlId statement in step 4.
If this UDV will be launched from a Scripted UDV, the SqlSource can refer to any SqlSource in any UDV in the Scripted UDV, to the calling SqlSource, or to any SqlSource in the active tool.
IMSqlTransactionName
The name of the SQL Transaction for this UDV. This SQL Transaction does not already have to be configured.
For Input Matrix UDVs only, this action links the matrix control to the SQLTransaction.
Max Height The maximum height in pixels to which the input UDVcan be resized.
Max Width The maximum height in pixels to which the input UDVcan be resized.
MinHeight The minimum height in pixels to which the matrix can be resized.
At run time, a value of -1 for any size property is the same as 0, which applies the default dimension.
MinWidth The minimum width in pixels to which the matrix can be resized.
At run time, a value of -1 for any size property is the same as 0, which applies the default dimension
MultimediaRequire d When set to mmRequired or mmOptional, causes the dialog box to open with a multimedia authoring panel at the bottom.
RequireLogon When enabled (True), converts this UDV to a single-transaction logon UDV: On activation of the UDV, Costpoint MES presents a logon dialog box, requiring a second user to log on before completing the UDV transaction. Note: The [Common].DisableUDVRequireLogon property overrides all instances of the RequireLogon property.
TransactionType The mode in which the matrix operates, ttsingle for Single Transaction or ttCached for Cached Transaction. You can change the transaction type at any time. It affects end-user behavior, but not configuration.
4. In the Non-visual Controls tab, add the internal SQL Source and in the Property panel set the following properties.
SelectSqlId The SQL ID of the SELECT statement that sets the number of columns and row order in the matrix. The WHERE clause of this statement should contain the sibling fields that restrict the data set and act as filters when configured as long lookups.
DeleteSqlId The SQL ID of the statement that deletes a row of the input matrix.

The UDV Library
Thin-Client Configuration Guide: Basics 125
SelectedFields The subproperties of individual columns in the input matrix. Make sure that header columns are enabled for Hidden in Input Matrix. This property value can be an expression/NOT expression derived by the following means:
Direct input of the desired value.
Use of a function whose returned value is compared to a True/False standard.
Direct return of a calculated value.
PublishParams Set this to True.
5. In the Non-visual Controls tab, add the SQLTransaction, and in the Properties panel, set properties as needed:
InputFields Columns/fields that appear in the matrix and header area of the input matrix.
For the header, in the Edit Control tab, configure one or more fields as long lookup control types as needed. These fields should corresponding to parameters in the WHERE clause of the SQL Source. See “Long Lookup Lists (Lookup Dialog Boxes).”
For nonlookup header fields, in the Attributes tab, set Read Only on Insert and Read Only on Update to True. Notes
If lookup fields rely on parameter values from the current row in addition to those from the SQL Source, you must order InputFields such that fields that provide parameters to lookups appear in the list before the lookup fields that use them.
You can configure a column to support an RTF control.
If [Common].DisplayInputMatrixYNasCheckbox is enabled, any column configured as a List Control Type and having 2 valid values will contain a check box.
InsertSqlId The SQL ID that inserts a new row at the bottom of the grid only. Make sure that this transaction does not affect any columns configured as lookup filters.
The new row will contain default and PopulateForInsert values from the previous row.
In Single Transaction mode only, to make the previous/parent row editable after an insert transaction, in the Exec statement, suffix the key-value parameter with a bang character (!):
Exec do_insert(:DATA,:KEY!)
On executing the Insert transaction, the KEY! parameter causes the stored procedure to return the KEY value to the corresponding cell of the parent row.
UpdateSqlId The SQL ID that updates existing rows (those inherited from the internal SQL Source). Make sure that this transaction does not affect any columns configured as lookup filters.
6. In the Design tab, add edit controls and link them to the SQLTransaction.

The UDV Library
Thin-Client Configuration Guide: Basics 126
Fill Wizards Fill wizards are available for certain fields that accept multiple entries, and all input matrix columns. They are used to auto-generate a set of sequential numbered records, most commonly for serial numbers. For example, if an order being released contains serial numbers 1-050 through 1-200, a fill wizard can quickly enter the entire set of 150 serial numbers instead of a user manually typing them in. The following figure shows the fill wizard settings used to do this example and displays the results.
The fields in the Fill Wizard dialog box are described in the following table.
Fill wizard fields
Fid Description
Prefix The string that precedes every generated number in the sequence. In the previous example, every number in the sequence begins with the the prefix “1-”.
Start Value The starting number of the sequence, not including the prefix or zeros added by the zero fill.
Increment The amount that each number in the sequence is increased by.
Max Value The ending number of the sequence, not including the prefix or zeros added by the zero fill.
Zero Fill The minimum number of digits every number must contain, not including the prefix. Any numbers with less than the minimum digits are "padded" with zeros. In the previous example, the zero fill is 3. Therefore, 50 becomes 050 so that it has three digits. Number 200 (not shown) is already three digits, so no zeros are added.
Overwrite Check this to overwrite existing values in the field.
In input matrices, field wizards are launched from a small Ellipsis button in a column header as shown in the following figure.
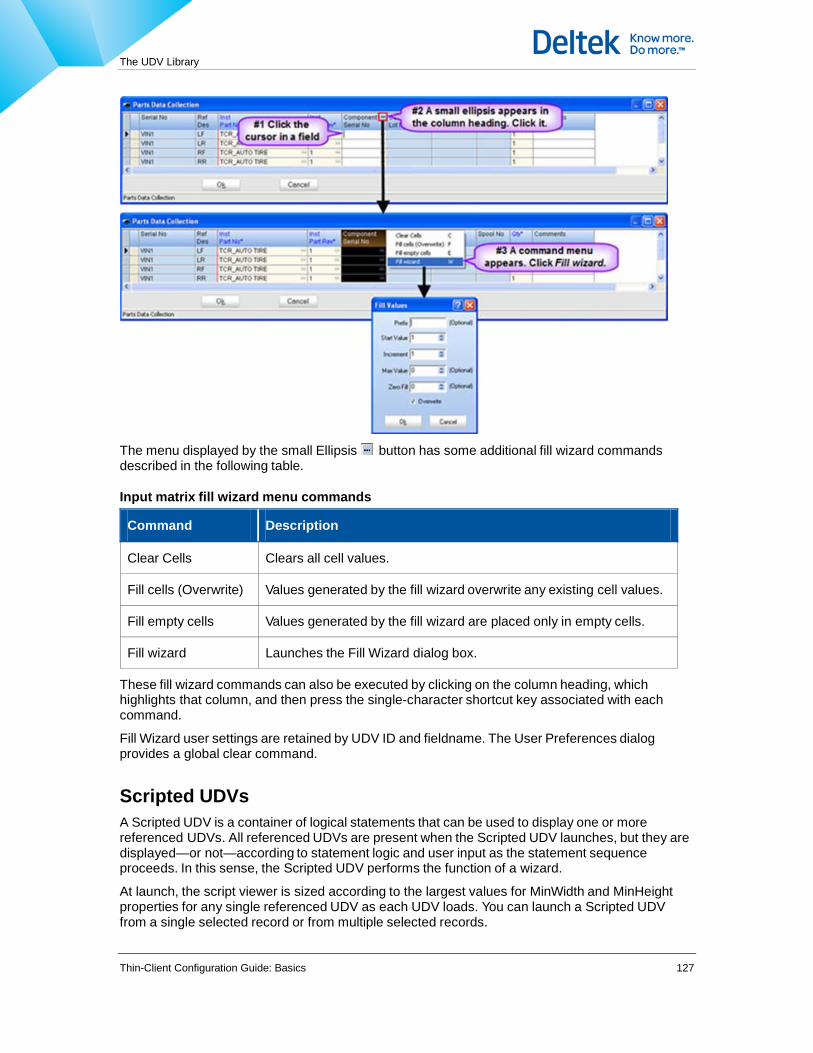
The UDV Library
Thin-Client Configuration Guide: Basics 127
The menu displayed by the small Ellipsis button has some additional fill wizard commands described in the following table.
Input matrix fill wizard menu commands
Command Description
Clear Cells Clears all cell values.
Fill cells (Overwrite) Values generated by the fill wizard overwrite any existing cell values.
Fill empty cells Values generated by the fill wizard are placed only in empty cells.
Fill wizard Launches the Fill Wizard dialog box.
These fill wizard commands can also be executed by clicking on the column heading, which highlights that column, and then press the single-character shortcut key associated with each command.
Fill Wizard user settings are retained by UDV ID and fieldname. The User Preferences dialog provides a global clear command.
Scripted UDVs A Scripted UDV is a container of logical statements that can be used to display one or more referenced UDVs. All referenced UDVs are present when the Scripted UDV launches, but they are displayed—or not—according to statement logic and user input as the statement sequence proceeds. In this sense, the Scripted UDV performs the function of a wizard.
At launch, the script viewer is sized according to the largest values for MinWidth and MinHeight properties for any single referenced UDV as each UDV loads. You can launch a Scripted UDV from a single selected record or from multiple selected records.

The UDV Library
Thin-Client Configuration Guide: Basics 128
Typically, when a display sequence contains multiple referenced UDVs, UDVs contain Next and Previous buttons to allow the user to go forward and backward in the UDV sequence. Also, for multi- UDV display sequences, the UDV status line shows a history of the displayed UDVs so that the user is aware of his position in the sequence.
Scripted UDVs are especially useful in situations where an Autoaccept UDV is used to set up data for a subsequent database transaction, and where context data is used to hide specific fields or to decide which UDV to display next. The session event-driven “Autoaccept + transaction UDV” scenario has the following side effects and limitations that are solved by using a UDV script instead:
Client data is unnecessarily refreshed after the Autoaccept UDV. This consumes additional database resources and network bandwidth.
The post-Autoaccept refresh clears the selected records on the original data set, making the associated data unavailable to the transaction UDV, which must acquire parameters through the session event.
The series of UDVs that are linked by session events perform independent transactions that require complex configurations to allow the user to cancel out of the multistage process.
Parameter values are stored in @ScriptParams, which receives initial values from @AuxParams. As the statement sequence continues, parameter values are added to @ScriptParams, but @AuxParams remains the same. Any time the Scripted UDV dialog box closes, the global data values in
@ScriptParams are cleared. Values in @AuxParams are not affected unless the high-level ClearAuxParams property is enabled. Also, if you enable the high-level IgnoreAuxParams property, on launch of the UDV, Thin-Client does not populate @ScriptParams with @AuxParams values.
The AutoRefresh value in @ScriptParams is initially set by the Scripted UDV container, but can be overridden by the value returned by any referenced UDV, or by any means that effect @ScriptParams values. For example, the AutoRefresh value of the Scripted UDV is set to arRefreshAndLocate (@AutoRefresh = RefreshAndLocate). If, at some point, script logic deletes an associated record— instead of updating it—the UDV executing that delete transaction can return an AutoRefresh value, which prevents the calling SqlSource from attempting to locate the original/deleted record (AutoRefresh = Refresh). For more information on UDV autorefresh values, see AutoRefresh in “UDV Properties.”
All statements and referenced UDV transactions are executed against the foreground (logged-on) user. The interface and selected records remain in control of the ANONYMOUS user.
The following table shows the types of statements that can be contained in a Scripted UDV. Each type can be used one or more times.
Scripted UDV Statement Types
Statement Type Description
SELECT Provides a way to add values to @ScriptParams for use by subsequent expression testing or by UDVs.
EXEC Executes a SQL statement.
If you end the statement sequence with an EXEC statement, Thin-Client displays the “Click OK to continue” prompt in the UDV viewer. Use a terminal EXIT

The UDV Library
Thin-Client Configuration Guide: Basics 129
Statement Type Description
statement (see below) to suppress this prompt.
You can use an EXEC statement to add data directly to @ScriptParams by calling an EXTFUNC-type SQL statement, which in turn calls the function as follows:
EXTFUNC <Func_Name>(<Opt_Filter_Param_1>,<Opt_Filter_Param_n>)
where Func_Name specifies an entry in the [ExternalFunctions] section of the Ini
Lib record.
Thin-Client assigns the returned string to the ResultParamName property of the specified External Function. Set ResultParamName to * (the asterisk) to indicate that the function will return multiple named parameter values separated by ~ (the tilde), in the format <name1>=<value1>~<name2>=<value2>~, etc.
Thin-Client also places the result value in the reserved variable @Result unless the value is greater than 255 bytes.
IF Provides simple branching (GoTo) logic to another statement based on evaluation
of a standard Boolean expression/NOT expression derived by the following means:
Direct input of the desired value.
Use of a function whose returned value is compared to a True/False standard.
Direct return of a calculated value.
If the expression is evaluated as True, Costpoint MES branches to the specified statement. Note: The IF statement is a GoTo mechanism only. To enable the display of a specific UDV based on IF/THEN or CASE logic, use a UDV statement for each case, and call out the display condition with the ShowUdvExpression property. If ShowUdvExpression evaluates as True, the script displays the corresponding UDV; if the value evaluates as False, the script ignores the UDV and moves on to the next statement.
If you end the statement sequence with an IF statement, Costpoint MES displays the “Click OK to continue” prompt in the UDV viewer. Use a terminal EXIT statement (see below) to suppress this prompt.
UDV Displays a specific UDV—or not—based on evaluation of UDV statement properties. Statement properties can also hide or display specific UDV fields and buttons.
Most referenced UDVs are Input UDVs, but you can also launch Display UDVs and Input Matrix (IM) UDVs. Note: To retain the current AutoRefresh value in @ScriptParams, set the high-level AutoRefresh value of this UDV to arNoEffect. See AutoRefresh in “UDV Properties.”
ASSERT Displays a warning, error, or exception.
If you end the statement sequence with an ASSERT statement, Costpoint MES displays the “Click OK to continue” prompt in the UDV viewer. Use a terminal EXIT statement (below) to suppress this prompt.
EXIT Causes the script sequence to end automatically without display of a prompt or user input, based on the value of the Accept property.

The UDV Library
Thin-Client Configuration Guide: Basics 130
Statement Type Description
If Accept = True, the script exits as if the user had clicked OK. Any previous transactions are committed to the database and the database transaction is closed.
If Accept = False, the script exits as if the user had clicked Cancel. Any previous transactions are rolled back and the database transaction is closed.
COMMENT Enters a nonfunctional, explanatory comment in the statement sequence.
Script Execution and UDV Transactions When Costpoint MES launches a Scripted UDV, it executes each script statement in turn. If any statement drops out due to expression logic, the script moves to the next statement. On user execution of the first UDV transaction, the script opens a database transaction; on execution of each subsequent UDV transaction, the script adds that transaction to the rollback segment. When all statements and referenced UDVs have been executed, the UDV script commits a group transaction to the database and then closes the database transaction.
Generally, in any multi-UDV display sequence, backward movement to the previous UDV leaves the corresponding UDV transaction intact unless the user changes any values and re-executes the transaction. Forward movement adds the corresponding UDV transaction to the rollback segment.
Table 5-12 shows how standalone UDVs and Scripted UDVs handle database transactions. Basically, all standalone Input UDVs perform a single database transaction/commit. In contrast, all Scripted UDVs perform a group transaction/commit, where the group transaction consists of 1 or more referenced UDV transactions. Note that the Scripted UDV does not open the database transaction until the first UDV transaction executes. All referenced UDVs add a transaction to the rollback segment, but do not perform a commit action.
UDV Database Transaction Types
Transaction Initiator Description Transaction Action/Type
Standalone Input
UDV
A UDV configured as type Input.
Performs a single database transaction/commit.
Scripted UDV A container consisting of one or more statements that can collect information, run logic, and display referencedUDVs.
On execution of first referenced UDVtransaction, opens database transaction.
On execution of last referenced UDV transaction, performs a group database transaction/commit; closes database transaction.
Referenced UDV A UDV referenced by a UDVstatement in a Scripted UDV.
Adds a transaction to the rollback segment.
End-User UDV Buttons Since Scripted UDVs often launch a multi-UDV display sequence, users will require more than the usual OK and Cancel buttons. Referenced UDVs can require one or more of the button types

The UDV Library
Thin-Client Configuration Guide: Basics 131
shown in Table 5-13. The only button that appears in all referenced UDVs is the Cancel button, but when other buttons do appear, they appear left-to-right in the descending order shown.
UDV Buttons
Button Name Button Action
Previous Redisplays the previous UDV in the statement sequence and executes
CancelSqlId.
Next Adds the UDV transaction to the rollback segment and executes the next statement in the statement sequence.
OK Adds the UDV transaction to the rollback segment, commits the database transaction, and closes the transaction and script dialog box. UDV Input fields can be configured to associate the ENTER key with the OK button.
Restart Rolls back all UDV transactions and redisplays the first UDV in the statement sequence.
Cancel Rolls back the database transaction and aborts the UDV script.
Cancel and Reset buttons appear automatically according to the display triggers.
Automatically Appearing UDV Buttons
Button Name Display Trigger
Cancel Appears in all referenced UDVs regardless of their position in the UDV sequence or any user action.
Restart Appears in any referenced UDV that follows a UDV in which the user has executed a database transaction.
Previous, Next, and OK buttons appear according to the configuration method.
Configurable UDV Buttons
Button Name Configuration Method
Previous Appears if ShowPrevious property of UDV statement is set to True or is evaluated as True.
Next Appears if ShowNext property of UDV statement is set to True (the default) or is evaluated as True.
OK Appears if ShowOk property of UDV statement is set to True or is evaluated as True. Note: If the last-displayed UDV does not contain an OK button and/or the script ends with a non-UDV statement, the UDV viewer displays a final prompt, “Click OK to continue...” OK and Cancel buttons appear in this final prompt. The Restart button also appears if any transactions have been started.
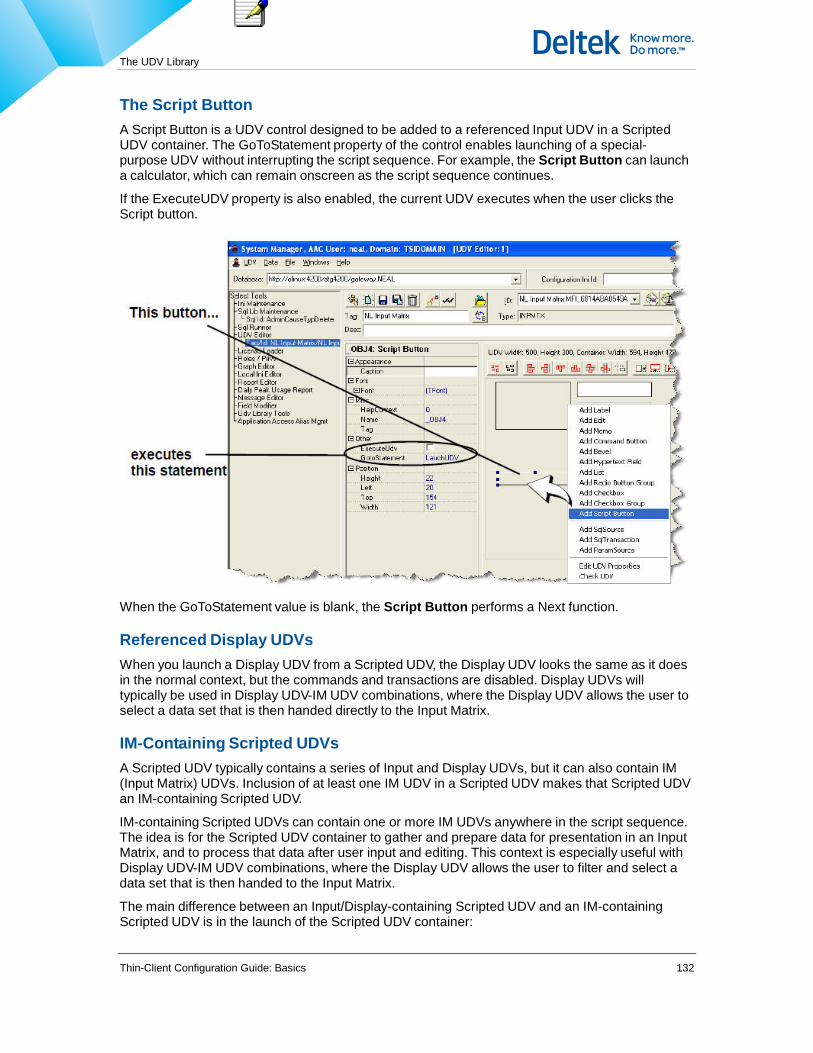
The UDV Library
Thin-Client Configuration Guide: Basics 132
The Script Button A Script Button is a UDV control designed to be added to a referenced Input UDV in a Scripted UDV container. The GoToStatement property of the control enables launching of a special-purpose UDV without interrupting the script sequence. For example, the Script Button can launch a calculator, which can remain onscreen as the script sequence continues.
If the ExecuteUDV property is also enabled, the current UDV executes when the user clicks the Script button.
When the GoToStatement value is blank, the Script Button performs a Next function.
Referenced Display UDVs When you launch a Display UDV from a Scripted UDV, the Display UDV looks the same as it does in the normal context, but the commands and transactions are disabled. Display UDVs will typically be used in Display UDV-IM UDV combinations, where the Display UDV allows the user to select a data set that is then handed directly to the Input Matrix.
IM-Containing Scripted UDVs A Scripted UDV typically contains a series of Input and Display UDVs, but it can also contain IM (Input Matrix) UDVs. Inclusion of at least one IM UDV in a Scripted UDV makes that Scripted UDV an IM-containing Scripted UDV.
IM-containing Scripted UDVs can contain one or more IM UDVs anywhere in the script sequence. The idea is for the Scripted UDV container to gather and prepare data for presentation in an Input Matrix, and to process that data after user input and editing. This context is especially useful with Display UDV-IM UDV combinations, where the Display UDV allows the user to filter and select a data set that is then handed to the Input Matrix.
The main difference between an Input/Display-containing Scripted UDV and an IM-containing Scripted UDV is in the launch of the Scripted UDV container:

The UDV Library
Thin-Client Configuration Guide: Basics 133
An Input/Display-containing Scripted UDV can be launched from these places:
An Insert button in a Navigator
An Update button in a Navigator
An Other Command button in a Navigator
A Command button
A session event
An IM-containing Scripted UDV must be launched from a UDV Script Other Command, either in a tool window or in a Display UDV.
IM-containing Scripted UDVs impose two constraints on referenced UDVs:
All contained IM UDVs are standalone types, i.e., they have an internal SqlSource. In the Scripted UDV context, the internal SqlSource (IMSqlSource) can refer to any SqlSource in any UDV in the Scripted UDV, to the calling SqlSource, or to any SqlSource in the active tool.
All Input/IM UDVs are launched by default with the Populate for Update property enabled. You override Populate For Update logic by setting the UdvTransaction property for each UDV statement as needed.
Also, in Input Matrix UDVs, you can use the high-level IMPopulateFromParams property to populate input fields according to @ScriptParams values. For a given Input field in a script-launched Input Matrix, when you enable PopulateforInsert for that field and also enable IMPopulateFromParams, the application populates the Input field with a default value based on @ScriptParams values for the Scripted UDV container.
Configuring a Scripted UDV
You configure IM-containing Scripted UDVs and Input/Display-containing Scripted UDVs the same way. This section shows you how to do that. However, you launch the two types of Scripted UDVs differently.
You configure a Scripted UDV (of any type) in the UDV Editor. You basically create a UDV of type Script and then add SELECT, EXEC, IF, UDV, ASSERT, and EXIT statements as nonvisual
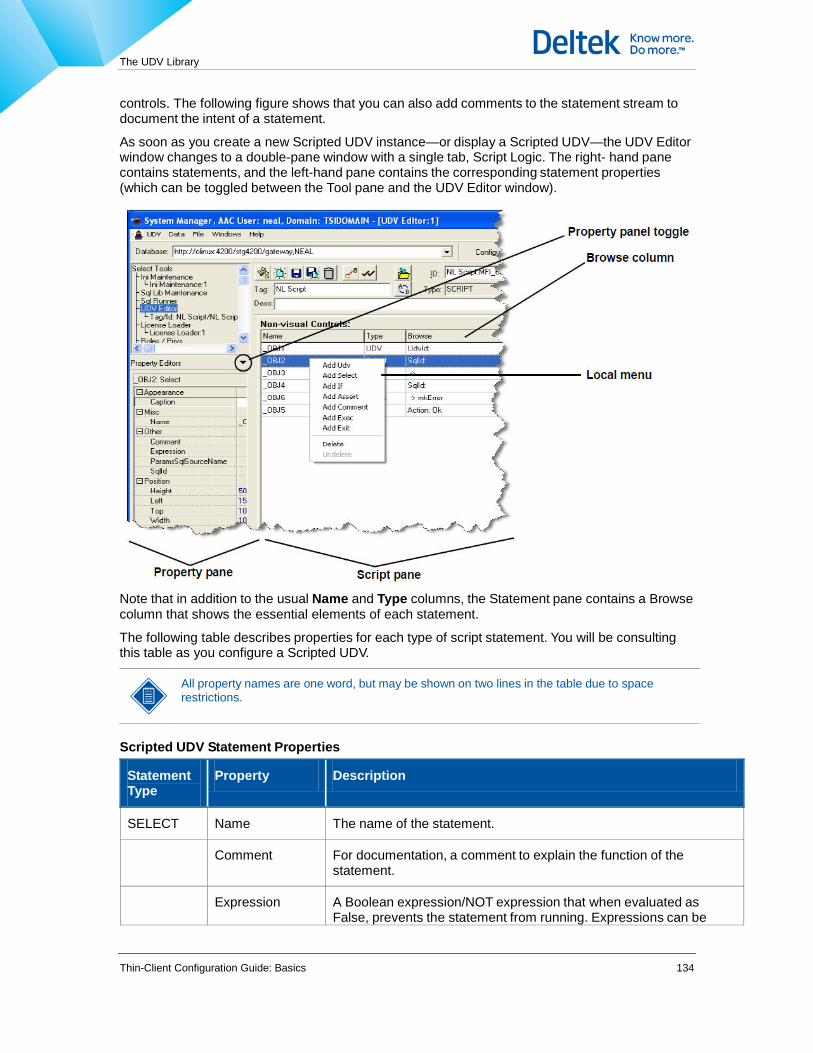
The UDV Library
Thin-Client Configuration Guide: Basics 134
controls. The following figure shows that you can also add comments to the statement stream to document the intent of a statement.
As soon as you create a new Scripted UDV instance—or display a Scripted UDV—the UDV Editor window changes to a double-pane window with a single tab, Script Logic. The right- hand pane contains statements, and the left-hand pane contains the corresponding statement properties (which can be toggled between the Tool pane and the UDV Editor window).
Note that in addition to the usual Name and Type columns, the Statement pane contains a Browse column that shows the essential elements of each statement.
The following table describes properties for each type of script statement. You will be consulting this table as you configure a Scripted UDV.
All property names are one word, but may be shown on two lines in the table due to space restrictions.
Scripted UDV Statement Properties
Statement Type
Property Description
SELECT Name The name of the statement.
Comment For documentation, a comment to explain the function of the statement.
Expression A Boolean expression/NOT expression that when evaluated as False, prevents the statement from running. Expressions can be

The UDV Library
Thin-Client Configuration Guide: Basics 135
Statement Type
Property Description
derived by the following means:
Direct input of the desired value.
Use of a function whose returned value is compared to a True/ False standard.
Direct return of a calculated value.
SqlId The SQL ID of the SELECT statement that adds parameters to @ScriptParams.
ParamsSqlSo urceName
The name of the SQL Source that publishes its parameters for use by this UDV.
PublishAsCo okie
When checked, posts the selected data / outbound values to a persistent param source named @Cookies. The default is unchecked.
EXEC Name The name of the statement.
Comment For documentation, a comment to explain the function of the statement.
Expression A Boolean expression/NOT expression that when evaluated as False, prevents the statement from running. Expressions can be derived by the following means:
Direct input of the desired value.
Use of a function whose returned value is compared to a True/ False standard.
Direct return of a calculated value.
ParamsSqlSo urceName
The name of the SQL Source that publishes its parameters for use by this UDV.
PublishAsCo okie
When checked, posts the selected data / outbound values to a persistent param source named @Cookies. The default is unchecked.
RetryBranch
To
The name of the statement that executes in the case where an error is raised during execution of the EXEC SqlId (see below).
When an error is raised by an EXEC statement, one of the following things happens:
If error text contains “<<”, Thin-Client displays the error and closes the UDV dialog.
If error text does not contain “<<”, but RetryBranchTo is assigned, Thin-Client branches to the assigned statement.
If error text does not contain “<<”, and RetryBranchTo is not assigned, Thin-Client branches to the previously executed UDV
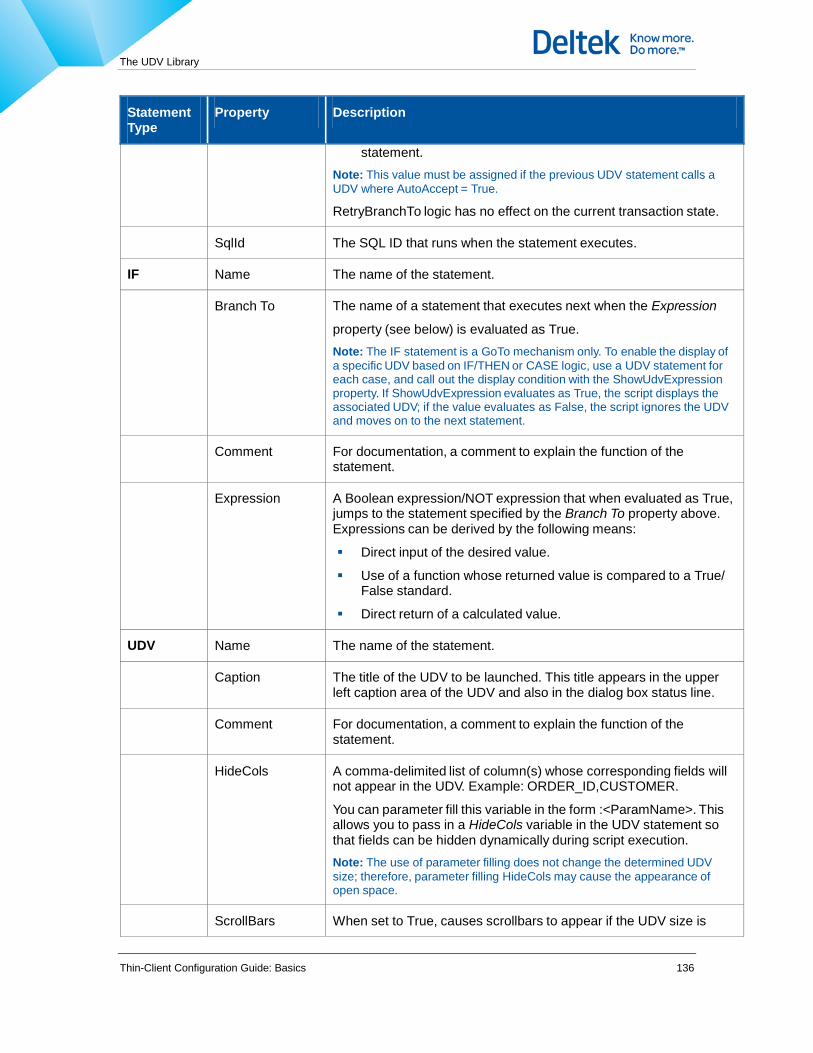
The UDV Library
Thin-Client Configuration Guide: Basics 136
Statement Type
Property Description
statement. Note: This value must be assigned if the previous UDV statement calls a UDV where AutoAccept = True.
RetryBranchTo logic has no effect on the current transaction state.
SqlId The SQL ID that runs when the statement executes.
IF Name The name of the statement.
Branch To The name of a statement that executes next when the Expression
property (see below) is evaluated as True. Note: The IF statement is a GoTo mechanism only. To enable the display of a specific UDV based on IF/THEN or CASE logic, use a UDV statement for each case, and call out the display condition with the ShowUdvExpression property. If ShowUdvExpression evaluates as True, the script displays the associated UDV; if the value evaluates as False, the script ignores the UDV and moves on to the next statement.
Comment For documentation, a comment to explain the function of the statement.
Expression A Boolean expression/NOT expression that when evaluated as True, jumps to the statement specified by the Branch To property above. Expressions can be derived by the following means:
Direct input of the desired value.
Use of a function whose returned value is compared to a True/ False standard.
Direct return of a calculated value.
UDV Name The name of the statement.
Caption The title of the UDV to be launched. This title appears in the upper left caption area of the UDV and also in the dialog box status line.
Comment For documentation, a comment to explain the function of the statement.
HideCols A comma-delimited list of column(s) whose corresponding fields will not appear in the UDV. Example: ORDER_ID,CUSTOMER.
You can parameter fill this variable in the form :<ParamName>. This allows you to pass in a HideCols variable in the UDV statement so that fields can be hidden dynamically during script execution. Note: The use of parameter filling does not change the determined UDV size; therefore, parameter filling HideCols may cause the appearance of open space.
ScrollBars When set to True, causes scrollbars to appear if the UDV size is

The UDV Library
Thin-Client Configuration Guide: Basics 137
Statement Type
Property Description
larger than the size set at initialization.
ShowNext When set to True or containing an expression/NOT expression evaluated as True, displays the Next button in the UDV. Default = True.
Expressions can be derived by the following means:
Direct input of the desired value.
Use of a function whose returned value is compared to a True/ False standard.
Direct return of a calculated value. Note: ShowNext and ShowPrevious properties have exclusive control over the appearance of the Next and Previous buttons; the database transaction state has no effect. It is the responsibility of the developer to ensure that there is no duplication of data if a user repeatedly goes forward and backward in the script sequence, providing the same keys to the InsertSql statement.
ShowOk When set to True or containing an expression/NOT expression evaluated as True, displays the OK button in the UDV. Expressions can be derived by the following means:
Direct input of the desired value.
Use of a function whose returned value is compared to a True/ False standard.
Direct return of a calculated value. Note: If the last-displayed UDV does not contain an OK button, the UDV script displays a final dialog box containing the message, “Click OK to continue...” OK and Cancel buttons appear in this final dialog. The Restart button also appears if any transactions have been started.
ShowPrevi ous When set to True or containing an expression/NOT expression evaluated as True, displays the Previous button in the UDV. Expressions can be derived by the following means:
Direct input of the desired value.
Use of a function whose returned value is compared to a True/ False standard.
Direct return of a calculated value. Note: ShowNext and ShowPrevious properties have exclusive control over the appearance of the Next and Previous buttons; the database transaction state has no effect. It is the responsibility of the developer to ensure that there is no duplication of data if a user repeatedly goes forward and backward in the script sequence, providing the same keys to the InsertSql statement.
ShowUdvEx pression
A Boolean expression/NOT expression that when evaluated as False, prevents the UDV from appearing, and moves the script to the next statement. Expressions can be derived by the following means:

The UDV Library
Thin-Client Configuration Guide: Basics 138
Statement Type
Property Description
Direct input of the desired value.
Use of a function whose returned value is compared to a True/ False standard.
Direct return of a calculated value.
This property should be used in cases where you want to selectively display one of a series of candidate UDVs, where display is based on evaluation of a simple criterion, e.g., PART_TYPE=A.
UdvId The UDV_ID of the UDV. Notes
If the UDV is a Display UDV, commands and transactions will be disabled.
If the UDV is an IM UDV, you must launch the Scripted UDV container from a UDV Script Other Command. See “IM-Containing Scripted UDVs.” Also, the following constraints apply:
The IM UDV must be standalone, with an assigned IMSqlSource.
The IM UDV (and all Insert UDVs) will be launched with Populate for Update enabled. See UdvTransaction below.
Any pending user edits in the Input Matrix are applied when the script proceeds to the next statement, rather than when the script viewer closes.
To retain the current AutoRefresh value in @ScriptParams when the SQL Transaction for this UDV executes, set the UDV (high-level) AutoRefresh value to arNoEffect.
UdvTransacti on A transaction that overrides the UDV-level TransactionType property of the UDV. Notes
If this is an IM UDV—or the Scripted UDV container will launch one or more IM UDVs—the container launches all appropriate UDVs with the Populate for Update property enabled. Override this setting as needed using the appropriate transaction.
If you assign any value other than uttUnassigned and you want the TransactionType property to revert to the original value when the user goes backward or forward in the script, enable the Common. UdvResumeInitialTransactionTypeEnabled property in the [IniLibOverrides] section of the Ini file.
uttUnassigned — Causes the UDV to use the TransactionType provided by the caller.
uttIgnore — Prevents the statement from running the UDV transaction logic. This makes it possible to define a UDV that is used only to collect field input and to add this information to
@ScriptParams. This value uses the Populate for Insert logic for UDV fields with data.

The UDV Library
Thin-Client Configuration Guide: Basics 139
Statement Type
Property Description
uttInsert — Uses insert logic.
uttUpdate — Uses update logic.
uttDelete — Uses delete logic.
uttInsUpdDel — Equivalent to uttInputMatrix.
uttMRInsert — Uses multirecord insert logic.
uttMRUpdate — Uses multirecord update logic.
uttGroupInsert — Uses group insert logic.
uttGroupUpdate — Uses group update logic.
uttInputMatrix — Equivalent to uttInsUpdDel.
uttDuplicate — Uses duplicate logic.
ASSERT Name The name of the statement.
CancelButt on When set to True, causes the Cancel button to appear in the message dialog box.
Comment For documentation, a comment to explain the function of the statement.
Expression A Boolean expression/NOT expression that when evaluated as False, causes the statement to run. Expressions can be derived as follows:
Through direct input of the desired value.
Through use of a function whose returned value is compared to a True/False standard.
Through direct return of a calculated value.
MsgId The ID of message from the SFCORE_MESSAGES table, or a literal string. In a literal string, the text can contain parameter names in the form :<ParamName>.
MsgKind The kind of a message: mkException, mkWarning, or mkError.
mkException — The message interrupts statement execution and overlays the most recently displayed UDV. Clicking any button always closes the UDV script dialog box.
mkWarning — When the user clicks OK, the statement sequence resumes and the next statement executes.
mkError — When the user clicks OK, the most recently displayed UDV reappears. However, if the value of RetryBranchTo is a UDV statement (see below), the called UDV appears.
Hitting Cancel closes the current UDV script dialog box.

The UDV Library
Thin-Client Configuration Guide: Basics 140
Statement Type
Property Description
OkButton When set to True, causes the OK button to appear in the message dialog box.
RetryBranchTo The name of the statement that should be run when the user clicks the Retry button. This makes it possible to loop back to a prior point in the script.
When the value of RetryBranchTo is a UDV statement and MsgKind
= mkError, causes the corresponding UDV to appear after the user clicks OK.
RetryButton When set to True, causes the Retry button to appear in the message dialog box.
EXIT Name The name of the statement.
Accept When set to True, causes the script sequence to end with an OK action, i.e., the script performs a group database transaction/commit and closes the database transaction.
When set to False, causes the script sequence to end with a Cancel action, i.e., the script rolls back any transactions and closes the database transaction.
Comment For documentation, a comment to explain the function of the statement.
The following procedure shows you how to create and configure a Scripted UDV. It assumes the following things:
The SQL statement that will be referenced in the SELECT statement already exists.
The UDVs that will be referenced in UDV statements already exist.
You have launched the UDV Editor and are connected to the desired database.
To configure a Scripted UDV, complete the following steps:
1. Create a new UDV instance and set the type to Script.
The UDV Editor window changes to a double-pane window with a single tab.
2. To add each SELECT statement, do the following:

The UDV Library
Thin-Client Configuration Guide: Basics 141
Position the cursor in the left-hand Statement pane, right-click, and select Add Select. The Object Name dialog box appears.
Enter the statement name and click OK.
In the right-hand pane, enter appropriate property values.
3. To add each EXEC statement, do the following:
Position the cursor in the left-hand Statement pane, right-click, and select Add Exec. The Object Name dialog box appears.
Enter the statement name and click OK.
In the right-hand pane, enter appropriate property values.
4. To add each IF (GoTo) statement, do the following:
Position the cursor in the left-hand Script pane, right-click, and select Add If. The Object Name dialog box appears.
Enter the statement name and click OK.
In the right-hand pane, enter appropriate property values.
5. To add each UDV statement, do the following:
Position the cursor in the left-hand Statement pane, right-click, and select Add Udv. The Object Name dialog box appears.
Enter the statement name and click OK.
In the right-hand pane, enter appropriate property values.
6. To add each ASSERT statement, do the following:
Position the cursor in the left-hand Statement pane, right-click, and select Add Assert. The Object Name dialog box appears.
Enter the statement name and click OK.
In the right-hand pane, enter appropriate property values.
7. To add each EXIT statement, do the following:
Position the cursor in the left-hand Statement pane, right-click, and select Add Exit. The Object Name dialog box appears.
Enter the statement name and click OK.
In the right-hand pane, enter appropriate property values.
Countdown Timers on Script UDVs Configuring countdown timers on script UDVs can reduce the impact of table locks that prevent other users from accessing shared data elements. When the timer times out, a timeout dialog displays which gives the end user an opportunity to cancel the closing of the Input UDV dialog. If the end user does not act on the warning, then the dialog is closes. The following are parameters to be followed in configuring a countdown timer.

The UDV Library
Thin-Client Configuration Guide: Basics 142
Be specific to each script to accommodate the uniqueness of each transaction context
Provided only on script UDVs
Begin countdowns only after a database transaction has been started
Be reset/disabled by any keyboard or mouse activity within the current dialog
Be available to restart, depending on the script requirements, if a database transaction is started
Configuration is in seconds
Timer progress is displayed on the left side of the status line, using a progress bar that changes color from blue > 30%, yellow < 30%, and red < 20%.
Timeout, in general, is set to a value lower than AutoLogoffMaxSeconds to have any effect
Appearance of the user auto-logoff warning resets and temporarily disables the script timeout timer
Canceling the user auto-logoff warning will re-start the script timeout timer, which was temporarily disabled.
Appearance of the script timeout warning temporarily disables the auto-logoff timer.
Canceling the user script timeout warning re-starts the auto-logoff timeout timer, which was temporarily disabled.
A value less than or equal to zero is used to indicate no-timeout.
Launching a Scripted UDV All Scripted UDVs operate in basically the same way, but you launch Input/Display-containing and IM-containing types differentl.
Scripted UDV Launch Methods
Scripted UDV Type Launch Method
Input/Display-containing Insert button in a Navigator
Update button in a Navigator
Other Command button in a Navigator
Command button
Session event
IM-containing UDV Script Other Command (only)
You can launch a Scripted UDV from a single selected record or from multiple selected records.
Standalone Input Fields Add, Edit, and Delete buttons in the Input Field Properties dialog box allow you to add, change or delete a standalone field, which is not connected to the InsertSql or UpdateSql statements of a SQL Transaction.
Typically, you would use standalone fields in a Scripted UDV. When added to the Input Fields of a referenced UDV, they allow collection of field values that are added to @ScriptParams but are not
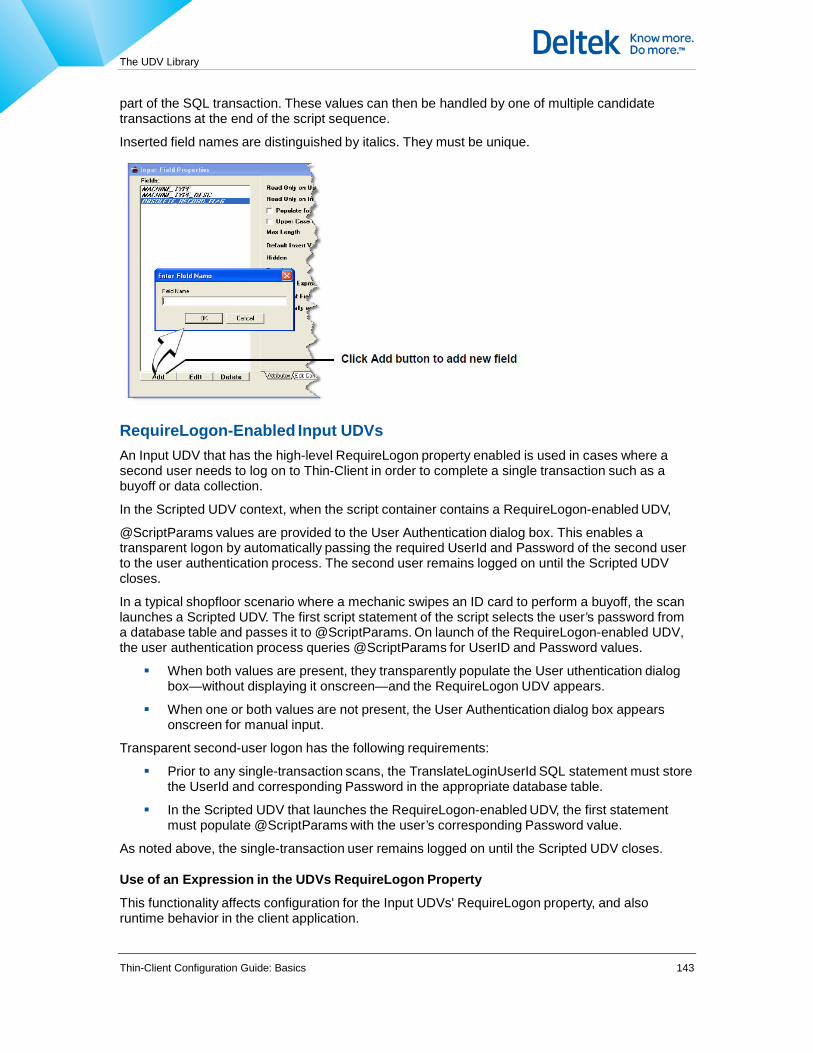
The UDV Library
Thin-Client Configuration Guide: Basics 143
part of the SQL transaction. These values can then be handled by one of multiple candidate transactions at the end of the script sequence.
Inserted field names are distinguished by italics. They must be unique.
RequireLogon-Enabled Input UDVs An Input UDV that has the high-level RequireLogon property enabled is used in cases where a second user needs to log on to Thin-Client in order to complete a single transaction such as a buyoff or data collection.
In the Scripted UDV context, when the script container contains a RequireLogon-enabled UDV,
@ScriptParams values are provided to the User Authentication dialog box. This enables a transparent logon by automatically passing the required UserId and Password of the second user to the user authentication process. The second user remains logged on until the Scripted UDV closes.
In a typical shopfloor scenario where a mechanic swipes an ID card to perform a buyoff, the scan launches a Scripted UDV. The first script statement of the script selects the user’s password from a database table and passes it to @ScriptParams. On launch of the RequireLogon-enabled UDV, the user authentication process queries @ScriptParams for UserID and Password values.
When both values are present, they transparently populate the User uthentication dialog box—without displaying it onscreen—and the RequireLogon UDV appears.
When one or both values are not present, the User Authentication dialog box appears onscreen for manual input.
Transparent second-user logon has the following requirements:
Prior to any single-transaction scans, the TranslateLoginUserId SQL statement must store the UserId and corresponding Password in the appropriate database table.
In the Scripted UDV that launches the RequireLogon-enabled UDV, the first statement must populate @ScriptParams with the user’s corresponding Password value.
As noted above, the single-transaction user remains logged on until the Scripted UDV closes.
Use of an Expression in the UDVs RequireLogon Property
This functionality affects configuration for the Input UDVs' RequireLogon property, and also runtime behavior in the client application.

The UDV Library
Thin-Client Configuration Guide: Basics 144
Prior configuration based on simple boolean (checkbox) is automatically converted to a literal 'True' or 'False' Costpoint MES expression.
Now supports the standard Costpoint MES expression format
For simple UDV, the expression is evaluated once based on initial ScriptParams (@ScriptParams).
For a multi-UDV script, the expression is evaluated once using ScriptParams, just prior to showing the UDV .
UdvRepopulate Property Scripted UDVs also allow control repopulation of fields when users go back to a previously viewed UDV in the script. Repopulation is controlled by the UDV statement property UdvRepopulate.
The UdvRepopulate property repopulates UDVfields with values collected from the last viewing as follows:
rpDefault — Applies “Populate for Insert/Update” logic as set in InputFields.
rpOverride — Populates field values from the prior visit. Does not execute default logic.
rpBefore — Populates field values from the prior visit and then executes default logic, with prior values having precedence.
rpAfter — Execute default logic and then populate field values from prior visit, with default logic values having precedence.
The UdvRepopulate action is controlled (or not) by the following buttons:
The Previous button always executes the UdvRepopulate action.
The Next button never executes the UdvRepopulate action.
Branching from an IF statement never executes the UdvRepopulate action.
ASSERT statements, which branch as a response to mkOk, mkError or mkRetry always execute the UdvRepopulate action.
Scripted UDV Diagnostics For any Scripted UDV you can debug script logic and show diagnostic information by Control-right clicking the referenced UDV. A local menu containing UDV Info and Diagnostics options appears.
If you need to see diagnostics for statements that are executed before a UDV statement, turn on diagnostics (Control-right click the error status area or Exit button of shell) before selecting the Diagnostic option in the referenced UDV.

The UDV Library
Thin-Client Configuration Guide: Basics 145
The UDV Info option displays the Debug Info dialog box, which identifies the UDV and shows the all SQL and parameter data. The Diagnostics option displays the Diagnostics dialog box.
If you enable the UDV and Display Diagnostics options, Information dialog boxes display at each step of the UDV display process. Figure 5-16 shows the first 3 Information dialog boxes that appear when the user clicks the Add button in the Manufacturing Bills of Material dispatch list. Boxes identify the active statement, announce collection of parameters in the SQL Source, and then list parameters after collection.
Scripted UDV Logic Scripted UDVs are a Thin Client 5.0 enhancement, which affect not only the handling of Scripted UDVs, but all other types of UDVs as well. In order to simplify handling, all UDV types use Scripted UDV logic. This means that Display, Input, and Input Matrix UDVs function as a special subset of Scripted UDVs.

The UDV Library
Thin-Client Configuration Guide: Basics 146
Whenever Costpoint MES discerns that a UDV is a non-Scripted type, it creates in memory a Scripted UDV with a single UDV statement that calls the non-Scripted UDV. In effect, Costpoint MES builds the Scripted UDV viewer on-the-fly and displays the non-Scripted UDV in it. Additionally, the on-the-fly Scripted UDV performs a single database transaction/commit (not a group transaction with a single transaction component).
Disable Unioning of Contained UDV Dimensions “Provides an option for script UDVs that can be used to disable the unioning of contained-UDV dimensions to arrive at minimum dialog dimensions. Enabling this option, results in changes in the dialog dimensions as you "next" your way through a script. This is contrary to the default “wizard- like” behavior which maintains consistent dialog dimensions through all presented screens (UDVs).
This behavior more closely resembles the apparent behavior resulting from chaining UDV dialogs via session events.
The designer provides the boolean property, ConsistentDialogSize, for Script UDVs only.
When ConsistentDialogSize is set to False, user prefs dialog dimensions and revert all work with respect to the individual UDVs, rather than for the script UDV as a whole.
Calculated Fields The Selected Fields of a SQL Source for a Display UDV can contain one or more calculated fields whose values are calculated according to a defined string, number, or date. When you set the Display Source Field of a given Selected Field to a Calculated field, the displayed value of the Selected Field is populated with the Calculated field value. The native column value of the Selected Field is unchanged; only the displayed value is different.
Calculated fields can be used in connection with UDV grids containing Memo cells whose values are too long to display. In a grid containing Memo cells, when a field/cell value exceeds the maximum character length, the user must select the cell and press [F2] to display the full value (see Figure 5-18). You can avoid showing a partial value by creating a Calculated field that “truncates” the Selected Field value below the maximum length. If you set the Calculated field to

The UDV Library
Thin-Client Configuration Guide: Basics 147
Hidden and specify it as the Display Source Field for the Selected Field, the displayed value of the Selected Field is populated with the Calculated field value.
Configuring a Calculated Field You configure a calculated field in the Select Fields and Set Properties dialog box of SQL Source in a given Display UDV.
The following procedure shows you how to create a calculated field. It assumes the following things:
The UDV already exists and is linked to a SQL Source.
You have launched the UDV Editor and are connected to the desired database.
To configure a calculated field, complete the following steps:
1. Display the UDV in which you want to create a calculated field.
2. In the NonVisual Controls tab, select the appropriate SQL Source, and then double-click the SelectedFields property in the Properties panel. The Select Fields and Set Field Properties dialog box appears.
3. In the Calculated Fields area, click the Add button. The Calculated Field dialog box appears.
4. In the Field Name field, enter the field name. This name will appear in the Selected Fields list, so it must be different than any name in the list. Also, once you create the field, you will probably want to set it to Hidden, so that it doesn’t display.
5. Set the Data Type and Width as needed.
6. In the Calculation box, enter the appropriate string, number, or date. You can use any expression/NOT expression derived by the following means:
Direct input of the desired value.
Use of a function whose returned value is compared to a True/False standard.
Direct return of a calculated value.
7. Click OK.
If the calculation is successful, the dialog box closes.
If the calculation is not successful, an error message appears in the Test field.
Correct any errors according to the error message.
8. If needed, set the Calculated field to Hidden.

The UDV Library
Thin-Client Configuration Guide: Basics 148
Using an External Function in a Calculated Field You can use the @GetExternalFunctionValue variable to return a value from an External Function in a calculated field.
Syntax @GetExternalFunctionValue(Func_Name)
where
Func_Name specifies an entry in the [ExternalFunctions] section of the Initialization Library record. Thin-Client assigns the returned result string to the ResultParamName property of the specified External Function. Set ResultParamName to * (the asterisk character) to indicate that the function will return multiple named parameter values separated by ~ (the tilde character), in the format <name1>=<value1>~<name2>=<value2>~, etc.
Thin-Client also places the result value in the reserved variable @Result unless the value is greater than 255 bytes.
In releases previous to 7.0.5.0, Windows Client did not post a returned value from an ExternalFunction when it was blank. In releases 7.0.5.0 and greater, it always posts the returned value.
File Upload You can upload a file through an input UDV, and then display that file from a linked grid value in a Display UDV (see Figure 5-19). This allows end users to click on a column value, for example a part number, and display the associated file—usually a drawing or specification.
Valid file types are those listed in the File Types tab of the Domain Manager.

The UDV Library
Thin-Client Configuration Guide: Basics 149
If you correctly configure file upload as shown in this section, but receive an error message such as “The page cannot be displayed” or “User authentication unsuccessful,” turn off the Show friendly HTTP error messages check box in Internet Explorer as follows.
Start Internet Explorer.
On the Tools menu, click Internet Options, and then click the Advanced tab.
Clear (uncheck) the Show friendly HTTP error messages option, and click OK.
For Web Express 1.x using IE 6.x, use the above workaround plus the appropriate FileUploadMode setting.
For Web Express 2.x using IE 6.x, use the above workaround plus the FileUploadMode=1 setting in “Internet Explorer 6 Anomaly.”
File upload and display operate through a parameter triad, which the file upload UDV loads to the database and the file Display UDV fetches through the usual SELECT statement. On display or refresh of the file Display UDV, Web Express looks for the presence of the parameter triad in the returned data set of the SELECT statement: if it finds members of the triad, it populates selected fields of a grid control with hyperlinks, that when clicked, display a file in the appropriate viewer.
In practice, this usually means that a parent Display UDV, for example a grid in a tab, launches a file upload UDV, which adds a file record to a database table. The launching Display UDV then refreshes, and in doing so reruns the SELECT statement, which repopulates the grid with an additional row containing a hyperlinked field value. A click of the hyperlinked value displays the file.
The parameter triad consists of the following parameters:
BaseName —- This is the triad prefix and is any column name you like. Example: PARTNAME. It usually contains the path and file name.
In the file upload UDV, this parameter corresponds to the field containing the path and filename of the file to be loaded to the database.
In the file display UDV, this parameter corresponds to a SelectedFields value—a grid column—containing the hyperlink(s) to the uploaded file. In the Select statement of the Display UDV, Web Express uses the BaseName as a flag for identifying other triad members in the returned data set. In Figure 5-19, the display BaseName selected field is the one with the circled value.
_DESC parameter — The BaseName plus the _DESC suffix. Example: PARTNAME_DESC. This parameter contains a description of the file and is optional for both the upload and display UDVs.
In the file upload UDV, this parameter corresponds to the field containing the file description.
In the file display UDV, Web Express uses this parameter as an alternate display field in place of the BaseName value in the hyperlinked selected field. If the Select statement returns no _DESC value, the BaseName value appears in the BaseName selected field.
The _DATA parameter - The BaseName plus the _DATA suffix. Example: PARTNAME_DATA. This parameter contains the file itself, e.g., a PDF file. Web Express infers the _DATA value from the BaseName value (which contains both the path and filename).
In the file upload UDV, there is no need for a field to collect the _DATA parameter—however the SQL Transaction must insert/update this parameter.

The UDV Library
Thin-Client Configuration Guide: Basics 150
In the file display UDV, the BaseName hyperlink invokes the _DATA value in the appropriate viewer.
You can have multiple parameter triads for any file upload UDV/database table and corresponding Select statements.
The following table shows the 4 possible results for the BaseName value in the file display UDV. These depend on the BaseName, BaseName_DESC, and BaseName_DATA values returned from the Select statement The table assumes that the database returns a value for every parameter.
File Display Scenarios
Select Statement Parameters Result Display UDV Field
BaseName [only] BaseName value populates BaseName selected field, but is not linked to any file.
Example C:\Drawings\Flange.pdf
BaseName + BaseName_DATA BaseName value populates BaseName selected field, and is linked to
_DATA file. If BaseName value contains a path, Web Express strips it from the display value.
Example Flange.pdf
BaseName + BaseName_DESC BaseName_DESC value populates BaseName selected field, but is not linked to any file. If _DESC parameter is empty, BaseName value sans path populates selected field.
Example 3-Way Utility Flange or Flange.pdf
BaseName + BaseName_DATA + BaseName_DESC
BaseName_DESC value populates BaseName selected field, which is linked to _DATA file. If _DESC parameter is empty, BaseName value sans path populates selected field.
Example 3-Way Utility Flange or Flange.pdf
The File Upload UDV The file upload UDV uploads a file to the database with the intent of displaying that file in a Display UDV.

The UDV Library
Thin-Client Configuration Guide: Basics 151
The file upload UDV is an ordinary Insert/Update UDV with the following characteristics:
The upload control is data linked to the BaseName parameter/database column (see “How File Upload Works”).
The upload control is an Edit Control Type with either a Filename or Filename with Data Entry Type.
Strictly speaking, the database table named in the SQL statement doesn’t have to contain any columns corresponding to the parameter triad. However, if the Input UDV is used as a means of displaying a file in a Display UDV—the intent of this functionality—the database table must contain columns corresponding to BaseName and BaseName_DATA parameters. The BaseName_DESC column is optional for both the Input UDV and Display UDV, but is recommended for display versatility (see “The Display UDV Select Statement”).
The BaseName_DATA database column must be a BLOB data type unless the SQL statement specifically handles non-BLOB parameters. The database may allow placing noncharacter data into non-BLOB fields, but the data can be corrupted as a result.
Configuring the File Upload UDV
You configure a file upload UDV in the UDV Editor, mainly through the Input Fields property of the SQL Transaction.
The following procedure shows you how to configure a file upload UDV. It assumes the following things:
The UDV already exists and is linked to a SQL Transaction.
The SQL Transaction contains the BaseName_DATA parameter to receive file data even though there is no corresponding data control in the file upload UDV. See “How File Upload Works.”
You have launched the UDV Editor and are connected to the desired database.
To configure a file upload UDV, complete the following steps:
1. Display the UDV in which you want to configure file uploading.
2. In the Design tab, right-click in the beveled area and add an Edit control that will be linked to the BaseName parameter/column. See “Step 4: Adding and Positioning Visual Controls.”

The UDV Library
Thin-Client Configuration Guide: Basics 152
3. If needed, add a control that will be linked to the BaseName_DESC parameter.
4. Link the BaseName and BaseName_DESC controls to the appropriate SQL transaction and columns. See “Step 9: Linking Visual and Nonvisual Controls.”
5. In the Non-Visual Controls tab, click the appropriate SQL transaction, and in the right-hand Properties pane, double-click the Value column of the InputFields property. The Input Fields Properties dialog box appears.
6. Click the Edit Control tab and in the Fields list, select the field corresponding to the BaseName Edit control.
7. Set the Control Type to Edit and the Entry Type to Filename or Filename with Data.
8. Select the field corresponding to the BaseName_DESC Edit control and set the Control
Type and Entry Type as needed.
The file display UDV displays a file from a hyperlinked value in a grid control (see Figure 5-21). It works in conjunction with a file upload UDV, which uploads the file to the database (see “The File Upload UDV”).
Population of the file display UDV with hyperlinks is a function of the parameters returned from the Select statement: if the statement returns a BaseName parameter plus the BaseName_DATA parameter, Web Express populates every BaseName value as a hyperlink to the BaseName_DATA file (see “How File Upload Works”). If the statement also returns a BaseName_DESC value, Web Express uses BaseName_DESC as an alternate display field and replaces the BaseName link name with the BaseName_DESC value.
The file display UDV is an ordinary Display UDV with the following characteristics:
The display control is a grid (only).
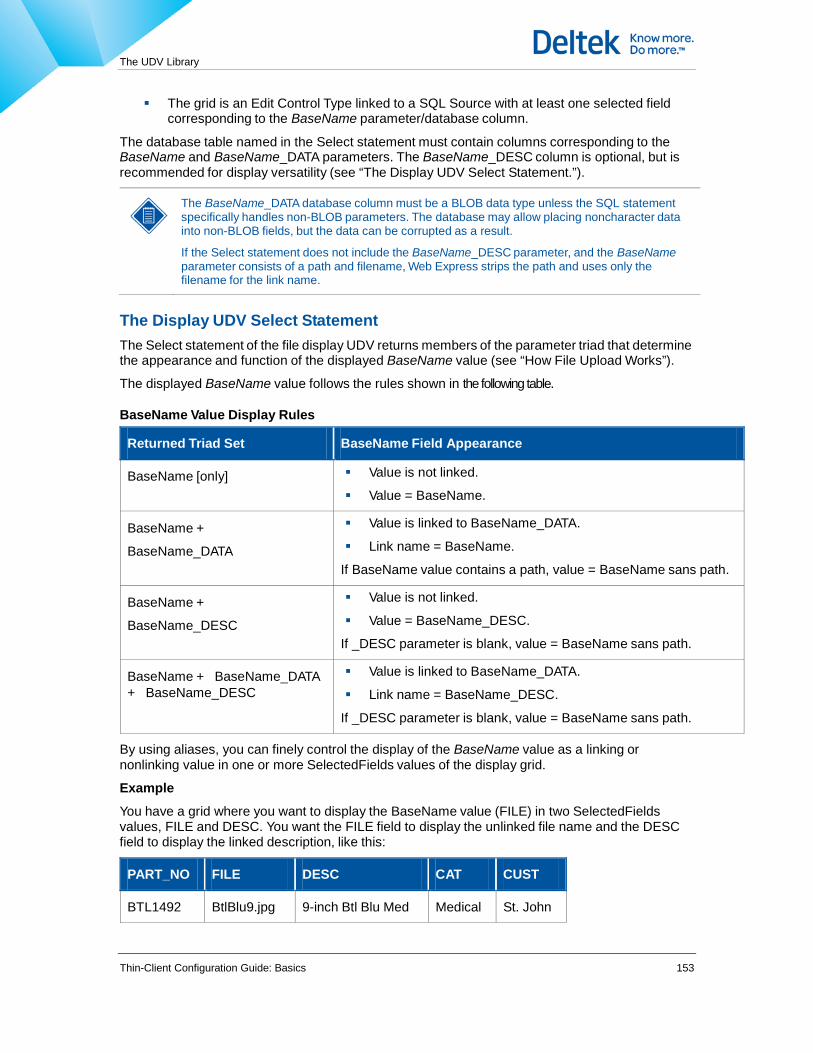
The UDV Library
Thin-Client Configuration Guide: Basics 153
The grid is an Edit Control Type linked to a SQL Source with at least one selected field corresponding to the BaseName parameter/database column.
The database table named in the Select statement must contain columns corresponding to the BaseName and BaseName_DATA parameters. The BaseName_DESC column is optional, but is recommended for display versatility (see “The Display UDV Select Statement.”).
The BaseName_DATA database column must be a BLOB data type unless the SQL statement specifically handles non-BLOB parameters. The database may allow placing noncharacter data into non-BLOB fields, but the data can be corrupted as a result.
If the Select statement does not include the BaseName_DESC parameter, and the BaseName parameter consists of a path and filename, Web Express strips the path and uses only the filename for the link name.
The Display UDV Select Statement
The Select statement of the file display UDV returns members of the parameter triad that determine the appearance and function of the displayed BaseName value (see “How File Upload Works”).
The displayed BaseName value follows the rules shown in the following table.
BaseName Value Display Rules
Returned Triad Set BaseName Field Appearance
BaseName [only] Value is not linked.
Value = BaseName.
BaseName +
BaseName_DATA
Value is linked to BaseName_DATA.
Link name = BaseName.
If BaseName value contains a path, value = BaseName sans path.
BaseName +
BaseName_DESC
Value is not linked.
Value = BaseName_DESC.
If _DESC parameter is blank, value = BaseName sans path.
BaseName + BaseName_DATA + BaseName_DESC
Value is linked to BaseName_DATA.
Link name = BaseName_DESC.
If _DESC parameter is blank, value = BaseName sans path.
By using aliases, you can finely control the display of the BaseName value as a linking or nonlinking value in one or more SelectedFields values of the display grid.
Example
You have a grid where you want to display the BaseName value (FILE) in two SelectedFields values, FILE and DESC. You want the FILE field to display the unlinked file name and the DESC field to display the linked description, like this:
PART_NO FILE DESC CAT CUST
BTL1492 BtlBlu9.jpg 9-inch Btl Blu Med Medical St. John

The UDV Library
Thin-Client Configuration Guide: Basics 154
PART_NO FILE DESC CAT CUST
BTL1493 BtlRed9.jpg 9-inch Btl Red Med Medical St. John
BTL1494 BtlWht7.jpg 7-inch Btl wht Med Medical St. John
The Select statement would look like this: SELECT
PART_NO,
FILE,
FILE AS DESC,
FILE_DESC AS DESC_DESC
FILE_DATA AS DESC_DATA
CAT,
CUST, FROM PARTS
Configuring the File Display UDV
You configure a file display UDV in the UDV Editor, mainly through the Selected Field Properties of the SQL Source. The Select statement for the SQL Source should already be complete (see “The Display UDV Select Statement”).
The following procedure shows you how to configure a file upload UDV. It assumes the following things:
The UDV already exists and is linked to a SQL Source.
You have launched the UDV Editor and are connected to the desired database.
To configure a file display UDV, complete the following steps:
1. Display the UDV in which you want to configure file display.
2. If the grid control you want to use for display is not already in the UDV, in the Design tab, right- click in the beveled area and add a Grid control. See “Step 4: Adding and Positioning Visual Controls.”
3. If the grid control is not already linked, link it to the appropriate SQL Source. See “Step 9: Linking Visual and Nonvisual Controls.”
4. Select the appropriate SQL Source, and in the right-hand Properties pane, double-click the Value column of the SelectedFields property. The Selected Fields Properties dialog box appears.

The UDV Library
Thin-Client Configuration Guide: Basics 155
5. If the BaseName and alias fields are not already in the Selected Fields list, select them in the Available Fields list and click the right arrow.
6. In the Display Attributes tab, set attributes for the BaseName and alias fields as needed.
7. In the Edit Control tab, make sure that the BaseName and alias fields are Edit Control Types.
Internet Explorer 6 Anomaly The previous sections show you how to upload a file via the browser. A known Internet Explorer 6.x issue, however, makes this upload problematic over secure (https) connections.
When using Internet Explorer 6.x, you can control file uploads through the FileUploadMode entry in the [StartUp] section of the domain-specific Ini file. Note that a FileUploadMode entry has no effect unless the browser is IE 6.
The FileUploadMode values are 1–5 as follows:
1. Uses the original protocol. Causes the original default behavior where uploads are performed using the same secure (https) or nonsecure (http) connection as the rest of the Web Express session.
2. Does not allow uploads. During use of a secure (https) connection, prevents uploads. Causes an
1. “Uploads are not possible” message to appear if the user attempts to do a file upload.
2. Uses http mode only. Causes the upload to occur in a nonsecure (http) mode even if the user is connected via a secure (https) connection for the rest of the Web Express session. This mode makes it possible for most users to upload using IE 6 even when using a secure connection for other Web Express activities.
3. Forces the mode to https.
4. Forces the mode to http.
Example
The following entry causes a domain to use the http-only setting for uploads: [StartUp]
FileUploadMode = 3
More Info UDVs Win A Display UDV field can be configured to display a More Info UDV, which contains further information about the selected field. Specifically, a More Info UDV can be used to implement the CFR21 Part 11 requirement to display the full name of the UserId.
You can configure a More Info UDV for simple Edit fields and grids in any Display UDV or Dispatch list. When a field or grid has been configured, and the user right-clicks on that field, the More Info option appears in the local menu. Selecting that option displays the configured More Info UDV:
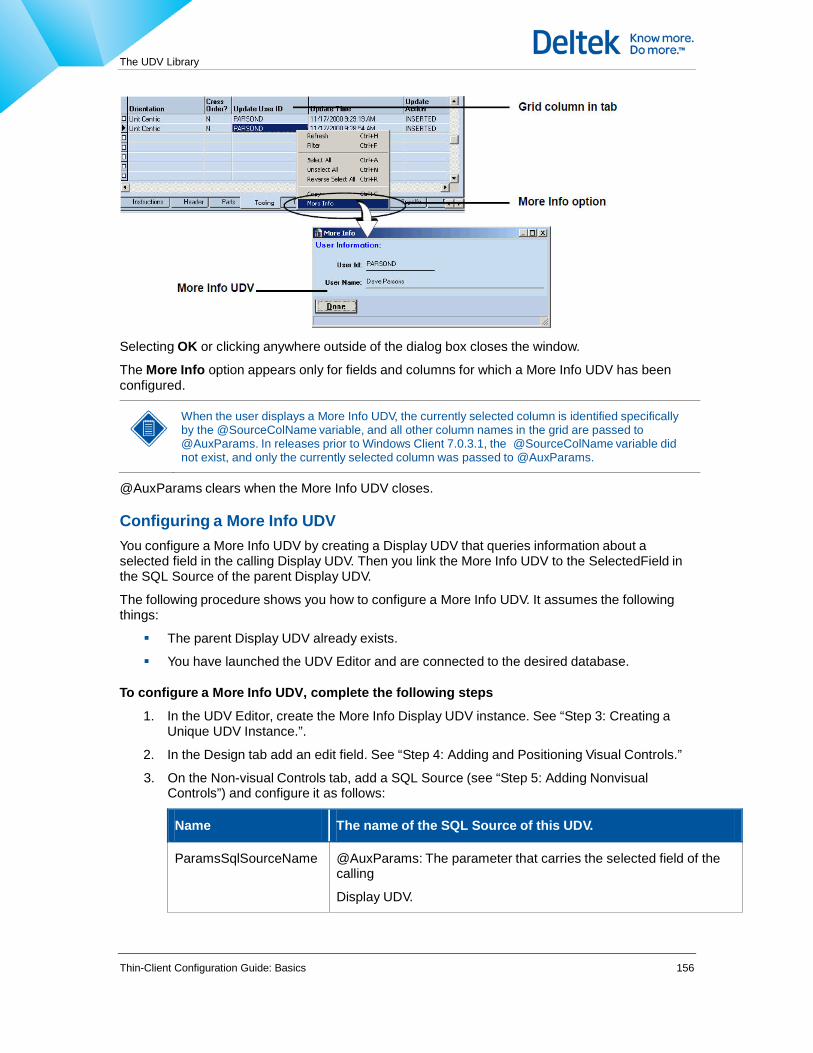
The UDV Library
Thin-Client Configuration Guide: Basics 156
Selecting OK or clicking anywhere outside of the dialog box closes the window.
The More Info option appears only for fields and columns for which a More Info UDV has been configured.
When the user displays a More Info UDV, the currently selected column is identified specifically by the @SourceColName variable, and all other column names in the grid are passed to @AuxParams. In releases prior to Windows Client 7.0.3.1, the @SourceColName variable did not exist, and only the currently selected column was passed to @AuxParams.
@AuxParams clears when the More Info UDV closes.
Configuring a More Info UDV You configure a More Info UDV by creating a Display UDV that queries information about a selected field in the calling Display UDV. Then you link the More Info UDV to the SelectedField in the SQL Source of the parent Display UDV.
The following procedure shows you how to configure a More Info UDV. It assumes the following things:
The parent Display UDV already exists.
You have launched the UDV Editor and are connected to the desired database.
To configure a More Info UDV, complete the following steps
1. In the UDV Editor, create the More Info Display UDV instance. See “Step 3: Creating a Unique UDV Instance.”.
2. In the Design tab add an edit field. See “Step 4: Adding and Positioning Visual Controls.”
3. On the Non-visual Controls tab, add a SQL Source (see “Step 5: Adding Nonvisual Controls”) and configure it as follows:
Name The name of the SQL Source of this UDV.
ParamsSqlSourceName @AuxParams: The parameter that carries the selected field of the calling
Display UDV.

The UDV Library
Thin-Client Configuration Guide: Basics 157
Name The name of the SQL Source of this UDV.
SelectSqlId The SQL ID of the statement retrieving information from the selected field in the calling UDV. Example: select
'Userid: '||USERID||', Name: '||FULL_NAME USER_INFO
from SFFND_USER
where USERID = :UPDT_USERID
1. Link the edit field to the SQL Source and save the UDV. See “Step 9: Linking Visual and Nonvisual Controls.”
4. In the parent Display UDV, display the Select Fields dialog box of the SQL Source.
5. Highlight the selected field for which you want to display more info and set the More Info UDV field to the UDV ID of the just-created More Info UDV. This More Info UDV can now be called from any Display UDV grid or simple edit field that is linked to the column corresponding to the selected field.
More Info UDVs and the Field Modifier Tool Win When you create a More Info UDV for a selected field/column (see “Configuring a More Info UDV”), the More Info UDV ID becomes one of the properties that can be changed for that column in the Field Modifier tool.
Display UDVs in Dialog Boxes As of Thin Client 4.1, you can show a Display UDV in a dialog box.
The “Display UDV dialog box” is always presented as a popup and is automatically closed when a peer or parent form receives focus.
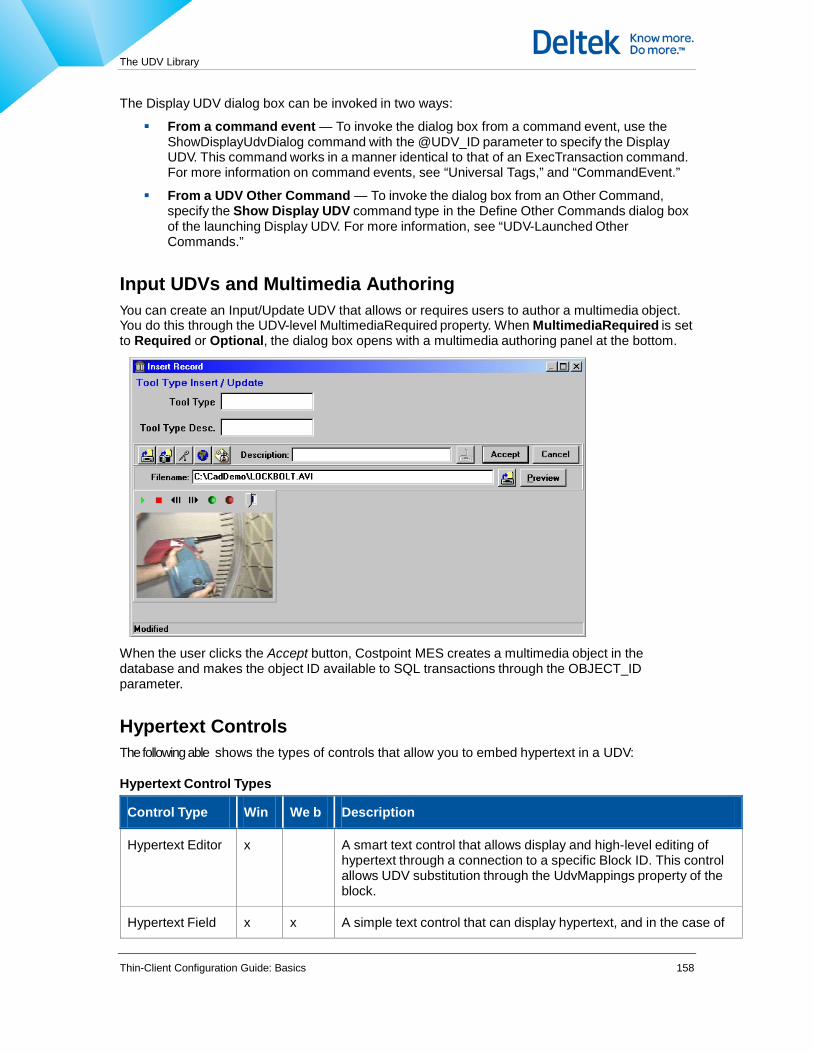
The UDV Library
Thin-Client Configuration Guide: Basics 158
The Display UDV dialog box can be invoked in two ways:
From a command event — To invoke the dialog box from a command event, use the ShowDisplayUdvDialog command with the @UDV_ID parameter to specify the Display UDV. This command works in a manner identical to that of an ExecTransaction command. For more information on command events, see “Universal Tags,” and “CommandEvent.”
From a UDV Other Command — To invoke the dialog box from an Other Command, specify the Show Display UDV command type in the Define Other Commands dialog box of the launching Display UDV. For more information, see “UDV-Launched Other Commands.”
Input UDVs and Multimedia Authoring You can create an Input/Update UDV that allows or requires users to author a multimedia object. You do this through the UDV-level MultimediaRequired property. When MultimediaRequired is set to Required or Optional, the dialog box opens with a multimedia authoring panel at the bottom.
When the user clicks the Accept button, Costpoint MES creates a multimedia object in the database and makes the object ID available to SQL transactions through the OBJECT_ID parameter.
Hypertext Controls The following able shows the types of controls that allow you to embed hypertext in a UDV:
Hypertext Control Types
Control Type Win We b Description
Hypertext Editor x A smart text control that allows display and high-level editing of hypertext through a connection to a specific Block ID. This control allows UDV substitution through the UdvMappings property of the block.
Hypertext Field x x A simple text control that can display hypertext, and in the case of

The UDV Library
Thin-Client Configuration Guide: Basics 159
Control Type Win We b Description
Thin-Client, allows low-level editing and text input. This control also provides UDV substitution, but does it directly through a Hypertext Field control property.
Hypertext Editor Controls The Hypertext Editor control is a smart text area that allows display and high-level editing of hypertext. Because of an associated Block ID, this control invokes a local menu with the editing and linking functions of the associated block type. The editor is an enhanced version of the earlier “Hypertext” control. Display, input, and editing functions are all present when the control is embedded in a Display UDV.
Hypertext and Rave RTF controls support RTF version 1.7.
Substitution of any embedded UDVs is configured through the UdvMappings property of the associated block. For more information, see “Substituting UDVs in Blocks.”
The following procedure shows you how to embed a Hypertext Editor control in a Display UDV. It assumes the following things:
You have launched the UDV Editor and are connected to the desired database.
A BlockId for the UDV already exists. For more information on creating and configuring a block, see “Blocks.”
To embed a Hypertext Editor control in a Display UDV, complete the following steps:
1. Display the desired Display UDV.
2. In the Design tab, right-click and select Insert Hypertext Editor. The Object Name dialog box appear. It’s a good idea to name the control after the label that identifies it.
3. Enter an appropriate name and click OK. The Hypertext Editor control appears in the work area.
4. Move the cursor over the Hypertext Editor control and left-click. The control properties appear in the Property panel.
5. Configure properties as appropriate:
BlockId The block type that defines the text in the control.

The UDV Library
Thin-Client Configuration Guide: Basics 160
BlockId The block type that defines the text in the control.
Caption Any text (such as a title) that appears at the top of the control.
Height The vertical size in pixels of the control.
HelpContext The Context ID of the Help topic that contains information about the control.
Left The distance in pixels between the left side of the control and the left side of the screen.
Name The name of the control.
ReadOnly Determines whether the control is read only.
TabOrder The order of controls as activated by the [Tab] key.
Top The distance in pixels between the top of the control and the top of the screen.
Width The width in pixels of the control.
6. Link the Hypertext Editor control to a data source (SQL Source). See “Step 9: Linking Visual and Nonvisual Controls.”
Hypertext Field Controls A Hypertext Field control is a simple text area that can display hypertext. Unlike the Hypertext Editor control, there is no connection to a Block ID (see “Hypertext Editor Controls”).
When the control is embedded in a Display UDV, it displays hypertext, which is refreshed whenever the linked SQL Source is refreshed.
Substitution of any embedded UDVs is configured through the UdvMappings property of the control (and is explained in the following procedure).
For Thin-Client, when the control is embedded in an Input UDV, it allows text input and limited editing. The associated SQL Transaction posts the contents as hypertext to a specific param/column name when the transaction is executed.
The following procedure shows you how to embed a Hypertext Field control in either a Display UDV (Thin-Client and Web Express Client) or Input UDV (Thin-Client). It assumes that you have launched the UDV Editor and are connected to the desired database.
To embed a Hypertext Field control in a Display or Input UDV, complete the following steps:
1. Display the desired Display UDV (for Thin-Client or Web Express Client) or Input UDV (for Thin-Client).

The UDV Library
Thin-Client Configuration Guide: Basics 161
2. In the Design tab, right-click and select Insert Hypertext Field.
3. The Object Name dialog box appear. It’s a good idea to name the control after the label that identifies it.
4. Enter an appropriate name and click OK. The Hypertext Field control appears in the work area.
5. Move the cursor over the Hypertext Field control and left-click. The control properties appear in the Property panel.
6. Configure properties as appropriate:
Property Win Web Description
ActivateEmbeddedControls
x For Display UDVs only, activates a database link to any controls embedded in the hypertext control.
Height x x The vertical size in pixels of the control.
HelpContext x The Context ID of the Help topic that contains information about the control.
Left x x The distance in pixels between the left side of the control and the left side of the screen.
Name x x The name of the control.
TabOrder x The order of controls as activated by the [Tab] key.
Top x x The distance in pixels between the top of the control and the top of the screen.
UdvMappings
x x For Display UDVs only, substitutes the indicated UDV for the indicated substitute. Enter or edit UDV=substitute pairs in the UdvMappings field directly, delimiting pairs with a semicolon. Or click the Ellipsis button to display the UdvMappings dialog box.
To navigate, use the arrow keys.
To add a row, position the cursor in the last row and press [Insert] or the down arrow key.
To delete a row, position the cursor in that row and press [Ctrl]-[Delete].
To restore a row, press [Esc].
Width x x The width in pixels of the control.
7. Link the Hypertext Field control to a SQL Source or SQL Transaction. See “Step 9: Linking Visual and Nonvisual Controls.”
There are new changes to Hypertext local menu option which includes a new INI Lib settings for Icon, MMIcon, and DefaultIconName, as follows:
ControlDefinition.Links.<link name>.Icon=<StdMarkup reference> — Defines the appearance of the hyperlink as it appears in the hypertext when Glyph is selected as Icon.

The UDV Library
Thin-Client Configuration Guide: Basics 162
Slide.Classifications.<classification>.Links.MMIcon=<StdMarkup reference> — Defines the appearance of the multimedia hyperlink when Glyph is selected as Icon. See also the LINKS section under Multimedia / Classifications.
common.DefaultIconName=<StdMarkup reference> — Must be a valid reference to an item in StdMarkup.
Default value is 'Slide'.
Memo Controls and RTF Mode Memo controls support an RTF (Rich Text Format) mode that allows users to apply font attributes such as highlighting and superscripting to text in the control.
Web Express supports Memo controls in RTF mode, but in View mode only.
You enable RTF mode for a memo control in an Input UDV through the PlainText property of the control. When PlainText is False, RTF mode is enabled. When PlainText is True, RTF mode is disabled.
For Thin-Client, the PlainText property of any individual UDV is overridden by the UdvRtfMemoEnabled property in the [Common] section of the Initialization Library record. When UdvRtfMemoEnabled is On, it enables RTF mode in all UDVs where PlainText is False. When UdvRtfMemoEnabled is Off, it disables RTF mode in all UDVs regardless of the PlainText setting. The default value of UdvRtfMemoEnabled is Off.
When RTF mode is enabled it increases the storage requirements for the related database column. Each new/unique font used in RTF text adds approximately 80 bytes to the text.

The UDV Library
Thin-Client Configuration Guide: Basics 163
You can also apply formatting to hypertext by inserting an RTF control in a block. For more information, see “RTF Controls.”
Input UDV - Caption for Memo Control provides a caption for memo controls that can be configured to appear to the left, or above the memo. Input memos have 3 important properties for configuring this label:
Caption — Controls the text of the label component.
CaptionPos — cpLeft, cpAbove, cpNone. Sets the position of the label component.
CaptionFont — Controls what font the label will use.
Graph Controls
A Graph control allows you to present a graph in a Display UDV. The control uses the existing base class control employed in the Report/Graph Viewer, presenting it within the Display UDV context.
In the Display UDV, the current record of the SQL Source provides parameters that populate the SQL statement of the graph control. The graph changes as the user moves from record to record, updating passed parameters.
An optional graph navigator scrolls time series data.
Creating the Graph You configure a Graph control by first creating the graph in the Graph Editor of the System Manager. Define the graph SQL statement in such a way that the parameters match by name the fields of the SQL Source in the host Display UDV. On creation, the editor assigns a unique Graph ID, which you will use to tie the graph to the Graph control in the UDV.
In the graph itself, you can create a hyperlink to an Other Command through the graph LinkToolName property (see figure below). The referenced Other Command must exist as a property of the SQL Source that datalinks the Graph control to the UDV. The LinkToolName command uses the following syntax: @Command(<OtherCommandName>)
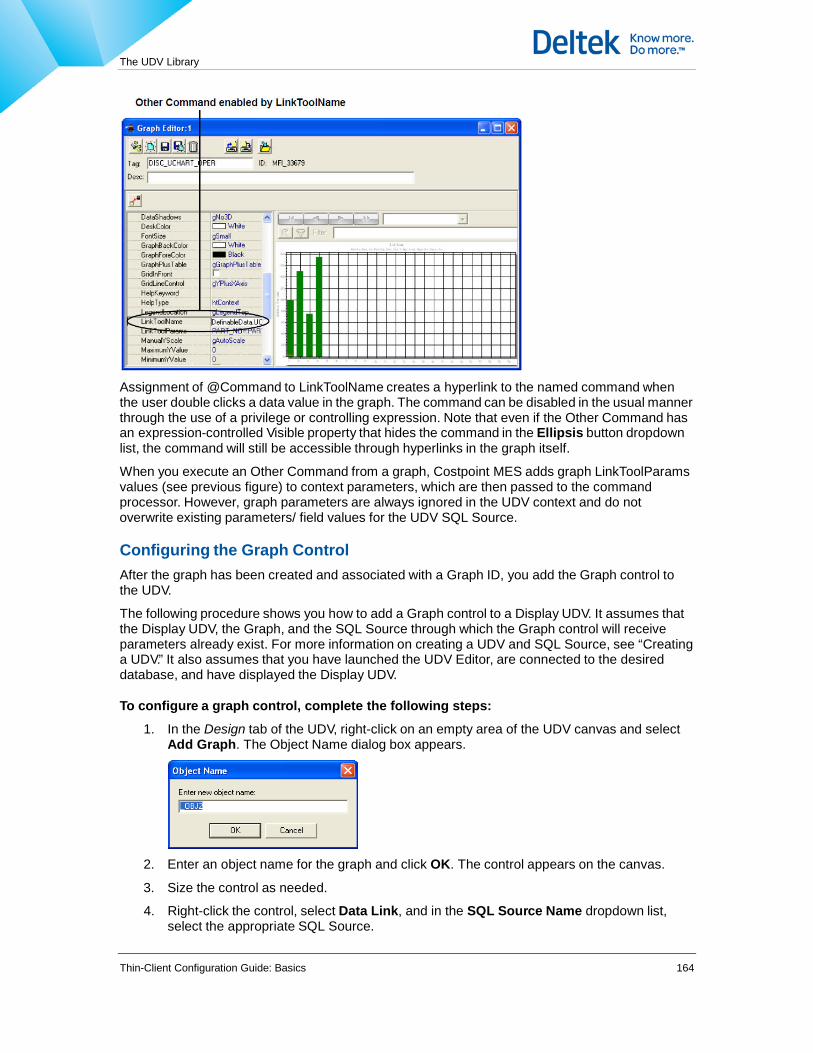
The UDV Library
Thin-Client Configuration Guide: Basics 164
Assignment of @Command to LinkToolName creates a hyperlink to the named command when the user double clicks a data value in the graph. The command can be disabled in the usual manner through the use of a privilege or controlling expression. Note that even if the Other Command has an expression-controlled Visible property that hides the command in the Ellipsis button dropdown list, the command will still be accessible through hyperlinks in the graph itself.
When you execute an Other Command from a graph, Costpoint MES adds graph LinkToolParams values (see previous figure) to context parameters, which are then passed to the command processor. However, graph parameters are always ignored in the UDV context and do not overwrite existing parameters/ field values for the UDV SQL Source.
Configuring the Graph Control After the graph has been created and associated with a Graph ID, you add the Graph control to the UDV.
The following procedure shows you how to add a Graph control to a Display UDV. It assumes that the Display UDV, the Graph, and the SQL Source through which the Graph control will receive parameters already exist. For more information on creating a UDV and SQL Source, see “Creating a UDV.” It also assumes that you have launched the UDV Editor, are connected to the desired database, and have displayed the Display UDV.
To configure a graph control, complete the following steps:
1. In the Design tab of the UDV, right-click on an empty area of the UDV canvas and select Add Graph. The Object Name dialog box appears.
2. Enter an object name for the graph and click OK. The control appears on the canvas.
3. Size the control as needed.
4. Right-click the control, select Data Link, and in the SQL Source Name dropdown list, select the appropriate SQL Source.

The UDV Library
Thin-Client Configuration Guide: Basics 165
5. Select the Graph control, and in the Property panel assign the following properties as needed. Note that all property names are a single word, but may be written on two lines due to space restrictions.
Category Property Description
Appearance Alignment The alignment of the control caption:
taCenter
taLeftJustify
taRightJustify
Caption The text of the control caption.
Behavior TabOrder The order in which the [Tab] key focuses elements in the control.
Font Font The font of the graph.
Font.Height The font height in pixels.
Font.Name The font name.
Misc HelpContext The Context ID of the Help topic that contains information about the control.
Name The name of the control.
Other GraphId The ID of the graph that will be associated with this control.
NavControlVisible When checked, causes a navigator to appear above the graph.
ParamSqlSourceNa me
The name of the SQL Source that publishes its parameters for use by this UDV. Note: This property behaves the same as the ParamsSqlSourceName property for other controls, but the “Param” element is singular (Param, not Params).
Position Height The vertical size in pixels of the control.
Left The distance in pixels between the left side of the control and the left side of the screen.
Top The distance in pixels between the top of the control and the top of the screen.
Width The width in pixels of the control.
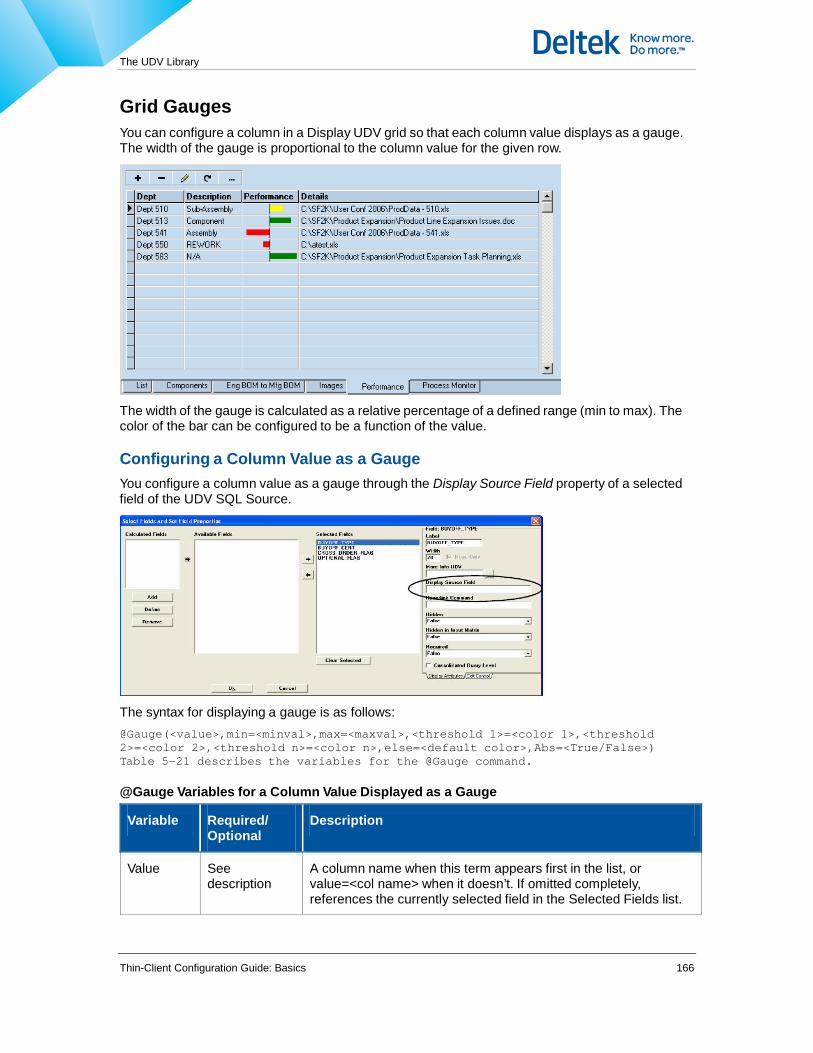
The UDV Library
Thin-Client Configuration Guide: Basics 166
Grid Gauges You can configure a column in a Display UDV grid so that each column value displays as a gauge. The width of the gauge is proportional to the column value for the given row.
The width of the gauge is calculated as a relative percentage of a defined range (min to max). The color of the bar can be configured to be a function of the value.
Configuring a Column Value as a Gauge You configure a column value as a gauge through the Display Source Field property of a selected field of the UDV SQL Source.
The syntax for displaying a gauge is as follows: @Gauge(<value>,min=<minval>,max=<maxval>,<threshold 1>=<color 1>,<threshold 2>=<color 2>,<threshold n>=<color n>,else=<default color>,Abs=<True/False>) Table 5-21 describes the variables for the @Gauge command.
@Gauge Variables for a Column Value Displayed as a Gauge
Variable Required/ Optional
Description
Value See description
A column name when this term appears first in the list, or value=<col name> when it doesn’t. If omitted completely, references the currently selected field in the Selected Fields list.

The UDV Library
Thin-Client Configuration Guide: Basics 167
Variable Required/ Optional
Description
Threshold Required The minimum value at which, or a range through which, a gauge is associated with either the associated Color value, or with the font color. Threshold values can be a single integer or a range in the form of low:high, such as 0:20.
Color Optional The color of the gauge for the associated threshold.
If threshold colors are omitted, the gauge color is set to the font color.
Minval and Maxval
Optional Minimum and maximum values allowed for the given column, respectively. The default for minval is zero. The default for maxval is
100.
Negative values are supported, and cause gauges to be displayed from the horizontal center of the cell, outward left and right. Otherwise, a gauge is left justified, extending to the right. To create an expanded scale, make minval a nonzero value.
CostpointMES raises an error when a row value is outside the minval–maxval range.
Abs Optional When set to true (abs=true), causes the color calculation to be insensitive to the sign of the value for a given row. This setting would be typical for configuration of a statistical control chart
The following examples show valid syntax:
@Gauge()
@Gauge(PERF_COL)
@Gauge(40=red,60=yellow,else=green)
@Gauge(0:40=red,41:60=yellow,else=green)
@Gauge(PERF_COL,40=red,60=yellow,else=green)
@Gauge(value=PERF_COL,40=red,60=yellow,else=green)
@Gauge(value=PERF_COL,min=0,max=100,40=red,60=yellow,else=green,abs=true)
The following procedure shows you how to configure a column value as a gauge in a Display UDV. It assumes that you have launched the UDV Editor, are connected to the desired database, and have displayed the Display UDV..
To configure a column value as a gauge, complete the following steps:
1. In the Non-Visual Controls tab of the UDV, click the SQL Source of the grid whose Selected Field you want to configure as a gauge.
2. In the Properties panel, double-click the column next to the SelectedFields property. The Select Fields and Set Properties dialog box appears.
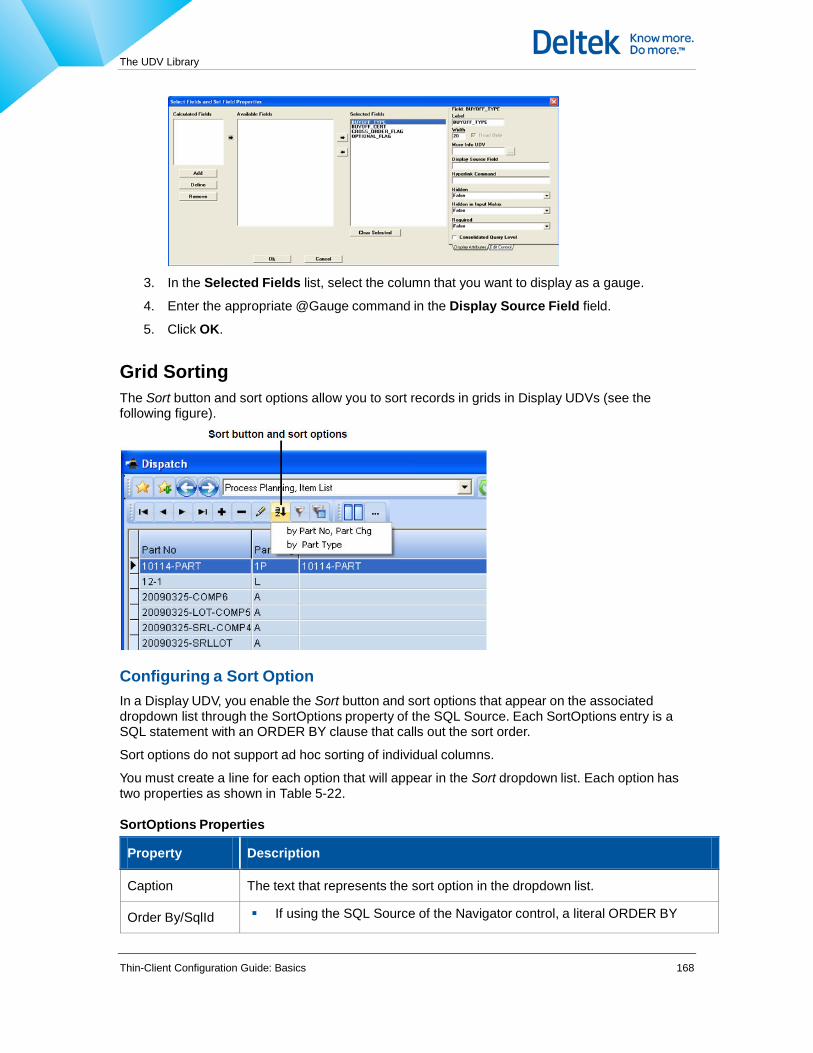
The UDV Library
Thin-Client Configuration Guide: Basics 168
3. In the Selected Fields list, select the column that you want to display as a gauge.
4. Enter the appropriate @Gauge command in the Display Source Field field.
5. Click OK.
Grid Sorting The Sort button and sort options allow you to sort records in grids in Display UDVs (see the following figure).
Configuring a Sort Option In a Display UDV, you enable the Sort button and sort options that appear on the associated dropdown list through the SortOptions property of the SQL Source. Each SortOptions entry is a SQL statement with an ORDER BY clause that calls out the sort order.
Sort options do not support ad hoc sorting of individual columns.
You must create a line for each option that will appear in the Sort dropdown list. Each option has two properties as shown in Table 5-22.
SortOptions Properties
Property Description
Caption The text that represents the sort option in the dropdown list.
Order By/SqlId If using the SQL Source of the Navigator control, a literal ORDER BY

The UDV Library
Thin-Client Configuration Guide: Basics 169
Property Description
statement such as ORDER BY PART_NO DESC, REVISION.
If not using the SQL Source of the navigator, a SQL ID in the SQL Library, that defines the entire SQL statement, including the ORDER BY clause.
The following procedure shows you how to configure sort options in a Display UDV grid. It assumes that you have launched the UDV Editor, are connected to the desired database, and have displayed the Display UDV.
To configure sort options in a Display UDV grid, complete the following steps:
1. In the Design tab of the UDV, select the Navigator control, and in the Property panel, double-click the column next to the VisibleButtons property. The Visible Buttons dialog box appears.
2. Enable the check box next to the Sort option and click OK. A Sort button appears in the Navigator.
3. In the Non-Visual Controls tab of the UDV, click the SQL Source of the Navigator control, and in the Property panel, double-click the column next to the SortOptions property. The Sort Options dialog box appears.
4. Enter Caption and Order By/SqlId values for each sort option. To create a new row, or if
entries already exist, highlight the last row and press the down arrow key.
5. Click OK.
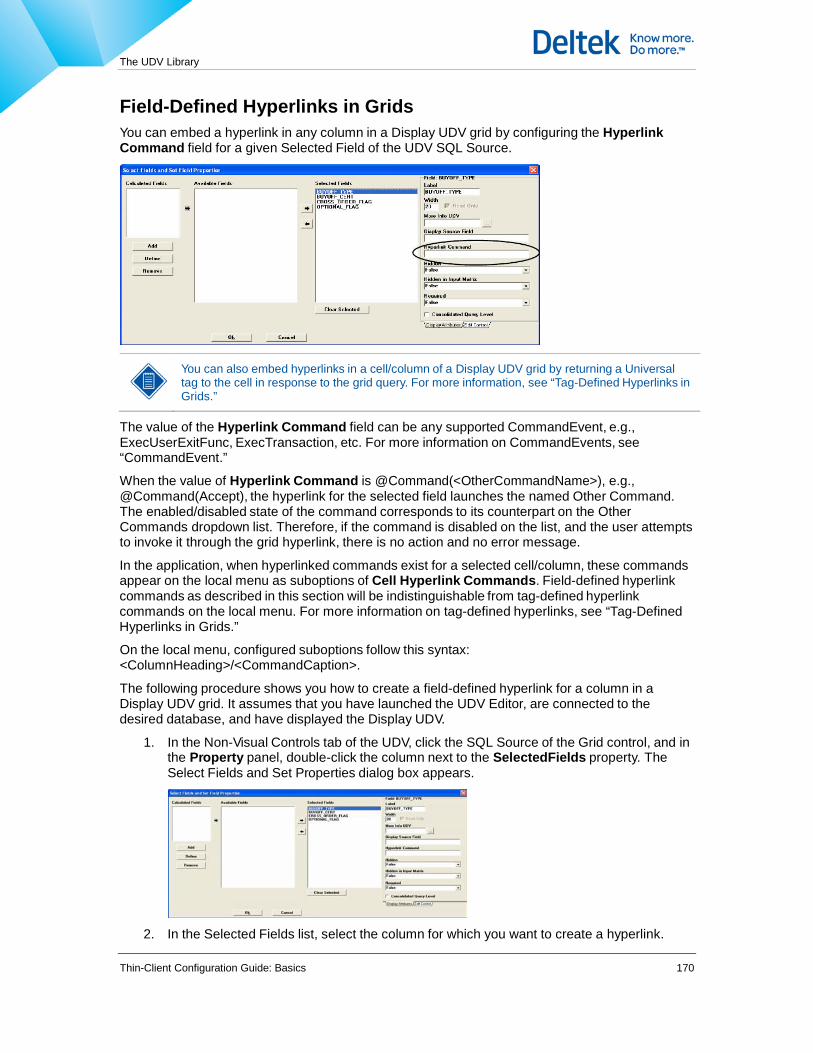
The UDV Library
Thin-Client Configuration Guide: Basics 170
Field-Defined Hyperlinks in Grids You can embed a hyperlink in any column in a Display UDV grid by configuring the Hyperlink Command field for a given Selected Field of the UDV SQL Source.
You can also embed hyperlinks in a cell/column of a Display UDV grid by returning a Universal tag to the cell in response to the grid query. For more information, see “Tag-Defined Hyperlinks in Grids.”
The value of the Hyperlink Command field can be any supported CommandEvent, e.g., ExecUserExitFunc, ExecTransaction, etc. For more information on CommandEvents, see “CommandEvent.”
When the value of Hyperlink Command is @Command(<OtherCommandName>), e.g., @Command(Accept), the hyperlink for the selected field launches the named Other Command. The enabled/disabled state of the command corresponds to its counterpart on the Other Commands dropdown list. Therefore, if the command is disabled on the list, and the user attempts to invoke it through the grid hyperlink, there is no action and no error message.
In the application, when hyperlinked commands exist for a selected cell/column, these commands appear on the local menu as suboptions of Cell Hyperlink Commands. Field-defined hyperlink commands as described in this section will be indistinguishable from tag-defined hyperlink commands on the local menu. For more information on tag-defined hyperlinks, see “Tag-Defined Hyperlinks in Grids.”
On the local menu, configured suboptions follow this syntax: <ColumnHeading>/<CommandCaption>.
The following procedure shows you how to create a field-defined hyperlink for a column in a Display UDV grid. It assumes that you have launched the UDV Editor, are connected to the desired database, and have displayed the Display UDV.
1. In the Non-Visual Controls tab of the UDV, click the SQL Source of the Grid control, and in the Property panel, double-click the column next to the SelectedFields property. The Select Fields and Set Properties dialog box appears.
2. In the Selected Fields list, select the column for which you want to create a hyperlink.

The UDV Library
Thin-Client Configuration Guide: Basics 171
3. In the Hyperlink Command field, enter the CommandEvent command that you want to invoke through the link (see “CommandEvent”).
or
Enter an @Command(<OtherCommandName>) value that will invoke an Other Command as configured for this SQL Source.
4. C lick OK.
List Controls A list control is a control that displays the current data value as a scrolling list of separate values, one to a line. Data is derived from a single, character-delimited field, the delimiter character for which is set by a list control property. Given the following string: Sample1,Sample2,Sample3
and defining the delimiter as a comma, the list control would display the following values: Sample1 Sample2
Sample3
All data going to and from the control is a delimited string. The string value is meant to be passed to a database procedure that parses the list and then processes each of the values individually.
List controls were originally limited to 2000 characters or 12k (for all concatenated items), but this restriction was removed in Windows Client release 5.1.3.0.
Display UDVs A list control in a display UDV displays a character-delimited string as separate values, one to a line. You insert the list control (Insert List) from the Controls menu in the Visual Design tab in the usual manner. For more information, see “Step 4: Adding and Positioning Visual Controls.”
Configuring the Display List Control
Linking the control to a SQL Source and field is identical to that for any visual control. See “Step 9: Linking Visual and Nonvisual Controls.” You change the delimiter character for the data string through the Delimiter property. The default is the semicolon. See “Step 7: Assigning Visual Control Properties.”
Input UDVs The list control in an Input UDV contains a drop-down button that displays the List Builder dialog box.

The UDV Library
Thin-Client Configuration Guide: Basics 172
The Selection area shows values that will be returned to the calling list control. The Available Items area contains values that can be added to the Selection list by using the intermediate arrow buttons or by double-clicking.
The “#” button brings up an Input dialog in which the user specifies the number of available items to move to the Selection list, beginning with the currently highlighted record. Once moved, the number of items appears in parentheses at the top of the Selection list.
The All button adds all Available Items to the Selection list.
The Clear button clears all items from the Selection area. Users can also input an item directly from the keyboard. Entries are validated against the Selection list.
Configuring the Input List Control
Configuration of an input list control is almost identical to that of an edit control. The following steps outline the basic configuration:
1. Insert the list control and a SQL Transaction and then link them. See “Step 4: Adding and Positioning Visual Controls,” “Step 5: Adding Nonvisual Controls,” and “Step 9: Linking Visual and Nonvisual Controls.”
2. In the InputFields property of the SQL Transaction, define the associated data field as a Control Type of Lookup. Define the SelectSqlId and ParamsSqlSourceName as you would normally do. The SelectSqlId determines the values that appear in the Available Items area of the List Builder dialog box.

The UDV Library
Thin-Client Configuration Guide: Basics 173
Lookup Lists A lookup list is a dropdown list that appears when the end user clicks the down arrow of a combo box or presses the [Down Arrow] key when the caret is in the input field. The list usually contains less than 50 items and is sometimes referred to as a “short lookup list.”
A Lookup dialog box is a dialog box produced when the end user clicks the down arrow of a combo box or presses the [Down Arrow] key when the caret is in the input field. Because it is created for the purpose of containing more than 200 items, it is sometimes referred to as a “list.”
Note that for Web Express Client, the Lookup dialog box in the above figure does not contain the Search section at the bottom.
For Thin-Client, both of these lists can also be viewed by positioning the cursor in the combo box and pressing [Alt]+[Down Arrow]. When a lookup list is open, clicking the down arrow of any other combo box closes the current list and drops down the new one.
Lists operate through a single query that returns the columns for end-user selection and performs validation on the entered value. If a field value is inserted from the list and is unchanged, no validation is performed. If a field value is manually entered or modified from the inserted list value, the field value is validated against the query. Modification includes copy-and-paste, delete, and

The UDV Library
Thin-Client Configuration Guide: Basics 174
backspace operations, but does not include selecting all text and pressing the [Delete] key. For Web Express Client, validation is not done on field-by-field basis, and is not performed until the OK button is clicked.
The SQL statement must meet the following criteria:
It cannot use UNION, MINUS, or INTERSECT functions
The column linked to the edit control must be either a simple column, the concatenation of simple columns, or the “substr()” of a simple column. “Simple” means that the column is not the result of a function or case-end syntax. Aliasing is permitted.
You create both the short lookup list (dropdown list) and long lookup list (Lookup dialog box) from a UDV edit control linked to a SQL Transaction that has an Input Field configured as a Lookup control type. The following sections show you how to do this.
Short Lookup Lists Short lookup lists are dynamic, meaning the list contents (less than 50 items) are updated whenever the UDV is invoked or the parameters of the query change. You can still create a static lookup list whose contents do not change throughout an entire Costpoint MES session, but you must enable this option when you configure the list. The dynamic, refreshing list is the default.
The list operates according to these rules:
When a dropdown list first appears, the focus is on the list item that matches the current field value.
If the field value is blank, the focus is on the first item in the list.
The [Up Arrow] and [Down Arrow] keys move the focus from one item to another, but do not change the field value.
Pressing [Enter] or single or double-clicking an item selects that value into the field and closes the dropdown list.
While the list is open, clicking outside the dropdown list (but within the UDV), or pressing [Esc] closes the list without changing the current field value.
You create a short lookup list by first creating an Input UDV with an Edit control linked to a SQL Transaction. A selected Input Field of the SQL Transaction is then configured to function as a “lookup/ dropdown list.”
Also, after creating a short lookup list, you can set the maximum number of entries in the dropdown list for all short lookups through the Common.UdvShortListLimit property. For more information, see “UdvShortListLimit.”
The following procedure shows you how to configure a short lookup list. It assumes that the Input UDV and linked SQL transaction already exist. For more information on creating a UDV, see “Creating a UDV.” It also assumes that you have launched the UDV Editor, are connected to the desired database, and have displayed the Input UDV.
To configure a short lookup list, complete the following steps:
1. In the Non-visual Controls tab of the UDV, select the SQL Transaction linked to the edit control that will display the short dropdown list. The corresponding properties appear in the Property panel.
2. Double-click the ellipsis next to Inputfields. The Input Field Properties dialog box appears.
3. In the Fields list, select the field that you want to configure as a short lookup list.

The UDV Library
Thin-Client Configuration Guide: Basics 175
4. Click the Edit Control tab, set the Control Type to Lookup, and enable the Dropdown List radio button.
5. Enable/disable the Validate Entry check box as needed.
6. For Thin-Client, enable/disable Default to Value of Single as needed. In cases where a single value exists for the field, this check box causes that value to appear as the default. Note that Static Lookup cannot also be enabled.
7. Assign other subproperties as follows:
SelectSqlId The SQL ID of the select statement returns the columns for end-user selection.
ParamsSqlSourceName
The name of the SQL Source that publishes its parameters to Published
Parameter memory for use by this UDV.
8. If you want the list to remain static (unrefreshed) throughout the Costpoint MES session, enable the Static Lookup check box. You cannot enable this check box if Default to Value of Single is also enabled.
The Common.UdvShortListLimit property allows you to set the maximum number of entries in the dropdown list for all short lists. See “UdvShortListLimit.”
Long Lookup Lists (Lookup Dialog Boxes) The long lookup list—the Lookup Dialog box—is designed to perform simple searches on very large data sets (200 to 1000+ items).
The dialog box operates according to the following rules:
Long Lookup End User Rules
Win Web Rule
x x It does not attempt to locate the record that matches the current field value.
x x The [Up Arrow] and [Down Arrow] keys move the focus from one item to another, but do not change the field value.

The UDV Library
Thin-Client Configuration Guide: Basics 176
Win Web Rule
x Pressing [Enter] or double-clicking an item selects that value into the field and closes the dialog box.
x Clicking a value and then clicking OK selects the value into the field and closes the dialog box.
x While the dialog box is open, clicking outside the box (but within the UDV), or pressing [Esc] closes the box without changing the current field value.
You create a long lookup list by first creating an Input UDV with an Edit control linked to a SQL Transaction. A selected Input Field of the SQL Transaction is then configured to function as a “lookup/ filter and find dialog.”
How the Lookup Dialog Box Works
The following table and figure show how the Lookup dialog box operates.
Long Lookup Query Rules
Win Web Rule
x x Lookup query is not executed/opened until user clicks down arrow in combo box.
x If corresponding data set contains more than 20 rows, Lookup dialog box appears in expanded state as if user had clicked the Find button; Search Text field is focused, and Field to Search is set to first column of the Select statement.
x If corresponding data set contains 20 or fewer rows, grid is focused and Field to Search is set to (All fields).
x Apply Filter button recognizes times when Field to Search value can be used to modify WHERE clause of SQL statement.
x Filter remains in effect until user selects Remove Filter.

The UDV Library
Thin-Client Configuration Guide: Basics 177
If the Verify (Validate Entry) flag is enabled (see the procedure below) or the lookup query returns more than one column, the column name assigned to the edit field must be either a literal column name or an alias of a literal column name. This produces an “associated column.”
The associated column operates under the following rules:
It must be found in the table or view named in the lookup query SELECT statement.
It can appear as the first argument in a SUBSTR() function.
It can be concatenated to other columns via the || operator.
It cannot contain quotes.
It cannot be part of a CASE-END column definition.
Configuring a Long Lookup List
The following procedure shows you how to configure a long lookup list. It assumes that the Input UDV and linked SQL transaction already exist. For more information on creating a UDV, see “Creating a UDV.”It also assumes that you have launched the UDV Editor, are connected to the desired database, and have displayed the Input UDV.
To configure a long lookup list (Lookup dialog box), complete the following steps:
1. In the Non-visual Controls tab, select the SQL Transaction linked to the edit control that will display the Lookup dialog box. The corresponding properties appear in the Property panel.
2. Double-click the ellipsis next to Inputfields. The Input Field Properties dialog box appears.

The UDV Library
Thin-Client Configuration Guide: Basics 178
3. In the Fields list, select the field that you want to configure as a long lookup list.
4. Click the Edit Control tab, set the Control Type to Lookup, and enable the Filter and Find Dialog radio button.
5. Enable/disable the Validate Entry check box as needed.
6. For Thin-Client, enable/disable Default to Value of Single as needed. In cases where a single value exists for the field, this check box causes that value to appear as the default.
7. Enable/Disable the Filter Input Matrix checkbox as needed. This causes the long lookup list to behave as a filter on the associated Input Matrix column. Default for this setting is Disabled which results in the conventional behavior as long lookup value selection.
8. Click the Visible Fields button to limit the columns that appear in the lookup. Otherwise, all columns display. In the case of the simplified long lookup, when VisibleFields are not defined, the lookup column widths are determined by measuring the maximum width of data for each column. (See also common.UdvAutoSimplifiedLongListThreshold)
9. Assign other subproperties as follows:
Property Win Web Description
SelectSqlId x x The SQL ID of the select statement returns the columns for end-user selection.
ParamsSqlSourceNa me
x x The name of the SqlSource that publishes its parameters toPublished Parameter memory for use by this UDV.
Explorer LevelField
x For an Explorer Grid, the name of the field that contains the record level. For more information, see “Explorer Grids.”
Explorer Id Fields
x For an Explorer Grid, the names of the fields whose values uniquely identify a record. Separate multiple fields with commas. For more information, see “Explorer Grids.”
Explorer
ParentFields
For an Explorer Grid, the parent record’s ExplorerIdFields value—names of the fields whose values uniquely identify the parent record. Separate multiple fields with commas. For more information, see
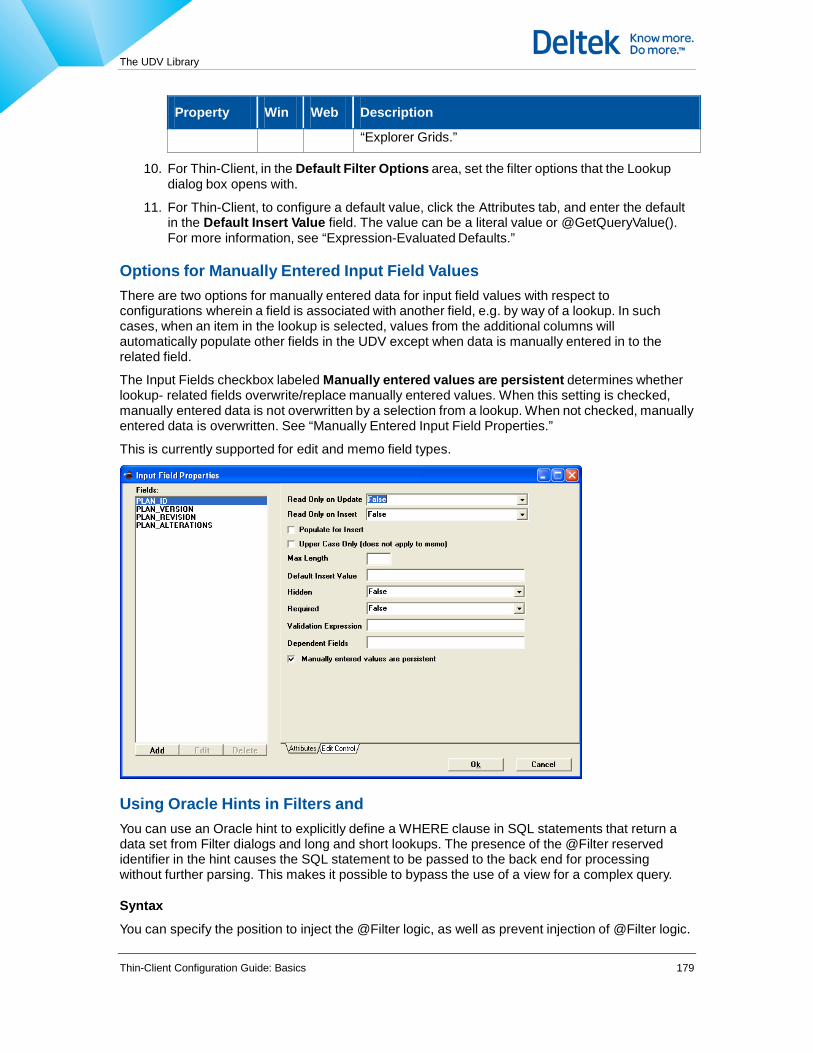
The UDV Library
Thin-Client Configuration Guide: Basics 179
Property Win Web Description
“Explorer Grids.”
10. For Thin-Client, in the Default Filter Options area, set the filter options that the Lookup dialog box opens with.
11. For Thin-Client, to configure a default value, click the Attributes tab, and enter the default in the Default Insert Value field. The value can be a literal value or @GetQueryValue(). For more information, see “Expression-Evaluated Defaults.”
Options for Manually Entered Input Field Values There are two options for manually entered data for input field values with respect to configurations wherein a field is associated with another field, e.g. by way of a lookup. In such cases, when an item in the lookup is selected, values from the additional columns will automatically populate other fields in the UDV except when data is manually entered in to the related field.
The Input Fields checkbox labeled Manually entered values are persistent determines whether lookup- related fields overwrite/replace manually entered values. When this setting is checked, manually entered data is not overwritten by a selection from a lookup. When not checked, manually entered data is overwritten. See “Manually Entered Input Field Properties.”
This is currently supported for edit and memo field types.
Using Oracle Hints in Filters and You can use an Oracle hint to explicitly define a WHERE clause in SQL statements that return a data set from Filter dialogs and long and short lookups. The presence of the @Filter reserved identifier in the hint causes the SQL statement to be passed to the back end for processing without further parsing. This makes it possible to bypass the use of a view for a complex query.
Syntax
You can specify the position to inject the @Filter logic, as well as prevent injection of @Filter logic.

The UDV Library
Thin-Client Configuration Guide: Basics 180
Syntax to inject filter logic /*+@Filter */
or /*+@Filter<OptParam_1,OptParam_n> */
where OptParam_1 to OptParam_n are optional parameters. Note that in the Oracle hint itself, there must be one or more space characters after the @Filter variable.
Syntax to specify where to explicitly prevent injection of filter logic /*+@Filter(-) */
The prevention technique is useful in a SQL select UNION where one of the unioned statements selects values from DUAL or from another table whose columns do not match the filter elements.
Scope
The Oracle hint modifier can be used with SELECT, EXEC or EXECQUERY statements and can be used multiple times within a single statement. The position and number of hints are at the discretion of the developer.
For SELECT statements, Thin-Client adds new filtering criteria—based on Input field values—immediately after the hint.
Example: SELECT statement for Filter dialog box
If the original SELECT statement looks like this:
SELECT role AS granted_role
from sfcore_user_roles a
where (userid = :userid) /*+ @Filter */
AND EXISTS (SELECT null
FROM sfcore_role_prefix
WHERE instr(a.role, role_prefix, 1, 1) = 1 AND assign_flag = 'Y')
Thin-Client modifies the SQL statement like this:
SELECT role AS granted_role
from sfcore_user_roles a
where (userid = :userid) /*+ @Filter */ AND (ROLE LIKE 'SF$A%')
AND EXISTS (SELECT null
FROM sfcore_role_prefix
WHERE instr(a.role, role_prefix, 1, 1) = 1 AND assign_flag = 'Y')
If @Filter refers to a function that contains parentheses or special characters, the value assigned to the parenthetical element, e.g., an alias name, can be enclosed in single quotes to avoid parsing problems.
In the following example, the parentheses in the function sfmfg.sfwid_order_no_get(t.order_id) may cause a parsing problem. To avoid this, use single quotes for the value assigned to the referenced alias (to_order_no_list). select distinct substr(sfmfg.sfwid_order_no_get(t.order_id),1,255) AS
to_order_no_list
from SFMFG.sfwid_serial_oper_dat_col t, SFMFG.sfwid_serial_oper t3

The UDV Library
Thin-Client Configuration Guide: Basics 181
where instr(sfmfg.sfwid_cross_order_get(:order_id,:cross_order_flag),t.order_id)
> 0
and (:order_skip_flag = 'N' and (value is null or value = 'N/A')))
/*+ @Filter(to_order_no_list='sfmfg.sfwid_order_no_get(t.order_id)') */ order by 1
If it's necessary to replace a column alias with a fully qualified column reference, add a list of replacement references as comma-delimited arguments using the following syntax: @Filter(FilterFieldName1=Col_Ref1,FilterFieldName1=Col_Refn)
Note that specifying column references limits the columns (fields) that are visible in the Filter Dialog. In the example above, only the field associated with new_part_no appears in the Filter dialog. Include unlisted fields by adding a comma-delimited asterisk (*) to the list as follows: @Filter(new_part_no=sfpl_non_obs_part_y_parts_v.part_no,*)
For EXEC and EXECQUERY statements, hint syntax is similar to that for SELECT statements, but execution differs in that parameters are replaced by literal values provided by the Filter dialog or lookup-associated fields. In this case, you can optionally limit the parameters that are populated by listing them in the @Filter declaration. If no parameters are listed, all matching parameters are replaced.
Syntax @Filter(Param_Ref1,Param_refn)
Example of EXEC or EXECQUERY statement
If the original SELECT statement looks like this: EXECQUERY MyExecQuery(:part_no,:part_type) /*+ @Filter(part_type) */
Thin-Client modifies the SQL statement like this: EXECQUERY MyExecQuery(:part_no,'COMPONENT') /*+ @Filter(part_type) */
Additional @Filter Effects
Use of @Filter in an Oracle hint has the following additional effects/characteristics:
@Filter logic is shown in the Sql Diagnostics option in the Diagnostics dialog box.
Filter generation logic ignores functions such as Upper( ), which may be present in the filter string for case-insensitive searches. Now the column-mapping logic attempts to match the column reference as if the function were not present.
Example
If the generated filter text is this: “and (upper(part_no) like ‘%MY_PART%’)”
And the Oracle filter hint string is this: /*+ @Filter(part_no=b.part_no) */
The resulting filter text is this: “and (upper(b.part_no) like ‘%MY_PART%’)”
Select statements using @Filter support WHERE clauses containing the OR operator and/or nested expressions.

The UDV Library
Thin-Client Configuration Guide: Basics 182
Radio Button and Check Box Controls Input UDVs can contain Check Box and/or Radio Button controls (see the following figure). Each control is a group of two or more buttons or boxes.
Radio Button and Check Box controls function in full accordance with the Microsoft standard:
Control UserAction
Radio Button The user can enable only one button at a time. Selection of a button automatically deselects any previously selected button.
Check Box The user can enable all check boxes, no check boxes, or any combination of check boxes.
Each Radio Button or Check Box control functions according to the InputField properties of the SQL transaction and can be configured as any one of the following InputFields control types:
Radio Button and Check Box Group Control Types
Control Type Radio Button Group Check Box Group
Edit Passes Boolean Yes/No values. Passes Boolean Yes/No values.
List Passes two delimited values, each value to the data-linked column.
Passes a delimited list of values, each value to the data-linked column.
Lookup Passes the first and second ordinal columns of the SELECT statement. Remaining columns can be used to populate related fields.
Passes delimited columns of the SELECT statement. Remaining columns can be used to populate related fields.
These controls receive values pushed from related fields and can also push values to related fields when configured as Filter/Long lookup dialog boxes.
Radio Button and Check Box group control properties are defined as follows:
CaptionPos — Position of the caption, cpAbove or cpLeft.
GroupLines — A beveled box drawn around a radio button or check box control group.
The following sections show you configuration settings for control types as listed in the Control Type dropdown list in the Edit Control tab of the Input Properties dialog box.

The UDV Library
Thin-Client Configuration Guide: Basics 183
Edit Control Type Settings If you configure the InputFields property of a Radio Button or Check Box group as an Edit control, values passed are either Y or N as follows:
Radio Button Group
CaptionPos is cpLeft.
Two radio buttons are labeled Yes and No.
Values passed are Y/N.
GroupLines are shown (GroupLines are not configurable).
Check Box Group
CaptionPos is cpLeft.
One check box is labeled by the Control Caption.
Values passed are Y/N.
GroupLines are not shown.
List Control Type Settings If you configure the InputFields property of a Radio Button or Check Box group as a List, values passed are valid values as configured for the list (see “List Controls). The following are settings for a List control type.
Valid Values List
<value 1>
<value 2>
or
<value 1>|<description 1>
<value 2>|<description 2>
Value is passed to the DataLinked column/field name.
Description defines the caption for each Radio Button or Check Box in a group. When description is not defined, value is used for the description.
When the Valid Values List has two values, Y and N, the Yes/No configuration presets always apply. See “Edit Control Type Settings.”
Check Boxes and Multiple Values
In the case of Check Boxes, the value that is returned to the datalinked field is always an ordinal concatenation of values from the Valid Values list, with values being delimited by the semicolon (;). Each positional value will be either blank, when the check box is unchecked, or nonblank, when the check box is checked.
If the list uses a pipe, the positional value will be the list value on the left side of the pipe. If the list does not use a pipe, the value returned will be the entire list item, i.e., the check box caption.
In order to use the information returned by Check Boxes, the string of delimited values must be parsed and interrogated to discern the Boolean state of each item in the Check Box group.
Example:

The UDV Library
Thin-Client Configuration Guide: Basics 184
Given the following list values (in the format <value 1>|<description 1>) for the ROUTING column:
√ QA|Quality Assurance
MFG|Manufacturing
√ PLG|Planning
where QA/Quality Assurance and PLG/Planning items are checked, param ROUTING will contain the value QA;PLG.
Filter Dialog Box/Long Lookup Settings If you configure the InputFields property of a Radio Button or Check Box group as a Filter dialog/ Long Lookup list, the first and second ordinal columns in the SELECT statement must correspond to the Column/Field Name and description. The remaining columns can be used to populate related fields. For more information, see “Long Lookup Lists (Lookup Dialog Boxes).”
As with a List control type, the Check Box Group provides multiple values through use of the semicolon (;) delimiter. The same example applies.
Example
Given the following list values (in the format <value 1>|<description 1>) for the ROUTING column:
√ QA|Quality Assurance
MFG|Manufacturing
√ PLG|Planning
where QA/Quality Assurance and PLG/Planning items are checked, param ROUTING will contain the value QA;PLG.
UDV-Launched Other Commands
This section shows you how to launch Other Commands from a UDV. You can also launch Other Commands from an Ellipsis button in a tool window. For more information, see “Window-Launched Other Commands.” The “How Other Commands Work” section pertains to both UDV-launched and window-launched Other Commands.
In UDVs, you can launch an Other Command from either an Ellipsis button in a Navigator control, or from a Command button.
The button can be configured to launch the following command types:
Command Types for UDV-Launched Other Commands
Command Win Web Description
Single-record transaction x x Updates a single record at a time.
Multirecord transaction x Updates multiple records at a time (see “Multirecord Transactions”)
Group transaction x Updates multiple records at a time (see “Group Transactions”)
Execute SQL x Executes a SQL ID.
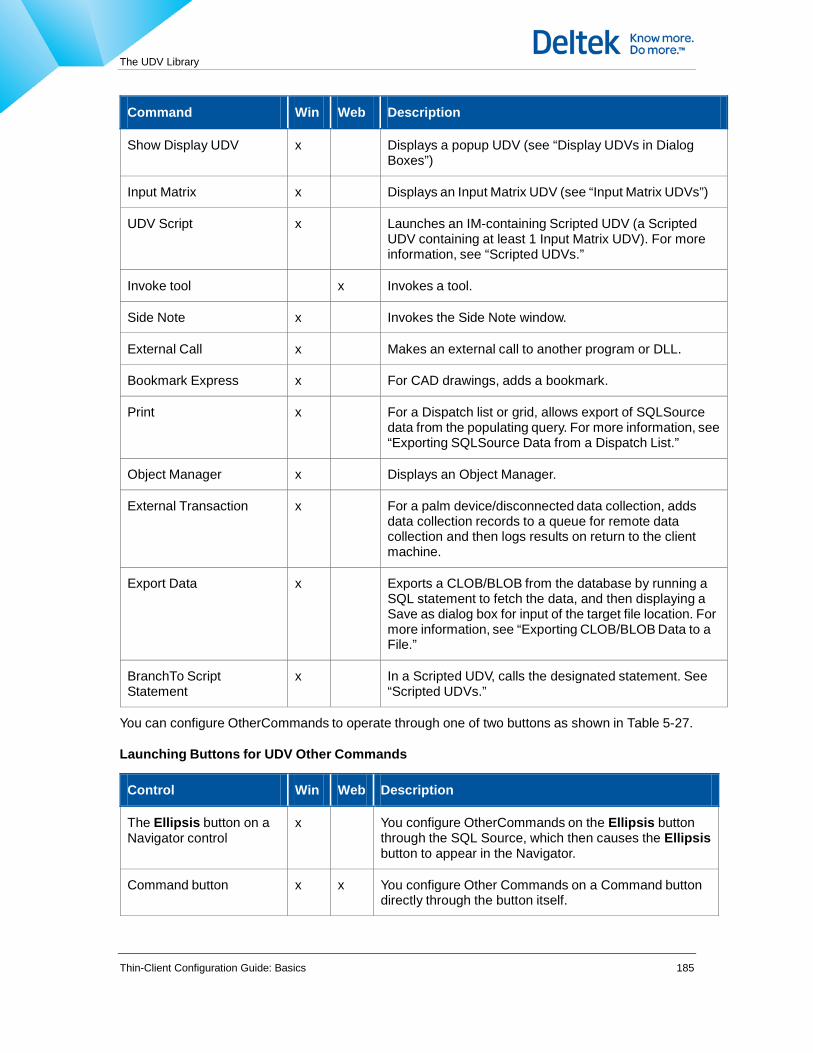
The UDV Library
Thin-Client Configuration Guide: Basics 185
Command Win Web Description
Show Display UDV x Displays a popup UDV (see “Display UDVs in Dialog Boxes”)
Input Matrix x Displays an Input Matrix UDV (see “Input Matrix UDVs”)
UDV Script x Launches an IM-containing Scripted UDV (a Scripted UDV containing at least 1 Input Matrix UDV). For more information, see “Scripted UDVs.”
Invoke tool x Invokes a tool.
Side Note x Invokes the Side Note window.
External Call x Makes an external call to another program or DLL.
Bookmark Express x For CAD drawings, adds a bookmark.
Print x For a Dispatch list or grid, allows export of SQLSource data from the populating query. For more information, see “Exporting SQLSource Data from a Dispatch List.”
Object Manager x Displays an Object Manager.
External Transaction x For a palm device/disconnected data collection, adds data collection records to a queue for remote data collection and then logs results on return to the client machine.
Export Data x Exports a CLOB/BLOB from the database by running a SQL statement to fetch the data, and then displaying a Save as dialog box for input of the target file location. For more information, see “Exporting CLOB/BLOB Data to a File.”
BranchTo Script Statement
x In a Scripted UDV, calls the designated statement. See “Scripted UDVs.”
You can configure OtherCommands to operate through one of two buttons as shown in Table 5-27.
Launching Buttons for UDV Other Commands
Control Win Web Description
The Ellipsis button on a Navigator control
x You configure OtherCommands on the Ellipsis button through the SQL Source, which then causes the Ellipsis button to appear in the Navigator.
Command button x x You configure Other Commands on a Command button directly through the button itself.
The UDV Library
Thin-Client Configuration Guide: Basics 186
For Thin-Client, on execution of the command, Costpoint MES adds the @Tag parameter to @AuxParams, where @Tag equals the Tag property value of the button transaction source.
For Thin-Client, you can disable Other Commands at run time by using an expression-controlled privilege. For more information, see “Disabling Other Commands in UDVs at Runtime.”
How Other Commands Work
This section explains the logic behind Other Commands. It pertains to both UDV- launched Other Commands and window-launched Other commands. For more information on window-launched commands, see “Window-Launched Other Commands.”
Other Command logic governs two main areas:
Visibility/Enabling — The appearance of the command option/GUI element that calls the command in the interface. Generally, when a command is visible, it is enabled.
Execution — Calling the command.
Visibility/Enabling Logic
The following process shows the steps that Costpoint MES takes in order to make visible/enable an Other Command.
1. Check PermitExternalOnly State and Command Type — If the tool window context is in a PermitExternalOnly state and the Command Type is not Invoke or External, THEN disable the command without further consideration.
For example, in Instruction windows, when a block is put in Edit mode, the Ellipsis commands at the tool window level are mostly disabled, except for Invoke and External command types. The Edit state does not affect commands hosted by UDVs in hypertext. In that case, command enabling is a function of the control context and is determined according to Apply Control Context rules (see “Apply Control Context” below).
2. Select Parameter Values — Select parameter values that are needed for expressions and for populating commands that explicitly define required parameters.
Check parameter sources in the following order:
The SQL Source (when provided)
The context (when provided), for example, @ToolScope parameters.
SystemData. SystemData parameters are the only parameters as seen by the Speed bar or a UDV when a control is not datalinked.
3. Apply Expressions — Evaluate and apply expressions for Visible and Enabled properties.
4. Apply Control Context — For UDVs, evaluate ReadOnly state information as applied through the following attributes, which constitute the control context:
BlockReadOnly. Enables/disables editing/control commands in a given block. This attribute is definable either in the Initialization Library [BlockDefinitions] section, or in the block tag itself. In the Ini Lib record, the parameter name is BlockReadOnly; in the block tag, the parameter name is @ReadOnly. (In hypertext, this parameter is visible in the Source Lines diagnostic dialog box.) Valid values are the following:

The UDV Library
Thin-Client Configuration Guide: Basics 187
False — Logically equivalent to UntilEdit. This value is appropriate for a block that has accessible commands, yet cannot be put into Edit mode. Provided for clarity and backward compatibility.
Always — Explicitly disables editing/commands. In releases prior to 6.0/7.0, True was a valid value, but maps to Always in 6.0+ releases.
Never — Explicitly enables editing/commands.
UntilEdit — Logically equivalent to False. This value is appropriate for a block that can be put into Edit mode, and disables editing/commands until that time. Candidate blocks are subject to the following state criteria:
ControlReadOnly — Explicitly disables commands for a single control instance. In diagnostics, this parameter is identified as ControlReadOnly; in the control tag, the parameter name is
@ReadOnly. Valid values are 1/0/True/False.
Also, ControlReadOnly is set to True when the ReadOnly property for a data page/tab resolves to True. A quick way to check for this is to [Ctrl]-right-click on the data page itself.
Step 5: IF either BlockReadOnly = Always or ControlReadOnly = 1/True, THEN disable the control commands without further consideration.
ParentEditing — Indicates that the tool window is in Edit mode. ParentEditing is True whenever an Instruction tool window is in any Edit mode/submode.
When ParentEditing = True, ParentReadOnly can be either True or False (see ParentReadOnly elow).
When ParentEditing = False, ParentReadOnly = False (always).
Also, when ParentEditing is False, all control commands are enabled per privilege and/or expression criteria, and with respect to context, subject only to the explicit attributes of BlockReadOnly and ControlReadOnly. Note that the Instruction tool window relies on both ParentEditing and ParentReadOnly state information to enable data page commands, whereas other tool window types rely solely on ParentReadOnly.
ParentReadOnly — Indicates that the controls in a tool window are in a mixed accessibility state, e.g., the parent context is read-only but a block is in Edit mode. UDV-hosted controls that are outside of the block are made inaccessible, except for commands of type Invoke and External, which are not subject to this constraint. See the note regarding “Embedded Control Command Enabling.” A UDV that appears on a data page/tab will have a ParentReadOnly value of True when the parent tool window is in a read-only state.
EmbeddedInBlock — Indicates that this control is located in a hypertext block.
AnyBlockInEdit — Indicates that this or some other block is currently in Edit mode (bevel down).
ThisControlsBlockIsInEdit — Indicates that this control is in the hypertext block that is currently in Edit mode (bevel down).
Diagnostics for Invoke and Expressions display the instantaneous state of the above attributes. You can also view the state at any time as follows: [Ctrl]-right-click any UDV and select the UDV Info menu option.
6. IF either Visible or Enabled is defined as an expression (uses expression operators), THEN apply the expression and disregard other conditions.

The UDV Library
Thin-Client Configuration Guide: Basics 188
7. IF Other Commands control is not hosted by an Input or Display UDV dialog box—as with tool window-level other commands, THEN proceed to Check Explicit Command Params.
8. IF the command type is Invoke and the control context is not a Display UDV in a Display UDV dialog box, THEN disable the command.
9. ELSE if the command type is BranchTo and the control context is not a Scripted UDV dialog box, THEN disable the command.
10. ELSE if the Command Type is not ExecSql, ExternalTransaction, ExportData, or External, and the control is not hosted by a Display UDV Dialog, THEN disable the command.
11. Check Explicit Command Parameters — For command types ExternalTransaction, ExportData, Print, ObjMgr, Invoke, BookmarkExpress, and External, test the available parameter values to make sure they can populate all of the explicitly defined parameters.
IF parameter values cannot populate all of the explicitly defined parameters, THEN disable the command.
Some UDV commands define parameters that can be empty. To prevent disabling the command based on optional parameters, add the parameter qualifier nullok to each optional parameter definition, as shown in the following example:
Params:
ORDER_ID = :ORDER_ID, OPER_KEY = :
OPER_KEY, STEP_KEY = :
STEP_KEY,
ITEM_ID = :PLND_ITEM_ID,nullok
REF_DES = :REF_DES,nullok
The OptionalCommandParams property in the [Common] section of the Initialization Library record, provides backward compatibility with the behavior of pre-6.0/7.0 releases. Note that the pre-6.0/7.0 behavior creates the possibility of “false positives” in the case where a partial set of parameter values may be available to command-enabling logic by way of multiple parameter sources. The same issue can arise in places where parameter values are progressively aggregated, as with UDV scripting.
12. Apply Data State — Assign values for ReadOnly and HasSelected:
IF the SQL Source is defined, i.e., the control is data linked, THEN apply the following:
ReadOnly = ReadOnlyRow or ParentReadOnly (see ParentReadOnly). A ReadOnlyRow value results when an expression defines a row as read only, or when the row, i.e., the data set, is empty.
HasSelected = True when the user has selected one or more rows via a [Ctrl]-click, check box, or local menu, etc.
13. ELSE apply the following:
ReadOnly = False unless the context is assigned and is in an explicit read-only state. An example of this is seen in a tool-level Other Commands button, when the tool is empty.
HasSelected = False.

The UDV Library
Thin-Client Configuration Guide: Basics 189
A database transaction-based command can be enabled in an otherwise context- disabled state by not datalinking the command/button to a SQL Source. This approach is intended for use by database transactions that do not alter data in the current tool window context. In this use, @ToolScope provides parameters to the transaction.
14. IF the command type is UDV, THEN apply the following:
IF records have been selected by the user (HasSelected = True), THEN apply the following:
IF transaction type is Insert or Update, THEN disable the command.
ELSE transaction type is anything other than MRInsert (such as MRUpdate, Group Transaction and Input Matrix) and ReadOnly is true, THEN disable the command. In general, these commands are disabled when the data is in a read-only state.
ELSE if no records are selected and the transaction type is anything except Insert, and ReadOnly = true, THEN disable the command.
15. ELSE if records have been selected by the user (HasSelected = True) and the command type is Invoke, SideNote, External or BookmarkExpress, THEN disable the command.
Diagnostics. Diagnostics for the above logic can be enabled using either the Invoke or Expressions check box in the Diagnostics dialog box.
Enabling of Embedded Control Commands. For embedded hypertext controls, command enabling depends on the mode.
View — When a tool window is in any View mode, command enabling is normal as defined by the rules for each control/command context.
Edit — When a tool window or any block is in any Edit mode, command enabling depends on the whether the control is internal or external to a hypertext block. Internal controls are enabled (bevel down). External controls (including commands that appear in the toolbar of the tool window, and on data pages/tabs) are disabled.
Nontransactional-type commands such as Invoke and External, are not affected by changes in the block editing state.
Command Execution
In general, the enabled state of a command is not recalculated when a user executes a command. Rather, availability of the command is determined by the availability of the GUI element (e.g., a Command button) that calls the command.
In some configurations, a command can be executed without being visible. In such cases, the command will not be executed if the calling GUI control has been disabled. The @Command(<OtherCommandName>), e.g., @Command(Accept), is an example of this.
In some cases, the data context that determines the visible/enabled state of a GUI element is broader that the data context provided for parameter filling during execution of the command. This will be corrected in time.
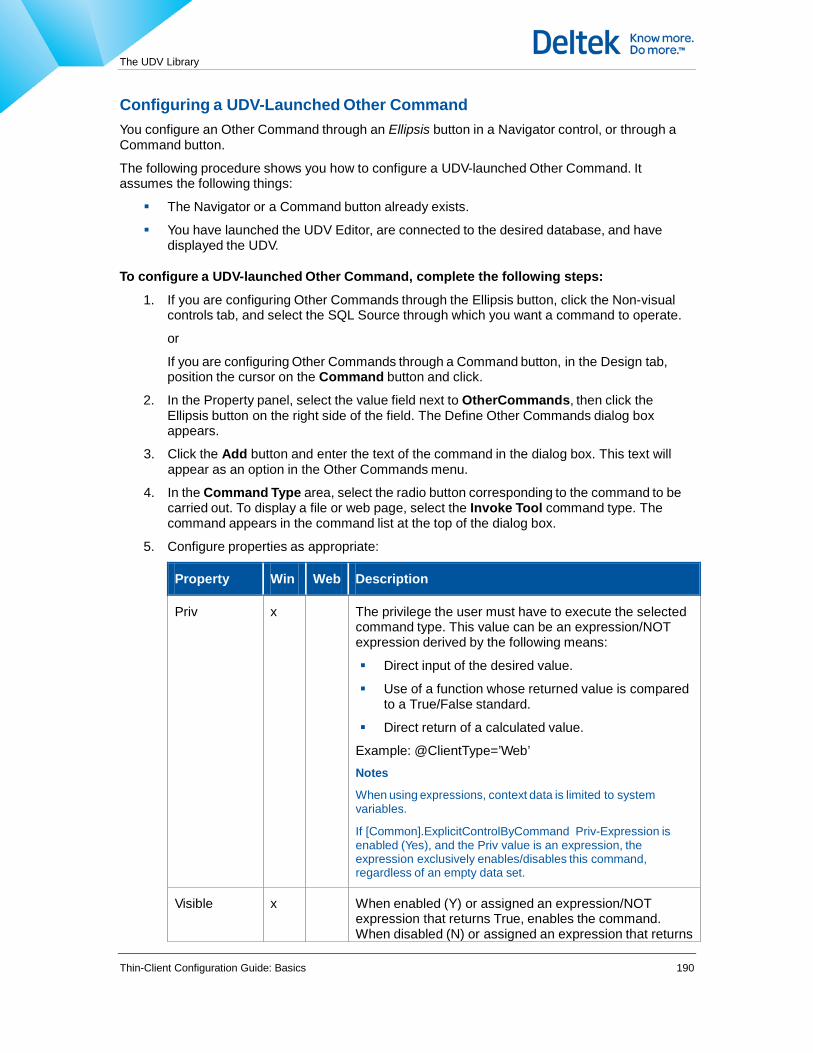
The UDV Library
Thin-Client Configuration Guide: Basics 190
Configuring a UDV-Launched Other Command You configure an Other Command through an Ellipsis button in a Navigator control, or through a Command button.
The following procedure shows you how to configure a UDV-launched Other Command. It assumes the following things:
The Navigator or a Command button already exists.
You have launched the UDV Editor, are connected to the desired database, and have displayed the UDV.
To configure a UDV-launched Other Command, complete the following steps:
1. If you are configuring Other Commands through the Ellipsis button, click the Non-visual controls tab, and select the SQL Source through which you want a command to operate.
or
If you are configuring Other Commands through a Command button, in the Design tab, position the cursor on the Command button and click.
2. In the Property panel, select the value field next to OtherCommands, then click the Ellipsis button on the right side of the field. The Define Other Commands dialog box appears.
3. Click the Add button and enter the text of the command in the dialog box. This text will appear as an option in the Other Commands menu.
4. In the Command Type area, select the radio button corresponding to the command to be carried out. To display a file or web page, select the Invoke Tool command type. The command appears in the command list at the top of the dialog box.
5. Configure properties as appropriate:
Property Win Web Description
Priv x The privilege the user must have to execute the selected command type. This value can be an expression/NOT expression derived by the following means:
Direct input of the desired value.
Use of a function whose returned value is compared to a True/False standard.
Direct return of a calculated value.
Example: @ClientType=’Web’ Notes
When using expressions, context data is limited to system variables.
If [Common].ExplicitControlByCommand Priv-Expression is enabled (Yes), and the Priv value is an expression, the expression exclusively enables/disables this command, regardless of an empty data set.
Visible x When enabled (Y) or assigned an expression/NOT expression that returns True, enables the command. When disabled (N) or assigned an expression that returns

The UDV Library
Thin-Client Configuration Guide: Basics 191
Property Win Web Description
False, disables (grays out) the command. Expressions can be derived by the following means:
Direct input of the desired value
Use of a function whose returned value is compared to a True/False standard
Direct return of a calculated value
Tag x A unique name for the command.
For Thin-Client, this value is assigned to @Tag and is added to @AuxParams and @ScriptParams.
F-Key x The function key assignment for the command. Multiple key combinations using CTRL, SHIFT and ALT are supported.
@FILE Param
x For a Bookmark Express command type, the CAD file to be displayed.
@BOOK_IDPara m
x For a Bookmark Express command type, the bookmark to be displayed.
Accept SQL ID
x For an Object Manager command type, the SQL ID of the statement that performs an Accept action of the selected object.
BranchTo UDV Script Statement
x For a BranchTo Script Statement command, the statement to be executed
Delete Sql Id x For a Bookmark Express command type, the SQL ID of the delete statement that deletes a bookmark.
External Call x For an External call command type, the command that calls an external program.
List Delimiter x For Group Transaction command types, the character that will delimit each column value in the List control of the Input UDV.
List Field Name
x For Group Transaction command types, the name of the column which will identify each selected record in the List control of the Input UDV.
Manager Name
x For an Object Manager command type, the name of the manager.
Name x For a Print command type, a unique print command name.

The UDV Library
Thin-Client Configuration Guide: Basics 192
Property Win Web Description
Params x x The parameters to be passed to the command.
To display a specific file or web page (where Tool=Slide), set @Location to the appropriate source:
A named file — @Location=c:\myfile.txt
A named web page — @Location=http://www.mywebpage.com
A parameterized file — @Location=:ColumnName
A parameterized web page — @Location=:URL
For a parameterized file, if the source is a column name, the column value is derived from @ToolScope.
ParamsSqlSource
Name
x For an Execute SQL command type, the name of the SQL Source that publishes its parameters for use by the SQL ID.
RefreshedSqlSou rceName
The name(s) of the SQL Source(s) that must be refreshed after data changes.
Select a Folder
x For an Object Manager command type, enables control of folders.
Select an Object
x For an Object Manager command type, enables control of objects.
Sql Id x x For Execute SQL, Side Note, and Export Data command types, the SQL ID to run.
For the Export Data command type, the SQL ID that fetches a CLOB/BLOB from the database for export. This statement must contain FilenameField and DataField parameter values (see below).
Tool x x For an Invoke Tool command type, the tool type.
To display a file or web page, set this to Slide and then use the @Location variable as a parameter to specify the file or web page.
Transaction Type
For transaction command types, the transaction type, Insert or Update.
UDV Id x x For transaction, Show Display UDV, Input Matrix, and UDV Script command types, the ID of the UDV that will appear when the user clicks the command option.
Update Sql Id x For a Bookmark Express command type (CAD only), the SQL ID of the update statement that adds a bookmark.

The UDV Library
Thin-Client Configuration Guide: Basics 193
Property Win Web Description
Filename Field
x For the Export Data command type, the column in the database table that contains the filename of the CLOB.
Data Field x For the Export Data command type, the database column containing the CLOB/BLOB.
Execute from OS Shell after Saving
x For the Export Data command type—which on execution triggers a Save As dialog box for input of the file name/ location—enables display of the file immediately after the save action according to the file extension.
Disabling Other Commands in UDVs at Runtime You can disable an Other Command at run time by using an expression-controlled privilege. Also, if the OtherCommandNoPrivHides property in the [Common] section the Initialization Library is set to Yes, and privilege logic returns a False result for any command, that control is not only disabled, but hidden.
All expressions can be the NOT form and derived by the following means:
Direct input of the desired value
Use of a function whose returned value is compared to a True/False standard
Direct return of a calculated value
The technique described in this section can also disable Other Commands and instruction modes in tool windows. For more information, see “Disabling Other Commands in Tool Windows at Runtime” and “Disabling Instruction Modes at Runtime.”
System data parameter values are always available to privilege expressions. Local context parameters consist of current record values.
The following procedure shows you how to disable Other Commands in a UDV at run time. It assumes the following things:
A configured Other Command or Command button exists in the UDV. For more information on Other Commands in a UDV, see “UDV-Launched Other Commands.”
You have launched the UDV Editor and are connected to the desired database.
To disable an Other Command/Command button in a UDV, complete the following steps:
1. Display the desired UDV.
2. In the Design tab, click the appropriate control. The properties for the control appear in the Property panel.
3. In the panel, click OtherCommands, and then the ellipsis button on the right side of the column. The Define Other Commands dialog box appears.
4. Select the appropriate command, and in the Priv field, enter an expression/NOT expression— which when evaluated as False, disables the command. Use a comma to delimit multiple Priv values.
Expressions can be derived by the following means:
Direct input of the desired value.

The UDV Library
Thin-Client Configuration Guide: Basics 194
Use of a function whose returned value is compared to a True/False standard.
Direct return of a calculated value.
Context data is limited to system variables.
Exporting SQLSource Data from a UDV Grid You can select one of more records in a Display UDV grid and export the SQLSource data from the populating query. You configure this capability through four prenamed Other Commands of command type Print. These commands allow you to print SQL data to either a file or to the Clipboard.
This section explains exporting SQLSource data from a Display UDV grid. You can also export SQLSource data from a Dispatch list. For more information, see “Exporting SQLSource Data from a Dispatch List.”
You can print data two ways.
SQL Data Print Formats
Native format Embeds the column names inline with the corresponding values:
“PART_NO=BA100MK1”,”PART_CHG=1”,”MFG_BOM_CHG=1”,”MFG_B OM_STATUS=COMPLETE”,…
CSV Comma-Separated Values. Prints a single line containing column labels and follows it by one or more lines of comma-separated values, like a table:
“Part No”,“Part Chg”,“MBOM Chg”,“MBOM Status”,… "BA100MK1","1","1","COMPLETE",…
The following table the prenamed commands, example dropdown menu text, and the action triggered by selecting the command from a dropdown menu. A name must be one of the four literal values shown, but is not case sensitive.
Prenamed SQL Data Other Commands
Prenamed Command Name
Example Dropdown Menu
Text
Action
File.Native Print Native SQL to File Displays a dialog box for input of a target file, and then prints SQL data in native format to the file location.
File.CSV Print CSV SQL to File Displays a dialog box for input of a target file, and then prints SQL data in comma-separated values to the file location.
Clipboard.Native Print Native SQL to Clipboard
Prints SQL data in native format to the Clipboard.
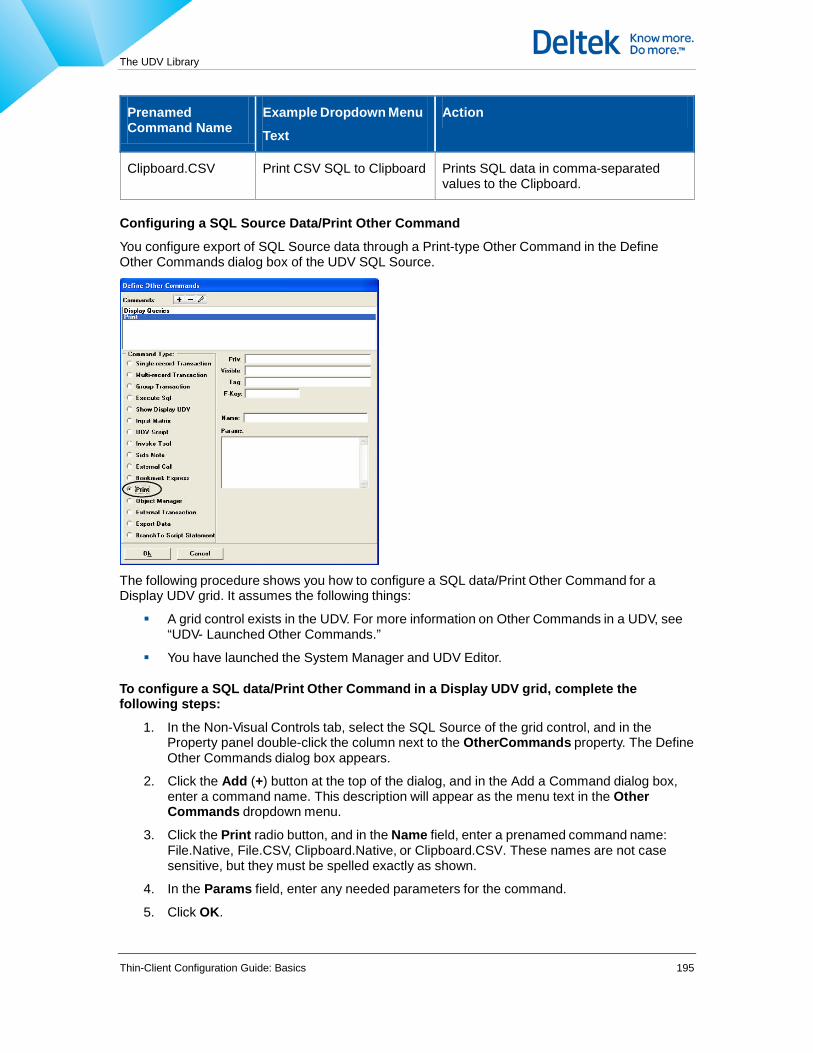
The UDV Library
Thin-Client Configuration Guide: Basics 195
Prenamed Command Name
Example Dropdown Menu
Text
Action
Clipboard.CSV Print CSV SQL to Clipboard Prints SQL data in comma-separated values to the Clipboard.
Configuring a SQL Source Data/Print Other Command
You configure export of SQL Source data through a Print-type Other Command in the Define Other Commands dialog box of the UDV SQL Source.
The following procedure shows you how to configure a SQL data/Print Other Command for a Display UDV grid. It assumes the following things:
A grid control exists in the UDV. For more information on Other Commands in a UDV, see “UDV- Launched Other Commands.”
You have launched the System Manager and UDV Editor.
To configure a SQL data/Print Other Command in a Display UDV grid, complete the following steps:
1. In the Non-Visual Controls tab, select the SQL Source of the grid control, and in the Property panel double-click the column next to the OtherCommands property. The Define Other Commands dialog box appears.
2. Click the Add (+) button at the top of the dialog, and in the Add a Command dialog box, enter a command name. This description will appear as the menu text in the Other Commands dropdown menu.
3. Click the Print radio button, and in the Name field, enter a prenamed command name: File.Native, File.CSV, Clipboard.Native, or Clipboard.CSV. These names are not case sensitive, but they must be spelled exactly as shown.
4. In the Params field, enter any needed parameters for the command.
5. Click OK.

The UDV Library
Thin-Client Configuration Guide: Basics 196
Exporting CLOB/BLOB Data to a File You can export CLOB/BLOB data from a Display UDV grid and copy it to a file by using the Export Data Other Command (see the following figure).
On execution, the Export Data command runs a SQL ID that fetches the CLOB/BLOB from the database and presents the Save As dialog box to the user for entry of a target location. You can also configure the command to display the CLOB/BLOB immediately after the Save action.
The following procedures show you how to configure export of CLOB/BLOB data to a file. The command can be launched from either a Display UDV or a tool window.
For UDV launch, the procedure assumes you have launched the UDV Editor, are connected to the desired database, and have displayed the UDV.
For tool-window launch, the procedure assumes you have launched the Initialization Library Editor, are connected to the desired database, and have displayed the appropriate record.
To export CLOB/BLOB data to a file from a Display UDV, complete the following steps:
2. In the UDV Editor, Non-Visual Controls tab, select the SQL Source of the grid control, and in the Property panel double-click the column next to the OtherCommands property. he Define Other Commands dialog box appears.
3. Click the Add (+) button at the top of the dialog, and in the Add a Command dialog box, enter a command name. This description will appear as the menu text in the Other Commands dropdown menu.
4. Click the Export Data radio button.
5. In the right-hand pane, enter property values as follows:
Property Win Web Description
Priv x The privilege the user must have to execute the Export Data command. This value can be an expression/NOT expression derived by the following means:
Direct input of the desired value
Use of a function whose returned value is compared

The UDV Library
Thin-Client Configuration Guide: Basics 197
Property Win Web Description
to a True/False standard
Direct return of a calculated value
Example: @ClientType=’Web’ Note: When using expressions, context data is limited to system variables.
Visible x When enabled (Y) or assigned an expression/NOT expression that returns True, enables the command. When disabled (N) or assigned an expression that returns False, disables (grays out) the command. Expression values can be derived by the following means:
Direct input of the desired value
Use of a function whose returned value is compared to a True/False standard
Direct return of a calculated value
Tag x A unique name for the command.
For Thin-Client, this value is assigned to @Tag and is added to @AuxParams and @ScriptParams.
Sql Id x x The SQL ID that fetches a CLOB/BLOB from the database for export. This statement must contain FilenameField and DataField parameter values (see below).
Filename Field
x The column in the database table that contains the filename of the CLOB.
Data Field x The database column containing the CLOB/BLOB.
Execute from OS Shell after Saving
x Enables display of the file according to the file extension immediately after the save action.
6. Click OK.
To export CLOB/BLOB data to a file from a tool window, complete the following steps:
2. In the Initialization Library record tree pane, navigate to the tool window and specific mode for which you want to configure the command.
3. Double-click OtherCommands and then [Add a New Command]. The Other Command panel appears in the right-hand pane.
4. In the topmost field, enter a command name. This description will appear as the menu text in the Other Commands dropdown menu.
5. Click the Export Data radio button.
6. In the right-hand pane, enter property values as follows:

The UDV Library
Thin-Client Configuration Guide: Basics 198
Property Win Web Description
Priv x The privilege the user must have to execute the Export Data command. This value can be an expression/NOT expression derived by the following means:
Direct input of the desired value
Use of a function whose returned value is compared to a True/False standard
Direct return of a calculated value
Example: @ClientType=’Web’ Note: When using expressions, context data is limited to system variables.
Visible x When enabled (Y) or assigned an expression/NOT expression that returns True, enables the command. When disabled (N) or assigned an expression that returns False, disables (grays out) the command. Expression values can be derived by the following means:
Direct input of the desired value
Use of a function whose returned value is compared to a True/False standard
Direct return of a calculated value
Tag x A unique name for the command.
For Thin-Client, this value is assigned to @Tag and is added to @AuxParams and @ScriptParams.
Sql Id x x The SQL ID that fetches a CLOB/BLOB from the database for export. This statement must contain FilenameField and DataField parameter values (see below).
Filename Field
x The column in the database table that contains the filename of the CLOB.
Data Field x The database column containing the CLOB/BLOB.
Execute from OS Shell after Saving
x Enables display of the file according to the file extension immediately after the save action.
7. Click Add Command to List.
Grid Attributes In a Display UDV, you can apply attributes to records in a grid by creating expressions. When the software evaluates the expression as true for any record, it applies the associated attribute(s). You

The UDV Library
Thin-Client Configuration Guide: Basics 199
can create up to three expressions for each grid. Each expression can apply only two attributes: font and font color.
Any expression in Cosptoint MES can be used in the NOT form and derived by the following means:
Direct input of the desired value
Use of a function whose returned value is compared to a True/False standard
Direct return of a calculated value
Automatic vertical grid sizing works on grids with multiple grid controls. However, the grids cannot be side-by-side. Other controls types which occupy the same vertical space of any grid control (i.e. are beside it) are ignored by the sizing logic.
The following table shows expressions and functions, which can be used in any field that can evaluate an expression.
Expressions and Functions
Function Description
@Empty( ) As an expression function, tests for an empty (zero-length) string and returns a
Boolean result. Trims leading and trailing spaces before evaluation.
Syntax @Empty(<string>)
Example @Empty(@OBJECT_ID)
This function is helpful in cases where single quote characters cause problems for the parser, e.g., single quotes used in hypertext parameters.
@HasPriv() Returns a True when the current user has a specified privilege.
Syntax: @HasPriv(“‘ANY_PRIV’”)
where “‘ANY_PRIV’” is a user privilege enclosed in single quotes enclosed in double quotes. Can also be used in the form NOT @HasPriv(). Note: This function does not support multiple arguments.
@GetQueryValue()
Returns a single column/row or output variable as a result of a query.
Syntax: @GetQueryValue(SQL_ID)
where SQL_ID is a query that returns the output variable. All column values from the current row and all system variables are available to the SQL_ID. This is useful when it is necessary to query the database to control a property, e.g., a view or edit privilege.
Example: GetQueryValue(GetStatus) = ‘COMPLETE’
Note: For tabs, @GetQueryValue() is evaluated only on tab selection, but not on tab refresh. Therefore, for a Selected Field in a tab (data page), avoid the use of the @GetQueryValue() function as the Hidden property value. Instead, append a column to the Scope Query and base the expression of the hidden field on the appended column. For example, to hide the Part_No field,

The UDV Library
Thin-Client Configuration Guide: Basics 200
Function Description
append to the Scope Query an additional column, Alt_Work_Center_Flag, and then for Part_No, set the Hidden property to Alt_Work_Center_Flag = ’N’.
@MD5() Returns an MD5 digest (a compact digital signature) as a string of extended ASCII characters.
Syntax: @MD5(ColumnName) or @MD5(LiteralValue)
where ColumnName is a column in a database table and LiteralValue is any value.
@SubStr() Returns part of a designated string.
Syntax: @SubStr(‘String’,Start,Length)
where String is the source string, Start is the sequential number of the character at which the substring starts, and Length is the number of characters in the substring, which can be any integer up to 2 GB. Note: If Length exceeds the number of characters in String, then@SubStr returns the string only. It does not pad spaces so that length of String = Length.
Example: SubStr('ABCDE',2,3) returns BCD.
@Trim() Returns a substring trimmed of leading and trailing spaces.
Syntax: @Trim(‘String’)
where String is the source string with leading and/or trailing spaces.
@ParamValue() Returns the literal value for a given local-context parameter. This function can be useful for comparing literals in an expression.
Syntax: @ParamValue(<ParamName>)
Example: @ParamValue(REVISION) = '1'
@GetExternalFunct ionValue()
When used in an expression, returns a string from an external function.
Syntax: @GetExternalFunctionValue(<Func_Name>;<OptFilterParam_1>; <OptFilterParam_n>)
where
Func_Name specifies an entry in the [ExternalFunctions] section of the Ini Library record.
OptFilterParam is an optional parameter that reduces the number of parameters that are visible to the parameter-filling logic of the External Function. This may be useful in preventing an unintended parameter match. Optional filter parameters can begin with a semicolon, which is ignored. These parameters do not impact parameter-filling itself because Thin-Client always populates parameters according to the Command Line property of the given External Function.
Expression examples
@GetExternalFunctionValue(GetWindowsUser)='Administrator'
The UDV Library
Thin-Client Configuration Guide: Basics 201
Function Description @GetExternalFunctionValue(IsValidDate,:TIME_STAMP)='TRUE'
You create attributes with the Highlighting property, which requires that the data source be active. Therefore, a completely functional grid (with a SQL Source) must already exist.
The following procedure shows you how to apply attributes to records in a grid. It assumes the following things:
You are connected to the desired database and have launched the UDV Editor.
The grid for which you want to apply attributes is connected to a SQL Source.
To apply attributes to records in a grid, complete the following steps:
1. Display the desired UDV.
2. In the Design tab, click the grid you want to apply attributes to. The grid properties appear in the Property panel.
3. Click the Highlighting drop-down list. The Highlighting dialog box appears.
4. In the Condition1 field, enter an expression/NOT expression, and in the Font Color and Font Style fields, set the appropriate color and style.
As a reminder, expressions/NOT expressions can be derived by the following means:
Direct input of the desired value
Use of a function whose returned value is compared to a True/False standard
Direct return of a calculated value
5. To test the expression, click Test Expression. The software tests the highlighted record and displays the test result (true or false) in the Test Result field.
6. For each additional expression, place the cursor in the appropriate Condition field and repeat step 4.
7. Click OK.
Edit Masks and Picture Masks An edit mask (or mask character) is a designator representing a set of valid input characters assigned to a specific character position in an input field. A picture mask, a format comprised of mask characters, imposes the structure of input for that field. On validation of a masked field, Costpoint Manufacturing Execution checks user input against the mask character and picture mask. If it detects an input character outside the assigned mask or a deviation from the picture mask, it triggers an error message.
Each mask character can be associated with a case-change attribute that forces the entered character to uppercase, lowercase, or mixed case. If there is no case-change attribute associated with the mask, the case is unchanged.
You assign mask characters and picture masks for input fields in the Entry Format field of the Input Properties dialog box (Nonvisual Controls | InputFields | Edit Control tab).See the figure below.
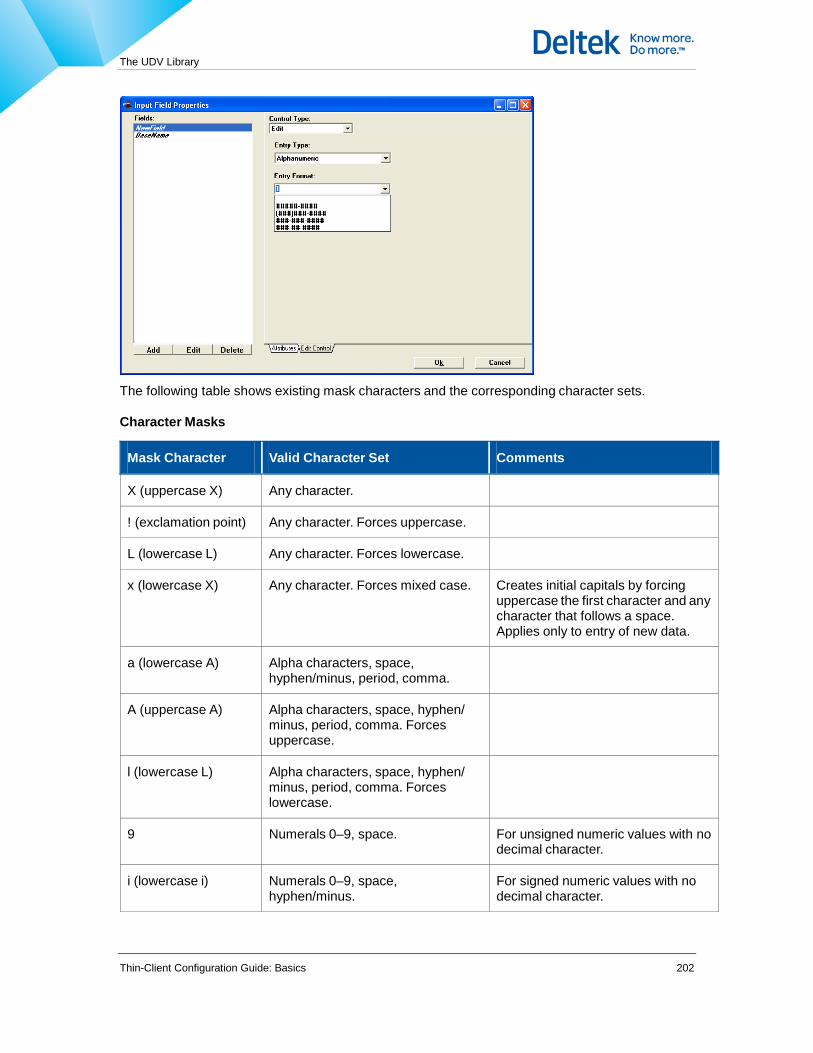
The UDV Library
Thin-Client Configuration Guide: Basics 202
The following table shows existing mask characters and the corresponding character sets.
Character Masks
Mask Character Valid Character Set Comments
X (uppercase X) Any character.
! (exclamation point) Any character. Forces uppercase.
L (lowercase L) Any character. Forces lowercase.
x (lowercase X) Any character. Forces mixed case. Creates initial capitals by forcing uppercase the first character and any character that follows a space. Applies only to entry of new data.
a (lowercase A) Alpha characters, space, hyphen/minus, period, comma.
A (uppercase A) Alpha characters, space, hyphen/ minus, period, comma. Forces uppercase.
l (lowercase L) Alpha characters, space, hyphen/ minus, period, comma. Forces lowercase.
9 Numerals 0–9, space. For unsigned numeric values with no decimal character.
i (lowercase i) Numerals 0–9, space, hyphen/minus.
For signed numeric values with no decimal character.

The UDV Library
Thin-Client Configuration Guide: Basics 203
Mask Character Valid Character Set Comments
# (pound sign) Numerals 0–9, space, hyphen/minus, period.
For real numeric values with a decimal character.
E (uppercase E) Numerals 0–9, space, hyphen/minus, period, e.
For real numeric values using scientific notation. Cannot be used with 9, i, or # fields.
K (uppercase K) Numerals 0–9, alphas A–F. Forces uppercase.
For hexadecimal formats using integer data types (Byte, ShortInt, Integer, Word, and LongInt). Assumes a single subfield consisting entirely of K characters.
O (uppercase O) Numerals 0–7, space. For octal formats.
b (lowercase B) Numerals 0–1, space. For binary formats.
B (uppercase B) T, t, F, f. For Boolean values.
Y (uppercase Y) Y, y, N, n. For Boolean values.
1 Alphanumeric characters except the space, comma, semicolon, period, colon, exclamation point, equal sign, tilde.
Costpoint MES-specific mask.
2 Alphanumeric characters except the space, comma, semicolon, period, colon, exclamation point, equal sign, tilde. Forces uppercase.
Cosptoint MES-specific mask.
3 Alphanumeric characters except the comma, semicolon, period, colon, exclamation point, equal sign, tilde. (Identical to 1, except that it allows spaces.)
Cosptoint MES-specific mask.
4 Alphanumeric characters except the comma, semicolon, period, colon, exclamation point, equal sign, tilde. Forces uppercase. (Identical to 2, except that it allows spaces.)
Costpoint MES-specific mask.
Edit Masks You can configure new edit masks and alter the existing, Costpoint Manufacturing Execution-specific masks (1, 2, 3, and 4). Edit masks are mask characters as described in the previous section, but are typically represented by more than a single character. Edit Masks reside in the [Common].EditMasks section of the Initialization Library record. Each mask consists of a Description = Mask pair, where Description is typically a representative name (corresponding to

The UDV Library
Thin-Client Configuration Guide: Basics 204
the Mask Character column the previous table) and Mask is the valid character set (corresponding to the Valid Character Set column in the previous table).
The Mask field value can consist of any character in the Costpoint Manufacturing Execution-supported ANSI character set of MS windows, which includes 256 characters, numbered 0 to 255. Values 0 to 127 are the same as in the ASCII character set. Values 128 to 255 are similar to those in the ISO Latin-1 character set, but include extensions and incompatibilities.
A Mask field character can be represented numerically or by its displayed form. For example, #42, #$2a, and "*" all represent an asterisk.
The following table shows Mask field characters that have special meaning.
Character Meaning
# (pound sign) Prefix of a numerical representation.
$ (dollar sign) When following a "#," designates a hexadecimal representation of a character. For example, a space can be represented as #$20.
! (exclamation point) When occurring as the first nonblank character in a mask, indicates that the following character(s) are excluded as valid input. When occurring anywhere else in the mask, indicates the displayed character.
^ (caret) When occurring as the last nonblank character, indicates that any alpha character should be forced to upper case. In such a case, any alpha character is treated as if both the upper and lower case versions were entered.
space When not within quotes, ignored. Spaces may be used anywhere to improve readability.
.. (double period) When occurring between two letters, indicates a range of letters. For example, A..Z or Z..#65 indicates all upper case alpha characters. If the first character is not indicated, #00 is assumed. If the last character is not indicated, #255 is assumed. Ranges are in ANSI character order.
, (comma) Used as a delimiter and like a space, used to aid readability. However, commas should not be used within a range of characters. For example, A,..,Z does not represent all uppercase alphanumeric characters. It represents three lists: A list consisting of the single character A, a list consisting of all characters (because ".." by itself is the same as #00..#255), and a list consisting of the single character Z.
“ “ and ‘ ‘ (double and single quotes)
Used to specify characters that would otherwise have special meaning. All characters included in opening and closing quotes of the same type are treated as normal characters. For example: ", !'#$^.", '"' could be used to indicate all the special characters including the quote characters themselves. Note: While not required, it is recommended that nonalphanumeric characters be enclosed in quotes or represented numerically to guard against the character being given special meaning in the future.
Following are edit mask examples in the form Description = Mask:

The UDV Library
Thin-Client Configuration Guide: Basics 205
ANSI = #00 .. #255
ASCII = #$00 .. #$7F
Alphanumeric = a .. z, A .. Z, 0 .. 9
Vowels = aeiou^
NotVowels = !aAeEiIoOuU
How Edit Masks Work On startup, any edit masks in the [Common].EditMasks section of the Initialization Library record are parsed and stored as binary arrays that indicate whether or not a given character is acceptable. At run time, on UDV creation and display, Costpoint MES checks for an Edit Format value for each field. If it finds one, it attempts to locate a matching Description value in the edit mask arrays. If it finds a Description match, it assigns the corresponding Mask value to check incoming characters. If doesn’t find a matching Description value, it assigns the Entry Format value as a picture mask. On subsequent keyboard input, the appropriate edit mask or picture mask validates each incoming character. Unacceptable characters are rejected.
Configuring and Applying an Edit Mask You configure an edit mask in the [Common].EditMasks section of the Initialization Library record. After configuring the mask, you apply it to a specific UDV field via the Input Field Properties dialog box of the UDV.
You alter an existing generic mask (1, 2, 3 or 4), by creating an edit mask whose Description = 1 (or 2, or 3, or 4), and assigning an altered Mask value to that description.
The following procedures show you how to configure and apply an edit mask and how to alter an existing Costpoint MES-specific mask. They assume that you have launched the Initialization Library editor (to configure the edit mask) or the UDV Editor (to apply the mask) and are connected to the desired database and library record.
To configure an edit mask, complete the following steps:
1. In the tree pane of the Structured Editor tab, double-click in turn Common and EditMasks.
2. Click [Add a New Edit Mask]. 3. In the right-hand pane Description field, enter a representative name for the mask. This
value corresponds to the Entry Format value of the UDV field.
4. In the Mask field, enter the corresponding character set.
To apply an edit mask to a UDV field, complete the following steps:
1. Display the Input UDV containing the field to which you want to apply an edit mask.
1. In the Non-visual Controls tab, select the SQL Source name. The corresponding properties appear in the Property panel.
2. Click Input Fields. The Input Field Properties dialog box appears. See “Picture Masks in the Input Field Properties Dialog Box.”
3. Click the Edit Control tab, and in the left-hand Fields area, highlight the field to which you want to apply the mask.
4. Enter the following values as needed:

The UDV Library
Thin-Client Configuration Guide: Basics 206
Entry Type Click the down arrow and select the appropriate type: Alphanumeric, Numeric, Date, Filename, Filename with Data, Hypertext.
Entry Format The Description value of an existing edit mask as found in the
[Common].EditMask section of the Initialization Library.
or
Any mask character(s). If Costpoint MES finds no edit mask with a Description value that matches this character(s), it uses the character(s) as a picture mask to validate field input.
To alter an existing Costpoint MES-specific mask (1, 2, 3, or 4), complete the following steps:
1. Follow steps 1 and 2 to configure a mask (see “To configure an edit mask”).
2. In the Description field, enter the mask character of the Costpoint MES mask you want to alter (1, 2, 3, or 4).
3. In the Mask field, enter the altered character set for the mask. From now on, when users enter values in a UDV control whose Edit Format value (1, 2, 3, or 4) matches the Description value of this edit mask, Costpoint MES uses the altered Mask value instead of the default value.
Multiuse Input UDVs
When launching an Input UDV from an ExecTransaction command event (see “CommandEvent”), you can use the @HideColumns parameter to hide Edit, List, and Memo controls based on named columns. This turns a single-use UDV into a multiuse UDV.
The following table shows the parameters that can be used to launch a multiuse UDV.
UDV Parameters
Parameter Win Web Description
@HideColumns x x Hides the delimited columns. Example:
@HideColumns=”OPER_NO,ORDER_NO,TOOL_TYPE”

The UDV Library
Thin-Client Configuration Guide: Basics 207
Parameter Win Web Description
@HideColumns with $ delimiter
x For Memo controls that don’t have a Caption property, hides an associated label by following the column name with a dollar sign ($) delimiter followed by the label text:
@HideColumns=”OPER_NO$Oper No,ORDER_NO” The above string hides all labels that read “Oper No.”
In searching for label text that matches the delimited label value, Costpoint MES disregards the following characters:
$ (dollar sign)
‘ (apostrophe)
“ (double quote)
, (comma)
; (semicolon)
~ (tilde)
This means that labels that differ only by one or more disregarded characters cannot be uniquely hidden. To avoid problems with disregarded characters, omit them from the parameter label value.
@Caption Changes the caption of the UDV to the @Caption value. Example:
@Caption=”New Caption”
@InstanceSerial Allows the subsequent UDV to use the original parameter values.
Auxiliary UDVs Win/Web
An auxiliary UDV is a simple Display UDV that can appear above or below the main content of dispatch-type windows (Dispatch and System Administration) and Instruction windows.

The UDV Library
Thin-Client Configuration Guide: Basics 208
In an auxiliary UDV, only the visible controls appear in the UDV—there are no Cancel or OK buttons—and UDVs do not have visible borders. Their size is determined by the size and placement of the individual controls. For Thin-Client, the Top property sets the distance between a UDV control and a host window control or its contents.
Most often, auxiliary UDVs consist of one or more command buttons that initiate an Other Command. They often take the place of an Ellipsis button where the user would otherwise have to click the button to see the list of menu options. Also, unlike embedded controls, auxiliary UDVs remain fixed and visible at the top or bottom of the window, regardless of the user’s position in the window.
For Web Express Client, due to the nature of the web browser, auxiliary UDVs at the bottom of a window may scroll out of view.
SQL Sources Auxiliary UDVs, like all Display UDVs, require a SQL Source whose SelectSqlId property returns the data set on which an executed command/child UDV operates.
The following table shows the three ways you can set the SQL Source.
SQL Sources for Auxiliary UDVs
SQL Source Type Win Web Description
Dummy SQL Source x Sets the SelectSqlId to a dummy statement, e.g., Select ‘X’ from Dual, and where ParamsSqlSourceName is @ToolScope (see Figure 5-41). This is an easy way to obtain parameters when the necessary data set is already present in the @ToolScope variable.
SelectSqlId statement
x x Uses the SelectSqlId statement. This method should be used when @ToolScope does not provide all the parameters necessary to perform the control t ti
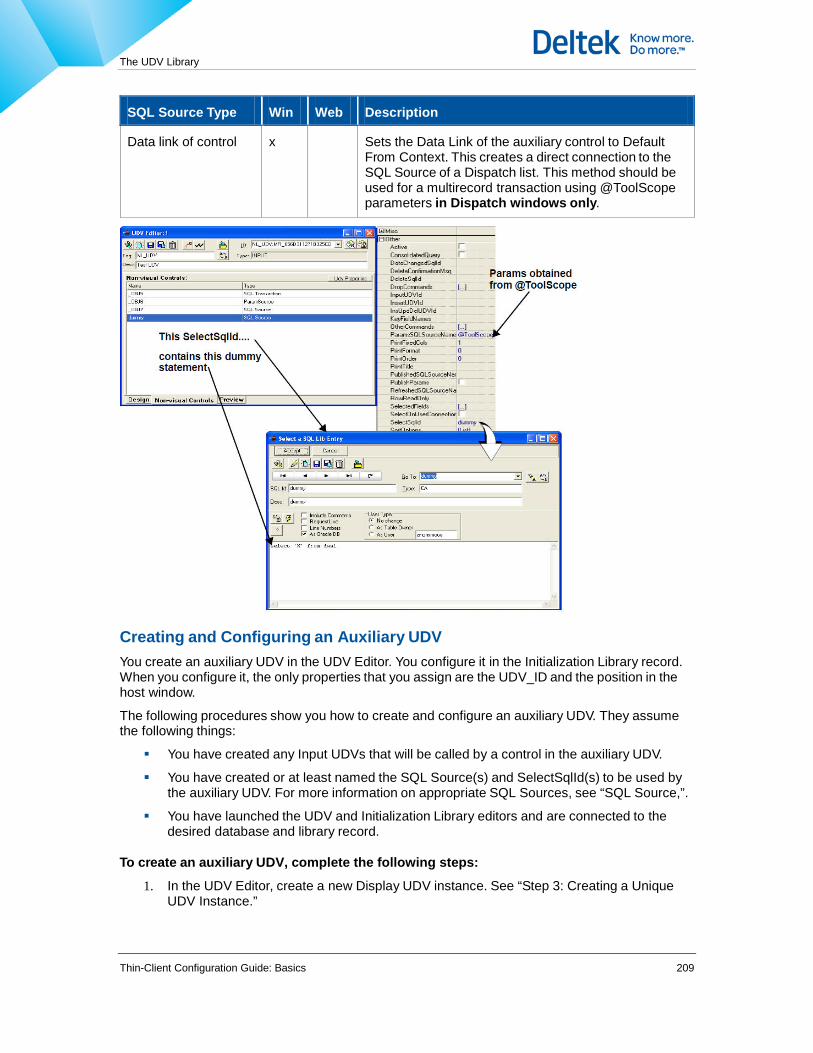
The UDV Library
Thin-Client Configuration Guide: Basics 209
SQL Source Type Win Web Description
Data link of control x Sets the Data Link of the auxiliary control to Default From Context. This creates a direct connection to the SQL Source of a Dispatch list. This method should be used for a multirecord transaction using @ToolScope parameters in Dispatch windows only.
Creating and Configuring an Auxiliary UDV You create an auxiliary UDV in the UDV Editor. You configure it in the Initialization Library record. When you configure it, the only properties that you assign are the UDV_ID and the position in the host window.
The following procedures show you how to create and configure an auxiliary UDV. They assume the following things:
You have created any Input UDVs that will be called by a control in the auxiliary UDV.
You have created or at least named the SQL Source(s) and SelectSqlId(s) to be used by the auxiliary UDV. For more information on appropriate SQL Sources, see “SQL Source,”.
You have launched the UDV and Initialization Library editors and are connected to the desired database and library record.
To create an auxiliary UDV, complete the following steps:
1. In the UDV Editor, create a new Display UDV instance. See “Step 3: Creating a Unique UDV Instance.”

The UDV Library
Thin-Client Configuration Guide: Basics 210
2. In the Design tab, add the controls that will appear in the auxiliary UDV. See “Step 4: Adding and Positioning Visual Controls.” Most often these controls are Command buttons, but they can be any type of control available to the Display UDV.
3. In the Nonvisual Controls tab, add all SQL Sources needed by the visual controls. See “Step 5: Adding Nonvisual Controls”. For Thin-Client, if the host window for the Auxiliary UDV will be a Dispatch window in which @ToolScope contains all the necessary parameters, instead of assigning a SQL Source for the control(s), you can link the control directly to the SQL Source of the Dispatch list. See step 6.
4. In the Design tab, configure properties for each control.
The Top property of any control defines the distance between the control and the nearest host window control at the top of the window, or the distance between the control and the window contents at the bottom of the window.
Most often, a control executes an Other Command. See “UDV-Launched Other Commands.”
5. In the View Nonvisual Controls tab, configure properties for each SQL Source. See “Step 8: Assigning Nonvisual Control Properties.”
6. In the Visual Design tab, link each control to the appropriate SQL Source. See “Step 9: Linking Visual and Nonvisual Controls.” For Thin-Client, for an Auxiliary UDV that will be hosted by a Dispatch window only, if you set a control link to Default From Context, the control will use the SQL Source of the Dispatch list.
To configure an auxiliary UDV, complete the following steps:
1. In the Initialization Library Editor, do one of the following:
If the host window will be a dispatch-type window, navigate to the appropriate window and list ([Dispatch] or [SysAdmin]ListGroups.GroupName.Lists.ListName).
If the host window will be an Instruction window, navigate to the appropriate window and View or Edit mode ([Instructions]WindowName. Modes.ViewModes/EditModes.ModeName).
2. In the tree pane, click AuxUdvId and in the right-hand pane, enter the UDV_ID of the auxiliary UDV.
3. In the tree pane, click AuxUdvLocation, and in the right-hand pane enter the position of the UDV:
Top — Above the hypertext or records in the host window.
Bottom — Below the hypertext or records in the host window.
Off — For Thin-Client, suppresses display of this auxiliary UDV. Use this setting to suppress the UDV under the appropriate conditions.
Explicitly Refresh the Instruction Tool's Aux UDV using @RefreshAlias .
Enhancement provides a way to explicitly refresh the Instruction tool's Aux UDV using @RefreshAlias.
The refresh alias modifier explicitly refreshes the Instructions tool window's AuxUdv with @AuxUdv. e.g. @RefreshAlias=@AuxUdv.
The Aux Udv is also refreshed when @RefreshAlias=*

The UDV Library
Thin-Client Configuration Guide: Basics 211
Single Transaction Logon The single-transaction logon feature allows a second user to log on to Costpoint MES for a single transaction only, for example a buyoff.
Single-transaction logon is a UDV property enabled by the high-level RequireLogon property. When this property is set to True, and the UDV is subsequently activated, Costpoint MES presents the User Authentication dialog box that requires a second user (usually) to log on before completing the transaction. On completion of the transaction, the application automatically logs off the single- transaction user and relogs the original user.
The Common.DisableUDVRequireLogon property in the Ini Lib record overrides all instances of the UDV RequireLogon property. If Common.
DisableUDVRequireLogon = Yes, no UDVs will enable single-transaction logon, even if RequireLogon = Yes. See “DisableUDVRequireLogon.”
When Common.RequiredLogonLocalReAuthentication is enabled, Thin-Client reauthenticates the logged-on user with the originally entered password—when the UserID matches that of the current user—without checking the database. See “RequiredLogonLocalReAuthentication.”
For Thin Client releases prior to 4.1.3, Windows Client processes the session event queue in a single loop, and then logs off the intermediate user and relogs the original user. In some cases this can cause second- and third-wave events to be improperly attributed to the original user. In Thin Client releases 4.1.3 and later, Costpoint MES loops repeatedly until all chained events are exhausted, and then logs out the intermediate user.
You can mask characters entered in the UserId field by enabling the MaskLoginUserIdField property.
In a Scripted UDV, the RequireLogon property allows transparent logon of the second
The following procedure show you how to enable single transaction logon. It assumes you have launched the UDV Editor and are connected to the desired database.
To enable single-transaction logon, complete the following steps:
1. Display the desired UDV.
2. In the Design tab, click any blank surface. High-level UDV properties appear in the Property panel.
3. Set RequireLogon to True.
4. Save the UDV.
Disabling In-Memory UDV Caching In the end-user application, Thin-Client automatically caches fetched UDVs in memory. This improves performance by reducing calls to the database.
Thin-Client also supports local caching of Ini, UDV, and SQL Library records on the client machine. For more information on the Local Library Cache, see “Local Library Caching.”
During development and testing, it is sometimes necessary to disable in-memory caching in order to immediately verify UDV changes. These changes would normally be seen only after cycling the application.

The UDV Library
Thin-Client Configuration Guide: Basics 212
When in-memory caching is disabled, Thin-Client clears and refreshes a UDV each time the system accesses object metadata:
On selection of a new Dispatch list
On invoking a tool window
On selecting a page tab
For example, when in-memory caching is disabled, you can note a needed change in a UDV in the application, change the UDV in the System Manager, and then re-invoke the parent tool window in the application. You will see the UDV changes immediately—because the application fetches the updated UDV from the database instead of from the in-memory cache.
You disable UDV in-memory caching through the /xc command line switch when starting the application: /n dvlp22.ini /od dvlp_40 /u sfmfg /p dvlp_40 /oi FW40_MFG_26_rtr /xc
Copying Input UDV Field Values You can copy field values from one Input UDV to another in the Costpoint MES application.
To do this, you right-click on the Input UDV panel and select Copy Values on the local menu. This action places an array of parameter values by column name on the Windows clipboard. You paste these values into a target UDV by right-clicking the target UDV panel and selecting Paste Values on the local menu. Costpoint MES copies only those values with matching column names.
Parameter values on the clipboard can also be pasted into Notepad for review.
Copy and paste does not support Memo fields.
UDV Property Overrrides The [UdvPropertyOverrides] section of the Initialization Library record is used to override UDV properties. Property overrides take place after UDV substitutions and after UDVs are read/loaded from the local cache. This capability provides a method of UDV configuration which is persistent acrosss product upgrades which replace UDV metadata.
Each entry in the [UdvPropertyOverrides] section follows the following format: UdvPropertyOverrides
<udvid 1>
Expression=...
PropertyValues=<prop1=value1;prop2=value2;...>
<udvid 2>
Expression=...
PropertyValues=<prop1=value1;prop2=value2;...>
where
UdvId is the UDV ID. This value can be an asterisk (*), indicating that the following expression and values pertain to all UDVs.
Expression is an expression that when evaluated as True, enables the property overrides of the PropertyValues parameter. Expression data can be context parameter data as well as system data (system data does not override local context data).
The UDV Library
Thin-Client Configuration Guide: Basics 213
Expression values can be derived by the following means:
Direct input of the desired value. Example: Visible = True
Use of a function whose returned value is compared to a True/False standard.
Example: Visible = @GetQueryValue(MySqlId) = ‘True’
Direct return of a calculated value. Example: @GetQueryValue(MySqlId)
PropertyValues is a semicolon-delimited list of UDV property values that override configured values for the corresponding property when the UDV loads. Valid data types are string, integer, Boolean, and typed/enumerated list. These values can be entered directly in the edit field or through the Property Settings dialog box. Property names must exactly match those listed in the UDV Properties panel.
Values can be specified down to the control level according to control name and class. Also, values can be set to iterate through all property levels: UDV-level property, control/class property, control/class subproperty. If you are specifying UdvPropertyOverrides as part of the [IniLibOverrides] section of the Ini file, use the following syntax to designate the targeted control/ class property:
<LiteralControlName, Class(ClassName), or * for all controls>: <PropName>:<SubPropName>
The control/class and each property level is delimited by a colon. Because the control/class and/or property must be identified at the proper level, this feature requires in-depth knowledge of internal UDV information.
Examples
You want every embedded buyoff and data collection UDV to trigger a logon dialog box for verification of the current user. You also want all UDVs to have the AutoAccept property = False. The [UdvPropertyOverrides] entries would look like this: UdvPropertyOverrides
<BO_udvid>
Expression=True
PropertyValues=RequireLogon=True
<DC_udvid>
Expression=True
PropertyValues=RequireLogon=True
*
Expression = True
PropertyValues=AutoAccept=False
Overrides can also be initiated through the Ini file. [IniLibOverrides]
UdvPropertyOverrides.*.PropertyValues=AutoAccept=False
Separate multiple property values with a semicolon. [IniLibOverrides]
UdvPropertyOverrides.*.PropertyValues=AutoAccept=False;MultimediaRequired=mmNo
Examples at the Control Level
For all UDVs, change the Font:Color property to green for every control UdvPropertyOverrides.*.PropertyValues=*:Font:Color=clGreen
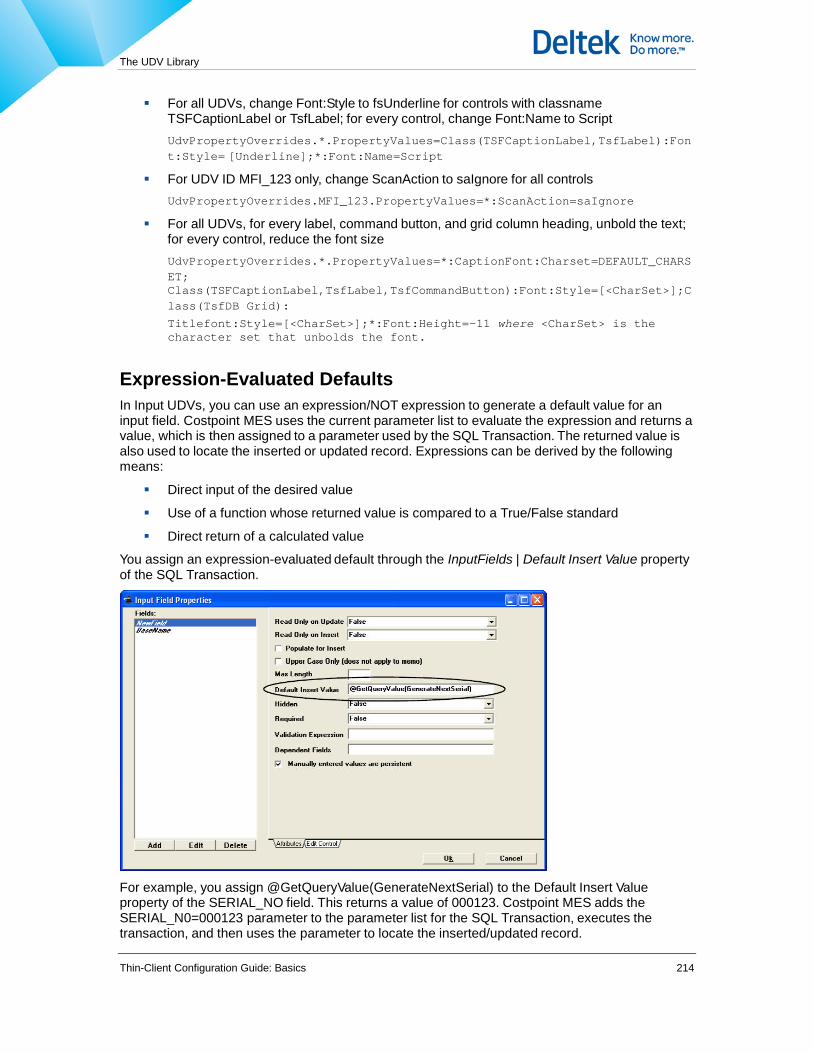
The UDV Library
Thin-Client Configuration Guide: Basics 214
For all UDVs, change Font:Style to fsUnderline for controls with classname TSFCaptionLabel or TsfLabel; for every control, change Font:Name to Script UdvPropertyOverrides.*.PropertyValues=Class(TSFCaptionLabel,TsfLabel):Font:Style= [Underline];*:Font:Name=Script
For UDV ID MFI_123 only, change ScanAction to saIgnore for all controls UdvPropertyOverrides.MFI_123.PropertyValues=*:ScanAction=saIgnore
For all UDVs, for every label, command button, and grid column heading, unbold the text; for every control, reduce the font size UdvPropertyOverrides.*.PropertyValues=*:CaptionFont:Charset=DEFAULT_CHARSET; Class(TSFCaptionLabel,TsfLabel,TsfCommandButton):Font:Style=[<CharSet>];Class(TsfDB Grid): Titlefont:Style=[<CharSet>];*:Font:Height=-11 where <CharSet> is the character set that unbolds the font.
Expression-Evaluated Defaults In Input UDVs, you can use an expression/NOT expression to generate a default value for an input field. Costpoint MES uses the current parameter list to evaluate the expression and returns a value, which is then assigned to a parameter used by the SQL Transaction. The returned value is also used to locate the inserted or updated record. Expressions can be derived by the following means:
Direct input of the desired value
Use of a function whose returned value is compared to a True/False standard
Direct return of a calculated value
You assign an expression-evaluated default through the InputFields | Default Insert Value property of the SQL Transaction.
For example, you assign @GetQueryValue(GenerateNextSerial) to the Default Insert Value property of the SERIAL_NO field. This returns a value of 000123. Costpoint MES adds the SERIAL_N0=000123 parameter to the parameter list for the SQL Transaction, executes the transaction, and then uses the parameter to locate the inserted/updated record.
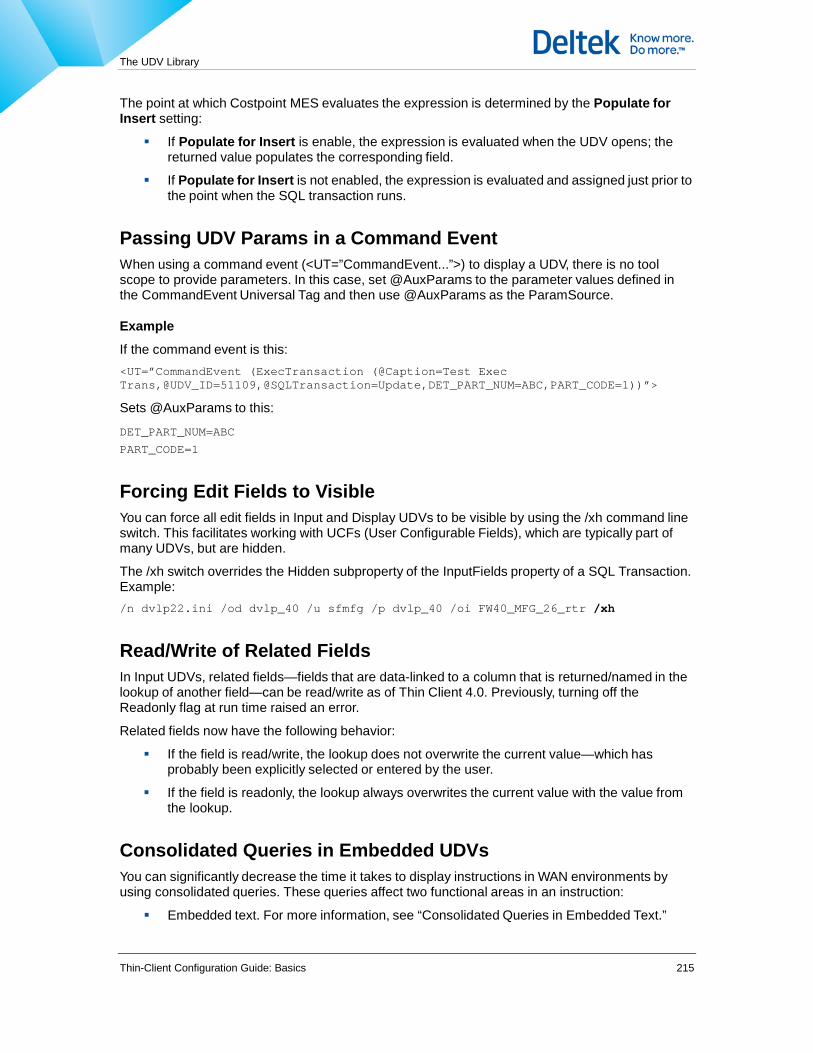
The UDV Library
Thin-Client Configuration Guide: Basics 215
The point at which Costpoint MES evaluates the expression is determined by the Populate for Insert setting:
If Populate for Insert is enable, the expression is evaluated when the UDV opens; the returned value populates the corresponding field.
If Populate for Insert is not enabled, the expression is evaluated and assigned just prior to the point when the SQL transaction runs.
Passing UDV Params in a Command Event When using a command event (<UT=”CommandEvent...”>) to display a UDV, there is no tool scope to provide parameters. In this case, set @AuxParams to the parameter values defined in the CommandEvent Universal Tag and then use @AuxParams as the ParamSource.
Example
If the command event is this: <UT=”CommandEvent (ExecTransaction (@Caption=Test Exec Trans,@UDV_ID=51109,@SQLTransaction=Update,DET_PART_NUM=ABC,PART_CODE=1))”>
Sets @AuxParams to this:
DET_PART_NUM=ABC PART_CODE=1
Forcing Edit Fields to Visible You can force all edit fields in Input and Display UDVs to be visible by using the /xh command line switch. This facilitates working with UCFs (User Configurable Fields), which are typically part of many UDVs, but are hidden.
The /xh switch overrides the Hidden subproperty of the InputFields property of a SQL Transaction. Example: /n dvlp22.ini /od dvlp_40 /u sfmfg /p dvlp_40 /oi FW40_MFG_26_rtr /xh
Read/Write of Related Fields In Input UDVs, related fields—fields that are data-linked to a column that is returned/named in the lookup of another field—can be read/write as of Thin Client 4.0. Previously, turning off the Readonly flag at run time raised an error.
Related fields now have the following behavior:
If the field is read/write, the lookup does not overwrite the current value—which has probably been explicitly selected or entered by the user.
If the field is readonly, the lookup always overwrites the current value with the value from the lookup.
Consolidated Queries in Embedded UDVs You can significantly decrease the time it takes to display instructions in WAN environments by using consolidated queries. These queries affect two functional areas in an instruction:
Embedded text. For more information, see “Consolidated Queries in Embedded Text.”

The UDV Library
Thin-Client Configuration Guide: Basics 216
Embedded UDVs. For more information, see the following paragraphs.
In both cases a consolidated query is a single query created from individual queries that differ only in WHERE clause parameters. On loading of the instruction, the single query returns all rows of data for the embedded objects whose queries share common selected columns. The returned data set then acts as a master list or cache from which each Embed tag retrieves specific data as the tag is executed.
The SQL Source parameter set of an embedded UDV contains the @ConsolidatedQueryType variable, which shows the level of the executed query, Master or Instance:
@ConsolidatedQueryType = Master. Denotes that the query is being used to create a master list, which is then used by subsequent instances of the embedded UDV.
@ConsolidatedQueryType = Instance. Denotes that the query is being used to populate data for an individual instance of the embedded UDV.
Configuring Consolidated Queries for UDVs You configure a consolidated query for embedded UDVs in the SQL Source of a UDV in the UDV Editor.
When parameters are explicitly defined, the consolidated query queries data at the level of the defined parameters. When columns are undefined, the WHERE clause of the current navigation level query replaces the WHERE clause of the original SELECT statement.
The following procedure shows you how to create a consolidated query for an embedded UDV. It assumes that you have launched the UDV Editor and are connected to the desired database and library record.
To create a consolidated query for an embedded UDV, complete the following steps:
1. Display the desired UDV.
2. In the Non-visual Controls tab, select the SQL Source name, and in the Property panel, set ConsolidatedQuery to True. This completes configuration if you do not want to explicitly define columns.
3. To explicitly define columns, click the ellipsis in the Selected Fields column to display the Select Fields and Set Field Properties dialog box.
4. In the Select Fields and Set Field Properties dialog box, select a column and enable the Consolidated Query Level check box.
5. Repeat step 4 for every additional column in the query.
The Local Library Cache You can cache Initialization, UDV, and SQL Library records on the client, which speeds startup and runtime response considerably, especially in WAN clients. Local caching was originally limited to Initialization Library records, but now applies to UDV and SQL Libraries as well.
When you enable local caching, you enable it for all three libraries. Because the cache works almost identically for all libraries, it is explained once in the Initialization Library chapter. For more information, see “Local Library Caching.”
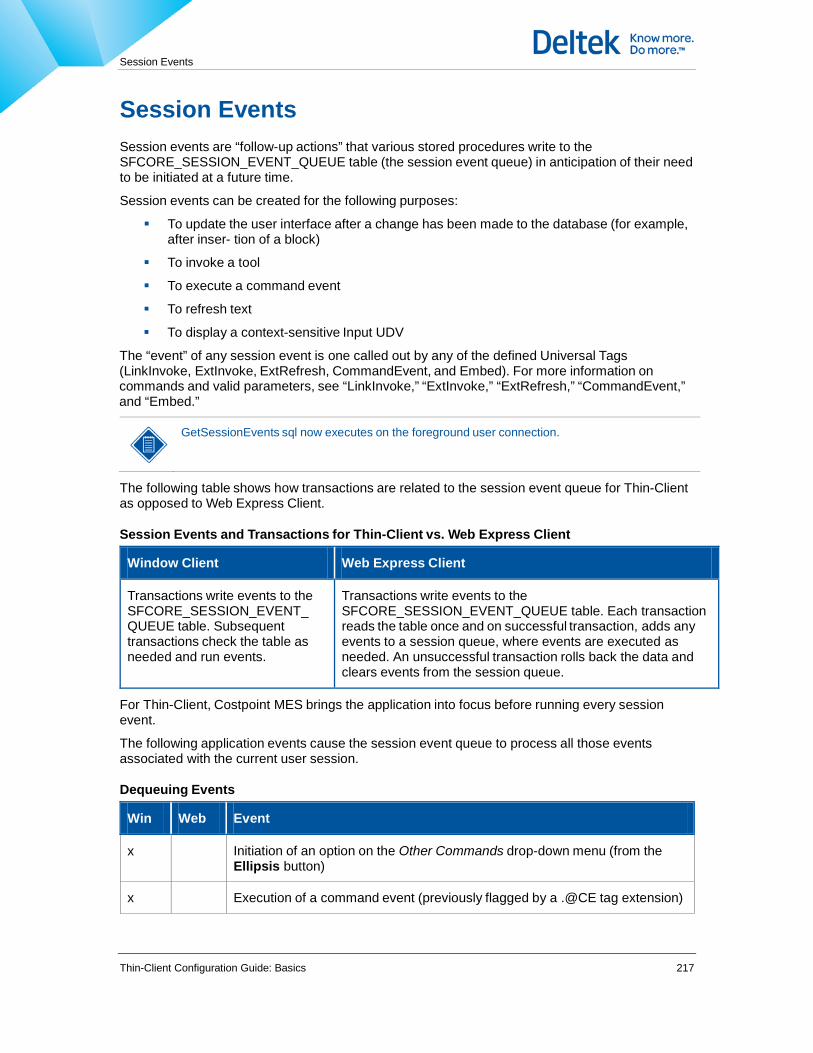
Session Events
Thin-Client Configuration Guide: Basics 217
Session Events Session events are “follow-up actions” that various stored procedures write to the SFCORE_SESSION_EVENT_QUEUE table (the session event queue) in anticipation of their need to be initiated at a future time.
Session events can be created for the following purposes:
To update the user interface after a change has been made to the database (for example, after inser- tion of a block)
To invoke a tool
To execute a command event
To refresh text
To display a context-sensitive Input UDV
The “event” of any session event is one called out by any of the defined Universal Tags (LinkInvoke, ExtInvoke, ExtRefresh, CommandEvent, and Embed). For more information on commands and valid parameters, see “LinkInvoke,” “ExtInvoke,” “ExtRefresh,” “CommandEvent,” and “Embed.”
GetSessionEvents sql now executes on the foreground user connection.
The following table shows how transactions are related to the session event queue for Thin-Client as opposed to Web Express Client.
Session Events and Transactions for Thin-Client vs. Web Express Client
Window Client Web Express Client
Transactions write events to the SFCORE_SESSION_EVENT_ QUEUE table. Subsequent transactions check the table as needed and run events.
Transactions write events to the SFCORE_SESSION_EVENT_QUEUE table. Each transaction reads the table once and on successful transaction, adds any events to a session queue, where events are executed as needed. An unsuccessful transaction rolls back the data and clears events from the session queue.
For Thin-Client, Costpoint MES brings the application into focus before running every session event.
The following application events cause the session event queue to process all those events associated with the current user session.
Dequeuing Events
Win Web Event
x Initiation of an option on the Other Commands drop-down menu (from the Ellipsis button)
x Execution of a command event (previously flagged by a .@CE tag extension)

Session Events
Thin-Client Configuration Guide: Basics 218
Win Web Event
x Any Insert Block action
x Execution of any “run” command as initiated from the Other Programs dialog box
x Saving changes to an instructions text block.
The following table shows the column definitions in the SFCORE_SESSION_EVENT_QUEUE table.
SFCORE_SESSION_EVENT_QUEUE
Column Name Attribute/Column Definition Data Type Opt P Key
SESSION_ID The unique identifier of a user login session to the Thin-Client system.
NUMBER(22) N N
DOC_TIME The time the Session Event record was created.
DATE N N
TAG_ID The unique, stored procedure-generated identifier of the record.
VARCHAR2(20) N N
TAG_DATA Properties from any of the defined Universal Tags, whose hierarchically based structure defines the content and appearance of hypertext in all Instruction windows and tabs.
CLOB Y Y

The Shell and User Interface
Thin-Client Configuration Guide: Basics 219
The Shell and User Interface The Costpoint MES shell is the parent window from which users navigate to tool windows and tasks. The shell also displays status information.
The following table shows how the shell differs for logging on/off tasks between Thin-Client and Web Express Client.
The Shell and Logging On/Off Tasks
Thin-Client Web Express Client
Serves as the log on/log off point for the application/session.
Serves only as the log off point for the Costpoint MES session.
The following figure shows the buttons and indicators along the lower border of the shell.
The following table explains what each button or control does.
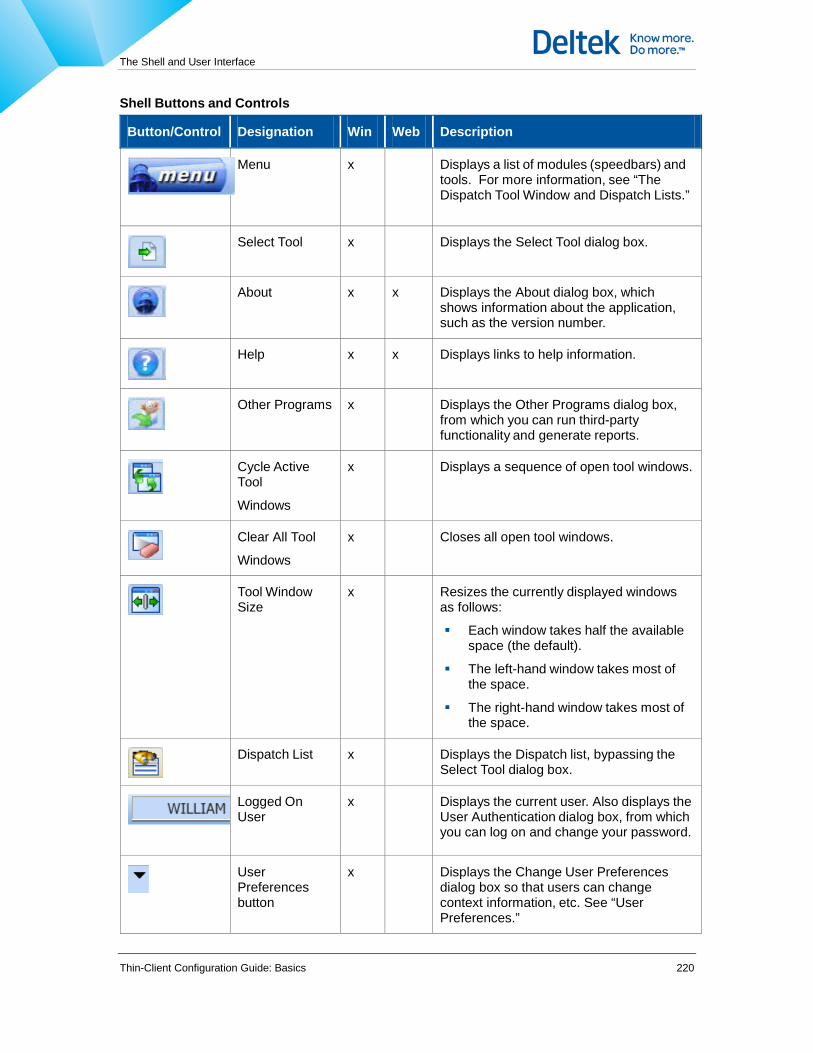
The Shell and User Interface
Thin-Client Configuration Guide: Basics 220
Shell Buttons and Controls
Button/Control Designation Win Web Description
Menu x Displays a list of modules (speedbars) and tools. For more information, see “The Dispatch Tool Window and Dispatch Lists.”
Select Tool x Displays the Select Tool dialog box.
About x x Displays the About dialog box, which
shows information about the application, such as the version number.
Help x x Displays links to help information.
Other Programs x Displays the Other Programs dialog box, from which you can run third-party functionality and generate reports.
Cycle Active Tool
Windows
x Displays a sequence of open tool windows.
Clear All Tool
Windows
x Closes all open tool windows.
Tool Window Size
x Resizes the currently displayed windows as follows:
Each window takes half the available space (the default).
The left-hand window takes most of the space.
The right-hand window takes most of the space.
Dispatch List x Displays the Dispatch list, bypassing the Select Tool dialog box.
Logged On User
x Displays the current user. Also displays the User Authentication dialog box, from which you can log on and change your password.
User Preferences button
x Displays the Change User Preferences dialog box so that users can change context information, etc. See “User Preferences.”
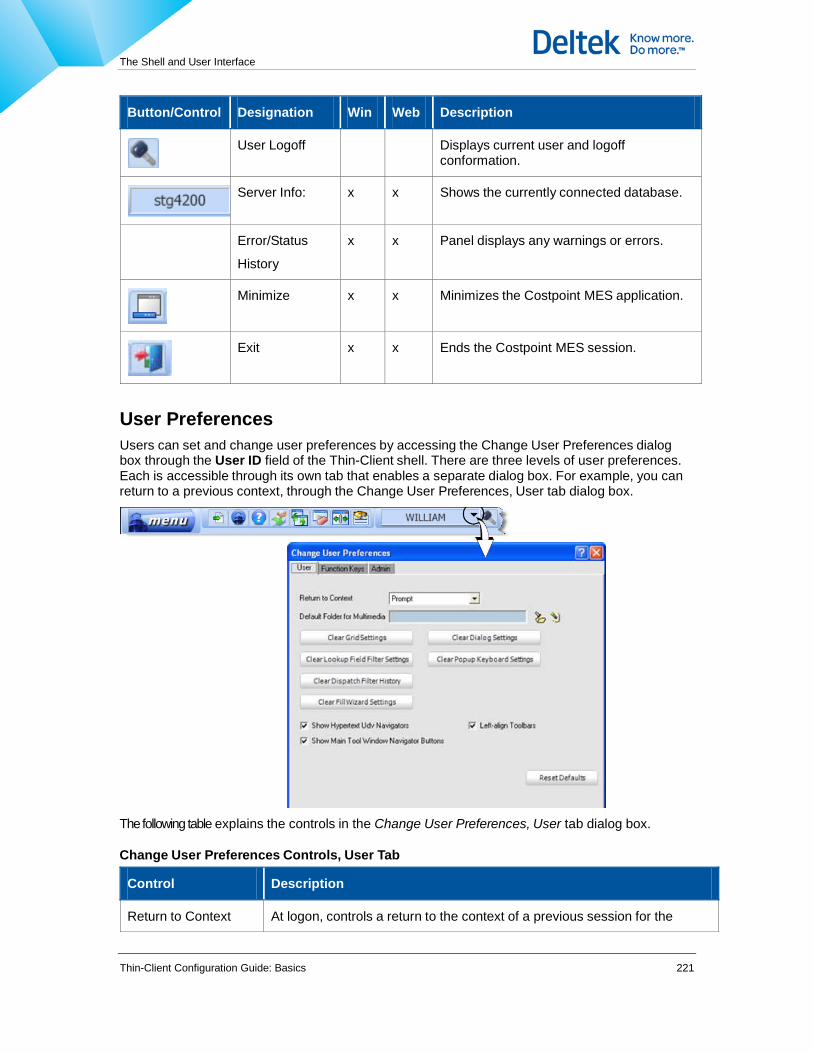
The Shell and User Interface
Thin-Client Configuration Guide: Basics 221
Button/Control Designation Win Web Description
User Logoff Displays current user and logoff conformation.
Server Info: x x Shows the currently connected database.
Error/Status
History
x x Panel displays any warnings or errors.
Minimize x x Minimizes the Costpoint MES application.
Exit x x Ends the Costpoint MES session.
User Preferences Users can set and change user preferences by accessing the Change User Preferences dialog box through the User ID field of the Thin-Client shell. There are three levels of user preferences. Each is accessible through its own tab that enables a separate dialog box. For example, you can return to a previous context, through the Change User Preferences, User tab dialog box.
The following table explains the controls in the Change User Preferences, User tab dialog box.
Change User Preferences Controls, User Tab
Control Description
Return to Context At logon, controls a return to the context of a previous session for the

The Shell and User Interface
Thin-Client Configuration Guide: Basics 222
Control Description
logged-on user as follows:
Yes (no user prompt) — Displays no prompt at logon and automatically returns the user to the previous context as stored in the database at last logoff. If the /oc switch is used on the command line, the user is prompted to return to the previous context, regardless of this setting. For more information, see Appendix F, “Command Line Options.”
No — Displays no prompt on logon and does not return the user to a previous context.
Prompt — Displays a prompt on logon, so that the user can decide to return to a previous context or not.
Default Folder for Multimedia
The default folder into which multimedia objects are saved on import. If no folder is specified, Thin-Client uses the default folder of the object classification.
Clear Grid Settings Resets all grid settings such as column order and widths to default values. Grids include those in Input Matrix UDVs. (To reset individual grids, select Reset column order and widths on the Local menu.)
For Graphical Dispatch mode, resets additional settings such as the date scale and the splitter position between the grid and Gantt Chart.
Clear Lookup Field Filter Settings
Resets to default values filter settings in all Lookup dialog boxes. (To reset filter settings for a specific Lookup only, open that Lookup and click the Reset Filter Defaults button.)
Clear Dispatch Filter History
Resets to default Dispatch filter history. To reset the Dispatch filter history, click the Clear Dispatch Filter History button
Clear Fill Wizard Settings
Resets all Fill Wizard settings to their default values.
Clear Dialog Settings Clears all dialog size preferences.
Clear Popup Keyboard Settings
Clears all popup keyboard settings.
Check Boxes There are three preset check box preferences available:
Show Hypertext Udv Navigators. See “Hide/”Show Hypertext Udv Navigators””
Show Main Tool Window Navigation Buttons. See “Hide/”Show Hypertext Udv Navigators””
Left-align Toolbars
Reset Defaults Resets context and folder settings to default values. Note: Modifications to Selected Fields also resets grids to default values.

The Shell and User Interface
Thin-Client Configuration Guide: Basics 223
Control Description
Ok Click Ok to accept all changes.
Cancel Click cancel to cancel all changes.
Hide/”Show Hypertext Udv Navigators” .In "Change User Preferences" dialog, the ability to have "Show Hypertext Udv Navigators" checked as default allow users to, as example, add/insert Skill Requirements and Process Types to Instructions sheets.
Show/Hide/”Show Main Tool Windows Navigator Buttons” The “Move” buttons in the Main Navigator control for Dispatch and Instruction-type windows can now be hidden.
You hide the Navigator move buttons through the new MainNavigatorMoveButtonsVisible property, which is a subproperty of a specific ListGroup.List and/or Instruction window in the Initialization Library record. The default is No, meaning Main Navigator buttons are hidden. You override the default—causing the navigator buttons to appear—by checking the Show Main Tool Window Navigator Buttons option in the Change User Preferences dialog box.
You display the Change User Preferences dialog box by clicking the down arrow in the User area of the shell.
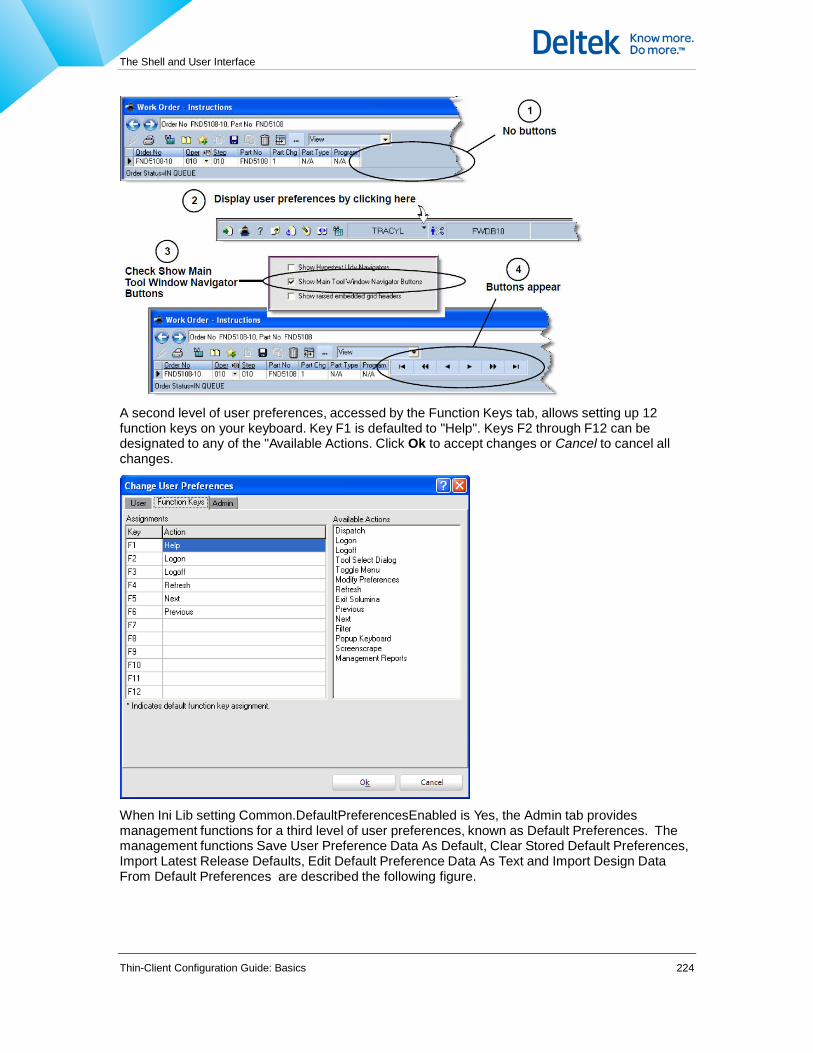
The Shell and User Interface
Thin-Client Configuration Guide: Basics 224
A second level of user preferences, accessed by the Function Keys tab, allows setting up 12 function keys on your keyboard. Key F1 is defaulted to "Help". Keys F2 through F12 can be designated to any of the "Available Actions. Click Ok to accept changes or Cancel to cancel all changes.
When Ini Lib setting Common.DefaultPreferencesEnabled is Yes, the Admin tab provides management functions for a third level of user preferences, known as Default Preferences. The management functions Save User Preference Data As Default, Clear Stored Default Preferences, Import Latest Release Defaults, Edit Default Preference Data As Text and Import Design Data From Default Preferences are described the following figure.

The Shell and User Interface
Thin-Client Configuration Guide: Basics 225
When Ini Lib setting Common.DefaultPreferencesEnabled is No, the Admin tab provides an Import Design Data From Default Preferences option as shown in the figure above.
The following table describes the preference categories available in the Admin tab.
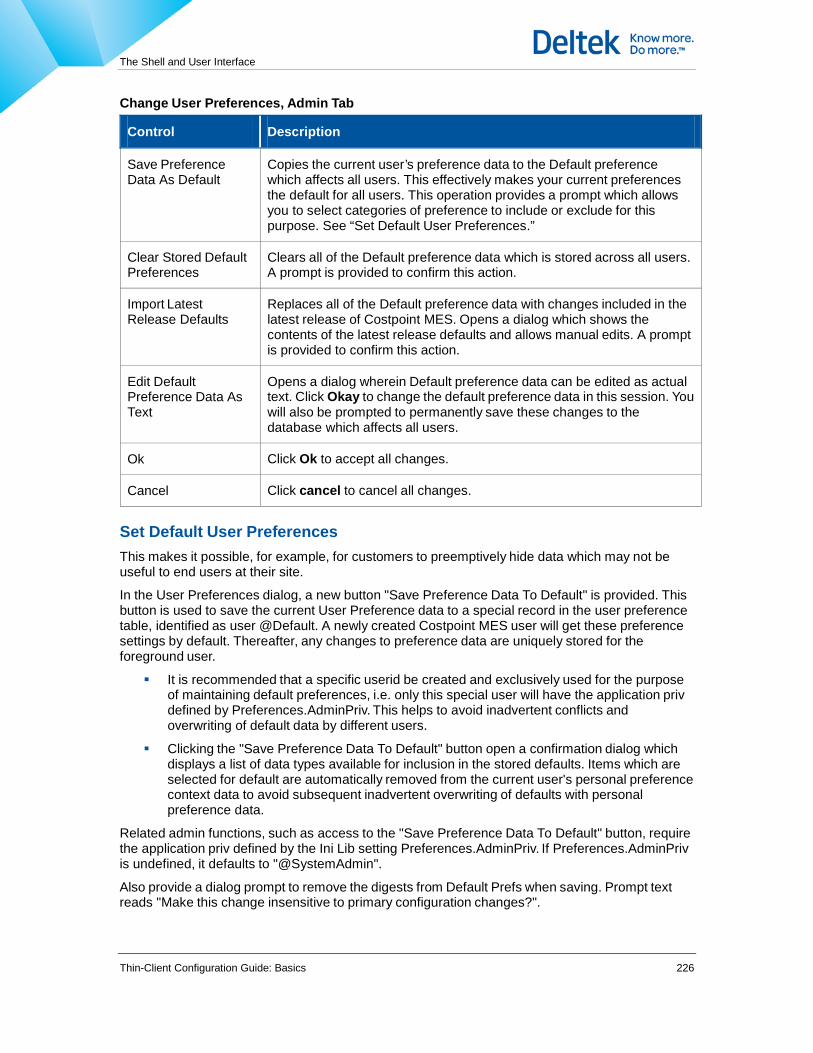
The Shell and User Interface
Thin-Client Configuration Guide: Basics 226
Change User Preferences, Admin Tab
Control Description
Save Preference Data As Default
Copies the current user’s preference data to the Default preference which affects all users. This effectively makes your current preferences the default for all users. This operation provides a prompt which allows you to select categories of preference to include or exclude for this purpose. See “Set Default User Preferences.”
Clear Stored Default Preferences
Clears all of the Default preference data which is stored across all users. A prompt is provided to confirm this action.
Import Latest Release Defaults
Replaces all of the Default preference data with changes included in the latest release of Costpoint MES. Opens a dialog which shows the contents of the latest release defaults and allows manual edits. A prompt is provided to confirm this action.
Edit Default Preference Data As Text
Opens a dialog wherein Default preference data can be edited as actual text. Click Okay to change the default preference data in this session. You will also be prompted to permanently save these changes to the database which affects all users.
Ok Click Ok to accept all changes.
Cancel Click cancel to cancel all changes.
Set Default User Preferences This makes it possible, for example, for customers to preemptively hide data which may not be useful to end users at their site.
In the User Preferences dialog, a new button "Save Preference Data To Default" is provided. This button is used to save the current User Preference data to a special record in the user preference table, identified as user @Default. A newly created Costpoint MES user will get these preference settings by default. Thereafter, any changes to preference data are uniquely stored for the foreground user.
It is recommended that a specific userid be created and exclusively used for the purpose of maintaining default preferences, i.e. only this special user will have the application priv defined by Preferences.AdminPriv. This helps to avoid inadvertent conflicts and overwriting of default data by different users.
Clicking the "Save Preference Data To Default" button open a confirmation dialog which displays a list of data types available for inclusion in the stored defaults. Items which are selected for default are automatically removed from the current user's personal preference context data to avoid subsequent inadvertent overwriting of defaults with personal preference data.
Related admin functions, such as access to the "Save Preference Data To Default" button, require the application priv defined by the Ini Lib setting Preferences.AdminPriv. If Preferences.AdminPriv is undefined, it defaults to "@SystemAdmin".
Also provide a dialog prompt to remove the digests from Default Prefs when saving. Prompt text reads "Make this change insensitive to primary configuration changes?".

The Shell and User Interface
Thin-Client Configuration Guide: Basics 227
By default, end user preference settings such as grid column order and size are sensitive to changes in the primary configuration, i.e. to changes in the UDV Selected Fields configuration. In practice, this means that stored preference information is ignored if the primary configuration data has changed since the preference information was last changed. This insures that a given user’s preferences will not, for example, prevent that user from seeing a column which has been added subsequent to his change in column order. In the case of Default preferences, answering Yes to this prompt indicates that you want these Default settings to be applied even if the UDV (in this example) changes. This choice also means that the Default preference settings should be reviewed whenever a UDV, or any related
primary configuration, is changed. Answer No to this prompt to make the Default preference settings sensitive to configuration changes.
Using the existing "Reset Defaults" button, restores the current user to the contents of the @Default settings record.
Similarly, finer grain end user functions such as the display grids' local menu command "Reset column order and widths" restore settings back to the behavior provided in the @Defaults record. When no correlated data is found in @Defaults, the behavior is restored to configured/inherent system defaults such as, in this case, SelectedFields configuration.
Supports compression for database/MT as follows. If the save transaction for compressed content fails for any reason, then the logic retries the save using uncompressed content.
Preferences Ini Properties
Property Description
CompressionEnabled
Y/N. Determines whether preference/user context data is stored in compressed format (ZLibs deflate format) . Default is Yes.
DefaultPreferences
Enabled
Boolean. Eliminates Clear, Restore and Save To Default Preference commands from display grids, filter dialogs and input matrix. Replaces the prior Default-Preference-related commands in the Admin page of the Change User Preferences dialog with option to import Default Preferences into Design Mode data. Default is True.
AdminPriv Required to perform Admin level configuration including any of the following lower level priv functions.
Grids HideShowPriv — Required to hide and show grid and input matrix columns.
MovePriv — Required to move grid and input matrix columns.
ResizePriv — Required to resize grid and input matrix columns.
FilterDialogs HideShowPriv — Required to hide and show filter dialog fields.
ToolSelect HideShowPriv — Required to hide and show tools in the Tool Select Dialog.
Additional User Preferences Following are additional user preferences that are not specifically identified when selecting “Change User Preferences”, see “User Preferences.”

The Shell and User Interface
Thin-Client Configuration Guide: Basics 228
User Preferences: Saving of Last-Applied Filter
When right-clicking the Filter button, Costpoint MES Thin-Client loads the last applied filter and positions the cursor in the first nonblank field. Costpoint MES Thin-Client now stores the user’s last-used filter on logoff. On startup of a new session, a right-click on the filter button loads the last-used filter of the previous session—just as if the filter had been last used in the current session.
Auto Execute Link options dialog to Maintain Last options in User Preferences
This enhancement allows both the fields in the screen to be auto-selected. See following screen display:
The grid lists all links and dynamically updates data in affected cells when selections are applied.
Grid includes information for the selected link, uniquely identified by an asterisk in col 1. Also the font on this row is black, whereas on other rows, the font color is gray.
The Apply button is enabled when the properties of the link are different than the currently selected options.
When clicked, changes the properties of the link in accordance with selected options (Does not close the dialog)
Also, updates the grid record which correlates with the selected hyperlink
Upon opening the dialog, the checkbox options are initialized from the last use of this dialog, which is maintained across Costpoint MES logon sessions.
Clicking on closes the dialog but does not perform any updates on the selected link.
Retain UDV Dialog Dimensions With User Preferences
End user changes to a UDV dialog's width and height are now maintained in user preference data. This means that the dialog width and height will open with the same width and height until changed or reverted by that user. See example below.

The Shell and User Interface
Thin-Client Configuration Guide: Basics 229
Hide and Show Tool Window items Preferences
Priv control is available for Tool Select Dialog and Filter dialogs. The rightmost column provides an "x" which hides the respective row when clicked. "Hide this Item" and "Choose Items to Display" commands are available on the local / right click menu of the grid.
The availability of hide and Show operations is controlled by the application privs as defined in Ini Lib settings, Preferences.FilterDialogs.HideShowPriv. These operations are enabled when the respective privs are undefined or the current user has the application priv defined by Preferences.AdminPriv.
Menu The Menu Pane is configurable and allows users to quickly go to daily tasks. The Menu button in the Shell displays the Menu Pane, containing a list of menu sections with different functionality. A different set of commands such as dispatches, tools, etc. display as menu items for each bar. Clicking a command in the menu items displays the selection. The menu sections and dispatches displayed depends on the logged-on user’s privilege set. Availability of the Sys Admin tab is controlled by the existing View priv for that tool window.
Thin-Client checks for a Menu Pane configuration at startup and updates the content pane each time a new user logs on.

The Shell and User Interface
Thin-Client Configuration Guide: Basics 230
To configure the Menu Pane, right click anywhere in it and select Design. The Menu Design UDV appears. If a user has either priv, then menu Design is available:
Preferences.MenuDesignPriv=Nonexistent
Preferences.AdminPriv=Nonexistent
The Menu Pane appears on the left column and available tools and commands appear in the right column. The buttons in the upper left add, remove and reorder menu sections from the Menu Pane.

The Shell and User Interface
Thin-Client Configuration Guide: Basics 231
The Add and Remove buttons in the middle of the UDV add and remove menu items from a selected menu section.
The Load From Backup button loads a previously customized menu from the prior default record which migrates custom menu items into a newly upgraded menu. This only works if the prior settings are backed up after the Middle Tier installation. This is done using the Import Latest Release Defaults button on the Admin tab of the Change User Preferences dialog, which also backs up prior settings.
When Ini Lib setting Preferences.DefaultPreferencesEnabled is Yes, the Load dropdown shows @Default and @DefaultBackup. When Ini Lib setting Preferences.DefaultPreferencesEnabled is No, the Load dropdown shows a list of all available User Type records. After selecting from the dropdown, the user clicks on Load to populate the menu designer with the selected User Type menu.
Discrete commands can be associated with menu items in the left-hand pane by right-clicking and selecting Add Discrete Command from the command menu. In the dialog that appears, users can add a caption, invoke command, priv or Fkey assignment.
The following additional properties can be edited by right-clicking a menu item and selecting Edit Menu Item Properties:
Caption
Tool
List Group
List Item
Priv
Params
FKey
Command groups contain one or more command buttons linked to one or more Other Commands. Commands groups/ buttons are contained within the Main UDV which is expandable down to the tool bar at the bottom of the shell, but cannot exceed the available vertical space. The appearance of both the Main UDV and command groups depends on the logged-on user’s privilege set. Thin-Client checks for a speed bar pane configuration at startup and updates the speedbar pane each time a new user logs on.
A new User Type field allows administrators to apply menu designs to a subset of users.
The System Admin pane can be configured the same way as the Main Menu.
Menu Configuration Data Menu configuration data has been changed from XML to indented strings:
The order of menu elements is currently inverse from end user appearance. This changes the order of stored menu elements to be consistent with order of appearance to facilitate compare and modification with external visual compare tools.
Provides automatic prompts for conversion to the new format in System Manager, Design Mode Data Management when menu record is loaded.
Thin Client application reads either XML or indented strings format.
When Preferences.DefaultPreferencesEnabled is true, the client stores menu changes in the original XML format.

The Shell and User Interface
Thin-Client Configuration Guide: Basics 232
The Main UDV is enabled, toggled on or off, by the Menu button.
Main UDVs and Special Purpose SQL Statements The purpose of the Main UDV is to set global parameters based on the logged-on user.
You can configure multiple Main UDVs. However, Thin-Client can display only 1 Main UDV at a time. On startup, the GetPrivsSqlId SQL ID returns a list of privileges for each Main UDV (see “Enabling the Speed Bar and Configuring the Main UDV”). The Main UDV whose privileges match those of the logged on user is the one that Thin-Client displays in the speed bar. It is the responsibility of the configuror to ensure that no more than 1 Main UDV matches a user’s privileges.
As a reminder, you can configure multiple Main UDVs for the speedbar; however, only one can appear at a time.
Main UDVs may require special purpose SELECT and UPDATE SQL statements that incorporate an exclamation point (pronounced “bang”) before the table name as follows: Select <col1>, <col2>,…, <coln> from !<table name>;
and Update !<table name> set <col1>=<val1>, <col2>=<val2>,…, <coln>=<valn>;
Examples Select WORK_CENTER from !MY_MEM_TABLE;
Update !MY_MEM_TABLE set WORK_CENTER=:WORK_CENTER;
This syntax defines and creates a local in-memory table consisting of one row. It can be used in any UDV; however, it is intended primarily for use in the Main UDV of the speedbar pane.

The Shell and User Interface
Thin-Client Configuration Guide: Basics 233
Data posted to this table is automatically available to dispatch lists, and to UDVs by using @SpeedBarData as a ParamsSource.
Enabling the Speed Bar and Configuring the Main UDV You enable the speed bar and configure the Main UDV in the [Common] and [Speedbar] sections of the Initialization Library record.
The appearance of the bar is controlled by the [Common]SpeedbarEnabled property. The default value is No. Similarly, the appearance of the Select Tool dialog box is controlled by the [Common]ToolSelectDialogEnabled property. The default value for ToolSelectDialogEnabled is Yes.
The following procedure assumes that the Main UDV already exists, and that you have launched the Initialization Library Editor and are connected to the desired database.
To enable the speed bar and configure a Main UDV, complete the following steps:
1. In the tree pane of the Structured Editor tab, double-click [Common], and then click SpeedbarEnabled. (SpeedbarEnabled is in the [Common] section, not the [Speedbar] section.)
2. In the right-hand pane, set the SpeedbarEnabled property to Yes.
3. In the tree pane, double-click [Speedbar], and set the following properties in the right-hand pane:
ViewPriv When ViewPriv is undefined, the Main menu section appears.
When ViewPriv is defined and the current user has one of the listed privs or the expression returns true, the Main menu section appears.
When ViewPriv is defined and the current user has none of the listed privs or the expression returns false, the Main menu section does not appear.
Width The width of the speedbar in pixels, regardless of the width of the Main UDV(s). This value also corresponds to the height of the bar if the bar is positioned at the bottom of the screen. See the Position property below.
GetPrivsSqlId The SQL ID of the statement that returns a list of privileges for each Main UDV. This statement runs after each logon and updates the speed bar accordingly.
InvokeAtLogon When enabled, causes the speed bar to display when a new user logs on.
Position Positions the speed bar:
Left — The bar appears vertically on the left side of the screen.
Bottom — The bar appears horizontally at the bottom of the screen.
4. In the tree pane, double-click MainUDV and then click [Add a New MainUdv Type].
5. In the right-hand pane, enter a description for the UDV and click Add New Entry. The new UDV appears in both the tree pane and right-hand pane.
The Shell and User Interface
Thin-Client Configuration Guide: Basics 234
6. In the right-hand pane, define the following properties:
UdvId The ID of the Main UDV.
Priv The required privilege(s) to view the UDV. Delimit multiple values with a comma. The runtime user must have at least one privilege for the UDV panel to appear. This value can be an expression/NOT expression derived by the following means:
Direct input of the desired value
Use of a function whose returned value is compared to a True/False standard
Direct return of a calculated value
Example: @ClientType=’Web’. Note: When using expressions, context data is limited to system variables.
Width The width in pixels of the UDV.
Creating QA s and Other Commands You configure command groups and Other Commands in the [Speedbar] section of the Initialization Library record. You can create as many command groups as you like, as long they don’t exceed the available space between the Main UDV and the tool bar. Each command group can have multiple buttons, which in turn can have multiple Other Commands. Other Commands operate in a manner identical to those in tool windows.
If only one command is defined for a command button, clicking the button executes the command. If multiple commands are defined, clicking the button displays a submenu of defined commands. Commands cannot be nested further.
For a left-aligned speed bar, you set the vertical position of a command group through the MinHeight property. This allows you to space command groups along the height of the speed bar as needed.
The height of a command group equals the sum of the following elements:
A buffer area above the command group
The group label
One or more command buttons

The Shell and User Interface
Thin-Client Configuration Guide: Basics 235
MinHeight values can be 0 to 1600. If MinHeight is less than the required height of the command group, it is ignored; if it is greater, the difference between MinHeight and the required height is added to the buffer segment.
The following procedure shows you how to create and command group. It assumes that the speedbar has been enabled and that a Main UDV exists. See See “Enabling the Speed Bar and Configuring the Main UDV.”
To create a Command Group and Other Commands, complete the following steps:
1. In the tree pane of the Structured Editor tab, double-click [Speedbar] and CommandGroups and then click [Add a New CommandGroup Type].
2. In the right-hand pane, enter a description for the group and click Add New Entry. The new command group appears in both the tree pane and right-hand pane.
3. In the right-hand pane, define the following properties:
Caption The heading for the command group.
Hint The hint that appears when the mouse passes over the group. This is meant to explain the group more fully without widening the speed bar.
Priv The required privilege(s) to view and access the command(s) under this group. Delimit multiple values with a comma. The runtime user must have at least one privilege for the command group to appear. This value can be an expression/NOT expression derived by the following means:
Direct input of the desired value
Use of a function whose returned value is compared to a True/False standard
The Shell and User Interface
Thin-Client Configuration Guide: Basics 236
Direct return of a calculated value
Example: @ClientType=’Web’ Note: When using expressions, context data is limited to system variables.
MinHeight For a vertical, left-aligned speed bar only, the minimum height of the command group (see previous figure). The height equals the sum of the following elements:
A buffer area above the command group
The group label
One or more command buttons
Values can be 0 to 1600, where 0 is the default and disables the feature.
If MinHeight is less than the required height of the command group, it is ignored; if it is greater, the difference between MinHeight and the required height is added to the buffer segment.
4. In the tree pane, under CommandButtons, click [Add a New CommandButton type], enter a description for the button in the right-hand pane, and then click Add New Entry.
5. In the right-hand pane Caption field, enter a label for the command button.
6. In the tree pane, under OtherCommands for the new button, click [Add a New Command] and in the right-hand pane define the following properties:
Menu Text The text of the option as it appears on a submenu. If there is only one command, the command initiates from the command button. The submenu does not appear.
Command The command type: External (calls an external program), Invoke (invokes a tool window), or UDV (displays a UDV).
FunctionId For External types, the name of the function as called out in the [ExternalFunctions] section of the Initialization Library record. This function calls a specific program in the [ExternalLibraries] section.
Parameters
For External and Invoke types, the parameters in calling the external program or tool window.
Tool For Invoke types, the tool window type.
UDV ID For UDV types, the ID of the UDV.
UDV Type For UDV types, the UDV type.
The following paragraphs contain an example of the SpeedBar data structure in the Initialization Library record. [Common]
ToolSelectDialogEnabled=Yes
SpeedbarEnabled=No
[Speedbar]
Width=150

The Shell and User Interface
Thin-Client Configuration Guide: Basics 237
MainUDV
UDV1
UDVId=SFFW_1065000
Priv=QA_AUTHORING,TEST
width=130
UDV2
UDVId=FW1_10002
Priv=PLG_AUTHORING,TEST
Width=130
CommandGroups
QA1
Caption=QA Eng
Hint=Quality Assurance – Engineering
Priv=SFFND_QA_ENG,SB_PRIV1,PLG_AUTHORING
CommandButtons
Button1
Caption=Defects
OtherCommands
Disc~Invoke~Discrepancy~~DISC_ID=100000
Corrective Action~Invoke~CAItemDiagram~~
Button2
Caption=More
OtherCommands
Disc Item~Invoke~DiscrepancyItem~~
Corrective Action~Invoke~CAItemDiagram~~
Enabling/Disabling Window Controls As of Thin Client 4.1, you can enable/disable the visibility and function of controls in the following windows:
Dispatch
Shell
Instructions
Definable Data
Flow Diagram
For more information, see “Enabling/Disabling Window Controls.”
Touchscreen Mode You can configure Costpoint MES for touchscreen mode, which allows users with touchscreen systems to select controls by touching the screen. Touchscreen mode can automatically enlarge selectable controls so that they are easier to use.
Only Costpoint MES objects required for user response can be enlarged. UDVs are not affected, with the exception of grids, whose records are automatically spaced according to touchscreen properties. On some objects, the font is also resized in order to make the object larger. In grids, only the line spacing is resized; the font is not. This allows for the maximum amount of information in the grid.

The Shell and User Interface
Thin-Client Configuration Guide: Basics 238
The size of Title bars and scroll bars are controlled by Windows display properties: On the desktop, right-click and select Properties. In the Display Properties dialog box, select the Appearance tab, and then in the Item dropdown list, select the appropriate control and set size and display attributes.
The Sticky Right-Click button enables right-clicking of a touchscreen object. Pressing the button causes the next-pressed screen object to initiate a right-click.
Enabling Touchscreen Mode and Enlarging Screen Objects
You enable touchscreen mode and enlarge screen objects by setting properties in the [Common].SpecialVideoMode section of the Initialization Library record. The AdjustmentFactor property, which controls the size of screen objects, is left to the user’s discretion, and if set too high, can result in an unusable interface.
The following procedure shows you how to enable touchscreen mode and enlarge screen objects. It assumes that you have launched the Initialization Library Editor and are connected to the desired database.
To enlarge screen objects, complete the following steps:
1. In the tree pane of the Structured Editor tab, double-click in turn [Common], and then SpecialVideoModes.
2. In the right-hand pane, define the following properties:
EnableBigButtons Enables (On) or disables (Off) touchscreen mode and automatic sizing of screen objects according to the AdjustmentFactor value (see below).
AdjustmentFactor The factor by which Cosptoint MES enlarges screen objects and the line spacing in grids. A factor of 1.2 enlarges screen objects 1.2 times the size of the original objects.
EnablePopupKeyboard As of Thin Client 4.1.2, enables (On) or disables (Off) an onscreen popup keyboard for user input. The keyboard is sized according to the AdjustmentFactor value. For more information, see “The Popup Keyboard.”
ExternalKeyboardDll The filename and/or full path of a DLL that allows use of a third-party popup keyboard. For more information, see “Using a Third-Party Keyboard.”
The Popup Keyboard Touchscreen mode includes a popup keyboard (see the following figure). When the EnablePopupKeyboard property is set to Yes (see “Enabling Touchscreen Mode and Enlarging Screen Objects”), the keyboard automatically appears onscreen whenever any edit field is active. Also, the keyboard automatically reappears anytime it senses that it has been hidden.

The Shell and User Interface
Thin-Client Configuration Guide: Basics 239
As with an ordinary keyboard, there are two modes, shifted and unshifted. The shifted, uppercase-letter mode is the default. For ease of typing, the shifted mode pairs uppercase letters with top-row numbers, instead of top-row symbols. The [Shift] key toggles between shifted and unshifted modes, and unless the [Caps] key is used to lock the shift state, a single keypress toggles the keyboard back to the shifted mode. The [Backspace] key (< ) erases entered characters.
The [Close] key in the lower right corner hides the keyboard until the next edit field is activated. . The keyboard also contains a Move button which repositions the popup keyboard and any open input UDV to minimize or prevent overlapping. The orientation of the popup keyboard and dialog are retained in the user preferences. Users may clear all keyboard positioning settings in the User Preferences dialog.
A separate numeric popup keyboard is automatically invoked whenever the cursor is placed into a numeric or integer input field.
An additional SpecialVideoModes property, ExternalKeyboardDLL, allows the use of a third-party keyboard instead of this default keyboard as described below.
Using a Third-Party Keyboard
The EnableKeyboardDLL property allows you to specify the name of a DLL that contains procedures to show and hide a third-party popup keyboard.
The Costpoint MES keyboard application supports two calling conventions to interface the keyboard DLL:
Standard Call — The callee cleans the stack. Parameters are pushed on the stack right to left.

The Shell and User Interface
Thin-Client Configuration Guide: Basics 240
Register — The callee cleans the stack. The first two parameters are passed in registers.
Fastcall — Remaining parameters are pushed on the stack right to left.
Standard Call procedures are differentiated from Register procedures by appending an _SC to the end of the procedure name. Only one convention should be used. If on querying the DLL at startup, Costpoint MES finds both types of procedures, it calls only the Standard Call versions.
The keyboard application handles four procedure calls to the DLL. The following tables show the procedures and passed parameters, respectively.
Procedure Calls to Third-Party Keyboard DLL
Procedure Name (Standard Call Fastcall)
Reqd Description Syntax
StartupDLL_SC
StartupDLL
No User-defined startup routine. If found in the DLL on startup, called at that time.
Procedure ProcName (PathToFramework:pChar; MainWindow:Longword);
ShutdownDLL_SC
ShutdownDLL
No User-defined shutdown routine. If found in the DLL on startup, called at shutdown.
Procedure ProcName;
ShowKeyboard_SC
ShowKeyboard
Yes Displays the onscreen keyboard. Called when focus enters a Cospoint MES edit box or combobox.
Procedure ProcName (EditHandle:Longword; KeyboardType:Word; EditMask:pChar; UDVId:pChar; PassedParams:pChar);
HideKeyboard_SC
HideKeyboard
Yes Hides the onscreen keyboard. Called when focus leaves the edit box or combobox.
Procedure ProcName;
Parameters Passed to Third-Party Keyboard DLL
Parameter Data Type Description
PathToFramewor k
pChar The path and directory in which the Thin Client modules and DLLs reside.
MainWindow Longword The window handle of the Cosptoint MES shell.
EditHandle Longword The window handle of the edit box or combobox. Can be used with the following Windows API calls:
GetWindowText (wm_GetText)
SetWindowText (wm_SetText)
WM_Char - Windows message to send a keystroke to the edit box.

The Shell and User Interface
Thin-Client Configuration Guide: Basics 241
Parameter Data Type Description
KeyboardType Word The type of input required for the edit field.
0 — AlphaNumeric
1 — Numeric only
EditMask pChar Any entry mask for the edit field. If there is no mask, this parameter is blank.
UDVId pChar If the edit field is in a UDV, the UDV ID. If the edit field is not in a UDV, this parameter is blank.
PassedParams pChar If the edit field is in a UDV, the list of parameters that were used to invoke the UDV. This list is in system data format (SDF):
Strings are separated by commas, and optionally enclosed in double quotes.
Double quotes that are part of the string are repeated to distinguish them from quotes that surround the string.
Spaces and commas that are not contained in double quotes are delimiters.
Two commas next to each other indicate an empty string.
After creating the called procedures in the keyboard DLL, ensure that the DLL is accessible to the Costpoint MES executable file.
In the EnableKeyboardDLL property field of the Initialization Library record, enter the DLL name (see “Enabling Touchscreen Mode and Enlarging Screen Objects”). If you do not provide a full path, the DLL must reside in the same path as the executable file or be in any directory in the PATH statement of the machine.
You do not need to define the DLL in the [ExternalLibraries] and [ExternalFunctions] sections of the library record.

The Dispatch Tool Window and Dispatch Lists
Thin-Client Configuration Guide: Basics 242
The Dispatch Tool Window and Dispatch Lists The Dispatch tool window allows you to define multiple User Groups and Dispatch Lists through which users select and display instructions or tasks. The Dispatch tool window is accessed from the Menu Pane as described in “Menu.”
Legacy Dispatch List
In previous releases, the Dispatch window was opened by clicking a dispatch button in the Shell. In the Dispatch window, dispatches are selected from a dropdown list. You configure the attributes of the Dispatch window in the [Dispatch] section of the Initialization. This legacy dispatch mode is enabled by changing an entry in the ini library.
User Groups and their inclusive Dispatch lists appear in the drop-down list of the List field. This list appears automatically when the user first displays the Dispatch tool window or when the user clicks the down arrow of the List field. The following figure shows a typical Dispatch list; when selected it displays a configured set of records.
In the list, user Groups are denoted by a folder icon and Dispatch Lists are denoted by a page icon. Each list defines the records and/or data that appear in the records pane, command menus, and tabs in the Dispatch tool window. Lists also control access privileges.
Configuring the Dispatch Window Interface Win/Web You configure the attributes of the Dispatch window in the [Dispatch] section of the Initialization Library record. The [Dispatch] section contains subheadings for List Groups, which in turn contain Dispatch lists and the queries that populate these lists. Many attributes are explained in detail in separate sections of this manual and are referenced accordingly.
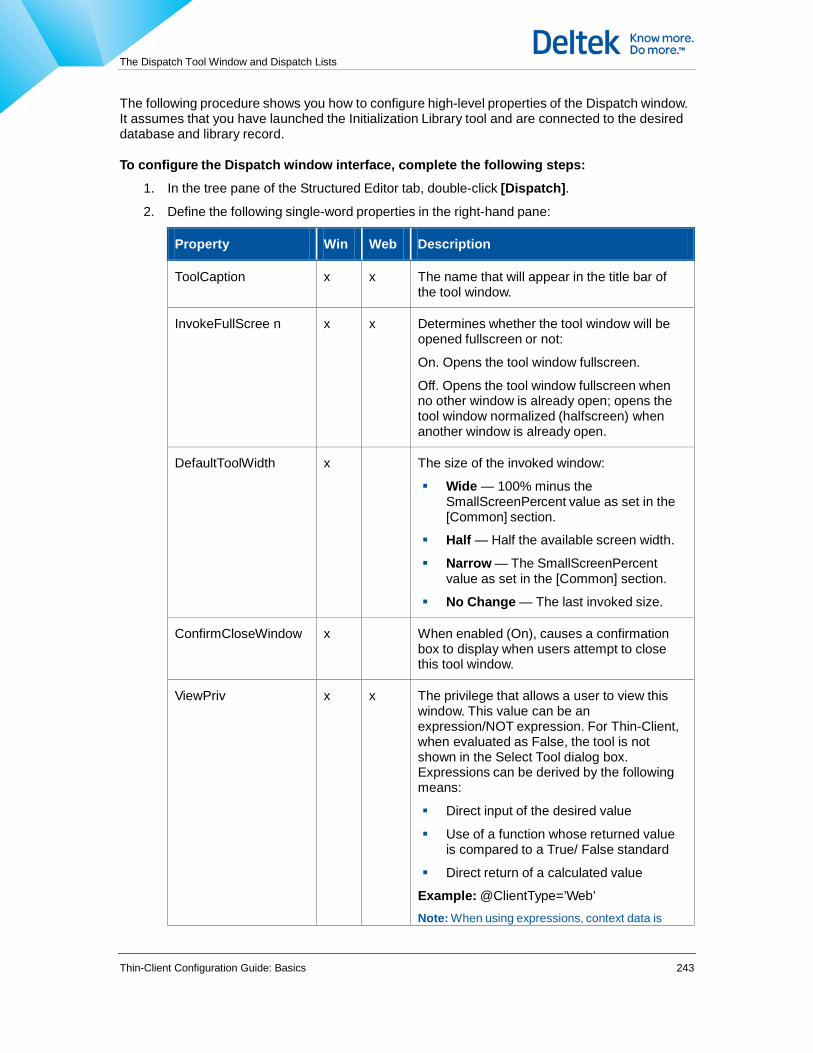
The Dispatch Tool Window and Dispatch Lists
Thin-Client Configuration Guide: Basics 243
The following procedure shows you how to configure high-level properties of the Dispatch window. It assumes that you have launched the Initialization Library tool and are connected to the desired database and library record.
To configure the Dispatch window interface, complete the following steps:
1. In the tree pane of the Structured Editor tab, double-click [Dispatch].
2. Define the following single-word properties in the right-hand pane:
Property Win Web Description
ToolCaption x x The name that will appear in the title bar of the tool window.
InvokeFullScree n x x Determines whether the tool window will be opened fullscreen or not:
On. Opens the tool window fullscreen.
Off. Opens the tool window fullscreen when no other window is already open; opens the tool window normalized (halfscreen) when another window is already open.
DefaultToolWidth x The size of the invoked window:
Wide — 100% minus the SmallScreenPercent value as set in the [Common] section.
Half — Half the available screen width.
Narrow — The SmallScreenPercent value as set in the [Common] section.
No Change — The last invoked size.
ConfirmCloseWindow x When enabled (On), causes a confirmation box to display when users attempt to close this tool window.
ViewPriv x x The privilege that allows a user to view this window. This value can be an expression/NOT expression. For Thin-Client, when evaluated as False, the tool is not shown in the Select Tool dialog box. Expressions can be derived by the following means:
Direct input of the desired value
Use of a function whose returned value is compared to a True/ False standard
Direct return of a calculated value
Example: @ClientType=’Web’ Note: When using expressions, context data is

The Dispatch Tool Window and Dispatch Lists
Thin-Client Configuration Guide: Basics 244
Property Win Web Description
limited to system variables.
BrowsePriv x x For Web Browser Express, the privilege required to browse this window. This value can be an expression/NOT expression. Expressions can be derived by the following means:
Direct input of the desired value
Use of a function whose returned value is compared to a True/ False standard
Direct return of a calculated value
Example: @ClientType=’Web’ Note: When using expressions, context data is limited to system variables.
EditPriv x The privilege that allows a user to edit this window. This value can be an expression/NOT expression. For Thin-Client, when evaluated as False, the tool is not shown in the Select Tool dialog box. Expressions can be derived by the following means:
Direct input of the desired value
Use of a function whose returned value is compared to a True/ False standard
Direct return of a calculated value
Example: @ClientType=’Web’ Note: When using expressions, context data is limited to system variables.
NavigatorLocatio n x The position of the Navigator:
Top — At the top line of the window, provided there is room for it; otherwise it wraps to the next line.
Bottom — At the bottom of the window.
Off — Disables display of the Navigator.
ScanPriority x When disabled (No) disables application-level scanning so that Costpoint MES performs only a tool-level scan match.
ListGroups x x Parent categories that contain Dispatch lists. Also called User Groups. For more information, see “User Groups.”
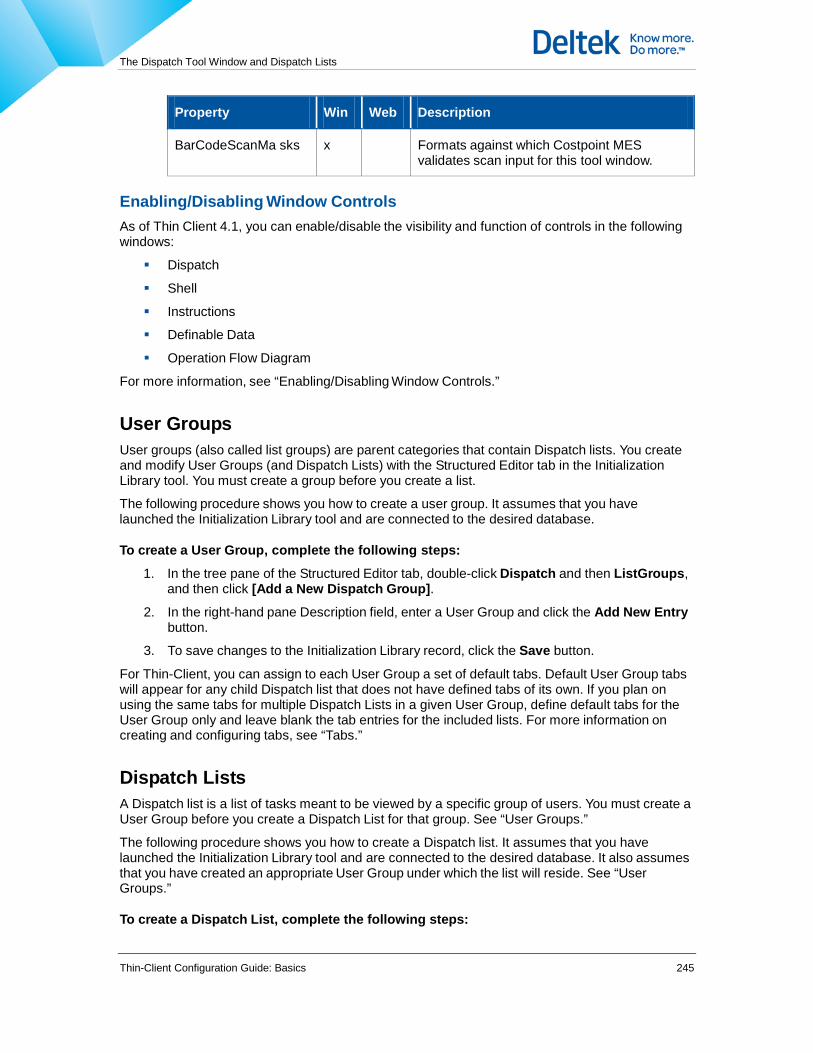
The Dispatch Tool Window and Dispatch Lists
Thin-Client Configuration Guide: Basics 245
Property Win Web Description
BarCodeScanMa sks x Formats against which Costpoint MES
validates scan input for this tool window.
Enabling/Disabling Window Controls
As of Thin Client 4.1, you can enable/disable the visibility and function of controls in the following windows:
Dispatch
Shell
Instructions
Definable Data
Operation Flow Diagram
For more information, see “Enabling/Disabling Window Controls.”
User Groups User groups (also called list groups) are parent categories that contain Dispatch lists. You create and modify User Groups (and Dispatch Lists) with the Structured Editor tab in the Initialization Library tool. You must create a group before you create a list.
The following procedure shows you how to create a user group. It assumes that you have launched the Initialization Library tool and are connected to the desired database.
To create a User Group, complete the following steps:
1. In the tree pane of the Structured Editor tab, double-click Dispatch and then ListGroups, and then click [Add a New Dispatch Group].
2. In the right-hand pane Description field, enter a User Group and click the Add New Entry button.
3. To save changes to the Initialization Library record, click the Save button.
For Thin-Client, you can assign to each User Group a set of default tabs. Default User Group tabs will appear for any child Dispatch list that does not have defined tabs of its own. If you plan on using the same tabs for multiple Dispatch Lists in a given User Group, define default tabs for the User Group only and leave blank the tab entries for the included lists. For more information on creating and configuring tabs, see “Tabs.”
Dispatch Lists A Dispatch list is a list of tasks meant to be viewed by a specific group of users. You must create a User Group before you create a Dispatch List for that group. See “User Groups.”
The following procedure shows you how to create a Dispatch list. It assumes that you have launched the Initialization Library tool and are connected to the desired database. It also assumes that you have created an appropriate User Group under which the list will reside. See “User Groups.”
To create a Dispatch List, complete the following steps:

The Dispatch Tool Window and Dispatch Lists
Thin-Client Configuration Guide: Basics 246
1. In the tree pane of the Structured Editor tab, double-click the User Group (ListGroups) under which you want to create the new Dispatch List, and then double-click Lists.
2. Click [Add a New List].
3. In the right-hand pane Description field, enter a Dispatch List and click the Add New Entry button. The new list appears in both the tree pane and right-hand pane.
4. In the right-hand pane, define the following single-word properties:
Property Win Web Description
Description x x The text that appears in the Dispatch tool window List box.
DefaultList x x Determines whether the list populates the Dispatch window when the window is opened.
Priv x x The privilege that allows a user to view this list. This value can be an expression/NOT expression. Expressions can be derived by the following means:
Direct input of the desired value
Use of a function whose returned value is compared to a True/ False standard
Direct return of a calculated value
Example: @ClientType=’Web’ Note: When using expressions, context data is limited to system variables.
EditPriv x x The privilege that allows a user to edit this list. This value can be an expression/NOT expression derived by the following means:
Direct input of the desired value
Use of a function whose returned value is compared to a True/ False standard
Direct return of a calculated value
Example: @ClientType=’Web’ Note: When using expressions, context data is limited to system variables.
ViewButton x x The procedure that displays the record associated with the currently highlighted record when the user clicks the View button in the Dispatch window, or when the user double-clicks the record. Configuration of explicit names and params for the Invoke command are supported.
ViewParamFields x Optional list of field names sent along with the ViewButton command. Use a command to

The Dispatch Tool Window and Dispatch Lists
Thin-Client Configuration Guide: Basics 247
Property Win Web Description
separate field names.
BrowseOption x Provides an option to show the filter dialog before displaying a dispatch list.
Browse All (This would be the default which equals the current / prior behavior)
Filter On Open (Shows the filter dialog when the list is first opened)
Filter Always (Requires that the list be filtered at all times) Note that the Filter Always option initially presents an empty list, with only column headings displayed. Also a message window is displayed as shown in the attached screenshot whenever user has not applied an explicit filter.
RefreshInterval x The interval in seconds at which the list is refreshed (if data will be changing often).
InputUDVId x x The ID of the UDV that allows the user to edit a record in the Dispatch List.
InsertUdvId x x The ID of the UDV that allows the user to add a record to the dispatch list. This UDV will appear when the user clicks the Add button in the Dispatch window Navigator. If this field is blank, the Add button is grayed out.
InsUpdDelUDVId x The ID of the Input Matrix UDV that allows the user to add, update, and delete a record from the dispatch list. This UDV will appear when the user clicks the Insert/Update/Delete button in the Dispatch window Navigator. If this field is blank, the Add button is grayed out.
DeleteSqlId x x The ID of the SQL entry that deletes a highlighted record. This entry runs when the user clicks the Delete button. If this field is blank, the Delete button is grayed out.
InvokeTwinGroup x The dispatch group whose list invokes a twin window displaying an identical list. Must be used with InvokeTwinList below. Used for drag-and-drop operations.
InvokeTwinList x The dispatch list that on selection invokes a twin window displaying an identical list. Must be used with InvokeTwinGroup above. Used for drag-and-drop operations.
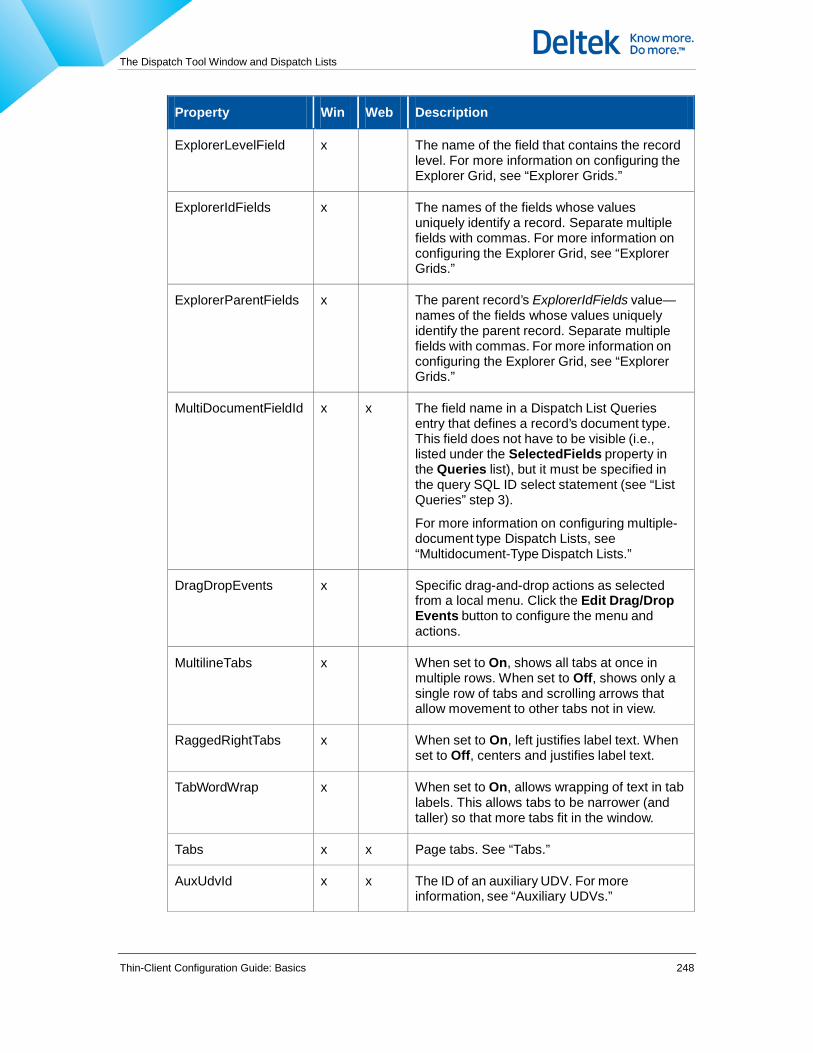
The Dispatch Tool Window and Dispatch Lists
Thin-Client Configuration Guide: Basics 248
Property Win Web Description
ExplorerLevelField x The name of the field that contains the record level. For more information on configuring the Explorer Grid, see “Explorer Grids.”
ExplorerIdFields x The names of the fields whose values uniquely identify a record. Separate multiple fields with commas. For more information on configuring the Explorer Grid, see “Explorer Grids.”
ExplorerParentFields x The parent record’s ExplorerIdFields value—names of the fields whose values uniquely identify the parent record. Separate multiple fields with commas. For more information on configuring the Explorer Grid, see “Explorer Grids.”
MultiDocumentFieldId x x The field name in a Dispatch List Queries entry that defines a record’s document type. This field does not have to be visible (i.e., listed under the SelectedFields property in the Queries list), but it must be specified in the query SQL ID select statement (see “List Queries” step 3).
For more information on configuring multiple-document type Dispatch Lists, see “Multidocument-Type Dispatch Lists.”
DragDropEvents x Specific drag-and-drop actions as selected from a local menu. Click the Edit Drag/Drop Events button to configure the menu and actions.
MultilineTabs x When set to On, shows all tabs at once in multiple rows. When set to Off, shows only a single row of tabs and scrolling arrows that allow movement to other tabs not in view.
RaggedRightTabs x When set to On, left justifies label text. When set to Off, centers and justifies label text.
TabWordWrap x When set to On, allows wrapping of text in tab labels. This allows tabs to be narrower (and taller) so that more tabs fit in the window.
Tabs x x Page tabs. See “Tabs.”
AuxUdvId x x The ID of an auxiliary UDV. For more information, see “Auxiliary UDVs.”

The Dispatch Tool Window and Dispatch Lists
Thin-Client Configuration Guide: Basics 249
Property Win Web Description
AuxUdvLocatio n x x The position of the auxiliary UDV:
Top — At the top of the list.
Bottom — At the bottom of the list.
Off — For Thin-Client, turns off the UDV.
OtherCommands x Commands accessed via an ellipsis or local menu. See “Window- Launched Other Commands.”
Queries x x The SQL statements that populate the dispatch grid. See “List Queries.”
MultidocumentT
ypes
x x Different document types for a specific Dispatch list. See “Multidocument-Type Dispatch Lists.”
GraphicalDispat ch x A Gantt Chart for a Dispatch list. See “The Graphical Dispatch Manager.”
Histograms x Histograms for a Dispatch list. See “The Graphical Dispatch Manager.”
5. To save changes to the record, click the Save button.
Hiding Grid Columns Three local menu commands allow you to select, hide, and reset grid columns in Dispatch windows, Display UDVs, and Input Matrixes. For System Administrators:
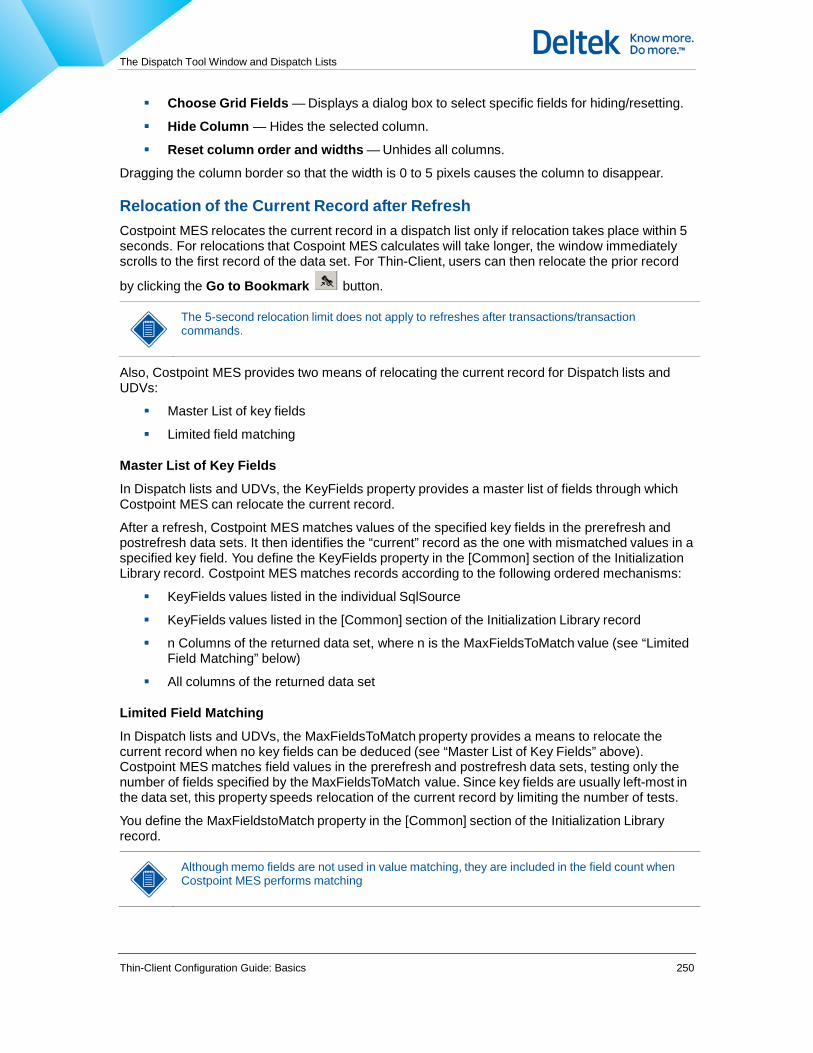
The Dispatch Tool Window and Dispatch Lists
Thin-Client Configuration Guide: Basics 250
Choose Grid Fields — Displays a dialog box to select specific fields for hiding/resetting.
Hide Column — Hides the selected column.
Reset column order and widths — Unhides all columns.
Dragging the column border so that the width is 0 to 5 pixels causes the column to disappear.
Relocation of the Current Record after Refresh Costpoint MES relocates the current record in a dispatch list only if relocation takes place within 5 seconds. For relocations that Cospoint MES calculates will take longer, the window immediately scrolls to the first record of the data set. For Thin-Client, users can then relocate the prior record
by clicking the Go to Bookmark button.
The 5-second relocation limit does not apply to refreshes after transactions/transaction commands.
Also, Costpoint MES provides two means of relocating the current record for Dispatch lists and UDVs:
Master List of key fields
Limited field matching
Master List of Key Fields
In Dispatch lists and UDVs, the KeyFields property provides a master list of fields through which Costpoint MES can relocate the current record.
After a refresh, Costpoint MES matches values of the specified key fields in the prerefresh and postrefresh data sets. It then identifies the “current” record as the one with mismatched values in a specified key field. You define the KeyFields property in the [Common] section of the Initialization Library record. Costpoint MES matches records according to the following ordered mechanisms:
KeyFields values listed in the individual SqlSource
KeyFields values listed in the [Common] section of the Initialization Library record
n Columns of the returned data set, where n is the MaxFieldsToMatch value (see “Limited Field Matching” below)
All columns of the returned data set
Limited Field Matching
In Dispatch lists and UDVs, the MaxFieldsToMatch property provides a means to relocate the current record when no key fields can be deduced (see “Master List of Key Fields” above). Costpoint MES matches field values in the prerefresh and postrefresh data sets, testing only the number of fields specified by the MaxFieldsToMatch value. Since key fields are usually left-most in the data set, this property speeds relocation of the current record by limiting the number of tests.
You define the MaxFieldstoMatch property in the [Common] section of the Initialization Library record.
Although memo fields are not used in value matching, they are included in the field count when Costpoint MES performs matching

The Dispatch Tool Window and Dispatch Lists
Thin-Client Configuration Guide: Basics 251
Tabs In the Initialization Library record, the Tabs sections of a User Group or Dispatch List control the tabs that appear at the bottom of the Dispatch tool window when a specific Dispatch List is active. Tabs sections operate in an identical way in all tool windows, therefore the following discussion applies to all tab cases.
Most tabs contain a Display UDV. Tab properties typically define the label that appears on the tab itself, the tab type (for example, UDV), the UDV ID, and any associated parameters. For Window Client, tab properties can include a histogram ID.
As a reminder, for Thin-Client, if the tabs for every Dispatch list in a given User Group will be the same, it’s easiest to leave them blank at the Dispatch List level and configure them only once at the User Group level.
Multiline Tabs and Tab Word Wrap The MultilineTabs and TabWordWrap properties cause tabs to appear in two or more rows, and the text label on each tab to wrap, respectively. You set these properties in the controlling context in which the tabs operate (not in the Tabs section as outlined in the procedure below). The following table shows you the controlling context for each tool window.
Window Controlling Context
For More Information, See
Dispatch List Group No MultilineTabs or TabWordWrap properties at this level.
List “Dispatch Lists”
Multidocument type
“Multidocument-Type Dispatch Lists”
Instruction Mode “Creating Modes”
Standard Text Window
Slide/Annotations Window
Configuring a Tab The following procedure shows you how to configure tabs. Use it to configure tabs in the Dispatch window, and also to create tabs for any other tool window/multidocument type (see “Multidocument- Type Dispatch Lists).
This procedure assumes that you have launched the Initialization Library tool and are connected to the desired database.
To create and configure a tab, complete the following steps:
1. In the tree pane of the Structured Editor tab, double-click the Tabs entry at the appropriate level for the Dispatch window (ListGroup or List), or in the appropriate tool window.
2. Click [Add a New Tab].
3. In the right-hand pane Tab Name field, enter the label that you want to appear on the tab itself and specify other information as follows:

The Dispatch Tool Window and Dispatch Lists
Thin-Client Configuration Guide: Basics 252
Default Tab For the Dispatch window, when checked at the group level, causes this tab to appear for any Dispatch List below it when no list-level tabs are defined; when checked at the list level, causes this tab to appear for any other lists of the same group when no list-level tabs are defined. For all other windows, causes this tab to appear when the window is opened.
Read Only When set to True or containing an expression/NOT expression evaluated as True, causes the tab to be read-only. An expression is populated from @ToolScope and is evaluated and applied each time a tool is invoked, @ToolScope changes, or the user changes. Expressions can be derived by the following means:
Direct input of the desired value
Use of a function whose returned value is compared to a True/False standard
Direct return of a calculated value
To make a tab read-only based on user privileges, see “Hidden and Read- Only Tabs.”
Hidden When set to True or containing an expression/NOT expression evaluated as True, causes the tab to be hidden. An expression is populated from @ToolScope and is evaluated and applied each time a tool is invoked, @ToolScope changes, or the user changes. Expressions can be derived by the following means:
Direct input of the desired value
Use of a function whose returned value is compared to a True/False standard
Direct return of a calculated value
To hide a tab based on user privileges, see “Hidden and Read-Only Tabs.”
Tab Type The tab type: Blank, Active UDV, Histogram (for the Graphical Dispatch Manager), or Hypertext. Active UDV, Histogram, and Hypertext options display additional ID fields.
UDV ID For UDV types, the ID of the UDV.
Histogram For Histogram types, the name of the histogram.
BlockType For Hypertext types, the block type whose SelectSql or ModifySql property returns the text that populates the tab. Note: As of Release 5.1.1.0, you can use the SelectSql property to select and return the text, and ModifySql to modify the text.
Height The height in pixels of the corresponding UDV, histogram, or hypertext.
Status SQLId The SQL ID that displays one of four indicators regarding the tab’s status.
You can globally turn off tab alerts through the Common.TabAlertsEnabled entry in Ini Lib Overrides. See “Override-Only Entries.”
StatusInterval The flash interval in seconds of the tab indicator.
The Dispatch Tool Window and Dispatch Lists
Thin-Client Configuration Guide: Basics 253
4. To save the tab, click the Add Tab to List button.
5. To save changes to the Initialization Library record, click the Save button.
The hierarchical position of the tab in the tree pane corresponds to the position of the tab at the bottom of the Dispatch tool window.
You can change the relative position of a tab any time. See “Relative Positions of Property Entries.”
Hidden and Read-Only Tabs You can hide a tab by setting the tab Hidden property to True, or by setting Hidden to an expression/ NOT expression that is evaluated as True. (See the Hidden property under “To create and configure a tab.”)
You can also hide a tab based on a user’s privileges. You do this by using the @HasPriv( ) expression function. For example, you can set the Hidden property value to @HasPriv(“‘Priv’”), where Priv is the user privilege in question. If the function returns a Boolean True, Costpoint MES hides the tab.
Enclose the privilege in single quotes enclosed in double quotes. This forces Costpoint MES to treat the privilege as a literal value instead of a column name.
To hide a tab based on a privilege a user does not have, use NOT @HasPriv(“‘Priv’”). Likewise, if the function returns a Boolean True (verifying that the user does not have the privilege), Costpoint MES hides the tab.
@HasPriv( ) and NOT @HasPriv( ) work in an identical manner with the Read Only property: A Boolean True make the tab read-only for the logged-on user.
Note that @HasPriv( ) and NOT @HasPriv( ) can also be used in every instance where Costpoint MES is configured through use of an expression, e.g., in highlighting of grids in Display UDVs. See “Grid Attributes.”
Expressions can be derived by the following means:
Direct input of the desired value
Use of a function whose returned value is compared to a True/False standard
Direct return of a calculated value
When using an expression, context data is limited to system variables.
When testing a hidden or read-only tab, make sure you’re in the mode in which you created it. To verify the mode, Control-right click on a text area of the instruction, select Source Lines, and look for the EDIT_MODE value.
Window-Launched Other Commands
This section shows you how to launch Other Commands from a tool window. You can also launch Other Commands from a UDV. For more information, see “UDV- Launched Other Commands.” For information on the logic behind Other Commands, see “How Other Commands Work.”
The OtherCommands property configures menu choices that appear on the Ellipsis button or local menu for a specific Dispatch List or tool window. See Figure below.

The Dispatch Tool Window and Dispatch Lists
Thin-Client Configuration Guide: Basics 254
A window-launched OtherCommand can execute the following command types:
Command Types for Window-Launched Other Commands
Command Win Web Description
Single-record transaction
x x Updates a single record at a time.
Multirecord transaction x Updates multiple records at a time (see “Multirecord Transactions”)
Group transaction x Updates multiple records at a time (see “Group Transactions”)
Execute SQL x Executes a SQL ID.
Show Display UDV x Displays a popup UDV (see “Display UDVs in Dialog Boxes”)
Input Matrix x Displays an Input Matrix UDV (see “Input Matrix UDVs”)
UDV Script x Launches an IM-containing Scripted UDV (a Scripted UDV containing at least 1 Input Matrix UDV). For more information, see “Scripted UDVs.”
Invoke tool x Invokes a tool.
Side Note x Invokes the Side Note window.

The Dispatch Tool Window and Dispatch Lists
Thin-Client Configuration Guide: Basics 255
Command Win Web Description
External Call x Makes an external call to another program.
Bookmark Express x For CAD drawings, adds a bookmark.
Print x For a Dispatch list or grid, allows export of SQLSource data from the populating query. For more information, see “Exporting SQLSource Data from a Dispatch List.”
Object Manager x Displays an Object Manager.
External Transaction x For a palm device/disconnected data collection, adds data collection records to a queue for remote data collection and then logs results on return to the client machine.
Export Data x Exports a CLOB/BLOB from the database by running a SQL statement to fetch the data, and then displaying a Save as dialog box for input of the target file location. For more information, see “Exporting CLOB/BLOB Data to a File.”
BranchTo Script Statement
x In a Scripted UDV, calls the designated statement. See “Scripted UDVs.”
For Thin-Client, on execution of the command, Costpoint MES adds the @Tag parameter to @AuxParams, where @Tag equals the Tag property value of the button transaction source.
Notes:
For Thin-Client, you can disable Other Commands at run time by using an expression-controlled privilege. For more information, see “Disabling Other Commands in Tool Windows at Runtime.”
The procedure below can be used to configure Other Commands for any tool type.
The following procedure assumes that you have launched the Initialization Library tool and are connected to the desired database.
To configure a window-launched Other Command, complete the following steps:
1. In the tree pane of the Structured Editor tab, double-click the OtherCommands entry under the appropriate Dispatch List (or for another tool type, for the appropriate tool).
2. Click [Add a New Command]. Other Command properties appear in the right-hand pane.
3. In the Other Command field, enter the name of the command as it will appear on the Ellipsis button dropdown list.
4. In the Command Type area, select the radio button corresponding to the command to be carried out (see previous table). To display a file or web page, select the Invoke Tool command type.
5. Configure properties as appropriate:

The Dispatch Tool Window and Dispatch Lists
Thin-Client Configuration Guide: Basics 256
Property Win Web Description
Priv x x The privilege the user must have to execute the selected command type. This value can be an expression/NOT expression derived by the following means:
Direct input of the desired value.
Use of a function whose returned value is compared to a True/False standard.
Direct return of a calculated value.
Example: @ClientType=’Web’ Notes
When using expressions, context data is limited to system variables.
If [Common].ExplicitControlByCommand Priv-Expression is enabled (Yes), and the Priv value is an expression, the expression exclusively enables/disables this command, regardless of an empty data set.
Visible x x When enabled (Y) or assigned an expression/NOT expression that returns True, enables the command. When disabled (N) or assigned an expression that returns False, disables (grays out) the command. Expressions can be derived by the following means:
Direct input of the desired value.
Use of a function whose returned value is compared to a True/False standard.
Direct return of a calculated value.
Tag x A unique name for the command.
For Thin-Client, this value is assigned to @Tag and is added to @AuxParams and @ScriptParams.
@FILE Param x For a Bookmark Express command type, the CAD file to be displayed.
@BOOK_ID Param x For a Bookmark Express command type, the bookmark to be displayed.
Accept SQLID x For an Object Manager command type, the SQL ID of the statement that performs an Accept action of the selected object.
BranchTo UDV Script Statement
x For a BranchTo Script Statement command, the statement to be executed
Delete Sq lId x For a Bookmark Express command type, the SQL ID of the delete statement that deletes a bookmark.

The Dispatch Tool Window and Dispatch Lists
Thin-Client Configuration Guide: Basics 257
Property Win Web Description
External Call x For an External call command type, the command that calls an external program.
List Delimiter x For Group Transaction command types, the character that will delimit each column value in the List control of the Input UDV.
List Field Name x For Group Transaction command types, the name of the column which will identify each selected record in the List control of the Input UDV.
Manager Name x For an Object Manager command type, the name of the manager.
Name x For a Print command type, a unique print command name.
Params x x The parameters to be passed to the command.
To display a specific file or web page (where Tool=Slide), set @Location to the appropriate source:
A named file — @Location=c:\myfile.txt
A named web page — @Location=http://www.mywebpage.com
A parameterized file — @Location=:ColumnName
A parameterized web page — @Location=:URL
For a parameterized file, if the source is a column name, the column value is derived from @ToolScope.
ParamsSqlSourcName
x For an Execute SQL command type, the name of the SQL Source that publishes its parameters for use by the SQL ID.
RefreshedSqlSourceName
The name(s) of the SQL Source(s) that must be refreshed after data changes.
Select a Folder x For an Object Manager command type, enables control of folders.
Select an Object x For an Object Manager command type, enables control of objects.
Sql Id x x For Execute SQL, Side Note, and Export Data command types, the SQL ID to run.
For the Export Data command type, the SQL ID that fetches a CLOB/BLOB from the database for export. This statement must contain FilenameField and DataField parameter values (see below).
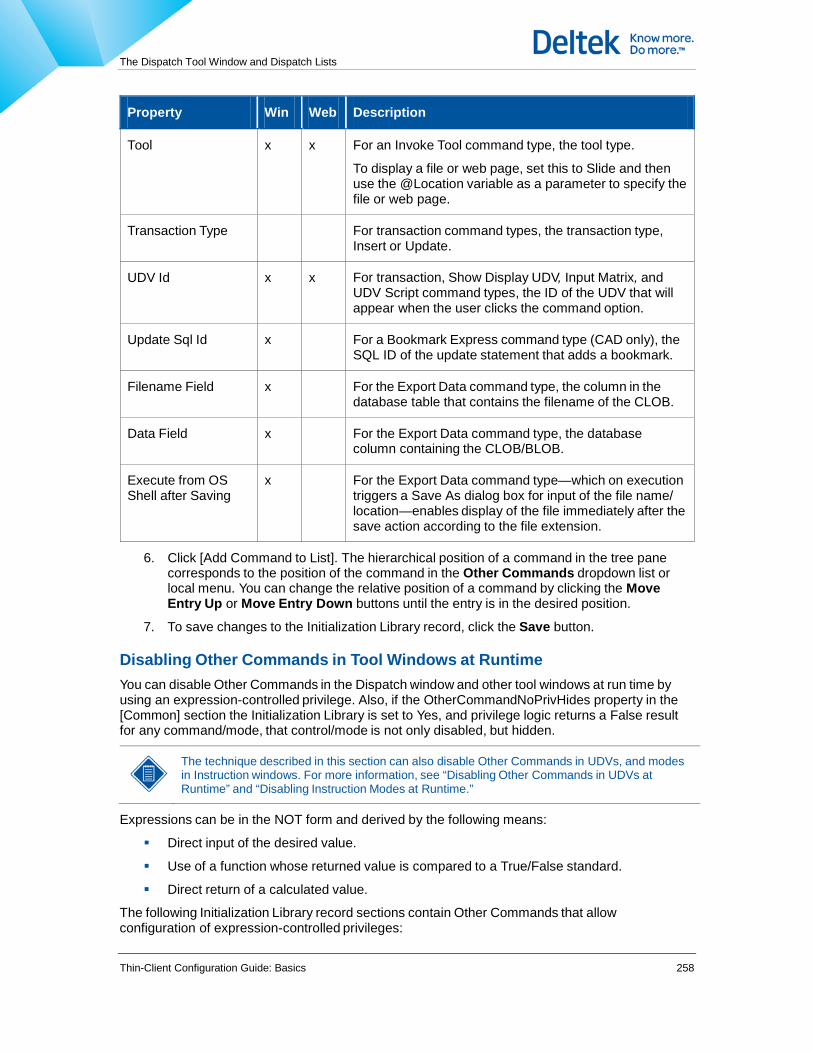
The Dispatch Tool Window and Dispatch Lists
Thin-Client Configuration Guide: Basics 258
Property Win Web Description
Tool x x For an Invoke Tool command type, the tool type.
To display a file or web page, set this to Slide and then use the @Location variable as a parameter to specify the file or web page.
Transaction Type For transaction command types, the transaction type, Insert or Update.
UDV Id x x For transaction, Show Display UDV, Input Matrix, and UDV Script command types, the ID of the UDV that will appear when the user clicks the command option.
Update Sql Id x For a Bookmark Express command type (CAD only), the SQL ID of the update statement that adds a bookmark.
Filename Field x For the Export Data command type, the column in the database table that contains the filename of the CLOB.
Data Field x For the Export Data command type, the database column containing the CLOB/BLOB.
Execute from OS Shell after Saving
x For the Export Data command type—which on execution triggers a Save As dialog box for input of the file name/ location—enables display of the file immediately after the save action according to the file extension.
6. Click [Add Command to List]. The hierarchical position of a command in the tree pane corresponds to the position of the command in the Other Commands dropdown list or local menu. You can change the relative position of a command by clicking the Move Entry Up or Move Entry Down buttons until the entry is in the desired position.
7. To save changes to the Initialization Library record, click the Save button.
Disabling Other Commands in Tool Windows at Runtime You can disable Other Commands in the Dispatch window and other tool windows at run time by using an expression-controlled privilege. Also, if the OtherCommandNoPrivHides property in the [Common] section the Initialization Library is set to Yes, and privilege logic returns a False result for any command/mode, that control/mode is not only disabled, but hidden.
The technique described in this section can also disable Other Commands in UDVs, and modes in Instruction windows. For more information, see “Disabling Other Commands in UDVs at Runtime” and “Disabling Instruction Modes at Runtime.”
Expressions can be in the NOT form and derived by the following means:
Direct input of the desired value.
Use of a function whose returned value is compared to a True/False standard.
Direct return of a calculated value.
The following Initialization Library record sections contain Other Commands that allow configuration of expression-controlled privileges:

The Dispatch Tool Window and Dispatch Lists
Thin-Client Configuration Guide: Basics 259
[Speedbar]
[DefinableData]
[Dispatch]
[FlowDiagrams]
[SysAdmin]
[Discrepancies]
[Instructions]
[CorrectiveAction]
System data parameter values are always available to privilege expressions. However, local context parameter values are available to privilege expressions as shown in the following table.
Local Parameter Values Available to Expressions in Tool Window Other Commands
For the Privilege Expression of this Control Local Context Values are
Dispatch list Other Commands Current record values
Tool window Other Commands Document key values
Graphical Dispatch date change Current record values/ToolScope
The following procedure shows you how to disable Other Commands in a tool window at run time. It assumes the following things:
The Other Command already exists in the tool window. For more information on Other Commands in a tool window, see “Window-Launched Other Commands.”
You have launched the Initialization Library Editor and are connected to the desired database.
To disable an Other Command in a tool window, complete the following steps:
1. In the Structured Editor tab of the Initialization Library Editor, navigate to the section/tool containing the Other Command you want to disable.
2. Double-click OtherCommands and then select the appropriate command.
3. In the right-hand Priv field, enter an expression/NOT expression—which when evaluated as False, disables the command/mode. Use a comma to delimit multiple Priv values.

The Dispatch Tool Window and Dispatch Lists
Thin-Client Configuration Guide: Basics 260
List Queries The Queries entries for a specific Dispatch List contain SQL Library statements that control the information displayed in the records grid in the Dispatch tool window. The invoking call to the Dispatch window determines which query populates the records grid.
The following procedure shows you how to configure a list query. It assumes that you have launched the Initialization Library tool and are connected to the desired database.
To configure a list query, complete the following steps:
1. In the tree pane of the Structured Editor tab, double-click the Dispatch List for which you want to configure a query.
2. Double-click the Queries entry for that Dispatch List and then click [Add a New Query].
3. In the right-hand SQL ID field, enter the SQL ID of the appropriate query.
or
Click the Folder button next to the SQL ID field and insert the correct SQL ID from the Select a SQL Lib Entry dialog box, and click the Add a New Entry button.
4. To specify high-level information for the query, click the new query entry in the tree pane and enter information in the right-hand pane as follows:
Description A description of the query.
SqlSourceName The SQL source for drag and drop operations between any configured Gantt chart and histogram.
KeyFieldNames The key field names in the query. Separate multiple fields with commas.
Highlighting Highlights specific records of the Dispatch list based on a boolean expression/NOT expression. Click Highlight to create the expression. For more information on the Highlighting dialog box, see “Grid Attributes.” Read the introductory paragraph and start at step 4.

The Dispatch Tool Window and Dispatch Lists
Thin-Client Configuration Guide: Basics 261
5. To specify the SelectedFields (the visible columns of the grid), click Add a New Column in the tree pane and enter information in the right-hand pane as follows:
Field Name The database column that appears in the results list. Click the down arrow for a list of fields.
Width The default column width in characters. This is optional.
Column Label The text that will appear as the column heading in the grid.
Hidden When checked, causes the field to be hidden.
6. To specify a FieldDefinitionId, click Add a New Definition Id in the tree pane and enter information in the right-hand pane as follows:
Field Name The database column to be acted on by the field definition.
Field Definition Id The ID of the field definition, which causes the Initialization Library properties of the current field to be changed when the Field Modifier tool applies a field/column definition with a matching ID.
7. For each additional column, repeat steps 5 and 6.
8. To save changes to the record, click the Save button.
The hierarchical position of a field in the tree pane corresponds to the position of the column in the displayed record.
You can change the relative position of a field any time. See “Relative Positions of Property Entries.”
Using a Stored Procedure as a Query You can use a stored procedure instead a SELECT statement as a list query. Sometimes a stored procedure is easier to use if the data is comprised of calculated values and/or is located in disparate sources, for example, tables versus memory variables.
The following example shows a query named PWP_Dispatch_ProcQuery whose SQL ID is that of a stored procedure. [Dispatch]
...
ListGroups
Manufacturing Process Planning
ParamsSqlSourceName=
Lists
List1
Description=Work Packages - All
Priv=DISPATCH_PRPLG
ViewButton=~
InputUDVId=
DeleteSqlID=
Tabs
*List~~0~~
Tasks~ActivateUDV:MF1_1000007~200~~
The Dispatch Tool Window and Dispatch Lists
Thin-Client Configuration Guide: Basics 262
Hypertext Test~Hypertext:TabHeaderText~200~~
OtherCommands
Create Work Package~UDV~Insert~MF1_1000772
Update Work Package~UDV~Update~MF1_1000772
Queries
PWP_Dispatch_ProcQuery
Description=by Status, PWP ID
SqlSourceName=
KeyFieldNames=PWP_ID
SelectedFields
PWP_ID~16~Plg Work Package
PWP_DESC~46~Description
SqlId: PWP_Dispatch_ProcQuery
exec PROC_QUERY(PWP_ID,PWP_DESC)
create or replace procedure PROC_QUERY
(v_o_pwp_id out varchar2
,v_o_pwp_desc out varchar2)
as
BEGIN
v_o_pwp_id := 'Id out';
v_o_pwp_desc := 'Desc out';
END;
/
The PWP_Dispatch_ProcQuery is the equivalent of the following SELECT statement: Select “Id_out” as pwp_id, “Desc_out” as pwp_desc from DUAL
Relative Positions of Property Entries The relative position of a displayed Dispatch List, tab, Other Command, or selected field (in a query) is called out by its hierarchical position in the Initialization Library record. This position is shown graphically in both the Structured Editor and Text Editor tabs of the Initialization Library tool.
You can change the hierarchical position of a list, tab or Other Command any time. The following procedure assumes that you have launched the Initialization Library tool and are connected to the desired database.
To change the relative position of a property entry, complete the following steps:
1. In the tree pane of the Structured Editor tab, double-click the entry whose position you want to change.
2. In the right-hand pane, click the Move Entry Up or Move Entry Down buttons until the entry is in the desired position.
3. To save changes to the Initialization Library record, click the Save button.
Exporting SQLSource Data from a Dispatch List You can select one of more records in a Dispatch list and export the SQLSource data from the populating query. You configure this capability through four prenamed Other Commands of
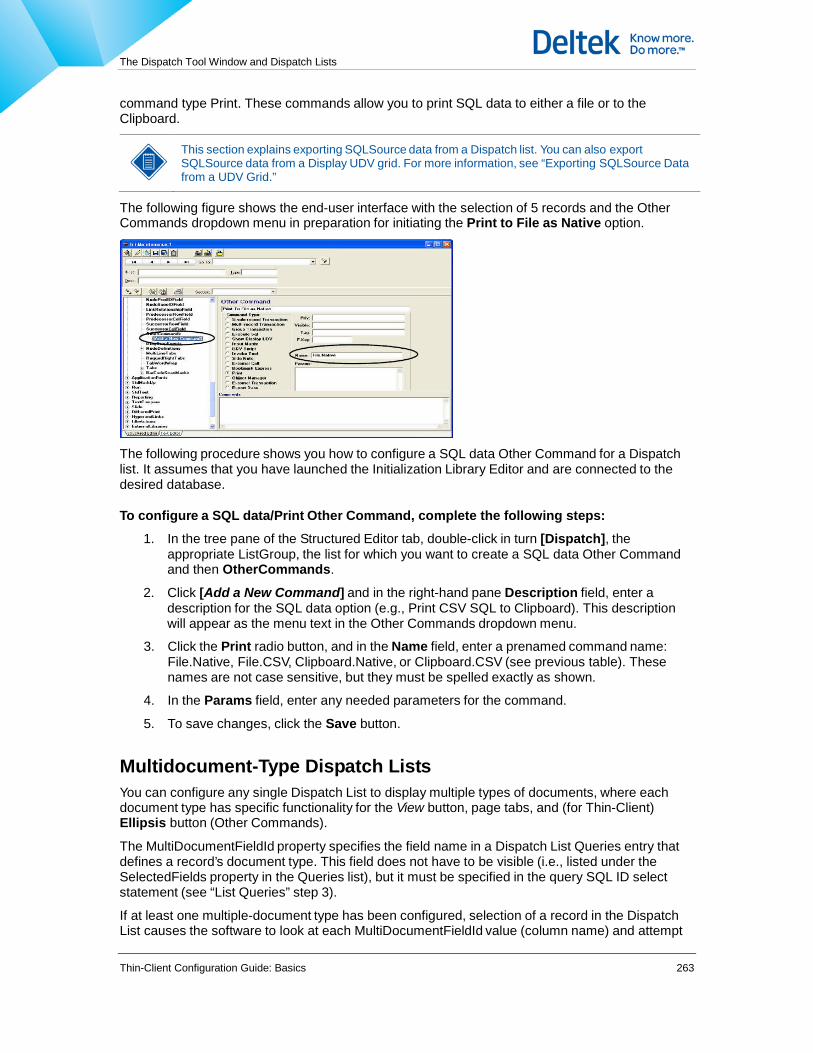
The Dispatch Tool Window and Dispatch Lists
Thin-Client Configuration Guide: Basics 263
command type Print. These commands allow you to print SQL data to either a file or to the Clipboard.
This section explains exporting SQLSource data from a Dispatch list. You can also export SQLSource data from a Display UDV grid. For more information, see “Exporting SQLSource Data from a UDV Grid.”
The following figure shows the end-user interface with the selection of 5 records and the Other Commands dropdown menu in preparation for initiating the Print to File as Native option.
The following procedure shows you how to configure a SQL data Other Command for a Dispatch list. It assumes that you have launched the Initialization Library Editor and are connected to the desired database.
To configure a SQL data/Print Other Command, complete the following steps:
1. In the tree pane of the Structured Editor tab, double-click in turn [Dispatch], the appropriate ListGroup, the list for which you want to create a SQL data Other Command and then OtherCommands.
2. Click [Add a New Command] and in the right-hand pane Description field, enter a description for the SQL data option (e.g., Print CSV SQL to Clipboard). This description will appear as the menu text in the Other Commands dropdown menu.
3. Click the Print radio button, and in the Name field, enter a prenamed command name: File.Native, File.CSV, Clipboard.Native, or Clipboard.CSV (see previous table). These names are not case sensitive, but they must be spelled exactly as shown.
4. In the Params field, enter any needed parameters for the command.
5. To save changes, click the Save button.
Multidocument-Type Dispatch Lists You can configure any single Dispatch List to display multiple types of documents, where each document type has specific functionality for the View button, page tabs, and (for Thin-Client) Ellipsis button (Other Commands).
The MultiDocumentFieldId property specifies the field name in a Dispatch List Queries entry that defines a record’s document type. This field does not have to be visible (i.e., listed under the SelectedFields property in the Queries list), but it must be specified in the query SQL ID select statement (see “List Queries” step 3).
If at least one multiple-document type has been configured, selection of a record in the Dispatch List causes the software to look at each MultiDocumentFieldId value (column name) and attempt

The Dispatch Tool Window and Dispatch Lists
Thin-Client Configuration Guide: Basics 264
to find that value in the current record. If it finds a match, it uses the corresponding ViewButton, Tabs, and OtherCommands properties to control the functionality of the View button, tabs, and Ellipsis button. If it doesn’t find a match, it uses the ViewButton, Tabs, and OtherCommands values defined for the current list.
The link between any MultiDocumentFieldId value and its MultiDocumentType is specified by the MultiDocumentType.Description value. The Description value must be identical to the corresponding MultiDocumentFieldId value.
The following procedure shows you how to configure a multidocument-type Dispatch list. It assumes that you have launched the Initialization Library tool and are connected to the desired database. It also assumes that the list for which you want to configure multiple document types already exists. To create a Dispatch List, see “Dispatch Lists.”
To configure a multidocument-type Dispatch List, complete the following steps:
1. In the tree pane of the Structured Editor tab, double-click in turn the list for which you want to create a multiple document type and MultiDocumentTypes.
2. Click [Add a New Document Type] and in the right-hand pane, enter a description that matches the value of the corresponding MultiDocumentFieldId and click Add New Entry.
3. In the right-hand pane, define the following single-word properties:
Property Win Web Description
ViewButton x x The procedure that displays the record associated with the currently highlighted record when the user clicks the View button in the Dispatch window, or when the user double-clicks the record.
ViewParamFields x Optional list of field names sent along with the ViewButton command. Separate field names with a comma.
MultilineTabs x When set to On, shows all tabs at once in multiple rows. When set to Off, shows only a single row of tabs and scrolling arrows that allow movement to other tabs not in view.
RaggedRightTabs x When set to On, left justifies label text. When set to Off, centers and justifies label text.
TabWordWrap x When set to On, allows wrapping of text in tab labels. This allows tabs to be narrower (and taller) so that more tabs fit in the window.
Tabs x x Page tabs. See “Tabs.”
OtherCommands x Commands accessed via an ellipsis or local menu. See “Window-Launched Other Commands.”
4. To save changes to the Initialization Library record, click the Save button.

The Dispatch Tool Window and Dispatch Lists
Thin-Client Configuration Guide: Basics 265
Explorer Grids You can configure any database grid to be an Explorer Grid modeled after the Windows Explorer. An Explorer Grid displays records hierarchically in a navigable tree structure.
The grid requires that you create a view that displays a hierarchical query. Inclusive records must have the following properties:
Each record must have a numeric field that lists the corresponding tree level. Level 1 is the root level; each child level below is incremented by 1.
Each record must have a field(s) whose value uniquely identifies it.
Each record must have a field(s) whose value identifies its parent, which is in turn identified by the unique record identifier above.
Records must appear in order, as they would if the explorer were showing all records.
You can create an Explorer Grid in three different places:
in a Dispatch List
in a UDV
in a lookup box (in an Input UDV)
Explorer grids can be expanded and collapsed through the local menu Expand/Collapse option. This option is a toggle based on the current display state of the record.
Expand and Collapse also have hotkey combinations:
Expand — [Ctrl]+[E]
Collapse — [Ctrl]+[O]
Creating an Explorer Grid in a Dispatch List To create an Explorer Grid in a Dispatch List, you configure three explorer properties for a specific list in the [Dispatch] section of the Initialization Library record.
The following procedure shows you how to configure an Explorer Grid in a Dispatch list. It assumes that you have launched the Initialization Library tool and are connected to the desired database.

The Dispatch Tool Window and Dispatch Lists
Thin-Client Configuration Guide: Basics 266
To create an Explorer Grid in a Dispatch List, complete the following steps:
1. In the tree pane of the Structured Editor tab, click [Dispatch] | [ListGroups] and then the list for which you want to configure an explorer.
2. In the tree pane, configure the three explorer properties as follows:
ExplorerLevelField The name of the field that contains the record indention level.
ExplorerIdFields The names of the field(s) whose values uniquely identify a record. Separate multiple fields with commas.
ExplorerParentFields The parent record’s ExplorerIdFields value—names of the field(s) whose values uniquely identify the parent record. Separate multiple fields with commas.
3. To save changes to the Initialization Library record, click the Save button.
Creating an Explorer Grid in a UDV To create an Explorer Grid in a UDV, you configure three explorer properties for a specific grid control in the UDV.
The following procedure shows you how to configure an Explorer Grid in a UDV. It assumes that the UDV and grid control already exist. For more information on creating a UDV and grid control, see “Creating a UDV.” It also assumes that you have launched the UDV Library tool and are connected to the desired database.
To create an Explorer Grid in a UDV, complete the following steps:
1. Display the UDV for which you want to create an Explorer Grid.
2. In the Design tab, click the grid that you want to configure as an Explorer Grid. The corresponding properties appear in the Property panel.
3. Configure the three explorer properties as follows:
ExplorerLevelField The name of the field that contains the record indention level.
ExplorerIdFields The names of the field(s) whose values uniquely identify a record. Separate multiple fields with commas.
ExplorerParentFields The parent record’s ExplorerIdFields value—names of the field(s) whose values uniquely identify the parent record. Separate multiple fields with commas.
4. To save changes to the UDV, click the Save button.
Creating an Explorer Grid in a Lookup Dialog Box A lookup dialog box is a search-type dialog box that can be displayed when the user clicks the down arrow of a drop-down combo box. It is part of an Input UDV and is created by setting a specific SQL Transaction InputField to a Control Type of Lookup and then setting the lookup type to Filter and Find dialog.
The following figure shows an Input Field Properties dialog box where an input field is being configured to display a lookup dialog box (Control Type = Lookup; Filter and Find dialog radio button enabled).

The Dispatch Tool Window and Dispatch Lists
Thin-Client Configuration Guide: Basics 267
To create an Explorer Grid in a lookup box, you configure the three explorer properties for the Filter and Find dialog option.
The following procedure shows you how to configure an Explorer Grid in a Lookup dialog box. It assumes that the Input UDV and input field already exist. For more information on creating a UDV and lookup dialog box, see “Creating a UDV.” It also assumes that you have launched the UDV Editor tool and are connected to the desired database.
To create an Explorer Grid in a lookup dialog box, complete the following steps:
1. Display the UDV for which you want to create the lookup dialog box Explorer Grid.
2. Click the Non-Visual Controls tab, and select the SQL Transaction. The corresponding properties appear in the Property panel.
3. Click the InputFields Ellipsis button. The Input Fields Properties dialog box appears (see previous table).
4. Select the input field for which you want to create the Explorer Grid and click the Edit Control tab.
5. Set Control Type to Lookup and click the Filter and Find dialog radio button.
6. Enable/disable the Validate Entry check box as needed.
7. Enable/disable Default to Value of Single as needed. In cases where a single value exists for the field, this check box causes that value to appear as the default.
8. Set other subproperties as follows:
SelectSqlId The SQL ID of the select statement used by the SQL Source.
ParamsSqlSourceName The name of the SqlSource that publishes its parameters to Published
Parameter memory for use by this UDV.
ExplorerLevelField The name of the field that contains the record indention level.
ExplorerIdFields The names of the field(s) whose values uniquely identify a record. Separate multiple fields with commas.
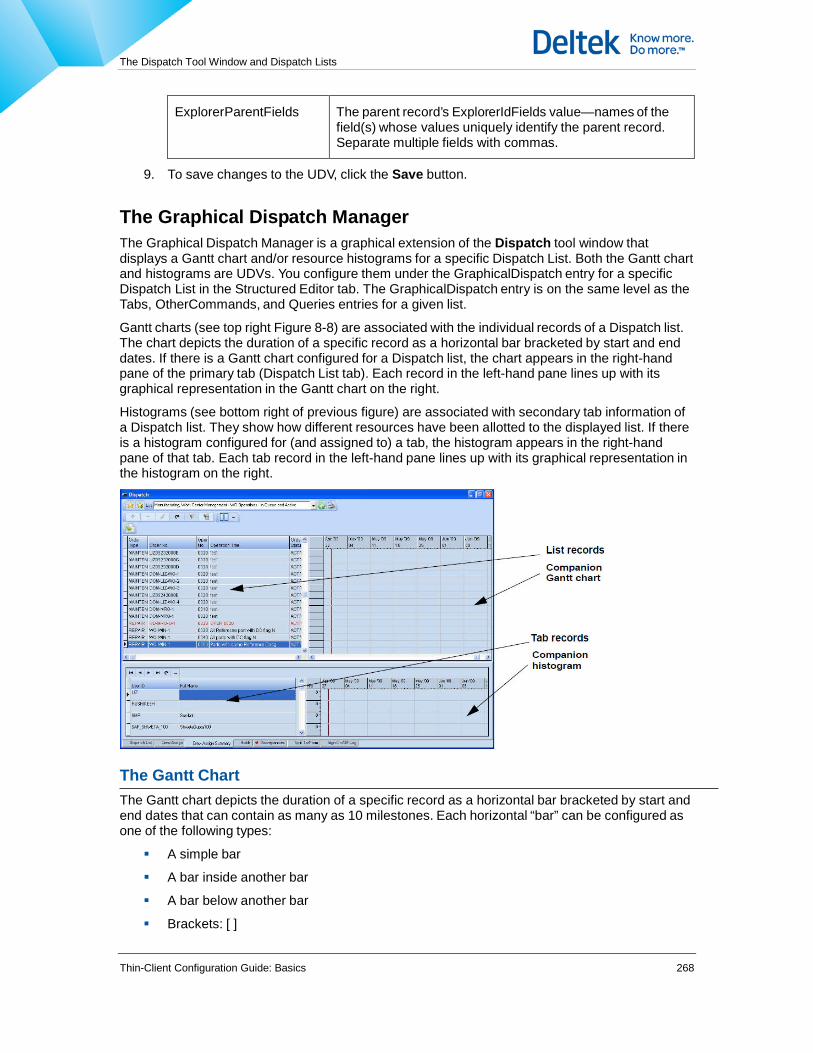
The Dispatch Tool Window and Dispatch Lists
Thin-Client Configuration Guide: Basics 268
ExplorerParentFields The parent record’s ExplorerIdFields value—names of the field(s) whose values uniquely identify the parent record. Separate multiple fields with commas.
9. To save changes to the UDV, click the Save button.
The Graphical Dispatch Manager The Graphical Dispatch Manager is a graphical extension of the Dispatch tool window that displays a Gantt chart and/or resource histograms for a specific Dispatch List. Both the Gantt chart and histograms are UDVs. You configure them under the GraphicalDispatch entry for a specific Dispatch List in the Structured Editor tab. The GraphicalDispatch entry is on the same level as the Tabs, OtherCommands, and Queries entries for a given list.
Gantt charts (see top right Figure 8-8) are associated with the individual records of a Dispatch list. The chart depicts the duration of a specific record as a horizontal bar bracketed by start and end dates. If there is a Gantt chart configured for a Dispatch list, the chart appears in the right-hand pane of the primary tab (Dispatch List tab). Each record in the left-hand pane lines up with its graphical representation in the Gantt chart on the right.
Histograms (see bottom right of previous figure) are associated with secondary tab information of a Dispatch list. They show how different resources have been allotted to the displayed list. If there is a histogram configured for (and assigned to) a tab, the histogram appears in the right-hand pane of that tab. Each tab record in the left-hand pane lines up with its graphical representation in the histogram on the right.
The Gantt Chart The Gantt chart depicts the duration of a specific record as a horizontal bar bracketed by start and end dates that can contain as many as 10 milestones. Each horizontal “bar” can be configured as one of the following types:
A simple bar
A bar inside another bar
A bar below another bar
Brackets: [ ]

The Dispatch Tool Window and Dispatch Lists
Thin-Client Configuration Guide: Basics 269
Brackets enclosing a line: [--------------------]
Angle brackets: { }
Angle brackets enclosing a line: {--------------------}
Milestones can be any of the following shapes:
Diamond
Circle
Square
Up triangle
Down triangle
Both bars and milestones can be configured for color and a 3-dimensional appearance.
Configuring Bar Styles and Milestones
You configure a Gantt chart through the StyleList entry under a specific Dispatch list.
If you do not configure a style list for a Dispatch list, the standard Dispatch window appears.
If you configure a single style list, the Dispatch window and the corresponding Gantt chart appear.
If you configure multiples styles, the Dispatch window and the companion Gantt chart appear. An additional drop-down list of all available styles allows the user to choose a specific style.
Each StyleList (bar style) entry must consist of at least a Bar1 bar or a milestone (explained below). The following procedure assumes that you have launched the Initialization Library tool and are connected to the desired database.
To create a bar style, complete the following steps:
1. In the tree pane of the Structured Editor tab, and under the Dispatch List for which you want to create a Gantt chart, double-click GraphicalDispatch | StyleList and then click [Add a New Bar Style].
2. In the right-hand pane, enter a description for the bar style and click Add a New Entry. If you create multiple styles, this description will appear in the drop-down list of styles in the Dispatch window. You can have two sets of data (Bar1 and Bar2) for each Style.
3. Click Bar1, and in the right-hand pane, enter the following information:
Description Describes the bar. Used for printing purposes.
StartField The field name of the bar start date.
EndField The field name of the bar end date.
Color The primary color of the bar. Click the Select button to choose a color.
BarType The bar type (see “The Gantt Chart”). Click the down arrow to choose a bar type.

The Dispatch Tool Window and Dispatch Lists
Thin-Client Configuration Guide: Basics 270
Show3D Indicates whether the bar will be displayed three dimensionally. Click Yes or No.
PercentFilledField The field name whose contents define a percent between 0 and 100. Use this property to show such things as percent completion.
PercentFilledColor Where PercentFilledField has been defined, specifies the color associated with that field to the extent of the field value. This color should contrast with the primary color of the bar (defined by Color).
EditPriv The privilege that users must have to edit the bar. Can be an expression/ NOT expression that when evaluated as False, disables editing the bar. Expressions can be derived by the following means:
Direct input of the desired value
Use of a function whose returned value is compared to a True/False standard
Direct return of a calculated value
Example: @ClientType=’Web’ Note: When using expressions, context data is limited to system variables.
ChangeUdvId The ID of the UDV that enables changing of dates.
The Graphical Dispatch Manager publishes @GraphicalDispatch which contains the parameter values from the active record in the list (with modified date fields if the user has dragged the bar).
MinDateField The name of the field whose contents define the date before which the user cannot drag the bar to indicate a start date.
MaxDateField The name of the field whose contents define the date after which the user cannot drag the bar to indicate an end date.
4. If you want to create a second set of data, repeat step 3, for Bar2.
5. If you have created two bars, and you want both to show, set BarTwoBelowBarOne to Yes.
6. Define high-level bar style properties by clicking the following properties in turn:

The Dispatch Tool Window and Dispatch Lists
Thin-Client Configuration Guide: Basics 271
DragAssignmentsPriv The privilege that users must have to perform drag and drop functions. This value can be an expression/NOT expression derived by the following means:
Direct input of the desired value
Use of a function whose returned value is compared to a True/False standard
Direct return of a calculated value
Example: @ClientType=’Web’ Note: When using expressions, context data is limited to system variables.
GridWidth The percent width of the Gantt grid, where 100 minus the GridWidth value is the width of the Dispatch list.
FixedColumns The number of fixed columns when printing.
PrintResolution The print resolution.
ShowPrintDialog If set to Yes, displays the print dialog box before printing the chart.
You can create up to 10 milestones for each bar style. See the following procedure.
To create a milestone for a bar style, complete the following steps:
1. In the tree pane of the Structured Editor tab, and under the bar style for which you want to create a milestone, double-click Milestone and then click [Add a New Milestone].
2. In the right-hand pane enter a description for the milestone and click the Add a New Entry button. The new milestone appears in the expanded tree pane.
3. For each milestone sub entry, enter the following information in the right-hand pane:
Description A description of the milestone. Used for printing purposes.
DateField The field name of the milestone date.
Color The color of the milestone. Click the Select button to choose a color.
Shape The shape of the milestone. Click the down arrow to choose a shape.
Show3D Indicates whether the milestone will be displayed three dimensionally. Click Yes or No.

The Dispatch Tool Window and Dispatch Lists
Thin-Client Configuration Guide: Basics 272
EditPriv The privilege that users must have in order to edit the bar. This value can be an expression/NOT expression derived by the following means:
Direct input of the desired value
Use of a function whose returned value is compared to a True/False standard
Direct return of a calculated value
Example: @ClientType=’Web’ Note: When using expressions, context data is limited to system variables.
ChangeUdvId The ID of the UDV that enables changing of dates.
The Graphical Dispatch Manager publishes @GraphicalDispatch which contains the parameter values from the active record in the list (with modified date fields if the user has dragged the bar).
MinDateField The name of the field whose contents define the date before which the user cannot drag the milestone.
MaxDateField The name of the field whose contents define the date after which the user cannot drag the milestone.
Histograms A histogram depicts a vertical representation of resources associated with the displayed dispatch list over time. You configure a histogram and then assign it to a specific tab. Unassigned histograms do not appear with any tab.
Creating a histogram is explained in three separate sections:
Creating the histogram instance and setting high-level properties
Creating a histogram configuration (setting visual characteristics)
Setting histogram display characteristics
Creating a Histogram Instance and Setting High-Level Properties
You create a histogram directly under the Dispatch List for which you want to display it. The order in which you create histograms and their respective order under a list is not important.
The following procedure shows you how to create a histogram instance and set high-level properties. It assumes that you have launched the Initialization Library tool and are connected to the desired database.
See also “Creating a Histogram Configuration” and “Setting Histogram Display Characteristics.”
To create a histogram and set high-level properties, complete the following steps:
1. In the tree pane of the Structured Editor tab, and under the Dispatch List for which you want to create a histogram, double-click Histogram and then click [Add a New Histogram].
2. In the right-hand pane, enter a description (name) for the histogram and click Add New Entry. The new histogram appears in the expanded tree pane.

The Dispatch Tool Window and Dispatch Lists
Thin-Client Configuration Guide: Basics 273
3. In the right-hand pane, enter the following high-level information:
Description A description of the histogram. Used for printing purposes.
ListSqlId The SQL ID that displays the list of resources.
ListIDField The key field name in ListSQLId.
ListMaxField The field name whose contents show the total available resources.
or
A number (for example 8, to show available hours per day).
ListPrintDescField The field name whose contents describe the resource for printout.
MatchSQLID The SQL ID that matches resources to tasks.
MatchTaskIDField The field name in MatchSQLID that contains the Task ID.
MatchListIDField The field name in MatchSQLID that contains the Resource ID.
MatchNumberField The field name in MatchSQLID that sums the histogram.
UnitLabel The label that appears above the MatchNumberField showing the appropriate units.
MainTaskIDField The field name in the Gantt chart that contains the task ID.
DragDropEvents The description, UDV ID, and valid SqlSourceName(s) for configuring dragging between the Gantt chart and histogram. Entries for SqlSourceName must match those set up for list queries.
The Graphical Dispatch Manager publishes @HistogramDrag which contains the published parameter values from the current record in the dispatch list and the published parameter values from the current histogram record.
Creating a Histogram Configuration
Creating a histogram configuration means setting characteristics such as start and end dates and colors for normal and alert states. You create a configuration under the Histograms.HistogramName.Configuration property.
The following procedure assumes that you have launched the Initialization Library tool and are connected to the desired database. It also assumes that the histogram already exists. To create a histogram, see “Creating a Histogram Instance and Setting High-Level Properties.”
To create a histogram and set high-level properties, complete the following steps:
1. In the tree pane of the Structured Editor tab, and under the histogram name for which you want to create a configuration, double-click Configuration and then click [Add a New Configuration].

The Dispatch Tool Window and Dispatch Lists
Thin-Client Configuration Guide: Basics 274
2. In the right-hand pane enter a description (name) for the configuration and click Add New Entry. The new configuration appears in both panes.
3. In the right-hand pane, enter the following configuration information:
Description A description of the histogram. Used for printing purposes.
OrderedTaskSqlId
The list of tasks ordered by StartField.
StartField The field name of the OrderedTaskSQLID that defines the start date.
EndField The field name of the OrderedTaskSQLID that defines the end date.
Color The color of the histogram under normal conditions.
WarningColor The color of the histogram when assigned resources are 100% of available resources.
AlertColor The color of the histogram when assigned resources are 125% of available resources.
InvertResults When enabled (Yes) shows available (remaining) resources instead of assigned resources.
Setting Histogram Display Characteristics
Display characteristics define the way the histogram behaves. You set display characteristics under the Histograms.HistogramName.ListDisplay property. This property also contains subproperties for Other Commands, SelectedFields, and Field Definition IDs.
The following procedure assumes that you have launched the Initialization Library tool and are connected to the desired database. It also assumes that the histogram already exists. To create a histogram, see “Creating a Histogram Instance and Setting High-Level Properties.”
To set histogram display characteristics, complete the following steps:
1. In the tree pane of the Structured Editor tab, and under the histogram name for which you want to set display characteristics, double-click ListDisplay.
2. In the right-hand pane, enter the following configuration information:
Highlighting Highlights the histogram according to a boolean expression/NOT
derived by the following means:
Direct input of the desired value
Use of a function whose returned value is compared to a True/ False standard
Direct return of a calculated value
Click Edit Highlight to create the expression. For more information on the Highlighting dialog box, see “Grid Attributes.” Read the introductory paragraph and start at step 4.

The Dispatch Tool Window and Dispatch Lists
Thin-Client Configuration Guide: Basics 275
KeyFieldNames The key field names in the ListSqlId query. Separate multiple fields with commas.
PublishedSqlSourceName The name of any parameters published to Published Parameter memory.
ParamsSqlSourceName The name of the SqlSource that publishes its parameters to Published Parameter memory for use by other modules and UDVs.
3. To configure Other Commands accessed via an Ellipsis button or local menu, in the tree pane under OtherCommands, click [Add a New Command]. Continue at step 3 under “Window- Launched Other Commands.”
4. To specify the visible columns of the ListSqlId, under SelectedFields, click [Add a New Column] and enter information in the right-hand pane as follows:
Field Name The database column that appears in the results list. Click the down arrow for a list of fields.
Width The default column width in characters. This is optional.
Column Label The text that will appear as the column heading in the grid.
Hidden When checked, causes the field to be hidden.
5. To specify a Field Definition ID, under FieldDefinitionId, click [Add a New Definition Id] and enter information in the right-hand pane as follows:
Field Name The database column to be acted on by the field definition.
Field Definition Id The ID of the field definition, which causes the Initialization Library properties of the current field to be changed when the Field Modifier tool applies a field/column definition with a matching ID.
Assigning a Histogram to a Tab
After creating a histogram, you must assign it to a tab.
To assign a histogram to a tab, complete the following steps:
1. Double-click tabs under the Dispatch List in which the histogram is configured and then click [Add a New Tab].
2. In the right-hand pane, change the Tab Type to Histogram.
3. In the Tab Name field, enter the name of the appropriate histogram. If you want more than one histogram to appear, enter multiple names separated by a commas.
Tag-Defined Hyperlinks in Grids You can add hyperlinks to cells in Dispatch and UDV grids by returning a properly formatted Universal tag to the cell in response to the grid query. The formatted tag causes a button to appear in the cell. When the cell is clicked, the Universal tag executes.

The Dispatch Tool Window and Dispatch Lists
Thin-Client Configuration Guide: Basics 276
You can also embed hyperlinks in a cell/column of a Display UDV grid by configuring the Hyperlink Command field for a given Selected Field of the UDV SQL Source. For more information, see “Field-Defined Hyperlinks in Grids.”
The button style and behavior are controlled by the following tag parameters:
@Caption=[TextValue] — Sets the label that appears on the button.
@ButtonStyle=[Hypertext | Popup | Flat | Normal] — Controls the appearance of the button as follows:
Hypertext — Mimics the hotlink button within hypertext (yellow background with a drop shadow).
Popup — The cell appears as normal text. When the mouse cursor passes over the cell, the button outline pops up.
Flat — The cell appears as normal text. When the mouse cursor passes over the cell, the cursor changes to a hand (similar to the behavior of a web page). The Flat property is independent from embeddedness.
Normal — The cell appears to be a raised button.
@FontColor — Sets the color of the label on the button according to a color names or theme.
@BGColor — Sets the background color of the hotlink.
The following cell data returned by a grid query will cause a button to appear in the grid: LinkInvoke(SideNotes(GET_TNOTE_WID(ORDER_ID=MFI_37504,…,@Caption-Tool-
2,@ButtonStyle=Normal,@BGColor=Red,@FontColor=White))
The button label is “Tool-2,” the style of the button is normal, and it is red with white text. When the user clicks the button, Costpoint MES invokes the Side Note window with the appropriate order.
In the application, when hyperlinked commands exist for a selected cell/column, these commands appear on the local menu as suboptions of Cell Hyperlink Commands. Tag-defined hyperlink commands as described in this section will be indistinguishable from field-defined hyperlink commands on the local menu. For more information on field-defined hyperlinks, see “Field-Defined Hyperlinks in Grids.”

The Dispatch Tool Window and Dispatch Lists
Thin-Client Configuration Guide: Basics 277
Browser-like Combobox The Dispatch Window contains a browser-like combobox that displays a history of dispatches viewed. It has forward, back and refresh buttons, and the ability to store favorites.

Instruction Windows
Thin-Client Configuration Guide: Basics 278
Instruction Windows In the Costpoint MES context, hypertext refers to any text that the hypertext engine displays in an instruction window or data page (tab). There are three basic instances of instruction windows: Manufacturing Instructions, Process Planning Instructions, and Supplemental Instructions. Notifications, Discrepancy and Discrepancy Item, and Corrective Action windows are also instances of instruction windows.
The window types listed above are “standard” types that are hardwired into the Costpoint MES application. You can also create additional, user-defined instruction and discrepancy windows. For more information, see “User-Defined Instruction Window Types.”
The bulk of this chapter deals with the hypertext engine that uses stored procedures to collate information and then displays that information in a suitable form in an Instruction window. The hypertext engine fetches, assembles, displays, navigates and updates records in the database in real time. In effect, the engine scopes out the widest possible area of inquiry, and in response to the user’s navigation and input, fetches the correct combination of data, parses it, displays it, and maintains dynamic control over it according to the user’s role and privileges. In a typical user context, this translates to a user requesting a specific work order—and in response—the engine displaying that work order, moving to other operations or steps based on the user’s input, and then allowing or denying attempted buyoffs or changes to the instructions text itself.
Creating instructions with hypertext consists of 8 basic steps:
1. Creating the scope query
2. Determining sub-level queries
3. Creating sub-level stored procedures
4. Creating the parent text assembly procedure
5. Creating instructions text interface statements
6. Defining column-specific scope properties
7. Defining the characteristics of each planned mode
8. Refining the behavior of the Instruction window interface
The following sections describe each step in detail.
Step 1: The Scope Query The first step in creating instructions text is to develop a SQL statement that returns a cursor defining the entire scope of text retrieval and maps the organizational divisions (levels) of information. This cursor usually consists of key fields of the database tables containing operations text data. The scope query can contain only columns of data that always contribute at least one row to each respective parent level. Inconsistently appearing sublevels can be incorporated, but only through the logic of stored procedures.
In the SQL Library, develop a “scope query” for each Instruction window in which you want to display hypertext. And then in the relevant Initialization Library record, set the ScopeQuerySqlId property for each instructions section ([PrPlgInstructions], [MfgInstructions], [SupplementalInstructions], etc.) to the value of the appropriate SQL ID.
Example
In the Initialization Library: [PrPlgInstructions]

Instruction Windows
Thin-Client Configuration Guide: Basics 279
...
ScopeQuerySqlId=PlanningScope
...
In the SQL Library: Sql id: PlanningScope
select distinct
PLAN_ID
,PLAN_VERSION
,PLAN_REVISION
,PLAN_ALTERATIONS
,OPER_NO
,STEP_NO
,OPER_KEY
,STEP_KEY
,STEP_UPDT_NO
,STEP_NAME
,STEP_STATE
from PL_STEP
where
PLAN_ID=:PLAN_ID and
PLAN_VERSION=:PLAN_VERSION and
PLAN_REVISION=:PLAN_REVISION and
PLAN_ALTERATIONS=0
order by
OPER_NO
,STEP_NO
The hypertext engine uses the returned cursor to navigate the organizational levels of instructions text. The table below shows a typical cursor returned from the scope query.
PLAN_ID VER REV OPER STEP
ACA7505-1 1 1 010 1
ACA7505-1 1 1 010 2
ACA7505-1 1 1 020 1
ACA7505-1 1 1 030 1
ACA7505-1 1 1 030 2
ACA7505-1 1 1 030 3
ACA7505-1 1 1 040 1
ACA7505-1 1 1 050 1
ACA7505-1 1 1 050 2

Instruction Windows
Thin-Client Configuration Guide: Basics 280
Step 2: Key Columns and Subqueries
Next, determine which key columns (fields) in the scope are relevant in collecting data and develop a query for each.
Assign each sub-level query to the TextSqlId property for the corresponding column (FieldName) in the [Instructions].InstructionsWindow.ScopeQueryData.FieldName= section of the Initialization library record. This causes the column to be available as a text summation level.
In the example shown in the above table, VER and REV values do not vary within the PLAN_ID, and do not define unique data.
The table below shows the sub-level queries for data levels that define unique data:
Level 1 Level 2 Level 3 Level 4 Level 5
TextSqlId=PlanningTextPlan
TextSqlId=PlanningTextOper
TextSqlId=PlanningTextStep
The following example shows the portion of the [Instructions] section that configures the sub-level queries for a Process Planning Instruction window. ScopeQueryData
FieldName=PLAN_ID
DisplayLabel=Plan No.
Visible=1
TextSqlId=PlanningTextPlan
FieldName=PLAN_VERSION
DisplayLabel=Version
Visible=1
FieldName=PLAN_REVISION
DisplayLabel=Revision
Visible=1
FieldName=OPER_NO
DisplayLabel=Oper
Visible=1
InputUdvId=OB1_1000276
TextSqlId=PlanningTextOper
FieldName=STEP_NO
DisplayLabel=Step
Visible=1
InputUdvId=OB1_1000024
TextSqlId=PlanningTextStep
BlockIDs=PlanningText
LoadTextWithDocumentEnabled=1
Step 3: Sublevel Stored Procedures After creating the scope query, for each unique division (level) of the defined scope, create a stored procedure that returns a single record of formatted “text.” This text should contain all of the narrative text, tabular data and keyed references to data that are associated with the input parameters to each routine.

Instruction Windows
Thin-Client Configuration Guide: Basics 281
The stored procedure always returns a single field of type VARCHAR2 (Oracle) or BLOB (InterBase, etc.). It contains the text itself, end-line control characters, and Costpoint MES markup tags that tell the engine what block type to create and how to define the appearance of the text in it. For information on markup tags, see “Markup Tags and Universal Tags.” For information on blocks, see “Blocks.”
The RDBMS packages sub-level procedures such that they can be invoked as a field of a SQL SELECT statement:
The following is an example of text returned by a typical text assembly stored procedure. All markup tags appear in angle brackets (<>). All attributes of any block (prefixed by a “<B=” tag) are determined by the [BlockDefinition] section of the controlling Initialization Library record. <S=@REGULARTEXT><M=ScopeQueryValues(ORDER_ID=MFI_141,OPER_NO=,OPER_KEY=,STEP_NO=,STEP_KEY=,O RDER_NO='LP_0226_01')>
<A HREF="GET_ORDER_INFO(ORDER_ID=MFI_141).@SN">Order Info</A><C=10><UT="CommandEvent(ExecTransaction(UDV_ID=MFI_162,SQLTransaction=Insert,PART_NO='LP_P ART1',SERIAL_NO=1,LOT_NO='LP_0226_01',@Caption=Unit Info))"></S>
<S=@PLANHDRTEXT>
<B=OrderPlanTextExe(ORDER_ID=MFI_141,OPER_NO=,OPER_KEY=,STEP_NO=,STEP_KEY=,ORDER_NO='LP_0226_01')>
(surrogate text)
</B>
</S>
<S=@REGULARTEXT>
<M=ScopeQueryValues(ORDER_ID=MFI_141,OPER_NO=010,OPER_KEY=146,STEP_NO=,STEP_KEY=-1,ORDER_NO='LP_0226_01')>
<S=@OPERIDTEXT> _</S><LTXT"IMBED_OPER_DESC_WID(ORDER_ID=MFI_141,OPER_NO=010,OPER_KEY=146,EDIT_MODE=VIEWMODES.VIEW,ORDE R_NO='LP_0226_01').@SQL">
<S=@OPERIDTEXT>[010] </S>
<S=@REGULARTEXT><A HREF="WidOperAdditionalSN(ORDER_ID=MFI_141,OPER_KEY=146,EDIT_MODE=VIEWMODES.VIEW).@SN">Oper Info</A></S><C=20>
<S=@OPERHDRTEXT>Operation Status </S><C=20><S=@OPERHDRTEXT>IN QUEUE</S>
<S=@CHANGEMSG> </S>
</LTXT "IMBED_OPER_DESC_WID(ORDER_ID=MFI_141,OPER_NO=010,OPER_KEY=146,EDIT_MODE=VIEWMODES.VIEW,ORDE R_NO='LP_0226_01').@SQL">
<S=@PLANPLGTEXT>
<B=OrderOperTextExe(ORDER_ID=MFI_141,OPER_NO=010,OPER_KEY=146,STEP_NO=,STEP_KEY=-1,TEXT_TYPE=PLANNING,ORDER_NO='LP_0226_01')>
<LTXT "IMBED_OPER_TEXT_WID(ORDER_ID=MFI_141,OPER_NO=010,OPER_KEY=146).@SQL"> Operation Text
<IMG "MF1_1000540(@CONTROL=MFI_2A7F581ACD4166DFE0440003BA560E35,REF_ID=MFI_2A7F581ACD4166DFE0440003BA560E35).@UDV">
</LTXT "IMBED_OPER_TEXT_WID(ORDER_ID=MFI_141,OPER_NO=010,OPER_KEY=146).@SQL">
</B>
</S>
</S>
<S=@REGULARTEXT>
<M=ScopeQueryValues(ORDER_ID=MFI_141,OPER_NO=010,OPER_KEY=146,STEP_NO=010,STEP_KEY=192,ORDER_NO='LP_0226_01')>
<S=@STEPIDTEXT> </S>

Instruction Windows
Thin-Client Configuration Guide: Basics 282
<S=@STEPIDTEXT>[010,010] </S>
<S=@CHANGEMSG> </S>
<S=@PLANPLGTEXT>
<B=OrderOperTextExe(ORDER_ID=MFI_141,OPER_NO=010,OPER_KEY=146,STEP_NO=010,STEP_KEY=192,TEXT_ TYPE=PLANNING,ORDER_NO='LP_0226_01')>
<LTXT "SFWID_IMBED_STEP_TEXT(ORDER_ID=MFI_141,OPER_KEY=146,STEP_KEY=192).@SQL"> Step Text
</LTXT "SFWID_IMBED_STEP_TEXT(ORDER_ID=MFI_141,OPER_KEY=146,STEP_KEY=192).@SQL">
</B>
</S>
The following figure shows the results of this returned text as the hypertext engine parses it and writes it to an Instruction window.
Markup Tags and Universal Tags Markup tags and Universal Tags define the appearance of text and allow you to embed text, links and such things as command events in hypertext. Both do the same thing. Markup tags are the original tags and Universal Tags are the “new, improved” versions of them. Many markup tags have been replaced by Universal Tags.
Markup Tags
The following table contains a list of the most common original markup tags. Any tag that has been replaced by a Universal tag is marked “Obsolete.” Obsolete tags are readable, but are saved to the new Universal Tag format.
For a complete list of markup tags and syntax, see Appendix C, “Hypertext Markup Tags.”

Instruction Windows
Thin-Client Configuration Guide: Basics 283
Commonly Used Hypertext Markup Tags
Tag Description
<M=...> ScopeQueryValues. Used to identify levels and divisions in the total scope of text. This tag has the form <M=ScopeQueryValues(p1,p2,pn)>. It must contain nonnamed parameter values for the text that follows the tag. Each instance of this tag in the returned text must be unique. If the total returned text represents only one row of the scope, this tag must still be present at the top.
For troubleshooting tips on this tag, see Appendix C, “Hypertext Markup Tags.”
<B=...> Block Type. Used to identify a specific BlockID as defined in the [BlockDefinition] section of the Initialization Library. This tag has the form <B=BlockID(p1,p2,...pn)>.
<TXT...> Read-only. Used to embed read-only rows of text that are returned by executing the specified query and parameters. This tag has the form <TXT "key.@SQL"> where key = <SqlId>(<params>). It returns rows of text that effectively nest text, data, and other tags, including the tag itself. All text retrieved by this tag is marked read-only and cannot be changed even if the user has editing privileges to the block type in which the text appears.
<LTXT...> Live Text. Used to return text in the same manner that <TXT”...”> does, with the exception that text can be edited in accordance with the user’s editing privileges for the block in which the text appears.
<IMG...> Linked data. Used to incorporate predefined data controls such as images and UDVs. This functionality is similar to that of OLEs except for the process of managing references. This tag has the form <IMG”...”>. To apply images added into assembled text through standard markup, use the following syntax:
<IMG "Image,@Transparent=True">
<A HREF...> Hotlink. Used to launch a specific CAD drawing (Thin-Client), image, video, side note, etc. as defined by the parameter list in the tag key. For Thin-Client, can also launch an external program through a user exit.
Universal Tags
All Universal Tags have an identical format, which is a linear listing of indented properties. A listing follows these rules:
Indented properties are children of parent properties and are delimited by parentheses.
Properties on the same level are equal “siblings” of a parent property and are delimited with commas.
Example 1
‘<UT=”LinkInvoke(Slide(OBJECT_ID=AIRCRAFT,@Caption=Aircraft, @Desc=Slide:Aircraft))”>’
LinkInvoke is the parent property. Slide is a child of LinkInvoke and OBJECT_ID is a child of Slide. OBJECT_ID, @Caption, and @Desc are on the same level. In an indented structure, the Universal Tag looks like this:
LinkInvoke Slide OBJECT_ID=AIRCRAFT

Instruction Windows
Thin-Client Configuration Guide: Basics 284
@Caption=Aircraft @Desc=Slide:Aircraft
Example 2
This universal tag: ‘<UT=”CommandEvent(ExecTransaction(@Caption=Test Exec
Trans,@UDV_ID=51109,@SQLTransaction=Update,DET_PART_NUM=ABC))”>’
looks like this in an indented structure:
CommandEvent
ExecTransaction
@Caption=Test Exec Trans
@UDV_ID=51109
@SQLTransaction=Update DET_PART_NUM=ABC
Universal Tags do not replace all existing markup tags. They do replace tags of the following types:
<A HREF...>
<TXT...>
Replaced tags are obsolete. They are readable, but saved to the new Universal Tag format. For a complete list, see Appendix C, “Hypertext Markup Tags.”
The following sections describe defined Universal Tags.
LinkInvoke
For Thin-Client, creates a hypertext link to an external program (external call), or to a multimedia tool window as defined by the [ControlDefinition].Links.LinkName property of the Initialization Library record. Also links a tab report or Sidenotes window.
Syntax
<UT=”LinkInvoke (<LinkName> (<param1>, <paramn>))”>
where LinkName is the [ControlDefinition].Links.LinkName property.
LinkInvoke LinkNames
If LinkName = Valid Properties or Params are Comments
External Call @Func= <call params> [ExternalFunctions] entry.
Can be used in a session event.
Image, Slide, Audio, WebBrowser, Video, OmniDocs, CADDrawing, Graph
REF_ID OBJECT_ID
@Caption
@GlyphName
@Desc
@Height
@Width
The reference ID The Object ID Text marking link Icon marking link Hint text of link. Value can be @GetQueryValue{<SqlId>). See “Creating and Editing Hints for Hypertext Links.”
Height in pixels of link background Width in pixels of link background Enables/disables link making the tag

Instruction Windows
Thin-Client Configuration Guide: Basics 285
If LinkName = Valid Properties or Params are Comments
@IsHot=<True/False> function like a nonlinked object.
TabReport, SideNotes
Example* LinkInvoke(SideNotes (PT_OrderDec(ORDER_ID=112, OPER_KEY=24)))
or
LinkInvoke(SideNotes (@SQL_ID=PT_OrderDec, ORDER_ID=112, OPER_KEY=24))
*Actual tag contains no line breaks or spaces.
(<SqlId>)(<p1=>,<p2=>) SQL Library entry with param values
SideNotes linkname has alternate syntax:
SideNotes syntax 1* (SideNotes(<Sql_Id>(<param1, param2)))
SideNotes syntax 2*
(SideNotes(@SQL_ID=<Sql_Id>,<param1,param2)) Can be used in a session event.
Any CommandEvent-type event (see “CommandEvent”) is followed by checking for and executing commands in the session event queue. By running a CommandEvent where the Command = None, you can trigger a round of session events to execute after a LinkInvoke event.
Image Embeds a nonlinked image in hypertext. Syntax is similar to that of LinkInvoke.
Syntax
<UT=Image (<LinkName> (<param1>, <paramn>))>
where LinkName is the [ControlDefinition].Links.LinkName property.
Valid Link Names and parameters are identical to those used for the LinkInvoke tag. See Table 9-2, “LinkInvoke LinkNames.”
You can disable a LinkInvoke tag—effectively converting it to an Image tag—by using the @IsHot parameter:
<UT="LinkInvoke(Slide(OBJECT_ID=MFI_20A...,@GlyphName=@InlineThumbnail,@Desc=@NA,REF_ID=MFI_27F...,@IsHot=false))">
The Hot-hand mouse cursor is not displayed for Image tags or for tags in which @IsHot = false. Transparency can be forced on or off using the following syntax:
<IMG "filename,@Transparent=True/False">
This is only available for the standalone IMG tag.

Instruction Windows
Thin-Client Configuration Guide: Basics 286
ExtInvoke
Invokes (opens with specific content) a tool window such as Manufacturing Instructions or Discrepancy Record as defined by the ToolType in the Initialization Library record. This tag is used mainly in session events and—unlike the LinkInvoke tag—does not operate through the [ControlDefinition].
Syntax
<UT=ExtInvoke (<ToolType> (<param1>, <paramn>))>
where ToolType is any tool (MfgInstructions, PrPlgInstructions, etc.).
ExtInvoke ToolTypes
If ToolType = Valid Properties or Params are Comments
Any ToolType <p1=>
<p2=>
<p3=>
Parameter value Parameter value Parameter value
@CommandQueue @CommandQueue=Stacked: The invoke is placed at the top of the FIFO queue and executed after all other processing is complete.
@CommandQueue=Immediate. The invoke is executed immediately.
For parameters that allow you to open a tool window with a specific record or interface element such as a tab, see “Invoking a Window at a Specific Record or Place.”
To open an Instruction window with a Side Note from a session event, see “LinkInvoke.”
Any CommandEvent-type event (see “CommandEvent”) is followed by checking for and executing commands in the session event queue. By running a CommandEvent where the Command = None, you can trigger a round of session events to execute after an ExtInvoke event.
ExtRefresh
Refreshes with specific content a tool window such as Manufacturing - Work Instructions or Discrepancy Record. This tag is generally used via the session event queue to refresh window contents whenever a transaction affects the data in view.
Syntax
<UT=ExtRefresh (<ToolType> (<param1>, <paramn>))>
where ToolType is any tool (MfgInstructions, PrPlgInstructions, etc.).
ExtRefresh Properties
If ToolType = Valid Properties or Params are Comments
Any ToolType <p1=>
<p2=>
Parameter value Parameter value Parameter value

Instruction Windows
Thin-Client Configuration Guide: Basics 287
If ToolType = Valid Properties or Params are Comments
<p3=>
ExtRefresh can be used with the Embed tag (which replaces the <TXT...> tag), but cannot be used with the <LTXT...> tag. For more information about the Embed tag, see “Embed.” For more information on the <TXT...> tag, which is still readable.
The following example shows how the ExtRefresh tag refreshes information in <TXT...> tag- embedded text in the Manufacturing - Work Instruction window. ExtRefresh(MfgInstructions(@SearchText=”IMBED_ORDER_TEXT(ORDER_ID=10051).@SQL”))
The @SearchText parameter value is IMBED_ORDER_TEXT(ORDER_ID=10051).@SQL, which corresponds to the literal value of a specific <TXT...> tag. Costpoint MES searches for the @SearchText value and refreshes the text by running the found tag’s SQL ID.
Literal text for any marker tag can be viewed in the Source Lines dialog box. To display the Source Lines dialog box, in the tool window, Ctrl-right click and select Source Lines.
CommandEvent
Launches a command such as a user exit function, or executes a transaction. This is a miscellaneous category that covers legacy functions.
CommandEvents are followed by checking for and executing commands in the session event queue. By running a CommandEvent where the Command type = None, you can trigger a round of session events to execute after a LinkInvoke event (see “LinkInvoke”) or after an ExtInvoke event (see “ExtInvoke”).
Syntax
<UT=CommandEvent (<Command> (<param1>, <paramn>))>
where Command is a defined command.
Example
v_o_text :=v_o_text||chr(10)||'<UT="CommandEvent(ExecTransaction (@UDV_ID=PTXI_15949D22B39D561FE0440003BA560E35'
||',@SQLTransaction=INSERT'
||',@Caption='||cont_rec.display_label
||',ORDER_ID='||v_g_order_id
||',LABEL='||cont_rec.label
||',OPER_KEY='||v_g_oper_key
||'))">';
The following table shows Command Event commands and properties/parameters.
CommandEvent Commands
If Command = Valid Properties or Params are
Comments
ExecUserExitFunc <Function name/index> [ExternalFunctions] entry.
ExecTransaction @Udv_Id UDV Library entry. Insert, duplicate,
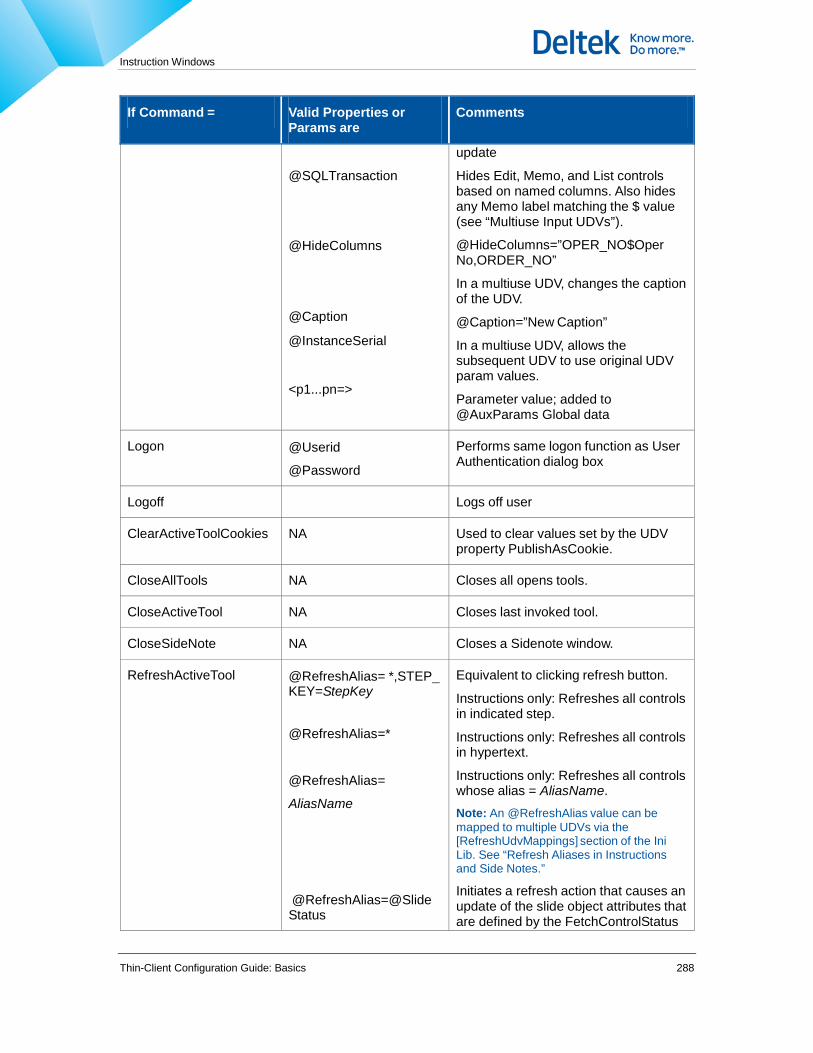
Instruction Windows
Thin-Client Configuration Guide: Basics 288
If Command = Valid Properties or Params are
Comments
@SQLTransaction
@HideColumns
@Caption
@InstanceSerial
<p1...pn=>
update
Hides Edit, Memo, and List controls based on named columns. Also hides any Memo label matching the $ value (see “Multiuse Input UDVs”).
@HideColumns=”OPER_NO$Oper No,ORDER_NO”
In a multiuse UDV, changes the caption of the UDV.
@Caption=”New Caption”
In a multiuse UDV, allows the subsequent UDV to use original UDV param values.
Parameter value; added to @AuxParams Global data
Logon @Userid
@Password
Performs same logon function as User Authentication dialog box
Logoff Logs off user
ClearActiveToolCookies NA Used to clear values set by the UDV property PublishAsCookie.
CloseAllTools NA Closes all opens tools.
CloseActiveTool NA Closes last invoked tool.
CloseSideNote NA Closes a Sidenote window.
RefreshActiveTool @RefreshAlias= *,STEP_KEY=StepKey
@RefreshAlias=*
@RefreshAlias=
AliasName
@RefreshAlias=@Slide Status
Equivalent to clicking refresh button.
Instructions only: Refreshes all controls in indicated step.
Instructions only: Refreshes all controls in hypertext.
Instructions only: Refreshes all controls whose alias = AliasName. Note: An @RefreshAlias value can be mapped to multiple UDVs via the [RefreshUdvMappings] section of the Ini Lib. See “Refresh Aliases in Instructions and Side Notes.”
Initiates a refresh action that causes an update of the slide object attributes that are defined by the FetchControlStatus

Instruction Windows
Thin-Client Configuration Guide: Basics 289
If Command = Valid Properties or Params are
Comments
@RefreshAlias=@Data Pages
@RefreshAlias=@Title
@RefreshAlias=@Main NavGrid
@RefreshAlias=@Aux Udv
@RefreshAlias=@Embed
SQL ID, e.g., the border color of shape objects.
Syntax CommandEvent(RefreshActiveTool(@ RefreshAlias=@SlideStatus))
Refresh the tool window's currently open page tab UDV. Supported in Instructions and DefineableData tool windows.
Refresh the Instruction tool window’s title sql
Refresh the Instruction tool window’s main nav grid contents
Refresh the Instruction tool window’s
Aux UDV
@Embed is used to refresh the content of a text block which is included in the hypertext by the <TXT ...> tag. When using @Embed the RefreshAlias param list should also include the param
@SearchText=<text> wherein the text is matched with any string in the associated tag text.
@HoldPosition
@RemoveFilter
@Expr=”<Expression>”
Dispatch only: When enabled (True), keeps the current record in focus after refresh. If record has been deleted, returns focus to first record in list. Defaults to False when not defined.
Dispatch only: When enabled (True), removes the current filter on refresh. Defaults to True when not defined.
Controls refresh according to the given expression, which must be evaluated as True. Enclose the expression in double quotes to avoid parsing errors.
@ToolScope, @ToolType, and @Config values are always available to the expression, which can be derived

Instruction Windows
Thin-Client Configuration Guide: Basics 290
If Command = Valid Properties or Params are
Comments
by the following means:
Direct input of the desired value
Use of a function whose returned value is compared to a True/False standard
Direct return of a calculated value
ShowDisplayUdvDialog @UDV_ID Invokes a dialog box containing the specified Display UDV (see “Display UDVs in Dialog Boxes”)
ToolCommand @Command Supports tool window specific commands. Example:
Assuming hypertext contains the tag <JP="MyJumpPoint1">
CommandEvent(ToolCommand(@Command=ScrollToJumpPoint,@Caption='MyJumpPoint1',@Align=Bottom))
CommandEvent(ToolCommand(@Command=ScrollToJumpPoint,@Caption='MyJumpPoint1',@Align=Center))
<JP="MyJumpPoint1">
CommandEvent(ToolCommand(@Command=ScrollToSearchText,@SearchText='REF_ID=MFI_37EA4F973BEE37B8E0440003BA041A64',@Align= Top))
CommandEvent(ToolCommand(@Command=ScrollToSearchText,@SearchText='REF_ID=MFI_37EA4F973BF037B8E0440003BA041A64',@Align=Bottom))
None Triggers a round of the session event queue.
CreateTextCompareBaseline
@GroupFields Stores a snapshot of the current window (work order) in @TextCompareBaseline for later retrieval/comparison. See “Alteration Comparison.”
ApplicationMinimize Minimizes the application.

Instruction Windows
Thin-Client Configuration Guide: Basics 291
If Command = Valid Properties or Params are
Comments
ApplicationRestore Restores the application window.
ApplicationBringToFront Brings the application to the front.
ApplicationExit Exits the application. Used for internal testing only.
ExecOtherCommand
@SqlSource
@Command
@SubCommand
Runs a session event-triggered OtherCommand from a specified SqlSource.
The originating SqlSource.
The Other Command to be run.
A specific subcommand of @Command.
Speedbar ControlbarVisible=True
ControlbarVisible=False
Displays or hides the speed bar from a session event using current settings in the Ini record.
Displays the speedbar. Hides the speedbar.
Embed Embeds a section of read-only text in a hypertext instruction by executing the specified query or parameters. The Embed tag returns rows of text that effectively nest text, data, and other tags, including the tag itself. Retrieved text cannot be changed even if the user has editing privileges to the block type in which the text appears. (This Universal tag replaces the <TXT...> tag.)
Syntax
<UT=Embed (<SqlId> (<param1>, <paramn>))>
where SqlId is the unique ID of a SQL statement in the SQL Library.
Embed Properties
If SqlId = Valid Properties or Params are Comments
Any valid SqlId REF_ID OBJECT_ID
@Text
<p1=>
The ID of a link to an object. The ID of an object.
Designed to be set to the hex (base-
16) equivalent of a given StdText entry, allowing inclusion of a StdText instance inline with the tag contents. Converted to original string value on parsing.
Parameter value Parameter value Parameter value

Instruction Windows
Thin-Client Configuration Guide: Basics 292
If SqlId = Valid Properties or Params are Comments
<p2=>
<p3=>
Note that Standard Text that is authored into a block by an end user always has the following form: Embed(StdTextGetStdText(REF_ID=...))
Refresh Aliases in Instructions and Side Notes
This section discusses refresh aliases for Instruction and Side Note windows. Refresh aliases can also be used in Dispatch windows.
You can use a Refresh alias (@RefreshAlias=<AliasName>) to refresh specific embedded controls rather than the entire text in Instruction and Side Note windows. The Refresh alias uses a session event to publish the refresh action, and control markup/tag data to identify specific subscribers. Optional parameter-matching data can narrow the refreshed target to a single embedded control.
You can identify subscribers/targets 2 ways:
By literal association of the Refresh alias. In this case, the subscriber is an embedded control whose tag contains a Refresh alias that matches the session event Refresh alias.
Through the [RefreshUdvMappings] section in the Initialization Library record. In this case, specific UDV IDs are mapped to a Refresh alias name. A subscriber is any embedded control whose tag contains a UDV ID that is mapped to the session event Refresh alias. (Note that the UDV cannot be substituted.)
Use the following arguments to specify the extent of the refresh.
Refresh Alias Arguments
Argument Description
<RefreshAlias> +
<RefreshAlias>
Refreshes multiple aliases of the focused window using the plus sign delimiter.
Example
CommandEvent(RefreshActiveTool(@RefreshAlias=Buyoffs+DataCollections))
@MainNavGrid Refreshes the Main Navigation grid of the focused window.
Example
CommandEvent(RefreshActiveTool(@RefreshAlias=@MainNavGrid))
@Title Refreshes the title of the focused window.
Example
CommentEvent(RefreshActiveTool(@RefreshAlias=@Title))
@Datapages Refreshes data pages of the focused window.
Example

Instruction Windows
Thin-Client Configuration Guide: Basics 293
Argument Description
CommandEvent(RefreshActiveTool(@RefreshAlias=*+@Datapages))
* Refreshes all controls of the focused window, plus the Main Navigation grid and title (but not data pages).
Example
CommandEvent(RefreshActiveTool(@RefreshAlias=*))
The alias name is a string value that cannot contain control characters or punctuation characters.
Literal Association
To identify subscribers through literal association, simply create an alias name and set the Refresh alias of the target control to the Refresh Alias of the Session Event.
Example
Command event CommandEvent(RefreshActiveTool(@RefreshAlias=Buyoffs))
Target/subscriber <IMG "OB1_100084(OPER_KEY=136786,OPER_UPDT_NO=1,@RefreshAlias=Buyoffs).@UDV">
Literal association has the benefit of being unaffected by changes in UDV IDs or the use of substituted UDVs (in the [SubstitutionUdvIds] section of the Initialization record). However, for controls authored in a text block, it requires that the control tags be maintained through back-end logic that executes during save. This is not an issue for controls tags that are generated on demand by the Assemble Text logic. This approach may be less effective for sites that have accumulated a large volume of data.
[RefreshUdvMappings] Association
To identify subscribers through the [RefreshUdvMappings] section of the Initialization Library record, you add an alias name and associate with it the UDV IDs that should be refreshed under that name.
When using a refresh alias through the [RefreshUdvMappings] section, the UDV cannot be substituted.
The [RefreshUdvMappings] section should have the following structure: [RefreshUdvMappings]
<AliasName1>
<UdvId1>
<AliasName2>
<UdvId1>
<UdvId2>
Example
Ini Lib Configuration [RefreshUdvMappings]
Buyoffs
MFI_1000135

Instruction Windows
Thin-Client Configuration Guide: Basics 294
OB1_100084
Command event CommandEvent(RefreshActiveTool(@RefreshAlias=Buyoffs))
Target/subscribers <IMG "MFI_1000135(OPER_KEY=136786,OPER_UPDT_NO=1).@UDV">
<IMG "OB1_100084(OPER_KEY=136786,OPER_UPDT_NO=1).@UDV">
<IMG "MFI_1000135(OPER_KEY=136999,OPER_UPDT_NO=2).@UDV">
<IMG "OB1_100084(OPER_KEY=136786,OPER_UPDT_NO=1,@RefreshAlias=Buyoffs).@UDV">
Position Tags Position tags position text immediately following the tag. Some tags use pixel placement. Others use character placement.
These tags are not authorable in the Instruction window. They must be incorporated into the assemble text logic.
Relative Pixel Placement <X+*>
Places the next character at the asterisk (*) position, where the asterisk (*) is the distance in pixels from the previous character.
For example, <X+5> moves the next character 5 pixels to the right of the previous character.
Absolute Pixel Placement <X=*>
Places the next character at the asterisk (*) position, where the asterisk (*) is the distance in pixels from the left margin.
For example, <X=5> places the next character 5 pixels to the right of the left margin. It is possible to overlap text with this tag.
Relative Character Placement <C+*>
Places the next character at the asterisk (*) position, where the asterisk (*) is the distance in characters from the previous character. For variable-width fonts, a “character” is the average character width for that font.
For example, <C+5> places the next character 5 characters to the right of the previous character.
Absolute Character Placement <C=*>
Places the next character at the asterisk (*) position, where the asterisk (*) is the distance in characters from the left margin. For variable-width fonts, a “character” is the average character width for that font.
For example, <C=5> places the next character 5 characters to the right of the left margin. It is possible to overlap text with this tag.
Markup Icons Hypertext icons can be one of three graphic formats:
MS Windows Icon (.ico)
JPEG - Joint Photographic Experts Group (.jpg)

Instruction Windows
Thin-Client Configuration Guide: Basics 295
Bitmap (.bmp)
You configure icons in the [StdMarkup] section of the Initialization Library record and specify the path to them through the [Common].PathToStdMarkup property.
Invoking a Window at a Specific Record or Place You can invoke a window so that it displays a specific record or interface element. For example, you can open an instruction window at a specified operation or step or show a specified tab. You do this by using an Invoke command with the appropriate parameters.
You can invoke a window in this manner from the following places:
The API using the sfxInvoke function.
The session event queue using the ExtInvoke command. See “ExtInvoke” and “Session Events.”
The Dispatch tool window (ViewButton property). See “Dispatch Lists.”
The following table shows you Invoke command parameters and the tool windows you can use them with.
Invoke Parameters
Parameter/Syntax/Example Description Tool Window
@InvokeDatapage
Syntax: @InvokeDatapage = <Tab Name>
where Tab Name is the tab identifier/tab caption.
Example: @InvokeDatapage = Instructions
Displays the specified tab.
Instruction Dispatch
@InvokeNavLevel
Syntax: @InvokeNavLevel = <FieldName/number>
where FieldName is the column name corresponding to the navigation level and number is the number of the field in the scope query. Use either the name or the number.
Example: @InvokeNavLevel = OPER_NO
Sets the window to the specified navigation level.
Instruction
@InvokeToolMode
Syntax: For tool window types which support multiple mode types, such as Instructions,
@InvokeToolMode = <ModeType.Mode>
where ModeType is ViewModes, EditModes, or PrintModes, and Mode is the specific mode of ModeType.
For other tool windows:
@InvokeToolMode = <Mode>, where Mode is “View” or “Edit”
Example: @InvokeToolMode = EditModes.Edit_PL
Displays the window in the specified mode.
All tool types which support
@InvokeToolMode now support use of
@GetQueryValue().
Params listed in the invoke command are provided to the query. For example:
@InvokeToolMode=@
Instruction

Instruction Windows
Thin-Client Configuration Guide: Basics 296
Parameter/Syntax/Example Description Tool Window
GetQ ueryValue(MyInvokeToolM odeSql)
@Invoke_Flag
Syntax: @Invoke_Flag = <InvokeType>
where InvokeType is Compare, Print, or ExportHTML.
When <InvokeType> = Print, subparameters are (Copies=n,Destination="PrinterName"), where n and PrinterName default to 1 and the default printer, respectively.
Examples: @Invoke_Flag = Compare
@Invoke_Flag = Print (Copies=2,Destination=”HP”)
Compare invokes the tool with a twin window.
Print invokes the tool, and automatically prints n copies to “PrinterName.”
Instruction Reporting
<FieldName>
Syntax: <FieldName1 = value, FieldNamen = value>
where FieldName is the name of a nonkey field (one not specified in the WHERE clause).
Example: OPER_NO = 040,STEP_NO = 020
Displays a specific record based on the FieldName value.
Instruction
@Group
Syntax: @Group = <ListGroup>
where ListGroup is a Dispatch group.
Example: @Group = Process Planning
Opens the Dispatch window with the specified list group. To be used with @List.
Dispatch
@List
Syntax: @List = <List>
where List is a list of a Dispatch group.
Example: @List = Plan Tasks
Opens the Dispatch window with the specified list. To used with @Group.
Dispatch
@Query
Syntax: @Query = <QueryName>
where QueryName is the name of a query for a given Dispatch list.
Example: @Query = Plan_Release
In the case where a list has multiple queries/sorts, opens the window with the specified query. If no value is specified, uses the first query for the list.
Dispatch
@Filter
Syntax: @Filter = <((FieldName1 = value) and (FieldName2 = value) and (FieldNamen = value))>
where FieldName is the name of a key field in a given
Opens the window displaying only those records that match the specified field value(s).
Dispatch

Instruction Windows
Thin-Client Configuration Guide: Basics 297
Parameter/Syntax/Example Description Tool Window
query.
Example: @Filter = ((Plan_Ver=1) and (Plan_Rev=3))
Hypertext Fonts You create fonts for hypertext in the [ApplicationFonts] section of the Initialization Library record. You then apply these fonts in the text assembly stored procedure through Style tags (<S=@[Font identifier]></S>).
The following procedure shows you how to create fonts. It assumes that you have launched the Initialization Library Editor and are connected to the desired database and library record. See “Launching a Configuration Tool” in the Costpoint MES System Configuration Manager Manual.
To create a hypertext font, complete the following steps:
1. In the Structured Editor tab of the Initialization Library record, double-click [ApplicationFonts] and then click [Add a New Font].
2. In the right-hand pane, configure properties as appropriate:
Font ID — The font identifier as used in the Style tag (<S=@[Font identifier]></S>).
Font — The font name as selected from the dropdown list.
Size — The font size as selected from the dropdown list. This value can also be typed directly into the field. Typed values are unlimited.
Style — The font style as selected from the dropdown list: Normal, Bold,.Italic, Strikeout, or Underline.
Color — The font color as selected from the dropdown list.
Blocks A block is a text area with a defined appearance, editing and transaction privileges, links, and controls to other objects. Blocks can be sequential or nested and are defined in the [BlockDefinition] section of the Initialization Library record.
The following procedure tells you how to create and configure a block. It assumes that you have launched the Initialization Library tool and are connected to the desired database and library record. See “Launching a Configuration Tool” in the Costpoint MES System Configuration Manager Manual.
You can disable the following maintenance SQL block properties by assigning the @NA value:
InsertSql
GetEffRefSql
HtRefDeleteAllSql
HtRefReconcileChangesSql
To create and configure a block, complete the following steps:
1. In the Structured Editor tab of the Initialization Library record, double-click [BlockDefinition] | Blocks and then click [Add a New Block Definition].

Instruction Windows
Thin-Client Configuration Guide: Basics 298
2. In the right-hand pane Description field, enter the name of the new block and click Add New Entry.
3. In the right-hand pane, configure single-word properties as appropriate:
Property Win Web Description
Caption x The description of the text block as displayed in menus.
If no PrintHeader value (see below) is assigned and a linked object is printed using the local Print Object command, the title is comprised of the block scope followed by this Caption value.
ImageName x The name of an entry in the [StdMarkup] section. When a value is assigned to this field, and a corresponding entry exists in the [StdMarkUp] section, an associated icon appears next to the Insert Block option (for this block type) on the local hypertext menu. The same icon also represents this block type in the Hypertext Palette. For more information, see “The Hypertext Palette.”
PrintHeader x The header that will be used when printing. Syntax is as follows: Part Number::PART_NO. Reference Copy As Of :@SystemDate(mm/dd/yyyy)
References are populated from the current ToolScope. This PrintHeader value is used as the title when printing a linked object with the local Print Object command (see “Printing Individual Hyperlinked Objects”).
EditPriv x The value that confers editing privileges for the block. This value can be an expression/NOT expression derived by the following means:
Direct input of the desired value
Use of a function whose returned value is compared to a True/ False standard
Direct return of a calculated value
Example: @ClientType=’Web’ Note: When using expressions, context data is limited to system variables.
ReadOnly x Determines whether the block is read-only (not editable):
True — The block is read only (can never be edited)
False — The block is not read only (can

Instruction Windows
Thin-Client Configuration Guide: Basics 299
Property Win Web Description
always be edited)
Until Edit — The embedded controls in the block are read only
(cannot be edited), until the block is put into Edit mode. For Web Express Client, blocks are always read only.
AllowMultimedia Objects
x Determines whether links to slides containing multimedia objects can be inserted. If set to Yes, enables the Insert Link option on the local menu:
You configure multimedia links in the [ControlDefinition] section. For more information, see “Insert Link Options for a Given Block Type.”
Links x x The types of links that are possible in the block. Configured links show up on the local menu as Insert options (see the first-level options in the above graphic).
For instructions on configuring this property, see “Insert Link Options for a Given Block Type.”
Controls x x Buyoff and data collection UDVs for the given block type. The buyoff or data collection must already exist.
To add a control, double-click Controls and then [Add a New UDV Control]. In the right-hand pane, enter a description (which will appear on the local menu) and a UDV ID—or click the folder button to search for the UDV in the Select a UDV dialog box. On completion of Description and UDV ID fields, click Add Entry to List. The new buyoff or data collection appears in the tree pane.
BeginEditSql x The SQL ID that runs when the user starts a block edit.
EndEditSql x The SQL ID that runs when the user ends a block edit.
PasteControlSql x The SQL ID that creates the initial data record for (initializes) a Standard Text-embedded
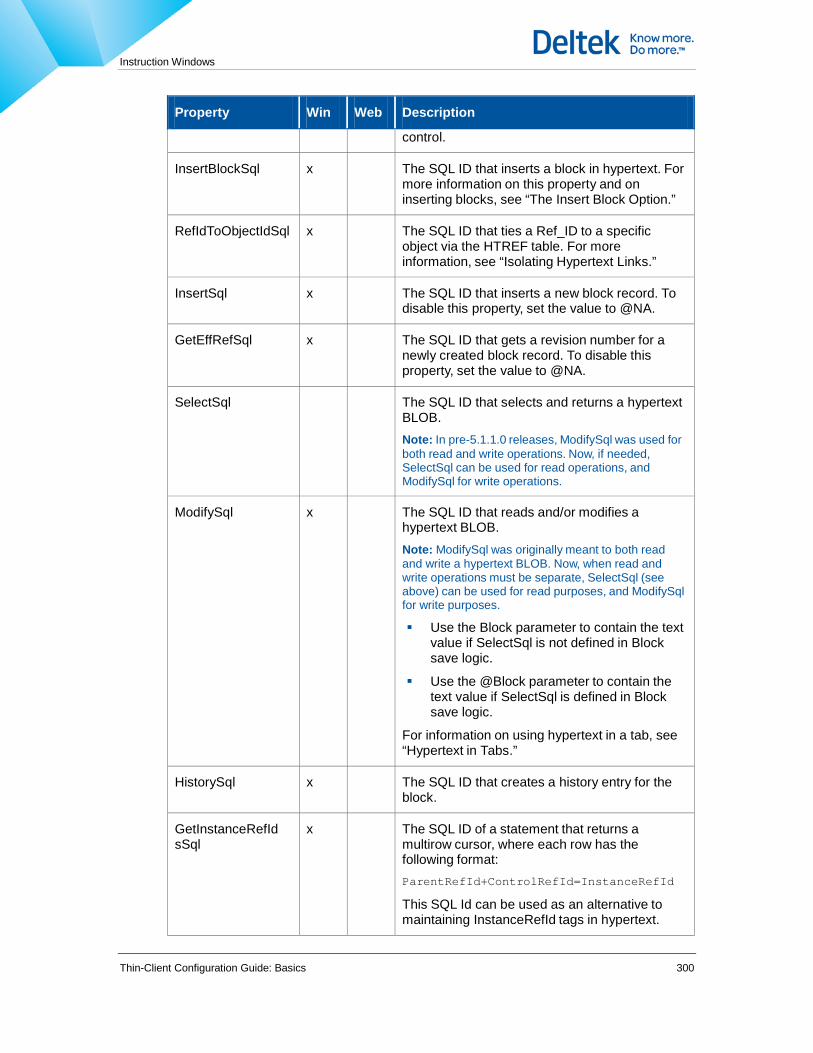
Instruction Windows
Thin-Client Configuration Guide: Basics 300
Property Win Web Description
control.
InsertBlockSql x The SQL ID that inserts a block in hypertext. For more information on this property and on inserting blocks, see “The Insert Block Option.”
RefIdToObjectIdSql x The SQL ID that ties a Ref_ID to a specific object via the HTREF table. For more information, see “Isolating Hypertext Links.”
InsertSql x The SQL ID that inserts a new block record. To disable this property, set the value to @NA.
GetEffRefSql x The SQL ID that gets a revision number for a newly created block record. To disable this property, set the value to @NA.
SelectSql The SQL ID that selects and returns a hypertext BLOB. Note: In pre-5.1.1.0 releases, ModifySql was used for both read and write operations. Now, if needed, SelectSql can be used for read operations, and ModifySql for write operations.
ModifySql x The SQL ID that reads and/or modifies a hypertext BLOB. Note: ModifySql was originally meant to both read and write a hypertext BLOB. Now, when read and write operations must be separate, SelectSql (see above) can be used for read purposes, and ModifySql for write purposes.
Use the Block parameter to contain the text value if SelectSql is not defined in Block save logic.
Use the @Block parameter to contain the text value if SelectSql is defined in Block save logic.
For information on using hypertext in a tab, see “Hypertext in Tabs.”
HistorySql x The SQL ID that creates a history entry for the block.
GetInstanceRefId sSql
x The SQL ID of a statement that returns a multirow cursor, where each row has the following format: ParentRefId+ControlRefId=InstanceRefId
This SQL Id can be used as an alternative to maintaining InstanceRefId tags in hypertext.

Instruction Windows
Thin-Client Configuration Guide: Basics 301
Property Win Web Description
HtRefInsertSql x In block save logic, the second of three back-end transactions that reconcile database object references with changes (deletes and inserts) made to the block. After HtRefDeleteAllSql (see below) runs, this SQL ID typically stores in the Hypertext Reference table all existing references in the block at the time of the save. HtRefReconcileChangesSql (see below) then compares marked-for-delete records with inserted records; any unmatched records are either deleted or inserted. For more information on Save logic, see “The Save Changes Option for a Block” and “Hypertext Block Save Pseudocode.”
This value overrides any like value in the [ControlDefinition] section.
HtRefDeleteAllSql x In block save logic, the first of three back-end transactions that reconcile database object references with changes (deletes and inserts) made to the block. This SQL ID typically marks for removal from the Hypertext Reference table, all pre-existing references at the time of save. After this statement runs, HtRefInsertSql typically inserts a record for each existing and new object reference and then HtRefReconcileChangesSql (see below) compares marked records with inserted records; unmatched records are either deleted or inserted. For more information on Save logic, see “The Save Changes Option for a Block” and “Hypertext Block Save Pseudocode.”
To disable this property, set the value to @NA.
HtRefReconcileChangesSql
x In block save and cancel logic, the last of three back-end transactions that reconcile database object references with changes (deletes and inserts) made to the block. Typically, HtRefDeleteAll Sql marks for removal all references at the time of save, and HtRefInsertSql inserts a record for each existing and new object reference. This SQL ID typically queries pending marked-for-delete records and new object RI records, retaining only matched marked records and newly inserted records. Note: Use of the @RefList parameter avoids calling the back end for each link/reference in the block. Format is as follows:
REF_ID=ri1,OBJECT_ID=oi1,OBJECT_TYPE=ot1~REF_ID=ri2,OBJECT_ID=oi2,OBJECT_TYPE=

Instruction Windows
Thin-Client Configuration Guide: Basics 302
Property Win Web Description ot2~...
To disable this property, set the value to @NA.
HistoryHeading x The heading that appears before each history entry for the block.
RefTextGensNewControlRefIds
x When disabled (Off), prevents generation of new Ref_IDs for embedded controls in Standard Text when inserting or copying a Standard Text instance in an instruction.
The default is On: Costpoint MES generates new Ref_IDs for embedded controls.
RefTextGensNewControlRefIds is also a property of the Standard Text window. When disabled (Off) in the Standard Text window, it prevents generation of new Ref_IDs during a Save As action.
This property makes it possible to configure HTREF-related logic without dependency on parent key values.
UDVMappings x x Block-specific substitution UDVs.
Also, in this section, any single UDV ID can be set to
@RptTagCaption in order to format the tag caption of an embedded UDV in a Report Designer (RAVE) report.
For more information on UDV mappings and using @RptTagCaption for an embedded UDV in a report, see “Substituting UDVs in Blocks.”
ViewCommands x Other Commands for view modes only. See “Window-Launched Other Commands.”
EditCommands x Other Commands for edit modes only. See “Window-Launched Other Commands.”
HtRefCheckUpda teSQL
x Takes in whatever scope values are necessary to determine if there is exacly one reference to a slide, and if that reference is the same. If this is true, the routine should return OK instead of PROMPT.
The @AnyBlock Block Type
The @AnyBlock block type is a special (reserved) block that allows an associated Standard Text entry to be inserted into any block. When configured, it causes the Select a Standard Text Entry dialog box to contain current block-associated entries as well as all @AnyBlock-associated entries.

Instruction Windows
Thin-Client Configuration Guide: Basics 303
Configuration of the @AnyBlock block type involves two main tasks:
Creation/configuration of the @AnyBlock block in the [BlockDefinition] section of the library record. For instructions on creating/configuring a block, see “To create and configure a block.”
Addition of the @AnyBlock block as a valid block type in the [StdText] section of the Initialization Library record. Follow instructions for adding a block as explained under “Blocks.”
Substituting UDVs in Blocks
You can make changes to block-specific UDVs by creating a substitute UDV that has the desired functionality. For example, when a work plan becomes a work instruction, the associated buyoffs must be changed to reflect Work Instruction-specific information. UDV substitution enables you to this by substituting the planning-specific buyoffs with Work Instruction-specific buyoffs.
You can also substitute UDVs as part of the customization process.
You substitute block-specific UDVs by creating UDV=substitute pairs in the [BlockDefinition].Blocks.BlockType.UDVMappings section of the Initialization Library record. On loading of a specific block, Costpoint MES checks UDV IDs against entries in the BlockType.UDVMappings section. If it finds a match, it loads the substitute instead.
If the library section contains multiple mappings for a single UDV ID, the software reads the first mapping and ignores any others. You cannot chain mappings.
The following procedure shows you how to substitute a block-specific UDV. It assumes that you have launched the Initialization Library Editor and are connected to the desired database. See “Launching a Configuration Tool” in the Costpoint MES System Configuration Manager Manual.
To substitute a block-specific UDV, complete the following steps:
1. In the Initialization Library tool window, display the appropriate record.
2. In the tree pane of the Structured Editor tab, double-click [BlockDefinition], the block type for which you want to substitute a UDV, and then UDVMappings.
3. Click [Add a New Mapping].
4. In the right-hand pane, in the Old UDV id field, enter the name of the UDV you want to replace.
5. In the New UDV id field, enter the name of the substitution UDV and click Add Entry to List.
UDVMappings and @RptTagCaption
You can use the UDVMappings section to define hyperlink tags for embedded UDVs in a Report Designer (RAVE) report.
Configuring the hyperlink tag involves 3 steps:
1. Set the report component containing the hypertext (usually SfHypertext) to KeepTags=True. For more information, see “SfHypertext and SfSlide” in the Costpoint MES Configuration Manual, Volume 3: The Costpoint MES Report Designer.
2. Define the RptTagCaption value for the embedded UDV link name in the [ControlDefinition].Links.<LinkName>.section of the Initialization Library record. Example, ControlDefinition.Links.Udvs.RptTagCaption=Data Collection.

Instruction Windows
Thin-Client Configuration Guide: Basics 304
3. Apply the RptTagCaption value to UDVs in the [BlockDefinition].UdvMappings section of the Initialization Library record. By default, @RptTagCaption is ignored for embedded UDV links unless you selectively apply it to UDVs as follows:
Syntax [BlockDefinition
<blockid>
UdvMappings
<Udv Id>=@RptTagCaption
Also, you can set the <Udv Id> value to blank or @na to prevent display of a UDV in a report:
Example [BlockDefinition
<blockid>
UdvMappings
<Udv Id>=
<Udv Id>=@na
@RptTagCaption and Query Results
You can also replace the readable tag caption with the results of a query. You do this by setting RptTagCaption equal to GetQueryValue(SQL_ID), where SQL_ID is the query whose result appears in place of the tag caption. Thin-Client passes to the query UDV tag values and SQL Source parameters, including those of the current record.
Creating and Editing Hints for Hypertext Links You can create hypertext hints in two ways:
By assigning a value to the @Desc parameter in the LinkInvoke tag (for more information on LinkInvoke, see “LinkInvoke”). You author and edit this hint through the Edit Hints dialog box (in Edit mode, right-click the link and select Edit Hint).
You can also assign the @GetQueryValue(<SqlId>) variable to @Desc. This returns the value of the SqlId as the hint.
Example <UT="LinkInvoke(Slide(OBJECT_ID=MFI_112E514B1CC1738DE0440003BA560E35,@GlyphName=@P2SM\slide.ico,@Desc='@GetQueryValue(MyGetObjRefHint)',REF_ID=MFI_1BF2C2B3930A5CEAE0440003BA560E35))">
Note that ‘@GetQueryValue(MyGetObjRefHint)’ is enclosed in single quotes.
By creating GetObjRefHint SQL. This SQL ID should use the parameter values of the LinkInvoke tag (and, if applicable, parameter values in @ToolScope and @ToolState) to return one or more records of text serving as a hint. The application runs GetObjRefHint SQL in both View and Edit modes.
The Object Hints button at the top of Instruction windows enables the display of hints. If GetObjRefHint SQL exists and returns one or more records, the application displays the returned record(s) and appends any authored hint (the @Desc value). If GetObjRefHint does not exist or returns no records, the application displays only the authored hint.

Instruction Windows
Thin-Client Configuration Guide: Basics 305
Isolating Hypertext Links You can configure the application so that authorized users can use a reference-managing UDV to manage link references individually. For example, they can “break” a link to any object and create a new link to another version of the same object. The unique REF_ID of the link remains unchanged; the user simply associates it with a new version of the same object.
Link isolation is carried out through the RefIdToObjectIdSql property which is defined in the [BlockDefinition] section of the Initialization Library record. It applies to the following types of links (as described in the section “Universal Tags”):
LinkInvoke.Image
LinkInvoke.Slide
LinkInvoke.Audio
LinkInvoke.WebBrowser
LinkInvoke.Video
LinkInvoke.OmniDocs
LinkInvoke.SideNotes
The following figure shows how the user’s input to the reference-managing UDV updates the HTREF table. After this, when a user clicks the associated link, RefIdToObjectIdSql consults the corresponding HTREF table, derives the correct object from the REF_ID and displays it in the object tool window.

Instruction Windows
Thin-Client Configuration Guide: Basics 306
The RefIdToObjectIdSql property can be defined at the block level or at the [BlockDefinition] level where generally, it applies to every block type. If you do not define RefIdToObjectIdSql for a specific block type, the application runs the value defined under [BlockDefinition].
Example of RefIdToObjectIdSql defined for a specific block type [BlockDefinition]
Blocks
<BlockName>
RefIdToObjectIdSql=GetRefIdFromObjectId
Example of RefIdToObjectIdSql defined for all block types [BlockDefinition]
RefIdToObjectIdSql=GetRefIdFromObjectId
When a RefIdToObjectIdSql Value is Not Defined at Either Level
In versions prior to 3.0, the application stores the OBJECT_ID in the hypertext tag. A click on the object link causes the application to load the referenced object directly from the appropriate database table, e.g., SFCORE_IMAGE_LIB. It does not query the site-specific cross reference table (HTREF table). This type of configuration precludes safe copying of block text within or between instructions documents; it is a means of maintaining backward compatibility.
When a RefIdToObjectIdSql Value is Defined
In versions 3.0 and later, the application stores the REF_ID (not the OBJECT_ID) in the hypertext tag. A click on the object causes the application to run the RefIdToObjectIdSql value, which in turn queries the appropriate HTREF table and derives the OBJECT_ID from the REF_ID and other parameters of the block marker.
You can use a SELECT statement or call a stored procedure with one output variable. Column name/ Output does not matter because the first ordinal column or output variable is assumed to contain the OBJECT_ID value.
A LinkInvoke can be initiated by either a hotlink or a session event.
In the case of a hotlink, pass to RefIdToObjectIdSql the parameters of the tag and @BlockID with the values of the parent text block.
In the case of a session event, pass tag parameters that contain a value for @BlockID.
or
Create a BlockDefinition.RefIdToObjectIdSql SQL ID/SQL statement that does not rely on parent block data.
Menu-Mediated Jump Points You can scroll to a specific point in an instruction by two means:
Through a Go To option in a local menu (covered in this section)
Through a hotlink (see “Hotlink-Mediated Jump Points”)
A local-menu Go To option can serve as an automatic bookmark. You create an automatic bookmark or Go To jump point by inserting a <JP=””> tag at any point after the marker (<M=...>) tag in the text assembly stored procedure. The presence of a single jump point causes a Goto option to appear in the local menu of the displayed hypertext. Each instance of a jump point appears as a Goto submenu option, and when clicked, positions the user at the hypertext line in which that jump point resides. If there are no jump point tags, the Goto option does not appear.

Instruction Windows
Thin-Client Configuration Guide: Basics 307
Jump point tag parameters call out the text of the Goto menu option, where sublevel (nested) options are delimited by a tilde (~): <JP=”Navigation~Top”>
The above example would look like this in a local menu:
Goto
Navigation
Top
There is no limit on the number of nested levels. Note that the text and nesting of menu levels is called out by the parameter list, but the position of the bookmark is determined by the position of the jump point in the hypertext.
Example
The following example of a local menu shows two level-one bookmarks, each with two level-two options. This is followed by an example of returned text showing how these bookmarks were configured. Jump points are in bold text.
Goto
Navigation
Top
Bottom
Controls
Data Collection
Buyoff <M=ScopeQueryValues(AO=8009927433-301,FUSE=0022,SERIAL=N64866,SEQ_NO=040)>
<JP="Navigation~Top">
<S=@PlanningText>
[040]
<B=PlanningText(8009927433-301,0022,N64866,040)>
Drill formers common to attach angles
<A HREF="CAD Viewer(C:\CADDEMO\angle.fsx).@UE"><IMG "@p2sm\draw.ico"></A> CAD Drawing of Angle
Record part serial numbers for angles below:
<JP="Controls~Data Collection">
<IMG "1034093(@CONTROL=20).@UDV">
Install lockbolts common to fuel cell and pressure bulkhead.
<JP="Controls~Buyoff"> <IMG "1034050(@CONTROL=18).@UDV"> Verify you have the proper mandrel and ockbolt collars Use washers to align collar with fluted section of the lockbolt stud. Pull lockbolt studs with pneumatic lockbolt gun.
Drill fillet former attach angles through pilot holes provided in the fillet former.
<A HREF="1034067.@BM"><IMG "@p2sm\camera.ico"></A> </B>
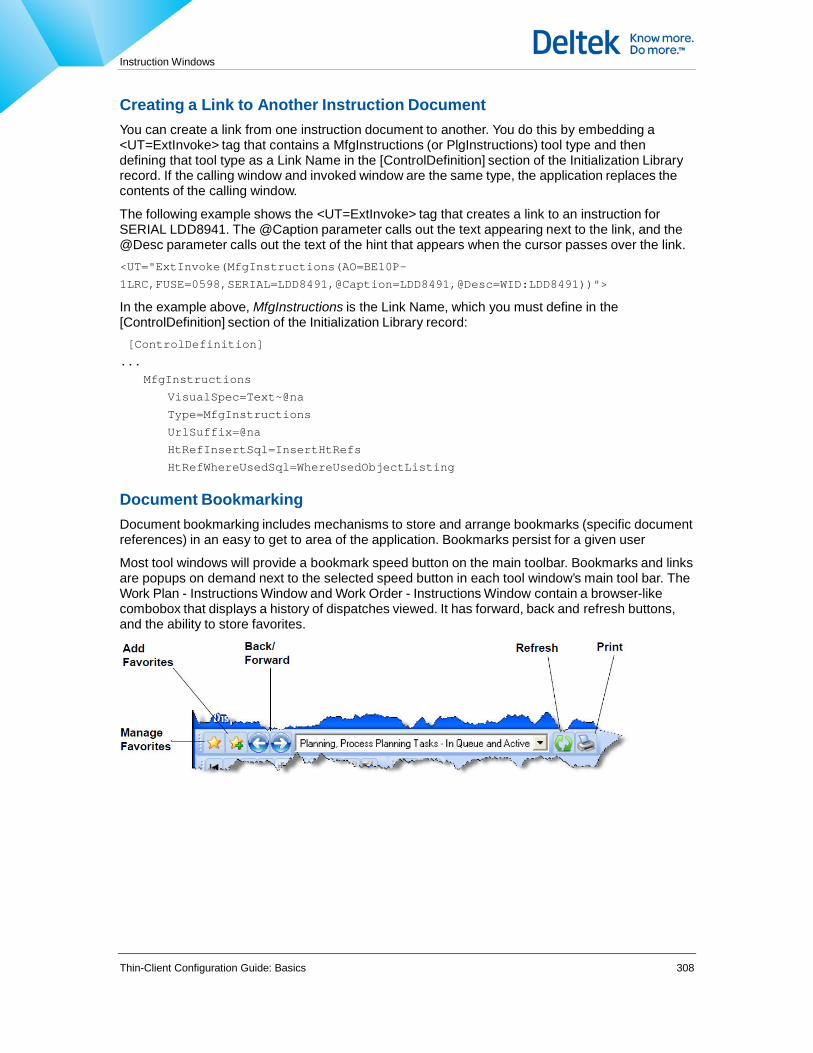
Instruction Windows
Thin-Client Configuration Guide: Basics 308
Creating a Link to Another Instruction Document You can create a link from one instruction document to another. You do this by embedding a <UT=ExtInvoke> tag that contains a MfgInstructions (or PlgInstructions) tool type and then defining that tool type as a Link Name in the [ControlDefinition] section of the Initialization Library record. If the calling window and invoked window are the same type, the application replaces the contents of the calling window.
The following example shows the <UT=ExtInvoke> tag that creates a link to an instruction for SERIAL LDD8941. The @Caption parameter calls out the text appearing next to the link, and the @Desc parameter calls out the text of the hint that appears when the cursor passes over the link. <UT="ExtInvoke(MfgInstructions(AO=BE10P-
1LRC,FUSE=0598,SERIAL=LDD8491,@Caption=LDD8491,@Desc=WID:LDD8491))">
In the example above, MfgInstructions is the Link Name, which you must define in the [ControlDefinition] section of the Initialization Library record: [ControlDefinition]
...
MfgInstructions
VisualSpec=Text~@na
Type=MfgInstructions
UrlSuffix=@na
HtRefInsertSql=InsertHtRefs
HtRefWhereUsedSql=WhereUsedObjectListing
Document Bookmarking Document bookmarking includes mechanisms to store and arrange bookmarks (specific document references) in an easy to get to area of the application. Bookmarks persist for a given user
Most tool windows will provide a bookmark speed button on the main toolbar. Bookmarks and links are popups on demand next to the selected speed button in each tool window’s main tool bar. The Work Plan - Instructions Window and Work Order - Instructions Window contain a browser-like combobox that displays a history of dispatches viewed. It has forward, back and refresh buttons, and the ability to store favorites.

Instruction Windows
Thin-Client Configuration Guide: Basics 309
Bookmarks in a Dispatch return to the focused record.
This functionality adds DocumentCaption property to all Tools and adds OverrideDocumentCaption property to Instructions
This property can contain param fill variables such as: DocumentCaption=Order No: ORDER_NO, Ver :VER, Rev :REV
Additional examples:
[IniLibOverrides] FlowDiagrams.PlanOFD.DocumentCaption=Part No :PART_NO, Plan Ver :PLAN_VERSION, Plan
Rev :PLAN_REVISION Slide.DocumentCaption=:OBJECT_TAG, Rev :OBJECT_REV
DefinableData.PartSerialInfo.DocumentCaption=Part No :PART_NO, Serial :SERIAL_NO, Lot :LOT_NO
Reporting.DocumentCaption=Report :@REPORT, :WORK_LOC

Instruction Windows
Thin-Client Configuration Guide: Basics 310
Accessing and Updating Hyperlink Related Data This section demonstrates how to access and update data related to a hyperlink, and to display descriptive information next to a hyperlink icon.
The tag's existing @Desc property is configured to display to the right of the icon, i.e. by expanding the bitmap and rendering the text into the icon's bitmap at runtime. The width of the "rendered bubble" is predetermined / constant; while height is adjusted to fit the size of the text. Line breaks happen either explicitly using control characters or implicitly using word boundaries. Font name and style is taken from the currently active hypertext font, however, font size is fixed at 8.
The UDV for editing and/or display of existing data can be configured in association with the hyperlink type using ControlDefinitions.
The local menu "Edit Object" sub menu provides a new item named "Data" which invokes the UDV. One UDV serves to both display and edit using UDV scripting to branch within as needed. See the following figure as an example of the functionality.
At link creation, a new REF_ID is generated and param values OBJECT_ID and the new REF_ID are populated and opens params in the hyperlink tag. These two params are permanently saved in the tag. When either HtRefHintSql is defined or the tag's @Desc param is assigned @GetQueryValue(), Edit->Object->Hint is disabled.
Sample Configuration data:
[ControlDefinition] .External Call Plus
..BrowsePriv=
..EditPriv=
..VisualSpec=Icon~Slide

Instruction Windows
Thin-Client Configuration Guide: Basics 311
..Type=DesignerLink
; Selection=LinkInvoke(Slide(@LinkName=External Call
Plus,OBJECT_ID=:OBJECT_ID,REF_ID=:REF_ID,@Desc=Object Id is
:OBJECT_ID,@RenderDescText=True))
; Selection=LinkInvoke(Slide(@LinkName=External Call Plus,OBJECT_ID=:OBJECT_ID,REF_ID=:REF_ID,@Desc='@GetQueryValue(DesignerLinkDesc)',@ RenderDescText=True))
Selection=LinkInvoke(Slide(@LinkName=External Call
Plus,OBJECT_ID=:OBJECT_ID,REF_ID=:REF_ID,@RenderDescText=True))
..UdvId=MFI_SOMETHING
..UrlSuffix=@UE
..GetInstanceRefIdsSql=
..HtRefInsertSql=ControlHtRefInsert
..HtRefWhereUsedSql=HtRefWhereUsedObject
..HtRefHintSql=DesignerLinkDesc
..RptTagCaption=
[IniLibOverrides] SubstitutionUDVs.'MFI_SOMETHING=@GetFromFile(c:\temp\MFI_1003689.txt)' SubstitutionSqlIds.DesignerLinkDesc=select 'Object Id is '||:OBJECT_ID||'\n\nRef Id is '||:REF_ID from dual
There is an additional method which adds a simple Ini Lib configuration option, Icon+BubbleText, to the ControlDefinition's VisualSpec setting which enables this behavior. It provide a global setting for the maximum width of hyperlink bubble text.
Common.HypertextBubbleTextMaxWidth=<pixels>
Default is 600.
Icon moved to the bottom left corner of the bubble text.
Flyover hint does not appear for links defined as Icon+BubbleText.
Remove outline around bubble text.
Also provides MMHtRefHintSql property for Slides.Classifications.Links so that each classification can customize the appearance of the associated hint/bubble text.
Examples:
Slide.Classifications.3D Models.Links.MMVisualSpec=Icon+BubbleText~3dmodels
ControlDefinition.Links.Slide.VisualSpec=Icon+BubbleText~Slide

Instruction Windows
Thin-Client Configuration Guide: Basics 312
Step 4: The Parent Text Assembly Procedure After creating sub-level assembly procedures, create a parent procedure that merges the results returned from each of them. This procedure accepts values for each level present in the scope. For Thin-Client it also accepts an additional parameter that indicates the user-selected navigation level (@NavLevel or @NavLevelFieldName). As with the sub-level procedures, this one returns a single record of text. This procedure nests sublevel text into parent levels and concatenates the range of parent-level records that satisfy the selected intersection of the user-selected navigation level and record position in the scope query. This procedure must mark every level in the scope using the ScopeQueryValues marker tag (<M=...>). Tag parameters must include the full set of keys in the scope, regardless of the current navigation level. Tags are used by the hypertext engine to locate records and to return record values needed for various editing operations performed by the user.
You can use either of two parameters to indicate the user’s current navigation level: @NavLevel or @NavLevelFieldName. The @NavLevel parameter value is the number corresponding to the current navigation level and the @NavLevelFieldName value is the name of the field corresponding to that same level. Both parameters work identically, passing into the level query either the numeric value or field name of the current user level. Because @NavLevelFieldName is an absolute rather than relative identifier, Deltek recommends that you use it instead of @NavLevel whenever possible.
This procedure can also accept the @ToolState parameter, which is a user-selectable value. @ToolState is generally associated with View and Edit modes (and for Web Express Client is always set to View mode). It modifies the manner in which data is prepared and presented by the hypertext engine. For example, tabular data can be incorporated into the text either as formatted rows or as an embedded UDV. In this example, the tabular data would typically be presented as formatted rows of read-only text (<TXT”...”) in the View tool state, and as an embedded UDV in the Edit state. For Thin-Client, you could also use the Live Text tag in the Edit state. For more information on the Live Text tag, see “Markup Tags and Universal Tags.”
In Thin-Client, the Edit state is restricted to those users who have the necessary EditPriv property associated with their user role.
Step 5: Text Interface SQL Statements Next, create SQL statements that act as an interface between assembly text stored procedures and the Instructions tool window. Each instructions text interface statement is a SELECT statement consisting of selected columns relevant to the respective level and one or more columns of type VARCHAR2 or BLOB/CLOB returning text for the given level. The WHERE clause should contain conditions that return a single record for each respective level. Query parameters are filled at runtime by linking the queries in parent-child fashion, beginning with the SQL statement assigned to ScopeQuerySqlId.
For the scope query that returns the cursor, the order of parameter dependencies is as follows:
PlanningScope < PlanningTextPlan < PlanningTextOper < PlanningTextStep
Child query parameter names must be consistent with parent query column names.
The instructions text interface statements for the given example follow:
SqlId: PlanningTextPlan select
plan_id
,plan_version ,plan_revision

Instruction Windows
Thin-Client Configuration Guide: Basics 313
,pl_run_assemble_text(
:@NavLevel
,plan_id
,plan_version
,plan_revision
,0
,''
,''
,:@TOOLSTATE) as ALL_TEXT
from
PL_PLAN /* view */
where
PLAN_ID=:PLAN_ID and
PLAN_VERSION=:PLAN_VERSION and
PLAN_REVISION=:PLAN_REVISION and
PLAN_ALTERATIONS=0
SqlId: PlanningTextOper select plan_id
,plan_version
,plan_revision
,plan_alterations
,oper_no
,pl_run_assemble_text(
:@NavLevel
,plan_id
,plan_version
,plan_revision
,0
,oper_no
,''
,:@TOOLSTATE) as ALL_TEXT
from
PL_OPERATION /* view */
where
PLAN_ID=:PLAN_ID and
PLAN_VERSION=:PLAN_VERSION and
PLAN_REVISION=:PLAN_REVISION and
PLAN_ALTERATIONS=0 and
oper_no=:oper_no
order by
oper_no
SqlId: PlanningTextStep select plan_id
,plan_version
,plan_revision
,plan_alterations
Instruction Windows
Thin-Client Configuration Guide: Basics 314
,oper_no
,step_no
,pl_run_assemble_text(
:@NavLevel
,plan_id
,plan_version
,plan_revision
,0
,oper_no
,step_no
,:@TOOLSTATE) as ALL_TEXT
from
PL_STEP /* view */
where
PLAN_ID=:PLAN_ID and
PLAN_VERSION=:PLAN_VERSION and
PLAN_REVISION=:PLAN_REVISION and
PLAN_ALTERATIONS=0 and
OPER_NO=:OPER_NO and
step_no=:step_no
order by
oper_no
,step_no
Note that data is retrieved through a database view. This is necessary because each query draws data from more than one table, but joins and other examples of complex SQL syntax are not allowed in this context.
The column alias “ALL_TEXT” is provided for clarity and is neither reserved nor necessary. Also, the query can return more than one text BLOB. The instruction tool logic appends the lines returned as BLOB field text as BLOB type fields are encountered in the query, left to right.
Use of the automatic value @NavLevel (or @NavLevelFieldName) allows the stored procedure to branch internally for the navigation level passed in by the application.
The “order by” clause is required for every level that can be summed into the parent level.
Step 6: Column-Specific Scope Properties Next, define properties for the columns returned by the scope query. You do this by configuring the ScopeQueryData indented structure for each Instruction window in the Initialization Library. Use the Structured Editor tab of the Initialization Library tool window to define column properties.
Properties for each ScopeQueryData entry are identical as shown the following table.
ScopeQueryData Properties
Property Win Web Description
FieldName x x The column name corresponding to the field.
DisplayLabel x x The heading name in the navigation grid. This also determines the minimum column width. Expressions are supported for this property. One possible use is to change

Instruction Windows
Thin-Client Configuration Guide: Basics 315
Property Win Web Description
the field heading for the Instructions document depending on the document type. For example:
DiaplayLable=@GetToken('Part Number,Repair Plan',DOC_TYPE_INDEX)
Wherein another column named DOC_TYPE_INDEX returns a value of 1 or 2 depending on the kind of document loaded.
FieldDefinitionId x The Field Definition ID, which causes the Initialization Library properties of the current field to be changed when the Field Modifier tool applies a field/column definition with a matching ID.
Visible x True/False. Determines whether the column is visible in the navigator. The default is True. This field supports expressions for a specific field name and value. For example: Field_flag=’N’
KeyField x When enabled (On), flags this field as one of one or more fields whose values uniquely identify a record in the ScopeQuery. This property must be enabled for a key field in order to properly locate a scope record after executing a Navigator-initiated operation, e.g., Add Step.
Example
The UDV assigned to InsertUdvId returns output values for fields whose KeyField value = On. Costpoint MES uses these values to locate the new record.
DeleteSqlId x The SQL ID that deletes an operation, step, etc. and is initiated by the Delete option in the dropdown menu. See the DropTextSqlId examples and “Column Dropdown Menus.”
InputUdvId x The ID of the UDV that modifies an operation, step, etc. and is initiated by the Modify option in the dropdown menu. See the DropTextSqlId examples and “Column Dropdown Menus.”
InsertUdvId x The ID of the UDV that adds a new operation, step. etc. and is initiated by the Add option in the dropdown menu. See the DropTextSqlId examples and “Column Dropdown Menus.”
RenumberUdvId x The ID of the UDV that renumbers the sequence or step, etc. and is initiated by the Renumber option in the dropdown menu. See the DropTextSqlId examples and “Column Dropdown Menus.”

Instruction Windows
Thin-Client Configuration Guide: Basics 316
Property Win Web Description
DropTextSqlId x The ID of the SQL statement that creates custom formatted data in the column values dropdown list. This query must return a single column of data with the same number of ordered rows returned by the parent level. Correlation with the default menu items is strictly ordinal.
Value list example:
select SEQ_NO||’=’||SEQ_NO||’ ‘||OP_TITLE
from OPERATION
where SERIAL=:SERIAL and REV_ID = ‘E’
Ordinal list example: select SEQ_NO||' '||OP_TITLE
from OPERATION
where SERIAL=:SERIAL
and REV_ID = 'E'
TextSqlId x x The ID of the SQL statement that causes the column to be available as a text summation level. Preventing access to larger text summation levels may be a strategy for coping with excessive network traffic. Any column for which you define this property must be visible.
ValueChangedSq lID
x Identifies a designated column in the Instructions main navigation grid. Whenever a value in the column changes an sql statement is executed.
This property can be used on any field in the ScopeQueryData. It does nothing when not defined.
Executes on the foreground user session.
Provides all values in the moved-to toolscope record as params for the query (as well as the std SystemData values).
AllowSelect x Determines whether the column can be selected as a navigation level in the navigator. 1= On, 0 = Off.
BlockIds x For the given column, the block types that can be inserted by the user through the Insert Block option of the local menu in edit mode. This property should be defined for only the last two FieldNames (columns) in the ScopeQueryData structure.
LockUdvId x The ID of the UDV that allows the user to lock the column, preventing other users from making any changes. When defined causes the Lock option to appear in the dropdown menu for the column.
UnlockUdvId x The ID of the UDV that allows the user to unlock the
Instruction Windows
Thin-Client Configuration Guide: Basics 317
Property Win Web Description
column, allowing other users to make changes. When defined causes the Unlock option to appear in the dropdown menu for the column.
ScopeQueryData example: ScopeQueryData
FieldName=PLAN_ID
DeleteSqlId=
InputUdvId=
DropTextSqlId=
TextSqlId=PlanningTextPlan
DisplayLabel=Plan No.
FieldName=PLAN_VERSION
DeleteSqlId=
InputUdvId=
DropTextSqlId=
TextSqlId=
DisplayLabel=Version
FieldName=PLAN_REVISION
DeleteSqlId=
InputUdvId=
DropTextSqlId=
TextSqlId=
DisplayLabel=Revision
FieldName=OPER_NO
DeleteSqlId=
InputUdvId=OB1_1000276
RenumberUdvId=OB1_1000031
DropTextSqlId=
TextSqlId=PlanningTextOper
DisplayLabel=Oper
FieldName=STEP_NO
DeleteSqlId=
InputUdvId=OB1_1000024
RenumberUdvId=OB1_1000101
DropTextSqlId=
TextSqlId=PlanningTextStep
DisplayLabel=Step
BlockIds=PlanningText
Column Dropdown Menus For each column, you can configure a local dropdown menu of any combination of Add, Delete, Modify, or Renumber options. Options are predefined in appearance and number and cannot be changed. Menu options are controlled by the following properties:
Menu Item Property Action

Instruction Windows
Thin-Client Configuration Guide: Basics 318
Menu Item Property Action
Add InsertUdvId Adds an operation, step, etc.
Delete DeleteSqlId Deletes the current operation, step, etc.
Modify InputUdvId Modifies an operation, step, etc.
Renumber RenumberUdvId Renumbers the values in the current column.
Menu options do not appear in the dropdown list if the corresponding property is not assigned. The following figure shows an Oper column with all 4 dropdown options.
In the Initialization Library record, dropdown menu options are subproperties of the field name in the ScopeQueryData structure ([Instruction].InstructionWindowName.ScopeQueryData.FieldName).
The following example shows DeleteSqlId, InputUdvId, and RenumberUDVId properties configured for the OPER_NO field. [Instructions]
PrPlgInstructions
...
ScopeQueryData
FieldName=ORDER_ID
DisplayLabel=Order ID
Visible=1
TextSqlId=WIDTextOrder
FieldName=OPER_NO
DisplayLabel=Oper
Visible=1
DeleteSqlId=PL_DeleteOper InputUdvId=MF1_1000773 RenumberUDVId=MF1_1000031
TextSqlId=WIDTextOper
Step 7: Mode Characteristics After defining column-specific properties, define the characteristics of each planned mode.

Instruction Windows
Thin-Client Configuration Guide: Basics 319
Creating Modes There are three possible types of modes in any Instruction window.
Mode Thin-Client Web Express Client
View x x
Edit x
Print x
When applicable, the Edit button in the top-left corner of each instruction window toggles between View modes and Edit modes. If you define multiple modes, and the window has the ability to accommodate multiple modes at a single time, a dropdown list allows selection of the appropriate mode. Most windows allow only one mode at a time; if you define multiple modes, they operate sequentially—one after another—as determined by the work flow. For information on work flows, see the Costpoint MES User’s Guide, Volume 5: System Administration.
You configure each view, edit and print mode in the [Instructions].InstructionsWindow.Modes section of the Initialization Library record. Although it is not apparent for print modes, each type of mode configures an Instruction window:
View modes do not allow additions or changes to the instructions in the window.
Edit modes allow additions or changes to the instructions in the window.
Print modes create and configure a second, background Instruction window, causing it to contain all or only specific elements of the onscreen instructions, which are then printed when the user chooses the All Text and Data Pages option in the Print Options dialog box.
Print modes affect only the All Text and Data Pages print option. All other options in the Print Options dialog box are preconfigured and not changeable.
Because all modes control windows, all have the same set of properties. However, all properties do not apply to all modes.
For Thin-Client, you can disable instruction modes at run time by using an expression-controlled privilege. For more information, see “Disabling Instruction Modes at Runtime.”
The following procedures show you how to configure each type of mode. They assume that you have launched the Initialization Library tool and are connected to the desired database and library record.
To create and configure a view mode, complete the following steps:
1. In the tree pane of the Structured Editor tab, double-click in turn [Instructions], the Instruction window for which you want to configure a view mode, Modes, and ViewModes.
2. Under ViewModes, click [Add a New View Mode] and in the right-hand Description field, enter the name of the new view mode and click Add New Entry.
3. Define the following single-word properties in the right-hand pane:

Instruction Windows
Thin-Client Configuration Guide: Basics 320
Property Win Web Description
Priv x x The privilege that allows access to this mode. This value can be an expression/NOT expression derived by the following means:
Direct input of the desired value
Use of a function whose returned value is compared to a True/False standard
Direct return of a calculated value.
Example: @ClientType=’Web’ Note: When using expressions, context data is limited to system variables.
TextEditEnabled x Determines whether the text is editable. Set this to OFF.
NavCommandsEnabled
x Determines whether navigation commands are enabled. ON enables users to navigate to specific levels (steps, operations, etc.) in the instructions.
InsertBlockIDs x The block types that can be inserted in this mode. This property does not apply to view modes.
DefaultNavLevel x x The lowest navigation level displayed when an instruction is first loaded into the Instruction window. Values can be either a string (specifying the field name of the respective level) or a number. A “-1” or blank value (the default) causes the instruction to display with the lowest level divisions. Any other numeric value specifies the displayed navigation level (the higher the value, the lower the level).
PrintMode x A print mode that defines the All Text and Data Pages option in the Print Options dialog box. The print mode is defined under [Instructions].InstructionsWindow.PrintModes.
This property is a window configuration that causes “pouring” of specific information from the currently displayed instruction into a background window, which is then printed.
OtherCommands x Commands accessed via an ellipsis or local menu. See “Window-Launched Other Commands.”
MultilineTabs x When set to On, shows all tabs at once in multiple rows. When set to Off, shows only a single row of tabs and scrolling arrows that allow movement to other tabs not in view.

Instruction Windows
Thin-Client Configuration Guide: Basics 321
Property Win Web Description
RaggedRightTabs
x When set to On, left justifies label text. When set to Off, centers and justifies label text.
TabWordWrap x When set to On, allows wrapping of text in tab labels. This allows tabs to be narrower (and taller) so that more tabs fit in the window.
Tabs x x Page tabs. See “Tabs.”
AuxUdvId x The ID of an auxiliary UDV. See “Auxiliary UDVs.”
AuxUdvLocation x The position of the auxiliary UDV:
Top — At the top of hypertext.
Bottom — At the bottom of hypertext and just above the tabs.
Off
4. To save changes to the Initialization Library record, click the Save button.
To create and configure an edit mode (Thin-Client), complete the following steps:
1. In the tree pane of the Structured Editor tab, double-click in turn [Instructions], the Instruction window for which you want to configure an edit mode, Modes, and EditModes.
2. Under EditModes, click [Add a New Edit Mode] and in the right-hand Description field, enter the name of the new edit mode and click Add New Entry.
3. Define the following properties in the right-hand pane:
Priv The privilege that allows access to this mode. This value can be an expression/NOT expression derived by the following means:
Direct input of the desired value
Use of a function whose returned value is compared to a True/False standard
Direct return of a calculated value.
Example: @ClientType=’Web’ Note: When using expressions, context data is limited to system variables.
TextEditEnabled Determines whether the text is editable. Set this to ON.
NavCommandsEnabled Determines whether navigation commands are enabled.
ON enables users to navigate to specific levels (steps, operations, etc.) in the instructions.
InsertBlockIDs The block types that can be inserted in this mode. Block types (definitions) are defined in the [BlockDefinition]
Instruction Windows
Thin-Client Configuration Guide: Basics 322
section of the library record. Separate multiple types with a tilde (~). For more information on configuring block insertion, see “The Insert Block Option.”
DefaultNavLevel The lowest navigation level displayed when an instruction is first loaded into the Instruction window. Values can be either a string (specifying the field name of the respective level) or a number. A “-1” or blank value (the default) causes the instruction to display with the lowest level divisions. Any other numeric value specifies the displayed navigation level (the higher the value, the lower the level).
PrintMode A print mode that defines the All Text and Data Pages option in the Print Options dialog box. The PrintMode value is a print mode as defined under [Instructions].InstructionsWindow.PrintModes.
This property is a window configuration that causes “pouring” of specific information from the currently displayed instruction into a background window, which is then printed.
OtherCommands Commands accessed via an ellipsis or local menu. See “Window-Launched Other Commands.”
MultilineTabs When set to On, shows all tabs at once in multiple rows. When set to Off, shows only a single row of tabs and scrolling arrows that allow movement to other tabs not in view.
RaggedRightTabs When set to On, left justifies label text. When set to Off, centers and justifies label text.
TabWordWrap When set to On, allows wrapping of text in tab labels. This allows tabs to be narrower (and taller) so that more tabs fit in the window.
Tabs Page tabs. See “Tabs.”
AuxUdvId The ID of an auxiliary UDV. See “Auxiliary UDVs.”
AuxUdvLocation The position of the auxiliary UDV:
Top — At the top of hypertext.
Bottom — At the bottom of hypertext and just above the tabs.
Off
4. To save changes to the Initialization Library record, click the Save button.

Instruction Windows
Thin-Client Configuration Guide: Basics 323
To create and configure a print mode (Thin-Client), complete the following steps:
1. In the tree pane of the Structured Editor tab, double-click in turn [Instructions], the Instruction window for which you want to configure a print mode, Modes, and PrintModes.
2. Under PrintModes, click [Add a New Print Mode] and in the right-hand Description field, enter the name of the new print mode and click Add New Entry.
3. Define the following properties in the right-hand pane:
Priv The privilege that allows access to this mode. This property does not apply to print modes.
TextEditEnabled Determines whether the text is editable.
ON causes editing information to appear in the printed instruction. OFF causes only viewing information to appear in the printed instruction.
NavCommandsEnabled Determines whether navigation commands are enabled. This property does not apply to print modes.
InsertBlockIDs The block types that can be inserted in this mode. This property does not apply to print modes.
DefaultNavLevel The lowest navigation level displayed when an instruction is first loaded into the Instruction window. It therefore determines what levels will be printed. Values can be either a string (specifying the field name of the respective level) or a number. A “-1” or blank value (the default) causes the instruction to display with the lowest level divisions. Any other numeric value specifies the displayed navigation level (the higher the value, the lower the level).
PrintMode A print mode that defines the All Text and Data Pages option in the Print Options dialog box. This property does not apply to print modes.
OtherCommands Commands accessed via an ellipsis or local menu. This property does not apply to print modes.
MultilineTabs When set to On, shows all tabs at once in multiple rows. When set to Off, shows only a single row of tabs and scrolling arrows that allow movement to other tabs not in view.
RaggedRightTabs When set to On, left justifies label text. When set to Off, centers and justifies label text.
TabWordWrap When set to On, allows wrapping of text in tab labels. This allows tabs to be narrower (and taller) so that more tabs fit in the window.
Tabs Page tabs. See “Tabs.”
Instruction Windows
Thin-Client Configuration Guide: Basics 324
AuxUdvId The ID of an auxiliary UDV. See “Auxiliary UDVs.”
AuxUdvLocation The position of the auxiliary UDV:
Top — At the top of hypertext.
Bottom — At the bottom of hypertext and just above the tabs.
Off
4. To save changes to the Initialization Library record, click the Save button.
The following example shows the Modes indented structure for the [Instructions].PrPlgInstructions section. Modes
ViewModes
View
Priv=MfgInstructions$View
NavCommandsEnabled=0
OtherCommands
Tabs
*Instructions~~0~
Header~ActivateUDV:OB1_1000009~380~
Comments~ActivateUDV:OB1_1000013~275~
Drawings~ActivateUDV:OB1_1000012~200~
BOM~ActivateUDV:OB1_1000011~300~
Tooling~ActivateUDV:OB1_1000016~200~
Buyoffs~ActivateUDV:OB1_1000014~200~
Effectivity~ActivateUDV:OB1_1000015~200~
Categorization~ActivateUDV:OB1_1000315~200~
EditModes
Edit_PL
Priv=MfgInstructions$Edit
TextEditEnabled=1
NavCommandsEnabled=1
OtherCommands
Start a New Version~UDV~Update~OB1_1000080
Start a New Revision~UDV~Update~OB1_1000073
-~~
Resequence Operations~UDV~Update~OB1_1000081
Resequence Steps~UDV~Update~OB1_1000082
Copy Plan~UDV~Update~OB1_1000102
Copy Plan Operation~UDV~Update~OB1_1000103
-~~
Update current Task Status~UDV~Update~OB1_1000316
Release to Manufacturing~UDV~Update~OB1_1000195
Tabs
*Instructions~~0~
Header~ActivateUDV:OB1_1000020~380~

Instruction Windows
Thin-Client Configuration Guide: Basics 325
Comments~ActivateUDV:OB1_1000022~200~
Drawings~ActivateUDV:OB1_1000019~200~
BOM~ActivateUDV:OB1_1000018~300~
Tooling~ActivateUDV:OB1_1000057~200~
Buyoffs~ActivateUDV:OB1_1000014~200~
Effectivity~ActivateUDV:OB1_1000021~200~
Categorization~ActivateUDV:OB1_1000296~200~
Edit_IE
Priv=MfgInstructions$Edit
TextEditEnabled=1
NavCommandsEnabled=1
OtherCommands
Tabs
*Instructions~~0~
Header~ActivateUDV:OB1_1000020~380~
Comments~ActivateUDV:OB1_1000022~200~
Drawings~ActivateUDV:OB1_1000019~200~
BOM~ActivateUDV:OB1_1000018~300~
Tooling~ActivateUDV:OB1_1000057~200~
Buyoffs~ActivateUDV:OB1_1000014~275~
Effectivity~ActivateUDV:OB1_1000021~200~
Categorization~ActivateUDV:OB1_1000296~200~
Edit_QA
Priv=MfgInstructions$Edit
TextEditEnabled=1
NavCommandsEnabled=1
OtherCommands
Tabs
*Instructions~~0~
.
.
.[Tabs same as Edit_IE above.]
Note that the mode name string will be used to populate the @ToolState parameter. The @ToolState parameter can then be passed in the assemble text stored procedures to affect the logical flow, and therefore the manner in which text and markup are prepared for parsing by the Instruction window.
For Thin-Client, use the /dt command line option to debug the assemble text logic.
Disabling Instruction Modes at Runtime You can disable an instruction mode at run time by using an expression-controlled privilege. Also, if the OtherCommandNoPrivHides property in the [Common] section the Initialization Library is set to Yes, and privilege logic returns a False result for any mode, that mode is not only disabled, but hidden.
Expressions can be in the NOT form and derived by the following means:
Direct input of the desired value

Instruction Windows
Thin-Client Configuration Guide: Basics 326
Use of a function whose returned value is compared to a True/False standard
Direct return of a calculated value
The technique of filtering an instruction mode through an expression-controlled privilege is an alternative method to ValidModeSql. See “Filtering Instruction Modes.”
The technique described in this section can also disable Other Commands in both UDVs and tool windows. For more information, see “Disabling Other Commands in UDVs at Runtime” and “Disabling Other Commands in Tool Windows at Runtime.”
System data parameter values are always available to privilege expressions. Local context parameters consist of ToolScope values.
The following procedure shows you how to disable an instruction mode at run time. It assumes the following things:
The mode already exists in the tool window. For more information on modes, see “Creating Modes.”
You have launched the Initialization Library Editor and are connected to the desired database.
To disable a mode in an instruction window, complete the following steps:
1. In the Structured Editor tab of the Initialization Library Editor, navigate to the instruction window containing the Other Command/mode you want to disable.
2. Select the appropriate mode.
3. In the right-hand Priv field, enter an expression/NOT expression—which when evaluated as False, disables the command/mode. Use a comma to delimit multiple Priv values.
Filtering Instruction Modes
You can filter an instruction mode so that it is disabled based on the logged-on user and specific attributes of the displayed instruction. For example, if the client does not want planners to edit instructions that have a COMPLETE status, you can disable the planner editing mode when the document status = COMPLETE.
You do this by assigning a value to the ValidModeSqlId property in the appropriate instruction tool window section of the Initialization Library record.
For Thin-Client, the technique of filtering an instruction mode through ValidModeSqlId is an alternative method to filtering modes through an expression- controlled privilege. See “Disabling Instruction Modes at Runtime.”

Instruction Windows
Thin-Client Configuration Guide: Basics 327
The example below shows a ValidModeSqlId value for a Process Planning window. Instructions
...
PrPlgInstructions
ToolCaption=Mfg Instructions – Authoring
PrintHeader=Reference Copy As Of :@SystemDate(mm/dd/yyyy)
InvokeFullScreen=1
NewUDVId=
DeleteSqlID=
ValidModeSqlId=PrPlgValidMode
...
The ValidModeSqlId value acts as a filter that is executed at each of the following points:
Filter Point Win Web
When the current user changes x
When a new instructions document loads x x
When the window changes from View to Edit mode x
The call to ValidModeSqlId can include either of two parameters plus the field parameters of the current scope:
@ValidToolMode=<ModeType(View/Edit)>.<ModeName>
Use the @ValidToolMode parameter to evaluate a single mode at a time. In this case, ValidModeSqlId returns a Boolean result that accepts/rejects the current mode.
@ValidToolModeType=<ModeType(ViewModes/EditModes/PrintModes)>
Use the @ValidToolModeType parameter to return a comma- or tilde-delimited list of all valid modes of the given type. A call using this parameter should reduce database transactions/ bandwidth.
The ValidModeSqlId value can use a SELECT statement or call a stored procedure with one output variable. Column name/Output does not matter. In the case of an @ValidToolMode call, the first ordinal column or output variable is assumed to contain the Boolean result (Y/N,0/1) that denotes acceptance of the @ValidToolMode parameter. In the case of an @ValidToolModeType call, when Costpoint MES sees a returned nonBoolean value, it assumes the value is a delimited string and sets the mode dropdown list according to string values.
In the valid modes check, missing parameters are permitted, and are automatically assigned NULL/blank values.
The following examples show how the PrPlgValidMode statements might look for each parameter case, @ValidToolMode and @ValidToolModeType.
Thin-Client Example, @ValidToolMode Sql Lib Example:
SqlId -
PrPlgValidMode
Text -

Instruction Windows
Thin-Client Configuration Guide: Basics 328
exec IS_MODE_VALID(:@Config,:@ValidToolMode,
:PLAN_ID,:PLAN_VERSION,:PLAN_REVISION,:PLAN_ALTERATIONS,:STATUS,
:@Result)
Stored Proc:
procedure IS_MODE_VALID
(v_i_config varchar2,
v_i_validtoolmode varchar2,
v_i_plan_id varchar2,
v_i_plan_version varchar2,
v_i_plan_revision varchar2,
v_i_plan_alterations varchar2,
v_i_status varchar2,
v_o_y_or_n out varchar2)
as
begin
-- Your logic goes here, e.g.
-- if (v_i_status = 'COMPLETE') and (v_i_validtoolmode = 'EditModes.Edit_PL')
-- then v_o_y_or_n := 'N'
-- else v_o_y_or_n := 'Y';
-- end if;
end;
Thin-Client Example, @ValidToolModeType Sql Lib Example:
SqlId -
PrPlgValidMode
Text -
exec GET_VALID_MODES(:@Config,:@ValidToolModeType,
:PLAN_ID,:PLAN_VERSION,:PLAN_REVISION,:PLAN_ALTERATIONS,:STATUS,
:@Result)
Stored Proc:
procedure GET_VALID_MODES
(v_i_config varchar2,
v_i_validtoolmodetype varchar2,
v_i_plan_id varchar2,
v_i_plan_version varchar2,
v_i_plan_revision varchar2,
v_i_plan_alterations varchar2,
v_i_status varchar2,
modes_listout varchar2)
as
begin
-- Your logic goes here, e.g.
-- if (v_i_status = 'IN_QUEUE') and (v_i_validtoolmodetype = 'EditModes’)
-- then modes_list := 'Edit_PL,Edit_ID,Edit_QA'
-- if (v_i_status = 'COMPLETE') and (v_i_validtoolmodetype = 'EditModes’)

Instruction Windows
Thin-Client Configuration Guide: Basics 329
-- then modes_list := 'Edit_ReadOnly'
-- if (v_i_validtoolmodetype = 'ViewModes’)
-- then modes_list := 'View'
-- end if;
end;
Step 8: Window Behavior The final steps in hypertext construction involve configuring the behavior of the Instruction window itself.
Configuring the Window Interface You configure the attributes of an instruction window in the [Instructions] section of the Initialization Library record: This section contains subsections for manufacturing (MfgInstructions), planning (PlgInstructions) and supplemental (SupplementalInstructions) instruction windows. Many attributes are explained in detail in separate sections of this manual and are referenced accordingly.
The following procedure shows you how to configure an instruction window. It assumes that you have launched the Initialization Library tool and are connected to the desired database and library record. See “Launching a Configuration Tool” in the Costpoint MES System Configuration Manager Manual.
To configure the instruction window interface, complete the following steps:
1. In the tree pane of the Structured Editor tab, double-click [Instructions], and then the Instruction window you want to configure
2. Define the following properties in the right-hand pane:
Property Win Web Description
ToolCaption x x The name that will appear in the title bar of the tool window.
InvokeFullScreen x x Determines whether the tool window will be opened fullscreen or not:
On. Opens the tool window fullscreen.
Off. Opens the tool window fullscreen when no other window is already open; opens the tool window normalized (halfscreen) when another window is already open.
DocumentCaption x Param fill text which appears as the document description in the top tool bar history list of every tool window.
For example:
DocumentCaption=Part No :PART_NO, Plan Ver
:PLAN_VERSION, Plan Rev :PLAN_REVISION

Instruction Windows
Thin-Client Configuration Guide: Basics 330
Property Win Web Description
DefaultToolWidth x The size of the invoked window:
Wide. 100% minus the SmallScreenPercent value as set in the [Common] section
Half. Half the available screen width
Narrow. The SmallScreenPercent value as set in the [Common] section.
No Change. The last invoked size
ConfirmCloseWindow
x When enabled (On), causes a confirmation box to display when you attempt to close this tool window.
ViewPriv x x (String) The privilege that allows a user to view this window. This value can be an expression/NOT expression derived by the following means:
Direct input of the desired value
Use of a function whose returned value is compared to a True/False standard
Direct return of a calculated value
Example: @ClientType=’Web’ Note: When using expressions, context data is limited to system variables.
BrowsePriv x (String) For Web Browser Express, the privilege required to browse this window. This value can be an expression/ NOT expression derived by the following means:
Direct input of the desired value
Use of a function whose returned value is compared to a True/False standard
Direct return of a calculated value
Example: @ClientType=’Web’ Note: When using expressions, context data is limited to system variables.
HypertextToolbarVisible
x When enabled (On), displays the hypertext toolbar at the top of the window in addition to displaying hypertext options on the local menu.
NavigatorLocation x The position of the Navigator:
Top — At the top line of the window, if there is room for it; otherwise it wraps to the next line
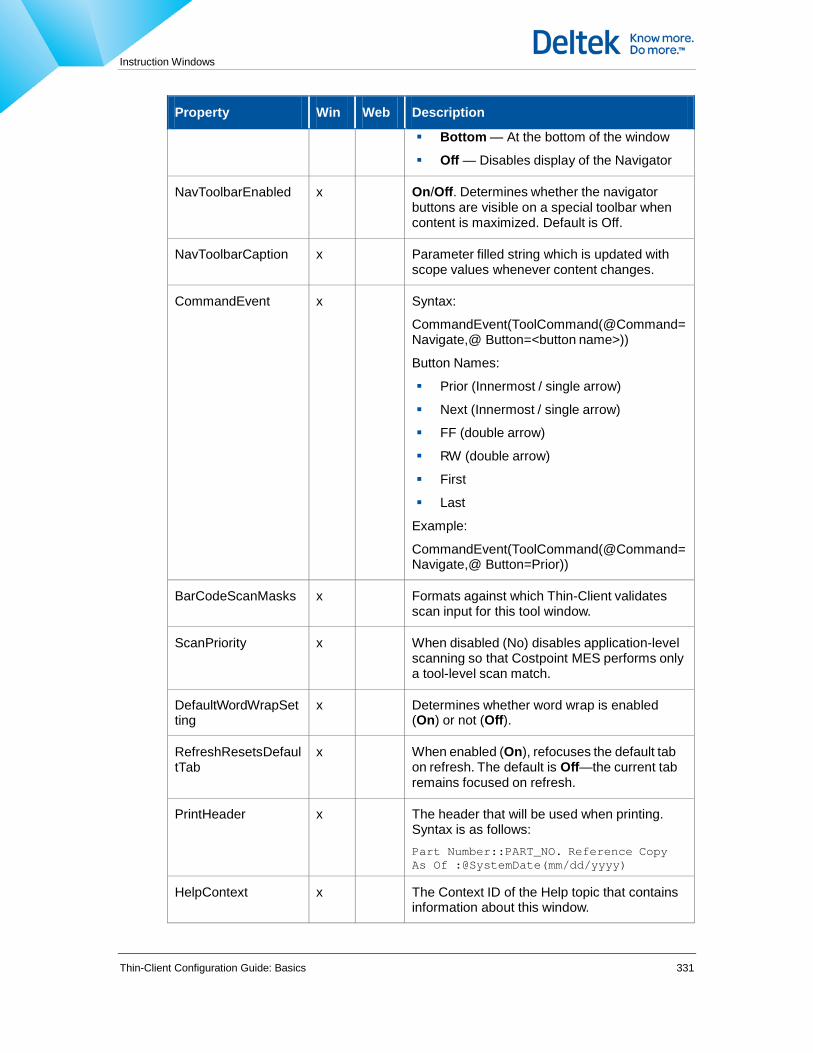
Instruction Windows
Thin-Client Configuration Guide: Basics 331
Property Win Web Description
Bottom — At the bottom of the window
Off — Disables display of the Navigator
NavToolbarEnabled x On/Off. Determines whether the navigator buttons are visible on a special toolbar when content is maximized. Default is Off.
NavToolbarCaption x Parameter filled string which is updated with scope values whenever content changes.
CommandEvent x Syntax:
CommandEvent(ToolCommand(@Command=Navigate,@ Button=<button name>))
Button Names:
Prior (Innermost / single arrow)
Next (Innermost / single arrow)
FF (double arrow)
RW (double arrow)
First
Last
Example:
CommandEvent(ToolCommand(@Command=Navigate,@ Button=Prior))
BarCodeScanMasks x Formats against which Thin-Client validates scan input for this tool window.
ScanPriority x When disabled (No) disables application-level scanning so that Costpoint MES performs only a tool-level scan match.
DefaultWordWrapSetting
x Determines whether word wrap is enabled (On) or not (Off).
RefreshResetsDefaultTab
x When enabled (On), refocuses the default tab on refresh. The default is Off—the current tab remains focused on refresh.
PrintHeader x The header that will be used when printing. Syntax is as follows: Part Number::PART_NO. Reference Copy As Of :@SystemDate(mm/dd/yyyy)
HelpContext x The Context ID of the Help topic that contains information about this window.

Instruction Windows
Thin-Client Configuration Guide: Basics 332
Property Win Web Description
HistoryText x The format of the each history entry as shown in the history button menu. Syntax is as follows: <Text :Param1 :Param2 :Paramn>
where Text can be any alphanumeric string and Param can be any valid parameter passed to the window. Example: If HistoryText = Order ID = :ORDER_ID Each menu entry looks like this: Order ID = 1350
If the HistoryText value is blank, all history entries show the first three passed parameters: Param1=:Param1, Param2=:Param2, Param3=:Param3
AllowMultiLevel x When enabled (On) allows nesting of multiple records. When disabled (Off), disables navigation dropdown menus in the instructions navigator. Note: AllowMultiLevel=On is now compatible with a configuration that returns more than one record in the instruction scope; however, if Error or Text Load diagnostics are enabled when this occurs, Costpoint MES issues a warning.
ObjectManagerName x The name of an Object Manager as defined in the [ObjectManagers] section of the Initialization Library record. Causes the Object Manager button to appear in the tool bar, enabling the insertion of objects (e.g., standard operations) into the instruction.
CheckUpdateSqlId x The ID of the SQL statement that, on loading of a readonly instruction, checks to see if that instruction can be edited as a new revision. When it returns an ‘OK’ string, it causes the disabled Edit button to be replaced with the Edit As
button in the toolbar; on clicking the Edit As button, the EditAsUdvId UDV appears (see below).
This statement should use the parameters provided by @ToolScope and return an ‘OK’ string.
EditAsUdvId x The ID of the UDV that appears when the user clicks the Edit As button (as enabled by the CheckUpdateSqlId value above).

Instruction Windows
Thin-Client Configuration Guide: Basics 333
Property Win Web Description
This UDV should create a new version of the current instruction using parameters provided by @ToolScope and user input, and load the instruction window accordingly.
NewUdvId x The ID of the UDV used to create a new instruction (plan, work order, etc.) through the New button. .
SaveAsUdvId x The ID of the UDV that allows the instruction to be saved as a new revision.
DeleteSqlId x The ID of the SQL statement that deletes the instruction in the window.
DeletePrompt x An alternative prompt that appears when the user clicks the Delete button in the instruction window.
If this property is not defined, the default prompt appears.
ValidModeSqlId x x The ID of the SQL statement that acts as a mode filter. For more information, see “Filtering Instruction Modes.”
UpdateModeAfterMo ve
x When enabled (On), reapplies modes after a change in the position of the scope query. This causes the correct mode to be applied to records that have been canceled or changed in such a way that the current mode no longer applies.
UpdateModeAfterMove should be enabled only when modes are applied conditionally, i.e., through execution of ValidModeSqlId (see above). For example, you have a scope that consists of multiple records identified by ITEM_NO and STATUS, and your ValidModeSqlId disables Edit mode when STATUS = CLOSED. If UpdateModeAfterMove is enabled, any move from one record to another runs ValidModeSqlId and reenforces the correct mode. Therefore, moving back to a CLOSED record automatically disables editing.
SideNotesDefFontId x The font ID for the Sides Notes window as specified in the [ApplicationFont] section.
NormalHypertextSideNoteWidth
x Sets the normal width of the hypertext side note panel.

Instruction Windows
Thin-Client Configuration Guide: Basics 334
Property Win Web Description
MaxHypertextSideNo teWidth
x Sets the maximized width of the hypertext side note panel.
NormalSlideSideNoteWidth
x Sets the normal width of the slide side note panel.
MaxSlideSideNoteWi dth
x Sets the maximized width of the slide side note panel.
CloseExpression x The expression is evaluated whenever instructions content changes. If this expression is defined and evaluates to true, the side panel is closed.
NestedQueriesEnable d
x Determines whether queries can be nested. 0=Off, 1=On.
DefaultNavLevel x x The lowest navigation level displayed when an instruction is first loaded into the window. Values can be either a string (specifying the field name of the respective level) or a number. A “-1” or blank value (the default) causes the instruction to display with the lowest level divisions. Any other numeric value specifies the displayed navigation level (the higher the value, the lower the level). For more information, see “Navigation Levels.”
TitleSql x x The ID of the SQL statement that displays text in the title area below the instructions navigator in instructions or discrepancy tool windows. This is typically information that does not appear in the scope. You can use either a SELECT statement or a stored procedure. WHERE clause parameters must be identical to, or a subset of, parameters used in the ScopeQuerySqlId statement.
NavLevelEnabledSql x x The ID of the SQL statement that evaluates each potential navigation level, returning a Y or N for each level. Any N value blocks user access to that level. (When a navigation level is accessible, Costpoint MES underlines the column label of that level in the Instruction identifier, and changes the cursor to a hand as it passes over the label.)
If a NavLevelEnabledSql value is not defined, each navigation level is accessible according to the scope query settings for the corresponding column (through the FieldName.TextSqlId and

Instruction Windows
Thin-Client Configuration Guide: Basics 335
Property Win Web Description
FieldName.AllowSelect properties).
NavLevelEnabledSql executes whenever an Instruction window is invoked and/or refreshed.
NavLevelEnabledSql also returns the current scope parameters and the @NavLevel value.
As of FW 4.1.8, if the corresponding SQL_ID returns an N value for any level, the dropdown list for that level is disabled.
AlwaysNavigateAtLowestLevel
x Determines movement between navigation levels. 1/On moves to the next value at the lowest navigation level regardless of the current navigation level. This is the default, which will be set if the value is blank or set to -1. 0/Off moves the scope to the nearest differing value at the current navigation level. For more information, see “Navigation Levels.”
ScopeQuerySqlId x x The ID of the SQL statement that returns a cursor defining the entire scope of the instruction. For more information, see “Step 1: The Scope Query.”
MarkerFieldTemplate x Reduces the redundant text returned by the assemble text procedure/package. Example: MarkerFieldTemplate=ORDER_ID,OPER_NO,OPE R_KEY, STEP_NO,STEP_KEY
PrefetchObjectDataSqlID
x This new Instructions tool window setting makes it possible to define a Sql Lib query which pre-fetches attributes for all hyperlink objects which are present in the current instructions content. This technique prevents issuing individual requests for thumbnails, object data and object bubble hint for each object parsed.
ScopeQueryData x x Defines each column (field) in the scope containing unique information. For more information, see “Step 2: Key Columns and Subqueries.”
To configure properties for each field in the scope query, see “Step 6: Column-Specific Scope Properties.”
LoadTextWithDocum entEnabled
x When enabled (On/1), on initial display of an instruction, loads the entire hypertext document into memory. For large documents this means longer loading intervals, but shorter

Instruction Windows
Thin-Client Configuration Guide: Basics 336
Property Win Web Description
scrolling intervals. For more information, see the tail end of “Navigation Levels.”
LoadTextOnDemandEnabled
x When enabled (On/1), on initial display of an instruction, loads only the first screenful of the hypertext document into memory. Loads subsequent portions in response to scrolling and [Page Down] commands. For large documents this means shorter loading intervals, but longer scrolling intervals.
Modes x x Defines edit, view, and print modes for the window. For more information, see “Creating Modes.”
MaximizedContentOnChange
x This optional behavior is determined by the Ini Lib setting, Instructions.<Instr type>.Modes.<Mode type>.<Mode>.MaximizedContentOnChange=0/1
For example: [IniLibOverrides]
Instructions.MfgInstructions.Modes.ViewModes.View_Alt. MaximizedContentOnChange=1
Instructions.PrPlgInstructions.Modes.EditModes.Edit_IE.M
aximizedContentOnChange=1
The command in the ini should only maximize the screens during launch of that screen and not if the screen view mode is being changed.
The maximized command should always show the tabs.
When invoking the side panel the maximized mode is normalized.
Enabling/Disabling Window Controls You can enable/disable the visibility and function of controls in the following windows:
Dispatch
Shell
Instructions
Definable Data
Flow Diagram
Multimedia Editor
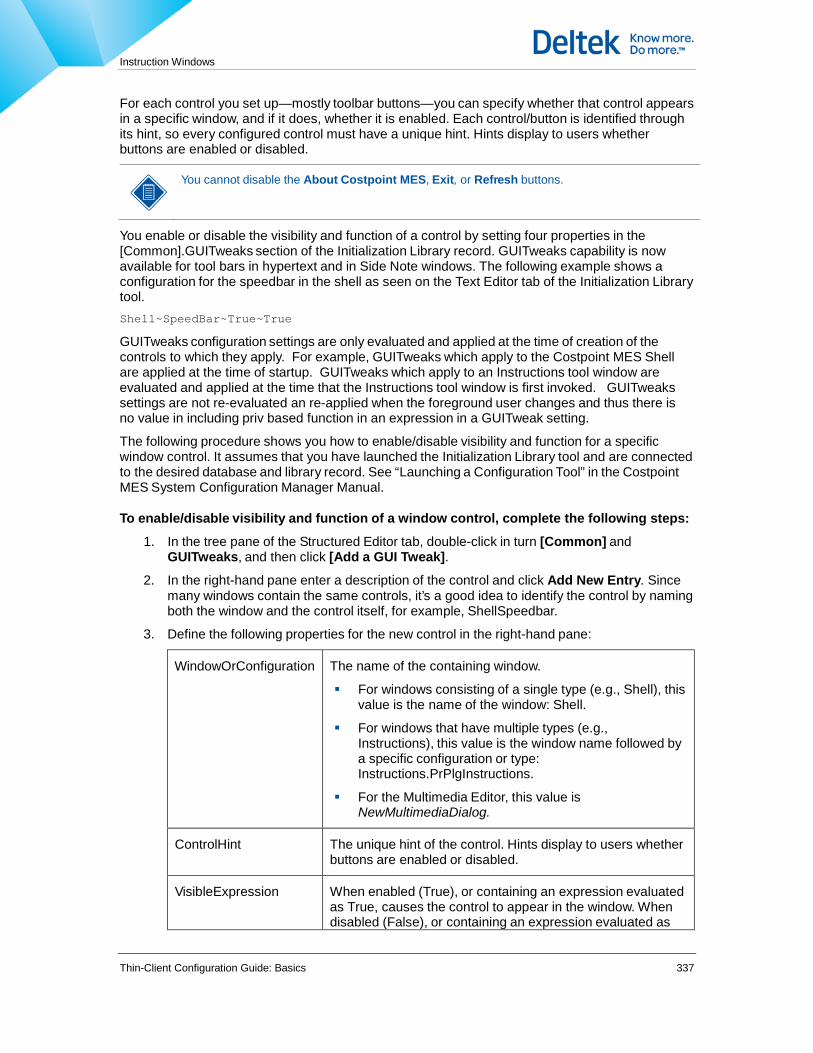
Instruction Windows
Thin-Client Configuration Guide: Basics 337
For each control you set up—mostly toolbar buttons—you can specify whether that control appears in a specific window, and if it does, whether it is enabled. Each control/button is identified through its hint, so every configured control must have a unique hint. Hints display to users whether buttons are enabled or disabled.
You cannot disable the About Costpoint MES, Exit, or Refresh buttons.
You enable or disable the visibility and function of a control by setting four properties in the [Common].GUITweaks section of the Initialization Library record. GUITweaks capability is now available for tool bars in hypertext and in Side Note windows. The following example shows a configuration for the speedbar in the shell as seen on the Text Editor tab of the Initialization Library tool. Shell~SpeedBar~True~True
GUITweaks configuration settings are only evaluated and applied at the time of creation of the controls to which they apply. For example, GUITweaks which apply to the Costpoint MES Shell are applied at the time of startup. GUITweaks which apply to an Instructions tool window are evaluated and applied at the time that the Instructions tool window is first invoked. GUITweaks settings are not re-evaluated an re-applied when the foreground user changes and thus there is no value in including priv based function in an expression in a GUITweak setting.
The following procedure shows you how to enable/disable visibility and function for a specific window control. It assumes that you have launched the Initialization Library tool and are connected to the desired database and library record. See “Launching a Configuration Tool” in the Costpoint MES System Configuration Manager Manual.
To enable/disable visibility and function of a window control, complete the following steps:
1. In the tree pane of the Structured Editor tab, double-click in turn [Common] and GUITweaks, and then click [Add a GUI Tweak].
2. In the right-hand pane enter a description of the control and click Add New Entry. Since many windows contain the same controls, it’s a good idea to identify the control by naming both the window and the control itself, for example, ShellSpeedbar.
3. Define the following properties for the new control in the right-hand pane:
WindowOrConfiguration The name of the containing window.
For windows consisting of a single type (e.g., Shell), this value is the name of the window: Shell.
For windows that have multiple types (e.g., Instructions), this value is the window name followed by a specific configuration or type: Instructions.PrPlgInstructions.
For the Multimedia Editor, this value is NewMultimediaDialog.
ControlHint The unique hint of the control. Hints display to users whether buttons are enabled or disabled.
VisibleExpression When enabled (True), or containing an expression evaluated as True, causes the control to appear in the window. When disabled (False), or containing an expression evaluated as

Instruction Windows
Thin-Client Configuration Guide: Basics 338
False, hides the control. Expressions can be derived by the following means:
Direct input of the desired value
Use of a function whose returned value is compared to a True/False standard
Direct return of a calculated value
EnableExpression When enabled (True), or containing an expression evaluated as True, enables the control. When disabled (False), or containing an expression evaluated as False, disables the control. Expressions can be derived by the following means:
Direct input of the desired value
Use of a function whose returned value is compared to a True/False standard
Direct return of a calculated value
Disabling Controls in the Multimedia Editor
You tweak controls in the Multimedia Editor by creating a GUITweak for each control you want to hide or disable.
The value in the WindowOrConfiguration field must be NewMultimediaDialog.
The value in the ControlHint field must exactly match the hint for the control you want to hide or enable/disable.
Values in VisibleExpression and EnableExpression fields can be True/False or expressions that when evaluated as True, cause the control to appear and to be enabled, respectively.
Optimizing Scrolling You can optimize scrolling for hypertext that contains many UDVs and/or graphics (as of release 7100) by setting a Boolean property in the [Common] section of the Initialization Library record.
When the OptimizedHypertextScrolling property is set to On, Costpoint MES does not update/display UDVs or graphics as it scrolls. It updates and displays only those controls and graphics that appear in the viewing area when scrolling stops.
When OptimizedHypertextScrolling is set to Off, Costpoint MES updates and displays every UDV and graphic as it scrolls.
For graphics only, when OptimizedHypertextScrolling is enabled, Thin-Client displays the file referenced by [StdMarkUp].Pending in place of inline graphics during the scrolling process. When scrolling is complete, Thin-Client replaces in-view bitmaps with inline graphic files. A Pending.bmp file is included in 7.1.1.0 and later installations and is referenced in the Initialization Library record installed with these releases.
If you are using an Initialization Record from a pre-7.1.1.0 release/implementation, you must add a reference for the Pending entry in the [StdMarkUp] section of the Ini record in order to display the desired bitmap during scrolling. To do this, add an entry using the following example as a guide:
[StdMarkUp] Pending=@P2SM\pending.bmp

Instruction Windows
Thin-Client Configuration Guide: Basics 339
Navigation Levels
In Web Express Client, navigation controls are displayed, but the user cannot change them to navigate. The following discussion, therefore, applies mostly to Thin- Client.
A navigation level is a number that indicates the relative position of a division of text, where a division of text functions hierarchically and can itself contain divisions of text. The hypertext engine sums (collects) these consistent divisions of information.
Configurations often define more than a single navigation level (for example, instruction>operation>step>substep). Use the [InstructionsWindowName].DefaultNavLevel property to set the navigation level the first time text is loaded into the Instructions tool window. This property accepts data in various forms. 1-based numeric data values refer to the visible columns in the main navigation grid; character values refer to the column name in the main navigation grid. A blank or -1 value tells the system to calculate to the lowest level of text that has been assigned a query in the SQL Library.
The following are example NavLevel values: DefaultNavLevel=
DefaultNavLevel=-1
DefaultNavLevel=3
DefaultNavLevel=OPER_NO
The VCR-like navigation buttons (see Figure 9-7) between the navigation grid and the hypertext area move the position of the cursor displayed in the grid and also locate the hypertext scroller by using <M=...> marker tags.
The [InstructionsWindowName].AlwaysNavigateAtLowestLevel property modifies the effect of the
Next Lowest Level and Prior Lowest Level navigation buttons.
1/On moves the scope one record at a time (to the next value at the lowest navigation level) regardless of the current navigation level. This is the default, which is set if the value is blank or -1.
0/Off moves the scope to the nearest differing value at the current navigation level (the level as indicated by the Navigation Level icon). In effect, this setting dynamically sets the current navigation level as the lowest level.
Buttons have the following functions based on the indicated AlwaysNavigateAtLowestLevel value:
Navigation Button Actions Based on AlwaysNavigateAtLowestLevel Value
Button Function when AlwaysNavigateAtLowestLevel = 1
Function when AlwaysNavigateAtLowestLevel = 0
Top of Instruction. Moves the cursor to the first value at the lowest level in the instruction.
Top of Instruction. Moves the cursor to the very first value at the lowest level in the instruction.
Prior level. Moves the cursor to the prior value at the next higher level. If the lowest level corresponds to a substep, this button moves the cursor
Prior level. In relationship to the current navigation level, moves the cursor to the prior value at the next higher level. If the current navigation level is a step and the

Instruction Windows
Thin-Client Configuration Guide: Basics 340
Button Function when AlwaysNavigateAtLowestLevel = 1
Function when AlwaysNavigateAtLowestLevel = 0
to the previous step.
If there are less than two levels, this button disappears.
next higher level is a sequence, this button moves the cursor to the prior sequence.
If there are less than two levels, this button disappears.
Prior Lowest Level. Moves the cursor to the previous value at the lowest level.
Prior Lowest Level. In relationship to the current navigation level, moves the cursor to the prior value at the same level.
Next lowest level. Moves the cursor to the next value at the lowest level.
Next Lowest Level. In relationship to the current navigation level, moves the cursor to the next value at the same level.
Next level. Moves the cursor to the next value at the next higher level. If the lowest level corresponds to a substep, this button moves the cursor to the next step. If there are less than two levels, this button disappears.
Next level. In relationship to the current navigation level, moves the cursor to the next value at the next higher level. If the current navigation level is a step and the next higher level is a sequence, this button moves the cursor to the prior sequence.
If there are less than two levels, this button disappears.
Bottom of Instruction. Moves the cursor to the very last value in the lowest level of the instruction.
Bottom of Instruction. Moves the cursor to the very last value in the lowest level of the instruction.
CommandEvent
Provides a way to control instructions navigator using configuration commands
Syntax: CommandEvent(ToolCommand(@Command=Navigate,@Button=<button name>)) Button Names:
Prior (Innermost / single arrow)
Next (Innermost / single arrow)
FF (double arrow)
RW (double arrow)
First
Last
Example: CommandEvent(ToolCommand(@Command=Navigate,@Button=Prior))
Generally, hints for Top of Instruction and Bottom of Instruction buttons contain the words “First” and “Last,” respectively. Hints for left-facing buttons contain the word “Prior” and right-facing buttons contain the word “Next.” However, the rest of the hint depends on the names of the navigation levels (step, substep, etc.) and the setting of the AlwaysNavigateAtLowestLevel property.

Instruction Windows
Thin-Client Configuration Guide: Basics 341
If AlwaysNavigateAtLowestLevel = 1, the hint for the button is static (for example, “Prior substep”).
If AlwaysNavigateAtLowestLevel = 0, the lowest navigation level is dynamic and the hints for the four midmost buttons will reflect the names of the current lowest level and next higher level.
In the case of large documents, a customer might want to control the initial loading time. Two properties control this: LoadTextWithDocumentEnabled and LoadTextOnDemandEnabled.
LoadTextWithDocumentEnabled loads the entire document into memory. For large documents, this results in a longer loading interval, but shorter scrolling intervals. The default for this property is On/1. LoadTextOnDemandEnabled loads only the first portion of the document and then loads subsequent portions in response to scrolling or [Page Down] commands. This results in a shorter loading interval, but longer scrolling intervals.

Multilanguage Display
Thin-Client Configuration Guide: Basics 342
Multilanguage Display Windows Client supports the Unicode character set, allowing you to create Standard Text entries in language-specific variations and to display them on Work Plan - Instructions or Work Order - Instructions screens. This chapter shows you how multilanguage display works and how to configure it.
How Multilanguage Display Works — Windows When multilanguage display is configured and enabled, the Standard Text window is divided into two language panels, the Authoring panel and the Display panel.
The Authoring panel allows authoring and editing of language-specific text strings for a single entry. The Display panel allows display of any one of those text strings—either the primary text string or a language-specific variant. Each Standard Text entry is still a single object, but for multilanguage display, that object is associated with one or more language-specific text variants, which display according to the user-selected display language.
When configured to enable multilanguage display, Instruction windows can display Standard Text two ways — with the primary text string only, or with the primary text string followed by a user-selected variant string.
Aut
horing/editing language
Display panel. Display existing strings in this panel.
Authoring panel, Create language-specific strings in this panel. Display language

Multilanguage Display
Thin-Client Configuration Guide: Basics 343
Multilanguage Constraints - Windows When multilanguage display is enabled, the following features in the Standard Text window are limited to English language strings:
The Spell Check utility
Rich Text
Variables
Configuration Components - Windows You enable multilanguage display for Standard Text and Instruction windows by configuring some components.
Multilanguage Configuration Components
Component Description

Multilanguage Display
Thin-Client Configuration Guide: Basics 344
Component Description
Oracle NLS_LANG parameter The Oracle software parameter that sets the language, territory, and character set used by the client application and the database server.
This value should be AMERICAN_AMERICA.AL32UTF8. See “The Oracle NLS_LANG Parameter,” .
Windows NLS_LANG setting The Oracle NLS_LANG parameter as it resides in the Windows Registry. This value should be AMERICAN_AMERICA.AL32UTF8.
See “The Windows NLS_LANG Setting,”.
PL/SQL Developer Unicode Enabled setting
The PL/SQL Developer software setting that enables Unicode display.
This third-party software is necessary for PL/SQL development because although Oracle 9i development tools support Unicode, they cannot display it correctly at this time.
Make sure the Unicode Enable setting is checked.
See “The PL/SQL Developer Unicode Enabled Setting,” .
Client machine Locale and Region settings Locale and region settings for the client machine.
Enable these settings as needed through the Windows Regional and Language Options dialog box.
See “Client Machine Locale and Region Settings,”.
Onscreen keyboard An onscreen keyboard whose keys map to an alternate input language on the client machine.
Add input languages through the Windows Regional and Language Options dialog box.
See “The Onscreen Keyboard,”.

Multilanguage Display
Thin-Client Configuration Guide: Basics 345
Component Description
Initialization Library settings General
[ApplicationsFonts]<FontID>: Applications fonts based on Unicode- supporting typefaces.
[Localization]<LanguageID>: User-configured languages that allow display of Standard Text in those languages.
Instruction windows
ViewModes<ViewModeName>.Languages: A list of languages in which the window can display Standard Text for the given mode.
Standard Text window
[StdText].EmbedSelectSql: The SQL ID used by instruction windows to populate Standard Text instances with multilanguage text.
See the following sections:
“Unicode-Supporting Fonts,”
“Application Fonts,”
“Display Languages,”
“Standard Text Database Tables,”
“The EmbedSelectSql Property,”
“Adding a Language to the Standard Text Window,”
“Adding a Language to an Instruction Window,”
Portable Object Files The strings that should be translated are contained in a specially formatted text file called a PO (portable object) file. The PO and MO files are commonly used formats that have standard utilities for generating the files. See “Portable Object Files,”.
The Oracle NLS_LANG Parameter - Windows Oracle uses the NLS_LANG parameter to set the language and territory for the database server and for the client application. It also sets the client’s character set, which is used to enter and display data through Windows Client.
On Microsoft Windows platforms, NLS_LANG is a Registry value.
On UNIX platforms, NLS_LANG is a local environment variable that has three components.

Multilanguage Display
Thin-Client Configuration Guide: Basics 346
NLS_LANG = Language_Territory.Charset
Where:
Language —This is the unique name of a language. Each language has default values for territory and charset arguments.
The default language is AMERICAN. The default Territory and Charset values for AMERICAN are AMERICA.US7ASCIII.
Territory — This is the unique name of a supported region associated with the given language. If this value is not specified, it defaults to the Territory of the specified language.
Charset — This is the character set used by the client application. Each supported character set is represented by a unique acronym consisting of a two-character region, the number of bits representing each character, and the Standard Character set name.
For example:
AL32UTF8
AL = All Languages
32 = 32 bits
UTF8 = UTF8 Unicode
WE8MSWIN1252
WE = Western European
8 = 8 bits
MSWIN1252 = MS Windows 1252
If no Charset is specified, it defaults to the Charset of the specified language.
For multilanguage display, Windows Client uses the UTF-8 encoding scheme, a variable-length scheme that uses 1 to 4 bytes to represent each character. The proper Charset for multilanguage display is therefore AL32UTF8 (not the AMERICAN default US7ASCIII).
Oracle maintains three levels of NLS parameters:
database level
instance level
session level.
The Oracle views you can use to check NLS_LANG settings for each level are in the succeeding table.
View Description
NLS_Database_Parameters This displays globalization values that were set when the database was created. These values are also the Instance and Session default values if Instance and Session values have not been specified.
These values cannot be changed.

Multilanguage Display
Thin-Client Configuration Guide: Basics 347
View Description
NLS_Instance_Parameters This displays globalization values for an Instance from the Init.Ora file or the SPFILE (Server Parameter File).
The Charset value should be AL32UTF8.
NLS_Session_Parameters This displays globalization settings for the session that queries it.
The Charset value should be AL32UTF8.
The Windows NLS_LANG Setting
For Oracle 9i database software, the Windows Registry contains an NLS_LANG value for each Oracle Home. This value should be AMERICAN_AMERICA.AL32UTF8.
You can use the following dummy statement to query the current client session from the SQL prompt to determine the NLS_LANG value:
@.[%NLS_LANG%].
You will receive an error message, but the message should return the current NLS_LANG value between the brackets. If this value is not AMERICAN_AMERICA.AL32UTF8, you must change it in the Windows Registry (or in the environment if NLS_LANG is an environment variable).
Deltek strongly recommends that you back up the Registry before changing the NLS_LANG value (in the Registry Editor, export the Registry file). Follow this path to the NLS_LANG setting:
HKLM\Software\Oracle\Home0
Only the Oracle Home value of NLS_LANG should be changed. You can skip other entries that have NLS_LANG set to NA.
The PL/SQL Developer Unicode Enabled Setting - Windows The Unicode Enabled setting of PL/SQL Developer allows query results to be correctly displayed in a Unicode-supporting character set in the SQL window, the Test Window, and the Report window. This third-party software is necessary for development because although Oracle 9i development tools support Unicode, they cannot display it correctly at this time.
See the following Preferences Dialog Box where the Unicode Enabled check box is selected.

Multilanguage Display
Thin-Client Configuration Guide: Basics 348
When the Unicode Enabled check box is selected, PL/SQL Developer ignores the charset value of NLS_LANG and supports Unicode to correctly display Unicode data.
When the Unicode Enabled check box is clear, PL/SQL Developer notes the charset value of NLS_LANG. Text may—or may not—display correctly.
The following procedure shows you how to enable Unicode in PL/SQL Developer. It assumes you have launched PL/SQL Developer.
To enable Unicode, complete the following steps:
1. On the PL/SQL Developer window, click Tools » Preference. The Preferences dialog box appears.
2. Under Oracle, select Options.
3. In the right-hand pane select the Unicode Enabled check box.
4. Click OK.
Client Machine Locale and Region Settings — Windows Locale and region settings allow Windows to configure the keyboard layout, date and time presentation, currency symbols, and recognition software for handwriting and speech identification. These settings are probably already in place on your computer.
For a full list of predefined Windows locales, see the following link:
http://msdn.microsoft.com/library/default.asp?url=/library/en-us/intl/nls_61df.asp
For a full list of language codes, see the following link:
http://msdn.microsoft.com/en-us/library/ms533052(VS.85).aspx
You set the locale and region in the Windows Regional Language Options dialog box. The following procedure shows you how to do this. It assumes that you have logged onto the client machine.
To set the locale and region on the client machine, complete the following steps:

Multilanguage Display
Thin-Client Configuration Guide: Basics 349
1. On the Windows desktop, click Start » Control Panel.
2. Double-click Regional and Language options. The Regional and Language Options dialog box appears.
On the Regional Options tab, select the appropriate local and region combination from the locale/region drop-down list. For example, English (United States).
The Onscreen Keyboard — Windows Microsoft Windows provides an onscreen keyboard whose keys map to any input language on your computer. This keyboard provides an easy way to enter text for any input language which is not the default. For example, if the locale/(Region) setting of your computer is English/(United States), the default input language is English, and the keys of the desktop keyboard map to the corresponding character set. If you add one or more input languages, however, you can select any one of them, and the keys and key labels of the onscreen keyboard will automatically map to the character set of that language.
The following is an example of the onscreen keyboard when the selected input language is Greek.
To configure a non-default onscreen keyboard, you simply add an input language through the Windows Regional Language Options dialog box.
The following procedure shows you how to add an input language. It assumes that you have logged onto the client machine.
To add an input language, complete the following steps:
1. On the Windows desktop, click Start » Control Panel.
1. Double-click Regional and Language Options. The Regional and Language Options dialog box appears.
2. On the Languages tab, click the Details button. The Text Services and Input Languages dialog box appears.
3. On the Settings tab, find the Installed Services list, and then select Keyboard. Click the Add button. The Text Services and Input Languages dialog box appears.
4. Select an input language (Locale/Region) in the Input Language drop-down list. Click OK.
5. Click OK in the Text Services and Input Languages dialog box, and then the Regional and Language Options dialog box.
Multilanguage Display
Thin-Client Configuration Guide: Basics 350
To display the keyboard for a specific input language, select that language in the Language toolbar and then display the onscreen keyboard.
To open the onscreen keyboard, click Start » Programs » Accessories » Accessibility » On-screen Keyboard.
Unicode-Supporting Fonts — Windows In configuring multilanguage display, you create fonts before display languages, because a display language uses a specific font.
In order to create a font for multilanguage display, you must do the following things:
Ensure that the font (typeface) you want to use supports Unicode. If it is not supported, text will not be displayed correctly. You ensure that a font supports Unicode by checking the font version number and font information on the Microsoft web site.
Create a FontID based on the Unicode-supporting font in the [ApplicationFonts] section of the Initialization Library record and ensure that the Encoding parameter of the FontID is set to UTF8 (not ASCII). See “Application Fonts,”.
There is a procedure wherein you can set a font to support Unicode. But first, you must do the following:
You have launched the Initialization Library editor and are connected to the desired database.
You are logged on to the Microsoft typography web site: http://www.microsoft.com/typography/fonts/default.aspx
To ensure that a font supports Unicode, complete the following steps:
1. Display the Initialization Library record that you want to configure. See Costpoint Manufacturing Execution Basic Configuration Manual, “Displaying an Initialization Library Record.”
2. On the Structured Editor tab, double-click [ApplicationFonts] and do one of the following:
If any FontIDs already exist, click one of them.
If no FontIDs exist, click [Add a new font].
3. In the Property pane, click the down arrow of the Font (typeface) field.
The typefaces in the list are those that are usable with Windows Client. Arial Unicode MS supports Unicode, but you should check all others.
4. Open the Windows Control Panel, double-click Fonts, and in the Fonts dialog box, double-click a font (typeface) you want to check.
A sample font dialog box appears.
5. Note the typeface version in the upper left-hand corner.
6. On the Fonts and Products web page, select the font/version that you want to check in the Select a font name from the list below... drop-down list, and then click the Go button. The Font Information page appears.
7. Note the Unicode Ranges and Codepage information for the font.

Multilanguage Display
Thin-Client Configuration Guide: Basics 351
Application Fonts — Windows After finding a suitable Unicode-supporting Microsoft font (see “Unicode-Supporting Fonts,”), you can create a Windows Client application font based on that font (which is actually a typeface). The application font will then be tied to a specific language for multilanguage display. You can use a single Unicode-supporting font (typeface) to create any number of Windows Client application fonts.
In Windows Client, a “font” is a uniquely named collection of attributes, such as size and color, in association with a specific typeface, such as Arial Unicode MS or Courier.
Deltek highly recommends that you base the font name (the FontID property) on the ISO 639 code name for the language it will be used to display—and in the next section, that you also base the display language (the LanguageId property) on that same code name, for example, EN for English. This will allow you to use the Sfcore_StdText_Get_AsmblText function, which assembles the Standard Text entry for display (see “The Sfcore_Stdtext_Get_AsmblText Function,” ).
The following procedure shows you how to create an application font. It assumes that you have launched the Initialization Library editor and are connected to the desired database.
To create an application font (FontID), complete the following steps:
1. Display the Initialization Library record that you want to configure. See Costpoint Manufacturing Execution Basic Configuration Manual, “Displaying an Initialization Library Record.”
2. On the Structured Editor tab, double-click [ApplicationFonts] and then click [Add a new font].
3. In the right-hand Property pane, enter appropriate values for the following properties.
FontID A name for this language-specific font. Deltek highly recommends the ISO 639 two-character code name for the language it will be used to display.
Font A Unicode-supporting font. See “Unicode-Supporting Fonts,” .
Although this property is referred to as the “font” by both Windows Client and Microsoft, it is actually a typeface on which the font is based.
Size The size of the font in points.
Style The style of the font: Normal, Bold, Italic, Strikeout, or Underline.
Color The color of the font.
Encoding The encoding scheme that converts characters to bytes for transmission and storage. Set this to UTF8.
4. Click Add Font to List.
Display Languages — Windows After creating a font based on a Unicode-supporting typeface (see “Application Fonts,” ), you can create a display language that uses that font.
You create a display language in the [Localization] section of the Initialization Library record.

Multilanguage Display
Thin-Client Configuration Guide: Basics 352
The following procedure shows you how to configure a display language (referred to as simply a “language” in the Initialization Library record). It assumes you have launched the Initialization Library Editor and are connected to the desired database.
To configure a display language, complete the following steps:
1. Display the Initialization Library record that you want to configure. See Costpoint Manufacturing Execution System Basic Configuration Manual, “Displaying an Initialization Library Record.”
2. On the Structured Editor tab, double-click [Localization] and then click [Add a New Language].
3. In the right-hand Properties pane, enter a description, for example, French, and then click Add New Entry. The new entry appears in the tree.
4. Enter appropriate values for the following properties:
Caption The text that represents this language option in dropdown lists and menus, for example, French.
ApplicationFont The FontID that will be used to display this language. See “Application Fonts,”.
In order to use the Sfcore_StdText_Get_AsmblText function, this value must match the LanguageId value below. See “The Sfcore_Stdtext_Get_AsmblText Function,” .
LanguageId The field value identifying the language in the database. This should be the two-character ISO 639 code, for example, EN for English or FR for French.
5. Save the record.
Standard Text Database Tables — Windows Standard Text objects are stored in two database tables:
Sfcore_MM_Object
Sfcore_StdText_Language_Xref
The Sfcore_MM_Object table stores object records containing the primary, EN (English) text string. By default, every Standard Text record is created as an EN language type in the
Sfpl_Operation_Text
Sffnd_Htref_Oper_Text Sfcore_MM_Object
REF ID OBJECT_ID
Sfcore_StdText_Language_Xref
OBJECT_ID LANGUAGE

Multilanguage Display
Thin-Client Configuration Guide: Basics 353
Sfcore_MM_Object table, even if no English text is entered. Sfcore_MM_Object is then linked via the OBJECT_ID foreign key to the Sfcore_StdText_Language_Xref table, which contains language-specific variant strings.
The following table shows the columns in the Sfcore_StdText_Language_Xref table.
SFCORE_STDTEXT_LANGUAGE_XREF Columns
Column Name Data Type Null? Comment
OBJECT_ID VARCHAR2(40) Not NULL
LANGUAGE VARCHAR2(30) Not NULL
UPDT_USERID VARCHAR2(30) Not NULL Default user
TIME_STAMP DATE Not NULL Default sysdate
TEXT_DATA CLOB
The EmbedSelectSql Property — Windows The main property that enables multilanguage display is EmbedSelectSql. The SQL ID assigned to EmbedSelectSql displays the primary text string of a Standard Text entry plus a user-selected variant string in the text block(s) of an Instruction window. You assign a SQL ID to EmbedSelectSql in the [StdText] section of the Initialization Library record
In the following screen, StdTextSelectSql SQL ID has been assigned to the EmbedSelectSql SQL property.
As shown in the following table, StdTextSelectSql is the recommended SQL ID for displaying multilanguage Standard Text.
Standard Text-Displaying SQL IDs
SQL ID Description SQL
StdTextSelectSql When assigned to select

Multilanguage Display
Thin-Client Configuration Guide: Basics 354
SQL ID Description SQL
EmbedSelectSql, it overrides StdTextGetStdText to display the primary string of a Standard Text entry plus a language- specific variant string in the text block of an Instruction window.
This is the recommended SQL ID for EmbedSelectSql and should be used as is. However, it can be used as a template to create a custom SQL ID.
This ID uses a function to concatenate the primary text string with the variant text string of the indicated language.
sfcore_stdtext_get_asmbltext (:OBJECT_ID,:@LANG) from
dual
This function assumes that FontID = LanguageID.
See “The EmbedSelectSql Property,” and “The Sfcore_Stdtext_Get_AsmblText Function,” .
StdTextGetStdText This ID displays the primary text string (or a single variant string) of a Standard Text object in the text block of an Instruction window (for single-language display).
This SQL ID is hardcoded into each text block (it is not assigned to a property name) and runs when EmbedSelectSql is not assigned or when Multilanguage display is not enabled.
Uses a view to return a text string of the indicated language.
Select text_data from Sfcore_stdtext_get_text_v where object_id=:OBJECT_ID and language=:@Lang
See “The Sfcore_Stdtext_Get_Text_V View,” .
StdTextSelectSql already exists in the SQL Library.
You can assign StdTextSelectSql to EmbedSelectSql if FontIDs match LanguageIDs.
You should use StdTextSelectSql as a template only—to create a suitable SQL ID and function that return the same data set as StdTextSelectSql—if FontIDs do not match LanguageIDs. See “The Sfcore_Stdtext_Get_AsmblText Function,” .
The Sfcore_Stdtext_Get_AsmblText Function Win/Web The Sfcore_Stdtext_Get_AsmblText function is called by StdTextSelectSql to return a single formatted Standard Text string to an Instruction window. For a given OBJECT_ID, it concatenates the primary EN text string with a variant text string corresponding to the user’s selected language.
The following code shows the copyrighted function: create or replace function sfcore_stdtext_get_asmbltext(

Multilanguage Display
Thin-Client Configuration Guide: Basics 355
vi_object_id varchar2,vi_language varchar2)
return clob as
Result clob;
begin
begin
select text_data
into result
from (select object_id, 'EN' as language, text_data
from sfcore_mm_object
union all
select a.object_id, language, a.text_data || chr(10) ||
'<S='||vi_language ||'>'|| b.text_data||'</S>'
from sfcore_mm_object a, sfcore_stdtext_language_xref b
where a.object_id = b.object_id)
where object_id = vi_object_id
and language = vi_language;
exception when no_data_found then
begin
select text_data into result from sfcore_mm_object where object_id=vi_object_id;
exception when no_data_found then
result := 'STDTEXT OBJECT '||vi_object_id||' MISSING IN SFCORE_MM_OBJECT';
end;
end;
return(Result);
end;
This function works only if FontID = LanguageID and there is a different FontID for each language, as explained in the following paragraphs.
All text returned to an Instruction window is bracketed by font markers (<S=...> and </S>) that call out and then terminate font formatting. When the primary text string from Sfcore_MM_Object is returned to an Instruction window, it is embedded in block text and subject to the font marker of that block. The key value of the font marker for block text is usually a non-Unicode FontID, for example, <S=RegularText>. In contrast, the concatenated variant string returned from Sfcore_StdText_Language_Xref is delimited by a font marker whose key value is a Unicode-supporting FontID, e.g., <S=FR>. Because the LanguageID (vi_language) populates the result CLOB with the correct variant string (b.text_data), and also matches the font marker key value—the FontID—it properly formats the string on return to the Instruction window.
If FontIDs do not match LanguageIDs at your site, you must create a custom AsmblText function that returns a properly formatted data set the way the Sfcore_Stdtext_Get_AsmblText function does. After creating a custom AsmblText function, add it to a custom SQL ID patterned after the StdTextSelectSql template (See “The EmbedSelectSql Property,” ).
The Sfcore_Stdtext_Get_Text_V View — Windows The Sfcore_Stdtext_Get_Text_V view is used by the StdTextGetStdText SQL ID (see Standard Text Displaying SQL IDs table in The EmbedSelectSQLProperty — Windows section) to combine the primary text string in the SFCORE_MM_OBJECT table with a specific- language text string in the

Multilanguage Display
Thin-Client Configuration Guide: Basics 356
Sfcore_StdText_Language_Xref table. This view is used with a SELECT statement that returns a single text string based on the passed-in language.
You do not have to create this view. It is explained here for information purposes only: select object_id,’EN’ as language,text_data from sfcore_mm_Object
union all
select object_id,language,text_data from sfcore_stdtext_language_xref
Assigning EmbedSelectSql — Windows After deciding that you can use StdTextSelectSql as-is (see “The EmbedSelectSql Property, ), or after creating a suitable SQL ID based on StdTextSelectSql (see “The Sfcore_Stdtext_Get_AsmblText Function,” ), you simply assign StdTextSelectSql or the appropriate customized SQL ID to EmbedSelectSql.
The following procedure shows you how to assign a SQL ID to EmbedSelectSql. It assumes you have launched the Initialization Library Editor and are connected to the desired database.
To assign EmbedSelectSql, complete the following steps:
1. Display the Initialization Library record that you want to configure. See Costpoint Manufacturing Execution System Basic Configuration Manual, “Displaying an Initialization Library Record.”
2. On the Structured Editor tab, double-click [StdText].
3. In the right-hand Properties pane, enter the appropriate SQL ID in EmbedSelectSql field, or click the Folder button and select the SQL ID from the Select a SQL Lib Entry dialog box.
After assigning an appropriate SQL ID to EmbedSelectSql, you enable it by simply enabling the Localization.Enabled property (Localization.Enabled = Yes) in the Initialization Library record. See “Enabling Multilanguage Display,” .
Adding a Language to the Standard Text Window — Windows In order for the Standard Text window to display Standard Text in multiple languages, you must have created/configured one or more display languages in the controlling Initialization Library record (see “Display Languages,” ). Once a language has been configured, you simply “add” it to the [StdText] properties in the record.
Addition of a display language makes a window capable of displaying multiple languages, but it does not enable the multilanguage display functionality. To enable multilanguage display, see “Enabling Multilanguage Display,” .
The following procedure shows you how to add a display language to the Standard Text window. It assumes you have launched the Initialization Library Editor and are connected to the desired database.
To add a display language to an Instruction window, complete the following steps:
1. Display the Initialization Library record that you want to configure. See Costpoint Manufacturing Execution System Basic Configuration Manual, “Displaying an Initialization Library Record.”
2. On the Structured Editor tab, double-click in turn [StdText] and [Languages]; and then click [Add a New Language Choice].
Multilanguage Display
Thin-Client Configuration Guide: Basics 357
3. In the right-hand Properties pane enter the language description in the Description field as configured in [Localization].Description (see step 3 in the procedure for configuring a display language in section Display Languages — Windows).
4. Click Add Entry to List. (The Expression field is not used at this time.) The new entry appears in the tree.
Adding a Language to an Instruction Window — Windows In order for an Instruction window to display Standard Text in multiple languages, you must have created/configured one or more display languages in the controlling Initialization Library record (see “Display Languages,” ). Once a language has been configured, you “add” it to [Instructions] properties in the same manner that you add a language to the [StdText] properties (see “Adding a Language to the Standard Text Window,” ). The only difference for Instruction windows is that you must specify the window, for example, Work Plan - Instructions, and the specific mode under which text for that language will appear, for example, Edit_PL.
Addition of a display language makes a window capable of displaying multiple languages, but it does not enable the multilanguage display functionality. To enable multilanguage display, see “Enabling Multilanguage Display,”.
The following procedure shows you how to add a display language to an Instruction window. It assumes you have launched the Initialization Library Editor and are connected to the desired database.
To add a display language to an Instruction window, complete the following steps:
1. Display the Initialization Library record that you want to configure. See Costpoint Manufacturing Execution System Basic Configuration Manual, “Displaying an Initialization Library Record.”
2. On the Structured Editor tab, navigate to the window to which you want to add a language and then double-click in turn [Modes], [ViewModes] (or [EditModes]), [ModeName], and [Languages]; and then click [Add a New Language Choice].
3. In the right-hand Properties pane enter the language description in the Description field as configured in [Localization]. See step 3 in the procedure for configuring a display language in section Display Languages — Windows.
4. Click Add Entry to List. (The Expression field is not used at this time.) The new entry appears in the tree.
Enabling Multilanguage Display — Windows After performing all configuration tasks as shown in the Multilanguage Configuration Components table in section Configuration Components — Windows, you can enable multilanguage display.
You enable multilanguage display in the Initialization Library record by setting [Localization].Enabled to Yes. This causes the EmbedSelectSql SQL ID to run instead of StdTextGetStdText in any Instruction window.
The following procedure shows you how to enable multilanguage support. It assumes you have launched the Initialization Library Editor and are connected to the desired database.
To enable multilanguage support, complete the following steps:

Multilanguage Display
Thin-Client Configuration Guide: Basics 358
1. Display the Initialization Library record that you want to configure. See Costpoint Manufacturing Execution System Basic Configuration Manual, “Displaying an Initialization Library Record.”
2. On the Structured Editor tab, double-click [Localization].
3. In the right-hand Properties pane, select Yes in the Enabled field.
Portable Object Files — Windows The strings that should be translated are contained in a specially formatted text file called a PO (portable object) file. The PO and MO files are commonly used formats that have standard utilities for generating the files. PO editors are used to create translations and compilers are used to turn PO files into MO files. There is a separate PO file (and thus a separate MO file) for each language being translated. The PO file can be edited with any text editor. However, there are also several PO editors that make the editing job much easier for translators. POedit is probably the most common and the installation files are included with Costpoint Manufacturing Execution, though it must be launched and installed manually.
POedit can also be downloaded on line in this website, http://www.poedit.net/.
How Translation Works Costpoint Manufacturing Execution System takes a text token and looks it up in a data structure. If a match is found it uses the translated token that is paired with the actual token. If no match is found the original token is returned. The data structure used is a binary MO (Machine Object) file that is compiled from a simple text PO (Portable Object) file. By default, POedit automatically generates an updated MO file whenever the PO file is saved. Only the MO files are needed by the end-users while translators work with both MO and PO files. The MO files and PO files are typically nested in folders below the application EXE as shown in the following example structure using Costpoint Manufacturing Execution System WinClient. The individual folders are shown in angle brackets. <Costpoint MES>
sf32.exe
<Locale>
<en_us>
<LC_MESSAGES>
Costpoint MES.mo
common.mo
vendor.mo
sqaa.mo
Each locale folder is indicated by a pair of standard two-character language_country codes separated by an underscore. Below that is the locale category for messages, LC-MESSAGES, which contains the MO files. Currently, only the common.mo and Costpoint MES.mo file of machine's configured locale are explicitly loaded.
If an MO file is missing or there is no translation, the original string will not be translated and will be used. This makes it very easy to see if the error is due to an attempted translation of a string. Just change the name of the MO file(s) or the containing folders so they will not be found. Rerun the application.
The format of a PO file is similar to the following: #. AddCmdFrame..Panel6..Panel2..Notebook1....GroupListPanel..Label16..Caption
#: AddCmndFrame.dfm:183
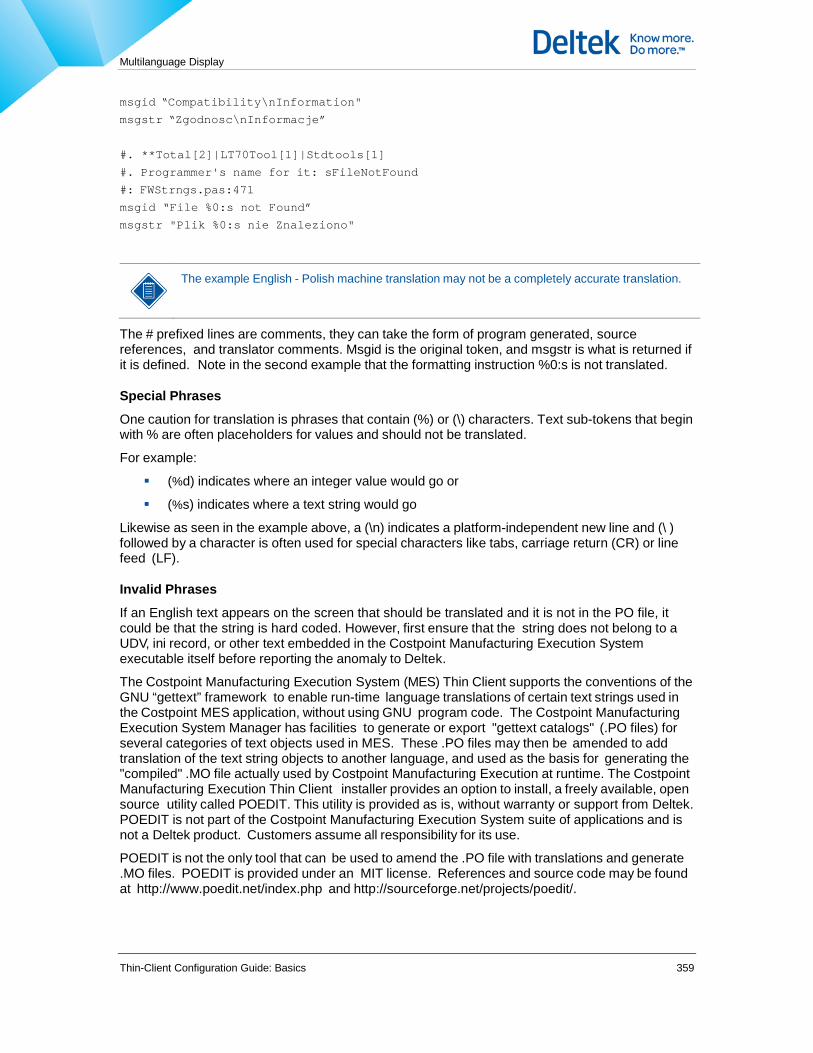
Multilanguage Display
Thin-Client Configuration Guide: Basics 359
msgid “Compatibility\nInformation"
msgstr “Zgodnosc\nInformacje”
#. **Total[2]|LT70Tool[1]|Stdtools[1]
#. Programmer's name for it: sFileNotFound
#: FWStrngs.pas:471
msgid “File %0:s not Found”
msgstr "Plik %0:s nie Znaleziono"
The example English - Polish machine translation may not be a completely accurate translation.
The # prefixed lines are comments, they can take the form of program generated, source references, and translator comments. Msgid is the original token, and msgstr is what is returned if it is defined. Note in the second example that the formatting instruction %0:s is not translated.
Special Phrases
One caution for translation is phrases that contain (%) or (\) characters. Text sub-tokens that begin with % are often placeholders for values and should not be translated.
For example:
(%d) indicates where an integer value would go or
(%s) indicates where a text string would go
Likewise as seen in the example above, a (\n) indicates a platform-independent new line and (\ ) followed by a character is often used for special characters like tabs, carriage return (CR) or line feed (LF).
Invalid Phrases
If an English text appears on the screen that should be translated and it is not in the PO file, it could be that the string is hard coded. However, first ensure that the string does not belong to a UDV, ini record, or other text embedded in the Costpoint Manufacturing Execution System executable itself before reporting the anomaly to Deltek.
The Costpoint Manufacturing Execution System (MES) Thin Client supports the conventions of the GNU “gettext” framework to enable run-time language translations of certain text strings used in the Costpoint MES application, without using GNU program code. The Costpoint Manufacturing Execution System Manager has facilities to generate or export "gettext catalogs" (.PO files) for several categories of text objects used in MES. These .PO files may then be amended to add translation of the text string objects to another language, and used as the basis for generating the "compiled" .MO file actually used by Costpoint Manufacturing Execution at runtime. The Costpoint Manufacturing Execution Thin Client installer provides an option to install, a freely available, open source utility called POEDIT. This utility is provided as is, without warranty or support from Deltek. POEDIT is not part of the Costpoint Manufacturing Execution System suite of applications and is not a Deltek product. Customers assume all responsibility for its use.
POEDIT is not the only tool that can be used to amend the .PO file with translations and generate .MO files. POEDIT is provided under an MIT license. References and source code may be found at http://www.poedit.net/index.php and http://sourceforge.net/projects/poedit/.
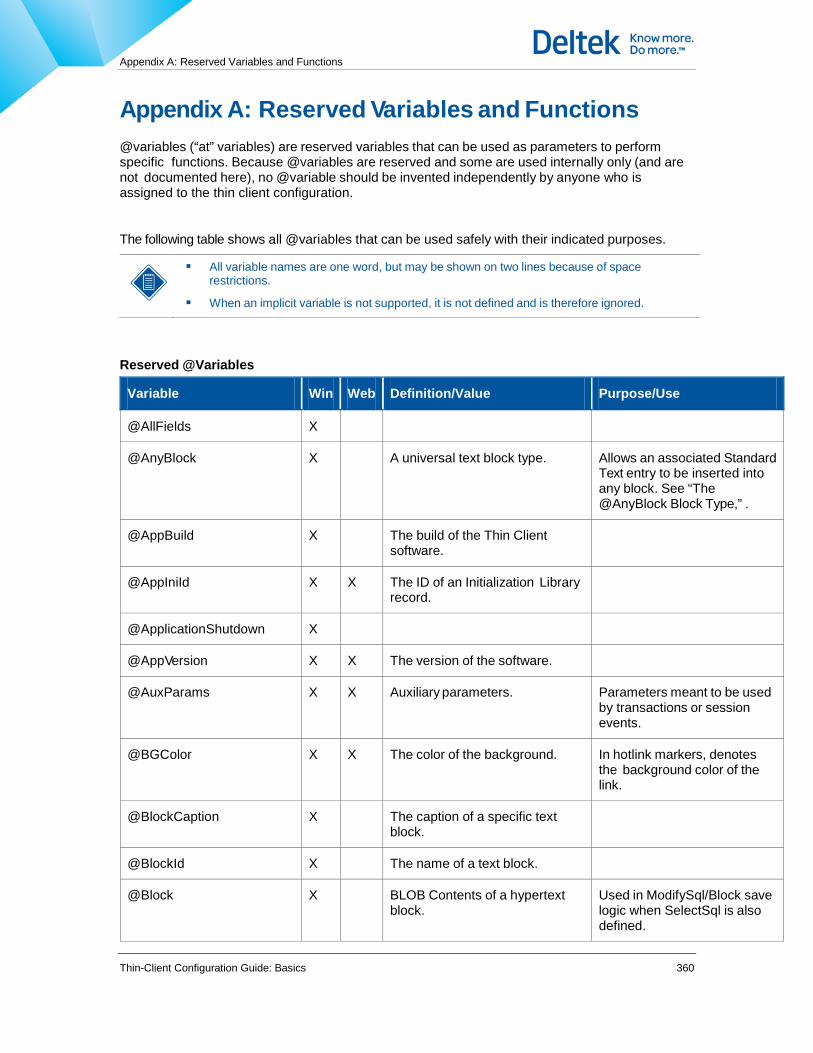
Appendix A: Reserved Variables and Functions
Thin-Client Configuration Guide: Basics 360
Appendix A: Reserved Variables and Functions @variables (“at” variables) are reserved variables that can be used as parameters to perform specific functions. Because @variables are reserved and some are used internally only (and are not documented here), no @variable should be invented independently by anyone who is assigned to the thin client configuration.
The following table shows all @variables that can be used safely with their indicated purposes.
All variable names are one word, but may be shown on two lines because of space restrictions.
When an implicit variable is not supported, it is not defined and is therefore ignored.
Reserved @Variables
Variable Win Web Definition/Value Purpose/Use
@AllFields X
@AnyBlock X A universal text block type. Allows an associated Standard Text entry to be inserted into any block. See “The @AnyBlock Block Type,” .
@AppBuild X The build of the Thin Client software.
@AppIniId X X The ID of an Initialization Library record.
@ApplicationShutdown X
@AppVersion X X The version of the software.
@AuxParams X X Auxiliary parameters. Parameters meant to be used by transactions or session events.
@BGColor X X The color of the background. In hotlink markers, denotes the background color of the link.
@BlockCaption X The caption of a specific text block.
@BlockId X The name of a text block.
@Block X BLOB Contents of a hypertext block.
Used in ModifySql/Block save logic when SelectSql is also defined.

Appendix A: Reserved Variables and Functions
Thin-Client Configuration Guide: Basics 361
Variable Win Web Definition/Value Purpose/Use
@BookId X
@Caption X X Text marking a hotlink, button, or UDV.
When used in a LinkInvoke tag, calls out text marking the specified LinkName. See “LinkInvoke,” .
When used to embed a hypertext link in a grid, calls out the button label. See “Tag- Defined Hyperlinks in Grids,”.
When used in a CommandEvent tag, changes the caption of a UDV. See “CommandEvent,” .
@Classification X A multimedia object classification.
@ClientComputerName X The name of a client machine
@ClientIPAddress X X The IP Address of the client machine.
Note that for Web Express, this value may not always be accurate due to use of proxy servers, firewalls, and so on.
@ClientIPHostName X The host name of the client machine.

Appendix A: Reserved Variables and Functions
Thin-Client Configuration Guide: Basics 362
Variable Win Web Definition/Value Purpose/Use
@ClientType X X The type of client machine: Standard, Internet, Web.
Returned system value is always in initial caps.
When used in an expression evaluated as True, enables the corresponding property.
Expression can be derived by the following means:
Direct input of the desired value
Use of a function whose returned value is compared to a True/False standard
Direct return of a calculated value
Example:
@ClientType=’Web’
Used mainly in Initialization Library record Priv properties.
@Command X An Other Command.
@Command(OtherCommand)
In an ExecOtherCommand command event, executes a specific Other Command of the specified SQL Source.
Used in executing a hyperlink in a UDV Display Grid. See “Field-Defined Hyperlinks in Grids,” . Also used for executing a hyperlink in a Graph control. See “Graph Controls,” .
@CommandQueue X
@Config X X A tool as identified by type and instance, for example, Instructions.PrPlgInstructions
When used in the Text Comparison window, calls out the window type in the LeftFile and RightFile display parameters. See “Configuring Text Comparison,”.

Appendix A: Reserved Variables and Functions
Thin-Client Configuration Guide: Basics 363
Variable Win Web Definition/Value Purpose/Use
@ConsolidatedQueryType x The specific type of consolidated query for a SQL Source: Master or Instance.
Master denotes that the query is being used to create a master list, which is then used by subsequent instances of the embedded UDV.
Instance denotes that the query is being used to populate data for an individual instance of the embedded UDV.
Part of the parameter set for the SQL Source of an embedded UDV that uses a consolidated query. See “Consolidated Queries in Embedded UDVs,”.
@ContentMaximized x Published in ToolScope to indicate that content is in a maximized or normalized state.
Tabs are refreshed whenever switching between normalized and maximized formats, and thus may make use of this reserved variable in expression evaluation.
@Control x A control name.
@Cookies x A tool window specific global param source cookie/container which holds values published by setting the UDV Exec Sql script statement’s PublishAsCookie property to true. These values are persistent across changes in the foreground user session.
This method can be used to propogate context param data from one user session to another.
@Copy x
@CurrentEditBlock x The caption for the block currently in Edit mode.
ToolScope reserved parameter.
When @CurrentEditBlock is added to ToolScope,
@TextModified is set to 1 or 0 indicating whether the block has been modified.
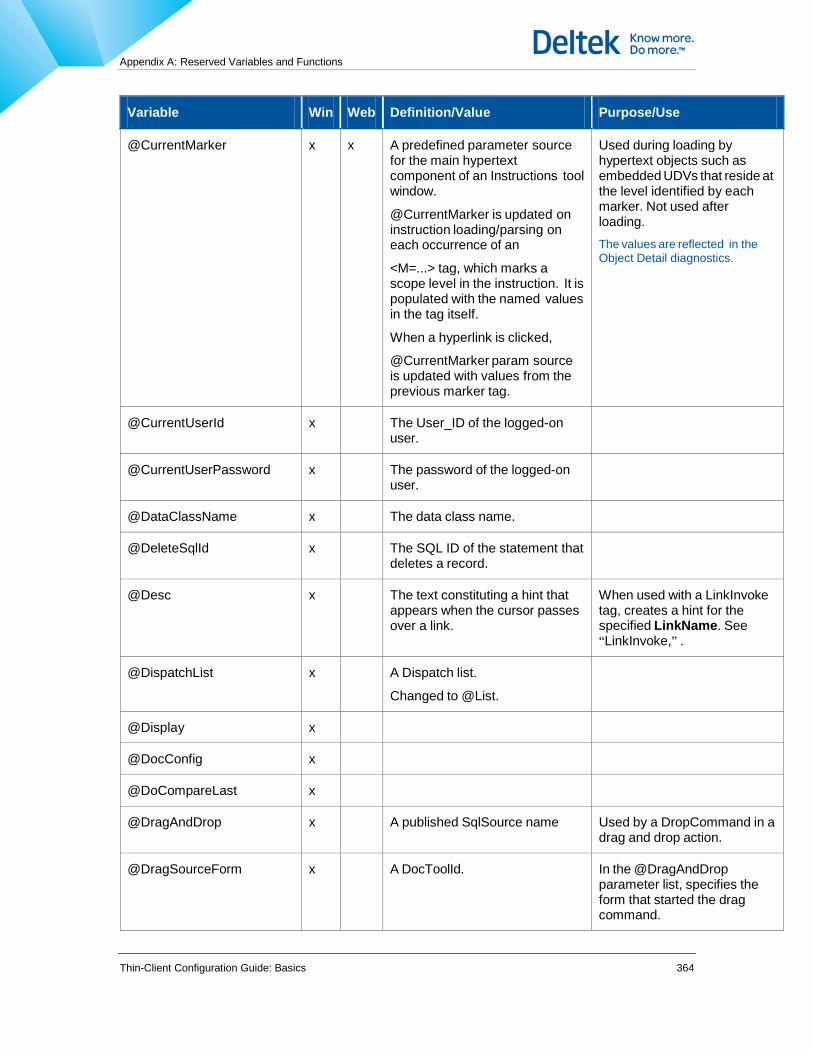
Appendix A: Reserved Variables and Functions
Thin-Client Configuration Guide: Basics 364
Variable Win Web Definition/Value Purpose/Use
@CurrentMarker x x A predefined parameter source for the main hypertext component of an Instructions tool window.
@CurrentMarker is updated on instruction loading/parsing on each occurrence of an
<M=...> tag, which marks a scope level in the instruction. It is populated with the named values in the tag itself.
When a hyperlink is clicked,
@CurrentMarker param source is updated with values from the previous marker tag.
Used during loading by hypertext objects such as embedded UDVs that reside at the level identified by each marker. Not used after loading. The values are reflected in the Object Detail diagnostics.
@CurrentUserId x The User_ID of the logged-on user.
@CurrentUserPassword x The password of the logged-on user.
@DataClassName x The data class name.
@DeleteSqlId x The SQL ID of the statement that deletes a record.
@Desc x The text constituting a hint that appears when the cursor passes over a link.
When used with a LinkInvoke tag, creates a hint for the specified LinkName. See “LinkInvoke,” .
@DispatchList x A Dispatch list.
Changed to @List.
@Display x
@DocConfig x
@DoCompareLast x
@DragAndDrop x A published SqlSource name Used by a DropCommand in a drag and drop action.
@DragSourceForm x A DocToolId. In the @DragAndDrop parameter list, specifies the form that started the drag command.
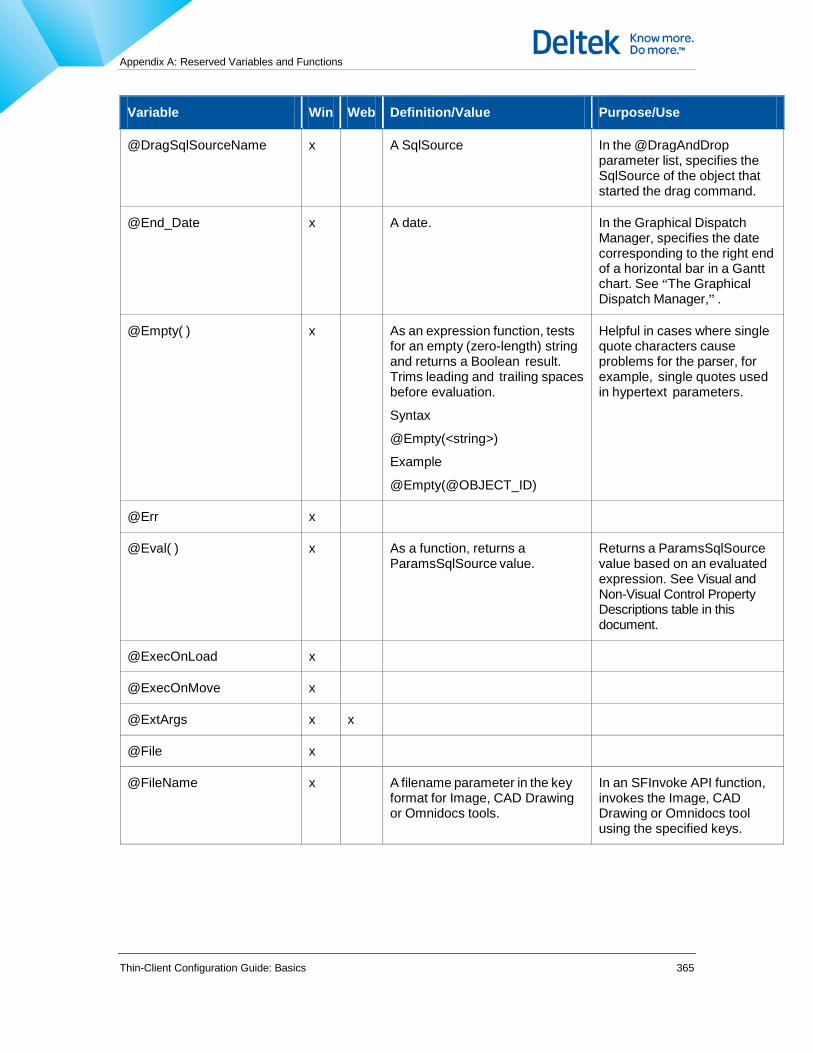
Appendix A: Reserved Variables and Functions
Thin-Client Configuration Guide: Basics 365
Variable Win Web Definition/Value Purpose/Use
@DragSqlSourceName x A SqlSource In the @DragAndDrop parameter list, specifies the SqlSource of the object that started the drag command.
@End_Date x A date. In the Graphical Dispatch Manager, specifies the date corresponding to the right end of a horizontal bar in a Gantt chart. See “The Graphical Dispatch Manager,” .
@Empty( ) x As an expression function, tests for an empty (zero-length) string and returns a Boolean result. Trims leading and trailing spaces before evaluation.
Syntax
@Empty(<string>)
Example
@Empty(@OBJECT_ID)
Helpful in cases where single quote characters cause problems for the parser, for example, single quotes used in hypertext parameters.
@Err x
@Eval( ) x As a function, returns a ParamsSqlSource value.
Returns a ParamsSqlSource value based on an evaluated expression. See Visual and Non-Visual Control Property Descriptions table in this document.
@ExecOnLoad x
@ExecOnMove x
@ExtArgs x x
@File x
@FileName x A filename parameter in the key format for Image, CAD Drawing or Omnidocs tools.
In an SFInvoke API function, invokes the Image, CAD Drawing or Omnidocs tool using the specified keys.

Appendix A: Reserved Variables and Functions
Thin-Client Configuration Guide: Basics 366
Variable Win Web Definition/Value Purpose/Use
@Filter x A filter as applied to a Dispatch list.
Example: @Filter = ((Plan_Ver=1) and (Plan_Rev=3))
A filter as applied in an Oracle hint.
In a Dispatch window, opens the window displaying only those records that match the specified field value(s). See “Invoking a Window at a Specific Record or Place,” .
When used in an Oracle hint, allows bypassing of a view for a complex query. See “Using Oracle Hints in Filters and Lookups,” .
@FMT() x
@FndBuild x x The build of the Foundation software.
@FndVersion x x The version of the Foundation software.
@Folder x A folder name.
@FontColor x The color of a font.
@FontId x A font name.
@ForceToSide x =true/false Optional boolean argument in the LinkInvoke syntax which indicates that the multimedia object should be opened in the side note panel, rather than the standalone Slide tool window.
Example:
@ForceToSide=true
The following multimedia types are supported:
Slide
Image
Video
WebBrowser
Audio
CADDrawing
OmniDocs

Appendix A: Reserved Variables and Functions
Thin-Client Configuration Guide: Basics 367
Variable Win Web Definition/Value Purpose/Use
@FormClassName x A form class name.
@FrameworkDbVersion x x The version of the Framework database.
@Func x x An external function as listed in the [ExternalFunctions] section of the Initialization Library record.
When used with a LinkInvoke ExternalCall tag, calls an external program. See “LinkInvoke,” .
@GetExternalFunctionValue x As a function, returns a string from an external function.
Syntax
@GetExternalFunctionValue (<Func_Name>)
where Func_Name is an entry in the [ExternalFunctions] section of the Ini Lib record.
This function is not supported in Web Express expressions.
Returns a string from an external function. Can used in the following contexts:
In a Calculated field of a SQL Source. See “Using an External Function in a Calculated Field,” .
In general expressions. See
@GetExternalFunction Value in Table 5-30 on page 261.
@GetFromFile( ) x As a function, returns a string from a specific file.
Syntax
@GetFromFile(<FileName>) or
@GetFromFile(‘<FileName>’)
Note that you can delimit the file name in single quote marks or not.
Returns a string for general use in an expression.
@GetFromClipboard( ) x As a function, returns a string from the clipboard.
Syntax
@GetFromClipboard (CF_TEXT)
The CF_TEXT clipboard format must be currently supported.
Returns a string for general use in an expression.
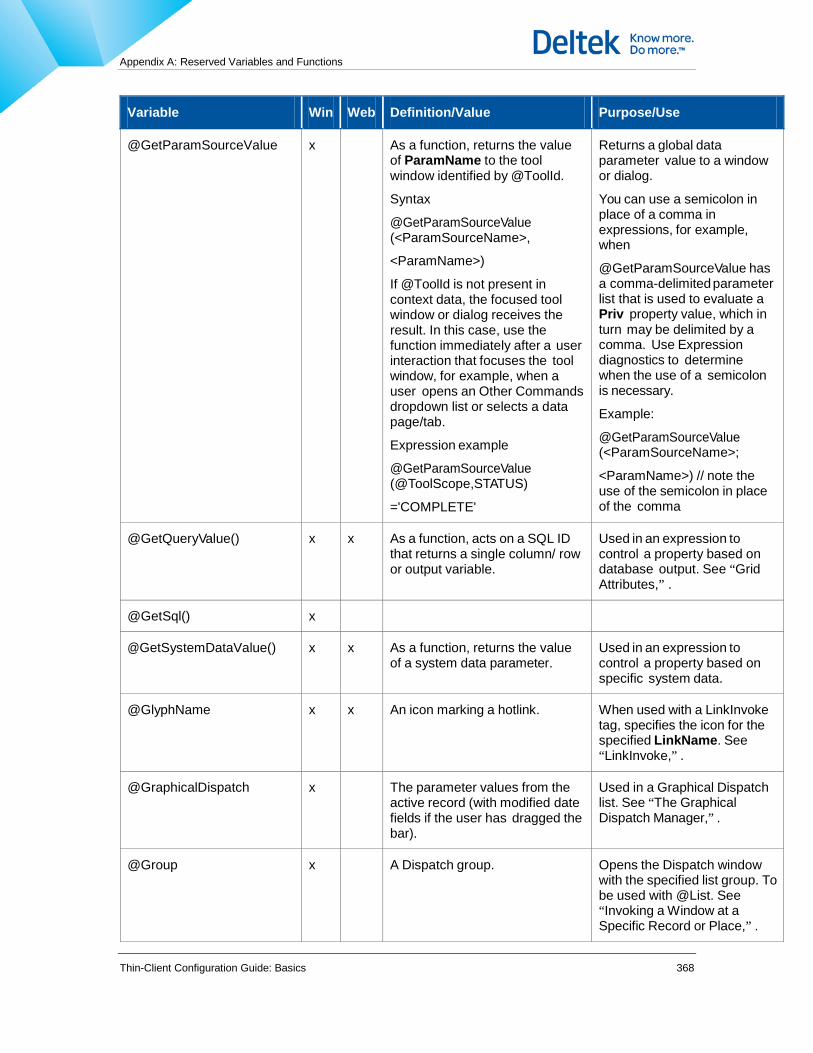
Appendix A: Reserved Variables and Functions
Thin-Client Configuration Guide: Basics 368
Variable Win Web Definition/Value Purpose/Use
@GetParamSourceValue x As a function, returns the value of ParamName to the tool window identified by @ToolId.
Syntax
@GetParamSourceValue (<ParamSourceName>,
<ParamName>)
If @ToolId is not present in context data, the focused tool window or dialog receives the result. In this case, use the function immediately after a user interaction that focuses the tool window, for example, when a user opens an Other Commands dropdown list or selects a data page/tab.
Expression example
@GetParamSourceValue (@ToolScope,STATUS)
='COMPLETE'
Returns a global data parameter value to a window or dialog.
You can use a semicolon in place of a comma in expressions, for example, when
@GetParamSourceValue has a comma-delimited parameter list that is used to evaluate a Priv property value, which in turn may be delimited by a comma. Use Expression diagnostics to determine when the use of a semicolon is necessary.
Example:
@GetParamSourceValue (<ParamSourceName>;
<ParamName>) // note the use of the semicolon in place of the comma
@GetQueryValue() x x As a function, acts on a SQL ID that returns a single column/ row or output variable.
Used in an expression to control a property based on database output. See “Grid Attributes,” .
@GetSql() x
@GetSystemDataValue() x x As a function, returns the value of a system data parameter.
Used in an expression to control a property based on specific system data.
@GlyphName x x An icon marking a hotlink. When used with a LinkInvoke tag, specifies the icon for the specified LinkName. See “LinkInvoke,” .
@GraphicalDispatch x The parameter values from the active record (with modified date fields if the user has dragged the bar).
Used in a Graphical Dispatch list. See “The Graphical Dispatch Manager,” .
@Group x A Dispatch group. Opens the Dispatch window with the specified list group. To be used with @List. See “Invoking a Window at a Specific Record or Place,” .

Appendix A: Reserved Variables and Functions
Thin-Client Configuration Guide: Basics 369
Variable Win Web Definition/Value Purpose/Use
@HasPriv() x x As a function, acts on a privilege that returns a True when the current user has the specified priv (enclosed in single quotes enclosed in double quotes).
Used in an expression to control a property based on the user’s privilege set. See “Grid Attributes,” and “Hidden and Read-Only Tabs,”.
@Height x x The height in pixels of the link background.
When used in a LinkInvoke tag, specifies the height of the text background marking the specified LinkName. See “LinkInvoke,” .
@HideColumns x x A comma-delimited column name(s).
@HideColumns=”OPER_NO, ORDER_NO”
When used in a CommandEvent ExecTransaction, hides Edit, List, and Memo controls based on the named UDV columns. See “CommandEvent,” and “Multiuse Input UDVs,” .
@HistogramDrag x The published parameter values from the current record in the dispatch list and the current histogram record.
In a Graphical Dispatch list, controls drag and drop events. See “Histograms,”.
@HistoryHeading x The heading of a history listing. Specifies the title of the history for a specific block. See “The Show History Menu Option,”.
@HoldPosition x True/False. As a param for a RefreshActiveTool Command Event (Dispatch only), when enabled (True), keeps the current record in focus after refresh. If record has been deleted, returns focus to first record in list. Defaults to False when not defined. See “RefreshActiveTool,” .
@Ht x
@Img x A special SQL Source for Report Designer (RAVE) report.
Points to an in-memory slide table. See “SfHypertext and SfSlide” in Volume 3.
@ImpBuild x The build of the Implementation software.

Appendix A: Reserved Variables and Functions
Thin-Client Configuration Guide: Basics 370
Variable Win Web Definition/Value Purpose/Use
@ImpVersion x The version of the Implementation software.
@InlineObject x x The object constituting a hotlink marker in an instruction.
@InlineText x The text value constituting a hotlink marker in an instruction.
The marker can be changed from an icon (default) to text through the Edit Object | Glyph
| Text option.
@InlineThumbnail x x The thumbnail constituting a hotlink marker in an instruction.
The marker can be changed from an icon (default) to a thumbnail through the Edit Object | Glyph | Thumbnail option.
@Input x
@InstanceSerial x A UDV ID. When used in an ExecTransaction command event, allows a subsequent UDV to use original UDV param values. See “CommandEvent,”.
@InvokeDatapage x A specified tab. Displays a window focusing the specified tab. See “Invoking a Window at a Specific Record or Place,” .
@Invoke_Flag x An Invoke type: Compare, Print, or ExportHTML.
Invokes a twin window when the argument = Compare. See “Invoking a Window at a Specific Record or Place,” .
@InvokeNavLevel x A specified navigation level (field name or number).
Displays a window at a specified navigation level. See “Invoking a Window at a Specific Record or Place,” .
@InvokeToolMode x x A mode type and mode:
<ModeType.Mode>
where ModeType is ViewModes, EditModes, or PrintModes, and Mode is the specific mode of ModeType.
Displays a window in the specified mode. See “Invoking a Window at a Specific Record or Place,”.

Appendix A: Reserved Variables and Functions
Thin-Client Configuration Guide: Basics 371
Variable Win Web Definition/Value Purpose/Use
@IsHot x True/False
When @IsHot=False, the cursor does change to a hot hand when the mouse goes over the link.
Enables/disables a LinkInvoke tag in hypertext. See “LinkInvoke,” and “Image,”.
@Key x
@LeftFile x A left-hand file. When used in the Text Comparison window, displays the specified file in the left- hand pane. See “Text Comparison,” .
@Lic x
@Lic_Prefix x A site-specific license prefix. Used in license creation and loading to identify a specific site.
@Link x
@LinkName x
@List x A Dispatch list. Opens the Dispatch window with the specified list. To be used with @Group. See “Invoking a Window at a Specific Record or Place,”.
@LoadCaller x
@Location x x A filename or WebAddress
where filename is the full path to a file (for example, c:\myfile.txt), and WebAddress is a URL prefixed by http (for example, http:// www.deltek.com).
Can also be a parameter designating a filename or URL.
Used most often in an Invoke Tool-type Other Command/ Command Button to invoke a file or web page in the Slide/ Annotations tool. Can also be used in an API Invoke Tool command. See “UDV- Launched Other Commands,” and “Window- Launched Other Commands,”.

Appendix A: Reserved Variables and Functions
Thin-Client Configuration Guide: Basics 372
Variable Win Web Definition/Value Purpose/Use
@Loop x When enabled (True/T/Yes/ Y), causes an Input UDV to display repeatedly until the user clicks the Cancel button.
Restricted to use with ExecTransaction-type CommandEvents.
Example CommandEvent(ExecTrans action(@Udv_Id=MFI_1234,
@Loop=true,@SQLTrans action=UDVSCRIPT,order_id
=MFIL_49,oper_key=25, step_key=-1))
@Loop behavior:
Output/result parameters from each iteration are provided as input parameters to the next iteration.
Transaction control remains under the control of each UDV iteration.
The calling SqlSource refreshes after each iteration.
@MarkerCaption x
@MD5() x x As a function, acts on a column name or literal value to return an MD5 digest.
Ensures that database values are unchanged. See “Grid Attributes,” .
@NA x x An assigned value. Disables any property to which it is assigned, including the following:
InsertSql
GetEffRefSql
HtRefDeleteAllSql
HtRefReconcileChangesSql See “Blocks,”.
@NavLevel x The number corresponding to the user-selected navigation level.
When used in the parent text assembly proc, indicates the user-selected nav level. See “Step 4: The Parent Text Assembly Procedure,”.
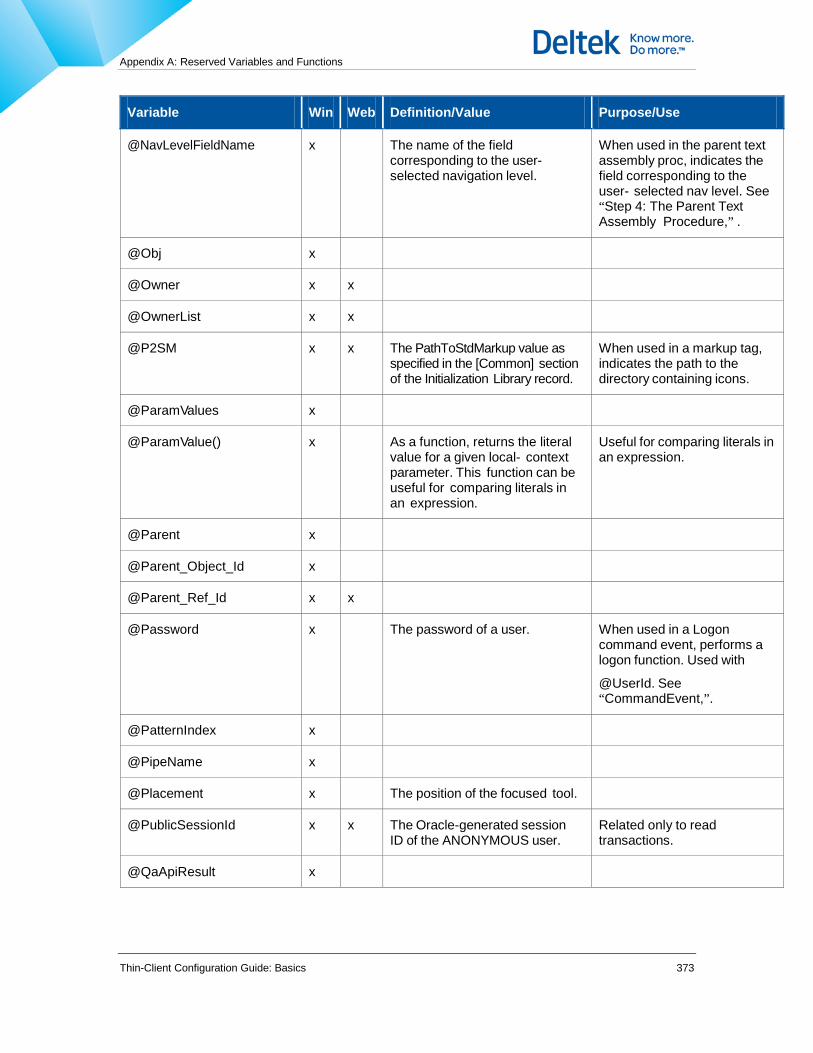
Appendix A: Reserved Variables and Functions
Thin-Client Configuration Guide: Basics 373
Variable Win Web Definition/Value Purpose/Use
@NavLevelFieldName x The name of the field corresponding to the user- selected navigation level.
When used in the parent text assembly proc, indicates the field corresponding to the user- selected nav level. See “Step 4: The Parent Text Assembly Procedure,” .
@Obj x
@Owner x x
@OwnerList x x
@P2SM x x The PathToStdMarkup value as specified in the [Common] section of the Initialization Library record.
When used in a markup tag, indicates the path to the directory containing icons.
@ParamValues x
@ParamValue() x As a function, returns the literal value for a given local- context parameter. This function can be useful for comparing literals in an expression.
Useful for comparing literals in an expression.
@Parent x
@Parent_Object_Id x
@Parent_Ref_Id x x
@Password x The password of a user. When used in a Logon command event, performs a logon function. Used with
@UserId. See “CommandEvent,”.
@PatternIndex x
@PipeName x
@Placement x The position of the focused tool.
@PublicSessionId x x The Oracle-generated session ID of the ANONYMOUS user.
Related only to read transactions.
@QaApiResult x

Appendix A: Reserved Variables and Functions
Thin-Client Configuration Guide: Basics 374
Variable Win Web Definition/Value Purpose/Use
@Query x A query as applied to a Dispatch list.
In the case where a list has multiple queries/sorts, opens the window with the specified query. See “Invoking a Window at a Specific Record or Place,”.
@ReadOnly x 1 or 0. Renders a control read only (1) or editable (0).
@Record x A specific record.
@RecordsSelected Y/N.
Indicates whether the user has selected records in a grid.
In Scripted UDVs, acts as a flag in @ScriptParams to indicate selected records and number of selected records. See “Scripted UDVs,”.
@Refx x x An internal pointer to a string value, where x denotes the
@Ref instance (for example, @Ref1,
@Ref2) during a single Costpoint Manufacturing Execution session.
Used internally to point to a string in memory.
This variable should never be used or seen by the user. Any appearance should be reported as an anomaly.
@RefList x An iterated list of links/ references in a specific block.
In block save and cancel logic, used with HtRefReconcileSql to avoid calling back end for each link. See “Blocks,”.
@RefreshAlias x The alias of a control in an Instruction, Side Note, or Dispatch window.
When used as a param for a RefreshActiveTool Command Event, refreshes controls accordingly.
For Instruction and Side Note windows, see “Refresh Aliases in Instructions and Side Notes,”.
@RefreshTime x x

Appendix A: Reserved Variables and Functions
Thin-Client Configuration Guide: Basics 375
Variable Win Web Definition/Value Purpose/Use
@RemoveFilter x True/False. As a param for a RefreshActiveTool Command Event (Dispatch only), when enabled (True), removes the current filter on refresh.
Defaults to True when not defined. See “RefreshActiveTool,”.
@ReportData x
@Report_Id x A report ID.
@RequestedUserId x The User ID of a user attempting to log on.
When passed to the TranslatedLoginUserId SQL ID, converts the User ID to another value.
@RightFile x A right-hand file. In the Text Comparison window, displays the specified file in the right-hand pane. See “Text Comparison,”.
@Row x
@RowsExecuted x The number of rows processed in an input matrix transaction.
Provides the EndExecSqlId transaction with the number of rows processed, that is, sql transactions executed.
@ScriptParams x The parameters associated with a Scripted UDV.
Used in Scripted UDVs. Values are cleared any time the script dialog closes. Initial values are received from @AuxParams.
See “Scripted UDVs,”.
@SearchText x x The literal value of a specific
<TXT...> tag.
RefreshAlias syntax is now supported. @SearchText match text value can be partial.
When used in an ExtRefresh tag, refreshes according to the searched-for tag’s SQL ID. See “ExtRefresh,”.
@Sender x

Appendix A: Reserved Variables and Functions
Thin-Client Configuration Guide: Basics 376
Variable Win Web Definition/Value Purpose/Use
@SessionId x x The Oracle-generated session ID.
In diagnostics, identifies the session ID.
@Show x
@SID x The ID of the Oracle database instance (the System Identifier).
In diagnostics, identifies of the Oracle instance.
@SideNoteContents x =<invoke string> A comma delimited list of named value params used to open the side note panel.
Published in @ToolScope param source after opening any object in a side note.
@SideNoteType x =Text/Slide/SlideEdit
Text, Slide and SlideEdit are literal values of the
@SideNoteType param.
Published in @ToolScope param source after opening any object in a side note.
Text indicates hypertext content.
Slide indicates a slide for viewing.
SlideEdit indicates a slide for editing.
@Silent x The User_ID of a user attempting to log on via the API.
On logon failure, prevents the User Authentication dialog box from appearing.
@SlideModified x 0/1 Used to control command visibility or enabled state via expressions. Used with
@ToolScope
@Source x The key format for the Slide tool. Composed of the file spec that in turn includes @Filename and @Title parameters.
In an SFInvoke API function, invokes the Slide tool using the specified keys.
@SourceColName x A column name in a grid. In Display UDVs and grids, identifies the column from which a More Info UDV has been launched. Passed to
@AuxParams. See “More Info UDVs,”.
@Sql_Id x A SQL ID.
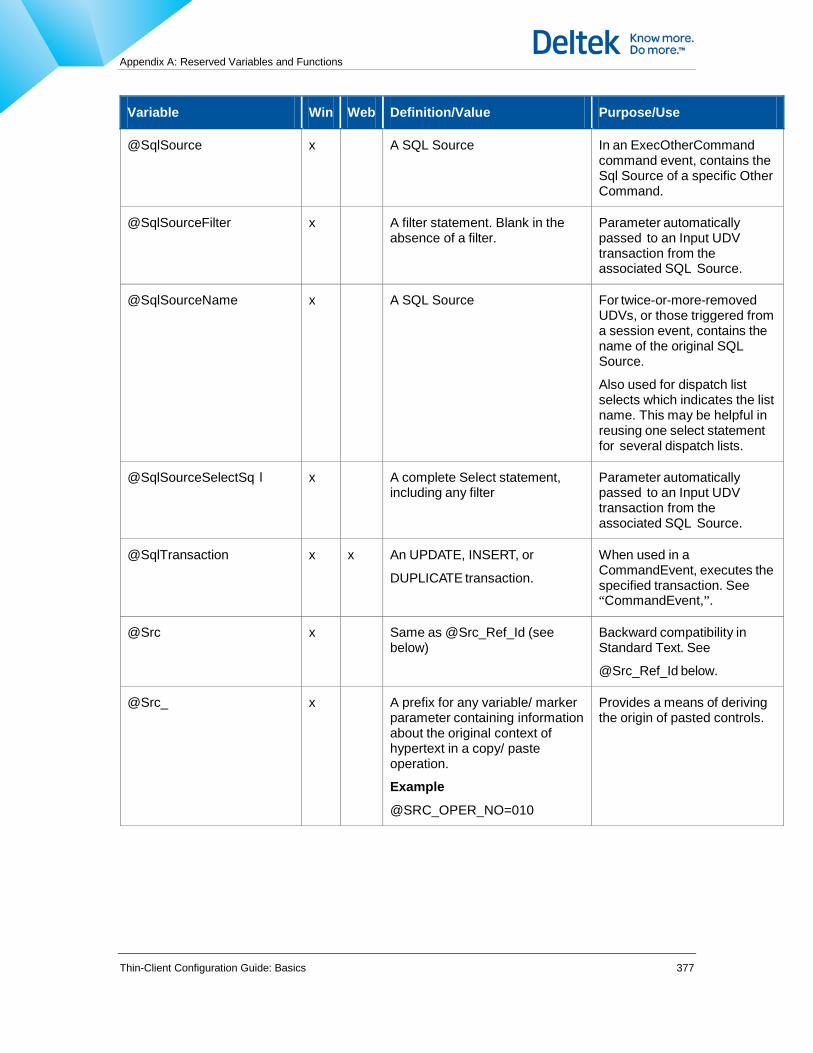
Appendix A: Reserved Variables and Functions
Thin-Client Configuration Guide: Basics 377
Variable Win Web Definition/Value Purpose/Use
@SqlSource x A SQL Source In an ExecOtherCommand command event, contains the Sql Source of a specific Other Command.
@SqlSourceFilter x A filter statement. Blank in the absence of a filter.
Parameter automatically passed to an Input UDV transaction from the associated SQL Source.
@SqlSourceName x A SQL Source For twice-or-more-removed UDVs, or those triggered from a session event, contains the name of the original SQL Source.
Also used for dispatch list selects which indicates the list name. This may be helpful in reusing one select statement for several dispatch lists.
@SqlSourceSelectSq l x A complete Select statement, including any filter
Parameter automatically passed to an Input UDV transaction from the associated SQL Source.
@SqlTransaction x x An UPDATE, INSERT, or
DUPLICATE transaction.
When used in a CommandEvent, executes the specified transaction. See “CommandEvent,”.
@Src x Same as @Src_Ref_Id (see below)
Backward compatibility in Standard Text. See
@Src_Ref_Id below.
@Src_ x A prefix for any variable/ marker parameter containing information about the original context of hypertext in a copy/ paste operation.
Example
@SRC_OPER_NO=010
Provides a means of deriving the origin of pasted controls.

Appendix A: Reserved Variables and Functions
Thin-Client Configuration Guide: Basics 378
Variable Win Web Definition/Value Purpose/Use
@Src_All_Params x A comma-delimited list of all parameters in the original marker of copied hypertext.
Example
@SRC_ALL_PARAMS=PLAN_ ID=262,PLAN_VERSION=1, PLAN_REVISION=1, PLAN_ALTERATIONS=0, OPER_NO=010,STEP_NO=010, OPER_KEY=38,STEP_KEY=906
Provides the original context of copied hypertext.
@Src_Control x x A parent control name.
@Src_Object_Id x Object_Id of a source Standard Text entry.
Contains the Object_Id of the source entry used in the Save As operation. Available only during a Standard Text Save As.
@Src_Ref_Id x x The Ref ID of an embedded control.
In copied hypertext and hypertext which contains hyperlinks, or a Standard Text entry, denotes the original Ref ID of an embedded control after the entry has been copied or added to an instruction.
@Start_Date x A date. In the Graphical Dispatch Manager, specifies the date corresponding to the left end of a horizontal bar in a Gantt chart. See “The Graphical Dispatch Manager,”.
@Status x SUCCESS or FAIL. In batch printing, indicates the success or failure of each selected record. Returned by EndGroupSql. See “Batch Printing Hypertext and Data Pages,” .
@StdText x
@SubCommand x A subcommand of an Other Command.
In an ExecOtherCommand command event, contains a specific subcommand of the specified Other Command.
@SubConfig x

Appendix A: Reserved Variables and Functions
Thin-Client Configuration Guide: Basics 379
Variable Win Web Definition/Value Purpose/Use
@SubSet x Parameters passed to an invoked tool.
In the Graph tool, maintains backward compatibility.
@SubStr() x x As a function, acts on a parent string, number of the starting character, and length of the substring to return part of the string.
Returns part of the designated string. See “Grid Attributes,”.
@SystemData x Global system values such as
@DbAlias, @FndVersion,
@FndBuild,
@ClientIPAddress,
@SessionId, and so on.
Also contains encrypted password.
In UDV and Dispatch logic, serves as a ParamsSqlSource, providing additional parameters for a SQLSource. Values are shown in System Data tab of Diagnostics dialog box.
This variable is available as a parameter in all contexts where there is access to in-memory parameter lists.
@SystemDate x A date. In diagnostics and time stamps, shows the date of the server system.
@SystemDateStr x
@Tag x For an Other Command or Insert transaction, the Tag property value of the launching button transaction source.
For a node in a diagram window, the NodeType property value.
@Tag=<Value>
For Other Commands, @Tag is added to @AuxParams on execution of an Other Command. See “Window- Launched Other Commands,” and “UDV- Launched Other Commands,”.
For nodes, @Tag is assigned on insertion of a new node.
@Text x Hex (base-16) equivalent of a Standard Text entry.
As an Embed parameter, allows inclusion of a Standard Text instance in line with the tag’s read-only contents. See “Embed,” .
@TextCompareBaseline x A snapshot of the current work order.
When used in a CreateTextCompareBaseline command event, compares an alteration to a previous state of the same work order. See “CommandEvent,” and “Alteration Comparison,”.
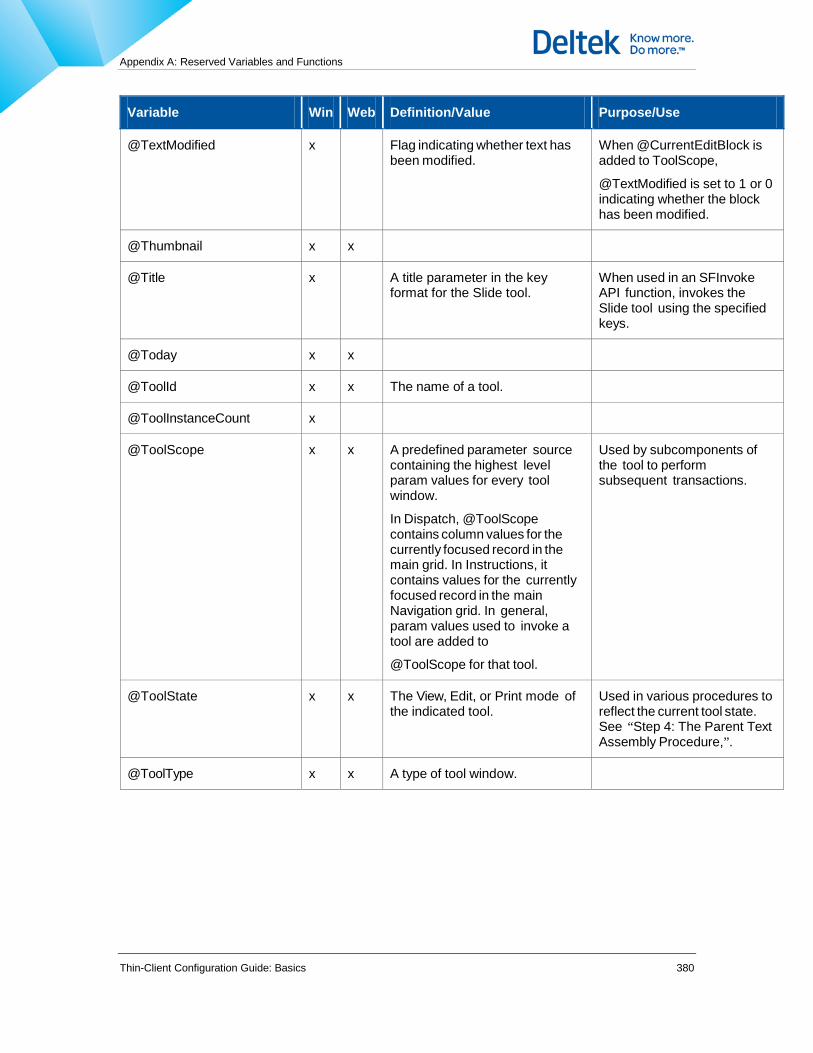
Appendix A: Reserved Variables and Functions
Thin-Client Configuration Guide: Basics 380
Variable Win Web Definition/Value Purpose/Use
@TextModified x Flag indicating whether text has been modified.
When @CurrentEditBlock is added to ToolScope,
@TextModified is set to 1 or 0 indicating whether the block has been modified.
@Thumbnail x x
@Title x A title parameter in the key format for the Slide tool.
When used in an SFInvoke API function, invokes the Slide tool using the specified keys.
@Today x x
@ToolId x x The name of a tool.
@ToolInstanceCount x
@ToolScope x x A predefined parameter source containing the highest level param values for every tool window.
In Dispatch, @ToolScope contains column values for the currently focused record in the main grid. In Instructions, it contains values for the currently focused record in the main Navigation grid. In general, param values used to invoke a tool are added to
@ToolScope for that tool.
Used by subcomponents of the tool to perform subsequent transactions.
@ToolState x x The View, Edit, or Print mode of the indicated tool.
Used in various procedures to reflect the current tool state. See “Step 4: The Parent Text Assembly Procedure,”.
@ToolType x x A type of tool window.

Appendix A: Reserved Variables and Functions
Thin-Client Configuration Guide: Basics 381
Variable Win Web Definition/Value Purpose/Use
@TransactionType x A transaction type Part of Input UDV
@AuxParams and
@ScriptParams parameter sets, making the Transaction Type available to lookup SQLSources, and so on.
In Scripted UDVs, the caption of a referenced Input UDV can be prepended with
@TransactionType, making it possible to use the UDV for both Insert and Update actions.
@Trim() x x As a function, acts on a string to return a substring trimmed of leading and trailing spaces.
Returns a substring. See “Grid Attributes,” .
@Udv_Id x x A UDV ID. Used in various procedures to identify a specific UDV.
@UdvUserEntries x User-entered values. A set of implementer-entered values published by control name.
@UdvUserFieldValues x Parameters for lookup Sql Sources.
Used internally to clear other fields when params have changed. Provides params for Lookup SqlSources/ dropdowns, etc. Includes values only for edits for which the fieldname is defined.
@UpdateSqlId x A SQL ID. Used in various procedures to identify a specific UpdateSqlId statement.
@Url x x An internet URL.
@UserID x x The User ID of a user. When used in a Logon command event, performs a logon function. Used with
@Password. See “CommandEvent,”.
@UserSessionId x x The Oracle-generated session ID of a logged-on user.
Passed for update and write transactions.

Appendix A: Reserved Variables and Functions
Thin-Client Configuration Guide: Basics 382
Variable Win Web Definition/Value Purpose/Use
@UserTemp x The user’s temp directory which is defined as follows:
The path specified by the TMP environment variable.
The path specified by the TEMP environment variable, if TMP is not defined.
The current directory, if both TMP and TEMP are not defined.
When serving the client from a common location, TMP or TEMP should be defined.
When used as the value for the PathToLocalCfgCache property, causes Costpoint Manufacturing Execution to look for a compressed Ini record in the user’s temp directory. See “Local Library Caching,”.
@ValidParentBlockType x
@ValidToolMode x A specific mode (View or Edit). When used a parameter in a ValidModeSqlId statement, accepts/rejects the current mode. See “Filtering Instruction Modes,”.
@ValidToolModeType x The type of mode, where type is ViewModes/EditModes/ PrintModes.
When used as a parameter in a ValidModeSqlId statement, returns a comma- or tilde- delimited list of all valid modes of the given type. See “Filtering Instruction Modes,”.
@WebLink x A URL. When used in an SFInvoke API function, invokes a web page using the specified URL.
@WH() x As a function, returns the Window Class Name.
Returns the window handle of a specific window.
@Width x x The width in pixels of a link background.
When used in a LinkInvoke tag, specifies the width of the text background marking the specified LinkName. See “LinkInvoke,”.
@XAxis x The name of the column whose values position data on the x- axis. For pie graphs, this property represents a slice.
Invokes a graph according to the passed parameter.
@XAxisEnd x The end date for data graphs. Invokes a graph according to the passed parameter.

Appendix A: Reserved Variables and Functions
Thin-Client Configuration Guide: Basics 383
Variable Win Web Definition/Value Purpose/Use
@XAxisStart x The start date for data graphs. Invokes a graph according to the passed parameter.
@YAxis x The name of the column whose values position data on the y- axis. For pie graphs, this property represents the size of a slice.
Invokes a graph according to the passed parameter.
@ZAxis x The name of the column in the ZAxisFieldSqlId that specifies the type of data to be graphed.
Invokes a graph according to the passed parameter.

Appendix B: UDV Properties
Thin-Client Configuration Guide: Basics 384
Appendix B: UDV Properties This appendix contains a description of control properties for UDVs. There are three types of properties.
Property Type Description
High-level Applies to overall function of the UDV.
Visual Control Applies to visual controls.
Non-visual control Applies to non-visual controls.
The UDV and each visual and non-visual control have an associated Properties panel in which you set attributes for the UDV or for the control.
The following screen shows a high-level Properties panel for an Input UDV.
UDV Properties For Thin-Client, properties can be one of six types.
Property Type Description
Numeric Valid values are number. Example properties are Height and Top.
String Valid values are user-defined, alphanumeric text of variable character length.
Examples are Name and Caption.
Boolean Valid values are True or False. Double-click the current value to toggle it. An example property is Ctl3D.
Property panel
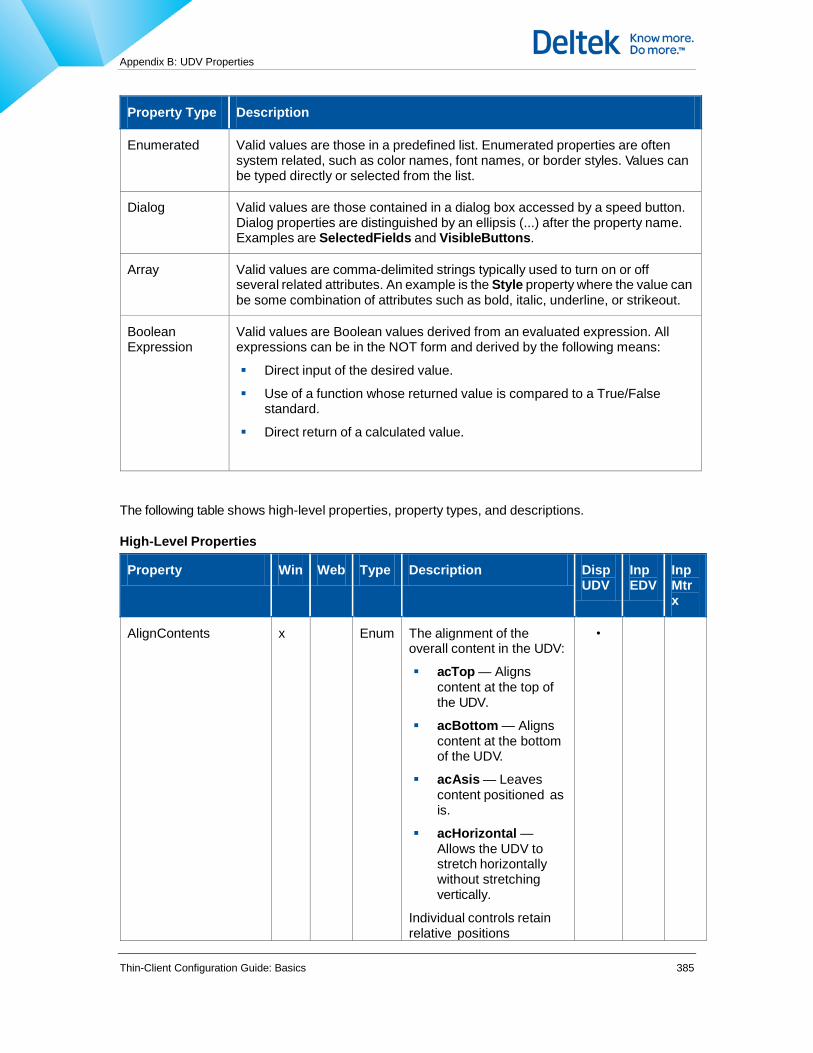
Appendix B: UDV Properties
Thin-Client Configuration Guide: Basics 385
Property Type Description
Enumerated Valid values are those in a predefined list. Enumerated properties are often system related, such as color names, font names, or border styles. Values can be typed directly or selected from the list.
Dialog Valid values are those contained in a dialog box accessed by a speed button. Dialog properties are distinguished by an ellipsis (...) after the property name. Examples are SelectedFields and VisibleButtons.
Array Valid values are comma-delimited strings typically used to turn on or off several related attributes. An example is the Style property where the value can be some combination of attributes such as bold, italic, underline, or strikeout.
Boolean Expression
Valid values are Boolean values derived from an evaluated expression. All expressions can be in the NOT form and derived by the following means:
Direct input of the desired value.
Use of a function whose returned value is compared to a True/False standard.
Direct return of a calculated value.
The following table shows high-level properties, property types, and descriptions.
High-Level Properties
Property Win Web Type Description Disp UDV
Inp EDV
Inp Mtrx
AlignContents x Enum The alignment of the overall content in the UDV:
acTop — Aligns content at the top of the UDV.
acBottom — Aligns content at the bottom of the UDV.
acAsis — Leaves content positioned as is.
acHorizontal — Allows the UDV to stretch horizontally without stretching vertically.
Individual controls retain relative positions
•

Appendix B: UDV Properties
Thin-Client Configuration Guide: Basics 386
Property Win Web Type Description Disp UDV
Inp EDV
Inp Mtrx
regardless of this setting.
AutoAccept x x Bool Determines whether an input dialog box will be executed without user intervention.
•
AutoRefresh x Enum Not implemented for multirecord transactions. Updates a calling SQL Source on execution of the SQL Transaction:
arNoEffect. Leaves an existing AutoRefresh value as-is; has no effect on the SQL Source. Passed back as NoEffect. Meant to be used by a referenced UDV in a Scripted UDV to preserve the current values in ScriptParams.
arRefresh. Refreshes according to transaction results. Passed back as Refresh.
arRefreshAndLocate. Default. Focuses an inserted/updated record based on transaction results. Passed back as RefreshAndLocate. Can be overridden by Ini Lib property Common.UdvAutoRefreshDefault.
arRefreshAndFilter. Refreshes and sorts according to the current filter. Passed back as RefreshAndFilter. Causes depression of the Filter button;
•
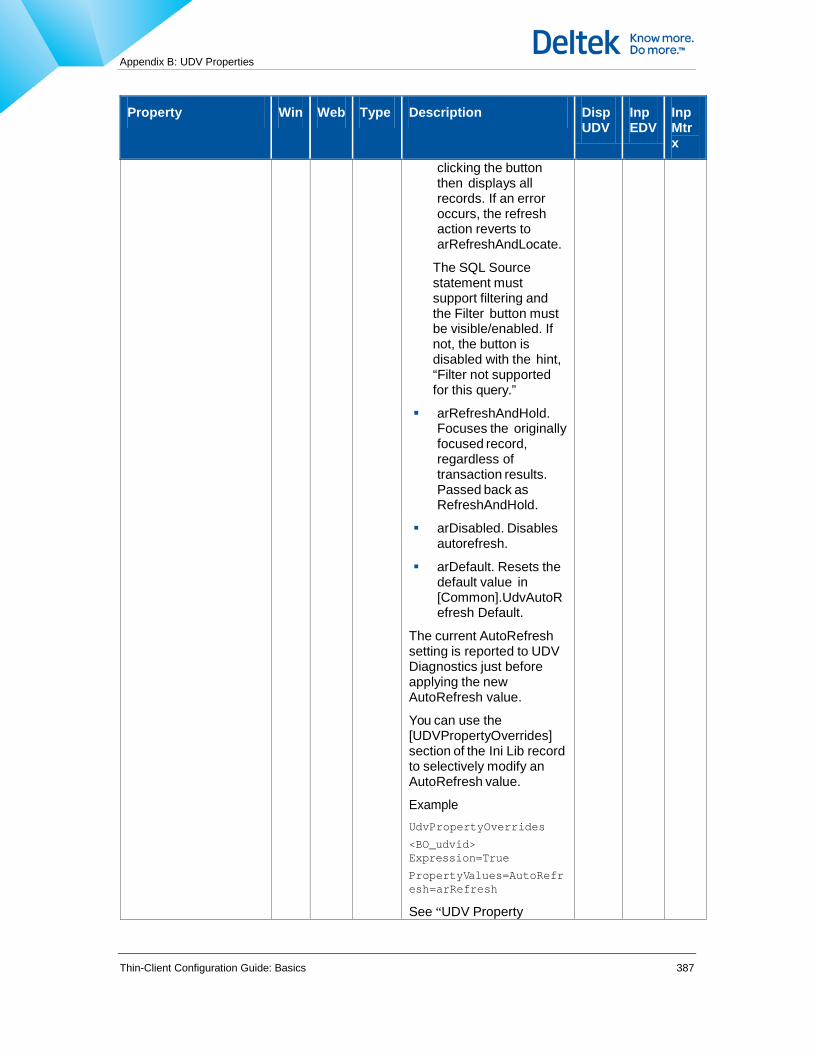
Appendix B: UDV Properties
Thin-Client Configuration Guide: Basics 387
Property Win Web Type Description Disp UDV
Inp EDV
Inp Mtrx
clicking the button then displays all records. If an error occurs, the refresh action reverts to arRefreshAndLocate.
The SQL Source statement must support filtering and the Filter button must be visible/enabled. If not, the button is disabled with the hint, “Filter not supported for this query.”
arRefreshAndHold. Focuses the originally focused record, regardless of transaction results. Passed back as RefreshAndHold.
arDisabled. Disables autorefresh.
arDefault. Resets the default value in [Common].UdvAutoRefresh Default.
The current AutoRefresh setting is reported to UDV Diagnostics just before applying the new AutoRefresh value.
You can use the [UDVPropertyOverrides] section of the Ini Lib record to selectively modify an AutoRefresh value.
Example UdvPropertyOverrides
<BO_udvid> Expression=True
PropertyValues=AutoRefresh=arRefresh
See “UDV Property

Appendix B: UDV Properties
Thin-Client Configuration Guide: Basics 388
Property Win Web Type Description Disp UDV
Inp EDV
Inp Mtrx
Overrides,”.
You can also use the [IniLibOverrides] section of the Ini file to selectively modify an AutoRefresh value.
Example [IniLibOverrides] UdvPropertyOverrides.MF1_1003151. PropertyValues=AutoRefresh= arDisabled
See “[IniLibOverrides],”.
Caption x Str The text that appears in the title bar of
the UDV.
• •
ClearAuxParams x Bool When True, clears @AuxParams values at the close of the UDV, or at the end of the UDV sequence in a Scripted UDV.
• • •
ConfirmationMsg x Str The confirmation message that appears after the user clicks OK in the UDV.
•
DynamicFieldAttributes x Bool Dynamically hides/unhides input UDV fields based on changes to field contents. When checked, it performs an expression evaluation of the InputFields Hidden property whenever the user leaves an input field in a single input UDV. It also does this when leaving any cell edit in an input matrix. The params provided to the expression parser consist of transaction params plus instantaneous field contents, the latter of which have precedence. The default is unchecked.
• •

Appendix B: UDV Properties
Thin-Client Configuration Guide: Basics 389
Property Win Web Type Description Disp UDV
Inp EDV
Inp Mtrx
Height x Num For very large UDVs, the height in pixels of the UDV. Causes a vertical scroll bar to appear in the UDV Editor, allowing scrolling to the extent of the Height value.
For Display UDVs only, sets the height of the UDV at run time.
See also Width.
• •
IgnoreAuxParams x Bool When True, on launch of a UDV, prevents Costpoint Manufacturing Execution from populating
@ScriptParams with @AuxParams values.
• • •
IMAllowRowReedit x Bool Controls re-editing of successfully completed row transactions. The default value is True. When set to False, the associated row is set to read-only and all fields are set to the read-only color after any successful transaction is executed. This applies to both ttSingleTransaction and ttCached.
•
IMBatchTransactions x Batches individual EXECs in a single call to the MiddleTier. This speeds up performance when multiple rows are processed.
Middle tier support is reported to clients via call to method com.Deltek.common.solumina.ISol uminaInfo.getCapabilities(), SUPPORTS_BATCH
•

Appendix B: UDV Properties
Thin-Client Configuration Guide: Basics 390
Property Win Web Type Description Disp UDV
Inp EDV
Inp Mtrx
=True
Client UDV must also set the new UDV property, IMBatchTransactions=True (Ideally, middle tier can execute the transactions using either method, by detecting the format of the incoming http content)
Batch transaction process optimization only occurs when all transactions in the group are of the same type, insert or update or delete.
IMBeginExecSqlId x Provides a way to setup data for the entire group of transactions to be processed.
Executes just before performing the transaction for the first executed row in the Input Matrix.
Runs only once for each time the Input Matrix is called, i.e. if an error is raised by one or more of the row transactions and the user makes changes and re-executes the data via Okay, Next, and so on, this sql does not execute again.
All SqlTransaction and row level values of the first executed row are provided as params to this transaction.
•

Appendix B: UDV Properties
Thin-Client Configuration Guide: Basics 391
Property Win Web Type Description Disp UDV
Inp EDV
Inp Mtrx
Reserved param @RowCount is automatically added to available transaction params.
When assigned, executes regardless of TransactionType; however, probably only useful for ttCachedTransaction.
Any outbound param values from this transaction are added to and will overwrite matching param values of every row transaction. These outbound params values are also applied with precedence over ScriptParams and thus eventually to the values returned by the hosting UDV dialog.
IMBlankRowValuesHavePrecedence
x Gives blank input matrix row values precedence over context params of the same name. The default is False.
•
IMDirtyFlagWhileLoading
x Causes the row to be automatically put in the edit state when, for example, Default to Single changes the value in the cell from that which was initially loaded.
•
IMEndExecSqlId x Can be used to perform cleanup after all rows transactions are processed or to submit session events for refresh, invoke, etc.
Executes immediately
•

Appendix B: UDV Properties
Thin-Client Configuration Guide: Basics 392
Property Win Web Type Description Disp UDV
Inp EDV
Inp Mtrx
after performing the last executed row in the Input Matrix, and only if no errors are raised from the time of clicking Okay, Next, and so on. (therefore, runs only once for each time the Input Matrix is called because the dialog is subsequently closed in this case).
All SqlTransaction and row level values of the last executed row are provided as params to this transaction
Reserved param @RowCount is automatically added to available transaction params
When assigned, executes only for TransactionType of ttCachedTransaction.
Any outbound param values from this transaction are added to and will overwrite matching param values from the outbound params provided by BeginExecSqlId. These outbound params values are also applied with precedence over ScriptParams and thus eventually to the values returned by the hosting UDV dialog.
IMFixedColCount x On opening a UDV, the • •

Appendix B: UDV Properties
Thin-Client Configuration Guide: Basics 393
Property Win Web Type Description Disp UDV
Inp EDV
Inp Mtrx
number of columns that are fixed/locked in place regardless of the scrolling position. Valid values are integers representing the total number of fixed columns starting from column 1. A value of -1 (minus one) disables the property.
When any columns are locked, keyboard keys such as [Home] and [End] operate only on visible, unlocked cells.
This number is overridden by subsequent Unlock Column and Lock Column actions as initiated through the local menu of the UDV.
IMForceTransactions x The action to be taken against any unchanged rows/records:
ftFalse — Performs no action.
ftInsert — Performs an INSERT according to the InsertSqlId of the SqlTransaction.
ftUpdate — Performs an UPDATE according to the UpdateSqlId of the SqlTransaction.
ftDelete — Performs a DELETE according to the DeleteSqlId of the SQL Source.
• •
IMPopulateFromParams
x This is for a given Input Field in a script-launched Input Matrix UDV, when enabled along with the field PopulateforInsert property. It populates the
• •

Appendix B: UDV Properties
Thin-Client Configuration Guide: Basics 394
Property Win Web Type Description Disp UDV
Inp EDV
Inp Mtrx
field with a default value based on @ScriptParams values. For more information on Scripted UDVs, see “Scripted UDVs,”.
IMScanAction x The action taken when a value is scanned into a cell of the matrix:
saIMAccept — Accepts scan into current cell and remains positioned in cell.
saIMOK — Accepts scan into current cell and performs OK button action.
saIMTab — Accepts scan into current cell and moves one cell to the right.
saIMDown — Accepts scan into current cell and moves one cell down.
saIMIgnore — Rejects scan data if use of scanner is not allowed.
saIMScanOnly — Accepts scan into Current cell while ignoring keyboard input.
• •
IMSqlSourceName For standalone input matrixes only, the name of an internal SQL Source that allows this UDV to receive data without having a Display UDV parent. For more information, see “Configuring a Standalone Input Matrix UDV,”.
• •

Appendix B: UDV Properties
Thin-Client Configuration Guide: Basics 395
Property Win Web Type Description Disp UDV
Inp EDV
Inp Mtrx
IMSqlTransactionName
The name of the SQL Transaction for this UDV. This SQL Transaction does not already have to be configured.
For Input Matrix UDVs only, assignment of this value links the matrix control to the SQLTransaction.
• •
Max Height The maximum height in pixels to which the input UDV can be resized.
• •
Max Width The maximum height in pixels to which the input UDVcan be resized.
• •
MinHeight x Num The minimum height in pixels to which the UDV can be resized.
At run time, a value of -1 for any size property is the same as 0, which applies the default dimension.
The speed bar also contains a MinHeight property. See “Creating QA s and Other Commands,”.
• •
MinWidth x Num The minimum width in pixels to which the UDV can be resized.
At run time, a value of -1 for any size property is the same as 0, which applies the default dimension.
• •
MultimediaRequired x Enum Determines whether a multimedia object must be authored in the UDV:
No — Default. A multimedia object cannot be authored in the UDV.
• •

Appendix B: UDV Properties
Thin-Client Configuration Guide: Basics 396
Property Win Web Type Description Disp UDV
Inp EDV
Inp Mtrx
Optional — A multimedia object can be, but doesn’t have to be, authored in the UDV.
Required — A Multimedia object must be authored in the UDV.
RequireLogonExpression
x Bool When enabled (True) causes display of a logon dialog box (for a single-logon transaction) before allowing the UDV transaction to take place. See “Single- Transaction Logon,”.
• •
TransactionType x x Enum The time of a database transaction: after a single-row input/update (ttSingle) or after multirow inputs/updates (ttCached).
• •
IMAllowHeaderChanges
x Bool For Input Matrix UDVs, when enabled (True) allows header field values to be changed, and therefore act as filter of the displayed matrix. See “Input Matrix UDVs,”.
•
IMBatchCommit x Bool For Input Matrix UDVs, when set to True, and when Transaction Type = ttCached, commits all changes in a single database transaction.
•
IMFixedColCount x Num For Input Matrix UDVs, on opening the UDV, the number of columns that are fixed in place regardless of the scrolling position. Valid values are integers representing the total number of fixed columns starting from column 1. A “-1” (minus
•
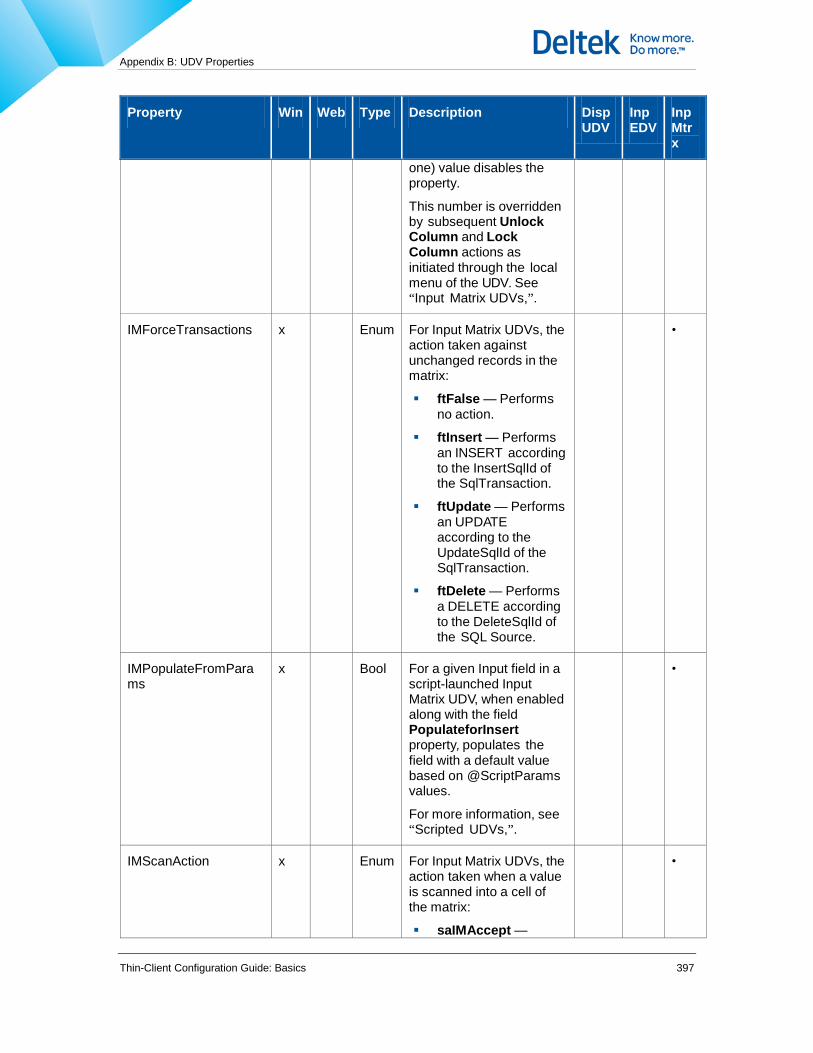
Appendix B: UDV Properties
Thin-Client Configuration Guide: Basics 397
Property Win Web Type Description Disp UDV
Inp EDV
Inp Mtrx
one) value disables the property.
This number is overridden by subsequent Unlock Column and Lock Column actions as initiated through the local menu of the UDV. See “Input Matrix UDVs,”.
IMForceTransactions x Enum For Input Matrix UDVs, the action taken against unchanged records in the matrix:
ftFalse — Performs no action.
ftInsert — Performs an INSERT according to the InsertSqlId of the SqlTransaction.
ftUpdate — Performs an UPDATE according to the UpdateSqlId of the SqlTransaction.
ftDelete — Performs a DELETE according to the DeleteSqlId of the SQL Source.
•
IMPopulateFromParams
x Bool For a given Input field in a script-launched Input Matrix UDV, when enabled along with the field PopulateforInsert property, populates the field with a default value based on @ScriptParams values.
For more information, see “Scripted UDVs,”.
•
IMScanAction x Enum For Input Matrix UDVs, the action taken when a value is scanned into a cell of the matrix:
saIMAccept —
•

Appendix B: UDV Properties
Thin-Client Configuration Guide: Basics 398
Property Win Web Type Description Disp UDV
Inp EDV
Inp Mtrx
Accepts scan into current cell and remains positioned in cell.
saIMOK — Accepts scan into current cell and performs OK button action.
saIMTab — Accepts scan into current cell and moves one cell to the right.
saIMDown — Accepts scan into current cell and moves one cell down.
saIMIgnore — Rejects scan data if use of scanner is not allowed.
saIMScanOnly — Accepts scan into Current cell while ignoring keyboard input.
IMSqlSourceName x Str For Input Matrix UDVs, the name of the internal SQL Source that allows the UDV to receive data without having a Display UDV parent.
•
IMSqlTransactionName
x Str For Input Matrix UDVs, the SQL ID of the input matrix control SQLTransaction.
•
Width x Num For very large UDVs, the width in pixels of the UDV. Causes a horizontal scroll bar to appear in the UDV Editor, allowing scrolling to the extent of the Width value.
For Display UDVs only, sets the width of the UDV at run time.
• •

Appendix B: UDV Properties
Thin-Client Configuration Guide: Basics 399
Property Win Web Type Description Disp UDV
Inp EDV
Inp Mtrx
See also Height.
The following tableshows all visual and non-visual control properties and descriptions.
Visual and Non-Visual Control Property Descriptions
Property Win
Web
Description
Accept x For the EXIT Statement of a Scripted UDV, when set to True, causes the script sequence to end with an OK action, that is, the script performs a group database transaction/commit and closes the database transaction.
When set to False, causes the script sequence to end with a Cancel action, that is, the script rolls back any transactions and closes the database transaction.
Active x Determines whether the SQL Source or SQL Transaction is active in design mode.
Alignment x Controls justification of words in a text field.
Anchors x Independently locks down each edge of UDV controls, left, right, top and bottom. When checked:
akTop — The controls position is fixed with respect to the top edge of its parent UDV.
akLeft — The controls position is fixed with respect to the left edge of its parent UDV.
akRight — The controls position is fixed with respect to the right edge of its parent UDV.
akBottom — The controls position is fixed with respect to the bottom edge of its parent UDV.
These values are only applied when the UDVs AlignContents property is set to acAsIs.
AutoScrollbars x Automatically provides scrollbars when UDV size is greater than the containing window. Default value is true/checked.
BlockId x x The block type of hypertext in a Hypertext Control.
BottomMargin x Defines the space between the bottom control and the edge of a display UDV. Must be an integer value >= -1. Default value is -1 which uses default spacing

Appendix B: UDV Properties
Thin-Client Configuration Guide: Basics 400
Property Win
Web
Description
according to context. For Aux UDVs the default spacing is 4 pixels. In all other places, the default spacing is 0.
BranchTo x For a Scripted UDV IF Statement, the name of a statement that executes next when the Expression property is evaluated as True.
Cancel x For an ASSERT Statement in a Scripted UDV, when set to True, causes the Cancel button to appear in the message dialog box.
CancelClears SessionsEvents
x When defined for the Script UDV itself, cancelling from any point in the script clears the session events. When defined for a particular UDV in the script, clears session events only when canceling from that point.
Does not clear session events created by the UDV's CancelSqlId.
CancelSqlId x x For SQL Transactions, the SQL ID that the UDV executes if the user clicks the Cancel button.
When no value has been assigned to this property and there are no transactions for an associated Input UDV, no Cancel button appears.
Caption x x For nonScripted UDVs, the text value of a visual control such as a label.
For a UDV Statement of a Scripted UDV, the title of the UDV to be launched. This title appears in the upper left caption area of the UDV and also in the dialog box status line. (Windows only).
CaptionFont.Color x x The font used for the control caption.
CaptionFont.Name x x The Windows identifier for the typeface used for the control caption.
CaptionFont.Size x x The height in pixels of the control caption.
CaptionFont.Style x x The set of active font attributes for the control caption; can include bold, italic, underline, and overstrike.
CaptionPos x x The position of the caption, where cpAbove and cpLeft position the caption above and left of the control, respectively.
Comment x In a Scripted UDV statement, nonexecuting text meant to explain the function of the statement.

Appendix B: UDV Properties
Thin-Client Configuration Guide: Basics 401
Property Win
Web
Description
ConsolidatedQuery x When set to True, causes a SQL Source to be used as a consolidated query. See “Consolidated Queries in Embedded UDVs,”.
ConsolidatedQueryLevel x When enabled, causes the Selected Field in a SQL Source to be explicitly called out in the consolidated query. See “Consolidated Queries in Embedded UDVs,” .
DefaultInsertValue x x The default field value to be used for Insert transactions. The value can be a literal value or @GetQueryValue(). See “Expression-Evaluated Defaults,”.
DefaultToValueofSingle x When enabled, in InputFields of Control Type Lookup (dynamic only), where only a single value exists, populates the field with that single value.
For Update transaction UDVs, when enabled in conjunction with UdvApplyDefaultValuesForUpdate, causes a single lookup value to populate the designated field.
DeleteConfirmationMsg x The confirmation message for a SQL Source when the user attempts to delete a record. Can include parameters so that the user can identify the record: Delete drawing
:DRAWING_NUMBER from plan :PLAN_NO ?
DeleteSQLId x x The SQL ID of the appropriate delete statement for a SQL Source.
Delimiter x The character that separates individual data elements in the data string going to and leaving a list control. The default is the semicolon.
Dependent Fields x For Input Fields, a comma-delimited list of field names that are cleared whenever the value in the specified Input Field changes.
DisplayNameField x Applies to the UDV List control. Refers to a single field name containing concatenated values which correlate with values for a data-linked field. This makes it possible to represent surrogate key fields such as GUIDs as end-user meaningful equivalent field values. Use this property to improve performance by making it unnecessary to re-join key values from selected input values. This property is limited to input UDVs.
The DisplayFieldName also identifies the column

Appendix B: UDV Properties
Thin-Client Configuration Guide: Basics 402
Property Win
Web
Description
name used by the list builder dialog to represent values in the select value list on the left.
The number of delimited tokens in the referenced DisplayFieldName field must match the data-linked fields token count. The referenced DisplayFieldName field tokens must also be delimited by the same delimiter as with the data-linked field, that is, as specified in the first position of the Delimiter property.
DisplaySourceField x For a Selected field of a SQL Source, an alternate field—or an expression/NOT expression that returns an alternate field—whose value appears in place of the selected field value.
DropCommands x One or more launchable UDVs that are designed to handle dragged- and-dropped records. Transactions can be Insert or Update, and can be grouped by field.
Entry Type x For an Input Field of Control Type Edit, the allowable data type of that Edit field:
Alphanumeric. A combination of integers and letters.
Numeric. Integers.
Date. A date.
Filename. A file.
Filename with Data. Image files, ASCII files, or scanned documents. Meant for Input fields in embedded controls such as data collections.
Hypertext. Hypertext.
Object Manager. An Object Manager.
URL. A web site URL.
Entry Format x For an Input Field of Control Type Edit, and all Entry Types except Filename, Filename with Data, and Object Manager, the allowable format of an entry.
ExecuteUdv x When enabled for a Script button control in an Input UDV, causes the current UDV to execute when the user clicks the Script button. For more information, see “The Script Button,” .
ExplorerIdFields x In an Explorer Grid, the names of the field(s) whose values uniquely identify a record. Separate multiple fields with commas. For more information on Explorer Grids, see “Explorer Grids”.

Appendix B: UDV Properties
Thin-Client Configuration Guide: Basics 403
Property Win
Web
Description
ExplorerLevelField x In an Explorer Grid, the name of the field that contains the record level. For more information on Explorer Grids, see “Explorer Grids”.
ExplorerParentFields x In an Explorer Grid, the parent record’s ExplorerIdFields value — names of the field(s) whose values uniquely identify the parent record. Separate multiple fields with commas. For more information on Explorer Grids, see “Explorer Grids”.
Expression x In a Scripted UDV, a Boolean expression/NOT expression that has the following affect:
SELECT and EXEC Statements — When evaluated as False, prevents the statement from running.
IF Statement — When evaluated as True, jumps to the statement specified by the Branch To property.
ASSERT Statement — When evaluated as False, causes the statement to run.
Expressions can be derived by the following means:
Direct input of the desired value.
Use of a function whose returned value is compared to a True/ False standard.
Direct return of a calculated value.
Font.Color x x The color of the typeface used for a control.
Font.Name x x The Windows identifier for the typeface.
Font.Size x x The height in pixels of the font.
Font.Style x x The set of active font attributes; can include bold, italic, underline, and overstrike.
GraphId x In a Graph control, the ID of the graph that is associated with the control.
Height x x The vertical size in pixels of a control.
HelpContext x The Context ID of the Help topic that contains information about the control.
Hidden x x In Display UDVs, determines whether a Selected Field in a grid control is hidden to the user. When Hidden = True or contains an expression/NOT expression

Appendix B: UDV Properties
Thin-Client Configuration Guide: Basics 404
Property Win
Web
Description
evaluated as True, the field is hidden.
For a Selected Field in a tab (data page), avoid the use of the @GetQueryValue() function as the Hidden value. Instead, append a column to the Scope Query and base the expression of the hidden field on the appended column. For example, to hide the Part_No field, append to the Scope Query an additional column, Alt_Work_Center_Flag, and then for Part_No, set the Hidden property to Alt_Work_Center_Flag = ’N’. This appended-column technique is necessary because @GetQueryValue is evaluated only on tab selection—but not on tab refresh.
In Input UDVs, determines whether an Input Field of the SQL Transaction is hidden to the user. When Hidden = True or contains an expression/NOT expression evaluated as True, the field is hidden.
For all Edit fields in Display and Input UDVs, this property can be overridden in a Thin-Client session by using the /xh switch in the command line.
For bevel or grid controls, this property can hide controls within their bounds by using a standard Costpoint Manufacturing Execution expression. The expression is evaluated and applied when the display UDV is initialized for display and when data changes in the DataLinked SqlSource. No context params are provided by default; therefore, configuration will probably rely on functions such as "@GetParamSourceValue()" to aquire values from scope, and so on.
The result of evaluating the Hidden properties expression affects visibility of the bevel itself and all of the controls within or intersecting its bounds. Note that the bevel itself can be made invisible for all cases by setting the Shape property to bsSpacer.
Expressions can be derived by the following means:
Direct input of the desired value.
Use of a function whose returned value is compared to a True/ False standard.
Direct return of a calculated value.
HiddenInInputMatrix x In an Input Matrix UDV, determines if a SelectedField of the SQL Source is hidden. Can contain an expression/NOT expression derived by the following means:
Direct input of the desired value.
Use of a function whose returned value is compared to a True/ False standard.

Appendix B: UDV Properties
Thin-Client Configuration Guide: Basics 405
Property Win
Web
Description
Direct return of a calculated value.
HideCols x For a UDV Statement of a Scripted UDV, a comma-delimited list of column(s) whose corresponding fields will not appear in the UDV. Example: ORDER_ID,CUSTOMER.
Can be parameter filled in the form :<ParamName> to dynamically hide columns during script execution.
Highlighting x x The set of data-dependent attributes of grid text.
InputFields x x The data fields that will be populated in a SQL Transaction.
InputUDVId x x For a SQLSource, the ID of a UDV that allows updating a record.
To disable insert actions in the presence of an InputUdvId value, set InsertUdvId to @NA.
InsertSQLId x x The SQL ID of the appropriate insert statement for a SQL Transaction. In buyoff or data collection UDVs, the InputUdvId (or InsertUdvId) property identifies the UDV with which the user inserts the buyoff/data collection in a block, and the InsertSqlId of this Input UDV creates a buyoff/data collection insertion record in the database.
When you devise the InsertSqlId statement, it is highly recommended that you create the insertion record in such a way that it reflects the state of the block save as “unconfirmed,” meaning the block save logic has not yet executed. (For more information on block save logic, see “The Save Changes Option for a Block,” .)
The state of the block save is important, because it is possible for Costpoint Manufacturing Execution to abort before cancelling or saving insertions to the block. When this happens, the database contains extraneous insertion records of which the block is unaware. You can use an “unconfirmed” save state to flag these extraneous records.
To flag extraneous insertion records, follow these guidelines:
Create insertion records in such a way that the block save state is recognized as “unconfirmed.”
Ensure that as the block save logic completes, it converts the save state of reconciled insertion records in such a way that they are recognized as “confirmed.”
Ensure that other procedures and SELECT statements ignore any insertion records recognized as “unconfirmed.”

Appendix B: UDV Properties
Thin-Client Configuration Guide: Basics 406
Property Win
Web
Description
InsertUDVId x x For a SQLSource, the ID of a UDV that allows insertion of a new record. If you assign no value, Thin-Client uses the InputUdvId value for insert.
To disable insert actions in the presence of an InputUdvId value, set InsertUdvId to @NA.
KeyFieldNames x x The names of the fields used to reposition a grid after a refresh.
Left x x The distance in pixels between the left side of an object and the left side of the screen.
Manually Entered Values Are Persistent
x For an Input Field of Control Type Lookup, causes dependent field values to be persistent, that is, manually entered values in dependent fields remain intact when the user selects a value in the lookup field.
When this property is deselected, selection of a value in the Lookup field causes overwriting of any manually entered value in a dependent field.
MaxLength x x For an InputFields value, the maximum number of characters for that value.
MoreInfoUDV x For a selected field of a SQL Source, the UDV that appears when the user highlights that field in a Display UDV and selects More Info on the local menu. For more information, see “More Info UDVs,”.
MsgId x For an ASSERT Statement in a Scripted UDV, the ID of a message from the SFCORE_MESSAGES table, or a literal string. In a literal string, the text can contain parameter names in the form
:<ParamName>.
MsgKind x For an ASSERT Statement in a Scripted UDV, the kind of message: mkException, mkWarning, or mkError.
mkException. The message interrupts statement execution and overlays the most recently displayed UDV. Clicking any button always closes the UDV script dialog box.
mkWarning. When the user clicks OK, the statement sequence resumes and the next statement executes.
mkError. When the user clicks OK, the most recently displayed UDV reappears.
When you click Cancel, the current UDV script dialog box closes.

Appendix B: UDV Properties
Thin-Client Configuration Guide: Basics 407
Property Win
Web
Description
MultiRecordUpdate x Determines whether the user can select multiple records in a grid.
MruTrue. Allows multirecord transactions and runs them in sequence.
MruFalse. Does not allow multirecord transactions.
MruGroup. Allows multirecord transactions and groups them into a single database transaction.
Name x x The name of a control or Scripted UDV statement.
NavControlVisible x For Graph controls, when enabled, causes a navigator to appear above the graph.
Options x Miscellaneous attributes of a grid.
OkButton x For an ASSERT Statement in a Scripted UDV, when set to True, causes the OK button to appear in the message dialog box.
OtherCommands x x Other commands that can be defined for an Ellipsis button in a navigator, or for a Command button. None of these commands are predefined or configured. Web Express Client supports a single command through a Command button only. For more information, see “UDV-Launched Other Commands,”.
ParamSqlSourceName x For Graph controls only, the name of another SQL Source that publishes its parameters for the current SQL Source. This property behaves the same as the ParamsSqlSourceName property for other controls, but the “Param” element is singular (Param, not Params). See below.
ParamsSQLSourceName x x The name of another SQL Source that will provide parameters for the current SQL Source. Typical parameters are @ToolScope,
@SystemData, and @CurrentMarker. As of Thin Client 4.2.8.0, in twice-or-more-removed UDVs/Input Matrixes launched from a session event, the ParamsSqlSourceName is logically aware of the originating (Display UDV) SQL Source.
If the associated control is a Graph control, the property name is ParamSqlSourceName, with a singular “Param” element. See above.
You can substitute a source value in ParamsSqlSourceName through use of an

Appendix B: UDV Properties
Thin-Client Configuration Guide: Basics 408
Property Win
Web
Description
expression.
Syntax @Eval(<Expression>~<TrueResult>~<FalseResult>)
where TrueResult is the returned SQL Source when the expression is True, and FalseResult is the returned SQL source when the expression is false.
Arguments must be delimited by the tilde character (~) and all three arguments (<Expression>, <TrueResult>, and <FalseResult>) must be defined, that is, function parentheses must contain 2 tildes. Values can be blank however.
Examples @Eval(PWP_ID='-ZADEH'~@ToolScope~@na),@ToolScope
@Eval(PWP_ID='-ZADEH'~@ToolScope~),@ToolScope “@Eval(@SubStr(PWP_ID,1,2)='- Z'~@ToolScope~)”,@ToolScope @Eval(@SubStr(PWP_ID,1,2)='-Z'~@ToolScope~);@ToolScope
You can use the semicolon (;) as a delimiter between ParamsSqlSourceName values and also use double quotes to enclose the @Eval() function for expressions that contain commas.
PasswordMode x Determines whether password characters are displayed as asterisks (True) or not (False) when the user inputs a password in an edit control.
In order to properly mask a password value when the associated Edit control appears in error diagnostics, you must link the Edit control to a column whose name contains an (underscore) _PASSWORD suffix, for example, USER_PASSWORD. If the column name does not have an _PASSWORD suffix, the unmasked password value may be visible in some diagnostics messages.
Populate for Insert x x For an input field of a SQL Transaction, on an insert transaction, causes the field to be populated with the existing value of the currently focused record.
PrintFixedCols x Determines whether Costpoint Manufacturing Execution enables or disables fixed columns during printing.
PrintFormat x Determines whether Costpoint Manufacturing Execution sets the page format for printing.
PrintOrder x The sequence in which the SQL Source should be
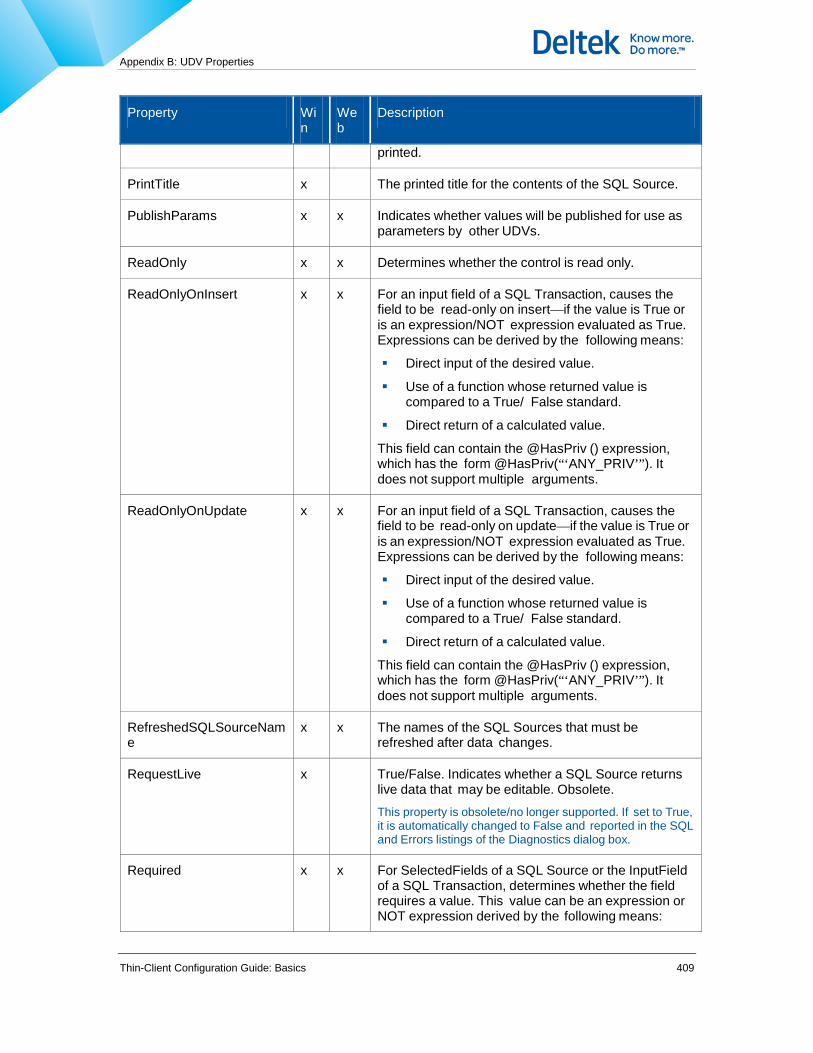
Appendix B: UDV Properties
Thin-Client Configuration Guide: Basics 409
Property Win
Web
Description
printed.
PrintTitle x The printed title for the contents of the SQL Source.
PublishParams x x Indicates whether values will be published for use as parameters by other UDVs.
ReadOnly x x Determines whether the control is read only.
ReadOnlyOnInsert x x For an input field of a SQL Transaction, causes the field to be read-only on insert—if the value is True or is an expression/NOT expression evaluated as True. Expressions can be derived by the following means:
Direct input of the desired value.
Use of a function whose returned value is compared to a True/ False standard.
Direct return of a calculated value.
This field can contain the @HasPriv () expression, which has the form @HasPriv(“‘ANY_PRIV’”). It does not support multiple arguments.
ReadOnlyOnUpdate x x For an input field of a SQL Transaction, causes the field to be read-only on update—if the value is True or is an expression/NOT expression evaluated as True. Expressions can be derived by the following means:
Direct input of the desired value.
Use of a function whose returned value is compared to a True/ False standard.
Direct return of a calculated value.
This field can contain the @HasPriv () expression, which has the form @HasPriv(“‘ANY_PRIV’”). It does not support multiple arguments.
RefreshedSQLSourceName
x x The names of the SQL Sources that must be refreshed after data changes.
RequestLive x True/False. Indicates whether a SQL Source returns live data that may be editable. Obsolete.
This property is obsolete/no longer supported. If set to True, it is automatically changed to False and reported in the SQL and Errors listings of the Diagnostics dialog box.
Required x x For SelectedFields of a SQL Source or the InputField of a SQL Transaction, determines whether the field requires a value. This value can be an expression or NOT expression derived by the following means:
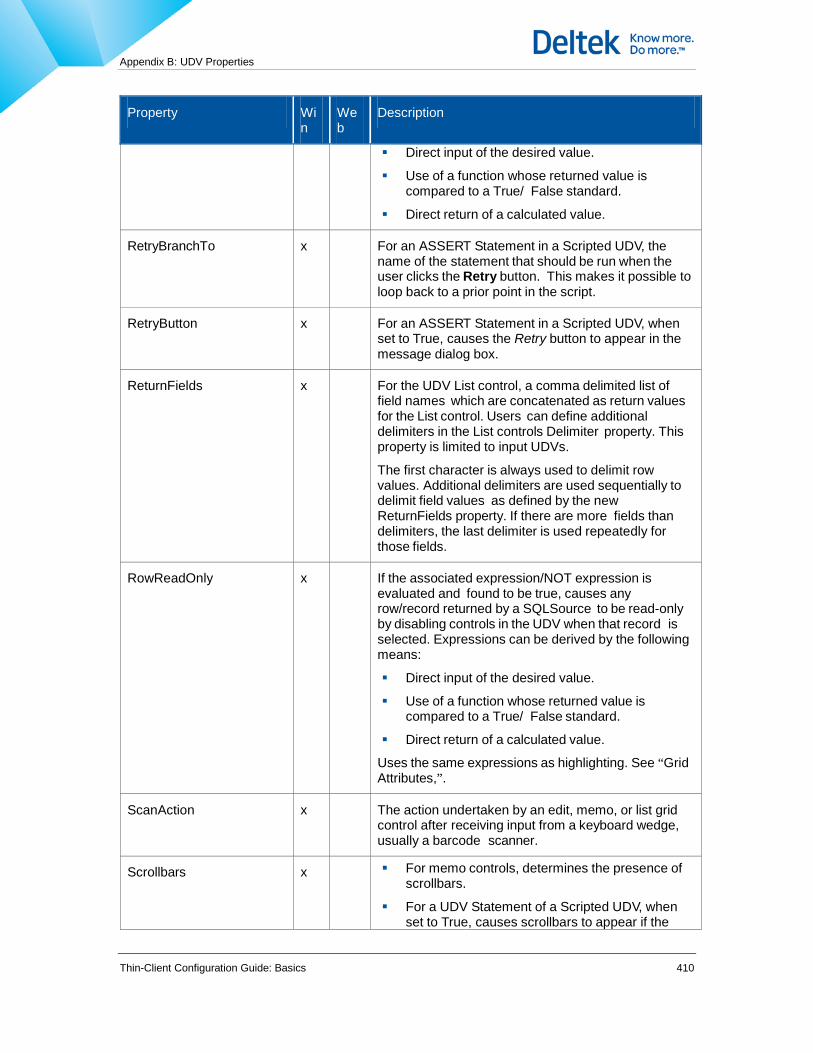
Appendix B: UDV Properties
Thin-Client Configuration Guide: Basics 410
Property Win
Web
Description
Direct input of the desired value.
Use of a function whose returned value is compared to a True/ False standard.
Direct return of a calculated value.
RetryBranchTo x For an ASSERT Statement in a Scripted UDV, the name of the statement that should be run when the user clicks the Retry button. This makes it possible to loop back to a prior point in the script.
RetryButton x For an ASSERT Statement in a Scripted UDV, when set to True, causes the Retry button to appear in the message dialog box.
ReturnFields x For the UDV List control, a comma delimited list of field names which are concatenated as return values for the List control. Users can define additional delimiters in the List controls Delimiter property. This property is limited to input UDVs.
The first character is always used to delimit row values. Additional delimiters are used sequentially to delimit field values as defined by the new ReturnFields property. If there are more fields than delimiters, the last delimiter is used repeatedly for those fields.
RowReadOnly x If the associated expression/NOT expression is evaluated and found to be true, causes any row/record returned by a SQLSource to be read-only by disabling controls in the UDV when that record is selected. Expressions can be derived by the following means:
Direct input of the desired value.
Use of a function whose returned value is compared to a True/ False standard.
Direct return of a calculated value.
Uses the same expressions as highlighting. See “Grid Attributes,”.
ScanAction x The action undertaken by an edit, memo, or list grid control after receiving input from a keyboard wedge, usually a barcode scanner.
Scrollbars x For memo controls, determines the presence of scrollbars.
For a UDV Statement of a Scripted UDV, when set to True, causes scrollbars to appear if the
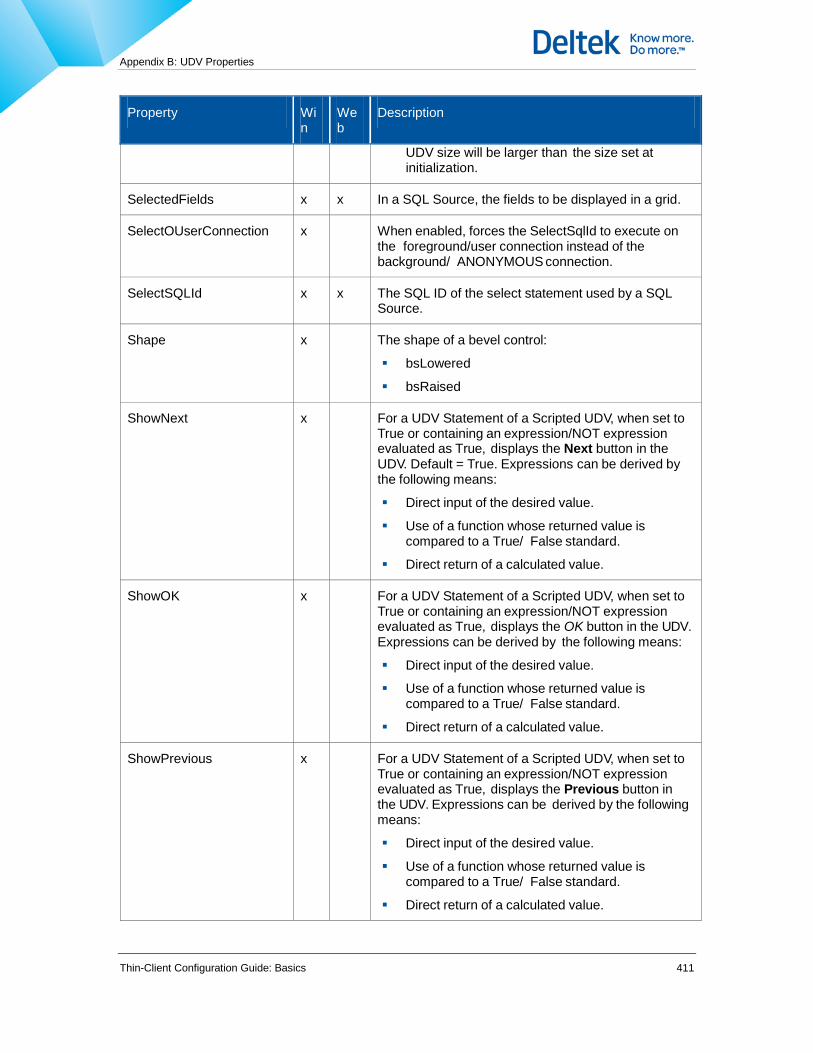
Appendix B: UDV Properties
Thin-Client Configuration Guide: Basics 411
Property Win
Web
Description
UDV size will be larger than the size set at initialization.
SelectedFields x x In a SQL Source, the fields to be displayed in a grid.
SelectOUserConnection x When enabled, forces the SelectSqlId to execute on the foreground/user connection instead of the background/ ANONYMOUS connection.
SelectSQLId x x The SQL ID of the select statement used by a SQL Source.
Shape x The shape of a bevel control:
bsLowered
bsRaised
ShowNext x For a UDV Statement of a Scripted UDV, when set to True or containing an expression/NOT expression evaluated as True, displays the Next button in the UDV. Default = True. Expressions can be derived by the following means:
Direct input of the desired value.
Use of a function whose returned value is compared to a True/ False standard.
Direct return of a calculated value.
ShowOK x For a UDV Statement of a Scripted UDV, when set to True or containing an expression/NOT expression evaluated as True, displays the OK button in the UDV. Expressions can be derived by the following means:
Direct input of the desired value.
Use of a function whose returned value is compared to a True/ False standard.
Direct return of a calculated value.
ShowPrevious x For a UDV Statement of a Scripted UDV, when set to True or containing an expression/NOT expression evaluated as True, displays the Previous button in the UDV. Expressions can be derived by the following means:
Direct input of the desired value.
Use of a function whose returned value is compared to a True/ False standard.
Direct return of a calculated value.

Appendix B: UDV Properties
Thin-Client Configuration Guide: Basics 412
Property Win
Web
Description
ShowUdvExpression x For a UDV Statement of a Scripted UDV, a Boolean expression/ NOT expression that when evaluated as False, prevents the UDV from appearing, and moves the script to the next statement.
Expressions can be derived by the following means:
Direct input of the desired value.
Use of a function whose returned value is compared to a True/ False standard.
Direct return of a calculated value.
SqlId x In a Scripted UDV statement, a SQL ID that has the following affect:
SELECT statement — Adds parameters to @ScriptParams.
EXEC Statement — Runs when the statement executes
Style x The style of a bevel control:
bsBox
bsFrame
bsTopLine
bsBottomLine
bsLeftLine
bsRightLine
bsSpacer
TabOrder x x The order of controls as activated by the [Tab] key.
TestParamValues x The values used as parameters for SQL Sources and SQL Transactions in testing UDVs.
TitleFont.Color x The color of the font used for titles in a grid.
TitleFont.Name x The name of the typeface used for titles in a grid.
TitleFont.Size x The height in pixels of the typeface used for titles in a grid.
TitleFont.Style x The set of active font attributes used for titles in a grid; can include bold, italic, underline, and overstrike.
Top x x The distance in pixels between the top of an object and the top of the screen.

Appendix B: UDV Properties
Thin-Client Configuration Guide: Basics 413
Property Win
Web
Description
UpdateSQLId x x The SQL ID of an UPDATE SQL statement used by a SQL Transaction.
UdvId x For a UDV Statement of a Scripted UDV, the UDV_ID of the UDV.
UdvTransaction x For a UDV Statement of a Scripted UDV, a transaction that overrides the UDV-level TransactionType property of the UDV as follows:
uttUnassigned — Causes the UDV to use the TransactionType provided by the caller.
uttIgnore — Prevents the statement from running the UDV transaction logic. This makes it possible to define a UDV that is used only to collect field input and to add this information to
@ScriptParams. This value uses the Populate for Update logic for UDV fields with data.
uttInsert — Uses insert logic.
uttUpdate — Uses update logic.
uttDelete — Uses delete logic.
uttInsUpdDel — Equivalent to uttInputMatrix.
uttMRInsert — Uses multirecord insert logic.
uttMRUpdate — Uses multirecord update logic.
uttGroupInsert — Uses group insert logic.
uttGroupUpdate — Uses group update logic.
uttInputMatrix — Equivalent to uttInsUpdDel.
uttDuplicate — Uses duplicate logic.
UpperCaseOnly x For an input field of a SQL Transaction, determines whether input is forced to uppercase. Does not apply to memo controls.
UserAbort x UDV specific property to control the availability of the Abort button.
Possible values are etDefault, etEnabled, etDisabled.
Default is etDefault which equates to the value of Common.UdvAbortTransactionEnabled.
Validation Expression x For an Input Field, allows entry of a Boolean expression that when evaluated as true, accepts the entered value—or when evaluated as False, rejects it.
Can be used with @GetQueryValue() to validate the

Appendix B: UDV Properties
Thin-Client Configuration Guide: Basics 414
Property Win
Web
Description
field contents according to middle-tier or back-end logic.
Example
If
the SQL ID MyValidationQry = Select from Dual where
:TARGET_VALUE = :DAT_COL_UOM
And
the Validation Expression value for TARGET_VALUE is
@GetQueryValue(MyValidationQry)
Then
when the user enters data in the TARGET_VALUE field, he cannot exit the field unless the value matches the one in the DAT_COL_UOM field.
Thin-Client checks the expression for every field having a Validation Expression value. If the field is defined as a Lookup control type, and Validate Entry is also enabled, it is ignored.
The following UDV types and Control Types support this property:
Input UDVs: Edit and List control types
Input Matrix UDVs: Edit, list and Lookup control types
VisibleButtons x x The buttons that are visible on a navigator in a Display UDV. Set by checking off the following options in the Visible Buttons dialog box:
First — Highlights the first record. For Web Express, visible by default. Can be overridden by [Common]NavigatorMoveButtonsVisible=No.
Last — Highlights the last record. For Web Express, visible by default. Can be overridden by [Common]NavigatorMoveButtonsVisible=No.
Previous — Highlights the previous record. For Web Express, visible by default. Can be overridden by [Common]NavigatorMoveButtonsVisible=No.
Next — Highlights the next record. For Web Express, visible by default. Can be overridden by [Common]NavigatorMoveButtonsVisible=No.
Unselect All — Deselects any selected records.
Insert — Linked to the InsertUdvId property of
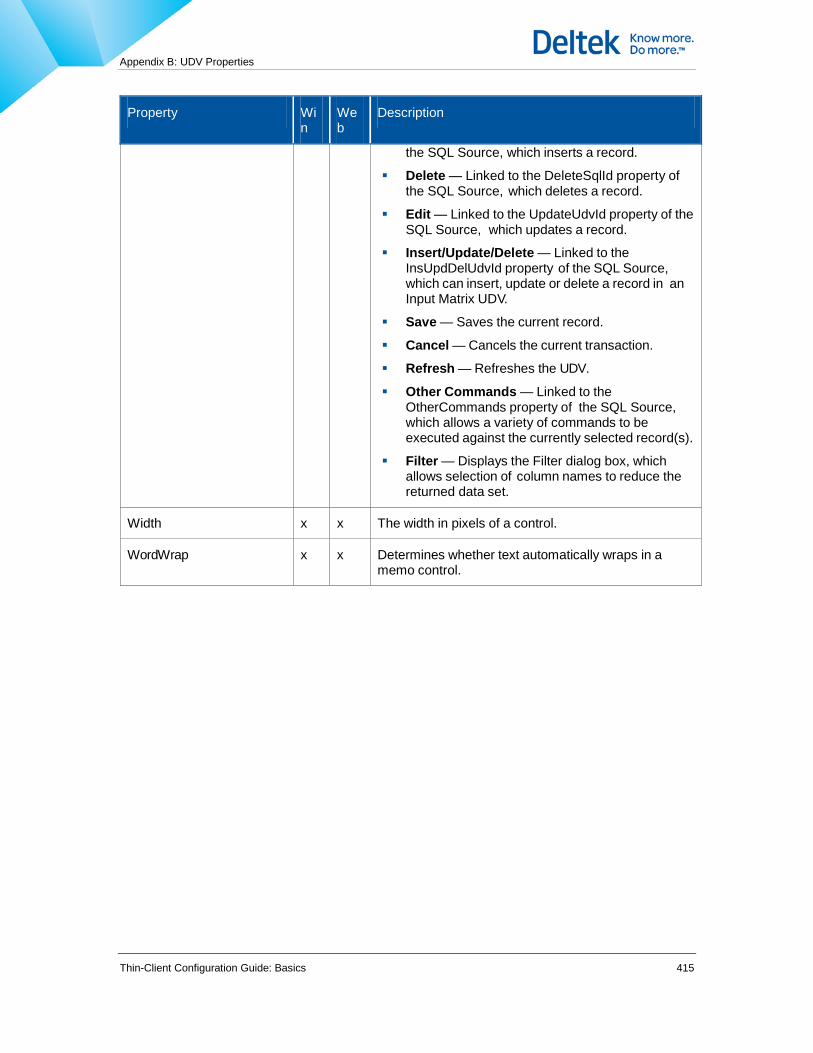
Appendix B: UDV Properties
Thin-Client Configuration Guide: Basics 415
Property Win
Web
Description
the SQL Source, which inserts a record.
Delete — Linked to the DeleteSqlId property of the SQL Source, which deletes a record.
Edit — Linked to the UpdateUdvId property of the SQL Source, which updates a record.
Insert/Update/Delete — Linked to the InsUpdDelUdvId property of the SQL Source, which can insert, update or delete a record in an Input Matrix UDV.
Save — Saves the current record.
Cancel — Cancels the current transaction.
Refresh — Refreshes the UDV.
Other Commands — Linked to the OtherCommands property of the SQL Source, which allows a variety of commands to be executed against the currently selected record(s).
Filter — Displays the Filter dialog box, which allows selection of column names to reduce the returned data set.
Width x x The width in pixels of a control.
WordWrap x x Determines whether text automatically wraps in a memo control.
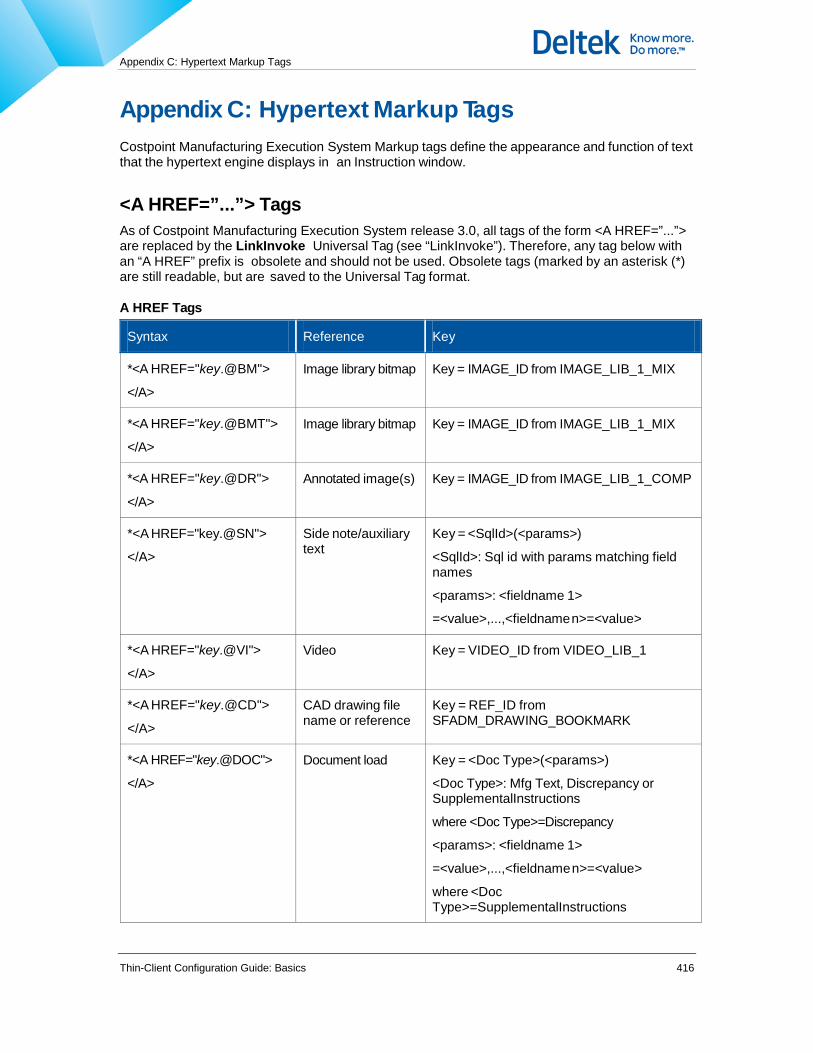
Appendix C: Hypertext Markup Tags
Thin-Client Configuration Guide: Basics 416
Appendix C: Hypertext Markup Tags Costpoint Manufacturing Execution System Markup tags define the appearance and function of text that the hypertext engine displays in an Instruction window.
<A HREF=”...”> Tags As of Costpoint Manufacturing Execution System release 3.0, all tags of the form <A HREF=”...”> are replaced by the LinkInvoke Universal Tag (see “LinkInvoke”). Therefore, any tag below with an “A HREF” prefix is obsolete and should not be used. Obsolete tags (marked by an asterisk (*) are still readable, but are saved to the Universal Tag format.
A HREF Tags
Syntax Reference Key
*<A HREF="key.@BM">
</A>
Image library bitmap Key = IMAGE_ID from IMAGE_LIB_1_MIX
*<A HREF="key.@BMT">
</A>
Image library bitmap Key = IMAGE_ID from IMAGE_LIB_1_MIX
*<A HREF="key.@DR">
</A>
Annotated image(s) Key = IMAGE_ID from IMAGE_LIB_1_COMP
*<A HREF="key.@SN">
</A>
Side note/auxiliary text
Key = <SqlId>(<params>)
<SqlId>: Sql id with params matching field names
<params>: <fieldname 1>
=<value>,...,<fieldname n>=<value>
*<A HREF="key.@VI">
</A>
Video Key = VIDEO_ID from VIDEO_LIB_1
*<A HREF="key.@CD">
</A>
CAD drawing file name or reference
Key = REF_ID from SFADM_DRAWING_BOOKMARK
*<A HREF="key.@DOC">
</A>
Document load Key = <Doc Type>(<params>)
<Doc Type>: Mfg Text, Discrepancy or SupplementalInstructions
where <Doc Type>=Discrepancy
<params>: <fieldname 1>
=<value>,...,<fieldname n>=<value>
where <Doc Type>=SupplementalInstructions
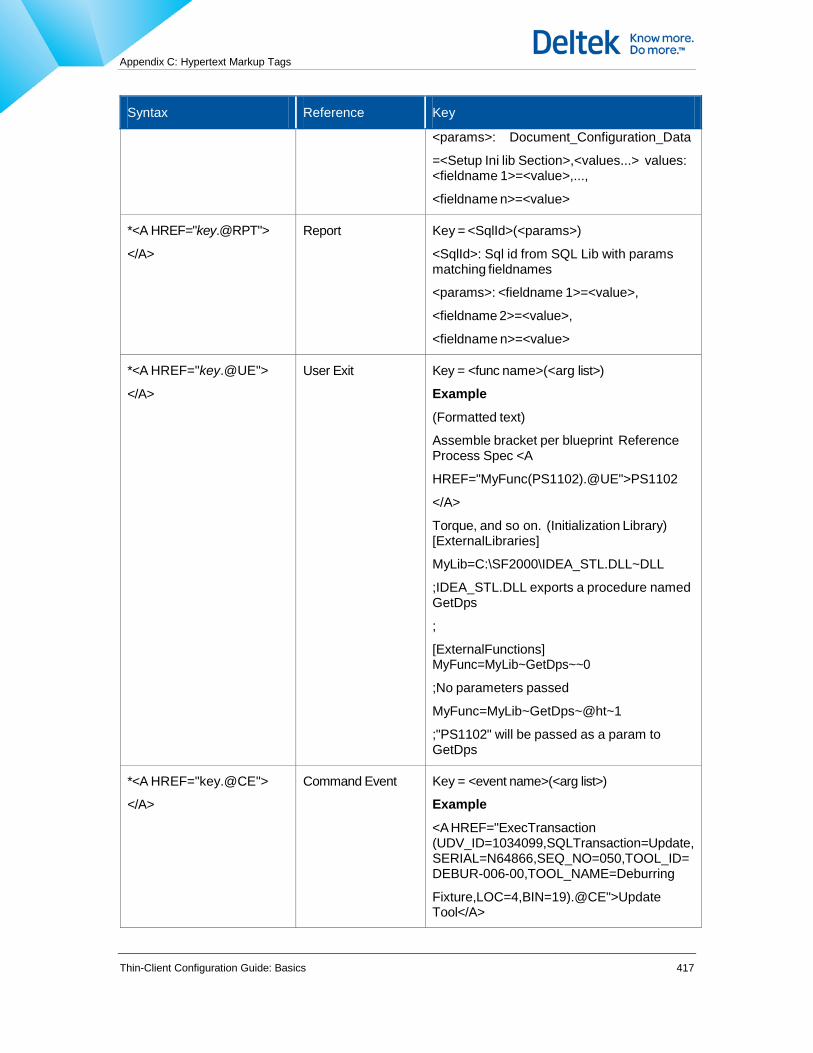
Appendix C: Hypertext Markup Tags
Thin-Client Configuration Guide: Basics 417
Syntax Reference Key
<params>: Document_Configuration_Data
=<Setup Ini lib Section>,<values...> values: <fieldname 1>=<value>,...,
<fieldname n>=<value>
*<A HREF="key.@RPT">
</A>
Report Key = <SqlId>(<params>)
<SqlId>: Sql id from SQL Lib with params matching fieldnames
<params>: <fieldname 1>=<value>,
<fieldname 2>=<value>,
<fieldname n>=<value>
*<A HREF="key.@UE">
</A>
User Exit Key = <func name>(<arg list>)
Example
(Formatted text)
Assemble bracket per blueprint Reference Process Spec <A
HREF="MyFunc(PS1102).@UE">PS1102
</A>
Torque, and so on. (Initialization Library) [ExternalLibraries]
MyLib=C:\SF2000\IDEA_STL.DLL~DLL
;IDEA_STL.DLL exports a procedure named GetDps
;
[ExternalFunctions] MyFunc=MyLib~GetDps~~0
;No parameters passed
MyFunc=MyLib~GetDps~@ht~1
;"PS1102" will be passed as a param to GetDps
*<A HREF="key.@CE">
</A>
Command Event Key = <event name>(<arg list>)
Example
<A HREF="ExecTransaction (UDV_ID=1034099,SQLTransaction=Update, SERIAL=N64866,SEQ_NO=050,TOOL_ID= DEBUR-006-00,TOOL_NAME=Deburring
Fixture,LOC=4,BIN=19).@CE">Update Tool</A>
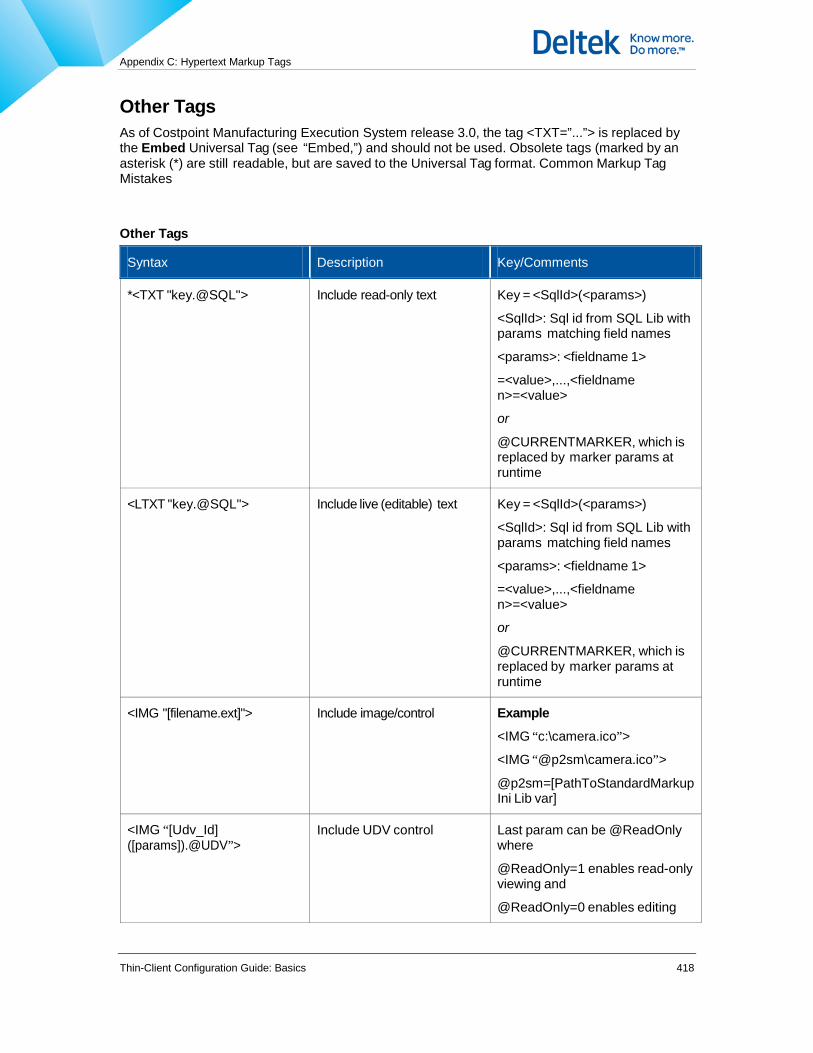
Appendix C: Hypertext Markup Tags
Thin-Client Configuration Guide: Basics 418
Other Tags As of Costpoint Manufacturing Execution System release 3.0, the tag <TXT=”...”> is replaced by the Embed Universal Tag (see “Embed,”) and should not be used. Obsolete tags (marked by an asterisk (*) are still readable, but are saved to the Universal Tag format. Common Markup Tag Mistakes
Other Tags
Syntax Description Key/Comments
*<TXT "key.@SQL"> Include read-only text Key = <SqlId>(<params>)
<SqlId>: Sql id from SQL Lib with params matching field names
<params>: <fieldname 1>
=<value>,...,<fieldname n>=<value>
or
@CURRENTMARKER, which is replaced by marker params at runtime
<LTXT "key.@SQL"> Include live (editable) text Key = <SqlId>(<params>)
<SqlId>: Sql id from SQL Lib with params matching field names
<params>: <fieldname 1>
=<value>,...,<fieldname n>=<value>
or
@CURRENTMARKER, which is replaced by marker params at runtime
<IMG "[filename.ext]"> Include image/control Example
<IMG “c:\camera.ico”>
<IMG “@p2sm\camera.ico”>
@p2sm=[PathToStandardMarkup Ini Lib var]
<IMG “[Udv_Id] ([params]).@UDV”>
Include UDV control Last param can be @ReadOnly where
@ReadOnly=1 enables read-only viewing and
@ReadOnly=0 enables editing

Appendix C: Hypertext Markup Tags
Thin-Client Configuration Guide: Basics 419
Syntax Description Key/Comments
<IMG
"filename,@Transparent= True/False">
Turns on/off image transparency
Only available for the standalone IMG tag.
<TITLE>[title text]
</TITLE>
Hypertext title format
<S=@[Font identifier]>
</S>
Start/end font Example
<S=@StepIdText>Component Step 1.0</S>
where StepIdText is defined in the [ApplicationFonts] of the Ini Lib record
<M=key> Marker tag used for navigation and to provide params for
.@UDV and .@SQL
Key = <Marker Name>(<params>)
<Marker Name>: ScopeQueryValues
<params>: <value 1>,...,<value n>
(Must include all values from main navigation grid and values must correlate ordinally.)
See “Common Markup Tag Mistakes,” for troubleshooting this tag.
<B=key> Block Id tag used to provide params for text block edits. Must be the only tag/text on row.
Key = <Block Id>(<params>)
<Block Id>: Generated by the back end if DbAssembleText=1
<params>: <value 1>,...,<value n>
(Must include all values from main nav grid)
or
<fieldname 1>=<value>,...,<fieldname n>=<value>,@ReadOnly=1
where @ReadOnly=1 enables read-only viewing and @ReadOnly=0 enables editing.
<SHAPE> <SHAPE=divider(col or=blue,height=2,wid
Using a series of hyphens (>3), beginning in column one of the
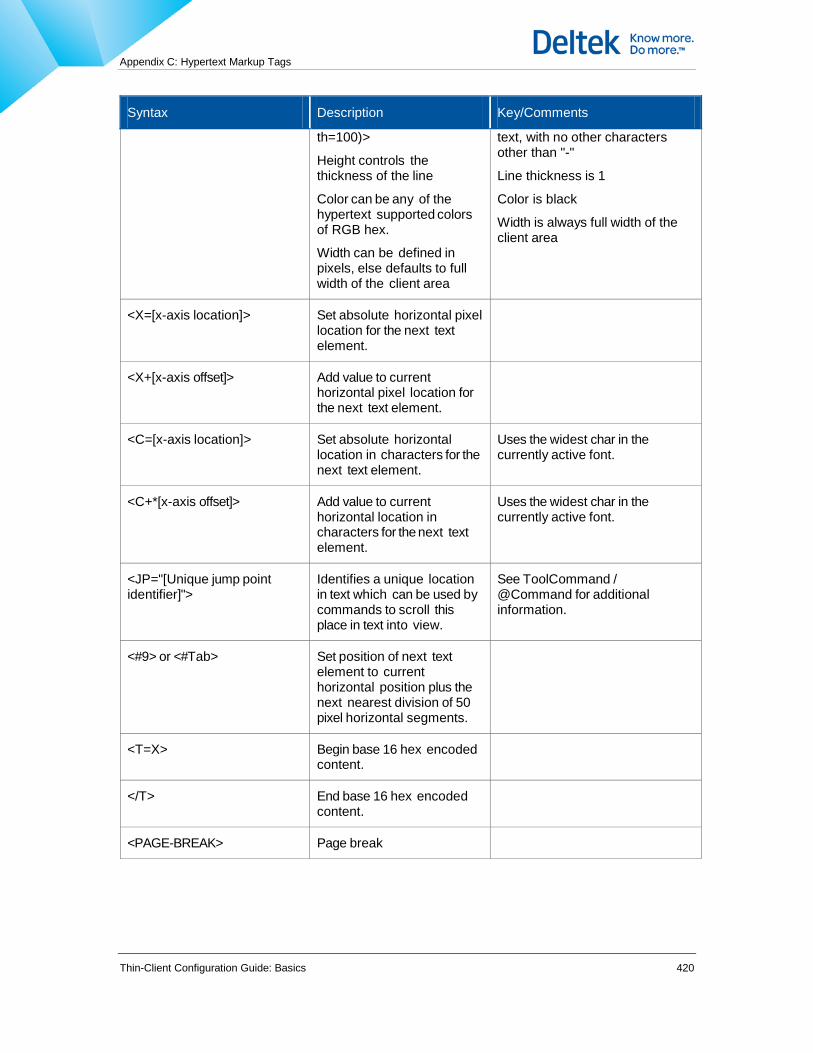
Appendix C: Hypertext Markup Tags
Thin-Client Configuration Guide: Basics 420
Syntax Description Key/Comments
th=100)>
Height controls the thickness of the line
Color can be any of the hypertext supported colors of RGB hex.
Width can be defined in pixels, else defaults to full width of the client area
text, with no other characters other than "-"
Line thickness is 1
Color is black
Width is always full width of the client area
<X=[x-axis location]> Set absolute horizontal pixel location for the next text element.
<X+[x-axis offset]> Add value to current horizontal pixel location for the next text element.
<C=[x-axis location]> Set absolute horizontal location in characters for the next text element.
Uses the widest char in the currently active font.
<C+*[x-axis offset]> Add value to current horizontal location in characters for the next text element.
Uses the widest char in the currently active font.
<JP="[Unique jump point identifier]">
Identifies a unique location in text which can be used by commands to scroll this place in text into view.
See ToolCommand / @Command for additional information.
<#9> or <#Tab> Set position of next text element to current horizontal position plus the next nearest division of 50 pixel horizontal segments.
<T=X> Begin base 16 hex encoded content.
</T> End base 16 hex encoded content.
<PAGE-BREAK> Page break

Appendix C: Hypertext Markup Tags
Thin-Client Configuration Guide: Basics 421
Common Markup Tag Mistakes Navigation in an Instructions tool window relies on proper formatting and content in the Marker (<M=...>) markup tag. Any operation that repositions the current record in the scope query is followed by a logical search through the hypertext for a marker tag that correlates with the scope query values. The search succeeds when the internal search logic encounters a marker tag whose parameter values match those of the column values in the current record of the scope.
When the application fails to find a match between the marker tag and the scope query values, it repeats the search. If the verification search also fails, an error message appears.
The following are common mistakes that result in improper navigation.
1. All marker parameters values are correct; however, the marker tag has too few values to adequately locate the record. The symptom in this case is failure to locate the relevant text when selecting a new record. Also, text does not refresh as needed when moving through the scope.
All Marker tags must include parameters for the maximum possible levels of text. Set to NULL any parameters that do not apply at a given level, for example, STEP=.
Incorrect example <M=ScopeQueryValues(PLAN=ABC-1,OPERATION=010)> <-- Incorrect
...
Install part operation
...
<M=ScopeQueryValues(PLAN=ABC-1,OPERATION=010,STEP=010)>
...
Prepare part step
...
<M=ScopeQueryValues(PLAN=ABC-1,OPERATION=010,STEP=010)>
...
Attach part step
...
<M=ScopeQueryValues(PLAN=ABC-1,OPERATION=020)> <-- Incorrect
...
Inspect part operation
...
Correct example <M=ScopeQueryValues(PLAN=ABC-1,OPERATION=010,STEP=)> <-- Correct
...
Install part operation
...
<M=ScopeQueryValues(PLAN=ABC-1,OPERATION=010,STEP=010)>
...
Prepare part step
...
<M=ScopeQueryValues(PLAN=ABC-1,OPERATION=010,STEP=010)>
...
Attach part step
...
<M=ScopeQueryValues(PLAN=ABC-1,OPERATION=010,STEP=)>
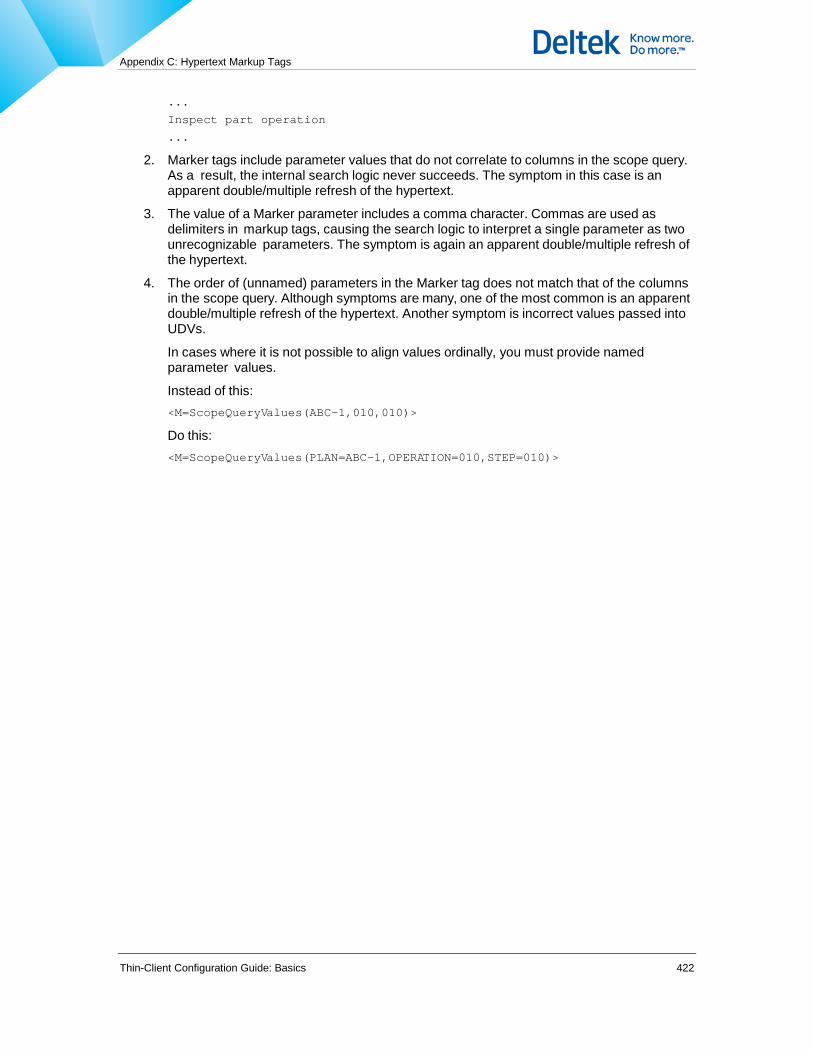
Appendix C: Hypertext Markup Tags
Thin-Client Configuration Guide: Basics 422
...
Inspect part operation
...
2. Marker tags include parameter values that do not correlate to columns in the scope query. As a result, the internal search logic never succeeds. The symptom in this case is an apparent double/multiple refresh of the hypertext.
3. The value of a Marker parameter includes a comma character. Commas are used as delimiters in markup tags, causing the search logic to interpret a single parameter as two unrecognizable parameters. The symptom is again an apparent double/multiple refresh of the hypertext.
4. The order of (unnamed) parameters in the Marker tag does not match that of the columns in the scope query. Although symptoms are many, one of the most common is an apparent double/multiple refresh of the hypertext. Another symptom is incorrect values passed into UDVs.
In cases where it is not possible to align values ordinally, you must provide named parameter values.
Instead of this: <M=ScopeQueryValues(ABC-1,010,010)>
Do this: <M=ScopeQueryValues(PLAN=ABC-1,OPERATION=010,STEP=010)>
Appendix D: Costpoint Manufacturing Execution Reserved SQL IDs
Thin-Client Configuration Guide: Basics 423
Appendix D: Costpoint Manufacturing Execution Reserved SQL IDs The Costpoint Manufacturing Execution System reserves certain SQL IDs. You cannot change a reserved ID, but you can change the corresponding statement.
Reserved SQL IDs AddFolderSQL
AudioAddFolderSQL
AudioChangeParentId
AudioCreateDBObjRef
AudioDeleteFolderQuery
AudioDeleteFromLib
AudioDeleteObjRef
AudioDeleteOrgFromFolder
AudioDeleteOrgFromOrg
AudioDisplayFromLib
AudioExecCreateLibRecord
AudioExecDeleteFromLib
AudioFolderRefInsert
AudioGetAllOrgNodes
AudioGetAudioData
AudioGetAudioLibFields
AudioGetLibInfo
AudioGetObjects
AudioGetOrgContainingObj
AudioInsertRec
AudioMoveObjRef
AudioNextID
AudioOrphanSQL
AudioSaveChangesToObj
AudioSaveChangesToOrg
AudioSaveChangesToOrgChildren
AudioUpdateFields
AudioUpdateLibWithDataInfo
ChangeParentId
CheckUpdateDrawingExtRefs

Appendix D: Costpoint Manufacturing Execution Reserved SQL IDs
Thin-Client Configuration Guide: Basics 424
ClearDrawingExtRefs
ClearSessionEvents
CreateDBObjRef
CreateImageDataRecord
CreateImageLibRecord
CreateSlideDataRecord
DeleteImageFromLib
DeleteObjRef
DeleteOrgFromFolder
DeleteOrgFromOrg
DeleteSlideFromLib
DeleteUDVFromLib
DisplayCompositeFromLib
DisplayImageFromLib
DrawingMarkDelete
DrawingMarkInsert
DrawingMarkSelect
EditStdText
FunctionOwners
GetAllOrgNodes
GetChildrenForOrgNode
GetImageGraphic
GetImageLibInfo
GetIniDate
GetIniStrings
GetObjects
GetOrgContainingObj
GetSessionEvents
GetSessionId
GetSlideLibInfo
GetSqlLibIdsForType
GetSqlLibTextForId
GetSqlLibTypes
GetStdText
GetSystemDate
GetUpdateThumbNailGraphic

Appendix D: Costpoint Manufacturing Execution Reserved SQL IDs
Thin-Client Configuration Guide: Basics 425
GetUpdateThumbNailRecords
GetUserAppRolePrivs
GetUserCerts
GetUserInfo
GetVideoInfo
ImageCheckHTRefs
ImageDeleteFolderQuery
ImageExecCreateLibRecord
ImageExecDeleteFromLib
ImageFolderRefInsert
ImageGetThumbnail
ImageInfo
InsertCompositeRec
MoveObjRef
NextControlId
NextFolderID
NextImageID
NextUdvID
OrphanSQL
ReturnImageIdFromTag
ReturnUDVFolderIDFromTag
SaveChangesToObj
SaveChangesToOrg
SaveChangesToOrgChildren
SlideAddFolderSQL
SlideChangeParentId
SlideCreateDBObjRef
SlideDeleteObjRef
SlideDeleteOrgFromFolder
SlideDeleteOrgFromOrg
SlideExecCreateLibRecord
SlideExecDeleteFromLib
SlideFolderRefInsert
SlideGetAllOrgNodes
SlideGetObjects
SlideGetOrgContainingObj
Appendix D: Costpoint Manufacturing Execution Reserved SQL IDs
Thin-Client Configuration Guide: Basics 426
SlideMoveObjRef
SlideOrphanSQL
SlideSaveChangesToObj
SlideSaveChangesToOrg
SlideSaveChangesToOrgChildren
StartUp
StdTextAddFolderSQL
StdTextAnyOrphanSQL
StdTextChangeParentId
StdTextCreateDBObjRef
StdTextDeleteFolderQuery
StdTextDeleteFromLib
StdTextDeleteObjRef
StdTextDeleteOrgFromFolder
StdTextDeleteOrgFromOrg
StdTextDisplayFromLib
StdTextFolderRefInsert
StdTextGetAllOrgNodes
StdTextGetAnyObjects
StdTextGetLibInfo
StdTextGetOrgContainingObj
StdTextGetSpecificObjects
StdTextGetStdText
StdTextInsertRec
StdTextMoveObjRef
StdTextNextID
StdTextSaveChangesToObj
StdTextSaveChangesToOrg
StdTextSaveChangesToOrgChildren
StdTextSpecificOrphanSQL
StdTextUpdateFields
UDVAddFolderSQL
UDVChangeParentId
UDVCreateDBObjRef
UDVDeleteObjRef
UDVDeleteOrgFromFolder

Appendix D: Costpoint Manufacturing Execution Reserved SQL IDs
Thin-Client Configuration Guide: Basics 427
UDVDeleteOrgFromOrg
UdvFolderList
UdvFolderRefDelete
UdvFolderRefInsert
UDVGetAllOrgNodes
UDVGetDefinitionBlob
UDVGetObjects
UDVGetOrgContainingObj
UdvInsertNewDef
UDVMoveObjRef
UDVOrphanSQL
UDVSaveChangesToObj
UDVSaveChangesToOrg
UDVSaveChangesToOrgChildren
UdvSelectUDV_ID
UdvUpdateFieldValues
UpdateImageFields
UpdateSlideFields
UpdateUserInfo
VideoMaintQuery
Appendix E: Core SQL Statements
Thin-Client Configuration Guide: Basics 428
Appendix E: Core SQL Statements A CORE type SQL statement (SQL ID) is a statement that is crucial to basic Costpoint Manufacturing Execution System operation. CORE statements should not be modified. The following is a list of CORE SQL statements.
StartUp
TableOwners
FunctionOwners
StoredProcOwners
GetSessionId
GetUserInfo
GetImageLibInfo
GetSlideLibInfo
DisplayImageFromLib
DisplayCompositeFromLib
VideoMaintQuery
GetVideoInfo
ImageDeleteFolderQuery
GetStdText
ClearDrawingExtRefs
CheckUpdateDrawingExtRefs
UpdateImageFields
UpdateSlideFields
NextControlId
GetSqlLibTypes
GetSqlLibIdsForType
GetSqlLibTextForId
DrawingMarkSelect
DrawingMarkInsert
DrawingMarkUpdate
DrawingMarkDelete
GetIniStrings
GetIniDate
GetIniId
GetUserAppRolePrivs
GetSystemDate
GetSessionEvents

Appendix E: Core SQL Statements
Thin-Client Configuration Guide: Basics 429
ClearSessionEvents
AudioNextID
AudioUpdateFields
AudioDeleteFolderQuery
AudioGetLibInfo
StdTextNextID
StdTextUpdateFields
StdTextDisplayFromLib
StdTextDeleteFromLib
StdTextDeleteFolderQuery
StdTextGetLibInfo
StdTextInsertRec
StdTextFolderRefInsert
StdTextGetSpecificObjects
StdTextSpecificOrphanSQL
StdTextGetStdText
UDVGetDefinitionBlob
DeleteUDVFromLib
ReturnUDVFolderIDFromTag
NextUdvID
UdvSelectUDV_ID
UdvInsertNewDef
UdvUpdateFieldValues
UdvFolderRefInsert
UdvFolderList
UdvFolderRefDelete
UdvLibSelect
NextImageID
NextFolderID
ImageGetThumbnail
GetAllOrgNodes
GetOrgContainingObj
GetObjects
OrphanSQL
SaveChangesToObj
SaveChangesToOrg

Appendix E: Core SQL Statements
Thin-Client Configuration Guide: Basics 430
SaveChangesToOrgChildren
AddFolderSQL
CreateDBObjRef
MoveObjRef
DeleteObjRef
DeleteOrgFromFolder
DeleteOrgFromOrg
ChangeParentId
GetImageGraphic
GetUpdateThumbNailRecords
GetUpdateThumbNailGraphic
ImageExecDeleteFromLib
ImageExecCreateLibRecord
SlideGetObjects
SlideGetAllOrgNodes
SlideGetOrgContainingObj
SlideOrphanSQL
SlideSaveChangesToObj
SlideSaveChangesToOrg
SlideSaveChangesToOrgChildren
SlideAddFolderSQL
SlideCreateDBObjRef
SlideMoveObjRef
SlideDeleteObjRef
SlideDeleteOrgFromFolder
SlideDeleteOrgFromOrg
SlideChangeParentId
SlideExecDeleteFromLib
SlideExecCreateLibRecord
AudioUpdateLibWithDataInfo
AudioGetAllOrgNodes
AudioGetOrgContainingObj
AudioGetObjects
AudioOrphanSQL
AudioSaveChangesToObj
AudioSaveChangesToOrg

Appendix E: Core SQL Statements
Thin-Client Configuration Guide: Basics 431
AudioSaveChangesToOrgChildren
AudioAddFolderSQL
AudioCreateDBObjRef
AudioMoveObjRef
AudioDeleteObjRef
AudioDeleteOrgFromFolder
AudioDeleteOrgFromOrg
AudioChangeParentId
AudioGetAudioData
AudioExecDeleteFromLib
AudioExecCreateLibRecord
StdTextGetAllOrgNodes
StdTextGetOrgContainingObj
StdTextGetAnyObjects
StdTextAnyOrphanSQL
StdTextSaveChangesToObj
StdTextSaveChangesToOrg
StdTextSaveChangesToOrgChildren
StdTextAddFolderSQL
StdTextCreateDBObjRef
StdTextMoveObjRef
StdTextDeleteObjRef
StdTextDeleteOrgFromFolder
StdTextDeleteOrgFromOrg
StdTextChangeParentId
UDVGetAllOrgNodes
UDVGetOrgContainingObj
UDVGetObjects
UDVOrphanSQL
UDVSaveChangesToObj
UDVSaveChangesToOrg
UDVSaveChangesToOrgChildren
UDVAddFolderSQL
UDVCreateDBObjRef
UDVMoveObjRef
UDVDeleteObjRef

Appendix E: Core SQL Statements
Thin-Client Configuration Guide: Basics 432
UDVDeleteOrgFromFolder
UDVDeleteOrgFromOrg
UDVChangeParentId
HTRefExists
RolesApplSelect
RolesDelete
RolesInsert
RolesPrivDelete
RolesPrivInsert
RolesSelect
RolesTpSelect
PrivsLookupA
PrivsLookupB
PrivsDelete
PrivsInsert
PrivsSelect

Appendix F: Command Line Options
Thin-Client Configuration Guide: Basics 433
Appendix F: Command Line Options You can start the Costpoint Manufacturing Execution System from the command line in order to change certain startup variables and to run diagnostics.
Syntax Costpoint MES Executable File [option1 option2 option3 option_n]
Options are shown in the following table.
Command Line Options
Option Description
/n <LocalIni> Starts Costpoint Manufacturing Execution with the indicated Local Ini file and assumes that the file is in the Costpoint Manufacturing Execution directory. See the /i option below for starting Costpoint Manufacturing Execution with a startup file that resides outside the Costpoint Manufacturing Execution directory.
/i <LocalIniPath> Starts Costpoint Manufacturing Execution with the indicated (Local Ini file in the indicated path. If Costpoint Manufacturing Execution cannot find the file, it uses the default (SF.Ini).
/oc <Filename> Overrides the user’s stored context information with the contents of the specified file, and on exit, writes the exiting context into the database.
If a filename, but no extension is specified, the application assumes a .txt extension.
If a filename, but no path is specified, the application assumes the file is in the home directory of the Thin-Client executable file.
You can also save and load User Context data through the User Context tab of the Diagnostics dialog box.
/oi <Ini_Id> Overrides the Ini_Id variable in the startup (Local Ini) file, starting Costpoint Manufacturing Execution with the indicated Initialization Library record.
/od <DbAlias> Overrides the DBAlias variable in the startup (Local Ini) file, starting Costpoint Manufacturing Execution with the indicated database. This option replaces /a DbAlias, which is also supported but is invalid in versions later than 3.1.1.
/opu <PName> Overrides the PublicUserName variable in the Local Ini (startup) file, starting Costpoint Manufacturing Execution with the indicated Public Username.
The public user name can contain the following special characters: Colon (:), Comma (,), Slash (/), At symbol (@).
/opp <PPsswrd> Overrides the PublicPassword variable in the Local Ini (startup) file, starting Costpoint Manufacturing Execution with the indicated Public
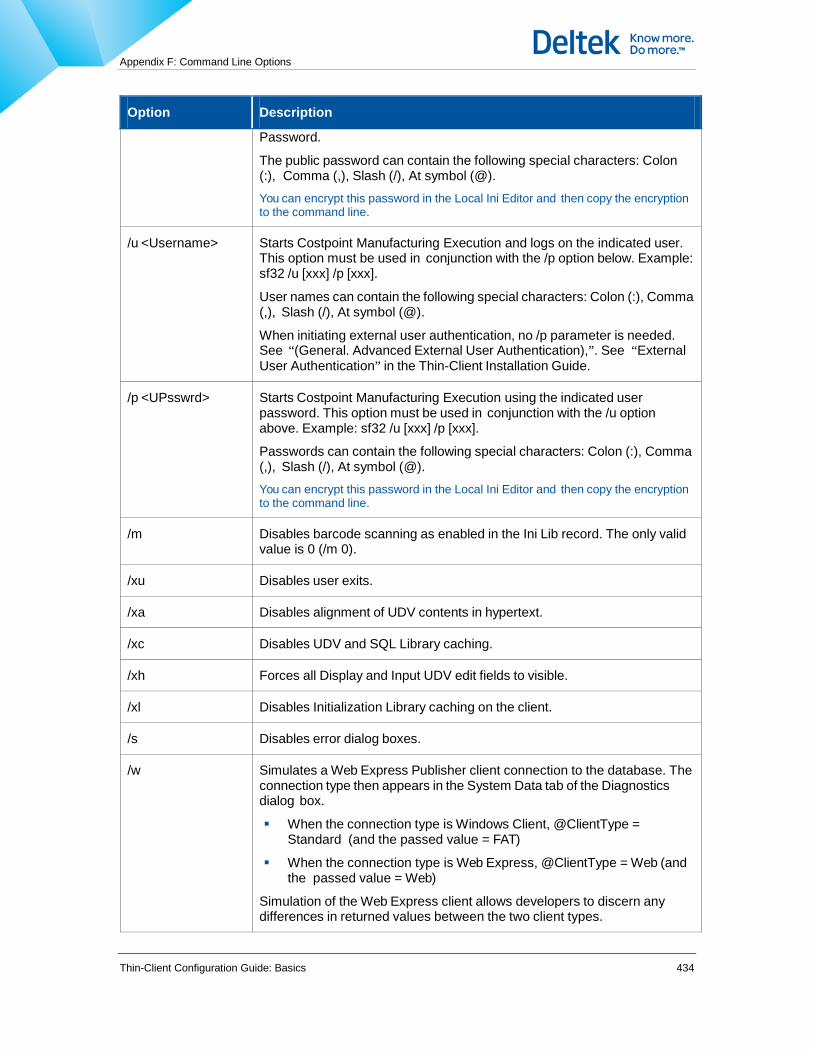
Appendix F: Command Line Options
Thin-Client Configuration Guide: Basics 434
Option Description
Password.
The public password can contain the following special characters: Colon (:), Comma (,), Slash (/), At symbol (@).
You can encrypt this password in the Local Ini Editor and then copy the encryption to the command line.
/u <Username> Starts Costpoint Manufacturing Execution and logs on the indicated user. This option must be used in conjunction with the /p option below. Example: sf32 /u [xxx] /p [xxx].
User names can contain the following special characters: Colon (:), Comma (,), Slash (/), At symbol (@).
When initiating external user authentication, no /p parameter is needed. See “(General. Advanced External User Authentication),”. See “External User Authentication” in the Thin-Client Installation Guide.
/p <UPsswrd> Starts Costpoint Manufacturing Execution using the indicated user password. This option must be used in conjunction with the /u option above. Example: sf32 /u [xxx] /p [xxx].
Passwords can contain the following special characters: Colon (:), Comma (,), Slash (/), At symbol (@).
You can encrypt this password in the Local Ini Editor and then copy the encryption to the command line.
/m Disables barcode scanning as enabled in the Ini Lib record. The only valid value is 0 (/m 0).
/xu Disables user exits.
/xa Disables alignment of UDV contents in hypertext.
/xc Disables UDV and SQL Library caching.
/xh Forces all Display and Input UDV edit fields to visible.
/xl Disables Initialization Library caching on the client.
/s Disables error dialog boxes.
/w Simulates a Web Express Publisher client connection to the database. The connection type then appears in the System Data tab of the Diagnostics dialog box.
When the connection type is Windows Client, @ClientType = Standard (and the passed value = FAT)
When the connection type is Web Express, @ClientType = Web (and the passed value = Web)
Simulation of the Web Express client allows developers to discern any differences in returned values between the two client types.

Appendix F: Command Line Options
Thin-Client Configuration Guide: Basics 435
Option Description
/d<Diag(s)> Starts Costpoint Manufacturing Execution System and enables the indicated diagnostics in the Diagnostics dialog box.
Diagnostics can be any of the following:
T — Text Load. Causes the log to list executed queries and other data that load hypertext.
I — Initialization. Triggers a trace of Initialization diagnostics, which is meant to be used by Deltek personnel to troubleshoot startup problems. This option should be used after getting the following error on attempted startup:
An application Self Check error has occurred.
Please enable Initialization diagnostics (/di) and retry, or contact Technical Support
The attempted restart triggers a trace of the initialization and Self Check up to the point of the error, and displays them in the Diagnostics dialog box. A text search for SELF CHECK pinpoints the entries that can be used to troubleshoot the problem.
N — Ini Lib. Causes the log to list executed property values in the Initialization Library record.
V — Invoke. Causes the log to list data/commands that load instructions and multimedia objects.
S — SQL. Causes the log to list executed SQL statements.
B — Text block. Causes the log to list executed queries, for example block save, defined in each block type.
U — User exits. Causes the log to list executed user exits. E Errors. Causes the log to list error messages.
D — Display. Causes Costpoint Manufacturing Execution to automatically display diagnostic messages for enabled diagnostic types as they occur.
C — Connection. Causes the log to list connection and licensing events.
L — Log. Causes enabled diagnostic events to be written to a log file.
List multiple diagnostics sequentially without delimiters: /dIVB.
To display the Diagnostics dialog box, control-right-click on the Exit button or the Error/Status area of the Costpoint Manufacturing Execution Shell.
Example
The example below shows the command used to start Costpoint Manufacturing Execution using a startup file called SF2.INI
(/n SF2.INI), an Initialization Library record called SFMFG_32 (/oi SFMFG_32), and diagnostics that cause display of SQL statements and

Appendix F: Command Line Options
Thin-Client Configuration Guide: Basics 436
Option Description
error messages (/dSE). The name of the executable file is SF32. SF32 /n SF2.INI /oi SFMFG_32 /dSE
/d* Starts Costpoint Manufacturing Execution and enables all diagnostics on the command line by using the asterisk (*) wild card after the diagnostics switch: /d*.
This capability also allows you to selectively exclude diagnostic types by listing excluded types after the asterisk: /d*-<Type1Type2Type3>.
Example
To turn on all diagnostics except Performance diagnostics (f), Record Time diagnostics (m), and Show Reserved diagnostics (p), the command is as follows:
/d*-fmp
/dH A command line switch for Performance (Central Log).

Appendix G: Frequently Asked Questions & Common Ta sks
Thin-Client Configuration Guide: Basics 437
Appendix G: Frequently Asked Questions & Common Ta sks This appendix includes information for frequently asked questions and common tasks.
Unsupported File Formats The Costpoint Manufacturing Execution System client can be configured to display third-party file formats using suitable third-party viewers. Actual results vary in accordance with the interoperability capabilities provided by each third-party viewer. Best results are achieved when the given third-party viewer provides an ActiveX programming interface.
In most cases, and wherein advanced integration capabilities such as bookmarking is not needed, a light amount of analysis and configuration is needed to provide ActiveX embedding in the Costpoint Manufacturing Execution client. In some cases, ActiveX interface code must be developed to provide viewer embedding. If for any reason ActiveX compatibility cannot be achieved, Costpoint Manufacturing Execution System supports external launching of third-party viewer applications with a custom command line. In such cases, Costpoint Manufacturing Execution passes control of the external application over to the operating system/application and is not responsible for window behavior such as position and/or occlusion by other windows including Costpoint Manufacturing Execution itself.
Configure a UDV Command to Call the Windows Shell with Arguments This section explains how to configure a UDV command to call the Windows Shell with arguments. This can be used to do things like sending an email using mailto: or to open a web page externally via http:. For this, we need to call the Windows API ShellExecute interface which is equivalent to using the Windows "Run" dialog available from the Windows Start menu, and also the same as double-clicking on a file in Windows Explorer.
The first step is to create an External Libraries definition using the special keyword ShellExecute in the Filename field in the Ini Lib record.
To create an External Library definition with keyword ShellExecute, complete the following steps:
1. Open the Windows API ShellExecute interface.
2. In the External Library pane, Enter WindowsShell in the Library Name field.
3. Enter ShellExecute in the Filename field.
4. Enter EXE in the Type field.
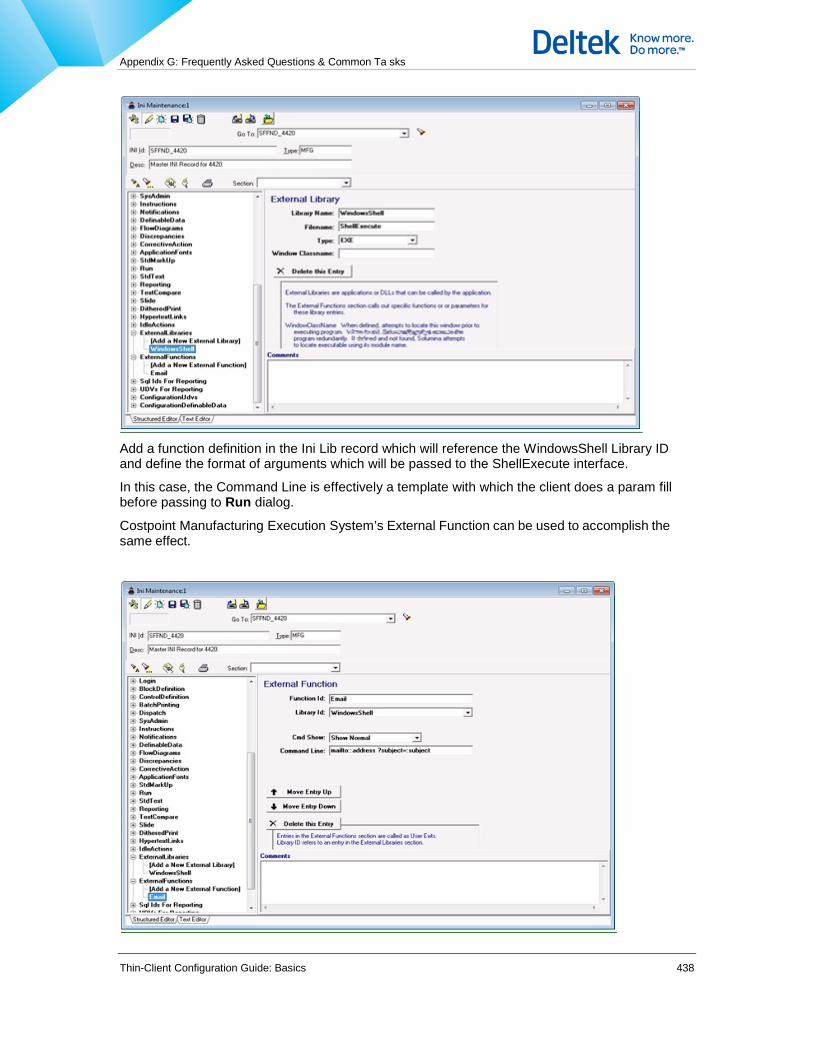
Appendix G: Frequently Asked Questions & Common Ta sks
Thin-Client Configuration Guide: Basics 438
Add a function definition in the Ini Lib record which will reference the WindowsShell Library ID and define the format of arguments which will be passed to the ShellExecute interface.
In this case, the Command Line is effectively a template with which the client does a param fill before passing to Run dialog.
Costpoint Manufacturing Execution System’s External Function can be used to accomplish the same effect.

Appendix G: Frequently Asked Questions & Common Ta sks
Thin-Client Configuration Guide: Basics 439
Note the space following the :address param which is necessary because the "?" is not interpreted as a param delimiter until the release of 8.0.11.1.
The original ShellExecute External Library definition can be used for other purposes, that is, other External Functions.
Finally, using the UDV Editor, define the command which will call the External Function definition.
Note that in this example, you will need DataLink the command to a SqlSource which will provide the value of :PART_NO. Also you must provide params in a single line, delimited by commas
When you click the new email command button, the predefined email address in the Params field will automatically appear in the To: field of the email message. In this example, it is [email protected].

Deltek is the leading global provider of enterprise software and information solutions for professional services firms, government contractors, and government agencies. For decades, we have delivered actionable insight that empowers our customers to unlock their business potential. Over 14,000 organizations and 1.8 million users in approximately 80 countries around the world rely on Deltek to research and identify opportunities, win new business, optimize resource, streamline operations, and deliver more profitable projects. Deltek – Know more. Do more.®
deltek.com