Deltek MPM 3.4 Installation Guide
91
Deltek MPM™ 3.4 Installation Guide June 24, 2011
-
Upload
khangminh22 -
Category
Documents
-
view
4 -
download
0
Transcript of Deltek MPM 3.4 Installation Guide

Deltek MPM™ 3.4 Installation Guide
June 24, 2011

Installation Guide ii
While Deltek has attempted to verify that the information in this document is accurate and complete, some typographical or technical errors may exist. The recipient of this document is solely responsible for all decisions relating to or use of the information provided herein.
The information contained in this publication is effective as of the publication date below and is subject to change without notice.
This publication contains proprietary information that is protected by copyright. All rights are reserved. No part of this document may be reproduced or transmitted in any form or by any means, electronic or mechanical, or translated into another language, without the prior written consent of Deltek, Inc.
This edition published June 2011.
© 2011 Deltek, Inc.
Deltek’s software is also protected by copyright law and constitutes valuable confidential and proprietary information of Deltek, Inc. and its licensors. The Deltek software, and all related documentation, is provided for use only in accordance with the terms of the license agreement. Unauthorized reproduction or distribution of the program or any portion thereof could result in severe civil or criminal penalties.
All trademarks are the property of their respective owners.

Installation Guide iii
Contents
Overview .......................................................................................................................................... 1
If You Need Assistance ................................................................................................................... 2
Customer Services ...................................................................................................................... 2
Customer Care Connect Site ...................................................................................................... 2
Additional Documentation ........................................................................................................... 3
Downloading Deltek Products using Deltek Software Manager ...................................................... 4
Accessing DSM Directly .............................................................................................................. 4
Accessing DSM from within Deltek Customer Care Connect Site .............................................. 5
DSM Documentation and Troubleshooting ................................................................................. 5
Pre-installation Information .............................................................................................................. 6
Minimum System Requirements ................................................................................................. 6
Previous Installations .................................................................................................................. 8
Access Control Requirements ..................................................................................................... 9
Path Restrictions ......................................................................................................................... 9
Pervasive.SQL v10 Workgroup Engine....................................................................................... 9
Uninstalling MPM 3.3 ..................................................................................................................... 10
MPM 3.4 Installation ...................................................................................................................... 11
MPM License Types .................................................................................................................. 11
Summary of Installation Types .................................................................................................. 13
Standalone Installation .............................................................................................................. 14
Administrator Installation ........................................................................................................... 21
Workstation Installation ............................................................................................................. 26
Database Engine Installation .................................................................................................... 31
MPM Post-Installation .................................................................................................................... 36
Configuring MPM ....................................................................................................................... 36
Accessing more than one MPM System Folder ........................................................................ 37
Pervasive System Analyzer ...................................................................................................... 38
MPM Conversions ......................................................................................................................... 42
Converting Data to MPM 3.4 ..................................................................................................... 42
Converting the MPM System Files ............................................................................................ 42
Converting Global and Project Files .......................................................................................... 43
MPM Data Warehouse and OLAP Installation and Configuration ................................................. 45
Client and Server Installation and Configuration ....................................................................... 45
Server: Install the MPM Data Warehouse Controller ................................................................ 46
Server: Configure the Data Warehouse Controller using the Controller.exe.Config File .......... 52
Installation Guide iv
Server: Complete the Data Warehouse Controller Configuration ............................................. 57
Client: Enable the Data Warehouse Scheduler and OLAP Processor ..................................... 58
OLAP: Creating Analysis Services Roles for Your Domain Users ............................................ 59
Uninstalling the Data Warehouse .............................................................................................. 65
Appendix A: Running the Database Engine as an Application or as a Service ............................ 66
Appendix B: Manual Creation of the Data Warehouse Database and Tables .............................. 67
Update the Database Name in the Controller.exe.Config File .................................................. 69
Appendix C: Manually Upgrading an Existing 3.2/3.3 Data Warehouse Database to 3.4 ............ 70
Appendix D: Manual Deployment of the OLAP Cube.................................................................... 71
Running the MPM3.4OLAPViewScript.sql Script ...................................................................... 71
Running the MPMDWOLAP.xmla Script ................................................................................... 71
Processing the OLAP Cube ...................................................................................................... 74
Change the OLAPConnectionString in the Controller.exe.Config file ....................................... 78
Enable OLAP in the MPM Project Maintenance Applet ............................................................ 78
Appendix E: MPMOPT.INI (MPM Options) Configuration ............................................................. 79
Control Account ......................................................................................................................... 79
Scheduler .................................................................................................................................. 79
OLAP ......................................................................................................................................... 80
Appendix F: Gateway Configuration .............................................................................................. 81
Appendix G: Permanent Gateway Decision Process .................................................................... 83
Appendix H: Verifying the SQL Server Version and Service Pack Prerequisites ......................... 84
Verifying Your SQL Server Version and Edition ....................................................................... 84
Verifying Your SQL Server 2005/2008 Integration Services (SSIS) Version and Edition ......... 84
Verifying Your SQL Server 2005/2008 Analysis Services Version and Edition ........................ 85

Overview
Installation Guide 1
Overview
Welcome to Deltek MPM™ 3.4 Installation Guide. This guide contains installation instructions for MPM Version 3.4 and MPM Data Warehouse. This Installation Guide contains the following sections:
Pre-Installation Information
MPM Installation
MPM Post Installation
MPM Conversions
MPM Data Warehouse and OLAP Installation
MPM uses the industry standard InstallShield application to guide you through the installation process.

If You Need Assistance
Installation Guide 2
If You Need Assistance
If you need assistance installing, implementing, or using MPM, Deltek makes a wealth of information and expertise readily available to you.
Customer Services
For over 20 years, Deltek has maintained close relationships with client firms, helping with their problems, listening to their needs, and getting to know their individual business environments. A full range of customer services has grown out of this close contact, including the following:
Extensive self-support options through the Customer Care Connect Web portal.
Phone and email support from Customer Care analysts
Technical services
Consulting services
Custom programming
Classroom, on-site, and Web-based training
Find out more about these and other services from the Customer Care Connect site https://deltek.custhelp.com.
Customer Care Connect Site
The Deltek Customer Care Connect site is a support Web portal for Deltek customers who purchase an Ongoing Support Plan (OSP).
The following are some of the many options you have at the Customer Care Connect site:
Download the latest versions of your Deltek products
Search Deltek’s knowledge base
Ask questions, exchange ideas, and share knowledge with other Deltek customers through the Deltek Connect Customer Forums
Display or download product information, such as release notes, user guides, technical information, and white papers
Submit a support case and check on its progress
Transfer requested files to a Customer Care analyst
Use Quick Chat to submit a question to a Customer Care analyst online
Subscribe to Deltek communications about your Deltek products and services
Receive alerts of new Deltek releases and hot fixes
If you need assistance using the Customer Care Connect site, the online help available on the site provides answers for most questions

If You Need Assistance
Installation Guide 3
Access Customer Care Connect
To access the Customer Care Connect site, complete the following steps:
1. Go to https://deltek.custhelp.com.
2. Enter your Customer Care Connect Username and Password.
3. Click Log In.
If you do not have a username and password for the Customer Care Connect site, contact your firm’s
MPM Administrator.
If you forget your username or password, you can click the Account Assistance button on the login
screen for help.
Additional Documentation
The following table lists the additional Deltek documentation available for this release. Except where noted, all the user guides and quick reference guides listed in this table are available for download from the Deltek Customer Care Connect site.
Document Name Description
Deltek MPM 3.4 Projects Manual This document describes how to create and maintain the components of the project data.
Deltek MPM 3.4 Globals Manual This document describes how to create components called ―globals‖ that are used across all projects.
Deltek MPM 3.4 Standard Reports Manual
This document contains a sample of each standard report, worksheet, and turnaround document included in MPM. Each report section has a brief description of the report, its typical usage in a project management environment, and all its available conditioning options.
Deltek MPM 3.4 Getting Started Guide This document describes how to begin using MPM, Data Warehouse, and OLAP.
Deltek MPM 3.4 Release Notes This document contains important information concerning the installation and use of the product, and describes outstanding issues.
Deltek MPM 3.4 Online Help The online help contains detailed information and instructions on how to use MPM’s various features.

Downloading Deltek Products using Deltek Software Manager
Installation Guide 4
Downloading Deltek Products using Deltek Software Manager
You can use Deltek Software Manager (DSM) to download complete Deltek products, hot fixes, and sub-releases. You can access DSM directly or through the Deltek Customer Care site.
When you access DSM directly, you will be prompted to log on before you can access the application. If you access DSM from within the Deltek Customer Care site, you do not have to log on since you are already logged into the Customer Care site.
Accessing DSM Directly
To access Deltek Software Manager directly, complete the following steps:
1. Launch Deltek Software Manager by taking one of the following actions:
Click here.
On your desktop, click Start » Programs » Deltek » MPM 3.4 » Deltek Software Manager.
2. In the Deltek Software Manager logon dialog box, enter your Deltek Customer Care User ID and Password, and click Logon.
3. To select the folder where you want to download Deltek products, click Settings above the right pane of Deltek Software Manager.
When you log on for the first time, Deltek Software Manager asks you to select a default folder where Deltek products are to be downloaded.
4. Use the Settings dialog box to specify the folder where you want to download Deltek products, and click OK.
You can change this folder anytime in the Settings dialog box.
5. In the left pane of Deltek Software Manager, expand the Deltek product that you want to download, if it is not already expanded.
If you clicked the link in step 1 to access DSM, the application automatically selects MPM for you.
6. Select the product type that you want to download. Your options are Complete, HotFix, and Sub-Release.
7. In the table, select the check box that corresponds to the Deltek product that you want to download. The right pane displays a message stating that the product has been added to the download queue.
To view the items in the download queue, click View Download Queue at the bottom of the
left pane.
Downloading Deltek Products using Deltek Software Manager
Installation Guide 5
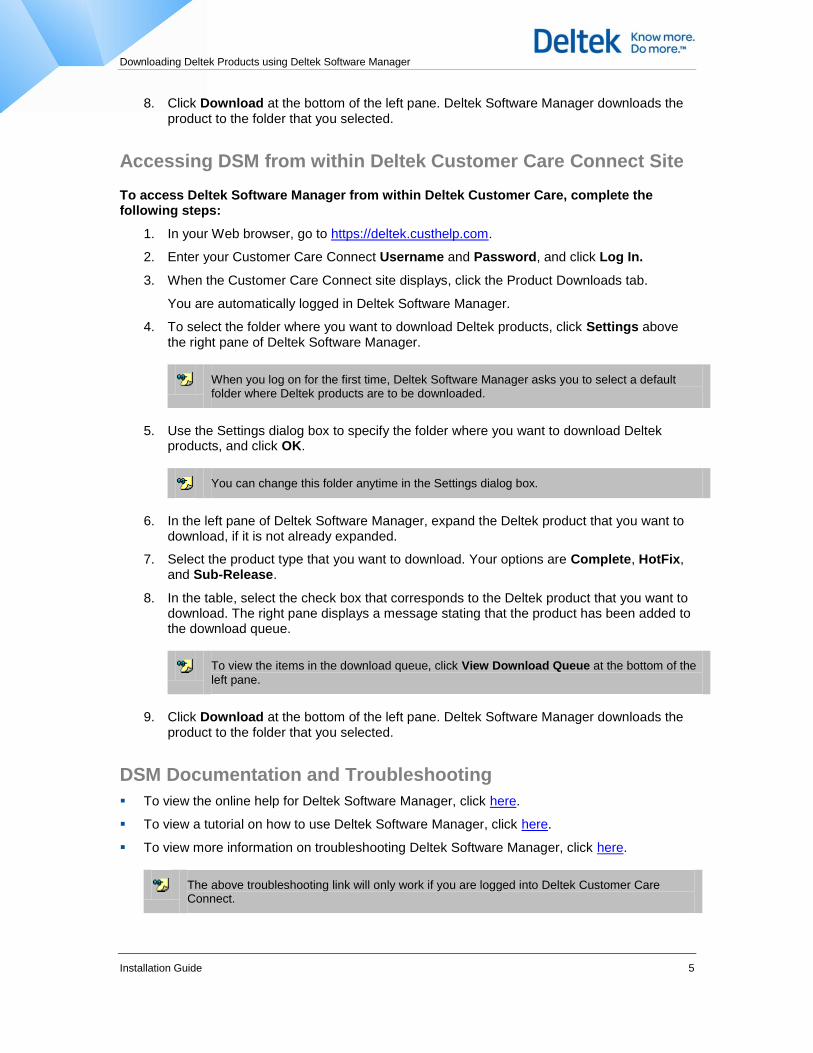
8. Click Download at the bottom of the left pane. Deltek Software Manager downloads the product to the folder that you selected.
Accessing DSM from within Deltek Customer Care Connect Site
To access Deltek Software Manager from within Deltek Customer Care, complete the following steps:
1. In your Web browser, go to https://deltek.custhelp.com.
2. Enter your Customer Care Connect Username and Password, and click Log In.
3. When the Customer Care Connect site displays, click the Product Downloads tab.
You are automatically logged in Deltek Software Manager.
4. To select the folder where you want to download Deltek products, click Settings above the right pane of Deltek Software Manager.
When you log on for the first time, Deltek Software Manager asks you to select a default folder where Deltek products are to be downloaded.
5. Use the Settings dialog box to specify the folder where you want to download Deltek products, and click OK.
You can change this folder anytime in the Settings dialog box.
6. In the left pane of Deltek Software Manager, expand the Deltek product that you want to download, if it is not already expanded.
7. Select the product type that you want to download. Your options are Complete, HotFix, and Sub-Release.
8. In the table, select the check box that corresponds to the Deltek product that you want to download. The right pane displays a message stating that the product has been added to the download queue.
To view the items in the download queue, click View Download Queue at the bottom of the
left pane.
9. Click Download at the bottom of the left pane. Deltek Software Manager downloads the product to the folder that you selected.
DSM Documentation and Troubleshooting
To view the online help for Deltek Software Manager, click here.
To view a tutorial on how to use Deltek Software Manager, click here.
To view more information on troubleshooting Deltek Software Manager, click here.
The above troubleshooting link will only work if you are logged into Deltek Customer Care Connect.

Pre-installation Information
Installation Guide 6
Pre-installation Information
This section contains important information for you to consider or perform prior to installing MPM 3.4, including:
Minimum System Requirements
Previous Installations
Access Control Requirements
Pervasive.SQL v10 Workgroup Engine
Minimum System Requirements
MPM 3.4 and Pervasive.SQL v10 install as 32-bit applications and run in 32-bit mode on either 32-bit or 64-bit platforms.
Type of Installation Required Disk Space
Standalone 580MB for all MPM files and Pervasive.SQL v10 Workgroup Engine (v10.3)
Administrator 200MB for the MPM files to be installed onto a network server
Workstation 530MB for minimal MPM files and Pervasive.SQL v10 Workgroup Engine (v10.3)
Database Engine 500MB for Pervasive.SQL v10 Workgroup Engine (v10.3)
Additional disk space is required for each project.
PC Requirements
Desktop Class Machine — Pentium 1.13GHz or higher
256MB RAM, 512MB RAM if using MSP Link
Operating Systems:
32-bit
Windows XP SP3
Windows Vista SP1 [Business, Enterprise, Ultimate]
Windows 7 [Professional, Enterprise, Ultimate]
64-bit
Windows 7 [Professional, Enterprise, Ultimate]
Internet Explorer 6.0 or later
Microsoft Project 2003 or Microsoft Project 20071

Pre-installation Information
Installation Guide 7
Server Requirements (without Data Warehouse)
Server Class Machine — Pentium 2.0GHz or higher
256MB RAM
Operating Systems:
Windows 2003 R2 Server (32-bit) [Standard Edition]2
Windows 2003 SP2 Server (32-bit) [Enterprise Edition] 2
Windows 2008 SP2 Server (32-bit) [Standard Edition] 5
Windows 2008 R2 Server (64-bit) [Standard Edition]5
Server Requirements (with Data Warehouse)2
Server Class Machine — Dual processor Pentium 2.8GHz or higher
150GB hard disk drive
2GB RAM, 4GB or more preferred.
Operating Systems:
Windows 2003 R2 Server (32-bit) [Standard Edition]2
Windows 2003 SP2 Server (32-bit) [Enterprise Edition] 2
Windows 2008 SP2 Server (32-bit) [Standard Edition] 5
Windows 2008 R2 Server (64-bit) [Standard Edition]5
Single Server Solution
(The Data Warehouse Controller is installed on the SQL Server)
Two Server Solution
(The Data Warehouse Controller is installed on a server other than the SQL Server machine)
SQL Server (32-bit or 64-bit) [Standard or Enterprise]: 2005 (SP2), or 2008 (SP2)
Integration Services3
Analysis Services4
.NET Framework 2.0, 3.0 or 3.5
Provided Components:
MPM Data Warehouse Controller Service
Pervasive.SQL v10 (10.3) Workgroup Engine
Server 1
SQL Server (32-bit or 64-bit) [Standard or Enterprise]: 2005 (SP2), or 2008 (SP2)
Server 2
SQL Server Components (32-bit or 64-bit) [Standard or Enterprise]: 2005 (SP2), or 2008 (SP2):
Integration Services3
Analysis Services4
.NET Framework 2.0, 3.0 or 3.5
Provided Components:
Data Warehouse Controller service
Pervasive.SQL v10 (10.3) Workgroup Engine

Pre-installation Information
Installation Guide 8
Other Requirements
NTFS file partition for the MPM database files that will be accessed. 6
1 Microsoft Project Standard or Professional is only required if you are using the MSP Link Interface. Microsoft Project Server and Enterprise Edition are not supported.
2 Pervasive workgroup Engine v10.3 is not supported on the following editions of Windows 2003:
Windows 2003 R2 Server or Windows 2003 R2 Small Business Server operating as part of a Failover Cluster
Windows 2003 Server or Windows 2003 Small Business Server operating as part of a Failover Cluster
Windows 2003 Server Terminal Services SP2
3 Running Integration Services on a machine other than where SQL Server is installed may require
additional SQL Server licensing.
4 Analysis Services is only required if you are installing OLAP. In order for the OLAP database to be
automatically created during the Data Warehouse setup, SQL Server Analysis Services 2005/2008 needs to be pre-installed on the machine where the Data Warehouse setup is executed. In order to accomplish this, we recommend running the Data Warehouse setup on an OLAP Analysis Server. Running Analysis Services on a machine other than where SQL Server is installed may require additional SQL Server licensing.
5 The minimum hardware requirements for Windows 2008 Server, as stated by Microsoft, are: 1.4 GHz (x64
processor); 512MB RAM; 32GB Disk Space.
6 Netware File shares are not supported in this version.
Previous Installations
Before installing MPM 3.4, remove any previous MPM installations by using Add or Remove Programs (or Programs and Features) found in the Windows Control Panel.
See Uninstalling MPM 3.3 for more details.
Deltek recommends that MPM 3.4 be installed in a different folder than the previous installation.
It is necessary to uninstall/reinstall the Pervasive.SQL Database Engine on the machine acting as the gateway. See Appendix F: Gateway Configuration and MPM Conversions for more details.
In order for the new version of MPM to recognize your User IDs, Globals, and Projects, copy the following three system files from the previous MPM system folder to the new MPM system folder:
global.dat
mpmusers.dat
proj.dat

Pre-installation Information
Installation Guide 9
Data Warehouse
Before installing MPM 3.4 Data Warehouse Controller, remove any previous Data Warehouse installations by using Add or Remove Programs (or Programs and Features) found in the Windows Control Panel.
See Uninstalling the Data Warehouse for more details.
Access Control Requirements
You must have administrator rights to successfully install and uninstall MPM. If you are not sure if you have administrator rights for a machine, check with your system administrator. Once installed, user access can be restricted based on the following criteria:
It is important to grant users correct access to the MPM System (aka Data), Executable, and Working directories, along with any locations where MPM data is stored. Be sure to grant users Modify permissions to these folders.
The executable files (*.EXE, *.DLL, *.MFL) can be flagged as Read-Only for added protection. No other files should be flagged as Read-Only. Please note that the Read-Only flag must be removed in order to install MPM updates.
Path Restrictions
When using drive letters, the software and data must reside in a subdirectory (for example, C:\DELTEKMPM or J:\DELTEKMPM), not a root directory of a local or mapped drive (for example, C:\ or J:\). When using UNC, Deltek recommends using a subdirectory under the share (for example, use \\Server\Share\DELTEKMPM\ instead of \\Server\Share\).
Do not use a hidden share or administrative share for any of the MPM folders. A hidden share, or administrative share, is identified by a dollar sign ($) at the end of the share name (i.e. \\Server\Share$). Examples are \\Server\C$, or \\Server\MPM$.
Pervasive.SQL v10 Workgroup Engine
MPM 3.4 uses the Pervasive.SQL v10 Workgroup Engine, which can run on a Microsoft Windows based workstation or server. This designated workstation or server is called a Gateway. The Gateway is a designated database engine that acts as a server engine for the Pervasive.SQL v10 Workgroup Engine.
Before installing MPM, you should decide which server(s) or workstation(s) will be the Permanent Gateway(s).
Pervasive.SQL v10 installs as a 32-bit application and runs in 32-bit mode on either a 32-bit or 64-bit platform.
See Appendix F: Gateway Configuration for more details.

Uninstalling MPM 3.3
Installation Guide 10
Uninstalling MPM 3.3
To uninstall MPM 3.3, complete the following steps:
1. Open the Control Panel and select Add or Remove Programs (or Programs and Features).
2. Select MPM 3.2, and click Uninstall.
The program will display as MPM 3.2 even though you have installed the MPM 3.3 patch.
3. A message displays asking if you would like to repair or remove Pervasive.SQL 9.5 SP2 Workgroup for Windows. Select Remove, and click Next.
4. Follow the prompts to complete the removal of Pervasive.SQL 9.5.
5. After MPM uninstalls, delete the MPM shortcut on your desktop.
a. Right-click on the MPM 3.3 shortcut on your desktop and select Delete.
b. Click Yes to confirm the delete.
6. Delete MPM from the Program Group by completing the following steps:
a. Click Start » Program Group, and navigate to the MPM 3.3 folder.
b. Right-click the MPM 3.3 folder, and click Delete on the shortcut menu.
c. Click Yes to confirm the deletion.
MPM 3.4 Installation
Installation Guide 11
MPM 3.4 Installation
MPM is a feature-rich system and correctly installing the software is important for the system to work properly. Please read this entire section before you begin installing the MPM software. Each installation type is described in detail in the following sections, and includes:
Standalone
Administrator
Workstation
Database Engine
MPM License Types
MPM provides two license options.
Concurrent User License — The Concurrent User license allows a set number of users to use MPM at the same time. The number of users that you can add to the MPM Security Window can be more than the number allowed to use MPM concurrently.
For example, if you have a 5-user Concurrent license, you can list up to 300 users in your Security Window, but only a maximum of five of those users can access MPM concurrently.
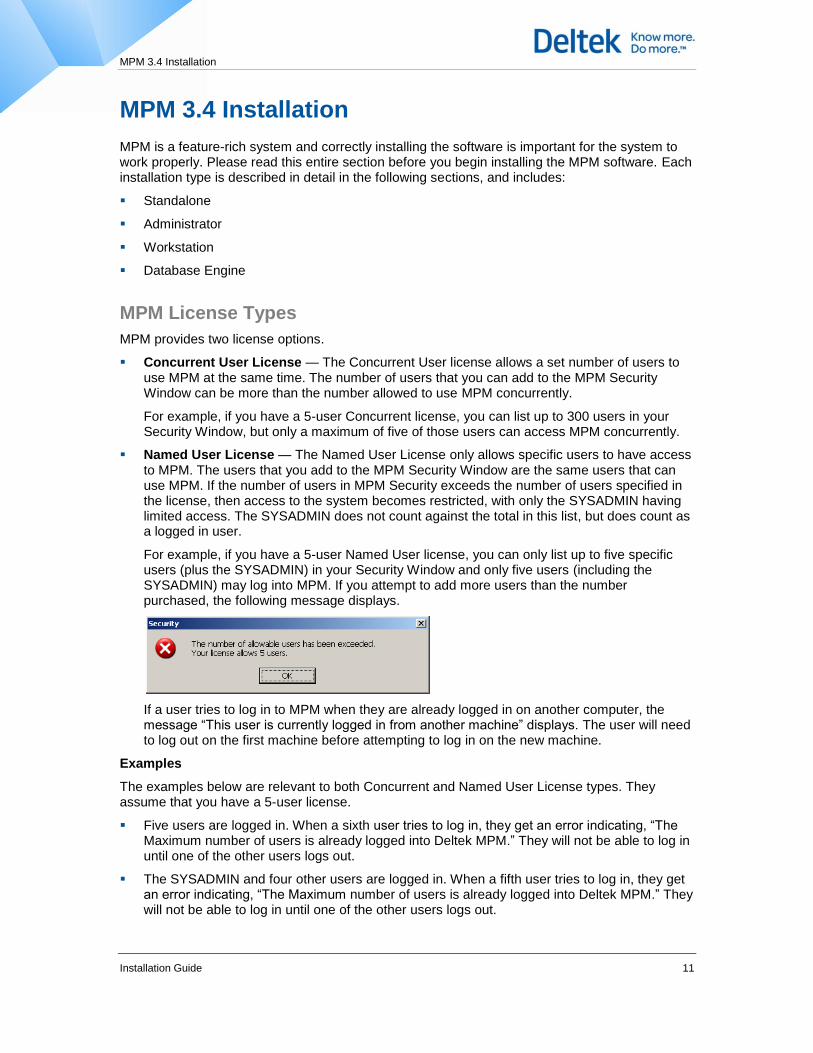
Named User License — The Named User License only allows specific users to have access to MPM. The users that you add to the MPM Security Window are the same users that can use MPM. If the number of users in MPM Security exceeds the number of users specified in the license, then access to the system becomes restricted, with only the SYSADMIN having limited access. The SYSADMIN does not count against the total in this list, but does count as a logged in user.
For example, if you have a 5-user Named User license, you can only list up to five specific users (plus the SYSADMIN) in your Security Window and only five users (including the SYSADMIN) may log into MPM. If you attempt to add more users than the number purchased, the following message displays.
If a user tries to log in to MPM when they are already logged in on another computer, the message ―This user is currently logged in from another machine‖ displays. The user will need to log out on the first machine before attempting to log in on the new machine.
Examples
The examples below are relevant to both Concurrent and Named User License types. They assume that you have a 5-user license.
Five users are logged in. When a sixth user tries to log in, they get an error indicating, ―The Maximum number of users is already logged into Deltek MPM.‖ They will not be able to log in until one of the other users logs out.
The SYSADMIN and four other users are logged in. When a fifth user tries to log in, they get an error indicating, ―The Maximum number of users is already logged into Deltek MPM.‖ They will not be able to log in until one of the other users logs out.

MPM 3.4 Installation
Installation Guide 12
Five users are logged in. When the SYSADMIN tries to log in, a message displays stating, ―The maximum number of users is already logged into Deltek MPM. Since you are a System Administrator-level user, you will be allowed to continue but only the User Logout Utility will be available.‖
See ―Using MPM: Running the User Logout Utility‖ in the Deltek MPM 3.4 Getting Started
Manual for more details.
See ―Chapter 8: Controlling Security Access to MPM‖ in the Deltek MPM 3.4 Globals Manual
for details on how to set up the list of users.
Viewing the License Type and Number of Users
You can see the type of license and number of users you have by clicking Help » About Deltek MPM and then clicking the System Info button. Use the scrollbar to scroll down to view the license information.

MPM 3.4 Installation
Installation Guide 13
Summary of Installation Types
Standalone MPM software and Pervasive.SQL v10 Workgroup Engine is installed on individual PCs.
Local or centralized administration of users and data based on the location of the MPM System folder.
Local executable files
Decreases network traffic
Multiple locations for software updates
Administrator MPM software and Pervasive.SQL v10 Workgroup Install files are installed on the network server. The software can be run by many users and administered from one central location. A Workstation installation must then be performed on every PC that needs to run the MPM software.
Centralized administration of users and data
Centralized executable files
Increases network traffic
Single location for software updates
Workstation Only the MPM software files that must reside locally on each individual PC are installed. This includes the Pervasive.SQL v10 Workgroup Engine.
Database Engine
Only the Pervasive.SQL v10 Workgroup Engine is installed.
Install to Microsoft Windows-based server that contains MPM database files.

MPM 3.4 Installation
Installation Guide 14
Standalone Installation
In a standalone installation, all MPM files are installed on a PC.
See the Pre-Installation Information section for system requirements.
The MPM Standalone install should not be installed using Remote Desktop or other remote control applications. To install the MPM Standalone install on a Microsoft Windows-based system, install from the system console.
Before you begin installing MPM, Deltek strongly recommends that you close all other Windows programs prior to executing the installation procedure.
To install the Standalone version of the MPM software, complete the following steps:
1. Download DeltekMPM34.exe from the Deltek Software Management distribution site and save the file to a location on your local drive or a network location. Double-click the file to begin the installation.

MPM 3.4 Installation
Installation Guide 15
2. InstallShield loads the Setup Wizard and displays the Welcome page.
3. Click Next to choose the Setup Type.
4. Select the Standalone option, and click Next to enter your Customer Information.

MPM 3.4 Installation
Installation Guide 16
5. Enter your User Name, Company Name, and the Activation Key.
The Activation Key controls the type of license and the number of users. It was shipped with your MPM package. If you have lost your Activation Key, please contact Deltek Customer Care. If you enter an incorrect Activation Key, an error message will display. You will not be able to continue the installation without the correct key.
See MPM License Types for a detailed explanation of each license type.
6. After entering the information, click Next to select the Executable and System folders.
7. Accept the default MPM Executable and System folders, or click Browse to select different folders. If a folder you specified does not exist, the folder will automatically be created.
Deltek recommends that MPM 3.4 be installed in a different folder than the previous
installation.
By default, the application files are installed in the MPM Executable folder. The system files are installed in the MPM System folder. Pervasive.SQL v10 is installed in the...\Program Files\Pervasive Software\PSQL folder.
When changing the Executable Folder, select a local physical drive letter, not a mapped or virtual drive letter.
The MPM System folder is where your project, global, and user lists will reside. If you have an existing installation of a previous version of MPM, this is where the MPM system files such as MPMCTRL.DAT, PROJ.DAT, MPMUSERS.DAT, DISTCURV.DAT, and GLOBAL.DAT reside.
If you want to share data with other users, then the MPM System folder should point to a centralized location on the network. A Pervasive Gateway is necessary when sharing data from a central location.
See Appendix F: Gateway Configuration for more details.
MPM 3.4 Installation
Installation Guide 17
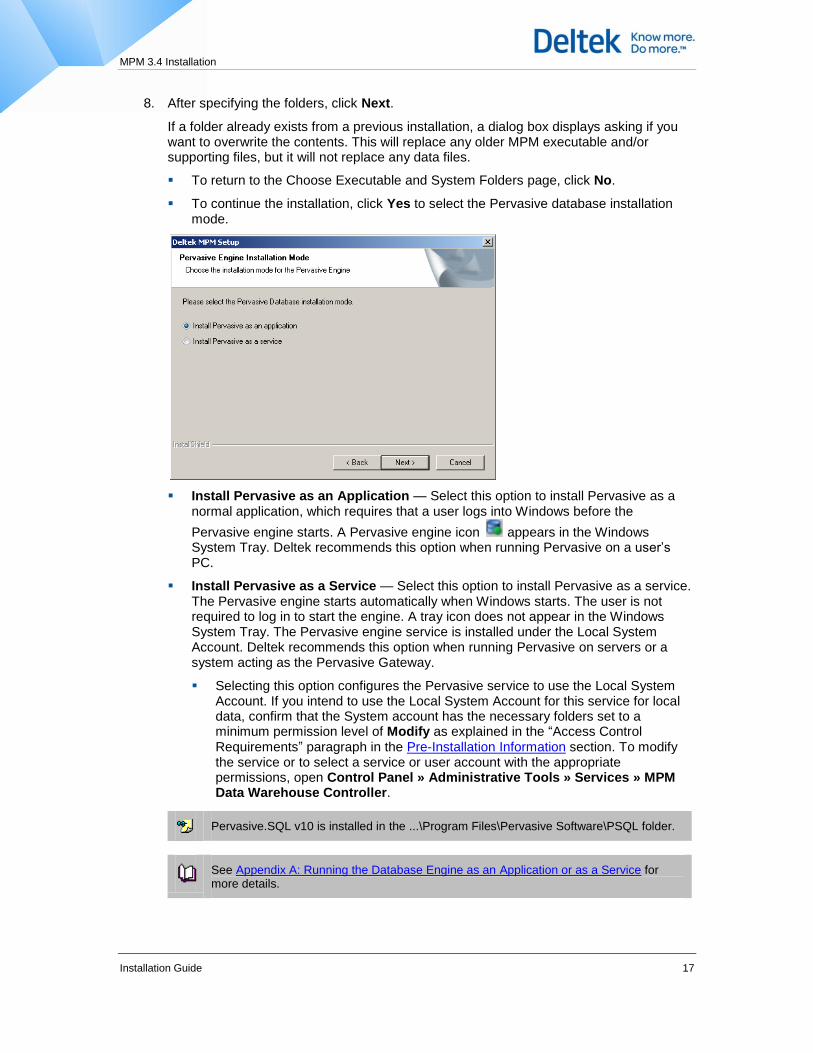
8. After specifying the folders, click Next.
If a folder already exists from a previous installation, a dialog box displays asking if you want to overwrite the contents. This will replace any older MPM executable and/or supporting files, but it will not replace any data files.
To return to the Choose Executable and System Folders page, click No.
To continue the installation, click Yes to select the Pervasive database installation mode.
Install Pervasive as an Application — Select this option to install Pervasive as a normal application, which requires that a user logs into Windows before the
Pervasive engine starts. A Pervasive engine icon appears in the Windows System Tray. Deltek recommends this option when running Pervasive on a user’s PC.
Install Pervasive as a Service — Select this option to install Pervasive as a service. The Pervasive engine starts automatically when Windows starts. The user is not required to log in to start the engine. A tray icon does not appear in the Windows System Tray. The Pervasive engine service is installed under the Local System Account. Deltek recommends this option when running Pervasive on servers or a system acting as the Pervasive Gateway.
Selecting this option configures the Pervasive service to use the Local System Account. If you intend to use the Local System Account for this service for local data, confirm that the System account has the necessary folders set to a minimum permission level of Modify as explained in the ―Access Control Requirements‖ paragraph in the Pre-Installation Information section. To modify the service or to select a service or user account with the appropriate permissions, open Control Panel » Administrative Tools » Services » MPM Data Warehouse Controller.
Pervasive.SQL v10 is installed in the ...\Program Files\Pervasive Software\PSQL folder.
See Appendix A: Running the Database Engine as an Application or as a Service for more details.
MPM 3.4 Installation
Installation Guide 18
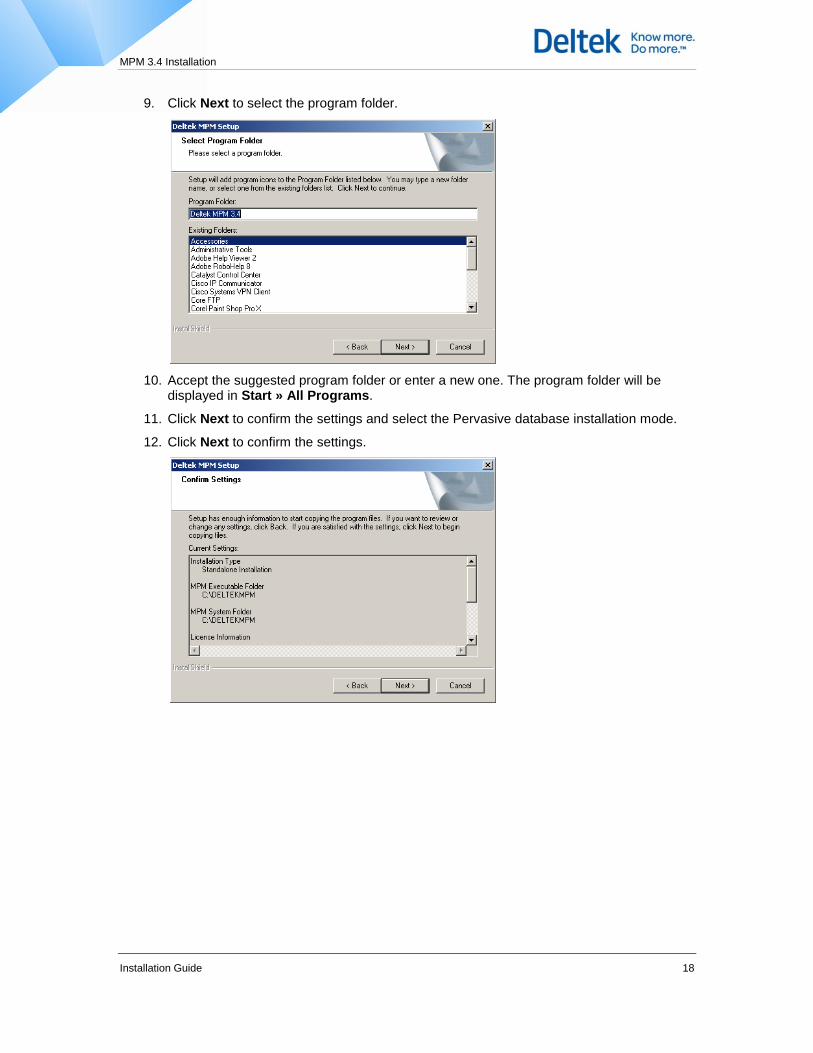
9. Click Next to select the program folder.
10. Accept the suggested program folder or enter a new one. The program folder will be displayed in Start » All Programs.
11. Click Next to confirm the settings and select the Pervasive database installation mode.
12. Click Next to confirm the settings.

MPM 3.4 Installation
Installation Guide 19
13. If you want to change a setting, click the Back button. This will step you back through the previous pages. To confirm the settings and initiate the installation, click Next.
A status page shows the files being installed. Setup generates a file list in the MPM Executable folder.
During installation, several messages display confirming that Pervasive is being installed.
Pervasive can take several minutes to install, and your screen will appear inactive during this time.
14. The Successful Setup page displays when the installation is complete.

MPM 3.4 Installation
Installation Guide 20
15. Click Finish to complete the setup process.
The Pervasive engine icon in the Windows System Tray indicates that Pervasive.SQL v10 Workgroup Engine is now running on this machine.
The Pervasive engine icon displays if Pervasive is installed as an Application and not as a Service.
What to Do Next
You have completed the Standalone installation. Deltek recommends that you run the Pervasive System Analyzer in order to test the local Pervasive.SQL v10 Workgroup Engine.
See Pervasive System Analyzer for more details.
If you plan to store data on a server, review the ―Pervasive.SQL v10 Workgroup Engine‖ section and decide what machine(s) will act as your Gateway (database server).
See Appendix F: Gateway Configuration for more details.

MPM 3.4 Installation
Installation Guide 21
Administrator Installation
In an Administrator install, all MPM files are installed onto a network server so that the software can be run from a central network location. After completing the Administrator install, you will have to do a Workstation install on every PC that needs to run the MPM software. This installs the necessary files on the workstation.
See the Pre-Installation Information section for system requirements.
Do not install the Administrator installation from the server console pointing to a local server
drive. Instead, install the Administrator installation from a workstation to a mapped network drive or UNC. This is important because the Workstation installation automatically uses the same MPM System Folder and Executable Folder location specified during the Administrator Installation.
If using a mapped network drive, be sure the mapped drive is the same for all users.
The Administrator Installation will not install the database engine on the server. Refer to the Database Engine Installation section for directions on installing the Pervasive.SQL v10 Database Engine on a Microsoft Windows-based server.
Before you begin installing MPM, Deltek strongly recommends that you close all other Windows programs prior to executing the installation procedure.
To install the Administrator version of the MPM software, complete the following steps:
1. Download DeltekMPM34.exe from the Deltek Software Management distribution site and save the file to a location on your local drive or a network location. Double-click the file to begin the installation.

MPM 3.4 Installation
Installation Guide 22
2. InstallShield loads the Setup Wizard and displays the Deltek MPM Setup page.
3. Click Next to select the Setup Type.
4. Select the Administrator option, and click Next to enter the Activation Key.

MPM 3.4 Installation
Installation Guide 23
5. Enter the activation key that was shipped with your MPM package.
The Activation Key controls the type of license and the number of users. It was shipped with your MPM package. If you have lost your Activation Key, please contact Deltek Customer Care. If you enter an incorrect Activation Key, an error message will display. You will not be able to continue the installation without the correct key.
See MPM License Types for a detailed explanation of each license type.
6. After entering the information, click Next to select the Executable and System folders.
7. Accept the default Executable and System folders, or click Browse to select different folders. If a folder you specified does not exist, the folder will automatically be created.
Deltek recommends that MPM 3.4 be installed in a different folder than the previous installation.
The application files are installed in the MPM Executable folder. The system files are installed in the MPM System folder.
The MPM System folder is where your project, global, and user lists will reside. If you have an existing installation of a previous version of MPM, this is where the MPM system files such as MPMCTRL.DAT, PROJ.DAT, MPMUSERS.DAT, DISTCURV.DAT, and GLOBAL.DAT reside.
Do not install the Administrator installation from the server console pointing to a local server drive. Instead, install the Administrator installation from a workstation to a mapped network drive or UNC. This is important because the Workstation installation automatically uses the same MPM System Folder and Executable Folder location specified during the Administrator Installation.
If using a mapped network drive, be sure the mapped drive is the same for all users.
MPM 3.4 Installation
Installation Guide 24
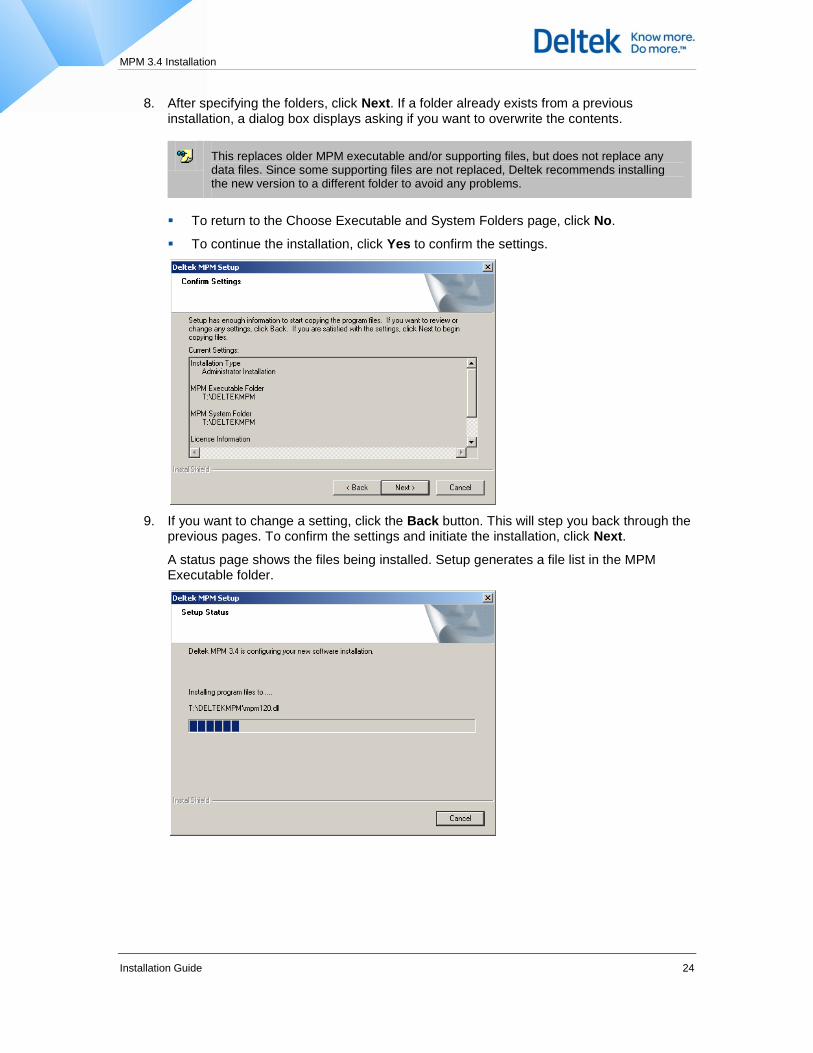
8. After specifying the folders, click Next. If a folder already exists from a previous installation, a dialog box displays asking if you want to overwrite the contents.
This replaces older MPM executable and/or supporting files, but does not replace any data files. Since some supporting files are not replaced, Deltek recommends installing the new version to a different folder to avoid any problems.
To return to the Choose Executable and System Folders page, click No.
To continue the installation, click Yes to confirm the settings.
9. If you want to change a setting, click the Back button. This will step you back through the previous pages. To confirm the settings and initiate the installation, click Next.
A status page shows the files being installed. Setup generates a file list in the MPM Executable folder.

MPM 3.4 Installation
Installation Guide 25
10. The Successful Setup page displays when the installation is complete.
11. Click Finish to complete the setup process.
What to Do Next
You have completed the Administrator installation. You should now perform the Workstation installation on each PC that will be running MPM.
See Workstation Installation for information on running the Workstation installation.
If you plan to store data on a server, review the ―Pervasive.SQL v10 Workgroup Engine‖ section, and decide what machine(s) will act as your Gateway (database server).

MPM 3.4 Installation
Installation Guide 26
Workstation Installation
In a Workstation install, minimal MPM files and the Pervasive.SQL v10 Workgroup Engine are installed on the local machine. The Workstation Installation will automatically use the MPM Executable and MPM System folders selected during the Administrator installation.
See the Pre-Installation Information section for system requirements.
Before you can perform the Workstation installation, you must have completed the Administrator installation.
The MPM Workstation install should not be installed using Remote Desktop or other remote control applications. To install the MPM Workstation install on a Microsoft Windows-based system, install from the system console.
Before you begin installing MPM, Deltek strongly recommends that you close all other Windows programs prior to executing the installation procedure.
To install the Workstation version of the MPM software, complete the following steps:
1. From the Setup subdirectory, run SETUP.EXE. This subdirectory is located in the directory designated as the MPM Executable Folder during the MPM Administrator install. Check with your system administrator for the name of the directory.
InstallShield loads the Setup Wizard and displays the Welcome page.

MPM 3.4 Installation
Installation Guide 27
2. Click Next to enter your User Information.
3. Enter your User Name and Company Name, and then click Next to view or change the Working Directory.
4. Accept the default working directory, or click Browse to select a different folder on the local drive. If a folder you specified does not exist, the folder will automatically be created.
Pervasive.SQL v10 is installed in the ..\Program Files\Pervasive Software\PSQL folder.
When changing the Destination Folder, select a local physical drive letter, not a mapped or virtual drive letter.
MPM 3.4 Installation
Installation Guide 28
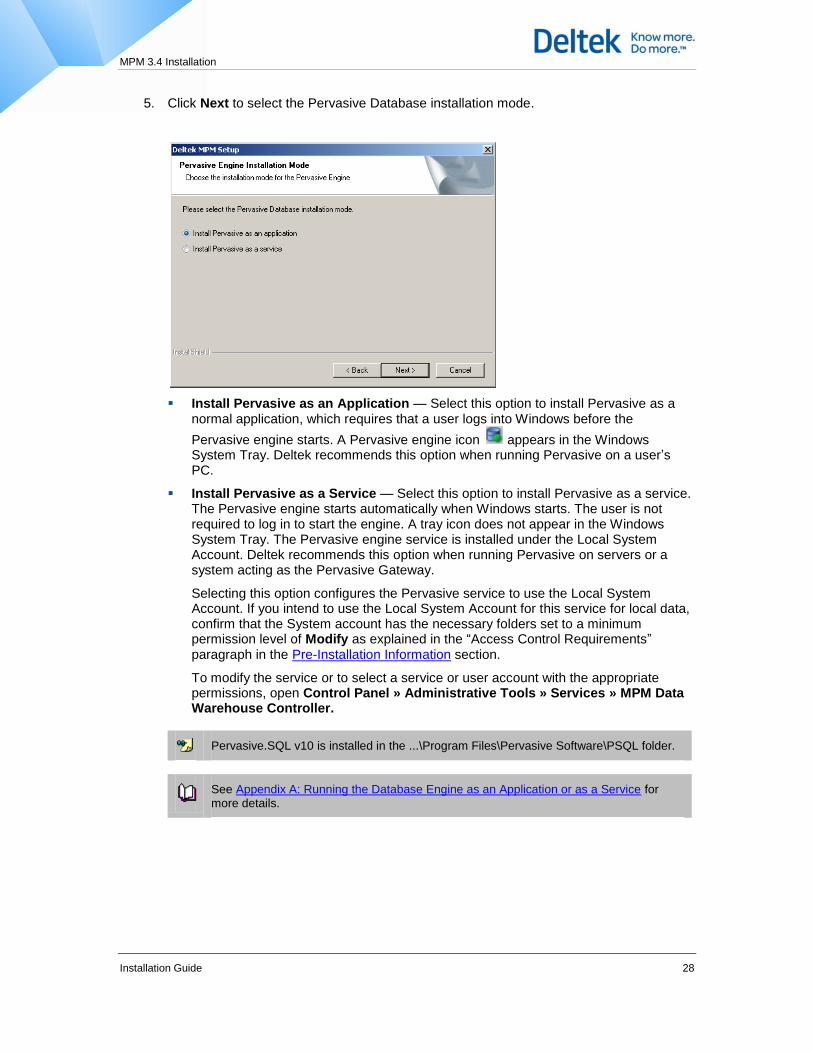
5. Click Next to select the Pervasive Database installation mode.
Install Pervasive as an Application — Select this option to install Pervasive as a normal application, which requires that a user logs into Windows before the
Pervasive engine starts. A Pervasive engine icon appears in the Windows System Tray. Deltek recommends this option when running Pervasive on a user’s PC.
Install Pervasive as a Service — Select this option to install Pervasive as a service. The Pervasive engine starts automatically when Windows starts. The user is not required to log in to start the engine. A tray icon does not appear in the Windows System Tray. The Pervasive engine service is installed under the Local System Account. Deltek recommends this option when running Pervasive on servers or a system acting as the Pervasive Gateway.
Selecting this option configures the Pervasive service to use the Local System Account. If you intend to use the Local System Account for this service for local data, confirm that the System account has the necessary folders set to a minimum permission level of Modify as explained in the ―Access Control Requirements‖ paragraph in the Pre-Installation Information section.
To modify the service or to select a service or user account with the appropriate permissions, open Control Panel » Administrative Tools » Services » MPM Data Warehouse Controller.
Pervasive.SQL v10 is installed in the ...\Program Files\Pervasive Software\PSQL folder.
See Appendix A: Running the Database Engine as an Application or as a Service for more details.

MPM 3.4 Installation
Installation Guide 29
6. Click Next to view or change the Program Folder.
7. Accept the suggested program folder, or enter a new one. The program folder will be displayed in Start » All Programs.
8. Click Next to confirm the settings.
9. If you want to change a setting, click the Back button. This will step you back through the previous pages. To confirm the settings and initiate the installation, click Next.

MPM 3.4 Installation
Installation Guide 30
10. The Successful Setup page displays when the installation is complete.
11. Click Finish to complete the setup process.
The Pervasive engine icon in your taskbar indicates that Pervasive.SQL v10 Workgroup Engine is now running on this machine.
The Pervasive engine icon displays if Pervasive is installed as an Application and not as a Service.
What to Do Next
You have completed the Workstation installation. Deltek recommends that you run the Pervasive System Analyzer in order to test the local Pervasive.SQL v10 Workgroup Engine.

MPM 3.4 Installation
Installation Guide 31
Database Engine Installation
In a Database Engine install, Pervasive.SQL v10 Workgroup Engine (v10.3) is installed on a Microsoft Windows-based workstation or server.
Requirements and Recommendations
Deltek recommends installing the Database Engine to every Microsoft Windows-based server that contains MPM Projects, Globals, or System files for best performance and ease of use.
It is not necessary to run the Database Engine installation on any system that has a standalone or workstation installation.
The database engine should not be installed using Remote Desktop or other remote control applications. To install the database engine on a Microsoft Windows-based server, install from the server console to a physical drive letter, not a mapped or virtual drive letter.
The database engine can be installed as an application or a service. Deltek recommends running it as a service on any systems that act as the Gateway and on all MPM Data Warehouse servers.
If it is installed as an application, a user must be logged into the Gateway machine(s) at all times. This user will need appropriate permissions to access MPM data. Refer to Access Control Requirements section for specific information.
See Appendix A: Running the Database Engine as an Application or as a Service for more information on configuring Pervasive.SQL v10 Workgroup Engine.
Before you begin installing the database engine, Deltek strongly recommends that you close all other Windows programs prior to executing the installation procedure.
To install the database engine, complete the following steps:
1. From the server or workstation that will act as the Pervasive Gateway, download DeltekMPM34.exe from the Deltek Software Management distribution site and save the file to a location on the local drive or a network location. Double-click the file to begin the installation.

MPM 3.4 Installation
Installation Guide 32
2. InstallShield loads the Setup Wizard and displays the Welcome page.
3. Click Next to select the Setup Type.
4. Select the Database Engine option, and click Next to enter your Activation Key.

MPM 3.4 Installation
Installation Guide 33
5. Enter the Activation Key that was shipped with your MPM package.
The Activation Key controls the type of license and the number of users. It was shipped with your MPM package. If you have lost your Activation Key, please contact Deltek Customer Care. If you enter an incorrect Activation Key, an error message will display. You will not be able to continue the installation without the correct key.
See MPM License Types for a detailed explanation of each license type.
6. Click Next to select the Pervasive Database installation mode.
Install Pervasive as an Application — Select this option to install Pervasive as a normal application, which requires that a user logs into Windows before the
Pervasive engine starts. A Pervasive engine icon appears in the Windows System Tray. Deltek recommends this option when running Pervasive on a user’s PC.
Install Pervasive as a Service — Select this option to install Pervasive as a service. The Pervasive engine starts automatically when Windows starts. The user is not required to log in to start the engine. A tray icon does not appear in the Windows System Tray. The Pervasive engine service is installed under the Local System

MPM 3.4 Installation
Installation Guide 34
Account. Deltek recommends this option when running Pervasive on servers or a system acting as the Pervasive Gateway.
Selecting this option configures the Pervasive service to use the Local System Account. If you intend to use the Local System Account for this service for local data, confirm that the System account has the necessary folders set to a minimum permission level of Modify as explained in the Access Control Requirements paragraph in the Pre-Installation section. To modify the service or to select a service or user account with the appropriate permissions, open Control Panel » Administrative Tools » Services » MPM Data Warehouse Controller.
Pervasive.SQL v10 is installed in the ..\Program Files\Pervasive Software\PSQL folder.
See Appendix A: Running the Database Engine as an Application or as a Service for more details.

MPM 3.4 Installation
Installation Guide 35
7. Click Next to begin the installation.
The Successful Setup page displays when the installation is complete.
8. Click Finish to complete the setup process and display the ReadMe file.
The Pervasive engine icon in your taskbar indicates that Pervasive.SQL v10 Workgroup Engine is now running on this machine.
The Pervasive engine icon displays if Pervasive is installed as an Application and not as a Service.
What to Do Next
You have just completed the Database Engine installation. Deltek recommends that you now run the Pervasive System Analyzer in order to test the local Pervasive.SQL v10 Workgroup Engine.
For information on setting up the engine, please refer to Appendix A: Running the Database Engine as an Application or as a Service for more information.
If you have not yet installed the MPM software, please refer to the Uninstalling MPM 3.3 section.

MPM Post-Installation
Installation Guide 36
MPM Post-Installation
Configuring MPM
The MPM installation is complete and your internal security has been established. To complete the setup process, verify the following information to make sure that MPM will function properly.
WINMPM.INI File
The WINMPM.INI file is located in your Windows directory, and should contain:
WINMPM.INI
[Path]
DataDirectory=C:\DELTEKMPM
In this example, C:\DELTEKMPM is the location of the MPM System folder. This directory was specified during installation in the Deltek MPM System Folder field on the Choose Executable
and System Folders dialog box..
Creating a Valid User List
As part of the installation procedure, the MPM Administrator will need to create a list of individuals in the Security applet who are authorized to use MPM. Up to 300 users can be entered.
If you have a Named User license, the number of users that can be added into the system is specified in your MPM License.
See ―Chapter 8: Controlling Security Access to MPM‖ in the Deltek MPM 3.4 Globals Manual
for details on how to set up the list of users.
See MPM License Types for a detailed explanation of each license type.
The default login for the MPM Administrator is:
User ID: SYSADMIN
Password: MPM
All MPM systems are delivered with the above default User ID and Password. The SYSADMIN User ID cannot be changed or deleted. However, in order to protect the security of your system, Deltek strongly recommends that the SYSADMIN password be changed immediately after MPM is installed, using the Menu Manager Tools » Change Password option.
The password for the SYSADMIN user cannot be easily reset. If the MPM administrator changes the default SYSADMIN password and forgets the new password, contact Deltek Customer Care for assistance.
See ―Chapter 8: Controlling Security Access to MPM‖ in the Deltek MPM 3.4 Globals Manual for more details.

MPM Post-Installation
Installation Guide 37
Subdirectory Organization
Some system administrators, particularly in a network environment, may wish to further enhance security features by restricting user access based on subdirectory organization. Careful consideration must be given to ensure that your subdirectory organization conforms to the
requirements of the MPM software.
When using drive letters, the software and data must reside in a subdirectory (for example, C:\DELTEKMPM or J:\DELTEKMPM), not a root directory of a local or mapped drive (for example, C:\ or J:\). When using UNC, Deltek recommends using a subdirectory under the share (for example, use \\Server\Share\DELTEKMPM\ instead of \\Server\Share\).
Do not use a hidden share or administrative share for any of the MPM folders. A hidden share, or administrative share, is identified by a dollar sign ($) at the end of the share name (i.e. \\Server\Share$). Examples are \\Server\C$, or \\Server\MPM$.
Maintaining Project Files
MPM provides features that allow you to create new project subdirectories, copy a project into another subdirectory, and move a project from one subdirectory to another, to name just a few. Some users have found that keeping each project in a unique subdirectory provides more effective data management and minimizes accidental loss of data.
Additionally, Deltek recommends that, as much as possible, project file manipulation be performed using only the Project Maintenance window.
Accessing more than one MPM System Folder
You can run MPM against different project lists without having to change the WINMPM.INI file to point to different MPM System Folders. MPM shortcuts that refer to different WINMPM.INI files are used in order to access more than one MPM System Folder from the same computer.
Installing MPM creates a WINMPM.INI file in the %SystemRoot% folder (i.e. C:\windows or C:\WINNT).
This file contains the path to the MPM System Folder that was designated during installation.
The MPM System Folder contains the PROJ.DAT, GLOBAL.DAT and MPMUSERS.DAT files which hold the project list, global list and users list.
In order to run MPM against different MPM System Folders, multiple copies of the WINMPM.INI file can be created and refer to these copies in various MPM shortcuts.
To run MPM 3.4 against different MPM System Folders, complete the following steps:
1. Copy the WINMPM.INI file from the Windows folder to the MPM System Folder used for one of your MPM installations
2. Modify this copy of the WINMPM.INI file so the DataDirectory line contains the path of this MPM System Folder.
For example: If the MPM System Folder is x:\mpmsys, then the WINMPM.INI file should look like the following:
[Path]
DataDirectory=X:\MPMSYS
3. If one does not already exist, create a MPM shortcut for this installation.

MPM Post-Installation
Installation Guide 38
4. Add a -i to the Target line that refers to this new WINMPM.INI file.
There should be no space between the -i and the WINMPM.INI path.
For example: If MPM is installed on the hard drive and the MPM System Folder is the same as above, x:\mpmsys, then the Target line should look like the following:
C:\WINMPM\WINMPM.EXE -iX:\MPMSYS\WINMPM.INI
When this shortcut is used, MPM will use the MPM System Folder in the specified WINMPM.INI file.
5. Repeat steps 1 – 4 for all of the different MPM System Folders that exist.
Pervasive System Analyzer
In order to test the local Pervasive SQL v10 Workgroup Engine, run the transactional and relational tests in Pervasive System Analyzer. Although you can skip this step of the installation, Deltek recommends that you complete this test.
To run the Pervasive System Analyzer, complete the following steps:
1. , Click Start » All Programs » Pervasive » PSQL10 » Utilities » Pervasive System Analyzer to start the Pervasive System Analyzer.
2. On the Pervasive System Analyzer wizard welcome page, click Next to continue with the analysis.
3. On the System Analyzer Options page, complete the following steps:
a. Select the Test active installation option.
b. Clear the Test network communication check box.
c. Click Next to continue with the analysis.

MPM Post-Installation
Installation Guide 39
4. To test the local Pervasive.SQL v10 Workgroup Transactional Engine, accept the defaults, and click Next.
The Pervasive System Analyzer tests the Transactional Engine and displays the Transactional Engine Test Results page. The Transactional Engine test is successful when all tasks are checked off.

MPM Post-Installation
Installation Guide 40
5. After reviewing the Transactional Engine Test Results, click Next to display the Test Relational Engine page.
6. To test the local Pervasive.SQL v10 Workgroup Relational Engine, accept the defaults, and click Next.
Although you can skip this step of the installation by clicking Cancel, Deltek recommends
that you complete this test.
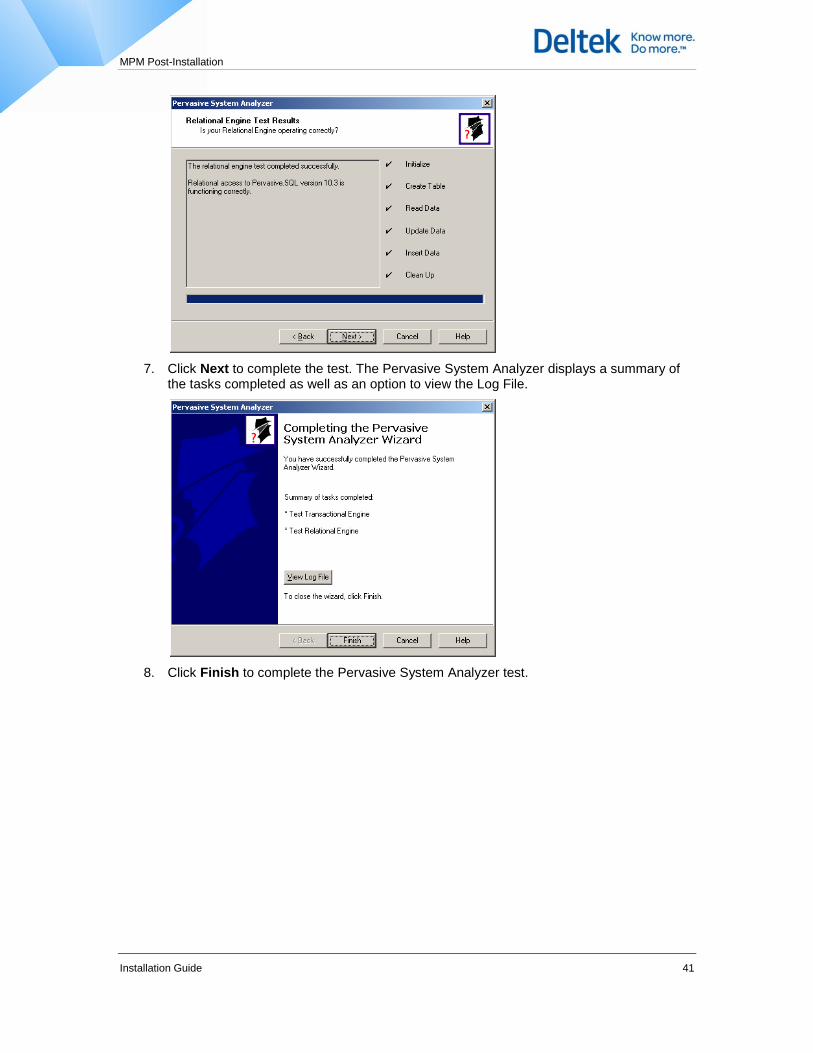
Pervasive System Analyzer tests the Relational Engine and displays the Relational Engine Test Results page. The Relational Engine test is successful when all tasks are checked off.
MPM Post-Installation
Installation Guide 41
7. Click Next to complete the test. The Pervasive System Analyzer displays a summary of the tasks completed as well as an option to view the Log File.
8. Click Finish to complete the Pervasive System Analyzer test.

MPM Conversions
Installation Guide 42
MPM Conversions
Converting Data to MPM 3.4
The first user to log into MPM 3.4 will be presented with a dialog box asking them if they want to convert their MPM System files.
After the MPM System files are converted, all project and global files that will be used or opened must be converted to MPM 3.4. The conversion utility allows MPM system administrators to convert projects and globals individually, several at a time, or all at once.
All data must be in MPM 3.2 or MPM 3.3 format before converting to MPM 3.4.
Disk Space
Make sure that you have enough disk space to convert the files. To determine the necessary size, double the size of the files you are converting. For example, (Holiday Calendar 1.4MB) x 2 = 2.8MB.
If you have not done so already, Deltek recommends reading the Pervasive.SQL v10 Workgroup Engine section in this manual prior to converting.
Converting the MPM System Files
After backing up all of your system, project, and global files, you will be ready to begin the conversion process.
See ―Backing Up MPM Files‖ in the Deltek MPM 3.4 Getting Started Manual for more details.
When you first log into MPM 3.4 (not limited to the system administrator), the following message displays.
Clicking Yes causes another message to display asking you to confirm that you want to continue with the conversion. Clicking No does not continue with the conversion of the MPM System files, and the menu manager opens with no tabs visible.

MPM Conversions
Installation Guide 43
Clicking Yes converts all the MPM System files to the Pervasive.SQL v10 format. Clicking No does not continue with the conversion of the MPM System files, and the menu manager opens with no tabs visible.
Converting Global and Project Files
You will not be able to use any project or global files anywhere in MPM until they are converted. Prior to running the conversion, global paths can be changed in Global Maintenance. However, projects must be converted before any changes are made in Project Maintenance.
Threshold information from 3.2/3.3 will not be converted to 3.4. Before upgrading to 3.4, make a note of the Threshold information from each project in Headers and Thresholds so that it can be added to the new Threshold section in the WBS after conversion.
The conversion utility verifies the file version so that it can display the proper conversion status: gray rows have been converted and white rows have not been converted.
You must be logged into MPM as a system administrator or you will not have access to the File Conversion tab.
To convert the Global and Project files, complete the following steps:
1. Log into MPM as a system administrator to begin the global and project files conversion.
2. From the MPM Menu Manager, click the File Conversion tab.
3. Double-click . The following dialog box displays.
4. Click OK if you want to continue loading the conversion grid, or click Cancel if you want to discontinue the file conversion process and return to the File Conversion tab.
From the File Conversion window, you will see a list of your files sorted by file type, with global files listed first followed by project files. This grid allows you to pick and choose the files you want to convert by clicking in the Convert cell to place a check mark next to the project or global you want to convert.
5. To select all project and global files, click Edit » Select All.
A blue next to a line item indicates that a project or global file has an invalid gateway and cannot be selected for conversion. Please refer to the Pervasive.SQL v10 Workgroup Engine section for gateway information.
A red next to a line item indicates that a project or global file does not exist and cannot be selected for conversion.
You will not be able to access any file that has not been converted.
Deltek strongly recommends that when you convert project files, you convert the corresponding set of global files at the same time.
MPM Conversions
Installation Guide 44
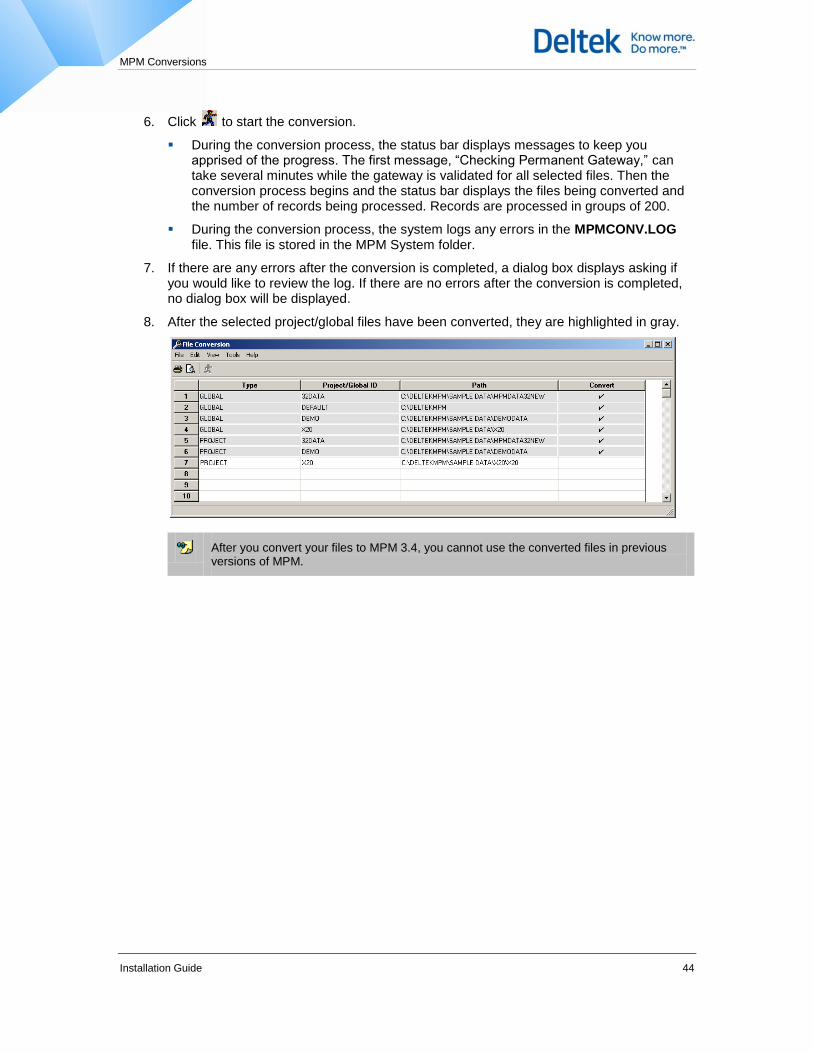
6. Click to start the conversion.
During the conversion process, the status bar displays messages to keep you apprised of the progress. The first message, ―Checking Permanent Gateway,‖ can take several minutes while the gateway is validated for all selected files. Then the conversion process begins and the status bar displays the files being converted and the number of records being processed. Records are processed in groups of 200.
During the conversion process, the system logs any errors in the MPMCONV.LOG file. This file is stored in the MPM System folder.
7. If there are any errors after the conversion is completed, a dialog box displays asking if you would like to review the log. If there are no errors after the conversion is completed, no dialog box will be displayed.
8. After the selected project/global files have been converted, they are highlighted in gray.
After you convert your files to MPM 3.4, you cannot use the converted files in previous versions of MPM.

MPM Data Warehouse and OLAP Installation and Configuration
Installation Guide 45
MPM Data Warehouse and OLAP Installation and Configuration
Client and Server Installation and Configuration
The following steps need to be completed in order to successfully install the MPM Data Warehouse:
Server-side Installation and Configuration
Install and verify the prerequisites
Install the Data Warehouse Controller
Configure the Data Warehouse Controller service
Finalize the Data Warehouse Controller
The Data Warehouse database and tables are automatically created during the MPM Data Warehouse Controller installation.
If you decide to create the Data Warehouse database and tables after the MPM Data Warehouse Controller installation, you will need to create them manually.
See Appendix B: Manual Creation of the Data Warehouse Database and Tables for more information.
Client-side Installation and Configuration
Enable the Data Warehouse Scheduler and OLAP
Project and Global Data
All project and global data must be in MPM 3.4 format. MPM data and system folder(s) are
shared and accessible from the account under which the MPM Data Warehouse Controller
service is running.

MPM Data Warehouse and OLAP Installation and Configuration
Installation Guide 46
Server: Install the MPM Data Warehouse Controller
The Data Warehouse Controller (DWC) was developed using the Integration Services runtime environment and requires this environment to run successfully. The DWC can be run in either a single server or a two server configuration.
If you are installing Data Warehouse and or OLAP, make sure you have any of the following versions of the SQL Server Integration Services and Analysis Services:
SQL Server 2005 versions 9.00.3042 and later
SQL Server 2008 R2 versions 10.50.1660 and later
SQL Server 2008 versions 10.00.4000 and later
See Appendix H: Verifying the SQL Server Version and Service Pack Prerequisites for information on how to verify your SQL Server and SSIS version and edition.
Installing the Data Warehouse Controller
To install the MPM Data Warehouse Controller, complete the following steps:
1. Download DeltekMPM34GADW.zip from the Deltek Software Management distribution site.
2. Unzip the DeltekMPM34GADW.zip file, and save the DeltekMPM34DW.msi and Setup.exe files to your local drive.
3. Run the Setup.exe to begin the installation.
InstallShield loads the Setup Wizard and displays the Welcome page.
MPM Data Warehouse and OLAP Installation and Configuration
Installation Guide 47
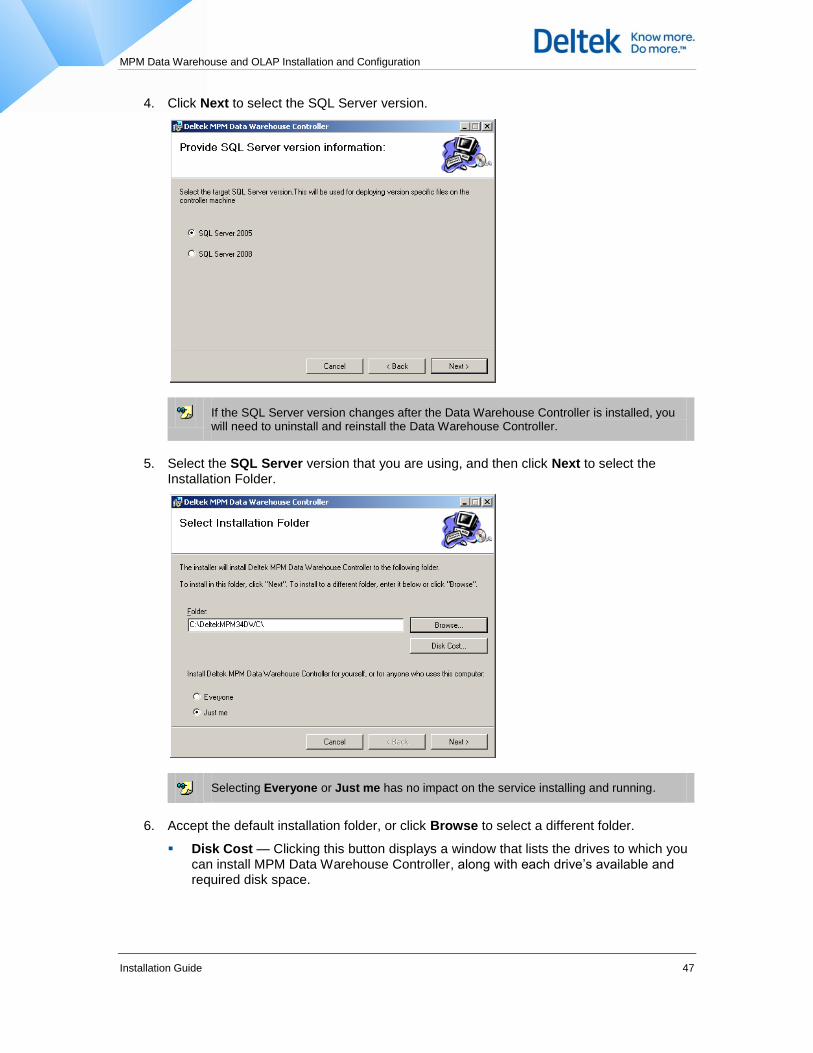
4. Click Next to select the SQL Server version.
If the SQL Server version changes after the Data Warehouse Controller is installed, you will need to uninstall and reinstall the Data Warehouse Controller.
5. Select the SQL Server version that you are using, and then click Next to select the Installation Folder.
Selecting Everyone or Just me has no impact on the service installing and running.
6. Accept the default installation folder, or click Browse to select a different folder.
Disk Cost — Clicking this button displays a window that lists the drives to which you can install MPM Data Warehouse Controller, along with each drive’s available and required disk space.

MPM Data Warehouse and OLAP Installation and Configuration
Installation Guide 48
7. After specifying the folder, click Next to enter the site information.
If the folder you specified does not exist, the setup wizard will automatically create the folder.
8. Enter the relevant information.
Refer to the Server: Configure the Data Warehouse Controller using the Controller.exe.Config File section after completing the Controller installation if you use mapped drive letters in Project Maintenance or Global Maintenance or if you are adding more than one site.
Site Name — Enter the name of the site.
There is no specific naming convention for site names, but each site must be uniquely named.
Site names are limited to a maximum of 100 characters.
Alphanumeric, special characters, and spaces are permitted with the exception of single quotes and pipe ( | ).
Deltek MPM Data Folder Path — Enter the UNC path for the MPM System folder.
Integrated Service (SSIS) Folder Path — Enter the UNC path for the SSIS packages.
Prior to installation, this folder must be shared and the installer must have full control permission.
The folder path cannot point to the DWC folder or to a \DWC\SSIS folder.

MPM Data Warehouse and OLAP Installation and Configuration
Installation Guide 49
9. Click Next to enter the SQL Server connection information.
Username and Password — This must be a Database Administrator using SQL Server Authentication, not using Windows authentication. In order to create the database, the username entered must be assigned one of the following roles:
dbcreater
Serveradmin
sysadmin
The user needs to be an Administrator on the Analysis Server machine if you intend to install OLAP (see the next step).
The SQL Server password is encrypted in the Controller.exe.Config file during
installation. If the SQL Server password changes after installation, it will be necessary to uninstall and re-install the Data Warehouse Controller and enter the new password.
SQL Database — You can enter any name for the SQL Server Database. The SQL Server Database name is case-insensitive. The database does not need to be pre-existing as the install creates a database of this name in SQL Server.
To upgrade or migrate from an existing MPM 3.2/3.3 Data Warehouse database, specify the server where the MPM 3.2/3.3 Data Warehouse database is located as well as the name of the MPM 3.2/3.3 Data Warehouse database. The installation wizard upgrades the MPM 3.2/3.3 Data Warehouse database to an MPM 3.4 Data Warehouse database.
If you do not want to upgrade your database at this stage, see Appendix C: Manually Upgrading an Existing 3.2/3 Data Warehouse Database to 3.4 when you are ready to upgrade.
Deltek recommends that you back up your existing MPM 3.2/3.3 Data Warehouse database prior to making any significant changes such as an upgrade.

MPM Data Warehouse and OLAP Installation and Configuration
Installation Guide 50
10. Click Next to enter the OLAP Analysis Server connection information. Leave the field blank if you do not require or do not want to install OLAP at this time.
In order for the OLAP database to be created automatically during the Data Warehouse setup, SQL Server Analysis Services 2005/2008 needs to be pre-installed on the machine where the Data Warehouse setup is executed. In order to accomplish this, Deltek recommends running the Data Warehouse setup on an OLAP Analysis Server.
If you choose not to connect to Analysis Server and deploy the OLAP cube at this time, leave this field blank and the OLAP cube will not deploy. If you choose to deploy OLAP at some point in the future, you can either uninstall and reinstall the Data Warehouse Controller and enter an Analysis Server name or refer to Appendix D: Manual Deployment of the OLAP Cube for information on manually deploying the OLAP cube.
11. Click Next to confirm the installation.

MPM Data Warehouse and OLAP Installation and Configuration
Installation Guide 51
12. Click Next to start the installation. The setup wizard installs the Data Warehouse Controller.
13. When the Data Warehouse Controller installation is complete, click Close to exit the setup wizard.

MPM Data Warehouse and OLAP Installation and Configuration
Installation Guide 52
Server: Configure the Data Warehouse Controller using the Controller.exe.Config File
The Data Warehouse Controller is configured using the Controller.exe.Config file. This XML format file is located at the root level of the folder where the Controller is installed. It can be used to specify multiple MPM sites (multiple MPM System folders), polling intervals, and associate drive mappings used by client machines with the UNC path necessary for data transfer between the Data Warehouse server and MPM server(s). This section illustrates the contents of the Controller.exe.Config file and gives examples of common changes made to this file.
Using a standard text editor, the file can be modified to add or change MPM Data Server paths as well as change the MPM Data Warehouse polling intervals. Other settings are not normally changed once the Data Warehouse is initially configured.
Any changes made to the Controller.exe.Config file will require restarting the Controller
service.
XML tags (for example, <Name>) are case-sensitive.
Sample Configuration File
<?xml version="1.0" encoding="utf-8" ?
<configuration>
<configSections>
<sectionGroup name="DriveInfo">
<section name="DriveSection"
type="Controller.DriveHandler,Controller"/>
</sectionGroup>
</configSections>
<DriveInfo>
<DriveSection>
<Drive>
<DriveLetter>T</DriveLetter>
<UNCPath>\\mpmserver\mpmdata</UNCPath>
<SiteName>Site1</SiteName>
</Drive>
</DriveSection>
</DriveInfo>
<appSettings>
<add key="DataFolder-SiteName_1" value="\\ServerA\Deltekmpm|MPM 3.4 Data
Warehouse" />

MPM Data Warehouse and OLAP Installation and Configuration
Installation Guide 53
<add key="PollInterval" value="1" />
<add key="RetryInterval" value="1" />
<add key="NoofRetries" value="3" />
<add key="SQLConnectionString" value="SERVER=ServerA; DATABASE=MPM34DW;
User ID=DBA; Password=3SgsKB4i3GRiuZophPpEUQ"/>
<add key="SQLDSN" value="Provider=sqloledb; Data Source=ServerA; Initial
Catalog=MPM34DW;
User ID=DBA; Password=3SgsKB4i3GRiuZophPpEUQ" />
<add key="ProcessingFolder" value="C:\DWC" />
<add key="MPMDDF_FolderPath" value="C:\DWC\MPMDDF" />
<add key="SSISPackagePath" value="\\ServerA\SSIS\SSIS\Master Package.dtsx"
/>
<add key="SSISPackageDtsConfigPath"
value="\\ServerA\SSIS\SSIS\MasterPkgConfig.xml" />
<add key="MinWorkerThreads" value="1" />
<add key="MaxWorkerThreads" value="1" />
<add key="ControllerServer" value="ServerA" />
<add key="LoadAuditData" value="N" />
<add key="SecurityKey" value="34cnIketleD" />
<add key="OLAPConnectionString" value="Provider=MSOLAP.3; Data
Source=ServerA;
Initial Catalog=MPMOLAP; Integrated Security=SSPI;
Impersonation Level=Impersonate" />
</appSettings>
</configuration>
There are three sections in the above file:
configSections — This information is used internally to define areas of the file. It should not be modified.
DriveInfo — This information is used to specify the Universal Naming Convention (UNC) path for a mapped drive.
appSettings — This information is used to specify MPM Data Server sites as well as the location of other internal required folders. Only the MPM Data Server site information should be modified.
DriveInfo
The DriveSection node in the configuration file is used to define mapped drives used in Project Maintenance and Global Maintenance to be associated with UNC paths used by the Data Warehouse server when transferring data.
It is not necessary to modify this section if you are only using UNC paths in Project Maintenance and Global Maintenance.

MPM Data Warehouse and OLAP Installation and Configuration
Installation Guide 54
All mapped drives are defined in the configuration file along with the site name and associated UNC path. The site name and drive letter are used to determine the UNC Path for the mapped drive of a particular site, which allows for situations where multiple sites use the same drive letter for different UNC paths. All mappings must be to existing sites defined in the appSettings section of the Controller.exe.Config file.
For example, SiteA and SiteB could both use drive letter M:\ that is mapped to different servers, MPMServ1 and MPMServ2. During initial installation, only the UNC path of the first site is specified and added to the Controller.exe.config file.
To add a mapped drive, add the drive letter parameter line with corresponding drive label as indicated below.
To add an additional mapped drive, add a new <Drive> node in the <DriveSection> as indicated below.
<Drive>
<DriveLetter>M</DriveLetter>
<UNCPath>\\ServerA\MPM34Data</UNCPath>
<SiteName>SiteA</SiteName>
</Drive>
The example shown above indicates there is an M (DriveLetter) drive for site A (SiteA), which points to \\ServerA\MPM34Data (UNCPath). While processing projects on the SiteA site, all M drive mappings in project and global file paths will be replaced with the \\ServerA\MPM34Data path.
If the same site has multiple drives, then an entry is added for each mapped drive:
<DriveSection>
<Drive>
<DriveLetter>M</DriveLetter>
<UNCPath>\\ServerA\MPM34Data</UNCPath>
<SiteName>SiteA</SiteName>
</Drive>
<Drive>
<DriveLetter>Q</DriveLetter>
<UNCPath>\\ServerB\DELTEKMPMData</UNCPath>
<SiteName>SiteA</SiteName>
</Drive>
<DriveSection>
In the above example, the same site SiteA has drives M and Q.
A default drive mapping is provided in the config file. It is mapped to the T:\ drive. You can optionally remap to the drive letter of your choice or ignore if drive mapping is not used.

MPM Data Warehouse and OLAP Installation and Configuration
Installation Guide 55
appSetting
The appSetting node of the Controller.exe.config file specifies the parameters necessary for the Controller to interact with the Pervasive.SQL and SQL Server 2005/2008 databases as well as determines the polling interval for reading the Scheduler.dat file. The individual parameters are described below:
DataFolder-SiteName_1 — This setting specifies the MPM system folder path for the site designated during installation.
(Optional) DataFolder-SiteName_2, 3, etc. — These settings specify additional sites after initial installation.
PollInterval — This setting controls the interval at which the Data Warehouse Controller will read the Scheduler.dat file. This setting is expressed in hours.
For example 3 = 3 hours, .25 = 15 minutes.
RetryInterval — This setting controls the amount of time the Data Warehouse Controller will wait between each project synchronization attempt. This setting is expressed in hours.
For example 3 = 3 hours, .25 = 15 minutes.
NoofRetries — This setting controls the number of project synchronization attempts to be made before continuing with the next project. This entry is manually added to the controller.exe.config.
SQLConnectionString — This setting contains the connection information for the MPM Data Warehouse SQL Server engine.
SQLDSN — This setting contains the OLEDB Connection Information for the MPM Data Warehouse SQL Server engine.
ProcessingFolder — This setting contains the Install Folder location specified during the installation.
MPMDDF_FolderPath — This setting contains the path for the Master DDF files (MPMFILE.DDF, MPMFIELD.DDF, and MPMINDEX.DDF) used to create the DDF files for the project currently being imported.
SSISPackagePath — This setting contains the path for the SSIS Master Package file. This file is the starting point of execution for the SSIS Packages.
SSISPackageDTSConfigPath — This setting contains the path for the configuration file used by SSIS Packages.
MinWorkerThreads and MaxWorkerThreads — These settings indicate the number of threads used for importing the projects. Since the Controller works in Single Threaded Mode, both values are set to 1.
ControllerServer — This setting is the name of the machine hosting the MPM Data Warehouse Controller.
LoadAuditData — This setting determines whether or not the audit trail data will be included in the project synchronization. It is off by default. Set to Y to include.
The audit log can become extremely large depending on the level of audit being performed at the project level.
SecurityKey — This is for internal use and should not be modified.

MPM Data Warehouse and OLAP Installation and Configuration
Installation Guide 56
OLAPConnectionString
If OLAP is selected during setup, a line is added to the Controller.exe.Config file:
<add key="OLAPConnectionString" value="Provider=MSOLAP.3;Data
Source=;Initial Catalog=MPMOLAP;Integrated Security=SSPI;Impersonation
Level=Impersonate" />
If you decide not to configure OLAP during the Data Warehouse Controller installation by not entering an OLAP Analysis Server, a commented line is added to the Controller.exe.Config file:
<!--<add key="OLAPConnectionString" value="Provider=MSOLAP.3;Data
Source=;Initial Catalog=MPMOLAP;Integrated Security=SSPI;Impersonation
Level=Impersonate" />-->
If the OLAP database is set up manually, the following changes need to be made to the OLAPConnectionString line of the Controller.exe.Config file:
Uncomment the OLAPConnectionString line.
Set the Data Source to the OLAP Analysis Server name.
Confirm that the Initial Catalog is set to the OLAP database name.
If the OLAP database name is the default name (MPMOLAP), then no change is required.
If the OLAP database name has been changed from the default name (MPMOLAP), the Initial Catalog must be updated.
See Appendix D: Manual Deployment of the OLAP Cube for information on manually deploying the OLAP Cube.

MPM Data Warehouse and OLAP Installation and Configuration
Installation Guide 57
Server: Complete the Data Warehouse Controller Configuration
After the MPM Data Warehouse server and Controller have been installed and configured, the following steps must be accomplished.
To complete the Data Warehouse Controller configuration, complete the following steps:
1. Click Start » Control Panel » Administrative Tools » Services.
2. Set up the MPM Data Warehouse Controller Service with a user account having administrator rights to this machine as well as read/write access to the MPM system and data folders.
3. Add a new entry to the server hosts file:
a. With Windows Notepad or similar text file editor, open the hosts file normally located at C:\Windows\System32\drivers\etc\hosts.
b. Add a new line 127.0.0.1 <Controller machine name>, where <Controller machine name> is the name assigned to the machine on which the Data Warehouse Controller is installed.
4. Start the service manually from the server console or set the service to automatic startup. Do not start the service via a remote connection.

MPM Data Warehouse and OLAP Installation and Configuration
Installation Guide 58
Client: Enable the Data Warehouse Scheduler and OLAP Processor
By default, the Data Warehouse scheduler and OLAP processor are not enabled in the MPM Project Maintenance applet. In order to enable them, a statement in the MPMOPT.INI (MPM Options) file must be modified.
See Appendix E: MPMOPT.INI (MPM Options) Configuration for details on how to modify these statements.

MPM Data Warehouse and OLAP Installation and Configuration
Installation Guide 59
OLAP: Creating Analysis Services Roles for Your Domain Users
An Analysis Services database role defines the access to objects/data in the Analysis Services database. It allows domain users who need to create MPM custom reports access to the Deltek MPM Analysis database (the data cubes).
To create an Analysis Services role, complete the following steps:
1. To open SQL Server Management Studio, click Start » All Programs » Microsoft SQL Server 2005 » SQL Server Management Studio.
2. Enter the server information.
Server Type — Select Analysis Services.
Server Name — Select or enter the Analysis Services server name.
3. Click Connect. to display the Object Explorer pane.

MPM Data Warehouse and OLAP Installation and Configuration
Installation Guide 60
4. Click Databases » <OLAP Database> » Roles.
5. Right-click Roles, and click New Role on the shortcut menu.
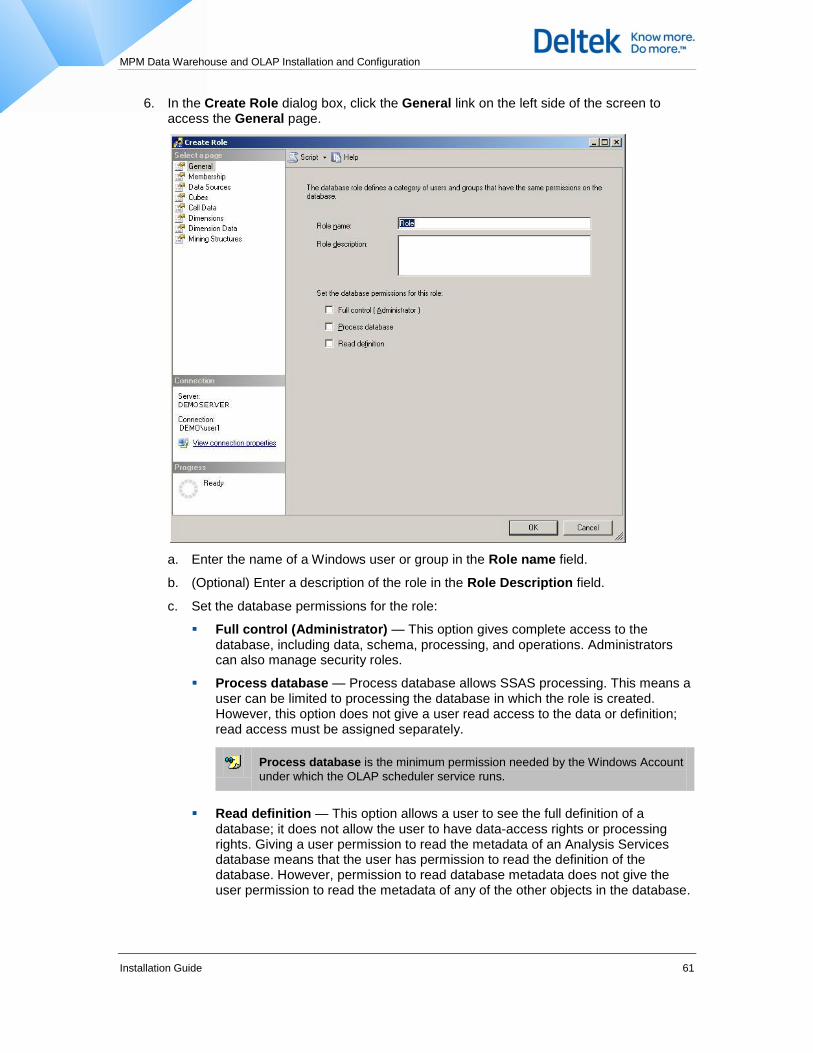
MPM Data Warehouse and OLAP Installation and Configuration
Installation Guide 61
6. In the Create Role dialog box, click the General link on the left side of the screen to access the General page.
a. Enter the name of a Windows user or group in the Role name field.
b. (Optional) Enter a description of the role in the Role Description field.
c. Set the database permissions for the role:
Full control (Administrator) — This option gives complete access to the database, including data, schema, processing, and operations. Administrators can also manage security roles.
Process database — Process database allows SSAS processing. This means a user can be limited to processing the database in which the role is created. However, this option does not give a user read access to the data or definition; read access must be assigned separately.
Process database is the minimum permission needed by the Windows Account
under which the OLAP scheduler service runs.
Read definition — This option allows a user to see the full definition of a database; it does not allow the user to have data-access rights or processing rights. Giving a user permission to read the metadata of an Analysis Services database means that the user has permission to read the definition of the database. However, permission to read database metadata does not give the user permission to read the metadata of any of the other objects in the database.

MPM Data Warehouse and OLAP Installation and Configuration
Installation Guide 62
Read definition is the minimum permission required to connect to an Analysis
Services database from any OLAP analysis tool (for example, Management Studio or BI Development Studio).
7. Click the Membership link on the left side of the screen to access the Membership page.
8. Click Add to add the domain users you want as members of the Analysis Services role.
Your network administrator may find it easier to create a domain group that contains all the necessary domain users. If this is the case, you must add the Windows domain group and not each individual domain user.
9. Click the Data Sources link on the left side of the screen to access the Data Source page, which is used to define access to the Data Warehouse data.
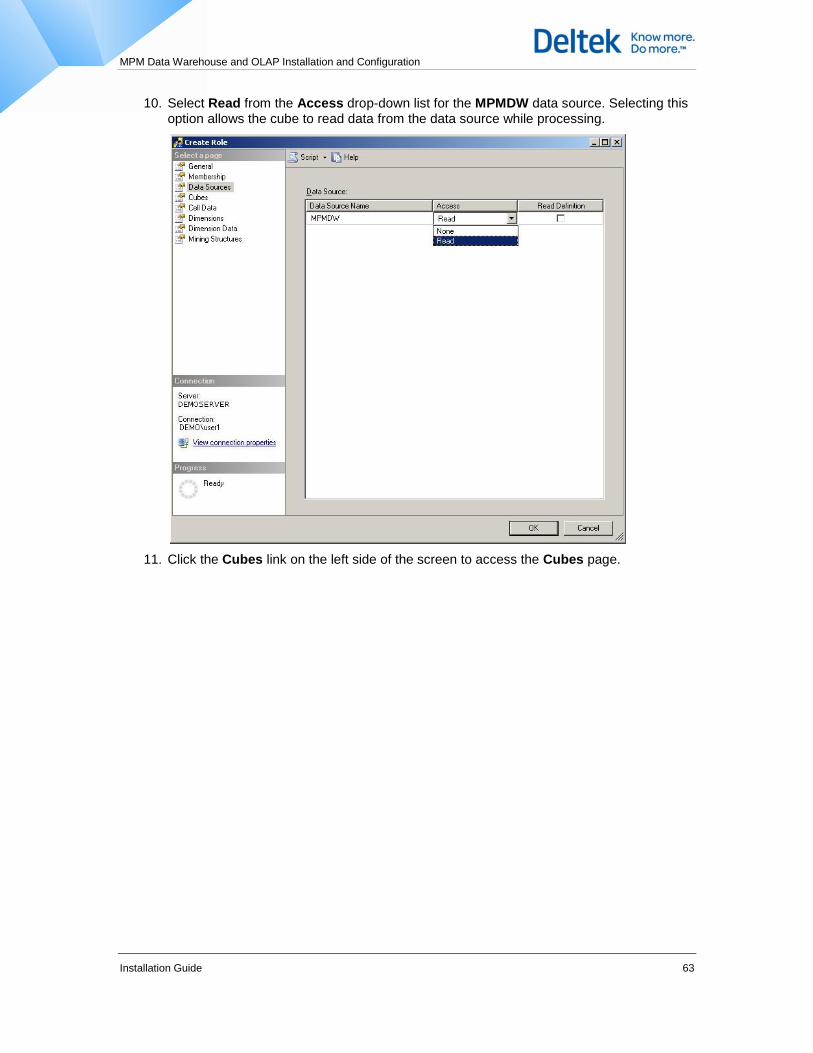
MPM Data Warehouse and OLAP Installation and Configuration
Installation Guide 63
10. Select Read from the Access drop-down list for the MPMDW data source. Selecting this option allows the cube to read data from the data source while processing.
11. Click the Cubes link on the left side of the screen to access the Cubes page.

MPM Data Warehouse and OLAP Installation and Configuration
Installation Guide 64
12. Take the following actions:
Select Read from the Access drop-down list for each MPM OLAP cube. This allows the user to read or browse the cube.
Select Drillthrough from the Local Cube/Drillthrough drop-down list for each MPM OLAP cube. This option allows the user to specify a single cell and the Analysis server returns the most detail level data that contributed to that cell.
Drillthrough settings in Analysis Services 2000 databases are not preserved by
Analysis Services 2005 upgrade or migration.
13. Click OK to complete the creation of the role(s).

MPM Data Warehouse and OLAP Installation and Configuration
Installation Guide 65
Uninstalling the Data Warehouse
Close MPM prior to completing these steps.
To uninstall the MPM Data Warehouse, complete the following steps:
1. Controller:
a. From the Services applet, stop the MPM Data Warehouse Controller.
b. Remove MPM Data Warehouse Controller using the Add or Remove Programs (Program and Features) found in the Windows Control Panel.
c. Remove Pervasive.SQL using the Add or Remove Programs (Program and Features) found in the Windows Control Panel, if it is not required for normal MPM data use.
2. MPM Data Warehouse Database:
Delete the MPM Data Warehouse database (for example, MPM34_DW) . This can be done in Microsoft SQL Server Management Studio, when logged in with a server type of Database Engine, by right clicking the database, selecting Delete and following any prompts.
3. MPM OLAP Database:
Delete the MPM OLAP database (for example, MPMOLAP) . This can be done in Microsoft SQL Server Management Studio, when logged in with a server type of Analysis Services, by right clicking the database, selecting Delete and following any prompts.
4. Disable the Data Warehouse Controller Scheduler and OLAP in Project Maintenance:
a. From the MPM System folder, open the MPMOPT.INI file in Notepad.
b. Change the Scheduler entry in the [DataWarehouse] section to N.
c. Change the OLAP entry in the [DataWarehouse] section to N.
MPMOPT.INI
[Settings]
Control Account=Y
[DataWarehouse]
Scheduler=N
OLAP=N
See Appendix E: MPMOPT.INI (MPM Options) Configuration for details on how to modify the statements.
Before uninstalling, if you are upgrading or plan to reinstall, make a backup copy of the Controller.exe.config file so that you can reference its contents when reconfiguring the
new installation.
5. Save and close MPMOPT.INI.

Appendix A: Running the Database Engine as an Application or as a Service
Installation Guide 66
Appendix A: Running the Database Engine as an Application or as a Service
During the MPM Standalone, Database, and Workstation installations, you have the option to install the database engine as an application or as a service.
Install Pervasive as an Application — Select this option to install Pervasive as a normal application, which requires that a user logs into Windows before the Pervasive engine starts.
A Pervasive engine icon appears in the Windows System Tray. Deltek recommends this option when running Pervasive on a user’s PC.
Install Pervasive as a Service — Select this option to install Pervasive as a service. The Pervasive engine starts automatically when Windows starts. The user is not required to log in to start the engine. A tray icon does not appear in the Windows System Tray. The pervasive engine service is installed under the Local System Account. Deltek recommends this option when running Pervasive on servers or a system acting as the Pervasive Gateway.
Selecting this option configures the Pervasive service to use the Local System Account. If you intend to use the Local System Account for this service for local data, confirm that the System account has the necessary folders set to a minimum permission level of Modify as explained in the ―Access Control Requirements‖ paragraph in the ―Pre-Installation Information‖ section. Otherwise, modify the service in Control Panel » Administrative Tools » Services » MPM Data Warehouse Controller.

Appendix B: Manual Creation of the Data Warehouse Database and Tables
Installation Guide 67
Appendix B: Manual Creation of the Data Warehouse Database and Tables
In order to create the MPM database on the Data Warehouse server, you need to connect to the SQL Server as the database administrator. After the connection is established with the SQL Server, follow the steps below to create the database.
The database password is encrypted in the Controller.exe.Config file, and there is no way to
change it unless you re-install the Data Warehouse Controller. If the passwords have changed, you will need to uninstall and re-install the Data Warehouse Controller and provide the correct password.
To create the Data Warehouse Database and Tables, complete the following steps:
1. From the Microsoft SQL Server Management Studio, right-click the Databases folder, and click New Database on the shortcut menu.

Appendix B: Manual Creation of the Data Warehouse Database and Tables
Installation Guide 68
2. Enter a Database name (for example, MPM34_DW).
The database name is case-insensitive.
3. Click OK to create the database.
4. After the database is created, run the MPM3.4DataWarehouseCreateTableScript.sql script against the database. The default location of the script is C:\DWC\SQLScript.
Running this script will create the tables and views necessary for the SQL Server Integrated Services (SSIS) Packages.
a. Expand the Databases folder.
b. Right-click the Data Warehouse database file name (for example, MPM34_DW), and click New Query on the shortcut menu.
c. In Notepad, open the MPM3.4DataWarehouseCreateTableScript.sql, and copy the contents into the New Query window.
d. Press F5 to run the script and create the necessary tables and views.

Appendix B: Manual Creation of the Data Warehouse Database and Tables
Installation Guide 69
Update the Database Name in the Controller.exe.Config File
The Controller.exe.Config file needs to be updated with the new database name.
To add the database name to the Controller.exe.Config file, complete the following steps:
1. In Notepad, open the Controller.exe.Config file. This XML format file is located at the root level of the folder where the Controller is installed.
2. Change the SQLConnectionString and SQLDSN entries to the database name that you created.
<add key="SQLConnectionString" value="SERVER = ServerA; DATABASE = MPM34_DW;
User ID = sa; Password = UwC8KprnZmc=" />
<add key="SQLDSN" value="Provider=sqloledb; Data Source=ServerA; Initial
Catalog=MPM34_DW;
User ID=sa; Password=UwC8KprnZmc=" />

Appendix C: Manually Upgrading an Existing 3.2/3.3 Data Warehouse Database to 3.4
Installation Guide 70
Appendix C: Manually Upgrading an Existing 3.2/3.3 Data Warehouse Database to 3.4
You can choose to upgrade an existing 3.2/3.3 Data Warehouse database by pointing to the 3.2/3.3 Data Warehouse database during the Data Warehouse Controller installation.
If you do not choose to upgrade your database during the installation process, you can manually upgrade it using the MPM3.2MigrationScript.sql Script.
To run the MPM3.2MigrationScript.sql script, complete the following steps:
1. Run the MPM3.2MigrationScript.sql script. The default location of the script is C:\DWC\SQLScript.
2. Update your Controller.exe.Config file so that it points to the upgraded database. You can do this by editing the config file using the steps listed in Appendix B, but instead of creating tables, you are upgrading them by running the script.
See Update the Database Name in the Controller.exe.Config File for more details.
The database password is encrypted in the Controller.exe.Config file, and there is no way to change it unless you re-install the Data Warehouse Controller.
If the passwords have changed, you will need to uninstall and re-install the Data Warehouse Controller and provide the correct password.
If you choose to configure OLAP after you have installed the Data Warehouse controller, you will need to:
Be an Administrator on the Analysis Server machine
Run the MPM3.4OLAPViewScript.sql script on the Data Warehouse database
Run the MPMDWOLAP.xmla script deployed on the target machine through the Data Warehouse setup
Change the OLAPConnectionString in the Controller.exe.Config file
Enable OLAP in the MPM client
Run the MPM3.4OLAPViewScript.sql script deployed on the target machine through the Data Warehouse setup

Appendix D: Manual Deployment of the OLAP Cube
Installation Guide 71
Appendix D: Manual Deployment of the OLAP Cube
This section describes the steps to deploy the OLAP cube manually.
Deltek MPM 3.4 Data Warehouse must be installed prior to running this manual deployment.
SQL Server Database Engine, Integration Services, and Analysis Services must be running on your database server prior to deploying the OLAP Cube.
Running the MPM3.4OLAPViewScript.sql Script
To run the MPM3.4OLAPViewScript.sql script, complete the following steps:
1. Select your MPM Data Warehouse database in SQL Server Management Studio.
2. On the File menu, click File » Open » (File Name)
3. In the Open File dialog box, select the MPM3.4OLAPViewScript.sql script, and click Open. The default location for the script is C:\DWC\SQLScript.
4. Click Execute or press F5 to run the script and create the OLAP views in your MPM Data Warehouse database.
Running the MPMDWOLAP.xmla Script
If the OLAP database name has been changed from the default name (MPMOLAP), the MPMDWOLAP.xmla script must be updated prior to running the script.
To run the MPMDWOLAP.xmla script, complete the following steps:
1. Copy the MPMDWOLAP.xmla XMLA script file from the Data Warehouse Controller machine to the machine where Analysis Services is installed. The default location of the script is C:\DWC\OLAPScript.
2. On the Analysis Services machine, open SQL Server Management Studio.
3. On the File menu, click Connect Object Explorer.
4. In the Connect to Server dialog box, select the Analysis Services server type, select or locate the server to connect to, and then click Connect.
5. On the File menu, click File » Open » (File Name)
6. In the Open File dialog box, select the MPMDWOLAP.xmla XMLA script, and click Open.
7. Click Execute or press F5 to create an MPMOLAP Analysis Service Database.

Appendix D: Manual Deployment of the OLAP Cube
Installation Guide 72
8. Check the Message window (lower pane) for any errors.
9. Open the MPMDW Properties dialog box by taking the following steps:
a. Click to expand the MPMOLAP database folder.
b. Open the Data Sources folder, right-click MPMDW, and click Properties on the shortcut menu.
10. Click to the right of Connection String to open the Configuration Manager dialog box.
Execute button
MPM OLAP Database

Appendix D: Manual Deployment of the OLAP Cube
Installation Guide 73
Server name — Enter the name of the server where the Data Warehouse database is located
Log on to the server — Select either Use Windows Authentication or Use SQL Server Authentication. If you use Windows Authentication, then the connection will always be performed based on the logged in user, rather than a specific user. In either case users must have db_datareader permissions to the Data Warehouse database.
Select or enter a database name — Enter the Data Warehouse database name.
11. Click Test Connection to test the Analysis Server connection.
12. Click OK to close the Connection Manager dialog box.
Use Deltek MPM 3.4’s Project Synchronization feature to populate projects for the OLAP cube.
13. This completes the OLAP cube setup process.
The next section provides you with instructions on processing the OLAP Cube.

Appendix D: Manual Deployment of the OLAP Cube
Installation Guide 74
Processing the OLAP Cube
All of the OLAP Cube components have been created and stored in the MPMOLAP database. The next step is to process the cube to populate it with data.
To manually process the OLAP cube, complete the following steps:
1. Click Start » All Programs » Microsoft SQL Server 2005 » SQL Server Management Studio To open SQL Server Management Studio.
2. Enter the server information:
Server type — Select Analysis Services.
Server name — Select or enter the Analysis Services server name.

Appendix D: Manual Deployment of the OLAP Cube
Installation Guide 75
3. Click Connect to display the Object Explorer window.

Appendix D: Manual Deployment of the OLAP Cube
Installation Guide 76
4. Right-click MPMOLAP, and click Process on the shortcut menu. The Process Database dialog displays.
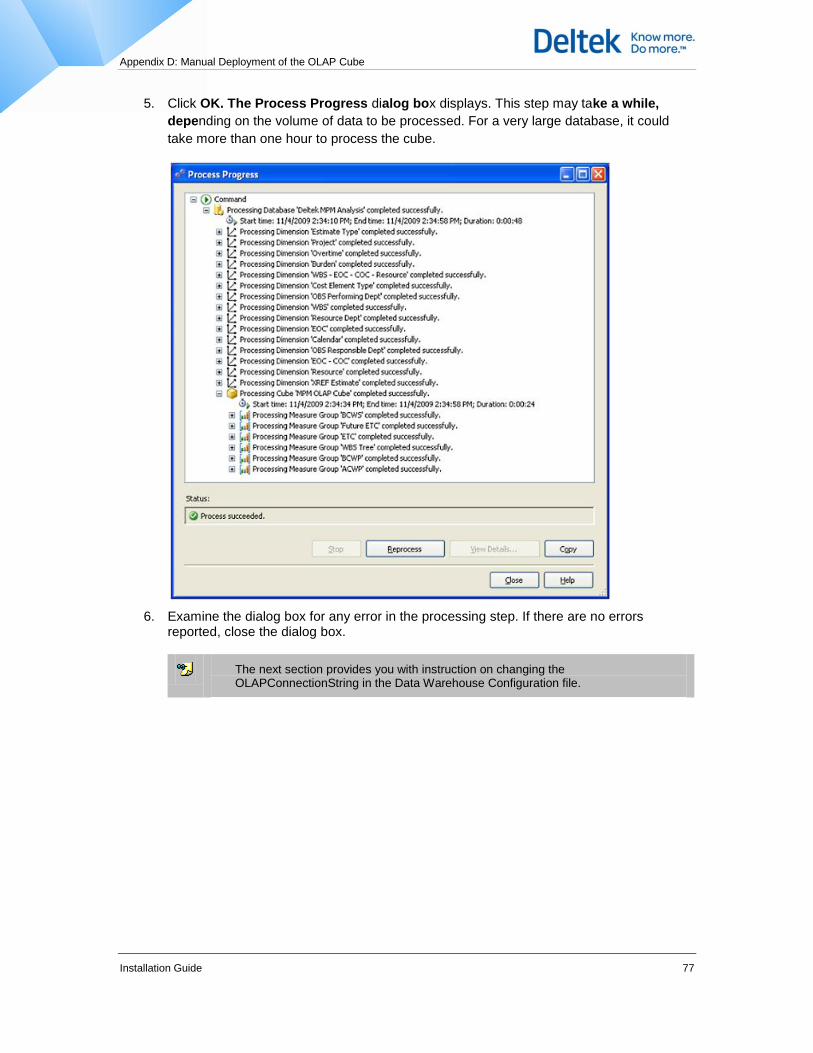
Appendix D: Manual Deployment of the OLAP Cube
Installation Guide 77
5. Click OK. The Process Progress dialog box displays. This step may take a while,
depending on the volume of data to be processed. For a very large database, it could
take more than one hour to process the cube.
6. Examine the dialog box for any error in the processing step. If there are no errors reported, close the dialog box.
The next section provides you with instruction on changing the OLAPConnectionString in the Data Warehouse Configuration file.

Appendix D: Manual Deployment of the OLAP Cube
Installation Guide 78
Change the OLAPConnectionString in the Controller.exe.Config file
If the OLAP database is set up manually, the OLAPConnectionString line in the Controller.exe.Config file must be uncommented and the Initial Catalog name changed to the OLAP database name.
To change the OLAPConnectionString line in the Controller.exe.Config file, complete the following steps:
1. Using a standard text editor, open the Controller.exe.Config file. This XML format file is located at the root level of the folder where the Controller is installed.
2. Locate the OLAPConnectionString line.
<!--<add key=”OLAPConnectionString” value=”Provider=MSOLAP.3;Data
Source=;Initial Catalog=MPMOLAP;Integrated Security=SSPI;Impersonation
Level=Impersonate” />-->
3. Uncomment the OLAPConnectionString line by removing the <!-- from the beginning
of the line and the --> from the end of the line.
<add key=”OLAPConnectionString” value=”Provider=MSOLAP.3;Data
Source=;Initial Catalog=MPMOLAP;Integrated Security=SSPI;Impersonation
Level=Impersonate” />
4. Set the Data Source to the OLAP Analysis Server name.
<add key=”OLAPConnectionString” value=”Provider=MSOLAP.3;Data
Source=<OLAP Analysis Server Name>;Initial Catalog=MPMOLAP;Integrated
Security=SSPI;Impersonation Level=Impersonate” />
5. Confirm that the Initial Catalog is set to the OLAP database name.
If the OLAP database name is the default name (MPMOLAP), then no change is required.
If the OLAP database name has been changed from the default name, the Initial Catalog must be updated.
<add key=”OLAPConnectionString” value=”Provider=MSOLAP.3;Data
Source=;Initial Catalog=MPMOLAP;Integrated Security=SSPI;Impersonation
Level=Impersonate” />
Enable OLAP in the MPM Project Maintenance Applet
By default, OLAP is not enabled in the MPM Project Maintenance applet. In order to enable it, the OLAP statement in the MPM Options file (MPMOPT.INI) must be modified.
See Appendix E: MPMOPT.INI (MPM Options) Configuration for details on how to modify this statement.

Appendix E: MPMOPT.INI (MPM Options) Configuration
Installation Guide 79
Appendix E: MPMOPT.INI (MPM Options) Configuration
The MPMOPT.INI (MPM Options) file is installed with MPM in your MPM System folder. When it is first installed, the default settings are:
MPMOPT.INI
[Settings]
Control Account=Y
[DataWarehouse]
Scheduler=N
OLAP=N
Control Account
By default, the Control Account flag is set to Y. When the Control Account is set to Y, MPM changes the Cost Account label to Control Account. If it is set to N, MPM displays the label as Cost Account.
Scheduler
By default, the Data Warehouse scheduler is not enabled in the MPM Project Maintenance applet. In order to enable it, the Scheduler statement in the MPM Options file must be modified.
To enable the Data Warehouse Scheduler, complete the following steps:
1. From the MPM System folder, open the MPMOPT.INI file in Notepad.
2. In the [DataWarehouse] section, change the Scheduler entry to Y.
3. Save and close MPMOPT.INI.
When you open Project Maintenance, you will see a Schedule for Synchronization icon in the toolbar.
See ―The Data Warehouse Scheduler‖ in the Deltek MPM 3.4 Getting Started Manual for
details on how to set the scheduler frequency.
See ―Changing the Project Synchronization Retry Settings‖ in the Deltek MPM 3.4 Getting Started Manual for details on how to adjust the retry interval.
Schedule for Synchronization

Appendix E: MPMOPT.INI (MPM Options) Configuration
Installation Guide 80
OLAP
By default, the OLAP processor is not enabled in the MPM Project Maintenance applet. In order to enable it, the OLAP statement in the MPM Options file must be modified.
To enable the OLAP processor in the MPM Project Maintenance applet, complete the following steps:
1. From the MPM System folder, open the MPMOPT.INI file in Notepad.
2. In the [DataWarehouse] section, change the OLAP entry to Y.
Both the OLAP and Scheduler statements must be enabled in order for OLAP to be enabled in MPM.
3. Save and close MPMOPT.INI.
When you open Project Maintenance, you will see a Schedule OLAP Processing icon in the toolbar.
Schedule OLAP Processing

Appendix F: Gateway Configuration
Installation Guide 81
Appendix F: Gateway Configuration
Consider which machine(s) you would like to act as your Gateway (database server). The designated Gateway machine will ―serve up‖ the data requested by the other users. The Gateway must be a Windows-based machine.
For optimum performance, the database engine should be running on the same machine as the data. If the data resides on another server, you can designate a different machine to be the Gateway. Please keep in mind the speed and reliability of the machine selected since it will be acting as a server.
See Database Engine Installation for specific installation instructions.
Gateway configuration is done in a file named MPMGATE.INI that is created in the MPM System folder when MPM is executed.
If you have an engine running on the computer where your data is located, you do not need to do anything with your MPMGATE.INI file.
If the engine is running on a computer other than where your data is located, the MPMGATE.INI will help you designate your Gateway computer(s) up front so that you do not have to select one when copying, moving, or creating files or during conversion for each folder containing data.
MPMGATE.INI
[Settings]
UsePermanentGateway=yes
[DefaultGateways]
;<DEFAULT>=gateway
;server=gateway
UsePermanentGateway — This setting should always read yes.
[DefaultGateways] — The information in this section is commented out and only displayed as an example. If you have a specific server where MPM data is stored but that you cannot put a database engine on, you should use an MPMGATE.INI setting like the SERVER=GATEWAY. You can have as many of these types of entries in the MPMGATE.INI as you need.
For example, assume you have three projects that are located on a server, and you cannot install a database engine on that server. The server’s name is NTSRV10. You have the database engine installed on your server that is named NTSRV8. In the MPMGATE.INI, you would enter NTSRV10=NTSRV8. Then when accessing data files on NTSRV10, MPM will use the database engine on NTSRV8 as the database server for those files.
<default>=GATEWAY — This sets the Gateway as the same machine regardless of where the data is located.
For example, assume you have your data spread across four different servers. You have a speedy Windows 2000 machine that you would like to use as your Gateway for all of the data. You would set the <default>=SPEEDY setting in the MPMGATE.INI, and it would designate SPEEDY as the database server for all of the folders containing data on all four servers. You can only have one <default> setting in the MPMGATE.INI.

Appendix F: Gateway Configuration
Installation Guide 82
The Database engine is unable to access data on a local drive using a remote Database engine. For this reason, MPM will attempt to use the local Database engine when data is being accessed from a local drive regardless of the [DefaultGateways] setting(s) defined in the MPMGATE.INI.
The MPMGATE.INI is evaluated when a ~PVSW~.LOC file does not exist in the data location. Each data location (folder) is evaluated independently at the time the data is used.
Refer to Appendix G: Permanent Gateway Decision Process for details on when the MPMGATE.INI is evaluated to create the ~PVSW~.LOC file.
The two settings can also be used in conjunction with each other. You can set specific gateways using the SERVER=GATEWAY settings and then set the <default>=GATEWAY to cover all other machines.
When a Gateway is established, a ~PVSW~.LOC file is located in the folder containing MPM data. A Gateway can be validated in Project and Global Maintenance by clicking Tools » Validate Gateway. If a Gateway is invalid, a system administrator can use the Validate Gateway utility to designate a new Gateway if necessary.

Appendix G: Permanent Gateway Decision Process
Installation Guide 83
Appendix G: Permanent Gateway Decision Process
When accessing any MPM data (that is, creating, copying, moving Globals or Projects, or opening any applet), MPM validates the gateway by looking for the ~PVSW~.LOC file and confirming that the MicroKernel is running.
The flowchart below shows the process that is followed when data is accessed.

Appendix H: Verifying the SQL Server Version and Service Pack Prerequisites
Installation Guide 84
Appendix H: Verifying the SQL Server Version and Service Pack Prerequisites
Use the information in this section to verify that the SQL Server has the correct Service Pack for use with the MPM Data Warehouse.
Verifying Your SQL Server Version and Edition
Use the following procedure to verify the SQL Server version and edition and to determine what Service Pack has been applied to the core SQL installation.
To verify your SQL Server version and edition, complete the following steps:
1. Launch the Microsoft SQL Server Management Studio.
2. In the Database folder, right-click the MPM Data Warehouse database (for example, MPM34_DW), and click New Query on the shortcut menu.
3. Run the following query:
SELECT @@Version, SERVERPROPERTY('productversion'),
SERVERPROPERTY('productlevel'), SERVERPROPERTY('edition');
4. Confirm that you have any of the following SQL Server versions and editions:
SQL Server (32-bit or 64-bit) [Standard or Enterprise]: 2005 (SP2)
SQL Server (32-bit or 64-bit) [Standard or Enterprise]: 2008 (SP2)
Verifying Your SQL Server 2005/2008 Integration Services (SSIS) Version and Edition
Use the information in this section to confirm that the version and Service Pack of SSIS meets the server requirements as specified in the Pre-Installation Information section.
To verify your SQL Server 2005/2008 Integration Services version and edition, complete the following steps:
1. Launch the SQL Server Management Studio.
2. In the Connect to Server dialog box, select Integration Services in the Server type field.
3. In the Server name field, specify the server that you want to connect to.
4. Click Connect.

Appendix H: Verifying the SQL Server Version and Service Pack Prerequisites
Installation Guide 85
5. The version number is displayed in root node in the Object Explorer pane of the SQL Server Management Studio.
6. Confirm that you have any of the following SQL Server (SSIS) versions:
SQL Server 2005 versions 9.00.3042 and later
SQL Server 2008 R2 versions 10.50.1660 and later
SQL Server 2008 versions 10.00.4000 and later
You can connect to other SQL servers and/or services by clicking File » Connect Object Explorer in the SQL Server Management Studio to display the Connect to Server dialog
box. .
Verifying Your SQL Server 2005/2008 Analysis Services Version and Edition
Use the information in this section to confirm that the version of the SQL Server Analysis Services meets the server requirements as specified in the Pre-Installation Information section.
To verify your SQL Server 2005/2008 Analysis Services version and edition, complete the following steps:
1. Launch the SQL Server Management Studio.
2. In the Connect to Server dialog box, choose Analysis Services in the Server type field.
3. In the Server name field, specify the server to which you want to connect.
4. Click Connect.

Appendix H: Verifying the SQL Server Version and Service Pack Prerequisites
Installation Guide 86
5. The version number is displayed in root node in the Object Explorer pane of the SQL Server Management Studio.
6. Confirm that you have any of the following SQL Server Analysis Services versions:
SQL Server 2005 versions 9.00.3042 and later
SQL Server 2008 R2 versions 10.50.1660 and later
SQL Server 2008 versions 10.00.4000 and later
You can connect to other SQL servers and/or services by clicking File » Connect Object Explorer in the SQL Server Management Studio to display the Connect to Server dialog
box. .