cx-9_8gc7ee17g.pdf - Mazda Motor Corporation
596
Thank you for choosing a Mazda. We at Mazda design and build vehicles with complete customer satisfaction in mind. To help ensure enjoyable and trouble-free operation of your Mazda, read this manual carefully and follow its recommendations. Regular servicing of your vehicle by an expert repairer helps maintain both its roadworthiness and its resale value. A world-wide network of Authorized Mazda Repairers can help you with their professional servicing expertise. Their specially trained personnel are best qualified to service your Mazda vehicle properly and exactly. Also, they are supported by a wide range of highly specialized tools and equipment specially developed for servicing Mazda vehicles. When maintenance or service is necessary we recommend an Authorized Mazda Repairer. We assure you that all of us at Mazda have an ongoing interest in your motoring pleasure and in your full satisfaction with your Mazda product. Mazda Motor Corporation HIROSHIMA, JAPAN Important Notes About This Manual Keep this manual in the glove compartment as a handy reference for the safe and enjoyable use of your Mazda. Should you resell the vehicle, leave this manual with it for the next owner. All specifications and descriptions are accurate at the time of printing. Because improvement is a constant goal at Mazda, we reserve the right to make changes in specifications at any time without notice and without obliga- tion. Please be aware that this manual applies to all models, equipment and options. As a result, you may find some explanations for equipment not installed on your vehicle. ©2017 Mazda Motor Corporation July 2017 (Print1) A Word to Mazda Owners
-
Upload
khangminh22 -
Category
Documents
-
view
0 -
download
0
Transcript of cx-9_8gc7ee17g.pdf - Mazda Motor Corporation

Thank you for choosing a Mazda. We at Mazda design and build vehicles with completecustomer satisfaction in mind. To help ensure enjoyable and trouble-free operation of your Mazda, read this manualcarefully and follow its recommendations. Regular servicing of your vehicle by an expert repairer helps maintain both itsroadworthiness and its resale value. A world-wide network of Authorized Mazda Repairerscan help you with their professional servicing expertise.Their specially trained personnel are best qualified to service your Mazda vehicle properlyand exactly. Also, they are supported by a wide range of highly specialized tools andequipment specially developed for servicing Mazda vehicles. When maintenance or serviceis necessary we recommend an Authorized Mazda Repairer. We assure you that all of us at Mazda have an ongoing interest in your motoring pleasureand in your full satisfaction with your Mazda product.
Mazda Motor CorporationHIROSHIMA, JAPAN
Important Notes About This ManualKeep this manual in the glove compartment as a handy reference for the safe and enjoyable use of your Mazda.Should you resell the vehicle, leave this manual with it for the next owner. All specifications and descriptions are accurate at the time of printing. Because improvement is a constant goalat Mazda, we reserve the right to make changes in specifications at any time without notice and without obliga-tion.
Please be aware that this manual applies to all models, equipment and options. As a result, you may findsome explanations for equipment not installed on your vehicle.
©2017 Mazda Motor Corporation
July 2017 (Print1)
A Word to Mazda Owners
CX-9_8GC7-EE-17G_Edition1 2017-5-16 8:22:04

We want to help you get the most drivingpleasure from your vehicle. Your owner'smanual, when read from cover to cover,can do that in many ways. Illustrations complement the words of themanual to best explain how to enjoy yourMazda. By reading your manual, you canfind out about the features, importantsafety information, and driving undervarious road conditions. The symbol below in this manual means“Do not do this” or “Do not let thishappen”.
References to left hand and right hand aremade as if facing in the same direction thevehicle faces. Although this manualexplains a left-hand-drive model, it alsoapplies to right-hand-drive models. Index: A good place to start is the Index,an alphabetical listing of all information inyour manual. You'll find several WARNINGs,CAUTIONs, and NOTEs in the manual.
WARNINGA WARNING indicates a situation in whichserious injury or death could result if thewarning is ignored.
CAUTIONA CAUTION indicates a situation in whichbodily injury or damage to your vehicle, orboth, could result if the caution is ignored.
NOTEA NOTE provides information andsometimes suggests how to make betteruse of your vehicle.
The following symbol, located on someparts of the vehicle, indicates that thismanual contains information related to thepart.Please refer to the manual for a detailedexplanation.
How to Use This Manual
CX-9_8GC7-EE-17G_Edition1 2017-5-16 8:22:04

Table of Contents
Pictorial IndexInterior, exterior views and part identification of your Mazda.
1
Essential Safety EquipmentImportant information about safety equipment, including seats, seat beltsystem, child-restraint systems and SRS air bags.
2
Before DrivingUse of various features, including keys, doors, mirrors and windows.
3
When DrivingInformation concerning safe driving and stopping.
4
Interior FeaturesUse of various features for ride comfort, including air-conditioning andaudio system.
5
Maintenance and CareHow to keep your Mazda in top condition.
6
If Trouble ArisesHelpful information on what to do if a problem arises with the vehicle.
7
Customer InformationImportant consumer information including warranties and add-onequipment.
8
SpecificationsTechnical information about your Mazda.
9
Index 10
CX-9_8GC7-EE-17G_Edition1 2017-5-16 8:22:04

CX-9_8GC7-EE-17G_Edition1 2017-5-16 8:22:04

1 Pictorial Index
Interior, exterior views and part identification of your Mazda.
Interior Overview (Left-Hand DriveModel).................................................1-2
Interior Equipment (View A)........1-2Interior Equipment (View B)........1-3Interior Equipment (View C)........1-4Interior Equipment (View D)........1-5
Interior Overview (Right-Hand DriveModel).................................................1-6
Interior Equipment (View A)........1-6Interior Equipment (View B)........1-7Interior Equipment (View C)........1-8Interior Equipment (View D)........1-9
Exterior Overview........................... 1-10
1-1
CX-9_8GC7-EE-17G_Edition1 2017-5-16 8:22:04

Interior Equipment (View A)
① Door-lock knob..................................................................................................... page 3-17② Turn and lane-change signal..................................................................................page 4-57③ Lighting control.....................................................................................................page 4-50④ Wiper and washer lever.........................................................................................page 4-58⑤ TCS OFF switch....................................................................................................page 4-74⑥ Lane-keep Assist System (LAS) & Lane Departure Warning System (LDWS) OFF
switch..................................................................................................................page 4-137⑦ Parking sensor switch.........................................................................................page 4-193⑧ Power liftgate switch.............................................................................................page 3-20⑨ Outside mirror switch............................................................................................page 3-32⑩ Door-lock switch................................................................................................... page 3-14⑪ Power window lock switch................................................................................... page 3-37⑫ Outside mirror folding switch............................................................................... page 3-32⑬ Power window switches........................................................................................page 3-37
Pictorial Index
Interior Overview (Left-Hand Drive Model)
1-2 The equipment and installation position varies by vehicle
CX-9_8GC7-EE-17G_Edition1 2017-5-16 8:22:04

Interior Equipment (View B)
① Audio control switches..........................................................................................page 5-14② Instrument cluster..................................................................................................page 4-12③ Dashboard illumination knob................................................................................page 4-16④ Trip meter selector.................................................................................................page 4-13⑤ Mazda Radar Cruise Control (MRCC) switches......................................page 4-114, 4-124⑥ Cruise control switches...................................................................................... page 4-170⑦ Hazard warning flasher switch..............................................................................page 4-65⑧ Seat warmer switches..............................................................................................page 2-6⑨ Heated steering wheel switch................................................................................page 3-31⑩ Drive selection switch........................................................................................... page 4-79⑪ Push button start......................................................................................................page 4-4⑫ Lock release lever................................................................................................. page 3-31⑬ Hood release handle.............................................................................................. page 6-16⑭ Remote fuel-filler lid release.................................................................................page 3-29
Pictorial Index
Interior Overview (Left-Hand Drive Model)
The equipment and installation position varies by vehicle 1-3
CX-9_8GC7-EE-17G_Edition1 2017-5-16 8:22:04

Interior Equipment (View C)
① SRS air bags.......................................................................................................... page 2-44② Active driving display........................................................................................... page 4-29③ Climate control system............................................................................................page 5-2④ Rear window defogger switch...............................................................................page 4-63⑤ Audio.....................................................................................................................page 5-18⑥ Glove compartment...............................................................................................page 5-82⑦ Selector lever.........................................................................................................page 4-41⑧ Commander switch................................................................................................page 5-18⑨ Electric parking brake (EPB) switch.....................................................................page 4-67⑩ Fuse block (Left side)............................................................................................page 6-48
Pictorial Index
Interior Overview (Left-Hand Drive Model)
1-4 The equipment and installation position varies by vehicle
CX-9_8GC7-EE-17G_Edition1 2017-5-16 8:22:04

Interior Equipment (View D)
① Seat belts............................................................................................................... page 2-20② SRS air bag............................................................................................................page 2-44③ Rear door sunshade............................................................................................... page 5-86④ Bottle holder..........................................................................................................page 5-81⑤ Sunvisor.................................................................................................................page 5-74⑥ Vanity mirror......................................................................................................... page 5-74⑦ Overhead lights..................................................................................................... page 5-74⑧ Sunroof switch...................................................................................................... page 3-39⑨ Rearview mirror.................................................................................................... page 3-34⑩ Accessory socket...................................................................................................page 5-77⑪ Cup holders........................................................................................................... page 5-79⑫ Front seat.................................................................................................................page 2-5⑬ Center console.......................................................................................................page 5-82⑭ External input terminal..........................................................................................page 5-15⑮ Seat warmer switches............................................................................................ page 2-11⑯ Second-row seat.................................................................................................... page 2-10⑰ USB power outlet..................................................................................................page 5-78⑱ Third-row seat....................................................................................................... page 2-16
Pictorial Index
Interior Overview (Left-Hand Drive Model)
The equipment and installation position varies by vehicle 1-5
CX-9_8GC7-EE-17G_Edition1 2017-5-16 8:22:04

Interior Equipment (View A)
① Wiper and washer lever.........................................................................................page 4-58② Lighting control.....................................................................................................page 4-50③ Turn and lane-change signal..................................................................................page 4-57④ Door-lock knob..................................................................................................... page 3-17⑤ Power window switches........................................................................................page 3-37⑥ Power window lock switch................................................................................... page 3-37⑦ Door-lock switch................................................................................................... page 3-14⑧ Outside mirror folding switch............................................................................... page 3-32⑨ Outside mirror switch............................................................................................page 3-32⑩ TCS OFF switch....................................................................................................page 4-74⑪ Lane-keep Assist System (LAS) & Lane Departure Warning System (LDWS) OFF
switch..................................................................................................................page 4-137⑫ Parking sensor switch.........................................................................................page 4-193⑬ Power liftgate switch.............................................................................................page 3-20
Pictorial Index
Interior Overview (Right-Hand Drive Model)
1-6 The equipment and installation position varies by vehicle
CX-9_8GC7-EE-17G_Edition1 2017-5-16 8:22:04
Interior Equipment (View B)
① Seat warmer switches..............................................................................................page 2-6② Hazard warning flasher switch..............................................................................page 4-65③ Audio control switches..........................................................................................page 5-14④ Instrument cluster..................................................................................................page 4-12⑤ Dashboard illumination knob................................................................................page 4-16⑥ Trip meter selector.................................................................................................page 4-13⑦ Mazda Radar Cruise Control (MRCC) switches.................................................page 4-114⑧ Cruise control switches...................................................................................... page 4-170⑨ Remote fuel-filler lid release.................................................................................page 3-29⑩ Hood release handle.............................................................................................. page 6-16⑪ Lock release lever................................................................................................. page 3-31⑫ Push button start......................................................................................................page 4-4⑬ Drive selection switch........................................................................................... page 4-79
Pictorial Index
Interior Overview (Right-Hand Drive Model)
The equipment and installation position varies by vehicle 1-7
CX-9_8GC7-EE-17G_Edition1 2017-5-16 8:22:04

Interior Equipment (View C)
① SRS air bags.......................................................................................................... page 2-44② Climate control system............................................................................................page 5-2③ Rear window defogger switch...............................................................................page 4-63④ Audio.....................................................................................................................page 5-18⑤ Active driving display........................................................................................... page 4-29⑥ Electric parking brake (EPB) switch.....................................................................page 4-67⑦ Commander switch................................................................................................page 5-18⑧ Selector lever.........................................................................................................page 4-41⑨ Glove compartment...............................................................................................page 5-82⑩ Fuse block (Left side)............................................................................................page 6-48
Pictorial Index
Interior Overview (Right-Hand Drive Model)
1-8 The equipment and installation position varies by vehicle
CX-9_8GC7-EE-17G_Edition1 2017-5-16 8:22:04

Interior Equipment (View D)
① Rearview mirror.................................................................................................... page 3-34② Overhead lights..................................................................................................... page 5-74③ Sunroof switch...................................................................................................... page 3-39④ Sunvisor.................................................................................................................page 5-74⑤ Vanity mirror......................................................................................................... page 5-74⑥ Bottle holder..........................................................................................................page 5-81⑦ Rear door sunshade............................................................................................... page 5-86⑧ Seat belts............................................................................................................... page 2-20⑨ SRS air bag............................................................................................................page 2-44⑩ Third-row seat....................................................................................................... page 2-16⑪ USB power outlet..................................................................................................page 5-78⑫ Second-row seat.................................................................................................... page 2-10⑬ Center console.......................................................................................................page 5-82⑭ External input terminal..........................................................................................page 5-15⑮ Cup holders........................................................................................................... page 5-79⑯ Front seat.................................................................................................................page 2-5⑰ Accessory sockets................................................................................................. page 5-77
Pictorial Index
Interior Overview (Right-Hand Drive Model)
The equipment and installation position varies by vehicle 1-9
CX-9_8GC7-EE-17G_Edition1 2017-5-16 8:22:04

① Hood......................................................................................................................page 6-16② Windshield wiper blades....................................................................................... page 6-26③ Sunroof..................................................................................................................page 3-39④ Doors and keys......................................................................................................page 3-10⑤ Fuel-filler lid......................................................................................................... page 3-29⑥ Wheels and Tires...................................................................................................page 6-36⑦ Exterior lights........................................................................................................page 6-39⑧ Rear window wiper blade......................................................................................page 6-29⑨ Liftgate.................................................................................................................. page 3-19⑩ Child safety locks..................................................................................................page 3-18⑪ Outside mirror....................................................................................................... page 3-32
Pictorial Index
Exterior Overview
1-10 The equipment and installation position varies by vehicle
CX-9_8GC7-EE-17G_Edition1 2017-5-16 8:22:04

2 Essential Safety Equipment
Important information about safety equipment, including seats, seatbelt system, child-restraint systems and SRS air bags.
Seats.................................................... 2-2Seat Precautions............................2-2Front Seat......................................2-5Second-Row Seat........................2-10Third-Row Seat.......................... 2-16Head Restraints...........................2-17
Seat Belt Systems.............................2-20Seat Belt Precautions..................2-20Seat Belt......................................2-23Seat Belt Warning Systems.........2-24Front Seat Belt Pretensioner andLoad Limiting Systems...............2-25
Child Restraint................................ 2-27Child-Restraint Precautions........2-27Child-Restraint SystemInstallation.................................. 2-31Child-Restraint System Suitabilityfor Various Seat PositionsTable........................................... 2-36Installing Child-RestraintSystems.......................................2-40
SRS Air Bags....................................2-44Supplemental Restraint System(SRS) Precautions.......................2-44Supplemental Restraint SystemComponents................................2-50How the SRS Air Bags Work..... 2-51SRS Air Bag DeploymentCriteria........................................2-55Limitations to SRS Air Bag........2-56Constant Monitoring...................2-58
2-1
CX-9_8GC7-EE-17G_Edition1 2017-5-16 8:22:04

Seat Precautions
WARNING
Make sure the adjustable components of a seat are locked in place:Adjustable seats and seatbacks that are not securely locked are dangerous. In a sudden stopor collision, the seat or seatback could move, causing injury. Make sure the adjustablecomponents of the seat are locked in place by attempting to slide the seat forward andbackward and rocking the seatback.
Never allow children to adjust a seat:Allowing children to adjust a seat is dangerous as it could result in serious injury if a child'shands or feet become caught in the seat.
Do not drive with the seatback unlocked:All of the seatbacks play an important role in your protection in a vehicle. Leaving theseatback unlocked is dangerous as it can allow passengers to be ejected or thrown aroundand baggage to strike occupants in a sudden stop or collision, resulting in severe injury. Afteradjusting the seatback at any time, even when there are no other passengers, rock theseatback to make sure it is locked in place.
Adjust the driver's seat only when the vehicle is stopped:Adjusting the driver's seat while the vehicle is moving is dangerous. The driver could losecontrol of the vehicle and have an accident.
Do not modify or replace the front seats:Modifying or replacing the front seats such as replacing the upholstery or loosening any boltsis dangerous. The front seats contain air bag components essential to the supplementalrestraint system. Such modifications could damage the supplemental restraint system andresult in serious injury. Consult an Authorized Mazda Repairer if there is any need to removeor reinstall the front seats.
Do not drive with damaged front seats:Driving with damaged front seats, such as seat cushions torn or damaged down to theurethane, is dangerous. A collision, even one not strong enough to inflate the air bags, coulddamage the front seats which contain essential air bag components. If there was asubsequent collision, an air bag may not deploy which could lead to injuries. Always have anAuthorized Mazda Repairer inspect the front seats, front seat belt pretensioners and air bagsafter a collision.
Essential Safety Equipment
Seats
2-2
CX-9_8GC7-EE-17G_Edition1 2017-5-16 8:22:04

Do not drive with either front seats reclined:Sitting in a reclined position while the vehicle is moving is dangerous because you do not getthe full protection from seat belts. During sudden braking or a collision, you can slide underthe lap belt and suffer serious internal injuries. For maximum protection, sit well back andupright.
Do not recline a second-row seatback when the third-row seat is occupied:Reclining the second-row seatback when the third-row seat is occupied is dangerous. Becausethe clearance in the third-row seat is limited, occupants in the third-row seat could be hurtseriously on a reclined second-row seatback.
Do not place an object such as a cushion between the seatback and your back:Putting an object such as a cushion between the seatback and your back is dangerousbecause you will be unable to maintain a safe driving posture and the seat belt cannotfunction at its full capacity in a collision, which could result in a serious accident, injury ordeath.
Do not place objects under the seat:The object could get stuck and cause the seat to not be fixed securely, and result in anaccident.
Do not stack cargo higher than the seatbacks:Stacking luggage or other cargo higher than the seatbacks is dangerous. During suddenbraking or a collision, objects can fly around and become projectiles that may hit and injurepassengers.
Make sure luggage and cargo is secured before driving:Not securing cargo while driving is dangerous as it could move or be crushed during suddenbraking or a collision and cause injury.
Never allow a passenger to sit or stand on the folded seatback while the vehicle is moving:Driving with a passenger on the folded seatback is dangerous. Allowing a child to sit up onthe folded seatback while the vehicle is moving is particularly dangerous. In a sudden stop oreven a minor collision, a child not in a proper seat or child-restraint system and seat belt couldbe thrown forward, back or even out of the vehicle resulting in serious injuries or death. Thechild in the baggage area could be thrown into other occupants and cause serious injury.
Essential Safety Equipment
Seats
2-3
CX-9_8GC7-EE-17G_Edition1 2017-5-16 8:22:04

CAUTIONWhen operating a seat, be careful not to put your hands or fingers near the moving parts of
the seat or on the side trim to prevent injury.When moving the seats, make sure there is no cargo in the surrounding area. If the cargo
gets caught it could damage the cargo.(Manual Seat)
When moving the seats forward and rearward or returning a rear-reclined seatback to itsupright position, make sure you hold onto the seatback with your hand while operating. Ifthe seatback is not held, the seat will move suddenly and could cause injury.
NOTE• When returning a rear seat to its original position, place the seat belt in its normal
position. Verify that the seat belt pulls out and retracts.• (Power Seat)
The seat-bottom power adjustment is operated by motors. Avoid extended operationbecause excessive use can damage the motors.
• To prevent the battery from running down, avoid using the power adjustment when theengine is stopped. The adjuster uses a large amount of electrical power.
• Do not use the switch to make more than one adjustment at a time.
Essential Safety Equipment
Seats
2-4
CX-9_8GC7-EE-17G_Edition1 2017-5-16 8:22:04

Front Seat▼ Seat Operation
Power operation
Seat Slide(Manual Seat)To move a seat forward or backward, raise the lever and slide the seat to the desired positionand release the lever.Make sure the lever returns to its original position and the seat is locked in place byattempting to push it forward and backward.(Power Seat)To slide the seat, move the slide lifter switch on the outside of the seat to the front or backand hold it. Release the switch at the desired position.
Height Adjustment*
(Manual Seat)To adjust the seat height, move the lever up or down.(Power Seat)To adjust the seat height, move the switch up or down.
Height Adjustment for Front Edge of Seat Bottom (Driver's Power Seat)*
To adjust the front height of the seat bottom, raise or lower the front of the slide lifterswitch.
Essential Safety Equipment
Seats
*Some models. 2-5
CX-9_8GC7-EE-17G_Edition1 2017-5-16 8:22:04

Seat Recline(Manual Seat)To change the seatback angle, lean forward slightly while raising the lever. Then lean backto the desired position and release the lever.Make sure the lever returns to its original position and the seatback is locked in place byattempting to push it forward and backward.(Power Seat)To change the seatback angle, press the front or rear side of the reclining switch. Release theswitch at the desired position.
Lumbar Support Adjustment (Driver's Power Seat)To increase the seat firmness, press and hold the front part of the switch to the desiredposition, then release it.Press the rear part of the switch to decrease firmness.
▼ Seat Warmer*
The front seats are electrically heated. Theignition must be switched ON.Press the seat warmer switch while theignition is switched ON to operate the seatwarmer. The indicator lights turn on toindicate that the seat warmer is operating.The mode changes as follows each timethe seat warmer switch is pressed.
OFF
High
Mid
Low
WARNING
Be careful when using the seat warmer:The heat from the seat warmer may be toohot for some people, as indicated asfollows, and could cause alow-temperature burn.
Infants, small children, elderly people,and physically challenged peoplePeople with delicate skinPeople who are excessively fatiguedPeople who are intoxicatedPeople who have taken sleep-inducing
medicine such as sleeping pills or coldmedicine
Do not use the seat warmer with anythinghaving high moisture-retention ability suchas a blanket or cushion on the seat:The seat may be heated excessively andcause a low-temperature burn.
Do not use the seat warmer even whentaking a short nap in the vehicle:The seat may be heated excessively andcause a low-temperature burn.
Essential Safety Equipment
Seats
2-6 *Some models.
CX-9_8GC7-EE-17G_Edition1 2017-5-16 8:22:04

Do not place heavy objects with sharpprojections on the seat, or insert needles orpins into it:This could cause the seat to becomeexcessively heated and result in injury froma minor burn.
CAUTIONDo not use organic solvents to clean theseat. It may damage the seat surface andthe heater.
NOTE• If the ignition is switched off while the
seat warmer is operating (High, Mid orLow) and then switched ON again, theseat warmer will automatically operateat the temperature set before switchingoff the ignition.
• Use the seat warmer when the engine isrunning. Leaving the seat warmer on forlong periods with the engine not runningcould cause the battery power to bedepleted.
• The temperature of the seat warmercannot be adjusted beyond High, Midand Low because the seat warmer iscontrolled by a thermostat.
▼ Driving Position Memory*
The desired driving position can be calledup after programming the position.The following driving positions can beprogrammed.
• Driver’s seat position (seat slide, heightadjustment, front edge of seat bottom,seat recline)Refer to Seat Operation on page 2-5.
• Active driving display (display position,brightness level, display information)Refer to Active Driving Display on page4-29.
CAUTIONDo not place fingers or hands around thebottom of the seat while the seat memoryfunction is operating. The seat movesautomatically while the seat memoryfunction is operating and fingers or handscould get pinched and injured.
SET button
A driving position can be programmed oroperated using the buttons on the side ofthe seat or the key.
NOTE• Lumbar support adjustment cannot be
programmed.• A driving position can be programmed
to the buttons on the side of the seat andthe key in use for driving the vehicle.
• If the vehicle has been serviced and thebattery cables disconnected, theprogrammed seat positions will havebeen erased. Re-program the seatpositions.
Essential Safety Equipment
Seats
*Some models. 2-7
CX-9_8GC7-EE-17G_Edition1 2017-5-16 8:22:04

Programming
1. Make sure the parking brake is on.2. Make sure the selector lever is in the P
position.3. Start the engine.4. Adjust the seat and the active driving
display to the desired driving position.5. Press the SET button on the seat until a
beep sound is heard one time.6. Perform one of the following settings
within 5 seconds of completing step 5above:
• Programming using a button onthe side of the seatPress the button you want toprogram, either button 1 or 2, until abeep sound is heard one time.
• Programming using the keyPress the key button until a beepsound is heard one time.
NOTEIf a beep sound is heard three times, theoperation is canceled.
To move the driving position to aprogrammed position
(Using a button on the side of the seat)
1. Make sure the parking brake is on.2. Make sure the selector lever is in the P
position.3. Start the engine.4. Press the programming button for the
driving position you want to call up(button 1 or 2).
5. A beep sound is heard when thedriving position adjustment iscompleted.
NOTE• If the driving position movement is not
changed, only the beep sounds.• A seat position can be called up even
with the engine not running.• The driving position adjustment is
canceled in the following cases:• Any of the seat adjustment switches is
operated.• The SET button is pressed.• Programming button 1 or 2 is pressed.• The key button or button is
operated.• The vehicle starts moving.• The active driving display is adjusted.
(Using a programmed key)
1. Unlock the doors by pressing a requestswitch or the key button.
2. After unlocking the doors, the seatposition adjustment begins within 40seconds of opening the driver's door,and a beep sounds when the operationis finished.
3. Make sure the parking brake is on.4. Make sure the selector lever is in the P
position.5. Start the engine.6. The active driving display adjustment
begins.
Essential Safety Equipment
Seats
2-8
CX-9_8GC7-EE-17G_Edition1 2017-5-16 8:22:04

NOTE• If there is no driving position movement,
a beep is not heard.• The driving position adjustment is
canceled in the following cases:• Any of the seat adjustment switches is
operated.• The SET button is pressed.• Programming button 1 or 2 is pressed.• The key button or button is
operated.• The vehicle starts moving.• The active driving display is adjusted.
Erasing programmed driving positions
(Erasing the driving positionsprogrammed to the key)
1. Switch the ignition OFF.2. Press the SET button on the side of the
seat until a beep sound is heard onetime.
3. After the beep sounds, press the key button within 5 seconds until a beepsound is heard one time.
NOTEIf a beep sound is heard three times, theoperation is canceled.
Essential Safety Equipment
Seats
2-9
CX-9_8GC7-EE-17G_Edition1 2017-5-16 8:22:04

Second-Row Seat▼ Seat Operation
Seat Slide (Forward-back adjustment)To move a seat forward or backward, raise the lever and slide the seat to the desired positionand release the lever.Make sure the lever returns to its original position and the seat is locked in place byattempting to push it forward and backward.
Seat ReclineTo change the seatback angle, lean forward slightly while raising the lever. Then lean backto the desired position and release the lever.The lever can also be used when flattening down the seats.Refer to How to Split Folding the Second-Row Seats on page 2-14.Make sure the lever returns to its original position and the seatback is locked in place byattempting to push it forward and backward.
Third-Row Seat AccessTo access to the third-row seats, pull up the lever on the side of the head restraint to fold theseatback and slide the seat forward.Refer to How to Third-Row Seat Access on page 2-12.Make sure the lever returns to its original position and the seatback is locked in place byattempting to push it forward and backward.
Essential Safety Equipment
Seats
2-10
CX-9_8GC7-EE-17G_Edition1 2017-5-16 8:22:04

▼ Seat Warmer*
The rear seats are electrically heated. Theignition must be switched ON.Press the seat warmer switch while theignition is switched ON to operate the seatwarmer. The indicator lights turn on toindicate that the seat warmer is operating.The mode changes as follows each timethe seat warmer switch is pressed.
OFF
High
Mid
Low
WARNING
Be careful when using the seat warmer:The heat from the seat warmer may be toohot for some people, as indicated asfollows, and could cause alow-temperature burn.
Infants, small children, elderly people,and physically challenged peoplePeople with delicate skinPeople who are excessively fatiguedPeople who are intoxicatedPeople who have taken sleep-inducing
medicine such as sleeping pills or coldmedicine
Do not use the seat warmer with anythinghaving high moisture-retention ability suchas a blanket or cushion on the seat:The seat may be heated excessively andcause a low-temperature burn.
Do not use the seat warmer even whentaking a short nap in the vehicle:The seat may be heated excessively andcause a low-temperature burn.
Do not place heavy objects with sharpprojections on the seat, or insert needles orpins into it:This could cause the seat to becomeexcessively heated and result in injury froma minor burn.
CAUTIONBefore folding a rear seatback, make sure
that the rear seat warmer switch is off. Ifa rear seatback is folded while the rearseat warmer is in operation, it may heatthe seat excessively and damage the seatsurface.Do not use organic solvents to clean the
seat. It may damage the seat surface andthe heater.
NOTE• Use the seat warmer when the engine is
running. Leaving the seat warmer on forlong periods with the engine not runningcould cause the battery power to bedepleted.
Essential Safety Equipment
Seats
*Some models. 2-11
CX-9_8GC7-EE-17G_Edition1 2017-5-16 8:22:04

• When the engine is stopped while theseat warmers are operating and then theignition is switched ON, the seatwarmers will not turn back onautomatically. In addition, the seatwarmer operation stops automaticallyafter the seat warmers have operated forabout 90 minutes.To turn the seat warmer back on, pressthe switch.
• The temperature of the seat warmercannot be adjusted beyond High, Midand Low because the seat warmer iscontrolled by a thermostat.
▼ Armrest
The armrest in the center of thesecond-row seatback can be used (nooccupant in the center seat) or placedupright.
WARNING
Never put your hands and fingers aroundthe moving parts of the seat and armrest:Putting your hands and fingers around themoving parts of the seat and armrest isdangerous as they could get injured.
CAUTIONWhen storing the armrest, make sure thatany cables connected to the USB poweroutlets in the armrest box are stored awayin the armrest box.If the cables are not stored away in thearmrest box, the cables and connectiondevices may become damaged whenstoring the armrest.
▼ Third-Row Seat Access
Occupants can get into and out of thethird-row seats easily by sliding thesecond-row seats forward.
WARNING
Make sure there is nobody in thesecond-row seat area before operating thelevers:Not checking the second-row seat area forpersons before folding the seatbacks withthe levers is dangerous. The second-rowseat area is difficult to see from the rear ofthe vehicle. Operating the levers withoutchecking could cause injury to a personwhen a seatback suddenly flips forward.
Do not operate the lever on the side of thehead restraint under the followingconditions:Operating the lever on the side of the headrestraint under the following conditions isdangerous as the seat may moveunexpectedly and cause an injury such as afoot getting pinched between the seat andfloor.
Essential Safety Equipment
Seats
2-12
CX-9_8GC7-EE-17G_Edition1 2017-5-16 8:22:04

Occupant is seated in second-row seat
Second-row seatback is folded forward
Child is seated on child restraint insecond-row seat
Entering/exiting the third-row seat area
Pull up the lever on the side of the headrestraint to fold the seatback and slide theseat forward.
CAUTIONDo not operate the lever on the side of a
second-row seat while the seatback isfolded down and the seat is slid forward.If the lever is forcefully operated, it coulddamage the lever.After entering/exiting the third-row seat
area, return the second-row seatback toits upright position and lock it aftersliding it rearward.Make sure it is locked by attempting tolightly move it back and forth.Otherwise, it could move unexpectedlyand cause injury.
Entering/exiting the third-row seat areawith child-restraint system installed(Right-side seat only)*1
Access to the third-row seats is possibleeven when a child-restraint system isinstalled to the second-row seat.Pull up the lever on the side of the headrestraint to lower the front side of the seatand slide the seat forward.
Essential Safety Equipment
Seats
2-13
CX-9_8GC7-EE-17G_Edition1 2017-5-16 8:22:04

*1 For left-hand drive models. Only forthe left-side seat for right-hand drivemodels.
CAUTIONAfter entering/exiting the third-row seatarea, lock the seat after sliding it rearward.Make sure it is locked by attempting tolightly move it back and forth.Otherwise, it could move unexpectedly andcause injury.
Second-row seat fixed position
Third-row seat ingress/egress
NOTEThe second-row seat cannot be movedforward while the seat belt is securing thechild-restraint system.
▼ Split folding the Second-Row Seats
To create a flat luggage compartmentspace, fold the seatbacks forward.
Folding the seatbacks
WARNING
Make sure the adjustable components of asecond-row seat are locked after foldingdown the seatback:A second-row seat that is not securelylocked is dangerous. In a sudden stop orcollision, the second-row seat could move,causing injury.After folding down the seatback of asecond-row seat, make sure the adjustablecomponents of the seat are locked in placeby attempting to slide the seat forward andbackward.
CAUTIONWhen folding the seatback forward,
always support the seatback with yourhand. If it is not supported by a hand,fingers or the hand raising the levercould be injured.Check the position of a front seat before
folding a second-row seatback.Depending on the position of a frontseat, it may not be possible to fold asecond-row seatback all the way downbecause it may hit the seatback of thefront seat which could scratch ordamage the front seat or its pocket.Remove the head restraint on thesecond-row outboard seat if necessary.
Essential Safety Equipment
Seats
2-14
CX-9_8GC7-EE-17G_Edition1 2017-5-16 8:22:04

1. Lower the head restraint all the waydown.Refer to Head Restraints on page 2-17.
2. Raise the lever on the side of thesecond-row seat to fold down theseatback.
NOTETo create a flat luggage compartmentspace from the rear of the vehicle to theback of the front seats, fold the second-rowand third-row seats (page 2-16).
To return the seatback to its uprightposition:
WARNING
When returning a seatback to its uprightposition, make sure the 3-point seat belt isnot caught in the seatback and the 3-pointseat belt is not twisted:If the seat belt is used while it is twisted andcaught in the seatback, the seat beltcannot function at its full capacity, whichcould cause serious injury or death.
1. Make sure that the seat belt is not stuckin the second-row seat and it is nottwisted, then raise the seatback whilepreventing the seat belt from beingcaught in the seatback.
2. Press the seatback rearward and lock itin place. After returning the seatbackto its upright position, make sure it issecurely locked.
Essential Safety Equipment
Seats
2-15
CX-9_8GC7-EE-17G_Edition1 2017-5-16 8:22:04

Third-Row Seat▼ Split folding the Third-Row Seats
To create a flat luggage compartmentspace, fold the seatbacks forward.
CAUTIONDo not apply load to the head restraintwith it in the upright position and theseatback folded down. Otherwise, it couldcause damage to the head restraint.
NOTEWhen folding the seatbacks forward, foldthem in two steps.
Folding the seatbacks (With strap)
1. Slide the second-row seat all the wayforward.
2. Pull the strap to fold down the headrestraint.
3. Pull the strap further to fold thethird-row seat forward.
Folding the seatbacks (With lever)
1. Slide the second-row seat all the wayforward.
2. Lower the lever to fold down the headrestraint.
Essential Safety Equipment
Seats
2-16
CX-9_8GC7-EE-17G_Edition1 2017-5-16 8:22:04

3. Lower the lever further to fold thethird-row seat forward.
NOTETo create a flat luggage compartmentspace from the rear of the vehicle to theback of the front seats, fold the second-rowand third-row seats (page 2-14).
To return third-row seat to its originalposition
1. Return the seatback to its originalposition by pulling the strap/lever onthe back of the seatback.Make sure the seatback is secured byattempting to lightly move it forwardand back.
2. Lift the head restraint upward to itsupright position.
Head RestraintsYour vehicle is equipped with headrestraints on all outboard seats and thesecond-row center seat. The headrestraints are intended to help protect youand the passengers from neck injury.
WARNING
Always drive with the head restraintsinstalled when seats are being used andmake sure they are properly adjusted. Inaddition, always raise the head restraintson all rear seat when they are being used:Driving with the head restraints adjustedtoo low or removed is dangerous. With nosupport behind your head, your neck couldbe seriously injured in a collision.
NOTE(Third-row seat)The head restraints are non-adjustable.
▼ Height Adjustment
Adjust the head restraint so that the centeris even with the top of the passenger'sears.
Essential Safety Equipment
Seats
2-17
CX-9_8GC7-EE-17G_Edition1 2017-5-16 8:22:04

To raise a head restraint, pull it up to thedesired position.To lower the head restraint, press thestop-catch release, then push the headrestraint down.
Front outboard seat
Second-row outboard seat
Second-row center seat
▼ Removal/Installation (Second-rowseat)
To remove the head restraint, pull it upwhile pressing the stop-catch.To install the head restraint, insert the legsinto the holes while pressing thestop-catch.
WARNING
Always drive with the head restraintsinstalled when seats are being used andmake sure they are properly installed:Driving with the head restraints notinstalled is dangerous. With no supportbehind your head, your neck could beseriously injured in a collision.
After installing a head restraint, try lifting itto make sure that it does not pull out:Driving with an unsecured head restraint isdangerous as the effectiveness of the headrestraint will be compromised which couldcause it to unexpectedly detach from theseat.
Essential Safety Equipment
Seats
2-18
CX-9_8GC7-EE-17G_Edition1 2017-5-16 8:22:04

CAUTIONWhen installing a head restraint, make
sure that it is installed correctly with thefront of the head restraint facingforward. If the head restraint is installedincorrectly, it could detach from the seatduring a collision and result in injury.The head restraints on each of the front
and rear seats are specialized to eachseat. Do not switch around the headrestraint positions. If a head restraint isnot installed to its correct seat position,the effectiveness of the head restraintduring a collision will be compromisedwhich could cause injury.
▼ Foldable Head Restraints(Third-row seat)
The third-row seats are equipped withfoldable head restraints.
NOTEThe foldable head restraints cannot beadjusted or removed.
(With strap)To fold the head restraint, pull the strapand fold the head restraint downward.
(With lever)To fold the head restraint, lower the leverdown.
To return the head restraint to its uprightposition, lift it upward.
WARNING
Always drive with the head restraints intheir upright positions when the third-rowseats are occupied, and make sure they aresecurely locked in place:Driving with the head restraints foldeddown is dangerous. With no supportbehind your head, your neck could beseriously injured in a collision.
Essential Safety Equipment
Seats
2-19
CX-9_8GC7-EE-17G_Edition1 2017-5-16 8:22:04

Seat Belt PrecautionsSeat belts help to decrease the possibility of severe injury during accidents and suddenstops. Mazda recommends that the driver and all passengers always wear seat belts. All the seats have lap/shoulder belts. These belts also have retractors with inertia locks thatkeep them out of the way when not in use. The locks allow the belts to remain comfortableon users, but they will lock in position during a collision.
WARNING
Always wear your seat belt and make sure all occupants are properly restrained:Not wearing a seat belt is extremely dangerous. During a collision, occupants not wearingseat belts could hit someone or things inside the vehicle or even be thrown out of the vehicle.They could be seriously injured or even killed. In the same collision, occupants wearing seatbelts would be much safer.
Do not wear twisted seat belts:Twisted seat belts are dangerous. In a collision, the full width of the belt is not available toabsorb the impact. This puts more force on the bones beneath the belt, which could causeserious injury or death. So, if your seat belt is twisted, you must straighten the seat belt toremove any twists and to allow the full width of the belt to be used.
Never use one seat belt on more than one person at a time:Using one seat belt for more than one person at a time is dangerous. A seat belt used in thisway cannot spread the impact forces properly and the two passengers could be crushedtogether and seriously injured or even killed. Never use one belt for more than one person at atime and always operate the vehicle with each occupant properly restrained.
Do not operate a vehicle with a damaged seat belt:Using a damaged seat belt is dangerous. An accident could damage the belt webbing of theseat belt in use. A damaged seat belt cannot provide adequate protection in a collision. Havean expert repairer, we recommend an Authorized Mazda Repairer inspect all seat belt systemsin use during an accident before they are used again.
Essential Safety Equipment
Seat Belt Systems
2-20
CX-9_8GC7-EE-17G_Edition1 2017-5-16 8:22:04

Have your seat belts changed immediately if the pretensioner or load limiter has beenexpended:Always have an expert repairer, we recommend an Authorized Mazda Repairer immediatelyinspect the seat belt pretensioners and air bags after any collision. Like the air bags, the seatbelt pretensioners and load limiters will only function once and must be replaced after anycollision that caused them to deploy. If the seat belt pretensioners and load limiters are notreplaced, the risk of injury in a collision will increase.
Positioning the Shoulder Portion of the Seat Belt:Improper positioning of the shoulder portion of the seat belt is dangerous. Always make surethe shoulder portion of the seat belt is positioned across your shoulder and near your neck,but never under your arm, on your neck, or on your upper arm.
Positioning the Lap Portion of the Seat Belt:The lap portion of the seat belt worn too high is dangerous. In a collision, this wouldconcentrate the impact force directly on the abdominal area, causing serious injury. Wear thelap portion of the belt snugly and as low as possible. In a rollover crash, an unbelted person is significantly more likely to die than a person wearinga seat belt.
Instructions for Use of Seat Belt Assemblies:Seatbelts are designed to bear upon the bony structure of the body, and should be worn lowacross the front of the pelvis or the pelvis, chest and shoulders, as applicable; wearing the lapsection of the belt across the abdominal area must be avoided.Seatbelts should be adjusted as firmly as possible, consistent with comfort, to provide theprotection for which they have been designed. A slack belt will greatly reduce the protectionafforded to the wearer.Care should be taken to avoid contamination of the webbing with polishes, oils andchemicals, and particularly battery acid. Cleaning may safely be carried out using mild soapand water. The belt should be replaced if webbing becomes frayed, contaminated ordamaged.It is essential to replace the entire assembly after it has been worn in a severe impact even ifdamage to the assembly is not obvious.Belts should not be worn with straps twisted.Each belt assembly must only be used by one occupant; it is dangerous to put a belt around achild being carried on the occupant's lap.No modifications or additions should be made by the user which will either prevent the seatbelt adjusting devices from operating to remove slack, or prevent the seat belt assembly frombeing adjusted to remove slack.
Essential Safety Equipment
Seat Belt Systems
2-21
CX-9_8GC7-EE-17G_Edition1 2017-5-16 8:22:04

CAUTIONBelt retraction may become difficult if the belts and rings are soiled, so try to keep them clean.For more details about cleaning the seat belts, refer to "Seat Belt Maintenance" (page 6-61).
Ring
▼ Pregnant Women and Persons with Serious Medical Conditions
Pregnant women should always wear seat belts. Ask your doctor for specificrecommendations.The lap belt should be worn SNUGLY AND AS LOW AS POSSIBLE OVER THE HIPS.The shoulder belt should be worn across your shoulder properly, but never across thestomach area.Persons with serious medical conditions also should wear seat belts. Check with your doctorfor any special instructions regarding specific medical conditions.
▼ Emergency Locking Mode
When the seat belt is fastened, it will always be in the emergency locking mode.In the emergency locking mode, the belt remains comfortable on the occupant and theretractor will lock in position during a collision.If the belt is locked and cannot be pulled out, retract the belt once, and then try pulling it outslowly. If this fails, pull the belt strongly one time and loosen, then pull it out again slowly.
Essential Safety Equipment
Seat Belt Systems
2-22
CX-9_8GC7-EE-17G_Edition1 2017-5-16 8:22:04
Seat Belt
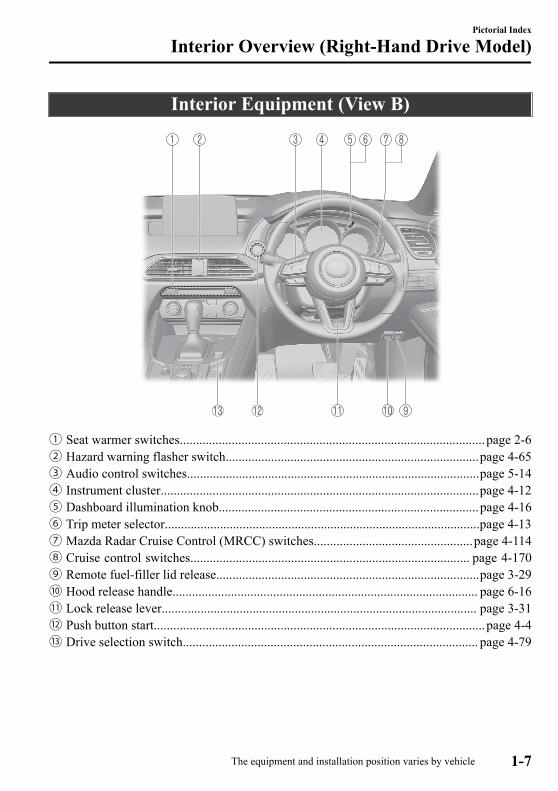
▼ Fastening the Seat Belt
Seat belt buckle
Seat belt tongue
Position the lap belt as low as possible, noton the abdominal area, then adjust theshoulder belt so that it fits snugly againstyour body.
Keep low on hip bone
Too high
Take up slack
▼ Unfastening the Seat Belt
Depress the button on the seat belt buckle.If the belt does not fully retract, pull it outand check for kinks or twists. Then makesure it remains untwisted as it retracts.
Button
NOTEIf a belt does not fully retract, inspect itfor kinks and twists. If it is still notretracting properly, have it inspected at anexpert repairer, we recommend anAuthorized Mazda Repairer.
To secure the outboard-third row seat beltswhen not in use, insert the belts into theirseat belt retainers.
Essential Safety Equipment
Seat Belt Systems
2-23
CX-9_8GC7-EE-17G_Edition1 2017-5-16 8:22:04
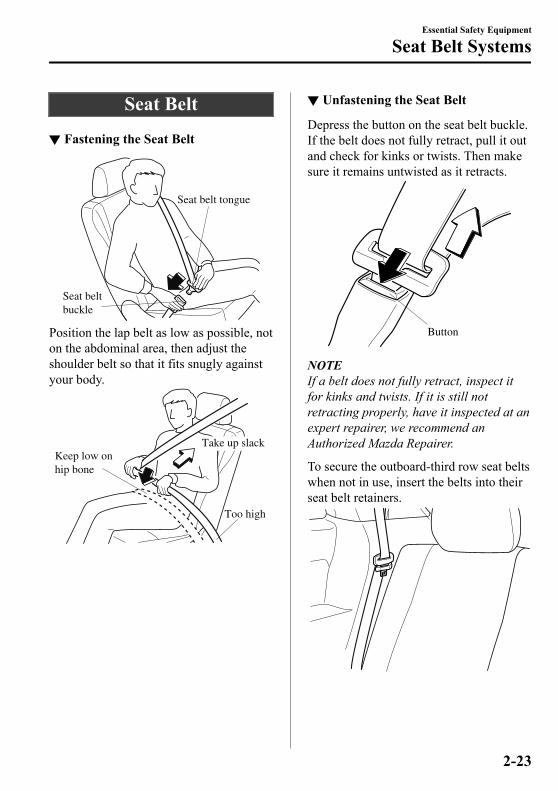
▼ Front Shoulder Belt Adjuster
To raise To lower
Make sure the adjuster is locked.
Seat Belt Warning SystemsIf it detects that the occupant seat belt isunfastened, the warning light or beepalerts the occupant.Refer to Warning/Indicator Lights on page4-32.Refer to Seat Belt Warning Beep on page7-55.
Essential Safety Equipment
Seat Belt Systems
2-24
CX-9_8GC7-EE-17G_Edition1 2017-5-16 8:22:04

Front Seat BeltPretensioner and Load
Limiting SystemsFor optimum protection, the driver andfront passenger seat belts are equippedwith pretensioner and load limitingsystems. For both these systems to workproperly you must wear the seat beltproperly. Pretensioners:When a collision is detected, thepretensioners deploy simultaneously withthe air bags.(European models)The pretensioners deploy simultaneouslywith the air bags when a roll-over is alsodetected.For deployment details, refer to the SRSAir Bag Deployment Criteria (page 2-55).The seat belt retractors remove slackquickly as the air bags are expanding. Anytime the air bags and seat beltpretensioners have fired they must bereplaced.A system malfunction or operationconditions are indicated by a warning.Refer to Warning/Indicator Lights on page4-32.Refer to Air Bag/Front Seat BeltPretensioner System Warning Beep onpage 7-55.
Load limiter:The load limiting system releases beltwebbing in a controlled manner to reducebelt force on the occupant's chest. Whilethe most severe load on a seat belt occursin frontal collisions, the load limiter has anautomatic mechanical function and canactivate in any accident mode withsufficient occupant movement.Even if the pretensioners have not fired,the load limiting function must be checkedby an expert repairer, we recommend anAuthorized Mazda Repairer.
WARNING
Wear seat belts only as recommended inthis owner's manual:Incorrect positioning of the seat belts isdangerous. Without proper positioning, thepretensioner and load limiting systemscannot provide adequate protection in anaccident and this could result in seriousinjury. For more details about wearing seatbelts, refer to "Fastening the Seat Belt"(page 2-23).
Have your seat belts changed immediatelyif the pretensioner or load limiter has beenexpended:Always have an expert repairer, werecommend an Authorized Mazda Repairerimmediately inspect the seat beltpretensioners and air bags after anycollision. Like the air bags, the seat beltpretensioners and load limiters will onlyfunction once and must be replaced afterany collision that caused them to deploy. Ifthe seat belt pretensioners and loadlimiters are not replaced, the risk of injuryin a collision will increase.
Essential Safety Equipment
Seat Belt Systems
2-25
CX-9_8GC7-EE-17G_Edition1 2017-5-16 8:22:04

Do not modify the components or wiring,or use electronic testing devices on thepretensioner system:Modifying the components or wiring of thepretensioner system, including the use ofelectronic testing devices is dangerous. Youcould accidentally activate it or make itinoperable which would prevent it fromactivating in an accident. The occupants orrepairers could be seriously injured.
Properly dispose of the pretensionersystem:Improper disposal of the pretensionersystem or a vehicle with non-deactivatedpretensioners is dangerous. Unless allsafety procedures are followed, injury couldresult. Have an expert repairer, werecommend an Authorized Mazda Repairersafely dispose of the pretensioner system orscrap a pretensioner system equippedvehicle.
NOTE• The pretensioner system may not
operate depending on the type of thecollision. For details, refer to the SRSAir Bag Deployment Criteria (page 2-55).
• Some smoke (non-toxic gas) will bereleased when the air bags andpretensioners deploy. This does notindicate a fire. This gas normally has noeffect on occupants, however, those withsensitive skin may experience light skinirritation. If residue from thedeployment of the air bags or thepretensioner system gets on the skin orin the eyes, wash it off as soon aspossible.
Essential Safety Equipment
Seat Belt Systems
2-26
CX-9_8GC7-EE-17G_Edition1 2017-5-16 8:22:04

Child-Restraint PrecautionsMazda strongly urges the use of child-restraint systems for children small enough to usethem.Mazda recommends use of a Mazda genuine child-restraint system or one that complieswith the UNECE*1 44 regulation. If you would like to purchase a Mazda genuinechild-restraint system, please contact an Authorized Mazda Dealer.Check your local and state or provincial laws for specific requirements regarding the safetyof children riding in your vehicle.*1 UNECE stands for United Nations Economic Commission for Europe. Whatever child-restraint system you consider, please pick the appropriate one for the ageand size of the child, obey the law and follow the instructions that come with the individualchild-restraint system. A child who has outgrown child-restraint systems should sit in the rear and use seat belts. The child-restraint system should be installed on the rear seat.Statistics confirm that the rear seat is the best place for all children up to 12 years of age-themore so with a supplemental restraint system (air bags). A rear-facing child-restraint system should NEVER be used in the front passenger seat withthe air bag system activated. The front passenger's seat is also the least preferred seat forother child-restraint systems.
WARNING
Use the correct size child-restraint system:For effective protection in vehicle accidents and sudden stops, a child must be properlyrestrained using a seat belt or child-restraint system depending on age and size. If not, thechild could be seriously injured or even killed in an accident.
Follow the manufacturer's instructions and always keep the child-restraint system buckleddown:An unsecured child-restraint system is dangerous. In a sudden stop or a collision it could movecausing serious injury or death to the child or other occupants. Make sure any child-restraintsystem is properly secured in place according to the child-restraint system manufacturer'sinstructions. When not in use, remove it from the vehicle or fasten it with a seat belt, or latch itdown to BOTH ISOFIX anchors, and attach the corresponding tether anchor.
Essential Safety Equipment
Child Restraint
2-27
CX-9_8GC7-EE-17G_Edition1 2017-5-16 8:22:04

Always secure a child in a proper child-restraint system:Holding a child in your arms while the vehicle is moving is extremely dangerous. No matterhow strong the person may be, he or she cannot hold onto a child in a sudden stop or collisionand it could result in serious injury or death to the child or other occupants. Even in amoderate accident, the child may be exposed to air bag forces that could result in seriousinjury or death to the child, or the child may be slammed into an adult, causing injury to bothchild and adult.
Extreme Hazard! Never use a rear-facing child-restraint system on the front passenger seatwith an air bag that could deploy:NEVER use a rearward facing child restraint on a seat protected by an ACTIVE AIRBAG in frontof it, DEATH or SERIOUS INJURY to the CHILD can occur.Vehicles with a front passenger air bag have the following warning label. The warning labelreminds you not to put a rear-facing child-restraint system on the front passenger seat at anytime.
(Except Taiwan) (Taiwan)
Even in a moderate collision, the child-restraint system can be hit by a deploying air bag andmoved violently backward resulting in serious injury or death to the child.
Essential Safety Equipment
Child Restraint
2-28
CX-9_8GC7-EE-17G_Edition1 2017-5-16 8:22:04

(Taiwan, except front passenger seat, if equipped with the following label)NEVER use a rearward facing child restraint on a seat protected by an ACTIVE AIRBAG in frontof it, DEATH or SERIOUS INJURY to the CHILD can occur.
Do not install a front-facing child-restraint system on the front passenger seat unless it isunavoidable:In a collision, the force of a deploying air bag could cause serious injury or death to the child. Ifinstalling a front-facing child-restraint system on the front passenger seat is unavoidable,move the front passenger seat as far back as possible and adjust the seat bottom (heightadjustable seat bottom) to the highest position at which the seat belt fastening thechild-restraint system is securely tightened.
Do not allow a child or anyone to lean over or against the side window of a vehicle with sideand curtain air bags:It is dangerous to allow anyone to lean over or against the side window, the area of the frontpassenger seat, the front and rear window pillars and the roof edge along both sides fromwhich the side and curtain air bags deploy, even if a child-restraint system is used. The impactof inflation from a side or curtain air bag could cause serious injury or death to an out ofposition child. Furthermore, leaning over or against the front door could block the side andcurtain air bags and eliminate the advantages of supplemental protection. With the front airbag and the additional side air bag that comes out of the front seat, the rear seat is always abetter location for children. Take special care not to allow a child to lean over or against theside window, even if the child is seated in a child-restraint system.
Essential Safety Equipment
Child Restraint
2-29
CX-9_8GC7-EE-17G_Edition1 2017-5-16 8:22:04

Never use one seat belt on more than one person at a time:Using one seat belt for more than one person at a time is dangerous. A seat belt used in thisway cannot spread the impact forces properly and the two passengers could be crushedtogether and seriously injured or even killed. Never use one belt for more than one person at atime and always operate the vehicle with each occupant properly restrained.
Use the tether and tether anchor only for a child-restraint system:Child-restraint system anchorages are designed to withstand only those loads imposed bycorrectly installed child-restraint systems. Under no circumstances are they to be used foradult seat belts, harnesses, or for attaching other items or equipment to the vehicle.
Always remove the head restraint and install child-restraint system (except when installing abooster seat) (Second-row seat):Installing a child-restraint system without removing the head restraint is dangerous. Thechild-restraint system cannot be installed correctly which may result in death or injury to thechild in a collision.
CAUTIONA seat belt or child-restraint system can become very hot in a closed vehicle during warmweather. To avoid burning yourself or a child, check them before you or your child touchesthem.
NOTEYour Mazda is equipped with ISOFIX anchors for attachment of ISOFIX child-restraintsystems on the second-row seats. When using these anchors to secure a child-restraintsystem, refer to “Using ISOFIX Anchor” (page 2-41).
Essential Safety Equipment
Child Restraint
2-30
CX-9_8GC7-EE-17G_Edition1 2017-5-16 8:22:04

Child-Restraint System Installation
▼ Categories of Child-Restraint Systems
NOTEWhen purchasing, ask the manufacturer of the child-restraint system which type ofchild-restraint system is appropriate for your child and vehicle.
(Europe and countries conforming to the UNECE 44 regulation)Child-restraint systems are classified into the following 5 groups according to the UNECE44 regulation.
Group Age Weight0 Up to about 9 months old Up to 10 kg (up to 22 lb)
0 Up to about 2 years old Up to 13 kg (up to 29 lb)1 About 8 months to 4 years old 9 kg ― 18 kg (20 lb ― 40 lb)2 About 3 to 7 years old 15 kg ― 25 kg (33 lb ― 55 lb)3 About 6 to 12 years old 22 kg ― 36 kg (48 lb ― 79 lb)
(Other countries)Please comply with the legal regulations concerning the use of child-restraint systems inyour country.
▼ Child-Restraint System Types
(Europe and countries conforming tothe UNECE 44 regulation)In this owner's manual, explanation ofchild-restraint systems secured with seatbelts is provided for the following threetypes of popular child-restraint systems:baby seat, child seat, junior seat.
NOTE• Installation position is determined by
the type of child-restraint system.Always read the manufacturer'sinstructions and this owner's manualcarefully.
• Due to variations in the design ofchild-restraint systems, vehicle seatsand seat belts, all child-restraint systemsmay not fit all seating positions. Beforepurchasing a child-restraint system, itshould be tested in the specific vehicleseating position (or positions) where itis intended to be used. If a previouslypurchased child-restraint system doesnot fit, you may need to purchase adifferent one that will.
Essential Safety Equipment
Child Restraint
2-31
CX-9_8GC7-EE-17G_Edition1 2017-5-16 8:22:04

Baby seatEqual to Group 0 and 0 of the UNECE44 regulation.
Child seatEqual to Group 1 of the UNECE 44regulation.
Junior seatEqual to Group 2 and 3 of the UNECE 44regulation.
When using a booster seat, always install the vehicle head restraint to the seat where the booster seat is installed.
Booster seat*1
*1
(Other countries)Please comply with the legal regulationsconcerning the use of child-restraintsystems in your country.
▼ Baby Seat Installation Position
A baby seat is used in the rear-facingposition only.
Refer to the table, “Child-Restraint SystemSuitability for Various Seat Positions” forbaby seat installation position (page 2-36).
Essential Safety Equipment
Child Restraint
2-32
CX-9_8GC7-EE-17G_Edition1 2017-5-16 8:22:04

WARNING
Always install a baby seat in the correctseat position:Installing a baby seat without firstconsulting the table “Child-RestraintSystem Suitability for Various SeatPositions” is dangerous. A baby seatinstalled on the wrong seat position cannotbe properly secured. In a collision, the childcould hit something or someone in thevehicle and be seriously injured or evenkilled.
Never use a rear-facing child-restraintsystem on the front passenger seatprotected by an air bag:NEVER use a rearward facing child restrainton a seat protected by an ACTIVE AIRBAG infront of it, DEATH or SERIOUS INJURY to theCHILD can occur.The child-restraint system can be hit by thedeploying air bag and knocked out ofposition. A child in the child-restraintsystem could be seriously injured or killed.
▼ Child Seat Installation Position
A child seat is used in front-facing andrear-facing positions depending on the ageand size of the child. When installing,follow the manufacturer's instructions inaccordance with the appropriate age andsize of the child as well as the directionsfor installing the child-restraint system.Refer to the table, “Child-Restraint SystemSuitability for Various Seat Positions” forchild seat installation position (page 2-36). Rear-facing type
WARNING
Always install a rear-facing child seat in thecorrect seat position:Installing a rear-facing child seat withoutfirst consulting the table “Child-RestraintSystem Suitability for Various SeatPositions” is dangerous. A rear-facing childseat installed on the wrong seat positioncannot be properly secured. In a collision,the child could hit something or someonein the vehicle and be seriously injured oreven killed.
Essential Safety Equipment
Child Restraint
2-33
CX-9_8GC7-EE-17G_Edition1 2017-5-16 8:22:04

Never use a rear-facing child-restraintsystem on the front passenger seatprotected by an air bag:NEVER use a rearward facing child restrainton a seat protected by an ACTIVE AIRBAG infront of it, DEATH or SERIOUS INJURY to theCHILD can occur.The child-restraint system can be hit by thedeploying air bag and knocked out ofposition. A child in the child-restraintsystem could be seriously injured or killed.
Front-facing type
WARNING
Never install a front-facing child seat in thewrong seat position:Installing a front-facing child seat withoutfirst consulting the table “Child-RestraintSystem Suitability for Various SeatPositions” is dangerous. A front-facingchild seat installed in the wrong seatposition cannot be properly secured. In acollision, the child could hit something orsomeone in the vehicle and be seriouslyinjured or even killed.
Do not install a front-facing child-restraintsystem on the front passenger seat unless itis unavoidable:In a collision, the force of a deploying airbag could cause serious injury or death tothe child. If installing a front-facingchild-restraint system on the frontpassenger seat is unavoidable, move thefront passenger seat as far back as possibleand adjust the seat bottom (heightadjustable seat bottom) to the highestposition at which the seat belt fasteningthe child-restraint system is securelytightened.
Essential Safety Equipment
Child Restraint
2-34
CX-9_8GC7-EE-17G_Edition1 2017-5-16 8:22:04

▼ Junior Seat Installation Position
A junior seat is used in the front-facingposition only.
Refer to the table, “Child-Restraint SystemSuitability for Various Seat Positions” forjunior seat installation position (page 2-36).
WARNING
Always install a junior seat in the correctseat position:Installing a junior seat without firstconsulting the table “Child-RestraintSystem Suitability for Various SeatPositions” is dangerous. A junior seatinstalled on the wrong seat position cannotbe properly secured. In a collision, the childcould hit something or someone in thevehicle and be seriously injured or evenkilled.
Do not install a front-facing child-restraintsystem on the front passenger seat unless itis unavoidable:In a collision, the force of a deploying airbag could cause serious injury or death tothe child. If installing a front-facingchild-restraint system on the frontpassenger seat is unavoidable, move thefront passenger seat as far back as possibleand adjust the seat bottom (heightadjustable seat bottom) to the highestposition at which the seat belt fasteningthe child-restraint system is securelytightened.
Essential Safety Equipment
Child Restraint
2-35
CX-9_8GC7-EE-17G_Edition1 2017-5-16 8:22:04

Child-Restraint System Suitability for Various SeatPositions Table
(Europe and countries conforming to the UNECE 16 regulation)Provided information in the table shows your child-restraint system suitability for variousseating position. For installation suitability of other manufacturer child-restraint system,carefully consult the manufacturer's instructions which accompany the child-restraintsystem.When installing a child-restraint system, the following points must be observed:
• If the child-restraint system does not fit into the seatback because of the head restraint,adjust the head restraint or remove the head restraint so that the child-restraint system fitsinto the seatback. However, when installing a booster seat, always install the vehicle headrestraint to the seat where the booster seat is installed.Refer to Head Restraints on page 2-17.
• When installing a child-restraint system to the rear seat, adjust the front seat position sothat the front seat does not contact the child-restraint system.Refer to Seat Operation on page 2-5.
• When installing a child-restraint system came equipped with a tether, remove the headrestraint.Refer to Head Restraints on page 2-17.
ISOFIX anchor-secured child-restraint systems
When installing a child-restraint system to the rear seat, refer to the child-restraint systemmanufacturer's instructions and the Using ISOFIX Anchor on page 2-41.
Mass group Size Class FixtureVehicle ISOFIX positions
Second-row seat (Outboard)
CarrycotF ISO/L1 XG ISO/L2 X
(1) X
GROUP 0Up to 10 kg (up to 22 lb)
E ISO/R1 IL(1) X
GROUP 0Up to 13 kg (up to 29 lb)
E ISO/R1 ILD ISO/R2 ILC ISO/R3 IL
(1) X
Essential Safety Equipment
Child Restraint
2-36
CX-9_8GC7-EE-17G_Edition1 2017-5-16 8:22:04

Mass group Size Class FixtureVehicle ISOFIX positions
Second-row seat (Outboard)
GROUP 19 kg ― 18 kg (20 lb ― 40
lb)
D ISO/R2 ILC ISO/R3 ILB ISO/F2 IUFB1 ISO/F2X IUFA ISO/F3 IUF
(1) XGROUP 2
15 kg ― 25 kg (33 lb ― 55lb)
(1) X
GROUP 322 kg ― 36 kg (48 lb ― 79
lb)(1) X
(1) For the CRS which do not carry the ISO/XX size class identification (A to G), for the applicable mass group, thecar manufacturer shall indicate the vehicle specific ISOFIX child-restraint system(s) recommended for eachposition.Key of letters to be inserted in the above table:IUF = suitable for ISOFIX forward child-restraints systems of universal category approved for use in this massgroup.IL = suitable for particular ISOFIX child-restraint systems (CRS).These ISOFIX CRS are those of the “specific vehicle”, “restricted” or “semi-universal” categories.X = ISOFIX position not suitable for ISOFIX child-restraint systems in this mass group and/or this size class.
NOTEWhen installing a child-restraint system, the following points must be observed:
• Always remove the head restraint before installing a child-restraint system. However,when installing a booster seat, always install the vehicle head restraint to the seat wherethe booster seat is installed. In addition, always use a tether strap and attach it securely.Refer to Head Restraints on page 2-17.
• When installing a child-restraint system to the second-row seat, adjust the front seatposition so that the front seat does not contact the child-restraint system. Refer to SeatOperation on page 2-5.
Essential Safety Equipment
Child Restraint
2-37
CX-9_8GC7-EE-17G_Edition1 2017-5-16 8:22:04
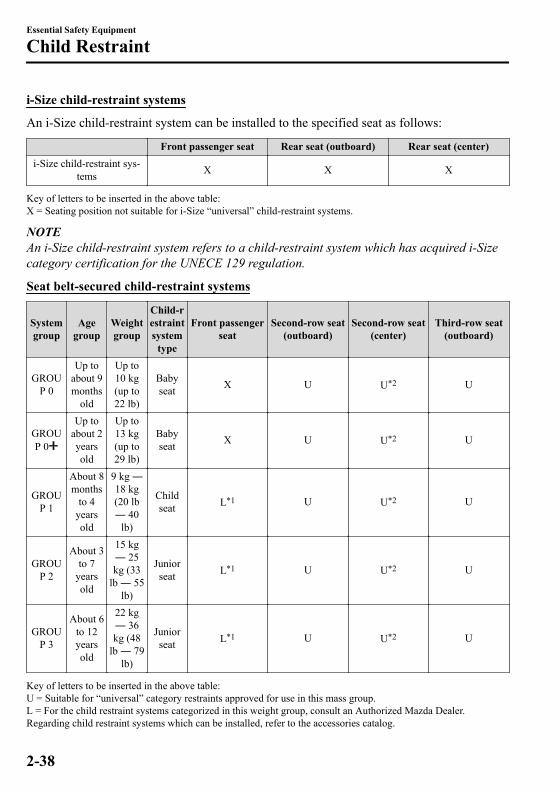
i-Size child-restraint systems
An i-Size child-restraint system can be installed to the specified seat as follows:
Front passenger seat Rear seat (outboard) Rear seat (center)i-Size child-restraint sys-
tems X X X
Key of letters to be inserted in the above table:X = Seating position not suitable for i-Size “universal” child-restraint systems.
NOTEAn i-Size child-restraint system refers to a child-restraint system which has acquired i-Sizecategory certification for the UNECE 129 regulation.
Seat belt-secured child-restraint systems
Systemgroup
Agegroup
Weightgroup
Child-restraintsystem
type
Front passengerseat
Second-row seat(outboard)
Second-row seat(center)
Third-row seat(outboard)
GROUP 0
Up toabout 9months
old
Up to10 kg(up to22 lb)
Babyseat X U U*2 U
GROUP 0
Up toabout 2yearsold
Up to13 kg(up to29 lb)
Babyseat X U U*2 U
GROUP 1
About 8months
to 4yearsold
9 kg ―18 kg(20 lb― 40
lb)
Childseat L*1 U U*2 U
GROUP 2
About 3to 7
yearsold
15 kg― 25kg (33
lb ― 55lb)
Juniorseat L*1 U U*2 U
GROUP 3
About 6to 12yearsold
22 kg― 36kg (48
lb ― 79lb)
Juniorseat L*1 U U*2 U
Key of letters to be inserted in the above table:U = Suitable for “universal” category restraints approved for use in this mass group.L = For the child restraint systems categorized in this weight group, consult an Authorized Mazda Dealer.Regarding child restraint systems which can be installed, refer to the accessories catalog.
Essential Safety Equipment
Child Restraint
2-38
CX-9_8GC7-EE-17G_Edition1 2017-5-16 8:22:04

X = Seat position not suitable for children in this mass group.*1 A Mazda genuine child restraint system can be installed in the forward-facing position.*2 When a child-restraint system is installed to the rear center seat, do not seat occupants in the rear left outboard
seat position.
NOTEWhen installing a child-restraint system, the following points must be observed:
• (Second-row seat)Always remove the head restraint before installing a child-restraint system. However,when installing a booster seat, always install the vehicle head restraint to the seat wherethe booster seat is installed. In addition, always use a tether strap and attach it securely.Refer to Head Restraints on page 2-17.
• When installing a child-restraint system to the second-row seat, adjust the front seatposition so that the front seat does not contact the child-restraint system. Refer to SeatOperation on page 2-5.
• When installing a child-restraint system to the third-row seat, adjust the second-row seatposition so that the second-row seat does not contact the child-restraint system. Refer toSeat Operation on page 2-5.
(Other countries)Please comply with the legal regulations concerning the use of child-restraint systems inyour country.
Essential Safety Equipment
Child Restraint
2-39
CX-9_8GC7-EE-17G_Edition1 2017-5-16 8:22:04

Installing Child-RestraintSystems
▼ Anchor Bracket
Anchor brackets for securingchild-restraint systems are equipped in thevehicle. Locate each anchor position usingthe illustration.To install a child-restraint system, removethe head restraint. Always follow theinstruction manual accompanying thechild-restraint system. Anchor bracket locationUse the indicated anchor bracket locationswhen installing a child-restraint systemequipped with a tether.
For right
For left
Second-row seat
WARNING
Always attach the tether strap to thecorrect tether anchor position:Attaching the tether strap to the incorrecttether anchor position is dangerous. In acollision, the tether strap could come offand loosen the child-restraint system. If thechild-restraint system moves it could resultin death or injury to the child.
Always remove the head restraint andinstall child-restraint system:Installing a child-restraint system withoutremoving the head restraint is dangerous.The child-restraint system cannot beinstalled correctly which may result indeath or injury to the child in a collision.
Tether strap
Forward
Always install the head restraint and adjustit to the appropriate position afterremoving the child-restraint system:Driving with the head restraint removed isdangerous as impact to the occupant'shead cannot be prevented duringemergency braking or in a collision, whichcould result in a serious accident, injury ordeath.Refer to Head Restraints on page 2-17.
▼ Using the Seat Belt
When installing a child-restraint system,follow the installation instructionsincluded with the product.In addition, remove the head restraint(except third-row seat). However, wheninstalling a booster seat, always install thevehicle head restraint to the seat where thebooster seat is installed.
Essential Safety Equipment
Child Restraint
2-40
CX-9_8GC7-EE-17G_Edition1 2017-5-16 8:22:04

▼ Using ISOFIX Anchor (Second-RowSeats)
WARNING
Follow the manufacturer's instructions forthe use of the child-restraint system:An unsecured child-restraint system isdangerous. In a sudden stop or a collision itcould move causing serious injury or deathto the child or other occupants. Make sureany child-restraint system is properlysecured in place according to themanufacturer's instructions.
Make sure the child-restraint system isproperly secured:A child-restraint system that is not securedis dangerous. In a sudden stop or collision,it can become a projectile and hit someone,causing serious injury. When not in use,remove it from the vehicle, put it in theluggage compartment or at least makesure it is securely fastened to the ISOFIXanchors.
Make sure there are no seat belts or foreignobjects near or around the ISOFIXanchor-secured child-restraint system:Not following the child-restraint systemmanufacturer's instructions wheninstalling the child-restraint system isdangerous. If seat belts or a foreign objectprevent the child-restraint system frombeing securely attached to the ISOFIXanchors and the child-restraint system isinstalled improperly, the child-restraintsystem could move in a sudden stop orcollision causing serious injury or death tothe child or other occupants. Wheninstalling the child-restraint system, makesure there are no seat belts or foreignobjects near or around the ISOFIX anchors.Always follow the child-restraint systemmanufacturer's instructions.
1. First, adjust the front seat to allowclearance between the child-restraintsystem and the front seat (page 2-5).
2. Adjust the second-row seat positionusing the following procedure.
Fold the second-row seatbackforward.
Raise the second-row seatback untila click sound is heard and it is lockedin place.
Essential Safety Equipment
Child Restraint
2-41
CX-9_8GC7-EE-17G_Edition1 2017-5-16 8:22:04

3. Make sure the seatback is securelylatched by pushing it back until it isfully locked.
4. Expand the area between the seatbottom and the seatback slightly toverify the locations of the ISOFIXanchor.
NOTEThe markings above the ISOFIXanchors indicate the locations of theISOFIX anchors for the attachment ofa child-restraint system.
5. Remove the head restraint. However,when installing a booster seat, alwaysinstall the vehicle head restraint to theseat where the booster seat is installed.Refer to Head Restraints on page 2-17.
6. Secure the child-restraint system usingthe ISOFIX anchor, following thechild-restraint system manufacturer'sinstruction.
7. If your child-restraint system cameequipped with a tether, that probablymeans it is very important to properlysecure the tether for child safety.Please carefully follow thechild-restraint system manufacturer'sinstructions when installing tethers(page 2-40).
WARNING
Always attach the tether strap to thecorrect tether anchor position:Attaching the tether strap to the incorrecttether anchor position is dangerous. In acollision, the tether strap could come offand loosen the child-restraint system. If thechild-restraint system moves it could resultin death or injury to the child.
Essential Safety Equipment
Child Restraint
2-42
CX-9_8GC7-EE-17G_Edition1 2017-5-16 8:22:04

Always remove the head restraint andinstall child-restraint system (except wheninstalling a booster seat):Installing a child-restraint system withoutremoving the head restraint is dangerous.The child-restraint system cannot beinstalled correctly which may result indeath or injury to the child in a collision.
Tether strap
Forward
Always install the head restraint and adjustit to the appropriate position afterremoving the child-restraint system:Driving with the head restraint removed isdangerous as impact to the occupant'shead cannot be prevented duringemergency braking or in a collision, whichcould result in a serious accident, injury ordeath.Refer to Head Restraints on page 2-17.
Essential Safety Equipment
Child Restraint
2-43
CX-9_8GC7-EE-17G_Edition1 2017-5-16 8:22:04

Supplemental Restraint System (SRS) PrecautionsThe front and side supplemental restraint systems (SRS) include different types of air bags.Please verify the different types of air bags which are equipped on your vehicle bylocating the “SRS AIRBAG” location indicators. These indicators are visible in the areawhere the air bags are installed.The air bags are installed in the following locations:
• The steering wheel hub (driver air bag)• The front passenger dashboard (front passenger air bag)• The outboard sides of the front seatbacks (side air bags)• The front and rear window pillars, and the roof edge along both sides (curtain air bags)
Vehicles for Europe have a sensor which detects an impending roll-over accident. The air bag supplemental restraint systems are designed to provide supplemental protectionin certain situations so seat belts are always important in the following ways: Without seat belt usage, the air bags cannot provide adequate protection during an accident.Seat belt usage is necessary to:
• Keep the occupant from being thrown into an inflating air bag.• Reduce the possibility of injuries during an accident that is not designed for air bag
inflation, such as rear impact.• Reduce the possibility of injuries in frontal, near frontal or side collisions or roll-over
accidents that are not severe enough to activate the air bags.• Reduce the possibility of being thrown from your vehicle.• Reduce the possibility of injuries to lower body and legs during an accident because the
air bags provide no protection to these parts of the body.• Hold the driver in a position which allows better control of the vehicle.
A child who is too small to use a seat belt must be properly secured using a child-restraintsystem (page 2-27). Carefully consider which child-restraint system is necessary for your child and follow theinstallation directions in this Owner's Manual as well as the child-restraint systemmanufacturer's instructions.
Essential Safety Equipment
SRS Air Bags
2-44
CX-9_8GC7-EE-17G_Edition1 2017-5-16 8:22:04

WARNING
Seat belts must be worn in air bag equipped vehicles:Depending only on the air bags for protection during an accident is dangerous. Alone, airbags may not prevent serious injuries. The appropriate air bags can be expected to inflateonly in the first accident, such as frontal, near frontal or side collisions or roll-over accidentsthat are at least moderate. Vehicle occupants should always wear seat belts.
Children should not ride in the front passenger seat:Placing a child, 12 years or under, in the front seat is dangerous. The child could be hit by adeploying air bag and be seriously injured or even killed. A sleeping child is more likely to leanagainst the door and be hit by the side air bag in moderate collision to the front-passengerside of the vehicle. Whenever possible, always secure a child 12 years and under on the rearseats with an appropriate child-restraint system for the child's age and size.
Extreme Hazard! Never use a rear-facing child-restraint system on the front passenger seatwith an air bag that could deploy:NEVER use a rearward facing child restraint on a seat protected by an ACTIVE AIRBAG in frontof it, DEATH or SERIOUS INJURY to the CHILD can occur.Even in a moderate collision, the child-restraint system can be hit by a deploying air bag andmoved violently backward resulting in serious injury or death to the child.
Do not sit too close to the driver and front passenger air bags:Sitting too close to the driver and front passenger air bag modules or placing hands or feet onthem is extremely dangerous. The driver and front passenger air bags inflate with great forceand speed. Serious injuries could occur if someone is too close. The driver should always holdonto only the rim of the steering wheel. The front seat passenger should keep both feet on thefloor. Front seat occupants should adjust their seats as far back as possible and always situpright against the seatbacks with seat belts worn properly.
Essential Safety Equipment
SRS Air Bags
2-45
CX-9_8GC7-EE-17G_Edition1 2017-5-16 8:22:04

Sit in the center of the seat and wear seat belts properly:Sitting too close to the side air bag modules or placing hands on them, or sleeping up againstthe door or hanging out the windows is extremely dangerous. The side and curtain air bagsinflate with great force and speed directly expanding along the door on the side the car is hit.Serious injury could occur if someone is sitting too close to the door or leaning against awindow, or if rear seat occupants grab the sides of the front seatbacks. Give the side andcurtain air bags room to work by sitting in the center of the seat while the vehicle is movingwith seat belts worn properly.
Do not attach objects on or around the area where driver and front passenger air bagsdeploy:Attaching an object to the driver and front passenger air bag modules or placing somethingin front of them is dangerous. In an accident, an object could interfere with air bag inflationand injure the occupants.
Do not attach objects on or around the area where a side air bag deploys:Attaching objects to the front seat in such a way as to cover the outboard side of the seat inany way is dangerous. In an accident the object could interfere with the side air bag, whichinflates from the outboard side of the front seats, impeding the added protection of the sideair bag system or redirecting the air bag in a way that is dangerous. Furthermore, the bagcould be cut open releasing the gas.Do not hang net bags, map pouches or backpacks with side straps on the front seats. Neveruse seat covers on the front seats. Always keep the side air bag modules in your front seatsfree to deploy in the event of a side collision.
Do not attach objects on or around the area where a curtain air bag deploys:Attaching objects to the areas where the curtain air bag activates such as on the windshieldglass, side door glass, front and rear window pillars and along the roof edge and assist grips isdangerous. In an accident the object could interfere with the curtain air bag, which inflatesfrom the front and rear window pillars and along the roof edge, impeding the addedprotection of the curtain air bag system or redirecting the air bag in a way that is dangerous.Furthermore, the bag could be cut open releasing the gas.Do not place hangers or any other objects on the assist grips. When hanging clothes, hangthem on the coat hook directly. Always keep the curtain air bag modules free to deploy in theevent of a side collision or roll-over accident.
Do not touch the components of the supplemental restraint system after the air bags haveinflated:Touching the components of the supplemental restraint system after the air bags haveinflated is dangerous. Immediately after inflation, they are very hot. You could get burned.
Essential Safety Equipment
SRS Air Bags
2-46
CX-9_8GC7-EE-17G_Edition1 2017-5-16 8:22:04

Never install any front-end equipment to your vehicle:Installation of front-end equipment, such as frontal protection bar (kangaroo bar, bull bar,push bar, or other similar devices), snowplow, or winches, is dangerous. The air bag crashsensor system could be affected. This could cause air bags to inflate unexpectedly, or it couldprevent the air bags from inflating during an accident. Front occupants could be seriouslyinjured.
Do not modify the suspension:Modifying the vehicle suspension is dangerous. If the vehicle's height or the suspension ismodified, the vehicle will be unable to accurately detect a collision or roll-over accidentresulting in incorrect or unexpected air bag deployment and the possibility of serious injuries.
To prevent false detection by the air bag sensor system, heed the following:
Do not use tires or wheels other than those specified for your Mazda:Use of any tire or wheel other than those specified for your Mazda (page 9-7) isdangerous. Use of such wheels will prevent the vehicle's accident detections system fromaccurately detecting a collision or roll-over accident resulting in incorrect or unexpected airbag deployment and the possibility of serious injuries.Do not overload your vehicle:
Overloading your vehicle is dangerous as it could prevent the air bag crash sensor systemfrom accurately detecting a collision or roll-over accident resulting in incorrect orunexpected air bag deployment and the possibility of serious injuries. The gross axle weightrating (GAWR) and the gross vehicle weight rating (GVWR) for your vehicle are on the MotorVehicle Safety Standard Label on the driver's door frame. Do not exceed these ratings.Do not drive the vehicle off-road:
Driving your Mazda off-road is dangerous because the vehicle has not been designed to doso. Driving the vehicle off-road could prevent the air bag crash sensor system fromaccurately detecting a collision or roll-over accident resulting in incorrect or unexpected airbag deployment and the possibility of serious injuries.
Do not modify the supplemental restraint system:Modifying the components or wiring of the supplemental restraint system is dangerous. Youcould accidentally activate it or make it inoperable. Do not make any modifications to thesupplemental restraint system. This includes installing trim, badges, or anything else over theair bag modules. It also includes installing extra electrical equipment on or near systemcomponents or wiring. An expert repairer, we recommend an Authorized Mazda Repairer canprovide the special care needed in the removal and installation of front seats. It is importantto protect the air bag wiring and connections to assure that the bags do not accidentallydeploy and the seats retain an undamaged air bag connection.
Essential Safety Equipment
SRS Air Bags
2-47
CX-9_8GC7-EE-17G_Edition1 2017-5-16 8:22:04

Do not place luggage or other objects under the front seats:Placing luggage or other objects under the front seats is dangerous. The componentsessential to the supplemental restraint system could be damaged, and in the event of a sidecollision, the appropriate air bags may not deploy, which could result in death or seriousinjury. To prevent damage to the components essential to the supplemental restraint system,do not place luggage or other objects under the front seats.
Do not operate a vehicle with damaged air bag/seat belt pretensioner system components:Expended or damaged air bag/seat belt pretensioner system components must be replacedafter any collision which caused them to deploy or damage them. Only a trained expertrepairer, we recommend an Authorized Mazda Repairer can fully evaluate these systems tosee that they will work in any subsequent accident. Driving with an expended or damaged airbag or pretensioner unit will not afford you the necessary protection in the event of anysubsequent accident which could result in serious injury or death.
Do not remove interior air bag parts:Removing any components such as the front seats, front dashboard, the steering wheel orparts on the front and rear window pillars and along the roof edge, containing air bag partsor sensors is dangerous. These parts contain essential air bag components. The air bag couldaccidentally activate and cause serious injuries. Always have an Authorized Mazda Repairerremove these parts.
Properly dispose of the air bag system:Improper disposal of an air bag or a vehicle with live air bags in it can be extremelydangerous. Unless all safety procedures are followed, injury could result. Have an expertrepairer, we recommend an Authorized Mazda Repairer safely dispose of the air bag systemor scrap an air bag equipped vehicle.
NOTE• When an air bag deploys, a loud inflation noise can be heard and some smoke will be
released. Neither is likely to cause injury, however, the texture of the air bags may causelight skin injuries on body parts not covered with clothing through friction.
• Should you sell your Mazda, we urge you to tell the new owner of its air bag systems andthat familiarization with all instructions about them, from the Owner's Manual, isimportant.
Essential Safety Equipment
SRS Air Bags
2-48
CX-9_8GC7-EE-17G_Edition1 2017-5-16 8:22:04

• This highly-visible label warns against the use of a rear-facing child-restraint system onthe front passenger seat.
(Except Taiwan) (Taiwan)
(Taiwan, except front passenger seat, if equipped with the following label)The highly-visible labels warn against the use of a rear-facing child-restraint system onthe seat protected by an air bag.
Essential Safety Equipment
SRS Air Bags
2-49
CX-9_8GC7-EE-17G_Edition1 2017-5-16 8:22:04

Supplemental Restraint System Components
Driver/Front passenger inflators and air bags Roll-over sensor*, crash sensors, and diagnostic module (SAS unit) Seat belt pretensioners (page 2-25) Front air bag sensors Side crash sensors Air bag/front seat belt pretensioner system warning light (page 4-33) Side and curtain inflators and air bags
Essential Safety Equipment
SRS Air Bags
2-50 *Some models.
CX-9_8GC7-EE-17G_Edition1 2017-5-16 8:22:04

How the SRS Air Bags WorkYour Mazda is equipped with the following types of SRS air bags. SRS air bags aredesigned to work together with the seat belts to help to reduce injuries during an accident.The SRS air bags are designed to provide further protection for passengers in addition to theseat belt functions. Be sure to wear seat belts properly.
▼ Front Seat Belt Pretensioners
The front seat belt pretensioners are designed to deploy in moderate or severe frontal, nearfrontal collisions.In addition, the pretensioners operate when a side collision (only on the side in which thecollision occurs) or a roll-over accident is detected. The pretensioners operate differentlydepending on what types of air bags are equipped. For more details about seat beltpretensioner operation, refer to the SRS Air Bag Deployment Criteria (page 2-55).
▼ Driver Air Bag
The driver's air bag is mounted in the steering wheel.When air bag crash sensors detect a frontal impact of greater than moderate force, thedriver's air bag inflates quickly helping to reduce injury mainly to the driver's head or chestcaused by directly hitting the steering wheel.For more details about air bag deployment, refer to "SRS Air Bag Deployment Criteria"(page 2-55).
Essential Safety Equipment
SRS Air Bags
2-51
CX-9_8GC7-EE-17G_Edition1 2017-5-16 8:22:04

▼ Front Passenger Air Bag
The front passenger air bag is mounted in the front passenger dashboard.The inflation mechanism for the front passenger air bag is the same as the driver's air bag.For more details about air bag deployment, refer to "SRS Air Bag Deployment Criteria"(page 2-55).
▼ Side Air Bags
The side air bags are mounted in the outboard sides of the front seatbacks.When the air bag crash sensors detect a side impact of greater than moderate force, thesystem inflates the side air bag only on the side in which the vehicle was hit. The side airbag inflates quickly to reduce injury to the driver or front passenger's chest caused bydirectly hitting interior parts such as a door or window.For more details about air bag deployment, refer to "SRS Air Bag Deployment Criteria"(page 2-55).
Essential Safety Equipment
SRS Air Bags
2-52
CX-9_8GC7-EE-17G_Edition1 2017-5-16 8:22:04

▼ Curtain Air Bags
The curtain air bags are mounted in the front and rear window pillars, and the roof edgealong both sides.When the air bag crash sensors detect a side impact of greater than moderate force, thecurtain air bag inflates quickly and helps to reduce injury mainly to the rear outboardpassenger's head caused by directly hitting interior parts such as a door or window.For more details about air bag deployment, refer to "SRS Air Bag Deployment Criteria"(page 2-55).In a side impact:Greater than moderate impact to one side of the vehicle will cause the curtain air bag on thatside only to inflate.
Only one side curtain air bag will deploy on the side of the vehicle that receives the force of an impact.
(European models)In a roll-over:In response to a vehicle roll-over, both curtain air bags inflate.
Both curtain air bags will deploy after the roll-over accident is detected.
Essential Safety Equipment
SRS Air Bags
2-53
CX-9_8GC7-EE-17G_Edition1 2017-5-16 8:22:04

▼ Warning Light/Beep
A system malfunction or operation conditions are indicated by a warning.Refer to Warning/Indicator Lights on page 4-32.Refer to Warning Sound is Activated on page 7-55.
Essential Safety Equipment
SRS Air Bags
2-54
CX-9_8GC7-EE-17G_Edition1 2017-5-16 8:22:04

SRS Air Bag Deployment CriteriaThis chart indicates the applicable SRS equipment that will deploy depending on the type ofcollision.(The illustrations are the representative cases of collisions.)
SRS equip-ment
Types of collisionA severe frontal/near frontal colli-
sionA severe side colli-
sion*1A roll-over/near
roll-over*2 A rear collision
Front seatbelt preten-
sionerX (both sides) X (impact side on-
ly) X (both sides)
No air bag andfront seat belt pre-tensioner will beactivated in a rearcollision.
Driver airbag X
Front pas-senger air
bagX
Side air bag X (impact side on-ly)
Curtain airbag
X (impact side on-ly) X (both sides)
X: The SRS air bag equipment is designed to deploy in a collision.*1 In a side collision, the seat belt pretensioners and the side/curtain air bags deploy (only on the side in which the
collision occurs).*2 (European models)
In a roll-over accident, the seat belt pretensioners and the curtain air bags deploy.
NOTEIn a frontal offset collision, the equipped air bags and pretensioners may all deploydepending on the direction, angle, and rate of impact.
Essential Safety Equipment
SRS Air Bags
2-55
CX-9_8GC7-EE-17G_Edition1 2017-5-16 8:22:04

Limitations to SRS Air BagIn severe collisions such as those described previously in "SRS Air Bag DeploymentCriteria", the applicable SRS air bag equipment will deploy. However, in some accidents,the equipment may not deploy depending on the type of collision and its severity. Limitations to front/near front collision detection:The following illustrations are examples of front/near front collisions that may not bedetected as severe enough to deploy the SRS air bag equipment.
Impacts involving trees or poles Frontal offset impact to the vehicle
Rear-ending or running under a truck's tail gate
Essential Safety Equipment
SRS Air Bags
2-56
CX-9_8GC7-EE-17G_Edition1 2017-5-16 8:22:04

Limitations to side collision detection:The following illustrations are examples of side collisions that may not be detected assevere enough to deploy the SRS air bag equipment.
Side impacts involving trees or poles Side impacts with two-wheeled vehicles
Roll-over (Except European models)
(European models)Limitations to roll-over detection:The following illustration is an example of an accident that may not be detected as aroll-over accident. Therefore, the front seat belt pretensioners and curtain air bags may notdeploy.
Pitch end over end
Essential Safety Equipment
SRS Air Bags
2-57
CX-9_8GC7-EE-17G_Edition1 2017-5-16 8:22:04

Constant MonitoringThe following components of the air bag systems are monitored by a diagnostic system:
• Front air bag sensors• Crash sensors, and diagnostic module (SAS unit)• Side crash sensors• Air bag modules• Front seat belt pretensioners• Air bag/Front seat belt pretensioner system warning light• Related wiring
The diagnostic module continuously monitors the system's readiness. This begins when theignition is switched ON and continues while the vehicle is being driven.
Essential Safety Equipment
SRS Air Bags
2-58
CX-9_8GC7-EE-17G_Edition1 2017-5-16 8:22:04

3 Before Driving
Use of various features, including keys, doors, mirrors and windows.
Keys.................................................... 3-2Keys..............................................3-2Keyless Entry System...................3-3
Advanced Keyless EntrySystem.................................................3-8
Advanced Keyless Entry System*........................................................... 3-8Operational Range........................ 3-9
Doors and Locks.............................. 3-10Door Locks................................. 3-10Liftgate....................................... 3-18
Fuel and Emission........................... 3-26Fuel and Engine ExhaustPrecautions................................. 3-26Fuel-Filler Lid and Cap.............. 3-29
Steering Wheel.................................3-31Steering Wheel........................... 3-31
Mirrors............................................. 3-32Mirrors........................................3-32
Windows........................................... 3-36Power Windows..........................3-36Sunroof*......................................3-39
Security System............................... 3-42Modification and Add-OnEquipment...................................3-42Immobilizer System....................3-42Theft-Deterrent System*.............3-44
Driving Tips..................................... 3-48Break-In Period.......................... 3-48Saving Fuel and Protection of theEnvironment............................... 3-48Hazardous Driving......................3-49Floor Mat.................................... 3-50Rocking the Vehicle....................3-51Winter Driving............................3-51Driving In Flooded Area............ 3-54Turbocharger Information.......... 3-55
Towing.............................................. 3-56Towing Caravans and Trailers(Russia).......................................3-56
*Some models. 3-1
CX-9_8GC7-EE-17G_Edition1 2017-5-16 8:22:04

Keys
WARNING
Do not leave the key in your vehicle withchildren and keep them in a place whereyour children will not find or play withthem:Leaving children in a vehicle with the key isdangerous. This could result in someonebeing badly injured or even killed. Childrenmay find these keys to be an interesting toyto play with and could cause the powerwindows or other controls to operate, oreven make the vehicle move.
CAUTIONBecause the key (transmitter) uses
low-intensity radio waves, it may notfunction correctly under the followingconditions:
The key is carried with communicationdevices such as cellular phones.The key contacts or is covered by a
metal object.The key is near electronic devices such
as personal computers.Non-Mazda genuine electronic
equipment is installed in the vehicle.There is equipment which discharges
radio waves near the vehicle.The key (transmitter) may consume
battery power excessively if it receiveshigh-intensity radio waves. Do not placethe key near electronic devices such astelevisions or personal computers.
To avoid damage to the key(transmitter), DO NOT:
Drop the key.Get the key wet.Disassemble the key.Expose the key to high temperatures
on places such as the dashboard orhood, under direct sunlight.Expose the key to any kind of magnetic
field.Place heavy objects on the key.Put the key in an ultrasonic cleaner.Put any magnetized objects close to
the key.
A code number is stamped on the plateattached to the key set; detach this plateand store it in a safe place (not in thevehicle) for use if you need to make areplacement key (auxiliary key).Also write down the code number andkeep it in a separate safe and convenientplace, but not in the vehicle. If your key (auxiliary key) is lost, consultyour Authorized Mazda Repairer and haveyour code number ready.
Before Driving
Keys
3-2
CX-9_8GC7-EE-17G_Edition1 2017-5-16 8:22:04

NOTEThe driver must carry the key to ensure thesystem functions properly.
Auxiliary keyTransmitter
Key code number plate
To use the auxiliary key, pull out theauxiliary key from the transmitter whilepressing the knob.
Knob
Keyless Entry SystemThis system uses the key buttons toremotely lock and unlock the doors andthe liftgate, and opens/closes the liftgate.The system can start the engine withouthaving to take the key out of your purse orpocket.Operating the theft-deterrent system isalso possible on theft-deterrentsystem-equipped vehicles. System malfunctions or warnings areindicated by the following warning lightsor beeps.For vehicles with the type A instrumentcluster, check the displayed message formore information and, if necessary, havethe vehicle inspected at an expert repairer,we recommend an Authorized MazdaRepairer, according to the indication.
• KEY Warning Light (Red)Refer to Warning/Indicator Lights onpage 4-32.
• Ignition Not Switched Off (STOP)Warning BeepRefer to Ignition Not Switched Off(STOP) Warning Beep on page 7-56.
• Key Removed from Vehicle WarningBeepRefer to Key Removed from VehicleWarning Beep on page 7-56.
If you have a problem with the key,consult an expert repairer, we recommendan Authorized Mazda Repairer. If your key is lost or stolen, consult anAuthorized Mazda Repairer as soon aspossible for a replacement and to make thelost or stolen key inoperative.
Before Driving
Keys
3-3
CX-9_8GC7-EE-17G_Edition1 2017-5-16 8:22:04

CAUTIONChanges or modifications not expresslyapproved by the party responsible forcompliance could void the user's authorityto operate the equipment.
NOTE• The keyless entry system operation may
vary due to local conditions.• The keyless entry system is fully
operational (door/liftgate lock/unlock)when the ignition is switched off. Thesystem does not operate if the ignition isswitched to any position other than off.
• If the key does not operate whenpressing a button or the operationalrange becomes too small, the batterymay be weak. To install a new battery,refer to Key Battery Replacement (page6-33).
• Battery life is about one year. Replacethe battery with a new one if the KEYindicator light (green) flashes in theinstrument cluster (for vehicles with atype A instrument cluster (page 4-32),messages are displayed in theinstrument cluster). Replacing thebattery about once a year isrecommended because the KEY warninglight/indicator light may not illuminateor flash depending on the rate of batterydepletion.
• Additional keys can be obtained at anAuthorized Mazda Repairer. Up to 6keys can be used with the keylessfunctions per vehicle. Bring all keys toan Authorized Mazda Repairer whenadditional keys are required.
▼ Transmitter
Operation buttons
Operation indicator light
NOTE• The headlights turn on/off by operating
the transmitter. Refer to Leaving HomeLight on page 4-53.
• (With theft-deterrent system)The hazard warning lights flash whenthe theft-deterrent system is armed orturned off.Refer to Theft-Deterrent System on page3-44.
• (With the advanced keyless function(European models))The setting can be changed so that abeep sound is heard for confirmationwhen the doors and the liftgate arelocked/unlocked using the key.
Before Driving
Keys
3-4
CX-9_8GC7-EE-17G_Edition1 2017-5-16 8:22:04

(With the advanced keyless function(Except European models))A beep sound can be heard forconfirmation when the doors and theliftgate are locked/unlocked using thekey. If you prefer, the beep sound can beturned off.The volume of the beep sound can alsobe changed.Refer to Personalization Features onpage 9-10.
Use the following procedure to change thesetting.1. Switch the ignition off and close all of
the doors and the liftgate.2. Open the driver's door.3. Within 30 seconds of opening the
driver's door, press and hold the LOCKbutton on the key for 5 seconds orlonger.The beep sound activates at thecurrently set volume. The settingchanges each time the LOCK button onthe key is pressed and the beep soundactivates at the set volume. (If the beepsound has been set to not activate, itwill not activate.)
4. The setting change is completed bydoing any one of the following:
• Switching the ignition to ACC orON.
• Closing the driver's door.• Opening the liftgate.• Not operating the key for ten
seconds.• Pressing any button except the
LOCK button on the key.• Pressing a request switch.
The operation indicator light flashes whenthe buttons are pressed.
Lock button
To lock the doors and the liftgate, press thelock button and the hazard warning lightswill flash once.(With the advanced keyless function(Except European models))A beep sound will be heard once.
NOTE• (European models)
The doors and the liftgate cannot belocked by pressing the lock button whileany other door is open. The hazardwarning lights will also not flash.(Except European models)The doors and the liftgate cannot belocked by pressing the lock button whileany other door or the liftgate is open.The hazard warning lights will also notflash.
• Make sure all doors and the liftgate arelocked after pressing the button.
• (With theft-deterrent system)When the doors are locked by pressingthe lock button on the key while thetheft-deterrent system is armed, thehazard warning lights will flash once toindicate that the system is armed.
Before Driving
Keys
3-5
CX-9_8GC7-EE-17G_Edition1 2017-5-16 8:22:04

Unlock button
To unlock the doors and the liftgate, pressthe unlock button and the hazard warninglights will flash twice.(With the advanced keyless function(Except European models))A beep sound will be heard twice.
NOTE• (Auto re-lock function)
After unlocking with the key, all doorsand the liftgate will automatically lock ifany of the following operations are notperformed within about 30 seconds. Ifyour vehicle has a theft-deterrentsystem, the hazard warning lights willflash for confirmation.The time required for the doors to lockautomatically can be changed.Refer to Personalization Features onpage 9-10.
• A door or the liftgate is opened.• The ignition is switched to any
position other than off.• (With theft-deterrent system)
When the doors are unlocked bypressing the unlock button on the keywhile the theft-deterrent system is turnedoff, the hazard warning lights will flashtwice to indicate that the system isturned off.
Power liftgate button*
To open/close the liftgate, press the powerliftgate button for one second or more withthe liftgate in the fully closed/openposition.The hazard warning lights flash twice andthe liftgate opens/closes after the beepsounds.
Type A Type B
Intrusion sensor cancel button*
To cancel the intrusion sensor (part of thetheft-deterrent system), press the intrusionsensor cancel button within 20 secondsafter pressing the lock button and thehazard warning lights will flash threetimes.Refer to Theft-Deterrent System on page3-44.
▼ Operational Range
The system operates only when the driveris in the vehicle or within operationalrange while the key is being carried.
Starting the Engine
NOTE• Starting the engine may be possible even
if the key is outside of the vehicle andextremely close to a door and window,however, always start the engine fromthe driver's seat.
Before Driving
Keys
3-6 *Some models.
CX-9_8GC7-EE-17G_Edition1 2017-5-16 8:22:04

If the vehicle is started and the key is notin the vehicle, the vehicle will not restartafter it is shut off and the ignition isswitched to off.
• The luggage compartment is out of theassured operational range, however, ifthe key (transmitter) is operable theengine will start.
With the advanced keyless function
Interior antenna
Operational range
Without the advanced keyless function
Interior antenna
Operational range
NOTEThe engine may not start if the key isplaced in the following areas:
• Around the dashboard• In the storage compartments such as the
glove compartment or the center console
▼ Key Suspend Function
If a key is left in the vehicle, the functionsof the key left in the vehicle aretemporarily suspended to prevent theft ofthe vehicle.To restore the functions, press the unlockbutton on the functions-suspended key inthe vehicle.
Before Driving
Keys
3-7
CX-9_8GC7-EE-17G_Edition1 2017-5-16 8:22:04

Advanced Keyless EntrySystem*
WARNING
Radio waves from the key may affectmedical devices such as pacemakers:Before using the key near people who usemedical devices, ask the medical devicemanufacturer or your physician if radiowaves from the key will affect the device.
The advanced keyless function allows youto lock/unlock the door and the liftgate, oropen the liftgate while carrying the key. System malfunctions or warnings areindicated by the following warning beeps.
• Request switch Inoperable WarningBeepRefer to Request Switch InoperableWarning Beep (With the advancedkeyless function) on page 7-56.
• Key Left-in-luggage CompartmentWarning BeepRefer to Key Left-in-luggageCompartment Warning Beep (With theadvanced keyless function) on page 7-57.
• Key Left-in-vehicle Warning BeepRefer to Key Left-in-vehicle WarningBeep (With the advanced keylessfunction) on page 7-57.
NOTEThe advanced keyless entry systemfunctions can be deactivated to preventany possible adverse effect on a userwearing a pacemaker or other medicaldevice. If the system is deactivated, youwill be unable to start the engine bycarrying the key. Consult an expertrepairer, we recommend an AuthorizedMazda Repairer for details. If theadvanced keyless entry system has beendeactivated, you can start the engine byfollowing the procedure indicated whenthe key battery goes dead.Refer to Engine Start Function When KeyBattery is Dead on page 4-9.
Before Driving
Advanced Keyless Entry System
3-8 *Some models.
CX-9_8GC7-EE-17G_Edition1 2017-5-16 8:22:04

Operational RangeThe system operates only when the driveris in the vehicle or within operationalrange while the key is being carried.
NOTEWhen the battery power is low, or inplaces where there are high-intensity radiowaves or noise, the operational range maybecome narrower or the system may notoperate. For determining batteryreplacement, Refer to Keyless EntrySystem on page 3-3.
▼ Locking, Unlocking the Doors andthe Liftgate
Exterior antenna
Operational range
80cm (31in)
80cm (31in)
Lock
Exterior antenna
Operational range
80cm (31in)
80cm (31in)
Unlock
NOTE• The system may not operate if you are
too close to the windows or doorhandles, or liftgate.
• If the key is left in the following areasand you leave the vehicle, the doors maybe locked depending on the radio waveconditions even if the key is left in thevehicle.
• Around the dashboard• In the storage compartments such as
the glove compartment or the centerconsole
• Next to a communication device suchas a mobile phone
▼ Opening the Liftgate
Exterior antenna
80cm (31in)
Operational range
Before Driving
Advanced Keyless Entry System
3-9
CX-9_8GC7-EE-17G_Edition1 2017-5-16 8:22:04

Door Locks
WARNING
Always take all children and pets with youor leave a responsible person with them:Leaving a child or a pet unattended in aparked vehicle is dangerous. In hotweather, temperatures inside a vehicle canbecome high enough to cause braindamage or even death.
Do not leave the key in your vehicle withchildren and keep them in a place whereyour children will not find or play withthem:Leaving children in a vehicle with the key isdangerous. This could result in someonebeing badly injured or even killed.
Keep all doors locked when driving:Unlocked doors in a moving vehicle aredangerous. Passengers can fall out if adoor is accidentally opened and can moreeasily be thrown out in an accident.
Always close all the windows and sunroof,lock the doors and the liftgate and take thekey with you when leaving your vehicleunattended:Leaving your vehicle unlocked is dangerousas children could lock themselves in a hotvehicle, which could result in death. Also, avehicle left unlocked becomes an easytarget for thieves and intruders.
After closing the doors and the liftgate,always verify that they are securely closed:Doors and the liftgate not securely closedare dangerous, if the vehicle is driven witha door and the liftgate not securely closed,the door and the liftgate could openunexpectedly resulting in an accident.
Always confirm the safety around thevehicle before opening a door and theliftgate:Suddenly opening a door and the liftgate isdangerous. A passing vehicle or apedestrian could be hit and cause anaccident.
CAUTIONAlways confirm the conditions around
the vehicle before opening/closing thedoors and the liftgate and use cautionduring strong winds or when parked onan incline. Not being aware of theconditions around the vehicle isdangerous because fingers could getcaught in the door and the liftgate or apassing pedestrian could be hit, resultingin an unexpected accident or injury.
Before Driving
Doors and Locks
3-10
CX-9_8GC7-EE-17G_Edition1 2017-5-16 8:22:04

NOTE• Always stop the engine and lock the
doors. In addition, to prevent theft ofvaluables, do not leave them inside thecabin.
• If the key is left in the following areasand you leave the vehicle, the doors maybe locked depending on the radio waveconditions even if the key is left in thevehicle.
• Around the dashboard• In the storage compartments such as
the glove compartment or the centerconsole
• Next to a communication device suchas a mobile phone
• The vehicle lock-out prevention featureprevents you from locking yourself outof the vehicle.(European models)All doors and the liftgate willautomatically unlock if they are lockedusing the power door locks with anydoor open.If all the doors are closed even thoughthe liftgate is open, all the doors willlock.(Except European models)All doors and the liftgate willautomatically unlock if they are lockedusing the power door locks with anydoor or the liftgate open.
• (Door unlock (control) system withcollision detection)*
This system automatically unlocks thedoors and the liftgate in the event thevehicle is involved in an accident toallow passengers to get out of thevehicle immediately and prevent beingtrapped inside. While the ignition isswitched ON and in the event the vehiclereceives an impact strong enough toinflate the air bags, all the doors and theliftgate are automatically unlocked afterabout 6 seconds have elapsed from thetime of the accident.The doors and the liftgate may notunlock depending on how an impact isapplied, the force of the impact, andother conditions of the accident.If door-related systems or the battery ismalfunctioning, the doors and theliftgate will not unlock.
Before Driving
Doors and Locks
*Some models. 3-11
CX-9_8GC7-EE-17G_Edition1 2017-5-16 8:22:04

▼ Locking, Unlocking with AuxiliaryKey
All doors and the liftgate lockautomatically when the driver's door islocked using the auxiliary key. They allunlock when the driver's door is unlockedusing the auxiliary key.Turn the auxiliary key toward the front tolock, toward the back to unlock.
Lock Unlock
▼ Locking, Unlocking with RequestSwitch (With the advanced keylessfunction)
All doors and the liftgate can be locked/unlocked by pressing the request switch onthe front doors while the key is beingcarried.
The request switch on the liftgate can onlybe used to lock all doors and the liftgate.
Front doors
Request switch
Liftgate (Lock only)
Request switch
To lock
To lock the doors and the liftgate, press therequest switch and the hazard warninglights will flash once.(Except European models)A beep sound will be heard once.
To unlock
To unlock the doors and the liftgate, pressthe request switch on a front door and thehazard warning lights will flash twice.(Except European models)A beep sound will be heard twice.
Before Driving
Doors and Locks
3-12
CX-9_8GC7-EE-17G_Edition1 2017-5-16 8:22:04

NOTE• Confirm that all doors and the liftgate
are securely locked.For the liftgate, move it without pressingthe electric liftgate opener to verify thatthe liftgate has not been left ajar.
• (European models)All doors and the liftgate cannot belocked when any door is open.(Except European models)All doors and the liftgate cannot belocked when any door or the liftgate isopen.
• It may require a few seconds for thedoors to unlock after the request switchis pressed.
• (European models)The setting can be changed so that abeep sound is heard for confirmationwhen the doors and the liftgate arelocked/unlocked using a request switch.(Except European models)A beep sound is heard for confirmationwhen the doors and the liftgate arelocked/unlocked using the requestswitch. If you prefer, the beep sound canbe turned off.The volume of the beep sound can alsobe changed. Refer to PersonalizationFeatures on page 9-10.Use the following procedure to changethe setting.1. Switch the ignition off and close all
of the doors and the liftgate.2. Open the driver's door.
3. Within 30 seconds of opening thedriver's door, press and hold theLOCK button on the key for 5seconds or longer.The beep sound activates at thecurrently set volume. The settingchanges each time the LOCK buttonon the key is pressed and the beepsound activates at the set volume. (Ifthe beep sound has been set to notactivate, it will not activate.)
4. The setting change is completed bydoing any one of the following:
• Switching the ignition to ACC orON.
• Closing the driver's door.• Opening the liftgate.• Not operating the key for ten
seconds.• Pressing any button except the
LOCK button on the key.• Pressing a request switch.
• (With theft-deterrent system)The hazard warning lights flash whenthe theft-deterrent system is armed orturned off.Refer to Theft-Deterrent System on page3-44.
• The setting can be changed so that thedoors and the liftgate are lockedautomatically without pressing therequest switch.Refer to Personalization Features onpage 9-10.
Before Driving
Doors and Locks
3-13
CX-9_8GC7-EE-17G_Edition1 2017-5-16 8:22:04

(Auto-lock function)A beep sound is heard when all doorsand the liftgate are closed while theadvanced key is being carried. All doorsand the liftgate are locked automaticallyafter about three seconds when theadvanced key is out of the operationalrange. Also, the hazard warning lightsflash once. (Even if the driver is in theoperational range, all doors and theliftgate are locked automatically afterabout 30 seconds.) If you are out of theoperational range before the doors andthe liftgate are completely closed oranother key is left in the vehicle, theauto-lock function will not work. Alwaysmake sure that all doors and the liftgateare closed and locked before leaving thevehicle. The auto-lock function does notclose the power windows.
• Auto re-lock functionAfter unlocking with the request switch,all doors and the liftgate willautomatically lock if any of thefollowing operations are not performedwithin about 30 seconds. If your vehiclehas a theft-deterrent system, the hazardwarning lights will flash forconfirmation.The time required for the doors to lockautomatically can be changed.Refer to Personalization Features onpage 9-10.
• Opening a door or the liftgate.• Switching the ignition to any position
other than off.
▼ Locking, Unlocking withTransmitter
All doors and the liftgate can be locked/unlocked by operating the keyless entrysystem transmitter, refer to Keyless EntrySystem (page 3-3).
▼ Locking, Unlocking with Door-LockSwitch*
All doors and the liftgate lockautomatically when the lock side ispressed with all doors and the liftgateclosed.They all unlock when the unlock side ispressed.
Unlock
Lock
NOTEThe doors and the liftgate cannot belocked while any other door or the liftgateis open.
Before Driving
Doors and Locks
3-14 *Some models.
CX-9_8GC7-EE-17G_Edition1 2017-5-16 8:22:04

▼ Auto Lock/Unlock Function*
WARNING
Do not pull the inner handle on a frontdoor:Pulling the inner handle on a front doorwhile the vehicle is moving is dangerous.Passengers can fall out of the vehicle if thedoor opens accidentally , which couldresult in death or serious injury.
• When the vehicle speed exceeds 20km/h (12 mph), all doors and the liftgatelock automatically.
• When the ignition is switched off, alldoors and the liftgate unlockautomatically.
These functions can also be disabled sothat they do not operate.
Auto lock/unlock function settingchange using door-lock switch (Withdoor-lock switch)
The doors and the liftgate can be set tolock or unlock automatically by selectingany one of the functions from thefollowing table and using the door-lockswitch on the interior door panel.
NOTE• Function number 3 in the following
table is the factory setting for yourvehicle.
• There are only a total of six auto lock/unlock settings available. Be sure topress the unlock side of the door-lockswitch the correct number of timesaccording to the selected functionnumber. If the switch is mistakenlypressed seven times, the procedure willbe cancelled. If this occurs, start theprocedure from the beginning.
Functionnumber Function*1
1 The auto door-lock function is disa-bled.
2All the doors and the liftgate lock au-tomatically when the vehicle speed isabout 20 km/h (12 mph) or more.
3 (FactorySetting)
All the doors and the liftgate lock au-tomatically when the vehicle speed isabout 20 km/h (12 mph) or more. Allthe doors and the liftgate unlockwhen the ignition is switched fromON to Off.
4
When the ignition is switched ONand the selector lever is shifted frompark (P) to any other gear position, allthe doors and the liftgate lock auto-matically.
5
When the ignition is switched ONand the selector lever is shifted frompark (P) to any other gear position, allthe doors and the liftgate lock auto-matically.When the selector lever is shifted topark (P) while the ignition is switchedON, all the doors and the liftgate un-lock automatically.
Before Driving
Doors and Locks
*Some models. 3-15
CX-9_8GC7-EE-17G_Edition1 2017-5-16 8:22:04

Functionnumber Function*1
6
All the doors and the liftgate lock au-tomatically when the vehicle speed isabout 20 km/h (12 mph) or more.When the selector lever is shifted topark (P) while the ignition is switchedON, all the doors and the liftgate un-lock automatically.
*1 Other settings for the auto door lock function areavailable at an expert repairer, we recommendan Authorized Mazda Repairer. For detailsconsult an expert repairer, we recommend anAuthorized Mazda Repairer. Refer toPersonalization Features on page 9-10.
Settings can be changed using thefollowing procedure.1. Safely park the vehicle. All doors and
the liftgate must remain closed.2. Switch the ignition ON.3. Press and hold the lock side of the
door-lock switch within 20 seconds ofswitching the ignition ON, and makesure a beep sound is heard about eightseconds afterwards.
4. Refer to the auto lock/unlock functionsetting table, determine the functionnumber for the desired setting. Pressthe unlock side of the door-lock switchthe same number of times as theselected function number (Ex. If youselect function 2, press the unlock sideof the switch only 2 times).
5. Three seconds after the functionsetting has been changed, a beep soundwill beep in the amount of the selectedfunction number. (Ex. Functionnumber 3 = 3 beep sounds)
Press unlock side of lock switch once
Press 2 times
Press 3 times
Current Function Number
Function Number 1
Function Number 2
Press 4 times
Function Number 3
Press 5 times
Function Number 4
Press 7 times
Function Number 5
Press 6 times
Function Number 6
Cancel setting
Cancel setting
Function set (The number of beeps heard is the same as the selected function number)
Press lock side of lock switch
Wait for 3 second
NOTE• The doors and the liftgate cannot be
locked or unlocked while the settingfunction is being performed.
• The procedure can be cancelled bypressing the lock side of the door-lockswitch.
Before Driving
Doors and Locks
3-16
CX-9_8GC7-EE-17G_Edition1 2017-5-16 8:22:04

▼ Locking, Unlocking with Door-LockKnob
Operation from inside
(With door-lock switch)To lock any door from the inside, press thedoor-lock knob.To unlock, pull it outward.This does not operate the other door locks.(Without door-lock switch)All doors and the liftgate lockautomatically when the driver's door-lockknob is pressed. They all unlock when thedriver's door-lock knob is pulled out.
Lock
Unlock
Unlocked: Red indicator
Operation from outside
To lock the rear and front passenger doorswith the door-lock knob from the outside,press the door-lock knob to the lockposition and close the door (holding thedoor handle in the open position is notrequired).This does not operate the other door locks.
Door-lock knob
NOTEWhen locking the door this way:
• Be careful not to leave the key inside thevehicle.
• The driver's door lock knob cannot beused while the driver's door is open.
Before Driving
Doors and Locks
3-17
CX-9_8GC7-EE-17G_Edition1 2017-5-16 8:22:04

▼ Rear Door Child Safety Locks
These locks are intended to help preventchildren from accidentally opening therear doors. Use them on both rear doorswhenever a child rides in the rear seat ofthe vehicle. If you slide the child safety lock to thelock position before closing that door, thedoor cannot be opened from the inside.The door can only be opened by pullingthe outside handle.
Lock
Unlock
Liftgate
WARNING
Never allow a person to ride in the luggagecompartment:Allowing a person to ride in the luggagecompartment is dangerous. The person inthe luggage compartment could beseriously injured or killed during suddenbraking or a collision.
Do not drive with the liftgate open:Exhaust gas in the cabin of a vehicle isdangerous. An open liftgate in a movingvehicle will cause exhaust gas to be drawninto the cabin. This gas contains CO(carbon monoxide), which is colorless,odorless, and highly poisonous, and it cancause loss of consciousness and death.Moreover, an open liftgate could causeoccupants to fall out in an accident.
Do not stack or leave loaded luggageunsecured in the luggage compartment:Otherwise, the luggage may move orcollapse, resulting in injury or an accident.In addition, do not load luggage higherthan the seatbacks. It may affect the side orrear field of view.
CAUTIONBefore opening the liftgate, remove any
snow and ice accumulation on it.Otherwise, the liftgate could close underthe weight of the snow and ice resultingin injury.
Before Driving
Doors and Locks
3-18
CX-9_8GC7-EE-17G_Edition1 2017-5-16 8:22:04

Be careful when opening/closing theliftgate during strong winds. If a stronggust blows against the liftgate, it couldclose suddenly resulting in injury.Fully open the liftgate and make sure
that it stays open. If the liftgate is onlyopened partially, it could slam shut byvibration or wind gusts resulting ininjury.When loading or unloading luggage in
the luggage compartment, turn off theengine. Otherwise, you could get burnedby the heat of the exhaust gas.Be careful not to apply excessive force to
the damper stay on the liftgate such asby putting your hand on the stay.Otherwise, the damper stay may bendand affect the liftgate operation.
Damper stay
Do not modify or replace the liftgatedamper stay. Consult an expert repairer,we recommend an Authorized MazdaRepairer if a liftgate damper stay isdeformed or damaged for reasons suchas a collision or if there is some otherproblem.
▼ Opening and Closing the Liftgate
Opening the liftgate with Electricliftgate opener
Unlock the doors and liftgate, then pressthe electric liftgate opener on the liftgateand raise the liftgate when the latchreleases.For the power liftgate operation, refer toPower Liftgate on page 3-20.
Electric liftgate opener
NOTE(With the advanced keyless function)
• A locked liftgate can also be openedwhile the key is being carried.
• When opening the liftgate with the doorsand the liftgate locked, it may require afew seconds for the liftgate latch torelease after the electric liftgate openeris pressed.
• The liftgate can be closed when thedoors are locked with the key left in thevehicle. However, to prevent locking thekey in the vehicle, the liftgate can beopened by pressing the electric liftgateopener. If the liftgate cannot be openeddespite doing this procedure, first pushthe liftgate completely closed, then pressthe electric liftgate opener to fully openthe liftgate.
Before Driving
Doors and Locks
3-19
CX-9_8GC7-EE-17G_Edition1 2017-5-16 8:22:04

• When the liftgate latch is released bypressing the electric liftgate opener, theliftgate raises slightly. If the liftgate isnot operated for a certain period oftime, the liftgate cannot be raised.To openPress the electric liftgate opener again.To closeTo close the liftgate from its slightlyraised position, open it first by pressingthe electric liftgate opener, then close itafter waiting at least 1 second.
• If the liftgate is not fully closed, thedriver is notified by a warning indicatedin the instrument cluster.
• If the vehicle battery is dead or there isa malfunction in the electrical systemand the liftgate cannot be unlocked, theliftgate can be opened by performing theemergency procedure.Refer to When Liftgate Cannot beOpened on page 7-61.
Closing the liftgate
Lower the liftgate slowly using the liftgatehandle, then push the liftgate closed usingboth hands.Do not slam it. Pull up on the liftgate tomake sure it is secure.
For the power liftgate operation, refer toPower Liftgate on page 3-20.
Liftgate handle
NOTEConfirm that the liftgate is securely closed.The liftgate, move it without pressing theelectric liftgate opener to verify that theliftgate has not been left ajar.
▼ Power Liftgate*
The power liftgate opens/closeselectrically by operating the switches inthe vehicle or the buttons on the keylessentry system transmitter.
WARNING
Be sure to watch the power liftgate as itopens or closes, and make sure that itcloses completely:Opening or closing the power liftgate whilenot watching it move is dangerous.Because of unseen obstacles and thejam-safe feature, a liftgate may not closecompletely and, if left unnoticed, couldresult in serious injury or death if anoccupant were to fall out of the vehicle.Always be sure that the area around theliftgate is clear before activating it.
Before Driving
Doors and Locks
3-20 *Some models.
CX-9_8GC7-EE-17G_Edition1 2017-5-16 8:22:04

Always confirm the safety of the areaaround the power liftgate before operatingit electrically.Not checking the area around the liftgatefor people before operating it using thepower liftgate switch or the button on thekeyless entry system is dangerous. A personcould become caught between the liftgateand an obstruction while it is openingelectrically or between the liftgate andvehicle while it is closing electrically,resulting in an accident and serious injury.
Never allow children to operate the powerliftgate system:Allowing children to operate the powerliftgate switch and the keyless entry systemis dangerous. Children are not aware of thedangers of people getting fingers andhands caught in a moving liftgate. Ifsomeone's neck, head or hands get caughtin a closing door, it could result in death orserious injury.
CAUTIONWhen closing the power liftgate, make
sure there are no foreign objects aroundthe striker. If foreign objects areobstructing the striker, the liftgate maynot close properly.
Striker
Do not install accessories to the powerliftgate other than specified accessories.Otherwise, it cannot be opened/closedautomatically and could result in amalfunction.Be careful when switching the power
liftgate from electrical to manualoperation. The power liftgate may open/close unexpectedly depending on itsposition which could result in injury.
Before Driving
Doors and Locks
3-21
CX-9_8GC7-EE-17G_Edition1 2017-5-16 8:22:04

NOTE• Do not apply unnecessary force to the
power liftgate when it is opening/closingelectrically. Unnecessary force on theliftgate may cause it to reverse directionof movement automatically. Also, itcould result in a malfunction.
• The power liftgate may not open/closeelectrically if the vehicle is parked on anincline, or there is strong wind, or theliftgate is laden with snow.
• If a power liftgate system fuse hasblown, the liftgate cannot be openedusing the power liftgate switch or theelectric liftgate opener. Use theemergency lever to open the liftgate.
• Fully close the power liftgate beforedisconnecting the vehicle battery. If thebattery is disconnected with the liftgateopen, it cannot be opened or closedautomatically after the battery isreconnected. If this happens, fully closethe liftgate manually to restore the autofull open/close function.
• If the system detects weight such as thatcaused by a snow-laden liftgate when itis opened electrically, after the beepactivates three times, the liftgate stopsafter reversing.
• If the power liftgate is snow-laden,remove the snow before operating theliftgate.
Operation using the transmitter
Press the power liftgate button for onesecond or more. The hazard warning lightsflash twice and the liftgate opens/closesafter the beep sounds.Refer to Transmitter on page 3-4.
NOTE• When the ignition is switched ON, the
transmitter does not operate.• When opening the liftgate by pressing
the power liftgate button on thetransmitter, the liftgate can be openedeven when it is locked.
• If the power liftgate button on thetransmitter is pressed while the liftgateis opening/closing electrically, the beepis activated and the liftgate stops. Whenpressing the power liftgate button again,the liftgate moves in the reversedirection.
Operation using each switch
Operation conditions
Opening the liftgateIf the vehicle has satisfied all thefollowing operation conditions, the powerliftgate can be opened using the powerfunction.
• All doors and the liftgate are unlocked.• The ignition is switched OFF, or the
selector lever is in P with the ignitionswitched ON.
Closing the liftgate• The ignition is switched OFF, or the
selector lever is in P with the ignitionswitched ON.
Before Driving
Doors and Locks
3-22
CX-9_8GC7-EE-17G_Edition1 2017-5-16 8:22:04

NOTE• If the vehicle moves with the selector
lever shifted to a position other than Pwhile the liftgate is opening/closingelectrically, the liftgate moves asfollows:While opening electricallyThe buzzer is activated, and the liftgatemoves in the reverse directionautomatically and closes. When theselector lever is shifted to P, you canresume the power liftgate operationusing the switches.While closing electricallyThe buzzer is activated, but the liftgatecontinues closing.
Operation from the driver's seat (Toopen/close)
Press the power liftgate switch for aboutone second or more while the liftgate is inthe fully closed/open position. The hazardwarning lights flash twice and the liftgateopens/closes fully after the beep sound isheard.
Power liftgate switch
Operation from outside (To open)
Press the electric liftgate opener on theliftgate and raise the liftgate. The hazardwarning lights flash twice and the liftgateopens automatically after the beep soundis heard.(With the advanced keyless function)A locked liftgate can also be opened whilethe key is being carried.
Electric liftgate opener
Operation from outside (To close)
Press the power liftgate close switch whilethe liftgate is fully opened. The hazardwarning lights flash twice and the liftgatecloses automatically after the beep soundis heard.
Power liftgate close switch
Before Driving
Doors and Locks
3-23
CX-9_8GC7-EE-17G_Edition1 2017-5-16 8:22:04

NOTEIf the power liftgate switch/power liftgateclose switch is pressed or the electricliftgate opener is operated while theliftgate is opening/closing electrically, thebeep sound is heard and the liftgate stops.Then, it reverses when any of the switchesare pressed again.
Changing the power liftgate fully openposition
The power liftgate fully-open position canbe changed according to the height of agarage.
When changing the position
1. Stop the liftgate at the desired position.2. Press the power liftgate close switch
for about three seconds.A beep sound is activated two times toindicate that the position change hasbeen completed.
NOTESet the desired fully-open position of theliftgate at the position where it is openmore than halfway. The position where itis less than halfway open cannot be set.
To reset
1. Open the liftgate.2. Press the power liftgate close switch
for about seven seconds.A beep sound is activated three timesto indicated that the reset has beencompleted.
NOTEAfter about 3 seconds have elapsed sincethe switch was pressed, a beep sound isactivated 2 times to indicate that theliftgate fully-open position has changed.Continuously press the switch for about 7seconds to complete the reset.
Jam-safe equipment
While the power liftgate is opening/closing electrically and the system detectsa person or an object in the liftgate's path,the liftgate will move in the reversedirection automatically and stops.
WARNING
Always check the area around the powerliftgate before opening/closing it:Not checking for occupants and objectsaround the power liftgate before opening/closing it is dangerous. The jam-safeequipment is designed to prevent jammingin the event an obstruction is in theliftgate's path. The system may not detectcertain objects obstructing the liftgatedepending on the way they are positionedand their shape. However, if the jam-safefunction detects an obstruction and movesthe liftgate in the reverse direction, anoccupant in the liftgate's path could beseriously injured.
Before Driving
Doors and Locks
3-24
CX-9_8GC7-EE-17G_Edition1 2017-5-16 8:22:04

CAUTIONSensors are installed on both ends of thepower liftgate. Be careful not to allow thesensors to be scratched or damaged bysharp objects, otherwise the liftgate mayno longer open/close automatically. Inaddition, if the sensor is damaged while theliftgate is closing automatically, the systemwill stop.
Sensor
NOTEThe jam-safe equipment does not activateduring easy closure operation when thepower liftgate is between the near-shutposition and fully closed position.
When the power liftgate is moving in theopen/close direction and an obstruction isdetected, the beep sound will be heard andthe liftgate moves in the reverse directionand stops.
Liftgate easy closure
The Easy Closure system automaticallycloses the liftgate completely from thenear-shut position.This system also operates when the liftgateis closed manually.
WARNING
When closing a liftgate, always keep handsand fingers away from the liftgate:Placing hands or fingers around a liftgate isdangerous because the liftgate closesautomatically from the near-shut position,which could cause hands and fingers to bepinched and injured.
NOTE• If the electric liftgate opener is pressed
while the easy closure function isoperating, the liftgate can be opened.
• If the liftgate is opened/closedrepeatedly in a short period of time, theeasy closure function may not operate.Wait for about 2 seconds and then tryagain.
Before Driving
Doors and Locks
3-25
CX-9_8GC7-EE-17G_Edition1 2017-5-16 8:22:04

Fuel and Engine Exhaust Precautions▼ Fuel Requirements
Vehicles with catalytic converters or oxygen sensors must use ONLY UNLEADED FUEL,which will reduce exhaust emissions and keep spark plug fouling to a minimum. The vehicle will perform best with fuel listed in the table.
Fuel Research Octane Num-ber Country
Premium unleaded fuel
95 or above
Azerbaijan, Kazakhstan, Armenia, Georgia, Russia, Bela-rus, Ukraine, Taiwan, Tahiti, New Caledonia, Vanuatu,UAE, Lebanon, Libya, Tunisia, Madagascar, Morocco,Guatemala, Bolivia, Uruguay, Honduras, Nicaragua, Aru-ba, St. Martin, Singapore, Hong Kong, Malaysia, Thailand,Brunei, Macau, Mauritius, Seychelles, Jamaica, Barbados,Grenada, ST. Lucia, ST. Vincent, Antigua, Surinam
Regular unleaded fuel
92 or above Egypt, Myanmar
90 or above
Vietnam, The Philippines, Cambodia, Laos, Marshall Is-lands, USTT*1, Kuwait, Oman, Qatar, Saudi Arabia, Syria,Bahrain, Jordan, Iraq, Cameroon, Ivory Coast, Nigeria,Angola, Burundi, Gabon, Ghana, Chile, El Salvador, CostaRica, Ecuador, Haiti, Colombia, Dominican Republic(LHD), Panama, Peru, B. Virgin, Curacao, Nepal, Sri Lan-ka, Fiji, Papua New Guinea, Kenya, Zimbabwe, Tanzania,Mozambique, Trinidad and Tobago, Commonwealth ofDominica
*1 Republic of Palau & Federated States of MicronesiaFuel with a lower rating will negatively affect the emission control system performance andcould also cause engine knocking and serious engine damage.
CAUTIONUSE ONLY UNLEADED FUEL.
Leaded fuel is harmful to the catalytic converter and oxygen sensors and will lead todeterioration of the emission control system and or failures.The use of E10 fuel with 10 % ethanol is safe for your vehicle. Damage to your vehicle may
occur when ethanol exceeds this recommendation.Never add fuel system additives, otherwise the emission control system could be damaged.
Consult an expert repairer, we recommend an Authorized Mazda Repairer for details.
Before Driving
Fuel and Emission
3-26
CX-9_8GC7-EE-17G_Edition1 2017-5-16 8:22:04
▼ Emission Control System
This vehicle is equipped with an emission control system (the catalytic converter is part ofthis system) that enables the vehicle to comply with existing exhaust emissionsrequirements.
WARNING
Never park over or near anything flammable:Parking over or near anything flammable, such as dry grass, is dangerous. Even with theengine turned off, the exhaust system remains very hot after normal use and could igniteanything flammable. A resulting fire could cause serious injury or death.
CAUTIONIgnoring the following precautions could cause lead to accumulate on the catalyst inside theconverter or cause the converter to get very hot. Either condition will damage the converterand cause poor performance.
USE ONLY UNLEADED FUEL.Do not drive your Mazda with any sign of engine malfunction.Do not coast with the ignition switched off.Do not descend steep grades in gear with the ignition switched off.Do not operate the engine at high idle for more than 2 minutes.Do not tamper with the emission control system. All inspections and adjustments must be
made by a qualified technician.Do not push-start or pull-start this vehicle.
Before Driving
Fuel and Emission
3-27
CX-9_8GC7-EE-17G_Edition1 2017-5-16 8:22:04

▼ Engine Exhaust (Carbon monoxide)
WARNING
Do not drive your vehicle if you smell exhaust gas inside the vehicle:Engine exhaust gas is dangerous. This gas contains carbon monoxide (CO), which is colorless,odorless, and poisonous. When inhaled, it can cause loss of consciousness and death. If yousmell exhaust gas inside the vehicle, keep all windows fully open and contact an expertrepairer, we recommend an Authorized Mazda Repairer immediately.
Do not run the engine when inside an enclosed area:Running the engine inside an enclosed area, such as a garage, is dangerous. Exhaust gas,which contains poisonous carbon monoxide, could easily enter the cabin. Loss ofconsciousness or even death could occur.
Open the windows or adjust the heating or cooling system to draw fresh air when idling theengine:Exhaust gas is dangerous. When the vehicle is stopped with the windows closed and theengine running for a long time even in an open area, exhaust gas, which contains poisonouscarbon monoxide, could enter the cabin. Loss of consciousness or even death could occur.
Clear snow from underneath and around your vehicle, particularly the tail pipe, beforestarting the engine:Running the engine when a vehicle is stopped in deep snow is dangerous. The exhaust pipecould be blocked by the snow, allowing exhaust gas to enter the cabin. Because exhaust gascontains poisonous carbon monoxide, it could cause loss of consciousness or even death tooccupants in the cabin.
Before Driving
Fuel and Emission
3-28
CX-9_8GC7-EE-17G_Edition1 2017-5-16 8:22:04

Fuel-Filler Lid and Cap
WARNING
When removing the fuel-filler cap, loosenthe cap slightly and wait for any hissing tostop, then remove it:Fuel spray is dangerous. Fuel can burn skinand eyes and cause illness if ingested. Fuelspray is released when there is pressure inthe fuel tank and the fuel-filler cap isremoved too quickly.
Before refueling, stop the engine, andalways keep sparks and flames away fromthe filler neck:Fuel vapor is dangerous. It could be ignitedby sparks or flames causing serious burnsand injuries.Additionally, use of the incorrect fuel-fillercap or not using a fuel-filler cap may resultin a fuel leak, which could result in seriousburns or death in an accident.
Do not continue refueling after the fuelpump nozzle shuts off automatically:Continuing to add fuel after the fuel pumpnozzle has shut off automatically isdangerous because overfilling the fuel tankmay cause fuel overflow or leakage. Fueloverflow and leakage could damage thevehicle and if the fuel ignites it could causea fire and explosion resulting in seriousinjury or death.
CAUTIONAlways use only a designated Mazdafuel-filler cap or an approved equivalent,available at an expert repairer, werecommend an Authorized MazdaRepairer. The wrong cap can result in aserious malfunction of the fuel andemission control systems.
▼ Fuel-Filler Lid
To open, pull the remote fuel-filler lidrelease.To close, press the fuel-filler lid until itlocks securely.
Remote fuel-filler lid release
Before Driving
Fuel and Emission
3-29
CX-9_8GC7-EE-17G_Edition1 2017-5-16 8:22:04

▼ Fuel-Filler Cap
To remove the fuel-filler cap, turn itcounterclockwise.Attach the removed cap to the inner sideof the fuel lid. To close the fuel-filler cap, turn itclockwise until a click is heard.
Open
Close
Before Driving
Fuel and Emission
3-30
CX-9_8GC7-EE-17G_Edition1 2017-5-16 8:22:04

Steering Wheel
WARNING
Never adjust the steering wheel while thevehicle is moving:Adjusting the steering wheel while thevehicle is moving is dangerous. Moving itcan very easily cause the driver to abruptlyturn to the left or right. This can lead to lossof control or an accident.
▼ Steering Wheel Adjustment
To change the angle or length of thesteering wheel:1. Stop the vehicle, and then pull down
the lock release lever under thesteering column.
Lock release lever
2. Tilt the steering wheel and/or adjustthe steering column length to thedesired positions, then push the leverup to lock the column.
3. Attempt to push the steering wheel upand down to make sure it's lockedbefore driving.
▼ Heated Steering Wheel*
The grips on the left and right of thesteering wheel can be warmed up.
Heating areaHeated steering wheel switch
The ignition must be switched ON. Press the switch to turn on the heatedsteering wheel. The heated steering wheeloperates for about 30 minutes and thenturns off automatically.The indicator light illuminates when theheater is operating. To turn off the heated steering wheelbefore the 30 minutes has elapsed, pressthe switch again.
CAUTIONThe following types of persons should becareful not to touch the steering wheel.Otherwise, it could cause alow-temperature burn.
Infants, small children, elderly people,and physically challenged peoplePeople with delicate skinPeople who are excessively fatiguedPeople who are intoxicatedPeople who have taken sleep-inducing
medicine such as sleeping pills or coldmedicine
Before Driving
Steering Wheel
*Some models. 3-31
CX-9_8GC7-EE-17G_Edition1 2017-5-16 8:22:04

MirrorsBefore driving, adjust the inside andoutside mirrors.
▼ Outside Mirrors
WARNING
Be sure to look over your shoulder beforechanging lanes:Changing lanes without taking intoaccount the actual distance of the vehiclein the convex mirror is dangerous. Youcould have a serious accident. What yousee in the convex mirror is closer than itappears.
NOTE(Driver's Side Wide Angle Mirror*)
• The wide angle mirror has twocurvatures on its surface separated by aregion line into outer and inner regions.The inner region is a standard convexmirror whereas the outer region allowsfor a wider range of visibility within thesame sweep. This combination allowsfor better assurance when making lanechanges.
Region line
• The perceived distance of objects in theouter and inner regions of the wideangle mirror is different. Objectsappearing in the outer region areactually further away than they are inthe inner region.
Power mirror adjustment
The ignition must be switched to ACC orON position. To adjust:1. Rotate the mirror switch to the left or
right to choose the left or right sidemirror.
2. Press the mirror switch in theappropriate direction.
Center positionMirror switch
After adjusting the mirror, lock the controlby rotating the switch to the centerposition.
Before Driving
Mirrors
3-32 *Some models.
CX-9_8GC7-EE-17G_Edition1 2017-5-16 8:22:04

Folding outside mirror
WARNING
Always return the outside mirrors to thedriving position before you start driving:Driving with the outside mirrors folded in isdangerous. Your rear view will berestricted, and you could have an accident.
Do not touch a power folding outsidemirror while it is moving:Touching the power folding outside mirrorwhen it is moving is dangerous. Your handcould be pinched and injured or the mirrorcould be damaged.
Use the switch to set the mirror to theon-road position:Setting the power folding outside mirror tothe on-road position by hand is dangerous.The mirror will not lock in position and willprevent effective rearview visibility.
Only operate the power folding outsidemirror with the vehicle safely parked:Operating the power folding outside mirrorwhile the vehicle is moving is dangerous.Wind blast on the mirror will cause them tocollapse and you will be unable to return itto the on-road position, preventingrearview visibility.
The ignition must be switched to ACC orON position.Type ATo fold, rotate the outside mirror switch.To return the mirror to the drivingposition, rotate the switch to the centerposition.
Center position
Type BTo fold the mirrors, press the lower side of the outside mirror folding switch.To return the mirrors to their on-roadpositions, press the upper side of theoutside mirror folding switch.
Fold in
Fold out
Before Driving
Mirrors
3-33
CX-9_8GC7-EE-17G_Edition1 2017-5-16 8:22:04

Automatic folding function*
The automatic folding function operateswhen the ignition is switched to ACC orOFF.When the outside mirror automatic foldingswitch is pressed to the AUTO position(neutral position), the outside mirrorsautomatically fold in and out when thedoors are locked and unlocked.Also, when the ignition is switched ON orthe engine is started, the outside mirrorsfold out automatically.
NOTEThe outside mirrors may not fold in andout automatically under cold weatherconditions.If the outside mirrors do not fold in andout automatically, remove any ice or snow,and then press the upper or lower side ofthe outside mirror automatic foldingswitch to fold the outside mirrors in or out.
Engine-off outside mirror operation
The outside mirrors can be operated forabout 40 seconds after the ignition isswitched from ON to off.
▼ Rearview Mirror
WARNING
Do not stack cargo or objects higher thanthe seatbacks:Cargo stacked higher than the seatbacks isdangerous. It can block your view in therearview mirror, which might cause you tohit another car when changing lanes.
Rearview mirror adjustment
Before driving, adjust the rearview mirrorto center on the scene through the rearwindow.
NOTEFor the manual day/night mirror, performthe adjustment with the day/night lever inthe day position.
Before Driving
Mirrors
3-34 *Some models.
CX-9_8GC7-EE-17G_Edition1 2017-5-16 8:22:04

Reducing glare from headlights
Manual day/night mirror
Push the day/night lever forward for daydriving. Pull it back to reduce glare ofheadlights from vehicles at the rear.
Day/Night leverDayNight
Auto-dimming mirror
The auto-dimming mirror automaticallyreduces the glare of headlights fromvehicles at the rear when the ignition isswitched ON. Press the ON/OFF button to cancel theauto-dimming function. The indicator lightwill turn off.To reactivate the auto-dimming function,press the ON/OFF button . The indicatorlight will illuminate.
ON/OFF buttonIndicator light
NOTEDo not use glass cleaner or suspendobjects on or around the light sensor.Otherwise, light sensor sensitivity will beaffected and may not operate normally.
Light sensor
Front
Back
The auto-dimming function is canceledwhen the ignition is switched ON and theselector lever is in reverse (R).
Before Driving
Mirrors
3-35
CX-9_8GC7-EE-17G_Edition1 2017-5-16 8:22:04

Power WindowsThe windows can be opened/closed byoperating the power window switches.
WARNING
Make sure the opening is clear beforeclosing a window:Closing a power window is dangerous. Aperson's hands, head, or even neck couldbe caught by the window and result inserious injury or even death. This warningapplies especially to children.
Never allow children to play with powerwindow switches:Power window switches that are not lockedwith the power window lock switch wouldallow children to operate power windowsunintentionally, which could result inserious injury if a child's hands, head orneck becomes caught by the window.
Make sure nothing blocks the window justbefore it reaches the fully closed position orwhile fully holding up the power windowswitch:Blocking the power window just before itreaches the fully closed position or whilefully holding up the power window switchis dangerous.In this case, the jam-safe function cannotprevent the window from closing all theway. If fingers are caught, serious injuriescould occur.
NOTEWhen driving with only one of the rearwindows open, your ears might experiencea resonating sound. However, this does notindicate a problem. The sound can bereduced by slightly opening a frontwindow or by changing the size of the rearwindow opening.
Before Driving
Windows
3-36
CX-9_8GC7-EE-17G_Edition1 2017-5-16 8:22:04

▼ Opening/Closing Windows
The window opens while the switch is pressed and it closes while the switch is pulled upwith the ignition switched ON. Do not open or close three or more windows at the sametime.The front passenger's side and rear windows can be opened/closed when the power windowlock switch on the driver's door is in the unlock position. Keep this switch in the lockedposition while children are in the vehicle.
CloseClose
OpenOpen
Right rear window
Driver's window
Power window lock switch
Driver's side
Front passenger's side/ Rear windows
Locked position
Unlocked positionFront passenger's window
Left rear window
NOTE• A power window may no longer open/close if you continue to press the switch after fully
opening/closing the power window. If the power window does not open/close, wait amoment and then operate the switch again.
• The passenger windows may be opened or closed using the master control switches on thedriver's door.
• The power window can be operated for about 40 seconds after the ignition is switchedfrom ON to ACC or off with all doors closed. If any door is opened, the power windowwill stop operating.For engine-off operation of the power window, the switch must be held up firmlythroughout window closure because the auto-closing function will be inoperable.
• When the power window lock switch is in the locked position, the light on each powerwindow switch, except for the driver's power window switch, turns off. The light may bedifficult to see depending on the surrounding brightness.
Before Driving
Windows
3-37
CX-9_8GC7-EE-17G_Edition1 2017-5-16 8:22:04

▼ Auto-opening/Closing
To fully open the window automatically,press the switch completely down, thenrelease. The window will fully openautomatically.To fully close the window automatically,pull the switch completely up, thenrelease. The window will fully closeautomatically.To stop the window partway, pull or pressthe switch in the opposite direction andthen release it.
NOTEPower window system initializationprocedureIf the battery was disconnected duringvehicle maintenance, or for other reasons(such as a switch continues to be operatedafter the window is fully open/closed), thewindow will not fully open and closeautomatically.The power window auto function will onlyresume on a power window that has beenreset.1. Switch the ignition ON.2. Make sure that the power window lock
switch located on the driver's door isnot depressed.
3. Press the switch and fully open thewindow.
4. Pull up the switch to fully close thewindow and continue holding theswitch for about 2 seconds after thewindow fully closed.
5. Make sure that the power windowsoperate correctly using the doorswitches.
After the system has been re-initialized,each passenger window can be fullyopened or closed automatically using themaster control switches.
▼ Jam-safe Window
If foreign matter is detected between thewindow and the window frame while thewindow is closing automatically (refer toAuto-opening/Closing on page 3-38), thewindow stops closing and automaticallyopens partway.
NOTE• The jam-safe function may operate
under the following conditions:• A strong impact is detected while the
window is closing automatically.• Window is closing automatically in
very low temperatures.• In the event the jam-safe function
activates and the power window cannotbe closed automatically, pull and holdthe switch and the window will close.
• The jam-safe window function does notoperate until the system has been reset.
Before Driving
Windows
3-38
CX-9_8GC7-EE-17G_Edition1 2017-5-16 8:22:04

Sunroof*
The sunroof can be opened or closed whenoperating the overhead tilt/slide switch atthe front seats.
WARNING
Do not let passengers stand up or extendpart of the body through the open sunroofwhile the vehicle is moving:Extending the head, arms, or other parts ofthe body through the sunroof is dangerous.The head or arms could hit somethingwhile the vehicle is moving. This couldcause serious injury or death.
Never allow children to play with the tilt/slide switch:The tilt/slide switch would allow children tooperate the sunroof unintentionally, whichcould result in serious injury if a child'shands, head or neck becomes caught bythe sunroof.
Make sure the opening is clear beforeclosing the sunroof:A closing sunroof is dangerous. The hands,head, or even neck of a person, especially achild, could be caught in it as it closes,causing serious injury or even death.
Make sure nothing blocks the sunroof justbefore it reaches the fully closed position:Blocking the sunroof just before it reachesthe closed position is dangerous.In this case, the jam-safe function cannotprevent the sunroof from closing. If fingersare caught, serious injuries could occur.
CAUTIONDo not sit on or put heavy items on the
area where the sunroof opens and closes.Otherwise, the sunroof could bedamaged.Do not open or close the sunroof
forcefully during freezing temperaturesor snowfall. Otherwise, the sunroof couldbe damaged.The sunshade does not tilt. To avoid
damaging the sunshade, do not push itup.Do not close the sunshade while the
sunroof is opening. Trying to force thesunshade closed could damage it.
▼ Tilt/Slide Operation
The sunroof can be opened or closedelectrically only when the ignition isswitched ON.
• Before leaving the vehicle or washingyour Mazda, make sure the sunroof iscompletely closed so that water does notget inside the cabin area.
• After washing your Mazda or after itrains, wipe the water off the sunroofbefore operating it to avoid waterpenetration which could cause rust andwater damage to your headliner.
Tilt/Slide switch
Before Driving
Windows
*Some models. 3-39
CX-9_8GC7-EE-17G_Edition1 2017-5-16 8:22:04

Tilt Operation
The rear of the sunroof can be tilted opento provide more ventilation. To fully tilt automatically, momentarilypress the tilt/slide switch.To fully close automatically, momentarilypress the tilt/slide switch in the forwarddirection.To stop tilting partway, press the tilt/slideswitch.When the sunroof is already slid open andyou want to tilt it open, first close thesunroof and then do a tilt operation.
Close (Tilt down)Tilt up
Slide Operation
To fully open automatically, momentarilypress the tilt/slide switch in the backwarddirection.To fully close automatically, momentarilypress the tilt/slide switch in the forwarddirection.To stop sliding partway, press the tilt/slideswitch.When the sunroof is already tilted openand you want to slide it open, first closethe sunroof and then do a slide operation.
Close
Open
NOTEIf the sunroof does not operate normally,do the following procedure:1. Switch the ignition ON.2. Press the tilt switch, to partially tilt
open the rear of the sunroof.3. Repeat Step 2. The rear of the sunroof
tilts open to the fully open position,then closes a little.
If the reset procedure is performed whilethe sunroof is in the slide position(partially open) it will close before therear tilt opens.
Before Driving
Windows
3-40
CX-9_8GC7-EE-17G_Edition1 2017-5-16 8:22:04

▼ Jam-safe Sunroof
If a person's hands, head or an objectblocks the sunroof while it is closing, thesunroof will stop and move in the opendirection.
NOTE• The jam-safe function may operate
under the following conditions:• A strong impact is detected while the
sunroof is closing automatically.• The sunroof is closing automatically
during very low temperatures.• In the event the jam-safe function
activates and the sunroof cannot beclosed automatically, press the tilt/slideswitch and the sunroof will close.
• The jam-safe sunroof function does notoperate until the system has been reset.
▼ Sunshade
The sunshade can be opened and closed byhand. The sunshade opens at the same time asthe sunroof slides open, but it must beclosed by hand.
Sunshade
Before Driving
Windows
3-41
CX-9_8GC7-EE-17G_Edition1 2017-5-16 8:22:04
Modification and Add-OnEquipment
Mazda cannot guarantee the immobilizerand the theft-deterrent systems' operationif the system has been modified or if anyadd-on equipment has been installed.
CAUTIONTo avoid damage to the vehicle, do notmodify the system or install any add-onequipment to the immobilizer and thetheft-deterrent systems or the vehicle.
Immobilizer SystemThe immobilizer system allows the engineto start only with a key the systemrecognizes. If someone attempts to start the enginewith an unrecognized key, the engine willnot start, thereby helping to preventvehicle theft.If you have a problem with theimmobilizer system or the key, consult anAuthorized Mazda Repairer.
CAUTIONChanges or modifications not expressly
approved by the party responsible forcompliance could void the user'sauthority to operate the equipment.To avoid damage to the key, do not:
Drop the key.Get the key wet.Expose the key to any kind of magnetic
field.Expose the key to high temperatures
on places such as the dashboard orhood, under direct sunlight.
If the engine does not start with thecorrect key, and the security indicatorlight keeps illuminating or flashing, thesystem may have a malfunction. Consultan Authorized Mazda Repairer.
NOTE• The keys carry a unique electronic code.
For this reason, and to assure yoursafety, obtaining a replacement keyrequires some waiting time. They areonly available through an AuthorizedMazda Repairer.
Before Driving
Security System
3-42
CX-9_8GC7-EE-17G_Edition1 2017-5-16 8:22:04

• Always keep a spare key in case one islost. If a key is lost, consult anAuthorized Mazda Repairer as soon aspossible.
• If you lose a key, an Authorized MazdaRepairer will reset the electronic codesof your remaining keys and immobilizersystem. Bring all the remaining keys toan Authorized Mazda Repairer to reset.Starting the vehicle with a key that hasnot been reset is not possible.
▼ Operation
NOTE• The engine may not start and security
indicator light may illuminate or flash ifthe key is placed in an area where it isdifficult for the system to detect thesignal, such as on the dashboard or inthe glove compartment. Move the key toa location within the signal range,switch the ignition off, and then restartthe engine.
• Signals from a TV or radio station, orfrom a transceiver or mobile telephonecould interfere with your immobilizersystem. If you are using the proper keyand the engine fails to start, check thesecurity indicator light.
Arming
The system is armed when the ignition isswitched from ON to off.The security indicator light in theinstrument cluster flashes every 2 secondsuntil the system is disarmed.
Disarming
The system is disarmed when the ignitionis switched ON with the correctprogrammed key. The security indicatorlight illuminates for about 3 seconds andthen turns off. If the engine does not startwith the correct key, and the securityindicator light remains illuminated orflashing, try the following:Make sure the key is within theoperational range for signal transmission.Switch the ignition off, and then restart theengine. If the engine does not start after 3or more tries, contact an AuthorizedMazda Repairer.
NOTE• If the security indicator light flashes
continuously while you are driving, donot shut off the engine. Go to anAuthorized Mazda Repairer and have itchecked. If the engine is shut off whilethe indicator light is flashing, you willnot be able to restart it.
• Because the electronic codes are resetwhen the immobilizer system is repaired,the keys are needed. Make sure to bringall the keys to an Authorized MazdaRepairer so that they can beprogrammed.
Before Driving
Security System
3-43
CX-9_8GC7-EE-17G_Edition1 2017-5-16 8:22:04

Theft-Deterrent System*
If the theft-deterrent system detects aninappropriate entry into the vehicle or theintrusion sensor detects movement in thevehicle which could result in the vehicle(with the intrusion sensor) or its contentsbeing stolen, the alarm alerts thesurrounding area of an abnormality bysounding the siren/horn and flashing thehazard warning lights. The system will not function unless it'sproperly armed. So when you leave thevehicle, follow the arming procedurecorrectly.
Intrusion sensor*
The intrusion sensor uses ultrasonic wavesto detect movement inside the vehicle andto raise an alert of an intrusion into thevehicle. The intrusion sensor detects certain kindsof movement inside the vehicle, however,it may also respond to phenomenonoutside the vehicle such as vibrations, loudnoise, wind, and air currents.
CAUTIONIn order for the intrusion sensor to operateappropriately, be aware of the following:
Do not hang clothing or objects from ahead restraint or a coat hook.Return the extension sunvisors to their
original positions.Do not blind the intrusion sensor by
covering it or placing objects over it.Do not allow the intrusion sensor to get
soiled or wipe it with a liquid.
Do not shock or cause an impact to theintrusion sensor or the intrusion sensorbezel.Do not install seats that are not Mazda
genuine products.To prevent obstruction of intrusion
sensor, do not place objects or cargonear the intrusion sensor that are higherthan the head restraints.
Intrusion sensor and intrusion sensor bezel
▼ Operation
Siren/Horn triggering conditions
The siren/horn sounds intermittently andthe hazard warning lights flash for about30 seconds when the system is triggeredby any one of the following:
• Unlocking a door with the auxiliary keyor an inside door-lock knob.
• Forcing open a door, the hood or theliftgate.
• Opening the hood by operating the hoodrelease handle.
• Switching the ignition ON without usingthe push button start.
Before Driving
Security System
3-44 *Some models.
CX-9_8GC7-EE-17G_Edition1 2017-5-16 8:22:04

• (With the intrusion sensor)The intrusion sensor detects a movementin the vehicle.
The system will be triggered again (up to10 times) if one of the above conditionsremains.
• (With the intrusion sensor)Disconnecting the battery terminal (thehazard warning lights do not flash).
The system will be triggered about 10times.
NOTE• The liftgate does not open while the
theft-deterrent system is operating.• For vehicles equipped with the power
liftgate, the liftgate can be opened evenwhile the theft-deterrent system isoperating by pressing the power liftgatebutton on the transmitter or the electricliftgate opener switch while carrying thekey.
• If the battery goes dead while thetheft-deterrent system is armed, thesiren/horn will activate and the hazardwarning lights will flash when thebattery is charged or replaced.
▼ How to Arm the System
1. Close the windows and the sunroof*
securely.
NOTE(With the intrusion sensor)Even with a window or the sunroof*open, the system can be armed,however, leaving the windows and thesunroof* even partially open can invitetheft, and wind blowing into thevehicle could trigger the alarm.
The intrusion sensor function can alsobe cancelled.Refer to Canceling the IntrusionSensor (With Intrusion Sensor) onpage 3-46.
2. Switch the ignition OFF.3. Make sure the hood, the doors, and the
liftgate are closed.4. Press the lock button on the transmitter
or lock the driver's door from theoutside with the auxiliary key.The hazard warning lights will flashonce.(With the advanced keyless function)Press a request switch. The security indicator light in theinstrument cluster flashes twice persecond for 20 seconds.
5. After 20 seconds, the system is fullyarmed.
NOTE• The theft-deterrent system can also
be armed by activating the autorelock function with all the doors,the liftgate and the hood closed.Refer to Transmitter on page 3-4.
Before Driving
Security System
*Some models. 3-45
CX-9_8GC7-EE-17G_Edition1 2017-5-16 8:22:04

• The system will disarm if one of thefollowing operations takes placewithin 20 seconds after pressing thelock button:
• Unlocking any door.• Opening any door.• Opening the hood.• Switching the ignition ON.
To rearm the system, do the armingprocedure again.
• When the doors are locked bypressing the lock button on thetransmitter or using the auxiliarykey while the theft-deterrent systemis armed, the hazard warning lightswill flash once to indicate that thesystem is armed.
▼ Canceling the Intrusion Sensor(With Intrusion Sensor)
If the theft deterrent system has beenarmed while any of the followingconditions are present, cancel the intrusionsensor to prevent the alarm from triggeringunnecessarily.
• Leaving the vehicle with a movableobject, passengers or pets remaininginside.
• Leaving an object inside the vehicle thatcan roll around, such as when thevehicle is placed on a tilting, unstablesurface when being shipped.
• Hanging small objects/accessories in thevehicle, hanging clothing on a coathook, or placing other items which canmove easily inside the vehicle.
• Parking in an area where there is strongvibration or loud noise.
• When using a high pressure orautomatic car wash.
• Continuous shock and vibration fromhail or thunder and lightning istransmitted to the vehicle.
• Doors are locked with a window or thesunroof* left open.
• An accessory heater or device thatproduces moving air and vibrationoperates while the theft deterrent systemis armed.
NOTEIf any door or the liftgate remains closedfor 30 seconds, all the doors and theliftgate automatically re-lock and the theftdeterrent system arms even if a windowand the sunroof* is left open.
To cancel the intrusion sensor, press theintrusion sensor cancel button on thetransmitter within 20 seconds afterpressing the lock button.The hazard warning lights will flash threetimes.
NOTE• To reactivate the intrusion sensor, turn
off the armed theft-deterrent system andthen rearm it.
• The intrusion sensor is operationalwhen the theft-deterrent system isarmed. To cancel the intrusion sensor,press the intrusion sensor cancel buttoneach time the theft-deterrent system isarmed.
Before Driving
Security System
3-46 *Some models.
CX-9_8GC7-EE-17G_Edition1 2017-5-16 8:22:04

▼ To Turn Off an Armed System
An armed system can be turned off usingany one of the following methods:
• Pressing the unlock button on thetransmitter.
• Starting the engine with the push buttonstart.
• (With the advanced keyless function)• Pressing a request switch on the
doors.
The hazard warning lights will flash twice.
NOTEWhen the doors are unlocked by pressingthe unlock button on the transmitter whilethe theft-deterrent system is turned off, thehazard warning lights will flash twice toindicate that the system is turned off.
▼ To Stop the Alarm
A triggered alarm can be turned off usingany one of the following methods:
• Pressing the unlock button on thetransmitter.
• Starting the engine with the push buttonstart.
• (With the advanced keyless function)• Pressing a request switch on the
doors.• Pressing the electric liftgate opener
while the key is being carried.• Pressing the power liftgate button on
the transmitter.
The hazard warning lights will flash twice.
Before Driving
Security System
3-47
CX-9_8GC7-EE-17G_Edition1 2017-5-16 8:22:04

Break-In PeriodNo special break-in is necessary, but a fewprecautions in the first 1,000 km (600miles) may add to the performance,economy, and life of the vehicle.
• Do not race the engine.• Do not maintain one constant speed,
either slow or fast, for a long period oftime.
• Do not drive constantly at full-throttle orhigh engine rpm for extended periods oftime.
• Avoid unnecessary hard stops.• Avoid full-throttle starts.• Do not tow a trailer.
Saving Fuel and Protectionof the Environment
How you operate your Mazda determineshow far it will travel on a tank of fuel. Usethese suggestions to help save fuel andreduce CO2.
• Avoid long warm-ups. Once the engineruns smoothly, begin driving.
• Avoid fast starts.• Drive at lower speeds.• Anticipate when to apply the brakes
(avoid sudden braking).• Follow the maintenance schedule (page
6-3) and have an expert repairer, werecommend an Authorized MazdaRepairer perform inspections andservicing.
• Use the air conditioner only whennecessary.
• Slow down on rough roads.• Keep the tires properly inflated.• Do not carry unnecessary weight.• Do not rest your foot on the brake pedal
while driving.• Keep the wheels in correct alignment.• Keep windows closed at high speeds.• Slow down when driving in crosswinds
and headwinds.
WARNING
Never stop the engine when going down ahill:Stopping the engine when going down ahill is dangerous. This causes the loss ofpower steering and power brake control,and may cause damage to the drivetrain.Any loss of steering or braking controlcould cause an accident.
Before Driving
Driving Tips
3-48
CX-9_8GC7-EE-17G_Edition1 2017-5-16 8:22:04

Hazardous Driving
WARNING
Be extremely careful if it is necessary todownshift on slippery surfaces:Downshifting into lower gear while drivingon slippery surfaces is dangerous. Thesudden change in tire speed could causethe tires to skid. This could lead to loss ofvehicle control and an accident.
Avoid sharp turns, excessive speed andabrupt maneuvers when driving thisvehicle:Sharp turns, excessive speed and abruptmaneuvering of this vehicle are dangerousas it could result in the increased risk of lossof vehicle control, vehicle roll-over,personal injury or death.This vehicle has a higher center of gravity.Vehicles with a higher center of gravitysuch as utility vehicles handle differentlythan vehicles with a lower center of gravity.Utility vehicles are not designed forcornering at high speeds any more thanlow profile sports cars are designed toperform satisfactorily under off-roadconditions.In addition, utility vehicles have asignificantly higher rollover rate than othertypes of vehicles.In a rollover crash, an unbelted person issignificantly more likely to die than aperson wearing a seat belt.
When driving on ice or in water, snow,mud, sand, or similar hazards:
• Be cautious and allow extra distance forbraking.
• Avoid sudden braking and suddenmaneuvering.
• Do not pump the brakes. Continue topress down on the brake pedal.Refer to Antilock Brake System (ABS)on page 4-72.
• If you get stuck, select a lower gear andaccelerate slowly. Do not spin the frontwheels.
• For more traction in starting on slipperysurfaces such as ice or packed snow, usesand, rock salt, chains, carpeting, orother nonslip material under the frontwheels.
NOTEUse snow chains only on the front wheels.
Before Driving
Driving Tips
3-49
CX-9_8GC7-EE-17G_Edition1 2017-5-16 8:22:04

Floor MatWe recommend the use of GenuineMazda floor mats.
WARNING
Make sure the floor mats are secured withthe grommets or the retainers to preventthem from bunching up under the footpedals (Driver's side):Using a floor mat that is not secured isdangerous as it will interfere with theaccelerator and brake pedal operation(driver's side), which could result in anaccident.Only use a floor mat which conforms to theshape of the floor on the driver's side andmake sure it is oriented correctly.Secure the floor mat using the grommets orretainers.There are various ways to secure floor matsdepending on the type used, thereforesecure the mat according to the type.After installing the floor mat, make surethat it does not slide from side to side orback and forth, and that there is sufficientclearance with the accelerator and brakepedals on the driver's side.After removing the floor mat for cleaningor some other reason, always securelyreinstall it while paying attention to theprecautions just mentioned.
Do not install two floor mats, one on top ofthe other, on the driver's side:Installing two floor mats, one on top of theother, on the driver's side is dangerous asthe retention pins can only keep one floormat from sliding forward.Loose floor mat(s) will interfere with thefoot pedals and could result in an accident.If using an all-weather mat for winter usealways remove the original floor mat.
When setting a floor mat, position thefloor mat so that its grommets or retainersare inserted over the pointed end of theretention posts.
Before Driving
Driving Tips
3-50
CX-9_8GC7-EE-17G_Edition1 2017-5-16 8:22:04

Rocking the Vehicle
WARNING
Do not spin the wheels at high speed, anddo not allow anyone to stand behind awheel when pushing the vehicle:When the vehicle is stuck, spinning thewheels at high speed is dangerous. Thespinning tire could overheat and explode.This could cause serious injuries.
CAUTIONToo much rocking may cause engineoverheating, transaxle failure, and tiredamage.
If you must rock the vehicle to free it fromsnow, sand or mud, depress the acceleratorslightly and slowly move the selector leverfrom D to R.
Winter DrivingCarry emergency gear, including tirechains, window scraper, flares, a smallshovel, jumper cables, and a small bag ofsand or salt.Ask an expert repairer, we recommend anAuthorized Mazda Repairer to check thefollowing:
• Have the proper ratio of antifreeze in theradiator.Refer to Engine Coolant on page 6-22.
• Inspect the battery and its cables. Coldreduces battery capacity.
• Use an engine oil appropriate for thelowest ambient temperatures that thevehicle will be driven in (page 6-19).
• Inspect the ignition system for damageand loose connections.
• Use washer fluid made withantifreeze―but do not use enginecoolant antifreeze for washer fluid (page6-24).
Before Driving
Driving Tips
3-51
CX-9_8GC7-EE-17G_Edition1 2017-5-16 8:22:04

NOTE• Remove snow before driving. Snow left
on the windshield is dangerous as itcould obstruct vision.
• Do not apply excessive force to awindow scraper when removing ice orfrozen snow on the mirror glass andwindshield.
• Never use warm or hot water forremoving snow or ice from windows andmirrors as it could result in the glasscracking.
• Drive slowly. Braking performance canbe adversely affected if snow or iceadheres to the brake components. If thissituation occurs, drive the vehicleslowly, releasing the accelerator pedaland lightly applying the brakes severaltimes until the brake performancereturns to normal.
▼ Snow Tires
WARNING
Use only the same size and type tires (snow,radial, or non-radial) on all four wheels:Using tires different in size or type isdangerous. Your vehicle's handling couldbe greatly affected and result in anaccident.
CAUTIONCheck local regulations before usingstudded tires.
Use snow tires on all four wheels
Do not exceed the maximum permissiblespeed for your snow tires or legal speedlimits.
▼ Tire Chains
Check local regulations before using tirechains.
CAUTIONChains may affect handling.Do not go faster than 50 km/h (30 mph)
or the chain manufacturer'srecommended limit, whichever is lower.Drive carefully and avoid bumps, holes,
and sharp turns.Avoid locked-wheel braking.Do not use chains on a temporary spare
tire; it may result in damage to thevehicle and to the tire.Do not use chains on roads that are free
of snow or ice. The tires and chains couldbe damaged.Chains may scratch or chip aluminum
wheels.
Before Driving
Driving Tips
3-52
CX-9_8GC7-EE-17G_Edition1 2017-5-16 8:22:04

NOTE• If your vehicle is equipped with the tire
pressure monitoring system, the systemmay not function correctly when usingtire chains.
• Use of tire chains on a vehicle equippedwith P255/50R20 (Left-hand drivemodel)/255/50R20 (Right-hand drivemodel) specification tires could causeinterference with the vehicle body andscratching. If tire chains are to be used,replace both front and rear tires withP255/60R18 (Left-hand drive model)/255/60R18 (Right-hand drive model)tyres. Please consult an AuthorizedMazda Repairer.
Install the chains on the front tires only.Do not use chains on the rear tires.
Tire chain selection (Europe)
Mazda recommends hexagon type steelring chains. Select the proper typeaccording to your tire size.
Tire size Tire chain255/60R18 Hexagon type
P255/60R18 Hexagon type
NOTEAlthough Mazda recommends hexagontype steel ring chains, all chains within theinstallation specifications may be used.
Installation specification (Europe)
When installing tire chains, the distancebetween the tire tread and the chain mustbe within the prescribed limits in thefollowing table.
Distance [Unit: mm (in)]A B
MAX 13 (0.51) MAX 13 (0.51)
Side view Cross section view
Tire
A B
Installing the chains
1. Secure the chains on the front tires astightly as possible. Always follow thechain manufacturer's instructions.
2. Retighten the chains after driving1/2―1 km (1/4―1/2 mile).
Before Driving
Driving Tips
3-53
CX-9_8GC7-EE-17G_Edition1 2017-5-16 8:22:04

Driving In Flooded Area
WARNING
Dry off brakes that have become wet bydriving slowly, releasing the acceleratorpedal and lightly applying the brakesseveral times until the brake performancereturns to normal:Driving with wet brakes is dangerous.Increased stopping distance or the vehiclepulling to one side when braking couldresult in a serious accident. Light brakingwill indicate whether the brakes have beenaffected.
CAUTIONDo not drive the vehicle on flooded roadsas it could cause short circuiting ofelectrical/electronic parts, or enginedamage or stalling from water absorption.If the vehicle has been immersed in water,consult an expert repairer, we recommendan Authorized Mazda Repairer.
Before Driving
Driving Tips
3-54
CX-9_8GC7-EE-17G_Edition1 2017-5-16 8:22:04

Turbocharger Information
CAUTIONAfter driving at freeway speeds or up a long hill, idle the engine at least 30 seconds before
stopping it. Otherwise, the turbocharger could be damaged.Racing or over-revving the engine, particularly after it's just been started, can damage the
turbocharger.To protect the engine from damage, the engine is designed so that it cannot be raced just
after starting it in extremely cold weather.
The turbocharger greatly enhances engine power. Its advanced design provides improvedoperation and requires minimum maintenance. To get the most from it, observe the following.1. Change engine oil and filter according to Scheduled Maintenance (page 6-3).2. Use only recommended engine oil (page 6-19). Extra additives are NOT recommended.
Before Driving
Driving Tips
3-55
CX-9_8GC7-EE-17G_Edition1 2017-5-16 8:22:04
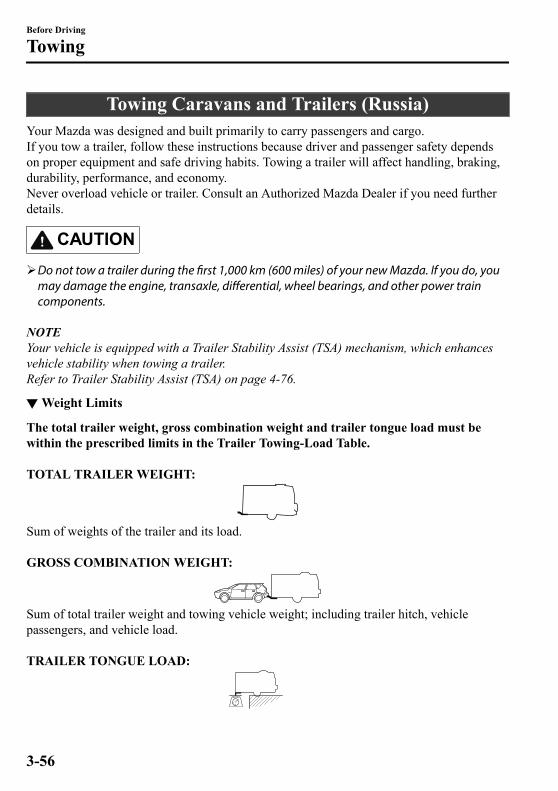
Towing Caravans and Trailers (Russia)Your Mazda was designed and built primarily to carry passengers and cargo.If you tow a trailer, follow these instructions because driver and passenger safety dependson proper equipment and safe driving habits. Towing a trailer will affect handling, braking,durability, performance, and economy.Never overload vehicle or trailer. Consult an Authorized Mazda Dealer if you need furtherdetails.
CAUTIONDo not tow a trailer during the first 1,000 km (600 miles) of your new Mazda. If you do, you
may damage the engine, transaxle, differential, wheel bearings, and other power traincomponents.
NOTEYour vehicle is equipped with a Trailer Stability Assist (TSA) mechanism, which enhancesvehicle stability when towing a trailer.Refer to Trailer Stability Assist (TSA) on page 4-76.
▼ Weight Limits
The total trailer weight, gross combination weight and trailer tongue load must bewithin the prescribed limits in the Trailer Towing-Load Table. TOTAL TRAILER WEIGHT:
Sum of weights of the trailer and its load. GROSS COMBINATION WEIGHT:
Sum of total trailer weight and towing vehicle weight; including trailer hitch, vehiclepassengers, and vehicle load. TRAILER TONGUE LOAD:
Before Driving
Towing
3-56
CX-9_8GC7-EE-17G_Edition1 2017-5-16 8:22:04

The weight exerted on the trailer tongue. It is varied by changing the weight distributionwhen loading the trailer.
CAUTIONBe aware of the towing load weight differences when towing at high altitudes. For altitudesexceeding 1,000 meter (3,280 ft 10 in), always reduce the towing load by 10% for every 1,000meter (3,280 ft 10 in) increase in altitude from the load indicated under the gross combinationweight heading in the maximum trailer towing-load table. If the determined maximum totaltowing load weight is exceeded, the engine and other power train parts may be damaged.
Maximum trailer towing-load table
Gradient up to 12%
MODEL TOTAL TRAILER WEIGHT GROSS COMBINATIONWEIGHT
Drive system Trailer without brake Trailer with brake Trailer with brake2WD 750 kg (1,653.4 lb) 2,500 kg (5,511.5 lb) 5,000 kg (1,1023.0 lb)4WD 750 kg (1,653.4 lb) 2,500 kg (5,511.5 lb) 5,060 kg (1,1155.2 lb)
TRAILER TONGUE LOAD: 100 kg (220.4 lb)
WARNING
Always keep tow loads within specified limits as indicated in the Trailer Towing-Load Table:Attempting to tow loads greater than those specified is dangerous as it may cause serioushandling and performance problems that could result in personal injury or vehicle damage,or both.
Always keep the trailer tongue load within the specified limits in the Trailer Towing-LoadTable:Loading the trailer with more weight in the rear than in the front is dangerous. This couldcause loss of vehicle control and an accident.
NOTE• The total trailer weight and tongue load can be determined by weighing the trailer on
platform scales at a highway weighing station or a trucking company.• Appropriate total trailer weight and tongue load may prevent the danger of trailer sway
from crosswinds, rough roads, or other causes.
Before Driving
Towing
3-57
CX-9_8GC7-EE-17G_Edition1 2017-5-16 8:22:04

▼ Trailer Hitch
When towing a trailer, use an appropriate trailer hitch. We recommend using a genuineMazda trailer hitch. Use the original holes drilled by the vehicle manufacture for securingthe trailer hitch. Contact your Authorized Mazda Dealer for more information.
Trailer hitch installation area
Unit: mm (in)
MAX. 100 Kg (220 lb)
Hitch coupling point
A
B
A:350—420 (13.8—16.5)B:1193.2 (46.976)C:1046.9 (41.217)
C
C
▼ Tires
When towing a trailer, make sure all tires are inflated to the recommended cold-tirepressure, as indicated on the tire pressure chart on the driver's door frame. Trailer tire size,load rating, and inflation pressures should conform to tire manufacturer specifications.
WARNING
Never use the temporary spare tire when towing:Using the temporary spare tire on your vehicle when towing a trailer is dangerous as it couldresult in tire failure, loss of control, and injury to vehicle occupants.
▼ Safety Chains
Safety chains must be used as a precautionary measure should the trailer becomeunintentionally unhitched. They should cross under the trailer tongue and attach to the hitch.Leave enough slack to allow full turns. Consult literature published by your trailer or hitchmanufacturer for more details.
Before Driving
Towing
3-58
CX-9_8GC7-EE-17G_Edition1 2017-5-16 8:22:04

WARNING
Make sure the safety chain is securely attached to both the trailer and the vehicle prior todeparture:Towing a trailer without using a safety chain securely attached to both the trailer and thevehicle is dangerous. If damage occurs to the coupling unit or hitch ball, the trailer couldwander into another lane and cause a collision.
▼ Trailer Lights
CAUTIONDo not connect a trailer lighting system directly to the lighting system of your Mazda. Thismay damage your vehicle's electrical system and lighting systems. To connect the lightingsystem, consult an Authorized Mazda Dealer.
▼ Trailer Brakes
Check the Maximum trailer towing-load table in Weight Limits (page 3-56), and if yourtrailer weight exceeds the value in the TOTAL TRAILER WEIGHT (Trailer without brake),trailer brakes are required.If your trailer has brakes, make sure they meet regulations.
WARNING
Do not connect a hydraulic trailer-brake system to your vehicle's brake system:Connecting a hydraulic trailer-brake system directly to the vehicle brake system is dangerousand will result in inadequate braking and possible injury.
▼ Trailer Towing Tips
Before driving• Verify that your Mazda maintains a near-normal attitude when a loaded or unloaded trailer
is connected. Do not drive if it has an abnormal front-up or front-down position. Inspectfor incorrect tongue load, worn suspension parts, and trailer overloading. Have the vehicleinspected by an expert repairer, we recommend an Authorized Mazda Repairer.
• Make sure the trailer cargo is secure to prevent it from shifting.• Make sure the mirrors meet all government regulations. Inspect them.• Before starting out, inspect the operation of all vehicle and trailer lights and all
vehicle-to-trailer connections. Stop and re-inspect all lights and connections after drivinga short distance.
Before Driving
Towing
3-59
CX-9_8GC7-EE-17G_Edition1 2017-5-16 8:22:04

Driving• Your Mazda will handle differently with a trailer in tow, so practice turning, backing, and
stopping in a traffic-free area.• Take time to get accustomed to the extra weight and length.• Do not exceed 100 km/h (62 mph) with a trailer in tow. If the local legal maximum speed
with a trailer in tow is less than 100 km/h (62 mph), do not exceed the legal speed.
CAUTIONIf the vehicle exceeds 100 km/h (62 mph) with a trailer in tow, the vehicle could bedamaged.
• When ascending a hill, shift into a lower gear to reduce the possibility of overloading oroverheating the engine, or both.
• When descending a hill, shift into a lower gear and use engine compression as a brakingeffect. Pay constant attention to speed and use the brakes only as needed. Holding thebrake pedal down for a prolonged period may cause the brakes to overheat and losepower.
Parking
Avoid parking on an incline with a trailer. If this must be done, follow these instructions.
Parking on an Incline
1. Set the parking brake and the brakes.2. Have someone block the wheels of the vehicle and trailer while you apply the brakes.3. After the wheels are blocked, release the parking brake and the brakes slowly, allowing
the blocks to bear the load.4. Set the parking brake firmly.5. If the vehicle has an automatic transaxle, put the selector lever in P. If it has a manual
transaxle, place the gear shift in 1 or R.
Starting on an Incline
1. Start the engine (page 4-5).2. Release the parking brake and slowly pull away a short distance from the wheel blocks.3. Stop on the nearest level ground, set the parking brake, and pick up the wheel blocks.
Before Driving
Towing
3-60
CX-9_8GC7-EE-17G_Edition1 2017-5-16 8:22:04

4 When Driving
Information concerning safe driving and stopping.
Start/Stop Engine.............................. 4-4Ignition Switch............................. 4-4Starting the Engine....................... 4-5Turning the Engine Off...............4-11
Instrument Cluster and Display.......................................................................4-12
Meters and Gauges..................... 4-12Multi-information Display and INFOSwitch*....................................... 4-20Active Driving Display*.............4-29Warning/Indicator Lights............4-32
Automatic Transaxle....................... 4-41Automatic TransaxleControls...................................... 4-41Shift-Lock System...................... 4-42Transaxle Ranges........................4-43Manual Shift Mode.....................4-45Driving Tips................................4-49
Switches and Controls.....................4-50Lighting Control......................... 4-50Front Fog Lights*....................... 4-55Rear Fog Light*.......................... 4-56Turn and Lane-ChangeSignals........................................ 4-57Windshield Wipers andWasher........................................ 4-58Rear Window Wiper andWasher........................................ 4-62Headlight Washer*......................4-62Rear Window Defogger..............4-63Horn............................................4-64Hazard Warning Flasher............. 4-65
Brake................................................ 4-66Brake System..............................4-66Emergency Stop SignalSystem........................................ 4-70Hill Launch Assist (HLA).......... 4-71
ABS/TCS/DSC/Trailer Stability Assist(TSA)................................................ 4-72
Antilock Brake System(ABS)..........................................4-72Traction Control System(TCS).......................................... 4-73Dynamic Stability Control(DSC)..........................................4-75Trailer Stability Assist (TSA)*............................................................... 4-76
Fuel Economy Monitor................... 4-77Fuel Economy Monitor...............4-77
*Some models. 4-1
CX-9_8GC7-EE-17G_Edition1 2017-5-16 8:22:04

Drive Selection................................. 4-79Drive Selection........................... 4-79
i-ACTIV AWD................................. 4-81i-ACTIV AWD Operation*.........4-81
Power Steering.................................4-83Power Steering............................4-83
i-ACTIVSENSE...............................4-84i-ACTIVSENSE*........................4-84Adaptive LED Headlights(ALH)*........................................4-87Blind Spot Monitoring (BSM)*............................................................. 4-90Traffic Sign Recognition System(TSR)*........................................ 4-96Distance Recognition SupportSystem (DRSS)*.......................4-103Driver Attention Alert (DAA)*............................................................ 4-106Rear Cross Traffic Alert (RCTA)*....................................................... 4-108Mazda Radar Cruise Control(MRCC)*...................................4-111Mazda Radar Cruise Control withStop & Go function (MRCC withStop & Go function)*...............4-121Lane-keep Assist System (LAS) &Lane Departure Warning System(LDWS)*.................................. 4-134Advanced Smart City Brake Support(Advanced SCBS)*...................4-145Smart City Brake Support [Forward](SCBS F)*.................................4-148Smart City Brake Support [Reverse](SCBS R)*................................ 4-152Smart Brake Support (SBS)*....4-156Forward Sensing Camera (FSC)*........................................................ 4-159Radar Sensor (Front)*.............. 4-164Radar Sensors (Rear)*..............4-167Ultrasonic Sensor (Rear)*.........4-169
Cruise Control............................... 4-170Cruise Control*.........................4-170
4-2 *Some models.
CX-9_8GC7-EE-17G_Edition1 2017-5-16 8:22:04

Tire Pressure MonitoringSystem.............................................4-175
Tire Pressure Monitoring System*....................................................... 4-175
Rear View Monitor....................... 4-179Rear View Monitor*................. 4-179
Parking Sensor System................. 4-191Parking Sensor System*........... 4-191
*Some models. 4-3
CX-9_8GC7-EE-17G_Edition1 2017-5-16 8:22:04

Ignition Switch▼ Push Button Start Positions
The system operates only when the driveris in the vehicle or within operationalrange while the key is being carried.Each time the push button start is pressed,the ignition switches in the order of off,ACC, and ON. Pressing the push buttonstart again from ON switches the ignitionoff.
Indicator light
NOTE• The engine starts by pressing the push
button start while depressing the brakepedal. To switch the ignition position,press the push button start withoutdepressing the pedal.
• Do not leave the ignition switched ONwhile the engine is not running. Doingso could result in the battery goingdead. If the selector lever is in the Pposition, and the ignition is in ACC, theignition switches off automatically afterabout 25 minutes.
Off
The power supply to electrical devicesturns off and the push button startindicator light (amber) also turns off.In this position the steering wheel islocked.
WARNING
Before leaving the driver's seat, alwaysswitch the ignition off, set the parkingbrake, and make sure the selector lever is inP:Leaving the driver's seat without switchingthe ignition off, setting the parking brake,and shifting the selector lever to P isdangerous. Unexpected vehicle movementcould occur which could result in anaccident.In addition, if your intention is to leave thevehicle for even a short period, it isimportant to switch the ignition off, asleaving it in another position will disablesome of the vehicle's security systems andrun the battery down.
NOTE(Locked steering wheel)If the push button start indicator light(green) is flashing and the beep sound isheard, this indicates that the steeringwheel is not unlocked. To unlock thesteering wheel, press the push button startwhile moving the steering wheel left andright.
When Driving
Start/Stop Engine
4-4
CX-9_8GC7-EE-17G_Edition1 2017-5-16 8:22:04

ACC (Accessory)
Some electrical accessories will operateand the indicator light (amber) illuminates.In this position the steering wheel isunlocked.
NOTEThe keyless entry system does not functionwhile the push button start has beenpressed to ACC, and the doors will notlock/unlock even if they have been lockedmanually.
ON
This is the normal running position afterthe engine is started. The indicator light(amber) turns off. (The indicator light(amber) illuminates when the ignition isswitched ON and the engine is notrunning.)Some indicator lights/warning lightsshould be inspected before the engine isstarted (page 4-32).
NOTEWhen the push button start is pressed toON, the sound of the fuel pump motoroperating near the fuel tank can be heard.This does not indicate an abnormality.
Starting the Engine
WARNING
Radio waves from the key may affectmedical devices such as pacemakers:Before using the key near people who usemedical devices, ask the medical devicemanufacturer or your physician if radiowaves from the key will affect the device.
NOTE• The key must be carried because the key
carries an immobilizer chip that mustcommunicate with the engine controls atshort range.
• The engine can be started when the pushbutton start is pressed from off, ACC, orON.
• The push button start system functions(function which can start the engine byonly carrying the key) can bedeactivated to prevent any possibleadverse effect on a user wearing apacemaker or other medical device. Ifthe system is deactivated, you will beunable to start the engine by carryingthe key. Consult an expert repairer, werecommend an Authorized MazdaRepairer for details. If the push buttonstart system functions have beendeactivated, you can start the engine byfollowing the procedure indicated whenthe key battery goes dead.Refer to Engine Start Function WhenKey Battery is Dead on page 4-9.
When Driving
Start/Stop Engine
4-5
CX-9_8GC7-EE-17G_Edition1 2017-5-16 8:22:04

• After starting a cold engine, the enginespeed increases and a whining soundfrom the engine compartment can beheard.This is for improved exhaust gaspurification and does not indicate anyparts defect.
1. Make sure you are carrying the key.2. Occupants should fasten their seat
belts.3. Make sure the parking brake is on.4. Continue to press the brake pedal
firmly until the engine has completelystarted.
5. Put the vehicle in park (P). If you mustrestart the engine while the vehicle ismoving, shift into neutral (N).
NOTEThe starter will not operate if theselector lever is not in P or N and thebrake pedal is not depressedsufficiently.
6. Verify that the KEY indicator light(green) (if equipped) in the instrumentcluster and the push button startindicator light (green) illuminate.
Indicator light
Push button start
KEY indicator light (green)/ KEY warning light (red)
When Driving
Start/Stop Engine
4-6
CX-9_8GC7-EE-17G_Edition1 2017-5-16 8:22:04

NOTE• If the push button start indicator
light (green) flashes, make sure thatthe key is being carried (for vehicleswith a type A instrument cluster(page 4-32), messages aredisplayed in the instrument cluster).
• If the push button start indicatorlight (green) flashes with the keybeing carried, touch the key to thepush button start and start theengine (for vehicles with a type Ainstrument cluster (page 4-32),messages are displayed in theinstrument cluster). Refer to EngineStart Function When Key Battery isDead on page 4-9.
CAUTIONIf the KEY warning light (red)illuminates, or the push button startindicator light (amber) flashes, thiscould indicate a problem with theengine starting system. This mayprevent the engine from starting orfrom switching the ignition to ACC orON (for vehicles with a type Ainstrument cluster (page 4-32),messages are displayed in theinstrument cluster). Have your vehicleinspected at an expert repairer, werecommend an Authorized MazdaRepairer as soon as possible.
NOTE• Under the following conditions, the
KEY warning light (red) flashes afterthe push button start is pressed. Thisinforms the driver that the pushbutton start will not switch to ACC,even if it is pressed from off (forvehicles with a type A instrumentcluster (page 4-32), messages aredisplayed in the instrument cluster).
• The key battery is dead.• The key is out of operational
range.• The key is placed in areas where it
is difficult for the system to detectthe signal (page 3-6).
• A key from another manufacturersimilar to the key is in theoperational range.
• (Forced engine starting method)If the KEY warning light (red)illuminates, or the push button startindicator light (amber) flashes, thiscould indicate that the engine maynot start using the usual startingmethod (for vehicles with a type Ainstrument cluster (page 4-32),messages are displayed in theinstrument cluster). Have yourvehicle inspected at an expertrepairer, we recommend anAuthorized Mazda Repairer as soonas possible. If this occurs, the enginecan be force-started. Press and holdthe push button start until the enginestarts. Other procedures necessaryfor starting the engine, such ashaving the key in the cabin, anddepressing the brake pedal arerequired.
When Driving
Start/Stop Engine
4-7
CX-9_8GC7-EE-17G_Edition1 2017-5-16 8:22:04

• When the engine is force-started, theKEY warning light (red) (ifequipped) remains illuminated andthe push button start indicator light(amber) remains flashing.
• When the selector lever is in theneutral (N) position, the KEYindicator light (green) (if equipped)and the push button start indicatorlight (green) do not illuminate.
7. Press the push button start after boththe KEY indicator light (green) (ifequipped) in the instrument cluster andthe push button start indicator light(green) illuminate.
NOTE• After starting the engine, the push
button start indicator light (amber)turns off and the ignition switches tothe ON position.
• After pressing the push button startand before the engine starts, theoperation sound of the fuel pumpmotor from near the fuel tank can beheard, however, this does notindicate a malfunction.
8. After starting the engine, let it idle forabout ten seconds (Prohibited inGermany).
NOTE• (Germany)
Drive immediately after starting theengine. However do not use highengine speeds until reaching theoperating temperature.
• Whether the engine is cold or warm,it should be started without the useof the accelerator.
• If the engine does not start the firsttime, refer to Starting a FloodedEngine under Emergency Starting. Ifthe engine still does not start, haveyour vehicle inspected by anAuthorized Mazda Repairer (page7-31).
When Driving
Start/Stop Engine
4-8
CX-9_8GC7-EE-17G_Edition1 2017-5-16 8:22:04

▼ Engine Start Function When KeyBattery is Dead
CAUTIONWhen starting the engine by holding thetransmitter over the push button start dueto a dead key battery or a malfunctioningkey, be careful not to allow the following,otherwise the signal from the key will notbe received correctly and the engine maynot start.
Metal parts of other keys or metal objectstouch the key.
Spare keys or keys for other vehiclesequipped with an immobilizer systemtouch or come near the key.
Devices for electronic purchases, orsecurity passage touch or come near thekey.
If the engine cannot be started due to adead key battery, the engine can be startedusing the following procedure:1. Continue to depress the brake pedal
firmly until the engine has completelystarted.
2. Verify that the push button startindication light (green) flashes.
3. Touch the push button start using thebackside of the key (as shown) whilethe push button start indicator light(green) flashes.
Transmitter
NOTEWhen touching the push button startusing the backside of the key as shownin the illustration, touch the pushbutton start with the lock switch side ofthe key facing up.
4. Verify that the push button startindicator light (green) turns on.
5. Press the push button start to start theengine.
When Driving
Start/Stop Engine
4-9
CX-9_8GC7-EE-17G_Edition1 2017-5-16 8:22:04

NOTE• The engine cannot be started unless
the brake pedal is fully depressed.• If there is a malfunction with the
push button start function, the pushbutton start indicator light (amber)flashes. In this case, the engine maystart, however, have the vehiclechecked at an expert repairer, werecommend an Authorized MazdaRepairer as soon as possible.
• If the push button start indicatorlight (green) does not illuminate,perform the operation from thebeginning again. If it does notilluminate, have the vehicle checkedat an expert repairer, we recommendan Authorized Mazda Repairer.
• To switch the ignition positionwithout starting the engine, performthe following operations after thepush button start indicator light(green) turns on.1. Release the brake pedal.2. Press the push button start to
switch the ignition position. Theignition switches in the order ofACC, ON, and off each time thepush button start is pressed. Toswitch the ignition positionagain, perform the operationfrom the beginning.
▼ Emergency Operation for Startingthe Engine
If the KEY warning light (red) illuminates,or the push button start indicator light(amber) flashes, this could indicate thatthe engine may not start using the usualstarting method (for vehicles with a type Ainstrument cluster (page 4-32), messagesare displayed in the instrument cluster).Have your vehicle inspected at an expertrepairer, we recommend an AuthorizedMazda Repairer as soon as possible. If thisoccurs, the engine can be force-started.Press and hold the push button start untilthe engine starts. Other proceduresnecessary for starting the engine such ashaving the key in the cabin, anddepressing the brake pedal are required.
When Driving
Start/Stop Engine
4-10
CX-9_8GC7-EE-17G_Edition1 2017-5-16 8:22:04

Turning the Engine Off
WARNING
Do not stop the engine while the vehicle ismoving:Stopping the engine while the vehicle ismoving for any reason other than in anemergency is dangerous. Stopping theengine while the vehicle is moving willresult in reduced braking ability due to theloss of power braking, which could causean accident and serious injury.
1. Stop the vehicle completely.2. Shift the selector lever to the P
position and set the parking brake.3. Press the push button start to turn off
the engine. The ignition position is off.
CAUTIONWhen leaving the vehicle, make sure the
push button start is off.
NOTE• The cooling fan in the engine
compartment could turn on for a fewminutes after the ignition is switchedfrom ON to OFF, whether or not the A/Cis on or off, to cool the enginecompartment quickly.
• If the system detects that the remainingbattery power of the key is low when theignition is switched from ON to ACC orOFF, the following is indicated.Replace with a new battery before thekey becomes unusable.Refer to Key Battery Replacement onpage 6-33.
(Vehicle equipped with Type Ainstrument cluster)A message is indicated in the display ofthe instrument cluster.(Vehicle equipped with Type Binstrument cluster)The KEY indicator light (green) flashesfor approximately 30 seconds.Refer to Warning/Indicator Lights onpage 4-32.
• If the engine is turned off while theselector lever is in a position other thanP, the ignition switches to ACC.
▼ Emergency Engine Stop
Continuously pressing the push buttonstart or quickly pressing it any number oftimes while the engine is running or thevehicle is being driven will turn the engineoff immediately. The ignition switches toACC.
When Driving
Start/Stop Engine
4-11
CX-9_8GC7-EE-17G_Edition1 2017-5-16 8:22:04

Meters and Gauges
Instrument ClusterType A
(With Multi-information Display)
(Without Multi-information Display)Type B
Steering Switch
Active Driving Display
① Speedometer..........................................................................................................page 4-13② Odometer, Trip Meter and Trip Meter Selector.................................................... page 4-13
When Driving
Instrument Cluster and Display
4-12
CX-9_8GC7-EE-17G_Edition1 2017-5-16 8:22:04

③ Tachometer............................................................................................................ page 4-14④ Dashboard Illumination.........................................................................................page 4-16⑤ Trip Computer and INFO Switch..........................................................................page 4-18⑥ Engine Coolant Temperature Gauge..................................................................... page 4-15⑦ Fuel Gauge............................................................................................................ page 4-15⑧ Outside Temperature Display................................................................................page 4-17⑨ Cruise Control Set Vehicle Speed Display............................................................page 4-18⑩ Vehicle Speed Alarm.............................................................................................page 4-19⑪ Multi-information Display and INFO Switch....................................................... page 4-20⑫ Active Driving Display......................................................................................... page 4-29
▼ Speedometer
The speedometer indicates the speed of thevehicle.
▼ Odometer, Trip Meter and TripMeter Selector (WithoutMulti-information Display)
The display mode can be changed fromodometer to trip meter A to trip meter Band then back to odometer by pressing theselector while one of them is displayed.The selected mode will be displayed.
Press the selector
Press the selector
Press the selector
Odometer
Trip meter A
Trip meter B
Selector
When Driving
Instrument Cluster and Display
4-13
CX-9_8GC7-EE-17G_Edition1 2017-5-16 8:22:04

Odometer
The odometer records the total distancethe vehicle has been driven.
Trip meter
The trip meter can record the total distanceof two trips. One is recorded in trip meterA, and the other is recorded in trip meterB. For instance, trip meter A can record thedistance from the point of origin, and tripmeter B can record the distance fromwhere the fuel tank is filled. When trip meter A is selected, pressing theselector again within one second willchange to trip meter B mode. When trip meter A is selected, TRIP Awill be displayed. When trip meter B isselected, TRIP B will be displayed. The trip meter records the total distancethe vehicle is driven until the meter isagain reset. Return it to “0.0” bydepressing and holding the selector for onesecond or more. Use this meter to measuretrip distances and to compute fuelconsumption.
NOTE• If the fuel economy data is reset using
the fuel economy monitor, or trip A isreset using the trip meter when thefunction which synchronizes the fueleconomy monitor and the trip meter ison, the fuel economy data and trip A arereset simultaneously.Refer to Fuel Economy Monitor on page4-77.
• Only the trip meters record tenths ofkilometers (miles).
• The trip record will be erased when:• The power supply is interrupted
(blown fuse or the battery isdisconnected).
• The vehicle is driven over 9999.9 km(mile).
▼ Tachometer
The tachometer shows engine speed inthousands of revolutions per minute (rpm).
CAUTIONDo not run the engine with the tachometerneedle in the RED ZONE.This may cause severe engine damage.
STRIPED ZONE
RED ZONE
When Driving
Instrument Cluster and Display
4-14
CX-9_8GC7-EE-17G_Edition1 2017-5-16 8:22:04

NOTEWhen the tachometer needle enters theSTRIPED ZONE, this indicates to thedriver that the gears should be shiftedbefore entering the RED ZONE.
▼ Engine Coolant Temperature Gauge(Without Multi-informationDisplay)
Displays the engine coolant temperature.The white gauge indicates that the enginecoolant temperature is low, and the redgauge indicates that the engine coolanttemperature is high and overheating.
CAUTIONIf the engine coolant temperature gaugeindicator flashes, there is a possibility ofoverheating. Park the vehicle in a safeplace immediately and take appropriatemeasures. If the vehicle continues to bedriven, it could cause damage to theengine.Refer to Overheating on page 7-32.
NOTE• The temperature unit (Centigrade/
Fahrenheit) of the engine coolant gaugedisplay changes in conjunction with thetemperature unit of the outsidetemperature display.Refer to Personalization Features onpage 9-10.
• During normal driving, the enginecoolant temperature stabilizes at 100 °C(210 °F) or less, and the gauge indicatesa range lower than 100 °C (210 °F).
▼ Fuel Gauge (WithoutMulti-information Display)
The fuel gauge shows approximately howmuch fuel is remaining in the tank whenthe ignition is switched ON. Werecommend keeping the tank over 1/4 full.
Full
1/4 Full
Empty
If the low fuel warning light illuminates orthe fuel level is very low, refuel as soon aspossible.Refer to Taking Action on page 7-47 .
When Driving
Instrument Cluster and Display
4-15
CX-9_8GC7-EE-17G_Edition1 2017-5-16 8:22:04

NOTE• After refueling, it may require some time
for the indicator to stabilize. In addition,the indicator may deviate while drivingon a slope or curve since the fuel movesin the tank.
• The display indicating a quarter or lessremaining fuel has more segments toshow the remaining fuel level in greaterdetail.
• The direction of the arrow ( ) indicatesthat the fuel-filler lid is on the left sideof the vehicle.
▼ Dashboard Illumination
(Without auto-light control)When the position lights are turned onwith the ignition switched ON, thebrightness of the dashboard illumination isdimmed.(With auto-light control)When the position lights are turned onwith the ignition switched ON, thebrightness of the dashboard illumination isdimmed. However, when the light sensordetects that the surrounding area is brightsuch as when the position lights are turnedon in the daytime, the dashboardillumination does not dim.
NOTE• (With auto-light control)
When the ignition is switched ON in theearly evening or at dusk, the dashboardillumination is dimmed for severalseconds until the light sensor detects thebrightness of the surrounding area,however, the dimmer may cancel afterthe brightness is detected.
• When the position lights are turned on,the position lights indicator light in theinstrument cluster turns on.Refer to Headlights on page 4-50.
The brightness of the instrument clusterand dashboard illuminations can beadjusted by rotating the knob.
• The brightness decreases by rotating theknob to the left. A beep sound will beheard when the knob has been rotated tothe maximum dim position.
• The brightness increases by rotating theknob to the right.
Dim
Bright
Function for cancelling illuminationdimmer
The illumination dimmer can be canceledby rotating the dashboard illuminationknob to the right until a beep sound isheard while the instrument cluster isdimmed with the ignition switched ON. Ifthe instrument cluster's visibility isreduced due to glare from surroundingbrightness, cancel the illuminationdimmer.
When Driving
Instrument Cluster and Display
4-16
CX-9_8GC7-EE-17G_Edition1 2017-5-16 8:22:04

NOTE• (With Multi-information Display)
The illumination dimmer can becanceled by pressing the dashboardillumination knob.
• When the illumination dimmer iscanceled, the instrument cluster cannotbe dimmed even if the position lights areturned on.
• When the illumination dimmer iscanceled, the screen in the centerdisplay switches to constant display ofthe daytime screen.
▼ Outside Temperature Display(Without Multi-informationDisplay)
When the ignition is switched ON, theoutside temperature is displayed. (European model)
(Except European model)
NOTE• Under the following conditions, the
outside temperature display may differfrom the actual outside temperaturedepending on the surroundings andvehicle conditions:
• Significantly cold or hot temperatures.• Sudden changes in outside
temperature.• The vehicle is parked.• The vehicle is driven at low speeds.
Changing the Temperature Unit of theOutside Temperature Display
The outside temperature unit can beswitched between Celsius and Fahrenheitusing the following procedure.Settings can be changed by operating thecenter display screen.Refer to Personalization Features on page9-10.
NOTEWhen the temperature unit indicated in theoutside temperature display is changed,the temperature unit indicated in theengine coolant gauge display changes inconjunction with it.
Outside Temperature Warning*
When the outside temperature is low, theindication flashes and a beep sound isheard to warn the driver of the possibilityof icy roads.If the outside temperature is lower thanabout 4 °C (39 °F), the outsidetemperature display and the markflashes for about ten seconds and a beepsound is heard once.
NOTEIf the outside temperature is lowerthan -20 °C (-4 °F), the beep sound doesnot operate. However, the markilluminates.
When Driving
Instrument Cluster and Display
*Some models. 4-17
CX-9_8GC7-EE-17G_Edition1 2017-5-16 8:22:04

▼ Cruise Control Set Vehicle SpeedDisplay (Without Multi-informationDisplay)*
The vehicle speed preset using the cruisecontrol is displayed. (European model)
(Except European model)
▼ Trip Computer and INFO Switch(Without Multi-informationDisplay)
The following information can be selectedby pressing the INFO switch with theignition switched ON.
• Distance-to-empty mode• Average fuel economy mode• Current fuel economy mode
If you have any problems with your tripcomputer, consult an expert repairer, werecommend an Authorized MazdaRepairer.
Distance-to-empty mode
This mode displays the approximatedistance you can travel on the remainingfuel based on the fuel economy. The distance-to-empty will be calculatedand displayed every second.(European model)
(Except European model)
NOTE• Even though the distance-to-empty
display may indicate a sufficient amountof remaining driving distance beforerefueling is required, refuel as soon aspossible if the fuel level is very low orthe low fuel warning light illuminates.
• The display may not change unless youadd more than approximately 9 L (2.3US gal, 1.9 Imp gal) of fuel.
• The distance-to-empty is theapproximate remaining distance thevehicle can be driven until all thegraduation marks in the fuel gauge(indicating the remaining fuel supply)disappear.
• If there is no past fuel economyinformation such as after firstpurchasing your vehicle or theinformation is deleted when the batterycables are disconnected, the actualdistance-to empty/range may differ fromthe amount indicated.
Average fuel economy mode
This mode displays the average fueleconomy by calculating the total fuelconsumption and the total traveleddistance since purchasing the vehicle,re-connecting the battery afterdisconnection, or resetting the data. Theaverage fuel economy is calculated anddisplayed every minute.(European model)
When Driving
Instrument Cluster and Display
4-18 *Some models.
CX-9_8GC7-EE-17G_Edition1 2017-5-16 8:22:04

(Except European model)
To clear the data being displayed, press theINFO switch for more than 1.5 seconds.After pressing the INFO switch, - - -L/100 km (- - - mpg) will be displayed forabout 1 minute before the fuel economy isrecalculated and displayed.
Current fuel economy mode
This mode displays the current fueleconomy by calculating the amount of fuelconsumption and the distance traveled. Current fuel economy will be calculatedand displayed every 2 seconds.(European model)
(Except European model)
When you've slowed to about 5 km/h (3mph), - - - L/100 km (- - - mpg) will bedisplayed.
▼ Vehicle Speed Alarm (WithoutMulti-information Display)*
In this mode, the current setting for thevehicle speed alarm is displayed. You canchange the vehicle speed setting at whichthe warning is triggered.
NOTEThe vehicle speed alarm display isactivated at the same time the beep soundis heard. The set vehicle speed flashesseveral times.
The vehicle speed alarm can be set usingthe center display.
NOTE• Always set the vehicle speed according
to the laws and regulations of thecountry/city in which the vehicle isdriven. In addition, always verify thespeed of the vehicle using thespeedometer.
• The vehicle speed alarm function can beset between 30 and 250 km/h (20 and150 mph).
When Driving
Instrument Cluster and Display
*Some models. 4-19
CX-9_8GC7-EE-17G_Edition1 2017-5-16 8:22:04

Multi-information Display and INFO Switch*
INFO switchMulti-information Display
The multi-information display indicates the following information.• Odometer• Trip meter• Engine coolant temperature gauge• Fuel gauge• Outside temperature• Distance-to-empty• Average fuel economy• Current fuel economy• Maintenance Monitor• Blind Spot Monitoring (BSM) Display• Distance Recognition Support System (DRSS) Display• Mazda Radar Cruise Control with Stop & Go function (MRCC with Stop & Go function)
System Display• Mazda Radar Cruise Control (MRCC) Display• Lane-keep Assist System (LAS) & Lane Departure Warning System (LDWS) Display• Cruise Control Display• Vehicle Speed Alarm• Warning message
When Driving
Instrument Cluster and Display
4-20 *Some models.
CX-9_8GC7-EE-17G_Edition1 2017-5-16 8:22:04

The screen content changes each time the INFO switch is pressed.
Press the INFO switch
Press the INFO switch
Press the INFO switch
Press the INFO switch
Press the INFO switch
Current Fuel Economy, Trip Meter A, Average Fuel Economy, Outside Temperature, Odometer, Distance-to-empty, Fuel Gauge
Current Fuel Economy, Trip Meter B, Average Fuel Economy, Outside Temperature, Odometer, Distance-to-empty, Fuel Gauge
Engine Coolant Temperature Gauge, Maintenance Monitor, Outside Temperature, Odometer, Distance-to-empty, Fuel Gauge
i-ACTIVSENSE display, Outside Temperature, Odometer, Distance-to-empty, Fuel Gauge
Warning message, Outside Temperature, Odometer, Distance-to-empty, Fuel Gauge
*1
*1:Displayed only when a warning occurs.
When Driving
Instrument Cluster and Display
4-21
CX-9_8GC7-EE-17G_Edition1 2017-5-16 8:22:04

▼ Odometer, Trip Meter and TripMeter Selector
The odometer is constantly displayed onthe screen when the ignition is switchedON, and the TRIP A or TRIP B screen canbe displayed by operating the INFOswitch.
Press the INFO switch
INFO switch
Odometer, Trip meter A
Odometer, Trip meter B
Odometer
The odometer records the total distancethe vehicle has been driven.
Trip meter
The driving distance for a specifiedinterval is indicated. Two types (TRIP A,TRIP B) of interval distance and theaverage fuel economy for each can bemeasured.
For instance, trip meter A can record thedistance from the point of origin, and tripmeter B can record the distance fromwhere the fuel tank is filled. When trip meter A is selected, TRIP Awill be displayed. When trip meter B isselected, TRIP B will be displayed. The trip meter and average fuel economycan be reset by pressing the INFO switchfor 1.5 second or more while in eachmode.
NOTE• Only the trip meters record tenths of
kilometers (miles).• The trip record will be erased when:
• The power supply is interrupted(blown fuse or the battery isdisconnected).
• The vehicle is driven over 9999.9 km(mile).
When Driving
Instrument Cluster and Display
4-22
CX-9_8GC7-EE-17G_Edition1 2017-5-16 8:22:04

▼ Engine Coolant Temperature Gauge
Displays the engine coolant temperature.The blue gauge indicates that the enginecoolant temperature is low, and the redgauge indicates that the engine coolanttemperature is high and overheating.
CAUTIONIf the high engine coolant temperaturewarning light (red) turns on, there is apossibility of overheating. Park the vehiclein a safe place immediately and takeappropriate measures. If the vehiclecontinues to be driven, it could causedamage to the engine.Refer to Overheating on page 7-32.
NOTE• The temperature unit (Centigrade/
Fahrenheit) of the engine coolant gaugedisplay changes in conjunction with thetemperature unit of the outsidetemperature display.Refer to Personalization Features onpage 9-10.
• During normal driving, the enginecoolant temperature stabilizes at 100 °C(210 °F) or less, and the gauge indicatesa range lower than 100 °C (210 °F).
▼ Fuel Gauge
The fuel gauge shows approximately howmuch fuel is remaining in the tank whenthe ignition is switched ON. Werecommend keeping the tank over 1/4 full.
Full
1/4 Full
Empty
If the fuel level is low, ( ) and ( ) turn anamber color. Refuel as soon as possible.Refer to Taking Action on page 7-47 .
NOTE• After refueling, it may require some time
for the indicator to stabilize. In addition,the indicator may deviate while drivingon a slope or curve since the fuel movesin the tank.
• The display indicating a quarter or lessremaining fuel has more segments toshow the remaining fuel level in greaterdetail.
• The direction of the arrow ( ) indicatesthat the fuel-filler lid is on the left sideof the vehicle.
When Driving
Instrument Cluster and Display
4-23
CX-9_8GC7-EE-17G_Edition1 2017-5-16 8:22:04
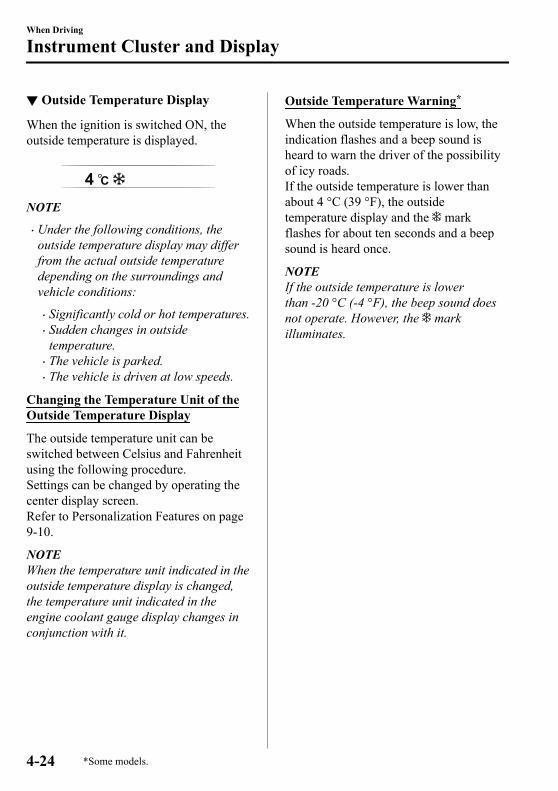
▼ Outside Temperature Display
When the ignition is switched ON, theoutside temperature is displayed.
NOTE• Under the following conditions, the
outside temperature display may differfrom the actual outside temperaturedepending on the surroundings andvehicle conditions:
• Significantly cold or hot temperatures.• Sudden changes in outside
temperature.• The vehicle is parked.• The vehicle is driven at low speeds.
Changing the Temperature Unit of theOutside Temperature Display
The outside temperature unit can beswitched between Celsius and Fahrenheitusing the following procedure.Settings can be changed by operating thecenter display screen.Refer to Personalization Features on page9-10.
NOTEWhen the temperature unit indicated in theoutside temperature display is changed,the temperature unit indicated in theengine coolant gauge display changes inconjunction with it.
Outside Temperature Warning*
When the outside temperature is low, theindication flashes and a beep sound isheard to warn the driver of the possibilityof icy roads.If the outside temperature is lower thanabout 4 °C (39 °F), the outsidetemperature display and the markflashes for about ten seconds and a beepsound is heard once.
NOTEIf the outside temperature is lowerthan -20 °C (-4 °F), the beep sound doesnot operate. However, the markilluminates.
When Driving
Instrument Cluster and Display
4-24 *Some models.
CX-9_8GC7-EE-17G_Edition1 2017-5-16 8:22:04
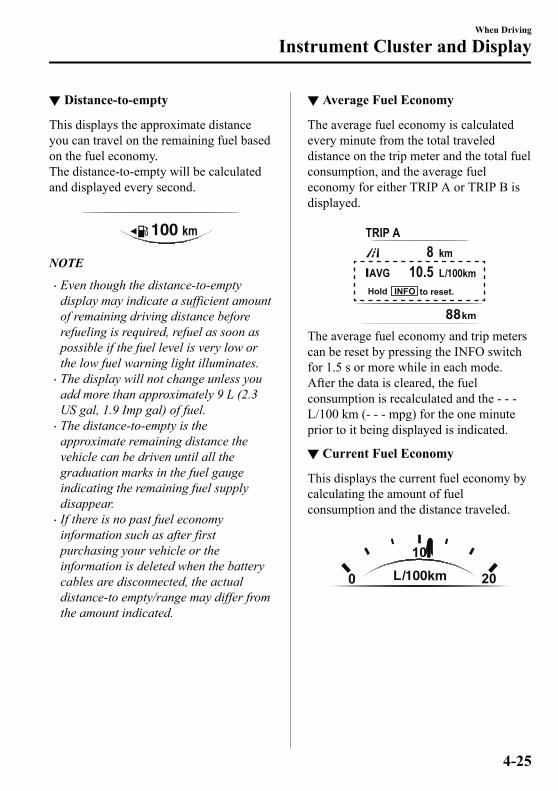
▼ Distance-to-empty
This displays the approximate distanceyou can travel on the remaining fuel basedon the fuel economy.The distance-to-empty will be calculatedand displayed every second.
NOTE• Even though the distance-to-empty
display may indicate a sufficient amountof remaining driving distance beforerefueling is required, refuel as soon aspossible if the fuel level is very low orthe low fuel warning light illuminates.
• The display will not change unless youadd more than approximately 9 L (2.3US gal, 1.9 Imp gal) of fuel.
• The distance-to-empty is theapproximate remaining distance thevehicle can be driven until all thegraduation marks in the fuel gaugeindicating the remaining fuel supplydisappear.
• If there is no past fuel economyinformation such as after firstpurchasing your vehicle or theinformation is deleted when the batterycables are disconnected, the actualdistance-to empty/range may differ fromthe amount indicated.
▼ Average Fuel Economy
The average fuel economy is calculatedevery minute from the total traveleddistance on the trip meter and the total fuelconsumption, and the average fueleconomy for either TRIP A or TRIP B isdisplayed.
The average fuel economy and trip meterscan be reset by pressing the INFO switchfor 1.5 s or more while in each mode.After the data is cleared, the fuelconsumption is recalculated and the - - -L/100 km (- - - mpg) for the one minuteprior to it being displayed is indicated.
▼ Current Fuel Economy
This displays the current fuel economy bycalculating the amount of fuelconsumption and the distance traveled.
When Driving
Instrument Cluster and Display
4-25
CX-9_8GC7-EE-17G_Edition1 2017-5-16 8:22:04

▼ Maintenance Monitor
The following maintenance periodnotifications can be displayed by turningthe Maintenance Monitor on.
• Scheduled Maintenance• Tire Rotation• Oil Change
For the setting method and indications forthe maintenance monitor, refer to theMaintenance Monitor.Refer to Maintenance Monitor on page 6-11.The maintenance monitor displays theinformation when the ignition is switchedON.
NOTEThis function is inoperable while thevehicle is being driven.
Message display
When the remaining time or the distanceapproaches 0, a message is displayed eachtime the ignition is switched ON.
NOTE• If any of the INFO switch is pressed
while a message is displayed, it will nolonger be displayed the next time theignition is switched ON.
• After the vehicle is serviced and theremaining time/distance is reset, themessage for the next maintenanceperiod will be displayed when theremaining distance or time to the nextmaintenance period approaches 0(displays when engine is started).
• If there are multiple messages, they aredisplayed according to their order.
• If OFF is set for Messages, messagesare not displayed.
▼ Blind Spot Monitoring (BSM)Display*
Displays the system status.
Refer to Blind Spot Monitoring (BSM) onpage 4-90.
When Driving
Instrument Cluster and Display
4-26 *Some models.
CX-9_8GC7-EE-17G_Edition1 2017-5-16 8:22:04

▼ Distance Recognition SupportSystem (DRSS) Display*
Displays the distance between yourvehicle and the vehicle ahead.
Refer to Distance Recognition SupportSystem (DRSS) on page 4-103.
▼ Mazda Radar Cruise Control withStop & Go function (MRCC withStop & Go function) Display*
Displays the currently set system status.
Refer to Mazda Radar Cruise Control withStop & Go function (MRCC with Stop &Go function) on page 4-121.
▼ Mazda Radar Cruise Control(MRCC) Display*
Displays the currently set system status.
Refer to Mazda Radar Cruise Control(MRCC) on page 4-111.
▼ Lane-keep Assist System (LAS) &Lane Departure Warning System(LDWS) Display*
Displays the system status.
Refer to Lane-keep Assist System (LAS)& Lane Departure Warning System(LDWS) on page 4-134.
When Driving
Instrument Cluster and Display
*Some models. 4-27
CX-9_8GC7-EE-17G_Edition1 2017-5-16 8:22:04

▼ Cruise Control Set Vehicle SpeedDisplay*
The vehicle speed preset using the cruisecontrol is displayed.
Refer to Cruise Control on page 4-170.
▼ Vehicle Speed Alarm*
In this mode, the current setting for thevehicle speed alarm is displayed. You canchange the vehicle speed setting at whichthe warning is triggered.
NOTEThe vehicle speed alarm display isactivated at the same time the beep soundis heard. The set vehicle speed flashesseveral times.
The vehicle speed alarm can be set usingthe center display.
NOTE• Always set the vehicle speed according
to the laws and regulations of thecountry/city in which the vehicle isdriven. In addition, always verify thespeed of the vehicle using thespeedometer.
• The vehicle speed alarm function can beset between 30 and 250 km/h (20 and150 mph).
▼ Warning (Display Indication)
A message is displayed to notify the userof the system operation status andmalfunctions or abnormalities.If the warning light turns on/flashessimultaneously or a symbol is indicated inthe display, check the informationregarding the warning light or symbol.(page 4-32)When only a message is displayed, refer toMessage Indicated in Multi-informationDisplay. (page 7-54)
When Driving
Instrument Cluster and Display
4-28 *Some models.
CX-9_8GC7-EE-17G_Edition1 2017-5-16 8:22:04

Active Driving Display*
Optical receiver Dust-proof sheet
WARNING
Always adjust the display brightness and position with the vehicle stopped:Adjusting the display brightness and position while driving the vehicle is dangerous as doingso could distract your attention from the road ahead and lead to an accident.
CAUTIONDo not place beverages near the active driving display. If water or other liquids are splashed
on the active driving display, it could cause damage.Do not place objects above the active driving display or apply stickers to the dust-proof
sheet/optical receiver as they will cause interference.A sensor is integrated to control the display's luminosity. If the optical receiver is covered,
the display's luminosity will lower making the display difficult to view.Do not allow intense light to hit the optical receiver. Otherwise, it could cause damage.
NOTE• Wearing polarized sunglasses will reduce the visibility of the active driving display due to
the characteristics of the display.• If the battery has been removed and re-installed or the battery voltage is low, the adjusted
position may deviate.• The display may be difficult to view or temporarily affected by weather conditions such as
rain, snow, light, and temperature.• If the audio system is removed, the active driving display cannot be operated.
The active driving display indicates the following information:• Blind Spot Monitoring (BSM) Operation Conditions and Warnings
When Driving
Instrument Cluster and Display
*Some models. 4-29
CX-9_8GC7-EE-17G_Edition1 2017-5-16 8:22:04

Refer to Blind Spot Monitoring (BSM) on page 4-90.• Distance Recognition Support System (DRSS) Warnings
Refer to Distance Recognition Support System (DRSS) on page 4-103.• Traffic Sign Recognition System (TSR) traffic signs and Warnings
Refer to Traffic Sign Recognition System (TSR) on page 4-96.• Mazda Radar Cruise Control with Stop & Go function (MRCC with Stop & Go function)
Operation Conditions and WarningsRefer to Mazda Radar Cruise Control with Stop & Go function (MRCC with Stop & Gofunction) on page 4-121.
• Mazda Radar Cruise Control (MRCC) Operation Conditions and WarningsRefer to Mazda Radar Cruise Control (MRCC) on page 4-111.
• Lane-keep Assist System (LAS) & Lane Departure Warning System (LDWS) OperationConditions and WarningsRefer to Lane-keep Assist System (LAS) & Lane Departure Warning System (LDWS) onpage 4-134.
• Advanced Smart City Brake Support (Advanced SCBS) WarningsRefer to Advanced Smart City Brake Support (Advanced SCBS) on page 4-145.
• Smart City Brake Support [Forward] (SCBS F) WarningsRefer to Smart City Brake Support [Forward] (SCBS F) on page 4-148.
• Smart Brake Support (SBS) WarningsRefer to Smart Brake Support (SBS) on page 4-156.
• Driver Attention Alert (DAA) WarningsRefer to Driver Attention Alert (DAA) on page 4-106.
• Cruise Control Operation ConditionsRefer to Cruise Control on page 4-170.
• Navigation Guidance (vehicles with navigation system)• Speed limit indicator (vehicles with navigation system)• Vehicle Speed
Each setting/adjustment for the active driving display can be performed on the centerdisplay.1. Select the icon on the home screen and display the Settings screen.2. Select the AD-Disp tab.3. Select the desired item and perform the setting/adjustment.
• Method for adjusting screen brightness (automatically/manually)• Screen brightness initial settings (automatic adjustment is selected)
When Driving
Instrument Cluster and Display
4-30
CX-9_8GC7-EE-17G_Edition1 2017-5-16 8:22:04

• Screen brightness adjustment (manual adjustment is selected)• Display position of active driving display (display height)• Active driving display angle adjustment (display angle correction)• Active driving display ON/OFF (indication)• Navigation guidance ON/OFF• Reset settings (reset)
NOTE• The desired driving position (display position, brightness level, display information) can
be called up after programming the position.Refer to Driving Position Memory on page 2-7.
When Driving
Instrument Cluster and Display
4-31
CX-9_8GC7-EE-17G_Edition1 2017-5-16 8:22:04

Warning/Indicator LightsInstrument Cluster varies depending on model and specifications.
Center of Dashboard
Warning/Indicator lights will appear in any of the highlighted areas
Instrument ClusterType A
(With Multi-information Display)
(Without Multi-information Display)Type B
When Driving
Instrument Cluster and Display
4-32
CX-9_8GC7-EE-17G_Edition1 2017-5-16 8:22:04

▼ Warning Indication/Warning Lights
These lights turn on or flash to notify the user of the system operation status or a systemmalfunction.
Signal Warning Page
Brake System Warning Light*1 7-38
ABS Warning Light*1
Electronic BrakeForce Distribu-
tion SystemWarning
7-38ABS warning
7-41
Charging System Warning Indication/Warning Light*1 7-38
Engine Oil Warning Light*1 7-38
(Red)High Engine Coolant Temperature Warning Indication/Warning Light*1 7-38
Power Steering Malfunction Indication/Malfunction Indicator Light*1 7-38
Master Warning Indication/Warning Light*1 7-41
Electric Parking Brake (EPB) Warning Indication/Warning Light 7-41
*Engine Oil Level Warning Indication 7-41
Check Engine Light*1 7-41
Automatic Transaxle Warning Indication/Warning Light*1 7-41
*4WD Warning Indication/Warning Light*1 7-41
Air Bag/Front Seat Belt Pretensioner System Warning Light*1 7-41
*Tire Pressure Monitoring System Warning Light*1
Flashing7-41
Turns on7-47
(Amber/White)*KEY Warning Indication 7-41
When Driving
Instrument Cluster and Display
*Some models. 4-33
CX-9_8GC7-EE-17G_Edition1 2017-5-16 8:22:04

Signal Warning Page
(Red)*KEY Warning Light*1
Turns on7-41
Flashing7-47
(Amber)*Adaptive LED Headlights (ALH) Warning Indication/Warning Light*1 7-41
*Blind Spot Monitoring (BSM) Warning Indication 7-41
(Amber)
*Mazda Radar Cruise Control (MRCC) Warning Indication 7-41*Mazda Radar Cruise Control with Stop & Go function (MRCC with Stop& Go function) Warning Indication 7-41
(Amber)
*Lane-keep Assist System (LAS) & Lane Departure Warning System(LDWS) Warning Indication 7-41
(Amber)*Driver Attention Alert (DAA) Warning Indication 7-41
LED Headlight Warning Light 7-41
(Amber)
*Smart Brake Support/Smart City Brake Support (SBS/SCBS) Warning In-dication/Warning Light*1 7-47
Low Fuel Warning Indication/Warning Light 7-47
*120 km/h Warning Light*1 7-47
Seat Belt Warning Light 7-47
Engine Oil Level Warning Light 7-47
*Low Washer Fluid Level Warning Indication/Warning Light 7-47
*Door-Ajar Warning Indication 7-47
When Driving
Instrument Cluster and Display
4-34 *Some models.
CX-9_8GC7-EE-17G_Edition1 2017-5-16 8:22:04

Signal Warning Page
*Liftgate-Ajar Warning Indication 7-47
*Door-Ajar Warning Light 7-47
*1 The light turns on when the ignition is switched on for an operation check, and turns off a few seconds later orwhen the engine is started. If the light does not turn on or remains turned on, have the vehicle inspected at anexpert repairer, we recommend an Authorized Mazda Repairer.
When Driving
Instrument Cluster and Display
*Some models. 4-35
CX-9_8GC7-EE-17G_Edition1 2017-5-16 8:22:04

▼ Indication/Indicator Lights
These lights turn on or flash to notify the user of the system operation status or a systemmalfunction.
Signal Indicator Page
(Green)KEY Indicator Light 4-5
Security Indicator Light*1 3-43
*Vehicle Speed Alarm Indication 4-28
Wrench Indication/Indicator Light*1 4-40
(Blue)*Low Engine Coolant Temperature Indicator Light 4-40
Shift Position Indication 4-44
Lights-On Indication/Indicator Light 4-50
Headlight High-Beam Indicator Light
HeadlightHigh-Low Beam
4-53Flashing theHeadlights
4-53
Turn Signal/Hazard Warning Indicator Lights
Turn andLane-Change
Signals4-57
Hazard WarningFlasher
4-65
*Front Fog Light Indicator Light 4-55
*Rear Fog Light Indicator Light 4-56
Electric Parking Brake (EPB) Indication/Indicator Light*1*2 7-41
When Driving
Instrument Cluster and Display
4-36 *Some models.
CX-9_8GC7-EE-17G_Edition1 2017-5-16 8:22:04
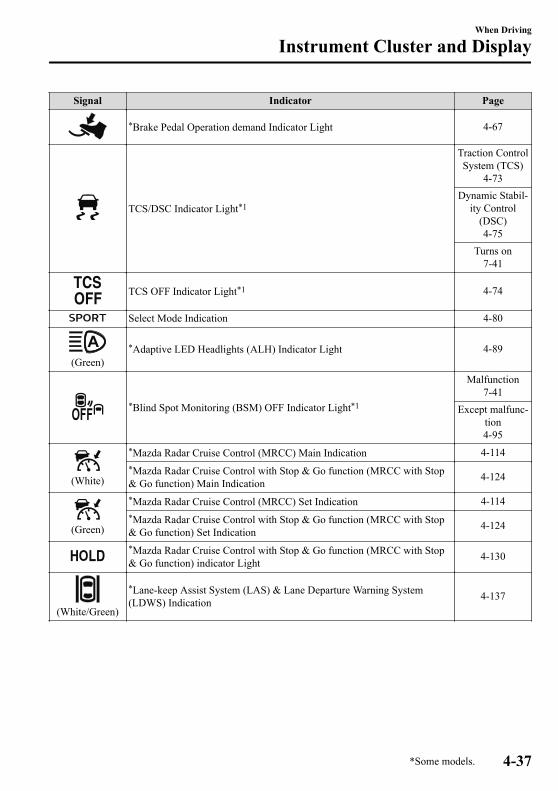
Signal Indicator Page
*Brake Pedal Operation demand Indicator Light 4-67
TCS/DSC Indicator Light*1
Traction ControlSystem (TCS)
4-73Dynamic Stabil-
ity Control(DSC)4-75
Turns on7-41
TCS OFF Indicator Light*1 4-74
Select Mode Indication 4-80
(Green)*Adaptive LED Headlights (ALH) Indicator Light 4-89
*Blind Spot Monitoring (BSM) OFF Indicator Light*1
Malfunction7-41
Except malfunc-tion4-95
(White)
*Mazda Radar Cruise Control (MRCC) Main Indication 4-114*Mazda Radar Cruise Control with Stop & Go function (MRCC with Stop& Go function) Main Indication 4-124
(Green)
*Mazda Radar Cruise Control (MRCC) Set Indication 4-114*Mazda Radar Cruise Control with Stop & Go function (MRCC with Stop& Go function) Set Indication 4-124
*Mazda Radar Cruise Control with Stop & Go function (MRCC with Stop& Go function) indicator Light 4-130
(White/Green)
*Lane-keep Assist System (LAS) & Lane Departure Warning System(LDWS) Indication 4-137
When Driving
Instrument Cluster and Display
*Some models. 4-37
CX-9_8GC7-EE-17G_Edition1 2017-5-16 8:22:04

Signal Indicator Page
*Smart City Brake Support (SCBS) Indication
Advanced SmartCity Brake Sup-port (Advanced
SCBS)4-147
Smart CityBrake Support
[Forward](SCBS F)
4-150Smart City
Brake Support[Reverse](SCBS R)
4-155
(Red)
*Smart City Brake Support (SCBS) Indicator Light
Advanced SmartCity Brake Sup-port (Advanced
SCBS)4-147
Smart CityBrake Support
[Forward](SCBS F)
4-150Smart City
Brake Support[Reverse](SCBS R)
4-155
When Driving
Instrument Cluster and Display
4-38 *Some models.
CX-9_8GC7-EE-17G_Edition1 2017-5-16 8:22:04

Signal Indicator Page
*Smart Brake Support/Smart City Brake Support (SBS/SCBS) OFF Indica-tor Light*1
Advanced SmartCity Brake Sup-port (Advanced
SCBS)4-147
Smart CityBrake Support
[Forward](SCBS F)
4-151Smart City
Brake Support[Reverse](SCBS R)
4-155Smart Brake
Support (SBS)4-158
(White)*Driver Attention Alert (DAA) Indication 4-107
(White)*Cruise Main Indication 4-171
(Green)
*Cruise Set Indication 4-171
*1 The light turns on when the ignition is switched on for an operation check, and turns offa few seconds later or when the engine is started. If the light does not turn on or remainsturned on, have the vehicle inspected at an expert repairer, we recommend anAuthorized Mazda Repairer.
*2 The light turns on continuously when the electric parking brake is applied.
When Driving
Instrument Cluster and Display
*Some models. 4-39
CX-9_8GC7-EE-17G_Edition1 2017-5-16 8:22:04
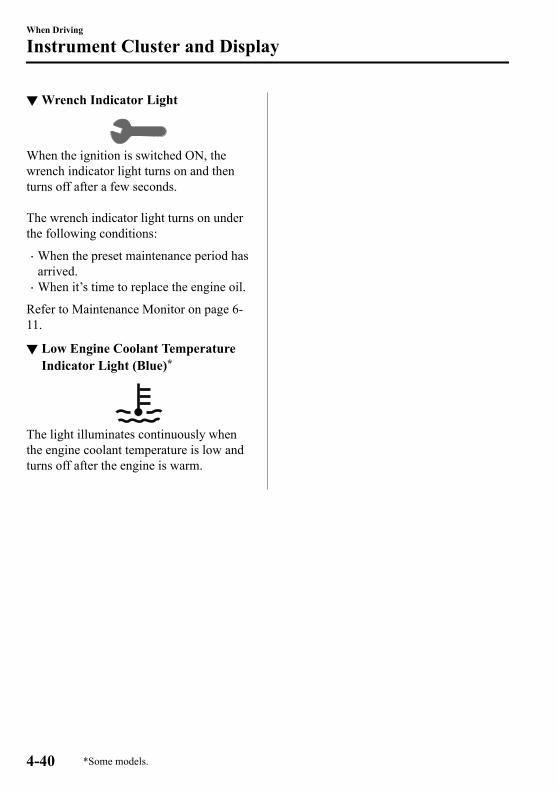
▼ Wrench Indicator Light
When the ignition is switched ON, thewrench indicator light turns on and thenturns off after a few seconds. The wrench indicator light turns on underthe following conditions:
• When the preset maintenance period hasarrived.
• When it’s time to replace the engine oil.
Refer to Maintenance Monitor on page 6-11.
▼ Low Engine Coolant TemperatureIndicator Light (Blue)*
The light illuminates continuously whenthe engine coolant temperature is low andturns off after the engine is warm.
When Driving
Instrument Cluster and Display
4-40 *Some models.
CX-9_8GC7-EE-17G_Edition1 2017-5-16 8:22:04

Automatic Transaxle Controls
Lock-release button
Indicates the selector lever can be shifted freely into any position.
Indicates that you must hold in the lock-release button to shift.
Indicates that you must depress the brake pedal and hold in the lock-release button to shift (The ignition must be switched ON).
Various Lockouts:
NOTEThe Sport AT has an option that is not included in the traditional automatic transaxle thatgives the driver the option of selecting each gear instead of leaving it to the transaxle toshift gears. Even if you intend to use the automatic transaxle functions as a traditionalautomatic, you should also be aware that you can inadvertently shift into manual shift modeand an inappropriate gear may be retained as the vehicle speed increases. If you notice theengine speed going higher or hear the engine racing, confirm you have not accidentallyslipped into manual shift mode (page 4-45).
When Driving
Automatic Transaxle
4-41
CX-9_8GC7-EE-17G_Edition1 2017-5-16 8:22:04

Shift-Lock SystemThe shift-lock system prevents shifting outof P unless the brake pedal is depressed. To shift from P:1. Depress and hold the brake pedal.2. Start the engine.3. Press and hold the lock-release button.4. Move the selector lever.
NOTE• When the ignition is switched to ACC or
the ignition is switched off, the selectorlever cannot be shifted from P.
• The ignition cannot be switched to OFFif the selector lever is not in P.
▼ Shift-Lock Override
If the selector lever will not move from Pusing the proper shift procedure, continueto hold down the brake pedal.Type A1. Remove the shift-lock override cover
using a cloth-wrapped flat headscrewdriver.
2. Insert a screwdriver and push it down.
Cover
3. Press and hold the lock-release button.
4. Move the selector lever.Take the vehicle to an expert repairer, werecommend an Authorized MazdaRepairer to have the system checked.Type B1. Press the lock-release button with the
button pressed.Lock-release button
Button
2. Move the selector lever.Take the vehicle to an expert repairer, werecommend an Authorized MazdaRepairer to have the system checked.
When Driving
Automatic Transaxle
4-42
CX-9_8GC7-EE-17G_Edition1 2017-5-16 8:22:04

Transaxle Ranges• The shift position indication in the
instrument cluster illuminates. Refer toWarning/Indicator Lights on page 4-32.
• The selector lever must be in P or N tooperate the starter.
P (Park)
P locks the transaxle and prevents thefront wheels from rotating.
WARNING
Always set the selector lever to P and setthe parking brake:Only setting the selector lever to the Pposition without using the parking brake tohold the vehicle is dangerous. If P fails tohold, the vehicle could move and cause anaccident.
CAUTIONShifting into P, N or R while the vehicle is
moving can damage your transaxle.Shifting into a driving gear or reverse
when the engine is running faster thanidle can damage the transaxle.
R (Reverse)
In position R, the vehicle moves onlybackward. You must be at a complete stopbefore shifting to or from R, except underrare circumstances as explained inRocking the Vehicle (page 3-51).
NOTE(With parking sensor system)When the selector lever is shifted to the Rposition with the ignition switched ON, theparking sensor system is activated and abeep sound is heard.Refer to Parking Sensor System on page4-191.
N (Neutral)
In N, the wheels and transaxle are notlocked. The vehicle will roll freely evenon the slightest incline unless the parkingbrake or brakes are on.
WARNING
If the engine is running faster than idle, donot shift from N or P into a driving gear:It's dangerous to shift from N or P into adriving gear when the engine is runningfaster than idle. If this is done, the vehiclecould move suddenly, causing an accidentor serious injury.
Do not shift into N when driving thevehicle:Shifting into N while driving is dangerous.Engine braking cannot be applied whendecelerating which could lead to anaccident or serious injury.
CAUTIONDo not shift into N when driving thevehicle. Doing so can cause transaxledamage.
When Driving
Automatic Transaxle
4-43
CX-9_8GC7-EE-17G_Edition1 2017-5-16 8:22:04

NOTEApply the parking brake or depress thebrake pedal before moving the selectorlever from N to prevent the vehicle frommoving unexpectedly.
D (Drive)
D is the normal driving position. From astop, the transaxle will automatically shiftthrough a 6-gear sequence.
M (Manual)
M is the manual shift mode position.Gears can be shifted up or down byoperating the selector lever. Refer toManual Shift Mode on page 4-45.
▼ Shift Position Indication
The selector position is indicated when theignition is switched ON.
Gear position indication
In manual shift mode, the “M” of the shiftposition indication illuminates and thenumeral for the selected gear is displayed.
▼ Active Adaptive Shift (AAS)
Active Adaptive Shift (AAS)automatically controls the transaxle shiftpoints to best suit the road conditions anddriver input. This improves driving feel.The transaxle may switch to AAS modewhen driving up and down slopes,cornering, driving at high elevations, ordepressing the accelerator pedal quicklywhile the selector lever is in the Dposition. Depending on the road anddriving conditions/vehicle operations, gearshifting could be delayed or not occur,however, this does not indicate a problembecause the AAS mode will maintain theoptimum gear position.
When Driving
Automatic Transaxle
4-44
CX-9_8GC7-EE-17G_Edition1 2017-5-16 8:22:04

Manual Shift ModeThe manual shift mode gives you the feelof driving a manual transaxle vehicle byallowing you to operate the selector levermanually. This allows you to controlengine rpm and torque to the drive wheelsmuch like a manual transaxle when morecontrol is desired.To change to manual shift mode, shift thelever from D to M.
NOTEChanging to manual shift mode whiledriving will not damage the transaxle.
To return to automatic shift mode, shift thelever from M to D.
NOTE• If you change to manual shift mode
when the vehicle is stopped, the gearwill shift to M1.
• If you change to manual shift modewithout depressing the accelerator pedalwhen driving in D range, 5th gear/6thgear, the gear will shift to M4/M5.
▼ Indicators
Manual shift mode indication
In manual shift mode, the “M” of the shiftposition indication in the instrument panelilluminates.
Gear position indication
The numeral for the selected gearilluminates.
Manual shift mode indicator
Gear position indicator
NOTE• If the gears cannot be shifted down
when driving at higher speeds, the gearposition indication will flash twice tosignal that the gears cannot be shifteddown (to protect the transaxle).
• If the automatic transaxle fluid (ATF)temperature becomes too high, there isthe possibility that the transaxle willswitch to automatic shift mode,canceling manual shift mode andturning off the gear position indicationillumination. This is a normal functionto protect the AT. After the ATFtemperature has decreased, the gearposition indication illumination turnsback on and driving in manual shiftmode is restored.
When Driving
Automatic Transaxle
4-45
CX-9_8GC7-EE-17G_Edition1 2017-5-16 8:22:04

▼ Manually Shifting Up
You can shift gears up by operating theselector lever.M1 → M2 → M3 → M4 → M5 → M6To shift up to a higher gear, tap theselector lever back once.
NOTE• When driving slowly, the gears may not
shift up.• Do not drive the vehicle with the
tachometer needle in the RED ZONEwhile in manual shift mode. In addition,manual shift mode switches to automaticshift mode while the accelerator pedal iscompletely depressed.This function is canceled while the TCSis turned off. However, if the vehicle iscontinuously driven at a high rpm, thegears may automatically shift up toprotect the engine.
▼ Manually Shifting Down
You can shift gears down by operating theselector lever.M6 → M5 → M4 → M3 → M2→ M1To shift down to a lower gear, tap theselector lever forward once.
WARNING
Do not use engine braking on slippery roadsurfaces or at high speeds:Shifting down while driving on wet, snowy,or frozen roads, or while driving at highspeeds causes sudden engine braking,which is dangerous. The sudden change intire speed could cause the tires to skid. Thiscould lead to loss of vehicle control and anaccident.
When Driving
Automatic Transaxle
4-46
CX-9_8GC7-EE-17G_Edition1 2017-5-16 8:22:04

NOTE• When driving at high speeds, the gear
may not shift down.• During deceleration, the gear may
automatically shift down depending onvehicle speed.
• When depressing the accelerator fully,the transaxle will shift to a lower gear,depending on vehicle speed. However,the gears do not kickdown while the TCSis turned off.
▼ Second Gear Fixed Mode
When the selector lever is moved back while the vehicle speed is about 10 km/h(6.2 mph) or less, the transaxle is set in thesecond gear fixed mode. The gear is fixedin second while in this mode for easieracceleration from a stop and driving onslippery roads such as snow-coveredroads.If the selector lever is moved back orforward while in the second gear fixedmode, the mode will be canceled.
When Driving
Automatic Transaxle
4-47
CX-9_8GC7-EE-17G_Edition1 2017-5-16 8:22:04

▼ Shift Gear (Shifting) Speed Limit
For each gear position while in the manual mode, the speed limit is set as follows: When theselector lever is operated within the range of the speed limit, the gear is shifted.
Shift up
The gear does not shift up while the vehicle speed is lower than the speed limit.
Shift down
The gear does not shift down while the vehicle speed exceeds the speed limit.If the vehicle speed exceeds the speed limit and the gear does not shift down, the gearposition indication flashes 2 times to notify the driver that the gear cannot be shifted.
Kickdown
When the accelerator pedal is depressed fully while driving, the gear shifts down.However, the gears do not kickdown while the TCS is turned off.
NOTEThe gear also shifts down using kickdown while in the second gear fixed mode.
Auto-shift down
The gear shifts down automatically depending on the vehicle speed during deceleration.
NOTEIf the vehicle comes to a stop while in the second gear fixed mode, the gear remains insecond.
When Driving
Automatic Transaxle
4-48
CX-9_8GC7-EE-17G_Edition1 2017-5-16 8:22:04

Driving Tips
WARNING
Do not let the vehicle move in a directionopposite to the direction selected by theselector lever:Do not let the vehicle move backward withthe selector lever in a forward position, ordo not let the vehicle move forward withthe selector lever in the reverse position.Otherwise, the engine may stop, causingthe loss of the power brake and powersteering functions, and make it difficult tocontrol the vehicle which could result in anaccident.
Passing
For extra power when passing anothervehicle or climbing steep grades, depressthe accelerator fully. The transaxle willshift to a lower gear, depending on vehiclespeed.
NOTE• The accelerator pedal may initially feel
heavy as it is being depressed, then feellighter as it is depressed further. Thischange in pedal force aids the enginecontrol system in determining how muchthe accelerator pedal has beendepressed for performing kickdown, andfunctions to control whether or notkickdown should be performed.
• While the selector lever is in the Mposition and the TCS is turned off,manual shift mode does not switch toautomatic shift mode even if theaccelerator pedal is completelydepressed. Operate the selector lever.
Climbing steep grades from a stop
To climb a steep grade from a stoppedposition:1. Depress the brake pedal.2. Shift to D or M1, depending on the
load weight and grade steepness.3. Release the brake pedal while
gradually accelerating.
Descending steep grades
When descending a steep grade, shift tolower gears, depending on load weight andgrade steepness. Descend slowly, using thebrakes only occasionally to prevent themfrom overheating.
When Driving
Automatic Transaxle
4-49
CX-9_8GC7-EE-17G_Edition1 2017-5-16 8:22:04

Lighting Control▼ Headlights
Turn the headlight switch to turn the headlights and other exterior lights on or off.When the lights are turned on, the lights-on indicator light in the instrument cluster turns on.
NOTE• To prevent discharging the battery, do not leave the lights on while the engine is off unless
safety requires them.• Headlights do not blind drivers approaching in the opposite direction no matter what side
of the road you must drive your vehicle (left-hand or right-hand traffic). Therefore, it isnot necessary to adjust the optical axis of the headlights when switching temporarily todriving on the opposite side of the road (left-hand or right-hand traffic).
Without auto-light control
Switch Position
Ignition Position ON ACC orOFF ON ACC or
OFF ON ACC orOFF
Headlights Off Off Off Off On Off
Running lights* On*1 Off Off Off Off OffTaillightsParking lightsLicense plate lights
On*2 Off On On On On*3
*1 The lights are turned on while the vehicle is driven.*2 When the running lights are turned on, the taillights, and license plate lights turn on. The parking lights does
not turn on.
When Driving
Switches and Controls
4-50 *Some models.
CX-9_8GC7-EE-17G_Edition1 2017-5-16 8:22:04

*3 The lights are turned on continuously if the ignition is switched from ON to any other position with the lightsturned on. The lights are turned off when the driver's door is opened or 30 seconds have elapsed since thelights turned on.
With auto-light control
Switch Position
Ignition Position ON ACC orOFF ON ACC or
OFF ON ACC orOFF ON ACC or
OFFHeadlights Off Off Auto*3 Off Off Off On Off
Running lights* On*1 Off On*4 Off Off Off Off OffTaillightsParking lightsLicense plate lights
On*2 Off Auto*3 On*5 On On On On*5
*1 The lights are turned on while the vehicle is driven.*2 When the running lights are turned on, the taillights, and license plate lights turn on. The parking lights does
not turn on.*3 The lights are turned on by the auto light function.*4 The lights are turned on while the vehicle is driven, and turned off when the headlights are turned on by the
auto light function.*5 The lights are turned on continuously if the ignition is switched from ON to any other position with the lights
turned on. The lights are turned off when the driver's door is opened or 30 seconds have elapsed since thelights turned on.
When Driving
Switches and Controls
*Some models. 4-51
CX-9_8GC7-EE-17G_Edition1 2017-5-16 8:22:04

Auto-light control*
When the headlight switch is in the position and the ignition is switched ON, the lightsensor senses the surrounding lightness or darkness and automatically turns the headlightsand other exterior lights on or off.
CAUTIONDo not shade the light sensor by adhering a sticker or a label on the windshield. Otherwise
the light sensor will not operate correctly.
The light sensor also works as a rain sensor for the auto-wiper control. Keep hands andscrapers clear of the windshield when the wiper lever is in the position and the ignitionis switched ON as fingers could be pinched or the wipers and wiper blades damaged whenthe wipers activate automatically. If you are going to clean the windshield, be sure thewipers are turned off completely ― this is particularly important when clearing ice andsnow ― when it is particularly tempting to leave the engine running.
NOTE• The headlights and other exterior lights may not turn off immediately even if the
surrounding area becomes well-lit because the light sensor determines that it is night timeif the surrounding area is continuously dark for several minutes such as inside longtunnels, traffic jams inside tunnels, or in indoor parking lots.In this case, the lights turn off if the light switch is turned to the position.
• The sensitivity of the auto-light control may be changed.Refer to Personalization Features on page 9-10.
When Driving
Switches and Controls
4-52 *Some models.
CX-9_8GC7-EE-17G_Edition1 2017-5-16 8:22:04

▼ Headlight High-Low Beam
The headlights switch between high andlow beams by moving the lever forward orbackward.
High beam
Low beam
When the headlight high-beams are on, theheadlight high-beam indicator light isturned on.
▼ Flashing the Headlights
Can be used when the ignition is switchedON.To flash the headlights, pull the lever fullytowards you (the headlight switch does notneed to be on).
OFF
Headlight flashing
The headlight high-beam indicator light inthe instrument cluster illuminatessimultaneously. The lever will return tothe normal position when released.
▼ Coming Home Light
The coming home light turns on theheadlights (low beams) when the lever isoperated.
To turn on the lights
When the lever is pulled with the ignitionswitched to ACC or OFF, the low beamheadlights turn on.The headlights turn off after a certainperiod of time has elapsed after the doorsare closed.
NOTE• The time until the headlights turn off
after all of the doors are closed can bechanged.Refer to Personalization Features onpage 9-10.
• If no operations are done for 3 minutesafter the lever is pulled, the headlightsturn off.
• The headlights turn off if the lever ispulled again while the headlights areilluminated.
▼ Leaving Home Light
The leaving home light turns on the lightswhen the transmitter unlock button ispressed while away from the vehicle.The following lights turn on when theleaving home light is operated.Low beams, Parking lights, Taillights,License plate lights.
When Driving
Switches and Controls
4-53
CX-9_8GC7-EE-17G_Edition1 2017-5-16 8:22:04

To turn on the lights
When the ignition switch and the headlightswitch are in the following conditions, theheadlights will illuminate when thetransmitter unlock button is pressed andthe vehicle receives the transmitter signal.The headlights turn off after a certainperiod of time has elapsed (30 seconds).
• Ignition switch: off• Headlight switch: , , or
Lock button
Unlock button
NOTE• Operation of the leaving home light can
be turned on or off.Refer to Personalization Features onpage 9-10.
• When the transmitter lock button ispressed and the vehicle receives thetransmitter signal, the headlights turnoff.
• When the headlight switch is turned tothe position, the headlights turn off.
▼ Headlight Leveling
The number of passengers and weight ofcargo in the luggage compartment changethe angle of the headlights. The angle of the headlights will beautomatically adjusted when turning onthe headlights.
▼ Running Lights
The running lights, which turn on whilethe vehicle is being driven during thedaytime, are designed to notify on-comingvehicles or pedestrians of the presence ofthe vehicle. Some countries require moving vehicles tohave their lights on (running lights) duringthe daytime. The running lights turn on when thevehicle is driven and turn off when theparking brake is operated or the selectorlever is shifted to the P position.
NOTEThe running lights can be deactivated.Refer to Personalization Features on page9-10.
When Driving
Switches and Controls
4-54
CX-9_8GC7-EE-17G_Edition1 2017-5-16 8:22:04

Front Fog Lights*
The front fog lights can be used when theignition is switched ON.Use this switch to turn on the front foglights. The front fog lights will improvevisibility at night and during foggyconditions. To turn the front fog lights on, rotate thefog light switch to the position.
Fog light switch
The headlight switch must be in the or position when turning on the front fog
lights.The front fog light indicator light in theinstrument cluster illuminates while thefront fog light are on.
To turn the front fog lights off, do any ofthe following:
• Rotate the fog light switch to the position.
• Turn the headlight switch to the position.
NOTE
• If the fog light switch is in the position or the headlight switch is in the
position, the fog lights will turn onwhen the headlights, the exterior lightsturn on.
• When the fog light switch is rotated tothe position while the headlights orthe front fog lights are turned on (thefog light switch returns to the positionautomatically), the rear fog light turnson and the rear fog light indicator lightturns on in the instrument cluster.
When Driving
Switches and Controls
*Some models. 4-55
CX-9_8GC7-EE-17G_Edition1 2017-5-16 8:22:04

Rear Fog Light*
The rear fog light can be used when theignition is switched ON.The rear fog light helps your vehicle to beseen.When the lights are turned on, the rear foglights indicator light in the instrumentcluster turns on.
▼ With Front Fog Lights
The headlight switch must be in the or position before turning on the rear fog
light. To turn the rear fog light on, rotate the foglight switch to the position (the foglight switch returns to the positionautomatically).The rear fog light indicator light in theinstrument cluster illuminates while therear fog light is on.
Fog light switch
To turn the rear fog light off, do any of thefollowing:
• Rotate the fog light switch to the position again (the fog light switchreturns to the position automatically).
• Rotate the fog light switch to the position.
• Turn the headlight switch to the position.
The rear fog light indicator light in theinstrument cluster goes off when the rearfog light is turned off.
NOTE• The front fog lights turns on when the
rear fog light is turned on.• If the fog light switch is rotated to the
position (the fog light switch returns tothe position automatically), the frontfog light indicator light in theinstrument cluster will also illuminate.
• When the headlight switch is in the position and the headlights, exteriorlights and instrument panel illuminated,the rear fog light turns on when the rearfog light switch is turned on.
When Driving
Switches and Controls
4-56 *Some models.
CX-9_8GC7-EE-17G_Edition1 2017-5-16 8:22:04

▼ Without Front Fog Lights
The headlights must be turned on to turnon the rear fog light. To turn the rear fog light on, rotate the foglight switch to the position (the foglight switch returns to its original positionautomatically).The rear fog light indicator light in theinstrument cluster illuminates while therear fog light is on.
Fog light switch
To turn the rear fog light off, do any of thefollowing:
• Rotate the fog light switch to the position again (the fog light switchreturns to its original positionautomatically).
• Turn the headlight switch to the position.
The rear fog light indicator light in theinstrument cluster goes off when the rearfog light is turned off.
NOTE(With auto-light control)When the headlight switch is in the position and the headlights, exterior lightsand instrument panel illuminated, the rearfog light turns on when the rear fog lightswitch is turned on.
Turn and Lane-ChangeSignals
The ignition must be switched ON to usethe turn and lane-change signals.
▼ Turn Signals
Move the signal lever down (for a leftturn) or up (for a right turn) to the stopposition. The signal will self-cancel afterthe turn is completed. If the indicator light continues to flashafter a turn, manually return the lever to itsoriginal position.
Right turn
Left turn
Right lane change
Left lane change
OFF
The turn signal indicators in theinstrument cluster flash according to theoperation of the turn signal lever to showwhich signal is working.
NOTE• If an indicator light stays on without
flashing or if it flashes abnormally, oneof the turn signal bulbs may be burnedout.
• A personalized function is available tochange the turn indicator sound volume.(page 9-10)
When Driving
Switches and Controls
4-57
CX-9_8GC7-EE-17G_Edition1 2017-5-16 8:22:04

▼ Lane-Change Signals
Move the lever halfway toward thedirection of the lane change―until theindicator flashes― and hold it there. Itwill return to the off position whenreleased.
▼ Three-Flash Turn Signal
After releasing the turn signal lever, theturn signal indicator flashes three times.The operation can be cancelled by movingthe lever in the direction opposite to whichit was operated.
NOTEThe three-flash turn signal function can beswitched to operable/inoperable using thepersonalization function.Refer to Personalization Features on page9-10.
Windshield Wipers andWasher
The ignition must be switched ON to usethe wipers.
WARNING
Use only windshield washer fluid or plainwater in the reservoir:Using radiator antifreeze as washer fluid isdangerous. If sprayed on the windshield, itwill dirty the windshield, affect yourvisibility, and could result in an accident.
Only use windshield washer fluid mixedwith anti-freeze protection in freezingweather conditions:Using windshield washer fluid withoutanti-freeze protection in freezing weatherconditions is dangerous as it could freezeon the windshield and block your visionwhich could cause an accident. In addition,make sure the windshield is sufficientlywarmed using the defroster beforespraying the washer fluid.
When Driving
Switches and Controls
4-58
CX-9_8GC7-EE-17G_Edition1 2017-5-16 8:22:04

NOTEIf the windshield wipers are operatedunder cold weather conditions or duringsnowfall, they could stop due toaccumulated snow on the windshield. Ifthe windshield wipers stop due toaccumulated snow on the windshield, parkthe vehicle in a safe place, turn the wiperswitch off, and then remove theaccumulated snow. If the wiper switch isturned to another position other than OFF,the wipers will operate. If the wipers donot operate even though the wiper switchis turned to a position other than OFF,consult an expert repairer, we recommendan Authorized Mazda Repairer as soon aspossible.
▼ Windshield Wipers
Turn the wipers on by pressing the leverup or down.
With intermittent wiper
Switch PositionWiper operation
No. TypeA
TypeB
Operation while pulling upleverStop
Intermittent
Switch PositionWiper operation
No. TypeA
TypeB
Low speed
High speed
Variable-speed intermittent wipers
Set the lever to the intermittent positionand choose the interval timing by rotatingthe ring.
INT ring Fast
Slow
With auto-wiper control
Switch PositionWiper operation
No. TypeA
TypeB
Operation while pulling upleverStop
Auto control
Low speed
High speed
When Driving
Switches and Controls
4-59
CX-9_8GC7-EE-17G_Edition1 2017-5-16 8:22:04

Auto-wiper control
When the wiper lever is in the position, the rain sensor senses the amountof rainfall on the windshield and turns thewipers on or off automatically(off―intermittent―low speed―highspeed). The sensitivity of the rain sensor can beadjusted by turning the switch on thewiper lever.From the center position (normal), rotatethe switch upward for higher sensitivity(faster response) or rotate it downward forless sensitivity (slower response).
Higher sensitivity
Less sensitivitySwitch
Center position
CAUTIONDo not shade the rain sensor by adhering
a sticker or a label on the windshield.Otherwise the rain sensor will notoperate correctly.
When the wiper lever is in the position and the ignition is switched ON,the wipers may move automatically inthe following cases:
If the windshield above the rain sensoris touched or wiped with a cloth. If the windshield is struck with a hand
or other object from either outside orinside the vehicle.
Keep hands and scrapers clear of thewindshield when the wiper lever is in the
position and the ignition isswitched ON as fingers could be pinchedor the wipers and wiper blades damagedwhen the wipers activate automatically.If you are going to clean the windshield,be sure the wipers are turned offcompletely (when it is most likely that theengine is left running) this is particularlyimportant when clearing ice and snow.
NOTE• Switching the auto-wiper lever from the
to the position while drivingactivates the windshield wipers once,after which they operate according tothe rainfall amount.
• The auto-wiper control may not operatewhen the rain sensor temperature isabout –10 °C (14 °F) or lower, or about85 °C (185 °F) or higher.
• If the windshield is coated with waterrepellent, the rain sensor may not beable to sense the amount of rainfallcorrectly and auto-wiper control maynot operate properly.
When Driving
Switches and Controls
4-60
CX-9_8GC7-EE-17G_Edition1 2017-5-16 8:22:04

• If dirt or foreign matter (Such as ice ormatter containing salt water) adheres tothe windshield above the rain sensor orif the windshield is iced, it could causethe wipers to move automatically.However, if the wipers cannot removethis ice, dirt or foreign matter, theauto-wiper control will stop operation.In this case, set the wiper lever to thelow speed position or high speedposition for manual operation, orremove the ice, dirt or foreign matter byhand to restore the auto-wiperoperation.
• If the auto-wiper lever is left in the position, the wipers could operateautomatically from the effect of stronglight sources, electromagnetic waves, orinfrared light because the rain sensoruses an optical sensor. It isrecommended that the auto-wiper leverbe switched to the position otherthan when driving the vehicle underrainy conditions.
• The auto-wiper control functions can beturned off.Refer to Personalization Features onpage 9-10.
▼ Windshield Washer
Pull the lever toward you and hold it tospray washer fluid.
Washer
OFF
NOTEIf the windshield washer is turned on whenthe windshield wipers are not operating,the windshield wipers operate a few times.
If the washer does not work, inspect thefluid level (page 6-24). If the fluid levelis normal, consult an expert repairer, werecommend an Authorized MazdaRepairer.
NOTE(With headlight washers)When the headlights are on, the headlightwashers operate automatically once everyfifth time the windshield washer operates.Refer to Headlight Washer on page 4-62.
When Driving
Switches and Controls
4-61
CX-9_8GC7-EE-17G_Edition1 2017-5-16 8:22:04

Rear Window Wiper andWasher
The ignition must be switched ON to usethe wiper.
▼ Rear Window Wiper
Turn the wiper on by turning the rearwiper/washer switch.
Switch PositionWiper operation
No. TypeA
TypeB
Stop
Intermittent
Normal
▼ Rear Window Washer
To spray washer fluid, turn the rear wiper/washer switch to either of the position.After the switch is released, the washerwill stop.If the washer does not work, inspect thefluid level (page 6-24). If the fluid levelis normal and the washer still does notwork, consult an expert repairer, werecommend an Authorized MazdaRepairer.
Headlight Washer*
The ignition must be switched ON and theheadlights must be turned on. The headlight washers operateautomatically once every fifth time thewindshield washer operates. If you want to operate headlight washers,double flick the wiper lever.
Washer
OFF
NOTEIf air enters the headlight washer fluidpipe under conditions such as when thevehicle is brand-new or after an emptywasher tank is replenished with washerfluid, washer fluid will not spray evenwhen the wiper lever is operated. If thisoccurs, perform the following procedure:1. Start the engine.2. Turn on the headlights.3. Double flick the wiper lever several
times until the washer fluid sprays.
When Driving
Switches and Controls
4-62 *Some models.
CX-9_8GC7-EE-17G_Edition1 2017-5-16 8:22:04

Rear Window DefoggerThe rear window defogger clears fog fromthe rear window. The ignition must be switched ON to usethe defogger. Press the switch to turn on the rearwindow defogger. The rear windowdefogger operates for about 15 minutesand then turns off automatically.The indicator light illuminates when thedefogger is operating. To turn off the rear window defoggerbefore the 15 minutes has elapsed, pressthe switch again.
Indicator light
CAUTIONDo not use sharp instruments or window
cleaners with abrasives to clean theinside of the rear window surface. Theymay damage the defogger grid inside thewindow.
NOTE• This defogger is not designed for
melting snow. If there is anaccumulation of snow on the rearwindow, remove it before using thedefogger.
• The rear window defogger setting canbe changed. After changing the setting,the rear window defogger stopsautomatically after 15 minutes haveelapsed and when the ambienttemperature is high. When the ambienttemperature is low, it continues tooperate until the switch is pressedagain.Refer to Personalization Features onpage 9-10.
▼ Mirror Defogger*
The mirror defoggers defrost the outsidemirrors. The mirror defoggers operate inconjunction with the rear windowdefogger.To turn on the mirror defoggers, switch theignition ON and press the rear windowdefogger switch (page 4-63).
Indicator light
When Driving
Switches and Controls
*Some models. 4-63
CX-9_8GC7-EE-17G_Edition1 2017-5-16 8:22:04

▼ Windshield Wiper De-icer*
The windshield wiper de-icer warms thelower part of the windshield using thermalfilaments which facilitates the removal ofice on the windshield wipers and theaccumulated snow on the lower part of thewindshield. The windshield wiper de-icer operates inconjunction with the rear windowdefogger.To turn on the windshield wiper de-icer,switch the ignition ON and press the rearwindow defogger switch (page 4-63).
Indicator light
HornTo sound the horn, press the mark onthe steering wheel.
When Driving
Switches and Controls
4-64 *Some models.
CX-9_8GC7-EE-17G_Edition1 2017-5-16 8:22:04

Hazard Warning FlasherThe hazard warning lights should alwaysbe used when you stop on or near aroadway in an emergency.
The hazard warning lights warn otherdrivers that your vehicle is a traffic hazardand that they must take extreme cautionwhen near it.
Depress the hazard warning flasher and allthe turn signals will flash. The hazardwarning indicator lights in the instrumentcluster flash simultaneously.
NOTE• The turn signals do not work when the
hazard warning lights are on.• Check local regulations about the use of
hazard warning lights while the vehicleis being towed to verify that it is not inviolation of the law.
When Driving
Switches and Controls
4-65
CX-9_8GC7-EE-17G_Edition1 2017-5-16 8:22:04
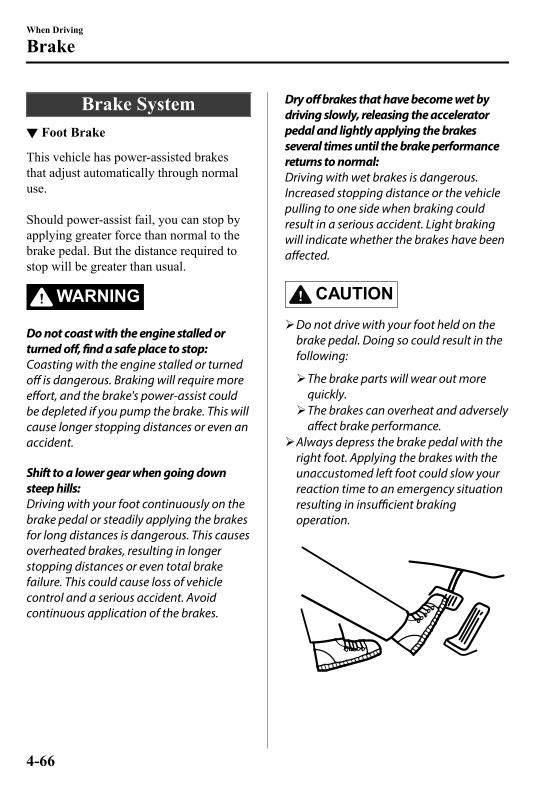
Brake System▼ Foot Brake
This vehicle has power-assisted brakesthat adjust automatically through normaluse. Should power-assist fail, you can stop byapplying greater force than normal to thebrake pedal. But the distance required tostop will be greater than usual.
WARNING
Do not coast with the engine stalled orturned off, find a safe place to stop:Coasting with the engine stalled or turnedoff is dangerous. Braking will require moreeffort, and the brake's power-assist couldbe depleted if you pump the brake. This willcause longer stopping distances or even anaccident.
Shift to a lower gear when going downsteep hills:Driving with your foot continuously on thebrake pedal or steadily applying the brakesfor long distances is dangerous. This causesoverheated brakes, resulting in longerstopping distances or even total brakefailure. This could cause loss of vehiclecontrol and a serious accident. Avoidcontinuous application of the brakes.
Dry off brakes that have become wet bydriving slowly, releasing the acceleratorpedal and lightly applying the brakesseveral times until the brake performancereturns to normal:Driving with wet brakes is dangerous.Increased stopping distance or the vehiclepulling to one side when braking couldresult in a serious accident. Light brakingwill indicate whether the brakes have beenaffected.
CAUTIONDo not drive with your foot held on the
brake pedal. Doing so could result in thefollowing:
The brake parts will wear out morequickly.The brakes can overheat and adversely
affect brake performance.Always depress the brake pedal with the
right foot. Applying the brakes with theunaccustomed left foot could slow yourreaction time to an emergency situationresulting in insufficient brakingoperation.
When Driving
Brake
4-66
CX-9_8GC7-EE-17G_Edition1 2017-5-16 8:22:04

Wear shoes appropriate for driving inorder to avoid your shoe contacting thebrake pedal when depressing theaccelerator pedal.
▼ Electric Parking Brake (EPB)
The EPB equipment applies the parkingbrake using an electric motor. When theEPB is applied, the EPB switch indicatorlight turns on.
Indicator light
WARNING
Do not drive the vehicle with the EPBapplied:If the vehicle is driven with the parkingbrake applied, the brake parts maygenerate heat and the brake system maynot operate, leading to an accident.Before driving, release the EPB and verifythat the EPB indicator light is turned off.
NOTE• The EPB cannot be applied or released
while the vehicle battery is dead.• An operation sound occurs when
applying or releasing the EPB, however,this does not indicate a malfunction.
• If the EPB is not used for long periods,an automatic inspection of the system isperformed while the vehicle is parked.An operation sound can be heard,however, this does not indicate aproblem.
• When the EPB is applied and theignition is switched OFF, an operationsound can be heard, however, this doesnot indicate a problem.
• The brake pedal may move while theEPB is being applied or released,however, this does not indicate aproblem.
• If the EPB switch is continually pulledwhile driving the vehicle, the EPB willbe applied and the EPB warning beepwill be activated. When the switch isreleased, the EPB is released and thebeep stops.
• If the EPB is applied with the ignitionswitched off or in ACC, the EPBindicator light in the instrument clusterand the indicator light in the switch mayturn on for 15 seconds.
• When running the vehicle through anautomatic car wash, it may be necessaryto switch the ignition off with theparking brake released depending onthe type of automatic car wash.
When Driving
Brake
4-67
CX-9_8GC7-EE-17G_Edition1 2017-5-16 8:22:04

When applying the EPB
The EPB can be applied regardless of theignition switch position.Securely depress the brake pedal and pullup the EPB switch.The EPB is applied and the EPB indicatorlight and the EPB switch indicator lightturn on.Refer to Warning/Indicator Lights on page4-32.
When releasing the EPB
The EPB can be released while theignition is switched ON or the engine isrunning. When the EPB is released, theEPB indicator light and the EPB switchindicator light turn off.
EPB manual release
Firmly depress the brake pedal and pressthe EPB switch.
If the EPB switch is pressed withoutdepressing the brake pedal, the display orindicator light in the instrument clusternotifies the driver that the brake is notdepressed.(Type A instrument cluster)A message is displayed on themulti-information display in theinstrument cluster.Refer to Message Indicated inMulti-information Display on page 7-54.(Type B instrument cluster)The brake pedal operation demandindicator light in the instrument clusterturns on.
When Driving
Brake
4-68
CX-9_8GC7-EE-17G_Edition1 2017-5-16 8:22:04

EPB automatic release
If the accelerator pedal is depressed withthe EPB applied and all of the followingconditions met, the parking brake isreleased automatically.
• The engine is running.• The driver's door is closed.• The driver's seat belt is fastened.• Selector lever is in the D, M, or R
position
NOTEIf something such as the driver's footcontacts the accelerator pedal with theengine running and the EPB applied, theparking brake may be releasedautomatically. If you do not intend to driveimmediately, shift the selector lever to theP or N position.
▼ Warning Light
The warning light turns on when thesystem has a malfunction.Refer to Warning Indication/WarningLights on page 4-33.
▼ Brake Pad Wear Indicator
When the disc brake pads become worn,the built-in wear indicators contact thedisc plates. This causes a screeching noiseto warn that the pads should be replaced.
When you hear this noise, consult anexpert repairer, we recommend anAuthorized Mazda Repairer as soon aspossible.
WARNING
Do not drive with worn disc pads:Driving with worn disc pads is dangerous.The brakes could fail and cause a seriousaccident. As soon as you hear a screechingnoise consult an expert repairer, werecommend an Authorized MazdaRepairer.
When Driving
Brake
4-69
CX-9_8GC7-EE-17G_Edition1 2017-5-16 8:22:04

▼ Brake Assist
During emergency braking situationswhen it is necessary to depress the brakepedal with greater force, the brake assistsystem provides braking assistance, thusenhancing braking performance. When the brake pedal is depressed hard ordepressed more quickly, the brakes applymore firmly.
NOTE• When the brake pedal is depressed hard
or depressed more quickly, the pedalwill feel softer but the brakes will applymore firmly. This is a normal effect ofthe brake assist operation and does notindicate a malfunction.
• When the brake pedal is depressed hardor depressed more quickly, a motor/pump operation noise may be heard.This is a normal effect of the brakeassist and does not indicate amalfunction.
• The brake assist equipment does notsupersede the functionality of thevehicle's main braking system.
Emergency Stop SignalSystem
Your Mazda is equipped with anemergency stop signal system that isdesigned to determine whether you aredepressing the brake pedal with greaterforce than during normal braking such asin a situation requiring emergencybraking. If the system determines that sucha situation is occurring, it flashes all theturn signals rapidly to caution the driver ofthe vehicle following behind your vehicleof the sudden braking situation.The system turns off when it determinesthat the brake pedal is released or that anemergency braking situation no longerexists based on the reduced vehicle speed.
NOTE• If you bring your vehicle to a complete
stop while all the turn signals areflashing rapidly, the rapid flashing of allthe turn signals changes back to thenormal flashing pattern.
• The emergency stop signal system doesnot operate at vehicle speeds underabout 60 km/h (37 mph).
• If the brake pedal is depressed whiledriving on slippery roads, theemergency stop signal system couldoperate causing all the turn and lanechange signals to flash.
When Driving
Brake
4-70
CX-9_8GC7-EE-17G_Edition1 2017-5-16 8:22:04

Hill Launch Assist (HLA)HLAis a function which assists the driverin accelerating from a stop while on aslope. When the driver releases the brakepedal and depresses the accelerator pedalwhile on a slope, the function prevents thevehicle from rolling. The braking force ismaintained automatically after the brakepedal is released on a steep grade.HLAoperates on a downward slope whenthe selector lever is in the reverse (R)position, and on an upward slope when theselector lever is in a forward gear.
WARNING
Do not rely completely on HLA:HLA is an auxiliary device for acceleratingfrom a stop on a slope. The system onlyoperates for about two seconds andtherefore, relying only on the system, whenaccelerating from a stop is dangerousbecause the vehicle may move (roll)unexpectedly and cause an accident.The vehicle could roll depending on thevehicle's load or if it is towing something.Always confirm the safety around thevehicle before starting to drive the vehicle.
NOTE• HLA does not operate on a gentle slope.
In addition, the gradient of the slope onwhich the system will operate changesdepending on the vehicle's load.
• HLA does not operate if the parkingbrake is applied, or if the vehicle has notstopped completely.
• HLA is operating, the brake pedal mayfeel stiff and vibrate, however, this doesnot indicate a malfunction.
• HLA does not operate while theTCS/DSC indicator light is illuminated.Refer to Warning/Indicator Lights onpage 4-32.
• HLA does not turn off even if the TCSOFF switch is pressed to turn off theTCS.
When Driving
Brake
4-71
CX-9_8GC7-EE-17G_Edition1 2017-5-16 8:22:04

Antilock Brake System(ABS)
The ABS control unit continuouslymonitors the speed of each wheel. If onewheel is about to lock up, the ABSresponds by automatically releasing andreapplying that wheel's brake. The driver will feel a slight vibration inthe brake pedal and may hear a chatteringnoise from the brake system. This isnormal ABS system operation. Continueto depress the brake pedal withoutpumping the brakes. The warning light turns on when thesystem has a malfunction.Refer to Warning Indication/WarningLights on page 4-33.
WARNING
Do not rely on ABS as a substitute for safedriving:The ABS cannot compensate for unsafeand reckless driving, excessive speed,tailgating (following another vehicle tooclosely), driving on ice and snow, andhydroplaning (reduced tire friction androad contact because of water on the roadsurface). You can still have an accident.
NOTE• Braking distances may be longer on
loose surfaces (snow or gravel, forexample) which usually have a hardfoundation. A vehicle with a normalbraking system may require lessdistance to stop under these conditionsbecause the tires will build up a wedgeof surface layer when the wheels skid.
• The sound of the ABS operating may beheard when starting the engine orimmediately after starting the vehicle,however, it does not indicate amalfunction.
When Driving
ABS/TCS/DSC/Trailer Stability Assist (TSA)
4-72
CX-9_8GC7-EE-17G_Edition1 2017-5-16 8:22:04
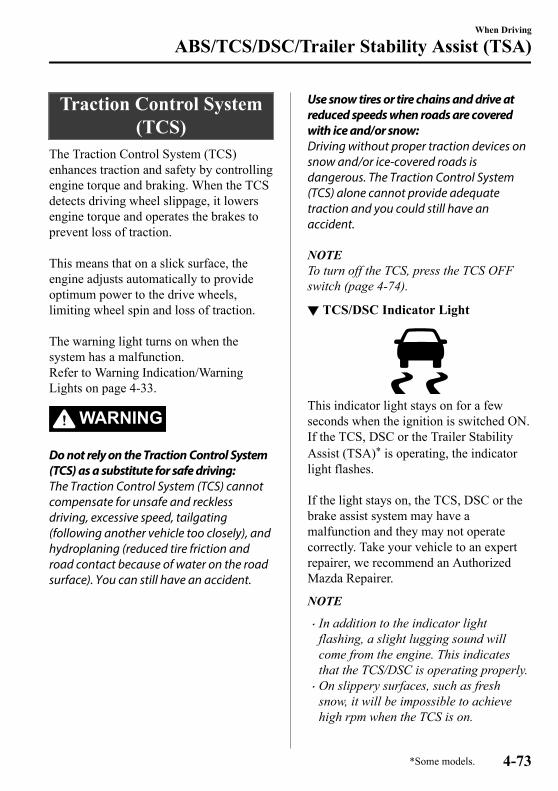
Traction Control System(TCS)
The Traction Control System (TCS)enhances traction and safety by controllingengine torque and braking. When the TCSdetects driving wheel slippage, it lowersengine torque and operates the brakes toprevent loss of traction. This means that on a slick surface, theengine adjusts automatically to provideoptimum power to the drive wheels,limiting wheel spin and loss of traction. The warning light turns on when thesystem has a malfunction.Refer to Warning Indication/WarningLights on page 4-33.
WARNING
Do not rely on the Traction Control System(TCS) as a substitute for safe driving:The Traction Control System (TCS) cannotcompensate for unsafe and recklessdriving, excessive speed, tailgating(following another vehicle too closely), andhydroplaning (reduced tire friction androad contact because of water on the roadsurface). You can still have an accident.
Use snow tires or tire chains and drive atreduced speeds when roads are coveredwith ice and/or snow:Driving without proper traction devices onsnow and/or ice-covered roads isdangerous. The Traction Control System(TCS) alone cannot provide adequatetraction and you could still have anaccident.
NOTETo turn off the TCS, press the TCS OFFswitch (page 4-74).
▼ TCS/DSC Indicator Light
This indicator light stays on for a fewseconds when the ignition is switched ON.If the TCS, DSC or the Trailer StabilityAssist (TSA)* is operating, the indicatorlight flashes. If the light stays on, the TCS, DSC or thebrake assist system may have amalfunction and they may not operatecorrectly. Take your vehicle to an expertrepairer, we recommend an AuthorizedMazda Repairer.
NOTE• In addition to the indicator light
flashing, a slight lugging sound willcome from the engine. This indicatesthat the TCS/DSC is operating properly.
• On slippery surfaces, such as freshsnow, it will be impossible to achievehigh rpm when the TCS is on.
When Driving
ABS/TCS/DSC/Trailer Stability Assist (TSA)
*Some models. 4-73
CX-9_8GC7-EE-17G_Edition1 2017-5-16 8:22:04

▼ TCS OFF Indicator Light
This indicator light stays on for a fewseconds when the ignition is switched ON.It also illuminates when the TCS OFFswitch is pressed and TCS is switched off.Refer to TCS OFF Switch on page 4-74. If the light remains illuminated and theTCS is not switched off, take your vehicleto an expert repairer, we recommend anAuthorized Mazda Repairer. The DSCmay have a malfunction.
▼ TCS OFF Switch
Press the TCS OFF switch to turn off theTCS. The TCS OFF indicator light in theinstrument cluster and TCS OFF switchindicator light turn on.
Indicator light
Press the switch again to turn the TCSback on. The TCS OFF indicator light andTCS OFF switch indicator light will turnoff.
NOTE• When TCS is on and you attempt to free
the vehicle when it is stuck, or drive itout of freshly fallen snow, the TCS (partof the DSC system) will activate.Depressing the accelerator will notincrease engine power and freeing thevehicle may be difficult. When thishappens, turn off the TCS.
• If the TCS is off when the engine isturned off, it automatically activateswhen the ignition is switched ON.
• Leaving the TCS on will provide the besttraction.
• If the TCS OFF switch is pressed andheld for 10 seconds or longer, the TCScan no longer be turned off even if theTCS OFF switch is pressed.In this case, the TCS OFF switch willoperate normally when the ignition isswitched ON again after being switchedOFF.
When Driving
ABS/TCS/DSC/Trailer Stability Assist (TSA)
4-74
CX-9_8GC7-EE-17G_Edition1 2017-5-16 8:22:04

Dynamic Stability Control(DSC)
The Dynamic Stability Control (DSC)automatically controls braking and enginetorque in conjunction with systems such asABS and TCS to help control side slipwhen driving on slippery surfaces, orduring sudden or evasive maneuvering,enhancing vehicle safety. Refer to ABS (page 4-72) and TCS (page4-73). DSC operation is possible at speedsgreater than 20 km/h (12 mph). The warning light turns on when thesystem has a malfunction.Refer to Warning Indication/WarningLights on page 4-33.
WARNING
Do not rely on the Dynamic StabilityControl as a substitute for safe driving:The Dynamic Stability Control (DSC)cannot compensate for unsafe and recklessdriving, excessive speed, tailgating(following another vehicle too closely), andhydroplaning (reduced tire friction androad contact because of water on the roadsurface). You can still have an accident.
CAUTIONThe DSC may not operate correctly
unless the following are observed:
Use tires of the correct size specified foryour Mazda on all four wheels.
Use tires of the same manufacturer,brand and tread pattern on all fourwheels.Do not mix worn tires.The DSC may not operate correctly when
tire chains are used or a temporary sparetire is installed because the tire diameterchanges.
▼ TCS/DSC Indicator Light
This indicator light stays on for a fewseconds when the ignition is switched ON.If the TCS, DSC or the Trailer StabilityAssist (TSA)* is operating, the indicatorlight flashes. If the light stays on, the TCS, DSC or thebrake assist system may have amalfunction and they may not operatecorrectly. Take your vehicle to an expertrepairer, we recommend an AuthorizedMazda Repairer.
When Driving
ABS/TCS/DSC/Trailer Stability Assist (TSA)
*Some models. 4-75
CX-9_8GC7-EE-17G_Edition1 2017-5-16 8:22:04

Trailer Stability Assist(TSA)*
If the vehicle sways while being drivenand towing a trailer, the Trailer StabilityAssist (TSA) automatically controlsbraking and engine torque to suppress theswaying and enhance vehicle stability.The Trailer Stability Assist (TSA) isoperable at a vehicle speed of about 65km/h (40 mph) or more.When the Trailer Stability Assist (TSA)operates while driving the vehicle, theTCS/DSC indicator light flashes.Refer to TCS/DSC Indicator Light on page4-75.
WARNING
Do not rely solely on the Trailer StabilityAssist (TSA)Assured vehicle stability is limited even ifthe Trailer Stability Assist (TSA) isoperating. Drive carefully to preventaccidents.In particular, if the TCS/DSC indicator lightis flashing, drive the vehicle carefully as it isin a less stable condition and could swaymore easily. Drive with caution and inaccordance with the road, vehicle andtrailer conditions.
CAUTIONThe Trailer Stability Assist (TSA) may not
operate correctly unless the following areobserved:
Use tires of the correct size specified foryour Mazda on all four wheels.
Use tires of the same manufacturer,brand and tread pattern on all fourwheels.Do not mix worn tires.The Trailer Stability Assist (TSA) may not
operate correctly when tire chains areused or a temporary spare tire is installedbecause the tire diameter changes.
NOTE• The Trailer Stability Assist (TSA) uses
the TCS/DSC functions. The TrailerStability Assist (TSA) does not operate ifthere is a malfunction in the TCS/DSC(the TCS/DSC indicator light turns on).
• When the Trailer Stability Assist (TSA)is operating, the brake lights may turnon.
• For information regarding trailertowing, refer to Towing Caravans andTrailers (Russia) on page 3-56.
When Driving
ABS/TCS/DSC/Trailer Stability Assist (TSA)
4-76 *Some models.
CX-9_8GC7-EE-17G_Edition1 2017-5-16 8:22:04
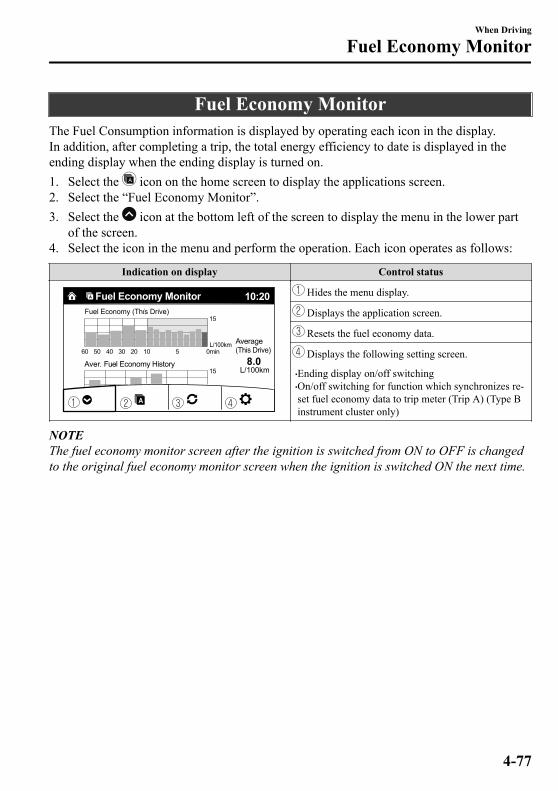
Fuel Economy MonitorThe Fuel Consumption information is displayed by operating each icon in the display.In addition, after completing a trip, the total energy efficiency to date is displayed in theending display when the ending display is turned on.1. Select the icon on the home screen to display the applications screen.2. Select the “Fuel Economy Monitor”.3. Select the icon at the bottom left of the screen to display the menu in the lower part
of the screen.4. Select the icon in the menu and perform the operation. Each icon operates as follows:
Indication on display Control status
Hides the menu display.
Displays the application screen.
Resets the fuel economy data.
Displays the following setting screen.
•Ending display on/off switching•On/off switching for function which synchronizes re-set fuel economy data to trip meter (Trip A) (Type Binstrument cluster only)
NOTEThe fuel economy monitor screen after the ignition is switched from ON to OFF is changedto the original fuel economy monitor screen when the ignition is switched ON the next time.
When Driving
Fuel Economy Monitor
4-77
CX-9_8GC7-EE-17G_Edition1 2017-5-16 8:22:04

▼ Fuel Consumption Display
Information regarding the fuel economy is displayed.
Indication on display Control status
Displays the fuel economy for the past 60 minutes.
•Displays the fuel economy every minute for the past 1to 10 minutes.
•Displays the fuel economy every 10 minutes for thepast 10 to 60 minutes.
Displays the average fuel economy over the past 5resets and after the current reset.
Calculates the average fuel economy every minuteafter vehicle travel begins, and displays it.
NOTE• The fuel economy data can be reset by doing the following operation:
• Press the reset switch from the menu screen.• When the function which synchronizes the fuel economy monitor and the trip meter is
on, reset trip A of the trip meter.• Delete the average fuel economy information displayed in the trip computer.
• After resetting the fuel economy data, “-- -” is displayed while the average fuel economyis calculated.
▼ Ending Screen Display
If the ending display on the fuel economy monitor is on when the ignition is switched fromON to OFF, the information regarding the fuel economy is displayed.
When Driving
Fuel Economy Monitor
4-78
CX-9_8GC7-EE-17G_Edition1 2017-5-16 8:22:04

Drive SelectionDrive selection is a system to switch the vehicle's drive mode. When the sport mode isselected, vehicle's response against accelerator operation is enhanced. This providesadditional quick acceleration which may be needed to safely make maneuvers such as lanechanges, merging onto freeways, or passing other vehicles.
CAUTIONDo not use the sport mode when driving on slippery roads such as wet or snow-covered roads.It may cause tire slipping.
NOTE• When the sport mode is selected, driving at higher engine speeds increases and it may
increase fuel consumption. Mazda recommends that you cancel the sport mode on normaldriving.
• Drive mode cannot be switched in the following conditions:• ABS/TCS/DSC is operating• The Mazda Radar Cruise Control with Stop & Go function (MRCC with Stop & Go
function) System/Mazda Radar Cruise Control (MRCC) system/cruise control isoperating.
• Steering wheel is being operated abruptly
▼ Drive Selection Switch
Press the drive selection switch forward(“ ”) to select the sport mode.Pull the drive selection switch back(“ ”) to cancel the sport mode.
NOTE• When the ignition is switched off, the
sport mode is canceled.• Depending on the driving conditions
when sport mode is selected, the vehiclemay perform shift-down or slightlyaccelerate.
When Driving
Drive Selection
4-79
CX-9_8GC7-EE-17G_Edition1 2017-5-16 8:22:04

▼ Select Mode Indication
When the sport mode is selected, the selectmode indication turns on in the instrumentcluster.
NOTEIf the drive selection cannot be switched tosport mode, the select mode indicationflashes to notify the driver.
When Driving
Drive Selection
4-80
CX-9_8GC7-EE-17G_Edition1 2017-5-16 8:22:04

i-ACTIV AWD Operation*
4WD provides excellent drivability onsnow-covered and ice-packed roads, sandand mud, as well as on steep slopes andother slippery surfaces.A system malfunction or operationconditions are indicated by a warning.Refer to Warning Indication/WarningLights on page 4-33.
WARNING
Never spin a wheel that is off the ground:Spinning a wheel that is off the ground as aresult of the vehicle being stuck or in aditch is dangerous. The drive assemblycould be seriously damaged which couldlead to an accident or could even lead tooverheating, oil leakage, and a fire.
▼ 4WD Driving
WARNING
Avoid sharp turns, excessive speed andabrupt maneuvers when driving thisvehicle:Sharp turns, excessive speed and abruptmaneuvering of this vehicle is dangerousas it could result in the increased risk of lossof vehicle control, vehicle roll-over,personal injury or death.This vehicle has a higher center of gravity.Vehicles with a higher center of gravitysuch as utility and 4WD vehicles handledifferently than vehicles with a lower centerof gravity.Utility and 4WD vehicles are not designedfor cornering at high speeds any more thanlow profile sports cars are designed toperform satisfactorily under off-roadconditions. In addition, utility vehicles havea significantly higher rollover rate thanother types of vehicles.
Drive carefully when the vehicle is loadedby lowering vehicle speed and applying thebrakes earlier:Abrupt maneuvering and sudden brakingwhen driving a loaded vehicle is dangerousas the driving behavior of a vehicle with ahigh center of gravity is different when it isloaded compared to when it is not, andcould result in the loss of vehicle controland an accident.
When Driving
i-ACTIV AWD
*Some models. 4-81
CX-9_8GC7-EE-17G_Edition1 2017-5-16 8:22:04

▼ Tires and Tire Chains
The condition of the tires plays a large rolein the performance of the vehicle.Moreover, to prevent adverse effects to thedrive assembly, please note the following:
Tires• When replacing tires, always replace all
front and rear tires at the same time.• All tires must be of the same size,
manufacture, brand and tread pattern.Pay particular attention when equippingsnow or other types of winter tires.
• Do not mix tread-worn tires with normaltires.
• Inspect tire inflation pressures at thespecified periods adjust to the specifiedpressures.
NOTECheck the tire inflation pressure labelattached to driver's door frame for thecorrect tire inflation pressure.
• Make sure to equip the vehicle withgenuine wheels of the specified size, onall wheels. With 4WD, the system iscalibrated for all four wheels being ofthe same dimensions.
Tire chains• Install tire chains to the front tires.• Do not use tire chains on the rear
wheels.• Do not drive the vehicle faster than 30
km/h (19 mph) with the tire chainsinstalled.
• Do not drive the vehicle with tire chainson road conditions other than snow orice.
▼ Towing
If the vehicle requires towing, have ittowed with all four wheels completely offthe ground.Refer to Towing Description on page 7-34.
When Driving
i-ACTIV AWD
4-82
CX-9_8GC7-EE-17G_Edition1 2017-5-16 8:22:04

Power Steering• Power steering is only operable when
the engine is running. If the engine is offor if the power steering system isinoperable, you can still steer, but itrequires more physical effort.If the steering feels stiffer than usualduring normal driving or the steeringvibrates, consult an expert repairer, werecommend an Authorized MazdaRepairer.
• The warning indication/warning lightnotifies the driver of systemabnormalities and operation conditions.In addition, the buzzer may also activatedepending on the system abnormality oroperation condition.Refer to Warning Indication/WarningLights on page 4-33.Refer to Power Steering WarningBuzzer on page 7-58.
CAUTIONNever hold the steering wheel to theextreme left or right for more than 5seconds with the engine running. Thiscould damage the power steering system.
When Driving
Power Steering
4-83
CX-9_8GC7-EE-17G_Edition1 2017-5-16 8:22:04
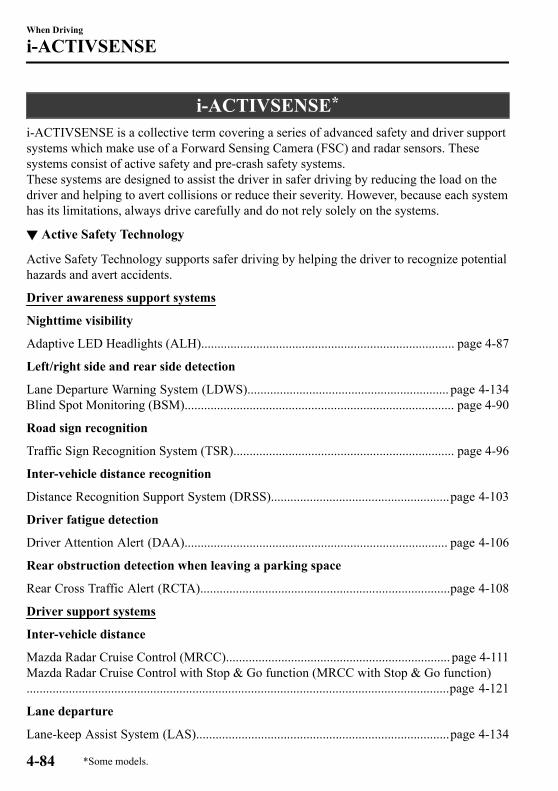
i-ACTIVSENSE*
i-ACTIVSENSE is a collective term covering a series of advanced safety and driver supportsystems which make use of a Forward Sensing Camera (FSC) and radar sensors. Thesesystems consist of active safety and pre-crash safety systems.These systems are designed to assist the driver in safer driving by reducing the load on thedriver and helping to avert collisions or reduce their severity. However, because each systemhas its limitations, always drive carefully and do not rely solely on the systems.
▼ Active Safety Technology
Active Safety Technology supports safer driving by helping the driver to recognize potentialhazards and avert accidents.
Driver awareness support systems
Nighttime visibility
Adaptive LED Headlights (ALH).............................................................................. page 4-87
Left/right side and rear side detection
Lane Departure Warning System (LDWS).............................................................. page 4-134Blind Spot Monitoring (BSM)................................................................................... page 4-90
Road sign recognition
Traffic Sign Recognition System (TSR).................................................................... page 4-96
Inter-vehicle distance recognition
Distance Recognition Support System (DRSS).......................................................page 4-103
Driver fatigue detection
Driver Attention Alert (DAA)................................................................................. page 4-106
Rear obstruction detection when leaving a parking space
Rear Cross Traffic Alert (RCTA).............................................................................page 4-108
Driver support systems
Inter-vehicle distance
Mazda Radar Cruise Control (MRCC)..................................................................... page 4-111Mazda Radar Cruise Control with Stop & Go function (MRCC with Stop & Go function)..................................................................................................................................page 4-121
Lane departure
Lane-keep Assist System (LAS)..............................................................................page 4-134
When Driving
i-ACTIVSENSE
4-84 *Some models.
CX-9_8GC7-EE-17G_Edition1 2017-5-16 8:22:04

▼ Pre-Crash Safety Technology
Pre-crash safety technology is designed to assist the driver in averting collisions or reducetheir severity in situations where they cannot be avoided.
Collision damage reduction in low vehicle speed range
Forward driving
Smart City Brake Support [Forward] (SCBS F)......................................................page 4-148Advanced Smart City Brake Support (Advanced SCBS)........................................page 4-145
Reverse driving
Smart City Brake Support [Reverse] (SCBS R)......................................................page 4-152
Collision damage reduction in medium/high speed range
Smart Brake Support (SBS).....................................................................................page 4-156
▼ Camera and Sensors
Forward Sensing Camera (FSC)
The Forward Sensing Camera (FSC) detects lane indications and recognizes headlights,taillights and city lights during nighttime driving. In addition, it also detects the vehicleahead, pedestrians, or obstructions. The following systems also use the Forward SensingCamera (FSC).
• Adaptive LED Headlights (ALH)• Driver Attention Alert (DAA)• Lane-keep Assist System (LAS) & Lane Departure Warning System (LDWS)• Traffic Sign Recognition System (TSR)• Advanced Smart City Brake Support (Advanced SCBS)• Smart City Brake Support [Forward] (SCBS F)• Smart Brake Support (SBS)• Mazda Radar Cruise Control with Stop & Go function (MRCC with Stop & Go function)
The Forward Sensing Camera (FSC) is installed at the top of the windshield near therearview mirror.Refer to Forward Sensing Camera (FSC) on page 4-159.
When Driving
i-ACTIVSENSE
4-85
CX-9_8GC7-EE-17G_Edition1 2017-5-16 8:22:04

Radar sensor (front)
The radar sensor (front) functions by detecting the radio waves reflected off a vehicle aheadsent from the radar sensor. The following systems also use the radar sensor (front).
• Mazda Radar Cruise Control with Stop & Go function (MRCC with Stop & Go function)• Mazda Radar Cruise Control (MRCC)• Distance Recognition Support System (DRSS)• Smart Brake Support (SBS)
The radar sensor (front) is mounted behind the radiator grille.Refer to Radar Sensor (Front) on page 4-164.
Radar sensors (rear)
The radar sensors (rear) function by detecting the radio waves reflected off a vehicleapproaching from the rear or an obstruction sent from the radar sensors. The followingsystems also use the radar sensors (rear).
• Blind Spot Monitoring (BSM)• Rear Cross Traffic Alert (RCTA)
The radar sensors (rear) are installed inside the rear bumper, one each on the left and rightsides.Refer to Radar Sensors (Rear) on page 4-167.
Ultrasonic sensors (rear)
The ultrasonic sensors (rear) function by detecting the ultrasonic waves reflected offobstructions at the rear sent from the ultrasonic sensors. The following systems also use theultrasonic sensors (rear).
• Smart City Brake Support [Reverse] (SCBS R)
The ultrasonic sensors (rear) are mounted in the rear bumper.Refer to Ultrasonic Sensors (Rear) on page 4-169.
When Driving
i-ACTIVSENSE
4-86
CX-9_8GC7-EE-17G_Edition1 2017-5-16 8:22:04

Adaptive LED Headlights (ALH)*
The ALH are a system which uses the Forward Sensing Camera (FSC) to determine thesituation of a vehicle ahead or a vehicle approaching in the opposite direction while drivingat night to automatically switch the illumination range of the headlights, the illuminatedarea, or the illumination brightness.Refer to Forward Sensing Camera (FSC) on page 4-159.The ALH are controlled between high and low beams as follows to assure the driver’svisibility without dazzling a vehicle ahead or a vehicle approaching in the oppositedirection.
Glare-Free High Beam
This feature dims only the high-beam light shone on the vehicle ahead.The high beams will dim while driving at a speed of about 40 km/h (25 mph) or faster.When the vehicle speed is less than about 30 km/h (18 mph), the beams switch to the lowbeams.
NOTEThe headlight high-beam indicator light turns on while the high beams are on.
When Driving
i-ACTIVSENSE
*Some models. 4-87
CX-9_8GC7-EE-17G_Edition1 2017-5-16 8:22:04

Wide-Range Low Beam
This feature extends the illumination range of the light cast by the low beams while drivingat a speed less than about 40 km/h (25 mph).
Highway Mode
This feature shifts the illumination angle of the light cast by the headlights upward whiledriving on highways.
The distance in which the ALH can detect objects varies depending on the surroundingconditions.
CAUTIONDo not modify the suspensions or headlight units, or remove the camera. Otherwise, the
ALH may not operate normally.Do not rely excessively on the ALH and drive the vehicle while paying sufficient attention to
safety. Switch the headlights between the high beams and low beams manually ifnecessary.
NOTEUnder the following conditions, the ALH may not operate normally. Manually switchbetween the high and low beams according to the visibility, and the road and trafficconditions.
• When there are other sources of light in the area such as street lamps, illuminatedsignboards, and traffic signals.
• When there are reflective objects in the surrounding area such as reflective plates andsigns.
When Driving
i-ACTIVSENSE
4-88
CX-9_8GC7-EE-17G_Edition1 2017-5-16 8:22:04

• When visibility is reduced under rain, snow and foggy conditions.• When driving on roads with sharp curves or undulations.• When the headlights/rear lamps of vehicles ahead or in the opposite lane are dim or not
illuminated.• When there is insufficient darkness such as at dawn or dusk.• When the luggage compartment is loaded with heavy objects or the rear passenger seats
are occupied.• When visibility is reduced due to a vehicle ahead spraying water from its tires onto your
windshield.
▼ To Operate the System
The system switches the headlights to thehigh beams after the ignition is switchedON and the headlight switch is in the position. The ALH indicator light (green)in the instrument cluster turns onsimultaneously.
The ALH determine that it is nighttimebased on the brightness of the surroundingarea.The system cancels operation when theheadlight switch is turned to a positionother than , the headlights aremanually switched to low beams, or thehigh beams are flashed on and off.
NOTEThe system can be changed so that theALH do not operate.Refer to Personalization Features on page9-10.
▼ Manual Switching
Switching to low beams
Shift the lever to the low beam position.The ALH indicator light (green) turns off.
Switching to high beams
Turn the headlight switch to the position.The ALH indicator light (green) turns offand the is illuminated.
When Driving
i-ACTIVSENSE
4-89
CX-9_8GC7-EE-17G_Edition1 2017-5-16 8:22:04

Blind Spot Monitoring (BSM)*
The BSM is designed to assist the driver in checking the area to the rear of the vehicle onboth sides during lane changes by notifying the driver of the presence of vehiclesapproaching from the rear in an adjacent lane.The BSM detects vehicles approaching from the rear while traveling in the forwarddirection at a speed of 30 km/h (19 mph) or faster and notifies the driver by turning on theBSM warning indicator light and displaying the vehicle detection screen (vehicles withmulti-information display and active driving display).If the turn signal lever is operated to signal a turn in the direction in which the BSMwarning indicator light is illuminated while the approaching vehicle is detected, the BSMnotifies the driver of possible danger by turning on the BSM warning indicator light, and byactivating the warning sound and the warning screen indicator display (vehicles withmulti-information display and active driving display).The detection area on this system covers the driving lanes on both sides of the vehicle andfrom the rear part of the front doors to about 50 m (164 ft) behind the vehicle.
Detection areas
Your vehicle
WARNING
Always check the surrounding area visually before making an actual lane change:The system is only designed to assist you in checking for vehicles at your rear when making alane change. Due to certain limitations with the operation of this system, the BSM warningindicator light, the warning sound and the warning screen indicator display may not activateor they might be delayed even though a vehicle is in an adjacent driving lane. Always make ityour responsibility as a driver to check the rear.
When Driving
i-ACTIVSENSE
4-90 *Some models.
CX-9_8GC7-EE-17G_Edition1 2017-5-16 8:22:04

NOTE• The BSM will operate when all of the following conditions are met:
• The ignition is switched ON.• The BSM OFF indicator light in the instrument cluster is turned off.• The vehicle speed is about 30 km/h (19 mph) or faster.
• The BSM will not operate under the following circumstances.• The vehicle speed falls below about 25 km/h (15 mph) even though the BSM OFF switch
indicator light is turned off.• The selector lever is shifted to reverse (R) and the vehicle is reversing.• The turning radius is small (making a sharp turn, turning at intersections).
• In the following cases, the BSM OFF indicator light turns on and operation of the systemis stopped. If the BSM OFF indicator light remains illuminated, have the vehicle inspectedat an Authorized Mazda Repairer as soon as possible.
• Some problem with the system including the BSM warning indicator lights is detected.• A large deviation in the installation position of a radar sensor (rear) on the vehicle has
occurred.• There is a large accumulation of snow or ice on the rear bumper near a radar sensor
(rear). Remove any snow, ice or mud on the rear bumper.• Driving on snow-covered roads for long periods.• The temperature near the radar sensors (rear) becomes extremely hot due to driving for
long periods on slopes during the summer.• The battery voltage has decreased.
• Under the following conditions, the radar sensors (rear) cannot detect target objects or itmay be difficult to detect them.
• A vehicle is in the detection area at the rear in an adjacent driving lane but it does notapproach. The BSM determines the condition based on radar detection data.
• A vehicle is traveling alongside your vehicle at nearly the same speed for an extendedperiod of time.
• Vehicles approaching in the opposite direction.• A vehicle in an adjacent driving lane is attempting to pass your vehicle.• A vehicle is in an adjacent lane on a road with extremely wide driving lanes. The
detection area of the radar sensors (rear) is set at the road width of expressways.• In the following case, the flashing of the BSM warning indicator light, and the activation
of the warning sound and the warning screen indicator display may not occur or they maybe delayed.
• A vehicle makes a lane change from a driving lane two lanes over to an adjacent lane.• Driving on steep slopes.• Crossing the summit of a hill or mountain pass.
When Driving
i-ACTIVSENSE
4-91
CX-9_8GC7-EE-17G_Edition1 2017-5-16 8:22:04

• When there is a difference in the height between your driving lane and the adjacentlane.
• Directly after the BSM system becomes operable by changing the setting.• If the road width is extremely narrow, vehicles two lanes over may be detected. The
detection area of the radar sensors (rear) is set according to the road width ofexpressways.
• The BSM warning indicator light may turn on and the vehicle detection screen may bedisplayed in the display in reaction to stationary objects (guardrails, tunnels, sidewalls,and parked vehicles) on the road or the roadside.
Objects such as guardrails and concrete walls running alongside the vehicle.
Places where the width between guardrails or walls on each side of the vehicle narrows.
The walls at the entrance and exits of tunnels, turnouts.
• A BSM warning indicator light may flash or the warning beep and the warning screenindicator display may be activated several times when making a turn at a cityintersection.
• Turn off the BSM while pulling a trailer or while an accessory such as a bicycle carrier isinstalled to the rear of the vehicle. Otherwise, the radar’s radio waves will be blockedcausing the system to not operate normally.
• In the following cases, it may be difficult to view the illumination/flashing of the BSMwarning indicator lights equipped on the door mirrors.
• Snow or ice is adhering to the door mirrors.• The front door glass is fogged or covered in snow, frost or dirt.
• The system switches to the Rear Cross Traffic Alert function when the selector lever isshifted to the reverse (R) position.Refer to Rear Cross Traffic Alert (RCTA) on page 4-108.
When Driving
i-ACTIVSENSE
4-92
CX-9_8GC7-EE-17G_Edition1 2017-5-16 8:22:04

▼ Blind Spot Monitoring (BSM) Warning Indicator Light/Display Indicator/BlindSpot Monitoring (BSM) Warning Beep
The BSM or Rear Cross Traffic Alert (RCTA) system notifies the driver of the presence ofvehicles in adjacent lanes or at the rear of the vehicle using the BSM warning indicatorlight, the warning sound and the display indicator (vehicles with multi-information displayand active driving display) (BSM) while the systems are operational.
BSM warning indicator lights
The BSM warning indicator lights are equipped on the left and right door mirrors. Thewarning indicator lights turn on when a vehicle approaching from the rear in an adjacentlane is detected.
When the ignition is switched ON, the warning indicator light turns on momentarily andthen turns off after a few seconds.
Forward driving (BSM operation)
The BSM detects vehicles approaching from the rear and turns on the BSM warningindicator lights equipped on the door mirrors according to the conditions. Additionally,while a BSM warning indicator light is illuminated, if the turn signal lever is operated tosignal a turn in the direction in which the BSM warning indicator light is illuminated, theBSM warning indicator light flashes.
Reverse driving (Rear Cross Traffic Alert (RCTA) system operation)
The Rear Cross Traffic Alert (RCTA) system detects vehicles approaching from the left andright of your vehicle and flashes the BSM warning indicator lights.
When Driving
i-ACTIVSENSE
4-93
CX-9_8GC7-EE-17G_Edition1 2017-5-16 8:22:04

Function for cancelling illumination dimmer
If the BSM warning indicator lights turn on when the parking lights are turned on, thebrightness of the BSM warning indicator lights is dimmed.If the BSM warning indicator lights are difficult to see due to glare from surroundingbrightness when traveling on snow-covered roads or under foggy conditions, press thedimmer cancellation button to cancel the dimmer and increase the brightness of BSMwarning indicator lights when they turn on.Refer to Dashboard Illumination on page 4-16.
Display indicator (Vehicles with multi-information display and active driving display)
The detected approaching vehicle and warning are displayed in the multi-informationdisplay and active driving display when the vehicle is moving forward (BSM operational).
Multi-information Display Active Driving Display
Detection and warning indicator Detection and warning indicator
The detected direction is displayed with a detection indicator (white) when an approachingvehicle is detected. In addition, if the turn signal lever is operated to signal a lane changewhile the vehicle is detected, the display changes the color (amber) of the warning indicator.
BSM warning beep
The BSM warning beep is activated simultaneously with the flashing of a BSM warningindicator light.
When Driving
i-ACTIVSENSE
4-94
CX-9_8GC7-EE-17G_Edition1 2017-5-16 8:22:04

▼ Canceling Operation of Blind SpotMonitoring (BSM)
The BSM system can be set to inoperable.Refer to Personalization Features on page9-10.When the BSM is set to inoperable, theBSM and Rear Cross Traffic Alert(RCTA) systems are turned off and theBSM OFF indicator light in the instrumentcluster turns on.
NOTEWhen the ignition is switched OFF, thesystem status before it was turned off ismaintained. For example, if the ignition isswitched OFF while the BSM and RearCross Traffic Alert (RCTA) systems areoperational, the BSM and Rear CrossTraffic Alert (RCTA) systems remainoperational the next time the ignition isswitched ON.
When Driving
i-ACTIVSENSE
4-95
CX-9_8GC7-EE-17G_Edition1 2017-5-16 8:22:04

Traffic Sign Recognition System (TSR)*
The TSR helps prevent the driver from overlooking traffic signs, and provides support forsafer driving by displaying traffic signs on the active driving display which are recognizedby the Forward Sensing Camera (FSC) or recorded in the navigation system while thevehicle is driven.The TSR displays the speed limit (including auxiliary signs) , do not enter, and passingprohibited signs.If the vehicle speed exceeds the speed limit sign indicated in the active driving display whilethe vehicle is driven, the system notifies the driver using the indication in the active drivingdisplay and a warning sound.
NOTE• The TSR is not supported in some countries or regions. For information concerning the
supported countries or regions, consult an expert repairer, we recommend an AuthorizedMazda Repairer.
• The TSR operates only if the navigation system SD card (Mazda genuine) is inserted inthe SD card slot. Consult an expert repairer, we recommend an Authorized MazdaRepairer for details.
Sign recognizedSign displayed
Active driving display indication Active driving display indication
When Driving
i-ACTIVSENSE
4-96 *Some models.
CX-9_8GC7-EE-17G_Edition1 2017-5-16 8:22:04

WARNING
Always check the traffic signs visually while driving.The TSR helps prevent the driver from overlooking traffic signs and provides support for saferdriving. Depending on the weather conditions or problems with traffic signs, a traffic signmay not be recognized or a traffic sign different from the actual traffic sign may be displayed.Always make it your responsibility as a driver to check the actual traffic signs. Otherwise, itcould result in an accident.
NOTE• The TSR does not operate if there is a malfunction in the Forward Sensing Camera (FSC).• Under the following conditions, the TSR may not operate normally.
• An object placed on the dashboard is reflected in the windshield and picked up by thecamera.
• Heavy luggage is loaded in the luggage compartment or on the rear seat and thevehicle is tilted.
• The tire pressures are not adjusted to the specified pressure.• Tires other than standard tires are equipped.• The vehicle is driven on the ramp and surrounding area to or from a rest area or a
tollgate on a highway.• When surrounding brightness suddenly changes such as when entering or exiting a
tunnel.• The illumination of the headlights is weakened because of dirt or the optical axis is
deviated.• The windshield is dirty or foggy.• The windshield and camera are fogged (water droplets).• Strong light is directed at the front of the vehicle (such as backlight or high-beam
headlights of on-coming vehicles).• The vehicle is making a sharp turn.• Strong light reflects off the road.• A traffic sign is in a position which makes it difficult to reflect the light from the
vehicle's headlights, such as when the vehicle is driven at night or in a tunnel.• The vehicle is driven under weather conditions such as rain, fog, or snow.• The stored map data for the navigation system is not current.• A traffic sign is obscured by mud or snow.• A traffic sign is concealed by trees or a vehicle.• A traffic sign is partially shaded.• A traffic sign is bent or warped.• A traffic sign is too low or too high.• A traffic sign is too bright or too dark (including electronic traffic signs).
When Driving
i-ACTIVSENSE
4-97
CX-9_8GC7-EE-17G_Edition1 2017-5-16 8:22:04
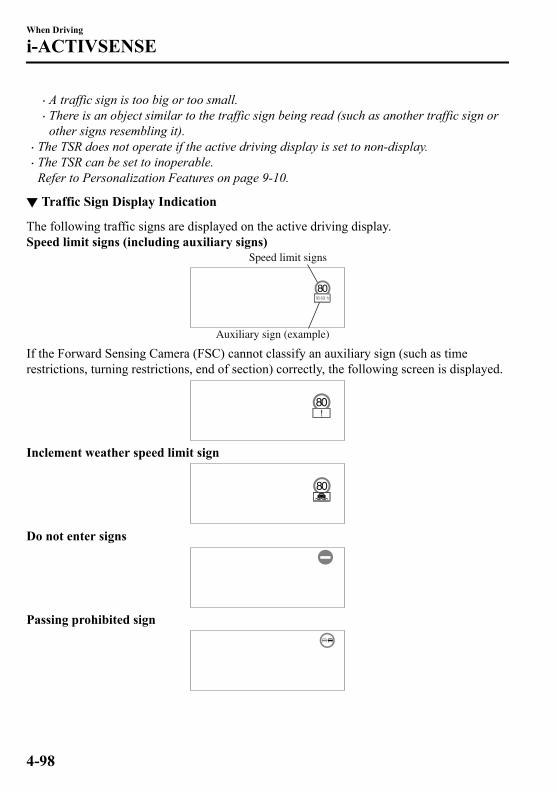
• A traffic sign is too big or too small.• There is an object similar to the traffic sign being read (such as another traffic sign or
other signs resembling it).• The TSR does not operate if the active driving display is set to non-display.• The TSR can be set to inoperable.
Refer to Personalization Features on page 9-10.
▼ Traffic Sign Display Indication
The following traffic signs are displayed on the active driving display.Speed limit signs (including auxiliary signs)
Speed limit signs
Auxiliary sign (example)
If the Forward Sensing Camera (FSC) cannot classify an auxiliary sign (such as timerestrictions, turning restrictions, end of section) correctly, the following screen is displayed.
Inclement weather speed limit sign
Do not enter signs
Passing prohibited sign
When Driving
i-ACTIVSENSE
4-98
CX-9_8GC7-EE-17G_Edition1 2017-5-16 8:22:04

The TSR can display a passing prohibited sign and a speed limit sign at the same time.
If the Forward Sensing Camera (FSC) cannot correctly recognize a traffic sign while thevehicle is driven, the following screen is displayed.
NOTESpeed limit signs (including auxiliary signs)
• When the vehicle speed is about 1 km/h (0.6 mph) or faster, the speed limit sign isdisplayed when any one of the following conditions are met.
• The Forward Sensing Camera (FSC) recognizes a speed limit sign as a sign targeted foryour vehicle and the vehicle passes it.
• The speed limit sign stored in the navigation system is read (if the Forward SensingCamera (FSC) does not recognize a speed limit sign).
• Inclement weather speed limit signs are displayed when all of the following conditions aremet.
• The vehicle speed is about 1 km/h (0.6 mph) or more.• The Forward Sensing Camera (FSC) recognizes an inclement weather speed limit sign
as a sign targeted for your vehicle and the vehicle passes it.• The inclement weather speed limit sign is lower than the currently displayed speed limit
sign.• The windshield wipers are operated.
• In the following cases, display of the speed limit sign stops.• The Forward Sensing Camera (FSC) recognizes the speed limit sign and the vehicle is
driven for a certain distance after passing the sign.• Each sensor determines that the vehicle has changed direction of travel. (The display of
a speed limit sign does not stop even if the vehicle changes lanes while a "ZONE"auxiliary sign is displayed.)
• The Forward Sensing Camera (FSC) recognizes a new speed limit sign which differsfrom the previous one (displays the new speed limit sign).
• The speed limit sign stored in the navigation system is not read within a certain periodof time (if the Forward Sensing Camera (FSC) does not recognize a speed limit sign,the speed limit sign stored in the navigation system is displayed).
When Driving
i-ACTIVSENSE
4-99
CX-9_8GC7-EE-17G_Edition1 2017-5-16 8:22:04

• The vehicle speed exceeds the displayed speed limit sign by 30 km/h (19 mph) or moreafter a certain period of time has elapsed since the speed limit sign was displayed.(Except when there is information for the speed limit sign in the navigation system)
Do not enter signs• A do not enter sign is displayed when all of the following conditions are met.
• The vehicle speed is about 80 km/h (50 mph) or slower.• The Forward Sensing Camera (FSC) recognizes a do not enter sign as a sign targeted
for your vehicle and the vehicle passes it.• When the Forward Sensing Camera (FSC) recognizes the do not enter sign and a certain
period of time has elapsed since the vehicle passed the sign, display of the do not entersign stops.
Passing prohibited sign• A passing prohibited sign is displayed when all of the following conditions are met.
• The vehicle speed is about 1 km/h (0.6 mph) or more.• The Forward Sensing Camera (FSC) recognizes a passing prohibited sign as a sign
targeted for your vehicle and the vehicle passes it.• In the following cases, the display of the passing prohibited sign stops.
• The Forward Sensing Camera (FSC) recognizes a passing prohibited sign and youdrive a certain distance after passing the sign.
• You have changed vehicle lanes.
When Driving
i-ACTIVSENSE
4-100
CX-9_8GC7-EE-17G_Edition1 2017-5-16 8:22:04

▼ Excessive Speed Warning
If the vehicle speed exceeds the speed limit sign displayed in the active driving display, thearea around the speed limit sign flashes three times in amber and the warning sound isactivated three times at the same time. If the vehicle speed continues to exceed the displayedspeed limit sign, the indication stops flashing and remains on. Check the surroundingconditions and adjust the vehicle speed to the legal speed using the appropriate operationsuch as depressing the brake pedal.
While 100 km/h is displayed80 km/h is displayed
Active driving display indicationActive driving display indication
The excessive speed warning is initially set to inoperable. If you want to activate theexcessive speed warning, change the setting in the personalization features. In addition, thewarning pattern and the warning activation timing differ depending on the setting contents.Refer to Personalization Features on page 9-10.Warning pattern
• Off: The excessive speed warning is not activated.• Visual: The area around the speed limit sign displayed in the display flashes three times in
amber, and if the vehicle speed continues to exceed the displayed speed limit sign, theindication stops flashing and remains on.
• Audio & Visual: The area around the speed limit sign displayed in the display flashesthree times in amber and the warning sound is activated three times at the same time. Ifthe vehicle speed continues to exceed the displayed speed limit sign, the indication stopsflashing and remains on.
When Driving
i-ACTIVSENSE
4-101
CX-9_8GC7-EE-17G_Edition1 2017-5-16 8:22:04

Warning activation timing• 0: If the vehicle speed exceeds the speed limit sign displayed in the display, the
excessive speed warning is activated.• 5: If the vehicle speed exceeds the speed limit sign displayed in the display by 5 km/h
(3 mph), the excessive speed warning is activated.• 10: If the vehicle speed exceeds the speed limit sign displayed in the display by 10
km/h (6.2 mph), the excessive speed warning is activated.
NOTE• In the following cases, the excessive speed warning stops operating.
• The vehicle speed is less than the speed of the displayed speed limit sign. (If theactivation timing for the excessive speed warning is changed in the personalizationfeatures, the excessive speed warning stops operating when the vehicle speed is lessthan the changed vehicle speed.
• A speed limit sign indication has been updated and the vehicle speed is lower than theupdated indication.
• Display of the speed limit sign stops.• The warning indication is displayed at the same time the excessive speed warning sound
is activated if the vehicle speed exceeds the speed indicated on the speed limit sign.Refer to Warning Sound is Activated on page 7-55.
• The TSR can recognize a speed limit sign with an auxiliary sign and display it, but itcannot determine the indication on the auxiliary sign (such as time restrictions, turningrestrictions, end of section). Therefore, the excessive speed warning is activated when thevehicle speed exceeds the displayed speed limit sign even if the conditions indicated onthe auxiliary sign do not apply to the vehicle.
• If the Forward Sensing Camera (FSC) incorrectly recognizes the actual speed limit signat a lower speed, the excessive speed alarm is activated even if the vehicle is driven at thelegal speed.
When Driving
i-ACTIVSENSE
4-102
CX-9_8GC7-EE-17G_Edition1 2017-5-16 8:22:04

Distance Recognition Support System (DRSS)*
The DRSS measures the distance between your vehicle and a vehicle ahead using a radarsensor (front) while the vehicle speed is about 30 km/h (19 mph) or faster, and if yourvehicle approaches a vehicle ahead more closely than what is appropriate for maintainingdistance between the vehicles according to the vehicle speed, a notification in the activedriving display is indicated to advise you to keep a safe distance from the vehicle ahead.
WARNING
Do not rely completely on the DRSS and always drive carefully:The ability to detect a vehicle ahead is limited depending on the type of vehicle ahead, theweather conditions, and the traffic conditions. Therefore, if the accelerator and brake pedalsare not operated correctly it could lead to an accident. Always verify the safety of thesurrounding area and depress the brake pedal or accelerator pedal while keeping a saferdistance from vehicles ahead or on-coming vehicles.
NOTE• The DRSS operates when all of the following conditions are met:
• The ignition is switched ON.• The DRSS is on.• The selector lever is in a position other than reverse (R).• The vehicle speed is 30 km/h or faster (19 mph or faster).
• The objects which activate the system are 4-wheeled vehicles.• The DRSS may also operate in the presence of motorcycles and bicycles.• The DRSS may not operate normally under the following conditions:
• The Dynamic Stability Control (DSC) has a malfunction.• The vehicle ahead is traveling at an extremely slow speed.
• The system does not operate with the following objects:• Vehicles approaching in the opposite direction.• Stationary objects (stopped vehicles, obstructions)
When Driving
i-ACTIVSENSE
*Some models. 4-103
CX-9_8GC7-EE-17G_Edition1 2017-5-16 8:22:04

▼ Indication on Display
The DRSS operation status is indicated in the active driving display or multi-informationdisplay. Regarding malfunctions, check the vehicle conditions or have it inspected by anexpert repairer, we recommend an Authorized Mazda Repairer according to the content ofthe displayed message.Refer to Warning/Indicator Lights on page 4-32.
NOTE• When the ignition is switched off, the operation status before the system was turned off is
maintained. For example, if the ignition is switched off with the DRSS operable, thesystem will be operable when the ignition is switched ON the next time.
• The DRSS can be turned on/off and the system's sensitivity can be changed.Refer to Personalization Features on page 9-10.
Multi-information display
Active driving display
Vehicle ahead display
Vehicle ahead display
When Driving
i-ACTIVSENSE
4-104
CX-9_8GC7-EE-17G_Edition1 2017-5-16 8:22:04

Distance-between-vehicles guidelines*1
Indication on display Distance between vehi-cles guidelines
(During travel at about40 km/h (25 mph)
Distance between vehi-cles guidelines
(During travel at about80 km/h (50 mph)
Multi-information dis-play Active driving display
About 25 m (82 ft) About 50 m (164 ft)
About 20 m (66 ft) About 40 m (131 ft)
About 15 m (49 ft) About 30 m (98 ft)
About 10 m (33 ft) About 20 m (66 ft)
Flashes in white*2
Illuminated in amber About 10 m (32 ft) or less About 20 m (65 ft) or less
*1 The distance between vehicles differs depending on vehicle speed.*2 Indication when the distance setting for notifying the driver that the vehicle approaches
a vehicle ahead is Near.
When Driving
i-ACTIVSENSE
4-105
CX-9_8GC7-EE-17G_Edition1 2017-5-16 8:22:04

Driver Attention Alert (DAA)*
The DAA is a system which detects driver fatigue and decreased attentiveness, andencourages the driver to take a rest.When the vehicle is driven inside traffic lane lines at about 65 to 140 km/h (41 to 86 mph),the DAA estimates the amount of accumulated fatigue and decreased attentiveness of thedriver based on the information from the Forward Sensing Camera (FSC) and other vehicleinformation, and encourages the driver to take a rest using an indication on themulti-information display and a warning sound.Use the DAA on expressways or highways.Refer to Forward Sensing Camera (FSC) on page 4-159.
WARNING
Do not rely completely on DAA and always drive carefully:The DAA detects driver fatigue and decreased attentiveness and encourages the driver to takea rest, however, it is not designed to prevent the vehicle from straying. If you rely too much onthe DAA it could lead to an accident. Drive carefully and operate the steering wheelappropriately.In addition, the system may not be able to detect driver fatigue and decreased attentivenesscorrectly depending on the traffic and driving conditions. The driver must take sufficient restin consideration of safer driving.
NOTE• The DAA operates when all of the following conditions are met.
When Driving
i-ACTIVSENSE
4-106 *Some models.
CX-9_8GC7-EE-17G_Edition1 2017-5-16 8:22:04

• The vehicle speed is about 65 to 140 km/h (41 to 86 mph).• The system detects white (yellow) lane lines.• The system has completed learning of the driver’s driving data.
• The DAA does not operate under the following conditions.• The vehicle speed is less than about 65 km/h (41 mph).• The vehicle speed exceeds about 140 km/h (86 mph)• The vehicle is making a sharp turn.• The vehicle is changing lanes.
• The DAA may not operate normally under the following conditions.• White (yellow) lane lines are less visible because of dirt or fading/patchiness.• The vehicle is jolted or swayed continuously by strong winds or rough roads.• The vehicle is driven aggressively.• When making frequent lane changes.
• The DAA detects driver fatigue and decreased attentiveness based on the driving datawhen the vehicle is driven at about 65 to 140 km/h (41 to 86 mph) for about 20 minutes.The driving data will be reset under the following conditions.
• The vehicle is stopped for 15 minutes or longer.• The vehicle is driven at less than about 65 km/h (41 mph) for about 30 minutes.• The ignition is switched off.
• After the DAA has displayed the first message encouraging rest, it does not display thenext one until 45 minutes have passed.
▼ Driver Attention Alert (DAA)Display
When the system detects driver fatigue ordecreased attentiveness, it activates thewarning sound and displays an alert in themulti-information display.
▼ Canceling Driver Attention Alert(DAA)
The DAA can be set to not activate.Refer to Personalization Features on page9-10.
When Driving
i-ACTIVSENSE
4-107
CX-9_8GC7-EE-17G_Edition1 2017-5-16 8:22:04

Rear Cross Traffic Alert (RCTA)*
The RCTA system is designed to assist the driver in checking the area to the rear of thevehicle on both sides while the vehicle is reversing by alerting the driver to the presence ofvehicles approaching the rear of the vehicle.The RCTA system detects vehicles approaching from the left and right sides of the vehicle,and the rear of the vehicle while the vehicle is being reversed out of a parking space, andnotifies the driver of possible danger using the Blind Spot Monitoring (BSM) warningindicator lights and the warning buzzer.
Detection areas
Your vehicle
RCTA operation
1. The RCTA system operates when the selector lever is shifted to the reverse (R) position.2. If there is the possibility of a collision with an approaching vehicle, the Blind Spot
Monitoring (BSM) warning indicator lights flashes and the warning beep is activatedsimultaneously.
When Driving
i-ACTIVSENSE
4-108 *Some models.
CX-9_8GC7-EE-17G_Edition1 2017-5-16 8:22:04

The RCTA warning indication in the rearview monitor also synchronizes with the BlindSpot Monitoring (BSM) warning indicator light on the door mirrors.
WARNING
Always check the surrounding area visually before actually putting the vehicle in reverse:The system is only designed to assist you in checking for vehicles at the rear when putting thevehicle in reverse. Due to certain limitations with the operation of this system, the Blind SpotMonitoring (BSM) warning indicator lights may not flash or it might be delayed even thougha vehicle is behind your vehicle. Always make it your responsibility as a driver to check therear.
NOTE• In the following cases, the Blind Spot Monitoring (BSM) OFF Indicator Light turns on
and operation of the system is stopped. If the Blind Spot Monitoring (BSM) OFF IndicatorLight remains illuminated, have the vehicle inspected at an Authorized Mazda Dealer assoon as possible.
• Some problem with the system including the Blind Spot Monitoring (BSM) warningindicator lights has occurred.
• A large deviation in the installation position of a radar sensor (rear) on the vehicle hasoccurred.
• There is a large accumulation of snow or ice on the rear bumper near a radar sensor(rear).
• Driving on snow-covered roads for long periods.• The temperature near the radar sensors becomes extremely hot due to driving for long
periods on slopes during the summer.
When Driving
i-ACTIVSENSE
4-109
CX-9_8GC7-EE-17G_Edition1 2017-5-16 8:22:04

• The battery voltage has decreased.• Under the following conditions, the radar sensors (rear) cannot detect target objects or it
may be difficult to detect them.• The vehicle speed when reversing is about 10 km/h (6 mph) or faster.• The radar sensor (rear) detection area is obstructed by a nearby wall or parked vehicle.
(Reverse the vehicle to a position where the radar sensor detection area is no longerobstructed.)
Your vehicle
• A vehicle is approaching directly from the rear of your vehicle.Your vehicle
• The vehicle is parked on a slant.
Your vehicle
• Directly after the Blind Spot Monitoring (BSM) system becomes operable using thepersonalization feature.
• Radio wave interference from a radar sensor equipped on a nearby parked vehicle.• In the following cases, it may be difficult to view the illumination/flashing of the Blind
Spot Monitoring (BSM) warning indicator lights equipped on the door mirrors.• Snow or ice adheres to the door mirrors.• The front door glass is fogged or covered in snow, frost or dirt.
• Turn off the RCTA system while pulling a trailer or while an accessory such as a bicyclecarrier is installed to the rear of the vehicle. Otherwise, the radio waves emitted by theradar will be blocked causing the system to not operate normally.
When Driving
i-ACTIVSENSE
4-110
CX-9_8GC7-EE-17G_Edition1 2017-5-16 8:22:04

Mazda Radar Cruise Control (MRCC)*
The MRCC system is designed to maintain headway control*1 with a vehicle aheadaccording to your vehicle's speed using a radar sensor (front) to detect the distance to thevehicle ahead and a preset vehicle speed without you having to use the accelerator or brakepedals.*1 Headway Control: Control of the distance between your vehicle and the vehicle ahead
detected by the MRCC system.Additionally, if your vehicle starts closing in on the vehicle ahead such as if the vehicleahead brakes suddenly, a warning sound and a warning indication in the display areactivated simultaneously to alert you to maintain a sufficient distance between the vehicles.Also refer to the following before using the MRCC.
• Radar sensor (front) (page 4-164)
WARNING
Do not rely completely on the MRCC:The MRCC system has detection limitations depending on the type of vehicle ahead and itsconditions, the weather conditions, and the road conditions. Additionally, the system may beunable to decelerate sufficiently to avoid hitting the vehicle ahead if the vehicle ahead appliesthe brakes suddenly or another vehicle cuts into the driving lane, which could result in anaccident.Always drive carefully and verify the surrounding conditions and depress the brake pedal oraccelerator pedal while keeping a safer distance from vehicles ahead or on-coming vehicles.
Do not use the MRCC system in the following locations, using the MRCC system at thefollowing locations may result in an unexpected accident:
General roads other than highways (Driving under these conditions using the MRCC systemis not possible.)Roads with sharp curves and where vehicle traffic is heavy and there is insufficient space
between vehicles.Roads where frequent and repetitive acceleration and deceleration occur (Driving under
these conditions using the MRCC system is not possible).When entering and exiting interchanges, service areas, and parking areas of highways (If
you exit a highway while headway control is in use, the vehicle ahead will no longer betracked and your vehicle may accelerate to the set speed).Slippery roads such as ice or snow-bound roads (Tires could spin causing you to lose vehicle
control, or the stop hold control may not operate.)Long, descending slopes (to maintain distance between vehicles, the system automatically
and continuously applies the brakes which could result in the loss of brake power.)
When Driving
i-ACTIVSENSE
*Some models. 4-111
CX-9_8GC7-EE-17G_Edition1 2017-5-16 8:22:04

Slopes with a steep gradient (The vehicle ahead may not be detected correctly, your vehiclemay slide while stopped by the stop hold control, and it may accelerate suddenly after itstarts moving.)
For safety purposes, switch the MRCC system off when it is not being used.
CAUTIONIf your vehicle is towed or you are towing something, switch the MRCC system off to prevent amiss-operation.
NOTE• The MRCC system does not detect the following as physical objects.
• Vehicles approaching in the opposite direction• Pedestrians• Stationary objects (stopped vehicles, obstructions)• If a vehicle ahead is traveling at an extremely low speed, the system may not detect it
correctly.• During headway control travel, do not set the system for detection of two-wheeled
vehicles such as motorcycles and bicycles.• Do not use the MRCC system under conditions in which close proximity warnings are
frequently activated.• During headway control travel, the system accelerates and decelerates your vehicle in
conjunction with the speed of the vehicle ahead. However, if it is necessary to acceleratefor a lane change or if the vehicle ahead brakes suddenly causing you to close in on thevehicle rapidly, accelerate using the accelerator pedal or decelerate using the brakepedal depending on the conditions.
• While the MRCC system is in use, it does not cancel even if the selector lever is operatedand any intended engine braking will not occur. If deceleration is required, lower thevehicle speed setting or depress the brake pedal.
• The sound of the automatic brakes operating may be heard, however, it does not indicatea problem.
• The brake lights turn on while the MRCC automatic braking is operating, however, theymay not turn on while the vehicle is on a downslope at the set vehicle speed or travelingat a constant speed and following a vehicle ahead.
When Driving
i-ACTIVSENSE
4-112
CX-9_8GC7-EE-17G_Edition1 2017-5-16 8:22:04

▼ Mazda Radar Cruise Control (MRCC) Display Indication
The MRCC setting status and operation conditions are indicated on the multi-informationdisplay and the active driving display.
MRCC Distance between vehicle display
MRCC Set vehicle speed
Vehicle ahead display
Vehicle ahead display MRCC Distance between vehicle display
MRCC Set vehicle speed
Active driving display
Multi-information display
If there is a problem with the MRCC system, a message is displayed on themulti-information display. Check the center display to verify the problem and then haveyour vehicle inspected by an expert repairer, we recommend an Authorized Mazda Repairer.Refer to Message Indicated on Display on page 7-52.
▼ Close Proximity Warning
If your vehicle rapidly closes in on the vehicle ahead because the vehicle ahead applies thebrakes suddenly while you are traveling in headway control, the warning sound activatesand the brake warning is indicated in the display. Always verify the safety of thesurrounding area and depress the brake pedal while keeping a safer distance from thevehicle ahead. Additionally, keep a safer distance from the vehicles behind you.
Multi-information Display
Active Driving Display
When Driving
i-ACTIVSENSE
4-113
CX-9_8GC7-EE-17G_Edition1 2017-5-16 8:22:04

NOTEIn the following cases, the warnings and brakes may not operate even if your vehicle startsclosing in on the vehicle ahead.
• You are driving your vehicle at the same speed as the vehicle ahead.• Directly after the MRCC system has been set.• Directly after the accelerator pedal is released.• Another vehicle cuts into the driving lane.
▼ Setting the System
The MRCC system operates when all of the following conditions are met.• Vehicle speed is 30 km/h (19 mph) to 145 km/h (90 mph)• The MRCC is turned on.• The brake pedal is not depressed.• The electric parking brake (EPB) is released (electric parking brake (EPB) indicator light
is turned off).• There is no problem with the DSC.• All the doors are closed.• The driver's seat belt is fastened.• The selector lever is in the drive (D) position or manual (M) position (manual mode).
Turning on the system
CANCEL switch
RES switch
OFF switch
switch
switch
MODE switch
SET- switch
SET+ switch
When the MODE switch is pressed once, the MRCC system turns on, and the MRCC mainindication (white) turns on and the vehicle speed and the distance between the vehicleswhile in headway control can be set.
When Driving
i-ACTIVSENSE
4-114
CX-9_8GC7-EE-17G_Edition1 2017-5-16 8:22:04

In addition, the MRCC system display indication is displayed on the multi-informationdisplay and the active driving display at the same time.
NOTE• If the ignition is switched off while the MRCC system is operating, the system will be
operable when the ignition is switched ON the next time.• The MRCC can switch to the Cruise Control Function.
Refer to Cruise Control Function on page 4-118.
How to set the speed
1. Adjust the vehicle speed to the desired setting using the accelerator pedal.2. Headway control begins when the SET or SET switch is pressed.
The set speed and the inter-vehicle distance display filled with white lines is displayed.The MRCC main indication (white) switches to the MRCC set indication (green) at thesame time.
Travel status Indication on multi-informationdisplay
Indication on active driving dis-play
During travel at constant speed
During travel under headway con-trol
NOTE• If a vehicle ahead is detected while traveling at a constant speed, the vehicle-ahead
indication is displayed and headway control is performed. Additionally, when a vehicleahead is no longer detected, the vehicle-ahead indication turns off and the systemswitches back to travel at constant speed.
When Driving
i-ACTIVSENSE
4-115
CX-9_8GC7-EE-17G_Edition1 2017-5-16 8:22:04

• The lowest possible speed which can be set on the MRCC system is 30 km/h (19 mph).• Headway control is not possible if the vehicle ahead is driving faster than your vehicle's
set speed. Adjust the system to the desired vehicle speed using the accelerator pedal.
How to set the distance-between-vehicles during headway control
The distance-between-vehicles is set to a shorter distance by pressing the switch. Thedistance-between-vehicles is set to a longer distance by pressing the switch. Thedistance-between-vehicles can be set to 4 levels; Long, medium, short, and extremely shortdistance.
Distance-between-vehicles guide-line
(at 80 km/h (50 mph) vehiclespeed)
Indication on multi-informationdisplay
Indication on active driving dis-play*1
Long (about 50 m (164 ft))
Medium (about 40 m (131 ft))
Short (about 30 m (98 ft))
Extremely short (about 25 m (82 ft))
*1 Displays a pop-up image in the active driving display only when the driver operates the switch.
When Driving
i-ACTIVSENSE
4-116
CX-9_8GC7-EE-17G_Edition1 2017-5-16 8:22:04
NOTE• The distance-between-vehicles differs depending on the vehicle speed, and the slower the
vehicle speed, the shorter the distance.• When the ignition is switched to ACC or OFF and then the engine is started again, the
system automatically sets the distance-between-vehicles to the previous setting.
How to change the set vehicle speed
To accelerate/decelerate using the SETswitch
When you press the SET switch, thevehicle accelerates and when you press theSET switch, it decelerates.
Short press 5 km/h (5 mph)Long press 10 km/h (5 mph)
NOTEFor example, the set vehicle speed ischanged by pressing the SET switch fourtimes as follows:The vehicle speed accelerates ordecelerates by 20 km/h (20 mph).
To increase speed using acceleratorpedal
Depress the accelerator pedal and pressand release the SET switch or SETswitch at the desired speed. If the switch isnot operated, the system returns to the setspeed after you release your foot from theaccelerator pedal.
CAUTIONThe warnings and brake control do notoperate while the accelerator pedal isdepressed.
NOTE• When accelerating using the SET
switch while in headway control, the setvehicle speed can be adjusted butacceleration is not possible. If there isno longer a vehicle ahead, accelerationcontinues until reaching the set vehiclespeed. For the set vehicle speed, checkthe set vehicle speed indication in thedisplay.
• When depressing the accelerator pedal,the inter-vehicle distance indication inthe display changes to the white-lineindication.
Canceling the system
When the following operations areperformed, the MRCC system is canceled,and the MRCC set indication (green)switches to the MRCC main indication(white) at the same time.
• The OFF/CAN switch is pressed.• The brake pedal is depressed.• The electric parking brake (EPB) is
applied.• The selector lever is in the P (Park), N
(Neutral), or R (Reverse) position.• Any of the doors is opened.• The driver's seat belt is unfastened.
Under the following conditions, theMRCC cancel indication is displayed inthe multi-information display and a singlebeep sound is heard.
When Driving
i-ACTIVSENSE
4-117
CX-9_8GC7-EE-17G_Edition1 2017-5-16 8:22:04

• The DSC has operated.• The Smart Brake Support (SBS) has
operated.• The Smart City Brake Support (SCBS)
or Advanced Smart City Brake Support(Advanced SCBS) has operated.
• When traveling on a downslope for along period of time.
• There is a problem with the system.• The radar sensor (front) cannot detect
target objects (during rain, fog, snow orother inclement weather conditions, orwhen the radiator grille is dirty).
• The vehicle speed decreases to less than25 km (16 mph).
Resuming control
If the MRCC system is canceled, you canresume control at the previously set speedby pressing the RES switch and after all ofthe operation conditions have been met.
NOTEIf the set speed is not indicated in thedisplay, the control does not resume evenif the RES switch is pressed.
Turning off the system
Press the OFF/CAN switch two timeswhile the MRCC system is operating toswitch off the system.
▼ Cruise Control Function
While this function is operating, theheadway control operation is canceled andonly the cruise control function operates.The vehicle speed can be set more thanabout 25 km/h (16 mph).Use the cruise control function onexpressways and other highways which donot require a lot of repeated accelerationand deceleration.
WARNING
Do not use the cruise control function inthe following locations:Otherwise, it could lead to an accident.
Roads with sharp curves and wherevehicle traffic is heavy and there isinsufficient space between vehicles.(Driving under these conditions using thecruise control function is not possible)Steep down slopes (Set speed may be
exceeded because sufficient enginebraking cannot be applied)Slippery roads such as ice or snow-bound
roads (Tires could spin causing you tolose vehicle control)
Always drive carefully:The warnings and brake control will notoperate after the headway control functionis canceled and the system is switched toonly the cruise control function. Depressthe brake pedal to decelerate according tothe surrounding conditions while keeping asafer distance from the vehicle ahead andalways driving carefully.
When Driving
i-ACTIVSENSE
4-118
CX-9_8GC7-EE-17G_Edition1 2017-5-16 8:22:04

Switching to cruise control function
When the MODE switch is pressed untilthe system switches to the cruise mainindication (white) while the MRCCsystem is turned on, the system switches tothe cruise control function.When the system switches to the cruisecontrol function, the indicator andmulti-information display notify the driveras follows:
• The MRCC set indication (green) or theMRCC main indication (white) is turnedoff, and the cruise main indication(white) is turned on.
• A message is displayed in themulti-information display.
WARNING
Always turn off the cruise control functionwhen it is not in use:Leaving the cruise control function turnedon when it is not in use is dangerous as itcould operate unexpectedly, resulting in anaccident.
How to set the speed
Adjust the system to the desired vehiclespeed using the accelerator pedal.When the SET or SET switch ispressed, the cruise set indication (green) isturned on and headway control begins.
NOTE• The system may not be able to maintain
the set speed constantly depending ondriving conditions such as steep up ordown slopes.
• The speed will continue increasing whilethe SET switch is pressed and held.The speed will continue decreasingwhile the SET switch is pressed andheld.
How to increase the set speed
The set speed can be increased using thefollowing operations:
To increase speed using the SETswitch
Press and hold the SET switch andrelease the switch at the desired speed.The set speed can be adjustedincrementally (1 km/h (1 mph)increments) by pressing the switch andreleasing it immediately. For example, ifthe switch is pressed 4 times, the set speedincreases by about 4 km/h (4 mph).
When Driving
i-ACTIVSENSE
4-119
CX-9_8GC7-EE-17G_Edition1 2017-5-16 8:22:04

To increase speed using acceleratorpedal
Depress the accelerator pedal and press theSET or SET switch at the desiredspeed.If the switch is not operated, the systemreturns to the set speed after you releaseyour foot from the accelerator pedal.
How to Decrease the Set Speed
Press the SET switch continuously andrelease the switch at the desired speed.The set speed can be adjustedincrementally (1 km/h (1 mph)increments) by pressing the switch andreleasing it immediately. For example, ifthe switch is pressed 4 times, the setvehicle speed decreases by about 4 km/h(4 mph).
Cancelling the function
Cancelling using OFF/CAN switch
When the OFF/CAN switch is pressedonce, the cruise control function iscancelled.
Cancelling using MODE switch
When the MODE switch is pressed, thecruise control function is canceled and theheadway control function is madeavailable for operation.The cruise control function is canceledautomatically in the following cases. If theRES switch is pressed while the vehiclespeed is 25 km/h (16 mph) or higher, thespeed returns to the original set speed.
• The OFF/CAN switch is pressed once.• The brake pedal is depressed.• The parking brake is applied.• The selector lever is shifted to P or N
position.
NOTE• If the vehicle speed decreases by about
15 km/h (9.4 mph) or more than the setspeed, the cruise control function maybe canceled.
• When the vehicle speed is less than 21km/h (13 mph), the cruise controlfunction is canceled. In this case, thevehicle speed will not return to theoriginal set speed even if the vehicle isaccelerated to 25 km/h (16 mph) orhigher and the RES switch is pressed.Reset the cruise control function.
When Driving
i-ACTIVSENSE
4-120
CX-9_8GC7-EE-17G_Edition1 2017-5-16 8:22:04

Mazda Radar Cruise Control with Stop & Go function(MRCC with Stop & Go function)*
The MRCC with Stop & Go function system is designed to maintain headway control*1
with a vehicle ahead according to your vehicle's speed using a radar sensor (front) to detectthe distance to the vehicle ahead and a preset vehicle speed without you having to use theaccelerator or brake pedals.*1 Headway Control: Control of the distance between your vehicle and the vehicle ahead
detected by the Mazda Radar Cruise Control (MRCC) system.Additionally, if your vehicle starts closing in on the vehicle ahead such as if the vehicleahead brakes suddenly, a warning sound and a warning indication in the display areactivated simultaneously to alert you to maintain a sufficient distance between the vehicles.If the vehicle ahead stops while you are following behind it, your vehicle will stop and beheld stopped automatically (stop hold control), and headway control will resume when youresume driving the vehicle such as by pressing the RES switch.Also refer to the following before using the MRCC with Stop & Go function.
• Forward Sensing Camera (FSC) (page 4-159)• Radar sensor (front) (page 4-164)
WARNING
Do not rely completely on the MRCC with Stop & Go function:The MRCC with Stop & Go function system has detection limitations depending on the type ofvehicle ahead and its conditions, the weather conditions, and the road conditions.Additionally, the system may be unable to decelerate sufficiently to avoid hitting the vehicleahead if the vehicle ahead applies the brakes suddenly or another vehicle cuts into the drivinglane, which could result in an accident.Always drive carefully and verify the surrounding conditions and depress the brake pedal oraccelerator pedal while keeping a safer distance from vehicles ahead or on-coming vehicles.
Do not use the MRCC with Stop & Go function system in the following locations, using theMRCC with Stop & Go function system at the following locations may result in an unexpectedaccident:
General roads other than highways (Driving under these conditions using the MRCC withStop & Go function system is not possible.)Roads with sharp curves and where vehicle traffic is heavy and there is insufficient space
between vehicles.Roads where frequent and repetitive acceleration and deceleration occur (Driving under
these conditions using the MRCC with Stop & Go function system is not possible).
When Driving
i-ACTIVSENSE
*Some models. 4-121
CX-9_8GC7-EE-17G_Edition1 2017-5-16 8:22:04

When entering and exiting interchanges, service areas, and parking areas of highways (Ifyou exit a highway while headway control is in use, the vehicle ahead will no longer betracked and your vehicle may accelerate to the set speed).Slippery roads such as ice or snow-bound roads (Tires could spin causing you to lose vehicle
control, or the stop hold control may not operate.)Long, descending slopes (to maintain distance between vehicles, the system automatically
and continuously applies the brakes which could result in the loss of brake power.)Slopes with a steep gradient (The vehicle ahead may not be detected correctly, your vehicle
may slide while stopped by the stop hold control, and it may accelerate suddenly after itstarts moving.)
For safety purposes, switch the MRCC with Stop & Go function system off when it is not beingused.
Do not get out of the vehicle while the stop hold control is operating:Getting out of the vehicle while the stop hold control is operating is dangerous as the vehiclemay move unexpectedly and result in an accident. Before getting out of the vehicle, switch theMRCC with Stop & Go function system off, shift the selector lever to the P position, and applythe electric parking brake (EPB).
CAUTIONIf your vehicle is towed or you are towing something, switch the MRCC with Stop & Gofunction system off to prevent a miss-operation.
NOTE• The MRCC with Stop & Go function system does not detect the following as physical
objects.• Vehicles approaching in the opposite direction• Pedestrians• Stationary objects (stopped vehicles, obstructions)• If a vehicle ahead is traveling at an extremely low speed, the system may not detect it
correctly.• During headway control travel, do not set the system for detection of two-wheeled
vehicles such as motorcycles and bicycles.• Do not use the MRCC with Stop & Go function system under conditions in which close
proximity warnings are frequently activated.
When Driving
i-ACTIVSENSE
4-122
CX-9_8GC7-EE-17G_Edition1 2017-5-16 8:22:04

• During headway control travel, the system accelerates and decelerates your vehicle inconjunction with the speed of the vehicle ahead. However, if it is necessary to acceleratefor a lane change or if the vehicle ahead brakes suddenly causing you to close in on thevehicle rapidly, accelerate using the accelerator pedal or decelerate using the brakepedal depending on the conditions.
• While the MRCC with Stop & Go function system is in use, it does not cancel even if theselector lever is operated and any intended engine braking does not occur. If decelerationis required, lower the set speed or depress the brake pedal.
• The sound of the automatic brakes operating may be heard, however, it does not indicatea problem.
• The brake lights turn on while the MRCC with Stop & Go function automatic braking isoperating, however, they may not turn on while the vehicle is on a downslope at the setvehicle speed or traveling at a constant speed and following a vehicle ahead.
▼ Mazda Radar Cruise Control with Stop & Go function (MRCC with Stop & Gofunction) Display Indication
The MRCC with Stop & Go function setting status and operation conditions are indicatedon the multi-information display and the active driving display.
MRCC Distance between vehicle display
MRCC Set vehicle speed
Vehicle ahead display
Vehicle ahead display MRCC Distance between vehicle display
MRCC Set vehicle speed
Active driving display
Multi-information display
If there is a problem with the MRCC with Stop & Go function system, a message isdisplayed on the multi-information display. Check the center display to verify the problemand then have your vehicle inspected by an expert repairer, we recommend an AuthorizedMazda Repairer.Refer to Message Indicated on Display on page 7-52.
When Driving
i-ACTIVSENSE
4-123
CX-9_8GC7-EE-17G_Edition1 2017-5-16 8:22:04

▼ Close Proximity Warning
If your vehicle rapidly closes in on the vehicle ahead because the vehicle ahead applies thebrakes suddenly while you are traveling in headway control, the warning sound activatesand the brake warning is indicated in the display. Always verify the safety of thesurrounding area and depress the brake pedal while keeping a safer distance from thevehicle ahead. Additionally, keep a safer distance from the vehicles behind you.
Multi-information Display
Active Driving Display
NOTEIn the following cases, the warnings and brakes may not operate even if your vehicle startsclosing in on the vehicle ahead.
• You are driving your vehicle at the same speed as the vehicle ahead.• Directly after the MRCC with Stop & Go function system has been set.• Directly after the accelerator pedal is released.• Another vehicle cuts into the driving lane.
▼ Setting the System
The MRCC with Stop & Go function system operates when all of the following conditionsare met.
• Vehicle speed is 0 km/h (0 mph) to 145 km/h (90 mph)• The MRCC with Stop & Go function is turned on.• The brake pedal is not depressed.• The electric parking brake (EPB) is released (electric parking brake (EPB) indicator light
is turned off).• There is no problem with the DSC.• All the doors are closed.• The driver's seat belt is fastened.• The selector lever is in the drive (D) position or manual (M) position (manual mode).
When Driving
i-ACTIVSENSE
4-124
CX-9_8GC7-EE-17G_Edition1 2017-5-16 8:22:04

NOTE• In the following cases, the MRCC with Stop & Go function system is canceled when the
vehicle is traveling at 30 km/h (19 mph) or less and “Mazda Radar Cruise Controldisabled under 30 km/h” is displayed in the multi-information display.
• The Forward Sensing Camera (FSC) cannot detect target objects (There is problemwith the Forward Sensing Camera (FSC) or windshield is dirty).
• There is a problem with the stop hold control function.• There is a problem with the electric parking brake (EPB).
• It may not be possible to set the MRCC with Stop & Go function system directly afterstarting the engine, while the DSC operation is being checked.
Turning on the system
OFF/CAN switch
RES switchswitch
switch
MODE switch
SET- switch
SET+ switch
When the MODE switch is pressed once, the MRCC with Stop & Go function system turnson, and the MRCC with Stop & Go function main indication (white) turns on and thevehicle speed and the distance between the vehicles while in headway control can be set.
In addition, the MRCC with Stop & Go function system display indication is displayed onthe multi-information display and the active driving display at the same time.
NOTE• If the ignition is switched off while the MRCC with Stop & Go function system is
operating, the system will be operable when the ignition is switched ON the next time.• The MRCC with Stop & Go function can switch to the cruise control function.
Refer to Cruise Control Function on page 4-131.
When Driving
i-ACTIVSENSE
4-125
CX-9_8GC7-EE-17G_Edition1 2017-5-16 8:22:04

How to set the speed
1. Adjust the vehicle speed to the desired setting using the accelerator pedal.2. Headway control begins when the SET or SET switch is pressed.
The set speed and the inter-vehicle distance display filled with white lines is displayed.The MRCC with Stop & Go function main indication (white) switches to the MRCCwith Stop & Go function set indication (green) at the same time.
Travel status Indication on multi-informationdisplay
Indication on active driving dis-play
During travel at constant speed
During travel under headway con-trol
NOTE• If a vehicle ahead is detected while traveling at a constant speed, the vehicle-ahead
indication is displayed and headway control is performed. Additionally, when a vehicleahead is no longer detected, the vehicle-ahead indication turns off and the systemswitches back to travel at constant speed.
• The lowest possible speed which can be set on the MRCC with Stop & Go function systemis 30 km/h (19 mph).
• Headway control is not possible if the vehicle ahead is driving faster than your vehicle'sset speed. Adjust the system to the desired vehicle speed using the accelerator pedal.
When Driving
i-ACTIVSENSE
4-126
CX-9_8GC7-EE-17G_Edition1 2017-5-16 8:22:04

How to set the distance-between-vehicles during headway control
The distance-between-vehicles is set to a shorter distance by pressing the switch. Thedistance-between-vehicles is set to a longer distance by pressing the switch. Thedistance-between-vehicles can be set to 4 levels; Long, medium, short, and extremely shortdistance.
Distance-between-vehicles guide-line
(at 80 km/h (50 mph) vehiclespeed)
Indication on multi-informationdisplay
Indication on active driving dis-play*1
Long (about 50 m (164 ft))
Medium (about 40 m (131 ft))
Short (about 30 m (98 ft))
Extremely short (about 25 m (82 ft))
*1 Displays a pop-up image in the active driving display only when the driver operates the switch.
NOTE• The distance-between-vehicles differs depending on the vehicle speed, and the slower the
vehicle speed, the shorter the distance.• When the ignition is switched to ACC or OFF and then the engine is started again, the
system automatically sets the distance-between-vehicles to the previous setting.
When Driving
i-ACTIVSENSE
4-127
CX-9_8GC7-EE-17G_Edition1 2017-5-16 8:22:04

How to change the set vehicle speed
To accelerate/decelerate using the SETswitch
When you press the SET switch, thevehicle accelerates and when you press theSET switch, it decelerates.
Short press 5 km/h (5 mph)Long press 10 km/h (5 mph)
NOTEFor example, the set vehicle speed ischanged by pressing the SET switch fourtimes as follows:The vehicle speed accelerates ordecelerates by 20 km/h (20 mph).
To increase speed using acceleratorpedal
Depress the accelerator pedal and pressand release the SET switch or SETswitch at the desired speed. If the switch isnot operated, the system returns to the setspeed after you release your foot from theaccelerator pedal.
CAUTIONThe warnings and brake control do notoperate while the accelerator pedal isdepressed.
NOTE• The setting speed can be changed by
operating the SET switch or SETswitch during stop hold control.
• When accelerating using the SETswitch while in headway control, the setvehicle speed can be adjusted butacceleration is not possible. If there isno longer a vehicle ahead, accelerationcontinues until reaching the set vehiclespeed. For the set vehicle speed, checkthe set vehicle speed indication in thedisplay.
• When depressing the accelerator pedal,the inter-vehicle distance indication inthe display changes to the white-lineindication.
Canceling the system
When the following operations areperformed, the MRCC with Stop & Gofunction system is canceled, and theMRCC with Stop & Go function setindication (green) switches to the MRCCwith Stop & Go function main indication(white) at the same time.
• The OFF/CAN switch is pressed.• The brake pedal is depressed.• The electric parking brake (EPB) is
applied.• The selector lever is in the P (Park), N
(Neutral), or R (Reverse) position.• Any of the doors is opened.• The driver's seat belt is unfastened.
Under the following conditions, theMRCC with Stop & Go function cancelindication is displayed in themulti-information display and a singlebeep sound is heard.
• The DSC has operated.• The Smart Brake Support (SBS) has
operated.
When Driving
i-ACTIVSENSE
4-128
CX-9_8GC7-EE-17G_Edition1 2017-5-16 8:22:04

• The Smart City Brake Support[Forward] (SCBS F) or Advanced SmartCity Brake Support (Advanced SCBS)has operated.
• When traveling on a downslope for along period of time.
• There is a problem with the system.• The engine has stalled.• The electric parking brake (EPB) is
automatically applied during stop holdcontrol.
• The radar sensor (front) cannot detecttarget objects (during rain, fog, snow orother inclement weather conditions, orwhen the radiator grille is dirty).
Resuming control
If the MRCC with Stop & Go functionsystem is canceled, you can resumecontrol at the previously set speed bypressing the RES switch and after all ofthe operation conditions have been met.
NOTEIf the set speed is not indicated in thedisplay, the control does not resume evenif the RES switch is pressed.
Turning off the system
Press the OFF/CAN switch two timeswhile the MRCC with Stop & Go functionsystem is operating to switch off thesystem.
When Driving
i-ACTIVSENSE
4-129
CX-9_8GC7-EE-17G_Edition1 2017-5-16 8:22:04

▼ Stop Hold Control
While in headway control using the MRCC with Stop & Go function system, your vehiclewill stop when a vehicle ahead stops. When the vehicle is stopped and the stop hold controloperates, the MRCC with Stop & Go function indicator light turns on.
NOTE• If the MRCC with Stop & Go function system is canceled during stop hold control, the
vehicle is held in its stopped position. The stop hold control can be canceled byperforming one the following actions.
• Press the accelerator pedal and resume driving the vehicle.• While forcefully depressing the brake, switch the MRCC with Stop & Go function
system off.• The electric parking brake (EPB) is automatically applied and the vehicle is held in its
stopped position when 10 minutes have elapsed since the stop hold control operated. Atthis time, the MRCC with Stop & Go function system is canceled.
• The brake lights turn on during stop hold control.
To resume driving
After the vehicle ahead starts moving while your vehicle is stopped under stop hold control,press the RES switch or depress the accelerator pedal to cancel the stop hold control andresume driving.
NOTE• When you resume driving by pressing the RES switch, your vehicle does not start moving
until the distance between your vehicle and the vehicle ahead lengthens to the specifieddistance or farther.
• If the MRCC with Stop & Go function is temporarily canceled during stop hold control,you cannot resume driving by pressing the RES switch when there are no vehicles in frontof your vehicle. Depress the accelerator pedal and resume driving the vehicle.
Resume driving information
If you do not resume driving within a few seconds after the vehicle ahead starts moving, themulti-information display vehicle-ahead indication flashes to urge the driver to resumedriving.
When Driving
i-ACTIVSENSE
4-130
CX-9_8GC7-EE-17G_Edition1 2017-5-16 8:22:04

▼ Cruise Control Function
While this function is operating, theheadway control operation is canceled andonly the cruise control function operates.The vehicle speed can be set more thanabout 25 km/h (16 mph).Use the cruise control function onexpressways and other highways which donot require a lot of repeated accelerationand deceleration.
WARNING
Do not use the cruise control function inthe following locations:Otherwise, it could lead to an accident.
Roads with sharp curves and wherevehicle traffic is heavy and there isinsufficient space between vehicles.(Driving under these conditions using thecruise control function is not possible)Steep down slopes (Set speed may be
exceeded because sufficient enginebraking cannot be applied)Slippery roads such as ice or snow-bound
roads (Tires could spin causing you tolose vehicle control)
Always drive carefully:The warnings and brake control will notoperate after the headway control functionis canceled and the system is switched toonly the cruise control function. Depressthe brake pedal to decelerate according tothe surrounding conditions while keeping asafer distance from the vehicle ahead andalways driving carefully.
Switching to cruise control function
When the MODE switch is pressed untilthe system switches to the cruise mainindication (white) while the MRCC withStop & Go function system is turned on,the system switches to the cruise controlfunction.When the system switches to the cruisecontrol function, the indicator andmulti-information display notify the driveras follows:
• The MRCC with Stop & Go function setindication (green) or the MRCC withStop & Go function main indication(white) is turned off, and the cruise mainindication (white) is turned on.
• A message is displayed in themulti-information display.
WARNING
Always turn off the cruise control functionwhen it is not in use:Leaving the cruise control function turnedon when it is not in use is dangerous as itcould operate unexpectedly, resulting in anaccident.
When Driving
i-ACTIVSENSE
4-131
CX-9_8GC7-EE-17G_Edition1 2017-5-16 8:22:04

How to set the speed
Adjust the system to the desired vehiclespeed using the accelerator pedal.When the SET or SET switch ispressed, the cruise set indication (green) isturned on and headway control begins.
NOTE• The system may not be able to maintain
the set speed constantly depending ondriving conditions such as steep up ordown slopes.
• The speed will continue increasing whilethe SET switch is pressed and held.The speed will continue decreasingwhile the SET switch is pressed andheld.
How to increase the set speed
The set speed can be increased using thefollowing operations:
To increase speed using the SETswitch
Press and hold the SET switch andrelease the switch at the desired speed.The set speed can be adjustedincrementally (1 km/h (1 mph)increments) by pressing the switch andreleasing it immediately. For example, ifthe switch is pressed 4 times, the set speedincreases by about 4 km/h (4 mph).
To increase speed using acceleratorpedal
Depress the accelerator pedal and press theSET or SET switch at the desiredspeed.If the switch is not operated, the systemreturns to the set speed after you releaseyour foot from the accelerator pedal.
How to Decrease the Set Speed
Press the SET switch continuously andrelease the switch at the desired speed.The set speed can be adjustedincrementally (1 km/h (1 mph)increments) by pressing the switch andreleasing it immediately. For example, ifthe switch is pressed 4 times, the setvehicle speed decreases by about 4 km/h(4 mph).
Cancelling the function
When the cruise control function iscanceled and the RES switch is pressedwhile the vehicle speed is 25 km/h (16mph) or faster, the speed returns to theoriginal set speed.
Cancelling using OFF/CAN switch
When the OFF/CAN switch is pressedonce, the cruise control function iscancelled.
Automatically cancel
The cruise control function is canceledautomatically in the following cases.
• The brake pedal is depressed.• The parking brake is applied.• The selector lever is shifted to P or N
position.
When Driving
i-ACTIVSENSE
4-132
CX-9_8GC7-EE-17G_Edition1 2017-5-16 8:22:04

NOTE• If the vehicle speed decreases by about
15 km/h (9.4 mph) or more than the setspeed, the cruise control function maybe canceled.
• When the vehicle speed is less than 21km/h (13 mph), the cruise controlfunction is canceled. In this case, thevehicle speed will not return to theoriginal set speed even if the vehicle isaccelerated to 25 km/h (16 mph) orhigher and the RES switch is pressed.Reset the cruise control function.
When Driving
i-ACTIVSENSE
4-133
CX-9_8GC7-EE-17G_Edition1 2017-5-16 8:22:04

Lane-keep Assist System (LAS) & Lane DepartureWarning System (LDWS)*
The LAS&LDWS alerts the driver that the vehicle may be deviating from its lane and itprovides steering assistance to help the driver stay within the vehicle lanes.The Forward Sensing Camera (FSC) detects the white lines (yellow lines) of the vehiclelane in which the vehicle is traveling and if the system determines that the vehicle maydeviate from its lane, it operates the electric power steering to assist the driver's steeringoperation. The system also alerts the driver by activating a lane departure warning sound,vibrating the steering wheel, and indicating an alert in the display. Use the system when youdrive the vehicle on roads with white (yellow) lines such as expressways and highways.Refer to Forward Sensing Camera (FSC) on page 4-159. The steering wheel operation of the LAS&LDWS has “Late” and “Early” steering assisttiming settings.For the “Late” setting, the system assists the driver's steering operation if there is thepossibility of the vehicle deviating from its lane.For the “Early” setting, the system assists the driver's steering operation constantly so thatthe vehicle stays near the center of the vehicle lane.“Late” and “Early” timing can be changed (timing at which steering operation assist isprovided) by changing the setting.Refer to Personalization Features on page 9-10.
"Late" setting "Early" setting
When Driving
i-ACTIVSENSE
4-134 *Some models.
CX-9_8GC7-EE-17G_Edition1 2017-5-16 8:22:04

WARNING
Do not rely completely on the LAS&LDWS:
The LAS&LDWS is not an automatic driving system. In addition, the system is not designedto compensate for a driver's lack of caution, and over-reliance on the system could lead toan accident.The detection ability of the LAS&LDWS is limited. Always stay on course using the steering
wheel and drive with care.
Do not use the LAS&LDWS in the following cases:The system may not operate adequately according to the actual driving conditions, resultingin an accident.
Driving on roads with tight curves.Driving under bad weather conditions (rain, fog, and snow).Slippery roads such as ice or snow-bound roads.Roads with heavy traffic and insufficient distance between vehicles.Roads with no white (yellow) lane lines.Narrow roads resulting from road construction or lane closures.The vehicle is driven on a temporary lane or section with a closed lane resulting from road
construction where there may be multiple white (yellow) lane lines or they are interrupted.Vehicle is driven on roads other than expressways and highways.The tire pressures are not adjusted to the specified pressure.Tires of a different specified size are used, such as an emergency spare tire.
CAUTIONHeed the following cautions so that the LAS&LDWS can operate normally.
Do not modify the suspensions.Always use wheels of the specified type and size for the front and rear wheels. Consult an
expert repairer, we recommend an Authorized Mazda Repairer for tire replacement.
NOTE• When the turn signal lever is operated for a lane change, the LAS&LDWS is
automatically disabled. The LAS&LDWS becomes operational again when the turn signallever is returned and the system detects white (yellow) lane lines while the vehicle is beingdriven normally within its vehicle lane.
When Driving
i-ACTIVSENSE
4-135
CX-9_8GC7-EE-17G_Edition1 2017-5-16 8:22:04

• If the steering wheel, accelerator pedal, or brake pedal is operated abruptly and thevehicle moves close to a white (yellow) line, the system determines that the driver ismaking a lane change and the LAS&LDWS operation is temporarily canceled. TheLAS&LDWS becomes operational again when the system detects white (yellow) lane lineswhile the vehicle is being driven normally within its vehicle lane.
• If the vehicle deviates from its lane repeatedly within a short period of time, theLAS&LDWS may not operate.
• When white (yellow) lane lines are not detected, the LAS&LDWS does not operate.• Under the following conditions, the LAS&LDWS may not be able to detect white (yellow)
lane lines correctly and it may not operate normally.• If an object placed on the dashboard is reflected in the windshield and picked up by the
camera.• Heavy luggage is loaded in the luggage compartment or on the rear seat and the
vehicle is tilted.• The tire pressures are not adjusted to the specified pressure.• Tires other than conventional tires are equipped.• Vehicle is driven on an intersection or junction, or on a forked road.• The white (yellow) lane lines are less visible because of dirt or fading/patchiness.• A vehicle in front of your vehicle is running near a white (yellow) lane line making it
less visible.• A white (yellow) lane line is less visible because of bad weather (rain, fog, or snow).• The vehicle is driven on a temporary lane or section with a closed lane resulting from
construction where there may be multiple white (yellow) lane lines or they areinterrupted.
• A misleading line is picked up on the road such as a temporary line for construction, orbecause of shade, lingering snow, or grooves filled with water.
• The surrounding brightness suddenly changes such as when entering or exiting atunnel.
• The illumination of the headlights is weakened because of dirt or the optical axis isdeviated.
• The windshield is dirty or foggy.• The windshield, camera is fogged (water droplets).• Back-light is reflected off the road surface.• The road surface is wet and shiny after rain, or there are puddles on the road.• The shade of a guardrail parallel to a white (yellow) lane line is cast on the road.• The width of the driving lane is narrow or wide.• Driving on roads with tight curves.• The road is excessively uneven.• The vehicle is shaken after hitting a road bump.• There are two or more adjacent white (yellow) lane lines.
When Driving
i-ACTIVSENSE
4-136
CX-9_8GC7-EE-17G_Edition1 2017-5-16 8:22:04

• There are various road markings or lane markings of various shapes near anintersection.
▼ System Operation
Make sure that the LAS&LDWS OFFswitch indicator light is turned off. Whenthe LAS&LDWS OFF switch indicatorlight is turned on, press the switch andmake sure that the switch indicator lightturns off.
Indicator light
The LAS&LDWS indication (white) isdisplayed in the multi-information display,and the system goes on stand-by.
(White)
Drive the vehicle in the center of thevehicle lane while the system is onstandby. When all of the followingconditions are met, the LAS&LDWSindication (green) is displayed in themulti-information display, and the systembecomes operational.
(Green)
• The engine is running.• The vehicle speed is about 60 km/h (37
mph) or faster.• The system detects white (yellow) lane
lines on both the right and left sides.• The driver is operating the steering
wheel.• The driving lane is neither narrow nor
wide.
NOTEThe LAS&LDWS indication is white whenthe system detects only a white (yellow)line on either the left or right, and theindication changes to green when thesystem detects white (yellow) lines on boththe left and right sides.
Detection only on either left or right
Detects on both left and right sides
(White) (Green)
The LAS&LDWS goes on stand-by statusin the following cases:
• The system cannot detect white (yellow)lane lines.
• The vehicle speed is less than about 60km/h (37 mph).
• The ABS/TCS is operating.• The TCS is turned off.
(If the TCS is turned off while thesystem is operational, a warning beep isheard and the system goes on standby.)
• The vehicle is making a sharp curve.• The brake pedal is depressed.
When Driving
i-ACTIVSENSE
4-137
CX-9_8GC7-EE-17G_Edition1 2017-5-16 8:22:04

• The steering wheel is operated abruptly.• The width of a lane is excessively
narrow or wide.
NOTE• (When the timing of the steering assist
is set to “Late”)• The LAS&LDWS does not operate
until the system detects white (yellow)lane lines on either the left or right.
• When the system detects a white(yellow) lane line on one side only, thesystem will not operate the steeringwheel operation assist and thewarning for the lane line on the sidethat is not being detected. Thesteering wheel operation assist andthe warning is only for a lanedeviation on the side that is beingdetected.
• (When the timing of the steering assistis set to “Early”)
• When the steering assist timing is setto “Early”, the LAS&LDWS does notoperate until the system detects white(yellow) lane lines on the left andright. When the system only detectswhite (yellow) lane lines on either theleft or right, the system only operatesfor a lane deviation on the side beingdetected.
• The steering wheel operation assist isperformed so that the vehicle remainsnear the center of the driving lane,however, depending on conditionssuch as the road curvature, road slopeand undulations, and vehicle speed,the system may not be able to keep thevehicle near the center of the drivinglane.
• If the driver takes his or her hands offthe steering wheel (not holding thesteering wheel), the warning sound isactivated and an alert is indicated in themulti-information display or the activedriving display.
Active Driving Display
Multi-information Display
If the steering wheel is held lightly, ordepending on the road conditions, thesystem may detect that you havereleased the steering wheel (not holdingthe steering wheel) even if you areholding it, and display a message in themulti-information display or the activedriving display.
• The timing at which the lane departurewarning is activated and the steeringwheel operation assist is performedvaries.
• The following settings for theLAS&LDWS can be changed. Refer toPersonalization Features on page 9-10.
• Steering operation assist operational/non-operational
• Cancel sensitivity (likelihood ofsteering assist)
When Driving
i-ACTIVSENSE
4-138
CX-9_8GC7-EE-17G_Edition1 2017-5-16 8:22:04

Vehicle lane line displayWhen the LAS&LDWS becomesoperational while on standby, the vehiclelane lines are displayed in themulti-information display and the activedriving display. In the vehicle lane linesdisplay indicating the operation status, thecolor of the vehicle lane lines beingdetected changes to white.(Stand-by status)
Multi-information Display
Active Driving Display
(Operational status)Multi-information Display
Active Driving Display
Auto cancel
In the following cases, the LAS&LDWS isautomatically canceled, the LAS&LDWSwarning indication (amber) turns on, andan alert is displayed. When theLAS&LDWS become operational, thesystem turns back on automatically.
• The temperature inside the camera ishigh or low.
• The windshield around the camera isfoggy.
• The windshield around the camera isblocked by an obstruction, causing poorforward visibility.
Auto cancel of warning/steering assist
When the following operations areperformed, the LAS&LDWS operation iscanceled automatically. The LAS&LDWSresumes automatically after the operation.
• The steering wheel is operated abruptly.• The brake pedal is operated.• The accelerator pedal is operated.
(To cancel the automatic sensitivitycancel function, deselect “Cancelsensitivity” in the personalizationfeatures setting.)
• The turn signal lever is operated.• The vehicle crosses a lane line.
When Driving
i-ACTIVSENSE
4-139
CX-9_8GC7-EE-17G_Edition1 2017-5-16 8:22:04
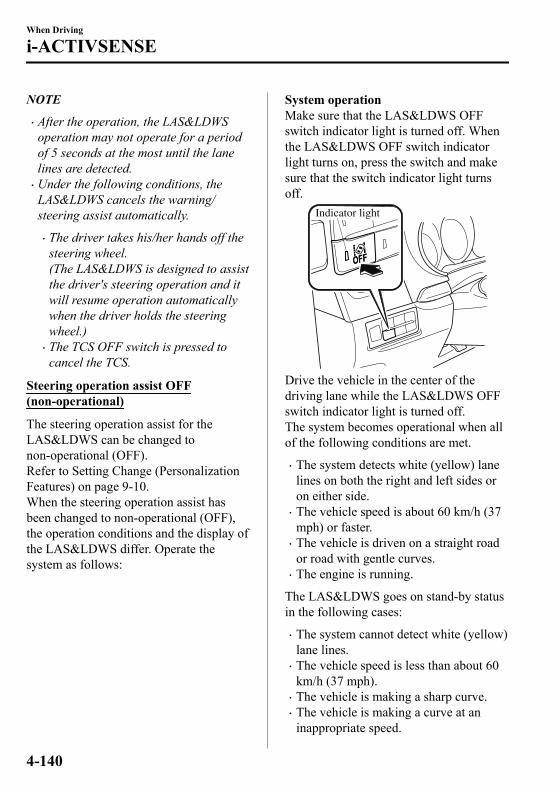
NOTE• After the operation, the LAS&LDWS
operation may not operate for a periodof 5 seconds at the most until the lanelines are detected.
• Under the following conditions, theLAS&LDWS cancels the warning/steering assist automatically.
• The driver takes his/her hands off thesteering wheel.(The LAS&LDWS is designed to assistthe driver's steering operation and itwill resume operation automaticallywhen the driver holds the steeringwheel.)
• The TCS OFF switch is pressed tocancel the TCS.
Steering operation assist OFF(non-operational)
The steering operation assist for theLAS&LDWS can be changed tonon-operational (OFF).Refer to Setting Change (PersonalizationFeatures) on page 9-10.When the steering operation assist hasbeen changed to non-operational (OFF),the operation conditions and the display ofthe LAS&LDWS differ. Operate thesystem as follows:
System operationMake sure that the LAS&LDWS OFFswitch indicator light is turned off. Whenthe LAS&LDWS OFF switch indicatorlight turns on, press the switch and makesure that the switch indicator light turnsoff.
Indicator light
Drive the vehicle in the center of thedriving lane while the LAS&LDWS OFFswitch indicator light is turned off.The system becomes operational when allof the following conditions are met.
• The system detects white (yellow) lanelines on both the right and left sides oron either side.
• The vehicle speed is about 60 km/h (37mph) or faster.
• The vehicle is driven on a straight roador road with gentle curves.
• The engine is running.
The LAS&LDWS goes on stand-by statusin the following cases:
• The system cannot detect white (yellow)lane lines.
• The vehicle speed is less than about 60km/h (37 mph).
• The vehicle is making a sharp curve.• The vehicle is making a curve at an
inappropriate speed.
When Driving
i-ACTIVSENSE
4-140
CX-9_8GC7-EE-17G_Edition1 2017-5-16 8:22:04

NOTE• The LAS&LDWS remains on stand-by
until it detects white (yellow) lines onboth the left and right sides, or on eitherside.
• When the system detects a white(yellow) lane line on one side only, thesystem will not activate warnings for thelane line on the side that is not beingdetected.
• The distance and warning sensitivity(likelihood of a warning) which thesystem uses to determine the possibilityof a lane departure can be changed.Refer to Setting Change(Personalization Features) on page 9-10.
Vehicle lane line displayWhen the LAS&LDWS becomesoperational while on standby, the vehiclelane lines are displayed in themulti-information display. The systemchanges to operational status display whenthe system detects a white (yellow) line oneither the left or right.(Stand-by status)
(Operational status)
Auto cancelIn the following cases, the LAS&LDWS isautomatically canceled, the LAS&LDWSwarning indication (amber) turns on, andan alert is displayed. When theLAS&LDWS become operational, thesystem turns back on automatically.
• The temperature inside the camera ishigh or low.
• The windshield around the camera isfoggy.
• The windshield around the camera isblocked by an obstruction, causing poorforward visibility.
(Auto cancel of warnings)When the following operations areperformed, the LAS&LDWS determinesthat the driver intends to make a lanechange and the system operation iscanceled automatically. The LAS&LDWSresumes automatically after the operation.
• The steering wheel is operated abruptly.• The brake pedal is depressed.• The accelerator pedal is depressed.
(To cancel the automatic sensitivitycancel function, deselect “Warningsensitivity” in the personalizationfeatures setting.)
• The turn signal lever is operated.• The vehicle crosses a lane line.
When Driving
i-ACTIVSENSE
4-141
CX-9_8GC7-EE-17G_Edition1 2017-5-16 8:22:04

▼ System Canceling
When the LAS&LDWS is turned off,press the LAS&LDWS OFF switch.
Indicator light
The LAS&LDWS OFF switch indicatorlight turns on.
NOTE• In the following cases, the LAS&LDWS
is canceled automatically and theLAS&LDWS OFF indication isdisplayed in the multi-informationdisplay. Have your vehicle inspected atan expert repairer, we recommend anAuthorized Mazda Repairer.
• There is a malfunction in the powersteering.
• There is a malfunction in the TCS.• There is a malfunction in the Forward
Sensing Camera (FSC).
(European models)• When the ignition is switched OFF, the
LAS&LDWS becomes operational thenext time the ignition switched ON.
(Except European models)• When the ignition is switched OFF, the
system status before it was turned off ismaintained. For example, if the ignitionis switched OFF with the lane-keepsystem operable, the system will beoperable when the ignition is switchedON the next time.
When the LAS&LDWS is turned off, thevehicle lane line indication in themulti-information display and the activedriving display turn off.
When Driving
i-ACTIVSENSE
4-142
CX-9_8GC7-EE-17G_Edition1 2017-5-16 8:22:04

▼ Lane Departure Warning
If the system determines that the vehicle may deviate from its lane, the lane departurewarning (beep sound, rumble sound*1, or steering wheel vibration) is activated and thedirection in which the system determines that the vehicle may deviate is indicated in themulti-information display or the active driving display.For vehicles equipped with the multi-information display, the direction which the systemdetermined that the vehicle may be deviating from its lane is indicated in themulti-information display.For vehicles equipped with the active driving display, the color of the lane line in thedirection which the system determined that the vehicle may be deviating from its lanechanges from white to amber and the vehicle lane line flashes.
Multi-information Display Active Driving Display
NOTE
• If you have set the lane departure warning sound to the beep sound/rumble sound*1
setting, the warning sound may not be heard depending on the surrounding noiseconditions.
• If you have set the lane departure warning system to the steering wheel vibrations setting,the vibration may not be felt depending on the road surface conditions.
• When the setting for the steering operation assist is changed to operational, the warningscan be set to activate/not activate. (When the setting for the steering operation assist ischanged to non-operational, the warnings cannot be set to not activate.)Refer to Setting Change (Personalization Features) on page 9-10.
• The LAS&LDWS can be changed to the following settings regardless of whether thesteering operation assist has been set to operational/non-operational. Always check thesetting status when driving the vehicle and make setting changes if necessary.Refer to Setting Change (Personalization Features) on page 9-10.
• Steering wheel vibration: Strong/weak• Warning sound volume• Types of warnings (steering wheel vibration/beep sound/rumble sound*1)
*1 A rumble strip is a series of grooves in the road pavement surface positioned at specificintervals, and when the vehicle passes over it a vibration and rumble sound is producedwhich alerts the driver that the vehicle is departing from the lane.
When Driving
i-ACTIVSENSE
4-143
CX-9_8GC7-EE-17G_Edition1 2017-5-16 8:22:04

The rumble sound is a reproduction of the sound which occurs when a vehicle passesover a rumble strip.
Rumble
Groove
When Driving
i-ACTIVSENSE
4-144
CX-9_8GC7-EE-17G_Edition1 2017-5-16 8:22:04

Advanced Smart City Brake Support (Advanced SCBS)*
The Advanced SCBS alerts the driver of a possible collision using the display and a warningsound when the Forward Sensing Camera (FSC) detects a vehicle ahead or pedestrian anddetermines that a collision with the object is unavoidable while the vehicle is driven at avehicle speed of about 4 to 80 km/h (2 to 50 mph) if the object is a vehicle ahead and about10 to 80 km/h (6.2 to 50 mph) if the object is a pedestrian. In addition, the system reducesdamage in the event of a collision by operating the brake control (Advanced SCBS brake)when the system determines that a collision is unavoidable. In addition, when the driverdepresses the brake pedal, the brakes are applied firmly and quickly to assist. (Brake Assist(Advanced SCBS brake assist))
Forward Sensing Camera (FSC)
WARNING
Do not rely completely on the Advanced SCBS system:
The Advanced SCBS system is only designed to reduce damage in the event of a collision.Over reliance on the system leading to the accelerator pedal or brake pedal beingmistakenly operated could result in an accident.The Advanced SCBS system operates in response to a vehicle ahead or a pedestrian. The
system does not operate in response to obstructions such as a wall, 2-wheeled vehicles, oranimals.
When Driving
i-ACTIVSENSE
*Some models. 4-145
CX-9_8GC7-EE-17G_Edition1 2017-5-16 8:22:04

CAUTIONIn the following cases, turn the system off to prevent a mis-operation:
The vehicle is being towed or when towing another vehicle.The vehicle is on a chassis roller.When driving on rough roads such as in areas of dense grass or off-road.
Refer to Stopping the Advanced Smart City Brake Support (Advanced SCBS) System Operationon page 4-147 on how to turn off the Advanced SCBS system.
NOTE• The Advanced SCBS system will operate under the following conditions.
• The engine is running.• The Smart City Brake Support (SCBS) warning light (amber) does not illuminate.• (Object is vehicle ahead)
The vehicle speed is between about 4 to 80 km/h (2 to 50 mph).• (Object is a pedestrian)
The vehicle speed is between about 10 to 80 km/h (6.2 to 50 mph).• The Advanced SCBS system is not turned off.
• Under the following conditions, the Advanced SCBS system may not operate normally:• The Advanced SCBS system will not operate if the driver is deliberately performing
driving operations (accelerator pedal and steering wheel).• If there is the possibility of partial contact with a vehicle ahead.• The vehicle is driven on a slippery road surface such as wet roads or icy or snow-bound
roads.• The braking performance is adversely affected due to cold temperatures or wet brakes.• The vehicle is driven at the same speed as the vehicle ahead.• The accelerator pedal is depressed.• The brake pedal is depressed.• The steering wheel is being operated.• The selector lever is being operated.
• In the following cases, the Advanced SCBS may operate.• Objects on the road at the entrance to a curve.• Vehicles passing in the opposite lane while making a curve.• When passing through a toll gate.• When passing through low gates, narrow gates, car washing machines, or tunnels.• If you suddenly come close to a vehicle ahead.• 2-wheeled vehicles, animals, or standing trees.
When Driving
i-ACTIVSENSE
4-146
CX-9_8GC7-EE-17G_Edition1 2017-5-16 8:22:04

▼ Smart City Brake Support (SCBS)Indicator Light (Red)
If the Advanced SCBS is operating, theindicator light (red) flashes.
▼ Collision Warning
If there is the possibility of a collision witha vehicle ahead, the beep soundscontinuously and a warning is indicated inthe multi-information display or the activedriving display.
Multi-information Display
Active Driving Display
NOTEThe operation distance and volume of thecollision warning can be changed. Referto Personalization Features on page 9-10.
▼ Automatic Brake Operation Display
The automatic brake operation display isindicated on the multi-information displayafter the Advanced SCBS is operated.
NOTE• The collision warning beep sounds
intermittently while the Advanced SCBSbrake or brake assist (Advanced SCBSbrake assist) is operating.
• If the vehicle is stopped by the AdvancedSCBS operation and the brake pedal isnot depressed, the warning beep soundsone time after about 2 seconds and theAdvanced SCBS brake is automaticallyreleased.
▼ Stopping the Advanced Smart CityBrake Support (Advanced SCBS)System Operation
The Advanced SCBS system can betemporarily deactivated.Refer to Personalization Features on page9-10.When the Advanced SCBS system isturned off, the Smart City Brake Support(SCBS) OFF indicator light turns on.
When the engine is restarted, the systembecomes operational.
When Driving
i-ACTIVSENSE
4-147
CX-9_8GC7-EE-17G_Edition1 2017-5-16 8:22:04

Smart City Brake Support [Forward] (SCBS F)*
The SCBS F system alerts the driver of a possible collision using an indication in thedisplay and a warning sound when the Forward Sensing Camera (FSC) detects a vehicleahead and determines that a collision with a vehicle ahead is unavoidable while the vehicleis being driven at a vehicle speed of about 4 to 80 km/h (2 to 50 mph). In addition, thesystem reduces damage in the event of a collision by operating the brake control (Smart CityBrake Support (SCBS) brake) when the system determines that a collision is unavoidablewhile the vehicle is being driven at a vehicle speed of about 4 to 30 km/h (2 to 18 mph). Itmay also be possible to avoid a collision if the relative speed between your vehicle and thevehicle in front of you is less than about 20 km/h (12 mph). In addition, when the driverdepresses the brake pedal while the system is in the operation range at about 4 to 30 km/h (2to 18 mph), the brakes are applied firmly and quickly to assist. (Brake Assist (Smart CityBrake Support (SCBS) brake assist))
Forward Sensing Camera (FSC)
WARNING
Do not rely completely on the SCBS F system:
The SCBS F system is only designed to reduce damage in the event of a collision. Overreliance on the system leading to the accelerator pedal or brake pedal being mistakenlyoperated could result in an accident.The SCBS F is a system which operates in response to a vehicle ahead. The system may not
be able to detect or react to 2-wheeled vehicles or pedestrians.
When Driving
i-ACTIVSENSE
4-148 *Some models.
CX-9_8GC7-EE-17G_Edition1 2017-5-16 8:22:04

CAUTIONIn the following cases, turn the system off to prevent a mis-operation:
The vehicle is being towed or when towing another vehicle.The vehicle is on a chassis roller.When driving on rough roads such as in areas of dense grass or off-road.
Refer to Stopping the Smart City Brake Support [Forward] (SCBS F) system Operation on page4-151 on how to turn off the SCBS F system.
NOTE• The SCBS F system will operate under the following conditions.
• The engine is running.• The Smart Brake Support/Smart City Brake Support (SBS/SCBS) system warning
indication/warning light (amber) does not illuminate.• (Rear-end collision warning)
The vehicle speed is about 4 to 80 km/h (2 to 50 mph).• (Brake control (Smart City Brake Support (SCBS) brake))
The vehicle speed is about 4 to 30 km/h (2 to 18 mph).• The SCBS F system is not turned off.
• Under the following conditions, the SCBS F system may not operate normally:• The SCBS F system will not operate if the driver is deliberately performing driving
operations (accelerator pedal and steering wheel).• If there is the possibility of partial contact with a vehicle ahead.• The vehicle is driven on a slippery road surface such as wet roads or icy or snow-bound
roads.• The braking performance is adversely affected due to cold temperatures or wet brakes.• The vehicle is driven at the same speed as the vehicle ahead.• The accelerator pedal is depressed.• The brake pedal is depressed.• The steering wheel is being operated.• The selector lever is being operated.
• In the following cases, the Forward Sensing Camera (FSC) determines that there is avehicle ahead and the SCBS F may operate.
• Objects on the road at the entrance to a curve.• Vehicles passing in the opposite lane while making a curve.• Metal objects, bumps, or protruding objects on the road.• When passing through a toll gate.• When passing through low gates, narrow gates, car washing machines, or tunnels.
When Driving
i-ACTIVSENSE
4-149
CX-9_8GC7-EE-17G_Edition1 2017-5-16 8:22:04

• If you suddenly come close to a vehicle ahead.• 2-wheeled vehicles, pedestrians, animals or standing trees.• Vehicle is driven with some of the tires having significant wear.
▼ Smart City Brake Support (SCBS)Indicator Light (Red)
If the Smart City Brake Support (SCBS) isoperating, the indicator light (red) flashes.
▼ Collision Warning
If there is the possibility of a collision witha vehicle ahead, the beep soundscontinuously and a warning is indicated inthe multi-information display or the activedriving display.
Multi-information Display
Active Driving Display
NOTEThe operation distance and volume of thecollision warning can be changed. Referto Personalization Features on page 9-10.
▼ Automatic Brake Operation Display
The automatic brake operation display isindicated on the multi-information displayafter the SCBS F is operated.
NOTE• The collision warning beep sounds
intermittently while the SCBS F brake orbrake assist (SCBS F brake assist) isoperating.
• If the vehicle is stopped by the SCBS Foperation and the brake pedal is notdepressed, the warning beep sounds onetime after about 2 seconds and the SCBSF brake is automatically released.
When Driving
i-ACTIVSENSE
4-150
CX-9_8GC7-EE-17G_Edition1 2017-5-16 8:22:04

▼ Stopping the Smart City BrakeSupport [Forward] (SCBS F)System Operation
The SCBS F system can be temporarilydeactivated.Refer to Personalization Features on page9-10.When the SCBS F system is turned off, theSmart City Brake Support (SCBS) OFFindicator light turns on.
When the engine is restarted, the systembecomes operational.
When Driving
i-ACTIVSENSE
4-151
CX-9_8GC7-EE-17G_Edition1 2017-5-16 8:22:04

Smart City Brake Support [Reverse] (SCBS R)*
The SCBS R is a system which is designed to reduce damage in the event of a collision byoperating the brake control (SCBS brake) when the system’s ultrasonic sensors detect anobstruction at the rear of the vehicle while driving at a speed of about 2 to 8 km/h (2 to 4mph) and the system determines that a collision is unavoidable.
Reverse
Ultrasonic sensor (rear)
WARNING
Do not rely completely on the SCBS R system:
The SCBS R system is only designed to reduce damage in the event of a collision. Overreliance on the system leading to the accelerator pedal or brake pedal being mistakenlyoperated could result in an accident.To assure the correct operation of the SCBS R, heed the following cautions.
Do not apply a sticker to an ultrasonic sensor (rear) (including transparent stickers).Otherwise, the ultrasonic sensor (rear) may not be able to detect vehicles or obstructionswhich could result in an accident.Do not disassemble an ultrasonic sensor (rear). If cracks or damage caused by flying gravel or debris is visible around an ultrasonic
sensor (rear), stop using the SCBS R system immediately and have your vehicle inspectedby an expert repairer, we recommend an Authorized Mazda Repairer. If the vehiclecontinues to be driven with cracks or scratch marks left around an ultrasonic sensor, thesystem may operate unnecessarily and cause an unexpected accident.Refer to Stopping the Smart City Brake Support [Reverse] (SCBS R) System Operation onpage 4-155.Consult an expert repairer, we recommend an Authorized Mazda Repairer for rear
bumper replacement.
Do not modify the suspension:If the vehicle height or inclination is changed, the SCBS R system may not operate correctlybecause it cannot detect obstructions correctly.
When Driving
i-ACTIVSENSE
4-152 *Some models.
CX-9_8GC7-EE-17G_Edition1 2017-5-16 8:22:04

Do not apply a strong force to an ultrasonic sensor (rear):When washing the vehicle, do not spray highly pressurized water against an ultrasonic sensor(rear), or rub it strongly. In addition, do not hit the rear bumper forcefully when loading andunloading cargo Otherwise, the sensors may not detect obstructions correctly which couldcause the SCBS R system to not operate normally, or it could operate unnecessarily.
CAUTIONWhen driving off-road in areas where there is grass or foliage, it is recommended that the
SCBS R system be turned off.Always use tires of the specified size and the same manufacturer, brand, and tread pattern
on all 4 wheels. In addition, do not use tires with significantly different wear patterns on thesame vehicle. Otherwise, the SCBS R system may not operate normally. If ice or snow is stuck on the ultrasonic sensors (rear) they may not be able to detect
obstructions correctly depending on the conditions. In such cases, the system may not beable to perform controls correctly. Always drive carefully and pay attention to the rear ofthe vehicle.
NOTE• The vehicle posture changes depending on the accelerator pedal, brake pedal and
steering wheel operations, which could make it difficult for the system to recognize anobstruction, or it could facilitate unnecessary detection. In such cases, the SCBS R may ormay not operate.
• The SCBS R system will operate under the following conditions.• The engine is running.• The selector lever is in the R (reverse) position.• “Reverse Smart City Brake Support Malfunction” is not displayed in the
multi-information display.• The vehicle speed is between about 2 to 8 km/h (2 to 4 mph).• The SCBS R is not turned off.• The DSC is not malfunctioning.
• The SCBS R operates using ultrasonic sensors (rear) which detect obstructions at the rearby emitting ultrasonic waves and then receiving the returning waves reflected off theobstructions.
• In the following cases, the ultrasonic sensors (rear) cannot detect obstructions and theSCBS R may not operate.
• The height of the obstruction is low such as low walls or trucks with low loadingplatforms.
• The height of the obstruction is high such as trucks with high loading platforms.
When Driving
i-ACTIVSENSE
4-153
CX-9_8GC7-EE-17G_Edition1 2017-5-16 8:22:04

• The obstruction is small.• The obstruction is thin such as a signpost.• The obstruction is positioned away from the center of the vehicle.• The surface of the obstruction is not pointed vertically relative to the vehicle.• The obstruction is soft such as a hanging curtain or snow stuck to a vehicle.• The obstruction is shaped irregularly.• The obstruction is extremely close.
• In the following cases, the ultrasonic sensors (rear) cannot detect obstructions correctlyand the SCBS R may not operate.
• Something is stuck on the bumper near an ultrasonic sensor (rear).• The steering wheel is turned sharply, or the brake or accelerator pedal is operated.• There is another obstruction near one obstruction.• During inclement weather such as rain, fog and snow.• High or low humidity.• High or low temperatures• Strong winds.• The path of travel is not flat.• Heavy luggage is loaded in the luggage compartment or on the rear seat.• Objects such as a wireless antenna, fog light, or illuminated license plate is installed
near an ultrasonic sensor (rear).• The orientation of an ultrasonic sensor (rear) has deviated for reasons such as a
collision.• The vehicle is affected by other sound waves such as the horn, engine noise, ultrasonic
sensor of another vehicle.• In the following cases, an ultrasonic sensor (rear) may detect something as a target
obstruction which could cause the SCBS R system to operate.• Driving on a steep slope.• Wheel blocks.• Hanging curtains, gate poles such as at toll gates and railroad crossing.• When traveling near objects such as foliage, barriers, vehicles, walls, and fences along
a road.• When driving off-road in areas where there is grass and forage.• When passing through low gates, narrow gates, car washing machines, and tunnels.• A towing bar is installed or a trailer is connected.
• When the system operates, the user is notified by the multi-information display.• The Smart City Brake Support (SCBS) warning indication (amber) turns on when the
system has a malfunction.Refer to Warning Indication/Warning Lights on page 4-33.
When Driving
i-ACTIVSENSE
4-154
CX-9_8GC7-EE-17G_Edition1 2017-5-16 8:22:04

▼ Smart City Brake Support (SCBS)Indicator Light (Red)
If the Smart City Brake Support (SCBS) isoperating, the indicator light (red) flashes.
▼ Automatic Brake Operation Display
“SCBS Automatic Brake” is indicated inthe multi-information display after theSmart City Brake Support (SCBS) brakesis operated.
NOTE• The collision warning beep sounds
intermittently while the Smart CityBrake Support (SCBS) brake isoperating.
• If the vehicle is stopped by the SmartCity Brake Support (SCBS) operationand the brake pedal is not depressed, thewarning beep sounds one time afterabout 2 seconds and the Smart CityBrake Support (SCBS) brake isautomatically released.
▼ Stopping the Smart City BrakeSupport [Reverse] (SCBS R) SystemOperation
The SCBS R system can be temporarilydeactivated.Refer to Personalization Features on page9-10.When the SCBS R system is turned off,the Smart City Brake Support (SCBS)OFF indicator light turns on.
When the engine is restarted, the systembecomes operational.
When Driving
i-ACTIVSENSE
4-155
CX-9_8GC7-EE-17G_Edition1 2017-5-16 8:22:04

Smart Brake Support (SBS)*
The SBS system alerts the driver of a possible collision using a display and warning soundif the radar sensor (front) and the Forward Sensing Camera (FSC) determine that there is thepossibility of a collision with a vehicle ahead while the vehicle is being driven at about 15km/h or faster (10 mph or faster). Furthermore, if the radar sensor (front) and the ForwardSensing Camera (FSC) determines that a collision is unavoidable, the automatic brakecontrol is performed to reduce damage in the event of a collision.In addition, when the driver depresses the brake pedal, the brakes are applied firmly andquickly to assist. (Brake Assist (SBS brake assist))
WARNING
Do not rely completely on the SBS system and always drive carefully:The SBS is designed to reduce damage in the event of a collision, not avoid an accident. Theability to detect an obstruction is limited depending on the obstruction, weather conditions,or traffic conditions. Therefore, if the accelerator pedal or brake pedal is mistakenly operatedit could result in an accident. Always verify the safety of the surrounding area and depress thebrake pedal or accelerator pedal while keeping a safer distance from vehicles ahead oron-coming vehicles.
CAUTIONIn the following cases, turn the system off to prevent a mis-operation:
The vehicle is being towed or when towing another vehicle.The vehicle is on a chassis roller.When driving on rough roads such as in areas of dense grass or off-road.
NOTE• The SBS system operates when all of the following conditions are met:
• The ignition is switched ON.• The SBS system is on.• The vehicle speed is about 15 km/h or faster (10 mph or faster).• The relative speed between your vehicle and the vehicle ahead is about 15 km/h or
faster (10 mph or faster).• The Dynamic Stability Control (DSC) is not operating.
• The SBS system may not operate under the following conditions:• If the vehicle is accelerated rapidly and it comes close to a vehicle ahead.
When Driving
i-ACTIVSENSE
4-156 *Some models.
CX-9_8GC7-EE-17G_Edition1 2017-5-16 8:22:04

• The vehicle is driven at the same speed as the vehicle ahead.• The accelerator pedal is depressed.• The brake pedal is depressed.• The steering wheel is being operated.• The selector lever is being operated.• The turn signal is being used.• When the vehicle ahead is not equipped with taillights or the taillights are turned off.• When warnings and messages, such as a dirty windshield, related to the Forward
Sensing Camera (FSC) are being displayed in the multi-information display.• Although the objects which activate the system are four-wheeled vehicles, the radar
sensor (front) could detect the following objects, determine them to be an obstruction, andoperate the SBS system.
• Objects on the road at the entrance to a curve (including guardrails and snow banks).• A vehicle appears in the opposite lane while cornering or rounding a curve.• When crossing a narrow bridge.• When passing under a low gate or through a tunnel or narrow gate.• When entering an underground parking area.• Metal objects, bumps, or protruding objects on the road.• If you suddenly come close to a vehicle ahead.• When driving in areas where there is high grass or forage.• Two-wheeled vehicles such as motorbikes or bicycles.• Pedestrians or non-metallic objects such as standing trees.
• When the system operates, the user is notified by the multi-information display.• The SBS warning indication (amber) turns on when the system has a malfunction.
Refer to Warning Indication/Warning Lights on page 4-33.
When Driving
i-ACTIVSENSE
4-157
CX-9_8GC7-EE-17G_Edition1 2017-5-16 8:22:04
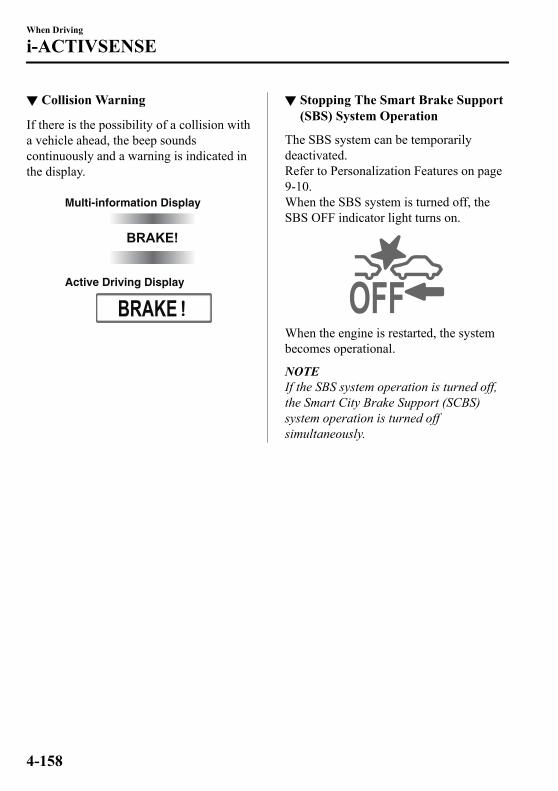
▼ Collision Warning
If there is the possibility of a collision witha vehicle ahead, the beep soundscontinuously and a warning is indicated inthe display.
Multi-information Display
Active Driving Display
▼ Stopping The Smart Brake Support(SBS) System Operation
The SBS system can be temporarilydeactivated.Refer to Personalization Features on page9-10.When the SBS system is turned off, theSBS OFF indicator light turns on.
When the engine is restarted, the systembecomes operational.
NOTEIf the SBS system operation is turned off,the Smart City Brake Support (SCBS)system operation is turned offsimultaneously.
When Driving
i-ACTIVSENSE
4-158
CX-9_8GC7-EE-17G_Edition1 2017-5-16 8:22:04

Forward Sensing Camera (FSC)*
Your vehicle is equipped with a Forward Sensing Camera (FSC). The Forward SensingCamera (FSC) is positioned near the rearview mirror and used by the following systems.
• Adaptive LED Headlights (ALH)• Driver Attention Alert (DAA)• Lane-keep Assist System (LAS) & Lane Departure Warning System (LDWS)• Traffic Sign Recognition System (TSR)• Advanced Smart City Brake Support (Advanced SCBS)• Smart City Brake Support [Forward] (SCBS F)• Mazda Radar Cruise Control with Stop & Go function (MRCC with Stop & Go function)• Smart Brake Support (SBS)
The Forward Sensing Camera (FSC) determines the conditions ahead of the vehicle whiletraveling at night and detects traffic lanes. The distance in which the Forward SensingCamera (FSC) can detect objects varies depending on the surrounding conditions.
WARNING
Do not modify the suspension:If the vehicle height or inclination is changed, the system will not be able to correctly detectvehicles ahead. This will result in the system not operating normally or mistakenly operating,which could cause a serious accident.
When Driving
i-ACTIVSENSE
*Some models. 4-159
CX-9_8GC7-EE-17G_Edition1 2017-5-16 8:22:04

CAUTIONDo not apply accessories, stickers or film to the windshield near the Forward Sensing
Camera (FSC).If the area in front of the Forward Sensing Camera (FSC) lens is obstructed, it will cause thesystem to not operate correctly. Consequently, each system may not operate normallywhich could lead to an unexpected accident.Do not disassemble or modify the Forward Sensing Camera (FSC).
Disassembly or modification of the Forward Sensing Camera (FSC) will cause a malfunctionor mistaken operation. Consequently, each system may not operate normally which couldlead to an unexpected accident.Heed the following cautions to assure the correct operation of the Forward Sensing Camera
(FSC).
Be careful not to scratch the Forward Sensing Camera (FSC) lens or allow it to get dirty.Do not remove the Forward Sensing Camera (FSC) cover.Do not place objects on the dashboard which reflect light.Always keep the windshield glass around the camera clean by removing dirt or fogging.
Use the windshield defroster to remove fogging on the windshield.Consult an expert repairer, we recommend an Authorized Mazda Repairer regarding
cleaning the interior side of the windshield around the Forward Sensing Camera (FSC).Consult an expert repairer, we recommend an Authorized Mazda Repairer before
performing repairs around the Forward Sensing Camera (FSC).The Forward Sensing Camera (FSC) is installed to the windshield. Consult an expert
repairer, we recommend an Authorized Mazda Repairer for windshield repair andreplacement.When cleaning the windshield, do not allow glass cleaners or similar cleaning fluids to
get on the Forward Sensing Camera (FSC) lens. In addition, do not touch the ForwardSensing Camera (FSC) lens.When performing repairs around the rearview mirror, consult an expert repairer, we
recommend an Authorized Mazda Repairer.Consult an expert repairer, we recommend an Authorized Mazda Repairer regarding
cleaning of the camera lens.Do not hit or apply strong force to the Forward Sensing Camera (FSC) or the area around
it. If the Forward Sensing Camera (FSC) is severely hit or if there are cracks or damagecaused by flying gravel or debris in the area around it, stop using the following systemsand consult an expert repairer, we recommend an Authorized Mazda Repairer.
Adaptive LED Headlights (ALH)Driver Attention Alert (DAA)Lane-keep Assist System (LAS) & Lane Departure Warning System (LDWS)Traffic Sign Recognition System (TSR)
When Driving
i-ACTIVSENSE
4-160
CX-9_8GC7-EE-17G_Edition1 2017-5-16 8:22:04

Advanced Smart City Brake Support (Advanced SCBS)Smart City Brake Support [Forward] (SCBS F)Mazda Radar Cruise Control with Stop & Go function (MRCC with Stop & Go function)Smart Brake Support (SBS)The direction in which the Forward Sensing Camera (FSC) is pointed has been finely
adjusted. Do not change the installation position of the Forward Sensing Camera (FSC) orremove it. Otherwise, it could result in damage or malfunction.
Always use tires for all wheels that are of the specified size, and the same manufacturer,brand, and tread pattern. In addition, do not use tires with significantly different wearpatterns on the same vehicle as the system may not operate normally.The Forward Sensing Camera (FSC) includes a function for detecting a soiled windshield
and informing the driver, however, depending on the conditions, it may not detect plasticshopping bags, ice or snow on the windshield. In such cases, the system cannot accuratelydetermine a vehicle ahead and may not be able to operate normally. Always drive carefullyand pay attention to the road ahead.
NOTE• In the following cases, the Forward Sensing Camera (FSC) cannot detect target objects
correctly, and each system may be unable to operate normally.• The height of the vehicle ahead is low.• You drive your vehicle at the same speed as the vehicle ahead.• Headlights are not turned on during the night or when going through a tunnel.
• In the following cases, the Forward Sensing Camera (FSC) may not be able to detecttarget objects correctly.
• Under bad weather condition, such as rain, fog and snow.• The window washer is being used or the windshield wipers are not used when it's
raining.• Ice, fog, snow, frost, rainfall, dirt, or foreign matter such as a plastic bag is stuck on the
windshield.• Trucks with low loading platforms and vehicles with an extremely low or high profile.• When driving next to walls with no patterning (including fences and longitudinally
striped walls).• The taillights of the vehicle ahead are turned off.• A vehicle is outside the illumination range of the headlights.• The vehicle is making a sharp turn, or ascending or descending a steep slope.• Entering or exiting a tunnel.• Heavy luggage is loaded causing the vehicle to tilt.• Strong light is shone at the front of the vehicle (back light or high-beam light from
on-coming vehicles).• There are many light emitters on the vehicle ahead.
When Driving
i-ACTIVSENSE
4-161
CX-9_8GC7-EE-17G_Edition1 2017-5-16 8:22:04

• When the vehicle ahead is not equipped with taillights or the taillights are turned off atnighttime.
• Elongated luggage or cargo is loaded onto installed roof rails and covers the ForwardSensing Camera (FSC).
• Exhaust gas from the vehicle in front, sand, snow, and water vapor rising frommanholes and grating, and water splashed into the air.
• When towing a malfunctioning vehicle.• The vehicle is driven with tires having significantly different wear.• The vehicle is driven on down slopes or bumpy roads.• There are water puddles on the road.• The surroundings are dark such as during the night, early evening, or early morning, or
in a tunnel or indoor parking lot.• The illumination brightness of the headlights is reduced or the headlight illumination is
weakened due to dirt or a deviated optical axis.• The target object enters the blind spot of the Forward Sensing Camera (FSC).• A person or object bursts onto the road from the shoulder or cuts right in front of you.• You change lanes and approach a vehicle ahead.• When driving extremely close to the target object.• Tire chains or a temporary spare tire is installed.• The vehicle ahead has a special shape. For example, a vehicle towing a trailer house or
a boat, or a vehicle carrier carrying a vehicle with its front pointed rearward.• If the Forward Sensing Camera (FSC) cannot operate normally due to backlight or fog,
the system functions related to the Forward Sensing Camera (FSC) are temporarilystopped and the following warning lights turn on. However, this does not indicate amalfunction.
• Adaptive LED Headlights (ALH) warning light (amber)• Lane-keep Assist System (LAS) & Lane Departure Warning System (LDWS) warning
indication• Mazda Radar Cruise Control with Stop & Go function (MRCC with Stop & Go
function) warning indication• Smart Brake Support/Smart City Brake Support (SBS/SCBS) warning indication/
warning light (amber)• If the Forward Sensing Camera (FSC) cannot operate normally due to high temperatures,
the system functions related to the Forward Sensing Camera (FSC) are temporarilystopped and the following warning lights turn on. However, this does not indicate amalfunction. Cool down the area around the Forward Sensing Camera (FSC) such as byturning on the air conditioner.
• Adaptive LED Headlights (ALH) warning light (amber)
When Driving
i-ACTIVSENSE
4-162
CX-9_8GC7-EE-17G_Edition1 2017-5-16 8:22:04

• Lane-keep Assist System (LAS) & Lane Departure Warning System (LDWS) warningindication
• Mazda Radar Cruise Control with Stop & Go function (MRCC with Stop & Gofunction) warning indication
• Smart Brake Support/Smart City Brake Support (SBS/SCBS) warning indication/warning light (amber)
• If the Forward Sensing Camera (FSC) detects that the windshield is dirty or foggy, thesystem functions related to the Forward Sensing Camera (FSC) are temporarily stoppedand the following warning lights turn on. However, this does not indicate a problem.Remove the dirt from the windshield or press the defroster switch and defog thewindshield.
• Adaptive LED Headlights (ALH) warning light (amber)• Lane-keep Assist System (LAS) & Lane Departure Warning System (LDWS) warning
indication• Mazda Radar Cruise Control with Stop & Go function (MRCC with Stop & Go
function) warning indication• Smart Brake Support/Smart City Brake Support (SBS/SCBS) warning indication/
warning light (amber)• If there are recognizable cracks or damage caused by flying gravel or debris on the
windshield, always have the windshield replaced. Consult an Authorized Mazda Repairerfor replacement.
• (With Advanced Smart City Brake Support (Advanced SCBS))• The Forward Sensing Camera (FSC) recognizes pedestrians when all of the following
conditions are met:• The height of a pedestrian is about 1 to 2 meters.• An outline such as the head, both shoulders, or the legs can be determined.
• In the following cases, the Forward Sensing Camera (FSC) may not be able to detecttarget objects correctly:
• Multiple pedestrians are walking, or there are groups of people.• A pedestrian is close to a separate object.• A pedestrian is crouching, lying, or slouching.• A pedestrian suddenly jumps into the road right in front of the vehicle.• A pedestrian opens an umbrella, or is carrying large baggage or articles.• A pedestrian is in a dark location such as during the night, or blends into the
background by wearing clothes matching the background color.
When Driving
i-ACTIVSENSE
4-163
CX-9_8GC7-EE-17G_Edition1 2017-5-16 8:22:04

Radar Sensor (Front)*
Your vehicle is equipped with a radar sensor (front).The following systems also use the radar sensor (front).
• Mazda Radar Cruise Control (MRCC)• Mazda Radar Cruise Control with Stop & Go function (MRCC with Stop & Go function)• Distance Recognition Support System (DRSS)• Smart Brake Support (SBS)
The radar sensor (front) functions by detecting the radio waves reflected off a vehicle aheador an obstruction sent from the radar sensor.The radar sensor (front) is mounted behind the front emblem.
Radar sensor (front)
If “Front radar blocked” is displayed in the multi-information display of the instrumentcluster, clean the area around the radar sensor (front).
CAUTIONHeed the following precautions to assure correct operation of each system.
Do not adhere stickers (including transparent stickers) to the surface of the radiator grilleand front emblem in and around the radar sensor (front), and do not replace the radiatorgrille and front emblem with any product that is not a genuine product designed for usewith the radar sensor (front).The radar sensor (front) includes a function for detecting soiling of the radar sensor's front
surface and informing the driver, however, depending on the conditions, it may requiretime to detect or it may not detect plastic shopping bags, ice or snow. If this occurs, thesystem may not operate correctly, therefore always keep the radar sensor (front) clean.Do not install a grille guard. If the front part of the vehicle has been damaged in a vehicle accident, the position of the
radar sensor (front) may have moved. Stop the system immediately and always have thevehicle inspected at an Authorized Mazda Repairer.
When Driving
i-ACTIVSENSE
4-164 *Some models.
CX-9_8GC7-EE-17G_Edition1 2017-5-16 8:22:04

Do not use the front bumper to push other vehicles or obstructions such as when pullingout of a parking space. Otherwise, the radar sensor (front) could be hit and its positiondeviated.Do not remove, disassemble, or modify the radar sensor (front).For repairs, replacement or paint work around the radar sensor (front), consult an
Authorized Mazda Repairer.Do not modify the suspension. If the suspension are modified, the vehicle's posture could
change and the radar sensor (front) may not be able to correctly detect a vehicle ahead oran obstruction.
NOTE• Under the following conditions, the
radar sensor (front) may not be able todetect vehicles ahead or obstructionscorrectly and each system may notoperate normally.
• The rear surface of a vehicle aheaddoes not reflect radio waveseffectively, such as an unloadedtrailer or an automobile with aloading platform covered by a softtop, vehicles with a hard plastictailgate, and round-shaped vehicles.
• Vehicles ahead with low vehicleheight and thus less area forreflecting radio waves.
• Visibility is reduced due to a vehicleahead casting off water, snow, orsand from its tires and onto yourwindshield.
• The luggage compartment is loadedwith heavy objects or the rearpassenger seats are occupied.
• Ice, snow, or soiling is on the frontsurface of the front emblem.
• During inclement weather such asrain, snow, or sand storms.
• When driving near facilities orobjects emitting strong radio waves.
• Under the following conditions, theradar sensor (front) may not be able todetect vehicles ahead or obstructions.
• The beginning and end of a curve.• Roads with continuous curves.• Narrow lane roads due to road
construction or lane closures.• The vehicle ahead enters the radar
sensor's blind spot.• The vehicle ahead is running
abnormally due to accident orvehicle damage.
• Roads with repeated up and downslopes
• Driving on poor roads or unpavedroads.
• The distance between your vehicleand the vehicle ahead is extremelyshort.
• A vehicle suddenly comes close suchas by cutting into the lane.
• To prevent incorrect operation of thesystem, use tires of the same specifiedsize, manufacturer, brand, and treadpattern on all four wheels. In addition,do not use tires with significantlydifferent wear patterns or tire pressureson the same vehicle (Including thetemporary spare tire).
• If the battery power is weak, the systemmay not operate correctly.
When Driving
i-ACTIVSENSE
4-165
CX-9_8GC7-EE-17G_Edition1 2017-5-16 8:22:04

• When driving on roads with little trafficand few vehicles ahead or obstructionsfor the radar sensor (front) to detect,“Front radar blocked” may betemporarily displayed, however, thisdoes not indicate a problem.
When Driving
i-ACTIVSENSE
4-166
CX-9_8GC7-EE-17G_Edition1 2017-5-16 8:22:04

Radar Sensors (Rear)*
Your vehicle is equipped with radar sensors (rear). The following systems also use the radarsensors (rear).
• Blind Spot Monitoring (BSM)• Rear Cross Traffic Alert (RCTA)
The radar sensors (rear) function by detecting the radio waves reflected off a vehicleapproaching from the rear or an obstruction sent from the radar sensor.
Radar sensors (rear)
The radar sensors (rear) are installed inside the rear bumper, one each on the left and rightsides.Always keep the surface of the rear bumper near the radar sensors (rear) clean so that theradar sensors (rear) operate normally. Also, do not apply items such as stickers.Refer to Exterior Care on page 6-55.
CAUTIONIf the rear bumper receives a severe impact, the system may no longer operate normally. Stopthe system immediately and have the vehicle inspected at an expert repairer, we recommendan Authorized Mazda Repairer.
When Driving
i-ACTIVSENSE
*Some models. 4-167
CX-9_8GC7-EE-17G_Edition1 2017-5-16 8:22:04

NOTE• The detection ability of the radar sensors (rear) has limitations. In the following cases,
the detection ability may lower and the system may not operate normally.• The rear bumper near the radar sensors (rear) has become deformed.• Snow, ice or mud adheres to the radar sensors (rear) on the rear bumper.• Under bad weather conditions such as rain, snow and fog.
• Under the following conditions, the radar sensors (rear) cannot detect target objects or itmay be difficult to detect them.
• Stationary objects on a road or a road side such as small, two-wheeled vehicles,bicycles, pedestrians, animals, and shopping carts.
• Vehicle shapes which do not reflect radar waves well such as empty trailers with a lowvehicle height and sports cars.
• Vehicles are shipped with the direction of the radar sensors (rear) adjusted for eachvehicle to a loaded vehicle condition so that the radar sensors (rear) detect approachingvehicles correctly. If the direction of the radar sensors (rear) has deviated for somereason, have the vehicle inspected at an expert repairer, we recommend an AuthorizedMazda Repairer.
• For repairs or replacement of the radar sensors (rear), or bumper repairs, paintwork, andreplacement near the radar sensors, consult an expert repairer, we recommend anAuthorized Mazda Repairer.
• Turn off the system while pulling a trailer or while an accessory such as a bicycle carrieris installed to the rear of the vehicle. Otherwise, the radio waves emitted by the radar willbe blocked causing the system to not operate normally.
• The radar sensors are regulated by the relevant radio wave laws of the country in whichthe vehicle is driven. If the vehicle is driven abroad, authorization from the country inwhich the vehicle is driven may be required.
When Driving
i-ACTIVSENSE
4-168
CX-9_8GC7-EE-17G_Edition1 2017-5-16 8:22:04

Ultrasonic Sensor (Rear)*
The ultrasonic sensors (rear) function by emitting ultrasonic waves which are reflected offobstructions at the rear and the returning ultrasonic waves are picked up by the ultrasonicsensors (rear).
Ultrasonic sensor (rear)
The ultrasonic sensors (rear) are mounted in the rear bumper.
When Driving
i-ACTIVSENSE
*Some models. 4-169
CX-9_8GC7-EE-17G_Edition1 2017-5-16 8:22:04

Cruise Control*With cruise control, you can set and automatically maintain any speed of more than about25 km/h (16 mph).
WARNING
Do not use the cruise control under the following conditions:Using the cruise control under the following conditions is dangerous and could result in lossof vehicle control.
Hilly terrainSteep inclinesHeavy or unsteady trafficSlippery or winding roadsSimilar restrictions that require inconsistent speed
▼ Cruise Control Switch
ON switch
RES/+ switch
SET- switch
OFF/CAN switch
NOTEIf your Mazda has the following steering switch, your Mazda is equipped the Mazda RadarCruise Control (MRCC) system or the Mazda Radar Cruise Control with Stop & Gofunction (MRCC with Stop & Go function) system.Refer to Mazda Radar Cruise Control (MRCC) on page 4-111.
When Driving
Cruise Control
4-170 *Some models.
CX-9_8GC7-EE-17G_Edition1 2017-5-16 8:22:04

Refer to Mazda Radar Cruise Control with Stop & Go function (MRCC with Stop & Gofunction) on page 4-121.
OFF/CAN switch
RES switchswitch
switch
MODE switch
SET- switch
SET+ switch
▼ Cruise Main Indication (White)/Cruise Set Indication (Green)
The indication has two colors.
Cruise Main Indication (White)
The indication turns on (white) when thecruise control system is activated.
Cruise Set Indication (Green)
The indication turns on (green) when acruising speed has been set.
▼ Activation/Deactivation
To activate the system, press the ONswitch. The cruise main indication (white)is displayed.To deactivate the system, press theOFF/CAN switch.The cruise main indication (white) turnsoff.
WARNING
Always turn off the cruise control systemwhen it is not in use:Leaving the cruise control system in anactivation-ready state while the cruisecontrol is not in use is dangerous as thecruise control could unexpectedly activateif the activation button is accidentallypressed, and result in loss of vehicle controland an accident.
NOTEWhen the ignition is switched OFF, thesystem status before it was turned off ismaintained. For example, if the ignition isswitched OFF with the cruise controlsystem operable, the system will beoperable when the ignition is switched ONthe next time.
When Driving
Cruise Control
4-171
CX-9_8GC7-EE-17G_Edition1 2017-5-16 8:22:04

▼ To Set Speed
1. Activate the cruise control system bypressing the ON switch. The cruisemain indication (white) is displayed.
2. Accelerate to the desired speed, whichmust be more than 25 km/h (16 mph).
3. Set the cruise control by pressing theSET switch at the desired speed. Thecruise control is set at the moment theSET switch is pressed. Release theaccelerator pedal simultaneously. Thecruise set indication (green) isdisplayed.
NOTE• The cruise control speed setting cannot
be performed under the followingconditions:
• The selector lever is in the P or Nposition.
• The parking brake is applied.• Release the SET or RES/ switch at
the desired speed, otherwise the speedwill continue increasing while the RES/
switch is pressed and held, andcontinue decreasing while the SETswitch is pressed and held (except whenthe accelerator pedal is depressed).
• On a steep grade, the vehicle maymomentarily slow down whileascending, or speed up whiledescending.
• The cruise control will cancel if thevehicle speed decreases below 21 km/h(13 mph) when climbing a steep grade.
• The cruise control may cancel at about15 km/h (9 mph) below the preset speedsuch as when climbing a long, steepgrade.
The vehicle speed preset using the cruisecontrol is displayed in the instrumentcluster.
Type A Instrument Cluster
Type B Instrument Cluster
European model
Except European model
Multi-information Display
Active Driving Display
▼ To Increase Cruising Speed
Follow either of these procedures.
To increase speed using cruise controlswitch
Press the RES/ switch and hold it. Yourvehicle will accelerate. Release the switchat the desired speed. Press the RES/ switch and release itimmediately to adjust the preset speed.Multiple operations will increase thepreset speed according to the number oftimes it is operated.
When Driving
Cruise Control
4-172
CX-9_8GC7-EE-17G_Edition1 2017-5-16 8:22:04

Increasing speed with a single RES/switch operation
Instrument cluster display for vehiclespeed indicated in km/h: 1 km/h (0.6 mph)Instrument cluster display for vehiclespeed indicated in mph: 1 mph (1.6 km/h)
To increase speed using acceleratorpedal
Depress the accelerator pedal to accelerateto the desired speed. Press the SETswitch and release it immediately.
NOTEAccelerate if you want to speed uptemporarily when the cruise control is on.Greater speed will not interfere with orchange the set speed. Take your foot offthe accelerator to return to the set speed.
▼ To Decrease Cruising Speed
Press the SET switch and hold it. Thevehicle will gradually slow.Release the switch at the desired speed. Press the SET switch and release itimmediately to adjust the preset speed.Multiple operations will decrease thepreset speed according to the number oftimes it is operated.
Decreasing speed with a single SETswitch operation
Instrument cluster display for vehiclespeed indicated in km/h: 1 km/h (0.6 mph)Instrument cluster display for vehiclespeed indicated in mph: 1 mph (1.6 km/h)
▼ To Resume Cruising Speed at MoreThan 25 km/h (16 mph)
If the cruise control system temporarilycanceled (such as applying the brakepedal) and the system is still activated, themost recent set speed will automaticallyresume when the RES/ switch is pressed.If vehicle speed is below 25 km/h (16mph), increase the vehicle speed up to 25km/h (16 mph) or more and press the RES/
switch.
▼ To Temporarily Cancel
To temporarily cancel the system, use oneof these methods:
• Slightly depress the brake pedal.• Press the OFF/CAN switch.
If the RES/ switch is pressed when thevehicle speed is 25 km/h (16 mph) orhigher, the system reverts to the previouslyset speed.
NOTE• If any of the following conditions occur,
the cruise control system is temporarilycanceled.
• The parking brake is applied.• The selector lever is in the P or N
position.• When the cruise control system is
temporarily canceled by even one of theapplicable cancel conditions, the speedcannot be re-set.
When Driving
Cruise Control
4-173
CX-9_8GC7-EE-17G_Edition1 2017-5-16 8:22:04

• The cruise control cannot be cancelledwhile driving in manual mode (selectorlever shifted from D to M position).Therefore, engine braking will not beapplied even if the transaxle is shifteddown to a lower gear. If deceleration isrequired, lower the set speed or depressthe brake pedal.
▼ To Deactivate
When a cruising speed has been set(cruise set indication (green) turns on)
Long-press the OFF/CAN switch or pressthe OFF/CAN switch 2 times.
When a cruising speed has not been set(cruise main indication (white) turnson)
Press the OFF/CAN switch.
When Driving
Cruise Control
4-174
CX-9_8GC7-EE-17G_Edition1 2017-5-16 8:22:04

Tire Pressure Monitoring System*
The Tire Pressure Monitoring System (TPMS) monitors the pressure for each tire.If tire pressure is too low in one or more tires, the system will inform the driver via thewarning light in the instrument cluster and by the warning beep sound.Refer to Warning Indication/Warning Lights on page 4-33.Refer to Tire Inflation Pressure Warning Beep on page 7-58. The tire pressure sensors installed on each wheel send tire pressure data by radio signal tothe receiver unit in the vehicle.
Tire pressure sensors
NOTEWhen the ambient temperature is low due to seasonal changes, tire temperatures are alsolower. When the tire temperature decreases, the air pressure decreases as well. The TPMSwarning light may illuminate more frequently. Visually inspect the tires daily before driving,and check tire pressures monthly with a tire pressure gauge. When checking tire pressures,use of a digital tire pressure gauge is recommended.
TPMS does not alleviate your need to check the pressure and condition of all four tiresregularly.
CAUTIONEach tire, including the spare (if provided), should be checked monthly when cold and
inflated to the inflation pressure recommended by the vehicle manufacturer on the vehicleplacard or tire inflation pressure label. (If your vehicle has tires of a different size than thesize indicated on the vehicle placard or tire inflation pressure label, you should determinethe proper tire inflation pressure for those tires.)
When Driving
Tire Pressure Monitoring System
*Some models. 4-175
CX-9_8GC7-EE-17G_Edition1 2017-5-16 8:22:04

As an added safety feature, your vehicle has been equipped with a tire pressure monitoringsystem (TPMS) that illuminates a low tire pressure telltale when one or more of your tires issignificantly under-inflated. Accordingly, when the low tire pressure telltale illuminates, youshould stop and check your tires as soon as possible, and inflate them to the properpressure. Driving on a significantly under-inflated tire causes the tire to overheat and canlead to tire failure. Under-inflation also reduces fuel efficiency and tire tread life, and mayaffect the vehicle's handling and stopping ability.Please note that the TPMS is not a substitute for proper tire maintenance, and it is thedriver's responsibility to maintain correct tire pressure, even if under-inflation has notreached the level to trigger illumination of the TPMS low tire pressure telltale.Your vehicle has also been equipped with a TPMS malfunction indicator to indicate whenthe system is not operating properly.The TPMS malfunction indicator is combined with the low tire pressure telltale. When thesystem detects a malfunction, the telltale will flash for approximately one minute and thenremain continuously illuminated. This sequence will continue upon subsequent vehiclestart-ups as long as the malfunction exists. When the malfunction indicator is illuminated,the system may not be able to detect or signal low tire pressure as intended. TPMSmalfunctions may occur for a variety of reasons, including the installation of replacementor alternate tires or wheels on the vehicle that prevent the TPMS from functioning properly.Always check the TPMS malfunction telltale after replacing one or more tires or wheels onyour vehicle to ensure that the replacement or alternate tires and wheels allow the TPMS tocontinue to function properly.To avoid false readings, the system samples for a little while before indicating a problem. As
a result it will not instantaneously register a rapid tire deflation or blow out.
▼ System Error Activation
When the warning light flashes, there maybe a system malfunction. Consult anAuthorized Mazda Dealer.A system error activation may occur in thefollowing cases:
• When there is equipment or a devicenear the vehicle using the same radiofrequency as that of the tire pressuresensors.
• When a metallic device such as anon-genuine navigation system isequipped near the center of thedashboard, which may block radiosignals from the tire pressure sensor tothe receiver unit.
• When using the following devices in thevehicle that may cause radiointerference with the receiver unit.
• A digital device such as a personalcomputer.
• A current converter device such as aDC-AC converter.
• When excess snow or ice adheres to thevehicle, especially around the wheels.
• When the tire pressure sensor batteriesare exhausted.
• When using a wheel with no tirepressure sensor installed.
• When using tires with steel wirereinforcement in the side walls.
• When using tire chains.
When Driving
Tire Pressure Monitoring System
4-176
CX-9_8GC7-EE-17G_Edition1 2017-5-16 8:22:04

▼ Tires and Wheels
CAUTIONWhen inspecting or adjusting the tire airpressures, do not apply excessive force tothe stem part of the wheel unit. The stempart could be damaged.
Changing tires and wheels
The following procedure allows the TPMSto recognize a tire pressure sensor's uniqueID signal code whenever tires or wheelsare changed, such as changing to and fromwinter tires.
NOTEEach tire pressure sensor has a unique IDsignal code. The signal code must beregistered with the TPMS before it canwork. The easiest way to do it is to havean Authorized Mazda Dealer change yourtire and complete ID signal coderegistration.
When having tires changed at anAuthorized Mazda Dealer
When an Authorized Mazda Dealerchanges your vehicle's tires, they willcomplete the tire pressure sensor ID signalcode registration.
When changing tires yourself
If you or someone else changes tires, youor someone else can also undertake thesteps for the TPMS to complete the IDsignal code registration.1. After tires have been changed, switch
the ignition ON, then back to ACC orOFF.
2. Wait for about 15 minutes.
3. After about 15 minutes, drive thevehicle at a speed of at least 25 km/h(16 mph) for 10 minutes and the tirepressure sensor ID signal code will beregistered automatically.
NOTEIf the vehicle is driven within about 15minutes of changing tires, the tire pressuremonitoring system warning light will flashbecause the sensor ID signal code wouldnot have been registered. If this happens,park the vehicle for about 15 minutes,after which the sensor ID signal code willregister upon driving the vehicle for 10minutes.
Replacing tires and wheels
CAUTIONWhen replacing/repairing the tires or
wheels or both, have the work done byan Authorized Mazda Dealer, or the tirepressure sensors may be damaged.The wheels equipped on your Mazda are
specially designed for installation of thetire pressure sensors. Do not usenon-genuine wheels, otherwise it maynot be possible to install the tire pressuresensors.
Be sure to have the tire pressure sensorsinstalled whenever tires or wheels arereplaced.When having a tire or wheel or bothreplaced, the following types of tirepressure sensor installations are possible.
• The tire pressure sensor is removedfrom the old wheel and installed to thenew one.
When Driving
Tire Pressure Monitoring System
4-177
CX-9_8GC7-EE-17G_Edition1 2017-5-16 8:22:04

• The same tire pressure sensor is usedwith the same wheel. Only the tire isreplaced.
• A new tire pressure sensor is installed toa new wheel.
NOTE• The tire pressure sensor ID signal code
must be registered when a new tirepressure sensor is purchased. Forpurchase of a tire pressure sensor andregistration of the tire pressure sensorID signal code, consult an AuthorizedMazda Dealer.
• When reinstalling a previously removedtire pressure sensor to a wheel, replacethe grommet (seal between valve body/sensor and wheel) for the tire pressuresensor.
When Driving
Tire Pressure Monitoring System
4-178
CX-9_8GC7-EE-17G_Edition1 2017-5-16 8:22:04

Rear View Monitor*
The rear view monitor provides visual images of the rear of the vehicle when reversing.
WARNING
Always drive carefully confirming the safety of the rear and the surrounding conditions bylooking directly with your eyes:Reversing the vehicle by only looking at the screen is dangerous as it may cause an accidentor a collision with an object. The rear view monitor is only a visual assist device whenreversing the vehicle. The images on the screen may be different from the actual conditions.
CAUTIONDo not use the rear view monitor under the following conditions: Using the rear view
monitor under the following conditions is dangerous and could result in injury or vehicledamage or both.
Icy or snow-covered roads.Tire chains or a temporary spare tire is installed.The liftgate is not fully closed.The vehicle is on a road incline.When the display is cold, images may course across the monitor or the screen and may be
dimmer than usual, which could cause difficulty in confirming the surrounding conditionsof the vehicle. Always drive carefully confirming the safety of the rear and the surroundingconditions by looking directly with your eyes.Do not apply excessive force to the camera. The camera position and angle may deviate.Do not disassemble, modify, or remove it as it may no longer be waterproof.The camera cover is made of plastic. Do not apply degreasing agents, organic solvents,
wax, or glass coating agents to the camera cover. If any are spilled on the cover, wipe offwith a soft cloth immediately.Do not rub the camera cover forcefully with an abrasive or hard brush. The camera cover or
lens may be scratched which might affect the images.
NOTE• If water, snow, or mud is stuck on the camera lens, wipe it off using a soft cloth. If it
cannot be wiped off, use a mild detergent.• If the camera temperature changes rapidly (Hot to cold, cold to hot), the rear view
monitor may not operate correctly.
When Driving
Rear View Monitor
*Some models. 4-179
CX-9_8GC7-EE-17G_Edition1 2017-5-16 8:22:04

• When replacing the tires, consult an expert repairer, we recommend an Authorized MazdaRepairer. Replacing the tires could result in deviation of the guide lines which appear onthe display.
• If the vehicle's front, side, or rear has been involved in a collision, the alignment of therear view parking camera (location, installation angle) may have deviated. Alwaysconsult an expert repairer, we recommend an Authorized Mazda Repairer to have thevehicle inspected.
• If “No Video Signal Available” is indicated in the display, there could be a problem withthe camera. Have your vehicle inspected at an expert repairer, we recommend anAuthorized Mazda Repairer.
• (Predicted vehicle path assist lines display type)If force is applied to the steering wheel, the guide lines may not display. Loosen your gripon the steering wheel to allow the guide lines to display.
▼ Rear View Parking Camera Location
Rear view parking camera
▼ Switching to the Rear View Monitor Display
Shift the selector lever to reverse (R) with the ignition switched ON to switch the display tothe rear view monitor display.
NOTEWhen the selector lever is shifted from reverse (R) to another selector lever position, thescreen returns to the previous display.
When Driving
Rear View Monitor
4-180
CX-9_8GC7-EE-17G_Edition1 2017-5-16 8:22:04

▼ Displayable Range on the Screen
The images on the screen may be different from the actual conditions.(Screen display)
(Actual view)
Object
Some models
Garnish
Bumper
Obstruction detection indication in parking sensor system
NOTE• The displayable range varies depending on the vehicle and road conditions.• The displayable range is limited. Objects under the bumper or around the bumper ends
cannot be displayed.• The distance appearing in the displayed image is different from the actual distance
because the rear view parking camera is equipped with a specific lens.• Images displayed on the monitor from the rear view parking camera are reversed images
(mirror images).• Some optionally installed vehicle accessories may be picked up by the camera. Do not
install any optional parts that can interfere with the camera view, such as illuminatingparts or parts made of reflective material.
• It may be difficult to see the display under the following conditions, however, it does notindicate a malfunction.
• In darkened areas.• When the temperature around the lens is high/low.• When the camera is wet such as on a rainy day or during periods of high humidity.• When foreign material such as mud is stuck around the camera.• When the camera lens reflects sunlight or headlight beams.
• Image display may be delayed if the temperature around the camera is low.
When Driving
Rear View Monitor
4-181
CX-9_8GC7-EE-17G_Edition1 2017-5-16 8:22:04

▼ Viewing the Display
Predicted vehicle path assist lines display type
The projected path guidance mode displays the predicted path of the vehicle after you turnthe steering wheel.Use this mode for parking your vehicle in a parking space or garage.
c
b
a
a) Projected vehicle path (yellow)These lines are displayed as a reference for the projected path of the vehicle.The lines displaying the projected vehicle path change after you turn the steering wheel.
b) Extended vehicle width lines (blue)These lines indicate the vehicle's extended width.These lines are not displayed when the vehicle's wheels are in the straight-ahead position.
c) Distance guide linesThese lines indicate the approximate distance to a point measured from the vehicle's rear(from the end of the bumper).The blue line indicates the point about 50 cm (19 in) from the rear bumper.The red and yellow lines, which change position after you turn the steering wheel,indicate the points about 50 cm (19 in) for the red line and 100 cm (39.3 in) for theyellow lines from the rear bumper (at the center point of each of the lines).A degree of error occurs when the wheels are not in the straight-ahead position.In the above illustration, the right side of the vehicle is in a position closer to the actualdistance displayed by the distance guide lines (red: about 50 cm (19 in) point, yellow:about 100 cm (39.3 in) point behind the rear bumper), whereas the left side is in aposition farther away.
CAUTIONThe indicated position of the guide lines on the display changes depending on the vehicleconditions (such as the number of occupants/cargo load) and the road conditions (such as asteep gradient to the rear of the vehicle).Always check the area to the vehicle's rear and the surrounding area directly with your eyeswhile backing up.
When Driving
Rear View Monitor
4-182
CX-9_8GC7-EE-17G_Edition1 2017-5-16 8:22:04

Fixed assist lines display type
Guide lines which indicate the width of the vehicle (yellow) are displayed on the screen as areference to the approximate width of the vehicle in comparison to the width of the parkingspace you are about to back into.Use this display view for parking your vehicle in a parking space or garage.
b
a
a) Vehicle width guide lines (yellow)Guide lines serve as a reference to the approximate width of the vehicle.
b) Distance guide linesThese guide lines indicate the approximate distance to a point measured from thevehicle's rear (from the end of the bumper).The red and yellow lines indicate the points about 50 cm (19 in) for the red line and 100cm (39.3 in) for the yellow lines from the rear bumper (at the center point of each of thelines).
CAUTIONThe guide lines on the screen are fixed lines. They are not synced to the driver's turning of thesteering wheel. Always be careful and check the area to the vehicle's rear and the surroundingarea directly with your eyes while backing up.
▼ Rear View Monitor Operation
The operation of the rear view monitor when reversing the vehicle varies depending on thetraffic, road, and vehicle conditions. The amount of steering and the timing also variesdepending on conditions, so confirm the surrounding conditions directly with your eyes andsteer the vehicle in accordance with the conditions.Be well aware of the above cautions prior to using the rear view monitor.
Predicted vehicle path assist lines display type
NOTEThe following shows an example of vehicle parking in which the steering wheel is turned tothe right when backing up the vehicle. The operation is reversed when backing up thevehicle from the opposite direction.
When Driving
Rear View Monitor
4-183
CX-9_8GC7-EE-17G_Edition1 2017-5-16 8:22:04

1. Shift the selector lever to reverse (R) to switch the display to the rear view monitordisplay.
2. Before backing the vehicle into the parking space, turn the steering wheel whilereferring to the projected vehicle path display so that the vehicle enters the center of theparking space.
(Display condition) (Vehicle condition)
3. After your vehicle begins entering the parking space, continue backing up slowly so thatthe distance between the vehicle width lines and the sides of the parking space on theleft and right are roughly equal.
(Display condition) (Vehicle condition)
4. Continue to adjust the steering wheel until the vehicle width guide lines are parallel tothe left and right sides of the parking space.
When Driving
Rear View Monitor
4-184
CX-9_8GC7-EE-17G_Edition1 2017-5-16 8:22:04
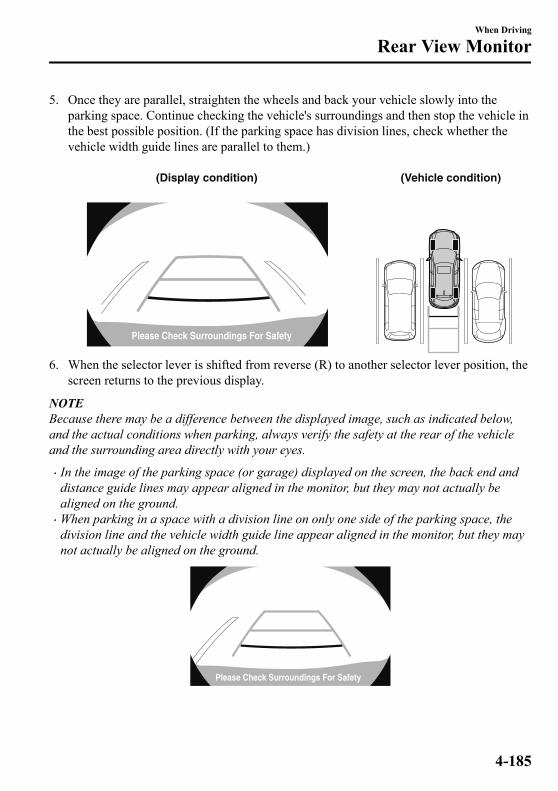
5. Once they are parallel, straighten the wheels and back your vehicle slowly into theparking space. Continue checking the vehicle's surroundings and then stop the vehicle inthe best possible position. (If the parking space has division lines, check whether thevehicle width guide lines are parallel to them.)
(Display condition) (Vehicle condition)
6. When the selector lever is shifted from reverse (R) to another selector lever position, thescreen returns to the previous display.
NOTEBecause there may be a difference between the displayed image, such as indicated below,and the actual conditions when parking, always verify the safety at the rear of the vehicleand the surrounding area directly with your eyes.
• In the image of the parking space (or garage) displayed on the screen, the back end anddistance guide lines may appear aligned in the monitor, but they may not actually bealigned on the ground.
• When parking in a space with a division line on only one side of the parking space, thedivision line and the vehicle width guide line appear aligned in the monitor, but they maynot actually be aligned on the ground.
When Driving
Rear View Monitor
4-185
CX-9_8GC7-EE-17G_Edition1 2017-5-16 8:22:04

Fixed assist lines display type
NOTEImages displayed on the monitor from the rear view parking camera are reversed images(mirror images).
1. Shift the selector lever to reverse (R) to switch the display to the rear view monitordisplay.
2. Confirming the surrounding conditions, reverse the vehicle.
(Display condition) (Vehicle condition)
3. After your vehicle begins entering the parking space, continue backing up slowly so thatthe distance between the vehicle width lines and the sides of the parking space on theleft and right are roughly equal.
4. Continue to adjust the steering wheel until the vehicle width guide lines are parallel tothe left and right sides of the parking space.
When Driving
Rear View Monitor
4-186
CX-9_8GC7-EE-17G_Edition1 2017-5-16 8:22:04

5. Once they are parallel, straighten the wheels and back your vehicle slowly into theparking space. Continue checking the vehicle's surroundings and then stop the vehicle inthe best possible position. (If the parking space has division lines, check whether thevehicle width guide lines are parallel to them.)
(Display condition) (Vehicle condition)
6. When the selector lever is shifted from reverse (R) to another selector lever position, thescreen returns to the previous display.
NOTEBecause there may be a difference between the displayed image, such as indicated below,and the actual conditions when parking, always verify the safety at the rear of the vehicleand the surrounding area directly with your eyes.
• In the image of the parking space (or garage) displayed on the screen, the back end anddistance guide lines may appear aligned in the monitor, but they may not actually bealigned on the ground.
• When parking in a space with a division line on only one side of the parking space, thedivision line and the vehicle width guide line appear aligned in the monitor, but they maynot actually be aligned on the ground.
When Driving
Rear View Monitor
4-187
CX-9_8GC7-EE-17G_Edition1 2017-5-16 8:22:04

▼ Variance Between Actual Road Conditions and Displayed Image
Some variance occurs between the actual road and the displayed road. Such variance indistance perspective could lead to an accident. Note the following conditions that may causea variance in distance perspective.
When the vehicle is tilted due to the weight of passengers and load
When the vehicle rear is lowered, the object displayed on the screen appears farther than theactual distance.
Variance
Object
When there is a steep grade behind the vehicle
When there is a steep upgrade (downgrade) behind the vehicle, the object displayed on thescreen appears farther (downgrade: closer) than the actual distance.
Appears farther than actual distance
Appears closer than actual distance
Object at actual position
Object at actual positionObject on screen
A: Distance between the vehicle and object displayed on the screen.B: Actual distance between the vehicle and object.
Object on screen
AA B
B
When Driving
Rear View Monitor
4-188
CX-9_8GC7-EE-17G_Edition1 2017-5-16 8:22:04

Three-dimensional object on vehicle rear
Because the distance guide lines are displayed based on a flat surface, the distance to thethree-dimensional object displayed on the screen is different from the actual distance.
AA
CB
C B
(Actual distance) B>C=A
Sensed distance on screen A>B>C
(Screen display) (Actual condition)
(Predicted vehicle path assist lines display type)
When reversing near a three-dimensional object
When reversing near an overhanging object, the vehicle may hit the object even if theanticipated course line does not contact the object on the screen. The position of the objectdisplayed on the screen is different from the actual position because the anticipated courselines on the screen are displayed based on a horizontal road surface. When backing up nearan overhanging object, confirm the rear and surrounding conditions directly with your eyes.
(Screen display) (Actual view)
When Driving
Rear View Monitor
4-189
CX-9_8GC7-EE-17G_Edition1 2017-5-16 8:22:04

▼ Picture Quality Adjustment
WARNING
Always adjust the picture quality of the rear view monitor while the vehicle is stopped:Do not adjust the picture quality of the rear view monitor while driving the vehicle. Adjustingthe picture quality of the rear view monitor such as brightness, contrast, color, and tint whiledriving the vehicle is dangerous as it could distract your attention from the vehicle operationwhich could lead to an accident.
Picture quality adjustment must be done while the selector lever is in reverse (R).There are four settings which can be adjusted including, brightness, contrast, tint, and color.When adjusting, pay sufficient attention to the vehicle surroundings.1. Select the icon on the screen to display the tabs.2. Select the desired tab item.3. Adjust the brightness, contrast, tint, and color using the slider.
If you need to reset, press the reset button.4. Select the icon on the screen to close the tab.
When Driving
Rear View Monitor
4-190
CX-9_8GC7-EE-17G_Edition1 2017-5-16 8:22:04

Parking Sensor System*
The parking sensor system uses ultrasonic sensors to detect obstructions around the vehiclewhile parking the vehicle in a garage or during parallel parking when the vehicle is driven ata speed of about 10 km/h (6 mph) or less. The system is equipped with an assist device tonotify the driver of the approximate distance from the vehicle to the surrounding obstructionusing a beep sound and obstruction detection indication*.
Rear corner sensor
Front corner sensorRear sensor
Front sensorSome models.
WARNING
Do not rely completely on the parking sensor system and be sure to confirm the safety aroundyour vehicle visually when driving.This system can assist the driver in operating the vehicle in the forward and backwarddirections while parking. The detection ranges of the sensors are limited, therefore, driving thevehicle while relying only on the system may cause an accident. Always confirm the safetyaround your vehicle visually when driving.
NOTE• Do not install any accessories within the detection ranges of the sensors. It may affect the
system operation.• Depending on the type of obstruction and the surrounding conditions, the detection range
of a sensor may narrow, or the sensors may not be able to detect obstructions.• The system may not operate normally under the following conditions:
• Mud, ice, or snow is adhering to the sensor area (Returns to normal operation whenremoved).
• The sensor area is frozen (Returns to normal operation when the ice is thawed).• The sensor is covered by a hand.• The sensor is excessively shocked.
When Driving
Parking Sensor System
*Some models. 4-191
CX-9_8GC7-EE-17G_Edition1 2017-5-16 8:22:04

• The vehicle is excessively tilted.• Under extremely hot or cold weather conditions.• The vehicle is driven on bumps, inclines, gravel, or grass covered roads.• Anything which generates ultrasound is near the vehicle, such as another vehicle's
horn, the engine sound of a motorcycle, the air brake sound of a large-sized vehicle, oranother vehicle's sensors.
• The vehicle is driven in heavy rain or in road conditions causing water-splash.• A commercially-available fender pole or an antenna for a radio transmitter is installed
to the vehicle.• The vehicle is moving towards a tall or square curbstone.• An obstruction is too close to the sensor.
• Obstructions under the bumper may not be detected. Obstructions that are lower than thebumper or thin which may have been initially detected but are no longer detected as thevehicle approaches more closely.
• The following types of obstructions may not be detected:• Thin objects such as wire or rope• Things which absorb sonic waves easily such as cotton or snow• Angular shaped objects• Very tall objects, and those which are wide at the top• Small, short objects
• Always have the system inspected at an expert repairer, we recommend an AuthorizedMazda Repairer if any shock is applied to the bumpers, even in a minor accident. If thesensors are deviated, they cannot detect obstructions.
• (With front sensor and front corner sensor)The system may have a malfunction if the beep does not operate or the indicator lightdoes not illuminate when the park assist sensors switch is turned on. Consult an expertrepairer, we recommend an Authorized Mazda Repairer.
• (Without front sensor and front corner sensor)The system may have a malfunction if the beep does not operate. Consult an expertrepairer, we recommend an Authorized Mazda Repairer.
• (With front sensor and front corner sensor)The system may have a malfunction if the beep sound which indicates a systemmalfunction is heard and the indicator light flashes. Consult an expert repairer, werecommend an Authorized Mazda Repairer.
• The beeper which indicates a system malfunction may not be heard if the ambienttemperature is extremely cold, or mud, ice, or snow adheres to the sensor area. Removeany foreign material from the sensor area.
• When installing a trailer hitch, consult an expert repairer, we recommend an AuthorizedMazda Repairer.
When Driving
Parking Sensor System
4-192
CX-9_8GC7-EE-17G_Edition1 2017-5-16 8:22:04

▼ Sensor Detection Range
The sensors detect obstructions within the following range.
Front sensor detection range
Front corner sensor detection range
Rear sensor detection range
Rear corner sensor detection range
BA
DC
A: About 55 cm (About 21.7 in) B: About 55 cm (About 21.7 in) C: About 100 cm (About 39.3 in) D: About 150 cm (About 59.0 in)
▼ Park Assist Sensor System Operation
With front sensor and front corner sensor
The switch can be activated when the ignition is switched ON, the selector lever is in anyposition except reverse (R), and the vehicle speed is about 10 km/h (6 mph) or less.When the parking sensor switch is pressed, a beep sound is heard, the obstruction detectionindication is displayed in the audio screen, and the indicator light in the switch illuminates.
Indicator light
NOTEIf the system is cancelled, it will not restore automatically even when the vehicle speed isdecreased to 10 km/h (6 mph) or less.
When Driving
Parking Sensor System
4-193
CX-9_8GC7-EE-17G_Edition1 2017-5-16 8:22:04

Sensor detection condition
The system can be used when the ignition is switched ON and the Park Assist SensorSwitch has been turned on.The sensors detect obstructions under the following conditions:
Sensor Condition
Front Sensor The selector lever is in any position except reverse (R), and the vehicle speed isabout 10 km/h (6 mph) or less.
Front Corner Sensor The vehicle speed is about 10 km/h (6 mph) or less.Rear Sensor The selector lever is in reverse (R).
Rear Corner Sensor The selector lever is in reverse (R), and the vehicle speed is about 10 km/h (6 mph)or less.
The system is cancelled under the following conditions:• The parking sensor switch is pressed while the parking sensor is in operation.• The vehicle speed is 10 km/h (6 mph) or more. (Except rear sensor)
Without front sensor and front corner sensor
When the ignition is switched ON and the selector lever is shifted to the reverse (R), thebeep sound activates and the system is enabled for use.The sensors detect obstructions under the following conditions:
Sensor ConditionRear Sensor The selector lever is in reverse (R).
Rear Corner Sensor The selector lever is in reverse (R), and the vehicle speed is about 10 km/h (6 mph)or less.
When Driving
Parking Sensor System
4-194
CX-9_8GC7-EE-17G_Edition1 2017-5-16 8:22:04

▼ Obstruction Detection Indication
The position of a sensor which has detected an obstruction is indicated. The gaugeilluminates in different areas depending on the distance to an obstruction detected by thesensor.As the vehicle approaches closer to an obstruction, the zone in the gauge closer to thevehicle illuminates.
Front left corner sensor gauge
Front right corner sensor gauge
Rear right corner sensor gauge
Rear left corner sensor gauge
Front sensor gauge
Rear sensor gaugeSome models.
NOTEThe detection indicator can switch between display and non-display.Refer to Personalization Features on page 9-10.
When Driving
Parking Sensor System
4-195
CX-9_8GC7-EE-17G_Edition1 2017-5-16 8:22:04

System problem notification
If any of the problems indicated in the table occurs, the driver is notified of the problemdepending on the type of system as shown.
Detection Indicator
SolutionWith front sensorand front corner
sensor
Without front sen-sor and front corner
sensor
Disconnection
The system may have a malfunction. Havethe vehicle inspected at an expert repairer,we recommend an Authorized Mazda Re-pairer as soon as possible.
System malfunc-tion
The system may have a malfunction. Havethe vehicle inspected at an expert repairer,we recommend an Authorized Mazda Re-pairer as soon as possible.
Frost/soiling
Foreign matter may be on the sensor areacorresponding to the obstruction detectionindication shown. If the system does not re-cover, have the vehicle inspected at an ex-pert repairer, we recommend an AuthorizedMazda Repairer.
When Driving
Parking Sensor System
4-196
CX-9_8GC7-EE-17G_Edition1 2017-5-16 8:22:04

▼ Parking Sensor Warning Beep
The beeper sounds as follows while the system is operating.Front Sensor*, Rear Sensor
Distance Detec-tion area
Distance between vehicle and obstructionBeeper sound*1
Front Sensor* Rear Sensor
Farthest distance
Approx. 100―60 cm (39.3―23.6in)
Approx. 150―60 cm (59.0―23.6in)
Slow intermittentsound
Far distance
Approx. 60―45 cm (23.6―17.7in)
Approx. 60―45 cm (23.6―17.7in)
Medium intermit-tent sound
Middle distance
Approx. 45―35 cm (17.7―13.7in)
Approx. 45―35 cm (17.7―13.7in)
Fast intermittentsound
Close distance
Within approx. 35 cm (13.7 in) Within approx. 35 cm (13.7 in)
Continuous sound
*1 The rate at which the intermittent sound beeps increases as the vehicle approaches the obstruction.
When Driving
Parking Sensor System
*Some models. 4-197
CX-9_8GC7-EE-17G_Edition1 2017-5-16 8:22:04
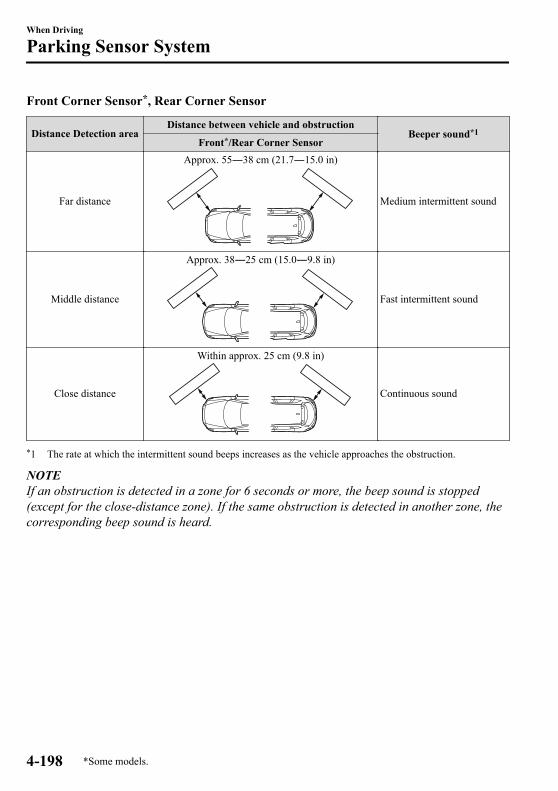
Front Corner Sensor*, Rear Corner Sensor
Distance Detection areaDistance between vehicle and obstruction
Beeper sound*1Front*/Rear Corner Sensor
Far distance
Approx. 55―38 cm (21.7―15.0 in)
Medium intermittent sound
Middle distance
Approx. 38―25 cm (15.0―9.8 in)
Fast intermittent sound
Close distance
Within approx. 25 cm (9.8 in)
Continuous sound
*1 The rate at which the intermittent sound beeps increases as the vehicle approaches the obstruction.
NOTEIf an obstruction is detected in a zone for 6 seconds or more, the beep sound is stopped(except for the close-distance zone). If the same obstruction is detected in another zone, thecorresponding beep sound is heard.
When Driving
Parking Sensor System
4-198 *Some models.
CX-9_8GC7-EE-17G_Edition1 2017-5-16 8:22:04

▼ When Warning Indicator/Beep is Activated
The system notifies the driver of an abnormality by activating the beep sound and theindicator light.
Indicator/Beep How to checkThe indicator light flashes whenthe parking sensor switch ispressed at a vehicle speed of 10km/h (6 mph) or less.
The system may have a malfunction. Have the vehicle inspected at an expertrepairer, we recommend an Authorized Mazda Repairer as soon as possible.
The beep sound is not heard. The system may have a malfunction. Have the vehicle inspected at an expertrepairer, we recommend an Authorized Mazda Repairer as soon as possible.
The intermittent sound of thebuzzer is heard five times.
Remove any foreign material from the sensor area. If the system does not re-cover, have the vehicle inspected at an expert repairer, we recommend an Au-thorized Mazda Repairer.
A certain obstruction detectionindicator is continuously dis-played.
Refer to Obstruction Detection Indication on page 4-195.
When Driving
Parking Sensor System
4-199
CX-9_8GC7-EE-17G_Edition1 2017-5-16 8:22:04

MEMO
4-200
CX-9_8GC7-EE-17G_Edition1 2017-5-16 8:22:04

5 Interior Features
Use of various features for ride comfort, including air-conditioning andaudio system.
Climate Control System....................5-2Operating Tips.............................. 5-2Vent Operation (Front)................. 5-3Front Air Conditioner................... 5-5Vent Operation (Rear).................5-10Rear Air Conditioner.................. 5-12
Before Using the Audio System......5-14Audio Control Switch.................5-14AUX/USB mode.........................5-15Antenna.......................................5-17
Audio Set.......................................... 5-18Basic Operation Method.............5-18Home screen............................... 5-22Volume/Display/SoundControls...................................... 5-23Operating the Radio....................5-25How to use AUX mode.............. 5-28How to use USB mode............... 5-29Bluetooth®..................................5-34Bluetooth® Preparation.............. 5-37Available Language.................... 5-39Bluetooth® Audio.......................5-40How to Use Aha™..................... 5-43How to Use Stitcher™ Radio..... 5-46Bluetooth® Hands-Free.............. 5-48Voice Recognition.......................5-57Settings....................................... 5-60Applications................................5-62Troubleshooting..........................5-63
Appendix.......................................... 5-68Things You Need to Know......... 5-68
Interior Equipment......................... 5-74Sunvisors.................................... 5-74Interior Lights.............................5-74Accessory Sockets...................... 5-77USB Power Outlet*.................... 5-78Cup Holder................................. 5-79Bottle Holder.............................. 5-81Storage Compartments............... 5-81Sunshade (Rear Door Window)*........................................................... 5-86
*Some models. 5-1
CX-9_8GC7-EE-17G_Edition1 2017-5-16 8:22:04

Operating Tips• Operate the climate control system with
the engine running.• To prevent the battery from being
discharged, do not leave the fan controlswitch on for a long period of time withthe ignition switched ON when theengine is not running.
• Clear all obstructions such as leaves,snow and ice from the hood and the airinlet in the cowl grille to improve thesystem efficiency.
• Use the climate control system to defogthe windows and dehumidify the air.
• The recirculate mode should be usedwhen driving through tunnels or whilein a traffic jam, or when you would liketo shut off outside air for quick coolingof the interior.
• Use the outside air position forventilation or windshield defrosting.
• If the vehicle has been parked in directsunlight during hot weather, open thewindows to let warm air escape, thenrun the climate control system.
• Run the air conditioner about 10minutes at least once a month to keepinternal parts lubricated.
• Have the air conditioner checked beforethe weather gets hot. Lack of refrigerantmay make the air conditioner lessefficient.
The refrigerant specifications areindicated on a label attached to theinside of the engine compartment. If thewrong type of refrigerant is used, itcould result in a serious malfunction ofthe air conditioner. Consult aprofessional, government certifiedrepairer for the inspection or repairbecause a special device is required forthe air conditioner maintenance.For details, consult an expert repairer,we recommend an Authorized MazdaRepairer.
Label
Interior Features
Climate Control System
5-2
CX-9_8GC7-EE-17G_Edition1 2017-5-16 8:22:04

Vent Operation (Front)▼ Adjusting the Vents
Directing airflow
To adjust the direction of airflow, movethe adjustment knob.
NOTE• When using the air conditioner under
humid ambient temperature conditions,the system may blow fog from the vents.This is not a sign of trouble but a resultof humid air being suddenly cooled.
• The air vents can be fully opened andclosed by operating the dial. (Side ventsonly)
Side Ventsknob
close openclose open
knob
Center VentsKnob
Interior Features
Climate Control System
5-3
CX-9_8GC7-EE-17G_Edition1 2017-5-16 8:22:04

▼ Selecting the Airflow Mode
Dashboard Vents
Dashboard and Floor Vents
Floor Vents
Defroster and Floor Vents
Defroster Vents
NOTEThe location airflow exits the air vents and the airflow amount may change depending onthe open or close status of the air vents.
Interior Features
Climate Control System
5-4
CX-9_8GC7-EE-17G_Edition1 2017-5-16 8:22:04

Front Air ConditionerClimate control system information is displayed on the display.
Passenger temperature control dial
Rear window defogger switch
Mode selector switch
Airflow display
Fan control switch
AUTO switch
OFF switch
Temperature setting display (Passenger’s side)
Windshield defroster switch
Air intake selector (Recirculated air position)
Temperature setting display (Driver’s side)
Driver temperature control dial A/C mode display
Mode selector display
A/C switch
DUAL switch
▼ Control Switches
AUTO switch
By pressing the AUTO switch thefollowing functions will be automaticallycontrolled in accordance with the selectedset temperature:
• Airflow temperature• Amount of airflow• Selection of airflow mode• Outside/Recirculated air selection• Air conditioner operation• A/C or A/C ECO selection
NOTEAUTO switch indicator light
• When on, it indicates auto operation,and the system will functionautomatically.
• If any of the following switches areoperated while in auto control, theAUTO switch indicator turns off.
• Mode selector switch• Fan control switch• Windshield defroster switch
The functions for switches other thanthose operated continue to operate inauto control.
Interior Features
Climate Control System
5-5
CX-9_8GC7-EE-17G_Edition1 2017-5-16 8:22:04

OFF switch
Pressing the OFF switch shuts off theclimate control system.
Temperature control dial
This dial controls temperature. Turn itclockwise for hot and counterclockwisefor cold.
• When the DUAL switch is off:Turn the driver temperature control dialto control the temperature throughoutthe entire cabin.
• When the DUAL switch is on:Turn the driver or front passengertemperature control dial toindependently control the temperatureon each side of the cabin.
NOTE• The climate control system changes to
the individual operation mode (DUALswitch indicator light illuminated) byturning the front passenger temperaturecontrol dial even when the DUAL switchis off, which allows individual control ofthe set temperature for the driver andfront passenger.
• The temperature units for thetemperature setting display can bechanged in conjunction with thetemperature units for the outsidetemperature display.(Type A instrument cluster)Refer to Outside Temperature Displayon page 4-24.(Type B instrument cluster)Refer to Outside Temperature Display(Without Multi-information display) onpage 4-17.
Fan control switch
The fan has seven speeds. The selectedspeed will be displayed.
Mode selector switch
The desired airflow mode can be selected(page 5-4).
NOTE• With the airflow mode set to the
position and the temperature controldial set at a medium temperature,heated air is directed to the feet and airat a comparably lower temperature willflow through the central, left and rightvents.
• To set the air vent to , press thewindshield defroster switch.
• In the position, the air conditioner isautomatically turned on and the outsideair position is automatically selected todefrost the windshield.
A/C switch
Pressing the A/C switch while the AUTOswitch is turned on will turn off the airconditioner (cooling/dehumidifyingfunctions).The on/off of the air conditioner switcheseach time the A/C switch is pressed.Changes as follows each time the A/Cswitch is pressed.A/C→A/C ECO→Stop
Interior Features
Climate Control System
5-6
CX-9_8GC7-EE-17G_Edition1 2017-5-16 8:22:04

NOTE• The air conditioner operates when the
A/C switch is pressed while the airconditioner is turned off.
• The A/C ECO function is designed toeconomize use of the climate controlsystem. “A/C ECO” is displayed toindicate that the climate control systemis operating at optimum control.
• The air conditioner may not functionwhen the outside temperatureapproaches 0 °C (32 °F).
Air intake selector
Outside or recirculated air positions can beselected. Press the switch to select outside/recirculated air positions.
Recirculated air position (indicator lightilluminated)
Outside air is shut off. Use this positionwhen going through tunnels, driving incongested traffic (high engine exhaustareas) or when quick cooling is desired.
Outside air position (indicator lightturned off)
Outside air is allowed to enter the cabin.Use this mode for ventilation orwindshield defrosting.
WARNING
Do not use the recirculated air position incold or rainy weather:Using the recirculated air position in cold orrainy weather is dangerous as it will causethe windows to fog up. Your vision will behampered, which could lead to a seriousaccident.
DUAL switch
Use the DUAL switch to change the modebetween the individual operation (driverand passenger) and interconnection(simultaneous) modes.
Individual operation mode (indicatorlight illuminated)
The set temperature can be controlledindividually for the driver and frontpassenger.
Interconnection mode (indicator lightturned off)
The set temperature for the driver andfront passenger is controlledsimultaneously.
Interior Features
Climate Control System
5-7
CX-9_8GC7-EE-17G_Edition1 2017-5-16 8:22:04

Windshield defroster switch
Press the switch to defrost the windshieldand front door windows.Refer to Windshield Defrosting andDefogging on page 5-8.
Rear window defogger switch
Press the rear window defogger switch todefrost the rear window.Refer to Rear Window Defogger on page4-63.
▼ Operation of Automatic AirConditioner
1. Press the AUTO switch. Selection ofthe airflow mode, air intake selectorand amount of airflow will beautomatically controlled.
2. Use the temperature control dial toselect a desired temperature.Press the DUAL switch or turn thefront passenger temperature controldial to control the set temperatureindividually for the driver and frontpassenger.
To turn off the system, press the OFFswitch.
NOTE• Setting the temperature to maximum hot
or cold will not provide the desiredtemperature at a faster rate.
• When selecting heat, the system willrestrict airflow until it has warmed toprevent cold air from blowing out of thevents.
▼ Windshield Defrosting andDefogging
Press the windshield defroster switch.In this position, the outside air position isautomatically selected, and the airconditioner automatically turns on. The airconditioner will directly dehumidify theair to the front windshield and sidewindows on page 5-4.Airflow amount will be increased.
WARNING
Set the temperature control to the hot orwarm position when defogging (position):Using the position with the temperaturecontrol set to the cold position isdangerous as it will cause the outside of thewindshield to fog up. Your vision will behampered, which could lead to a seriousaccident.
NOTEUse the temperature control dial toincrease the air flow temperature anddefog the windshield more quickly.
Interior Features
Climate Control System
5-8
CX-9_8GC7-EE-17G_Edition1 2017-5-16 8:22:04

▼ Sunlight/Temperature Sensor
Sunlight sensor
Do not place objects on the sunlightsensor. Otherwise, the interior temperaturemay not adjust correctly.
Sunlight sensor
Interior temperature sensor
Do not cover the interior temperaturesensor. Otherwise, the interior temperaturemay not adjust correctly.
Interior temperature sensor
Interior Features
Climate Control System
5-9
CX-9_8GC7-EE-17G_Edition1 2017-5-16 8:22:04

Vent Operation (Rear)
▼ Adjusting the Vents
Directing airflow
You can direct air flow by moving the adjustment knob.
NOTEWhen using the air conditioner, mist may come out from the vents. This is not a sign oftrouble but a result of humid air being suddenly cooled.
knob
Interior Features
Climate Control System
5-10
CX-9_8GC7-EE-17G_Edition1 2017-5-16 8:22:04

▼ Selecting the Airflow Mode
Dashboard Vents
Dashboard and Floor Vents
Floor Vents
Interior Features
Climate Control System
5-11
CX-9_8GC7-EE-17G_Edition1 2017-5-16 8:22:04

Rear Air ConditionerClimate control system information is displayed on the display.
Mode selector switch
Airflow display
AUTO switch
Temperature setting display
REAR switch
Mode selector display
OFF switch
AUTO
SYNC
Temperature control switchFan control switch
▼ Control Switches
Rear switch
Press the rear switch to operate the rear airconditioner.The indicator illuminates to indicate thatthe rear air conditioner is operating.
AUTO switch
By pressing the AUTO switch thefollowing functions will be automaticallycontrolled in accordance with the settemperature:
• Airflow temperature• Amount of airflow• Selection of airflow mode
OFF switch
Pressing the OFF switch shuts off theclimate control system.
Interior Features
Climate Control System
5-12
CX-9_8GC7-EE-17G_Edition1 2017-5-16 8:22:04

Temperature control switch
This switch controls temperature. Press for hot and for cold.
Fan control switch
The fan has five speeds. The selectedspeed will be displayed.
Mode selector switch
The desired airflow mode can be selected.Refer to Selecting the Airflow Mode onpage 5-11.
▼ Operation of Automatic AirConditioner
Operation from front seats
1. Turn the front air conditioner on.2. Press the rear switch. The rear air
conditioner operates.3. Selection of the airflow mode, airflow
amount and temperature will beautomatically controlled to the sametemperature setting as the front airconditioner for the driver's side.
NOTE• If the AUTO switch is pressed while
the front A/C switch is off, the rearair conditioner operates only tocirculate air.
• Setting the temperature to themaximum high or low will notprovide the desired temperature at afaster rate.
• When selecting heat, the system willrestrict airflow until it has warmedto prevent cold air from blowing outof the vents.
• When the rear air conditioner iscontrolled to the same temperaturesetting as the front air conditionerfor the driver's side, “SYNC” isdisplayed on the rear screen.
Operation from rear seats
1. Turn the front air conditioner on.2. Press the AUTO switch. The selection
of the airflow mode and airflowamount will be automaticallycontrolled.
3. Use the temperature control switch toset the desired temperature.
NOTE• If the AUTO switch is pressed while
the front A/C switch is off, the rearair conditioner operates only tocirculate air.
• Setting the temperature to themaximum high or low will notprovide the desired temperature at afaster rate.
• When selecting heat, the system willrestrict airflow until it has warmedto prevent cold air from blowing outof the vents.
• When the rear air conditioner isoperated automatically, “AUTO” isdisplayed on the rear screen.
• When the rear air conditioner iscontrolled to the same temperaturesetting as the front air conditionerfor the driver's side, “SYNC” isdisplayed on the rear screen.
To turn off the system, press the OFFswitch.
Interior Features
Climate Control System
5-13
CX-9_8GC7-EE-17G_Edition1 2017-5-16 8:22:04

Audio Control Switch
▼ Adjusting the Volume
To increase the volume, press up thevolume switch ( ).To decrease the volume, press down thevolume switch ( ).
▼ Seek Switch
AM/FM radio
Press the seek switch ( , ). The radioswitches to the next/previous storedstation in the order that it was stored.Press and hold the seek switch ( , ) toseek all usable stations at a higher or lowerfrequency whether programmed or not. Radio stations which have been previouslystored in the favorite radio can be calledup by pressing the seek switch ( , )while any radio station stored in thefavorite radio is being received. Radiostations can be called up in the order theywere stored with each press of the switch( , ).
USB Audio/Bluetooth® Audio
Press the seek switch ( ) to skip forwardto the beginning of the next track.Press the seek switch ( ) within a fewseconds after playback begins to trackdown to the beginning of the previoustrack.Press the seek switch ( ) after a fewseconds have elapsed to start playbackfrom the beginning of the current track.Press and hold the seek switch ( , ) tocontinuously switch the tracks up or down.
Interior Features
Before Using the Audio System
5-14
CX-9_8GC7-EE-17G_Edition1 2017-5-16 8:22:04

Aha™/Stitcher™ Radio
Press the seek switch ( ) to skip forwardto the beginning of the next track.Press and hold the seek switch ( ) toevaluate the playback of the current songas “Like”.Press and hold the seek switch ( ) toevaluate the playback of the current songas “Dislike”.
AUX/USB modeAudio can be heard from the vehicle'sspeakers by connecting acommercially-available portable audiounit to the auxiliary jack.A commercially-available, non-impedance(3.5 ) stereo mini plug cable is required.Contact an expert repairer, we recommendan Authorized Mazda Repairer for details.In addition, audio can be played from thevehicle audio device by connecting a USBdevice to the USB port.
NOTEThe SD card slot is for the navigationsystem. For vehicles with the navigationsystem, the SD card (Mazda genuine) withstored map data is inserted into the SDcard slot and used.
USB port
Auxiliary jack
① How to use AUX mode..........page 5-28② How to use USB mode.......... page 5-29
Interior Features
Before Using the Audio System
5-15
CX-9_8GC7-EE-17G_Edition1 2017-5-16 8:22:04
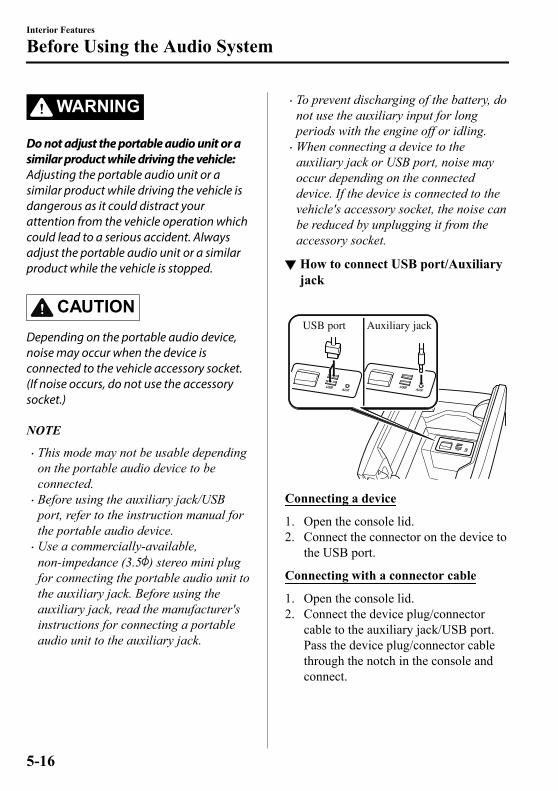
WARNING
Do not adjust the portable audio unit or asimilar product while driving the vehicle:Adjusting the portable audio unit or asimilar product while driving the vehicle isdangerous as it could distract yourattention from the vehicle operation whichcould lead to a serious accident. Alwaysadjust the portable audio unit or a similarproduct while the vehicle is stopped.
CAUTIONDepending on the portable audio device,noise may occur when the device isconnected to the vehicle accessory socket.(If noise occurs, do not use the accessorysocket.)
NOTE• This mode may not be usable depending
on the portable audio device to beconnected.
• Before using the auxiliary jack/USBport, refer to the instruction manual forthe portable audio device.
• Use a commercially-available,non-impedance (3.5 ) stereo mini plugfor connecting the portable audio unit tothe auxiliary jack. Before using theauxiliary jack, read the manufacturer'sinstructions for connecting a portableaudio unit to the auxiliary jack.
• To prevent discharging of the battery, donot use the auxiliary input for longperiods with the engine off or idling.
• When connecting a device to theauxiliary jack or USB port, noise mayoccur depending on the connecteddevice. If the device is connected to thevehicle's accessory socket, the noise canbe reduced by unplugging it from theaccessory socket.
▼ How to connect USB port/Auxiliaryjack
USB port Auxiliary jack
Connecting a device
1. Open the console lid.2. Connect the connector on the device to
the USB port.
Connecting with a connector cable
1. Open the console lid.2. Connect the device plug/connector
cable to the auxiliary jack/USB port.Pass the device plug/connector cablethrough the notch in the console andconnect.
Interior Features
Before Using the Audio System
5-16
CX-9_8GC7-EE-17G_Edition1 2017-5-16 8:22:04

WARNING
Do not allow the connection plug cord toget tangled with the selector lever:Allowing the plug cord to become tangledwith the selector lever is dangerous as itcould interfere with driving, resulting in anaccident.
CAUTIONDo not place objects or apply force to theauxiliary jack/USB port with the plugconnected.
NOTE• Insert the plug into the auxiliary
jack/USB port securely.• Insert or pull out the plug with the plug
perpendicular to the auxiliary jack/USBport hole.
• Insert or remove the plug by holding itsbase.
AntennaAntenna
Interior Features
Before Using the Audio System
5-17
CX-9_8GC7-EE-17G_Edition1 2017-5-16 8:22:04

Basic Operation MethodNOTEThe explanation of functions described in this manual may differ from the actual operation,and the shapes of screens and buttons and the letters and characters displayed may alsodiffer from the actual appearance.Additionally, depending on future software updates, the content may successively changewithout notice.
Audio Set has three different human interfaces.• Commander switch• Touch panel• Voice recognition with steering switch and microphone
Refer to Voice Recognition on page 5-57.
▼ Commander switch operation
NOTEFor safety reasons, some operations are disabled while the vehicle is being driven.
Volume dial operationVolume dial
Press the volume dial to switch the audio MUTE on and off.Turn the volume dial to adjust the volume. The volume increases by turning the dialclockwise, and decreases by turning it counterclockwise.
Interior Features
Audio Set
5-18
CX-9_8GC7-EE-17G_Edition1 2017-5-16 8:22:04

Switches around commander knob
The following operations can be done by pressing the switches around the commanderknob.
: Displays the home screen. : Displays the Entertainment screen.
: Displays the Navigation screen (Only navigation-equipped vehicles). For operationof the Navigation screen, refer to the navigation system manual. If the SD card for thenavigation system is not inserted, the compass indicating the direction in which the vehicleis moving is displayed.
: Displays the Favorites screen. Long-press to store particular items in Favorites. (Radio,phonebook and destination of the navigation system can be programmed.)
: Returns to previous screen.
Commander knob operation
(Selection of icons on screen)
1. Tilt or turn the commander knob and move the cursor to the desired icon.2. Press the commander knob and select the icon.
NOTELong-press operation of the commander knob is also possible for some functions.
Interior Features
Audio Set
5-19
CX-9_8GC7-EE-17G_Edition1 2017-5-16 8:22:04

▼ Touch panel operation
CAUTIONDo not press the screen strongly or press it with a sharp-pointed object. Otherwise, the screencould be damaged.
NOTEFor safety reasons, operation of the center display is disabled while the vehicle is beingdriven. However, items not displayed in gray can be operated using the commander switchwhile the vehicle is being driven.
Touch & Tap
1. Touch or tap on the item indicated on the screen.2. The operation is launched and the next item is displayed.
Interior Features
Audio Set
5-20
CX-9_8GC7-EE-17G_Edition1 2017-5-16 8:22:04
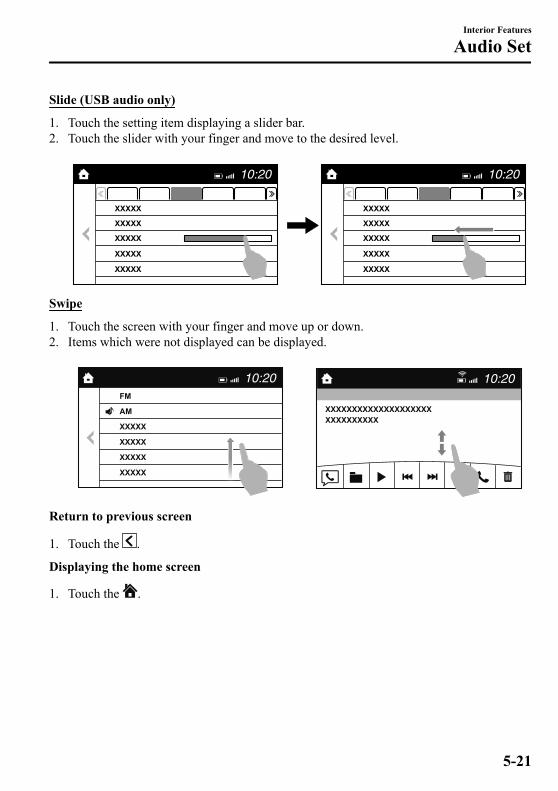
Slide (USB audio only)
1. Touch the setting item displaying a slider bar.2. Touch the slider with your finger and move to the desired level.
Swipe
1. Touch the screen with your finger and move up or down.2. Items which were not displayed can be displayed.
Return to previous screen
1. Touch the .
Displaying the home screen
1. Touch the .
Interior Features
Audio Set
5-21
CX-9_8GC7-EE-17G_Edition1 2017-5-16 8:22:04

Home screen
Icon FunctionApplicationsInformation such as average fuel economy, maintenance, and warnings can be verified.Depending on the grade and specification, the screen display may differ.EntertainmentOperates audio such as the radio. The audio source most recently used is displayed. Anaudio source which cannot be used at that time is skipped and the previous audio source isdisplayed.
To change the audio source, select the icon displayed at the bottom of the screen.
CommunicationBluetooth® related functions are available.
NavigationNavigation screen is displayed (vehicles with navigation system).If the SD card for the navigation system is not inserted, the compass indicating the direc-tion in which the vehicle is moving is displayed.The compass may not indicate the correct bearing when the vehicle is stopped or travelingat a slow speed.SettingsOverall setting menu (Such as display, sound, Bluetooth® and Language).Depending on the grade and specification, the screen display may differ.
Interior Features
Audio Set
5-22
CX-9_8GC7-EE-17G_Edition1 2017-5-16 8:22:04
Volume/Display/Sound ControlsCommander switch Audio control switch
Volume dial
Volume switch
▼ Volume adjustment
Turn the commander switch volume dial.The volume switch on the steering switchcan also be pressed.
▼ Display setting
Select the icon on the home screen todisplay the Settings screen.Select the tab to select the item youwould like to change.
Display OFF/Clock
The center display can be turned off.Select to turn the display off.When isselected the center display turns off andthe clock is displayed.The center display can be turned back onas follows:
• Touch the center display.• Operate the commander switch.
Daytime/nighttime (Mode) screensetting
The daytime or nighttime screen can beselected.
: Switches screen automaticallyaccording to headlight illuminationcondition*1
: Daytime screen setting : Nighttime screen setting
*1 The display is constantly on daytimescreen when the illumination dimmeris cancelled.
Brightness adjustment
Adjust the center display brightness usingthe slider.
Contrast adjustment
Adjust the center display contrast usingthe slider.
Display setting reset
All of the screen setting values can bereset to their initial settings.1. Select .2. Select .
Interior Features
Audio Set
5-23
CX-9_8GC7-EE-17G_Edition1 2017-5-16 8:22:04

▼ Audio sound adjustment
Select the icon on the home screen todisplay the Settings screen.Select the tab to select the item youwould like to change.
Indication Setting value
Bass(Low pitch sound)
Side: Low pitch en-hancement
Side: Low pitch re-duction
Treble(Treble sound)
Side: Treble enhance-ment
Side: Treble reduction
Fade(Front/Rear volume bal-ance)
Front: Front speaker vol-ume enhancementRear: Rear speaker vol-ume enhancement
Balance(Left/right volume bal-ance)
Right: Right speakervolume enhancementLeft: Left speaker vol-ume enhancement
ALC*1
(Automatic volume ad-justment)
Off―Adjustment at sev-en levels
Bose® Centerpoint*2
(Automatic surroundlevel adjustment)
On/Off
Bose® AudioPilot*2
(Automatic volume ad-justment)
On/Off
Beep(Audio operation sound) On/Off
*1 Standard audio*2 Bose® sound systemALC (Automatic volume adjustment)The automatic level control (ALC) is afeature that automatically adjusts audiovolume and sound quality according to thevehicle speed. The volume increases inaccordance with the increase in vehiclespeed, and decreases as vehicle speeddecreases.
Bose® Centerpoint (Automaticsurround level adjustment)Centerpoint®*3 lets vehicle owners enjoy aBose® surround sound experience fromtheir existing MP3s.Specifically engineered to meet the uniquedemands of reproducing surround sound ina vehicle.Converts stereo signals to multiplechannels allowing greater precision whenreproducing the sound.An enhanced algorithm to simultaneouslycreate a wider, more spacious sound field.*3 Centerpoint® is a registered trademarkof Bose Corporation. Bose® AudioPilot (Automatic volumeadjustment)When driving, background noise caninterfere with enjoying music.AudioPilot®*4 noise compensationtechnology continuously adjusts the musicto compensate for background noise andvehicle speed.It reacts only to sustained noise sourcesand not intermittent ones, such as speedbumps.An enhanced DSP algorithm allows fasterand more effective compensation forunusual situations, such as driving on avery rough road or at high speeds.*4 AudioPilot® is a registered trademarkof Bose Corporation.
Interior Features
Audio Set
5-24
CX-9_8GC7-EE-17G_Edition1 2017-5-16 8:22:04

Operating the Radio▼ Radio ON
Select the icon on the home screen to display the Entertainment screen. When selectingthe desired radio, the following icons are indicated in the lower part of the center display.AM/FM Radio
Icon Function
Displays the Entertainment menu. Use to switch to a different audio source.
Displays the list of receivable RDS radio stations (FM only).*1
Displays the station list.*2
Select to display the frequencies of up to ten radio stations on the automemory preset list.Select the desired frequency.
Displays the Favorites list. Long-press to store radio station currently being aired.
You can search for receivable radio stations.Scanning stops at each station for about five seconds.Select again to continue receiving the radio station.You can change the radio frequency manually.Rotate the commander knob, slide the screen, or touch the radio frequency.Press or to change the radio frequency one step at a time.When or is long-pressed, the radio frequency changes continually. It stops when youremove your hand from the icon or the commander knob.
Switches the TA mode on and off.*1
Automatic radio station selection.When long-pressed, the radio frequency changes continually. It stops when you removeyour hand from the icon or the commander knob.
Displays the FM settings screen (FM only).*1
On/Off of Alternative frequency and Region lock can be set.
Displays sound settings to adjust audio quality level.Refer to Volume/Display/Sound Controls on page 5-23.
*1 With Radio Data System (RDS)*2 Not displayed when listening to FM radio on vehicles with Radio Data System (RDS).
Interior Features
Audio Set
5-25
CX-9_8GC7-EE-17G_Edition1 2017-5-16 8:22:04

NOTE(With Radio Data System (RDS))When the or icon is selected whileFM is selected, each program is selected.
▼ Favorites Radio
Selected stations can be registered forconvenient operation. Up to 50 stationscan be registered. The Favorites list iscommon to AM and FM radio.
Registering to Favorites
Long-press the icon to register thecurrent radio station. The registration canalso be performed using the followingprocedure.1. Select the icon to display the
Favorites list.2. Select .3. Select .4. The station is added to the bottom of
the Favorites list.
NOTEIf the battery is disconnected, yourFavorites list will be not deleted.
Selecting radio station from Favorites
1. Select the icon to display theFavorites list.
2. Select the radio frequency to tune inthe radio station.
Deleting from Favorites
1. Select the icon to display theFavorites list.
2. Select .3. Select .4. Select the radio frequency you want to
delete.5. Select .
Changing Favorites list order
1. Select the icon to display theFavorites list.
2. Select .3. Select .4. Select a radio frequency. The selected
radio station can be moved.5. Slide the radio station or move it using
the commander switch, then select .
▼ Radio Data System (RDS)*
Alternative frequency (AF)
AF functions on FM stations. Turn on theAF mode. If the radio reception of thecurrent station weakens, the systemswitches to an alternative stationautomatically.If you wish to continue a regionalprogram, turn on the Region lock (REG)mode.
AF/REG on or off switching
Select the icon while in FM mode toswitch to the FM settings screen. AF/REGon or off switching can be performed asfollows:(AF mode on/off)Select On/Off on the FM settings screen.(REG mode on/off)While the AF mode is on, select On/Off.
Traffic announcement (TA)
Select during FM/AM reception toswitch to the TA mode.If a TA broadcast is received while in theTA mode, the TA broadcast intercedeseven while using other functions (FM,USB device, AUX, BT audio, Aha™radio, or Stitcher™ radio), and “TrafficAnnouncement” is displayed.
Interior Features
Audio Set
5-26 *Some models.
CX-9_8GC7-EE-17G_Edition1 2017-5-16 8:22:04

If a TA is received on the Entertainmentscreen, is displayed on the screen.Select to cancel the received TA andreturn to TA reception stand-by. If a TA isreceived on a screen other than theEntertainment screen, the selection screensfor , , and are displayedon the screen. If is selected, theselection screen turns off when a TA isreceived while continuing to receive TAs.
Selection from Station List
List of receivable RDS radio stations isdisplayed. You can easily select the stationyou want to listen to from the list. If aradio station name is not available, thefrequency is displayed. In addition, radiostations which have been programmed to aGenre code (Program types like Rock,News, and so on) can also be displayedseparately by category.
NOTEIt may take longer to display the stationlist depending on the reception conditions.
1. Select the icon to display the radiostation list.
2. Select the radio frequency to tune inthe radio station.
(Selecting Genre)
1. Select the on the station listscreen to display the genre list screen.
2. Select the genre to display the radiostation list in the genre.
NOTEOnly one Genre can be selected.
Interior Features
Audio Set
5-27
CX-9_8GC7-EE-17G_Edition1 2017-5-16 8:22:04

How to use AUX mode▼ Playback
1. Select the icon on the home screen to display the Entertainment screen.2. Select to switch to the AUX mode. The following icons are displayed in the lower
part of the center display.
Icon Function
Displays the Entertainment menu. Use to switch to a different audio source.
Displays sound settings to adjust audio quality level.Refer to Volume/Display/Sound Controls on page 5-23.
NOTE• If a device is not connected to the auxiliary jack, the mode does not switch to the AUX
mode.• Adjust the audio volume using the portable audio device, commander switch, or audio
control switch.• Audio adjustments can also be made using the portable audio device's volume setting.• If the connection plug is pulled out from the auxiliary jack while in AUX mode, noise may
occur.
Interior Features
Audio Set
5-28
CX-9_8GC7-EE-17G_Edition1 2017-5-16 8:22:04

How to use USB modeType Playable data
USB mode MP3/WMA/AAC/OGG file
This unit does not support a USB 3.0 device. In addition, other devices may not besupported depending on the model or OS version.The recommended capacity of the USB memory is 16 GB or less.USB devices formatted to FAT32 are supported (USB devices formatted to other formatssuch as NTFS are not supported).
▼ Playback
1. Select the icon on the home screen to display the Entertainment screen.2. Select or to switch the USB mode. The following icons are displayed in the
lower part of the center display.
Icon Function
Displays the Entertainment menu. Use to switch to a different audio source.
Category list is displayed.
Current track list is displayed.Select a desired track to play it.
Plays the current track repeatedly.Select it again to play the tracks in the current track list repeatedly.When selected again, the function is canceled.
Tracks in the current track list are played randomly.Select it again to cancel.
Starts playing a track similar to the current track using Gracenote®'s More Like This™.Select the desired song from the category list to cancel More Like This™.
If selected within a few seconds from the beginning of a song which has started to play,the previous song is selected.If more than a few seconds have elapsed, the song currently being played is replayed fromthe beginning.Long-press to fast reverse. It stops when you remove your hand from the icon or thecommander knob.
Track is played. When selected again, playback is temporarily stopped.
Advances to the beginning of the next song.Long-press to fast forward.
Interior Features
Audio Set
5-29
CX-9_8GC7-EE-17G_Edition1 2017-5-16 8:22:04

Icon Function
Displays sound settings to adjust audio quality level.Refer to Volume/Display/Sound Controls on page 5-23.
NOTE• If a file name in the USB memory is too long, it could cause operation problems such as
not being able to playback the song.(Recommended: Within 80 characters)
• To move to the desired location on the track, move the slider indicating the playback time.• The appearance of the repeat and shuffle icons changes depending on the type of
operation in which the function is used.
Category list
Select the icon to display the following category list.Select a desired category and item.
Category FunctionPlaylist*1 Displays playlists on the device.
Artist Displays the artist name list.All the tracks or tracks for each album of the selected artist can be played.
Album Displays the album name list.Song All the tracks in the device are displayed.
Genre Displays the genre list.All the tracks or tracks per album or artist in the selected genre can be played.
Audiobook*2 Displays the audiobook list.Chapters can be selected and played.
Podcast*2 Displays the podcast list.Episode can be selected and played.
Folder*3 Displays the folder/file list.
*1 Playlist folders of Apple devices are not supported.*2 Apple device only*3 USB-Sticks and USB-Android™ device only
Interior Features
Audio Set
5-30
CX-9_8GC7-EE-17G_Edition1 2017-5-16 8:22:04
Example of use (to play all tracks inUSB device)
(Method 1)
1. Select to display the category list.2. Select .
All the tracks in the USB device aredisplayed.
3. Select a desired track.The selected track is played. All thetracks in the USB device can be playedby continuing playback.
NOTEOnly the tracks in the desired categoryselected in Step 2 are played.
(Method 2)*1
1. Select to display the category list.2. Select .
All the folders in the USB device aredisplayed.
3. Select .All the tracks in the USB device aredisplayed.
4. Select a desired track.The selected track is played. All thetracks in the USB device can be playedby continuing playback.
*1 Can be operated using an Android™device or USB flash memory.
NOTEOnly the tracks in the desired folderselected in Step 3 are played.
Interior Features
Audio Set
5-31
CX-9_8GC7-EE-17G_Edition1 2017-5-16 8:22:04

▼ Gracenote Database
When a USB device is connected to this unit and the audio is played, the album name, artistname, genre and title information are automatically displayed if there is a match in thevehicle's database compilation to the music being played. The information stored in thisdevice uses database information in the Gracenote® music recognition service.
CAUTIONFor information related to the most recent Gracenote® database which can be used and howto install it, go to the Mazda Hands Free Website:http://www.mazdahandsfree.com
Introduction
Gracenote, the Gracenote logo and logotype are either a registered trademark or a trademarkof Gracenote, Inc. in the United States and/or other countries.
Gracenote® End User License AgreementThis application or device contains software from Gracenote, Inc. of Emeryville, California(“Gracenote”). The software from Gracenote (the “Gracenote Software”) enables thisapplication to perform disc and/or file identification and obtain music-related information,including name, artist, track, and title information (“Gracenote Data”) from online servers orembedded databases (collectively, “Gracenote Servers”) and to perform other functions. Youmay use Gracenote Data only by means of the intended End-User functions of thisapplication or device.You agree that you will use Gracenote Data, the Gracenote Software, and Gracenote Serversfor your own personal non-commercial use only. You agree not to assign, copy, transfer ortransmit the Gracenote Software or any Gracenote Data to any third party. YOU AGREENOT TO USE OR EXPLOIT GRACENOTE DATA, THE GRACENOTE SOFTWARE,OR GRACENOTE SERVERS, EXCEPT AS EXPRESSLY PERMITTED HEREIN.You agree that your non-exclusive license to use the Gracenote Data, the GracenoteSoftware, and Gracenote Servers will terminate if you violate these restrictions. If yourlicense terminates, you agree to cease any and all use of the Gracenote Data, the GracenoteSoftware, and Gracenote Servers. Gracenote reserves all rights in Gracenote Data, theGracenote Software, and the Gracenote Servers, including all ownership rights. Under nocircumstances will Gracenote become liable for any payment to you for any information thatyou provide. You agree that Gracenote, Inc. may enforce its rights under this Agreementagainst you directly in its own name.
Interior Features
Audio Set
5-32
CX-9_8GC7-EE-17G_Edition1 2017-5-16 8:22:04

The Gracenote service uses a unique identifier to track queries for statistical purposes. Thepurpose of a randomly assigned numeric identifier is to allow the Gracenote service to countqueries without knowing anything about who you are. For more information, see the webpage for the Gracenote Privacy Policy for the Gracenote service.The Gracenote Software and each item of Gracenote Data are licensed to you “AS IS.”Gracenote makes no representations or warranties, express or implied, regarding theaccuracy of any Gracenote Data from in the Gracenote Servers. Gracenote reserves the rightto delete data from the Gracenote Servers or to change data categories for any cause thatGracenote deems sufficient. No warranty is made that the Gracenote Software or GracenoteServers are error-free or that functioning of Gracenote Software or Gracenote Servers willbe uninterrupted. Gracenote is not obligated to provide you with new enhanced or additionaldata types or categories that Gracenote may provide in the future and is free to discontinueits services at any time.GRACENOTE DISCLAIMS ALL WARRANTIES EXPRESS OR IMPLIED,INCLUDING, BUT NOT LIMITED TO, IMPLIED WARRANTIES OFMERCHANTABILITY, FITNESS FOR A PARTICULAR PURPOSE, TITLE, ANDNON-INFRINGEMENT. GRACENOTE DOES NOT WARRANT THE RESULTS THATWILL BE OBTAINED BY YOUR USE OF THE GRACENOTE SOFTWARE OR ANYGRACENOTE SERVER. IN NO CASE WILL GRACENOTE BE LIABLE FOR ANYCONSEQUENTIAL OR INCIDENTAL DAMAGES OR FOR ANY LOST PROFITS ORLOST REVENUES.© Gracenote, Inc. 2009
Updating the database
The Gracenote® media database can be updated using USB device.1. Connect a USB device containing the software for updating Gracenote®.2. Select the icon on the home screen to display the Settings screen.3. Select the tab and select .4. Select . The list of the update package stored in the USB device and the version
are displayed.5. Select the package to use the update.6. Select .
NOTEGracenote® can be downloaded from the Mazda Hands-free Website.
Interior Features
Audio Set
5-33
CX-9_8GC7-EE-17G_Edition1 2017-5-16 8:22:04

Bluetooth®
▼ Introduction
Bluetooth® Hands-Free outline
When a Bluetooth® device (mobile phone) is connected to the vehicle's Bluetooth® unit viaradio wave transmission, a call can be made or received by pressing the talk button, pick-upbutton, or hang-up button on the audio remote control switch, or by operating the centerdisplay. For example, even if a device (mobile phone) is in your coat pocket, a call can bemade without taking the device (mobile phone) out and operating it directly.
Bluetooth® audio outline
When a portable audio unit equipped with the Bluetooth® communication function is pairedto the vehicle, you can listen to music stored on the paired portable audio device from thevehicle's speakers. It is not necessary to connect the portable audio device to the vehicle'sexternal input terminal. After programming, operate the vehicle audio control panel to play/stop the audio.
NOTE• For your safety, a device can be paired only when the vehicle is parked. If the vehicle
starts to move, the pairing procedure will end. Park the vehicle in a safe place beforepairing.
• The communication range of a Bluetooth® equipped device is about 10 meters (32 ft) orless.
• Basic audio operation is available using voice commands even if Bluetooth® is notconnected.
• For safety reasons, operation of the center display is disabled while the vehicle is beingdriven. However, items not displayed in gray can be operated using the commanderswitch while the vehicle is being driven.
CAUTIONSome Bluetooth® mobile devices are not compatible with the vehicle. Consult an AuthorizedMazda Repairer, Mazda's call center or Web support center for information regardingBluetooth® mobile device compatibility:
Interior Features
Audio Set
5-34
CX-9_8GC7-EE-17G_Edition1 2017-5-16 8:22:04

Phone:(Germany)0800 4263 738 (8:00―18:00 Central European Time)(Except Germany)00800 4263 7383 (8:00―18:00 Central European Time)(Worldwide)
49 (0) 6838 907 287 (8:00―18:00 Central European Time)Web:http://www.mazdahandsfree.com
Applicable Bluetooth® specification (Recommended)Ver. 1.1/1.2/2.0 EDR/2.1 EDR/3.0 (conformity)
▼ Component Parts
Microphone
Talk button, Pick-up button and Hang-up button
Microphone
Talk button
Hang-up button
Pick-up button
Audio unit
Microphone (hands-free)
The microphone is used for speaking voice commands or when making a Hands-free call.
Talk button
Activates the voice recognition. In addition, it skips the voice guidance.
Interior Features
Audio Set
5-35
CX-9_8GC7-EE-17G_Edition1 2017-5-16 8:22:04

Pick-up button
Responds to incoming calls. In addition, after selecting a contact or dialing a number, itplaces the call when the button is pressed.
Hang-up button
Ends the call or refuses an incoming call. In addition, it ends the voice recognitionoperation.
Commander switch
The commander switch is used for volume adjustment and display operation. Tilt or turn thecommander knob to move the cursor. Press the commander knob to select the icon.
Volume adjustment
The volume dial of the commander switch is used to adjust the volume. Turn the dial to theright to increase volume, to the left to decrease it.The volume can also be adjusted using the volume button on the steering wheel.
NOTEIf the volume is lower compared to other audio modes, increase the volume from the deviceside.
Conversation volume and the volume of the voice guidance and ringtone can each be set inadvance.1. Select the icon on the home screen to display the Communication screen.2. Select .3. Adjust the and the using the slider.
Interior Features
Audio Set
5-36
CX-9_8GC7-EE-17G_Edition1 2017-5-16 8:22:04

Bluetooth® Preparation▼ Device pairing
To use Bluetooth® audio and Hands-Free,the device equipped with Bluetooth® hasto be paired to the unit using the followingprocedure. A maximum of seven devicesincluding Bluetooth® audio devices andhands-free mobile phones can be paired.
NOTE
• The Bluetooth® system may not operatefor 1 or 2 minutes after the ignition isswitched to ACC or ON. However, thisdoes not indicate a problem. If theBluetooth® system does not connectautomatically after 1 or 2 minutes haveelapsed, make sure that the Bluetooth®
setting on the device is normal andattempt to reconnect the Bluetooth®
device from the vehicle side.• If Bluetooth®-enabled devices are used
in the following locations or conditions,connection via Bluetooth® may not bepossible.
• The device is in a location hiddenfrom the center display such as behindor under a seat, or inside the glovecompartment.
• The device contacts or is covered by ametal object or body.
• The device is set to power-savingmode.
Pairing Procedure
1. Select the icon on the home screento display the Settings screen.
2. Select the tab.3. Select .
4. Turn the Bluetooth® setting on.5. Select to display the
message and switch to the deviceoperation.
6. Using your device, perform a searchfor the Bluetooth® device (Peripheraldevice).
7. Select “Mazda” from the device listsearched by the device.
8. (Device with Bluetooth® version 2.0)Input the displayed 4-digit pairingcode into the device.(Device with Bluetooth® version 2.1or higher)Make sure the displayed 6-digit codeon the audio is also displayed on thedevice, and touch the .Connection permission and phonebookaccess permission for your mobiledevice may be required depending onthe mobile device.
9. If pairing is successful, the functionsof the device connected to Bluetooth®
are displayed.10. (Devices compatible with Mazda
E-mail / SMS function)SMS (Short Message Service)messages, and E-mail for the deviceare downloaded automatically. Adownload permission operation foryour device may be requireddepending on the device.
NOTEWhen Call history and messages aredownloaded automatically, each automaticdownload setting must be on.Refer to Communication Settings on page5-56.
Interior Features
Audio Set
5-37
CX-9_8GC7-EE-17G_Edition1 2017-5-16 8:22:04

After a device is registered, the systemautomatically identifies the device. Byactivating Bluetooth® Hands-Free again,or by activating Bluetooth® Hands-Freefirst after switching the ignition from OFFto ACC, the device connection conditionis indicated in the center display.
IMPORTANT note about pairing andautomatic reconnection:
• If pairing is redone on the samemobile phone device, first clear“Mazda” displayed on the Bluetooth®
setting screen of the mobile device.• When the OS of the device is updated,
the pairing information may be deleted.If this happens, reprogram the pairinginformation to the Bluetooth® unit.
• Before you pair your device, make surethat Bluetooth® is “ON”, both on yourphone and on the vehicle.
▼ Device selection
If several devices have been paired, theBluetooth® unit links the device lastpaired. If you would like to link a differentpaired device, it is necessary to change thelink. The order of device priority after thelink has been changed is maintained evenwhen the ignition is switched off.
Connecting other devices
1. Select the icon on the home screento display the Settings screen.
2. Select the tab.3. Select .4. Turn the Bluetooth® setting on.5. Select the name of the device you
would like to connect.
6. selectionConnects both devices as hands-freeand Bluetooth® audio.
selectionConnects as a hands-free device.
selectionConnects as Bluetooth® audio.
NOTEThe following functions can be used forthe Hands-free or audio.
• Hands-free: Phone calls andE-mail/SMS
• Audio: Bluetooth® audio, Aha™,Stitcher™ radio
Disconnecting a device
1. Select the icon on the home screento display the Settings screen.
2. Select the tab.3. Select .4. Turn the Bluetooth® setting on.5. Select the device name which is
currently connected.6. Select .
Interior Features
Audio Set
5-38
CX-9_8GC7-EE-17G_Edition1 2017-5-16 8:22:04

▼ Deleting a device
Selecting and deleting devices
1. Select the icon on the home screento display the Settings screen.
2. Select the tab.3. Select .4. Turn the Bluetooth® setting on.5. Select the device name which you
would like to delete.6. Select .7. Select .
Deleting all devices
1. Select the icon on the home screento display the Settings screen.
2. Select the tab.3. Select .4. Select .5. Select .6. Select .
▼ Changing PIN code
PIN code (4 digits) can be changed.1. Select the icon on the home screen
to display the Settings screen.2. Select the tab.3. Select .4. Select .5. Select .6. Input the new PIN code to be set.7. Select .
Available LanguageThe language can be changed.Refer to Settings on page 5-60.
NOTEDepending on the language, it may only beavailable for the screen display, but notfor the voice recognition.
Interior Features
Audio Set
5-39
CX-9_8GC7-EE-17G_Edition1 2017-5-16 8:22:04

Bluetooth® AudioApplicable Bluetooth® specification(Recommended)Ver. 1.1/1.2/2.0 EDR/2.1 EDR/3.0(conformity)Response profile
• A2DP (Advanced Audio DistributionProfile) Ver. 1.0/1.2
• AVRCP (Audio/Video Remote ControlProfile) Ver. 1.0/1.3/1.4
A2DP is a profile which transmits onlyaudio to the Bluetooth® unit. If yourBluetooth® audio device corresponds onlyto A2DP, but not AVRCP, you cannotoperate it using the control panel of thevehicle's audio system. In this case, onlythe operations on the mobile device areavailable the same as when a portableaudio device for a non-compliantBluetooth® device is connected to theAUX terminal.
Function A2DPAVRCP
Ver.1.0
Ver.1.3
Ver.1.4
Playback X X X XPause X X X XFile (Track)up/down — X X X
Reverse — — X XFast-forward — — X XText display — — X X
Repeat — —
De-pendson de-vice
De-pendson de-vice
Function A2DPAVRCP
Ver.1.0
Ver.1.3
Ver.1.4
Shuffle — —
De-pendson de-vice
De-pendson de-vice
Scan — —
De-pendson de-vice
De-pendson de-vice
Folder up/down — — —
De-pendson de-vice
X: Available—: Not available
NOTE
• The battery consumption of Bluetooth®
audio devices increases whileBluetooth® is connected.
• If a general mobile phone device is USBconnected during music playback overthe Bluetooth® connection, theBluetooth® connection is disconnected.For this reason, you cannot have musicplayback over a Bluetooth® connectionand music playback using a USBconnection at the same time.
• The system may not operate normallydepending on the Bluetooth® audiodevice.
Interior Features
Audio Set
5-40
CX-9_8GC7-EE-17G_Edition1 2017-5-16 8:22:04

▼ Switching to Bluetooth® audio mode
To listen to music or voice audio recorded to a Bluetooth® audio device, switch to theBluetooth® audio mode to operate the audio device using the audio system control panel.Any Bluetooth® audio device must be paired to the vehicle's Bluetooth® unit before it canbe used.Refer to Bluetooth® Preparation on page 5-37.1. Turn on the Bluetooth® audio device's power.2. Switch the ignition to ACC or ON.3. Select the icon on the home screen to display the Entertainment screen.4. When is selected, switches to the Bluetooth® audio mode to begin playback.
NOTE
• If Bluetooth® audio is used after using Aha™ or Stitcher™ radio, the application on themobile device has to be closed first.
• If the Bluetooth® audio device does not begin playback, select the icon.• If the mode is switched from Bluetooth® audio mode to another mode (radio mode), audio
playback from the Bluetooth® audio device stops.
▼ Playback
To listen to a Bluetooth® audio device over the vehicle's speaker system, switch the mode toBluetooth® audio mode. (Refer to “Switching to Bluetooth® audio mode”)After switching to the Bluetooth® audio mode, the following icons are displayed in thelower part of the display. Icons which can be used differ depending on the version of theBluetooth® audio device which you are currently using.
Icon Function
Displays the Entertainment menu. Use to switch to a different audio source.
(AVRCP Ver. 1.4 only)Displays the top level folder/file list.Select the folder which you want to select.The files in the selected folder are displayed.Select the file you want to play.(AVRCP Ver. 1.3 or higher)Replays the song currently being played repeatedly.When selected again, the songs in the folder are played repeatedly.Select it again to cancel.Icons change when the song is repeated or the folder is repeated.
Interior Features
Audio Set
5-41
CX-9_8GC7-EE-17G_Edition1 2017-5-16 8:22:04

Icon Function(AVRCP Ver. 1.3 or higher)Plays songs in the folder in random order.When selected again, the songs on the device are played in random order.Select it again to cancel.Icons change during folder shuffle or device shuffle.Scans the titles in a folder and plays the beginning of each song to aid in finding a desiredsong.When selected again, the beginning of each song on the device is played.When selected again, the operation is canceled and the song currently being played con-tinues.Returns to the beginning of the previous song.Long-press to fast reverse. It stops when you remove your hand from the icon or thecommander knob.
Plays the Bluetooth® audio. When selected again, playback is temporarily stopped.
Advances to the beginning of the next song.Long-press to fast forward. It stops when you remove your hand from the icon or thecommander knob.
Displays sound settings to adjust audio quality level.Refer to Volume/Display/Sound Controls on page 5-23.
▼ Bluetooth® Audio DeviceInformation Display
If a Bluetooth® audio device is connected,the following information is displayed inthe center display.
AVRCPVer. lowerthan 1.3
AVRCPVer. 1.3
AVRCPVer. 1.4 or
higherDevice name X X XRemainingbattery chargeof device
X X X
Song name — X XArtist name — X XAlbum name — X XPlaybacktime — X X
AVRCPVer. lowerthan 1.3
AVRCPVer. 1.3
AVRCPVer. 1.4 or
higherGenre name — X XAlbum artimage — — —
X: Available—: Not available
NOTESome information may not displaydepending on the device, and if theinformation cannot be displayed,“Unknown - - -” is indicated.
Interior Features
Audio Set
5-42
CX-9_8GC7-EE-17G_Edition1 2017-5-16 8:22:04

How to Use Aha™▼ What is Aha™?
Aha™*1 is an application which can be used to enjoy various Internet content such asInternet radio and podcasts.Stay connected to your friends activities by getting updates from Facebook and Twitter.Using the location-based service, nearby services and destinations can be searched orreal-time local information can be obtained.For details on Aha™, refer to “http://www.aharadio.com/”.*1 Aha™, the Aha™ logo, and the Aha™ trade dress are trademarks or registered
trademarks of Harman International Industries, Inc., used with permission.
NOTE• The service content provided by Aha™ varies depending on the country in which the user
resides. In addition, the service is not available in some countries.• To operate Aha™ from your Bluetooth® device, perform the following in advance:
• Install the Aha™ application to your device.• Create an Aha™ account for your device.• Log onto Aha™ using your device.• Select the preset station on your device.
▼ Playback
Select the icon on the home screen to display the Entertainment screen. When isselected, the following icons are displayed at the bottom of the center display. The displayedicon differs depending on the selected station.In addition, icons other than the following icons may be displayed.
Icon Function
Displays the Entertainment menu. Use to switch to a different audio source.
Displays the main menu.Use to switch to other stations.
Displays the content list.Use to switch to other desired content on the station.
ShoutRecords voice.Records voice and posts it as playable audio to Facebook and other social stations.
Like*1
Evaluates the current content as “Like”.
Interior Features
Audio Set
5-43
CX-9_8GC7-EE-17G_Edition1 2017-5-16 8:22:04

Icon Function
Dislike*1
Evaluates the current content as “Dislike”.
Reverses for 15 seconds.
Map (vehicles with navigation system)Displays the destination searched by the location based services on the navigation system.
CallA call can be made to the telephone number of a shop searched using the Location BasedServices. Available when a device is connected as a Hands-Free.
Returns to the previous content.
Pauses playback of the content. When selected again, playback resumes.
Goes to the next content.
Fast-forwards for 30 seconds.
Displays sound settings to adjust audio quality level.Refer to Volume/Display/Sound Controls on page 5-23.
*1 Some stations may use alternate variations of Like and Dislike, based on station type or provider.
Main menu
Select the icon.
Switch the tab and select the station category.
Tab Function
Presets Displays the preset station list set on the device.Select the preset station name to play the station content.
Interior Features
Audio Set
5-44
CX-9_8GC7-EE-17G_Edition1 2017-5-16 8:22:04

Tab Function
Nearby
Select the desired station.Guidance is provided to the searched destination near the vehicle's posi-tion.You can designate desired categories previously set using the filter settingon your device.
NOTEThe available Location Based Services may differ because the services depend on thecontent provided by Aha™.
Example of use (Location BasedServices)
1. Select the desired station from the“Nearby” tab on the main menu.The destination name or addressplayback starts in the order of thedestination name list.
2. When the icon is selected, thecurrently displayed destination isdisplayed on the navigation system(vehicles with navigation system).
3. When the icon is selected, a phonecall is placed to the currently displayeddestination.
4. Select the icon to display thecontent list.
Selection of other destinations fromthe list can be made.
▼ Shout
Some social stations, such as Facebook orCaraoke, support the ability to record andshare voice messages using the “Shout”function.1. Select the icon and start the
countdown (3, 2, 1, 0). Recordingstarts when the countdown reacheszero.
2. Records voice.3. Select and store/post the
recording.
NOTE• Recordable time varies depending on
the station (Max. 30 seconds).• Recording stops automatically when the
recordable time has elapsed. You canthen post or delete the recording.
Interior Features
Audio Set
5-45
CX-9_8GC7-EE-17G_Edition1 2017-5-16 8:22:04

How to Use Stitcher™ Radio▼ What is Stitcher™ Radio?
Stitcher™*1 radio is an application which can be used to listen to Internet radio or streampodcasts.Recommended content is automatically selected by registering content which you put intoyour favorites, or by pressing the Like or Dislike button.For details on Stitcher™ Radio, refer to “http://stitcher.com/”.*1 Stitcher™, the Stitcher™ logo, and the Stitcher™ trade dress are trademarks or
registered trademarks of Stitcher, Inc., used with permission.
NOTETo operate Stitcher™ Radio from your Bluetooth® device, perform the following inadvance:
• Install the Stitcher™ Radio application to your device.• Create a Stitcher™ Radio account for your device.• Log onto Stitcher™ Radio using your device.
▼ Playback
Select the icon on the home screen to display the Entertainment screen. When isselected, the following icons are indicated in the bottom part of the center display.
Icon Function
Displays the Entertainment menu. Use to switch to a different audio source.
Displays the station list.Use to switch to other stations.
DislikeEvaluates the current program as “Dislike”.
LikeEvaluates the current program as “Like”.
Adds the current station to your favorites or deletes the current station from your favorites.
Reverses for 30 seconds.
Plays the station. Select it again to pause playback.
Interior Features
Audio Set
5-46
CX-9_8GC7-EE-17G_Edition1 2017-5-16 8:22:04

Icon Function
Goes to the next station.
Displays sound settings to adjust audio quality level.Refer to Volume/Display/Sound Controls on page 5-23.
Station list
1. Select the icon to display the station list. Favorites station name: Select to display the program registered to your favorites. Category name: A recommended category selected from your favorites by Stitcher™
is displayed.Select it to display the category program.
2. Select the program name to play it.
Add to your favorites
If the current program has not beenregistered to your favorites, it can beregistered to your favorites.1. Select the icon to display the
favorites station which the registrationcan be added.
2. Select the station name which youwant to register.
3. Select to add the program to theselected favorites station.
NOTE• Multiple favorites stations can be
selected and registered.
• Favorites stations registered by oneselfas well those set by default aredisplayed.
Delete from your favorites
If the current program has already beenregistered to your favorites, the programcan be deleted from your favorites.1. Select the icon.2. The program is automatically deleted
from the favorites station.
Interior Features
Audio Set
5-47
CX-9_8GC7-EE-17G_Edition1 2017-5-16 8:22:04

Bluetooth® Hands-Free▼ Making a Call
For Mazda Connect, making calls ispossible using any of the following sixmethods:
• Phonebook downloaded fromBluetooth® device (mobile phone)(voice recognition function can be used)
• Favorites• Call record• Dialing a telephone number (voice
recognition function can be used)• “Redial” - Voice recognition command
for making a call to the latest outgoingcall record.
• “Call back” - Voice recognitioncommand for making a call to the latestincoming call record.
Phonebook Usage
Telephone calls can be made by saying thecontact name in the downloadedphonebook or the name of a person whosephone number has been registered in theBluetooth® Hands-Free. Refer to Importcontact (Download Phonebook).1. Press the talk button.2. Wait for the beep sound.3. Say: “Call XXXXX... (Ex. “John”)
Mobile”.4. Follow the voice guidance to place the
call.
Screen operation
1. Select the icon on the home screento display the Communication screen.
2. Select to display the contactlist.
3. Select the contact you would like tocall to display the details for thecontact.
4. Select the desired phone number tomake the call.
Import contact (Download Phonebook)
Phonebook data from your device (Mobilephone) can be sent and registered to yourBluetooth® Hands-Free phonebook usingBluetooth®.
(Automatic downloading)
The “Auto Download Contacts” settingmust be on. When hands-free is connectedto the device, the phonebook isdownloaded automatically.Refer to Communication Settings on page5-56.
(Manually downloading)
If the “Auto Download Contacts” settingis off, download the phonebook using thefollowing procedure.1. Select the icon on the home screen
to display the Communication screen.2. Select to display the contact
list.3. Select .4. Select or
to switch to thedevice operation.
5. If is selected, select.
6. Download will be started from themobile phone.
Interior Features
Audio Set
5-48
CX-9_8GC7-EE-17G_Edition1 2017-5-16 8:22:04
NOTE• If “Import All Contacts” is performed
after saving the phonebook to theBluetooth® unit, the phonebook will beoverwritten.
• A maximum of 1,000 contacts can beregistered to the phonebook.
• Phonebook, incoming/outgoing callrecord, and favorite memories areexclusive to each mobile phone toprotect privacy.
Favorites Contacts
A maximum of 50 contacts can beregistered. It will take less time to make acall after registering the telephone number.In addition, you do not have to look for theperson you want to call in the phonebook.
Registering to your favorites
1. Select the icon on the home screento display the Communication screen.
2. Select to display the favoriteslist.
3. Select .4. Select or
.5. Select from the displayed list.
NOTEWhen “Add New Contact” is selected,information such as the selected person’sname is also registered. In addition, when“Add New Contact Details” is selected,only the telephone number of the selectedperson is registered.
Calling a favorite
1. Select the icon on the home screento display the Communication screen.
2. Select to display the favoriteslist.
3. (If only one phone number isregistered to contact)Select the contact information youwould like to call. Go to Step 5.(If multiple phone numbers areregistered to contact)Select the contact you would like tocall to display the screen indicating thedetails for the contact. Go to Step 4.
4. Select the phone number you wouldlike to call.
5. Select .
Deleting a favorite
1. Select the icon on the home screento display the Communication screen.
2. Select to display the favoriteslist.
3. Select .4. Select .5. Select the contact information which
you would like to delete.6. Select .
Changing the display order of yourfavorites list
1. Select the icon on the home screento display the Communication screen.
2. Select to display the favoriteslist.
3. Select .4. Select .5. The contact can be moved after it is
selected.6. Slide the contact or move it using the
commander switch, then select .
Interior Features
Audio Set
5-49
CX-9_8GC7-EE-17G_Edition1 2017-5-16 8:22:04

Changing contact name of yourfavorites
1. Select the icon on the home screento display the Communication screen.
2. Select to display the favoriteslist.
3. Select .4. Select .5. Select the contact to display the
keyboard screen.6. If a new name is input and is
selected, the contact name is stored.
NOTEIf the contact is long-pressed when thefavorites list is displayed, the contactinformation can be edited (deleted,moved).
Telephone Number Input
NOTEPractice this while parked until you areconfident you can do it while driving in anon-taxing road situation. If you are notcompletely comfortable, make all callsfrom a safe parking position, and onlystart driving when you can devote yourfull attention to driving.
1. Select the icon on the home screento display the Communication screen.
2. When is pressed, the dial padis displayed.
3. Input the telephone number using thedial pad.
4. Select to make the call.
Numeral or symbol entry
Use the dial pad.Long-press the to input +.Select to delete the currently inputvalue.Long-press to delete all input values.
Redial Function
Makes a call to the last person called(latest person on outgoing call record)from the mobile phone/vehicle.1. Press the talk button.2. Wait for the beep sound.3. Say: “Redial”
Call back Function
Makes a call to the last person who calledyour (latest person on incoming callrecord) mobile phone/vehicle.1. Press the talk button.2. Wait for the beep sound.3. Say: “Call back”
Interior Features
Audio Set
5-50
CX-9_8GC7-EE-17G_Edition1 2017-5-16 8:22:04

▼ Receiving an Incoming Call
When an incoming call is received, the incoming call notification screen is displayed. The“Incoming Call Notifications” setting must be on.Refer to Communication Settings on page 5-56.To accept the call, press the pick-up button on the audio control switch or select onthe screen.To reject the call, press the hang-up button on the audio control switch or select on thescreen.The following icons are displayed on the screen during a call. Icons which can be useddiffer depending on use conditions.
Icon Function
Displays the Communication menu.
Ends the call.
Transferring a call from hands-free to a mobile phoneCommunication between the Bluetooth® unit and a device (mobile phone) is canceled,and an incoming call will be received by the device (mobile phone) like a standard call.Transferring a call from a device (mobile phone) to hands-freeCommunication between devices (mobile phone) can be switched to Bluetooth®
Hands-Free.MuteThe microphone can be muted during a call.When selected again, the mute is canceled.To make a 3-way call, select the contacts from the following:
: Call History is displayed.: The phonebook is displayed.
: The dial pad is displayed. Input the phone number.The device may be unusable depending on the contractual content.
The call on hold is made to make a 3-way call.The device may be unusable depending on the contractual content.
Switches the call on hold.
DTMF (Dual Tone Multi-Frequency Signal) TransmissionThis function is used when transmitting DTMF via the dial pad. The receiver of a DTMFtransmission is generally a home telephone answering machine or a company's automatedguidance call center.Input the number using a dial pad.
Interior Features
Audio Set
5-51
CX-9_8GC7-EE-17G_Edition1 2017-5-16 8:22:04

NOTE• If the ignition is switched off during a
hands-free call, the line is transferred tothe device (Mobile phone)automatically.
• If the DTMF code has two or moredigits or symbols, each one must betransmitted individually.
▼ Call Interrupt
A call can be interrupted to receive anincoming call from a third party.When is selected or thepick-up button on the steering wheel ispressed, the current call is held and thesystem switches to the new incoming call.When is selected, the currentcall is ended and the system switches tothe new incoming call (GSM networkonly).When is selected or the hang-upbutton on the steering wheel is pressed, anincoming call is refused.
NOTE• The function may not be available
depending on the contractual content ofthe mobile device.
• The function may not be operabledepending on the type of the telephonenetwork and the mobile device.
▼ Receiving and Replying to Messages(available only with E-mail/SMScompatible phones)
SMS (Short Message Service) messages,and E-mail received by connected devicescan be downloaded, displayed, and played(read by the system).Additionally, replies can also be made tocalls and messages in the receivedmessages.
Downloading messages
Up to 20 new messages can bedownloaded and displayed from aconnected device.
NOTEFor E-mail, 20 messages for each accountcan be downloaded.
(Automatic downloading)
The “Auto Download Email” (E-mail) or“Auto Download SMS” (SMS) settingmust be on. A message is downloadedautomatically when the Bluetooth® unit isconnected to the device.Refer to Communication Settings on page5-56.
(Manually downloading)
When the “Auto Download Email”(E-mail) or “Auto Download SMS” (SMS)setting is off, the message is downloadedusing the following procedure.1. Select the icon on the home screen
to display the Communication screen.2. Select or to display the
Inbox.3. Select .
Interior Features
Audio Set
5-52
CX-9_8GC7-EE-17G_Edition1 2017-5-16 8:22:04

4. Download will be started from themobile phone.
NOTE• Attached data is not downloaded.• Messages up to 1 kilobyte (E-mail)/
140-bytes (SMS) can be downloaded.• A message list is created for each
device.• If the connected device does not
correspond to MAP 1.0, the ATcommand is used to download. Thedownloaded message indicates that it isalready read.
• Downloading using the AT commandmay not function depending on theconnected device.
• If an iPhone is connected, the followingfunctions cannot be used.
• Downloading past messages• Replying to messages
∗ iPhone is a trademark of Apple Inc.,registered in the U.S. and othercountries.
Receiving messages
(Method 1)
When a device receives a message, amessage received notification is displayed.The “Email Notifications” (E-mail) or“SMS Notifications” (SMS) setting mustbe on.Refer to Communication Settings on page5-56.Select and display the message.
(Method 2)
1. Select the icon on the home screento display the Communication screen.
2. Select and display the newmessage list for E-mail and SMS.
3. Select the message you would like todisplay.
Interior Features
Audio Set
5-53
CX-9_8GC7-EE-17G_Edition1 2017-5-16 8:22:04

The following icons are displayed in the lower part of the details on the message. Iconswhich can be used differ depending on use conditions.
Icon Function
Displays the Communication menu.
Displays the inbox.
Plays back a message.When selected again, playback is temporarily stopped.
Displays the previous message.
Displays the next message.
Only replies to the sender of the currently displayed message.Select the sentence on the displayed reply screen and select the sentence for sending fromthe preset message.Select .(Only E-mail)Replies to all members including CC.Select the sentence on the displayed reply screen and select the sentence for sending fromthe preset message.Select .
Makes a call to a person who sent a message.For E-mail, this function may not work depending on the device.
Deletes a message.The messages stored in a device is also deleted.
NOTEUp to three preset messages can be selected.
Interior Features
Audio Set
5-54
CX-9_8GC7-EE-17G_Edition1 2017-5-16 8:22:04
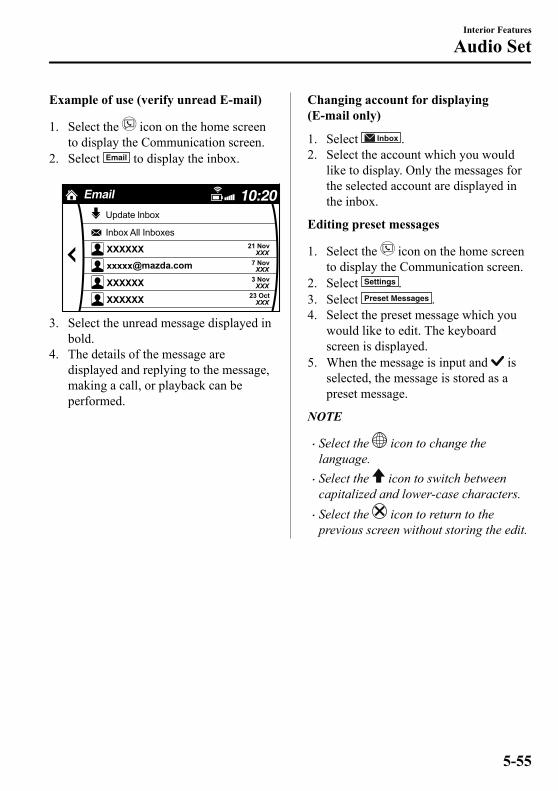
Example of use (verify unread E-mail)
1. Select the icon on the home screento display the Communication screen.
2. Select to display the inbox.
3. Select the unread message displayed inbold.
4. The details of the message aredisplayed and replying to the message,making a call, or playback can beperformed.
Changing account for displaying(E-mail only)
1. Select .2. Select the account which you would
like to display. Only the messages forthe selected account are displayed inthe inbox.
Editing preset messages
1. Select the icon on the home screento display the Communication screen.
2. Select .3. Select .4. Select the preset message which you
would like to edit. The keyboardscreen is displayed.
5. When the message is input and isselected, the message is stored as apreset message.
NOTE
• Select the icon to change thelanguage.
• Select the icon to switch betweencapitalized and lower-case characters.
• Select the icon to return to theprevious screen without storing the edit.
Interior Features
Audio Set
5-55
CX-9_8GC7-EE-17G_Edition1 2017-5-16 8:22:04

▼ Communication Settings
Select the icon on the home screen to display the Communication screen.Select to change the setting.
Item Setting Function
Bluetooth® — Go to Bluetooth® setting menu.Refer to Bluetooth® Preparation on page 5-37.
Incoming Call Notifi-cations On/Off Notifies when an incoming call is received.
Auto Download SMS On/Off Downloads SMS automatically when the Bluetooth® unit is connectedto the device.
SMS Notifications On/Off Notifies when a new SMS is received.Auto DownloadEmail*1 On/Off Downloads E-mail automatically when the Bluetooth® unit is connect-
ed to the device.Email Notifications On/Off Notifies when a new E-mail is received.Auto Download CallHistory On/Off Downloads Call History automatically when the Bluetooth® unit is
connected to the device.Auto Download Con-tacts*1 On/Off Downloads the phonebook automatically when the Bluetooth® unit is
connected to the device.
Ringtone Fixed/In-band/Off Changes the ringtone setting.
Phone Volume Adjusts usingthe slider. Adjusts the conversation volume.
VR and Ringtone Adjusts usingthe slider. Adjusts the voice guidance and ringtone volume.
Contacts Sort Order
First Name, LastName
Displays the contact information in alphabetical order of the firstname.
Last Name, FirstName
Displays the contact information in alphabetical order of the lastname.
Preset Messages —Edits the preset message.Refer to Receiving and Replying to Messages (available only withE-mail/SMS compatible phones) on page 5-52.
Reset — Initializes all Communication Settings.
*1 Depending on the device, it may be necessary to acquire download permission on the device side.
Interior Features
Audio Set
5-56
CX-9_8GC7-EE-17G_Edition1 2017-5-16 8:22:04

Voice Recognition▼ Basic Operation Method
Activating Voice Recognition
Press the talk button.
Ending Voice Recognition
Use one of the following methods:• Press the hang-up button.• Say, “Cancel”.• Operate the commander switch or the
center display (only when vehicle isstopped).
Skipping Voice Guidance (for fasteroperation)
Press and release the talk button.
Troubleshooting for Voice Recognition
If you do not understand an operationmethod while in the voice recognitionmode, say “Tutorial” or “Help”.
Commands useable anytime duringvoice recognition
“Go Back” and “Cancel” are commandswhich can be used at anytime during voicerecognition.
Returning to previous operation
To return to the previous operation, say,“Go Back” while in voice recognitionmode.
Cancel
To put the Bluetooth® Hands-Free systemin standby mode, say, “Cancel” while invoice recognition mode.
To prevent a deterioration in the voicerecognition rate and voice quality, thefollowing points should be observed:
• The voice recognition cannot beperformed while voice guidance or thebeep sound is operating. Wait until thevoice guidance or the beep sound isfinished before saying your commands.
• Phone related commands are availableonly when your phone is connected viaBluetooth®. Make sure your phone isconnected via Bluetooth® before youoperate phone related voice commands.
• Music play commands, such as PlayArtist and Play Album can be used onlyin USB audio mode.
• Do not speak too slowly or loudly (noloud voice).
• Speak clearly, without pausing betweenwords or numbers.
• Dialects or different wording other thanhands-free prompts cannot berecognized by voice recognition. Speakin the wording specified by the voicecommands.
• It is not necessary to face themicrophone or approach it. Speak thevoice commands while maintaining asafe driving position.
• Close the windows and/or the sunroof toreduce loud noises from outside thevehicle, or turn down the airflow of theclimate control system while Bluetooth®
Hands-Free is being used.• Make sure the vents are not directing air
up towards the microphone.
NOTEIf the voice recognition performance is notsatisfactory.Refer to Troubleshooting on page 5-63.
Interior Features
Audio Set
5-57
CX-9_8GC7-EE-17G_Edition1 2017-5-16 8:22:04

▼ Voice Command List
Voice command
When the talk button is pressed and the following command is spoken, the audio ornavigation can be operated. The commands in the () can be omitted. The specified name andnumber are put into the {}.
Standard command
Voice command Functioncancel Ends the voice recognition mode.go back Returns to the previous operation.help Usable commands can be verified.tutorial Basic voice commands and methods of use can be verified.(go to) home (screen)/main menu Moves to the home screen.(go to) communication Moves to the communication screen.(go to) navigation Moves to the navigation screen (vehicles with navigation system).(go to) entertainment (menu) Moves to the entertainment screen.(go to) settings Moves to the setting screen.(go to) favorites Moves to the favorites screen.
Communication (phone) related command
Voice command FunctionCall {name in phonebook} (mobile/home/work/other)Example: “Call John Mobile”
Call to the contact in the downloaded phonebook.Refer to Making a Call on page 5-48.
Redial Call to the last contact you called.Refer to Making a Call on page 5-48.
Callback Call to the last contact who called you.Refer to Making a Call on page 5-48.
Entertainment (audio) related command
Voice command Function Corresponding audiosource
(Go to/Play) AM (Radio) Switches the audio source to AM radio. All(Go to/Play) FM (Radio) Switches the audio source to FM radio. All(Go to/Play) Bluetooth (Audio) Switches the audio source to BT audio. All(Go to/Play) Aha (Radio) Switches the audio source to Aha™ Radio. All(Go to/Play) Stitcher Switches the audio source to Stitcher™ Radio. All(Go to/Play) USB 1 Switches the audio source to USB 1. All(Go to/Play) USB 2 Switches the audio source to USB 2. All
Interior Features
Audio Set
5-58
CX-9_8GC7-EE-17G_Edition1 2017-5-16 8:22:04

Voice command Function Corresponding audiosource
Play Playlist {Playlist name} Plays the selected playlist. USBPlay Artist {Artist name} Plays the selected artist. USBPlay Album {Album name} Plays the selected album. USBPlay Genre {Genre name} Plays the selected genre. USBPlay Folder {Folder name} Plays the selected folder. USB
Navigation related command*
For the navigation screen voice commands, refer to the separate navigation system manual.
NOTE• Some commands cannot be used depending on the grade and specification.• Some commands cannot be used depending on the device connection conditions and the
use conditions.• The commands are examples of the available commands.
Interior Features
Audio Set
*Some models. 5-59
CX-9_8GC7-EE-17G_Edition1 2017-5-16 8:22:04

SettingsNOTEDepending on the grade and specification, the screen display may differ.
Select the icon on the home screen and display the Settings screen.Switch the tab and select the setting item you want to change.You can customize settings in the setup display as follows:
Tab Item Function
AD-DispHeightBrightness ControlOther
Refer to Active Driving Display on page 4-29.
Display Refer to Volume/Display/Sound Controls on page 5-23.
SafetyDistance Recognition Support SystemSBS/SCBSOther
Refer to Personalization Features on page 9-10.
Sound Refer to Volume/Display/Sound Controls on page 5-23.
Clock
Adjust Time
Displays the currently set time is displayed.Press to advance the hour/minute, and select
to move the hour/minute back.AM/PM can only be selected with the 12-hourclock display.
GPS SyncSynchronizes with GPS when turned on.When turned off, the time can be changedfrom “Adjust Time”.
Time Format Changes the display between 12 and 24-hourclock time.
Time Zone Select When it's not synchronized with GPS, selectthe region you want to specify.
Daylight Savings TimeTurns the daylight saving time setting on/off.When ON, the time advances 1 hour. WhenOFF, it returns to normal time.
VehicleRain Sensing WiperDoor LocksOther
Refer to Personalization Features on page 9-10.
Devices
Bluetooth Refer to Bluetooth® Preparation on page 5-37.
Network ManagementWi-Fi™ is used to obtain Navi POI/Real TimeTraffic function (Such as gas prices, weather,nearest restaurant)
Interior Features
Audio Set
5-60
CX-9_8GC7-EE-17G_Edition1 2017-5-16 8:22:04

Tab Item Function
System
Tool Tips Turns button explanations ON/OFF.Language Changes the language.
Temperature Changes the setting between Fahrenheit andCelsius.
Distance Changes the setting between miles and kilome-ters.
Music Database Update
Used to update Gracenote®. Gracenote® isused with USB Audio, and provides:1. Supplemental music information (Such as
song name, artist name)2. Voice recognition assistance for Play Ar-
tist and Play AlbumGracenote® can be downloaded from the Maz-da Handsfree Website.Refer to Gracenote® Database on page 5-32.
Factory Reset
Memory and settings are initialized to the fac-tory settings.The initialization launches by selecting the
button.
About
Agreements andDisclaimers Verify the disclaimer and agree.
Version Information Can verify the current audio unit OS versionand Gracenote® Database version.
Interior Features
Audio Set
5-61
CX-9_8GC7-EE-17G_Edition1 2017-5-16 8:22:04

ApplicationsNOTEDepending on the grade and specification, the screen display may differ.
Select the icon on the home screen to display the Applications screen. The followinginformation can be verified.
Top screen Item Function
Fuel Economy Monitor Fuel Consumption Display Refer to Fuel Economy Monitoron page 4-77.
Vehicle Status Monitor
Warning Guid-ance
Warnings currently active can beverified.
Refer to If a Warning LightTurns On or Flashes on page 7-38.
MaintenanceScheduled MaintenanceTire RotationOil Change
Refer to Maintenance Monitoron page 6-11.
Interior Features
Audio Set
5-62
CX-9_8GC7-EE-17G_Edition1 2017-5-16 8:22:04

TroubleshootingMazda Bluetooth® Hands-Free Customer Service
If you have any problems with Bluetooth®, contact our toll-free customer service center.Phone:(Germany)0800 4263 738 (8:00―18:00 Central European Time)(Except Germany)00800 4263 7383 (8:00―18:00 Central European Time)(Worldwide)
49 (0) 6838 907 287 (8:00―18:00 Central European Time)Web:http://www.mazdahandsfree.com
Bluetooth® Device pairing, connection problems
Symptom Cause Solution method
Unable to perform pairing ―
Make sure that the Bluetooth® de-vice is compatible with the Blue-tooth® unit, and that Bluetooth® andFind Mode*1 are on and the airplanemode is off in the Bluetooth® devicesetting. Turn off the power of theBluetooth® device once, then turn itback on. If pairing is still not possi-ble after this, contact an expert re-pairer, we recommend an Author-ized Mazda Repairer or MazdaBluetooth® Hands-Free CustomerService.
Interior Features
Audio Set
5-63
CX-9_8GC7-EE-17G_Edition1 2017-5-16 8:22:04

Symptom Cause Solution method
Pairing cannot be performed againThe pairing information paired tothe Bluetooth® unit or device is notrecognized correctly.
Perform pairing using the followingprocedure:1. Delete the applicable Blue-
tooth® device on the MazdaConnect.
2. Delete “Mazda” from the Blue-tooth® search screen of theBluetooth® device.
3. Perform pairing again.If pairing is not possible after tryingthe procedure, turn off the power of theBluetooth® device once, then turn itback on. If pairing is still not possibleafter this, contact an expert repairer,we recommend an Authorized MazdaRepairer or Mazda Bluetooth®
Hands-Free Customer Service.Unable to perform pairing The Bluetooth® function and the
Find Mode/Visible setting*1 on thedevice may turn off automaticallyafter a period of time has elapseddepending on the device.
Check whether the Bluetooth® func-tion and the Find Mode/Visible set-ting*1 on the device are turned onand pairing or reconnect.
Does not connect automaticallywhen starting the engineAutomatically connects, but thendisconnects suddenly
Disconnects intermittently
The device is in a location in whichradio wave interference can occureasily, such as inside a bag in a rearseat, in a rear pocket of a pair ofpants.
Move the device to a location inwhich radio wave interference isless likely to occur.
Does not connect automaticallywhen starting the engine
The pairing information is updatedwhen the device OS is updated.
Perform pairing using the followingprocedure:1. Delete the applicable Blue-
tooth® device on the MazdaConnect.
2. Delete “Mazda” from the Blue-tooth® search screen of theBluetooth® device.
3. Perform pairing again.If pairing is not possible after tryingthe procedure, turn off the power of theBluetooth® device once, then turn itback on. If pairing is still not possibleafter this, contact an expert repairer,we recommend an Authorized MazdaRepairer or Mazda Bluetooth®
Hands-Free Customer Service.
*1 Setting which detects the existence of a device external to the Bluetooth® unit.
Interior Features
Audio Set
5-64
CX-9_8GC7-EE-17G_Edition1 2017-5-16 8:22:04

NOTE• When the OS of the device is updated, the pairing information may be deleted. If this
happens, reprogram the pairing information to the Bluetooth® unit.• If you pair your phone which has already been paired to your vehicle more than once in
the past, you need to delete “Mazda” on your mobile device. Then, execute theBluetooth® search on your mobile device once again, and pair to a newly detected“Mazda”.
• Before you pair your device, make sure that Bluetooth® is “ON”, both on your phone andon the vehicle.
• If Bluetooth®-enabled devices are used in the following locations or conditions,connection via Bluetooth® may not be possible.
• The device is in a location hidden from the center display such as behind or under aseat, or inside the glove compartment.
• The device contacts or is covered by a metal object or body.• The device is set to power-saving mode.
• Different Bluetooth®-enabled devices can be used for Bluetooth® Hands-Free andBluetooth® audio. For example, device A can be connected as a Bluetooth® Hands-Freedevice and device B can be connected as a Bluetooth® audio device. However, thefollowing may occur when they are used at the same time.
• The Bluetooth® connection of the device is disconnected.• Noise occurs in the Hands-Free audio.• Hands-Free operates slowly.
Voice recognition related problems
Symptom Cause Solution methodPoor voice recognition •Excessive, slow speech.
•Excessive, forceful speech (shout-ing).
•Speaking before the beep soundhas ended.
•Loud noise (speaking or noise fromoutside/inside vehicle).
•Airflow from A/C is blowingagainst the microphone.
•Speaking in off-standard expres-sions (dialect).
Regarding the causes indicated onthe left, be careful with how youspeak. In addition, when numbersare spoken in a sequence, recogni-tion ability will improve if no stop isplaced between the numbers.
False recognition of numbers
Poor voice recognition There is a malfunction in the micro-phone.
A poor connection or malfunctionwith the microphone may have oc-curred. Consult an expert repairer,we recommend an Authorized Maz-da Repairer.
Interior Features
Audio Set
5-65
CX-9_8GC7-EE-17G_Edition1 2017-5-16 8:22:04

Symptom Cause Solution method
Phone-related voice recognition isdisabled
There is a problem with the connec-tion between the Bluetooth® unitand the device.
If there is any malfunction afterchecking the pairing situation, checkfor device pairing or connectionproblems.
Names in the phonebook are noteasily recognized
The Bluetooth® system is under acondition in which recognition isdifficult.
By carrying out the following meas-ures, the rate of recognition will im-prove.
•Clear memory from the phonebookwhich is not used very often.
•Avoid shortened names, use fullnames. (Recognition improves thelonger the name is. By not usingnames such as “Mom”, “Dad”, rec-ognition will improve.)
When operating the audio, a songname is not recognized
Song names cannot be recognizedby voice. ―
You want to skip guidance ―Guidance can be skipped by quicklypressing and releasing the talk but-ton.
Interior Features
Audio Set
5-66
CX-9_8GC7-EE-17G_Edition1 2017-5-16 8:22:04

Regarding problems with calls
Symptom Cause Solution method
When starting a call, vehicle noisefrom the other party can be heard
For about three seconds after start-ing a call, the Bluetooth® unit'sNoise Suppression function requirestime to adapt to the call environ-ment.
This does not indicate a problemwith the device.
The other party cannot be heard orthe speaker's voice is quiet The volume is set at zero or low. Increase the volume.
Other problems
Symptom Cause Solution methodThe indication for the remainingbattery is different between the ve-hicle and the device
The indication method is differentbetween the vehicle and the device. ―
When a call is made from the vehi-cle, the telephone number is updatedin the incoming/outgoing call recordbut the name does not appear
The number has not been registeredinto the phonebook.
If the number has been registeredinto the phonebook, the incoming/outgoing call record is updated bythe name in the phonebook whenthe engine is restarted.
The cell phone does not synchronizewith the vehicle regarding the in-coming/outgoing call record
Some types of cell phones do notsynchronize automatically.
Operate the cell phone for synchro-nization.
It takes a long time to complete thefunction for changing the language
A maximum of 60 seconds is re-quired. ―
Interior Features
Audio Set
5-67
CX-9_8GC7-EE-17G_Edition1 2017-5-16 8:22:04

Things You Need to Know
WARNING
Always adjust the audio while the vehicle isstopped:Do not adjust the audio control switcheswhile driving the vehicle. Adjusting theaudio while driving the vehicle isdangerous as it could distract yourattention from the vehicle operation whichcould lead to a serious accident.Even if the audio control switches areequipped on the steering wheel, learn touse the switches without looking down atthem so that you can keep your maximumattention on the road while driving thevehicle.
CAUTIONFor the purposes of safe driving, adjust theaudio volume to a level that allows you tohear sounds outside of the vehicleincluding car horns and particularlyemergency vehicle sirens.
NOTE• To prevent the battery from being
discharged, do not leave the audiosystem on for a long period of time whenthe engine is not running.
• If a cellular phone or CB radio is usedin or near the vehicle, it could causenoise to occur from the audio system,however, this does not indicate that thesystem has been damaged.
Do not spill any liquid on the audiosystem.
▼ Radio Reception
AM characteristics
AM signals bend around such things asbuildings or mountains and bounce off theionosphere.Therefore, they can reach longer distancesthan FM signals.Because of this, two stations maysometimes be picked up on the samefrequency at the same time.
Station 2Station 1
Ionosphere
Interior Features
Appendix
5-68
CX-9_8GC7-EE-17G_Edition1 2017-5-16 8:22:04

FM characteristics
An FM broadcast range is usually about40―50 km (25―30 miles) from thesource. Because of extra coding needed tobreak the sound into two channels, stereoFM has even less range than monaural(non-stereo) FM.
FM Station
40—50km (25—30 miles)
Signals from an FM transmitter are similarto beams of light because they do not bendaround corners, but they do reflect. UnlikeAM signals, FM signals cannot travelbeyond the horizon. Therefore, FMstations cannot be received at the greatdistances possible with AM reception.
AM waveFM wave
FM wave
100—200 km (60—120 miles)
Ionosphere
Atmospheric conditions can also affectFM reception. High humidity will causepoor reception. However, cloudy days mayprovide better reception than clear days.
Multipath noise
Since FM signals can be reflected byobstructions, it is possible to receive boththe direct signal and the reflected signal atthe same time. This causes a slight delayin reception and may be heard as a brokensound or a distortion. This problem mayalso be encountered when in closeproximity to the transmitter.
Reflected waveDirect
Flutter/Skip noise
Signals from an FM transmitter move instraight lines and become weak in valleysbetween tall buildings, mountains, andother obstacles. When a vehicle passesthrough such an area, the receptionconditions may change suddenly, resultingin annoying noise.
Interior Features
Appendix
5-69
CX-9_8GC7-EE-17G_Edition1 2017-5-16 8:22:04

Weak signal noise
In suburban areas, broadcast signalsbecome weak because of distance from thetransmitter. Reception in such fringe areasis characterized by sound breakup.
Strong signal noise
This occurs very close to a transmittertower. The broadcast signals are extremelystrong, so the result is noise and soundbreakup at the radio receiver.
Station drift noise
When a vehicle reaches the area of twostrong stations broadcasting at similarfrequencies, the original station may betemporarily lost and the second stationpicked up. At this time there will be somenoise from this disturbance.
Station 2 88.3 MHz
Station 1 88.1 MHz
▼ Operating Tips for MP3
MP3 stands for MPEG Audio Layer 3,which is standardized voice compressionestablished by the ISO*1 working group(MPEG).Use of MP3 allows for audio data to becompressed to approximately a tenth ofthe source data size.This unit plays files with the extension(.mp3) as MP3 files.*1 International Organization for
Standardization
CAUTIONDo not use an audio file extension on filesother than audio files. In addition, do notchange the audio file extension. Otherwise,the unit will not recognize the file correctlyresulting in noise or a malfunction.
NOTESupply of this product only conveys alicense for private, non-commercial useand does not convey a license nor implyany right to use this product in anycommercial (i.e. revenue-generating) realtime broadcasting (terrestrial, satellite,cable and/or any other media),broadcasting/streaming via the Internet,intranets and/or other networks or in otherelectronic content distribution systems,such as pay-audio or audio-on-demandapplications. An independent license forsuch use is required. For details, pleasevisit http://www.mp3licensing.com.
• When naming an MP3 file, be sure toadd an MP3 file extension (.mp3) afterthe file name.
Interior Features
Appendix
5-70
CX-9_8GC7-EE-17G_Edition1 2017-5-16 8:22:04

• The number of characters which can bedisplayed is restricted.
▼ Operating Tips for WMA
WMA is short for Windows Media*1
Audio and is the audio compressionformat used by Microsoft*1.Audio data can be created and stored at ahigher compression ratio than MP3.This unit plays files with the extension(.wma) as WMA files.*1 Windows Media and Microsoft are
registered trademarks of MicrosoftCorporation U.S. in the United Statesand other countries.
CAUTIONDo not use an audio file extension on filesother than audio files. In addition, do notchange the audio file extension. Otherwise,the unit will not recognize the file correctlyresulting in noise or a malfunction.
• WMA files written under specificationsother than the indicated specificationmay not play normally or files or foldernames may not display correctly.
• The file extension may not be provideddepending on the computer operatingsystem, version, software, or settings. Inthis case, add the file extension “.wma”to the end of the file name, and thenwrite it to the memory.
▼ Operating Tips for AAC
AAC stands for Advanced Audio Coding,which is standardized voice compressionestablished by the ISO*1 working group(MPEG). Audio data can be created andstored at a higher compression ratio thanMP3.This unit plays files with the extensions(.aac/.m4a/.wav) as the AAC files.
CAUTIONDo not use an audio file extension on filesother than audio files. In addition, do notchange the audio file extension. Otherwise,the unit will not recognize the file correctlyresulting in noise or a malfunction.
• AAC files written under specificationsother than the indicated specificationmay not play normally or files or foldernames may not display correctly.
• The file extension may not be provideddepending on the computer operatingsystem, version, software, or settings. Inthis case, add the file extension “.aac”,“.m4a”, or “.wav” to the end of the filename, and then write it to the memory.*1 International Organization forStandardization
Interior Features
Appendix
5-71
CX-9_8GC7-EE-17G_Edition1 2017-5-16 8:22:04

▼ Operating Tips for OGG
OGG is the audio compression format forXiph. Org Foundation.Audio data can be created and stored at ahigher compression ratio than MP3.This unit plays files with the extension(.ogg) as OGG files.
CAUTIONDo not use an audio file extension on filesother than audio files. In addition, do notchange the audio file extension. Otherwise,the unit will not recognize the file correctlyresulting in noise or a malfunction.
• OGG files written under specificationsother than the indicated specificationmay not play normally or files or foldernames may not display correctly.
• The file extension may not be provideddepending on the computer operatingsystem, version, software, or settings. Inthis case, add the file extension “.ogg”to the end of the file name, and thenwrite it to the memory.
▼ Operating Tips for USB device
This unit plays audio files as follows:
Extension Playback with this unit.mp3 MP3.wma WMA.aac
AAC.m4a.wav WAV.ogg OGG
CAUTIONDo not use an audio file extension on filesother than audio files. In addition, do notchange the audio file extension. Otherwise,the unit will not recognize the file correctlyresulting in noise or a malfunction.
NOTE• Playback may not be possible depending
on the type and condition of the USBflash memory even if the audio filecomplies with the standard.
• A copyright protected WMA/AAC filecannot be played in this unit.
• If a file name in the USB memory is toolong, it could cause operation problemssuch as not being able to playback thesong.(Recommended: Within 80 characters)
• The order of the music data stored in thedevice may differ from the playbackorder.
• To prevent loss or damage of storeddata, we recommend that you alwaysback up your data.
Interior Features
Appendix
5-72
CX-9_8GC7-EE-17G_Edition1 2017-5-16 8:22:04

• If a device exceeds the maximumelectric current value of 1,000 mA, itmay not operate or recharge whenconnected.
• Do not pull out the USB device while inthe USB mode (only pull it out while inFM/AM radio mode).
• The device will not operate if the data ispassword protected.
MP3/WMA/AAC/OGG files written underspecifications other than the indicatedspecification may not play normally orfiles/folder names may not displaycorrectly.
Interior Features
Appendix
5-73
CX-9_8GC7-EE-17G_Edition1 2017-5-16 8:22:04

SunvisorsWhen you need a sunvisor, lower it for usein front or swing it to the side.
Sunvisor
▼ Vanity Mirrors
To use the vanity mirror, lower thesunvisor.The vanity mirror light will illuminatewhen you open the cover.To prevent the battery from beingdischarged, the vanity mirror will onlyilluminate in the tilt range shown in thefigure.
off
off
on
Interior LightsNOTE
• Do not leave the lights on for longperiods while the engine is turned off.Otherwise the battery power could bedepleted.
Overhead Lights
Switch Posi-tion Overhead Lights
Light off•Light is on when any door is open•Light is on or off when the illumi-nated entry system is on
Light on
Front
Center
Interior Features
Interior Equipment
5-74
CX-9_8GC7-EE-17G_Edition1 2017-5-16 8:22:04

Rear
NOTEThe rear overhead light and the centermap lights also turn on and off when thefront overhead light switch is operated.
Map Lights
When the overhead light switch is in thedoor or off position, press the lens toilluminate the map lights, and then pressthe lens again to turn them off.
Front
Center
NOTE• Once the center map lights have been
turned off, they will turn on and offdepending on the position to which theoverhead light is switched.
• The map lights will not turn off even ifthe lens is pressed in the followingcases:
• The overhead light switch is in the ONposition.
• The overhead light switch is in thedoor position with the door open.
• The illuminated entry system is on.
Luggage Compartment Lights
Switch Posi-tion Luggage Compartment Light
Light offLight on when the liftgate is open
Interior Features
Interior Equipment
5-75
CX-9_8GC7-EE-17G_Edition1 2017-5-16 8:22:04

Ambient Light*
The ambient lights continuously turn on when the ignition is switched ON.The ambient lights dim when the parking lights or headlights are turned on.
Ambient light
NOTE• The ambient lights turn on or off in conjunction with the illuminated entry system when
the ignition is switched OFF.• The ambient light illumination level can be changed while the parking lights or headlights
are turned on.Refer to Personalization Features on page 9-10.
Interior Features
Interior Equipment
5-76 *Some models.
CX-9_8GC7-EE-17G_Edition1 2017-5-16 8:22:04

▼ Illuminated Entry System
The overhead lights turn on when any ofthe following operations is done with theoverhead light switch in the DOORposition.The ambient lights turn on regardless ofthe overhead light switch position.
• The driver's door is unlocked with theignition is switched OFF.
• The ignition is switched OFF with alldoors closed.
NOTE• The illumination time differs depending
on the operation.• Battery saver
If an interior light is left on with theignition switched OFF, the light isturned off automatically after about 30minutes to prevent battery depletion.
• The operation of the illuminated entrysystem can be changed.Refer to Personalization Features onpage 9-10.
Accessory SocketsOnly use genuine Mazda accessories orthe equivalent requiring no greater than120 W (DC 12 V, 10 A).The ignition must be switched to ACC orON.Front
Rear
CAUTIONTo prevent accessory socket damage or
electrical failure, pay attention to thefollowing:
Do not use accessories that requiremore than 120 W (DC 12 V, 10 A).
Interior Features
Interior Equipment
5-77
CX-9_8GC7-EE-17G_Edition1 2017-5-16 8:22:04

Do not use accessories that are notgenuine Mazda accessories or theequivalent.Close the cover when the accessory
socket is not in use to prevent foreignobjects and liquids from getting intothe accessory socket.Correctly insert the plug into the
accessory socket.Do not insert the cigarette lighter into
the accessory socket.Noise may occur on the audio playback
depending on the device connected tothe accessory socket.Depending on the device connected to
the accessory socket, the vehicle'selectrical system may be affected, whichcould cause the warning light toilluminate. Disconnect the connecteddevice and make sure that the problem isresolved. If the problem is resolved,disconnect the device from the socketand switch the ignition off. If the problemis not resolved, consult an expertrepairer, we recommend an AuthorizedMazda Repairer.
NOTETo prevent discharging of the battery, donot use the socket for long periods with theengine off or idling.
USB Power Outlet*
The USB power outlets can be usedregardless of whether the ignition isswitched to ACC or ON.Only use USB devices that have amaximum power consumption of 10.5W(DC5V, 2.1A) or below.
USB power outlet
CAUTIONTo prevent USB power outlets damage or
electrical failure, pay attention to thefollowing:
Do not use USB devices that requiremore than 10.5 W (DC 5 V, 2.1 A).Close the lid when the USB power
outlets are not in use to preventforeign objects and liquids fromgetting into the USB power outlets.Correctly connect the USB connector
into the USB power outlets.
NOTE• The USB power outlets are designed
only for charging and they cannot beused for connecting to the vehicle'saudio system.
Interior Features
Interior Equipment
5-78 *Some models.
CX-9_8GC7-EE-17G_Edition1 2017-5-16 8:22:04

• To prevent discharging of the battery, donot use the USB power outlets for longperiods with the engine off or idling.
How to connect
The groove in the armrest box can be usedto pass the cord of the device into the boxto connect it to the USB power outlets.1. Open the lid.2. Route the cord through the groove in
the armrest box and insert the USBconnector into the USB power outlets.
Connector
Cup Holder
WARNING
Never use a cup holder to hold hot liquidswhile the vehicle is moving:Using a cup holder to hold hot liquids whilethe vehicle is moving is dangerous. If thecontents spill, you could be scalded.
Do not put anything other than cups ordrink cans in cup holders:Putting objects other than cups or drinkcans in a cup holder is dangerous.During sudden braking or maneuvering,occupants could be hit and injured, orobjects could be thrown around thevehicle, causing interference with the driverand the possibility of an accident. Only usea cup holder for cups or drink cans.
▼ Front
Interior Features
Interior Equipment
5-79
CX-9_8GC7-EE-17G_Edition1 2017-5-16 8:22:04

▼ Rear
Second-row seat
Cup holders are located in the armrest.
Third-row seat
Cup holders are located in the third-rowseat side trims.Right-side
Left-side
Interior Features
Interior Equipment
5-80
CX-9_8GC7-EE-17G_Edition1 2017-5-16 8:22:04

Bottle HolderBottle holders are on the inside of thedoors.
Bottle holder
CAUTIONDo not use the bottle holders for containerswithout caps. The contents may spill whenthe door is opened or closed.
Storage Compartments
WARNING
Keep storage boxes closed when driving:Driving with the storage boxes open isdangerous. To reduce the possibility ofinjury in an accident or a sudden stop, keepthe storage boxes closed when driving.
Do not put articles in storage spaces withno lid:Putting articles in storage spaces with nolid is dangerous as they could be thrownaround the cabin if the vehicle is suddenlyaccelerated and cause injury depending onhow the article is stored.
CAUTIONDo not leave lighters or eyeglasses in thestorage boxes while parked under the sun.A lighter could explode or the plasticmaterial in eyeglasses could deform andcrack from high temperature.
▼ Overhead Console
This console box is designed to storeeyeglasses or other accessories.Push and release to open.
Interior Features
Interior Equipment
5-81
CX-9_8GC7-EE-17G_Edition1 2017-5-16 8:22:04

▼ Glove Compartment
To open the glove compartment, pull thelatch toward you.
To close the glove compartment, firmlypress in the center of the glovecompartment lid.
▼ Center Console
To open, push the button.
▼ Armrest Box*
To open, push the button and pull up thelid.
Interior Features
Interior Equipment
5-82 *Some models.
CX-9_8GC7-EE-17G_Edition1 2017-5-16 8:22:04

▼ Luggage Compartment
Cargo Securing Loops
WARNING
Make sure luggage and cargo is secured before driving:Not securing cargo while driving is dangerous as it could move or be crushed during suddenbraking or a collision and cause injury.
Use the loops in the luggage compartment to secure cargo with a rope or net. The tensilestrength of the loops is 196 N (20 kgf, 44 lbf). Do not apply excessive force to the loops asit will damage them.
Cargo Sub-Compartment
Open the cover to put small items in the cargo sub-compartment.
Interior Features
Interior Equipment
5-83
CX-9_8GC7-EE-17G_Edition1 2017-5-16 8:22:04

NOTELoading golf bags(Some golf bags may not fit using the following methods depending on their sizes.)Up to two golf bags can be carried in the luggage compartment. Bottom: Place the first golf bag in the luggage compartment with the bottoms pointed to theleft.Top: Place the second golf bag with its bottom pointed to the right in the luggagecompartment.
The arrows indicate the bottoms of the golf bags.
TopBottom
Interior Features
Interior Equipment
5-84
CX-9_8GC7-EE-17G_Edition1 2017-5-16 8:22:04

▼ Shopping Bag Hook
The shopping bag hook can be used forhanging shopping bags.
CAUTIONDo not hang excessive weight on theshopping bag hook as it could bedamaged.
Shopping bag hook (tensile strength:3 kg (6.6 lb))
▼ Rear Coat Hooks
WARNING
Never hang heavy or sharp objects on theassist grips and coat hooks:Hanging heavy or sharp-ended objectssuch as a coat hanger from the assist gripsor coat hooks is dangerous as they can flyoff and hit an occupant in the cabin if acurtain air bag was to deploy, which couldresult in serious injury or death.
Always hang clothes on the coat hooksand the assist grips without hangers.
Coat hook
Interior Features
Interior Equipment
5-85
CX-9_8GC7-EE-17G_Edition1 2017-5-16 8:22:04
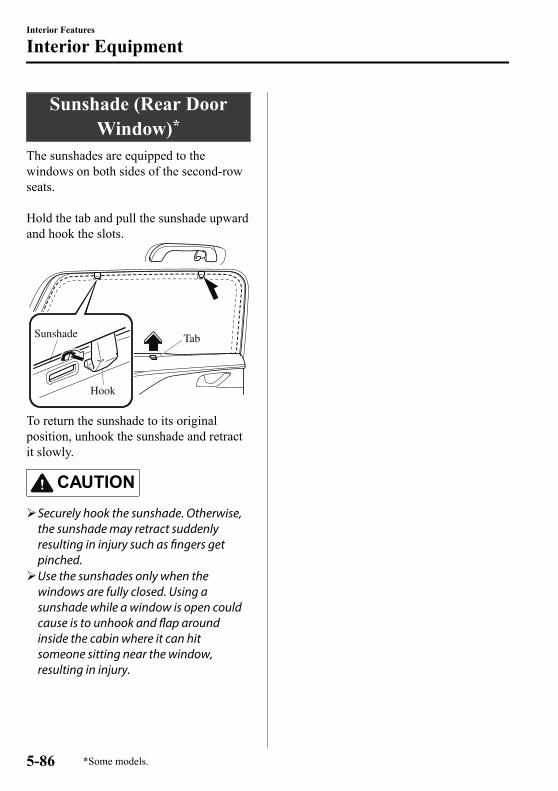
Sunshade (Rear DoorWindow)*
The sunshades are equipped to thewindows on both sides of the second-rowseats. Hold the tab and pull the sunshade upwardand hook the slots.
Tab
Hook
Sunshade
To return the sunshade to its originalposition, unhook the sunshade and retractit slowly.
CAUTIONSecurely hook the sunshade. Otherwise,
the sunshade may retract suddenlyresulting in injury such as fingers getpinched.Use the sunshades only when the
windows are fully closed. Using asunshade while a window is open couldcause is to unhook and flap aroundinside the cabin where it can hitsomeone sitting near the window,resulting in injury.
Interior Features
Interior Equipment
5-86 *Some models.
CX-9_8GC7-EE-17G_Edition1 2017-5-16 8:22:04

6 Maintenance and Care
How to keep your Mazda in top condition.
Essential Information........................6-2Introduction.................................. 6-2
Scheduled Maintenance.................... 6-3Scheduled Maintenance................6-3Maintenance Monitor................. 6-11
Owner Maintenance........................6-14Owner MaintenancePrecautions................................. 6-14Hood........................................... 6-16Engine CompartmentOverview.................................... 6-18Engine Oil...................................6-19Engine Coolant........................... 6-22Brake Fluid................................. 6-23Window and Headlight WasherFluid............................................6-24Body Lubrication........................6-25Wiper Blades.............................. 6-25Battery........................................ 6-31Key Battery Replacement...........6-33Tires............................................ 6-36Light Bulbs................................. 6-39Fuses........................................... 6-48
Appearance Care.............................6-55Exterior Care.............................. 6-55Interior Care................................6-60
6-1
CX-9_8GC7-EE-17G_Edition1 2017-5-16 8:22:04

IntroductionBe careful not to hurt yourself when inspecting your vehicle, replacing a tire, or doing somekind of maintenance such as car washing.In particular, wear thick work gloves such as cotton gloves when touching areas that aredifficult to see while inspecting or working on your vehicle. Doing inspections orprocedures with your bare hands could cause injury. If you are unsure about any procedure it describes, we strongly urge you to have a reliableand qualified technician perform the work, we recommend an Authorized Mazda Repairer. Authorized Mazda technicians and genuine Mazda parts are dedicated to your vehicle.Without this expertise and the parts that have been designed and made especially for yourMazda, inadequate, incomplete, and insufficient servicing may result in problems. Thiscould lead to vehicle damage or an accident and injuries. For expert advice and quality service, consult an expert repairer, we recommend anAuthorized Mazda Repairer. The owner should retain evidence that proper maintenance has been performed asprescribed. A claim against a warranty will not qualify if it results from lack of maintenance and notfrom defective material or authorized workmanship. The malfunction diagnosis connector is designed exclusively for connecting the speciallydesigned device to perform on-board diagnosis.Do not connect any devices other than the specially designed malfunction diagnosis devicesfor servicing. If any device other than the malfunction diagnosis device is connected, it mayaffect the vehicle's electrical devices or lead to damage such as battery depletion.
Malfunction diagnosis connector
Maintenance and Care
Essential Information
6-2
CX-9_8GC7-EE-17G_Edition1 2017-5-16 8:22:04

Scheduled MaintenanceNOTEAfter the prescribed period, continue to follow the described maintenance at therecommended intervals.
Emission control and related systemsThe ignition and fuel systems are highly important to the emission control system and toefficient engine operation. Do not tamper with them.All inspections and adjustments must be made by an expert repairer, we recommend anAuthorized Mazda Repairer.
▼ Europe
Maintenance IntervalNumber of months or kilometers, whichever comes first.
Months 12 24 36 48 60 72 84 96 108 120 132 144×1000 km 15 30 45 60 75 90 105 120 135 150 165 180
Drive belts*1 I I I I
Engine oil & filter*2 Replace when indicator is ON. (Max interval: 12 months or15,000 km)
Cooling system I I I I I I
Engine coolant*3 Replace at first 195,000 km or 10 years; after that, every90,000 km or 5 years.
Air filter*4 Replace every 60,000 km or 3 years.Fuel lines and hoses I I I I I ISpark plugs I I I R I I I R I I I REvaporative system (if installed) I I I I
Battery*5 I I I I I I I I I I I IBrake lines, hoses and connections I I I I I I I I I I I I
Brake fluid*6 R R R R R RParking brake I I I I I I I I I I I IDisc brakes I I I I I I I I I I I ISteering operation and linkages I I I I I IRear differential oil *7
Transfer oil *7
Front and rear suspension, ball joints and wheelbearing axial play I I I I I I
Driveshaft dust boots I I I I I IExhaust system and heat shields I IBolts and nuts on chassis and body T T T T T T
Maintenance and Care
Scheduled Maintenance
6-3
CX-9_8GC7-EE-17G_Edition1 2017-5-16 8:22:04

Maintenance IntervalNumber of months or kilometers, whichever comes first.
Months 12 24 36 48 60 72 84 96 108 120 132 144×1000 km 15 30 45 60 75 90 105 120 135 150 165 180
Body condition (for rust, corrosion and perfora-tion) Inspect annually.
Cabin air filter (if installed) R R R R R RTires (including spare tire) (with inflation pres-sure adjustment)*8*9 I I I I I I I I I I I I
Emergency flat tire repair kit (if installed)*10 Inspect annually.
Chart symbols:
I: Inspect: Inspect and clean, repair, adjust, fill up, or replace if necessary.R: ReplaceC: CleanT: TightenL: LubricateD: Drain
Remarks:
*1 Also inspect the air conditioner drive belts, if installed.If the vehicle is operated primarily under any of the following conditions, inspect the drive belts at every15,000 km or 12 months.a) Driving in dusty conditionsb) Extended periods of idling or low speed operationc) Driving for long period in cold temperatures or driving regularly at short distance onlyd) Driving in extremely hot conditionse) Driving in mountainous conditions continually
*2 The vehicle calculates the remaining oil life based on engine operating conditions and lets you know when anoil change is due by illuminating the wrench indicator light in the instrument cluster.Replace the engine oil and filter when message/wrench indicator light is ON. And they must be changed atleast once a year or within 15,000km since last engine oil and filter change.The system must be reset whenever replacing the engine oil regardless of the message/wrench indicator lightdisplay.
*3 Use of FL-22 is recommended when replacing engine coolant. Using engine coolant other than FL-22 maycause serious damage to the engine and cooling system.
*4 If the vehicle is operated in very dusty or sandy areas, clean and if necessary, replace the air filter more oftenthan the recommended intervals.
*5 Inspect the battery electrolyte level, specific gravity and outer appearance. The sealed battery only requires anouter appearance inspection.
*6 If the brakes are used extensively (for example, continuous hard driving or mountain driving) or if the vehicleis operated in extremely humid climates, replace the brake fluid annually.
*7 If this component has been submerged in water, the oil should be replaced.*8 Tire rotation is recommended every 10,000 km.*9 The Tire Pressure Monitoring System (TPMS) initialization must be performed so that the system operates
normally (if equipped).*10 Check the tire repair fluid expiration date every year when performing the periodic maintenance. Replace the
tire repair fluid bottle with new one before the expiration date.
Maintenance and Care
Scheduled Maintenance
6-4
CX-9_8GC7-EE-17G_Edition1 2017-5-16 8:22:04

▼ Except Europe
Russia/Belarus/Azerbaijan/Kazakhstan
Maintenance IntervalNumber of months or kilometers, whichever comes first.
Months 12 24 36 48 60 72 84 96 108 120 132 144×1000 km 15 30 45 60 75 90 105 120 135 150 165 180
Drive belts*1 I I I I I I I I I I I I
Engine oil
Russia/Belarus/Kazakhstan*12
Replace when indicator is ON. (Max interval: 12 months or15,000 km)
Azerbai-jan*2*13*14 Replace every 5,000 km or 6 months.
Engine oil filter
Russia/Belarus/Kazakhstan*12
Replace when indicator is ON. (Max interval: 12 months or15,000 km)
Azerbaijan*3 Replace every 10,000 km or 12 months.Cooling system I I I I I I
Engine coolant*4 Replace at first 195,000 km or 10 years; after that, every90,000 km or 5 years.
Air filter*5
Russia/Belarus/Kazakhstan
C C R C C R C C R C C R
Azerbaijan C R C R C R C R C R C R
Fuel filter
Russia/Belarus/Kazakhstan
Replace every 120,000 km.
Azerbaijan Replace every 60,000 km.Fuel lines and hoses I I I I I ISpark plugs I I I R I I I R I I I REvaporative system (if installed) I I I
Battery*6 I I I I I I I I I I I IBrake lines, hoses and connections I I I I I I I I I I I I
Brake fluid*7 R R R R R RParking brake I I I I I I I I I I I IDisc brakes I I I I I I I I I I I ISteering operation and linkages I I I I I I I I I I I IRear differential oil *8
Transfer oil *8
Front and rear suspension, ball joints and wheelbearing axial play I I I I I I I I I I I I
Maintenance and Care
Scheduled Maintenance
6-5
CX-9_8GC7-EE-17G_Edition1 2017-5-16 8:22:04

Maintenance IntervalNumber of months or kilometers, whichever comes first.
Months 12 24 36 48 60 72 84 96 108 120 132 144×1000 km 15 30 45 60 75 90 105 120 135 150 165 180
Driveshaft dust boots I I I I I I I I I I I IExhaust system and heat shields I I I I I I I I I I I IBolts and nuts on chassis and body T T T T T T T T T T T THinges and catches L L L L L L L L L L L LAll electrical system I I I I I I I I I I I IBody condition (for rust, corrosion and perfora-tion) Inspect annually.
Cabin air filter (if installed) R R R R R RTires (including spare tire) (with inflation pres-sure adjustment)*9*10 I I I I I I I I I I I I
Emergency flat tire repair kit (if installed)*11 Inspect annually.
Chart symbols:
I: Inspect: Inspect and clean, repair, adjust, fill up, or replace if necessary.R: ReplaceL: LubricateC: CleanT: TightenD: Drain
Remarks:
*1 Also inspect the air conditioner drive belts, if installed.If the vehicle is operated primarily under any of the following conditions, inspect the drive belts at every 7,500km or 6 months.a) Driving in dusty conditionsb) Extended periods of idling or low speed operationc) Driving for long period in cold temperatures or driving regularly at short distance onlyd) Driving in extremely hot conditionse) Driving in mountainous conditions continually
*2 If the vehicle is operated primarily under any of the following conditions, replace the engine oil at every 2,500km or 3 months.a) Purpose of vehicle use is police car, taxi or driving school car.b) Driving in dusty conditionsc) Extended periods of idling or low speed operationd) Driving for long period in cold temperatures or driving regularly at short distance onlye) Driving in extremely hot conditionsf) Driving in mountainous conditions continually
Maintenance and Care
Scheduled Maintenance
6-6
CX-9_8GC7-EE-17G_Edition1 2017-5-16 8:22:04

*3 If the vehicle is operated primarily under any of the following conditions, replace the engine oil filter at every5,000 km or 6 months.a) Purpose of vehicle use is police car, taxi or driving school car.b) Driving in dusty conditionsc) Extended periods of idling or low speed operationd) Driving for long period in cold temperatures or driving regularly at short distance onlye) Driving in extremely hot conditionsf) Driving in mountainous conditions continually
*4 Use of FL-22 is recommended when replacing engine coolant. Using engine coolant other than FL-22 maycause serious damage to the engine and cooling system.
*5 If the vehicle is operated in very dusty or sandy areas, clean the air filter at every 7,500 km or 6 months.*6 Inspect the battery electrolyte level, specific gravity and outer appearance. The sealed battery only requires an
outer appearance inspection.*7 If the brakes are used extensively (for example, continuous hard driving or mountain driving) or if the vehicle
is operated in extremely humid climates, replace the brake fluid annually.*8 If this component has been submerged in water, the oil should be replaced.*9 Tire rotation is recommended every 10,000 km.*10 The Tire Pressure Monitoring System (TPMS) initialization must be performed so that the system operates
normally (if equipped).*11 Check the tire repair fluid expiration date every year when performing the periodic maintenance. Replace the
tire repair fluid bottle with new one before the expiration date.*12 The vehicle calculates the remaining oil life based on engine operating conditions and lets you know when an
oil change is due by illuminating the wrench indicator light in the instrument cluster.Replace the engine oil and filter when message/wrench indicator light is ON. And they must be changed atleast once a year or within 15,000 km since last engine oil and filter change.The system must be reset whenever replacing the engine oil regardless of the message/wrench indicator lightdisplay.
*13 Reset the engine oil data whenever replacing the engine oil regardless of the message/wrench indicator lightdisplay.
*14 Replace the engine oil when message/wrench indicator light is ON.
Maintenance and Care
Scheduled Maintenance
6-7
CX-9_8GC7-EE-17G_Edition1 2017-5-16 8:22:04

Except Russia/Belarus/Azerbaijan/Kazakhstan
Maintenance Inter-val
Number of months or kilometers (miles), whichever comes first.Months 6 12 18 24 30 36 42 48 54 60 66 72 78 84 90 96
×1000 km 10 20 30 40 50 60 70 80 90 100 110 120 130 140 150 160×1000 miles 6.25 12.5 18.75 25 31.25 37.5 43.75 50 56.25 62.5 68.75 75 81.25 87.5 93.75 100
Fuel filter Replace every 60,000 km (37,500 miles).
Spark plugs*1 Replace every 60,000 km (37,500 miles).Evaporative system (if installed) I I I I I I I I
Drive belts*2 I I I I I I I I I I I I I I I I
Engine oil*3*4*5
Except be-low coun-tries
R R R R R R R R R R R R R R R R
Georgia/Armenia/Cambodia/Gabon/Ghana/Cameroon/Burundi/Mozambi-que/Mongolia
Replace every 5,000 km (3,125 miles) or 6 months.
Tanzania Replace every 3,000 km (1,875 miles) or 3 months.
Engine oil filter*3
Except be-low coun-tries
R R R R R R R R R R R R R R R R
Georgia/Armenia/Cambodia
Replace every 10,000 km (6,250 miles) or 1 year.
Gabon/Ghana/Cameroon/Burundi/Mozambi-que/Mongolia
Replace every 5,000 km (3,125 miles) or 6 months.
Tanzania Replace every 3,000 km (1,875 miles) or 3 months.Cooling system I I I I I I I I
Engine coolant*6 Replace at first 200,000 km (125,000 miles) or 10 years; after that, every100,000 km (62,500 miles) or 5 years.
Maintenance and Care
Scheduled Maintenance
6-8
CX-9_8GC7-EE-17G_Edition1 2017-5-16 8:22:04

Maintenance Inter-val
Number of months or kilometers (miles), whichever comes first.Months 6 12 18 24 30 36 42 48 54 60 66 72 78 84 90 96
×1000 km 10 20 30 40 50 60 70 80 90 100 110 120 130 140 150 160×1000 miles 6.25 12.5 18.75 25 31.25 37.5 43.75 50 56.25 62.5 68.75 75 81.25 87.5 93.75 100
Air filter*7
Except be-low coun-tries
C C R C C R C C
Georgia/Armenia C R C R C R C R
Fuel lines and hoses I I I I I I I I
Battery*8 I I I I I I I IBrake lines, hoses and connections I I I I I I I I
Brake fluid*9 I I I R I I I R I I I R I I I RParking brake I I I I I I I I I I I I I I I IPower brake unit (Brake booster)and hoses I I I I I I I I
Disc brakes I I I I I I I I I I I I I I I ISteering operation and linkages I I I I I I I IRear differential oil *10
Transfer oil *10
Front and rear suspension, balljoints and wheel bearing axial play I I I I I I I I
Driveshaft dust boots I I I IExhaust system and heat shields Inspect every 80,000 km (50,000 miles).Bolts and nuts on chassis and body T T T T T T T TBody condition (for rust, corrosionand perforation) Inspect annually.
Cabin air filter (if installed) R R R R R R R RTires (including spare tire) (withinflation pressure adjustment)*11 I I I I I I I I I I I I I I I I
Tire rotation*11 Rotate every 10,000 km (6,250 miles).Emergency flat tire repair kit (if in-stalled)*12 Inspect annually.
Chart symbols:
I: Inspect: Inspect and clean, repair, adjust, fill up, or replace if necessary.R: ReplaceL: LubricateC: CleanT: TightenD: Drain
Maintenance and Care
Scheduled Maintenance
6-9
CX-9_8GC7-EE-17G_Edition1 2017-5-16 8:22:04

Remarks:
*1 In the countries below, inspect the spark plugs at every 10,000 km (6,250 miles) or 1 year before replacingthem at the said interval.Algeria, Armenia, Angola, Bahrain, Bolivia, Burundi, B.Virgin, Cambodia, Cameroon, Chile, Costa Rica, Coted'Ivoire, Curacao, El Salvador, Gabon, Ghana, Georgia, Guatemala, Haiti, Honduras, Hong Kong, Iran, Jordan,Kenya, Macau, Malaysia, Mongolia, Mozambique, Myanmar, Nigeria, Nicaragua, Oman, Panama, Papua NewGuinea, Peru, Philippines, Senegal, Seychelles, Syria, Tanzania, United Arab Emirates, Vietnam, Zaire,Zimbabwe
*2 Also inspect the air conditioner drive belts, if installed.If the vehicle is operated primarily under any of the following conditions, inspect the drive belts more oftenthan the recommended intervals.a) Driving in dusty conditionsb) Extended periods of idling or low speed operationc) Driving for long period in cold temperatures or driving regularly at short distance onlyd) Driving in extremely hot conditionse) Driving in mountainous conditions continually
*3 If the vehicle is operated primarily under any of the following conditions, replace the engine oil and oil filtermore often than the recommended intervals.a) Purpose of vehicle use is police car, taxi or driving school car.b) Driving in dusty conditionsc) Extended periods of idling or low speed operationd) Driving for long period in cold temperatures or driving regularly at short distance onlye) Driving in extremely hot conditionsf) Driving in mountainous conditions continually
*4 Reset the engine oil data whenever replacing the engine oil regardless of the message/wrench indicator lightdisplay.
*5 Replace the engine oil when message/wrench indicator light is ON.*6 Use of FL-22 is recommended when replacing engine coolant. Using engine coolant other than FL-22 may
cause serious damage to the engine and cooling system.*7 If the vehicle is operated in very dusty or sandy areas, clean and if necessary, replace the air filter more often
than the recommended intervals.*8 Inspect the battery electrolyte level, specific gravity and outer appearance. If the vehicle is operated in
extremely hot and cold areas, inspect the battery electrolyte level, specific gravity and appearance every10,000 km (6,250 miles) or 6 months. The sealed battery only requires an outer appearance inspection.
*9 If the brakes are used extensively (for example, continuous hard driving or mountain driving) or if the vehicleis operated in extremely humid climates, replace the brake fluid annually.
*10 If this component has been submerged in water, the oil should be replaced.*11 The Tire Pressure Monitoring System (TPMS) initialization must be performed so that the system operates
normally (if equipped).*12 Check the tire repair fluid expiration date every year when performing the periodic maintenance. Replace the
tire repair fluid bottle with new one before the expiration date.
Maintenance and Care
Scheduled Maintenance
6-10
CX-9_8GC7-EE-17G_Edition1 2017-5-16 8:22:04

Maintenance Monitor1. Select the icon on the home screen to display the “Applications” screen.2. Select “Vehicle Status Monitor”.3. Select “Maintenance” to display the maintenance list screen.4. Switch the tab and select the setting item you want to change.You can customize settings in the setup display as follows:
Tab Item Explanation
Scheduled
Setting Notification can be switched on/off.Time (months) Displays the time or distance until maintenance is due.
Select this item to set the maintenance period.The wrench indication/indicator light in the instrument cluster willbe illuminated when the remaining distance is less than 1,000 kmor 600 mile, or the remaining number of days is less than 15(whichever comes first).
Distance (mile or km)
ResetResets the time and distance to the initial values.Once the system turns on, it needs to be reset whenever carryingout maintenance.
Tire Rotation
Setting Notification can be switched on/off.
Distance (mile or km)
Displays the distance until tire rotation is due.Select this item to set the tire rotation distance.The wrench indication/indicator light in the instrument cluster willbe illuminated when the remaining distance is less than 1,000 kmor 600 mile.
ResetResets the remaining distance to the initial value.Once the system turns on, it needs to be reset whenever rotating thetires.
Maintenance and Care
Scheduled Maintenance
6-11
CX-9_8GC7-EE-17G_Edition1 2017-5-16 8:22:04

Tab Item Explanation
Oil Change
Setting Interval*1 Notification can be switched on/off.
Distance (mile or km)
Displays the distance until the oil replacement is due.Select this item to set the oil replacement distance.The wrench indication/indicator light in the instrument cluster willbe illuminated when the remaining distance is less than 1,000 kmor 600 mile.
Reset*2
In flexible settingResets the remaining oil life to 100 %.In fixed settingResets the remaining distance until oil replacement is due to the in-itial value. In addition, a vehicle engine control unit reset is re-quired as follows:Press and hold the dashboard illumination knob with the ignitionswitched OFF, then switch it ON. Keep pressing the dashboard illu-mination knob for more than 7 seconds.
Dashboard illumination knob
In OFF settingPress and hold the dashboard illumination knob with the ignitionswitched OFF, then switch it ON. Keep pressing the dashboard illu-mination knob for more than 7 seconds.
Dashboard illumination knob
*1 The engine oil flexible maintenance setting is available (only some models). Consult an Authorized MazdaRepairer for details.When the engine oil flexible maintenance setting is selected, you will see the following items in the display.The vehicle calculates the remaining oil life based on the engine operating conditions and lets you know whenan oil change is due by illuminating the wrench indicator light in the instrument cluster.
Maintenance and Care
Scheduled Maintenance
6-12
CX-9_8GC7-EE-17G_Edition1 2017-5-16 8:22:04

*2 Whenever the engine oil is replaced, the vehicle engine control unit reset is necessary.
Tab Item Explanation
Oil ChangeOil life (%)
Displays the engine oil life until the oil replacement is due.The wrench indication/indicator light in the instrument cluster willbe illuminated when remaining oil life distance is less than 1,000km or 600 mile, or remaining days are less than 15 (whichevercomes first).
Reset Resets the remaining oil life to 100 %.The system must be reset whenever replacing the engine oil.
Maintenance and Care
Scheduled Maintenance
6-13
CX-9_8GC7-EE-17G_Edition1 2017-5-16 8:22:04

Owner Maintenance PrecautionsRoutine Service
We highly recommend that these items be inspected daily, or at least every week.• Engine Oil Level (page 6-21)• Engine Coolant Level (page 6-22)• Brake Fluid Level (page 6-23)• Washer Fluid Level (page 6-24)• Battery Maintenance (page 6-32)• Tire Inflation Pressure (page 6-36)
Improper or incomplete service may result in problems. This section gives instructions onlyfor items that are easy to perform. As explained in the Introduction (page 6-2), several procedures can be done only by aqualified service technician with special tools. Improper do-it yourself maintenance during the warranty period may affect warrantycoverage. For details, read the separate Mazda Warranty statement provided with thevehicle. If you are unsure about any servicing or maintenance procedure, have it done by anexpert repairer, we recommend an Authorized Mazda Repairer. There are strict environmental laws regarding the disposal of waste oil and fluids. Pleasedispose of your waste properly and with due regard to the environment. We recommend that you entrust the oil and fluid changes of your vehicle to an AuthorizedMazda Repairer.
WARNING
Do not perform maintenance work if you lack sufficient knowledge and experience or theproper tools and equipment to do the work. Have maintenance work done by a qualifiedtechnician:Performing maintenance work on a vehicle is dangerous if not done properly. You can beseriously injured while performing some maintenance procedures.
Maintenance and Care
Owner Maintenance
6-14
CX-9_8GC7-EE-17G_Edition1 2017-5-16 8:22:04

If you must run the engine while working under the hood, make certain that you remove alljewelry (especially rings, bracelets, watches, and necklaces) and all neckties, scarves, andsimilar loose clothing before getting near the engine or cooling fan which may turn onunexpectedly:Working under the hood with the engine running is dangerous. It becomes even moredangerous when you wear jewelry or loose clothing.Either can become entangled in moving parts and result in injury.
Pull over to a safe location, then switch the ignition off and make sure the fan is notrunning before attempting to work near the cooling fan:Working near the cooling fan when it is running is dangerous. The fan could continue runningindefinitely even if the engine has stopped and the engine compartment temperature is high.You could be hit by the fan and seriously injured.
Do not leave items in the engine compartment:After you have finished checking or doing servicing in the engine compartment, do not forgetand leave items such as tools or rags in the engine compartment.Tools or other items left in the engine compartment could cause engine damage or a fireleading to an unexpected accident.
Maintenance and Care
Owner Maintenance
6-15
CX-9_8GC7-EE-17G_Edition1 2017-5-16 8:22:04

Hood
WARNING
Always check that the hood is closed andsecurely locked:A hood that is not closed and securelylocked is dangerous as it could fly openwhile the vehicle is moving and block thedriver's vision which could result in aserious accident.
▼ Opening the Hood
1. With the vehicle parked, pull therelease handle to unlock the hood.
Release handle
2. Insert your hand into the hoodopening, slide the latch lever to theright, and lift up the hood.
Lever
3. Grasp the support rod in the paddedarea and secure it in the support rodhole indicated by the arrow to hold thehood open.
Pad
Support rod
Maintenance and Care
Owner Maintenance
6-16
CX-9_8GC7-EE-17G_Edition1 2017-5-16 8:22:04

▼ Closing the Hood
1. Check under the hood area to makecertain all filler caps are in place andall loose items (e.g. tools, oilcontainers, etc.) have been removed.
2. Lift the hood, grasp the padded area onthe support rod, and secure the supportrod in the clip. Verify that the supportrod is secured in the clip before closingthe hood.
Clip
ClipClip
3. Lower the hood slowly to a height ofabout 20 cm (7.9 in) above its closedposition and then let it drop.
CAUTIONWhen closing the hood, do not push itexcessively such as by applying yourweight. Otherwise, the hood could bedeformed.
Maintenance and Care
Owner Maintenance
6-17
CX-9_8GC7-EE-17G_Edition1 2017-5-16 8:22:04

Engine Compartment Overview
Engine oil dipstick
Brake fluid reservoir
Engine oil-filler cap
Fuse blockBattery
Cooling system cap Engine coolant reservoir
Windshield washer fluid reservoir
Maintenance and Care
Owner Maintenance
6-18
CX-9_8GC7-EE-17G_Edition1 2017-5-16 8:22:04

Engine OilNOTEChanging the engine oil should be done by an expert repairer, we recommend an AuthorizedMazda Repairer.
▼ Recommended Oil
In order to keep the maintenance interval (page 6-3) and to protect the engine from damagecaused by poor lubrication, it is vitally important to make use of engine oil with the correctspecification. Do not use oils which do not meet the following specifications orrequirements. Use of unsuitable oil may lead to engine damage which is not covered by theMazda Warranty.
Mazda Original Oil Ultra 5W-30
Mazda Original Oil Supra 0W-30
Grade
Temperature Range SAE Viscosity Numbers–30 –20 –10 0 10 20 30 40
–20 0 20 40 60 80 100
–40
–40
API SN or ACEA A5/B5
Alternative Oil Quality
Recommended oils
5W-30
0W-30
Europe
Grade
Temperature Range SAE Viscosity Numbers–30 –20 –10 0 10 20 30 40
–20 0 20 40 60 80 100
–40
–40
Except Europe
API SM/SN or ILSAC GF-IV/GF-V
Engine oil viscosity, or thickness, has an effect on fuel economy and cold-weather operation(starting and oil flow).Low-viscosity engine oils can provide improved fuel economy and cold-weatherperformance. When choosing an oil, consider the temperature range your vehicle will operate in beforethe next oil change.Then select the recommended viscosity from the chart.
Maintenance and Care
Owner Maintenance
6-19
CX-9_8GC7-EE-17G_Edition1 2017-5-16 8:22:04

CAUTIONUsing oils of viscosity besides those recommended for specific temperature ranges could
result in engine damage.
NOTE• It is normal for all engines to consume engine oil under normal driving conditions.
Engine oil consumption may be as high as 0.8 L/1,000 km (1 L/800 miles). This may be asa result of evaporation, internal ventilation or burning of the lubricating oil in theworking engine. Oil consumption may be higher when the engine is new due to therunning-in process. Oil consumption is also dependant on engine speed and engine load.Under extreme driving conditions, oil consumption may be higher.
▼ Vehicle Engine Control Unit Reset Procedure
After replacing the engine oil, it is recommended to have a repair shop such as anAuthorized Mazda Repairer perform the initialization (engine oil data resetting) of therecorded value. If the value recorded by the computer is not initialized, the wrench indicatorlight may not turn off or it may turn on earlier than normal.
NOTEThere are two methods for resetting the engine control unit.1. The procedure described in the following.2. The procedure described in the maintenance monitor item when the flexible maintenance
setting is selected. Refer to Maintenance Monitor on page 6-11.If either one of the methods is performed, resetting of the engine control unit is completed.
NOTEThe initialization (engine oil data resetting) of the recorded value can be performed usingthe following procedure:1. Switch the ignition OFF.
Maintenance and Care
Owner Maintenance
6-20
CX-9_8GC7-EE-17G_Edition1 2017-5-16 8:22:04

2. Switch the ignition ON with the dashboard illumination knob pressed, and press andhold the dashboard illumination knob for about 7 seconds.
Dashboard illumination knob
▼ Inspecting Engine Oil Level
1. Be sure the vehicle is on a levelsurface.
2. Warm up the engine to normaloperating temperature.
3. Turn it off and wait at least 5 minutesfor the oil to return to the oil pan.
4. Pull out the dipstick, wipe it clean, andreinsert it fully.
MAX
MIN
OK
5. Pull it out again and examine the level.The level is normal if it is between theMIN and MAX marks.If it is near or below MIN, add enoughoil to bring the level to MAX.
CAUTIONDo not overfill the engine oil. This maycause engine damage.
6. Make sure the O-ring on the dipstick ispositioned properly before reinsertingthe dipstick.
7. Reinsert the dipstick fully.
Maintenance and Care
Owner Maintenance
6-21
CX-9_8GC7-EE-17G_Edition1 2017-5-16 8:22:04

Engine Coolant▼ Inspecting Coolant Level
WARNING
Do not use a match or live flame in theengine compartment. DO NOT ADDCOOLANT WHEN THE ENGINE IS HOT:A hot engine is dangerous. If the engine hasbeen running, parts of the enginecompartment can become very hot. Youcould be burned. Carefully inspect theengine coolant in the coolant reservoir, butdo not open it.
Pull over to a safe location, then switchthe ignition off and make sure the fan isnot running before attempting to worknear the cooling fan:Working near the cooling fan when it isrunning is dangerous. The fan couldcontinue running indefinitely even if theengine has stopped and the enginecompartment temperature is high. Youcould be hit by the fan and seriouslyinjured.
Do not remove either coolingsystem cap when the engine and radiatorare hot:When the engine and radiator are hot,scalding coolant and steam may shoot outunder pressure and cause serious injury.
NOTEChanging the coolant should be done byan expert repairer, we recommend anAuthorized Mazda Repairer.
Inspect the antifreeze protection andcoolant level in the coolant reservoir atleast once a year―at the beginning of thewinter season―and before traveling wheretemperatures may drop below freezing. Inspect the condition and connections ofall cooling system and heater hoses.Replace any that are swollen ordeteriorated. The coolant should be at full in theradiator and between the F and L marks onthe coolant reservoir when the engine iscool.
If it is at or near L, add enough coolant tothe coolant reservoir to provide freezingand corrosion protection and to bring thelevel to F.Securely tighten the coolant reservoir tankcap after adding coolant.
Maintenance and Care
Owner Maintenance
6-22
CX-9_8GC7-EE-17G_Edition1 2017-5-16 8:22:04

CAUTIONRadiator coolant will damage paint.
Rinse it off quickly if spilled.
If the “FL22” mark is shown on or nearthe cooling system cap, use of FL-22isrecommended when replacing enginecoolant. Using engine coolant other thanFL-22 may cause serious damage to theengine and cooling system.
If the coolant reservoir is empty or newcoolant is required frequently, consult anexpert repairer, we recommend anAuthorized Mazda Repairer.
Brake Fluid▼ Inspecting Brake Fluid Level
WARNING
If the brake fluid level is low, have thebrakes inspected:A low brake fluid level is dangerous.A low level could indicate brake lining wearor a brake system leak which could causethe brakes to fail and lead to an accident.
Inspect the fluid level in the reservoirregularly. It should be kept between theMAX and MIN lines.The level normally drops withaccumulated distance, a conditionassociated with wear of brake linings. If itis excessively low, have the brake systeminspected by an expert repairer, werecommend an Authorized MazdaRepairer.
Left-hand drive model
Maintenance and Care
Owner Maintenance
6-23
CX-9_8GC7-EE-17G_Edition1 2017-5-16 8:22:04

Right-hand drive model Window and HeadlightWasher Fluid
▼ Inspecting Washer Fluid Level
WARNING
Use only windshield washer fluid or plainwater in the reservoir:Using radiator antifreeze as washer fluid isdangerous. If sprayed on the windshield, itwill dirty the windshield, affect yourvisibility, and could result in an accident.
Inspect fluid level in the washer fluidreservoir; add fluid if necessary.
L
Use plain water if washer fluid isunavailable.But use only washer fluid in cold weatherto prevent it from freezing.
NOTEFront and rear washer fluid is suppliedfrom the same reservoir.
Maintenance and Care
Owner Maintenance
6-24
CX-9_8GC7-EE-17G_Edition1 2017-5-16 8:22:04

Body LubricationAll moving points of the body, such asdoor and hood hinges and locks, should belubricated each time the engine oil ischanged. Use a nonfreezing lubricant onlocks during cold weather. Make sure the hood's secondary latchkeeps the hood from opening when theprimary latch is released.
Wiper Blades
CAUTIONHot waxes applied by automatic car
washers have been known to affect thewiper's ability to clean windows.To prevent damage to the wiper blades,
do not use gasoline, kerosene, paintthinner, or other solvents on or nearthem.When the wiper lever is in the AUTO
position and the ignition is switched ON,the wipers may move automatically inthe following cases:
If the windshield above the rain sensoris touched. If the windshield above the rain sensor
is wiped with a cloth. If the windshield is struck with a hand
or other object. If the rain sensor is struck with a hand
or other object from inside the vehicle.
Be careful not to pinch hands or fingersas it may cause injury, or damage thewipers. When washing or servicing thevehicle, make sure the wiper lever is inthe OFF position.
Contamination of either the windshield orthe blades with foreign matter can reducewiper effectiveness. Common sources areinsects, tree sap, and hot wax treatmentsused by some commercial car washes. If the blades are not wiping properly, cleanthe window and blades with a goodcleaner or mild detergent; then rinsethoroughly with clean water. Repeat ifnecessary.
Maintenance and Care
Owner Maintenance
6-25
CX-9_8GC7-EE-17G_Edition1 2017-5-16 8:22:04
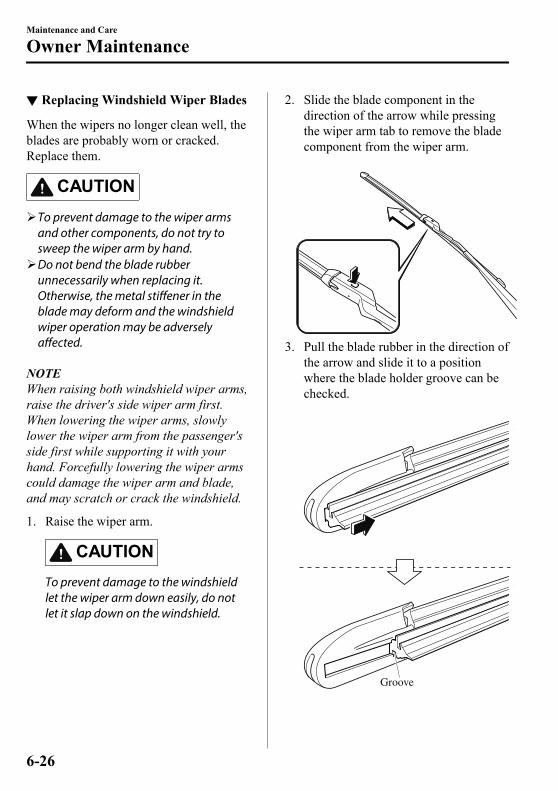
▼ Replacing Windshield Wiper Blades
When the wipers no longer clean well, theblades are probably worn or cracked.Replace them.
CAUTIONTo prevent damage to the wiper arms
and other components, do not try tosweep the wiper arm by hand.Do not bend the blade rubber
unnecessarily when replacing it.Otherwise, the metal stiffener in theblade may deform and the windshieldwiper operation may be adverselyaffected.
NOTEWhen raising both windshield wiper arms,raise the driver's side wiper arm first.When lowering the wiper arms, slowlylower the wiper arm from the passenger'sside first while supporting it with yourhand. Forcefully lowering the wiper armscould damage the wiper arm and blade,and may scratch or crack the windshield.
1. Raise the wiper arm.
CAUTIONTo prevent damage to the windshieldlet the wiper arm down easily, do notlet it slap down on the windshield.
2. Slide the blade component in thedirection of the arrow while pressingthe wiper arm tab to remove the bladecomponent from the wiper arm.
3. Pull the blade rubber in the direction ofthe arrow and slide it to a positionwhere the blade holder groove can bechecked.
Groove
Maintenance and Care
Owner Maintenance
6-26
CX-9_8GC7-EE-17G_Edition1 2017-5-16 8:22:04
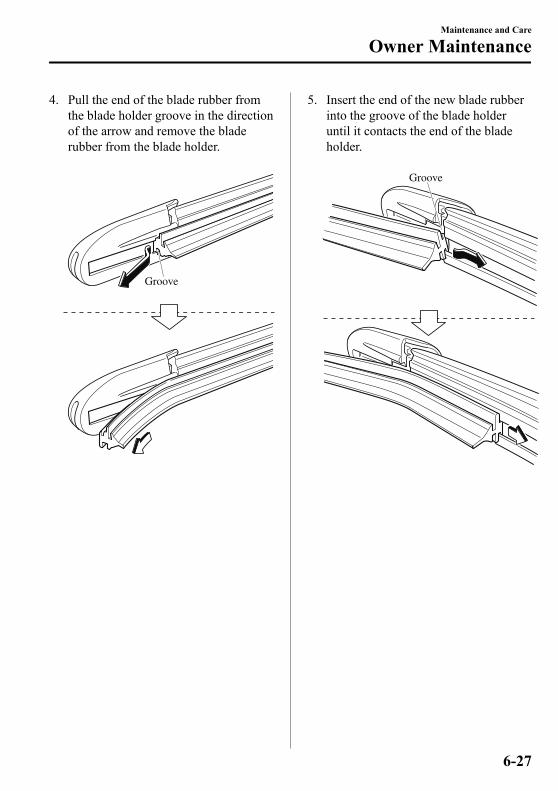
4. Pull the end of the blade rubber fromthe blade holder groove in the directionof the arrow and remove the bladerubber from the blade holder.
Groove
5. Insert the end of the new blade rubberinto the groove of the blade holderuntil it contacts the end of the bladeholder.
Groove
Maintenance and Care
Owner Maintenance
6-27
CX-9_8GC7-EE-17G_Edition1 2017-5-16 8:22:04

6. After pulling the blade rubber in thedirection of the arrow and sliding theblade rubber to a position to check theblade holder groove, slide the bladerubber end in the opposite direction.
Groove
7. Make sure that the blade rubber iscorrectly installed to the blade holder.
8. Align the wiper arm tabs with theblade component grooves.
Tabs
Grooves
9. Align the blade component projectionwith the wiper arm notch.
Projection
Notch
10. Slide the blade component and installit to the wiper arm.
11. Slowly lower the wiper arm onto thewindshield.
Maintenance and Care
Owner Maintenance
6-28
CX-9_8GC7-EE-17G_Edition1 2017-5-16 8:22:04

▼ Replacing Rear Window WiperBlade
When the wiper no longer cleans well, theblade is probably worn or cracked.Replace it.
CAUTIONTo prevent damage to the wiper arm andother components, do not move the wiperby hand.
1. Raise the wiper arm and rotate thewiper blade to the right until itunlocks, then remove the blade.
CAUTIONTo prevent damage to the rear window,do not let the wiper arm fall on it.
2. Pull down the blade rubber and slide itout of the blade holder.
3. Remove the metal stiffeners from theblade rubber and install them in thenew blade.
CAUTIONDo not bend or discard the stiffeners.You need to use them again.
Maintenance and Care
Owner Maintenance
6-29
CX-9_8GC7-EE-17G_Edition1 2017-5-16 8:22:04

4. Carefully insert the new blade rubber.Then install the blade assembly in thereverse order of removal.
Maintenance and Care
Owner Maintenance
6-30
CX-9_8GC7-EE-17G_Edition1 2017-5-16 8:22:04

Battery
WARNING
Read the following precautions carefully before using the battery or inspecting toensure safe and correct handling:
Always wear eye protection when working near the battery:Working without eye protection is dangerous. Battery fluid contains SULFURIC ACID whichcould cause blindness if splashed into your eyes. Also, hydrogen gas produced during normalbattery operation, could ignite and cause the battery to explode.
Wear eye protection and protective gloves to prevent contact with battery fluid:Spilled battery fluid is dangerous.Battery fluid contains SULFURIC ACID which could cause serious injuries if it gets in eyes, or onthe skin or clothing. If this happens, immediately flush your eyes with water for 15 minutes orwash your skin thoroughly and get medical attention.
Always keep batteries out of the reach of children:Allowing children to play near batteries is dangerous. Battery fluid could cause serious injuriesif it gets in the eyes or on the skin.
Keep flames and sparks away from open battery cells and do not allow metal tools tocontact the positive ( ) or negative ( ) terminal of the battery when working near a battery.Do not allow the positive ( ) terminal to contact the vehicle body:Flames and sparks near open battery cells are dangerous. Hydrogen gas, produced duringnormal battery operation, could ignite and cause the battery to explode. An exploding batterycan cause serious burns and injuries. Keep all flames including cigarettes and sparks awayfrom open battery cells.
Maintenance and Care
Owner Maintenance
6-31
CX-9_8GC7-EE-17G_Edition1 2017-5-16 8:22:04

Keep all flames, including cigarettes, and sparks away from open battery cells:Flames and sparks near open battery cells are dangerous. Hydrogen gas, produced duringnormal battery operation, could ignite and cause the battery to explode. An exploding batterycan cause serious burns and injuries.
NOTEBefore performing battery maintenance, remove the battery cover.
▼ Battery Maintenance
To get the best service from a battery:• Keep it securely mounted.• Keep the top clean and dry.• Keep terminals and connections clean,
tight, and coated with petroleum jelly orterminal grease.
• Rinse off spilled electrolyte immediatelywith a solution of water and bakingsoda.
• If the vehicle will not be used for anextended time, disconnect the batterycables and charge the battery every sixweeks.
▼ Inspecting Electrolyte Level
A low level of electrolyte fluid will causethe battery to discharge quickly.
Upper level
Lower level
Maintenance and Care
Owner Maintenance
6-32
CX-9_8GC7-EE-17G_Edition1 2017-5-16 8:22:04

Inspect the electrolyte level at least once aweek. If it is low, remove the caps and addenough distilled water to bring the levelbetween the upper and lower level(illustration). Do not overfill.Examine the specific gravity of theelectrolyte with a hydrometer, especiallyduring cold weather. If it is low, rechargethe battery.
▼ Battery Recharging
NOTE• Before performing maintenance or
recharging the battery, turn off allaccessories and stop the engine.
• To disconnect the battery, remove thenegative cable first. Install it last whenconnecting the battery.
• Be sure to remove the caps beforerecharging the battery.
• If the battery quickly dischargesbecause, for example, the lights wereleft on too long with the engine off,slow-charge it as required by batterysize and charger capacity.
• If the battery gradually dischargesbecause of high electric load while thevehicle is being used, recharge it asrequired by battery size and chargercapacity.
▼ Battery Replacement
Contact an Authorized Mazda Repairer fora battery replacement purchase.
Key Battery ReplacementIf the buttons on the transmitter areinoperable and the operation indicatorlight does not flash, the battery may bedead.Replace with a new battery before thetransmitter becomes unusable.
CAUTIONMake sure the battery is installed
correctly. Battery leakage could occur if itis not installed correctly.When replacing the battery, be careful
not to touch any of the internal circuitryand electrical terminals, bend theelectrical terminals, or get dirt in thetransmitter as the transmitter could bedamaged.There is the danger of explosion if the
battery is not correctly replaced.Dispose of used batteries according to
the following instructions.
Insulate the plus and minus terminalsof the battery using cellophane orequivalent tape.Never disassemble.Never throw the battery into fire or
water.Never deform or crush.Replace only with the same type battery
(CR2025 or equivalent).
Maintenance and Care
Owner Maintenance
6-33
CX-9_8GC7-EE-17G_Edition1 2017-5-16 8:22:04

The following conditions indicate that thebattery power is low:
• The KEY indicator light (green) flashesin the instrument cluster for about 30seconds after the engine is turned off(for vehicles with a type A instrumentcluster (page 4-32), messages aredisplayed in the instrument cluster).
• The system does not operate and theoperation indicator light on thetransmitter does not flash when thebuttons are pressed.
• The system's operational range isreduced.
Replacing the battery at an AuthorizedMazda Repairer is recommended toprevent damage to the key. If replacing thebattery by yourself, follow the instruction.
Replacing the key battery
1. Press the knob and pull out theauxiliary key.
Knob
2. Twist a tape-wrapped flatheadscrewdriver in the direction of thearrow and open the cover slightly.
Cover
3. Insert the tape-wrapped flatheadscrewdriver into the gap and slide it inthe direction of the arrow.
Cover
Gap
4. Twist the flathead screwdriver in thedirection of the arrow and remove thecover.
Cover
Maintenance and Care
Owner Maintenance
6-34
CX-9_8GC7-EE-17G_Edition1 2017-5-16 8:22:04

5. Remove the battery cap, then removethe battery.
CAUTIONBe careful not to allow the rubber
ring shown in the figure to bescratched or damaged. If the rubber ring detaches, reattach
it before inserting a new battery.
Rubber ring
6. Insert a new battery with the positivepole facing up, and then cover thebattery with the battery cap.
7. Close the cover.
8. Reinsert the auxiliary key.
Maintenance and Care
Owner Maintenance
6-35
CX-9_8GC7-EE-17G_Edition1 2017-5-16 8:22:04

TiresFor reasons of proper performance, safety,and better fuel economy, always maintainrecommended tire inflation pressures andstay within the recommended load limitsand weight distribution.
WARNING
Using Different Tire Types:Driving your vehicle with different types oftires is dangerous. It could cause poorhandling and poor braking; leading to lossof control.Except for the limited use of the temporaryspare tire, use only the same type tires(radial, bias-belted, bias-type) on all fourwheels.
Using Wrong-Sized Tires:Using any other tire size than what isspecified for the vehicle (page 9-7) isdangerous. It could seriously affect ride,handling, ground clearance, tire clearance,and speedometer calibration. This couldcause you to have an accident. Use onlytires that are the correct size specified forthe vehicle.
▼ Tire Inflation Pressure
WARNING
Always inflate the tires to the correctpressure:Overinflation or underinflation of tires isdangerous. Adverse handling orunexpected tire failure could result in aserious accident.Refer to Tires on page 9-7.
Use only a Mazda-genuine tire valve cap:Use of a non-genuine part is dangerous asthe correct tire air pressure cannot bemaintained if the tire valve becomesdamaged. If the vehicle is driven under thiscondition, the tire air pressure will decreasewhich could result in a serious accident. Donot use any part for the tire valve cap thatis not a Mazda-genuine part.
Inspect all tire pressures monthly(including the spare) when the tires arecold. Maintain recommended pressures forthe best ride, handling, and minimum tirewear.Refer to the specification charts (page 9-7).
NOTE• Always check tire pressure when tires
are cold.• Warm tires normally exceed
recommended pressures. Do not releaseair from warm tires to adjust thepressure.
• Underinflation can cause reduced fueleconomy, uneven and accelerated tirewear, and poor sealing of the tire bead,which will deform the wheel and causeseparation of tire from rim.
• Overinflation can produce a harsh ride,uneven and accelerated tire wear, and agreater possibility of damage from roadhazards.Keep your tire pressure at the correctlevels. If one frequently needs inflating,have it inspected.
Maintenance and Care
Owner Maintenance
6-36
CX-9_8GC7-EE-17G_Edition1 2017-5-16 8:22:04

▼ Tire Rotation
WARNING
Rotate tires periodically:Irregular tire wear is dangerous. Toequalize tread wear for maintaining goodperformance in handling and braking,rotate the tires every 10,000 km (6,250miles), or sooner if irregular wear develops.
During rotation, inspect them for correctbalance.
Do not include (TEMPORARY USE ONLY) spare tire in rotation.
Forward
Also, inspect them for uneven wear anddamage. Abnormal wear is usually causedby one or a combination of the following:
• Incorrect tire pressure• Improper wheel alignment• Out-of-balance wheel• Severe braking
After rotation, inflate all tire pressures tospecification (page 9-7) and inspect thelug nuts for tightness.
CAUTIONRotate unidirectional tires and radial tiresthat have an asymmetrical tread pattern orstuds only from front to rear, not from sideto side. Tire performance will be reduced ifrotated from side to side.
▼ Replacing a Tire
WARNING
Always use tires that are in good condition:Driving with worn tires is dangerous.Reduced braking, steering, and tractioncould result in an accident.
Replace all four tires at the same time:Replacing just one tire is dangerous. Itcould cause poor handling and poorbraking resulting in loss of vehicle control.Mazda strongly recommends that youreplace all four tires at the same time.
If a tire wears evenly, a wear indicator willappear as a solid band across the tread.Replace the tire when this happens.
New tread
Tread wear indicator
Worn tread
You should replace the tire before the bandcrosses the entire tread.
Maintenance and Care
Owner Maintenance
6-37
CX-9_8GC7-EE-17G_Edition1 2017-5-16 8:22:04

▼ Temporary Spare Tire
Inspect the temporary spare tire at leastmonthly to make sure it is properlyinflated and stored.
NOTEThe temporary spare tire conditiongradually deteriorates even if it has notbeen used.
The temporary spare tire is easier tohandle because of its construction which islighter and smaller than a conventionaltire. This tire should be used only for anemergency and only for a short distance. Use the temporary spare tire only until theconventional tire is repaired, which shouldbe as soon as possible. Refer to Tire on page 9-7.
CAUTIONDo not use your temporary spare tire rim
with a snow tire or a conventional tire.Neither will properly fit and coulddamage both tire and rim.The temporary spare tire has a tread life
of less than 5,000 km (3,000 miles). Thetread life may be shorter depending ondriving conditions.The temporary spare tire is for limited
use, however, if the tread wearsolid-band indicator appears, replace thetire with the same type of temporaryspare (page 6-37).
▼ Replacing a Wheel
WARNING
Always use wheels of the correct size onyour vehicle:Using a wrong-sized wheel is dangerous.Braking and handling could be affected,leading to loss of control and an accident.
CAUTIONA wrong-sized wheel may adversely affect:
Tire fitWheel and bearing lifeGround clearanceSnow-chain clearanceSpeedometer calibrationHeadlight aimBumper heightTire Pressure Monitoring System*
NOTE• When replacing a wheel, make sure the
new one is the same as the originalfactory wheel in diameter, rim width,and offset (inset/outset).
• For details, contact an expert repairer,we recommend an Authorized MazdaRepairer.
Proper tire balancing provides the bestriding comfort and helps reduce treadwear. Out-of-balance tires can causevibration and uneven wear, such ascupping and flat spots.
Maintenance and Care
Owner Maintenance
6-38 *Some models.
CX-9_8GC7-EE-17G_Edition1 2017-5-16 8:22:04
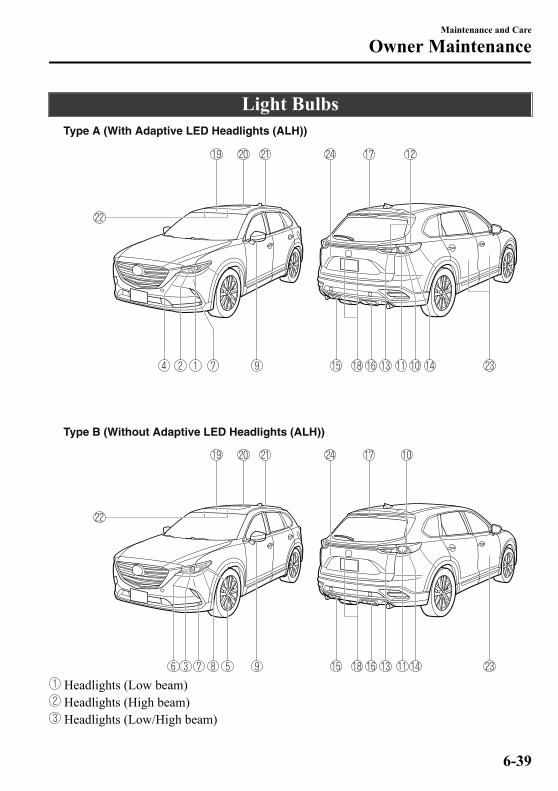
Light BulbsType A (With Adaptive LED Headlights (ALH))
Type B (Without Adaptive LED Headlights (ALH))
Headlights (Low beam) Headlights (High beam) Headlights (Low/High beam)
Maintenance and Care
Owner Maintenance
6-39
CX-9_8GC7-EE-17G_Edition1 2017-5-16 8:22:04

Running lights/Parking lights/Front turn signal lights Parking lights Running lights Front fog lights*
Front turn signal lights Side turn signal lights Brake lights/Taillights Rear turn signal lights Taillights Reverse lights Brake lights Rear fog light (Left-hand drive model)*
Rear fog light (Right-hand drive model)*
High-mount brake light License plate lights Overhead lights (Front)/Map lights (Front) Map lights (Center) Overhead light (Rear) Vanity mirror lights Ambient lights (Front/Rear door pocket) Luggage compartment light
CAUTIONWhen removing the lens or lamp unit usinga flathead screwdriver, make sure that theflathead screwdriver does not contact theinterior terminal. If the flathead screwdrivercontacts the terminal, a short circuit mayoccur.
NOTE• To replace the bulb, contact an expert
repairer, we recommend an AuthorizedMazda Repairer.
• Use the protective cover and carton forthe replacement bulb to dispose of theold bulb promptly and out of the reachof children.
▼ Replacing Exterior Light Bulbs
Headlights, Running lights/Parkinglights/Front turn signal lights (type A),Front fog lights*, Brake lights,Taillights, High-mount brake light, Sideturn signal lights
The LED bulb cannot be replaced as asingle unit because it is an integrated unit.The LED bulb has to be replaced with theunit. We recommend an AuthorizedMazda Repairer when the replacement isnecessary.
Maintenance and Care
Owner Maintenance
6-40 *Some models.
CX-9_8GC7-EE-17G_Edition1 2017-5-16 8:22:04

Parking lights (type B), Front turnsignal lights (type B)
NOTEWhen replacing a bulb for the front turnsignal lights and parking lights/frontside-marker lights, turn the steering wheeland change the direction in which the tiresare pointed to the position where the bulbreplacement can be done easily.Turn the steering wheel after starting theengine and stop the engine after you finishturning the steering wheel.
1. If you are changing the right bulb, startthe engine, turn the steering wheel allthe way to the right, and turn offengine. If you are changing the leftbulb, turn the steering wheel to the left,and turn off engine.
2. Make sure the ignition is switched off,and the headlight switch is off.
3. Turn the screw counterclockwise andremove it.
4. Pull the center of each plastic retainerand remove the retainers, and thenpartially peel back the mudguard.
Removal
Installation
5. Disconnect the wiring harness byreleasing the clamp.
6. Turn the socket and bulb assemblycounterclockwise and remove it.
Maintenance and Care
Owner Maintenance
6-41
CX-9_8GC7-EE-17G_Edition1 2017-5-16 8:22:04

7. Disconnect the bulb from the socket. Parking lights
Front turn signal lights
8. Install the new bulb in the reverseorder of the removal procedure.
NOTEThere will be no problem withfunctionality with the wiring harnessdisconnected in Step 5 leftdisconnected.Therefore, there is no need to connectthe wiring harness.
Running lights (type B)
1. Make sure the ignition is switched off,and the headlight switch is off.
2. Turn the screws counterclockwise andremove them.
3. Turn the socket and bulb assemblycounterclockwise and remove it.
4. Install the new bulb in the reverseorder of the removal procedure.
Rear turn signal lights
1. Make sure the ignition is switched off,and the headlight switch is off.
2. Remove the cover.
Maintenance and Care
Owner Maintenance
6-42
CX-9_8GC7-EE-17G_Edition1 2017-5-16 8:22:04

3. Turn the screws counterclockwise andremove them.
4. Pull the unit rearward to remove it.
5. Disconnect the wiring harness byreleasing the clamp.
6. Turn the socket and bulb assemblycounterclockwise and remove it.
7. Temporarily install the light unit withthe socket pulled out of the top of thelight unit.
Socket pull-out range
CAUTIONThe wiring harness may be damaged
when temporarily installing the lightunit. When performing theprocedure, observe the followingpoints.
Pull out the socket from within thesocket pull-out range shown in thefigure.Do not push the light unit into the
vehicle with force.When temporarily installing the light
unit, cover the rear bumper light unitinstallation surface with a soft cloth.The rear bumper may be scratched ordamaged if the light unit contacts it.
Maintenance and Care
Owner Maintenance
6-43
CX-9_8GC7-EE-17G_Edition1 2017-5-16 8:22:04

8. Disconnect the bulb from the socket.
9. Install the new bulb in the reverseorder of the removal procedure.
Reverse lights
1. Make sure the ignition is switched off,and the headlight switch is off.
2. Remove the cover.
3. Disconnect the electrical connectorfrom the bulb by pressing the tab onthe connector with your finger andpulling the connector.
4. Turn the socket and bulb assemblycounterclockwise and remove it.
5. Disconnect the bulb from the socket.
6. Install the new bulb in the reverseorder of the removal procedure.
Maintenance and Care
Owner Maintenance
6-44
CX-9_8GC7-EE-17G_Edition1 2017-5-16 8:22:04

Rear fog light*
WARNING
Do not replace the rear fog light bulb justafter turning off the engine:Replacing the fog light bulb just afterturning off the engine is dangerousbecause the exhaust pipe near the rear foglight would still be very hot and couldcause a burn if you touch it. Replace thebulb after the exhaust pipe has cooled.
1. Make sure the ignition is switched off,and the headlight switch is off.
2. Turn the screws counterclockwise andremove them.
3. Turn the socket and bulb assemblycounterclockwise and remove it.
4. Install the new bulb in the reverseorder of the removal procedure.
License plate lights
1. Make sure the ignition is switched off,and the headlight switch is off.
2. Wrap a flathead screwdriver with asoft cloth to prevent damage to thelens, and then remove the lens bycarefully prying on the edge of the lenswith a flathead screwdriver.
3. Disconnect the bulb by pulling it out.
4. Install the new bulb in the reverseorder of the removal procedure.
▼ Replacing Interior Light Bulbs
Overhead lights (Front)/Map lights(Front) (LED type), Map lights (Center)(LED type), Overhead lights (Rear)(LED type), Ambient lights
The LED bulb cannot be replaced as asingle unit because it is an integrated unit.The LED bulb has to be replaced with theunit. We recommend an AuthorizedMazda Repairer when the replacement isnecessary.
Maintenance and Care
Owner Maintenance
*Some models. 6-45
CX-9_8GC7-EE-17G_Edition1 2017-5-16 8:22:04

Overhead lights (Front)/Map lights(Front) (bulb type), Map lights (Center)(bulb type), Overhead light (Rear) (bulbtype), Vanity mirror lights
1. Wrap a small flathead screwdriver witha soft cloth to prevent damage to thelens, and then remove the lens bycarefully prying on the edge of the lenswith the flathead screwdriver.
2. Disconnect the bulb by pulling it out.Overhead lights (Front)/Map lights(Front)
Map lights (Center)
Forward
Overhead light (Rear)
Edge
Forward
Maintenance and Care
Owner Maintenance
6-46
CX-9_8GC7-EE-17G_Edition1 2017-5-16 8:22:04

Vanity mirror lights
3. Install the new bulb in the reverseorder of the removal procedure.
Luggage compartment light
1. Wrap a small flathead screwdriver witha soft cloth to prevent damage to thelens and remove the lens unit bycarefully prying on the edge of the lensunit with the flathead screwdriver.
2. Disconnect the electrical connectorfrom the bulb by pressing the tab onthe connector with your finger andpulling the connector.
CAUTIONWhen replacing the bulb alwaysdisconnect the connector first.Otherwise, electric and electronicdevices could be shorted.
3. Insert the flathead screwdriver into thegap between the lens and the lens unit,and then slide the screwdriver todetach the lens.
Maintenance and Care
Owner Maintenance
6-47
CX-9_8GC7-EE-17G_Edition1 2017-5-16 8:22:04

4. Disconnect the bulb by pulling it out.
5. Install the new bulb in the reverseorder of the removal procedure.
FusesYour vehicle's electrical system isprotected by fuses. If any lights, accessories, or controls donot work, inspect the appropriate circuitprotector. If a fuse has blown, the insideelement will be melted. If the same fuse blows again, avoid usingthat system and consult an expert repairer,we recommend an Authorized MazdaRepairer as soon as possible.
▼ Fuse Replacement
Replacing the fuses on the vehicle's leftside
If the electrical system does not work, firstinspect the fuses on the vehicle's left side. 1. Make sure the ignition is switched off,
and other switches are off.2. Open the fuse panel cover.
Maintenance and Care
Owner Maintenance
6-48
CX-9_8GC7-EE-17G_Edition1 2017-5-16 8:22:04

3. Pull the fuse straight out with the fusepuller provided on the fuse blocklocated in the engine compartment.
4. Inspect the fuse and replace it if it isblown.
Normal Blown
5. Insert a new fuse of the sameamperage rating, and make sure it fitstightly. If it does not fit tightly, have anexpert install it. We recommend anAuthorized Mazda Repairer.If you have no spare fuses, borrow oneof the same rating from a circuit notessential to vehicle operation, such asthe AUDIO or OUTLET circuit.
CAUTIONAlways replace a fuse with a genuineMazda fuse or equivalent of the samerating. Otherwise you may damage theelectric system.
6. Reinstall the cover and make sure thatit is securely installed.
Replacing the fuses under the hood
If the headlights or other electricalcomponents do not work and the fuses inthe cabin are normal, inspect the fuseblock under the hood. If a fuse is blown, itmust be replaced. Follow these steps: 1. Make sure the ignition is switched off,
and other switches are off.2. Remove the fuse block cover.
3. If any fuse but the MAIN fuse isblown, replace it with a new one of thesame amperage rating.
Normal Blown
Maintenance and Care
Owner Maintenance
6-49
CX-9_8GC7-EE-17G_Edition1 2017-5-16 8:22:04

WARNING
Do not replace the main fuse byyourself. Have an Authorized MazdaRepairer perform the replacement:Replacing the fuse by yourself isdangerous because the MAIN fuse is ahigh current fuse. Incorrectreplacement could cause an electricalshock or a short circuit resulting in afire.
4. Reinstall the cover and make sure thatit is securely installed.
Maintenance and Care
Owner Maintenance
6-50
CX-9_8GC7-EE-17G_Edition1 2017-5-16 8:22:04

▼ Fuse Panel Description
Fuse block (Engine compartment)
DESCRIPTION FUSERATING PROTECTED COMPONENT
1 WIPER.DEI 20 A Windshield wiper de-icer*
2 IG2 30 A For protection of various circuits3 INJECTOR 30 A Engine control system4 ― ― ―5 P.WINDOW1 30 A ―6 ― ― ―7 ― ― ―8 EVVT 20 A Engine control system9 DEFOG 40 A Rear window defogger10 ― ― ―11 R.HEATER 40 A Air conditioner12 EPB L 20 A Electric parking brake (EPB) (LH)13 AUDIO 40 A Audio system14 EPB R 20 A Electric parking brake (EPB) (RH)15 ENG.MAIN 40 A Engine control system16 ABS/DSC M 50 A ABS, Dynamic stability control system17 50 A For protection of various circuits18 WIPER 20 A Front window wiper and washer19 HEATER 40 A Air conditioner
Maintenance and Care
Owner Maintenance
*Some models. 6-51
CX-9_8GC7-EE-17G_Edition1 2017-5-16 8:22:04

DESCRIPTION FUSERATING PROTECTED COMPONENT
20 ― ― ―21 ENGINE.IG1 7.5 A Engine control system22 C/U IG1 15 A For protection of various circuits23 H/L LOW L 15 A Headlight low beam (LH)24 H/L LOW R1 15 A Headlight low beam (RH)*
25 ENGINE3 15 A Engine control system26 ENGINE2 15 A Engine control system27 ENGINE1 15 A Engine control system28 AT 15 A Transaxle control system29 H/CLEAN 20 A Headlight washer*
30 A/C 7.5 A Air conditioner31 AT PUMP 15 A ―32 STOP 10 A Brake lights33 R.WIPER 15 A Rear window wiper34 H/L HI 20 A Headlight high beam35 H/L LOW R2 15 A Headlight low beam (RH)*
36 FOG 15 A Fog lights*
37 7.5 A Engine control system38 AUDIO2 7.5 A Audio system*
39 INTERIOR 10 A Overhead light40 METER2 15 A ―41 METER1 10 A Instrument cluster42 SRS1 7.5 A Air bag43 AUDIO4 10 A Audio system*
44 AUDIO1 25 A Audio system*
45 ABS/DSC S 30 A ABS, Dynamic stability control system46 ― ― ―47 ST.HEATER 15 A Heated steering wheel*
48 TAIL 15 A Parking lights49 FUEL PUMP2 25 A Fuel system50 HAZARD 25 A Hazard warning flashers, Turn signal lights, Taillights51 DRL 15 A Running lights52 R.OUTLET2 15 A Accessory sockets53 HORN 15 A Horn54 ROOM 25 A For protection of various circuits
Maintenance and Care
Owner Maintenance
6-52 *Some models.
CX-9_8GC7-EE-17G_Edition1 2017-5-16 8:22:04

Fuse block (Left side)
DESCRIPTION FUSERATING PROTECTED COMPONENT
1 P.SEAT D 30 A Power seat*
2 P.WINDOW3 30 A Power windows3 R.OUTLET3 15 A Accessory sockets*
4 P.WINDOW2 25 A Power windows5 PLG 20 A Power liftgate*
6 D.LOCK 25 A Power door locks7 SEAT WARM 20 A Seat warmer*
8 SRS2/ESCL 15 A Electronic steering lock9 SUNROOF 10 A Sunroof*
10 INTERIOR2 15 A Audio system11 7.5 A Engine control system12 MIRROR 7.5 A Power control mirror13 AT IND 7.5 A AT shift indicator14 F.OUTLET 15 A Accessory sockets15 R.OUTLET1 15 A Accessory sockets16 ― ― ―
Maintenance and Care
Owner Maintenance
*Some models. 6-53
CX-9_8GC7-EE-17G_Edition1 2017-5-16 8:22:04

DESCRIPTION FUSERATING PROTECTED COMPONENT
17 M.DEF 7.5 A Mirror defogger*
18 R.SEAT.WARM 20 A Seat warmer*
19 AUDIO3 15 A Audio system20 ― ― ―21 P.SEAT P 30 A Power seat*
Maintenance and Care
Owner Maintenance
6-54 *Some models.
CX-9_8GC7-EE-17G_Edition1 2017-5-16 8:22:04

Exterior CareThe paintwork on your Mazda representsthe latest technical developments incomposition and methods of application. Environmental hazards, however, canharm the paint's protective properties, ifproper care is not taken. Here are some examples of possibledamage, with tips on how to prevent them.
Etching Caused by Acid Rain orIndustrial Fallout
Occurrence
Industrial pollutants and vehicle emissionsdrift into the air and mix with rain or dewto form acids. These acids can settle on avehicle's finish. As the water evaporates,the acid becomes concentrated and candamage the finish.And the longer the acid remains on thesurface, the greater the chance is fordamage.
Prevention
It is necessary to wash and wax yourvehicle to preserve its finish according tothe instructions in this section. These stepsshould be taken immediately after yoususpect that acid rain has settled on yourvehicle's finish.
Damage Caused by Bird Dropping,Insects, or Tree Sap
Occurrence
Bird droppings contain acids. If these arenot removed they can eat away the clearand color base coat of the vehicle'spaintwork. When insects stick to the paint surface anddecompose, corrosive compounds form.These can erode the clear and color basecoat of the vehicle's paintwork if they arenot removed. Tree sap will harden and adherepermanently to the paint finish. If youscratch the sap off while it is hard, somevehicle paint could come off with it.
Prevention
It is necessary to have your Mazda washedand waxed to preserve its finish accordingto the instructions in this section. Thisshould be done as soon as possible. Bird droppings can be removed with a softsponge and water. If you are traveling andthese are not available, a moistened tissuemay also take care of the problem. Thecleaned area should be waxed according tothe instructions in this section.Insects and tree sap are best removed witha soft sponge and water or a commerciallyavailable chemical cleaner. Another method is to cover the affectedarea with dampened newspaper for one totwo hours. After removing the newspaper,rinse off the loosened debris with water.
Maintenance and Care
Appearance Care
6-55
CX-9_8GC7-EE-17G_Edition1 2017-5-16 8:22:04

Water Marks
Occurrence
Rain, fog, dew, and even tap water cancontain harmful minerals such as salt andlime. If moisture containing these mineralssettles on the vehicle and evaporates, theminerals will concentrate and harden toform white rings. The rings can damageyour vehicle's finish.
Prevention
It is necessary to wash and wax yourvehicle to preserve its finish according tothe instructions in this section. These stepsshould be taken immediately after you findwater marks on your vehicle's finish.
Paint Chipping
Occurrence
Paint chipping occurs when gravel thrownin the air by another vehicle's tires hitsyour vehicle.
How to avoid paint chipping
Keeping a safe distance between you andthe vehicle ahead reduces the chances ofhaving your paint chipped by flyinggravel.
NOTE• The paint chipping zone varies with the
speed of the vehicle. For example, whentraveling at 90 km/h (56 mph), the paintchipping zone is 50 m (164 ft).
• In low temperatures a vehicle's finishhardens. This increases the chance ofpaint chipping.
• Chipped paint can lead to rust formingon your Mazda. Before this happens,repair the damage by using Mazdatouch-up paint according to theinstructions in this section. Failure torepair the affected area could lead toserious rusting and expensive repairs.
Follow all label and container directionswhen using a chemical cleaner or polish.Read all warnings and cautions.
▼ Maintaining the Finish
Washing
CAUTIONWhen the wiper lever is in the
position and the ignition is switched ON,the wipers may move automatically inthe following cases:
If the windshield above the rain sensoris touched or wiped with a cloth. If the windshield is struck with a hand
or other object from either outside orinside the vehicle.
Keep hands and scrapers clear of thewindshield when the wiper lever is in the
position and the ignition isswitched ON as fingers could be pinchedor the wipers and wiper blades damagedwhen the wipers activate automatically.If you are going to clean the windshield,be sure the wipers are turned offcompletely (when it is most likely that theengine is left running) this is particularlyimportant when clearing ice and snow.
Maintenance and Care
Appearance Care
6-56
CX-9_8GC7-EE-17G_Edition1 2017-5-16 8:22:04

Do not spray water in the enginecompartment. Otherwise, it could resultin engine-starting problems or damageto electrical parts.When washing and waxing the vehicle,
be careful not to apply excessive force toany single area of the vehicle roof.Otherwise, you could dent the vehicle.
To help protect the finish from rust anddeterioration, wash your Mazdathoroughly and frequently, at least once amonth, with lukewarm or cold water. If the vehicle is washed improperly, thepaint surface could be scratched. Here aresome examples of how scratching couldoccur. Scratches occur on the paint surface when:
• The vehicle is washed without firstrinsing off dirt and other foreign matter.
• The vehicle is washed with a rough, dry,or dirty cloth.
• The vehicle is washed at a car wash thatuses brushes that are dirty or too stiff.
• Cleansers or wax containing abrasivesare used.
NOTE• Mazda is not responsible for scratches
caused by automatic car washes orimproper washing.
• Scratches are more noticeable onvehicles with darker paint finishes.
To minimize scratches on the vehicle'spaint finish:
• Rinse off any dirt or other foreign matterusing lukewarm or cold water beforewashing.
• Use plenty of lukewarm or cold waterand a soft cloth when washing thevehicle. Do not use a nylon cloth.
• Rub gently when washing or drying thevehicle.
• Take your vehicle only to a car washthat keeps its brushes well maintained.
• Do not use abrasive cleansers or waxthat contain abrasives.
CAUTIONDo not use steel wool, abrasive cleaners,
or strong detergents containing highlyalkaline or caustic agents onchrome-plated or anodized aluminumparts. This may damage the protectivecoating; also, cleaners and detergentsmay discolor or deteriorate the paint.
Pay special attention to removing salt, dirt,mud, and other foreign material from theunderside of the fenders, and make surethe drain holes in the lower edges of thedoors and rocker panels are clean. Insects, tar, tree sap, bird droppings,industrial fallout, and similar deposits candamage the finish if not removedimmediately. When prompt washing withplain water is ineffective, use a mild soapmade for use on vehicles. Thoroughly rinse off all soap withlukewarm or cold water. Do not allowsoap to dry on the finish. After washing the vehicle, dry it with aclean chamois to prevent water spots fromforming.
Maintenance and Care
Appearance Care
6-57
CX-9_8GC7-EE-17G_Edition1 2017-5-16 8:22:04

WARNING
Dry off brakes that have become wet bydriving slowly, releasing the acceleratorpedal and lightly applying the brakesseveral times until the brake performancereturns to normal:Driving with wet brakes is dangerous.Increased stopping distance or the vehiclepulling to one side when braking couldresult in a serious accident. Light brakingwill indicate whether the brakes have beenaffected.
When using an automatic car wash• Retract the door mirrors.• The automatic car wash brushes could
reduce the paint lustre or hasten paintdeterioration.
When using a high water pressure carwash
High water temperature and high waterpressure car washers are availabledepending on the type of car washmachine. If the car washer nozzle is puttoo close to the vehicle, the force of thespray could damage or deform themolding, affect the sealability of parts, andallow water to penetrate the interior. Keepa sufficient space (30 cm (12 in) or more)between the nozzle and the vehicle. Inaddition, do not spend too much timespraying the same area of the vehicle, andbe very careful when spraying betweengaps in doors and around windows.
Waxing
Your vehicle needs to be waxed whenwater no longer beads on the finish.
Always wash and dry the vehicle beforewaxing it. In addition to the vehicle body,wax the metal trim to maintain its luster. 1. Use wax which contains no abrasives.
Waxes containing abrasive will removepaint and could damage bright metalparts.
2. Use a good grade of natural wax formetallic, mica, and solid colors.
3. When waxing, coat evenly with thesponge supplied or a soft cloth.
4. Wipe off the wax with a soft cloth.
NOTEA spot remover to remove oil, tar, andsimilar materials will usually also take offthe wax. Rewax these areas even if the restof the vehicle does not need it.
▼ Paint Damage Touch-up
Repair damage to the finish caused bystone chipping, damage during parkingetc., by using Mazda touch-up paint beforerust begins to form. First, remove the dirtand grease with a clean soft cloth. If rust has already begun to form: 1. Remove rust completely with
sandpaper.2. Wipe with a clean soft cloth.3. Apply rust preventive primer to the
area.4. After drying it completely, apply a
suitable top coat material to the area.Of course there will be no problem if youassign the work to an expert repairer, werecommend an Authorized MazdaRepairer.
Maintenance and Care
Appearance Care
6-58
CX-9_8GC7-EE-17G_Edition1 2017-5-16 8:22:04

▼ Cavity Protection
Cavities are treated for protection at thefactory, but additional protective treatmentafter the vehicle has been put into use willextend the life of the body.We recommend that you consult an expertrepairer, we recommend an AuthorizedMazda Repairer concerning this additionalprecaution.
▼ Bright-Metal Maintenance• Use tar remover to remove road tar and
insects. Never do this with a knife orsimilar tool.
• To prevent corrosion on bright-metalsurfaces, apply wax or chromepreservative and rub it to a high luster.
• During cold weather or in coastal areas,cover bright-metal parts with a coatingof wax or preservative heavier thanusual. It would also help to coat themwith noncorrosive petroleum jelly orsome other protective compound.
CAUTIONDo not use steel wool, abrasive cleaners, orstrong detergents containing highlyalkaline or caustic agents onchrome-plated or anodized aluminumparts. This may result in damage to theprotective coating and cause discolorationor paint deterioration.
▼ Undercoating
This special coating is applied to thecritical parts of the underside to protectvehicles from damage caused bychemicals or stones. This coating is liableto be damaged with time. Check thiscoating periodically. Should repairs be necessary, consult anexpert repairer, we recommend anAuthorized Mazda Repairer. They are wellinformed on how repairs should be made.
▼ Aluminum Wheel Maintenance
A protective coating is provided over thealuminum wheels. Special care is neededto protect this coating.
CAUTIONDo not use any detergent other than milddetergent. Before using any detergent,verify the ingredients. Otherwise, theproduct could discolor or stain thealuminum wheels.
NOTE• Do not use a wire brush or any abrasive
cleaner, polishing compound, or solventon aluminum wheels. They may damagethe coating.
• Always use a sponge or soft cloth toclean the wheels.Rinse the wheels thoroughly withlukewarm or cold water. Also, be sure toclean the wheels after driving on dustyor salted roads to help preventcorrosion.
• Avoid washing your vehicle in anautomatic car wash that uses high-speedor hard brushes.
Maintenance and Care
Appearance Care
6-59
CX-9_8GC7-EE-17G_Edition1 2017-5-16 8:22:04

▼ Plastic Part Maintenance• When cleaning the plastic lenses of the
lights, do not use gasoline, kerosene,rectified spirit, paint, thinner, highlyacidic detergents, or strongly alkalinedetergents. Otherwise, these chemicalagents can discolor or damage thesurfaces resulting in a significant loss infunctionality. If plastic parts becomeinadvertently exposed to any of thesechemical agents, flush with waterimmediately.
• If plastic parts such as the bumpersbecome inadvertently exposed tochemical agents or fluids such asgasoline, oil, engine coolant, or batteryfluid, it could cause discoloration,staining, or paint peeling. Wipe off anysuch chemical agents or fluids using asoft cloth immediately.
• High water temperature and high waterpressure car washers are availabledepending on the type of high pressurecar washer device. If the car washernozzle is put too close to the vehicle oraimed at one area for an extended periodof time, it could deform plastic parts ordamage the paint.
• Do not use wax containing compounds(polish). Otherwise, it could result inpaint damage.
• In addition, do not use an electrical orair tool to apply wax. Otherwise, thefrictional heat generated could result indeformation of plastic parts or paintdamage.
Interior Care
WARNING
Do not spray water into the vehicle cabin:Spraying water into the vehicle cabin isdangerous as electrical devices such as theaudio and switches could get wet resultingin a malfunction or vehicle fire.
NOTE• Do not wipe the interior using alcohol,
chlorine bleach, or organic solventssuch as thinner, benzene, and gasoline.Otherwise, it may cause discoloration orstains.
• Rubbing hard with a stiff brush or clothmay cause damage.
If the vehicle interior becomes soiled byany of the following, wipe it offimmediately using a soft cloth.Leaving it uncleaned could causediscoloration, stains, cracks, or peeling ofthe coating, and it will make it hard towipe off later.
• Beverage or fragrance• Grease or oil• Soiling
Maintenance and Care
Appearance Care
6-60
CX-9_8GC7-EE-17G_Edition1 2017-5-16 8:22:04

▼ Seat Belt Maintenance
1. Clean the soiled area by lightlydabbing it with a soft cloth soaked in amild detergent (approx. 5%) dilutedwith water.
2. Wipe off the remaining detergent usinga cloth soaked in clean water andwrung out well.
3. Before retracting seat belts which havebeen pulled out for cleaning, dry themoff thoroughly and make sure there isno remaining moisture on them.
WARNING
If a seat belt appears frayed or hasabrasions, have it replaced by anAuthorized Mazda Repairer:If a seat belts is used under such acondition, it cannot function at its fullcapacity which could result in serious injuryor death.
Use a mild detergent to remove soilingfrom a seat belt:If organic solvents are used for cleaning theseat belts or they become stained orbleached, there is the possibility of thembecoming weakened and as a result, theymay not function at their full capacitywhich could cause serious injury or death.
NOTEClean seat belts diligently if they get dirty.Leaving them uncleaned will make itdifficult to clean them later, and it mayaffect the smooth retracting of the seatbelt.
▼ Vinyl Upholstery Maintenance
Remove dust and dirt from the vinylupholstery using a brush or vacuum.Remove soiling from vinyl upholsteryusing a leather and vinyl upholsterycleaner.
▼ Upholstery Maintenance
1. Clean the soiled area by lightlydabbing it with a soft cloth soaked in amild detergent (approx. 5%) dilutedwith water.
2. Wipe off the remaining detergent usinga cloth soaked in clean water andwrung out well.
Maintenance and Care
Appearance Care
6-61
CX-9_8GC7-EE-17G_Edition1 2017-5-16 8:22:04

▼ Leather Upholstery Maintenance*
1. Remove dust and sand using a vacuumcleaner.
2. Wipe off the soiled area with a softcloth and a suitable, special cleaner ora soft cloth soaked in a mild detergent(about 5%) diluted with water.
3. Wipe off the remaining detergent usinga cloth soaked in clean water andwrung out well.
4. Remove moisture with a dry, soft clothand allow the leather to further dry in awell-ventilated, shaded area. If theleather gets wet such as from rain,remove the moisture and dry it as soonas possible.
NOTE• Because genuine leather is a natural
material, its surface is not uniform andit may have natural scars, scratches,and wrinkles.
• To maintain the quality for as long aspossible, periodical maintenance, abouttwice a year, is recommended.
• If the leather upholstery comes intocontact with any of the following, cleanit immediately.Leaving it uncleaned could causepremature wear, mold, or stains.
• Sand or dirt• Grease or oil, such as hand cream• Alcohol, such as in cosmetic or hair
dressing items
• If the leather upholstery gets wet,promptly remove moisture with a drycloth. Remaining moisture on thesurface may cause deterioration such ashardening and shrinkage.
• Exposure to direct sunlight for longperiods may cause deterioration andshrinkage. When parking the car underdirect sunlight for long periods, shadethe interior using sunshades.
• Do not leave vinyl products on theleather upholstery for long periods.They may affect the leather quality andcoloring. If the cabin temperaturebecomes hot, the vinyl may deteriorateand adhere to the genuine leather.
▼ Plastic Part Maintenance
CAUTIONDo not use polishing agents.Depending on the product ingredients,they could cause discoloration, stains,cracks or peeling of the coating.
Maintenance and Care
Appearance Care
6-62 *Some models.
CX-9_8GC7-EE-17G_Edition1 2017-5-16 8:22:04
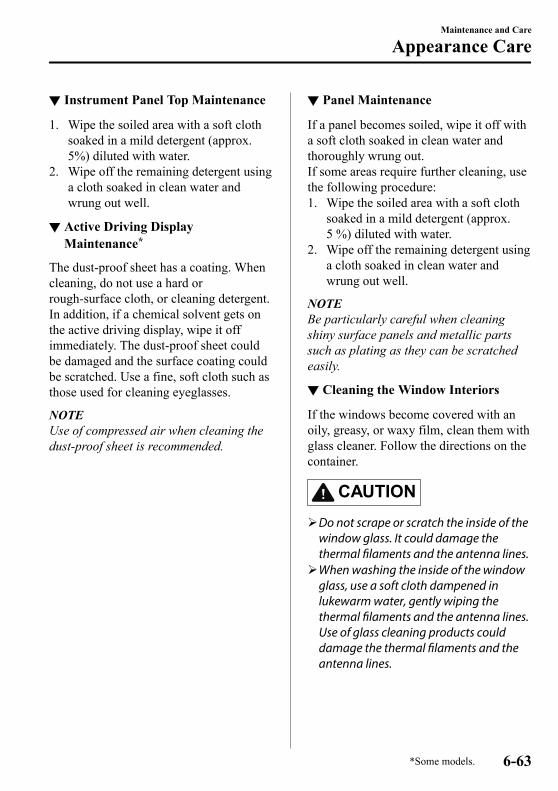
▼ Instrument Panel Top Maintenance
1. Wipe the soiled area with a soft clothsoaked in a mild detergent (approx.5%) diluted with water.
2. Wipe off the remaining detergent usinga cloth soaked in clean water andwrung out well.
▼ Active Driving DisplayMaintenance*
The dust-proof sheet has a coating. Whencleaning, do not use a hard orrough-surface cloth, or cleaning detergent.In addition, if a chemical solvent gets onthe active driving display, wipe it offimmediately. The dust-proof sheet couldbe damaged and the surface coating couldbe scratched. Use a fine, soft cloth such asthose used for cleaning eyeglasses.
NOTEUse of compressed air when cleaning thedust-proof sheet is recommended.
▼ Panel Maintenance
If a panel becomes soiled, wipe it off witha soft cloth soaked in clean water andthoroughly wrung out.If some areas require further cleaning, usethe following procedure:1. Wipe the soiled area with a soft cloth
soaked in a mild detergent (approx.5 %) diluted with water.
2. Wipe off the remaining detergent usinga cloth soaked in clean water andwrung out well.
NOTEBe particularly careful when cleaningshiny surface panels and metallic partssuch as plating as they can be scratchedeasily.
▼ Cleaning the Window Interiors
If the windows become covered with anoily, greasy, or waxy film, clean them withglass cleaner. Follow the directions on thecontainer.
CAUTIONDo not scrape or scratch the inside of the
window glass. It could damage thethermal filaments and the antenna lines.When washing the inside of the window
glass, use a soft cloth dampened inlukewarm water, gently wiping thethermal filaments and the antenna lines.Use of glass cleaning products coulddamage the thermal filaments and theantenna lines.
Maintenance and Care
Appearance Care
*Some models. 6-63
CX-9_8GC7-EE-17G_Edition1 2017-5-16 8:22:04

MEMO
6-64
CX-9_8GC7-EE-17G_Edition1 2017-5-16 8:22:04

7 If Trouble Arises
Helpful information on what to do if a problem arises with the vehicle.
Mazda ERA-GLONASS................... 7-2Mazda ERA-GLONASS*.............7-2Indicator Light/Beep Sound....... 7-10Test Mode................................... 7-11
Parking in an Emergency............... 7-14Parking in an Emergency............7-14
Flat Tire............................................7-15Spare Tire and Tool Storage....... 7-15Changing a Flat Tire................... 7-20
Battery Runs Out............................ 7-28Jump-Starting............................. 7-28
Emergency Starting.........................7-31Starting a Flooded Engine.......... 7-31Push-Starting.............................. 7-31
Overheating......................................7-32Overheating................................ 7-32
Emergency Towing.......................... 7-34Towing Description.................... 7-34Towing Hooks............................ 7-36
Warning/Indicator Lights andWarning Sounds.............................. 7-38
If a Warning Light Turns On orFlashes........................................ 7-38Message Indicated onDisplay........................................7-52Message Indicated in Multi-information Display*.................. 7-54Warning Sound is Activated....... 7-55
When Liftgate Cannot beOpened..............................................7-61
When Liftgate Cannot beOpened........................................7-61
Active Driving Display Does NotOperate.............................................7-62
If the Active Driving Display DoesNot Operate................................ 7-62
*Some models. 7-1
CX-9_8GC7-EE-17G_Edition1 2017-5-16 8:22:04

Mazda ERA-GLONASS*
When an emergency situation such as an accident or sudden illness occurs, the MazdaERA-GLONASS dials the call center automatically or the user can make a call to the callcenter manually to enable a voice call.The system operates automatically when the vehicle receives an impact of a certain level ormore in a collision, or it can be operated manually using the Mazda ERA-GLONASS switchif an emergency situation arises such as sudden illness.The call center operator confirms the status via the voice call, confirms the vehicle's positioninformation using the GPS/GLONASS*1, and calls the police or emergency services.*1 GPS/GLONASS, short for “Global Positioning System/Global Navigation Satellite
System”, is a system that obtains the vehicle's current location by receiving radio wavesemitted from the GPS/GLONASS (operated by the Russian Federation) satellites to theground.
Status information
Emergency vehicle
Dial & Position information
Position
SatelliteMobile phone base station
Emergency situation occurs
Call center
Police and emergency services
If Trouble Arises
Mazda ERA-GLONASS
7-2 *Some models.
CX-9_8GC7-EE-17G_Edition1 2017-5-16 8:22:04
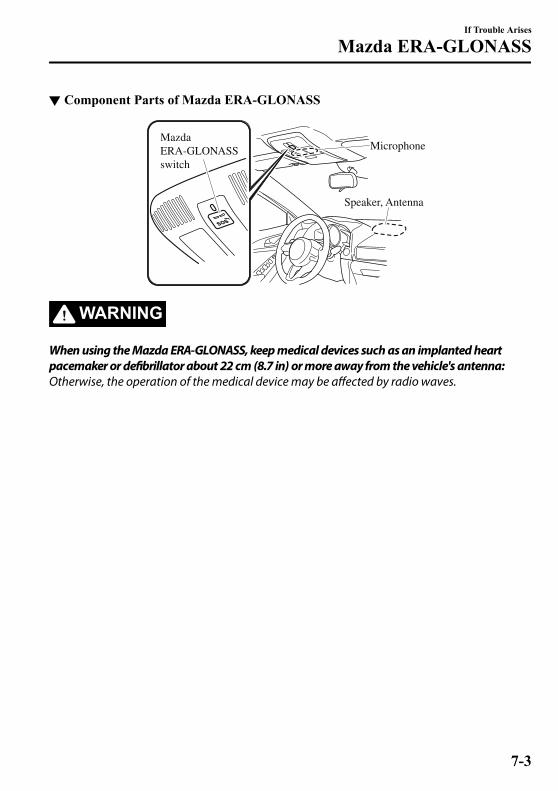
▼ Component Parts of Mazda ERA-GLONASS
Speaker, Antenna
Mazda ERA-GLONASS switch
Microphone
WARNING
When using the Mazda ERA-GLONASS, keep medical devices such as an implanted heartpacemaker or defibrillator about 22 cm (8.7 in) or more away from the vehicle's antenna:Otherwise, the operation of the medical device may be affected by radio waves.
If Trouble Arises
Mazda ERA-GLONASS
7-3
CX-9_8GC7-EE-17G_Edition1 2017-5-16 8:22:04

▼ Flow of Mazda ERA-GLONASS
Automatic callUser status
Mazda ERA-GLONASS Call center/ Police/ Emergency servicesManual call
Emergency situation arises such as collision or sudden illness
Automatic call made due to vehicle receiving impact of certain level or more
Vehicle information, position information, other
Status information
Police and emergency services
Emergency vehicle
Rescue
Status confirmation/report by voice call
Manual call made by user
Mazda ERA-GLONASS switch
If Trouble Arises
Mazda ERA-GLONASS
7-4
CX-9_8GC7-EE-17G_Edition1 2017-5-16 8:22:04

CAUTIONDo not disassemble the Mazda ERA-GLONASS. Otherwise, it could become damaged and
may not function in an emergency.The Mazda ERA-GLONASS has a special built-in battery so that it can operate even if the
power supply from the vehicle is cut such as in an accident.Heed the following cautions. If the Mazda ERA-GLONASS is not used correctly it may notoperate.
The built-in battery is not a rechargeable type battery. Do not attempt to recharge thebattery. If the built-in battery power is low due to natural discharge and the system determines
that there is a problem, the Mazda ERA-GLONASS cannot be used. If the systemdetermines that there is a problem, the indicator light (red) in the Mazda ERA-GLONASSswitch turns on to notify the driver. Have the vehicle inspected at an Authorized MazdaRepairer. Refer to Indicator light/Beep sound on page 7-10.
NOTE• The Mazda ERA-GLONASS can be used when the ignition is switched ON.• There are two ways the Mazda ERA-GLONASS makes calls; automatically or manually.• The Mazda ERA-GLONASS may not make a connection under the following conditions or
depending on the use environment. If the Mazda ERA-GLONASS does not connect, makea call from another telephone such as the nearest available public telephone.
• The vehicle is outside of a mobile phone network area• The vehicle is in a weak radio wave transmission environment (such as inside tunnels,
underground parking areas, shadow of buildings, and mountain areas)• The vehicle does not receive an impact of a certain level or more even if an accident has
occurred.• An extremely serious collision occurs resulting in damage to the Mazda
ERA-GLONASS.• The position information cannot be obtained when signals cannot be received from the
GPS and GLONASS satellites, however, voice calls are possible.• When a voice call is made by the Mazda ERA-GLONASS, the audio system is muted so
that it does not interfere with the call.• It may take some time for the call center to respond after the Mazda ERA-GLONASS first
starts operating.• If you are unable to respond to an operator's questions after the voice call begins, the
operator may proceed with emergency procedures at their own discretion.• Even if it is difficult for you to hear the operator's voice, your voice may be heard by the
call center. Continue explaining your circumstances.
If Trouble Arises
Mazda ERA-GLONASS
7-5
CX-9_8GC7-EE-17G_Edition1 2017-5-16 8:22:04

• If the Mazda ERA-GLONASS operates while you are making a call with your mobilephone using Bluetooth® Hands-Free, the call may be interrupted.
• It may not be possible to receive a call using the Bluetooth® Hands-Free normally whilethe Mazda ERA-GLONASS is operating.
• A voice call with an operator may not be possible if the speaker or microphone is broken.If the speaker or microphone is broken, always have the vehicle inspected at anAuthorized Mazda Repairer.
• The Mazda ERA-GLONASS may not operate normally outside of the followingtemperature range: If the Mazda ERA-GLONASS does not operate normally, make a callfrom another telephone such as the nearest available public telephone.Operation temperature range: -40 °C (-40 °F) to 85 °C (185 °F)
• There may be a difference between the position information sent to the call center and theactual position of the vehicle where the call was made. Indicate landmarks around theposition of the vehicle where the call is being made to the operator during the voice call.
Automatic emergency calls
If the vehicle receives an impact of a certain level or more in a collision, vehicle informationis automatically sent to the call center.When the transmission of the vehicle information is completed or about 20 seconds haveelapsed since the transmission began, the voice call with the call center starts.
CAUTIONIf an automatic call is made, the built-in battery power may be depleted and emergency callsmay not be possible in the event that an emergency occurs again. After an automaticemergency call has been made, have the built-in battery replaced by an Authorized MazdaRepairer.
NOTE• Automatic emergency calls cannot be canceled by the user.• The call center will end an emergency call. The user cannot end the emergency call.• If the vehicle receives an impact of a certain level or more in a collision, an automatic
call is made even if the air bags do not deploy.• If a call is disconnected or a call cannot be made to the call center correctly, an
automatic call is made again to the call center. Redialing cannot be canceled.
1. If the vehicle receives an impact of a certain level or more in a collision, the MazdaERA-GLONASS begins operating automatically.
If Trouble Arises
Mazda ERA-GLONASS
7-6
CX-9_8GC7-EE-17G_Edition1 2017-5-16 8:22:04

2. The indicator light (green) on the Mazda ERA-GLONASS switch flashes slowly (0.5second intervals) and the call is made to the call center.
Green
Indicator light
3. When the connection is established with the call center, the indicator light (green)flashes somewhat quickly (0.3 second intervals) and the beep sounds simultaneously,and the transmission of the vehicle information begins.
4. When the transmission of the vehicle information is completed or about 20 seconds haveelapsed since the transmission began, the beep sounds and the voice call with the callcenter starts.
5. If the connection fails, the indicator light (red) turns on and the indicator light (green)flashes quickly (0.15 second intervals) and the beep sounds simultaneously.In this case, make a manual connection using the Mazda ERA-GLONASS switchbecause an automatic connection is not possible.
Green (Flashes)
Red (Turns on)
Manual emergency calls
With the ignition switched ON, long-press the Mazda ERA-GLONASS switch and afterreleasing your finger from the switch, the vehicle information is automatically transmitted tothe call center.When the transmission of the vehicle information is completed or about 20 seconds haveelapsed since the transmission began, the voice call with the call center starts.
NOTE• Only make calls manually for conditions requiring urgent treatment such as illness or
serious injury.
If Trouble Arises
Mazda ERA-GLONASS
7-7
CX-9_8GC7-EE-17G_Edition1 2017-5-16 8:22:04

• When making emergency calls manually, stop the vehicle in a safe location before makingthe call.
• The call center will end an emergency call. The user cannot end the emergency call.• If a call is disconnected or a call cannot be made to the call center correctly, an
automatic call is made again to the call center. To cancel the redialing, refer to Manualemergency call cancellation.
1. Make sure that the ignition is switched ON.2. Long-press the Mazda ERA-GLONASS switch on the overhead console and then release
your finger from the switch.
Mazda ERA-GLONASS switch
3. The indicator light (green) on the Mazda ERA-GLONASS switch flashes slowly (0.5second intervals) and the call is made to the call center.
Green
Indicator light
4. When the connection is established with the call center, the indicator light (green)flashes somewhat quickly (0.3 second intervals) and the beep sounds simultaneously,and the transmission of the vehicle information begins.
5. When the transmission of the vehicle information is completed or about 20 seconds haveelapsed since the transmission began, the beep sounds and the voice call with the callcenter starts.
6. If the connection fails, the indicator light (red) turns on and the indicator light (green)flashes quickly (0.15 second intervals), and the beep sounds simultaneously.
If Trouble Arises
Mazda ERA-GLONASS
7-8
CX-9_8GC7-EE-17G_Edition1 2017-5-16 8:22:04

Make a manual emergency call again.
Green (Flashes)
Red (Turns on)
NOTEIf a call to the call center does not connect even though the indicator light shows a call ispossible, make a call to the police or other authority by means other than the MazdaERA-GLONASS.
Manual emergency call cancellation
A manual emergency call can be canceled even after the Mazda ERA-GLONASS switchhas been pressed by pressing the switch again, as long as the call with the call center has notbegun. If the call cannot be canceled and the call with the call center has begun, tell theoperator that the call is mistaken.
If Trouble Arises
Mazda ERA-GLONASS
7-9
CX-9_8GC7-EE-17G_Edition1 2017-5-16 8:22:04

Indicator Light/Beep SoundThe indicator light turns on/flashes and beep sounds are activated to notify the driver of thesystem operation status or if there is a problem with the system.
StatusIndicator light Beep sound
status On/flashing conditionsGreen Red Flash interval
Diagnosis Turns on Turns on ― ―
When the ignition is switchedON, it turns on and then turnsoff after a few seconds.
NOTEA manual emergency call is notpossible during diagnosis.
Normal Turns off Turns off ― ― The system is operating normal-ly.
Malfunction Turns off Turns on ―3 beeps
(Slow intermit-tent sound)
•A system malfunction is de-tected.
•The remaining power of thebuilt-in battery is low.
CAUTIONIf the indicator light (red) re‐mains on constantly, the systemwill not operate normally. Havethe vehicle inspected at an Au‐thorized Mazda Repairer as soonas possible.
Call being madewith call center Flashes Turns off
Slow(0.5 second in-
tervals)
The beep doesnot sound, butthe ringbacktone can be
heard.
An emergency call is beingmade by the Mazda ERA-GLO-NASS.
Vehicle infor-mation is being
transmittedFlashes Turns off
Somewhatquick
(0.3 second in-tervals)
Continuous in-termittent sound
Vehicle information is beingtransmitted to the call center.
Start of voicecall Turns on Turns off ― 1 beep
During a voice call with the callcenter.During voice
call Turns on Turns off ― ―
Connection fail-ure Flashes Turns on
Quick(0.15 second in-
tervals)
3 beeps(Fast intermit-
tent sound)
When an emergency call fails toconnect.
If Trouble Arises
Mazda ERA-GLONASS
7-10
CX-9_8GC7-EE-17G_Edition1 2017-5-16 8:22:04

Test ModeThe test mode function makes sure that the Mazda ERA-GLONASS can operate normally.Have your vehicle tested at an Authorized Mazda Repairer when performing the test mode.
Method to start test mode
Switch the ignition ON while the parking brake is applied, and wait two minutes with thevehicle stopped.
If Trouble Arises
Mazda ERA-GLONASS
7-11
CX-9_8GC7-EE-17G_Edition1 2017-5-16 8:22:04

After that, perform the following procedure.
Move the signal lever up to right turn
Move the signal lever up to right turn
Move the signal lever down to left turn
Move the signal lever down to left turn
Return the signal lever to off
Return the signal lever to off
Return the signal lever to off
Return the signal lever to off
Return the signal lever to off
Move the signal lever up to right turn
Within five seconds
Within one second
Within one second
Within one second
Within one second
Within one second
Within one second
Within one second
Within one second
Within five seconds
Within five second
Within one second
Turn on the hazard warning lights.
Turn off the hazard warning lights.
Both red and green Mazda ERA-GLONASS switch indicator lights turn on.
Press the Mazda ERA-GLONASS switch for one second or longer and release it.
If Trouble Arises
Mazda ERA-GLONASS
7-12
CX-9_8GC7-EE-17G_Edition1 2017-5-16 8:22:04

After the procedure is completed, the test mode is performed in the following orderautomatically.
Switch to test mode
Procedure is completed
Voice guidance from the call center is played
Call is placed to call center
Start of voice call
Vehicle information is sent
NOTECommunication with the call center may fail if the reception is poor. Perform the test modein a location with good reception.
The test mode finishes automatically.
If Trouble Arises
Mazda ERA-GLONASS
7-13
CX-9_8GC7-EE-17G_Edition1 2017-5-16 8:22:04

Parking in an EmergencyThe hazard warning lights should alwaysbe used when you stop on or near aroadway in an emergency.
The hazard warning lights warn otherdrivers that your vehicle is a traffic hazardand that they must take extreme cautionwhen near it.
Depress the hazard warning flasher and allthe turn signals will flash. The hazardwarning indicator lights in the instrumentcluster flash simultaneously.
NOTE• The turn signals do not work when the
hazard warning lights are on.• Check local regulations about the use of
hazard warning lights while the vehicleis being towed to verify that it is not inviolation of the law.
If Trouble Arises
Parking in an Emergency
7-14
CX-9_8GC7-EE-17G_Edition1 2017-5-16 8:22:04

Spare Tire and Tool StorageSpare tire and tools are stored in the locations illustrated in the diagram.
Lug wrench
Jack lever
Towing eyelet
Flat tire belt
Spare tire hold-down bolt
Jack
Tool bag
With sub-woofer
Lug wrench
Jack lever
Towing eyelet
Spare tire hold-down bolt
Jack
Tool bag
Without sub-woofer
Some models.
ScrewdriverWrench
Screwdriver
Wrench
If Trouble Arises
Flat Tire
7-15
CX-9_8GC7-EE-17G_Edition1 2017-5-16 8:22:04

▼ Jack
To remove the jack
1. Set the third-row seatbacks to theiron-road positions.
2. Raise the luggage board.
Luggage Board
3. Raise the luggage board a little whilepulling it towards you, and then insertthe bottom edge into the holders.
Luggage Board
Holder
4. Remove the cover on the right side.
Cover
5. Remove the cargo sub compartment.
Cargo sub compartment
6. Turn the wing bolt and jack screwcounterclockwise.
Wing bolt Jack screw
If Trouble Arises
Flat Tire
7-16
CX-9_8GC7-EE-17G_Edition1 2017-5-16 8:22:04

To secure the jack
1. Insert the wing bolt into the jack withthe jack screw pointing back and turnthe wing bolt clockwise to temporarilytighten it.
2. Tighten the jack screw clockwise.
Wing bolt Jack screw
3. Turn the wing bolt completely tosecure the jack.
NOTEIf the jack is not completely secured, itcould rattle while driving. Make surethe jack screw is sufficiently tightened.
Maintenance• Always keep the jack clean.• Make sure the moving parts are kept
free from dirt or rust.• Make sure the screw thread is
adequately lubricated.
▼ Spare Tire
Your Mazda has a temporary spare tire.The temporary spare tire is lighter andsmaller than a conventional tire, and isdesigned only for emergency use andshould be used only for VERY shortperiods. Temporary spare tires shouldNEVER be used for long drives orextended periods.
WARNING
Do not install the temporary spare tire onthe front wheels (driving wheels):Driving with the temporary spare tire onone of the front driving wheels isdangerous. Handling will be affected. Youcould lose control of the vehicle, especiallyon ice or snow bound roads, and have anaccident. Move a regular tire to the frontwheel and install the temporary spare tireto the rear.
CAUTIONWhen using the temporary spare tire,
driving stability may decrease comparedto when using only the conventional tire.Drive carefully.To avoid damage to the temporary spare
tire or to the vehicle, observe thefollowing precautions:
Do not exceed 80 km/h (50 mph).Avoid driving over obstacles. Also, do
not drive through an automatic carwash. This tire's diameter is smallerthan a conventional tire, so the groundclearance is reduced.
If Trouble Arises
Flat Tire
7-17
CX-9_8GC7-EE-17G_Edition1 2017-5-16 8:22:04

Do not use a tire chain on this tirebecause it will not fit properly.Do not use your temporary spare tire
on any other vehicle, it has beendesigned only for your Mazda.Use only one temporary spare tire on
your vehicle at the same time.
To remove the spare tire
NOTE(Vehicles with sub-woofer)Because the sub-woofer is not operationalwhen the sub-woofer connector isdisconnected, no sound is output from thesub-woofer.
1. Set the third-row seatbacks to theiron-road positions.
2. Raise the luggage board.
Luggage Board
3. Raise the luggage board a little whilepulling it towards you, and then insertthe bottom edge into the holders.
Luggage Board
Holder
4. Remove the tool bag.5. (Vehicles with sub-woofer)
Disconnect the sub-woofer connector.
Connector
If Trouble Arises
Flat Tire
7-18
CX-9_8GC7-EE-17G_Edition1 2017-5-16 8:22:04

6. (Vehicles with sub-woofer)Turn the hold-down boltcounterclockwise and remove thesub-woofer and the spare tire.
(Vehicles without sub-woofer)Turn the hold-down boltcounterclockwise and remove the sparetire.
To secure the spare tire
Store the spare tire in the reverse order ofremoval. After storing, verify that thespare tire is stored securely.
CAUTION(Vehicles with sub-woofer)
Secure the sub-woofer in its correctposition. If the sub-woofer is not installedto the correct position, it may move whilethe vehicle is driven which may damagethe sub-woofer or the wiring harness.Store the tool bag on the right side of the
vehicle. If the tool bag is stored on the leftside of the vehicle, it may move while thevehicle is driven which may damage thewiring harness.
Refer to Spare Tire and Tool Storage onpage 7-15.
If Trouble Arises
Flat Tire
7-19
CX-9_8GC7-EE-17G_Edition1 2017-5-16 8:22:04

Changing a Flat TireNOTEIf the following occurs while driving, itcould indicate a flat tire.
• Steering becomes difficult.• The vehicle begins to vibrate
excessively.• The vehicle pulls in one direction.
If you have a flat tire, drive slowly to alevel spot that is well off the road and outof the way of traffic to change the tire.Stopping in traffic or on the shoulder of abusy road is dangerous.
WARNING
Be sure to follow the directions forchanging a tire:Changing a tire is dangerous if not doneproperly. The vehicle can slip off the jackand seriously injure someone.No person should place any portion of theirbody under a vehicle that is supported by ajack.
Never allow anyone inside a vehiclesupported by a jack:Allowing someone to remain in a vehiclesupported by a jack is dangerous. Theoccupant could cause the vehicle to fallresulting in serious injury.
NOTEMake sure the jack is well lubricatedbefore using it.
1. Park on a hard, level surface off theright-of-way and firmly set the parkingbrake.
2. Shift into Park (P) and turn off theengine.
3. Turn on the hazard warning flasher.4. Have everyone get out of the vehicle
and away from the vehicle and traffic.5. Remove the jack, tool, and spare tire
(page 7-15).6. Block the wheel diagonally opposite
the flat tire. When blocking a wheel,place a tire block both in front andbehind the tire.
NOTEWhen blocking a tire, use rocks orwood blocks of sufficient size ifpossible to hold the tire in place.
If Trouble Arises
Flat Tire
7-20
CX-9_8GC7-EE-17G_Edition1 2017-5-16 8:22:04

▼ Removing a Flat Tire
WARNING
When jacking-up a vehicle, always shift theshift lever to 1st or R (manual transaxlevehicle) or shift the selector lever to P(automatic transaxle vehicle), apply theparking brake, and place wheel blocks inthe position diagonally opposed to thejack:Changing a flat tire without using wheelblocks is dangerous because the vehiclemay move and fall off the jack even withthe shift lever in 1st or R, or the select leveris in P, which could result in an accident.
1. Loosen the lug nuts by turning themcounterclockwise one turn each, but donot remove any lug nuts until the tirehas been raised off the ground.
2. Place the jack on the ground.
3. Turn the jack screw in the directionshown in the figure and adjust the jackhead so that it is close to the jack-upposition.
Jack head
4. Set the jack to the designated jack-upposition closest to the tire beingremoved.(Jacking-up the vehicle front)Set the groove on the top of the jackhead at a right angle into the center ofthe designated jack-up position guideprojection closest to the vehicle front.
Jacking position
Jacking headGuide projection
If Trouble Arises
Flat Tire
7-21
CX-9_8GC7-EE-17G_Edition1 2017-5-16 8:22:04

NOTEAlways set the jack into the designatedjack-up position shown in the figurecorrectly.
(Jacking-up the vehicle rear)Set the groove on the top of the jackhead at a right angle between thedesignated jack-up position guideprojections.
Jacking position
Jacking head
5. Continue raising the jack headgradually by rotating the screw withyour hand until the jack head isinserted into the jack-up position.
Tire blocks
Jacking position
WARNING
Use only the front and rear jackingpositions recommended in this manual:Attempting to jack the vehicle inpositions other than thoserecommended in this manual isdangerous. The vehicle could slip offthe jack and seriously injure or even killsomeone. Use only the front and rearjacking positions recommended in thismanual.
If Trouble Arises
Flat Tire
7-22
CX-9_8GC7-EE-17G_Edition1 2017-5-16 8:22:04

Do not jack up the vehicle in a positionother than the designated jack-upposition or place any objects on orunder the jack:Jacking up the vehicle in a positionother than the designated jack-upposition or placing objects on or underthe jack is dangerous as it could deformthe vehicle body or the vehicle could falloff the jack resulting in an accident.
Use only the jack provided with yourMazda:Using a jack that is not designed foryour Mazda is dangerous. The vehiclecould slip off the jack and seriouslyinjure someone.
Never place objects under the jack:Jacking the vehicle with an objectunder the jack is dangerous. The jackcould slip and someone could beseriously injured by the jack or thefalling vehicle.
6. Insert the jack lever and attach the lugwrench to tire jack.
7. Turn the jack handle clockwise andraise the vehicle high enough so thatthe spare tire can be installed. Beforeremoving the lug nuts, make sure yourMazda is firmly in position and that itcannot slip or move.
WARNING
Do not jack up the vehicle higher thanis necessary:Jacking up the vehicle higher than isnecessary is dangerous as it coulddestabilize the vehicle resulting in anaccident.
Do not start the engine or shake thevehicle while it is jacked up:Starting the engine or shaking thevehicle while it is jacked up isdangerous as it could cause the vehicleto fall off the jack resulting in anaccident.
Never go under the vehicle while it isjacked up:Going under the vehicle while it isjacked up is dangerous as it could resultin death or serious injury if the vehiclewere to fall off the jack.
If Trouble Arises
Flat Tire
7-23
CX-9_8GC7-EE-17G_Edition1 2017-5-16 8:22:04

8. Remove the lug nuts by turning themcounterclockwise; then remove thewheel and center cap.
▼ Mounting the Spare Tire
1. Remove dirt and grime from themounting surfaces of the wheel andhub, including the hub bolts, with acloth.
WARNING
Make sure the mounting surfaces of thewheel, hub and lug nuts are cleanbefore changing or replacing tires:When changing or replacing a tire, notremoving dirt and grime from themounting surfaces of the wheel, huband hub bolts is dangerous. The lugnuts could loosen while driving andcause the tire to come off, resulting inan accident.
2. Mount the spare tire.
3. Install the lug nuts with the bevelededge inward; tighten them by hand.
WARNING
Do not apply oil or grease to lug nutsand bolts and do not tighten the lugnuts beyond the recommendedtightening torque:Applying oil or grease to lug nuts andbolts is dangerous. The lug nuts couldloosen while driving and cause the tireto come off, resulting in an accident. Inaddition, lug nuts and bolts could bedamaged if tightened more thannecessary.
4. Turn the lug wrench counterclockwiseand lower the vehicle.
If Trouble Arises
Flat Tire
7-24
CX-9_8GC7-EE-17G_Edition1 2017-5-16 8:22:04

5. Use the lug wrench to tighten the nutsin the order shown.
If you are unsure of how tight the nutsshould be, have them inspected at anexpert repairer, we recommend anAuthorized Mazda Repairer.
Nut tightening torque
N·m (kgf·m, ft·lbf) 108―147 (12―14,80―108)
WARNING
Always securely and correctly tightenthe lug nuts:Improperly or loosely tightened lugnuts are dangerous. The wheel couldwobble or come off. This could result inloss of vehicle control and cause aserious accident.
Be sure to reinstall the same nuts youremoved or replace them with metricnuts of the same configuration:Because the wheel studs and lug nutson your Mazda have metric threads,using a non-metric nut is dangerous.On a metric stud, it would not securethe wheel and would damage the stud,which could cause the wheel to slip offand cause an accident.
6. (Vehicles with sub-woofer)Secure the sub-woofer to the flat tireusing the flat tire belt.1. Pass the flat tire belt through the
wheel of the flat tire.
If Trouble Arises
Flat Tire
7-25
CX-9_8GC7-EE-17G_Edition1 2017-5-16 8:22:04

2. Install the sub-woofer to the flattire.
3. Pass the flat tire belt through thebuckle.
4. Pull the end of the flat tire belt andsecure the sub-woofer and thewiring harness to the flat tire.
CAUTIONWhen pulling the flat tire belt, wrapthe buckle with a cloth. If the buckledirectly contacts the sub-woofer,the sub-woofer may be damaged.
7. Place the flat tire in the luggagecompartment so that it leans againstthe luggage board.
If Trouble Arises
Flat Tire
7-26
CX-9_8GC7-EE-17G_Edition1 2017-5-16 8:22:04

CAUTIONTuck a cloth between the flat tire andthe vehicle trim. If the flat tire directlycontacts the vehicle trim, the trim maybe damaged.
8. Slowly close the liftgate while makingsure that the liftgate trim does notcontact the flat tire.
NOTEIf the liftgate trim contacts the flat tire,adjust the position of the flat tire.
9. Make sure that the liftgate closessecurely.
10. Check the tire inflation pressure.Refer to the specification charts onpage 9-7.
11. Have the flat tire repaired or replacedas soon as possible.
WARNING
Do not drive with any tires that haveincorrect air pressure:Driving on tires with incorrect air pressureis dangerous. Tires with incorrect pressurecould affect handling and result in anaccident. When you check the regular tires'air pressure, check the spare tire, too.
NOTETo prevent the jack and tool from rattling,store them properly.
If Trouble Arises
Flat Tire
7-27
CX-9_8GC7-EE-17G_Edition1 2017-5-16 8:22:04

Jump-StartingJump-starting is dangerous if done incorrectly. So follow the procedure carefully. If you feelunsure about jump-starting, we strongly recommend that you have a competent servicetechnician do the work.
WARNING
Follow These Precautions Carefully:To ensure safe and correct handling of the battery, read the following precautions carefullybefore using the battery or inspecting it.
Do not allow the positive ( ) terminal to contact any other metal object that couldcause sparks:Flames and sparks near open battery cells are dangerous. Hydrogen gas, produced duringnormal battery operation, could ignite and cause the battery to explode. An exploding batterycan cause serious burns and injuries. When working near a battery, do not allow metal toolsto contact the positive ( ) or negative ( ) terminal of the battery.
Keep all flames, including cigarettes, and sparks away from open battery cells:Flames and sparks near open battery cells are dangerous. Hydrogen gas, produced duringnormal battery operation, could ignite and cause the battery to explode. An exploding batterycan cause serious burns and injuries.
Do not jump-start a frozen battery or one with a low fluid level:Jump-starting a frozen battery or one with a low fluid level is dangerous. It may rupture orexplode, causing serious injury.
Connect the negative cable to a good ground point away from the battery:Connecting the end of the second jumper cable to the negative ( ) terminal of the dischargedbattery is dangerous.A spark could cause the gas around the battery to explode and injure someone.
Route the jumper cables away from parts that will be moving:Connecting a jumper cable near or to moving parts (cooling fans, belts) is dangerous. Thecable could get caught when the engine starts and cause serious injury.
If Trouble Arises
Battery Runs Out
7-28
CX-9_8GC7-EE-17G_Edition1 2017-5-16 8:22:04

CAUTIONUse only a 12 V booster system. You can damage a 12 V starter, ignition system, and otherelectrical parts beyond repair with a 24 V power supply (two 12 V batteries in series or a 24 Vmotor generator set).
Connect cables in numerical order and disconnect in reverse order.
Jumper cables
Booster battery
Discharged battery
1. Remove the battery cover.
2. Make sure the booster battery is 12 Vand that its negative terminal isgrounded.
3. If the booster battery is in anothervehicle, do not allow both vehicles totouch. Turn off the engine of thevehicle with the booster battery and allunnecessary electrical loads in bothvehicles.
4. Connect the jumper cables in the exactsequence as in the illustration.
• Connect one end of a cable to thepositive terminal on the dischargedbattery (1).
• Attach the other end to the positiveterminal on the booster battery (2).
• Connect one end of the other cableto the negative terminal of thebooster battery (3).
If Trouble Arises
Battery Runs Out
7-29
CX-9_8GC7-EE-17G_Edition1 2017-5-16 8:22:04

• Connect the other end to the groundpoint indicated in the illustrationaway from the discharged battery(4).
5. Start the engine of the booster vehicleand run it a few minutes. Then start theengine of the other vehicle.
6. When finished, carefully disconnectthe cables in the reverse orderdescribed in the illustration.
7. If the battery cover has been removed,install it in the reverse order ofremoval.
NOTEVerify that the covers are securelyinstalled.
If Trouble Arises
Battery Runs Out
7-30
CX-9_8GC7-EE-17G_Edition1 2017-5-16 8:22:04

Starting a Flooded EngineIf the engine fails to start, it may beflooded (excessive fuel in the engine). Follow this procedure: 1. If the engine does not start within five
seconds on the first try, wait tenseconds and try again.
2. Make sure the parking brake is on.3. Depress the accelerator all the way and
hold it there.4. Depress the brake pedal, then press the
push button start. If the engine starts,release the accelerator immediatelybecause the engine will suddenly revup.
5. If the engine fails to start, crank itwithout depressing the accelerator.
If the engine still does not start using theprevious procedure, have your vehicleinspected by an expert repairer, werecommend an Authorized MazdaRepairer.
Push-StartingDo not push-start your Mazda.
WARNING
Never tow a vehicle to start it:Towing a vehicle to start it is dangerous.The vehicle being towed could surgeforward when its engine starts, causing thetwo vehicles to collide. The occupantscould be injured.
NOTEYou cannot start a vehicle with anautomatic transaxle by pushing it.
If Trouble Arises
Emergency Starting
7-31
CX-9_8GC7-EE-17G_Edition1 2017-5-16 8:22:04
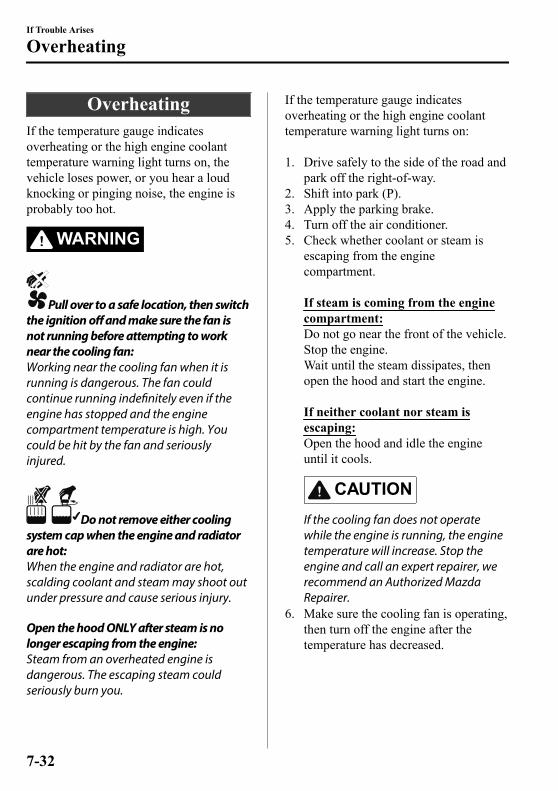
OverheatingIf the temperature gauge indicatesoverheating or the high engine coolanttemperature warning light turns on, thevehicle loses power, or you hear a loudknocking or pinging noise, the engine isprobably too hot.
WARNING
Pull over to a safe location, then switchthe ignition off and make sure the fan isnot running before attempting to worknear the cooling fan:Working near the cooling fan when it isrunning is dangerous. The fan couldcontinue running indefinitely even if theengine has stopped and the enginecompartment temperature is high. Youcould be hit by the fan and seriouslyinjured.
Do not remove either coolingsystem cap when the engine and radiatorare hot:When the engine and radiator are hot,scalding coolant and steam may shoot outunder pressure and cause serious injury.
Open the hood ONLY after steam is nolonger escaping from the engine:Steam from an overheated engine isdangerous. The escaping steam couldseriously burn you.
If the temperature gauge indicatesoverheating or the high engine coolanttemperature warning light turns on: 1. Drive safely to the side of the road and
park off the right-of-way.2. Shift into park (P).3. Apply the parking brake.4. Turn off the air conditioner.5. Check whether coolant or steam is
escaping from the enginecompartment. If steam is coming from the enginecompartment:Do not go near the front of the vehicle.Stop the engine.Wait until the steam dissipates, thenopen the hood and start the engine. If neither coolant nor steam isescaping:Open the hood and idle the engineuntil it cools.
CAUTIONIf the cooling fan does not operatewhile the engine is running, the enginetemperature will increase. Stop theengine and call an expert repairer, werecommend an Authorized MazdaRepairer.
6. Make sure the cooling fan is operating,then turn off the engine after thetemperature has decreased.
If Trouble Arises
Overheating
7-32
CX-9_8GC7-EE-17G_Edition1 2017-5-16 8:22:04

7. When cool, check the coolant level.If it is low, look for coolant leaks fromthe radiator and hoses.
If you find a leak or other damage, or ifcoolant is still leaking:Stop the engine and call an expert repairer,we recommend an Authorized MazdaRepairer.
Cooling system capCoolant reservoir
Cooling fan
If you find no problems, the engine iscool, and no leaks are obvious:Carefully add coolant as required (page6-22).
CAUTIONIf the engine continues to overheat orfrequently overheats, have the coolingsystem inspected. The engine could beseriously damaged unless repairs aremade. Consult an expert repairer, werecommend an Authorized MazdaRepairer.
If Trouble Arises
Overheating
7-33
CX-9_8GC7-EE-17G_Edition1 2017-5-16 8:22:04

Towing DescriptionWe recommend that towing be done onlyby an expert repairer, we recommend anAuthorized Mazda Repairer or acommercial tow-truck service. Proper lifting and towing are necessary toprevent damage to the vehicle. Particularlywhen towing a 4WD vehicle, where all thewheels are connected to the drive train,proper transporting of the vehicle isabsolutely essential to avoid damaging thedrive system. Government and local lawsmust be followed.
Wheel dollies
A towed 2WD vehicle should have itsdrive wheels (front wheels) off the ground.If excessive damage or other conditionsprevent this, use wheel dollies. When towing a 2WD vehicle with the rearwheels on the ground, release the parkingbrake.Refer to Electric Parking Brake (EPB) onpage 4-67. A towed 4WD vehicle must have all itswheels off the ground.
WARNING
Always tow a 4WD vehicle with all fourwheels off the ground:Towing a 4WD vehicle with either the frontor rear wheels on the ground is dangerousas the drive train could be damaged, or thevehicle could trail away from the tow truckand cause an accident. If the drive train hasbeen damaged, transport the vehicle on aflatbed truck.
CAUTIONDo not tow the vehicle pointed backward
with driving wheels on the ground. Thismay cause internal damage to thetransaxle.
If Trouble Arises
Emergency Towing
7-34
CX-9_8GC7-EE-17G_Edition1 2017-5-16 8:22:04

Do not tow with sling-type equipment.This could damage your vehicle. Usewheel-lift or flatbed equipment.
If the electric parking brake (EPB) cannotbe released when towing the vehicle,transport the vehicle with all front andrear wheels raised off the ground asshown in the figure. If the vehicle istowed without raising the wheels off theground, the brake system could bedamaged.
Wheel dollies
If towing service is not available in anemergency, the vehicle may be towed withall four wheels on the ground using thetowing hook at the front of the vehicle.Only tow the vehicle on paved surfaces forshort distances at low speeds.
CAUTIONFollow these instructions when towing thevehicle with all wheels on the ground.1. Shift to the N position.2. Switch the ignition to ON.3. Release the parking brake.
Refer to Electric Parking Brake (EPB) onpage 4-67.
Remember that power assist for the brakesand steering will not be available when theengine is not running.
If Trouble Arises
Emergency Towing
7-35
CX-9_8GC7-EE-17G_Edition1 2017-5-16 8:22:04

Towing Hooks
CAUTIONThe towing eyelet should be used in an
emergency (to get the vehicle out of aditch or a snow bank, for example).When using the towing eyelets, always
pull the cable or chain in a straightdirection with respect to the eyelet. Neverapply a sideways force.
NOTEWhen towing with chain or cable, wrapthe chain or cable with a soft cloth nearthe bumper to prevent damage to thebumper.
▼ Towing Hook
1. Remove the towing eyelet and the lugwrench from the luggage compartment(page 7-15).
2. Wrap a flathead screwdriver or similartool with a soft cloth to preventdamage to a painted bumper, and openthe cap located on the front or rearbumper.Front
Rear
CAUTIONDo not use excessive force as it maydamage the cap or scratch the paintedbumper surface.
NOTERemove the cap completely and store itso as not to lose it.
3. Securely install the towing eyelet usingthe lug wrench.Front
Lug wrench
Towing eyelet
If Trouble Arises
Emergency Towing
7-36
CX-9_8GC7-EE-17G_Edition1 2017-5-16 8:22:04

Rear
Lug wrench
Towing eyelet
4. Hook the towing rope to the towingeyelet.
CAUTION If the towing eyelet is not securely
tightened, it may loosen ordisengage from the bumper whentowing the vehicle. Make sure thatthe towing eyelet is securelytightened to the bumper.Be careful not to damage the towing
eyelet and towing hook, vehicle body,or transaxle system when towingunder the following conditions:
Do not tow a vehicle heavier thanyours.Do not suddenly accelerate your
vehicle as it will apply a severeshock to the towing eyelet andtowing hook or rope.Do not attach any rope other than
to the towing eyelet and towinghook.
If Trouble Arises
Emergency Towing
7-37
CX-9_8GC7-EE-17G_Edition1 2017-5-16 8:22:04

If a Warning Light Turns On or FlashesIf any warning light turns on/flashes, take appropriate action for each light. There is noproblem if the light turns off, however if the light does not turn off or turns on/flashes again,consult an Authorized Mazda Repairer.The details for some warnings can be viewed on the center display.1. If the warning light is turned on, select icon on the home screen to display the
application screen.2. Select “Vehicle Status Monitor”.3. Select “Warning Guidance” to display the current warnings.4. Select the applicable warning to view the warning details.
▼ Stop Vehicle in Safe Place Immediately
If any of the following warning lights turns on, the system may have a malfunction. Stop thevehicle in a safe place immediately and contact an Authorized Mazda Repairer.
Signal Warning
Brake System WarningLight
If the brake system warning light remains illuminated the brake fluid may be low orthere could be a problem with the brake system. Park the vehicle in a safe place im-mediately and contact an expert repairer, we recommend an Authorized Mazda Re-pairer.
WARNING
Do not drive with the brake system warning light illuminated. Contact an expert repair‐er, we recommend an Authorized Mazda Repairer to have the brakes inspected as soonas possible:Driving with the brake system warning light illuminated is dangerous. It indicates thatyour brakes may not work at all or that they could completely fail at any time. If thislight remains illuminated, after checking that the parking brake is fully released, havethe brakes inspected immediately.
CAUTIONIn addition, the effectiveness of the braking may diminish so you may need to depressthe brake pedal more strongly than normal to stop the vehicle.
If Trouble Arises
Warning/Indicator Lights and Warning Sounds
7-38
CX-9_8GC7-EE-17G_Edition1 2017-5-16 8:22:04

Signal Warning
Electronic Brake ForceDistribution System
Warning
If the electronic brake force distribution control unit determines that some compo-nents are operating incorrectly, the control unit may illuminate the brake systemwarning light and the ABS warning light simultaneously. The problem is likely to bethe electronic brake force distribution system.
WARNING
Do not drive with both the ABS warning light and brake warning light illuminated.Have the vehicle towed to an expert repairer, we recommend an Authorized Mazda Re‐pairer to have the brakes inspected as soon as possible:Driving when the brake system warning light and ABS warning light are illuminatedsimultaneously is dangerous.When both lights are illuminated, the rear wheels could lock more quickly in an emer‐gency stop than under normal circumstances.
Charging System Warn-ing Indication/Warning
Light
If the warning light illuminates while driving, it indicates a malfunction of the alter-nator or of the charging system.Drive to the side of the road and park off the right-of-way. Consult an expert repairer,we recommend an Authorized Mazda Repairer.
CAUTIONDo not continue driving when the charging system warning light is illuminated be‐cause the engine could stop unexpectedly.
Engine Oil WarningLight
This warning light indicates low engine oil pressure.
CAUTIONDo not run the engine if the oil pressure is low. Otherwise, it could result in extensiveengine damage.
If the light illuminates or the warning indication is displayed while driving:1. Drive to the side of the road and park off the right-of-way on level ground.2. Turn off the engine and wait 5 minutes for the oil to drain back into the oil pan.3. Inspect the engine oil level. (page 6-21) If it's low, add the appropriate amount of
engine oil while being careful not to overfill.
CAUTIONDo not run the engine if the oil level is low. Otherwise, it could result in extensiveengine damage.
4. Start the engine and check the warning light. If the light remains illuminated even though the oil level is normal or after adding oil,stop the engine immediately and have your vehicle towed to an expert repairer, werecommend an Authorized Mazda Repairer.
If Trouble Arises
Warning/Indicator Lights and Warning Sounds
7-39
CX-9_8GC7-EE-17G_Edition1 2017-5-16 8:22:04

Signal Warning
(Red)High Engine CoolantTemperature WarningIndication/Warning
Light
The light flashes when the engine coolant temperature is extremely high, and illumi-nates when the engine coolant temperature increases further.Handling ProcedureFlashing lightDrive slowly to reduce engine load until you can find a safe place to stop the vehicleand wait for the engine to cool down.Illuminated lightThis indicates the possibility of overheating. Park the vehicle in a safe place immedi-ately and stop the engine.Refer to Overheating on page 7-32.
CAUTIONDo not drive the vehicle with the high engine coolant temperature warning light illumi‐nated. Otherwise, it could result in damage to the engine.
Power Steering Mal-function Indication*
The message is displayed if the electric power steering has a malfunction.If the message is displayed, stop the vehicle in a safe place and do not operate thesteering wheel. There is no problem if the message in the display turns off after awhile. Contact an expert repairer, we recommend an Authorized Mazda Repairer ifthe message is displayed continuously.
NOTE•If the message is displayed, the power steering will not operate normally. In thiscase, the steering wheel can still be operated, however, the operation may feel heavycompared to normal, or the steering wheel could vibrate when turning.
•Repeatedly jerking the steering wheel left and right while the vehicle is stopped ormoving extremely slowly will cause the power steering system to go into protectivemode which will make the steering feel heavy, but this does not indicate a problem. Ifthis occurs, park the vehicle safely and wait several minutes for the system to returnto normal.
Power Steering Mal-function Indicator
Light*
The light illuminates/flashes if the electric power steering has a malfunction.If the light illuminates/flashes, stop the vehicle in a safe place and do not operate thesteering wheel. There is no problem if the light turns off after a while. Contact an ex-pert repairer, we recommend an Authorized Mazda Repairer if the light illuminates/flashes continuously.
NOTE•If the indicator light illuminates/flashes, the power steering will not operate normal-ly. In this happens, the steering wheel can still be operated, however, the operationmay feel heavy compared to normal, or the steering wheel could vibrate when turn-ing.
•Repeatedly jerking the steering wheel left and right while the vehicle is stopped ormoving extremely slowly will cause the power steering system to go into protectivemode which will make the steering feel heavy, but this does not indicate a problem. Ifthis occurs, park the vehicle safely and wait several minutes for the system to returnto normal.
If Trouble Arises
Warning/Indicator Lights and Warning Sounds
7-40 *Some models.
CX-9_8GC7-EE-17G_Edition1 2017-5-16 8:22:04

▼ Contact Authorized Mazda Repairer and Have Vehicle Inspected
If any of the following warning lights or the indicator light turns on/flashes, the system mayhave a malfunction. Contact an expert repairer, we recommend an Authorized MazdaRepairer to have your vehicle inspected.
Signal Warning
ABS Warning Light
If the ABS warning light stays on while you're driving, the ABS control unit has detecteda system malfunction. If this occurs, your brakes will function normally as if the vehiclehad no ABS.Should this happen, consult an expert repairer, we recommend an Authorized Mazda Re-pairer as soon as possible.
NOTE•When the engine is jump-started to charge the battery, uneven rpm occurs and the ABSwarning light may illuminate. If this occurs, it is the result of the weak battery and doesnot indicate an ABS malfunction.Recharge the battery.
•The brake assist system does not operate while the ABS warning light is illuminated.
Master Warning In-dication/Warning
Light
Type A instrument cluster
Master warning light
Master warning indication
(Master warning indication)Displays when notification of the system malfunctions is required.Check the message indicated in the display and consult an expert repairer, we recommendan Authorized Mazda Repairer.(Master warning light)The master warning light displays when a warning message occurs.This indicates a malfunction with the vehicle system. Check the message indicated in thedisplay and consult an expert repairer, we recommend an Authorized Mazda Repairer.For details, refer to the explanations for the warning/indicator lights, in the warning/indi-cator lights section, which match the symbol in the upper part of the display.If a message is not indicated in the display, operate the INFO switch to display the “Warn-ing” screen.Refer to Message Indicated in Multi-information Display and INFO switch on page 4-20.
Type B instrument cluster
The light illuminates continuously if any one of the following occurs. Consult an expertrepairer, we recommend an Authorized Mazda Repairer.
•There is a malfunction in the battery management system.•There is a malfunction in the brake switch.
If Trouble Arises
Warning/Indicator Lights and Warning Sounds
7-41
CX-9_8GC7-EE-17G_Edition1 2017-5-16 8:22:04

Signal Warning
Electric ParkingBrake (EPB) Warn-
ing Light
The warning light illuminates when the system has a malfunction. Have your vehicle in-spected at an expert repairer, we recommend an Authorized Mazda Repairer.
Electric ParkingBrake (EPB) Indica-tion/Indicator Light
This warning has the following functions:Parking brake warning/Indicator light inspectionThe light illuminates when the electric parking brake is applied with the ignition switchedto START or ON. It turns off when the electric parking brake is released.
When the light is turned on
If the light remains turned on even if the electric parking brake switch is released, an ex-pert repairer, we recommend an Authorized Mazda Repairer.
When the light is flashing
The light flashes if the electric parking brake has a malfunction. If the light remains flash-ing even if the electric parking brake switch is operated, consult an expert repairer, werecommend an Authorized Mazda Repairer as soon as possible.
Engine Oil LevelWarning Indication*
The message is displayed when the system has a malfunction. Have your vehicle inspect-ed at an expert repairer, we recommend an Authorized Mazda Repairer.
Check Engine Light
If this light illuminates while driving, the vehicle may have a problem. It is important tonote the driving conditions when the light illuminated and consult an expert repairer, werecommend an Authorized Mazda Repairer.The check engine light may illuminate in the following cases:
•The engine's electrical system has a problem.•The emission control system has a problem.•The fuel tank level being very low or approaching empty.
If the check engine light remains on, or it flashes continuously , do not drive at highspeeds and consult an expert repairer, we recommend an Authorized Mazda Repairer assoon as possible.
Automatic Trans-axle Warning Indi-
cation/WarningLight
The indication/light illuminates when the transaxle has a problem.
CAUTIONIf the automatic transaxle warning indication/light illuminates, the transaxle has an electri‐cal problem. Continuing to drive your Mazda in this condition could cause damage to yourtransaxle. Consult an expert repairer, we recommend an Authorized Mazda Repairer assoon as possible.
If Trouble Arises
Warning/Indicator Lights and Warning Sounds
7-42 *Some models.
CX-9_8GC7-EE-17G_Edition1 2017-5-16 8:22:04

Signal Warning
4WD Warning Indi-cation*
“4WD system malfunction” is displayed
The indication is displayed under the following conditions. The system may have a mal-function. Have the vehicle checked at an expert repairer, we recommend an AuthorizedMazda Repairer.
•When there is a malfunction in the 4WD system.•When there is a large difference between the tire size of the front and rear wheels.
“ 4WD system high-load” is displayed
The indication is displayed under the following conditions. Park the vehicle in a safeplace and check that the warning indication light turns off, and then drive the vehicle.Contact an expert repairer, we recommend an Authorized Mazda Repairer if the indica-tion is continuously displayed.
•When the differential oil temperature is excessively high.•When there is a large difference between the front and rear wheel rotation, such as whentrying to remove the vehicle from mud.
4WD WarningLight*
When the light is turned on
The light turns on under the following conditions. The system may have a malfunction.Have the vehicle checked at an expert repairer, we recommend an Authorized Mazda Re-pairer.
•When there is a malfunction in the 4WD system.•When there is a large difference between the tire size of the front and rear wheels.
When the light is flashing
Park the vehicle in a safe place. After a few moments, if the warning light stops flashing,you can resume driving. If the light does not stop flashing, contact an expert repairer, werecommend an Authorized Mazda Repairer.
•When the differential oil temperature is excessively high.•When there is a large difference between the front and rear wheel rotation, such as whentrying to remove the vehicle from mud.
(Turns on)TCS/DSC Indicator
Light
If the light stays on, the TCS, DSC or the brake assist system may have a malfunction andthey may not operate correctly. Take your vehicle to an expert repairer, we recommend anAuthorized Mazda Repairer.
If Trouble Arises
Warning/Indicator Lights and Warning Sounds
*Some models. 7-43
CX-9_8GC7-EE-17G_Edition1 2017-5-16 8:22:04

Signal Warning
Air Bag/Front SeatBelt PretensionerSystem Warning
Light
A system malfunction is indicated if the warning light constantly flashes, constantly illu-minates or does not illuminate at all when the ignition is switched ON. If any of theseoccur, consult an expert repairer, we recommend an Authorized Mazda Repairer as soonas possible. The system may not operate in an accident.
WARNING
Never tamper with the air bag/pretensioner systems and always have an expert repairer,we recommend an Authorized Mazda Repairer perform all servicing and repairs:Self-servicing or tampering with the systems is dangerous. An air bag/pretensioner couldaccidentally activate or become disabled causing serious injury or death.
(Flashing)Tire Pressure Moni-toring System Warn-
ing Light*
If the tire pressure monitoring system has a malfunction, the tire pressure warning lightflashes. Have your vehicle checked by an expert repairer, we recommend an AuthorizedMazda Repairer as soon as possible.
WARNING
If the tire pressure monitoring system warning light illuminates or flashes, or the tire pres‐sure warning beep sound is heard, decrease vehicle speed immediately and avoid suddenmaneuvering and braking:If the tire pressure monitoring system warning light illuminates or flashes, or the tire pres‐sure warning beep sound is heard, it is dangerous to drive the vehicle at high speeds, orperform sudden maneuvering or braking. Vehicle drivability could worsen and result in anaccident.To determine if you have a slow leak or a flat, pull over to a safe position where you cancheck the visual condition of the tire and determine if you have enough air to proceed to aplace where air may be added and the system monitored again by an expert repairer, werecommend an Authorized Mazda Repairer or a tire repair station.
Do not ignore the TPMS Warning Light:Ignoring the TPMS warning light is dangerous, even if you know why it is illuminated. Havethe problem taken care of as soon as possible before it develops into a more serious situa‐tion that could lead to tire failure and a dangerous accident.
If Trouble Arises
Warning/Indicator Lights and Warning Sounds
7-44 *Some models.
CX-9_8GC7-EE-17G_Edition1 2017-5-16 8:22:04
Signal Warning
(Amber)KEY Warning Indi-
cation*
“Keyless System malfunction” is displayedThis message is displayed if the advanced keyless entry & push button start system has aproblem.Contact an expert repairer, we recommend an Authorized Mazda Repairer.
CAUTIONIf the message is indicated, or the push button start indicator light (amber) flashes, the en‐gine may not start. If the engine cannot be started, try starting it using the emergency oper‐ation for starting the engine, and have the vehicle inspected at an expert repairer, we rec‐ommend an Authorized Mazda Repairer as soon as possible.Refer to Emergency Operation for Starting the Engine on page 4-10.
“Set Power to OFF” is displayedThis message is displayed when the driver's door is opened without switching the ignitionoff.“Key not found” is displayedThis message is displayed when any of the following operations is performed with the keyout of the operational range or placed in areas inside the cabin where it is difficult for thekey to be detected.
•The push button start is pressed with the ignition switched off•The ignition is switched on•All doors are closed without switching the ignition off
(Red)(Turns on)
KEY WarningLight*
If any malfunction occurs in the keyless entry system, it illuminates continuously.
CAUTIONIf the key warning indicator light illuminates or the push button start indicator light (am‐ber) flashes, the engine may not start. If the engine cannot be started, try starting it usingthe emergency operation for starting the engine, and have the vehicle inspected at an ex‐pert repairer, we recommend an Authorized Mazda Repairer as soon as possible.
Refer to Emergency Operation for Starting the Engine on page 4-10.
Security IndicatorLight
If the engine does not start with the correct key, and the security indicator light remainsilluminated or flashing, try the following:Make sure the key is within the operational range for signal transmission. Switch the igni-tion off, and then restart the engine. If the engine does not start after 3 or more tries, con-tact an expert repairer, we recommend an Authorized Mazda Repairer.
(Amber)Adaptive LED
Headlights (ALH)Warning Indication/
Warning Light*
The light remains turned on if there is a problem with the system. Have your vehicle in-spected at an expert repairer, we recommend an Authorized Mazda Repairer.
NOTEIf the windshield area in front of the Forward Sensing Camera (FSC) is fogged or ob-structed, the light turns on temporarily. If the light remains turned on, there may be aproblem with the system.
If Trouble Arises
Warning/Indicator Lights and Warning Sounds
*Some models. 7-45
CX-9_8GC7-EE-17G_Edition1 2017-5-16 8:22:04
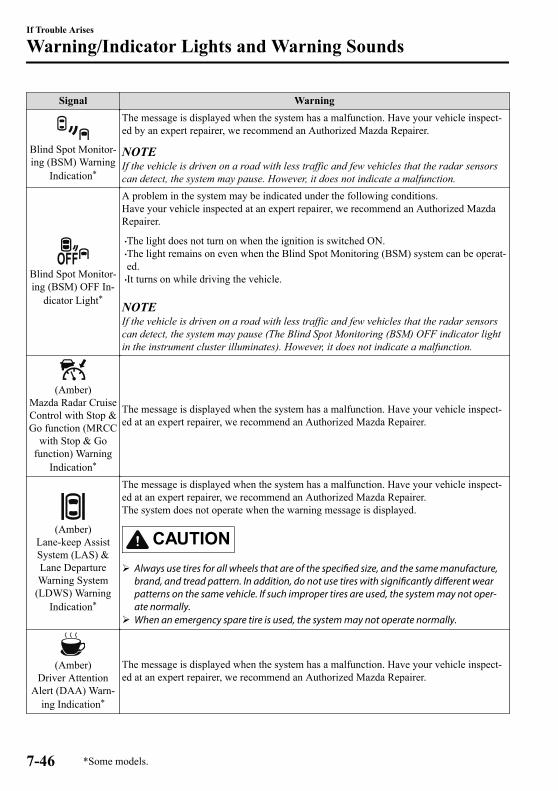
Signal Warning
Blind Spot Monitor-ing (BSM) Warning
Indication*
The message is displayed when the system has a malfunction. Have your vehicle inspect-ed by an expert repairer, we recommend an Authorized Mazda Repairer.
NOTEIf the vehicle is driven on a road with less traffic and few vehicles that the radar sensorscan detect, the system may pause. However, it does not indicate a malfunction.
Blind Spot Monitor-ing (BSM) OFF In-
dicator Light*
A problem in the system may be indicated under the following conditions.Have your vehicle inspected at an expert repairer, we recommend an Authorized MazdaRepairer.
•The light does not turn on when the ignition is switched ON.•The light remains on even when the Blind Spot Monitoring (BSM) system can be operat-ed.
•It turns on while driving the vehicle.
NOTEIf the vehicle is driven on a road with less traffic and few vehicles that the radar sensorscan detect, the system may pause (The Blind Spot Monitoring (BSM) OFF indicator lightin the instrument cluster illuminates). However, it does not indicate a malfunction.
(Amber)Mazda Radar CruiseControl with Stop &Go function (MRCC
with Stop & Gofunction) Warning
Indication*
The message is displayed when the system has a malfunction. Have your vehicle inspect-ed at an expert repairer, we recommend an Authorized Mazda Repairer.
(Amber)Lane-keep AssistSystem (LAS) &Lane DepartureWarning System
(LDWS) WarningIndication*
The message is displayed when the system has a malfunction. Have your vehicle inspect-ed at an expert repairer, we recommend an Authorized Mazda Repairer.The system does not operate when the warning message is displayed.
CAUTION Always use tires for all wheels that are of the specified size, and the same manufacture,
brand, and tread pattern. In addition, do not use tires with significantly different wearpatterns on the same vehicle. If such improper tires are used, the system may not oper‐ate normally.
When an emergency spare tire is used, the system may not operate normally.
(Amber)Driver Attention
Alert (DAA) Warn-ing Indication*
The message is displayed when the system has a malfunction. Have your vehicle inspect-ed at an expert repairer, we recommend an Authorized Mazda Repairer.
If Trouble Arises
Warning/Indicator Lights and Warning Sounds
7-46 *Some models.
CX-9_8GC7-EE-17G_Edition1 2017-5-16 8:22:04

Signal Warning
LED HeadlightWarning Light
This light illuminates if there is a malfunction in the LED headlight. Have your vehicleinspected by an expert repairer, we recommend an Authorized Mazda Repairer.
▼ Taking Action
Take the appropriate action and verify that the warning light turns off.
Signal Warning Action to be taken
Smart Brake Support/Smart City Brake Sup-
port (SBS/SCBS)Warning Indication/
Warning Ligh*
The light turns on if the windshield or theradar sensor are dirty, or there is a malfunc-tion in the system.
Verify the reason why the warning light isilluminated on the center display.If the reason why the warning light is illu-minated is due to a dirty windshield, cleanthe windshield.If the warning light is illuminated becauseof a dirty radar sensor, clean the front em-blem.For any other reasons, have the vehicle in-spected at an expert repairer, we recom-mend an Authorized Mazda Repairer.
Low Fuel Warning In-dication/Warning
Light
The light turns on when the remaining fuelis about 9.0 L (2.3 US gal, 1.9 Imp gal).
NOTEThe light illumination timing may vary be-cause fuel inside the fuel tank moves aroundaccording to the driving conditions and thevehicle posture.
Add fuel.
120km/h WarningLight*
The 120 km/h warning light illuminateswhen the vehicle speed exceeds 120 km/h. Lower the vehicle speed.
If Trouble Arises
Warning/Indicator Lights and Warning Sounds
*Some models. 7-47
CX-9_8GC7-EE-17G_Edition1 2017-5-16 8:22:04

Signal Warning Action to be taken
Seat Belt WarningLight
The seat belt warning light turns on if thedriver or front passenger's seat is occupiedand the seat belt is not fastened with the ig-nition switched ON.If the driver or front passenger's seat belt isunfastened (only when the front passenger'sseat is occupied) and the vehicle is driven ata speed faster than about 20 km/h (12 mph),the warning light flashes. After a short time,the warning light stops flashing, but re-mains illuminated. If a seat belt remains un-fastened, the warning light flashes again fora given period of time.
NOTE•If the driver or front passenger's seat beltis unfastened after the warning light turnson, and the vehicle speed exceeds 20 km/h(12 mph), the warning light flashes again.
•Placing heavy items on the front passeng-er's seat may cause the front passenger'sseat belt warning function to operate de-pending on the weight of the item.
•To allow the front passenger seat weightsensor to function properly, do not placeand sit on an additional seat cushion onthe front passenger's seat. The sensor maynot function properly because the addi-tional seat cushion could cause sensor in-terference.
•If a small child is seated on the front pas-senger's seat, the warning light may notoperate.
Fasten the seat belts.
Engine Oil LevelWarning Light
This warning light indicates that the engineoil level is around the MIN mark (page 6-21).
Add 1 L (0.3 US gal, 0.2 Imp gal) of en-gine oil (page6-19 ).
Low Washer FluidLevel Warning Indica-tion/Warning Light*
This warning light indicates that little wash-er fluid remains. Add washer fluid (page 6-24).
If Trouble Arises
Warning/Indicator Lights and Warning Sounds
7-48 *Some models.
CX-9_8GC7-EE-17G_Edition1 2017-5-16 8:22:04

Signal Warning Action to be taken
Door-Ajar/Lift-gate-Ajar Warning In-
dication/WarningLight
The light turns on if any door/liftgate is notclosed securely. Close the door/liftgate securely.
Tire Pressure Monitoring System Warning Light (Turns on)*
Take the appropriate action and verify that the warning light turns off.
WarningWhen the warning light illuminates, and the warning beep sound is heard when tire pressure is too low in one ormore tires.
WARNING
If the tire pressure monitoring system warning light illuminates or flashes, or the tire pressure warning beep soundis heard, decrease vehicle speed immediately and avoid sudden maneuvering and braking:If the tire pressure monitoring system warning light illuminates or flashes, or the tire pressure warning beep soundis heard, it is dangerous to drive the vehicle at high speeds, or perform sudden maneuvering or braking. Vehicledrivability could worsen and result in an accident.To determine if you have a slow leak or a flat, pull over to a safe position where you can check the visual conditionof the tire and determine if you have enough air to proceed to a place where air may be added and the systemmonitored again by an expert repairer, we recommend an Authorized Mazda Repairer or a tire repair station.
Do not ignore the TPMS Warning Light:Ignoring the TPMS warning light is dangerous, even if you know why it is illuminated. Have the problem takencare of as soon as possible before it develops into a more serious situation that could lead to tire failure and adangerous accident.
If Trouble Arises
Warning/Indicator Lights and Warning Sounds
*Some models. 7-49
CX-9_8GC7-EE-17G_Edition1 2017-5-16 8:22:04

Action to be takenInspect the tires and adjust to the specified inflation pressure (page 6-36).
CAUTIONWhen replacing/repairing the tires or wheels or both, have the work done by an Authorized Mazda Repairer, orthe tire pressure sensors may be damaged.
NOTE•Perform tire pressure adjustment when the tires are cold. Tire pressure will vary according to the tire tempera-ture, therefore let the vehicle stand for 1 hour or only drive it 1.6 km (1 mile) or less before adjusting the tirepressures. When pressure is adjusted on hot tires to the cold inflation pressure, the TPMS warning light/beepmay turn on after the tires cool and pressure drops below specification.Also, an illuminated TPMS warning light, resulting from the tire air pressure dropping due to cold ambienttemperature, may turn off if the ambient temperature rises. In this case, it will also be necessary to adjust thetire air pressures. If the TPMS warning light illuminates due to a drop in tire air pressure, make sure to checkand adjust the tire air pressures.
•After adjusting the tire air pressures, it may require some time for the TPMS warning light to turn off. If theTPMS warning light remains illuminated, drive the vehicle at a speed of at least 25 km/h (16 mph) for 10 mi-nutes, and then verify that it turns off.
•Tires lose air naturally over time and the TPMS cannot tell if the tires are getting too soft over time or youhave a flat. However, when you find one low tire in a set of four-that is an indication of trouble; you shouldhave someone drive the vehicle slowly forward so you can inspect any low tire for cuts and any metal objectssticking through tread or sidewall. Put a few drops of water in the valve stem to see if it bubbles indicating abad valve. Leaks need to be addressed by more than simply refilling the trouble tire as leaks are dangerous ―take it to an expert repairer, we recommend an Authorized Mazda Repairer which has all the equipment to fixtires, TPMS systems and order the best replacement tire for your vehicle.
If the warning light illuminates again even after the tire pressures are adjusted, there may be a tire puncture.
If Trouble Arises
Warning/Indicator Lights and Warning Sounds
7-50
CX-9_8GC7-EE-17G_Edition1 2017-5-16 8:22:04

KEY Warning Indication/Warning Light*
Take the appropriate action and verify that the warning light turns off.
Signal Cause Action to be taken
(White)KEY Warning Indica-
tion
The key battery is dead. Replace the key battery (page 6-33).
(Red)(Flashing)
KEY Warning Light
The key battery is dead. Replace the key battery (page 6-33).The key is not within the operation range.
Bring the key into the operation range(page 3-6).
The key is placed in areas inside the cabinwhere it is difficult for the key to be detect-ed.
A key from another manufacturer similar tothe key is in the operation range.
Take the key from another manufacturersimilar to the key out of the operationrange.
Without the ignition switched off, the key istaken out of the cabin, and then all thedoors are closed.
Bring the key back into the cabin.
If Trouble Arises
Warning/Indicator Lights and Warning Sounds
*Some models. 7-51
CX-9_8GC7-EE-17G_Edition1 2017-5-16 8:22:04

Message Indicated on DisplayIf a message is displayed in the center display, take appropriate action (in a calm manner)according to the displayed message.
(Display example)
▼ Stop Vehicle in Safe Place Immediately
If the following messages are displayed in the center display , a vehicle system may bemalfunctioning. Stop the vehicle in a safe place and contact an Authorized Mazda Repairer.
Display Indicated Condition
Displays if the engine coolant temperature has increased excessively.
Displays if the charging system has a malfunction.
If Trouble Arises
Warning/Indicator Lights and Warning Sounds
7-52
CX-9_8GC7-EE-17G_Edition1 2017-5-16 8:22:04

▼ Verify Display Content
Displays in the following cases:
Display Indicated Condition/Action to be taken
The following message is displayed when the temperature around thecenter display is high.Lowering the temperature in the cabin or the temperature around thecenter display by avoiding direct sunlight is recommended.
If Trouble Arises
Warning/Indicator Lights and Warning Sounds
7-53
CX-9_8GC7-EE-17G_Edition1 2017-5-16 8:22:04

Message Indicated in Multi-information Display*
If there is a notification from the vehicle, a message is displayed in the multi-informationdisplay. Check the information and take the necessary action.
(Display example)
If the warning light turns on/flashes simultaneously or a symbol is indicated in the display,check the information regarding the warning light or symbol. (page 4-32)
Display Content Action to be takenIndicated when the push button start ispressed while the selector lever is not inthe P position.
Shift the selector lever to the P position.
Indicated when the push button start ispressed without depressing the brakepedal.
Depress the brake pedal and press thepush button start.
Indicated while the steering wheel islocked. Release the steering lock.
Indicates when the Electric ParkingBrake (EPB) switch is operated withoutdepressing the brake pedal.
Operate the Electric Parking Brake(EPB) switch while depressing the brakepedal.
If Trouble Arises
Warning/Indicator Lights and Warning Sounds
7-54 *Some models.
CX-9_8GC7-EE-17G_Edition1 2017-5-16 8:22:04

Warning Sound isActivated
▼ Lights-On Reminder
If lights are on and the ignition is switchedto ACC or off, a continuous beep soundwill be heard when the driver's door isopened.
NOTE• When the ignition is switched to ACC,
the “Ignition Not Switched Off (STOP)Warning Beep” (page 7-56) overridesthe lights-on reminder.
• A personalized function is available tochange the sound volume for thelights-on reminder.Refer to Personalization Features onpage 9-10.
▼ Air Bag/Front Seat BeltPretensioner System Warning Beep
If there is a problem with the air bag/seatbelt pretensioner systems and the warninglight illumination, a warning beep soundwill be heard for about 5 seconds everyminute. The air bag and seat belt pretensionersystem warning beep sound will continueto be heard for approximately 35 minutes.Have your vehicle inspected at an expertrepairer, we recommend an AuthorizedMazda Repairer as soon as possible.
WARNING
Do not drive the vehicle with the air bag/seat belt pretensioner system warning beepsounding:Driving the vehicle with the air bag/seatbelt pretensioner system warning beepsounding is dangerous. In a collision, theair bags and the seat belt pretensionersystem will not deploy and this could resultin death or serious injury. Contact anexpert repairer, we recommend anAuthorized Mazda Repairer to have thevehicle inspected as soon as possible.
▼ Seat Belt Warning Beep
If the vehicle speed exceeds about 20km/h (12 mph) with the driver or frontpassenger's seat belt unfastened, a warningbeep sounds continuously. If the seat beltremains unfastened, the beep sound stopsonce and then continues for about 90seconds. The beep stops after the driver orfront passenger's seat belt is fastened.
NOTE• Placing heavy items on the front
passenger seat may cause the frontpassenger seat belt warning function tooperate depending on the weight of theitem.
• To allow the front passenger seat weightsensor to function properly, do not placeand sit on an additional seat cushion onthe front passenger seat. The sensor maynot function properly because theadditional seat cushion could causesensor interference.
• When a small child sits on the frontpassenger seat, it is possible that thewarning beep will not operate.
If Trouble Arises
Warning/Indicator Lights and Warning Sounds
7-55
CX-9_8GC7-EE-17G_Edition1 2017-5-16 8:22:04

▼ Ignition Not Switched Off (STOP)Warning Beep
European models
If the driver's door is opened with theignition switched to ACC, a beep will beheard 6 times in the cabin to notify thedriver that the ignition has not beenswitched OFF (STOP). Under thiscondition, the keyless entry system willnot operate, the vehicle cannot be locked,and the battery voltage will be depleted.
Except European models
If the driver's door is opened with theignition switched to ACC, a beep will beheard continuously in the cabin to notifythe driver that the ignition has not beenswitched OFF (STOP). Under thiscondition, the keyless entry system willnot operate, the vehicle cannot be locked,and the battery voltage will be depleted.
▼ Key Removed from Vehicle WarningBeep
Vehicles with advanced keyless function
If the key is taken out of the vehicle whilethe ignition is not switched OFF and allthe doors are closed, the beep whichsounds outside of the vehicle will be heard6 times, the beep which sounds inside thevehicle will be heard 6 times, and theKEY warning light (red) in the instrumentcluster flashes continuously to notify thedriver that the ignition has not beenswitched OFF.
Vehicles without advanced keylessfunction
If the key is taken out of the vehicle whilethe ignition is not switched OFF and allthe doors are closed, a beep will be heardin the cabin 6 times and the KEY warninglight (red) in the instrument cluster turnson continuously to notify the driver thatthe ignition has not been switched OFF.
NOTEBecause the key utilizes low-intensityradio waves, the Key Removed FromVehicle Warning may activate if the key iscarried together with a metal object or itis placed in a poor signal reception area.
▼ Request Switch Inoperable WarningBeep (With the advanced keylessfunction)
If the request switch is pressed with thedoor open or ajar, or the ignition is notswitched OFF with a key being carried, abeep will be heard outside for about 2seconds to notify the driver that the dooror liftgate cannot be locked.
If Trouble Arises
Warning/Indicator Lights and Warning Sounds
7-56
CX-9_8GC7-EE-17G_Edition1 2017-5-16 8:22:04

▼ Key Left-in-luggage CompartmentWarning Beep (With the advancedkeyless function)
If the key is left in the luggagecompartment with all the doors locked andthe liftgate closed, a beep will be heardoutside for about 10 seconds to notify thedriver that the key is in the luggagecompartment. In this case, take out the keyby pressing the electric liftgate opener andopening the liftgate. The key taken out ofthe luggage compartment may not operatebecause its functions have beentemporarily stopped. To restore the key'sfunctions, perform the applicableprocedure (page 3-7).
▼ Key Left-in-vehicle Warning Beep(With the advanced keylessfunction)
If all the doors and luggage compartmentare locked using another key while the keyis left in the cabin, the beep which soundsoutside of the vehicle will be heard forabout 10 seconds to notify the driver thatthe key is in the cabin. In this case, takeout the key by opening the door. A keytaken out of the vehicle using this methodmay not operate because its functions havebeen temporarily stopped. To restore thekey's functions, perform the applicableprocedure (page 3-7).
▼ Electronic Steering Lock WarningBeep
The warning beep operates if the steeringwheel is not unlocked after the pushbutton start is pressed. (page 4-4)
▼ Power Liftgate Warning Beep*
If system operation precautions arenecessary, the driver is notified by thewarning sound.
Cautions What to check
The beep sounds 3 times
The conditions requiredfor the power liftgate tooperate have not beenmet, such as an objectbeing stuck in the lift-gate.
The beep sound contin-ues
The vehicle is beingdriven with the liftgateopen. Stop the vehicleand close the liftgate.
▼ Outside Temperature WarningBeep*
Warns the driver of the possibility of icyroads when the outside temperature is low.If the outside temperature is lower thanabout 4 °C (39 °F) , a beep sound is heardonce and the outside temperature displayflashes for about ten seconds.(Type A instrument cluster)Refer to Outside Temperature Display onpage 4-24.(Type B instrument cluster)Refer to Outside Temperature Display onpage 4-17.
If Trouble Arises
Warning/Indicator Lights and Warning Sounds
*Some models. 7-57
CX-9_8GC7-EE-17G_Edition1 2017-5-16 8:22:04
▼ Vehicle Speed Alarm*
The vehicle speed alarm function isdesigned to alarm the driver via a singlebeep sound and a warning indication in theinstrument cluster that the previously setvehicle speed has been exceeded.You can change the vehicle speed settingat which the warning is triggered.
▼ Electric Parking Brake (EPB)Warning Beep
The warning buzzer is activated under thefollowing conditions:
• The vehicle is driven with the electricparking brake (EPB) applied.
• The electric parking brake (EPB) switchis pulled while the vehicle is driven.
▼ Tire Inflation Pressure WarningBeep*
The warning beep sound will be heard forabout 3 seconds if the tire pressuresdecrease.Refer to Tire Pressure Monitoring Systemon page 4-175.
▼ Power Steering Warning Buzzer
If the power steering system has amalfunction, the power steeringmalfunction light turns on or flashes andthe buzzer operates at the same time.Refer to Warning Indication/WarningLights on page 4-33.
▼ Lane Departure Warning Sound*
While the system is operating, if thesystem determines that the vehicle maydepart from the lane, it sounds a warningsound.
NOTE• The volume of the Lane-keep Assist
System (LAS) & Lane DepartureWarning System (LDWS) warning soundcan be changed.Refer to Personalization Features onpage 9-10.
• The type of the Lane-keep Assist System(LAS) & Lane Departure WarningSystem (LDWS) warning sound can bechanged.Refer to Personalization Features onpage 9-10.
▼ Blind Spot Monitoring (BSM)System Warning Beep*
Driving forward
The warning beep operates when the turnsignal lever is operated to the side wherethe Blind Spot Monitoring (BSM) warninglight is illuminated.
NOTEA personalized function is available tochange the Blind Spot Monitoring (BSM)warning beep sound volume.Refer to Personalization Features on page9-10.
If Trouble Arises
Warning/Indicator Lights and Warning Sounds
7-58 *Some models.
CX-9_8GC7-EE-17G_Edition1 2017-5-16 8:22:04
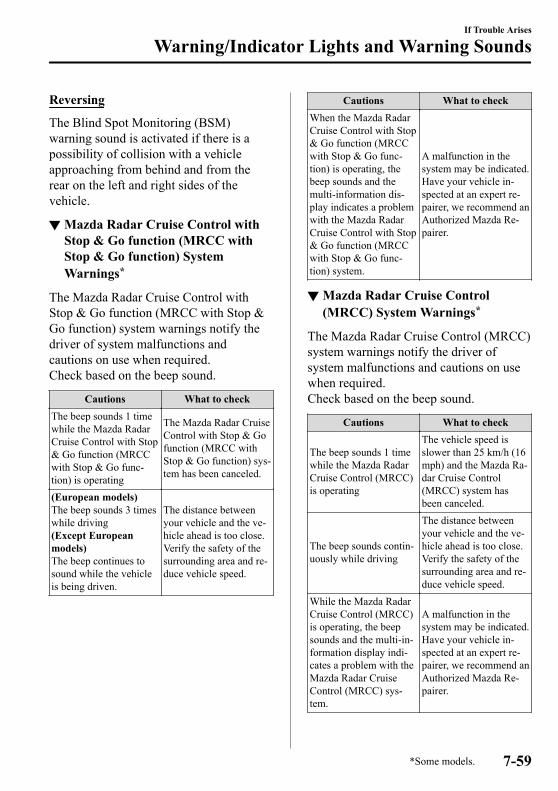
Reversing
The Blind Spot Monitoring (BSM)warning sound is activated if there is apossibility of collision with a vehicleapproaching from behind and from therear on the left and right sides of thevehicle.
▼ Mazda Radar Cruise Control withStop & Go function (MRCC withStop & Go function) SystemWarnings*
The Mazda Radar Cruise Control withStop & Go function (MRCC with Stop &Go function) system warnings notify thedriver of system malfunctions andcautions on use when required.Check based on the beep sound.
Cautions What to checkThe beep sounds 1 timewhile the Mazda RadarCruise Control with Stop& Go function (MRCCwith Stop & Go func-tion) is operating
The Mazda Radar CruiseControl with Stop & Gofunction (MRCC withStop & Go function) sys-tem has been canceled.
(European models)The beep sounds 3 timeswhile driving(Except Europeanmodels)The beep continues tosound while the vehicleis being driven.
The distance betweenyour vehicle and the ve-hicle ahead is too close.Verify the safety of thesurrounding area and re-duce vehicle speed.
Cautions What to checkWhen the Mazda RadarCruise Control with Stop& Go function (MRCCwith Stop & Go func-tion) is operating, thebeep sounds and themulti-information dis-play indicates a problemwith the Mazda RadarCruise Control with Stop& Go function (MRCCwith Stop & Go func-tion) system.
A malfunction in thesystem may be indicated.Have your vehicle in-spected at an expert re-pairer, we recommend anAuthorized Mazda Re-pairer.
▼ Mazda Radar Cruise Control(MRCC) System Warnings*
The Mazda Radar Cruise Control (MRCC)system warnings notify the driver ofsystem malfunctions and cautions on usewhen required.Check based on the beep sound.
Cautions What to check
The beep sounds 1 timewhile the Mazda RadarCruise Control (MRCC)is operating
The vehicle speed isslower than 25 km/h (16mph) and the Mazda Ra-dar Cruise Control(MRCC) system hasbeen canceled.
The beep sounds contin-uously while driving
The distance betweenyour vehicle and the ve-hicle ahead is too close.Verify the safety of thesurrounding area and re-duce vehicle speed.
While the Mazda RadarCruise Control (MRCC)is operating, the beepsounds and the multi-in-formation display indi-cates a problem with theMazda Radar CruiseControl (MRCC) sys-tem.
A malfunction in thesystem may be indicated.Have your vehicle in-spected at an expert re-pairer, we recommend anAuthorized Mazda Re-pairer.
If Trouble Arises
Warning/Indicator Lights and Warning Sounds
*Some models. 7-59
CX-9_8GC7-EE-17G_Edition1 2017-5-16 8:22:04

▼ Excessive Speed Warning*
If the vehicle speed exceeds the speedlimit sign displayed on the active drivingdisplay, the warning sound is activated andthe area around the speed limit signdisplayed on the active driving displayflashes 3 times in amber, and if the vehiclespeed continues to exceed the displayedspeed limit sign, the indication stopsflashing and remains on.
▼ 120 km/h Warning Beep*
If the vehicle speed exceeds 120 km/h, achime sounds for 5 seconds.
▼ Collision warning*
If there is a possibility of a collision with avehicle ahead or an obstruction at the rearof the vehicle, a warning sound isactivated intermittently at the same time asthe warning indications are displayed inthe instrument cluster or active drivingdisplay.
If Trouble Arises
Warning/Indicator Lights and Warning Sounds
7-60 *Some models.
CX-9_8GC7-EE-17G_Edition1 2017-5-16 8:22:04

When Liftgate Cannot beOpened
If the battery is dead, the liftgate cannot beunlocked and opened.In this case, the liftgate can be unlockedby taking care of the dead batterysituation.Refer to Jump-Starting on page 7-28.If the liftgate cannot be unlocked even ifthe dead battery situation has beenresolved, the electrical system may have amalfunction.In this case, the liftgate can be openedusing the following procedure as anemergency measure.1. Wrap the end of a flathead screwdriver
in a cloth and remove the cover on theinterior surface of the liftgate using it.
Cover
2. (Without power liftgate)Turn the lever to the right to unlock theliftgate. Lever
(With power liftgate)Push the liftgate while pressing thelever down.
Lever
After performing this emergency measure,have the vehicle inspected at an expertrepairer, we recommend an AuthorizedMazda Repairer as soon as possible.
If Trouble Arises
When Liftgate Cannot be Opened
7-61
CX-9_8GC7-EE-17G_Edition1 2017-5-16 8:22:04

If the Active DrivingDisplay Does Not Operate
If the active driving display does notoperate, switch the ignition off and thenrestart the engine. If the active drivingdisplay does not operate even with theengine restarted, have the vehicleinspected at an expert repairer, werecommend an Authorized MazdaRepairer.
If Trouble Arises
Active Driving Display Does Not Operate
7-62
CX-9_8GC7-EE-17G_Edition1 2017-5-16 8:22:04

8 Customer Information
Important consumer information including warranties and add-onequipment.
Warranty............................................ 8-2Registering Your Vehicle in AForeign Country............................8-2Add-On Non-Genuine Parts andAccessories................................... 8-3
Cell Phones.........................................8-4Cell Phones Warning.................... 8-4
Recording of Vehicle Data................ 8-5Recording of Vehicle Data............8-5
Declaration of Conformity................8-6Declaration of Conformity........... 8-6
Electromagnetic Compatibility...... 8-20ElectromagneticCompatibility..............................8-20
Collection/Disposal of Old Equipment/Used Battery.....................................8-22
Information for Users on Collectionand Disposal of Old Equipment andUsed Batteries.............................8-22
8-1
CX-9_8GC7-EE-17G_Edition1 2017-5-16 8:22:04

Registering Your Vehicle in A Foreign CountryRegistering your vehicle in a foreign country may be problematic depending on whether itmeets the specific emission and safety standards of the country in which the vehicle will bedriven. Consequently, your vehicle may require modifications at personal expense in orderto meet the regulations.In addition, you should be aware of the following issues:Satisfactory vehicle servicing may be difficult or impossible in another country. The fuel specified for your vehicle may be unavailable. Parts, servicing techniques, and tools necessary to maintain and repair your vehicle may beunavailable. There might not be an Authorized Mazda Dealer in the country you plan to take yourvehicle. The Mazda warranty is valid only in certain countries.
Customer Information
Warranty
8-2
CX-9_8GC7-EE-17G_Edition1 2017-5-16 8:22:04

Add-On Non-Genuine Parts and AccessoriesPlease note that technical alterations to the original state of your Mazda vehicle can affectthe safety of the vehicle. Such technical alterations include not only the use of unsuitablespare parts, but also accessories, fittings or attachments, including rims and tires. Genuine Mazda Parts and Genuine Mazda Accessories have been specifically designed forMazda vehicles.Other parts and accessories than those mentioned above have not been examined andapproved by Mazda unless explicitly stated by Mazda. We cannot certify the suitability ofsuch products. Mazda is not liable for any damage caused by the use of such products.
WARNING
Be very careful in choosing and installing add-on electrical equipment, such as mobiletelephones, two-way radios, stereo systems, and car alarm systems:Incorrectly choosing or installing improper add-on equipment or choosing an improperinstaller is dangerous. Essential systems could be damaged, causing engine stalling, air-bag(SRS) activation, ABS/TCS/DSC inactivation, or a fire in the vehicle.
Mazda assumes no responsibility for death, injury, or expenses that may result from theinstallation of add-on non-genuine parts or accessories.
Customer Information
Warranty
8-3
CX-9_8GC7-EE-17G_Edition1 2017-5-16 8:22:04

Cell Phones Warning
WARNING
Please comply with the legal regulations concerning the use of communication equipment invehicles in your country:Use of any electrical devices such as cell phones, computers, portable radios, vehiclenavigation or other devices by the driver while the vehicle is moving is dangerous. Dialing anumber on a cell phone while driving also ties-up the driver's hands. Use of these devices willcause the driver to be distracted and could lead to a serious accident. If a passenger is unableto use the device, pull off the right-of-way to a safe area before use. If use of a cell phone isnecessary despite this warning, use a hands-free system to at least leave the hands free todrive the vehicle. Never use a cell phone or other electrical devices while the vehicle is movingand, instead, concentrate on the full-time job of driving.
Customer Information
Cell Phones
8-4
CX-9_8GC7-EE-17G_Edition1 2017-5-16 8:22:04

Recording of Vehicle DataThis vehicle is equipped with a computer which records the following main vehicle datarelated to vehicle controls, operation, and other driving conditions.
Recorded data• Vehicle conditions such as engine speed and vehicle speed• Driving operation conditions such as accelerator and brake pedals, and information related
to the environmental circumstances while the vehicle is driven• Malfunction diagnosis information from each on-vehicle computer• Information related to controls of other on-vehicle computers
NOTEThe recorded data may vary depending on the vehicle grade and optional equipment. Voiceand images are not recorded.
Data handling
Mazda and its subcontracting parties may obtain and use the recorded data for vehiclemalfunction diagnosis, research and development, and quality improvement.Mazda will not disclose or provide any of the obtained data to a third party unless:
• An agreement from the vehicle owner (agreements from lessor and lessee for leasedvehicle) is obtained
• Officially requested by the police or other law enforcement authorities• For statistical processing by a research institution after processing the data so that
identification of the owner or the vehicle is impossible
Customer Information
Recording of Vehicle Data
8-5
CX-9_8GC7-EE-17G_Edition1 2017-5-16 8:22:04

Declaration of Conformity▼ Keyless Entry System/Immobilizer System
Customer Information
Declaration of Conformity
8-6
CX-9_8GC7-EE-17G_Edition1 2017-5-16 8:22:04
▼ Blind Spot Monitoring (BSM) System
Customer Information
Declaration of Conformity
8-7
CX-9_8GC7-EE-17G_Edition1 2017-5-16 8:22:04

Customer Information
Declaration of Conformity
8-8
CX-9_8GC7-EE-17G_Edition1 2017-5-16 8:22:04

Customer Information
Declaration of Conformity
8-9
CX-9_8GC7-EE-17G_Edition1 2017-5-16 8:22:04
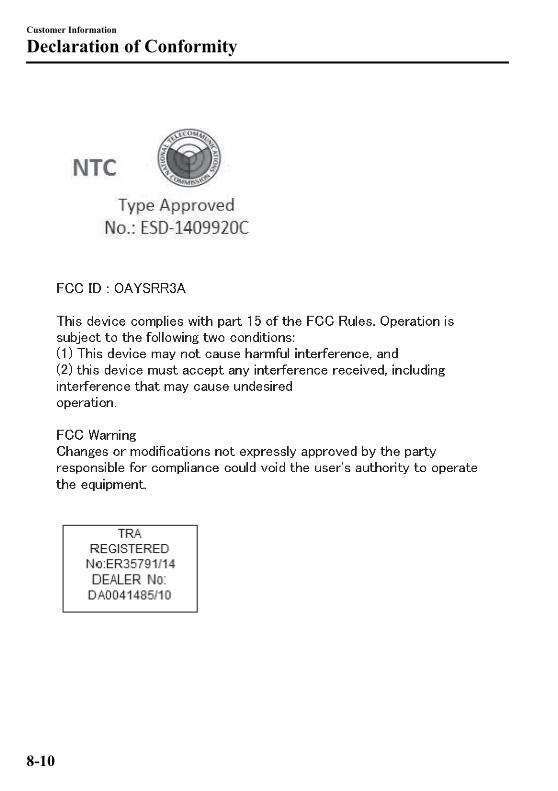
Customer Information
Declaration of Conformity
8-10
CX-9_8GC7-EE-17G_Edition1 2017-5-16 8:22:04

Customer Information
Declaration of Conformity
8-11
CX-9_8GC7-EE-17G_Edition1 2017-5-16 8:22:04

▼ Bluetooth® Hands-Free
Customer Information
Declaration of Conformity
8-12
CX-9_8GC7-EE-17G_Edition1 2017-5-16 8:22:04

Customer Information
Declaration of Conformity
8-13
CX-9_8GC7-EE-17G_Edition1 2017-5-16 8:22:04

Customer Information
Declaration of Conformity
8-14
CX-9_8GC7-EE-17G_Edition1 2017-5-16 8:22:04

Customer Information
Declaration of Conformity
8-15
CX-9_8GC7-EE-17G_Edition1 2017-5-16 8:22:04

Customer Information
Declaration of Conformity
8-16
CX-9_8GC7-EE-17G_Edition1 2017-5-16 8:22:04

▼ Mazda Radar Cruise Control (MRCC)/Distance Recognition Support System(DRSS)/Smart Brake Support (SBS)
Customer Information
Declaration of Conformity
8-17
CX-9_8GC7-EE-17G_Edition1 2017-5-16 8:22:04

Customer Information
Declaration of Conformity
8-18
CX-9_8GC7-EE-17G_Edition1 2017-5-16 8:22:04

▼ Mazda ERA-GLONASS
Customer Information
Declaration of Conformity
8-19
CX-9_8GC7-EE-17G_Edition1 2017-5-16 8:22:04
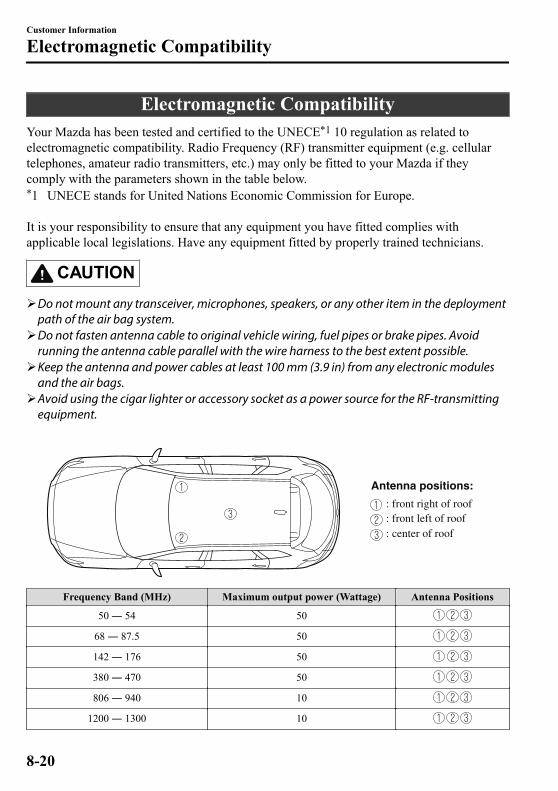
Electromagnetic CompatibilityYour Mazda has been tested and certified to the UNECE*1 10 regulation as related toelectromagnetic compatibility. Radio Frequency (RF) transmitter equipment (e.g. cellulartelephones, amateur radio transmitters, etc.) may only be fitted to your Mazda if theycomply with the parameters shown in the table below.*1 UNECE stands for United Nations Economic Commission for Europe. It is your responsibility to ensure that any equipment you have fitted complies withapplicable local legislations. Have any equipment fitted by properly trained technicians.
CAUTIONDo not mount any transceiver, microphones, speakers, or any other item in the deployment
path of the air bag system.Do not fasten antenna cable to original vehicle wiring, fuel pipes or brake pipes. Avoid
running the antenna cable parallel with the wire harness to the best extent possible.Keep the antenna and power cables at least 100 mm (3.9 in) from any electronic modules
and the air bags.Avoid using the cigar lighter or accessory socket as a power source for the RF-transmitting
equipment.
Antenna positions:
: front right of roof: front left of roof: center of roof
Frequency Band (MHz) Maximum output power (Wattage) Antenna Positions
50 ― 54 50
68 ― 87.5 50
142 ― 176 50
380 ― 470 50
806 ― 940 10
1200 ― 1300 10
Customer Information
Electromagnetic Compatibility
8-20
CX-9_8GC7-EE-17G_Edition1 2017-5-16 8:22:04

Frequency Band (MHz) Maximum output power (Wattage) Antenna Positions
1710 ― 1885 10
1885 ― 2025 10
2400 ― 2500 0.01*1 In a cabin*1
*1 Only for Bluetooth®
NOTEAfter the installation of RF transmitters, check for disturbances from and to all electricalequipment in the vehicle, both in the standby and transmit modes.Check all electrical equipment:
• with the ignition ON• with the engine running• during a road test at various speeds.
Customer Information
Electromagnetic Compatibility
8-21
CX-9_8GC7-EE-17G_Edition1 2017-5-16 8:22:04

Information for Users on Collection and Disposal of OldEquipment and Used Batteries
When disposing your old battery, please refer to the information as follows.
▼ Information on Disposal in the European Union
These crossed-out wheeled bin symbols on the products, packaging, and/or accompanyingdocuments mean that used electronic products and batteries should not be mixed withgeneral household waste. For proper treatment, recovery and recycling of old products andused batteries, please take them to applicable collection points, in accordance with yournational legislation and the Directives 2006/66/EC. By disposing of these products and batteries correctly, you will help to save valuableresources and prevent any potential negative effects on human health and the environmentwhich could otherwise arise from inappropriate waste handling. For more information about collection and recycling of old products and batteries, pleasecontact your local municipality, your waste disposal service or the point of sales where youpurchased the items.
NOTE
The bottom two letters might be used in combination with the crossed-out wheeled binsymbol. In this case it complies with the requirement established by the Directive for thechemical involved.“Pb” and “Cd” mean lead and cadmium respectively.
Customer Information
Collection/Disposal of Old Equipment/Used Battery
8-22
CX-9_8GC7-EE-17G_Edition1 2017-5-16 8:22:04
▼ Information on Disposal in Other Countries Outside the European Union
The above symbols are only valid in the European Union. If you wish to discard oldproducts and used batteries, please contact your local authorities, your waste disposalservice or the point of sales where you purchased the items, and ask for the correct methodof disposal.
Customer Information
Collection/Disposal of Old Equipment/Used Battery
8-23
CX-9_8GC7-EE-17G_Edition1 2017-5-16 8:22:04

MEMO
8-24
CX-9_8GC7-EE-17G_Edition1 2017-5-16 8:22:04

9 Specifications
Technical information about your Mazda.
Identification Numbers..................... 9-2Vehicle Information Labels.......... 9-2
Specifications..................................... 9-4Specifications............................... 9-4
Personalization Features.................9-10Personalization Features.............9-10
9-1
CX-9_8GC7-EE-17G_Edition1 2017-5-16 8:22:04

Vehicle InformationLabels
▼ Vehicle Identification Number (ArabGulf Cooperation Council, Iraq)
The vehicle identification number legallyidentifies your vehicle. The number is on aplate attached to the cowl panel located onthe left corner of the dashboard. This platecan easily be seen through the windshield.
▼ Model Plate
▼ Chassis Number/VehicleIdentification Number (Russia,Kazakhstan, Belarus, Armenia)
Chassis NumberOpen the cover shown in the figure tocheck the chassis number.
Vehicle Identification Number
Specifications
Identification Numbers
9-2
CX-9_8GC7-EE-17G_Edition1 2017-5-16 8:22:04

▼ Vehicle Emission ControlInformation Label (The Philippines)
▼ Tire Pressure Label
Left-hand drive model
Right-hand drive model
▼ Engine Number
Forward
▼ Conformity Plate (Arab GulfCooperation Council)
Production year and month are shown onthis plate.
Specifications
Identification Numbers
9-3
CX-9_8GC7-EE-17G_Edition1 2017-5-16 8:22:04

Specifications▼ Engine
Item SpecificationType DOHC-16V in-line, 4-cylinderBore × Stroke 89.0 × 100 mm (3.50 × 3.94 in)Displacement 2,488 ml (2,488 cc)Compression ratio 10.5
Arab Gulf Cooperation Council
Item SpecificationMaximum engine power/revolution 170 kW/5,000 rpmMaximum engine torque/revolution 420 N·m/2,000 rpmMaximum speed 210 km/h (130 mph)
▼ Electrical System
Item ClassificationBattery 12V-55Ah/20HR or 12V-65Ah/20HRSpark-plug number Mazda Genuine spark plug*1 PY8V-18-110
*1 The spark plugs provide the SKYACTIV-G its optimum performance. Consult an expert repairer, werecommend an Authorized Mazda Repairer for details.
CAUTIONWhen cleaning the iridium plugs, do not use a wire brush. The fine particulate coating on theiridium alloy and platinum tips could be damaged.
▼ Lubricant Quality
Lubricant Europe Except Europe
Engine oil*1
Recommended Oils*2 Oil QualityMazda Original Oil Supra 0W-30
API SM/SN or ILSACGF-IV/GF-V
0W-30/5W-30/10W-30
Mazda Original Oil Ultra 5W-30
Alternative Oil Quality*3
API SN or ACEA A5/B50W-305W-30
*1 Refer to Recommended Oil on page 6-19.
Specifications
Specifications
9-4
CX-9_8GC7-EE-17G_Edition1 2017-5-16 8:22:04

*2 Mazda Original Oils are specially designed/tested for the respective engine. For optimum performance werecommend to use Mazda Original Oils at all times.
*3 If you are unable to find a Mazda Original Oil, alternative oils meeting the listed specification may also beused.
Do not use oils which do not meet the above specification or requirements. Use of unsuitable oil may lead to enginedamage which is not covered by the Mazda Warranty.
Lubricant ClassificationCoolant FL-22 typeAutomatic transaxle fluid Mazda Original Oil ATF-FZTransfer case oil Mazda Long Life Hypoid Gear Oil SG1Rear differential oil Mazda Long Life Hypoid Gear Oil SG1Brake fluid SAE J1703 or FMVSS116 DOT-3 or DOT-4
▼ Capacities
(Approximate Quantities)
Item Capacity
Engine oilWith oil filter replacement 4.8 L (5.1 US qt, 4.2 Imp qt)Without oil filter replacement 4.6 L (4.9 US qt, 4.0 Imp qt)
Coolant
Azerbaijan, Kazakhstan, Armenia, Geor-gia, Russia, Belarus, Ukraine 9.9 L (10.5 US qt, 8.7 Imp qt)
Except aboveLeft-hand drive model 9.8 L (10.4 US qt, 8.6 Imp qt)Right-hand drive model 9.9 L (10.5 US qt, 8.7 Imp qt)
Automatic transaxle fluid 8.0 L (8.5 US qt, 7.0 Imp qt)Transfer case oil 0.45 L (0.48 US qt, 0.40 Imp qt)Rear differential oil 0.35 L (0.37 US qt, 0.31 Imp qt)
Fuel tank2WD 72.0 L (19.0 US gal, 15.8 Imp
gal)
4WD 74.0 L (19.5 US gal, 16.3 Impgal)
Check oil and fluid levels with dipsticks or reservoir gauges.
▼ Dimensions
Item Vehicle specificationOverall length 5,075 mm (199.8 in)Overall width 1,969 mm (77.5 in)Overall height 1,747 mm (68.8 in)Front tread 1,663 mm (65.5 in)Rear tread 1,663 mm (65.5 in)Wheelbase 2,930 mm (115.4 in)
Specifications
Specifications
9-5
CX-9_8GC7-EE-17G_Edition1 2017-5-16 8:22:04

▼ Light Bulbs
Exterior light
With Adaptive LED Headlights (ALH)
Light bulbCategory
Wattage UNECE *1 (SAE)
HeadlightsHigh beam LED*2 ― (―)
Low beam LED*2 ― (―)
Running lights/Parking lights LED*2 ― (―)
Front turn signal lights LED*2 ― (―)
Front fog lights LED*2 ― (―)
Side turn signal lights LED*2 ― (―)
High-mount brake light LED*2 ― (―)Rear turn signal lights 21 WY21W (7443NA)Brake lights/Taillights LED*2 ― (―)
Brake lights LED*2 ― (―)
Taillights LED*2 ― (―)Reverse lights 16 W16W (921)
Rear fog light* 21 W21W (7440)License plate lights 5 W5W (―)
*1 UNECE stands for United Nations Economic Commission for Europe.*2 LED is the abbreviation for Light Emitting Diode. Without Adaptive LED Headlights (ALH)
Light bulbCategory
Wattage UNECE *1 (SAE)
HeadlightsHigh beam LED*2 ― (―)
Low beam LED*2 ― (―)Running lights 21/5 W21/5W (7443)Parking lights 5 W5W (―)Front turn signal lights 21 WY21W (7443NA)
Front fog light* LED*2 ― (―)
Side turn signal lights LED*2 ― (―)
High-mount brake light LED*2 ― (―)Rear turn signal lights 21 WY21W (7443NA)Brake lights/Taillights LED*2 ― (―)
Specifications
Specifications
9-6 *Some models.
CX-9_8GC7-EE-17G_Edition1 2017-5-16 8:22:04
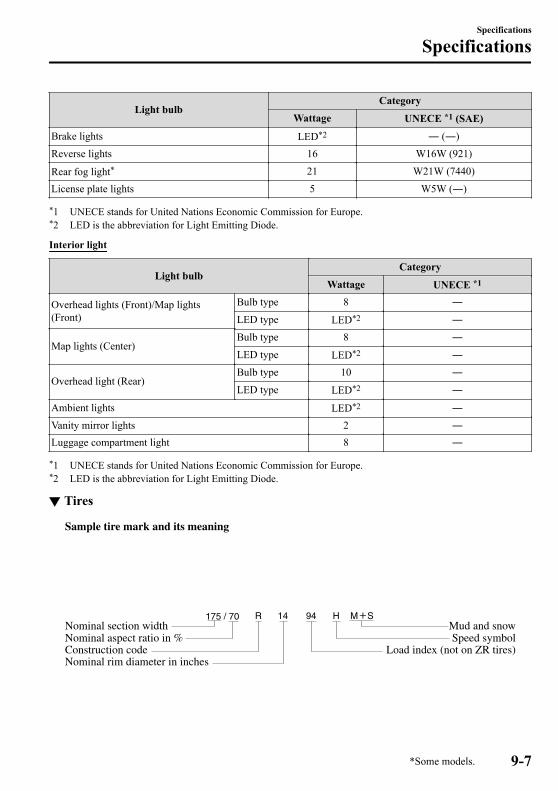
Light bulbCategory
Wattage UNECE *1 (SAE)Brake lights LED*2 ― (―)Reverse lights 16 W16W (921)
Rear fog light* 21 W21W (7440)License plate lights 5 W5W (―)
*1 UNECE stands for United Nations Economic Commission for Europe.*2 LED is the abbreviation for Light Emitting Diode.
Interior light
Light bulbCategory
Wattage UNECE *1
Overhead lights (Front)/Map lights(Front)
Bulb type 8 ―LED type LED*2 ―
Map lights (Center)Bulb type 8 ―LED type LED*2 ―
Overhead light (Rear)Bulb type 10 ―LED type LED*2 ―
Ambient lights LED*2 ―Vanity mirror lights 2 ―Luggage compartment light 8 ―
*1 UNECE stands for United Nations Economic Commission for Europe.*2 LED is the abbreviation for Light Emitting Diode.
▼ Tires
Sample tire mark and its meaning
Nominal section widthNominal aspect ratio in %Construction code
Mud and snowSpeed symbol
Load index (not on ZR tires)Nominal rim diameter in inches
Specifications
Specifications
*Some models. 9-7
CX-9_8GC7-EE-17G_Edition1 2017-5-16 8:22:04

Tire mark information
Choose the proper tires for your vehicle using the following tire mark information.
Speed symbol Maximum permissible speedQ Up to 160 km/h (99 mph)R Up to 170 km/h (105 mph)S Up to 180 km/h (111 mph)T Up to 190 km/h (118 mph)U Up to 200 km/h (124 mph)H Up to 210 km/h (130 mph)V Up to 240 km/h (149 mph)W Up to 270 km/h (167 mph)Y Up to 300 km/h (186 mph)
ZR Over 240 km/h (149 mph)
Tire and inflation pressure
NOTEThe tires have been optimally matched with the chassis of your vehicle.When replacing tires, Mazda recommends that you replace tires of the same type originallyfitted to your vehicle. For details, contact an expert repairer, we recommend an AuthorizedMazda Repairer.
Check the tire pressure label for tire size and inflation pressure (page 6-36).
Standard tire
(Left-hand drive model)
Tire sizeInflation pressure
Front RearP255/60R18 107H 230 kPa (2.3 bar, 33 psi) 230 kPa (2.3 bar, 33 psi)P255/50R20 104V 230 kPa (2.3 bar, 33 psi) 230 kPa (2.3 bar, 33 psi)
Specifications
Specifications
9-8
CX-9_8GC7-EE-17G_Edition1 2017-5-16 8:22:04

(Right-hand drive model)
Tire sizeInflation pressure
Front Rear255/60R18 108H 230 kPa (2.3 bar, 33 psi) 230 kPa (2.3 bar, 33 psi)255/50R20 105V 230 kPa (2.3 bar, 33 psi) 230 kPa (2.3 bar, 33 psi)
Temporary spare tire
Tire size Inflation pressure185/80R17 99M 320 kPa (3.2 bar, 46 psi)
Lug nut tightening torque
When installing a tire, tighten the lug nut to the following torque.108―147 N·m (12―14 kgf·m, 80―108 ft·lbf)
▼ Fuses
Refer to Fuses on page 6-48.
▼ Brakes
If you require information regarding the wear limit specification for the brake disc platesand the measurement method, please contact an expert repairer, we recommend anAuthorized Mazda Repairer. The information is made freely available.
Specifications
Specifications
9-9
CX-9_8GC7-EE-17G_Edition1 2017-5-16 8:22:04

Personalization FeaturesThe following personalization features can be set or changed by the customer or an Author-ized Mazda Repairer. Consult an Authorized Mazda Repairer for details.Additionally, some of the personalization features can be changed by the customer depend-ing on the feature.Personalization features and settings which can be changed differ depending on the marketand specification.
Settings Change Method
Settings can be changed by operating the center display screen.A: Refer to Settings on page 5-60.B: Refer to Fuel Economy Monitor on page 4-77.C: Refer to Active Driving Display on page 4-29.
Settings can be changed by operating the vehicle switches.D: Refer to Auto Lock/Unlock Function on page 3-15.E: Refer to Transmitter on page 3-4.F: Refer to Locking, Unlocking with Request Switch (With the advanced keyless function)on page 3-12.
Settings can be changed by an Authorized Mazda Repairer.
Item Feature Factory Set-ting
Available Set-tings
SettingsChangeMethod
SafetySmart CityBrake Support[Forward](SCBS F) (page4-148)Smart CityBrake Support[Reverse](SCBS R) (page4-152)
The system can be changed so that Smart CityBrake Support (SCBS) does not operate.*1 On On/Off A ―
AdvancedSmart CityBrake Support(AdvancedSCBS) (page4-145)Smart BrakeSupport (SBS)(page 4-156)
The system can be changed so that Smart CityBrake Support (Advanced SCBS)/Smart BrakeSupport (SBS) does not operate.*1
On On/Off A ―
The distance at which the collision warning ac-tivates can be changed. Med Near/Med/Far A ―
The volume of the collision warning can bechanged. High High/Low/Off A ―
Specifications
Personalization Features
9-10
CX-9_8GC7-EE-17G_Edition1 2017-5-16 8:22:04

Item Feature Factory Set-ting
Available Set-tings
SettingsChangeMethod
Lane-keep As-sist System(LAS) & LaneDepartureWarning System(LDWS) (page4-134)
The system can be changed so that the steeringwheel assist does not operate. On On/Off A ―
When the steeringwheel operation assis-tance is turned on
The timing at which thesteering wheel operationassist of the Lane-keepAssist System (LAS) &Lane Departure WarningSystem (LDWS) operatescan be changed.
Late Early/Late A ―
The cancel sensitivity ofthe steering assistance forthe Lane-keep Assist Sys-tem (LAS) & Lane Depar-ture Warning System(LDWS) can be changed.
High High/Medium/Low A ―
The system can bechanged so that the lanedeparture warning doesnot activate.
On On/Off A ―
When the steeringwheel operation assis-tance is turned off
The warning timing inwhich the Lane-keep As-sist System (LAS) & LaneDeparture Warning System(LDWS) system deter-mines that the vehicle maybe deviating from its lanecan be changed.
Med Early/Med/Late/Adaptive A ―
The sensitivity of thewarning for the Lane-keepAssist System (LAS) &Lane Departure WarningSystem (LDWS) can bechanged.
Med Often/Med/Rare A ―
The type of Lane-keep Assist System (LAS) & LaneDeparture Warning System (LDWS) warning can bechanged.
Vibration Vibration/Beep/Rumble A ―
The warning intensity/volume of the Lane-keepAssist System (LAS) &Lane Departure WarningSystem (LDWS) systemcan be changed.
Vibration Low High/Low A ―
Rumble Low High/Mid/Low A ―
Beep Low High/Low A ―
Specifications
Personalization Features
9-11
CX-9_8GC7-EE-17G_Edition1 2017-5-16 8:22:04

Item Feature Factory Set-ting
Available Set-tings
SettingsChangeMethod
Blind SpotMonitoring(BSM) (page4-90)
The system can be changed so that Blind SpotMonitoring (BSM) does not operate.*1 On On/Off A ―
Warning beep volume*2 High High/Low/Off A ―
Distance Recog-nition SupportSystem (DRSS)(page 4-103)
The system can be changed so that DistanceRecognition Support System (DRSS) does notoperate.*1
On On/Off A ―
The distance at which the vehicle ahead andyour vehicle indicated in the display flashes inwhite can be changed.
Near Far/Medium/Near A ―
Driver AttentionAlert (DAA)(page 4-106)
The system can be changed so that driver atten-tion alert does not operate.*1 On On/Off A ―
Traffic SignRecognitionSystem (TSR)*3
(page 4-96)
The Traffic Sign Recognition System (TSR)can be set to inoperable.*1 On On/Off A ―
The warning pattern of the excessive speedwarning can be changed. Off
Off/Visual/
Audio & VisualA ―
The activation timing for the excessive speedwarning can be changed.
0 km/h or0 mph
0 km/h or 0mph/
5 km/h or 5mph/
10 km/h or 10 mph/
A ―
Parking SensorSystem (page4-195)
Display/non-display On On/Off A ―
Specifications
Personalization Features
9-12
CX-9_8GC7-EE-17G_Edition1 2017-5-16 8:22:04
Item Feature Factory Set-ting
Available Set-tings
SettingsChangeMethod
Vehicle
Door locks(page 3-15)
Operation condition of auto lock/unlock func-tion
Lock: WhenDriving Un-lock: IGN
Off
Lock: Out ofPark Unlock: In
Park/Lock: ShiftingOut of Park/Lock: When
Driving Unlock:In Park/
Lock: WhenDriving Unlock:
IGN Off/Lock: When
Driving/Off
A D
Keyless entrysystem (page3-3)
Time for locking door automatically 30 seconds90 seconds/60 seconds/30 seconds
A ―
Advanced key-less entry sys-tem (page 3-8)
Time for locking door automatically 30 seconds90 seconds/60 seconds/30 seconds
A ―
Auto-lock function operation/non-operational Off On/Off A ―
Beep volume when locking/unlocking Off or Medi-um
High/Medium/
Low/Off
A E,F
Illuminated en-try system (page5-77)
Time until interior lights turn off after closingdoor 15 seconds
60 seconds/30 seconds/15 seconds/7.5 seconds
A ―
Time until interior lights turn off automaticallywhen any door is not closed completely 30 minutes
60 minutes/30 minutes/10 minutes
A ―
Auto-wiper con-trol (page 4-58) Operational/non-operational On On/Off*4 A ―
Running lights(page 4-54) Operational/non-operational On On/Off ― ―
Auto-light con-trol (page 4-50) Timing by which lights turn on Medium
Light/Medium Light/
Medium/Medium Dark/
Dark
A ―
Specifications
Personalization Features
9-13
CX-9_8GC7-EE-17G_Edition1 2017-5-16 8:22:04

Item Feature Factory Set-ting
Available Set-tings
SettingsChangeMethod
Adaptive LEDHeadlights(ALH) (page4-87)
Operational/non-operational*1 On On/Off A ―
Lights-on re-minder (page7-55)
Warning beep volume High or Lowor Off High/Low/Off A ―
Coming homelight (page 4-53)
Time until headlights turn off 30 seconds
120 seconds/90 seconds/60 seconds/30 seconds/
Off
A ―
Leaving homelight (page 4-53)
Operational/non-operational On or Off On/Off A ―
Turn signal in-dicator (page4-57)
Beep volume High High/Low A ―
Three-flash turnsignal (page4-58)
Operational/non-operational On or Off On/Off A ―
Ambient lights(page 5-74) Ambient lights brightness*5 Medium
Bright/Medium/
Dark/Off*6
A ―
Rear windowdefogger (page4-63)
The operation time for the rear window defog-ger can be changed. 15 minutes 15 minutes/
Continuous*7 ― ―
System
Language Language indicated in display English-UK Depends onmarket*8 A ―
Temperature Temperature unit indicated in display °C °F/°C A ―
Distance Distance unit indicated in display mi or km mi/km A ―Fuel Economy Monitor (page 4-77)Ending display On/off Off On/Off B ―Fuel economyresetting proce-dure
Linkage/non-linkage with fuel economy resetand trip meter reset Off On/Off B ―
Specifications
Personalization Features
9-14
CX-9_8GC7-EE-17G_Edition1 2017-5-16 8:22:04

Item Feature Factory Set-ting
Available Set-tings
SettingsChangeMethod
Active driving display (page 4-29)
Display
Setting can be changed so that the Active Driv-ing Display is not displayed. On On/Off C ―
The display height (up/down position) can bechanged. 0
13 steps up/down from ini-
tial setting (total:27 steps)
C ―
The method for adjusting the display brightness(automatically/manually) can be changed. AUTO AUTO/
MANUAL C ―
The standard brightness with the automaticbrightness adjustment can be changed. 0
2 steps up/downfrom initial set-
ting (total: 5steps)
C ―
The standard brightness with the manualbrightness adjustment can be changed. 0
20 steps up/down from ini-
tial setting (total:41 steps)
C ―
The display angle can be changed. 0
3steps up/downfrom initial set-
ting (total:7steps)
C ―
Navigationguidance Display/non-display On On/Off C ―
*1 Though these systems can be turned Off, doing so will defeat the purpose of the system and Mazdarecommends that these systems remain On.
*2 Only the volume of the warning beep during Blind Spot Monitoring (BSM) operation can be changed. Thevolume of the warning beep during Rear Cross Traffic Alert (RCTA) operation cannot be changed.
*3 This system functions only when the navigation system is functioning.*4 If the auto-wiper control is set to Off, the wiper lever position is set to intermittent operation.*5 Change the ambient light illumination level with the parking lights or headlights turned on.*6 When set to OFF, the ambient lights remain turned off regardless of whether or not the parking lights or
headlights are on or off. However, they will turn on or off in conjunction with the illuminated entry system.*7 The operation may stop in 15 minutes due to the effect of the outside temperature even if the operation time of
the rear window defogger has been changed to Continuous.*8 Available only in display from the center display.
Specifications
Personalization Features
9-15
CX-9_8GC7-EE-17G_Edition1 2017-5-16 8:22:04

MEMO
9-16
CX-9_8GC7-EE-17G_Edition1 2017-5-16 8:22:04

10 Index
10-1
CX-9_8GC7-EE-17G_Edition1 2017-5-16 8:22:04

Index
AAccessory Socket.............................. 5-77Active Driving Display.....................4-29Adaptive LED Headlights (ALH)..... 4-87Add-On Non-Genuine Parts andAccessories..........................................8-3Advanced Key
Advanced keyless entry system.....3-8Operational range.......................... 3-9
Advanced Smart City Brake Support(Advanced SCBS)........................... 4-145
Collision warning...................... 4-147Smart City Brake Support (SCBS)Indicator Light (Red).................4-147Stopping the Advanced Smart CityBrake Support (Advanced SCBS)system operation........................4-147
Air Bag Systems............................... 2-44Air Bag/Front Seat Belt PretensionerSystem Warning Beep.......................7-55Ambient Temperature Display.......... 4-17Antilock Brake System (ABS)..........4-72Armrest Box......................................5-82Audio Control Switch
Adjusting the Volume..................5-14Seek Switch................................. 5-14
Audio SetApplications.................................5-62AUX.............................................5-28Bluetooth®.................................. 5-34Radio............................................5-25Radio (RDS)................................ 5-25Settings........................................ 5-60Troubleshooting...........................5-63USB............................................. 5-29Voice Recognition....................... 5-57Volume/Display/SoundControls....................................... 5-23
Audio SystemAntenna........................................5-17
Appendix..................................... 5-68Audio Control Switch................. 5-14Audio Set.....................................5-18AUX/USB mode..........................5-15Before Using the AudioSystem......................................... 5-14
Automatic Transaxle......................... 4-41Active Adaptive Shift (AAS)...... 4-44Automatic transaxle controls.......4-41Driving tips..................................4-49Manual shift mode.......................4-45Shift-lock system.........................4-42Transaxle ranges..........................4-43
BBattery............................................... 6-31
Inspecting electrolyte level..........6-32Maintenance.................................6-32Recharging...................................6-33Replacement................................ 6-33Specifications.................................9-4
Battery Runs Out.............................. 7-28Jump-starting............................... 7-28
Blind Spot Monitoring (BSM).......... 4-90Canceling operation of Blind SpotMonitoring (BSM).......................4-95
Blind Spot Monitoring (BSM) SystemWarning Beep....................................7-58Bluetooth®
Bluetooth® Audio....................... 5-40Bluetooth® Hands-Free...............5-48Bluetooth® Preparation...............5-37
Body Lubrication.............................. 6-25Bottle Holder.....................................5-81Brakes
Brake assist..................................4-70Electric parking brake (EPB)...... 4-67Foot brake....................................4-66Pad wear indicator.......................4-69Warning light............................... 4-69
10-2
CX-9_8GC7-EE-17G_Edition1 2017-5-16 8:22:04

Index
Break-In Period................................. 3-48
CCapacities............................................ 9-5Carbon Monoxide............................. 3-28Cell Phones......................................... 8-4Center Console..................................5-82Child Restraint
Categories of child-restraintsystems.........................................2-31Child-restraint precautions.......... 2-27Child-restraint systeminstallation................................... 2-31Child-restraint system suitability forvarious seat positions table..........2-36Installing child-restraintsystems.........................................2-40
Child Safety Locks for Rear Doors... 3-18Climate Control System......................5-2
Dual-zone automatic climatecontrol............................................5-5Front Air Conditioner....................5-5Operating tips................................ 5-2Rear Air Conditioner...................5-12Vent Operation (Front).................. 5-3Vent Operation (Rear)................. 5-10
Collision warning..............................7-60Coming Home Light......................... 4-53Console Box......................................5-82Cruise Control................................. 4-170
Cruise control switch.................4-170Cruise main indication (white)/cruiseset indication (green).................4-171
Cruise Control Set Vehicle SpeedDisplay.............................................. 4-18Cup Holder........................................5-79
DDashboard Illumination.....................4-16Defogger
Mirror...........................................4-63Rear window............................... 4-63
Dimensions..........................................9-5Distance Recognition Support System(DRSS)............................................ 4-103
Indication on display................. 4-104Door Locks........................................3-10Driver Attention Alert (DAA).........4-106Drive Selection..................................4-79Driving In Flooded Area...................3-54Driving Tips
Automatic transaxle.....................4-49Break-in period............................3-48Driving in flooded area............... 3-54Floor mat..................................... 3-50Hazardous driving....................... 3-49Rocking the vehicle.....................3-51Saving fuel and protection of theenvironment................................. 3-48Turbocharged vehicles.................3-55Winter driving............................. 3-51
Dynamic Stability Control (DSC).....4-75TCS/DSC indicator light............. 4-75
EElectric parking brake (EPB)............4-67Electric Parking Brake (EPB) WarningBeep...................................................7-58Electronic steering lock warningbeep................................................... 7-57Emergency Starting
Push-starting................................ 7-31Starting a flooded engine............ 7-31
Emergency Stop Signal System........ 4-70Emergency Towing
Towing description...................... 7-34Towing hooks.............................. 7-36
Emission Control System..................3-27Ending Screen Display......................4-78Engine
10-3
CX-9_8GC7-EE-17G_Edition1 2017-5-16 8:22:04

Index
Coolant.........................................6-22Engine compartment overview....6-18Exhaust gas..................................3-28Hood release................................ 6-16Oil................................................ 6-19Starting...........................................4-5
Engine Coolant TemperatureGauge................................................ 4-15Essential Information.......................... 6-2Excessive Speed Warning................. 7-60Exhaust Gas...................................... 3-28Exterior Care..................................... 6-55
Aluminum wheel maintenance.... 6-59Bright-metal maintenance........... 6-59Cavity protection......................... 6-59Maintaining the finish................. 6-56Paint damage touch-up................6-58Plastic part maintenance..............6-60Undercoating............................... 6-59
FFlasher
Hazard warning........................... 4-65Headlights....................................4-50
Flat Tire.............................................7-15Mounting the spare tire............... 7-24Removing a flat tire.................... 7-21
Floor Mat.......................................... 3-50Fluid
Brake............................................6-23Washer......................................... 6-24
FluidsClassification................................. 9-4
Fog Lights......................................... 4-55Front.............................................4-55Rear..............................................4-56
Foot Brake.........................................4-66Forward Sensing Camera (FSC)..... 4-159Front Seat............................................ 2-5Fuel
Filler lid and cap......................... 3-29Gauge...........................................4-15Requirements............................... 3-26Tank capacity.................................9-5
Fuel Consumption Display............... 4-78Fuel Economy Monitor.....................4-77
Ending screen display................. 4-78Fuel consumption display............4-78
Fuses..................................................6-48Panel description......................... 6-51Replacement................................ 6-48
GGauges...............................................4-12Glove Compartment..........................5-82
HHazardous Driving............................ 3-49Hazard Warning Flasher....................4-65Headlights
Coming home light......................4-53Control......................................... 4-50Headlight flashing....................... 4-53High-low beam............................ 4-53Leaving home light..................... 4-53Leveling....................................... 4-54Running lights............................. 4-54Washer......................................... 4-62
Headlight Washer.............................. 4-62Head Restraint...................................2-17Hill Launch Assist (HLA)................ 4-71Hood Release.................................... 6-16Horn...................................................4-64
IIf a Warning Light Turns On orFlashes...............................................7-38If the Active Driving Display Does NotOperate.............................................. 7-62Ignition
10-4
CX-9_8GC7-EE-17G_Edition1 2017-5-16 8:22:04

Index
Switch............................................ 4-4Ignition Not Switched Off (STOP)Warning Beep....................................7-56Illuminated Entry System................. 5-77Immobilizer System.......................... 3-42Indication/Indicator Lights................4-36Indicator Lights
Low engine coolanttemperature.................................. 4-40Wrench.........................................4-40
Inspecting Brake Fluid Level............6-23Inspecting Coolant Level.................. 6-22Inspecting Engine Oil Level............. 6-21Inspecting Washer Fluid Level......... 6-24Instrument Cluster.............................4-12Interior Care...................................... 6-60
Active driving displaymaintenance................................. 6-63Cleaning the window interiors.....6-63Instrument panel topmaintenance................................. 6-63Leather upholsterymaintenance................................. 6-62Panel maintenance.......................6-63Plastic part maintenance..............6-62Seat belt maintenance..................6-61Upholstery maintenance.............. 6-61Vinyl upholstery maintenance..... 6-61
Interior Lights................................... 5-74Luggage compartment light.........5-74Map lights....................................5-74Overhead lights............................5-74
i-ACTIVSENSE................................ 4-84Active safety technology.............4-84Adaptive LED Headlights(ALH).......................................... 4-87Advanced Smart City Brake Support(Advanced SCBS)..................... 4-145Blind Spot Monitoring (BSM).....4-90Camera and sensors.....................4-85
Distance Recognition Support System(DRSS).......................................4-103Driver Attention Alert (DAA)... 4-106Forward Sensing Camera(FSC)......................................... 4-159Lane-keep Assist System (LAS) &Lane Departure Warning System(LDWS)..................................... 4-134Mazda Radar Cruise Control withStop & Go function (MRCC withStop & Go function)..................4-121Mazda Radar Cruise Control(MRCC)..................................... 4-111Pre-crash safety technology.........4-85Radar sensors (rear)...................4-167Radar sensor (front)...................4-164Rear Cross Traffic Alert(RCTA)...................................... 4-108Smart Brake Support (SBS)...... 4-156Smart City Brake Support [Forward](SCBS F)................................... 4-148Smart City Brake Support [Reverse](SCBS R)...................................4-152Traffic Sign Recognition System(TSR)........................................... 4-96Ultrasonic sensor (rear)............. 4-169
i-ACTIV AWD Operation.................4-81
JJack....................................................7-16Jump-Starting.................................... 7-28
KKeyless Entry System......................... 3-3Keys.....................................................3-2
Key suspend function....................3-7Transmitter.....................................3-4
Key Left-in-luggage CompartmentWarning beep (With the advancedkeyless function)............................... 7-57
10-5
CX-9_8GC7-EE-17G_Edition1 2017-5-16 8:22:04

Index
Key Left-in-vehicle Warning Beep (Withthe advanced keyless function)......... 7-57Key Removed from Vehicle WarningBeep...................................................7-56Key Suspend Function........................ 3-7
LLabel Information............................... 9-2Lane Departure Warning sound........ 7-58Lane-change Signals......................... 4-58Lane-keep Assist System (LAS) & LaneDeparture Warning System(LDWS)...........................................4-134Leaving Home Light.........................4-53Liftgate.............................................. 3-18
When Liftgate Cannot beOpened.........................................7-61
Lighting Control................................4-50Lights-on Reminder.......................... 7-55Light Bulbs
Replacement................................ 6-39Specifications.................................9-6
Lubricant Quality................................ 9-4Luggage Compartment......................5-83
Cargo securing loops...................5-83Cargo sub-compartment.............. 5-83
Luggage Compartment Light............ 5-74
MMaintenance
Information.................................... 6-2Scheduled.......................................6-3
Maintenance Monitor........................ 6-11Map Lights........................................ 5-74Mazda ERA-GLONASS..................... 7-2Mazda Radar Cruise Control with Stop &Go function (MRCC with Stop & Gofunction).......................................... 4-121
Close proximity warning...........4-124Cruise control function..............4-131
Display indication......................4-123Setting the system..................... 4-124Stop hold control....................... 4-130
Mazda Radar Cruise Control with Stop &Go function (MRCC with Stop & Gofunction) System Warnings...............7-59Mazda Radar Cruise Control(MRCC)........................................... 4-111
Close proximity warning........... 4-113Cruise control function..............4-118Display indication......................4-113Setting the system......................4-114
Mazda Radar Cruise Control (MRCC)System warnings............................... 7-59Message Indicated in Multi-informationDisplay.............................................. 7-54Message Indicated on Display.......... 7-52Meters and Gauges............................4-12Mirrors
Outside mirrors............................3-32Rearview mirror.......................... 3-34
Mirror Defogger................................4-63Multi-information Display................ 4-20
Average fuel economy.................4-25Blind Spot Monitoring (BSM)Display.........................................4-26Cruise Control Set Vehicle SpeedDisplay.........................................4-28Current fuel economy..................4-25Distance Recognition Support System(DRSS) Display...........................4-27Distance-to-empty....................... 4-25Engine Coolant TemperatureGauge...........................................4-23Fuel Gauge.................................. 4-23Lane-keep Assist System (LAS) &Lane Departure Warning System(LDWS) Display..........................4-27Maintenance Monitor.................. 4-26Mazda Radar Cruise Control withStop & Go function (MRCC with
10-6
CX-9_8GC7-EE-17G_Edition1 2017-5-16 8:22:04

Index
Stop & Go function) SystemDisplay.........................................4-27Mazda Radar Cruise Control(MRCC) Display......................... 4-27Odometer and Trip Meter............4-22Outside Temperature Display...... 4-24Vehicle Speed Alarm...................4-28Warning (Display Indication)...... 4-28
OOdometer and Trip Meter................. 4-13Outside Mirrors................................. 3-32Outside Temperature Display............4-17Outside temperature warning beep....7-57Overhead Console............................. 5-81Overhead Lights................................5-74Overheating....................................... 7-32Owner Maintenance
Closing the hood......................... 6-17Engine compartment overview....6-18Key battery replacement..............6-33Opening the hood........................ 6-16Owner maintenanceprecautions...................................6-14
PParking Sensor System................... 4-191
Park assist sensor systemoperation.................................... 4-193Sensor detection range.............. 4-193
Personalization Features................... 9-10Power Liftgate...................................3-20Power Liftgate Warning Beep...........7-57Power Steering.................................. 4-83Power Steering Warning Buzzer....... 7-58Power Windows................................ 3-36
RRadar Sensors (Rear)...................... 4-167Radar Sensor (Front).......................4-164
Rearview Mirror................................3-34Rear Coat Hooks...............................5-85Rear Cross Traffic Alert (RCTA).... 4-108Rear Door Child Safety Locks..........3-18Rear Door Sunshade......................... 5-86Rear Fog Light..................................4-56Rear View Monitor......................... 4-179
Displayable range on thescreen......................................... 4-181Picture quality adjustment......... 4-190Rear view monitor operation..... 4-183Rear view parking cameralocation...................................... 4-180Switching to the rear view monitordisplay........................................4-180Variance between actual roadconditions and displayedimage......................................... 4-188Viewing the display...................4-182
Rear Window Defogger.................... 4-63Rear Window Washer....................... 4-62Rear Window Wiper......................... 4-62Recommended Oil.............................6-19Recording of Vehicle Data..................8-5Registering Your Vehicle in A ForeignCountry................................................8-2Replacement
Fuse..............................................6-48Key battery.................................. 6-33Light bulbs...................................6-39Tires............................................. 6-37Wheel...........................................6-38Wiper........................................... 6-25
Request Switch Inoperable WarningBeep (With the advanced keylessfunction)............................................ 7-56Rocking the Vehicle.......................... 3-51
10-7
CX-9_8GC7-EE-17G_Edition1 2017-5-16 8:22:04

Index
SSaving Fuel and Protection of theEnvironment...................................... 3-48Scheduled Maintenance...................... 6-3Seat
Driving position memory.............. 2-7Seats.................................................... 2-5
Front seat....................................... 2-5Front seat warmer..........................2-6Head restraint.............................. 2-17Second-row seat.......................... 2-10Second-row seat warmer............. 2-11Third-row seat............................. 2-16
Seat Belt System............................... 2-23Emergency locking......................2-22Pregnant women.......................... 2-22Seat belt precautions................... 2-203-point type................................. 2-23
Seat Belt Warning Beep....................7-55Second-Row Seat.............................. 2-10Security System
Immobilizer system..................... 3-42Theft-deterrent system.................3-44
Shopping Bag Hook..........................5-85Smart Brake Support (SBS)............4-156
Collision warning...................... 4-158Stopping the Smart Brake Support(SBS) system operation.............4-158
Smart City Brake Support [Forward](SCBS F).........................................4-148
Collision warning...................... 4-150Smart City Brake Support (SCBS)Indicator Light (Red).................4-150Stopping the Smart City BrakeSupport [Forward] (SCBS F) systemoperation.................................... 4-151
Smart City Brake Support [Reverse](SCBS R)........................................ 4-152
Smart City Brake Support (SCBS)Indicator Light (Red).................4-155
Stopping the Smart City BrakeSupport [Reverse] (SCBS R) systemoperation.................................... 4-155
Spare Tire.......................................... 7-17Specifications...................................... 9-4Speedometer...................................... 4-13SRS Air Bags
How the SRS air bags work........ 2-51Limitations to SRS air bag.......... 2-56Monitoring................................... 2-58SRS air bag deploymentcriteria..........................................2-55Supplemental restraint systemcomponents..................................2-50
Starting the Engine..............................4-5Steering Wheel..................................3-31
Horn............................................. 4-64Storage Compartments......................5-81
Armrest box.................................5-82Center console............................. 5-82Console box.................................5-82Glove compartment..................... 5-82Luggage compartment.................5-83Overhead console........................ 5-81Rear coat hooks........................... 5-85Shopping bag hook......................5-85
Sunroof.............................................. 3-39Sunshade............................................3-41Sunshade (Rear door window)..........5-86Sunvisors........................................... 5-74
TTachometer........................................ 4-14Theft-Deterrent System.....................3-44Third-Row Seat................................. 2-16Three-flash Turn Signal.................... 4-58Tires...................................................6-36
Flat tire........................................ 7-15Replacing a tire........................... 6-37Replacing a wheel....................... 6-38
10-8
CX-9_8GC7-EE-17G_Edition1 2017-5-16 8:22:04

Index
Snow tires....................................3-52Specifications.................................9-7Temporary spare tire....................6-38Tire chains................................... 3-52Tire inflation pressure................. 6-36Tire rotation................................. 6-37
Tire Inflation Pressure WarningBeep...................................................7-58Tire Pressure Monitoring System....4-175Towing
Hook............................................ 7-36Towing caravans and trailers(Russia)........................................3-56
Towing Description...........................7-34Traction Control System (TCS)........ 4-73
TCS OFF Indicator Light............ 4-74TCS OFF Switch......................... 4-74TCS/DSC indicator light............. 4-73
Traffic Sign Recognition System(TSR).................................................4-96Trailer Stability Assist (TSA)........... 4-76Transmitter.......................................... 3-4Trip Computer...................................4-18Trip Meter......................................... 4-13Trouble
Battery runs out...........................7-28Emergency starting......................7-31Emergency towing.......................7-34Flat tire........................................ 7-15Overheating................................. 7-32Parking in an emergency.............7-14When Liftgate Cannot beOpened.........................................7-61
Turn Signals...................................... 4-57
UUltrasonic Sensor (Rear).................4-169USB Power Outlet............................ 5-78
VVanity Mirrors................................... 5-74Vehicle Information Labels.................9-2Vehicle Speed Alarm........................ 4-19
WWarning Indication/WarningLights.................................................4-33Warning Sound is Activated............. 7-55
Air bag/front seat belt pretensionersystem warning beep................... 7-55Blind Spot Monitoring (BSM)System warning beep.................. 7-58Collision warning........................ 7-60Electric Parking Brake (EPB)Warning Beep.............................. 7-58Electronic steering lock warningbeep..............................................7-57Excessive speed warning.............7-60Ignition not switched off (STOP)warning beep............................... 7-56Key left-in-luggage compartmentwarning beep (With the advancedkeyless function)..........................7-57Key left-in-vehicle warning beep(With the advanced keylessfunction).......................................7-57Key removed from vehicle warningbeep..............................................7-56Lane Departure Warning sound... 7-58Lights-on reminder...................... 7-55Mazda Radar Cruise Control withStop & Go function (MRCC withStop & Go function) systemwarnings.......................................7-59Mazda Radar Cruise Control(MRCC) System warnings.......... 7-59Outside temperature warningbeep..............................................7-57
10-9
CX-9_8GC7-EE-17G_Edition1 2017-5-16 8:22:04

Index
Power Liftgate Warning Beep..... 7-57Power steering warning buzzer....7-58Request switch inoperable warningbeep (With the advanced keylessfunction).......................................7-56Seat belt warning beep................ 7-55Tire inflation pressure warningbeep..............................................7-58Vehicle speed alarm.....................7-58120 km/h warning beep...............7-60
Warranty.............................................. 8-2Windows
Power windows........................... 3-36
Windshield Washer........................... 4-61Windshield Wipers............................ 4-59Windshield Wiper De-icer................ 4-64Winter Driving.................................. 3-51Wiper
Replacing Rear Window WiperBlade............................................6-29Replacing windshield wiperblades........................................... 6-26
0-9120 km/h warning beep.................... 7-60
10-10
CX-9_8GC7-EE-17G_Edition1 2017-5-16 8:22:04

10-11
CX-9_8GC7-EE-17G_Edition1 2017-5-16 8:22:04

10-12
CX-9_8GC7-EE-17G_Edition1 2017-5-16 8:22:04