
CUUSAN Salsa Final Draft for Print.pdf - My Voice. My Vision.
208
-
Upload
khangminh22 -
Category
Documents
-
view
1 -
download
0
Transcript of CUUSAN Salsa Final Draft for Print.pdf - My Voice. My Vision.


Welcome to Salsa! If you are a dues paying member of the Coalition of Unitarian Universalist State
Advocacy Networks (CUUSAN), you have a wonderful opportunity to take advantage of an excellent and
powerful supporter/donor/advocacy program called Salsa. This on-line advocacy program normally
would cost an individual state chapter over $2400/yr. However, as a dues paying CUUSAN member, you
can have a SALSA chapter membership with all the same capabilities free of charge.
Salsa enables you to maintain supporter files, communicate through email blasts and emails,
implement and track on-line donation efforts, create event invitations and RSVPs, and most importantly,
launch advocacy email letter campaigns and petitions to local, state and national elected officials. It is
easy to use, with online tutorials available to help you learn everything you need to know. These can be
found at www.Salsalabs.com. This manual is a synopsis of some of the most pertinent Salsa materials
available online. It is designed to get you started as a CUUSAN Chapter Member.
How Can My State Advocacy Network Enroll in Salsa?
First of all, make sure you have paid your CUUSAN dues, the amount determined by your annual budget. Dues are due in January of each year.
Complete the templates indicated in this document with you database and other indicated information
Contact the CUUSAN Salsa Administrator to set up your state chapter. Do not go through Salsa directly for chapter membership or you may be charged.
What Happens to My State Advocacy Network Information?
Data is the most important asset that a State Advocacy Network (SAN) has to accomplish its advocacy
work. CUUSAN has taken precautions to protect this information. CUUSAN and each UU state chapter are asked
to adhere to the conditions and responsibilities as outlined in the following Terms of Service. Each chapter is
asked to sign a copy of this agreement as a requirement of participation as a CUUSAN Salsa chapter. Please
take time to review this important document. For questions and additional information, please contact the current
CUUSAN Salsa Administrator.

Terms of Service for
CUUSAN SALSA Member Chapters
The following constitutes the arrangement between CUUSAN and its member chapters relative to the use of the SalsaLabs database system under contract from Salsa Labs, Inc. This governs the use of the system by chapters of CUUSAN and is in addition to any requirements and stipulations required of CUUSAN and its chapters by Salsa Labs, Inc.
I. Right to Use and General Terms
A. Each member chapter in good standing has a right to use the SalsaLabs system. Each will be
provided with a chapter-based login and the ability to upload, delete, maintain and update, and use available features within their chapter so long as they remain a member in good standing.
B. No member chapter will have access to or use another chapter’s login credentials or access any
data related to individuals not in their chapter.
C. CUUSAN will not use data from any chapter for gain of any other chapter, CUUSAN or for the benefit of any individual. CUUSAN access to chapter data is limited to technical support assistance, troubleshooting, training of members of the chapter for which data is being accessed, deduplication and other system-wide configuration needs, establishment of donation processing and other uses similar in nature.
D. CUUSAN will not send messages, solicitations, phone calls, mailings or attempt to contact any
individual or institution from any members chapter unless upon the request of said member.
II. Responsibilities of Chapter Members
A. Members are responsible for all maintenance of their lists (except for deduplication). This includes
but is not limited to uploading supporters, editing supporters, deleting and otherwise maintaining their chapter in good order.
B. Members are responsible for notifying the CUUSAN Salsa contact with an email address and
password for their primary login.
C. Members are responsible for maintaining their email list including the removal of bouncing emails and “non-openers” to prevent being flagged as spammers. A spam flag from SalsaLabs, Inc. may result in temporary suspension of service or permanent removal of access.
D. Members further agree to not add any email addresses to their chapter without the express
permission of the individual to which the email belongs. This may be achieved through sign-up forms, online opt-ins, donation forms or other means. Failure to do so will result in a suspension of not less than two weeks and not more than 30 days provided that when the suspension period ends, all address not in compliance have been removed.
E. Should the chapter choose to use SalsaLabs for receiving donations, the Member is responsible for
establishing a vendor account with a payment processor compatible with the SalsaLabs system. They are further responsible for coordinating the receipt of payments to their bank or their fiscal agent.

III. Responsibilities of CUUSAN
A. CUUSAN is responsible for maintaining the master account in good standing with SalsaLabs, Inc.
and ensuring the continuity of service for member chapters.
B. CUUSAN is responsible for setting up login accounts for the primary account manager for each member in good standing upon request.
C. CUUSAN is responsible for configuring the payment processing accounts for each member in good
standing upon request
D. CUUSAN is responsible for deduplication of records on a monthly basis
E. CUUSAN is responsible for suspension and termination of service as provided for by this document and under the provisions of bylaws and other governing documents of CUUSAN.
IV. Suspension and Termination of Service
A. Suspension or termination of service due to lack of standing as a member or for acts defined in this
document and as established in CUUSAN bylaws and other governing documents.
B. Any member may choose to terminate service at any time. After downloading, copying or otherwise capturing their data, they may notify CUUSAN and request their data be removed from the CUUSAN system. CUUSAN will comply with such a request within 30 days of notice.
V. Revisions and Modifications to the Terms of Service
A. These Terms of Service may be modified at any time, with written notice via email or postal mail to
every member in good standing on the date of the modification.
B. Members in good standing have 90 days to file a written request to opt-out of the modified Terms of Service. Upon such notice, said member will have until 60 days the date of the opt-out notice to download, copy or otherwise capture the data in their chapter before it is removed from the system.
Effective as of June 2016

GOAL: To create a rich data landscape for targeted engagement and fundraising.
With Salsa, your voice will rise above the noise. Quickly launch your campaigns wherever your supporters are - web,
email, social - and unleash the power of activists.
Over 3,000 Non-Profits use Salsa globally. We can learn a lot from each other. Explore how some of these organizations
are using Salsa by visiting their websites and/or signing up for their newsletters:
Environmental Working Group, Public Interest Network, Climate Reality Project, Polar Bears International, National
Urban League, Habitat for Humanity International, Endangered Species Coalition
SPECIAL NOTES:
Salsa is optimized for use with Mozilla Firefox. To guarantee the best user experience possible please download Firefox
and make sure you are running the latest version.
Never copy direct from an MS program like Word. If you want to write a content block in Word and then transfer, copy
into Notepad first. Then copy from Note into Salsa’s WYSIWYG editor.
Save your work regularly. Salsa does not save your work automatically like some online tools. To ensure you don’t lose
work, save every time you add content.
To open a different package after having done work in one area for the website, click on the colored bar at the top right
corner of your screen. This will open the same sidebar that you see on your Salsa dashboard or homepage.
Customize Emails with Dynamic Content
https://help.salsalabs.com/entries/65149280-Customize-Emails-With-Dynamic-Content
Salsa Blog: It’s a big world. We want to help you change it.
https://www.salsalabs.com/blog
Salsa Blog is a great place to get information about new or trending online practices.
6 Strategies and Techniques for Running an Advocacy Campaign
https://www.salsalabs.com/blog/advocacy-campaign-strategies-techniques
50 Things About SALSA
https://www.salsalabs.com/get-know-us/blog/50-things-about-salsa-part-1

Account Overview Dashboard Overview………………………...1
Manage Campaign Managers…………….4
Tech Support……………………………………..6
Managing imports Formatting Your File………………………….8
International/Non-English Data….……10
Basic Supporter Import……………….…..10
Importing Custom Fields………………....13
Basic Donations Import…………………...14
Deleting Imported Donations…………..17
Website Management Web Templates……………………………….18
Uploading Images and Files…………..…25
Signup Pages……………………………………28
Create and Edit Donation Pages………35
Unsubscribe Pages…………………………..39
Thank You/Landing Pages………………..45
Tell-A-Friend Pages………………………….46
Supporter Management
Individual Details Page…….…….…………49
Manage Custom Fields……..………………57
Profile Manager………….….………………..60
Scoring…………………….…….………………..63
Managing Groups………..……………….….70
Queries……………………..…………………….75
Export……………………………………………...80
Email Blasts Creating Email Templates…………………84
Email Blasts 101……………………………….88
Create an Email Blast……………………….89
Personalize Emails with Supporter
Merge Fields…………………………………….99
Automatically Insert Targeted Action
Content into Emails……………………………102
Autoresponses / Email Triggers………….105
Streaming Emails………………………………..111
Welcome Series Primer………………………115
Bounce Processing……………………………..120
Advocacy Targeted Actions………………………….…….123
Blind Targeted Action……………………...…131
Multi-Content Targeted Action……….….132
Petitions………………………………………….….136
Letters to the Editor……………………………141
Creating Custom Recipients…………….….143
Donations
Gateway Processor and
Merchant Account………………………………146
Individual Donation Records ………….…..148
Welcome Series for New Donor………….156
Events Creating an Event…………………………….…159
Reports
Blast Summary Reports………………………172
Advocacy Reports …………………………..…174
Donation Reports…………………………......177
Build a Custom Report……………………….180
Schedule a Report for Export……………..188
Appendix
Query Terms……………………………………...191
Brief Table Summary……………………..….196
Receive Email Values…………………………197
Common Merge Fields………………………199
Creating a Complete Advocacy Campaign….…..201

1
Dashboard Overview
A dashboard is your own customizable canvas for you to add, move and remove reports, notes and other information. That
page you see after you login? That is your main dashboard. You also have a unique dashboard for every package you have
installed (an Email dashboard, an Advocacy dashboard, a Supporter dashboard, and so on).
Dashboards are unique to each user account, so when you customize your dashboard, the reports and stickies on your
dashboard will look different from those of other administrators or campaign managers.
Adding items to a Dashboard
Reports and stickies can be added to each dashboard by selecting them from the Dashboard item menu at the top right of
the Dashboard area.
To add a Dashboard item, first click its category in the Dashboard item menu...
...and then click the name of the item you wish to add to the Dashboard.

2
Positioning Dashboard Items
Once you've added a Dashboard item to your page, you can drag and drop it to change it's position on the Dashboard.
Removing Dashboard Items

3
To remove a Dashboard item, you can close it with the white 'X' button in the top right hand corner.
Useful Links
There is also a section of useful links on every dashboard, so that you have access to public links such as your legislative
lookup page, the profile manager, email blast archives, actions and events lists, etc.
Stickies
Stickies are a tool for adding notes to your dashboards. They can hold reminders to yourself, quick tips to remember, or
other information you need handy when you're working.
Stickies are also useful as an intra-organization
communication tool; when you create a sticky note, it will
be visible to any campaign manager who logs in to your
organization's account. If you need to leave instructions
for an intern who's using the system for the first time, or
have an off-hours strategy note be available to your west
coast web designer when you're not online, Stickies are
your best bet.
Creating Stickies
There are two ways to create new sticky notes:
Method 1: The Dashboard Item Menu
If you click the "Add Content" plus sign in the top right corner of a dashboard, you'll see the Dashboard Item Menu screen
appear. If you click the subsection labeled 'Stickies,' one of the options available will be 'Create a new sticky'. Clicking that
link will take you to the edit page for a new Sticky note:
Method 2: The Stickies Menu
Alternately, you can click the Stickies menu item. In the Dashboard tab sub-navigation menu, the click the "Stickies" link and
then click the "add sticky" button. After the page refreshes, you'll see a new,
blank Sticky at the end of the list, and you can click the "Details" link next to it in
order to add content to your new Sticky.
Editing Stickies
Stickies are fairly straightforward -- give them a title and some content, hit
submit, and they'll appear as selectable items in the Dashboard Item Menu
when you next go to one of your Dashboards.
Title appears in the colored bar across the top of the Sticky
Content is the body
Type lets you select whether your Sticky will display HTML or not.
Choosing HTML causes the Sticky to render its content in html, while
choosing Normal forces the Sticky to display plaintext. Choosing Raw html will
render the sticky in html but without the structure of the box. If you need to
show a piece of web content to your designers that you think they should

4
emulate, choose HTML and paste in the source code. If you want the source code itself to be available to them, choose
Normal, paste in the content, and the source code will appear as non-rendered HTML.
Editing is a checkbox which allows you to specify whether or not the Sticky should be editable from the Dashboard. If the
box is checked, you'll be able to change the content of the Sticky when it's on the Dashboard, and your changes will be
reflected everywhere else that Sticky appears (after the screen is refreshed).
Adding and Removing Stickies from the Dashboard
Once the sticky you want to add has been created:
1. Go to the dashboard where you would like to place the sticky (such as, on the donation dashboard).
2. Click the "+" symbol located at the top left of the screen.
3. Select the sticky from the drop down. Your sticky is now on the dashboard. You can move it around or you can remove it
by clicking the "x" in the top right of the sticky's box.
To remove a Sticky note from a Dashboard, simply click the white close icon in the top right corner of the note.
Deleting Stickies
To delete a Sticky note completely, click the Stickies menu item in the Dashboard tab, and then click the 'Delete' link to the
right of the Sticky in the list.
Note that this removes the Sticky note permanently, and it is not retrievable.
Your dashboard is now customized to help you maximize your needs! Remember, you can change at any time to reflect your
current priorities.
Manage Campaign Managers
Use the Manage Account link to govern campaign manager settings, listed under the little "Gear" icon at the top of the new
Salsa interface. If you do not have Super Admin permissions, you will not see this Account link.
A campaign manager is anyone with login access to your Salsa back end. While many times one login is used for several
people within your office, it's generally preferable to create a Campaign Manager for each person.

5
Adding and Editing Campaign Managers
You can add an unlimited number of campaign managers to your account, though it's important to remember to manage
who has access to your information.
After clicking the Account link at the top right of your Salsa interface, you'll see a Salsa Configuration box from which you can
click Campaign Managers to access a full list of your Campaign Manager records.
Click the Add Campaign Manager button at the top right, and a new row will appear at the top of this list.
You can edit some information directly through the row in the list. To edit password and permission details, you'll want to
click the Details link to the left of your campaign manager record.
User Information
Fill out the contact information for the user here. At minimum, you'll want to
fill out the email field, since this will be your campaign manager's
username. The rest of the fields are essentially informational. Make sure to hit
the Save button within the User Information box, before moving on to other
sections.
Change Password

6
Enter the new password twice in order to change a campaign manager's password. Once a new user has been assigned a
user name and password, they'll be able to log in to the Salsa interface. The number of dots within the space does not
indicate how many characters are in your password.
Note that only Super Admins can modify their own or other
campaign managers' passwords. If Salsa Support is necessary to
add or edit a campaign manager record, we must receive written
request for the edits from a Super Admin on your account.
Manager Type
There are two types of campaign manager permissions
for Salsa. By default, campaign managers will be set to
Super Admin, indicating that they have access to all of
your Salsa interface, including their own and other
campaign manager settings.
If the manager type menu is set to "Normal", this
campaign manager will have limited access to the Salsa
interface and will not be able to view the Account
settings link. You will want to configure a default role for
Normal permissioned campaign managers, which will
specify what tabs they can view in the Salsa interface.
At this time, permissions cannot be more granular. It is not possible, for example, to allow access to the Supporter
Managment tab, but to limit editing or viewing of data within a supporter record.
TECH SUPPORT
There will come a time when Salsa doesn’t function the way you want
it to or you aren’t sure how to do something. Luckily, the Salsa
Support Team is there to help you with a 98% satisfaction rating! To
begin your support ticket click the settings “Gear” icon, then click
“Submit a Support Ticket.” You will be redirected to Salsa Commons, a
public forum for questions, answers, and helpful how-tos.
You will see a list of options in the right sidebar “Submit New Request”. If for some
reason you are unable to login you can send an email to [email protected]. You will
need to include your organizations number (CUUSAN is 51510) and your chapter number.
We suggest writing it into the cover of this manual so you have it even if there are
technical difficulties.

7
Be specific with your subject line. You will get suggested topics in Salsa
Commons after creating a specific subject line
If you don’t find an answer in the Commons explain what you are trying to do
and what roadblocks are preventing you from achieving that goal. If you are
getting an error message, popups, or being directed to an unintended page,
take a screenshot and include the screenshot as an attachment to your request
using the attachment form at the bottom of your screen.
First, you’ll get an auto response acknowledging your ticket in the system.
After that, you should receive a personal response, often within two hours. If
it’s a quick fix, they’ll get you straightened out, or Salsa will put you in touch
with a Support Specialist who will give personalized attention to the ticket. We
guarantee you’ll get a resolution or escalation for your ticket within two days
(though often much sooner). After submitting your support request you can
check on your request by clicking on the “check existing requests” link in the
sidebar. You’ll be redirected to a screen like this.
The support representative may ask you for further screenshots to better understand your problem. Each response field has
an attachment option “Attach file” in a link on the left side under the response field.
If your problem has been resolved or
question answered check the box “Please
consider this request resolved.” before
clicking submit. This will let Salsa know that
they can close the request without follow-
up.

8
Use Imports to put entire lists of supporters into Salsa with one action from an outside database or
spreadsheet. Imports are a powerful, flexible feature. They feature heavily in the setup of most new Salsa accounts, but are
also useful for a variety of ongoing data management needs.
Creating new supporter records in bulk
Making bulk updates to existing supporter records (see also Queries)
Adding donation data from outside Salsa
Even adding non-supporter data in bulk, imported to any data table
How to Get There
Imports begin outside of Salsa, with a data source like an Excel spreadsheet that will need to be saved into a delimited file
for import. Once there's an import-ready delimited file, navigate to the Import Supporters tool in the Supporter Package.
Training Video
Here's a short training video with an overview of the import process.
https://www.youtube.com/watch?v=HJTIwAGAbC0
Preparing Your Data for Import
The first step to importing happens outside Salsa altogether: you'll need to ready your
data for import by getting it into a Salsa-friendly format.
Formatting Your Import File
An import file should comprise data that can be held in a single worksheet of Excel or
a similar spreadsheet application.
That spreadsheet should hold:
One horizontal row per supporter (or other record) to create in Salsa
One vertical column per field whose data will be filled in each of those records
You probably have a lot more information than just email: first names, last names,
addresses, phone numbers, and so forth. There is no maximum or minimum "width"
to your import spreadsheet.
By default, Salsa deduplicates based on the Email field. This means that Salsa takes
the Email field from your import and searches your existing supporter records for any identical email address. When it finds
a match, it knows to update an existing record (rather than creating a new one). For this reason, you should always include
Email as one of the columns in your source file.
If you want even more assurance against duplicate records, you can add additional columns for these data points. The Salsa
Import Tool seeks a data match using these three fields, in this order, if any of them are provided in the import file:
1. supporter_KEY - A distinct ID number assigned by Salsa

9
2. uid - An optional unique ID field that you can fill with values generated from an outside database
3. Email
No matter how much (or how little) you're importing, every column in an import spreadsheet should contain only one single
piece of information. For example, First Names and Last Names need to be in two distinct columns. The same goes for
addresses, which must be broken up into separate columns for Street, City, State and Zip.
You can download a file to see how best to format your data for import into Salsa at
https://wfc2.wiredforchange.com/o/8001/images/supporter-importer-template.txt
Wary? If you're new to the imports feature or unsure how Salsa will render the data in your file, a good way to start might
be to make a test import file comprising just the first three or four lines of your potential import. Import that test, then
eyeball the resulting data before proceeding with the full file import.
Saving Your Import File
The last step in prepping your data is saving it to a usable format. Because Salsa cannot import directly from an Excel or
OpenOffice spreadsheet, you'll need to save your data in a tab-delimited text format. This process will work for most files,
but if you have international characters, please use the alternate process noted below.
Basic process:
1) Open your correctly formatted Excel file
2) In the File menu, click Save As
3) Select the Format drop down list and
select Tab Delimited Text. Click Save.
4) When prompted with the scary message that
some features may be removed,
click Continue to convert the file anyway. This is
just Excel being proprietary. If you’re still scared,
save your file first as an Excel file then make a
copy to save as a CSV.

10
International/Non-English Data
Salsa can readily handle data sets that contain non-English characters. Usually, you'll just need to do one quick preparatory
loop before import.
1. Saving Your Import File with International Data
Ensure the source import file is saved with a
compatible character encoding, ideally UTF-8.
Follow these steps:
For instance, the process for generating a
compatible import file for Excel is typically:
1. Save-as a tab-delimited text file as described above.
2. Close and then reopen the newly-saved tab-delimited text file in a plain-text application such as Notepad.
3. Select File > Save As and set the Encoding value to UTF-8.
Basic Supporter Import
Your import file is ready, and Salsa is ready. Now, let's do what you came to do -
import a list of supporters!
The import tool is located in the Supporter Package. Click the Supporter tab, then click
"Import Supporters" in the sub-navigation menu:
It's just a two-step process.
Step 1: Choose your data source
When you've opened Salsa's import feature, you'll immediately see the first step to run
an import: selecting the data file that you'll be importing. Click the "Browse" button
next to the Filename field to import a file (you'll usually use this option). This option is
illustrated below.
Write-In Table enables
advanced users to import to
Salsa data objects other than
the Supporter table.
Similar Uploads may help
shortcut the second import
step if you regularly import
data files that look pretty
similar to one another.
Character Encoding is important only when importing non-
English data characters.
Click “Save and Continue” to upload the file and move on to step 2.

11
Step 2: Match your spreadsheet columns to Salsa's field names
In the second step of the import process, you tell Salsa to insert
Tab A into Slot B.
You should now see two columns:
1. A list of fields matching the top row of data in your
import file; and,
2. A parallel column of pull-down menus full of Salsa
fields.
Your task is simple, but INCREDIBLY IMPORTANT. You must
match your column headers (on the left) with Salsa's field
names (on the right). This ensures that your data gets stored in
the correct place. You also have the option to set any column to
"Ignore" to have the importer disregard it.
If the second step shows you garbled data, or all your data in a
single field, the importer didn't understand your file. Return to
step one and try again. The most common cause of this is choosing the wrong field delimiter (e.g. tab instead of comma) in
step one.
Supporter Groups and Tags
To add all supporters in this source file to be added to a
particular group (which must exist prior to the upload), or given a
particular tag, you can specify them here.
If you want to add some supporters in this source file to one or
more groups and tags, read more information about formatting
groups and tags for import at
https://help.salsalabs.com/entries/56069084-Formatting-
Groups-for-Import .
Advanced Options
Most regular imports can just ignore these steps.
Skip Lines enables you to put a number of rows in the import spreadsheet that you'd like Salsa to skip over. Often,
the first line of a file will have the column names in it, instead of actual values, and it can be helpful (though not
essential) to skip that one line in order to avoid create a supporter whose first name is "First Name."
Deduplication overrides Salsa's default deduplication logic by keying it to any supporter field -- or turning it off
deduplication entirely for the current upload.
Overwrite Options modify Salsa's behavior when the import's deduplicator does match an incoming row to a record
already in Salsa. Absent any of these settings, such a match will result in Salsa

12
Overwriting existing data with the data for a corresponding field in the import. (e.g., if the pre-existing
supporter record has a First Name of "Joe" and the import has a First Name of "Joseph", "Joseph" will be the
First Name in the record post-import); and
Ignoring null or empty values in import fields. (e.g., if the pre-existing supporter record has a First Name of
"Joe" and the import has a blank value for First Name, "Joe" will be the First Name in the record post-
import).
When you're ready with field matching and any additional settings, hit the Submit for Upload button!
A note about e-mail subscriptions
Salsa's baseline behavior is to assume that it's managing a list of (actual or potential) recipients of mass email blasts. If
you're importing a list of people who should not receive email, include a column in your import file with the value of 0 for
every row in the import. Have the importer write that column to Salsa's Receive Email field. If some supporters SHOULD
receive emails, give them a value of 1 in this column.
What if there's a problem?
It's easier to prevent problems than to fix them. If you're unsure of your import, take these precautionary steps first:
1. Use the Query/Export tool to run a query of your entire supporter list and export that data to Excel. This creates a
backup of data stored on the supporter table.
2. After you finish formatting your source file, make a copy of it and delete all except a few rows in the copy. Import
this copy first and spot check the data. After you've verified the data in this "mini-import," go back and import the
complete file.
Despite all of those precautions, mistakes can still happen. To help you sort out the data should this occur, Salsa
automatically creates two system-generated tags for every import (where XXXXX is the unique ID number of the import):
1. import:createdXXXXX - New records were created by the import
2. import:updatedXXXXX - Pre-existing records which were "touched" by the import.
Running a query on these two tags will help you identify every record which was affected by this import. If there is a
problem, this list of supporter records gives you a place to start restoring your data.

13
Importing Custom Fields
Populate the supporter data related to your organization's custom fields during the import process.
How to get there
First, create your custom fields. (See custom fields in “Supporter Management”.)
Second, use the standard import tool to map columns in your spreadsheet to those fields.
Importing into Custom Fields
Custom fields are still data about supporters, so in this
case, you'll still import into the default supporter
table. Prepare you data for import and save your file
following the instructions in the supporter imports
documentation.
Create one column per custom field in your spreadsheet.
In step two of the import process, scroll down to the Custom fields section.
Option 1
If you've created your custom field before the import (recommended), this is very simple. Simply choose the field from the
drop down list as you would any other Salsa field.

14
Option 2
If you didn't create your custom fields before the import, you can do so now.
Basic Donations Import
You can use a standard import (importing into the Supporter Table) to populate a supporter's history of donations. For an
intermediate level option, read about importing directly into the Donation Table at
https://help.salsalabs.com/entries/65941680
How to get there
You can import supporter donation history directly into the supporter table following the standard import process.
Basic Donation Import
1. Format your file as shown below. For additional tips on preparing
our data for import, review our import documentation. Download a sample
Excel file for importing donations to the supporter table.
2. Your file must contain:
A column for one of the three variables used to identify supporters
(Supporter_KEY, uid or e-mail)
Appropriate donation transaction information (see appendix for a list
of available donation fields)
Two sets of First Name and Last Name fields in your import file (one set for
the Supporter Table and one for the Donation Table)

15
3. Navigate to the Supporter Package and open the Import Supporters tool.
4. Follow the standard import process. When you get to the field mapping step, remember there's a First Name and
Last Name field on both the Supporter and the Donation table. This means your field mapping looks like this:
Importing Directly to Donation Table
If you're doing a very simple donations import, you can import directly into the supporter table. Import directly to the
donation table if you need to do any of the following:
Add multiple new donation records to an existing supporter
record (this process will not work to create new supporters);
Update existing donation records with new/amended
information.
Donations imported directly to the donation table also have an
additional benefit - you can batch delete all of them from the
query tool.
How to get there
To import into the donation table, you use the standard Import
Supporters tool (found in the Supporter package). You'll just use
the Write in table field instead of importing into the Supporter
table (which is the default).

16
Import Donations Directly into the Donation Table
1. Export EXISTING supporter data from Salsa - Ensure that your export includes the Supporter_KEY
2. Add any additional donation information columns to the exported file (suggested columns include Transaction Date,
Transaction Type, and Amount, but you can review the full list of fields on the Donation Object in the appendix to see all of
your options).
3. Format your import file as you would for any Salsa import.
4. Ensure that your import file still has a column for Supporter_KEY.
5. Open the import tool and upload your properly formatted
Tab Delimited Text file.
6. Write in "donation" as the table to which you're importing:
7. In the second step of the import workflow, match your
fields just like any standard import. The task is the same, but the
values in the Database Field column will be those in the Donation
Object instead of the Supporter Object.
8. IMPORTANT: Turn off deduplication completely so that
the records don't automatically deduplicate by supporter key. If you
don't turn this off, only one donation for each supporter will be
added.

17
Deleting Imported Donations
Sometimes you'll need to delete or back out a series of donations that you've imported. You can use this query tool to
identify imported donations and delete them if BOTH of these conditions are true:
You imported directly to the donation table
AND all the donations were new
To identify and bulk delete the donations in a single donation import:
1. Using the query/export tool, select this Condition Type
2. Complete your query as shown (you'll need to know the Import Key and/or date and
time of your donation import to be sure you're identifying the correction donations import
3. Run your query, and then complete the
desired bulk action on the Take Action tab of the workflow. Bulk Delete is one of
the options.
18
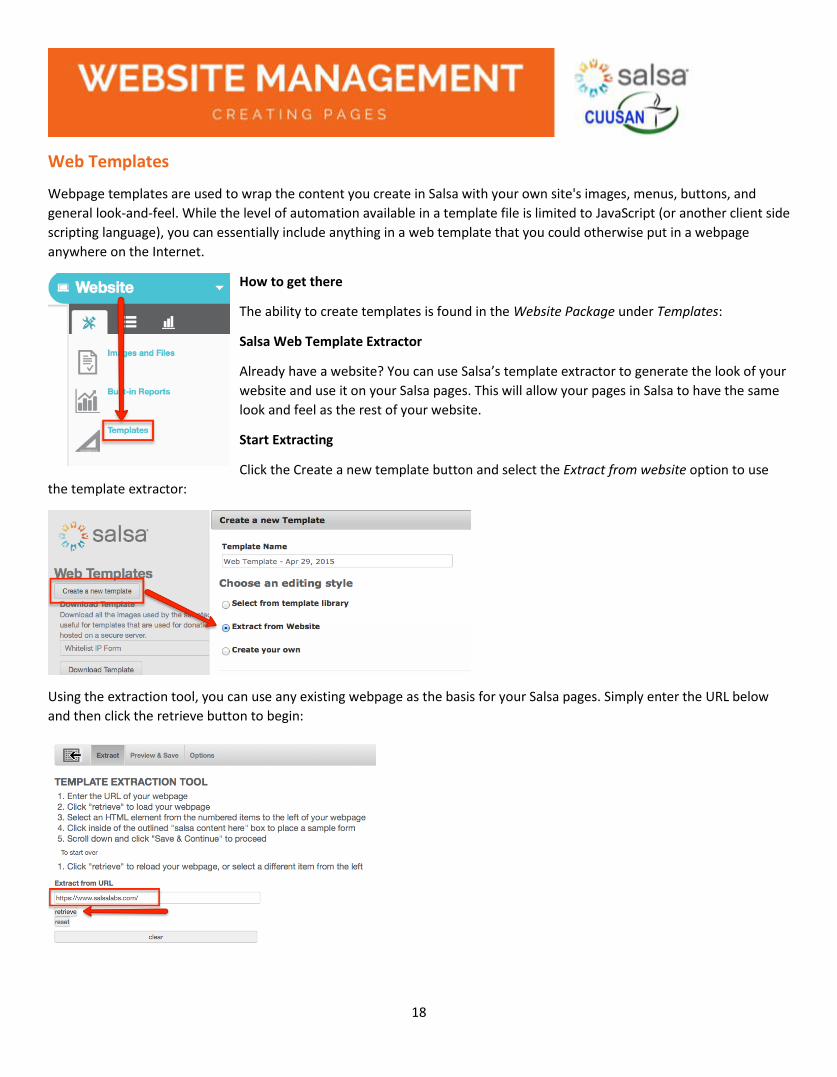
Web Templates
Webpage templates are used to wrap the content you create in Salsa with your own site's images, menus, buttons, and
general look-and-feel. While the level of automation available in a template file is limited to JavaScript (or another client side
scripting language), you can essentially include anything in a web template that you could otherwise put in a webpage
anywhere on the Internet.
How to get there
The ability to create templates is found in the Website Package under Templates:
Salsa Web Template Extractor
Already have a website? You can use Salsa’s template extractor to generate the look of your
website and use it on your Salsa pages. This will allow your pages in Salsa to have the same
look and feel as the rest of your website.
Start Extracting
Click the Create a new template button and select the Extract from website option to use
the template extractor:
Using the extraction tool, you can use any existing webpage as the basis for your Salsa pages. Simply enter the URL below
and then click the retrieve button to begin:

19
Select Your Content Area
After you retrieve the web page, select your main content area by scrolling down the web template. Use the bar on the left
side of the screen to jump between content sections.
Once you decide which content section to use, click the green salsa content here box at the top of the content section. You
will know it was selected when it changes to Content Placed.
If you accidentally select the wrong content area, simply click the Reset button. The template will revert back to its original
state (before the content area was selected), and you can choose again. Clicking Clear will clear out the entire web template.
Click the Save & Continue button at the bottom of the screen to preview the template.
Preview & Save
On the preview tab, you can review the source code of your newly created web template. If you need to manually edit the
source code, you can do so on this step.

20
When finished making changes click the Save button.
My template looks really bad!
At this point, your template has been copied over to Salsa, but it probably looked really bad in the Preview. The reason?
Salsa templates must be secure. By "secure", we mean that:
1. the template URL starts with 'https://' and;
2. all of the files that the template uses also have URLs that start with 'https://’.
If a file that a browser needs starts with 'http://', then it's not secure. This is the case with almost all of our clients'
websites. Browsers block those files when they are requested by a secure template. Your template can't get to the files to
make it beautiful, and that's why it looks pretty bad looking when it's previewed.
The solution is to copy all of these files from your website and store them onto Salsa. See “Uploading Images and Files.”)
When that happens, then they automatically become secure files. Browsers will not block secure files, and our template will
look a lot better after this happens.
Downloading Files
Click on the Options tab in the template editor window.
Click the Download Template button. Clicking this button tells Salsa to go to your website and retrieve the files that the
template needs. As each file is copied over, Salsa stores it, and gives it a secure URL. The non-secure URL is removed from
the template and the new, secure URL is put in its place.
This process is repeated for all of the files that your template needs so it can take some time. Don't navigate away from the
page until it reloads with a list of items downloaded.

21
Building a Template from Scratch
If you know HTML and CSS you might want to build a template from scratch. You can either write content directly into the
text area, or copy and paste HTML from your favorite editor
such as Dreamweaver.
Click the Create a new template button and select the create
your own option.
A Salsa template is essentially a standard HTML document
and can include links to files, images, scripts and forms. It
must have two specific codes to indicate where the content
of pages you create in Salsa will be placed.
<!-- TemplateBeginEditable name="content" --> <!--
TemplateEndEditable -->
As a sample of where the content tags go, this would apply a template to a page without any styling:
Create a Basic Web Template from a Banner Image
To create a basic web template, all you need is a 700x100-pixel banner image in .png, .jpg, or .gif format.
1. Upload your banner image to your Salsa account under website management -> images and files and copy the URL of the
uploaded image.
2. Click the Create a new template button and then choose the Select from template library option.

22
3. Enter an internal reference name for the template and click save & continue.
4. Banner text will be placed over your banner image
(optional), Banner Redirect will link to an external URL if the
banner is clicked (optional), Banner Image will be the image
you uploaded in step 1 of this process. Click “Save &
Continue” to get to the last step of this process.
5. Simply click the Save button on this last tab to finish the
process.
Editing a template
Here are some steps that you can use if you need to edit a template:
1. Navigate to the Templates section of Website Management.

23
2. Choose the template from the array of templates, then click the Edit link just above the thumbnail:
3. When the template window opens, you should see HTML like this:
4. If there's not a window of HTML, then the best way to edit the template is to copy it, then make your changes to the
copy.
Template Tips
Adding your own CSS, with styles specific to the Salsa tools, is very powerful in customizing your pages. Add a style sheet to
your template via HTML, using either this method:
<style type="text/css">your css code here</style>
or this method:
<link rel="stylesheet" type="text/css" href="URL of your stylesheet">

24
When thinking about styling Salsa pages it's important to keep a few things in mind. Salsa adds its own style sheet directly
before it adds the HTML for its tools, meaning these are the last styles in your document. To override Salsa styles you'll need
to make use of the Specificity Rules of CSS. Since Salsa styles come last, you'll need to be more specific with your selectors
then Salsa is. An easy way to do this is to simply add 'body' as the starting selector to selectors used on Salsa styles. This will
add one point of specificity to your selector, and that's all you need.
The more you know about CSS, the more power you'll have to radically change the default layout of the Salsa tools. If you
don't know CSS or need to freshen up, we highly recommend www.HTMLDog.com as it has clear guides and an attention to
doing things a valid way.
Applying Templates
The template builder is not the section of Salsa where you'll actually affiliate particular templates with particular pages. In
general, any Salsa page you create will give you the option to assign that page a specific template.
Salsa pages will use your Default template unless specified. Click the Show Publishing Tools button to change your template:
Once the publishing tools are expanded click the Change link next to the currently template:
Once you click the link to change the template, select the template you want to use by clicking on the preview image. The
image will then have a red border. Then click the Save button to apply the template.
Web Templates CSS - how to override Salsa's CSS
When editing a template, you'll notice an input field labeled: "Template (optional) Replace our default styles with this
stylesheet"

25
This is an advanced feature only to be used by those with an advanced understanding of CSS. This field accepts a URL of a
CSS style sheet. It will completely remove all default Salsa styles and use only your own. Many Salsa tools depend on these
default styles to work properly, so overriding it can break tools.
This option is available for those who would rather recreate any necessary styles than style over a select few. It is important
to note; we cannot provide any template support for those using this option.
In some cases, you might find you want or need to override Salsa's default CSS. What we recommend in these cases is that
you take advantage of CSS's built in specificity rules and override particular styles in your header. This page has great info
about CSS specificity: http://htmldog.com/guides/cssadvanced/specificity/
So for example if you wanted to change the style of an LI-( Salsa's default style)
.salsa li {list-style:none;clear:both;text-align:left;}
To override that, you'll want to be more specific with your selectors. Adding a simple body selector does the trick.
body .salsa li {list-style:disc;}
Uploading Images and Files
Note: You can use free tools to resize images before you upload them to Salsa. If you're using a PC, use Microsoft
Paint and if you're using a Mac, use Preview. Anyone can use PicResize: a free, web-based tool. For more tips on
formatting images, see Formatting Files for Email below.
1. Navigate to the Website package.
2. Click the sub navigation link for Images and Files.

26
3. Click Browse..., find your file or image in the file browser, and then click Upload.
4. When the upload has completed, the Salsa-hosted link to your image/file will be seen next to the text "Most recent
upload:", which you can copy and then use in your emails or pages:
5. Right-click on the link and choose "Copy Link (Location)" to copy the link to your clipboard for pasting into other
locations:
6. If you need to locate the image/file at a later time, the thumbnail gallery of your files are listed in alphabetical order;
you can either skip to the corresponding page or search for the name by entering your search term and
clicking Submit Query:

27
Formatting Files for Email
A few tips for formatting your images (before you upload them) if you're going to use them in an email blast. The screenshot
shows how you might format your image in a free tool called PicResize.
Ensure there are no spaces or non alpha/numeric characters (i.e. &) in the file names;
Make sure the file size is under 100 KB;
Match the dimension of the image you're uploading to the dimensions recommended in your email template.

28
Organizing images and files into folders
Salsa usually doesn't recommend usage of file folders because
there is not a direct Salsa HQ page on which these folders can
be managed. All management of folders (and the images and
files within them) must happen through the WYSIWYG editor
on a Salsa page.
Click on the image icon in the
WYSIWYG editor menu. Click
the Browse Server button and
the editor displays a typical-
looking file selection dialog.
Create a folder or select one of
the existing folders.
Select a folder before
uploading a file or image. The
file or image will be uploaded into the selected folder.
Note: There is no way to remove a folder or an image. There's also no way to download a
file or folder from this tool. If you need to recover a file, add the file to a public-facing page
and use the browser's "Save the image" command.
Signup Pages
Signup pages give you a simple way to allow supporters to enter their information into your supporter database on a page
that matches the look and feel of your own website. Signup pages can be used for email signup, volunteer signup, or for any
purpose that requires a custom form.
How to get there
Navigate to the Website package and click the Signup Page option under Web Pages.
This is the fck editor

29
Signup Page: Content
Reference Name is entirely an internal name, invisible to the public. Use organized, specific titles such as May 2015
Supporter Signup to make sorting and locating easier.
Title is the public facing display title for the page, it will show up at the very top of the page and on the browser tab (as long
as a title isn't specified in your template).
Header text and information appears at the top of the finished signup page; it will appear below the Title. Use the WYSIWYG
editor to edit text and insert/upload images, or click the Source button and paste in HTML code directly.
Signup Page: Supporter Info
You can add more fields, including custom fields, by
clicking “Add a new field” and selecting the new field from the
drop-down menu.
You can make any field required by clicking the "required"
check box next to it.
Remove fields by clicking the button with the minus symbol
to the right of the field name.
To change the order of the fields, Click the Use Field Order Shown
Below box, then change the order of your saved fields by click the
drag handle next to any field, and holding down your mouse
button as you move it up or down the field list.
Add to these groups
Choosing one or several groups here will automatically add your supporters to the corresponding groups when they submit
the page.
1. Click Add a group

30
2. Click in the search bar area or the search icon
3. Find and select the group you want to add
Optional Groups
Utilizing this option will add the groups to the public facing page to allow the supporter to choose which groups they want to
join.
Signup Page: Other text
The Other Text tab allows you to insert some additional text at various places throughout the signup page. These boxes also
allow HTML, and since all save the last box ("Content after the submit button") occur within the signup form itself, they can
also enable you to insert code that customizes the behavior of the form itself.
Text before the group selection adds text before the optional groups listed on the page.
Required Confirmation Text adds text next to a checkbox that will appear below the supporter fields. This box will be a
required field, so the supporter will have to check it to submit the page.
Content before the submit button appears above the submit button.
Content after the submit button will appear below the submit button.

31
Signup Page: Follow-up
Redirect Path
This field allows you to specify the web address to which your registrant will be redirected after completing the signup page.
Use a full URL -- e.g., http://www.salsalabs.com and not www.salsalabs.com.
In the Assign Email Autoresponses (Triggers) section you can choose what type of
automated message the supporter receives after signing up. See the guides on
Autoresponses/Email Triggers and Streaming Emails for further information.
Signup Page: Tags
This tab allows you to add optional tags to the signup pages -- they function just like optional groups.
Pre-Tag Text shows above the list of optional tags to select.
Tags allows you to add one or more tags to the page. Click the +Add a tag button to select an existing tag.

32
Signup Page: Options
For volunteers, request availability If checked, this box causes a set of volunteer availability fields to be requested on the
signup page. The options added are not customizable and will store the data collected on the page in the
supporter_volunteer database table. You will only be able to get to this information with a custom report.
Do not add without confirmation will require a double-opt in by the new supporter to actually join your list: after signing up
on this page, s/he will have to confirm by clicking a link in an email message. This is a good idea to improve inbox placement.
If you click this box, you must set up the email confirmation messages as a trigger.
Maximum field width enables you to control the span of input fields on the signup page. You may want to use it if you have
a narrow template. If left blank, fields are set to 22 characters wide by default.
Signup Page: Built in tracking
Often, Salsa users will repurpose sign up pages in other ways than just signing up new supporters - such as a quick survey, or
as a follow-up page to collect more information on supporters who just took action. To allow you to easily find everyone
who completed a particular sign up page, Salsa will automatically add a tag to any supporter who finishes a sign up page.
The tags take the form of: signup:page#### Where #### is the sign up page key number.
Double Opt-In Signup Page
Keeping a clean list (practicing good list hygiene) improves your email deliverability. Using a double opt-in signup page
ensures that supporters who are signing up to receive email from you are really ready to be on your list and are more likely
to open, read, and interact with the email you send them.
Want to learn more about list hygiene? Watch this: https://www.youtube.com/watch?v=C84uLY1Oh5Q
How to get there
To configure a double opt-in signup page, follow these steps:
1. Create an autoresponse or streaming email with confirmation content.
2. Create a signup page with the Do not add without confirmation checkbox checked and the automated email (from
step 1) added on the follow-up tab.

33
3. Optional: Create a custom thank you page
Create the Automated Email
Create an autoresponse or streaming email with a link to the confirmation page. The content is (obviously) up to you, but
we've shown some options here. The important part is the link which does have to be configured properly (so pay careful
attention to that part).
Sample email content
Someone (hopefully you) has subscribed your email address to Salsa's email newsletter. If this is correct, please click this link
to confirm your subscription:
http://Your_Node_Address/processConfirm.jsp?supporter_KEY=[[support...
If this is not correct, you do not need to do anything, simply delete this message. Thank you!
Configuring the URL
1. Click on Show Publishing Tools and View Page to open up the user-facing version of any Salsa page (such as your
signup page)
2. Copy the URL of the user-facing page
3. Remove the parts of the URL in the red boxes to get down to Your_Node_Address.
In this example, we've gone
from org2.salsalabs.com/o/7001/p/salsa/web/common/public/signup?signup_page_KEY=8742
To org2.salsalabs.com/salsa
4. Copy this URL (the base of all email confirmation pages):
5. And paste what is left from your "URL surgery" (Your_Node_Address from step 3) over the placeholder text label
Your_Node_Address
6. The final result should look something like
Create the Signup Page
Create your signup page as normal. The two steps which are especially important to the double opt-in process are:
1. On the options tab of the signup page workflow, check the Do not add without confirmation checkbox.

34
2. On the follow-up tab of the signup page workflow, add the automated you configured following the instructions
above.
Create a Thank You Page
After supporters click on the link in the confirmation email...
They'll be redirected to the first thank you page you created in your account (by
default). Sometimes, however, that just won't do - you need a custom thank you page
for this subscribe confirmation. If this is the case, simply follow these steps.
1. Create the thank you page (or grab any URL on which you'd like supporters to land
after they click the subscription confirmation link).
2. Go back to your automatic email (autoresponse or streaming email) from the
section above. When we left off, the URL looked something like this:
3. Add one more query string on the end of that URL: &redirect=THANK_YOU_PAGE_URL

35
The supporter will then be redirected to the appended page after they click the link to confirm their subscription.
Create and Edit Donation Pages
A donation page allows your supporters to contribute money to your organization. It will collect their personal information
and credit card number, then submit the transaction to your merchant gateway processor. Salsa will then display a thank
you or redirect page to your supporter, and record the status and details of the transaction in a donation record.
How to get there
To get started working on a donation page, you'll need to navigate to
the Donations package:
Create a Donation Page will allow you to start a new page from scratch
Edit a Donation Page will list all your existing donation pages, and allow you to edit
them
Donation Page: Content
Reference Name is entirely an internal name, invisible to the public. Use organized, specific titles such as Action Donate Page
to make sorting and locating easier.
Header text and information appears at the top of the finished donation page the supporter will see, above the donation
form itself. Use the WYSIWYG editor to edit text and insert/upload images, or click the Source button and paste in HTML
code directly.

36
Footer text and information appears below the donation form, and is generally used for either additional information about
the page or identity information about your organization (for example, this might be where you put your tax-exempt status).
Donation Page: User Info
Salsa automatically requires First Name, Last Name, Email Address, and Address information because these fields are
necessary to process a credit card transaction.
User Info setup is the same on all pages. Please see signup pages on page
Groups
Group setup is the same on all Salsa pages.
Donation Page: Amounts
Enter amounts in Comma delimited Amounts like 5,10,20,50,100. Don't use spaces or dollar/currency symbols. All
Salsa donation pages will always provide an Other (fill in the blank) option for donors.
Select Include Recurring Payments to add recurring options to your page. Make sure your Merchant Gateway allows
Recurring Payments before using this option.
Selecting Include Only Recurring Payments will remove the option of one-time donations on this particular donation
page. Great if you are running a monthly pledge drive.
The Include Payments By Check (a.k.a. Electronic Funds Transfer/EFT) option is only available with the PayflowPro
gateway. Selecting this box will enable a supporter to donate directly with their bank account. Contact support if you
want this option enabled on your account.
Use the Merchant Gateway section to select the specific gateway you want to use; this is only applicable if you have more
than one on your account.

37
Donation Page: Follow Up
In the Assign Email Autoresponses section you can choose what type of automated message a donor receives after
donating. Learn more about Autoresponses on page.
Enter content in the Thank You Page Text section if you wish to display a simple thank you message after a donation.
If you want to send a donor to an entirely different page after donating leave the Thank You Page Text blank and enter a
URL in the Redirect field. Make sure to include http:// or https:// in your redirect URL to ensure it redirects correctly.
Donation Page: Optional Text
The Optional Text tab of the Donation workflow allows you to personalize and customize the content on your donation
page. This is an optional step and can be skipped entirely, if you prefer.
Text and content entered in the Pre Donation Text will appear directly
above your donation amounts.
Text and content entered in the Pre Custom Text will appear directly above
any custom fields added to the page. Leave blank if not using custom fields.
The Custom Donation HTML section is used to add elements to your page to give
it a unique look and feel. You should only use it as directed by Salsa Support or
your organization's current practice.
Please note: any code entered in this section will override both the amounts
entered in the Comma Delimited Amounts section and the Pre Donation
Text section. You'll want to make sure that you've moved any code/text from
Comma Delimited Amounts and Pre Donation Text into your Custom Donation
HTML.

38
An example of custom donation HTML can include changing the donation values to 10, 20, or 30 dollars. This code that you
would add in would like the following:
<p><input type="radio" class="radio" value="10" id="amount10" name="amount"><span class="dia_field_name">$10 - One
ticket</span></p>
<p><input type="radio" class="radio" value="20" id="amount20" name="amount"><span class="dia_field_name">$20 - Two
Tickets</span></p>
<p><input type="radio" class="radio" value="30" id="amount30" name="amount"><span class="dia_field_name">$30 -
Three Tickets</span></p>
You can also use custom donation HTML, to have a donation amount pre-selected when your members visit your donation
page. The following piece of code would check the value “$20 - Two Tickets”:
<input type="radio" class="radio" value="20" id="amount20" name="amount" checked = "checked"><span
class="dia_field_name">$20 - Two Tickets</span>
When using Custom Donation HTML, it is always important to test your page before you publicize the link in an email blast
or on a webpage.
Adding content to the Confirm Box Text section will add a checkbox to your donation page. Donors will not be
allowed to submit their donation without clicking the check box next to this text.
Adding content to the Pre Submit Footer will add content above the Submit button.
Donation Page: Options and Previewing your Donation Page
Use the Number of Columns option to select between a single or double column page.
Use the Minimum Donation Allowed section to set a minimum amount. Must be at least $2 or above.
Use the Maximum Donation Allowed section to set a max amount, if left blank the amount will be set to $25,000.
Use the Default Tracking Code section to assign a specific Tracking_Code to all donations that come in from this
page.
Checking the Include In-Honor-Of Donation option will add three fields to
your donation page to collect In-Honor-Of information.
Checking the Include Designation Code option will add a fill in the blank box
to the page, it saves to the Designation_Code field.
Checking the Include In-Memory-of Donation option will add one field to your donation page to collect In-Memory-
Of information.

39
Checking the Disable option will deactivate the page. If you have a redirect set in the Follow-up section, the page will
redirect to that page. If not, the page will load with the message "This page is no longer available." -- this is
uneditable so we recommend setting a redirect.
Use the Tax Status to set a specific Tax_Status for all donations that come in through the page.
Preview and Publish Your Page
Previewing and publishing is the same for all Salsa pages. For a quick how-to visit
https://help.salsalabs.com/entries/23377301 .
Unsubscribe Pages
Unsubscribe pages allow your supporters to opt out of a list they had previously joined.
Your terms of service (and the law) REQUIRE you to offer a valid unsubscribe mechanism to your mailing recipients.
Complying with this requirement helps us to ensure the deliverability of your email blasts!
You have two principal options for configuring an unsubscribe page for your users. These options are not mutually exclusive:
you can use different pages and different unsubscribe paths for different list segments or situations.
Default Unsubscribe Pages
Simpler to employ, but offering fewer options for customization. When your supporters unsubscribe using the Default
Unsubscribe Page, they are updating their Receive Email value so that they will never receive any email from you again.
This solution is only recommended for organizations who are managing one email list (with no segments)
Custom Unsubscribe Pages
These pages allow you to customize the user messaging you provide on your unsubscribe pages, as well as to specify exact
lists (Salsa Groups and/or Tags and/or Chapters) that the user can opt out of on that page.
This solution is recommended for organizations who are managing multiple email lists and supporter segments.

40
How to get there
The link to your Default Unsubscribe Form can be found in
the Useful Links widget on your main dashboard.
Default Unsubscribe Page
Every Salsa-using organization has a default unsubscribe URL. You can find your default unsubscribe page in the "useful
links" sticky on your dashboard. If you use the default unsubscribe page, supporters will follow three steps to unsubscribe:
1) Click the unsubscribe link in an email.
2) Supporter enters the email address which should be unsubscribed.
3) Supporter receives a confirmation email with a link.
4) Supporter clicks the link and is taken to an unsubscribe form with only one option.

41
When the supporter unsubscribes from "Everything" through this
process, he or she is setting their Receive_Email value to
unsubscribed. You can add groups to this page using the Display
to User field (in the Manage Groups tool). However, it's much
easier to manage lists in the Custom Unsubscribe Pages.
Custom Unsubscribe Pages
Custom Unsubscribe Pages allow your supporters to have more granular control
over how they want to hear from you (rather than just blocking your emails
altogether). Once you set up a custom unsubscribe page, it will look something
like this.
Custom Unsubscribe Pages: Page Content
This tab allows you to customize the presentation of the unsubscribe page.
Your Custom Unsubscribe Page URL
At the top of the page, you'll see the properly formatted link for use in your emails.
Just copy and paste this URL into your email template and your unsubscribe statistics will be tracked in your email blast
statistics.

42
Custom Unsubscribe Pages: Options
The Options tab allows you to customize how your supporters are unsubscribing, and from what.
Hide ability for supporters to remove themselves from the list entirely
The "remove from list entirely" option allows supporters to change their Receive_Email value to "unsubscribed." This means
they won't receive any emails you send them - ever.
If you prefer for users to only have the option of removing their record from a particular list, you can hide this ability. To
maintain good standing with spam lists, Salsa will force display of this option if the supporter does not belong to any of the
included groups/tags/chapters.
List Management

43
Supporter lists (or segments) can be managed in several different ways and you may use one or more than one of these
options to organize your supporters. However, you organize your supporters into segments/lists, you can use these tools to
allow them to unsubscribe only from certain types of correspondence.
To select multiple items in the list, hold the "Control" button (if using a PC) or the "Command" button (if using a Mac) while
clicking the list titles.
Chapters to unsubscribe from: If you use chapters, they will display in a list here. If you want to show a chapter (or
chapters) as an unsubscribe option, select the chapter(s) here. Chapters will only appear on the public page if the supporter
processing the page is already a member of the chapter.
Groups to unsubscribe from: If you want to show a group (or groups) as an unsubscribe option, select the group(s) here.
Selected groups will be presented as checkboxes on the form, but they will only appear on the public page if the supporter
processing the page is already a member of the group(s).
While you have the option of creating a page that lists all your newsletter groups, one of the benefits of using Unsubscribe
Pages is the ability to build separate, list-specific Unsubscribe Pages – perhaps offering on each page only a single group (list)
at a time, and linking that page only from that list's newsletters.
Remove from the following interests/tags: Tags are less commonly used as the basis for list subscriptions. However, if you
want to show a tag (or tags) as an unsubscribe option, select the tag(s) here. Selected tags will be presented as checkboxes
on the form, but they will only appear on the public page if the supporter processing the page already has the tag(s) on their
supporter record.
Email triggers
This box lists all auto-responses (also called triggers)
created in your Salsa headquarters. Choosing one or
several auto-responses here will cause those responses to
send to the supporter every time the page is
completed. Use this section to associate thank-you
messages and/or internal notifications when actions are
completed. See the auto-responses section for more on how to configure these messages.
Comment Field
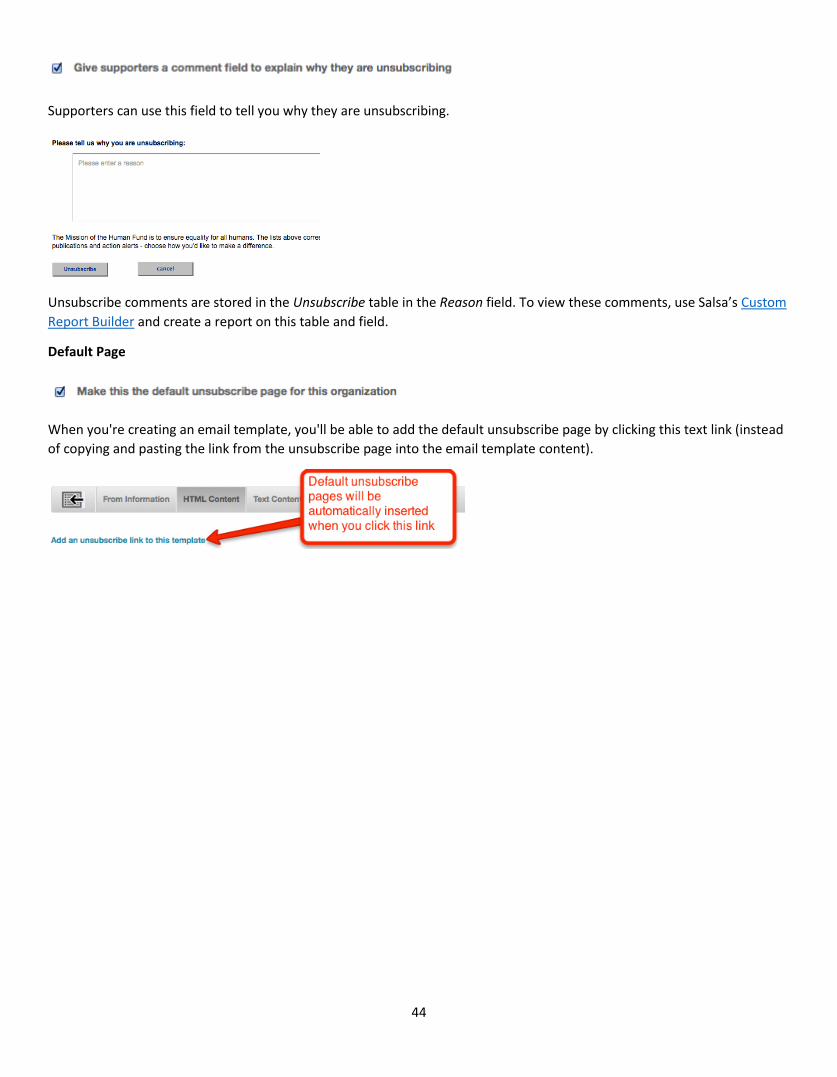
Clicking this checkbox adds a comment field to your unsubscribe page.
44
Supporters can use this field to tell you why they are unsubscribing.
Unsubscribe comments are stored in the Unsubscribe table in the Reason field. To view these comments, use Salsa’s Custom
Report Builder and create a report on this table and field.
Default Page
When you're creating an email template, you'll be able to add the default unsubscribe page by clicking this text link (instead
of copying and pasting the link from the unsubscribe page into the email template content).

45
Thank You/Landing Pages
Thank you pages are simple landing pages, generally used as a redirection from another page where a user takes some sort
of action. For example, you might have a donation page which redirects to a
special thank you page after a successful donation.
You can create a distinct thank you page for each campaign to increase your
donor cultivation. Here's an example thank you page that's specific to a
fundraising page asking one-time donors to become sustaining donors.
How to get there
Navigate to the Website Management package and click on the Thank you
pages link listed in the Web Pages section.
Reference Name & HTML Content
Use the same as all other pages.
If you use merge fields on your Thank You page though you need to append
your page URL with the merge fields you want to be passed to the Thank You
page. Using the above example, this is what the page URL would look like:
http://org2.salsalabs.com/o/7354/p/salsa/web/thank_you_page/public/thankYou.sjs?thank_you_page_KEY=3060&First_Na
me=[[First_Name]]&Last_Name=[[Last_Name]]&Email=[[Email]]
Show Tell-a-Friend
This option allows you to incorporate an existing Tell-a-Friend page's content into the Thank You Page, which will appear
after the HTML content you've specified.
It is unchecked by default, in which case the Thank You page will be
strictly static content.
Tell-a-Friend page to show
If you're including a Tell-a-Friend page, choose it here by selecting it from
the dropdown menu.

46
Tell-A-Friend Pages
Tell-A-Friend pages allow your supporters to spread your
message for you. Salsa provides a simple form which allows
supporters to input email addresses, sending a customizable
message to those recipients.
How to get there
Navigate to the Website Management package and then click
the Tell-A-Friend Pages option under Web Pages.
How to create the page:
Configuring the page
Reference Name - An internal reference for you to identify the page. End-users will never see this.
Title - The public name of page which will appear at the top of the published page (as an h2)
HTML Content - This content appears below the title and above the configurable email text. This is a good place to
describe what users should be telling their friends about!
Configuring the email
Email subject - This is the email subject you suggest, but it will be editable by the supporter who is actually sending
the email
Email Body - This is the email text you suggest, but it will be editable by the supporter sending the email
Uneditable Content (on the "Options" tab) - This is the email text which will NOT be editable by the supporter
sending the email

47
Other Settings
Redirect Path - After supporters submit the Tell a Friend form, they will be redirected to the page entered here.
Tell a friend about what?
An email blast
To generate a tell a friend link for emails, create a link following this example:
<a href="mailto:Enter e-mail address here?subject=FWD: [[Subject]]&body=I
thought you might be interested in this message
http://XXXXXXXXXXXX/o/YYYY/t/0/blastContent.jsp?
email_blast_KEY=[[email_blast_KEY]]">Forward to a Friend</a>
The stuff in the Xs should be your base URL and/or node and the Y's should be
your organization_KEY, including your chapter code. Example:
http://salsa4.salsalabs.com/o/51510/c/301/p/salsa/
web/tellafriend/public/?tell_a_friend_KEY=8955
Whether you're asked by our support team or working on a custom form, you'll
likely need to find your organization key at some point.
How to get there
Take that URL and put ?email_blast_KEY=[[email_blast_KEY]] at the end of it, and also insert /t/0/ in front of the part that
says blastContent.
Finally, paste all of that into the sample link provided above. You can then insert this link into your email blast content. Salsa
will put the email blast key of the email into the dynamic content field at the end automatically, and then the link will be
able to function.
Curious about the extra /t/0/ in there? That extra part of the URL tells Salsa not to load your default web template when

48
loading the email blast for web display. The link will still work without the /t/0/ but it'll probably look unpleasant. (Try it out
and see.)
An advocacy action
On the Follow-up tab, select "Redirect to a Tell a Friend Page."
A donation page
After making a donation, users will be redirected to the URL entered here. You may enter a Tell a Friend page if you wish.

49
Individual Details Page
Snapshot
Pulling up an individual supporter's page will show you a snapshot of their data. The first thing you'll see at the top left is the
supporter snapshot.
This snapshot lists the supporter's name, email, and ID number, and will display a picture of
the supporter if you've uploaded one. (It'll show a generic-looking avatar image like in the
picture above if you haven't.) You'll also see two buttons that will allow you to search for
duplicate records or to delete this supporter's record. The rest of the data on the page will
be the Overview panel.
Overview Panel
The Overview Panel provides a simple and customizable summary of information about the supporter. A host of details
about the supporter are available here in a single glance. You can add or subtract fields from the panel to suit your needs, as
you'll see below.
Default Overview Panel Fields
The fields available in the Overview Panel will appear in the
middle of your screen, directly to the right of the detail
tabs. The following fields will appear by default.
Chapter Membership: This lists the chapter(s) that a
supporter is a member of.
Address: The Address field lists the supporter's primary
email address. This information is also available under the
supporter's name in the upper left corner of the page.
Email Status: The Email Status field shows whether or not
the supporter can receive email blasts. A large, green check
mark indicates "Yes" while a bold, red X signifies "No."
You'll find the detailed email status immediately to the
right of the check or X.

50
Source: The Source field denotes the supporter record's origin. It'll
show "File" if the supporter was imported into Salsa and "Web" if
the supporter signed up online.
Source Details: The Source Details field shows a detailed origin of
the supporter. If the supporter was imported, it will report the
import file's name. If the supporter signed up online, it'll show the
web address the supporter used.
Source Tracking Code: The Source Tracking Code field provides you
with additional details about the supporter's origin.
Action History: The Action History field shows any actions the
supporter has taken on behalf of your organization. If the supporter
has responded to one of your petitions, contacted a politician as a
result of your online activism, or otherwise responded to your
advocacy campaigns, it'll show up here.
Interests: The Interests field lists any interests the supporter might have.
You might also see the following fields on each record, depending on what other fields you have made visible.
Overdue Contacts: The Overdue Contacts field signals a past due contact attempt, such as one you might schedule in the
Contact History Panel.
Recent Contacts: The Recent Contacts field keeps a record of any contact attempts you've logged in the Contact History
Panel.
Customizing the Overview Panel
The Overview Panel also allows you to customize the fields you see. You can add any field in the supporter table to the
Overview Panel, including Custom Fields. Just follow these three steps:
Click the "Select fields to display" link. It should appear right above the Action History or Modification History fields.
When the Select Fields box comes up, use the drop-down menu to select the fields you want to add to the Overview Panel.
Once you've added all the fields you want to add, click the "Save" button in the lower right corner of the Select Fields box.
That's all there is to it! The page will reload and you'll see your new Overview Panel. Repeat the same process to add or
remove fields later on.
Individual Details Page: Profile Panel
The Profile Panel contains detailed information about the supporter and is broken into many different sections. At first it
might look complicated, but with a little practice it'll prove quite simple. After updating a section's fields, you must click the
"Save" button at the bottom of the section to save the changes.
Basic Profile
The Basic Profile section contains all the elementary information available about the supporter, including title, first name,
middle initial, last name, suffix, email, phone number, and occupation.
The Email section contains the supporter's email address, whether or not she receives HTML or text only emails, whether or
not she receives email blasts, an alternate email address for reference, and information about email bounces from her
address.

51
A "soft bounce" occurs when an email makes it to the supporter's mail server but is undeliverable, for reasons like a full
supporter's inbox, a swamped recipient server, or overly large email messages. Soft bounces don't necessarily mean the
supporter cannot be contacted via email. They just suggest she cannot be contacted at that time.
Hard bounces, in contrast, signify a permanent delivery failure. Either the supporter's email domain doesn't exist or the
address is invalid. It is also possible (although unlikely) that the supporter's mail server blocked incoming traffic from your
server.
Notes
The Notes section allows you to record notes about the supporter. Use this field to store any information or details you
don't feel have a place in the other profile sections.
Phone & Fax
The Phone & Fax section contains the supporters phone number, cell phone number, work phone, pager, and home and
work fax numbers. It also holds fields for the supporter's phone provider, instant messenger service, instant messenger
name, and web page.
Location
The Location section holds five fields pertaining to the supporter's location - county, district, latitude, and longitude. (Please
note that "Time zone" is not related to the supporter, but is a field set by the server.) Districts are named according to their
state's postal code and district number. Nebraska's second Congressional district, for example, shows up as NE02.
Additional Info
The Additional Info section contains a host of fields not available in other sections, including the supporter's occupational
title, organizations of which she is a member, details about the record's origin, status, and unique ID, and additional "other"
fields for your organization's use.
Password
The Password section stores the password the supporter uses to log into your web site. Some supporters will log in with
other networks, like Facebook.
Source
The Source section contains five fields about the supporter's origin - acquired from, source details, date created, external ID,
and last updated, and should be used as a point of reference.
Individual Details Page: Action History Panel
The Action History Panel, like the Contact History and Events panels, is a simple
way to track the way your supporters interact with your campaign. Volunteers are
the lifeblood of many organizations. Knowing your supporters' action histories
allows you to predict their volunteer behavior more accurately.
Unlike other panels in the Individual Details page, the Action History Panel is auto-
filled by another feature of the Salsa platform, namely the Advocacy Campaigns
package. Whenever you create a new action and a supporter completes it (be it
writing a letter to the editor, signing a petition, or taking another action on behalf
of your campaign), that information will appear in the Action History Panel.
Actions will also appear in the supporter's record if it was added as part of query.

52
At the top of the panel, you'll see the actions broken into different types. Click on the type you want to see, or click "Show
All" to see all the actions the supporter took for your campaign. The actions themselves are sorted by date, name, and type.
Click on an action's name to learn more about it.
Individual Details Page: Addresses Panel
The Addresses Panel allows you to record addresses for each
supporter. Salsa distinguishes between shipping, billing, and work
addresses, as well as a host of other types. This panel also stores the
supporter's phone and fax number, if that information is available.
Editing an Address
To change an address already in the system, simply click "Edit Address"
on the address you'd like to alter. Make whatever changes you'd like in
the Address box that appears. Then, click "Save."
Adding an Address
To add an address to a supporter's record, click the "Add a new address" link at the bottom of the panel. Select the
appropriate address type in the box that appears. Then add the supporter's address information into the appropriate fields.
Click "Save" to complete the process.
Individual Details Page: Contact History Panel
An important aspect of supporter
management is keeping a timeline of your
communications with individuals. Salsa
makes it simple to record this information
and log your efforts to keep in touch with
your supporters.
Scheduled Contacts
In this section, you can schedule new
contacts with the supporter. Simply click
the "Schedule a contact" link and you'll be
presented with the following fields:
Purpose: The Purpose field allows six possible options - personal, event, volunteer, fundraising, grant proposal, and grant
report. Pick the most appropriate purpose of the contact.
Scheduled Date: You can set a precise day and time to contact the supporter in the Scheduled Date field.
Method: The Method field allows for six possible options - contacting the supporter by phone, direct email, IM, text
message, letter, or other.
Campaign Manager: You record who should initiate contact with the supporter in the Campaign Manager field.
Priority: The Priority field records the relative urgency of the contact: low, normal, high, or critical.
Codes: You can assign codes to the contact in the Codes field.

53
Notes: Put detailed notes about the scheduled contact in the Notes field. Type all you like: there's plenty of room to record
what you need to know.
Related Items: The Related Items section allows you to record other data that might be relevant for the contact. These
include other supporters, donations to your organization, and events.
After you enter information into the fields above, click "Save." You'll now see the scheduled contact, its due date, method,
priority, and the first few words of the note field listed in the Scheduled Contacts section. Click the contact's "Edit" link on
the right side of the screen to edit a scheduled contact. If the contact is past due, the date will become bright red and add
the phrase(overdue)to the date field.
Recent Contacts
Recent Contacts works exactly the same way as Scheduled Contacts. Click "Log a new contact" and enter information into
the fields above. The only difference is the Scheduled Date field. It's called "Contact Date" in the Recent Contacts section, as
the contact already occurred.
Recent Email Blast History
The Recent Email Blast History section shows information about blasts the supporter received. Click the blast's subject line
to see details about the email in the email blast management tool.
Individual Details Page: Donations Panel
The Donations Panel grants you a full
contribution history of your supporters.
You can track pledges, recurring
donations, personal fundraising pages,
and donations from this page.
Pledges
The Pledges section allows you to
record monetary pledges made to your
organization by your supporters. Click
"Add a Pledge" to start the process. In
the box that appears, mark the date the
pledge occurred, the amount of the
pledge without a dollar sign, the date
the pledge is due, and the status of the
pledge - either new, fulfilled, or
overdue.
The pledge will appear in the panel
once you click "Save." To edit the pledge's details, click on the pledge ID. You can change the donor's name, donation
amount or due date, or add notes to the pledge from the detail screen.
Recurring Donations
Processed recurring donations appear in the Recurring Donations tab. Click on the donation's ID to learn more information
about the donation.

54
Personal Fundraising Pages
The Personal Fundraising Pages section lists any fundraising pages the supporter created on behalf of your organization.
Individual Details Page: Events Panel
The Events Panel lets you track any events a supporter attends or hosts. It is broken into two sections.
Event Attendance
The Event Attendance section tracks every event the
supporter has attended or will attend at some point
in the future. Each event is tracked by its unique
event ID, start date and time, type, and status. If
you'd like more detail about an event, simply click
on the event ID and you'll be taken to the
appropriate event management page.
Host for the Following Events
The Host for the Following Events section tracks every event the supporter hosted or is hosting in the future. Like the Event
Attendance section, events are tracked by unique event ID, start date and time, type, and status. Click on the event IDs to
learn more about the events the supporter is hosting.
Individual Details Page: Groups and Interests Panel
Salsa lets you track many types of information about your supporter, but its true beauty lies in letting you customize: You
can tag supporters in ways that are meaningful to your organization and group them
the way you want anytime you want. The Groups and Interests Panel gives you full
control over each of these features. Use this panel in close conjunction with
the Contact History, Household, and Relationships panels, and you'll develop a
supporter database unrivaled by other campaigns.
Groups
Click the "Add to a group" link to add a supporter to a group. In the box that appears,
select the appropriate group from the drop-down menu. Note smart groups won't
appear in the list, as they auto-populate based on criteria established when they are created. Click "Save" and you're done!
The group name will appear in the Groups section of the panel. Click "Remove" to remove a supporter from a group.
Interests
The Interests section provides a way to tag supporters who share interests, but before you add
them to a record there are two things to note. First, previous versions of the Salsa interface
possessed an "interests" feature that was separate from tags. We merged the two in the new
interface. Interests are now just special kinds of tags, specifically ones with the "interest" prefix.
That's the second thing to note: You'll use the "Manage Tags" feature (described here) to
manage both interests and tags.
Setting a new interest for a supporter is easy. Simply type its name into the "add interests" box,
separating different interests with commas, and click the "add interests" button. They page will
reload and the interests will appear.

55
Individual Details Page: Household Panel
Unlike some systems, we don't track households independently of supporters (after all, is a house with no one in it a
household?). Instead, every supporter, by default, is what we call the
Point of Contact for her household. You can then add supporters to a
household. We define householding as a way to group and query
supporters based on a shared residence.
The Household Panel will change depending on the supporter's
household status. Let's start with the first case you're likely to
encounter - a supporter whose household record is untouched.
Customizing a Household
If you've never changed a supporter's household, the Household Panel will display two sections, one that allows you to
customize the supporter's household (remember, by default every
supporter is the Point of Contact for her household) and one that
allows you place her in another supporter's household. If you click
on "Customize Household," you can change the supporter's
household name (which is used for mailing addresses) and add other
supporter's to the household.
After you click the Customize Household button, you will see options to update this household (the household of which this
supporter is the Point of Contact). You can update the household name, add other supporters to the household. You will
also see a Change Households button which will give you the option to add this supporter to a household headed by a
different supporter.
If you choose instead to make the supporter part of
another household, use the search box to find the correct
Point of Contact and click Assign.
Once you edit a supporter's Household Panel, it'll change
depending on whether or not the supporter is a Point of
Contact or a subordinate household member. In either
case, you can change the supporter's household, change
the Point of Contact, or add and remove members from the Household.
After your supporters are organized into the households you'd prefer, you can use the query tool to segment your list and
target email blasts to only reach Points of Contact for households.

56
Individual Details Page: Legislative Districts Panel
The Legislative Districts panel is where you can assign legislative districts for your supporters. Using legislative districts to
segment your supporter list allows you to target and mobilize supporters that will have the strongest ability to sway a
federal or state legislator or even a city council member.
Federal Districts
Built into Salsa are all Federal Senate and House districts—so all you need to do
is pick the correct one for each supporter from the dropdown menus. To speed
up the process, Salsa also has a script that is available to members that will
automatically fill in district information. This script can be run once or daily. If
you are interested in using this script, send an email
to [email protected] and ask us about it.
State Districts
While Salsa doesn’t have State Senate and House districts preloaded, you can
add them here.
Local Districts
Because actions sometimes focus on local politicians, agencies or other levels of government, it can be useful to keep track
of which of your supporters are their constituents. Here you have the option of adding local agencies (or other custom
agencies or districts) that a supporter falls under.
Individual Details Page: Pictures Panel
Under the Pictures Panel, you can add pictures to the individual supporter's record.
Upload a Picture
The first section of the Pictures Panel, Upload a Picture, allows you to select a picture from your hard drive and upload it into
Salsa. Simply click the "Browse" button, find the appropriate photo on your computer, click the "Upload" button, and you're
done!
Uploaded Pictures
The Uploaded Pictures section holds all the photos you've uploaded to Salsa for your individual supporter. In this section,
you can delete photos by clicking the "delete" option next to the picture you want to trash.
Individual Details Page: Relationships Panel
The Relationships Panel allows you to establish relationships between supporters. Relationships provide you with a better
understanding of the social networks your supporters populate, as well as their interconnectedness within your database. A
strong focus on relational data could yield many insights
into how your supporters influence each other.
To add a relationship, click the "Add a new relationship"
link in the panel. Use the search field that appears to find
the related supporter. Then, pick the relationship type. You
can choose from friend, neighbor, spouse, parent, sibling,

57
child, boss, employee, coworker, partner, even enemy! Note the household relationship type is a legacy option whose use is
no longer encouraged, but don't worry. We've made it better. If you'd like to establish households for your supporter, use
the Household Panel.
Manage Custom Fields
If you want to track certain kinds of data about your supporters, but you see no place in the
standard Salsa database structure to store it, you can create custom fields to extend your
supporter database.
Managing Custom Fields
You can see a list of all of your custom fields by going to the Supporter Management tab and
choosing manage custom fields from the submenu:
This will display a list of all of your custom fields. If you have not created any custom fields,
this list will be empty. Otherwise, the list will display the following information for each
custom field: Name, Field Type, API Name, and Description. There are also buttons
marked Edit and Delete which allow you to, respectively, edit and delete existing custom
fields.
Adding a Custom Field
To add a custom field, click on the Add a custom field button in the
custom fields list:
This will take you to the properties panel:
The Reference Name will be the internal name of the field. When you
type a name in this field, it will automatically appear in the API name
field as well, edited to remove spaces. You shouldn't need to edit the
API name (and should avoid doing so unless you have a good reason!). If
you use Chapters within your organization, check the box for Expose to
all chapters if you want the custom field to be available to all chapters.
Finally, you will have to choose a Field Type for your new custom field.
Database Field Types
The Field Type is the kind of data being stored in your custom field. It's important to the inner workings of Salsa that you
choose the right type, but once you pick it you probably won't have to deal with it again. This isn't as complicated as it looks,
we promise! For example, if your organization assigns membership numbers to supporters and you wanted to make a
custom field for it, you would pick the Integer type, since it's a number. If you wanted to have an expiration date for
memberships, you would store that as the Date type. If you wanted to ask new supporters where they first learned about
your organization, you could either choose the One Line of Text option if you wanted them to type their answer, or create

58
a picklist/list of values which would provide multiple set choices (such as "Saw your website" or "Heard from a friend" or
"Saw newspaper article about your organization.")
There are thirteen types of custom fields you can create. Examples of each type are provided, but you don't need to limit
yourself to them--be creative with your data management.
One Line of Text (VARCHAR)
This type of field allows for the input of one line of text (maximum of 255 characters). Examples: Preferred Name; Political
Party; Work Address (Street Name)
Multiple Lines of Text (TEXT)
This type of field allows for the input of multiple lines of text but is smaller than Very Large Text (between 256 and 64,999
characters - right in between the One Line of Text and the Very Large Text limits). Example responses to open-ended
questions like "What would you like to see added to our website?"
Very Large Text (MEDIUMTEXT)
This will appear as a large text area. It allows for the input of large amounts of text (>65,000 characters). Examples:
responses to requests for long stories, like "Please tell us about a situation that requires our organization's attention" or
"Tell your story: how did our work affect you?"
Integer (INT)
This will appear as an input field that will only accept numbers. Decimal points and fractions are not allowed. You will be
able to run queries on this field with conditions such as "equals," or "greater than/less than. Examples: Number of Calls
Made to Office; Membership Number; Work Address (Zip Code); Score from 2011 Bowling Fundraiser.
Yes/No or True/False (BOOL)
This type of field will display as a checkbox on a supporter record. A supporter will have a value of 1 (true/checked) or 0
(false/unchecked) for this field, denoted by the presence or absence of a check mark in the checkbox. Examples: Vegetarian
(Y/N), Supports Our Big Issue (Yes/No), Graduated College (Yes/No).
Decimal Number (FLOAT)
Works in the same way as an Integer, but allows you to include decimals. Examples: GPA
Date (DATE)
This will appear in Salsa in the format YYYY-MM-DD, and must also be in that format if you are importing data to this field.
Choosing this type of custom field will not allow dates after 31 December 2037. Examples: Membership expiration date; join
date; birthday; incident date.
Time (TIME)
This will appear in Salsa in the format HH:MM:SS, and must also be in that format if you are importing data to this
field. Examples: time of incident; time of contact.
Date and Time (DATETIME)
This will appear as two input fields. The larger one is for dates, which are recorded in Salsa in the format YYYY-MM-DD. The
smaller field is for time, which is recorded in the format HH:MM:SS on a 24-hour clock. Choosing this type of custom field
will not allow dates before 1 January 1970 or after 31 December 2037.
Date, Time and Milliseconds

59
This works just like Date and Time, but includes Milliseconds for additional precision. Choosing this type of custom field will
not allow dates before 1 January 1970 or after 31 December 2037. For when you've just got to have millisecond levels of
precision in measuring stuff.
Picklist/List of Values (Multiple Choice Option) (ENUM)
This is the multiple choice option, which lets you create different selections which will appear in a drop down menu. You will
have to specify each of the possible options in an additional step. Learn more here. Examples: Entree chosen for fundraising
dinner (chicken, fish, or tofu); marital status (married/partnership/single/divorced/widowed); employment status (full
time/part time/student/unemployed).
Percentage (PERCENT)
This is set up to specifically accept percentages in number form.
Currency (CURRENCY)
This allows you create a specific field to hold monetary values. Examples: prices of items.
Click Save to continue to the rest of the Properties tab.
Adding a Custom Field, Part 2: the Rest of the Properties Tab
After you click Save, new fields will appear on the
page: Display in profile manager , Public Display
Name, Description, and Order :
The Display in profile manager checkbox allows you
to choose whether your supporters will be able to
see and edit this field in their profile manager. This is
assuming you encourage your supporters to actually
access or edit their profile within Salsa.
The Public Display Name is the name that will appear
next to your custom field when you place it in public
pages. For example, if you're asking people for their
high school GPA and write "High School GPA" in this
box, that's what they'll see when you include this
field on a sign-up sheet or other web page.
The Description is internal: here you can put notes on how your staff should interpret or use this field. It will not be visible to
the public.
Order allows you to optionally define the sequence in which the field will appear relative to other fields in the internal list. In
other words, when your staff is reviewing or editing the data in the custom fields, this number will determine the order that
your custom fields appear to them. (The public won't generally see this.) If you leave this blank, Salsa will automatically
assign an order to your custom field. Give it a weighted number if you want to change it (for example, if you want something
to appear last no matter what, type "1000" in the box to ensure that it comes after everything else less than 1000.)
Click Save again to finish setting up your custom field, which will now appear on the Custom Field List discussed before.

60
Setting Up Picklist/List of Values Fields
If creating a PickList/List of Values custom field, there is an additional step of creating the options that will appear in your
drop down menu. After finishing step two above and clicking Save, a tab will appear called Allowed Values. In order to
complete the Picklist, it necessary to fill in both the Option Label and the Option Value for each of the options you want on
the Picklist. The Option Label is how the label will appear to your supporters, while the Option Value (which Salsa will fill out
automatically) is how it will be stored in the database.
For example, suppose you are hosting a fundraising dinner and offering
three entrees to attendees: Beef, Chicken, or Vegetarian. You would first
enter Beef as the Option Label, then click Add Option below. You would
do the same for Chicken and Vegetarian. At the end, you would have a list
like this:
You can also change the order of the options by entering numbers in
the Order field. PickList options cannot be edited and/or deleted after
creation. However, you can permanently disable options through the
"manage custom fields" interface, by selecting "edit" for your specific
PickList.
Profile Manager
The Profile Manager allows your supporters to securely log in to Salsa and edit their own profile information (to update their
address or email, for example). The Profile Manager is enabled by default, but it is entirely optional to make it publicly
accessible to your supporters. Making the profile manager accessible to Supporters means that supporters can edit their
own data in your database, so you're giving up some control of your records. What you gain in return is the ability for
Supporters to manage their own group memberships, event attendance, donation, and action history all in one place.
How to get there
The easiest way to locate the URL for the Profile
Manager is to log into the Salsa HQ and look for
the Useful Links section on the dashboard. The URL is
always available - you can decide whether or not you
want to publish it to your Supporters.
Supporter Login to the Profile Manager
When Supporters click on the Profile Manager link you
have published on your website, they will see a login
screen like this:

61
Supporters have three options on the login screen:
Login now - if they know their email address and password (and have logged
in before), simply enter the credentials and proceed
Forgot your password? - If they've logged in to their Profile Manager before,
but have forgotten their credentials, they can simply click this link
Not signed up yet?
Features of Profile Manager
The first two features of the Profile Manage (Search for events and Group Membership) are found on the home page of the
Profile Manager.
Search for events
Supporters enter a zip code to search for Salsa events in their location.
Group membership
Display public groups so that Supporters can manage their own group memberships.
Make groups visible in the Profile Manager by selecting the group name in the Manage Groups section of
the Supporter Package
and then checking the Display to User checkbox on the Information tab of the Group workflow

62
Supporters will see these public groups and be able to join or "un-join" them.
Your Profile
The Your Profile tab allows supporters to edit their own supporter record
including:
Core supporter address information from the Salsa supporter table
Public custom fields (those marked as display to supporters in the
custom fields manager).
Events
This tab shows a list of all Salsa events that the supporter is affiliated with
including:
Events the Supporter has signed up to attend
Distributed Events for which the Supporter is the host
Upcoming events near the Supporter's zip code
Past events the Supporter has attended

63
Donations & Fundraising
Shows a history of donations received from
the supporter. Also shows, if available, peer-
to-peer personal fundraising pages created by
the supporter, with direct links to edit that
page. Supporters are also able to see any
storefront purchases and the current status
on the item they purchased
Action History
Shows instances of actions, campaigns, petitions, and letters to the editor
acted upon by the supporter.
Scoring
Do you need to know who your most active supporters are?
The problem with "the most active supporters" is that each organization defines "the most active" in a different way. For
some organizations, number of actions taken matters the most, but for others it's number of donations given. The Scoring
Package allows you to array all of your supporters' actions on a single scale that you define - it gives you complete control
over creating the definition of "most active" and then for querying and grouping supporters based on their activity level.
Check out this 45 minute tutorial https://www.youtube.com/watch?list=PLMm0S6LhM-
6M2OPIwvXaERdLQF4w6Uog1&v=vDLjKIejpyA

64
Supporter Scores take instances of different types of things
your supporters might do (such as make a donation, register
for an event, or join a group) and defines point values for
them.
You can also create multiple scores to measure supporter
involvement in different ways: for instance, organizers might
be very interested in people proven to turn up to events,
while fundraisers will prioritize donors. Maybe you want a
Score to isolate people who are heavy online activists to see if
you can upgrade them to donors. There's no limit on the
number of different Scores your organization can create.
How to get there
Training Video
Want a quick overview of the scoring package? Watch this video at
https://www.youtube.com/watch?list=PLMm0S6LhM-
6M2OPIwvXaERdLQF4w6Uog1&v=vDLjKIejpyA
Scoring Step 1: Create a Score
To create a new score, click on Add a Score in the Scoring section of the Supporter
Package. To see a list of Scores in your account, click on Edit a Score.
When created a new or editing an existing score, you'll first edit the options on
the Overview tab of the Score workflow. On the Overview tab, you can give the score
a name, a short description, and set the status of the score to Active or Inactive.

65
You can create as many Scores as you'd like. What the fundraising
team considers an "Active Supporter" may be slightly different from
what your advocacy team considers an "Active Supporter." You can
build separate scores for each group or purpose within your
organization.
Scoring Step 2: Create Scoring Entries
Each Score is defined by one or more constituent Scoring Entries.
Those entries are enumerated under the Scoring Entries tab.
You must have at least one Scoring Entry for your Score to generate
any point values at all, but a Score can contain as few or as many
Entries as you like -- there's no limit.
Scoring Entry: Decide what data to report on
To build a new Scoring Entry with its own
set of variables, just click the Add a new
scoring entry button.
Reference Name
The reference name is simply an internal
name, such as donation or group
membership that you'll use to identify the
function of a particular Scoring Entry when
you scan your Score's list of Entries in the
future.
Scoring Category
You have two choices in the Scoring
Category menu.
Normal: Normal scoring entries
treat all instances the same: for example, a
donation of $10 and a donation of $10,000
are each a single instance on the donation
table, and will therefore count the same.

66
Fixed: Fixed scoring entries give different values to each entry based on some number in that entry. Possible uses
for Fixed Scoring Categories include:
Scoring different donations according to the amount of the donation
Scoring on a lifetime total of emails clicked or opened
If you select the Scoring Category Fixed, you'll see a new field called "Optional Column". Enter the name of the database
field you intend to use here. (For scoring the value of supporters' donations, enter amount.)
Object
Select the name of the database table from which your Scoring Entry should pull data. The pull-down menu provides an
exhaustive list of such tables; for more information about them, consult the database documentation.
Noted here are the tables likely to be the most useful for inclusion in a Score; bolded entries are especially recommended.
Table Name Scoring Function
blog comment For placing a comment (when signed in) on one of your Salsa blogs.
chapter officer For being designated an officer of one of your chapters.
contact history If you use Salsa as a contact manager for tracking supporter "touches", contact history would
include these.
donation Gives a score for every instance of a donation -- regardless of amount.
email Gives a score for every Salsa email blast sent to the supporter, regardless of whether opened
or clicked.
event Not to be confused with supporter_event. Gives a score for any supporter registering
through a Distributed Event action to host their own event.

67
listserve message If you use Salsa's group-based listserve functionality, this credits a subscriber every time s/he
sends an email to the list.
pledge Gives a score for every instance of a pledge -- regardless of amount or fulfillment status.
recurring donation
Gives a score to a supporter for submitting a recurring donation, regardless of amount or
payment schedule. This is a one-time credit for making a recurring commitment; the
individual payments generated by a recurring donation will be scored with thedonationtable.
supporter Gives an immediate value to every supporter for his or her initial signup.
supporter action
Value for every action (write-your-rep, etc.) taken. If a single person takes action and
contacts his or her two Senators and one House representative, supporter action target will
countoneinstance.
supporter action target
Value for every individual message sent as a result of an action. If a single person takes action
and contacts his or her two Senators and one House representative, supporter action target
will count three instances.
supporter_campaign
supporter_campaign_data
Same as supporter_action, but for the deprecated original write-your-rep tool aka
"Campaigns". For scoring purposes, these tables are redundant with one another; use either
one, but not both.
supporter chapter Gives a score to any supporter who is a member of a chapter.
supporter_email_statistics
A table that keeps count of supporters' lifetime email messages received, opened, and
clicked. This table can only be used with the Fixed scoring category ; because the
supporter_email_statistics table lacks a date_created field, it will cause an error if set to
Normal.
supporter event
Gives a score for any supporter registering to attend an event (either your own, or a Salsa
distributed event conducted by another supporter). Note that a paid event registration
generates both a supporter_event entry and a donation entry.
supporter groups
Credits supporter for every group membership. (The scoring tool does not differentiate
between which groups are "important" and which not; it weighs all group memberships
equally.)
supporter letter Credits supporter for every letter-to-the-editor (LTE) action taken.
supporter my donate page Gives a score to any supporter who has created a personal friend-to-friend fundraising page.
supporter my donate page
donation
Gives a score to any supporter who has donated through a friend's personal fundraising
page. Score is in addition to the score they will also receive for "donation" above.
supporter petition Same as supporter_action, but for the deprecated original petition tool.
supporter picture If using an instance of Salsa that allows supporters to upload a personal profile picture, this
table would give them a scoring credit for doing so.
supporter volunteer Credits with a score every supporter marked as a volunteer using the Salsa Volunteers tool.
Scoring Entry: Decide how to report on the data

68
Point values are dynamic: they're worth the most immediately after the actions happen, and then they decline over time.
How much each is worth originally, and how much it declines over time is up to you. As the campaign manager, you define
the parameters Salsa employs to generate these scores using several variables. The principal ones are:
Multiplier: the initial point value of the scored instance
Expiration: the amount of time after which the scored instance will drop to the minimum value
Minimum Value: the "floor" of the lowest value (which might be zero) the scored instance will retain
Half-life: the speed at which the scored instance "decays" and loses value
Multiplier
Multiplies the initial point value of the instance by this figure. Differing multiplier values are the key thing differentiating the
importance you place on various forms of engagement.
For Scoring Entries of category Normal, the initial value is always 1; therefore, the multiplier is the initial point value.
For Scoring entries of category Fixed Value, the initial value may vary widely; you might consider a decimal
multiplier, such as .1 or .01, to scale the resulting score appropriately.
Example: If a donation is worth twice as much as event attendance to your organization, the multiplier for your donation
scoring entry might be 6 while the multiplier for your event attendance scoring entry might be 3 (because 6 is twice 3).
Expiration
At a certain number of days after a scoring instance takes place, you can drop it from further consideration. To do so, enter
in the Expiration field an integer representing the number of days. For instance, you might decide that after one year,
donations are no longer worth considering. To set this behavior up, enter 365 in your Expiration field. If you leave the
Expiration blank, scoring instances will be included in your supporters' score calculations no matter how old they might be.
Half-life
Instead of suddenly expiring (via the value set in the Expiration field above), points may optionally "decay" over time via the
value entered in the Half-life field.
The Half-life field defines the rate at which different types of actions decay. By the point the Half-life is reached, the value of
the initial action will have been halved, and it will
continue the same arc of decay going forward,
continually halving itself.
For instance, if a donation is worth 6, and has a half-
life of 180 days, then by the 180th day it will only
count 3 towards the supporter's score. At the 360th
day, it will only count 1.5 towards the supporter's
score. If we've also set an expiration at 365 days, as
described above, it will continue its incremental
decline on days 361 through 364, then drop to exactly
1 on the 365th day and remain worth 1 point,
permanently.

69
If you leave Half-life blank, all scoring instances will have
stable, permanent values (unless you use an Expiration),
meaning a donation yesterday will count the same as a
donation three years ago.
Minimum Value
As supporters' actions decay (either via the Half-Life field or
the Expiration field above), they will decline towards zero.
The Minimum field allows you to set a "floor" insuring that
certain types of actions will always have a point value, no
matter how long ago they occurred.
For instance, you might decide that a donation at any point in the supporter's history is at least as valuable as taking the
most recent online action and set a Minimum of 1. If you have also set an Expiration such as 365, the value will drop to 1 on
the 365th day and remain there permanently (rather than dropping to 0).
If you leave the Minimum blank, Salsa will treat it as 0.
Threshold and Fixed Score
Available under the Scoring Entry's Advanced settings, a
Threshold is a score below which regular score decay
ceases and the scoring instance becomes worth either 0
(the default) or the Fixed Score value you define.
Threshold and Fixed Score are very similar to Expiration
and Minimum, and both sets of values react to scores
decaying over time using the Half-life setting. The
difference is that:
Threshold is activated when the score drops to a
specified level (e.g., below 1 point)
Expiration is activated at a specified time elapsed
(e.g., 365 days since the scoring instance took place)
Sample Salsa Score
The following simple set of Scoring Entry settings might give you a starting point for your first Salsa Score. The settings in this
table have no special authority, and you should feel free to vary them or exclude them as you experiment with your own
Salsa Scores.
Category Table Name Multiplier Half-life Expiration Minimum

70
Initial signup supporter 2 15 365 0
Online Activism supporter_action 1 60 180 .05
Letters to the Editor supporter_letter 1.5 60 180 .1
Event registration supporter_event 6 180 365 1.5
Donation donation 6 180 365 1
Conducting P2P Fundraising supporter_my_donate_page 12 365 730 2.5
What happens after I create a Score?
Scoring values don't compute instantaneously. A periodic script (generally executing twice per day) will generate a point
value for every supporter as determined by every Salsa Score. Set up your score and check on it in 24 hours.
Query, target, or report. Once the script does populate values, you'll be able to run queries, target emails, and generate
reports based on its numerical output.
For more information on ways to incorporate scoring into your advocacy campaigns, see “Target your List and Engage
Supporters with Scoring” in the Appendix.
Managing Groups
Groups are a great way of tracking your supporters who meet certain criteria that set them apart from the rest of the list.
These groups can be used as search criteria for queries, for targeting email messages, and crafting donor appeal messaging.
Salsa allows you to create as many groups as you like, and each group can contain as many of your supporters as you would
like to include.

71
Creating a New Group
First, open the Supporter package from the right sidebar of your Salsa dashboard. One of
the links that appears under the tabs will be Manage Groups--click on this to be taken to
the groups management page.
In the lower left hand corner of the groups page, there
is a blank field labeled New Group Name. (If you
already have a lot of groups set up in Salsa, you may
need to scroll down to find this field.) Enter a name for
your new group and click the button labeled Create
New Group. The page will refresh, and your new group
will appear in the list of groups.
Editing group information
To manage group memberships or rename, edit, or delete any of your groups, click on
the group name to bring up the group management options. After clicking the name of
a group, tabs and information will appear on the right hand side of the group
management page. Let's look at what each of the tabs do:
Members Tab
The members tab displays the supporters who are members of this group. You will see
the First Name, Last Name, and email address of each group member. By default, the
list of members is sorted by the creation date for each supporter record--you can
change the sorting criteria by clicking the Sort by drop-down menu on the right hand side of the screen. If there are too
many members to display in the area, members will be sorted into multiple pages. Underneath the list of members, you will
see links to navigate through the pages. You will also see information on the total number of members of this group.
If you click on the name or email address of any member, a new
window will open to display that member's supporter record. To the
left of each member is a link labeled Remove. If you click on that link,
it will remove the supporter from this group. (To remove many
supporters from a group at once, use the query tool under supporter
management.)
You can quickly add new individual members to the group by
entering a supporter's email address in the text field labeled Add
supporter by email address and clicking the Add to Group button. If
that email address already exists in your system, that person will be
added to the group. If you add an email address that does not match
up with an existing supporter, the system will create a new
supporter record with that email address.
Information Tab
This tab will allow you to change the name of the group, or create a
parent/child or group/subgroup relationship with another group. Be
sure to hit the Save button each time you make modifications to a
group's settings!
Group Name - Change the name of the group by simply typing a new name in the group. No other changes will need to be
made.

72
Choose Item Parent - This feature allows you to
create parent/child and group/subgroup relationships. To designate a
group as a child (or sub) group, click the Choose Item Parent dropdown
and then select an existing group from the list: the current group will
become a child/sub to the group you select. This is useful when you have
groups with different positions of leadership, places, etc. In our example
we are placing the “Family Funding Petition” group under the parent
group “Taken Action”.
Once a group has been designated with a parent, the parent will appear in the Manage Groups section as a folder, which can
be expanded to show a nested list of its child groups:
Note: The parent-child group relationship in Salsa is just for your visual and organizational reference. The members of a
child group are not automatically members of the parent group. If you want members to be in each group, you will have to
assign both. They're two completely separate groups that just happen to look like one "contains" the other. In other words,
if you query or target a parent group, you only target the people in the parent group itself, not the child groups. (In our
example above, targeting the 2012 Community Teams group won't target the various team groups.) If you want the parent
group to contain all the members of its child groups, configure the parent as a Smartgroup with a query that adds all
members of the child groups.
Additional note: Running a query, but you can't find your child groups in the listing? Only top-level groups are alphabetized
in the list: the child groups appear in a sub-list under their parent. (For example: if you're looking for the Volleyball group,
you'll find it listed underneath the 2012 Community Teams group, not under "V" in the groups list.)
Description - This is an optional field for a short description of the group.
Please Note: If the group is public, this description is also displayed on unsubscribe pages, so use discretion when adding text
here. Use the Notes field (coming up next) for internal information.
Notes - This is an optional field to store your notes about this group. This text is only visible internally in Salsa, so if you want
to say something unflattering or confidential about a group, this is the place to do it.
Display to user - If you check this box, the name of this group will appear on unsubscribe and supporter profile pages so that
your supporters can opt in or out of this group. Leave this box unchecked if you do not want your supporters to be able to
add or remove themselves from this group.
Smart Group Options
Groups, by default, don't add or subtract their membership except through somebody's manual intervention, either by a
campaign manager (you) adding, deleting or importing supporters, or by supporters themselves opting-in or unsubscribing
from groups. If you find yourself running the same kinds of queries over and over to add people to groups, why not make
the group a smart group and automate the process?
To watch a 5 minute tutorial, visit https://www.youtube.com/watch?list=PLMm0S6LhM-
6M2OPIwvXaERdLQF4w6Uog1&v=jzFSrFthigk
A Smart Group's membership is automatically updated once a day (every 24 hours) according to criteria you specify in
advance.

73
To create a smart group, build and save a named query. Then, select the group and under the "Smart Group Options" tab,
check the "smart group" option from the pull down menu, select the appropriate query, and save. (You need to have
the query defined before you get to this screen.) Smart Groups are also useful when working with data that takes more time
to compile, such as action history or email statistics.
It’s easier than it sounds.
Once you've got a Group, you'll need to do two things to change it into a Smart Group:
1. Under the specific Group's Smart Group Options tab, set it as a "Smart Group" (or, a "Greedy Smart Group" - see
below)
2. Still in the same tab, associate the Smart Group with a saved Query.
(Greedy smart groups are just like smart groups - except they ONLY ADD SUPPORTERS, never emptying themselves. For most
purposes, we recommend regular, non-greedy Smart Groups.)
Tip: Smart groups can be a handy tool for giving local organizers access to a dynamically updating roster of people
in just their region. Just create a role limiting that user to the membership of a smart group, then have the smart
group run a query such as a single state or a postal code radius. Presto--no more emails saying "Hey, could you
export me another list of all the people from my congregation?"
Rather than making a really complicated smart group that covers every possible supporter in a manager's district, though,
keep the smart groups simple, then add child groups with manually added supporters that might not match the query. Read
more at https://www.salsalabs.com/blog/salsa-weekly-highlight-smart-groups
A regular smart group will automatically empty itself once every 24 hours, then repopulate itself with your saved
query. "Greedy" smart groups are just like smart groups -- except they only add supporters, never emptying themselves.
Once you’ve created this smart group it will only grow in size.

74
A smart vs. greedy smart group example: Say that you're constantly importing supporters to your database, and you want
to use smart groups to automatically add everyone from one congregation to a group. A standard smart group (set to use a
query that finds every supporter who belongs to that congregation) will add everyone in your database who claims that
congregation to the group. However, suppose a supporter moves from Cherry Hill to Summit, and her supporter record is
updated accordingly. A smart group would remove her from the Cherry Hill group, the group empties itself and then adds
people who attend Cherry Hill--since her record changed, she wouldn't be re-added at the next update.
A "greedy" smart group will greedily hold on to this supporter and any others who leave Cherry Hill, and only adds new
members instead of removing those that no longer match your query. This might be helpful, for example, if you want to give
people the option to continue in a group that follows a local issue even if they move away from an area.
If you're not sure or just starting out with smart groups, we recommend sticking with regular, non-greedy smart groups. You
generally need a good reason for keeping people in a group who don't match the current group criteria, and you can get
stale or incorrect data if you're not careful.
Tip: Greedy smart groups can send autotriggers (emails set to send automatically when a recorded action is taken) when
new members are added. So if you want to make sure that people in a certain group always receive a welcome message, it's
easy to set that up. Read more about that in the “Welcome Series” section.
What's the difference between groups and tags?
Should you use groups or tags? As a rule of thumb, if your need is to manage people (and only people), use groups. If you
need to manage any other data-- instead of people, or in addition to them--use tags. Because of some of the specific
features of groups (smartgroups, listservs) and tags (attach to any object/page in Salsa), you might find yourself gravitating
towards using them for certain kinds of data:
But don't be afraid to use both! Groups and tags are similar in many ways to one another--groups collect subsets of
supporters (and only supporters), while tags can attach to any object in Salsa (including supporters, but also including
donations, donation pages, actions, or all of those together). Since you can use groups and tags as different data points,
make the most of them.
To learn more about groups and tags check out this entry on Salsa Commons https://help.salsalabs.com/entries/21715120-
Tags-vs-Groups-Why-You-Should-Use-Both-to-Create-a-Data-Landscape

75
Queries
Queries are a quick and flexible way to segment your supporter list using the trove of data that Salsa helps you collect about
your supporters: location, activity history, group membership, and everything else.
Queries can be used simply, just to get a quick head count for reporting purposes.
But they're even more powerful when used to key mass targeting effects, such as:
Bulk updates to records
Targeting an email blast
Data export for mass-mailing
How to Get There
Just click the Query/Export navigation link in the Supporter tab to get started.
Once you're there, Queries only have two simple steps:
1. Build the query by setting parameters that define some segment of your list
to select
2. Optionally, take some additional action (such as exporting or bulk-updating)
with the selected segment.
Build a Query
Building a query is simply describing the characteristics of supporters you'd like to identify. Any actions you take on this step
of the query workflow are simply identifying supporters - you're not making any changes to supporter data until you get to
the Take Action tab of the workflow (so don't worry!).
Build a Single-Variable Query
To create a simple query with one variable:
Click the Condition Type dropdown menu for a list of some overarching query categories available.
Any selection you make from the first drop down menu will open secondary menus with the specific conditions
available for that Condition Type. Select a Condition from this updated secondary menu.
For a specific description of any of the various available conditions, click here.

76
It is recommended that you select a
segment of your list via the query tool
when sending an email blast, but you can
select your entire list by clicking Select my
entire list (or by setting no query
conditions) and hitting Save and Run.
Add Additional Variables to Your Query
The query builder also helps you create
complex queries embracing multiple
variables ... such as supporters who both
live in Arizona and have also donated.
You can build your multi-variable query
that connects those variables
using AND (logical conjunction), or
using OR (logical disjunction).
To add a second query term using
AND (meaning the query will only select
supporters of whom both terms are true),
click
the button
on the right side
of the query
builder
To add a second query term using OR (meaning the query will select supporters of whom either term is true),
click towards the bottom of the query builder

77
The Query tool can even mix and match AND and OR connectors in any combination you like, creating finely-attuned logic to
identify the exact supporter segment you need.
Chain multiple colored boxes using the button
Within those boxes, chain multiple AND conditions using the button
The query selects everyone who meets all the conditions of any one box
Salsa uses the MySQL query syntax for queries, which means that you can use an underscore ('_') to match any one
character, and a percent sign ('%') to match all characters. But be sure to use the 'like' operator when building a query for
wildcards -- otherwise, Salsa will try to match those exact characters! Wildcards can be used for almost all fields. For
example, to find anyone with a street address, you would choose: Street like _%. To find anyone with an email address at
one specific domain, you would choose: %@yahoo.com
Saving a Query
Need to use this query again and again, or just save
it for future reference?
Just enter a name -- any name will do -- in
the Query Name text box at the top off the query
builder, then click Save and Run.
Any query so named and saved will appear in the
future in the Select a Saved Query pull-down menu.
The next time you need it, just pick the saved query
and Salsa will fill in the saved query conditions.

78
Finding Deleted Supporters
At the very bottom of the query builder, just above the Save and Run button, you'll
see a checkbox option to "Query Deleted Supporters":
Mass supporter deletions you accomplish through the query's bulk updater are
actually only "soft" deletes. Such records can be recovered by ticking this box: when
selecting the “Query Deleted Supporters" option, your query conditions will be
applied not to your active supporter list but to the pool of soft-deleted supporters.
To identify all of your deleted supporters, check this box and run a query with no
query conditions selected.
On the query Take Action tab (after clicking Save and run), the only option available
is to Restore these supporters:
Click this button, and you have now raised the dead. Your restored supporters will all retain their previous history and data.
This feature applies only to supporters deleted from the date of
release (September 2012) and on. Restored supporters will carry
over their previous settings - i.e. a subscribed supporter will be
restored as a subscribed supporter, an unsubscribed supporter will
be restored as still unsubscribed. Additionally, a deleted supporter
who takes action in your Salsa account - signs up again, donates,
signs a petition, etc. - will not automatically be restored.
Take Action
Take Action is the second step of the query workflow. It's on this step that you can apply updates to the supporters who
meet the conditions you set on step one. This is where you're changing your data so proceed carefully.
Once you've built your query and hit Save and Run, you'll advance to the query's Take Action tab: a menu of actions you can
take with the queried segment.
This tab looks pretty much the same regardless of what query conditions you've set in the first step.

79
The overall count of supporters who match the conditions appears at the top of the next page. If you scroll down, the
bottom of the page displays up to 200 clickable supporter records who fall among these query matches. They're handy for
spot-checking.
The remainder of the page consists of the various bulk operations you can take with your selected supporters. All bulk
operations affect the entire selected segment -- not merely the 200-person spot-check sample.
Group Operations
Add to a group
You can add the supporters in your query set to a pre-
existing group (you must create the group before you run
the query).
Delete from a group
Allows you to remove the supporters in your query
from a group that they are in. This does not remove the
supporters from your supporter list, nor does it remove
the group itself.
Tags
Tag supporters
This allows you to add a tag to all of the resulting supporters.
Remove the following tag from these supporters
Allows you to bulk de-tag the selected supporters.
Petitions/Actions/Events
Indicate that these supporters have signed a petition
Mark the queried supporters as signers of an existing Petition-style Action.

80
Indicate that these supporters have participated in an action
Mark the queried supporters as participants in an existing Targeted-style Action.
Indicate that these supporters have participated in an event
Set the queried supporters as attendee registrants for one of your Events.
Supporter Operations
Delete supporters
The Delete button deletes your supporters from your list entirely. Bulk deletes are soft-deletions that are restorable via
the Query; however, we always recommend exporting a local copy of the data to your own workstation before deleting.
Bulk Field Update
This allows you to write a single value to any field for every queried supporter. You can choose one of two options:
1. Update all instances of a field in the found set to a single value (e.g., all queried supporters' First Names become
"Tom")
2. Update all instances of one field in the found set to the value of another (e.g., all queried supporters' First Names
become the value currently held in those records' Last Name field).
Export
Enables you to export the supporters in your query results of your query. Select an export data format (Tab delimited, Excel,
or HTML) and, optionally, a subset of fields to include in the export. (Some large queries might lack these options. If they're
not present, you'll only be able to export a tab delimited file consisting of all supporter fields.)
Click Export Information once you've selected your export parameters to generate your data file.
Although supplementary data like the actions supporters took or the donations they made, can be used as conditions to
generate your query segment, the segment itself consists only of the core supporter data itself: the base supporter fields in

81
Salsa, plus any custom fields you've created. To export a richer data set, such as supporters with their donations, you'll need
to use a Report.
Exports also allow for a Scheduled Export options. This can be handy if you need to automatically generate the report at a
future date, or even on a recurring future schedule. To utilize this option, click Advanced Export Options and then click the
blue Export Options link on the next screen to expand your scheduled export options.
1. Set the "run and export this report" field to either "immediately" (to generate right away) or "on a schedule" (for
scheduled exports into the future)
2. Select a start time for the first report to run.
3. Select the run frequency from the "Run the report" menu.
4. Select one or more (comma-delimited) email addresses to receive the reports.
The other fields on this page -- a custom header, optional include fields, compressed files -- are strictly optional.
Relative Date Queries
The relative date queries can be used to find all matching records that fall within a time period relative to the current date.
Fields that can be queried include Date Created and Last Modified, as well as any custom date fields.
The only standard Supporter fields you can query on are the Last Modified and Date Created. Last Modified will tell you the
last time a supporter’s record was updated – through taking action, by opening or clicking an email, or any other activity
within Salsa. The Date Created field reflects the date that the supporter joined your list (this date will never change).
Where the relative date conditions are really helpful are with custom fields. When you create a custom field with the type
“Date” or “Date and Time”, you will then see those options displayed in your drop-down list.

82
This is most helpful for custom fields related to dates – think along the lines of membership expiration dates.
Note: You can’t query for the last time a particular field was edited, or the last time a name showed up.
Query conditions:
After you select the field you’d like to query on, you’ll choose a secondary condition. These conditions all use the same basic
construction: <Field being queried> + <After/Prior to/Since...> + X
Let’s run through a few examples. For all of the uses below, assume we have 4 supporters who have different membership
expiration dates:
Assume that now is August 30.
Russ expired on July 4.
Jess expires on August 31.
Dave expires on September 27.
Shannon expires on October 12.
After ___ days from now
X=1, we end up with the date August 31. That means anything that comes after August 31 will be returned in the results. In
this case, that means Dave & Shannon are the only results returned, and Jess is excluded because her record falls ON August
31 (remember – it’s greater than, not greater than or equal to).
X = 27 returns a date of September 26, and still gives us Dave (who’s expiration is the next day following) and Shannon.
X = 28 returns a date of September 27, which means Dave is now excluded and Shannon is the only result returned.
Prior to ___ days from now
X = 1 = Anything before August 31 – this would return Jessica and Russ.
X = 33 = Anything before October 2 – this would return Jessica, Russ, and Dave, but not Shannon.
Since ___ days ago
X = 1 = August 29 – this would return everyone except Russ.
X = 60 = July 1 – this would return everyone, including Russ (who’s expiration is now three days after the variable date).
After ___ months from now
X = 1 = September 30 - this will only return Shannon, but not Dave (his membership has lapsed 3 days prior).
X = 2 = October 30 - this will return no results, as we have no other membership due dates after October 12.

83
Prior to ___ months from now
X = 1 = September 30 - this will return everyone but Shannon (she misses out by 12 days).
X = 2 = October 30 - this will return everyone, including Shannon.
Since ___ months ago
X = 1 = July 30 - this will return Shannon, Dave, and Jessica, but not Russ.
X = 2 = June 30 - this will return all, including Russ.
After ___ years from now
Because of the scale here, any X is going to exclude all of our examples since they all fall in the same calendar year.
Prior to ___ years from now
Because of the scale here, any X is going to include all of our examples.
Since ___ year ago
Because of the scale here, any X is going to include all of our examples.

84
Creating Email Templates
When it comes to email communications, the first impression makes a difference. Whether it’s a catchy subject line, an
entertaining image or enjoyable reading material, when your supporters like what they see in one email, they’ll be more
likely to open and click the next.
Salsa’s build-your-own tool allows customers to:
Choose from 3 beautiful templates, including a basic e-blast template, a sidebar template with a great big hero
image, and a beautiful newsletter template
Customize fonts, colors, and text size
Upload a logo and add a tagline to the header
Add links to social media profiles to the footer
Add Donate and Unsubscribe buttons
All of the designs are fully responsive, so they will look great on whatever device your supporters view them! After
customizing to your hearts’ desire, simply click a button to generate the Salsa-ready HTML, and cut and paste in directly in to
Salsa. No HTML knowledge required!
If you need more guidance along the way, check out this 22 minute tutorial
https://www.youtube.com/watch?v=dvhk05QO9KY&feature=youtu.be
Let’s get started!
First, go to http://email-
templates.salsalabs.com/ This site does
not require authentication or login, so if
you are lucky enough to have a volunteer
who is willing to do this for you, they can
use the generator then simply copy the
code into a .txt file and send it to you.
When you visit this link you will see a
blank template generator that looks like
this. This is the “Basic” template.
First you will set up General preferences

85
Font Stack
Click on the pull down menu to select the font suite you want
to use in your template.
As you click on the different font suites you will see the
generator content change to reflect your selection. Choose
the fonts that best suit your needs.
Text Color
Next select the color of your text. You can use any HEX color you want either by typing
the code into the field or by selecting using the color palette then click “choose”.
Accent Color
Use the same process for your accent color. This will change the color of some of the
design elements on your template, including segment lines between content fields.
Do you not know what a HEX code is? Do you already have a logo that you want to
match to your template but don’t know the color? Not to worry. With the magic of
HTML5 you can get colors from any image with this simple online tool! http://html-
color-codes.info/colors-from-image/
Step 1: Select image from your computer and click "Show image"
button.
Step 2: Click anywhere on the image to choose an area. 9x9 pixels
will be magnified in a small box.
Step 3: Click anywhere in the small box to select desired color.
Step 4: Click again on the image to choose another 9x9 pixels area.
Copy the color code in the bottom right corner then paste it into the
color field (shown above as #000000).
Do you have an RGB color but don’t know the HTML translation? www.rgbtohex.net/ lets you fill in the red, green, blue
values
then click convert and you will be able to copy the HEX code.
Text Size
Next you will set you text size. Recipients will be able to set their own preferences for viewing email content, but you can set
the defaults for your font size here. A size in the medium to large range is recommend for easiest readability. Using the
slider bar, slide right to make text larger and left to make it smaller. The current (June, 2016) trend is bigger, easier to read
text. Smaller text is hard to view on a device screen.
Now let’s build your header!
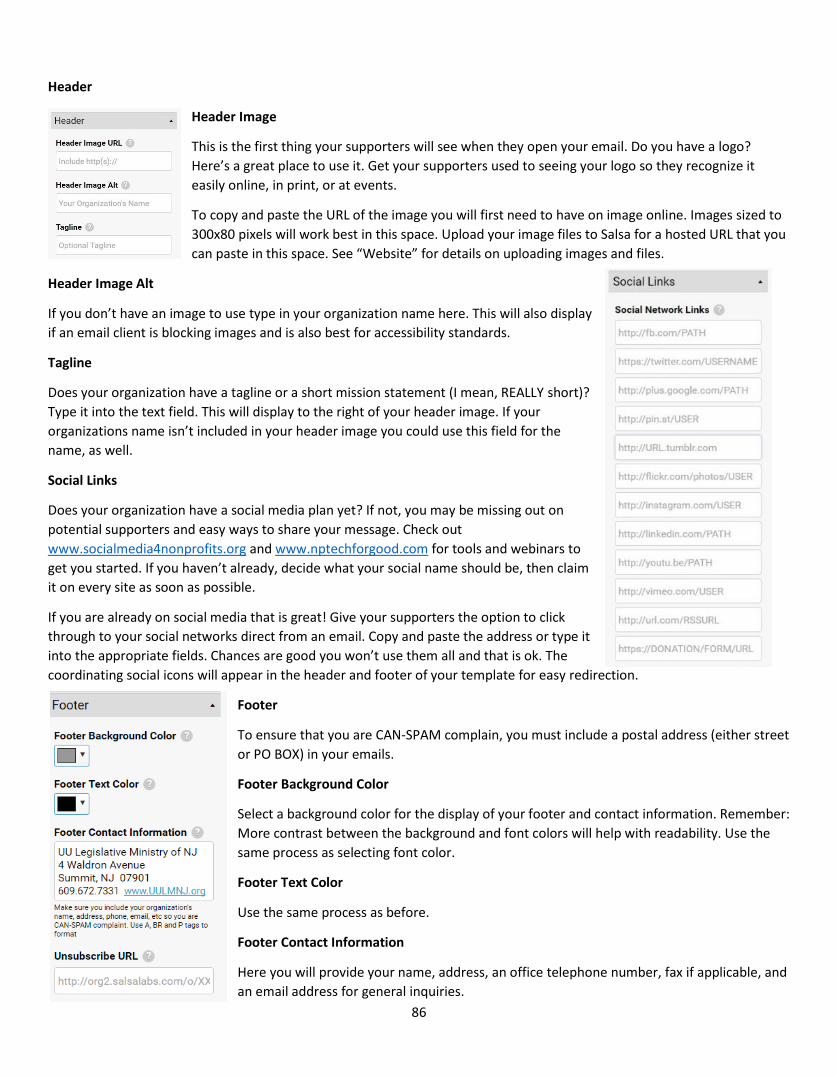
86
Header
Header Image
This is the first thing your supporters will see when they open your email. Do you have a logo?
Here’s a great place to use it. Get your supporters used to seeing your logo so they recognize it
easily online, in print, or at events.
To copy and paste the URL of the image you will first need to have on image online. Images sized to
300x80 pixels will work best in this space. Upload your image files to Salsa for a hosted URL that you
can paste in this space. See “Website” for details on uploading images and files.
Header Image Alt
If you don’t have an image to use type in your organization name here. This will also display
if an email client is blocking images and is also best for accessibility standards.
Tagline
Does your organization have a tagline or a short mission statement (I mean, REALLY short)?
Type it into the text field. This will display to the right of your header image. If your
organizations name isn’t included in your header image you could use this field for the
name, as well.
Social Links
Does your organization have a social media plan yet? If not, you may be missing out on
potential supporters and easy ways to share your message. Check out
www.socialmedia4nonprofits.org and www.nptechforgood.com for tools and webinars to
get you started. If you haven’t already, decide what your social name should be, then claim
it on every site as soon as possible.
If you are already on social media that is great! Give your supporters the option to click
through to your social networks direct from an email. Copy and paste the address or type it
into the appropriate fields. Chances are good you won’t use them all and that is ok. The
coordinating social icons will appear in the header and footer of your template for easy redirection.
Footer
To ensure that you are CAN-SPAM complain, you must include a postal address (either street
or PO BOX) in your emails.
Footer Background Color
Select a background color for the display of your footer and contact information. Remember:
More contrast between the background and font colors will help with readability. Use the
same process as selecting font color.
Footer Text Color
Use the same process as before.
Footer Contact Information
Here you will provide your name, address, an office telephone number, fax if applicable, and
an email address for general inquiries.

87
Unsubscribe URL
You may not want people to unsubscribe from your list, but it is absolutely necessary to provide an unsubscribe option. You
want to keep your list clean and you want your message seen! Copy the link to your unsubscribe page from your Salsa
dashboard and paste it into the field. For help setting up your unsubscribe page, see “Website”.
Now click the “GENERATE” button and you will be directed to your template. You will then be given instructions on how to
incorporate the code you just generated into a Salsa email template. The source is the mumbo jumbo in the field below.
Click anywhere in the box, press ctrl+A, then copy (ctrl+C).

88
The process is the same for a
“Sidebar Hero” (left) or a
“Newsletter” (right) Confused by
this newsletter design? Learn
why restructuring your
newsletter is so important at
http://www.nptechforgood.com/2014/09/28/10-e-newsletter-best-practices-for-
nonprofits/
Email Blasts 101
To view a 50 minute tutorial visit https://www.youtube.com/watch?v=_ED1bnTF0P8
When someone takes that step to subscribe to your email list they’re saying, “I’d like to get to know you better.” They’ve
invited you into their inbox. If you allow your supporters to get to know, like, and trust you, over time you’ll find yourself
with more relationships that lead to, “Yes.” This means repeat actions, donations, and long-time loyalty.
Running successful email campaigns will be the backbone to every success you have on Salsa, either advocacy campaigns or
donor appeals.
To learn how to make the most out of your email marketing campaigns, read this blog https://www.salsalabs.com/blog/10-
tips-for-more-effective-nonprofit-email-marketing
Now let’s learn how to create email blasts that you can send to either your whole list or a select group of individuals.

89
Select the Email package from the right column menu. To create a new email blast, select Create Blasts.
To edit an existing email blast, select List Blasts to see a list of all previous email blasts. If the email has not yet been sent,
you can click Edit (NOTE: If the email has already been sent, you can only View -- not edit -- the content).
From this list of saved Salsa email blasts, you can also
Copy and recycle content (creating a “cloned” second copy of an existing email blast that you can either resend or
easily edit)
Remove (delete) an email blast (not recommended for blasts you have already sent)
Search your email blasts (using the search options at the top)
Filter your list of email blasts (using the Show rows where conditions at the top of the list)
Export a list of all of your email blasts (using the export options in the lower right)
Create an Email Blast
After you click Create Blasts to begin composing a new email, your workflow will only show one option. Follow these steps
to expose the subsequent options of your email workflow:
1. Give the email a reference name.
2. Select an email template.
3. Save your email blast updates

90
After you click the Save button (or “save & continue”), the rest of your email workflow will appear.
Email Blast Content
In the Content tab, you will write the actual email message that your supporters will see in their inboxes.
From Name: The name (and optionally, title)
the email should appear to be from.
From Email: A valid email address which the
email should appear to be from.
Reply-To email address: An email address
where responses to the email will be directed.
If you don’t want to flood someone’s inbox
with vacation responses, choose a different reply to address.
Salsa cannot control how mail clients or individual mail recipients will use the Reply-To field. Even if you specify
a Reply-To address different from your From address, expect the From address to receive at least some replies.
Having the same email address in both the From and Reply-To fields may reduce spam filtering.
Subject: The subject line of the email. Both text and HTML versions of the email blast will use the same subject line. Merge
fields (see below) can be used to personalize the subject line.
Subject lines of less than 50 characters tend to perform better than longer ones;
Spam filters may be suspicious of multiple exclamation points, or all caps, or the word "FREE!" or any other typical
spam red flags (e.g., "Viagra") in your subject line.
Choose a
template

91
HTML Content: The HTML Content will be pre-populated with placeholder text and emails from your email template.
Replace the placeholder text and images with your email blast content. You can delete any placeholders within an email
template if you aren’t going to use them this time.
Salsa uses a WYSIWYG (What You See Is What You Get) editor for pages that contain HTML called 'fck' editor, and it appears
in a number of locations in the Salsa interface.
Adding Text
To enter text into the fck editor, simply click anywhere inside the text box and begin typing. The editor will take your input,
and create HTML based on the input which can then be inserted into the email you're creating. Once you've entered some
text, you can style it using the various buttons in the fck menu. While some should be familiar from word processors (the
bold, italic, and underline features, for instance), it may be helpful to review fck's full array of button documentation
here: http://wiki.fckeditor.net/UsersGuide. Please note that not all of fck's options may be present when you use it in the
Salsa interface.
Adding an Image
To add an image that should appear inside the content section of the page or email you're creating (as distinct from the
templated portion of the page), you can use the Insert/Edit Image button:
Insert/Edit Image

92
Once you've clicked the image insertion button, a dialog will appear that allows you to
choose an image. If you've already uploaded an image, click the "Browse Server" button.
Clicking the "Browse Server" button will open a second dialog, in which you can choose an
image from your uploaded images. You can click the image name you want to select in this
dialog, which will close the server browsing dialog, and select the appropriate image.
Once the server browsing dialog is closed, your selected image will appear in the Image Properties dialog.
Now you can adjust the size. NEVER try to make an image bigger than its uploaded
size. The quality will not be that of it’s original. You can go smaller. Consider resizing
before upload.
Add a border to the image if you’d like.
Set the amount of space surrounding the image, both horizontally (“Hspace”) and
vertically (“VSpace”). If you do not add space the image will directly abut with the
text.
You can also set the alignment of the image.
Clicking the "Ok" button in the Image Properties dialog will insert your image, which
should appear where the cursor was located when the image insertion button was
clicked:
Select an image
already uploaded
Upload a new image by browsing your
computer. The image name will appear next to
the browse button. Then click “Upload”.

93
Adding a Link
It's likely that the most used feature of
the fck editor will be adding links to your
emails and webpages, and doing so is
simple. The first step is to enter the text
or insert the image that you want to be
the clickable portion of the link:
Once you have the text you want to be
clickable, simply select that text using your mouse or click on the inserted image, then click the link button (the icon that
looks like a chain. A dialog box will open, and you can input the URL that
you want your link to go to.
Then, simply click the "Ok" button in that dialog, to close the dialog and
create your link. Your link should now appear inside the editor, though it
won't be clickable until you view it in the email (or page) you're creating.
If you click the other tabs in the dialog, you'll be able to add further
options to your link, such as having it open in a new window.
Using the Sidebar
Have an event coming up? Have an action item you want to promote? Drop a small image, a line of text and a link into the
sidebar to maximize your emails. Even if you have already or plan on sending an email about the specific campaign, drop a
sidebar as a reminder.
Helpful hints for your HTML content:
Personalize the message with merge fields and Dynamic Content.
Do not use Microsoft Word to edit email content. If you write content in Word, copy it into a plain text program like
WordPad first. Then copy and paste from there.
More email is read on mobile devices than on desktop email clients. New stats say 55% of email is now opened on
a mobile device. So don’t make it difficult. It’s hard to tap on a text link in an email. Link the pictures! Create
tappable buttons using online tools like www.dabuttonfactory.com
Text Content: As a best practice, you should never send an HTML email without a plain-text twin. To create text content:
1. Click the Text Content tab to type or paste the plain text version of the email.
2. Optionally, use the Auto-Generate Text from HTML button to generate the HTML content you've just written as text.
3. After auto-generating the text content, review and clean up the formatting of the text version. Delete the code.
Clarify web links. GO ahead and delete image links unless absolutely necessary. You don’t want the important
information to get to lost.

94
Previewing email blasts
How would you like to see what an email blast will look likes to the supporter? Without even leaving the
editor. And you choose the supporter. Like that? Read on!
Steps you can use
1. Edit an email blast.
2. Click on the Content tab.
3. Click on the Show Publishing Tools button to show the publishing tools in
the upper right hand of your screen, above the workflow.
4. Click on the grey search box in the Preview Content section of the
publishing tools
5. A dialog will appear. Use the top part of the dialog to search for a supporter if you have one in mind. For example, a
board member or a supporter that has donation and action history that you're using in dynamic content.
6. Use the bottom part of the dialog to select a supporter by clicking
on the “Select a supporter” field.
7. The search box will be
populated with supporter
information. Click on
the “Save Content and
Preview” button to
preview the selected
supporter's version of the
email blast.
8. A dialog containing the email blast will appear. The blast will be the
same one that the select supporter will see in their inbox.

95
9. Use the Close Window link when you are through previewing the email blast.
Send Options
These options are rarely used; don't feel badly about skipping this step. These boxes are all unchecked by default. If you
have a “Take Action” link on your website, you can easily redirect it to your blast webpage if you only add action items to
that webpage.
Do not track links: By default, Salsa will track whether individual recipients click through links in the email blast, in order to
generate click-through statistics -- you need do no special setup for such tracking to occur. If you prefer to disable link
tracking in this message, check this box. This will not disable link-tracking for any other email blasts. But really, why wouldn’t
you want to have the data on hand, just in case?
Do not track open rates: By default, Salsa will track whether individual recipients open the email blast in order to generate
open rate statistics -- you need do no special setup for such tracking to occur. If you prefer to disable open rate tracking in
this message, check this box. This will not disable link-tracking for any other email blasts. We’re trying to build a rich data
landscape and open rates are one of the best ways to track the success of a campaign.
Add to web page: If your organization is using Salsa's available Email Blast Archive page to allow browsing of past email
newsletters, click this box to add this email blast to the public archive page.

96
Targeting
Use these tools to decide who will receive this email blast. You have three options:
1. Send the email to your entire list.
2. Send the email to all supporters who meet the conditions of a saved query.
3. Build a new query and send the email to all supporters who meet those conditions.
Send to entire list
Simply click the Send to entire list button and proceed past this step.
Send to saved query of supporters
Be Advised: Any query that takes more than 60 seconds to complete will be
canceled, so keep queries as simple as possible. You can create more
complex queries in supporter management, add them to groups, and then
run the email query on the group.
6) Validation
In the Validation step, Salsa automatically performs various
tests on your email blast to help you avoid some common
problem areas. Click any of the More Info links underneath
the tests for additional information.
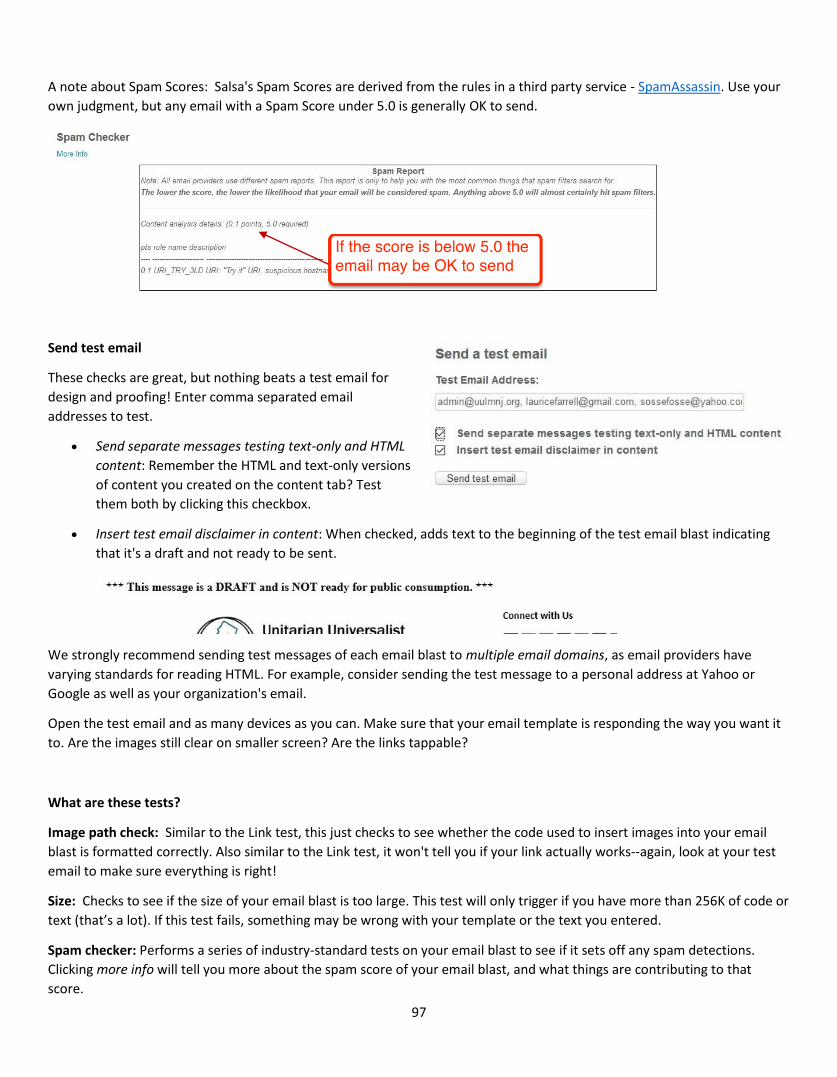
97
A note about Spam Scores: Salsa's Spam Scores are derived from the rules in a third party service - SpamAssassin. Use your
own judgment, but any email with a Spam Score under 5.0 is generally OK to send.
Send test email
These checks are great, but nothing beats a test email for
design and proofing! Enter comma separated email
addresses to test.
Send separate messages testing text-only and HTML
content: Remember the HTML and text-only versions
of content you created on the content tab? Test
them both by clicking this checkbox.
Insert test email disclaimer in content: When checked, adds text to the beginning of the test email blast indicating
that it's a draft and not ready to be sent.
We strongly recommend sending test messages of each email blast to multiple email domains, as email providers have
varying standards for reading HTML. For example, consider sending the test message to a personal address at Yahoo or
Google as well as your organization's email.
Open the test email and as many devices as you can. Make sure that your email template is responding the way you want it
to. Are the images still clear on smaller screen? Are the links tappable?
What are these tests?
Image path check: Similar to the Link test, this just checks to see whether the code used to insert images into your email
blast is formatted correctly. Also similar to the Link test, it won't tell you if your link actually works--again, look at your test
email to make sure everything is right!
Size: Checks to see if the size of your email blast is too large. This test will only trigger if you have more than 256K of code or
text (that’s a lot). If this test fails, something may be wrong with your template or the text you entered.
Spam checker: Performs a series of industry-standard tests on your email blast to see if it sets off any spam detections.
Clicking more info will tell you more about the spam score of your email blast, and what things are contributing to that
score.

98
Number of targets: Checks to see that you actually have some targets for the email blast. If your search query was wrong
and produced zero targets, this test will warn you.
Subject Line: Verifies that your email has a subject line
From/reply-to: Checks to make sure you have an e-mail address listed in the from and reply to fields. These don't have to be
real addresses (e.g. it can be "[email protected]") but emails sent without this information are frequently blocked as
spam.
Unsubscribe link: Checks to see that you have supplied an unsubscribe link in both the HTML and plaintext copies of your
email. Again, not having this information in your email blasts increases the chance of them being marked as spam.
Microsoft check: Checks to see if you have embedded code from Microsoft Word in your email blast. This code can ruin
your email blast formatting or even block it as spam!
Links: Checks to see if links in your email blast are properly formatted. The most common error here will be entering a link
as something like www.organization.org instead of http://www.organization.org. The WYSIWYG editor should fix this most
times, but occasionally a mistake will slip through. Note: The Link checking doesn't actually make sure your links are correct
or functioning--it just makes sure they're formatted correctly. Be sure to send yourself a test email and check the links by
clicking on every one of them.
Summary
At this last step, you'll get a summary of the email blast you've just built.
Content Preview: Click on the HTML preview and Text preview links to open & close email previews of your email blast's
current HTML and Text content.
Target Query Summary: Opens a view of your current targeting logic.
Target Count: This is the number of eligible recipients in your target segment -- that is, the number of emails Salsa will
attempt to send. Note that the number of email recipients identified in the target count may differ from a count of this

99
same segment in the query or report tool. In order for a supporter to be counted in the target count, two conditions must
be met:
1. Supporter matches the conditions in the query used to target the blast
2. Supporter is actively subscribed to your list. If the supporter has a negative receive email value, he/she will not be
counted. Learn more about bounce processing at https://help.salsalabs.com/entries/22421542-Bounce-Processing
A/B Split Tests: Creating test blasts will divide your blast 3 ways (an A/B test), so that you can test the performance of
different subject lines and content.
Schedule and Submit: Everything ready to go? You have two options:
1. Send the email right now, OR
2. Schedule it to be sent at a later time.
To send the email right now, click the big, red Submit Email for Scheduled Time button without making any other
adjustments.
To schedule the email for a later send date:
1. Click the blue Reschedule link
2. Enter the date and time that you wish to send the blast by manually typing it into
the box OR by clicking in the date box and selecting the time from the pop-up calendar.
After selecting from the calendar lick anywhere outside the box to insert the assigned
date and time into the field.
3. Click Reschedule blast to save the new date
4. Click Submit Email for Scheduled Time
button.
Scheduling emails for a later date is a great way to keep an organization with limited
resources on track. If you want to send emails on the weekend you don’t need to
WORK on the weekend, just schedule them. Want to create a month long giving
campaign in advance? You can by scheduling the blasts.
Personalize Emails with Supporter Merge Fields
While email blasts are often written so the content applies to all recipients, emails that have personalized content often
have more impact, result in more actions taken and can increase donation amounts.
Turn this:

100
Into this:
And increase the open rates on your emails!
Note: For tools to individualize content based upon group membership, donation history, or actions taken read
about dynamic content.
Merge Fields can be used in:
The subject line of an email blast;
The HTML body of an email blast; and
The text body of an email blast.
How to get there
You have two options to insert merge
fields into your email blast content.
1. Simply type a field name wrapped
in double square brackets in-line in the
text - for instance, Dear [[First_Name]]
2. Use the dynamic content drop
down list to automatically generate and
insert the merge field.
Generating Supporter Merge Fields for Email Blasts
When creating an email blast content, place your cursor where you'd like the merge field to be.
With the cursor in place, select Supporter Fields from the Add dynamic content drop down list.

101
Select the supporter field you'd like to insert. The field First_Name is
shown in this example.
Click Generate Script. The script will be inserted into the field below.
Click Insert Content. The script will be inserted into the email content
where your cursor was at the start of this process.
Manually entering merge fields
The merge field drop down box gives you access to the most used merge fields, but you have access to all of the fields in the
supporter record, using the same syntax (look here for a complete list).
To manually insert a merge field:
1. Find the appropriate field name
2. Type it into your email content encased in double brackets.
To put a supporter's full address into an email, you would type the following merge fields directly into your email blast
content:
[[First_Name]] [[Last_Name]]
[[Street]] [[Street_2]]
[[City]], [[State]] [[Zip]]-[[PRIVATE_Zip_Plus_4]]
Note: Since [[Street 2]] will often be empty, it's best to place it on the same line as [[Street]] to avoid an empty line break.
When the blast is sent, assuming values existed for those fields in the supporter's record, it would display for an individual
supporter as something like:
Hot Tamale
491 Pepper Street Apartment 100
Las Salsas, TX 12345-0023
Troubleshooting Common Issues
The merge field is not populated in some supporter records. If you begin an email Dear [[First_Name]] and it's received by a
supporter for whom you do not have a First_Name value, Salsa will substitute a default value that you can configure
in Default Merge Fields.
Improperly formatted merge fields. Merge fields must have the [[ ]] syntax. They are also case-sensitive.

102
Test all email blasts before sending them - especially those with merge fields. Create a few email accounts across several
mail clients (Yahoo, Hotmail, Gmail, etc.) and create a group for these emails so you can target yourself, confirm the merge
fields appear as you wish, and view how your blast appears across multiple clients.
Would you like to include merge fields for donation information? Only values from the supporter and supporter_custom
tables can be merged, but check out these tips for donation merge fields in blasts at
https://help.salsalabs.com/entries/23529790-Donation-related-merge-fields-dynamic-content-in-emails .
Misnamed merge fields. Custom fields will use the same double-bracket syntax as regular supporter fields; the field name
within those brackets will be the API Name you assign to your custom field. You can see the API name for any custom field
by examining the custom fields area under the Supporter Management tab.
Automatically Insert Targeted Action Content into Emails
Want to insert the title and brief description of your targeted action in your email blast without having to retype it? Use this
tool to automatically insert this content and a Take action now! link.
You can use all dynamic content (Targeted Action text) in regular email blasts and streaming emails.
How to get there
Use the dynamic content drop down list to automatically generate and insert dynamic content into your email blasts.

103
How to insert Targeted Action Dynamic Content
Prepare your email content
Write your HTML content in your email blast or streaming email as normal.
Put your cursor where you'd like the dynamic email content (the Targeted Action text) to go.
Select the Action
Once your cursor is in the right place, use the Add dynamic content drop down menu and select Actions. This will open a pop
up window.
Select Action: Search for and select the Targeted Action from which you would like to insert content.

104
Insert the Script
Once you have selected the Targeted Action, click the Generate Script button to
see the script in the Dynamic Preview field below. Then click the Insert
Content button to insert the script in your email content.
The Result
As a result, the title, brief description and a link to the Targeted Action, will be inserted into your email content.
Test
There are two options for testing to ensure your dynamic content displays
correctly: Sending a test email and previewing the content.
Test email
On the validation tab of your email blast workflow, send test email(s) to
verify the dynamic content appears as expected.

105
Preview
On the content tab of the email blast workflow, click on the blue Show Publishing Tools button at the top right. Select a
supporter in the Content Preview field and click the Save Content and Preview button. You will see how this content will
display to the selected supporter.
Autoresponses / Email Triggers
Autoresponses are email messages which are sent to your supporters automatically after a supporter completes an action
on a Salsa form. A few examples of autoresponses in action:
1. A supporter makes a donation and automatically receives a donation receipt
2. A supporter registers for an event and automatically receives a confirmation with event details
NOTE: The Streaming Email tool is a separate, more advanced version of Autoresponses, but it is not suited to all situations.
How to get there
There are two steps to using autoresponses:

106
Autoresponse Configuration
After you click Create Autoresponse, a new autoresponse will open. The first step of the workflow is Configuration.
1. Enter a Reference Name:
As elsewhere in Salsa, Reference Name is entirely an internal name, invisible to the public. Use organized, specific titles such
as 2013-January Donation Page: Cute Puppies Campaign to make sorting and location easier.
2. Select a Trigger Type
There are three types:
Reply Emails - go to the supporter immediately
Individual emails - go to one or more specific email address(es) immediately

107
Timed triggers - go to the supporter on a timed delay (i.e. 72 hours after the action was taken)
3. Enter a From Name
Format the name similar to how you would
format it for an email blast.
4. Enter a From Email
Setting the From Email fields is very
important - without a valid email address,
the Autoresponse will appear to be from no
one, and may be filtered by anti-spam
programs.
5. Email Address (Individual Triggers only)
Populate an Email Address field only for
Individual Triggers. In that case, you'll need
to specify who receives notification of the
action. Separate multiple email addresses with a comma and no space, forexample [email protected],[email protected].
For Reply and Timed triggers, the address will be automatically populated by Salsa so you should leave this field blank.
Autoresponse Content
Write the content of the automatic email.
To identify available merge fields you have a few options:
1. See the appendix for common merge fields.
2. Use Append Available Values (see Autoresponse Advanced
Options)
3. View the source code of the user-facing Salsa page and
identify the field names
Need a quick format for a donation receipt? Create a new autoresponse for your donation page and paste in the text below!
Thank you for your donation of $[[amount]]!
You can print this email as a record of your donation for your tax purposes.
Donation Summary:
Confirmation Code: [[PNREF]][[RPREF]]
Donation Amount: $[[amount]]
Donation Date: [[CURRENT_DATE]]
Donation Made By: [[First_Name]] [[Last_Name]]

108
[[Street]] [[Street_2]]
[[City]] [[State]] [[Zip]]
Autoresponse Advanced Options
Note: This last step has some technical options which most users will ignore.
Send Conditions
The Send Condition field allows you to limit the trigger to
sending only under specific conditions. If the send conditions
evaluates to a true, then the Autoresponse email is sent.
Otherwise, the Autoresponse is not sent.
Example Send Conditions
Condition Result
[[isNew]] == 1 Send if the supporter is new
"[[isNew]]"=="" Send if the supporter has an existing supporter record
"[[State]]" == "FL" Send Autoresponse if the State field on the form is Florida
"[[State]]" != "AR" Send the Autoresponse if the State field on the form in not Arkansas
[[amount]] == 500 Send the Autoresponse if the donation amount is 500 dollars
[[recurring_donation_KEY]] != -1 Send the Autoresponse if the donor made a recurring donation.
[[recurring_donation_KEY]] == -1 Send the Autoresponse if the donor did not make a recurring donation
(i.e. made a one-time donation)
"[[State]]" == "FL" && "[[State]]" != "GA" &&
[[amount]] < 10000
Send the Autoresponse if the donor is from Florida, but not from Georgia,
and the donation is less than $10,000
[[BOOL5]] == 1 Send the Autoresponse if the "BOOL5" custom field is checked.
[[recurring_donation_key]] != -1 || [[amount]] <
50
Send the Autoresponse if the donation is a recurring donation or the
amount is less than $50.
Writing your own send conditions
Salsa uses a parser called JEP to evaluate the statement you enter. The syntax for a send condition may look a little unusual
when you get started, but anyone can pick it up. A basic conditional statement consists of three parts:
A Salsa merge field generated by the page
Example merge field: [[State]]
All of the merge fields can be used in a send condition.

109
An operator. These are the available operators.
Less<
Less or Equal<=
More>
More or Equal>=
Not Equal!=
Equal==
A fixed value
Values depend upon the merge field you've selected
Example values might be a state (FL) or a number (500)
If the fixed value is not a number, then it must be enclosed in quotation marks.
Strung together, these elements produce a single condition. If the condition is true, then the Autoresponse will be sent. If
the condition is false, then the Autoresponse will not be sent.
More complicated conditions
It's also possible to create a trigger limited by multiple conditions by connecting them with one of two special operators:
And&&
Both conditions must be true for the Autoresponse to send
Or||
Autoresponse will send if either condition is true
For instance, [[amount]] > 100 && "[[State]]" == "FL“ will send the condition only for Florida donors of more than $100.
Tip: Here are some things to keep in mind as you create send conditions:
The send condition must evaluate to true or false.
The condition statement can be as long as you need it to be.
All of the merge fields are available -- you are not limited just to donations. Consult the list of common merge
fields page for ideas.
Put spaces around any operators (==, !=, &&, ||, etc) to make the text easier to read.
All merge fields must be surrounded by quotation marks (For example:"[[Field_Name]]" .
Numeric fixed value fields do not need quotes (For example: 55 or .25 or 100).
Do not use commas in numeric fixed value fields (For example: do not use 10,000. Use 10000 instead.)
Text fixed value fields ("FL", "Texas", "Yes") must be quoted.
Hours Delayed for Timed Trigger
Only use this for the Timed Trigger-type Autoresponse.

110
Reply triggers are sent immediately after an action is taken (i.e. immediately after a donor presses the Submit button on a
donation form). Use this field to configure the number of hours after an action is taken that an email should be sent.
Append Available Values
If this box is checked, the Autoresponse message will be appended with a dump of data fields available on the page. Its
intended function is to deliver a list of potential merge fields to campaign managers in the process of configuring a
message.
1. Click this checkbox
2. Send the autoresponse to yourself by completing a test action
3. Copy the merge fields you intend to use into the autoresponse content
NOTE: Un-check this box before adding this Autoresponse to a live page.
Group-Based Email Triggers - Send Automated Emails When Supporters Are Added to a Group
Did you know you can trigger an email every time a supporter joins a group? With one important limit:
The group launching the email must be a Greedy
Smart Group, which also means that it must be linked
to a saved query that fills the group based on some
pre-selected criteria. Regular (non-smart) groups, and
regular (non-greedy) smart groups cannot trigger
emails.
You'll find the selection menu to add trigger emails to
a group available in the "Options" tab of the "Manage
Groups" workflow in Supporter Management.
PLEASE NOTE - If adding a group like this to a page
(sign-up, donation, advocacy, etc.), the group MUST
be added as an "automatic add", not an optional group. Otherwise the trigger WILL NOT operate correctly. See the red
arrow below:

111
Enlarge.
We see a bottomless well of possibilities in this feature. Here are just a few ideas:
Build a common email "welcome series" for use on many different pages by having those pages populate a single
Group. Need to change the welcome series? Just alter that single Group's trigger associations, instead of manually
updating dozens of individual pages.
Have a "branching" welcome series where supporters who take a suggested action are automatically shifted to a
new group with a higher-value follow-up ask.
Link email triggers to a group populated by Salsa Scoring to automatically trip donation appeals once supporters
cross a "super-activist" threshold.
Launch an internal notification trigger to your organization's project or campaign manager every time someone signs
up for her Group.
Streaming Emails
There are two types of automatic emails in Salsa - Streaming Emails and Autoresponses. Streaming Emails are enhanced
autoresponses, adding the automation features of autoresponses to the design template and statistics reporting features of
email blasts. Usually, we want our emails to look pretty (email templates) and we want to know who opened our emails and
clicked on the links in them (email metrics), and Streaming Emails accomplish those goals.
To sum that up:
Autoresponse + Email Template + Email Metrics = Streaming Email
Use either autoresponses, streaming emails, or some combination of the two to set up a cascading stream of automated
emails that are sent to a supporter. Common examples of this in action include:
A Welcome Series which is sent to new supporters
A series of nurture emails which are sent after a supporter makes a donation via a Salsa page (a post-donation drip
campaign)
A series of nurture emails which are sent after a supporter signs an online petition
NOTE: Since Streaming Emails are "enhanced autoresponses," why don't we just use those all the time? They do have some
limits. When you add streaming emails to a page (on the Follow Up tab), they can only pull in merge fields from
the Supporter Table. If you need to merge in data from any other table (such as merging the donation amount and
transaction date to create a donation receipt), you'll need to use an Autoresponse.
How to get there
Before you attempt to use Streaming Emails, ensure you have the package installed. It's free and you can contact our client
success managers to have it added to your account.

112
First, create a new Autoresponse.
Second, fill out the basic information on the Configuration tab
of the Autoresponse and then save it. If you have the
Streaming Email package installed, the option to update it to a
Streaming Email will appear.
Once you convert from an Autoresponse to a Streaming Email, your workflow changes from this...
to this:
Create Blast
The first step of creating a Streaming Emails is very similar to the process for creating a regular email blast. Below are your
configuration options:
Reference Name - A unique name for this Streaming Email that is only used internally, and will not be shown to your
supporters.
NOTE: Salsa will list Streaming Emails by their reference name so entering a meaningful value in this field is critical to the
utility of the Streaming Email you're creating.
Select an email template - Select the email blast template you want to use by clicking on its thumbnail image

113
Content
On this tab, you will set up and edit the content of the
Streaming Email that your supporters will receive in their
inboxes. These fields are identical to the fields in the Email
Blast tool. Streaming Emails, like autoresponses and regular
email blasts, can include Merge Fields in the content of the
email. Unique to Streaming Emails is the limitation that these
merge fields can only be populated with supporter data,
and not data from which will be stored on other tables (such
as donations data).
Step 3: Send Options
This step allows you to turn off open and link tracking (both
of which are enabled by default), as well as make your
streaming email publicly available as a web page. The options
below are all unchecked by default.
Do not track links - Check this box to disable link tracking in this streaming email.
Why disable link tracking? In order to do the actual tracking of link clicks, Salsa creates a unique URL for each link contained
in your email, for each supporter who will receive the email (3 links in an email sent x 3 supporters = 9 different URLs). This
means that your original URL - for example, www.SaveTheWorld.org - is converted into a Salsa-specific URL,
like http://salsa3.salsalabs.com/dia/track.jsp?v=2&c=opG%2B4. Some organizations may wish to not have their original URL
changed. In this case the choice is preserved URL and no link tracking or modified URL and link tracking.
Do not track open rates - Check this box to disable the tracking of open rate statistics.
Why disable open rate tracking? Disabling open rate tracking would remove the "Display images below" option that your
supporters may see in their email client upon receiving a streaming email ONLY IF your email content and template do not
contain any images. To track opens, Salsa automatically inserts a small 1x1 pixel image to be downloaded by your supporter
in the email client - this is to 'acknowledge' the supporter has actually opened the email blast (which is confirmed by the
image download). It is extremely rare that this tracking be turned off.
Add to web page - If your organization is displaying Salsa's available Email Blast Archive page to allow web visitors to browse
past issues of your email newsletters, click this box if you wish to add this Streaming Email to the archive page for public
viewing.

114
Stream Options
On this tab you will select the type of trigger (Reply, Individual, and Timed) for the Streaming Email and what conditions
must be met for the email to send.
Trigger Type:
Reply Emails: Sent almost instantly to the supporter who took action.
Individual emails: Individual emails are not supported for Streaming Emails. Do not select this option.
Timed triggers: Sent on a timed delay to the supporter who took action. You set the time of the delay on the Hours
Delayed for Timed Trigger field.
Append All Values: If this box is checked, the message will be appended with a dump of data fields available from the
referring Salsa page (the page that is triggering the streaming email). Its intended function is to deliver a list of potential
merge fields to campaign managers in the process of configuring a message.
Be sure to copy the merge fields you intend to use into a message and un-check this box before going live with the
Streaming Email.
Send Condition: Here you can set a send condition that will tell the Streaming Email to fire if and only if it meets a certain
criterion. Streaming Email send conditions are identical to Autoresponse send conditions.
Hours Delayed for Timed Trigger: (Only applicable for Timed Trigger type emails) By way of example, if you want to have a
call to action automatically go to anyone three days after completing your sign up page, the Hours Delayed field would be
set to 72.
Summary
On this tab you can see a live preview of what the HTML and Text-only versions of the Streaming Email look like. Note that
there was no Validation tab in this process, unlike regular email blasts. Because streaming emails are sent on an individual
basis, Salsa won't need to check things like targeting or unsubscribe links in streaming emails. However, you should still
ensure that you are keeping the message size to a reasonable length and not including Word Code.
Streaming Email Stats
The major advantage of Streaming Emails over regular autoresponses are the tracking and reporting options. To see how
well your Streaming Emails are doing, navigate to the list of email triggers (from the first step of this guide), then under the
"Statistics" column, click the “View Stats” link.

115
Clicking on that link will take you to Salsa’s email performance report, which provides all of the same information that a
regular email blast does.
Welcome Series Primer
New supporters are often the most enthusiastic about your work and ready to learn more. A Welcome Series of emails (or
nurture program) can harness this excitement and transform it into action on behalf of your mission. Welcome Series email
have much higher click through and open rates than other emails, so they can help you lay the foundation for a long-lasting
and authentically engaged relationship between your supporters and your organization.
How to get there
There are a few different ways to create a Welcome Series in Salsa, but here we're going to talk through one specific use
case - how to Welcome all new supporters no matter how they were added to your database.
To do this you'll use several tools:
Create a query to identify new supporters
Use the query as the basis of a smart group
Create the emails (You'll usually use streaming emails) and add them to the smart group.
This page previously documented a process that would not work for supporters created via a donation page. We have
updated this page and the new process will appropriately welcome any new supporters.
Step 1: Create the Query
Query Option 1 - All New Supporters

116
This simple query will identify find all supporters created in the last 24 hours. Remember to give the query a name so that it
will be saved.
Query Option 2 - All New Supporters Created via Web Pages
This slightly more complex query will identify all supporters created via a web page in the last 24 hours. This query will filter
out supporters which were added to your database by an import.

117
How does it work? This query finds supporters who meet either of these condition sets:
1. Those created by via Salsa donation page in the past 24 hours (Source = "Web Donation" for those supporters).
2. Those created via any other Salsa page in the past 24 hours (Source = "Web" for those supporters).
FYI: If a supporter was added to your database via an import, the Source will equal "File" in their supporter record.
Step 2: Use the Query as the basis of a Smart Group
Navigate to the Manage Groups area of the Supporter Package.
Create a new group for your Welcome Series.

118
On the Smart Group Options tab of the Group workflow, change this group to a Greedy Smart Group.
Select the query you named in step 1 (the one that finds your new supporters).
Save your group.
There are two types of Smart Groups - Regular Smart Groups and "Greedy" Smart Groups. Sending streaming emails as
group join triggers will only work correctly when using "Greedy" Smart Groups. Once supporters are added to a Greedy
Smart Group, they're never removed (even if they no longer meet the conditions of the query).
Step 3: Add Streaming Emails to your Group
Create a series of Streaming Emails - you can create as many as you'd
like.
Create one Reply Email (which will be sent to new supporters
immediately after they are added to the Smart Group).
Create one or more Timed Triggers and vary the field Hours
Delayed for Timed Trigger.

119
After you create the Streaming Emails, add them to your Welcome
Series Group on the Options tab of the Group workflow.
Optional Step 4: Use a Suppression Group
While your supporters are in the middle of their Welcome Series of
email, they're on a journey that you've carefully crafted to welcome
them. You may choose to prevent other emails that your
organization is sending from going to these fragile new supporters.
Here's how you do it.
First, create a query to identify supporters who are in the queue for
the final Streaming Email in your Welcome Series, but have not
actually received it yet.

120
Make that query the basis for a Smart Group (NOT a Greedy Smart Group).
When you set the targets for your email blasts, add a condition for NOT member of Welcome Series Suppression Group
because you DON'T want to send the email to them if they're in the suppression group.
Bounce Processing
Salsa provides your organization with a variety of automated list-cleaning procedures to maintain optimal delivery
standards--ensuring that your emails get delivered to your supporters' inboxes rather than their spam folders. And the best
part is, most of this takes place behind the scenes, where you'll never have to deal with it directly!
But all the same, you may wonder what's going on under the hood, so in this article we'll discuss what some of the numbers
on your supporters' records mean, and how they affect deliverability.
Receive Email
Receive email values are managed on the Profile tab of a supporter record.

121
At the most fundamental level, the field on the Supporter table
called Receive Email governs whether Salsa will actually attempt to send
email to that particular supporter. Supporters must have a positive,
valid Receive Email value or the system will not even attempt to send them
email.
Imported supporters, by default, have Receive Email status set to 1 -
Imported or unknown (subscribed). They will receive emails. Supporters who
sign up through a web form, or complete the optional double opt-in process
will receive an even higher status, guaranteeing that Salsa will send them
emails.
There are many Receive Email statuses below these initial values--none of
them will be sent email. The most common reason will be people who
unsubscribe: supporters who click on an unsubscribe link or use one of your
unsubscribe pages will get a Receive Email value of -3.
Bounce and spam processing operations that indicate supporters should not
receive e-mail result in switching the Receive Email field to one of a variety of negative values, each of which correspond to
various reasons for the status. The supporter record continues to exist in your database, but will no longer receive e-mail of
any sort from you.
The Receive Email field can be queried and reported on like any other on the Supporter table; see here for a list of
all Receive Email values.
How Salsa handles hard bounces
Salsa deactivates all undeliverable supporters (those supporters who have confirmed deactivated email accounts - when
their mail server says to Salsa, "Hey, this user no longer exists or does not have a valid email address") by switching
their Receive Email field to a value of -24 (5.1.1 User Unknown). This is considered the hardest of hard bounces and this is
the only type of hard bounce that Salsa unsubscribes automatically.
Note: hard bounces are universal--that is, an email won't hard bounce for your organization but work for something else.
Hard bounces usually only occur in specific circumstances (user's account deactivated, user's account full/exceeds quota,
etc.) that affect a user's ability to receive email from any source. If Salsa were to continue attempting to email people after
their email server reports 5.1.1 User Unknown hard bounces, both Salsa and your organization would be labeled as
spammers and be blacklisted.
How Salsa handles "This is Spam" buttons
As you may know from using personal mail on a service such as Gmail or Yahoo, most providers offer a button marked "this
is Spam" allowing users to identify emails as unwanted Spam. Salsa automatically unsubscribes any supporters who mark
your email as spam--Salsa receives notification of this happening through our relationships with postmasters at major mail
providers and a variety of independent spam-control services. These unsubscribes are specific to an organization - that is,
unlike hard bounces, they only unsubscribe the user from the list of the organization whose message triggered the spam
complaint - and encompass any receive email flags between -40 and -49.
How Salsa handles soft bounces
A "soft bounce" is a server response such as a vacation or Out of Office response, or a notification that the mail server is
busy. For all soft bounces, Salsa keeps count using the soft_bounce_count field in the supporter record; currently, we don't
currently do anything with that data automatically - none of these records are set not to receive further e-mails. However,
these bounce counter fields are available as queryable fields; as a user organization, if you wish to implement a business rule

122
such as "any subscriber with more than two hard bounces is inactive," you can manually remove these users with the query
tool, or create a Smart Group to bring these users to your attention.
Okay, so I've got these supporters who aren't receiving email--can I just reset all their Receive Email statuses and start
mailing them again?
NO! NO NO NO! Please don't do this. This is not only a violation of your Salsa Terms of Service, and not only is it terrible
etiquette that will cost you goodwill, but doing so can result in your domain and organization being actively blacklisted by
mail providers. In extreme cases, you may find yourself unable to email your own staff members because your email server
will refuse to carry any traffic from your organization. (It happens.)
If you are interested in these supporters, consider running a “Win Back” Campaign. Good list hygiene dictates that you stop
sending emails to inactive supporters (i.e. people who aren't opening your emails, clicking the links, or taking the follow up
actions you're requesting of them anyway). It can be hard to say goodbye, however. Once you've identified who your
inactive supporters are, a win-back campaign allows you to send them one last appeal with a message similar to:
We've noticed that you're not behaving like you actually want to hear from us. Would you like to keep receiving our emails or
not?
Once you get their response, you can remove those supporters who really are inactive (i.e. those who didn't response to
that last, desperate appeal) from your list. Learn more at https://help.salsalabs.com/entries/67435860-Conduct-a-Win-Back-
Campaign.
The only situation in which it is acceptable to reset a supporter's Receive Email status is if they individually contact you and
ask why they are not receiving emails--they may have accidentally unsubscribed, or gone on a long vacation resulting in their
email account being full and sending hard bounces. In this instance, it's okay to reset the individual supporter's record.
Otherwise, please respect your supporters' email preferences. It's good for them, good for you, good for Salsa, and good for
the universe.

123
TARGETED ACTION
A supporter who completes a targeted action will be sending either a pre-formed or user-edited letter on a particular
subject via email, webform data, or fax to a governmental or custom target. In the setup workflow, you will write the basic
letter (which you can allow your supporters to edit), choose and filter your targets, and restrict your action to a particular
subset of supporters.
This type of action is a two-step process - supporters will first enter their zip code to determine 1) if their geographic area is
restricted from taking action and 2) which targets they will be contacting. Then the letter content and the targets will be
dynamically loaded (dynamic content automatically merges user-specific information into the text), at which point the
supporter will enter their information, make edits to the letter content (if available), and submit the action.
*Learn more about dynamic content here http://www.slideshare.net/salsalabs/email-dynamic-content
1) DESCRIPTION: When you click the “Create a New Action” button you will be directed to the description section of your
new action.
Reference Name
This is the name that only you will see on your Action Dashboard or list of actions. It is used for internal reference only (so
you can differentiate this petition from others in a list). Your supporters will never see this data.
The Action Title is what your supporters will see at the top of your action page. Be descriptive and clear. Your supporters
want to know first thing what they are being asked to do and what that action will accomplish.
Example: Support S51 (action) Limiting Solitary Confinement Practices (outcome)
Here you give a brief description of why your action is important and any key background information. If you want to be
more in depth, add a “read more” link in the description section that links back to your own website. This way interested
supporters get more info and you get traffic on your website!
The text appears below the title on the end-user page, but above the field containing the actual campaign letter. You can
use simple text or get creative with text styling and images. Remember though: be clear.
Footer
The page footer text appears below the form fields where supporters enter their personal information. It is generally used
for either additional explanatory text about the page or identity information about your organization.
2) CONTENT
This where you will write the messages being sent to your targets. (We’ll get to that in the next step)
Your default content set is named "Primary Content", but you can easily change this (and the name of any other content
sets) by clicking Rename Set. You'll make your changes to the name and then click the "Update Content" button.
Alternate Content
You can create multiple different letters that will be presented randomly to your supporters. This assures that the messages
being sent are not all completely identical in tone or content. You can create a "carousel" of multiple suggested subjects and

124
messages by saving a message, then clicking the "Add Alternate Version" button a second, third, fourth, or any number of
times, creating distinct versions of the same message. When multiple entries are associated with a single content block,
Salsa will randomly pick one to display each time the page is loaded -- so different supporters will see (and send) different
default messages. This may be a luxury your organization doesn’t have time or resources for, but it is a good goal for the
future.
Recommended Letter Subject
This will appear as a header above the content on your action page. The recipient of the letter will see this subject header.
BE SPECIFIC! On average an aide will be “reading” your message and may skim for the exact reason for your communication.
“Please Support S51, Limiting Solitary Confinement” in the subject line lets the reader know the exact action you are
requesting before even opening the message.
Your supporters will be able to edit this subject by default, unless you click the "Make this subject uneditable" box. (In
practice, most of your supporters probably will not edit the subject line.)
Recommended Letter Content
This will be the suggested content of the message. Ideally, this is relatively brief, maybe two or three paragraphs. As
religiously based organizations we have an opportunity to present a different message than what law makers are hearing
regularly. Think about how your action claims Unitarian Universalism and explain how “as a Unitarian Universalist” you
believe your action is the right thing to do.
Example: “As a Unitarian Universalist, my faith’s principles call for justice, equity and compassion in human relations. As a
UU, I also believe in the inherent worth and dignity of all people. Long-term isolated confinement poses extremely harmful
effects on any prisoner, particularly people with mental illnesses, pregnant women, youth and elderly.”
3) TARGETS
Here you will determine who is receiving your messages.
Add a Set of targets
Every action will include at least one target set. As state advocacy networks it will likely not be a problem, but keep in mind
there is a maximum of 90 target sets in any action you set up. If for some reason you have more than 90 sets, look to Salsa
commons for suggestions.
To select the target(s), select a "target type" from the pull-down menu on the left side of the
"add a set of targets" box.
Select Multiple Recipients - This option presents the list of available custom targets to a
supporter, and allows them to choose multiple targets to include.
Custom Recipient Groups - This option allows you to present a supporter with a group of
custom targets to contact at one time.
Select Single Recipient - This option presents the list of available custom targets to a supporter,
and allows them to choose one single target to include.
Custom Recipients
*Only constituents of these targets can send messages to them, as determined by matching a
supporter's address to legislative districts.
Make your target type selection from the menu then click “Add Target” button.

125
For each target type, you must also choose a contact method. The contact method is always a choice between
Email/Webform, Fax, or Black Hole
"Black Hole" is used for testing purposes. The action page will operate normally, but no emails or faxes will actually be sent.
This allows you to test the page without sending a draft letter to a legislator. Whew! Be sure to CHANGE YOUR ACTION BACK
to "Email" or "Fax" after testing, as there is no way to recover or resend messages your supporters send through an action
set to "Black Hole".
In our example the emails were sent to the members of a New Jersey Senate Committee. Because Salsa only allows users to
contact legislators from their own district you will have to create a “Custom Recipient” to send communications to a specific
group of legislators (i.e. committees, Senate presidents or speakers).
Filter
By default, the targets you add to your action will be set to Auto-Targeting, which means that the individual target (within
the target type group you have selected) will be chosen based on the address information provided by your supporters. For
example, for an action targeting the US Senate, entering address information with a zip code of 07052 would bring up
Senators Cory Booker and Robert Menendez (as of June 2016, anyway!). (screenshot)
However, in some cases, you'll want to select a specific group of targets (perhaps to exclude other targets who are not on a
committee or have already pledged their support to the cause at hand). In those cases, you'll want to use the Filter feature
to select only the targets of interest. Clicking the Filter feature brings up a screen similar to this: (screen shot)
Please note that this screen will provide different options based on the target type you are filtering. The above screenshot is
of the New Jersey State House. Possible targets will be listed by district number in ascending order, not alphabetically.
To filter by committee, click on the drop down menu. You will see a list of all state House Committees, or committees
relative to your selected target type. Committees are listed alphabetically by state, then alphabetically by committee name.
The state is indicated by postal abbreviation in parentheses at the end of each committee name. (Screenshot)
At this point, you can select what criteria you would like to filter on, and then make as many selections in the checkboxes
next to each target. If you do a second search based on other criteria, your previous selections will be maintained.
4) Who Can Act?
Can everyone take action? Or do you want to limit it to only residents of your state or even select districts? The options on
this tab of the workflow allow you to restrict this petition to supporters who meet certain criteria.

126
If you choose to restrict actions, you will see this screen.
Restrict to these States
Only supporters providing an address from one of the U.S. states or Canadian provinces will be permitted to take the
action. (Possible use case: When running a write-your-rep action to Minnesota state legislators, select "Minnesota" to allow
only Minnesotans to write.)
Restrict to these Federal Districts
Only supporters providing an address from one of the selected U.S. congressional districts will be permitted to take the
action. (Possible use case: When attempting to generate constituent messages to only a specific legislator, select that
legislator's district.)
If you choose to restrict a petition in this manner, we'll need to validate that a supporter meets the criteria you set before
we allow him or her to sign the petition. In this case, the supporter will be prompted to enter a zip code so we can see if
she's from the correct state or federal district.
Make your selections and choose whether or not to add text for people who are excluded from taking action.
Text for Excluded Users
The text in this box (which also accepts HTML) appears to a supporter who cannot take action due to the above restrictions.
For example, you may redirect them to the CUUSAN list of state advocacy networks to take action in their own state. If you
are restricting to a specific district you could direct them to a statewide organization related to the topic, such as Planned
Parenthood or American Civil Liberties Union. Or if you have an action that anyone can take part in, direct them there!
Engage while you have their attention!
5) User Information
Here you will define what information you gather from your supporters when they take action. It also allows you to assign
your supporters to groups. (We’ll talk more about the importance of this. See “Supporter” section.)
Requested User Fields

127
Let’s set the fields that your supporters will
be asked to fill out. You will also set the
required information using the "Required"
checkboxes beside each field.
Users will see an error message like "Please
provide the following information," when
they try to submit a form that doesn’t
include fields you have required.
To add an additional field, click the "another
field" link, and choose the field from the
pull-down menu. To eliminate a field you've
already selected, click the "-" button next to
that field.
You can change the order of the fields to
your own preference. For example, if you want
the supporters Congregation listed before their
contact information, you can do that. To order the
fields
Click the "Use Field Order Shown Below" box,
and save.
Change the order of your saved fields by
clicking the drag handle (the double arrow) to the
left of any field, and holding down your mouse
button as you move it up or down the field list.
When the fields are in the order you want displayed, click "save"
Add to these Groups
Groups are a way of recognizing your supporters by a
certain criterion that sets them apart from the rest of
your list. There is no limit to the number of groups
you create, and each group can contain as many of
your supporters as you would like! Groups can be
used as search criteria for queries and for targeting
email messages. (More on the importance of groups
in “Supporters”)
Under “Add to these Groups” click “Add a Group.”
Then click the magnifier icon. A pop-up window will
appear. You can either provide information in the
search fields and click “search” to find your group or
scroll through your complete list. When you have
found the group click “Select” to choose which group
end-user supporters on your action page will be
automatically added to. Continue this process if you
want to choose multiple groups.

128
If you have not created a group for this action item, save your work and create a group in the Supporter area, then come
back to finish up.
Optional Groups
You can also allow supporters to join other groups. “Optional Groups” are set up the same you would an automatic group. A
checkbox will appear on the user-facing (public action) page for each optional group that you select, giving supporters a
choice of whether to add themselves to groups. Many organizations use Optional Groups to invite supporters to receive one
or more newsletters or to be included in priority issues communications. In our example supporters are given the option to
join the Criminal Justice Task Force, based on their interest in this actions topic.
6) Follow Up
This will let you setup what happens after your supporter has taken action.
What do you want to display on success?
Choose where you would like your supporters to see after submitting the action. You can only choose one of the following
options. The options from the pull down menu are:
Display Thank You Text - The supporter will not be redirected to a new page, but will see the message entered in
the Thank You Text box below.
Redirect to a Tell a Friend Page – (Redirect means you will be taken to another web address.) This option will
provide you with a list of existing Tell a Friend (TAF) pages to choose as your redirect page. Alternatively, you can
click the "Create Tell-a-Friend" link to make a TAF page on the fly. The good news is that the process is exactly the
same either way! (To learn more about TAFs, see “Website”)
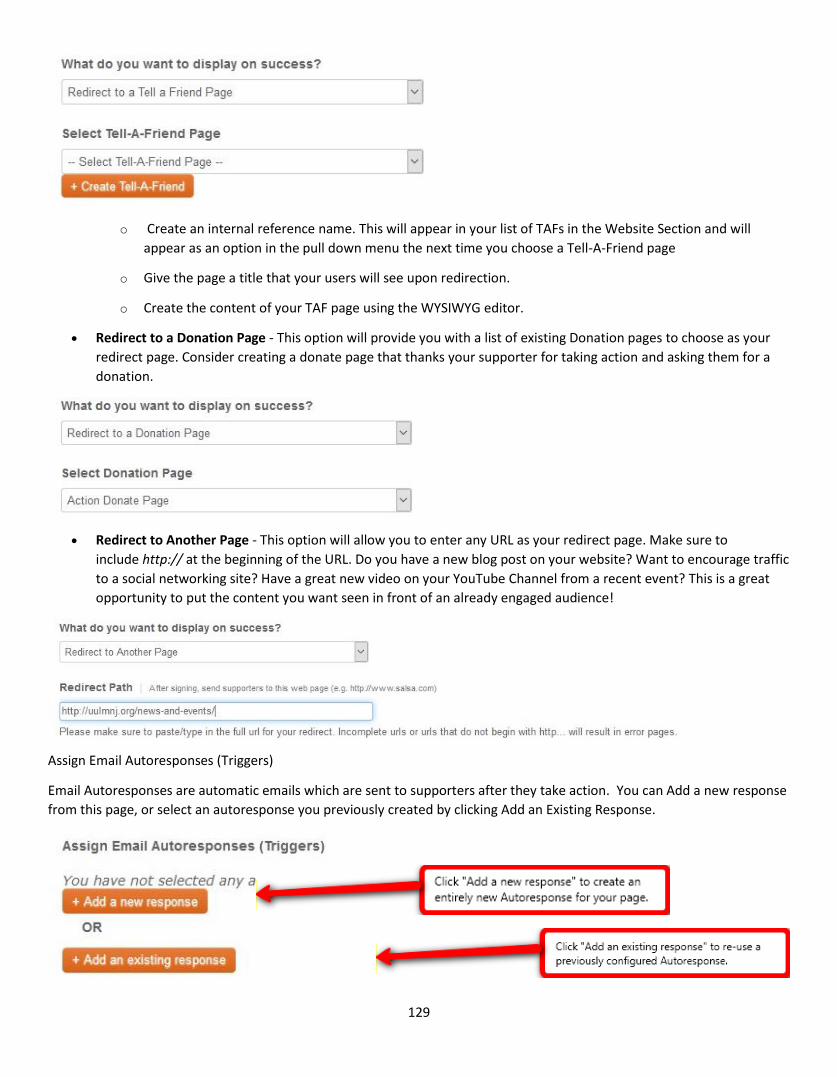
129
o Create an internal reference name. This will appear in your list of TAFs in the Website Section and will
appear as an option in the pull down menu the next time you choose a Tell-A-Friend page
o Give the page a title that your users will see upon redirection.
o Create the content of your TAF page using the WYSIWYG editor.
Redirect to a Donation Page - This option will provide you with a list of existing Donation pages to choose as your
redirect page. Consider creating a donate page that thanks your supporter for taking action and asking them for a
donation.
Redirect to Another Page - This option will allow you to enter any URL as your redirect page. Make sure to
include http:// at the beginning of the URL. Do you have a new blog post on your website? Want to encourage traffic
to a social networking site? Have a great new video on your YouTube Channel from a recent event? This is a great
opportunity to put the content you want seen in front of an already engaged audience!
Assign Email Autoresponses (Triggers)
Email Autoresponses are automatic emails which are sent to supporters after they take action. You can Add a new response
from this page, or select an autoresponse you previously created by clicking Add an Existing Response.

130
“Add a new response” creates a brand-new Autoresponse on the fly.
Click "Add a new response"
The new, not-yet-customized response appears in a shaded bar (screenshot)
Click the response title to edit the message settings and content
Set as a Reply Email (delivered immediately to the person who signed up), an Individual Email (delivered
immediately to a designated third party), or a Timed Trigger (delivered after a set delay to the person who signed
up)
Enter a name and email address who should appear on the "From" line of the email when the recipient reads it, as
well as the content of the message itself. When creating an autoresponse on the fly you won’t be able to use
dynamic content, images, or text styling. This is for a basic text response from your default email template. To create
a more exciting create an autoresponse in the “Email” section then…
“Add an existing response” selects an Autoresponse you have already configured
Click "Add an existing response"
You will see a pop up window similar to the group pop up. Search among all Autoresponses in your Salsa
account using the same process as groups
Click "Select" to associate your chosen Autoresponse with this page (Note: the Autoresponse will still remain in use
for any other pages for which it has been selected.)
The selected response appears in a shaded bar
If you need to edit the Autoresponse content, you can. It is the same way you would edit a new response as detailed
above (Note: editing the Autoresponse content changes its content for every other page that uses the response!
When in doubt, create a new response instead.) You can always copy and paste the content from an existing
autoresponse to a new one then edit it as needed.
7) OPTIONS
You’re almost there! You just have a few more options to finish up.
Send, at most, this many emails
To limit the number of e-mails that can be sent through the action, set the maximum number of e-mails to a number where
you would like them to stop. You may want to use this as a tactical courtesy when the action is directed to a target (such as a
custom target or a local official) not accustomed to receiving large numbers of advocacy e-mails -- pick a number high
enough to make your point and low enough to avoid alienating the recipient. Leaving the number at 0 will allow an
unlimited number of e-mails to be sent.
Send, at most, this many total faxes
To limit the number of faxes that can be sent through the action (and thus the amount you can be charged for fax service),
set the maximum number of faxes to a number where you would like them to stop. By default, this number is set to zero:
you must enter a larger figure to conduct a faxing action.
There may be an additional cost for faxing – check with your provider. DemocracyInAction and Wired For Change currently
bill $0.10 per page (there may be more than one page per action for long messages) for domestic faxing and actual cost
(which can range well above $1 per page) for international faxing.
Consider your organizations mission, too. If your organization works towards climate justice email may be the best way to
communicate while staying true to your cause. Did you know that the carbon footprint for the average email is 4 grams of
CO2, while a posted letter emits 29G, and a single business fax machine omits an average of 200 kg of CO2 every day! Which

131
doesn’t even include paper and ink! (For fun, check out this great infographic on faxes http://visual.ly/carbon-footprint-fax-
machine )
Status
If there is a need to disable the action entirely, you can simply select "Inactive" from the drop-down list.
Congratulations! You have created a targeted action campaign!
BLIND TARGETED ACTION
Also referred to as a one-click or single-click action, this type of action is set up and works exactly the same as a targeted
action. However, your supporters will not be required to first enter their zip codes to determine their targets; instead, the
supporter will review the letter content and enter their information without knowing before submitting the form which
targets will receive their letter.
After submitting the form, Salsa uses the supporter's identifying information to route the letter content to the proper target,
and the supporter is then directed to a follow-up screen that tells them which targets have received their letter.
The rest of the set-up process is the same as a targeted action.
Consider adding a descriptive message at the end of your content to let your supporters know how the blind action works.
Example: “We want to make things easy for you--so we will handle the technical process of submitting your communications
and will provide your name and any required contact information to public officials’ websites. They may contact you by
email or phone in response to your message.”
Footer Sample: “We submit your correspondence through officials' contact forms and therefore must provide the
information that they require. To ensure that your response is successfully transmitted, please fill out the form above (all
fields marked with an *).”
What does an action letter look like?
You've written your action letter content, you've selected your targets, and your supporters are taking action - but what
does the actual letter look like when it arrives in your targets' inbox?
There are three main parts:
1. The target's title and name. In the case of a House representative, this will show up as Rep. Nancy Pelosi.
2. The letter content. This will be sent exactly as it has been written in the Content tab of your action page workflow. If
you have enabled editing of the letter, Salsa will send the supporter's version of the content instead.
3. The supporter information. Whichever fields you required the supporter to fill out to complete the action will be
appended at the end of the letter.

132
Put the three together and an example letter would look like this:
Sen. Harry Reid
I am an American citizen. I am a taxpayer. I am a blimp owner.
S.8148, also known as the DIAL Act, would impose heavy licensing fees on blimp owners, as well as strict regulations that
would unfairly increase the cost of blimp ownership and operation. If the DIAL Act passes, only large corporations could
afford to operate blimps, squeezing out recreational owners as well as small businesses and entrepreneurs.
This is a time for Congress to support job creation and investment in American communities. The DIAL Act will not support
these goals, and will only reward large corporate interests. I urge the members of the Senate Committee on Housing,
Transportation and Community to halt the progress of the DIAL Act and keep it from being introduced before the Senate.
John Smith
7800 Shoal Creek
Austin, TX 78757
Multi-Content Targeted Action
Creating an Action or Petition
Step 1: Description
Reference Name
The Reference Name that you selected in the “create a new action” box will appear in this field.
Action Title
This field creates the "headline" in large text at the top of the end-user page (the page your supporters will see). Typically,
this is used to briefly describe the purpose of the action.
Brief Description
This text appears on the end-user page, and explains to your supporters why they should take action. The text appears
below the title on the end-user page, but above the field containing the actual campaign letter.

133
You can lay out this text block very simply or elaborately. If you want to, you can add images, text styling, hyperlinks and
other design features using either code or the embedded WYSIWYG editor. Do not paste your action description text from
MS Word.
Footer
The page footer text appears below the form fields where supporters enter their personal information. It is generally used
for either additional explanatory text about the page or identity information about your organization.
Template
To brand your page appropriately, choose a web template by clicking on the appropriate thumbnail. This will act as a
wrapper for the page's entire content. If you don't choose a specific template, your Default Template will be used.
Press “Save” and proceed to the next step.
Step 2 - Content
Multi-Content actions differ from normal Targeted actions in that you can create several different messages, each targeted
to different recipients. This allows your supporters to send finely targeted messages – such as a "thank and spank" (in which
the message varies with whether the legislator voted for or against your cause), or different messages crafted to different
versions of legislation in the House and the Senate.
Under “Create your first set of content” enter a “set name.” This is an internal name that will help you match this content to
the appropriate target(s). This may be something like “Thank you for sponsoring,” or “Judiciary Committee message,” or
whatever best distinguishes the content of this message from others that you will create in this action. Click “add” to get
started.
Add another content set...
This is the meat and potatoes of the multi-content action tool. Clicking this link will add a new content set which you can
then set up in addition to you first/primary content set.

134
After clicking the "Add another content set..." link, you'll be prompted to name the content set. Don't gloss over this, as the
name you give the content set will be visible by your supporters.
After you've added your content set, you'll see a new tab next to your previous content set, and you'll then be able to add
your actual letter content.
Rename Set
Your default content set is named "Primary Content", but you can easily change this (and the name of any other content
sets) by clicking Rename Set. You'll make your changes to the name and then click the "Update Content" button.
Add Alternate Version
Optionally, you can create multiple different letters that will be presented randomly to your supporters. You can create a
"carousel" of multiple suggested subjects and messages by saving a message, then clicking the "Add Alternate Version"
button a second, third, fourth, or any number of times, creating distinct versions of the same message. When multiple
entries are associated with a single content block, Salsa will randomly pick one to display each time the page is loaded -- so
different supporters will see (and send) different default messages. This assures that the messages being sent are not all
completely identical in tone or content.
Recommended Letter Subject
This will appear as a header above the content on the user-facing page, but below the action description you created in Step
1. The recipient of the letter will see this subject header, so be specific. Be sure that this subject header is appropriate to the
content set (e.g., a content set named “thanks for sponsoring” would have a subject header like “Thank You for Sponsoring
H.R.977”).

135
Your supporters will be able to edit this subject by default, unless you click the "Make this subject uneditable" box. (In
practice, most of your supporters probably will not edit the subject line.)
Recommended Letter Content
This will be the suggested content of the message. Ideally, this is relatively brief, maybe two or three paragraphs (especially
if you intend to send fax messages).
When you have completed all of the content sets, it’s time to select which targets are to receive which messages.
Step 3 - Targets
Here you’ll select who will receive the message(s) you just created.
Add a Set of targets
Every action will include at least one target set. But please note: there is a maximum of 90 target sets in any action you set
up. If you have more than 90 target sets, you may want to consider segmenting your action (and any email blast associated
with it). (However, keep in mind a target set itself can include more than 90 individual targets.)
To select a target set, select a "target type" from the pull-down menu on the left side of the "add a set of targets" box.
For each target type, you must also choose a contact method. The contact method is always a choice between:
Email or Webform
Fax
Black Hole
"Black Hole" is normally used for testing purposes. Selecting this option will cause the action to operate normally, but no
emails or faxes will actually be sent. Be sure to change your action back to "Email" or "Fax" after testing, as there is no way
to recover or resend messages your supporters send through an action set to "Black Hole".
Planning Your Targets
When using a Multi-Content action, you're explicitly planning to send different types of messages. You'll want to think
through who should get which message.
In the Targets tab, you'll be creating multiple horizontal rows consisting of a target (such as "U.S. House") associated with
some content. The Content Set field allows you to assign one of the content sets your created in the previous tab to a
particular set of targets. For example, one set of targets will receive a “Letter of concern” message, while another set of
targets will receive a “Letter of thanks” message:
In a Multi-Content Targeted Action, a supporter attempting to take action might, according to the targeting instructions, be
given no matches, one match, two matches, or many matches – and they'll simply be presented with a message for each
different recipient they match.

136
Filter
By default, the targets you add to your action will be set to Auto-Targeting, which means that the individual target (within
the target type group you have selected) will be chosen based on the address information provided by your supporters. For
example, for an action targeting the US House, entering address information with a zip code of 90212 would bring up
Representative Henry Waxman (as of Nov 2011, that is!).
However, in some cases, you'll want to select a specific group of targets (perhaps to exclude other targets who are not on a
committee or have already pledged their support to the cause at hand). In those cases, you'll want to use the Filter feature
to select only the targets of interest. Clicking the Filter feature brings up a screen similar to this:
Please note that this screen will provide different options based on the target type you are filtering. The above screenshot is
for the US House type.
At this point, you can select what criteria you would like to filter on, and then make as many selections in the checkboxes
next to each target. If you do a second search based on other criteria, your previous selections will be maintained.
Step 4 - Who can act?
Same as Targeted Action. Refer back.
Step 5 - User Information
Same as a Targeted Action. Refer back.
Step 6 - Follow-up
Same as a Targeted Action. Refer back.
Step 7 - Options
Same as a Targeted Action. Refer back.
PETITIONS
A supporter who signs a petition is adding their name - publicly, anonymously, or completely hidden depending on the
options you choose - to a pledge or letter that your organization has drafted. It is a one step process which requires only the
fields you have designated in the workflow. Your organization must determine what to do with the data/signatures of your
supporters - they are not automatically printed, sent, or shared in any way.
Petitions may not have as much weight as a direct message, but they can help you build your community of supporters.
Read this great article about how petitions can help your organization overall.
SUGGESTED READING: 5 Ways Online Petitions Can Help Your Nonprofit Win Real Change
https://www.salsalabs.com/get-know-us/blog/5-ways-online-petitions-can-help-your-nonprofit-win-real-change

137
The workflow is the same for all actions created in Salsa, whether it is targeted, multi-content or petition. When creating
a petition though, you will see “Compose your Petition” in place of “Content”. You will need to set Targets for other
actions, but not a petition.
1) Description
The following fields appear on the description tab of the workflow.
Reference Name
This field appears consistently through all Salsa forms. It is used for internal reference only (so you can differentiate this
petition from others in a list). Your supporters will never see this data.
Action Title
This field creates the "headline" in large text at the top of the end-user page (the page your supporters will see). Typically,
this is used to briefly describe the purpose of the action.
Brief Description
This text appears on the end-user page, and explains to your supporters why they should take action. The text appears
below the title on the end-user page, but above the field containing the actual campaign letter. You can lay out this text
block very simply or elaborately. If you want to, you can add images, text styling, hyperlinks and other design features using
either code or the embedded WYSIWYG editor. Do not paste your action description text from MS Word. To paste code into
your description, click “Source” in the top left corner of the WYSIWYG editor.
Footer
The page footer text appears below the form fields where supporters enter their personal information. It is generally used
for either additional explanatory text about the page or identity information about your organization.

138
2) Compose Your Petition
This is the content of the petition itself – the message you are asking your supporters to sign. Petitions are not editable to
your supports. By signing they are supporting your content.
4) Who can act?
Same as Targeted Action. Refer back.
5) Signatures
This tab formats the appearance of signatures on your petition action page. If you do not want users' signatures of a petition
to appear on the petition page itself, you can skip this step. If you want signatures to be seen, continue.
Signature Options
Choose one of three options for how supporter signatures display
on the page
1. Do not show signatures – (you don’t need an explanation,
right?)
2. Show number of signers - Displays the number, but no
details about signers. You can customize how this displays to users
as well.
3. Show number and most recent signers - Displays names in
addition to overall count. Due to privacy concerns, please ensure
your page properly informs potential signers that their information
will be displayed to others on the page.
Signature Minimum
If you choose to display information about signers, this field allows you to set a minimum number of signatures to your
petition. Signer information will not display until after this number of signatures have been obtained.

139
Signature Goal
This field accepts a numeric value, and will publicly set the maximum number of signatures. If you need only 1900
signatures, for instance, you would enter 1900 in this field, and after 1900 signatures were provided, no more signatures
would be allowed.
Allow Signers to be Anonymous
Checking this box allows anonymous signatures to be added to the petition, advisable where a full name may not be
appropriate for reasons of personal safety or privacy. There is a tradeoff for an organization:
o Anonymous signatures will likely encourage more people to sign, but...
o ...the anonymous signatures themselves may be less credible.
NOTE: The signers name will not be displayed on the public page, but the organization will still capture in the personal
information the supporter provided in the Supporter Record.
Deadline
This field accepts a date, in the form 'YYYY-MM-DD', and will be the cutoff point where no further signatures will be
accepted. This field is useful for "switching off" a petition as a live action opportunity while retaining the page as a valid URL
for future reference. When using a deadline, you don’t need to deactivate at a later date.
Allow Signer Comments & Comment Question
Generally used only with petitions that display signer
information, this allows the petition signers to add their own
remarks. If the Allow Signer Comments box is checked, the
Comment Question field allows you to write the question that
will solicit an additional comment from your supporters as
they take action. The comment will then be displayed along
with the signer's name on the petition signature list.
Manage Signatures
If you'd like to view and export petition signatures, click on the Show signatures and comments link at the top of the
Signatures tab.

140
You'll be able to view a list of all signatures and delete any that don't look valid. You can also view comments entered by
signers in this view.
If you'd like to export these signatures to Excel, click on View and export signatures. This will open a report and you'll be
able to export from there.
To bulk delete duplicate signatures (rather than use the delete text link in the signature list one at a time), use the
Deduplicate these signatures tool.
6) Follow-up
Same as a Targeted Action. Refer back.
7) Options
Same as a Targeted Action. Refer back.
You did it! You created an online petition!

141
Letters to the Editor
Letters to the editors of local papers can be a powerful way not only to get your message out to diverse communities, but to
influence legislative opinion. With the letter to the editor tool in Salsa, you can create a webpage which allows supporters to
choose from their local papers, or from media contacts of your choice, to generate and send letters.
Reporting on letter results is a little different than reporting in our actions/campaign tools. There will be only a media key
used to identify the publication that was targeted with each letter. Here is a list of Media Keys and
Publications https://help.salsalabs.com/entries/21565919-Media-Keys-and-Publications that you can use to determine
which keys correspond with which publication.
Step 1: Description and Details
Reference Name
Internal name for this letter (your supporters won't see this).
Description
Enter the description you want your supporters to see on the page, above where they edit/send the letter. For example, this
is where you can explain what the letter is for and why it's so important for them to send it.
Paper Selection Text
Enter any special instructions or explanations about the paper selection step. This text will appear below the Description but
before the list of papers in the supporter's area.
Letter Subject
Enter the subject line you want the media outlet to see when your supporters' emails/faxes are sent. This is editable by your
supporters.
Letter Salutation
Enter the salutation (e.g., "To Whom It May Concern") you want used, if any. Your supporters cannot edit this.
Letter Content
This is where supporters can create/edit the content of the letter. Here, you have several choices. You can either enter the
full content of the letter you want your supporters to use (which they will be able to edit), or just enter part of it and let your
supporters finish it, or just enter "Please type the body of your letter here" and let your supporters create 100% of the
content. It's up to you!
Request
This is where you'll select the fields your supporters will complete before submitting the LTE. Name and address fields are
selected by default. We also recommend adding phone and email fields at the least. This is because most media outlets will
not print letters unless they can contact the letter-writers and confirm that they wrote the letters.
Template
Select the Templates you want to use for this page.
Step 2: Add Talking Points
Add talking point (blue button):
Click here to add one or more talking points your supporters can select from. These talking points will be listed next to the

142
letter a supporter is writing/editing. If your supporters want to use any of the talking points, they can just click on the ones
they want to add to their letters. This allows you to suggest content but let’s your supporters pick and choose how they
want to create their letters!
Edit talking point
Enter the text of the talking point. If you have multiple talking points and want them to appear in a specific order, select an
"Order" number for each one. Higher numbers will appear lower on the list of talking points.
Step 3: Follow-Up
Redirect path
Enter a full URL (starting with http://) if you want supporters to be brought to a certain page on your website after they have
submitted the LTE. For example, you might want them to be brought to a donation page, or a tell-a-friend page, etc. This
step is optional.
Thank you page text
If you don't enter a URL in the redirect path box, your supporters will be brought to a generic thank-you page after they
submit the LTE. This page will use your template and supporters will be able to click on any of the navigation items on the
thank-you page to go to another page on your website. Enter the text you want to appear on this thank-you page. (If you
enter no text, a generic "thank you" message will appear.)
Email Trigger Keys
If you have created email auto-responses on your Email Blasts tab, they will appear here. If you select an auto-response, it
will be automatically emailed after the Letter to the Editor is submitted.
Step 4: Options
Use custom contacts
Select this box only if you have created custom recipients that you want to include on the contact list for this LTE. You can
create Target by going to the "target recipients" link in the navigation bar. Any recipient you create as a "Media Outlet" type
will be available if you select this box.
Recipient KEYS:
Select which custom recipients you would like to appear for your contact list by highlighting them from this menu. You can
multi-select menu options by holding down either your Apple or Control key and clicking on multiple options. To "un-select"
an option, use this same technique and make sure the option you wish to remove is no longer highlighted before saving.
Note that you cannot use both auto-targeting and custom targets together in this tool. You can only use all custom targets
or Salsa's auto-targeting.
Disallow clickover talking points
Select this box if you do not want supporters to be able to add the talking points to their letters by clicking on them. This can
be helpful if you want supporters to see the talking points, but want to force them to type them in manually, thereby
increasing the likelihood they'll personalize them.
Allow faxes
Select this box if you want your supporters' letters to be sent by fax to media outlets with fax numbers. Please note that you
will be charged $0.10/page for these faxes.
Max no. of faxes
Enter the maximum number of faxes you want sent for this LTE (this is very helpful in ensuring there is a maximum cost you
will incur for allowing the fax option).

143
Letter width
Enter a width if you want to customize the size of the box supporters will use to type in their letter.
Letter height
Enter a height if you want to customize the size of the box supporters will use to type in their letter.
Creating Custom Recipients
Step 1 - Name and Contact Information
First Name
This is the target recipient's first name.
Last Name
This is the last name for the recipient.
Organization
This is the name of the organization that the recipient represents.
This is the email of the target recipient.
Fax
This is the fax number of the target recipient.
Fax numbers for North American destinations should be a numeric string beginning with the 1, uninterrupted by any spaces,
dashes, parentheses, or alphabetical text. For instance, a fax number with a New York area code might be entered as:
12123334444
Fax numbers for international destinations should likewise be an uninterrupted numeric string, beginning with the country
code number (e.g., 44 for the U.K.).
Step 2 - Other Information
Address Line
The recipient's primary physical address.
Address Line 2
The recipient's physical address.
City
The recipient's city as related to the primary physical address.
State/Province
The recipient's state as related to the primary physical address.
Postal Code
The recipient's postal code as related to the primary physical address.
Country
The recipient's country as related to the primary physical address.
Image URL
If you have a picture of your recipient, enter the hosted URL here.

144
Letter Salutation
Is there a custom greeting this person expects? "Dear Your Highness," etc.
Step 3 - Custom Targeting
Preferred Contact Method
Choose between several contact methods, to pick the one that represents how best to contact the recipient. Selecting Email
or Fax will override the Action's settings and always send this type of message when this recipient is targeted.
Region Restrictions
Here, you can select various states that the recipient should only receive messages from.
Postal Code restrictions
Enter zip codes in comma separated format (five digit zips only) if you wish the recipient to only receive messages from
people in these zip codes.
Block sending supporter phone numbers
Block sending supporter street address
Check these boxes if you would like this supporter information to be hidden from the target.
Listing Recipients
This page lists all the custom target recipients you have created. Here, you can sort and filter a variety of ways.
Uploading Recipient Lists
The recipient upload process matches the supporter upload process in almost every way, except for the table to which you'll
upload. You can access the import interface from either the Manage Imports dropdown in the Supporter
Management package, or from the Target Recipients dropdown in the Advocacy Campaigns package.
In the first step of your import, you'll select the spreadsheet which contains your custom recipients. (Remember to save this
file as a tab-delimited text file before you begin.)
Taking a step back - to create the spreadsheet of your custom recipients, you can use as few or as many of the fields below
as your column headings. Just remember to not leave out any contact information if you actually want to send letters to
those targets!
honorific (Such as Mr., Ms., Dr., Councilman)
given_name
middle_name
family_name
suffix
Letter_Salutation (e.g. "Dear Councilwoman Chen," without quotes)
organization
phone
fax
address_line

145
municipality (this is the City)
region (this is the State)
postal_code (this is the Zip)
postal_code_extension (this is the Zip +4)
country
Note
Once you've selected your file, then change the selection on the Table to upload to field to RECIPIENTS OF CAMPAIGN
ACTIONS for action targets, and IMPORTS TO MEDIA CONTACTS for letter to the editor targets. After making that selection,
you can begin your import by clicking SAVE + CONTINUE. See below:
On the second step, you'll want to make sure that all of your field names from your spreadsheet (listed on the left) are
properly matched up with the field names in Salsa's tables.
If you are trying to update previously added custom recipients, you can dedupe on the email field. This is not an automatic
setting and needs to be manually set to look like this:
At that point, you'll want to set the Skip lines section under advanced
options to 1 (skipping the header row) and then click Submit for Upload.
Once the upload has finished (hit refresh after a few minutes), you will then be
able to select that custom target in your Action or Letter to the Editor pages.
For more information on how to use the uploader, try taking a look at the guide
to Manage Imports.
Manage Recipient Groups
Here you can group your custom recipients. Create a group by naming it and
saving it (towards the bottom of the page). Then select the target recipients you
want in that group. For example, you might call a group "Montana Roadless
Campaign" and put various Forest Service decision makers in that group.

146
Gateway Processor and Merchant Account
To accept funds through donation pages you need to select and setup a Merchant Gateway in your Salsa account. There are
a few things you should know about how they work. In order to accept credit card donations online, you need to have the
following two types of accounts:
1. A gateway processor account (for processing the credit cards)
2. A merchant account (transfers and deposits the donations into your bank account)
Learn more at www.idealware.org/articles/payment_processing_pictures.php
How to get there
Selecting a Gateway Processor is a business decision that takes place outside of your Salsa account. Once you've selected the
Gateway Processor that's right for you, set.
Selecting a Gateway Account
A gateway or gateway processor account works to validate that the credit card is valid, make sure the name, address, and
CVV code (three-digit code on back) all match, and protect against fraud. If the card is rejected a message will be sent to
your Salsa account. If not, the card is processed and the money is placed in your merchant account.
Salsa works with the following gateway processors:
Democracy Engine
Authorize.net
PayPal Payments Pro
Payflow Pro (owned by PayPal - it used to be a Verisign product)
YourPay/First Data API (formerly LinkPoint - not the YourPay Connect product)

147
Below is a chart that compares features and fees for each of the gateways. This information is provided for comparison
purposes only - for full gateway documentation contact gateway staff directly. Any fees are associated with the gateway, not
Salsa. Salsa does not charge extra for using any merchant gateways.
Selecting a Merchant Account
Some Gateway Processors include a merchant account and some require you to select a merchant account separately. If
your selected Gateway Processor requires a separate merchant account, you'll need to select and configure that account
next.
A merchant account is an account that holds credit card payments and allows you to receive the money from a donation.
When the payment gateway processes a payment, the money is transferred from the credit card company to your merchant
account.
Many banks offer merchant accounts, so you might consider contacting your financial institution first. Other members have
had good experiences using Chase Paymentech as well. If you are a customer of Authorize.net, they also offer merchant
accounts.
A note about accepting American Express and Discover: If you want to be able to accept American Express and Discover, ask
your merchant bank how to create accounts with these card companies. You will not automatically be able to accept these
cards through Salsa until you have done the additional setup required by your merchant account.
Configure your gateway processor account to connect with your merchant account
You must configure your gateway processor to direct the money to your merchant account. If you have questions about how
to do this, contact your gateway account vendor for directions.
Notify yourself or your staff when a donation arrives
Many times, you or someone on your staff would like to be notified when a donation is made. If you'd like to have a
message in your inbox when that happens, then read on!
Solution
The solution is to configure your donation page to send an autoresponse to you or your staff. Autoresponses are the
messages that Salsa sends automatically after a successful donation. Typically, these are thank you or receipt messages. By
adding an autoresponse to the donation page, Salsa can send an autoresponse to you or your staff as well.
Here are some steps that you can use.
1. Edit the donation page.
2. Click on the Follow Up tab.
3. Click on the Add a new response button. A new autoresponse will be added.

148
4. Click on the triangle on the left-hand side of the new autoresponse. An autoresponse configuration form will
appear.
5. Change the Type from Reply Email to Individual Email. A Target Email field will appear.
6. The Target Email field needs to contain the email address(es) that you want to receive the donation. Fill those in. If
there are more than one, then please follow the advice in the field header.
7. Fill in the rest of the form with the information that you'd like to see when a donation arrives.
8. Save the donation.
9. Test!
Listing Recent Individual Donation Records
Sometimes it's necessary to drill down and find the details of a single donation record, or just
to take a quick look at the latest donations that have come in. To do that, you can use the
donation listing and search interface.
Locating the donations listing
Click on the Donations package, then click List all donations or List successful, online
donations:
List all donations
In the List all donations interface, you'll see a list of all of your donations, summarized with
the donation KEY, Transaction Date, Amount, Transaction Type, Last Name, Email, PNREF
(credit card processing reference number), RESPMSG (response message) and Status fields.

149
To see more details for a single donation, click the Details link to the left of the donation ID field for the donation you wish
to examine. You can also use filters to search for donations in the list view: choose a field to search from the Filter By drop
down, then enter the value you're looking for, and click the Search button. It's only necessary to enter the beginning of what
you're looking for--though Smi will return Smithee and Smithers as well as Smith. You can also search for text inside fields,
by using the % wildcard character. %son, for instance, would bring back both Johnson and Robertson.
Once you've found a donation you'd like to see details for, click the Details link to bring up the Donation Details screen:
On this screen, you will be able to view details of donations, issue refunds (if your merchant gateway account supports this
feature), and modify certain fields including Designation Code and Tracking Code.
You will not be able to modify the transaction date for credit card donations: the date will be whenever the donation was
submitted for processing.
Note: if your merchant gateway account does not support online refund processing, you will have to contact your merchant
account provider directly in order to request refunds for your supporters.

150
List successful, online donations
The List successful, online donations is similar to the List all donations page: you'll see a list of your donations, summarized
via the donation KEY, Transaction Date, Amount, Transaction Type, Last Name, Email, PNREF (credit card processing
reference number), RESPMSG (response message) and Status fields. The difference is that the List successful, online
donations page will only list successful online donations made through Salsa donation pages. It will not show failed
donations (i.e. those rejected by the merchant gateway processor for any reason), test donations, imported donations, or
donations manually entered into Salsa.
How do I edit a donation record?
Existing donation records can't be directly modified through the Salsa headquarters interface the way you'd modify, say, the
supporter record.
However, you can update donations by using Salsa's importer, under the Supporter Management tab.
The concepts in that guide should throw some light on interacting with donations data via the importer, but the guide itself
focuses mostly on adding donations en masse via an import (for instance, importing the week's batch of snail-mail check
donations).
Updating a Salsa data row from an outside file
Conceptually, what we're going to do is find a row of Salsa data -- on the donation table in this case, though it could be any
other table -- and use data on an outside file to modify it.
The importer is the tool that lets us tell Salsa to make this kind of file-based update.
Using the Importer to Change Data
All Salsa data, no matter what table it resides on, is identified by a tablename_key number that's completely unique. Each
supporter has a unique supporter_key. Each donation has a unique donation_key. (You'll notice that the donation record in
the screenshot above also has a supporter_key. That number tells Salsa which donor made this particular gift.)
To update data via the importer, whether that's one field in one record or many fields in thousands of records, we're going
to reconstruct the path in that screenshot for your data.
Step 1: Identify the table_key number of the record(s) you intend to change
For a single donation like our example, that's just a matter of looking at the target record in your Salsa headquarters. Key
numbers will be shown in the leftmost column when you list Salsa data; they'll also be visible in the URL when you view the
details for a specific record.

151
This key number is going to become the "key"
that unlocks the file when we import. So to
start with, just copy it into the first cell of a
spreadsheet.
In this example, the key 1803637 in cell A2
indicates that all the other data we
subsequently add to row 2 will modify record
1803637 when we import. (Note that the
column headers in row 1 in this example are
optional; you need not include column names
in your own file, and if you do include them,
you need not name them in accord with
Salsa's own field names.)
If there are two or three records to update, just find the unique key numbers for the second and third records, and add
them to your spreadsheet as additional rows in the same column.
If you intend to make a batch update of many records, you might want to take a shortcut here by exporting key numbers en
masse from Salsa via a report, and using those to begin your import file.
2. Add to your import file the data you intend to write into Salsa
Once key numbers are in place, we'll just need a second column in the spreadsheet reflecting the data you wish to update.
In our example screenshot, we want to reclassify donation 1803637 with the tracking code new-code. So, in cell B2 (the next
column for the row beginning with 1803637), we just enter the text new-code.
Extend as desired.
If there are many different donation_keys to update (besides just 1803637), copy the tracking code and paste it all
the way down the spreadsheet column.
If there are many different fields to update (besides just tracking code), create additional columns for each field, and
drop in the appropriate data updates in those columns.
3. Execute the import
With the full import file of keys, tracking codes, and whatever else set up, it's time to translate that data into Salsa via
the importer.
3a. Make your data into an importable delimited file
If you've done steps (1) and (2) with a spreadsheet application such as Excel, you'll have to make your data import-friendly
by saving it as a delimited text file (such as a comma-delimited .csv file, or a tab-delimited .txt file). It's probably as simple as
doing a save-as in your spreadsheet application.

152
3b. In your Salsa headquarters, navigate to the importer
You'll find it in your Supporter Management tab, under Imports >> Import Supporters.
3c. Complete the first step of the import process
There are three things you'll need to do on this screen:
1. Browse for and select the saved import-ready file you created in (3a);
2. Designate the field delimiter used by that import-ready file (this is the most frequently overlooked step); and,
3. Write in the Salsa table name you intend to target with the import. For donations, the table name to write in
is donation (singular). For other imports, consult this of Salsa's most frequently used tables.
Once you've done all this, hit the "Save and Continue" button. We're almost there!
3d. Complete the second step of the import
process
In step 2 of the import process, you should see
two columns: a list of the fields in your import
file; and, for each such field, a pull-down menu of
available Salsa fields from the write-in table you
designated in step one. If your data doesn't look
like this, there's a problem; begin again with (3c).
In our example, we're matching the donation_key column to the Salsa field donation_key, and we're matching our second
column to the Salsa field Tracking Code.
Once the fields are aligned, we're ready to go! Just hit "Submit for Upload".
4. Confirm the update
The only thing left to do is confirm that your data updates look right. Navigate in the headquarters to an updated record and
give it the old eyeball test.
Postscript: So why can't I just hit an "edit" button?
Many data rows in Salsa aren't available for editing directly in the interface simply because users so rarely want to edit
them.

153
That's largely true of donations (how often do you
retroactively alter an existing donation record?). And it's also
the case that most donation records in Salsa mirror records
kept in at least one external database. For instance, all online
donations are recorded by the merchant gateway processor.
Most organizations adding offline donations to Salsa are also
recording them in at least one third-party location as well,
such as a donor database or an audit log. Discrepancies
among these financial records caused by casual or
unconsidered data alterations can present serious accounting
problems.
Disallowing easy headquarters editing while allowing updates
by import is intended to filter out potentially error-prone
casual updates while still allowing experienced Salsa users to
make a considered change when necessary.
Donation Errors
When donation errors are encountered by you or your donors, you'll need to find out what the error means - 95% of the
time, the error is due to your merchant gateway setup, or an entry error from your supporters.
First, track down the RESULT value. Start on the Donation Details page for an individual donation, and click the See private
donation summary link:
Then, find the RESULT field and take note of the number provided:

154
Use that number to find the error, as provided by your merchant gateway
documentation. Links to the corresponding documentation or contact
information for each merchant gateway is below:
Democracy Engine - please contact DE directly
Note: RESULT of -2 indicates a rare interruption of the Salsa-
Democracy Engine bridge during the donation processing. If you see this
result, you may have a successful donation (in DE) which Salsa has
recorded as failed: check your Democracy Engine terminal to confirm the
donation's status, then contact Salsa support.
Payflow Pro
Authorize.net
YourPay / Linkpoint - please contact directly at 1-800-285-6079
1-800-285-6079.
Website Payment Pro (page 74)
Did that transaction go through? It's all about the RESULTs.
One important but easily misunderstood bit of data we use in our donations module is RESULT. (I don't mean to yell. The
field name is just in all-caps, you see.)
Every attempted donation gets an entry in Salsa's donation table. The RESULT field encodes, well, the result of that donation
attempt -- whether it was successful or not. Because of that, RESULT can be a very useful field to use in building reports,
since you might often want to winnow the report output to successful donations.
A. Successful Online Transactions
This one's easy.
All successful online transactions have the number 0 in the RESULT field.
So, in a reporting context, you can drill down to successful, online donations by using the condition RESULT = 0. Just like so:
B. Testing Donations
You can execute a test transaction on any donation or payment page by using the card number 1111111111111111 (sixteen
consecutive ones). This type of "donation" doesn't actually hit the merchant gateway processor, but it's handy for testing
out the visible performance of the page: does the page redirect successfully? do the autoresponses look right?

155
You'll also see the test logged in your donation history.
All test donations have the number -1 in the RESULT field. They're also marked as Transaction_Type = Testing.
C. Manually Entered Offline Donations
Not everyone records gifts they receive offline -- like snail-mailed checks -- in Salsa, but it is possible to do so.
These are an interesting case, because all manually entered donations have the number -1 in the RESULT field. Just like
Test transactions!
Since you might often want a report on all your donations for the year, online or off, we'll want to tweak reports conditions
to incorporate both the RESULT codes 0 and -1, while excluding test donations. To do just that, try these report conditions:
D. Unsuccessful Transactions
Here we're into the Wild West.
When your donation is rejected by the merchant gateway processor, the processor ships us a result code ... but these codes
are not standardized between gateways. Each has its own codes, a variety of positive and negative integers; the only thing
we know is that they're never 0 or -1.
You'll probably interact with these failed donations RESULTs less in a reporting environment than one by one -- when you're
trying to troubleshoot what happened with a particular donor. Here's a quick cheatsheet to figure out what the heck they
might mean.
Check the individual donation's RESPMSG field: usually, a rejected donation will also send us a somewhat human-
readable description of the error. These may be more or less self-explanatory, but they might give an initial read on
the likely problem. Copy the text of the error into the web search engine of your choice and see what comes up.
Look up the gateway processor's index of codes. We've got a list of links to currently-supported gateways here; if by
the time you read this some have been afflicted by link-rot, a web search on something like "Paypal gateway error
codes" should lead you to current documentation in short order. Salsa's RESULT field is a direct capture of just such
a gateway-generated code.
Log into the gateway processor back end itself. You may have additional details about the transaction available
there.
Contact Salsa support. Just be aware that we ourselves don't have a secret trove of additional information about
donations: our pages hand the proposed gift off to the gateway processor, then we record what the gateway told us.
It's the gateway itself that's the ultimate arbiter here, but we might be able to help you make an educated guess at
what's going on.

156
Welcome Series for New Donors
An email nurture campaign is one or more emails that are sent automatically at intervals that you define. Use this process if
you'd like to queue up a series of emails which will be automatically sent supporters meeting both of the following two
conditions:
1. The supporter is new to your list
2. The supporter was added to your list by making a donation via a Salsa donation page.
NOTE: If you'd like to set up a welcome series which will work for any new supporter (no matter how they were added to
your database), refer back to the Welcome Series Primer.
How to get there
This technique uses:
Relative date queries to determine supporters who were recently created via a donation page
Greedy smart groups to regularly collect new supporters
Autoresponses and Streaming emails (Salsa's "automatic email" tools)
Tutorial After the Donation - Drip Campaigns and Thank You Pages
https://youtu.be/3j0aBkiHsvw?list=PLMm0S6LhM-6M2OPIwvXaERdLQF4w6Uog1
There's a similar (but simpler) process for creating a nurture campaign which can be added to any donation page. This
process is page-specific and will queue up a series of emails as soon as a donor makes a donation via a particular page. This
process is different from the process described on this page in the following ways:
It is page specific - using the process in the video you can have a different series of emails for each donation page
It is inclusive of all donors - The process on this page only sends emails to donors who are new to your list overall
(i.e. they were not in your supporter list before they made a donation). The process in the video will send emails to
all donors - whether they're new or not.
Details
Create the selection query
The selection query will use Relative Date Queries.
For our example, we want the new supporters - those whose record was created in the last 24 hours.
The query should make sure that the supporters came from a web page. This makes sure that supporters that were
imported are not included.
To restrict these query results to only those supporters who were created by a specific donation page, add
the Source_Details condition shown where the value = %donation page key%.

157
Create the greedy smart group
A greedy smart group in Salsa is a group that's updated by a query. Supporters added to the group stay in the group until
they are removed (thus "greedy").
Greedy smart groups have an amazing capability -- they can send out a streaming email or autoresponse to a supporter
when the supporter is added to the group. This is perfect for a nurture campaign. Here's what happens:
1. A query runs to find supporters that match the criteria
2. The supporter gets added to the group
3. When the supporter is added to the group, Salsa sends the supporter a streaming email.
4. Note: The next night, the same supporter will be selected again, but they're already in the greedy smart group.
Since they're already there, they won't be added, and the streaming email won't be sent again.
Here's a sample configuration that uses the query that we created above:

158
Create the streaming emails
Streaming emails, like regular email blasts, can have supporter fields like First_Name and expiration_date and Membership
Level embedded into them. Since we are targeting supporters who were created in the last 24 hours, the message can be
personalized to the new supporter's needs and interests.
Conclusion
We've found that a mixture of
Date Range queries,
Greedy smarty groups, and
Streaming emails
Can be used to automate a series of emails for new users. The query finds new supporters relative to the time that the query
is run. Greedy smart groups collect the supporters found by the query, then queue up a series of streaming emails as the
supporter is added to the smart group.

159
Creating an Event
Events Step 1: Select the Events Package
To get started working with an event, you'll need to navigate to the Events package and
either create a new event or select an existing event to edit.
Navigating to the Events Package
Navigate to the Events package by selecting the "events & parties" tab along the upper horizontal
bar in your Salsa headquarters.
Creating a New Event
Create a new event in either of two ways:
Enter an Event Name in the sticky on the main dashboard
Click "Create New Event"
Hover over "events >>" in the sub-navigation bar
Select "create event"
After creating the event, you will automatically be redirected to the screen where you can set up and edit the event.
Editing an Existing Event
To access and edit an existing event click “List Saved Events.”
From this list of saved Salsa events, you can also
copy an event (creating a cloned second copy of an existing event, with all the same
settings but no attendees)
remove (delete) an event
search your events (using the search options at the top)
export a list of all of your events (using the export options in the lower right)

160
Configuring Sharing
Configuring sharing, as with many of the tools in Salsa, is available for events.
Events Step 2: Description
The events screen's first tab, "Description",
configures the basic appearance and settings
of the event.
All the information set on the "Description"
tab will be included in the "Add to Calendar"
buttons which are accessible by your
supporters on the public-facing events page.
Title
The public name of the event will appear as a
banner headline atop the page (in h1 HTML
style).
Description
Describe the purpose or highlights of your event. This description appears on the event page, and can be HTML-styled using
the WYSIWYG editor, including images, links, and video embeds.
Start/end date and time
Add an event time using Salsa's built-in calendar picker. (If adding by
hand, enter using the format yyyy-mm-dd hh:mm.)
Only events of status "Active" and possessing a start date in the future
will be displayed on public lists or searches. The date/time values are
displayed to the end user on the event registration page; they can be
hidden using CSS.
The end date and time are optional but highly recommended. This is
especially true as your supporters will have the option to sync your page
with Gmail and/or outlook, which will only work correctly if you have a
date and time.
Maximum Attendees and Wait-list
To allow an unlimited number of registrations, simply leave the "Maximum Attendees" field empty, or set to 0.
Optionally, you may limit signups by entering a maximum number of attendees. Supporters who sign up after the maximum
number has been reached will be blocked from signing up or (if a waiting list is available) placed on the waiting list.

161
If you have capped event signups, you can optionally specify an additional number of supporters that you are willing to
accept for your wait-list, should your maximum attendee count be reached. If any of your other attendees cancel or
otherwise change their status to anything other than attending, then the first person on your waitlist will be contacted
through your waiting list auto-response.
When using the wait-list, be sure to configure a "waiting list auto-response" under the Step 6: Follow-up & Reminders tab.
To make changes to your attendee and wait list, navigate to the Full Attendee List.
Registration Unlimited; Waitlist Not Used
Registration Capped at 20; Waitlist Not Used
Registration Capped at 20; Waitlist Capped at 10
Select a Status
Changing the status menu to anything other than "Active" will generally prevent
your event from appearing in an event search.
Address
This tab allows you to display information about an event's location. If location is
not needed for the event (for instance, a webinar), just skip this tab.
Address, City, State, Zip, and Country
This information will display on the page under an "address" heading. It will also
be used to identify the event on a map, if enabled.
Directions
Use this field to optionally supplement the address information with a human-
readable description, such as "two blocks north of DuPont Circle, above the
Starbucks." This field allows HTML, if you want to style text or include an image.

162
Hide Standard Map
If address information is entered, Salsa will by default pin the location on a Google map.
Checking this box suppresses the Google map display.
Map URL
If this field is populated, the word "Map" will appear on the event registration page, linked to the URL you provide. Most
online mapping tools generate unique, linkable URLs for any street address you enter, which can then be copied and pasted
into this field.
User Information
This tab governs the information that will be collected about registrants.
The User Information tab lets you determine what information you'll be collecting when someone signs up on the page.
Facebook Connect
By checking this box, your supporters will be able to register for your event by using their Facebook login. The registration is
a one-click process, allowing supporters (and new visitors) to register with minimal effort. If the supporter has arrived at
your event page already logged into Facebook, the event will automatically have their information ready to register. If they
are not already logged in, it will ask them to do so.
Before enabling this feature, make sure that you do not need to collect additional information in your event registration.
With Facebook Connect, Salsa can only collect the supporter's email address and name - if you're looking for other data (say,
their address), that information won't be collected. Because of this, the Facebook Connect option cannot be used on paid
events.
Requested User Fields
You can request or require as much or as little data as you like when processing an event sign up. Salsa's default will be to
request first name and last name, and require email and zip.
Add more fields, including custom fields, by clicking the button with the plus symbol and selecting the new field from the
drop-down menu.
Make any field requested field into a required field by clicking the "required" check box next to it.
Remove fields by clicking the button with the minus symbol.

163
By default, fields will appear in Salsa's predefined sequence of precedence regardless of the order those fields appear in
your headquarters page setup. However, you may choose to order the fields to your own preference. To order the fields:
1. Click the "Use Field Order Shown Below" box, and save.
2. Change the order of your saved fields by click the drag handle next to any field, and holding down your mouse
button as you move it up or down the field list.
3. When the fields are ordered to your liking, click "save".
Groups
In addition to collecting supporter data,
you can optionally have people who use
the signup page sorted into different
Groups, or subsets of your list.
Allow Users to Sign Up Guests
Check this box to allow your event attendees to sign up others as their guests for your event. This will then appear next to
your submit button on the event registration page. Supporters can then add as many guests as they would like.
Event Fees
Use this tab to configure payment options, if you intend to charge a registration fee on your event page. If your event is free
/ you are not processing paid registrations through Salsa, just skip this step.
To start adding event fees, click "Yes" under Does this event cost money? and use this tab to tell Salsa what and how to
charge.
Merchant Account
Select the merchant gateway you wish to use from the drop down list. Note: drop-down menu will only appear if multiple
merchant gateways are available.
Default Tracking Code
If you wish registration payments for this event to have a specialized tracking code, enter it here.
(Registration payments are differentiated from regular donations, and associated with the event that earned them, by
default ... whether or not you enter a tracking code.)
Confirmation Text
This text will appear next to a required checkbox and may be used to confirm that a supporter understands the implications
of giving to your organization. This checkbox appears only on the last page of the event registration sequence, where the
user enters credit card information to complete the registration.
Generally, this option will only be used by organizations whose event registrations constitute political fundraising affected
by campaign finance laws.
Maximum Donation Amount
Sets a maximum amount a single supporter can pay in a single transaction.

164
Generally, this option will only be used by organizations whose event registrations constitute political fundraising affected
by campaign finance laws.
Invoice Option
Check the “Invoice Option” box to allow event attendees to pay via an invoice provided by your organization, rather than
paying immediately with a credit card. Please note that Salsa does not generate an invoice but simply makes note of the
payment choice on the Full Attendee List page, so that your organization can reconcile the payment in the supporter's
record once it has been received.
Attendees opting to pay via invoicing will be considered full attendees, regardless of the receipt status of their payment. You
can edit their registration status and enter their final payment on the Full Attendee List page.
For more on the full workflow of the Invoice Option, read
http://wfc2.salsalabs.com/o/8001/p/salsa/web/blog/public/index?blog_entry_KEY=2238 .
Add an Event Fee
Create (by clicking the 'Add an event fee' link) or edit the event's fee options here.

165
Set an amount, a category for your fee (Normal, Early Bird, Discount, etc.) and a description for that specific fee.
Fees classified as Discount give you the opportunity to set a discount code that your supporters will need to
enter in order to be eligible for the discount fee. Discounted fees are displayed only after the registrant has
entered the code.
If you add an Other fee category, the page will allow a registrant to enter their own payment amount.
Select the status of a fee.
The fee status refers to whether a fee should be displayed as an option or not. You can set a fee as 'inactive'
and it will no longer appear as an option (useful for expiring early-bird pricing).
Click on ‘Save this fee’ to add the fee to your events.
Note that event fees cannot currently be re-ordered through the Salsa interface.
NOTE: If you need to remove American Express and Discover from the list of accepted credit cards, you can do so with
some modifications to your template.
1. Edit the template.
2. Locate the </head> tag.
3. Copy this text:
4. Save the template.
5. Test!
6. <script type="text/javsacript">
// See: https://salsasupport.zendesk.com/entries/44958284
$(document).ready(function() {
if (/checkout\.sjs\?event_KEY=\d+/.test(window.location.href)) {
$('option[value="amex"]').remove();
$('option[value="disc"]').remove();
}
})
</script>
Caveats
This script removes Amex and Discover from all event payment pages that use the modified template.
Follow-up
Use the options in this tab to automate follow-up communication with a new event registrant. From this step, auto-
responses can be set up for successful registrants, waitlisted registrants, waitlist upgrades, and pre-event reminders.

166
Email auto-responses
Auto-Responses are email messages sent automatically upon completion of a page. Including at least one Reply-type auto-
response confirming event registration by email is highly recommended. See the autoresponse section in “Emails” for more
information.
You can configure any number of Autoresponses, in any combination of new and existing Autoresponses, on each different
event page.
1. Add a new response creates a brand-new Autoresponse on the fly.
2. Add an existing response selects an Autoresponse you have already configured.
Click "Add an existing response".
Search among all Autoresponses in your Salsa account.
Click "Select" to associate your chosen Autoresponse with this page. (Note: the Autoresponse will still remain
in use for any other pages for which it has been selected.)
The selected response appears in a shaded bar.
If desired, edit the Autoresponse content just as you would a new response (above). (Note: editing the
Autoresponse content changes its content for every other page that uses the response. When in doubt,
create a new response instead.)
A note on autoresponses in events for chapters: To assign an autoresponder to an event that is at the chapter level, you will
need to log in at the chapter level and then assign the autoresponse. If you are signed in at the organization- or national-
level, then the autoresponder will not correctly be applied.
Reminders
Reminders are a slightly different type of auto-response
which are sent ahead of the event at a time of your
choosing. They are only sent to event registrants, not to
those on the waitlist.
Create new or select existing [[Auto-responses]] to
use as reminders, as described above.
Set the Reminder Status menu to "Send Reminder".
Specify how many hours before the event (defined
as the event's start time, which Salsa interprets as U.S.
Eastern time) you wish for the email to be sent.

167
Tip: Enter an integer or a decimal for this value, but not a fraction. You could use a value like 1, 3, 12, or 24
to send the email out 1, 3, 12, or 24 hours before the event respectively; or, a value such as 2.5 to send a
reminder two and one-half hours (150 minutes) before the event.
Waiting list auto-responses
This automated email notifies the (prospective) registrant that s/he was placed on the waiting list due to size limitations of
the event. It is only used for events that incorporate a wait-list, but it is highly recommended to use them for clear
communication of their registration status.
Configure a waiting list auto-response as per regular email auto-responses above. When the event reaches capacity and
begins allocating wait-list spots, the auto-responses defined here will be sent instead of (not in addition to) the email auto-
responses.
Upgrade from waiting list auto-responses
This auto-response is important to inform the wait-listed registrant that a spot has opened up (due to a cancellation or
removal of a previously-registered attendee). The steps to create this auto-response are the same as those above.
In the case of a paid event, it is extremely important to include a URL link to the event itself in this auto-response so that the
supporter can finalize their registration. The supporter will not automatically be upgraded to the attendee list unless they
revisit the event page and complete their transaction. (Free events, on the other hand, will automatically update the wait-
listed supporter.)
To manually edit the status of your attendees and wait-listed supporters, navigate to the Full Attendee List.
Redirect path
This field allows you to specify the web address to which your registrant will be redirected after completing the event
registration. This could be your website’s homepage, a donation page, a tell-a-friend page, or literally any other page on the
web. You could even design a special landing page that tells the registrant to expect an email from your organization, or
provides an event welcome package.
Use a full URL -- e.g., http://www.salsacommons.org and not www.salsacommons.org
If a redirect path is not specified, the event will send registrants to a tell-a-friend page automatically configured with event
details.
Events Step 7: Attendees
The attendees tab allows you to view, export, or manually add attendees to the event. You can also manually remove
attendees on this tab.
Attendee summary
Provides a heads-up at-a-glance view of event registrations. Click the Full Attendee List link to see and edit a complete list of
registrants, with statuses, guests, and ticket prices.
Export your attendee list
Select the export format in the drop-down menu.
Click "Export Attendees".

168
Alternatively, click "Print Labels" to generate a print-ready .pdf of all registrants' names. (Format of 14 per page, in
two columns; suitable for use with 1 1/ 3"x4" label formats such as Avery 5162, 5262, 5522, 5962, 8162, 8252, 8462,
and 8662)
Add an existing supporter
This box allows you to register for the event a supporter who is already on your supporter list.
Click inside the box below "select a supporter"
Search for the supporter by using one of the supporter fields in the pop-up box
Click "Select" to the left of the desired supporter
Set the supporters status (Invited, Waiting List, etc.)
Click "save"
The supporter appears in an attendee summary above the "add an existing supporter" box
Add a new supporter
This box allows you to create a new supporter (not previously on your supporter list) and simultaneously register that new
supporter for your event.
Enter the new supporter's first and last name, email, zip, and event registration status.
Click "save".
The supporter appears in the attendee summary (s/he has also been added to your supporter list).
Remove an event attendee
1. On the Attendees tab, click Full Attendee List.
2. In the list of attendees, there is a Remove column. Check the checkbox for all attendees which should be removed
and then click the Update Attendees button.
Additional feature: Full Attendee List
The Full Attendee List page allows you view and change the status of your event's attendees, review the attendees'
registration information, and add guest information to existing attendees.

169
On the right hand side of the page you will see the "status" drop down menu. The options are as follows:
Invited
Waiting List - This status is applied when your supporter has registered for your event, but because the
event has already reached the "max attendees" amount, the attendee is assigned to the wait-list. You can
set the wait-list and attendee list sizes in the Description tab of your event.
If the event has fees (e.g. tickets), a supporter who is coming off of the wait-list will need to revisit the event
page in order to submit their payment. Otherwise, you can manually set their status here if they have paid
by another method.
Viewed Invite
Signed Up
Not Attending
Unsure
Attended
Cancelled
Awaiting Payment
Invoiced - This option will only appear if you have enabled the "invoice option" in the Event Fees Tab. This
allows your event registrants to pay later.
If an attendee has registered to pay for an event via invoicing, you can click the “Enter Payment” link under
the "Donation Total" column to be directed to the supporter's record where you will then enter the
payment information for the supporter.
For more on the invoicing feature, please read our blog post here.
To change an attendee's status, just set your dropdown to the event status and click the "update attendees" button at the
upper right of the table (not to be confused with the "update" button at the bottom!). To remove an attendee from your
event, just check the "remove" box on the same line as the attendee in question and click "update attendees".
Additional feature: Add guests to existing attendees
An attendee can return to the event page at any point to add additional guests. However, there may be times you will need
to manually add guests to a registered attendee.
Clicking the "Add guest" link to the right of an attendee's record, as seen below, will take you to a screen to enter the guest's
information to be associated with the original registrant.
On the guest entry screen, you'll be able to choose from the following statuses:
Pending
Accepted

170
Declined
Maybe
Already a supporter
Each of these is a manual designation useful for tracking your guest attendance, but are not related to any automated
features in Salsa.
Because these guests are being added manually, there are no registration number limits applied to how many additional
guests can be submitted.
Events Step 8: Publicizing Your Events
As with other Salsa pages, it's up to you to determine how best to publicize your events -- whether to link them in email
invitations, post them on your website, or invite only a select group of supporters.
How to share or publish your Salsa page with supporters
"Now that I've created this event/action/donation/signup page, how do I share it with our supporters?" This is perhaps the
most common question when new users are learning Salsa.
Once you've finished setting up your page, here's how to obtain the URL of the page and share it.
How to get there
Every page in Salsa has the same publishing process - it doesn't matter whether we're talking about a donation page, a sign
up page, a petition, or an event. It's all the same!
Step 1
When editing the page, click the Show Publishing Tools box

171
Step 2
Click the View Page link within the Publishing Tools box:
Step 3
A new window/tab will open containing your new page. There is no publish button - this page is already "published." To
share it with your supporters, simply copy the URL from the address bar and share the link.
Additional Tips
Supporters won't find the page until you're ready for them to find it. As soon as you save the first step of a page
setup, the View Page URL will be created and available for your page. Although the published "View Page" URL has
already been created, your supporters won't stumble across the page unless you actively share the URL.
Don't forget to try out the Short URL feature (where available) - this will allow you to create a more human-readable
URL

172
Blast Summary Reports
When evaluating email blast performance, it's a good idea to compare your metrics to two different standards:
1. Industry standards
2. Your own past email blast performance
To compare against industry standards, we recommend the M+R Benchmarks report. Each year M + R publishes a study
about nonprofit industry standards for online fundraising, advocacy, and list building. Download their report and see how
your emails compare to the emails of other nonprofit organizations like yours.
The Email Summary Report lists all of the completed email blasts for an organization and allows you to evaluate open rates,
click-through rates, and unsubscribes across all of your email blasts. You can use this report to quickly identify any anomalies
amongst your email blast performance.
How to get there
To compare email blast metrics across your organization's email blast history:
1. Go to the Email Blast Package
2. Click Summary Report in the tools menu
Important Note: The process that generates the data for the summary report runs on a daily basis.
The report header contains the last time that the summary report processing was run (where it
says Last Updated in the upper right). If an email blast was started after the summary report data
was collected, it's possible that the email blast may not appear on the summary report until the
next time the processing is run. If an email blast is in the summary report, but the statistics seem
wrong, click on the Live Details link at the end of the email blasts row. Clicking there will take you
to the detailed report for the email blast.
Understanding Your Email Blast Summary
Each row of the summary report is a summary of an individual blast. The columns in the row contain information about the
report that can be used to
check on the status of a report
rank blasts on various metrics
compare two or more blasts

173
What do the email statistics mean?
Summary of Fields
View -- View the email blast workflow. The email will not be editable, but you can review the settings used in the initial
email blast setup.
Email blast KEY -- The email blast KEY is the value to uniquely identify the email blast in the database.
Reference Name -- The reference name is the internal-only name of the blast provided in the first setup step (not to be
confused with the Subject line).
Subject -- This is what the supporter sees in the subject field for the blast. The subject is set up on the content page of the
email blast workflow.
First Email Time -- The date and time that the first email was sent from the email blast.
Total Emails -- The total number of emails sent in the blast.
Emails Opened -- The number of emails that supporters opened. An open only registers to each supporter once, no matter
how many times they open the message.
Emails opened and emails clicked may not be 100% accurate because Salsa is unable to count the number of opens or clicks
in the following circumstances:
1. Emails opened or clicked in text-only / plain-text email blasts
2. Opened or clicked by supporters that do not allow images to be downloaded into the emails they receive.
Open Percentage -- The ratio of the number of emails opened to the number of
emails sent. This number may vary from day to day depending upon the number
of emails that were opened as time passes.
Emails Clicked -- If an email blast contains links, this is the total number of times
that supporters clicked on the links in an email blast. See note above about
instances in which open and click counts may not be 100% accurate.
Click Percentage -- If an email blast contains links, this is the ratio of the number
of links that were clicked to the number of emails sent. This can be an
interesting statistic to determine how effective the email blast content itself
was. The more effective the call to action on the link, the higher the click
percentage will be.
Unsubscribes -- The number of supporters who completed the unsubscribe form linked to from this email blast OR those
whose Receive_Email value was set to a negative (unsubscribed) value due to a hard bounce.
Emails Failed -- The number of emails that were not delivered. The reasons why emails are not delivered can be viewed by
clicking on the Live Details link and reviewing the information in the Delivery Statistics section (see below). Failed messages
do not mean messages which were not successfully received, but instead messages which could not be sent at all due to
various reasons.

174
Stats by Group -- This link will take you to a single line of that particular email's statistics, with a dropdown menu from which
you can view the email performance for one particular group, as seen below:
Live Details -- Click on this link to go directly to the individual summary report for the email blast (This is the same report
you get to when you click on the report link in the email blast list). The live details are usually more up to date than the
summary report.
Advocacy Reports
Each action created will have its own unique report providing details on how many
actions were taken, and who the messages went to. Use these built in reports to analyze
how well the action did or export the information to share it.
How to get there:
You will find the report for each action when listing all action pages. Navigate to
the Advocacy 3 package and click the List Actions link.
In the action list you will find a Report link next to each action.

175
Targeted Actions
There are three types of Targeted Actions:
1. Targeted Actions
2. Multi-Content Targeted Actions
3. Blind Targeted Actions
The reports for Multi-Content Targeted, Targeted, and Blind actions follow the same format. If you click on the Report link
for any targeted action, you will see a report that looks like this:
There are 3 sections in the report:
Action Overview
Target Details
Content Details
Action Overview
The Action Overview is a handy way to see how the action has been used. Each row contains a different summary for the
action.
The Action Overview also has links at the top so that you can
View the action exactly as your supporters are seeing it
Edit the action
Return to the list of Actions

176
Target Details
The Target Details section focuses on the targets that you chose for your action:
Each row in the Target Details summarizes the messages sent to a single target by your supporters.
the columns are self explanatory. However, there are 3 that need to be described in detail:
Contact method
This column holds the method that Salsa used to send your supporters' messages to the contact. This column will hold one
of 3 possible options:
Email/webform - Salsa delivered the messages to the target via email or by filling in a webform on the target's
website.
Fax - Salsa delivered the messages via fax.
Black Hole - Salsa did not deliver any messages because the action was being used in test mode.
Messages
The column holds the number of messages that Salsa sent to the target.
Export PDF's
This column contains a link to the messages that your supporters sent to the target. The contents of each message is exactly
what the supporter sent, and will contain any changes or additional comments. Click the link to download a PDF copy of the
messages.
Export Text
This column contains a link to the messages in text format, click the link to open a new tab in your browser containing the
letter information.
Export
By clicking on the Export link in the Target Details section, Salsa will prompt you to download an excel file.

177
Content Details
The Content Details section of the report shows how many supporters sent the message:
Each line contains a single message, and how many of those messages were sent. If you click on the link in the Subject
column, then the message description appears including a link to the last three action takers.
Petition
If you click on the Report link for a petition, you will see a report that looks like this:
The descriptions are self-explanatory. If there is a difference between the numbers, you may want to edit the petition to
remove duplicates before you submit it.
The Action Overview also has links at the top so that you can
View the petition exactly as your supporters are seeing it
Edit the petition
Return to the list of Actions
Donation Reports
Reporting on donations can be done through the built-in reports in the donation
package, you can also use those reports as basis for custom reports that will provide
unique options for your organization.
How to get there
Navigate to the Donation package and click the Built-in Reports link.

178
Built-in Donation Reports
The reports are listed alphabetically and are named according to what data will be returned and under what
conditions/groupings. Simply click the Run Report link in the first column for any report and you'll see your results:
Some of the reports have user-selected conditions, so after clicking Run Report, you may be prompted to enter a selection.
For instance, some reports ask you to enter a starting and ending date for a date range:
Editing built-in reports
What if the built-in report gives you everything you need, except it's missing just one particular column? Using the Clone and
Edit link for the report will create a copy of the built in report which can be altered to your needs. You can find this link after
you run a report:
After clicking the Clone and Edit link, you'll be taken to the Properties tab of the Custom Report editor tool so that you can
make changes to your copy.
To find your cloned reports the next time you visit Salsa, go to the Reports & Statistics package and click the List Custom
Reports link. You'll see a list of custom reports which have been built in your account (this includes the cloned reports
you've modified). Click on the Details link to run or edit any of these custom reports.

179
Donation Reports
The donation table has some unique fields to keep in mind when creating custom reports.
Columns you may want to add
Donation Key: The unique identifying number Salsa assigns to each donation. This is the most distinctive value on which
group your report.
RESULT: Stored as a number in our database, different numbers indicate different response messages. The two most
important values are:
-1 = Denotes either a test transaction, or a successful offline donation. That is, the processing (deposited check/cash,
credit/debit card run through a non-Salsa service) happens outside of Salsa but the record is logged in Salsa.
0 = Successful online donation. A donation processed through a public facing Salsa page.
Any other RESULT values may be specific to your merchant gateway. Refer to your merchant gateway's documentation or
review our page linking to merchant gateway error codes.
Transaction_Type: Transaction Types include 'Donation,' 'Purchase,' 'Payment,' 'Recurring,' 'Other,' 'New Member,'
'Renewal,' 'Gift Membership,' 'Event Fee,' 'Publication Purchase,' 'Testing.'
Form_Of_Payment: Values include 'Credit Card,' 'Check,' 'Cash,' 'Other,' 'Unknown.'
Conditions you may want to add
Since you might often want a report on all your successful, non-test donations, online or off, you might want to tweak
reports conditions to incorporate both the RESULT codes 0 and -1, while excluding test donations. To do just that, try these
report conditions:
General donation report tips
The report builder can seem rather overwhelming when you first check it out, but we've learned a few things which may
help make it all a little less daunting:
1. Grouping by key numbers is often most efficient.
2. The more tables that are being used for the report, the more complex the query will be, so keep this in mind when
you're trying to run the final report.

180
3. If you're not entirely sure how to find the information you need, try requesting a wide variety of columns before
specifying conditions. You can narrow things down more easily if you can see more details first.
Build a Custom Report
The custom report builder uses visual user interface to construct a MySQL query. Don't worry: you
don't have to know anything about MySQL queries to use the report builder! You will be able to use
the reports tool to pull information from any section of Salsa.
How to get there
Select the Reports & Statistics Package on your Salsa
interface.
To create a new report, click Create a custom report
To edit a pre-existing report, click List your custom
reports
Create a custom report
The first step in the custom report builder is to set the properties of the report you're
building.
This is a decision point. Once chosen, these settings cannot be altered for a particular
report: you can only change them by starting a new report from scratch. Once you
click save on this step, the only editable fields in this tab are the name of the report
and the type of report – but your 'object' selections are locked in.
Name: Internal reference name, can be modified at any time.
Report Type
1. Standard Report: For making complete lists of data. The Standard Report displays all
records (within the confines of any limiting criteria). Use this report when you want a
list of all entries for detailed micro-level reports: every individual supporter, every
individual donation, every individual event registration, etc.
2. Aggregate Report: Summarizes data by reducing multiple records that have the
same value for a particular field into a single record. It can then sum, count, or apply
other aggregate functions to the details of the group to provide a more summarized data. Use this report when you
want to see more macro-level analysis such as supporters registered by date, donations by tracking code, online
actions by chapter, etc. Aggregate reports have some options not available in standard reports; however, all
standard report options are also available in aggregate reports.

181
Choose objects for this report
Select an object or objects on which you wish to report via a drop-down menu. Objects = database tables. See the
Appendix.
Once you choose objects (or tables), only data stored on those tables is available in your report.
Classic object chooser
The default, simpler option. The classic object chooser gives you a list of options in familiar terms to choose the data you
want to report on. It then automatically chooses the related tables.
EXAMPLE: If you want to build a report listing all donations (which also includes the name, address, and email address of the
supporter making the donation), choose Donations and the supporter table is automatically selected for you.
Advanced object chooser
The advanced object chooser will be necessary if you want to access data from a combination of tables that is not available
in the Classic Object Chooser. With the advanced object chooser, you start by selecting a single table. Salsa dynamically
generates all the tables linked to the table you’ve selected -
and offers you a second menu with all those tables, and
then a third, and a fourth, and so forth, until you either
have chosen all of the tables you need (up to five).
EXAMPLE: To build a report on subsequent donor
performance of people who attended an event last
year, you would use the advanced object chooser and
select Supporter_Event (the table joining supporters and
events), followed by Supporter, and followed by Donation.

182
Let's get Technical
As a general rule of thumb, every page and record you create in Salsa has its own table having the same name as the entity.
For example, if you create a group called ‘Activists’, it will be saved in a table called Group. Because almost all features and
activities in Salsa depend in some part on supporter activities, almost all tables are connected to the Supporter table. The
connection between the supporter activity (such as group membership or action history) and the supporter record itself is
done through a third table named “Supporter”. For example, supporter_group.
Create a Custom Report: Columns
In this tab, choose the fields you'll want to see in the report. Click the add column button as many times as you would like to
add fields to the report.
Field: This is the actual database field, selected from a pull-down menu based on the objects chosen for the report.
Label: Type whatever header you'd like to see at the top of the column. The field name will display by default.
Function: This menu offers a number of functions that could be applied to the results of the field in question. If the report is
a Standard Report, most of these functions are about formatting numerical values, especially date values. If the report is an
Aggregate Report the list of options is longer.
Group by: The "group by" box only appears if the report is an Aggregate Report. If box is checked for a particular field, it
means it’s going to aggregate records which have the same value in that particular field in to one record. When multiple
"group by" options are selected, it creates a sort of hierarchy of how the results will be organized defined by the sequence of
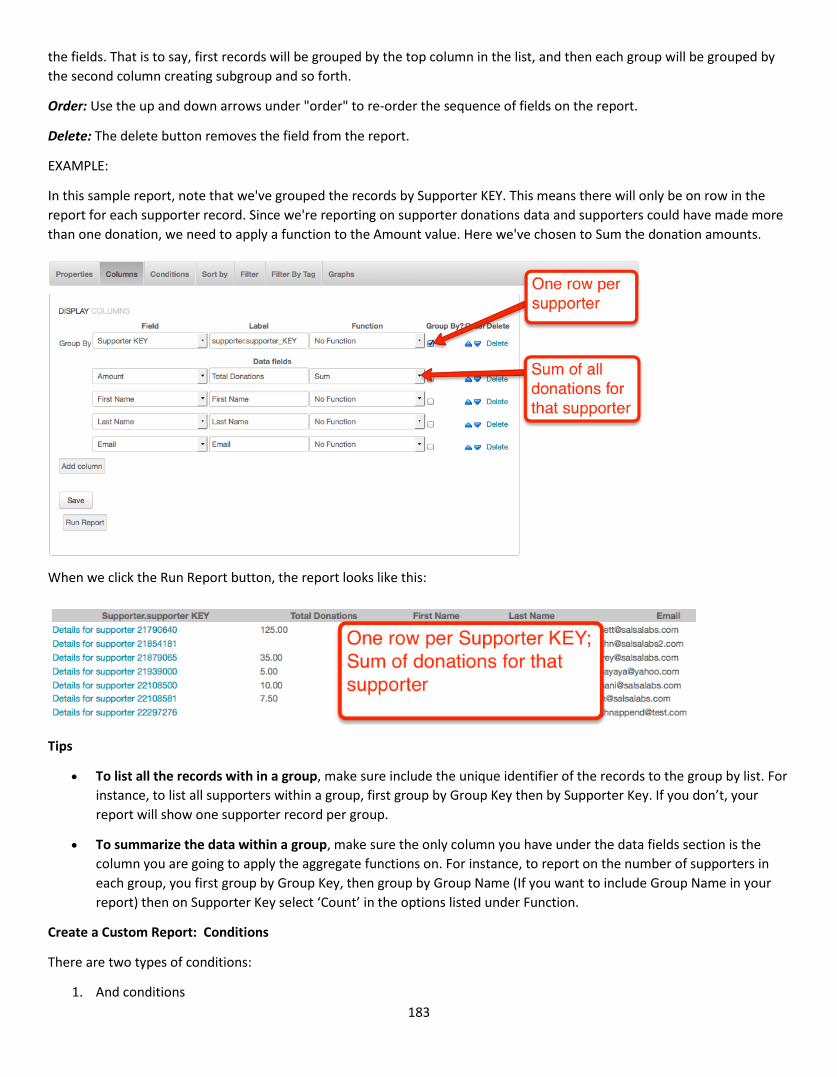
183
the fields. That is to say, first records will be grouped by the top column in the list, and then each group will be grouped by
the second column creating subgroup and so forth.
Order: Use the up and down arrows under "order" to re-order the sequence of fields on the report.
Delete: The delete button removes the field from the report.
EXAMPLE:
In this sample report, note that we've grouped the records by Supporter KEY. This means there will only be on row in the
report for each supporter record. Since we're reporting on supporter donations data and supporters could have made more
than one donation, we need to apply a function to the Amount value. Here we've chosen to Sum the donation amounts.
When we click the Run Report button, the report looks like this:
Tips
To list all the records with in a group, make sure include the unique identifier of the records to the group by list. For
instance, to list all supporters within a group, first group by Group Key then by Supporter Key. If you don’t, your
report will show one supporter record per group.
To summarize the data within a group, make sure the only column you have under the data fields section is the
column you are going to apply the aggregate functions on. For instance, to report on the number of supporters in
each group, you first group by Group Key, then group by Group Name (If you want to include Group Name in your
report) then on Supporter Key select ‘Count’ in the options listed under Function.
Create a Custom Report: Conditions
There are two types of conditions:
1. And conditions

184
2. Or conditions
To add the first condition, click the Add Or condition button. When you add additional conditions, you can choose whether
they're "and" or "or" conditions. The option to add "and" conditions isn't available until after you save the first condition.
Field: All the fields in the tables you have selected are available to you to choose from at this point even if they are not
included in the column list of the report. Simply select the field you want to base your criteria on.
Operator: Operators are the mathematical and equality symbols. They are used to compare, evaluate, or calculate the value
of the field selected to the value specified in the next step, "Value". It defines which subset of results the report will
return. This variable tells the report to select only fields with one of the following relationships to the value you enter.
Example:
Function: The "Function" menu offers a selection of choices much like the one available under "Columns", but perhaps of a
more limited utility. The functions will apply on the column selected during the search process itself, as opposed to the
formatting of the information on the final report.

185
Value: Paired with "Field" and "Operator", above, the value defines the condition -the cutoff line or search term that will
delimit the report.
TIP: % is a "wildcard" character that can be used to search for partial matches in your database when used with the operator
"like" (or "not like"). For example, 90%means any value that starts with 90, regardless of any other characters after that text.
The condition matches the following: 90210, 90ABC, 90, 90--++, and 90@#
Value Type: A value can be of two types, Constant or Variable.
Constant (the default option): This option sets the condition to be based on the value set in the ‘value’ box. When
you run the report, you'll only return data that meets the constant condition(s).
User Variable: Enables you to create report widgets that are responsive to your inputs at run time. With one or
more User Variables in place, the report when run (either by clicking "Run" in this report screen, or by placing the
report on a Salsa dashboard) will display entry boxes for you to enter the value(s) to be used. Once those variables
are entered, the report will run based on the inputs. If you're using this option, select a field, an operator, a variable
label-- but don't set a value in the box above.
Variable Label: When the value type is User Variable, the variable label "labels" the entry field with your own description
during run time. You might want to use this as a prompt to help cue users (e.g., "Enter amount here, with no $" or "Show
only donations since ...") or simply to make the report entry screen easier on the eye.

186
These user variables look like this when you run the report:
Create a Custom Report: Sort by
At this point, you pretty much have decided what data you want from the database,
what is left is managing the results. More often than not, your data needs a little
order. You can build a hierarchical sequence of up to three columns organize your
results in alphabetic or numeric order.
Create a Custom Report: Filter
The major difference between conditions and filters:
Conditions limit the data selected from the database

187
Filters are applied on only those results which remain AFTER the conditions are applied.
A secondary distinction:
Conditions can apply to any field on the tables selected.
Filters can only apply to fields selected under the columns tab.
Here is a good guideline to follow when you are in doubt in which one to use: Use conditions to select records; use Filters to
filter results based on the results of aggregate functions used with the groups by option. For example, to display only events
with a certain number of supporters or more, set up a filter using the column for the Count field. The filter for Count >100
will only display Events that have over 100 supporters.
With Rollup: If the report is grouped by at least one column and a function is applied on at least one of the data fields, then
you have the option to produce another row that shows the grand total of the values. The grand total super-aggregate line is
identified by the value (empty) in the column the report is grouped. When the report is grouped by multiple columns, the
report produces a grand total for each subgroup a except for the last group by column.
When you use Rollup, you cannot have any columns selected under the “Sort By” tab. In other words, Rollup and Sort are
mutually exclusive.
Only bring back: You can restrict the results to a limited number of lines, just enter a value in the box.
Create a Custom Report: Filter by Tag
Filtering by tag limits a report's results by one or more tags, applied to any table the report is searching. Simply select the
table, and select a tag. Remember that
because tags can relate to any object in the
database, there might be many cases where
the table selection is vital.
Multiple tags can be applied simply by
additional clicks on the "add a tag filter"
button. When multiple tag filters are
implemented, they are conjoined by "and" -
- that is, only data meeting every tag filter
will be returned.
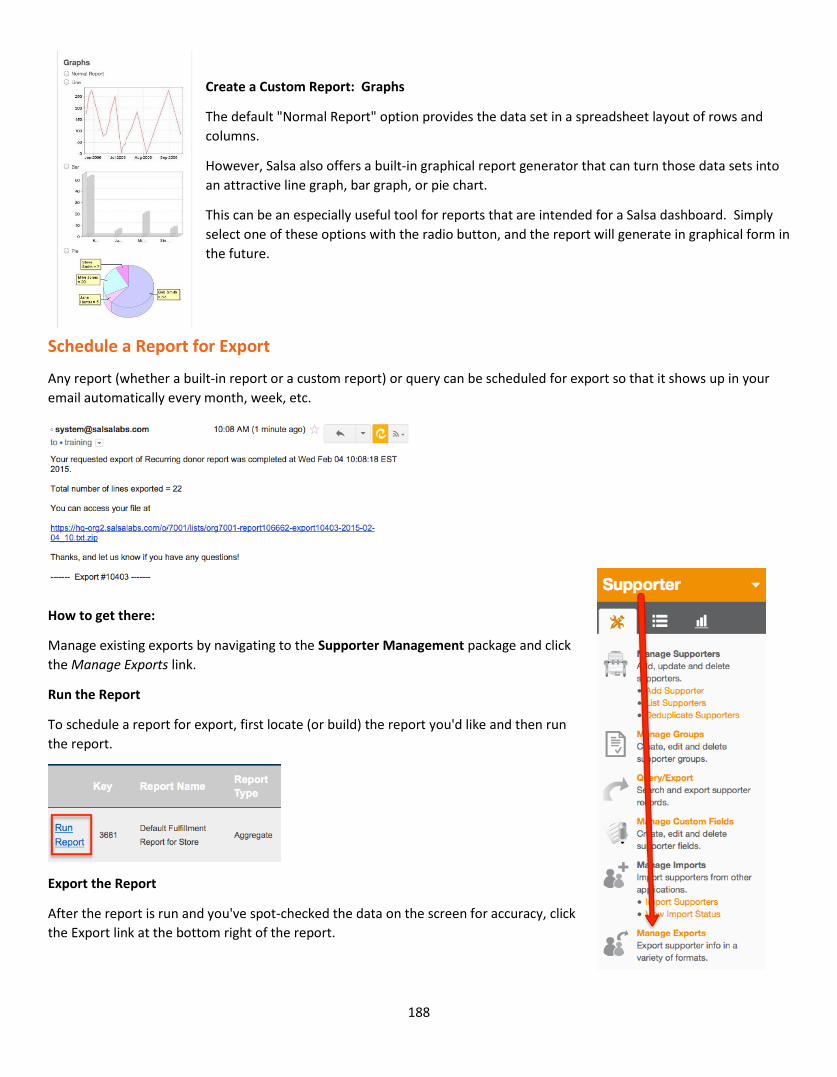
188
Create a Custom Report: Graphs
The default "Normal Report" option provides the data set in a spreadsheet layout of rows and
columns.
However, Salsa also offers a built-in graphical report generator that can turn those data sets into
an attractive line graph, bar graph, or pie chart.
This can be an especially useful tool for reports that are intended for a Salsa dashboard. Simply
select one of these options with the radio button, and the report will generate in graphical form in
the future.
Schedule a Report for Export
Any report (whether a built-in report or a custom report) or query can be scheduled for export so that it shows up in your
email automatically every month, week, etc.
How to get there:
Manage existing exports by navigating to the Supporter Management package and click
the Manage Exports link.
Run the Report
To schedule a report for export, first locate (or build) the report you'd like and then run
the report.
Export the Report
After the report is run and you've spot-checked the data on the screen for accuracy, click
the Export link at the bottom right of the report.

189
Schedule the Export
After you click the export link, you'll be taken to a screen with options for immediate export. Ignore all of those and click on
the Export Options link.
Follow these instructions to set your export options. Note: When entering email addresses, make sure the email is
associated with a campaign manager account.

190
Retrieving the Scheduled Export
At the scheduled date and time, an email will be sent to the campaign manager emails which were entered in the export
options. This email will contain a link to the report. In order to protect your data, campaign managers must be logged in to
access the link.
When Exports Can't Be Scheduled
If the report includes User Defined Variables (set on the conditions tab), this means the report requires information from the
user in order to run. Consequently, reports which include User Defined Variables cannot be scheduled.
User Defined Variables are set on the conditions tab in the Custom Report Builder.
When User Defined Variables are present in a report, information is required from a user in order for the report to collect
data. Since there's no way to automate the entry of User Defined Data, these reports cannot be scheduled.

191
Query Terms
Conditions modifiers
Note: We've tried to list a lot of these terms in the order that they appear when using Salsa, but you may find it a bit hard to
find a particular term. Use your web browser's search function (Ctrl-F on PC, Command-F on Mac) to search for the term
you're looking for.
Equals: the exact content set in the accompanying "value" box
Does Not Equal: Everything that is not the exact content set in the accompanying "value" box
Less Than: Anything that registers as a smaller value (only relevant for amounts)
Greater Than: Anything that registers as a larger value (only relevant for amounts)
Greater Than or Equal To; Anything that registers as a larger value or the same (only on scoring)
Less Than or Equal To: Anything that registers as a smaller value or the same (only on scroring)
Like: anything that contains the value (best when used with % on both sides of value)
Not Like: anything that does not contain the value (best when used with % on both sides of value)
Is Empty: The selected condition is empty (no value required)
Is Not Empty: The selected condition is not empty (no value required)
Is In List: Allows for multiple input values to judge list vs. what records are in Salsa
Is Not In List: Allows for multiple input values to judge list vs. what is not in Salsa
Is tagged with: Includes any supporter record with selected tag(s) (available under tags condition type)
Is not tagged with: Excludes any supporter record with selected tag(s) (available under tags condition type)
Is a member of: Includes any supporter record within selected group(s) (available under groups, Companies/Organization
condition type)
Is not a member of: Excludes any supporter record within selected group(s) (available under groups,
Companies/Organization condition type)
Is In (segment): Includes any supporter record in any given segment in your list (available under percentiles condition type)
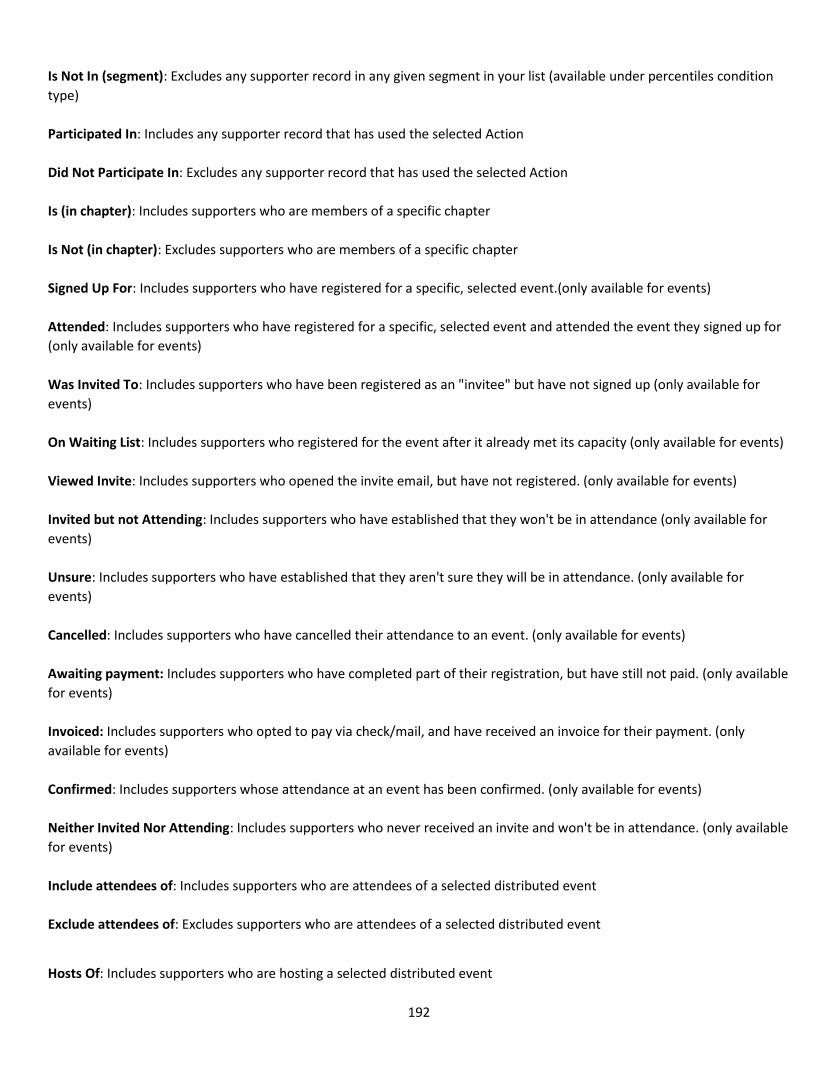
192
Is Not In (segment): Excludes any supporter record in any given segment in your list (available under percentiles condition
type)
Participated In: Includes any supporter record that has used the selected Action
Did Not Participate In: Excludes any supporter record that has used the selected Action
Is (in chapter): Includes supporters who are members of a specific chapter
Is Not (in chapter): Excludes supporters who are members of a specific chapter
Signed Up For: Includes supporters who have registered for a specific, selected event.(only available for events)
Attended: Includes supporters who have registered for a specific, selected event and attended the event they signed up for
(only available for events)
Was Invited To: Includes supporters who have been registered as an "invitee" but have not signed up (only available for
events)
On Waiting List: Includes supporters who registered for the event after it already met its capacity (only available for events)
Viewed Invite: Includes supporters who opened the invite email, but have not registered. (only available for events)
Invited but not Attending: Includes supporters who have established that they won't be in attendance (only available for
events)
Unsure: Includes supporters who have established that they aren't sure they will be in attendance. (only available for
events)
Cancelled: Includes supporters who have cancelled their attendance to an event. (only available for events)
Awaiting payment: Includes supporters who have completed part of their registration, but have still not paid. (only available
for events)
Invoiced: Includes supporters who opted to pay via check/mail, and have received an invoice for their payment. (only
available for events)
Confirmed: Includes supporters whose attendance at an event has been confirmed. (only available for events)
Neither Invited Nor Attending: Includes supporters who never received an invite and won't be in attendance. (only available
for events)
Include attendees of: Includes supporters who are attendees of a selected distributed event
Exclude attendees of: Excludes supporters who are attendees of a selected distributed event
Hosts Of: Includes supporters who are hosting a selected distributed event

193
Donors with any donation before date: tracks all donations for specific supporters prior to selected date (only available for
donation history)
Donors with any donation after date: tracks all donations for specific supporters after a selected date (only available for
donation history)
Donations with tracking code: Tracks all donations for a specific Tracking Code (only available for donation history)
Has Never Attempted to Donate: Includes all supporter records that do not have successful or failed donations (only
available for donation history)
Has Attempted to Donate: Includes all supporter records that have successful and/or failed donation attempts (only
available for donation history)
Whose Last Donation Failed: Includes all supporter records who's last donation failed to complete (only available for
donation history)
Has Never Successfully Donated: Includes all supporter records that have failed donations or have never attempted to
donate (only available for donation history)
Has Successfully Donated: Includes all supporter records that have a successful donation record, i.e. donation records with a
RESULT = 0 or a RESULT = -1
Has made a Recurring Donation: Includes all supporter records that have successful and/or failed recurring donation
attempts (only available for donation history)
Has not made a Recurring Donation: Includes all supporter records with no successful and/or failed recurring donation
attempts (only available for donation history)
Who Donated on the Following Donation Page: Tracks all supporters who donated through a specific donation page
selected (only available for donation history)
Who Donated on a page other than: Tracks all supporters who donated through a donations page other than the specific
donation page selected (only available for donation history)
Received an email from blast: Includes all supporters who were a recipient of the selected email
Did Not Receive an email from blast: Excludes all supporters who were a recipient of the selected email
Condition Types
Supporter Fields:
Conditions: All standard supporter fields and all custom fields. (supporter table can be seen
here:http://salsacommons.org/o/8001/p/salsa/website/public2/commons/dev/...) Value: Either input value (click into last
box) or utilize "compare to" function.
Tags:
Conditions: All available tags that have been created. Click tag and click "Add" to include tag in query. Click "Remove" to
exclude tag from your selections.

194
Groups:
Conditions: All available groups that have been created. Click group and click "Add" to include group in query. Click
"Remove" to exclude group from your selections.
Percentiles:
Conditions: Allows to select a specific segment of your list (1/100th up to 100/100th). This is Particularly helpful for testing
and seeing a random sample of a supporter list.
Within Postal Region:
Conditions: Can set mile distance from specific postal code. Value: Input zip code into open field. Background: The
query starts from the centroid of the zip code you choose, then looks up any zip codes that fall within X mile radius of that
centroid. Then the query returns any supporters with those zip codes.
Home Address:
Conditions: Basic address fields that can be found in the "Address" tab of the Supporter Record. Value: Either input
value (click into last box) or utilize "compare to" function.
Other Addresses:
Conditions: All available address fields in the Supporter Record. Value: Either input value (click into last box) or utilize
"compare to" function.
Legislative District:
Conditions: Federal Senate, Federal House, State Senate, State House. *NOTE* Federal Senate districts will auto-populate
with the correct district. For other types of districts, it will only show the districts that have been chosen in a supporter
record.
Households:
Conditions: There is only one condition: Filter out non-heads of households. This allows users to slim down their list when
doing mailings, to save money.
Contact History:
Conditions: All fields that are available in the "contact history" panel of a standard supporter record
Relatives Dates:
Run queries on date fields, looking at time periods in the past and future with a day offset ( X days ago / in the
future). Read more here.
Email Delivery Status:
Conditions: All emails that you have sent out via the "Email Blast" package. Values: User Unknown, Hard Bounce, Soft
Bounce, Refused by Receiving ISP, Delivered. Click the email you want and click "Add" to include email in query. Click
"Remove" to exclude email from your selections.
Action History:
Conditions: Allows you to select an action type, which are: Action, Letter, External Action, External Action Record,
Campaign, and Petition Value: click into the box to prompt the action selection screen.
Volunteers:

195
Conditions: There is only one condition: supporters who have in some way register to volunteer through a volunteer
registration page (not applicable to all organizations)
Scoring:
Conditions: A list of all available scoring options previously created. Value: The numeric scoring "total" of a supporter
record.
Companies/Organizations:
Conditions: Click into the box to select from the existing list of all companies/organizations that are in Salsa.
Email Statistics:
Conditions: Supporter Email Statistics KEY, Supporter KEY, Email Sent, Email Opened, Email Clicked, Last Open, Last Click,
Open Percentage, and Click Percentage.
Chapters:
Conditions: All available chapters that have been created.
Event History:
Conditions: Click into the box to select from the existing list of all events that are in Salsa.
Distributed Event:
Conditions: All available distributed events that have been created. Click distributed events and click "Add" to include
event in query. Click "Remove" to exclude event from your selections.
Donation History:
Conditions: Condition is set based on the condition modifier (see above)
Donation Relative Date:
Conditions: Donation Transaction was Within the last X days/months/years where X is <set by user>.
This option will allow you to find supporters who have donated recently, with a time frame set by the user.
Email Status:
Conditions: All available emails that have been sent. Click email and click "Add" to include email in query. click "remove"
to exclude email from query. Value: Send Failed (failed to deliver), Sent (received by user), Sent and Opened (User received
and opened email), and Sent and Clicked (User received, Opened and then clicked a link in the email)
Email History:
Conditions: Click into the box to select from the existing list of all emails that have been sent out via Salsa.
Unsubscribes:
Conditions: Lists all available "receive email" values in Salsa.

196
Brief Table Summary
This provides a list of common database tables used with corresponding Salsa features. It is intended to assist you with
determining what tables you will need to select when using the Advanced Object menu in the first step of the custom report
creation process.
Actions
- action references the details of the particular action page
- supporter_action contains the supporter information and action key
- supporter_action_content has letter detail
- supporter_action_comment has petition comments
- supporter_action_target returns a record for each targeted recipient
Custom fields:
- supporter_custom contains values of the custom fields per supporter
- custom_column has the name and type of custom field per organization
- custom_column_option lists the option values for multiple choice fields
Note: Custom field responses may also be stored through tables such as supporter_custom2 or supporter_custom3. These
details can be confirmed through the custom_column table, however. Additionally, custom field information is included by
default when running a report on supporter information.
Donations:
- donate_page details donation page information/defaults
- donation individual donor information/matches to donation page
Email:
- email_blast stores all the info about the blast (content/targeting, etc.)
- email This table stores the Status (Open/Sent/Clicked) and links the email blast to the supporter record, so there's one
email record per supporter per email.
Events:
- supporter_event links your Event to the attendees
- supporter_invite includes guest details corresponding with the supporter_KEY for your attendees
- event stores the name and other details for your event
- distributed_event details the settings for a distributed event
- event_fee gives your event fee types and descriptions
- donation includes transactional data for any paid events
Groups:
- groups has the group name
- supporter_groups matches supporter record to groups record by key
P2P pages:
- my_donate_page includes the data for your p2p campaign
- supporter_my_donate_page details which supporter made which page
- supporter_my_donate_page_donation links specific donation keys to the corresponding p2p pages
Questionnaires:
- questionnaire contains basic questionnaire information/header/fields

197
- questionnaire_question details each individual question
- supporter_questionnaire_question lists each response per supporter per question
Storefronts:
- store_item contains store item information
- storefront has storefront details, including which items are on the page and which fields are requested
- store_item_category store items can be grouped by categories (Books, tickets, etc.), but this isn't often used
- donation_store_item matches the donation with the store item - probably the most useful for reports, as it brings back a
count
- supporter_address stores all secondary address information. Billing addresses are recorded as type = "Billing"
Tags:
- tag has the tag name/tag-specific information
- tag_data tells what tables are tagged, using a key number for each table
- database_table gives more user-friendly information regarding the tag_data table, especially the table's name
Receive Email Values
Below are the values that a supporter can be assigned manually or automatically by Salsa to signify their status when
receiving email blasts. Positive numbers (i.e.the first four rows) will successfully receive email; all numbers 0 and below are
considered unsubscribed and will not receive emails.
receive_email details
15 NO ACTIVITY (Supporters who remain subscribed, have not opened/clicked emails)
10 ACTIVE: CONFIRMED (Double opt-in)
3 ACTIVE: CLIENT (Client has directly signed up)
1 1 - Imported or unknown (subscribed)
0 0 - Inactive or Unknown(not subscribed)
-3 INACTIVE: UNSUBSCRIBED (actively unsubscribed by user)
-9 INACTIVE: DEATH (supporter has died)
-10 INACTIVE: Disabled because of Soft bounces (SOFT_BOUNCE)
-11 INACTIVE: Disabled due to quota restrictions (SOFT_BOUNCE)
-13 INACTIVE: Disabled due to file size transmission restrictions (SOFT_BOUNCE)
-14 INACTIVE: (4.4.0 No servers available)
-18 INACTIVE: Challenge response probe.
-20 INACTIVE: Disabled because of Hard Bounces (HARD_BOUNCE)
-21 INACTIVE: (Misc 550 Errors) (User Inactive, Unable to Relay, Mailbox Unavailable, etc)
-22 INACTIVE: NULL MX (The domain is not valid)
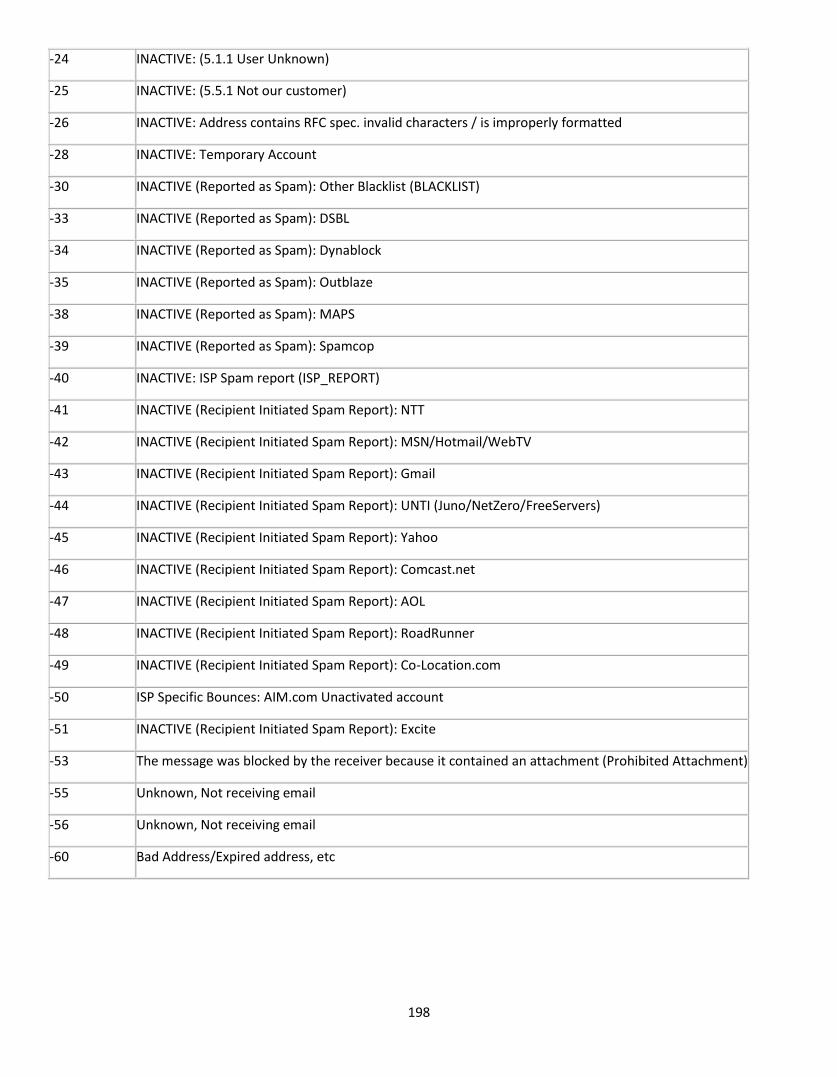
198
-24 INACTIVE: (5.1.1 User Unknown)
-25 INACTIVE: (5.5.1 Not our customer)
-26 INACTIVE: Address contains RFC spec. invalid characters / is improperly formatted
-28 INACTIVE: Temporary Account
-30 INACTIVE (Reported as Spam): Other Blacklist (BLACKLIST)
-33 INACTIVE (Reported as Spam): DSBL
-34 INACTIVE (Reported as Spam): Dynablock
-35 INACTIVE (Reported as Spam): Outblaze
-38 INACTIVE (Reported as Spam): MAPS
-39 INACTIVE (Reported as Spam): Spamcop
-40 INACTIVE: ISP Spam report (ISP_REPORT)
-41 INACTIVE (Recipient Initiated Spam Report): NTT
-42 INACTIVE (Recipient Initiated Spam Report): MSN/Hotmail/WebTV
-43 INACTIVE (Recipient Initiated Spam Report): Gmail
-44 INACTIVE (Recipient Initiated Spam Report): UNTI (Juno/NetZero/FreeServers)
-45 INACTIVE (Recipient Initiated Spam Report): Yahoo
-46 INACTIVE (Recipient Initiated Spam Report): Comcast.net
-47 INACTIVE (Recipient Initiated Spam Report): AOL
-48 INACTIVE (Recipient Initiated Spam Report): RoadRunner
-49 INACTIVE (Recipient Initiated Spam Report): Co-Location.com
-50 ISP Specific Bounces: AIM.com Unactivated account
-51 INACTIVE (Recipient Initiated Spam Report): Excite
-53 The message was blocked by the receiver because it contained an attachment (Prohibited Attachment)
-55 Unknown, Not receiving email
-56 Unknown, Not receiving email
-60 Bad Address/Expired address, etc

199
Common Merge Fields
To save you the step of identifying all potential merge fields on a form (see above), the following is a list the most frequently
used merge fields. They are case-sensitive.
Standard Supporter Fields
Salsa's standard supporter fields are usually the capitalized word or phrase exactly as it appears (with underscores for
spaces) in your Salsa headquarters or on an end-user form. So, [[City]] for City, and [[First_Name]] for First Name.
Here are the most frequently used Salsa supporter fields:
[[Title]]
[[First_Name]]
[[MI]]
[[Last_Name]]
[[Suffix]]
[[Email]] User for signup confirmation messages
[[Phone]]
[[Cell_Phone]]
[[Work_Phone]]
[[Street]]
[[Street_2]]
[[City]]
[[State]] provides the standard two-letter postal abbreviation for American states and Canadian provinces,
e.g., CA rather than California
[[StateName]] provides the full state name of a supporter's address, e.g. Texas rather than TX
[[Zip]]
[[Country]] provides the full text name of the country, e.g., United States or Brazil.
[[Organization]]
[[Occupation]]
Donation Pages
In addition to the regular supporter fields, donation pages generate a variety of donation-specific merge fields useful for
donor receipts.
[[amount]] The total amount of the gift or transaction
[[Transaction_Date]] The date and time when the donation was processed.
[[CURRENT_DATE]] offers a more reader-friendly formatted date (e.g., January 13, 2011 instead of the Salsa
format of 2011-01-13 15:42).

200
[[PNREF]] A unique alphanumeric code returned by the merchant gateway for each transaction. Handy for use as a
"confirmation code" in a reply autoresponse.
[[RPREF]] A unique alphanumeric code returned by the merchant gateway for a new recurring donation. Handy for
use as a "confirmation code" in a reply autoresponse.
[[donation_KEY]] Returns the numeric donation KEY value associated with the donation in Salsa; can be used as a
transaction ID number.
[[donate_page_KEY]] Returns the primary key for the donation page that was used for this donation.
[[Credit_Card_Digits]] Returns a securely obfuscated card value such as 4111xxxxxxxx1111 useful for receipts.
[[Credit_Card_Expiration]] Returns the credit card's expiration in MM/YY format, e.g., 03/12.
[[Tracking_Code]] The tracking code associated with the gift. Since this will be your own organizational code, it is
probably most useful for internal notifications rather than acknowledgments to the donor.
[[PAYPERIOD]] The frequency of a recurring donation, e.g. monthly, quarterly, annually. Caution: The frequency is
returned as a code and not as a useful description. The mapping of codes to payperiods follows.
WEEK - Weekly
MONT - Monthly
QTER - Quarterly (every 3 months)
YEAR - Yearly
[[TERM]] The number of times the above pay period will run. E.g. if the pay period is monthly, and the term is 6,
then the donor will be charged every month for six months. if [[TERM]] is 9999, then the recurring donation will
continue forever or until the credit card expires.
[[Start_Date]] The starting date of the recurring donation. Subsequent donations will be processed as close as
possible to this date (depending on the pay period chosen).
[[recurring]] A flag indicating whether or not the donation was recurring. If the value is one then the donation was
a recurring donation. Otherwise the value is zero.
[[recurring_donation_KEY]] the database key for a recurring donation. If [[recurring]] is one, then this is a recurring
donation database key. if [[recurring]] is zero, then the value is -1.
Actions
Actions can generate fields for the subject line and content of the message launched by the action. These merge fields have
names that are specific to each set of content, so if you want to include the text of the action message sent in an
acknowledgment email, that acknowledgment will need to be specific to one and only one action page.
[[Content1111]] Provides the body of the action message (but not the subject) sent by the user, where 1111 is the
key number of the specific content the user is sending.
[[Subject1111]] Provides the subject of the action message (but not the body) sent by the user, where 1111 is the
key number of the specific content the user is sending.

201
Creating a Complete Campaign (18 minute tutorial)
https://help.salsalabs.com/entries/97649068-Video-Tutorial-Creating-a-Complete-Campaign
STEP ONE: GROUPS & TAGS
Manage Groups: https://help.salsalabs.com/entries/22509702-Manage-Groups
Manage Tags: https://help.salsalabs.com/entries/22552886-Manage-Tags
STEP TWO: AUTORESPONSES
Autoresponses / Email Triggers: https://help.salsalabs.com/entries/22509702-Manage-Groups
STEP THREE: WEB PAGES
Build a Tell A Friend (TAF) Page: https://help.salsalabs.com/entries/45089234-Tell-a-Friend-Pages
Build a Donation Page: https://help.salsalabs.com/entries/22544283-Create-and-Edit-Donation-Pages
STEP FOUR: EMAIL BLAST
Creating and Sending an Email Blast: https://help.salsalabs.com/entries/22380381-Creating-and-Sending-an-Email-Blast
STEP FIVE: REPORTING
Queries: https://help.salsalabs.com/entries/22537388-Query-and-Export
Donation Reports: https://help.salsalabs.com/entries/22527882-Donation-Reports
Building Custom Reports: https://help.salsalabs.com/entries/22550463-Build-a-Custom-Report
Advocacy Reports: https://help.salsalabs.com/entries/22543753-Advocacy-Reports
Manual compiled and designed for CUUSAN by staff at the Unitarian Universalist Legislative Ministry of NJ
Laurice Grae-Hauck, Outreach Coordinator Rev. Craig Hirshberg, Executive Director