Contents - Ketabton.com
73
Ketabton.com
-
Upload
khangminh22 -
Category
Documents
-
view
0 -
download
0
Transcript of Contents - Ketabton.com
Ketabton.com

Contents
Contents.................................................................................................................................................. 2 Introduction ............................................................................................................................................ 3 About the Author: ................................................................................................................................... 4 Chapter 1: What The Heck Is Google AdSense? ........................................................................................ 6 Chapter 2: Micro-Niche Blogging ........................................................................................................... 13 Chapter 3 : Things To Know Before Signing Up For AdSense................................................................... 26 Chapter 4: How To Sign Up For AdSense And Get Approved .................................................................. 32 Chapter 5: How To Create & Add AdSense Ad Unit: ............................................................................... 38 Chapter 6: Maximum Number of AdSense Units .................................................................................... 48 Chapter 7: Google AdSense Auto Ads .................................................................................................... 49 Chapter 8: Tips to Increasing Your AdSense Revenue ............................................................................. 52 Chapter 9: A Secret To Earning $50 Per Click From Google AdSense....................................................... 62 Chapter 10: AdSense Tools And Apps .................................................................................................... 65 Chapter 11: Life Without And After AdSense ......................................................................................... 69 Before we bid goodbye:......................................................................................................................... 72 My Other eBooks that you should read next: ......................................................................................... 72
(c) ketabton.com: The Digital Library

Google AdSense Mastery Guide 3
Introduction
Howdy Mate,
In recent years, there has been a great deal of discussion concerning Google’s AdSense program.
There have also been truckloads of eBooks and articles written on this topic.
Why?
Because AdSense is a profitable program that is often overlooked by many who are looking to earn a passive income online, or those (like me) who are looking to create a full-time business.
The myth is that AdSense is no longer useful. But the truth is that a lot of people are still making lots of money from this program.
Because here’s the reality of online income:
◉ If you really want to make a living from the internet, then you must learn to spread your wings wide. When it comes to earning online from a blog, AdSense by Google is the most trusted & reputed ad network out there. As long as you are blogging responsibly, you will enjoy earning money from Google AdSense.
If you’ve decided to give AdSense a shot, but you’re confused about what it is and how to set things up, then this Google AdSense Mastery HandBook is going to be your best friend. It will walk you through everything you need to start making money from Google AdSense.
That’s why we call it the A-Z of Google AdSense.
In other words, this is, by far, the best eBook you’ll ever read about AdSense. By the time you’re done reading it, you will know the secrets used by millions of others to make lots of money from their blog or YouTube channel using AdSense.
Sound good? Cool.
Let’s do it!
(c) ketabton.com: The Digital Library
About the Author:
Hi there,
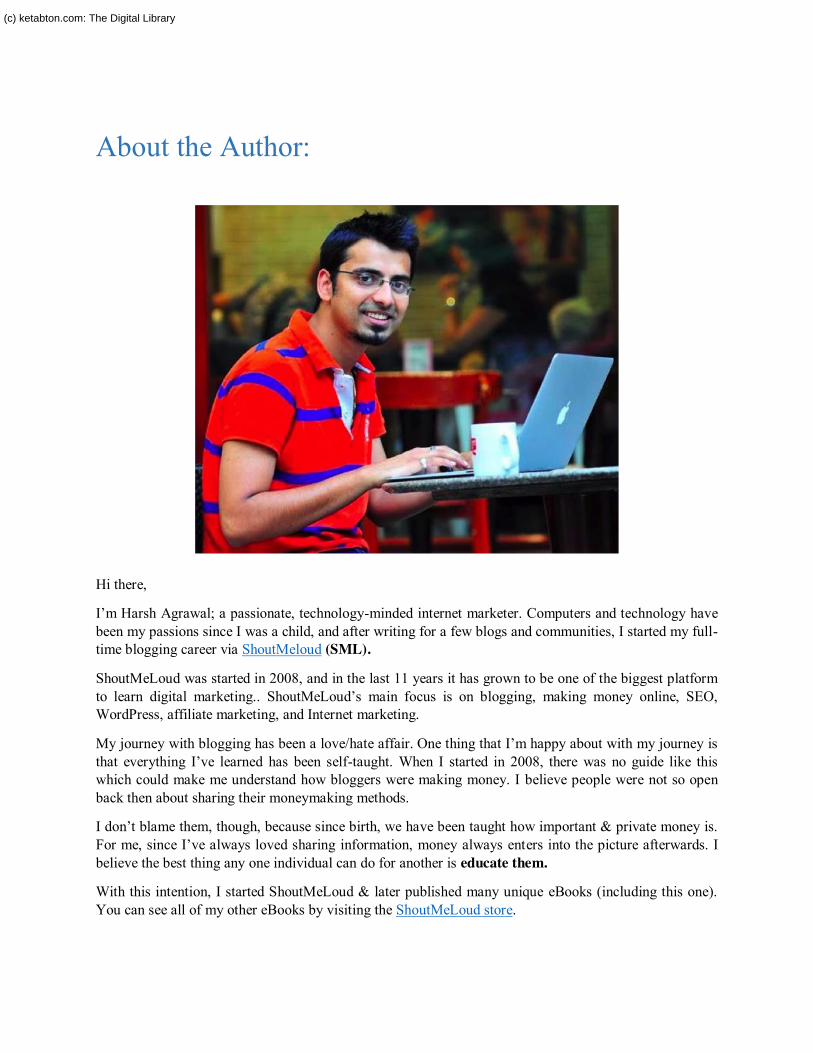
I’m Harsh Agrawal; a passionate, technology-minded internet marketer. Computers and technology have been my passions since I was a child, and after writing for a few blogs and communities, I started my full-time blogging career via ShoutMeloud (SML).
ShoutMeLoud was started in 2008, and in the last 11 years it has grown to be one of the biggest platform to learn digital marketing.. ShoutMeLoud’s main focus is on blogging, making money online, SEO, WordPress, affiliate marketing, and Internet marketing.
My journey with blogging has been a love/hate affair. One thing that I’m happy about with my journey is that everything I’ve learned has been self-taught. When I started in 2008, there was no guide like this which could make me understand how bloggers were making money. I believe people were not so open back then about sharing their moneymaking methods.
I don’t blame them, though, because since birth, we have been taught how important & private money is. For me, since I’ve always loved sharing information, money always enters into the picture afterwards. I believe the best thing any one individual can do for another is educate them.
With this intention, I started ShoutMeLoud & later published many unique eBooks (including this one). You can see all of my other eBooks by visiting the ShoutMeLoud store.
(c) ketabton.com: The Digital Library
Google AdSense Mastery Guide 5
I’m blessed to have so many amazing people around me who have made me what I am today. Currently, I’m living in the capital city of India (New Delhi) with my wife, and recently I purchased a flat with my blogging earnings.
But don’t fool yourself by thinking that this all was easy! It took 11 years of persistent dedication to achieve this result. And now I’m sharing this all with you, because I believe if I can do it, anyone else can, too.
However, you will need complete dedication & a game plan. While you read this book and educate yourself about Google AdSense, make sure you apply these techniques on your blog. This kind of stuff takes time, and I believe with 2 hours of dedicated work every day, you will start seeing results within the next 3 months.
With that, I leave the further pages of this eBook at your disposal. What you do with this information is completely your choice. It could be just another book that is in your collection, or it could be the book that changes your life.
With ❤
Harsh Agrawal
(c) ketabton.com: The Digital Library

Chapter 1: What The Heck Is Google AdSense? Welcome to chapter 1 of the Google AdSense Mastery Handbook. We will be first going through the basics, which will lay the foundations for you to make money with AdSense. Over time, we will move to more advance stuff, which will help, you increase your Google AdSense earnings with simple & smart tweaks.
But before we move ahead, you really need to understand this: The biggest struggle with AdSense for many bloggers is getting approval. This is largely because most bloggers are so excited to get started making money that they forget to do some pretty basic stuff. I recommend you go through every chapter of this guide with an open mind & strive to understand why some are able to make millions, while others still struggle to even get accepted into the program!
In 2009, before getting into the world of “Professional Blogging”, I started looking for recurring income opportunities in order to monetize my blog. Out of all the ad networks I read about, tried & tested, Google AdSense worked out to be the best monetization technique out there.
I started using Google AdSense in Feb 2009, and since then I have earned about $50,000+. For anxious minds, here is the latest screenshot from my AdSense dashboard:
This revenue is generated from a group of my blogs. Some of them are:
◉ ShoutMeLoud.com (I don’t use AdSense anymore on SML. I have shared the reasons why in a later section of this eBook...)
(c) ketabton.com: The Digital Library

Google AdSense Mastery Guide 7
◉ ShoutMeTech.com
◉ CydiaGuide.com (Micro-niche blog making $174/month). This nice is outdated now.
◉ LetsTalkRelations.com
◉ ShoutMeHindi.com (I created this to help my Indian brothers and sisters to match up with International learnings)
One important thing that you must know is that AdSense is not the only great ad network out there. There are many ad networks available (such as Media.net) that will pay you well when you have traffic from English speaking countries.
Obviously, you shouldn’t clutter your website or blog with too many ads. It’s best to choose one or two ad networks which can generate a maximum amount of revenue for you while keeping the integrity of your website intact.
That said, it’s a good idea to try AdSense & Media.net at the same time.
Media.net is from Bing (Google competitor) & usually works out pretty solidly for anyone with traffic from the U.S.A., the U.K. & other English speaking countries.
I’m not really going to talk about Media.net in this eBook, but there is good news:
Once you know everything there is to know about AdSense, you will automatically know everything about Media.net. They both are similar in nature & when one fails, the other one is there to help you keep making money from your blog.
So what is AdSense? AdSense is a product from Google that allows us to show contextual ads on a website. It’s one of the best monetization ad networks available for any website, and people are making thousands of dollars every day using only Google AdSense.
By “contextual”, I mean showing advertisements, which are relevant to the content (i.e. context) or relevant to the users interest. This improves the quality of ads & makes your blog look more authentic.
AdSense is one of the most convenient ways to make additional income from your blog or website. What makes AdSense so powerful is its simplicity & high quality ads.
It’s simple because all you need to do is place a few lines of code on your site & AdSense will automatically start showing ads. After the initial setup, you don’t need to do any major changes & money will start pouring in automatically.
These ads are then displayed to your readers. When readers click on these ads, you make money. Everything is automated & all you need to focus on is writing great content & driving genuine traffic to your blog/website.
To make a living from your blog, it’s important for you to understand how and why AdSense works. This knowledge is essential for you to fully maximize the income potential from your website.
Let me make it easy for you to understand…
(c) ketabton.com: The Digital Library

Google has two services:
Google AdWords: This is where companies, brands & advertisers purchase traffic from Google by displaying ads. We see these advertisements in Google Search all the time.
These are called Sponsored Results, and the advertisers are paying a certain amount of money for every click on those ads. Along with showing ads in Google Search, Google also lets advertisers place their ads on popular websites & blogs.
Google AdSense: This is the 2nd program, which is targeted at bloggers (aka “Publishers” or “Webmasters”). So a user like you or me creates a website/blog & signs up for an AdSense account. Once our account is approved, we place a few lines of code onto our site. Google now offers our site to advertisers on Google AdWords as a place to host their ads.
From here, the moneymaking process begins. Advertisers place their ads on our site, and when our readers click on the ads (or sometimes just view the ads), we get paid.
Now, you may ask:
Why Google is doing this? Well, the foremost reason is:
◉ It’s all about money.
One of the biggest ways to earn money online is through online advertising. What Google does here is it connects advertisers with publishers (i.e. bloggers) like you & me. Google then keeps a percentage of the total payment.
(c) ketabton.com: The Digital Library

Google AdSense Mastery Guide 9
Note: Revenue share between Google AdSense & the Publisher is 32:68. When someone clicks, you earn roughly 68% of the click and Google gets the remaining 32%.
For example, if an advertiser spends $100 to advertise on our blog, we would get $68 & Google would keep $32 for providing the platform.
Let me tell you this one thing:
◉ Everybody loves Google AdSense for the quality of service, timely payments, and most importantly, the quality of the ads.
Fact: Google Ad Words is an auction-based system that allows advertisers to compete for those ad spots. Whoever has the highest bid and most "quality" ad, gets the top spot. This helps to maintain the high quality of ads & we get paid handsomely for our efforts.
What are our “efforts”? Maintaining a high quality blog/website, creating new content, and driving traffic to our site. This is no joke and requires a lot of work. But the cool part is that this is better than those 9-6 jobs where we have to take orders from bosses that we don’t like.
AdSense is best for websites that are mainly content driven. The more content you have, the more Google can get a “sense” of what your site is about and better match the ads to the theme of your website.
This is why bloggers, specifically, have so much success with AdSense.
Here’s a graph that shows how AdSense works according to Google:
(c) ketabton.com: The Digital Library

AdSense shows an ad on a page based on various factors. Here are 2 of the most common & popular ones:
1. Context of the page: This is when ads are shown according to the content of the page. For example, if your page is about mobile phones & the ads shown are related to mobiles or gadgets, readers are more likely to interact with these ads. This way, ads remain highly relevant & don’t annoy readers. This is one reason why Google AdSense is also known as a “Contextual (Context-ual) ad network”.
Note: As mentioned earlier, there are many other contextual ad networks out there. It’s important for you to know about them as sometimes it takes months to get approval from AdSense. In the meantime, you can use these other networks to make money from your blog.
2. Retargeting: This one is a really cool concept for multiple reasons. One of those reasons is how relevant they are. You’ve probably interacted with one of these ads before.
Have you ever visited a website and then when you visit other websites, you are shown the same ad? It’s like an ad is following you wherever you go.
Well, my friend, this is what retargeted ads are. Here, AdSense shows ads based on a user’s search history and cookies. They are pretty great from an advertising perspective, and because of their relevance, they typically convert really well.And again, there are so many similar programs like Infolinks, Media.net, etc., but AdSense is always preferred before everything else due to the reasons I have mentioned above and below.
Why Choose AdSense Over Other Programs? AdSense makes sure that readers will see relevant and targeted ads, which will give you more clicks and result in higher payouts than any other ad network.
(c) ketabton.com: The Digital Library

Google AdSense Mastery Guide 11
The ads displayed will be appropriate for your content and relatable to your readers. For example, if you are writing a post on dog grooming, a user is more likely to see an ad for dog shampoo than an ad for a coffee maker.
Another reason for AdSense’s popularity:
You can filter unwanted ads. I will show you more about this in an upcoming section, but in short, you should know that you can stop showing ads from any particular category. For example, if your blog is about technology, at times Google might show ads related to dating or fashion.
Why?
It’s because Google does not understand your content or because a visitor might have visited fashion or dating websites before coming to your site (i.e. retargeting). With AdSense, you can stop displaying ads from unwanted categories to ensure your website only shows relevant ads. Moreover, in the majority of cases, retargeted ads, while they convert better, also pay a lot less than normal contextual ads.
Here are a few more reasons for AdSense’s popularity:
◉ It’s easy to set up & start making money.
◉ With a single account, you can run advertisements on multiple websites and YouTube channels.
◉ Easy payment & low minimum payout threshold ($100).
◉ Direct bank deposit.
Important point to note: AdSense is not a get rich quick scheme, and it takes a lot of work to make money. Don't think that just because you have joined, you are guaranteed to make big money. I don’t mean to scare you, but it’s my duty to tell you the truth. While you are preparing yourself to make money from your blog, you should be ready to struggle & have enough patience to enjoy the true value of your hard work.
How Much Can You Earn With AdSense? This is one of the most common questions asked by every newbie & I’m sure you also have the same question somewhere in your mind.
Here’s what you need to understand:
There is no upper limit when it comes to earning from AdSense. There are bloggers and media houses who are earning thousands, if not millions, of dollars from AdSense every month.
Your earnings will depend upon the following factors:
1) Blog Niche
2) Traffic Source
(c) ketabton.com: The Digital Library

3) Traffic Country
Blog Niche: If you are blogging in a niche where the commercial value is high, you have a higher likelihood of earning a lot more. For example, if you are blogging in a niche like Banking, Technology, or Fashion, you can end up making good money. If you are blogging in a niche which has less commercial value like Whatsapp news, birthday memes, Bollywood gossip (yeah, people do create such websites), you will probably end up making less money. (Of course, there are exceptions…)
Now, in the next chapter, I will guide you on how to make money. Usually a person needs to pay $1,000-$2,000 for learning what you are about to learn, so you better get serious and take it all in!
If you want to take your own notes, you should grab a pen-paper combo. Most importantly, put your phone into Airplane Mode, because your attention needs to be focused here.
So now that we are on same page (literally), let me tell you the secret of earning money from AdSense.
(c) ketabton.com: The Digital Library
Google AdSense Mastery Guide 13
Chapter 2: Micro-Niche Blogging
What is Micro-Niche Blogging? Micro-niche = A website based on one specific topic. Ex: Dog food, women’s fashion, running shoes, Chinese food, etc.
A micro-niche blog is one, which is catered toward a very particular topic.
For example:
● Niche topic - Lose weight
● Micro-niche topic - Lose belly fat
If you want to create a micro-niche in mobile technology:
● Niche topic - Android/iPhone
● Micro-niche topic - Android apps
● Micro-niche topic - iPhone apps
The biggest challenge to getting started with a micro-niche site is finding a profitable niche. In our case, we are going to use Google AdSense to monetize our work, so we will want to focus on a niche where we can get a high CPC (cost per click).
Note: In certain scenarios, it's good to pick a lower CPC niche if that is a niche that is of particular interest to you.
How To Select a Profitable Niche for AdSense: I have created this 4-step mantra to find a niche that works well & at the same time makes money.
Here’s the mantra:
1. Traffic
2. Trend
3. CPC (or commercial value)
4. Interest
To find a perfect micro-niche blog topic, your selection should satisfy all of the above four pillars.
One important question to ask yourself: Can I create more than 20 posts in this topic?
If you pick a really narrow micro-niche where you can’t write more than 4-5 posts, it will be hard to make that site rank. So keep in mind that you need to pick a topic that can have 20+ posts written about it.
(c) ketabton.com: The Digital Library

1. Traffic: You need to pick a topic that has decent traffic. Since we are looking to monetize from AdSense, we need to ensure that the blog can generate more than 1,000+ visitors/day from search engines. If you are going to monetize using affiliate marketing, even 100 daily visitors can give great results, but with AdSense, we need a lot of traffic.
Note: In some cases, even 100 visitors/day can generate great results with AdSense. You will learn how to judge how much traffic is appropriate over time once you start driving traffic & start earning some income.
2. Trend: You need to pick a topic that is hot or always talked about. Avoid selecting a topic that will die in a few months and cause you to keep repeating the same process over and over. You can use this micro-niche blueprint to create a seasonal blog, but if you need financial freedom, you should pick an “evergreen topic” or a topic that will last for (at least) the next couple of years. There are two tools that you can use for checking trends:
1. Free Google Trends
2. SEMrush (Paid tool)
Note: Only use the paid tool once your objectives are clear.
3. CPC (Cost per Click): Pick a topic that has real commercial value. You can use tools like Google Keyword Planner or SEMrush to check the CPC of your topics. I will show you how to do this in a minute.
4. Interest: If you want to have real financial freedom, I suggest you pick a topic based on your personal interests. Your first few micro-niche sites should be built and written by you. If you outsource articles around a topic for which you have no knowledge of, you might end up publishing low or medium-quality content.
However, if you are very smart & have an eye for quality stuff, you can always hire writers from online platforms to get high-quality niche content.
This micro-niche model will only work if you are publishing high-quality original content. This is one crucial step & also the first step to finding your niche.
If you are planning to write your own content, here are some questions to help you find interesting topics:
● What are things you read about all the time?
● What’s the topic that friends and family rely on your advice for?
● If you work in an office, which subject area are you an expert on?
● Are you a doctor? A lawyer? What are your fields of study?
(c) ketabton.com: The Digital Library

Google AdSense Mastery Guide 15
Chances are you might be one of those people who feel like they don't have expertise in any area. The truth is that there are always a few things that we are good at, but all too often, we just can’t see them.
When in doubt, take a notepad & paper, and write down the gadgets, accessories, and things you have. Write down the topics you know better than many people around you, and later on you can narrow down your niche ideas based on the other 3 pillars.
What’s The Commercial Appeal? Once you have narrowed down your topics, it's time to see how commercially viable each of these topics are. There are various tools which you can use here to check, and we will start with the free Google Keyword Planner tool. This will help us to narrow down our topic, and later on we will use SEMrush and LongTailPro to find related keywords for our micro-niche.
My Case Study: This case study will help you understand good & bad practices when selecting a niche. One of these examples was a mistake & another one was a hit. The latter helped me earn more than $2,000 in a year with only 20 hours of total work.
This is detailed & contains essential knowledge on how to earn a lot of money from AdSense. Not only that, you will also learn about how to do keyword research, which is crucial for proper SEO (search engine optimization).
So, if you have been reading this Google AdSense Mastery Guide in a single flow, take a break! Come back when you are rested and ready to read the most important part of this book.
Onward!
In my case, I have narrowed down my interests to:
◉ Cydia (It's a tool for iPhone jail-breaking)
◉ Movies on hacking (Targeting geeks who love hacking movies)
The next step is to open Google.com & search for the target topic. In my case, I searched for "Cydia".
Now, go to the bottom of the search page and see the related keywords suggested by Google.
(c) ketabton.com: The Digital Library

Now I have more keywords which are related to Cydia. Let's call it Set#1:
◉ Cydia
◉ Cydia Download
◉ Cydia Apps
◉ Cydia Installer
◉ Cydia Store
Having a bunch of keywords will help us pick the most profitable micro-niche from our short-listed topics. Similarly, I have done a search for "hacking movies":
Here is the keyword list for the second topic, and let's call it Set#2:
◉ Hacking Movies ◉ Hacker Movies ◉ Hacking Movies in Hollywood ◉ Hacking Movies in Hindi
Similarly, you can create any number of sets. Just don't get overwhelmed; keep it around 10 or so.
(c) ketabton.com: The Digital Library

Google AdSense Mastery Guide 17
Here is what you need to do next:
Open Google’s Keyword Planner tool and click on “Sign into AdWords”. If you haven't used it before, you need to do a one-time signup. This tool is completely free to use.
Once you are inside the dashboard, click on "Search for new keywords using a phrase, website or category", under “Find New Keywords”.
Now enter Set#1 into the first box & keep your settings as shown:
◉ In “Targeting”, use countries like the United States, Canada, the United Kingdom & other countries with high purchasing power.
On the next page, the first thing you’ll see is “Search volume trends”. This lets you know if the searches for your target keyword are increasing, decreasing, or staying consistent.
(c) ketabton.com: The Digital Library

Click on “Keyword ideas” at the bottom & this will show you monthly search volume & average bidding for that keyword.
◉ The CPC here is not very high, but the Avg. monthly searches are good. Apart from that, we will do a competition check to find out if this topic is easy to rank for or not.
Note: In most cases, don't worry too much about competition, as you can always rank higher with the help of high-quality content and proper SEO.
Now let's do the same research for Set#2 (Hacking Movies):
Avg. monthly searches is 1,300 & there is no one bidding for the keyword. Sigh!
Clearly this topic is a waste of time & energy. At least we have a winner with Set#1.
You can carry on your research to compare all of your sets and identify 2-3 profitable ideas.
In this case, I will stick to “Cydia Guide” for the following reasons:
◉ High search volume
◉ I have good knowledge about this topic
(c) ketabton.com: The Digital Library

Google AdSense Mastery Guide 19
◉ Medium CPC ($0.4-$1)
◉ Low competition
Note: This is what I have done, and you need to repeat this process with around 10-12 sets to find a couple of profitable niches that you can target.
You can see in the above screenshots that Google AdWords Keyword Planner is displaying exact number of searches for the keywords. But recently Google updated this tool and now for Free users, it shows a range. For example as you can see in the above screenshot, that hacker movies keyword has 1,300 searches but now it will show you the range 1000-10000. Well, I know its not good but you can still view the exact number of searches by running at least one ad campaign with Google AdWords.
Content Planning: Our goal here is to create a profitable niche-based authority site, and it can't be entirely automated. If you have automation in mind, you should push it aside as we will be using automation for making money only. This method requires you to spend around 30-40 hours in the first 3 weeks & after that, things will be automated.
(Note: The actual time may vary depending upon your online skills.)
Content is the most crucial factor to make this thing work for you. So we need to work on content planning. I will share how I personally did it for my micro-niche which will provide you with a lot of takeaways.
A quick recap:
◉ We have identified a profitable niche to work on – “Cydia”
Basic content planning: Most bloggers make mistakes by targeting advanced topics only, and miss out on covering basic topics. Covering the basics of the niche you are working on is really important to creating an authority blog.
If you only cover the advanced topics, you miss out on those who want to learn the basics. If you cover both, your site becomes a complete solution for your niche.
Moreover, when you cover basic topics, your internal linking gets stronger, you can target a fresh audience, and the bounce rate of your blog remains very low. Overall, these metrics give positive signals to search engines.
So to start with, make an Excel sheet or Google Doc. Create the outline of your base topic.
In my case, here are the base topics which a reader needs in order to get started with the topic:
◉ What is Cydia?
◉ How to use Cydia
◉ Cydia related terms
(c) ketabton.com: The Digital Library

These are only 3 posts but they are good enough to get my micro-niche blog started. Now, it's time to get into technical keyword research, and pick those keywords which can give great results.
From here you have two options:
◉ If you are working on a niche no one has covered, you can use the Keyword Planner tool.
◉ If you are working on a niche which is already out there on internet, you can use SEMrush.
I highly recommend you to read my guide on SEO friendly writing to understand how to craft article that ranks.
About SEMrush: I started using SEMrush in 2012 & since then, it's been my favorite keyword research & SEO tool. It helps me to quickly find keywords which are already ranking for any existing domain. They are an award-winning company (just like ShoutMeLoud!!) & I whole-heartedly recommend them for any serious internet marketer.
It's a paid tool, but you can use the below link to get a 14-day free trial. I suggest you sign up once you are ready for keyword research (after initially setting up your blog).
Get a 14-day Free Trial of SEMrush
You can do your initial research & if you are done with the tool, you can cancel your subscription before 14 days & you will not end up paying anything. However, you are more likely to earn more when you are using this tool consistently, and for a long time.
One of the mistakes newbies make is that they don’t utilize the tools available to them.
If you want to be rich online, you need to think like a rich person. Question: How does a rich person think?
Answer (with another question):
◉ How can the same work be done in a much faster and more efficient way?
SEMrush is one such tool which made my life easier in the past 7 years & I can’t thank this tool enough.
It made the process of keyword research a total piece of cake.
Note: They have many other options such as SEO auditing, keyword tracking, backlink monitoring, and other advanced SEO stuff. You can go to ShoutMeLoud.com & search for “SEMrush” to learn more.
Moving on…
Let’s learn how to find AdSense-worthy keywords using SEMrush.
(c) ketabton.com: The Digital Library

Google AdSense Mastery Guide 21
Using SEMrush to find keywords in one click: In our case, we have 3 basic content ideas for our niche/keyword -Cydia.
Now, let’s do a Google search for our keyword:
In the above example, we have:
◉ 2 websites on the topic “Cydia”
◉ 1 Wikipedia page for the topic “Cydia”.
Now, our goal is to find keywords which are driving traffic to those websites. This is where SEMrush comes into the picture. With SEMrush, we can quickly find all of the keywords which a page or a website is ranking for.
Here I’m finding all the keywords for our first site (CydiaInstaller.net):
(c) ketabton.com: The Digital Library

This above screenshot is crucial. Let me explain some important fields for you:
◉ Keyword: The keyword (this one’s pretty obvious...)
◉ Pos: Position of that keyword in the search engine from the same domain (In this case our domain is CydiaInstaller.net).
◉ Volume: The average number of search queries for the keyword in the past 12 months.
◉ KD: This means “Keyword Difficulty”. The lower the number, the easier it is to rank.
◉ CPC (USD): The average price advertisers are willing to pay for one user’s click. The higher the number, the better the chances of higher earnings.
◉ Trend: This is important because you don’t want to work on a niche which has no future. You should also use the “Google Trend” tool to check if the target keyword (i.e. your topic) has increased or decreased in search volume over the last few months.
So now you know one of the secrets of earning huge from AdSense. But don’t jump with joy just yet, as that was merely the fun part.
The real work will start from here.
Since you are reading this so sincerely, let me share one more trick which will help you earn 10X more from AdSense.
Ready?
There are two types of keywords.
1. Short-Tail: Google AdSense
2. Long-Tail: How to make money from AdSense with viral content
Long-tail keywords have fewer searches than short-tail keywords, but they’re easier to rank & advertisers are willing to pay more for these kinds of keywords.
(c) ketabton.com: The Digital Library
Google AdSense Mastery Guide 23
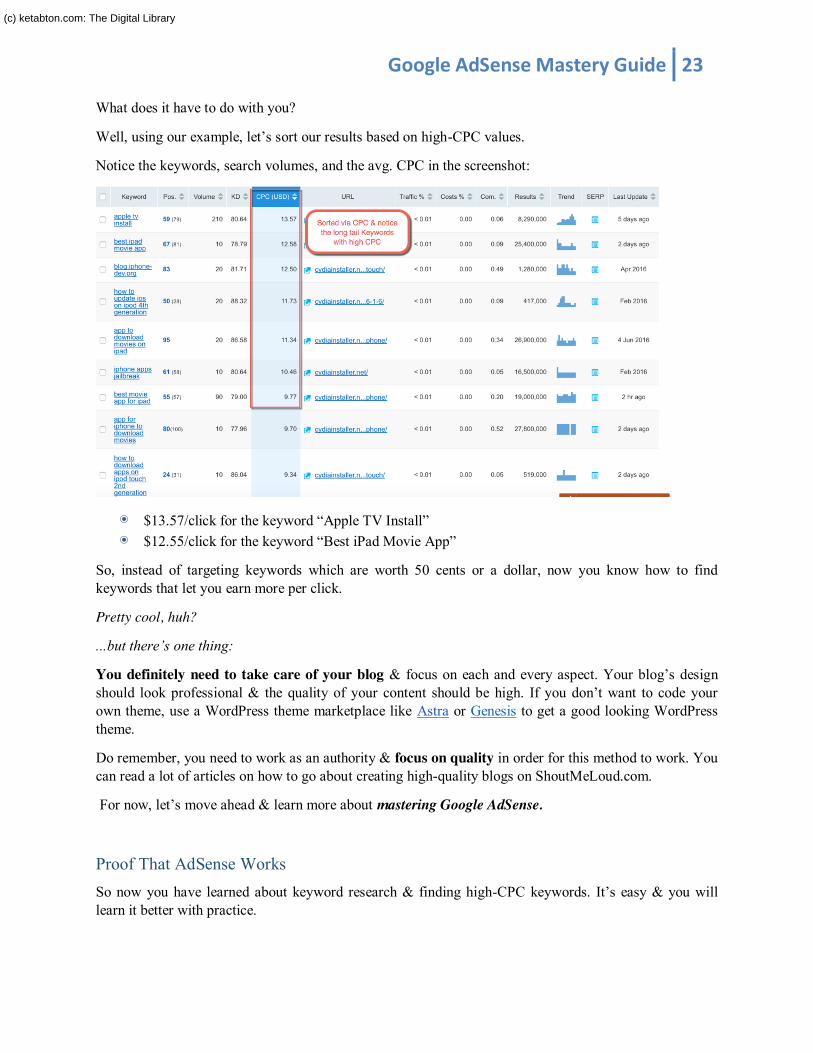
What does it have to do with you?
Well, using our example, let’s sort our results based on high-CPC values.
Notice the keywords, search volumes, and the avg. CPC in the screenshot:
◉ $13.57/click for the keyword “Apple TV Install” ◉ $12.55/click for the keyword “Best iPad Movie App”
So, instead of targeting keywords which are worth 50 cents or a dollar, now you know how to find keywords that let you earn more per click.
Pretty cool, huh?
...but there’s one thing:
You definitely need to take care of your blog & focus on each and every aspect. Your blog’s design should look professional & the quality of your content should be high. If you don’t want to code your own theme, use a WordPress theme marketplace like Astra or Genesis to get a good looking WordPress theme.
Do remember, you need to work as an authority & focus on quality in order for this method to work. You can read a lot of articles on how to go about creating high-quality blogs on ShoutMeLoud.com.
For now, let’s move ahead & learn more about mastering Google AdSense.
Proof That AdSense Works So now you have learned about keyword research & finding high-CPC keywords. It’s easy & you will learn it better with practice.
(c) ketabton.com: The Digital Library

We need to move ahead with our AdSense guide, but before I share the tips & tricks of getting AdSense approval, let me share this income screenshot from AdSense.
Even though it’s not necessary to add this screenshot, many people need to see it to believe it. It’s always better to have proof.
My first ever AdSense screenshot:
My AdSense journey started in February 2009, and I received my first payment during the first week of May 2009. It was for $179.77. Let me tell you, it felt amazing when I was holding my first ever AdSense check!
Here is my total income from then until April 2019:
From February 2009 - April 2019, I have earned $50,622 from AdSense on all of my blogs.
(c) ketabton.com: The Digital Library

Google AdSense Mastery Guide 25
If you notice in the “Product” column: “Hosted AdSense for Content” earned $571.27. This is not much, but again, this comes from the AdSense-YouTube partnership. I also earn from AdSense ads running on my YouTube channel.
In fact, once you have a consistent stream of earnings, you should also try your hand at video blogging (aka “vlogging”). It’s here to stay & you would be wise to get in on it now.
NOTE: While $50k is nice, to be honest, my affiliate income report for any one individual network is so much better than my ten year combined earnings from AdSense, but as I always say: AdSense gives us peace of mind. Why “peace of mind”? Because when you are earning online, recurring income is the first thing that you should target.
Alright, so far you have learned:
◉ What AdSense is & how it works
◉ What micro-niche blogging is
◉ How to do keyword research
◉ How to find profitable keywords
◉ That AdSense works (with proof)
And now, it’s time to get your own AdSense account.
Well, this is where things get tricky & you need to bring back all of your focus to this next chapter. It’s ok to take a quick break if you want, because in the next section you will have to do a lot of thinking & planning.
(c) ketabton.com: The Digital Library

Chapter 3 : Things To Know Before Signing Up For AdSense
Congratulations for completing the first few chapters of the Google AdSense Mastery Guide! Even if you don’t realize it, you have just learned a lot about SEO in the previous chapter. This will help you get more search engine traffic, which is very important for earning more with Google AdSense.
Now, it’s time to get you an AdSense account! The method we’ll be utilizing will use your blog’s address to secure your AdSense account. This way, once you are approved within the AdSense network, you can use that one AdSense account to add ads on other blogs you own and your YouTube videos.
An alternative & faster way to get an AdSense account is by using your YouTube channel. However, such accounts don’t allow you to run ads on a blog. So, it’s always better to try getting an AdSense account using the ”blog method”. If this method doesn’t work for you (it usually takes about 2 weeks), then you can move ahead to the YouTube method.
Sound good?
OK, moving on…
As I mentioned earlier, one of the major challenges with AdSense is:
◉ Getting an account approved.
A lot of people don’t get AdSense approval because they take it lightly. Do understand, this account will be taking care of lot of your expense and might become your braid and butter one day.
If you are not fulfilling the basic criteria, you are going to miss out on getting approval
I don’t mean to scare you & I will definitely help you get your AdSense account approved, but I also want you to know how tough it is to get an AdSense account. Once you get your account approved, one other thing which is very important for you to know is:
◉ Once your AdSense account gets disabled for any reason, it is very hard to get another AdSense account.
So what can we do to make sure this doesn’t happen?
Before applying for an AdSense account, you need to understand the mistakes that many newbies make after getting AdSense approval which ends up getting their accounts banned.
I’m sure you don’t want to become one of these careless & desperate people. Do you?
No, of course not.
Let’s move ahead & understand some mistakes that will get your account banned.
1. Invalid Clicks This is where most AdSense accounts get into the danger zone.
(c) ketabton.com: The Digital Library

Google AdSense Mastery Guide 27
Most newbie publishers who start with AdSense usually ask their friends to click on ads or they themselves click on their own ads from a different I.P. (public computer, friend’s computer, etc.) just to make more money. They don’t know that they’re actually shooting themselves in the foot.
When Google’s AdSense team detects such activity on your site, they put your account into “Disable Mode” to safeguard their advertisers.
As stated in the Google AdSense program policies, clicking on, or encouraging people to click on your ads is unacceptable. You should not attempt it at all.
**WARNING**: Never, ever, EVER click on your own ads. If you do, the AdSense team will permanently ban your account & you will never be permitted to get another AdSense account… ever. That said, also stay away from Facebook groups and/or private groups that encourage you to click on others’ ads & others to click on your ads. Such techniques don’t work, and they will cause you to be forever banned from the AdSense platform. Be smart and be careful.
2. Using AdSense on Non-Supported Language Blog At the time of writing this report, Google doesn’t allow all languages to qualify for the AdSense program. If you have an approved AdSense account and you are using it on a blog whose language doesn’t qualify, then you need to make changes immediately.
Allowed languages:
(c) ketabton.com: The Digital Library

3. Sending Ads via Email Many publishers started the trend of sending AdSense advertisements to their readers through email. Google considers this against their program policies.
4. Using Tricks to Encourage Clicks Sometimes people use some sort of trick to persuade their visitors to click on AdSense ads. Generally, these methods can arouse a visitor’s curiosity and they may end up clicking the ad, but if caught, you may end up getting your account banned.
Encouraging clicks: This could be by using words like “click here and get money” or “click here to see a hot babe”, etc.
Shading with image: Placing AdSense’s image ad units alongside an adjacent image can be a great and smart move, but guess what? Do it and Google might ban you. Google’s TOS doesn’t allow the use of shading your AdSense image ads with an adjacent image.
Pop Up Ads: Also, don’t try to use pop ups of any kind to display ads.
If you want to succeed with AdSense, then you should stay away from any means of using tricks to get clicks.
◉ Read a few more from the official Google page
5. Altering the AdSense Code in Any Way So you’re a programmer? Doesn’t matter. Google does not permit you changing your AdSense code in any way.
6. Hosting Copyrighted Content If you are running AdSense on a site that distributes copyrighted content like movies, music, or any other copyrighted files, you are most likely going to get an instant ban. AdSense doesn’t allow ads on sites that distribute copyrighted content of any kind.
7. Linking to Sites that Distribute Illegal and Copyrighted Content This is one of the big reasons why sites get banned from AdSense. This is especially true for bloggers coming from a tech background or those who are really into downloading pirated stuff. If you are linking to sites like movie streaming, illegal or pirated software, Keygen sites, etc., your AdSense ads might end up being permanently disabled for that particular site.
Here is a list of content which is not allowed for AdSense sites:
◉ Porn/Adult material
◉ Violent content
(c) ketabton.com: The Digital Library

Google AdSense Mastery Guide 29
◉ Racist content
◉ Hacking/Cracking
◉ Gambling/Casino sites
◉ Pages selling drugs or alcohol (including beer/liquor)
◉ Pages selling weapons and/or ammunition
◉ Distribution of course work (Example: Writing student essays)
The above are just examples and there could be more. You should avoid putting such content on your blog or linking to any of those sites. At the very least, remove your AdSense ads from those sites or risk being banned for life.
◉ (Also, consider reading AdSense’s landing page quality guidelines which will give you ample information regarding what Google expects from your pages.)
8. Paid Traffic Buying certain kinds of traffic for your AdSense enabled sites, according to AdSense’s TOS, is not permitted.
However, promoting your post on social media, or buying traffic from quality sites like Facebook, Google AdWords,, Reddit, etc. is not part of the violation. However, this model of buying cheap traffic to earn from AdSense doesn’t work anymore.
9. Making Ads Look Like Content You are free to make your ads blend with the content by changing the color or size, but don’t make it look exactly like content.
In the below image, you can see what kind of gimmicking is not acceptable. See how hard it is to spot the ads in below screenshot (notice the 3rd picture on the 1st row & the 1st picture on the 2nd row):
(c) ketabton.com: The Digital Library

Quick things to know:
◉ Don’t make your AdSense ads sticky. Making them sticky is against AdSense implementation policy. But, I do use this technique for getting more clicks on my affiliate ads & direct ads. If you are using WordPress, you can use a plugin called Q2W3 Fixed Widget.
◉ Using AdSense ads on a site which curates videos from YouTube or other video hosting sites can put your account on radar. To avoid this, ensure you also have original content on your blog. A good idea is to add 500-700 words of original content describing the video. I usually aim to have at least 1500+ words on every blog post.
◉ Don’t place AdSense ads on a 404 error page, an exit page, a log in page, or a “Thank You” page.
It might take a long time (2-3 weeks) for you to get approved by the Google AdSense team, but if you go against any of their TOS, you will lose your account within the blink of an eye. However, as AdSense has made the approval process more competitive, they have become liberal when it comes to banning. Now, they usually stop showing ads on pages which are violating their policies.
This is a big relief, but don’t take it for granted as AdSense is very strict about their TOS, and you have to take care of the above things to make sure you aren’t violating AdSense policies. We all know that getting AdSense approval is not that easy, so we need to take proper care to keep our AdSense account active.
If you are one of those good bloggers who has a good blog, then you don’t have to worry much. I just had to share these “not-to-do” things first, as these are important to know before you get started with AdSense.
(c) ketabton.com: The Digital Library
Google AdSense Mastery Guide 31
Things To Do and Note Before Applying for Google AdSense 1. Name/email verification: When you apply, don’t forget to put your name in some easily visible area on your site like the “About Us” and “Contact Us” pages. It will help to inform the Google AdSense team that you are the same person who applied for AdSense and are not some crappy spam bot. Otherwise, the AdSense team will ask you to prove your ownership & this will delay the approval process even further. You can see my About Page for an idea of how yours should be.
2. How old are you? According to Google’s Terms and Conditions, they can only accept applications from applicants who are 18 years and above. Therefore, if you’re not yet at that age, don’t apply for AdSense because you will not get approval. What you can do in this case is apply using your parent/guardian’s name. The payment will also come to your parent/guardian’s bank account.
3. Is your blog well-designed? As mentioned earlier, your blog design matters a lot. It should be professional and not look like a messy photo gallery. Google appreciates clean, professional, and smart designs.
NOTE: Your blog design is the biggest thing after your content. This represents your expertise, your experience, and your professionalism. Be careful here because anything that’s not designed well can kill your chances of getting approved by AdSense. Don’t overdo things either; just make it as easy and good looking as possible. If you are using WordPress, you can get good looking themes from Astra or Genesis.
4. Content type: Be careful with what type of content you are publishing because it’s the number one thing that matters. I have already shared what kind of content you shouldn’t have. Google AdSense is not for pornographic content, pirated content, illegal items, drugs, or other related sites like that. The AdSense team also won’t approve you if your content is in a language that’s not supported. (Check out what languages they support.) Having posts shorter than 600 words is also a red flag. (More over, have at least 1200+ words in every article as it helps in attaining a better ranking.)
5. Delete other ad networks: If you have any other ads placed like Chitika, Clicksor, or anything else, it’s time to drop them. Even if Google AdSense allows you to use other ad networks along with them, it’s better to remove those ads before applying and don’t put them back up until you get a reply from the AdSense team.
◉ Important: Before submitting your application for Google AdSense, make sure you remove all of the ads on your blog from any other network.
6. Has your site been active for at least six months? In some locations, including China and India, Google requires your site to have been active for at least six months before it can be considered for approval. According to them, they’re taking this step to ensure the quality of their advertising network and to protect the interests of their advertisers and existing publishers. Though, personally I have seen many people getting approval within the first month of creating their blog. Even ShoutMeLoud got approval within 3 months. The key is how well you have maintained your blog during its initial days.
If you’ve done all of the things mentioned above, then it’s time to go to the next chapter where we will talk about how to sign up and secure your own AdSense account.
(c) ketabton.com: The Digital Library

Chapter 4: How To Sign Up For AdSense And Get Approved
Steps to Getting Approved AdSense has recently changed the account approval process to include the following steps:
1. Sign up for AdSense.
2. You get an instant account where you need to add AdSense ads to your blog.
3. Add your payment details
4. Verify phone number
5. Your account will be activated within 1-2 days or you may get an email about changes you need to make. In the later case, it may take 1-3 weeks to get final approval.
Although the new AdSense account approval process is quite lengthy, this process ultimately helps Google to maintain the quality of AdSense for all users.
It is also important to make sure your blog or website is abiding by AdSense policies before being accepted.
Step-by-Step Guide to Creating an AdSense Account: First, go to the signup page for AdSense. You can either create a new Google account or you can choose to use your existing Google account. If you have a domain-specific email address, I suggest you use that to sign up for your AdSense account. If you have not set up domain email, you can use Google apps to create one for your domain name.
Otherwise, use your existing Gmail address.
(c) ketabton.com: The Digital Library

Google AdSense Mastery Guide 33
Note: To date, I have seen many people find greater success using domain-specific email addresses. You can create a domain specific email using Google Apps (which is another Google service) & it costs $5/month/user.
Phone Verification I have only started seeing this kind of verification in 2019. If you see a phone verification screen, simply verify your number.
(c) ketabton.com: The Digital Library

Website Details (First stage of AdSense application)
This form is straight-forward. You simply need to enter your website address and select the content language.
For the website URL, use your blog’s web address, and make sure to add it without “HTTP://” or “HTTPS://”
(c) ketabton.com: The Digital Library
Google AdSense Mastery Guide 35
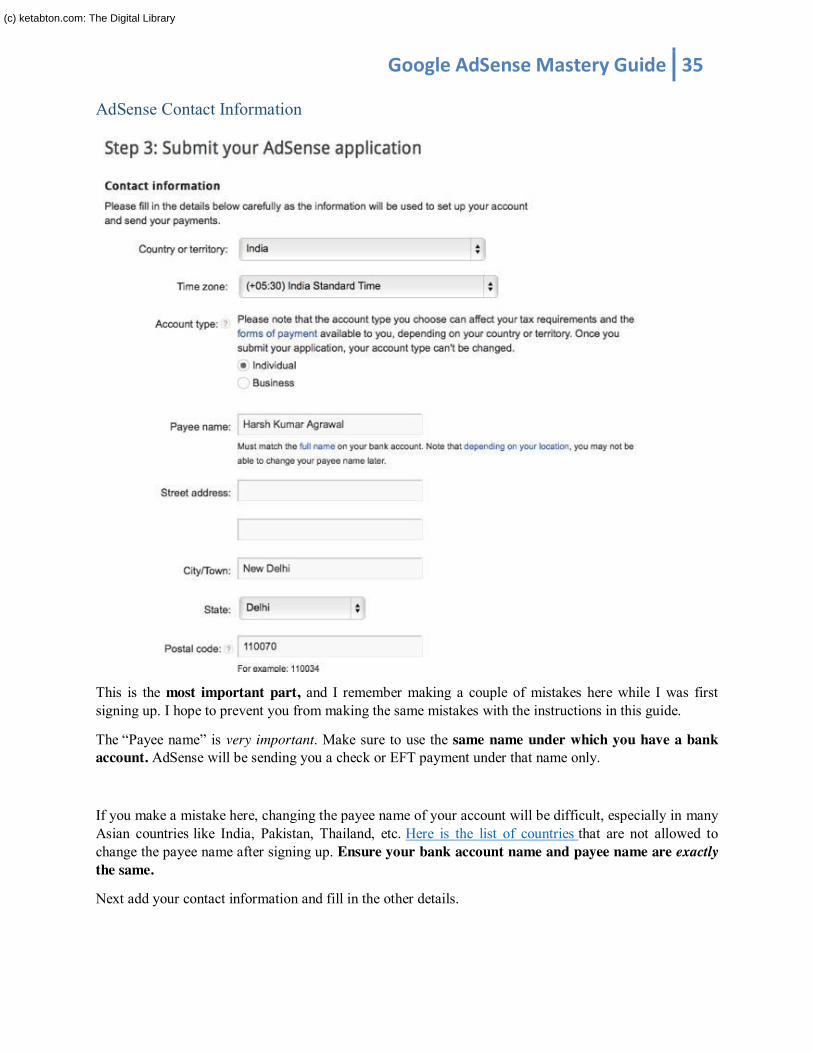
AdSense Contact Information
This is the most important part, and I remember making a couple of mistakes here while I was first signing up. I hope to prevent you from making the same mistakes with the instructions in this guide.
The “Payee name” is very important. Make sure to use the same name under which you have a bank account. AdSense will be sending you a check or EFT payment under that name only.
If you make a mistake here, changing the payee name of your account will be difficult, especially in many Asian countries like India, Pakistan, Thailand, etc. Here is the list of countries that are not allowed to change the payee name after signing up. Ensure your bank account name and payee name are exactly the same.
Next add your contact information and fill in the other details.
(c) ketabton.com: The Digital Library

Accept AdSense Policies
Read the AdSense policies and put a checkmark in all three boxes.
Once done, click on “Submit”, and on the next page you can review your details. Make sure that all the details are accurate and up to date.
In my case, it took about 3 days to get the approval email. This is what it looks like:
Even though I was submitting this new AdSense application just for this tutorial, it still felt really nice to see the approval email. But you should know that this is only Phase#1 of getting AdSense approval. To get fully approved, you need to create and add the AdSense code on your blog.
Hosted and Non-Hosted AdSense Account The AdSense account that we get by approval via the above described method is a Non-Hosted AdSense account. Non-Hosted here means we can use this AdSense account for any website that is not hosted by the services of Google.
Here the hosted by the services of Google means the services like YouTube and Blogger etc. which can also be monetized through Google AdSense.
If you are applying for a fresh New AdSense account via your YouTube channel, you will be getting a Hosted AdSense account by default. Hosted AdSense account means, this account can only be used to display ads on Google’s Hosted services such as YouTube. A Hosted AdSense account Profile is shown in the screenshot. So, with a Hosted AdSense account you can only view AdSense ads on your YouTube videos but what if you want to display ads with the same account your website also?
(c) ketabton.com: The Digital Library

Google AdSense Mastery Guide 37
Then, you can apply to Google to make your Hosted AdSense account into a normal or Non-Hosted account. For this your website should qualify all the things that AdSense requires and then you have to apply for AdSense through that website. If you get approval your AdSense account will now become fully approved Non-Hosted or a Normal AdSense account. But if you won’t get approval, still won’t lose your AdSense account, your account will still remain valid for YouTube and other Google hosted services.
So, this was all about Hosted and Non-Hosted AdSense account. Hope you got the difference. Now, let’s begin with the steps of creating our first AdSense Ad unit in the next chapter.
(c) ketabton.com: The Digital Library

Chapter 5: How To Create & Add AdSense Ad Unit:
This process is best understood through video. I am going to link you to a video that will assist you with the process of creating your first ad unit. Click on the below image & watch to see the process.
(From here, you can continue reading & learning more about AdSense, as this eBook is not finished yet. However, I recommend that you first implement all of the things above before continuing. Get your blog up & running along with your AdSense ads. Once you have done that, read the further sections to learn all of the AdSense optimization tricks. Following the tricks will help you increase your earnings by 2-3x in a short amount of time.)
Once you have signed up for AdSense, you need to add the AdSense code to your blog.
The AdSense team will review your application again after you add the codes, and if approved, your account will be fully activated and you will be sent an AdSense PIN.
All of this takes approximately 2 weeks - 2 months depending upon your geographical location.
Once everything is set up, in order to get paid from AdSense, you need to complete two further steps:
◉ Submit your tax information.
◉ Enter your PIN.
(c) ketabton.com: The Digital Library

Google AdSense Mastery Guide 39
You will also need to submit a tax form depending on how you are entitled to do business. For certification of Non-U.S. activities, and for Indian AdSense publishers, you can fill in this tax information:
For those in the U.S., or elsewhere, simply answer the questions accurately and you’ll be taken to the appropriate form.
AdSense PIN: You will receive an AdSense PIN by mail once you reach the threshold of $10 with your AdSense account. You then need to add the PIN to your AdSense account. You will start receiving payment once your AdSense account reaches the $100 threshold.
(c) ketabton.com: The Digital Library
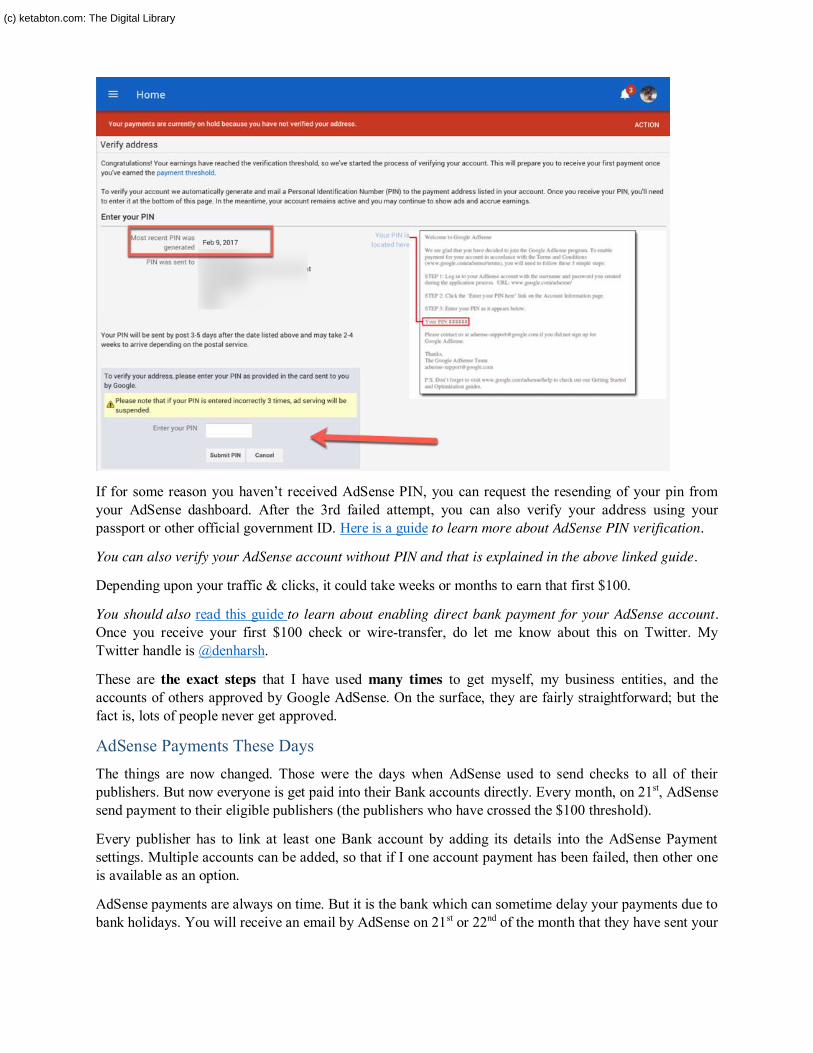
If for some reason you haven’t received AdSense PIN, you can request the resending of your pin from your AdSense dashboard. After the 3rd failed attempt, you can also verify your address using your passport or other official government ID. Here is a guide to learn more about AdSense PIN verification.
You can also verify your AdSense account without PIN and that is explained in the above linked guide.
Depending upon your traffic & clicks, it could take weeks or months to earn that first $100.
You should also read this guide to learn about enabling direct bank payment for your AdSense account. Once you receive your first $100 check or wire-transfer, do let me know about this on Twitter. My Twitter handle is @denharsh.
These are the exact steps that I have used many times to get myself, my business entities, and the accounts of others approved by Google AdSense. On the surface, they are fairly straightforward; but the fact is, lots of people never get approved.
AdSense Payments These Days The things are now changed. Those were the days when AdSense used to send checks to all of their publishers. But now everyone is get paid into their Bank accounts directly. Every month, on 21st, AdSense send payment to their eligible publishers (the publishers who have crossed the $100 threshold).
Every publisher has to link at least one Bank account by adding its details into the AdSense Payment settings. Multiple accounts can be added, so that if I one account payment has been failed, then other one is available as an option.
AdSense payments are always on time. But it is the bank which can sometime delay your payments due to bank holidays. You will receive an email by AdSense on 21st or 22nd of the month that they have sent your
(c) ketabton.com: The Digital Library

Google AdSense Mastery Guide 41
earnings. Once, you receive that email, you will get the amount in your bank account within five business days.
Different Types of AdSense Ads: In the next few chapters, we will learn many important things related to your AdSense account. Use them properly and you will earn the most amount of money possible from AdSense.
AdSense offers various ad types & all of them perform differently. Especially with the rise of smart phones, a lot of innovation has been happening with different ad styles. Let’s have a look at some of these common types of AdSense ads.
Banner Ads: This is the most common ad type and you have likely seen them on many other sites. Banner ads come in three styles: “Image ads”, “Text ads” & “Magazine ads”.
They also come in various sizes & you should pick the highest size possible. Since AdSense ads are now responsive, you don’t have to worry about resizing the ads for smaller screens.
In a majority of cases, create a responsive ad unit & it will ensure a proper ad size is displayed regardless of how a user comes to see the ad.
(c) ketabton.com: The Digital Library

Link Ads:
These are popular & you can place these kinds of units anywhere on your blog (below the comment form, in the navigation bar, etc.). They work really well when blended (legally!) with your content.
AdSense for Search: You can create a search box for your blog which will add in another potential revenue stream. I have seen great results with this ad unit type. You are allowed to place 2 AdSense for Search ad units on your page.
Mobile Ads: The following AdSense ad sizes are available for mobile sites...
Text ads-
◉ Mobile leaderboard (320x50)
◉ Large mobile banner (320x100)
◉ Small square (200x200)
◉ Square (250x250)
(c) ketabton.com: The Digital Library
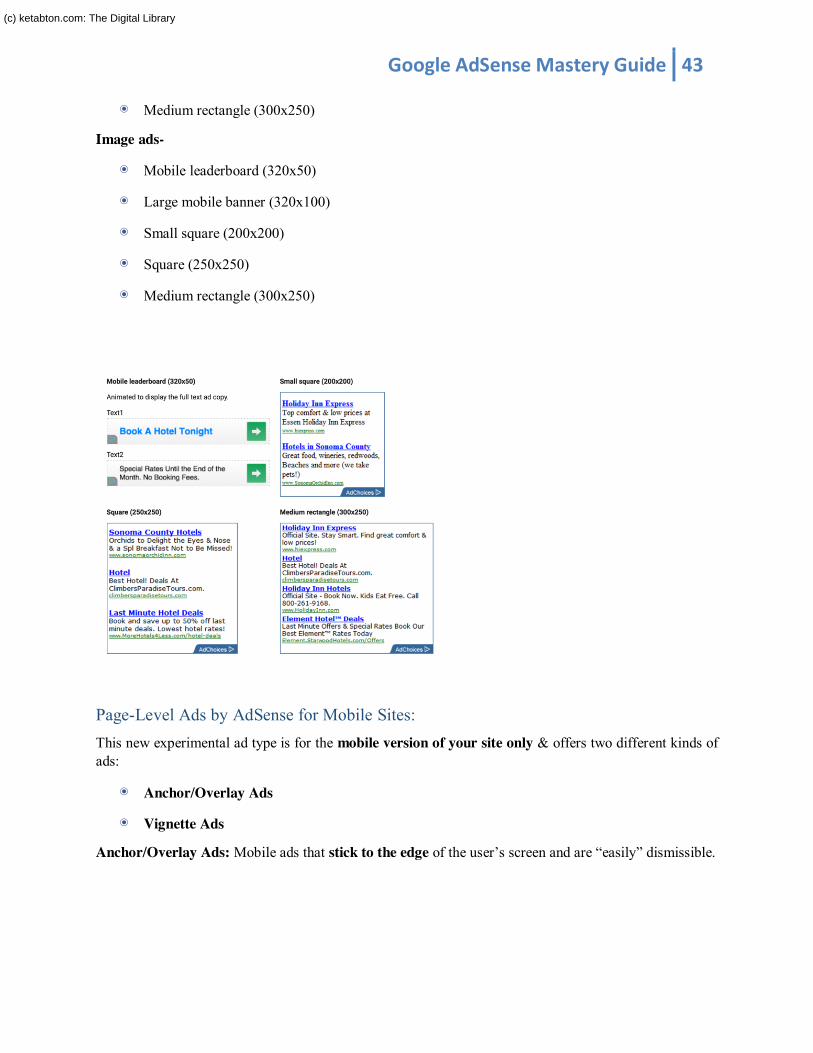
Google AdSense Mastery Guide 43
◉ Medium rectangle (300x250)
Image ads-
◉ Mobile leaderboard (320x50)
◉ Large mobile banner (320x100)
◉ Small square (200x200)
◉ Square (250x250)
◉ Medium rectangle (300x250)
Page-Level Ads by AdSense for Mobile Sites: This new experimental ad type is for the mobile version of your site only & offers two different kinds of ads:
◉ Anchor/Overlay Ads
◉ Vignette Ads
Anchor/Overlay Ads: Mobile ads that stick to the edge of the user’s screen and are “easily” dismissible.
(c) ketabton.com: The Digital Library
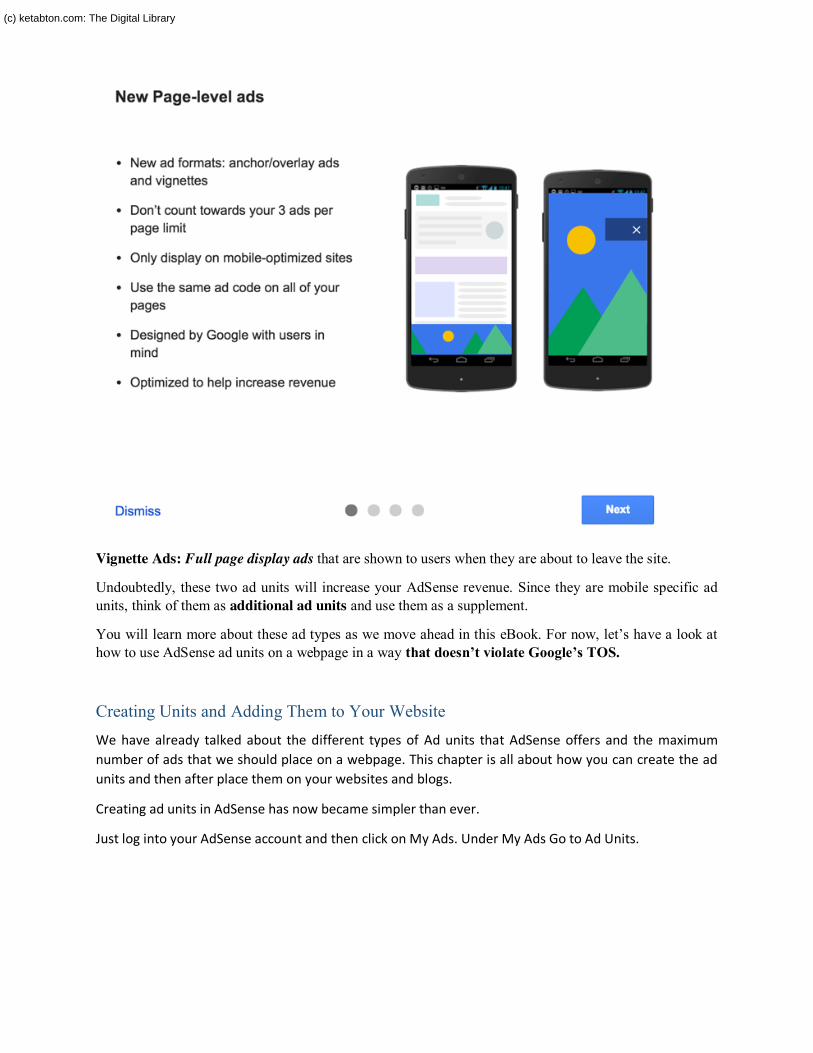
Vignette Ads: Full page display ads that are shown to users when they are about to leave the site.
Undoubtedly, these two ad units will increase your AdSense revenue. Since they are mobile specific ad units, think of them as additional ad units and use them as a supplement.
You will learn more about these ad types as we move ahead in this eBook. For now, let’s have a look at how to use AdSense ad units on a webpage in a way that doesn’t violate Google’s TOS.
Creating Units and Adding Them to Your Website We have already talked about the different types of Ad units that AdSense offers and the maximum number of ads that we should place on a webpage. This chapter is all about how you can create the ad units and then after place them on your websites and blogs.
Creating ad units in AdSense has now became simpler than ever.
Just log into your AdSense account and then click on My Ads. Under My Ads Go to Ad Units.
(c) ketabton.com: The Digital Library

Google AdSense Mastery Guide 45
Then Click on New Ad Unit as shown in the screenshot above.
Now you’ve to choose what type of ad you want to create. The four types available as of now are:
● Text & Display Ads (Which includes most of the sub ad types like banners, skyscrapers, etc. as defined in the previous chapters)
● Matched Content (To promote your related content) ● In-feed Ads (Ads that displays with content feed) ● In-Article Ads (Ads specially optimized for articles and blog posts)
You can choose any of these according to the requirement. For instance, I’ve selected the Text and Display Ads.
(c) ketabton.com: The Digital Library

Give the ad unit a unique name with which you can identify it.
Instead of choosing the size of ads manually, Google recommends using the Responsive Ad Type as it automatically displays the ad type according the space available on the website. That’s why by default, it is showing the responsive type only.
You can also switch to pre-defined ad sizes from the Size section and then can choose manual sizes.
In the Ad Type, you can choose from Text & Display Ads, Text Ads and Display Only Ads. I recommend using Text & Display Ads option as it performs the best.
(c) ketabton.com: The Digital Library
Google AdSense Mastery Guide 47
You can also configure the other options like Text ad styles, which lets you defines the colors and other styles of the text type ads. And you also have the option to choose custom channels and the options to how to make the ad unit look like if ads are not available for an instance.
After submitting all this information, you will be a given a code for this particular Ad unit and this is exactly the code that you have to paste on your website location where you want this ad unit to be displayed to the visitors.
AdSense Ads On AMP Pages AMP Pages are on trend as Google is trying to speed up the web by reducing the page size and thus forming a standard for slow speed internet connections.
AMP pages have a different HTML schema and fixed code types. Adding Ad units on AMP pages is also not the same as placing ad units on the normal web pages. Regarding this, I recommend you reading Google’s official guide about AMP and Google AdSense.
Again in WordPress, this is pretty much easy. Most of the websites are using AMP For WP plugin to enable the functionality of AMP pages. This plugin has all the necessary options to integrate Google AdSense Ads, about which you can find a detailed tutorial here.
Note: AdSense keeps on updating its interface by making minor changes time to time. So, it might be possible what is represented in the screenshots of this book is not exactly what you are seeing on your side of AdSense interface.
(c) ketabton.com: The Digital Library

Chapter 6: Maximum Number of AdSense Units
Wondering how many ad units you can add on a web-page?
Earlier, AdSense had a maximum limit of 3 ad units (while “premium partners” enjoyed serving up to 6 ad units).
In August 2016, AdSense lifted the ad unit limit for every site. That means you can now place an unlimited amount of AdSense ads on a page.
However, advertising and other paid promotional material added to your pages should not exceed your content.
In other words:
You also need to maintain the quality of your site.
As long as your ads do not exceed your content, there is no upper limit on the number of ads on a single page.
It’s important to note that while picking the number of ads, you should think about the short posts on your blog. If you decide to place more than 5-6 ad units, and you are placing them site wide using a plugin, you might be spamming your own short posts with a large number of ads.
AdSense has explicitly mentioned:
“We may limit or disable ad serving on pages with little to no value and/or excessive advertising until changes are made.”
So I suggest you keep less than 5 ads per page.
I usually stick to 3 or 4.
But you should identify your own limit according to your blog’s layout.
Placement of AdSense Units A couple things which I have learned from my own experience:
◉ Placing ads above the fold yields better results.
◉ A combination of image + text ads perform better.
Again, be careful to make sure you don’t violate AdSense policies by placing your ads in such a way that forces users to click on them. Additionally, be sure to never ask someone to click your ads.
So, now that you have decided the type, size, position, and the number of ads which you want to place on your blog, let’s move on to our next section where I will teach you how you can boost your revenue and earn a handsome amount of money.
(c) ketabton.com: The Digital Library

Google AdSense Mastery Guide 49
Chapter 7: Google AdSense Auto Ads
Google is known for its innovation. Despite multiple alternatives, none has thus far consistently outperformed AdSense in terms of innovation, user-friendliness and overall experience.
On February 21, 2018, the AdSense team launched Google Auto ads for everyone. This is one of the biggest innovation from the AdSense team in the recent time. In fact, Auto ads are expected to change the way you have been using AdSense all this while.
One of the biggest concerns of most AdSense publishers is the ad placement, ad optimization and maintaining a pleasant user experience.
Google Auto ads are utilizing artificial intelligence to automatically manage ad placements and ad optimization for the publishers. However, as a publisher, you can manage:
● Global settings: What ads should be shown
● Domain-based setting: Configure what ads should be shown on specific domain or sub-domain
● Directory settings: Configure the kind of ads to be shown on the particular directory. For example, on pagination pages or archive pages, you might not want to show matched content ads, and you can configure the same from the AdSense settings panel. This feature is called Advanced URL settings. You can read more about it here.
So far we have got mixed reviews from users about Auto ads. However, I’m optimistic about the future of AdSense auto ads as it will take away the pain of ad optimization and a blogger can focus on building content while the AdSense takes care of everything else. Google AdSense was always a plug and play ad program, but now it’s completely automatic. Thanks to artificial intelligence.
Important things to know about AdSense Auto ads Auto-ads is not going to be a problem for anyone who has used Google AdSense. However, before you start setting up Auto-ads, here are few things you should know. This will also answer your questions before you start integrating it.
● If you already have AdSense ads placed on your blog, you can decide not to remove it. AdSense auto ads will automatically detect those ads and place more ads accordingly.
● Already using Anchor or Vignette ads? Auto ads include Anchor and Vignette ads and many more additional formats such as Text and display, In-feed and Matched content ads. Note that all users that use Page-level ads will automatically be migrated to Auto ads without any need to add a code to their page. However, logging in to your AdSense account and setting up Global settings for auto-ads for the first time is a good idea.
How to Enable Google AdSense Auto ads (Complete Guide) If you would like to learn by watching a video, there is a detailed Google AdSense Auto ad video guide at the end of this tutorial. Here is a quick walkthrough of the steps:
● Login to your Google AdSense account
(c) ketabton.com: The Digital Library

● Go to my Ads > Auto Ads
● Click on ‘Setup Auto Ads’
● Configure your Global settings
● ‘Enabling’ automatically get new formats at the bottom.
● Click on Save.
● Now place the ad codes on every page of your blog/website. I use Google tag manager for the same. You can use any technique suitable for you. If you are already using Page level ads, you don’t need to do anything.
● You can always check the performance of Google Auto ads by going to My Ads > Auto ads and clicking on Statistics.
Overall, it will be exciting to see how Google Auto ads work in the future. So far, we are getting mixed reviews. One user from the ShoutMeLoud community complained of seven ads on one of his articles!
(c) ketabton.com: The Digital Library

Google AdSense Mastery Guide 51
But as I said earlier, over time this would be something everyone will adapt to, and since it uses machine learning (artificial intelligence), it will only get better with time.
For now, here is the video tutorial to set up Google AdSense auto-ads
https://youtu.be/pc_XtNg9Jzk
AdSense Auto Ads On AMP Pages Google is running an Experiment of implementing Auto Ads on AMP pages as well. This feature of having the Auto Ads on AMP pages is not available directly.
It is available as an experiment in AdSense Labs but Google is slowly rolling it out.
Setting it up is also very easy. Just Log into your AdSense Account. Go To My Ads and then by default the Auto Ads default tab will be selected. You will see another tab in the right labelled ad Auto Ads for AMP, just go there and follow the steps 1, 2 and 3 as displayed the screenshot as well.
1. Enable the option 2. Get The Code from step 2 and step 3. 3. Paste in the header section (got from 2nd step) and the body section (got from step 3) of the AMP
pages where you want to make them work.
Google AdSense Auto Ads may be beneficial if you don’t want to place ads manually and want to leave everything on Google itself.
As the work is of AI, it will be getting better only with time. So, don’t even worry about more number of ads on your article because Google is managing it itself, so even they can’t complain you for more number of ads.
I would say Auto Ads has uplifted all the worries of placing ads for a publisher.
(c) ketabton.com: The Digital Library

Chapter 8: Tips to Increasing Your AdSense Revenue
It is commonly said that traffic is directly proportional to money in blogging, but this is not really accurate in terms of AdSense advertising. The reason for this is that there are many factors that affect your AdSense income. These include ad placement, ad type, traffic source, and perhaps most importantly, CPC.
I have already discussed about the ad type and placement above.
Let’s take a look at CPC.
What is AdSense CPC? CPC stands for “Cost per Click”. In short, it means the amount of money that you make per click on your ad.
Now, you might have noticed AdSense publishers talking more about CTR (Click Through Rate) and less about CPC.
If you are really serious about your AdSense revenue, you should work more on CPC and focus only on getting a decent CTR. Getting thousands of impressions on your ads won’t be of much help, but a blog with a really good CPC and a decent CTR can land very high earnings.
NOTE: CPC is not directly linked to traffic.
For example:
Micro-niche blogs make more money from AdSense despite receiving less traffic.
The reason why is simple. Engaged readership for such blogs is so high that you get paid really well for CPC. Of course, there are other factors as well, like ad competition, keywords, etc., but the main reason is high readership with engaged readers.
Factors that Affect AdSense CPC
Niche:
Choosing the right niche for your blog or website is of the utmost important. Cost per Click (CPC) of an ad directly depends upon the topic on which you’re writing.
I have listed below some niches that will pay you a high CPC (in decreasing order of CPC):
◉ Gadgets – Tech gadgets
◉ Apple – Apple products
◉ Google – Google products
◉ Microsoft – MS Office
(c) ketabton.com: The Digital Library
Google AdSense Mastery Guide 53
◉ Banking
◉ Automobiles
◉ Health
◉ Real Estate
◉ Home Loans
◉ Jobs
◉ Dating & Romance
Content: The second thing is the content. You must write content that answers a reader’s question. So before writing blog posts, find what your readers are searching for on the internet and try to present them with solutions.
Remember that you should always directly engage with your readers. Your content must be tailored according to your niche so that more and more readers will read your blogs.
Good content is what search engines love, resulting in more clicks and more revenue if your ads are highly targeted and your traffic is from countries like the U.S.A or the U.K.
Write your content based around keywords that have a high CPC. When you do keyword research, make sure to use the “approximate CPC column” to see which keywords pay the best. Base your content around that.
Allow/Block ads: In Google AdSense, you will find a column where you can allow or block ads.
This will show you different ad categories that are showing on your website. You can go there and see for yourself how much each ad category is paying you. If you find that any ad category is not paying much, then feel free to block that category.
(c) ketabton.com: The Digital Library

Try to block those categories that are completely irrelevant to the content or niche of your blog. For example: If your blog is about technology, then block the ad categories for politics, religion, gardening, etc.
This will surely increase your AdSense CPC and CTR. However, you should only do this step once you have placed AdSense ads for the first few months. The reason is because by that time, you will have enough data to make an informed decision on what needs to go.
Platform: Your blogs are read from different platforms like desktops, laptops, mobiles, etc. Although CPC is generally not affected by the platforms on which ads are shown, you should try your best to target as many readers as possible. You will get the most readers from desktops and laptop devices, though more and more people are surfing the web on mobile phones.
If you are able to reach mobile readers, then you may find that CPC increases, as ads shown on phones are of higher quality. You should only serve AdSense ads that are optimized for mobile screen sizes. Try “Anchor” & “Vignette” ads to make the most out of your mobile traffic.
Country (Location of your traffic): One of the most important factors that can increase CPC is the country you are targeting. For example, a click on an ad from the U.S.A. can pay you $3, and a click on the same ad from an African country can end up paying only 30 cents.
(c) ketabton.com: The Digital Library
Google AdSense Mastery Guide 55
Therefore, always tailor your blog and its content to audiences in English speaking and/or developed countries.
This guide will help you in targeting country-specific traffic.
Text & Image Format: I have already mentioned this earlier, but it’s important to mention again. Choose the right format for your ad.
Here are some of the AdSense sizes that work best:
◉ 336 * 280: Large Rectangle
◉ 300*250:
◉ 728*90
◉ 160*600
If you can place three ads on a page (and not make it look spammy), then choose two 336 X 280 ads and one 468 X 60 ad. If your design allows you to add a 160*600 ad unit, you should add it in, too.
At times, depending upon the niche and blog type, image ads perform better in terms of higher CTR, but CPC won’t be as good as text ads. As I mentioned above, it differs for different niche types, and the most important thing is proper ad placement.
Placement: Never neglect the placement of your ads on a web page as it is directly proportional to your AdSense revenue.
So where should you place ads for maximum CPC? The answer is simple.
You should try putting AdSense ads around the content and above the fold. (Above the fold ads perform far better than below the fold ads!)
Alternatively, you can place 2 ads inside of your blog post and 1 outside the post.
As far as placing inside the post goes, place one 336 X 280 rectangle ad on the top of the blog just below the title and place the second 468 X 60 ad in between the blog post.
Again, make sure to add enough space between the ads & your content so that it doesn’t violate AdSense policies. The remaining ad (for a total of 3- just make sure to not overrun your page with ads) you can place in the sidebar or at the end of the post.
Just remember these points:
◉ Ads placed above the fold pay better.
◉ Serve ads in places where visitors are more likely to click.
(c) ketabton.com: The Digital Library
If you are a professional blogger and your only earning source is from your blog, you should not miss a chance to optimize your ads and use the maximum possible ad units on a single page. Though, again, don’t add ads in a way that could hamper the readability of the content.
However, if you are a hobby blogger or blogging on a personal blog, your first target should be giving quality content, and you should focus less on ads. In general, readers hate advertisements that distract them from reading.
From personal experience, the maximum number of clicks and higher CPCs will come from 2 ads that are inside the blog post somewhere at the top.
AdSense Section Targeting: Make ads more relevant AdSense is a contextual ad network that works based on the content (i.e. context) of your page. This includes your header and footer. So ads shown via AdSense must be highly relevant to the context of your article.
AdSense section targeting is a quick technique to add two lines of code before and after the content, thus targeting your ad based on the content. Here is an official guide from Google for implementing AdSense Section Targeting.
AdSense for Search: Add extra revenue source AdSense for Search not only helps you monetize, but it also helps with user navigation. When we configure AdSense for Search, we have two options to show search results:
◉ Within a blog page
◉ On a Google page
In order to retain the visitor on your blog and lower down the bounce rate, it’s a good idea to show the search result within your blog.
Placement Targeting: This is one thing that many bloggers are not implementing. When you create a channel, you have the option to add more details about your ad types, and then put your ad up for auction by opting for placement targeting.
This increases competition and the ad values on your site go up. You must enable this manually for every custom channel. To enable placement targeting on your existing custom channel:
Log in to your AdSense account > My ads > Content > Custom Channels.
(c) ketabton.com: The Digital Library

Google AdSense Mastery Guide 57
Next, click on one of the names and a screen will pop up. Simply add the details and put a checkmark at “Placement Targeting”.
If you have already watched the above video on how to create AdSense ad units, you already know how to add custom channels to new or existing ad units.
AdSense for YouTube: If you are a video publisher or if you upload videos to YouTube, you can monetize your copyrighted video using the YouTube publisher program. I have been using it for a long time on selected videos and it performs really well.
In the above screen you can see my YouTube channel earnings so far.
Keep Experimenting: Always keep trying something new. Experimenting can really pay you high dividends. You can try out different niches, choose different ad placements, and finally, take as much advice as possible from the Google AdSense Center.
(c) ketabton.com: The Digital Library
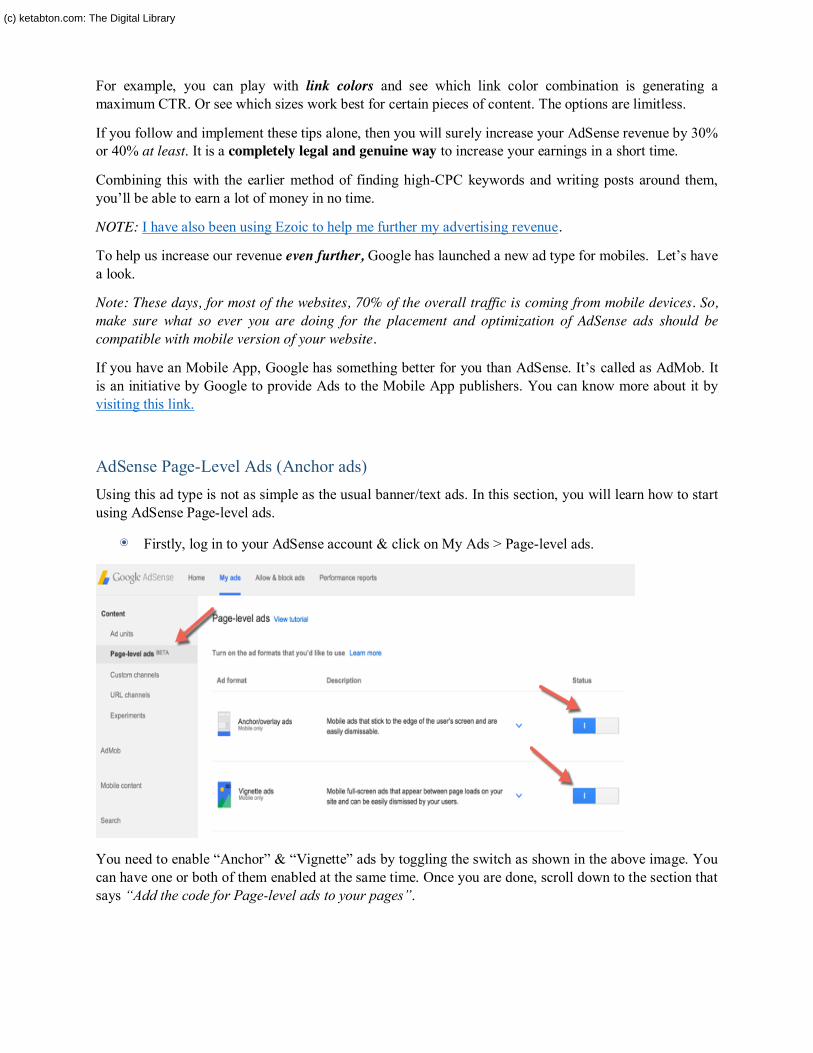
For example, you can play with link colors and see which link color combination is generating a maximum CTR. Or see which sizes work best for certain pieces of content. The options are limitless.
If you follow and implement these tips alone, then you will surely increase your AdSense revenue by 30% or 40% at least. It is a completely legal and genuine way to increase your earnings in a short time.
Combining this with the earlier method of finding high-CPC keywords and writing posts around them, you’ll be able to earn a lot of money in no time.
NOTE: I have also been using Ezoic to help me further my advertising revenue.
To help us increase our revenue even further, Google has launched a new ad type for mobiles. Let’s have a look.
Note: These days, for most of the websites, 70% of the overall traffic is coming from mobile devices. So, make sure what so ever you are doing for the placement and optimization of AdSense ads should be compatible with mobile version of your website.
If you have an Mobile App, Google has something better for you than AdSense. It’s called as AdMob. It is an initiative by Google to provide Ads to the Mobile App publishers. You can know more about it by visiting this link.
AdSense Page-Level Ads (Anchor ads) Using this ad type is not as simple as the usual banner/text ads. In this section, you will learn how to start using AdSense Page-level ads.
◉ Firstly, log in to your AdSense account & click on My Ads > Page-level ads.
You need to enable “Anchor” & “Vignette” ads by toggling the switch as shown in the above image. You can have one or both of them enabled at the same time. Once you are done, scroll down to the section that says “Add the code for Page-level ads to your pages”.
(c) ketabton.com: The Digital Library

Google AdSense Mastery Guide 59
Unlike other AdSense ad units, here you need to get the code & place it in the <head> tag (or at the top of the <body> tag) of the pages where you want to show the ads. (This is similar to where you place your Google Analytics code.)
You should usually add it on all the pages of your blog.
You can add the code in your theme or by using a plugin. I use Google Tag Manager as it makes it easier to manage tags for all of my sites from one place (& it’s free).
Test out your ads: Once you have placed the ad codes, now it’s time to test the ads. This is the only part that is not as smooth as it could be (probably because this ad unit is still in beta).
All you need to do is open your site in your mobile browser & add “#googleads” at the end of the URL to see the ads in action. Here is a preview from one of my blogs:
(c) ketabton.com: The Digital Library

I had a little bit of a hard time testing the “Vignettes” ad type as it requires you to click on the link. The full-screen ad was only displayed for a fraction of a second. Anyhow, I have implemented this new ad type on a few of my blogs that are monetized with AdSense and it is working out pretty well.
Google Auto Ads After implementing the Page Level Ads code into your website, you can enable the Auto Ads in just one click. Page Level Ads code servers as the same code for Auto Ads. So, if you already have the Page Level ads code embedded into your website, you need not to create any additional code for the Auto Ads. Then just go to your AdSense account and enable the Auto Ads option.
That’s it. Your blog or website’s ads will now be taken care by the Google’s AI technologies itself. I have enabled auto ads on one of my blogs which have very good amount of traffic. Initially, they were not performing well but as the AI gets smarter by time, the ads are appearing more smartly on my site and giving me better than ever results with good CPC and CTR as well.
The Auto Ads AI will analyze the behavior of visitors on your website and will display the ads on various available website locations accordingly.
(c) ketabton.com: The Digital Library
Google AdSense Mastery Guide 61
Consequently we can say that Auto Ads is one of the biggest things that Google ever brought to us in AdSense and this is the future. Trust me! AI and AdSense is soon going to bring something that publishers can’t even imagine.
It would be great to see how these new AdSense ad units for mobile sites will perform in the future. For now, if you see the AdSense Page-level ads and Auto ads feature enabled under your account, take advantage of it.
(c) ketabton.com: The Digital Library

Chapter 9: A Secret To Earning $50 Per Click From Google AdSense
There are two kinds of professionals in the world: The ones who only work hard, and the ones who work hard and work smart.
The greatest levels of success come to the people who find a balance between hard work and smart work. This is certainly true in the world of ‘Internet Marketing’.
In this chapter, let’s quickly see one of the simplest ways to improve traffic flow and increase AdSense income!
This is an extension of the earlier chapter on micro-niche blogging.
Surely by now you are aware of the fact that the more targeted traffic your blog has, the more money you will make. Similarly, the more high-CPC keywords you are using, the more your AdSense earnings will increase over time. I have already explained how long-tail keywords are easy to rank for and help you to get highly targeted organic traffic.
Now suppose we could find a way to identify the perfect combination of long-tail keywords that are also high-CPC AdSense keywords?
Sounds like a money-making combination, right? Read on!
I suggest you prepare yourself with the following:
◉ Google Docs spreadsheet (or any other place you’re using to manage keywords)
◉ SEMrush account (get a complete 14-day free trial using this link)
As mentioned earlier, SEMrush is one seriously amazing tool and is unique in terms of the amazing features it offers.
Make a list of high and medium authority blogs in your niche: Log in to your SEMrush account, and type the name of the domain that you want to use for finding long-tail high-CPC keywords.
(c) ketabton.com: The Digital Library

Google AdSense Mastery Guide 63
On the next page, click on Organic keywords > Full Report and you will be shown a list of keywords that are driving traffic to the Warrior Forum (for example).
Now, you simply need to sort the list by clicking on the CPC tab, and it will sort the list in order of high-CPC keywords first.
Interesting to note is the fact that the majority of high-CPC AdSense keywords are usually long-tail keywords. Some of them are as high as $70+ per click!
Now begin copying the keywords which you think are most suitable to your blog.
(I usually note most of the keywords on my content planning Google document, and I use these notes later for structuring content on my blog.)
Continue to repeat the process for the other domains on the list, and by the time you have completed this exercise, you will have an extensive list of high-CPC AdSense keywords.
Since you are already targeting niche-based, long-tail keywords, you are most likely to rank higher and drive traffic on those keywords. This is one of the simplest and fastest ways to skyrocket your AdSense earnings.
(c) ketabton.com: The Digital Library

Keep in mind that you need to make sure your keywords are driving traffic from countries like the U.K. and the United States, otherwise you won’t be maximizing your potential from this trick.
You can use the link below to get completely free access to SEMrush for 14 days, which usually costs $150. (You do need a credit card to take advantage of this offer, but you can cancel your subscription anytime within the 14-day trial period.)
(c) ketabton.com: The Digital Library

Google AdSense Mastery Guide 65
Chapter 10: AdSense Tools And Apps
There are a lot of tools and apps that can help in growing your AdSense income and overall management. This chapter features many of those tools.
Ezoic Imagine if you had a helpful friend who told you:
● Exactly where to put your ads.
● Which displays sizes to use.
● Which advertisers to work with to make the most money from your blog.
That would have a direct impact on the amount of money you make from your blog, right?
For example, what if you found out that the way you’re currently displaying your ads isn’t optimal?
If you changed to a better way, you could instantly make more money without needing to increase your blog’s traffic.
● That’s exactly what Ezoic is trying to help with.
Ezoic lets you test ad placements, sizes, and help publishers to find the best combination which maximize the earning.
(c) ketabton.com: The Digital Library

Ezoic claims that most websites see a revenue increase of at least 50% from implementing their optimization.
● In fact, they’ve worked with over 21,000 websites.
● Those websites increased their revenue by an average of 115%!
Those are powerful numbers!
And while the focus of this review is on ad optimization, Ezoic can also help you test your site’s layout and content, too.
You can get a detailed guide of this tool @shoutmeloud, by visiting this link.
AdSense Plugins For WordPress If you are having a WordPress website, then you are lucky if you also want to use AdSense. A lot of free and premium plugins are available to help you with AdSense.
Although, there are a lot of useful AdSense-WordPress plugins but WP Advanced ads is the one which we officially recommend.
WP Advanced Ads (Recommended Plugin)
Advanced Ads is a free WordPress plugin (Also offers pro option) that’s available at WordPress.org, as well as a variety of premium extensions that add additional functionality.
It works with all the major ad networks, including AdSense and Amazon. You can also use it to manage your own ads (either affiliate offers or direct ad sales).
Advanced Ads is also quite popular. It is active on over 50,000 WordPress sites and with 4.9-star rating & 1,00,000+ downloads, which is pretty impressive stats for a WordPress plugin.
You can find a detailed review of this plugin here.
Here’s a list of some more plugins which can help in placing AdSense ads on your WordPress website and to increase your revenue.
Chrome AdSense Extension for AdSense Publishers There are many Chrome AdSense extension for Bloggers, which they can use to check AdSense earnings without logging into AdSense account.
Here I’m talking about one such Chrome AdSense addon which will make your work easier as a publisher to check AdSense earning.
We will, start with official addon by Google team which is named as Google publisher toolbar. This addon will let you check your earning at the fly. There are some features which are missing like you can’t check earning for custom channels or if you have different Gmail account for AdSense, you need to login from AdSense enabled account in Chrome and not your personal Email. But, overall if you are looking for a quick option to check AdSense earning from Chrome, this addon is for you.
(c) ketabton.com: The Digital Library

Google AdSense Mastery Guide 67
Using Google publisher toolbar addon is easy, once you install this addon, you need to give access to your account, which you can do by clicking the addon icon on toolbar. Once, you have given access to your AdSense account data, this addon will keep fetching your earning and you can see it with single click.
There is nothing more than this in this addon, but small and useful for any Publisher out there. This Google publisher toolbar is good enough to take care of your need and what else you need when it’s coming from official Google team.
Here’s the link to this amazing toolbar.
AdSense Official App (For Android and iOS)
Nobody has the time to open their Laptops every hour and to log into their AdSense Web account to
check their so far earned money.
But to check it, you need not to deal with the AdSense web interface. I hardly log into my AdSense account on Laptop. Because most of the things which I want to know about my earnings are available on the Mobile App.
AdSense has apps for both platforms, Android as well as iOS. Links are given below.
Android | iOS
The app is very user friendly and full of features. Every time when I am curious about how my sites are performing with AdSense, I just tap the AdSense App icon.
Although the desktop interface of AdSense is also very user friendly but the mobile app interface is pretty much minimal and displays only what you actually need to know most of the times.
(c) ketabton.com: The Digital Library
As I said everything is minimal and to the point in the mobile app. You can also view your payments in the app itself but in a minimal way. As in the desktop interface, you can see the payments along with the details like adjustments and deductions but in the app, you will just be able to see the final amount. So, these kind of minimal things make the app, pretty much easy to use.
This app is capable of displaying various reports and stats which are useful in the overall improvement.
Blogging Tools Before you can implement the tips and tricks to increase your revenue from AdSense, you should first create wonderful blog or website with lots of useful content.
Blogging is an art, and using the right blogging tools will make your art rise and shine.
This is an epic list of blogging tools to which you can refer, and find new tools to enhance your blogging experience as well as the experience of your readers!
This epic list of blogging tools consists of resources for all types of bloggers whether professional, part-time or personal. I have structured them into various sections, allowing you to evaluate and choose the right tool for the right purpose.
Though the list of available tools is long, every tool is useful in its own way. I also offer a one-line comment for each tool as a quick but helpful reference.
I have personally used at least 75% of the tools mentioned below, and the remaining 25% are suggested by bloggers whose opinions I read and I trust.
(c) ketabton.com: The Digital Library

Google AdSense Mastery Guide 69
Chapter 11: Life Without And After AdSense
There is something I want you to always be aware of as you’re trying to make money with AdSense:
Nothing is guaranteed. As frustrating as it is to get banned from AdSense, keep in mind, Google never promises us anything, and they will do what they can to protect their own revenue.
If that means disabling accounts they feel are at risk of producing click fraud, they will do it. Google has to protect their advertisers’ money.
I know that's a tough pill to swallow and I can imagine how horrible it feels to get your account disabled, but when we all "accepted" the terms and conditions upon signing up, this is basically what we agreed to.
There are no guarantees with AdSense and we are all at risk of losing our accounts any day.
Now, I do believe that the system has its kinks, and I believe some innocent people are occasionally banned. This is why you cannot put all of your income eggs in one basket. No one is safe from getting banned... not even me... and it's just one of those things that comes with the territory if you decide to join the AdSense program.
Google will always safeguard their advertisers because they are their customers -- the publishers are not. And if they feel their money is being wasted on fraudulent clicks (even if it's only a potential), they won't stand for it.
Back in 2012, Google began disabling a lot of accounts. I know because I got tons of emails from frustrated people.
It was kind of odd how it all seemed to happen at once. But it happened. And there’s no appeal process. Once you’re banned, that’s it.
Always remember that AdSense is pretty great, but it doesn't provide stable income or security like affiliate marketing or selling your own products.
Hey Harsh! What about Media.net? Glad you asked (and remembered)! Well, Media.net offers similar kinds of ads like Google AdSense & the optimization techniques are also similar.
Their policies are also similar. If they suspect fraudulent clicks, they will quickly ban your account.
Why and how your life is better without an AdSense account Let me start by sharing my own journey with AdSense:
(c) ketabton.com: The Digital Library

When I started blogging, I had no idea how to make money from a blog. I started blogging because of my passion for sharing knowledge. I heard about AdSense after a few months of blogging, but my first advertising income was $47 from affiliate marketing. It was not from AdSense or another similar ad network.
You may be wondering why I would say this since I make lots of money blogging. But have you ever seen AdSense ads on ShoutMeLoud?
If you happen to stumble upon a previous ShoutMeLoud article on my AdSense earnings for 10 years, you know that I made almost no money with AdSense relative to other monetization techniques I have used.
The best thing about AdSense is recurring income, which can offer a feeling of security to some degree.
When I quit my high-end white collar job at Accenture to pursue blogging, it was the recurring income from AdSense that gave me the much needed support I needed to tackle the pressure of running my own business.
But I have found more monetization potential with affiliate marketing. That’s why ShoutMeLoud doesn’t currently have any AdSense ads.
Now that you know my AdSense story, I will share with you my experience of successfully monetizing blogs without using AdSense at all (and what can happen if you choose to do the same).
Your blogging becomes more experimental: The best blogging education comes when you experiment with things.
When you experiment with the latest monetization methods, for example, you may find a solution which works perfectly for your niche. On the other hand, you can also learn things from the experiences of other bloggers. So instead of spending time trying something completely new, you should start by trying methods which have worked for someone like me or for other bloggers in your niche.
For example, some time back I talked about Viglink on my blog, which is a great advertising network, but not good for a niche like ShoutMeLoud. It does, however, work great for the fashion niche. You can check out my case study of running Viglink on a fashion blog here.
(I don’t have a blog on fashion, but fortunately one of my clients does and she trusted my judgment. She allowed me to experiment. It worked, and – viola! – it became a case study.)
Takeaway: When you read about a new ad network, try it out. Don’t be afraid to experiment with things. Instead of simply looking for a review, search for income reports and case studies.
You will be inclined to earn via your own skill set: I have a blog called WPSutra which is currently in its orphan stage, but the good thing is that I have a blog business plan ready and I believe it will work.
To what extent, I’m not sure. But this blog has been running for a while now. I do not use AdSense on this blog and it is still making enough money to cover my hosting and maintenance fees.
(c) ketabton.com: The Digital Library

Google AdSense Mastery Guide 71
You may be thinking “Sure, Harsh, but you have been using WordPress for elevent years now and you know how things work around WordPress”.
Yes, you would be right.
But that is part of my skill set. Have you considered what your skill set is?
◉ If you are running a technology blog, you can write an eBook on how to do certain tasks.
◉ If you are running a finance blog, you could offer to make a finance plan for your readers at an affordable price.
◉ If you are running a relationship blog, you could offer premium one-on-one consultancy around relationship issues.
◉ If you are running a health blog, you could offer to create a diet plan for your readers.
◉ If you are running a fashion blog, you could help people shop for fashion that works for them… and you could get paid for that.
REMEMBER: There is a market out there for everything! All you need to know is how and where to sell what you have to offer.
Affiliate Marketing AdSense is a good way to get started, but honestly, the real money online is in affiliate marketing.
Here at ShoutMeLoud, affiliate marketing is the main source of income. If you are planning to earn income via affiliate marketing and use it as an alternative to AdSense, you need to work hard, and you need a plan to reach an even more sustainable income. If someone tells you that affiliate marketing doesn’t offer recurring income, they are wrong.
I know that every month, no matter what, I will earn at least $5,000 from affiliate marketing. That is the minimum amount I will earn because I’ve created a sales funnel to sustain that amount of income regardless of any other income factors that may vary during that month.
The key to this kind of sustainable success with affiliate marketing is to recommend something that you personally use, and also guide readers on how they can use it as well. While it is true that Google doesn’t like affiliate links, they don’t mind them if you are adding value to your website. You can download my affiliate marketing eBook from the ShoutMeLoud store here.
Takeaway: There are many types of affiliate marketing, and you can choose what works for you. You can either create a blog and try to recommend every new product in your niche, or you can be selective and recommend products that you are likely to use or are actually using, and then teach your readers how to benefit from these products.
The possibilities are endless.
So remember my micro-niche site? Read more about it here:
◉ How I Built a Micro-Niche Site Earning $174/Month from AdSense
(c) ketabton.com: The Digital Library

Before we bid goodbye:
Dear friend,
We have just spent some quality time together. What you have learned can change your life for good. But the only way to make it work is by taking action. You don’t have to create a perfect blog or be the perfect person while working online, but you should at least try.
It’s ok to start small, but most importantly, start right. Do it for the right reasons. We are going through a stage where we are seeing the transition of offline business to online business.
Many businesses have been successfully shut down by tech companies like Uber, Amazon, and Facebook (to name just a few). If you haven’t started working online yet, you should do this while you still can. Once you start taking steps, you will find many people walking along this path with you.
You will always find help, but only when you ask for it. With this, I wish you luck & once you reach your first $100 revenue from AdSense, do let me know on Twitter-@denharsh.
With love!
Harsh Agrawal
Founder @ShoutMeLoud
I would love to connect on Instagram or YouTube
My Other eBooks that you should read next:
1. Affiliate Marketing Handbook
2. WordPress eBook: Create a perfect blog
3. Web-Hosting Guide eBook
(c) ketabton.com: The Digital Library

Get more e-books from www.ketabton.comKetabton.com: The Digital Library