Construction manual - Squarespace
27
Technology, Management, Training and Media Services for Sustainable Development 4886 Highway 66 Ashland, Oregon, 97520 USA Tel: 541 • 448-1559 Fax: 541 • 488-6402 E-mail: [email protected] g Web Site: www .legacyfound.or g
-
Upload
khangminh22 -
Category
Documents
-
view
1 -
download
0
Transcript of Construction manual - Squarespace

Technology, Management,
Training and Media Services
for Sustainable Development
4886 Highway 66 Ashland, Oregon, 97520 USATel: 541 • 448-1559Fax: 541 • 488-6402
E-mail: [email protected] Site: www.legacyfound.org


THE LEGACY FOUNDATION 2003 — Fuel Briquette Press Kit: A Construction Manual
Acknowledgements
The Legacy Foundation would like to thank the following
persons and organizations for their important contribu-
tions to the lessons learned in the development and
extension of briquette technology.
Dr. Ben Bryant, Professor Emeritus, (retired) University
of Washington Forest Products Laboratories, Seattle
Washington who developed the first briquette press and
continues to be a guide in the technology development.
Malawi: Harry Chuma, Principal Secretary Ministry of
Energy and Mines, Lilongwe Malawi; Wisdom Mulango
Nkhomano Center for Development; Sue Clasby, Peace
Corps Volunteer with the AIDS Orphans project Balaka;
the women’s groups of Mchinji and Mangochi districts
especially the senior trainers Stanford Noa and Frederick
Banda; Anna Erdelmann and Esther Chirwa of the Urban
Poverty Alleviation Project/GTZ; Sean Southey of UNDP;
Marijke Mooij of a private Dutch consortia and Godfrey
Sabiti, UNHCR.
Kenya: Christopher, Elizabeth and Nicholas Wood,
project designers, program managers and equipment
suppliers; Mary and Francis Kavita, lead trainers; Charles
Njiroge, Francis Oloo and the women of the Kangemi
Women’s Empowerment Center; Stephen Gitonga,
ITDG Kenya.
Peru: Carlos Olivera, Pablo Arujo, Nestor Valesco Castilla,
Bill Davis and John Wilcox of ADRA; Mario Carrion of
Canel 9; the women’s groups in Mosocllacta, Q’quea and
Chiaquilccasa communidades en la departamente del
Cusco, Juan Ponce de Leon and Txema Torrebada; the
faculty of the National University of San Antonia Abad del
Cusco and Juan Ponce de Leon and Txema for translation
assistance.
Mali: Enterprise Works Worldwide staff; Youshaou Traore,
translator; Adame Ba extension trainer; Abdullaye Dem
technician and Affa Sammassekou, thresher device design-
er and manufacturer.
Haiti: Dr. Keith Flannagan of World Concern; Richard
Ireland, Peace Corps Volunteer and extension trainer.
Zimbabwe: Claudio Dembezeka of the Mukuvisi
Woodlands Center Education; Emmanual Koro of the
Africa Resources Trust (ART); Gus Le Breton, Southern
Africa for Indigenous Resource Use (SAFIRE); Steve Murray
of Action Magazine; Ramson Choto of the Ministry of
Energy and Mines and the ZIMTRUST organisation.
Mexico: Nancy and Robert Hall; Juan Pablo Tapia Cruz
of DESMUNI; Porfirio and Xavier briquette technology
technicians
Uganda: Uganda Industrial Research Institute; Dr. Mike
Foster and Charles Sembatya of Sasakawa Global 2000.
Ashland Oregon: Dr. Owen McDougal - Southern
Oregon University Chemistry professor and principal
investigator on briquette technology applications.
Other supporters of the briquette technology
development include:
Steve Troy of Sustainable Village; Claire and Jack Fincher/
practitioners; Mike Stanley/ Media Development; Kirsten
Paul /Web site development; Jeff Stanley/sound and video
graphics; Peter Stanley/extension training; USAID; The
Jane Marcher Foundation; UNDP; USAID; ADRA; Plan
International; GTZ and UNHCR; Special thanks to Michael
Lee (idesigncom.com) for his graphics design expertise
and patience in the production of this series of briquette
manuals.

THE LEGACY FOUNDATION 2003 — Fuel Briquette Press Kit: A Construction Manual

THE LEGACY FOUNDATION 2003 — Fuel Briquette Press Kit: A Construction Manual
FUEL BRIQUETTE PRESS KIT
A CONSTRUCTION MANUAL
© 2003, The Legacy Foundation

THE LEGACY FOUNDATION 2003 — Fuel Briquette Press Kit: A Construction Manual
INTRODUCTION
The Briquette Press Kit 2
Preparation of the Fuel Briquette Press Kit 4
Tools Required for Fuel Briquette Press and Molds Construction 5
Materials Required for the Construction of the Fuel Briquette Press 6
Building the Press 8
Step 1: Cut all the Wood Step 2: Assemble the Frame 9Step 3: Assemble and Place the Handle, Top Beam
and Handle Linkages 10Step 4: Attach the Pivot Pipes 11Step 5: Make and Install the Eject Lip 12Step 6: Do a Final Check of the ConstructionStep 7: Coat the Press with Wood Preservative
Making the Molds, Pistons and Other Pieces for the Fuel Briquette Press 13
Step 1: Prepare the Two Center Guide Pipes 14Step 2: Make the Two pistons 15Step 3: Make Two PVC Cylinders 16Step 4: Make the Base Block and Centering RingStep 5: Test the Mold Set for Proper Fit 17
Purchase of Standard Wash Basins, Large Size Mortars and Pestles and Heavy Duty Plastic Tarpualin 18
Important Notes for Fuel Briquette Press Kit Construction 20
Conclusion 21
Table of Contents

THE LEGACY FOUNDATION 2003 — Fuel Briquette Press Kit: A Construction Manual
INTRODUCTION
Fuel Briquettes - made from everyday agricultural and commercial
residues such as weeds, leaves, sawdust, rice husks, carton board and
scrap paper – are a unique, yet well proven technology.
In many parts of the world, people are making this new and modern
fuel, saving time, saving energy, saving our environment and creating
income. Fuel briquettes are unique because they provide a fuelwood
alternative from resources that are right under your feet or in your
wastebasket! Fuel briquettes can be made relatively quickly at a low
cost to the manufacturer or consumer and can be adapted and applied
in a wide variety of settings, making the briquettes appropriate, sus-
tainable and renewable.
The Legacy Foundation and its partners have tested the briquette-
making process over ten years in a wide variety of environments and
conditions – in urban and sub urban and rural areas in Malawi, Haiti,
Kenya, Zimbabwe, Nicaragua, Peru, Mali and the United States. The
producers who have participated in briquette training have become
expert in the process and able to adapt their own conditions, materials
and environment to the briquette production process.
This manual provides all that is required to make a Briquette Press Kit.
Other manuals in our series include Briquette Making: A Users Manual a
step by step guide in making fuel briquettes, Fuel Briquettes: A Trainers
Manual a guide to expand briquette making into a community project
and Fuel Briquettes: The Theory and Applications From Around the World
which includes a recipe book for the experienced briquette maker
to expand the variety and types of fuel briquettes made and their
applications.

Mold Sets — 2 each
(from top left) center GS guide pipe, woodpiston with cap plate at bottom end, dividerwasher and wood base plate with its center-ing ring and (bottom) white perforated PCVcylinder.
2 THE LEGACY FOUNDATION 2003 — Fuel Briquette Press Kit: A Construction Manual
The Briquette Press Kit
A Fuel Briquette Press Kit consists of the following:
■ A wooden hand press
■ Two mold sets
■ A plastic tarpaulin or black PVC sheet film of 5 meters by 2 meters insize, for drying and composting. Heavy-duty plastic sheet is preferred asshown on the right, below.
■ 4 large metal pails or plastic buckets, as used for washing clothes, orkids. Two are shown, below.
■ Two -three large mortar and pestles, used in pounding maize; optionalfor higher production is a hand thresher or motor powered maize orhammer mill with a modified screen.
■ Water: 200 - 250 liters is consumed gradually, throughout a full day'sproduction effort. However to initiate production, another 200 litersshould be available. Remember that this will be recycled throughout theday.
Wooden Hand Press
Plastic Tarpaulin

3THE LEGACY FOUNDATION 2003 — Fuel Briquette Press Kit: A Construction Manual
The fuel briquette press itself is made of normal pineor other medium density softwood and is designedto provide considerable mechanical advantagethrough a compound lever arrangement. It wasoriginally developed at the University of Washington’sForest Products Laboratory in the mid 1980’s.Through extensive field use throughout the world, ithas been modified to the current design. However,no structural changes have been made to the origi-nal design.
Overall fuel briquette press dimensions, ex-handle,are roughly six (6) feet (183 cm) in length (mainbeam) with a three (3) foot (91.5 cm) wide base. It can be collapsed into roughly, a 6 ft. by 1.5 ft by1-ft. (183 x 46 x 30 cm) rectangular solid package
for transportation in about thirty minutes, with anadjustable spanner and simple pliers.
The press is easily transported in the back of a station wagon or light pickup. The weight of theassembled unit, assuming use of the low-to mediumdensity wood, is between 80 and 125 lbs (36-57 kg).
Thus far, the cost of materials for the press andmold sets has varied only about 25% from the experience in Malawi, Zimbabwe, Kenya, Tanzania,Nicaragua, Haiti, Mali and Peru and most recentlyUganda.
This press design was initially developed by Dr. Ben Bryant, ret. Prof Emeritus, College of Forest Resources University of Washington SeattleWashington US. Dr Bryant is the real technical godfather of the fuel concept. He has taught, done research and consulting work in the field ofwood utilization technology for 38 years. Over 200 similar presses have been built in seven nations and are in use daily since the late 1980’s

4 THE LEGACY FOUNDATION 2003 — Fuel Briquette Press Kit: A Construction Manual
Preparation of the Fuel Briquette Press Kit
A Step-by Step Process
Any qualified carpenter can produce the press andmolds entirely with hand tools in about three tofour days. The length of time will depend on theexperience of the carpenter and quality of the tools.With training, the construction process can bereduced. The diagrams and photos throughout thismanual illustrate the general layout and the detailedconstruction requirements.
The fuel briquette press is made much stronger thanit needs to be. Tolerances are relatively low andquality of wood can vary considerably without lossof functionality.
There are several steps in preparing a Fuel Briquette Press Kit
1. Construction of the briquette press.
2. Construction of the two mold sets.
3. Purchase of standard wash basins, large size mortars and pestles and a heavy-duty plastic tarpaulin.

5THE LEGACY FOUNDATION 2003 — Fuel Briquette Press Kit: A Construction Manual
Tools Required for Fuel Briquette Press and Molds Construction
To start the process you will need some tools. In our experience, all ofthese tools are available to a rural carpenter or in a small home work-shop.
1. Claw Hammer
2. Wood saw
3. Hacksaw
4. Chisel
5. Hand drill with 1/2inch diameter (12mm) bit
6. Additional hand bit and brace with a 11/8 inch diameter. (28 to30 mm), a 1/2 inch (12 mm) wood bit
7. Screwdriver (flat blade)
8. Hand plane and/or wood rasp
9. Flat and round metal files
10. Adjustable spanner: an 8 -10 inch (20-25 cm) length, medium size
11. Tape measure
12. Two wood clamps with a 10 inch (25cm) opening capacity
Use Sharp Tools!

An Illustration of the Fuel Briquette Wood Parts
6 THE LEGACY FOUNDATION 2003 — Fuel Briquette Press Kit: A Construction Manual
Materials Required for theConstruction of the FuelBriquette Press
The following is a detailed list of all of the materialsrequired for fuel briquette press construction
WOOD — Should be planed and beveled, and relatively free of knots
DIMENSIONS TOTAL QUANTITY
Top and Bottom Beamsare made up of two (2) 2 inch x 6 inch boards (5cm x15cm)sandwiched together. This makes the 4 inch x 6 inch (10cm x15 cm)cross section.
2 inch x 6 inch
(5 cm x 15cm)
30 feet
(10.02 mtrs)
Legs, Feet, Handle and Handle LinkagesThe handle is shaped of two (2), 2 inch x 4 inch (5cm x 10cm)stock giving a 4 inch x 4 inch (10cm x 10cm) cross section.The wood is to be cut to dimensions shown in construction diagram above.
2 inch X 4 inch (5cm x 10cm)
28 feet
(9.52 mtrs)
Center Guide Rings for Base Blocks of Mold SetsOne piece of 4 inch X 12 inch (10cm x 30.4cm) plywood of 1⁄4inch thickness (6mm). A flattened plastic sheet can be used as well.
4 inch X 12 inch (10cm x 30.4cm)
Once Piece
PIPE — 1 inch outside diameterTotal pipe length = 63 inches (160 cm cut into 6 pieces)
Pivot Pipes in PressFour (4) pieces galvanized steel or “black” pipe: 3⁄4 inch X 10 inches (25.4 cm) length.
3⁄4 inch pipe1 inch (25.4mm) OD x10” (24.5cm) length
40 inches (101.6cm)
Center Guide Pipes for the MoldsTwo (2) pieces of the same diameter pipe each cut to 11.5”(29.3cm) length.
3⁄4 inch pipe1 inch (25.4mm) ODx11.5” (29.3cm) length
23 inches (58.6cm)
Handle to MainBeamLinkages
Front and Rear Foot
Front Legs
Bed
Rear Legs
Handle
Main Beam

7THE LEGACY FOUNDATION 2003 — Fuel Briquette Press Kit: A Construction Manual
ANGLE IRON DIMENSIONS TOTAL QUANTITY
Eject Lip in the pressOne (1) piece. One side of this is to be cut back to ~1/8 inch to 3/16 inch (3mm to 4.5 mm).
1 inch x 1/2 inch x 8 inches
(25mm x 12mm x20cm)
1
NAILS AND SCREWS
Twenty-four (24) nails - flathead. (12-14 penny) Nails length3.5 inches (9cm)
Screws1.5 inches (39mm)
length
24
Six (6) flathead woodscrews 6
BOLTS — mild steel with washers (NOTE: Adjust lengths to actual lumber dimensions)
Four (4) mild steel bolts with nuts and two washers per bolt. These are used for attaching bolt frame bed to legs.
3/8 inch x 8 inches(10mm) x (20cm)
4 bolts
8 washers
Four (4) mild steel bolts with nuts and two washers per bolt. These are used for attaching legs to feet.
3/8 inch x 6 inches(10mm) x (15mm)
4 bolts
8 washers
WASHERS — mild steel washers
Eight (8) flat washers: These will be needed only for the first twoof the three options shown below for attaching the pivot pipe. Check p. 11 of this manual first to determine which attachment method you
prefer before sourcing these large flat washers.
1 inch (2.54 cm)
inside diameter
8
PVC PIPE — 4 inch (10 cm) inside diameter
Cylinders for MoldsTwo (2) pieces heavy-duty gray or white PVC pipe. Note the wall
thickness and the kind of plastic used is important! The wall needs to be
3/16 inch to 1/4 inch (5 to 6 mm) thick: Do not use thinner wall PVC drain
pipe or black ABS plastic of any thickness.
4 inches x 11 inches(10cm) x (28cm)
inside diameter2 ea.
METAL SHEET
Dividers and End CapsThick mild steel or aluminum plate cut into four (4) pieces 1/ 4 inch (10 cm) diameter disks. A one foot square piece is not essen-
tial. You can assemble these from any scraps of sheet metal you may have.
Oil drum material can work if it is of a relatively heavy gauge. Two of the
disks are to be used for dividers in the molds; the other two disks are used as
end caps for the pistons in same mold sets.
1/16 inch to 1/8 inch thickness
(1.5 – 3 mm) x
1 square foot( 925 sq cm)
4 disks
WOOD PRESERVATIVE
Linseed oil, commercial wood preservative, or if nothing else available, used motor oil.
1 quart(1 liter)

8 THE LEGACY FOUNDATION 2003 — Fuel Briquette Press Kit: A Construction Manual
8“Left Side Top - 1” (25mm) radius on beam end.
Drill 11⁄8” (28 - 30mm) dia. holes, 4” (10cm) in fromends and 11⁄2” (38mm) down from top.
Drill two 11⁄8” (28 - 30mm) dia. holes, One on rightis 2” (5cm) in from right end and 11⁄2” (38mm)down from top. Other is 13” (33cm) in from rightend and 11⁄2” up from the bottom. Holes are 11”(28cm) apart.
Main (top) beam: Double thickness of, 6” (15cm) X 2”(5cm) X 5 ft (1.52 mtrs.)
Step 1: Cut all the wood as shown below: (only pivot holes are shown)
Building the Press
Handle: Double thickness of,6 X 2 x 4 ft (1.22 mtrs.).
Base: Double thickness of, 6 X 2 x 4 ft (1.22 mtrs.).

Links: Two each of, 4” X 2” X 22” (56cm)
very close attention to hole placement for the mainbeam handle and handle linkages. The varyingdimensions of the lumber will necessitate pre-testingthe rear hole position to assure the correct clearancebetween the base at the rear of the press and themain beam – as is noted and shown in the accom-panying blueprint drawing.
9THE LEGACY FOUNDATION 2003 — Fuel Briquette Press Kit: A Construction Manual
Legs: Four each of 4” X 2” X 39”(~1 mtr): Two for front; two for back.
Feet: Two each of,4” X 2” X 2 ft (61 cm)
Step 2: Assemble the frame
Put feet, legs and base in position - then clamp,drill and bolt all together. Use a ‘square’ to ensurelegs are vertical before drilling. Not shown are thetop (moving) beam, the handle and the handlelinkages).
Hole placement is not critical for the legs wherethey attach to the feet, but it is necessary to pay
.....
...... . . . .. . . . .
front back front back
. ...... ............
. .
SIDE VIEW END VIEW
Drill two 11⁄8” (28 - 30mm) dia. holes, 11” (28cm)apart and 51⁄2” (14cm) in from each end and 11⁄2”(38mm) down from top.
Pivot holes for legs not shown because they mayvary according to wood sizes and results of actualassembly.
Taper ends 45 deg.
10 THE LEGACY FOUNDATION 2003 —Fuel Briquette Press Kit —A Construction anual
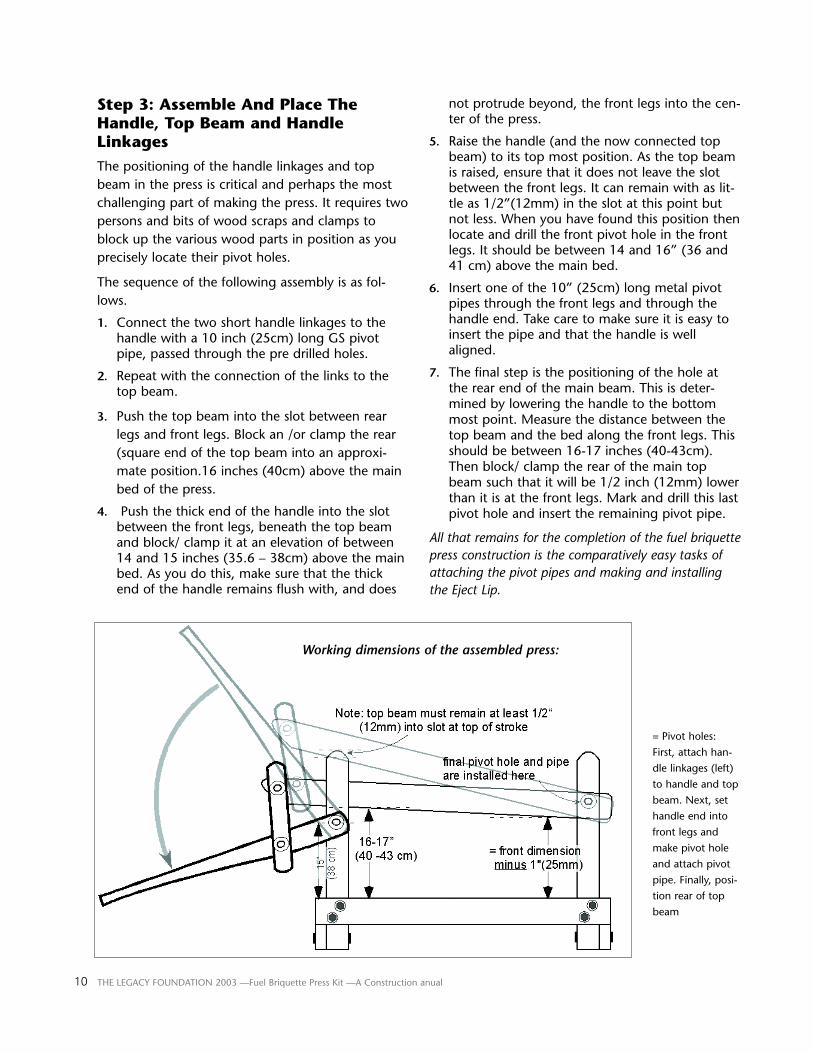
Step 3: Assemble And Place TheHandle, Top Beam and HandleLinkagesThe positioning of the handle linkages and topbeam in the press is critical and perhaps the mostchallenging part of making the press. It requires twopersons and bits of wood scraps and clamps toblock up the various wood parts in position as youprecisely locate their pivot holes.
The sequence of the following assembly is as fol-lows.
1. Connect the two short handle linkages to thehandle with a 10 inch (25cm) long GS pivotpipe, passed through the pre drilled holes.
2. Repeat with the connection of the links to thetop beam.
3. Push the top beam into the slot between rearlegs and front legs. Block an /or clamp the rear(square end of the top beam into an approxi-mate position.16 inches (40cm) above the mainbed of the press.
4. Push the thick end of the handle into the slotbetween the front legs, beneath the top beamand block/ clamp it at an elevation of between14 and 15 inches (35.6 – 38cm) above the mainbed. As you do this, make sure that the thickend of the handle remains flush with, and does
not protrude beyond, the front legs into the cen-ter of the press.
5. Raise the handle (and the now connected topbeam) to its top most position. As the top beamis raised, ensure that it does not leave the slotbetween the front legs. It can remain with as lit-tle as 1/2”(12mm) in the slot at this point butnot less. When you have found this position thenlocate and drill the front pivot hole in the frontlegs. It should be between 14 and 16” (36 and41 cm) above the main bed.
6. Insert one of the 10” (25cm) long metal pivotpipes through the front legs and through thehandle end. Take care to make sure it is easy toinsert the pipe and that the handle is wellaligned.
7. The final step is the positioning of the hole atthe rear end of the main beam. This is deter-mined by lowering the handle to the bottommost point. Measure the distance between thetop beam and the bed along the front legs. Thisshould be between 16-17 inches (40-43cm).Then block/ clamp the rear of the main topbeam such that it will be 1/2 inch (12mm) lowerthan it is at the front legs. Mark and drill this lastpivot hole and insert the remaining pivot pipe.
All that remains for the completion of the fuel briquettepress construction is the comparatively easy tasks ofattaching the pivot pipes and making and installingthe Eject Lip.
Working dimensions of the assembled press:
= Pivot holes:
First, attach han-
dle linkages (left)
to handle and top
beam. Next, set
handle end into
front legs and
make pivot hole
and attach pivot
pipe. Finally, posi-
tion rear of top
beam

11THE LEGACY FOUNDATION 2003 — Fuel Briquette Press Kit: A Construction Manual
Step 4: Attach the Pivot Pipes
There are three known alternative methods forattaching the pivot pipes. Each varies according towhat resources one has available. There are threeoptions which follow:
Method #1 This is the most basic method which presumes nomeans of drilling holes in steel, but at least access toa hack saw.
Cut two (2) 1 inch long slots (about 1/2 inch apart)in the ends of the pivot pipes with a hacksaw.Bending this slotted section out will form a lipwhich will easily retain the tube and washer. Whilethis may be the easiest method, it is more or less aone-time fix. The lip will not last if you were to bebending it back and forth frequently to remove thepivot tube.
Method #2 Drill 3/16 inch (4mm) diameter holes and insert cot-ter pins. If no cotter pins are available, you can usesome of the 12 penny nails:
The nails should be bent around and tightly to thepipe, to avoid possible injury to the operators.
Method #3Another more recent pivot tube fastening methodhas emerged in Uganda. This is proving cleaner,stronger and safer than either of the above pivottube fastening methods. However, it requires alonger drill bit and greater skill in aligning the holesthan the above method.
In this method, the pivot pipes are cut flush withthe legs. The hole is drilled halfway through the 4inches (10cm) width of the leg and through themidsection of the pivot pipe where it passesthrough the leg. (Alignment of the hole with thecenter of pivot pipe is easier said than done). A longnail is then first inserted through the leg and onthrough pipe, then driven through the remainingleg section. The ends of the pipes are not exposednor are any nails or cut off pipes and the use of asteel nail across the leg section at this locationgreatly strengthens the wood leg at one of its great-est stress points.
washer
bent nail
pivot pipe
typical front / rear leg section
White line shows approximate nail positionfor attaching the pivot pin, through thewood.

12 THE LEGACY FOUNDATION 2003 — Fuel Briquette Press Kit: A Construction Manual
Step 5: Make and Install the Eject Lip
The Eject Lip is a 7 to 8 inch (18- 20cm) long pieceof modified angle iron used to hold the bottom ofthe plastic cylinder up from the base so that theprepared fuel briquette can be ejected. We indicate7 or 8 inches length because the lumber dimensionsvary resulting in varying spans between the legs.The length of the angle iron should be such that itdoes not extend beyond the legs in either case.
Cut and file one side of the angle iron to form a3/16 inch (5 mm) wide lip. Screw the longer (unal-tered) side onto the back of the front legs, so thatthe lip will be 8" (20cm) above the base: The exactmeasurement is not critical but it is important toensure that the lip is somewhat level in its span fromone leg to the other and that the lip is filed back farenough to let the fuel briquettes pass through thecylinder unobstructed.
Plastic cylinder
Step 6: Do a Final Check of the Construction
Check over all the wood parts to ensure that theyare smooth and do not have sharp edges or splin-ters. Cut of protruding bolt, pivot pipe and eject lipends.
Step 7: Coat the Press with Wood Preservative
In some locations where there is no wood preserva-tive used motor oil can be used. The most importantareas to protect will be the bottom of the legs, thefeet and the bed (lower main beam). Apply whatev-er preservative you have liberally as the press will beoperated daily in a water-saturated environment.
With the smoothing and application of preservative,the fuel briquette press is structurally complete. Itnow awaits the construction of the mold sets andthe assembly of the additional off the shelf suppliessuch as the tarpaulin, mixing pails and mortars andpestles.
SIDE VIEW
FACE VIEW

13THE LEGACY FOUNDATION 2003 — Fuel Briquette Press Kit: A Construction Manual
Making the Molds, Pistons and Other Pieces for the Fuel Briquette Press
The mold sets can be made at the same time as theconstruction of the press. While we suggest twomold sets, some prefer to make three in areas wherehigher production is anticipated. It would not addmuch to use more than three mold sets for onepress, as work flow, material resource processingand fuel briquette storage demand would likelyexceed the work space available.
Mold set components in detail:
1. A hollow piston: water resistant medium densitywood, 37⁄8 inches (98mm) diameter by 11 inches(28cm) length. The piston has to have a 11⁄8 inch(28 - 30 mm) diameter hole through its center.This can be a daunting task if one has no lathe,but there are alternative and well-tested con-struction methods using many laminated piecesof wood. Note the construction options below.
2. A Plastic Cylinder Pipe: 4 inches (10cm) diame-ter X 11 inches (28 cm) length. Required is theso-called “Schedule 40” or, 3⁄16 -1⁄4 inch (5–6mm)wall thickness pipe. It is commonly white or grayin color. Do NOT use thin walled PVC rain gutteror black ABS pipe, (even that of 1⁄4 inch thick-ness), as these will NOT withstand the pressure.
3. A Center Pipe: 1 inch (25.4mm) outside diame-ter (GS) galvanized steel pipe x 11.5 inches(29.2cm). The center pipe slides through the pis-ton and rests in the base plate ring. Bevel andfile the ends of these pipes so that they aresmooth to the touch.
4. Two metal (steel or aluminum) washers:between 1⁄16 inch and 1⁄8 inch (1.5 – 3mm) thick-ness x 4 inches (10cm) diameter, with an insidehole diameter of 11⁄8 inches (29-30mm). One ofthese is to be used as an end cap plate for thepiston, the other as a divider in the cylinder, formaking two fuel briquettes at one time.
5. A base plate: This is a 6 inches x 6 inches x 2inches (15 x15 x5cm) block of wood (usually cutfrom leftover press beam wood stock).
6. Center guide ring: 1⁄4 inch (6mm) thick. Thisring is similar in dimensions to the above metal
washers – 4 inches (10cm) diameter –with aninside hole diameter of 11⁄8 inches (29 -30mm),however it is made of wood or plastic, notmetal. This guide ring centers the cylinder andthe guide pipe on the base plate.

14 THE LEGACY FOUNDATION 2003 — Fuel Briquette Press Kit: A Construction Manual
This space for your notes
Step 1: Prepare the Two Center GuidePipes
The Center Pipe is a 11.5 inch long piece of 1inch(2.54 cm) outside diameter galvanized metal waterpipe commonly known as 3/4 inch GS pipe.
It slides through the piston.
File it until it is smooth to the touch all along theexterior surface, especially at both ends.
Do not use plastic, aluminum or wood dowels, asthese tend to float up and out of the base, withfrustrating consequences in the actual fuel briquetteproduction operation.

15THE LEGACY FOUNDATION 2003 — Fuel Briquette Press Kit: A Construction Manual
Step 2: Make the two pistons
The piston is the most difficult part of the mold kitto make. It requires the fabrication of a long, hol-low, wood cylinder, which must be fairly accurate interms of outside size and alignment of the centerhole.
The easiest way to make a piston without a machinelathe, is to build up the piston by layering pieces offlat wood together, leaving a square hole in the cen-ter, then planing them round. This is much easierthan trying to bore a hole through a solid piece ofwood with the very unlikely chance of coming outthe other end exactly on center. You can use twonotched pieces as shown below or a four-pieceassembly (top, bottom and two sides) to the sameend. The latter does not require notching but ismore hassle to assemble. Either way, the resultingsquare hole must be at least 1 and 1/8 (30mm)inches on each side to allow the center guide pipeto easily pass through. It should not be a tight fit.
Cut two 11 inch ((28cm) long pieces of 4 inch x 2inch (10 x 5cm) (medium to hard) wood which isresistant to shrinking, swelling or deteriorating inwater.
A. Make a “V” notch along the length of each blockto create a square hole when you align thepieces as shown. The two blocks are then nailedand glued together,
Take care to sink the nails well below the surfacewhile avoiding passing the nails through thecenter hole.
B. Cut off the corners of this square block with asaw, then shave or plane it it round, so that itcan slide up and down without sticking, in thePVC pipe cylinder (see below).
C. Screw a divider washer (described below) ontothe end of the piston with six flat head woodscrews, each about 1 inch (25mm) in length.
A
B
C

16 THE LEGACY FOUNDATION 2003 — Fuel Briquette Press Kit: A Construction Manual
Step 3: Make Two PVC Cylinders
Cut two 11 inch (28cm) lengths of a 4 inch (10cm)–inside diameter- heavy duty PVC pipe.
Drill or burn 1/8 inch (3mm) diameter holes on 3/4inch (20mm) centers, all along and around thepipe. In other words, the holes should be placedabout 3/4 inch (20cm) apart.
Clean off all rough edges inside the pipe that will bethere from drilling and bevel the outside and insideends so that the inside and outside surfaces and theends are smooth to the touch.
Step 4: Make the Base Block and Centering Ring (2 each)
The base plate is made from a 6” (15cm) squarecutoff of any 2” x 6” scrap wood from the pressitself. Either nail or screw on to the base plateanother washer of the same size as you made forthe piston above. This washer should be 1/4”(6mm) thick plywood.
This washer is added to align the center rod and thecylinder in production.
Cut two 6 inch (15cm) squares out of the excessfrom the boards used for the main beam or bed.
Cut two 4 inch (10cm) diameter circles out of 1/4inch (5mm) plywood. Screw circles onto the centersof the base blocks and drill 11/8 inch (29 - 30mm)hole in their centers.

17THE LEGACY FOUNDATION 2003 — Fuel Briquette Press Kit: A Construction Manual
Step 5: Test the Mold Set for ProperFit
Test to make sure that:
■ The 1 inch guide pipe slides through piston anddivider and into the base block centre.
■ The piston slides through PVC cylinder easily. Inactual operation, the piston may swell as itbecomes saturated with water, so make sure thatthe piston is small enough to slide easily throughthe PCV pipe and that the center pipe slides easi-ly through the piston under water- saturatedconditions. The piston may wind up 1/4 inch(3mm) smaller in diameter than the plastic pipe.
This is acceptable because it is the metal pistonring at the base of the piston which determinesthe actual clearance of the fuel briquette, not thepiston wood itself.
■ Finally, make sure the PVC tube (cylinder) fitseasily over the centering ring on the base block,when the circle is saturated with water.
Piston
Center/Guide pipe
PVC pipe Cylinder
Metal end cap / piston ring
Centering ring Base block(Divider washer not shown)

18 THE LEGACY FOUNDATION 2003 — Fuel Briquette Press Kit: A Construction Manual
Purchase of Standard Wash Basins, Large Size Mortars andPestles and Heavy Duty Plastic Tarpualin
The Wash Basins:These are more or less standard items, which canusually be purchased directly at the village or districtor town shop. The basins should be of 4 to 5 gallon(16 to 20 liter) capacity, heavy duty and if at all pos-sible, with rounded smooth inside surfaces. Varioussizes and shapes are shown throughout the manual.
The Tarpaulin:The tarp has several functions: as a water catchmentliner for the press, as a material processing closureto accelerate decomposition. The tarpaulin 5 to +6 ft (1.5 to 2 mtrs.) x 17 ft (~5 mtrs.) can besimple black plastic sheeting but it should be of theheaviest gauge possible. Select the darkest coloravailable (preferably black) as the tarp will be usedto accelerate material decomposition and needs tofunction as a solar heat absorber. The exact size isless important that obtaining a durable heavygauge. Indeed, the tarp need not even be onepiece.
The Mortar and Pestle:The mortar and pestle pictured (right) is of a typefound in most villages that use pounding as ameans of food preparation. More mechanized, alternative means of mixing and breaking up ofmaterials follow.

19THE LEGACY FOUNDATION 2003 — Fuel Briquette Press Kit: A Construction Manual
Alternatives to hand pounding include a variety ofhand operated threshing or field-chopping tech-nologies that break up the materials into the opti-mum size/shape far faster than hand pounding.These are commonly available in agricultureresearch institutes and development projects. Withthe manually operated thresher chopper equip-ment, the processing can be greatly acceleratedbecause material size and shape is altered to greatly
accelerate decomposition and or softening. LegacyFoundation has developed a specialized handthresher for this purpose. It can provide choppedresidues sufficient for two press groups per dayunder most conditions. Information on how toorder this hand thresher can be found on theLegacy Foundation web site: www.legacyfound.org
In the district centers and more urban areas ofdeveloping nations, mechanized technologies maybe a wiser choice for chopping. The mechanizedprocess involves a chipper, lawn shredder or a lawn-mower with a mulcher attachment, or a commonhammer mill commonly known as a Maize/Posho/Chigayo/Molino. The chipper or shredder orhammer mill needs to be fitted with a screen/sieveof a 5⁄8” to 3⁄4” (15 to 20mm) diameter hole size.These machines can greatly assist the process ofchopping the materials and free up much labor forproduction. A six to eight Hp (~4 to 6 Kw) hammermill can process the residues needed for up to sixpress groups.
Hand operated thresher chopper: Uganda
5 Kilowatt Hammer-mill: Bamaco, Mali
5 Kilowatt Hammer-mill:Mosocllacta, Cusco, Peru
3 Kw homemade Hammer-mill Unit:Comitan, Chiapas, Mexico

20 THE LEGACY FOUNDATION 2003 — Fuel Briquette Press Kit: A Construction Manual
■ In order to prevent injury to the users, be certainto bevel all edges, in particular, the handle, mainbeam, bed and legs as these points are wherepeople are most likely to be in contact the press.To further prevent any injury to the users, beveland smooth all protruding pipes and bolt ends.
■ If you plan to ship the press disassembled, youshould mark the location of the legs and feet, asit will make it much easier to reassemble.
■ To haul the Fuel Briquette Press in a typical 4x4or pickup truck or atop a bus, remove the pivotpipe, which attaches the handle end to the frontlegs. This allows you to fold the handle up overand back onto the top of the main beam, mak-ing the press much more compact and easier tohandle.
Maintenance of the press:
There are a few basic maintenance techniques tohelp ensure that the press is well taken care of andwill last a long time. Over the past ten years, in usearound the world, in several climates, with all differ-ent types of wood, the press stands up well withcare and regular maintenance.
Important Notes for Fuel Briquette Press Kit Construction
The best way to make the fuel briquette press last alifetime is to watch for any problems with the pressas it is used. The following maintenance tips willhelp to ensure a long and useful life of the press.
■ A combination of drying in the sun and watersoaking of the frame during production cancrack the frame. Saturate the press with eitherused motor oil, linseed oil or other wood preser-vative, regularly, as the press will be constantlysplashed with water during operation, then issubject to drying when not in use. This satura-tion can be required once weekly to oncemonthly depending upon use rate and localconditions.
■ Cracking will likely first occur in the rear mainbeam where it joins the legs. Where operatingconditions are harsh or the wood type is ques-tionable, you may need to protect the press fur-ther by wrapping banding steel around the endof the rear beam. Alternatively you may prefer todrill two vertical holes through the top beam inthe vicinity of the rear pivot hole so that you canbolt the beam together vertically.
■ Protect bolts and nuts with used motor oil orgrease.
■ Store the press in the shade or cover it when notin use to further prevent the drying and crackingnoted above.
21THE LEGACY FOUNDATION 2003 — Fuel Briquette Press Kit: A Construction Manual
Conclusion
This Fuel Briquette Press Kit that you have preparedhas much potential to be used for making a fuelthat will save our environment and provide manywith employment.
While no social taboos against fuel briquette makingexist to our experience, it is nonetheless a newproduct and one that will challenge traditional fuelwood usage in any part of the world. FuelBriquettes therefore require strong initial promotionto gain wide public acceptance. They cannot beintroduced casually. Fuel briquettes must be treatedlike a new product and become as popular as Coca-Cola. The broad public acceptance is what attractsthe entrepreneurs to produce a positive economicand social impact in your area.
Legacy Foundation provides:
■ Other training manuals in the fuel briquette making process,
■ Comprehensive training of trainers programsand services,
■ Marketing support and
■ Technical consulting and backstopping for thosecommitted to fuel briquette making.
For further information on training programs, or toorder other manuals, please visit our web sitewww.legacyfound.org
We are building a global fuel briquette making network and welcome your input and insights.