COMPUTER SCIENCE - Punjab School Education Board
110
COMPUTER SCIENCE (for 7th Class) Punjab School Education Board Sahibzada Ajit Singh Nagar
-
Upload
khangminh22 -
Category
Documents
-
view
2 -
download
0
Transcript of COMPUTER SCIENCE - Punjab School Education Board

COMPUTER SCIENCE(for 7th Class)
Punjab School Education BoardSahibzada Ajit Singh Nagar

Punjab Government
Edition : 2016 ...............(24,000 Copies)
All rights, including those of translation, reproductionand annotation etc., are reserved by the Punjab Government.
Price : Rs. 60/-
Published by: Punjab School Education Board, Vidya BhavanSecretary, Phase-8, Sahibzada Ajit Singh Nagar-160062 &
Printed by Swan Printing Press

Punjab School Education Board has been updating the school level syllabi compatible with modern approach and latest research. The previously written text-books are in continuous process of revision according to the latest syllabi. The Board has also launched a special derive to prepare new text books as per latest National Policies in this regard. The present book is a part of this rpesn'gious program.
The knowledge in the subject of Computer Science is the need of the hour because its study is essential for enhancement of efficient usage of Science and Technology in every field of modern era. Computerization of every department is done to keep it updated light of all round development of Information Tech-nology and Communication. The knowledge of Computer Education as well as usage of internet is necessary for everyone to have latest information about different departments, to avail facilities of E-Ticketing etc.
Keeping in view of these requirements Punjab School Education Board has introduced Computer Science as a compulsory subject at. Elementary and Sec-ondary levels as per guidelines of Punjab Government. This subject is already being taught bhy PICTES to some Government Schools. The present book is English translation of its Punjabi version prepared according to revised syllabus on the demand of teachers, Every effort has been made to include each requisite information regarding the subject in this book. I hope it will be useful for students and teachers.
All suggestions for the improvement of the book will be highly appreciated.
ChairpersonPunjab School Education Board
PREFACE

WRITER
1. Pooja Arora
Govt Sen. Sec. School, Sahauran (Mohali)
2. Bindu
Govt. Model Sen. Sec. School, 3B1, Mohali
3. Sachin Dhiman
Govt. Sen Sec. School, Ghumandgarh (Sri Fatehgarh Sahib)
4. Gagandeep Singh
Govt. Model Sen. Sec. School, 3B1, Mohali
5. Amrishpal Kaur,
Govt. Sen Sec School, Kharar (Mohali)
VETTER
Sukhwinder Kaur
Govt. Sen. Sec. School, Sahauran (Mohali)
Co-Ordinator
Manvinder Singh Mathoda
Artists
Manjit Singh Dhillon
This book is going to be of great help to the students. Any suggestions for the improvement would be welcomed. I improve the content, suggestions can be sent at [email protected]

INDEX1. Typing Tutor 1-11 1.1 Touch typing 1.2 Position of the fingers on key-board 1.3 Numeric key pad 1.4 Important Keys on Key-board 1.5 Typing in Punjabi using Anmol Lipi Font 1.6 Tips to improve typing speed 1.7 Proper Posture 1.8 Suggestions for Repetitive Stress Injuries/ Discomfort during
continuous typing2. Window Explorer 12-26 2.1 Windows Explorer 2.2 Opening Windows Explorer 2.3 Parts of Windows Explorer 2.4 Windows Explorer Views 2.5 Working with Tiles and folders 2.6 Searching 2.7 Using Run Command 2.8 Calculator 2.9 Customizing of Desktop3, Storage Devices 27-34 3.1 What is memory? 3.2 Usage of Memory 3.3 Types of Memory 3.3.1 Primary Meinon 3.3.2 Secondary Memory4. Formatting in M.S Word- Part I 35-57 4.1 Selection of text 4.2 Cut, Copy and Paste 4.3 Format Painter 4.4 Formatting Text 4.5 Text effects 4.6 Change Text Ca.se 4.7 Bullets or number 4.8 Text Alignment 4.9 Adjusting Line Spacing 4.10 Shading 4.11 Find and Replace 4.11.1 Page Break

4.12 Page Number 4.13 Header and footer 4.14 Picture/Clip Art 4.15 Shapes 4.16 SniartArt Graphic 4.17 Inserting Text Boxes 4.18 Word Art 4.19 Symbols5. Formatting in MS-Word (Part-II) 58-75 5.1 Picture Tools (Format Tab) 5.2 Page layout 5.3 Page Background 5.4 Review 5.5 Printing Documents6. Introduction to Multimedia 76-83 6.1 Components of Multimedia 6.2 Requirement for Multimedia 6.3. Multimedia Presentation 6.4. Applications of Multimedia7. MS- DOS 84-90 7.1.1 User Interfaces 7.1.2 What is DOS? 7.1.3 Command Prompt 7.1.48. MS-DOS Commands 91-104 8.1 Files Required For MS-DOS 8.2 MS-DOS Commands 8.3 How do DOS organize disks? 8.4 How are files named? 8.5 Root Directory 8.6 Directory Structure of DOS 8.7 Internal commands 8.8 External Command 8.9 MS DOS EDITOR 8.10 Batch File

Chapter 1 Typing Tutor
Objectives of this chapter1.1 Touch typing 1.2 Position of the fingers on key-board
1.2.1 Home line1.2.2 Secondline1.2.3 Third line 1.2.4 Fourth line
1.3 Numeric key pad1.4 Important Keys on Key-board1.5 Typing in Punjabi using Anmol Lipi Font1.6 Tips to improve typing speed 1.7 Proper Posture1.8 Suggestions for Repetitive Stress Injuries/Discomfort during continuous
typing
IntroductionIn this chapter, we will learn to expertise our typing skills. Wewill also learn how to use keyboard properly and position of fingers on keyboard. Typing Tutor is a program for learning touch typing.
1.1 Touch typing
Touch typing is a technique by which we can learn typing with all fingers, step by step, without having to look down at the keyboard. If all the time we keep on looking for right keys on keyboard, which results in slows our typing speed a lot. As shown in figure below, the keyboard is divided in two parts: one for the left hand and one for the right.
Fig1.1: Keyboard divided into two parts: left and right for typing
1

1.2 Position of fingers on Keyboard
Keys of left side are pressed with left hand fingers similarly right hand fingers press right side keys. There are mainly four lines on key board. Fingers of both the hands are placed on the line starting with A. After pressing the key of any other row fingers return the first row. Due to this the first line is called home Row.
Fig 1.2 Home Row Finger position
1.2.1 The Home line: The finger position is shown in the below picture. “Home Row”Place your fingers in the Home Row position on your keyboard.
Fig 1.3 Position of fingers on Home row keys
· Position of Home Row: First of all the fourth finger (Little finger) of our left hand would be on A key, third finger on S key, second finger on D key, first finger on F and on G key respectively.
Similarly fourth, third, second and first fingers of right hand should be on; key, 'L' key, 'K' key, 'J' key or 'H' key alternatively.
2
Left Hand Right Hand
Left Hand Side Right Hand Side

Fig 1.4 Home row keys of both hands1.2.2 Second Line Keys: Suppose our fingers are on home row keys. Now place fourth
finger (Little finger) of our left hand on 'Q' key, third finger on Wkey, Second on E key and first on 'R' key or T key alternatively. Similarly place fourth finger of right hand on 'P' key, third finger on 'O' key, Second on 'I' key and first on 'U' key or 'Y' key alternatively.
Fig 1.5 Second row keys of both hands
1.2.3 Third Line Keys: Suppose our fingers are on home line keys. Now fourth finger of your left hand should go to 'Z' key and then come back to home key. Similarly third finger should move to 'X' key and second finger to C key and first finger on V or B key turn by turn. In the same way fourth finger of right hand on '/' key,third finger on '.' key. Second finger on ',' key first finger on M or N keyalternatively.
3
A S D F G H J K L ;
Middle Finger D
Little (Pinky) Finger A
Index Finger F and G
Ring Finger S
Middle Finger K
Little (Pinky) Finger ;
Index Finger J and H
Ring Finger L
Left Hand Side Right Hand Side
Q W E R T Y U I O P
Left Hand Side Right Hand Side
Middle Finger E
Little (Pinky) Finger Q
Index Finger R and T
Ring Finger W
Middle Finger I
Little (Pinky) Finger P
Index Finger U and Y
Ring Finger O

Fig 1.6 Third row keys of both hands1.2.4 Fourth Line Keys: Fourth line is related to numbers keys. We should be careful
white typing numbers. Our fingers should be on home line. Press the desired number key with the related finger and comes back to home line for 100% correct results, we should type carefully. If whole task is related to numbers then keep the fingers on fourth line.
Left Hand Side Right Hand Side
4
Z X C V B N M , . / Left Hand Side Right Hand Side
Middle Finger C
Little (Pinky) Finger Z
Index Finger V and B
Ring Finger X
Middle Finger ,
Little (Pinky) Finger /
Index Finger M and N
Ring Finger .
Fig 1.7 Fourth row keys of both hands
1 2
3
4
5 6
7
8
9
0
Middle Finger 3
Little (Pinky) Finger 1
Index Finger 4 and 5
Ring Finger 2
Middle Finger 8
Little (Pinky) Finger 0
Index Finger 7 and 6
Ring Finger 9
Left Hand Side Right Hand Side
Fig 1.8 Fourth row keys of both hands

1.3 Numeric key Pad
To add numbers, most impressive and fast method is Numeric Key Pad. It is present on right side of key board.Place your fingers on numeric key pad as follows:· Right hand thumb on 0· First finger of right hand on 4· Second finger of right hand on 5· Fourth finger of right hand on 6
Fig 1.9 Numeric key Pad
Note: To use number pad, lock should be kept ON There are also External USB Num . keypads available in the market for typing work.
1.4 Important Keys on Key-board
· Spacebar: - To put a space in between letter pairs we use spacebar key. We use our dominant right thumb for the spacebar.
· Enter key: - It is used to move down to a new line. Use our right little finger for the Enter key.
· Backspace key: - Deletes one character to the left of the blinking cursor. Use our right little finger for the Backspace key.
· Shift key: - It is present on both the sides of key board. It is used to write capital letters. If we want to write a capital letter with left hand, press shift button with fourth finger of right hand and similarly press shift button with fourth fingers of left hand to type capital letter with to right hand.
· Caps lock key: - Press caps lock key if we want to type complete word, line or paragraph in Capital Letters. Use our left little finger for the Caps Lock key.
5

1.5 Typing in Punjabi using Anmol Lipi FontWe can also type in Punjabi language with the help of Anmol lipi font easily. We can practice typing in Punjabi language by using the same finger positions as we used for typing in English language. But before typing we need to choose the font Anmollipi. Figure below shows the Anmol Lipi Key map.
Fig 1.10 Anmol Lipi Key Map 1.6 Tips to improve typing speed
1. Our hand/finger position should always be in home position. We must start from and return to this position. We should reach for other keys from home position.
2. We should focus on accuracy not speed. Speed will come with time and practice. 3. Don't look at the keyboard. 4. Be steady, even pace and strive for accuracy. 5. As we tap each key, we should say its letter to ourselves.
1.7 Proper Posture
While typing we must know about the proper posture. So follow the steps written below :
1. We should sit up straight, directly in front of keyboard.
2. Our feet must be flat on floor. 3. Monitor should be at our eye level.
Fig 1.11 Proper Posture
6

4. Our eyes should be on copy or monitor.5. Our fingers must be curved and upright over home keys.6. We should strike each key with a quick snap and then return to home position
Keys.
1.8 Suggestions for Repetitive Stress Injuries/Discomfort during continuous typing
1. Position yourself properly at your computer. Your screen should be 2 feet away from you and the top of your document should be at eye level.
2. Your chair is at the perfect height if you can sit at your computer with your knees bent at right angles and your feet flat on the floor.
3. Set up your keyboard so that it is flat or slightly elevated. Do not have your keyboard slanted downward.
4. Keep your wrists straight and elbows in a 90 degree angle while typing. Your wrists should not rest on the table or wrist rest while typing.
5. Rest your wrists when you are not typing. 6. Take frequent short breaks rather than one long break. 7. Stretch your wrists before you start to work and during breaks, and strengthen
your wrists with exercise. 8. Exercise regularly. Overall body conditioning seems to help guard against
repetitive motion injuries.
Points to Remember1. Touch typing is a technique by which we can learn typing with all fingers2. The keyboard is divided in two parts: one for the left hand and one for the right.3. Keys of left side are pressed with left hand fingers similarly right hand fingers
press right side keys. 4. To add numbers, most impressive and fast method is Numeric Key Pad. It is
present on right side of key board.5. To put a space in between letter pairs. We use our dominant thumb for the
spacebar. 6. Backspace key Deletes one character to the left of the blinking cursor7. Anmol lipi font helps us typing in Punjabi. 8. Our hand/finger position should always be in home position. We must start from
and return to this position.9. Enter key is used to move down to a new line.10. We should focus on accuracy not speed. Speed will come with time and practice
7

EXERCISE1. Fill in the blanks
1. To use number pad, _________ should be kept ON
(a) Num lock (b) Caps Lock (c) scroll lock (d) none of these
2. In home row, _______ key is pressed with little finger of left hand.
(a) A (b) S (c) D (d) F
3. In home row, _______ key is pressed with Middle finger of right hand.
(a) J (b) K (c) L (d) ;
4. In Second row, _______ key is pressed with ring finger of left hand.
(a) Q (b) W (c) E (d) R
5. In third row, _______ key is pressed with index finger of right hand.
(a) B (b) N (c) M (d) ,
2. True/False
1. For typing, the keyboard is divided in two parts: one for the left hand and one for the right.
2. Touch typing is a technique by which we can learn typing with all fingers while looking at keyboard.
3. Anmol lipi font helps us typing in Punjabi.
4. We use our dominant little finger (pinky finger) for the spacebar.
5. Shift key is used to move down to a new line.
3. Short Answer type Questions
1. What is Touch typing?
2. Describe the position of our fingers on Home Row Key?
3. Describe keys in Second Row of Keyboard?
4. Describe the position of your fingers on Third Row Key?
5. While typing numbers form numeric key pad, which hand we should use? Explain the position of your fingers on numeric key pad.
4. Long Answer type Questions:
1. Draw Anmol Lipi Key Map.
2. How can we improve typing speed?
3. Explain the Proper Posture while typing?
8

4. Explain following keys:a. Spacebarb. Enter keyc. Backspace keyd. Shift keye. Caps lock key
Lab Activity
Exercise I
asdfg ;lkjh asdfg ;lkjh asdfg ;lkjh asdfg ;lkjh asdfg ;lkjh asdfg ;lkjh asdfg ;lkjh asdfg ;lkjh asdfg ;lkjh asdfg ;lkjh asdfg ;lkjh asdfg ;lkjh asdfg ;lkjh asdfg ;lkjh
Exercise II
Exercise III qwert poiuy qwert poiuy qwert poiuy qwert poiuy qwert poiuy qwert poiuy qwert poiuy qwert poiuy qwert poiuy qwert poiuy qwert poiuy qwert poiuy
9
Exercise IV
Exercise V
Exercise VI
Exercise VII
Exercise VIII
10

Exercise IXType the following sentences five times:
Type the following paragraph ten times:
Exercise X
11

Chapter 2 Windows Explorer
Objectives of this chapter2.1 Windows Explorer2.2 Opening Windows Explorer2.3 Parts of Windows Explorer
2.3.1 Hierarchy of locations2.4 Windows Explorer Views2.5 Working with files and folders 2.5.1 Selecting Item 2.5.1.1 Selecting an item 2.5.2 Creating a Folder 2.5.3 Copying Item using copy and paste 2.5.4 Moving Item using cut and paste 2.5.5 Copy Item using send to2.6 Searching2.7 Using Run Command2.8 Opening Calculator2.9 Customizing Desktop
IntroductionWindows Explorer is an important application of Operating System. It connects us
with the files and folders present in computer. Basically Explorer is of two types-Windows Explorer and Internet Explorer. Internet Explorer is used in Internet applications. In this chapter we will learn only about Windows Explorer.
2.1 Windows ExplorerWe know that Windows Explorer is an important application of Operating
System. Windows explorer is also known as file explorer. It is used to view files and folder that is in our Computer. We can browse or search the contents of disks, folders and libraries. We can use it in opening files, deleting files and folders, renaming them, copying and moving them around, and creating new folders. The main function of Windows Explorer is to provide a graphical interface to navigate the hard disk or any other media that is connected to our computer. It also provides help to display the contents of the sub folders and folders used to organize files on the hard disk and proper management of files and folders.
12

2.2 Opening windows explorer
There are a number of ways to open windows explorer. Let's discuss these ways:1. Press together.Windows key + E button
Or2. Press Windows key-> Click on All Programs-
> Accessories-> Windows Explorer.Or
3. Press windows key -> Type "Explorer" in search Box and Press Enter
Or4. Press together-Run box will open-> windows key+R Type Explorer in Run Box
and press Enter.Or
5. By default windows explorer button is located at second on Taskbar. So Press Windows and 2 keys together.
2.3 Parts of Windows Explorer
Before studying parts of Windows Explorer we should learn about Structure of Windows Explorer. In windows Explorer we can see three basic structures-Files, folders and Drives. A file is the smallest unit to store data. Files of common subject are present in a same folder. A folder can have many files stored in it. These files can be of different applications.
We know that we need a storage device like Hard Disk, CD, DVD to store our data for future use. A hard disk is available mostly in all computers. The storage area of a Hard disk is further divided into small parts. These small parts are called drives. We can label these drives such as C:\,D:\etc.
We can easily access a file, folder or drive with the help of Explorer.
Windows explorer is further divided into two panes:
1. Left Pane.
2. Right Pane.
Left pane of Windows explorer is also called Navigation Pane. We can see Drives, files and folders in left pane. Any object opened in left pane can be selected. The selected object can be a drive, file or a folder. When a drive, file or a folder is selected the detail of the same can be seen on the right pane of windows explorer. The figure below shows detail of my computer on the right pane:
13
Fig. Searching

Fig 2.1 Left Pane and Right Pane
Parts of Windows Explorer windows are given below:1. Title bar.
2. Back and forward buttons
3. Address Bar
4. Search Box
5. Menu bar
6. Toolbar
7. Status bar
14
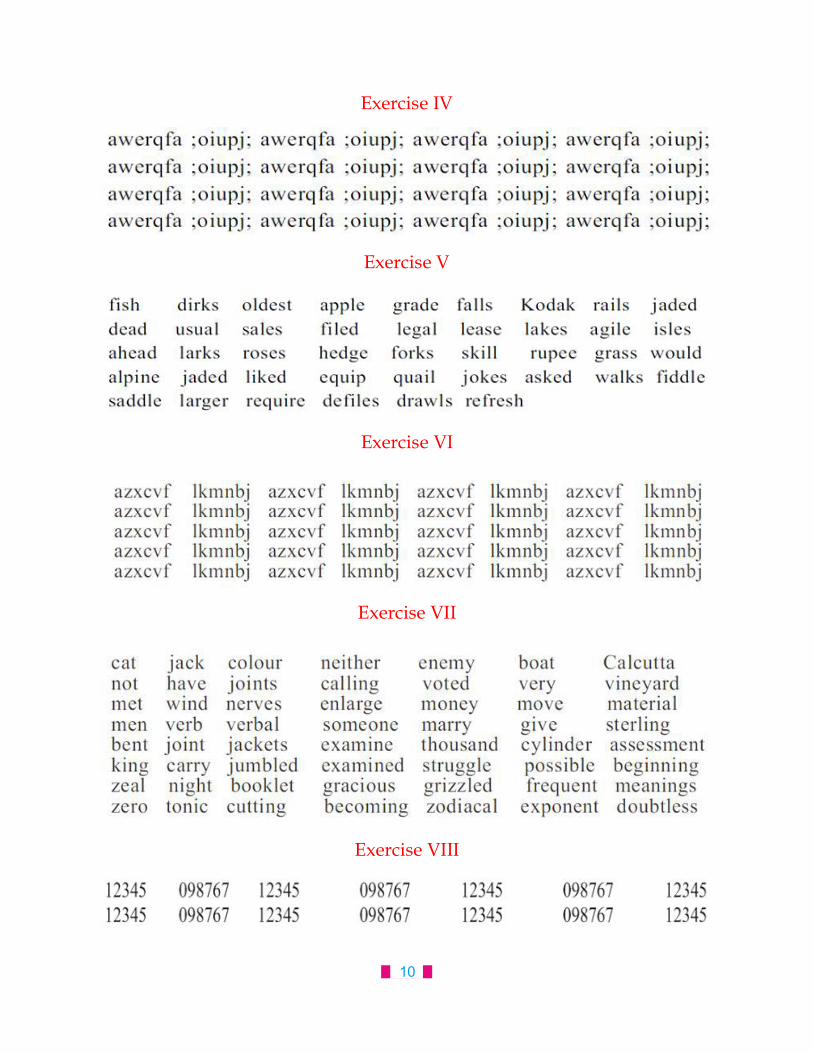
2.3.1 Hierarchy of locations
The folder and drives on your computer, together with any networked computers and their shared folders, drives and printers etc. form a tree like hierarchy called hierarchy of location. This contains the following items : see fig. 2.21. Favourites: In this hierarchy Desktop is the top
most folder. It contains Desktop, Download and Recent Places Items. See. fig. 2.3
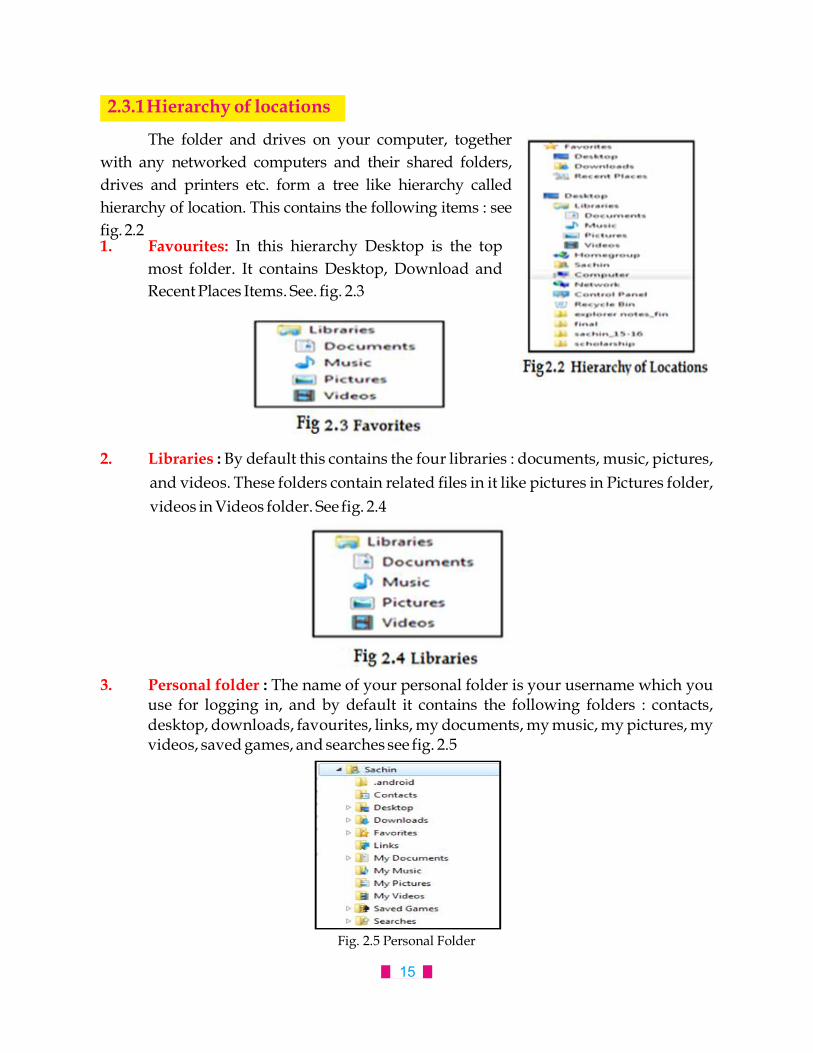
2. Libraries : By default this contains the four libraries : documents, music, pictures, and videos. These folders contain related files in it like pictures in Pictures folder, videos in Videos folder. See fig. 2.4
3. Personal folder : The name of your personal folder is your username which you use for logging in, and by default it contains the following folders : contacts, desktop, downloads, favourites, links, my documents, my music, my pictures, my videos, saved games, and searches see fig. 2.5
15
Fig. 2.5 Personal Folder

4. Computer : It contains all the disks like D:\E:\ drive which are contained in or attached to the computer, if other devices like USB memory sticks and camera are attached to computer are also shown in Computer. see fig. 2.6
5. Network, which contains other computers and devices if you are connected to a local network.
6. Control Panel : Control Panel is used to configure our hardware and software or to change the program setting etc. see fig. 2.7
7. Recycle bin : Items deleted by your move into the recycle bin.
2.4 Windows Explorer Views
Each location has a view setting, and this the layout of the items determines
on the screen and the sort of information which is displayed for each item.
2.4.1 Small, medium, large and extra large icons views. The items are laid out as
one or more rows, and each item consists of an icon with its name see fig 2.4.1
2.4.2 Tiles Icons view. The items are laid out as one or more rows, and each item
consists of an icon. Each item contains a name. It has some other information
like type of file and size. See fig 2.4.2
2.4.3 List Icons view. The items are laid out as one or more columns, and each item
consists of a name, with a small icon just to its left see fig 2.4.3
16
Fig. 2.7 Control Panel

2.4.4 Details Icons view. Each item consists of a row in a table. The first column
contains a name, together with a small icon, and the other columns contain
various properties such as size and date modified see fig 2.4.42.4.5 Content Icons view. The items are laid out column wise. Each item consists on
an icon. It has a name and type of item is written below. Some other properties
like modified date and size is shown below. This view is used by default for
searches see fig 2.4.5
Fig 2.8Windows Explorer Views
17

2.5 Working with files and folders
2.5.1 Selecting items : For copying and deleting items, you often need to able to one or more items select
in the items view. Let's learn how to do this.2.5.1.1. Selecting a single item : If there are a number of items available and you want to select a single item then
you can select by clicking on it.2.5.1.2 Selecting all the items : If you want to select all the items then Press keys together or choose Ctrl + A
select all option from Edit Menu in Menu bar.2.5.1.3 Selecting items using Shift key: 1. Select the first item. 2. Start holding down the key. shift 3. Extend the selection using , or , or , or key up arrow down arrow home end 4. Release the key. shift2.5.1.4 Selecting items using Ctrl key: 1. Select the first item. 2. Start holding down the key. ctrl 3. Move up or down the list using up arrow , down arrow , home or end key..
To change an item from unselected to selected, of from selected to unselected, press . spacebar
4. Release the key. ctrl2.5.1.5 Inverting the selection : Choose invert selection from the menu: all the items which were selected are Edit
deselected, and all the items which were not selected become selected.
2.5.2 Creating a new folder
When you create a new folder, it's created in the current location. Let's learn how to do this.
1. Open the file menu, then open the new sub-menu and choose new folder. Or
Press keys together.Ctrl + Shift + N Or
Right click from mouse on empty space, then click New and Folder option from opened menu.
2. Type a name for the folder, and press enter. 18

2.5.2.1 Renaming an itemTo rename an item:
1. Select an item.
2. Choose rename from the item's context menu or press F key from keyboard.2 3. The item's name appears temporarily in an edit box. If the item is a folder or
library, then the whole name is selected, so you can just type in a new name to replace the old name. If the item is a file, then the entire name except for the extension, for example .doc or .pdf, is selected. So if you type in a new name, you shouldn't include the extension, because the original extension is not overwritten.
4. Press . Alternatively press to cancel the rename. enter Esc2.5.2.2.Deleting an Item:
Delete option is used to delete a file or folder. Deleted files or folders moves to Recycle Bin. The Steps to delete file or folder are as follows:1. Click on the file or folder to be deleted.2. Press the delete key of the keyboard. A message will appear which will confirm the files to be deleted.3. Click on “Yes”. Your item will delete.
2.5.3 Copying items using copy and paste1. Select the items you want to copy.
2. Choose copy from the edit or context menu of press keys.Ctrl + C3. Specify your destination to paste files4. Choose paste from the menu or press to paste the items. Your item Edit Ctrl + V
will be pasted.
2.5.4 Moving items using cut and paste We can move items from one place to another. It involves exactly the same steps as copy and paste, which was described earlier. But in the second step choose cut from the edit or context menu ( ), rather than copy. difference between copy or paste and ctrl + x The in cut or paste is that while using copy command a duplicate copy of the selected item is created and it is place on new location while in cut and paste, the original item is moved from its location. Let's learn moving items using cut or paste about it:
1. Select the item you want to cut.2. Choose cut from Edit menu or Press key from keyboard.Ctrl+X3. Specify your destination to paste file.4. Choose paste option or Press Ctrl+V keys. Now cut item will be pasted.
19

Fig 2.10 Run Command
2.5.5 Copy items using send to The sent to sub menu provides a convenient way of copying one or more items to a number of locations and programs. Let's Learn about this :–
1. Select the items you want to copy.2. Press right button of your mouse, you will see a dialog box choose send to option
and select your required place. By default, the send to sub menu contains the following destinations:
1. Compressed (zipped) folder.
2. Desktop (create shortcut).
3. Documents library.
4. Fax and Mail recipients.
5. Devices with removable storage, forexample USB memory sticks.
2.6 Searching Sometimes we forget the location of our file saved
in computer. We couldn't find when we need it in future. So, searching is a tool to find that file. This option is used to find a file or a folder in our computer system. To search the current location using the search box does the following :
1. In window explorer, Press to move to the search edit box.Ctrl + E 2. Type in one or more search terms. If you use more than one search term, then a file
must match all the search terms.3. As you type in the search terms, the results automatically appear in the items view
– there's no need to press to make this happen. enter
2.7 Using Run commandRun command is used to run a program directly without going into a long way of selecting options. The steps for run command are as below: 1. Click on Start button 2. Select Run option. Run box will open as below :
3. Type the name of program which can be opened in it e.g.: Notepad. 4. Click on Ok button.
20
Fig 2.9 Searching

2.8 Opening a calculatorCalculator is a simple program. It is quite similar to commonly used calculators for
calculations. Steps to open calculator through run box are as follows: 1. Click on Start button. 2. Select Run option. Run box will open as below:
3. Type “Calc” in the box. 4. Click on Ok button. Calculator will appear.
Note: If you want to add 2 to 3 on calculator then first click on 2, then click on + sign. After this click on 3. To see answer click equal to = sign.
2.9 Customizing Desktop Windows lets us to customize or personalize the look of the screen. In Windows 7 we customize the look of the screen using Personalization dialog.
If our computer has different user accounts, the changes that we make in the Display dialog will apply only to the current user we are logging in. Let's see how to do this :
21
Fig 2.11 Opening Calculator using Run command
Fig 2.12 Calculator

Step 1: Right click on a blank area of the desktop to get the context-sensitive menu.Step:2 Left click on Personalize.
Fig 2.13 Customizing Desktop
22
The Personalization dialog shows themes and has links at the bottom and left for other choices.1. Themes: A theme is a combination of pictures, colors, and sounds on your
computer. It includes a desktop background, a screen saver, a window border color, and a sound scheme. Some themes might also include desktop icons and mouse pointers. You can create attractive look of your desktop using themes. Windows themes are available as follows:
Fig 2.14 Customizing Desktop
· My themes· Aero themes· Basic and High Contrast Themes.
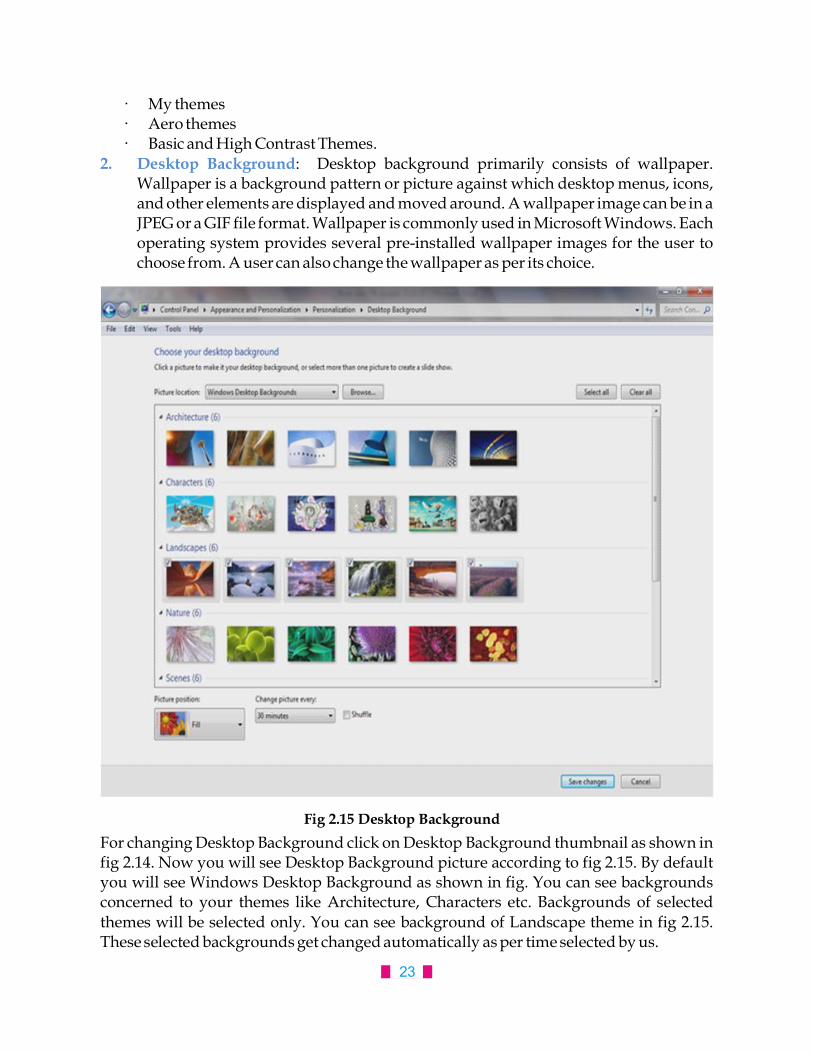
2. Desktop Background: Desktop background primarily consists of wallpaper. Wallpaper is a background pattern or picture against which desktop menus, icons, and other elements are displayed and moved around. A wallpaper image can be in a JPEG or a GIF file format. Wallpaper is commonly used in Microsoft Windows. Each operating system provides several pre-installed wallpaper images for the user to choose from. A user can also change the wallpaper as per its choice.
Fig 2.15 Desktop BackgroundFor changing Desktop Background click on Desktop Background thumbnail as shown in fig 2.14. Now you will see Desktop Background picture according to fig 2.15. By default you will see Windows Desktop Background as shown in fig. You can see backgrounds concerned to your themes like Architecture, Characters etc. Backgrounds of selected themes will be selected only. You can see background of Landscape theme in fig 2.15. These selected backgrounds get changed automatically as per time selected by us.
23
Steps to change background:1. Choose any option from Pictures Locations as shown in fig 2.15. for example
Windows Desktop Background is shown in fig 2.152. All Background of your selected theme are selected by default. If you want to use a
single background then click on Clear all button as shown in fig 2.153. To use your desired Background click on the top left corner as shown in fig.4. for picture position click on Picture Position and choose an option as per your
choice.5. If more than one Background are selected, to change all automatically after some
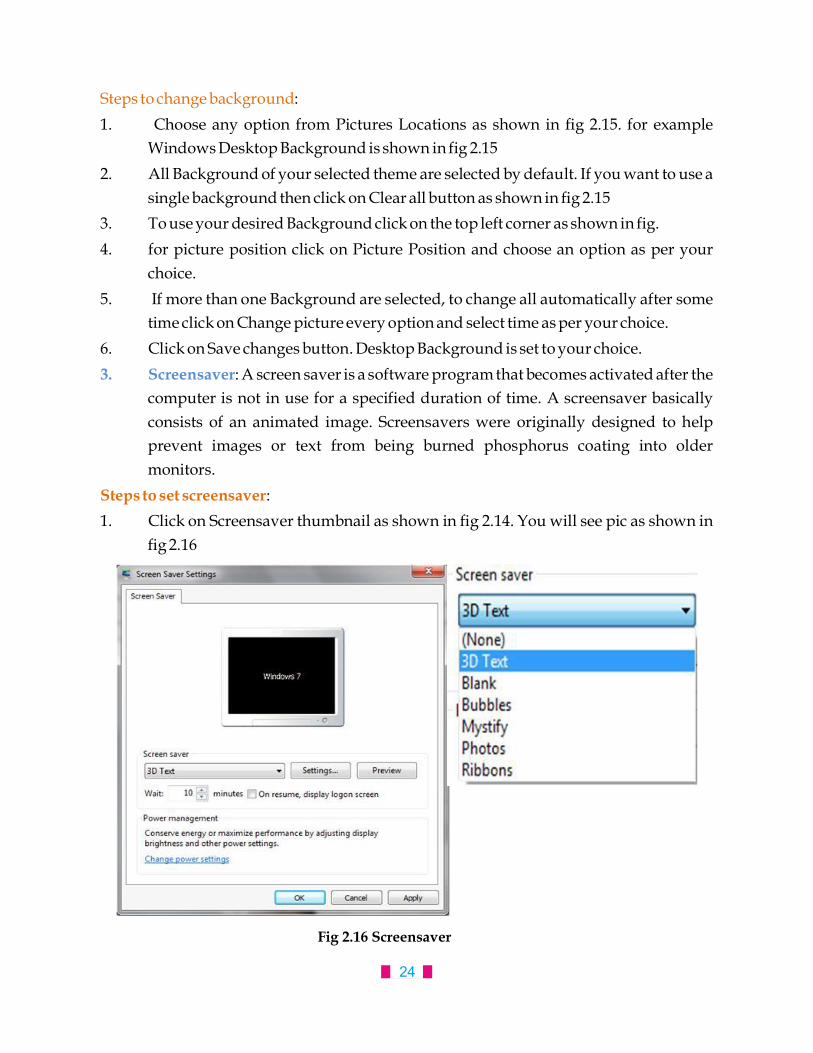
time click on Change picture every option and select time as per your choice.6. Click on Save changes button. Desktop Background is set to your choice.3. Screensaver: A screen saver is a software program that becomes activated after the
computer is not in use for a specified duration of time. A screensaver basically consists of an animated image. Screensavers were originally designed to help prevent images or text from being burned phosphorus coating into older monitors.
Steps to set screensaver:1. Click on Screensaver thumbnail as shown in fig 2.14. You will see pic as shown in
fig 2.16
Fig 2.16 Screensaver
24

2. To set screensaver of your choice click on Screen saver button as shown in fig 2.16 and select a screen saver of your choice from drop down menu. For example 3D Text screen saver is selected in fig.
3. For Screen saver settings click on Settings button and set setting as per your choice.
4. To see preview of your screensaver click on Preview button as shown in fig. 2.165. To run a screen saver automatically on your desktop we need to adjust its time. To
do this click on Wait option as shown in fig 2.16 and type time settings as it is set to 10 minutes shown in fig 2.16.
3. Click on Apply button and then on OK button. Screen saver will be set.
Points to Remember 1. Windows Explorer is an important application. It connects us with the files and
folders present in computer.2. Press windows key->Click on All Programs->Accessories->Windows Explorer
3. Windows Explorer has two panes-left Pane and right Pane.4. Left Pane is also known as Navigation Pane that has drives, folders and files.5. You can cut,copy,delete or rename the files or folders with the help of windows
explorer.6. By default there are four libraries: documents, music, pictures, and videos.
Exercise1. Fill in the blanks 1. Windows Explorer has two panes. These are______ and _____
1. First ,Second) 2. (Left,Right) 3.(Top,Bottom) 4.(File, folder)( 2. ________ view tells about size, type and date of modified of a file.
1. (details) 2. (Tiles) 3. (List) 4. (Content) 3. _________ option is used to search files and folders.
1. (File) 2. (Select) 3. (Search) 4. (Delete) 4. Calculator can be opened by typing ________in the run box.
1. (Calculator) 2. (Cal) 3. (calc) 4. (None of these) 5. __________command is used to cut an item from its place.
1. (Copy) 2. (Paste) 3. (Cut) 4. (Delete)
25

2. True / False: 1. Windows Explorer is used for management of files. 2. A file may contain many files and folders. 3. A method of opening widows explore is : Press windows key+R-> Type Explorer in Run Box 4. Windows Explore is an Operating System. 5. “Copy” option is used to make a duplicate of an item.3. Short Answer type questions:- 1. How many panes are available in Window Explorer? Write their names? 2. List the parts of window explorer? 3. How can we create a new folder with the use of keyboard? 4. How can we copy items using copy and paste? 5. Write a note on Background. 6. Explain Screen Saver?4. Long Answer type questions: 1. What is windows explorer? Give different ways to open windows explorer. 2. Explain different views of explorer. 3. How can we move an item using cut and paste? 4. How can we Copy items using 'send to' option? 5. Explain the followings: a. Run command b. Search command c. Calculator 6. Write down the steps to change Background. 7. Write down the steps to set Screen saver.
26

Chapter 3 Storage Devices
Objectives of this chapter
3.1 What is memory?
3.2 Usage of Memory
3.3 Types of Memory
3.3.1 Primary Memory
3.3.1.1 ROM
3.3.1.2 RAM
3.3.2 Secondary Memory
3.3.2.1 Hard Disk Drive
3.3.2.2 External Hard Disk Drive
3.3.2.2.1 Advantages of External Hard disk drive
3.3.2.3 Floppy Disk
3.3.2.4 Magnetic Tape
3.3.2.5 CD
3.3.2.6 DVD
3.3.2.7 Pen Drive
3.3.2.8 Memory Card
3.1 What is Memory?
Memory can be referred to as any medium capable of data storage Computer . memory can be electronic space provided by silicon chips or magnetic/optical media. It can be temporary or permanent storage for data and instructions to control a computer or execute one or more programs. The memory is divided into number of small parts called cells.
3.2 Usage of Memory
Just like a human brain, computer need memory to store data. Computer memory is the storage space in computer where data to be processed and instructions required for processing are stored. Computers store data in digital format and unlike human memory, the computer's memory doesn't get worse over time.
27

3.3 Types of MemoryThere are two main categories of memories:
3.3.1 Primary memory: It is of two types.
3.3.1.1 ROM: Read Only Memory
3.3.1.2 RAM: Random Access Memory
3.3.2 Secondary memory3.3.1 Primary Memory:
Primary memory or internal memory holds only those data and instructions on which computer is currently working.It uses micro conductors that are fast specialized electronic circuits. It has limited capacity and data is lost when power is switched off. It is generally made up of semiconductor device. The data and instruction required to be processed reside in main memory. Let's learn about types of primary memory:
3.3.1.1 ROM: ROM means Read Only Memory. It is a smaller part of a computer's memory that is fixed in size and permanently stores manufacturer's instructions to run the computer when it is switched on. There are many types of ROMs available in market such as ROM, PROM, EPROM, EEPROM etc.
3.3.1.2RAM: RAM means Random Access Memory. Random access memory is that part of a computer's memory which is employed in running programs and in archiving of data. These are memory chips which provide access to stored data or instructions. It is hundreds times faster than secondary storage. When our computer boots up or starts, it loads the operating system into its memory, or RAM. This allows our computer to access system functions, such as handling mouse clicks and keystrokes etc. Whenever we open a program, the interface and functions used by that program are also loaded into RAM. RAM is a very high-speed type of memory, which makes it ideal for storing active programs and system processes.
Fig 3.1: Read Only Memory (ROM)
Fig 3.2: Random Access Memory (RAM)
28

Fig 3.3: Hard Disk Drive
Fig 3.4: Internal View of Hard disk Drive
3.3.2 Secondary MemorySecondary memory is also called External memory, physical memory or auxiliary
memory. It stores information over the long term, even after the computer is turned off. Auxiliary memory corresponds to magnetic storage devices such as the hard drive, optical storage devices such as CD-ROMs and DVD-ROMs etc. Let's learn about the following types of secondary memory.3.3.2.1 Hard Disk Drive:
This type of memory is non-volatile. It is slower than main memory or primary memory. These are used for storing data/Information permanently. CPU does not access these memories directly; instead they are accessed via input-output routines. Content of secondary memory is first transferred to main memory, and then CPU can access it. A hard disk consists of one or more rigid metal plates coated with a metal oxide material. It allows data to be magnetically recorded on the surface of the platters. The hard disk platters spin at a high rate of speed, typically 5400 to 7200 revolutions per minute (RPM). Storage capacities of hard disks for personal computers range from 20 GB to 500 GB approximately.3.3.2.2 External Hard Disk Drive: A hard drive is a computer component that holds data. Every computer needs at least one hard drive to store its operating system, programs and user information. This drive usually is internal, or built into the computer, but as computer systems have evolved and different needs, threats and circumstances have arisen, external hard drives have become more popular. External hard drives usually are used in addition to internal hard drives in order to store more data. They also allow the user to put sensitive, confidential or otherwise important information on them, then disconnect them and store them in secure locations. An external hard drive is a portable storage device that can be attached to a computer through a USB or wirelessly. External hard drives typically have high storage capacities and are often used to back up computers or serve as a network drive.
Fig 3.5: External Hard Disk Drive
29

3.3.2.2.1 Advantages of External Hard disk drive:
1. An external hard drive is a portable storage device and operates on a plug-and-play basis.
2. It allows the user to back up or store information separate from the main internal hard drive.
3. Internet access regularly exposes computers to threats which could damage or corrupt sensitive documents, large music files, movies, images and other backup files. These can be kept securely and safely on an external hard drive.
3.3.2.3 Floppy Disk:
These are small removable disks that are plastic coated with magnetic recording material. Floppy disks are typically 3.5″ in size (diameter) and can hold 1.44 MB of data. This portable storage device is a rewritable media and can be reused a number of times. Floppy disks are commonly used to move files between different computers. The main disadvantage of floppy disks is that they can be damaged easily and, therefore, are not very reliable.
3.3.2.4 Magnetic Tape
Magnetic tape is a sequential storage medium used for data collection and backup. Computer tape is made of flexible plastic with one side coated with a ferromagnetic material. Tapes were originally open reels, but were superseded by cartridges and cassettes of many sizes and shapes. Tape has been more economical than disks for storing data, but that is changing as disk capacities have increased enormously. The major drawback of tape is its sequential format. Locating a specific record requires reading every record in front of it.
30
Fig 3.6: Floppy Disk

Fig 3.7: Magnetic Tape
3.3.2.5 CD: Compact Disk (CD) is portable disk having data storage capacity between 650-700 MB. It can hold large amount of information such as music, full-motion videos, and text etc. It contains digital information that can be read, but cannot be rewritten. Separate drives exist for reading and writing CDs. Since it is a very reliable storage media, it is very often used as a medium for distributing large amount of information to large number of users. In fact today most of the software is distributed through CDs. One side of a CD is very shining, just like a mirror. The shining surface of a CD has micro pits and plats to store information. These pits are not visible by naked eyes. A laser beam is used to read information from the disk. There are two types of CDs:1. CDs, which can be written only once, afterward you can only read information,
such CDs are called Compact Disk Read only (CD-R).2. CDs, which can perform read and write operations as many times as desired by
you. Such CDs are called Compact Disk Read and Write (CD-RW).3.3.2.6 DVD Digital Versatile Disk (DVD) is similar to a CD but has larger storage capacity and enormous clarity. Depending upon the disk type it can store several gigabytes (GB) of data. DVDs are primarily used to store music or 6 or more movies and can be played on your television or the computer too. DVDs are generally used to store very large multimedia presentations and movies that combine high quality sound and graphics. They are not rewritable media. It is also termed DVD (Digital Video Disk)
Fig 3.8: Compact Disk (CD)
Fig 3.9: Digital Versatile Disk (DVD)
31

· We should take the following precautions at the time of using a CD/DVD:
1. When we are not using a CD/DVD, keep it in its cover.
2. Do not touch the shining side of a CD/DVD.
3. Do not write with pen or pencil on the backside of a CD/DVD.
4. Do not bend a CD/DVD.
5. Use soft cloth to clean a CD/DVD. You may use water to remove dirt from a CD/DVD.
3.3.2.7 Pen Drive
A pen drive is a portable Universal Serial Bus (USB) flash memory device for storing and transferring audio, video, and data files from a computer. They are small enough to fit into a pocket. Other names include flash drive, jump drive, and thumb drive. USB flash drives are often used for the same purposes for which floppy disks or CDs used, i.e., for storage, data back-up and transfer of computer files. They are smaller, faster, have thousands of times more capacity, and are more durable and reliable because they have no moving parts. Additionally, they are immune to electromagnetic interference (unlike floppy disks), and are unharmed by surface scratches (unlike CDs).
3.3.2.8Memory Cards:
Memory cards are a type of storage media that is most commonly used in digital cameras, handheld computers, MP3 players, cell phones, game consoles, and printers, to store pictures, videos, music, and other data. They are also referred to as a flash memory card. There are many types of memory cards in the market, each varying in size, compatibility, and storage capacity. Data stored on memory cards can be read by using card readers and also with the help of data-cables.
32
Fig 3.10: Pen Drive
Fig 3.11: Memory Cards

Points to remember
1. Computer memory is the electronic space in computer.
2. There are two main categories of memories: Primary memory, Secondary memory.
3. ROM means Read Only Memory and RAM means Random Access Memory.
4. Secondary memory also called External memory, physical memory or auxiliary memory.
5. An external hard drive is a portable storage device and operates on a plug-and-play basis.
6. The shining surface of a CD has micro pits and plats to store information.
7. A pen drive is a portable Universal Serial Bus (USB). It is small enough to fit into a pocket.
8. Data stored on memory cards can be read by using card readers and also with the help of data-cables.
EXERCISE1. Fill in the blanks: 1. Primary memory is also called ___________. (a) internal memory (b) External memory (c) physical memory (d) auxiliary memory 2. ________________ memory is not a Read Only Memory. (a) ROM (b) PROM (c) EPROM (d) RAM 3 _____________ is not a portable storage device. (a) External Hard Disk Drive (b) Pen Drive (c) Hard disk Drive (d) Memory Card 4 The memory is divided into number of small parts called
________________. (a) Cells (b) Area (c) inter-section (d) None of these 5 USB means __________________ (a) Uniform service book (b) Universal serial bus ( c) Universal straight bus (d) Uniform serial bus
33
2. True / False:
1. Floppy disks are typically 3.5″ in size (diameter) and can hold 1.44 MB of data
2. Compact Disk (CD) is portable disk having data storage capacity between 650-700 MB
3. Storage capacities of hard disks for personal computers range from 20 GB to 500 GB.
4. DVD has smaller storage capacity as compared to CD.
5. We should write with pen or pencil on the shining side of a CD/DVD.
3. Short Answer type Questions:
1. Write the types of Primary Memory.
2. Name four Secondary Memories?
3. Write precautions, we must follow while using a CD/DVD.
4. Write down two main categories of memories?
5. What is pen drive?
4. Long Answer type Questions:
1. What is memory? Write about its Usage?
2. What is Memory Card? Explain?
3. What is Floppy Disk? Explain?
4. What is CD? Explain its types?
5. What is external hard disk drive? Write its advantages?
34

Chapter 4 Formatting in MS Word-Part I
Objective of this chapter:4.1 Selection of text4.2 Cut, Copy and Paste4.3 Format Painter4.4 Formatting Text4.5 Text effects 4.6 Change Text Case4.7 Bullets or numbers4.8 Text Alignment4.9 Adjusting Line Spacing4.10 Shading4.11 Find and Replace4.12 Page Break4.13 Page Number4.14 Header and footer4.15 Picture/Clip Art4.16 Shapes/Insert Shapes4.17 SmartArt Graphic4.18 Inserting Text Boxes4.19 WordArt4.20 Symbols
Introduction
Sometimes we need to create, design and organize effective documents. For this we need to know how to . In addition, to make our document more appealing, format textformatted text can draw the reader's attention to specific parts of the document and help communicate our message.
In this lesson, we'll learn to format the font, size, style, and color; highlight the text; and use the bold, italic, underline, and change case commands.
4.1 Selection of text :
Whenever we change the text of our document or apply formatting, we will first need to select the text that we want to change or format. Once we have selected text, it will be highlighted in blue colour as shown in figure below and ready to accept our change.
35

Fig: 4.1: Selection of text
For editing in MS Word Selection of text plays a lead role in editing of a particular document. Without selection we cannot edit and format the given text. We can do the selection in the following ways:4.1.1 Using mouse: 1 Take the curser in the starting of the text to be selected. 2 Click the mouse. While holding it down, drag mouse over the text to select it. 3 Release the mouse button. The text will be selected.4.1.2 Using keyboard 1 Take the curser in the starting of the text to be selected. 2 Keep the shift key pressed and select the text by using arrow keys.Steps to Select Text in Document: 1. To select a whole , click on it.word double 2. To select a whole click anywhere in the paragraph.paragraph, triple 3. To select a , over the block of text.long block of text drag our mouse cursor
4.2 Cut, Copy and Paste : 1. If we would like to remove text from our document, we can copy or cut the text
from the document. First Select the text and go to the Home tab in the Clipboard group.
2. Click Cut or Copy option in the Clipboard group.OR
We can also right click on our mouse and select Cut or Copy.OR
Press (cut) and (copy) simultaneously from keyboard.Ctrl+X Ctrl+C
3. Pasting Text: If we Copy text, then we need to Paste it somewhere. Click the Paste Option in the Clipboard group.
OR We can also right click on our mouse and select paste option.
OR Press simultaneously from keyboard.Ctrl+V
36
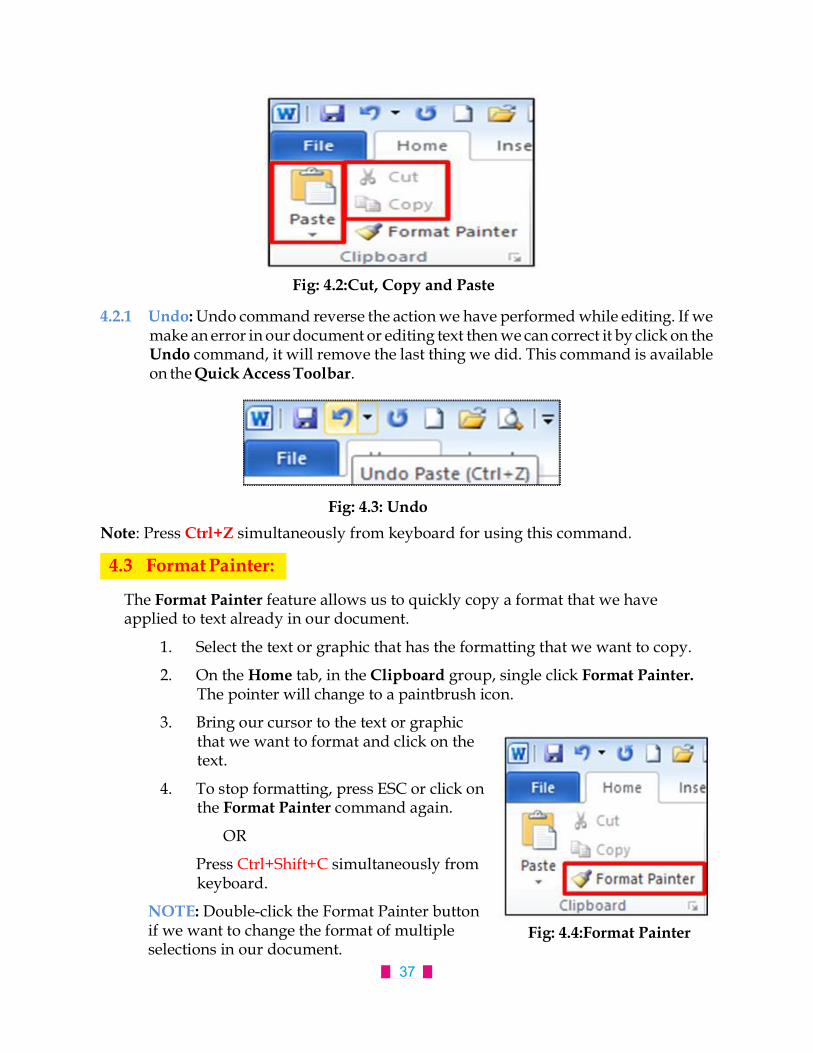
Fig: 4.2:Cut, Copy and Paste
4.2.1 Undo: Undo command reverse the action we have performed while editing. If we make an error in our document or editing text then we can correct it by click on the Undo command, it will remove the last thing we did. This command is available on the .Quick Access Toolbar
Fig: 4.3: UndoNote: Press simultaneously from keyboard for using this command.Ctrl+Z
4.3 Format Painter:
The feature allows us to quickly copy a format that we have Format Painter applied to text already in our document.
1. Select the text or graphic that has the formatting that we want to copy.
2. On the tab, in the group, single click Home Clipboard Format Painter. The pointer will change to a paintbrush icon.
3. Bring our cursor to the text or graphic that we want to format and click on the text.
4. To stop formatting, press ESC or click on the command again. Format Painter
OR
Press simultaneously from Ctrl+Shift+C keyboard.
NOTE: Double-click the Format Painter button if we want to change the format of multiple selections in our document.
Fig: 4.4:Format Painter
37

4.4 Formatting Text : Formatting a document includes modifying text size, font face, color, style, alignment, line spacing, graphics and many more things. Microsoft Word provides many easy ways to add creative touches to any document.4.4.1 Font : A font is a set of printable or displayable in a specific and text characters face
size font face/ typeface. The type design for a set of fonts is the .4.4.2 Modifying Fonts: The Group allows us to change our text font style, size, color and many Font
other elements.
4.4.2.1 Steps to Modify Text 1. Select the text we want to modify.
2. Click on the font face, from the drop down list select the style and font size simultaneously.
Note : We can grow (increase) and shrink (decrease) font sizes of text by clicking growfont option shrink font option. and
OR Press Ctrl+[and Ctrl+] keys simultaneously from keyboard for increase and
decrease size of text
Fig: 4.5:Font Face Fig: 4.6: Font Size
Fig: 4.7:Modify nt Face and Font SizeFo
38

4.4.3 Font styles: There are three basic font styles using in text. These are following: Bold: To write in bold text, it means using thicker letter. Italic: To write in italic text, it means using slanted letter. Underline: To write in underline the text, it means draw a horizontal line
underneath the letters.4.4.3.1 Bold, Italic, Underline: While text is highlighted we can also click on the bold, italics or underline
commands to modify the text style from font group in the home tab.OR
Press Ctrl+B, Ctrl+I, Ctrl+U simultaneously from keyboard for bold, italics or underline.
4.4.4 Font color: If we want to type text in any colour of our choice then we need to choose font color option in font group of home tab. There are following steps to change font color of text.
1. Select the text we want to modify.
Fig: 4.8: Grow font and shrink font
Fig: 4.9:Bold, Italic, Underline
Fig: 4.10:Font color
39

2. Click on the tab. Choose the Font color option in the Font group. The HomeFont Color drop down box appears.
3. Move the mouse pointer over the various font colors. A live preview of the color will appear in the document.
4. Select the colour according to your choice.4.4.5 Text highlight color: When we use text highlight color option, it means that the text shows like it was marked with a highlighter pen. Steps to use the text highlight color are following: 1. Select the text that we want to highlight. 2. On the Home tab, move the arrow next to Text Highlight Color in the
Font group. 3. Click the color that we want
4.5 Text effects
Text effects include Outline, shadow, glow, and reflection.4.5.1 Adding Text effects 1. Select the text that you want to add an effect to. 2. On the tab, in the group, click . Home Font Text Effect 3. Click the effect that you want. 4. For more choices, point to , , , or , and Outline Shadow Reflection Glow
then click the effect that you want to add.
Fig: 4.11: Text highlight color
Fig: 4.12: Text effects40

4.5.2 Remove text effects: 1. Select the text from which we want to remove an effect. 2. On the tab, in the group, click Home Font Clear.
4.6 Change Text Case : If we type some text in lower case and after some time, we feel that the text should be in upper case then no need to delete text, because Word provides us a facility to change text in any case like Sentence case, Lowercase, UPPERCASE, Capitalize Each Word and Toggle case. We can change the case of selected text in a document by clicking a single button ·
called on the ribbon.Change Case
1. Select the text for which you want to change the
case.2. On the tab, in the group, click Home Front
Change case. Choose an option from the dropdown list, which
inc ludes : Sentence case , Lowercase, UPPERCASE, Capitalize Each World and Toggle case.
Fig: 4.13:Remove text effects
Fig: 4.14: Change Case
Fig: 4.15:Change Case
41

Note: We can quickly display the "Font" dialog box (Font tab) by clicking on the Font dialog box launcher in the bottom right corner of this group. OR Press to Ctrl+D open it.
Fig: 4.16:Font dialog box launcher
Fig: 4.17:Font dialog box 4.7 Bullets or Numbers : We can quickly add bullets or numbers to existing lines of text, or Word and can automatically create lists as we type. By default, if we start a paragraph with an asterisk or a number.4.7.1 Insert Bulleted or Numbered List Click on the area where we would like our list to appear or highlight the text we would like to be in a list.
42

4.7.2 Select Bullets or Numbering Style 1. Select the items that we want to add bullets or numbering to.
2. On the tab, in the group, click the arrow next to the Home Paragraph Bullets Numbering or command.
3. Select the bullet or number format we would like to be inserted.Note: · To finish the list, press ENTER twice, or press BACKSPACE to delete the
last bullet or number in the list. · Word automatically inserts the next bullet or number. (Press tab key if we
want to create multilevel list)
4.8 Text Alignment : A l i g n m e n t d e t e r m i n e s t h e appearance and orientation of the edges of the paragraph: left-aligned text, right-aligned text, centered text, or justified text, which is aligned evenly along the left and right margins.
Fig: 4.18:Bulleted or Numbered List
Fig: 4.19:BulletsStyle Fig: 4.20:NumberingStyle
Fig: 4.21Text Alignments
43
1. Go to the tab, in the group, click or .Home Paragraph Bullets Numbering 2. A bullet(s) or number(s) will be inserted.

4.8.1 Change text alignment: 1. Select the text we want to modify. 2. Select one of the four from alignment options
the group on the tab.Paragraph Home 1. Align Text Left: Aligns all selected text to
the left margin (Press )Ctrl+L 2. Centre: Aligns text an equal distance from
the left and right margins(Press )Ctrl+E 3. Align Text Right: Aligns all selected text
to the right margin. (Press Ctrl+R 4. Justify: Aligns text equally on both sides
and lines up equally to the right and left margins; used by many newspapers and magazines. (Press )Ctrl+J
4.9 Adjusting Line Spacing :
The default spacing is 1.15 line spacing and 10 points after each paragraph. The default spacing in MS Office Word documents is 1.0 between lines and no blank line between paragraphs. The easiest way to change the line spacing for an entire document is to highlight the paragraphs or entire document that you want to change the line spacing on. Adjusting the line spacing will affect how easily our document can be read. We can spacing to improve increasereadability, or it to fit more text on the page.reduce4.9.1 To format line spacing: 1. Select the text we want to format. 2. Click the Line and Paragraph Spacing
command in the group on the ParagraphHome tab.
3. Select the desired spacing option from the drop-down menu. 4. From the drop-down menu, we can also select to Line Spacing Options
open the dialog box. From here, we can adjust the line spacing Paragraphwith even more precision.
When we select or in the Paragraph dialog box, the line At least Exactlyspacing is measured in . Otherwise, it is measured in points lines.
Fig: 4.22 Text Alignments
44
Fig: 4.23:Line and Paragraph Spacing

Fig: 4.24:Paragraph dialog box
Important Tip: If a line contains a large text character, graphic, or formula, Word increases the spacing for that line.
For Example:
To space all lines evenly within a paragraph, use exact spacing and specify an amount of space that is large enough to fit the largest character or graphic in the line. If items appear cut off, we must increase the amount of spacing between lines.
4.10 Shading :
Microsoft Word offer features to apply border and shadings to our document. We can apply a border, shading or both around a single word, a selection of words, a paragraph, group of paragraphs, a single page, a section, or all pages. Simply hit the Shading option to choose the shading style.
Fig: 4.25:Word increases the spacing
45
Note: We can quickly display the "Paragraph" dialog box (Indents and Spacing tab) by clicking on the dialog box launcher in the bottom right corner of this group.

4.11 Find and Replace :When we are working with longer documents, it is difficult and time consuming to locate a specific word or phrase. Word can automatically search our document for specific word or phrase using the feature. It also allows us to change words or phrases using FindReplace.
4.11.1 Steps to find text:
1. From the tab, click the command. The pane will Home Find navigationappear on the left side of the screen.
2. Type the text we want to find in the field at the top of the navigation pane. 3. If the text is found in the document, it will be highlighted in yellow, and a
preview will appear in the navigation pane. 4. If the text appears more than once, we can click the on the arrows
navigation pane to step through the results. We can also click the result previews on the navigation pane to jump to the location of a result in our document.
5. When we close the navigation pane, the highlighting will disappear.
Fig: 4.26:Shading
Fig: 4.27:Find command
46

4.11.2 Steps to replace text: 1. From the tab, click the command. The Home Replace Find and Replace
dialog box will appear.
2. Type the text we want to find in the field.Find what 3. Type the text we want to replace it with in the field.Replace with 4. Click and then to replace text. We can also click Find Next replace Replace
All to replace all instances within the document.
4.12 Page Breaks :
Word automatically inserts a page break when we reach the end of a page. If we want the page to break in a different place, we can insert a manual page break.
4.12.1 Inserting a Page Break
1. Click where we want to start a new page. 2. On the tab, in the group, click .Insert Pages Page Break
Fig: 4.28:Replace command
Fig: 4.29:Find and Replace dialog box
47

OR · We can also insert breaks into our document by going to the tab, Page Layout Page
Setup Breaks group and clicking on the command to view a variety of page and section breaks we can insert into our document.
4.12.2 Deleting a Page Break: We cannot delete the page breaks that Word inserts automatically, we can only delete a page break that we have inserted manually. 1. Go to the page break we would like to remove. 2. Select the page break by clicking in the margin next to the dotted line. 3. Press the key on your keyboard. DELETE
4.13 Page Number :Word automatically labels each page with a page number and places it in a , headerfooter side margin, or . When we need to number some pages differently, Word allows us to .restart page numbering
Fig: 4.30:Page Break
Fig: 4.31:Breaks command
Fig: 4.32:Page Number
48

4.13.1 Add Page Numbers: If we want to put a page number on each page, we can quickly add a page number from the gallery. 1. On the tab, in the group, click Insert Header & Footer Page Number. 2. Click the page number location that we want. (Top of page or Bottom of page) 3. In the gallery, scroll through the options, and then click the page number
format that we want. 4.13.2 Remove Page Numbers: If we want to remove page number, which already added. Follow the below steps: 1. On the tab, in the group, click Insert Header & Footer Page Number. 2. Click the “Remove page Number” option.
4.14 Headers and Footers :We can add headers, footers and page numbers in numerous ways. The simplest way is to double click on the top or bottom of the page and the header and footer area will appear. Enter the text we wish to be displayed at the top or bottom of every page.
Note: After t , Close Header and Footer yping text in the header or footer area on the Design Header & Footer Toolstab (under ).
Fig: 4.33:Headers and Footers
Fig: 4.34:Close Header and Footer
49
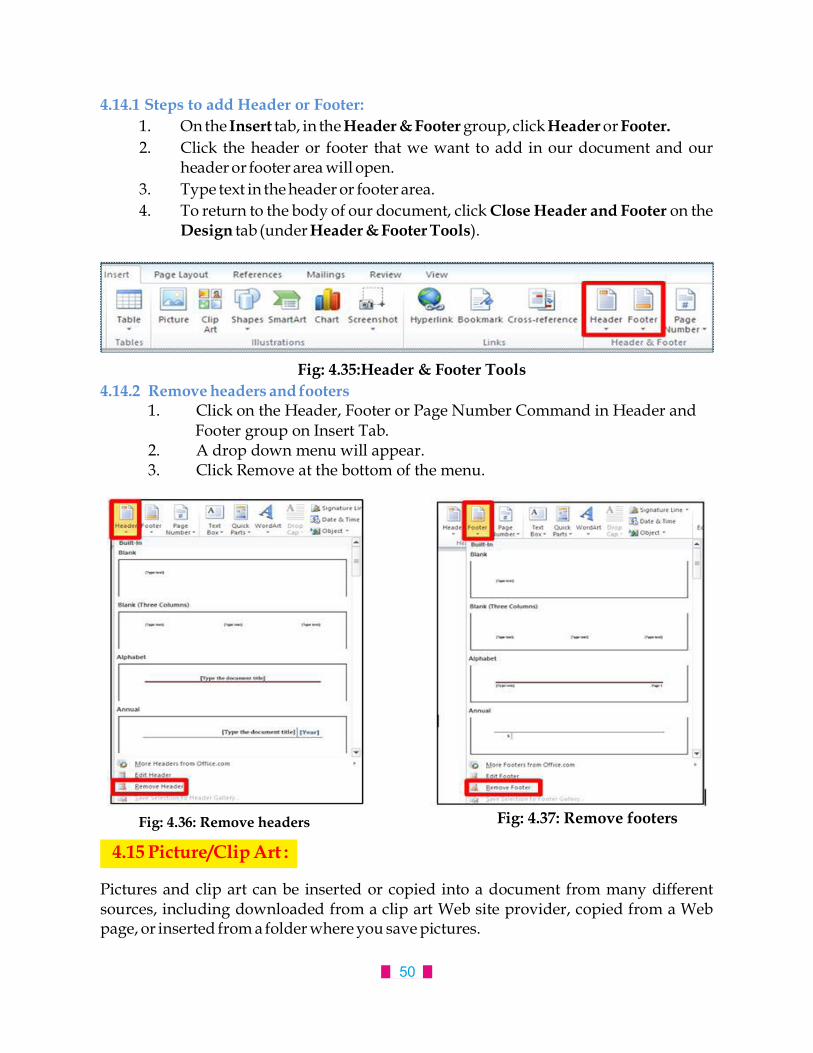
4.14.1 Steps to add Header or Footer: 1. On the tab, in the group, click orInsert Header & Footer Header Footer. 2. Click the header or footer that we want to add in our document and our
header or footer area will open. 3. Type text in the header or footer area. 4. To return to the body of our document, click on the Close Header and Footer
Design Header & Footer Toolstab (under ).
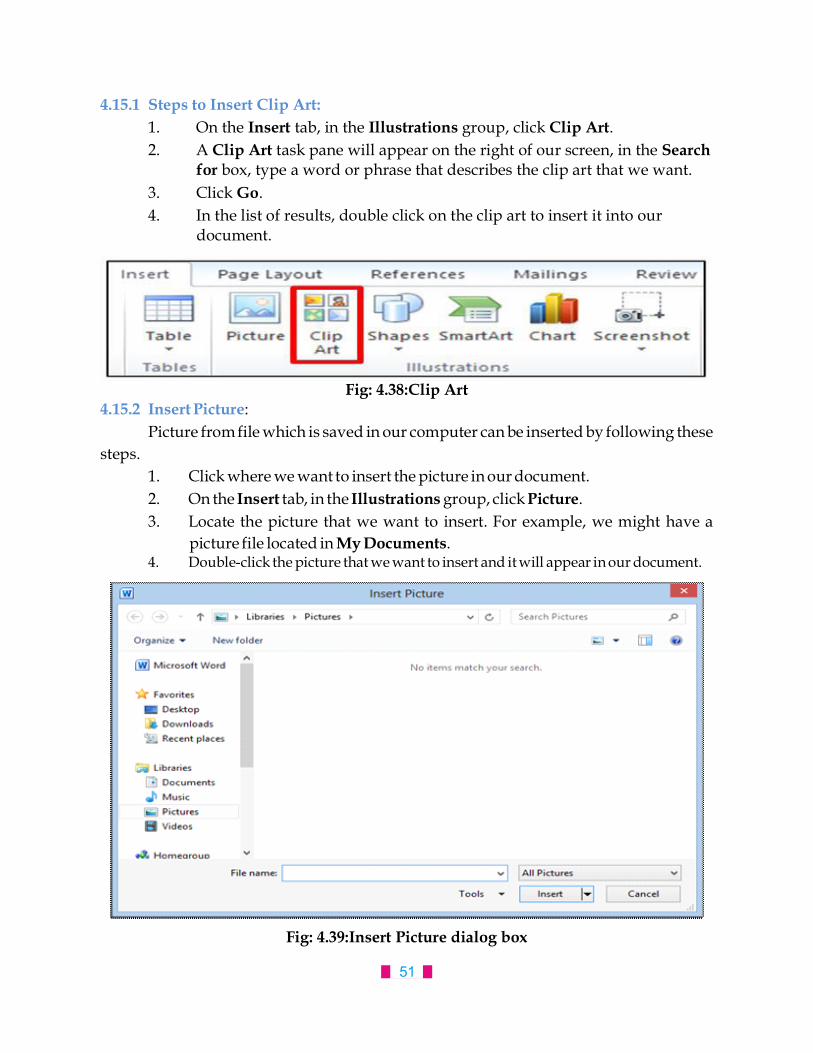
4.14.2 Remove headers and footers 1. Click on the Header, Footer or Page Number Command in Header and
Footer group on Insert Tab. 2. A drop down menu will appear. 3. Click Remove at the bottom of the menu.
4.15 Picture/Clip Art :
Pictures and clip art can be inserted or copied into a document from many different sources, including downloaded from a clip art Web site provider, copied from a Web page, or inserted from a folder where you save pictures.
Fig: 4.35:Header & Footer Tools
Fig: 4.36: Remove headers Fig: 4.37: Remove footers
50
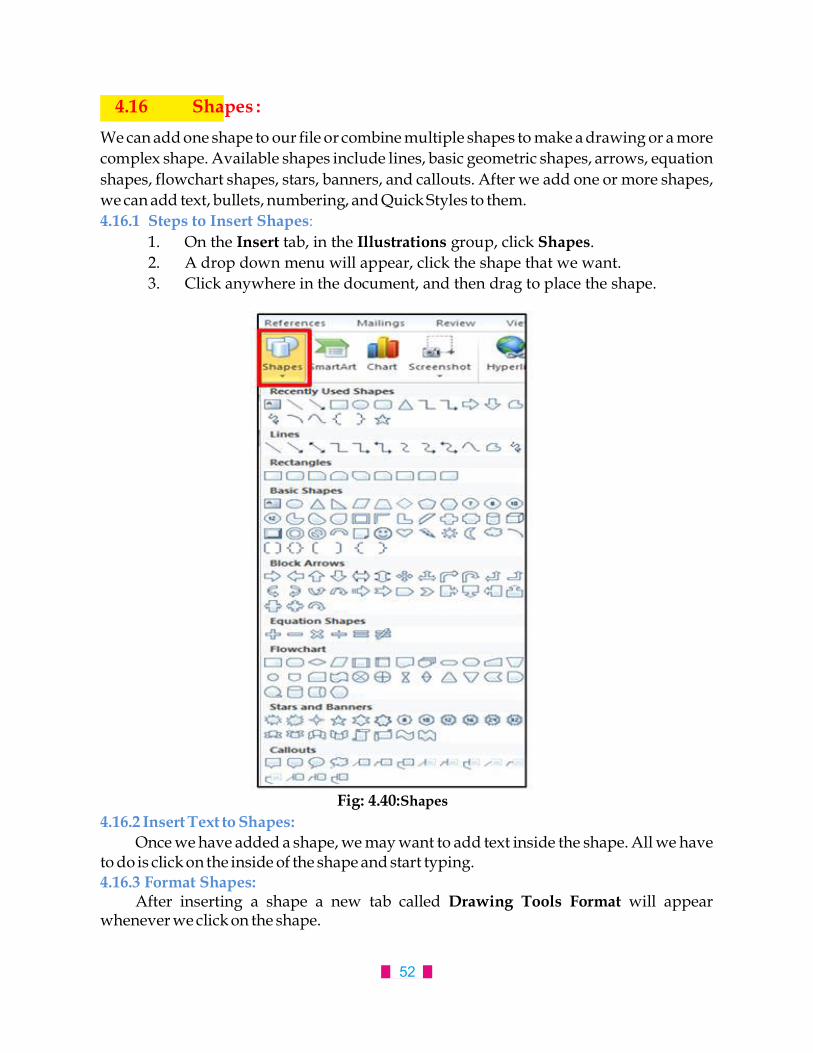
4.15.1 Steps to Insert Clip Art: 1. On the tab, in the group, click . Insert Illustrations Clip Art 2. A task pane will appear on the right of our screen, in the Clip Art Search
for box, type a word or phrase that describes the clip art that we want. 3. Click . Go 4. In the list of results, double click on the clip art to insert it into our
document.
Fig: 4.38:Clip Art4.15.2 Insert Picture: Picture from file which is saved in our computer can be inserted by following these steps. 1. Click where we want to insert the picture in our document. 2. On the tab, in the group, click . Insert Illustrations Picture 3. Locate the picture that we want to insert. For example, we might have a
picture file located in . My Documents 4. Double-click the picture that we want to insert and it will appear in our document.
Fig: 4.39:Insert Picture dialog box
51
4.16 Shapes :We can add one shape to our file or combine multiple shapes to make a drawing or a more complex shape. Available shapes include lines, basic geometric shapes, arrows, equation shapes, flowchart shapes, stars, banners, and callouts. After we add one or more shapes, we can add text, bullets, numbering, and Quick Styles to them.4.16.1 Steps to Insert Shapes: 1. On the tab, in the group, click . Insert Illustrations Shapes 2. A drop down menu will appear, click the shape that we want. 3. Click anywhere in the document, and then drag to place the shape.
4.16.2 Insert Text to Shapes: Once we have added a shape, we may want to add text inside the shape. All we have to do is click on the inside of the shape and start typing. 4.16.3 Format Shapes: After inserting a shape a new tab called will appear Drawing Tools Format whenever we click on the shape.
Fig: 4.40:Shapes
52

Steps to Format Shapes:1. Click the shape on which we want to apply a new or different Quick Style. 2. Go to the tab, in the group, click the Drawing Tools Format Shape Styles
style that we want to apply.
4.17 SmartArt GraphicA SmartArt graphic is a visual representation of our information that we can quickly and easily create to effectively communicate our message or ideas. We can create SmartArt graphics in Excel, Outlook, PowerPoint, and Word. SmartArt graphics enables us to create designer-quality illustrations with only a few clicks of our mouse. When we create a SmartArt graphic, we are prompted to choose a type of SmartArt graphic, such as Process Hierarchy Cycle Relationship, , , or . Each type of SmartArt graphics contains several different layouts. After we choose a layout, it is easy to switch the layout or type of a SmartArt graphic. Most of our text and other content, colors, styles, effects, and text formatting are automatically carried over to the new layout. 4.17.1 Steps to create a SmartArt Graphic
1. On the tab, in the group, click . Insert Illustrations SmartArt2. In the dialog box, click the type and layout that Choose a SmartArt Graphic
we want. 3. Enter text by doing one of the following: · Click in the Text pane, and then type text. [Text]
Fig: 4.41:Format Shapes
Fig: 4.42:SmartArt Graphic
53
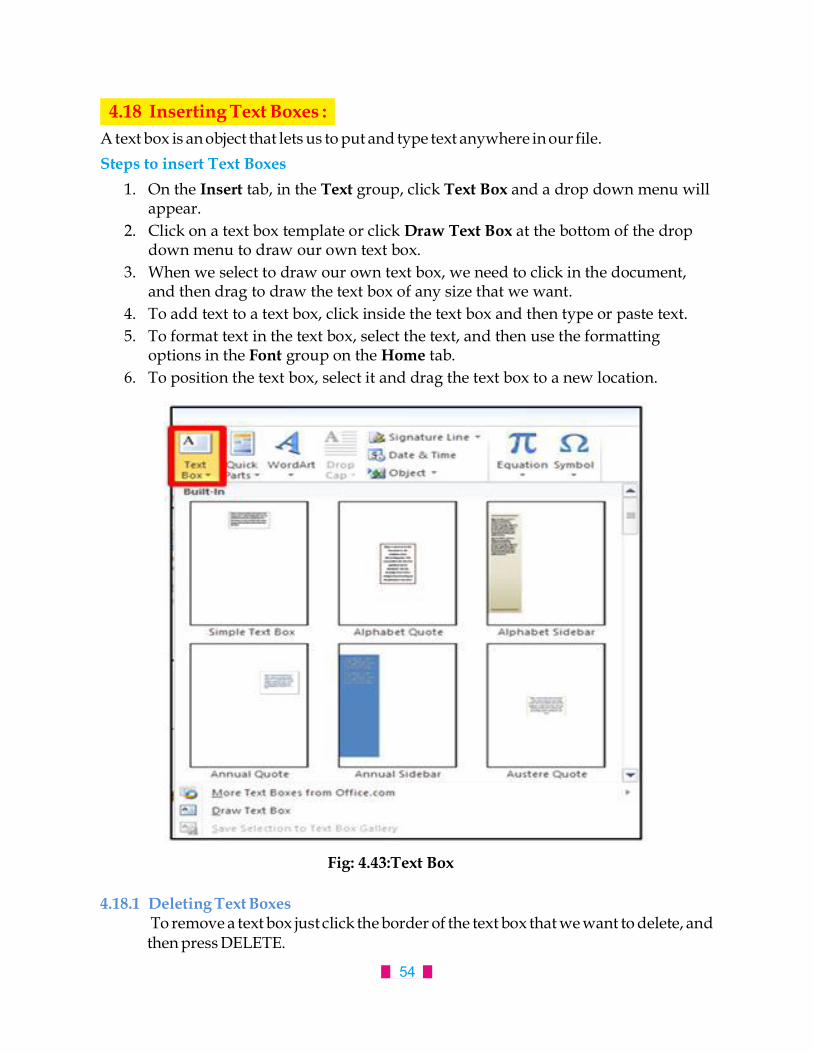
4.18 Inserting Text Boxes : A text box is an object that lets us to put and type text anywhere in our file. Steps to insert Text Boxes
1. On the tab, in the group, click and a drop down menu will Insert Text Text Box appear.
2. Click on a text box template or click at the bottom of the drop Draw Text Box down menu to draw our own text box.
3. When we select to draw our own text box, we need to click in the document, and then drag to draw the text box of any size that we want.
4. To add text to a text box, click inside the text box and then type or paste text. 5. To format text in the text box, select the text, and then use the formatting
options in the group on the tab. Font Home 6. To position the text box, select it and drag the text box to a new location.
4.18.1 Deleting Text Boxes To remove a text box just click the border of the text box that we want to delete, and
then press DELETE.
Fig: 4.43:Text Box
54

4.19 WordArt :
WordArt can be used to add special text effects to our document. For example, we can stretch a title, skew text, make text fit a pre-set shape, or apply a gradient fill. This WordArt becomes an object that we can move or position in our document to add decoration or emphasis. We can modify or add to the text in an existing WordArt object whenever we want.
4.19.1 Steps to add WordArt:
1. On the tab, in the group, click .Insert Text WordArt
2. A Drop down menu will appear, click the WordArt style which we want.
3. A Text Box will appear with the words “Enter your text here”, Type our text.
4.20 Symbols : Word 2010 lets us add characters beyond the keyboard's 26 letters of the alphabet, numbers and punctuation marks. For example, Word provides foreign language letters and symbols — all sorts of fun stuff.
4.20.1 Steps to insert Symbols: 1. Click the Symbol command button in the Symbol group on the Insert tab.2. A list of some popular or recently used symbols appears. Selecting a symbol from the menu
inserts the special symbol directly into our text (where we currently have the insertion pointer), just like we insert any other character.
Fig: 4.44:WordArt
55

Points to remember1. Formatting a document includes modifying text size, font face, color, style,
alignment, line spacing, graphics and many more things.2. A font is a set of printable or displayable text characters in a specific face and size.3. The Format Painter feature allows us to quickly copy a format that we have
applied to text already in our document.4. Undo command reverse the action we have performed while editing. If we make
an error in our document or editing text then we can correct it by click on the Undo command, it will remove the last thing we did.
5. We can grow (increase) and shrink (decrease) font sizes of text by clicking grow font option and shrink font option.
6. There are three basic font styles using in text: Bold, Italic, Underline.7. When we use text highlight color option, it means that the text shows like it was
marked with a highlighter pen.8. Text effects include Outline, shadow, glow, and reflection.9. Alignment determines the appearance and orientation of the edges of the
paragraph: left-aligned text, right-aligned text, centered text, or justified text, which is aligned evenly along the left and right margins
10. When we are working with longer documents, it is difficult and time consuming to locate a specific word or phrase. Word can automatically search our document for specific word or phrase using the feature.Find
11. Word automatically labels each page with a page number and places it in a header, footer, or side margin.
12. Pictures and clip art can be inserted or copied into a document from many different sources.
13. A text box is an object that lets us to put and type text anywhere in our file.
Fig: 4.45:Symbols
56
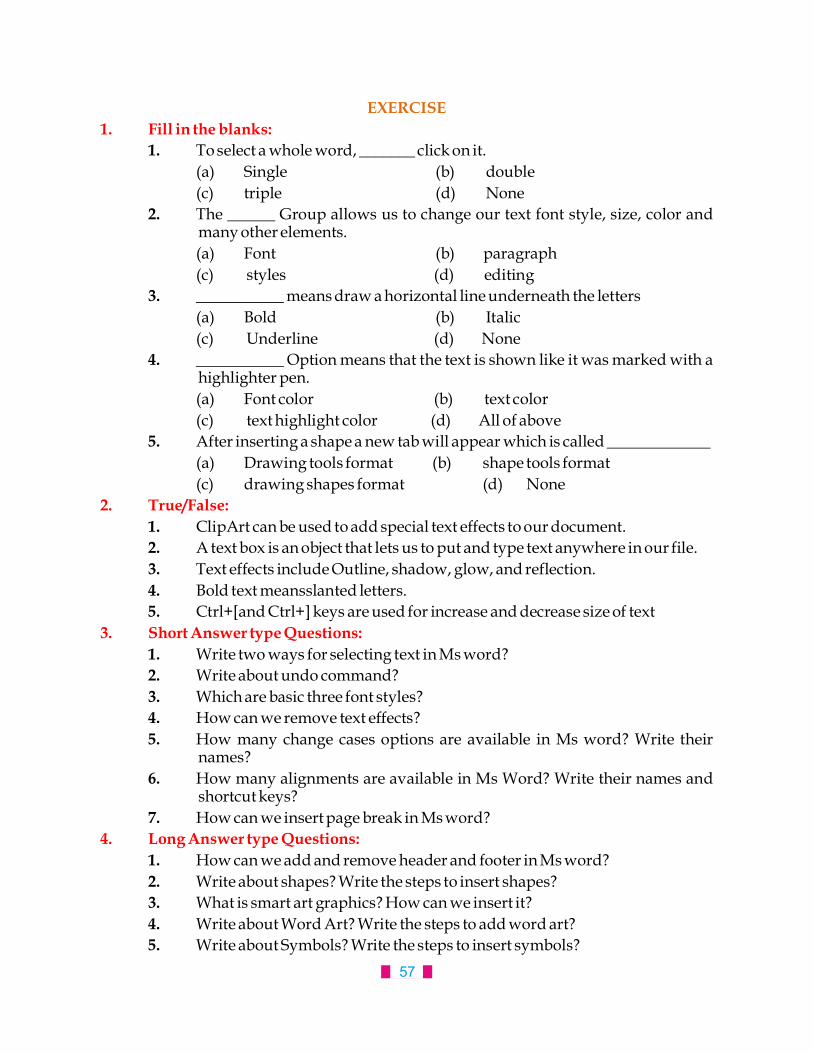
EXERCISE1. Fill in the blanks: 1. To select a whole word, _______ click on it. (a) Single (b) double (c) triple (d) None 2. The ______ Group allows us to change our text font style, size, color and
many other elements. (a) Font (b) paragraph (c) styles (d) editing 3. ___________ means draw a horizontal line underneath the letters (a) Bold (b) Italic (c) Underline (d) None 4. ___________ Option means that the text is shown like it was marked with a
highlighter pen. (a) Font color (b) text color (c) text highlight color (d) All of above 5. After inserting a shape a new tab will appear which is called _____________ (a) Drawing tools format (b) shape tools format (c) drawing shapes format (d) None 2. True/False: 1. ClipArt can be used to add special text effects to our document. 2. A text box is an object that lets us to put and type text anywhere in our file. 3. Text effects include Outline, shadow, glow, and reflection. 4. Bold text meansslanted letters. 5. Ctrl+[and Ctrl+] keys are used for increase and decrease size of text3. Short Answer type Questions: 1. Write two ways for selecting text in Ms word? 2. Write about undo command? 3. Which are basic three font styles? 4. How can we remove text effects? 5. How many change cases options are available in Ms word? Write their
names? 6. How many alignments are available in Ms Word? Write their names and
shortcut keys? 7. How can we insert page break in Ms word?4. Long Answer type Questions: 1. How can we add and remove header and footer in Ms word? 2. Write about shapes? Write the steps to insert shapes? 3. What is smart art graphics? How can we insert it? 4. Write about Word Art? Write the steps to add word art? 5. Write about Symbols? Write the steps to insert symbols?
57

Chapter 5 Formatting in Ms Word (Part-II)
Objectives of this chapterIntroduction5.1 Picture Tools (Format Tab) 5.1.1 Adjust 5.1.2 Picture Style 5.1.3 Arrange 5.1.4 Size5.2 Page layout 5.2.1 Margins 5.2.2 Orientation 5.2.3 Size 5.2.4 Columns5.3 Page Background 5.3.1 Water Mark 5.3.2 Page Color 5.3.3 Page Borders5.4 Review 5.4.1 Proofing5.5 Printing Documents
IntroductionIn this lesson, we will learn how to change the and , add a , picture style shape border crop
and pictures, and add . Once we have inserted a picture into our compress artistic effectsdocument that we want to trim or make appear smaller on the page. We must select that picture first.
5.1 Picture Tools (Format Tab)Once we have added pictures to our documents, we can format them in various ways. The picture tools modify these images in Word 2010 make it easy to include images into our documents and in interesting ways.
Fig: 5.1: Picture to be formatted58

After selecting that picture “Picture tools format” tab appears. When we double click the picture “Picture tools format” tab's ribbon appears as shown in figure below:
5.1.1 Adjust The first group in this ribbon is “Adjust”. This group is having the options named as:5.1.1.1 Corrections: The Brightness and Contrast presets are available in this option. To sharpen or soften the image we can use this option.Steps to use correction option: 1. Select the image. The Format tab will appear. Click the Format tab. 2. Click the Corrections command. A drop-down menu will appear as shown
in the figure below:
3. To sharpen or soften the image, roll over the Sharpen and Soften presets. You'll see a live preview of the preset in the document.
4. When we have found a preset we like, click it to select it. 5. Click the Corrections command again and again to see a live preview. 6. When we found one we like, click it to select it.
Fig: 5.2:Picture Tools (Format Tab)
Fig: 5.3:Corrections
59
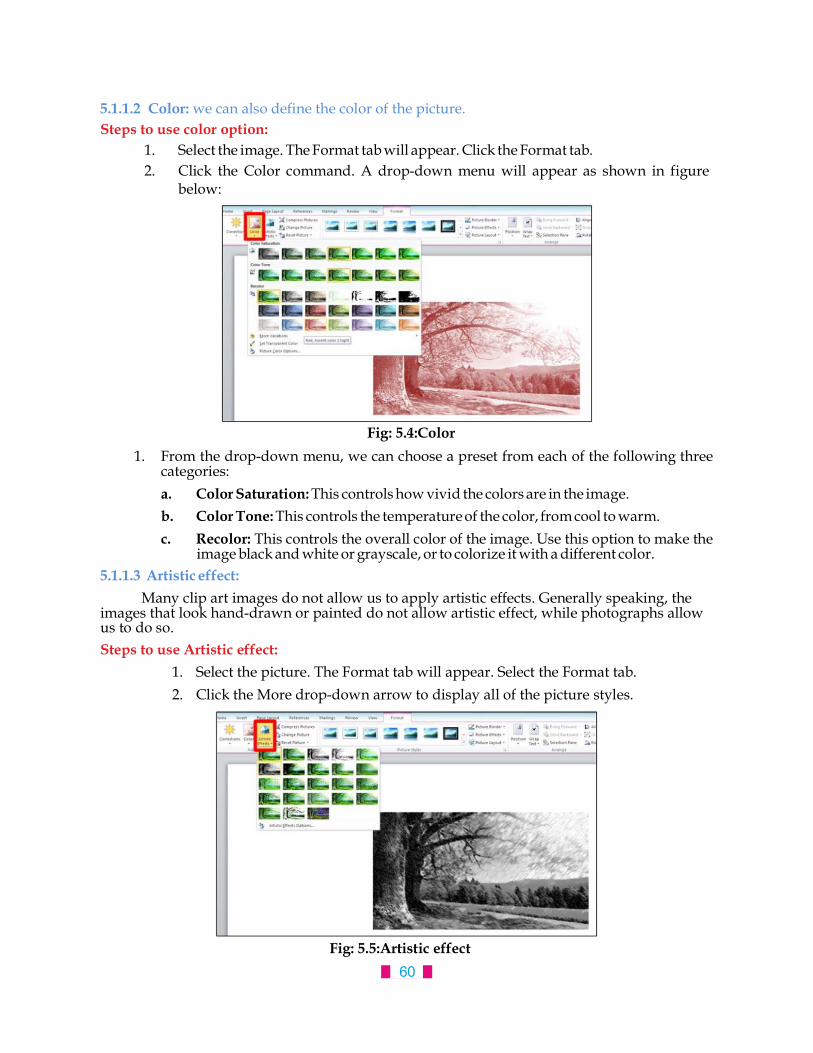
5.1.1.2 Color: we can also define the color of the picture. Steps to use color option: 1. Select the image. The Format tab will appear. Click the Format tab. 2. Click the Color command. A drop-down menu will appear as shown in figure
below:
1. From the drop-down menu, we can choose a preset from each of the following three categories:
a. Color Saturation: This controls how vivid the colors are in the image. b. Color Tone: This controls the temperature of the color, from cool to warm. c. Recolor: This controls the overall color of the image. Use this option to make the
image black and white or grayscale, or to colorize it with a different color.5.1.1.3 Artistic effect: Many clip art images do not allow us to apply artistic effects. Generally speaking, the images that look hand-drawn or painted do not allow artistic effect, while photographs allow us to do so.Steps to use Artistic effect:
1. Select the picture. The Format tab will appear. Select the Format tab.2. Click the More drop-down arrow to display all of the picture styles.
Fig: 5.4:Color
Fig: 5.5:Artistic effect60

3. Move our mouse over a picture style to display a live preview of the style in the document.
4. Select the desired style.
5.1.1.4. Compress picture: We might need to look the file size of our documents that include pictures, especially if we want to send them via email. Large high-resolution pictures make our document to become too large, which may make it difficult or impossible to attach to an email. In addition, cropped areas of pictures are saved with the document by default, which may be added to the file size. Word can reduce the file size by compressing pictures, lowering their resolution, and deleting cropped areas.Steps to compress a picture: 1. Select the picture. The Format tab will appear. Select the Format tab.
2. Click the Compress Pictures command in the Adjust group. A dialog box appears
Fig: 5.6:Compress picture
Fig: 5.7:Compress picture dialog box
61

3. Place a check mark next to Delete cropped areas of pictures. We can also choose whether to apply the settings to this picture only or to all pictures in the document.
4. Choose a Target output. If we are emailing our document, we may want to select Email, which produces the smallest file size.
5. Click OK.5.1.1.5 Change picture: While working in Word 2010, we may need to change/replace any picture.
To replace the picture, select the image, in Picture Tools Format tab under Adjust group, click Change Picture. Select the picture we want in place of the current picture. This option will change the picture preserving the formatting and size of the current picture.
5.1.1.6 Reset Picture:
This option of Adjust group discards all the formatting and changes made by us to the selected picture.
5.1.1.7 Remove Background:
Removing the background from an image can give our images a cleaner appearance. If we are printing our document, it can also save ink. To remove background, Word uses special methods to determine which parts of the image are the background and then removes these areas from the image. Background Removal does not work with some clip art images.
Steps to remove the background from an image:
1. Click the image. The Format tab will appear. Click the Format tab.
Fig: 5.8:Change picture
Fig: 5.9:To remove the background from an image62

2. Click the Remove Background command in Adjust group.
3. Word will try to guess which part of the image is the background, and it will mark
the area with a magentafill. It will also place a box around the image with selection handles.
4. Drag the selection handles until the entire foreground is inside the box. After this, Word may readjust the background.
5. At this point, we may need to help Word to decide which parts of the image are foreground and which parts is background. We can do this by using the Mark Areas to Keep Mark Areas to Removeand commands.
If Word has marked part of the foreground magenta, click · Mark Areas to
keep and draw a line in that region of the image. · If part of the background has not been marked with magenta, click Mark
Areas to Remove and draw a line in that region of the image.
Fig: 5.10:Background area with a magenta fill
Fig: 5.11:Mark Areas to Keep Mark Areas to Removeand
63

6. After we add our marks, Word will readjust the image.
7. When you're satisfied with the image, click All of the Keep Changes . magenta areas will be removed from the image.
8. We can adjust the image at any time by clicking the Remove Background option again.
5.1.2 Picture Style:
This is the next group of Picture tools format tab ribbon. Here we can choose an overall style for the picture.
Steps to apply a picture style:
1. Select the picture. The Format tab will appear. Select the Format tab.
2. Click the More drop-down arrow to display all of the picture styles.
3. Roll-over a picture style to display a live preview of the style in the document. 4. Select the desired style.
Fig: 5.12:Image after removing the background
Fig: 5.13:Picture Style
64

5.1.2.1 Picture Border: This option specify the color, width and the line style for the outline of the selected picture.
5.1.2.2 Picture Effects: This option applies a visual effect such as a shadow, glow, reflection or 3D rotation. We can apply any of these effects to the picture as per our requirement.
5.1.3 Arrange: This group has many options which helps in arranging the picture with the text and other pictures in the documents.5.1.3.1 Position: It positions the selected object on the page. The text is automatically set to wrap around the object.
Fig: 5.14:Picture Border
Fig: 5.15:Picture Effects
65

5.1.3.2 Wrap Text: It changes the way text wraps around the selected object.Steps to apply a Wrap Text: 1. Select the image and click the Picture Tools tab.
2. In the group, click .Arrange Wrap Text
3. Do one of the following:
· Click to wrap text around the border of your image.Square
· Click to wrap text closely around a clip art image or an irregularly shaped Tightpicture.
· Click and then click Edit Wrap Points to drag the wrap points closer to Throughthe image, so that text can fill in more of the negative space around the image.
· Click to place the image on its own line.Top and Bottom
· Click Text to display the text over the image.Behind
· Click In of Text to display the image over the text.Front
4. Click and then click the Text Wrapping tab to change where the text More Layout Optionswraps or the distance between the text and the image.
5.1.3.3 Align: This option is used to align the picture according to the margins.
5.1.3.4 Group: This option is used to group two or more images together so that they can be treated as a single object.
5.1.6.5 Rotate: This option is used to flip or rotate the image/picture.
Fig: 5.16:Wrap Text
66

5.1.4 :Size This is the next group on the ribbon. When we click on the Picture tools format tablauncher of the group. It shows a dialog box to change the size of a shape or picture. it has the sizefollowing main options or commands:5.1.4.1 Crop: it is used to crop the picture to remove any unwanted parts. 5.1.4.2 Height and Width: these options are used to change the height and width of the shape and image in inches.
5.2 Page layout Page layout tab offers a variety of and options that affect the page layout formattingappearance of content on the page. We can select the , , and page orientation paper size page margins depending on how we want our document to appear.5.2.1 Margins: Page margins are the blank space around the edges of the page. Generally, we insert text and graphics in the printable area between the margins. We can specify the position some items in the margins — for example, headers, footers, and page numbers. In Margin option various predefined margin size are available. Steps to format page margins: 1. Select the tab.Page Layout 2. Click the command. A menu of options will appear. is selected Margins Normal
by default. 3. Click the we want.predefined margin size
Fig: 5.17:Margins
67

Steps to use custom margins: 1. From the tab, click and select . This will Page Layout Margins Custom Margins
take us to the dialog box.Page Setup
2. Adjust the for each side of the page, and then click .margin sizes OK5.2.2 Orientation:
LandscapeOrientation decides the Landscape or portrait format. format means the page is oriented , while format means it is oriented .horizontally portrait verticallySteps to change page orientation:
1. Select the Page Layout tab. 2. Click the Orientation command in the Page Setup group.
3. Click either or to change the page orientation.Portrait Landscape
Fig: 5.18:Custom margins
Fig: 5.19:To change page orientation
68

5.2.3 :Size This option provides various paper sizes for the current section.
Steps to change page size: 1. Select the Page Layout tab. 2. Click the Size command, and a drop-down menu will appear. The current page
size is highlighted.
3. Click the size option you want. The page size of the document will change.5.2.4 Columns: This option splits the text into two or more columns.
5.3 Page Background
We can add a background when we want some graphical elements, such as a watermark, to appear on more than one page.
Fig: 5.20:To change page size
Fig: 5.21:Columns
69

5.3.1 Water Mark: Watermarks are text or pictures that appear behind document text. They often identify the document status, such as marking a document as a or . So we can add text Draft Confidentialwatermarks, such as Draft or Confidential, to our document. Word provides galleries of ready-made watermarks, or we can create our own custom watermark, such as any logo. We can also add a background color or picture to our document. We can insert a predesigned watermark from a gallery of watermark text, or can insert a watermark with custom text.5.3.1.1. Steps to add a text watermark to document:
1. On the Page Layout tab, in the Page Background group, click Watermark.2. Do one of the following:
· Click a predesigned watermark, such as or , in the Confidential Do not copygallery of watermarks.
· Click , click and then select or type the text Custom Watermark Text watermarkthat we want. We can also format the text.
Watermarks can be viewed only in Print Layout and Full Screen Reading views and on the printed page.
Fig: 5.22Watermark
70

5.3.2 Page Color: We can apply different colors, texture or picture to our document.Steps to add a background color or texture: 1. On the , in the group, click Page .Page Layout tab Page Background Color
2. Do any of the following:
· Click the that we want under or .color Theme Colors Standard Colors
· Click to change or add special effects, such as , Fill Effects gradientstextures patterns, or .
Note: Select the that we want before we apply a gradient or pattern.color5.3.3 Page Borders: Page Borders are used to put borders around the page. When we click option Page Borders Page Background Page Layout in group of tab, a dialog box appears as shown in the figure below:
Here we can design our page border
Fig: 5.23:Page Background
Fig: 5.24:Page Borders
71

1. Under , we can choose the border style we want.Setting 2. Under , we can click on the line style we want.Style 3. Under the Click the arrow and choose a border color. Color, 4. Under the , Click the arrow and choose the width for the border.Width 5. If we want a clip-art border instead of the borders provided under , click the Style
arrow under and choose a border graphic.Art 6. Next, click the arrow under and choose the suitable option as per our Apply to
requirement. 7. Click OK. Note: Preview boxThe confirms our border styles. To remove the border from one side,
we can click that line in the Preview box.
5.4 Review
The Review tab is we find the Spelling &Grammar, Word Count, Translate, and Language features. There are other features also, but these are the most commonly used ones.
5.4.1 Proofing: Word provides us with several that help us to produce professional, proofing featureserror-free documents.
5.4.1.1 Spelling and Grammar: To make our document error free, we have to make sure that it is free from spelling and grammar errors. Word has several options for checking spellings. We can run a spelling and grammar , or we can allow Word to check our spelling as we type.check automaticallySteps to run a spelling and grammar check: 1. Go to the .Review tab 2. Click on the command.Spelling & Grammar
Fig: 5.25:Spelling and Grammar
72

3. The will open. For each error in our document, Spelling and Grammar dialog boxWord will try to offer one or more suggestions. We can select a suggestion and click to correct the error.Change
4. If no suggestions are given, we can manually type the correct spelling.5.4.1.2 Word Count:
Word Count is the feature which is used to find out number of words, characters, paragraphs and lines in the document. We can also find the number of words in the status bar at the bottom of the window.
5.2 Printing Documents Once we have completed our document, we may want to it. The is an print Print Previewoption that allowed us to see exactly what the document looked like before printing it. This option is combined with the window to create the Print Print pane.Steps to print: 1. Go to the pane. The Print window opens as shown in figure below:Print
2. If we want to print certain pages, we can type a of pages. Otherwise, select rangePrint All Pages.
3. Select the .number of copies 4. Check the box if we are printing multiple copies of a multi-page Collate
document.
5. Select a from the drop-down list.printer 6. Click the button.Print
Fig: 5.26:Printing Documents
73

Points To Remember
1. When we double click the picture “Picture tools format” tab's ribbon appears2. There are three categories in color option: Color Saturation, Color Tone, Recolor3. Word can reduce the file size by compressing pictures, lowering their resolution, and
deleting cropped areas4. Reset Picture option of Adjust group discards all the formatting and changes made by us to
the selected picture5. Picture Border option specify the color, width and the line style for the outline of the selected
picture6. Picture Effects option applies a visual effect such as a shadow, glow, reflection or 3D
rotation7. Wrap Text changes the way text wraps around the selected object8. Crop is used to crop the picture to remove any unwanted parts9. There are two types of orientation of page: Landscape and portrait format. · Landscape format means the page is oriented horizontally · Portrait format means the page is oriented vertically10. Word provides us with several that help us to produce error-free proofing features
documents or free from errors. We can allow Word to check our spelling and grammarspelling as we typeautomatically
EXERCISE1. Fill in the blanks: 1. After selecting a picture ___________ tab appears. (a) format (b) page layout (c) insert (d) view 2. To do wrap text, we can use _____________option. (a) Square (b) tight (c) behind text (d) All of these 3. To remove any unwanted parts of picture, ______________ option is used. (a) crop (b) rotate (c) group (d) compress 4. We can apply different colors, texture or picture to our document with the help of
_____________ option. (a) Page design (b) page background (c) page color (d) page style 5. We can find the number of words in the __________ bar at the bottom of the window. (a) Task bar (b) status bar (c) title bar (d) scroll bar2. True/False: 1. Columns option splits the text into two or more columns. 2. Landscape format means the page is oriented horizontally.
74

3. Group option is used to group two or more images together so that they can be treated as a single object.
4. 3D rotation is not a type of Picture Effects. 5. Removing the background from an image can give our images a cleaner
appearance.3. Short Answer type Questions: 1. What are the three categories in color option? 2. What do you mean by compress picture? 3. Write about Reset picture? 4. What is crop option? 5. What do you mean byorientation?4. Long Answer type Questions: 1. What is Water Mark? Write the Steps to add a watermark in a word document? 2. How can we design our page border? 3. Write the steps to run a spelling and grammar check? 4. Explain the steps to print Document 5. What is Artistic effect? Write steps to use Artistic effect?
75

Chapter 6 Introduction to Multimedia
Objectives of this chapter 6.1 Components of Multimedia 6.1.1 Text 6.1.2 Sound 6.1.3 Image 6.1.4 Animation 6.1.5 Video 6.2 Requirement for Multimedia 6.2.1 Hardware Requirements 6.2.2 Software Requirements 6.2.3 File Formats for Multimedia 6.3. Multimedia Presentation 6.3.1 Types of Multimedia Presentation 6.4. Applications of Multimedia
DefinitionThe term multimedia is a combination of two words, “multi and �
“media . Multi refers to many i.e. at least two. Media refers to �
medium i.e. storage, transmission and communication. Multimedia also refers to a basic information type like text, graphics, images, audio, animation, video etc.Therefore multimedia is a combination of many types of media (i.e. text, graphics, images, audio, animation, video etc.) on a single medium in the same information unit.Thus the simultaneous use of two or more different forms of media (text, graphics, animation, sound and video) for effective information communication is referred as multimedia. Multimedia is a technology that engages a variety of media including text, audio, video, graphics and animation either separately or in combination, using computers to communicate ideas or to disperse information.
6.1. Components of Multimedia
There are five components of multimedia i.e. text, sound, images, animation and video.
Fig. 6.1 Multimedia
Fig 6.2 Components of Multimedia76

6.1.1 Text Text is the common way to communicate the information to others. It is one of the basic components of multimedia. Although multimedia include pictures, audio and video but text is the most common data type used in multimedia applications. Text used in multimedia can be categorized in two parts:6.1.1.1 Static Text :-static text is just plain old .text6.1.1.2 Hypertext: - Hypertext text texts is which contains links to other . 6.1.2 Sound(Audio): Audio is an important component of multimedia. Multimedia is concerned with recording and playing sound. Sound is an important component of multimedia because this component increases the understandability and improves the clarity of the concept. Audio includes speech, music etc. some audio formats are as below:6.1.2.1 MIDI: Its full form is Musical Instrument Digital Identifier. It's a sound standard. It's a cheap source for Musicians. These files are smaller than other Music Files. These files are mostly used for web pages.6.1.2.2 Digital Audio: Digital Audio mostly used in Multimedia. These files are greater than MIDI files. Its sound quality is good. A special format is used for Digital Audio called WAV.6.1.3 Images: Images are also an important component used in multimedia. Images are generated by the computer in two ways such as bitmap or raster images and as vector images. 6.1.3.1 Raster or Bitmap Images The most common form for storing images on a computer is a raster or bitmap image. Bitmap is a simple matrix of the tiny dots called pixel that forms a raster or bitmap image. Each pixel consists of two or more colors. For example MS Paint is a program that is used for creating Bitmap Images.
Fig 6.3 Raster or Bitmap Images
77

6.1.3.2 Vector Images Vector images are based on drawing elements or objects such as lines, rectangles, circles to create an image. We use programs to create images, that are called Vector Image Programming. The advantage of vector image is the relatively small amount of data required to represent the image and therefore, it does not requires a lot of memory to store. We can't draw images directly with the help of mouse.
6.1.4 Animation In animation still images are used for movement in a time. Animation consists of still images that are displayed so quickly that they give the impression of continuous movement. For movement a number of effects are recorded. Animations may be two or three dimensional. Specific software's are used for animation like: Windows Movie Maker, Macromedia Director and Flash.
Animation is of two types :6.1.4.1 Path Animation : A path animation is a type of Animation timeline that uses a Path Geometry as its input6.1.4.2 Frame Animation : A simulation of movement created by displaying a series of pictures, or framesis called frame animation.Functions of Animation: · Draw Attention · To give Presentation · To Practice6.1.5 Video : Video is an important component of Multimedia. In this moving images are shown. Moreover in video moving pictures are shown with sound. Video can be without sound. It is the best way to communicate with each other. In multimedia it is used to makes the information more presentable and it saves a large amount of time. The video may be categorized in two types:
Fig 6.4 Vector Images
Fig 1.5 Animation
78

6.1.5.1 Analog Video : The original video recording method that stores continuous waves of red, green and blue intensities.6.1.5.2 Digital Video : Digital video is a representation of moving visual images in the form of encoded digital data.Advantages of Video :
1. Video information is effective because we can use audio, images etc to create animations.
2. Student can be taught easily with the help of videos.
6.2. Requirements for Multimedia
Multimedia resources are based on the ability of a computer to capture, process, and present text, pictures, audio and video. Selection of proper hardware, software and file format for developing multimedia product is based on the budget and type of content in the product and delivery requirements. Following is a description of infrastructure requirement for producing multimedia resources. 6.2.1 Hardware Requirement The special hardware requirement for multimedia can be described in categories such as below: 6.2.1.1 Input Devices: An input device is used to give essential directions to computer. Input Devices used in Multimedia are as follows:
· Keyboard · Mouse · Touch screen · Scanner · Voice Recognition System · Digital Camera
6.2.1.2 Output Devices : Output Devices are used to take results from computer. Output Devices used in Multimedia are as follows:
· Monitors · Audio devices · Video devices · Projectors · Printers
6.2.1.3 Storage Devices: Storage Devices are used to store data processed by computer so that intermediate and final results can be stored. Storage Devices used in Multimedia are as follows:
79

§ RAM § Hard Disc § Magnetic Tapes § Optical Disc- CD-R, CD-RW, and DVD. § Pen Drive and External Hard Disc
6.2.2 Software Requirement Multimedia software are like tools, which provide an important framework for organizing and editing the elements of multimedia including graphics, sound, animation and video. A brief description of some of the software is as follows.
o Adobe Director o CREATE Together o Media Blendero Media Works 6.2 o PlayMoo Multimedia Builder
6.2.3 File Formats for Multimedia The following are file formats used in multimedia: 6.2.3.1 Text Formats:
1 RTF: Its full form is Rich Text Format. It is a universal format. File of this format is easily accessible by all word processors.
2 Plain text: It supports Standard ASCII including characters, numbers and spaces. We can't do formatting in plain text. So we can't Bold, In Italic and Underline a text in this.
6.2.3.2 Image Formats 1. TIFF: Its full form is Tagged Image File Format. It can support color depth 1
bit to 24 bit.2. BMP: Its stands for Bitmap. It can store color data of an image without
compressing it.3. DIB: Its full form is Device Independent Bitmap. These files are stored in a
standard Bitmap4. GIF: Its full form is Graphics Interchange format. This file is mostly used in
web pages and graphic software.5. JPEG: Its full form is Joint Photographic Experts Group. It is a compressed
file format. These files are not limited to color depth like GIF files because it has millions of colors.
6. PNG: Its full form is Portable Network Graphics. It is also a compressed Raster graphical format. It is mostly used on web pages and graphical applications.
6.2.3.3 Digital Audio File Formats : 1. WAV: Its full form is Waveform Audio File Format. These files are like AIF
Files. 2. MP3: Its full nameis MPEG Layer-3 Format. It is a famous compressed file
format. Its sound quality is good and file size is small.
80

3. AIFF: Its full form is Audio Interchange File Format. Its was developed by Apple Computers to store audio format data.
4. WMA: Its full form is Windows Media Audio. It is an audio data compression technique developed by Microsoft.
5. RA: Its full form is Real Audio Format. It is mostly used to play audio clips on web.
6.2.3.4 Digital Video File Formats
1. AVI: Its full form is Audio/Video Interleave. These files can be played on any video player.
2. MPEG: Its full form is Moving Picture Experts Group. These are compressed video files and can be audio/video file.
6.3. Multimedia Presentation
We can present our ideas effectively by using subject material in multimedia related to a specific subject. So we need to write script before preparing multimedia presentation. We need to specify which tools (Hardware and Software) to be used and how to use it before listeners. After preparing script we prepare its basic components-Audio, Video, Image and animation.
· What to keep in mind before preparing Multimedia Presentation:
1. We should keep minimum text in Multimedia Presentation.
2. Quality of Audio and Music should be good.
3. There should be the facility for user to use keyboard and mouse.
4. Multimedia Presentation should be effective and of small size.
6.3.1 Types of Multimedia Presentation:
Multimedia Presentation can be of many types, some of are as follows:
1. Virtual: It is a type of technology that using it we can prepare virtual reality presentation by selecting subject material based on a subject. We can perform effectively and best by using such presentation.
2. Slide Presentation: Slides are used in such type of presentation. Such slides are prepared using Microsoft Power point. We can use Images, sound and video as per our requirement.
3. Web Pages: Web pages become multimedia resources and presentations when they are designed with media other than static images and text such as audio, video, animation and virtual reality.
81

6.4. Applications of Multimedia
Multimedia is one of the most fascinating and fastest growing areas in the field of information technology. The capability of computers to handle different types of media makes them suitable for a wide range of applications. A brief account of multimedia applications in different fields can be traced as follows. 6.4.1 Education : Multimedia is becoming popular in the field of education. It is commonly used to prepare study material for the students and also provide them proper understanding of different subjects. E-learning is the use of new multimedia technologies and the internet to improve the quality of learning by facilitating access to resources and services 6.4.2 Business Systems : Business applications for multimedia include presentations, training, marketing, advertising, product demos, simulations, databases, catalogues, instant messaging and video conferencing are provided on many local and wide area networks using distributed networks and internet protocols. 6.4.3 Medical Services: Medical services are very much affected with the development of multimedia. Medical students are trained by using life demonstration of human body, various operations and other pathological and radiological investigation. They can practice surgery methods via simulation prior to actual surgery. 6.4.4 Entertainment : Multimedia technology is a must need in each and every mode of entertainment. It is used in entertainment via radio, TV, online newspapers, online gaming, video on demand etc. Multimedia made possible innovative and interactive games that greatly enhanced the learning experience. Groups of people could play a game together, competing as individuals or working together in teams. 6.4.5 Public Places: Multimedia is available in libraries, museums, malls, airports, railway stations, banks, hotels, trade shows and exhibitions, providing information and help for customers. 6.4.6 Multimedia Conferencing Multimedia conferencing or video-conferencing is a system that simulates face-to-face interactions among participating users, located far from each other, as if they were sitting and discussing in a single room.
Points to Remember1. Multimedia is a combination of two words-Multi and Media2. Five Component of Multimedia are-text, graphics, images, audio, animation, video.3. Hardware and Software are necessary elements for Multimedia4. Video is of two types-Analog Video and Digital Video5. Animation consists of still images that are displayed so quickly that they give the
impression of continuous movement.
82

6. We need to write script before preparing multimedia presentation.7. Education, Business system, Medical Services, Entertainment, Public places and
Multimedia conferencing are applications of Multimedia
Exercise1. Fill in the blanks: a. Multimedia is a combination of two words-……….. and…….. 1(Images, Sound) 2.(Audio, video) 3.(Multi, Media) 4.(Hardware, Software) b. Animation is of two types, these are……….and………… 1.(Analog, digital) 2.(Static, Hyper) 3.(Raster, Bitmap) 4.(Path, Frame) c. Requirements for Multimedia are………and…………. 1.(Images, Sound) 2.(Analog, Digital) 3.(Hardware, Software) 4.(Multimedia) d. Input Devices consists of………and………….. 1.(Monitor, Printer) 2.(RAM, Hard Disk) 3.(Keyboard, Mouse) 4.(Hardware, Software) e. In Multimedia Text is of………….and …………… type. 1(Analog, digital) 2.(Raster, Bitmap) 3.(Static, Hyper) 4.(Path, Frame)2. True/False: 1. Hardware and Software are basic elements for Multimedia 2. Video is of two types-Analog Video and Digital Video 3. Text is of three types 4. Animation is of two types-Path Animation and Text Animation 5. Multimedia is not required in Education Field3. Short Answer type Questions: 1. Define Multimedia? 2. Write down Components of Multimedia? 3. What is an Animation? 4. What is Video? 5. Write note on Slide Presentation? 6. What is Multimedia Conferencing?4. Long Answer Type Questions: 1. Write down Components of Multimedia. 2. What are the requirements for Multimedia? 3. What is a Multimedia Presentation? What should we keep in mind before preparing
Multimedia Presentation? 4. Write down Applications of Multimedia.
83
CHAPTER 7 MS-DOS
Objective of this chapter:
7.1 User Interfaces 7.1.1 What is CUI7.1.2 What is GUI7.1.3 CUI vs GUI
7.2 What is DOS?7.2.1 How to open MS-DOS?
7.3 Command Prompt7.3.1 Typing a command
Introduction
An is the that runs on a computer. It is an operating system necessary softwareinterface It manages the computer's , , and all of its and memory processes softwarehardware communicate. It also allows you to with the computer without knowing how to instruct the computer to work. .Without an operating system, a computer is useless
Our computer's ( ) manages all of the andoperating system OS software hardware on the computer. Most of the time, there are many different computer programs running at the same time, and they all need to access your computer's central processing unit (CPU) memory storage, , and . The operating system coordinates all of this to make sure each program gets what it needs.
7.1 User Interfaces
An interface is a communication between a user and a computer system. Generally we have two types of user interfaces:
1. CUI (Character User Interfaces)2. GUI (Graphic User Interfaces)
7.2.1 What is CUI?As the name suggests CUI means we have to take help of a keyboard to type commands to interact with the computer. We can only type text to give commands to the computer as in
Fig 7.1(User Interfaces)
84

MS DOS or command prompt. There are no images or graphics on the screen. In the beginning, computers had to be operated through this interface and users had to contend with a black screen with white text only. In those days, there was no need of a mouse as CUI did not support the use of pointer devices. CUI's have gradually become outdated with the more advanced GUI taking their place. However, even the most modern computers have a modified version of CUI called CLI (Command Line Interface).
7.2.2 What is GUI? GUI is the interface what most modern computers make use of. This is an interface that makes use of graphics, images and other visual clues such as icons. This interface made it possible for a mouse to be used with a computer and interaction really became very easy as the user could interact with just a click of the mouse rather than having to type every time to give commands to the computer. GUI is a type of interface in operating system that gives the facility to work with Windows, Icons, Menus, and Pointers.
Fig 7.2 (Character User Interface)
Fig 7.3 (Graphical User Interface)
85

7.1.3 CUI vs GUI CUI and GUI are acronyms that stand for different kinds of user interface systems. These are terms used in reference to computers. CUI stands for Character User Interface while GUI refers to Graphical User Interface. Though both are interfaces and serve the purpose of running the programs, they differ in their features and the control they provide to the user. Here is a brief explanation of the two types of user interface.7.1.3.1 Comparison Between CUI and GUI · Both CUI and GUI are user interface that are used for computer · CUI is the precursor of GUI and stands for character user interface where user
has to type on keyboard to proceed. On the other hand GUI stands for Graphical User Interface which makes it possible to use a mouse with keyboard
· GUI is much easier to navigate than CUI · There is only text in case of CUI whereas there are graphics and other visual clues
in case of GUI · Most modern computers use GUI and not CUI · DOS is an example of CUI whereas Windows is an example of GUI.
7.2 What is DOS?
DOS stands for Disk Operating System. Microsoft Corporation manufactured the DOS and IBM first introduced it for their PC, in the year 1971. MS-DOS is a disk-based, single-user, single-task operating system, which is total text based and non-graphical, where user is required to learn and type commands with proper syntax.
l DOS has a way of showing which disk drive is currently active. The floppy disk drives are assigned alphabets and , whereas the hard disk drive is assigned the alphabet .A B C
l Ex: If your PC includes a hard disk, besides a FDD (Floppy Disk Drive), the drive names would be and . If the prompt is , then it implies that the first floppy disk A C Adrive is active. Whereas the DOS prompt would be , if the hard disk is active. Data as Cwell as instructions reside in a file stored in a disk.
DIRECTORY STRUCTURE IN DOSl Directory is just like a file folder, which contain all the logically related files. l DOS files are organized in a hierarchical or an inverted tree-like structure. l DOS enables the user to organize the files in a disk into directories and sub-directoriesl A directory within another directory is called a sub-directory l Of course, there may be sub-directories of sub-directories.
86

7.2.1 How to Open MS-DOS Step 1. Run cmd.exe
To open a Microsoft MS-DOS command prompt shell window, first click the Windows Start menu (located at the very lower-left corner of our computer's desktop) and select "Run...".
Then if we are using Windows XP or Vista or Windows 7, type cmd into the Run box and click "OK". You could also type cmd.exe
Step 2. The Window: After you click "OK", an MS-DOS command prompt window will appear.
Depending upon which version of Windows you are using, the MS-DOS command window will look similar to these images:
Fig 7.4 (Run Box)
Fig 7.5Dos Window (1)
87

7.3 Command Prompt A command prompt is an entry point for typing computer commands in the Command Prompt window. By typing commands at the command prompt, you can perform tasks on your computer without using the Windows graphical interface. The original DOS was an entirely text based system. All it provided for the user was a command prompt, where the user would type in commands from the keyboard.
C:\> This is called the command prompt or DOS prompt. The flashing underscore next to the command prompt is called the cursor. The cursor shows where the command you type will appear. 7.3.1 Typing a Command This section explains how to type a command at the command prompt and demonstrates the "Bad command or file name" message. To type a command at the command prompt 1. Type the following at the command prompt (we can type the command in
either uppercase or lowercase letters):
C:\>var If you make a typing mistake, press the BACKSPACE key to erase the mistake,
and then try again. 2. Press ENTER. (You must press ENTER after every command you type. ) The following message appears “Bad command or file name “
Fig 7.6Dos Window(2)
88

The "Bad command or file name" or “not recognized as internal or external command” message appears when you type something that MS- DOS does not recognize. Because 'var'(step 1) is not a valid MS-DOS command.
3. Now, type the following command at the command prompt:
C:\>ver The following message appears on your screen: MS-DOS version 6.22 or Microsoft Windows [version 6.3.9600]
Points to Remember1. Operating system OS software hardware ( ) manages all of the and on the
computer.2. DOS stands for Disk Operating System.3. CUI stands for Character User Interface while GUI refers to Graphical User
Interface.4. DOS is an example of CUI whereas Windows is an example of GUI.5. A command prompt is an entry point for typing computer commands.6. We can type the command in either uppercase or lowercase letters.
Exercise1. Fill in the blanks:- a. _ _ _ _ _ _ _ _ _ _ _ a n i n t e r f a c e t h a t m a k e s u s e o f g r a p h i c s .
(CUI,GUI,DOS,WINDOWS) b. DOS is a __________ user system. (Single, Multiple, zero, Two) c. DOS stands for ____________. ( Data
Operating System, Dull Operating System, Disk Operating System, Device Operating System)
Fig 7.7 (Typing Dos Commands)
89

d. DOS is an example of ___________. (GUI,CUI,CCLI,CLI)e. A __________ is an entry point for typing computer commands.
(Command Prompt, Common Prompt, Cursor, Black Screen)2. True/False 1. Operating system OS software hardware ( ) manages the and of the computer. 2. CUI and GUI are different kinds of user interface systems. 3. We can only type text to give commands to the computer as in MS DOS. 4. There are no images or graphics on the screen GUI interface. 5. Run command is used to open a Microsoft MS-DOS command prompt shell
window.3. Short Answer Type Questions a. What is DOS? b. What is GUI? c. What is CUI? d. What is Command Prompt?4. Long Answer Type Questions a. Explain the procedure of writing a command in the DOS. b. Give the comparison between CUI and GUI. c. How will we open MS-DOS? Explain.
90

CHAPTER 8 MS-DOS COMMANDS
Objective of this chapter:
8.1 Files Required For MS-DOS8.2 MS-DOS Commands8.3 How do DOS organize disks?8.4 How are files named?8.5 Root Directory8.6 Directory Structure of DOS8.7 Internal commands8.8 External Command 8.9 MS DOS EDITOR 8.9.1 Availability 8.9.2 Using editor to create a file8.10 Batch File
8.10.1 Creating A Batch File Introduction DOS provides function for management of files and their organization also. It isolates the user from the technicalities of the actual working of the computer. The user has to only concentrate on issuing instructions for the specific application to be performed and rest everything is handled by the operating system.
8.1 Files Required For MS-DOS
DOS consists of three major files. These are· IO.SYS· MSDOS.SYS· COMMAND.COM
The first two files are hidden files. If the first two files are missing then 'Non-system disk message' is displayed on the screen and if COMMAND.COM is missing then “Missing command interpreter” message is displayed on the screen. These three files are located in the first sector (Boot Sector) of the hard disk or floppy disk and automatically loaded when system is on.
· IO.SYS : controls and communicates with peripherals and checks out the amount of memory in the system.
· MSDOS.SYS :- determines , which hardware to contact for any particular command. MSDOS.SYS takes input from COMMAND.COM
91

· COMMAND.COM:- interprets the command typed at the keyboard and executes them.
8.2 MS-DOS COMMANDS
Any instruction given to the computer to perform specific task is called command. The DOS has several commands, each for a particular task and these are stored in DOS directory in the disk.The commands are of two types
1. Internal commands2. External commands
Before discussing these commands in detail, we will discuss how do DOS organize disks? And how are files named?
8.3 How do DOS organize disks?
DOS works within a file, directory and disk drive structure. This means that all program and data files are named, and grouped together in named directories (folders) on disks. 'Directories' are just lists of files.
8.4 How are files named?
While newer versions of DOS support longer filenames, the standard DOS filename format or rather the naming scheme remains: 1-8 letter name, period, 3 letter extension e.g.: MYPROG.BAS MYPIC.JPG LETTER.DOC For example we would expect a ".TXT" file to be a file containing unformatted text, or a ".BMP" file to be in a bit mapped graphics file format. We sometimes will see a “.BAK” file which stands for backup file. To completely specify a file on our computer we must specify its drive , its directory path, and its filename. However a file does not always have to be specified in this complete form: If it is in the current directory, then you can just enter its filename.
8.5 Root Directory
Root is the main directory and all other directories called sub-directories are created under it..the first level in a directory system is root directory which is created automatically at the time of disk formatting. Within the root directory, additional directories and sub-directories can be created. Immediately after booting root directory is the current directory or working directory
92

8.6 Directory Structure of DOS: A directory is like a drawer filing cabinet that holds files of related information or subdirectories. It is specially structured and marked on the disk so that it has special meaning to the operating system. The structure of directories and subdirectories form a logical tree. One thing is to be kept in mind is that a directory can have as many child (sub) directories, but the child directory can have only one parent directory.
8.7 Internal commands The internal commands reside in COMMAND.COM, which loads into memory when the computer system is started; these commands do not reside on disk. These are in-built commands of MS-DOS.To use these commands no extra/external file is required e.g. DATE,TIME DIR ETC.Some Internal commands:- 1. CLS:- This command is used to clean the screen.
Syntex: C:\>CLS
2. Date:- It displays system date in the form of mm - dd - yy and allows the user to change it if desired .Syntax: C:\>date
Syntex: C:\>Date
Fig 8.1 (Directory Structure)
93

3. Time :- It displays the system time in the form of hh:mm:ss and enables the user to change it. Syntax: C:\>time
It displays the version of DOS currently being used in the system; 4. Ver:- Syntax: C:\>ver
5. Copy con:- Copy con allows the creation of a file through the command prompt. To use this command type followed by the name of the Copy Confile you want to create as shown below.
Syntax: D:\>copy con Filename.txt
This command copies whatever typed on keyboard to the text file; the file can be closed by giving the command . Con is short of console or keyboard. This ctrl+z or F6command will copy whatever text is typed by keyboard to the file filename.txt.
For Example: Suppose we want to create a text file name ” student” in D: drive.
5.1 if we want to create file , we follow following steps.in Ms-Dos
1. In command prompt, type the following command
D:\>Copy Con Student.txt
2. Type “This is my first Dos file”
3. Press Ctrl+Z or F6,then Enter
4. The file Student.txt will create on D: drive
94

5.2 But if we want to create a file in We will follow the following stepsWindow
1. Go to D: drive in My computer
2. Right click the mouse. Then click “New” option--- > Text document.
3. The new text file will created. Name the file “student”
6. MKDIR(MD):- Allows us to create directories (folders) or sub directories (Sub folders) on a disk on which we can kept our files. A is a directorylocation for storing files on your computer
Syntax: D:\> md DirectoryName Or D:\>MkdirDirectoryName
For Example:Suppose we want to make a Directory(Folder) ” Fruit ” in current D: drive.
6.1 If we want to create Directory (Folder) , we will follow the following in Ms-Dossteps.
1. In command prompt, type the following command D:\> MD Fruit or D:\>Mkdir Fruit
Fig 8.2
95

2. Press Enter.
3. The Directory “Fruit” will created in D: drive
6.2 But if we want to create Directory(folder ) in We follow following stepsWindow
1. Go to D: drive in My computer
2. Right click the mouse. Then click “New” option--- >Folder.
3. The New Folder will created. Name the Folder “Fruit”
Note: We can also create directory (Folder) in another location or drive rather
than current working location or drive. For example this D:\> tMD E:\school\Fruit
command will create a “Fruit” sub –directory under “school” directory in E: Drive. 7. CHDIR(CD):- CHDIR or CD command allows us to change our working
directory or sub directory.Syntax : D:\> CD DirectoryName Or D:\> CD Drive:\DirectoryNameFollowing example will show how we can create a directory fruit, make the fruit current directory and create another sub directory named mango under the directory fruit
Fig 8.3
96

1. Our current working directory is D drive. To create a Fruit directory under D: we write or D:\>Mkdir Fruit. This command will create D:\>Md FruitFruit Directory under D:\
2. To change our current working directory D: to D:\Fruit , we write
. Now our working directory is D:\> Fruit.D:\> Cd Fruit
3. To Create a “Mango” Directory under Fruit Directory we write
D:\Fruit>Md Mango. This command will create a Mango Directory under Fruit Directory
4. To change our current working directory D:\Fruit to D:\Fruit\Mango , we write . Now our working directory is D:\Fruit> Cd MangoD:\Fruit\Mango.
5. Now if we wants to move back to previous directory we can use Cd..command. For example we want to move back to Fruit directory we will write following command D:\Fruit\Mango Cd..
This will make as current working directoryD:\Fruit
6. Now if we wants to move back to , we can use command. root directory Cd \For example we want to move back to root directory D: we will write following command D:\Fruit\Mango Cd \
This will make as current working directoryD:\>
8. DIR: This command allows the user to see all files and sub-directory in the current directory. DIR Command lists file information in columns like primary name of file, the extension of the file , the file size - number of bytes used,the last updated date,the last updated time etc.
Syntax: D:\> DIR Dir/p - page by page display of file name and directory names;
Dir/w - width-wise display;
97

Dir/s - displays all sub directory and files in the sub-directory of current directory.
9 . Type:- It displays the content of saved file. D:\> Type FilenameSyntex:
10. Ren:- This command used to Rename (changes the name) of existing file or directory.
Syntax: D:\>Ren <old name> <new name> For example, we can rename our student.txt file to New-student.txt by
using following command.
11. Copy:- It copies the given file or files from the source directory to the target directory.
Syntax: C:\> Copy <source file name> <target file name>. For example: we can copy file to D:\Fruit\Mango directory New-student.txt by using following command
98

Now we can go to D:\Fruit\Mango directory to see the file copied by using following commands
12. Delete:- This command delete a file from current directory. Syntax:D:\> del<file name> For example : -we can delete New Student.txt file by using following
command.
13 . RD(RMDIR):-This command is used to remove a directory from the disk; it can't remove a directory which contains sub directory or files, ie, the child should be removed from the parent; similarly this command can't remove the current directory and root directory.
Syntax: c:\> RD <Dir name>. For example: We can remove “Graphes” directory under
D:\Fruit\Mango directory by using following commands.
99

14. Prompt:- Allows the user to set a new DOS prompt instead of usual C:\> or D:\>.
Syntex: D:\>Prompt [option] Options: $d : Display Current date as prompt $t : Display Current time as prompt $p$g : Reset Default Prompt
Note: We can also reset our Name as prompt by typing D:\> Prompt MyName This command is used to exit From Ms-Dos.15. Exit: Syntex: D:\> exit
8.8 External Command
An is an MS-DOS command that is not included in external commandcommand.com. External commands are needed less frequently and stored in the external memory. In DOS any file name with an extension COM,EXE and BAT is treated as an external command.Some External Commands:-
1. Attrib:- This command is used for protecting the files from accidental changes or modification. It can also be used for making a hidden file, archive files, read only files. Syntax: Attrib +R/-R/+H/-H/+A/-A <file name>+R protects the file by making it read only,
Fig 8.8
100

-R removes the read only protection. H- Stands for Hidden, A- Stands for Archive For Example: We can make “Mango” directory Hidden by using following
command D:\>Attrib +H Mango 2. Scandisk/ Chkdisk:- This command checks the status of the disk; it shows
a graphical display, information about the user file.It checks and repairs file systems errors on a disk drive
Syntax: D:\> scandisk 3. Tree:- This command graphically displays the path of each directory and
sub directory in given drive. Syntex: D:\> Tree
4. t displays one screen of data at a time and is used with another :- IMorecommand when one screen is full; if you press any key on the next screen is displayed.
For Example: D:\> type student.txt | more. 5. label is a name given to a disk drives which refers to collection of :- ALabel
filers and directories on disk. Label command is used to view or change the label of the computer disk drives.
Syntax: D :\>label A. 6. his command is used for sorting data and displaying the result on :-TSort
the screen. Syntax: D:\>dir/sort/r (reverse order) 7 he command loads the MSDOS editor, where we can edit files, :-T. Edit
create new files, open existing files. Syntax: D:\> edit < file name>
101

8.9 MS DOS EDITOR
The MS-DOS editor is a command line text editor that allows you to view, create, or modify any file on your computer. When running the edit command a screen similar to the picture below is shown.
8.9.1 Availability The edit command is an external command that is available in the below Microsoft operating systems.MS-DOS 5.x and aboveWindows 85Windows 88Windows MEWindows NTWindows 2000Windows XPWindows Vista*Windows 7*8.9.2 Using edit to create a file copy con <name of file> Once you have entered the above command this will create the file with the name specified. Once you have typed all the lines you want to be in the file, press and hold CTRL + Z. This should enter ̂ Z, once on the screen, press enter and one file should be copied. Using edit you can also create files; for example, if we wanted to create a file called abc.txt, we would type the below command. edit C:\abc.txt If this file is not exist in the computer then this would bring up a blank blue colour edit screen, as long as the file is saved upon exit this will create the file abc.txt.Additional information
Fig 8.12
102

Note:1. Edit is only able to open a file with a maximum of 65,280 lines.2. When editing this any file, ensure that you know what you are placing in the
files. Improperly editing the file can cause issues with your computer.
8.10 Batch File A batch file is used for combining several commands into one command, that you might ordinarily issue at the system prompt in order to perform a computer operation. The example of a very well known batch file is the AUTOEXE.BAT, which is simply a boot file loaded each time we power up the system. Within this file contains various lines to load various programs and drivers in to memory each time the computer boots.8.10.1 Creating A Batch File Edit is the most common method to create a batch file. We can also use COPY CON command to create a batch file For Example At the MS-DOS prompt type Edit Test.bat and press enter We will get blue sceen. Now type: CLS
DATE TIME
Once we type above three lines , in the blue screen, choose File>>Exit. When prompted to save , click on Yes button Now at the MS-DOS prompt type 'Test'. When enter is pressed, this should execute the Test.bat file and start running the file If we wish to add more lines to this batch file we would simply type EDIT Test.bat to edit the file again
POINTS TO REMEMBER1. DOS consists of three major files. These are
§ IO.SYS§ MSDOS.SYS§ COMMAND.COM
2. Any instruction given to the computer to perform specific task is called command
3. DOS works within a file, directory and disk drive structure4. The internal commands reside in COMMAND.COM, which loads into memory
when the computer system is started.5. A batch file is used for combining several commands into one command
103

EXERCISE1. Fill in the blanks
a. ___________ file determines , which hardware to contact for any particular command. (IO.SYS, MS.SYS,MSDOS.SYS,COMMAND.COM)
b. Any instruction given to the computer to perform specific task is called _________. (LINE, COMMAND,SENTENCE,INSTRUCTION)
c. _______ directory is the main directory. (SUB, CURRENT,FILE,ROOT)d. T he in terna l commands res i de in ______ f i l e . ( IO.SYS ,
MS.SYS,MSDOS.SYS,COMMAND.COM)e. A ________is used for combining several commands into one
command(BATCH FILE, EDIT,COPY CON,ATTRIB)2. TRUE/FALSE
a. Improperly editing the file can cause issues with your computer.b. Attrib command is used for protecting the files from accidental changes or
modification.c. Notepad is a command line text editor that allows you to view, create, or
modify any file on your computer.d. Batch files are stored with an extension .bate. Prompt is an external command.
3. Short Answer Type Questions:a. Define the term Root Directoryb. Give examples of four internal commands.c. Give examples of four external commands.d. What is a Batch File?e. What is MS-DOS Editor?
4. Long Answer Type Questions:a. Write the process of creating a Batch File.b. Explain any three Internal Commands.c. Explain any three External Commandsd. Give difference between Internal and External commands.e. Give syntax of following commands
i. RD ii. COPY iii. TYPE iv. ATTRIB v. EDIT
104