CLOCKWORK Training Manual and Reference: Inventory
66
© TechnoPro Computer Solutions, Inc. CLOCKWORK Training Manual and Reference: Inventory
-
Upload
khangminh22 -
Category
Documents
-
view
3 -
download
0
Transcript of CLOCKWORK Training Manual and Reference: Inventory
© TechnoPro Computer Solutions, Inc.
CLOCKWORK
Training Manual and Reference: Inventory

ClockWork Training Guide & Manual Page 2 of 66
Table of Contents
Inventory – Learning Objectives
License Key 5
Create a Catalog 6
Assign Permissions 9
Categories and Sub-categories 10
Assign a Dynamic Form 11
Products
Create a Product 14
Product Info 16
Product Status 17
Extra Info 18
Accessories 19
Vendor info 20
Product Image 21
Attachments 22
Movement History 23
Edit a Product 24
Delete a Product 25
Find Product by Barcode 26
Search for Product 27
Product List 28
Products by Category 29
Movement History 30
Export to Excel 31
Export to PDF 32
Show Products Report 33
Add/Remove Formatting 34
Reservations
Create a Reservation 36
Edit a Reservation 37

ClockWork Training Guide & Manual Page 3 of 66
Show Reservations 38
Cancel a Reservation 40
Loans and Reservations by Person 41
Show Loans/Reservations Calendar 42
Export to Excel 43
Export to PDF 44
Add/Remove Formatting 45
Loans Create a Loan 47 Edit a Loan 49 Return a Loan 50 Loan Status 52 Active Loans 54 Loans and Reservations by Person 55 Show Loans/Reservations Calendar 56 Export to Excel 57 Export to PDF 58 Add/Remove Formatting 59 Reports 60 Other Features Drag and Re-size 63 Copy of the Product 64 Batch Emails 65 Export working catalog scheme 66

ClockWork Training Guide & Manual Page 4 of 66
CLOCKWORK TRAINING INVENTORY LEARNING OBJECTIVES Become familiar with the Inventory interface Create a new catalog Create a category and a sub-category Add a product in the Product List Become familiar with Movement History Understand the difference between loans and reservations Make loans Make reservations Show Product Report Become familiar with the graphical calendar

ClockWork Training Guide & Manual Page 5 of 66
License Key
The inventory module is not going to work without its license key
If the license key is not imported, please submit a support ticket
In ClockWork, go to Extra tab > Submit a Support Ticket
How do you know if the license key is not imported?
In the server, go to Start > All Programs > TechnoPro > ClockWork 5 Server > Clockwork Server Initialization Wizard
It should have ‘Inventory System’ in the Licenses tab

ClockWork Training Guide & Manual Page 6 of 66
Create a catalog
Add a catalog by going to
ClockWork Admin > Inventory > Catalogs > New Catalog
Select the New Catalog button
ClockWork Training Guide & Manual Page 7 of 66
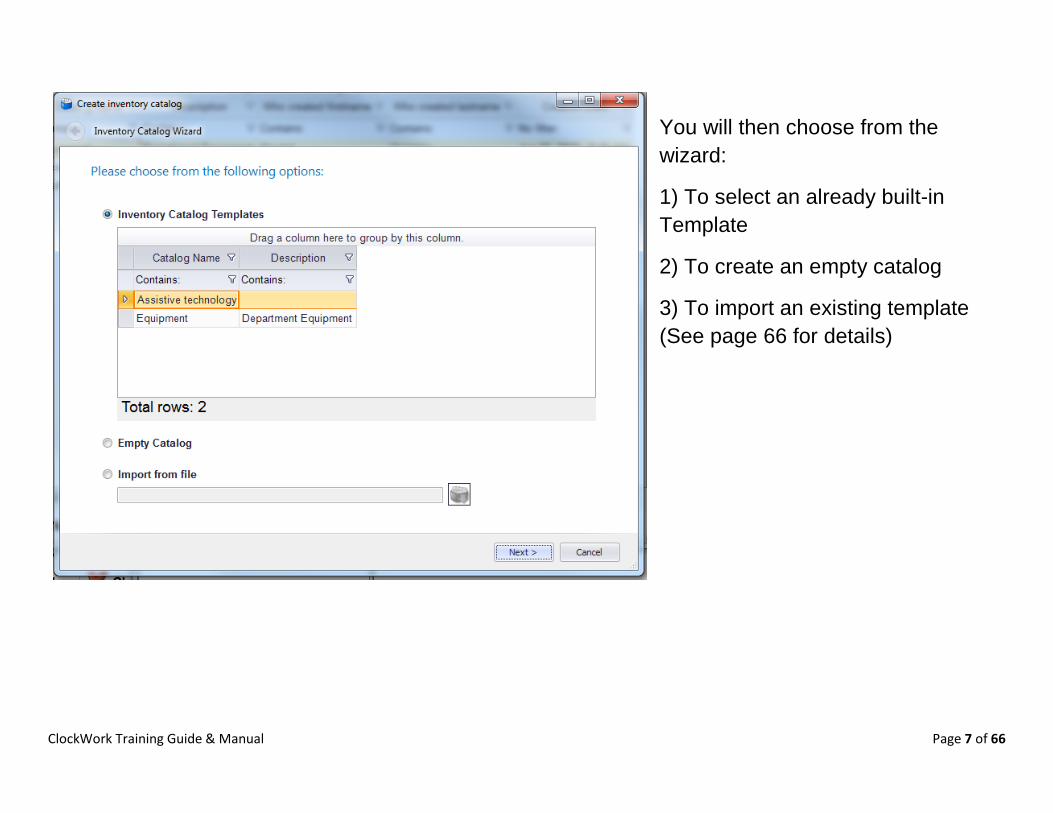
You will then choose from the
wizard:
1) To select an already built-in
Template
2) To create an empty catalog
3) To import an existing template
(See page 66 for details)

ClockWork Training Guide & Manual Page 8 of 66
Catalog Name, Catalog ID, Who created, and the Creation Date cannot be edited.
To edit the catalog’s description, double click on the selected catalog or right-click and select Edit Catalog.
A catalog can only be deleted if it’s empty; you must first delete all the categories and products in the catalog.
Right-click and select Delete Catalog

ClockWork Training Guide & Manual Page 9 of 66
Assign permissions
After adding the Catalog, by default, users are not going to be able to see it right away. First,
add a permission to allow users to see the Catalog.
By going to ClockWork Main Settings > Inventory > Allow catalog Ids.
Select the appropriate catalog
Click Save

ClockWork Training Guide & Manual Page 10 of 66
Categories and Sub-categories
When you open the catalog, on the side you will see a
Category section…
Right-click and select New Category. Example: Hardware, Software
The same for when you’re creating a sub-category. Example: Laptop, Server, Workstation
To delete a category or sub-category, they should not contain any product. You can only delete a category if it’s empty.
Right-click and select Delete Empty Category

ClockWork Training Guide & Manual Page 11 of 66
Assign a Dynamic Form
Step 1: Build the form using “Per Inventory” in ClockWork Admin’s Data Forms.
Go to ClockWork Admin > Data Forms > Manage Data Forms > Create new form > Inventory product

ClockWork Training Guide & Manual Page 12 of 66
]
Step 2: Select a category or a sub-category
Step 3: Right-click on the category or sub-category, and select “Setting up extended data to a category”
This will show as an Extra Info tab between the Product
Info and Accessories.

ClockWork Training Guide & Manual Page 13 of 66
PRODUCTS

ClockWork Training Guide & Manual Page 14 of 66
New Product
There are two ways to add a new product.
You can use the button on top of the screen
Or you can right-click on the Product List screen.
o Select New Product
ClockWork Training Guide & Manual Page 15 of 66
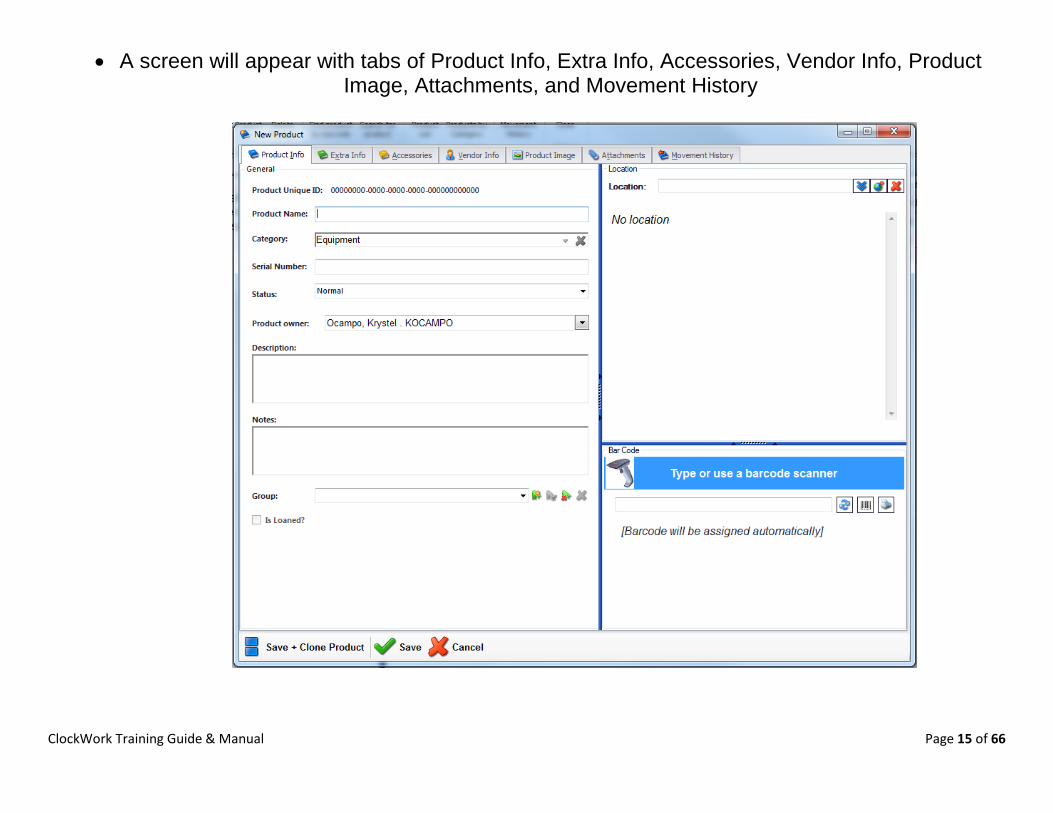
A screen will appear with tabs of Product Info, Extra Info, Accessories, Vendor Info, Product Image, Attachments, and Movement History

ClockWork Training Guide & Manual Page 16 of 66
Product Info

ClockWork Training Guide & Manual Page 17 of 66
Product Status
From the Product Info in the New Product screen, there’s a Status drop down menu.
This menu can be change by going ClockWork Admin > Inventory > Product Status List

ClockWork Training Guide & Manual Page 18 of 66
Extra Info
When you assign a form to a category, an Extra Info tab will appear between the Product Info and Accessories
To assign a form, refer back to page 11
ClockWork Training Guide & Manual Page 19 of 66
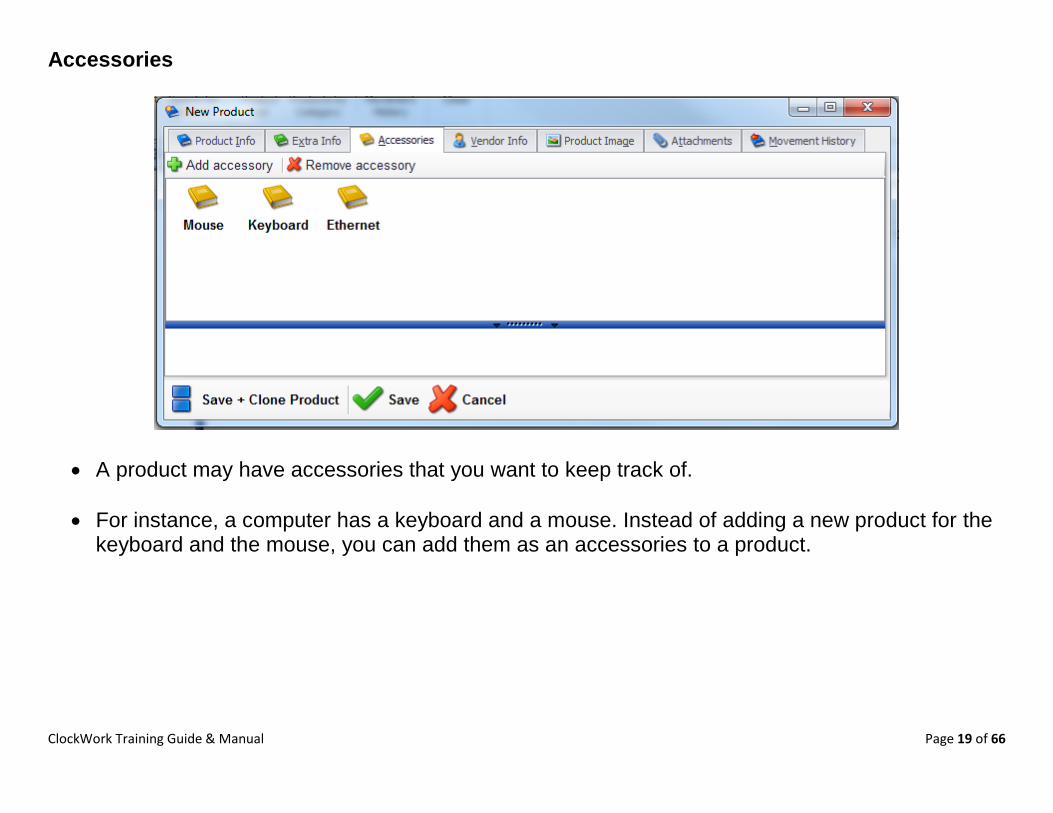
Accessories
A product may have accessories that you want to keep track of.
For instance, a computer has a keyboard and a mouse. Instead of adding a new product for the keyboard and the mouse, you can add them as an accessories to a product.

ClockWork Training Guide & Manual Page 20 of 66
Vendor Info
This section is for the product’s price, warranty expiration date, and where and when it was bought.
Anything related to the vendor
ClockWork Training Guide & Manual Page 21 of 66
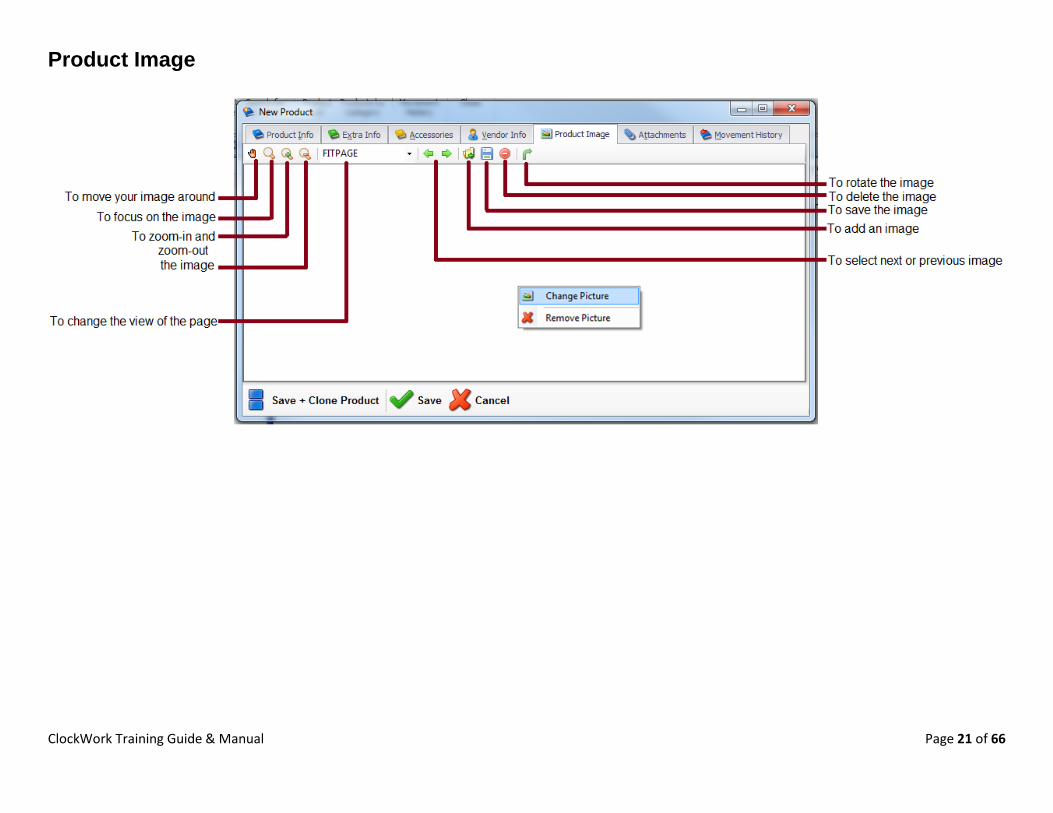
Product Image

ClockWork Training Guide & Manual Page 22 of 66
Attachments
An attachment can be a manual, technical documents, or a license key.
You can attach as many documents as you want, in any format.
ClockWork Training Guide & Manual Page 23 of 66
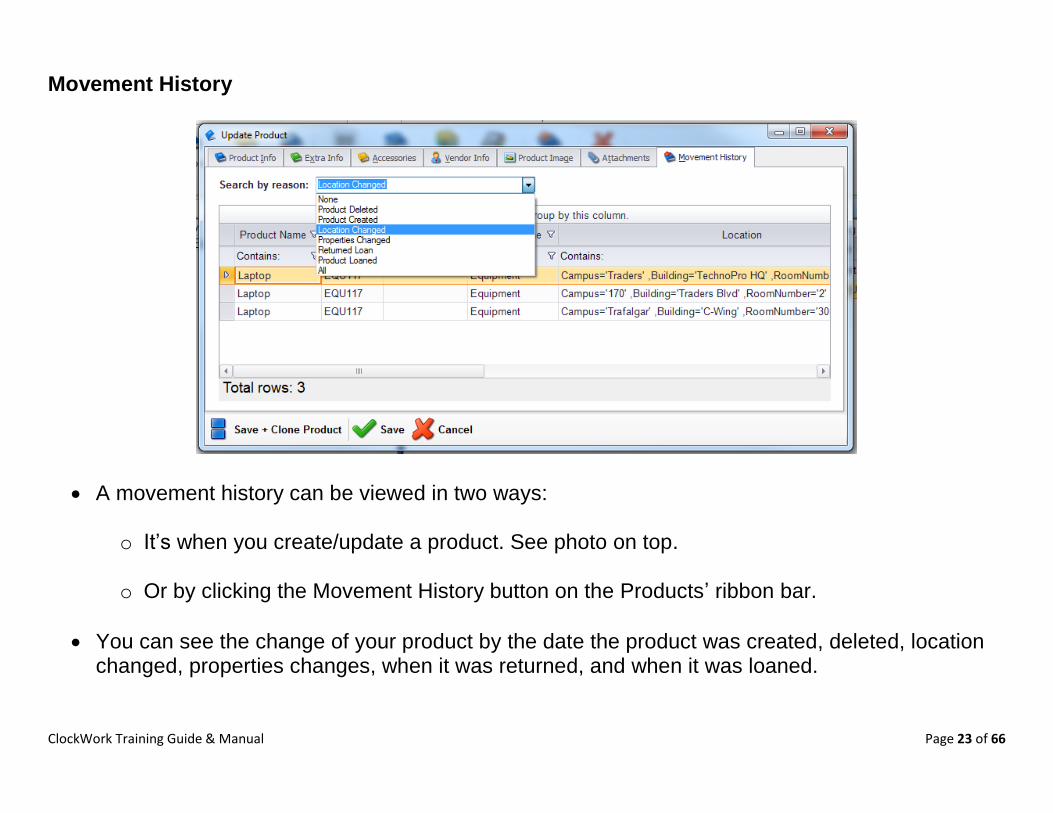
Movement History
A movement history can be viewed in two ways: o It’s when you create/update a product. See photo on top.
o Or by clicking the Movement History button on the Products’ ribbon bar.
You can see the change of your product by the date the product was created, deleted, location changed, properties changes, when it was returned, and when it was loaned.

ClockWork Training Guide & Manual Page 24 of 66
Edit Product
There are two ways to edit a product:
You can use the button on top of the screen
Or you can right-click on the product in the Product List screen.
Select Edit Product

ClockWork Training Guide & Manual Page 25 of 66
Delete Product
There are two ways to delete a product.
You can use the button on top of the screen
Or you can right-click on the product in the Product List screen.
Select Delete Product
ClockWork Training Guide & Manual Page 26 of 66
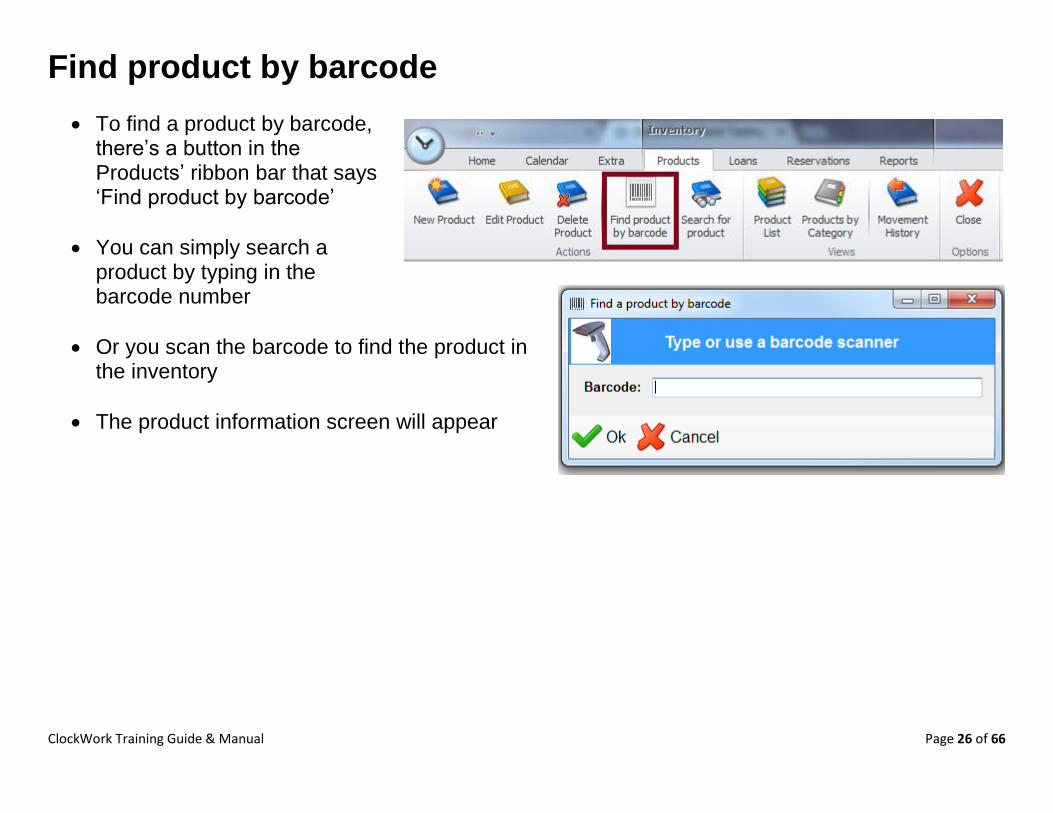
Find product by barcode
To find a product by barcode, there’s a button in the Products’ ribbon bar that says ‘Find product by barcode’
You can simply search a product by typing in the barcode number
Or you scan the barcode to find the product in the inventory
The product information screen will appear

ClockWork Training Guide & Manual Page 27 of 66
Search for product
To search for a product, there’s a button in the Product ribbon bar that says ‘Search for product’
You can type in anything related to that product
Such as Name, Serial Number, Category, Location or by Vendor
The product information screen will appear

ClockWork Training Guide & Manual Page 28 of 66
Product List
The Product List will give you all the products that you currently have in your inventory.
It will display the products by Catalogs
You can filter this list by Product ID, Name, Serial Number, Bar Code, Loaned, Status, Category, Vendor, Location, Group, In charge person, and by Accessories.
You can double-click on a product to view their information
You can also right-click and make changes in your inventory in the Product List
Such as, to create a new product, edit a product, delete a product, make a copy of the product, group the products, make a loan or a reservation, export to excel or pdf, and to show products sheet

ClockWork Training Guide & Manual Page 29 of 66
Products by Category
The Products by Category opens another tab to segregate products by categories and sub-categories.
You can filter this list by Product ID, Name, Serial Number, Bar Code, Loaned, Status, Category, Vendor, Location, Group, In charge person, and by Accessories.
You can double-click on a product to view their information
You can also right-click and make changes in your inventory in the Product List
Such as, to create a new product, edit a product, delete a product, make a copy of the product, group the products, make a loan or a reservation, export to excel or pdf, and to show products sheet

ClockWork Training Guide & Manual Page 30 of 66
Movement History
A Movement History is a process that displays all the events and changes of the product including
the location or status; it is an important feature because it enables you to keep track of the location
and condition of your product in case if it’s lost or damaged.

ClockWork Training Guide & Manual Page 31 of 66
Export to Excel
You can export the entire Product List to Excel by selecting the Export to Excel when you right click
This will give you all the fields in the Product List, in an Excel format
ClockWork Training Guide & Manual Page 32 of 66
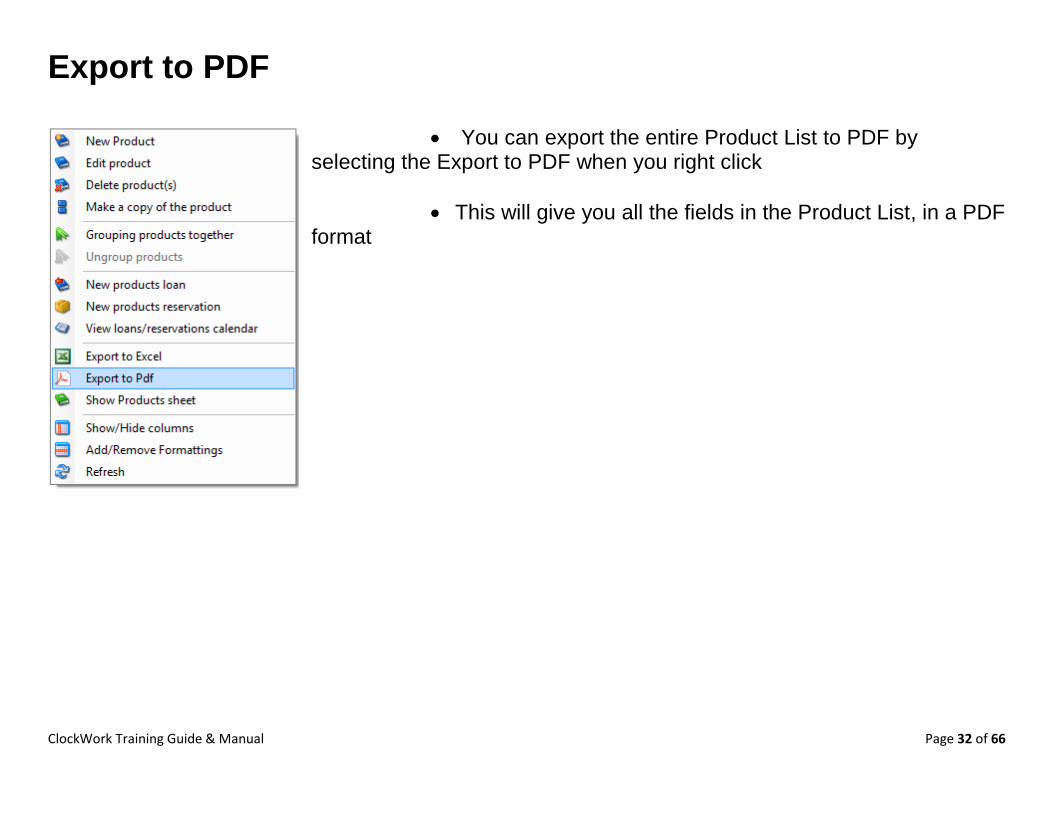
Export to PDF
You can export the entire Product List to PDF by selecting the Export to PDF when you right click
This will give you all the fields in the Product List, in a PDF format

ClockWork Training Guide & Manual Page 33 of 66
Show Products Report
In the Product List, right-click and select Show Product Report to view this report on the right.
This report will give you a summary of the product you’ve selected.
It includes the product information and the product’s image.
ClockWork Training Guide & Manual Page 34 of 66
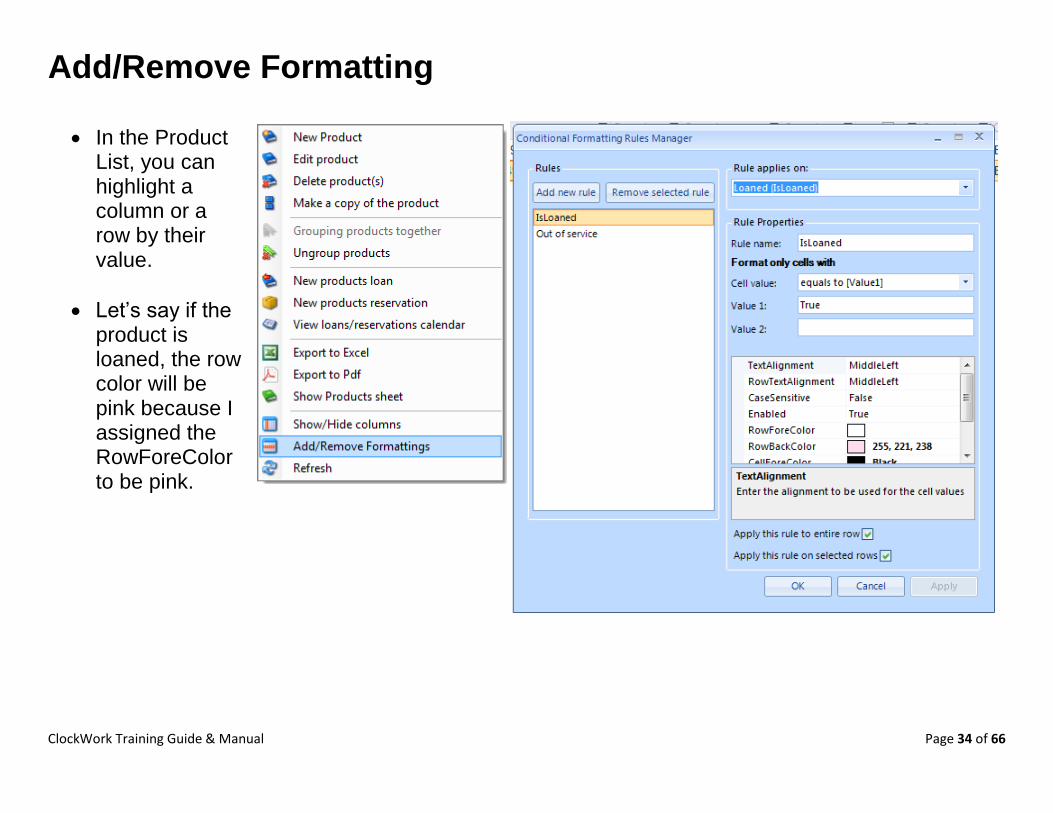
Add/Remove Formatting
In the Product List, you can highlight a column or a row by their value.
Let’s say if the product is loaned, the row color will be pink because I assigned the RowForeColor to be pink.
ClockWork Training Guide & Manual Page 35 of 66
RESERVATIONS

ClockWork Training Guide & Manual Page 36 of 66
Create a Reservation
Sometimes, a student is not ready to borrow an item yet or the item
might not be available at the time. This student needs to make a
reservation.
To add a reservation, right-click the product and select New Products Reservation
Or use the button on top of the screen.

ClockWork Training Guide & Manual Page 37 of 66
Edit a Reservation
You can edit a loan by using the button on top of the screen.
A screen with summary information will then appear.
Everything is editable except for the product information and who it’s reserved for.
ClockWork Training Guide & Manual Page 38 of 66
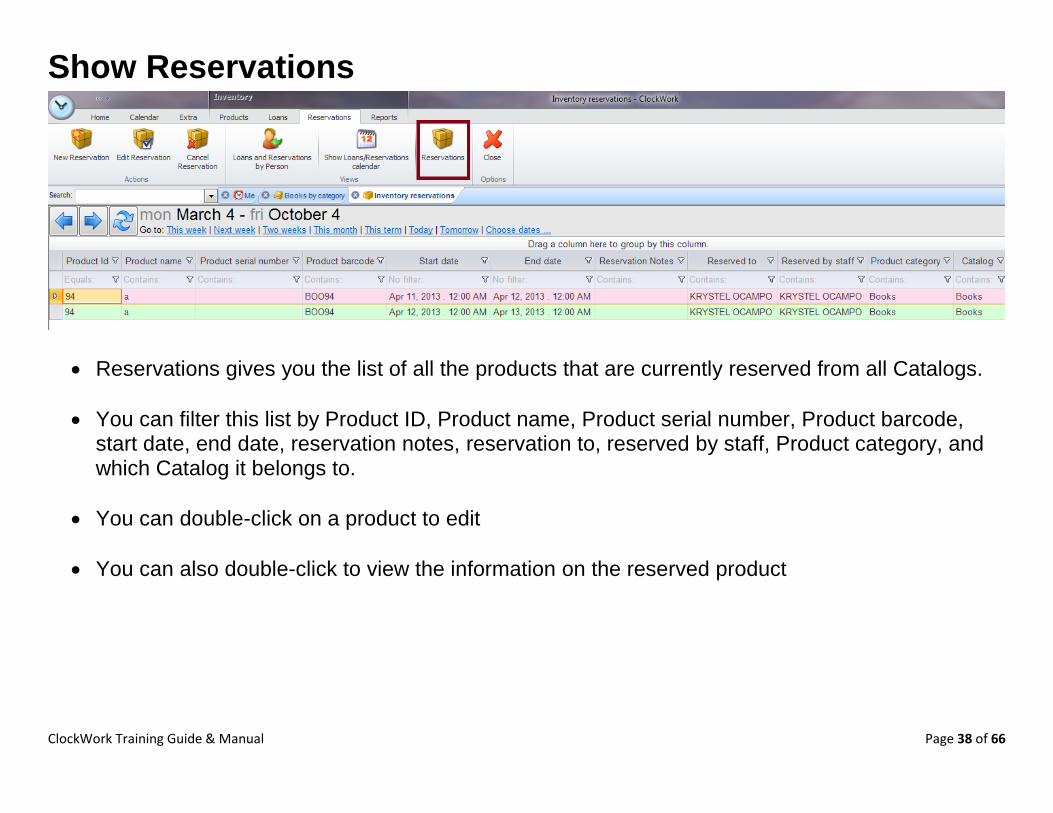
Show Reservations
Reservations gives you the list of all the products that are currently reserved from all Catalogs.
You can filter this list by Product ID, Product name, Product serial number, Product barcode, start date, end date, reservation notes, reservation to, reserved by staff, Product category, and which Catalog it belongs to.
You can double-click on a product to edit
You can also double-click to view the information on the reserved product

ClockWork Training Guide & Manual Page 39 of 66
If you right-click, you can loan a reserved product
You can also mark a reserved product as completed Let’s say the reservation date is done and there’s still no available product to be loaned, you would want to mark a reservation as completed.

ClockWork Training Guide & Manual Page 40 of 66
Cancel a Reservation
You have two options to cancel a reservation…
First, select the product that you want to cancel
Then use the button at the top
Or right-click and select Cancel Reservation

ClockWork Training Guide & Manual Page 41 of 66
Loans and Reservations by Person
Loans and Reservations by Person, let’s you search for a loan or a reservation by the person’s first name or last name.
So let’s say that I typed in my name, I’m only going to see my loaned products and my reservations.

ClockWork Training Guide & Manual Page 42 of 66
Show Loans/Reservations calendar
This is the graphical calendar view.
It can be viewed by weeks or months.
The product name is on the side, the dates on top, and the length of time an item is borrowed as bars.
To change the date, you can adjust the bars.
The blue bar is for your active reservations.
Select multiple products to see more than one product in the Loans/Reservation Calendar
ClockWork Training Guide & Manual Page 43 of 66
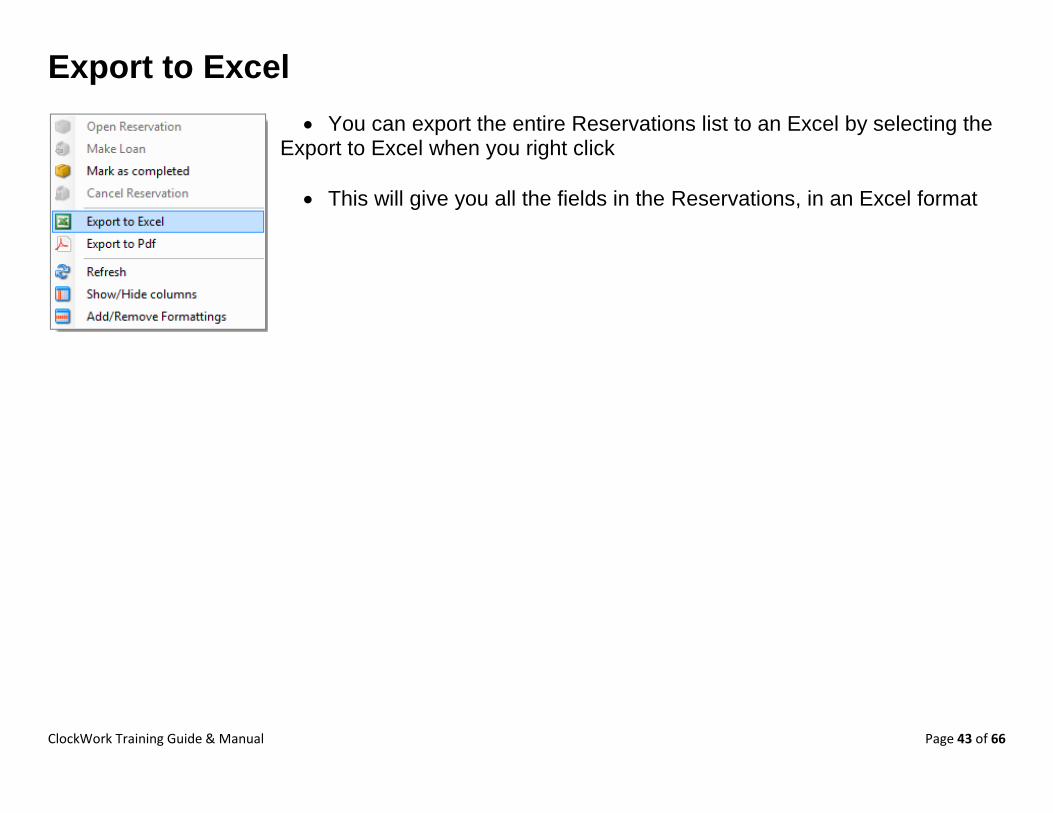
Export to Excel
You can export the entire Reservations list to an Excel by selecting the Export to Excel when you right click
This will give you all the fields in the Reservations, in an Excel format

ClockWork Training Guide & Manual Page 44 of 66
Export to PDF
You can export the entire Reservations list to a PDF by selecting the Export to PDF when you right click
This will give you all the fields in the Reservations, in an PDF format
ClockWork Training Guide & Manual Page 45 of 66
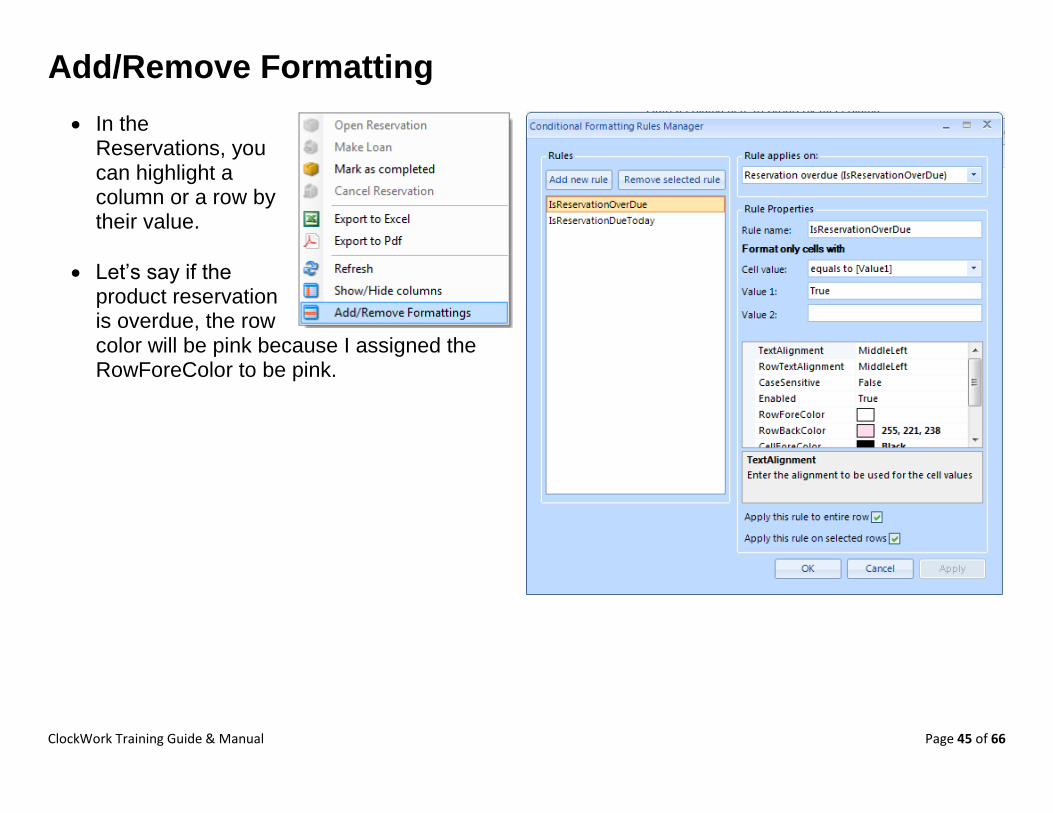
Add/Remove Formatting
In the Reservations, you can highlight a column or a row by their value.
Let’s say if the product reservation is overdue, the row color will be pink because I assigned the RowForeColor to be pink.

ClockWork Training Guide & Manual Page 46 of 66
LOANS

ClockWork Training Guide & Manual Page 47 of 66
Create a Loan
There are two ways to make a loan.
You can use the button on top of the screen
Or you can right-click on a product in the Product List screen. o Select New Products Loan

ClockWork Training Guide & Manual Page 48 of 66

ClockWork Training Guide & Manual Page 49 of 66
Edit Loan
You can edit a loan by using the button on top of the screen.
A screen with summary information will then appear.

ClockWork Training Guide & Manual Page 50 of 66
Return a Loan
There are two ways to return a loan.
You can use the button on top of the screen
Or you can right-click on the product in the Active Loans screen. o Select Return Loans

ClockWork Training Guide & Manual Page 51 of 66

ClockWork Training Guide & Manual Page 52 of 66
Loan Status
To change the menu for the loan status, go to ClockWork Admin > Inventory > Loan Status List
See page 48 and 53

ClockWork Training Guide & Manual Page 53 of 66
To change the return loan status, double click on the loaned product that is being returned
You should get a form with Edit Inventory Returned Loan as a heading
Edit the loan status from here
ClockWork Training Guide & Manual Page 54 of 66
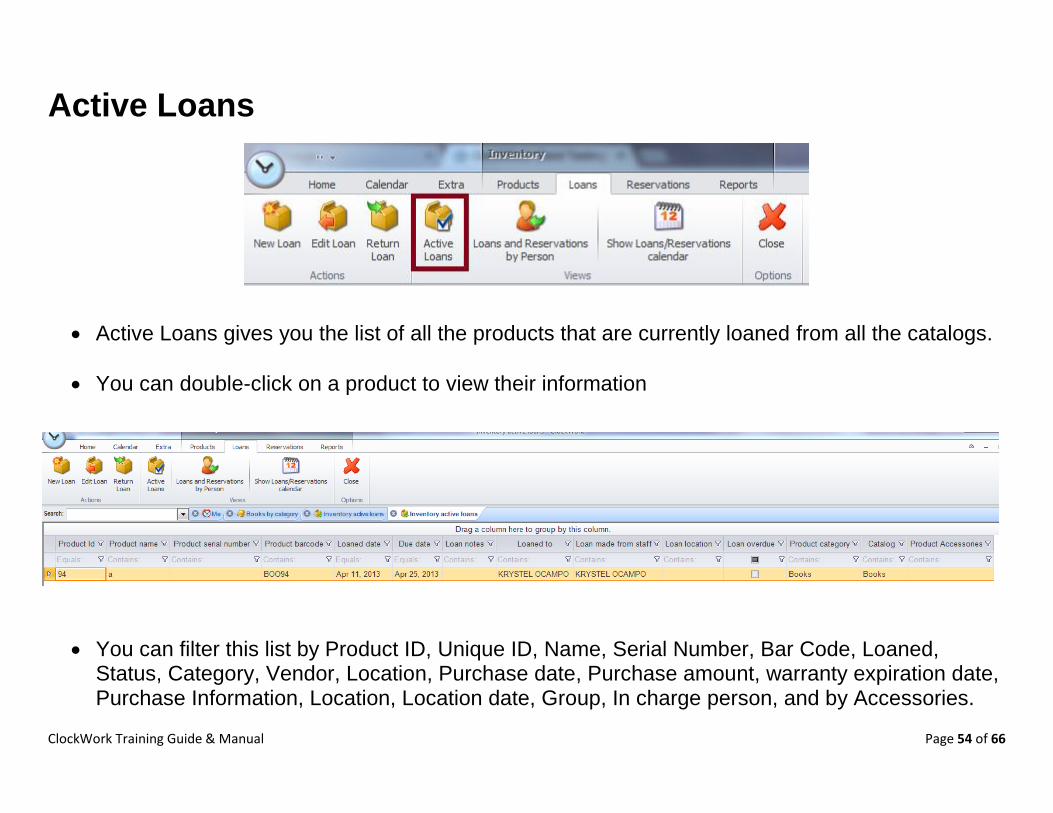
Active Loans
Active Loans gives you the list of all the products that are currently loaned from all the catalogs.
You can double-click on a product to view their information
You can filter this list by Product ID, Unique ID, Name, Serial Number, Bar Code, Loaned, Status, Category, Vendor, Location, Purchase date, Purchase amount, warranty expiration date, Purchase Information, Location, Location date, Group, In charge person, and by Accessories.
ClockWork Training Guide & Manual Page 55 of 66
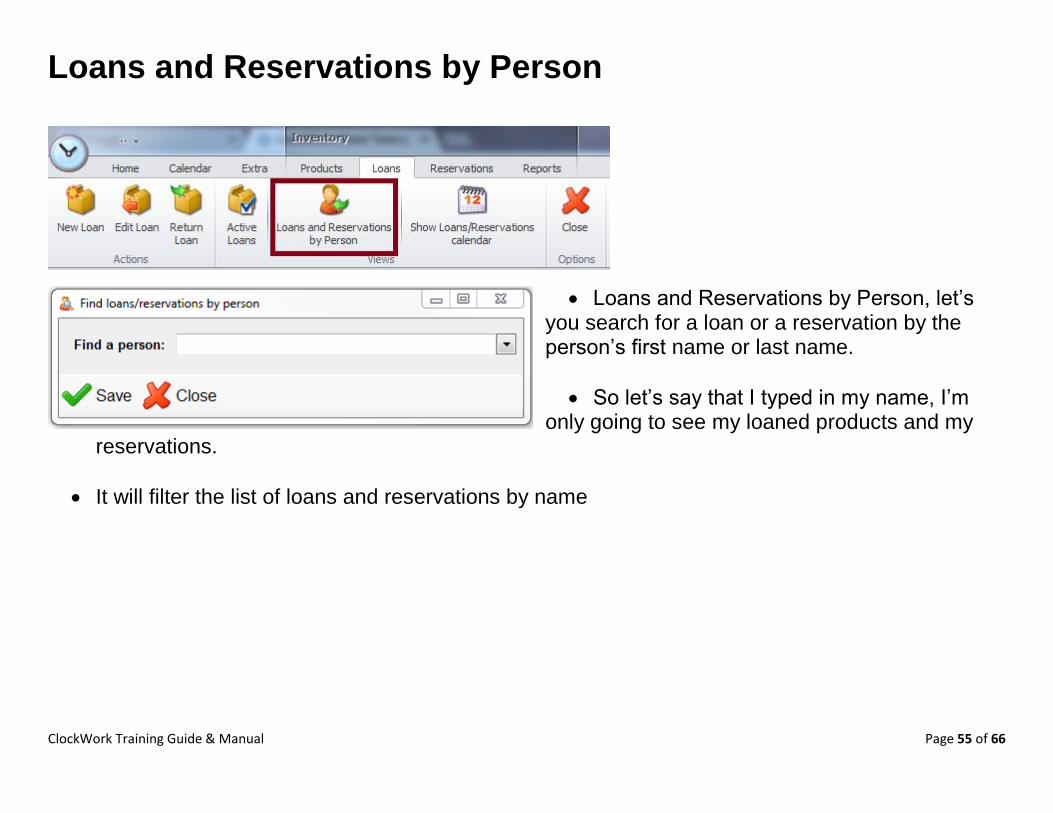
Loans and Reservations by Person
Loans and Reservations by Person, let’s you search for a loan or a reservation by the person’s first name or last name.
So let’s say that I typed in my name, I’m only going to see my loaned products and my
reservations.
It will filter the list of loans and reservations by name
ClockWork Training Guide & Manual Page 56 of 66
Show Loans/Reservations calendar
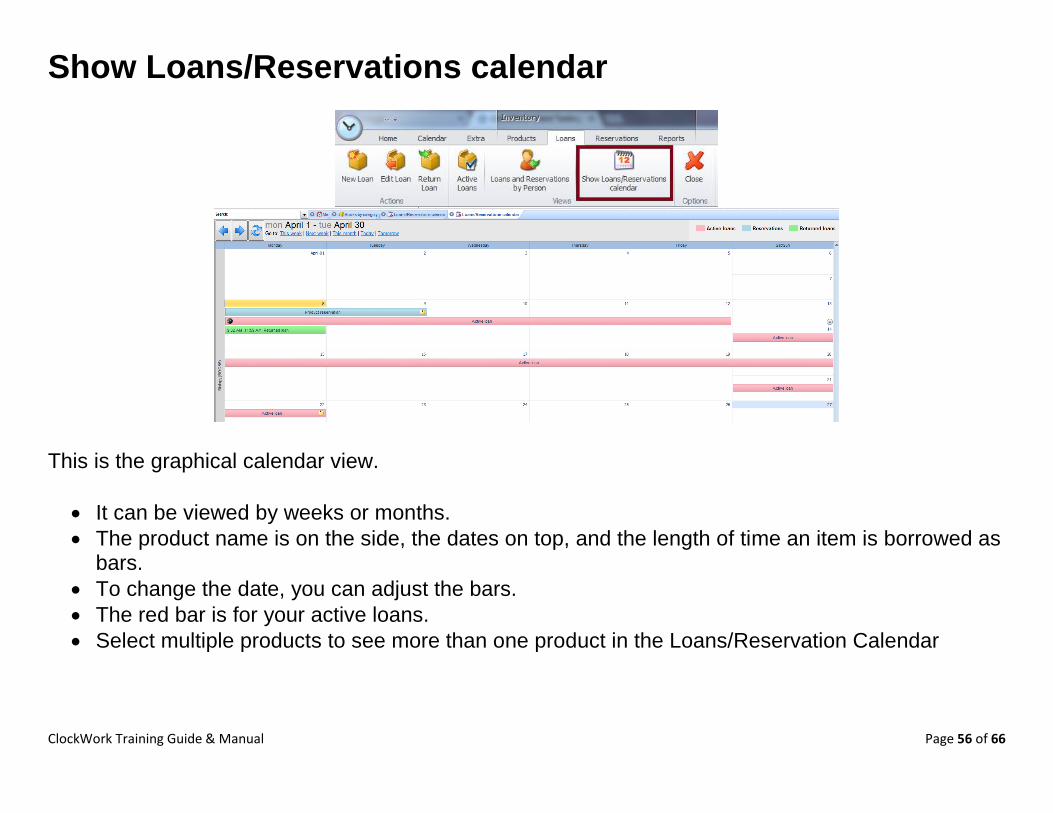
This is the graphical calendar view.
It can be viewed by weeks or months.
The product name is on the side, the dates on top, and the length of time an item is borrowed as bars.
To change the date, you can adjust the bars.
The red bar is for your active loans.
Select multiple products to see more than one product in the Loans/Reservation Calendar

ClockWork Training Guide & Manual Page 57 of 66
Export to Excel
You can export the entire Active Loan list by selecting the Export to Excel when you right click
This will give you all the fields in the Active Loans, in an Excel format

ClockWork Training Guide & Manual Page 58 of 66
Export to PDF
You can export the entire Active Loan list by selecting the Export to PDF when you right click
This will give you all the fields in the Active Loans, in an PDF format

ClockWork Training Guide & Manual Page 59 of 66
Add/Remove Formatting
In the Active Loans, you can highlight a column or a row by their value.
Let’s say if the product is loan is overdue, the row color will be pink because I assigned the RowForeColor to be pink.

ClockWork Training Guide & Manual Page 60 of 66
REPORTS

ClockWork Training Guide & Manual Page 61 of 66
In Reports, automatically they would be four reports that will be displayed on the ribbon bar this is for easy access for the most used reports
There’s also a button called Run a report to run the remaining hidden reports.

ClockWork Training Guide & Manual Page 62 of 66
OTHER FEATURES
ClockWork Training Guide & Manual Page 63 of 66
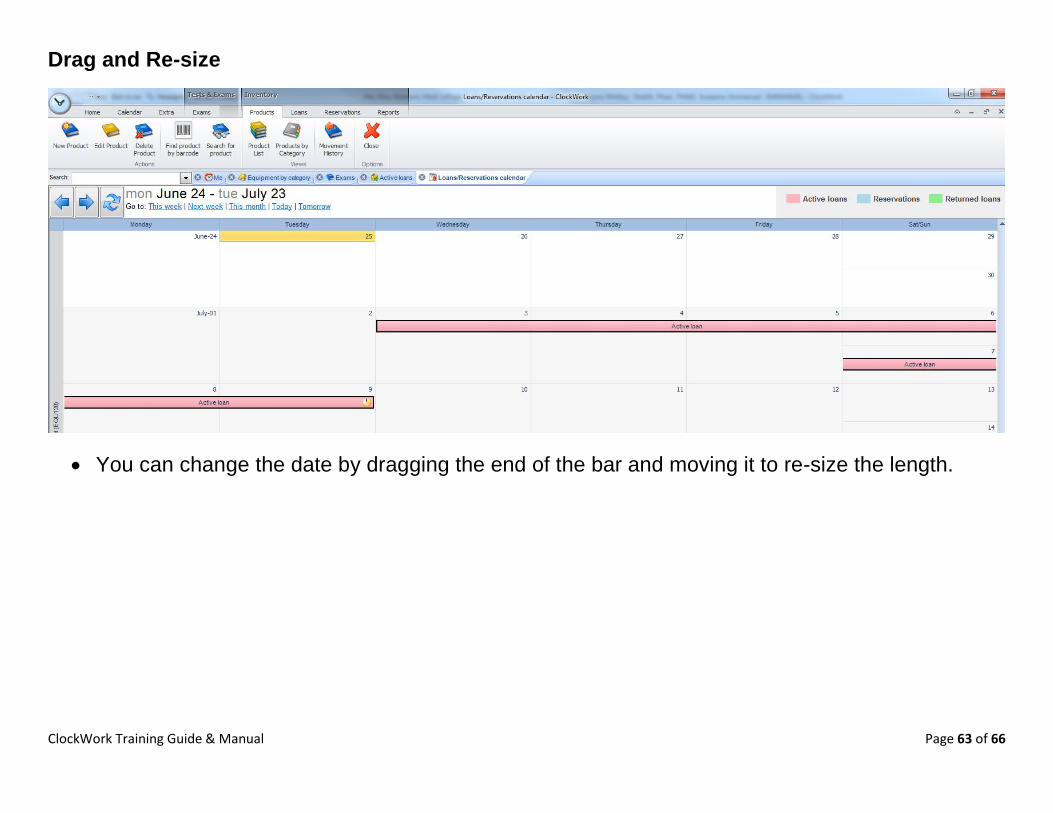
Drag and Re-size
You can change the date by dragging the end of the bar and moving it to re-size the length.
ClockWork Training Guide & Manual Page 64 of 66
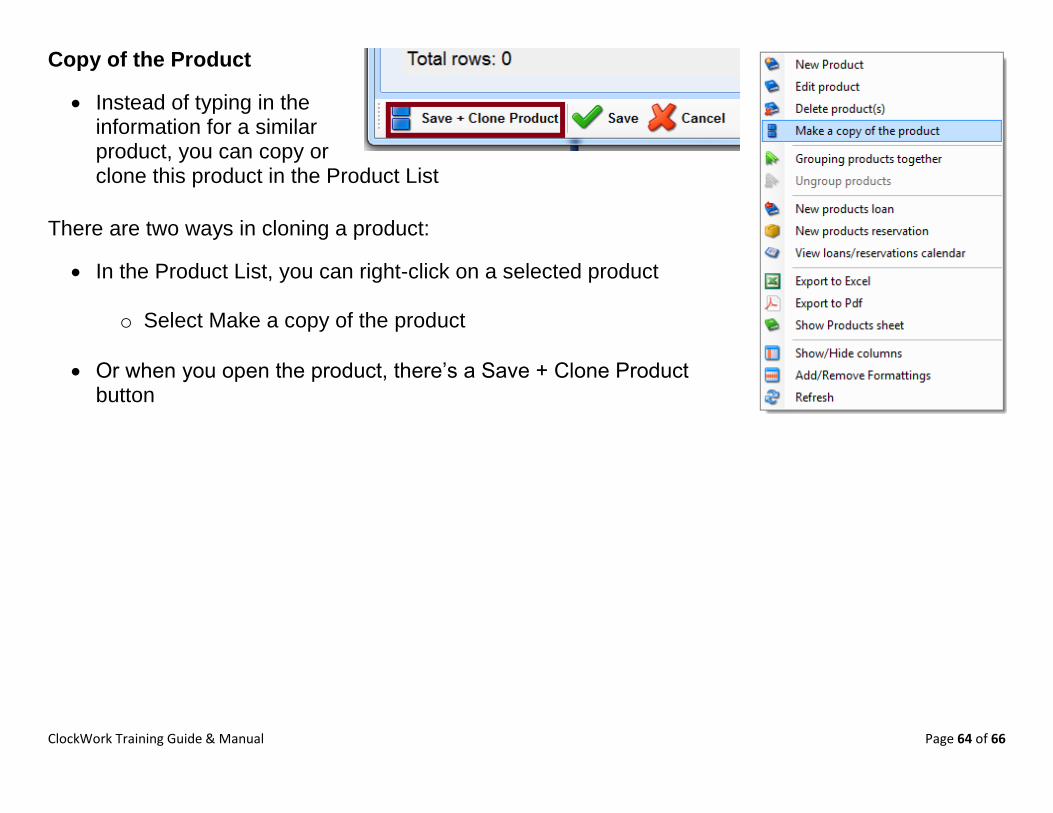
Copy of the Product
Instead of typing in the information for a similar product, you can copy or clone this product in the Product List
There are two ways in cloning a product:
In the Product List, you can right-click on a selected product o Select Make a copy of the product
Or when you open the product, there’s a Save + Clone Product button

ClockWork Training Guide & Manual Page 65 of 66
Batch Email
There are two emails that get sent out to students:
o Reminder email when a loan is overdue
o Reminder email when for an upcoming product reservation

ClockWork Training Guide & Manual Page 66 of 66
Export working catalog scheme
After creating the structure of your Catalogs, you can export this and save it on your computer.
You can upload this later when you want to create another Catalog
See page 7