Human ESC/iPSC-based "Omics" and Bioinformatics for Translational Research
Upload
khangminh22Category
view
2download
0
Takara Bio USA, Inc.
1290 Terra Bella Avenue, Mountain View, CA 94043, USA
U.S. Technical Support: [email protected]
United States/Canada
800.662.2566
Asia Pacific
+1.650.919.7300
Europe
+33.(0)1.3904.6880
Japan
+81.(0)77.565.6999
Page 1 of 34
Takara Bio USA, Inc.
Cellartis® iPSC CRISPR/Cas9 Gesicle and Single-Cell Cloning System User Manual
Cat. No. 632642
(030619)
Cellartis iPSC CRISPR/Cas9 Gesicle and Single-Cell Cloning System User Manual
(030619)
takarabio.com
Takara Bio USA, Inc.
Page 2 of 34
Table of Contents I. Introduction ..................................................................................................................................................................... 4
II. List of Components ......................................................................................................................................................... 7
III. Additional Materials Not Supplied ................................................................................................................................. 7
A. Required ...................................................................................................................................................................... 7
B. Recommended ............................................................................................................................................................. 8
IV. General Considerations ............................................................................................................................................... 9
A. Storage and Handling .................................................................................................................................................. 9
B. Transferring Human iPS Cells to the DEF-CS Culture System .................................................................................. 9
V. Complete Experimental Workflow ............................................................................................................................... 10
VI. Producing CRISPR/Cas9 Gesicles ............................................................................................................................ 10
A. Protocol Overview .................................................................................................................................................... 10
B. Designing sgRNAs Against the Target Sequence ..................................................................................................... 11
C. Generating a Plasmid Encoding the sgRNA ............................................................................................................. 14
D. Produce CRISPR/Cas9 Gesicles ............................................................................................................................... 17
E. Harvest and Concentrate Cas9/sgRNA Gesicles ....................................................................................................... 20
VII. Editing hiPS Cells by Gesicle Delivery of Cas9/sgRNA RNPs ................................................................................ 22
A. Protocol Overview .................................................................................................................................................... 22
B. Treating hiPS Cells with Cas9/sgRNA Gesicles ....................................................................................................... 22
VIII. Single-Cell Cloning of Gesicle-Treated Cells ........................................................................................................... 27
A. Protocol Overview .................................................................................................................................................... 27
B. Single-Cell Seeding into a 96-Well Plate.................................................................................................................. 28
C. Culturing Single-Cell Colonies ................................................................................................................................. 30
IX. Passaging Cells from the 96-Well Plate to a 48-Well Plate ...................................................................................... 31
A. Coating a 48-Well Plate ............................................................................................................................................ 31
B. Preparing DEF-CS SCC Medium for Passaging ....................................................................................................... 31
C. Passaging ................................................................................................................................................................... 31
X. Scaling up from the 48-Well Plate ................................................................................................................................ 32
XI. References ................................................................................................................................................................. 32
Appendix A. Troubleshooting Guide .................................................................................................................................... 33
Appendix B: pGuide-it-sgRNA1 Vector Information ........................................................................................................... 34

Cellartis iPSC CRISPR/Cas9 Gesicle and Single-Cell Cloning System User Manual
(030619)
takarabio.com
Takara Bio USA, Inc.
Page 3 of 34
Table of Figures Figure 1. Using Guide-it technology to perform genome editing ........................................................................................... 4
Figure 2. Gesicle Producer 293T cells generate nanovesicles (gesicles) for delivery of Cas9/sgRNA RNP complexes
specific to a gene of interest .................................................................................................................................................... 5
Figure 3. Using DEF-CS technology to generate edited clonal cell lines ............................................................................... 6
Figure 4. Workflow for gene editing of hiPS cells using components of the Cellartis iPSC CRISPR/Cas9 Gesicle and
Single-Cell Cloning System .................................................................................................................................................. 10
Figure 5. Workflow for CRISPR/Cas9 gesicle production ................................................................................................... 11
Figure 6. Workflow of sgRNA manual design ..................................................................................................................... 12
Figure 7. Examples of optimal sgRNAs targeting common genes ....................................................................................... 13
Figure 8. Cloning a target sequence ...................................................................................................................................... 14
Figure 9. pGuide-it-sgRNA1 includes an improved sgRNA scaffold design for increased editing efficiency .................... 15
Figure 10. Overview of the CRISPR/Cas9 gesicle production protocol ............................................................................... 17
Figure 11. Optimal density of Gesicle Producer 293T cells at the time of transfection ....................................................... 18
Figure 12. Gesicle Producer 293T cells after transfection .................................................................................................... 20
Figure 13. Workflow for gesicle-based delivery of Cas9/sgRNA complexes to hiPSCs. .................................................... 22
Figure 14. Optimal density of hiPS cells before Cas9/sgRNA gesicle treatment ................................................................. 25
Figure 15. Positive fluorescent signal from gesicle-treated hiPS cells ................................................................................. 26
Figure 16. Recommended density of starting culture used for single-cell cloning ............................................................... 28
Figure 17. A single cell seeded in one well generates an emerging colony .......................................................................... 30
Figure 18. Clonal colonies, ready for transfer to larger wells and scale-up .......................................................................... 31
Figure 19. pGuide-it-sgRNA1 Vector (Linear) map and cloning site for user’s guide sequence. ........................................ 34
Table of Tables Table I. Preparation of coating solution for the 6-well plate. ............................................................................................... 23
Table II. Preparation of medium and dissociation enzyme for culture during gesicle treatment. ......................................... 23
Table III. Preparation of coating solution for the 48-well plate. ........................................................................................... 24
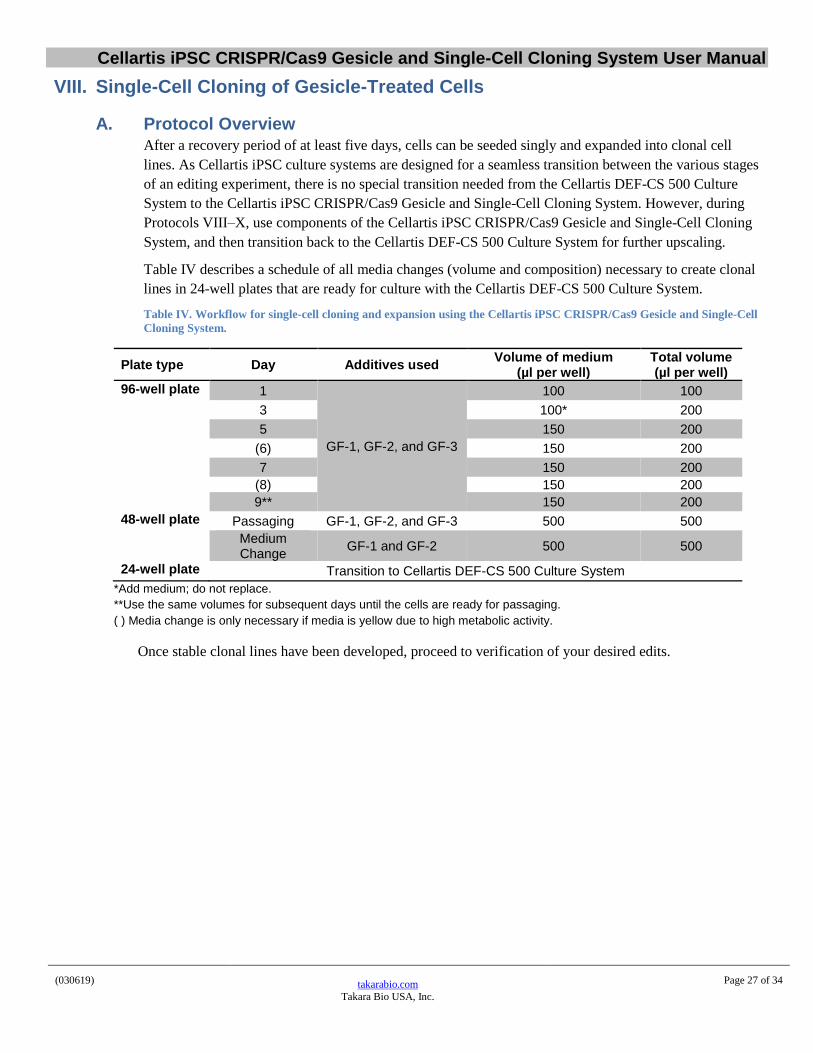
Table IV. Workflow for single-cell cloning and expansion using the Cellartis iPSC CRISPR/Cas9 Gesicle and Single-Cell
Cloning System. .................................................................................................................................................................... 27
Table V. Preparation of coating solution for a 96-well plate. ............................................................................................... 28
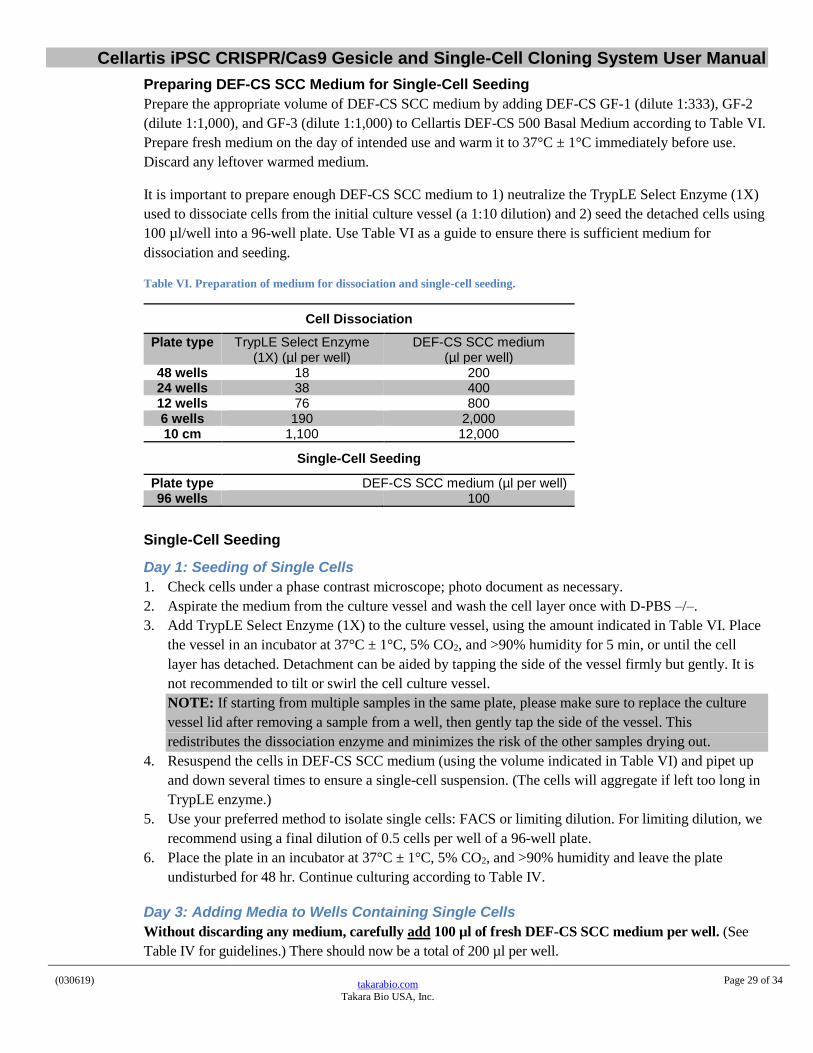
Table VI. Preparation of medium for dissociation and single-cell seeding. ......................................................................... 29
Table VII. Preparation of coating solution for a 48-well plate. ............................................................................................ 31
Table VIII. Troubleshooting guide for the Guide-it CRISPR/Cas9 Gesicle Production System. ......................................... 33

Cellartis iPSC CRISPR/Cas9 Gesicle and Single-Cell Cloning System User Manual
(030619)
takarabio.com
Takara Bio USA, Inc.
Page 4 of 34
I. Introduction The Cellartis iPSC CRISPR/Cas9 Gesicle and Single-Cell Cloning System is a complete system that allows
efficient, footprint-free gene editing of human induced pluripotent stem cells (iPSCs) via gesicle delivery of a
Cas9/sgRNA complex, followed by successful clonal expansion of single, edited iPSCs. Importantly, this system
maintains karyotype and pluripotency during the whole editing process.
The CRISPR/Cas9 system has emerged as a powerful tool for gene editing because of its high targeting
specificity, editing efficiency, and ease of use. The power of this technology derives from its simplicity, since all
it requires is a Cas9 nuclease enzyme combined with a single guide RNA (sgRNA) that determines its target
specificity (Jinek et al. 2012). This RNA-programmable method exploits the error-prone nature of the non-
homologous end joining DNA repair pathway (NHEJ) to generate gene knockouts (via insertion/deletion).
Figure 1. Using Guide-it technology to perform genome editing. The CRISPR/Cas9 system is a simple, RNA-programmable method to
mediate gene editing in mammalian cells. The CRISPR/Cas9 system relies on a single guide RNA (sgRNA), which consists of a single
RNA strand with a crRNA sequence that binds to a specific DNA target and a tracrRNA sequence that binds to Cas9 protein. When an
sgRNA engineered to contain a 20-nucleotide (nt) target sequence of interest binds to a recombinant form of Cas9 protein that has double-
stranded DNA endonuclease activity, the resulting complex will produce target-specific double-stranded cleavage. Cellular repair, which is
error-prone, will take place at the cleavage site, and may result in a mutation that can knock out a gene.
CRISPR/Cas9 system components have been delivered successfully into target cells through a variety of
approaches, including vector-based expression systems, transfection of RNA, and introduction of Cas9/sgRNA
ribonucleoprotein (RNP) complexes (Sander and Joung 2014). Delivery of Cas9/sgRNA RNPs provides a fast
turnaround for gene-editing experiments while minimizing the likelihood of off-target effects compared to vector-
based approaches (Kim et al. 2014).
We have developed a method to deliver Cas9/sgRNA RNP complexes using cell-derived nanovesicles called
gesicles. Gesicles are vesicles released from the plasma membrane of mammalian producer cells and are capable
of carrying any cargo, such as proteins and protein complexes. CRISPR/Cas9 Gesicles are generated by the co-
expression of Cas9 protein, a customer-designed sgRNA, and other proteins that stimulate gesicles to be released

Cellartis iPSC CRISPR/Cas9 Gesicle and Single-Cell Cloning System User Manual
(030619)
takarabio.com
Takara Bio USA, Inc.
Page 5 of 34
from the producer cell membrane (Figure 2). Once gesicles have been made, they can be harvested, concentrated,
and applied to target cells, where the active Cas9/sgRNA complex is released and transported to the nucleus for
efficient gene editing.
The editing component of the Cellartis iPSC CRISPR/Cas9 Gesicle and Single-Cell Cloning System features a
complete system for producing high yields of gesicles containing a Cas9/sgRNA complex targeting a user’s gene
of interest in human iPS cells. The included Guide-it Gesicle Packaging Mix contains lyophilized Xfect™
Transfection Reagent premixed with an optimized, ready-to-use formulation of plasmids that contain coding
sequences for all the elements necessary for Cas9 expression and gesicle production. Gesicle Producer 293T Cells
(sold separately; Cat. No. 632617) are transfected with these plasmids plus a target-specific sgRNA plasmid,
allowing users to easily generate their own Cas9/sgRNA gesicles for gene editing in target cells.
Figure 2. Gesicle Producer 293T cells generate nanovesicles (gesicles) for delivery of Cas9/sgRNA RNP complexes specific
to a gene of interest. Once produced (left side of image), gesicles are harvested from the culture supernatant and concentrated.
The gesicles can be applied to target cells immediately (right side of image), or frozen in aliquots for future use. Below are
detailed descriptions corresponding to the steps in yellow.
1. The Gesicle Producer 293T Cell Line (Cat. No. 632617) (not included) is transfected with a mix of
plasmids that induce the formation of gesicles from the surface of transfected cells, together with a target-
specific sgRNA expression plasmid (pGuide-it-sgRNA1) and a plasmid encoding for Cas9.
2. Since they are both co-expressed in the packaging cell, the Cas9 protein associates with the sgRNA,
forming Cas9/sgRNA complexes. The Cas9 protein is tagged with an inducible dimerization domain
(iDimerize™ technology), as is the membrane-bound CherryPicker™ protein. In the presence of a small
molecule ligand (the A/C Heterodimerizer), the Cas9/sgRNA complexes are localized with the
CherryPicker protein at the plasma membrane and are actively packaged into the forming gesicles.

Cellartis iPSC CRISPR/Cas9 Gesicle and Single-Cell Cloning System User Manual
(030619)
takarabio.com
Takara Bio USA, Inc.
Page 6 of 34
3. Gesicles loaded with Cas9/sgRNA complexes and labeled with the CherryPicker protein pinch off from
the producer cell line, and then they are collected from the supernatant and concentrated via
centrifugation to provide a stock of Cas9/sgRNA gesicles.
4. Harvested gesicles can either be frozen in aliquots for later use or applied immediately to the target cells
of interest. The gesicles fuse to the target cells, transiently labeling them with the CherryPicker red
fluorescent protein. Due to the lack of A/C Heterodimerizer in the culture media of the target cells, the
Cas9/sgRNA complex is released from CherryPicker and translocated to the nucleus to perform site-
specific gene editing in a broad range of cell types.
Once the Cas9/sgRNA RNP complexes have been delivered by gesicles and cells have recovered, single cells
must be isolated and expanded into clonal cell lines in order to isolate and screen for the genotype of interest
(Figure 3). Traditionally, the establishment of a clonal population from hiPS cells grown and passaged as colonies
is inefficient, challenging, and time-consuming; often, it results in cell death or premature differentiation.
However, the cell culture component of the Cellartis iPSC CRISPR/Cas9 Gesicle and Single-Cell Cloning System
contains a defined culture system (the Cellartis DEF-CS™ culture system, composed of basal medium, coating,
and additives) for efficient single-cell cloning and expansion of edited hiPSC clones. The DEF-CS culture system,
a monolayer-based culture system, overcomes the challenges of colony-based culture by allowing single-cell
passaging, promoting survival and further expansion of plated single cells, and preserving the pluripotency of
these cells.
Figure 3. Using DEF-CS technology to generate edited clonal cell lines. Human induced pluripotent stem (hiPS) cells can be cultured,
edited, and clonally expanded using the Cellartis iPSC CRISPR/Cas9 Gesicle and Single-Cell Cloning System. Initially, hiPS cells are
adapted to the DEF-CS culture system, which maintains cells as a karyotypically stable and pluripotent monolayer. Next, gesicle-based
delivery of Cas9 and an sgRNA (together as an RNP) are used to edit the cells. Using FACS or limiting dilution, edited cells can be
individually seeded into wells of a 96-well plate (Panel A) and expanded into clonal lines. If desired, edited cells can be first sorted by flow
cytometry, then seeded into wells of a 96-well plate, and finally expanded into clonal lines (Panel B).
All procedures described in this manual are optimized for Cellartis human iPS cell lines. If you wish to use the
Cellartis iPSC CRISPR/Cas9 Gesicle and Single-Cell Cloning System for other human iPS cell lines or for
Cellartis iPS cells grown in another system, please be aware that these cell lines will need to be adapted to the
DEF-CS culture system before editing (see Section IV.B).
Cellartis iPSC CRISPR/Cas9 Gesicle and Single-Cell Cloning System User Manual
(030619)
takarabio.com
Takara Bio USA, Inc.
Page 7 of 34
II. List of Components The Cellartis iPSC CRISPR/Cas9 Gesicle and Single-Cell Cloning System (Cat. No. 632642) contains:
• Guide-it™ CRISPR/Cas9 Gesicle Packaging Set (Cat. No. 632616)
o 10 vials Guide-it CRISPR/Cas9 Gesicle Packaging Mix 1, in a foil pouch (green cap)
o 10 vials Guide-it CRISPR/Cas9 Gesicle Packaging Mix 2, in a foil pouch (yellow cap)
o 50 µl A/C Heterodimerizer (0.5 mM)
o 200 µl Protamine Sulfate (4 mg/ml)
• Guide-it Ligation Components v2 (Cat. No. 632615) (Not sold separately)
o 50 µl DNA Ligation Mighty Mix*
o 1.5 ml Guide-it Oligo Annealing Buffer
o 10 µl Guide-it Control Annealed Oligos v2 (100 fmol/µl)
o 10 µl Guide-it Sequencing Primer 1 (100 pmol/µl)
o 1 ml PCR Grade Water
*DNA Ligation Mighty Mix is also available separately (100 rxns, Cat. No. 6023).
• pGuide-it-sgRNA1 Vector (Linear) (Cat. No. 632614) (Not sold separately)
o 20 µl pGuide-it-sgRNA1 Vector (Linear) (7.5 ng/µl)
• Stellar™ Competent Cells (Cat. No. 636763)
o 10 tubes Stellar Competent Cells (100 µl/tube)
o 10 tubes SOC Medium (1 ml/tube)
o 10 µl pUC19 Vector (0.1 ng/µl)
• 2 x 800 µl Cellartis iPSC Single-Cell Cloning DEF-CS COAT-1 (Cat. No. Y30018) (Not sold separately)
• 500 ml Cellartis DEF-CS 500 Basal Medium (Cat. No. Y30011) (Not sold separately)
• Cellartis iPSC Single-Cell Cloning DEF-CS Additives (Cat. No. Y30019) (Not sold separately)
o 2 x 750 µl DEF-CS GF-1
o 500 µl DEF-CS GF-2
o 500 µl DEF-CS GF-3
III. Additional Materials Not Supplied
A. Required
Mammalian Cell Culture Supplies
Use the Cellartis DEF-CS 500 Culture System (Takara Bio, Cat. No. Y30010) for maintaining hiPS cell
lines 1) prior to using the Cellartis iPSC CRISPR/Cas9 Gesicle and Single-Cell Cloning System and 2)
for scaling up clonal lines created using this system.
The following tissue culture materials are required but not supplied:
Cas9/sgRNA Gesicle Production:
• Gesicle Producer 293T Cell Line (Cat. No. 632617)
• Medium for HEK 293 or HEK 293T Cells
Dulbecco's Modified Eagle's Medium (DMEM) with high glucose (4.5 g/L), 4 mM L-glutamine, and
sodium bicarbonate (Sigma, Cat. No. D5796 or equivalent)
• 10% Fetal Bovine Serum (FBS) (Takara Bio, Cat. No. 631107 or equivalent)
• 1% Antibiotic Antimycotic Solution (100X), Stabilized (Sigma, Cat. No. A5955 or equivalent)
Cellartis iPSC CRISPR/Cas9 Gesicle and Single-Cell Cloning System User Manual
(030619)
takarabio.com
Takara Bio USA, Inc.
Page 8 of 34
• Trypsin/EDTA (Sigma, Cat. No. T4049 or equivalent)
• Dulbecco’s Phosphate Buffered Saline, Modified, without calcium chloride and magnesium chloride,
liquid, sterile-filtered, suitable for cell culture (Sigma, Cat. No. D8537 or equivalent)
• 10-cm tissue culture dishes coated with collagen I or poly-lysine for transfecting Gesicle Producer
293T cells (Corning, 354450 or equivalent)
Single-Cell Cloning:
• 96-well plates, flat bottom, cell-culture treated (Corning, Cat. No. 3595 or equivalent)
• 48-well plates, flat bottom, cell-culture treated (Corning, Cat. No. 3548 or equivalent)
• TrypLE Select Enzyme (1X), no phenol red (Thermo Fisher Scientific, Cat. No. 12563011)
• PBS Dulbecco's with Ca2+ & Mg2+ (D-PBS +/+) (Sigma, Cat. No. D8662 or equivalent)
• PBS Dulbecco's w/o Ca2+ & Mg2+ (D-PBS –/–) (Sigma, Cat. No. D8537 or equivalent)
Molecular Biology Supplies
• Target-specific oligos (see Section VI.B)
• TE buffer or molecular biology grade, nuclease-free water
• PCR reaction tubes
• Micropipette tips (with hydrophobic filters)
• 1.5-ml microfuge tubes
• Thermal cycler
• 42°C heat block
• 37°C incubator/shaker
• LB plates containing ampicillin (100 µg/ml)
• Bacteria spreader
• 50 ml conical tubes (Corning Falcon, Cat. No. 352070 or equivalent)
• 20 ml sterile syringes with Luer-Lok tip (BD, Cat. No. 302830 or equivalent)
• 0.45-µm sterile syringe filters (Thermo Fisher Scientific, Cat. No. 723-9945 or equivalent)
• Beckman J2-HS Centrifuge with a JS-7.5 swinging bucket rotor (or equivalent)
B. Recommended
Plasmid Purification Supplies
Cat. No. Product Size 740588.50 NucleoSpin Plasmid 50 preps 740410.10 NucleoBond Xtra Midi 10 preps 740414.10 NucleoBond Xtra Maxi 10 preps
Genotype Confirmation Supplies
These items are recommended for determining the efficiency of gene editing after gesicle treatment (Cat.
Nos. 631443 & 631448), the genotype (Cat. No. 632611), and the sequence of the edits (Cat. No. 631444)
in the clonal cell lines:
Cat. No. Product Size 631443 Guide-it Mutation Detection Kit 100 rxns 631448 Guide-it Mutation Detection Kit 25 rxns 632611 Guide-it Genotype Confirmation Kit 100 rxns 631444 Guide-it Indel Identification Kit 10 rxns
Cellartis iPSC CRISPR/Cas9 Gesicle and Single-Cell Cloning System User Manual
(030619)
takarabio.com
Takara Bio USA, Inc.
Page 9 of 34
IV. General Considerations
A. Storage and Handling
• Guide-it CRISPR/Cas9 Gesicle Packaging Set
o Store all components at –20°C.
o Return unused vials of Guide-it CRISPR/Cas9 Gesicle Packaging Mix 1 and Mix 2 to the
supplied foil pouches containing the desiccant sachet and store at –20°C.
• Guide-it Ligation Components v2
o Store at –20°C.
o Avoid repeated freeze/thaw cycles.
• pGuide-it-sgRNA1 Vector (Linear)
o Store at –20°C.
o Spin briefly to recover contents.
o Avoid repeated freeze/thaw cycles.
• Stellar Competent Cells
o Store cells at –70°C, and store all other components at –20°C.
• Cellartis iPSC Single-Cell Cloning DEF-CS COAT-1
o Store at 2–8°C.
o Shelf life is specified on the product label.
• Cellartis DEF-CS 500 Basal Medium
o Store at 2–8°C.
o Contains penicillin and streptomycin.
• Cellartis iPSC Single-Cell Cloning DEF-CS Additives
o Store at –20°C.
o Shelf life is specified on the product label.
o At first use, thaw provided vials, mix each vial gently, and aliquot each component separately into
appropriate volumes. Store aliquots at –20°C until the expiration date on the original vial. Thawed
vials may be stored at 2–8°C for up to one week. Do not re-freeze aliquots after thawing.
B. Transferring Human iPS Cells to the DEF-CS Culture System
It is strongly recommended to transfer cells from other culturing systems to the Cellartis DEF-CS 500
Culture System (Cat. No. Y30010) before editing and single-cell cloning with the Cellartis iPSC
CRISPR/Cas9 Gesicle and Single-Cell Cloning System. Human iPS cells maintained in other culture
systems can be readily transferred: fresh cultures can be transferred at passage and cryopreserved cultures
can be thawed directly into the Cellartis DEF-CS 500 Culture System. Cells should be passaged at least
five times in the DEF-CS system prior to using the Cellartis iPSC CRISPR/Cas9 Gesicle and Single-Cell
Cloning System.
Expected Morphology of Human iPS Cells in the DEF-CS System
DEF-CS technology uses enzyme-based passaging in conjunction with a coating to promote single-cell
survival, rapid expansion, and easier passaging. When transferring iPS cells to this system, you will
notice that some cell characteristics differ from those of iPS cells cultured in your previous system. In
contrast to commonly used colony-based culture systems, the DEF-CS culture system yields a monolayer
of evenly spaced cells. Newly passaged cells grown in the DEF-CS culture system tend to spread out;
however, as cells proliferate, the culture gets more confluent, and cells display typical undifferentiated
stem cell morphology (i.e., high nucleus to cytoplasm ratio, defined borders, and prominent nucleoli).
Cellartis iPSC CRISPR/Cas9 Gesicle and Single-Cell Cloning System User Manual
(030619)
takarabio.com
Takara Bio USA, Inc.
Page 10 of 34
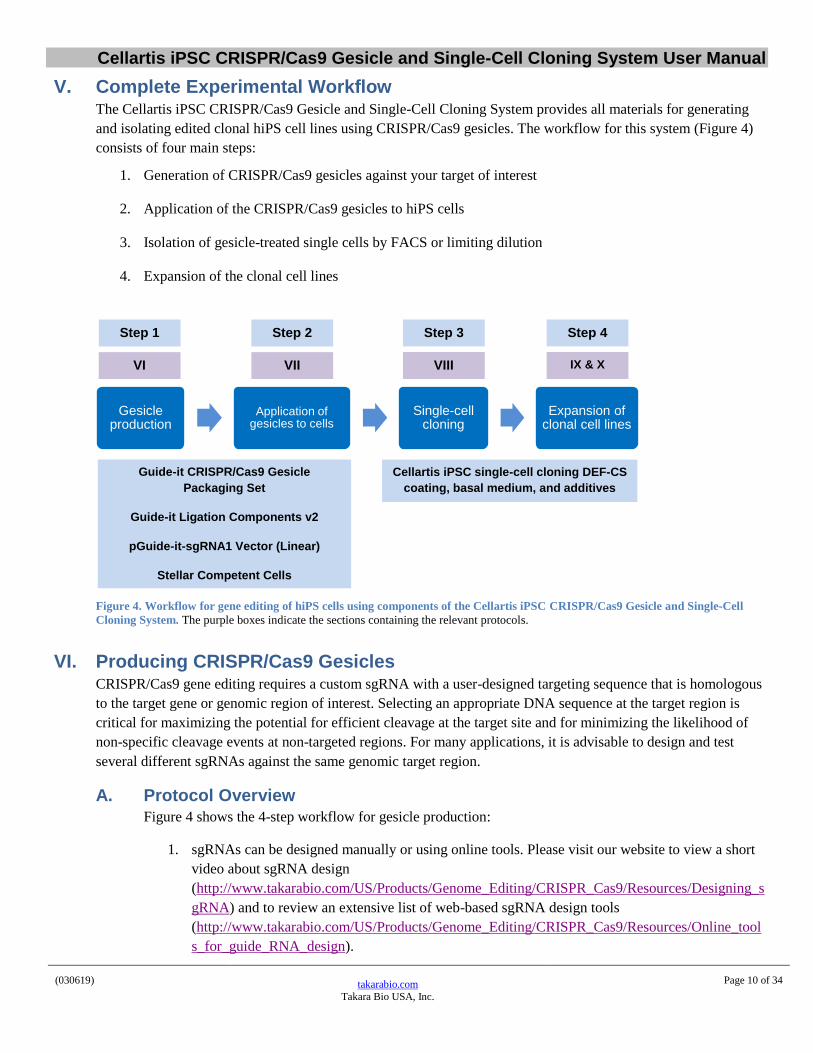
V. Complete Experimental Workflow The Cellartis iPSC CRISPR/Cas9 Gesicle and Single-Cell Cloning System provides all materials for generating
and isolating edited clonal hiPS cell lines using CRISPR/Cas9 gesicles. The workflow for this system (Figure 4)
consists of four main steps:
1. Generation of CRISPR/Cas9 gesicles against your target of interest
2. Application of the CRISPR/Cas9 gesicles to hiPS cells
3. Isolation of gesicle-treated single cells by FACS or limiting dilution
4. Expansion of the clonal cell lines
Figure 4. Workflow for gene editing of hiPS cells using components of the Cellartis iPSC CRISPR/Cas9 Gesicle and Single-Cell
Cloning System. The purple boxes indicate the sections containing the relevant protocols.
VI. Producing CRISPR/Cas9 Gesicles CRISPR/Cas9 gene editing requires a custom sgRNA with a user-designed targeting sequence that is homologous
to the target gene or genomic region of interest. Selecting an appropriate DNA sequence at the target region is
critical for maximizing the potential for efficient cleavage at the target site and for minimizing the likelihood of
non-specific cleavage events at non-targeted regions. For many applications, it is advisable to design and test
several different sgRNAs against the same genomic target region.
A. Protocol Overview
Figure 4 shows the 4-step workflow for gesicle production:
1. sgRNAs can be designed manually or using online tools. Please visit our website to view a short
video about sgRNA design
(http://www.takarabio.com/US/Products/Genome_Editing/CRISPR_Cas9/Resources/Designing_s
gRNA) and to review an extensive list of web-based sgRNA design tools
(http://www.takarabio.com/US/Products/Genome_Editing/CRISPR_Cas9/Resources/Online_tool
s_for_guide_RNA_design).
Gesicle production
Application of gesicles to cells
Single-cell cloning
Expansion of clonal cell lines
Step 1 Step 2 Step 3 Step 4
Guide-it CRISPR/Cas9 Gesicle
Packaging Set
Guide-it Ligation Components v2
pGuide-it-sgRNA1 Vector (Linear)
Stellar Competent Cells
Cellartis iPSC single-cell cloning DEF-CS
coating, basal medium, and additives
VI VII VIII IX & X

Cellartis iPSC CRISPR/Cas9 Gesicle and Single-Cell Cloning System User Manual
(030619)
takarabio.com
Takara Bio USA, Inc.
Page 11 of 34
2. Oligos corresponding to the target-specific sgRNA designed above are annealed to form a DNA
duplex and then cloned into the provided linearized delivery plasmid, pGuide-it-sgRNA1.
3. The cloned plasmid is diluted with dH2O and added to the gesicle packaging mixes. Following a
10-min incubation, the mix is applied to producer cells in the presence of the A/C
Heterodimerizer ligand.
4. 48–72 hr later, gesicles containing active Cas9/sgRNA complexes are collected from the medium
and concentrated via overnight centrifugation.
Figure 5. Workflow for CRISPR/Cas9 gesicle production. The purple boxes indicate the sections containing the relevant protocols.
B. Designing sgRNAs Against the Target Sequence
Identifying Candidate sgRNAs Against Your Target Sequence
The first step of a CRISPR/Cas9 experiment is to design candidate sgRNAs that target your gene of
interest. Cas9 from S. pyogenes cleaves DNA sequences located 5’ to the sequence NGG (also called the
Proto-spacer Adjacent Motif, or PAM). Given a predetermined target sequence, sgRNAs can be designed
manually or by using an online tool. Here is a short tutorial on sgRNA design:
https://www.takarabio.com/learning-centers/gene-function/gene-editing/gene-editing-tools-and-
information/how-to-design-sgrna-sequences
Designing Candidate sgRNAs
• Here is a list of helpful online tools for finding sgRNAs against your target sequence:
http://www.takarabio.com/US/Products/Genome_Editing/CRISPR_Cas9/Resources/Online_t
ools_for_guide_RNA_design
• To design your sgRNAs manually (Figure 6), first identify PAMs in your gene of interest.
Then simply count 20 nucleotides upstream of, or 5' to, the PAM. These nucleotides (the
target-specific fragment of your sgRNA) will be cloned in front of the sgRNA scaffold to
construct the full sgRNA sequence. The PAM itself is not included in your sgRNA. If your
PAM is found on the antisense strand (Panel B of Figure 6), be sure to count your 20
nucleotides in a direction that is still 5’ to the PAM and remember to read the final sequence
in the 5’ to 3’ direction.
Design sgRNA against target
sequence
Generate a plasmid encoding the
sgRNA
Produce Cas9/sgRNA
gesicles
Harvest and concentrate Cas9/sgRNA
gesicles
VI.B VI.C VI.D
Step 1 Step 2 Step 3
VI.E
Step 4

Cellartis iPSC CRISPR/Cas9 Gesicle and Single-Cell Cloning System User Manual
(030619)
takarabio.com
Takara Bio USA, Inc.
Page 12 of 34
Figure 6. Workflow of sgRNA manual design. The PAM may be located on the sense strand (Panel A) or the antisense strand
(Panel B).
Whether you use an online tool or design the sequences of potential sgRNAs manually, you will
obtain many candidate sgRNAs, because PAM sequences such as NGG occur every 8–12 base
pairs in the human genome. In order to narrow the list of potential sgRNAs, you can evaluate the
efficiency of each sgRNA and its potential off-target effects.
Testing Candidate sgRNA Efficiency
Effective sgRNAs for gesicle-mediated Cas9/sgRNA editing (i.e., those that result in high levels
of gene knockout) contain a G in position 1 and an A/T in position 17 (counting down from the
PAM sequence at position 21). In our experience, only sgRNAs that fulfill both requirements
are effective for editing via gesicle-mediated delivery (Figure 7).

Cellartis iPSC CRISPR/Cas9 Gesicle and Single-Cell Cloning System User Manual
(030619)
takarabio.com
Takara Bio USA, Inc.
Page 13 of 34
Figure 7. Examples of optimal sgRNAs targeting common genes. Each of these sequences contains a G in position 1
and an A or T in position 17 (in red).
As an additional check, the Guide-it sgRNA Screening Kit (Cat. No. 632639) enables you to test
the efficacy of different sgRNAs in vitro prior to using them in studies involving Cas9-mediated
gene editing in cells.
Minimizing Off-Target Effects
• To minimize off-target cleavage, the entire target sequence including the PAM site should
contain at least three base mismatches with any other, non-targeted genomic sequence (Hsu et
al. 2013; Mali et al. 2013); off-target cleavage is especially low if the mismatches are in, or
adjacent to, the PAM site.
• Most online tools for sgRNA design also predict the off-target sequences related to each
sgRNA. We recommend choosing sgRNAs with minimal predicted off-target effects.

Cellartis iPSC CRISPR/Cas9 Gesicle and Single-Cell Cloning System User Manual
(030619)
takarabio.com
Takara Bio USA, Inc.
Page 14 of 34
Designing and Ordering Oligos
In order to clone your sgRNA into the provided prelinearized pGuide-it-sgRNA1 Vector, you must order
or synthesize a pair of oligos corresponding to the target-specific sequence of the sgRNA of interest,
determined in Section VI.B above, including short 5’ overhang sequences complementary to the vector
backbone (Figure 8). Only the 20-nucleotide sequence corresponding to the target needs to be cloned into
the linearized pGuide-it-sgRNA1 vector; the vector already contains the sgRNA scaffold sequence.
1. The sense oligo (Oligo 1) corresponds to the 20-nucleotide sgRNA sequence chosen in Section VI.B,
plus the 5’ overhang sequence, cacc. Do not include the PAM sequence.
Oligo 1: 5’-cacc XXX XXX XXX XXX XXX XXX XX-3’
2. The antisense oligo (Oligo 2) is the complementary sequence of Oligo 1, plus the 5’ overhang
sequence, aaac.
Oligo 2: 5’-aaac YY YYY YYY YYY YYY YYY YYY-3’
NOTE: If the first base at the 5’ end of the sgRNA sequence (Oligo 1) is not a guanine, it is necessary to
add an extra guanine at this end, as shown below:
• Oligo 1: 5’-cacc GXXX XXX XXX XXX XXX XXX XX-3’
• Oligo 2: 5’-aaac YY YYY YYY YYY YYY YYY YYYC-3’
Figure 8. Cloning a target sequence. This example corresponds to the sequence of the Guide-it Control Annealed Oligos v2
included in the kit. The target region (marked in red) is shown in the top half of the figure. Both oligos contain the additional 5’
overhang sequences required for cloning into the pGuide-it-sgRNA1 vector, marked in blue (bottom half of figure).
C. Generating a Plasmid Encoding the sgRNA
Please read the protocol completely before starting. Successful results depend on understanding and
performing the following steps correctly.
It is essential to use the pGuide-it-sgRNA1 Vector for cloning your target oligos (designed according to
Section VI.B above), since using other commonly used guide RNA vectors will not result in formation of
effective Cas9/sgRNA RNP gesicles. We have modified the sgRNA scaffold in the pGuide-it-sgRNA1
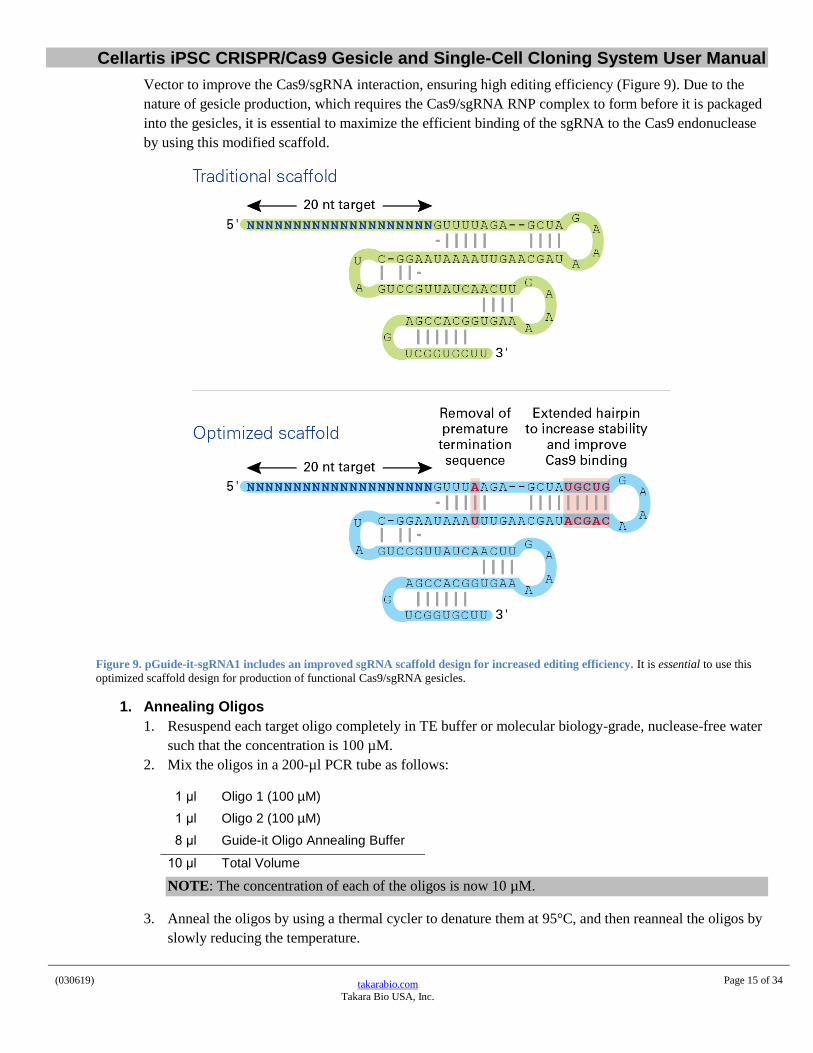
Cellartis iPSC CRISPR/Cas9 Gesicle and Single-Cell Cloning System User Manual
(030619)
takarabio.com
Takara Bio USA, Inc.
Page 15 of 34
Vector to improve the Cas9/sgRNA interaction, ensuring high editing efficiency (Figure 9). Due to the
nature of gesicle production, which requires the Cas9/sgRNA RNP complex to form before it is packaged
into the gesicles, it is essential to maximize the efficient binding of the sgRNA to the Cas9 endonuclease
by using this modified scaffold.
Figure 9. pGuide-it-sgRNA1 includes an improved sgRNA scaffold design for increased editing efficiency. It is essential to use this
optimized scaffold design for production of functional Cas9/sgRNA gesicles.
1. Annealing Oligos
1. Resuspend each target oligo completely in TE buffer or molecular biology-grade, nuclease-free water
such that the concentration is 100 µM.
2. Mix the oligos in a 200-µl PCR tube as follows:
1 μl Oligo 1 (100 µM)
1 μl Oligo 2 (100 µM)
8 μl Guide-it Oligo Annealing Buffer
10 μl Total Volume
NOTE: The concentration of each of the oligos is now 10 µM.
3. Anneal the oligos by using a thermal cycler to denature them at 95°C, and then reanneal the oligos by
slowly reducing the temperature.

Cellartis iPSC CRISPR/Cas9 Gesicle and Single-Cell Cloning System User Manual
(030619)
takarabio.com
Takara Bio USA, Inc.
Page 16 of 34
Program your thermal cycler with the following cycling conditions:
95°C 2 min
Slope from 95°C to 25°C 15 min
25°C hold
4. Mix 1 µl of the annealed oligo solution with an additional 99 µl of Guide-it Oligo Annealing Buffer to
make a 100 nM (fmol/µl) solution.
5. Store the annealed oligos at –20°C until use.
2. Cloning the sgRNA Targeting Sequence Into pGuide-it-sgRNA1
1. Thaw the necessary reagents at room temperature and set up the reaction as follows:
2 μl pGuide-it-sgRNA1 Vector (Linear) (7.5 ng/μl)*
3 μl Target-specific annealed oligos (100 fmol/μl; from Section VI.C.1, Step 5) (For a positive control reaction, use the included Guide-it Control Annealed Oligos v2 (100 fmol/µl)
5 μl DNA Ligation Mighty Mix
10 μl Total volume
*Use the pGuide-it-sgRNA1 Vector to clone your target oligos. Other commonly used guide RNA vectors will
not result in formation of effective Cas9/sgRNA complexes (see Figure 9).
2. Incubate the reaction mix at 16°C for 30 min.
3. Meanwhile, thaw one vial of Stellar Competent Cells on ice.
4. Add the entire 10-µl ligation mixture to the competent cells and mix gently by tapping.
5. Allow the mixture to stand on ice for 30 min.
6. Heat shock the cells at 42°C for 45 sec and immediately place on ice. Incubate for 2 min.
7. Add 1 ml of SOC medium and incubate at 37°C for 1 hr with vigorous shaking.
8. Plate an appropriate amount of the culture on pre-warmed (37°C) LB plates containing ampicillin
(final concentration 100 µg/ml).
9. Incubate the plates at 37°C overnight.
3. Isolate and Analyze Plasmids
1. Pick single colonies and inoculate into an appropriate amount of LB medium containing ampicillin
(final concentration 100 µg/ml).
2. Incubate with shaking overnight at 37°C.
3. Purify plasmid DNA from bacteria. We highly recommend NucleoSpin Plasmid (Cat. No. 740588.50)
for rapid, high-yield, and high-purity purification. For transfection-grade plasmid preparation, use
NucleoBond Xtra Midi (Cat. No. 740410.10) or NucleoBond Xtra Maxi (Cat. No. 740414.10).
4. Perform sequencing analysis using the included Guide-it Sequencing Primer 1 and your preferred
sequencing protocol.
Cellartis iPSC CRISPR/Cas9 Gesicle and Single-Cell Cloning System User Manual
(030619)
takarabio.com
Takara Bio USA, Inc.
Page 17 of 34
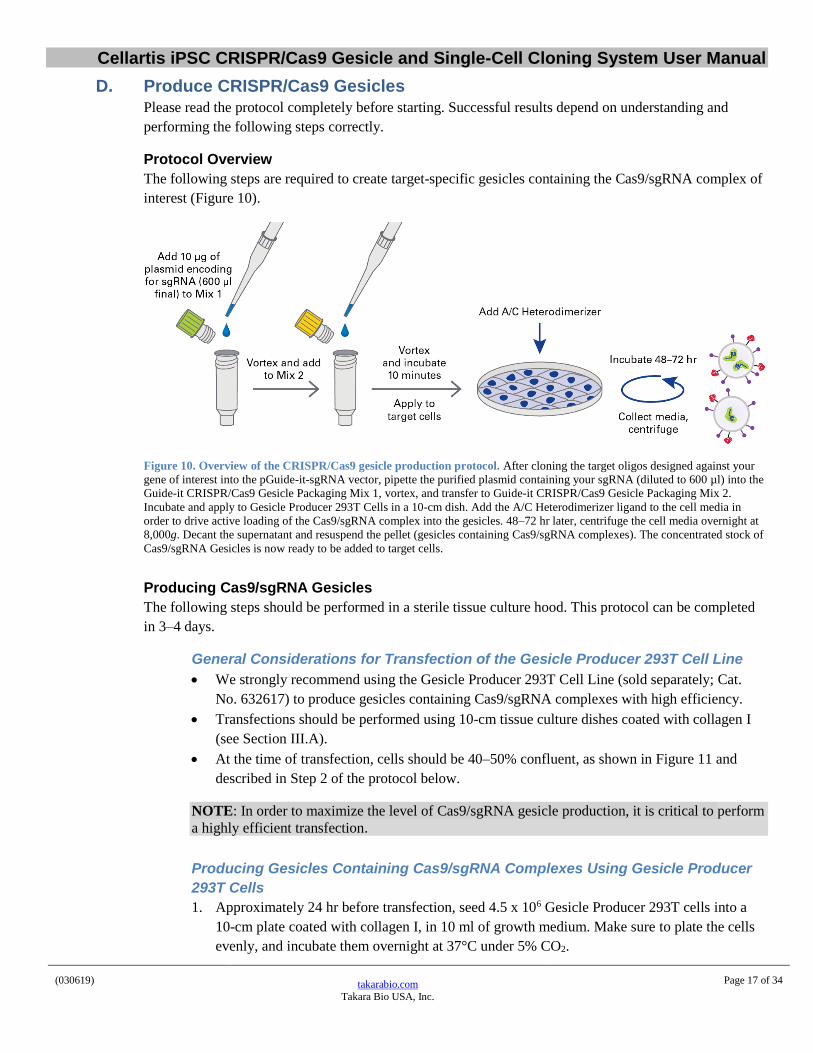
D. Produce CRISPR/Cas9 Gesicles
Please read the protocol completely before starting. Successful results depend on understanding and
performing the following steps correctly.
Protocol Overview
The following steps are required to create target-specific gesicles containing the Cas9/sgRNA complex of
interest (Figure 10).
Figure 10. Overview of the CRISPR/Cas9 gesicle production protocol. After cloning the target oligos designed against your
gene of interest into the pGuide-it-sgRNA vector, pipette the purified plasmid containing your sgRNA (diluted to 600 µl) into the
Guide-it CRISPR/Cas9 Gesicle Packaging Mix 1, vortex, and transfer to Guide-it CRISPR/Cas9 Gesicle Packaging Mix 2.
Incubate and apply to Gesicle Producer 293T Cells in a 10-cm dish. Add the A/C Heterodimerizer ligand to the cell media in
order to drive active loading of the Cas9/sgRNA complex into the gesicles. 48–72 hr later, centrifuge the cell media overnight at
8,000g. Decant the supernatant and resuspend the pellet (gesicles containing Cas9/sgRNA complexes). The concentrated stock of
Cas9/sgRNA Gesicles is now ready to be added to target cells.
Producing Cas9/sgRNA Gesicles
The following steps should be performed in a sterile tissue culture hood. This protocol can be completed
in 3–4 days.
General Considerations for Transfection of the Gesicle Producer 293T Cell Line
• We strongly recommend using the Gesicle Producer 293T Cell Line (sold separately; Cat.
No. 632617) to produce gesicles containing Cas9/sgRNA complexes with high efficiency.
• Transfections should be performed using 10-cm tissue culture dishes coated with collagen I
(see Section III.A).
• At the time of transfection, cells should be 40–50% confluent, as shown in Figure 11 and
described in Step 2 of the protocol below.
NOTE: In order to maximize the level of Cas9/sgRNA gesicle production, it is critical to perform
a highly efficient transfection.
Producing Gesicles Containing Cas9/sgRNA Complexes Using Gesicle Producer
293T Cells
1. Approximately 24 hr before transfection, seed 4.5 x 10⁶ Gesicle Producer 293T cells into a
10-cm plate coated with collagen I, in 10 ml of growth medium. Make sure to plate the cells
evenly, and incubate them overnight at 37°C under 5% CO2.

Cellartis iPSC CRISPR/Cas9 Gesicle and Single-Cell Cloning System User Manual
(030619)
takarabio.com
Takara Bio USA, Inc.
Page 18 of 34
2. At the time of transfection, cells should be 40–50% confluent, as shown in Figure 11.
Figure 11. Optimal density of Gesicle Producer 293T cells at the time of transfection. Cells are shown at 20X
magnification (Panel A) and 5X magnification (Panel B).
3. Just before transfection, remove 2.5 ml of medium from the 10-cm plate containing the cells
and discard it, leaving a total cell culture volume of approximately 7.5 ml.
4. Add 1.25 µl of the A/C Heterodimerizer to the 10-cm plate. Rock the plate gently back and forth
to mix.
NOTE: Do not add more than the recommended amount of A/C Heterodimerizer. Its final
concentration has been optimized to maximize the number of Cas9/sgRNA complexes
packaged inside the gesicles. The number of Cas9/sgRNA complexes will decrease if
additional A/C Heterodimerizer ligand is used.
5. In a sterile microfuge tube, dilute 10 μg of the pGuide-it-sgRNA1 plasmid encoding your
sgRNA of choice (from Section VI.C.1, Step 5) with sterile water to a final volume of 600 μl.
Mix thoroughly by vortexing.
NOTE: Always dilute your DNA in water prior to adding it to a Guide-it CRISPR/Cas9
Gesicle Packaging Mix. Do not add water and DNA separately; undiluted DNA should not be
mixed with the Guide-it CRISPR/Cas9 Packaging Mix.
6. Add the 600 μl of diluted pGuide-it-sgRNA1 plasmid to a tube of Guide-it CRISPR/Cas9
Gesicle Packaging Mix 1 (green cap), replace the cap, and vortex well at a high speed for 20
sec. The pellet should dissolve completely.
NOTE: In some cases, some insoluble material may be visible after vortexing. This material
does not have a negative effect on transfection efficiency or gesicle production yields.
7. Transfer the 600 μl of Mix 1 to a tube of Guide-it CRISPR/Cas9 Gesicle Packaging Mix 2
(yellow cap), replace the cap, and vortex well at a high speed for 20 sec. The pellet should
dissolve completely.
NOTE: In some cases, some insoluble material may be visible after vortexing. This material
does not have a negative effect on transfection efficiency or gesicle production yields.
8. Incubate the tube for 10 min at room temperature. After the 10-min incubation, centrifuge the
tube for 2 sec to collect the complete contents of the tube.
NOTE: Sample tubes can be inserted into 1.5-ml microfuge tubes for centrifugation.
Cellartis iPSC CRISPR/Cas9 Gesicle and Single-Cell Cloning System User Manual
(030619)
takarabio.com
Takara Bio USA, Inc.
Page 19 of 34
9. Add the entire 600 μl of solution from Mix 2 dropwise to the cell culture (Step 4). Distribute
evenly across the culture dish. Rock the plate gently back and forth to mix.
NOTE: It is normal for the medium to change color slightly upon addition of the Guide-it
CRISPR/Cas9 Gesicle Packaging Mix solution.
10. Incubate the cells at 37°C under 5% CO2.
NOTE: A 4-hr incubation with the Guide-it CRISPR/Cas9 Gesicle Packaging Mix is
sufficient for optimal transfection. Incubation may be continued overnight for convenience.
11. After incubating the cells (from 4 hr to overnight), add an additional 7.5 ml of fresh complete
growth medium containing 1.25 µl of A/C Heterodimerizer to the 10-cm plate (the final cell
culture volume will be 15 ml).
NOTE: Do not add more than the recommended amount of A/C Heterodimerizer. Its final
concentration has been optimized to maximize the amount of Cas9/sgRNA loaded inside each
gesicle. The amount of Cas9/sgRNA in each gesicle will decrease if additional ligand is used.
12. Rock the plate gently back and forth to mix, and incubate at 37°C under 5% CO2 for an
additional 48–72 hr.
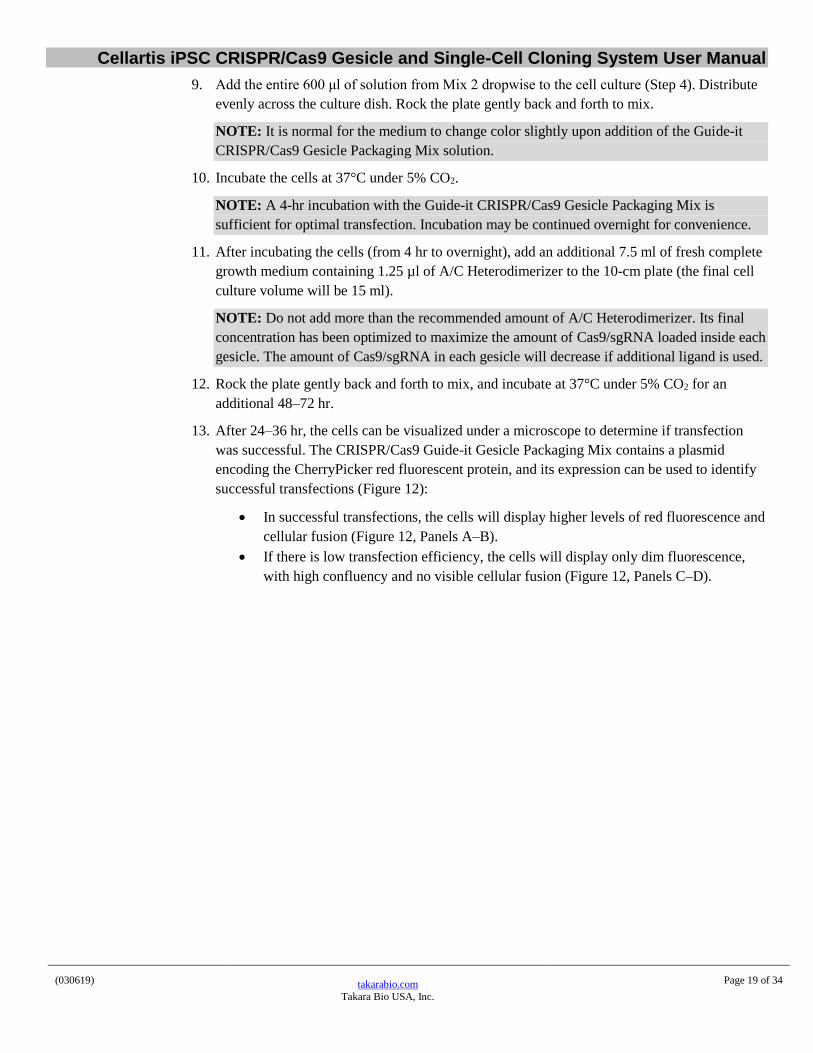
13. After 24–36 hr, the cells can be visualized under a microscope to determine if transfection
was successful. The CRISPR/Cas9 Guide-it Gesicle Packaging Mix contains a plasmid
encoding the CherryPicker red fluorescent protein, and its expression can be used to identify
successful transfections (Figure 12):
• In successful transfections, the cells will display higher levels of red fluorescence and
cellular fusion (Figure 12, Panels A–B).
• If there is low transfection efficiency, the cells will display only dim fluorescence,
with high confluency and no visible cellular fusion (Figure 12, Panels C–D).
Cellartis iPSC CRISPR/Cas9 Gesicle and Single-Cell Cloning System User Manual
(030619)
takarabio.com
Takara Bio USA, Inc.
Page 20 of 34
Figure 12. Gesicle Producer 293T cells after transfection. These images (20X magnification) show red fluorescence (left) and
phase microscopy (right) results for successfully transfected Gesicle Producer 293T cells (Panels A and B) and unsuccessfully
transfected Gesicle Producer 293T (Panels C and D).
E. Harvest and Concentrate Cas9/sgRNA Gesicles
Collect gesicles from the cell media 48 hr after transfection. If you prefer, you can wait up to 72 hr to
collect the gesicles.
1. 48 hr after transfection, centrifuge the cell culture medium briefly (500g for 10 min) and filter through a
0.45-µm syringe sterile filter made of cellulose acetate or polysulfonate to remove cellular debris.
NOTE: Do not use a nitrocellulose filter.
2. To concentrate gesicles containing the Cas9/sgRNA complexes, transfer the gesicle filtrate to a 50-ml
tube that can withstand ~8,000g (Corning Falcon Cat. No. 352070 or equivalent). Centrifuge the
filtered samples at ~8,000g at 4°C for 16 hr to overnight (e.g., 6,500 rpm in a Beckman J2-HS
Centrifuge with a JS-7.5 swinging bucket rotor).
IMPORTANT: Do not use a fixed angle rotor. Because gesicles are not visible, it is important to
collect them into the smallest possible area at the very bottom of your tube, which requires using a
swinging bucket rotor in order to collect of all gesicles in the sample.
3. After centrifugation, gently pour the supernatant (which does NOT contain the gesicles) into another
50-ml tube. Do not aspirate to remove the supernatant, because the gesicle pellet is easily dislodged.
Keep the tube tilted while decanting, and use a pipette to remove the medium that remains on the

Cellartis iPSC CRISPR/Cas9 Gesicle and Single-Cell Cloning System User Manual
(030619)
takarabio.com
Takara Bio USA, Inc.
Page 21 of 34
upper rim of the tube. Do not remove the residual medium (~60 µl) at the bottom of the original
tube—it contains the gesicles.
NOTE: The pellet of gesicles is not visible to the naked eye.
4. Add 60 μl of PBS (without calcium or magnesium) to the bottom of the original, centrifuged tube and
resuspend the pellet containing the Cas9/sgRNA gesicles by pipetting up and down. Since there is
likely to be some residual medium at the bottom of the tube, the total volume of the resuspended
pellet will be close to 120 µl.
NOTE: The pellet at the bottom of the tube is usually not visible.
5. Measure the total volume of the suspension and, if necessary, add a 1:1 mixture of 293T cell
media:PBS to a final volume of 120 μl. If the volume is higher than 120 µl, no further dilution is
necessary.
NOTE: It is important to use a mixture of media and PBS, not PBS alone.
6. Agitate the gesicles on a rocking platform for 2 hr at 4°C.
7. Divide the Cas9/sgRNA gesicle suspension into 30-µl aliquots in separate tubes. Store the
Cas9/sgRNA gesicles at –70°C. These gesicles can be stored for more than 1 year.
NOTE: The presence of Cas9 in the gesicles can be verified by Western blot using the Guide-it Cas9
Polyclonal Antibody (Cat. Nos. 632606 & 632607). 2–5 µl of the gesicle suspension is sufficient for
Western blot detection using the Guide-it Cas9 Polyclonal Antibody.

Cellartis iPSC CRISPR/Cas9 Gesicle and Single-Cell Cloning System User Manual
(030619)
takarabio.com
Takara Bio USA, Inc.
Page 22 of 34
VII. Editing hiPS Cells by Gesicle Delivery of Cas9/sgRNA RNPs
IMPORTANT:
• Please read the protocol completely before starting. Successful results depend on understanding and
performing all the following steps correctly
• This protocol has been optimized using the Cellartis Human iPS Cell Line 18 (Cat. No. Y00305)
• The protocol has also been optimized using the Cellartis DEF-CS 500 Culture System (Cat. No. Y30010)
during the gene editing process as well as the cell recovery step (prior to single-cell cloning, Section VIII.A).
• Please note that when the following protocol specifies use of “COAT-1,” it is referring to the DEF-CS
COAT-1 from the Cellartis DEF-CS 500 Culture System. Do not use the coating contained in the Cellartis
iPSC CRISPR/Cas9 Gesicle and Single-Cell Cloning System, which is abbreviated as “SCC-COAT-1” due to
its sole use for the single-cell cloning and expansion protocols.
• If cells have not been previously adapted to growing in the DEF-CS system, we strongly recommend
transitioning cells by passaging five times in the DEF-CS system prior to performing the editing experiments.
A. Protocol Overview
Figure 13. Workflow for gesicle-based delivery of Cas9/sgRNA complexes to hiPSCs.
B. Treating hiPS Cells with Cas9/sgRNA Gesicles
NOTE: If cells have not previously been adapted to growing in DEF-CS, it is strongly recommended to
transition cells by passaging five times in DEF-CS prior to performing the editing experiments.
To achieve a correct cell density for the gesicle treatment, cells need to be cultured for 48 hr in a 6-well
plate and then transferred to a 48-well plate for gesicle treatment.
Day 1: Plating Cells in the 6-Well Plate for Culture Prior to Gesicle Treatment
Plate hiPS cells in a coated 6-well plate and grow for 48 hr. One 6-well plate will provide enough
cells for at least four samples.
Coating the 6-Well Plate
1. Calculate the amount of diluted coating solution required depending on the number of wells
to be used (950 µl of diluted DEF-CS COAT-1 solution per well; see Table I).
Application of CRISPR/Cas9 Gesicles
Cas9/sgRNA gesicles are added to hiPSCs at an appropriate density.
Preparing Media and Cells
Cells are plated at an appropriate density.

Cellartis iPSC CRISPR/Cas9 Gesicle and Single-Cell Cloning System User Manual
(030619)
takarabio.com
Takara Bio USA, Inc.
Page 23 of 34
Table I. Preparation of coating solution for the 6-well plate.
2. Dilute the required volume of Cellartis DEF-CS COAT-1 in D-PBS +/+ before use (in a 1:20
dilution).
3. Mix the diluted Cellartis DEF-CS COAT-1 solution gently and thoroughly by pipetting up
and down.
4. Add the diluted Cellartis DEF-CS COAT-1 solution to a 6-well plate (use 950 µl/well),
making sure the entire surface of each well is covered.
5. Place the cell culture plate in an incubator at 37°C ± 1°C, 5% CO2, and >90% humidity for a
minimum of 20 min.
6. Aspirate the Cellartis DEF-CS COAT-1 solution from the cell culture plate just before use.
Preparing DEF-CS Medium for Dissociation and Plating
In this step, you will need medium from the Cellartis DEF-CS 500 Culture System (Cat.
No. Y30010) to neutralize the dissociation reagent and passage the cells in the 6-well plate.
Prepare the DEF-CS medium using additives from the Cellartis DEF-CS 500 Culture
System according to Table II.
Table II. Preparation of medium and dissociation enzyme for culture during gesicle treatment.
Cell dissociation
Plate type TrypLE Select Enzyme (1X) (µl per well)
DEF-CS medium (µl per well)
48 wells 18 200 24 wells 38 400 12 wells 76 800 6 wells 190 2,000 10 cm 1,100 12,000
Cell plating
Plate type DEF-CS medium (ml per well) 6 wells 2.5
48 wells 0.3
Prepare the appropriate volume of DEF-CS medium by adding DEF-CS GF-1 (dilute 1:333), GF-
2 (dilute 1:1,000) and GF-3 (dilute 1:1,000) to Cellartis DEF-CS 500 Basal Medium. Prepare
fresh medium on the day of intended use and warm it to 37°C ± 1°C immediately before use.
Discard any leftover warmed medium.
Plating Cells in the 6-Well Plate
1. Collect the cells from the cell culture flask. First, aspirate the medium from the cell
culture flask and wash the cell layer once with D-PBS –/–.
2. Add TrypLE Select to the cell culture flasks (as described in Table II) and incubate for
5 min at 37°C, or until the cell layer has detached. Detachment can be aided by swirling
the cell culture flask or by tapping the side of the cell culture flask firmly but gently.
Number of wells (6-well plate)
Volume of diluted coating solution (µl)
Volume of COAT-1 (µl)
Volume of D-PBS +/+ (µl)
1 950 47.5 902.5 2 1,900 95 1,805 n 90 x n (950 x n)/20 (950 x n) – (volume of COAT-1)

Cellartis iPSC CRISPR/Cas9 Gesicle and Single-Cell Cloning System User Manual
(030619)
takarabio.com
Takara Bio USA, Inc.
Page 24 of 34
3. Resuspend the cells in DEF-CS medium (as described in Table II) and pipet up and
down several times to ensure a single-cell suspension. (The cells will aggregate if left
too long in TrypLE Select.)
4. Count cells with the hemocytometer.
5. Plate 4.0 x 10⁴ cells per well in the previously coated 6-well plate.
6. Place the plate in an incubator at 37°C ± 1°C, 5% CO2, and >90% humidity and leave
the plate undisturbed for 48 hr.
Day 3: Plating Cells in the 48-Well Plate for Culture During Gesicle Treatment
Plate the cells in the 48-well plate, in which they will be treated with gesicles on Day 4. When the
treatment is applied, the cells should be 40–50% confluent and evenly distributed in the well
(Figure 14).
Preparing the 48-Well Plate
1. Dilute the required volume of COAT-1 in D-PBS +/+ prior to use. Make a 1:20 dilution.
Calculate the amount of diluted coating solution required depending on the number of wells
to be used (90 µl of diluted coating solution per well; see Table III for guidance).
Table III. Preparation of coating solution for the 48-well plate.
2. Mix the diluted COAT-1 solution gently and thoroughly by pipetting up and down.
3. Add the diluted COAT-1 solution to a 48-well plate (using 90 µl/well), making sure the entire
surface of each well is covered.
4. Place the plate in the incubator at 37°C ± 1°C, 5% CO2, and >90% humidity for a minimum of
3 hr.
5. Aspirate the diluted COAT-1 solution from the 48-well plate immediately before use.
Preparing DEF-CS Medium for Dissociation and Plating
In this step, you will need medium from the Cellartis DEF-CS 500 Culture System (Cat. No.
Y30010) to neutralize the dissociation reagent and passage the cells into the 48-well plate.
Prepare the appropriate volume of DEF-CS medium by adding DEF-CS GF-1 (dilute 1:333), GF-
2 (dilute 1:1,000), and GF-3 (dilute 1:1,000) to Cellartis DEF-CS 500 Basal Medium. Prepare
fresh medium on the day of intended use and warm it to 37°C ± 1°C immediately before use.
Discard any leftover warmed medium.
Plating Cells
1. Collect the cells from the 6-well plate. First, aspirate the medium from the 6-well plate
and wash the cell layer once with D-PBS –/–.
2. Add 190 µl of TrypLE Select to each well of the 6-well plate (as described in Table II)
and incubate for 5 min at 37°C, or until the cell layer has detached. Detachment can be
aided by swirling the cell culture flask or by tapping the side of the plate firmly but
gently.
3. Resuspend the cells in DEF-CS medium (as described in Table II) and pipet up and
down several times to ensure a single-cell suspension. (The cells will aggregate if left
too long in TrypLE Select.)
Number of wells (48-well plate)
Volume of diluted coating solution (µl)
Volume of COAT-1 (µl)
Volume of D-PBS +/+ (µl)
1 90 4.5 85.5 2 180 9 171 n 90 x n (90 x n)/20 (90 x n) – (volume of COAT-1)

Cellartis iPSC CRISPR/Cas9 Gesicle and Single-Cell Cloning System User Manual
(030619)
takarabio.com
Takara Bio USA, Inc.
Page 25 of 34
4. Count cells with a hemocytometer.
5. Plate cells in a 48-well plate at different densities: 3.0 x 10⁴, 2.5 x 10⁴, 2.0 x 10⁴, 1.5 x
104, and 1.0 x 10⁴ cells per well.
6. Place the plate in an incubator at 37°C ± 1°C, 5% CO2, and >90% humidity, and leave
the plate undisturbed overnight.
Days 4 and 5: Applying Cas9/sgRNA Gesicles to hiPS Cells in the 48-Well Plate
Perform the following steps under sterile conditions. The quantities specified here are for a 48-well
plate (prepared on Day 3 above). We advise using 30 µl of gesicles per well in a 48-well plate. If you
would like to use 12- or 6-well plates, increase the amount of Cas9/sgRNA gesicles accordingly.
Preparing DEF-CS Media for Gesicle Incubation and Recovery
In this step, use components from the Cellartis DEF-CS 500 Culture System (Cat. No. Y30010) in
two media preparations:
• Day 4: “DEF-CS gesicle incubation medium,” 300 µl/well, containing DEF-CS GF-1 (dilute
1:333), GF-2 (dilute 1:1,000), and protamine sulfate to a final concentration of 4 μg/ml.
• Day 5: “DEF-CS recovery medium,” 300 µl/well, which contains DEF-CS GF-1 (dilute 1:333)
and GF-2 (dilute 1:1,000) without protamine sulfate.
Add supplements and protamine sulfate to Cellartis DEF-CS 500 Basal Medium. Prepare fresh
medium on the day of intended use according to the protocol below, and warm it to 37°C ± 1°C
immediately before use. Discard any leftover warmed medium.
1. Thaw the Cas9/sgRNA gesicles (from Section VI.E, Step 7) on ice for 30 min before adding them to the target cells.
NOTE: Occasionally, small aggregates have been observed in the gesicle suspension. The
presence of these aggregates will not affect their function. If you notice such aggregates, pipette
the thawed gesicle suspension up and down several times and perform a quick spin (e.g. 400g
for 15 sec) before adding the gesicles to your cells.
2. Check the different dilutions plated the day before under a microscope. Confirm that the cells plated
on the previous day are approximately 40–50% confluent (Figure 14).
Figure 14. Optimal density of hiPS cells before Cas9/sgRNA gesicle treatment. The left photo shows Cellartis Human
iPS Cell Line 18 cells plated at an insufficient density (5X magnification) and the right photo shows the correct density
suitable for addition of Cas9/sgRNA gesicles (5X magnification).
3. Prepare DEF-CS gesicle incubation medium and warm to 37°C ± 1°C immediately before use.
Cellartis iPSC CRISPR/Cas9 Gesicle and Single-Cell Cloning System User Manual
(030619)
takarabio.com
Takara Bio USA, Inc.
Page 26 of 34
4. Replace the media in the wells that will be treated with gesicles with 300 µl of DEF-CS gesicle
incubation medium.
5. Incubate for 2 hr in an incubator at 37°C ± 1°C, 5% CO2, and >90% humidity.
6. Add 30 μl of the thawed Cas9/sgRNA gesicles from Step 1 to each well containing DEF-CS gesicle
incubation medium.
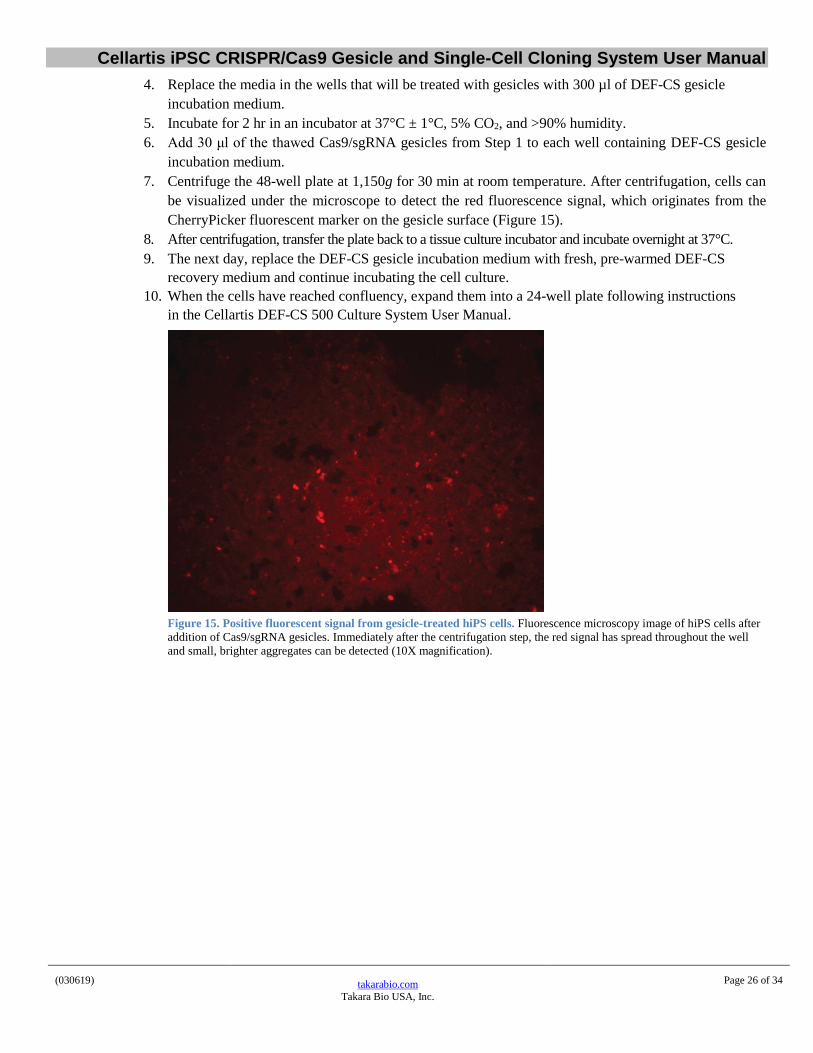
7. Centrifuge the 48-well plate at 1,150g for 30 min at room temperature. After centrifugation, cells can
be visualized under the microscope to detect the red fluorescence signal, which originates from the
CherryPicker fluorescent marker on the gesicle surface (Figure 15).
8. After centrifugation, transfer the plate back to a tissue culture incubator and incubate overnight at 37°C.
9. The next day, replace the DEF-CS gesicle incubation medium with fresh, pre-warmed DEF-CS
recovery medium and continue incubating the cell culture.
10. When the cells have reached confluency, expand them into a 24-well plate following instructions
in the Cellartis DEF-CS 500 Culture System User Manual.
Figure 15. Positive fluorescent signal from gesicle-treated hiPS cells. Fluorescence microscopy image of hiPS cells after
addition of Cas9/sgRNA gesicles. Immediately after the centrifugation step, the red signal has spread throughout the well
and small, brighter aggregates can be detected (10X magnification).
Cellartis iPSC CRISPR/Cas9 Gesicle and Single-Cell Cloning System User Manual
(030619)
takarabio.com
Takara Bio USA, Inc.
Page 27 of 34
VIII. Single-Cell Cloning of Gesicle-Treated Cells
A. Protocol Overview
After a recovery period of at least five days, cells can be seeded singly and expanded into clonal cell
lines. As Cellartis iPSC culture systems are designed for a seamless transition between the various stages
of an editing experiment, there is no special transition needed from the Cellartis DEF-CS 500 Culture
System to the Cellartis iPSC CRISPR/Cas9 Gesicle and Single-Cell Cloning System. However, during
Protocols VIII–X, use components of the Cellartis iPSC CRISPR/Cas9 Gesicle and Single-Cell Cloning
System, and then transition back to the Cellartis DEF-CS 500 Culture System for further upscaling.
Table IV describes a schedule of all media changes (volume and composition) necessary to create clonal
lines in 24-well plates that are ready for culture with the Cellartis DEF-CS 500 Culture System.
Table IV. Workflow for single-cell cloning and expansion using the Cellartis iPSC CRISPR/Cas9 Gesicle and Single-Cell
Cloning System.
Plate type Day Additives used Volume of medium
(µl per well) Total volume (µl per well)
96-well plate 1
GF-1, GF-2, and GF-3
100 100
3 100* 200
5 150 200
(6) 150 200
7 150 200
(8) 150 200
9** 150 200
48-well plate Passaging GF-1, GF-2, and GF-3 500 500
Medium Change
GF-1 and GF-2 500 500
24-well plate Transition to Cellartis DEF-CS 500 Culture System
*Add medium; do not replace.
**Use the same volumes for subsequent days until the cells are ready for passaging.
( ) Media change is only necessary if media is yellow due to high metabolic activity.
Once stable clonal lines have been developed, proceed to verification of your desired edits.

Cellartis iPSC CRISPR/Cas9 Gesicle and Single-Cell Cloning System User Manual
(030619)
takarabio.com
Takara Bio USA, Inc.
Page 28 of 34
B. Single-Cell Seeding into a 96-Well Plate
To optimize the survival rate and expansion potential during single-cell seeding, use cells that are in an
early proliferative state. We recommend starting with a confluent but not dense culture, corresponding to
a density of 0.8–1.5 x 10⁵ cells/cm2 (Figure 16).
Coating a 96-Well Plate
1. Dilute the required volume of Cellartis iPSC Single-Cell Cloning DEF-CS COAT-1 (SCC-COAT-1)
in D-PBS +/+ prior to use. Make a 1:10 dilution. Calculate the amount of diluted coating solution
required depending on the number of wells to be used (50 µl of diluted coating solution per well; see
Table V for guidance).
Table V. Preparation of coating solution for a 96-well plate.
Number of wells (96-well plate)
Volume of diluted coating solution (µl)
Volume of SCC-COAT-1 (µl)
Volume of D-PBS +/+ (µl)
1 50 5 45 2 100 10 90
96 4,800 480 4,320 n 50 x n (50 x n)/10 (50 x n) – (volume of SCC-COAT-1)
2. Mix the diluted SCC-COAT-1 solution gently and thoroughly by pipetting up and down.
3. Add the diluted SCC-COAT-1 solution to a 96-well plate for single-cell seeding, making sure the
entire surface of each well is covered.
4. Place the cell culture plate in an incubator at 37°C ± 1°C, 5% CO2, and >90% humidity for a
minimum of 3 hr.
5. Aspirate the diluted SCC-COAT-1 solution from the cell culture plate just before use.
Figure 16. Recommended density of starting culture used for single-cell cloning.
Representative image shows the morphology of cells with a density of 1.5 x 10⁵ cells/cm2 at
10X magnification. Scale bar = 100 microns.
Cellartis iPSC CRISPR/Cas9 Gesicle and Single-Cell Cloning System User Manual
(030619)
takarabio.com
Takara Bio USA, Inc.
Page 29 of 34
Preparing DEF-CS SCC Medium for Single-Cell Seeding
Prepare the appropriate volume of DEF-CS SCC medium by adding DEF-CS GF-1 (dilute 1:333), GF-2
(dilute 1:1,000), and GF-3 (dilute 1:1,000) to Cellartis DEF-CS 500 Basal Medium according to Table VI.
Prepare fresh medium on the day of intended use and warm it to 37°C ± 1°C immediately before use.
Discard any leftover warmed medium.
It is important to prepare enough DEF-CS SCC medium to 1) neutralize the TrypLE Select Enzyme (1X)
used to dissociate cells from the initial culture vessel (a 1:10 dilution) and 2) seed the detached cells using
100 µl/well into a 96-well plate. Use Table VI as a guide to ensure there is sufficient medium for
dissociation and seeding.
Table VI. Preparation of medium for dissociation and single-cell seeding.
Cell Dissociation
Plate type TrypLE Select Enzyme (1X) (µl per well)
DEF-CS SCC medium (µl per well)
48 wells 18 200 24 wells 38 400 12 wells 76 800 6 wells 190 2,000 10 cm 1,100 12,000
Single-Cell Seeding
Plate type DEF-CS SCC medium (µl per well) 96 wells 100
Single-Cell Seeding
Day 1: Seeding of Single Cells
1. Check cells under a phase contrast microscope; photo document as necessary.
2. Aspirate the medium from the culture vessel and wash the cell layer once with D-PBS –/–.
3. Add TrypLE Select Enzyme (1X) to the culture vessel, using the amount indicated in Table VI. Place
the vessel in an incubator at 37°C ± 1°C, 5% CO2, and >90% humidity for 5 min, or until the cell
layer has detached. Detachment can be aided by tapping the side of the vessel firmly but gently. It is
not recommended to tilt or swirl the cell culture vessel.
NOTE: If starting from multiple samples in the same plate, please make sure to replace the culture
vessel lid after removing a sample from a well, then gently tap the side of the vessel. This
redistributes the dissociation enzyme and minimizes the risk of the other samples drying out.
4. Resuspend the cells in DEF-CS SCC medium (using the volume indicated in Table VI) and pipet up
and down several times to ensure a single-cell suspension. (The cells will aggregate if left too long in
TrypLE enzyme.)
5. Use your preferred method to isolate single cells: FACS or limiting dilution. For limiting dilution, we
recommend using a final dilution of 0.5 cells per well of a 96-well plate.
6. Place the plate in an incubator at 37°C ± 1°C, 5% CO2, and >90% humidity and leave the plate
undisturbed for 48 hr. Continue culturing according to Table IV.
Day 3: Adding Media to Wells Containing Single Cells
Without discarding any medium, carefully add 100 µl of fresh DEF-CS SCC medium per well. (See
Table IV for guidelines.) There should now be a total of 200 µl per well.
Cellartis iPSC CRISPR/Cas9 Gesicle and Single-Cell Cloning System User Manual
(030619)
takarabio.com
Takara Bio USA, Inc.
Page 30 of 34
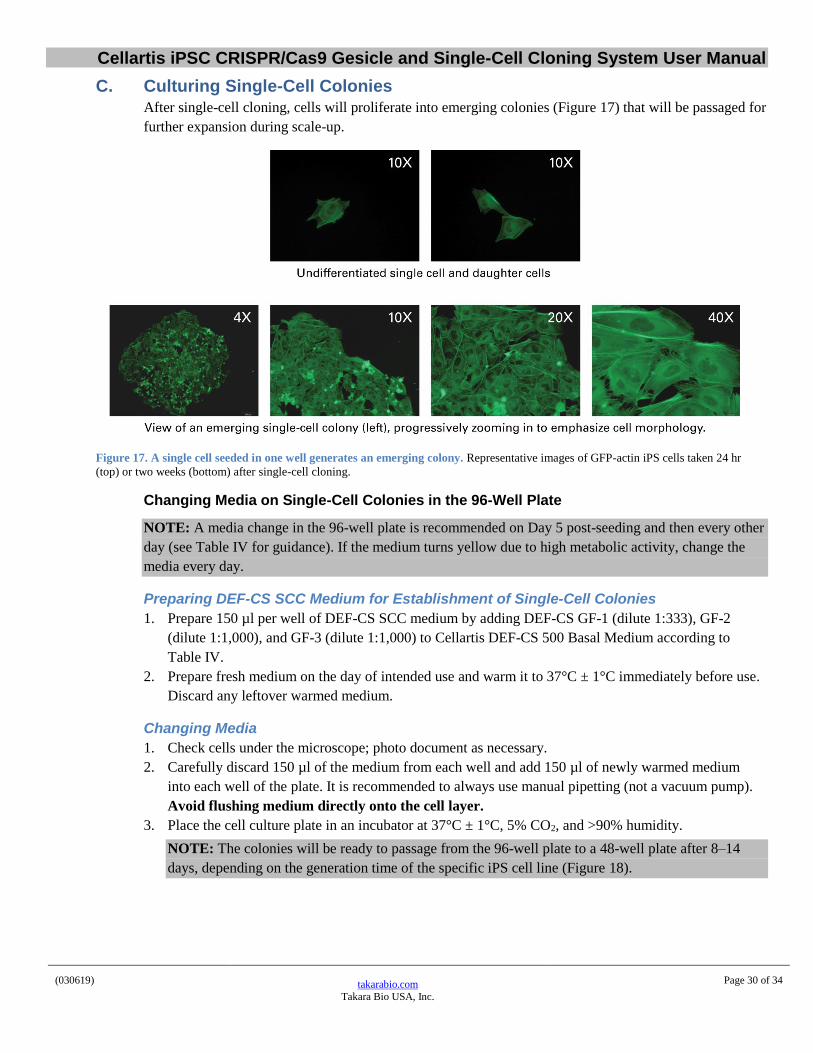
C. Culturing Single-Cell Colonies
After single-cell cloning, cells will proliferate into emerging colonies (Figure 17) that will be passaged for
further expansion during scale-up.
Figure 17. A single cell seeded in one well generates an emerging colony. Representative images of GFP-actin iPS cells taken 24 hr
(top) or two weeks (bottom) after single-cell cloning.
Changing Media on Single-Cell Colonies in the 96-Well Plate
NOTE: A media change in the 96-well plate is recommended on Day 5 post-seeding and then every other
day (see Table IV for guidance). If the medium turns yellow due to high metabolic activity, change the
media every day.
Preparing DEF-CS SCC Medium for Establishment of Single-Cell Colonies
1. Prepare 150 µl per well of DEF-CS SCC medium by adding DEF-CS GF-1 (dilute 1:333), GF-2
(dilute 1:1,000), and GF-3 (dilute 1:1,000) to Cellartis DEF-CS 500 Basal Medium according to
Table IV.
2. Prepare fresh medium on the day of intended use and warm it to 37°C ± 1°C immediately before use.
Discard any leftover warmed medium.
Changing Media
1. Check cells under the microscope; photo document as necessary.
2. Carefully discard 150 µl of the medium from each well and add 150 µl of newly warmed medium
into each well of the plate. It is recommended to always use manual pipetting (not a vacuum pump).
Avoid flushing medium directly onto the cell layer.
3. Place the cell culture plate in an incubator at 37°C ± 1°C, 5% CO2, and >90% humidity.
NOTE: The colonies will be ready to passage from the 96-well plate to a 48-well plate after 8–14
days, depending on the generation time of the specific iPS cell line (Figure 18).

Cellartis iPSC CRISPR/Cas9 Gesicle and Single-Cell Cloning System User Manual
(030619)
takarabio.com
Takara Bio USA, Inc.
Page 31 of 34
Figure 18. Clonal colonies, ready for transfer to larger wells and scale-up. The cells have the typical undifferentiated stem
cell morphology (i.e., high nucleus-to-cytoplasm ratio, defined borders, and prominent nucleoli).
IX. Passaging Cells from the 96-Well Plate to a 48-Well Plate
A. Coating a 48-Well Plate
1. Dilute the required volume of SCC-COAT-1 in D-PBS +/+ prior to use. Make a 1:10 dilution.
Calculate the amount of diluted coating solution required depending on the number of wells to be
used (200 µl of diluted coating solution per well of a 48-well plate; see Table VII for guidance).
Table VII. Preparation of coating solution for a 48-well plate.
2. Mix the diluted SCC-COAT-1 solution gently and thoroughly by pipetting up and down.
3. Add the diluted SCC-COAT-1 solution to a 48-well plate (using 200 µl/well), making sure the entire
surface of each well is covered.
4. Place the plate in the incubator at 37°C ± 1°C, 5% CO2, and >90% humidity for a minimum of 3 hr.
5. Aspirate the diluted SCC-COAT-1 solution from the 48-well plate immediately before use.
B. Preparing DEF-CS SCC Medium for Passaging
1. Prepare the appropriate volume of DEF-CS SCC medium by adding DEF-CS GF-1 (dilute 1:333),
GF-2 (dilute 1:1,000), and GF-3 (dilute 1:1,000) to Cellartis DEF-CS 500 Basal Medium according to
Table IV. The volume of medium needed for each well of the 48-well plate is 500 µl. Calculate the
amount of medium needed depending on the number of clonal lines to be expanded.
2. Prepare fresh medium on the day of intended use and warm it to 37°C ± 1°C immediately before use.
Discard any leftover warmed medium.
C. Passaging
1. Check the cells under the microscope; photo document as necessary.
2. Aspirate the media from the wells and wash the cell layer with D-PBS –/–.
3. Add 50 µl per well of room-temperature TrypLE Select Enzyme (1X) to the cells. Make sure the
whole colony in the well is covered. Place the plate in an incubator at 37°C ± 1°C, 5% CO2, and
>90% humidity, and incubate for 5 min or until all cells have detached.
Number of wells (48-well plate)
Volume of diluted coating solution (µl)
Volume of SCC-COAT-1 (µl)
Volume of D-PBS +/+ (µl)
1 200 20 180 2 400 40 360 48 9,600 960 8,640 n 200 x n (200 x n)/10 (200 x n) – (volume of SCC-COAT-1)
Cellartis iPSC CRISPR/Cas9 Gesicle and Single-Cell Cloning System User Manual
(030619)
takarabio.com
Takara Bio USA, Inc.
Page 32 of 34
4. Resuspend the cells in 500 µl per well of pre-warmed DEF-CS SCC medium. Transfer all of the cell
suspension to a newly coated well in a 48-well plate.
NOTE: To prevent cell loss, counting the cells at this stage is not recommended.
5. Tilt the dish backwards and forwards gently to ensure that the cell suspension is dispersed evenly
over the surface, then place it in an incubator at 37°C ± 1°C, 5% CO2, and >90% humidity.
X. Scaling up from the 48-Well Plate Once the cells have been passaged into a 48-well plate, DEF-CS GF-3 is no longer needed in the growth
medium used when changing the media. Prepare “DEF-CS medium for maintenance” by adding DEF-CS GF-1
(dilute 1:333) and GF-2 (dilute 1:1,000) to Cellartis DEF-CS 500 Basal Medium. When the cells are ready to be
scaled up to a 24-well plate, they can be cultured with the Cellartis DEF-CS 500 Culture System (Cat. No.
Y30010).
XI. References Hsu, P. D. et al. DNA targeting specificity of RNA-guided Cas9 nucleases. Nat. Biotechnol. 31, 827–832 (2013).
Jinek, M. et al. A Programmable Dual-RNA–Guided DNA Endonuclease in Adaptive Bacterial Immunity.
Science (80-. ). 337, (2012).
Kim, S., Kim, D., Cho, S. W., Kim, J. & Kim, J.-S. Highly efficient RNA-guided genome editing in human cells
via delivery of purified Cas9 ribonucleoproteins. Genome Res. 24, 1012–9 (2014).
Mali, P. et al. CAS9 transcriptional activators for target specificity screening and paired nickases for cooperative
genome engineering. Nat. Biotechnol. 31, 833–838 (2013).
Sander, J.-D. & Joung, J.-K. CRISPR-Cas9 systems for genomic editing, regulation and targeting. Nat.
Biotechnol. 32, 347–55 (2014).
Cellartis iPSC CRISPR/Cas9 Gesicle and Single-Cell Cloning System User Manual
(030619)
takarabio.com
Takara Bio USA, Inc.
Page 33 of 34
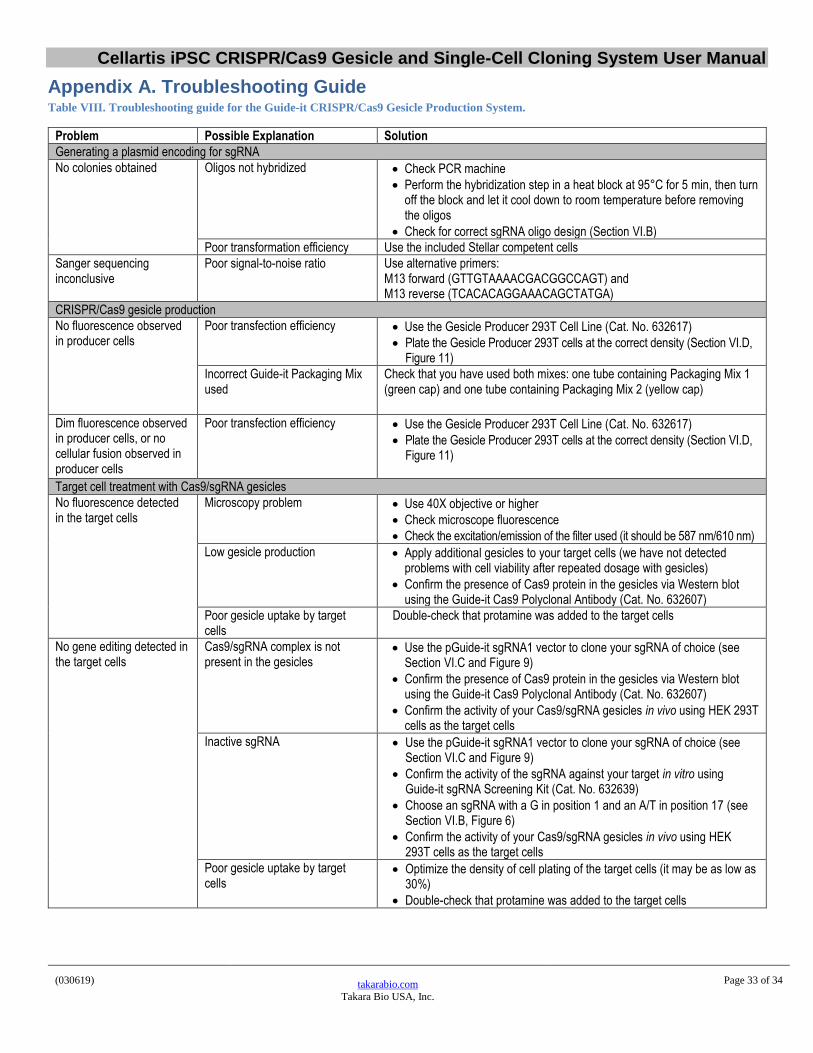
Appendix A. Troubleshooting Guide Table VIII. Troubleshooting guide for the Guide-it CRISPR/Cas9 Gesicle Production System.
Problem Possible Explanation Solution
Generating a plasmid encoding for sgRNA
No colonies obtained Oligos not hybridized • Check PCR machine
• Perform the hybridization step in a heat block at 95°C for 5 min, then turn off the block and let it cool down to room temperature before removing the oligos
• Check for correct sgRNA oligo design (Section VI.B)
Poor transformation efficiency Use the included Stellar competent cells
Sanger sequencing inconclusive
Poor signal-to-noise ratio Use alternative primers: M13 forward (GTTGTAAAACGACGGCCAGT) and M13 reverse (TCACACAGGAAACAGCTATGA)
CRISPR/Cas9 gesicle production
No fluorescence observed in producer cells
Poor transfection efficiency • Use the Gesicle Producer 293T Cell Line (Cat. No. 632617)
• Plate the Gesicle Producer 293T cells at the correct density (Section VI.D, Figure 11)
Incorrect Guide-it Packaging Mix used
Check that you have used both mixes: one tube containing Packaging Mix 1 (green cap) and one tube containing Packaging Mix 2 (yellow cap)
Dim fluorescence observed in producer cells, or no cellular fusion observed in producer cells
Poor transfection efficiency • Use the Gesicle Producer 293T Cell Line (Cat. No. 632617)
• Plate the Gesicle Producer 293T cells at the correct density (Section VI.D, Figure 11)
Target cell treatment with Cas9/sgRNA gesicles
No fluorescence detected in the target cells
Microscopy problem • Use 40X objective or higher
• Check microscope fluorescence
• Check the excitation/emission of the filter used (it should be 587 nm/610 nm)
Low gesicle production • Apply additional gesicles to your target cells (we have not detected problems with cell viability after repeated dosage with gesicles)
• Confirm the presence of Cas9 protein in the gesicles via Western blot using the Guide-it Cas9 Polyclonal Antibody (Cat. No. 632607)
Poor gesicle uptake by target cells
Double-check that protamine was added to the target cells
No gene editing detected in the target cells
Cas9/sgRNA complex is not present in the gesicles
• Use the pGuide-it sgRNA1 vector to clone your sgRNA of choice (see Section VI.C and Figure 9)
• Confirm the presence of Cas9 protein in the gesicles via Western blot using the Guide-it Cas9 Polyclonal Antibody (Cat. No. 632607)
• Confirm the activity of your Cas9/sgRNA gesicles in vivo using HEK 293T cells as the target cells
Inactive sgRNA • Use the pGuide-it sgRNA1 vector to clone your sgRNA of choice (see Section VI.C and Figure 9)
• Confirm the activity of the sgRNA against your target in vitro using Guide-it sgRNA Screening Kit (Cat. No. 632639)
• Choose an sgRNA with a G in position 1 and an A/T in position 17 (see Section VI.B, Figure 6)
• Confirm the activity of your Cas9/sgRNA gesicles in vivo using HEK 293T cells as the target cells
Poor gesicle uptake by target cells
• Optimize the density of cell plating of the target cells (it may be as low as 30%)
• Double-check that protamine was added to the target cells

Cellartis iPSC CRISPR/Cas9 Gesicle and Single-Cell Cloning System User Manual
(030619)
takarabio.com
Takara Bio USA, Inc.
Page 34 of 34
Appendix B: pGuide-it-sgRNA1 Vector Information For complete descriptions of the vectors provided with each system, refer to the Certificate of Analysis, which is available
at www.takarabio.com.
Figure 19. pGuide-it-sgRNA1 Vector (Linear) map and cloning site for user’s guide sequence.
Contact Us
Customer Service/Ordering Technical Support
tel: 800.662.2566 (toll-free) tel: 800.662.2566 (toll-free)
fax: 800.424.1350 (toll-free) fax: 800.424.1350 (toll-free)
web: takarabio.com web: takarabio.com
e-mail: [email protected] e-mail: [email protected]
Notice to Purchaser Our products are to be used for research purposes only. They may not be used for any other purpose, including, but not limited to, use in drugs, in vitro diagnostic
purposes, therapeutics, or in humans. Our products may not be transferred to third parties, resold, modified for resale, or used to manufacture commercial products or to
provide a service to third parties without prior written approval of Takara Bio USA, Inc.
Your use of this product is also subject to compliance with any applicable licensing requirements described on the product’s web page at takarabio.com. It is your
responsibility to review, understand and adhere to any restrictions imposed by such statements.
© 2017 Takara Bio Inc. All Rights Reserved.
All trademarks are the property of Takara Bio Inc. or its affiliate(s) in the U.S. and/or other countries or their respective owners. Certain trademarks may not be
registered in all jurisdictions. Additional product, intellectual property, and restricted use information is available at takarabio.com.
This document has been reviewed and approved by the Quality Department.
Copyright © 2022 FDOKUMEN