Catherine - Wiki Guide PDF
73
Wiki Guide PDF
-
Upload
khangminh22 -
Category
Documents
-
view
1 -
download
0
Transcript of Catherine - Wiki Guide PDF

Wiki Guide PDF

Catherine
BasicsGeneral TipsWalkthrough
Stage 1 - Underground CemeteryStage 2 - Prison of DespairStage 3 - Torture ChamberStage 4 - InquisitionStage 5 - QuadrangleStage 6 - Clock TowerStage 7 - Spiral CorridorStage 8 - The CathedralStage 9 - The Empireo
Boss Tips and Strategies Fist of a GrudgeImmoral BeastThe ChildDoom's BrideChild With A ChainsawShadow of VincentCatherineThomas MuttonDumuzid
Saving Other Sheep SheepJustinToddArchieDanielMorgan
Technique Videos Suspending TechniquePullback TechniqueTornado TechniqueSpider TechniqueBridge TechniqueFlying Bridge TechniqueSwing Out TechniqueToppler TechniqueWall Suspension TechniqueWall Spider TechniqueCutout TechniqueCut AcrossIce Pulling Technique

Ice Evasion TechniqueGeronimo TechniqueControlled Demolition TechniqueTimber TechniqueControlled Explosions TechniqueBombs, Away TechniqueSpring TechniqueInazuma TechniqueInazuma Variant TechniqueMarching Spider TechniqueBack Spider TechniqueFall Dodger TechniqueUprooting TechniqueBracing Technique
Secrets Questions and ResponsesEndingsCatherine's Pictures
Achievements / TrophiesFrequently Asked Questions

Basics
Xbox 360 Specifications
Players 1 to 2
Network Players n/a
Game Save Size 472 KB
HDD Space Req'd TBD
HD Output 720p, 1080i, 1080p
Audio Dolby Digital
Other Rec'd Broadband Access
DLC No
Playstation 3 Specifications
Players 1 to 2
Network Players n/a
HDD Space Req'd 2.5 GB / 2500 MB
HD Output 480p, 720p
Audio DTS 5.1
Dualshock 3 n/a
Other Rec'd Broadband Access
DLC No
PC Specifications
TBD - n/a
Downloadable Content
TBD - n/a
Additional Information
Frequently Asked Questions

General Tips
Techniques
Check out a whole bunch of Technique Videos to learn a few neat tricks that can be used throughout the game. Of course, there are certain techniques that will be used more often than others and will be the cornerstone of your climbing skills.
Gettin' Tipsy
Vincent spends a lot of time at the bar each night, way before the nightmares happen. Take this opportunity to drink as many drinks as possible (and learn interesting alcohol-related trivia in the meantime). The more liquored up he is, the faster he moves in the dream state. Sounds strange and counterintuitive, but this is ideal for boss battles in which you must ascend rapidly up to the exit. Vincent's current state of drunkenness is indicated by the number of filled booze bottles in the lower left corner.
The Power of Undo
This feature lets you rewind to a step before something occurred -- whether that be moving a block, falling off a ledge, or what have you -- and erase that step from existence. The only time you can't exploit the Undo feature is while you're falling. You can even Undo a boss' attack by activating it before the boss actually executes the move. If you let the combo timer run out, you can even revert it back to an active combo timer with the press of this magic button. You have a very powerful tool at your disposal - use it. However, Undo is deactivated on Hard difficulty.
Replying To Texts
There are usually about three variations in the way Vincent responds to his texts. The difference is most notable in the response's tone. The gamut of Vincent's feelings can go from indifference to abrasive to considerate - it all depends on how you want to convey his emotions.
You can view your answer options by pressing erase and then pressing enter. When you are satisfied with the first sentence, you can do the same with the second and the third. This allows you to tailor unique combination of responses that will give you either good or bad adjustments to the morality meter accordingly. So, play around with your texting options for a bit before you hit the Send button.
Talk To Everyone At Stray Sheep
Talking to people and drinking passes the time, bringing in new people throughout the night. While they won't outwardly demand your ear or help, they have problems that need to be resolved as well. Talk to them until the Talk option is greyed out and continue to talk to them each night you see them

at the bar. See the section Saving Other Sheep for further details on each individual.
Walkthrough
The walkthrough section of IGN's Catherine wiki guide provides videos and tips for all the stages of Catherine on Normal mode. The strategies and solutions held within this guide may not be the definitive or optimum way to complete the level, but they are effective enough to advance you through the stages.
As a side note, if you have any other tips or strategies (or even videos) for other modes, feel free to add them!
Contents
Stage 1 - Underground CemeteryStage 2 - Prison of DespairStage 3 - Torture ChamberStage 4 - InquisitionStage 5 - QuadrangleStage 6 - Clock TowerStage 7 - Spiral CorridorStage 8 - The CathedralStage 9 - The Empireo

Stage 1 - Underground Cemetery
As introductory levels go, the Underground Cemetary is short and sweet. The main thing you'll learn here is pushing single blocks to form one-step stairs to the next tier. Nothing too complicated right now. If you're having trouble, be sure to watch the video for the way we went about it and also review the different kinds of techniques in the Technique Videos section.
Stage 1: 1st Floor
(Normal Mode)Click this link to see the videohttp://www.ign.com/videos/2011/07/27/catherine-stage-1-underground-cemetery-walkthrough-normal

Stage 2 - Prison of Despair
You learn that you can move just about every kind of block except for the ones with an animal's face engraved on it. Those are permanently immobile. Heavy Blocks are introduced by Stage 2. Like its name implies, these blocks are heavier and require more exertion on Vincent's part, thereby slowing him down. They don't become a big deal unless you're dealing with them consecutively combined with the stress of the floor crumbling beneath your feet.
Stage 2: 1st Floor
(Normal Mode)Click this link to see the videohttp://www.ign.com/videos/2011/07/25/catherine-1st-nightmare-boss-fist-of-grudge-normal-
walkthrough
Stage 3 - Torture Chamber
Spike traps galore! These activate instant death-causing spikes once you step on these volatile blocks. The good thing is, though, they essentially turn into normal blocks after the initial protrusion of spikes. In fact, you won't be harmed even if you run over them following immediately after the spike animation. You generally want to play it safe by running over them and quickly darting back to a safe block to set them off prematurely.
Stage 3: 1st Floor
(Normal Mode) Click this link to see the videohttp://www.ign.com/videos/2011/07/25/catherine-2nd-nightmare-boss-immoral-beast-normal-
walkthrough

Stage 4 - Inquisition
Stage 4 lets you experiment with the concept of falling blocks. Blocks are connected by their edges - as long as the edges connect, the blocks will stay in place. If you disconnect them, the block without any connecting edge will fall and go away forever. By this principle, you can force entire walls of blocks to shift down by getting rid of certain cornerstone blocks.
Stage 4: 1st Floor
(Normal Mode) Click this link to see the videohttp://www.ign.com/videos/2011/07/26/catherine-3rd-nightmare-boss-the-child-normal-walkthrough

Stage 5 - Quadrangle
Quadrangle is a cold, icy environment that is fittingly accompanied by ice blocks. These new friction-less blocks cause Vincent to slip and slide until he either rolls right off the edge or is stopped by a non-ice block (either as an anchor block or a sort of wall). Usually, the latter is the more desired outcome.
This means that you can't move freely around on the ice blocks. Your moves must be calculated and deliberate. There are a few ways to circumvent this slippage problem. For one, you can drag a block with you to travel along rows of ice blocks; two, you can drop into a hanging position and shimmey across, putting yourself in full control of where you want to get haul yourself back up. The third option is to make sure you have a non-ice block to stop your inertia.
Stage 5: 1st Floor
(Normal Mode) Click this link to see the videohttp://www.ign.com/videos/2011/07/26/catherine-4th-nightmare-boss-dooms-bride-normal-walkthrough

Stage 6 - Clock Tower
The Clock Tower throws yet another new kind of block at you against your will: The Bomb Block. As you've probably guess from its name, the Bomb Block initiates a countdown to detonation on contact. After a certain amount of time, it explodes with a certain blast radius and transforms the affected blocks into Cracked Blocks.
The affected surrounding blocks glow a bright red. An exploding block often brings unwanted consequences - sometimes entire columns collapse and seek to corner you into an unsolvable situation. Try to avoid using Bomb Blocks as much as possible. If Bomb Blocks sit on the edge, you can push them off the edge so that they will effectively be rendered ineffective and lost.
Stage 6: 1st Floor
(Normal Mode) Click this link to see the videohttp://www.ign.com/videos/2011/07/29/catherine-stage-6-nightmare-boss-child-with-chainsaw-
walkthrough-normal

Stage 7 - Spiral Corridor
Stage 7 doesn't introduce any new elements - not at first, anyway. Split into five floors, including the boss floor, the Spiral Corridor challenges you to really ponder outside the normal scope of block-climbing. While you tend to recycle many of the techniques, some of the floors here stick to some true fundamentals, which aren't always obvious. From shimmeying across blocks to switching between the left and right side on a level to abusing the crap out of the Inazuma Technique, you should remember to try out these few techniques whenever you're stumped. Those ones plus the Pullback Technique usually solves a lot of the problems here.
When you get to the boss battle, the boss isn't actually as deadly as the other ones in terms of tangible threats. Surely, the boss has a very intimidating presence, but he doesn't actually spend that much time trying to kill you with an arsenal of annoying attacks. The only thing to watch out for is the all-new Black Hole Block that you must avoid stepping on at all costs. It has a strong aptitude for sucking in anything and everything on top of it into its void (a.k.a instant death).
Stage 7: 1st Floor
(Normal Mode) Click this link to see the videohttp://www.ign.com/videos/2011/08/02/catherine-stage-7-nightmare-boss-shadow-of-vincent-
walkthrough-normal
Stage 8 - The Cathedral
There's only one floor at the Cathedral. That's the good news. The bad news is that this single floor also boasts a very putrid-looking and wrathful Catherine boss. The other curveball here is that Katherine is in the nightmare with you, which means you must escort her safely up the blocks and make sure that she navigates the puzzles with you. You can't leave her behind, and if any unfortunate fate befalls her, it's game over for you.
Naturally, with Katherine in tow, you can't just move blocks around willy-nilly - she needs to be able to climb up, too. Thankfully, the block puzzles don't demand too much critical thinking. Catherine, the boss, occasionally strikes targeted blocks (marked red) with lightning. When the blocks glow red, you can tell Katherine to stay put to avoid her meandering into her untimely demise.
Katherine is a very reliable gal and can climb relatively well, provided you carve the path for her.
Stage 8: 1st Floor
(Normal Mode) Click this link to see the videohttp://www.ign.com/videos/2011/08/02/catherine-stage-8-nightmare-boss-catherine-walkthrough-
normal
Stage 9 - The Empireo
Although the game advertises that Stage 8 and 9 are both "Final Stages," the Empireo is truly the final Stage with each floor renamed as Spheres. Even at the last Stage, the omniscient opponent still manages to surprise you with all-new blocks: Mystery blocks and Monster blocks.
Once activated, the Mystery blocks can be transformed into any number of blocks (i.e. a Cracked block, a Heavy block, a Spiked block, etc.) - you won't know until you step on them. For that reason, you'll usually want to touch the block and immediately move in case it is a spiked trap.
On the other hand, Monster blocks are sort of sentient blocks that move around of their own free will. These blocks are characterized by a mouth that ruin your plans to ascend by moving sideways, forward, or wherever. The Monster blocks become inactive once you tap the topside of the block (a la Mario style).
Dealing with the boss
The boss fight comprises the last two Spheres. Thomas Mutton has a couple of attacks that result in truly devastating consequences - they could mean the frail difference between being able to continue climbing successfully or getting you stuck.
The first attack turns any number of blocks into a block with a random property that you've encountered before: Ice block, Monster block, Trap blocks, and so on. Because of this unpredictable variable, each attempt will differ slightly or greatly from another.
The other attack involves him pointing his laser sight-equipped gun and trying to put a bead on you. Once he does, he zaps the block you were last on cleanly out of existence. This makes for some troublesome climbing, especially if the destroyed block was essential. The trick is to stay at an inconsequential block or even a spot devoid of blocks and move at the very last moment.
The last attack has Thomas move in closer to the tower of blocks and snap kick at your last spot. This is an instant-kill, of course, but is easily avoidable
Stage 9: 1st Sphere
(Normal Mode) Click this link to see the videohttp://www.ign.com/videos/2011/08/10/catherine-final-nightmare-boss-dumuzid-walkthrough-normal

Boss Tips and Strategies
At the end of each of the game's stages (except for Stage 1 - Underground Cemetery), you will encounter a boss - usually in some grotesque form - representative of what Vincent is going through in his relationships with Catherine and Katherine.
Awesome Boss Cheat: Each boss in the game has a special move or two that will really cramp your style. As soon as the boss is about to use this move (listen for audio cues) press the UNDO button and you will cancel the attack, or at least delay it a bit. This makes boss fight much easier.
In this section, we've provided some quick and handy tips to beating each boss. As this guide is updated, we'll also provide videos of how to survive each encounter.
Bosses
Fist of a GrudgeImmoral BeastThe ChildDoom's BrideChild With A ChainsawShadow of VincentCatherineThomas MuttonDumuzid

Fist of a Grudge
First Appearance
Stage 2 - Prison of Despair
Boss Fight Strategy
Click this link to see the videohttp://www.ign.com/videos/2011/07/25/catherine-1st-nightmare-boss-fist-of-grudge-normal-
walkthrough
The "Fist of Grudge" is basically a giant hand that's chasing you up the blocks. Aside from the usual way of dying (falling from the blocks), the Fist of Grudge will try to stab you with a fork. Avoid this fate by climbing up the wall.
Even if you do put some distance between you and the Fist, it can still screw up your climbing by slashing across rows of cubes. This will cause all nearby cubes to transform into dark cubes, which are heavier and take longer to move.
If the Fist manages to catch up with you, watch the fork. You can still avoid being stabbed if you keep moving over cubes. Best case scenario: the Fist will stab the cube you're standing on and you'll lose your balance, but you won't fall off.
As you progress up the wall, look for the bell that can change the dark heavy cubes into regular ones. Although you may not need it, the bell can come in handy if the Fist catches up to you and you're stuck pulling heavy blocks to make a staircase.

Immoral Beast
First Appearance
Stage 3 - Torture Chamber
Boss Fight Strategy
Click this link to see the videohttp://www.ign.com/videos/2011/07/25/catherine-2nd-nightmare-boss-immoral-beast-normal-
walkthrough
The "Immoral Beast" isn't the only thing you'll have to keep an eye on. Introduced earlier in the Torture Chamber stage, the booby-trapped cubes can still prove to be your worst enemy if you don't pay attention to where you're going. Remember that you can step on them to trigger them, but you need to step off before the spikes actually deploy.
The Immoral Beast's tongue is its weapon of choice. It attacks the same way the Fist of Grudge attacked you, so when trying to avoid getting speared by the tongue, follow the same strategies you may have used when escaping from the Fist of Grudge.
Aside from its vicious tongue, the Beast also shoots hearts into the air that flutter down onto the cubes. Avoid these by either standing out of the way, or by placing yourself underneath a hanging cube. If you touch any of these hearts, your controls are reversed for period of time. While you can still move and perform all your usual functions, having the controls reversed can certainly slow you down. For those playing on Easy mode, pressing Undo will correct all of the screwed up controls.

The Child
First Appearance
Stage 4 - Inquisition
Boss Fight Strategy
Click this link to see the videohttp://www.ign.com/videos/2011/07/26/catherine-3rd-nightmare-boss-the-child-normal-walkthrough
The one thing you have to watch out for when facing "The Child" is the shock wave attack. When the Child slams a palm into the wall of cubes, the energy will shoot up the length of the wall, and if you happen to be caught in it, you'll go tumbling down a few levels. Usually this will put you right next to the giant baby, forcing you to act faster than normal to get up to where you previously were.
The good thing is that you'll know when the attack is going to happen. The camera's angle will shift slightly, showing you more of what's below and giving you a clear view of the baby raising a hand in preparation for the strike. The wave also moves up along a single column, so if you happen to be in the column the wave is riding on, just step to either side (given that there's something to step on).
If the Child catches up with you, it'll use its palm to smash you to death. It can be avoided the same way as the Immoral Beast's tongue or the Fist of Grudge's fork, but just like those boss encounters, if you hang around too long near the Child, you will die.

Doom's Bride
First Appearance
Stage 5 - Quadrangle
Boss Fight Strategy
Click this link to see the videohttp://www.ign.com/videos/2011/07/26/catherine-4th-nightmare-boss-dooms-bride-normal-walkthrough
The Doom's Bride has similar abilities to the Child, only she's faster and the avalanche attack is more of a challenge to avoid. Instead of riding up the wall like with the shock wave attack from the Child, the Doom's Bride can cause ice to fall from above. This will cause you to fall down several levels. You also won't be able to grab onto any blocks to stop your fall; you need to just wait until your ride downward is finished.
That's not all. The avalanche can reach across several columns, unlike the shock wave attack. The avalanche will start from above, so when it strikes, watch the spread of the ice chunks. There will be two separate 'sides' to the wall of cubes, and the avalanche will actually start from both, so you'll need to watch for the attack no matter where you are on the wall. As the ice starts to tumble down, it can fall onto columns either to its left or right.
The avalanche can be avoided just like the shock wave (step out of the way) or the hearts (hide under a block).

Child With A Chainsaw
First Appearance
Stage 6 - Clock Tower
Boss Strategy
This vicious child is back and, if you didn't think he was terrifying enough, he now wields a chainsaw with a vengeance.
The first half of the level (separated by the Checkpoint) is nothing too unusual, which lets you gain the adequate ground ahead of the grotesque-looking baby.
When you reach the checkpoint, things start heating up when the demonic baby starts unleashing his arsenal of annoying attacks. For one thing, he uses his giant chainsaw to sever one side of the block tower, leaving you with a sizable chunk left to scale. No worries there, but the attack to watch out for unfolds in two parts.
First, chainsaw-wielding baby launches a volley of shots into the air that sends burning rubble crashing down along the platforms. Avoid these by watching which blocks turn red and getting off these blocks as soon as possible. Some of these turn into self-propelling buzzsaws that travel along the blocks vertically or horizontally. Horizontal buzzsaws prove to be more menacing than the vertical ones, since they loop around and try to tear you a new one indefinitely.
You'll be spending most of your energy just avoiding these attacks. Figuring out the pathway to the top will not be too challenging, thankfully.
Click this link to see the videohttp://www.ign.com/videos/2011/07/29/catherine-stage-6-nightmare-boss-child-with-chainsaw-
walkthrough-normal

Shadow of Vincent
First Appearance
Stage 7 - Spiral Corridor
Boss Strategy
Shadow of Vincent is a menacing-looking foe, but you'll discover that he really just only circles around you, taunting you and being an overall intimidating presence. In the first couple seconds of the battle, you simply need to run over to the right and let the stack of blocks collapse into a better position that lets you access the background. Steer clear of the giant wall of blocks on the left, as Shadow of Vincent is about to bulldoze the wall and annihilate anything with it.
(Normal Mode)Click this link to see the videohttp://www.ign.com/videos/2011/08/02/catherine-stage-7-nightmare-boss-shadow-of-vincent-
walkthrough-normal
The boss isn't actually as deadly as the other ones in terms of tangible threats - he doesn't have any attacks directed at you. The only thing to watch out for is the all-new Black Hole Block that you must avoid stepping on at all costs. It has a strong aptitude for sucking in anything and everything on top of it into its void (a.k.a instant death).
Catherine
First Appearance
Stage 8 - The Cathedral
Boss Strategy
(Normal Mode) Click this link to see the videohttp://www.ign.com/videos/2011/08/02/catherine-stage-8-nightmare-boss-catherine-walkthrough-
normal
There's only one floor at the Cathedral. That's the good news. The bad news is that this single floor also boasts a very putrid-looking and wrathful Catherine boss. The other curveball here is that Katherine is in the nightmare with you, which means you must escort her safely up the blocks and make sure that she navigates the puzzles with you. You can't leave her behind, and if any unfortunate fate befalls her, it's game over for you.
Naturally, with Katherine in tow, you can't just move blocks around willy-nilly - she needs to be able to climb up, too. Thankfully, the block puzzles don't demand too much critical thinking. Catherine, the boss, occasionally strikes targeted blocks (marked red) with lightning. When the blocks glow red, you can tell Katherine to stay put to avoid her meandering into her untimely demise.
Katherine is a very reliable gal and can climb relatively well, provided you carve the path for her.

Thomas Mutton
First Appearance
Stage 9 - The Empireo
Boss Strategy
Thomas Mutton has several forms of attacks, and one move that's designed to just slow you down. One of his attacks involves kicking whatever block you're standing on. This will just cause you to stumble, forcing you to take precious moments standing back up again. Or, if you happen to be on or hanging from the block he kicks, he splatters you instantly under his boot.
For the other attack, Thomas Mutton will use his pistol to shoot you. If he misses and strikes a block instead, the block will explode. The best thing to do is to stand in front of an open space in the wall where there is no block behind you. Wait until his pistol's red laser sight aims at you, then move away at the last minute. You'll avoid getting blown up, and no blocks will be destroyed. If you can't find an open space, just watch for whatever block is highlighted in red -- this will be the one that Mutton is aiming for.
His last attack (and a moderately annoying one) causes random blocks to turn into into different types of blocks, such as Heavy blocks or Ice blocks. While this won't stop you from climbing them, it can slow you down. When this happens, just stay calm and keep moving, or Undo to maybe catch a different kind of block.
Click this link to see the videohttp://www.ign.com/videos/2011/08/09/catherine-stage-9-5-boss-thomas-mutton-walkthrough-normal
Dumuzid
First Appearance
Stage 9 - The Empireo
Boss Strategy
Dumuzid has three primary attacks, only one of which prevails in causing you much distress during your ascent.
The first one comes when Dumuzid's eyes turn purple, which casts a curse on Vincent, sending a purple cloud over his head. From that point, a number of the surrounding blocks will start changing every few seconds into a random block (Monster blocks, Bomb blocks, Bounce blocks, etc.). If you're lucky enough to get a Bounce block nearby, use it quickly to propel yourself upward. You can even Undo to keep the Bounce block if it gets changed too quickly.
The pace of this boss battle is a bit faster than one you're used to mainly because Dumuzid's beam attack targets a large portion of the lower blocks and guarantees its destruction within a matter of moments. This greatly reduces the amount of leeyway you have with poor block movements. Thankfully, though, the puzzles aren't so obnoxious that you'll be stumped for too long. As long as the climbing goes apace, you will not need to worry too much about this attack.
Click this link to see the videohttp://www.ign.com/videos/2011/08/10/catherine-final-nightmare-boss-dumuzid-walkthrough-normal
The third attack doesn't rear its ugly head until about the second Checkpoint marker, where Dumuzid begins to send fiery rocks crashing down on individual blocks. This attack is properly televised with the target block turning red, giving you enough time to move aside.
Never forget the efficacy of Undos here, especially when it comes to retaining those Bounce blocks or erasing those despicable Cracked or Bomb blocks. Due to the ever-changing state of the blocks, your runthrough will differ a bit from one another.
Saving Other Sheep
At the Stray Sheep, you'll notice a bunch of other patrons that you can interact with. For either Achievement/Trophy-driven reasons or for the simple sake of being a good human being, it's important for you to lend an ear to the different individuals each night. The big spoiler here is that these same people that visit the bar are in the nightmare with you, taking on the forms of the numerous sheep in your nightmares.
As you live through more bouts of nightmares, you'll receive news updates on the deaths of young men. Whether these deaths happen or not are contingent upon whom you speak to and how you choose your dialogue when given a choice. If you are keen on saving them, you must make a real effort to speak with everyone at the Stray Sheep until they go home, using only conciliatory words to push them on. Likewise, when you encounter them in later nightmares, you can sense their sanity starting to wane, but words of encouragement help pull them back from the void and boost their will to keep climbing.
The passage of time determines which patrons enter, stay, or leave, and they generally leave either once you've exhausted all of the conversation options or of their own volition. Be careful not to dawdle for too long with a particular patron or drinking, as you may miss the opportunity to speak with someone.
Here are the characters that need saving and how to save them:
SheepJustinToddArchieDanielMorgan

Sheep
On some nights, especially the second one, before you meet most of the other Sheep, there is one who is plainly named Sheep. The conversation choices you make with this individual also have an impact on the overarching Achievement/Trophy for saving everyone.
Day/Night Question Answer
Stage 2-1 Aaaahhh! I don't want to die! Calm down.
Stage 2-2News flash: FUCK YOU! I need to make sure I survive!
That's not right!
Stage 3-2Nnooooo...I don't want to go any higher!
What do you mean, "terrible"?
Stage 4-1Ughhh...It's all my fault...I'm sorry...I'm apologizing, okay!?!? I'M SORRY!
Come on, get a hold of yourself!
Stage 6-1How have you been answering them?
I'd been answering honestly...
Justin
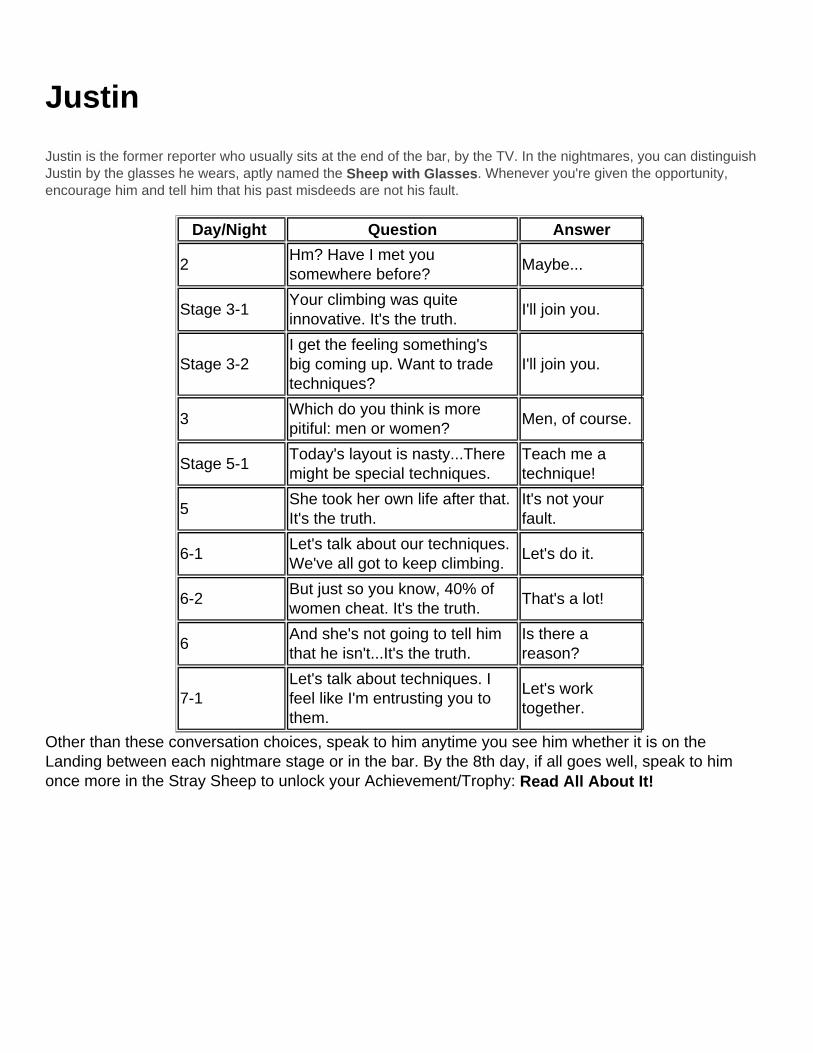
Justin is the former reporter who usually sits at the end of the bar, by the TV. In the nightmares, you can distinguish Justin by the glasses he wears, aptly named the Sheep with Glasses. Whenever you're given the opportunity, encourage him and tell him that his past misdeeds are not his fault.
Day/Night Question Answer
2Hm? Have I met you somewhere before?
Maybe...
Stage 3-1Your climbing was quite innovative. It's the truth.
I'll join you.
Stage 3-2I get the feeling something's big coming up. Want to trade techniques?
I'll join you.
3Which do you think is more pitiful: men or women?
Men, of course.
Stage 5-1Today's layout is nasty...There might be special techniques.
Teach me a technique!
5She took her own life after that. It's the truth.
It's not your fault.
6-1Let's talk about our techniques. We've all got to keep climbing.
Let's do it.
6-2But just so you know, 40% of women cheat. It's the truth.
That's a lot!
6And she's not going to tell him that he isn't...It's the truth.
Is there a reason?
7-1Let's talk about techniques. I feel like I'm entrusting you to them.
Let's work together.
Other than these conversation choices, speak to him anytime you see him whether it is on the Landing between each nightmare stage or in the bar. By the 8th day, if all goes well, speak to him once more in the Stray Sheep to unlock your Achievement/Trophy: Read All About It!
Todd
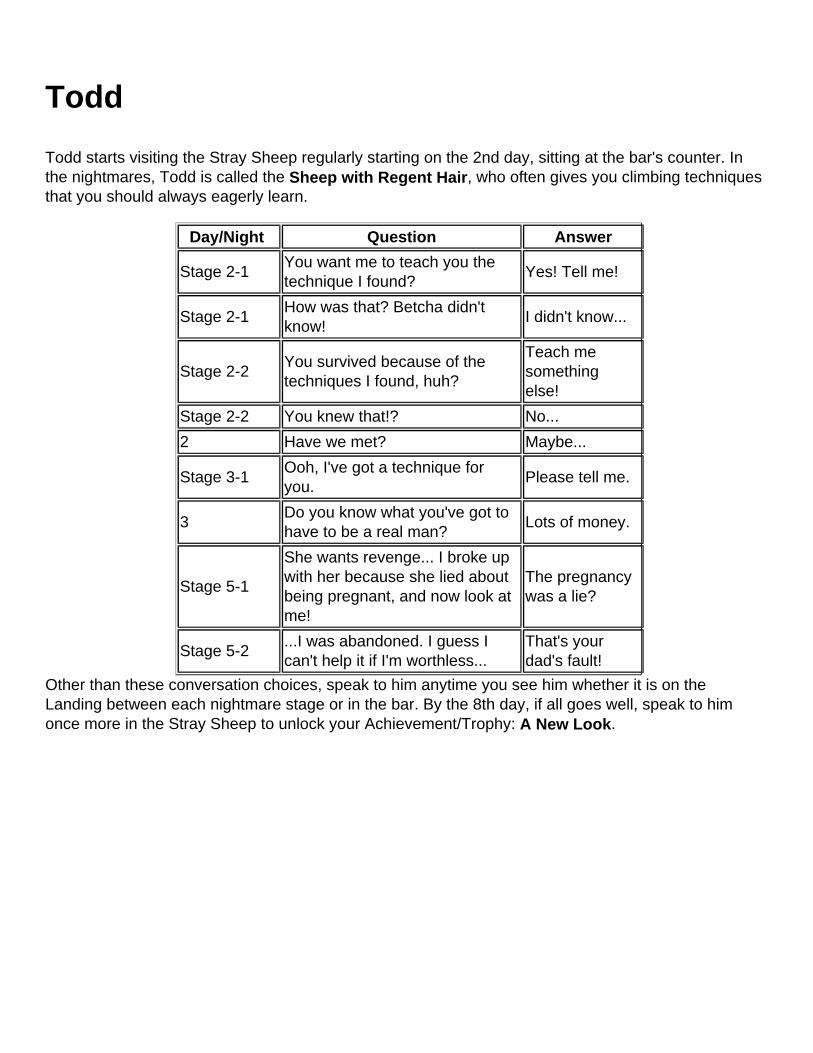
Todd starts visiting the Stray Sheep regularly starting on the 2nd day, sitting at the bar's counter. In the nightmares, Todd is called the Sheep with Regent Hair, who often gives you climbing techniques that you should always eagerly learn.
Day/Night Question Answer
Stage 2-1You want me to teach you the technique I found?
Yes! Tell me!
Stage 2-1How was that? Betcha didn't know!
I didn't know...
Stage 2-2You survived because of the techniques I found, huh?
Teach me something else!
Stage 2-2 You knew that!? No...
2 Have we met? Maybe...
Stage 3-1Ooh, I've got a technique for you.
Please tell me.
3Do you know what you've got to have to be a real man?
Lots of money.
Stage 5-1
She wants revenge... I broke up with her because she lied about being pregnant, and now look at me!
The pregnancy was a lie?
Stage 5-2...I was abandoned. I guess I can't help it if I'm worthless...
That's your dad's fault!
Other than these conversation choices, speak to him anytime you see him whether it is on the Landing between each nightmare stage or in the bar. By the 8th day, if all goes well, speak to him once more in the Stray Sheep to unlock your Achievement/Trophy: A New Look.

Archie
Archie will be found sitting with Todd at the Stray Sheep starting on the 2nd day. In the nightmares, he is theLong-Haired Sheep. Give positive reinforcement to help him along with his troubles.
Day/Night Question Answer
2 Have we met? Maybe...
3Do you know what you've got to have to be a real man?
Lots of money.
Stage 4-1We were talking about techniques. Wanna join in?
Join the conversation.
4Do I look like a good person?
Of course.
4So you mean you'd pull back even if the woman of your dreams hit on you?
Of course.
Stage 6-3Instead of dragging myself through Hell... Maybe it's better just to die here...
Come on, don't think like that!
Other than these conversation choices, speak to him anytime you see him whether it is on the Landing between each nightmare stage or in the bar. By the 8th day, if all goes well, speak to him once more in the Stray Sheep to unlock your Achievement/Trophy: Mother Inferior.

Daniel
Daniel seems to have a history with Vincent and can be found at the bar's counter. He has a bit of an inferiority complex and shows up with his wife, Anna. In the nightmares, he is known as the Sheep with Sunglasses. In addition to speaking with Daniel and his sheep alter ego, you must also approach his wife in the Stray Sheep bar whenever the option is available.
Day/Night Question Answer
Stage 3-1I'll give you any amount of money you want! Just get me out of here!
I'm clueless, too!
3I heard your voice somewhere... Was it yesterday...?
I think so too...
4So why do I feel so powerless?
Forget about it.
Stage 5-1I won't join them. I don't need their help to climb some blocks!
By the way, there's this technique...
Stage 5-2 Even if it makes you unhappy?I'll find a way for us both.
Stage 6-3
Anyway, let's try and come up with some techniques. Why don't we exchange some information?
Join the meeting.
Stage 7-1I don't want true freedom. I just want normal freedom everyone else has.
Don't give up! Follow me!
Other than these conversation choices, speak to him anytime you see him whether it is on the Landing between each nightmare stage or in the bar. By the 8th day, if all goes well, speak to him once more in the Stray Sheep to unlock your Achievement/Trophy: Love is Patient, Love is Kind.
Morgan
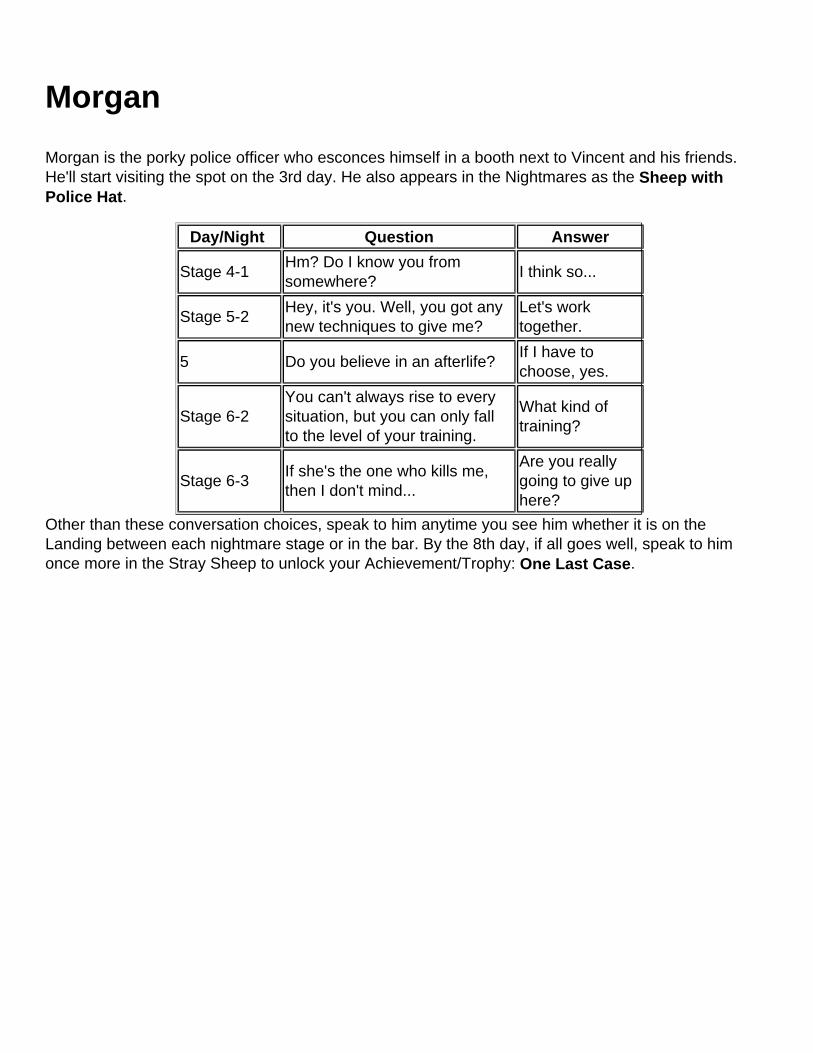
Morgan is the porky police officer who esconces himself in a booth next to Vincent and his friends. He'll start visiting the spot on the 3rd day. He also appears in the Nightmares as the Sheep with Police Hat.
Day/Night Question Answer
Stage 4-1Hm? Do I know you from somewhere?
I think so...
Stage 5-2Hey, it's you. Well, you got any new techniques to give me?
Let's work together.
5 Do you believe in an afterlife?If I have to choose, yes.
Stage 6-2You can't always rise to every situation, but you can only fall to the level of your training.
What kind of training?
Stage 6-3If she's the one who kills me, then I don't mind...
Are you really going to give up here?
Other than these conversation choices, speak to him anytime you see him whether it is on the Landing between each nightmare stage or in the bar. By the 8th day, if all goes well, speak to him once more in the Stray Sheep to unlock your Achievement/Trophy: One Last Case.

Technique Videos
Throughout the game, you will be taught how to perform different "techniques" that will help you solve the puzzles. In this section, we've provided videos of each of the game's techniques, just in case you forget how to pull one off.
Bridge TechniqueSuspending TechniqueSwing Out TechniqueIce Pulling TechniqueSpider TechniqueWall Suspension TechniquePullback Technique

Suspending TechniqueClick this link to see the videohttp://www.ign.com/videos/2011/07/22/catherine-walkthrough-suspending-technique

Pullback TechniqueClick this link to see the videohttp://www.ign.com/videos/2011/07/27/catherine-walkthrough-pullback-technique

Tornado TechniqueClick this link to see the videohttp://www.ign.com/videos/2011/07/26/catherine-walkthrough-tornado-technique

Spider TechniqueClick this link to see the videohttp://www.ign.com/videos/2011/07/26/catherine-walkthrough-spider-technique

Bridge TechniqueClick this link to see the videohttp://www.ign.com/videos/2011/07/26/catherine-walkthrough-bridge-technique

Flying Bridge TechniqueClick this link to see the videohttp://www.ign.com/videos/2011/07/28/catherine-walkthrough-flying-bridge-technique

Swing Out TechniqueClick this link to see the videohttp://www.ign.com/videos/2011/07/22/catherine-walkthrough-swing-out-technique

Toppler Technique

Wall Suspension TechniqueClick this link to see the videohttp://www.ign.com/videos/2011/07/27/catherine-walkthrough-wall-suspension-technique

Wall Spider TechniqueClick this link to see the videohttp://www.ign.com/videos/2011/07/26/catherine-walkthrough-wall-spider-technique

Cutout TechniqueClick this link to see the videohttp://www.ign.com/videos/2011/07/26/catherine-walkthrough-cutout-technique

Cut AcrossClick this link to see the videohttp://www.ign.com/videos/2011/07/26/catherine-walkthrough-cut-across-technique

Ice Pulling TechniqueClick this link to see the videohttp://www.ign.com/videos/2011/07/22/catherine-walkthrough-ice-pulling-technique

Ice Evasion Technique

Geronimo TechniqueClick this link to see the videohttp://www.ign.com/videos/2011/07/26/catherine-walkthrough-geronimo-technique

Controlled Demolition TechniqueClick this link to see the videohttp://www.ign.com/videos/2011/07/26/catherine-walkthrough-controlled-demolition-technique

Timber TechniqueClick this link to see the videohttp://www.ign.com/videos/2011/07/29/catherine-walkthrough-timber-technique

Controlled Explosions TechniqueClick this link to see the videohttp://www.ign.com/videos/2011/07/29/catherine-walkthrough-controlled-explosion-technique

Bombs, Away TechniqueClick this link to see the videohttp://www.ign.com/videos/2011/08/02/catherine-walkthrough-bombs-away-technique

Spring TechniqueClick this link to see the videohttp://www.ign.com/videos/2011/08/02/catherine-walkthrough-spring-technique

Inazuma Technique
The incredibly important Inazuma Technique allows you to climb sheer walks, like the walls in Stage 7-1. Learn it well!
Click this link to see the videohttp://www.ign.com/videos/2011/08/02/catherine-walkthrough-inazuma-technique

Inazuma Variant TechniqueClick this link to see the videohttp://www.ign.com/videos/2011/08/02/catherine-walkthrough-inazuma-variant

Marching Spider TechniqueClick this link to see the videohttp://www.ign.com/videos/2011/08/05/catherine-walkthrough-marching-spider-technique

Back Spider TechniqueClick this link to see the videohttp://www.ign.com/videos/2011/08/05/catherine-walkthrough-back-spider-technique

Fall Dodger TechniqueClick this link to see the videohttp://www.ign.com/videos/2011/08/05/catherine-walkthrough-fall-dodger-technique

Uprooting TechniqueClick this link to see the videohttp://www.ign.com/videos/2011/08/05/catherine-walkthrough-uprooting-technique

Bracing TechniqueClick this link to see the videohttp://www.ign.com/videos/2011/08/05/catherine-walkthrough-bracing-technique

Secrets
How to Unlock Multiplayer Mode
Beat the game to unlock Colosseum Mode, a multiplayer competitive mode.
Always Avoid Boss Attacks
Awesome Boss Cheat: Each boss in the game has a special move or two that will really cramp your style. As soon as the boss is about to use this move (listen for audio cues) press the UNDO button and you will cancel the attack, or at least delay it a bit. This makes boss fight much easier.
Infinite Combo Meter
You can beat an entire level with one step combo pretty easily by using this exploit: When your combo bar is almost fully drained, press undo to reset the whole bar.
Skip Stages in New Game +
If you get a Gold on a stage in Normal mode or higher, you get the option to skip it on a second playthrough. This allows you to focus on story stuff and see the multiple endings.
How to Activate Very Easy Mode
At the title screen hold SELECT (BACK) while you have "Golden Playhouse" highlighted for a few seconds until you hear a tone and see a message about Very Easy Mode. Now, select Easy Mode in Golden Playhouse and it should be much, much easier.
Here's where things become a little unclear. I selected Golden Playhouse and there was no option called "Very Easy," but I chose "Easy" and continued my save and the game became substantially easier. For instance, there are many energy drinks that allow you to climb two blocks instantly in Very Easy Mode.
Editorial Note: Easy and Very Easy difficulty will not count towards having your Gold ranking count for puzzle-skipping conditions.
Additional Rapunzel (Arcade Game) Stages
In the bar you'll find a Rapunzel arcade machine. Enter this code at the game's title screen to unlock more stages. UP, DOWN, DOWN, UP, UP, UP, DOWN, DOWN, DOWN, DOWN, RIGHT
You should see visual confirmation of the code. You can enter it again to disable it.

Shin Megami Tensei Persona 4 Easter Egg
While wandering around the Stray Sheep, you can pause for a moment to look at the far right corner of the bar. It's Teddie from Persona 4! Or at least, it's a stuffed Teddie. Apparently Boss is quite a fan of the Shin Megami Tensei games.
Shin Megami Tensei: Persona 3 Easter Egg
In The Stray Sheep, near where Erica usually stands, look on the wall -- you should recognize the Gekkoukan emblem from Shin Megami Tensei: Persona 3.
Related Secrets
Endings

Questions and ResponsesBelow is a list of some of the questions encountered during the game, along with what effect their responses will have on your karma meter. Keep in mind that the order of the questions are random, so a question that one player might encounter during the 7th Night may be different for another player.
Also, all questions posed during the 9th Night have no visible effect on your karma meter, but your answers do effect what ending you get. Please check our Endings page for a breakdown to those questions.
Questions and Responses
Prefer an older or younger partner?Older: BlueYounger: Red
Are all men stupid?That's right: RedNot all men: Blue
What is more like "paradise"?A beautiful countryside: BlueSomewhere I can get a drink: Red
Could you ever be paid enough to go nude in public?Never!: BlueHow much are we talking about?: Red
How does a life of no responsibility sound?Sign me up: RedNo way: Blue
What's your take on praying mantis mating habits?It makes me nauseous: BlueWhatever: Red
Is it okay to lie if you'll never be caught?No problem there: RedI still can't lie: Blue
Which is harder: lying, or being lied to?Lying: BlueBeing lied to: Red
Your lover is cheating on you. Do you...?Break up with them: BlueMake them end it: Red

How would you propose to your lover?Just let it happen: RedIt has to be special: Blue
If you get reincarnated, would you want to be human?I love being human: BlueIt doesn't matter: Red
Is it easier to love, or be loved?To love: RedTo be loved: Blue
Does life begin or end at marriage?It begins: BlueIt ends: Red
Do you prefer being in quiet or loud places?Bring in the noise!: RedI like it quiet: Blue
Which is a better life?Long and dull: BlueShort and full: Red
Do you prefer to stand out from the crowd or fit in?Fit in: BlueStand out: Red
Which makes you more nervous?Being alone: BlueBeing with others: Red
Who would be responsible if you cheated?It'd be my fault: BlueThe person I cheat with: Red
What do you think of actors in sex scenes?Lucky!: RedIt's just a job: Blue
Have you been told your romantic standards were too high?Yes: BlueNot that I recall: Red
Are you more of a Sadist or a Masochist?Masochist: BlueSadist: Red
Could you show everything in your inbox to your lover?

Of course!: BlueEh... I don't think so: Red
If reincarnation existed, would you want to come back to life as a human?I love being human!: BlueIt doesn't matter: Red
Would you marry the perfect...robot?Is it fully...functional?: RedI don't do robots: Blue
Have you ever changed your personal style for someone else?Nope: RedSure: Blue
Do you look for appearance or personality in a mate?Looks: RedMind: Blue

Endings
There are a total of 8 endings for Catherine based on your Karma.
Spoiler-filled descriptions and videos of each ending can be found at the very bottom of the page.
Karma is affected by the choices you make during the "confession" segments in the game, by replying to text messages on your phone and even dialogue choices.
There are three possible main routes with different variations of good and bad endings for each. These are achieved by being nice to either Catherine (Pink Side) or Katherine (Blue Side), or being mean to both (keeping your Karma meter in the middle).
The ending variations are actually affected by the Confession questions in the last stage (9th Night). The last few questions and your standing on the Karma meter up to that point determine the ending.
During the 9th Night, the first question actually doesn't affect your ending, but the following two determine your fourth question and ending. Here's how to get all the different variations:
Ending Meter Q2 Q3 Q4Katherine (True)
Extreme Blue Yes No I'm Ready
Catherine (True)
Extreme Pink No Yes Yes
Freedom (True)
Middle No No Yes
Katherine (Good)
Extreme Blue Yes Yes Peaceful Days
Catherine (Good)
Extreme Pink Yes YesChaotic Excitement
Freedom (Good)
Extreme Either
No No Yes
Katherine (Bad)
Extreme Pink Yes Yes Peaceful Days
Catherine (Bad)
Extreme Blue Yes YesChaotic Excitement
Catherine Ending Descriptions
Katherine (True)
Vincent and Katherine get back together and there's an extended wedding scene. Erica, the waitress, turns out to be transsexual.
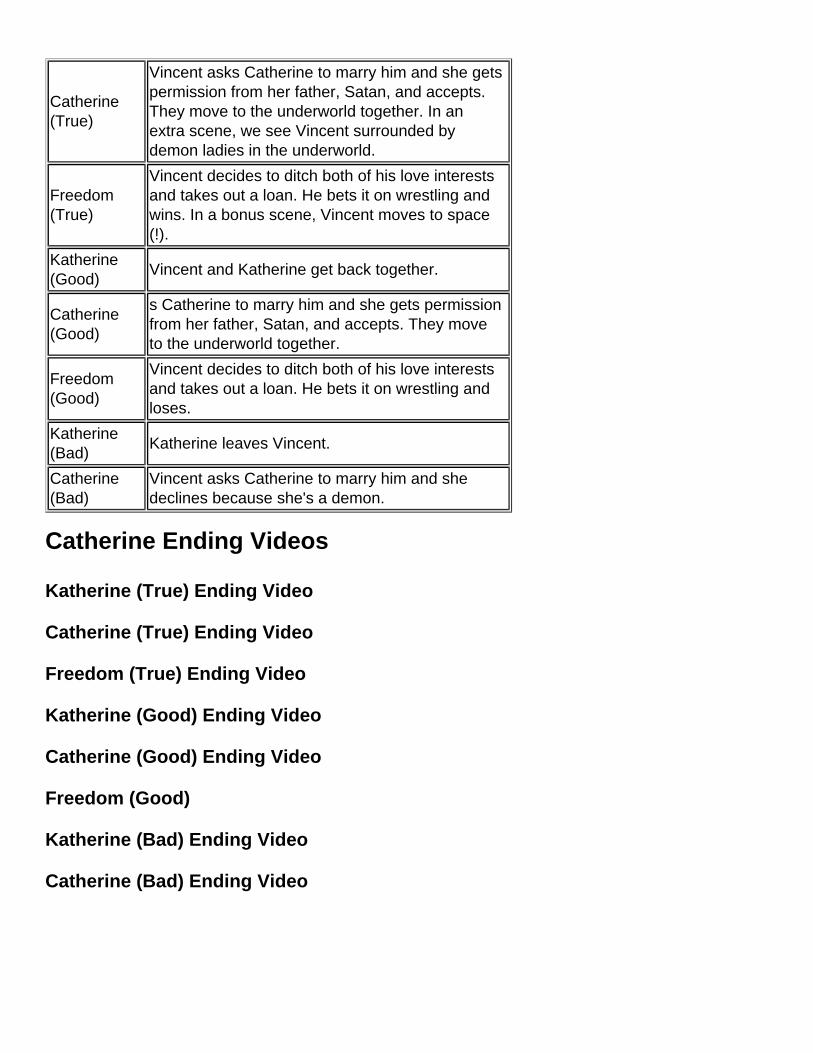
Catherine (True)
Vincent asks Catherine to marry him and she gets permission from her father, Satan, and accepts. They move to the underworld together. In an extra scene, we see Vincent surrounded by demon ladies in the underworld.
Freedom (True)
Vincent decides to ditch both of his love interests and takes out a loan. He bets it on wrestling and wins. In a bonus scene, Vincent moves to space (!).
Katherine (Good)
Vincent and Katherine get back together.
Catherine (Good)
s Catherine to marry him and she gets permission from her father, Satan, and accepts. They move to the underworld together.
Freedom (Good)
Vincent decides to ditch both of his love interests and takes out a loan. He bets it on wrestling and loses.
Katherine (Bad)
Katherine leaves Vincent.
Catherine (Bad)
Vincent asks Catherine to marry him and she declines because she's a demon.
Catherine Ending Videos
Katherine (True) Ending Video
Catherine (True) Ending Video
Freedom (True) Ending Video
Katherine (Good) Ending Video
Catherine (Good) Ending Video
Freedom (Good)
Katherine (Bad) Ending Video
Catherine (Bad) Ending Video

Catherine's Pictures
On days when you are in the Stray Sheep, Vincent will receive texts through his phone from Catherine and others. Of particular interest to some are the attached phone images of Catherine in a variety of provocative poses. These are often so scandalous that Vincent must retreat into the privacy of the bathroom stall to be able to gawk at them at length. Catherine sends five of these photos throughout the course of a playthrough. If you answer reply in a favorable manner to Catherine all the time, you almost guarantee getting them.
Pic # Day Text Subject How to Unlock
1 2 YAYReply positively to prior text messages titled: "Is this reaching you?" and "R U getting these?"
2 3 OkiesReply positively to prior text message titled: "Hey!"
3 4 Show & Tell!!Automatic. First text message from Catherine.
4 5Some good medicine!
Automatic. First text message from Catherine.
5 6 I'm so excited!Automatic. First text message from Catherine.

Achievements / Trophies
Accolades are listed alphabetically for ease of indexing.
Note: The Xbox 360 Gamerscore values are missing. There are also 22 hidden Achievements / Trophies not yet known--feel free to add them! See: Using Wiki Templates15G3-Star ManEarn 3 Prizes on Normal or Hard.20G5-Star ManEarn 5 Prizes on Normal or Hard.10GA New LookHelp Todd out of his trouble.10GAltar Conquered!Complete Stage 1 of Babel.10GBabel’s CallingPrize on Normal or Hard.10GBeer BaronListen to all the beer factoids.20GBomberlambHit 15 blocks with a single explosion. (Golden Playhouse)10GCheers to YouGet all other trophies.10GCocktail ConnoisseurListen to all the cocktail trivia.100GDreams Come TrueView all of the endings.50GEveryday HeroHelp everyone out of their predicaments.10GHave an Ice DaySlide an Ice Block 5 or more blocks. (Golden Playhouse)30GI Can Fly!Jump on a Spring Block 3 times in a row. (Golden Playhouse)10G

Love Is Patient, Love Is KindResolve Daniel’s dilemma.15GMenhir Conquered!Complete Stage 2 of Babel.10GMother InferiorHelp Archie work through his quandary.20GObelisk Conquered!Complete Stage 3 of Babel.10GOne Last CaseHelp Morgan clean up his mess.10GPast a Heap of PuzzlesBeat Stage 64 of Rapunzel.5GPlay It Again, VinceUse the jukebox to change the music.10GPush It to the Limit!Push 5 blocks at once. (Golden Playhouse)10GRead All About It!Get Justin out of his jam.10GSake SenseiListen to all the sake sound bites.30GTake Your TimeMove a Dark Block 10 times in a row. (Golden Playhouse)30GTaking on the GodsGet all gold Prizes on Normal or Hard.20GText JunkieReply to at least 20 text messages by the end of the final day.5GWelcome to the ColosseumUnlock the Colosseum Mode.10GWhisky WisemanListen to all the whisky minutiae.10GYou Don’t Have to Go HomeStay in the bar until all the other customers left.

All achievement and trophy pages on IGN's wikis use a special template. Please visit the Template Page for the correct code and instructions on how to use them. Thank you.

Frequently Asked Questions
Does this game feature nudity?
There is no pornographic nudity or activities in this game. However, Catherine features suggestive themes and is rated M for mature audiences only (not AO, which is Adults Only).
How many endings are there in Catherine?
There are a total of 8 endings for Catherine based on your Karma.
External Sources
Official Site - United StatesOfficial Site - Japan