CA Explore Performance Management for z/VSE Installation Guide
68
Installation Guide r7.1 CA Explore ® Performance Management for z/VSE
-
Upload
khangminh22 -
Category
Documents
-
view
3 -
download
0
Transcript of CA Explore Performance Management for z/VSE Installation Guide

Installation Guide r7.1
CA Explore® Performance
Management for z/VSE

This documentation and any related computer software help programs (hereinafter referred to as the
"Documentation") are for your informational purposes only and are subject to change or withdrawal by CA at any time.
This Documentation may not be copied, transferred, reproduced, disclosed, modified or duplicated, in whole or in part,
without the prior written consent of CA. This Documentation is confidential and proprietary information of CA and may
not be used or disclosed by you except as may be permitted in a separate confidentiality agreement between you and
CA.
Notwithstanding the foregoing, if you are a licensed user of the software product(s) addressed in the Documentation,
you may print a reasonable number of copies of the Documentation for internal use by you and your employees in
connection with that software, provided that all CA copyright notices and legends are affixed to each reproduced copy.
The right to print copies of the Documentation is limited to the period during which the applicable license for such
software remains in full force and effect. Should the license terminate for any reason, it is your responsibility to certify
in writing to CA that all copies and partial copies of the Documentation have been returned to CA or destroyed.
TO THE EXTENT PERMITTED BY APPLICABLE LAW, CA PROVIDES THIS DOCUMENTATION "AS IS" WITHOUT
WARRANTY OF ANY KIND, INCLUDING WITHOUT LIMITATION, ANY IMPLIED WARRANTIES OF MERCHANTABILITY,
FITNESS FOR A PARTICULAR PURPOSE, OR NONINFRINGEMENT. IN NO EVENT WILL CA BE LIABLE TO THE END USER
OR ANY THIRD PARTY FOR ANY LOSS OR DAMAGE, DIRECT OR INDIRECT, FROM THE USE OF THIS DOCUMENTATION,
INCLUDING WITHOUT LIMITATION, LOST PROFITS, LOST INVESTMENT, BUSINESS INTERRUPTION, GOODWILL, OR
LOST DATA, EVEN IF CA IS EXPRESSLY ADVISED IN ADVANCE OF THE POSSIBILITY OF SUCH LOSS OR DAMAGE.
The use of any software product referenced in the Documentation is governed by the applicable license agreement and
is not modified in any way by the terms of this notice.
The manufacturer of this Documentation is CA.
Provided with "Restricted Rights." Use, duplication or disclosure by the United States Government is subject to the
restrictions set forth in FAR Sections 12.212, 52.227-14, and 52.227-19(c)(1) - (2) and DFARS Section
252.227-7014(b)(3), as applicable, or their successors.
Copyright © 2010 CA. All rights reserved. All trademarks, trade names, service marks, and logos referenced herein
belong to their respective companies.

CA Product References
This document references the following CA products:
■ CA CIS for z/VSE
■ CA Explore® Performance Management for z/VSE (CA Explore PM for z/VSE)
■ CA Explore® Performance Management for CICS (CA Explore PM for CICS)
■ CA Explore® Performance Management for VTAM (CA Explore PM for VTAM)
■ CA FAQS® Automated Systems Operation for z/VSE (CA FAQS ASO for
z/VSE)
■ CA GSS® for VSE (CA GSS for VSE)
■ CA Top Secret® (CA Top Secret)
Contact CA
Contact Technical Support
For your convenience, CA provides one site where you can access the
information you need for your Home Office, Small Business, and Enterprise CA
products. At http://ca.com/support, you can access the following:
■ Online and telephone contact information for technical assistance and
customer services
■ Information about user communities and forums
■ Product and documentation downloads
■ CA Support policies and guidelines
■ Other helpful resources appropriate for your product
Provide Feedback
If you have comments or questions about CA product documentation, you can
send a message to [email protected].
If you would like to provide feedback about CA product documentation, complete
our short customer survey, which is also available on the CA Support website,
found at http://ca.com/docs.


Contents 5
Contents
Chapter 1: Introduction 9
Performance Monitoring Made Easy ............................................................... 9
Audience ....................................................................................... 10
Chapter 2: Preparing for Installation 11
Checklist ....................................................................................... 11
Step1. Install the CA CIS for VSE Tape .......................................................... 11
CA Explore PM for z/VSE Residence Library .................................................. 12
Step 2. Obtain the LMP Key ..................................................................... 12
Step 3. Satisfy System Requirements ............................................................ 12
Storage Requirements ...................................................................... 12 Step 4. Installing the Product Using MSHP ....................................................... 13
Using MSHP ................................................................................ 13
Product Installation Tape ........................................................................ 14
Chapter 3: Installing the Product 15
Installation Process ............................................................................. 16
Standard Installation Sequence ................................................................. 17
Standard Installation JCL .................................................................... 17
Installation Checklist ........................................................................ 19
Step 1: Review System Requirements ........................................................... 19
Step 2: Install CA CIS for VSE ................................................................... 20 Step 3: Complete the Installation Worksheet..................................................... 20
Library Allocation Requirements ............................................................. 20
Step 4: Extract the Installation JCL .............................................................. 22
Step 5: Install the Product Distribution Tape with MSHP .......................................... 22
Step 6: Add CA Explore Messages to the VSE Messages File (optional) ............................ 23
Step 7: Define the Archive and Flashback Files ................................................... 23
File Allocation Requirements ................................................................. 24
Define the Archive File ...................................................................... 24
Defining the Flashback File .................................................................. 26 Step 8: Define Access to the Online Interface .................................................... 27
Recommended Access Methods .............................................................. 28
Step 9: Define CA Explore PM for z/VSE as a VTAM Application ................................... 28
Update Your VTAM Resource Definitions...................................................... 29
Step 10: Define CICS Access to CA Explore PM for z/VSE ......................................... 29

6 Installation Guide
Step 11: Update CICS Tables.................................................................... 29
Add Entries to the PCT ...................................................................... 30
Add Entries to the PPT ...................................................................... 30
CICS/TS (Transaction Server) Considerations ................................................ 30
Step 12: Define a Dedicated Terminal in the z/VSE environment .................................. 30 Define a Dedicated Terminal in a VM Environment ............................................ 30
Assigning Other Logical Unit Numbers ....................................................... 31
Step 13: Define the Product to CA FAQS ASO for z/VSE .......................................... 31
Step 14: Activate the CA-CIS MWRT VM Component ............................................. 32
Step 15: Copy User-defined Options ............................................................. 32
Members of the Residence Library Containing User-defined Options ........................... 32
Step 16: Initialize CA Explore PM for z/VSE ...................................................... 34
Requirements for Running CA Explore PM for z/VSE .......................................... 34
Initialization Procedure ...................................................................... 35 Step 17: Access the Product .................................................................... 36
Main Menu .................................................................................. 37
Chapter 4: Troubleshooting 39
Collecting Diagnostic Data ...................................................................... 39
Interpreting Diagnostic Data .................................................................... 40
Appendix A: Implementing Security 43
Define Internal Security ......................................................................... 43
Install the Internal Security Exit ............................................................. 44
Using CA Top Secret to Secure CA Explore for z/VSE ............................................. 46
Step 1. Run Jobstream to Rename EVSESSFI ................................................ 46 Step 3. Define the CA Explore PM for z/VSE ACID ............................................ 47
Step 4. Define the CA Explore PM for z/VSE Resource Class ................................... 48
Step 5. Secure CA Explore PM for z/VSE Resources ........................................... 48
Step 6. Grant Permission to Access CA Explore PM for z/VSE Resources ....................... 49
Step 7. Set SECURITY Configuration ......................................................... 50
Appendix B: Accessing and Using Sample JCL 51
Extracting the Product Installation JCL ........................................................... 51
Extracting From a Physical Tape: CAINSTB0 ................................................. 52
Extracting From an ESD File: CAINSTC0 ..................................................... 53
Install the CA Product ........................................................................... 54 Install From a Physical Tape: CAINSTB2 ..................................................... 55
Install From an ESD File: CAINSTC2 ......................................................... 57
Migrate the CA Product into Production: CAINSTB3 ........................................... 59
Perform a Direct CA Product Installation ......................................................... 60

Contents 7
Install Directly From a Physical Tape: CAINSTQ4 ............................................. 61
Install Directly From an ESD File: CAINSTC4 ................................................. 62
Appendix C: Starting the Product before POWER 65
Step 1. Starting the Product ..................................................................... 65
Step 2. Remove F4 References .................................................................. 66 Step 3. Include START F4 Statement ............................................................ 66
Step 4. Recatalog JCL PROCs .................................................................... 66
Step 5. IPL ..................................................................................... 66
Index 67


Chapter 1: Introduction 9
Chapter 1: Introduction
CA Explore® Performance Management for z/VSE (CA Explore PM for z/VSE) is a
software performance monitor for VSE operating platforms. It provides real-time
performance reporting, and short-term and long-term historical performance
reporting. The product facilitates performance analysis of VSE operating
environments and provides data for performance tuning and capacity analysis
functions. Monitoring support is also included for CA Datacom/Database
environments running under VSE. The ability to use this solution to set
thresholds in critical areas helps maintain optimal system resource utilization.
This section contains the following topics:
Performance Monitoring Made Easy (see page 9)
Audience (see page 10)
Performance Monitoring Made Easy
CA Explore PM for z/VSE is the VSE product offering that also includes CA Explore
PM for CICS for CICS systems under VSE, and CA Explore PM for VM for VM
operating environments.
CA Explore provides information that helps you perform following tasks:
■ Ensure that your system and applications are meeting your performance
goals
■ Make strategic decisions
■ Estimate the impact of planned changes
The following features help you use the product more efficiently:
■ Panel-driven online interface with an online help facility
■ Full color and graphics support
■ Cursor menu selection
■ Batch reporting facilities that include easy-to-run canned reports and
user-created reports with more than 400 variables
■ Monitoring support for CA Datacom database environments running under
VSE
■ Interface to obtain the current CA Datacom user from the database manager
using the new CA Explore PM for z/VSE/CA Datacom API

Audience
10 Installation Guide
Audience
The intended users of this guide are system programmers, administrators, and
performance analysts, who perform and manage the following processes:
■ Installation of the product.
■ Implementation and maintenance of the product.
■ Customizing additional capabilities.
■ Analyzing and interpreting the diagnostic data
These users should possess a good working knowledge of IBM mainframe
hardware components and configurations. They should also be familiar with the
facilities, and the operating and performance characteristics of IBM's VSE/ESA
operating systems.

Chapter 2: Preparing for Installation 11
Chapter 2: Preparing for Installation
This chapter provides the installation information required prior to successfully
installing CA Explore PM for z/VSE.
This section contains the following topics:
Checklist (see page 11)
Step1. Install the CA CIS for VSE Tape (see page 11)
Step 2. Obtain the LMP Key (see page 12)
Step 3. Satisfy System Requirements (see page 12)
Step 4. Installing the Product Using MSHP (see page 13)
Product Installation Tape (see page 14)
Checklist
You can use the following checklist to keep track of the pre-installation steps you
completed:
Step Description Completed (√)
1 Install the CA CIS for VSE tape.
2 Obtain the LMP Key for CA Explore PM for z/VSE.
3 Determine if your site meets the requirements
for installing and running the CA Explore PM for
z/VSE components you are installing.
4 Restore the installation tape using the IBM
Maintain System History Program (MSHP).
Important! Ensure that CA CIS for VSE is installed before starting the
installation process for CA Explore PM for z/VSE.
Step1. Install the CA CIS for VSE Tape
The CA CIS for VSE tape consists of components common to all CA VSE products.
If you have already installed the latest CA CIS for VSE tape as part of another
product's installation step, you may skip this step. Otherwise, see the CA CIS for
VSE Getting Started guide to install the CA CIS for VSE tape.

Step 2. Obtain the LMP Key
12 Installation Guide
CA Explore PM for z/VSE Residence Library
The CA Explore PM for z/VSE residence library sub-library is where programs,
panels, and customized configuration options reside. You can either create a
library or select a pre-existing library to serve as the residence library.
Step 2. Obtain the LMP Key
You must have an LMP licensing key for each CA solution you want to install and
use. If you do not have the LMP key you need, you can obtain it from your CA
Account Manager. Be sure to name the specific solutions for which you need an
LMP key.
Step 3. Satisfy System Requirements
To run CA Explore PM for z/VSE, you must have VSE/ESA 2.6 or later.
Storage Requirements
CA Explore PM for z/VSE must run in a dedicated partition. The partition can be
either static or dynamic.
A partition of at least 2 MB is required for minimal monitoring.
Shared System Storage for CA Explore PM for z/VSE
The shared system storage, CA Explore PM for z/VSE uses, can come from the
SDAID storage area or system GETVIS storage. No SDL/SVA phases are
required.
Using default monitoring options, CA Explore PM for z/VSE requires the following
approximate amounts of shared system storage:
■ 32 KB of 24-bit storage below the 16 MB line.
■ 152 KB of 31-bit storage above the 16 MB line. If the available amount of
31-bit system GETVIS is insufficient, 24-bit system GETVIS is used.

Step 4. Installing the Product Using MSHP
Chapter 2: Preparing for Installation 13
Determining the System GETVIS Storage Available
To determine how much system GETVIS you have available, enter GETVIS SVA
on the system console. We recommend that your LARGEST FREE AREA be a
minimum of 128 KB.
The default size of the SDAID area is 64 KB. The SYS SDSIZE= VSE IPL option
controls its size.
Library Size Requirements
CA Explore PM for z/VSE installation requires approximately 6,000 1 KB library
blocks.
Step 4. Installing the Product Using MSHP
The machine-readable program materials required for installation are distributed
as a single, unlabeled, multi-file installation tape in IBM Maintain System History
(MSHP) BACKUP format. This can either be a physical tape or a file distributed
through electronic delivery. In either case, the layout of the tape is the same.
Installation of the product requires one tape unit.
For more information about tape formats, see Product Installation Tape.
Using MSHP
You can use MSHP to perform product installation and maintenance. MSHP
provides the ability to control these activities in a consistent manner. The MSHP
format also provides an installation mechanism that system programmers use to
maintain the VSE operating system.
MSHP is used to perform the installation and maintenance of CA Explore PM for
z/VSE in the same way you install and maintain the operating system. When
utilizing MSHP to install a product, you need an MSHP history file to archive
product information such as product identification and library residence. The
history file is subsequently used during maintenance application for product and
library identification, and for archival of maintenance information.
For more information about creating an MSHP history file, see the IBM's VSE
System Control Statements Guide.
The distribution tape includes the library containing the CA Explore PM for z/VSE
product and a corresponding product history file. The history file you use to
install CA Explore PM for z/VSE should be kept separate from the operating
system history file. We recommend that the CA Explore PM for z/VSE target
library be kept separate from the VSE system libraries.

Product Installation Tape
14 Installation Guide
Product Installation Tape
The installation tape contains the following files:
File # Description
001 Tape Mark
002 CA Explore PM for z/VSE History File – MSHP BACKUP format.
003 CA Explore PM for z/VSE product library – MSHP BACKUP
format.
004-007 Reserved use
008 MSHP Installation JCL

Chapter 3: Installing the Product 15
Chapter 3: Installing the Product
CA has created standardized procedures for installing products using the VSE
MSHP utility. These standards for product installation have been developed to
allow a common method for installing all CA VSE products.
This section contains the following topics:
Installation Process (see page 16)
Standard Installation Sequence (see page 17)
Step 1: Review System Requirements (see page 19)
Step 2: Install CA CIS for VSE (see page 20)
Step 3: Complete the Installation Worksheet (see page 20)
Step 4: Extract the Installation JCL (see page 22)
Step 5: Install the Product Distribution Tape with MSHP (see page 22)
Step 6: Add CA Explore Messages to the VSE Messages File (optional) (see page
23)
Step 7: Define the Archive and Flashback Files (see page 23)
Step 8: Define Access to the Online Interface (see page 27)
Step 9: Define CA Explore PM for z/VSE as a VTAM Application (see page 28)
Step 10: Define CICS Access to CA Explore PM for z/VSE (see page 29)
Step 11: Update CICS Tables (see page 29)
Step 12: Define a Dedicated Terminal in the z/VSE environment (see page 30)
Step 13: Define the Product to CA FAQS ASO for z/VSE (see page 31)
Step 14: Activate the CA-CIS MWRT VM Component (see page 32)
Step 15: Copy User-defined Options (see page 32)
Step 16: Initialize CA Explore PM for z/VSE (see page 34)
Step 17: Access the Product (see page 36)

Installation Process
16 Installation Guide
Installation Process
The installation process uses two types of history files and libraries: Production
and Installation.
■ Production Libraries and History File
When you install the first CA product tape using this standard, it creates the
production libraries and a history file. This library or library set and history
file are designed to contain all CA VSE production products. You should
allocate sufficient space to contain all CA VSE products you want to install,
even if you install only one product initially. When a product is subsequently
installed or reinstalled, it is not merged into the Production library set and
history file until testing is complete.
■ Installation Libraries and History File
Using the installation libraries and history file for subsequent product
installation avoids the installation of a new product, or new release of an
existing product, into the user's production environment. These libraries and
history file are used for product installation, verification, and testing. Each
product tape that is installed creates a separate sublibrary and history file
that is unique for that product tape. Once all testing completes, the product
is merged into the production libraries and history file.
Creating these two library sets requires two different installation procedures and
sets of JCL, depending upon whether the installation is an initial or subsequent
installation. When the first standardized CA VSE product tape is installed, one job
creates the production library or library set and history file, and installs the
product into the same. When a subsequent product tape is installed, the
installation library or library set and history file are created and utilized until the
product is ready to migrate into the production environment, after which, the
installation library set is deleted.

Standard Installation Sequence
Chapter 3: Installing the Product 17
Standard Installation Sequence
The standard sequence of product installation is as follows:
1. Retrieve the install JCL samples using the supplied JCL example for either
CAINSTB0 or CAINSTC0. These JCL examples are shown in the Extracting
Product Installation JCL section, located in the appendix, "Accessing and
Using Sample JCL."
2. Modify the install JCL.
Use an editor to modify the variables in this JCL. A worksheet provides
defined variables that must be provided (VOLSER, beginning BLOCK or
TRACK, and so forth for a total of 21 possible variables).
3. Install CA-CIS for VSE.
You must install CA-CIS for VSE before you install the individual product. If
you already installed other CA VSE products then this has probably been
done already. If not, review the CA CIS for VSE Getting Started guide to
perform this function.
4. Install the products.
Submit the modified MSHP job from Step 2 to install the product from tape.
5. Tailor and verify the product.
6. Proceed with product tailoring and verification.
Standard Installation JCL
You must use the standard installation JCL to install all CA VSE products. The
following table provides a brief overview of the JCL described in detail in the
appendix, "Accessing and Using Sample JCL."
Job Name Resides Source
Member
Description
CAINSTB0 Appendix B
Only
Not supplied
as a source
member
Used to retrieve CA Explore
PM for z/VSE install JCL
supplied as source members
in file #8 of the physical install
tape. The ".Z" members are
placed into the specified VSE
libname.subname.
CAINSTB2 Source
Library
CAINSTB2.Z Used to install CA Explore PM
for z/VSE (from a physical
tape) into a test library to
allow installation, verification,

Standard Installation Sequence
18 Installation Guide
Job Name Resides Source
Member
Description
and testing prior to migration
into the production libraries.
CAINSTB3 Source
Library
CAINSTB3.Z Used to merge products into
the production library and
history file when installed with
either CAINSTB2 or
CAINSTC2.
CAINSTC0 Appendix B
Only
Not supplied
as a source
member
Used to retrieve CA Explore
PM for z/VSE install JCL
supplied as source members
in file #8 of the electronic
delivery file. The ".Z"
members are placed into the
specified VSE
libname.subname.
CAINSTC2 Source
Library
CAINSTC2.Z Used to install CA Explore PM
for z/VSE into a test library
from an electronic delivery file
using IBM VSE Virtual Tape to
allow installation, verification,
and testing prior to migration
into the production libraries.
CAINSTC4 Source
Library
CAINSTC4.Z Used to install CA Explore PM
for z/VSE distributed as an
electronic file using IBM VSE
Virtual Tape directly into an
existing library and history
file.
CAINSTQ4 Source
Library
CAINSTQ4.Z Used to install CA Explore PM
for z/VSE distributed as a
physical tape directly into an
existing library and history
file.

Step 1: Review System Requirements
Chapter 3: Installing the Product 19
Installation Checklist
Use the following checklist to track your progress through the installation
process. These steps are described in detail in this chapter.
Note: When you contact Technical Support for assistance during the installation
process, refer to the appropriate step number.
Step Installation Task Completed (√)
1 Review system requirements.
2 Install CA CIS for VSE.
3 Complete the installation worksheet.
4 Extract the installation JCL.
5 Install the product distribution tape with MSHP.
6 Add CA Explore Messages to the VSE Messages file
(optional).
7 Define the CA Explore PM for z/VSE files.
8 Define access to the Online Interface.
9 Define CA Explore as a VTAM Application.
10 Define CICS Access to CA Explore PM for z/VSE.
11 Update CICS Tables.
12 Define a Dedicated Terminal.
13 Define CA Explore PM for z/VSE to CA FAQS
Automated Systems Operation for z/VSE (CA
FAQS/ASO).
14 Copy user-defined options.
15 Initialize CA Explore PM for z/VSE.
116 Access CA Explore PM for z/VSE.
Step 1: Review System Requirements
Before attempting to complete any of the following installation steps for CA
Explore PM for z/VSE, see the sections System Requirements, and Storage
Requirements for CA Explore PM for z/VSE in the "System Requirements"
chapter.

Step 2: Install CA CIS for VSE
20 Installation Guide
Step 2: Install CA CIS for VSE
If you have not already installed CA CIS for VSE as part of the installation of
another CA product, you should do so now. For more information, see the
CA-CIS for VSE Getting Started guide.
Step 3: Complete the Installation Worksheet
Before proceeding with the installation process, answer these questions
concerning the environment in which CA Explore PM for z/VSE will be installed:
1. Which DASD packs are used to hold libraries and installation files?
2. Which file IDs are used for libraries and installation files?
3. What is the EXTENT information that describes the location of the libraries
and installation files?
The worksheet is provided later in this section to help you define these items,
and should be completed before continuing the installation procedure. The
keywords on the worksheet are the same as the symbolic parameters used in the
supplied installation JCL. These keywords are used to update the sample
installation JCL for proper execution in your environment.
Library Allocation Requirements
The allocations given specify the library block requirements for installing CA
Explore PM for z/VSE, and include sufficient space to allow for product
reinstallation and maintenance. Use the calculated file sizes to complete the
worksheet. For installation of CA Explore PM for z/VSE, the requirements are
6,000-1 KB library blocks.
Note: If you are installing additional CA products, add the library requirements
to the previous amount.

Step 3: Complete the Installation Worksheet
Chapter 3: Installing the Product 21
The CA Explore PM for z/VSE - Product Installation Worksheet is shown as
follows:
Task Description Keywords
1 Supply the following information to
personalize the CA production history
file:
Customer Name
Customer Address
Customer Phone Number
Programmer Name
1.@CUSTNME= ______
@CUSTADD= ______
@CUSTPHN= ______
@PROGNME= ______
2 Supply the following information for the
production history file EXTENT:
Volume ID of DASD pack
Beginning relative track or block
Number of tracks or blocks
2. @HISTVOL= ______
@HISTREL=_______
@HISTEXT=_______
3 Supply the following information for the
install history file EXTENT:
Volume ID of DASD pack
Beginning relative track or block
Number of tracks or blocks
3. @INSTVOL=_______
@INSTREL= _______
@INSTEXT= _______
4 Supply the tape drive address where you
will mount the installation tape.
Tape drive address of CUU 4.@TAPECUU=______
5 Supply the following information for the
production library EXTENT:
Volume ID of DASD pack
Beginning relative track or block
Number of tracks or blocks
5.@DLIBVOL=_______
@DLIBREL=_______
@DLIBEXT=_______
6 Supply the following information for the
install library EXTENT:
Volume ID of DASD pack
Beginning relative track or block
Number of tracks or blocks
6. @ILIBVOL=_______
@ILIBREL=_______
@ILIBEXT=_______
7 Supply the product name and product
code you are installing:
PRODUCT NAME: CA Explore VSE
PRODUCT CODE: SO670
7. @PRODUCT=______
@PRODCDE=______
8 Supply the following only if you are 8. @IPADDR = ______

Step 4: Extract the Installation JCL
22 Installation Guide
Task Description Keywords
installing from the electronic delivery file
using IBM VSE Virtual Tape:
IP address of the machine that currently
holds the ".AWS" file.
The fully qualified location and name of
the CA Explore VSE .AWS file.
@AWSFILE=______
Step 4: Extract the Installation JCL
For more information about extracting installation JCL from File 8, see the
appendix, "Accessing and Using Sample JCL."
Step 5: Install the Product Distribution Tape with MSHP
Step required: CA Explore PM for zVSE installation
Extract the appropriate installation JCL member from the product library
specified during the execution of either CAINSTB0 or CAINSTC0. Edit the JCL
according to the worksheet items and the information located in the appendix,
"Accessing and Using Sample JCL." It is important that you adhere to the
following guidelines when editing the execution JCL:
1. Be certain to limit the scope of editor changes to columns 1 through 71 of the
sample JCL.
2. Remove the CATALS or CATALOG and BKEND statements that may appear in
the beginning and end of each JCL sample.
3. Ιn each JCL sample, change '@*' to '/*', change '@&' to '/&', change './' to
'//', change '.*' to '/*', and change '.&' to '/&
After all modifications are complete, mount the installation tape on the specified
tape drive and submit the JCL for execution.

Step 6: Add CA Explore Messages to the VSE Messages File (optional)
Chapter 3: Installing the Product 23
Step 6: Add CA Explore Messages to the VSE Messages File
(optional)
Step optional: CA Explore PM for z/VSE Installation
To add the CA Explore PM for z/VSE messages to the VSE Messages File for online
access, perform the following steps:
1. Issue the EXPLAIN OFF command from the VSE console.
2. Run the following job stream to add CA Explore PM for z/VSE messages to
the VSE messages file:
// JOB CAEVSEMS
// OPTION LOG,LIST
// LIBDEF *,SEARCH=(Explore.Sublib)
// EXEC PROC=EVSEOMSG
// EXEC PROC=ECOMOMSG
/*
/&
3. Issue the EXPLAIN ON command from the VSE console.
Step 7: Define the Archive and Flashback Files
Logging of data to either or both of these files is optional. If you do not want to
log performance data, then skip this step. If you have defined archive and
flashback files for a previous version of CA Explore PM for z/VSE, proceed to Step
8. This step lets you define logging files for CA Explore PM for z/VSE.
CA Explore PM for z/VSE records performance data in two VSAM disk files shown
as follows:
Archive
File ID : EVSEARC
Used for batch reports and for backing up to tape or disk for long-term
analysis. Performance data is appended to the end of this file.
Flashback
File ID : EVSEFBK
Used for batch reports, online reports, and online analysis of the recent past.
This file is a wrap-around file.
You can use the system configuration options LOGFBK and LOGARC to control
logging to these files. For more information about configuration options, see the
User Guide.

Step 7: Define the Archive and Flashback Files
24 Installation Guide
File Allocation Requirements
The recommended initial storage allocation for the archive and flashback files is
12 cylinders each. This allocation should let you collect one or two days of data.
To help you determine the best file size for your site, use the following
guidelines:
Archive file
■ How often do you want to back up the archive file to tape or disk?
■ How quickly the archive file fills depends on the CA Explore PM for z/VSE
monitoring options you select and your site's typical workload.
Flashback file
■ What is the time range of data you want available for online analysis and
short-term batch reports?
■ The time interval at which the flashback file begins to wrap depends on
the CA Explore PM for z/VSE monitoring options you select and typical
workload for your site.
Determine Appropriate Allocations
Take the following steps to find out whether the recommended allocations are
appropriate for your site:
1. Run CA Explore PM for z/VSE with the recommended allocations for one day.
2. Cursor-select the Display Resources option from the CA Explore PM for z/VSE
Main Menu to access the Display Menu. The Display Menu shows the
percentage full of the CA Explore PM for z/VSE archive file.
3. Use the percentage shown on the Display Menu to calculate the approximate
number of cylinders that the archive file will use for one day of logging.
Whether the recommended allocation is sufficient depends on how often you
want to back up the archive file.
4. Data is logged to the flashback file at the same rate as it is logged to the
archive file; for example, if your calculation shows that the archive file will fill
in three days, the flashback file will begin to wrap in three days. Since you do
not have to back up the flashback file, decide how much space to allocate for
it based on the number of days you want online reports and flashback
analysis to cover.
Define the Archive File
Use the following jobstream to define the archive file for CA Explore PM for
z/VSE. The member EVSEARC.Z of the CA Explore PM for z/VSE residence library
contains a copy of this jobstream.

Step 7: Define the Archive and Flashback Files
Chapter 3: Installing the Product 25
Sample Jobstream
// DLBL IJSYSUC,'your.vsam.catalog',,VSAM // DLBL EVSEARC,'evse.archive',,VSAM // LIBDEF *,SEARCH=evse.library // EXEC EXPUTIL,SIZE=EXPUTIL INSTALL FILE(EVSEARC) NAME(evse.archive) INPUT(NONE) CYL(12 4) USCL(0 0) VOL(volume) /* /&
Modify the Sample Jobstream
Replace the italicized items in the previous sample jobstream with the values
shown in the next table.
Item How to Modify
your.vsam.catalog Replace with the name of your VSAM catalog.
evse.archive Replace with the name of your archive file.
evse.library Replace with the name of the EVSE residence
library.sublibrary.
CYL(12 4) Specify the storage to allocate for the archive file.
The recommended primary allocation is 12
cylinders; the recommended secondary allocation is
4. The default allocation is (25 0).
If You Use FBA Disk Devices: If you use
fixed-block architecture (FBA) disk devices, replace
the keyword CYL with BLK, and specify the number
of blocks. To calculate the number of blocks,
multiply the number of cylinders as follows:
3370 device cylinders x 744
9336 device cylinders x 960
9335 device cylinders x 426
9332 device cylinders x 292
USCL(0 0) Specify the primary and secondary VSAM user-class

Step 7: Define the Archive and Flashback Files
26 Installation Guide
Item How to Modify
assignments.
VOL(volume) Specify the volume ID of the disk device where the
archive file will reside.
Defining the Flashback File
Use the following jobstream to define the flashback file for CA Explore PM for
z/VSE. The member EVSEFBK.Z of the residence library contains a copy of this
jobstream.
Sample Jobstream
// JOB EVSEFBK DEFINE THE CA EXPLORE PM for z/VSE FLASHBACK FILE // DLBL IJSYSUC,'your.vsam.catalog',,VSAM // DLBL EVSEFBK,'evse.flashback',,VSAM // LIBDEF *,SEARCH=evse.library // EXEC EXPUTIL,SIZE=EXPUTIL INSTALL FILE(EVSEFBK) NAME(evse.flashback) INPUT(NONE) CYL(12 0) USCL(0 0) VOL(volume) /* /&
Modifying the Sample Jobstream
Replace the italicized items in the previous jobstream with the values shown in
the next table.
Item How to Modify
your.vsam.catalog Replace with the name of your VSAM catalog.
evse.flashback Replace with the name of your flashback file.
evse.library Replace with the name of the EVSE residence
library.sublibrary.
CYL(12 0) Specify the storage to be allocated for the archive file. The
recommended primary allocation is 12 cylinders. You
cannot specify a secondary allocation for the flashback

Step 8: Define Access to the Online Interface
Chapter 3: Installing the Product 27
Item How to Modify
file. The default allocation is (25 0).
If You Use FBA Disk Devices: If you use fixed-block
architecture (FBA) disk devices, replace the keyword CYL
with BLK, and specify the number of blocks. To calculate
the number of blocks, multiply the number of cylinders as
follows:
3370 device cylinders x 744
9336 device cylinders x 960
9335 device cylinders x 426
9332 device cylinders x 292
USCL(0 0) Specify the primary and secondary VSAM user-class
assignments.
VOL(volume) Specify the volume ID of the disk device where the
flashback file will reside.
Step 8: Define Access to the Online Interface
You can proceed to Step 9 if either of the following applies:
■ You do not want to access CA Explore PM for z/VSE through VTAM, CICS, CA
FAQS ASO for z/VSE, or a dedicated 3270 terminal.
■ You are installing CA Explore PM for z/VSE into the same residence library as
a prior release and have previously defined CA Explore PM for z/VSE to
VTAM, CICS, CA FAQS ASO for z/VSE, or a dedicated 3270 terminal.
This step explains how to define access to the CA Explore PM for z/VSE online
interface. The available access methods include:
1. Dedicated local bisynchronous 3270 terminals
2. CA FAQS ASO for z/VSE, through the FAQS EVSE command
3. Through VTAM, using the EVSEAPPL native VTAM application
4. Through CICS using the EVSE transaction
5. Through the CA-GSS for VSE terminal driver (DCMTDRIV)
For more information about using this interface, see the CA GSS for VSE
Getting Started guide.

Step 9: Define CA Explore PM for z/VSE as a VTAM Application
28 Installation Guide
Recommended Access Methods
We recommend that you access CA Explore PM for z/VSE either through VTAM or
through a dedicated terminal. Doing so lets you:
■ Use it for problem determination if CICS or CA FAQS ASO for z/VSE goes
down.
■ Use the automatic redisplay feature.
Online Interface
A single copy of the online interface uses cross-partition (XPCC) communication
facilities to send 3270 screens to any of the above environments.
Overhead Considerations
All the work necessary to create panels is done in the CA Explore PM for z/VSE
partition. Because no major panel processing is done in the CICS or VTAM
partitions, the CPU, I/O, and storage overhead in the CICS and VTAM partitions
is minimal. The overhead (for CICS or VTAM) only includes the processing
required to send the display to the terminal. The storage (partition GETVIS) used
is restricted to the dedicated partition.
Step 9: Define CA Explore PM for z/VSE as a VTAM
Application
If your IBM libraries containing the VTAM program product (usually PRD1.BASE
and PRD2.CONFIG) are in a CA Explore PM for z/VSE product's LIBDEF search
chain, the online interface attempts to open the VTAM application ID EVSEAPPL.
If the open is successful, you can then log on to CA Explore PM for z/VSE from
any VTAM terminal.
To use CA Explore PM for z/VSE from a VTAM terminal, you must first update
your VTAM resource definitions. If you choose to, you can also update the VTAM
USSTAB.
Step 10: Define CICS Access to CA Explore PM for z/VSE
Chapter 3: Installing the Product 29
Update Your VTAM Resource Definitions
The following steps are required to update your VTAM resource definitions to
include definitions for CA Explore PM for z/VSE.
To update the VTAM resource definitions for CA Explore PM for z/VSE
1. Run the following jobstream to add the CA Explore PM for z/VSE application
definitions to your VTAM configuration sublibrary.
// JOB LIBR
// EXEC LIBR,SIZE=192K,PARM='MSHP'
CONNECT S=explore.library:vtam.library
COPY EVSEAPPL.B:EVSEVTAM.B REP=YES
/*
/&
■ Replace explore.library with the name of the CA Explore PM for z/VSE
residence library.sublibrary.
■ Replace vtam.library with the name of your VTAM configuration
sublibrary (usually PRD2.CONFIG).
2. Add EVSEVTAM to the set of members VTAM activated during initialization.
This list is contained in the member ATCCONnn of the VTAM configuration
sublibrary. nn is a number your installation uses which is specified in the
member ATCSTRnn with the CONFIG=nn parameter. Normally nn is 00.
3. If you want to access the CA Explore PM for z/VSE interface without cycling
the VTAM partition, issue the following command from the VSE console:
V NET,ACT,ID=EVSEVTAM
If you do not issue this command, you can access the online interface after
the next time that VTAM is cycled.
Step 10: Define CICS Access to CA Explore PM for z/VSE
This step explains how to update CICS PCT and PPT tables to allow access
through CICS to the online monitor.
You must take this step if you plan to access CA Explore PM for z/VSE from CICS.
Step 11: Update CICS Tables
In this step you will update your PCT and PPT tables (in CICS 2.3). You may also
use RDO in either CICS 2.3 or CICS/TS to define the transaction and program to
CICS.
Step 12: Define a Dedicated Terminal in the z/VSE environment
30 Installation Guide
Add Entries to the PCT
Add the entry shown in the following example to the CICS DFHPCTxx table,
where xx is the phase suffix of the DFHPCT table you use:
DFHPCT TYPE=ENTRY,TRANSID=EVSE,PROGRAM=CICSEVSE,TRNPRTY=255
Add Entries to the PPT
Add the entry shown in the following example to the CICS DFHPPTxx table,
where xx is the phase suffix of the DFHPPT table you use. All CA Explore PM for
z/VSE programs are ASSEMBLER programs.
DFHPPT TYPE=ENTRY,PROGRAM=CICSEVSE
You can also add the previous transaction and program using the CICS RDO
facility.
CICS/TS (Transaction Server) Considerations
To run the EVSE transaction under CICS/TS with Storage Protection On
(STGPROT=YES), specify EXECKEY CICS for the program CICSEVSE. You can do
this through the RDO facility or by running DFHCSDUP.
Step 12: Define a Dedicated Terminal in the z/VSE
environment
Assign logical unit numbers to the terminals' CUUs in the CA Explore PM for
z/VSE partition to define dedicated terminals. SYS000 through SYS004 are the
default logical unit numbers.
Define a Dedicated Terminal in a VM Environment
Perform the following tasks to define a dedicated terminal in a VM environment.
Throughout these steps, replace cuu with the channel and unit address of the
terminal from which you want to access CA Explore PM for z/VSE.
Step 13: Define the Product to CA FAQS ASO for z/VSE
Chapter 3: Installing the Product 31
Task 12a. Define Dedicated Terminal for Permanent or Temporary Use
Do one of the following:
■ To permanently define a dedicated terminal, add the following line to the VM
directory for the VSE machine:
SPECIAL cuu 3270
■ To temporarily define a dedicated terminal to CA Explore PM for z/VSE, enter
the following CP command on your VSE machine. The terminal will no longer
exist after you log off your VSE machine.
DEFINE GRAF cuu 3270
Task 12b. Add Device to VSE
Add the device to VSE by adding the following statement to your ASI IPL
procedure:
ADD cuu,3270
Task 12c. Assign Logical Unit Number to CUU
Assign a logical unit number (SYS000-SYS004) to the terminal's CUU by adding
the following statement to your JCL for initializing CA Explore PM for z/VSE.
Replace nnn with 000 through 004.
// ASSGN SYSnnn,cuu
Assigning Other Logical Unit Numbers
The CA Explore PM for z/VSE BTAMTERM configuration option lets you define the
programmer logical units that CA Explore PM for z/VSE is to use for dedicated
local bisynchronous 3270 terminals. For more information, see the User Guide.
Step 13: Define the Product to CA FAQS ASO for z/VSE
Take the following tasks if you want to access CA Explore PM for z/VSE from CA
FAQS ASO for z/VSE:
■ Add the CA Explore PM for z/VSE residence library to the CA FAQS ASO for
z/VSE partition's LIBDEF phase search chain.
■ Use the CA FAQS ASO for z/VSE Security Maintenance facility to let users
access CA Explore PM for z/VSE from CA FAQS ASO for z/VSE.
■ If you accessed a prior release of CA Explore PM for z/VSE through CA FAQS
ASO for z/VSE, you must terminate and reinitialize the CA FAQS ASO for
z/VSE online partition before you can access CA Explore PM for z/VSE from
CA FAQS ASO for z/VSE.
Step 14: Activate the CA-CIS MWRT VM Component
32 Installation Guide
Step 14: Activate the CA-CIS MWRT VM Component
If VSE is running in an LPAR, CA Explore PM for z/VSE can collect and report on
CPU statistics for all active LPARs in the system. When running under VM in an
LPAR the same data can be collected if the CA-CIS MWRT VM component is
active. For more information on installing and activating this component see the
CA-CIS for VSE Getting Started Guide.
If you do not activate the CA-CIS MWRT VM component CA Explore PM for z/VSE
will collect a VM simulation of LPAR data, consisting of CPU statistics for the VSE
virtual machine and for VM as a whole.
Step 15: Copy User-defined Options
Note: If you do not have a prior release of CA Explore PM for z/VSE installed at
your site, proceed to Step 15.
Users of CA Explore PM for z/VSE can skip this step if one of the following applies:
■ You are installing into the same residence library as the prior release of CA
Explore PM for z/VSE.
■ You have customized only a few monitoring options, and it is easier for you
to reenter your options online than to copy your configuration members.
This step lets current users of CA Explore PM for z/VSE save the monitoring
options defined with a prior release (for example, threshold and configuration
settings).
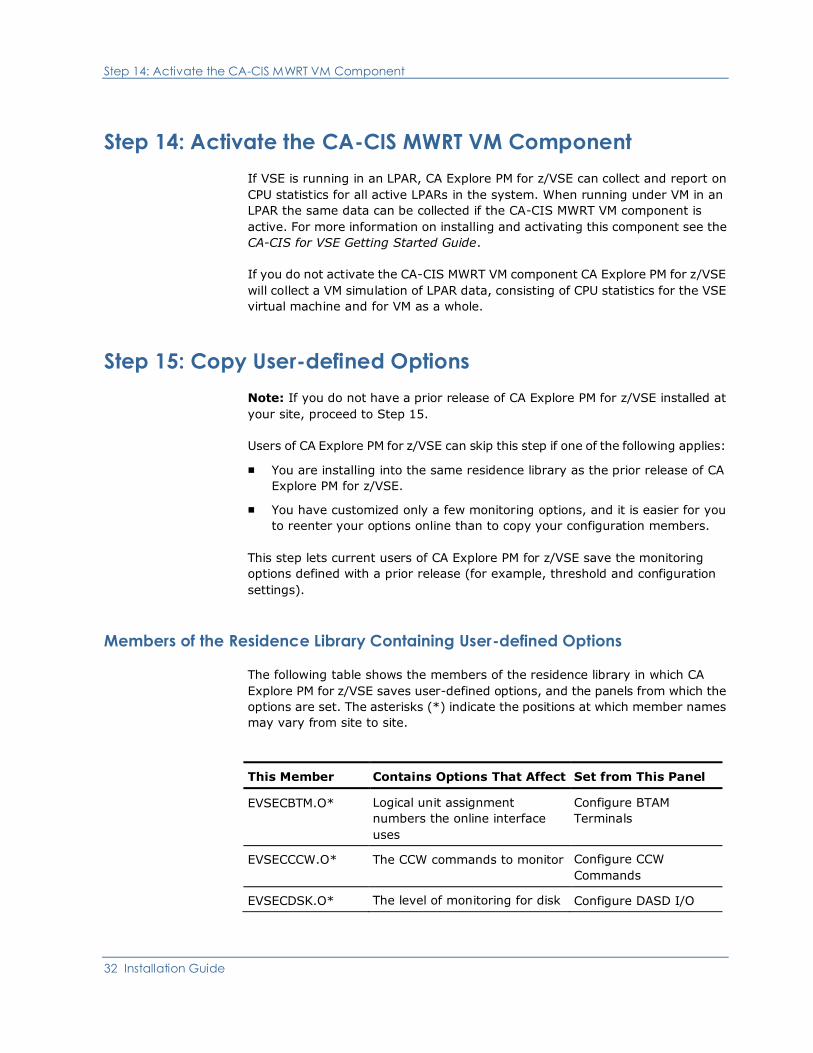
Members of the Residence Library Containing User-defined Options
The following table shows the members of the residence library in which CA
Explore PM for z/VSE saves user-defined options, and the panels from which the
options are set. The asterisks (*) indicate the positions at which member names
may vary from site to site.
This Member Contains Options That Affect Set from This Panel
EVSECBTM.O* Logical unit assignment
numbers the online interface
uses
Configure BTAM
Terminals
EVSECCCW.O* The CCW commands to monitor Configure CCW
Commands
EVSECDSK.O* The level of monitoring for disk Configure DASD I/O

Step 15: Copy User-defined Options
Chapter 3: Installing the Product 33
This Member Contains Options That Affect Set from This Panel
devices
EVSECGVS.O* How to monitor GETVIS storage Configure GETVIS
EVSECINT.O* How CA Explore PM for z/VSE
runs and collects data
System Configuration
Options
EVSECNDK.O* The level of monitoring for
non-disk devices
Configure Non-DASD
I/O
EVSECPGM.O* How to monitor program loads Configure Program
Loads
EVSECSMF.O* Record types to write into the
archive and flashback files
Configure Log Records
EVSECSVC.O* SVC codes to monitor Configure SVC
EVSECTHR.O* Thresholds Configure Thresholds
EVSECTMO.O* How the online interface runs
and displays data
Online Configuration
Options
EVSEU*.O Overriding data set names for
disk mapping
Configure DASD DSN
Sample Jobstream for Copying Members
Run the following jobstream to copy members containing user-defined options
into your new residence library.
// JOB COPYCONF // EXEC LIBR,SIZE=180K,PARM='MSHP' CONNECT S=evse.oldlib:evse.newlib COPY EVSECBTM.O* COPY EVSECCCW.O* COPY EVSECDSK.O* COPY EVSECGVS.O* COPY EVSECINT.O* COPY EVSECNDK.O* COPY EVSECPGM.O* COPY EVSECSMF.O* COPY EVSECSVC.O* COPY EVSECTHR.O* COPY EVSECTMO.O* COPY EVSEU*.O /* /&

Step 16: Initialize CA Explore PM for z/VSE
34 Installation Guide
Modifying the Sample Jobstream
Replace the italicized items in the previous sample jobstream as follows. You do
not need to replace the asterisks with actual member names.
Replace With
evse.oldlib The name of your current CA Explore PM for z/VSE residence
library.
evse.newlib The name of the residence library you will use for the new
release of CA Explore PM for z/VSE.
Step 16: Initialize CA Explore PM for z/VSE
Important! You should perform initialization only in a controlled test
environment.
This step contains:
■ An overview of what happens when you initialize CA Explore PM for z/VSE.
■ The procedure for initializing CA Explore PM for z/VSE.
Requirements for Running CA Explore PM for z/VSE
CA Explore PM for z/VSE must run in a dedicated partition. The partition can be
either static or dynamic.
A partition of 2 MB is required for minimal monitoring using default configuration
options.
You may need additional storage for detailed monitoring of some resources, such
as monitoring disk activity at the data set level. You can find the storage
requirements for each monitoring option in the User Guide.
Initialization Program (EVSEIBAT)
The initialization program (EVSEIBAT) performs the following functions if you
initialize CA Explore PM for z/VSE with the default configuration options:
■ Activates the CA Explore PM for z/VSE performance-monitoring probe points.
■ Fetches the subsystem partition program (EVSESBAT).
■ Attaches CA Explore PM for z/VSE subtasks.

Step 16: Initialize CA Explore PM for z/VSE
Chapter 3: Installing the Product 35
Initialization Procedure
If you are a new user of CA Explore PM for z/VSE, run the Sample Initialization
Jobstream found later in this step to initialize CA Explore PM for z/VSE.
Initialization Procedure for Current Users
If you installed CA Explore PM for z/VSE into a new residence library, use the
following jobstream to terminate the prior release of CA Explore PM for z/VSE
with the EVSEPBAT utility before initializing the new release:
// JOB EVSEPBAT Remove CA EXPLORE PM for z/VSE from the VSE System
// LIBDEF *,SEARCH=evse.oldlib
// EXEC EVSEPBAT,SIZE=EVSEPBAT
/*
/&
Replace evse.oldlib with the name of the residence library for the prior version of
CA Explore PM for z/VSE.
Sample Initialization Jobstream
Run the following job to initialize CA Explore PM for z/VSE. The member
EVSEINIT.Z of the CA Explore PM for z/VSE residence library contains a copy of
this jobstream. For more information about other options, see EVSEIBAT:
Initialize CA Explore PM for z/VSE in the Utilities Guide.
// JOB EXPLORE // ASSGN SYS000,cuu Optional dedicated local 3270 // ASSGN SYS001,UA Unused local 3270 terminal // ASSGN SYS002,UA Unused local 3270 terminal // ASSGN SYS003,UA Unused local 3270 terminal // ASSGN SYS004,UA Unused local 3270 terminal // DLBL EVSEARC,'evse.archive',,VSAM,CAT=catname // DLBL EVSEFBK,'evse.flshback',,VSAM,CAT=catname // LIBDEF *,SEARCH=(evse.lib,ibm.vtamlibs) // EXEC EVSEIBAT,SIZE=EVSEIBAT /* /&
Modifying the Sample Jobstream
Replace the italicized items in the preceding jobstream as follows:
Item How to Modify
cuu or UA Channel and unit address of a dedicated local
bisynchronous 3270 terminal (optional) or, if unused, UA.
evse.archive Name of your VSAM archive file.

Step 17: Access the Product
36 Installation Guide
Item How to Modify
catname Name of the VSAM catalog where the archive and flashback
files reside.
evse.flshback Name of your VSAM flashback file.
evse.lib Name of the EVSE residence library.sublibrary.
ibm.vtamlibs Names of the IBM libraries containing the VTAM program
product, usually PRD1.BASE and PRD2.CONFIG. If you
want to access CA Explore PM for z/VSE from native VTAM
terminals, you must include these names.
Step 17: Access the Product
The following procedures descibes how to access CA Explore PM for z/VSE:
To access the product from a CICS-controlled terminal
Enter the CICS transaction EVSE.
To access the product from a VTAM-controlled terminal
Log on to the CA Explore PM for z/VSE VTAM application using the application ID
specified with the CA Explore PM for z/VSE VTAMAPPL configuration option.
Note: EVSEAPPL is the default application ID.
To access the product using a dedicated local bisynchronous 3270
terminal in native VSE
1. Turn on a terminal dedicated to CA Explore PM for z/VSE. The following
message appears:
EVSE601I Press any key to access EXPLORE for VSE
2. Press any key to access CA Explore PM for z/VSE.
To access the product using a dedicated local bisynchronous 3270
terminal in a VM environment
1. Enter the following command from CP:
DIAL vsemachine cuu
2. Replace vsemachine with the name of the VSE machine on which you defined
the terminal.
3. Replace cuu with the terminal's CUU as you defined it to the VSE machine, as
in the "Step 12: Define a Dedicated Terminal in the z/VSE environment".

Step 17: Access the Product
Chapter 3: Installing the Product 37
To access the product using CA FAQS ASO for z/VSE
Enter the following command on the CA FAQS ASO for z/VSE command line.
EVSE
To access the product from the CA GSS for VSE terminal driver
(DCMTDRIV)
Select the CA Explore PM for z/VSE option from the Terminal Driver Main Menu.
To access the product from another CA Explore product
Select the CA Explore PM for z/VSE option from the CA Software Products panel.
Main Menu
When you access CA Explore PM for z/VSE, the first panel you see is the Main
Menu, shown in the following screen.
EVSEMAIN DEVTST3 CA EXPLORE MAIN MENU SOA0009B Explore 7.1 SP00 16:39:48 ==>
RATE
Current Activity Configuration
_ Status _ System Options
_ GETVIS _ Online Interface Options
Past Activity System Information
_ Flashback _ Display Resources
_ Online Reports
Excessive Resource Usage Other CA Products
_ Thresholds _ CA-EXPLORE for CICS
_ CA-EXPLORE for VTAM
_ CA FAQS ASO for VSE
_ CA-GSS (DCMTDRIV)
CA Explore Performance Management for VSE
Copyright(c) 1985,2005 CA International, Inc.
F1=HELP F2=STATUS F3=END F4=FLSHBACK F5=REFRESH F6=REPORTS
F7=UP F8=DOWN F9=AUTO F10=EXIT F11=DISPLAY F12=ALTPFKEY


Chapter 4: Troubleshooting 39
Chapter 4: Troubleshooting
This chapter contains information about analyzing and interpreting the
diagnostic data.
This section contains the following topics:
Collecting Diagnostic Data (see page 39)
Interpreting Diagnostic Data (see page 40)
Collecting Diagnostic Data
The following information is helpful in diagnosing problems that may occur:
■ Control statements used to activate your product
■ JCL used to install or activate your product
■ Relevant system log or console listings
■ Relevant system dumps or product dumps
■ List of other IBM or third-party products that may be involved
■ Manufacturer, model number, and capacity of your hardware
■ Numbers and text of IBM or CA error messages associated with the problem
■ Names of panels where the problem occurs
■ Listings of all fixes applied to all relevant software, including:
■ The dates fixes were applied
■ Fix numbers
■ Names of components to which fixes were applied
■ Short description of problems

Interpreting Diagnostic Data
40 Installation Guide
Interpreting Diagnostic Data
When you have collected the specified diagnostic data, write down your answers
to the following questions:
1. What was the sequence of events prior to the error condition?
2. What circumstances existed when the problem occurred and what action did
you take?
3. Has this situation occurred before? What was different then?
4. Did the problem occur after a particular PTF was applied or after a new
release of the software was installed?
5. Have you recently installed a new release of the operating system?
6. Has the hardware configuration (tape drives, disk drives, and so forth)
changed?
From your response to these questions and the diagnostic data, try to identify
the cause and resolve the problem.
If you are unable to resolve the problem, have the following information ready
before contacting Technical Support:
■ All the diagnostic information described in Collecting Diagnostic Data
■ Product name, release number, operating system, and service pack
■ Product name and release number of any other software you suspect is
involved
■ Release level and PUTLEVEL of the operating system
■ Your name, telephone number, and extension (if any)
■ Your company name
■ Your site ID
■ A severity code—A number (from 1 to 4) that you assign to the problem.
Use the following to determine the severity of the problem:
■ 1
Indicates a system down or inoperative condition.
■ 2
Indicates a suspected high-impact condition associated with the product.

Interpreting Diagnostic Data
Chapter 4: Troubleshooting 41
■ 3
Indicates a question concerning product. performance or an intermittent
low-impact condition associated with the product.
■ 4
Indicates a question concerning general product utilization or
implementation.
For online technical assistance and a complete list of locations, primary service
hours, and telephone numbers, contact Technical Support at
http://ca.com/support.


Appendix A: Implementing Security 43
Appendix A: Implementing Security
You can provide security for CA Explore PM for z/VSE in the following ways:
■ You can use the internal security table to control user access and command
privileges.
■ You can use CA Top Secret for VSE to define and maintain all security.
This section contains the following topics:
Define Internal Security (see page 43)
Using CA Top Secret to Secure CA Explore for z/VSE (see page 46)
Define Internal Security
The residence library.sublibrary contains an assembler program, EVSESCTY that
you can modify to implement security for CA Explore PM for z/VSE. Using this
program, you can create a security exit that:
■ Requires users of CA Explore PM for z/VSE to enter a logon ID and password
■ Restricts access to the panels you specify
■ Restricts changes to monitoring configuration options
■ Restricts the use of any online command
■ Restricts the use of the following critical margin commands:
– The F margin command on the GETVIS Storage panel, which frees
the selected storage. Secure the command GADRFREE to restrict use
of this margin command.
– The K margin command on the Status Task or Status Partition panel,
which cancels the selected task. Secure the command TASKKILL to
restrict use of this margin command.
– The H margin command on the Status Task or Status Partition panel,
which halts the selected task or partition. Secure the command
TASKHALT to restrict use of this margin command.
– The R margin command on the Status Task or Status Partition panel,
which restarts the selected task or partition. Secure the command
TASKSTRT to restrict use of this margin command.
Note: Creating a security exit requires knowledge of writing assembler
programs.

Define Internal Security
44 Installation Guide
Install the Internal Security Exit
Take the following steps to install an internal security exit for CA Explore PM for
z/VSE:
Step 1. Run LIBRPUN Jobstream
Run the following jobstream to punch out the member EVSESCTY.Z, which
contains a sample security program, EVSESCTY. Replace explore.library with the
name of the residence library.sublibrary.
// JOB LIBRPUN
// EXEC LIBR
ACCESS SUBL= explore.library
PUNCH EVSESCTY.Z
/*
/&
Step 2. Modify EVSESCTY Assembler Program
Modify the sample assembler program EVSESCTY to meet your installation's
Needs.
Step 3. Run EVSESCTY Jobstream
Run the following jobstream to assemble and catalog the modified member.
Replace explore.library with the name of the residence library.sublibrary.
// JOB EVSESCTY ASSEMBLE TERMINAL MONITOR SECURITY EXIT
// OPTION CATAL
PHASE EVSESCTY,*
// EXEC ASSEMBLY,SIZE=400K
* * Include your modified EVSESCTY source code here * *
/*
// LIBDEF PHASE,CATALOG= explore.library
// EXEC LNKEDT,SIZE=200K
/&
Step 4. Set SECURITY Configuration
Access the Configure Online Options panel and set the SECURITY configuration
option to YES. When you press F3 (UPDATE), you must enter a logon ID and
password at the CA Explore PM for z/VSE Main Menu.

Define Internal Security
Appendix A: Implementing Security 45
Step 2. Define a CA Explore PM for z/VSE Facility
The CA Explore PM for z/VSE partition functions as a 'facility' in CA Top Secret.
The Facility definition is used to define specific execution environments for CA
Explore PM for z/VSE, such as identifying CA Explore PM for z/VSE as a multiuser
partition, and preventing abends due to a single user security violation.
The following example shows the commands required to define the CA Explore
PM for z/VSE facility. These commands should be added to your TSS PARM file.
FACILITY(USERx=NAME=EVSEMAST)
FACILITY(EVSEMAST=ID=xx)
FACILITY(EVSEMAST=PGM=EVSEIBAT)
FACILITY(EVSEMAST=MULTIUSER,MODE=IMPL,NOABEND,RES)
Where:
USERx
Specifies the predefined dummy Facility that you will reconfigure for CA
Explore PM for z/VSE. 'x' is a number from 0 to 221.
EVSEMAST
Is the name you will give to the CA Explore PM for z/VSE. This is an arbitrary
name, and any other name of up to 8 characters is valid. If you choose
another name the subsequent examples must be adjusted accordingly.
ID=x
Equals either one or two alphanumeric characters that represents the facility
for reporting purposes. This value is predefined in the Facilities Matrix Table
and corresponds to the USERx definition. For USER1, use ID=1, for USER99
use ID=99. For values over 99, see How to Add a New Facility in the chapter
"Protecting Facilities" of the CA-Top Secret User Guide for the corresponding
2 character alphanumeric code.
PGM=EVSEIBAT
Defines the Program Name. This must be EVSEIBAT
MODE=IMPL
Defines the Security Mode.
MULTIUSER
Identifies the CA Explore PM for z/VSE partition as a multiuser address
space.
NOABEND
Specifies that the CA Explore PM for z/VSE partition does not abend if one
user causes a security violation.

Using CA Top Secret to Secure CA Explore for z/VSE
46 Installation Guide
Sample Security Exit Program
A sample security exit program, EVSESCTY, is contained in the member
EVSESCTY.Z in the residence library.sublibrary.
Using CA Top Secret to Secure CA Explore for z/VSE
If your site runs the CA Top Secret security product, you can centralize your
security administration by having CA Top Secret perform logon validation and
access control calls for CA Explore PM for z/VSE.
Take the following steps to secure CA Explore PM for z/VSE with CA Top Secret.
For more information about the commands listed in this section, see the CA Top
Secret Command Functions Guide and the CA Top Secret Control Options Guide.
Step 1. Run Jobstream to Rename EVSESSFI
Run the following jobstream to rename the phase EVSESSFI to EVSESCTY:
// JOB LIBRCOPY Install CA-Top Secret for VSE security
// EXEC LIBR,PARM='MSHP'
ACCESS S=explore.library
DELETE EVSESCTY.PHASE
RENAME EVSESSFI.PHASE:EVSESCTY.PHASE
/*
/&
Replace explore.library with the name of the CA Explore PM for z/VSE residence
library.sublibrary.

Using CA Top Secret to Secure CA Explore for z/VSE
Appendix A: Implementing Security 47
Step 3. Define the CA Explore PM for z/VSE ACID
The following TSS CREATE command will create an ACID for the CA Explore PM
for z/VSE partition and associate this ACID with the facility you created in the
previous step.
TSS CREATE(EVSE) NAME('CA-Explore/VSE') FAC(STC,BATCH) -
TYPE(USER) PASS(NOPW) DEPT(deptname)
MASTFAC(EVSEMAST)
Where
EVSE
Is the ACID name you assign for the CA Explore PM for z/VSE partition This
is an arbitrary name, and any other name of up to eight characters is valid.
If you choose another name, the subsequent examples must be adjusted
accordingly.
NAME
Associates the ACID with a name for further identification.
FAC(STC,BATCH)
Allows access to the facilities BATCH and STC
TYPE(USER)
EVSE is defined as a USER ACID
PASS(NOPW)
Indicates that the CA Explore PM for z/VSE ACID does not require a password
DEPT(deptname)
Assigns the EVSE ACID to an owning department
MASTFAC(EVSEMAST)
Identifies the Master Facility for the CA Explore PM for z/VSE online ACID.
This is the facility ID defined previously.
Example:
After you have defined the ACID you can add it to the // ID statement in the JCL
for your CA Explore PM for z/VSE master partition. For example:
// ID USER=EVSE

Using CA Top Secret to Secure CA Explore for z/VSE
48 Installation Guide
Step 4. Define the CA Explore PM for z/VSE Resource Class
CA Explore PM for z/VSE security includes protection for line commands, panel
access, and configuration. These resources are all assigned to The Resource
Class EXPVSE. You can add a resource using the TSS ADD command. The
following command will add the EXPVSE resource class to the CA Top Secret
Resource Descriptor Table.
TSS ADD(RDT) RESCLASS(EXPVSE) RESCODE(xx) - ACLST(READ WRITE)
Where:
RESCLASS(EXPVSE)
Defines the new resource class. This must be EXPVSE.
RESCODE(xx)
Adds the two-digit hexadecimal code ranging between 01 and 3F. Choose a
code that you have not used previously.
ACLST(READ WRITE)
Defines the available access levels.
Step 5. Secure CA Explore PM for z/VSE Resources
After the EXPVSE resource class has been defined, you can start to add the
resources you wish to protect your CA-Top Secret Database.
For example:
TSS ADD(deptname) EXPVSE(EVSECINT)
TSS ADD(deptname) EXPVSE(EVSESTAT)
TSS ADD(deptname) EXPVSE(SYSTIMEI)
Where:
deptname
Specifies the department ACID to which the EXPVSE resource is being
assigned.
EXPVSE(EVSECINT)
Protects the CA Explore PM for z/VSE Configuration.
EXPVSE(EVSESTAT)
Protects the CA Explore PM for z/VSE Status Menu Panel.
EXPVSE(SYSTIMEI)
Protects the CA Explore PM for z/VSE SYSTIMEI command.

Using CA Top Secret to Secure CA Explore for z/VSE
Appendix A: Implementing Security 49
Step 6. Grant Permission to Access CA Explore PM for z/VSE Resources
Before users can access CA Explore PM for z/VSE, you need to authorize them to
be able to access the facility you defined earlier. The command TSS ADD is
required to authorize each CA Explore PM for z/VSE user. The command syntax
is as follows:
TSS ADD(username) FAC(EVSEMAST)
Where:
username
Specifies the CA Top Secret ACID that is being granted access to the
EVSEMAST facility.
FAC(EVSEMAST)
Defines the name you assigned to the CA Explore PM for z/VSE facility. You
can then grant resource authorizations to individual users or profiles. For
example, the following code explains the various options.
TSS PERMIT(user) EXPVSE(EVSECINT) ACCESS(READ) (1)
TSS PERMIT(user) EXPVSE(EVSECINT) ACCESS(WRITE) (2)
TSS PERMIT(user) EXPVSE(EVSESTAT) ACCESS(READ) (3)
TSS PERMIT(user) EXPVSE(SYSTIMEI) ACCESS(READ) (4)
Where:
■ (1)—Allows user to view the CA Explore PM for z/VSE
System Options.
■ (2)—Allows user to update theCA Explore PM for z/VSE
System Options.
■ (3)—Allows user to view the CA Explore PM for z/VSE
Status Menu Panel.
■ (4)—Allows user to issue the CA Explore PM for z/VSE
SYSTIMEI Command.

Using CA Top Secret to Secure CA Explore for z/VSE
50 Installation Guide
The following commands can be protected using CA-Top Secret
■ ATTACH
■ PURGE
■ AUTO
■ RESIDENT
■ CLOSE
■ RVW
■ COMPRESS
■ SATISFY
■ CRASH
■ SBAT
■ DCMPGS
■ SEGMENT
■ DETACH
■ SHUTDOWN
■ OPEN
■ SYSTIMEI
■ PLAYBACK
■ TEMPUPD
■ POST
■ UPDATE
No other CA Explore PM for z/VSE commands can be secured.
Step 7. Set SECURITY Configuration
Access the Configure Online Options panel and set the SECURITY configuration
option to YES. When you press F3 (UPDATE), you must enter a logon ID and
password at the CA Explore PM for z/VSE Main Menu.

Appendix B: Accessing and Using Sample JCL 51
Appendix B: Accessing and Using
Sample JCL
This appendix provides the instructions you must follow to perform the following
tasks:
■ Extract the product installation JCL from a physical installation tape or
electronic software delivery (ESD) file.
■ Install the product into test libraries to verify and test the product before
migrating into the production libraries.
■ Migrate the product from the validation/test environment into the production
libraries.
This section contains the following topics:
Extracting the Product Installation JCL (see page 51)
Install the CA Product (see page 54)
Perform a Direct CA Product Installation (see page 60)
Extracting the Product Installation JCL
Use one of the following jobs to extract the installation JCL. The job that you
choose depends on the medium on which the product is delivered.
■ CAINSTB0—Use this job if your product is delivered on a physical tape.
■ CAINSTC0—Use this job if your product is delivered as an ESD file.
These jobs are described in detail in the sections that follow.

Extracting the Product Installation JCL
52 Installation Guide
Extracting From a Physical Tape: CAINSTB0
Use the following JCL to extract the installation JCL from a physical tape:
* ***************************************************************
* *** ***
* *** Update the following SETPARM statements: ***
* *** ***
* *** @LIBNAME to the name of the library you are using ***
* *** ***
* *** @SUBNAME to the name of the sublibrary you are ***
* *** using. ***
* *** ***
* *** @TAPECUU to the tape drive address where the ***
* *** physical tape is mounted. ***
* *** ***
* ***************************************************************
// JOB CAINSTB0 CATAL INSTALL JCL TO LIBRARY
// SETPARM LIBNAME=@LIBNAME replace with library name
// SETPARM SUBNAME=@SUBNAME replace with sublibrary name
// SETPARM TAPECUU=@TAPECUU replace with install tape address
// MTC FSF,&TAPECUU,7
// ASSGN SYSIPT,&TAPECUU
// EXEC LIBR,SIZE=256K,PARM='ACCESS SUBLIB=&LIBNAME..&SUBNAME'
// RESET SYSIPT
/&

Extracting the Product Installation JCL
Appendix B: Accessing and Using Sample JCL 53
Extracting From an ESD File: CAINSTC0
Use the following JCL to extract the installation JCL from an ESD file:
* ***************************************************************
* *** ***
* *** Update the following SETPARM statements: ***
* *** ***
* *** @LIBNAME to the name of the library you are using ***
* *** ***
* *** @SUBNAME to the name of the sublibrary you are ***
* *** using. ***
* *** ***
* *** @TAPECUU to the tape drive address of the IBM VSE ***
* *** Virtual Tape used to read the .AWS file. ***
* *** ***
* *** @IPADDR to the IP address of the machine that ***
* *** currently holds the .AWS file, and that ***
* *** has the IBM Virtual Tape Server running ***
* *** in JAVA. This value must be enclosed in ***
* *** single quote marks ('). For example: ***
* *** '192.168.255.255' ***
* *** ***
* *** @AWSFILE to the fully qualified location and name ***
* *** of the CA Explore PM for z/VSE ***
* *** .AWS file. This Value must be enclosed ***
* *** in single quote marks ('). For example: ***
* *** 'E:\filename.AWS' ***
* *** ***
* ***************************************************************
// JOB CAINSTC0 CATAL INSTALL JCL TO LIBRARY
// SETPARM LIBNAME=@LIBNAME replace with library name
// SETPARM SUBNAME=@SUBNAME replace with sublibrary name
// SETPARM TAPECUU=@TAPECUU replace with install tape address
// SETPARM IPADDR=@IPADDR
// SETPARM AWSFILE=@AWSFILE
// ON $CANCEL GOTO RELTAP

Install the CA Product
54 Installation Guide
DVCDN &TAPECUU
VTAPE START,UNIT=&TAPECUU,LOC=&IPADDR, x
FILE='&AWSFILE',READ
DVCUP &TAPECUU
// MTC REW,&TAPECUU
// MTC FSF,&TAPECUU,7
// ASSGN SYSIPT,&TAPECUU
// EXEC LIBR,SIZE=256K,PARM='ACCESS SUBLIB=&LIBNAME..&SUBNAME'
// RESET SYSIPT
/. RELTAP
DVCDN &TAPECUU
VTAPE STOP,UNIT=&TAPECUU
DVCUP &TAPECUU
/&
Install the CA Product
The job you use to install the product depends on the medium on which the
product is delivered. It is one of the following:
■ CAINSTB2—Use this job if your product is delivered on a physical tape.
■ CAINSTC2—Use this job if your product is delivered as an ESD file.
Either job installs the CA product into test libraries, so that you can perform
installation verification and testing prior to migrating the product into the
production libraries. (Product migration is discussed later in this appendix.) If
you prefer to install the product directly into an existing library and history file,
see Performing a Direct CA Product Installation later in this chapter.
The following sections describe CAINSTB2 and CAINSTC2 in detail.

Install the CA Product
Appendix B: Accessing and Using Sample JCL 55
Install From a Physical Tape: CAINSTB2
Use the CAINSTB2 JCL to install the product from a physical tape into test
libraries for verification and testing. The variable symbols for CAINSTB2 are
listed as follows:
■ @CUSTNME
Customer name used to personalize the MSHP History file
■ @CUSTADD
Customer address used to personalize the MSHP History file
■ @CUSTPHN
Customer phone number used to personalize the MSHP History file
■ @PROGNME
Customer programmer name used to personalize the MSHP History file
■ @INSTVOL
Volume serial number of the volume where the CA product installation
history file will reside
■ @INSTREL
Relative track or block where the CA product installation history file is to
begin
■ @INSTEXT
Number of tracks or blocks to allocate to the CA product installation history
file
■ @ILIBVOL
Volume serial number of the volume on which the CA product installation
library will reside
■ @ILIBREL
Relative track or block where the product installation library is to begin
■ @ILIBEXT
Number of tracks or blocks to allocate to the CA product installation library
■ @PRODCDE
CA product code for CA Explore PM for z/VSE—SO670
■ @PRODUCT
CA product name: CA Explore PM for z/VSE
■ @TAPECUU
Device address of the device on which the product tape will be mounted

Install the CA Product
56 Installation Guide
Make the following additional changes:
■ Change each './' to a '//'
■ Change each '.*' to a '/*'
■ Change each '.&' to a '/&'
CAINSTB2 Execution
CAINSTB2 performs the following functions:
■ Opens SYSPCH using the extents of the history file. This measure avoids
errors when the history file extent resides on a newly defined VM minidisk.
■ Creates the CA installation libraries and history file for the product being
installed from the product tape.
■ Installs the product into the installation history file and libraries.

Install the CA Product
Appendix B: Accessing and Using Sample JCL 57
Install From an ESD File: CAINSTC2
Use the CAINSTC2 JCL to install the product from an ESD file, using IBM VSE
Virtual Tape, into test libraries for verification and testing prior to migration into
the product libraries.
The variable symbols for CAINSTC2 are described as follows:
■ @PRODCDE
CA product code for CA Explore PM for z/VSE—SO670
■ @INSTVOL
Volume serial number of the volume where the CA product installation
history file will reside
■ @INSTREL
Starting track or block number where the CA product installation history file
is to begin
■ @INSTEXT
Number of tracks or blocks to allocate to the CA product installation history
file
■ @TAPECUU
Device address of the IBM VSE Virtual Tape device used to read the .AWS
file.
■ @ILIBVOL
Volume serial number of the volume on which the CA product installation
library will reside
■ @ILIBREL
Starting track or block number where the product installation library is to
begin
■ @ILIBEXT
Number of tracks or blocks to allocate to the CA product installation library
■ @IPADDR
IP address of the machine that currently holds the .AWS file, and that has the
IBM VSE Virtual Tape Server running in JAVA. This value must be enclosed in
single quotes (').
Example: '192.168.255.255'
■ @AWSFILE
Fully qualified location and name of the CA Explore PM for z/VSE .AWS file.
This value must be enclosed in single quotes (').
Example: 'E:\filename.aws'

Install the CA Product
58 Installation Guide
Make the following additional changes:
■ Change each './' to a '//'.
■ Change each '.*' to a '/*'.
■ Change each '.&' to a '/&'.
CAINSTC2 Execution
CAINSTC2 performs the following functions:
■ Opens SYSPCH using the extents of the history file. This is a precautionary
measure to avoid errors when the history file extent resides on a newly
defined VM minidisk.
■ Creates the CA installation libraries and history file for the product being
installed from the ESD.
■ Installs the product into the installation history file and libraries.

Install the CA Product
Appendix B: Accessing and Using Sample JCL 59
Migrate the CA Product into Production: CAINSTB3
Use CAINSTB3 to migrate a product into the production libraries and history file
after you install the product using CAINSTB2 or CAINSTC2.
Note: A product is migrated into production only after installation,
customization, verification, and testing have been completed.
The sample JCL member CAINSTB3.Z is located in the library specified when
either CAINSTB0 or CAINSTC0 was run.
After this process is complete, you can delete the installation libraries and history
file.
The variable symbols for CAINSTB3 are listed as follows:
■ @HISTVOL
Volume serial number of the volume where the CA production history file will
reside.
■ @HISTREL
Relative track or block where the CA production history file is to begin.
■ @HISTEXT
Number of tracks or blocks to allocate to the CA production history file.
■ @DLIBVOL
Volume serial number of the volume where the CA production library will
reside.
■ @INSTVOL
Volume serial number of the volume where the CA product installation
history file resides.
■ @INSTREL
Relative track or block where the CA product installation history file begins.
■ @INSTEXT
Number of tracks or blocks allocated to the CA product installation history
library.
■ @ILIBVOL
Volume serial number of the volume where the CA product installation
library resides.
■ @PRODCDE
The CA product code for CA Explore PM for z/VSE—SO670.

Perform a Direct CA Product Installation
60 Installation Guide
CAINSTB3 Execution
CAINSTB3 merges the tested products into the production libraries and history
file.
Perform a Direct CA Product Installation
A direct product installation installs the CA product into an existing library and
history file. The job you use to install the product depends on the medium on
which the product is delivered. It is one of the following:
■ CAINSTQ4—Use this job if your product is delivered on a physical tape.
■ CAINSTC4—Use this job if your product is delivered as an ESD file.
The sections that follow describe CAINSTQ4 and CAINSTC4 in detail.

Perform a Direct CA Product Installation
Appendix B: Accessing and Using Sample JCL 61
Install Directly From a Physical Tape: CAINSTQ4
Use the CAINSTQ4 JCL to install the product from a physical tape directly into an
existing library and history file. The variable symbols for CAINSTQ4 are listed as
follows:
■ @DLIBVOL
Volume serial number of the volume on which the CA production library
resides
■ @DLIBREL
Starting track number where the CA production library begins
■ @DLIBEXT
Number of tracks or blocks allocated to the CA production library
■ @HISTVOL
Volume serial number of the volume on which the CA production history file
resides
■ @HISTREL
Starting track or block number where the CA production history file begins
■ @HISTEXT
Number of tracks or blocks allocated to the CA production history file
■ @TAPECUU
Device address of the device on which the product tape will be mounted
Make the following additional changes:
■ Change each './' to a '//'.
■ Change each '.*' to a '/*'.
■ Change each '.&' to a '/&'.
CAINSTQ4 Execution
CAINSTQ4 installs CA Explore PM for z/VSE from a physical tape into an existing
library and history file.

Perform a Direct CA Product Installation
62 Installation Guide
Install Directly From an ESD File: CAINSTC4
Use the CAINSTC4 JCL to install the product from an ESD file, using IBM VSE
Virtual Tape, directly into an existing library and history file.
The variable symbols for CAINSTC4 are listed as follows:
■ @DLIBVOL
Volume serial number of the location of the CA production library you are
using.
■ @DLIBNAM
File name of the CA production library you are using.
■ @DLIBID
File ID of the CA production library being used. This must be enclosed in
single quotes (').
Example: 'CAI.PRODUCT.LIBRARY'
■ @HISTVOL
Volume serial number of the location of the CA production history file you are
using.
■ @HISTREL
Starting track or block number where the CA production history file begins
■ @HISTEXT
Number of tracks or blocks allocated to the CA production history file being
used.
■ @HISTID
File ID of the history file being used. This must be enclosed in single quotes
(').
Example: 'CAI.PRODUCT.HISTORY.FILE'
■ @TAPECUU
Device address of the IBM VSE Virtual Tape used to read the .AWS file.
■ @IPADDR
IP address of the machine that currently holds the .AWS file, and that has the
IBM VSE Virtual Tape Server running in JAVA. This value must be enclosed in
single quotes (').
Example: '192.168.255.255'
■ @AWSFILE
Fully qualified location and name of the CA Explore PM for z/VSE for .AWS
file. This value must be enclosed in single quotes (').

Perform a Direct CA Product Installation
Appendix B: Accessing and Using Sample JCL 63
Example: 'E:\filename.aws'
Make the following additional changes:
■ Change each './' to a '//'
■ Change each '.*' to a '/*'
■ Change each '.&' to a '/&'
CAINSTC4 Execution
CAINSTC4 installs CA Explore PM for z/VSE from an electronic software delivery
file into an existing library and history file.


Appendix C: Starting the Product before POWER 65
Appendix C: Starting the Product before
POWER
The report writer currently supports the VSE/POWER accounting record types.
Before you can run VSE/POWER accounting reports, CA Explore PM for z/VSE
must log VSE/POWER records. This method is described in the VSE/POWER
Reports chapter of the Report Reference Guide.
This appendix provides you with the steps needed to start CA Explore PM for
z/VSE before POWER (for example, to monitor the GETVIS usage of POWER).
This section contains the following topics:
Step 1. Starting the Product (see page 65)
Step 2. Remove F4 References (see page 66)
Step 3. Include START F4 Statement (see page 66)
Step 4. Recatalog JCL PROCs (see page 66)
Step 5. IPL (see page 66)
Step 1. Starting the Product
CA Explore PM for z/VSE could be started only in a static partition (if it needs to
be started prior to POWER), assume that CA Explore PM for z/VSE needs to be
started for VSE in F4. Typically, VTAM runs in F3 and CICS in F2. The example
statements in the sample JCL proc (example, $4JCL223.PROC) would be as
follows:
CATALOG $4JCL223.PROC DATA=YES REPLACE=YES
// JOB F4
// OPTION DUMP
// ASSGN SYS000,UA LOCAL 3270 TERMINAL
// ASSGN SYS001,UA LOCAL 3270 TERMINAL
// ASSGN SYS002,UA
// ASSGN S7S003,UA
// ASSGN SYS004,UA
// ASSGN SYSLST,IGN
// LIBDEF PHASE,SEARCH=(Explore.sublib,ibm.vtamlibs)
// EXEC EVSEIBAT,SIZE=EVSEIBAT
/*
/&
/+

Step 2. Remove F4 References
66 Installation Guide
Step 2. Remove F4 References
Remove any references to F4 in the PROC for POWER startup (the
$1JCLxxx.PROC). For example, remove the statement PSTART F4 and the
statements associated with it.
Step 3. Include START F4 Statement
Include the statement START F4 in the BG startup PROC ($0JCLxxx.PROC)
before starting POWER (before the START F1 statement).
Step 4. Recatalog JCL PROCs
Recatalog the JCL PROCs involved; In the previous case, the BG ($0), F1 ($1),
and F4 ($4) PROCs.
Step 5. IPL
IPL. CA Explore PM for z/VSE will start in partition F4 before POWER.

Index 67
Index
@
@AWSFILE • 62
@CUSTADD • 55
@CUSTNME • 55
@CUSTPHN • 55
@DLIBEXT • 61
@DLIBID • 62
@DLIBNAM • 62
@DLIBREL • 61
@DLIBVOL • 59, 61, 62
@HISTEXT • 59, 61, 62
@HISTID • 62
@HISTREL • 59, 61, 62
@HISTVOL • 59, 61, 62
@ILIBEXT • 55, 57
@ILIBREL • 55, 57
@ILIBVOL • 55, 57, 59
@INSTEXT • 55, 57
@INSTREL • 55, 57, 59
@INSTVOL • 55, 57, 59
@IPADDR • 57, 62
@PRODCDE • 55, 57, 59
@PRODUCT • 55
@PROGNME • 55
@TAPECUU • 55, 57, 62
C
CA Explore PM for CICS • 28, 29
accessing from VTAM • 28
PCT entries for • 29
PPT entries for • 29
VTAM application ID, defining • 28
VTAM resource definitions • 28
activating • 28
updating • 28
CA Explore PM for z/VSE • 12, 13, 23, 24, 25,
28, 29, 30, 31, 33, 35, 37
accessing • 28, 30, 31, 35, 37
from a dedicated terminal • 30, 35
from BTAM • 30
from CICS • 35
from FAQS/ASO • 31
from GSS for VSE • 35
from VTAM • 28
Main Menu • 37
archive file • 23, 24
allocation requirements • 23
defining • 24
archive file, purpose of • 23
configuration options, copying • 31
copying user-defined optionscudo • 31
flashback file • 23, 25
allocation requirements • 23
defining • 25
purpose of • 23
initializing • 33
PCT entries for • 29
PPT entries for • 29
product code, specifyingCAExploreforVSE •
35
storage used • 12, 13
in SDAID area • 13
required for installation • 12
VTAM application ID, defining • 28
VTAM resource definitions • 28
activating • 28
updating • 28
CAINSTB0 extraction JCL • 52
CAINSTB2 • 55
CAINSTB2 installation JCL • 55
CAINSTB3 migration JCL • 59
CAINSTC0 extraction JCL • 53
CAINSTC2 installation JCL • 57
CAINSTC4 • 62
CAINSTC4 installation JCL • 62
CAINSTQ4 • 61
CAINSTQ4 installation JCL • 61
checklist • 18
creating • 12
E
EVSEIBAT, initialization program • 34
EVSEPBAT, initialization • 34
F
from VTAM • 28, 35
I
initialization • 34
procedure, EVSEPBAT • 34

68 Installation Guide
program, EVSEIBAT • 34
installation • 15, 17, 18, 19, 20, 22, 54, 55, 57,
60, 61, 62
adding common comment messages tape •
22
CACIS for VSE • 19
checklist • 18
direct • 60
from physical tape, JCL • 61
install distribution tape • 22
JCL • 21, 51, 52, 53, 54, 55, 57, 59, 60, 61,
62
CAINSTB2 • 55
CAINSTC2 • 57, 60
CAINSTC4 • 62
CAINSTQ4 • 61
choosing • 54
from ESD file • 62
library allocation requirements • 20
overview • 15
procedure • 17
production libraries • 15
review requirements • 19
worksheet • 20
installing • 19
J
JCL • 54, 55, 57, 60, 61, 62
accessing using sample JCL • 51
CAINSTC2 migration JCL • 59
choosing • 54
direct • 60
extracting sample JCL • 51
extracting using CAINSTB0 • 52
extracting using CAINSTC0 • 53
installation member, extracting • 21
L
LIBRPUN Jobstream • 44
M
migration, CAINSTC2 JCL • 59
O
online interface • 27
online interface access • 27
P
Pre-installation checklist • 11
problem resolution • 39
R
Residence library.sublibrary • 12
T
troubleshooting • 39