Patterns of Audio-Visual Consumption: The Reflection of Objective Divisions in Class Structure
Upload
khangminh22Category
view
1download
0

DMA-05
Audio Visual Production Block – I: Audio Production
Odisha State Open University

Audio Visual Production
This course has been developed with the support of the Commonwealth of Learning (COL). COL is an intergovernmental organisation created by Commonwealth Heads of Government to promote the development and sharing of open learning and distance education knowledge, resources and technologies. Odisha State Open University, Sambalpur (OSOU) is the first Open and Distance learning institution in the State of Odisha, where students can pursue their studies through Open and Distance Learning (ODL) methodologies. Degrees, Diplomas, or Certificates awarded by OSOU are treated as equivalent to the degrees, diplomas, or certificates awarded by other national universities in India by the University Grants Commission.
© 2018 by the Commonwealth of Learning and Odisha State Open University. Except where otherwise noted, Audio Visual Production is made available under Creative Commons Attribution-ShareAlike 4.0 International (CC BY-SA 4.0) License: https://creativecommons.org/licenses/by-sa/4.0/legalcode For the avoidance of doubt, by applying this license the Commonwealth of Learning does not waive any privileges or immunities from claims that it may be entitled to assert, nor does the Commonwealth of Learning submit itself to the jurisdiction, courts, legal processes or laws of any jurisdiction. The ideas and opinions expressed in this publication are those of the author/s; they are not necessarily those of Commonwealth of Learning and do not commit the organisation
Odisha State Open University Commonwealth of Learning
G.M. University Campus 4710 Kingsway, Suite 2500, Sambalpur Burnaby, V5H 4M2, British Odisha Columbia India Canada Fax: +91-0663-252 17 00 Fax: +1 604 775 8210 E-mail: [email protected] Email: [email protected] Website: www.osou.ac.in Website: www.col.org

Acknowledgements The Odisha State Open University and COL, Canada wishes to thank those Resource Persons below for their contribution to this DMA-05:
Concept / Advisor
Dr. Srikant Mohapatra Vice- Chancellor Odisha State Open University, Sambalpur
Course Writer
Anadi Puhan Sound Engineer and Producer Reliance Broadcast Network Limited (92.7 BIG Fm)
Course Editor
Narasingh Majhi Faculty of Media studies Sri Sri University, Cuttack
Video Production
Durgadatta Kanungo AIDB trained, Media Person, Doordarshan Suvendu Mohanty Anchor, Doordarshan & AIR Retd. Reader, Swami Vivekananda Memorial (Auto)College, Jagatsinghpur
Published by :
Dr. Jayanta Kar Sharma Registrar on behalf of Odisha State Open University, Sambalpur
Contribution of following staff members of Odisha State Open University is acknowledged:
Sambit Mishra
Debidatta Behera
Prashansa Das
Radhakanta Suna
Abhinandan Tripathy
OSOU and COL acknowledge the support extended by Prof. Madhu Parhar, STRIDE, IGNOU, New Delhi in conducting several workshops in the process of preparation of course material for DMA.

Audio Visual Production
Contents
Contents
Course Overview 5
Welcome to Audio-Production ......................................................................................... 5
Concept of Sound .............................................................................................................. 5 Audio Equipments ............................................................................................................ 5 Sound Recording ............................................................................................................... 5 Audio Editing .................................................................................................................... 6
Course outcomes ............................................................................................................... 6 Timeframe ......................................................................................................................... 7 Study skills ........................................................................................................................ 7
Need help? ........................................................................................................................ 8 Assignments ...................................................................................................................... 8 Assessments ...................................................................................................................... 8 Video Resources .............................................................................................................. 9
Getting around this Course material 10
Margin icons ................................................................................................................... 10
Unit- 1 11
Concept of Sound ............................................................................................................ 11 Introduction ........................................................................................................... 11
Outcomes ............................................................................................................... 12
Terminology .......................................................................................................... 12 Concept of Sound .................................................................................................. 12
Types of Sound ...................................................................................................... 14 Characteristics of a Wave Form ............................................................................ 15 Velocity ................................................................................................................. 17
Phase: ..................................................................................................................... 17 Frequency Response .............................................................................................. 18 Pitch ....................................................................................................................... 19
Unit Summary ....................................................................................................... 20
Assignments .......................................................................................................... 20
Resources ............................................................................................................... 20
Unit 2 21
Audio Equipments .......................................................................................................... 21
Introduction ........................................................................................................... 21 Outcomes ............................................................................................................... 21 Terminology .......................................................................................................... 21

ii Contents
Acoustics ............................................................................................................... 22
Microphone ........................................................................................................... 22 Types of microphone ............................................................................................. 23 Characteristics of Microphone: ............................................................................. 28 Microphone Placement .......................................................................................... 29 Ambient Microphone Placement ........................................................................... 30
Microphone Applications ...................................................................................... 31 Stereo Microphone Placement ............................................................................... 32 Things to remember ............................................................................................... 34 Recorder ................................................................................................................ 34 The professional Analog Tape recorder (ATR) .................................................... 35
Audio Mixer .......................................................................................................... 36
Unit summary ........................................................................................................ 41
Assessment ............................................................................................................ 41
Resources ............................................................................................................... 41
Unit 3 42
Sound Recording ............................................................................................................. 42 Introduction ........................................................................................................... 42 Outcomes ............................................................................................................... 42
Terminology .......................................................................................................... 42 Recording Process ................................................................................................. 43
Magnetic Tape ....................................................................................................... 44 The Function of Magnetic tape Heads .................................................................. 45 The Signal flow and recording Process ................................................................. 45
Signal Flow in a recording setup ........................................................................... 46
Digital Recording .................................................................................................. 47 Sampling: ............................................................................................................... 48 Quantization: ......................................................................................................... 48
The Digital Recording process .............................................................................. 48 Digital Audio tape (DAT) System ......................................................................... 49
Mixing or Mastering: ............................................................................................. 50 Sound processing ................................................................................................... 51 Recording level ...................................................................................................... 52
Digital Audio Workstation .................................................................................... 53 Amplitude Modulation (AM) ................................................................................ 53
Frequency Modulation (FM) ................................................................................. 54
Unit summary ........................................................................................................ 56
Assessment ............................................................................................................ 56
Resources ............................................................................................................... 56
Unit 4 57
Audio Editing .................................................................................................................. 57
Introduction ........................................................................................................... 57 Outcomes ............................................................................................................... 57 Terminology .......................................................................................................... 57
Audio Visual Production
Dubbing ................................................................................................................. 58
Editing ................................................................................................................... 59 Audacity Software ................................................................................................. 59 Editing in Analog medium .................................................................................... 60 Editing in Digital Medium .................................................................................... 61 Noise Reduction .................................................................................................... 61
Dolby and DBX noise reduction system ............................................................... 62 Analog noise reduction .......................................................................................... 62 Digital Noise reduction ......................................................................................... 63 Source of noise ...................................................................................................... 63 Noise Gates ............................................................................................................ 64
Monitoring ............................................................................................................. 64 Monitoring Configurations .................................................................................... 66
Mono ..................................................................................................................... 66 Stereo ..................................................................................................................... 66 Surround Sound ..................................................................................................... 67 Active Monitors for studio .................................................................................... 68
Near-Field Speaker ................................................................................................ 68 Far-Field Speaker .................................................................................................. 69
Speaker polarity ..................................................................................................... 69 Headphones ........................................................................................................... 69 Amplifiers .............................................................................................................. 70
The operational Amplifier ..................................................................................... 71 The Preamplifier .................................................................................................... 71
Distributing amplifiers .......................................................................................... 71 Power Amplifier .................................................................................................... 72 Synchronization ..................................................................................................... 72
Time Code ............................................................................................................. 72
Unit summary ........................................................................................................ 73
Assessment ............................................................................................................ 73
Resources ............................................................................................................... 73

Audio Visual Production
5
Course Overview
Welcome to Audio-Production
In this block, you will learn about two parts of film making like hypothesis and practical. You will find out about the means utilized as a part of making preparations for different mediums like T.V., Film and so on. Other than that you will learn the skill to write a screenplay, shooting script, storyboard, and making of a budget, designs a production and so on.
Concept of Sound
Sound plays a greater role in the field of communication, entertainment, understanding, sharing of the information. It is one of the most important fields for electronic media like Television, Radio, Cinema and Public Broadcasting. The world of modern music is becoming so popular that the audio technology has become simpler.
Audio Equipments
Audio equipments are used for different purpose and for various applications. Audio engineer uses outdoor portable recorder for an outdoor recording and other equipments for studio recording.
Sound Recording
Sound recording is a process that involves both the skill of art and science. The purpose of recording is to restore the information for future use and it may be stored for years. Sound recording process takes multiple steps.

Course Overview Concept of Sound
6
Audio Editing
Audio Editing is done in many stages of audio production. In the post
production many things are to be done on the mixing console desk.
Noise is an important factor to be remembered and taken care of during
track laying and editing. Noise is removed in this stage of audio
production.
This video will provide a brief overview of this course.
Topic YouTube link QR
Code
Video 1 – Audio fundamental and its equipments
https://youtu.be/AqN6_SF
oAaw
Video 2 – Audio editing
process using Audacity https://youtu.be/aXspsAD
KwsY
Video 3 – Dubbing mixing &
sound designing
https://youtu.be/O6FcIhR0
B68
Course outcomes
Upon completion of Audio-Production you will be able to:
Outcomes
Describe the Concept of Sound and its phenomena.
Name the audio equipments that are used in audio
productions.
Differentiate between the types of Microphones.
Explain the Process of Sound Recording
Describe Voice Dubbing process.

Audio Visual Production
7
Timeframe
How long?
This course will be completed within “2” classes.
This course is of “1” credits.
4 Hours of study time is required to complete this unit.
Study skills
Learning about the audio visual productions are a part of Multimedia
Coaching. But, when it comes to creation of an output, there is no
specific ABC formula for doing so. It is just like a painting in which the
artists choose the colour and proportion according to the need, not as
per a written plan.
In creating outputs for TV, Films etc. we have to utilize the software
tools from one corner to another randomly. So for every project, the
formula is different. There is no fixed recipe for all kind of output. So, the
more and more you learn about the options, more variety you will get.
Each and every option is explained step by step in the course material.
Apart from this course material, the learner has to adopt the tendency
of learning from multiple sources i.e.,
Internet tutorials
Video tutorials on youtube
Collaboration with people working in the industry etc.
Only classroom study will not make you a professional. You have to be active to grab the opportunity of learning wherever you get a chance.
Course Overview Concept of Sound
8
Need help?
Help
In case of any help needed you can browse the internet sites like youtube.com for video tutorials about the subject.
Assignments
Assignments
There will be some assignments at the end of each unit.
These assignments are mostly practical based and should be submitted in CD or DVD. Theoretical assignments are to be submitted neatly written on A4 size sheet.
All assignments will be submitted to respective study centre of Odisha State Open University or as directed by Co-ordinator.
All assignment should be unit wise on separate CD/DVDs clearly mentioning course title and unit on Top. Theoretical Assignment will be neatly filed or spiral bind with cover clearly mentioning necessary information of course.
Assessments
Assessments
There will be “1” assessment for each unit.
All practical assessment will be submitted to OSOU.
Assessment will take place once at the end of each unit.
Learner will be allowed to complete the assessment within stipulated time frame given by the university.

Audio Visual Production
9
Video Resources
This study material comes with additional online resources in the form of
videos. As videos puts in human element to e-learning at the same time
demonstrating the concepts visually also improves the overall learning
experience.
You can download any QR code reader from Google Play to view the
videos embedded in the course or type the URL on a web browser.
.
Reading
Getting around this Course material Concept of Sound
10
Getting around this Course material
Margin icons
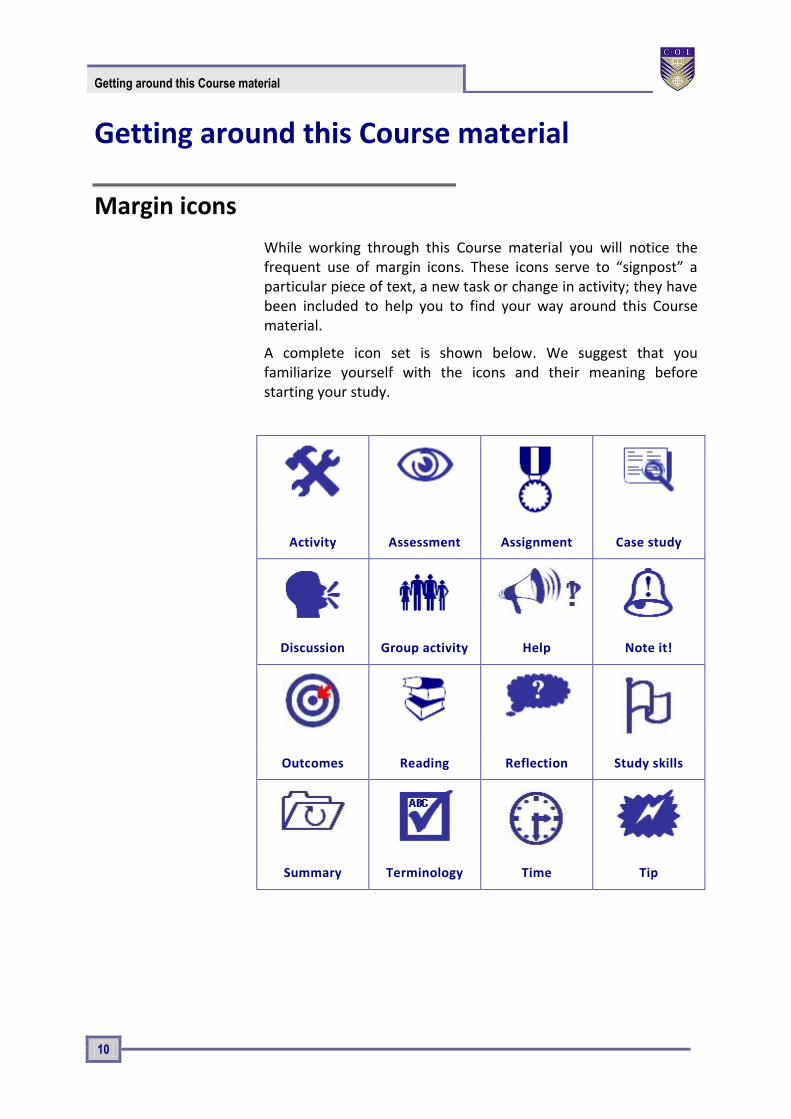
While working through this Course material you will notice the frequent use of margin icons. These icons serve to “signpost” a particular piece of text, a new task or change in activity; they have been included to help you to find your way around this Course material.
A complete icon set is shown below. We suggest that you familiarize yourself with the icons and their meaning before starting your study.
Activity Assessment Assignment Case study
Discussion Group activity Help Note it!
Outcomes Reading Reflection Study skills
Summary Terminology Time Tip

Audio Visual Production
11
Unit- 1
Concept of Sound
Introduction
Sound is an important concept in our life. It plays a greater
role in the field of communication, entertainment, understanding,
sharing of the information. It is one of the most important fields
for electronic media like Television, Radio, Cinema and Public
Broadcasting. The world of modern music is becoming so popular
that the audio technology has become simpler. The sound
production abides with different aspects, this is a field where both
art and science work together and creates the wonders in the
form of music that has a healing power. Imagination, artistic
support and technical expertise can give birth to a creative
production. Sound recording technology changes with the time.
Now we are living in a digital world, where most of us are
spending so much time with the social media like facebook,
twitter, whatsapp and dealing with voice calling, voice sms, video
calling, chatting etc. Knowingly or unknowingly you are using a
camera, video recorder, audio recorder, transmitter and a receiver
in the form of a smart phone. The reason is the advancement in
the technology, vis-à-vis the convergence of audio-video
technology. If you want to pursue a career in the media industry,
then you have to learn the expertise of media technology. It may
be an audio recording, a video shooting or a digital promotion.
Sound technology is one of the widely used in the electronic
media and film production.

Unit- 1 Concept of Sound
12
Outcomes
Upon completion of this unit you will be able to:
Terminology
Terminology
Wave: A Graphic representation that describe sound.
Loudness: It is the Gain of sound pressure level.
Propagation: Travel of sound in air medium.
Decibel: Unit of Loudness.
Amplitude: Distance above or below the centre line of wave.
Stimulus: The vibrating sensation.
Concept of Sound
In our surrounding, many physical events occur. You can
see them through the eyes and hear the sound by ears. Sound is a
phenomenon that describes the brain’s perception and
interpretation of a physical stimulus that arrives to the ears. It is a
both physical and psychological phenomenon. Sound is generated
from a source attached to the atmosphere which travels through
wave propagation in the air (Figure 01). Not only in the air, it can
also travel through the water and metal also. It takes place
through periodic vibration in the air molecules and reaches to our
Outcomes
Describe the Concept of Sound and its phenomena
Differentiate between different types of Sound.
Describe the construction of human ear and its function.
Explain the characteristics of Wave Form

Audio Visual Production
13
ear. When it passes into our ear through the external object many
things tend to happen and our brains responds to it accordingly.
Now let us learn how the ear acts. The Sound arrives at our
ear in the form of a periodic vibration in the atmospheric pressure
known as sound pressure level (SPL). Sound Pressure Level is the
acoustic pressure that is built up within a specific atmospheric
area. The greater the sound pressure level, the louder the sound.
Sound pressure level can be measured in decibel (dB).Our ear can
receive the sound vibrations from 360 Degree angle.
Title- Fig-1 Wave propagation Attribution- Pluke Source- Link- https://commons.wikimedia.org/wiki/File:CPT-sound-physical-
manifestation.svg
The vibrating waves travel through the air, medium are
collected at the outer ear and then passes through the aural canal
of inner ear and hits the stretched drum like membrane called
eardrum which is attached to the ear drum, a snail like organ
called cochlea that contains so many tinny hairs. The sound waves
after reaching the inner ear are then changed into mechanical
vibrations, which are transferred to the inner ear of three bones;
these three bones are the hammer, anvil and stirrup (Figure 02).
These bones act like an amplifier and a limiter, means they help
the weak signals to boost and limit the louder sound too(we will
discuss on amplifier and limiter in the next unit).The vibrations are
then applied to the cochlea-a tubular, snail like organ that

Unit- 1 Concept of Sound
14
contains two fluid filled chambers. Within these chambers there
are tiny hair receptors .These tiny hairs can response to different
frequencies and are lined in a row along the length of the cochlea.
Then the mechanical signals are sent to the brain and this neural
stimulation gives us the sense of hearing.
Title- Figure-02: Diagram showing the outer, middle and inner ear.
Attribution- Iain at English Wikipedia, SVG conversion by User:Surachit Source- Link- https://commons.wikimedia.org/wiki/File:Ear-anatomy-text-small-en.svg
A convenient pressure level that produces the
phenomenon of hearing is called threshold of hearing. The
minimum Sound Pressure Level (SPL) that is required for hearing in
most of the people is equal to 0.0002 microbar. One microbar is
equal to one million atmospheric pressure. The SPL that causes
discomfort in a listener 50 percent of the time is called the
threshold of feeling. It occurs at a level of about 228decibel.The
SPL that causes pain in the listener 50 percent of the time is called
threshold of pain and it occurs at a level of 140dB.
Types of Sound
We are dealing with so many types of sounds. Some are
artificial and some are natural. The sound we hear may be a
combination of multiple frequencies, and having different
magnitude. The wave forms are in the shape of a triangle wave,

Audio Visual Production
15
sine wave, square wave and saw-tooth wave (Figure 03). Our ear
can receive frequency of a single cycle per unit time and a
maximum of 20,000 cycles per second.
Title- Figure-03: Different wave forms
Attribution- Omegatron Source- Link- https://commons.wikimedia.org/wiki/File:Waveforms.png
Frequencies are categorised into low, low-mid, high-mid and high
band. There are two kinds of waves they are transverse and
longitudinal. Longitudinal waves move parallel to the direction the
wave is travelling. Whereas the transverse waves on the other
hand is where the vibration is at 90 degrees to the motion of the
wave.
When we speak, the sound usually generated at the vocal cord of
the throat. Human beings have a definite frequency band in our
vocals. Similarly there are different tones and timber in animals
and musical instruments.
Characteristics of a Wave Form
A wave form is the graphical symbol that represent of a
signal’s sound pressure level as it moves through a medium over
time. A wave form is helpful to see & understand the actual
Unit- 1 Concept of Sound
16
phenomenon that takes place in the physical environment.
Followings are the characteristics of wave form.
Amplitude
Frequency
Wave length
Velocity
Phase
Harmonic content
Envelope
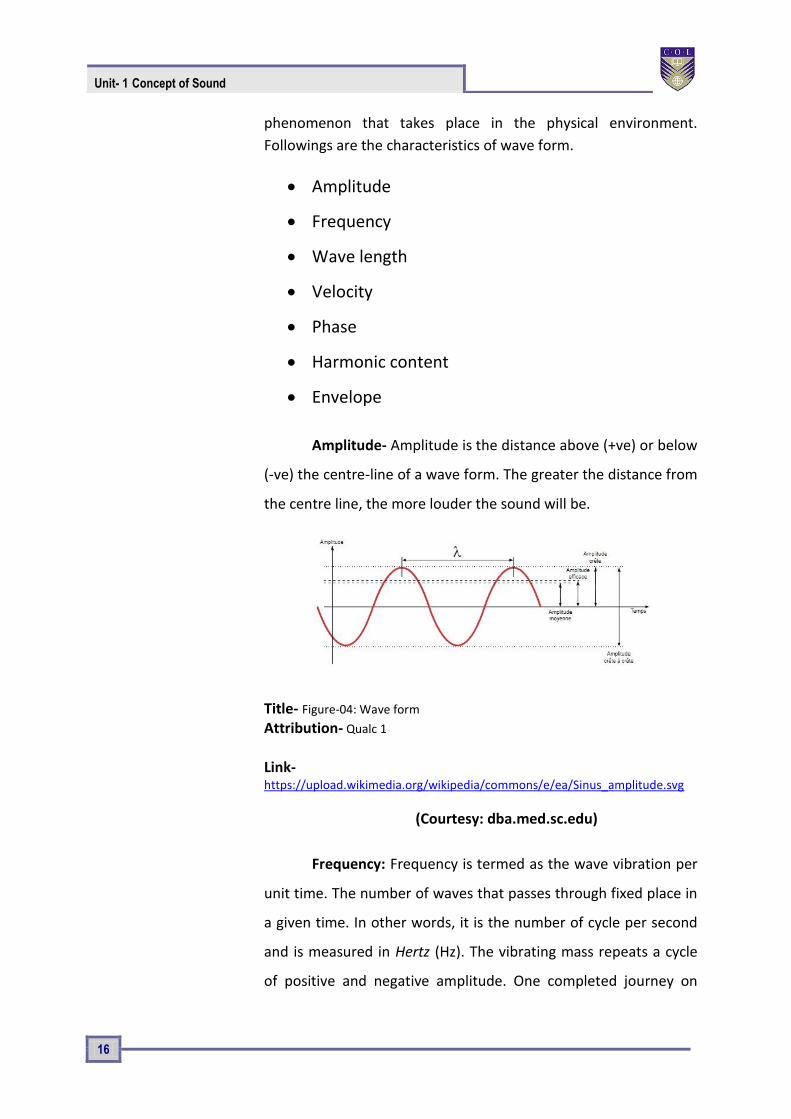
Amplitude- Amplitude is the distance above (+ve) or below
(-ve) the centre-line of a wave form. The greater the distance from
the centre line, the more louder the sound will be.
Title- Figure-04: Wave form
Attribution- Qualc 1 Source- Link- https://upload.wikimedia.org/wikipedia/commons/e/ea/Sinus_amplitude.svg
(Courtesy: dba.med.sc.edu)
Frequency: Frequency is termed as the wave vibration per
unit time. The number of waves that passes through fixed place in
a given time. In other words, it is the number of cycle per second
and is measured in Hertz (Hz). The vibrating mass repeats a cycle
of positive and negative amplitude. One completed journey on

Audio Visual Production
17
both positive and negative side of the centre line is known as a
cycle.
Wave Length: It is the actual distance in a medium
between the beginning and the end of a cycle, and is measured in
Lambda (). The wave length changes according to the frequency.
The lower frequencies have a greater wave length and the higher
frequencies have the shorter wave length. Low Frequencies travel
more distance than high frequencies.
The physical length of a wave can be calculated using the formula.
=v/f
Where is the wave length in the medium?
V is the velocity in the medium
F is the frequency in hertz
Velocity
In physics the term ‘velocity’ is a rate of change of speed. Like the
light, the sound which travels in the air. The speed of sound when
it travels through air medium at 680 F or 200 C temperature is
approximately 344 meter per second. The speed may vary
according to the variations in atmospheric temperature.
Phase:
A cycle can begin at any point on a wave form. It is the position of
a point in time on a wave form. When two sine waves combine
together, it produces a single sound; their relative amplitude is
different at any point of any time.

Unit- 1 Concept of Sound
18
Phase is measured in degree. The sine wave is usually consider to
begin at 00 with zero amplitude and it can increase to a maximum
of 900 and then decrease to having a zero amplitude at 1800 and
then increase to a maximum of 2700 (in the negative direction) &
finally come back to its original level at 3600.
In-Phase: When two waves form and having the same frequency
shape & peak amplitude are added, the resulting wave form will
have the same frequency, phase &shape but double in amplitude.
This wave forms will be called as in-phase wave.
Out-of-Phase: When two waves of different frequency, shape and
phase are combined together, it results in a straight line of zero
amplitude. That means both the positive phase and negative
phase will cancel each other.
Harmonic Contents: A Sine wave is a single frequency that
produces a pure tone. Compound sound waves have a
combination of multiple frequencies. A piano can produce the
tones of different frequencies and at different pitch too. The
factors that help us to differentiate between instruments are
called partials that exist in addition to the pitch that’s being played
which is called fundamental. Partial that are higher than the
fundamental frequency are called upper partial or over tone. The
over tone frequencies that are whole numbers of multiple of the
fundamental frequency are called harmonies.
Acoustic envelope: Every instrument has its unique timber.
Timber differentiates one instrument to others. Envelope of a
wave form is the characteristic variations in level that occurs over
the duration of a played note.
Frequency Response
Frequency response is simply defined as the response to
frequency range. Our ears can response to a too low frequency
and a too high frequency. This frequency range is known as
dynamic range of hearing. And the dynamic range of human ear is
20Hz to 20 kHz.

Audio Visual Production
19
For example, we can hear the sound of a bass guitar, which carries
low and low mid frequencies. And we can also hear the sound of a
mosquito which creates extreme high frequencies.
Pitch
Pitch is word that defines the position of a note in the musical
scale. Then what is a musical scale? Arrange of notes in different
pitch. We can say that the pitch refers to the highness and
lowness of a note. Pitch is related to frequency. Two notes are
very closely related. In fact it is convenient to give an exact
frequency to a particular musical note, or rather the fundamental
frequency of that note but we ought to note that the pitch of
sound can be affected by its loudness.

Unit- 1 Concept of Sound
20
Unit Summary
Summary
In this unit you learned about the definition of sound, wave propagation, role of human ear in receiving the sound, how the sound travels and reaches to our ear drum, the construction and function of the human ear, various characteristics of a wave form such as frequency, wavelength, amplitude, velocity, harmonic content, phase and acoustic envelope, pitch etc.
Assignments
Assignments
1. Discuss the characteristics of wave form.
2. List the main obstacles for hearing?
3. Write the various medium through which sound can travel.
4. Describe the construction of ear with diagram.
5. Describe the pitch.
6. Name the unit of loudness
7. Frequency is measured in_______.
8. We measure the wave length in______.
9. What is the dynamic range of human ear?
Resources
Modern Recording Techniques , David Miles Hurber and Robert E.Runstein, Focal Press
https://en.wikipedia.org/wiki/Sound_recording_and_reproduction
https://www.makeuseof.com/tag/7-free-resources-learn-
sound-engineering/
https://www.recordingconnection.com/courses/audio-
engineering/audio-lesson-01/
Reading

Audio Visual Production
21
Unit 2
Audio Equipments
Introduction
Sound recording is a process of converting one form of signal to another corresponding form of energy using so many equipments.
In this unit you will learn about the various kind of equipments related to sound recording and processing. These equipments are used for different purpose and for various applications. For an outdoor recording audio engineer they use different kinds of outdoor portable recorder whereas for studio recording they use required equipment as applicable.
Outcomes
Upon completion of this unit you will be able to:
Outcomes
Name the audio equipments that are used in audio
productions.
Differentiate between the types of Microphones.
Identify the use of different microphone at different places
Locate various sections of an audio mixing console.
Terminology
Terminology
Acoustic Wave: A longitudinal wave that consists of a sequence of pressure pulses or elastic displacements of the material, whether gas, liquid, or solid, in which the wave propagates.
Microphone: A device that convert acoustic signal to electrical signal.
Diaphragm: A thin sheet of material forming a partition.
Capacitor: An electricity storing device.

Unit 2 Audio Equipments
22
Omni directional: Response to all direction.
Unidirectional: Response to a particular direction only.
Learners, it is very important that you should know the different
types of audio equipments that are used in the recording setup.
Acoustics
The term acoustic is an interdisciplinary science deals with
the study of all mechanical waves and concerned with the
production, effects, and transmission of sound waves. The
transmission of sound waves through different mediums, we often
hear people talking about good or bad acoustics. Good acoustics
may improve the sound quality. To judge the sound, we need good
audible conditions. That means the venue should be good and free
from any sound reflection, diffraction, refraction, absorption and
interference. You might have visited any auditorium, theatre or
music studio, which are treated acoustically to produce a good
sound outputs. Proper acoustic design of a music recording studio
is not so easy. It may be cost effective and time taking.
Microphone
Microphone is a transducer that changes one form of
energy (sound waves) to another corresponding form of energy
(electrical signal). It is often the first device in a recording chain.
The overall sound quality of a microphone will depend upon its
operating type, sensitivity and polar pattern. The other factors
that influence the sound quality are placement, distance, and the
acoustic environment. Knowledge of the behaviour of micro
phone is essential for everyone working in sound industry (Figure
07).

Audio Visual Production
23
Title- Figure-07: Microphone
Attribution- Didgeman Source- Link- https://pixabay.com/en/microphone-mixer-cable-626032/
In order to deal with the wide range of musical, acoustic
and situational circumstances, a large number of microphone
types, styles and designs are available for a purposeful use. Before
go for a recording let us know the microphone.
Types of microphone
There are three types of transducer used: Dynamic
microphones, Ribbon microphones and Condenser microphones.
All of them work on different principles.
The Dynamic Microphone
Dynamic microphone operates by using the principle of
electromagnetic induction. The theory of electromagnetic
induction states that whenever an electrically conducted metal
cuts across the flux lines of a magnetic field, a current of a specific
magnitude and direction will be generated within that metal.

Unit 2 Audio Equipments
24
1. incoming sound
2. diaphragm
3. Coil
4. permanent magnet
5. resulting signal
Title- Figure-08: Microphone Construction
Attribution- Banco Source- Link- https://commons.wikimedia.org/wiki/File:Mic-dynamic.PNG
Dynamic microphone consists of a stiff Mylar diaphragm of about
0.35 mil thickness. Attached to the diaphragm is a finely wrapped
core of wire, also called as moving coil or voice coil. That is
precisely suspended within a high level magnetic field. Whenever
an acoustic pressure wave hit the diaphragm, the attached voice
coil is displaced in proportion to the amplitude and frequency of
this wave. Causing the coil to cut across the lines of magnetic flux
supplied by a permanent magnet. Hence an analogues electrical
signal is induced in to the coil and across the output lead (Figure
08).
The Ribbon Microphone
Ribbon microphone operates on the same principle the dynamic
microphone operates.

Audio Visual Production
25
Title- Figure-09: Cut away details of ribbon microphone
Attribution- N.H. Crowhurst Source- Link- http://www.vias.org/crowhurstba/crowhurst_basic_audio_vol1_032.html
It consists of two extremely thin aluminium ribbons. Often this
diaphragm is corrugated along its width and is suspended within a
strong field of magnetic flux. Sound pressure variations between
the front and the back of the diaphragm causes it to move and cut
across these flux lines, inducing a current into the ribbon that is
proportional to the amplitude & frequency of the account wave
form.
The Condenser Microphone:
The third type of microphone is condenser microphone, which
operates on the principle of electro-static. The condenser microphone
consists of two very thin plates. One immovable and one fixed. These
two plates form a capacitor. And the capacitors are capable to store an
electrical charge. The amount of charge that a capacitor can store is
determined by its capacitance value and the voltage that’s applied to it.
According to the formula
Q=CV
Where Q is the charge, in Coulomb

Unit 2 Audio Equipments
26
C is the capacitance, in Farads.
V is the Voltage, in volt
The capacitance is determined by the distance between the plates, the
substance between the plates and surface area of the plates.
1. Sound Waves
2. Diaphragm
3. Back Plate
4. Battery
5. Resistor
6. Audio Signal
Title- Figure-10: Cutaway of Condenser Microphone
Attribution- Banco Source- Link- https://commons.wikimedia.org/wiki/File:Mic-condenser.PNG
The plates are commuted to opposite sides of a DC power
supply, which provides a polarizing voltage to the capacitor. The
sound pressure wave hits the diaphragm, its capacitance charges
and the distance between the two plates decreases with the
increase of capacitance and vice-versa. In the formula Q=CV, R.C
and V are interrelated. So if the charge (Q) is constant and the
capacitance (C) changes, the voltage (V) must change in inverse
proportion. Along with the variable capacitor a high value resister
is placed into the circuit that produce a circuit time that’s longer
than a single audio cycle. The resistor prevents the capacitor’s
Audio Visual Production
27
charge from varying with rapid changes in capacitance due to the
applied sound pressure, the voltage across the capacitor changes
according to V=Q/C. When the voltage across the capacitor
changes, the voltage across the resistor will also changes. But the
direction is opposite. This voltage across the resistor will become
the microphone’s output signal.
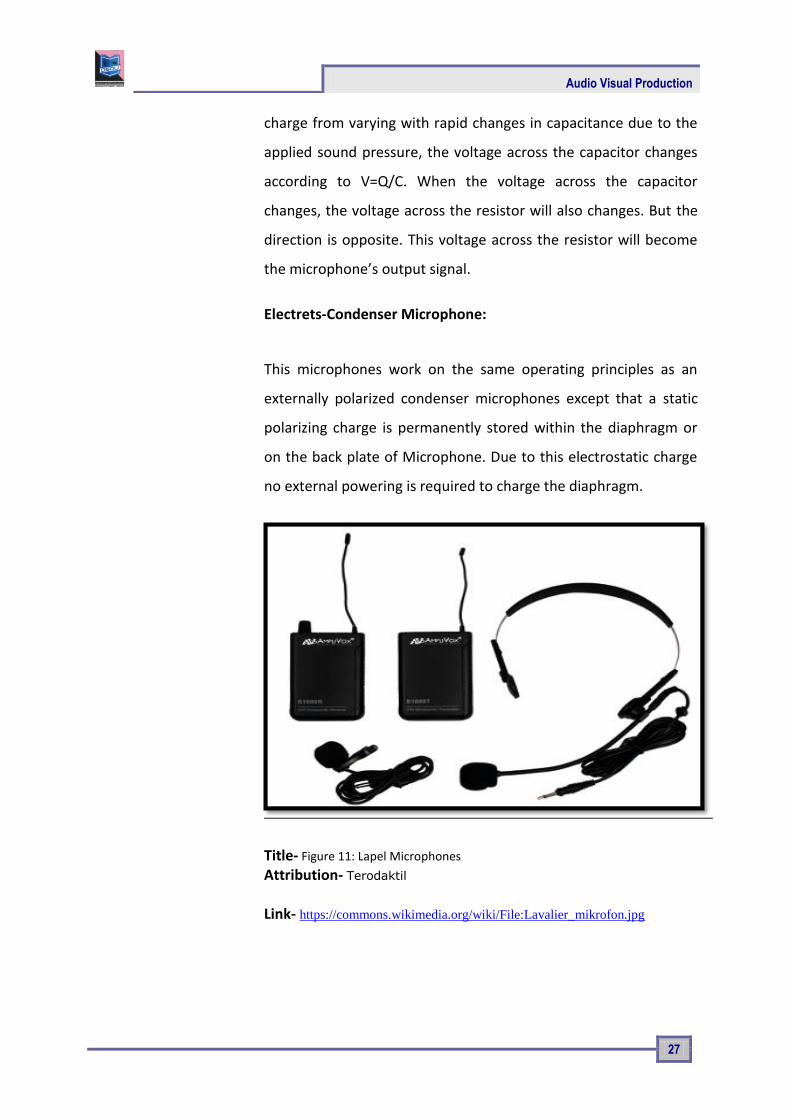
Electrets-Condenser Microphone:
This microphones work on the same operating principles as an
externally polarized condenser microphones except that a static
polarizing charge is permanently stored within the diaphragm or
on the back plate of Microphone. Due to this electrostatic charge
no external powering is required to charge the diaphragm.
Title- Figure 11: Lapel Microphones
Attribution- Terodaktil Source- Link- https://commons.wikimedia.org/wiki/File:Lavalier_mikrofon.jpg

Unit 2 Audio Equipments
28
Characteristics of Microphone:
The microphones are of different types, styles and designs to fulfil a wide range of applications. Its physical and electrical characteristics also differ. To get the best result one need to understand its directional response, sensitivity, frequency response & transient response.
Microphone’s directional Response:
All microphones have different directional responses, means responding to the sound wave at various angles of incidence. This is known as polar pattern of a microphone. Microphone directionality can be classified in to two categories.
Omni directional polar pattern
Unidirectional polar Pattern
Title- Figure 12: Directive response of Mic. Attribution-Galak76 Source- Link- https://commons.wikimedia.org/wiki/File:Polar_pattern_omnidirectional.
png
The Omni directional microphone’s diaphragm reacts equally to all
sounds from all the direction. In other word the Omni directional
microphone can catch the sound wave from 360 degree angle.

Audio Visual Production
29
When the diaphragm picks up the sound pressure from the front
side (on-axis) and backside (off-axis) of the microphone, we called
it a bidirectional polar pattern. It means responding the sound
wave from both the directions. Here the microphone can receive
the sound from the opposite directions only. Various polar pattern
used in the sound engineering technology are unidirectional,
cardioids, super cardioids, hyper cardioids, bidirectional etc.
(Figure 12).
Microphone Placement
Placing the microphone at a suitable distance and
appropriate direction from the sound source, can give a good
recording output. Microphone placement is very important. The
sound intensity may vary according to the distance of the
microphone from the source. Don’t hesitate to experiment on the
placement of microphone. Hear the sound first. Place the
microphone at the source and hear it through monitor. A
microphone can give its best result when the placement will be
accurate. The more the distance of the microphone from the
sound source, the more it will add the ambience sound with the
main signal. That means the microphone allow the room’s acoustic
environment to be picked up with the direct sound signal.
Title- Figure 13: Placement of Microphone for vocal artist

Unit 2 Audio Equipments
30
Attribution-akd835
Source- Link- https://pixabay.com/en/singer-sillouette-concert-mic-1595864/
Close microphone placement will give a tight and present sound
quality and excluded the acoustic environment. The position of
microphone for a singer may be different for male singer and
female singer. Similarly the placement for musical instruments is
also varying from source to source according to the timber,
intensity and quality of the musical instrument.
Microphone stands and cabling
We learnt about the microphones and its characteristics.
Now we will study about its supporting stands. Microphone stands
should be stable and not movable and must have the ability to
tolerate the weight of the microphone .There are different types,
designs of microphone stands are available in the market.
Cabling is the wired communication between two devices. For
example-
from microphone to audio mixer,
from mixer to recorder and
from recorder to amplifier to audio monitor.
The quality of sound depends upon a neat and clear cabling. The
untidy cables can create a bad impression in the minds of
performers and public. A neat layout makes it easier to track
down. Don’t cross the line cable over audio cable to avoid
electrical fluctuations.
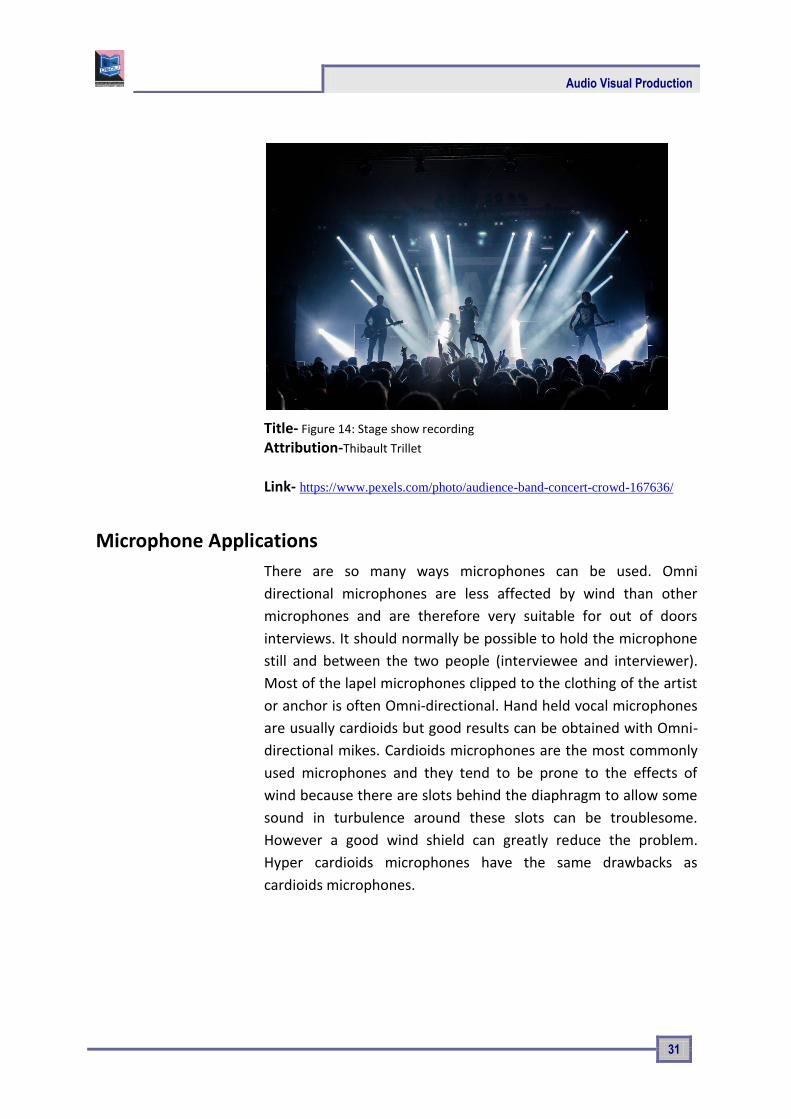
Ambient Microphone Placement
The microphone should be placed in such a distance that the room
ambience is more prominent than the direct signal. The ambient
pickup is often a stereo cardioids pair. This type of placement is
preferred for a live concert recording, in a hall to restore the
natural reverberation. It is also applicable in a live concert or
musical stage show to pick up the reaction and applause of the
audience. (Figure 14)
Audio Visual Production
31
Title- Figure 14: Stage show recording
Attribution-Thibault Trillet
Source- Link- https://www.pexels.com/photo/audience-band-concert-crowd-167636/
Microphone Applications
There are so many ways microphones can be used. Omni
directional microphones are less affected by wind than other
microphones and are therefore very suitable for out of doors
interviews. It should normally be possible to hold the microphone
still and between the two people (interviewee and interviewer).
Most of the lapel microphones clipped to the clothing of the artist
or anchor is often Omni-directional. Hand held vocal microphones
are usually cardioids but good results can be obtained with Omni-
directional mikes. Cardioids microphones are the most commonly
used microphones and they tend to be prone to the effects of
wind because there are slots behind the diaphragm to allow some
sound in turbulence around these slots can be troublesome.
However a good wind shield can greatly reduce the problem.
Hyper cardioids microphones have the same drawbacks as
cardioids microphones.

Unit 2 Audio Equipments
32
Stereo Microphone Placement
Stereo miking techniques are used to obtain a coherent stereo
image. In this technique two microphones are used. These
techniques can be used in either the close or distance miking of
background vocals, large or small ensembles, and single
instrument, on location or studio applications. There are three
types of miking techniques used such as space pair, XY-Technique
and the M-S Method.
Title- Figure 15: Stereo Mic placement
Attribution-Lainf
Source- Link- https://commons.wikimedia.org/wiki/File:XY_stereo.svg
Spaced Microphone In this type of placement, the mic can be
placed in front of an instrument. This techniques place the two
mics anywhere from only a few feet to more than 30 feet apart
and to create a stereo image, where the time and amplitude cue
are used. This technique has a drawback of phase discrepancies.
The XY Technique The XY Technique is an intensity dependant
system that uses only the cue of amplitude to discriminate
direction. In this technique two directional microphones of same
type, manufacture and model are placed at their face close
together and facing at angle to each other. The microphone
outputs are equally panned left and right. In this technique the
stereo image is excellent. The generally accepted polar pattern for
this technique is cardioids. They are effective for string
instruments and acoustic instruments.

Audio Visual Production
33
Title- Figure 16: XY Placement of Mic. Attribution-Lainf Source- Link- https://commons.wikimedia.org/wiki/File:XY_stereo.svg
M-S Method
In this configuration, one of the microphone capsules is designed
to be the mid position pickup. The side capsule is generally chosen
to be a figure 8 patterns that’s oriented sideways. In this way the
direct sound is picked up by the mid capsule, where the ambient
and reverberant sound is picked up by the side figure 8 capsules.
Title- Fig-17 M-S Method mic placement. Attribution-Daniel Keller Source- Link- https://www.uaudio.com/blog/mid-side-mic-recording/

Unit 2 Audio Equipments
34
Things to remember
Microphones are sensitive devices. So handle them with care.
Never try to repair them yourself. Because microphones are
complicated and delicate things and it’s all too easy unless we
really know what we are doing to get things out of alignment, over
tighten a screw or in some other way to make things worse. Some
of the faulty symptoms with remedial actions are given below.
1. If there is no mic output: The possible causes are faulty
cable and connector, plugged into wrong socket, not faded
up on mixing desk. In case of an electrostatic microphone,
the power may not be on.
2. If the output is very low: There may be incorrect setting on
mixer.
3. If the output is too high and distorting: There may be
incorrect setting on mixer.
4. Thin sound with no bass: This may be due to faulty cable.
5. Excessive bass: This may be due to faulty mic.
So whenever you face any problem due to microphone, do check
plugging, mixer setting, powering, cable, connectors. If problem
still persist, then take the microphone to a mechanic.
Recorder
A recorder is a device which can record or write the
information and reproduce the data on demand. Recorders are of
various shape, size and designs. In the field of reporting mobile
phone is now becoming a portable audio visual recorder. We can
record things instantly anytime and anywhere. Professional
recorders have some specific features and specifications. And a
layman may not operate it. In the professional recording fields
people use magnetic recorders, and digital recorders for their
audio project.

Audio Visual Production
35
Title- Fig-18 Movement of Tape through 3 magnetic heads. Attribution- Source- Link- http://artsites.ucsc.edu/EMS/music/equipment/analog_recorders/analog_r
ecorders.html
The analog audio tape recorder (ATR) is a sound recording device
that has the capacity to store audio information, on request it may
play this information back using Magnetic medium. An analog ATR
is called analog because of its ability to transform an electrical
input signal into corresponding magnetic energy that can be store
on to the magnetic tape (Figure 20)
The professional Analog Tape recorder (ATR)
The professional ATRs can be found in 2-, 4-, 8- , 16-, 24-
track formats. Multi track ATRs are used to record so many
individual tracks of a time layer by layer. The 8-, 16- and 24 track
machines are generally used for multi track recording whereas the
2 track recorder is used to recording the final output of an audio
project. Most of Professional ATRS uses three magnetic tape
heads, each of which performs different tasks.
Record head- can record the information on the tape.
Reproduce / play back head can reproduce the
information.
Erase head can erase the data previously recorded.

Unit 2 Audio Equipments
36
Title- Fig-19 Analog Tape Recorder Attribution- Erkaha Source- Link- https://commons.wikimedia.org/wiki/File:Tape_recorder_GX-
6300.jpg
Magnetic recording medium was the most popular format among
the audio Engineers for decades. Technology changes rapidly and
now we are in a digital world. Digitalization has become the slogan
for the today’s generation. Recording has taken its place at a new
level in the digital medium. The magnetic tape recorders became
outdated due to some draw backs such as the machine noises,
breakdown of tapes & maintenance costs. To overcome these
problems engineers developed this modern recording technology
called digital recording. The digital technology makes things so
easier. In a simple meaning it is process of data encoding and
reproducing numeric representations of analog’s original levels
over time through the use of the binary number system.
Recording, editing, voice dubbing and mixing become more
accurate and perfect due to digital recording medium. Now a day’s
potable digital recording device are used for outdoor recording
and shooting also.
Audio Mixer
A mixer is a device which mixes up so many individual
signals together in a proper ratio and can give a balanced and

Audio Visual Production
37
processed final signal in two tracks. The basic purpose of an audio
console is to give us full control over volume, tone, blending and
frequencies of all signals that are applied to its input, from a sound
source through microphones or electronic device, effect devices &
other audio devices. It helps us to route the signals quickly and
reliably. Individual signals come to the mixing console, mix
together at one time during a live performance. The console has
so many features to facilitate the operator, a wide range of
opportunities. It provides amplification for the weak signals from
the microphones and other sources, allow the operators to
control, mix and balance them. Provide monitoring so that the
sources and outputs can be checked and controlled. Provide
communication facilities with other staffs, artists, technicians in
the studio, allow audio signal to be processed and add artificial
effects in the signal. The consoles are of different type, various
styles and designs. On the recording industry people use various
types of console. There are 2 channel, 4 channel, 8 channel, 16
channel, 24 channel, and 32 channel mixing consoles available for
different applications.
Title- Fig-20 Audio Mixer
Attribution- JohnDILiberto
Source-
Link- https://pixabay.com/en/sound-mixer-mixing-board-1503092/

Unit 2 Audio Equipments
38
The mixing console (Figure 21) has different sections for
different applications. There are input section, equalization
section, auxiliary section, insert point, dynamic section, monitor
section, fader section, group faders, output fader, patch bay,
metering, channel assignment, pan pot, aux return and master
output.
Input Section:
The channel input section provides to optimize the signal
gain levels at the input can be an I/O module before being further
processed and routed. Either mic or line input can be selected.
Gain trims can increase the weak signal from microphones.
Auxiliary Section:
The auxiliary section is used to route the signal to various
effect processor and the processed signal can be returned back
through the auxiliary return. Effects like delay, echo,
reverberation, chorus etc can be mixed with the signal via auxiliary
section.
Equalization:
This section is used to compensate for variations or
discrepancies in frequencies that are present in the audio signal. It
is having a variable bandwidth and a boost or cut control. It helps
the engineer to differentiate frequencies at the time of editing,
processing and mixing.
Monitor Section:
This section helps to monitor the signal which provides
control over each inputs level, pan & effects.
Channel Assignment:
This section helps to distribute the signal to any or all
tracks of a multi track recorder. Pressing any or all assignment

Audio Visual Production
39
bottoms will route the input strips main signal to the
corresponding track output buses.
Fader:
Fader provides control on the volume or gain of the
balanced or imbalanced signals. The master fader serves as a
convenient point for the controlling overall group output levels
that are being sent to recording device.
Monitor level Section:
This section helps to compare and judge the input signal
and output signal. Also controls levels for the various monitoring
functions like control room level, head phone levels & talk back.
Cables and connectors:
Cables and connectors (Figure 22) are considered as the
transportation system between the sound source and the
recorder, from the microphone to the speaker. Cables helps in
carrying the signal and the connectors help the cable and the
devices to be connected for signal flow. An audio cable is used to
carry the audio signal from the microphone to the mixer, from
mixer to the recorder and from recorder to the audio monitor.
Microphones are available with different impedances. Each
impedance range has its advantages.
Title- Fig-21 Audio Cable

Unit 2 Audio Equipments
40
Attribution- byrev
Source- Link- https://pixabay.com/en/audio-black-box-cables-ebn-music-88202/
Cables are of two types- Balanced cable & unbalanced
cable. The cable contains three wires specifics, positive (+),
Negative (-) and shield or common is termed as balanced cable.
The cable in which the negative, shield are combined together and
positive (+) is kept separate is called unbalanced cable.
Balanced lines operate on the principle that the alternating
current of an audio signal will be presented in opposite polarity
potential between the two conductors.
Any electrostatic or electromagnetic pick up will be
simultaneously induced into both leads at equal polarities and
level. The input transformer or amplifier of the receiving device
will only responds to the difference in voltage between the two
leads. As a result, the unwanted noise signal will cancel and the
audio signal will be unaffected. The various connector used in
audio recording studio are XLR (Male and female), ¼” Jack pin,
RCA, EP Jack pin. The connectors have 3 pin termed as 1, 2, 3. The
pin 2 is used as positive (+) or hot, pin 3 used as negative (-) or
neutral and pin 1 is used as shield or common.
Title- Fig-22 Audio Connectors Attribution- Trude Bergheim Mikkelsen Source- Link- https://commons.wikimedia.org/wiki/File:Jack_mono_jack_stereo_xlr_m
ale_and_female.JPG

Audio Visual Production
41
Unit summary
Summary
In this unit we have described about the acoustic, different types of microphones, their operating principle, polar pattern, applications, microphone techniques and its placement, cable and connectors, analog tape recorder, record head, erase head, reproduce head, audio mixer, different segments of audio mixer.
Assessment
Discuss the role of a sound engineer in an audio studio.
Write how to check the connectivity of an audio cable?
How the signal flows from Microphone to the monitor.
Describe various polar patterns of Microphone.
Briefly discuss the connectors used in the studio.
Describe the principle and function of Dynamic
microphone.
Explain the construction and function of condenser
microphone.
Resources
https://en.wikipedia.org/wiki/Microphone
http://cemca.org.in/ckfinder/userfiles/files/7_Lesson-
06_MICROPHONES.pdf
http://artsites.ucsc.edu/ems/music/tech_background/te-
20/teces_20.html
https://en.wikipedia.org/wiki/Mixing_console
http://downloads.izotope.com/guides/iZotope-Mixing-Guide-Principles-Tips-Techniques.pdf
Assessment
Reading

Unit 3 Sound Recording
42
Unit 3
Sound Recording
Introduction
Sound recording is a process that involves both the skill of art and science. The purpose of recording is to restore the information for future use and it may be stored for years. Sound recording process takes multiple steps. In this unit we will discuss on the process of recording, analog and digital recording format, Analog Tape Recorder(ATR), DAT recorder, Analog to digital conversion(ADC), Digital to analog conversion(DAC),AM and FM radio wave transmission, audio production, editing, processing, editing and mixing. In this unit we will learn all these process.
Outcomes
Upon completion of this unit you will be able to:
Outcomes
Explain the Process of Sound Recording
Layout the diagram of an analog recording setup.
Describe the signal flow in a digital recording system.
Terminology
Terminology
ATR: Analog Tape Recorder.
ADC: Analog to digital converter
DAC: Digital to analog converter
PVC: Polyvinyl chloride
Equalization: Blending of frequencies
AM: Amplitude modulation
FM: Frequency Modulation

Audio Visual Production
43
Recording Process
Sound recording is the technique of writing the
information and storing the data in a medium such as magnetic
tape, CDs, DVDs or hard disk. These are the storing devices. The
recorder can record the signal and the recorded signal may be
stored in a storing device for future reproduction or playback.
There are two types of recording method we are using in
professional field. One is Analog and the other is digital. The
analog tape recording medium depends on magnetic induction
theory and the digital recording medium depends on data
encoding and decoding. The recording technology differs from one
medium to another. Each recording format has its own distinct
type of sound and application in audio and music production.
Recording in analog medium is cost effective than the digital
medium. We will learn the recording process in both analog and
digital medium. In the music industries analog recording process
was most popular among the sound engineers, musician,
producers and directors for so many decades. In some places
analog recording is still playing a key role in multi-track music
recording. An analog ATR is called “analog’’ because of its ability to
transform an electrical input signal into corresponding magnetic
energy that can be stored on to tape in the form of magnetic
remnants. On playback this magnetic energy can be reconverted
back into corresponding electrical signals that can be amplified,
mixed and processed. In the analog tape recording (ATR),
electromagnetic induction theory plays the key role.

Unit 3 Sound Recording
44
Title- Fig-1 Signal flow from mic to recorder Attribution- Teeks99 Source- Link- https://commons.wikimedia.org/wiki/File:A-D-A_Flow.svg
Magnetic Tape
The magnetic tape is the storing device in analog ATR. The
tape itself is composed of several layers of materials, each serving
a specific function. The base material is composed of polyester or
poly-vinyl chloride (PVC), which is a durable polymer. And it can
withstand a great deal of stress before being damaged. Bonded to
the PVC base is the all important layer of magnetic oxide. The
molecules of the oxide works together to create some of the
smallest known permanent magnets which are known as domains.
On an un-magnetized tape, these domains are oriented randomly
over the entire surface of the tape. The net result of this random
magnetization is a general cancellation of the north and south
magnetic poles of each domain at the reproduced head, resulting
in a signal at the recorder’s output. The speed of motor that rotate
the spool that contains the magnetic tape should be constant at
the time of recording and reproducing of the programming. The
process of recording audio into magnetic tape depends on the
transport’s capability to pass the tape across the head path at a
constant speed and within uniform tension. During playback the

Audio Visual Production
45
same time relationship is maintained by replaying the tape across
the heads at the same speed, there by obtaining the original pitch,
rhythm and duration.
The Function of Magnetic tape Heads
In a magnetic tape recorder, the magnetic tape head write
the information on the tape. In most professional recorder, there
are three magnetic tape heads, the record head, the erase head
and the playback head. All the three heads perform different task
during recording process.
Record Head:
The record head is responsible to record or write the data which
electromagnetically translate the analog input signal supplied to it
into the corresponding magnetic fields that can be permanently
stored into magnetic tape.
The Signal flow and recording Process
The input signal (current) flows through coils of wire, which are
wrapped around the head of magnetic pole pieces. The magnetic
pole has two gaps, one at the front side called front gap and one is
at the back side called rear gap. The input current causes the
magnetic forces to flow through the pole pieces and across the
head gap. The head gaps between poles create an insulator or
breaks in the magnetic field, and create a physical resistance to
the magnetic force that’s been set up. Since the gap is indirect
contact with the moving magnetic tape, the tape’s magnetic oxide
offers a lower resistance path to the field than does the magnetic
gap. Thus, the flux path travels from one pole piece through the
tape to the other pole. So the actual recorded signal occurs at the

Unit 3 Sound Recording
46
trailing edge of the record head and the magnetic domains retain
the same polarity and magnetic intensity that they had on leaving
the gap. The recorded signals are stored in the tape and can be
played back on demand. The playback head operates in a way that
is just opposite to that of the record head.
Erase Head:
The head which is helping to erase the information previously
recorded in a magnetic tape. The function of the erase head is to
reduce the average magnetization level of a recorded tape track to
zero, thereby allowing the tape to be re-recorded and reused. The
professional ATRs can be found in 2, 4, 8 or 16 tracks format.
Tracks are the different lines of a magnetic tape. The multi-track
recorder performs a specific production and post production task.
Generally two track recorders are used to record the final, stereo
mix output of a project and the 8-, 16- and 24-track recorders are
used for multi track laying.
Signal Flow in a recording setup
In a recording studio there are so many equipment, machines,
cable and connectors. The recording process begins with the
microphone and the acoustic signal after being converted to
electrical signal by the microphones flows through the audio
cables to the mixer inputs. The audio mixer has specific role to
blend or modify the signal and the processed signal then given to
the individual tracks of a recorder input. For example, if we are
going to record the voice of a singer, then we have to set the input
level of the vocal mic and then correct the errors and equalize the
voice signal in the mixer and finally assign the mixer output to the
recorder. After the voice being recorded in the recorder we play it

Audio Visual Production
47
back to monitor the recording output. Like this method we can
record some other instruments such as Violin, Guitar, Flute, Tabla,
Drums, and Percussions etc. After the microphone, the second
important device is the audio mixer. The audio mixer is a device
that can receive so many input signals at a time. Then it blends,
modify, split and process the individual signal channels. As the
signal being processed it can be assigned to the recorder. The
ATRs record the program according to the amplitude and
frequencies of the corresponding signals. As soon as the recording
process over the tracks are played back for reviewing purpose.
This is how the signal travels from the sound source to the audio
monitors through many types of machinery.
Digital Recording
Digital recording is the process of data conversion and storage of
information in the form of binary numbers. The process involves
some extra device such as ADC & DAC to convert analog to digital
and digital to analog signal. This method of recording makes thing
easier and simpler.
Digital audio recording process has become so familiar now a day.
Like the analog recording process, this medium also has the same
steps like signal routing, balancing, levelling, encoding, processing,
recording, decoding and reproducing numeric representations of
analog signal levels over time through the use of the binary
number system. Digital audio can be likewise broken down into
two analogous components: Sampling and Quantization. The
sampling represents the time and the quantization represents
level.

Unit 3 Sound Recording
48
Sampling:
Sampling is the breakdown of the analog wave in time
direction. In digital audio system, the sampling rate is defined as
the number of instrument (samples) that are taken of an analog
signal in one second. Its reciprocal sampling time is the elapsed
time between each sampling period. For example, a sample rate of
44.1 kHz corresponds to a sample time of 1/44100th of second.
During the sampling process an incoming analog signal is sampled
at discrete and precisely timed intervals. The universal sample rate
for an audio CD is 44.1 kHz
Quantization:
Quantization is the breakdown of the amplitude of an
analog wave signal. Quantization represents the amplitude
component of the digital sampling process. The amplitude of the
incoming signal is broken down into a series of discrete voltage
steps. Each step is then assigned an analogous set of binary
numbers that are arranged together to form binary word. The
representative word encodes the signal level with as high as
degree of accuracy as can be permitted by the word’s bit length
and system’s overall design. The most common binary word
length for professional audio is 16 bit. However this word length
can be increased to 24 bit or 32bit.
The Digital Recording process
The digital recording chain include a low pass filter a
sample and hold circuit, an analog to digital converter and the
circuit for signal coding and error correction. The sampling rate to

Audio Visual Production
49
be chosen that is higher than twice the highest frequency to be
recorded.
For example, a system with a frequency ranges that
reaches in to 20 KHz range is often sampled at a rate of 44.1k or
48k samples/second. After the signal has been converted into a
digital bit form, the data must be conditioned for further data
processing and storage. This conditioning includes data coding
modulation and error correction. In most of the cases, the digital
media encodes data onto magnetic media in the form of highly
saturated on/off transition states, the reproduced signal must be
reconditioned so as to restore the digital bit stream back to its
originally modulated binary state. Once this is done, the data is
then de-interleaved back into its original form, where it can be
easily converted back into PCM data. After the signal has been
reconstructed back in to its original PCM form, the process of
digital to analog (D/A) conversion can take place. We can hear the
sound when it will be converted to analog form. The digital
recording formats facilitate so many advance features for the
audio editing, processing & mixing purpose. Digital recording can
be done by using the digital recorder, a sound work station, audio
recording software, Analog to Digital Converter (ADC) and Digital
to Analog Converter (DAC) etc.
Digital Audio tape (DAT) System
The digital audio tape or DAT format is used for the creation of a
compact, dedicated PCM digital audio recorder that display a wide
dynamic range, low distortion and low noise ratio. A DAT is an
enclosed compact cassette that is even smaller than a compact
audio cassette. It has the ability with both analog and digital input

Unit 3 Sound Recording
50
/ outputs. And it can record and play back at the sample rate of 32
KHz, 44.1 KHz and 48 KHz.
Title- Portable DAT Recorder Attribution- JPRoche Source- Link- https://commons.wikimedia.org/wiki/File:Kenwood_DAT-140218-
0002WP.jpg
Mixing or Mastering:
Mixing is the final stage of a recording process. Mixing is a process
of audio levelling, balancing the individual channels, blending the
frequencies, modifying bandwidth, effect processing. And all these
tasks are done during the post production, once the recording
process is over. At this point, the multi-track’s play back outputs
channels are assigned to the console input. The recorded tape is
then repeatedly played while adjustments in the level, panning,
EQ, effects, etc. are made for individual lack. In this artistic process
the individually recorded signals are blended into a composite
surrounding, stereo or mono signal that is fed from the console
outputs to the master mix-down. Mixing is a key role for an
engineer. It may take hours or even days to finalize a mixing.

Audio Visual Production
51
Mixing keep going on until the engineer gets the level of
satisfaction. Balancing the live audio during a concert is a big task.
Experiment on mixing can be done in a postproduction studio
where as there is no chance for an engineer to do experiment in a
live concert. So technical expertise, skill and creativity are must
required for mixing or mastering the tracks.
Sound processing
The processing of signal means deliberately modifying or altering
the characters of audio signal. There are many processes available
like frequency correction, dynamic range manipulation, addition of
effects into the main signal etc. In frequency correction we usually
modify the frequencies according to the timber or tonal quality of
the instruments by judging through our ears and monitor. We may
increase or decrease the low bandwidth, mid or high bandwidth as
per the demand of the signal. It is wise not to blend or modify the
original signal if it is not required. Taking the tracks carefully is
much more important than modifying the signal at post
production. Levelling of each channels, filtering of the noise, use
of SFX or effects, normalize the audio, fade-in, fade-out, cross
fade, trimming, panning etc. are the editing tools used for the
signal process. Effects like eco, delay, reverberation chorus are
applied to specific instruments for a live feeling. Before recording
the final audio project all the necessary editing, processing,
rectifications need to be done during audio post production.

Unit 3 Sound Recording
52
Recording level
Title- VU meter Attribution-Openclipart Source- Link- https://pixabay.com/en/metering-electronic-measure-meter-156796/
Recording level is the reference of the amount of input signal that
arrives at the recorder’s input. It is necessary to check the record
input level to avoid the over gain signals beyond the saturation
point of the recording medium and audio distortion. A proper level
of input signal has to be maintained throughout the recording
process. The channel input section serves to optimize the signal
gain levels at the input of an I/O module before being further
processed to levels that cause the preamp’s output to be driven
above +28 dBm, serve clipping distortion will almost certainly
occur. In order to avoid such overloads, the input gain must be
reduced. On the other hand, signals that are too low in level will
unnecessarily add noise into signal path. Finding the right levels is
often a matter of knowing your equipment, watching the meters
and/or overload lights and using year experience.

Audio Visual Production
53
Digital Audio Workstation
A Digital audio workstation is a computer based hard disk
recording system that offers advanced multi track recording,
editing, processing and integrated peripheral features in one desk.
It can perform a wide range of audio related task. It has a great
ability to integrate a wide range of applications and devices into a
single, connected audio production environment. These systems
are usually suited to perform audio, video, MIDI and hardware
peripherals together under a single multifunctional umbrella that
can freely communicate data and perform tasks related to
sequencing, sampling, editing, signal processing and mastering
etc.
Amplitude Modulation (AM)
This is a kind of technology that is used for radio wave
transmission. Radio waves carry the information, whether it may
be speech, music, picture or any other form of communication.
This involves causing some characteristics to vary in a controlled
way. We call this a modulation. There are several methods of
modulating radio waves. In Amplitude Modulation (AM), the
amplitude of the wave is varied to follow the shape of the
modulating signal. The original wave is called the carrier
frequency, usually denoted by ‘f’. An important aspect of AM and
one which is perhaps not obvious at first sight, is that the
modulation process creates other frequencies are called side
bands.

Unit 3 Sound Recording
54
Title- Amplitude Modulation
Attribution- The.ever.kid Source- Link- https://commons.wikimedia.org/wiki/File:AM-Final-Wiki-TEK.svg
Frequency Modulation (FM)
All the commercial and community radio stations use this
technology to broadcast their signal. In FM, it is not the amplitude
of the carrier which is caused to vary, it is the frequency. The
amplitude remains constant. The big advantages of FM over AM is
that it is a system which is much less prone to interference,
whether man made or natural, for the reason that the effects tend
to be amplitude affects, these might occur and affect the FM wave
but receivers are designed to disregard such things being
connected only with the frequency. While AM is still an important
broadcast medium.
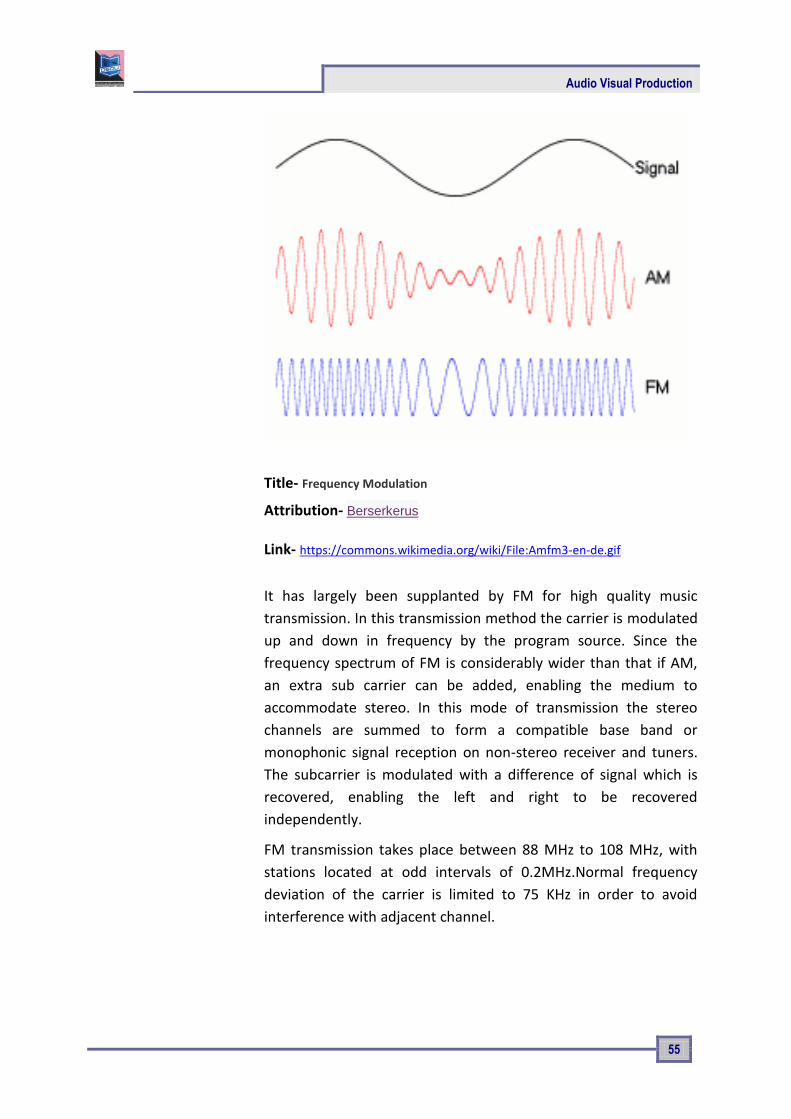
Audio Visual Production
55
Title- Frequency Modulation
Attribution- Berserkerus Source- Link- https://commons.wikimedia.org/wiki/File:Amfm3-en-de.gif
It has largely been supplanted by FM for high quality music
transmission. In this transmission method the carrier is modulated
up and down in frequency by the program source. Since the
frequency spectrum of FM is considerably wider than that if AM,
an extra sub carrier can be added, enabling the medium to
accommodate stereo. In this mode of transmission the stereo
channels are summed to form a compatible base band or
monophonic signal reception on non-stereo receiver and tuners.
The subcarrier is modulated with a difference of signal which is
recovered, enabling the left and right to be recovered
independently.
FM transmission takes place between 88 MHz to 108 MHz, with
stations located at odd intervals of 0.2MHz.Normal frequency
deviation of the carrier is limited to 75 KHz in order to avoid
interference with adjacent channel.

Unit 3 Sound Recording
56
Unit summary
Summary
In this unit we discussed about the process of recording. The signal flow from the Microphone to the recorder, different medium of recording, the function of erasing, record and playback heads, analog to digital converter and digital to analog converter, DAT recorder, amplitude modulation and frequency modulation .
Assessment
Assessment
How to check the connectivity of an audio cable?
How does signal flows from mic to the monitor.
Briefly discuss the connectors used in the studio.
Differentiate AM and FM.
Resources
Readings
Modern Recording Techniques , David Miles Hurber and Robert E.Runstein, 7th Edition, Focal Press
https://en.wikipedia.org/wiki/Sound_recording_and_reproduction
https://www.makeuseof.com/tag/7-free-resources-learn-sound-engineering/
https://www.recordingconnection.com/courses/audio-engineering/audio-lesson-01/
https://www.britannica.com/topic/digital-sound-recording
https://en.wikipedia.org/wiki/Digital_recording
https://en.wikipedia.org/wiki/AM_broadcasting
https://en.wikipedia.org/wiki/Frequency_modulation

Audio Visual Production
57
Unit 4
Audio Editing
Introduction
Recording takes place in three phases such as pre-production,
production and post-production. In the production, tracks are
recorded. After that the artist or singer’s voice is recorded on the
same track. After the dubbing and editing final mixing/mastering is
done. In the post production many things are to done on the
mixing console desk. Noise is an important factor to be
remembered and taken care of during track lying and editing.
In this unit we will discuss on various noise reduction process. We will
also focus on audio monitor and its applications.
Outcomes
Upon completion of this unit you will be able to:
Outcomes
Describe Voice Dubbing process.
Describe the monitoring system.
Explain different noise reduction system.
Terminology
Terminology
Dubbing: Recording of voice or instrument on a pre-recorded track.
Gain: Volume control.
Noise control: Reducing of unwanted environmental sound
Noise gate: A device to filter the noise.

Unit 4 Audio Editing
58
Dubbing
Once we have done with the track recording or shooting of a
scene, we can proceed for dubbing. It may be an audio dubbing or
a video dubbing. Audio dubbing can start when the track recording
gets over. The artist or singer listen to the tracks carefully,
remember the tune, scale and rhythm pattern of that song and
then try to sing the song referring to the dummy-voice track. A
dummy voice track is a reference track that represents the length
of the lines, stanza, tempo, feelings and landing of the notes. The
singer needs ahead phone to listen the music track. Along with the
music track the singer must be able to hear his/her own voice
loudly, so that he/she can sing in proper synchronization.
Dubbing is a process of track addition to the basic tracks
previously recorded. These additional tracks are added by
monitoring the previously recorded tape tracks. In an overdub
session, the same procedure is followed for mic selection,
placement, EQ and levels as occurs during the recording session.
Dubbing can be done in a sound proof or acoustic studio.
However, leakage can occur if the musician’s headphones are too
loud or are not sealed properly on their head. Dubbing is done on
proper synchronization with the original track. If the recorder to
be used is analog it should be placed in the master sync mode.
Dubbing takes place during post production work. Video dubbing
can be done by referring the image or video on a big screen and
record the voice in properly synchronization.

Audio Visual Production
59
Title- Voice dubbing by vocal artist Attribution- (Photograph taken by Author) Source- Link-
Editing
Editing is a process of assembling the data or images in a
sequential order. In other word we can say the arrangement of
clips, scenes, shots, images according to the flow of story. Editing
is applicable to print medium, visual medium and audio medium.
Editing in different medium is different. Different softwares are
used to edit the image of video and audio. There are types of
audio editing softwares are available like Audacity, Sound forge,
Sony Vegas Pro, Nuendo, Protocols etc. Audio editing is an
essential part of audio production. It helps us to remove the errors
from a track to correct the errors, to process the signal, use
different effects to the signal, bouncing the track, cut &remove
the unused part, trimming, crossfade, fade-in, fade-out,
overlapping, noise reduction, normalize the level etc. are the basic
tools of sound editing.
Audacity Software
Audacity is user friendly software, compactable with windows 98,
ME and 2000 and also with the XP, MAC OS,OS X, Linux, UNIX and

Unit 4 Audio Editing
60
other operating systems. It provides with a full set of tools for
recording and editing the audio files, adds on effect to the signal.
It can both record and playback the tracks. It enables the user to
schedule in and out of a recording. It can also import and export
the different audio formats like WAV, MP3, AIFF, OggVorbis,
WMA, AAC, AMR etc. It can be used for multi-track music
recording, a large use of digital effects and plug-ins, VST plug-ins,
Noise reduction, vocal reduction and isolation for the creation of
karaoke tracks. It supports only 32-bit or 64-bit VST audio effect
plug-ins. Whereas It lacks dynamic equalizer controls and real time
effects while recording. Learner can download this software and
start experimenting on this.
Editing in Analog medium
Editing in analog medium needs more attention. It needs
both theoretical and practical knowledge. During this process, the
engineer edit the original music track out from their reels and
begins the process of splicing them together into a final sequence
on a master reel set. Once this is done, the mix master in/out edits
should be tightened. This is done by listening to the intro and
outro at high volume levels, while the heads are in contact with
the tape. The tape can then move back and forth to the exact
point where the music begins and after it ends.
The length of time between the end of the song and the
beginning of the next can be constant or the timings can vary
according to the musical relationship between the songs. When
the sequencing is complete, one or two analog or DAT back copies
should be made to the final sequence master, before it leaves the
studio.

Audio Visual Production
61
Editing in Digital Medium
Editing in the digital workstation has wide applications
because of the wide range of plug-ins and tools. With the advent
of digital audio editing systems, the relatively cumbersome
process of sequencing music tracks in the analog domain using
magnetic tape has given way to the faster, easier and more
flexible process of editing the final master from hard disk. When a
computer based editor is used, the start and the end points can be
located for each song and can define a region that can then be
assembled into a final song version. Once this is done, each song
can be individually processed using EQ. Overall level, dynamics,
effects etc.
Title- Editing of Sound clip
Attribution- Source- Screenshot Link-
Noise Reduction
Any ambience sound that disturbs us in hearing to the
main signal is considered as a noise. Noise is the unwanted sound
or signal that disturbs our main program, that’s creating an
obstacle in our communication. It is one of the most challenging
tasks during recording. In audio recording process the noise needs
to be reduced and should not overlap the main signal. Noise may

Unit 4 Audio Editing
62
be created by so many sources in the room and outside also. In an
analog ATR and VTR format, we usually notice so many noises like
the tape noise, hissing, through print, humming etc. We will
largely focus on reducing tape noise that’s a natural by product of
the analog recording or playback process.
Dolby and DBX noise reduction system
We must have heard about Dolby digital sound system. The first
widely used audio noise reduction technique was developed
by Ray Dolby in the year 1966. Intended for professional use,
Dolby Type A was an encode/decode system in which the
amplitude of frequencies in four band was increased during
recording (encoding), and then decreased proportionately during
playback (decoding). The Dolby B system was a single band system
designed for consumer products. In particular, when recording
quiet parts of an audio signal, the frequencies above 1 kHz would
be boosted. This had the effect of increasing the signal to noise
ratio on tape up to 10 dB depending on the initial signal volume.
When it was played back, the decoder reverses the process, in
effect reducing the noise level by up to 10 dB. The Dolby B system,
while not as effective as Dolby A, had the advantage of remaining
listenable on playback systems without a decoder. DBX was the
competing analog noise reduction system developed
by D.E.BLACKMER.
Analog noise reduction
When recording is done in an analog medium, special care has to
be taken at the time of recording. It is too difficult to reduce the
noise from a recorded signal. Better to avoid the unwanted sound
or noise at the time of recording.

Audio Visual Production
63
Noise reduction in analog tape recording is very necessary in order
to get a proper audio quality. Analog tape noise might not be a
limiting factor when we are dealing with one or two tracks in an
audio production, but the combined noise and other distortions
that are brought about by combining 8,16,24 or 48 tracks can
range from being bothersome to downright unacceptable. The
different types of noise that create problems in analog recording
formats are tape and amplifier noise, cross talk between tracks,
print through and modulation noise.
Digital Noise reduction
In digital signal processing, the noise can be reduced easily
by the use of various noise filter plug-inns. The noises like tape
hissing, hum, obtrusive background ambience, needle ticks, pop
and certain types of distortion that are present in the original
recording can be removed by using noise gate and limiters.
Source of noise
Noise may generate from different sources. It may bear
from the environment and travel through air is called external air
borne noise. Noises that is being created by any giant machineries
or constructions is called external structure borne noise,
sometimes it may travel from other nearby rooms of the same
building is called as internal noise transfer. Recording generally
takes place in the indoor setting or at the outdoor location. Noise
is everywhere in our surrounding. Our main goal is to avoid the
unwanted sounds and record a clean and noiseless project. Noise
can be reduced by taking some necessary steps like the proper
microphone placement, using of windshield, controlling the
environmental noise like crowd, traffic, switching off the electrical

Unit 4 Audio Editing
64
equipments such as fan, motor, Ac, generator, grinder or other
noise producing accessories.
Noise Gates
To reduce the noise there are so many applications and
tools available in a digital workstation. A noise gate is one of the
best effective noise reduction devices which are used to reduce
the background noise on certain program material. A noise gate
effectively passes signals that fall above a user defined threshold
at unity gain, while turning off signals that fall below this
threshold. This is a useful tool for removing noise, leakage and
other gremlins from a track within a mix.
Title- Diagram of a Noise Gate Attribution- Lainf Source- Link- https://commons.wikimedia.org/wiki/File:Noise_Gate_Attack_Hold_Release.svg
Monitoring
Monitor is required to view or listen to a program. It may be a TV,
Computer, LCD, and LED Screen, a headphone, ear phone or
speakers. Devices that allow us to judge a program is called a

Audio Visual Production
65
monitor. In the recording process, we use professional audio
monitors to listen a program. They should not produce colorful
program with additional low and high frequency. In the
professional studios good acoustic, active monitors are used.
These monitors are used throughout the recording process such as
track recording, editing and mixing or mastering. The placement of
these monitors is also important. Monitors are placed on the front
console board with a little angle to the ears. When mixing, it’s
important that the engineer be seated as closely as possible to the
center of the sound field and that all the speakers volumes are
adjusted equally. The engineer should always make sure that an
audible volume deferent between speakers is accompanied by a
corresponding visual difference on the VU meters, which are
monitoring the signal sent to tape.
Title- Field monitors at console desk Attribution- Photographs by Author Source- Link-

Unit 4 Audio Editing
66
Monitoring Configurations
Stereo monitoring and Mono monitoring are some terms
used in audio technology. The programs are designed in such a
manner that gives differentiation feelings in our hearing. There are
mono, stereo, mono surround and stereo surround. A large
percentage of people hear the music or program through various
monitoring devices like speaker, earphones or head phones. The
music seems good in stereo headphones. Stereo tracks have
different musical treatment on both left and right side of the
tracks. Whereas in mono, it contains a single and mix track that
sounds equal to both the ears. Mono mastering is done for TV
program, programs broadcasted at AM Radio channels, whereas
stereo track mastering is done for songs, musical jingles that can
be heard through ear phones, head phones or stereo speakers.
The most commonly speaker configurations are mono, stereo and
surround sound.
Mono
When all the individual sound tracks are bounced to a
single track only, that gives a common listening to both the ears.
For example, listening to the program of All India Radio, Watching
the TV, listening to the music in an elevator, on the computer, we
may experience a mix mono-aural sound. In this case the sound
engineer assigns all the tracks to a single mono track. The sound
on each ear will be same without any hearing variation.
Stereo
In stereo mastering, we have two different tracks, one is
for left ear and another is for right ear. Stereo tracks give us
different sound effects at both the side. To get the stereo feeling,

Audio Visual Production
67
we need two speakers for both the ears and they should be placed
in such a manner that the left ear can perceive the sound of left
speaker and the right ear will perceive the sound of the right
speaker. The mastering of a good and impactful stereo tracks are
extremely important, with relation to L/R balance, overall
frequency balance, dynamics and effects. When mixing in stereo,
it is always a good idea to check for mono compatibility
Surround Sound
Our ears have the ability to receive the sounds from 360
degree. Hence to give a real surround effect, surround sound
mixing is done for the theatres.
Surround sound configuration gives us a 360 degree hearing
effects, depending on the design of the hall and the placement of
the speakers. In the cinema theatre, we feel the Dolby digital
surround sounds. Surround sound has grown into a major
professional and consumer entertainment market. In the house
and audio theatres, 5.1 surround playbacks are available. The 5.1
name refers to the five, full range channels (Left, center, right,
surround left & surround right), plus a six sub-bass channel.
Title- Placement of speaker from the listener Attribution- Kamina

Unit 4 Audio Editing
68
Source- Link- https://commons.wikimedia.org/wiki/File:5-1-surround-sound.svg
Surround sound adds multi channels from loudspeakers behind
the listener, thus is able to create the sensation of sound coming
from any horizontal direction 360° about the listener. Surround
sound is generally depending on the location of the listener and
presents a fixed or forward perspective of the sound field to the
listener at this location.
In a 5.1 surround system, the phantom images between the front
speakers are quite accurate, with images towards the back and
especially to the sides being unstable .Also 7.1 channel surround is
another setup, commonly used in large cinema theatres which is
compatible with 5.1 surround systems with two additional
channels, center-left, and center-right to the 5.1 surround setup,
with the speakers situated 15 degrees off center from the listener.
Another surround set up is 10.2. This format was developed
by THX creator Tomlinson Holman of TMH Labs and University of
Southern California. This is just the twice of 5.1 Setup.
Active Monitors for studio
A speaker is a device which convert electrical signal to
acoustic signal. Each speaker is acoustically measured and
adjusted using an instrument known as a spectrum analyzer,
which is used to visually display the speaker’s frequency response
as measured through a specially calibrated omnidirectional
condenser microphone. More accurate readings of both a
speaker’s frequency response and delay or refection response can
be measured by using a Time Delay Spectrometer (TDS). A variety
of speaker types & design are available in the market for
professional use.
Near-Field Speaker
Near field refers to the placement of small to medium sized
speakers to each side of the working environment or on the
production console. These speakers are usually placed at a closer

Audio Visual Production
69
distance, allowing the engineer to hear more of the direct sound
and less of the room’s overall reflection.
Far-Field Speaker
Far-field monitors often large loudspeaker systems that are
capable of delivering relatively accurate sound at moderate to
high volume levels. Because of their large size and basic design,
the enclosures are generally built into the control room wall to
reduce reflections around and behind the enclosure and to
increase overall speaker efficiency.
Speaker polarity
Speaker Polarity is said to be electrically in phase whenever
one signal is equally applied to both speakers, which will make
their cones to move in the same direction.
When the speakers are wired out-of-phase, one speaker cone will
move in one direction while the other moves in the opposite
direction. Speaker polarities can be easily tested by applying a
mono signal to both or all of the speakers at same level. If the
signal images appear to originate from directly between the
speakers, they have been properly wired in phase. An out of phase
speaker condition can be easily corrected by checking the speaker
wire polarities.
Headphones
Almost all of us use headphones or ear phones.
Headphones are also an important monitoring tool. It helps us to
get the actual sound and acoustic effects by avoiding the room’s
acoustic environment. Open air and sealed headphone types have
their advantages.

Unit 4 Audio Editing
70
Title- Headphones Attribution- Photographs taken by Author Source- Link-
Amplifiers
An amplifier is a device that amplifies the signal level.
Amplifiers have many applications. They can be designed to
amplify, equalize combine, distribute or isolate a signal. They can
even be used to match signal impedance between two devices. At
the heart of any amplifier system is either a vacuum tube or semi-
conductor transistor design.
Title- Audio Amplifier Attribution- Inspiredimages

Audio Visual Production
71
Source- Link- https://pixabay.com/en/stereo-vintage-audio-music-sound-883186/
The operational Amplifier
The operational amplifier or op-amp is a stable, high
bandwidth amp that has high input impedance and low output
impedance. The qualities allow op-amps to be used as basic
building blocks for a wide variety of audio and video applications,
simply by tagging additional components into the basic circuit to
fit the required design needs.
The Preamplifier
Every mixing console has a pre-amp section. The purpose is
to amplify the weaker signals that come from the microphone.
This amp type is often used in a wide range of applications, such
as boosting a mic’s signal to line level, providing variable gain for
line level signals, isolating signals from extraneous input
interference or improper grounding or signal voltage conditions
and equalization.
Distributing amplifiers
Distributing amplifiers are useful to increase power. It is
necessary for audio signal to be distributed from one device to
several other devices or signal paths within a recording console or
music studio. Whenever increased power is needed, a distribution
amp may be required. Under seen circumstances, a distribution
amp might not provide gain, but instead will amplify the current
that is delivered to one or more signal loads.

Unit 4 Audio Editing
72
Power Amplifier
Power amplifiers are used to boost the current of a signal
to a level that can drive one or more loud speakers at their rated
volume levels.
Synchronization
Synchronization is a word used mostly at a multi setup studio.
Whenever we use more than one audio visual machines at a setup
for recording purpose, we have to run them in sync. In media
production studios the sync refers to time relationship. This is a
process that allows multiple audio visual media to maintain a
direct time relationship. Synchronization is the occurrence of two
or more events at precisely the same time. In the analog audio and
video systems, Sync is achieved by interlocking the transport
speed of two or more machines. All the devices of a setting must
maintain the same relative speed at all points over the course of a
program.
In digital systems, internal or external sync between compactable
devices is often maintained by using a clocking pulse that is
directly embedded within the digital data line itself. It is necessary
for both analog and digital devices to be synchronized together. As
a result a proper system communication and data translocation
have been developed.
Time Code
The Method of interlocking audio, video, film making uses code
that was developed by Society of Motion Picture and Television
Engineers (SMPTE).The time code helps us to identify a specific
position on a tape or within the media program by assigning a
digital address to each specific length. The specified tape
segments are called frames. Each audio or video frame is tagged
with a unique identifying number. This number is known as time
code address. The eight digit address is displayed in the form
00:00:00:00.

Audio Visual Production
73
Unit summary
Summary
In this unit we learnt about the process of voice dubbing, voice over, editing, processing of signal, noise reduction, noise gate, amplifiers, synchronisation, time code, monitoring system, speaker polarity and many more.
Assessment
Assessment
1. Discuss the role of a sound engineer in the audio
studio.
2. How to check the connectivity of an audio cable?
3. How the signal flows from Mic to the monitor.
4. Describe various polar patterns of Microphone.
5. Briefly discuss the connectors used in the studio.
6. Discuss different noise reduction systems.
7. Discuss various types of amplifiers.
8. What is the need of time code?
Resources
https://en.wikipedia.org/wiki/Voice-over_translation
https://en.wikipedia.org/wiki/Sound_editor_(filmmaking)
https://en.wikipedia.org/wiki/Noise_reduction
Reading


DMA-05
Audio Visual Production Block – II: Video Production (Pre-Production)
Odisha State Open University

Audio Visual Production
This course has been developed with the support of the Commonwealth of Learning (COL). COL is an intergovernmental organisation created by Commonwealth Heads of Government to promote the development and sharing of open learning and distance education knowledge, resources and technologies. Odisha State Open University, Sambalpur (OSOU) is the first Open and Distance learning institution in the State of Odisha, where students can pursue their studies through Open and Distance Learning (ODL) methodologies. Degrees, Diplomas, or Certificates awarded by OSOU are treated as equivalent to the degrees, diplomas, or certificates awarded by other national universities in India by the University Grants Commission.
© 2018 by the Commonwealth of Learning and Odisha State Open University. Except where otherwise noted, Audio Visual Production is made available under Creative Commons Attribution-ShareAlike 4.0 International (CC BY-SA 4.0) License: https://creativecommons.org/licenses/by-sa/4.0/legalcode For the avoidance of doubt, by applying this license the Commonwealth of Learning does not waive any privileges or immunities from claims that it may be entitled to assert, nor does the Commonwealth of Learning submit itself to the jurisdiction, courts, legal processes or laws of any jurisdiction. The ideas and opinions expressed in this publication are those of the author/s; they are not necessarily those of Commonwealth of Learning and do not commit the organisation
Odisha State Open University Commonwealth of Learning
G.M. University Campus 4710 Kingsway, Suite 2500, Sambalpur Burnaby, V5H 4M2, British Odisha Columbia India Canada Fax: +91-0663-252 17 00 Fax: +1 604 775 8210 E-mail: [email protected] Email: [email protected] Website: www.osou.ac.in Website: www.col.org

Acknowledgements The Odisha State Open University and COL, Canada wishes to thank those Resource Persons below for their contribution to this DMA-05:
Concept / Advisor
Dr. Srikant Mohapatra Vice- Chancellor Odisha State Open University, Sambalpur
Course Writer
Sambit Mishra Academic Consultant Odisha State Open University, Sambalpur
Course Editor
Durgadatta Kanungo AIDB trained, Media Person, Doordarshan
Video Production
Durgadatta Kanungo AIDB trained, Media Person, Doordarshan Suvendu Mohanty Anchor, Doordarshan & AIR Retd. Reader, Swami Vivekananda Memorial (Auto)College, Jagatsinghpur
Published by :
Dr. Jayanta Kar Sharma Registrar on behalf of Odisha State Open University, Sambalpur
Contribution of following staff members of Odisha State Open University is acknowledged:
Sambit Mishra
Debidatta Behera
Prashansa Das
Radhakanta Suna
Abhinandan Tripathy
OSOU and COL acknowledge the support extended by Prof. Madhu Parhar, STRIDE, IGNOU, New Delhi in conducting several workshops in the process of preparation of course material for DMA.

Audio Visual Production
Contents
Contents
Course Overview 5
Welcome to Pre-Production .............................................................................................. 5 Conceptualising Pre-Production ....................................................................................... 5 Peoples involved in Pre-Production .................................................................................. 5
Making of Set, Budget and Music etc. .............................................................................. 5 Production Design & other things .................................................................................... 6 Course outcomes ............................................................................................................... 6 Timeframe ......................................................................................................................... 7
Study skills ........................................................................................................................ 7 Need help? ........................................................................................................................ 8
Assignments ...................................................................................................................... 8 Assessments ...................................................................................................................... 9 Video Resources ............................................................................................................ 10
Getting around this Course material 11
Margin icons ................................................................................................................... 11
Unit-1 13
Conceptualising Pre-Production ..................................................................................... 13 Introduction ........................................................................................................... 13 Outcomes ............................................................................................................... 13
Terminology .......................................................................................................... 14 The Concept .......................................................................................................... 14 Research & Development: ..................................................................................... 15 Visualisation: ......................................................................................................... 16 Great pre-perception for better shoot .................................................................... 18
Screenplay Writing: ............................................................................................... 18 Storyboard Making: ............................................................................................... 24 Makingof Shooting Script: .................................................................................... 27
The shooting script configuration: ........................................................................ 29

ii Contents
Unit summary ................................................................................................................. 30
Assignments .................................................................................................................... 30 Assessment ...................................................................................................................... 31 Resources ........................................................................................................................ 31
Unit 2 33
People involved in Pre-production ................................................................................ 33 Introduction ........................................................................................................... 33 Outcomes ............................................................................................................... 33 Terminology .......................................................................................................... 33 Producer: ............................................................................................................... 34
Executive Producer: .............................................................................................. 35 Production Designer: ............................................................................................. 35
Production Manager: ............................................................................................. 35 Production Accountant: ......................................................................................... 35 Production Coordinator: ........................................................................................ 36 Director: ................................................................................................................. 36
Screenplay Writer: ................................................................................................. 37 Storyboard artist: ................................................................................................... 37 Art Director: .......................................................................................................... 37
Art Department coordinator: ................................................................................. 38 Casting Director: ................................................................................................... 39
Lyricist: ................................................................................................................. 39 Music Director: ...................................................................................................... 39 Cinematographer: .................................................................................................. 40
Visual effects Supervisor: ..................................................................................... 40
Crew’s Responsibility: .......................................................................................... 40 Unit summary ................................................................................................................. 41 Assignment ..................................................................................................................... 41
Resources ........................................................................................................................ 41
Unit 3 42
Making of Set, Music & Budget etc. .............................................................................. 42 Introduction ........................................................................................................... 42 Outcomes ............................................................................................................... 42 Terminology .......................................................................................................... 42
Making of Set ........................................................................................................ 43 Art Director, the man behind the set ..................................................................... 43
Job of an art department coordinator: .................................................................... 43 Film Music Composition: ...................................................................................... 44 Film Budget Making: ............................................................................................ 45 Elements of Budgeting .......................................................................................... 46 Tips for cutting the budgets ................................................................................... 47
Going over budget ................................................................................................. 48 A few cases of Budget: .......................................................................................... 48 Lara Croft: Tomb Raider – The Cradle of Life ..................................................... 48

Audio Visual Production
Terminator 3: Rise of the Machines ...................................................................... 49
Spider-Man 2 ......................................................................................................... 49
Unit summary ........................................................................................................ 50
Assessment ............................................................................................................ 50
Resources ............................................................................................................... 50
Unit 4 51
Production Design & other things .................................................................................. 51 Introduction ........................................................................................................... 51 Outcomes ............................................................................................................... 51 Terminology .......................................................................................................... 51
Production Design: ................................................................................................ 52 Responsibilities: .................................................................................................... 53
Location Scouting: ................................................................................................ 55 Process of Work .................................................................................................... 55 Job titles and job descriptions: .............................................................................. 56 Waste Removal ...................................................................................................... 58
Hiring of Equipments: ........................................................................................... 63 Choosing & hiring of crews: ................................................................................. 65 Basic Personnel ..................................................................................................... 66
Where and How to discover Crew: ....................................................................... 71
Unit summary ........................................................................................................ 75
Assignment ............................................................................................................ 75
Assessment ............................................................................................................ 76
Resources ............................................................................................................... 76

Audio Visual Production
5
Course Overview
Welcome to Pre-Production
In this block, you will learn about two parts of film making like hypothesis and practical. You will find out about the means utilized as a part of making preparations for different mediums like T.V., Film and so on. Other than that you will learn the skill to write a screenplay, shooting script, storyboard, and making of a budget, designs a production and so on.
Conceptualising Pre-Production
This course has been designed for individuals who need to go into the field of Film and T.V. production. In this course you will figure out how to build up an idea. When we are discussing film production we require story, screenplay, dialogue, storyboard and so on. This course will show you how to write story and transform it on the screen.
Peoples involved in Pre-Production
This course has been designed for individuals who want to make a career in the fascinating field of film production. Many of them hone their skills by training hard and shape career as movie produce. They choose their career as per their age, understanding, and expertise.
Making of Set, Budget and Music etc.
This part of the syllabus has been designed for individuals who need to make a lasting impact on the filmgoers. Composing music and designing sets are considered as the creative sections of film making. Production houses spend heavily on these aspects. Other than that you will learn how to make budget for a production.

Course Overview Conceptualising Pre-Production
6
Production Design & other things
This course is aimed at creating outlines for film making. Outlining a film is not easy as several aspects are needed to be taken care of. This apart, you will have to pick the best location for shooting. In this section it is taught how to handle equipment, artists and crews.
This video will provide a brief overview of this course.
Topic YouTube link QR
Code
Video 1 –Concept and visual
production Preparation
https://youtu.be/f7r9FnAS
WJU
Video 2 –Scripting research
&Screenplay writing
https://youtu.be/3cjbk1oY
b60
Video 3 –production
designing&
Location finalising
https://youtu.be/qCpmWJ
DiRfI
Video 4 –Character finalising https://youtu.be/j4yb-
yVkUyY
Course outcomes
Upon completion ofPre-Productionyou will be able to:

Audio Visual Production
7
Outcomes
Learnabout writing for Film production.
Learnabout making a storyboard for Film.
Learnthe steps for making budget for small to big budget movies.
Learnthe steps for scouting a location for shooting.
Get acquaintedwith the steps of choosing and hiring of equipments with crew members.
Timeframe
How long?
This course will be completed within “2” classes.
This course is of “1” credits.
4 Hours of study time is required to complete this unit.
Study skills
Learning about the audio visual productions are a part of Multimedia
Coaching. But, when it comes to creation of an output, there is no
specific ABC formula for doing so. It is just like a painting in which the
artists choose the colour and proportion according to the need, not as
per a written plan.
In creating outputs for TV, Films etc. we have to utilize the software
tools from one corner to another randomly. So for every project, the
formula is different. There is no fixed recipe for all kind of output. So, the
more and more you learn about the options, more variety you will get.
Each and every option is explained step by step in the course material.
Apart from this course material, the learner has to adopt the tendency
of learning from multiple sources i.e.,
Internet tutorials

Course Overview Conceptualising Pre-Production
8
Video tutorials on youtube
Collaboration with people working in the industry etc.
Only classroom study will not make you a professional. You have to be active to grab the opportunity of learning wherever you get a chance.
Need help?
Help
In case of any help needed you can browse the internet sites like youtube.com for video tutorials about the subject.
Assignments
Assignments
There will be some assignments at the end of each unit.
These assignments are mostly practical based and should be submitted in CD or DVD. Theoretical assignments are to be submitted neatly written on A4 size sheet.
All assignments will be submitted to respective study centre of Odisha State Open University or as directed by Co-ordinator.
All assignment should be unit wise on separate CD/DVDs clearly mentioning course title and unit on Top. Theoretical Assignment will be neatly filed or spiral bind with cover clearly mentioning necessary information of course.

Audio Visual Production
9
Assessments
Assessments
There will be “1” assessment for each unit.
All practical assessment will be submitted to OSOU.
Assessment will take place once at the end of each unit.
Learner will be allowed to complete the assessment within stipulated time frame given by the university.

Course Overview Conceptualising Pre-Production
10
Video Resources
This study material comes with additional online resources in the form of
videos. As videos puts in human element to e-learning at the same time
demonstrating the concepts visually also improves the overall learning
experience.
You can download any QR code reader from Google Play to view the
videos embedded in the course or type the URL on a web browser.
Reading
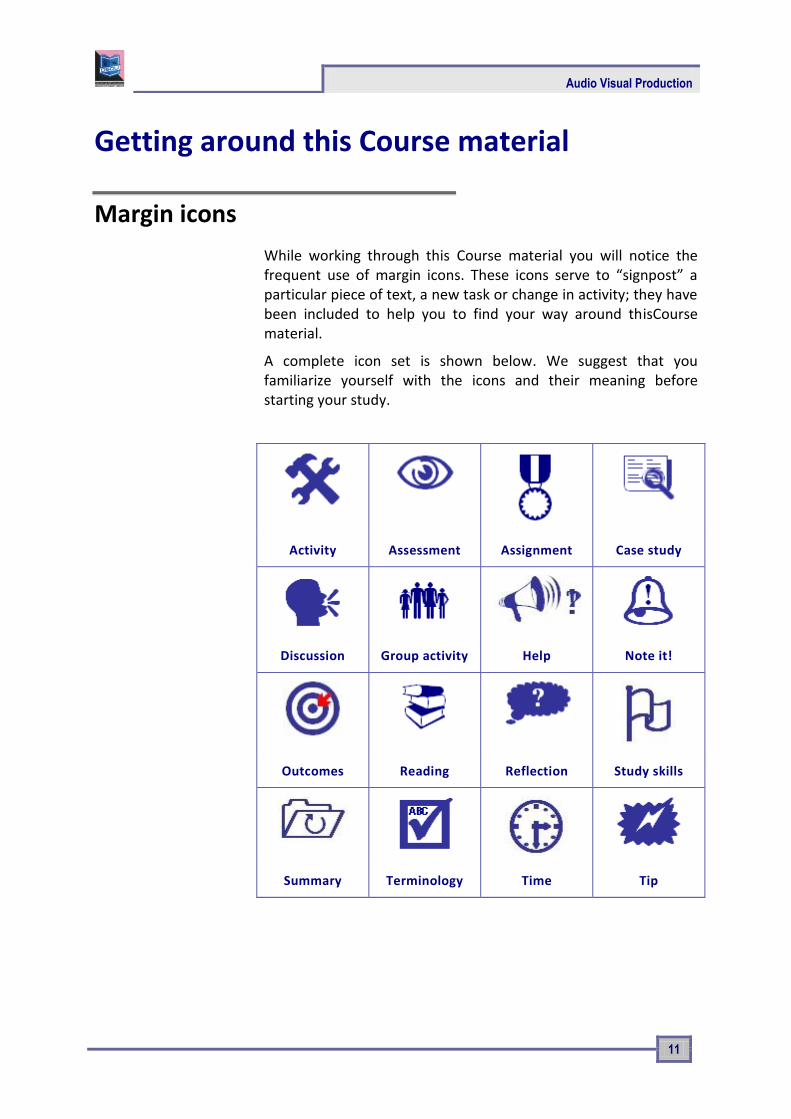
Audio Visual Production
11
Getting around this Course material
Margin icons
While working through this Course material you will notice the frequent use of margin icons. These icons serve to “signpost” a particular piece of text, a new task or change in activity; they have been included to help you to find your way around thisCourse material.
A complete icon set is shown below. We suggest that you familiarize yourself with the icons and their meaning before starting your study.
Activity Assessment Assignment Case study
Discussion Group activity Help Note it!
Outcomes Reading Reflection Study skills
Summary Terminology Time Tip

Audio Visual Production
13
Unit-1
Conceptualising Pre-Production
Introduction
There is a very thin line between TV & Video Production. And
producing videos are now become a profession. Many of us are
still confused about the production process and producing videos
are not less than creating a creative content. In other words you
can say Video industry is the content-driven industry.
Every production has toundergo several stages of
processing. But the video production divided into three basic
stages like-
- Pre-Production
- Production
- Post-Production
Here we will discuss the first stage of film & video production & its
functions in production.
Outcomes
Upon completion of this unit you will be able to:
Outcomes
Describe the concept of Pre-Production
Use small idea to a large extent
Explain the fundamentals of Pre-Production
Visualize the idea before shooting.
Prepare a rough idea to a visual form.

Unit-1 Conceptualising Pre-Production
14
Terminology
Terminology
Visualisation: Representation of an object, situation, or set of information as a chart or other image.
Storyboard: It is the first planning tool of a film/video project on paper. Sequential drawing sheet of a film/video project.
Script: A kind of written format of text for film, TV, Play, Drama etc.
The Concept
Pre-Production is the most vital stage for any Video production.
Much of your time should be spent in planning stage (Pre-
Production). Depending on the complexity of the project, 25% will
be spent on filming, and the other 15% will be spent in editing,
publicity, distribution & transmission.
Pre-Production includes many things like ;
Title-Pre Production work diagram
Attribution-(Created by Author) Source- Link-

Audio Visual Production
15
Above said all these steps are very necessary to understand the
Pre-Production.
Research & Development:
Though Pre-Production is the most vital part in the process of
video production, you have to concentrate on research &
development. And before you start for shoot you should give
stress on what is the purpose of shoot, who is the target audience
and in which way you should develop the content.
Why research is necessary?
Because the content is important.
Because you have to set your target audience.
Because the final output timing is necessary.
Because research shows the actual & accurate
budget.
Research shows how to practically maintain the
quality of the production.
Development work will be done by the team members after
thorough research. What should be done and what should be
avoided is decided in development stages. Final concept of the
project is decided in this preliminary stage of Pre-Production.
In this phase of film making, the maker chooses a story.
Furthermore, the story is chosen from a thought, play, novel,
book, another film, a genuine story, unique thought, a daily paper
cutting and so forth. In the wake of recognizing a topic or the
message, the maker sits with authors to set up a synopsis. Next
work is that the maker creates a blueprint out with the assistance
of art director. It separates the story into one-paragraph scenes
and that make an emotional structure.
At that point, they decide the treatment required to improve the
quality of the production.
In later stages, a screenwriter writes the screenplay. The screenwriter may rework it a few times to enhance the sensation, exactness, shape, characters, exchange, and general style to improve the quality of the venture. Be that as it may, makers frequently skirt the past steps. S/he may build up the screenplays in which financial specialists, studios, and other invested

Unit-1 Conceptualising Pre-Production
16
individuals are informed through a procedure called script coverage.
A film distributor may be contacted at the beginning of film
making to help in subsidizing of the film and the conceivable
budgetary accomplishment of the film. Executive producers
embrace a headstrong business approach and consider factors, for
example, the style, the intended interest group, the authentic
achievement of comparable film preparations, the on-screen
characters who may show up in the project, and potential
directors. Every one of these variables infers a specific interest of
the task to a conceivable audience amid the projection and
transmission.
The producer and screenwriter get ready with treatment, and
present it to potential investors and financers. In the event that
the point is effective, somebody may offer budgetary sponsorship.
When all parties have made the decision to settle the
arrangement, at that point film may continue into the pre-
production stage. By this stage, the film ought to have an exact
showcasing plan for particular audience.
Visualisation:
Visualisation is the way toward making pictures, charts, or
liveliness for conveying an idea or message. Conveying through
visual symbolism has been a powerful approach to impart both
theoretical and solid thoughts since the development of human
civilization. Visualization these days has extended to different
segments of science, training, designing, intuitive interactive
media, drug, agribusiness, space science and so on.
Followings are the purposes of visualisation behind any production
be it a short film, TV commercial or promotional videos.
1. To tell the entire thought in visual shape
Keep in mind that you're working for the visual medium, so
you should visualise the entire process of production which
would eventually be transformed onto the screen.
What sort of changes do the characters experience
throughout their journey and by what method will you
show it before the audience?

Audio Visual Production
17
Which sorts of hindrances are likely to be faced by the
characters and how would you display them on screen?
Identify all the sequences and stamp them as plot focuses.
Design each shot that outwardly improve the screen.
2. To Create a Strong Visual portrayal
Once the story is chosen, you have to make visual
attestation. That is the reason it is said that a photo is
worth more than a thousand words. Best pictures convey
the story rapidly, effectively and strikingly. Be that as it
may, there is a few inquiries those may come to your mind
Has the new information moved the potential change in
your scene?
How would you utilize this trap to draw the viewers and
the correct perspectives at the perfect time?
3. To Create the best shooting Plan
When you visualize the shot in your inward vision, you've all the
while arranged the camera position on the location. You've
likewise distinguished the focal point you'll require. You don't
need to be stressed over the specific focal point and its millimetre.
It's sufficient to think about the wide angle lens or a zoom lens.
Once you've recognized every camera setup, now you've the
certainty to make a shot-list and an appropriate shooting design.
4. To Develop the Point of View
All the great stories have a perspective and a "possess
method for narrating style." It's vital to investigate that, from
whose perspective you'll be narrating the story. Your decision on
shot taking should be distinct. If you decide to let it know from the
other individual's perspective, your shots will be not quite the
same as others. A spectator perspective may require all the more
wide shots. These wide shots may at the same time catch the
untold segments of the story. Every character in the shot gives a
new data.

Unit-1 Conceptualising Pre-Production
18
5. To Lead the Production Team
You need to remember both the imaginative and business
parts of the film. Separating individuals in a little group will help
you to enhance the standard of the movie.
Your crew members are totally manacled with you and
they can't move until you've made sense of how and what you
need to be shot. The group can't work until the point when they
comprehend what the activity is, the thing that particular range of
the area is "encircled in". This should be particular that why and
how it is critical in the content. Working through these choices
ahead of time doesn't imply that, you can't alter your plan.
Great pre-perception for better shoot
You need to shoot with your vision first and after that you shoot
with a camera. Indeed, even essential storyboards help you to
investigate shot juxtaposition and sequencing. You see many
people with "cool" shot thoughts get into the alter room and
locate the "cool shot" but doesn't cut with alternate shots. The
main shot often does not coordinate with the second shot.
When we shoot we're working non-direct. Yet, the story is
composed in a straight way. While shooting we utilize nonlinear
arrangement to unfurl the story and it is the best technique.
Stories are generally composed with occasions unfurling
sequentially. There are exemptions like the Christopher Nolan
motion picture "Keepsake", "Regular Suspects" and others.
Conferring top to bottom pre-representation may help you to
improve films.
Screenplay Writing:
It is a composed work by screen writers for a film, video or
TV production.
A screenplay is a more than 100 pages written document
and comprises of 12point textual style on 8 1/2" x 11"
splendid white three-opening punched paper.
One designed content pagemeasures up to approximately
one moment of screen time. A normal page tally of a
screenplay should come in the middle of 90 and 120 pages.

Audio Visual Production
19
Comedies may be of shorter duration (90 pages, or 1 ½
hours) while Dramas run longer (120 pages, or 2 hours).
Screenplay is the plan for a film or video project. Experts on the
shooting set including the producer, director, Cinematographer,
Art executive, VFX director, Set architect and on-screen characters
change the screenwriter's vision by utilizing their individual
feedback. In spite of the fact that a film is synergistic
workmanship, the screenwriter must know about every
individual's part. Also, the content ought to mirror the author's
knowledge.
In spite of the fact that film is principally visual medium,
screenwriters, instead of telling anything, demonstrate the story.
A 2-page internal monolog may function admirably for a novel, yet
it won't work for Film or TV production.
The advancement, exercises, explanation, feeling and
reaction and trades of the characters are also depicted in a
screenplay. A screenplay made for TV is generally called a teleplay.
It helps in production when you have a grip of the general
separating measures. The best, base and right edges of a
screenplay are 1" while the left edge is 1.5". The additional half-
inch of blank area to one side of a content page takes into account
authoritative with cuts. The whole record ought to be single-
separated. The principal thing on the main page ought to be the
words FADE IN or something to that effect for transition:
Transition
The principal page is never numbered. Back page numbers
showed up in the upper right hand corner, 0.5" from the highest
point of the page, flush ideal to the edge. Be that as it may, it
might shift starting with one screenplay author then onto the
next.
The following is a specimen screenplay with rundown of things
(with definitions) that depict the screenplay arrange, alongside
indenting and organizing data. Screenplay programming will
consequently design all these arranging components, yet a
screenwriter must have an essential learning of the definitions to
when and how to utilize every definition.

Unit-1 Conceptualising Pre-Production
20
Title-Sample Screenplay Attribution-Mendaliv Source- Link-
https://commons.wikimedia.org/wiki/File:Screenplay_example.svg
1- How to write a decent screenplay
Screenplay is the backbone of any production. Here you
will take in a portion of the best, screenwriting procedures to start
your alluring screenplay composing.
The secret to making the opening work is not exhausting. Simply
give utmost importance to the main lead of the venture in the
Audio Visual Production
21
screenplay. The contention may or may not be identified with the
primary story, but it should first stun the viewers.
These are a couple of ventures of screenwriting methods to get
your motion picture/video generation begin. Initial couple of
pages of screenplay has a few capacities like-
- It sets up the lead character.
- It demonstrates the time, area.
- The basic component ought to be first and foremost to
begin the story.
- The first act ought to build up the fundamental inquiry of
the story: What does your lead character need to do, for sure and
who remains in that direction?
Other than that, there are a few hints to make the screenplay
more appealing.
- Try to maintain a strategic distance from superfluous
portrayal in light of the fact that the gathering of people needs to
know where they are and a name of the place.
- Don't let the characters to reveal to us what they are going
to portray on the screen.
- Don't attempt to set up a protracted content (Not more
than 150 pages).
- Though it is a visual medium so attempt to keep up a
decent harmony amongst discourse and physical activity.
2- Format of Screenplay Writing:
2 (a) How to write Scene Heading
Indent: Left: 0.0" Right: 0.0" Width: 6.0"

Unit-1 Conceptualising Pre-Production
22
A scene heading is a one-line depiction of the area. It should
demonstrate the time of year of when the scene is being shot. It is
otherwise called a "slug line." It should preferably written in
UPPER Case.
Illustration: EXT. SHOPPING MALL - DAY indicates that the shot is
being taken outside a shopping center during the daytime.
2 (b) How to write Sub header
Indent: Left: 0.0" Right: 0.0" Width: 6.0"
Sub headers help a director when some modification is made
during the shooting. A decent case is when, there are number of
fast cuts between two areas; you can utilize the term INTERCUT
and the scene areas.
2 (c) How to write Action
Indent: Left: 0.0" Right: 0.0" Width: 6.0"
Scenes are composed on a present situation. It should be kept in
mind that only stationary objects and activities are to be included
so that they can be shown to the viewers on the screen.
2 (d) How to write Character
Indent: Left: 2.0" Right: 0.0" Width: 4.0"
When a character is presented to the viewers, its name should be
conveyed along with the activities. For instance: The entryway
opens and JOHN strolls in to the room. The name of the character
should always be in upper case and constantly recorded over
his/her lines of discourse. Other minor characters might be
recorded without names, for instance "Cab driver" or "Client."
2 (e) How to write Dialogues
Indent: Left: 1.0" Right: 1.5" Width: 3.5"

Audio Visual Production
23
Compose a solitary line or lines of discourse for each character.
The length of the exchange of dialogues may varyaccording to the
pace of the show in scene.
2 (f) How to write Extension
Put after the character's name
Some indicative alphabets should be mentioned in bracket after
the name of the character to let the director know how the voice
would be heard on the screen. For instance, if the character is
talking as a voice-over, it would show up as JOHN (V.O.).
2 (g) How to write Transition
Indent: Left: 4.0" Right: 0.0" Width: 2.0"
Transition of shots should be mentioned as follows:
• CUT TO:
• DISSOLVE TO:
• QUICK CUT:
• FADE IN:
• FADE OUT:
While composing content, you should abstain from utilizing a
progress unless there is no other approach to show a story
component. For instance, you may need to utilize DISSOLVE TO: to
show that a lot of time has passed.
2 (h) How to write shot
Indent: Left: 0.0" Right: 0.0" Width: 6.0"
The length of visual recorded between the on and off of the
camera is called a ‘Shot’. A shot demonstrates the viewer to the
point of convergence inside a scene.
Examples of Shots:
• ANGLE ON -

Unit-1 Conceptualising Pre-Production
24
• EXTREME CLOSE UP –
• ESTABLISHING SHOT-
• PAN TO -
• JOHN'S P.O.V –
• TILT UP-
• TRACK IN-
• DOLLY OUT-
Storyboard Making:
As examined above, arrangement is most important part of the
entire production. There are numerous perspectives for pre-
production arranging; however we will concentrate on storyboard
making.
Storyboard is the primary arranging device for a movie producer.
It is the visual portrayal of a film or video project. Shot by shot you
create the content and choose how to create each shot on the
shooting floor.
A storyboard made with all sincerity helps you manage the budget
and the man power. A storyboard brings out thoughts and
discovers the genuine problematic spots in your scenes.
Making Storyboard is a crucial and finest part of the production. In
the least complex frame, one can draw lines and figures on a
notebook. This makes an energized 3D pre-visualization that
practically feels like a motion picture. The best part is itsuits to
customer's pocket.
Before you begin making the storyboard, study and live your
shooting areas in subtle mind. You may even take a few previews
from potential edges. This sort of field work will give you a
superior visualisation and presentation to form the shots on
paper. Camera is additionally an extraordinary apparatus for
making an essential storyboard. Subsequent to taking many
pictures, stack the photos into a PowerPoint introduction and
afterward play the introduction to perceive how it streams.
Audio Visual Production
25
Creation of Storyboard:
Put two lines of boxes on the page with plenty of space above and
beneath each column for making notes.
1- Match your cases so as to it can help you when you will
shoot.
2- Have loads of duplicates of your clear sheets.
3- Sketch every scene utilizing numerous cases to catch all
your proposed shot points.
4- Critically analyze the completed item searching for crevices
in shot scope or hazardous setups.
5- Always utilize pencil since it will help you to erase and
redraw.
6- Indicate the camera position with kind of camera shots and
camera developments.
7- Use bolts to demonstrate the zoom's course.
8- Use single bolts to convey development.
9- Show the bearing of a tilt by drawing the start and
consummation in two separate casings. At that point put a bolt
and a directional documentation to influence the activity to clear.
10- Use the space around each edge to influence notes on
camera.
11- Also keep a notebook ready where you can note down the
required apparatus, sound impacts, props, make-up and
embellishments.

Unit-1 Conceptualising Pre-Production
26
Pre-visualization helps you take your project to the next level. You
will get two sorts of advantages in this kind of storyboard like-
- A) It makes for a compelling customer introduction. They can
without much of a stretch handle how your idea will truly
function.
- B) It can help you to imagine better complex sequences that are
difficult to draw on paper.
When you are done with your storyboard, proceed to arrange
your shooting technique. The scenes in your content may require
various camera angles. If you are recording with a single camera,
shoot the scenes directly with fixed lighting arrangement. Make
the shot list by looking through a scene's storyboard and noticing
which casings can be taken amid a similar setup. Keep in touch
with them together on the rundown. At that point utilize your shot
list as a guide, and verify shots as they're taken. You will shield
yourself from skipping a critical close-up or building up wide-shot.
Another advantage of the shot list is in making a calendar. You can
get a harsh picture of how much time it will take to shoot a scene
according to your designs. The crew members, just with a look at
the shot list, can see how many shots are left in a particular set up
so that they can plan for the following setup.
In the event that you don't have involvement with storyboarding
and shot records, at that point give yourself a training run. Watch
a scene from a motion picture, TV show or business. Keep your
remote beside you, and note the camera angle changes, screen
activity at regular intervals. At that point hold out your storyboard
paper and draw a couple of minutes of the scene.
Lighting and camera work are great aptitudes to learn. In any case,
keep in mind the expertise of planning. By the day's end, it’s a
speculation of time which would prove vital

Audio Visual Production
27
Making of Shooting Script:
The shooting script is more intricate, exact, overwritten form of
the screenplay. Not at all like what good judgment may
recommend, the shooting script is not written by the screenwriter.
It is composed by the director alongside his cinematographer,
while both examine everything required for the film.
In wide terms, the primary distinction between the screenplay and
the shooting script is that, the screenplay is an offering apparatus,
while the shooting script is a production instrument.
At the point when a screenwriter pens the screenplay, s/he is
endeavouring to offer, to the exclusion of everything else, the
story. In this way, he needs to make a smooth read with an
agreeable stream, generally his/her screenplay and diligent work
wind up in the wastebasket. Screenplays should contain next to
zero course at all. Directing the movie and calling the shots is not
the writer's undertaking; it is the Director's obligation.
While your script is being written, its motivation is to enable
readers to comprehend the story, however once a script is
concluded and pre-production starts, the script is modified a tad
bit to improve it a calculated outline for the production. When
we're part up the script into areas that we can film, those terms
are quite recently excessively unclear and could cause lamentable
false impressions. As a result of this, we make an adaptation of the
last written work content called a shooting content that is altered
for our necessities in pre-production.
The script is conveyed and referenced while the film is underway
too. Before making a shooting script, influences a reinforcement
to duplicate of your written work. That way the last draft of script
stays in place and all pre-production changes occur in the new
duplicate. At that point, you need to number up the scenes.
These numbers are truly critical and shouldn’t be changed at any
point of time. After the film is shot we need to shoot a pickup
scene that may need to go between scenes.
While making a shooting script, ensure the areas and time of
day/night for each slug line. We require underwriting the name of
each character on the first occasion when we see them in the
content. We underwrite huge sounds. We could likewise include

Unit-1 Conceptualising Pre-Production
28
camera angles and movement under the supervision of the
director.
Sometimes these things will be capitalized by the screenplay
writer. In any case, these are the underlying changes we make
while making a shooting script. The subsequent stage is to
introduce props.
During pre-creation stage, the director changes the story
according to his shooting content. The shooting script is ordinarily
splitted into shots, including exact cinematography wording. For
example, close-ups, Long shot, panning, dolly in, overexposed and
so on. Before main photography begins, the shooting content is
arranged according to the scheduled of dates.
a) A Guide to writing a shooting script
The shooting script is the producer's approach to discuss well with
alternate departments of a production. It additionally spares time
and money. Other than that if you're shooting content is finely
written, the chances of committing errors would be less.
Shooting script is a critical apparatus to convey your director's
vision to the team alongside storyboard. In the shooting script the
director is separating the screenplay into number of shots. So it is
a sort of another draft of the script composed by the director, in
this manner the shots you write in the shooting script will
characterize the scene.
b) Arrangement of shooting script
Before you have a look at the shooting script, ensure that, the
script is elegantly written and to be in the correct manner. It is
essential. In case, the content is not composed in proper manner,
you will be left with a broken apparatus and you won't know the
correct length of a scene.
Try not to go into an excessive number of subtle elements now;
simply consider the general atmosphere. Your subsequent stage
will be to ensure the right feel from the shots.
c) Writing the shooting script
At least three significant aspects should be looked into before
writing shooting scripts.

Audio Visual Production
29
1. Camera
2. Lighting
3. Blocking of the characters
The camera
When we say camera, we mean camera angle and the sort of focal
point you utilize as a part of the project. Consider the shot you
need for each action. You ought to write it first in the script since it
encourages director to picture the film better. When you are
done, go through all the script and ensure that nothing is left
behind. Go through the shots again and think what sort of focal
point will present to you the best outcomes.
Lighting and hues
It is high time the directors considered more image techniques to
enhance the atmosphere. For that he needs to talk to the
executive of photography. He should be given freedom to express
his thoughts for a better yield. Your attempt should be to ensure
that the subject of the film is communicated by these shots.
Blocking of the characters
The third step is to consider the blocking of the characters.
Blocking is the movements of the characters required for filming a
particular scene.
The shooting script configuration:
The shooting script is a table equipped with practically everything
about the shots. It ought to contain these points of interest
including number of the scene, number of the shots, the
clarification in the matter of who is in the shot, what is going on in
it, time – day/night, area Indoor/outdoor, the exceptional camera
needs (like Steadicam, helicam, submerged camera or activity
cam) and the area of the scene. You need to compose the changes
required for each shot and specify extraordinary sound impacts
(Sync or foley) that are essential for the scene.

Unit-1 Conceptualising Pre-Production
30
Activity
Study script, screnplay writing in YouTube and try to identify the
tricks in which they would have been made. Try to utilize your
skills and learning to develop that kind of ability.
Unit summary
Summary
In this unit you would get to know the basics process of transformation of a small idea into big screen storytelling for visual medium.
Assignments
Assignments
Define pre-production in 5 lines.
Describe the names of software used for screenplay writing.
Explain the need of research in Pre-production.
Define screenplay in 150 words.
Write down the concept behind pre-production and explain
why it is necessary in the first stage of Film/Video
production.
What are the steps to write a good screenplay?
Explain the necessity of screenplay.
What are the main aspects of a shooting script?
Try to write a two character dialogue scene.
Differentiate between shooting script and screenplay.
Audio Visual Production
31
Assessment
Assessment
Initially write a short story. At that point make heaps of inconvenience to the main protagonist. After the improvement, include few characters and suitable discourse into the story. At that point divide the story into little scenes.
Resources
https://issuu.com
http://www.oercommons.org
http://digitalfilmfarmworkshops.com
http://www.storyboardthat.com
https://en.wikipedia.org
http://www.indiewire.com
https://goodinaroom.com
http://www.elementsofcinema.com/
Reading

Audio Visual Production
33
Unit 2
People involved in Pre-production
Introduction
Even as it is a medium of art, still it is considered as a community
oriented medium of science and business. Number of artists,
expert and different groups of people are engaged with the
procedure of film making. At the time of shooting the director did
his/her work with the assistance of other crew members. Quite a
few numbers of talented and expert hands including chief
associate, second associate, second unit director, script
supervisor, and cameraman needed to raise the standard of the
production.
Outcomes
Upon completion of this unit you will be able to:
Outcomes
Describe the people involved in pre-production stage
Use their talent and skill in pre-production
Explain the responsibilities of each skilled person in pre-
production
Know the work structure of every crew member
Terminology
Terminology
Skilled: Showing the knowledge, ability, to perform a certain activity within a stipulated time period.
Agreement: A negotiation, typically legally binding arrangement between parties for a course of action.
Technician: An expert for practical application of technology in film making.

Unit 2 People involved in Pre-production
34
Casting: Selection of certain individuals to play their parts as actor, dancer, singer, etc for a particular role or part in a script, screenplay, or teleplay or in the film.
By this time all of you must have the knowledge that Pre
Production is the most crucial stage for any sort of film/video
production.
A large no of individuals are engaged to bring the best output.
They are divided into three parts
1- Highly skilled or fully professional
2- Semi skilled or professional
3- Unskilled or amateur
Highly gifted people groups are exceptionally experts and they
know how to do their job effectively in coordination with others
including the director of photography, sound engineer, VFX
supervisor, art director and stunt coordinator. Operating
cameraman, assistant cameraman, lighting chief and others are
proficient people groups who are associated with the production
stage. In any case, while we are discussing pre-production stage
then production designer, production assistant, executive
producer play crucial roles.
There is no such department called production. However, as
indicated by some expert's work, a division is formed and known
as production office. Furthermore, a certain groups of people are
included under this department. Let us quickly talk about it.
Producer:
The key individual who makes the film is known as Producer. A
film takes shape due to his/her fascination towards craftsmanship
and culture. At the end of the day s/he bears the entire cost of the
production. After total discussion with the director, producer
takes the financial burden. S/he often has to sit with the script
writer and director for story, location, and casting director.

Audio Visual Production
35
Executive Producer:
Executive producer executes the investment of producer. Till 1980
Line producers are known as executive producers in Hollywood.
They used to go to the shooting spot oversee the creative parts of
the production. The executive producer often invests fund as and
when required.
Production Designer:
The production designers are in charge of the visual splendor of a
film, TV or theater production. They pick up a style for sets, areas,
designs, props, lighting, camera angles and costumes, while
working intimately with the director and producer.
Once the idea is selected, designers name and deal with art
department, which devise a plan and form a team. Designers
should have expertise in film, TV or theater production despite the
fact that they do have some assistants to oversee things. In the
theater, production designers are called stage or set designers.
Production Manager:
The responsibility of the production manager includes:
1- Chalking out plans with actors and actresses to finalize
shooting dates.
2- Transportation of crew members and artists n to shooting
location.
3- Production administration and management
4- Preparation of Budget
A production manager deals with every single administrative issue
and mostly keeps the director free of burden.
Production Accountant:
Film making is an expensive venture therefore a huge amount of
money is pumped into the production. So, the role of a production

Unit 2 People involved in Pre-production
36
assistant is crucial as s/he keeps all the accounts starting from the
pre-production stage till the release of the movie.
Production Coordinator:
A production coordinator is the person who plays the role of
mediator between the producer and others. His/her part is
essential in a film production.
The coordinator decides the following aspects of film making:
1- Location of the shooting
2- Arrangements of required equipment
3- Hiring of professionals
Director:
There is a person in each and every family, who manage the entire
family and whose instruction is carried out by family members.
And s/he is known as the head of the family. Similarly, the director
is the captain of the ship or hey person in the film making.
His responsibilities include the location of the shooting, which
lighting condition is best to shoot, the kind of cameras and so on.
Most directors are called the Jack of all trades’. They know every
segment of film making. Some are there who assumes the
responsibility of producing and directing. There are a lot of cases
in Bollywood like-Raj Kapoor, Raj Kumar Santoshi, Raj Kumar
Hirani, David Dhawan, Sanjay Leela Bhansali and so on. Director's
innovativeness, vision, specialized learning, solid self control, right
administration aptitude, aesthetic and business mind sets the
silver screen on fire.
In pre-production stage a director discusses the story with the
producer, artists, art director and cameraman and others. If
required, then s/he corrects the whole story and sequences.
Before going for shoot s/he talks about each subtle elements of
the film with the chosen crew members.

Audio Visual Production
37
Screenplay Writer:
A screenplay writer is an essayist. S/he is the individual who writes
screenplays for several mediums such as stages, films, TV projects,
funnies or computer games.
Each screenplay and teleplay begins with an idea or thought.
These days, however, scripts are mostly written on current issues
and biopics are also made. Screenwriters who frequently pitch
new ideas, regardless of whether unique or an adjustment, don’t
become jobless.
Storyboard artist:
A storyboard artist envisions stories and representations, frames
of the story. Quick pencil illustrations and marker renderings are
two of the most widely recognized conventional systems, albeit
now days Celtx, and other storyboard applications are regularly
used to draw storyboard. The computerized camera is one of the
most recent procedures in making storyboards.
They are generally independent specialists, commonly procured by
art director and movie director. Commonly independent
storyboard artist will have a place with at least one storyboard
organizations much like an illustration agency.
Numerous storyboard specialists these days start and complete
their work on PCs utilizing programming and advanced pencils or a
graphics tablet. Storyboard artists may utilize photographs to
make visuals where stock photographs or photographs taken
particularly for the task are assembled carefully to deliver a
photographic portrayal called a photo visual.
For movies, a few movie producers, directors, and makers utilize
clip art PC programs intended to make storyboards, or utilize a
devoted 3D storyboarding programming, or a more multi-purpose
3D program which can likewise be utilized to create components
of the storyboards.
Art Director:
An Art director is a man who is in charge of each one of those
properties and set, that is required for shooting at area. His/her
guideline is completed by his/her group to develop a set. Art

Unit 2 People involved in Pre-production
38
director's work begins after the scripting. In this stage Art director
talks about with director about every shot, at that point trains
his/her group to fabricate another set by the request of the every
scene. Art director conveys his/her full and effective group to
make the set in time.
Art Department coordinator:
Continuously the art department is the greatest department on
any film production, because of its group individuals. Art
Department coordinator coordinates everyday administration.
These people groups must be very proficient and sorted out to
adapt to the day by day to every day work stack.
Their primary obligation is to co-ordinate information between the
accompanying departments like: set decoration, props,
production, locations and construction. They are ordinarily
accountable to the supervising art director and the production
designer.
They are among the first to be utilized in a film's art department.
As a rule they start working with the production manager. They
ensure that art department spending plan (e.g. work costs, set
dressing, wraps, and so forth.) is monitored properly. Along these
lines correspondence is made between film's producers through
the production manager.
Art department coordinator plays out an extensive variety of jobs
including:
1- Compilation of costumes
2- Schedule for the art department; sorting out transport and
travel related issues
3- Shipping hardware during overseas schedule
4- Supplying duplicates of all illustrations and data.
5- They additionally download and set up all area photos for
the Production Designer and make a rundown of all sets for the
construction.
Art Department coordinators examine all location notes with
points of interest of development, dressing and vehicle

Audio Visual Production
39
prerequisites. They also arrange authorization letter from the
concerned authorities for shooting requirements. They also
oversee health and safety issues.
During shooting, they needed to be contacted by the standby art
director who liaisons with them about any pressing needs.
Art Department organizers deal with an independent premise and
might be required to spend long time working far from home.
Casting Director:
Casting director is the individual who chooses the character for
every single scene. He organizes audition for this selection
process. Before picking up anybody, he hands over a page of script
to an actor to show his skill before the director and casting
director. A good performance during audition lands the actor in a
role for the project. As so many characters are there in a movie or
production, it takes even a week to finalize the actors for a
project. Each aspirant is selected o the basis of his/her aptitude,
capacity, conduct, persistence, dialogue delivery style. In spite of
the fact that each character is unique in his/her own capacity,
casting director takes utmost care to finalize the casing.
Lyricist:
A lyricist writes the lyrics of the songs. A successful lyricist works
closely with a music director of a production. Commonly, a lyricist
plays a crucial role in the success of a movie.
An average lyricist manages to operate admirably with other
members of the music team. A decent lyricist can come out with
some very good lines, which enhance the quality of a music album.
Music Director:
Music director is the head of music department of a production.
However, the job of a music director is extremely troublesome in
Indian Film industry. Despite the fact that Indian audience
cherishes music, the part of music in Indian movies is critical and
unequivocal. Before shooting, music director makes music with
Lyricist and director for movie. Music director adds to the
circumstance in a movie with his soulful creation working in
tandem with director and uses it in the movie.

Unit 2 People involved in Pre-production
40
Cinematographer:
The most imperative division in the production is filming the
scene. It is done specifically under the supervision of
cinematographer. Cinematographer is the individual who knows
the whole traps of photography, lighting and camera systems.
S/he trains the camera administrator and other technicians. In
pre-production stage a cinematographer examines every details of
each and singular shot with the director.
Visual effects Supervisor:
The most innovative, otherworldly shots and scenesare conceived
under the immediate supervision of visual effects supervisor.
Before shooting visual effects supervisor speaks to the director,
cameraman, and production manager for execution of the special
effects. Several professionalsare engaged to enhance the standard
of visual effects.
Crew’s Responsibility:
A group of people plays very important role in the success of a
commercial feature film and they are called the crew members.
The success of a movie depends upon the level sincerity of the
crew members. Crew sizes fluctuate depending upon the scale of
mounting. Some specialized crew members identified as day
players, carpenters, crowd specialists, security guards, and so on.
Audio Visual Production
41
Unit summary
Summary
In this unit you learnt the key people and the role they play at the pre-production stage of a production. What's more, in the wake of perusing this unit you comprehended that every one's part is extremely novel and testing in the film production.
Assignment
Discuss the role of Producer in Film/video making?
Who is responsible for all the expenditure in the shooting?
Who is known as the captain of the ship?
Describe the role of a music director in Indian film industry.
Briefly discuss the works of a production coordinator.
Write down the three categories of people worked for film making.
What is the role of visual effects supervisor in the pre-production stage of film making.
Who is responsible for the implementation of Health and safety procedures?
Whose job is very important in Indian film industry?
Who are capable of writing both words and music piece?
Resources
https://www.sokanu.com
http://www.thevideoeffect.tv/
https://en.wikipedia.org/wiki/Main_Page
http://filmincolorado.com/
Assignment
Reading

Unit 3 Making of Set, Music & Budget etc.
42
Unit 3
Making of Set, Music & Budget etc.
Introduction
Ahead of beginning the shoot of a film, a large number of tasks are
to be completed by experts with refinement. Making of a striking
set to shoot is always expensive than doing it in natural location.
Making of music, making of budget and making of set are to be
discussed in this unit.
Outcomes
Upon completion of this unit you will be able to:
Terminology
Outcomes
Describe the set making process in pre-production stage
Elaborate the responsibilities of art department
Explain the importance of budget in film making
Know the music talent of Indian film industry
Terminology
Set:
Representation of a building, palace and
other properties as and when required
by the director.
Storyboard: It is the first planning tool of a film/video
project on paper. Sequential drawing sheet
of a film/video project.
Diegetic Sound: Type of sound which is visible in screen.

Audio Visual Production
43
Making of Set
Set making is the procedure to construct full-scale view, as
determined by an art director working in a team with the director
of a film or any other production.
The set designer creates illustrations and realistic views , research
about properties, surfaces, etc. Designers and most business
theaters have started creating scale illustrations with the
assistance of PC drafting projects, for example, AutoCAD, or 3d
max.
Art Director, the man behind the set
It is the art director's business to understand the imaginative
vision of production designer and director to improve the
standard of production. The art directors are the vital components
in theaters, short films, feature films, advertisements and varieties
of TV productions.
In bigger productions, art directors take charges of the work
routine and the art department budget. On a few occasions, the
art department may comprise of just the production designer, art
director, and a few assistants.
The art directors dissect the content to distinguish all props or
extraordinary things those are required by the directors. On a big
budget film or TV production, this work may begin four to five
months before the shooting. On low budget productions, it can be
as less as one month.
It's vital for an art director to work with other concerned divisions.
They work together intimately with the Location Manager to
consult about when and where the locations can be readied. They
should discover savvy inventive arrangements which add to the
splendor of the production. On location, they additionally look
after the safety arrangements.
Job of an art department coordinator:
The art department is a indispensable part of any film or TV
production. Art department coordinators give everyday

Unit 3 Making of Set, Music & Budget etc.
44
administration and support to help keep the division running
successfully. They should be exceptionally fit and sorted out
individuals to adapt to any situation required by the production
team.
The coordinators are answerable to the supervising art director
and the production designer. They fill in as a scaffold between the
art department and production.
They are among the first to be utilized in a film's art department.
They as a rule begin their work with the production manager. They
clarify the art department spending plan (e.g. labor costs, set,
dressing, props and so on).
Art department coordinators play out varieties of roles including:
1- Compiling of locations those may include house, hill,
palace, school, hospital, police station and so forth.
2- Preparing calendar for the art department;
3- Organizing transport and travel;
4- Shipping equipment when working overseas
5- Supplying duplicates of all illustrations and data;
6- Download and set up all location photos;
7- Make a rundown of all sets for the construction
8- Preparing of set dressing budget.
Art department coordinators are considered the most capable
individuals in a production unit. At times they chip in with their
assisting skills to help out the production designer.
Film Music Composition:
Indian films are incomplete without regular doses of dance, music
and songs. Film music not only adds value to a scene but impacts a
film's overall appeal immensely.
Film music makes disposition and fortifies importance of film.
Music is not seen as a rule but it comes in the sequence in a
natural manner.
At present, music is routinely showcased as a ware from the films
for which it is formed or made. It has its own auxiliary crowd. By

Audio Visual Production
45
and large Film music has gone up against its very own musical
existence since the arrival of compact disc. The lyricist composes
the verses in types of expressions of the melody which are set to
tune by the music arranger or music director. S/he is helped by an
orchestra. The melodies are sung by proficient and prevalent vocal
artist. They are playback vocalists who play back for the actors.
Tunes in Bollywood motion pictures are purposely created with
lyrics. These are regularly composed by recognized lyricists and
frequently inserted into the music track. In Hollywood, a writer
who exercises considerable authority in film music is in charge of
the main part of music on the film's soundtrack. While in a few
films melodies may assume an imperative part in some Bollywood
films.
Bollywood film tunes regularly utilize outside instruments and
revise existing tunes. Bollywood films comprise various genre of
music like Ghazal, Disco, Qawwali, Devotional, Pathetic, Patriotic,
Thematic and so forth.
The different employments of dialects in Bollywood tunes can
spellbind the listeners. A few melodies incorporate different
dialects, for example, Urdu and Persian, and it is normal to hear
the utilization of English words in tunes from present day Hindi
motion pictures. Other than Hindi, a few other Indian dialects
have likewise been utilized including Braj, Avadhi, Bhojpuri,
Punjabi, Bengali and Rajasthani in Bollywood films.
Presently film soundtracks are uploaded in social networking sites
like Youtube much before the film is released in theater. Earlier,
radio was the only medium of film music yet with the introduction
of satellite TV and FM radio the situation has been changed
radically. Also, the appearance of new media like web has changed
the audience group.
Film Budget Making:
Budgeting a film is a procedure required to make a financial plan
for the production. The budget is fundamentally a report, which
can run into more than 150 pages in length. It is utilized to secure
financing for and prompt the three phases of the film making.
As a rule a budget is divided into four segments like:

Unit 3 Making of Set, Music & Budget etc.
46
1- Above the line (talents, procuring of types of gear, location
and so on),
2- Below the line (direct production costs),
3- Post-production (editing, visual effects, and so on.),
4- And others (insurance, completion bond, promotion and
so on.)
The budget excludes film promotion and marketing, as it is the
obligation of the film distributor. However, sometimes the
producer bears the cost of film promotion.
Elements of Budgeting
Story rights: As discussed earlier, a film’s success depends on the
quality of novel, music or computer graphics. It can cost anything
from two or three thousand. A unique screenplay from a writer
can cost more.
Screenplay: While the remuneration of a screenplay writer in India
depend on the paying capacity of the producers, in US Columbia
Pictures pay 2 percent of the gross profit to the screenplay writers.
Producers: Film producers and executive producers are the key
individuals who put resources into a film production.
Director: As the director is the captain of the ship he is one who
receives the bouquets and the brickbats. When move does well a
director walks away with the credit while the failure also
attributed to him. What we see on a screen is the imagination of
the nobody but the director.
Production costs: The cost of delivering the film includes gear
procurement, wages of the crew, production configuration, set
making, studio costs, costumes, cooking, settlement,
transportation, travel, inn stay, and so on. The director of
photography is typically the most generously compensated
individual from the crew.
Visual effects: Now a day each story demands greatest measure of
VFX shots and the best thing is, it looks normal in extra large
screen. Though the cost of computer generated imagery and other
visual effects enhance the quality of a movie, it needs loads of
diligent work.
Audio Visual Production
47
Music: The music arrangers who are in demand ask for fat
remuneration for their unique score. Some movies may not look
good content wise but they get away and become a hit because of
their music albums. Ordinarily, the music budget of a noteworthy
film is around 2 percent of the last aggregate. In any case, some
film's music budget crossed million.
Tips for cutting the budgets
Elimination of night scenes-
Shooting around evening time requires intense/costly lighting and
the payment of crew members during the evening is more than
usual. For Example, Broken Arrow (1996) cut expenses by several
dollars by dispensing with the night scenes from the content.
Numerous directors have utilized the "day for night" system for
this cost cutting purposes.
• Avoid area shooting in celebrated regions-
Shooting a scene on, profoundly bustling region for instance, the
Parliament of India/Mumbai Railway Station requires halting
movement with a high security caution. On the off chance that the
director moved the shooting area to a set then the production can
save significantly. Besides, a few areas, (for example, business
ventures like inns, eateries, bars and dance club) are more ready
to permit filming than others. A few producers who work on a
low-budget, generally abstain from paying area charges and look
to catch shots at set or by vfx.
• Use obscure, not-well known on-screen characters-
Striving for obscure and not well known on-screen characters and
performing artiste is the best alternative to cost cutting. Picking of
settled motion picture stars demands more cost than obscure
performing artists.
• Film in another district
For instance, numerous Hollywood films set in U.S. urban areas
are shot in Canada to exploit bring down work costs, subject to

Unit 3 Making of Set, Music & Budget etc.
48
fluctuating trade rates. They exploit government and
commonplace endowments intended to develop and maintain the
film and TV production ventures in the region. Numerous U.S.
states have reacted with impose motivations of their own.
Going over budget
In the US film production framework, producers are regularly not
permitted to surpass the underlying budget. Exemptions have
obviously been made, a standout amongst the most prominent
cases being Titanic (1997). Director James Cameron ran on solid
land with the budget and offered his charge back to the studio. In
different nations, producers who surpass their budget have a
tendency to eat the cost by getting less of their producer's
expenses. While the US framework is productive and can stand to
go over budget, some other nations' film businesses have a
tendency to be financed through government appropriations.
A few cases of Budget:
A portion of the motion picture studios and production
houses are hesitant to give the best possible budget. Here a few
cases of budget are given from the web sources.
Lara Croft: Tomb Raider – The Cradle of Life
Story rights and screenplay: $4 million
Producers: $4 million
Director (Jan de Bont): $5 million
Cast: $17.25 million
Angelina Jolie: $12 million
Extras: $250,000
Other (inc. Angelina's perks): $5 million
Production costs: $67 million
Set design and construction: $17.8 million
Visual Effects: $13 million
Music: $3.3 million
Editing: $3 million
Post Production costs: $1.6 million
Total: $118 million

Audio Visual Production
49
Terminator 3: Rise of the Machines
Story rights (Carolco and Gale Anne Hurd): $19.5 million
Screenplay: $5.2 million
John D. Brancato& Michael Ferris: $1 million
Director (Jonathan Mostow): $5 million
Producers: $10 million
Cast: $35 million
Arnold Schwarzenegger: $29.25 million + 20% gross profits
Arnold's perks: $1.5 million
Rest of principal cast: $3.85 million
Extras: $450,000
Production costs: $58 million
Post-production costs: $4 million
Visual effects: $20 million
Music: $2 million
Other costs: $33.6 million
Total: $187.3 million
Spider-Man 2
Story rights: $20 million
Screenplay: $10 million
Producers: $15 million
Director (Sam Raimi): $10 million
Cast: $30 million
Tobey Maguire: $17 million
Kirsten Dunst: $7 million
Alfred Molina: $3 million
Rest of cast: $3 million
Production costs: $45 million
Visual effects: $65 million
Music: $5 million
Composer (Danny Elfman): $2 million.
Total: $202 million
(Source- Wikipedia.org)

Unit 3 Making of Set, Music & Budget etc.
50
Unit summary
Summary
In this Unit we have learnt the key persons involved in making the
set, budget, music, and their role and responsibility in the
preproduction stage. Besides that you have acquired the
knowledge about the elements of budget and how to minimize the
cost in budgeting.
Assessment
Assessment
Discuss the role of Art director in Film/video making?
Who is responsible for all the expenditure in the shooting?
Who is known as the bridge between art and production department.
Describe the role of Music director and lyricist in Film industry.
Briefly discuss the works of an art department coordinator.
Write down the process to minimize the cost of budget in film making.
Briefly discuss the element of budgeting in 100 words.
Resources
Readings
https://www.futurelearn.com/
https://www.youtube.com/
http://www.thevideoeffect.tv/
http://www.magix.com/us/movie-making-
software/
https://en.wikipedia.org/

Audio Visual Production
51
Unit 4
Production Design & other things
Introduction
As discussed earlier, production is the activity of making or
assembling of raw segments or crude materials to a finished item.
At the end of the day, it is compilation of good things. Every
assembly unit needs crude materials, apparatus, areas for
foundation and man forces to run it. Much the same as some
other businesses, film is considered as an industry. It needs
individuals or a group of individuals for both before the camera
and behind the camera to complete the job. In this unit, we will
talk about the area requirements for shooting, the hiring of gear
and picking of crew individuals.
Outcomes
Upon completion of this unit you will be able to:
Outcomes
Describe the peoples involved in pre-production stage
Use of their talent and skill in pre-production stage
Explain the responsibilities of each skilled person in pre-
production
Terminology
Terminology
Skilled: Showing the knowledge, ability, to perform a certain activity within a stipulated time period.
Agreement: A negotiation, typically legally binding arrangement between parties for a course of action.
Unit 4 Production Design & other things
52
Technician: An expert in the practical application of a science, technique of an art or craft.
Casting: It is the pre-production process for selecting a certain type of actor, dancer, singer, or extra to enact a script, screenplay, or teleplay or in the film.
Production Design:
The production originator is the individual in charge of the whole
procedure of planning.
He regularly uses the storyboard as a guide and cashes in on an
opportunity to make representations of the settings. Film is the
successor of painting and theatre. Film has fused a considerable
lot of the angles from its antecedent. Outline for sensible films has
an incredible arrangement to do with visual generalizations the
way the watcher anticipates that specific things will look. In the
event that content requires the foundation of an upscale home,
certain components can be utilized to make that impact. In the
event that the objective is to build up a secluded, run down
mountain lodge, different parts can be joined to propose that.
Those settings for a dream film might be progressively the
formation of an imaginative designer.
Visual environment characterizes character well in the film. A
littered domain has a tendency to set up comparative qualities in
the character. Numerous different components add to the tone
and climate of a scene. Shading assumes a vital part, with scenes
being imagined in an assortment of passionate tones to earth
tones.
A film can clearly go in a wide range of bearings as far as stylistic
theme is concerned. The key is that it needs to go some place. In
the event that low budget films have a typical falling flat, it is that
they much of the time do not have a predictable way to deal with
visual style. Frequently this is both an enhancement and a camera
matter. It is additionally to a great extent a monetary reality. Low
budget films regularly stall out in the areas that are accessible to
them, shooting without the assets or an opportunity to change
things.

Audio Visual Production
53
Production Designer:
Production originators are the individuals who are in charge of the
visual idea of a film, TV or theatre production. They distinguish an
outline style for sets, locations, illustrations, properties, lighting,
camera angles, make ups and costumes. S/he is working intimately
with the director and producer.
Once the idea is chosen by the creative director, designers
typically name and deal with a workmanship office. The
workmanship office incorporates an outline and development
group. They regularly frame a solid association with a specific
director, who they may work with on numerous productions.
Designers must have the practical experience in film, TV or
theatre. In the theatre, production planners are additionally called
stage or set architects. Production architects must have the
information of-
• Drama/theatre studies
• Architecture
• Creative/performing/technical arts
• Graphic design /illustration
• Interior outline
• Theatre/execution outline
• 3D design
• Landscape architecture/design
• Fine art/visual art
Responsibilities:
Most production designers fill in as freelancers. The imperative
piece of their work is advertising their aptitudes and experience, in
making contacts and preparation agents.
Their first errands typically incorporate illuminating the brief and
concurring an appropriate charge and timescale for the
production, which is some of the time done by an agent.
After this, undertakings may include:

Unit 4 Production Design & other things
54
• Reading the total scripts to recognize factors that
demonstrates a specific visual style
• Considering the production brief, which can be in form of
written or verbal?
• Meeting with the producer and director to talk about the
ideas and the production necessities
• Sourcing fitting materials and looking into effects
• Researching on each viewpoints like art, history, legislative
issues, history and producing design ideas
• Planning and observing to outline the budget
• Providing scale illustrations or models for studio or area
sets
• Researching, evaluating and setting up a property list
• Producing plan thoughts for outfits, wigs, properties,
enhancements, make-up and illustrations
• Identifying and surveying potential spots like studios and
areas
• Presenting thoughts to other crew individuals engaged
with the production, for example, performing artistes and camera
administrators
• Hiring and dealing with an art department crew or team
members
• Instructing the set development organization, picturesque
craftsmen and enhancements experts and observing their work
• Collaborating with the costume designer and the director
of photography, and additionally the properties, lighting chief and
sound engineer
• Attending blocking, rehearsals and shooting to exhort on
visual presentation
• Checking sets and locations amid shooting to ensure that
all the necessities are met.

Audio Visual Production
55
Location Scouting:
The audience expects everything about the product tobe
wonderful. Furthermore, from the production perspective, a best
area gives the absolute best. Also, legitimate area exploring brings
about the best area. Area exploring is a crucial procedure in the
pre-production phase of filmmaking.
When scriptwriters, producers or directors have chosen what
general sort of landscape they require for the different parts of
the scene that are shot outside of the studio, the look for an
appropriate place or "area" outside of the studio started. Once in
a while Location scouts arrange legitimate access to filming areas.
Location necessities
Appropriateness of an area relies upon many components,
including:
• Overall aesthetic
• Financial cost of production
• Logistic plausibility inclusion
• Distance from base of operations or different areas
planned
• Availability of stopping and offices to keep crew and ability
protected and dry constantly
• Availability of electrical power or plausibility of getting
generators for lights and electrical gear.
• Available light (inside or outside)
• Weather conditions (outside)
• Permission and participation of area proprietor and
neighbors, nearby government, and law authorization
Process of Work
The location scouts and different locations department staff (see
beneath), working under the supervision of the Location Manager,

Unit 4 Production Design & other things
56
by and large endeavor to give the same number of conceivably
valuable/reasonable thoughts.
Fixing problems
Taking care of location issues can be an extremely difficult
occupation. It requires diligent work for extend periods of time,
sharp relational abilities, concentration on each scene what will
shoot, capacity to think even one foot or make a move rapidly and
mindfully and in addition utilizing specialized aptitudes.
Thought of climate
Nearby climate conditions can consider vigorously along with an
area's feasibility and influence numerous regions of production
booking, so possibilities and exchange, budgetary-proficient plans
ought to be made well ahead of time of any shoot day with
plausibility to be influenced by climate.
A location with potential to be influenced by climate ought to
dependably be cleared and put, ahead of time, with the property
proprietor's understanding and assent "on climate hold" or under
the condition that production will just affirm utilization of the area
and start photography pending suitable climate conditions.
Job titles and job descriptions:
A film crew may have the accompanying titled positions staffed
with respect to the Locations Department.
Location Manager
Location manager regulates the Locations Department and its
staff, commonly detailing straightforwardly to the Production
Manager and additionally Assistant Director (or even Director or
potentially Executive Producer). Location Manager is in charge of
all last clearing of a location for shooting and should frequently
help Production/Finance Department(s) in keeping up spending
administration with respect to real location/allow expenses and
additionally work expenses to creation for himself and the
Locations Department on the loose.
Assistant Location Manager

Audio Visual Production
57
S/he works with the Location Manager and the different
departments in orchestrating specialized scouts for the
fundamental staff (grips, electric, camera, and so forth.) to see
alternatives which the Location Manager has chosen for shooting.
The Assistant Location Manager will be beginning amid the
shooting procedure to regulate the entire operation, while the
Location Manager proceeds with preproduction from on the
forthcoming locations.
Location Scout
A location scout does a great part of the real research, footwork
and photography for reporting location conceivable outcomes.
Location Manager Often do some exploring for himself/herself.
Location Assistant
Location Assistant is contracted by the Location Manager to be on-
set some time recently, amid, and after the filming procedure.
General duties of the assistant include:
a- Arriving first at the location to permit the set dressers into
the set for arrangement
b- Maintaining the cleanliness of the location ranges amid
shooting
c- Limiting the effect of a working production crew on the
location grounds
d- Fielding objections from neighbours; and at last, toward
the finish of the filming
e- Managing on-set time and crew concerning the conclusion
of the location inside legally allowed time limitations.
There are by and large one to three assistants on a shoot at any
given time.
Location Production Assistant
This position exists for the most part on bigger spending
preparations. The Locations PA is the assistant who is never
beginning, yet rather is continually "preparing" a location or
"wrapping" a location. That is, the point at which a location
requires a few days of set up and breakdown earlier and following
the day(s) of recording.

Unit 4 Production Design & other things
58
Parking Coordinator
Parking Coordinator is regularly employed by Location Manager on
a need premise. Their work is to direct Parking Staff keeping in
mind the end goal to secure and organize crew stopping including
gear trucks and individual vehicles. Locations Department and
Parking Department may cooperate with neighbourhood law
authorization to arrange movement control if the scene is being
shot includes roadway.
Waste Removal
Location Department's aura is to be the last to withdraw a location
upon wrap and to leave the location in order if worse condition as
it existed upon entry. A waste evacuation organization may be
enlisted on an as-require premise.
Strategies:
A location scout normally takes graphic, all encompassing photos
or video of location potential outcomes. A decent location scout
will make photographs of a location probability that mirror the
stylish objectives of the generation and will likewise incorporate
outwardly illustrative utilitarian photography and data archiving
substantially more than exactly what will possibly show up
onscreen.
Extra distinct data may include:
• Reverse/interchange edge, all encompassing photography, to
demonstrate space accessible for camera, lighting, video assist,
hair and makeup
• Geographic arranges, compass directions, other map
information as might be pertinent
• Ambient lighting conditions at different circumstances of day (or
night), solar information, i.e., angle of sun at various
circumstances of day
• Photos of holding/organizing territories and accessible stopping
or potentially stopping limitation signage
• Hand representations of road/building layout(s), building/room
floor plan(s), room or territory measurement information

Audio Visual Production
59
• Crew/vehicle gets to information, i.e., entryways, lobbies, lifts,
stairs, accessibility and data of faculty required for get to
• Notes with respect to surrounding sound conditions
• On the shoot day, if a set is to be "dressed" (props/furniture
included or (re)moved),
• Locations Department as well as Art Department/Property
Master Staff/Prop Stylist will photograph the particular zones to
be influenced in order to guarantee that the location will be come
back to its unique state once shooting is finished.
As we have examined before choosing the correct location
is the initial move towards an effective shoot, here are a couple of
insights that will empower you as you research to potential
film/video shooting areas.
1.Concentration on content. Get an area that that
perfectly suits to your story line sets.to explore an area or location
this the primary regulation that needs to be worked out.When you
will set out to survey your locations, somehow you may face face
endless potential outcomes like: natural areas, memorable
destinations, unmistakable structures, urban scenes and
waterfront settings, and numerous different things. Keep in mind
one thing.Pick an area or location that offers itself to the story you
want to convey. You should never be bound by your areas or
location. Areas are fundamentally rough materials. You need to
acknowledge what the substance asks for already for picking a
preferred best area or location.
2.Explore at the ideal time. We should be constantly careful about
the locations or areas can change according to the weather and
the climatic conditions. Choose or check your location or area
during day time. Change in locations can create shockingly huge
changes on the reasonableness of a location.
Elements that ought to be in your mind like-
• Noise and Traffic
• Visitors for entertainment and amusement spots

Unit 4 Production Design & other things
60
• Tourists at beautiful or memorable spots
3.Accessibility of light. Temples, sanctuaries, mosques, churches,
dance halls, eateries, amphitheaters and homes for the most part
highlight with low measures of accessible lighting. Verify the light
levels by shooting two or three snapshots of test film with your
handheld or mobile camcorder.
Look at the window curtains that can be opened to allow light.
Sometimes you may wish to acquire lights or approach the
location proprietor for authorization to supplant the knobs in
available light apparatuses with brighter lights.
4.Power supplies. Numerous open air locations are a long way
from control sources and apart from this some AC challenges
could be faced in indoor locations. Hence conveying with
numerous batteries of camera could be dependably a smart
thought. Be that as it may, regardless you'll have to assess your
energy choices at any location what you will pick.
• How will you offer energy to your lights?
• What on the off chance that you do wind up depleting every one
of the batteries?
• Could you find any place to connect to the charger?
• Whether the selected spot is remote and adequate to influence
an auto to lighter AC connector a smart thought?
5.Perfectly clear sound. Perfect, amazing sound is vital for making
a film. Search for a hush that guarantees and provides you the
location as per your desire.
The whooshing sound of activity, sound of commotion of running
water, and the sound from echoing of voices and developments all
would be able to hinder amazing sound. As soon as you explore
the location, verify all these conditions after tuning in to your
camcorder's mouthpiece pickup via headphones. Your codeless
microphone should be tested at the location too, and listen careful
and intently for an impedance.

Audio Visual Production
61
6.Inspect the influencing components. Rain, Sun, wind, warm,
snow, icy –these all could be helpful or may hinder, contingent
upon your want to include over the film. In this way, it's basic to
know and verify the figure as you will be exploring.
Film cameras are not affected by rain, salty shoreline, dampness
from waterfalls or air. Smeared lens and water or salt inside the
card reader can spell catastrophe. Splendid, hot or sunny locations
that’s having loads of daylight could likewise may be a major issue:
grey and black bodies of camcorder ingest the beams of Sun and
results in their overheating when it remains uncovered.
Cool temperatures can deplete batteries and make you and your
aides awkward rapidly. Always have try to keep hardware warm by
putting away the same covered in a coat or auto till the point
when you will be prepared to shoot, and by wrapping it in an extra
scarf or coat during taping.
7.Choose where to shoot. Ensure for having satisfactory space for
setting up the greater part of your rigging, with the goal that
you're ready to get the shots you have at the top of the priority
list. A little issue may appear for example the ideal location for a
shoot, till the point when it’s been understood that the site may
not have sufficient space for positioning your rigging. There might
be a lot of room in a vast area similar to a hut or a theater, yet you
will most likely not be able to meander uninhibitedly. The moment
you explore for the location confirm that you have physically
visited the spots were you will be shooting from.
8.Get appropriate authorization. You should be known that you
may have to recieve grants and other legitimate consents for
shooting at specific locations. As you're taking a gander at a
location, plan a legitimate rude awakening.
• Did you picked a road or walkway location that may obstruct
movement?
• Are you intended for shooting on another person's property?
Burial grounds, shopping centers, markets, enterprises and
organizations are on the whole private property. Numerous

Unit 4 Production Design & other things
62
proprietors will be cheerful to oblige you on the off chance that
you ask, however in the event that won’t oblige, you have to pick
a different location. It will be smarter to secure consent ahead of
time than to have a shoot hindered by the specialists.
9.Assess the zone. Keep an eye on interchanges:
• Is there mobile phone gathering in the region you've shot?
• How about an adjacent pay telephone?
• When you have to drive far, have you made arrangements for a
breakdown?
Look the region for brisk sustenance stops to fulfill you and your
team amidst a bustling timetable and twofold find the address of a
nearby gadgets store, in case on the off chance that you have to
supplant a link or connector.
10.Lastly, note down! While taking a seat to assess a location
following a day of investigating, you may feel happy to have
exploring reports to allude to. During the exploring campaigns in
your shoot, day by day goes, on your family get-always, and in
your inner consciousnesses, you'll run over innumerable locations
and evolving situations, every condition would be novel and
conceivably essential for you.
Record all the surveys, take still photographs or you could shoot a
small video with a running sound editorial.
• Note the season of day
• The nature of the light
• The sounds noticeable all around
• your specific experiences
Here is a rundown of things to pay special mind to.
• Auditoriums of schools: poor sound, substantial space, hard to
draw near to activity

Audio Visual Production
63
• Churches: lighting may be low, resounding sound, difficult to be
unpretentious
• Parks and Natural Areas: evolving climate, troublesome
apparatus transport
• Urban Centers: foundation commotion, high movement and
person on foot nearness
• Beaches: wind commotion, salt air, sand defilement, coordinate
sun
• Events of outdoor: rivalry for space, poor sound, swarm
commotion
Make sure to recollect the extremely valuable spots that you have
explored during this rundown for a location exploring pack:
• Notebook (or PDA) with composing actualize for field notes
• Still camera for making location file photographs
• Camcorder with earphones for recording test video and sound
• Compass for checking dawn/dusk, wind course, and so on.
• Watch for time-delicate perceptions
• Maps particularly for remote locations
• Cell telephone in the event that something goes wrong
Hiring of Equipments:
Employing of most recent top of the line and fitting equipments is
the most ideal approach to make a best film. Every one of the
equipments like camera, lighting and support gear shift amazingly
broadly relying upon your need.
What kind of gear you might want to lease and for to what extent
it will be utilized? Numerous rental houses offer a 3 or 4 day week.

Unit 4 Production Design & other things
64
So the day rental goes down the more you lease it. Everything is
based around the day rental.
Additionally most rental houses have outside the box/understudy
rental rates. With trade out hand (no credit) and a moment level
rigging list autonomous productions can get equip that will do the
trap at a small amount of the cost of the huge players needs. Truly
simple to cut free a solitary camera and a handful of lights without
trading off the huge rentals.
When you are arranging it is simpler for the rental house to toss a
couple of more things into the rental at a similar cost than
bringing down the quote.
Some rental houses will offer gear protection if the tenant does
not have any. This is normally exceptionally pricy. Best to get a
production protection bundle somewhere else that incorporates
rentals. Depending what you are leasing you could be talking
$10,000 of rigging or upwards of a million dollars. You can't exit
any entryway without protection. As a rule around $1500 will get a
bundle that will cover unobtrusive gear rentals and production
protection for the span of the production. Shooting on city streets
requires protection in any case, in addition to if something
happens you require someone to have your back.
However, you are inquiring as to why would nobody be able to
reveal to me the amount it will cost? The scope of expenses for
production gear is insane colossal. For a 4K resolution shoot you
could purchase a GoPro for $600 or purchase an professional cine
camera with top lens, frill, crane, dolly, track and a lively lighting
bundle that can cruise more than Million dollars in adapt instant.
Rental rates take after the cost of gear and its rate of
deterioration.
A medium range star cine camera a Red Epic, prime lens bundle,
matte box, filters, take after concentration, batteries, accessories,
media and tripod will run you somewhere in the range of $1000-
$2500 every day rental and expect near $100,000 protection.
There is no standard method for building a camera and by and
large the lens and required accessories will cost far more than the
camera body. The renter will disclose to you how much protection
you require.

Audio Visual Production
65
Here and there you can locate a proprietor, owner that will
consent to go ahead board with his/her camera and lights for less
expensive than ala trucking gear from rental houses.
Beside the enormous players there are little rental houses and
groups of proprietor administrators that might have the capacity
to set you up on the off chance that you can't bear the cost of
awesome.
Everything depends on what gauge of rigging you are searching for
and how much spending plan can be designated to get it. Getting
some rigging locally from a free source is typically the best for
your production. Getting the proprietor of the rigging to work with
you is frequently much more productive.
Before picking any hardware there ought to be a few inquiries may
ring a bell like-
• What sort of film and what sort of hardware?
• Is it a computerized film?
• What sort of camera and focal points you will be required?
• Do you require lightning hardware and if so what kind?
• Daylight or Tungsten?
• What kind of Filters and so forth?
Choosing & hiring of crews:
To influence your film to the best, in the normal component film
production will require no less than twelve group individuals, and
we will demonstrate to you who to contract, how to discover
them and what their obligations will be.
In the event that you are working with an amazingly constrained
spending plan, at that point you will discover modest or free
enable, which we will soon demonstrate to you best practices to
accomplish. In the event that you have to work for a bigger
budget, presumably you need a more experienced staff to work
with and no more basic positions, known as Above-the-Line crew.
Have you at any point gone through the credits of any significant
Hollywood movie? Numerous people are incorporated—

Unit 4 Production Design & other things
66
necessarily not all of them all in the production arrange.
Obviously, there is no need employ hundreds, or even handfuls, of
crew. Countless positions are an excess dealt with the enormous
studios and production organizations. In the event that of bigger
production, extra individuals can be added in your group, since
there may be a great deal of tasks associated with making
enchantment.
Basic Personnel
How about we begin with the essential personnel, and after that
we'll take a shot at how to discover them. Furthermore, the most
essential is the means by which to discover the general population
who are the most suitable to fit the needs. The measure of work
force that you require will clearly differ starting with one kind of
shoot then onto the next. The bigger the set, the more team is
required. Over all the three most imperative employments
consisting in group will be:
• Producer
• Director
• Production Manager
Since it will be your motion picture, you totally should go up
against one of these parts or it won't be your motion picture when
it's done. It's essential that you employ capable, experienced
individuals whom you know and trust for the other two positions.
On a small scale budget shoot, everybody will go up against
various roles. The most important example is the producer.
Alongside the standard producer parts, this individual will likewise
go up against the duties of area chief, area scout, set creator and
typically throwing director, despite the fact that the director might
be the one to go up against this part rather, or you can procure an
expert throwing director. The producer will be the person who
acknowledges general duty regarding the movie. He is the person
in charge of getting the finding, arranging and financing, the sets,
managing accounts — both approaching and active — promoting
film and masterminding conveyance. Principally it’s the producer's
business to appoint professional and monitor the running of the

Audio Visual Production
67
project on time and on track from the earliest starting point of the
task via conveyance.
Imaginative genius of the project is the director. Besides from
saying “action," the director likewise integrates to the cast to learn
that all of them are in agreement altogether — and not just while
being on-set. The director works with the on-screen characters in
pre-production to enable their understanding to that of the vision
of the film and accordingly their role or cast in the movie. S/he will
in like manner be in charge of all read-through of the content and
work with the camera group to guarantee that the set and the
lighting are done honestly. The director shall work intimately with
producer since they are the prime members responsible for
making a beeline for a similar objective.
While the director deals with the inventive parts of the film, the
production manager (PM) is responsible for its specialized aspects.
Planning, finance, show discharges, organizing with the associate
director, booking and leasing/purchasing hardware fall under
his/her ward. In bigger productions, huge numbers of duties of PM
fall along with the specification of the line producer. Similarly like
that of the director and producer, the production manager
additionally takes a shot at the undertaking from pre-to-post.
It's essential that the director works in tandem with the
cinematographer.
Commonly on ultra-low-spending shoots, the cinematographer
would give the camera package and at times make a request to
bring their own gaffer along. The procedure in which the shoot in
the most part works is that the director would guide the DP the
way that he want scene to look along and in turn the DP would
set up the camera and lighting edges to influence his exact idea to
work.
In spite of the fact that, earlier we talked about, this is basic that
the cinematographer is going to provide the whole package of
camera, you ought to dependably better to have a backup camera
and lights, as Hollywood awfulness stories flourish.
The next crew member supporting to the director and whom the
director require to assign is his assistant director. The AD is

Unit 4 Production Design & other things
68
imperative to keeping up arrange on the set. S/he should be
responsible to assure that cast and group are on the whole
mindful of what they have to do every day. Planning call sheets,
checking personnel, keeping the director and producer mindful of
any issues that no one but they can comprehend and dealing with
coordination are all piece of the AD's occupation.
The gaffer is considered to be the lighting head and s/he'll work
intimately with the photography director to ensure that the
lighting is in accord to the director's preference. Afresh, if the DP
has some person that he genuinely lean towards working with,
you should undoubtedly get that gaffer; generally, the director
undoubtedly will be the best individual to enlist this position.
Another imperative part to appoint is of content director. A
content director will be the individual who guarantees congruity
and without progression, you are taking a gander at genuine
inconvenience as reshoots and those are about the scariest thing
that you can have happen. In view of precisely how vital this is, if
you could not utilize a script supervisor while shooting, you would
be asking for catastrophe.
A great script supervisor would maintain a record of an expansive
folio that could be utilized to think of his/her notes and also for
making notes on each shot. S/he will likewise be the person
ensuring that each scene should get shot and that the
clapperboard operator should have each scene and take
composed legitimately on the clapper. S/he must ensure that each
and every thing is set up starting with one shot then onto the next,
from the performing artists' makeup to the props to the lighting
point. A few directors have a feeling that they needn't bother with
a script supervisor. As they are off-base.
Since audio is equally vital as visual, great production sound mixer
ought to go with each video made by you. The PSM would be
working with the boom mic holder and deal with entire mics, and
also the audio blender. Likewise you may require an after
production sound individual, known as the sound designer, so
before enlisting your sound mixer, ensure that he's accessible for
that work, or discover another person will's identity ready to.

Audio Visual Production
69
Notwithstanding, it would be wise to have the post-audio person
on set, so if your PSM can likewise work post, you're brilliant!
Similarly each armed force requires privates, each set requires
production colleagues! For proceeding with the armed force
relationship: it’s always better to have more PAs — until your set
has PAs stumbling, at that point you'll need to send a few people
home. Utilize your PAs for doing all the little assignments in and
around the set that would somehow or another engage your key
work force and keep them occupied with doing errands that are
underneath them. A few cases would incorporate:
• Taping down wires
• Operating the clapperboard
• Getting model discharges marked
• Checking mics
• Standing in for on-screen characters amid sound and
lighting checks
Likewise, you need to do the best for shielding them from
hoarding the services table of the craft. We've all needed to work
with PAs who assume that it was requested only for them.
On the off chance that you are shooting individuals, and it's
practically sure that you will be, you should utilize no less than one
individual, talented for doing perfect hair and makeup; ideally
somebody able to comprehend the distinction among "genuine"
makeup and film/video makeup. Along these lines, there will be
someone to comprehend what should be ideal, and what should
be avoided depending on the lights of the surroundings.
Regardless of the possibility that you're running a zero-spending
production, please make a special effort to be prepared to pay
your MUA a "pack charge" on the grounds that a decent craftsman
will convey her own apparatuses to your shoot. S/he should get
something back for his/her project. In case it is viewed as that the
creation adequately critical to enroll hair and cosmetics, review
that more entertainers in a scene thinks about to more
beauticians. It's more affordable and more secure to have MUAs
staying around after the shot begins than to have entertainers in

Unit 4 Production Design & other things
70
full cosmetics holding up for substitute on-screen characters to get
readied for the scene – it in like manner shields the on-screen
characters from mutinying on the set — not beautiful. Once
you've gotten your lead beautician, work with him/her on what
number of people s/he'll need to help and look for him/her
recommendation to contracting partners.
People don't learn hair and cosmetic makeup in a vacuum; they
know a great deal of others and they should know who can trim it
and who can't!
In small productions, producer might deal with the costume and,
props however as a rule, it's best to enlist maybe a couple people
to deal with these undertakings. Lot of costume or fashion
designers additionally make great props experts, hence you need
to regularly spare compensation on the off chance that you get
the ideal individual to deal with both.
When you complete the process of movie making, then you
require a video editor. At times editor is an indistinguishable
individual from the director, yet in the event that it's not, s/he
needs to work with the director for ensuring that the last item
suffice perfectly to the director's vision. A few editors are
equipped for including special effects and colour correction and
cutting the film — and some are most certainly not. In the event
that you discover an editor, great for making the cuts, yet not
including, essential subtleties required incredibly to the last item,
at that point you'll presumably need to procure somebody to
include those completing touches, too.
Unless your shoot will be little and short, you ought to likewise
employ for security and safety. If it’s a large project or set with
many individuals, than you require the larger security personnel.
Guarantee that the security faculty are faithful and can be relied
upon, so either employ known persons, or friend or pay them well.
Another critical note: if the production incorporates stunts, you
should incorporate an accomplished stunt coordinator and make
certain to convey at any rate $1,000,000 protection and have EMS
close by. Stunts regularly turn out badly and lawyers love to sue.

Audio Visual Production
71
Of the positions delineated above, you ought to request a demo
reel from the going with people:
• Producer
• Director
• Assistant Director
• Cinematographer/DP
• Gaffer
• Hair, Makeup
• Wardrobe, Props
• Script Supervisor
• Production Sound Manager
• Editor
Where and How to discover Crew:
While contracting the crew, your principle objective should be to
choose the capable individuals who could work as per the
requirement. Who do you coexist together with best? Similar
individuals who will have your best advantages on the most
fundamental level — companions and (here and there) family. The
enormous focal points are that you comprehend what's in store of
these individuals, with the goal so that you do not hurl them in a
tight spot, and their work will be trashy — in light of the fact that
they need your project to be successful.. The disservice is that
most likely they may not be exceptionally experienced, so make
certain not to give them positions that they can't manage..
A) Online Resources
How about we begin with the self-evident. Assets incorporate
www.Mandy.com,
www.Backstage.comwww.Variety.comandwww.Craigslist.org. All
these have free occupation postings, despite the fact that you
need to agree to accept most. One other issue is that contracting
Below-the-Line team is exceptionally troublesome. A large number
Unit 4 Production Design & other things
72
of these individuals are just in it for the cash, so in case if they are
not offered a union scale, they'll be outraged and, as opposed to
disregarding your advertisement, signal it with the goal that your
impeccably authentic promotion will get erased numerous times
each day. This may not be genuine when searching for producers
and directors.
Once you've gotten your team, it's an inconceivable arrangement
to have no under two sessions in the midst of pre-production to
go over basic information. While conducting these gatherings,
discover how well the group coexists with each other; this should
demonstrate to you how well they'll cooperate. On the off chance
that somebody is acting diva-like or you notice a contention
fermenting, right now is an ideal opportunity to make a move. The
motion picture's production may just last half a month, yet they
will be serious, regularly 12-hours-per-day, so you don't need
strife.
B) Disconnected Resources
Film schools!
In the event that while, searching for individuals who should
happily work for credit — and perhaps a couple of bucks to enable
them to work more proficiently — and will's identity anxious and
imaginative, the best place to meet your majority requirement of
your movie is the nearby film schools. This likewise an awesome
place to choose performers and after production help — and here
and there altering offices, as well.
While visiting a set is an awesome approach to pick off group, yet
don't hope to procure the division heads in case the motion
picture does not have a huge spending plan. Rather, get the
opportunity to be companions with their collaborators and, on the
off chance that you were successful to make them agree, offer a
position to them as the office head in your next film. They would
not expect an indistinguishable pay from the division head on a
bigger film, however they would be anxious to get nearer to their
objectives and eager to have the title and the obligation.

Audio Visual Production
73
Film Commissions
Most states and significant urban communities have a film
commission and their employment is to motivate you to film in
their general vicinity, such that they would be extremely eager to
do the job with you, even as a learner film maker. Even they will
be additionally prone to have free employment postings on their
sites. While shooting in Philadelphia, I swung to www.film.org and
they were brilliantly useful, despite the fact that our productions
were little! These are on the whole awesome assets. Do a scan for
the film commission in your state or district; it's certainly justified
regardless of the exertion.
C) From Network!
In case you're not kidding about getting into the business, you've
heard every one of the three of those words previously. That is on
the grounds that they're valid. Systems administration is the way
to making it in this industry. Regardless of whether you're
searching for official producers to fund your film, on-screen
characters, producers or PAs, you have to meet similar individuals
who are likewise searching for a break in the business — or for
those who've effectively made it. While organizing, recall that the
general population whom you meet likewise know other
individuals. Suppose you got to meet with the camera director and
you figure out how to believe her capacities and aptitudes;
however you're not searching for a DP on your forthcoming shoot.
In spite of the fact that you should not have to enlist her, she
could be the person who could prescribe an incredible gaffer, so
ask her sentiment. Quality references in this industry are
unadulterated gold!
Above the-Line versus Below the-Line
Some individuals inside the business are there who trust that
"above the Line" is a disparaging term; it isn't. The "line" alludes to
how a team part gets paid. The individuals who are “above the
line" get paid a straight pay that depends on just two elements:
spending plan and position. Keeping in mind the end goal to
enhance their compensation, individuals in BtL positions need to
work their way up to motion pictures with bigger spending plans.

Unit 4 Production Design & other things
74
The individuals who work "over the line" get paid by the financial
plan and the measure of cash that the venture acquires, alongside
their experience/aptitudes. When you have paid your contribution
by chipping away at bring down spending productions, you will
begin getting notoriety. In the event that it's a decent rep — and
you've organized legitimately — you will be made a request to
take a shot at higher-spending films. The best directors and
producers make a huge number of dollars per film since they are
normally paid in "focuses," which is a level of the film (one point =
one percent). In the event that the film slumps, the AtL individuals
won't make much else besides their base pay, however in the
event that it's a win, these are the people who receive the money
related rewards. In spite of the fact that not specified in the
article, the screenwriter is likewise an "over the line" individual.
Be that as it may you make your living in the business, organizing
is constantly essential. No different business is as communitarian
as making films, so keep your name, face and notoriety out there.
All the above positions we talked about till now, lets see their
breakdown according to the area where they fit:
Over the Line
• Director
• Production Manager
• Producer
Below the Line
• Cinematographer
• Script Supervisor
• Production Sound Mixer
• Assistant Director
• Gaffer
• Hair, Makeup
• Wardrobe, Props
• Stunt organizer

Audio Visual Production
75
• Editor
• PA
In spite of the fact that these positions are "below the line," the
best cinematographers, editors, costume, hair and makeup men
and stunt coordinators are paid high compensations.
Unit summary
Summary
In this unit you learntthe key people and their part and duty in the
pre-production stage. Every one's part is exceptionally one of a
kind and testing in the film production. Other than that you have
learnt that how to design the production, enlist the gear, scout the
location for filming.
Assignment
Assignment
First visit your favourite location. Note down the facilities available
there on a notepad. Go to aequipment hiring centre and list out
the equipments you want to hire for your production. Selects few
characters from your college and neighbours.

Unit 4 Production Design & other things
76
Assessment
Assessment
Discuss the role of producer in Film/video making?
Who is responsible for all the expenditure in the
shooting?
Who is known as the captain of the ship?
Describe the role of music director in Indian film
industry.
Briefly discuss the works of a production coordinator.
Write down the three categories of people worked for
film making.
What is the role of visual effects supervisor in the pre-
production stage of film making?
Resources
https://www.sokanu.com/careers/lyricist/ https://www.futurelearn.com/ http://www.thevideoeffect.tv/ https://en.wikipedia.org/wiki/Main_Page
https://www.prospects.ac.uk/job-profiles/production-designer-theatre-television-film/
https://www.videomaker.com/


DMA-05
Audio Visual Production Block – III: Video Production (Production)
Odisha State Open University

Audio Visual Production
This course has been developed with the support of the Commonwealth of Learning (COL). COL is an intergovernmental organisation created by Commonwealth Heads of Government to promote the development and sharing of open learning and distance education knowledge, resources and technologies. Odisha State Open University, Sambalpur (OSOU) is the first Open and Distance learning institution in the State of Odisha, where students can pursue their studies through Open and Distance Learning (ODL) methodologies. Degrees, Diplomas, or Certificates awarded by OSOU are treated as equivalent to the degrees, diplomas, or certificates awarded by other national universities in India by the University Grants Commission.
© 2018 by the Commonwealth of Learning and Odisha State Open University. Except where otherwise noted, Audio Visual Production is made available under Creative Commons Attribution-ShareAlike 4.0 International (CC BY-SA 4.0) License: https://creativecommons.org/licenses/by-sa/4.0/legalcode For the avoidance of doubt, by applying this license the Commonwealth of Learning does not waive any privileges or immunities from claims that it may be entitled to assert, nor does the Commonwealth of Learning submit itself to the jurisdiction, courts, legal processes or laws of any jurisdiction. The ideas and opinions expressed in this publication are those of the author/s; they are not necessarily those of Commonwealth of Learning and do not commit the organisation
Odisha State Open University Commonwealth of Learning
G.M. University Campus 4710 Kingsway, Suite 2500, Sambalpur Burnaby, V5H 4M2, British Odisha Columbia India Canada Fax: +91-0663-252 17 00 Fax: +1 604 775 8210 E-mail: [email protected] Email: [email protected] Website: www.osou.ac.in Website: www.col.org

Audio Visual Production
Acknowledgements The Odisha State Open University and COL, Canada wishes to thank those Resource Persons below for their contribution to this DMA-05:
Concept / Advisor
Dr. Srikant Mohapatra Vice- Chancellor Odisha State Open University, Sambalpur
Course Writer
Sourav Sengupta
Visual Editor, News World Odisha
Course Editor
Durgadatta Kanungo
AIDB trained, Media Person, Doordarshan
Published by :
Dr. Jayanta Kar Sharma Registrar on behalf of Odisha State Open University, Sambalpur
Contribution of following staff members of Odisha State Open University is acknowledged:
Sambit Mishra
Debidatta Behera
Prashansa Das
Radhakanta Suna
Abhinandan Tripathy
OSOU and COL acknowledge the support extended by Prof. Madhu Parhar, STRIDE, IGNOU, New Delhi in conducting several workshops in the process of preparation of course material for DMA.

ii Contents
Contents
Contents
Course Overview 5
Welcome to Video-Production ......................................................................................... 5
Know your Equipment ...................................................................................................... 5 Lights and Camera Support .............................................................................................. 5 Clapboard & Sound Equipment ........................................................................................ 6 Blocking & Rehearsal ....................................................................................................... 6
Course outcomes ............................................................................................................... 6 Timeframe ......................................................................................................................... 6 Study skills ........................................................................................................................ 7
Need help? ........................................................................................................................ 7 Assignments ...................................................................................................................... 8 Assessments ...................................................................................................................... 8
Getting around this Course material 9
Margin icons ..................................................................................................................... 9
Unit-1 11
Know your Equipment .................................................................................................... 11
Introduction ........................................................................................................... 11 Outcomes ............................................................................................................... 11
Terminology .......................................................................................................... 11 Cameras and accessories ....................................................................................... 12 Different types of cameras .................................................................................... 12
Digital cameras ...................................................................................................... 13 Blackmagic ............................................................................................................ 14 Camcorders ............................................................................................................ 16
Mirrorless & DSLR Cameras ................................................................................ 16 Smart Phones ......................................................................................................... 17 Camera Accessories .............................................................................................. 18 Tapes and Storage device ...................................................................................... 21 Digital Storage Devices ......................................................................................... 22
Unit Summary ....................................................................................................... 23
Assignments .......................................................................................................... 23
Resources ............................................................................................................... 23
Unit 2 25
Lights and Camera Supports ........................................................................................... 25 Introduction ........................................................................................................... 25
Audio Visual Production
Outcomes ............................................................................................................... 25
Terminology .......................................................................................................... 25 Lights ..................................................................................................................... 26 HMI lights ............................................................................................................. 28 Light Accessories .................................................................................................. 29 Camera Support ..................................................................................................... 32
Cranes / Jibs ........................................................................................................... 33 Rigs / Stabilizers .................................................................................................... 35
Unit summary ........................................................................................................ 36
Assessment ............................................................................................................ 36
Resources ............................................................................................................... 36
Unit 3 37
Clapboard &Sound Equipment ....................................................................................... 37 Introduction ........................................................................................................... 37 Outcomes ............................................................................................................... 37 Clapboard: ............................................................................................................. 37
Terminology .......................................................................................................... 37 Clapboards ............................................................................................................. 38 Historical Background of Clapperboards .............................................................. 38
Traditional Clapboards .......................................................................................... 38 Digital clapboards .................................................................................................. 39
Sound Equipment .................................................................................................. 40 Microphones .......................................................................................................... 40 Omni-directional ................................................................................................... 42
Transducer ............................................................................................................. 43
Portable and Camera Mounted Receivers ............................................................. 48 Audio Mixers, Interface and Recorders ................................................................ 48 Audio Interface ...................................................................................................... 49
Audio Mixers ......................................................................................................... 49 Audio Recorder ..................................................................................................... 50
Cables and Connectors .......................................................................................... 51 XLR Connector ..................................................................................................... 52 USB Connector ...................................................................................................... 52
Quarter inch phono plug ........................................................................................ 53 Field Monitors ....................................................................................................... 54
Necessity of Field Monitors .................................................................................. 54
Unit summary ........................................................................................................ 56
Assessment ............................................................................................................ 56
Resources ............................................................................................................... 56
Unit 4 57
Blocking & Rehearsal ..................................................................................................... 57
Introduction ........................................................................................................... 57 Outcomes ............................................................................................................... 57 Terminology .......................................................................................................... 57

iv Contents
Meaning of the Term “Blocking” .......................................................................... 58
Overview of Evolution of Blocking ...................................................................... 59 Uses of Blocking ................................................................................................... 59 Uses of an Establishing Shot ................................................................................. 60 Long Shot .............................................................................................................. 61 Mid shot ................................................................................................................. 61
Master shot ............................................................................................................ 62 Close-upshot .......................................................................................................... 62 Over Shoulder Shot ............................................................................................... 63 Rehearsal ............................................................................................................... 63 Lighting ................................................................................................................. 64
Key light ................................................................................................................ 65 Fill Light ................................................................................................................ 66
Back Light ............................................................................................................. 67 Ambient Lighting .................................................................................................. 67 Shooting ................................................................................................................. 68 How much to film .................................................................................................. 69
Get the location sound ........................................................................................... 70
Unit summary ........................................................................................................ 71
Assessment ............................................................................................................ 71
Resources ............................................................................................................... 71

Audio Visual Production
5
Course Overview
Welcome to Video-Production
Video production is an entry-level course that will serve as
an introduction to basic video/film/audio production. The goal of
the course is for the student to develop the ability to capture and
audio relevant video images and audio, aspects and to be able to
edit those elements into a harmonised and meaningful
programme or film. This process involves shooting, composition,
lighting, audio recording, editing and much more. Upon
completion of this training production training course, students
will gain a basic understanding of principles, techniques and
essential elements of video production.
Most important, the course will provide an opportunity for you to
create a variety of video productions, allowing you to express
personal creativity while developing the ability to conceptualize
story, idea, send effectively translate these ideas into captivating
visual forms.
Know your Equipment
Starting from the early days of analogue production to
present digital era, the standard and quality of equipment may
have varied but the basic process is almost the same. As we all are
aware that the starting process is filming your subject, and this
filming or shooting is carried out by a camera. So this unit of the
course is dedicated to make you familiar to your shooting device.
Lights and Camera Support
The light creates images on the sensor of the camera
through lenses. The light condition decides the quality of images
that will be formed so it should always be kept in mind as to how
to use the light according to our needs. The camera supports such
as tripods, trolleys, rigs also are an important part of camera

Course Overview Know your Equipment
6
handling. The other camera equipment creates different kind of
effect in the image capturing process.
Clapboard & Sound Equipment
After camera and lights, clapboards, various audio
equipments and field monitors are the necessities for proper and
systematic production. These devices have evolved during course
of time and change of technology.
Blocking & Rehearsal
Proper camera placement, proper lighting and proper
rehearsal of subject could lead to a good production material. In
case of fiction shoot it is advisable to rehearse your subject more
and more so as to give perfect shot in less number of takes.
Course outcomes
Upon completion of Video-Production you will be able to:
Outcomes
Learn to operate a Film/video camera.
Capture well composed video images.
Capture great quality sound.
Edit video and audio into a compelling story.
Timeframe
How long?
This course will be completed within “2” classes.
This course is of “1” credits.
4 Hours of study time is required to complete this unit.
Audio Visual Production
7
Study skills
Learning about the audio visual productions are a part of Multimedia
Coaching. But, when it comes to creation of an output, there is no
specific ABC formula for doing so. It is just like a painting in which the
artists choose the colour and proportion according to the need, not as
per a written plan.
In creating outputs for TV, Films etc. we have to utilize the software
tools from one corner to another randomly. So for every project, the
formula is different. There is no fixed recipe for all kind of output. So, the
more and more you learn about the options, more variety you will get.
Each and every option is explained step by step in the course material.
Apart from this course material, the learner has to adopt the tendency
of learning from multiple sources i.e.,
Internet tutorials
Video tutorials on youtube
Collaboration with people working in the industry etc.
Only classroom study will not make you a professional. You have to be active to grab the opportunity of learning wherever you get a chance.
Need help?
Help
In case of any help needed you can browse the internet sites like youtube.com for video tutorials about the subject.

Course Overview Know your Equipment
8
Assignments
Assignments
There will be some assignments at the end of each unit.
These assignments are mostly practical based and should be submitted in CD or DVD. Theoretical assignments are to be submitted neatly written on A4 size sheet.
All assignments will be submitted to respectivestudy centre of Odisha State Open University or as directed by Co-ordinator.
All assignment should be unit wise on separate CD/DVDs clearly mentioning course title and unit on Top. Theoretical Assignment will be neatly filed or spiral bind with cover clearly mentioning necessary information of course.
Assessments
Assessments
There will be “1” assessment for each unit.
All practical assessment will be submitted to OSOU.
Assessment will take place once at the end of each unit.
Learner will be allowed to complete the assessment within stipulated time frame given by the university.

Audio Visual Production
9
Getting around this Course material
Margin icons
While working through this Course material you will notice the frequent use of margin icons. These icons serve to “signpost” a particular piece of text, a new task or change in activity; they have been included to help you to find your way around this Course material.
A complete icon set is shown below. We suggest that you familiarize yourself with the icons and their meaning before starting your study.
Activity Assessment Assignment Case study
Discussion Group activity Help Note it!
Outcomes Reading Reflection Study skills
Summary Terminology Time Tip
Audio Visual Production
11
Unit-1
Know your Equipment
Introduction
Every video production starts with a camera and ends on an editing table. Starting from the early days of analogue production to present digital era the standard and quality of equipment may have varied but the basic process is almost the same. As we all are aware that the starting process is filming your subject, and this filming or shooting is carried out by a camera. So this unit of the course is dedicated to make you familiar to your shooting device. You will be going through a full on theory and practical knowledge of various kind of cameras presently used in field. You will come across varieties of terminologies and use of the buttons of the cameras.
Outcomes
Upon completion of this unit you will be able to:
Terminology
Terminology
Lens: A transparent material which have at least one side spherical.
Camera: A dark box with a hole to capture the image.
Filming: The process of shooting a film.
Outcomes
Learn to operate a video camera
Differentiate between types of camera used for shooting.
Describe the Lens.
Explain the characteristics of DSLR Camera.

Unit-1 Know your Equipment
12
Cameras and accessories
Camera is the first gateway to the world of filmmaking or video
production. A camera is a dark box with a lens and a small opening
for the light to enter. But the very first camera did not have a lens.
Unbelievable! Yes the pinhole camera was the very first still
camera to portray an image on a wall of a dark room just through a
tiny hole. Such is the magical world of cameras or you can say you
can create magic with light through cameras in your hand. In this
course you will be having hands on knowledge on various types of
cameras. Starting from regular video cameras to the still cameras
which are also used for shooting video images Along with it the
accessories required with a camera such as use of different kinds
of lenses and tripods, trolleys, cranes, dolly, rigs and jimmy are
also covered in this part.
Different types of cameras
The most common camera types used by professionals and semi-professionals are analogue and digital cameras.
Analogue Camera The analogue cameras work on the principle of magnetic recording system. It converts the light images into magnetic information. The two presently used analogue cameras are DVCAM and BETACAM
DVCAM DVCAM is a variation of the DV format developed by Sony with an aim to function at the semi-professional and lower-end professional market. DVCAM uses the tape format for recording images. Sony HVR-Z7U is commonly used for this format. HD cameras record the pictures and sounds on the hard disc only.

Audio Visual Production
13
Title-DV Camera Attribution-CHIN.DENG Source-Flickr Link-https://commons.wikimedia.org/wiki/File:Sony_HVR-V1U_3CMOS_1080p_HDV_Camcorder.jpg
BETACAM BETACAM is a higher version of tape based image recording device designed by Sony for professionals with a half inch cassette. The image recorded and produced by BETACAM are superior in quality compared to DVCAM.
Title-Betacam Attribution-Ubcule Source- Link-https://commons.wikimedia.org/wiki/File:Betacam_SP_camera.jpg
Digital cameras
The digital cameras work on the principle of pixels recording
system. The light images are converted into pixels form on the
recording device.
Now coming to the digital world of cameras we have a number of
options to try with. Starting from daily use smartphones to highly
sophisticated chip based cameras its so easy and fun to work with
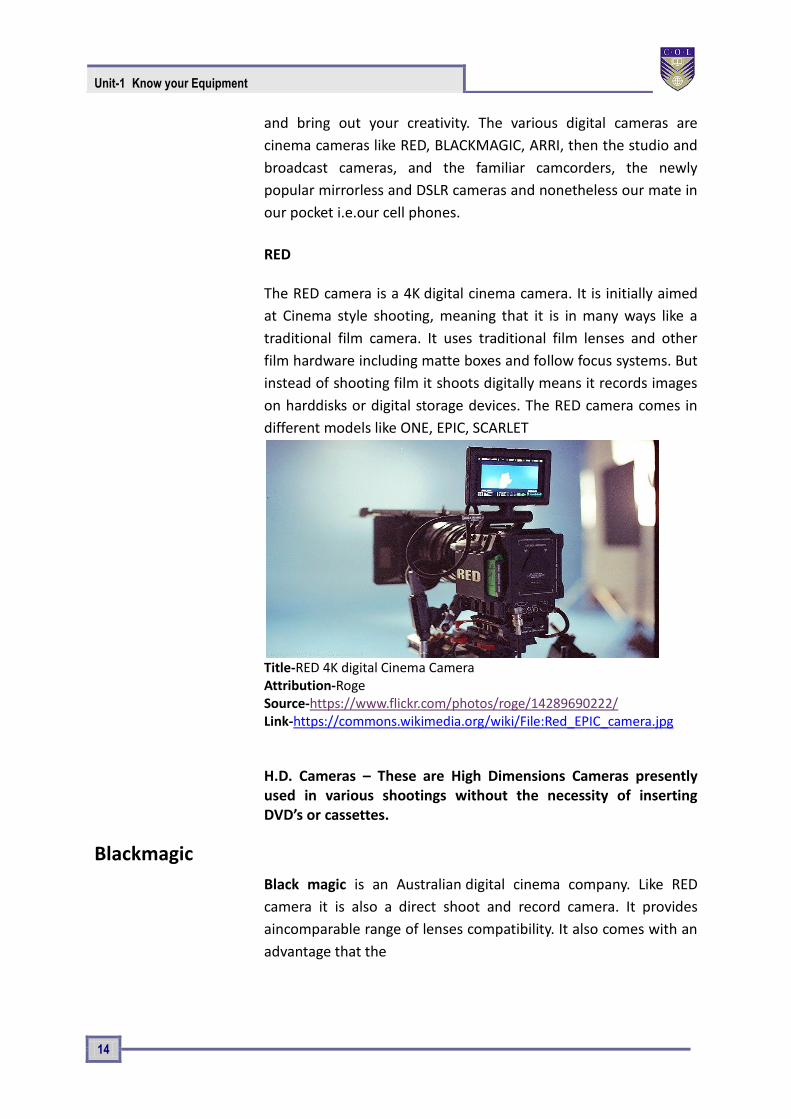
Unit-1 Know your Equipment
14
and bring out your creativity. The various digital cameras are
cinema cameras like RED, BLACKMAGIC, ARRI, then the studio and
broadcast cameras, and the familiar camcorders, the newly
popular mirrorless and DSLR cameras and nonetheless our mate in
our pocket i.e.our cell phones.
RED The RED camera is a 4K digital cinema camera. It is initially aimed
at Cinema style shooting, meaning that it is in many ways like a
traditional film camera. It uses traditional film lenses and other
film hardware including matte boxes and follow focus systems. But
instead of shooting film it shoots digitally means it records images
on harddisks or digital storage devices. The RED camera comes in
different models like ONE, EPIC, SCARLET
Title-RED 4K digital Cinema Camera Attribution-Roge Source-https://www.flickr.com/photos/roge/14289690222/ Link-https://commons.wikimedia.org/wiki/File:Red_EPIC_camera.jpg
H.D. Cameras – These are High Dimensions Cameras presently used in various shootings without the necessity of inserting DVD’s or cassettes.
Blackmagic
Black magic is an Australian digital cinema company. Like RED
camera it is also a direct shoot and record camera. It provides
aincomparable range of lenses compatibility. It also comes with an
advantage that the

Audio Visual Production
15
Company provides an editing platform to support easy editing of
the recorded materials. It comes in 2K, 4K and 8K variants.
Title-Blackmagic Design Cinema Camera Attribution-Morio Source- Link-https://commons.wikimedia.org/wiki/File:2012_Blackmagic_Cinema_Camera_front_2013_CP%2B.jpg
ARRI ALEXA ARRI ALEXA , a very familiar name among film makers aims at high class video image production. ARRI who was first into celluloid film cameras manufacturing came up with a digital version to cope up with the market with ALEXA model.This is the first camera of the Alexa product family. The ARRI ALEXA’s CMOS Super-35mm sensor is rated at 2.8K and ISO 800. That sensitivity allows the camera to see a full seven stops of over exposure and another seven stops of underexposure, an unprecedented Dynamic Range. To take advantage of this, ARRI offers both industry-standard REC709 HD video output as well as the Log-C mode that shows the entire range of the chip’s sensitivity, allowing for an extreme range of colour correction options in post. It is used mostly in shooting films along with studio shoots and commercials.

Unit-1 Know your Equipment
16
Title-ARRI ALexa Camera Attribution-ARRI AG Source- Link-https://commons.wikimedia.org/wiki/File:ARRI_ALEXA_SXT_Plus.jpg
Camcorders
The camcorders are the most user friendly device that can be operated by almost anyone. The semi-professional camcorders like Sony PWM and Panasonic P2 series are in regular use nowadays mostly in news and documentary shoot sectors. Title-Panasonic Camcorder Attribution-Mkunert Source- Link-https://commons.wikimedia.org/wiki/File:Panasonic-AF100.jpg
The ease of working and budget affordability makes it a first choice. The HD quality video images produced without any extra lights are its plus points. One can just point and shoot with these cameras.
Mirrorless & DSLR Cameras
In last few years the DSLR cameras have evolved as a handy
medium of capturing still as well as video images simultaneously.
The DSLR cameras which were thought to be only still cameras are
now a very effective video capturing device too.

Audio Visual Production
17
Title-Canon DSLR Camera Attribution-Maksim Sidorov Source- Link-https://commons.wikimedia.org/wiki/File:Canon_EOS_60D_01.jpg
The qualities of images captured are very high and nowadays most
DSLR are providing 1080 pixel quality video images. So any
amateur can also shoot great images with much ease. The mirror
less cameras are the same as DSLR but in the place of a mirror it
comes with a sensor which decides how much light information to
catch for the image. Canon 5D, Nikon D750 is most popular
players. These cameras like other professional cameras come with
interchangeable lenses required for different needs.
Smart Phones
The present day Smartphone’s , the one device which replaced
almost all other gadgets which used to serve our daily needs
starting from clock to compass and T.V to radio has now also
evolved as a replacement to the cameras. The everyday
developments in Smartphone technology has made Smartphone
so capable of filming still and videos that people are now shooting
films with them. Pocket friendly device loaded with 20-30
megapixel camera and sensor are the most effective device for
shooting. Nowadays editing can also be done on a Smartphone.

Unit-1 Know your Equipment
18
Title-Smartphone Camera Attribution-EsaRiutta Source- Link-https://pixabay.com/en/phone-photography-shot-forest-2405253/
Most Important- Whether indoor or outdoor recording, it is extremely essential to have a white balancing, just before the shooting.
Camera Accessories
Now you are fully aware of different types of cameras, it’s now
time that you also get to know about other accessories that are
required for smooth and better shooting experience. Most of the
compatible accessories come along with the camera itself. The
accessories required with a camera such as use of different kinds
of lenses and tripods, trolleys, cranes, dolly, rigs and jimmy are
also covered in this part.
There are other accessories which are available in the market. The
main accessories required for camera operation are lens, battery,
microphone, tapes and micro cards or hard disks, headphones.
Lens
Lens is the eye of the camera. The light after falling upon the
target subject enters through the lens and produces the image on
the image plane. The lens contains an iris which controls the
amount of light. The lens is mainly categorized as fixed lens,
telephoto lens wide angle lens and normal lens.

Audio Visual Production
19
Fixed Lens / Block Lens A fixed lens also known as block lens and also referred as prime
lens. The fixed focal length lens (FFL) has a focal length that is not
adjustable. Photographers are unable to zoom in and out on a
particular subject when using a prime lens. In other words we
shoot what our normal eyes see from the specific position. Mostly
the block lenses are available in 50mm and 85mm focal length.
Title-Lens Attribution-fernandozhiminaicela Source- Link-https://pixabay.com/en/lens-camera-round-technology-team-3095743/
Telephoto lens A telephoto lens is called so because it brings distant objects
nearer to us through zooming on it. A telephoto or zoom lens is
made up of number of lenses which helps the cameraman to zoom
in or zoom out on a subject while not physically moving but still
concentrating on the subject from a fixed point. The lenses with a
focal length above 100mm are known as zoom lens. They may
come up to 135-300mm.
Title-Telephoto Lens Attribution-allupinc Source- Link-https://pixabay.com/en/sony-a7r-camera-mirrorless-dslr-1328082/

Unit-1 Know your Equipment
20
Wide angle lens
In photography and cinematography, a wide-angle lens refers to
a lens whose focal length is substantially smaller than the focal
length of a normal lens for a given film plane. This type of lens
allows more of the scene to be included in the photograph, which
is useful in architectural, interior and landscape photography
where the photographer may not be able to move farther from
the scene to photograph it.
Another use is where the photographer wishes to emphasise the
difference in size or distance between objects in the foreground
and the background; nearby objects appear very large and objects
at a moderate distance appear small and far away.
.
Title-Wide angleLens Attribution-Capri23auto Source- Link-https://pixabay.com/en/lens-wide-angle-tokina-photograph-2115686/
Specialist lenses Other than these 3 types of lenses some lenses come with multi-function such as super telephoto, macro and fisheye shooting modes. They are collectively called specialist lens. Their zoom range may vary from 5mm-2000mm.
Title-SpecialistLens

Audio Visual Production
21
Attribution-Monoar Source- Link-https://pixabay.com/en/camera-lense-photography-zoom-1272791/
Tapes and Storage device
Depending on the cameras the images captured are recorded on tapes and digital storage devices such as memory cards and solid state hard disks. The analogue cameras usually use various kinds of tapes whereas digital cameras use digital recording mediums.
Tapes The tapes used in video cameras are magnetic tapes on which the
images shot are recorded using a rolling magnetic head which
writes the visual and audio information on the tapes. There are
two types of tapes mostly used in shooting which are quarter inch
and half inch tapes, otherwise known as DV tape and BETA tape.
DVcam Sony’s variant of the DV (Digital Video) format. Developed
for professional use, DVCAM improves quality by increasing the
tape speed and track pitch. The increased track size uses more
tape because DV tracks are recorded on the diagonal.
In addition, it "locks the audio," which prevents the audio from
drifting out of sync with the video.
DVCAM uses the same metal evaporated (ME) tape as does DV and
DVCAM cassettes can be played in DVCAM and DVCPRO tape
decks. DVCAM VTRs can also play and record DV cassettes.
Title-Video tapes Attribution-Grm wnr Source- Link-https://commons.wikimedia.org/wiki/File:DV_tape_sizes_2.jpg
Betacamis a high-quality videotape technology introduced by Sony

Unit-1 Know your Equipment
22
in 1982. Betacam evolved from Sony's Betamax consumer format,
but with a large increase in tape speed and using component video
signal separation rather than composite video. Betacam was
designed for professional TV recording.
Title-Beta tapes Attribution-Grm wnr Source- Link-https://commons.wikimedia.org/wiki/File:Beta_tape_sizes_2.jpg
Digital Storage Devices
Most of the present day digital cameras starting from point and
shoot to highly professional filmmaking cameras use digital devices
to store recorded visual and audio materials as files in pixel
formats. These devices are categorized as solid state hard disks
and memory cards. These digital devices have an advantage that
unwanted files can be deleted on the spot itself releasing more
space for shoot and they are very sturdy as well as handy.
Title-Memory card
Attribution-Adryan R. Villanueva Source- Link-https://commons.wikimedia.org/wiki/File:Lexar_Professional_1000x_128GB_SDXC_UHS-II_Card_(tidied).jpg

Audio Visual Production
23
Unit Summary
Summary
In this unit we learnt about the first basic equipment required for video production that is the camera. We also learnt about different types of camera. We also came across the other camera accessories such as lens, tapes and digital storage devices which are also required for video production.
Assignments
Assignments
What is a camera?
What are different types of camera depending on signal?
What is the work of a lens?
A camera can work without lens. True or false?
Name the different type of lens.
How mirror less camera is different from DSLR?
What is the focal length of a fixed length?
Resources
Further reading:
Mixing secrets for the small studio Senior, Mike.
Fundamentals of Digital Audio Alan P. Kefauver and David Patschke
Visual Studio 2013 Cookbook Bruce Johnson
Audio Effects Workshop Geoffrey Francis
How to shoot Video that doesn’t suck Stockman, Steve, 1958
The Book of Audacity : record, edit, mix and master with the free audio editor Schroder, Carla
Reading

Audio Visual Production
25
Unit 2
Lights and Camera Supports
Introduction
As we all know light is the main pivotal element behind
photography or videography. The light creates images on the
sensor of the camera through lenses. The light condition decides
the quality of images that will be formed so it should always be
kept in mind as to how to use the light according to our needs.
Most of the cameras use available ambient light to record subject
whereas some need extra artificial lights to create good images.
The camera supports such as tripods, trolleys, rigs also are an
important part of camera handling. The other camera equipment
creates different kind of effect in the image capturing process. In
this section you will come across some of these regular used lights
and camera supports.
Outcomes
Upon completion of this unit you will be able to:
Outcomes
Learn about different kinds of lights & the source used in outdoor and indoor shoot.
Learn about different light accessories used along with the lights for shoot.
Learn about different kinds of camera supports used.
Terminology
Terminology
Gels: A gel is a transparent material with different
colours which filters the source light and adds
to focal variety of effective shooting.
Fluorescent A kind of lights used for shooting. It will

Unit 2 Lights and Camera Supports
26
lights: capable of generating up to 100 lumens per
watt.
LED: Light Emitting Diode.
Lights
As mentioned earlier the main factor for good images is good light
condition. The lights are divided as natural and artificial depending on
the source. The main source of natural light is sun whereas the artificial
lights are manufactured according to the demand of intensity required.
Some of the artificial lights used are soft lights, tungsten and hard lights.
Some of the soft lights are fluorescent and LEDs
Fluorescent lights
A fluorescent lamp uses the excitement of low pressure mercury
vapour to produce ultra-violet light, in turn causing a phosphor
coating inside of the glass tube to glow radiating light in the visible
spectrum.
A fluorescent light is much more efficient than an incandescent
light, and is capable of generating up to 100 lumens per watt,
similar to the output of HMI.
Title-Fluorescent light Attribution- Christian Taube Source- Link-https://commons.wikimedia.org/wiki/File:Leuchtstofflampen-chtaube050409.jpg

Audio Visual Production
27
LED LED stands for light emitting diode and is a solid-state
semiconductor device. Only recently, LED’s of sufficient power
have become available to make practical LED film lighting possible.
LED’s are extremely efficient but are still limited in overall light
output when compared to any of the other light sources.
LED lights can be daylight or tungsten balanced, sometimes
switchable or having variable color temperature. Some have
variable color through the entire RGB spectrum, which is
something not possible with any other lighting technology. The CRI
rating of LED lighting can be over 90.
Some of the hard lights are open face lights, Fresnel lights and
HMI. These lights cast very hard intensity of light and shadow.
Title-LED light Attribution-KlausHausmann Source- Link-https://pixabay.com/en/spot-spots-spotlight-fresnel-lens-950389/
Open Face lights An open faced lighting fixture is used to create hard light that
casts hard shadows. It is not much more than a housing and
reflector for the bulb, and provides nothing in between the bulb
and the subject.
The commonly known 800W “Redhead” and 2000W “Blonde” are
examples of open faced video lights.

Unit 2 Lights and Camera Supports
28
Title-Open face light Attribution- Openclipart-Vectors Source- Link-https://pixabay.com/en/stage-light-spotlight-light-stage-576008/
Fresnel Lights A Fresnel lens is a special type of lens which is divided into many
concentric circles. It results in a much thinner lens compared to a
conventional lens of the same power. This lens evenly throws
out the light and allows for the beam to be varied from flood to
spot, just by changing the distance between the lamp/reflector
unit and the lens. It is also known as Baby lights.
HMI lights
HMI stands for Hydrargyrum medium-arc iodide and is a metal-
halide gas discharge medium arc-length lamp.
A HMI bulb contains mercury vapour mixed with metal halides. An
electrical arc between two electrodes excites the mercury vapour
and metal halides resulting in a very high light output and
luminous efficiency. HMI lamps are potentially functional between
85 and 108 lumens per watt, up to four times that of conventional
incandescent lamps. It almost casts a light of intensity like
daylight.
Another kind of light is tungsten/ halogen also known as solar lights. Tungsten light sources are basically related to the same type of incandescent filament bulbs which until recently were common in homes and offices everywhere. These lights lamps operate at a higher temperature than normal incandescent tungsten bulbs, and

Audio Visual Production
29
so they can achieve a higher colour temperature, and higher luminous efficiency. They naturally produce a warm light, but blue colour correction gels can be used to simulate daylight.
Light Accessories
Just getting the appropriate lights while shooting is not enough,
you may need some more materials to get the perfect lighting
mood and condition. These are called light accessories such as
barn doors, gels, cookie, diffuser, flag, umbrella, scrim, silk,
reflector, black wrap.
Barn doors Based on the terminology of video and film, barn doors are not
utilized for corral farm animals. Consider them like leaves - 2 to 4
of such, as a rule. Now place the entryways before a light source.
They would be seen everywhere in lights utilized for TV, film, or
Broadway creations. They would be utilized to shape the light and
keep it in a place based on your requirement and mask the other
where it is not needed. The specialty is that the equipment is very
handy and on won’t feel tired on utilizing it. Know that the lights
may become hot upon use – so in case if there is a requirement for
adjusting the barn doors, utilize gloves before using it. On a
creation, people generally forgot to wear gloves and simply move
the barn doors - that is an awful thought. It controls the quantum of
light turning out.
Gels Gel are related with many names - so it may be referred as color
filter, color gel, lighting gel or simply gel. Regardless of the name,
each element performs the same task. Gel is a material that is
transparent with a color. Gels are broadly utilized on photography
shoots, photography shoots, theater productions, videography
shoots and, obviously, in film production. These gels can also be
utilized for correcting the color or adding colour to a scene for a
dramatic impact. Thin sheets of polyester or polycarbonate are
used to make these gels. These can be placed straightforwardly
before the lights. Gels won't keep going forever; they blur or the
greater part of them melt in view of the extreme warmth from the
lights. It is used for colour balancing and bringing some dramatic
effect.

Unit 2 Lights and Camera Supports
30
Cookie Cookie is basically a shape that is cut out and is put before a hard light. By hard light we mean a light which is small generally, and that can be focused and utilized to deliver shadows and highlights. So we can use these cut out shapes maybe abstract or geometrical place in front of the light to get such patterns in the background or foreground.
Diffuser
Similar to the gel, a diffuser is a translucent bit of material placed
before a light for softening shadows and highlights. Likewise a
diffuser is utilized to diminish contrast and to enhance the angle of
beam. By contrast here we mean the differentiation among one
intensity and another or among the lightest and darkest
components of a scene. Diffused light means a light that comes via
a diffuser. As compared to the hard uncovered light, the diffused
light is more capable of creating softer shadows. It is utilized to
lessen contrast.
Flag Flag is called by different names by photographer such as siders,
cutters or gobos. Basically its panel is opaque in nature due to
which it is utilized to block light and shadow the subject, camera
lens or the background. Likewise it can be utilized to hide lights
within a scene.
Reflector
Reflectors are basically of two types. The former type is utilized for
lightning the indoors. This reflector is bowl-shaped and is available
in different sizes. Once in a while any hard white surfaced
materials like thermocols are additionally utilized as reflectors.You
can use this type of reflector to shape and intensify the light's
beam. For outdoor use the second type reflector is used. These
reflectors are basically used to redirect light. They are flat and
coloured in white, silver or gold. It is used to redirect and intensify
the light beam.

Audio Visual Production
31
Title-Hand Reflector Attribution-Katie Chan Source- Link-https://commons.wikimedia.org/wiki/File:Ex-Pro_42_inches_Photographic_Light_Reflector.JPG
Title-Light Meter Attribution-Wolfgang Lonien Source-7dcp2185798-flash-meter Link-https://commons.wikimedia.org/wiki/File:Sekonic_L-308S_Flashmate_digital_light_meter.jpg
Another very important and useful device that is necessary for good and proper light intensity and that is light meter or exposure meter. This small device is used to detect the amount of light falling on the subject and adjust the light condition accordingly.

Unit 2 Lights and Camera Supports
32
Camera Support
The camera supports are the equipments used to balance and
operate the camera other than handheld. They help in smooth
operation and creating camera motion effects. Some of these are
known as tripods, trolleys, dolly, rigs, jibs and stabilizers etc.
Tripod
A tripod is a portable three-legged frame, used as a platform for
supporting the weight and maintaining the stability of camera.
Many a times cameraman uses heavy lenses which makes smooth
camera operation difficult in handheld condition.
Title-Tripod Attribution- Source- Link-https://pixabay.com/en/tripod-camera-stand-photography-390902/
The tripod serves the purpose. A tripod provides stability against
downward forces and horizontal forces and movements about
horizontal axes. It also gives proper level and balance to the
camera.
Trolleys or Dolly A camera dolly is a wheeled cart or similar device used
in filmmakingand television production to create smooth
horizontal camera movements. The camera is mounted to the

Audio Visual Production
33
dolly and the camera operator andcamera assistant usually ride on
the dolly to push the dolly back and forth. The camera dolly is
generally used to produce images which involve moving the
camera toward or away from a subject while the camera is moving,
a technique known as a "dolly shot."
Title-Round trolley Attribution-Dan aka jack Source- Link-https://commons.wikimedia.org/wiki/File:Production_still.jpg
Studio dollies are large and stable and can feature hydraulics.
These are the first choice for studio, backlot and location shoots
when using professional cameras. A studio dolly usually needs a
specialized operator called a "dolly grip", and many are built for
the camera operator to ride on the dolly with the camera.
Lightweight dolly systems are simpler, affordable and are best
used with lighter-weight cameras. Lightweight systems are usually
favoured by independent filmmakers and students because they
are easier to carry and operate. These dollies support only the
camera, and the operator needs to move alongside. Some
lightweight dollies are small enough to be carried in a backpack.
Most of the dolly tracks are either straight or circular and semi-
circular.
Cranes / Jibs
In filmmaking and video production, a crane shot is a shot taken
by a camera on a moving crane or jib. Most cranes accommodate
both the camera and an operator, but some can be moved

Unit 2 Lights and Camera Supports
34
by remote control. Camera cranes go back to the dawn of movie-
making, and were frequently used in silent films to enhance the
epic nature of large sets and massive crowds. Another use is to
move up and away from the actors, a common way of ending
a movie.
Crane shots are often found in what are supposed to be emotional
or suspenseful scenes. A boom arm helps to move it around easily
between ordinary setups.
Title-Crane Attribution-Vssun Source- Link-https://commons.wikimedia.org/wiki/File:Film_Shooting_From_a_Crane.jpg
The traditional design provided seats for both the director and the
camera operator, and sometimes a third seat for
the cinematographer as well. Large weights on the back of the
crane compensate for the weight of the people riding the crane
and must be adjusted carefully to avoid the possibility of
accidents. During the 1960s, the tallest crane was the Chapman
Titan crane, a massive design over 20 feet high that won an
Academy Scientific & Engineering award. Most such cranes were
manually operated, requiring an experienced boom operator who
knew how to vertically raise,lower, and "crab" the camera
alongside actors while the crane platform rolled on separate
tracks. The crane operator and camera operator had to precisely
coordinate their moves so that focus, pan, and camera position all

Audio Visual Production
35
started and stopped at the same time, requiring great skill and
rehearsal. Present day jibs are remote operated and much easier
to use as it allows the access to any height and direction.
Rigs / Stabilizers
A rig is a modular piece of equipment used to extend the
usefulness of a camera, whether through accommodating
additional shooting styles, allowing for additional gear to be
mounted safely, or for smoothing out the motion of the shot. To
simplify rig is an equipment which not only gives support to
camera but also could include additional gears such as microphone
and viewfinder monitor. Most of the rigs are attached to body such
as steadicam or shoulder rigs as it stabilizes the camera movement
while handheld.
Title-Steadycam Attribution- Source- Link-https://commons.wikimedia.org/wiki/File:Steadicam_Operator_John_Fry_with_Master_Steadicam_%26_Arri_Alexa_camera.jpg

Unit 2 Lights and Camera Supports
36
Unit summary
Summary
In this unit we learnt about different kind of professional and semi-professional lights that are used in day to day shooting or production. Along with the accessories used for various lighting conditions we also learnt about various camera supports such as dolly, jibs and rigs. We can decide which kind of light and camera support we can use according to our shot design.
Assessment
What is a camera?
What are different types of cameras depending on signal?
What is the function of lens?
A Camera can work without lens. True and False?
Name different types of lens.
How mirror less camera is different from DSLR?
What is the focal length of a fixed length?
Resources
Further reading:
Mixing secrets for the small studio Senior, Mike.
Fundamentals of Digital Audio Alan P. Kefauver and David Patschke
Visual Studio 2013 Cookbook Bruce Johnson
Audio Effects Workshop Geoffrey Francis
How to shoot Video that doesn’t suck Stockman, Steve, 1958
The Book of Audacity : record, edit, mix and master with the free audio editor Schroder, Carla
Assessment
Reading

Audio Visual Production
37
Unit 3
Clapboard &Sound Equipment
Introduction
This unit introduces you to the functionality of clapboards, various
audio equipments and field monitors. After camera and lights
these are the necessities for proper and systematic production.
These devices have evolved during course of time and change of
technology.
Outcomes
Upon completion of this unit you will be able to:
Outcomes
Identify various types of clapboards and their use.
Identify different sound/audio equipments.
Plan for audio recording. Choose different kind of field monitors.
Terminology
Terminology
Clapboard: Clapboard is a hinged slate used for proper
marking and description of the visuals.
Time Code: Time Code is the digital marking of the tape or
celluloid depending upon the length of time it is
shot.
Microphone: Microphone is an electromagnetic device used to
convert sound energy to electrical energy.

Unit 3 Clapboard &Sound Equipment
38
Clapboards Clapboard also called clapperboard is a device used in filmmaking and video production to assist in the synchronizing of picture and sound, and to designate and mark particular scenes and takes recorded during a production. The sharp "clap" noise that the clapperboard makes can be identified easily on the audio track, and the shutting of the clapstick can be identified easily on the separate visual track. The two tracks can then be precisely synchronised by matching the sound and movement. It is kind of a slate on which the production name, name of director, production title, scene, shot and takes are depicted. There are commonly two kinds of clapboards in use i.e. traditional and digital.
Historical Background of Clapperboards
The clapper board was invented sometime during the early 1920's. Sound was just being introduced to film, and film makers needed a way to synchronize sound with film. Striking the sticks would create a clap sound that would be recorded and later synchronized with the visual film allowing the picture and sound to run in sync. Clappers are still in use today and have become an historic symbol of the motion picture industry. However latest improvisations have brought about, novel methods as substitute to clapboards.
Traditional Clapboards
In the early days of film making, one person would hold a slate for the camera with the scene information, while another clapped two hinged sticks together in front of the camera.The combination of the two into one unit made it possible for one person to perform both tasks.
Title-Clapboard Attribution- OpenClipart-Vectors Source- Link-https://pixabay.com/en/clapperboard-clapper-clapboard-146180/
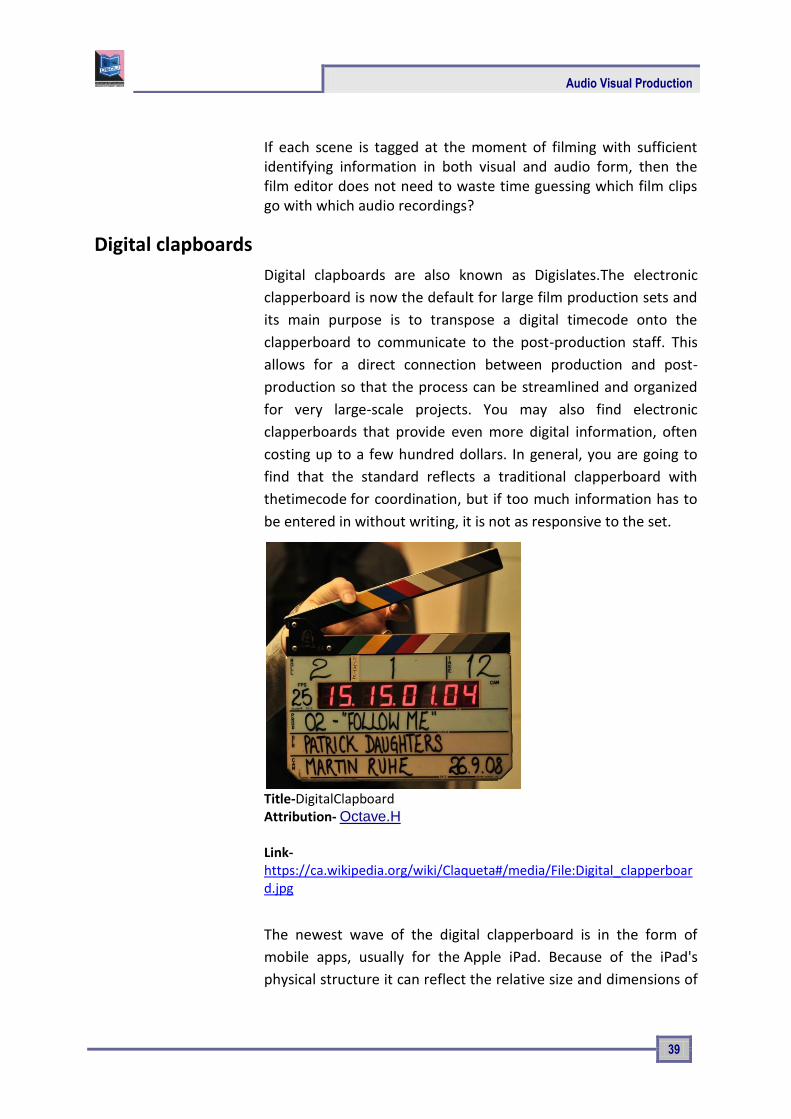
Audio Visual Production
39
If each scene is tagged at the moment of filming with sufficient identifying information in both visual and audio form, then the film editor does not need to waste time guessing which film clips go with which audio recordings?
Digital clapboards
Digital clapboards are also known as Digislates.The electronic
clapperboard is now the default for large film production sets and
its main purpose is to transpose a digital timecode onto the
clapperboard to communicate to the post-production staff. This
allows for a direct connection between production and post-
production so that the process can be streamlined and organized
for very large-scale projects. You may also find electronic
clapperboards that provide even more digital information, often
costing up to a few hundred dollars. In general, you are going to
find that the standard reflects a traditional clapperboard with
thetimecode for coordination, but if too much information has to
be entered in without writing, it is not as responsive to the set.
Title-DigitalClapboard Attribution- Octave.H Source- Link-https://ca.wikipedia.org/wiki/Claqueta#/media/File:Digital_clapperboard.jpg
The newest wave of the digital clapperboard is in the form of
mobile apps, usually for the Apple iPad. Because of the iPad's
physical structure it can reflect the relative size and dimensions of

Unit 3 Clapboard &Sound Equipment
40
the clapperboard through the touch screen. Here you enter in the
scene information directly as digital information that is then listed
on the image of the clapperboard, and then the actual clap used
for syncing sound can be done with a graphical imitation of the
clap or a substitute like a bright whiteflash.
Sound Equipment
In the field of video production or filmmaking the role of sound or
audio is as important as video or visuals. There are different kinds
of sound around us which we come across in our daily life. Like the
camera is used to video images, special instruments called
microphone are used to record these sounds. Though innovation
changes every single year, one thing is always constant: the sound
is similarly as vital as the visual. Regardless of how inventive and
highly executed the video part of the production might be, and
wherever it may be posted on YouTube, copied to a DVD or shows
up on a major, small or portable screen, the watcher's experience
can be absolutely destroyed by dull sound. A more noteworthy
degree than a great many people acknowledge, audio could "make
or break" any video or movie venture.
In the realm of expert sound for-video and sound for-movie, The
first thing, is the catch, recording, and playback procedures are
normally taken care of by various bits of hardware. Secondly,
there is an extra transitional stage in which the sound is altered to
dispose of errors or fit a specific time limitation, handled to
improve quality of the audio, and organized to match a specific
deployment medium, for example, online video or DVD.
In the following section we will come across the equipment which
are used for recording and reproduction of sound.
Microphones
Microphones or mic are the device used to catch sound waves and
amplify them.An exceptionally fundamental need is filled by the
microphones i.e.: conversion of acoustic energy (sound) to
electrical energy by the electromagnetic process. The sound waves
are converted into an audio signal by them such that the product
can be recorded, edited, deployed, and amplified for playback. As
the microphone’s function is that general, that one mayinquire as

Audio Visual Production
41
to why there are such a large number of various types of
microphones This is on the grounds that a few sorts of amplifiers
are more qualified to specific uses than others, similarly as a few
cameras are more qualified for use on a tripod in a sufficiently
bright studio whereas others are better for handheld use with
accessible light. Some microphones are used to record voice while
some are used to capture the ambient sounds. If one is familiar
with the different types of microphones then one can use them to
get the best effect, the productions will start sounding more
professional. The microphones are mainly categorized upon their
directionality i.e. in which the sound waves they can capture.
In order to speak to larger groups of people, a need arose to
increase the volume of the human voice. The earliest devices used
to achieve this were acoustic megaphones. Some of the first
examples, from fifth century BC Greece, were theatre masks with
horn-shaped mouth openings that acoustically amplified the voice
of actors in amphitheatres. In 1665, the English physicist Robert
Hooke was the first to experiment with a medium other than air
with the invention of the "lovers' telephone" made of stretched
wire with a cup attached at each end.
German inventor Johann Philipp Reis designed an early sound
transmitter that used a metallic strip attached to a vibrating
membrane that would produce intermittent current. Better results
were achieved with the "liquid transmitter" design in Scottish-
American Alexander Graham Bell's telephone of 1876 – the
diaphragm was attached to a conductive rod in an acid solution.
These systems, however, gave a very poor sound quality. David
Edward Hughes invented a carbon microphone in the 1870s.
The first microphone that enabled proper voice telephony was the
(loose-contact) carbon microphone. This was independently
developed by David Edward Hughes in England and Emile
Berliner and Thomas Edison in the US. Thomas Edison refined the
carbon microphone into his carbon-button transmitter of
1886. This microphone was employed at the first ever radio
broadcast, a performance at the New York Metropolitan Opera
House in 1910.
In 1923, the ribbon microphone was introduced which was
another type of electromagnetic microphone, believed to have

Unit 3 Clapboard &Sound Equipment
42
been developed by Harry F. Olson. It was a kind of reverse-
engineered version of a ribbon speaker. These microphones were
further developed by several companies but they were kind of raw
microphones which would catch all the sound near them.RCA
made advancements in pattern control of the diaphragm giving
directionality to the microphones. With television and film
technology booming there was demand for high fidelity
microphones and greater directionality. Electro-Voice responded
with their Academy Award-winning shotgun microphone in 1963.
Primarily microphones can be categorised as per the target
directions used while recording or covering.
Omni-directional
By “Omni” we means “all”, this suggests that a microphone with
Omnidirectional feature so it can grab sound from all directions
equally. An Omni mic receives a 360 degree COVERAGE sphere,
this implies it can grab sound from above, below, in front of,
behind, and to the side of the mic. The polar example for an Omni,
likewise, is generally spherical. It could have an additive
advantage, as a single Omni-directional microphone could be
utilized to grab voices from various directions, till every individual
voice is roughly in a similar pitch and a similar separation from the
microphone.
Largely, an Omni-directional mic grabs a portion of the mood of
the circumstance, which can strengthen the visual setting. On the
off chance that the scene is occurring on a road corner, and we
require the sounds of the considerable number of exercises going
around, the Omni-directional mic could be utilized. The handheld
mouthpieces utilized by the reporters in news from field and
games columnists or reporters are typically Omni directional,
enabling the journalist and interviewee to be grabbed by one
microphone receiver held amongst them, and conveying a specific
measure of surrounding sound. But few disadvantages also exists
in utilizing Omni-directional mic.Since they pick up sounds from
every corner they cannot be used for those scenes where the
dialogue or the sound of the main subject is more necessary.
Hence the background noises can create disturbance.They also
tend to get more noteworthy measures of room resonation when
utilized as a part of rooms that have hard-surfaced dividers and

Audio Visual Production
43
floors. This can once in a while result in a diffuse, empty, "inside a
barrel" sound.
Bi-directional
Such microphones are generally used, in case of two persons,
facing each other in an interview, live – interaction, or alternative
bi-presentation, of a content to match a recording or live telecast.
Unidirectional
A microphone with unidirectional feature discards sound
originating from back side of the mic whereascontinue tograb up
sound originating from the front. In other words it captures sound
signals from only that direction in which they are faced. Hence,
unidirectional microphones could grab only little noise of the
background and room resonation and on utilization with the
loudspeaker systems they show lesser sensitisation towards
‘feedback’. The ‘feedback’ is a situation of loop sound which
occurs when the sound which comes out of the speaker is again
caught by the microphone. As the same sound is caught between
the mic and speaker it creates a noise like sound. There are
different kinds of unidirectional, microphones every one possess a
somewhat unique polar pattern and its own particular
arrangement of points of strength and weaknesses. Till now
cardioid is the highly common sort of unidirectional, it is named as
cardioid, on the grounds that it’s polar pattern somehow look alike
a heart-moulded figure. Many cardioid mic will grab lesser to as
much as half as much sound from the sides, than from the front,
and short of what one tenth as much sound from the back than
from the front. In this way, the cardioid mic have a tendency to
grab most of desired sound (where you are pointing the mic) and
little of the undesired sound (where you are not pointing the mic).
Transducer
Again the microphones can be divided in two categories
depending on the transducers used. The transducer is the
mechanism which actually converts sound energy into electrical
energy. The two types of transducer are dynamic and condenser.

Unit 3 Clapboard &Sound Equipment
44
a) Dynamic Microphones
Dynamic mouthpieces simply utilizes a magnet and loop of wire to
change over sound waves into a flag or signal. At the point if a thin
diaphragm is appended with a loop of fine wire it starts vibrating if
got struck via sound waves. In turn it makes the loop of wire move
forward and backward around a magnet, generating a little
electricity, which streams out of the microphone’s connector and
via the cable of microphone. Dynamic mics of great quality
produces a great quality of sound; they can deliver sound with less
measure of commotion, are exceptionally tough, and will as a rule
endure unpleasant taking care of or extraordinary temperatures
and stickiness exposure. Since the Dynamic amplifiers can't be
made in little size, numerous handheld and voiceover mics are the
dynamic sort, as here the size of the mic isn't a matter.
b) Condenser Microphones
In the Condenser microphones (once in a while called electrets
condenser mouthpieces) does not use a dynamic diaphragm
rather utilizes a significantly more slender diaphragm extended
tight simply over a piece of flat metal or ceramic i.e. metal-coated,
also known as back plate. At the point if an electrical charge is
fixed electrical charge thereafter it is placed on the
diaphragm/back plate assembly, now its electrical yield fluctuates
relying upon the diaphragm movements, that in corresponding to
sound waves will vibrate. The output signal is to a great degree
feeble and reactionary to outside electrical obstruction, be that as
it may, it must be altered and additionally amplified and opened
up by a circuit called a preamplifier. The location of preamplifier
could be the the handle of the mic or in a little outboard or
detachable electronic tube or pack. Many advantages are offered
by Condenser mouthpieces. Their most vital feature is that they
can be built smaller, therefore all mini livelier mics are of
condenser variety. Condensers have a tendency to be
exceptionally touchy to the extraordinary low and high
frequencies, and generally have an extremely fresh, clean sound
that improves dialogue intelligibility and also numerous melodic
instruments. Their implicit preamplifiers permit condenser
microphones to give higher yield than dynamic mics, implying that
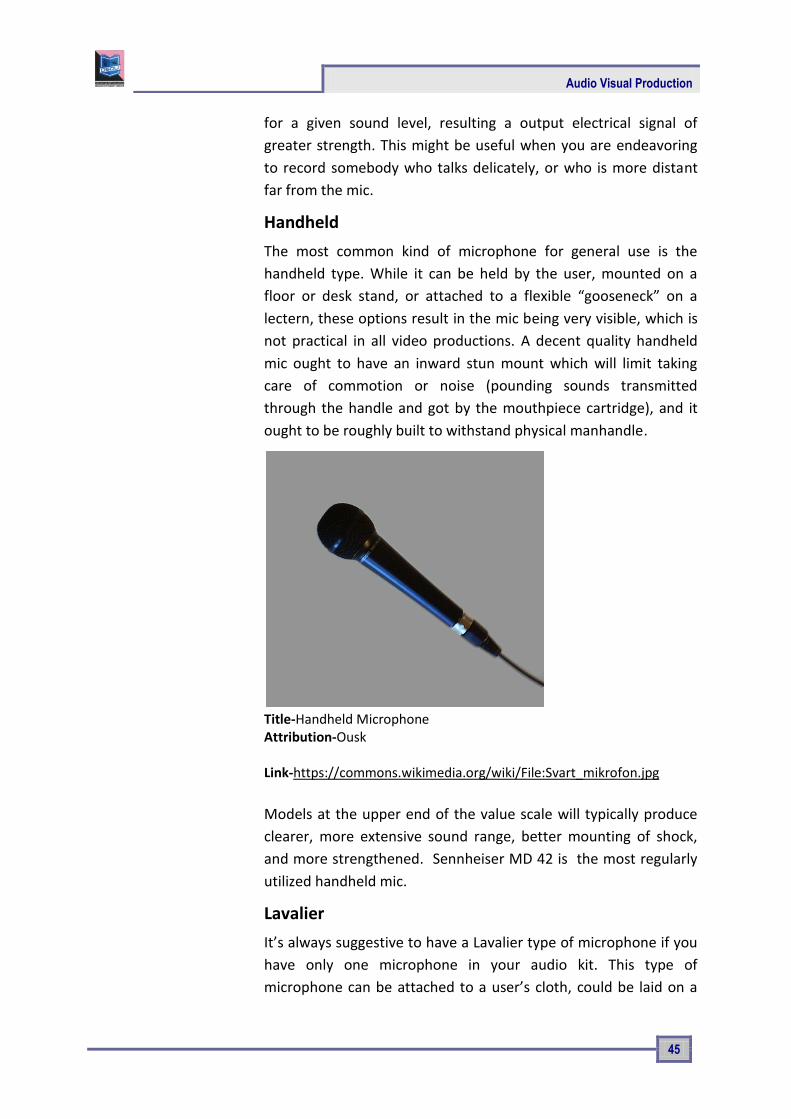
Audio Visual Production
45
for a given sound level, resulting a output electrical signal of
greater strength. This might be useful when you are endeavoring
to record somebody who talks delicately, or who is more distant
far from the mic.
Handheld
The most common kind of microphone for general use is the
handheld type. While it can be held by the user, mounted on a
floor or desk stand, or attached to a flexible “gooseneck” on a
lectern, these options result in the mic being very visible, which is
not practical in all video productions. A decent quality handheld
mic ought to have an inward stun mount which will limit taking
care of commotion or noise (pounding sounds transmitted
through the handle and got by the mouthpiece cartridge), and it
ought to be roughly built to withstand physical manhandle.
Title-Handheld Microphone Attribution-Ousk Source- Link-https://commons.wikimedia.org/wiki/File:Svart_mikrofon.jpg
Models at the upper end of the value scale will typically produce
clearer, more extensive sound range, better mounting of shock,
and more strengthened. Sennheiser MD 42 is the most regularly
utilized handheld mic.
Lavalier
It’s always suggestive to have a Lavalier type of microphone if you
have only one microphone in your audio kit. This type of
microphone can be attached to a user’s cloth, could be laid on a
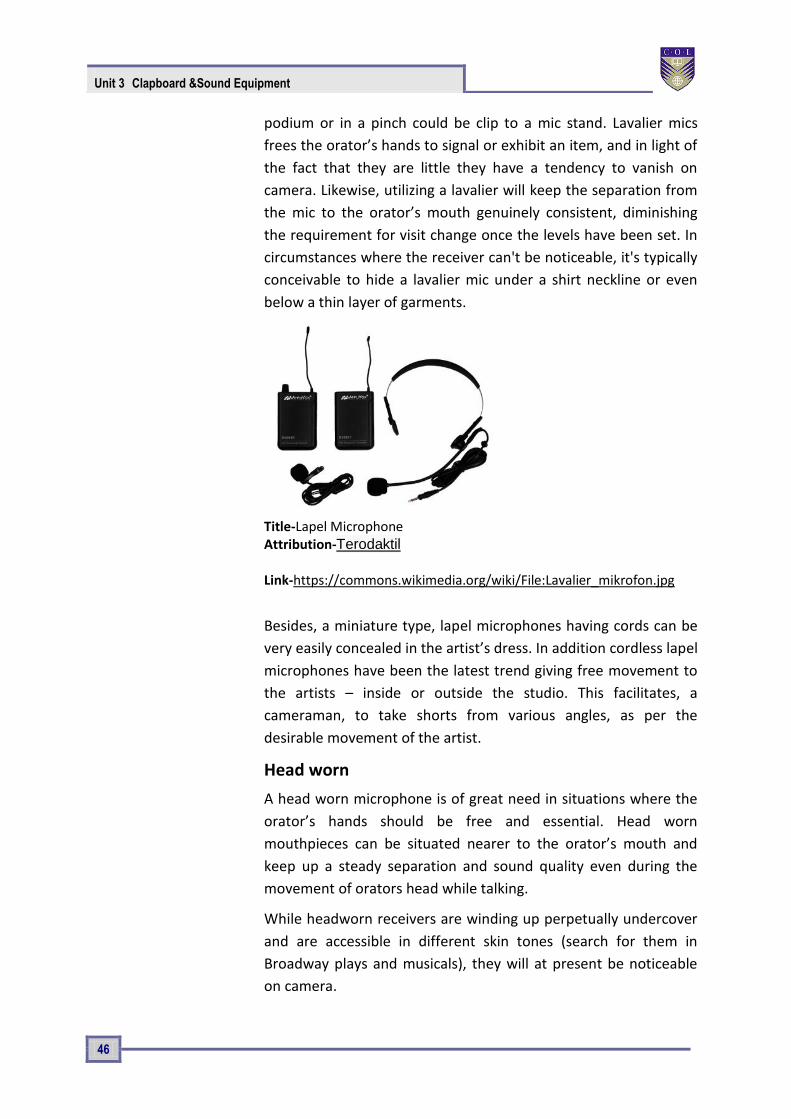
Unit 3 Clapboard &Sound Equipment
46
podium or in a pinch could be clip to a mic stand. Lavalier mics
frees the orator’s hands to signal or exhibit an item, and in light of
the fact that they are little they have a tendency to vanish on
camera. Likewise, utilizing a lavalier will keep the separation from
the mic to the orator’s mouth genuinely consistent, diminishing
the requirement for visit change once the levels have been set. In
circumstances where the receiver can't be noticeable, it's typically
conceivable to hide a lavalier mic under a shirt neckline or even
below a thin layer of garments.
Title-Lapel Microphone Attribution-Terodaktil Source- Link-https://commons.wikimedia.org/wiki/File:Lavalier_mikrofon.jpg
Besides, a miniature type, lapel microphones having cords can be
very easily concealed in the artist’s dress. In addition cordless lapel
microphones have been the latest trend giving free movement to
the artists – inside or outside the studio. This facilitates, a
cameraman, to take shorts from various angles, as per the
desirable movement of the artist.
Head worn
A head worn microphone is of great need in situations where the
orator’s hands should be free and essential. Head worn
mouthpieces can be situated nearer to the orator’s mouth and
keep up a steady separation and sound quality even during the
movement of orators head while talking.
While headworn receivers are winding up perpetually undercover
and are accessible in different skin tones (search for them in
Broadway plays and musicals), they will at present be noticeable
on camera.

Audio Visual Production
47
Surface Mounted
Surface mounted mics are developed to grab the sound at a fixed or levelled surface. Surface mount mics are typically physically moulded to look less nosy on a meeting table or work area. The mic component is found near (yet not touching) the surface, with the goal that sound waves reflected from the surface land at the mic component in the meantime as the immediate sound. This viably duplicates the sensitization of the mic contrasted with an unsupported handheld write at a similar separation. (This affectability support accept that the surface is adequately substantial to reflect even sound waves of lower frequencies.)
Shotgun Microphone
The shotgun microphone is so named because the long, slotted tube in front ofthe microphone cartridge makes it resemble a shotgun.
The presence of “interference tube” helps it to be lesser sensitize for sounds originating from back and sides, compared to other directional mics. A shotgun mic is amazingly directional pickup design (called a line/inclination design) making these well known for news gathering, outside games scope and TV/movie creation.
Shotgun mouthpieces are not zooming focal points for sound or enhancers. They don't enable you to zoom in on a discussion from 100 feet away. Here's a considerably more precise similarity: envision looking through a long tube at a man standing 20 feet away. The individual's picture does not have all the earmarks of being any bigger or closer, but rather is to some degree easy to see, in light of the fact that the eye isn't diverted by things occurring off to either side. This is precisely what shotgun mics do best: screen out sounds originating from the sides, making the sound originating from the front easily audible.
Wireless Components
In short a wireless mic can be called as a mini radio station. The
working starts with a conversion process of input sound waves in
to audio signal by the microphone cartridge. Now the signal is
conveyed by a low-control transmitter, and after that grabbed by
a receiver present close-by, that changes over the radiofrequency
signal once more into sound. This transmitter could be placed in
the receivers handle, in a little pack such that one can wear it in
the body, or in a piece or tube which could be connected
specifically to any standard mouthpiece with a XLR connector. A
table top unit, a rack mount unit, or a convenient battery-worked

Unit 3 Clapboard &Sound Equipment
48
type that can mount on top or in the camera could be a receiver. A
remote framework comprises of the mix of the mouthpiece,
transmitter, and recipient. Than a link or wire associates the sound
output of the receiver of the camera or sound recorder.
Portable and Camera Mounted Receivers
The battery powered portable mics can be accessed and used only
with the presence of receiver and transmitter in and around. Such
units size wise are very small about the extent of a deck of cards
and could be worn on the body or mounted specifically to a
camera. Connection is done via a short cable from the receiver’s
portable output to the cameras or recorders audio input. But
today we have advanced models that provides a separate output
for headphone or an earpiece with the goal that the camera
administrator can screen the sound through earphones or an ear
piece. A microphone having wireless system is an extremely
helpful thing for a video shooting, as here both the camera and
the subject might move. For bigger projects where various orators
are involved, numerous portable receivers could be connected to
an audio recorder that could be carried in a bag.
The other application for a wireless receiver that is portable is
feeding sound from a blender to a camera situated over the room.
If we take example of an extensive gathering room, for instance,
the sound blender is frequently situated at a side of the stage,
whereas the camera is at the back of the room. During situation
like this, the wireless transmitters input needs to be connected
with the output of the mixer or the blender, and with the portable
receiver attached to the camera. Thus the requirement to depend
on the internal microphone of the camera or to put extra mics
particularly for recording video is eliminated.
Audio Mixers, Interface and Recorders
If you view the videos streaming online you could sense that the
sound quality is not up to the mark,this is because the video
recording takes place via the inbuilt microphone of the camera.
Generally the inbuilt cameras microphone are not of superior
quality and moreover the mic is placed far from the orator and
very close to the cameras autofocus and image stabilization
system. What's more, the sound hardware in the camera may

Audio Visual Production
49
have excessively murmur and insufficient capacity to oversee
changing sign levels for an expert sounding creation. On the off
chance that you need better audio sound, you should utilize an
external audio, and perhaps an outer sound interface or recorder.
Audio Interface
A sound interface is a little box that goes about as a middle of the
road arrange between your mouthpiece and the audio input of the
camera. One or two adjusted XLR mouthpiece inputs are there in
many interfaces (sometimes equipped with phantom power for
condenser mic), and a means of adjusting the audio imbalanced
level.
Title- Audio Interface Attribution- Nicolas Esposito Source- Interface audio M-Audio FireWire Solo Link- https://commons.wikimedia.org/wiki/File:Interface_audio_M-Audio_FireWire_Solo.jpg
The interface output can be an connection that is unbalanced that
works with a DSLR, or a USB connection that enables you to record
specifically to a PC. A sound interface is helpful in light of the fact
that it gives you better control over sound levels and makes it easy
to utilize proficient mics with XLR connectors.
Audio Mixers
On the off chance that we are utilizing a few receivers
immediately, for instance to record a gathering or board
discourse, prior to start recording it may be important to

Unit 3 Clapboard &Sound Equipment
50
consolidate the signal of the mic altogether. The audio blender
here provides a single output that incorporates the consolidated
output of all the mics and it also enables adjustment at individual
level for every mic.
Title-Audio Mixer Attribution- Evan-Amos Source- Link- https://commons.wikimedia.org/wiki/File:Behringer-Xenyx-1002FX.jpg
The downside of utilizing a blender is that it makes it hard to
segregate the voice of one orator while editing.. There are
different blenders relying upon their ability of tracks like 8, 16, 24
tracks. They additionally include some sound impacts like
reverberate, reverb, bass and treble. These days advanced
blenders are likewise accessible in type of PC applications
Audio Recorder
Nearly all cameras have sound recorder inbuilt in it however one
might find that audio recording from the camera directly is not
satisfactory, because of inordinate murmur, bending, or absence
of control over sound levels. For this situation, video makers utilize
a "double framework" in which the video is recorded on the
camera, and the sound is recorded on an outside sound recorder.
Utilizing an outside sound recorder enables you to have a
powerful control over sound levels and less murmurs than
generally cameras. Furthermore, a great sound recorder as a rule
has adjusted mic input with XLR connectors, and frequent
phantom control for condenser mics.

Audio Visual Production
51
In huge projects, four or eight tracks recorders are accessible,
enabling independent recording of every orator’s mic to empower
more exact control of signal levels and enabling easy editing. An
essential thing to be consider is the way to synchronize the
recorders audio with the cameras video. The arrangement is to
start each shot with a hand applaud that is picked by the mic and
visualise by the camera. While editing, the sound track is adjusted
by moving backward or forward such that the sound of the
applaud matches perfectly with the visual. The sound recorder
enables you to definitely modify for signals of various levels from
different sources and safeguard them as isolated sound tracks that
can be altered into the program as proper. A few recorders have
an assortment of input connectors, developed to assort sounds of
different levels and types.
Cables and Connectors
The most important link that connects the recorder or receiver and the microphone are the cables and connectors. These are likely the most ignored connection in the sound chain, but low quality cables or potentially damaged connectors are as often as possible the reason for real audio issues. Basically among audio devices for connection two types of connections are used:
• Balanced &
• Imbalanced
In a balanced connections there is a requirement of cable consisting of two wires (one for the “hot” signal and one for the “return”) this wires needs to be shielded with a mesh, braid, or metal foil. From different sources the random electrical signals are bombarded to the cable that is intercepted by the shield and then drain it in to the ground. Both the shield and the wires works together to avoid interference of the various audio signals. The quality of the audio depends on the types of connectors and cables utilized.
In an imbalanced connection a shielded single wire is used by a cable, however here the shield has to perform dual task i.e. it has to carry back the returned audio signal along with providing protection to the wire from electrical interference. Balanced audio connections are more stable than the imbalanced audio connection as these cables are prone to be affected via florescent light fixtures, some types of dimmer switches, and other audio or electrical cables present nearer to it.

Unit 3 Clapboard &Sound Equipment
52
So according to rule balanced connections are more reliable in terms of clean, free of noise output. In present era all the well-known connectors for proficient mics and audio devices trust and favour XLR and USB connectors
XLR Connector
There are two types of XLR Connectors 1) Male XLR connectors 2) Female XLR Connectors.
Male XLR Connectors consist of three pins, these are utilized for
providing signal output; whereas female XLR connectors
comprises of three sockets, utilized for provision of signal input.
The XLR connector is strong, it generally don’t break or bend when
connected, and many varieties have secure interlocks to make it
free from accidental unplugging. A cable that has an XLR
connector at both ends almost certainly indicates a balanced
connection.
Title- XLR Connector
Attribution- Photographer: Michael Piotrowski (2005-06-04)
Source-
Link- https://commons.wikimedia.org/wiki/File:Xlr-connectors.jpg
Both low- and high-impedance microphones contains XLR
connectors. High calibre and expert mics supports the XLR
connector over the 1/4-inch telephone plug.
USB Connector
Universal Serial Bus (USB) connectors and links, which have turned
out to be indistinguishable with PC peripherals, are obviously

Audio Visual Production
53
winding up more typical for mics, since more sound and video
recording is occurring specifically on PCs. This has made the
requirement for XLR-to-USB connectors, which allows you to
utilize your XLR cables and XLR mics with gadgets which contains
USB ports.
Quarter inch phono plug
Another to some degree normal sound connector is the male 1/4-
inch telephone plug, which mates with the female 1/4-inch
telephone jack. The origin of the name is from utilization of this
connector on early phone switchboards. These can be found on
cables utilized with a sound hardware: earphones, amplifiers,
loudspeakers, signal processing gear, and mics. As a rule, 1/4-inch
telephone plugs are utilized on mics of lower ends.
Two-conductor types (at times referred as "TS" or "tip-sleeve",
which alludes to the region of the connector utilized for each wire)
comprises of two different portions and are utilized for
imbalanced mono connections. Three-conductor types (at times
referred as "TRS" or "tip-ring-sleeve") can be arranged to convey
an adjusted mono signal or an unbalanced stereo signal
Microphones and microphone inputs on blenders utilizing 1/4-inch
telephone connectors are quite often of the unbalanced high-
impedance compose.
RCA Plug
The last sort of connector you'll likely keep running into is the male RCA plug or phono plug, which mates with the female phono jack. The prefix "phono" originates from the way that these are the standard for associating phonograph turntables (and also cassette players, CD players, et cetera) to home stereo hardware
Miniplug or EP Jack
The Mini plug is available in two sizes: 3.5 millimetres (1/8 inch)
and 2.5 millimetres. Mini plug of 3.5 millimeter form is similar to
the normal attachment generally found on earphones and ear
buds. Even though famously delicate for microphone applications,
because of their little size, mini plug connectors are every now and
again utilized on consumer and even semi-proficient video
hardware, even in DSLR cameras. Quite often they show an
unbalanced stereo sound association. Most mics that come

Unit 3 Clapboard &Sound Equipment
54
furnished with mini plugs are affordable units of low cost. Even if
your equipment has a smaller than normal attachment port or
1/4-inch microphone input, you can at present utilize a decent
quality expert mic. You simply need to acquire a cable with the
proper connectors, or in certain instances, an impedance
transformer.
Field Monitors
A field monitor is an external, portable, battery-powered display
that replicates the picture being recorded to camera. We most
often attach our monitor directly to the camera or camera rig, and
sometimes we’ll attach it to a light stand as a stand-alone monitor
for clients to view. Most field monitors available today range from
five to nine inches in screen size, making them two to three times
larger than most camera displays. When we’re moving quickly in
the field, the extra pixels are extremely helpful for maintaining a
focused image and seeing all the details within a frame.
It is very much difficult to monitor a picture while conducting an
interview for a solo camera operator interviewing someone. As
the interviewer, you’re often sitting beside the camera, making it
difficult to keep an eye what’s being recorded. An external field
monitor acts as a crucial piece of gear in these types of situations,
allowing you to observe whether your subject is drifting out of
frame or focus.
When shooting high-perspective shots above crowds with the
camera is mounted much higher, it can be difficult or sometimes
impossible to see our camera’s screen.So an external field monitor
can potentially be the only option for framing a shot. We also
regularly use jibs, sliders and stabilizers that require the use of an
external monitor to direct camera movement.
Necessity of Field Monitors
The majority of field monitors use traditional LCD technology for
their screens. However some of the newer, higher-end LCD panels
integrate IPS (In-Plane Switching) technology, resulting in a higher
contrast ratio and better, more accurate overall colour and better
image quality. Lately, the monitor trend has been moving towards
even newer, OLED (Organic Light-Emitting Diode) displays, which

Audio Visual Production
55
according to Small HD, offer the richest colours and extremely
high contrast ratios. The extra brightness of OLED monitors makes
them a great choice for outdoor production.
The present day field monitors also coming with recorders. That
means you don’t have to carry an extra video or audio recorder
known as back pack such equipments help the spot- reporter or
the artist to monitor the programme on air, locate his proper
position and link the production control room with matching
presentation, as per requirement.

Unit 3 Clapboard &Sound Equipment
56
Unit summary
Summary
In this unit we came across some necessary filmmaking and video shooting devices such as clapboard, various kinds of microphones and other audio equipments used from shooting to post production. We also came across the use of clapboard, sound equipment and field monitors. We learnt about the use of microphones according to the situation.
Assessment
Assessment
1. What is a microphone?
2. Differentiate between Traditional and Digital Clapboards
3. Classify various types of microphones. Clipboards.
4. Write the functions of Field Monitors
5. How many columns are there in clapboard and name them.
6. Who developed electromagnetic type of microphone?
7. How many types of microphones are there depending on direction?
8. What is the other name for RCA plug connector?
9. What is a transducer in a microphone?
Resources
Further reading:
Fundamentals of Digital Audio Alan P. Kefauver and David Patschke
Visual Studio 2013 Cookbook Bruce Johnson
How to shoot Video that doesn’t suck Stockman, Steve, 1958
The Book of Audacity : record, edit, mix and master with the free audio editor Schroder, Carla
Reading

Audio Visual Production
57
Unit 4
Blocking & Rehearsal
Introduction
Every video production requires proper research, planning,
setup and on location decision. Proper camera placement, proper
lighting and proper rehearsal of subject could lead to a good
production material. Sometimes we have to shoot documentary or
news material so it is mandatory to get a proper location idea as
to cover the objective as nearly as possible. In case of fiction shoot
it is advisable to rehearse your subject more and more so as to
give perfect shot in less number of takes.
Outcomes
Upon completion of this unit you will be able to:
Outcomes
Describe what is blocking
Identify different kind of shots
Use different techniques of lighting
Examine different aspects, faced while shooting.
Terminology
Terminology
Blocking: Blocking is the process of staging actors in reference to the foreground and background to get a frame.
Establishment shot:
Establishment shots are the shot which shows the establishment between the subject and the surrounding.
Close shot: Close shot is the most nearest magnification of the subject being shot which shows the physical and emotional details.
Helicopter Shot: A 3600 shot of the sky or subjects in the high

Unit 4 Blocking & Rehearsal
58
altitude from the ground.
Mid Shot: Shot covering the artist up to his / her waist
Cheating shot: To Sync – with other person’s response by the artist in the form of reactions
Panning: Moving The Camera right or left as per requirement.
Arial Shot: Covering the ground from an aeroplane or helicopter or high altitude.
Meaning of the Term “Blocking”
The term blocking came from theatres. In theatre, blocking is the
precise staging of actors in order to facilitate the performance of
a play, ballet, film or opera. In contemporary theatre, the director
usually determines blocking during rehearsal, telling actors where
they should move for the proper dramatic effect, ensure sight
lines for the audience and work with the lighting design of the
scene.
Each scene in a play is usually "blocked" as a unit, after which the
director will move on to the next scene. The positioning of actors
on stage in one scene will usually affect the possibilities for
subsequent positioning unless the stage is cleared between
scenes.
During the blocking rehearsal, the assistant director, stage
manager or director take notes about where actors are positioned
and their movements on stage. It is especially important for the
stage manager to note the actors' positions, as a director is not
usually present for each performance, and it becomes the stage
manager's job to ensure that actors follow the assigned blocking
from night to night.
In film, the term is sometimes used to speak of the arrangement
of actors in the frame. In this context, there is also a need to

Audio Visual Production
59
consider the movement of the camera as part of the blocking
process.
Title-Shooting
Attribution- Yerpo Source-
Link- https://commons.wikimedia.org/wiki/File:Premium_Rush_shooting.JPG
Overview of Evolution of Blocking
As we discussed earlier that the term blocking came from
stage or theatre, in the theatre the stage is a fixed location and
the characters are moving. So the characters have to be placed or
staged in such a manner so that each character is clearly visible to
audience at each point of movement. No one should overlap the
other character. Likewise their entry and exit was also to be kept
in continuity which means a character which exits from the left of
the stage must come from right of the stage to mark the
continuity of movement. So when coming to film making or video
production the most of the things remain the same. The director
has to plan the shot in such a manner that there should be enough
space between characters, their continuity in the frame and their
movement as well as entry and exit from one shot to the next.
This is part of shot division in a screenplay.
Uses of Blocking
Blocking not only helps the director direct easily but also
helps the actors to perform smoothly. Sometimes a motivated
blocking helps create a twist in the scene. Blocking not only is fixed
with actor and director but also with the camera. The movement
of the camera in proper direction is also important. The proper

Unit 4 Blocking & Rehearsal
60
camera and subject movement can create a bigger impact. If the
blocking is not proper the transition from shot to shot will be
jerky.
Mostly the films or videos are made up of various scenes.
These scenes are broken down into shots. Each shot is individual
information of place, time and character. It means that we can
know what our subject is doing in particular place at a particular
time. Each shot can be taken up by the director according to the
availability of place, time and character and connect in different
manners to build up a scene. But sometimes director also tries to
cover the whole scene in one take without breaking them into
smaller shots. The various types of shots which are used are
establishing shot, long shot, mid shot and close shot.
Establishing shot: An establishing shot in filmmaking and television
establishes the scene by showing the relationship between its
important figures and objects.It is generally a long or extreme-long
shot at the beginning of a scene indicating where, and sometimes
when, the remainder of the scene takes place.
Establishing shots were more common during the classical era of filmmaking than they are now. Today's filmmakers tend to skip the establishing shot in order to move the scene along more quickly. In addition, the expositional nature of the shot (as described above) may be unsuitable to scenes in mysteries, where details are intentionally obscured or left out.
Uses of an Establishing Shot
Location: Establishing shots may use famous landmarks to
indicate the city where the action is taking place or has moved to,
most probably it establishes the whole area where the shooting is
going on or where the story is based. It creates an idea in the mind
of the viewer about the location of the subject and other things
going around in that particular location.
Time of Day: Sometimes the viewer is guided in their
understanding of the action. For example, an exterior shot of a
building at night followed by an interior shot of people talking
implies that the conversation is taking place at night inside that
building - the conversation may in fact have been filmed on a
Audio Visual Production
61
studio set far from the apparent location, because of budget
constraint or time limitations.
Relationship: An establishing shot might be a long shot of a room
that shows all the characters from a particular scene. For example,
a scene about a murder in a college lecture hall might begin with a
shot that shows the entire room, including the lecturing professor
and the students taking notes. A close-up shot can also be used at
the beginning of a scene to establish the setting (such as, for the
lecture hall scene, a shot of a pencil writing notes).
Concept: An establishing shot may also establish a concept, rather
than a location. For example, opening with a martial arts drill
visually establishes the theme of martial arts. A shot of rain falling
could be an establishing shot, followed by more and more detailed
look at the rain, culminating with individual raindrops falling. A
film maker is colluding with their audience to provide a short hand
learned through a common cinematic cultural background.
Long Shot
In photography, filmmaking and video production, a long
shot (sometimes referred to as a full shot or, and to remove
ambiguity it will be called a, wide shot) typically shows the entire
object or human figure and is usually intended to place it in some
relation to its surroundings. These are typically shot now using
wide angle cameras. However due to the sheer distance
establishing shots and extreme wide shots can use almost any
camera type.
Mid shot
In film, a medium shot, mid shot (MS), or waist shot is a camera
angle shot from a medium distance. Medium shots are favored in
sequences where dialogues or a small group of people are acting,
as they give the viewer a partial view of the background and also
show the subjects' facial expressions in the context of their body
language. Medium shots are also used when the subject in the
shot is delivering information, such as news presenters. It is also
used in interviews. It is the most common shot in movies, and it
Unit 4 Blocking & Rehearsal
62
usually follows the first establishing shots of a new scene or
location.
A normal lens that sees what the human eye see is usually used
for medium shots.
Medium shots are divided into singles (a waist-high shot of one
actor), group shots, over-the shoulders or two-shots (featuring
two people). A medium wide shot, or American shot, shows a bit
more of the background but is still close enough for facial
expressions to be seen, although these facial expressions would be
better seen in a waist-high shot.
Master shot
A master shot is a shot which covers all the characters along with
the location or background. It is different from an establishing
shot because in an establishing shot the whole location or all the
characters may not be revealed, just a portion could be used. It
may not establish the character to character relation.
Close-upshot
Close-upshot or closes hot in filmmaking or in television
production, still photography is a type of shot, which
tightly frames a person or an object. Close-ups are one of the
standard shots used regularly with medium shots and long
shots (cinematic techniques). Close-ups display the most detail,
but they do not include the broader scene. Moving in to a close-up
or away from a close-up is a common type of zooming.
Close-ups are used in many ways and for many reasons. They are
often employed as cutaways from a more distant shot to show
detail, such as characters' emotions, or some intricate activity with
their hands. Close cuts to characters' faces are used far more often
in television than in movies]; they are especially common in soap
operas]. For a director to deliberately avoid close-ups may create
in the audience an emotional distance from the subject matter.
Close-ups are used for distinguishing main characters. Major
characters are often given a close-up when they are introduced as
a way of indicating their importance. Leading characters will have
multiple close-ups. There is a long-standing stereotype of insecure
actors desiring a close-up at every opportunity and counting the

Audio Visual Production
63
number of close-ups they received. Close-up shots do not show
the subject in the broad context of its surroundings. If overused,
they may leave viewers uncertain as to what they see. Close-ups
are rarely done with wide-angle lenses, because perspective
causes objects in the centre of the picture to be unnaturally
enlarged. Certain times, different directors use wide-angle lenses,
because they can convey the message of confusion, and bring life
to certain characters.
Over Shoulder Shot
In film or video, an over the shoulder shot (alsoOTS, or third-
person shot) is a shot of someone or something taken from the
perspective or camera angle from the shoulder of another person.
The back of the shoulder and head of this person is used to frame
the image of whatever (or whomever) the camera is pointing
toward. This type of shot is very common when two characters are
having a discussion and will usually follow an establishing
shot which helps the audience place the characters in their
setting. It is an example of a camera angle.
Other than these basic shot or blocking techniques there are two
other shots depending on camera movement i.e. Pan shot and Tilt
Shot. In a Pan shot the Camera is moved from left to right or right
to left to cover a subject or location. Similarly when the camera is
tilted from up to down and vice versa the shot is called Tilt shot.
Rehearsal
The rehearsal is an activity in the performing arts that occurs as
preparation for a performance in music, theatre, dance and
related arts, such as opera, musical theatre and film production. It
is undertaken as a form of practising, to ensure that all details of
the subsequent performance are adequately prepared and
coordinated. The term "rehearsal" typically refers to ensemble
activities undertaken by a group of people. For example, when a
musician is preparing a piano concerto alone in their music studio,
this is called "practicing", but when they begin to practice the
concerto with an orchestra, this activity is called a "rehearsal". The
music rehearsal takes place in a music rehearsal space.

Unit 4 Blocking & Rehearsal
64
A rehearsal may involve as few as two people, as with a small play
for two actors, an art song performance by a singer and
a pianist or a folk music duo of a singer and a guitar player. On the
other end of the spectrum, a rehearsal can be held for a very
large orchestra with over 100 performers and a choir. A rehearsal
can involve only performers of one type, as in an a
cappella choir show, in which a group of singers perform without
instrumental accompaniment or a play involving only theatre
actors; it can involve performers of different instruments, as with
an orchestra, rock band or jazz "big band"; vocal and instrumental
performers, as with opera and choral works accompanied by
orchestra; or a mix of actors, vocalists, instrumentalists and
dancers, as with musical theatre.
While the term is most commonly used in the performing arts to
refer to preparation for a public presentation or show, the term is
also used to refer to the preparation for other anticipated
activities.
In field of filmmaking or video production rehearsal not only
means the practicing the acting skill for the scene but also
practicing the camera and audio parts too to get the perfect take.
Lighting
Lighting is an essential tool for enhancing the video image. The
subtle use of light creates atmosphere and mood, dimension, and
texture. It can help to convey a plot line, enhance key elements
such as set colour or skin tone, and signals the difference between
comedy and drama, reality and fantasy.
The subject in a planned shoot can be lit up using various lighting
techniques to achieve desirable result. In this unit we will discuss
these lighting techniques.
Lighting, as with nearly every other aspect of Film & TV, is an
integral part of the filmmaking process. Light can sculpt and
describe a scene or character, it can hide or reveal key areas of
your frame, it can enhance suspense and evoke emotion. It is as
critical in directing the audiences’ attention or influencing their
emotions as camera movement, acting, music and editing. Ignore
it at your own loss.
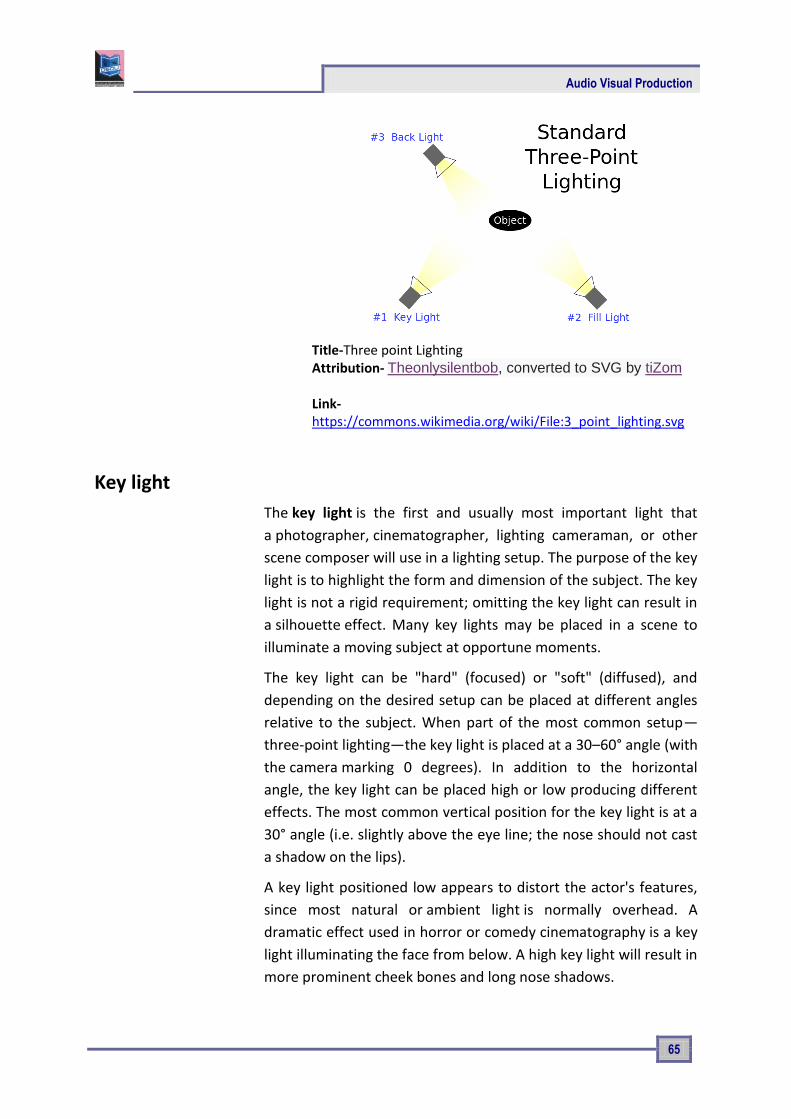
Audio Visual Production
65
Title-Three point Lighting Attribution- Theonlysilentbob, converted to SVG by tiZom Source- Link- https://commons.wikimedia.org/wiki/File:3_point_lighting.svg
Key light
The key light is the first and usually most important light that
a photographer, cinematographer, lighting cameraman, or other
scene composer will use in a lighting setup. The purpose of the key
light is to highlight the form and dimension of the subject. The key
light is not a rigid requirement; omitting the key light can result in
a silhouette effect. Many key lights may be placed in a scene to
illuminate a moving subject at opportune moments.
The key light can be "hard" (focused) or "soft" (diffused), and
depending on the desired setup can be placed at different angles
relative to the subject. When part of the most common setup—
three-point lighting—the key light is placed at a 30–60° angle (with
the camera marking 0 degrees). In addition to the horizontal
angle, the key light can be placed high or low producing different
effects. The most common vertical position for the key light is at a
30° angle (i.e. slightly above the eye line; the nose should not cast
a shadow on the lips).
A key light positioned low appears to distort the actor's features,
since most natural or ambient light is normally overhead. A
dramatic effect used in horror or comedy cinematography is a key
light illuminating the face from below. A high key light will result in
more prominent cheek bones and long nose shadows.

Unit 4 Blocking & Rehearsal
66
In many cases, the key light is a stage light for indoor scenes,
or sunlight for outdoors. A lighting instrument may also be used
outdoors to supplement sunlight or as the primary light source
with sunlight or skylight serving as fill lighting. Actual lamps,
lighting fixtures, can serve as key lights, provided they are of
sufficient brightness. They may also appear within the scene as
props — in which case they are called "practical’s." Similarly, fire,
candles and other natural sources of light can be used.
Fill Light
In television, film, stage, or photographic lighting, a fill light (often
simply fill) may be used to reduce the contrast of a scene to match
the dynamic range of the recording media and record the same
amount of detail typically seen by eye in average lighting and
considered normal. From that baseline of normality using more or
less fill will make shadows seem lighter or darker than normal
which will cause the viewer to react differently, by inferring both
environmental and mood clues from the tone of the shadows.
Natural skylight fill is omnidirectional and diffuse, with lower rate
of inverse-square fall-off than artificial sources. A common
artificial lighting strategy which creates an overall appearance
similar to natural fill places the fill light on the lens axis so it will
appear to cast few if any shadows from the point of view of the
camera, which allows the key light which overlaps it to create the
illusion of 3D in a 2D photo with the same single source patterns
typically seen with natural lighting where the sun acts as key
light and the skylight as fill. The use of cantered near-axis
"neutral" fill also prevents dark unfilled voids in the lighting
pattern which can occur on faces if cheeks or brows block the fill
source.
The positioning of the fill affects the overall appearance of the
lighting pattern. When a cantered fill strategy is used the ratio is
created by overlapping the key light over the foundation of fill. A
key source of equal incident intensity to the fill, overlapping the
even fill, will create a 2:1 reflected ratio (1 key + 1 fill over 1 Fill) =
2:1.

Audio Visual Production
67
Back Light
In lighting design, backlighting is the process of illuminating the
subject from the back. In other words, the lighting instrument and
the viewer face each other, with the subject in between. This
creates a glowing effect on the edges of the subject, while other
areas are darker. The backlight can be a natural or artificial source
of light. When artificial, the back light is usually placed directly
behind the subject in a 4-point lighting setup. A back light, which
lights foreground elements from the rear, is not to be confused
with a background light, which lights background elements (such
as scenery).
The back light is sometimes called hair or shoulder light, because
when lighting an actor or an actress, backlighting makes the edges
the subject's hair glow if the hair is fuzzy. This can create an
angelic halo type effect around the head. Television productions
often use this effect in soap operas, news presentation, panel
discussions, studio based interview where it has become
something of a cliché of the genre. It is also sometimes called
the kicker or rim light.
Ambient Lighting
Ambient light means the light that is already present in a scene,
before any additional lighting is added. It usually refers to natural
light, either outdoors or coming through windows etc. It can also
mean artificial lights such as normal room lights.
Ambient light can be the photographer's friend and/or enemy.
Clearly ambient light is important in photography and video work,
as most shots rely largely or wholly on ambient lighting.
Unfortunately ambient light can be a real nuisance if it conflicts
with what the photographer wants to achieve. For example,
ambient light may be the wrong colour temperature, intensity or
direction for the desired effect. In this case the photographer may
choose to block out the ambient light completely and replace it
with artificial light. Of course this isn't always practical and
sometime compromises must be made.

Unit 4 Blocking & Rehearsal
68
On the other hand, many of history's greatest photographs and
film shots have relied on interesting ambient light. Unusual
lighting can turn an otherwise ordinary shot into something very
powerful.
Motivated Lighting
Motivated lighting refers to the light in a scene which appears to
have a source such as a window, a lamp and fireplace etc. In some
cases the light will come from a source visible in the scene and in
some cases, it will only appear to come from a source that is
visible in the scene.
Shooting
Shooting otherwise known as production stage is the practical
part. Now that we have a thorough knowledge about all things
needed for a good production starting from a script to camera and
lights and audio equipment we have to get in the field to make our
production.
For a systematic production along with a good storyboard and
shot division we also need a very well planned production design
which includes the location details, the artist availability details
and time details etc. which would make our work less time
consuming and easy.
Before every shoot it is wise to have a location hunt which means
the director or one who is in charge of the shoot should visit all
the places and confirm them according to the demand of the
script. On the other hand the script writer is supposed to collect
the data available and improvise it, considering the nature of
location; printed materials; experts on the location; time frame
and conception of the director producer and the target audience.
The kind of location could be both indoor and outdoor. On one
side it is to be seen that it justifies the need of the script whereas
on the other hand it should also be kept in mind that whether it is
possible to shoot in that place with all the production team.
After the location is finalized it comes to the availability of the
artist. Sometimes it is impossible to get busy artist for shoot, so
getting appropriate dates from them would confirm their
availability. If we are shooting documentaries then we have to

Audio Visual Production
69
deal with real life subjects so it is necessary that they should be
there according to our shoot planning.
After these two points are ready we have to prepare a production
schedule according to these two factors. In other words, we have
to plan on which day at which place and at what time we have to
shoot the particular part of the script. Sometimes a number of
scenes or parts of the story or script is to be held at a particular
location, so it will be cost-effective to complete all those scenes at
that particular location in one go, so as to not visiting to the same
place again and again.
How much to film
For things that don’t move, or general shots of scenes or people,
shoot at least ten seconds of each shot.
For scenes with people talking or acting, you need to keep the top
and tail of your shots. Start the camera a few seconds before the
action starts, and leave it running for a few seconds after it ends.
This is called pre roll and post roll. If you’re working on your own,
the best thing to do is to start the camera and check it’s recording.
The count of ten seconds before and after the action can provide
the excess length we require.
If you’re working as a team, you can follow some version of this
drill:
Get your shot set up and your actors in place.
The camera operator says ‘Camera set’ when they’re ready.
Then the director says ‘Silence please’.
Once everyone’s silent, they say ‘Standby’ and then ‘Turn over’.
The camera operator starts the camera and checks that it’s recording, then they say ‘Camera rolling’.
The director counts to ten and then says ‘Action’ (or they can count the actors in with a hand signal).
The actors or presenters do their thing, and then the director counts to ten again and says ‘Cut’.
The camera operator stops the camera and the production assistant makes a note of the shot.

Unit 4 Blocking & Rehearsal
70
Get the location sound
You should always record some sound from the location, without
dialogue. With any scene, leave the camera or audio recorder
running to get half a minute or so of atmosphere or wild track,
also known as room tone. It can help cover up audio problems
when you edit. If you’re filming at a location with interesting or
distinctive sounds, record them separately.
Don’t forget to record atmosphere/ wild track, also known as
room tone. This is the background sound of the room or location.
You need at least half a minute of this: just leave your camera or
audio recorder running with nothing happening. This can be really
useful when you edit.

Audio Visual Production
71
Unit summary
Summary
In this unit you learned the Basic of blocking, rehearsing, lighting and shooting. The type of shots and kind of lighting was also described. We also learnt the proper procedure for a planned production or shoot.
We discussed how lighting and kind of shot creates different impact on screen. The need of rehearsal and proper planning schedule to manage time and money was also explained.
Assessment
Assessment
1. Describe the meaning of blocking?
2. Name the different types of shot.
3. Differentiate between master shot from establishing shot?
4. Identify the different kinds of lighting?
5. What is motivated lighting?
6. What is pre roll and post roll?
Resources
Further reading:
Mixing secrets for the small studio Senior, Mike.
Fundamentals of Digital Audio Alan P. Kefauver and David Patschke
Visual Studio 2013 Cookbook Bruce Johnson
Audio Effects Workshop Geoffrey Francis
How to shoot Video that doesn’t suck Stockman, Steve, 1958
The Book of Audacity : record, edit, mix and master with the free audio editor Schroder, Carla
Reading


DMA-05
Audio Visual Production Block – IV: Video Production (Post Production)
Odisha State Open University

Audio Visual Production
This course has been developed with the support of the Commonwealth of Learning (COL). COL is an intergovernmental organisation created by Commonwealth Heads of Government to promote the development and sharing of open learning and distance education knowledge, resources and technologies. Odisha State Open University, Sambalpur (OSOU) is the first Open and Distance learning institution in the State of Odisha, where students can pursue their studies through Open and Distance Learning (ODL) methodologies. Degrees, Diplomas, or Certificates awarded by OSOU are treated as equivalent to the degrees, diplomas, or certificates awarded by other national universities in India by the University Grants Commission.
© 2018 by the Commonwealth of Learning and Odisha State Open University. Except where otherwise noted, Audio Visual Production is made available under Creative Commons Attribution-ShareAlike 4.0 International (CC BY-SA 4.0) License: https://creativecommons.org/licenses/by-sa/4.0/legalcode For the avoidance of doubt, by applying this license the Commonwealth of Learning does not waive any privileges or immunities from claims that it may be entitled to assert, nor does the Commonwealth of Learning submit itself to the jurisdiction, courts, legal processes or laws of any jurisdiction. The ideas and opinions expressed in this publication are those of the author/s; they are not necessarily those of Commonwealth of Learning and do not commit the organisation
Odisha State Open University Commonwealth of Learning
G.M. University Campus 4710 Kingsway, Suite 2500, Sambalpur Burnaby, V5H 4M2, British Odisha Columbia India Canada Fax: +91-0663-252 17 00 Fax: +1 604 775 8210 E-mail: [email protected] Email: [email protected] Website: www.osou.ac.in Website: www.col.org

Audio Visual Production
Acknowledgements The Odisha State Open University and COL, Canada wishes to thank those Resource Persons below for their contribution to this DMA-05:
Concept / Advisor
Dr. Srikant Mohapatra Vice- Chancellor Odisha State Open University, Sambalpur
Course Writer
Kaushik Nath Promo and Creative Producer, News 7,Bhubaneswar
Course Editor Padmalochan Das Audio & Visual Programme Producer All India Radio and Doordarshan
Video Production
Durgadatta Kanungo AIDB trained, Media Person, Doordarshan Pragyan Padhi Freelance Anchor
Published by :
Dr. Jayanta Kar Sharma Registrar on behalf of Odisha State Open University, Sambalpur
Contribution of following staff members of Odisha State Open University is acknowledged:
Sambit Mishra
Debidatta Behera
Prashansa Das
Radhakanta Suna
Abhinandan Tripathy
OSOU and COL acknowledge the support extended by Prof. Madhu Parhar, STRIDE, IGNOU, New Delhi in conducting several workshops in the process of preparation of course material for DMA.

ii Contents
Contents
Contents
Course Overview 5
Welcome to Video Post-Production ................................................................................. 5
Compiling the Concept ..................................................................................................... 5
Crew Members & Equipments ......................................................................................... 5
Editing & other Things ..................................................................................................... 5 Transmission, Distribution & Rating ................................................................................ 6 Course outcomes ............................................................................................................... 6 Timeframe ......................................................................................................................... 7 Study skills ........................................................................................................................ 7
Need help? ........................................................................................................................ 8 Assignments ...................................................................................................................... 8 Assessments ...................................................................................................................... 8 Video Resources .............................................................................................................. 9
Getting around this Course material 10
Margin icons ................................................................................................................... 10
Unit-1 11
Compiling the Concept ................................................................................................... 11 Introduction ........................................................................................................... 11
Outcomes ............................................................................................................... 11 Terminology .......................................................................................................... 11 Post-Production ..................................................................................................... 12
Post-Production Activities ..................................................................................... 12
The overall Post-production Workflow Explained ............................................... 13
Post Production Workflow .................................................................................... 16 Linear video editing ............................................................................................... 17 History ................................................................................................................... 18
Early technology .................................................................................................... 18 Introduction of computerized systems .................................................................. 19
Current usage ......................................................................................................... 21 Non-linear editing system ..................................................................................... 21 Linear and non-linear editing ................................................................................ 22
Direct access .......................................................................................................... 22 Basic techniques .................................................................................................... 22
Broadcast workflows and advantages ................................................................... 23 Accessing the material ........................................................................................... 24 Edit decision list .................................................................................................... 24 Various Formats of Video ..................................................................................... 25

Audio Visual Production
DV ......................................................................................................................... 25
HD ......................................................................................................................... 25 4K .......................................................................................................................... 26
Unit Summary ....................................................................................................... 27
Assignments .......................................................................................................... 27
Resources ............................................................................................................... 27
Unit 2 28
Crew Members and Equipments ..................................................................................... 28
Introduction ........................................................................................................... 28 Outcomes ............................................................................................................... 28 Terminology .......................................................................................................... 28 The Editing Process ............................................................................................... 29
The Principle of Editing ........................................................................................ 29 People involved in Post-production ...................................................................... 30 Compositing .......................................................................................................... 31 Sound/Music .......................................................................................................... 31
Different Types of Video Editing .......................................................................... 32 Working method of Editing Software ................................................................... 37 What to Look For in Editing Software .................................................................. 38
Digitising/Capturing Video in NLE ...................................................................... 38
The Editing Workspace ......................................................................................... 39 Creating Video output ........................................................................................... 39
Unit summary ........................................................................................................ 40
Assessment ............................................................................................................ 40
Resources ............................................................................................................... 40
Unit 3 41
Editing & other things ..................................................................................................... 41
Introduction ........................................................................................................... 41 Outcomes ............................................................................................................... 41
Terminology .......................................................................................................... 41 Effect: .................................................................................................................... 41
About Open Shot Video Editing Software ............................................................ 42 Main Window ........................................................................................................ 43 Keyboard shortcuts to work faster ......................................................................... 44 How to Import Files to the Project ........................................................................ 45 Color grading ......................................................................................................... 49
Motion Tracking .................................................................................................... 50 Digital Intermediate ............................................................................................... 50 Publicity ................................................................................................................. 51
Unit summary ........................................................................................................ 53
Assessment ............................................................................................................ 53
Resources ............................................................................................................... 53

iv Contents
Unit 4 54
Transmisssion, Distribution & Rating ............................................................................ 54 Introduction ........................................................................................................... 54 Outcomes ............................................................................................................... 54 Terminology .......................................................................................................... 54
Distribution ............................................................................................................ 55 Transmission ......................................................................................................... 55 Various Methods of TV Transmission .................................................................. 57 New technologies .................................................................................................. 60 RATING ................................................................................................................ 64
Unit summary ........................................................................................................ 66
Assessment ............................................................................................................ 66
Resources ............................................................................................................... 66

Audio Visual Production
5
Course Overview
Welcome to Video Post-Production
In this block, you will learn about how to compile a concept. You will find out the crew members and utilisation of equipments involved in the post production stage. Other than that you will learn the skill to edit the shooting materials, and acquire the skills to distribution and transmission etc.
Compiling the Concept
The post work process may take more time than pre and
production work. The work flow is based on indoor sound and
video editing studio. Many mistakes happened during shooting are
to be corrected in post production work. The concept is being
compiled in this stage.
Crew Members & Equipments
Post-Production involves a lot of other work like sound mixing,
colour correction and mastering which required experienced
individual to complete the process. After all a number of
equipments are necessary to do the work successfully.
Editing & other Things
Editing is so important to the visual storytelling process because it duplicate the manner in which the mind sees. We all edit reality with our eyes and mind. The art of editing lies therefore in creating illusion and new realities, new relationship and controlling emotional responses.

Course Overview Compiling the Concept
6
Transmission, Distribution & Rating
Distribution is the important part of the Television Industry and Movie Business, it is the way a financier or a film producer gets back their returns. India is the fastest growing cable & satellite market in the world, with exciting growth for Television industry as well as Distribution Company.
This video will provide a brief overview of this course.
Topic YouTube link QR
Code
Video 1 –Marketing &
Publicity
https://youtu.be/MwxkLU
6_-fs
Course outcomes
Upon completion of Video post-Production you will be able to:
Outcomes
Get a whole idea about Post work in video production
Understand the history & various process of video editing
Know about the persons involved in Editing
Get a whole idea about Editing using Editing software
Understand the process of transmission system in India

Audio Visual Production
7
Timeframe
How long?
This course will be completed within “1” classes.
This course is of “1” credits.
2 Hours of study time is required to complete this unit.
Study skills
Learning about the audio visual productions are a part of Multimedia
Coaching. But, when it comes to creation of an output, there is no
specific ABC formula for doing so. It is just like a painting in which the
artists choose the colour and proportion according to the need, not as
per a written plan.
In creating outputs for TV, Films etc. we have to utilize the software
tools from one corner to another randomly. So for every project, the
formula is different. There is no fixed recipe for all kind of output. So, the
more and more you learn about the options, more variety you will get.
Each and every option is explained step by step in the course material.
Apart from this course material, the learner has to adopt the tendency
of learning from multiple sources i.e.,
Internet tutorials
Video tutorials on youtube
Collaboration with people working in the industry etc.
Only classroom study will not make you a professional. You have to be active to grab the opportunity of learning wherever you get a chance.

Course Overview Compiling the Concept
8
Need help?
Help
In case of any help needed you can browse the internet sites like youtube.com for video tutorials about the subject.
Assignments
Assignments
There will be some assignments at the end of each unit.
These assignments are mostly practical based and should be submitted in CD or DVD. Theoretical assignments are to be submitted neatly written on A4 size sheet.
All assignments will be submitted to respective study centre of Odisha State Open University or as directed by Co-ordinator.
All assignment should be unit wise on separate CD/DVDs clearly mentioning course title and unit on Top. Theoretical Assignment will be neatly filed or spiral bind with cover clearly mentioning necessary information of course.
Assessments
Assessments
There will be “1” assessment for each unit.
All practical assessment will be submitted to OSOU.
Assessment will take place once at the end of each unit.
Learner will be allowed to complete the assessment within stipulated time frame given by the university.

Audio Visual Production
9
Video Resources
This study material comes with additional online resources in the form of
videos. As videos puts in human element to e-learning at the same time
demonstrating the concepts visually also improves the overall learning
experience.
You can download any QR code reader from Google Play to view the
videos embedded in the course or type the URL on a web browser.
Reading

Getting around this Course material Compiling the Concept
10
Getting around this Course material
Margin icons
While working through this Course material you will notice the frequent use of margin icons. These icons serve to “signpost” a particular piece of text, a new task or change in activity; they have been included to help you to find your way around this Course material.
A complete icon set is shown below. We suggest that you familiarize yourself with the icons and their meaning before starting your study.
Activity Assessment Assignment Case study
Discussion Group activity Help Note it!
Outcomes Reading Reflection Study skills
Summary Terminology Time Tip

Audio Visual Production
11
Unit-1
Compiling the Concept
Introduction
Post production is the last and most critical piece of film making and TV production. The completing item wants broadcast after this procedure. The post work process may take additional time than pre and production work. The work process depends on indoor sound and video editing studio. But visual editor, illustrations creator, sound recordist and color grading artist have a key part in post production. Numerous mix-ups occurred amid shooting are to be rectified in post production work. The entire yield of the item relies upon the general population occupied with post work.
Outcomes
Upon completion of this unit you will be able to:
Terminology
Terminology
Digitising: It is a process to input raw video and audio into computer hard disk in digital format.
Color Correction: It is the process to correct the visual clip which was shot in low light or high exposure condition through an engine or tools incorporated with editing software.
Outcomes
Get a whole idea about Post work in video
production
Understand the history & various process of video
editing
Set up your own editing machine
Explain the different rule of editing and
Make your own film

Unit-1 Compiling the Concept
12
Audio Balance: Audio balance is to arrange the ambience
sound, BGM and sound effect in such a
manner which is clearly audible to audience.
Mastering: Mastering the video is the process to give final output of the edited product in high quality for telecast purpose.
Compress: Compress video is the way to create the final
video for preview or upload in social site using
a compressor.
Post-Production
Post-production is the third and last significant period of the production procedure. It is frequently alluded to just as post, e.g. "We can deal with that in post".
There are numerous things which can occur in post-production. Normal assignments include:
Editing video footage
Editing the soundtrack, including sound effects, music, and so on.
Adding titles and illustrations
Colour and introduction correction Adding special effects
Re-shooting certain scenes if required ("get" shots)
Now and again post-production generally direct, comprises of picking and masterminding footage in the right grouping. By and large be that as it may, post-production is a tedious activity taking longer than the genuine production stage.
Post-Production Activities
Post-production starts with the finishing of filming and proceeds until the point when the project is conveyed to the system for the telecast. The three fundamental exercises of post-production are the editing or collecting of video footage; colour correction and the formation of an entire soundtrack or sound adjust.
Editing may start amid production. In single-camera shoots, the film from every day is checked on at a later time by the director, producer, and network in the request in which it was shot. These films are then separated and collected into scenes by the editors. The main full assemble is appeared to the Director, who rolls out

Audio Visual Production
13
further editing improvements and makes the director's cut. From that point, the producer and the system roll out improvements until the point when a finished product is made.
The final cut is given to the sound department, which is in charge of setting up the music tracks or recordings; sound effects; and discourse tracks for final mix into one track. The final mixing of all the sound is called dubbing. Amid this period, the sound architects will recognize the music– that is, select the focuses at which music will be inserted– and musicians will compose and record the music. Sound designers additionally alter dialogue recording for production quality and record new or replaced the dialogues in a procedure called looping. Sound effects are likewise included as of now. The subsequent dubbing session, which can take a few days for a motion picture or only a couple of hours for a multiple camera tape production, can include the blend of 5 to 25 separate sound tracks.
The final phase of post-production is the expansion of transition and effects, for example, scene fade-outs or dissolves, inclusion of titles and credits; making of special visual effects, for example, animations; and color correction.
The overall Post-production Workflow Explained
In present time it's anything but difficult to work in computerized arrange in TV or film production. It relies upon each individual how they orchestrate post production function. Some superior editing software is accessible in the market to work in computerized arrange. Regardless of what camera you are utilizing the software will import any configuration. The workflow will be a real-time preview.
Before examining Post-production workflow how about we see the means you need to experience amid this post work.
Stage 1: Ingesting or Capturing raw files
The first stage in any post-production work is to ingest the film-began, tape-based, or tapeless media records that you shot. Distinctive kinds of media require diverse ingest techniques; for instance, ingesting from tape requires the Log and Capture window, and ingesting from a tapeless format requires the Log and Transfer window.
Amid ingest, you'll as of now be finding a way to sort out your media by picking what media to ingest and by including logging information, for example, cut names and notes. After ingest is finished, you promptly find a way to sort cuts into bins and survey, check.

Unit-1 Compiling the Concept
14
In the vast majority of the editing studio, they utilize Storage area network to capture diverse format video and alter it in various editing framework. The visual can be gotten to from any PC connected to the capacity gadget. Extra storage room can be included at times amid the work.
In the film, for most activities, low quality visual is utilized for editing and after culmination of work uncompressed visual are connected to give final output.
Stage 2: Rough cut Edit
Editorial development is done when your clips are assembled. Sometimes, it is alluded to as the disconnected alter or the story alters, this is the place the raw media that you have ingested in stage 1 is transformed into an edited program.
A few programs are gathered completely inside editing software, where you can make every one of the titles and effects you require and do any vital sound outline right in your arrangement while you alter. Be that as it may, keep in mind that there are different applications in editing software that you can swing to for specialized errands. For instance, you can make ace layouts in Motion gfx for use as generators from inside editing software, or you can utilize Motion to make communicate illustrations and composites that you would then be able to alter into the editing software Timeline. As you work, you can likewise send particular sound clips from the editing Timeline specifically to Sound editing to do things like eliminate noise, make ambient noise to fix openings, and do balance coordinating on a clasp by-cut premise.
Regardless of whether you utilize one application or many, the greater part of the program's components met up in your altered grouping, controlling your editorial choices as you work to finish the program's content.
Stage 3: Preview for Producer
In case you're chipping away at an undertaking for a customer, successive and particular input is a flat out prerequisite. In case you're working in a directed session, you can just play your undertaking from the editing software Timeline. Nonetheless, there are events when you might work with customers who are remotely found and you need to give an adaptation of the program for their screening at their places. Editing software gives numerous methods for conveying singular clips or whole groupings to customers for remote survey, for example, by means of a QuickTime film or DVD, on the web, or even intelligently in I-Cloud.

Audio Visual Production
15
Stage 4: Finishing the movie
Subsequent to editing the story on the timeline and finishing the content work, it's time to give the program it's final shape and tweaking, suitably alluded to as wrapping up. In the initial segment of completing, the offline-nature of media in the event that you are utilizing as a part of the project, should be changed over to the most elevated quality form accessible in the first source through the altered grouping. The most ideal approach to do this relies upon how the first media was procured, how you ingested the media, and how painstakingly you dealt with the media amid editorial development.
On the off chance that your offline alter consolidates source media in a few unique formats; it is the time to change over any unmatched clasp perfect to final arrangement settings so the whole program is simple for send out. The format-change ability of the Compressor encourages this procedure.
This is additionally the time when every single impermanent component like placeholder titles, offline effects, and other placeholder media must be supplanted with their final, online-quality renditions with rendering. These components can be made inside the editing software or in conjunction with Motion gfx.
In conclusion, once your succession has been deliberately arranged, your program is prepared for color correction and the final sound mix.
Stage 5: Mastering
Mastering is the way toward giving a final output of your project in various arrangement and quality according to a request from the director. It's simple and less time taking to give final output by request ahead of advanced editing software.
Sometimes, a mixed and unmixed adaptation of the final item as requested by the customer can be given effectively inside less time. A different output without graphics work can likewise be given.
Stage 6: Output and Delivery
Output and delivery are the last stage of the post-production process. As the name infers, it's the process of making the final, playable media that you can hand over to the customer and group of onlookers. Output can take numerous organizations: High quality tape arrange, making a DVD, or compressing your program to a configuration appropriate for web playback.

Unit-1 Compiling the Concept
16
Post Production Workflow
Establishing a solid workflow can help eliminate time waste, make
you more profitable, and result in a better product. This course is
designed to teach you about the different steps of the post-
production process, as well as how to jump from application to
application all the while staying organized. Editing technique is
one thing, but proper workflow is what truly elevates editors to
pro-status.
Background
Video editing is the process of editing segments of motion video
production footage, special effects and sound recordings in
the post-production process. Motion picture film editing is a
predecessor to video editing and, in several ways, video editing
simulates motion picture film editing, in theory and the use
of linear video editing and video editing software on non-linear
editing systems (NLE). Using video, a director can communicate
non-fictional and fictional events. The goal of editing is to
manipulate these events to bring the communication closer to the
original goal or target. It is a visual art.
Early 1950's video tape recorders (VTR) were so expensive, and
the quality degradation caused by copying was so great, that 2
inch Quadruplex videotape was edited by visualizing the recorded
track with ferro fluid and cutting with a razor
blade or guillotine cutter and splicing with video tape. The two
pieces of tape to be joined were painted with a solution of
extremely fine iron filings suspended in carbon tetrachloride, a
toxic and carcinogenic compound. This "developed" the magnetic
tracks, making them visible when viewed through a microscope so
that they could be aligned in a splicer designed for this task.
Improvements in quality and economy, and the invention of
the flying erase-head, allowed new video and audio material to be
recorded over the material already recorded on an
existing magnetic tape and were introduced into the linear
editing technique. If a scene closer to the beginning of the video
tape needed to be changed in length, all later scenes would need
to be recorded onto the video tape again in sequence. In addition,

Audio Visual Production
17
sources could be played back simultaneously through a vision
mixer (video switcher) to create more complex transitions
between scenes. A popular 1970-80s system for doing that was
the U-matic equipment (named for the U-shaped tape path). That
system used two tape players and one tape recorder, and edits
were done by automatically having the machines back up, and
then speed up together in synchrony, so the edit didn't roll or
glitch. Later, 1980-90's came the smaller beta equipment (named
for the B-shaped tape path), and more complex controllers, some
of which did the synchronizing electronically.
There was a transitional analogue period using multiple
source video cassette recorder (VCR)s with the Edit
Droid using Laser Disc players, but modern NLE systems edit video
digitally captured onto a hard drive from an analogue
video or digital video source. Content is ingested and recorded
natively with the appropriate codec which will be used by video
editing software In order to control the shot film. HD video is
ending up more famous and can be promptly altered utilizing a
similar video editing programming alongside similar movie graphic
software’s. All the clippings of video are sequentially arranged in
the time line, on it addition of titles, music tracks, computerized
onscreen graphics are done, creation of special effects is made
and the completed product is "rendered" into a completed video.
The video may then be circulated in an assortment of methods
including DVD, video tape, CD-ROM, iPod, QuickTime Movies, , or
web gushing..
Linear video editing
Linear video editing is a video altering after production procedure
of choosing, organizing and adjusting pictures and sound in a
foreordained, sequentially as ordered. Despite whether it was
caught by a camcorder, tapeless camcorder, or TV studio
recording on a video recording device (VTR) sequence access of
content should be done on priority. Mostly linear editing is
replaced by video editing.
In the early 1990s until the appearance of PC random access non-
linear editing systems in general “linear video editing" was
referred as "video editing".

Unit-1 Compiling the Concept
18
History
Live TV is still basically delivered in an indistinguishable way from
it was in the 1950s, albeit changed by present day specialized
advances. Before tape, the main method for airing similar shows
again was by taping demonstrates utilizing a kinescope, basically a
video screen combined with a motion picture camera. In any case,
kinescopes (the movies of TV programs) experienced different
sorts of picture debasement, from picture twisting and clear
sweep lines to relics conversely and loss of detail. Kinescopes
needed to be processed and imprinted in a film research center
that makes them questionable for broadcasts postponed for
various time zones.
The essential inspiration for the improvement of video tape was as
a short or long haul authentic medium. Simply after a progression
of specialized advances spreading over decades did video tape
altering at last turn into a practical production instrument,
acceptable with film editing.
Early technology
The foremost generally acknowledged video tape in the United
States was 2 inch Quadruplex tape and with a motion of at 15
inches every second. To increase more head to tape speed, four
video recording and playback heads were spun on a head wheel
crosswise over a large portion of the two-inch width of the tape.
(Sound and synchronization tracks were recorded at the edges of
the tape with stationary heads.) This framework was known as
Quad, for quadruplex account.
The subsequent video tracks were marginally not as much as a
ninety-degree point (keeping in mind the the vector expansion of
fast spinning heads following over the 15 inches every second
forward movement of the tape).
If we see from the origin, video was altered on viewing the
recorded track with ferrofluid and cutting it with an razor blade or
guillotine shaper and joining with video tape, in a way like editing
of the movie. This was a burdensome procedure and as possible
generally avoided. If utilized, the two bits of tape to be joined

Audio Visual Production
19
were painted with an answer of to a great degree fine iron filings
suspended in carbon tetrachloride, a harmful and cancer-causing
compound. This "built up" the magnetic tracks, to view them
when seen through a magnifying instrument with the goal that
they could be adjusted in a splicer intended for this errand. The
tracks were needed to cut amid a vertical follow, not disturbing
the ordered odd-field/even-field. The slice likewise must be at a
similar point that the video tracks were set down on the tape. As
the video and sound read heads were a many inches separated it
was almost impossible for physical editing that would work
accurately in both video and sound. The cut was made for video
and a bit of sound then re-replicated into the right relationship,
the similar method like for editing 16mm film with a combined
attractive track.
There were various detriments of physically altering tapes. Few
broadcasters proclaimed that altered tapes cannot be used again,
in a time when the moderately high cost of the machines and
tapes was adjusted by the funds associated with having the
capacity to wipe and reuse the media. Others, for example, the
BBC, permitted reuse of spliced tape in specific conditions as long
as it adjusted to strict criteria about the quantity of splices in a
given term. The procedure required extraordinary ability, and
frequently brought about editing which might roll (lose match up)
and each editing requires many minutes for performance, in spite
of the fact that this was additionally at first valid for the electronic
editing which arrived later.
Introduction of computerized systems
In 1960s a framework to edit Quad tape "by hand" was produced.
This was factually only a methods in order to sync two machines
playback in such a way that the new shots signal could be
"punched in" with a sensible possibility at progress. An issue with
this and early PC controlled frameworks was that the sound track
was inclined to endure the artifact in light of the fact that the
video of the recently recorded shot would record into the side of
the sound track. A business arrangement known as "Buzz Off" was
utilized to limit this impact.
Around over 10 years, PC controlled Quad altering frameworks
were the standard after production instrument for TV. Quad tape

Unit-1 Compiling the Concept
20
included costly equipment, tedious setup, and moderately long
rollback times for every edit and indicated misalignment as not
agreed "banding" in the video. Notwithstanding, it ought to be
specified that Quad tape has a superior data transfer capacity than
any littler arrangement simple tape, and legitimately taken care
could deliver a photo strongly similar to that of a live camera.
Title- Linear editing system
Attribution- Channel R Link- https://commons.wikimedia.org/wiki/File:Linear_suite.jpg
At the point when helical scan video recorders turned into the
standard it was never again conceivable to cut the tape physically.
Now editing the video turned into a procedure of utilizing two
video tape machines, playing back the source tape (or "crude
film") from one machine and duplicating only the bits wanted on
to a second tape (the "edit master").
The heft of linear editing is done basically, with two machines and
an edit controller gadget to exercise control over them. Numerous
video tape machines are equipped for controlling a second
machine, disposing of the requirement for an external editing
control gadget.
This procedure is "linear", as opposed to non-linear editing, since
according to the feature of the tape-to-tape duplicating needs that
laying of all shots should be done as per the final edited order. On

Audio Visual Production
21
tape if once the shot is placed, nothing can be put in front of it
without overwriting whatever is there as of now. On the off
chance that totally essential, material can be named by replicating
the altered substance onto another tape, since with every copy
the picture is corrupted in total, this isn't attractive.
One disadvantage of early video altering strategy was that it was
illogical to deliver a raw slice for presenting before an Executive
producer. Since Executive Producers are never sufficiently
comfortable with the material to have the capacity to view the
completed item from examination of an alter choice rundown
(EDL), they were denied of the chance to voice their suppositions
when those sentiments could be effectively followed up on.
Hence, especially in documentary TV, video was opposed for a
significant long time.
Current usage
While PC based video altering programming has been received all
through the majority of the business, film, industrial and
consumer video enterprises, editing of linear video tape altering is
as yet ordinary in TV station newsrooms for TV news production,
and production facilities of medium-size who till date did not plan
to invest capital in latest technologies.
Non-linear editing system
Title-Non linear Editing System
Attribution-Nullcron Source- Link-https://commons.wikimedia.org/wiki/File:Videowisconsinstudio.tif

Unit-1 Compiling the Concept
22
Non-linear editing is a form of audio, video or image
editing where the original content is not modified in the course of
editing – instead the edits themselves are specified and modified
by specialized software. A pointer-based playlist – effectively
an edit decision list (EDL) – for video or a directed acyclic graph for
still images is used to keep track of edits. Each time the edited
audio, video, or image is rendered, played back, or accessed, it is
reconstructed from the original source and the specified editing
steps. Although this process is more computationally intensive
than directly modifying the original content, changing the edits
themselves can be almost instantaneous, and it prevents
further generation loss as the audio, video, or image is edited.
A non-linear editing system (NLE) is a video (NLVE) or audio
editing (NLAE) digital audio workstation (DAW) system that
performs non-destructive editing on source material. The name is
in contrast to 20th century methods of linear video
editing and film editing.
Linear and non-linear editing
Non-linear editing is the most natural approach when all assets
are available as files on video servers or hard disks, rather than
recordings on reels or tapes—while linear editing is tied to the
need to sequentially view film or hear tape.
Direct access
Non-linear editing enables direct access to any video frame in a
digital video clip, without needing to play or scrub/shuttle through
adjacent footage to reach it, as is necessary with video tape linear
editing systems. It is now possible to access any frame by entering
directly the time-code or the descriptive metadata. An editor can,
for example at the end of the day in the Olympic Games, easily
retrieve all the clips related to the players who received a gold
medal.
Basic techniques
The non-linear editing method is similar in concept to the "cut and
paste" techniques used in film editing or in IT. However, with the
use of non-linear editing systems, the destructive act of cutting of
film negatives is eliminated. It can also be viewed as the

Audio Visual Production
23
audio/video equivalent of word processing, which is why it is
called desktop video editing in the consumer space.
Broadcast workflows and advantages
Video and audio data are first captured to video servers, other
hard disk-based systems, or other digital storage devices. The data
are either direct to disk recording or are imported from another
source (trans-coding, digitizing, transfer). Once imported, the
source material can be edited on a computer using application
software, any of a wide range of video editing software. For a
comprehensive list of available software, see list of video editing
software, whereas comparison of video editing software gives
more detail of features and functionality.
In non-linear editing, the original source files are not lost or
modified during editing. This is one of the biggest advantages of
non-linear editing compared to linear editing.
Professional editing software records the editor's decisions in
an edit decision list (EDL) that is exportable to other editing tools.
Many generations and variations of the original source files can
exist without storing many different copies, allowing for very
flexible editing. It also makes it easy to change cuts and undo
previous decisions simply by editing the edit decision list (without
having to have the actual film data duplicated). Generation loss is
also controlled, due to not having to repeatedly re-encode the
data when different effects are applied.
In comparison with the linear method of tape-to-tape editing,
non-linear editing offers the flexibility of film editing, with random
access and easy project organization. With the edit decision lists,
the editor can work on low-resolution copies of the video. This
makes it possible to edit both standard-definition broadcast
quality and high definition broadcast quality very quickly on
desktop computers that may not have the power to process huge
full-quality high-resolution data in real-time.
The costs of editing systems have dropped such that non-linear
editing tools are now within the reach of home users. Some
editing software can now be accessed free as web applications;
some, like Cinelerra (focused on the professional market)
Unit-1 Compiling the Concept
24
and Blender3D, can be downloaded as free software; and some,
like Microsoft's Windows Movie Maker or Apple Inc.'s i-Movie,
come included with the appropriate operating system.
Accessing the material
The non-linear editing retrieves video media for editing. Because
these media exist on the video server or other mass storage that
stores the video feeds in a given codec, the editing system can use
several methods to access the material:
Direct access: the video server records feeds with a codec
readable by the editing system, has an Ethernet connection
and allows direct editing. The editor previews material directly
on the server (which it sees as remote storage) and edits
directly on the server without trans-coding or transfer. This
method is new.
Shared storage: the video server transfers feeds to and from
shared storage that is accessible by all editors. Media in the
appropriate codec on the server need only transferred. If
recorded with a different codec, media must be trans-
coded during transfer. In some cases (depending on material),
files on shared storage can be edited even before the transfer
is finished.
Importing: the editor downloads the material and edits it
locally. This method can be used with the previous methods
Edit decision list
An edit decision list or EDL is used in the post-production process
of film editing and video editing. The list contains an ordered list
of reel and time-code data representing where each video clip can
be obtained in order to conform the final cut.
EDLs are created by offline editing systems, or can be paper
documents constructed by hand such as shot logging. These
days, linear video editing systems have been superseded by non-
linear editing (NLE) systems which can output EDLs electronically
to allow auto conform on an online editing system – the
recreation of an edited programme from the original sources
(usually video tapes) and the editing decisions in the EDL.

Audio Visual Production
25
They are also often used in the digital video editing world, so
rather than referring to reels they can refer to sequences of
images stored on disk.
Some formats, such as CMX3600, can represent simple editing
decisions only. Final Cut Pro XML, the Advanced Authoring
Format (AAF), and AviSynth scripts are relatively advanced file
formats that can contain sophisticated EDLs.
Various Formats of Video
DV
Another leap came in the late 1990s with the launch of DV-based video formats for consumer and professional use. With DV came IEEE 1394 (FireWire/iLink), a simple and inexpensive way of getting video into and out of computers. Users no longer had to convert video from analogue to digital—it was recorded as digital to start with—and FireWire offered a straightforward way to transfer video data without additional hardware or compression. With this innovation, editing became a more realistic proposition for standard computers with software-only packages. It enabled real desktop editing producing high-quality results at a fraction of the cost of other systems.
HD
In early 2000, the introduction of highly compressed HD formats such as HDV has continued this trend, making it possible to edit HD material on a standard computer running a software-only editing application.
Avid is still considered the industry standard, with the majority of major feature films, television programs, and commercials created with its NLE systems.[7] Final Cut Pro received a Technology & Engineering Emmy Award in 2002 and continues to develop a following.
Avid has held on to its market-leading position in the advent of cheaper software packages, notably Adobe Premiere in 1992 and Final Cut Pro in 1999. These three competing products by Avid, Adobe, and Apple are the foremost NLEs, often referred to as the A-Team.[8] With advances in raw computer processing power, new products have appeared including NewTek's software application SpeedEdit.
Since 2000, many personal computers include basic non-linear video editing software free of charge. This is the case of

Unit-1 Compiling the Concept
26
Apple iMovie for the Macintosh platform, various open source programs like Kdenlive and PiTiVi for the Linux platform, and Windows Movie Maker for the Windows platform. This phenomenon has brought low-cost non-linear editing to consumers.
4K
As of 2014, 4K Video in NLE is fairly new, but it is being used in the creation of many movies throughout the world, due to the increased use of advanced 4K cameras such as the Red Camera. Examples of software for this task are Avid Media Composer, Apple's Final Cut Pro X, Sony Vegas, Adobe Premiere, VSDC Free Video Editor, and Edius. Open source Video editing software also responds the 4K format.

Audio Visual Production
27
Unit Summary
Summary
In this unit you learned the basic principle of Editing. You will be able to edit your own video using Non linear video editing. You can understand about various processes of Linear and non-linear video editing. You have a basic idea about different format used during editing workflow.
Assignments
Assignments
1. Explain difference between Linear & Non-linear Video Editing? 2. List the steps to follow during editing? 3. Describe the use of Ambience sound in editing. 4. What is the aspect ratio of DV, HD and 4K video? 5. What is Online and Offline editing? 6. Why color correction is important in Post production? 7. What is the role of Time-code (TC) in editing? 8. What is EDL? 9. Which is easier for you? LE or Non-LE? 10. Name 2 Bollywood film editor who became Director?
Resources
1. http://www.mediacollege.com 2. Video Production by Vasuki Belavadi
(Oxford University Press) 3. Television Field Production And Reporting by Fred Shook
(PEARSON Education) 4. www.wikipedia.org 5. www.documentmx.com
Reading

Unit 2 Crew Members and Equipments
28
Unit 2
Crew Members and Equipments
Introduction
Post production activity is the phase where the film actually takes
shape. Most people assume that post-production activity ends
with editing the film. It involves a lot of other work like sound
mixing, colour correction and mastering which required
experienced individual to complete the process. After all, we do
not produce a video just for ourselves, we may want to distribute
it through DVD, compressed video for website or even get it
telecast and exhibits.
Outcomes
Upon completion of this unit you will be able to:
Outcomes
Know about the persons involved in Editing
Understand the grammar and functions of video editing
Setup editing machine
Choose different editing techniques
Terminology
Terminology
Capture Device: A hardware or firmware device used to
convert analogue video into digital video.
Compressors &
Codec’s: Software or firmware used to compress and
decompress digital video. Compression makes
the file size smaller.
Encoding: The process of converting digital video into a
particular format, for example, saving a video
project in MGEG-2 format for DVD
distribution.

Audio Visual Production
29
Layering: Adding multiple layers of superimposed video.
Transition: The way one shot changes to the next.
Non Linear
Editing: An editing method which uses computer
software to edit the footage.
The Editing Process
Video editing is the process of controlling and reworking video shots to make another work. Editing is typically thought to be one a player in the post-production process — other post-production undertakings incorporate titling, color correction, sound mixing, and so on.
Title-Screenshot of NLE Timeline Many people use the term editing to describe all their post-production work, especially in non-professional situations.
Rearranging, adding and/or removing sections of video clips and/or audio clips.
Applying colour correction, filters and other enhancements.
Creating transitions between clips.
The Principle of Editing
There are numerous motivations to alter a video and your editing
approach will rely upon the coveted result. Before you start you
should plainly characterize your editing objectives, which could
incorporate any of the accompanying:
Evacuate undesirable footage
This is the least difficult and most basic undertaking in editing.
Numerous videos can be significantly improved by essentially
disposing of the imperfect or undesirable bits.
Pick the best footage

Unit 2 Crew Members and Equipments
30
It is regular to shoot significantly more footage than you really
require and pick just the best material for the final alter.
Frequently you will shoot a few variants (takes) of a shot and pick
the best one when editing.
Create a flow
Most videos fill a need, for example, recounting a story or
providing data. Editing is an essential advance in ensuring the
video flows in a way which accomplishes this objective.
Include effects, graphics, music, and so on
This is frequently the "stunning" some portion of editing. You can
improve most videos (and have a considerable measure of fun) by
including additional components.
Adjust the style, pace or state of mind of the video
A decent editorial manager will have the capacity to create
unobtrusive mind-set prompts in a video. Procedures, for
example, inclination music and visual effects can impact how the
gathering of people will respond.
Give the video a specific "angle"
Video can be custom fitted to help a specific viewpoint, grant a
message or serve a plan.
People involved in Post-production
Editor
The editor works under the supervision of the director and
executive producer to gather the movie. Particular obligations will
include:
(I) To gather the footage into progressive cuts until the
point when a final cut is achieved,
(II) To assist the DP (Director of Photography) with color
correction and other post-production effects,
(III) To make the output of the final cut to a few
organizations.
Assistant Editor

Audio Visual Production
31
The assistant editor functions as an assistant to the editor, helping
him/her with by logging and catching footage, sorting out and
overseeing media as a team with the script supervisor's log.
Particular obligations will include:
• Logging and capture media. • Preparing harsh cut alter on timetables for the director. • Managing media in a joint effort with the script supervisor's log. • Maintaining an arrangement of reinforcements. • Assisting with compression and multi-format output
Compositing
Lead Compositor/Visual Effects Supervisor
The lead compositor works under the supervision of the director, DP, and art director and in a joint effort with the editor to outline and execute compositing effects. Particular obligations will include:
(I) Supervision of all compositing work, (II) Assist the art director and DP in the innovative and
specialized outline of composite shots, (III) To actualize the composite shots
Compositors The compositors work under the supervision of the lead compositor and the art director to actualize compositing effects. Particular obligations will include:
(I) Digital scrubbing and cleaning (II) Implementation of composite shots
Sound/Music
Sound Designer
The sound designer, working in conjunction with the director, is in charge of the ideation and formation of the general soundtrack of the movie. The sound architect regulates the blend of music,

Unit 2 Crew Members and Equipments
32
dialog, ADR, Foley, and sound effects. Sound designer’s work also includes: • Realization of sound effects, textures, and landscapes • Supervision of the mix for different output formats
Sound Composer
The composer composes unique music to be heard in the film, both diegetic and non-diegetic. Particular obligations will include:
(I) Writing music as requested in both pre and postproduction,
(II) Supervising the recording of the music
Mixing Engineer
The mixing engineer, under the supervision of the sound designer, blends the general soundtrack into its last blends for an assortment of yield formats. Particular obligations will include:
(I) Mixing sound in stereo and additionally multi-channel formats, for home framework and theatrical discharge.
(II) Preparing last mix for mastering audio.
Foley Artist
The Foley artist makes sound effcts to go with particular visual items, developments, and sound sources, for example, footsteps or punches. Particular obligations will include: Generating and recording sound to go with particular on-screen sound sources.
Different Types of Video Editing
There are a few diverse approaches to alter video and every technique has its upsides and downsides. Albeit most editors choose computerized non-linear altering for most ventures, it bodes well to have a comprehension of how every strategy functions.
Film Splicing
Actually this isn't video editing, it's film editing. Be that as it may, it is justified regardless of a say as it was the main method to alter moving pictures and theoretically it shapes the premise of all video editing.

Audio Visual Production
33
Title-Film Splicer Attribution-DRs Kulturarvsprojekt Source-Dr. Cattozzo film splicer Link-https://commons.wikimedia.org/wiki/File:Dr._Cattozzo_film_splicer_(6498607259).jpg
Traditionally, the film is altered by cutting segments of the film and adjusting or disposing of them. The procedure is exceptionally clear and mechanical. In principle, a film could be altered with a couple of scissors and some joining tape, in spite of the fact that in all actuality, a grafting machine is the main down to earth arrangement. A grafting machine permits film footage to be arranged and held set up while it is cut or joined together.
Tape to Tape (Linear)
Linear editing was the first technique for editing electronic video tapes, before editing PCs ended up noticeably accessible in the 1990s. Despite the fact that it is not any more the preferred choice, it is as yet utilized as a part of a few circumstances. In linear editing, video is selectively copied from one tape to another. It requires at least two video machines connected together — one acts as the source and the other is the recorder. The basic procedure is quite simple: 1. Place the video to be edited in the source machine and a blank tape in the recorder. 2. Press play on the source machine and record on the recorder. The idea is to record only those parts of the source tape you want to keep. In this way desired footage is copied in the correct order from the original tape to a new tape. The new tape becomes the edited version.

Unit 2 Crew Members and Equipments
34
This method of editing is called "linear" because it must be done in a linear fashion; that is, starting with the first shot and working through to the last shot. If the editor changes their mind or notices a mistake, it is almost impossible to go back and re-edit an earlier part of the video. However, with a little practice, linear editing is relatively simple and trouble-free.
Digital/Computer (Non-linear)
In this strategy, video footage is recorded (caught) onto a PC hard drive and afterward altered utilizing specific programming. Once the editing is finished, the completed item is recorded back to tape or optical plate. Non-linear editing has numerous noteworthy favorable circumstances over linear editing. Most quite, it is an exceptionally adaptable technique which enables you to roll out improvements to any piece of the video whenever. This is the reason it's called "non-linear" — in light of the fact that you don't need to alter in a linear manner. A standout amongst the most troublesome parts of the non-linear advanced video is the variety of equipment and programming alternatives accessible. There are additionally a few normal video principles which are inconsistent with each other, and setting up a strong editing framework can be a test.
The exertion is justified, despite all the trouble. In spite of the fact that non-linear editing is more hard to learn than linear, once you have aced the nuts and bolts you will have the capacity to do considerably more, substantially speedier.
Live Video Editing
In a few circumstances, multiple cameras and other video sources are directed through a focal mixing console and altered progressively. Live television coverage is a case of live editing. Live editing is a reasonably expert theme and won't concern a great many people.
Requirement for a Non Linear Edit Suite To edit video on a PC you will require: • A source device to play the first tape or circle. Commonly a VCR or camera.

Audio Visual Production
35
• A PC with at any rate these specs: Intel Core i5 processor/4 GB RAM/Fast hard drive with 1 TB or all the more free space and a devoted illustrations card like AMD Radeon or Nvidia GeForce. Note: If you need OK comes about, you'll require significantly higher specs. Some editing programming requires a superior PC to try and work legitimately. • A video capture device. To capture video from a simple source, (for example, VHS or Video8) you require a device to change the video into an advanced organization. This can be an independent device which connects to the PC or a video capture card which turns out to be a piece of the PC. In the event that you are utilizing a source device which yields a computerized flag, (for example, Firewire or USB) you needn't bother with a capture device, yet you do need to ensure your PC has the fitting info accessible. • Connecting prompts to connect the source device to the capture device or PC. • Software to control the catching, editing and outputting. • A video screen (or television). We'll return to the product on the following page. Before we start, let’s look with, the hardware and physical connections. There are different alternatives relying upon your equipment.
Connectors
Title-Firewire Connector Attribution- Mikkel Paulson Link- https://commons.wikimedia.org/wiki/File:FireWire_cables.jpg
The main work is to connect your video camera straightforwardly to your PC by means of a computerized link, for example, Firewire or USB. These connections and enable you to "dump" footage

Unit 2 Crew Members and Equipments
36
straight from the camera to the hard drive. This is a helpful and cheap approach to work. Counsel your camera manual for points of interest. On the off chance that your camera doesn't have a digital output, however, has simple AV output, you can utilize a capture device. In the event that your camera doesn't have any video outputs whatsoever, you should utilize a VCR as the source device.
Connection between Computer & VCR
A VCR is utilized for the source gadget, associated with a computer
with the assistance of capture card. A video monitor (or TV) is
utilized to monitor the videos. Sound can be monitored with the
TV speakers, a separate sound framework or with an earphone.
1. If the VCR has at least two AV outputs, utilize one of the outputs
to plug as AV input for monitoring. On the off chance that there is
just a single AV output, utilize the RF (aeronautical) output rather,
and utilize the AV output for the subsequent stage.
2. The second AV output of the VCR plugs into the AV input of the
computer's capture card.
3. The AV output of the capture card plugs into the AV input of the
VCR.
In this system, footage is played from the VCR to the computer,
edited and after that played again from the computer to the VCR
(for recording).
Amateur Editing Suite
This suite is meant for editing of home videos, DVDs, television-
quality productions, and authoring for internet upload.
Different Editing Software
Choosing which video editing software to utilize isn't simple. There
is an enormous range available, from exceptionally fundamental
applications, for example, Windows Movie Maker to proficient
bundles, for example, Final Cut Pro, ULead Media Studio, Avid and
Adobe Premiere.
Audio Visual Production
37
For many people, the primary imperative is cash. Best editing
software is costly and frequently requires an extravagant
computer to run adequately. Clearly the more cash you can spend
the better, however you can accomplish sensible outcomes with
ease software.
Exceptionally modest or free software (e.g. Windows Movie
Maker) has a tendency to be exceptionally restricted and to some
degree unfeasible. In the event that you are at all genuine you
should spend some cash.
Note that numerous capture gadgets and cameras accompany
their own editing software, or maybe a constrained adaptation of
an expert bundle. This can be a financially savvy approach to
begin.
Working method of Editing Software
Mainly editing software does the basic three things:
1. Capture 2. Edit 3. Output
This implies the software controls the capturing (recording) of the footage, gives an approach to edit the footage, and enables the completed item to be output to a recording device, for example, a VCR or DVD. On the off chance that you like, you can utilize isolate software for catch or output, yet at first, you will presumably think that its more helpful to utilize a similar program for all assignments. What is a project? The term “project” may vary one non linear editing software to another. A project is a compilation of different elements like- video clips, audio clips, titles, gfx, animations, sound effects, still images etc from start to finish. The project likewise incorporates data about how these components are orchestrated in the edit. As a result, a project comprises of all the individual components and directions on how they are assembled. When you make a video project, you import or catch the components you require, at that point mastermind them in the request you need (including effects and different treats on the off chance that you like).
Unit 2 Crew Members and Equipments
38
What to Look For in Editing Software
1. Make beyond any doubt it is good with your hardware and operating system. 2. Check the catch, import and fare alternatives. Ensure it can deal with the configurations and determination you need to utilize. 3. Does the software take into account layering and effects? What other propelled highlights does it have? 4. Is there some other software packaged with the bundle (e.g. sound editing)?
5. Is it perfect with other regular software (e.g. Adobe
Photoshop)?
Digitising/Capturing Video in NLE
Once your edit system is set up effectively, you have to record (catch) the footage from the source machine (e.g. camera or VCR) onto the PC's hard drive. The catch procedure goes this way: Turn everything on and dispatch the video catch software. Precisely how this functions will rely upon your software, yet by and large you will have a menu choice to open a catch window. Press "play" on the source machine. In the event that fortunes is your ally the catch window will demonstrate the photo originating from the source. If not, counsel your software enable record to perceive what you to need to do. Search for a record or catch in the catch window. Essentially click this catch to record (similarly as you would press the record catch on a VCR). Continue recording until the point that you have all the footage you need. As a rule you will need to catch just the footage you are probably going to require, however it is smarter to catch more footage than less — you can dispose of undesirable clips later. When you have caught every one of the footages, spare the video file(s) to your hard drive.

Audio Visual Production
39
The Editing Workspace
Once you have done your capturing of footages, you can ready to start your project. Almost every professional/amateur non linear editing software have same type interface like- project window, monitor window, Timeline, effects controls etc. But the terminology may be varied. The most straightforward approach to organize components on the course of events is to move them from the project window. You would then be able to modify the components, for instance, trim video clasps to make them shorter or decrease the volume of sound clasps. You can adjust components as much as you prefer and review the outcomes previously finishing them. Any great software bundle will likewise enable you to include different layers of video, sound and graphics which can be mixed and superimposed to make different effects. Before you start editing you should read the manual of that software carefully.
Creating Video output
Since you have wrapped up your artful editing and you have your timeline all concluded, you are prepared to output the video record. The two most normal approaches to do this are: 1. Encode the video to a computerized arrangement, for example, MPEG-2 and record it specifically to DVD or other optical disk. 2. Output the video through your PC's video card to a recording device, for example, a VCR.
Once more, you should counsel your software/hardware manual for particular guidelines.

Unit 2 Crew Members and Equipments
40
Unit summary
Summary
In this unit you learned the process of Editing. Able to know the role of all the members involved in editing. How to install an editing machine. Various technical term used during the editing process.
Assessment
1. What is the role of Editor & Asst. Editor in Post production?
2. What is the main work of a Compositor? 3. Describe the job of Foley Artist. 4. What is Live editing? 5. Why a monitor is important during editing? 6. What is Transition? 7. Why a clip shows offline on timeline during editing? 8. What is the most general purpose of editing software? 9. What is the minimum system configuration required for
a professional editing work?
Resources
6. http://www.mediacollege.com 7. Video Production by Vasuki Belavadi
(Oxford University Press) 8. Television Field Production And Reporting by Fred Shook
(PEARSON Education) 9. www.wikipedia.org 10. www.documentmx.com
Assessment
Reading

Audio Visual Production
41
Unit 3
Editing & other things
Introduction
Editing is so important to the visual storytelling process because it
duplicate the manner in which the mind sees. We all edit reality
with our eyes and mind. The art of editing lies therefore in
creating illusion and new realities, new relationship and
controlling emotional responses. No matter in which software you
are doing the editing work, it’s always the mind game. The final
product should be communicative and informative. Editing is to be
done in mind, software is the tool only.
Outcomes
Upon completion of this unit you will be able to:
Outcomes
Get a whole idea about Editing using OPENSHOT Video Editor
Understand the tools and project setting
Learn about color correction
Final output in different format
How to make promotion and publicity of your own film
Terminology
Terminology
Effect: In addition to the many clip properties which can be animated and adjusted, you can also drop an effect directly onto a clip.
Transition: A transition is used to gradually fade (or wipe) between two clips
Color grading:
Itis the process of altering and enhancing the colour of a motion picture, video image, or still image either electronically, photo-chemically or digitally.

Unit 3 Editing & other things
42
About Open Shot Video Editing Software
Open Shot Video Editor is an open-source video editor, available
on Linux, Mac, and Windows platform. You can create stunning
videos, films, and animations by using Open Shot Video Editor. It
has a user friendly interface and flexible set of features.
System Requirements
Every Video editing system needs large memory, advance CPUs,
and fast hard disks. Here are the basic system requirements to run
Open shot Video Editor:
64-bit Operating System (Linux, OS X, Windows 7/8/10)
Multi-core processor with 64-bit support
4GB of RAM (16GB recommended)
Minimum 500 MB of hard-disk space for installation
Optional: Solid-state drive (SSD), if utilizing disk-caching (and an
additional 1 TB of hard-disk space)
Main Features
It’s a Cross-platform software that Supports Windows, MAC OS
X, and Linux.
It Supports multiple video, audio, and image formats
You can create attractive curve-based Key frame animations
It supports desktop integration (drag and drop support)
It has Unlimited tracks / layers
Clip resizing, scaling, trimming, snapping, rotation, and cutting
options are available in this software.
It has Video transitions with real-time previews options.
Compositing, image overlays, watermarks are easily can be
done.
Title templates, title creation, sub-titles can be done here.
It supports 2D animation (image sequences).
3D animated titles are possible with effects.
Audio balance:
Re-arranging the audio track i.e. voiceover, bgm and ambience track in such a manner that is clearly audible to the viewers.

Audio Visual Production
43
It has SVG friendly facility to create and include vector titles and
credits.
It can Scroll motion picture credits.
Like any other editing software it has advanced Timeline
options that include Drag & drop, scrolling, panning, zooming,
and snapping.
Time-mapping and speed changes on clips (slow/fast,
forward/backward, etc...) is easily can be done.
You can mix and edit audio.
Digital video effects, and color correction options including
brightness, gamma, hue, greyscale, chroma key (blue screen /
green screen), and many more are available in this software.
Main Window

Unit 3 Editing & other things
44
SL. no.
Name Interpretation
1 Main Toolbar Contain buttons to open, save, export your project
2 Function Tabs A switch between project files, Transition and Effects
3 Project Files It shows all video, audio and image files.
4 Preview Window Playback video will show here.
5 Edit Toolbar It contains buttons that is used for adding tracks, snapping, markers and jumping between markers.
6 Zoom Slider This will adjust the time scale of the timeline.
7 Play-head/Ruler This shows the current playback position.
8 Timeline This shows the each track, each clip, transition, effects, titles and graphics.
9 Filter It is used for finding, what you are looking for.
10 Playback arrows It shows the play, pause, rewind, forward, jump to start, jump to end arrow to control the playback.
Keyboard shortcuts to work faster
Shortcut Action
Ctrl+H About OpenShot
Ctrl+M Add Marker
Ctrl+Shift+T Add Track
Ctrl+W Add to Timeline
Ctrl+B Animated Title
Ctrl+P Choose Profile
Ctrl+C Copy
Delete Delete Item
Backspace Delete Item
Ctrl+D Details View
Ctrl+E Export Video
L Fast Forward
F11 Fullscreen
Ctrl+F Import Files
Ctrl+End Jump to End
Ctrl+Home Jump to Start
Ctrl+N New Project
Right Next Frame
Ctrl+Right Next Marker
Ctrl+O Open Project
Ctrl+V Paste
Space Play/Pause Toggle
Up Play/Pause Toggle

Audio Visual Production
45
Down Play/Pause Toggle
K Play/Pause Toggle
Ctrl+Shift+P Preferences
Left Previous Frame
Ctrl+Left Previous Marker
Ctrl+I Properties
Ctrl+Q Quit
Ctrl+Y Redo
J Rewind
Ctrl+S Save Project
Ctrl+Shift+S Save Project As...
Ctrl+A Select All
Ctrl+Shift+A Select None
Ctrl+K Slice All: Keep Both Sides
Ctrl+L Slice All: Keep Left Side
Ctrl+J Slice All: Keep Right Side
Ctrl+G Toggle Snapping
Ctrl+X Split Clip
Ctrl+Shift+D Thumbnail View
Ctrl+T Title Editor
Ctrl+Z Undo
= Zoom In
– Zoom Out
Ctrl+Scroll Zoom In/Out
Ctrl+Middle Button Scroll Timeline
How to Import Files to the Project
Name Functions
Drag and Drop Drag and drop the files from your file manager (file
explorer, finder, etc...)
Right Click-
>Import
Right click in the Project Files panel, choose Import
Files...
File Menu->Import File menu->Import Files...
Import Files
Toolbar
Click the Import Files... toolbar button (on the top
menu)

Unit 3 Editing & other things
46
Quick operation Manual
It is very to operate and use Open shot Video Editor. It is very easy
to make a five minutes output from your images or videos that
you have shot previously.
a- Importing Files(Photos & Music)
b- Working in Timeline
c- Adding Background Music to create mood
d- Adding titles
e- Finalising your project
f- Export your project
a- Importing Files(Photos & Music)
Before we can start making a video, we have to import records
into Open Shot. Intuitive a couple of pictures (JPG, PNG etc...)
and a music record (most configurations will work) from your
Desktop to Open Shot Video Editor. Make sure to drop the
documents where the arrow is indicating.
Screenshot
b- Working in Timeline

Audio Visual Production
47
Screenshot
Next, drag each visual onto the timeline. The timetable speaks
to your last video, so arrange or sort your photographs in
whatever grouping you need them to show up in your video. In
the event that you cover two clips, Open Shot Video Editor will
naturally make a smooth transition between them, showed by
blue rounded rectangles between the clips. Keep in mind, you
can improve the clips the same number of times as required by
essentially moving them.
c- Adding Background Music to create mood
To influence your photograph to slide indicate additionally
intriguing, you have to include some music. You ought to have
imported a music record in stage 1. Tap on the music
document, and drag it onto the timeline. In the music is too
long, get the correct edge of your music clip, and resize it
littler.
Screenshot

Unit 3 Editing & other things
48
d- Adding titles
Including text and titles in a video is a vital part of video editing,
and Open Shot accompanies a simple to utilize Title Editor. Utilize
the Title menu (situated in the main menu of Open Shot video
editor) to dispatch the Title Editor. You can likewise utilize the
keyboard shortcut Ctrl+T.
Screenshot
e- Finalising your project
To preview what our video looks and sounds like, click the Play catch under the preview window. You can likewise stop, rewind, and fast-forward your video venture by clicking the relating buttons.
Screenshot

Audio Visual Production
49
f- Export your project
When you are content with your photograph /video is ready,
the subsequent stage is to export your video. This will convert
your Open Shot venture into a solitary video document, which
will take a shot at most media players, (for example, VLC) or
sites, (for example, YouTube, WhatsApp and Facebook etc...).
Click on the Export Video icon at the highest point of the screen
(or utilize the File > Export Video menu). Browse one of the
numerous preset export choices, and click the Export Video
button.
Screenshot
Now you have an essential understanding of how Open Shot
functions. Importing, Arranging, Previewing, and Exporting. Read
whatever is left of this learning material for a more point by point
understanding of Open Shot software.
Color grading
Color grading is the process of adjusting and improving the color of a motion picture, video picture, or still picture either electronically, photo-chemically or carefully. Color grading envelops both color and the age of imaginative color effects. Regardless of whether for dramatic film, video dispersion, or print, color grading is by and large now performed carefully in a color suite. The prior photo-chemical film process, known as color timing, was performed at a photographic research facility.

Unit 3 Editing & other things
50
Title-Coor grading Attribution-MichaelMMR Source- Link-https://commons.wikimedia.org/wiki/File:Michael_Martinez_doing_color_correction_on_a_DaVinci_Resolve_Panel.jpg
Motion Tracking When attempting to separate a color adjustment on a moving subject, the colorist customarily would have expected to physically move a mask to take after the subject. In its most basic shape, motion tracking programming computerizes this tedious process utilizing calculations to assess the motion of a gathering of pixels. These techniques most part gotten from match moving techniques utilized as a part of special effects and compositing work.
Digital Intermediate
Digital intermediate (regularly condensed to DI) is a motion picture completing process which traditionally includes digitizing a motion picture and controlling the color and other picture attributes. It regularly replaces or increases the photochemical planning process and is generally the last creative adjustment to a motion picture before distribution in theatres. It is distinguished from the telecine process in which film is scanned and color is controlled right on time in the process to encourage editing. However the lines amongst telecine and DI are persistently obscured and are regularly executed on similar equipment by

Audio Visual Production
51
colorists of a similar foundation. These two stages are commonly part of the general color administration process in a motion picture at different focuses in time. A digital intermediate is additionally generally done at higher resolution and with more noteworthy color loyalty than telecine exchanges.
Albeit initially used to depict a process that began with film scanning and finished with film recording, digital intermediate is likewise used to portray color adjustment and color grading and even last acing when a digital camera is utilized as the picture source and/or when the last motion picture isn't yield to film. This is because of late advances in digital cinematography and digital projection innovations that endeavor to match film origination and film projection.
In traditional photochemical film completing, an intermediate is delivered by presenting film to the first camera negative. The intermediate is then used to mass-deliver the films that get distributed to theatres. Color grading is finished by shifting the measure of red, green, and blue light used to uncover the intermediate. This tries to have the capacity to supplant or increase the photochemical way to deal with making this intermediate.
The digital intermediate process utilizes digital apparatuses to color review, which considers substantially better control of individual colors and zones of the picture, and takes into account the adjustment of picture structure (grain, sharpness, and so on.). The intermediate for film generation would then be able to be created by methods for a film recorder. The physical intermediate film that is an aftereffect of the recording process is now and then additionally called a digital intermediate, and is normally recorded to internegative (IN) stock, which is naturally better grain than camera negative (OCN).
One of the key specialized accomplishments that made the transition to DI conceivable was the utilization of the 3D look-up tables (otherwise known as "3D LUTs"), which could be utilized to imitate how the digital picture would look once it was imprinted onto discharge print stock. This expelled a lot of talented mystery from the film-making process, and permitted more noteworthy opportunity in the color grading process while decreasing danger.
Publicity
Anybody with a camera, PC or advanced cell can make a film today. To collect production cash, you can sidestep organizations completely and go directly to the general population by means of

Unit 3 Editing & other things
52
sites. It's likewise no longer extraordinary to do dramatic appointments and different types of distribution, from celebration positions to overseeing download and DVD deals, all alone and exposure.
However frequently, the professional writers and best faultfinders whom each filmmaker needs to achieve feel awkward managing direct. Setting up a relationship (one of the foundations of advertising) makes desires, and these media professionals must don't hesitate to react sincerely to a film, regardless of whether that reaction is negative. They consider irreconcilable circumstances important and will make a special effort to maintain a strategic distance from them. A different publicist gives an attractive unbiased support zone.
So in a perfect world, you should contract a professional publicist or dole out somebody to speak to you as a "whiskers" or go-between. In the event that you can't, tread delicately in any direct collaboration, particularly with prominent professional media. Endeavor to see the experience from their point of view and spotlight on genuine reasons why your task may be specifically noteworthy. Be exceptionally particular about how and why you approach them.
Regardless of whether you've employed a professional publicist, what you do unsupervised and all alone—particularly through postings on social media and funding sites—impacts the general advertising result. And it won't be useful.
Like film production, attention has its own particular peculiar rationale. It can be particularly disappointing and exhausting. Equipping yourself with a general understanding of some of reputation's subtle riddles is a decent method to take full advantage of your assets, regardless of how rare.

Audio Visual Production
53
Unit summary
Summary
In this unit you learned the whole process of editing using Open Shot Editing Software. You will understand the various tools visual effect and transition. You can understand the process of colour correction. You have a got a basic idea about what steps should be taken for the publicity of a TV program.
Assessment
Assessment
Make your own project setting in Open Shot start making a short film.
Shoot an interesting story in your mobile in HD format and start editing using Open Shot editing software.
Make a sepia color sequence using color grading in Open Shot.
Try to make an “End Scroll” like Hollywood film using title tool.
Make a montage sequence using BGM and ambience sound.
Take some production photos and make a publicity plan for your film.
Make a promo video using photographs of on location shooting.
Make a list of recent Blockbuster Bollywood film using unique strategy for huge publicity i.e. Dangal of Amir Khan Production.
Resources
1. http://www.mediacollege.com 2. Video Production by Vasuki Belavadi
(Oxford University Press) 3. Television Field Production And Reporting by Fred Shook
(PEARSON Education) 4. www.wikipedia.org 5. www.documentmx.com
Reading

Unit 4 Transmisssion, Distribution & Rating
54
Unit 4
Transmisssion, Distribution & Rating
Introduction
Distribution is the important part of the Television Industry and
Movie Business, it is the way a financier or a film producer gets
back their returns. India is the fastest growing cable & satellite
market in the world, with exciting growth for Television industry
as well as Distribution Company.
Globally the broadcasting & distribution sector is moving from
analogue to digital. DTH operators have already invested over
15,000 crores in India.
Outcomes
Upon completion of this unit you will be able to:
Outcomes
Get a whole idea about Film &TV Program Distribution
Understand the process of transmission system in India
Learn about Digital and Analog signal
Get full idea about Digital satellite TV
How to calculate TRP in TV channels in India
Terminology
Terminology
Distributor: A person who distributes the film through the theatres is called film distributor. The distributor buys the “distribution rights” from the producer, mostly in the very beginning itself or sometimes after previewing the final cut.
Exhibitor: A person who owned theatre is called an Exhibitor.

Audio Visual Production
55
TRP: (Television Rating Point) is a tool provided to judge which programmes are viewed the most. This gives us an index of the choice of the people and also the popularity of a particular channel. For calculation purpose, a device is attached to the TV set in a few thousand viewers’ houses for judging purpose.
Distribution
Film or TV distribution is the way toward making a TV program movie accessible for review by an audience. This is ordinarily the undertaking of a professional film distributor, who might decide the marketing strategy for the film, the media by which a film is to be displayed or made accessible for survey, and who may set the discharge date and different issues. The film might be displayed specifically to the general population either through a movie theatre or television, or personal home survey (counting VHS, video-on-demand, download, television programs through broadcast syndication). For business ventures, film distribution is generally joined by film promotion.
At the point when a film is at first produced, an element film is regularly appeared to audiences in a movie theatre. Commonly, one film is the highlighted presentation (or highlight film). Prior to the 1970s, there were "twofold highlights"; commonly, a high calibre "A photo" leased by an autonomous theatre for a single amount, and a lower-quality "B picture" leased for a level of the gross receipts. Today, the main part of the material appeared before the component film consists of sneak peaks for upcoming movies (otherwise called trailers) and paid advertisements.
Transmission
The standard release routine for a movie is controlled by a plan of action called "discharge windows". The discharge windows framework was first considered in the mid-1980s, on the very edge of the VHS home stimulation showcase, as a procedure to shield distinctive cases of a movie from contending with each other, enabling the movie to exploit diverse markets (cinema, home video, TV, and so forth.) at various circumstances.
In the standard procedure, a movie is first discharged through movie theatres (showy window), at that point, after roughly 16 and one-half weeks, it is discharged to VHS and VOD services (entering its video window). Following an extra number of months, it is normally discharged to Pay TV, and roughly two years after its

Unit 4 Transmisssion, Distribution & Rating
56
dramatic discharge date, it is influenced accessible for free-to-air to TV.
A concurrent discharge happens when a movie is made accessible on numerous media (cinema, DVD, internet...) in the meantime or with next to no distinction in timing.
Synchronous discharges offer incredible points of interest to the two consumers, who can pick the medium that most suits their requirements, and production studios that lone need to run one showcasing effort for all discharges. The other side, however, is that such distribution endeavours are regularly viewed as trial and in this way doing get generous investment or promotion.
Cinema proprietors can be influenced genuinely on the off chance that they need to share their chance window, particularly toward the start of the movie lifecycle, since, as indicated by Disney; around 95% of all box office tickets for a film are sold inside the initial a month and a half after introductory distribution.
A straight to video (or straight-to-DVD or straight-to-Blu-ray contingent upon the media whereupon the movie is influenced accessible) to discharge happens when a movie is discharged on home video groups, (for example, VHS, DVD, and so forth.) without being discharged in theatres to start with, accordingly not thinking about the "showy window".
Because of solid DVD deals, Direct-to-video discharges likewise made higher progress and have turned into a gainful market of late particularly for independent moviemakers and companies.
Internet look into is still new with regards to the film distribution platform. The volume of downloaded movies is hard to discover yet none thinks about to the considerably more problematical revelation of their root.
Internet investigate is still new with regards to the film distribution platform. The volume of downloaded movies is hard to discover yet none looks at to the considerably more problematical revelation of their root.

Audio Visual Production
57
Various Methods of TV Transmission
There are a few kinds of TV transmission systems and that are:
1. Analogue Terrestrial TV
2. Digital Satellite TV
3. Cable TV
Advance technologies:
1. Digital terrestrial TV (DTTV)
2. High Definition Television (HDTV)
3. Pay-per-view
4. Video-on-demand
5. Web TV
6. IPTV
1. ANALOGUE TERRESTRIAL TV
The term refers to the modes of television broadcasting, which is
not involved with satellite transmission or via underground cables.
The main non-terrestrial method of conveying TV signals that not
the slightest bit relied upon a signal beginning from a conventional
terrestrial source started with the utilization of communications
satellites amid the 1970s of the twentieth century.
Simple TV encodes the image and sound data and transmits them
as a simple signal in which the message transmitted by the
telecom signal is made out of amplitude as well as frequency
varieties and tweaked into a VHF or UHF bearer.
The simple TV picture is "drawn" a few times on the screen (25 in
PAL framework) all in all each time, as in a movie film, paying little
heed to the substance of the image.
2. DIGITAL SATELLITE TV
Satellite television will be television signals delivered by methods
for communications satellites and received by satellite dishes and
set-top boxes. In numerous zones of the world it gives an
extensive variety of channels and services, regularly to zones that
are not serviced by terrestrial or cable suppliers.
Satellite television, like different communications relayed by
satellite, begins with a transmitting radio wire located at an uplink
facility which has large uplink satellite dishes, as much as 9 to 12
meters (30 to 40 feet) in width what results in more accurate
pointing and increased signal quality at the satellite.

Unit 4 Transmisssion, Distribution & Rating
58
The uplink dish is indicated to a specific satellite and the uplinked
signals are transmitted inside a specific frequency range, in order
to be received by one of the transponders tuned to that frequency
range on board that satellite, which 'retransmits' the signals back
to Earth however at a different frequency band, a process known
as "translation", used to evade interference with the uplink signal,
typically in the C-band (4– 8 GHz) or Ku-band (12– 18 GHz) or
both.
The down linked satellite signal, very weak in the wake of
travelling the immense distance, is collected by a parabolic
receiving dish, which reflects the weak signal to the dish's focal
point where is a "down converter" device called LNB (low-noise
block) that is essentially a waveguide that accumulates the signals,
amplifies the relatively weak signals, filters the block of
frequencies in which the satellite TV signals are transmitted, and
converts it to a lower frequency range in the L-band range.
The evolution of LNB was a need, so the plans for micro strip
based converters were adjusted for the C-Band exploiting its
central outline that was the concept of a block for down
conversion of a range of frequencies to a lower, and
technologically more easily handled block of frequencies, the IF -
intermediate frequency.
Title-DigitalTVSet top Box Attribution- Source-Pepito5 Link-https://commons.wikimedia.org/wiki/File:Tuner_DVB-T_Cabletech_URZ0083.jpg
The upsides of utilizing a LNB are that cheaper cable could be utilized to connect the indoor receiver with the satellite TV dish

Audio Visual Production
59
and LNB and that the technology for handling the signal at L-Band and UHF was far cheaper than that for handling the signal at C-Band frequencies. The shift to cheaper technology from the 50 Ohm impedance cable and N-Connectors of the early C-Band frameworks to the 75 Ohm technology and F-Connectors allowed the early satellite TV receivers to utilize what were in reality modified UHF TV tuners which selected the satellite television channel for down conversion to another lower intermediate frequency centred on 70 MHz where it was demodulated. This shift allowed the satellite television industry to change to a much more commercial large scale manufacturing one. The satellite receiver demodulates and converts the signals to the coveted shape (yields for television, sound, data, etc.) and once in a while, the receiver includes the capability to unscramble or decrypt; the receiver is then called an Integrated Receiver/Decoder or IRD. The cable connecting the receiver to the LNB must be of the "low loss" type, RG-6 or RG-11 and should not be utilized the standard RG-59 cable.
3. CABLE TV
Cable Television or Community Antenna Television (CATV) is a framework for distribution of audiovisual content for television, FM radio and different services to consumers through settled coaxial cables, maintaining a strategic distance from the traditional arrangement of radio broadcasting antennas (broadcast television) and have across the board utilize, mainly through the pay-TV services.
Technically, the cable TV involves the distribution of various television channels received and processed in a central location (known as head-end) to subscribers inside a community through a system of optical fibre or potentially coaxial cables and broadband amplifiers.
The utilization of different frequencies allows numerous channels to be disseminated through a similar cable, without discrete wires for each, and the tuner of the TV or Radio selects the coveted channel from among all transmitted.
A cable television framework starts at the head end, where the program is received (and some of the time began), amplified, and after that transmitted over a coaxial cable system.

Unit 4 Transmisssion, Distribution & Rating
60
The architecture of the system appears as a tree, with the "storage compartment" that carries the signals in the lanes, the "branches" carrying the signals for buildings and, finally, the "arms" carrying the signals to individual homes.
The coaxial cable has a bandwidth capable of carrying a hundred television channels with six megahertz of bandwidth each; however the signals decay quickly with distance, hence the need to utilize amplifiers to "recharge" the signals periodically to help them.
Backbone trunks in a local cable system frequently utilize optical fibre to limit noise and eliminate the requirement for amplifiers as optical fibre has considerably more capacity than coaxial cable and allows more projects to be carried without signal lost or commotion including.
The majority of the TV tuners can directly receive the cable channels, which are usually transmitted in the RF (radio frequency) band, be that as it may, numerous projects are encrypted and subject to a tariff itself and in such cases, you should install a converter between the cable and the receiver.
New technologies
1. DIGITAL TERRESTRIAL TV
Digital Terrestrial Television (DTTV or DTT) is an execution of
digital television innovation to give a more prominent number of
channels and additionally better nature of picture and sound
utilizing aerial broadcasts to a conventional antenna (or aerial)
rather than a satellite dish or cable connection.
The measure of data that can be transmitted (and consequently
the quantity of channels) is specifically influenced by the
modulation method of the channel.
The modulation method in DVB-T is COFDM with either 64 or 16
state Quadrature Amplitude Modulation (QAM). When all is said in
done a 64QAM channel is fit for transmitting a more noteworthy
piece rate, however is more helpless to impedance. 16 and
64QAM can be joined in a solitary multiplex, giving a controllable
degradation to more imperative program streams. This is called
hierarchical modulation.

Audio Visual Production
61
New advancements in pressure have brought about the MPEG-
4/AVC standard which will empower two top notch
administrations to be coded into a 24 Mbit/s European terrestrial
transmission channel.
DTTV is gotten through a digital set-top box, or coordinated
accepting gadget, that translates the flag got by means of a
standard aerial antenna, nonetheless, because of recurrence
arranging issues, an aerial with an alternate gathering (ordinarily a
wideband) might be required if the DTTV multiplexes lie outside
the bandwidth of the initially introduced aerial.
2.HDTV
The HDTV is transmitted digitally and thusly its execution for the most part matches with the presentation of digital television (DTV), the innovation that was propelled amid the 1990s. Albeit a few examples of top notch television have been proposed or actualized, the present HDTV guidelines are characterized by ITU-R BT.709 as 1080i (intertwined), 1080p (progressive) or 720p utilizing the 16:9 screen design. What will be of enthusiasm for the not so distant future is top notch video, through the successors of the DVD, HD DVD and Blu-Ray (is normal that the last one will be embraced as a standard) and, subsequently, the projectors and LCD and plasma televisions sets and additionally retro projectors and video recorders with 1080p determination/definition. Top notch television (HDTV) yields a superior quality picture than standard television does, in light of the fact that it has a more noteworthy number of line determination. The visual data is somewhere in the range of 2 to 5 times more honed in light of the fact that the holes between the output lines are smaller or undetectable to the bare eye. The bigger the extent of the television the HD picture is seen on, the more noteworthy the change in picture quality. On littler televisions there might be no perceptible change in picture quality.
The lower-case "I" attached to the numbers indicates interweaved; the lower-case "p" means progressive: With the

Unit 4 Transmisssion, Distribution & Rating
62
entwined scanning method, the 1,080 lines of determination are isolated into sets, the initial 540 interchange lines are painted on a casing and after that the second 540 lines are painted on a moment outline as far as odd and considerably number. If there should be an occurrence of the progressive scanning method at the same time shows each of the 1,080 lines on each edge, requiring a more prominent bandwidth.
3.PAY-PER-VIEW
Pay-per-view (frequently condensed PPV) offers a framework by which a television group of onlookers can buy events to view on TV-monitors by means of private broadcast of that occasion to their homes. The telecaster demonstrates the occasion in the meantime to everyone requesting it (rather than video-on-demand frameworks, which enable viewers to see the occasion whenever) and can be acquired utilizing an on-screen direct, a mechanized telephone framework, or through a live client benefit delegate. Events frequently incorporate feature films, sporting events, adult content movies and "uncommon" events.
4. VIDEO-ON-DEMAND
Download and streaming video-on-demand frameworks give the client a substantial subset of VCR functionality including pause, fast forward, fast rewind, slow forward, slow rewind, and jump to previous/future frame and so on. These functions are called trap modes. For plate based streaming frameworks which store and stream programs from hard circle drive, trap modes require additional handling and storage on the piece of the server, since particular documents for fast forward and rewind must be stored. Memory-based VoD streaming frameworks have the upside of having the capacity to perform trap modes straightforwardly from RAM, which requires no additional storage or CPU cycles on the piece of the processor. It is conceivable to put video servers on LANs, in which case they can give extremely fast response to clients. Streaming video servers can likewise serve a more extensive group through a WAN, in which case the responsiveness might be diminished. Download VoD administrations are functional to homes furnished with cable modems or DSL connections. 5.WEB TV

Audio Visual Production
63
Web TV or TV on the Internet is the transmission of a program through the Internet. It can be known "typical" TV channels or channels particularly intended for the Internet. Presently a day greatest individuals have web in their smart phone. They are extremely user friendly to observe any video content on you tube or some other stage.
Web TV, in an improved frame, is simply the provision of video and sound over the Internet and the best approach to help the transmission changes from the monitor of a PC using an iPod or a cell phone to the TV set on the off chance that one have the decoder. 6.IP TV The current introduction of Television over Internet Protocol innovation, commonly known as IPTV, made a revolution on the distribution networks for TV signals, permitting dispose of a significant number of the issues related with a distribution network in view of coaxial cables, specifically those related with the degradation of signal, impedance, signal levels, and limit of the transmission of the channel's band. Additionally, because of IP (Internet Protocol), will be conceivable the combination of a few interfaces in a multi-benefit unit and the communicate and distribution of assorted and changed administrations on a similar network, which previously required separated foundation, including: TV signals, telephone benefit and broadband Internet get to, setting a stage we know today as Triple Play. Basically, the triple play concept isn't altogether new on the grounds that, as far as administrations, there are a few years prior that are accessible a few solutions joining a blend of TV administrations, telephony and Internet get to. Studies demonstrate that the stir rate (intentional abandonment of administration) of the offer triple play endorsers is significantly lower than that watched when the voice, information and TV are sold on a non-convergent way. Another factor is the advance in get to innovations and stages for bundle telephony and video. A variation of ADSL (unbalanced digital endorser line), known as ADSL2+, speaks to an adjustment in the viable performance of Internet connection on the first

Unit 4 Transmisssion, Distribution & Rating
64
organization, not to mention the later advancements, for example, VDSL (high-piece rate DSL). The entrance over optical fibre in its more famous shape, known as PON (passive optical network), mirrors a considerably all the more brave path, brought about noteworthy interests in that innovation, looking for fast Internet access, voice and multi-channel of top notch TV union. Advance in video distribution frameworks is on the much too. As of late, various innovations and advancements in the business of equipment and software frameworks for the TV business have begun to TV once again IP (otherwise called IPTV). The main driver is incorporated stages consisting of set-top-boxes, servers and video content protection framework (DRM - digital rights management), together with suitable tools, middleware and charging, permit the provision of an assortment of TV benefits in a few arrangements, for example, streaming, video on demand and time-shifted TV, in view of a combination of fundamental IP networks and DSL or optical access frameworks. In this context, the sophistication of calculations for compression of video signals has an applicable part. Systems, for example, MPEG-4 AVC (propelled video coding), for instance, empowers the transmission of signals in top quality TV over IP networks.
The look for a system to offer different play-based (double, triple, fourfold and so forth.) is an irreversible phenomenon in the communications business yet in the meantime it forces gigantic difficulties - especially as far as selection of innovation stages, control and regulation - opens an enormous horizon of conceivable outcomes, both free market activity.
RATING
Television content rating systems will be systems for assessing the content and announcing the reasonableness of television programs for youngsters, adolescents, or grown-ups. Numerous nations have their own particular television rating system and nations' rating forms shift by local priorities. Projects are rated by the association that deals with the system, the broadcaster, or the content producers.
A rating is typically set for every individual scene of a television arrangement. The rating can change per scene, system, rerun, and

Audio Visual Production
65
nation. In that capacity, program ratings are normally not significant unless when and where the rating is utilized is said. Television rating point for estimation objects is a gadget connected to the TV set in a couple of thousand watchers' homes for judging reason. These numbers are dealt with as an example from the general TV proprietors in various geographical and demographic sectors. It records the time and the program that a watcher watches on a specific day. At that point, the normal is taken for a 30-day time span, which gives the viewership status for a specific channel. Television Rating Point (TRP) is an instrument gave to judge which programs are seen the most. This gives us a record of the decision of the people and furthermore the prevalence of a specific channel. For count purpose, a gadget is connected to the TV set in a couple of thousand viewers' houses for judging purpose. These numbers are dealt with as sample from the general TV owners in various geographical and demographic sectors. The gadget is called as People's Meter. It records the time and the program that a watcher watches on a specific day. At that point, the normal is taken for a 30-day time span which gives the viewership status for a specific channel.

Unit 4 Transmisssion, Distribution & Rating
66
Unit summary
Summary
In this unit you learned the whole process about Distribution of TV
program. You will understand the various transmission systems in
our country. You can understand the process of calculating TRP.
You have a basic idea about traditional and modern method of
calculating TRP.
Assessment
Assessment
1. Explain difference between Terrestrial TV and Digital satellite TV
2. How to connect your TV set with digital setup box? 3. In which format digital setup box encode signal receive from
satellite? 4. Through which cable you will connect your TV with HD Digital
setup box? 5. What is VOD? How it works? 6. What is the function of People’s Meter? 7. What is TRP and how it has been calculated?
Resources
1. http://www.mediacollege.com 2. Video Production by Vasuki Belavadi
(Oxford University Press) 3. Television Field Production And Reporting by Fred Shook
(PEARSON Education) 4. www.wikipedia.org 5. www.documentmx.com
Reading


DMA-05
Audio Visual Production Block – V: Practical
Odisha State Open University
Audio Visual Production
This course has been developed with the support of the Commonwealth of Learning (COL). COL is an intergovernmental organisation created by Commonwealth Heads of Government to promote the development and sharing of open learning and distance education knowledge, resources and technologies. Odisha State Open University, Sambalpur (OSOU) is the first Open and Distance learning institution in the State of Odisha, where students can pursue their studies through Open and Distance Learning (ODL) methodologies. Degrees, Diplomas, or Certificates awarded by OSOU are treated as equivalent to the degrees, diplomas, or certificates awarded by other national universities in India by the University Grants Commission.
© 2018 by the Commonwealth of Learning and Odisha State Open University. Except where otherwise noted, Audio Visual Production is made available under Creative Commons Attribution-ShareAlike 4.0 International (CC BY-SA 4.0) License: https://creativecommons.org/licenses/by-sa/4.0/legalcode For the avoidance of doubt, by applying this license the Commonwealth of Learning does not waive any privileges or immunities from claims that it may be entitled to assert, nor does the Commonwealth of Learning submit itself to the jurisdiction, courts, legal processes or laws of any jurisdiction. The ideas and opinions expressed in this publication are those of the author/s; they are not necessarily those of Commonwealth of Learning and do not commit the organisation
Odisha State Open University Commonwealth of Learning
G.M. University Campus 4710 Kingsway, Suite 2500, Sambalpur Burnaby, V5H 4M2, British Odisha Columbia India Canada Fax: +91-0663-252 17 00 Fax: +1 604 775 8210 E-mail: [email protected] Email: [email protected] Website: www.osou.ac.in Website: www.col.org

Acknowledgements The Odisha State Open University and COL, Canada wishes to thank those Resource Persons below for their contribution to this DMA-05:
Concept / Advisor
Dr. Srikant Mohapatra Vice- Chancellor Odisha State Open University, Sambalpur
Course Writer
Bhagbat Kar Animation Director News 7, Bhubaneswar
Course Editor Sanghamitra Padhi Lecturer in English, JKBK College, Cuttack
Video Production
Durgadatta Kanungo AIDB trained, Media Person, Doordarshan Suvendu Mohanty Anchor, Doordarshan & AIR Retd. Reader, Swami Vivekananda Memorial (Auto)College, Jagatsinghpur
Published by :
Dr. Jayanta Kar Sharma Registrar on behalf of Odisha State Open University, Sambalpur
Contribution of following staff members of Odisha State Open University is acknowledged:
Sambit Mishra
Debidatta Behera
Prashansa Das
Radhakanta Suna
Abhinandan Tripathy
OSOU and COL acknowledge the support extended by Prof. Madhu Parhar, STRIDE, IGNOU, New Delhi in conducting several workshops in the process of preparation of course material for DMA.

Audio Visual Production
Contents
Contents
Course Overview 5
Welcome to Audio-Visual-Production ............................................................................. 5
Recording & Mixing of multi track audio ........................................................................ 5 Script Writing & Budget Making ..................................................................................... 5 Shooting for 5 minutes program ....................................................................................... 6 Editing of 5 minutes program ........................................................................................... 6
Course outcomes ............................................................................................................... 7 Timeframe ......................................................................................................................... 7 Study skills ........................................................................................................................ 7
Need help? ........................................................................................................................ 8 Assignments ...................................................................................................................... 8 Assessments ...................................................................................................................... 9 Video Resources .............................................................................................................. 9
Getting around this Course material 10
Margin icons ................................................................................................................... 10
Unit- 1 11
Recording & Mixing of multi-track audio ...................................................................... 11 Introduction ........................................................................................................... 11
Outcomes ............................................................................................................... 11
Terminology .......................................................................................................... 12 Why Record? ......................................................................................................... 12
The Recording Chain ............................................................................................. 13 Types of Recording ............................................................................................... 13 Multitrack Recorder and Mixer ............................................................................. 15
Recording the Mixes ............................................................................................. 16 Software’s For Audio Recording and Mixing ....................................................... 17 USB Recording ...................................................................................................... 19 Reverting an edit or effect ..................................................................................... 20 Mixing Audio Tracks ............................................................................................ 21
Explicit Mixing and Rendering ............................................................................. 25
Unit Summary ....................................................................................................... 29
Assignments .......................................................................................................... 29
Resources ............................................................................................................... 29

ii Contents
Unit 2 30
Script Writing & Budget Making ................................................................................... 30 Introduction ........................................................................................................... 30 Outcomes ............................................................................................................... 30 Terminology .......................................................................................................... 31
Script Writing: How to Write a Script? .......................................................... 31 Starting an AV project in Celtx ............................................................................. 34 Writing an AV Project in Celtx ............................................................................. 41 Scene Heading ....................................................................................................... 43 Shots ...................................................................................................................... 44
Character ............................................................................................................... 44 Dialogue ................................................................................................................ 44 BUDGETING ........................................................................................................ 46
Setting "The Finish Line" ...................................................................................... 47 Budget Sample ...................................................................................................... 53
Unit summary ........................................................................................................ 57
Assessment ............................................................................................................ 57
Resources ............................................................................................................... 57
Unit 3 58
Shooting for 5 minutes Program ..................................................................................... 58 Introduction ........................................................................................................... 58
Outcomes ............................................................................................................... 58 Terminology .......................................................................................................... 58
DSLR: .................................................................................................................... 58
Production ............................................................................................................. 59
Equipments for video production .......................................................................... 59 Cameras ................................................................................................................. 59
Checklist: Before Filming ..................................................................................... 60 How to shoot a Music Video ................................................................................. 61
How to Shoot Interviews ....................................................................................... 66 Before the Interview .............................................................................................. 66 The techniques to shoot Interview ......................................................................... 67
How to shoot a documentary ................................................................................. 67 How to Shoot News ............................................................................................... 72
Equipment for News coverage .............................................................................. 73 Precaution .............................................................................................................. 74
Unit summary ........................................................................................................ 75
Assessment ............................................................................................................ 75
Resources ............................................................................................................... 75
Unit 4 76
Editing of 5 minutes Program ......................................................................................... 76 Introduction ........................................................................................................... 76 Outcomes ............................................................................................................... 76 Terminology .......................................................................................................... 77

Audio Visual Production
Editing ................................................................................................................... 77
How to Edit a Video? ............................................................................................ 78 Choose the Right Software .................................................................................... 78 Learn the basics of your editing interface ............................................................. 79 Know the essential tools for editing ...................................................................... 80 Organise your Footage .......................................................................................... 81
Create a New Project ............................................................................................. 82 Add transitions and effects to footage ................................................................... 86 Add Music ............................................................................................................. 86 Balancing of Sound ............................................................................................... 87 Adjust the colour ................................................................................................... 87
Titles and Graphics ................................................................................................ 88 Preview video at various point .............................................................................. 88
Unit summary ........................................................................................................ 91
Assessment ............................................................................................................ 91
Resources ............................................................................................................... 91

Audio Visual Production
5
Course Overview
Welcome to Audio-Visual-Production
On completion of this module the learner will be able to
manage a production, from initial stages to the conclusion
utilising A/V production methods and paperwork alongwith
understanding a script from concept through storyboarding, shot
listing to final editting and utilising the basic principles of shot
composition, lighting and shooting. He/she would also be able to
demonstrate basics of camera technique and audio recording
equipment and will be able to effectively record audio through
camera and through standard audio recorders; utilise a digital
non-linear editing system to edit video and audio effectively;
understand and practically apply key principles of technical theory
relevant to digital audio and video - formats, codecs, bit rates,
transcoding etc.
Recording & Mixing of multi track audio
This unit will be like a practical guide for beginners like the
recording engineers, producers, musicians etc. —anyone who
wants to make better music recordings by understanding
recording equipment and techniques. I hope to prepare you all for
work in a home studio, a small professional studio, or an on-
location recording session.
Script Writing & Budget Making
The purpose of this unit is to help you to make a proper budgeting process with specific examples to help you succeed in producing your own video.

Course Overview Recording & Mixing of multi-track audio
6
It’s helpful to consider the overall workflow of creating budget and script writing. Decisions such as what the major takeaway message of the video budgeting and scripting will be, what steps to use, and the sequence of budgeting and scripting each have effects on other aspects of the project. This can make it hard to know where to start.
Shooting for 5 minutes program
Shoot can help take your story from merely ‘telling’ to ‘showing’, and can be a very powerful teaching tool if used correctly.
It’s helpful to consider the overall workflow of creating a video. Decisions such as what the major takeaway message of the video will be, what equipment to use and the sequence of filming each have effects on other aspects of the project.
Editing of 5 minutes program
Editing is an essential part of making any film or video. Capturing
high-quality video has never been easier, but capturing video is
only part of the storytelling process.
You will learn about color correction and grading, video effects
and transitions, and more!
This video will provide a brief overview of this course.
Topic YouTube link QR
Code
Video 1 – Budgeting, Set &
Music Making
https://youtu.be/DMBJgm
xtXtg
Video 2 – Editing, Mixing,
Color Correction of the Final
Product
https://youtu.be/fSDjkc5E
57k

Audio Visual Production
7
Course outcomes
Upon completion of Audio-Production you will be able to:
Outcomes
Explain the Process of Sound Recording.
Describe Voice Dubbing process.
Use the software Celtx for scripting
Plan to shoot News, Music Video, and Documentary.
Practice the steps of Editing
Timeframe
How long?
This course will be completed within “2” classes.
This course is of “1” credits.
2 Hours of study time is required to complete this unit.
Study skills
Learning about the audio visual productions are a part of Multimedia
Coaching. But, when it comes to creation of an output, there is no
specific ABC formula for doing so. It is just like a painting in which the
artists choose the colour and proportion according to the need, not as
per a written plan.
In creating outputs for TV, Films etc. we have to utilize the software
tools from one corner to another randomly. So for every project, the
formula is different. There is no fixed recipe for all kind of output. So, the
more and more you learn about the options, more variety you will get.
Each and every option is explained step by step in the course material.
Apart from this course material, the learner has to adopt the tendency
of learning from multiple sources i.e.,
Internet tutorials

Course Overview Recording & Mixing of multi-track audio
8
Video tutorials on youtube
Collaboration with people working in the industry etc.
Only classroom study will not make you a professional. You have to be active to grab the opportunity of learning wherever you get a chance.
Need help?
Help
In case of any help needed you can browse the internet sites like youtube.com for video tutorials about the subject.
Assignments
Assignments
There will be some assignments at the end of each unit.
These assignments are mostly practical based and should be submitted in CD or DVD. Theoretical assignments are to be submitted neatly written on A4 size sheet.
All assignments will be submitted to respective study centre of Odisha State Open University or as directed by Co-ordinator.
All assignment should be unit wise on separate CD/DVDs clearly mentioning course title and unit on Top. Theoretical Assignment will be neatly filed or spiral bind with cover clearly mentioning necessary information of course.

Audio Visual Production
9
Assessments
Assessments
There will be “1” assessment for each unit.
All practical assessment will be submitted to OSOU.
Assessment will take place once at the end of each unit.
Learner will be allowed to complete the assessment within stipulated time frame given by the university.
Video Resources
This study material comes with additional online resources in the form of
videos. As videos puts in human element to e-learning at the same time
demonstrating the concepts visually also improves the overall learning
experience.
You can download any QR code reader from Google Play to view the
videos embedded in the course or type the URL on a web browser.
Reading

Getting around this Course material Recording & Mixing of multi-track audio
10
Getting around this Course material
Margin icons
While working through this Course material you will notice the frequent use of margin icons. These icons serve to “signpost” a particular piece of text, a new task or change in activity; they have been included to help you to find your way around this Course material.
A complete icon set is shown below. We suggest that you familiarize yourself with the icons and their meaning before starting your study.
Activity Assessment Assignment Case study
Discussion Group activity Help Note it!
Outcomes Reading Reflection Study skills
Summary Terminology Time Tip

Audio Visual Production
11
Unit- 1
Recording & Mixing of multi-track audio
Introduction
This unit will be like a practical guide for beginners like the
recording engineers, producers, musicians etc. —anyone who
wants to make better music recordings by understanding
recording equipment and techniques. I hope to prepare you all for
work in a home studio, a small professional studio, or an on-
location recording session. Practical Recording Techniques offers
up-to-date information on the latest music recording technology,
such as hard-disk and Flash memory recorders, computer
recording, loop-based recording, keyboard and digital
workstations, MIDI, surround sound, Web audio, and online
collaboration. But it also guides the beginner through the basics,
showing how to make quality recordings with the new breed of
inexpensive home-studio equipment.
Outcomes
Upon completion of this unit you will be able to:
Outcomes
State the reasons for recording
List the types of recording
Name the software’s for recording
Plan to record an Audio

Unit- 1 Recording & Mixing of multi-track audio
12
Terminology
Terminology
Ambience: Room acoustics, early reflections and
reverberation. Also, the audible sense of a
room or environment surrounding a recorded
instrument.
Control room: The room in which the engineer controls and
monitors the recording. It houses most of the
recording hardware.
Delay: The time interval between a signal and its
repetition.
Effects: Interesting sound phenomena created by
signal processors, such as reverberation, echo,
flanging, doubling, compression, or chorus.
Signal: A varying electrical voltage that represents
information, such as a sound.
Why Record?
Recording is a genuine service. Without it, individuals would be
presented to substantially less music. They would be restricted to
the intermittent live concert or to their own particular live music,
played once and everlastingly gone.
With recordings, you can protect an execution for a huge number
of listeners. You can hear a tremendous assortment of musical
articulations at whatever point you need. Not at all like a live
concert, a record can be played again and again for examination.
Tapes or circles are likewise an approach to accomplish a kind of
eternality. The Beatles might be gone, yet their music lives on.
Records can even uncover your advancing awareness as you
develop and change. A PC audio file or CD remains the same
physically, however you hear it contrastingly finished the years as
your recognition changes. Recordings are a steady against which
you can quantify change in yourself.

Audio Visual Production
13
The Recording Chain
This SLM will demonstrate to you a review of current recording
technology, enable you to pick the gear that best suits your
necessities, and guide you in utilizing it to make incredible
recordings. What's more, it will clarify the specialized language in
plain English.
As a recording engineer, you're a key player. Your abilities enable
craftsmen to understand their dreams in sound. Your miking
techniques capture the energy of the execution, regardless of
whether it's the gleaming suggestions of a string group of four or
the sonic attack of an electric blues band. Your " post" work in the
studio—adding effects, tweaking levels, and so forth.— will take
the crude material of the execution and shape and mix it into a
cleaned musical articulation. By mastering the technology and
getting to be noticeably familiar with the audio tools nearby, you
will produce exciting recordings that will amuse your customers
and give you a genuine feeling of pride and accomplishment.
Types of Recording
Let’s get started with some best ways o record music.
Live Stereo Recording
Here we will talk about for Record with a stereo microphone or
two microphones into a recorder. This technique is most normal
when used to record an orchestra, symphonic band, pipe organ,
small ensemble, quartet, or soloist. The microphones get the
general sound of the instruments and the concert-hall acoustics
from a few feet away. You may utilize this moderate system to
record a society group, shake group, or acoustic jazz group in a
good-sounding room.
1. The musical instruments or voices make sound waves.
2. The sound waves go through the air and bob or reflect off the
dividers, roof, and floor of the concert hall. These reflections
include a satisfying feeling of openness.
3. The sound waves from the instruments and the room achieve
the microphones, which convert the sound into electrical signals.

Unit- 1 Recording & Mixing of multi-track audio
14
4. The sound quality is significantly influenced by mic method:
microphone decision and situation.
5. The signals from the microphones go to a 2-track recorder. It
might be a hard-drive recorder, CD-R burner, DVD-R burner, Flash
memory recorder, or computer hard drive. The signal changes to a
pattern stored on a medium, for example, attractive patterns on a
hard disk. During playback, the patterns on the medium are
converted once again into a signal. During recording, signals are
stored along a track—a way or channel on the medium containing
a recorded signal. A single medium can record one or more tracks.
For instance, 2-track hard-disk recording stores two tracks on the
hard disk, for example, the two different audio signals required for
stereo recording.
Title- Live Recording Source- www.metalworksinstitute.com Attribution- Metalworks Institute Link- https://commons.wikimedia.org/wiki/File:Metalworks_Institute%27s_Recording_Studios_for_Student_Use.jpg
Live Mix Recording
This strategy is from time to time utilized with the exception of live broadcasts or recordings of PA mixes. Utilizing a mixer, you set up a blend of several microphones and record the mixer's yield

Audio Visual Production
15
signal on a 2-track recorder (CD-R, Flash memory recorder, or computer hard drive). Each mic is near its sound source.
Multitrack Recorder and Mixer
Try to record with several mics into a mixer, which is associated
with a multitrack hard-disk recorder. You record the signal of
every microphone all alone track; at that point blend these
recorded signals after the performance is finished. You can
likewise record different groups of instruments on each track.
1. Place the microphones near the music instruments.
2. Plug the mics into a mixing console: a professional audio mixer.
During multitrack recording, the mixing console increases the frail
microphone signals up to the level required by the recorder. The
console additionally sends every microphone signal to the desired
track.
3. Record the amplified mic signals on the multitrack recorder.
Title- Multitrack Mixer Source- www.metalworksinstitute.com Attribution- Andyzweb Link- https://commons.wikimedia.org/wiki/File:Audient_ASP8024_and_other_gear.jpg
Stand-alone DAW (Recorder–Mixer)
This is a multitrack recorder and a mixer combined in one portable frame. It's relatively simple to utilize. The recording medium is a hard drive or a Flash memory card. Other names for a recorder– mixer are "stand-alone Digital Audio Workstation,” "digital multitracker, “personal digital studio, " or "portable studio.” Most recorder– mixers have built-in effects.

Unit- 1 Recording & Mixing of multi-track audio
16
Title- Computer with a choice of audio interface and recording/editing software. Attribution- Teeks99 Source- Link- https://commons.wikimedia.org/wiki/File:A-D-A_Flow.svg
Recording the Mixes
Regardless of which recording strategy you utilize, in the long run you'll mix every melody and record the mix on a 2-track recorder, or record the mix as a stereo WAVE document on your hard drive. You can change over the WAVE document to a MP3 or WMA organize for uploading to the Web. You should need to amass a collection of your recorded mixes. To do this expel noises and tally offs between tunes, put the melodies in the coveted request, and put a couple of moments of quiet between tunes. This is finished with a PC and altering software .The last advance is to duplicate the collection to a clear CD. There's your final product, prepared to copy or duplicate.
Regardless of what sort of recording you do, each stage adds to the sound quality of the got done with recording. An awful sounding CD can be caused by any frail connection: low-quality microphones, insufficient mic placement or mixer settings, et cetera. You can make progress toward quality recordings by advancing each stage.
It gives you a chance to do complex altering and computerized mixing. A few plug-in (software) impacts are incorporated, and you can buy and install other plug-ins. Recording software can be refreshed at little cost. With respect to disadvantages, PCs can crash and can be hard to set up and optimize for audio work.

Audio Visual Production
17
Software’s For Audio Recording and Mixing
A few software for audio recording are listed below for you:
Audacity
Ardour
Traverso
Qtractor
Nuendo
Pro tools
How we record audio?
So let us start with a couple of advances to record audio...
Audacity is an extremely solid audio program; it's an open source
program for sound recording and mixing. It's accessible for every
operating framework, effective audio recorder and manager that
can do substantially more than you would envision from an open
source program. Its interface is somewhat covered in places, so
you may get yourself a little overpowered when you first utilize it.
Start Audacity: a new untitled project window opens. Click on File
>Save project As... And save the project with a name.
Set the recording source to microphone in Audacity's mixer
toolbar recording selector Mixer Toolbar (or on OS X, set the
microphone as the default recording source in Apple Audio MIDI
Setup).
You are now ready to record the Sound. Don't worry about
mistakes, pauses, and cough and similar - we can edit those out
later. In fact you may want to make a few deliberate mistakes so
you can practice editing them out later. When you stop to make a
correction, go back to the start of a natural break - sentence or
phrase - and start again in a normal voice: once you've tried to
edit out your mistakes you will realize the importance of this.
To record:
Set the Recording Device,
monitor and then adjust the recording level,
then press the red Record button.
Correct adjustment of level before recording is essential to avoid noise or distortion.

Unit- 1 Recording & Mixing of multi-track audio
18
1. Set the Recording Device either in the Devices section of
Preferences or in Device Toolbar.
2. Click in the Recording Meter to start monitoring as in the
following image:
Screenshot
3. Singing or playing the loudest part of what you are recording,
adjust the recording level using the right-hand slider on Mixer
Toolbar:
Screenshot
So that the moving meter toolbars do not get too close to the
right-hand edge of the meter.
4. Optionally, turn on Transport > Software Playthrough (on/off)
(so it has a check mark) to hear what the recording will sound like.
Don't enable Software Playthrough when recording playback, because it creates echoes. To hear what a recording of computer playback will sound like, make a test recording to check the level before recording for real.
5. Press the red Record button to record for real. 6. Audacity will record until you stop the recording using the yellow Stop button.
To record a specific length of time 1. Use Tracks > Add New to create a new track if there are no
tracks yet

Audio Visual Production
19
2. Drag-select a region in an existing track or choose the selection
to be recorded in Selection Toolbar
3. Ensure Transport > Overdub (on/off) is enabled (on) which is its
default setting, then press Record to record in a new track.
Alternatively, try Timer Record.
USB Recording
Connect the USB cable of the turntable, or tapedeck, to the
computer, and then launch Audacity. If Audacity was already
running when you connected the cable, restart Audacity or
choose Transport >Rescan Audio Devices.
Use the device toolbar to set the recording and playback
devices and set the channels to "2(stereo) Recording
Channels":
Screenshot
From the transport menu check "Software Play through" to
be "on" to hear the turntable through the computer speakers;
this setting can be toggled on/off easily from the Transport
Menu.
Then, ignoring any instructions in the manufacturer's guide to
select "stereo mix", simply press the red Record button in
transport toolbar to start recording from the turntable.
Edit
The main commands for editing audio are under the EDIT MENU
and the EFFECT MENU.
When playing, recording or paused, most of the Edit Menu and all of the Effect Menu will appear greyed out. Changes to the audio data cannot be made until you press the yellow Stop button.

Unit- 1 Recording & Mixing of multi-track audio
20
The most common editing actions such as CUT, COPY, PASTE and
DELETE also have buttons in EDIT TOOLBAR . Effects let you do
things like boost the bass, change pitch or tempo, or remove noise
in various ways. Find the correct effect to do what you want on
the INDEX OF EFFECTS, GENERATORS and ANALYZERS page.
Edits
Audacity applies each edit to a selected area of the audio track or
tracks. To select a particular area, click in the track and drag the
shaded area with the mouse. If no audio is selected, Audacity by
default selects all the audio in the project window.
The Tutorial Editing an Existing Audio File has more detailed
information on how to edit audio.
Effects
To apply an effect you need to first select some audio, then click
on the effect you require from the Effect Menu, then make any
parameter settings in the dialog box that you want and then press
the OK button to apply the effect. Note that a few effects have no
parameters that can be set and these are applied as soon as you
click on them in the Effect Menu; An example is: Cross Fade
Tracks .
For the effects that have settable parameters the dialog box
contains a Preview button which enables you to hear a short
sample of the audio with the effect temporarily applied so that
you can audition the result prior to accepting the settings you
have made.
Reverting an edit or effect
If you are unhappy with the result of your edit or effect you can
simple use the Audacity UNDO command or use the CTRL-
Z keyboard shortcut. A good tip for effects is to try them out on a
short section of audio first to try it out on a longer section than
preview allows and then use the UNDO.

Audio Visual Production
21
Marking edit points
You can mark edit points or regions in your audio labels. These can
be useful for recalling the edits when saving and reopening a
project. They can also be useful to mark splits in a long audio track
that is to be exported as multiple files.
Save
There are two main commands for saving projects:
File >Save project saves an .aup project file and
a _data folder containing the actual audio.
File >Save project as is for saving an empty project. It also
lets you save an existing Project with a new name.
When saving an Audacity project it is normally easiest to use
the File >Save project command, which has a default shortcut
of CTRL + S . If you save a project again having made further
changes to it, "Save Project" then updates the .aup file and _data
folder silently without bothering you with prompts.
If the project does not have any unsaved changes (for example, if
the project is empty or you just saved it), "Save Project" will be
grayed out. In that case, use File > Save project as instead. "Save
Project As" is the safe and recommended way to make a copy of a
project with a new name or in a different location. This could
serve either as a single backup copy of the project, or as one of
several incremental copies of the project in the state it had at a
particular date and time.
Open
To re-open a saved project:
choose File >Open
Or use File >Recent Files and open the .aup file.
Mixing Audio Tracks
Mixing refers to the process of combining multiple Audacity tracks
which play simultaneously into a single track.

Unit- 1 Recording & Mixing of multi-track audio
22
Audacity mixes automatically when playing or exporting, but it can
also physically mix selected multiple tracks together into one
within the project.
The channel of a track being mixed affects whether it will be mixed
into the left channel of the resulting track(s), the right channel, or
both (mono). For example, if you have four tracks:
Mixing can be done for a number of reasons, for example mixing
speech with background music to make a podcast, or adding
different instruments into the same song. Concatenating songs
(for example, playing three songs one after the other) does not
necessarily involve mixing, but if you wanted the songs to fade
into each other it would involve mixing.
Within an Audacity project, you can physically mix selected
multiple selected tracks into a single mono or stereo track using
either of two explicit mix commands:
Track 1: left channel
Track 2: left channel
Track 3: right channel
Track 4: mono channel
You select them all and perform a Mix and Render, you will end up
with one stereo track: the left channel will contain a mix of tracks
1, 2, and 4 and the right channel will contain a mix of tracks 3 and
4.
Within an Audacity project, you can physically mix selected
multiple selected tracks into a single mono or stereo track using
either of two explicit mix commands:
Tracks >Mix and render (which replaces the original track(s) with
the mixed track) or
Tracks > Mix and render to new track (which adds the mixed
track to the project, preserving the original tracks).
However in Audacity, mixing is automatic. You could just put
audio into two different tracks, Play to listen to the result then
Export it as an audio file like Mp3 or Wav or burn the WAV to
Audio CD .

Audio Visual Production
23
However once audio has been finally mixed (as in an audio file you
might Import into Audacity) it is essentially impossible to separate
out all the original parts again; it's like trying to take the banana
out of a banana milkshake after you've already put it through the
blender. There are a few occasions when it actually is possible to
separate sounds a bit - you can sometimes isolate the bass, or
remove the lead vocals. But these processes don't always work
well and usually cause some quality loss. So remember, as long as
the multiple tracks are inside an Audacity project, you can
manipulate them independently, but once you export as a mixed
down file you can't expect to separate the different parts again. So
keep your Audacity project around if you plan to continue editing!
Although Audacity by default exports files as either two channel
stereo or single channel mono (if exporting unpanned mono
tracks), you can also export multi-channel files having more than
two channels, such as a 5:1 file. To enable this, choose "Use
custom mix" in the Import / Export Preferences.
The controls used for mixing are the Mute and Solo buttons and
the Gain (-.....+) and Pan (L.....R) sliders.
Title- Mixing of Audio at Audacity Timeline Attribution- Source- Link- https://manual.audacityteam.org/man/mixing.html

Unit- 1 Recording & Mixing of multi-track audio
24
In the above example, mixing the mono (upper) and stereo (lower)
track means that the audio of the mono track will be heard equally
in both left and right channels of the resulting stereo mix.
Muting and Soloing
When working with multiple tracks, it's often important to be able
to hear just one at a time. Each track has a Mute and a Solo
button, allowing you to temporarily hear just some of your tracks -
see the figure above
Mute causes a track to be silenced. More than one track can be
muted.
Solo can behave in two different ways depending on the setting
made in Tracks Preferences.
Default behaviour is that Solo silences all of the tracks except the
ones being soloed. More than one track can be soloed and soloing
overrides muting.
Alternative behaviour is that only one track can be soloed at a
time. Soloing still overrides muting.
A third option in Tracks Preferences is to hide the Solo button
from tracks, leaving just a Mute button which silences whichever
tracks it is applied to.
You can press the Mute and Solo buttons while tracks are playing.
If you're using the keyboard, SHIFT+U toggles muting on the
currently focused track which has the yellow border, and SHIFT +
S toggles soloing. The solo shortcut works even if you hide the
Solo button.
Sometimes it can be handy to export a preliminary mix with one or more
of the tracks left out. Exporting will automatically ignore any tracks on
which the Mute button is pressed.
Gain and panning
Above the Mute / Solo buttons, each track has a - / + gain slider
which adjusts the track's volume, and an L / R pan slider which
adjusts the track's stereo position in the overall mix - whether it
comes from the left speaker, right speaker or in-between. To

Audio Visual Production
25
change the value, just click on the slider and drag. For finer control
when dragging, hold SHIFT while dragging or double-click on the
slider or slider scale to enter a precise value as text.
The normal range of gain is from -36 dB to 36 dB. If you need
more, choose Effect > Amplify.
If you're using the keyboard, use:
ALT + SHIFT + UP to increase the gain on the focused track or ALT
+ SHIFT + DOWN to reduce it
Use ALT + SHIFT + LEFT to pan left on the focused track or ALT +
SHIFT + RIGHT to pan right.
Or press SHIFT + G to adjust the gain in a dialog box or SHIFT + P to
adjust the pan.
If you don't see the gain or pan slider for a track, you may need to
make it taller. Position the mouse on the bottom edge of the
waveform and drag downwards. You can use the button with the
upward pointing arrow (below the pan slider) to collapse the track
upwards to a minimal height.
Explicit Mixing and Rendering
While mixing is automatic, there are times when you may want to
explicitly tell Audacity to mix several tracks. This is useful in
several ways:
You can consolidate tracks which you have finished working
on, making it easier to see the other tracks without scrolling up
and down.
Playback may respond more quickly with fewer tracks.
You can see what the final mix will look like as a waveform so
as to check the overall level of the final mix before exporting it.
To mix explicitly, select all the tracks you want to mix together
then choose either Tracks > Mix and Render or Tracks > Mix and
Render to New Track (shortcut CTRL + SHIFT + M).
For mouse users, a quick way to select multiple tracks is to select
the first track by clicking on its Track Control Panel, then hold

Unit- 1 Recording & Mixing of multi-track audio
26
SHIFT while clicking on the Track Control Panels of the other tracks
you want to select.
Several things happen when you choose either Mix or Render
command.
All selected tracks are mixed down to a single track called
"Mix".
If you choose "Mix and Render", the resulting "Mix" track
replaces the selected original tracks.
If you choose "Mix and Render to New Track", the original
tracks are preserved so that the resulting "Mix" track
becomes an additional track in the project.
The "Mix" track is always placed underneath any non-
selected or remaining tracks.
The new mixed track will be stereo unless the tracks you
mixed were mono tracks panned to center.
If any of the original tracks did not match the sample rate of
the project (set at bottom left of the project window in
Selection Toolbar), they will be resampled to match the
project rate.
Any envelope points defining amplitude modifications will
be applied and the previous envelope points removed.
Gain and panning changes will be applied and the sliders
reset to normal in the mixed track.
Mute and Solo button states will be released.
You can always Edit > Undo if you're not happy with the results of
Mix and Render, then make changes and try it again.
Mixing Levels
The act of mixing multiple tracks adds the waveforms together. In
most cases this will cause the mixed track to have a higher peak
and RMS (average) level than the individual pre-mixed tracks,
though this is not always true by definition. How much (or
whether) the peak level increases and how much louder it actually

Audio Visual Production
27
sounds depends on how related the waveforms of the mixed
tracks are.
When peaks or troughs in the waveform coincide, the waveforms
will reinforce each other, leading to an increased signal level. In
fact if you combined two identical tracks, the signal level would
exactly double, leading to an increase in peak level of 6 dB. But
when a peak in one track coincides with a trough in another track
the waveforms will tend to cancel each other out, leading to a
lower level in the mix at that point.
Also the more tracks that have audio at the same point on the
Timeline, the higher the mix level is likely to be.
The overall mix level is indicated on the Playback meter when the
project is playing. You can see individual meters for each track
(showing the levels as modified by the track's gain/pan sliders and
mute/solo buttons) if you enable View >Mixer board .
Because mixing tracks is additive, the combined level may
show clipping distortion in the Meter Toolbar. In that case, you
should use the gain sliders on one or more tracks to reduce the
overall level.
If you already have the balance of the mix (the levels of the
tracks relative to each other) exactly as you want it, select all
the tracks using CTRL + A then choose Effect > Amplify. Enter
a negative value in the "Amplification (dB)" box which will
reduce the level of all the tracks by the specified value.
Save and Export
The "File > Save" command just saves the Audacity project. You
need to export your project in order to use it with other audio
programs. When you export your project, Audacity automatically
mixes it, so the exported file sounds just like what you hear when
you click the Play button.
Make sure there are no unwanted bits of audio far along the time
line or your exported file will be unexpectedly long! Click on the Fit
Project button in the Edit Toolbar. If the expected length of
your final mix is displayed in the window, all is fine. If the

Unit- 1 Recording & Mixing of multi-track audio
28
displayed time line is much longer than your actual production,
look for the unwanted bits of audio and delete them. You may
need to click just past the real end of your narration/music and
delete everything from there to the end of the track(s).
Backup
Backup your exported WAV or MP3 files - you don't want to lose
all that valuable work and have to do it all over again, do you?
Computer hard drives can fail, destroying all data.
Ideally use a dedicated drive (1+ TB external drives are convenient
and economical), or upload to an online (cloud) storage service, to
store the WAVs or MP3s. Better still is to make two copies on
different external devices and even better is to hold an off-site
backup

Audio Visual Production
29
Unit Summary
Summary
In this unit you learned the basic of recording & mixing of
multi track audio;. Now you will be able to explain about the
‘elements of recording & mixing’ and ‘Principles of recording &
mixing’. How to add aesthetics to any composition? Why these
elements are important for any project.
We also addressed about ‘Fundamental of recording &
mixing’ and able to distinguish mono and stereo. How their
properties are different from each other? You also learnt the
different Studio setup Techniques, the recording chain systems,
types of recording and mixing the multiple channels.
Assignments
Assignments
1. List the equipment used in audio recording process? 2. List the steps to record in stereo? 3. Explain the need of using principle of recording? 4. Describe the use of mixing. 5. State the role of Mixer? 6. Practice importing different audio files into your project from
internet. 7. Practice importing audio from CD/DVD or from Web. 8. Try to save Audio projects from webpage to your computer
drive. 9. Differentiate between mono and stereo recording. 10. List the primary tools for recording?
Resources
https://google.com
http://wikipedia.com
https://www.prepressure.com
http://www.youtube.com
http://www.audacityteam.org
Reading

Unit 2 Script Writing & Budget Making
30
Unit 2
Script Writing & Budget Making
Introduction
Almost every facet of the filmmaking process is distinguished by its lack of predictability. Anyone who has attempted to make a film will attest to this simple truth. Not only is filmmaking a complex medium from a technical standpoint, it's a medium that places the filmmaker at the mercy of his own abilities and limitations, as well as those of his associates. Throw in weather and logistical problems, which multiply in proportion to the complexity of the production, and you, can see why making a feature film is very difficult indeed. With that said, the best protection for the filmmaker is adequate advance preparation. This includes a realistic and carefully constructed production budget.
The purpose of this unit is to help you to make a proper budgeting process with specific examples to help you succeed in producing your own video.
Outcomes
Upon completion of this unit you will be able to:
Outcomes
Write an Audio script
Name the various Scripting Software
Use the software Celtx
Prepare a video Budget
Make a Sample Budget

Audio Visual Production
31
Terminology
Terminology
Script: A written format used for TV & Cinema
production.
Budget: Detail planned & non planned expenditure of
any TV & Film Production.
Top sheet: One page summary of the budget.
Dialogue: Conversation between two characters.
Transition: The way one shot changes to the next.
Celtx: Software used for script making.
Script Writing: How to Write a Script?
Once you've picked a topic, it's a great opportunity to compose
that script. The script doesn't need to be extravagant. You're not
endeavoring to submit this script for any honors or hang it in the
lobby. It's motivation is entirely utilitarian. A decent script makes it
simple for the people on camera to communicate as the need
should arise while sounding and acting characteristic.
Write in Plain, Conversational English.
Writing a script isn't the same as writing a school paper or
promoting research report. You need to compose the script how
you need the video subject to talks. On camera, saying, "I will
make a video in the wake of perusing this unit" will read much
better than "I am will make a video subsequent to perusing this
unit."
Make it Thorough.
A script doesn't simply incorporate dialogue. On the off chance
that your video will require multiple shots, characters, or scenes,
incorporate these subtle elements. Be certain to incorporate any
essential data about the set or stage activities, for example, a
wardrobe change. Basically, you need the script to be sufficiently

Unit 2 Script Writing & Budget Making
32
exhaustive that you could hand it off to another person to shoot.
Separate the fundamental story from B-Roll, text overlays, and
voiceover utilizing distinctive formatting or callouts.
If the transition will show from a subject talking the essential
account to a close-up shot of your item with a text overlay, you'll
need to call that out in your script so any individual who
understands it comprehends what's supposed to be perused on
screen versus consolidated in the editing procedure.
Script Every Word.
It's understandable to figure you can simply scribble down the
primary bullet points for a script and after that simply wing it on
camera, particularly on the off chance that you know your subject
issue. This approach makes it intense to impart a message as
obviously and briefly as could reasonably be expected (which you
should plan to do in each video you make), and it as a rule brings
about a considerable measure of re-dos.
In this way, doing this will keep you sorted out amid recording and
spare you heaps of time later.
Influence It To brief.
Shorter videos are better than long videos, and to make short
videos, you require a short script. Try not to compose a script any
longer. On the off chance that you can keep it to the base page,
stunningly better. It's additionally worth completing a few rounds
of alters exclusively centered around cutting all pointless fat.
Set the scene.
Keep in mind to incorporate essential points of interest, for
example, time of day, setting, and actions of the characters in the
scene. These are about as imperative as the dialogue that
happens.
Tissue out your story
Compose the whole commence of the play, motion picture, and so
on with heaps of subtle elements and thoughts, paying no psyche

Audio Visual Production
33
to style, configuration, reiteration, or whatever else that impedes
your innovative stream. Your completed item should cover the
plot, personalities, connections, character circular segments, and a
bigger point to the story. Some of the time, drawings or diagrams
might be utilized as a brief storyboard to show to different people
to exhibit aspects of your plot and characters, and so forth. Your
characters should drive the activity on the stage or screen, so
ensure they are intriguing and inventive. It may not be
fundamental for you to completely create them immediately, be
that as it may, as they tend to go up against lives of their own as
the script-writing proceeds.
Invest a lots of time in Dialogue
The dialogue will represent the moment of truth your characters
and their connections. What's more regrettable, the dialogue is
amazingly troublesome for a great many people to compose. To
get your bearings, record or record genuine discussions to
perceive how people truly talk and which articulations they utilize.
Be certain to tune in to an assortment of speakers so you can give
your own particular characters more flavor and independence.
Guaranteeing that distinctive characters have their own "voice"
and "persona" based on their background will shield them from
blending into each other. Remember, their persona will influence
their mentality, word decisions and lingo. Read your dialogue so
anyone might hear as you go, giving careful consideration to
regardless of whether it sounds stopping, stereotyped, over-the-
top, or absolutely uniform.
Keep up your style
Scripts are about activity and discourse. Ensure your characters
talk reasonably and do whatever it takes not to blend styles of
discourse and vocabulary a lot of unless you are going for a
specific impact.
Research after the first draft
Watch plays, TV shows, and motion pictures which are like the
work you've quite recently composed. Analyze your own work in
contrast with these others. Do you fall into numerous tropes? Is

Unit 2 Script Writing & Budget Making
34
your story over done? Check whether you can discover
approaches to separate yourself from these works.
Work on making significant contributions to the subject you has
composed. Adopt a philosophical strategy to the topic and test
regular thoughts. This will make your work significantly more
captivating.
Scripting Software's
You might possibly require scriptwriting software to enable you to
compose your script. A basic 2-column Audio/Video script format
is regularly bounty for the normal script. A 2-column layout can be
made for nothing from your pledge processor.
Be that as it may, on the off chance that you are shooting a
considerable measure of re-establishments for your film (half
movie, half documentary sort of thing), some scriptwriting
software could prove to be useful to enable you to block out the
scenes. Celtx is great decisions for this.
Celtx
Trelby
Fountain
After writing
Starting an AV project in Celtx
So, my example project for this chapter is how I set up "Celtx Half
Married" in Celtx.
Beginning new AV Project
We start our project by making a directory on our computer.
Having a separate directory for our projects makes it a lot easier to
organize and to find stuff when we need it. Therefore, I first create
the new empty directory on my hard drive named Celtx Half
Married, as shown in the following screenshot
: Screen shot

Audio Visual Production
35
Now, open up Celtx. In a moment, left click on Audio-Visual to
open a project container that has an Audio-Visual script in it.
However, first, since I have not mentioned it to date, look at the
items outside the Project Templates and Recent Project boxes in
the lower part of the splash page, as shown in the following
screenshot:
Screen shot
As Celtx is connected to the Internet, we get some information
each time Celtx starts up from the servers at: http://celtx.com.This
information from online includes links to news, help features, ads
for Celtx add-ons, and announcements. Next we open an audio-
visual project in celtx .
Screen shot

Unit 2 Script Writing & Budget Making
36
This gives us a chance to check out those five script elements we
met earlier by left clicking on the downward arrow next to Scene
Heading. In the next section, we'll examine each and use them.
Setting up the Content
Continuing with the initial setup of the container for this project,
rename the A/V Script in the Project Library. Just for example, the
project name was renamed, as Half Married. Also, remember we
can have hundreds of files, directories, subdirectories, and so on in
the Project Library. Just right click on A/V Script, choose
Rename… and type in the new title, as shown in the following
screenshot:
Screen shot
Left click on File at the top left of the Celtx screen, then on Save
Project As… (or use the Ctrl+ Shift +S key shortcut) to save the
project into your new directory, all properly titled and ready for
action, as shown in the following screenshot:
Screenshot
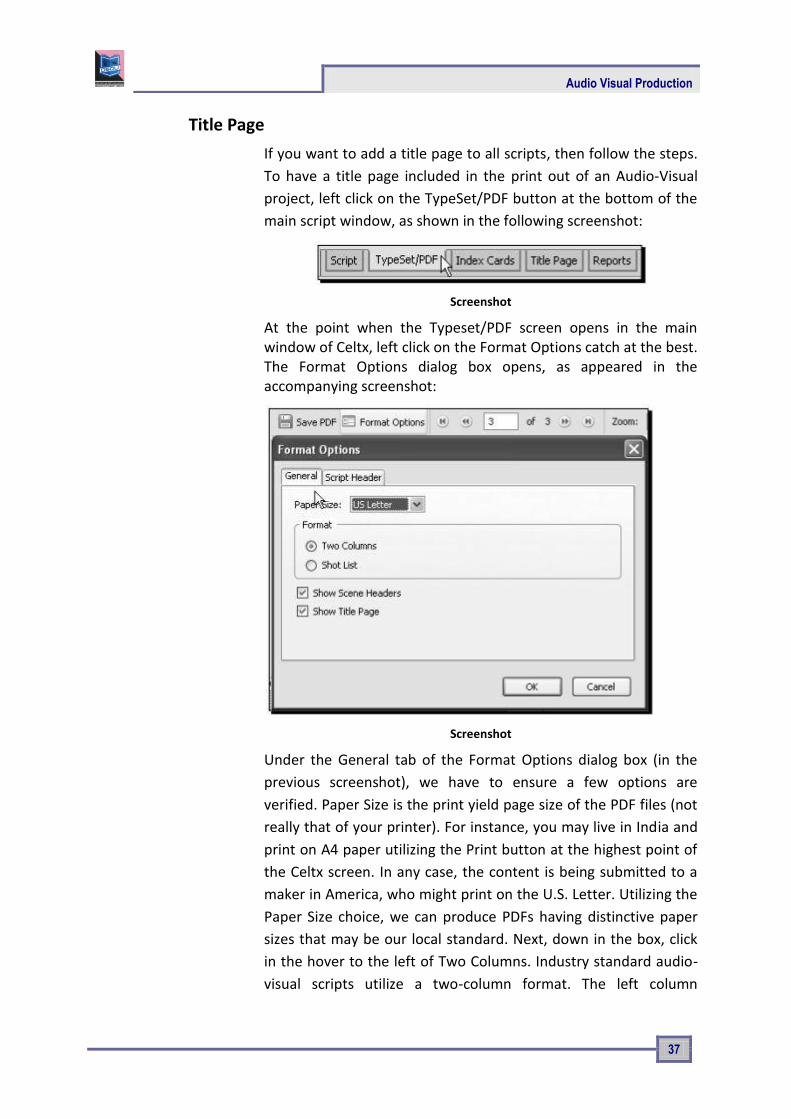
Audio Visual Production
37
Title Page
If you want to add a title page to all scripts, then follow the steps.
To have a title page included in the print out of an Audio-Visual
project, left click on the TypeSet/PDF button at the bottom of the
main script window, as shown in the following screenshot:
Screenshot
At the point when the Typeset/PDF screen opens in the main window of Celtx, left click on the Format Options catch at the best. The Format Options dialog box opens, as appeared in the accompanying screenshot:
Screenshot
Under the General tab of the Format Options dialog box (in the
previous screenshot), we have to ensure a few options are
verified. Paper Size is the print yield page size of the PDF files (not
really that of your printer). For instance, you may live in India and
print on A4 paper utilizing the Print button at the highest point of
the Celtx screen. In any case, the content is being submitted to a
maker in America, who might print on the U.S. Letter. Utilizing the
Paper Size choice, we can produce PDFs having distinctive paper
sizes that may be our local standard. Next, down in the box, click
in the hover to the left of Two Columns. Industry standard audio-
visual scripts utilize a two-column format. The left column

Unit 2 Script Writing & Budget Making
38
contains camera shots and alternate bearings. The right column
has characters and dialog (who talks and what they say). This is
appeared in the accompanying screenshot:
Screenshot
As we're right at it, let us say the Shot List decision. Once our audio-visual script is done, we can check here to generate and print a list of shots. This would be valuable for the camera operator in setting up scenes, and resembles the accompanying:
Screen shot
For the time being, we need the two-columns format chose. To complete out this tab, check Show Scene Headers (we need to see the titles of the scenes in our sample script) and Title Page on the grounds that as expressed before, we need to incorporate a title page.

Audio Visual Production
39
We won't utilize the Script Header tab in this task, however in the event that you ever need to, it replaces the title page with a data page listing the fields that can be rounded out in this tab, as appeared in the accompanying screenshot:
Screen shot
You would discover a script header more useful for internal use in
an extensive organization where a few people chip away at the
project and the data is more critical than appearances. This dialog
box does not enable you to choose both in the event that you
needed a cover sheet and the script heading data. In any case, that
is anything but difficult to get around; simply duplicate the
completed script by right-clicking on its name in the Projects
Library and selecting Duplicate. You'll have two scripts of a similar
name. In one, you can have a cover sheet and in the other the PDF
prints out with the script header data. You should need to change
the name marginally, so it's undeniable which has what.
Adding a Title Page
Affirm, now that we've disclosed to Celtx we need a title page incorporated, we should set one up. Left click on the Title Page button at the button of the main script window, as appeared in the accompanying screenshot:
Screenshot

Unit 2 Script Writing & Budget Making
40
The title page form, as we've seen most as of late in title page, shows up in the main script window of the Celtx screen, as appeared in the accompanying screenshot:
Screen shot
Round it out by typing in the boxes. The undertaking title, creator's name and contact data have been entered. Additionally, copyright included. Utilize air conditioning in brackets (c) to show the copyright symbol. While you could type the Alt-0169 key blend for a real "c around" copyright symbol, the PDF conversion software on Internet does not change over it effectively, so utilize the above workaround. It's similarly as lawful. Everything else, including varying media contents, ought to have a copyright take note.
Presently, the way copyrights work is basic, particularly under Indian copyright act, 1957. When you complete a work, it is naturally copyrighted. Rounding out structures to do that on the web and sending in cash just registers the copyright, on the off chance that you do need it, do what needs to be done on the web.

Audio Visual Production
41
Tap on the Typeset/PDF button once more (base of the primary content window), as appeared in the accompanying screenshot:
Screenshot
Celtx sends our title page out on the Internet, groups it, and returns it to our PC, showing it in the main script window, as appeared in the accompanying screenshot:
Screen shot
We could spare the cover sheet as a PDF document to our hard disk by tapping on the Save PDF button at the highest point of the main script window, yet it's not justified, despite any potential benefits until the point when we have a portion of the script composed. The data we rounded out and changes in setup on made as of now are spared each time the Celtx venture gets spared, so nothing is lost.
Writing an AV Project in Celtx
A varying media script is composed utilizing the five script components in the Audio-Visual venture script, which are Scene Heading, Shot, Character, Dialog, and Parenthetical. A script in advance—Celtx Half Married—is appeared in the accompanying screenshot:
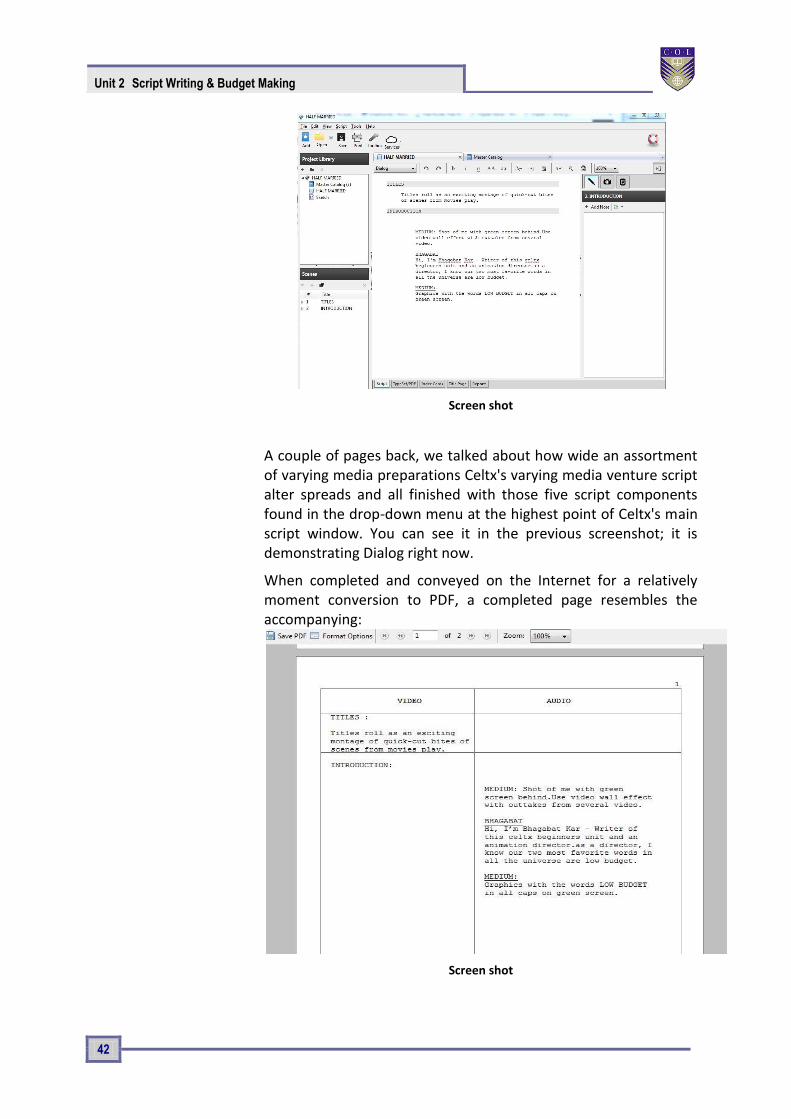
Unit 2 Script Writing & Budget Making
42
Screen shot
A couple of pages back, we talked about how wide an assortment of varying media preparations Celtx's varying media venture script alter spreads and all finished with those five script components found in the drop-down menu at the highest point of Celtx's main script window. You can see it in the previous screenshot; it is demonstrating Dialog right now.
When completed and conveyed on the Internet for a relatively moment conversion to PDF, a completed page resembles the accompanying:
Screen shot
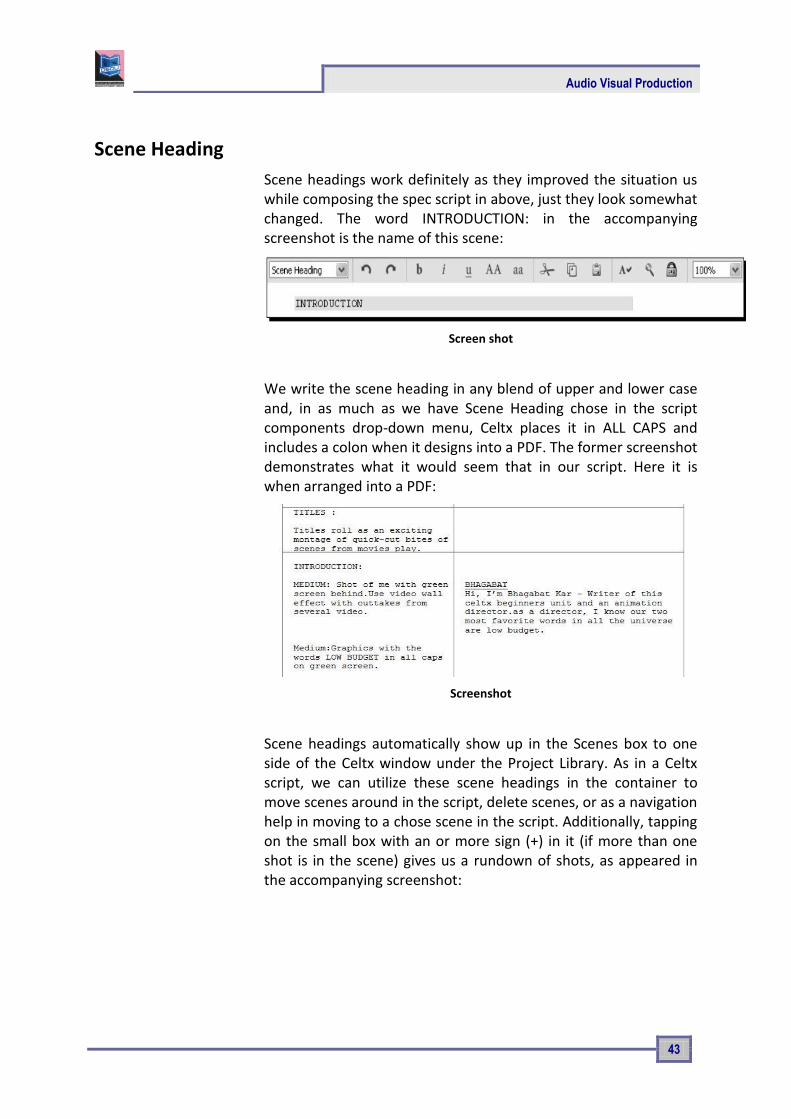
Audio Visual Production
43
Scene Heading
Scene headings work definitely as they improved the situation us while composing the spec script in above, just they look somewhat changed. The word INTRODUCTION: in the accompanying screenshot is the name of this scene:
Screen shot
We write the scene heading in any blend of upper and lower case and, in as much as we have Scene Heading chose in the script components drop-down menu, Celtx places it in ALL CAPS and includes a colon when it designs into a PDF. The former screenshot demonstrates what it would seem that in our script. Here it is when arranged into a PDF:
Screenshot
Scene headings automatically show up in the Scenes box to one side of the Celtx window under the Project Library. As in a Celtx script, we can utilize these scene headings in the container to move scenes around in the script, delete scenes, or as a navigation help in moving to a chose scene in the script. Additionally, tapping on the small box with an or more sign (+) in it (if more than one shot is in the scene) gives us a rundown of shots, as appeared in the accompanying screenshot:

Unit 2 Script Writing & Budget Making
44
Screen shot
Shots
The Shots script element alludes to camera shots. These can be industry standard shot names, or more casual directions for the camera operator or video editor, or a mix like the accompanying:
Choosing the Shot script element and typing the shot makes Celtx organize it in the left segment when the PDF is made.
Character
The Character script element signifies somebody who talks. In the previous illustration, that would be me. When we write a character name with the Character element chose, Celtx capitalizes and underlines it, and spots it in the correct segment. Gracious yes, Celtx makes our typing speedier by provoking us. Sort a scene heading, hit the Enter key, and we are automatically in shot mode. Sort the shot and hit Enter, we are in character, at that point in dialogue, and back in character, etcetera. We secured key alternate routes before; they can really accelerate your productivity.
Dialogue
The Dialogue element is for the talked word. Celtx designs it, when PDFs are made, in the correct segment. Keep in mind, in your script, simply tap on any gatherings of words and the script elements box demonstrates to you which element it is in. To change the sort of script element, basically select that element in the drop-down menu. Dialogue resembles the accompanying screenshot in the completed PDF (right section):

Audio Visual Production
45
Know the kind of script you're writing. On the off chance that your script is a comedy, ensure that other individuals imagine that it's amusing. In case you're writing a drama, make the exchange dramatic and holding.
Ensure your script sounds great, all things considered, dislike a robot is talking.
In the event that you've composed a motion picture script, you might need to utilize one of the film industry's online exploring administrations, to get your story and screenplay looked into by industry administrators in an ensured platform of presentation.
Before pitching a screenplay, you'll need to get electronic verification of-creation. You can do this online.
You might need to go to a script writing class, which will give you supportive indications on the subtleties of writing a full script, especially things, for example, plot development, character development, and discourse.
Make sure to make the script as unique as could reasonably be expected!
Include your own particular wind characters looks or identity.
Tip
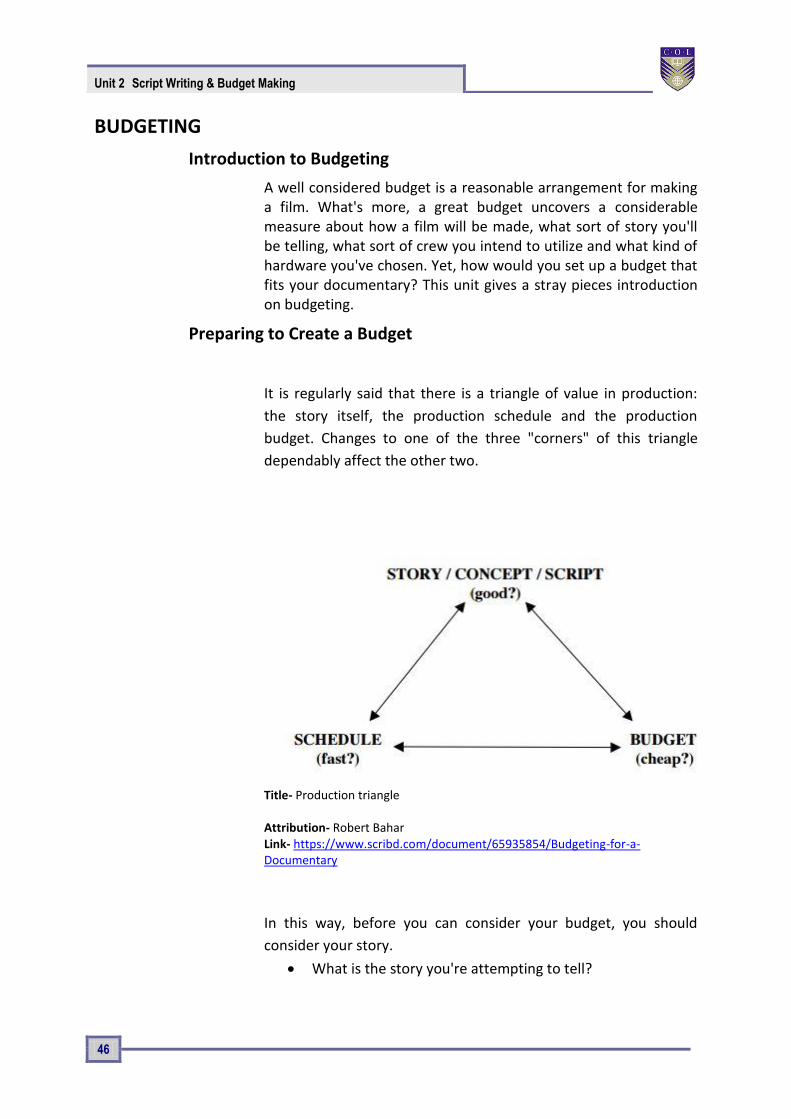
Unit 2 Script Writing & Budget Making
46
BUDGETING
Introduction to Budgeting
A well considered budget is a reasonable arrangement for making a film. What's more, a great budget uncovers a considerable measure about how a film will be made, what sort of story you'll be telling, what sort of crew you intend to utilize and what kind of hardware you've chosen. Yet, how would you set up a budget that fits your documentary? This unit gives a stray pieces introduction on budgeting.
Preparing to Create a Budget
It is regularly said that there is a triangle of value in production:
the story itself, the production schedule and the production
budget. Changes to one of the three "corners" of this triangle
dependably affect the other two.
Title- Production triangle Source- Attribution- Robert Bahar Link- https://www.scribd.com/document/65935854/Budgeting-for-a-Documentary
In this way, before you can consider your budget, you should
consider your story.
What is the story you're attempting to tell?

Audio Visual Production
47
Who are the characters?
What elements will it require—Interviews?
Authentic research?
Portrayal?
Re-establishments?
Dramatic elements?
Then you must plan for a schedule.
To what extent will you research?
At the point when will shooting start and to what extent
will it take?
Shouldn't something be said about editing and post-
production?
Once you've drafted a schedule, attempt to list the key suspicions
that you'll need to set up the budget.
To what extent will the film be?
What tape, digital or film format will you utilize?
What number of individuals will be on your crew?
What number of "caps" will you wear yourself?
What will your shooting ratio be?
What amount of travel will be required?
What deliverables will be needed?
With a depiction of the story, a draft schedule and a rundown of suppositions close by, you're relatively prepared to begin budgeting.
Setting "The Finish Line"
Before you begin budgeting, you need to assess your objectives and set up an "end goal". Would you like to compose a budget that will empower you to make the greater part of the materials to premiere your film at a noteworthy film festival? Or then again do

Unit 2 Script Writing & Budget Making
48
you need a budget to make the greater part of the deliverables for a particular broadcaster? Would you like to incorporate making advancement materials or doing publicity? It is safe to say that you are getting ready for self distribution? These choices will have repercussions all through your budget, and you need to know where "The Finish Line" is for your budget before you can start.
Software
In case you're savvy with spreadsheet programs like Microsoft Excel or Google Docs
Spreadsheets you can make a budget rapidly with no uncommon software. On the off chance that you favor, particular software packages are likewise accessible including
• EP Budgeting/Movie Magic,
• Gorilla Film Production
• Showbiz Budgeting
Just to give some examples. Abstain from utilizing Microsoft Word for budgets. Long tables rapidly end up unmanageable, and it's difficult to work with recipes in Word.
The Budget Top sheet
The top sheet is a one-page synopsis of the budget. It is generally created naturally by the budgeting software or spreadsheet in light of your detail budget. As should be obvious in the example, expenses are for the most part separated into two areas. "Above the-line" costs incorporate the purported key creative costs, for example, the producer, director, writer and actors (assuming any), and may likewise incorporate the costs of rights required to make the venture. "Below-the-line" costs typically incorporate the hard production costs, for example, crew, equipment and services.
Budgets can be composed in various ways. For instance, some place post-production in a separate segment and some have an extra segment for general overhead. Some like to see staff members recorded inside every department (Camera Crew recorded under Camera Department, and so on.) while others want to see the greater part of the production staff in one place.

Audio Visual Production
49
The Detail Budget
Making a definite budget requires a great deal of research. Each budget is unique and you'll need to call potential crew, post-production offices, hotels and so on for direction and bids, and to begin arranging rates.
How about we look at the budget segment by area:
Research—this segment incorporates cash for the books, videos, meetings and other expenses required to research the undertaking.
Test Shoots/Fundraising Trailer– Networks and funders much of the time hope to see an example reel or "fundraising trailer" before thinking about a task. This area incorporates fundamental line things to cover a couple of shooting days.
Directors, Producers, Writers—these expenses differ generally yet ought to be sensible for every individual's experience level, production locale and general budget level.
Here a solitary filmmaker is filling in as director/producer/writer
and plans to spend about a year on the project.
Story and Other Rights—If your project is based on a book, an
article, a song or other copyrighted material, you may have to
pay for the rights to make a documentary based on that
material.
Archival Photographs and Stills—Research the sources for any
still photographs that you plan to utilize.
Stock Footage and Film Clips—you should thoroughly consider
the costs of both researching and licensing material. You’ll
need to carefully understand the evaluating for each clip. For
example, a few archives charge a 30-second least, regardless
of the length of the clip that you utilize, and you should
budget accordingly.
Talent—on the off chance that you are planning to do re-
enactments with actors or contract a narrator, you'll need to
show them here. Depending on how surely understood an
actor is, rates can vary considerably.

Unit 2 Script Writing & Budget Making
50
Music—Music rights can end up both complicated and costly.
To control these costs in the sample, it is assumed that all of
the music will be written specifically for the project by a
composer.
Production Staff—the composition of the crew and their rates
can vary considerably. In the sample, the Director/Producer
has chosen to contract a production coordinator however
wrap up of the delivering herself. In this case, the shooting
crew comprises of a director of photography, sound recordist
and production assistant. Keep as a main priority that while
crew rates are certainly negotiable, it's best to maintain parity
among various crew members.
Editorial Staff—given the great importance of editing to
documentary making, the cash allocated for an accomplished
editor who is passionate about your story may simply be the
absolute most important line thing in the budget. The
editorial team usually incorporates an editor and an assistant.
On low-budget projects, the director or an intern may play out
some assistant functions, for example, logging and capturing
footage. While this can be a decent cost-saving measure, be
careful not to slow the editing process and make certain that
you have access to a decent tech support person in case
issues arise. On association projects, there may be additional
edges. Check the terms of any applicable Guild agreements.
Production Expenses—these segments detail the camera,
sound, lighting and grip equipment, the facilities and the
services required to shoot the documentary. Now and again,
long-term equipment rental costs on a doc can surpass the
cost of purchasing equipment. In these cases, either the
production may purchase the equipment and then re-offer it
at the finish of production, or a crew part may get it and rent
it back to the production at a low rate. This can work out well
for everybody, and the sample assumes that the
Director/Producer bought the camera and the editing system
and is renting them to the production. To secure itself and its
funders, the production maintains a strategy that the total
rental in these cases cannot surpass 75% of the actual

Audio Visual Production
51
purchase cost, and you'll see that a multiplier of 0.75 is
utilized by these things.
"Production Film and Lab" covers videotape stock and/or hard
drives utilized on-set. It would also incorporate film stock and
processing.
Travel Expenses—Travel expenses add up rapidly and may be
scrutinized by funders. Attempt to keep travel to a base and
contract local crew at whatever point conceivable. When you
should travel, research airfare and hotel rates fastidiously and
search out advice from individuals who have shot in the
location before."Per diems" allow crew members to pay for
their own particular meals and expenses while travelling.
Post-Production—as issues arise amid production, somebody
will invariably recommend that you can "settle it in post." But
that can get costly, fast. It may be smarter to consider post
the second half of a marathon. You can't afford to carry
excessively baggage from the principal half. You'll be best
prepared for post by doing a lot of research before you even
get a camera. Call your editor, online facility, colourist and
sound designer. Talk to them about the intricacies of the
camera that you'll be utilizing, frame rate, time code, and
synchronize and delivery requirements. Do a few tests. Talk
about everything about could get complicated later. These
conversations will enable you to budget your post workflow,
and may also lead to suggestions that will save you time and
cash amid production.
Insurance—Production resembles war. Cars and property get damaged. Individuals get hurt. You need insurance. There are various different sorts of coverage for film productions and the most ideal way to assess your needs is to talk to several representatives who specialize in the entertainment industry. Note that some coverage, similar to laborers' compensation, is required by law.
Office and Administrative Costs—Most of these things are self-explanatory. Note that so as to rent a production office you may be required to give an insurance certificate.
Promotion, Publicity, Website—The line things appeared in the sample budget could certainly be increased, yet keep as a

Unit 2 Script Writing & Budget Making
52
primary concern that some funders, especially broadcasters, won't allow these things as part of the production budget.
Professional Services—talk with your attorney ahead of time to estimate the cost of legal expenses. Unforeseen legal services add up rapidly.
Other Required Items—Professional publicity and production stills are critical to securing placement in press and film festival catalogs. Shut captioning is required by various broadcasters.

Audio Visual Production
53
Budget Sample
Screenshot

Unit 2 Script Writing & Budget Making
54
Screenshot

Audio Visual Production
55
Screenshot

Unit 2 Script Writing & Budget Making
56
Screenshot

Audio Visual Production
57
Unit summary
Summary
In this unit, we described the many types of productions falling
under the term "audio-visual" and how Celtx makes them easier to
create and use. We learned how to build a Celtx project container
for our AV project and to use the AV script elements of Scene
Heading, Shot, Character, and Dialogue. We learn how to make a
proper budget for a video production and story breakdown, the
budgeting chain systems and focus on creating the “professional”
budget.
Assessment
1. Name the software's which can be used writing a script? 2. What elements go into a successful script?. 3. How do you write about the characters in the script? 4. What are the margins for a screenplay? 5. Describe the role of Script Writer? 6. Should you add copyright information on the title page of an
A/V project? 7. Write an audio script Draft. 8. What is screenplay? 9. State the various expenditure heads for preparing an audio
Script?
Resources
https://google.com
http://wikipedia.com
http://www.youtube.com
https://image.slidesharecdn.com
https://www.celtx.com
Assessment
Reading

Unit 3 Shooting for 5 minutes Program
58
Unit 3
Shooting for 5 minutes Program
Introduction
The purpose of this unit is to help you identify if video is an appropriate medium to reach your target audience and if video is the correct venue, provide you with specific examples to help you succeed in producing your own video.
Video is a great medium to tell a story. Shoot can help take your story from merely ‘telling’ to ‘showing’, and can be a very powerful teaching tool if used correctly.
It’s helpful to consider the overall workflow of creating a video. Decisions such as what the major takeaway message of the video will be, what equipment to use and the sequence of filming each have effects on other aspects of the project. This can make it hard to know where to start. A common mistake among those new to visual storytelling is to hastily jump into a new project.
Outcomes
Upon completion of this unit you will be able to:
Outcomes
Name the Equipment needed for Video Production
Develop a Checklist before going for Shooting
Plan to Shoot NEWS
Plan to shoot Music Video
Plan to shot Documentary
Terminology
Terminology
DSLR: Digital Single Reflex Camera
Storyboard: Shot by shot visual description Documentary: A kind of non-fiction video or film.
Scene: Combination of multiple shots with a understandable meaning.

Audio Visual Production
59
Production
Production is the most important part of any video, film, news and another medium. You can control the majority of the environmental variables, yet unless you have a big studio and a department or workshop where you can create sets, you're essentially up the creek without a paddle shooting anything other than a talking head, or a talking head before a green screen so you can put a different background behind your talking head. In case you're not a video production company or a system, you don't have the equipment and wherewithal to focus on large-looking productions. What do you do?
Most commercial production houses shunned shooting in the studio years ago. Going outside to create video can be somewhat scary and it can make your life, um, energizing sometimes! Regardless of how well you've scouted your locations, you will be faced with a touch of the obscure. Big production companies have the cash for bunches of lights and electricians to light them, sound equipment and individuals to operate it, video (film) equipment and whatever treats you can consider. In any case, even regardless they have a ton of questions on the set. How about we take a gander at what makes video production practical.
Equipments for video production
There are two things to think about practical video production: your equipment, and actually going out and shooting the video with your decent sparkly equipment. To begin with comes practical equipment. How about we take a gander at a practical approach to equipment with minimal spend for maximum impact.
Cameras
You can't afford to make video with a Red or an Arri or any other
extremely expensive camera. You don't need expensive
equipment to shoot great video. Do expensive cameras make a
distinction? It depends. Good lighting makes the biggest
distinction, as does understanding how to utilize the camera. In
the event that you know how to light well, and have a camera
operator who understands how to shoot past simply pressing the
start catch, you'll do fine. We don't have all the time on the planet
to get the most ideal chances to recount the story.

Unit 3 Shooting for 5 minutes Program
60
What can do you do with a really constrained budget? How about
we go up the value range. You get an affordable bit of equipment.
If you are shooting HD video, one thing you can do is get a DSLR
(digital single-lens reflex camera) like a Nikon or Canon. Yet,
despite everything you'll need a lens. If you want to change focus
or the introduction during a shot, you need a lens that can do that
unobtrusively. DSLR lenses are generally not intended to change
exposures easily without a tick between f-stops. And many DSLR
lens-focus engines have a tendency to be noisy. A different
camera option is to get a Sony Handycam, Panasonic, JVC, or
whatever kind of really portable camera that accompanies a built-
in lens. Those are available in affordable cost. Another
arrangement could be a Blackmagic Design Pocket Cinema
Camera. It's a genuinely professional camera without a
considerable measure of extravagant accessories however it can
make to a great degree beautiful pictures. It shoots RAW video,
which is incredibly flexible and which you can easily color grade.
RAW means the video files the camera records are sensor data
with no image processing. RAW video requires color grading
software (Adobe has it handily built into Premiere Pro CC) keeping
in mind the end goal to be viewable (in other words, lovely).
Checklist: Before Filming
Before going to shoot something, CHECK to make sure you have not forgotten anything! Basics Camera, the field monitor, and their accessories
Batteries At least 2 charged batteries each for the camera and the field
monitor
Videocassettes 2 blank mini-DV cassettes or 2 SD cards to record on, plus an extra one, in case you need it, a head-cleaning cassette
Audio Microphone(s) (Hand-held, shotgun, or camera-mounted
microphone, Lapel etc.)

Audio Visual Production
61
Appropriate cable for each microphone with connectors
Extra battery for each microphone
Professional headphones for sound monitoring
Cables
Cables for the connection from the camera to the field monitor.
Cables for the connection from the microphone to the camera.
Note: When you get to the place where you are filming, set up the
equipment and make certain to CHECK picture and sound before
you begin shooting.
Sound Before you going to record audio you should check-
Connection between the headphones to the monitor
Placement of the microphone to capture important
sounds/voices
Quality of the sound
Camera Before you going to record video you should check-
Clarity and stability of the image
Framing of the image in the monitor
How to shoot a Music Video
With late advances in computer and video technology, it's turned
out to be easier than ever to create amateur music videos. Like
any artistic endeavor, the process of recording a music video can
be rewarding, frustrating, and fun, trying, exhausting, and thrilling
- sometimes all at once. Music videos are constrained just by your
imagination and your budget. In this practical, you'll investigate
the basics of the technical and creative processes that go into
making music videos.
STEP 1: Developing of the Concept
A written plan about what you should record during the activity is extremely useful so as to prepare the actual recording and further editing of the final video item. Having a schedule of the planned
Unit 3 Shooting for 5 minutes Program
62
activity and thinking about what you hope to happen in each of the minutes in terms of dynamics and interaction with the participants will enable you to pick beforehand those parts worth paying more attention to for recording.
STEP 2: Proper Paper Work
You want something to gather your contemplations, take down
notes, and sketch scenes. Keep pencils and an eraser or two with
your notebook and keep these things with you all through the
filming process. Ideas may come to you when you least expect
them.
STEP 3: Listen the Song
Try not to do anything else the first time — simply listen. Then,
listen to it many, many more times. Listen to it with the artist.
Regardless of whether you know the song by heart, attempt to
listen to it as if it's the first time. How can it make you feel? Does it
make you want to dance, cry, act senseless, or head for the bar?
Or on the other hand does it make you feel strange combinations
of feelings? When you have an idea of the song's emotional
centre, brainstorm that ideas for your video. It can be
exceptionally useful during this process to counsel with members
of your technical staff - they'll recognize what's easy to film and
what's not all that easy.
STEP 4: Search Locations
Before you start shooting, you'll need to know exactly where you
want to shoot. Sometimes the video concept can necessitate
travelling to a remote location or building a custom set. Talk to the
owners or management of any location you want to utilize. Make
beyond any doubt they are OK with your shooting. If you're
fortunate, they may also be a perfect fit for a character in your
video (if they're willing).
STEP 5: Create a Storyboard
A standout amongst the best video-planning tools at your disposal
is a storyboard. Storyboards are shot-by-shot sketches of a video
that are counseled to coordinate the video's action. Storyboards
don't have to be flashy. They can be as basic as the position of
Audio Visual Production
63
actors and props in each scene, or they can be as detailed as
individual cutaways, expressions, the direction of development,
and so on. If you can't draw a straight line, don't stress: make a
content storyboard. As long as you have an idea of what is going
to happen in each shot, and you can communicate that to your
crew, you'll be good to go. Hope to break your video into "scenes"
that match your vision. You can minimize shooting time if you
shoot all the footage in a certain location at once (regardless of
whether it's out of the request it will appear in as a finished
video.) Plan your shooting with the goal that you travel as
efficiently as conceivable.
STEP 6: Crew member
Depending on the scale of your production, you may have the
capacity to depend exclusively on yourself and your actors, or you
may need to create large a crew for the video. Here are a few
positions you should seriously mull over filling based on what work
you'll need done:
Director: This will in all probability be you. You'll be sharing your
vision to the cast and crew, to mediating question amongst
lighting and sound. You're the manager, but at the same time
you're in charge of more than anyone else.
Videographer: The videographer will be in charge of capturing the
action on at least one cameras. You'll define the shot, however he
will actually frame the scene, work with the gaffer to guarantee
the set is appropriately lit, and let the sound person know when
the boom is in the scene.
Sound Man: On a shooting set, he's the person sticking mics in
everyone's faces. For a video, which often doesn't feature dialog,
he'll be the person cuing up the song so the actors have something
to work with. In the middle of pressing "Stop" and "Play" and
"Rewind".

Unit 3 Shooting for 5 minutes Program
64
Grip: This is the fortunate soul who gets the opportunity to move
all the wires, all the lights, all the gear, seating, tables, props, and
everything else that is expedited set. It's a ton easier to run a
shoot when you have someone to handle those things while you
handle the bigger-picture things.
Costume: you may essentially give guidance to the talent ("wear
jeans and a tight shirt,") or have costumes made to arrange for the
actors. Whichever way you do it, if there are costume changes
involved, make beyond any doubt some individual can coordinate
that between scenes.
Props: Again, this may be you, however some individual has to
find the vehicles utilized, in addition to things actors on the set
utilize—mustard bottles that squirt reliably on sign, anything an
actor gets or puts down, or isn't part of the location.
Choreographer: If you do want dancers and it's in your budget, get
a choreographer. They will make beyond any doubt the dancing is
smooth and coordinated.
STEP 7: Set the Stage
Now that you have all your ducks in a row, the actors are well-
rehearsed, and your crew is loaded for beer, it's time to prep your
set and shoot your video. Pick a scene to shoot.
Put the objects and anything else that's in the scene into position,
and have the actors stand on their marks.
Set your lighting. If this is an open air shoot, if you don't have
powered lights you may have the capacity to utilize a reflector,
which is a large bit of white fabric or poster board that reflects the
daylight, softening shadows and brightening a scene. For the best
way to focus light, utilize more than one reflector, or even a
mirror.

Audio Visual Production
65
Keep in mind, the main person on screen is always the brightest
on screen. Whenever outside, always have the main character's
back to the sun except when the sun is amidst the sky. Along these
lines, the reflectors can illuminate the person's face and front.
Although there is a great deal to do to get efficient lighting, it is
justified, despite all the trouble when you want a fantastic video. STEP 8: Set the Lights & Camera
You may want to shoot part of your video on a tripod, for static
scenes. Jiggly cameras can sometimes distract the watcher from
the video itself. Other times you may want to utilize a handheld
Steadicam for more dynamic shots, shooting a combination of
angles and styles will support creative options in the editing suite.
Get your actors in place. If they're in the scene as the camera rolls,
have them take their marks. If they come into the scene as it plays,
have them at their entrance point. If your light boys are in position
then put on all the lights for that particular zone, where you are
going to shoot.
STEP 9: Set the Sound
Locate the sound’s best possible point in the song, and give it a
good lead-in time so individuals can "get in sync" with the music.
Longer is better, at first. If you do multiple takes, you may have
the capacity to abbreviate this part up. At the point when Sound is
ready and music playing, he'll yell "speed!" The sound person may
also want to feed the sound into the video.
STEP 10: Say Action
You know the bore here—on "Action!", the actors turn out and do
the action. You may wind up with multiple takes, multiple angles,
great takes, and awful takes. This is the place the fun begins.

Unit 3 Shooting for 5 minutes Program
66
How to Shoot Interviews
Title- Interview Source- Interview Radio 4 Attribution- Minister-president Rutte Link- https://commons.wikimedia.org/wiki/File:Interview_Radio_4_(6840565867).jpg
When recording an interview, endeavor to keep it around 5 minutes. If your video is any longer than that, you may lose your audience's attention. Follow these tips to prepare and record your video. Ask the person you're interviewing to take a gander at you, not at the camera. Endeavor to avoid a straight-on shot - shoot the person from a slight angle to the left or right.
Before the Interview
This is a pure pre-production step. These are the important rules
for a good interview shooting session.
Record and share your inquiries in advance with the interviewee. Make beyond any doubt they understand the inquiries and that the themes/things they want to talk about are secured.
Make beyond any doubt the interviewee understands the time responsibility of the interview; recordings often take longer than anticipated.
Ask the interviewee to wear strong, neutral colors.

Audio Visual Production
67
Find a decent, sufficiently bright location to record the interview. Make certain the background will help focus attention regarding your matter, instead of accidentally blending them into the background. For instance, if the interviewee is wearing white or has white hair, they may get 'lost' in the frame if placed against a white background.
Test your camera equipment at the location to search for reflections and/or glare from windows, computer screens, and so forth.
The techniques to shoot Interview
Set you camera up at eye level and focus it before you start the interview. When you are recording, don't to change camera angles or zoom in and out unless it's necessary.
If your subject is sitting, you ought to also sit in a chair while you're doing the interview so the interviewee does not have to gaze toward you. If they're standing, stand up.
If you are interviewing more than one person make beyond any doubt they are in the same lighting.
Utilize a lapel microphone to eliminate background noise.
Speak slowly and clearly; carefully articulate your words. Be careful about using 'umm,' 'uhuh,' and other similar "filler words."
Try not to interrupt the interviewee; wait until the point when they finish speaking to ask for clarification.
How to shoot a documentary
A documentary is any non-fiction video or film that informs
watchers about a real-life topic, person, event, or issue. Some
documentary films give us educational information about things
that aren't outstanding. Others recount detailed stories about
important person and/or events. Still others attempt to persuade
the audience to agree with a certain viewpoint. Whatever subject
you pick, filming a documentary can be a genuine undertaking.
Follow these steps for a few tips on creating a documentary film.
STEP 1: Preparing the Concept
Try out your ideas in verbal form first. Start telling your
documentary idea in story form to your family and friends. Based
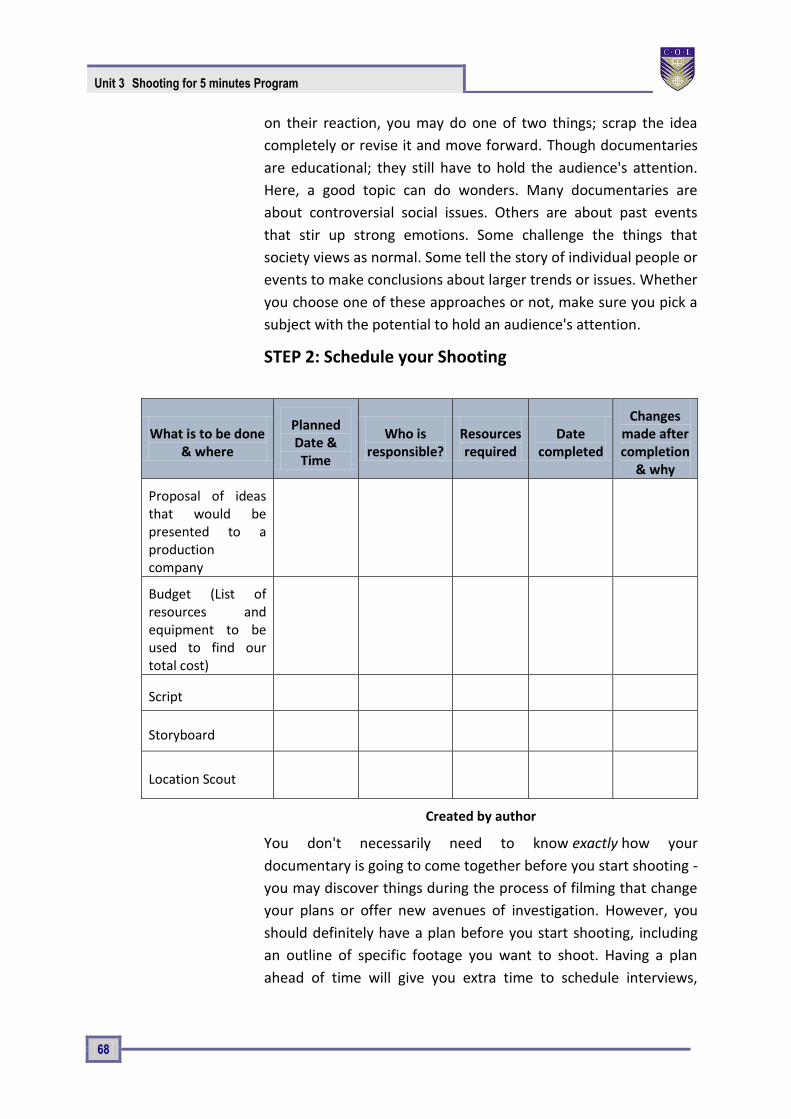
Unit 3 Shooting for 5 minutes Program
68
on their reaction, you may do one of two things; scrap the idea
completely or revise it and move forward. Though documentaries
are educational; they still have to hold the audience's attention.
Here, a good topic can do wonders. Many documentaries are
about controversial social issues. Others are about past events
that stir up strong emotions. Some challenge the things that
society views as normal. Some tell the story of individual people or
events to make conclusions about larger trends or issues. Whether
you choose one of these approaches or not, make sure you pick a
subject with the potential to hold an audience's attention.
STEP 2: Schedule your Shooting
What is to be done & where
Planned Date & Time
Who is responsible?
Resources required
Date completed
Changes made after completion
& why
Proposal of ideas that would be presented to a production company
Budget (List of resources and equipment to be used to find our total cost)
Script
Storyboard
Location Scout
Created by author
You don't necessarily need to know exactly how your
documentary is going to come together before you start shooting -
you may discover things during the process of filming that change
your plans or offer new avenues of investigation. However, you
should definitely have a plan before you start shooting, including
an outline of specific footage you want to shoot. Having a plan
ahead of time will give you extra time to schedule interviews,

Audio Visual Production
69
work around scheduling conflicts, etc. Your plan for shooting
should include:
1. Specific people you want to interview - make contact with
these people as early as possible to schedule interviews.
2. Specific events you want to record as they occur - arrange
travel to and from these events, buy tickets if necessary, and
get permission from the event's planners to be able to shoot at
the event.
3. Specific writings, pictures, drawings, music, and/or other
documents you want to use. Get permission to use these from
the creator(s) before you add them to your documentary.
4. Any dramatic recreations you want to shoot. Search for actors,
props, and shooting locations well ahead of time.
STEP 3: Interview Relevant People.
Many documentaries devote much of their running time to one-
on-one interviews with people who are knowledgeable about the
subject of the documentary. Pick a selection of relevant people to
interview and collect as much footage as you can from these
interviews. You'll be able to splice this footage throughout your
documentary to help prove your point or convey your message.
Interviews can be "news style" - in other words, simply sticking a
microphone in someone's face - but you'll probably want to rely
more on one-on-one sit-down interviews, as these give you a
chance to control the lighting, staging, and sound quality of your
footage while also allowing your subject to relax, take his or her
time, tell stories, etc.
1. These people may be famous or important - well-known
authors who have written about your subject, for instance, or
professors who have studied it extensively. However, many of
these people may not be famous or important. They may be
ordinary people whose work has given them a familiarity of
your subject or people who simply witnessed an important
event firsthand. They can, in certain situations, even be
completely ignorant of your subject - it can even be
enlightening (and entertaining) for the audience to hear the

Unit 3 Shooting for 5 minutes Program
70
difference between a knowledgeable person's opinion and an
ignorant person's opinion.
2. If you're stumped for interview questions, brainstorm
questions based on the basic queries "who?" "What?" "Why?"
"When?" "Where?" and "how?" Often, asking someone these
basic questions about your subject will be enough to get him
or her to relate an interesting story or some enlightening
details.
3. Remember––a good interview should be more like a
conversation. As the interviewer, you must be prepared,
having done your research and informed yourself to glean the
most information from the interview subject.
STEP 4: Get Footage from Film
One of the main advantages of documentary films (as opposed to
dramatic films) is that they allow the director to show the
audience real footage of actual real-life events. Provided you don't
break any privacy laws, get as much real-world footage as you can.
Film events that support your documentary's viewpoint, or, if the
subject of your documentary happened in the past, get in touch
with agencies or people who have historical footage to get
permission to use it. For instance, if you're making a documentary
on police brutality during the Occupy of Posco land protests, you
may want to contact people who participated in the protests and
collected hand-held footage.
In historical documentary, we'd obviously want lots of footage of
temples taking place in and around odisha. If we're creative,
though, there are plenty of other things we might want to film: a
discussion on a proposed temple protection, for instance, might
provide some thrilling dramatic tension.
STEP 5 : Film Establishing Shots
If you've watched a documentary before, you've surely noticed
that the entire movie isn't just footage of interviews and of live
events with nothing in between. For instance, there are often
shots leading into interviews that establish a mood or
show where the interview is taking place by showing the outside

Audio Visual Production
71
of the building, the city skyline, etc. These are called "establishing
shots," and they're a small but important part of your
documentary.
1. In historical temple documentary, we'd want to film
establishing shots at the locations where our interviews
took place: in this case, Temple walls, Badadanda shops,
Puri beach etc. We might also want to get some footage of
near far temples in puri landmarks to give the audience a
sense of the locale.
2. Always collect audio from the shoot including room tone
and sound effects unique to that location.
STEP 6: Shoot Dramatic Recreations
If there's no real-life footage of an event your documentary
discusses, it's acceptable to use actors to re-create the event for
your camera, provided the recreation is informed by real-world
fact and it's perfectly clear to the audience that the footage is a
recreation. Be reasonable with what you film as a dramatic
recreation - make sure that whatever you commit to film is
grounded in reality. Sometimes, dramatic recreations will obscure
the actors' faces. This is because it can be jarring for an audience
to see an actor portray a real-world person in a film that also
contains real footage of him or her.
STEP 6: Keep a Note.
As you film your documentary, keep a note of how the filming
went each day. Include any mistakes you made as well as any
unexpected surprises you encountered. Also consider writing a
brief outline for the next day of shooting. If an interview subject
said something that makes you want to pursue a new angle for
your film, note this. By keeping track of each day's events, you
have a better chance of keeping on track and on schedule. Once
finished, do a paper edit viewing footage and making notes of
shots to keep and others to discard.
Then goes to next step post production for your documentaries.

Unit 3 Shooting for 5 minutes Program
72
How to Shoot News
Concept of News
Before starting any news report, the most critical point to recollect is: Keep it simple. Consider how you might recount the story in the most captivating path, without making it excessively confounded.
Planning for News Similarly as with any story, you should arrange for how you need
to begin your news report and how you need to end it. This will
keep your story heading in the right direction, and you won't pass
up a major opportunity any important information in the middle.
When planning your report, you should think about the five ways.
These are:
What - What is the story? Get the actualities right before
starting your report.
Why - Why is the story important to your gathering of
people? Which indicates do you require focus on to get
their advantage?
Who - Who is included? Consider who will have the
capacity to recount their sides of the story in an intriguing
way. Ensure they're accessible to film when you require
them.
Where - Where is the story happening, and where is the
best place to film? In case you're shooting outside of a
lodge, you may need to get consent first.
When - Has the story as of now happened, or is it going to
happen? On the off chance that there will be a noteworthy
occasion you need to report on, ensure you arrive on time!
By planning every one of these focuses in detail, you'll know precisely what you have to film, where and when. That way, you won't pass up a great opportunity for anything when you're on location.

Audio Visual Production
73
Equipment for News coverage
Always bring a lot of pens and paper, spare camera batteries and
SD card. On the off chance that you run out amid an interview,
you won't have the capacity to complete your story. What's more,
on the off chance that you have a tripod, take it with you to keep
the shots steady.
Shooting the news
When you have done all your planning, at that point you can begin to film. A fundamental TV news report is comprised of five sections:
Introduction - This is the place the reporter starts to clarify the story. Try not to make it too long, keep it short and snappy.
First interview - The first person you converse with will give their opinion on what is occurring, and how it affects them.
Second interview - You have to converse with someone with an alternate opinion, to give balance.
Extra shots - These show the audience more about the place and the general population in the story. They make the report additionally interesting.
Conclusion - This will be the reporter's sign-off, where they summarize the outcome, or possible outcomes, of the story.
Contemplate where you need to set up every one of the shots, using distinctive backgrounds and angles to keep it interesting for the audience.
For instance, reporters can look straight at the camera when they do their introductions and sign-offs. These are called "pieces to camera".
The interviewee stands on one side of the frame looking to the
reporter on the other side. Consider how to position your
interviewee in the shot. Interviewees usually stand on one side of
the frame looking over to the other side of the screen. This is

Unit 3 Shooting for 5 minutes Program
74
because they are looking at the reporter, who stands on one side
of the camera, so you can't see them in the shot.
Be exceptionally watchful to check your audio levels too. Wear
your headphones! Without great sound you won't have the
capacity to use the video that goes with it.
Precaution
When filming, you and your group's safety is top need. Don't film
in dangerous places - in the street, for instance, or adjusting on
top of something. Be cautious of cables and leads - keep them off
the beaten path so individuals don't stumble over. Planning ahead
can truly enable, so you to know where you're going and don't get
lost. Always ensure someone in charge knows where you will be.
Audio Visual Production
75
Unit summary
Summary
In this unit you learned the Basics of shooting. You were able to examine the ‘Elements of Shootings’ and ‘Principles of recording’. How to add aesthetics to any composition? Why these elements are important for any project.
We also addressed about ‘Fundamental of shooting’ and able to distinguish type of video shoot. How their properties are different from each other? You also learn the difference shooting techniques and the shooting chain systems.
Assessment
Assessment
1. List any three equipments used in shooting process.
2. Write the points you will keep in mind while shooting a
music video?
3. Explain the principles to shoot an Interview?
4. Describe the use of storyboard.
5. Write the use of lapel when you are recording.
6. Write the step you performed as a director.
7. Differentiate between music video and documentary.
8. State the primary tools for lighting?
Resources
Readings
https://www.google.co.in/
https://www.wikipedia.org/ https://www.youtube.com/ https://www.wikihow.com/ https://library.creativecow.net/ https://pixabay.com/

Unit 4 Editing of 5 minutes Program
76
Unit 4
Editing of 5 minutes Program
Introduction
Editing is an essential part of making any film or video. Capturing
high-quality video has never been easier, but capturing video is
only part of the storytelling process. And it doesn't even have to
be storytelling; it could be sharing an experience, presenting
information, or covering news. To get video from its raw form to a
finished, watchable piece, it needs to be edited.
A lot of folks think video editing is complicated and hard to learn.
But it doesn't have to be! In this unit you will learn the basics of
video editing. You will learn how to import and organize your
footage and assets, how to trim clips and add them to a timeline,
and how to sweeten audio. You will learn about color correction
and grading, video effects and transitions, and more! This way you
can follow along and get real, hands-on experience.
At the end of this course you will have the skills to start editing
your own projects so that you can get started telling stories of
your own.
Outcomes
Upon completion of this unit you will be able to:
Outcomes
List the types of movie editing
Practice the steps of Editing
Choose the Right software’s for editing
Plan to edit music video
State the Important Editing rules

Audio Visual Production
77
Terminology
Terminology
Off-Line Editing:
This is the process in which the raw footage is
copied and edited at a lower resolution than the
final output, and an online EDL is created to be
used in the final assembly of a picture.
On-Line: This process is to an electronic edit what a negative cutter is to a picture completed on film.
PAL: (Phase Alternate Line) The 625-line, 25 frame per-second television standard used in Western Europe, India, China, Australia, New Zealand, Argentina and parts of Africa.
Real time: Real time the ability to interact with data as it’s being created.
Pan and Scan: It is a method of converting a widescreen image to a 4:3 (standard television) aspect ratio for projection or television
VTR: Video tape recorder also referred to as a “deck.” They’re used for duplicating video tapes and inputting and outputting from a computer.
Editing
Non-linear (film style) Editing
Non-linear editing is best for highly structured, short-format
projects. When professionally done, tightly edited tapes of
highlights usually take about one hour to edit1 minute of the final
segment. The more time you spend editing, the better your video
can be, but don’t overdo it.
Non-linear editing is like writing an essay with a computer.
Video segments called “clips” are digitized to a hard disk.
Any shot can be accessed instantly and at random and can
be shortened lengthened, juxtaposed, moved or removed
Video and audio changes can easily be cut and pasted
Rough Edit: On this first pass, edit the original material by
choosing the best clips. No transitions or audio mixing are
added yet; the story structure is simply assembled in order
to make sure the intended story comes through clearly

Unit 4 Editing of 5 minutes Program
78
Tight Edit: Make a second pass adding transitions between
scenes and a third pass cleaning up the sound and adding
music, if any.
Before final mastering, add titles to identify people,
places, and things; to help tell the story, or to give credit.
Titles are rendered. Bars and tone can be added to the
beginning for future reference.
Final Mastering: The final step is to playback the program
on the computer and records it onto your preferred
medium (hard drive, Blu-Ray, DVD, Mini DV).
Source-
http://web.mit.edu/techtv/videoprodguide/editing.html
How to Edit a Video?
To begin with thing you recollect that as an editorial manager you are a storyteller! Editing is far beyond basically cutting footage. It's a chance to take your audience on a voyage. Regardless of whether you're editing a mind boggling narrative film or just assembling a corporate video, that doesn’t matter, but every cut, every transition, every sound effect, and graphic needs to recount a great story. So while you're editing, ask yourself how each scene is advancing the story. Audiences cherish struggle. Find that contention and emphasize it through pacing and music, you have to do when you take a seat to alter a video is figure out who your hero is. For a video, the hero may the interviewee or even the audience. Release your hero on an excursion and defeat obstacles — regardless of whether the obstacle is as trivial as not realizing what sort of toothpaste to choose. Utilizing this procedure will change the way in which you alter and you'll instantly observe a change in your video's quality.
Amid the editing process, you should assemble all of the various content you have gathered. This may incorporate video clips, still shots, slide images, voiceovers, and music. You may deliver an audio program, a video, or an image slideshow amid this phase.
Choose the Right Software
Picking the correct editing software is a considerable measure like
picking the correct car. They'll all get your from A to B, yet relying
upon your tastes and inclinations, you may lean toward one above
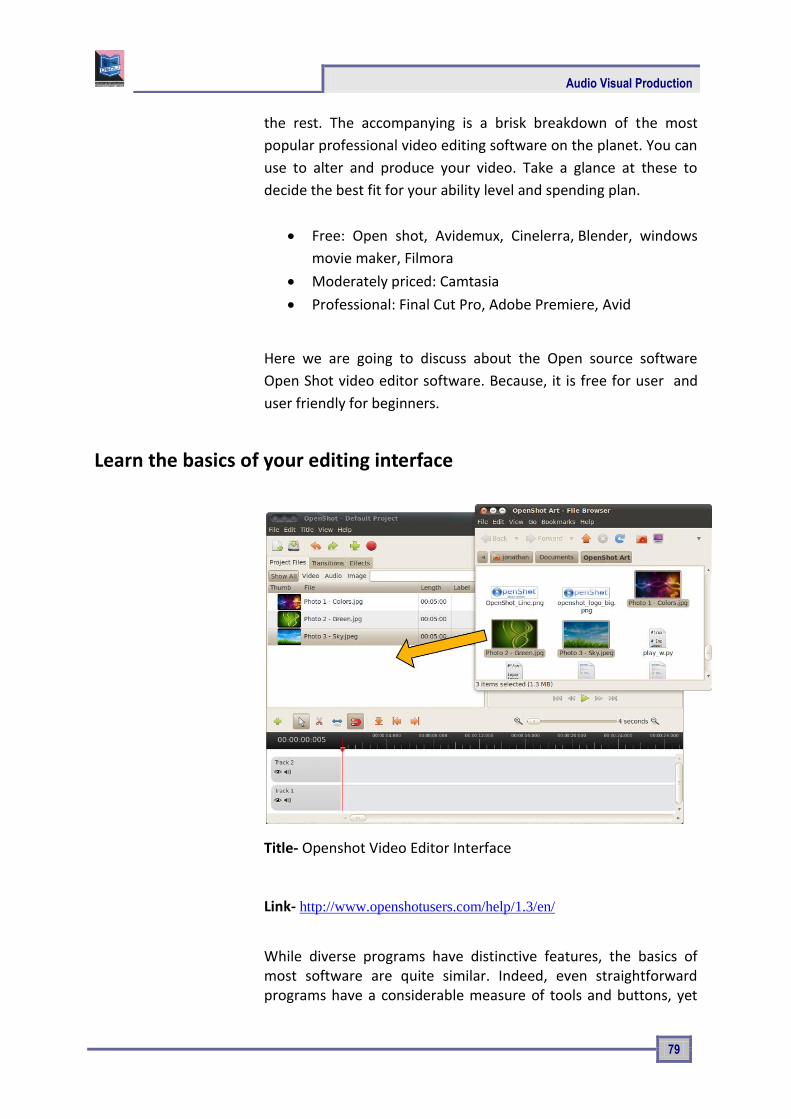
Audio Visual Production
79
the rest. The accompanying is a brisk breakdown of the most
popular professional video editing software on the planet. You can
use to alter and produce your video. Take a glance at these to
decide the best fit for your ability level and spending plan.
Free: Open shot, Avidemux, Cinelerra, Blender, windows
movie maker, Filmora
Moderately priced: Camtasia
Professional: Final Cut Pro, Adobe Premiere, Avid
Here we are going to discuss about the Open source software
Open Shot video editor software. Because, it is free for user and
user friendly for beginners.
Learn the basics of your editing interface
Title- Openshot Video Editor Interface Attribution- Source- Link- http://www.openshotusers.com/help/1.3/en/
While diverse programs have distinctive features, the basics of most software are quite similar. Indeed, even straightforward programs have a considerable measure of tools and buttons, yet

Unit 4 Editing of 5 minutes Program
80
there are three main parts to every video program that you should know:
The Timeline: This is the place you arrange, alter, and trim your footage into the final video. Here and there known as a "sequencer" or "storyboard editor" this is the place you do the majority of your work. Most programs indicate both audio and video in the timeline. It is usually near the bottom of your window.
The Preview Screen: This is the place you watch the draft of your motion picture while you alter. It usually starts out as a black box with play, rewind, and stop buttons underneath it. It is usually in the upper right quadrant.
The Library/Collection: This is the place all of your imported audio, video, and pictures are arranged, allowing you to drag and drop them into your timeline for editing. It usually accompanies a search function and some labeling tools. It is usually on the left side of the window.
Different areas may incorporate audio controls, a "toolbox," special effects, a place to add titles, and a moment video screen to check imported footage.
Know the essential tools for editing
Title- Openshot Video Editor toolbar Attribution- Source- Link- http://www.openshotusers.com/help/1.3/en/ar01s04.html#sect2_15 In spite of the fact that each program has distinctive names for them, there are just a modest bunch of tools that are obligatory for basic editing. Drift over an icon to perceive what it is named in your program.
1. Add Track: Add a new track to the top of the stack.
2. Select Mode: Select mode allows you to click and move
clips.
3. Razor Mode: Razor mode allows you to split a clip where
ever you click. If snapping is enabled, clicking near the play-
Audio Visual Production
81
head (the red line), will slice the clip exactly on the play-
head.
4. Resize Mode: Resize mode allows you to grab the edges of
a clip and drag to resize (or trim) the clip.
5. Snap Mode: Snap mode allows clips to snap (or jump) to
the nearest clip or play-head (if any are close) when you
drop them. Transitions will snap to nearby clips. Also, clips
and transitions will snap to the play-head's position.
6. Add Marker: Add a new marker, which allows you to
quickly jump back to this exact point while previewing.
7. Previous Marker: Skip to the previous marker (if any).
8. Next Marker: Skip to the next marker (if any).
Organise your Footage
Regardless of whether you are producing a simple video or a
feature to film, the well-organized footage is significant to forestall
misfortune, streamline your editing process, and help other team
member's hop into the venture without confusion. Despite the
fact that it might be an issue at to start with, completely naming
and documenting your video footage will spare endless cerebral
pains later on.
1. Organize folders by project and the date it was shot. Ex. E:\
Movie\ Project_2-22-17.
2. Organize clips by scene and take. Ex. E\ Movie\
Project_Scene1_Take1.

Unit 4 Editing of 5 minutes Program
82
Create a New Project
Title- New project window Attribution- Source- Link- http://www.openshotusers.com/help/1.3/en/ar01s05.html#sect2_21 Depending on your footage several options will appear here, but standard digital video quality will be 720x480 or 1080x720 (High Definition) at 25 frames per second. These settings are called PAL standard and are used in most countries. If you are in doubt, ask the cinematographer or director what settings they shot the video on. If you're still lost, look up your camera's settings on the internet -- it should tell you what sort of video you are editing. Many modern programs will automatically conform project settings to your footage, eliminating this headache for less experienced editors.

Audio Visual Production
83
Import Your Footage
Title- Importing files Attribution- Source- Link- http://www.openshotusers.com/help/1.3/en/ar01s06.html Link- http://www.openshotusers.com/help/1.3/en/ar01s05.html#sect2_21 Though all programs are different, you can usually bring your film clips into the project under File-->Import. This does not make your movie or order your clips, it simply tells the program which videos you will be editing and allows you to access them.
1. Some programs let you drag and drop footage from another window into your editing window.
2. Importing footage allows for Non-Linear-Editing (NLE): the process of editing video out of order without changing the original footage. All modern editing is Non-Linear.
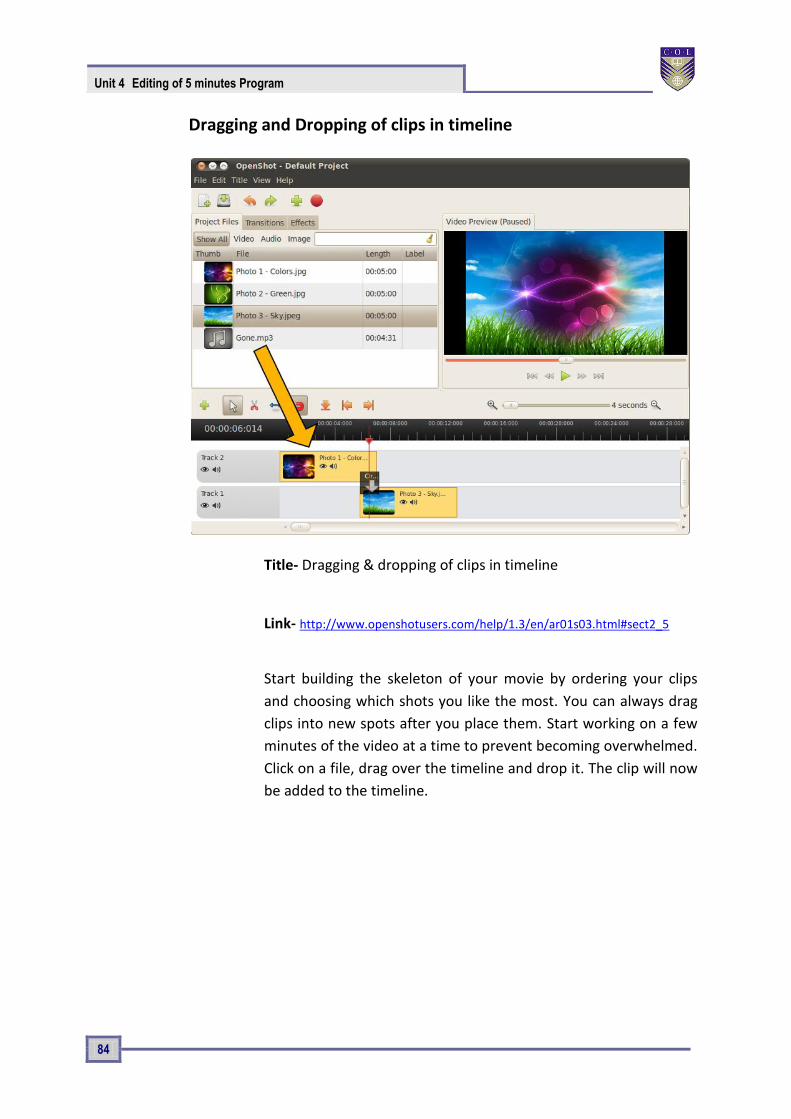
Unit 4 Editing of 5 minutes Program
84
Dragging and Dropping of clips in timeline
Title- Dragging & dropping of clips in timeline Attribution- Source- Link- http://www.openshotusers.com/help/1.3/en/ar01s03.html#sect2_5
Start building the skeleton of your movie by ordering your clips
and choosing which shots you like the most. You can always drag
clips into new spots after you place them. Start working on a few
minutes of the video at a time to prevent becoming overwhelmed. Click on a file, drag over the timeline and drop it. The clip will now
be added to the timeline.

Audio Visual Production
85
Splice the scenes together
Title- Splice the scenes Attribution- Source- Link- https://www.kurup.org/blog/2011/08/10/openshot-video-editor
Once you have the scenes in order you need to trim the beginning and ends so they line up cohesively. While sometimes this is as easy as eliminating the initial "Action!" you'll have to make artistic decisions here too. To splice, find the "razor" or cut tool to break the footage up into smaller parts, and then delete the parts you don't like from the timeline. Many programs let you drag the beginnings and ends of clips to shorten or lengthen them. Never permanently delete any footage-- you never know what will come in handy, even if only for the "blooper reel!"

Unit 4 Editing of 5 minutes Program
86
Add transitions and effects to footage
Though these are essential to most movies, they can only be effective once you have the footage completely organized and cut. Most programs have dedicated windows and menus for titles and transitions, and you should play around to see which fit your project. The most common transitions are "fade-ins" and "fade-outs," which is when the image slowly appears or disappears from the screen. For more complicated special effects, transitions, or animations, editors often rely on separate post-production programs like Blender.
Add Music
Title- Adding music Attribution- Source- Link- https://www.openshot.org/static/files/user-guide/quick_tutorial.html
To make the Video more interesting, you need to add some music. You should have imported a music file. Click on the music file, and drag it onto Track 1 on the timeline.

Audio Visual Production
87
Balancing of Sound
It appears like each video editor has their own particular feelings about what your audio levels ought to be, so the accompanying suggestions are in no way, shape or form law. Notwithstanding, in case you're experiencing some difficulty getting your audio without flaw, simply take after these speedy recommendations and start changing your audio from that point.
Overall Mix Level: -10db to -14db
Dialogue: -12db to -15db
Music: -18db to -22db
Sound Effects: -10db to -20db with occasional spikes up to -8db.
By the day's end, your ears should be the judge. Your audio may take after these tips consummately, however in the event that it sounds awful… it's terrible.
Adjust the colour
Not all movies need to take this step, but if you want to look
professional you'll need to balance audio and video so that the
shots all look alike and there are no jarring volume shifts. Luckily,
many programs have an "auto color-correct" function and
"volume equalizer" built in. For a professional looking film you'll
need to do this manually.
Color correction is the way toward getting your footage to a color
baseline. Regardless of how incredible your footage looks on set,
you will quite often need to do some fundamental post-preparing
to get the greater part of your footage reliable. The greater part of
the major NLEs have fundamental color correction effects worked
in that make it simpler than ever to perform essential color
correction. However, you might be somewhat constrained on your
capacity to control colors on the off chance that you are given a
highly compressed codec. Remember this when shooting your
footage on set. Record groups like RAW and ProRes will be simpler
to control than h.264 and AVC-HD.

Unit 4 Editing of 5 minutes Program
88
Titles and Graphics
Title- title window Attribution- Source- Link- http://www.openshotusers.com/help/1.3/en/ar01s17.html After you've edited your video, included music, and color graded, it's an ideal opportunity to include the graphics. While it's anything but difficult to spot awesome motion graphic work when you see it, great graphics are shockingly hard to create yourself. It's extremely best to keep things simple.
Once the title editor dispatches, you have to choose a template and tap the Create New Title button. The will make a duplicate of the template SVG title, and add it to your Project Files. Enter the name of the record, as it will be spared to your hard-drive.
Preview video at various point
Title- Preview window

Audio Visual Production
89
Attribution- Source- Link- http://www.openshotusers.com/help/1.3/en/ar01s03.html#sect2_7
You may need to rehash this stage five, ten, or even fifty times relying upon the project, and it will feel monotonous. Welcome friends, co-workers, or other crew members to watch the project with you and give feedback. Take takes note of each time you watch it about what you need to settle. Removing a couple of days from the project before watching can help gather new bits of knowledge.
Export your Video
Title- Export window Attribution- Source- Link- http://www.openshotusers.com/help/1.3/en/ar01s03.html#sect2_7

Unit 4 Editing of 5 minutes Program
90
Once you have completed a project, the next step is export video.
This will convert your Open Shot project into a single video file,
which should work on any media player. Open Shot has many
predefined formats to simplify this process. There are two modes
to export a video in Open Shot, Simple Mode and Advanced Mode.
Both modes share a common area at the top of the screen,
General Options. Name your video file (no extension) and choose
an export folder.
Click on the Export Video icon at the top of the screen (or use
the File > Export Video... menu). Choose from one of the many
preset export options, and click the Export Video button.
Audio Visual Production
91
Unit summary
Summary
In this unit you learned the basic steps of editing; After reading the steps of editing, you can do video editing. How to edit videos? Why these rules are important for any edit.
We also addressed about ‘Fundamental of editing' and able to distinguish different types of editing. How their rules are different from each other? You also learn the difference Studio setup techniques and the editing steps.
Assessment
Assessment
List the software is used in editing?
List the steps to edit?
Explain the need of using principle of editing?
Describe the use of music in editing.
State the role of an editor?
Differentiate between linear and non linear editing.
Identify the primary tools for editing?
Name the tool which is used for cutting a video clip?
Describe how to import video in project?
Audio overall mix level is---?
Dialogue level is-----?
PAL stands for?
RGB stands for?
Resources
https://www.google.co.in/ https://www.wikipedia.org/ https://www.youtube.com/ https://www.wikihow.com/ https://library.creativecow.net/ https://pixabay.com/
http://www.openshotusers.com/
Reading
Copyright © 2022 FDOKUMEN