aqua point
32
User's Manual Therapy Air Humidifier aquapoint
-
Upload
khangminh22 -
Category
Documents
-
view
0 -
download
0
Transcript of aqua point

User's ManualTherapy Air Humidifi er
aquapoint

SERIAL NUMBER
Every HOFFRICHTER GmbH device is supplied with a serial number for traceability purposes.
Please enter your device's serial number here. You will fi nd the serial number on the rating plate on the bottom of the device.
Serial number: .....................................
Please always quote the serial number for all queries and complaints.
CONFORMITY
The device complies with the requirements of Directive 93/42/EEC.
2 Info

CONTENTS
Scope of Delivery ................................................... 5General .................................................................. 6
Information on User's Manual .............................. 6Symbols used in this User's Manual .................... 7Symbols on the Rating Plate ............................... 9
Safety Information ................................................ 10General Safety Instructions ................................ 10Installation Requirements and Transport ............ 11Intended Use .................................................... 12Contraindications .............................................. 12Side Effects ...................................................... 12
How the Device Works ......................................... 13Description of Device ........................................... 14
Humidifi er ......................................................... 14Controls ............................................................ 15
Fitting the Accessories ......................................... 16Using the Humidifi er ............................................. 18
Filling the Humidifi er .......................................... 19Connecting the Humidifi er to the Device ............ 20Setting Heating Level ........................................ 20
Cleaning .............................................................. 21Troubleshooting ................................................... 23
Contents 3

Preparing the Humidifi er when Changing Patient .. 24Disposal............................................................... 25
Humidifi er ......................................................... 25Packaging ......................................................... 25
Technical Data ..................................................... 26Disclaimer ............................................................ 28
4 Contents
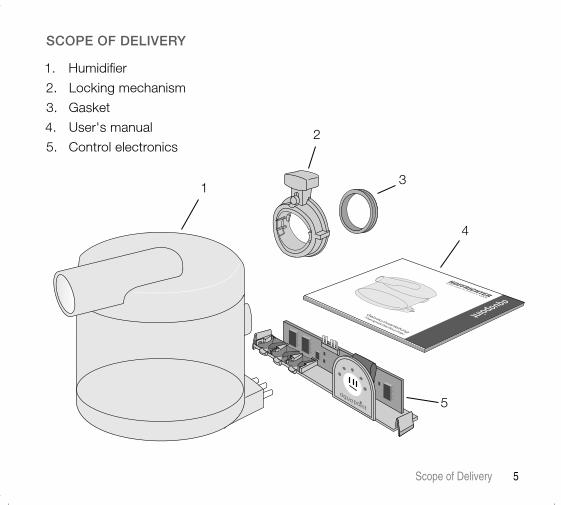
SCOPE OF DELIVERY
1. Humidifi er
2. Locking mechanism
3. Gasket
4. User's manual
5. Control electronics
1
2
3
4
5
Scope of Delivery 5

GENERAL
INFORMATION ON USER'S MANUAL
Read this user's manual through carefully before using your therapy air humidifi er for the fi rst time.
Follow the safety and cleaning instructions in particular.
Keep the manual in a safe place close to the device so that you can refer to it immediately if necessary.
6 General

SYMBOLS USED IN THIS USER'S MANUAL
Important information is denoted by symbols in this user's manual. Be sure to follow these instructions in order to avoid accidents, personal injury and mate-rial damage.
In addition, the local accident prevention regulations and general safety regulations in force in the area of use must be observed.
This symbol denotes general safety instructions. Follow these instructions to avoid accidents, personal injury or material damage.
This symbol denotes hazardous situations that may lead to serious injuries or death.
This symbol denotes hazardous situations that may lead to moderately severe injuries.
General 7

This symbol denotes situations that may lead to material damage or damage to the device.
This symbol denotes information, tips and instruc-tions for the effi cient, error-free use of the device.
8 General

SYMBOLS ON THE RATING PLATE
Observe the warning and safety instruc-tions in the user's manual.
BF application part
Protection class II (protective insulation)
CE conformity declaration
Manufacturer
Follow the user's manual.
Caution hot
Do not dispose of the device with the household waste. Please contact the relevant customer services department to fi nd out how to dispose of the device properly.
General 9

SAFETY INFORMATION
GENERAL SAFETY INSTRUCTIONS
• Only use the humidifi er in combina-tion with the point respiratory therapy device. Follow all the specifi c user instructions for it.
• Only use accessories that have been recommended and supplied to you by the manufacturer or your special-ist dealer.
• Do not start the humidifi er if it is dam-aged or not working. In this event, inform your specialist dealer imme-diately.
• Change the water in the humidifi er daily, as otherwise germs can multiply.
10 Safety Information

INSTALLATION REQUIREMENTS AND TRANS-PORT
• Place the humidifi er on a fi rm, level, heat-resistant surface. Avoid an un-favourable sloping position.
• Never transport or tilt the respiratory therapy device with a full humidifi er fi tted. If you do this, water could get into the therapy device and damage it.
• Do not put the respiratory therapy device with a full humidifi er fi tted in the sun or in the vicinity of heaters or similar.
Safety Information 11

INTENDED USE
The aquapoint is used to humidify the therapy air fl ow.
The aquapoint must only be used in combination with a point. The point is a respiratory therapy device for treating obstructive sleep apnea syndrome (OSAS) in patients weighing more than 30 kg.
The water in the aquapoint must not contain any additives, such as medicines, salts, aromatic oils or other substances.
CONTRAINDICATIONS
No contraindications are known for the use of the aqua-point.
SIDE EFFECTS
Possible side effects from the use of the aquapoint are not known.
12 Safety Information

HOW THE DEVICE WORKS
The aquapoint is a plug-in hot air humidifi er for the point respiratory therapy device.
It is used to add humidity to the therapy air fl ow to pre-vent the mucous membranes in the upper respiratory passages from drying out.
The heating power can be set to 5 different levels and can thus be adjusted to the patent's individual require-ments.
The aquapoint has an integral memory that guaran-tees that the last set heating level is retained after the therapy device has been switched off or the humidifi er has been removed.
How the Device Works 13

DESCRIPTION OF DEVICE
HUMIDIFIER
1. Air outlet (connection for therapy tube)
2. Water container with heating plate
3. Sealing cap
4. Air control
5. Air inlet
6. Contact pins
14 Description of Device
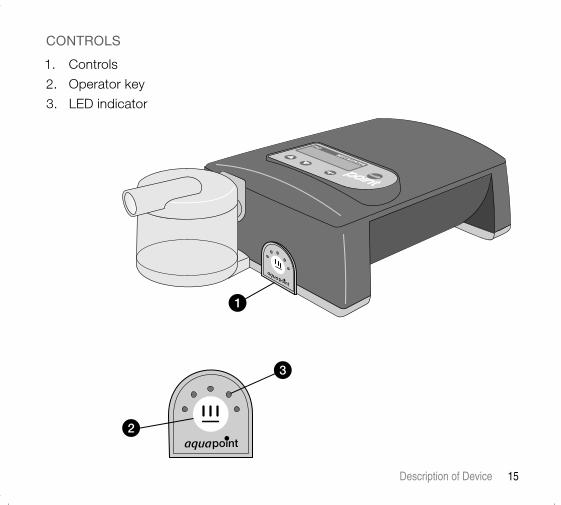
CONTROLS
1. Controls
2. Operator key
3. LED indicator
Description of Device 15
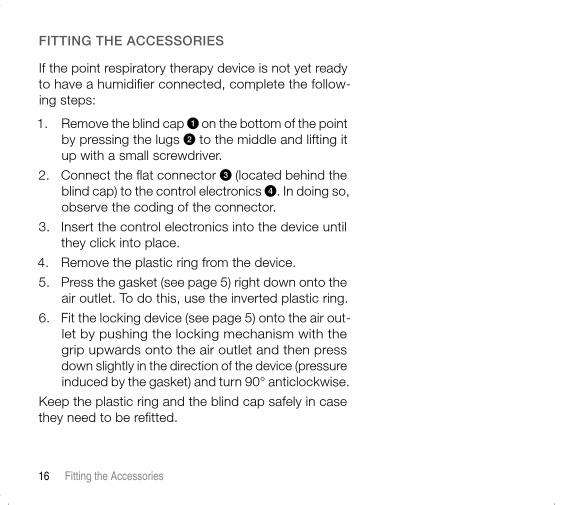
FITTING THE ACCESSORIES
If the point respiratory therapy device is not yet ready to have a humidifi er connected, complete the follow-ing steps:
1. Remove the blind cap on the bottom of the point by pressing the lugs to the middle and lifting it up with a small screwdriver.
2. Connect the fl at connector (located behind the blind cap) to the control electronics . In doing so, observe the coding of the connector.
3. Insert the control electronics into the device until they click into place.
4. Remove the plastic ring from the device.
5. Press the gasket (see page 5) right down onto the air outlet. To do this, use the inverted plastic ring.
6. Fit the locking device (see page 5) onto the air out-let by pushing the locking mechanism with the grip upwards onto the air outlet and then press down slightly in the direction of the device (pressure induced by the gasket) and turn 90° anticlockwise.
Keep the plastic ring and the blind cap safely in case they need to be refi tted.
16 Fitting the Accessories

3
5
2
4
6
1
Fitting the Accessories 17

USING THE HUMIDIFIER
Before using for the fi rst time, rinse the humidi-fi er thoroughly with clear water. To do this, read section "Cleaning" on page 21.
While it is being fi lled, the humidifi er must not be attached to the respiratory therapy device.
When the humidifi er is full of water, it must not be laid on its side or turned over because water could leak.
Using the blower when the humidifi er is full and not connected to the therapy tube may lead to drops of water being carried along by the air fl ow. Therefore, only use the humidifi er when the therapy tube is properly attached.
18 Using the Humidifi er

FILLING THE HUMIDIFIER
1. Open the humidifi er by twisting the sealing cap anticlockwise off the water container.
2. Remove the air control.
3. Only fi ll the humidifi er with cold, decalcifi ed, boiled water containing no additives. Alternatively, you can also use distilled water suitable for medical purposes.
Note the specifi ed maximum fi ll level.
4. Put the air control back on.
5. Close the water container by placing the sealing cap on the container and turning it clockwise until it stops.
1 + 5
2 + 4
3
Using the Humidifi er 19

CONNECTING THE HUMIDIFIER TO THE DEVICE
1. Turn the locking device to its upper position.
2. Connect the humidifi er to the therapy device. Ensure that the contact pins and the air inlet of the humidi-fi er are fi tted to the therapy device without being skewed or distorted.
3. Turn the locking device downwards until it locks into place.
SETTING HEATING LEVEL
The humidifi er has 5 heating levels. By pressing the key you increase the heating power one level each time. If you press after level 5, the heating switches off. To switch the heating back to level 1, press again.
The LED indicator shows you what level the heating is set to. At level 1 the fi rst LED is lit, at level 5 all LEDs are lit. The LED display dims automatically if is not pressed for at least 5 seconds.
The water is only heated when the turbine is running.
1
2
3
20 Using the Humidifi er

CLEANING
Make sure that you follow the cleaning instruc-tions. Disregarding them could damage your health because of germs.
We recommend cleaning the humidifi er after each use and leaving it to dry completely during the day. In this way, you will prevent limescale accumulating and germs multiplying.
Clean the humidifi er as follows:
Never use sharp edged or pointed objects for cleaning.
1. Turn the locking device to its upper position. Detach the humidifi er from the respiratory therapy device and take it to a sink unit.
2. Open the humidifi er by twisting the sealing cap anticlockwise off the water container.
3. Remove the air control.
1
2
3
Cleaning 21

4. Empty the water container and rinse it out under running water.
5. Remove the limescale by wiping it out with a soft cloth. Should stubborn limescale residue remain, we recommend fi lling the water container with an ordinary household descaler or a weak vinegar solu-tion and leave to stand for some time. Then rinse the container very thoroughly under running water.
6. Rinse the sealing cap and the air control under running water.
7. Leave all components to dry completely in the air.
You can clean the water container, the air control and the sealing cap in the dishwasher up to a tempera-ture of 60°C. However, we recommend cleaning them under running water to ensure that food remains from the dishwasher are not deposited on them.
The user does not have to perform any technical maintenance or chemical or thermal disinfection on the humidifi er.
4
5
22 Cleaning

TROUBLESHOOTING
Problem Remedy
Water in therapy tube The heat is set too high. Select a lower heating level.
Increase the room temperature.
Run the therapy tube underneath the bedclothes.
No or insuffi cient humidifi cation Set a higher heating level.
Set heating level not displayed Check that the contact pins are inserted into the respiratory therapy device as far as the stop and that the locking mechanism lever is horizontal. The therapy device must be switched on.
Water is leaking from the air outlet
Check whether the maximum permissible fi ll level of the water container has been exceeded. Check the cleaning status.
Troubleshooting 23

PREPARING THE HUMIDIFIER WHEN CHANGING PATIENT
If the humidifi er is to be used for another patient, it must fi rst of all be prepared hygienically.
When being given to another patient, the humidifi er must be prepared hygienically by the specialist dealer or the manufacturer.
The preparation procedure is described in detail in the corresponding hygiene plan.
24 Preparing the Humidifi er when Changing Patient
DISPOSAL
HUMIDIFIER
The humidifi er must not be disposed of with the household waste.
Please contact the relevant customer services depart-ment to fi nd out how to dispose of the humidifi er properly.
Proper disposal saves natural resources and prevents harmful substances being released into the environment.
PACKAGING
The packaging is taken back by the distributor but it can alternatively be disposed of separately with the normal household waste.
Disposal 25

TECHNICAL DATA
Dimensions (W x D x H) 100 x 145 x 109 mm
Weight without water 283 g
Maximum capacity 220 ml
Operating voltage 24 V DC
Power consumption 24 V DC 230 V AC
Heating level 1 < 5 W < 9 W
Heating level 2 < 8 W < 11 W
Heating level 3 < 12 W < 14 W
Heating level 4 < 15 W < 20 W
Heating level 5 < 19 W < 22 W
Relative humidity (measured at 24°C and 59% rel. humidity) Flow Level 1 Level 5
4 hPa 16 l/min > 85% 100%
10 hPa 24 l/min > 70% 100%
20 hPa 37 l/min > 60% > 70%
Output of the humidifi er system at heating level 5 (measured at 24°C and 34% rel. humidity)
4 hPa : 16 l/min : 13 mg/l10 hPa: 24 l/min : 12 mg/l20 hPa : 37 l/min : 10 mg/l
The humidifi er output may vary under different ambient conditions.
26 Technical Data

Maximum water temperature 41°C
Maximum temperature of gas emitted 35°C
Operating temperature + 5°C ... + 35°C
Storage temperature - 20°C ... + 50°C
Relative humidity 15% ... 95%
Operating conditions 1060 hPa ... 700 hPa (approx. - 400 m ... 3500 m)
Therapy tube connection 22 mm, cone (as per ISO 5356-1)
Product class according to 93/42/EEC IIa
Classifi cation according to EN 60601-1 Protection class II, BF type device
CE marking as per EC directive 93 / 42 / EEC.The manufacturer reserves the right to make technical changes without notice.
Technical Data 27

DISCLAIMER
HOFFRICHTER GmbH is not liable for consequences in terms of safety, reliability and performance of the product where:
• interventions, modifi cations, extensions, calibration, repairs and maintenance are carried out by persons not authorized by us,
• other manufacturers' accessories and spare parts are used that have not been approved by us for use on the product,
• the product is used other than as described in the user's manual or
• the hygiene and cleaning instructions described in the user's manual have not been complied with.
Statutory guarantee rights remain unaffected by this.
28 Disclaimer

NOTES
............................................................................................................................
............................................................................................................................
............................................................................................................................
............................................................................................................................
............................................................................................................................
............................................................................................................................
............................................................................................................................
............................................................................................................................
............................................................................................................................
............................................................................................................................
............................................................................................................................
............................................................................................................................
Notes 29

NOTES
............................................................................................................................
............................................................................................................................
............................................................................................................................
............................................................................................................................
............................................................................................................................
............................................................................................................................
............................................................................................................................
............................................................................................................................
............................................................................................................................
............................................................................................................................
............................................................................................................................
............................................................................................................................
30 Notes

NOTES
............................................................................................................................
............................................................................................................................
............................................................................................................................
............................................................................................................................
............................................................................................................................
............................................................................................................................
............................................................................................................................
............................................................................................................................
............................................................................................................................
............................................................................................................................
............................................................................................................................
............................................................................................................................
Notes 31
aquapoint-eng-0510-04
HOFFRICHTER GmbHMettenheimer Strasse 12 / 1419061 SchwerinGermanyPhone: +49 385 39925 - 0Fax: +49 385 39925 - 25E-mail: [email protected]
Art. no.: 5000 0012