ansi-mv-ais-gmsg-im-en.pdf - Siemens
68
Instruction manual Types GMSG and GMSG-GCB 5 kV to 15 kV vacuum circuit breakers Installation operation maintenance E50001-F710-A231-V3-4A00 www.usa.siemens.com/mvswitchgear
-
Upload
khangminh22 -
Category
Documents
-
view
0 -
download
0
Transcript of ansi-mv-ais-gmsg-im-en.pdf - Siemens

Instruction manualTypes GMSG and GMSG-GCB 5 kV to 15 kV vacuum circuit breakers
Installation operation maintenance E50001-F710-A231-V3-4A00
www.usa.siemens.com/mvswitchgear

2
ImportantThe information contained herein is general in nature and not intended for specific application purposes. It does not relieve the user of responsibility to use sound practices in application, installation, operation and maintenance of the equipment purchased. Siemens reserves the right to make changes in the specifications shown herein or to make improvements at any time without notice or obligations. Should a conflict arise between the general information contained in this publication and the contents of drawings or supplementary material or both, the latter shall take precedence.
Qualified personFor the purpose of this instruction manual a qualified person is one who is familiar with the installation, construction or operation of the equipment and the hazards involved. In addition, this person has the following qualifications:
Is trained and authorized to de-energize, clear, ground and tag circuits and equipment in accordance with established safety procedures.
Is trained in the proper care and use of protective equipment, such as: rubber gloves, hard hat, safety glasses or face shields, flash clothing, etc., in accordance with established safety practices.
Is trained in rendering first aid.
Further, a qualified person shall also be familiar with the proper use of special precautionary techniques, personal protective equipment, insulating and shielding materials and insulated tools and test equipment. Such persons are permitted to work within limited approach of exposed live parts operating at 50 volts or more, and shall, at a minimum, be additionally trained in all of the following:
The skills and techniques necessary to distinguish exposed energized parts from other parts of electric equipment.
The skills and techniques necessary to determine the nominal voltage of exposed live parts.
The approach distances specified in NFPA 70E and the corresponding voltages to which the qualified person will be exposed.
The decision-making process necessary to determine the degree and extent of the hazard and the personal protective equipment and job planning necessary to perform the task safely.
Hazardous voltages and high speed moving parts.
Will cause death, serious injury or property damage.
Always de-energize and ground the equipment before maintenance. Read and understand this instruction manual before using equipment. Maintenance should be performed only by qualified personnel. The use of unauthorized parts in the repair of the equipment or tampering by unqualified personnel will result in dangerous conditions which will cause death, severe injury or equipment damage. Follow all safety instructions contained herein.

3
Note:These instructions do not purport to cover all details or variations in equipment, nor to provide for every possible contingency to be met in connection with installation, operation or maintenance. Should further information be desired or should particular problems arise that are not covered sufficiently for the purchaser’s purposes, the matter should be referred to the local sales office.
The contents of this instruction manual shall not become part of or modify any prior or existing agreement, commitment or relationship. The sales contract contains the entire obligation of Siemens Industry, Inc. The warranty contained in the contract between the parties is the sole warranty of Siemens Industry, Inc. Any statements contained herein do not create new warranties or modify the existing warranty.
Table of contents
Introduction 04 – 05
Receiving, handling and storage 06 – 08
Installation checks and functional tests 09 – 13
Vacuum interrupter/operator 14 – 35
Maintenance 36 – 52
Overhaul 53 – 58
Maintenance and troubleshooting 59 – 61
Appendix 62 – 67
4
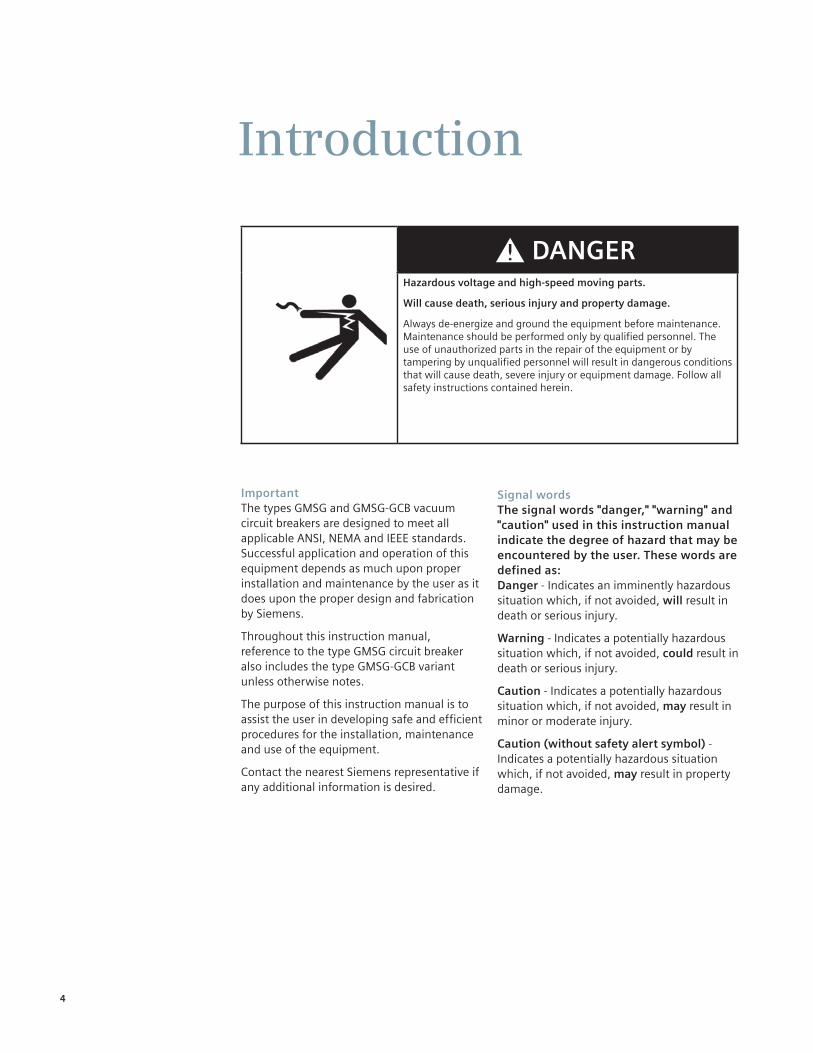
Signal wordsThe signal words "danger," "warning" and "caution" used in this instruction manual indicate the degree of hazard that may be encountered by the user. These words are defined as:Danger - Indicates an imminently hazardous situation which, if not avoided, will result in death or serious injury.
Warning - Indicates a potentially hazardous situation which, if not avoided, could result in death or serious injury.
Caution - Indicates a potentially hazardous situation which, if not avoided, may result in minor or moderate injury.
Caution (without safety alert symbol) - Indicates a potentially hazardous situation which, if not avoided, may result in property damage.
ImportantThe types GMSG and GMSG-GCB vacuum circuit breakers are designed to meet all applicable ANSI, NEMA and IEEE standards. Successful application and operation of this equipment depends as much upon proper installation and maintenance by the user as it does upon the proper design and fabrication by Siemens.
Throughout this instruction manual, reference to the type GMSG circuit breaker also includes the type GMSG-GCB variant unless otherwise notes.
The purpose of this instruction manual is to assist the user in developing safe and efficient procedures for the installation, maintenance and use of the equipment.
Contact the nearest Siemens representative if any additional information is desired.
Hazardous voltage and high-speed moving parts.
Will cause death, serious injury and property damage.
Always de-energize and ground the equipment before maintenance. Maintenance should be performed only by qualified personnel. The use of unauthorized parts in the repair of the equipment or by tampering by unqualified personnel will result in dangerous conditions that will cause death, severe injury or equipment damage. Follow all safety instructions contained herein.
Introduction

5
Hazardous proceduresIn addition to other procedures described in this instruction manual as dangerous, user personnel must adhere to the following:1. Always work only on a de-energized cir-
cuit breaker. The circuit breaker should be isolated, grounded and have all con-trol power removed before performing any tests, maintenance or repair.
2. Always perform maintenance on the cir-cuit breaker after the spring-charged mechanisms are discharged (except for test of the charging mechanisms). Check to be certain that the indicator flags read OPEN and DISCHARGED.
3. Always let an interlock device or safety mechanism perform its function without forcing or defeating the device.
Field service operation and warranty issuesSiemens can provide competent, well trained field service representatives to provide technical guidance and advisory assistance for the installation, overhaul, repair and maintenance of Siemens equipment, processes and systems. Contact regional service centers, sales offices or the factory for details, or telephone Siemens field service at +1 (800) 347-6659 or +1 (919) 365-2200 outside the U.S.
For medium-voltage customer service issues, contact Siemens at +1 (800) 347-6659 or +1 (919) 365-2200 outside the U.S.
6
IntroductionThis portion of the instruction manual covers the receiving, handling and storage instructions for a type GMSG or GMSG-GCB vacuum circuit breaker shipped separately from the switchgear. This section of the instruction manual is intended to help the user identify, inspect and protect the circuit breaker prior to its installation.
Receiving procedureMake a physical inspection of the shipping container before removing or unpacking the circuit breaker.
Check for shipment damage or indications of rough handling by the carrier. Check each item against the manifest to identify any shortages.
Accessories such as the manual charging crank, the racking crank and the split plug jumper are shipped separately.
Shipping damage claimsImportant: The manner in which visible shipping damage is identified by consignee prior to signing the delivery receipt can determine the outcome of any damage claim to be filed.
Notification to carrier within 15 days for concealed damage is essential if loss resulting from unsettled claims is to be eliminated or minimized.
1. When the shipment arrives, note whether the equipment is properly protected from the elements. Note the trailer number the equipment arrived on. Note also any blocking of equipment. During unloading, check the actual equipment delivered to verify it agrees with the delivery receipt.
2. Make immediate inspection for visible damage upon arrival and prior to disturbing or removing packaging or wrapping material. This should be done prior to unloading when possible. When total inspection cannot be made on vehicle prior to unloading, close inspection during unloading must be performed and visible damage noted on the delivery receipt. Take pictures if possible.
Heavy weight.
Improper lifting or hoisting can result in death, serious injury or property damage.
Obtain the services of a qualified rigger prior to hoisting the circuit breaker to assure adequate safety margins in the hoisting equipment and procedures to avoid damage.
Receiving, handling and storage

7
3. Any visible damage must be noted on the delivery receipt and acknowledged with the driver’s signature. The damage should be detailed as much as possible. It is essential that a notation "possible internal damage, subject to inspection" be included on the delivery receipt. If the driver will not sign the delivery receipt with the damage noted, the shipment should not be signed for by the consignee or their agent.
4. Notify Siemens medium-voltage customer service immediately of any damage, at +1 (800) 347-6659 or +1 (919) 365-2200 outside the U.S.
5. Arrange for a carrier inspection of the damage immediately.
Important: Do not move the equipment from the place it was set when unloading. Also, do not remove or disturb packaging or wrapping material prior to carrier damage inspection. Equipment must be inspected by carrier prior to handling after receipt. This eliminates loss due to claims by carrier that the equipment was damaged or further damaged on site after unloading.
6. Be sure the equipment is properly protected from any further damage by covering it properly after unloading.
7. If practical, make further inspection for possible concealed damage while the carrier’s inspector is on site. If inspection for concealed damage is not practical at the time the carrier’s inspector is present, it must be done within 15 days of receipt of the equipment. If concealed damage is found, the carrier must again be notified and inspection made prior to taking any corrective action to repair. Also notify Siemens immediately at +1 (800) 347-6659 or +1 (919) 365-2200 outside the U.S.
8. Obtain the original carrier inspection report and forward it with a copy of the noted delivery receipt to Siemens.Approval must be obtained by Siemens from the carrier before any repair work can be performed.
Before approval can be obtained, Siemens must have the documents referenced in the paragraph above. The carrier inspection report and/or driver’s signature on the delivery receipt does not constitute approval to repair.
Note: Shipments are not released from the factory without a clear bill of lading. Approved methods are employed for preparation, loading, blocking and tarping of the equipment before it leaves the Siemens factory. Any determination as to whether the equipment was properly loaded or properly prepared by shipper for over-the-road travel cannot be made at the destination. f the equipment is received in a damaged condition, this damage to the equipment has to have occurred while en route due to conditions beyond Siemens‘ control. If the procedure outlined above is not followed by the consignee, purchaser or their agent, Siemens cannot be held liable for repairs. Siemens will not be held liable for repairs in any case where repair work was performed prior to authorization from Siemens.
Handling procedure
1. Carefully remove the shipping carton from the circuit breaker. Keep the shipping pallet for later use if the circuit breaker is to be stored prior to its installation.
2. Inspect for concealed damage. Notification to carrier must take place within 15 days to assure prompt claim resolution.
3. Each circuit breaker should be lifted appropriately to avoid crushing the side panels of the circuit breaker, or damaging the primary disconnect assemblies.
Type GMSG vacuum circuit breakers weigh between 430 and 930 lbs (195-422 kg), plus an additional 75 lbs (34 kg) for the pallet and packaging.
4. The palleted circuit breaker can be moved using a properly rated fork-lift vehicle. The pallets are designed for movement by a standard fork-lift vehicle.

8
Storage procedure1. Whenever possible, install the circuit
breaker in its assigned switchgear enclosure for storage. Follow instructions contained in the switchgear instruction manual, E50001-F710-A230-X-XXXX for type GM-SG non-arc-resistant or E50001-F710-A254-X-XXXX for type GM-SG-AR arc-resistant switchgear.
2. When the circuit breaker needs to be placed on its pallet for storage, be sure the unit is securely bolted to the pallet and covered with polyethylene film at least 10 mils thick.
Indoor storageWhenever possible, store the circuit breaker indoors. The storage environment must be clean, dry and free of such items as construction dust, corrosive atmosphere, mechanical abuse and rapid temperature variations.
Outdoor storageOutdoor storage is not recommended. When no other option is available, the circuit breaker must be completely covered and protected from rain, snow, dirt and all other contaminants.
Space heatingSpace heating must be used for both indoor and outdoor storage to prevent condensation and corrosion. When the circuit breaker is stored outdoors, 250 watts per circuit breaker of space heating is recommended. If the circuit breaker is stored inside the switchgear enclosure, and the switchgear is equipped with space heaters, energize the space heaters.
Figure 1: Type GMSG vacuum circuit breaker front panel controls
1 Manual spring-charging access port
2 Manual close button
3 Charged/discharged indicator
4 Open/closed indicator
5 Operations counter
6 Manual open/trip button
1 2
3
4
5
6

9
IntroductionThis section provides a description of the inspections, checks and tests to be performed on the circuit breaker prior to operation in the metal-clad switchgear.
Inspections, checks and tests without control powerVacuum circuit breakers are normally shipped with their primary contacts open and their springs discharged. However, it is critical to first verify the discharged condition of the spring-loaded mechanisms after de-energizing control power.
De-energizing control power in switchgearWhen the circuit breaker is mounted in switchgear, open the control-power disconnect device in the metal-clad switchgear cubicle.
The control-power disconnect device is normally located on the secondary-device panel in the middle cell of the vertical section. The normal control-power disconnect device is a pullout-type fuse holder. Removal of the fuse holder de-energizes control power to the circuit breaker in the associated switchgear cell. In some switchgear assemblies, a molded-case circuit breaker or knife switch is used in lieu of the pullout-type fuse holder.
Opening this circuit breaker or switch accomplishes the same result: control power is disconnected.
Spring-discharge checkRefer to Figure 1: Type GMSG vacuum circuit breaker front panel controls on page 8.
Perform the spring-discharge check before removing the circuit breaker from the pallet or removing it from the switchgear.
The spring-discharge check should be performed after de-energizing control power. This check assures both the tripping and closing springs are fully discharged.
Note: Do not perform the spring-discharge check if the circuit breaker is in the CONNECT position. Open the circuit breaker and rack to the DISCONNECT position, and then perform the spring-discharge check.
1. Press red trip pushbutton.
2. Press black close pushbutton.
3. Press red trip pushbutton again.
4. Verify spring-condition indicator shows DISCHARGED.
5. Verify main contact status indicator shows OPEN.
Installation checks and functional tests
Hazardous voltage and high-speed moving parts.
Will cause death, serious injury and property damage.
Read instruction manuals, observe safety instructions and use qualified personnel.

10
Removal from cell in outdoor non-walk-in enclosures or for indoor switchgear installed on a raised padRemoval of the circuit breaker from a non-walk-in outdoor-switchgear assembly is similar to removal of a circuit breaker at floor level with several additional steps.
The procedure for removal of a circuit breaker not located at floor level is:
1. If the circuit breaker is in the DISCONNECT position, skip to step 4. Close the circuit breaker compartment door and secure all latches.
2. Insert the racking crank onto the racking screw on the front of the circuit breaker cell, and push in (refer to "Racking crank engagement procedure" on page 11). This action operates the racking-interlock latch.
For arc-resistant type GM-SG-AR switchgear, rotate the racking access cover to enable insertion of the racking crank.
3. Rotate the racking crank counterclockwise until the circuit breaker is in the DISCONNECT position.
4. Open the circuit breaker compartment door, slide the covers to the side that allow the circuit breaker to roll out of the cell, and insert the two extension rails into the fixed rails. Be sure the extension rails are properly secured in place.
Removal from cell in indoor switchgear (if not on raised pad) and Shelter-Clad outdoor switchgearAfter performing the spring discharge check (with control power de-energized), remove the circuit breaker from its switchgear cubicle.
1. Insert the racking crank on the racking screw on the front of the circuit breaker cell, and push in (refer to "Racking crank engagement procedure" on page 11). This action operates the racking-interlock latch. Figure 2: Type GMSG vacuum circuit breaker racking on page 11 shows circuit breaker racking.
For arc-resistant type GM-SG-AR switchgear, rotate the racking access cover to enable insertion of the racking crank.
2. Rotate the racking crank counterclockwise until the circuit breaker is in the DISCONNECT position, as indicated on the racking mechanism.
Open the circuit breaker compartment door. For arc-resistant type GM-SG-AR switchgear, slide the covers to the side that allows the circuit breaker to rollout of the cell.
3. Depress and hold down the circuit breaker racking latch release handle and pull the circuit breaker out from the DISCONNECT position. The circuit breaker can now be removed from the cubicle.
4. The circuit breaker is now free to be rolled out onto the floor using the handles on the front. The wheels of the circuit breaker are at floor level (unless the switchgear is installed on a raised pad), and one person can handle the unit.
Heavy weight.
Can result in death, serious injury or property damage.
Observe all handling instructions in this instruction manual to prevent tipping or dropping of equipment.

11
Figure 2: Type GMSG vacuum circuit breaker racking
Figure 3: Use of extension rails for removal of circuit breaker not at floor level
Figure 3: Use of extension rails for removal of circuit breaker not at floor level shows the two extension rails inserted into the fixed rails within the cell. The rails engage locking pins in the fixed rails to secure them in position. The photo shows use of the extension rails in a lower cell installed above floor level. The procedure is similar for an upper circuit breaker cell.
5. Depress and hold down the circuit breaker racking latch release handle and pull the circuit breaker out from the DISCONNECT position. The circuit breaker can now be removed from the cubicle and rolled out onto the two extension rails.
6. Remove the circuit breaker from the two extension rails using the approved Siemens circuit breaker lifting device or Siemens lifting sling and a suitable crane.
7. Lift the two extension rails and withdraw them from the switchgear.
8. For arc-resistant type GM-SG-AR switchgear, return the covers that allow the circuit breaker to roll out of the cell to their original position. Close the circuit breaker compartment door and secure all latches.
Type GMSG vacuum circuit breakers weigh between 430 and 930 lbs (195-422 kg) depending upon ratings. The circuit breaker can be moved using a properly rated crane and lift sling. A lift sling can be attached to the circuit breaker, and then used to hoist the circuit breaker vertically clear of the extension rails. When clear, remove the rails and lower the circuit breaker to the floor.
Racking crank engagement procedureA crank for racking the circuit breaker is provided as a standard accessory. Racking a circuit breaker can be accomplished with the drawout compartment front door open (for type GM-SG non-arc-resistant switchgear) or through a small opening (or window) in the front door, with the door closed.
The racking crank consists of an offset handle with a custom socket assembly welded to the end. The socket end of the crank is designed to engage the shoulder of the racking-mechanism shaft and remain engaged during racking with spring plungers. The plungers operate in a manner similar to the retainers of an ordinary mechanic’s socket wrench.
The portion of the racking-mechanism shaft visible is cylindrical, and the shoulder of the racking-mechanism shaft is hidden by a shroud until the engagement procedure starts. The square socket-end of the crank will only engage the shoulder of the shaft if it is aligned properly.
The suggested procedure to engage the racking mechanism is as follows:
1. The circuit breaker must be OPEN. (The racking shroud cannot be moved if the circuit breaker is CLOSED.)
Heavy weight.
Can result in death, serious injury or property damage.
Do not transport a circuit breaker using a lift truck with the lift truck in the raised position.

12
Note: For arc-resistant type GM-SG-AR switchgear, if control power is not available and the circuit breaker compartment door is closed, the circuit breaker can be opened manually. To open the circuit breaker manually with the door closed, insert the pushrod in the aperture (receptacle) in the front door for opening the circuit breaker. Push the rod against the open pushbutton on the circuit breaker. The circuit breaker should open. The circuit breaker position indicator will change from CLOSED to OPEN, and this change can be observed through the viewing window included in the circuit breaker compartment door.
2. Hold the socket-end of the crank in one hand and the crank handle in the other hand.
For arc-resistant type GM-SG-AR switchgear, rotate the racking access cover to enable insertion of the racking crank.
3. Place the socket over the end of the racking-mechanism shaft. Align the socket with the shoulder on the racking-mechanism shaft.
Note: If the socket is not aligned, the socket will not be able to engage the shoulder of the racking-mechanism shaft.
4. Once alignment is achieved, firmly push the crank and socket assembly toward the racking mechanism.
5. When properly engaged, the crank should remain connected to the racking mechanism. If the crank does not remain in position, adjust the spring plungers clockwise one-half turn. This will increase the contact pressure of the spring plunger.
6. To remove the crank, pull the assembly off of the racking-mechanism shaft.
Note: If the effort to rack the circuit breaker increases considerably during racking, or if turning of the racking crank requires excessive force, stop racking immediately. Do not try to force the racking crank to rotate, or parts of the circuit breaker or racking mechanism could be damaged. Determine the source of the problem and correct it before continuing with racking.
Physical inspections1. Verify the rating of the circuit breaker is
compatible with both the system and the switchgear.
2. Perform a visual-damage check. Clean the circuit breaker of all dust, dirt and foreign material.
Manual-spring charging check1. Insert the manual-spring charging crank
into the manual-charge handle socket as shown in Figure 4: Manual charging of the closing spring. Turn the crank clockwise (about 48 revolutions) until the spring condition indicator shows the closing spring is CHARGED.
2. Repeat the spring discharge check.
3. Verify the springs are DISCHARGED and the circuit breaker primary contacts are OPEN by indicator positions.
As-found and vacuum-integrity check testsPerform and record the results of both the as-found insulation test and the vacuum-integrity check (dielectric) test. Procedures for these tests are described in the Maintenance section of this instruction manual on pages 36-52.
Figure 4: Manual charging of the closing springs

13
Automatic spring-charging checkRefer to the specific wiring information and rating label for your circuit breaker to determine the voltage required and where the control-voltage signal should be applied. Usually, spring-charging power is connected to secondary-disconnect fingers SD16 and SD15, closing control power to SD13 and SD15 and tripping power to SD1 and SD2.
Note: Secondary-disconnect terminals are numbered 1-16, from top to bottom.
When control power is connected to the type GMSG vacuum circuit breaker, the closing springs should automatically charge, if the racking crank is not engaged.
Note: A temporary source of control power and test leads may be required if the control power source has not been connected to the switchgear.
The automatic spring-charging features of the circuit breaker must be checked. Control power is required for automatic spring-charging to take place.
1. Open control-power circuit by opening the control-power disconnect device.
2. Install the circuit breaker end of the split-plug jumper (if furnished) to the circuit breaker as shown in Figure 5: Split-plug jumper connected to circuit breaker. The split-plug jumper is secured over the circuit breaker secondary contacts with knurled thumb screws.
3. Install the switchgear end of the split-plug jumper to the secondary-disconnect block inside the switchgear cubicle as shown in Figure 6: Split-plug jumper connected to switchgear. The jumper slides into place and interconnects all control power and signal leads (for example, electrical trip and close contacts) between the switchgear and the circuit breaker.
4. Energize (close) the control-power circuit disconnect.
5. Use the close and trip controls (refer to Figure 1: Type GMSG vacuum circuit breaker front panel controls on page 8) to first close and then open the circuit breaker contacts. Verify the contact positions visually by observing the OPEN/CLOSED indicator on the circuit breaker.
Figure 5: Split-plug jumper connected to circuit breaker
Figure 6: Split-plug jumper connected to switchgear
6. De-energize control power by repeating Step 1. Disconnect the split-plug jumper from the switchgear before disconnecting the circuit breaker end.
7. Perform the spring discharge check again. Verify the closing springs are DISCHARGED and the primary contacts of the type GMSG vacuum circuit breaker are OPEN.
Final mechanical inspections without control power
1. Make a final mechanical inspection of the circuit breaker. Verify the contacts are in the OPEN position, and the closing springs are DISCHARGED.
2. Check the upper- and lower-primary studs and contact fingers shown in Figure 7: Circuit breaker primary disconnect. Verify mechanical condition of finger springs and the disconnect studs, check for loose hardware, damaged or missing primary-disconnect contact fingers and damaged disconnect studs.
3. Coat movable primary-contact fingers (refer to Figure 7: Circuit breaker primary disconnects) and the secondary-disconnect contacts (refer to Figure 23: Secondary disconnect on the circuit breaker on page 28) with a light film of Siemens contact lubricant number 15-172-791-233.
4. The type GMSG vacuum circuit breaker is ready for installation into its assigned cubicle of the metal-clad switchgear. Refer to removal procedures and install the circuit breaker into the switchgear.
5. Refer to the switchgear instruction manual for functional tests of an installed circuit breaker.
Figure 7: Circuit breaker primary disconnects

14
Figure 8: Front view of type GMSG vacuum circuit breaker with front panel removed
1 Closing spring
2 Gearbox
3 Opening spring
4 Push-to-close
5 Auxiliary switch
6 Close coil
7 Trip coil
8 Push-to-trip
9 Mechanism-operated cell (MOC) switch operator
10 Closed circuit breaker interlock
11 Trip-free interlock
12 Operations counter
13 Ground disconnect
14 Capacitor trip (optional) (not shown)
15 Jack shaft
16 OPEN/CLOSED indicator
17 CHARGED/DISCHARGED indicator
18 Spring-charging motor
19 Secondary disconnect
1
2
3
45
67
8
9
10
11
12
13
14
15
16
17 18
19
IntroductionThe type GMSG and type GMSG-GCB vacuum circuit breakers are of drawout construction designed for use in medium-voltage, metal-clad switchgear. The GMSG (not GMSG-GCB) circuit breaker conforms to the requirements of ANSI and IEEE standards, including C37.20.2, C37.04, C37.06, C37.09 and C37.010. The GMSG-GCB conforms to the requirements of ANSI and IEEE standards, including C37.20.2 and C37.013.
A type GMSG vacuum circuit breaker consists of three vacuum interrupters, a stored-energy operating mechanism, necessary electrical controls and interlock devices, disconnect devices to connect the circuit breaker to both primary and control power and an operator housing. Insulating barriers are located along the outer sides as shown in Figure 11: Type GMSG vacuum circuit breaker on page 17.
Vacuum interrupter/operator

15
This section describes the operation of each major sub-assembly as an aid in the operation, installation, maintenance and repair of the type GMSG vacuum circuit breaker.
Type GMSG-GCB generator circuit breakersThe type GMSG-GCB generator circuit breaker is a special variant of the type GMSG circuit breaker family. The circuit breaker design, construction, use and operation of the generator circuit breaker is as described in this instruction manual. Important variations are noted in the text where appropriate.
Vacuum interruptersThe operating principle of the vacuum interrupter is simple. Figure 9: Vacuum interrupter cutaway view is a cutaway view of a typical vacuum interrupter. The entire assembly is sealed after a vacuum is established. The vacuum-interrupter stationary contact is connected to the upper-disconnect stud of the circuit breaker. The vacuum-interrupter movable contact is connected to the lower-disconnect stud and driving mechanism of the circuit breaker. The metal bellows provides a secure seal around the movable contact, preventing loss of vacuum while permitting vertical motion of the movable contact.
When the two contacts separate, an arc is initiated that continues conduction up to the following current zero. At current zero, the arc extinguishes and any conductive metal vapor that has been created by and supported by the arc condenses on the contacts and on the surrounding arc shield.
Contact materials and configuration are optimized to achieve arc motion, resist welding and to minimize switching disturbances.
Figure 9: Vacuum interrupter cutaway view
Primary disconnectsFigure 10: Upper and lower primary disconnects is a side view of the circuit breaker with the outer-insulating phase barrier removed to show details of the primary disconnects. Each circuit breaker has three upper- and three lower-primary disconnects. Upper-primary disconnects are connected to the stationary contacts of the vacuum interrupters, and the lower primary disconnects are connected to the movable contacts.
Each disconnect arm has a set of multiple spring-loaded fingers that mate with bus bars in the metal-clad switchgear. The number of fingers in the disconnect assembly varies with the continuous and/or interrupting rating of the circuit breaker.
There are three insulating push rods. Each push rod connects the movable contact of one of the vacuum interrupters to the jack shaft driven by the closing and tripping mechanism. Flexible connectors provide secure electrical connections between the movable contacts of each vacuum interrupter and its bottom-primary disconnect.
1 Fixed contact-current connection
2 Ceramic insulator
3 Arc shield
4 Fixed contact
5 Moving contact
6 Ceramic insulator
7 Metal bellows
8 Guide
9 Moving contact-current connection
1
2
34
5
6
8
9
7

16
Phase barriersFigure 11: Type GMSG vacuum circuit breaker on page 17 is a rear view of a type GMSG vacuum circuit breaker that shows the outer-phase (phase-to-ground) barriers. Interphase barriers are not standard but may be provided as an option. These glass-polyester insulating barriers are attached to the circuit breaker frame and provide suitable electrical insulation between the vacuum-interrupter primary circuits and the housing.
Stored-energy operating mechanismThe stored-energy operating mechanism of the type GMSG vacuum circuit breaker is an integrated arrangement of springs, solenoids and mechanical devices designed to provide a number of critical functions. The energy necessary to close and open (trip) the contacts of the vacuum interrupters is stored in powerful tripping and closing springs. The closing springs are normally charged automatically, but there are provisions for manual charging. The operating mechanism that controls charging, closing and tripping functions is fully trip-free. Trip-free requires that the tripping function prevail over the closing function as specified in ANSI/IEEE C37.04-1999, clause 6.9 (for type GMSG) or ANSI/IEEE C37.013, clause 6.3.8 (for type GMSG-GCB). The operation of the stored-energy mechanism will be discussed later in this section.
The vacuum circuit breaker consists of two sub-assemblies. The "interrupter/operator" module is a unitized assembly of the three vacuum interrupters, primary insulators and operating mechanism. The second module, the "vehicle", is the supporting drawout-structure module for the operating mechanism.
The vehicle provides primary-stud extensions, closed circuit breaker racking interlocks, closing spring discharge feature and other requirements needed to ensure safe and reliable use during racking and during operation. These two sub-assemblies will be separately described.
Interrupter/operator moduleThe interrupter/operator module consists of the three poles, each with its vacuum interrupter and primary insulators, mounted on the common motor or hand-charged spring-stored energy-operating-mechanism housing. This module is shown in Figure 12: Interrupting/operating mechanism module on page 17.
Figure 10: Upper and lower primary disconnects
Shown with outer-phase barriers removed

17
Figure 11: Type GMSG vacuum circuit breaker
Figure 12: Interrupter/operating mechanism module
ConstructionRefer to Figure 12: Interrupting/operating mechanism module on page 17, Figure 13: Operating mechanism controls and indicators on page 18, Figure 14: Type GMSG vacuum circuit breaker pole section on page 19 and Figure 15: Stored-energy operating mechanism on page 20.
Each of the circuit breaker poles is fixed to the rear of the operating-mechanism housing (60.0) by cast-resin insulators (16.0).
The insulators also connect to the upper (20.0) and lower (40.0) pole-supports that in turn support the ends of the vacuum interrupter (30.0). Primary stud-extensions are attached directly to the upper pole-support (20.0) and lower terminal (29.0).
The energy-storing mechanism and all the control and actuating devices are installed in the mechanism housing (60.0). The mechanism is of the spring-stored energy-type and is mechanically and electrically trip-free.
The OPEN/CLOSED indicator (58.0), CHARGED/DISCHARGED indicator (55.0) and the operations counter (59.0) are located on the front of the mechanism housing (60.0).
Shown with outer-phase barriers removed
Shown with outer-phase barriers installed
16.0 Insulator
20.0 Pole head
29.0 Lower connection terminal
30.0 Vacuum interrupter
40.0 Pole bottom
60.0 Operator housing
16.0
16.0
20.0
30.060.0
40.0

18
Circuit breaker pole Refer to Figure 14: Type GMSG vacuum circuit breaker pole section on page 19.
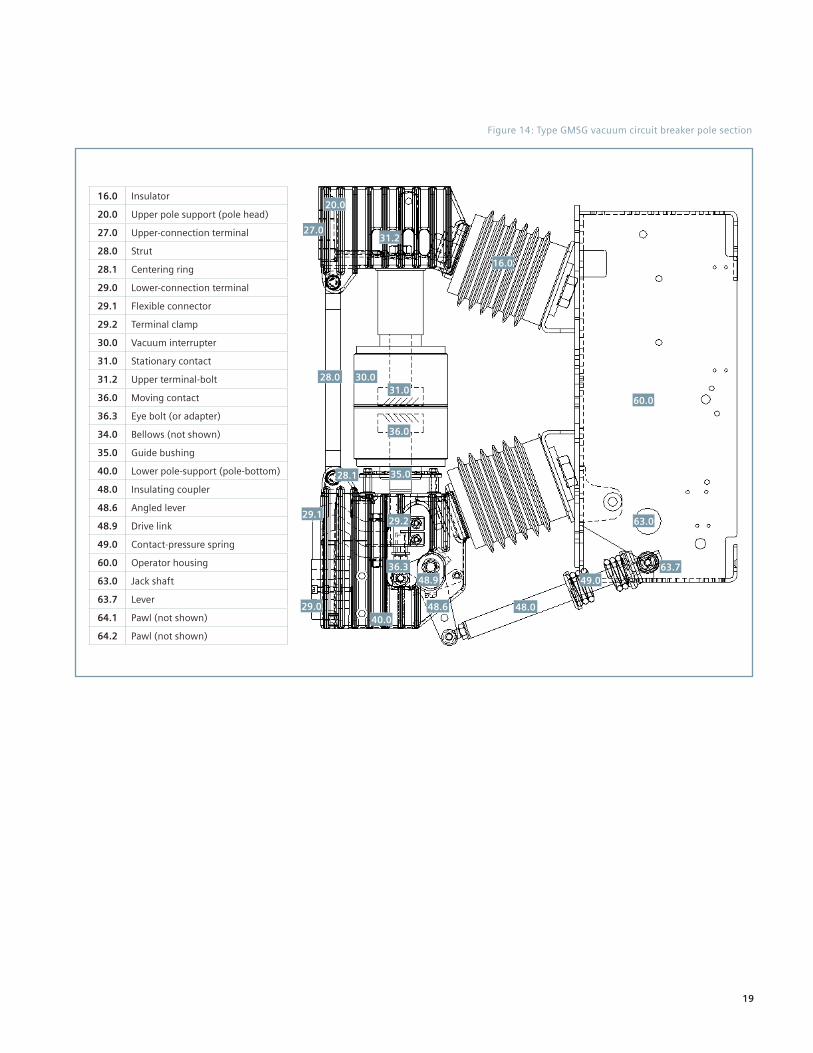
The vacuum interrupter (30.0) is rigidly connected to the upper terminal and pole support (20.0) by its terminal bolt (31.2). The lower part of the vacuum interrupter is stabilized against lateral forces by a centering ring (28.1) on the pole-support (40.0). The external forces due to switching operations and the contact pressure are absorbed by the struts (28.0).
Current-path assembly Refer to Figure 14: Type GMSG vacuum circuit breaker pole section on page 19.
The current-path assembly consists of the upper terminal and pole support (20.0), the stationary contact (31.0) and the moving contact (36.0), that is connected with the lower terminal (29.0) by terminal clamp (29.2) and a flexible shunt (29.1).
Figure 13: Operating mechanism controls and indicators
Vacuum interrupter Refer to Figure 9: Vacuum interrupter cutaway view on page 15.
The moving-contact (36.0) motion is aligned and stabilized by guide bushing (35.0). The metal bellows (34.0) follows the travel of contact (36.0) and seals the vacuum interrupter against the surrounding atmosphere.
Switching operationRefer to Figure 14: Type GMSG vacuum circuit breaker pole section on page 19.
When a closing command is initiated, the closing spring, that was previously charged by hand or by the motor, actuates the moving contact (36.0) through jack shaft (63.0), lever (63.7), insulated coupler (48.0) and lever (48.6).
The motion of the insulated coupler is converted into the vertical movement of the moving contact.
The moving-contact motion is controlled by the guide link (48.9), that pivots on support (40.0) and the eye bolt (36.3).
During closing, the tripping spring and the contact-pressure springs (49.0) are charged and latched by the pawl (64.1). The closing spring is recharged immediately after closing.
In the CLOSED state, the necessary contact pressure is maintained by the contact-pressure spring and the atmospheric pressure. The contact-pressure spring automatically compensates for contact erosion, which is very small.
When a tripping command is given, the energy stored in the tripping- and contact-pressure springs is released by pawl (64.2). The opening sequence is similar to the closing sequence. The residual force of the tripping spring arrests the moving contact (36.0) in the OPEN (TRIPPED) position.
53.0 Manual close button
54.0 Manual open/trip button
55.0 Charged/discharged indicator
58.0 Open/closed indicator
59.0 Operations counter
53.0
55.0
58.0
59.0
54.0
19
Figure 14: Type GMSG vacuum circuit breaker pole section
16.0 Insulator
20.0 Upper pole support (pole head)
27.0 Upper-connection terminal
28.0 Strut
28.1 Centering ring
29.0 Lower-connection terminal
29.1 Flexible connector
29.2 Terminal clamp
30.0 Vacuum interrupter
31.0 Stationary contact
31.2 Upper terminal-bolt
36.0 Moving contact
36.3 Eye bolt (or adapter)
34.0 Bellows (not shown)
35.0 Guide bushing
40.0 Lower pole-support (pole-bottom)
48.0 Insulating coupler
48.6 Angled lever
48.9 Drive link
49.0 Contact-pressure spring
60.0 Operator housing
63.0 Jack shaft
63.7 Lever
64.1 Pawl (not shown)
64.2 Pawl (not shown)
16.0
60.0
63.7
63.0
49.0
48.048.6
48.9
40.0
20.0
27.031.2
31.0
36.0
28.0 30.0
29.0
35.028.1
29.129.2
36.3

20
Figure 15: Stored-energy operating mechanism
50.1 Manual-spring charging port
50.2 Charging mechanism gear box
50.3 Charging flange
50.3.1 Driver
50.4Spring-charging motor (behind limit switches)
50.4.1 Limit switches
53.0 Close button
53.1 Close coil
54.0 Open button
54.1 Trip coil
54.2 Undervoltage (or secondary) release
55.2
55.0 Spring-charge CHARGED/DISCHARGED indicator
55.1 Linkage
55.2 Control lever
58.0 CLOSED/OPEN indicator
59.0 Operation counter
60.0 Operator housing
61.8 Shock absorber
62.0 Closing spring
62.2 Crank
62.3 Cam disc
62.5 Lever
62.5.2 Close-latch pawl
62.6 Drive lever
62.8 Coupling rod
63.0 Jack shaft
63.1 Phase C lever
63.5 Phase B lever
63.7 Phase A lever
64.0 Opening spring
64.2 Pawl
64.3 Lever
64.3.1 Pawl roller
68.0 Auxiliary switch
68.1 Linkage
50.2
62.250.1
55.1
62.050.4.1
55.0
50.4
58.0
63.7
59.0
60.0
61.8
64.0
62.8
63.564.3.1
64.3
63.0 63.1
68.1
64.254.2
54.0
53.1
54.1
53.068.0
62.6
62.5
62.5.2
62.350.3.1
50.3

21
Operating mechanismThe operating mechanism is comprised of the mechanical and electrical components required to:
1. Charge the closing springs with sufficient potential energy to close the circuit breaker and to store opening energy in the tripping- and contact-pressure springs.
2. Means to initiate closing and tripping actions.
3. Means of transmitting force and motion to each of three poles.
4. Operate all of these functions automatically through electrical-charging motor, cutout switches, anti-pump relay, release (close and trip) solenoids and auxiliary switches.
5. Provide indication of the circuit breaker status (OPEN/CLOSED), spring condition (CHARGED/DISCHARGED) and number of operations.
ConstructionThe essential parts of the operating mechanism are shown in Figure 15: Stored-energy operating mechanism on page 19. The control and sequence of operation of the mechanism is described in Figure 17: Operator sequence operation diagram on page 23.
Indirect releases (tripping coils)The shunt releases (54.1) convert the electrical-tripping pulse into mechanical energy to release the trip latch and open the circuit breaker.
The undervoltage release (optional) (54.2) may be electrically actuated by a make or a break contact.
If a make contact is used, the coil is shorted out, and a resistor must be used to limit the current. The undervoltage-release option mounts to the immediate right of the trip coil (54.1).
Motor-operating mechanismThe spring-charging motor (50.4) is bolted to the charging-mechanism (50.2) gear box installed in the mechanism housing. Neither the gear-box mechanism nor the motor require any normal maintenance.
Auxiliary switchThe auxiliary switch (68.0) is actuated by the jack shaft (63.0) and link (68.1).
Mode of operationThe operating mechanism is of the stored-energy trip-free type. In other words, the charging of the closing spring is not automatically followed by the contacts changing position, and the tripping function prevails over the closing function in accordance with ANSI/IEEE C37.04-1999, clause 6.9 (for type GMSG) or ANSI/IEEE C37.013, clause 6.3.8 (for type GMSG-GCB).
When the stored-energy mechanism has been charged, the circuit breaker can be closed manually or electrically at any desired time. The mechanical energy for carrying out an "Open-Close-Open" sequence for auto-reclosing duty is stored in the closing and tripping springs.
While the type GMSG-GCB generator circuit breaker is capable of rapid reclosing duty, fast reclosing should never be used in a generator circuit to avoid major damage to the generator.
ChargingThe details of the closing-spring charging mechanism are shown in Figure 15: Stored-energy operating mechanism on page 19. The charging shaft is supported in the charging mechanism (50.2), but is not coupled mechanically with the charging mechanism.
Fitted to it are the crank (62.2) at one end, and the cam (62.3), together with lever (62.5) at the other.
When the charging mechanism is actuated by hand with a hand crank or by a motor (50.4), the flange (50.3) turns until the driver (50.3.1) locates in the cutaway part of the cam disc (62.3), thus causing the charging shaft to follow. The crank (62.2) charges the closing spring (62.0).

22
When the closing spring has been fully charged, the crank actuates the linkage (55.1) via control lever (55.2) for the closing-spring CHARGED indicator (55.0), and actuates the limit switches (50.4.1) for interrupting the motor supply.
At the same time, the lever (62.5) at the other end of the charging shaft is securely locked by the close-latch pawl (62.5.2).
When the closing spring is being charged, cam disc (62.3) follows along, and it is brought into position for closing when the closing spring is fully charged.
Closing Refer to Figure 15: Stored-energy operating mechanism on page 20 and Figure 16: Use of manual-spring operating crank on page 22.
If the circuit breaker is to be closed locally, the closing spring is released by pressing the close button (53.0). In the case of electrical control, the spring-release coil 52SRC (53.1) unlatches the closing spring.
As the closing spring discharges, the charging shaft is turned by crank (62.2). The cam disc (62.3) at the other end of the charging shaft actuates the drive lever (62.6), with the result that the jack shaft (63.0) is turned by lever (63.5) via the coupling rod (62.8).
At the same time, the levers (63.1), (63.5) and (63.7) fixed on the jack shaft operate the three-insulated couplers for the circuit breaker poles.
Lever (63.7) changes the OPEN/CLOSED indicator (58) to CLOSED. Lever (63.5) charges the tripping spring (64) during closing, and the circuit breaker is latched in the CLOSED position by lever (64.3) with pawl roller (64.3.1) and by pawl (64.2). Lever (63.1) actuates the auxiliary switch through the linkage (68.1).
The crank (62.2) on the charging shaft moves the linkage (55.1) by acting on the control lever (55.2). The closing-spring CHARGED indication (55.0) is thus canceled and, the limit switches (50.4.1) switch in the control supply to cause the closing spring to recharge immediately.
Figure 16: Use of manual-spring operation crank
50.0 Hand crank
50.1 Manual-spring charging port
53.0 Manual close button
54.0 Manual open (trip) button
55.0 CHARGED/DISCHARGED indicator
50.050.1
55.0 54.0
53.0

23
Trip-free functionality Refer to Figure 15: Stored-energy operating mechanism on page 20.
Trip-free functionality is accomplished by blocking movement of the close latch pawl (62.5.2) when the manual trip pushbutton (54.0) or associated locking provisions for preventing closing are in use (e.g., trip-free padlock provisions).
OpeningIf the circuit breaker is to be tripped locally, the tripping spring (64.0) is released by pressing the trip button (54.0). In the case of an electrical command being given, the shunt-trip coil 52T (54.1) unlatches the tripping (opening) spring (64.0). The tripping spring turns the jack shaft (63.0) via lever (63.5); the sequence being similar to that for closing.
Rapid auto-reclosingSince the closing spring is automatically recharged by the motor-operating mechanism when the circuit breaker has closed, the operating mechanism is capable of an "Open-Close-Open" duty cycle as required for rapid auto-reclosing.
The type GMSG circuit breaker is suitable for use in applications with a rated reclosing-time interval of 0.3 seconds, per ANSI/IEEE C37.06-2009.
While the type GMSG-GCB generator circuit breaker is capable of rapid reclosing duty, fast reclosing should never be used in a generator circuit to avoid major damage to the generator.
Manual operationElectrically-operated vacuum circuit breakers can be operated manually if the control supply should fail.
Manually charging the closing spring Refer to Figure 16: Use of manual-spring operation crank on page 22.
Insert the hand crank (50.0) in hole (50.1) and turn it clockwise (about 48 revolutions) until the indicator (55.0) shows CHARGED. The hand crank is coupled with the charging mechanism via an over-running coupling; thus the operator is not exposed to any risk should the control supply be restored during charging.
Manual closingTo close the circuit breaker, press the close button (53.0). The OPEN/CLOSED indicator (58.0) will then display CLOSED and the closing-spring condition indicator (55.0) will now read DISCHARGED.
Manual openingThe tripping spring is charged during closing. To open the circuit breaker, press the trip button (54.0) and OPEN will be displayed by indicator (55).
Note: For arc-resistant type GM-SG-AR switchgear, the circuit breaker can be opened manually when the circuit breaker compartment is closed (refer to "Racking crank engagement procedure" on page 11).
Indirect releases (dual-trip or undervoltage) (optional)The indirect release provides for the conversion of modest-control signals into powerful mechanical-energy impulses. It is primarily used to trip medium-voltage circuit breakers while functioning as a secondary (dual-trip) release or undervoltage-release device.

24
Figure 17: Operator sequence operation diagram
Closed voltage applied.
Undervoltage device 27 picks up.
Spring-charge motor (88) energized.
L3 opens in series with anti-pump relay (52Y).
LS21 and LS22 operate to de-energize spring-charging motor.
LS4 closes to signal closing spring is charged.
LS9 closes close circuit only when closing spring is fully charged.
Closing spring is fully charged.
No action! Open 52b in series with close coil (52SRC) blocks closing spring-release.
Close coil is actuated through the closed 52b contacts and the two normally closed contacts of the anti-pump relay (52Y).
Closing command when
circuit breaker is closed.
circuit breaker is open.
No action! Anti-pump relay (52Y) picks up through the closed LS3 contact and opens.
closing spring is not charged.
The closing spring is unlatched.
The opening spring is charged.
Circuit breaker auxiliary contacts 52a and 52b change state.
The circuit breaker closes.
LS21 and LS22 close to energize motor (88). LS3 closes and LS4 opens to cancel closing spring signal.
52a contacts in series with the trip coil (52T) close to enable a trip opertion.
Continuous closing command.
Close coil (52SRC) unlatches the closing spring and the circuit breaker closes.
Motor cutoff switches LS21, LS22 and LS3 are closed because the closing spring is discharged.
Before the spring-charge motor has recharged the closing spring and opened LS3, anti-pump relay (52Y) picks up and seals in.
The anti-pump relay (52Y) opens two contacts in series with the close coil (52SRC).
The close coil (52SRC) is now blocked and cannot be activated until springs are fully-charged and close command is removed.
Rapid auto-reclosing. The closing spring is automatically recharged as described above. Therefore, when the circuit breaker is closed both of its springs are charged. The closing spring charges the opening spring during closing. As a result, the circuit breaker is capable of an O-0.3s-CO-3 min-CO operating cycle. The dashed line shows the operating sequence initiated by the closing command.
Closing
Tripping
Anti-pumping feature (52Y) assures a continuously applied closing command does not cause the circuit breaker to reclose automatically after it has tripped out on a fault.
Trip command.
Trip coil (52T) can only be activated when in series connected 52a contact is closed.
Undervoltage device (27) is activated by opening a NC contact in series with 27 or by loss or reduction of tripping voltage.1
Secondary shunt-release (dual-trip) function activated by remote trip command contact NO.1
Undervoltage device (27) is activated by closing NO contact, shorting the 27 coil. The NO contact is only effective with the circuit breaker closed. Resistor required.1
Undervoltage device 27 unlatches the opening spring.1
Circuit breaker trips.
Secondary release unlatches the opening spring.1
Trip coil (52T) unlatches the opening spring.
Footnote: 1 Optional items.

25
Figure 18: Typical elementary diagram
88 (M1) - Spring-charging motor
52a (S1) - Auxiliary switch is open when circuit breaker is open
52b (S1) - Auxiliary switch is closed when circuit breaker is open
LS3 (S3) - Anti-pump circuit is open when closing spring is charged
LS8 (S8) - Open close circuit when trip button is depressed
LS9 (S9) - Closing spring position switch is open when closing spring is discharged
LS12 (S12) - Opens close circuit when circuit breaker is in transit
LS13 (S13) - Opens motor circuit when circuit breaker is in transit
LS21, LS22 (S21, S22) - Position switch (cut-off motor after spring charge)
LS41 (S41) - Closing spring position switch is open when closing spring is discharged
52SRC (Y9) - Spring-release coil (CLOSE)
52T (Y1) - Shunt trip coil
52Y (K1) - Closing relay (anti-pump)
XO (SD) - Secondary disconnect
G - Green indicating light (TRIP)
LS - Spring-charged switch
CF - Circuit breakerr control fuse (CLOSE)
TF - Circuit breaker control fuse (TRIP)
MF - Circuit breaker control fuse (MOTOR)
CS/C - Control switch (CLOSE)
CS/T - Control switch (TRIP)
R - Red indicating light (CLOSED)
W - White indicating light (spring-charged).
Standard:
Shown with closing springs discharged, circuit breaker open, circuit breaker located in disconnect, test or connect position.
All wires are #14AWG SIS unless otherwise noted.
(+)
(-)
DC power supply
TF
W
XO (SD)
A2
21
52T (Y1) TRIP
63
64
51
52
61
62
53
54
23
24
52a (S1)
A131
32
CF 21
3
XO (SD)
16
XO (SD)
13
CS C
G RCS T
XO (SD)
4
XO (SD)
1
33
34
52a (S1)
21
22
LS3 (S3)
A1
A2
52Y (K1)
52b (S1)
13
14
52Y (K1)
XO (SD)
2
XO (SD)
14
TF 43
CF 43
XO (SD)
15
11
12
52b (S1)
22
21
LS21 (S21)
21
22
52Y (K1)
31
32
52Y (K1)A1
D2
88 (M1) MOTOR A1
A2
52SRC (Y9) CLOSE
13
14
LS41 (S41)
21
22
LS22 (S22)
13
14
LS13 (S13)
13
14
LS12 (S12)
13
14
LS9 (S9)
13
14
LS8 S8)
52a (S1)
52b (S1)
52a (S1)
52b (S1)
XO (SD)
11
XO (SD)
9
XO (SD)
7
XO (SD)
5
XO (SD)
12
XO (SD)
10
XO (SD)
8
XO (SD)
6
13
14
52a (S1)
21
22
52b (S1)
41
42
52b (S1)
43
44
52a (S1)
Not wired

26
Figure 19: Construction of secondary shunt release
These releases are mechanical-energy storage devices. Their internal springs are charged as a consequence of the circuit breaker mechanism operation. This energy is released upon application or removal (as appropriate) of applicable control voltages (refer to Figure 19: Construction of secondary shunt release and Figure 20: Latch details on page 26 and Figure 21: Undervoltage lock/operate selection on page 27).
Secondary shunt release (optional) (54.2)A secondary shunt release (second trip coil) is used for electrical tripping of the circuit breaker by protective relays or manual-control devices when more than one trip coil is required. The second trip coil is generally connected to a separate auxiliary supply (dc or ac) from the control supply used for the normal trip coil.
Undervoltage release (optional) (54.2)The undervoltage release is used for continuous monitoring of the tripping-supply voltage. If this supply voltage falls excessively, the undervoltage release will provide for automatic tripping of the circuit breaker.
The undervoltage device may be used for manual or relay tripping by employing a contact in series with an undervoltage-device holding-coil.
Relay tripping may also be achieved by employing a normally open contact in parallel with the holding coil. If this scheme is used, a resistor must be provided to limit current when the normally open contact is closed.
Secondary and undervoltage releases are available for all standard ANSI/IEEE control voltages.
Figure 20: Latch details
Shown charged
Shown charged
1.0 Magnet core
3.0 Housing
5.0 Mounting holes
7.0 Magnet coil
9.0 Magnet armature
11.0 Tension spring
13.0 Adjusting (factory-set) screw for 11.0
23.0
15.0 Tripping pin
21.0 Locking pin
23.0 Striker pin
25.0 Latch
27.0 Spring
31.0 Striker-pin spring
33.0 Terminal block
11.013.0
9.015.0
5.0
3.0
21.025.0
27.033.031.0
7.0
1.0
21.0 Locking pin
23.0 Striker pin
25.0 Latch
27.0 Spring
29.0 Lower connection terminal
A Locked/unlocked selection screw (undervoltage release only)
23.0
25.0
21.0
A29.0
27.0

27
Figure 21: Undervoltage lock/operate selection
Figure 22: Capacitor-trip device
Position A: locked
Position B: unlocked (operating position)
Cancel the lock for the undervoltage release by shifting the locking screw (29.0) from A to B.
A
B
A
B
120 or 240 Vac supply
01 T
24
2352o
SD5
34
3352o
A1
A2
52T
(+)
(-)
(+)
(-) 1
2
Construction and mode of operation of secondary release and undervoltage release Refer to Figure 19: Construction of secondary shunt release and Figure 20: Latch details on page 26 and Figure 21: Undervoltage lock/operate selection.
The release consists of a spring power-storing mechanism, a latching device and an electromagnet. These elements are accommodated side-by-side in a housing (3.0), with a detachable cover and three through-holes (5.0) for fastening screws. The supply leads for the trip coil are connected to a terminal block (33.0).
The energy-storing mechanism consists of the striker pin (23.0) and its operating spring (31.0), which is mostly located inside the striker pin (23.0). When the spring is compressed, the striker pin is held by a latch (25.0), whose sloping face is forced against the appropriately shaped striker pin (23.0) by spring (27.0). The other end of the latch (25.0) is supported by a partly-milled locking pin (21.0) (refer to Figure 20: Latch details on page 25) that pivots in the cover sheets of the magnet armature (9.0). The armature (9.0) pivots in front of the poles of the U-shaped magnet core, (1.0) and is pulled away from it by the tension spring (11.0).
If the magnet coil (7.0) of the shunt release 3AX1101 is energized by a trip signal, or if the tripping pin (15.0) is mechanically actuated, magnet armature (9.0) is swung against the pole faces.
When this happens, the latch (25.0) loses its support and releases the striker pin (23.0), that is forced out by the spring (31.0).
On the undervoltage release 3AX1103, the latch (25.0) is held by the locking pin (21.0) as long as the armature (9.0) is attracted (energized) (refer to Figure 17: Operator sequence operation diagram on page 24). If the circuit of the magnet coil (7.0) is interrupted, the armature (9.0) drops off, thus causing the latch (25) to lose its support and release the striker pin (23).
23.0 Striker pin
29.0 Screw
23.0
29.0
23.029.0
A Capacitor
B Resistor
C Rectifier
D Capacitor trip
A
B
C
D

28
Following every tripping operation, the striker pin (23.0) must be reset to its normal position by loading the spring (31). This takes place automatically via the operating mechanism of the circuit breaker.
Since the striker pin of the undervoltage release 3AX1103 is latched only when the armature is attracted, this trip is provided with a screw (29.0) (refer to Figure 21: Undervoltage lock/operate selection on page 27).
This screw is provided to allow locking the striker pin (23.0) in the normal position for adjusting purposes or for carrying out trial operations during circuit breaker servicing. Position A (locked) disables the undervoltage release. Position B is the normal (operating) position.
Capacitor-trip deviceThe capacitor-trip device is an auxiliary tripping option providing a short-term means of storing adequate electrical energy to ensure circuit breaker tripping.
This device is applied in circuit breaker installations lacking independent auxiliary-control power or a station battery. In such installations, control power is usually derived from the primary source.
In the event of a primary-source fault, or disturbance with resulting reduction of the primary-source voltage, the capacitor-trip device will provide short-term tripping energy for circuit breaker opening due to the protective relay operation.
The capacitor trip includes a rectifier to convert the 120 or 240 Vac control voltage to a dc voltage that is used to charge a large capacitor to the peak of the converted-voltage wave (refer to Figure 22: Capacitor trip device on page 27).
Figure 23: Secondary disconnect on the circuit breaker
Figure 24: Secondary disconnect inside the switchgear
Figure 25: Auxiliary switch
Shock absorberA type GMSG vacuum circuit breaker is equipped with a sealed, oil-filled, viscous damper or shock absorber (61.8) (referto Figure 15: Stored-energy operating mechanism on page 20). The purpose of this shock absorber is to limit overtravel and rebound of the vacuum interrupter movable-contacts during the conclusionof an opening operation. The shock-absorber action affects only the end of an opening operation.
Secondary disconnectSignal and control power is delivered to the internal circuits of the circuit breaker by an arrangement of movable-contact fingers (refer to Figure 23: Secondary disconnect on the circuit breaker) mounted on the top of the circuit breaker.
When the circuit breaker is racked into the TEST or CONNECT position in the metal-clad switchgear, these disconnect fingers engage a mating-disconnect block on the inside of the switchgear (refer to Figure 24: Secondary disconnect inside the switchgear). These electrical connections automatically disengage when the circuit breaker is racked from the TEST to the DISCONNECT position.
All of the control power necessary to operate the circuit breaker is connected to this disconnect block inside the switchgear. The external trip- and close- circuits and associated circuits are also connected to the same disconnect block.
Auxiliary switchFigure 25: Auxiliary switch shows the circuit breaker mounted auxiliary switch. This switch provides auxiliary contacts for control of circuit breaker closing and tripping functions. Contacts are available for use in relaying and external logic circuits. This switch is driven by linkages connected to the jack shaft.
The auxiliary switch contains both "b" (normally closed) and "a" (normally open) contacts. When the circuit breaker is open, the "b" switches are closed and the "a" switches are open.

29
Figure 26: MOC switch operating arm on a circuit breaker
Figure 27: MOC (bottom) and TOC (top) switches and associated terminal blocks
Mechanism-operated cell (MOC) switch (optional)Figure 26: MOC switch operating arm on a circuit breaker and Figure 27: MOC (bottom) and TOC (top) switches and associated terminal blocks show the principal components that provide optional control flexibility when operating the circuit breaker in the TEST (optional) and CONNECT (standard) positions.
Figure 26: MOC switch operating arm on a circuit breaker shows the MOC-switch operating arm that projects from the right side of the circuit breaker, above the bottom rail structure. The MOC-switch operating arm is part of the jack-shaft assembly and directly reflects the OPEN or CLOSED position of the circuit breaker primary contacts.
As the circuit breaker is racked into the appropriate position inside the switchgear, the MOC-switch operating arm engages the pantograph linkage (refer to Figure 29: Circuit breaker compartment (up to 50 kA shown) on page 30). Operation of the circuit breaker causes the pantograph linkage to transfer motion to the MOC switches located above the pantograph. The "a" and "b" contacts can be used in relaying and control-logic schemes.
All circuit breakers contain the MOC-switch operating arm. However, MOC switches are provided in the switchgear only when specified.
Figure 28: Circuit breaker interlocks and ground disconnect
The circuit breaker engages the MOC switch only in the CONNECT (operating) position unless an optional TEST position pickup is specified in the contract. If a TEST position pickup is included, the circuit breaker will engage the auxiliary switch in both positions. Up to 24-stages may be provided.
Truck-operated cell (TOC) switchFigure 27: MOC (bottom) and TOC (top) switches and associated terminal blocks shows the optional TOC switch. This switch is operated by the circuit breaker as it is racked into the CONNECT position.
Various combinations of "a" and "b" contacts may be optionally specified. These switches provide control and logic indication that a circuit breaker in the cell has achieved the CONNECT (ready-to-operate) position.
1.0 Ground disconnect
2.0 Racking mechanism release handle
3.0 Trip-free interlock
1.0
5.0
2.0
3.04.0 6.0
4.0 Closed circuit breaker racking interlock
5.0 Circuit breaker frame
6.0 Rating interlock

30
Figure 29: Circuit breaker compartment (up to 50 kA shown)
1.0 Interface blocking plate (rating interlock)
2.0 Racking mechanism
3.0 Ground bar
4.0 Guide rails
5.0 Trip-free and racking interlock padlock provisions
6.0 MOC switch operator
12.0
7.0 MOC switch terminals
8.0 TOC switch terminals
9.0 Shutter-operating linkage
10.0 Shutter (behind barrier)
11.0 CT barrier
12.0 Secondary disconnect
9.0
4.0
3.0
2.05.0
1.0
4.0
7.0
6.0
7.0
8.011.0
10.0

31
Trip-free interlockFigure 28: Circuit breaker interlocks and ground disconnect on page 29 shows the devices providing the trip-free interlock function. The purpose of the trip-free interlock is to hold the circuit breaker operating-mechanism mechanically and electrically trip-free. The circuit breaker is held trip-free during racking and whenever the circuit breaker is between the TEST and CONNECT positions within the switchgear enclosure.
This interlock functions so that the circuit breaker primary contacts can only be closed when in the CONNECT position, in the TEST position or out of the switchgear cell.
Rating interlockFigure 28: Circuit breaker interlocks and ground disconnect on page 29 shows the rating-interlock interference plates mounted on the circuit breaker frame.
The circuit breaker interference plates are complemented by matching plates located in the cubicle.
The interference plates (rating interlocks) test the circuit breaker voltage, continuous current and interrupting and momentary ratings and will not allow circuit breaker insertion unless the circuit breaker ratings match or exceed the cell rating.
Hazardous voltage and high-speed moving parts.
Will cause death, serious injury and property damage.
Do not by-pass interlocks or otherwise make interlocks inoperative. Interlocks must be in operation at all times.
Read this instruction manual. Know and understand correct interlock function. Check interlock function prior to inserting a circuit breaker into a switchgear cubicle.
Type GMSG (not type GMSG-GCB) circuit breaker rating interlocksType GMSG (not type GMSG-GCB) vacuum circuit breakers rated up to 50 kA are designed such that a single circuit breaker of the maximum ratings (voltage, interrupting rating and continuous current) can be installed in any switchgear compartment. For example, a type GMSG circuit breaker rated 15 kV, 50 kA interrupting and 3,000 A continuous current can be installed in any type GM-SG circuit breaker cell (except generator circuit breaker cells) of equal or lower ratings.
Type GMSG (not type GMSG-GCB) vacuum circuit breakers rated 63 kA are designed such that a circuit breaker can be installed in any type GM-SG circuit breaker cell (except generator circuit breaker cells) rated 63 kA and of equal or lower voltage and continuous current ratings.
Type GMSG-GCB (not type GMSG) generator circuit breaker rating interlocksType GMSG-GCB (not type GMSG) generator circuit breakers rated 40 kA are designed such that the circuit breaker can be installed in a generator circuit breaker cell rated 40 kA of equal or lower continuous current rating.
Type GMSG-GCB generator circuit breakers rated 50 kA or 63 kA are designed such that the circuit breaker can be installed in a generator circuit breaker cell of equal or lower interrupting rating, and equal or lower continuous current rating.
Circuit breaker frameThe frame of the type GMSG vacuum circuit breaker contains several important devices and features deserving of special attention. These are the ground disconnect, the four racking wheels and the four handling wheels.

32
1. They prevent racking a CLOSED circuit breaker into or out of the switchgear assembly.
2. They discharge the closing springs whenever the circuit breaker is inserted into or withdrawn from the switchgear.
3. They prevent closing of the circuit breaker unless it is in either the TEST or CONNECT positions, and the racking crank is not engaged.
The rating interlock prevents insertion of a lower-rated circuit breaker into a cubicle intended for a circuit breaker of higher ratings, subject to the limitations detailed in "Rating interlock".
Siemens integrated electric-racking system (SIERS) (optional)An electrical racking system integrated into the racking mechanism of a circuit breaker (or 63 kA rollout tray in arc-resistant GM-SG-AR switchgear) compartment is optionally available. The SIERS system allows an operator to control the racking of a circuit breaker (or 63 kA rollout tray in arc-resistant GM-SG-AR switchgear) from a remote location (outside the arc-flash boundary) without the need to install a portable racking accessory. This reduces the need for personal protective equipment required by NFPA-70E®.
The SIERS system is available in three configurations:
1. Basic: Each circuit breaker cell is equipped with an integrated electric-racking system, which includes a fixed-mounted, high-torque gear motor and logic-control module. A control pendant is provided, and a compartment mounted connector for supplying control power from the switchgear, or from an external supply (either 120 Vac or 125 Vdc). Typically, one control pendant is supplied per lineup.
2. Local HMI: Basic type as in configuration 1 plus local HMI panel personal computer (PC) interface for use with the user’s PC.
3. SCADA: Basic type as in configuration 1 plus custom interface with SCADA or other control system.
For further information, refer to instruction manual EMMS-T40013-00-4A00.
Ground disconnectFigure 28: Circuit breaker interlocks and ground disconnect on page 29 shows the ground disconnect contact mounted at the bottom of the circuit breaker. The spring-loaded fingers of the disconnect contact engage the ground bar (refer to Figure 29: Circuit breaker compartment (up to 50 kA shown) on page 30) at the bottom of the switchgear assembly.
The ground bar is to the right of the racking mechanism, shown at the bottom center of the switchgear.
Circuit breaker handling wheelsThe type GMSG vacuum circuit breaker is designed for easy movement into and out of the metal-clad switchgear assembly.
A section of indoor or Shelter-Clad switchgear does not require a transfer truck or lifting truck for handling of the circuit breaker when all circuit breakers are located at floor level. Once the circuit breaker is racked out of the switchgear, the unit can be pulled using the handles on the front of the circuit breaker. The circuit breaker will roll on its bottom four wheels.
When circuit breakers are located above floor level, handling of the circuit breakers requires the use of a lifting device or a crane with a lift sling.
Racking mechanismFigure 29: Circuit breaker compartment (up to 50 kA shown) on page 30 shows the racking mechanism in the switchgear used to move the circuit breaker among the DISCONNECT, TEST and CONNECT positions. This mechanism contains a circuit breaker racking-block that mates with the bottom of the circuit breaker housing, and locks the circuit breaker to the racking mechanism during in and out movement.
A racking crank (refer to Figure 2: Type GMSG vacuum circuit breaker racking on page 12) mates to the square shaft of the racking mechanism. Clockwise rotation of the crank moves the circuit breaker into the switchgear, and counterclockwise rotation removes it.
The racking and trip-free interlocks provide several essential functions.

33
Vehicle function and operational interlocksA type GMSG vacuum circuit breaker is comprised mainly of the vacuum interrupter/operator module fitted to a vehicle. This vacuum interrupter/operator module is an integral arrangement of operating mechanism, dielectric system, vacuum interrupters and means of connecting the primary circuit. The vehicle supports the vaccum interrupter/operator module, providing mobility and fully coordinated application in Siemens type GM-SG or type GM-SG-AR switchgear.
Successful coordinated application of the fully assembled type GMSG vacuum circuit breaker is achieved through precise alignment in fixtures during manufacture, and important functional interlocking.
AlignmentAll aspects of the circuit breaker structure impacting alignment and interchangeability are checked using master fixtures at the factory. Field adjustment will not normally be required.
InterlocksCircuit breaker racking-interlocksThe vacuum interrupter/operator module, the vehicle portion of the circuit breaker and the racking mechanism in the switchgear all cooperate to provide important operational interlocking functions.
1. Rating interlock
The rating interlock consisting of a coded-interference plate is mounted on the vehicle (refer to Figure 28: Circuit breaker interlocks and ground disconnect on page 29).
A mating-interference blocking plate is mounted in the drawout compartment (refer to Figure 29: Circuit breaker compartment (up to 50 kA shown) on page 30).
The two plates are mounted in alignment and must pass through each other in order for the circuit breaker vehicle to enter the drawout compartment. The interlock is coded to test rated voltage, as well as interrupting and continuous current ratings.
Figure 30: Interlock mechanisms on the type GMSG vacuum circuit breaker
A. Type GMSG (not type GMSG-GCB) circuit breaker rating interlock
Type GMSG (not type GMSG-GCB) vacuum circuit breakers rated up to 50 kA are designed such that a single circuit breaker of the maximum ratings (voltage, interrupting rating and continuous current) can be installed in any switchgear compartment. For example, a type GMSG circuit breaker rated 15 kV, 50 kA interrupting and 3,000 A continuous current can be installed in any type GM-SG circuit breaker cell (except generator circuit breaker cells) of equal or lower ratings.
Type GMSG (not type GMSG-GCB)vacuum circuit breakers rated 63 kA are designed such that a circuit breaker can be installed in any type GM-SG circuit breaker cell (except generator circuit breaker cells) rated 63 kA and of equal or lower voltage and continuous current ratings.
1.0 Ground disconnect
2.0 Racking mechanism release handle
3.0 Trip-free interlock
4.0 Closed circuit breaker racking interlock
1.0
2.0
3.0
4.0

34
Figure 31: Closed circuit breaker interlock mechanism in stored-energy mechanism
2. Racking interlocks
A. CLOSED circuit breaker interlock
Figure 28: Circuit breaker interlocks and ground disconnect on page 29 shows the location of the CLOSED circuit breaker interlock-plunger on the circuit breaker frame.
The purpose of this interlock is to positively block circuit breaker racking-operations whenever the circuit breaker is CLOSED. The plunger is coupled to the jack shaft as seen in Figure 15: Stored-energy operating mechanism, item 63 on page 20. When the jack shaft rotates to close, the interlock plunger is driven straight downward beneath the frame of the circuit breaker. The downward projecting plunger blocks racking operation when the circuit breaker is CLOSED.
Figure 29: Circuit breaker compartment (up to 50 kA shown) on page 30 shows the racking mechanism located on the floor in the center of the circuit breaker compartment. Note the two "wing-like" elements that project from the right side of the racking mechanism. The CLOSED circuit breaker interlock plunger, when down (circuit breaker CLOSED), falls behind the front wing in the TEST position and behind the rear wing in the CONNECT position.
The wings are coupled to the element of the racking mechanism that shrouds the racking screw. This shroud must be moved rearward to insert the racking-crank socket in order to engage the racking shaft. With the plunger down (circuit breaker CLOSED), the wings and shroud cannot be moved and thus racking is blocked.
B. Trip-free interlock
Figure 28: Circuit breaker interlocks and ground disconnect on page 30 shows the automatic closing spring energy released (spring dump) and trip-free interlock. This interlock is a plunger with a roller on the lower end. The plunger roller tracks the shape of the cam profiles on the racking mechanism in the switchgear (refer to Figure 29: Circuit breaker compartment (up to 50 kA shown) on page 30).
1.0 Close-latch lever
2.0 Closing-spring release cam
3.0 Normal operating position
4.0 Trip-latch lever
5.0 Trip-free pushrod
6.0 Trip-pushrod cam
7.0 Enclosure rear
8.0 Interlock levers
9.0 Retaining rings
10.0 Spring-dump tube
1.0
2.0
3.04.0
6.05.0
7.0
8.0
8.0 9.0
9.0
10.0
B. Type GMSG-GCB (not type GMSG) generator circuit breaker rating interlocks
Type GMSG-GCB (not type GMSG) generator circuit breakers rated 40 kA are designed such that the circuit breaker can be installed in a generator circuit breaker cell rated 40 kA of equal or lower continuous current rating.
Type GMSG-GCB generator circuit breakers rated 50 kA or 63 kA are designed such that the circuit breaker can be installed in a generator circuit breaker cell of equal or lower interrupting rating, and equal or lower continuous current rating.

35
The spring dump cam profile on the racking mechanism raises the spring dump/trip-free interlock upon insertion of the circuit breaker into the compartment, or upon withdrawal from the compartment. The interlock is raised at about the time the front wheels pass over the cubicle sill. It allows the spring dump interlock to be in the reset (lowest) position at all other times.
The trip-free cam profile on the racking mechanism allows the spring dump/trip-free racking interlock to be in the lowest position (reset) only when the circuit breaker is in the TEST or the CONNECT position. Thus, during racking, the trip-free/spring dump interlock is held in an elevated condition except when the circuit breaker reaches the TEST or the CONNECT position. The circuit breaker can be closed only when the interlock position is down, and will trip if the plunger is moved up.
Figure 31: Closed circuit breaker interlock mechanism in stored-energy mechanism on page 35 shows the operating mechanism detail components which establish a spring dump condition as the spring dump/trip-free interlock is actuated by the spring dump and trip-free cam profiles on the racking mechanism. The rising plunger raises a lever attached to the base of the operating mechanism enclosure. This lever raises the trip-free pushrod, which raises the closing spring release cam. This blocks closing of the circuit breaker while the circuit breaker is being racked.
C. Trip-free interlock position - mechanical interlock
In order to prevent the motor- charging circuit from "making and breaking" as the circuit breaker and cubicle secondary disconnects make or break physical contact, an electrical switch is provided.
This switch is mounted in the line of action taken by the trip-free interlock plunger that follows the racking-mechanism cam and is elevated at all times while the circuit breaker is in the drawout compartment except when in the TEST or CONNECT positions.
A striker plate, integral with the trip-free interlock plunger, engages and operates (opens) the switch when the plunger is in an elevated position blocking spring-charging motor operation. The switch is closed when the circuit breaker occupies the TEST or CONNECT position, allowing the charging motor to operate automatically.

36
Hazardous voltage and high-speed moving parts.
Will cause death, serious injury and property damage.
Do not by-pass interlocks or otherwise make interlocks inoperative. Interlocks must be in operation at all times.
Read instruction manuals, observe safety instructions and use qualified personnel.
Introduction and maintenance intervalsPeriodic inspections and maintenance are essential to safe and reliable operation of the type GMSG vacuum circuit breaker.
When the type GMSG vacuum circuit breaker is operated under "usual service conditions," maintenance and lubrication is recommended at ten-year intervals or at the number of operations indicated in Table 2: Maintenance and lubrication schedule on page 40.
"Usual" and "unusual" service conditions for medium-voltage metal-clad switchgear are defined in ANSI/IEEE C37.20.2, section 8.1 and C37.04, section 4 together with C37.010, section 4 for type GMSG non-generator circuit breakers. For type GMSG-GCB generator circuit breakers, these service conditions are defined in ANSI/IEEE C37.20.2, section 8.1 and ANSI/IEEE C37.013, section 4.2
Generally, "usual service conditions" are defined as an environment where the equipment is not exposed to excessive dust, acid fumes, damaging chemicals, salt air, rapid or frequent changes in temperature, vibration, high humidity and extreme temperatures.
The definition of "usual service conditions" is subject to a variety of interpretations. Because of this, you are best served by adjusting maintenance and lubrication intervals based on your experience with the equipment in the actual service environment.
Regardless of the length of the maintenance and lubrication interval, Siemens recommends the circuit breaker should be inspected and exercised annually.
For the safety of maintenance personnel as well as others who might be exposed to hazards associated with maintenance activities, the safety-related work practices of NFPA 70E (especially chapters 1 and 2) should always be followed when working on electrical equipment.
Maintenance personnel should be trained in the safety practices, procedures and requirements that pertain to their respective job assignments.
This instruction manual should be reviewed and retained in a location readily accessible for reference during maintenance of this equipment.
The user must establish a periodic maintenance program to ensure trouble-free and safe operation.
The frequency of inspection, periodic cleaning and preventive maintenance schedule will depend upon the operation conditions. NFPA Publication 70B, "Electrical Equipment Maintenance" may be used as a guide to establish such a program.
Note: A preventive maintenance program is not intended to cover reconditioning or major repair, but should be designed to reveal, if possible, the need for such actions in time to prevent malfunctions during operation.
Maintenance

37
The use of unauthorized parts in the repair of the equipment, or tampering by unqualified personnel can result in hazardous conditions, that can result in death, serious injury or property damage.
Follow all safety instructions contained herein.
Recommended hand toolsThe type GMSG vacuum circuit breaker uses both standard SAE (U.S. customary) and metric fasteners. Metric fasteners are used for the vacuum interrupters and in the vacuum interrupter/operator module. SAE (U.S. customary) fasteners are used in most other locations. This list of hand tools describes those normally used in disassembly and re-assembly procedures.
Metric:
Sockets and open-end wrenches: 7, 8, 10, 13, 17, 19 and 24 mm
Hex keys: 5, 6, 8 and 10 mm
Deep sockets: 19 mm
Torque wrench: 0 - 150 Nm (0 - 100 ft-lbs).
SAE (U.S. customary):
Socket and open-end wrenches: 5/16, 3/8, 7/16, 1/2, 9/16, 11/16, 3/4 and 7/8 inches
Hex keys: 3/16 and 1/4 inches
Screwdrivers: 0.032 x 1/4 inches wide and 0.055 x 7/16 inches wide
Pliers
Light hammer
Dental mirror
Flashlight
Drift pins: 1/8, 3/16 and 1/4 inches
Retaining-ring pliers (external type, tip diameter 0.038 inches).
Recommended maintenance and lubricationPeriodic maintenance and lubrication should include all the tasks shown in Table 1: Maintenance tasks on page 38.
Recommended procedures for each of the listed tasks are provided in this section of the instruction manual.
The list of tasks in Table 1: Maintenance tasks on page 38 does not represent an exhaustive survey of maintenance steps necessary to ensure safe operation of the equipment.
Particular applications may require further procedures. Should further information be desired or should particular problems arise not covered sufficiently for the Purchaser's purposes, the matter should be referred to Siemens at +1 (800) 347-6659 or +1 (919) 365-2200 outside the U.S.

38
Inspection items and tests
Primary-power path checks
Cleanliness check
Inspection of primary disconnects
Stored-energy operator-mechanism checks
Maintenance and lubrication
Fastener check
Manual-spring charging check
Contact-erosion check
Electrical-control checks
Wiring and terminals checks
Secondary-disconnect check
Automatic spring-charging check
Electrical close and trip check
Vacuum-integrity check
High-potential test
Insulation test
Contact-resistance test
Inspection and cleaning of circuit breaker insulation
Functional tests
Table 1: Maintenance tasks
Failure to maintain the equipment can result in death, serious injury, property damage or product failure, and can prevent successful functioning of connected apparatus.
The instructions contained herein should be carefully reviewed, understood and followed.
The maintenance tasks in Table 1 must be performed regularly.

39
Removal from switchgearPrior to performing any inspection or maintenance checks or tests, the circuit breaker must be removed from the switchgear. The "Installation checks and initial functional tests" section (refer to page 8) describes the removal procedure in detail. The principal steps are repeated here for information and guidance, but without the details of the preceding section.
1. The first step is to de-energize the circuit breaker. Figure 32: Trip-control pushbutton (lower button) illustrates the location of the trip control on the circuit breaker operator panel. Depressing the trip pushbutton opens the circuit breaker prior to removal from the switchgear.
2. The second step in the removal procedure is to de-energize control power to the circuit breaker. Open the control-power disconnect device.
3. Rack the circuit breaker to the DISCONNECT position.
4. Perform the spring discharge check. This is done by first depressing the red trip pushbutton. Second, depress the black close pushbutton. Third, depress the red trip pushbutton again, and observe the spring condition indicator. It should read DISCHARGED.
5. Remove the circuit breaker from the switchgear. Refer to page 10 of "Installation checks and initial functional tests" section of this instruction manual for special instructions and precautions regarding removal of a circuit breaker not at floor level.
6. The circuit breaker can be located either on the floor or on a pallet. Each circuit breaker has four wheels and handles to allow one person to maneuver the unit on a level surface without assistance.
Checks of the primary power pathThe primary power path consists of three vacuum interrupters and three upper-primary and three lower-primary disconnects. These components are checked for cleanliness and condition. The vacuum interrupters are also checked for vacuum integrity.
Some test engineers prefer to perform the contact-erosion check during the manual-spring charging check of the operator, since charging of the springs is necessary to place the contacts in the CLOSED position. Also, the vacuum-integrity check is usually performed in conjunction with the high-potential test.
These instructions follow the recommendation these tests (contact-erosion/manual-spring charging check and vacuum integrity/high-potential tests) should be combined as described.
Cleanliness checkFigure 33: Type GMSG vacuum circuit breaker showing vacuum interrupters and primary disconnects (barriers removed) is a side view of the type GMSG vacuum circuit breaker with the outer-insulating barriers removed to show the vacuum interrupter and the upper- and lower-primary disconnects.
All of these components must be cleaned and free of dirt or any foreign objects. Use a dry lint-free cloth. For stubborn dirt, use a clean cloth saturated with isopropyl alcohol (except on a vacuum interrupter).
For stubborn dirt on a vacuum interrupter, use a cloth and warm water and a small amount of mild liquid-household detergent as a cleaning agent. Dry thoroughly using a dry lint-free cloth.
Figure 32: Trip-control pushbutton (lower button)
Figure 33: Type GMSG vacuum circuit breaker showing vacuum interrupters and primary disconnects (barriers removed)

40
Inspection of primary disconnectsFigure 34: Primary disconnect in mated position shows the primary-disconnect contact-fingers engaged. When the contacts are mated with the switchgear primary-stud assembly, there is forceful contact distributed over a wide area. This maintains low-current flow per individual contact finger.
Inspect the contact fingers for any evidence of burning or pitting that would indicate weakness of the contact-finger springs.
Inspect the primary-disconnect arms for physical integrity and absence of mechanical damage.
Inspect the flexible connectors that connect the bottom movable-contacts of the vacuum interrupters to the lower primary-disconnect arms for tightness and absence of mechanical damage, burning or pitting.
Using a clean cloth saturated with isopropyl alcohol, clean old lubricant from primary disconnects, and apply a very thin layer of Siemens contact lubricant (reference 15-172-791-233).
Checks of the stored-energy operator mechanismThe stored-energy operator checks are divided into mechanical and electrical checks for simplicity and better organization. This first series of checks determine if the basic mechanism is clean, lubricated and operates smoothly without control power. The contact-erosion check of the vacuum interrupter is also performed during these tasks.
Maintenance and lubricationTable 2: Maintenance and lubrication schedule gives the recommended maintenance intervals for circuit breakers. These intervals assume the circuit breaker is operated under “usual service conditions” as discussed in ANSI/IEEE C37.20.2, section 8.1, and C37.04, section 4, together with C37.010, section 4 for type GMSG non-generator circuit breakers. For type GMSG-GCB generator circuit breakers, these service conditions are defined in ANSI/IEEE C37.20.2, section 8.1 and ANSI/IEEE C37.013, section 4.2. The maintenance and lubrication interval is the lesser of the number of closing operations or the time interval since last maintenance.
The vacuum-interrupter operator mechanism is shown in Figure 35: Operator mechanism lubrication on page 41, with the front cover and the operator-control panel removed to show construction details.
Both the tripping spring and the closing spring are shown. The movable end of the closing spring is connected to a crank arm. The movable end of the opening spring is connected to the jack shaft by a pull rod.
Clean the entire stored-energy operator mechanism with a dry, lint-free cloth.
Check all components for evidence of excessive wear.
Place special attention on the closing spring-crank and the various pushrods and linkages.
Lubricate all non-electrical moving or sliding surfaces with a light coat of synthetic grease or oil.
Lubricants composed of ester oils and lithium thickeners will generally be compatible.
For all lubrication (except electrical moving or sliding surfaces), use one of the following:
Klüber Isoflex Topas L32 (part 3AX11333H)
Klüber Isoflex Topas L32N (spray) (part 15-172-879-201).
Source:
Klüber Isoflex Topas L32 or L32N: Klüber Lubrication North America L.P. www.klueber.com.
Primary-disconnect contacts (multi-fingered clusters) and secondary- disconnect contacts (strips and fingers) are to be wiped clean, and a film of Siemens contact lubricant (15-172-791-233) applied. Avoid getting contact lubricant on any insulating materials.
Figure 34: Primary disconnect in mated position
Circuit breaker type
Number of years/closing
operations (whichever comes first)
Non-generator circuit breakers
GMSG up to 50 kA
10-years/ 10,000
operations
GMSG 63 kA
10-years/ 10,000
operations
Generator circuit breakers
GMSG-GCB 40 kA
10-years/ 10,000
operations
GMSG-GCB 50 kA
10-years/ 10,000
operations
GMSG-GCB 63 kA
10-years/ 10,000
operations
Table 2: Maintenance and lubrication schedule

41
Figure 35: Operator mechanism lubrication
Klüber L32 or Klüber L32N
Typical for all three phases
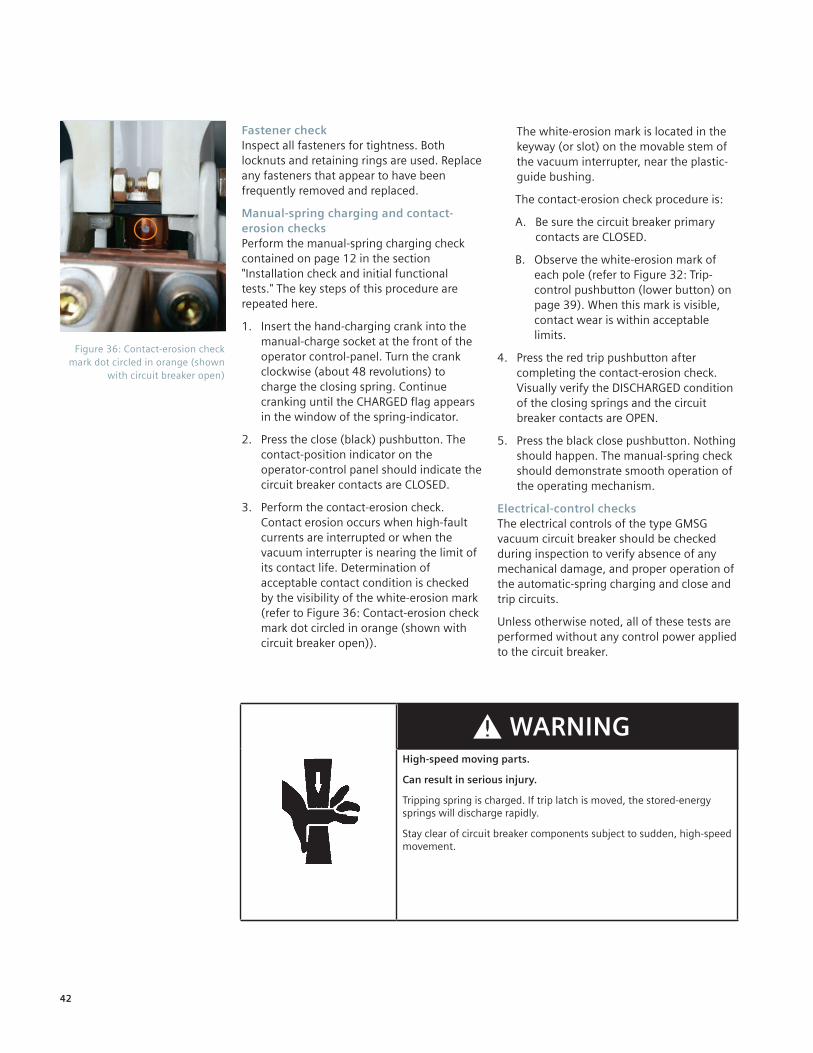
42
Fastener checkInspect all fasteners for tightness. Both locknuts and retaining rings are used. Replace any fasteners that appear to have been frequently removed and replaced.
Manual-spring charging and contact-erosion checksPerform the manual-spring charging check contained on page 12 in the section "Installation check and initial functional tests." The key steps of this procedure are repeated here.
1. Insert the hand-charging crank into the manual-charge socket at the front of the operator control-panel. Turn the crank clockwise (about 48 revolutions) to charge the closing spring. Continue cranking until the CHARGED flag appears in the window of the spring-indicator.
2. Press the close (black) pushbutton. The contact-position indicator on the operator-control panel should indicate the circuit breaker contacts are CLOSED.
3. Perform the contact-erosion check. Contact erosion occurs when high-fault currents are interrupted or when the vacuum interrupter is nearing the limit of its contact life. Determination of acceptable contact condition is checked by the visibility of the white-erosion mark (refer to Figure 36: Contact-erosion check mark dot circled in orange (shown with circuit breaker open)).
The white-erosion mark is located in the keyway (or slot) on the movable stem of the vacuum interrupter, near the plastic-guide bushing.
The contact-erosion check procedure is:
A. Be sure the circuit breaker primary contacts are CLOSED.
B. Observe the white-erosion mark of each pole (refer to Figure 32: Trip-control pushbutton (lower button) on page 39). When this mark is visible, contact wear is within acceptable limits.
4. Press the red trip pushbutton after completing the contact-erosion check. Visually verify the DISCHARGED condition of the closing springs and the circuit breaker contacts are OPEN.
5. Press the black close pushbutton. Nothing should happen. The manual-spring check should demonstrate smooth operation of the operating mechanism.
Electrical-control checksThe electrical controls of the type GMSG vacuum circuit breaker should be checked during inspection to verify absence of any mechanical damage, and proper operation of the automatic-spring charging and close and trip circuits.
Unless otherwise noted, all of these tests are performed without any control power applied to the circuit breaker.
Figure 36: Contact-erosion check mark dot circled in orange (shown
with circuit breaker open)
High-speed moving parts.
Can result in serious injury.
Tripping spring is charged. If trip latch is moved, the stored-energy springs will discharge rapidly.
Stay clear of circuit breaker components subject to sudden, high-speed movement.

43
Wiring and terminals check1. Physically check all of the circuit breaker
wiring for evidence of abrasion, cuts, burning or mechanical damage.
2. Check all terminals to be certain they are solidly attached to their respective device.
Secondary-disconnect checkIn addition to checking the terminals of the secondary disconnect, the secondary contact fingers need to be free to move without binding. Depress each finger, confirm presence of spring force (contact pressure) and verify freedom-of-motion.
Automatic spring-charging check (control power required)Repeat the automatic spring-charging check described in "Installation checks and initial functional tests" (refer to page 13).
Primary tasks of this check are:
1. The circuit breaker is energized with control power for this check.
2. De-energize the source of control power.
3. Install the circuit breaker end of the split-plug jumper over the secondary disconnect of the circuit breaker. The split-plug jumper has one male and one female connector and cannot be installed incorrectly (refer to Figure 5: Split-plug jumper connected to circuit breaker on page 13).
4. Install the switchgear end of the split- plug jumper over the secondary-disconnect block inside the switchgear (refer to Figure 6: Split-plug jumper connected to switchgear on page 13).
5. Energize the control-power source.
6. When control power is connected to the circuit breaker, the closing springs should automatically charge. Visually verify the closing springs are charged.
Note: A temporary source of control power and test leads may be required if the control-power source has not been connected to the switchgear. When control power is connected to the type GMSG vacuum circuit breaker, the closing springs should automatically charge.
Hazardous voltage and high-speed moving parts.
Will cause death, serious injury and property damage.
Read instruction manuals, observe safety instructions and use qualified personnel.

44
Table 3: Typical vacuum interrupter contact life and stroke
Non-generator circuit breakers (type GMSG)
Rated maximum
voltage
Interrupting class
Rated short-circuit current
Vacuum interrupter
Continuous current Stroke2 GraphRight hand
limit of curve (refer to
Figure 37)
Co
nst
ant
MV
A r
atin
gs
bas
is
kV MVA or kA kA Type A mm
4.76 250 MVA29 [email protected] kV; 36 [email protected] kV
VS-15052 VS-17040
1,200, 2,000 1,200, 2,000
8.5-9.5 7-9
C B
36 36
4.76 350 MVA41 [email protected] kV; 49 [email protected] kV
VS-15052 1,200, 2,000, 3,000 8.5-9.5 C 49
8.25 500 MVA33 [email protected] kV; 41 [email protected] kV
VS-15052 1,200, 2,000, 3,000 8.5-9.5 C 41
15.0 500 MVA18 [email protected] kV; 23 [email protected] kV
VS-17006 1,200, 2,000 7-9 A 23
15.0 750 MVA28 [email protected] kV; 36 [email protected] kV
VS-15052 VS-17040
1,200, 2,000, 3,000 1,200, 2,000
8.5-9.5 7-9
C B
36 36
15.0 1,000 MVA37 [email protected] kV; 48 [email protected] kV
VS-15052 1,200, 2,000, 3,000 8.5-9.5 C 48
Co
nst
ant
kA r
atin
gs
bas
is
4.76 31.5 kA 31.5 [email protected] kVVS-15052 VS-17040
1,200, 2,000 1,200, 2,000
8.5-9.5 7-9
C B
31.5 31.5
4.76 40 kA 40 [email protected] kVVS-15052 VS-17040
1,200, 2,000, 3,000 1,200, 2,000
8.5-9.5 7-9
C B
40 40
4.76 50 kA 50 [email protected] kV VS-15052 1,200, 2,000, 3,000 8.5-9.5 C 50
4.76 63 kA 63 [email protected] kV VS-17085 1,200, 2,000, 3,000 10-11 D 63
8.25 40 kA 40 [email protected] kVVS-15052 VS-17040
1,200, 2,000, 3,000 1,200, 2,000
8.5-9.5 7-9
C B
40 40
15.0 20 kA 20 [email protected] kV VS-17006 1,200, 2,000 7-9 A 20
15.0 25 kA 25 [email protected] kV VS-17006 1,200, 2,000 7-9 A 25
15.0 31.5 kA 31.5 [email protected] kVVS-15052 VS-17040
1,200, 2,000 1,200, 2,000
8.5-9.5 7-9
C B
31.5 31.5
15.0 40 kA 40 [email protected] kVVS-15052 VS-17040
1,200, 2,000, 3,000 1,200, 2,000
8.5-9.5 7-9
C B
40 40
15.0 50 kA 50 [email protected] kV VS-15052 1,200, 2,000, 3,000 8.5-9.5 C 50
15.0 63 kA 63 [email protected] kV VS-17085 1,200, 2,000, 3,000 10-11 D 63
Generator circuit breakers (type GMSG-GCB)
Up to 15.0 40 kA 40 [email protected] kV VS-15052 1,200, 2,000, 3,000 8.5-9.5 C 40
Up to 15.0 50 kA 50 [email protected] kV VS-17085 1,200, 2,000, 3,000 10-11 D 50
Up to 15.0 63 kA 63 [email protected] kV VS-17085 1,200, 2,000, 3,000 10-11 D 63
Footnotes:1. The vacuum interrupter type designation is labeled on the vacuum interrupter. If the vacuum interrupter installed does not match that indicated in this
table, contact the nearest Siemens representative.2. If you need assistance achieving the indicated stroke setting, contact the nearest Siemens representative.

45
Figure 37: Typical vacuum interrupter contact life curves
100,000
50,000
20,000
10,000
5,000
2,000
1,000
500
200
100
50
20
10
Permissible operating cycles
Load graph "A" vacuum interrupter type VS-17006
Breaking current (symmetrical value)
1 2 5 50 10010 2018 2325
Note: Right-hand vertical segment of curve is located at the maximum symmetrical interrupting current rating of the circuit breaker, as indicated in Table 3: Typical vacuum interrupter contact life and stroke on page 44.

46
Figure 37: Typical vacuum interrupter contact life curves (continued)
Load graph "B" vacuum interrupter type VS-17040
40
Note: Right-hand vertical segment of curve is located at the maximum symmetrical interrupting current rating of the circuit breaker, as indicated in Table 3: Typical vacuum interrupter contact life and stroke on page 44.
28
100,000
50,000
20,000
10,000
5,000
2,000
1,000
500
200
100
50
20
10
Permissible operating cycles
Breaking current (symmetrical value)
1 2 5 10010 20 31.5

47
Load graph "C" vacuum interrupter type VS-15052
Figure 37: Typical vacuum interrupter contact life curves (continued)
40
Note: Right-hand vertical segment of curve is located at the maximum symmetrical interrupting current rating of the circuit breaker, as indicated in Table 3: Typical vacuum interrupter contact life and stroke on page 44.
28
100,000
50,000
20,000
10,000
5,000
2,000
1,000
500
200
100
50
20
10
Permissible operating cycles
Breaking current (symmetrical value)
1 2 5 50 10010 20 31.5
41

48
Figure 37: Typical vacuum interrupter contact life curves (continued)
Load graph "D" vacuum interrupter type VS-17085
100,000
50,000
20,000
10,000
5,000
2,000
1,000
500
200
100
50
20
10
Permissible operating cycles
Breaking current (symmetrical value)
1 2 5 50 10010 20 63
Note: Right-hand vertical segment of curve is located at the maximum symmetrical interrupting current rating of the circuit breaker, as indicated in Table 3: Typical vacuum interrupter contact life and stroke on page 44.

49
Electrical close and trip check (control power required)A check of the circuit breaker control circuits is performed while the unit is still connected to the switchgear by the split- plug jumper. This check is made with the circuit breaker energized by control power from the switchgear.
1. Once the circuit breaker springs are charged, move the switchgear-mounted close/trip switch to the close position. There should be both the sound of the circuit breaker closing and indication the circuit breaker contacts are CLOSED by the main contact status indicator.
2. As soon as the circuit breaker has closed, the automatic spring-charging process is repeated.
3. After a satisfactory close operation is verified, move the switchgear-mounted close/trip switch to the trip position, or send a trip command from a protective relay. Verify by both sound and contact position that the contacts are open. Completion of these checks demonstrates satisfactory operation of auxiliary switches, internal protective relays and solenoids.
Spring-charging motor checksNo additional checks of the spring-charging motor are necessary.
Vacuum interrupter The life expectancy of a vacuum interrupter is a function of the number of interruptions and magnitude of current interrupted.
A vacuum interrupter must also be replaced at 10,000 mechanical operations or when the contacts have been eroded beyond allowed limits.
Vacuum interrupter replacement procedures are detailed in the following maintenance instructions.
The curves shown in Figures 37: Typical vacuum interrupter contact life curves beginning on page 45 are offered as a guide to life expectancy. Table 3: Typical vacuum interrupter contact life and stroke on page 44.
Vacuum-interrupter mechanical check Refer to Figure 38: Lower pole support with insulated coupler, Figure 39: Primary contact closed and insulated coupler disconnected and Figure 40: Closed primary contact forced open by manual pressure, Figure 41: Contact-resistance test of the primary contacts on page 52 and Figure 42: Vacuum interrupter replacement illustration on page 56.
Before putting the circuit breaker into service, or if a vacuum interrupter is suspected of leaking as a result of mechanical damage, perform a vacuum-integrity check either mechanically as described in this section, or alternatively, electrically using a high-potential test set as described in the next section.
Open and isolate the circuit breaker and detach the insulated coupler (48.0) from lever (48.6) (refer to Figure 38: Lower pole support with insulated coupler).
The atmospheric pressure will force the moving contact of a hermetically-sealed interrupter into the CLOSED position, causing lever (48.6) to move into the position shown in Figure 39: Primary contact closed and insulated coupler disconnected.
A vacuum interrupter may be assumed to be intact if it shows the following characteristics:
1. An appreciable closing force has to be overcome when lever (48.6) is moved to the OPEN position by hand (refer to Figure 40: Closed primary contact forced open by manual pressure).
2. When the lever is released, it must automatically return to the CLOSED position with an audible sound as the contacts touch.
After vacuum-integrity check, reconnect the lever (48.6) to the insulated coupler (48.0).
Figure 38: Lower pole support with insulated coupler
Figure 39: Primary contact closed and insulated coupler disconnected
Figure 40: Closed primary contact forced open by manual pressure
48.048.6
48.0 48.6
48.0 Insulated coupler
48.6 Lever
48.0 Insulated coupler
48.6 Lever

50
High-potential testsThe next series of tests (vacuum integrity and insulation) involve use of high-voltage test equipment. The circuit breaker under test should be inside a suitable test-barrier equipped with warning lights.
Vacuum-integrity check (using dielectric test)A high-potential test is used to verify the vacuum integrity of the circuit breaker. The test is conducted on the circuit breaker with its primary contacts in the OPEN position.
High-potential test voltagesThe voltages for high-potential tests are shown in Table 4: High-potential test voltages on page 51.
Note: Do not use dc high-potential testers incorporating half-wave rectification. These devices produce high-peak voltages.
High-peak voltages will produce X-ray radiation. DC testers producing excessive peak-voltages also show erroneous readings of leakage current when testing vacuum circuit breakers.
High-potential tests employ hazardous voltages.
Will cause death and serious injury.
Follow safe procedures, exclude unnecessary personnel and use safety barriers. Keep away from the circuit breaker during application of test voltages. Disconnect the split plug jumper from between the circuit breaker and switchgear before conducting high-potential tests.
Vacuum interrupters may emit X-ray radiation.
Can result in serious injury.
Keep personnel more than six feet away from a circuit breaker under test.
X-rays can be produced when a high-voltage is placed across two circuit elements in a vacuum.

51
Vacuum-integrity test procedure1. Observe safety precautions listed in the
DANGER and WARNING advisories. Construct the proper barrier and warning light system.
2. Ground the frame of the circuit breaker, and ground each pole not under test.
3. Apply test voltage across each pole for one minute (circuit breaker OPEN).
4. If the pole sustains the test voltage for that period, its vacuum integrity has been verified.
Note: This test includes not only the vacuum interrupter, but also the other insulation components in parallel with the vacuum interrupter. These include the standoff insulators and the insulated drive-links, as well as the insulating (tension) struts between the upper and lower vacuum-interrupter supports. If these insulation components are contaminated or defective, the test voltage will not be sustained. If so, clean or replace the affected components, and retest.
As-found insulation and contact-resis-tance testsAs-found tests verify the integrity of the circuit breaker insulation system. Megger* or insulation-resistance tests conducted on equipment prior to installation provide a basis of future comparison to detect changes in the protection afforded by the insulation system.
Rated maximum voltage Rated power-frequency withstand Field-test voltage
kV (rms) kV (rms) kV (rms) kV dc
4.76 19 14.25 20.2
8.25 36 27 38.2
15.0 36 27 38.2
15.0 generator circuit breaker
38 28.5 40.3
Table 4: High-potential test voltages
A permanent record of periodic as-found tests enables the maintenance organization to determine when corrective actions are required by watching for significant deterioration in insulation resistance, or increases in contact resistance.
Insulation and contact-resistance test equipmentIn addition to the high-potential test equipment capable of test voltages as listed in Table 4: High-potential test voltages, the following equipment is required:
AC high-potential tester with test voltage of 1,500 volts, 60 Hz
Test equipment for contact-resistance tests.
Insulation and contact-resistance test procedure1. Observe safety precaution listed in the
DANGER and WARNING advisories for the vacuum-integrity check tests.
2. Close the circuit breaker. Ground the frame of the circuit breaker, and ground each pole not under test. Use manual charging, closing and tripping procedures.
3. Apply the proper ac or dc high-potential test voltage as shown in Table 4 between a primary conductor of the pole and ground for one minute.
4. If no disruptive discharge occurs, the insulation system is satisfactory.
5. After test, ground both ends and the center metal section of each vacuum interrupter to dissipate any static charge.
6. Disconnect the leads to the spring-charging motor.
*Megger is a registered trademark of Megger Group, Ltd.

52
7. Connect all points of the secondary disconnect with a shorting wire. Connect the shorting wire to the high-potential lead of the high-voltage tester and ground the circuit breaker housing. Starting with zero volts, gradually increase the test voltage to 1,500 volts rms, 60 Hz. Maintain test voltage for one minute.
8. If no disruptive discharge occurs, the secondary-control insulation level is satisfactory.
9. Disconnect the shorting wire and re-attach the leads to the spring-charging motor.
10. Perform contact-resistance tests of the primary contacts (refer to Figure 41: Contact-resistance test of the primary contacts). Contact resistance should not exceed the values listed in Table 5: Maximum contact resistance.
Inspection and cleaning of circuit breaker insulation1. Perform the spring discharge check on the
circuit breaker after all control power is removed. The spring discharge check consists of:
A. Depressing the red trip pushbutton
B. Depressing the black close pushbutton, and
C. Depressing again the red trip pushbutton.
All of these controls are on the circuit breaker front panel. Visually verify the DISCHARGED condition of the springs.
2. Remove phase barriers as shown in Figure 7: Circuit breaker primary disconnects on page 13.
3. Clean barriers and post insulators using a clean cloth dipped in isopropyl alcohol.
4. Replace all barriers. Check all visible fasteners again for condition and tightness.
Note: Do not use any cleaning compounds containing chlorinated hydrocarbons such as trichlorethylene, perchlorethylene or carbon tetrachloride. These compounds will damage the phenylene ether copolymer material used in the barriers and other insulation on the circuit breaker.
Functional testsRefer to the "Installation checks and functional tests" section of this instruction manual on pages 9 to 13. Functional tests consist of performing at least three manual spring-charging checks and three automatic spring-charging checks. After these tests are complete, and the springs fully discharged, all fasteners and connections are checked again for tightness and condition before re-installing the circuit breaker into the metal-clad switchgear.
Figure 41: Contact-resistance test of the primary contacts
Continuous
current rating
Contact resistance (micro-ohms)
Type GMSG
non-generator circuit breaker
Type GMSG-GCB
generator circuit breaker
(A) 25 kA All others 63 kA 40 kA 50 kA 63 kA
1,200 40 35 30 35 30 30
2,000 35 30 30 30 30 30
3,000 ---- 30 30 30 30 30
Table 5: Maximum contact resistance

53
IntroductionThe following procedures along with the troubleshooting charts at the end of this section, provide maintenance personnel with a guide to identifying and correcting possible malfunctions of the type GMSG vacuum circuit breaker.
Circuit breaker overhaulTable 6: Overhaul schedule gives the recommended overhaul schedule for a type GMSG vacuum circuit breaker. These intervals assume that the circuit breaker is operated under "usual service conditions" as discussed in ANSI/IEEE C37.20.2, section 8.1 and ANSI/IEEE C37.04, section 4, and elaborated in ANSI/IEEE C37.010, section 4 for type GMSG non-generator circuit breakers. For generator circuit breakers, these service conditions are defined in ANSI/IEEE C37.20.2, section 8.1 and ANSI/IEEE C37.013, section 4.2. If the circuit breaker is operated frequently, the maintenance interval in Table 6: Overhaul schedule may coincide with the maintenance interval in Table 2: Maintenance and lubrication schedule on page 40.
When actual operating conditions are more severe, overhaul periods should occur more frequently. The counter on the front panel of the circuit breaker records the number of operations.
Replacement at overhaulThe following components are replaced during an overhaul of the circuit breaker, when required:
Vacuum interrupters as determined by vacuum-integrity test, contact erosion or after 10,000 operations
Spring-release coil, 52SRC
Shunt-trip coil, 52T
Auxiliary switch.
When these parts are changed, locking devices must also be removed and replaced. These include lock washers, retaining rings, retaining clips, spring pins, cotter pins, etc.
1. Replace vacuum interrupters, instructions follow (refer to page 49).
2. Spring-release coil (52SRC) or shunt- trip coil (52T).
A. Remove two "push on" terminal connections
B. Remove two M4 hex-head screws and dismount solenoid.
C. Install replacement solenoids with two M4 hex-head screws and new lock washers.
Circuit breaker type
Number of closings
GMSG 10,000
GMSG-GCB 10,000
Table 6: Overhaul schedule
Overhaul
High-potential tests employ hazardous voltages.
Will cause death, serious injury and property damage.
Read instruction manual. All work must be performed with the circuit breaker completely de-energized and the springs discharged. Limit work to qualified personnel.

54
D. Solenoid mounting screws must be installed using thread locking adhesive (Loctite #222, Siemens part 15-133-281-007) and primer (Loctite primer T, Siemens part 15-133-281-005).
E. Connect wires to coils with new "push on" wire terminals (Siemens part 15-171-600-002).
3. Lubricate operating mechanism in accordance with instructions that follow.
4. When work is finished, operate circuit breaker, CLOSE/OPEN several times, and check that all screw connections are tight.
Vacuum interrupter replacementIt is recommended that vacuum interrupters be replaced only by a qualified Siemens field service representative. The information in the following sections is provided to aid in understanding the replacement procedures.
Vacuum interrupters for type GMSG circuit breakers rated 63 kA interrupting and type GMSG-GCB generator circuit breakers rated 50 kA or 63 kA interrupting require special expertise for replacement, and must be replaced only by a qualified Siemens field service representative. Accordingly, detailed instructions for replacement of vacuum interrupters for type GMSG circuit breakers rated 63 kA interrupting and type GMSG-GCB generator circuit breakers rated 50 kA or 63 kA interrupting are not provided in this instruction manual.
Replacement vacuum interrupters are furnished as a complete assembly, and have been completely tested and mechanically conditioned.
It is recommended one vacuum interrupter be removed and replaced completely rather than removing two or more vacuum interrupters at a time.
The following procedure describes the procedure for removing and replacing a vacuum interrupter. Components may be identified by referencing Figure 42: Vacuum interrupter replacement illustration on page 56 and Figure 43: Illustration showing required technique for fastening terminal-clamp hardware on page 57.
Note: Special care needs to be exercised in removal or installation of hardware around the bottom, or movable contact end, of the vacuum interrupter.
The movable contact uses a metal bellows to maintain the vacuum seal while still permitting up and down motion of the contact. This metal bellows is rugged and reliable, and is designed to withstand years of vertical movement. However, care should be exercised to avoid subjecting the metal bellows to excessive torque during removal and replacement. Twisting the metal bellows through careless bolt removal or tightening may damage the vacuum interrupter.
1.0 Removing the vacuum interrupter
1.1 Before starting work, the circuit breaker should be isolated from all primary- and control-power sources and all stored energy discharged by tripping, closing and tripping the circuit breaker by hand. Discharge any static charge by grounding both ends and the center metal section of the vacuum interrupter. Carefully remove outer-phase and inter-phase barriers.
1.2 Loosen the lateral bolt(s) on terminal clamp (29.2). Refer to Figure 43: Illustration showing required technique for fastening terminal-clamp hardware on page 57 and employ the illustrated procedure to loosen clamp hardware (6 or 8 mm hex-key and 13 or 16 mm socket).
1.3 Withdraw pin (48.5) from insulating coupler (48.0) and levers (48.6).
1.4 Remove coupling pin from the eye bolt (36.3).
1.5 Free struts (28.0) from the upper pole-support (20.0). Loosen the strut hardware on the lower support (40.0) and swing the struts forward and downward (16 mm open-end wrench and 16 mm socket).
1.6 Loosen screws that secure the centering ring (28.1) (10 mm open-end wrench).

55
1.7 Remove bolt (31.2), lock washer and large washer at stationary contact of the vacuum interrupter (24 mm socket with extension).
1.8 Using a deep 24 mm socket with an extension, loosen and remove the hex-head bolt fastening the upper pole-support to the post insulator. Completely remove the upper pole-support and set aside.
1.9 Grasp the vacuum interrupter (30.0) and withdraw vertically upward. Assistance may be required to spread the clamp and work the terminal clamp off the movable stem of the vacuum interrupter. FORCIBLE TWISTING EFFORT IS NOT ALLOWED. If the terminal clamp cannot be easily removed, STOP!, check to be certain hardware is loose and the clamp is not binding.
2.0 Installing a vacuum interrupter
Note: Replacement vacuum interrupter (30.0) will be received from the factory with an eye bolt (36.3) in place, adjusted and torqued to specific requirements. DO NOT ALTER THE ADAPTER (eye-bolt) SETTING.
2.1 Inspect all silver-plated connection surfaces for cleanliness. Clean only with a cloth and solvent. Do not abrade, as this will damage the silver plating.
2.2 Insert vacuum interrupter (30.0) in the lower pole-support (40.0) with the vacuum-interrupter label facing away from the mechanism housing. Slip terminal clamp (29.2) into position on the movable stem.
2.3 Align vacuum interrupter and fasten finger-tight using heavy flat-washer, lock washer and nut (31.2).
2.4 Fasten the upper pole-support to the post insulator using finger pressure only using hex-head (M16) bolt, lock washer and flat washer.
2.5 Attach struts (28.0) to the upper pole-support (20) and replace hardware (M10), but do not tighten at this time.
2.6 Couple levers (48.6) and drive link (48.9) to the eye bolt (36.3), using the pin supplied. Apply retention clips. Appropriate pin is modestly chamfered, not to be confused with pin for the insulated coupler.
2.7 Raise terminal clamp (29.2) against the spacer (29.3) on the movable terminal of the vacuum interrupter (36.1) and position the vacuum interrupter (30.0) so that its groove faces the connecting surface of flexible strap (29.1). Refer to Figure 43: Illustration showing required technique for fastening terminal-clamp hardware on page 57and employ the technique illustrated to fasten the terminal clamp. Note opposing wrenches. Tighten the bolt(s) of the terminal clamp to a torque of 40 Nm (30 ft-lb), taking care to see that the terminal of the vacuum interrupter is not subjected to excessive bending movement.
Note: Excessive bending movement exerted while fastening the terminal clamp will damage the vacuum interrupter.
2.8 Align pole support (20.0) correctly and tighten bolt fastening it to the post insulator. Fasten securely all bolts associated with struts (28.0).
2.9 Tighten upper fastening bolt (31.2) on the upper pole-support (20.0) holding the vacuum interrupter firmly by its upper insulator and operate levers (48.6) by hand to see whether the movable contact moves freely. If any binding or lack of freedom is noted, loosen bolt (31.2) and adjust the vacuum interrupter in pole support by turning the vacuum interrupter and moving it slightly. Torque M16 bolt to 91-101 ft-lb (123-137 Nm).

56
Figure 42: Vacuum interrupter replacement illustration
20.0 Upper pole-support (pole-head)
28.0 Strut
28.1 Centering ring
29.1 Flexible connector
29.2 Terminal clamp
29.3 Spacer (or shoulder)
30.0 Vacuum interrupter
31.2 Upper terminal-bolt
20.0
36.1 Moving terminal
36.3 Eye bolt (or adapter)
40.0 Lower pole-support (pole-bottom)
48.0 Insulating coupler
48.5 Pin
48.6 Angled lever
48.9 Drive link
31.2
28.0
30.0
28.1
48.048.6
48.5
48.9
40.0
36.3
36.1
29.2
29.329.1

57
Figure 43: Illustration showing required technique for fastening terminal-clamp hardware
APosition of torque wrench to avoid undue stressing of moving contact (36.1)
B Holding wrench
C Direction of force (P)
D Torque wrench
29.2 Terminal clamp
29.3 Spacer (or shoulder)
30.0 Vacuum interrupter
36.1 Moving contact
C
A
D
B
30.0
29.2
29.3
36.1
C

58
2.10 The centering ring (28.1) has been loose and floating during installation of the vacuum interrupter. Check that the movable contact is free to move vertically without binding, and then tighten the hardware that secures the centering ring. Re-check that the movable contact is free to move vertically without binding.
2.11 Attach insulating coupler (48.0) and lever (48.6) together, using pin (48.5). Apply retaining clips. Correct pin has ends that have been generously chamfered.
2.12 Open and close circuit breaker several times and then check to see that all bolted joints and devices are tight.
3.0 Checking the contact stroke
3.1 Open the circuit breaker.
3.2 Free insulating coupler (48.0) by removing pin (48.5). The vacuum interrupter contacts must now close automatically as a consequence of atmospheric pressure.
3.3 Observe the terminal clamp (29.2) through the openings on each side of the lower pole support (40.0).
Using vernier calipers measure the distance from the bottom surface of the terminal clamp to the bottom edge of the cutout opening. Measure carefully and record your result.
3.4 Connect the insulating coupler (48.0) using pin (48.5) and the retaining clips provided.
3.5 Repeat the measurement described in step 3.3 again with care to maximize accuracy. Record your result.
3.6 Determine difference between the measurements made under steps 3.3 and 3.5. Your result should fall within the range shown in Table 3: Typical vacuum interrupter contact life and stroke on page 44.
3.7 If you fail to achieve the listed results, carefully repeat the entire procedure making certain of your measurements.
3.8 Loosen locking nut on eye bolt on insulated coupler (48.0), and retain position of the eye. Make adjustments in one-half turn increments. After adjustment is completed, tighten eye-bolt locking nut to 26-34 ft-lb (35 to 45 Nm).
4.0 After eye bolt is tightened to proper torque, repeat all measurement procedures, making certain they are in agreement with values indicated in step 3.6.
5.0 Complete all other maintenance procedures. Completely reassembled circuit breaker should pass high-potential test before it is ready for service.
Hydraulic shock absorber
The type GMSG mechanism is equipped with hydraulic shock-absorber and a stop bar that functions when the circuit breaker opens (refer to Figure 15: Stored-energy operating mechanism on page 20). The shock absorber (61.8) should require no adjustment. However, at maintenance checks, the shock absorber should be examined for evidence of leaking. If evidence of fluid leakage is found, the shock absorber must be replaced to prevent damage to the vacuum-interrupter bellows.

59
Sub-assembly Item Inspect for
Primary power path
Vacuum interrupter
1. Cleanliness.
2. Contact erosion. Note: Perform with manual-spring checks.
3. Vacuum integrity. Note: Perform with high-potential tests.
Primary disconnects1. Burnt or damaged fingers.
2. Lubrication of contact surfaces.
Vacuum interrupter contact resistance1. Record contact resistance with contacts closed
and check at each maintenance interval to monitor condition.
Vacuum interrupter operator mechanism
Cleanliness 1. Dirt or foreign material.
Fasteners 1. Tightness of nuts and other locking devices.
Manual-spring check1. Smooth operation of manual charging, manual
closing and manual tripping.
Lubrication1. Evidence of excessive wear.
2. Lubricaion of wear points.
Electrical controls
Wiring 1. Mechanical damage or abrasion.
Terminals and connectors 1. Tightness and absence of mechanical damage.
Close and trip solenoids, anti-pump relay, auxiliary switches and secondary disconnect
1. Automatic charging.
2. Close and trip with control power.
High-potential test
Primary circuit-to-ground and between primary disconnects
1. 60-second withstand 14 kV or 27 kV or 28.5 kV, 60 Hz (20 kV or 38 kV or 40 kV dc).
Control circuit-to-ground 1. 60-second withstand 1.5 kV, 60 Hz.
Insulation Barrier and all insulating components
1. Cleanliness.
2. Cracking, crazing, tracking or other sign of deterioration.
Table 7: Periodic maintenance and lubrication tasks
Maintenance and troubleshooting

60
Problem Symptoms Possible causes and remedies
Circuit breaker fails to close.
Closing spring will not automatically charge.
1. Secondary control circuit is de-energized or control circuit fuses are blown. Check and energize or replace if necessary.
2. Secondary disconnect contacts 15 or 16 are not engaging. Check and replace if required.
3. Damage to wiring, terminals or connectors. Check and repair as necessary.
4. Failure of charging motor (88). Replace if required.
5. Motor cut-off switch LS21 or LS22 fails to operate. Replace if necessary.
6. Mechanical failure of operating mechanism. Check and contact regional service centers, the factory or telephone Siemens field service at +1 (800) 347-6659 or +1 (919) 365-2200 outside the U.S.
Closing springs charge, but circuit breaker does not close.
Closing coil or solenoid (52SRC) fails to energize. No sound of circuit breaker closing.
1. Secondary control circuit de-energized or control circuit fuses blown. Correct as indicated.
2. No closing signal to secondary disconnect pin 13. Check for continuity and correct protective relay logic.
3. Secondary disconnect contacts 13 or 15 are not engaging. Check and correct as required.
4. Failure of anti-pump relay (52Y) contacts 21 to 22, 31 to 32 or 13 to 14. Check and replace as required.
5. Failure of close coil (solenoid) (52SRC). Check and replace as required.
6. Auxiliary switch NC contacts 41 to 42 are open when circuit breaker contacts are open. Check linkage and switch. Replace or adjust as necessary.
7. Spring-charged switch LS9 NO contacts remain open after springs are charged. Check and replace as required.
Closing coil energizes. Sound of circuit breaker closing is heard but circuit breaker contacts do not close.
1. Mechanical failure of operating mechanism. Check and contact regional service centers, the factory or telephone Siemens field service at +1 (800) 347-6659 or +1 (919) 365-2200 outside the U.S.
Table 8: Troubleshooting

61
Problem Symptoms Possible causes and remedies
Nuisance or false close
Electrical problem
1. Nuisance or false closing signal to secondary disconnect 13. Check protective relay logic. Correct as required.
2. Closing coil (52SRC) terminal A2 is shorted-to-ground. Check to determine if problems are in wiring or coil. Correct as required.
Mechanical problem
1. Mechanical failure of operating mechanism. Check and contact regional service centers, the factory or telephone Siemens field service at +1 (800) 347-6659 or +1 (919) 365-2200 outside the U.S.
Circuit breaker will not trip
Tripping coil or solenoid (52T) does not energize. There is no tripping sound.
1. Secondary control power is de-energized or control power fuses are blown. Correct as indicated.
2. Damage to wiring, terminals or connectors. Check and repair as necessary.
3. No tripping signal to secondary disconnect contact 1. Check for continuity and correct protective relay logic.
4. Secondary disconnect contacts 1 or 2 are not engaging. Check and replace if required.
5. Failure of trip coil (52T). Check and replace if necessary.
6. Auxiliary switch NO contacts 23 to 24 or 33 to 34 are open when circuit breaker is closed. Check linkage and switch. Replace or adjust as necessary.
Tripping coil (52T) energizes. No tripping sound is heard, and circuit breaker contacts do not open. In other words, they remain closed.
1. Failure of tripping spring or its mechanical linkage. Check and replace if required.
Tripping coil (52T) energizes. Tripping sound is heard, but circuit breaker contacts do not open.
1. Mechanical failure of operating mechanism. Check and contact regional service centers, the factory or telephone Siemens field service at +1 (800) 347-6659 or +1 (919) 365-2200 outside the U.S.
2. One or more of the vacuum interrupters are held closed. Check and replace as necessary.
Nuisance or false trip
Electrical problem
1. Tripping signal remains energized on secondary-disconnect contact.
2. Check for improper protective relay logic.
Mechanical problem
1. Mechanical failure of operating mechanism. Check and contact regional service centers, the factory or telephone Siemens field service at +1 (800) 347-6659 or +1 (919) 365-2200 outside the U.S.
Table 8: Troubleshooting (continued)

62
Control voltages, ANSI/IEEE C37.06 Close
coilTrip coil
Spring charging motor
NominalRange
Run (Average)1
Inrush (Peak)
Charging
Close Trip A1 A1 A A Seconds
24 Vdc 19 - 28 14 - 28 5.7 15/----4 ----4 ----4 ----4
48 Vdc 36 - 56 28 - 56 11.4 11.4/303 8 25 10
125 Vdc 100 - 140 70 - 140 2.1 4.8/7.43 4 18 10
250 Vdc 200 - 280 140 - 280 2.1 4.2/9.63 2 10 10
120 Vac 104 - 127 ----4 2.0 ----2, 4 6 ----4 10
240 Vac 208 - 254 ----4 2.0 ----2,4 3 ----4 10
Table 9: Circuit breaker control data
Footnotes:1. Current at nominal voltage2. Capacitor trip3. Value preceding slash (/) is the current
for the standard trip coil with standard rating interrupting time. Value following (/) is current for optional trip coil with three-cycle interrupting time.
4. ---- means this selection is not available.
Footnotes:1. Two contacts in series2. All switch contacts are non-convertible.
Type switch Continuous current Control circuit voltage
Non-inductive A 120 Vac 240 Vac 48 Vdc 125 Vdc 250 Vdc
Circuit breaker 10 10 5 10/301 9.6 4.8
TOC 15 15 10 0.5 0.5 0.2
MOC 20 15 10 10 10 5
Inductive
Circuit breaker 10 6 3 10 6 3
TOC 15 15 10 0.5 0.5 0.2
MOC 20 15 10 10 10 5
Table 10: Interrupting capacity auxiliary switch contacts2
Appendix

63
Table 11: Type GMSG vacuum circuit breaker weight in lbs (kg)1, 2, 3
Footnotes:1. Weight estimates are for circuit breaker only. Add
75 lbs (34 kg) if shipped separately packaged.2. Weight and dimensions are approximate.3. Approximate circuit breaker dimensions in inches (mm)
(W x D x H): • 32" (813 mm) X 39” (991 mm) X 36” (914 mm). If packed for shipment separate from switchgear:
• 42” (1067 mm) X 47” (1194 mm) X 43” (1,092 mm).
Spring charging time ≤ 10 s
Close time from energizing close coil at rated control voltage to contact touch (last pole) ≤ 65 ms
Opening time from energization trip coil at rated control voltage to contact part (last pole), not including arcing time
5-cycle interrupting time (83 ms) ≤ 56 ms
3.5-cycle interrupting time (58 ms) ≤ 43 ms
3-cycle interrupting time (50 ms) ≤ 33 ms
Table 12: Circuit breaker operating times (type 3AH3 operator)
Circuit breaker type
Continuous current (A)
1,200 2,000 3,000
5-GMSG-40 5-GMSG-250
440 (200)
650 (295)
665 (302)
5-GMSG-50 5-GMSG-350
455 (206)
665 (302)
670 (304)
5-GMSG-63809
(368)819
(372)824
(375)
7-GMSG-40 7-GMSG-500
455 (206)
665 (302)
675 (306)
15-GMSG-25 15-GMSG-500
430 (195)
640 (290)
----
15-GMSG-40 15-GMSG-750
445 (202)
670 (304)
675 (306)
15-GMSG-50 15-GMSG-1000
460 (209)
675 (306)
680 (308)
15-GMSG-63819
(372)829
(377)834
(379)
5-GMSG-GCB-40 15-GMSG-GCB-40
475 (215)
685 (311)
715 (324)
5-GMSG-GCB-50 15-GMSG-GCB-50
825 (374)
835 (379)
865 (392)
5-GMSG-GCB-63 15-GMSG-GCB-63
875 (397)
900 (408)
930 (427)

64
Circuit breaker type1
Maximum design voltage
(V)2Voltage range
factor (k)3
Withstand voltage levels Continuous current4Short-circuit
(I)5, 6
Interrupting time7
kV rmsPower
frequency kV rms
Lightning impulse (BIL)
kV peakA rms kA rms sym ms/cycles
5-GMSG-40-xxxx-104 4.76 1.0 19 60 1,200, 2,000, 3,000, 4,000FC 40 83/5
5-GMSG-50-xxxx-130 4.76 1.0 19 60 1,200, 2,000, 3,000, 4,000FC 50 83/5
5-GMSG-63-xxxx-164 4.76 1.0 19 60 1,200, 2,000, 3,000, 4,000FC 63 83/5
7-GMSG-40-xxxx-104 8.25 1.0 36 95 1,200, 2,000, 3,000, 4,000FC 40 83/5
15-GMSG-25-xxxx-65 15.0 1.0 36 95 1,200, 2,000 25 83/5
15-GMSG-40-xxxx-104 15.0 1.0 36 95 1,200, 2,000, 3,000, 4,000FC 40 83/5
15-GMSG-50-xxxx-130 15.0 1.0 36 95 1,200, 2,000, 3,000, 4,000FC 50 83/5
15-GMSG-63-xxxx-164 15.0 1.0 36 95 1,200, 2,000, 3,000, 4,000FC 63 83/5
Circuit breaker type1
Permissible tripping delay (y)
Maximum symmetrical
interrupting (I)
% dc component
Short-time current (I)
(three seconds)
Closing and latching (momentary)
Sec kA rms sym % kA rmsAsymmetrical
(1.55 x I) kA rms
Peak (2.6 x I) kA peak
5-GMSG-40-xxxx-104 2 40 47 40 62 104
5-GMSG-50-xxxx-130 2 50 47 50 78 130
5-GMSG-63-xxxx-164 2 63 47 63 98 164
7-GMSG-40-xxxx-104 2 40 47 40 62 104
15-GMSG-25-xxxx-65 2 25 47 25 39 65
15-GMSG-40-xxxx-104 2 40 47 40 62 104
15-GMSG-50-xxxx-130 2 50 47 50 78 130
15-GMSG-63-xxxx-164 2 63 47 63 98 164
Table 13: Type GMSG vacuum circuit breaker ratings (new "constant kA" ratings basis)
These ratings are in accordance with:
ANSI/IEEE C37.04-1999 Standard Rating Structure for AC High-Voltage Circuit Breakers
ANSI/IEEE C37.06-2009 AC High-Voltage Circuit Breakers Rated on a Symmetrical Current Basis - Preferred Ratings and Related Required Capabilities for Voltages Above 1,000 Volts
ANSI/IEEE C37.09-1999 Standard Test Procedure for AC High-Voltage Circuit Breakers Rated on a Symmetrical Current Basis
ANSI/IEEE C37.010-1999 Application Guide for AC High-Voltage Circuit Breakers Rated on a Symmetrical Current Basis.
Footnotes:1. “xxxx” in type designation refers to the
continuous current rating 1,200 A, 2,000 A or 3,000 A, as appropriate. The 4,000 A fan-cooled rating is achieved using a 3,000 A circuit breaker, in combination with fan cooling as indicated in Footnote 4.
2. Maximum design voltage for which the circuit breaker is designed and the upper limit for operation.
3. K is listed for information purposes only. For circuit breakers rated on a "constant kA" ratings basis, the voltage range factor is 1.0.
4. 4000FC indicates that fan cooling is included in the switchgear structure for this rating. 4000 A rating is not available in outdoor equipment.
5. All values apply to polyphase and line-to-line faults.
6. Standard duty cycle is O - 0.3s - CO - 3 min. - CO.
7. Standard rating interrupting time is five-cycles (83 ms). Optional rated interrupting time of three-cycles (50 ms) is available (except with 24 Vdc tripping).

65
Footnotes:1 Interrupting time is based on the first current zero
occurring not later than 66 ms after fault initiation, for example, %dc component <100.
2 "xxxx" in type designation refers to the continuous current rating 1,200 A, 2,000 A or 3,000 A, as appropriate. The 4,000 A fan-cooled rating is achieved using a 3,000 A circuit breaker in combination with fan cooling in the switchgear structure.
Rated values and related capabilitiesIEEE C37.013
clauseUnits
Circuit breaker type2
15-GMSG-GCB-40-XXXX-110
15-GMSG-GCB-50-XXXX-137
15-GMSG-GCB-63-XXXX-173
Rated maximum voltage (V) 5.1 kV 15.0 15.0 15.0
Power frequency 5.2 Hz 60 60 60
Rated continuous current 5.3 A1,200, 2,000,
3,000, 4,000 FC1,200, 2,000,
3,000, 4,000 FC1,200, 2,000,
3,000, 4,000 FC
Rated dielectric strength (withstand voltage) 1. Power frequency, one minute 2. Impulse
5.4.2 C37.013a, Table 4
kV
kV peak
38 95
38 95
38 95
Rated short-circuit duty cycle 5.5 CO-30 min-CO CO-30 min-CO CO-30 min-CO
Rated interrupting time1 5.6 ms < 80 ms < 80 ms < 80 ms
Rated short-circuit current 1. System source (100%) (I) 2. Generator source (50%)
5.8.1
5.8.2.3
kA sym kA sym
40 20
50 25
63
31.5
dc component % 75 64 61
Asymmetry ratio (historical "S" factor) ---- 1.46 1.35 1.32
Asymmetrical interrupting (ref) kA rms 57.9 67.5 83
Delayed current zero capability ms 40 30 30
Close and latch capability (274% I) kA peak 110 137 173
Short-time current carrying capability (100% I) 5.8.2.7 kA sym 40 50 63
Short-time current duration 5.8.2.7 s 3 3 3
Transient recovery voltage (TRV) rating System source 1. E2 peak voltage 2. RRRV (TRV rate) 3. T2 time-to-peak
Generator source 1. E2 crest voltage 2. RRRV (TRV rate) 3. T2 time-to-peak
Out-of-phase switching 1. E2 crest voltage 2. RRRV (TRV rate) 3. T2 time-to-peak
5.9 C37.013a, Table 5
C37.013a, Table 6
C37.013a, Table 9
kV kV / µs
µs
kV
kV / µs µs
kV
kV / µs µs
27.6 (1.84 V) 3.5
9.3 (0.62 V)
27.6 (1.84 V)
1.6 20.25 (1.35 V)
39.0 (2.6 V)
3.3 13.4 (0.89 V)
27.6 (1.84 V) 4.5
7.2 (0.48 V)
27.6 (1.84 V)
1.8 18.0 (1.20 V)
39.0 (2.6 V)
4.1 10.8 (0.72 V)
27.6 (1.84 V) 4.5
7.2 (0.48 V)
27.6 (1.84 V)
1.8 18.0 (1.20 V)
39.0 (2.6 V)
4.1 10.8 (0.72 V)
Rated load-current switching capability 5.10 A1,200, 2,000,
3,0001,200, 2,000, 3,000, 4,000
1,200, 2,000, 3,000, 4,000
Out-of-phase current switching capability 5.12 kA 20 25 31.5
Mechanical endurance operations 10,000 10,000 10,000
Table 14: Type GMSG-GCB generator circuit breaker rated values and related capabilities

66
Table 15: Type GMSG vacuum circuit breaker ratings (historic "constant MVA" ratings basis)
Circuit breaker type1
Nominal voltage
class
Nominal three-phase MVA class9
Maximum design
voltage (V)2
Continuous current4
Voltage range
factor (K)3
Withstand voltage levels
Short-circuit (at rated
maximum design
voltage) (I)5,
6, 10
kV MVA kV rms A rms ----Power
frequency kV rms
Lightning impulse (BIL)
kV peakkA rms sym
5-GMSG-250-xxxx-97 4.16 250 4.76 1,200, 2,000 1.24 19 60 29
5-GMSG-350-xxxx-132 4.16 350 4.761,200, 2,000,
3,000, 4,000FC1.19 19 60 41
7-GMSG-500-xxxx-111 7.2 500 8.251,200, 2,000,
3,000, 4,000FC1.25 36 95 33
15-GMSG-500-xxxx-62 13.8 500 15.01,200, 2,000,
3,000, 4,000FC1.30 36 95 18
15-GMSG-750-xxxx-97 13.8 750 15.01,200, 2,000,
3,000, 4,000FC1.30 36 95 28
15-GMSG-1000-xxxx-130 13.8 1,000 15.01,200, 2,000,
3,000, 4,000FC1.30 36 95 37
Circuit breaker type1
Interrupting time11
Permissible tripping delay
(Y)
Rated maximum
design voltage (V)
divided by K (= V/K)
Maximum symmetrical interrupting
(K x I)7
Short-time current (K x I) (three seconds)
Closing and latching (momentary)
ms/cycles Sec kV rms kA rms sym kA rmsPeak
( 2.7 x K x I)8 kA peak
Asymmetrical (1.6 x K x I)8
kA rms
5-GMSG-250-xxxx-97 83/5 2 3.85 36 36 97 58
5-GMSG-350-xxxx-132 83/5 2 4.0 49 49 132 78
7-GMSG-500-xxxx-111 83/5 2 6.6 41 41 111 66
15-GMSG-500-xxxx-62 83/5 2 11.5 23 23 62 37
15-GMSG-750-xxxx-97 83/5 2 11.5 36 36 97 58
15-GMSG-1000-xxxx-130 83/5 2 11.5 48 48 130 77

67
These ratings are in accordance with:
ANSI/IEEE C37.04-1979 Standard Rating Structure for AC High-Voltage Circuit Breakers Rated on a Symmetrical Current Basis
ANSI C37.06-1987 AC High-Voltage Circuit Breakers Rated on a Symmetrical Current Basis - Preferred Ratings and Related Required Capabilities
ANSI/IEEE C37.09-1979 Standard Test Procedure for AC High-Voltage Circuit Breakers Rated on a Symmetrical Current Basis
ANSI/IEEE C37.010-1979 Application Guide for AC High-Voltage Circuit Breakers Rated on a Symmetrical Current Basis.
Footnotes:1. “xxxx” in type designation refers to the continuous
current rating 1,200 A, 2,000 A or 3,000 A, as appropriate. The 4,000 A fan-cooled rating is achieved using a 3,000 A circuit breaker, in combination with fan cooling as indicated in Footnote 4.
2. Maximum design voltage for which the circuit breaker is designed and the upper limit for operation.
3. K is the ratio of the rated maximum design voltage to the lower limit of the range of operating voltage in which the required symmetrical and asymmetrical interrupting capabilities vary in inverse proportion to the operating voltage.
4. 4,000FC indicates that fan cooling is included in the switchgear structure for this rating. 4,000 A rating is not available in outdoor equipment.
5. To obtain the required symmetrical interrupting capability of a circuit breaker at an operating voltage between 1/K times rated maximum design voltage and rated maximum design voltage, the following formula shall be used: Required symmetrical interrupting capability = rated short-circuit current (I) x [(rated maximum design voltage)/(operating voltage)]. For operating voltages below 1/K times maximum design voltage, the required symmetrical interrupting capability of the circuit breaker shall be equal to K times rated short-circuit current.
6. Within the limitations stated in ANSI/IEEE C37.04-1979, all values apply to polyphase and line-to-line faults. For single phase-to-ground faults, the specific conditions stated in clause 5.10.2.3 of ANSI/IEEE C37.04-1979 apply.
7. Current values in this row are not to be exceeded even for operating voltage below 1/K times rated maximum design voltage. For operating voltages between rated maximum design voltage and 1/K times rated maximum design voltage, follow Footnote 5.
8. Current values in this row are independent of operating voltage up to and including rated maximum voltage.
9. Nominal three-phase MVA class" is included for reference only. This information is not listed in ANSI C37.06-1987.
10. Standard duty cycle is O - 15s - CO.11. Standard rating interrupting time is five-cycles
(83 ms). Optional rated interrupting time of three-cycles (50 ms) is available (except with 24 Vdc tripping).

The information provided in this document contains merely general descriptions or characteristics of performance which in case of actual use do not always apply as described or which may change as a result of further development of the products. An obligation to provide the respective characteristics shall only exist if expressly agreed in the terms of contract.
All product designations may be trademarks or product names of Siemens AG or supplier companies whose use by third parties for their own purposes could violate the rights of the owners.
Subject to change without prior notice. Order No.: E50001-F710-A231-V3-4A00 All rights reserved. Printed in USA © 2015 Siemens Industry, Inc.
Siemens Industry, Inc. 7000 Siemens Road Wendell, NC 27591
For more information, contact: +1 (800) 347-6659
www.usa.siemens.com/mvswitchgear