Adobe Analytics – Technical Specification Document
47
Adobe Analytics – Technical Specification Document Adobe Consulting
-
Upload
khangminh22 -
Category
Documents
-
view
2 -
download
0
Transcript of Adobe Analytics – Technical Specification Document

1 | Adobe Experience Cloud Tech Spec
Adobe Analytics – Technical Specification Document
Adobe Consulting
sturcotte_CMF
Typewritten Text
sturcotte_CMF
Typewritten Text
sturcotte_CMF
Typewritten Text
sturcotte_CMF
Typewritten Text
2 | Adobe Experience Cloud Tech Spec
ContentsContents ................................................................................................................................................................................................................................................ 2
Revision History ............................................................................................................................................................................................................................... 3
Document Overview .................................................................................................................................................................................................................... 3
Tools for Adobe Launch Debugging and QA .............................................................................................................................................................. 4
Introduction to Data Layers .................................................................................................................................................................................................... 5
General Launch Configurations & Settings – Adobe Consulting .................................................................................................................... 6
Install Experience Cloud ID Service Configuration – Adobe Consulting ................................................................................................. 16
Deployment Instructions ................................................................................................................................................................................................... 16
Install Adobe Analytics & Configuration – Adobe Consulting ........................................................................................................................ 18
Deployment Instructions ................................................................................................................................................................................................... 18
Install AA Product String Builder & Configuration – Adobe Consulting .................................................................................................. 21
Deployment Instructions ................................................................................................................................................................................................... 21
Site Content Effectiveness – Adobe Consulting & Client Development Team ...................................................................................... 22
Deployment Instructions .................................................................................................................................................................................................. 22
Implementation Testing – Adobe Consulting & Client Development Team .................................................................................... 27
Media Tracking – Adobe Consulting & Client Development Team .............................................................................................................. 28
Deployment Instructions .................................................................................................................................................................................................. 28
Implementation Testing – Adobe Consulting & Client Development Team .................................................................................... 37
Shopping Cart – Adobe Consulting & Client Development Team ................................................................................................................. 39
Deployment Instructions .................................................................................................................................................................................................. 39
Implementation Testing – Adobe Consulting & Client Development Team .................................................................................... 43
Appendix: Validation – Adobe Consulting & Client Development Team ................................................................................................. 44
Validation: Debugging with Charles – Adobe Consulting & Client Development Team ......................................................... 44
3 | Adobe Experience Cloud Tech Spec
Revision History VERSION DATE AUTHOR SUMMARY OF CHANGES
1.0 04/01/2022 Sheetal Raina First Draft
Document Overview This tech spec contains basic setup best practices for implementing the Adobe Experience Cloud on a web property using Launch by Adobe. As a companion to this guide, a reference implementation using these best practices can be found at:
• https://helpx.adobe.com/experience-manager/kt/integration/using/launch-reference-architecture-guides.html
The goal is of this document is to guide you through implementing Adobe Analytics using Launch by Adobe:
After completing this you will be able to:
• Enable Experience Cloud Extension on the site• Enable Adobe Analytics Extension on the site• Identify pages and content available on the site• Capture product SKU and conversion• Track cart, checkout, and purchase flows• External Campaign performance
4 | Adobe Experience Cloud Tech Spec
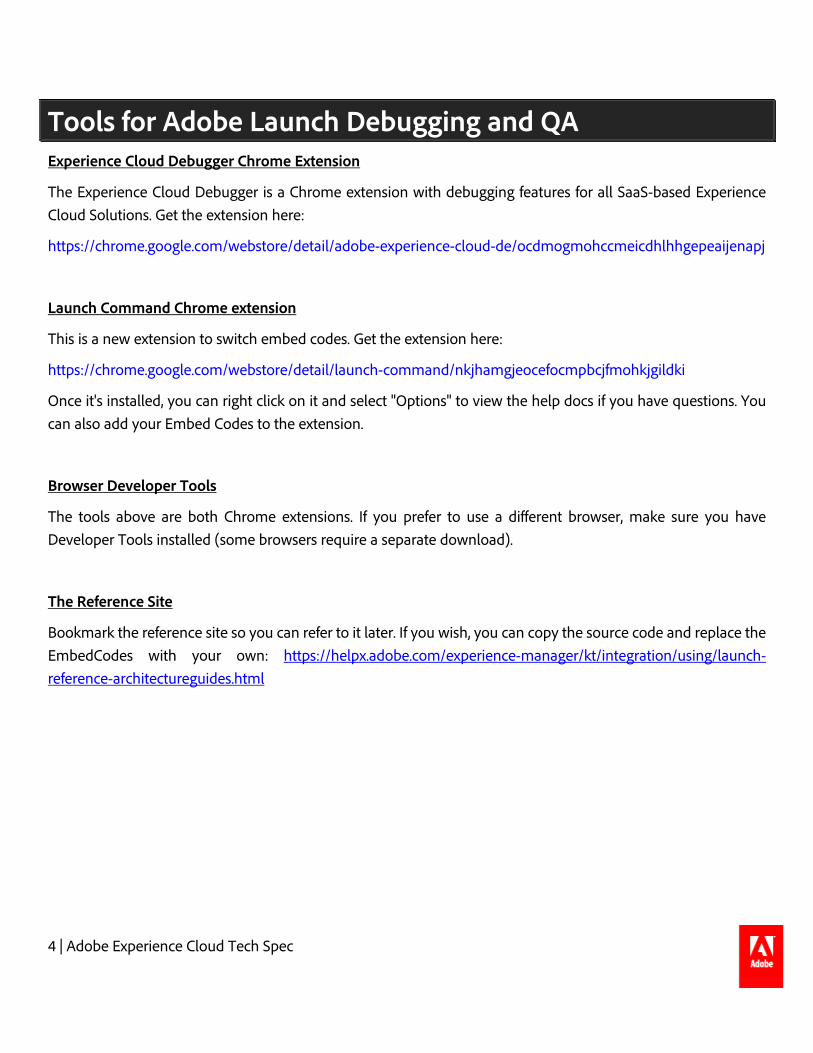
Tools for Adobe Launch Debugging and QA Experience Cloud Debugger Chrome Extension
The Experience Cloud Debugger is a Chrome extension with debugging features for all SaaS-based Experience Cloud Solutions. Get the extension here:
https://chrome.google.com/webstore/detail/adobe-experience-cloud-de/ocdmogmohccmeicdhlhhgepeaijenapj
Launch Command Chrome extension
This is a new extension to switch embed codes. Get the extension here:
https://chrome.google.com/webstore/detail/launch-command/nkjhamgjeocefocmpbcjfmohkjgildki
Once it's installed, you can right click on it and select "Options" to view the help docs if you have questions. You can also add your Embed Codes to the extension.
Browser Developer Tools
The tools above are both Chrome extensions. If you prefer to use a different browser, make sure you have Developer Tools installed (some browsers require a separate download).
The Reference Site
Bookmark the reference site so you can refer to it later. If you wish, you can copy the source code and replace the EmbedCodes with your own: https://helpx.adobe.com/experience-manager/kt/integration/using/launch-reference-architectureguides.html
5 | Adobe Experience Cloud Tech Spec
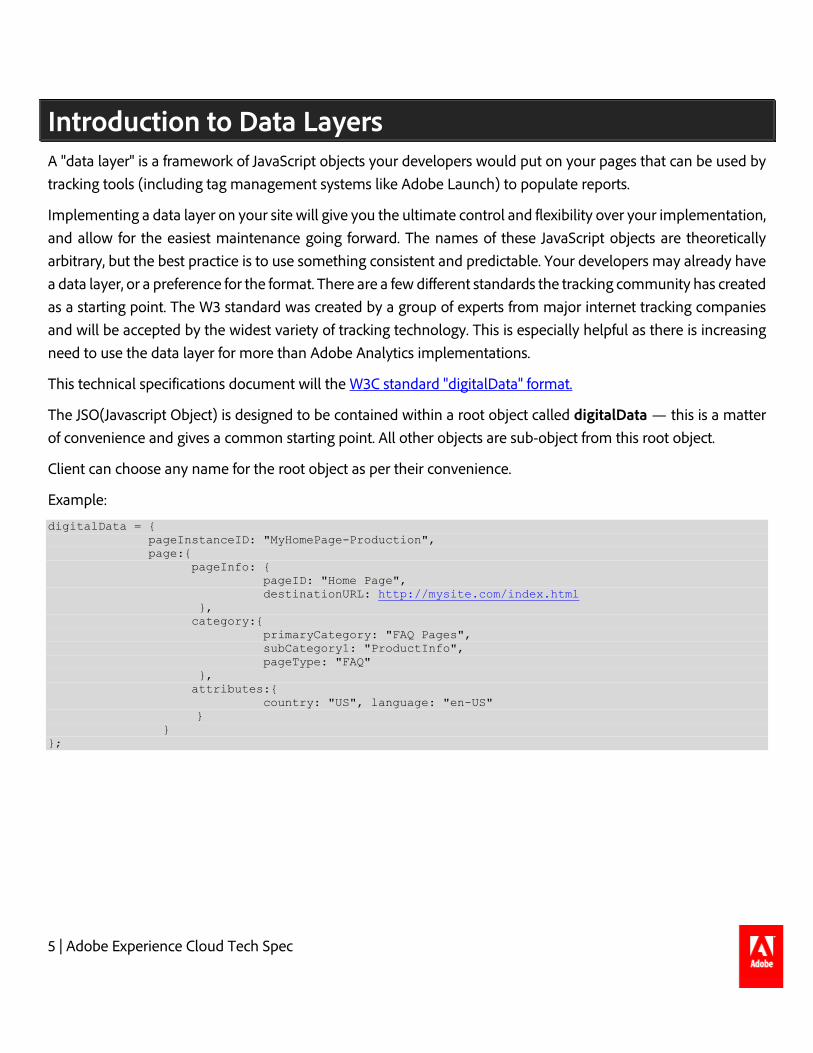
Introduction to Data Layers A "data layer" is a framework of JavaScript objects your developers would put on your pages that can be used by tracking tools (including tag management systems like Adobe Launch) to populate reports.
Implementing a data layer on your site will give you the ultimate control and flexibility over your implementation, and allow for the easiest maintenance going forward. The names of these JavaScript objects are theoretically arbitrary, but the best practice is to use something consistent and predictable. Your developers may already have a data layer, or a preference for the format. There are a few different standards the tracking community has created as a starting point. The W3 standard was created by a group of experts from major internet tracking companies and will be accepted by the widest variety of tracking technology. This is especially helpful as there is increasing need to use the data layer for more than Adobe Analytics implementations.
This technical specifications document will the W3C standard "digitalData" format.
The JSO(Javascript Object) is designed to be contained within a root object called digitalData — this is a matter of convenience and gives a common starting point. All other objects are sub-object from this root object.
Client can choose any name for the root object as per their convenience.
Example:
digitalData = { pageInstanceID: "MyHomePage-Production", page:{ pageInfo: { pageID: "Home Page", destinationURL: http://mysite.com/index.html }, category:{ primaryCategory: "FAQ Pages", subCategory1: "ProductInfo", pageType: "FAQ" }, attributes:{ country: "US", language: "en-US"
} } };

6 | Adobe Experience Cloud Tech Spec
General Launch Configurations & Settings – Adobe Consulting
Configuration 1: Create a Property 1. Click the “Add New Property” or “New Property” button:
2. Name your property.3. Enter the domain or domains where you will be implementing the property.4. Don’t change any of the Advanced Settings.5. Click “Save”
Your new property should display on Property list page. Click on the name of your property to open the Overview screen and then click on the Extensions tab. Note that the “Core Extension” was automatically added
7 | Adobe Experience Cloud Tech Spec
when you created the Property. The “Core” extension provides many of the capabilities that you are used to from DTM, such as the ability to fire actions at specific events, add custom code snippets and so forth.
What is similar to DTM?
• Launch and DTM properties both have these options:• Name• Additional domains• Return empty string for undefined Data Elements• Tracking Cookie Name, with “sat_track” as the default• Anchor Delay, with 100ms as the default• Properties can be deleted• Properties on the list page can be filtered by Property Name
What is different from DTM?
• “URL” has been changed to “domain” and only accepts a domain name• Launch properties do not have these options:
a. Allow Multi-Rule Approvals (similar capabilities are available in Launch’s publishing process)b. Enable Selective Publish (similar capabilities are available in Launch’s publishing process)c. Tag Timeoutd. Properties in Launch cannot currently be disabled (ETA is TBD)e. Properties on the list page cannot currently be filtered by domain namef. Properties on the list page cannot currently be filtered by the property id (use the Experience Cloud
Debugger to look up a property name)
Configuration 2: Create an Adapter Adapter is a new term in Launch, although the concept existed in DTM. An “Adapter” refers to the destination(s) where you want to deploy your Launch libraries—on Adobe’s Akamai instance or on your own web servers. To make environments more flexible in Launch, this level of control was broken out as its own setting. For example, you could choose to host to your Production libraries on your own domain (self-hosting allows for security checks, automated testing, version control, TTL, caching, etc), but use Adobe’s Akamai instance for development environments since it doesn’t require any IT work. The Akamai Adapter can also be used to create a zip archive of your library, which you can then retrieve via the Launch API.
This reference architecture uses the Akamai Adapter.
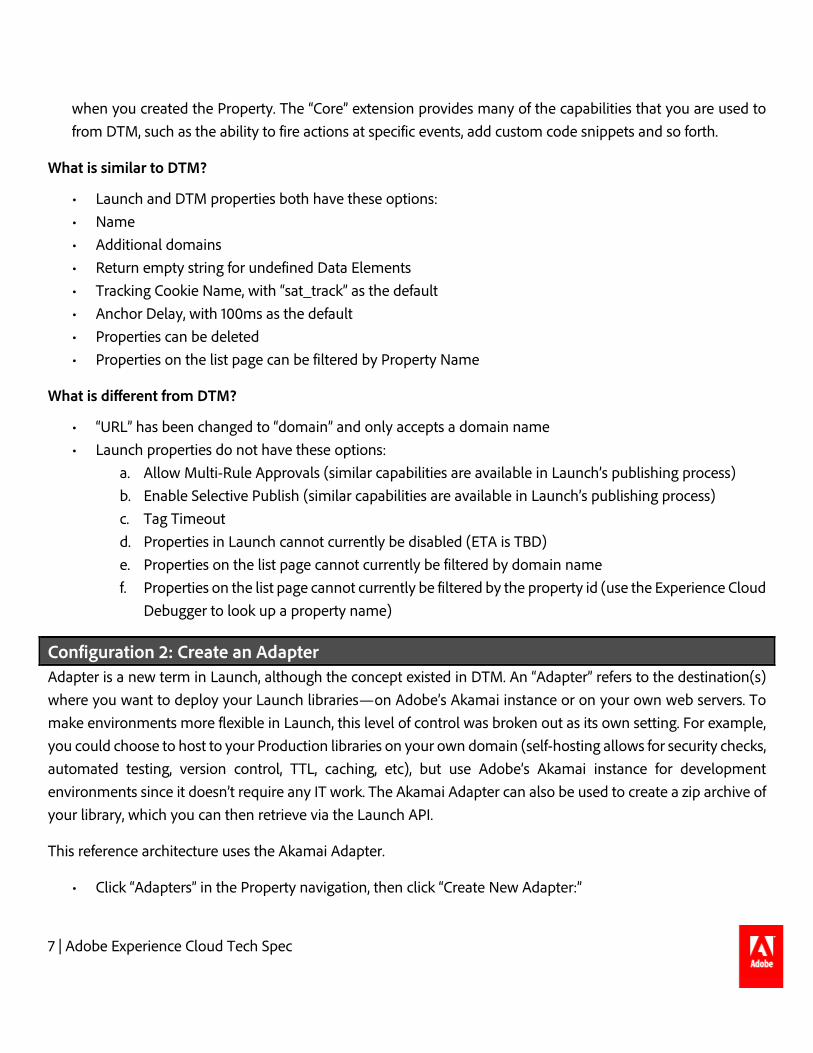
• Click “Adapters” in the Property navigation, then click “Create New Adapter:”
8 | Adobe Experience Cloud Tech Spec
• Name the Adapter—“Akamai” is a good name—using the “Akamai” type from the dropdown and click“Save”:
What is similar to DTM?
• Options to host your libraries through Akamai or on your own server
What is different from DTM?
• No insecure FTP options• SFTP option uses an encrypted private key instead of a password• SFTP has no separate HTTP/HTTPS path sections• SFTP has no “Enable relative hostnames for staging and production library hosting” checkbox
9 | Adobe Experience Cloud Tech Spec
Configuration 3: Create Environments
In DTM, there were only two environments—Staging and Production. Launch introduces a Development environment and allows you to have multiple Development environments.
For example, the Analytics implementation team can work in their own development environment, while the Target implementation team can work in their own development environment. They can work independently and merge their code later in the publishing process.
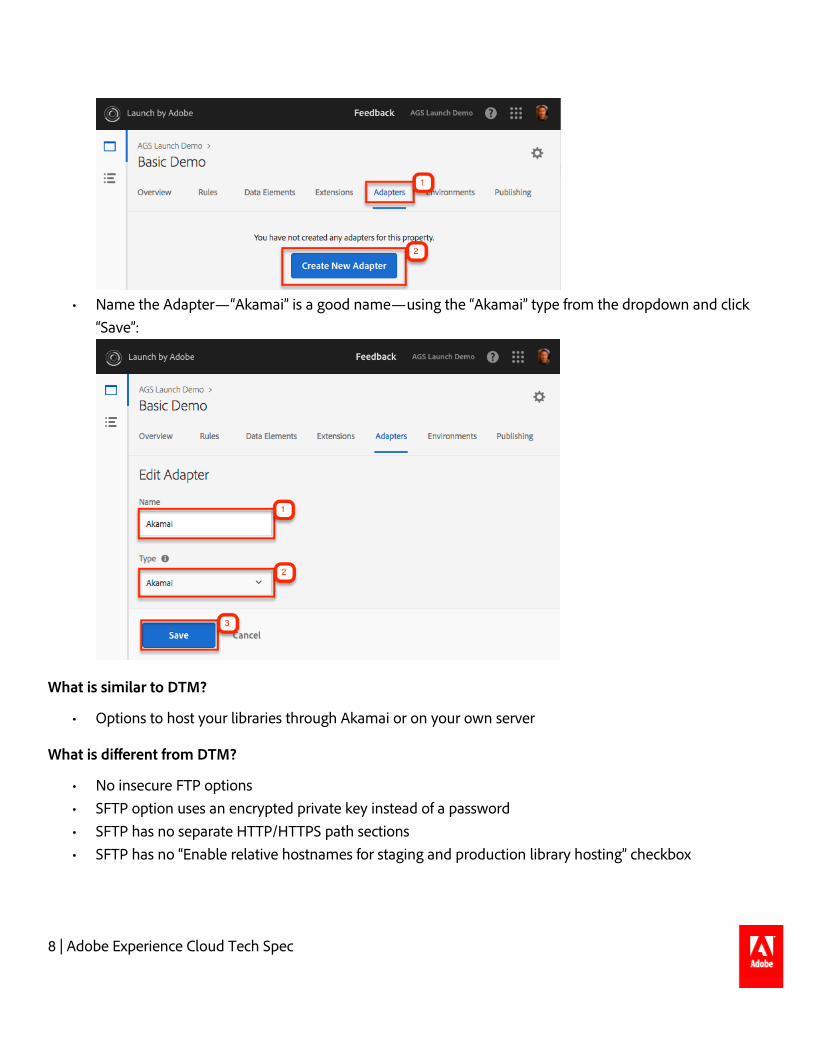
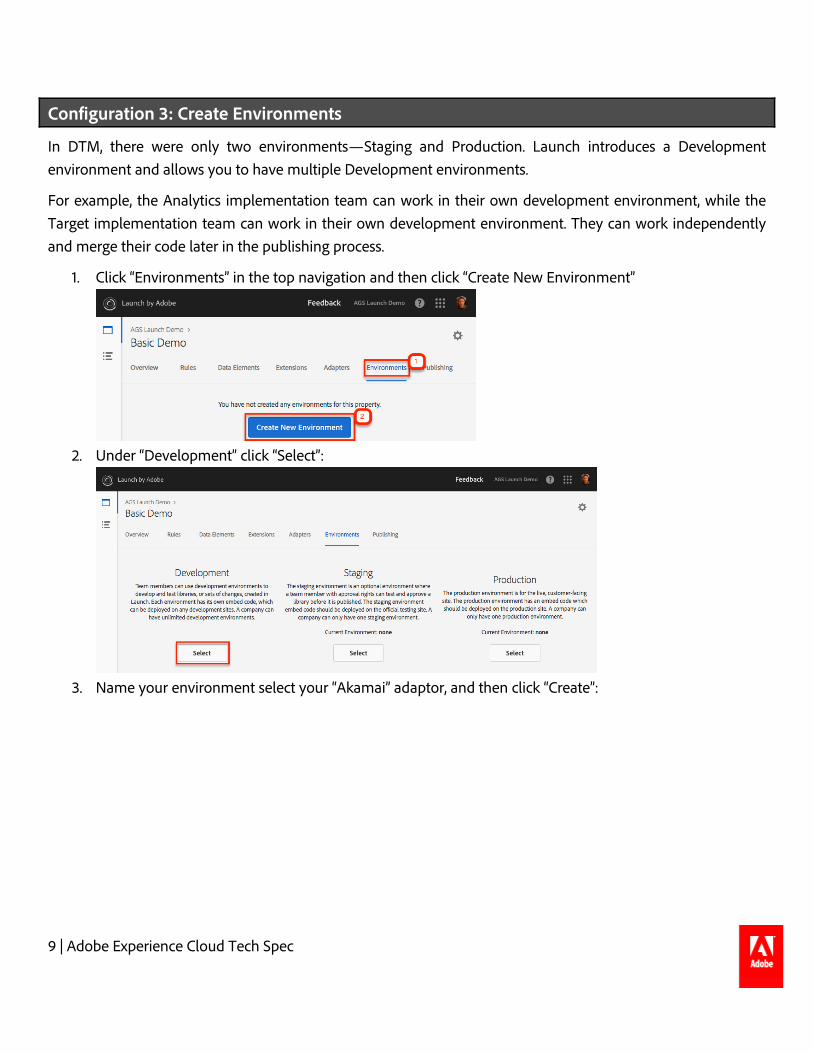
1. Click “Environments” in the top navigation and then click “Create New Environment”
2. Under “Development” click “Select”:
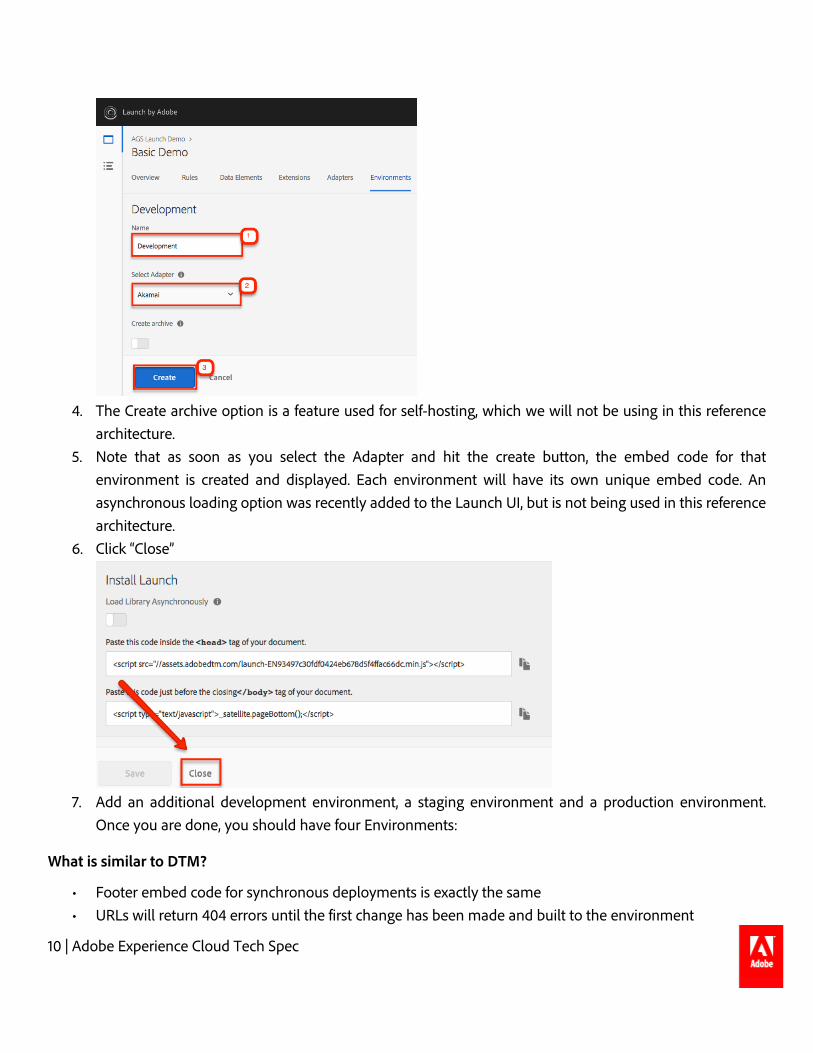
3. Name your environment select your “Akamai” adaptor, and then click “Create”:
10 | Adobe Experience Cloud Tech Spec
4. The Create archive option is a feature used for self-hosting, which we will not be using in this referencearchitecture.
5. Note that as soon as you select the Adapter and hit the create button, the embed code for thatenvironment is created and displayed. Each environment will have its own unique embed code. Anasynchronous loading option was recently added to the Launch UI, but is not being used in this referencearchitecture.
6. Click “Close”
7. Add an additional development environment, a staging environment and a production environment.Once you are done, you should have four Environments:
What is similar to DTM?
• Footer embed code for synchronous deployments is exactly the same• URLs will return 404 errors until the first change has been made and built to the environment
11 | Adobe Experience Cloud Tech Spec
What is different from DTM?
• DTM Switch can’t be used to switch you between Staging and Prod environments—the new LaunchCommand tool should be used for this purpose.
• DTM Embed URLs are slightly different from Launch Embed URLs. Migration tools are being built soexisting DTM embed codes can be transferred to Launch properties, so that customers will eventually beable to migrate without having to update their page code.
• An Asynchronous embed code option is available
Configuration 3: Implement the Launch Embed Codes
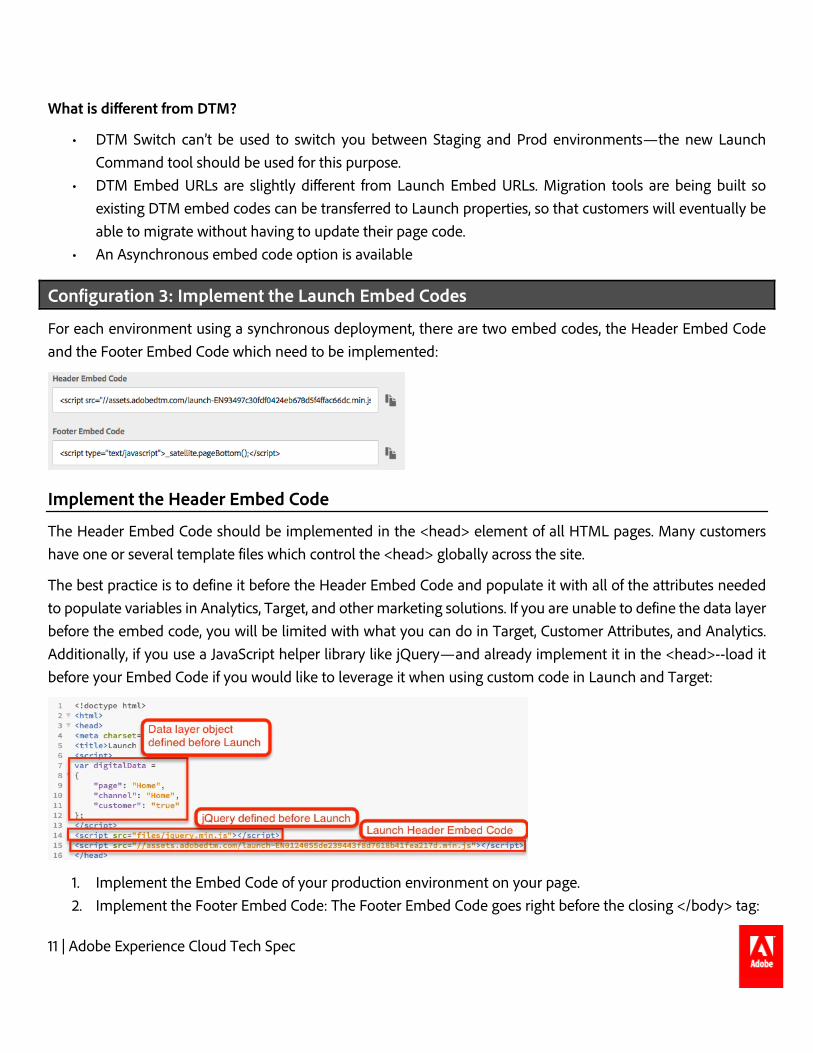
For each environment using a synchronous deployment, there are two embed codes, the Header Embed Code and the Footer Embed Code which need to be implemented:
Implement the Header Embed Code
The Header Embed Code should be implemented in the <head> element of all HTML pages. Many customers have one or several template files which control the <head> globally across the site.
The best practice is to define it before the Header Embed Code and populate it with all of the attributes needed to populate variables in Analytics, Target, and other marketing solutions. If you are unable to define the data layer before the embed code, you will be limited with what you can do in Target, Customer Attributes, and Analytics. Additionally, if you use a JavaScript helper library like jQuery—and already implement it in the <head>--load it before your Embed Code if you would like to leverage it when using custom code in Launch and Target:
1. Implement the Embed Code of your production environment on your page.2. Implement the Footer Embed Code: The Footer Embed Code goes right before the closing </body> tag:
12 | Adobe Experience Cloud Tech Spec
Configuration 4: Data Element for Page Name
Data elements are Launch’s version of a data layer. They can store values from your own data layer object, cookies, local storage objects, query string parameters, page elements, meta tags, etc. In this exercise, we will create a data element for Page Name, which we will use later for our simple Target and Analytics implementations.
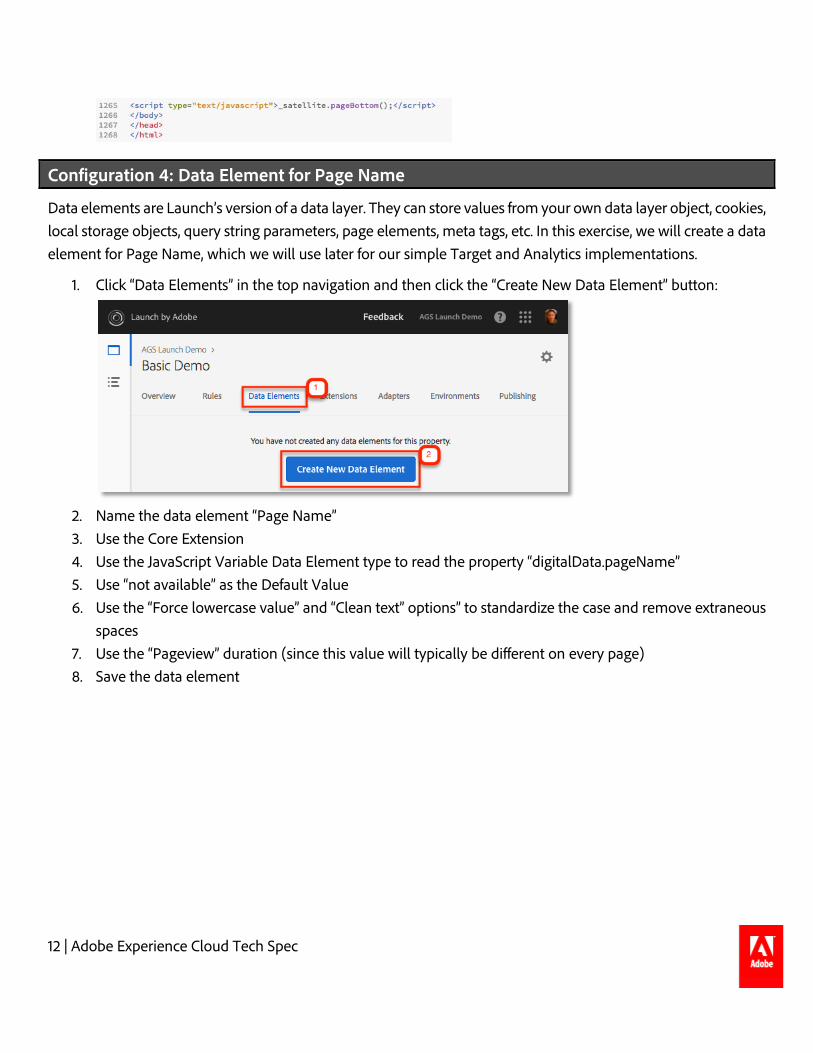
1. Click “Data Elements” in the top navigation and then click the “Create New Data Element” button:
2. Name the data element “Page Name”3. Use the Core Extension4. Use the JavaScript Variable Data Element type to read the property “digitalData.pageName”5. Use “not available” as the Default Value6. Use the “Force lowercase value” and “Clean text” options” to standardize the case and remove extraneous
spaces7. Use the “Pageview” duration (since this value will typically be different on every page)8. Save the data element

13 | Adobe Experience Cloud Tech Spec
What is similar to DTM?
• All DTM data element types are available• The main options—Name, Default Value, Force lowercase, cleanText, and duration—are the same• Sub-options of specific element types are also the same
What is different from DTM?
• Data Elements have their own top navigation element and are no longer under “Rules”• New data element types—Local Storage, Session Storage, Page Info, and Random Number• Names of Data Element types are different. Here is a full list of the element types in Launch with their
corresponding DTM names in parentheses ():a. Cookie (Cookie)b. Custom Code (Custom Script)c. DOM Attribute (CSS Selector)d. Query String Parameter (URL Parameter)
14 | Adobe Experience Cloud Tech Spec
e. JavaScript Variable (JS Object)• The DOM Selector Tool used to select CSS paths for DOM Attributes was discontinued• Data element capabilities can be extended with Extensions. For example, the ContextHub extension allows
you to add data elements using features of the extension.
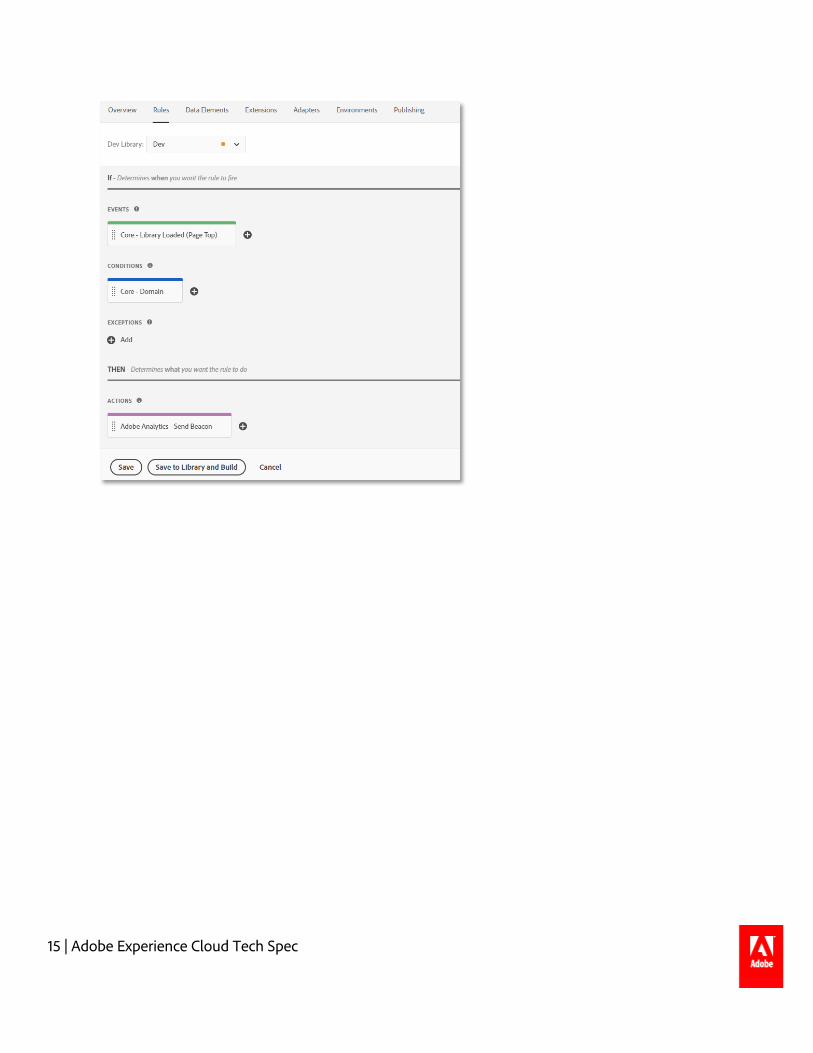
Configuration 5: Launch Rule Creation
This subsection may also detail how to fire beacons after a page has loaded using Launch rules. Launch is a rule-based system. It looks for user interactions and associated data. When the criteria outlined in the rules are met, the rule triggers the extension, script or HTML specified. Events are where the majority of interactions on site take place.
Event (If) - The event is what you want to rule to look for. This is defined by choosing an event, any application conditions, and any exception.
Actions (Then) - Triggers occur after a rule's events take place and all conditions are satisfied. A rule in Launch can trigger as many discrete actions as you want, and you can control the order in which these actions occur. For example, a single rule for an e-commerce Thank You page can trigger your analytics tools and third-party tags from a single rule. There is no need to create separate rules for each extension or tag.
In this exercise, we will create a Launch rule for Page Name, which we will use later for our simple Target and Analytics implementations.
1. Create one Global Rule to set page load beacon across all pages. Go to “Rules” Tab and Create the rulewith the following settings:
15 | Adobe Experience Cloud Tech Spec
16 | Adobe Experience Cloud Tech Spec
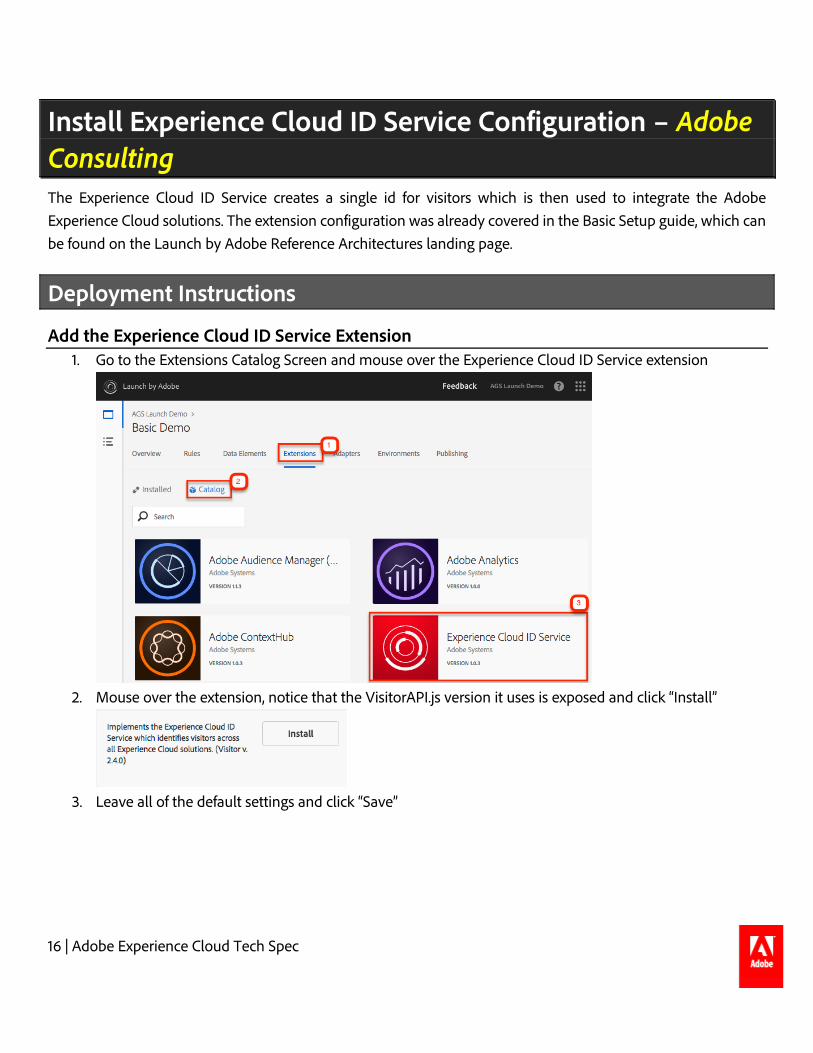
Install Experience Cloud ID Service Configuration – Adobe Consulting The Experience Cloud ID Service creates a single id for visitors which is then used to integrate the Adobe Experience Cloud solutions. The extension configuration was already covered in the Basic Setup guide, which can be found on the Launch by Adobe Reference Architectures landing page.
Deployment Instructions
Add the Experience Cloud ID Service Extension 1. Go to the Extensions Catalog Screen and mouse over the Experience Cloud ID Service extension
2. Mouse over the extension, notice that the VisitorAPI.js version it uses is exposed and click “Install”
3. Leave all of the default settings and click “Save”
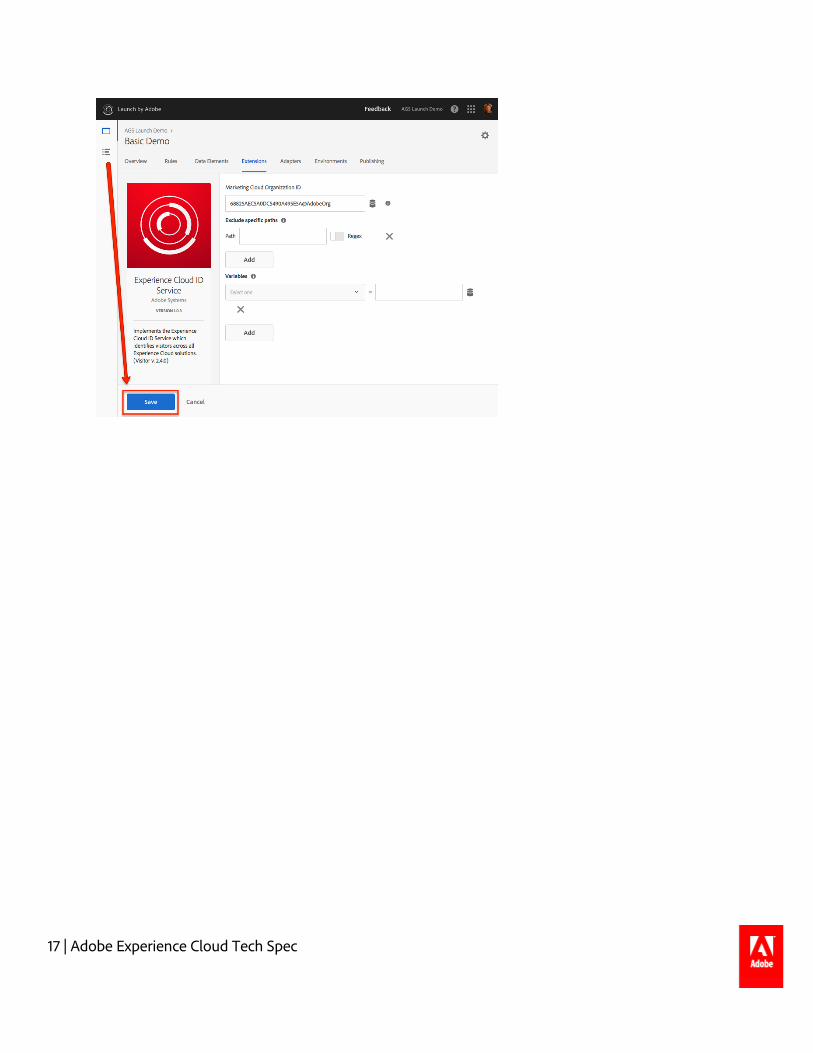
17 | Adobe Experience Cloud Tech Spec
18 | Adobe Experience Cloud Tech Spec
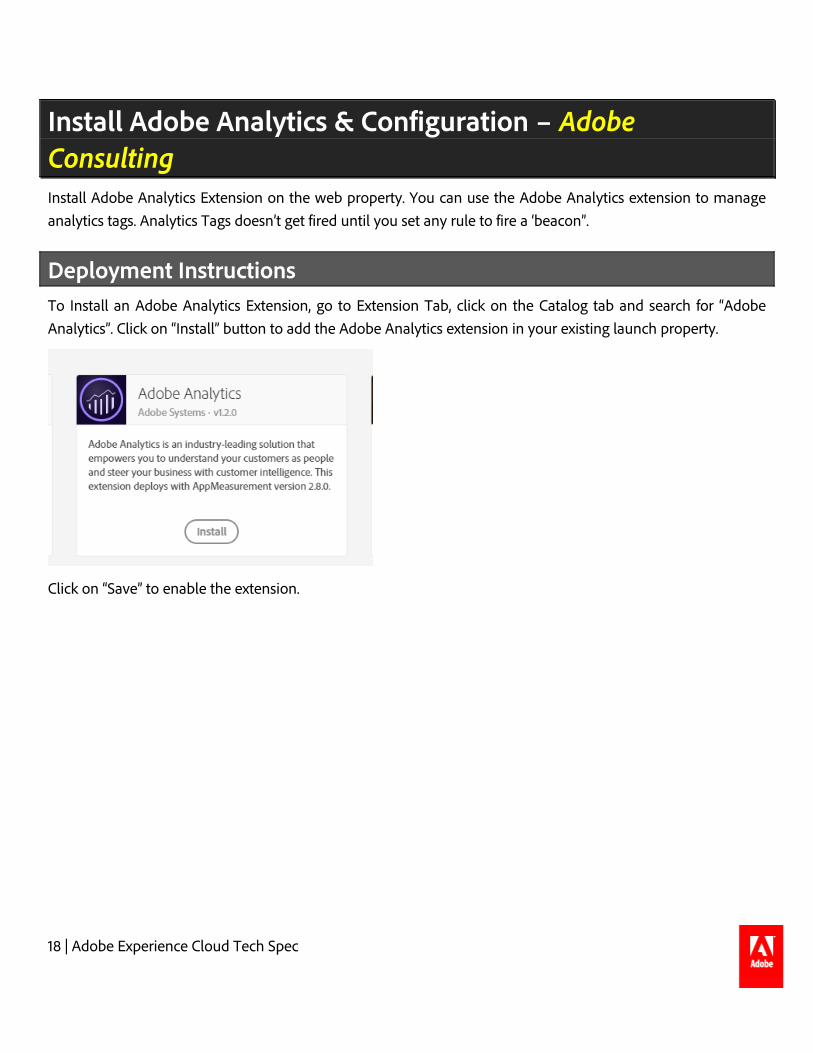
Install Adobe Analytics & Configuration – Adobe Consulting Install Adobe Analytics Extension on the web property. You can use the Adobe Analytics extension to manage analytics tags. Analytics Tags doesn’t get fired until you set any rule to fire a ‘beacon”.
Deployment Instructions To Install an Adobe Analytics Extension, go to Extension Tab, click on the Catalog tab and search for “Adobe Analytics”. Click on “Install” button to add the Adobe Analytics extension in your existing launch property.
Click on “Save” to enable the extension.

19 | Adobe Experience Cloud Tech Spec
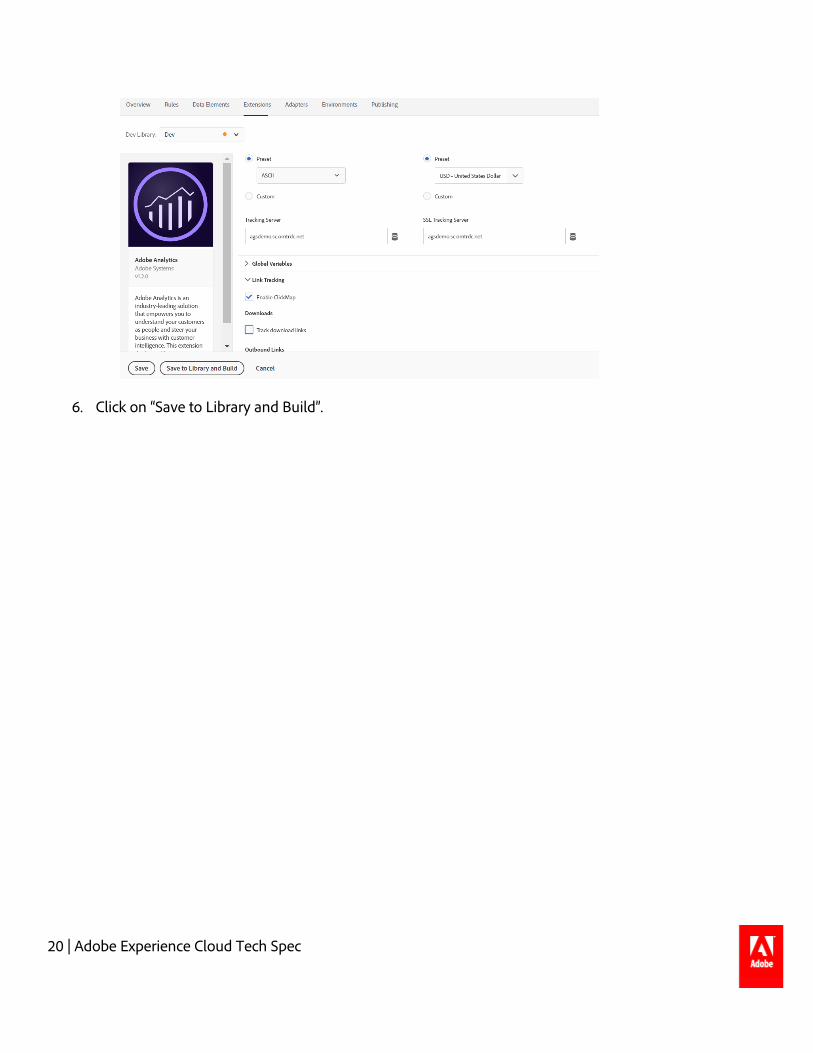
As a next step, Configure your Analytics extension as per the requirement.
1. Select the correct Dev library.2. Adobe Recommend to use the option “Manage the library for me” during configuration.3. Enter the Correct Report suites for Dev, Staging and Production Report suite.
4. For multi suite tagging, click again on “Add Report Suite” and enter the second report suite id5. Enter All other configurations details on the UI
a. Tracking server detailb. Global Variablesc. Cookies details
20 | Adobe Experience Cloud Tech Spec
6. Click on “Save to Library and Build”.

21 | Adobe Experience Cloud Tech Spec
Install AA Product String Builder & Configuration – Adobe Consulting Install AA Product String Builder Extension on the web property. It will help you harness the power of the Adobe Analytics product string.
Deployment Instructions To Install an Adobe Analytics Extension, go to Extension Tab, click on the Catalog tab and search for “AA Product String Builder”. Click on “Install” button to add the AA Product String Builder extension in your existing launch property.
Click on “Save” to enable the extension.
No additional configuration is required.

22 | Adobe Experience Cloud Tech Spec
Site Content Effectiveness – Adobe Consulting & Client Development Team This solution allows the clients to evaluate the effectiveness of the site's pages, including their influence on conversion, landing page bounce rate and exit rate as well as gives the marketers the ability to drill down on each level of your site hierarchy. To do that requires that every page of the site be tagged with an effective page name and variables to represent each level of the content hierarchy.
Variables in This Section – Adobe Consulting
The below table consists of variables used for this solution.
Analytics Variable Used For Source pageName Pages Data layer campaign Tracking Code Launch - Analytics Extension
- Custom Code prop3 Page URL (Pages Not Found) Data layer prop5 Language Data layer prop6 Page URL Data layer prop7 Time Zone Data layer prop14 Domain Name Data layer prop21 Media Name Data layer prop23 Page Query String Parameter Launch - Analytics Extension
- Custom Code eVar1 Application ID Data layer eVar6 Page URL Data layer eVar7 Page Name Data layer eVar14 Domain Name Data layer eVar21 Media Name Data layer eVar23 Page Query String Parameter Launch - Analytics Extension
- Custom Code eVar35 ECID Launch - Analytics Extension
- Custom Code eVar36 User ID Data layer
Deployment Instructions
23 | Adobe Experience Cloud Tech Spec
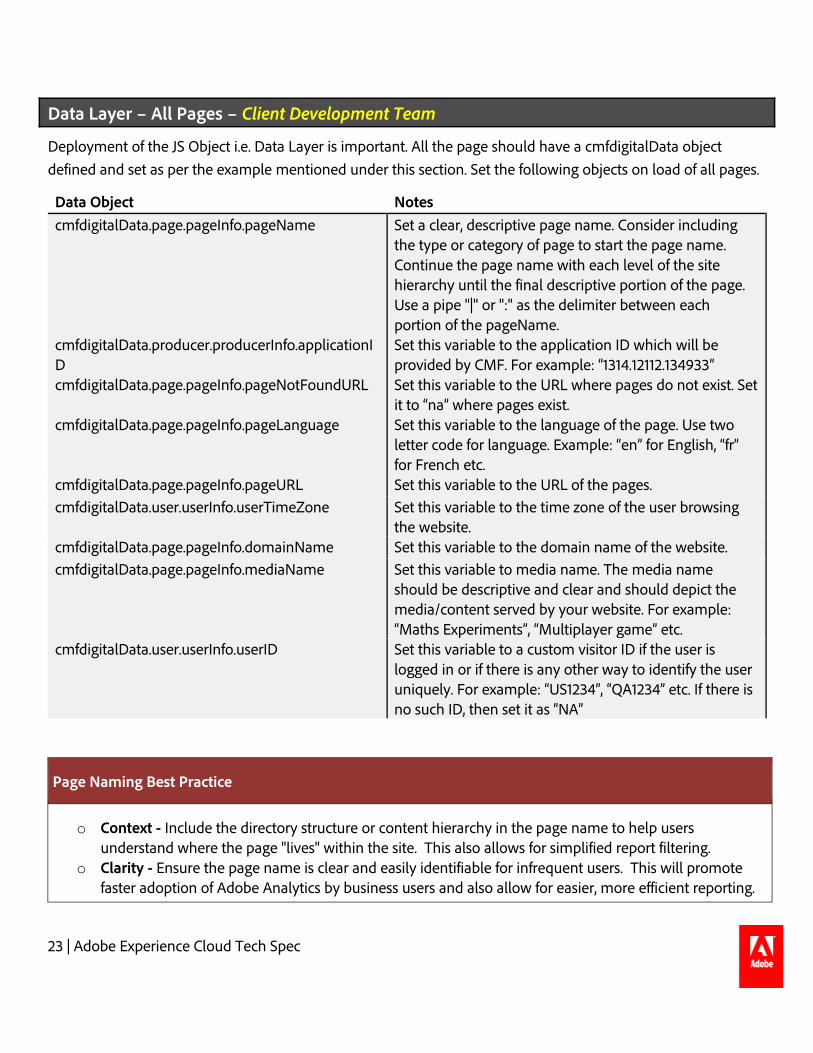
Data Layer – All Pages – Client Development Team
Deployment of the JS Object i.e. Data Layer is important. All the page should have a cmfdigitalData object defined and set as per the example mentioned under this section. Set the following objects on load of all pages.
Data Object Notes cmfdigitalData.page.pageInfo.pageName Set a clear, descriptive page name. Consider including
the type or category of page to start the page name. Continue the page name with each level of the site hierarchy until the final descriptive portion of the page. Use a pipe "|" or ":" as the delimiter between each portion of the pageName.
cmfdigitalData.producer.producerInfo.applicationID
Set this variable to the application ID which will be provided by CMF. For example: “1314.12112.134933”
cmfdigitalData.page.pageInfo.pageNotFoundURL Set this variable to the URL where pages do not exist. Set it to “na” where pages exist.
cmfdigitalData.page.pageInfo.pageLanguage Set this variable to the language of the page. Use two letter code for language. Example: “en” for English, “fr” for French etc.
cmfdigitalData.page.pageInfo.pageURL Set this variable to the URL of the pages. cmfdigitalData.user.userInfo.userTimeZone Set this variable to the time zone of the user browsing
the website. cmfdigitalData.page.pageInfo.domainName Set this variable to the domain name of the website. cmfdigitalData.page.pageInfo.mediaName Set this variable to media name. The media name
should be descriptive and clear and should depict the media/content served by your website. For example: “Maths Experiments”, “Multiplayer game” etc.
cmfdigitalData.user.userInfo.userID Set this variable to a custom visitor ID if the user is logged in or if there is any other way to identify the user uniquely. For example: “US1234”, “QA1234” etc. If there is no such ID, then set it as “NA”
Page Naming Best Practice
o Context - Include the directory structure or content hierarchy in the page name to help usersunderstand where the page "lives" within the site. This also allows for simplified report filtering.
o Clarity - Ensure the page name is clear and easily identifiable for infrequent users. This will promotefaster adoption of Adobe Analytics by business users and also allow for easier, more efficient reporting.
24 | Adobe Experience Cloud Tech Spec
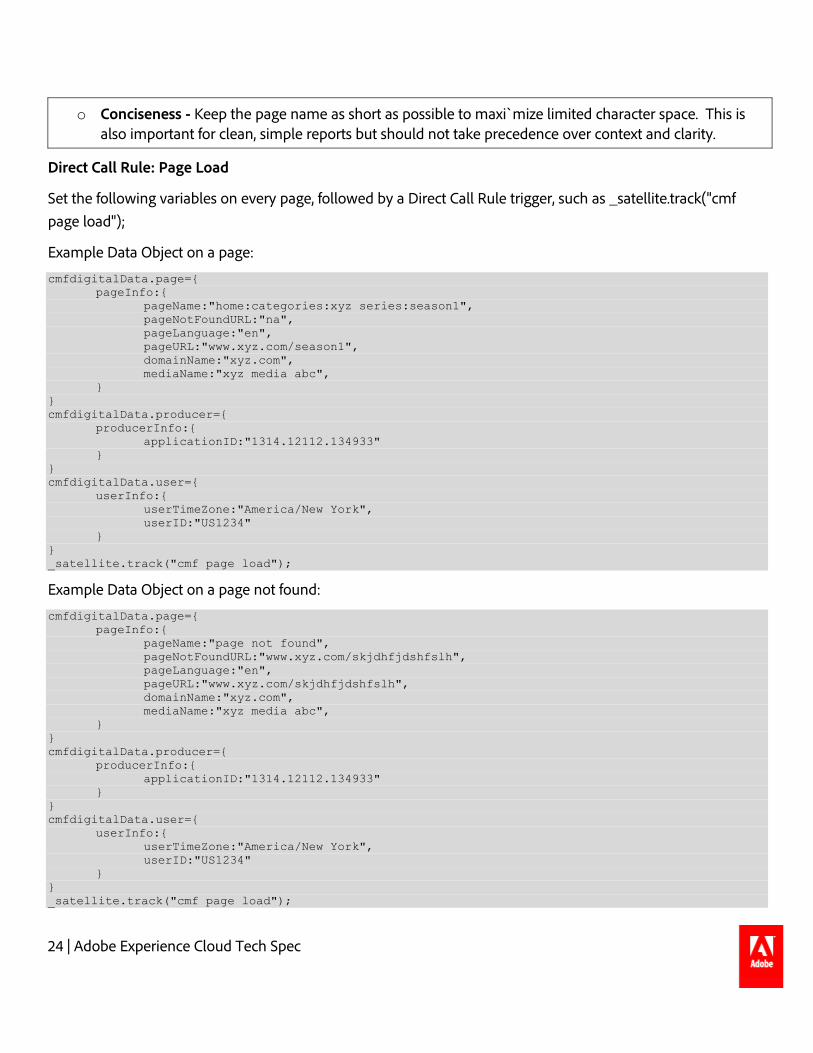
o Conciseness - Keep the page name as short as possible to maxi`mize limited character space. This is also important for clean, simple reports but should not take precedence over context and clarity.
Direct Call Rule: Page Load
Set the following variables on every page, followed by a Direct Call Rule trigger, such as _satellite.track("cmf page load");
Example Data Object on a page:
cmfdigitalData.page={ pageInfo:{ pageName:"home:categories:xyz series:season1", pageNotFoundURL:"na", pageLanguage:"en", pageURL:"www.xyz.com/season1", domainName:"xyz.com", mediaName:"xyz media abc",
} } cmfdigitalData.producer={ producerInfo:{ applicationID:"1314.12112.134933"
} } cmfdigitalData.user={ userInfo:{ userTimeZone:"America/New York", userID:"US1234"
} } _satellite.track("cmf page load");
Example Data Object on a page not found:
cmfdigitalData.page={ pageInfo:{ pageName:"page not found", pageNotFoundURL:"www.xyz.com/skjdhfjdshfslh", pageLanguage:"en", pageURL:"www.xyz.com/skjdhfjdshfslh", domainName:"xyz.com", mediaName:"xyz media abc",
} } cmfdigitalData.producer={ producerInfo:{ applicationID:"1314.12112.134933"
} } cmfdigitalData.user={ userInfo:{ userTimeZone:"America/New York", userID:"US1234"
} } _satellite.track("cmf page load");
25 | Adobe Experience Cloud Tech Spec
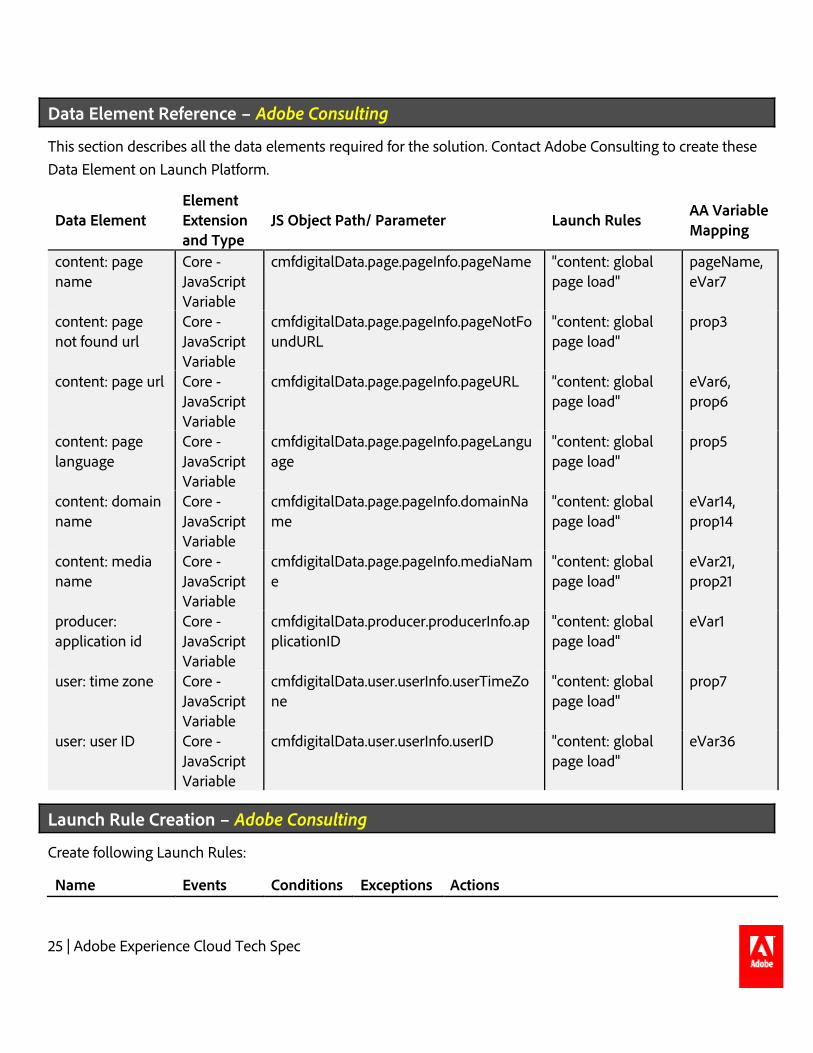
Data Element Reference – Adobe Consulting
This section describes all the data elements required for the solution. Contact Adobe Consulting to create these Data Element on Launch Platform.
Data Element Element Extension and Type
JS Object Path/ Parameter Launch Rules AA Variable Mapping
content: page name
Core - JavaScript Variable
cmfdigitalData.page.pageInfo.pageName "content: global page load"
pageName, eVar7
content: page not found url
Core - JavaScript Variable
cmfdigitalData.page.pageInfo.pageNotFoundURL
"content: global page load"
prop3
content: page url Core - JavaScript Variable
cmfdigitalData.page.pageInfo.pageURL "content: global page load"
eVar6, prop6
content: page language
Core - JavaScript Variable
cmfdigitalData.page.pageInfo.pageLanguage
"content: global page load"
prop5
content: domain name
Core - JavaScript Variable
cmfdigitalData.page.pageInfo.domainName
"content: global page load"
eVar14, prop14
content: media name
Core - JavaScript Variable
cmfdigitalData.page.pageInfo.mediaName
"content: global page load"
eVar21, prop21
producer: application id
Core - JavaScript Variable
cmfdigitalData.producer.producerInfo.applicationID
"content: global page load"
eVar1
user: time zone Core - JavaScript Variable
cmfdigitalData.user.userInfo.userTimeZone
"content: global page load"
prop7
user: user ID Core - JavaScript Variable
cmfdigitalData.user.userInfo.userID "content: global page load"
eVar36
Launch Rule Creation – Adobe Consulting
Create following Launch Rules:
Name Events Conditions Exceptions Actions
26 | Adobe Experience Cloud Tech Spec
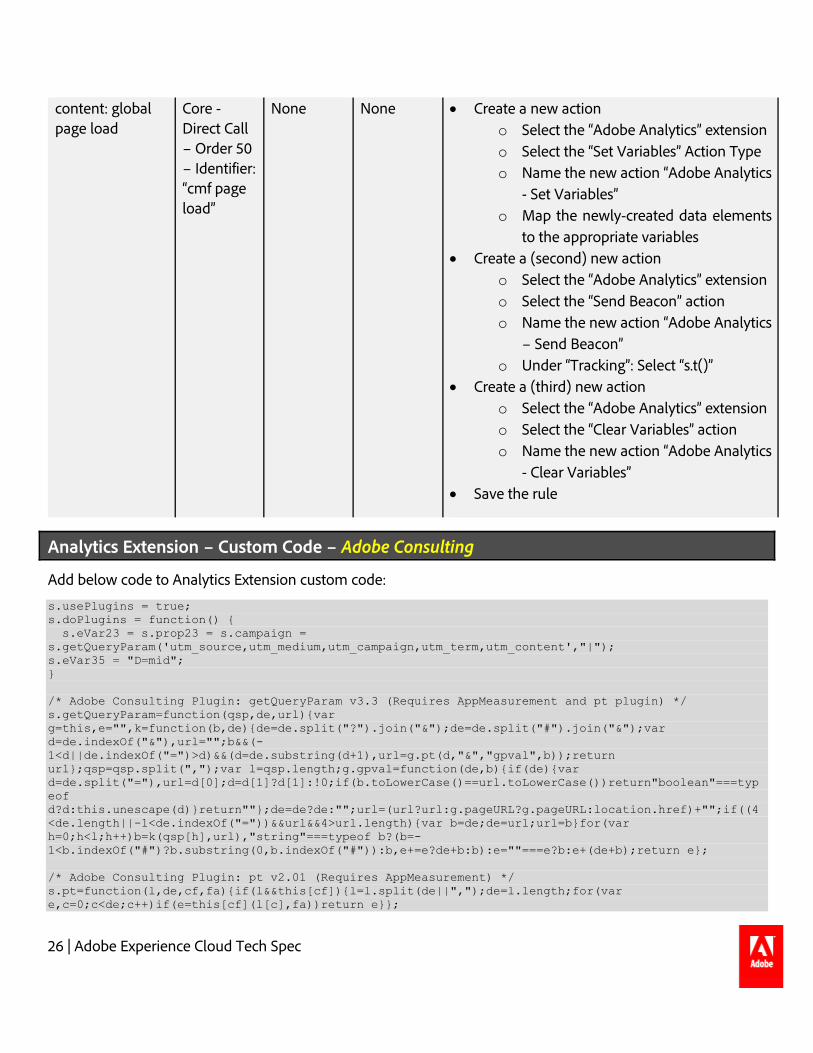
content: global page load
Core - Direct Call – Order 50 – Identifier: “cmf page load”
None None • Create a new action o Select the “Adobe Analytics” extension o Select the “Set Variables” Action Type o Name the new action “Adobe Analytics
- Set Variables” o Map the newly-created data elements
to the appropriate variables • Create a (second) new action
o Select the “Adobe Analytics” extension o Select the “Send Beacon” action o Name the new action “Adobe Analytics
– Send Beacon” o Under “Tracking”: Select “s.t()”
• Create a (third) new action o Select the “Adobe Analytics” extension o Select the “Clear Variables” action o Name the new action “Adobe Analytics
- Clear Variables” • Save the rule
Analytics Extension – Custom Code – Adobe Consulting
Add below code to Analytics Extension custom code:
s.usePlugins = true; s.doPlugins = function() { s.eVar23 = s.prop23 = s.campaign = s.getQueryParam('utm_source,utm_medium,utm_campaign,utm_term,utm_content',"|"); s.eVar35 = "D=mid"; } /* Adobe Consulting Plugin: getQueryParam v3.3 (Requires AppMeasurement and pt plugin) */ s.getQueryParam=function(qsp,de,url){var g=this,e="",k=function(b,de){de=de.split("?").join("&");de=de.split("#").join("&");var d=de.indexOf("&"),url="";b&&(-1<d||de.indexOf("=")>d)&&(d=de.substring(d+1),url=g.pt(d,"&","gpval",b));return url};qsp=qsp.split(",");var l=qsp.length;g.gpval=function(de,b){if(de){var d=de.split("="),url=d[0];d=d[1]?d[1]:!0;if(b.toLowerCase()==url.toLowerCase())return"boolean"===typeof d?d:this.unescape(d)}return""};de=de?de:"";url=(url?url:g.pageURL?g.pageURL:location.href)+"";if((4<de.length||-1<de.indexOf("="))&&url&&4>url.length){var b=de;de=url;url=b}for(var h=0;h<l;h++)b=k(qsp[h],url),"string"===typeof b?(b=-1<b.indexOf("#")?b.substring(0,b.indexOf("#")):b,e+=e?de+b:b):e=""===e?b:e+(de+b);return e}; /* Adobe Consulting Plugin: pt v2.01 (Requires AppMeasurement) */ s.pt=function(l,de,cf,fa){if(l&&this[cf]){l=l.split(de||",");de=l.length;for(var e,c=0;c<de;c++)if(e=this[cf](l[c],fa))return e}};

27 | Adobe Experience Cloud Tech Spec
Implementation Testing – Adobe Consulting & Client Development Team Test the variables listed in this section by analyzing incoming image requests and looking for expected values for the variables listed in the table at the beginning of this section. Refer to the "Validation" section in the Appendix of this document for further details on the tools that can be leveraged to ensure the right variables and values are being set.
Use the debugger to check the following:
• pageName and eVar7 are set correctly and identifies the page being viewed. • eVar1 is set with Application ID • prop3 is set with “na” if page exists or set with a page URL if page does not exist • eVar6 and prop6 are set with page URL • prop5 is set with page language • eVar14 and prop14 are set with domain name • eVar21 and prop21 are set with media name • prop7 is set with user timezone • eVar23, prop23 and campaign are set with utm parameters
('utm_source,utm_medium,utm_campaign,utm_term,utm_content') concatenated with ‘|’ if thy exist in URL
• eVar35 is set with ECID • eVar36 is set with custom user ID if it exists or NA if there is no user ID
28 | Adobe Experience Cloud Tech Spec
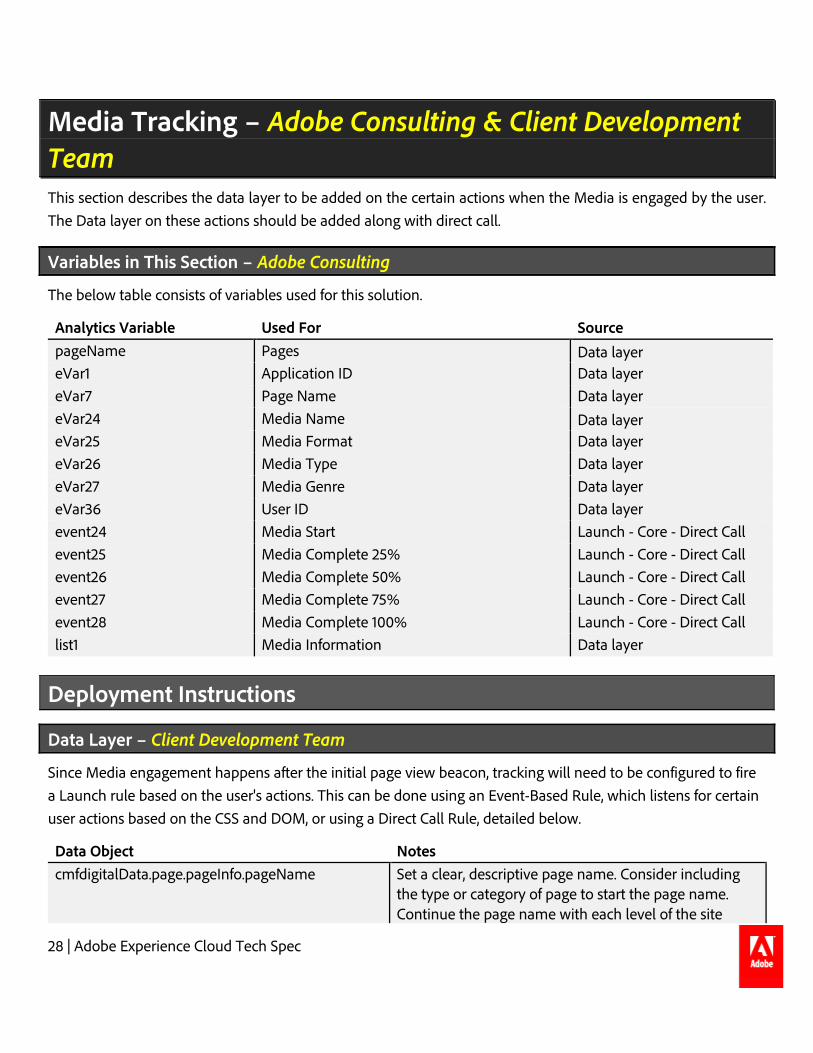
Media Tracking – Adobe Consulting & Client Development Team This section describes the data layer to be added on the certain actions when the Media is engaged by the user. The Data layer on these actions should be added along with direct call.
Variables in This Section – Adobe Consulting
The below table consists of variables used for this solution.
Analytics Variable Used For Source pageName Pages Data layer eVar1 Application ID Data layer eVar7 Page Name Data layer eVar24 Media Name Data layer eVar25 Media Format Data layer eVar26 Media Type Data layer eVar27 Media Genre Data layer eVar36 User ID Data layer event24 Media Start Launch - Core - Direct Call event25 Media Complete 25% Launch - Core - Direct Call event26 Media Complete 50% Launch - Core - Direct Call event27 Media Complete 75% Launch - Core - Direct Call event28 Media Complete 100% Launch - Core - Direct Call list1 Media Information Data layer
Deployment Instructions
Data Layer – Client Development Team
Since Media engagement happens after the initial page view beacon, tracking will need to be configured to fire a Launch rule based on the user's actions. This can be done using an Event-Based Rule, which listens for certain user actions based on the CSS and DOM, or using a Direct Call Rule, detailed below.
Data Object Notes cmfdigitalData.page.pageInfo.pageName Set a clear, descriptive page name. Consider including
the type or category of page to start the page name. Continue the page name with each level of the site

29 | Adobe Experience Cloud Tech Spec
hierarchy until the final descriptive portion of the page. Use a pipe "|" or ":" as the delimiter between each portion of the pageName.
cmfdigitalData.producer.producerInfo.applicationID
Set this variable to the application ID which will be provided by CMF. For example: “1314.12112.134933”
cmfdigitalData.media.mediaInfo.mediaName Set this variable with Media name. For example: “Education Guidelines”
cmfdigitalData.media.mediaInfo.mediaFormat Set this variable with Media format. For example: Feature Film, Feature Length Documentary, Mini-Series, MOW, One-off, Pilot, Series etc.
cmfdigitalData.media.mediaInfo.mediaType Set this variable with Media type. For example: Live Action, Animation, Both Live Action and Animation etc.
cmfdigitalData.media.mediaInfo.mediaGenre Set this variable with Media genre. For example: Education, Kids, Thriller, Horror etc.
cmfdigitalData.media.mediaInfo.mediaInformation Set this variable with Media information - season, episode number of the Media, episode name – concatenated by “|”. For example: “S02|E11|Education Guidelines”
cmfdigitalData.user.userInfo.userID Set this variable to a custom visitor ID if the user is logged in or if there is any other way to identify the user uniquely. For example: “US1234”, “QA1234” etc. If there is no such ID, then set it as “NA”
Direct Call Rule: Media Start
Set the following variables when the user starts watching a Media, followed by a Direct Call Rule trigger, such as _satellite.track("cmf media start");
Example Data Object on Media Start:
cmfdigitalData.page={ pageInfo:{ pageName:"home:categories:xyz series:season1"
} } cmfdigitalData.producer={ producerInfo:{ applicationID:"1314.12112.134933"
} } cmfdigitalData.user={ userInfo:{ userID:"US1234"
} } cmfdigitalData.media={ mediaInfo:{ mediaName:"Education Guidelines", mediaFormat:"Feature Length Documentary",
30 | Adobe Experience Cloud Tech Spec
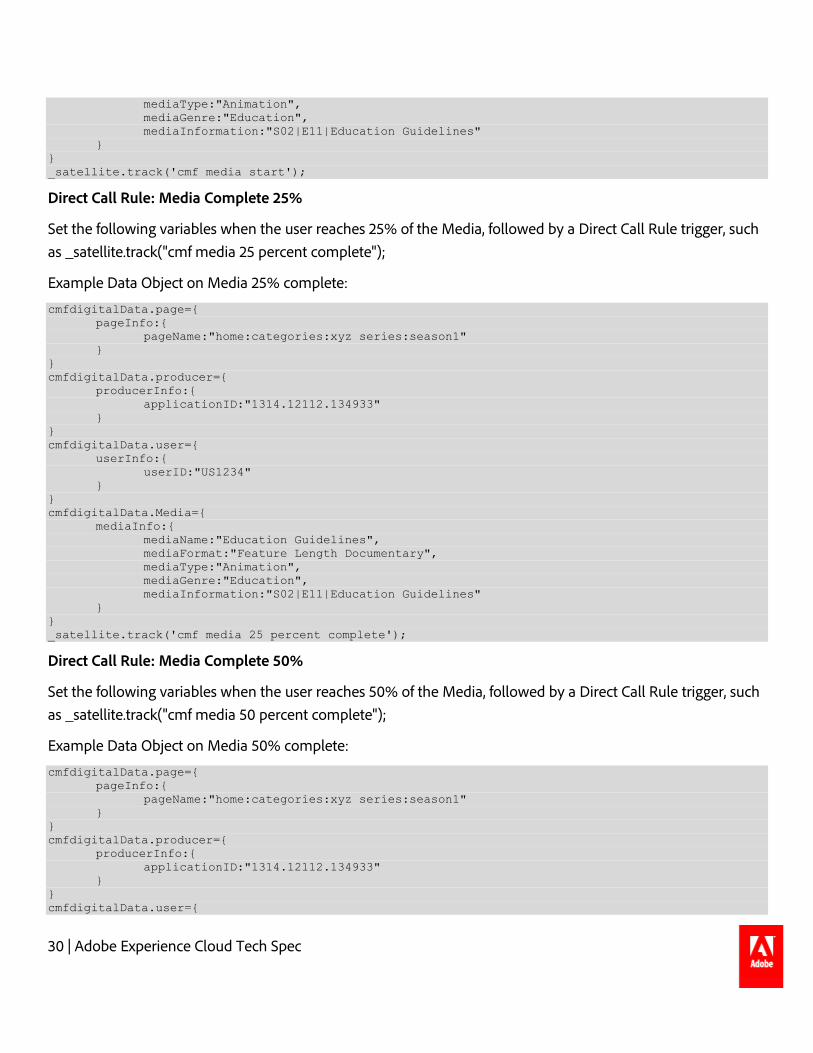
mediaType:"Animation", mediaGenre:"Education", mediaInformation:"S02|E11|Education Guidelines" } } _satellite.track('cmf media start');
Direct Call Rule: Media Complete 25%
Set the following variables when the user reaches 25% of the Media, followed by a Direct Call Rule trigger, such as _satellite.track("cmf media 25 percent complete");
Example Data Object on Media 25% complete:
cmfdigitalData.page={ pageInfo:{ pageName:"home:categories:xyz series:season1"
} } cmfdigitalData.producer={ producerInfo:{ applicationID:"1314.12112.134933"
} } cmfdigitalData.user={ userInfo:{ userID:"US1234"
} } cmfdigitalData.Media={ mediaInfo:{ mediaName:"Education Guidelines", mediaFormat:"Feature Length Documentary", mediaType:"Animation", mediaGenre:"Education", mediaInformation:"S02|E11|Education Guidelines" } } _satellite.track('cmf media 25 percent complete');
Direct Call Rule: Media Complete 50%
Set the following variables when the user reaches 50% of the Media, followed by a Direct Call Rule trigger, such as _satellite.track("cmf media 50 percent complete");
Example Data Object on Media 50% complete:
cmfdigitalData.page={ pageInfo:{ pageName:"home:categories:xyz series:season1"
} } cmfdigitalData.producer={ producerInfo:{ applicationID:"1314.12112.134933"
} } cmfdigitalData.user={

31 | Adobe Experience Cloud Tech Spec
userInfo:{ userID:"US1234"
} } cmfdigitalData.Media={ mediaInfo:{ mediaName:"Education Guidelines", mediaFormat:"Feature Length Documentary", mediaType:"Animation", mediaGenre:"Education", mediaInformation:"S02|E11|Education Guidelines" } } _satellite.track('cmf media 50 percent complete');
Direct Call Rule: Media Complete 75%
Set the following variables when the user reaches 75% of the Media, followed by a Direct Call Rule trigger, such as _satellite.track("cmf media 75 percent complete");
Example Data Object on Media 75% complete:
cmfdigitalData.page={ pageInfo:{ pageName:"home:categories:xyz series:season1"
} } cmfdigitalData.producer={ producerInfo:{ applicationID:"1314.12112.134933"
} } cmfdigitalData.user={ userInfo:{ userID:"US1234"
} } cmfdigitalData.Media={ mediaInfo:{ mediaName:"Education Guidelines", mediaFormat:"Feature Length Documentary", mediaType:"Animation", mediaGenre:"Education", mediaInformation:"S02|E11|Education Guidelines" } } _satellite.track('cmf media 75 percent complete');
Direct Call Rule: Media Complete 100%
Set the following variables when the user reaches 100% of the Media/ finishes the Media, followed by a Direct Call Rule trigger, such as _satellite.track("cmf media 100 percent complete");
Example Data Object on Media 100% complete:
cmfdigitalData.page={ pageInfo:{ pageName:"home:categories:xyz series:season1"

32 | Adobe Experience Cloud Tech Spec
} } cmfdigitalData.producer={ producerInfo:{ applicationID:"1314.12112.134933"
} } cmfdigitalData.user={ userInfo:{ userID:"US1234"
} } cmfdigitalData.Media={ mediaInfo:{ mediaName:"Education Guidelines", mediaFormat:"Feature Length Documentary", mediaType:"Animation", mediaGenre:"Education", mediaInformation:"S02|E11|Education Guidelines" } } _satellite.track('cmf media 100 percent complete');
Data Element Reference – Adobe Consulting
This section describes all the data elements required for the solution. Contact Adobe Consulting to create these Data Element on Launch Platform.
Data Element Element Extension and Type
JS Object Path/ Parameter Launch Rules AA Variable Mapping
media: name Core - JavaScript Variable
cmfdigitalData.media.mediaInfo.mediaName
"media: start", "media: 25 percent complete", "media: 50 percent complete", "media: 75 percent complete", "media: 100 percent complete"
eVar24
media: format Core - JavaScript Variable
cmfdigitalData.media.mediaInfo.mediaFormat
"media: start", "media: 25 percent complete", "media: 50 percent complete", "media: 75 percent complete", "media: 100 percent complete"
eVar25

33 | Adobe Experience Cloud Tech Spec
media: type Core - JavaScript Variable
cmfdigitalData.media.mediaInfo.mediaType
"media: start", "media: 25 percent complete", "media: 50 percent complete", "media: 75 percent complete", "media: 100 percent complete"
eVar26
media: genre Core - JavaScript Variable
cmfdigitalData.media.mediaInfo.mediaGenre
"media: start", "media: 25 percent complete", "media: 50 percent complete", "media: 75 percent complete", "media: 100 percent complete"
eVar27
media: information
Core - JavaScript Variable
cmfdigitalData.media.mediaInfo.mediaInformation
"media: start", "media: 25 percent complete", "media: 50 percent complete", "media: 75 percent complete", "media: 100 percent complete"
list1
Launch Rule Creation – Adobe Consulting
Create following Launch Rules:
Name Events Conditions Exceptions Actions media: start
Core - Direct Call – Order 50 – Identifier: “cmf media start”
None None • Create a new action o Select the “Adobe Analytics” extension o Select the “Set Variables” Action Type o Name the new action “Adobe Analytics -
Set Variables” o Map the newly-created data elements
to the appropriate variables o Add the custom code in the rule:

34 | Adobe Experience Cloud Tech Spec
s.list1 = _satellite.getVar("media: information"); • Create a (second) new action
o Select the “Adobe Analytics” extension o Select the “Send Beacon” action o Name the new action “Adobe Analytics
– Send Beacon” o Under “Tracking”: Select “s.tl()” o Keep Link Type as Custom Link and give
Link Name as “Media Start” • Create a (third) new action
o Select the “Adobe Analytics” extension o Select the “Clear Variables” action o Name the new action “Adobe Analytics -
Clear Variables” • Save the rule
media: 25 percent complete
Core - Direct Call – Order 50 – Identifier: “cmf media 25 percent complete”
None None • Create a new action o Select the “Adobe Analytics” extension o Select the “Set Variables” Action Type o Name the new action “Adobe Analytics -
Set Variables” o Map the newly-created data elements
to the appropriate variables o Add the custom code in the rule: s.list1 = _satellite.getVar("media: information");
• Create a (second) new action o Select the “Adobe Analytics” extension o Select the “Send Beacon” action o Name the new action “Adobe Analytics
– Send Beacon” o Under “Tracking”: Select “s.tl()” o Keep Link Type as Custom Link and give
Link Name as “Media 25 percent complete”
• Create a (third) new action o Select the “Adobe Analytics” extension o Select the “Clear Variables” action o Name the new action “Adobe Analytics -
Clear Variables”
35 | Adobe Experience Cloud Tech Spec
• Save the rule
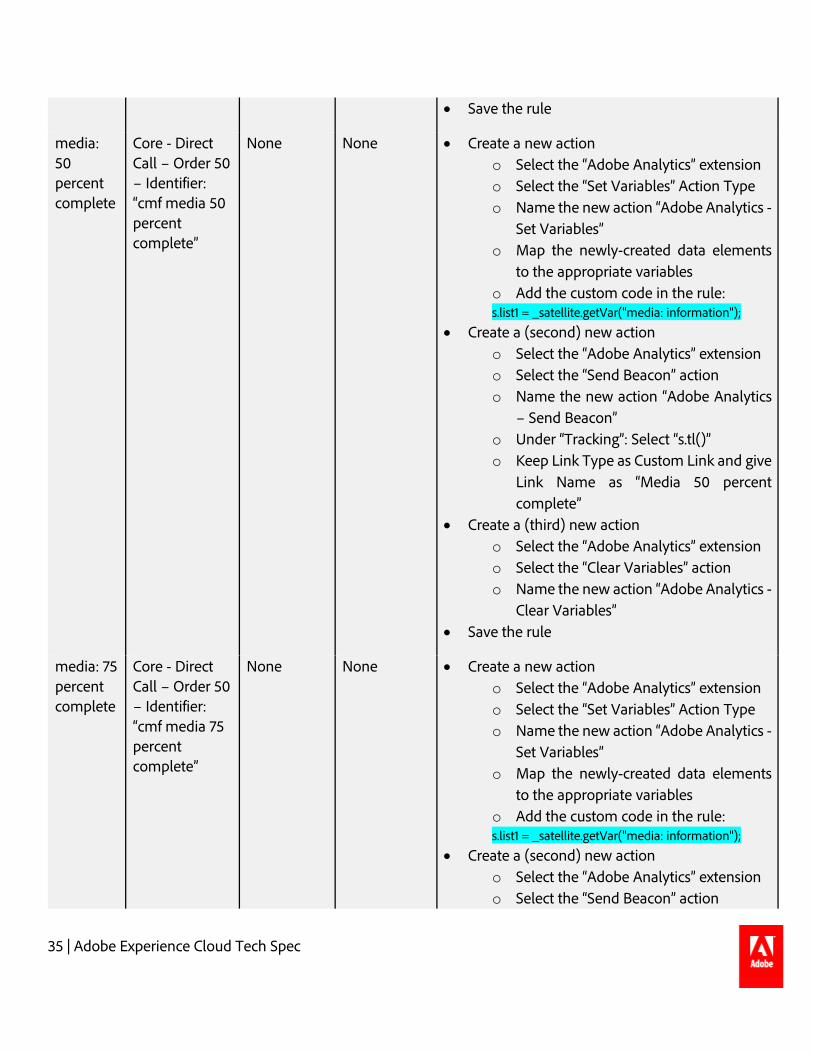
media: 50 percent complete
Core - Direct Call – Order 50 – Identifier:“cmf media 50percentcomplete”
None None • Create a new actiono Select the “Adobe Analytics” extensiono Select the “Set Variables” Action Typeo Name the new action “Adobe Analytics -
Set Variables”o Map the newly-created data elements
to the appropriate variableso Add the custom code in the rule:s.list1 = _satellite.getVar("media: information");
• Create a (second) new actiono Select the “Adobe Analytics” extensiono Select the “Send Beacon” actiono Name the new action “Adobe Analytics
– Send Beacon”o Under “Tracking”: Select “s.tl()”o Keep Link Type as Custom Link and give
Link Name as “Media 50 percentcomplete”
• Create a (third) new actiono Select the “Adobe Analytics” extensiono Select the “Clear Variables” actiono Name the new action “Adobe Analytics -
Clear Variables”• Save the rule
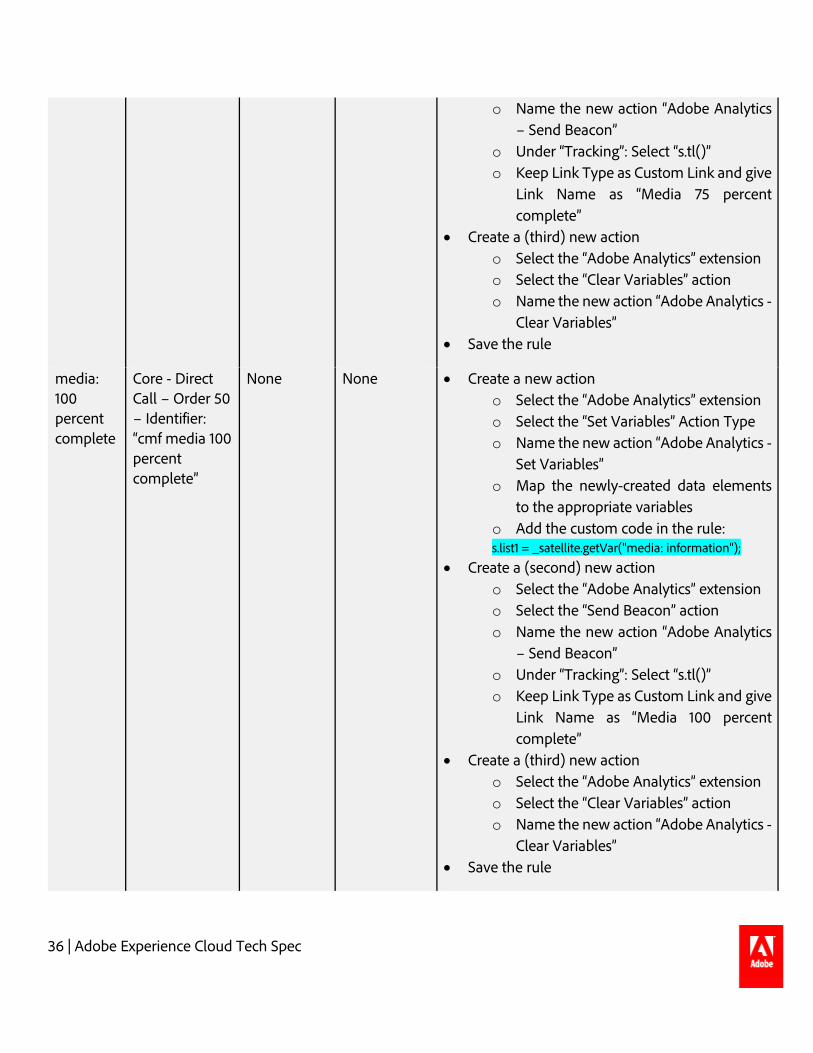
media: 75 percent complete
Core - Direct Call – Order 50 – Identifier:“cmf media 75percentcomplete”
None None • Create a new actiono Select the “Adobe Analytics” extensiono Select the “Set Variables” Action Typeo Name the new action “Adobe Analytics -
Set Variables”o Map the newly-created data elements
to the appropriate variableso Add the custom code in the rule:s.list1 = _satellite.getVar("media: information");
• Create a (second) new actiono Select the “Adobe Analytics” extensiono Select the “Send Beacon” action
36 | Adobe Experience Cloud Tech Spec
o Name the new action “Adobe Analytics – Send Beacon”
o Under “Tracking”: Select “s.tl()” o Keep Link Type as Custom Link and give
Link Name as “Media 75 percent complete”
• Create a (third) new action o Select the “Adobe Analytics” extension o Select the “Clear Variables” action o Name the new action “Adobe Analytics -
Clear Variables” • Save the rule
media: 100 percent complete
Core - Direct Call – Order 50 – Identifier: “cmf media 100 percent complete”
None None • Create a new action o Select the “Adobe Analytics” extension o Select the “Set Variables” Action Type o Name the new action “Adobe Analytics -
Set Variables” o Map the newly-created data elements
to the appropriate variables o Add the custom code in the rule: s.list1 = _satellite.getVar("media: information");
• Create a (second) new action o Select the “Adobe Analytics” extension o Select the “Send Beacon” action o Name the new action “Adobe Analytics
– Send Beacon” o Under “Tracking”: Select “s.tl()” o Keep Link Type as Custom Link and give
Link Name as “Media 100 percent complete”
• Create a (third) new action o Select the “Adobe Analytics” extension o Select the “Clear Variables” action o Name the new action “Adobe Analytics -
Clear Variables” • Save the rule
37 | Adobe Experience Cloud Tech Spec
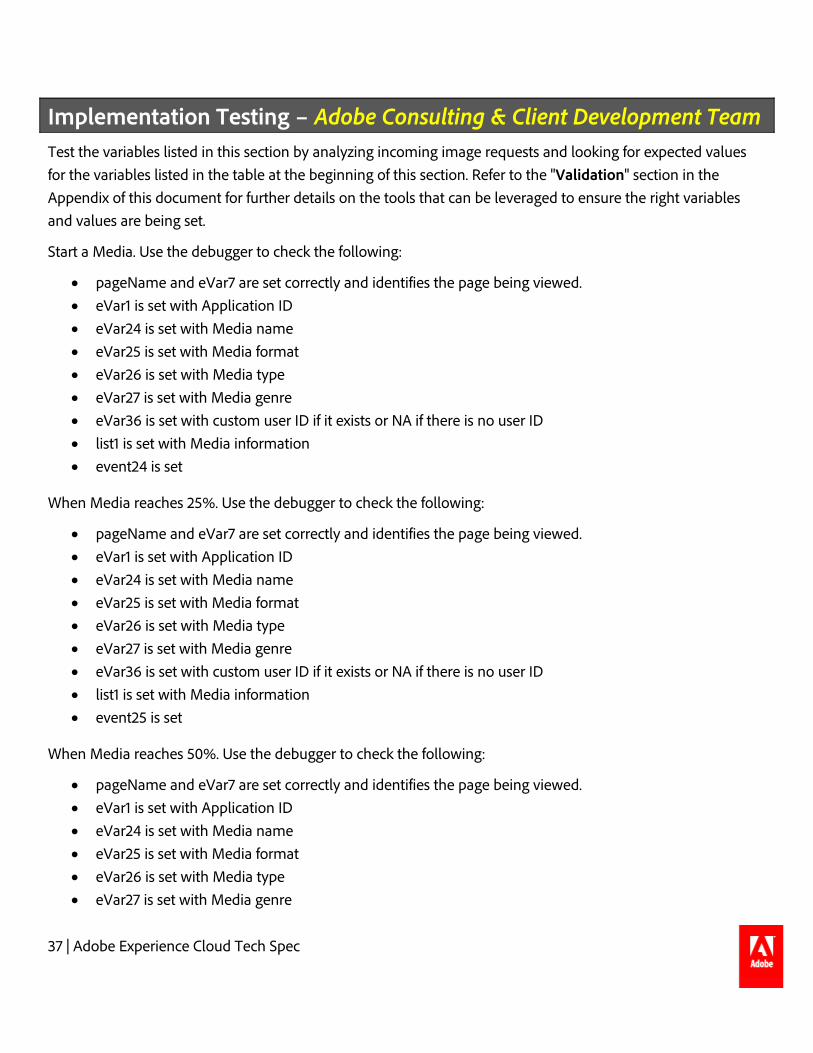
Implementation Testing – Adobe Consulting & Client Development Team Test the variables listed in this section by analyzing incoming image requests and looking for expected values for the variables listed in the table at the beginning of this section. Refer to the "Validation" section in the Appendix of this document for further details on the tools that can be leveraged to ensure the right variables and values are being set.
Start a Media. Use the debugger to check the following:
• pageName and eVar7 are set correctly and identifies the page being viewed. • eVar1 is set with Application ID • eVar24 is set with Media name • eVar25 is set with Media format • eVar26 is set with Media type • eVar27 is set with Media genre • eVar36 is set with custom user ID if it exists or NA if there is no user ID • list1 is set with Media information • event24 is set
When Media reaches 25%. Use the debugger to check the following:
• pageName and eVar7 are set correctly and identifies the page being viewed. • eVar1 is set with Application ID • eVar24 is set with Media name • eVar25 is set with Media format • eVar26 is set with Media type • eVar27 is set with Media genre • eVar36 is set with custom user ID if it exists or NA if there is no user ID • list1 is set with Media information • event25 is set
When Media reaches 50%. Use the debugger to check the following:
• pageName and eVar7 are set correctly and identifies the page being viewed. • eVar1 is set with Application ID • eVar24 is set with Media name • eVar25 is set with Media format • eVar26 is set with Media type • eVar27 is set with Media genre
38 | Adobe Experience Cloud Tech Spec
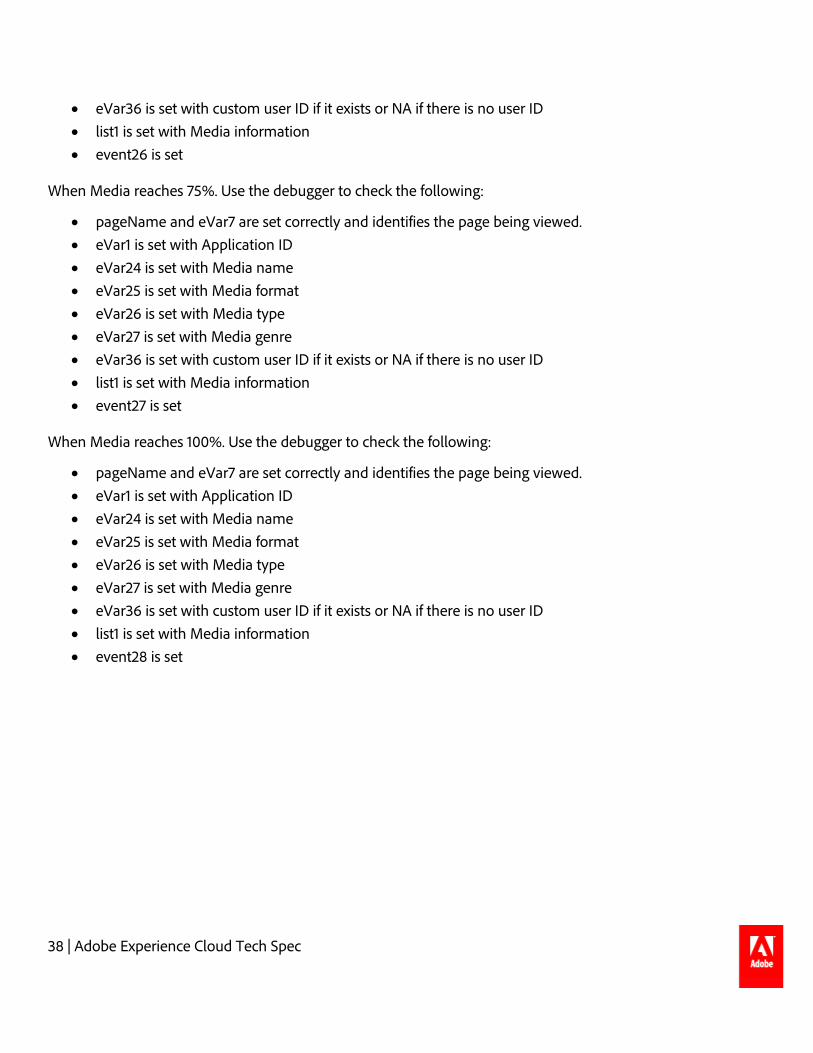
• eVar36 is set with custom user ID if it exists or NA if there is no user ID • list1 is set with Media information • event26 is set
When Media reaches 75%. Use the debugger to check the following:
• pageName and eVar7 are set correctly and identifies the page being viewed. • eVar1 is set with Application ID • eVar24 is set with Media name • eVar25 is set with Media format • eVar26 is set with Media type • eVar27 is set with Media genre • eVar36 is set with custom user ID if it exists or NA if there is no user ID • list1 is set with Media information • event27 is set
When Media reaches 100%. Use the debugger to check the following:
• pageName and eVar7 are set correctly and identifies the page being viewed. • eVar1 is set with Application ID • eVar24 is set with Media name • eVar25 is set with Media format • eVar26 is set with Media type • eVar27 is set with Media genre • eVar36 is set with custom user ID if it exists or NA if there is no user ID • list1 is set with Media information • event28 is set
39 | Adobe Experience Cloud Tech Spec
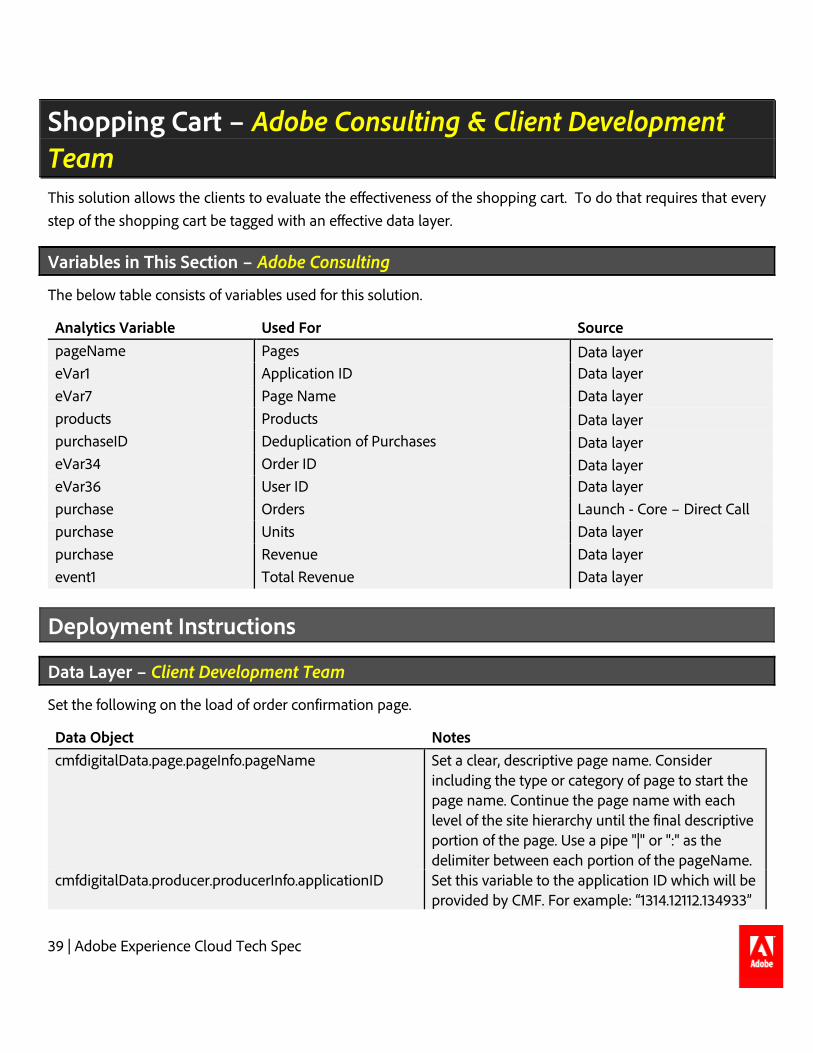
Shopping Cart – Adobe Consulting & Client Development Team This solution allows the clients to evaluate the effectiveness of the shopping cart. To do that requires that every step of the shopping cart be tagged with an effective data layer.
Variables in This Section – Adobe Consulting
The below table consists of variables used for this solution.
Analytics Variable Used For Source pageName Pages Data layer eVar1 Application ID Data layer eVar7 Page Name Data layer products Products Data layer purchaseID Deduplication of Purchases Data layer eVar34 Order ID Data layer eVar36 User ID Data layer purchase Orders Launch - Core – Direct Call purchase Units Data layer purchase Revenue Data layer event1 Total Revenue Data layer
Deployment Instructions
Data Layer – Client Development Team
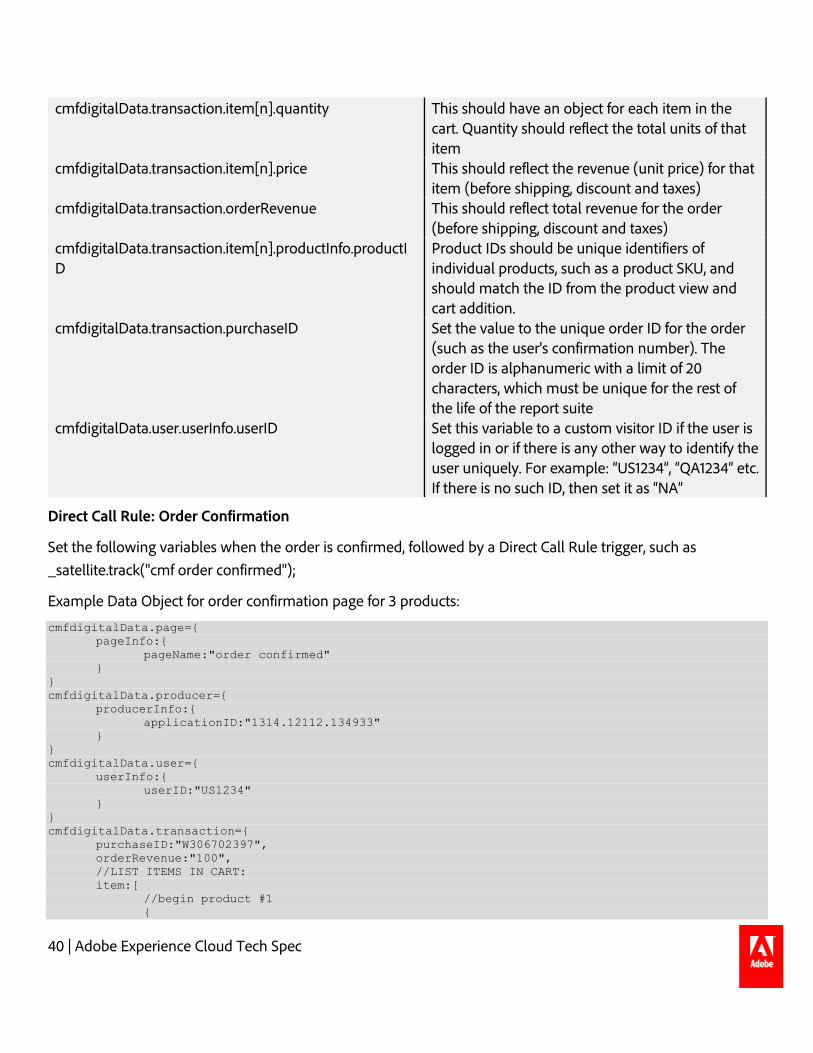
Set the following on the load of order confirmation page.
Data Object Notes cmfdigitalData.page.pageInfo.pageName Set a clear, descriptive page name. Consider
including the type or category of page to start the page name. Continue the page name with each level of the site hierarchy until the final descriptive portion of the page. Use a pipe "|" or ":" as the delimiter between each portion of the pageName.
cmfdigitalData.producer.producerInfo.applicationID Set this variable to the application ID which will be provided by CMF. For example: “1314.12112.134933”
40 | Adobe Experience Cloud Tech Spec
cmfdigitalData.transaction.item[n].quantity This should have an object for each item in the cart. Quantity should reflect the total units of that item
cmfdigitalData.transaction.item[n].price This should reflect the revenue (unit price) for that item (before shipping, discount and taxes)
cmfdigitalData.transaction.orderRevenue This should reflect total revenue for the order (before shipping, discount and taxes)
cmfdigitalData.transaction.item[n].productInfo.productID
Product IDs should be unique identifiers of individual products, such as a product SKU, and should match the ID from the product view and cart addition.
cmfdigitalData.transaction.purchaseID Set the value to the unique order ID for the order (such as the user's confirmation number). The order ID is alphanumeric with a limit of 20 characters, which must be unique for the rest of the life of the report suite
cmfdigitalData.user.userInfo.userID Set this variable to a custom visitor ID if the user is logged in or if there is any other way to identify the user uniquely. For example: “US1234”, “QA1234” etc. If there is no such ID, then set it as “NA”
Direct Call Rule: Order Confirmation
Set the following variables when the order is confirmed, followed by a Direct Call Rule trigger, such as _satellite.track("cmf order confirmed");
Example Data Object for order confirmation page for 3 products:
cmfdigitalData.page={ pageInfo:{ pageName:"order confirmed"
} } cmfdigitalData.producer={ producerInfo:{ applicationID:"1314.12112.134933"
} } cmfdigitalData.user={ userInfo:{ userID:"US1234"
} } cmfdigitalData.transaction={
purchaseID:"W306702397", orderRevenue:"100", //LIST ITEMS IN CART: item:[
//begin product #1 {

41 | Adobe Experience Cloud Tech Spec
quantity:"2", price:"20", productInfo:{ productID: "XYZ-100087613" } }, //end product #1, start product 2: { quantity:"5", price:"10", productInfo:{ productID: "XYZ-53215652" } }, //end product 2, start product 3 { quantity:"1", price:"10", productInfo:{ productID: "XYZ-205432881" } }, //end product 3 ]
} _satellite.track("cmf order confirmed");
Data Element Reference – Adobe Consulting
This section describes all the data elements required for the solution. Contact Adobe Consulting to create these Data Element on Launch Platform.
Data Element Element Extension and Type
JS Object Path/ Parameter Launch Rules AA Variable Mapping
root: data object Core - JavaScript Variable
cmfdigitalData "cart: purchase" s.products
purchase: product path
Core – Constant
transaction.item "cart: purchase" s.products
purchase: product id
Core – Constant
productInfo.productID "cart: purchase" s.products
purchase: product quantity
Core – Constant
quantity "cart: purchase" s.products
purchase: product price
Core – Constant
price "cart: purchase" s.products
purchase: order ID
Core - JavaScript Variable
cmfdigitalData.transaction.purchaseID "cart: purchase" eVar34, purchaseID
42 | Adobe Experience Cloud Tech Spec
purchase: total revenue
Core - JavaScript Variable
cmfdigitalData.transaction.orderRevenue "cart: purchase" event1
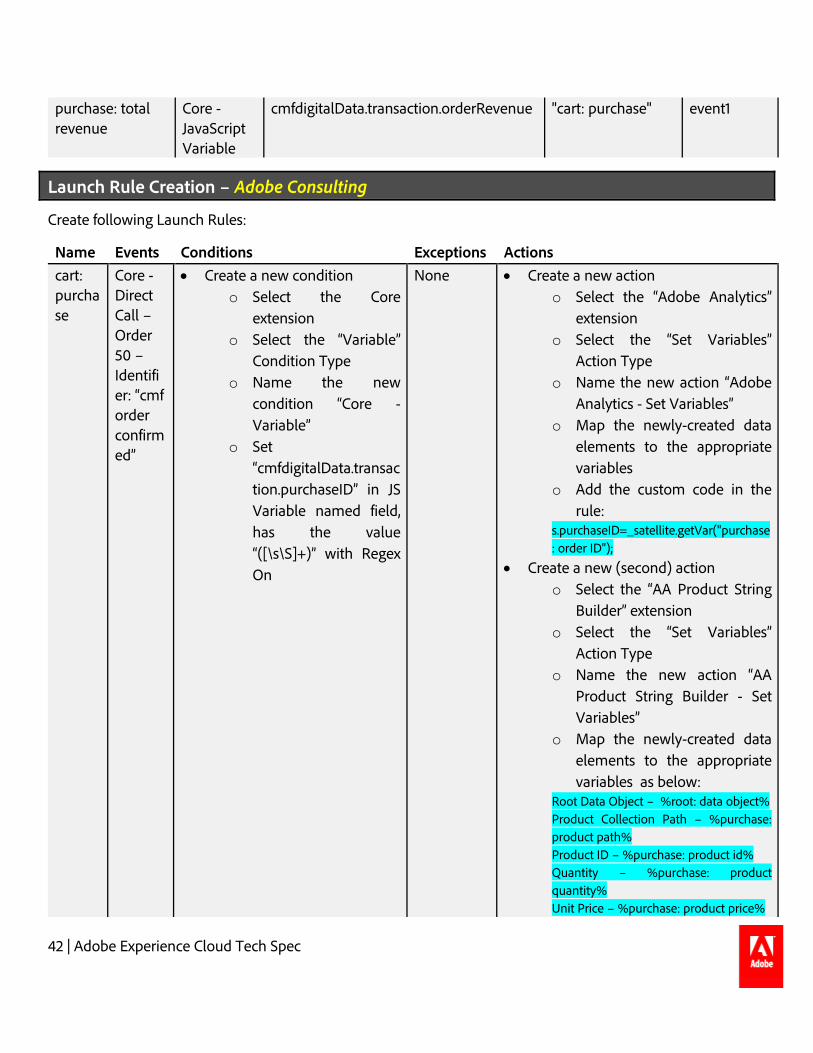
Launch Rule Creation – Adobe Consulting
Create following Launch Rules:
Name Events Conditions Exceptions Actions cart: purchase
Core - Direct Call – Order 50 – Identifier: “cmf order confirmed”
• Create a new conditiono Select the Core
extensiono Select the “Variable”
Condition Typeo Name the new
condition “Core -Variable”
o Set“cmfdigitalData.transaction.purchaseID” in JSVariable named field,has the value“([\s\S]+)” with RegexOn
None • Create a new actiono Select the “Adobe Analytics”
extensiono Select the “Set Variables”
Action Typeo Name the new action “Adobe
Analytics - Set Variables”o Map the newly-created data
elements to the appropriatevariables
o Add the custom code in therule:
s.purchaseID=_satellite.getVar("purchase: order ID");
• Create a new (second) actiono Select the “AA Product String
Builder” extensiono Select the “Set Variables”
Action Typeo Name the new action “AA
Product String Builder - SetVariables”
o Map the newly-created dataelements to the appropriatevariables as below:
Root Data Object – %root: data object% Product Collection Path – %purchase: product path% Product ID – %purchase: product id% Quantity – %purchase: product quantity% Unit Price – %purchase: product price%
43 | Adobe Experience Cloud Tech Spec
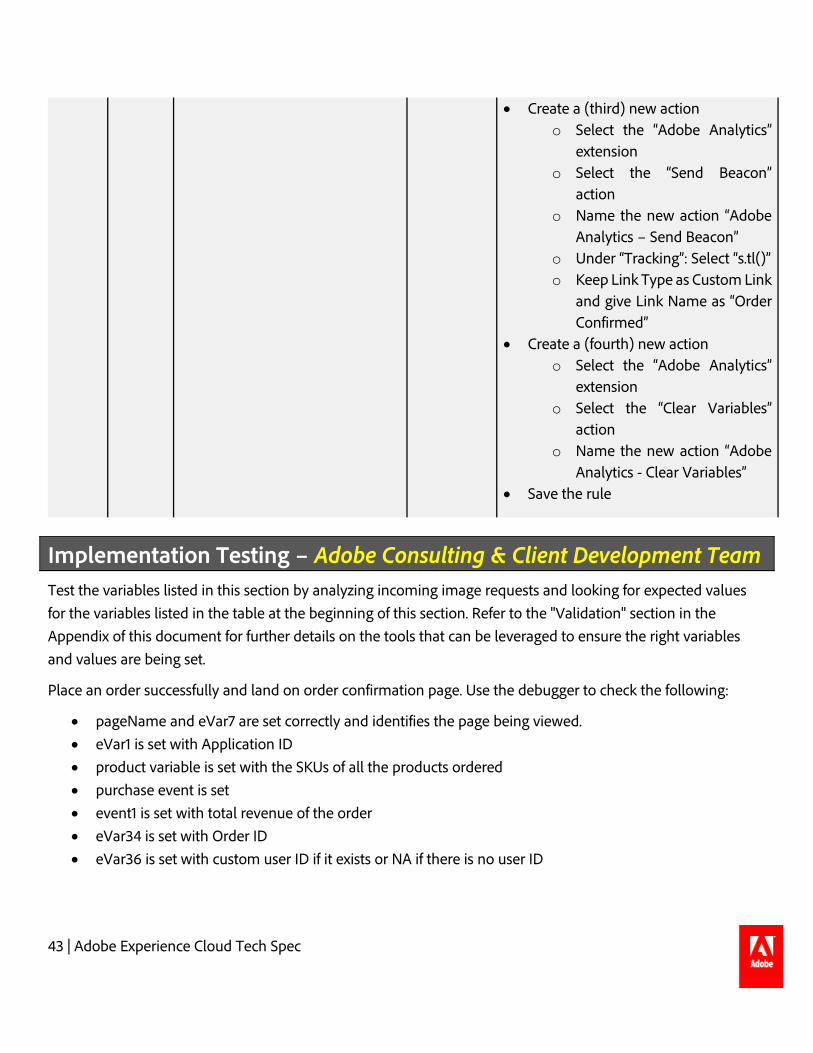
• Create a (third) new action o Select the “Adobe Analytics”
extension o Select the “Send Beacon”
action o Name the new action “Adobe
Analytics – Send Beacon” o Under “Tracking”: Select “s.tl()” o Keep Link Type as Custom Link
and give Link Name as “Order Confirmed”
• Create a (fourth) new action o Select the “Adobe Analytics”
extension o Select the “Clear Variables”
action o Name the new action “Adobe
Analytics - Clear Variables” • Save the rule
Implementation Testing – Adobe Consulting & Client Development Team Test the variables listed in this section by analyzing incoming image requests and looking for expected values for the variables listed in the table at the beginning of this section. Refer to the "Validation" section in the Appendix of this document for further details on the tools that can be leveraged to ensure the right variables and values are being set.
Place an order successfully and land on order confirmation page. Use the debugger to check the following:
• pageName and eVar7 are set correctly and identifies the page being viewed. • eVar1 is set with Application ID • product variable is set with the SKUs of all the products ordered • purchase event is set • event1 is set with total revenue of the order • eVar34 is set with Order ID • eVar36 is set with custom user ID if it exists or NA if there is no user ID
44 | Adobe Experience Cloud Tech Spec
Appendix: Validation – Adobe Consulting & Client Development Team
Validation: Debugging with Charles – Adobe Consulting & Client Development Team The Adobe Marketing Cloud Debugger is helpful for quickly reading the contents of server calls that are sent from the browser. However, the Debugger does not contain sufficient functionality to examine all server calls and also does not keep a log of all server calls produced during a visit over time. Because of this, Adobe Consulting strongly recommends that on top of using the Debugger, you use another outside web monitoring tool/packet sniffer during the testing and validation process. Adobe Consulting's preferred tool to use is the web debugging/proxy application known as Charles (available at http://www.charlesproxy.com).
Charles' most visible feature is its HTTP monitoring functionality. Per its website's own explanation, "[a]n HTTP Monitor is an application that enables the developer to view all of the HTTP traffic between your computer and the Internet. This includes the request data… and the response data.
An HTTP Monitor is useful as it enables the developer to see the hidden communications between the web browser (or other application using HTTP) and the Internet."
In terms of debugging an Adobe Analytics implementation, Charles will not only keep a log of all server calls that are created, but also group them together under a single domain entry throughout the duration of the visit. This is especially helpful in cases where the browser sends server calls as a page unloads or sends multiple server calls at a single time.
Testing Instructions
After downloading, installing, and running Charles, go ahead and visit any page of your website. When you do this, you will notice that any URL that your browser accesses during the visit will appears under Charles' Structure tab:

45 | Adobe Experience Cloud Tech Spec
This list of URLs might appear intimidating at first, but using the Marketing Cloud Debugger (in conjunction) will give you a hint as to where to begin your actual debugging within Charles. For instance, the Debugger's First Party Cookies (or Third Party Cookies) parameter shows the domain that the server calls are being sent to. For example:
Once you know the domain where the Analytics server calls are being sent to, you can look through the list of domains recorded in Charles and should be able to find the same domain as shown in the Debugger. Once you find the domain, you may click on the plus button icon next to the domain entry to see the list of all server calls sent to that domain so far. If you compare what appears from clicking on the plus icon, you will notice how the complete domain entries in Charles match up with what you may see in the Debugger.

46 | Adobe Experience Cloud Tech Spec
Once this list appears, you may click on any of the entries that have picture-based icons right next to them. Feel free to ignore any other entries under that domain, especially ones that resemble "reloading" icons; they are used mostly for identification/setup purposes when a visitor comes to your site for the first time.
As you click on each picture-based icon, you'll notice the contents of the right-hand side window in Charles will change. When this happens, be sure that the right-hand side window has both the request tab (up top) and the query string tab (at the bottom) highlighted – see the screenshot below. You may ignore the other tabs on the right-hand side window as they provide information that will not be relevant for server call debugging purposes.

47 | Adobe Experience Cloud Tech Spec
You'll notice the contents of the server call in Charles don't completely matchup with what you would see if you use the Marketing Cloud Debugger. Charles does not present each individual parameter of the server call in an as-easy-to-read format as the Debugger's format. All Analytics "prop" variables, for example, will show up as such in the Debugger (e.g. prop69, prop60) but will show up in Charles with the letter c instead (e.g. c59, c60).
Here is a list of the possible parameters that you will encounter during the testing and debugging process and what each variable the parameter maps to:
JavaScript Variable Query String Parameter Current URL g Referring URL r pageName pageName server server channel ch contextData (begin) c. contextData (end) .c prop1 – prop75 c1 – c75 campaign v0 eVar1 – eVar75 v1 – v75 state state zip zip events events products products purchaseID purchaseID currencyCode cc
As hinted at above, other parameters will appear in all Analytics server calls but most likely can be ignored as they will contain data that are mostly technical in nature and not specific to the implementation.