Integrating Experience Manager with Adobe Launch, Analytics ...
113
TL28 - Integrating Experience Manager with Adobe Launch, Analytics and Target Dave Luckett [email protected] Flemming Blixt [email protected]
-
Upload
khangminh22 -
Category
Documents
-
view
3 -
download
0
Transcript of Integrating Experience Manager with Adobe Launch, Analytics ...

TL28 - Integrating Experience Manager with Adobe Launch, Analytics and Target
Dave Luckett [email protected]
Flemming Blixt [email protected]

1. LESSON LAB OVERVIEW ........................................................................................................................................................... 4 1.1 Objective ..................................................................................................................................................................... 4 1.2 What Solutions will we use? ......................................................................................................................................... 4 1.3 Tools you will need ...................................................................................................................................................... 7
2. LESSON – LOG INTO AEM AUTHOR .......................................................................................................................................... 8 2.1 Objective ..................................................................................................................................................................... 8 2.2 Task ............................................................................................................................................................................ 8
3. LESSON – BUILD AN ACTIVITY ................................................................................................................................................ 12 3.1 Objective ................................................................................................................................................................... 12 3.2 Task .......................................................................................................................................................................... 12
4. LESSON – PUBLISH AND VERIFY EXPERIENCES ....................................................................................................................... 22 4.1 Objective ................................................................................................................................................................... 22 4.2 Task .......................................................................................................................................................................... 22 4.3 Optional Task – Inspect Targeting in Developer Tools ................................................................................................. 25
5. LESSON – INVESTIGATE AND DEBUG THE EXPERIENCES......................................................................................................... 28 5.1 Objective ................................................................................................................................................................... 28 5.2 Task .......................................................................................................................................................................... 28 5.3 Task – Authenticate and see the final experience........................................................................................................ 31 5.4 Optional Task – Track a conversion ............................................................................................................................ 33
6. AEM DATA LAYER - CONTEXT HUB ......................................................................................................................................... 34 6.1 Objective ................................................................................................................................................................... 34 6.2 What is Context Hub .................................................................................................................................................. 34 6.3 Task – Inspect Context Hub ........................................................................................................................................ 34 6.4 Optional Task – Inspect Context Hub Donation-store configuration ............................................................................ 36 6.6. Optional Task – Inspect Context Hub include in your page template ........................................................................... 40
7. APPENDIX 1 – SETUP LAUNCH WITH EXPERIENCE CLOUD, ADOBE TARGET AND ADOBE ANALYTICS ..................................... 42 7.1 Objective ................................................................................................................................................................... 42 7.2 Task – Login to Launch ............................................................................................................................................... 42 7.3 Data Elements ........................................................................................................................................................... 44 7.4 Extensions ................................................................................................................................................................. 44 7.5 Rules ......................................................................................................................................................................... 45 7.6 Publishing.................................................................................................................................................................. 46 7.7 Task – Setup Data Elements in Launch ....................................................................................................................... 46 7.8 Task – Setup Experience Cloud ID Service Extension .................................................................................................... 52 7.9 Task – Setup Adobe Target Extension ......................................................................................................................... 56 7.10 Task – Setup Adobe Analytics Extension ..................................................................................................................... 57 7.11 Task – Setup Rules in Launch ...................................................................................................................................... 59 7.12 Initialize Target on Page Load Rule ............................................................................................................................ 59 7.13 Analytics tracking on Page Load Rule ......................................................................................................................... 65 7.14 “ContextHub Listener" Rule ........................................................................................................................................ 72 7.15 "Thank you Page" or Conversion Rule......................................................................................................................... 73 7.16 Task – A4T Integration – Target + Analytics ................................................................................................................ 76
8. APPENDIX 2: SETUP AEM WITH LAUNCH , ANALYTICS AND TARGET ................................................................................. 77 8.1 Task – AEM + Launch ................................................................................................................................................. 77 8.2 Task – AEM + Analytics .............................................................................................................................................. 96 8.3 Task – AEM + Target ................................................................................................................................................ 100
9. APPENDIX 3: ANALYTICS SETUP ........................................................................................................................................... 105 10. APPENDIX 4: ADOBE TARGET SETUP ............................................................................................................................... 107 11. APPENDIX 5: AEM AND ANALYTICS PAGE NAMES ........................................................................................................... 109

3
12. APPENDIX 8: LAUNCH SCRIPTS ........................................................................................................................................ 110 DATA ELEMENT ............................................................................................................................................................................ 110
13. APPENDIX 10: KEY TERMINOLOGIES ................................................................................................................................ 112 14. LINKS AND RESOURCES ................................................................................................................................................... 113

4
1. Lesson Lab Overview
In this lab, we step through the process to set up the latest AEM 6.4 integrations with Adobe Analytics, Adobe Target and Adobe Launch to build, deliver and measure personalized experiences. We also examine how to leverage Context Hub to use your data for personalizing experiences and AEM Content Insights to visualize content KPIs.
1.1 Objective
For the lab exercise we assume a scenario in which our sample company - We.Retail - plans to collect donations to support water supply in emerging regions. We.Retail runs such campaigns on a yearly basis to support good causes.
We assume that we have already sent out a mail blast to our customers asking them if they are willing to donate. We also have a landing page in place which provides more background and allows to place a donation.
We are seeing that people are going to the landing page, but conversion rate and total donations are not as good as we had hoped. This is where the lab will start.
Using Adobe Experience Cloud Technology and the data that we have about our customers, we will optimize the landing page with the goal of increasing donations. For the purpose of the lab we will personalize the landing page experience based on data about previous donations that we have about our customers.
Lastly, we will look at how KPIs that are tracked for our landing page can be made available to content creators to support further improvements of the experience.
1.2 What Solutions will we use?
We will tell you a bit more about what solutions from the Adobe Experience Cloud we are going to use in this lab. While this will be covered by the lab instructors, you can also find an overview in this section for later reference. We also prepared configurations for some of the
solutions. For more details see – Appendix 1 – Setup Launch with Experience Cloud, Adobe Target and Adobe Analytics

5
The diagram below shows an overview of the Experience Cloud solutions used in this lab and how they connect with each other. We will quickly describe the purpose of each solution and how it will be used in the lab scenario.
Figure 1

6
Solution Purpose Adobe Experience Manager
Adobe Experience Manager (AEM) is a comprehensive content management solution for building websites, mobile apps and forms. And it makes it easy to manage your marketing content and assets. In this lab, we will use AEM to deploy the landing page for our campaign. We will use AEMs integration with Adobe Target to create a new activity that will be used to optimize our landing page for different audiences.
In addition, we will use AEMs capability to pull reports from Analytics to make performance data about our landing page available to content editors.
Core Services – Activation
Activation, powered by Launch, gives you intuitive tools to manage an unlimited number of Adobe and third-party tags. Launch will be used in this lab to activate and configure Analytics, Target and Experience Cloud ID service for our landing page.
Core Services – Profiles and Audiences
The Profiles and Audiences core service gives you a complete and actionable view of your customers. It provides a common ID service (Experience Cloud ID Service) to identify audiences across Adobe solutions so insights taken from one solution can be applied in another. Note that Profiles and Audiences also can import 3rd party data via Adobe Audience manager which can then be used for building audiences. We will not use this in the lab, but it was added to the architecture overview for completeness.
Adobe Target Adobe Target (Target) is a personalization solution that makes it easy to identify your best content through tests that are easy to execute. So you can deliver the right experience to the right customer. In this lab, personalization of the landing page will be driven by Target. AEM will import Audiences from Target so that they can be used right within AEM to create activities to personalize our page. AEM will then synchronize the activity to Target.
Adobe Analytics
Adobe Analytics (Analytics) is the industry-leading solution for applying real-time analytics and detailed segmentation across all of your marketing channels. Use it to discover high-value audiences and power customer intelligence for your business. In this lab we will use Analytics to track page views and conversion for the activity that we will create in the lab. Tracking conversion leverages the integration between Analytics and Target called Analytics for Target (A4T). We will also retrieve reports from Analytics and make it available to content editors in AEM.
Table 1 – Adobe Experience Cloud Solutions used in this Lab

7
1.3 Tools you will need
This guide will use all of the latest Adobe tools for Debugging and QA. This is partly to enable you on these tools and partly so we can identify updates we need in these tools to better support Launch!
Experience Cloud Debugger Chrome Extension The Experience Cloud Debugger is a Chrome Extension built by an Adobe.com developer. It contains basic debugging tools for all SaaS-based Experience Cloud Solutions, in addition to some very powerful and unique Target capabilities built by the Target Engineering Team. Add the extension from here: https://chrome.google.com/webstore/detail/adobe-experience-cloud-de/ocdmogmohccmeicdhlhhgepeaijenapj
Launch Command Chrome Extension This is a new Extension built by the Launch BU to switch embed codes. Add the extension from here: https://chrome.google.com/webstore/detail/launch- command/nkjhamgjeocefocmpbcjfmohkjgildki
Browser Developer Tools The tools above are both Chrome extensions. If you prefer to use a different browser, make sure you have Developer Tools installed (some browsers require a separate download).

8
2. Lesson – Log into AEM Author
2.1 Objective
To authenticate into Adobe Experience Manager to the web page which we will be personalizing.
2.2 Task
1. Log in using the following credentials and navigate to the We.Retail Make a Donation page
Type Value URL http://localhost:4502/sites.html/content Username admin Password admin Actual URL to GO DIRECT
http://localhost:4502/editor.html/content/we-retail/us/en/make-a- donation.html
Table 2 – AEM default login credentials and URL
Figure 2: AEM Login Screen
2. Once you have logged in, navigate to the page we want to use for our targeting campaign. 3. Click on the Adobe Experience Manager logo from the top left corner and Select Navigation. 4. Click on the Sites option and open it. (Figure 3)

9
Figure 3: Sites Icon under Navigation
Figure 4: Onboarding Dialog box
Optionally, you can also learn about the new AEM 6.4 UI enhancements from the onboarding dialog box. To close the onboarding dialog box, select the “Don’t show this again” checkbox and click on Close. (Figure 5)

10
5. Click on the We.Retail folder and open it (Figure 6)
Figure 5 :We.Retail Folder
6. Click on the United States language root folder
Figure 6 : We.Retail language root folder
7. Select the We.Retail English Homepage.

11
Figure 7 : We.Retail English folder
8. You should now be able to see the “Make a Donation” and “Thank You” page for We.Retail. (Figure 9)
Figure 8: Make a donation and thank-you page
9. Hover your mouse across the “Make a Donation” page, and you will see a row of icons. Click the “Edit” icon, the pencil. (Figure 9).

12
3. Lesson – Build an activity
3.1 Objective
Content authors can easily create an activity within AEM using the Targeting Mode for AEM pages. In order to create an activity for your We.Retail campaign, follow the below steps.
3.2 Task
Note : Step9 from previous lesson could open your “Make-A-Donation” page either in Edit Mode or preview mode by default.
Switch to Target Mode to access the tools that the touch-optimized UI provides for authoring targeted content.
1. On the toolbar on top of the page, click or tap the mode drop-down menu to reveal the available mode types (Figure 10)
2. Select the Targeting mode for Authoring targeted content. (Figure 10)
Figure 9 : Different content authoring modes
3. Make sure to select the brand “We.Retail” and open the Activity creation dialog by clicking on the “+” next to activities dropdown. (Figure 11)
4. In the dialog use the following scheme to name your activity:

13
Field Value to Choose Brand We.Retail (1) Activity TL28-YOURNUMBER-YOURNAME
Targeting Engine Adobe Target Select a Target Configuration Summit2017-target-config Activity Type Experience Targeting Action CREATE
Table: New Activity Dialog Value
Figure 10 : Brand Selection & Create New Activity
5. Then select the targeting engine as “Adobe Target” and select the Activity Type as “Experience Targeting” 6. Double check your values and Click on the Create button
7. After verifying that the newly created activity is selected, Click on the button to create difference experiences for different audiences. (Figure 11)

14
Figure 11 : Brand-We.Retail & Newly created Activity is selected
The first step of the targeting wizard provides the targeted content editor that allows you to target components and define experiences.
We begin with selecting the components to be targeted.
8. Click on the hero banner image at the top of the landing page and click on the target icon in the edit bar that appears. (Fig 13)
Figure 12: Targeting hero Image component
9. There will be a green message box at the top of the page telling you that the component is now targeted.
Figure 13 : Component Target Message
10. Repeat the same for the donation component which is placed underneath the hero image at the right side of the page.

15
Figure 14 : Targeting Donation Component
11. After the components are targeted you can now create the first experience by clicking on “Add Experience Targeting” from the Audiences rail on the right side. (Fig 16)
Figure 15 : Add Experience Targeting
These audiences have already been created in Adobe Target for you. You can find details about
how those where set up in “Appendix 1 – Setup Launch with Experience Cloud, Adobe Target and Adobe Analytics”
12. Select the “Small Donors” audience from the Choose Audience Dialog box in order to target the customers who have made smaller contributions in previous campaign.

16
You should be able to see a list of audiences already created for this lab. User can also create a new audience within AEM or can create an audience in Adobe Target and sync your audience segments with AEM.
Figure 16 : Existing Audiences
13. After selecting the Small Donor audience, confirm the experience name that will default to the audience name. Leave the default value unchanged and click OK

17
14. Create an experience for “Major Donors” by repeating the same steps as done for “Small Donors”.
We know that users in the “Major Donors” audience are willing to donate a significant amount. Thus we want to provide them with a specific call to action and ask for a donation sum that would be sufficient to buy a new water pump.
As the “Major Donors” experience is currently active we can now start defining the experience for this audience.
15. Replace the hero banner image by opening the asset finder, search for “desert” and place the image with the green plant and tag line by dragging it onto the hero banner. (Fig 18)
Figure 17 : Changing Hero Banner Image for Major Donors
16. Customize the donation component by clicking on the donation component, click on the “Configure” Icon (Wrench) in the opened edit bar and set a default value of $150 and the title to “Donate a pump!”.

18
Save the changes by clicking the checkmark icon in the upper right corner of the dialog. (Fig 19) & (Fig 20)
Figure 19 : Donation component change for Major Donors
Figure 20 : Donation component content change for Major Donors

19
17.! To change the banner for the “Small Donors” experience, switch to the “Small Donors” experience by clicking on the “Sm” abbreviation in the collapsed experience rail, search for “drop” in the asset finder and pick the image with the tag line “Every Drop Counts” and use drag it onto the hero banner. (Fig 21)
18.! For “Small Donors” we want to start with a higher default donation proposal since they have donated
already in the past. To customize the donation component, open the “Configure” dialog and define a custom Default donation value of 15. Save the changes by clicking the checkmark in the upper right of the dialog. (Fig 20)
Figure 20: Experience for Small Donors with Hero Image Change and Donation Component Text
change
19.! Click to get to the “Target” step of the targeting wizard. (Fig 21)
Figure 21 : Step2 in Targeting Content

20
20.! Review audience diagram that visualizes the mapping between experiences and audiences. As the default names of experiences are the audience names both sides should look the same. (Fig 22)
Figure 22: Audience Vs Experience mapping
21.! Switch to Goals & Settings by clicking 22.! In this step, you configure settings for the activity such as the Reporting Source and the Goal Metric.
Field Value Reporting Source Adobe Analytics (1) Company aemlabsummit2017 (2) Report Suite Adobe Summit Lab Dev (3) Goal Metric – What you want to measure
Use an Analytics Metric (4)
The following are metrics available from Analytics:
Donations (5)

21
Figure 23: Goal Settings for Activity
23. To save these settings click “Save” in the wizard that will also trigger a synch of the activity to Target and you should see a green success message. “Your activity was saved and synchronized to Target”

22
4. Lesson – Publish and verify experiences 4.1 Objective
Understand the power of simulating in Authoring interface using Context Hub UI.
4.2 Task
1. To verify everything works as expected, switch to preview mode. Fig 26
Figure 26: Preview mode
2. Open the Context Hub UI and open the donations UI module and set a value around 60 to trigger Small Donor Audience experience (Fig 27)

23
Figure 27: Context Hub: Store Property - Donation
3. Now, set a value >100 to trigger the Major Donors audience. As soon as you hit <Enter> the experience should switch to the Major Donors Experience. (Fig 28)
Figure 28: Experience for Donation value > 100
4. Try a value less than 20 and you should be able to view the default experience.

24
Figure 29 : Experience for value less than 20
5. Publish the new experience

25
4.3 Optional Task – Inspect Targeting in Developer Tools
Open Chrome Developer Tools by either
•! pressing CMD+ALT+I or •! using Chromes menu and selecting View > Developer > Developer Tools.
You can use the Network Tab to inspect the data that is sent via the global mbox request and the JS fragments being returned for the additional regional mbox requests. The console below the network data allows to inspect events logged by Context Hub and Launch.
As the regional mbox requests share the mboxSession of the global mbox request the attributes do not have to be transmitted again to pick up the correct experience.
26
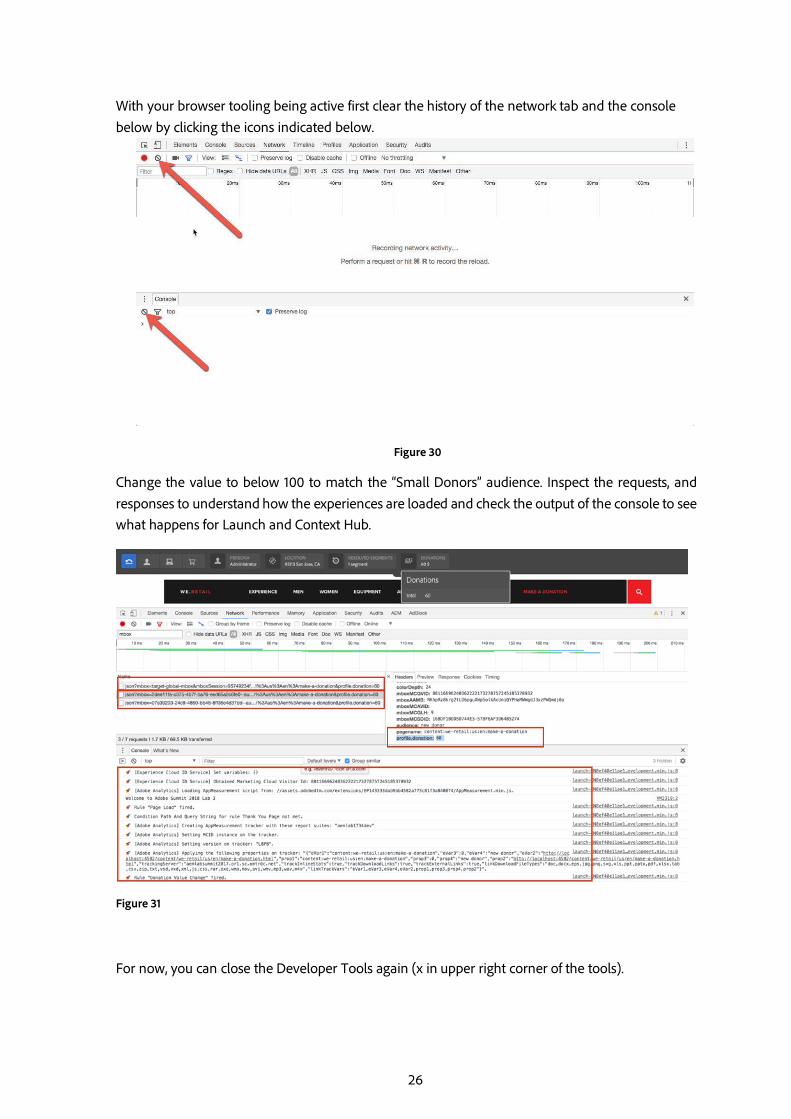
With your browser tooling being active first clear the history of the network tab and the console below by clicking the icons indicated below.
Figure 30
Change the value to below 100 to match the “Small Donors” audience. Inspect the requests, and responses to understand how the experiences are loaded and check the output of the console to see what happens for Launch and Context Hub.
Figure 31
For now, you can close the Developer Tools again (x in upper right corner of the tools).

27
When inspecting the responses for the local mbox request you can see that AEM just synchs a JS snippet that takes care of loading the experience from AEM. This means the actual content stays in AEM and will be delivered from there, which allows to leverage AEMs powerful content aggregation and management capabilities.
Figure 32

28
5. Lesson – Investigate and Debug the experiences 5.1 Objective
See how your final page works for different audiences.
5.2 Task
In your Chrome browser, you should find a bookmark called “AEM Publish”. Open a new tab and then open the bookmark in this new tab. This will open the landing page that you published earlier.
Note that Launch Command also has a toggle for debugging: . Just like with the DTM Switch extension, this will expose debugging statements in your browser console. Launch console
statements are prefixed with a . Lets select the Launch plugin from your browser and toggle the Debug option to ON.
Next open Chrome Developer Tools by either
•! pressing CMD+ALT+I or •! using Chromes menu and selecting View > Developer > Developer Tools.
Make sure you have the “Network” tab selected in Chrome developer tools. After this reload the page so that you can see the request being made in the Network tab of the developer tools console.
As we want to inspect a full-page load with all of its requests we toggled the developer tools to dock it on the right side as this provides you maximum vertical space for the list of requests.

29
If you inspect the requests after the page reload in the developer console, you will find the previously highlighted requests in the following order after the initial page request. The order is important for the setup to work properly as we will explain now. No Item Definition 1 contexthub The first include in your page
header. This loads the Context Hub base library including the code for the stores.
2 Launch - EN8ef40e11ae184b569be08b3d92bd3b66- development.min.js
The second include in your page template. This loads the Launch library.
3 data.json This is the request that loads the data for our donation store.
4 global-mbox-request (json?mbox=target- global-mbox):
This is the request made by the auto-generated global mbox
5 mbox requests (shown as json?mbox=): These are the 2 targeted locations on our page. You can notice 2 such mbox calls. One for Hero Image and one for Donation component

30
The page will show the default experience since we are not logged in.
The difference between the json?mbox=target-global-mbox
request for the global mbox and the json?mbox= request for the targeted components is that we don’t expect content to be returned by the global mbox request. So, we can send this as an asynchronous request that just sends the profile data required for the current user and then forget about it.
The targeted components and their mbox however are expected to return actual content to be displayed. In the lab setup, we are using a synchronous request for the targeted components to make sure our page loads smoothly without any flicker. For the mbox managed by the targeted components this means that on the AEM publish instance we are using an mboxCreate call to define the mbox. But using synchronous requests can affect page load performance.
If you inspect the global mbox request by clicking on it, you will see that it contains the profile.donation parameter that we have previously defined in Launch in the Target tool configuration. Currently it does not contain a value since currently we are an unknown user and don’t have any details about previous donations. This is highlighted in the next image.

31
Before we see how this will work for known users, let’s verify that our page views are tracked by Analytics as expected after setting up Analytics tracking in the previous chapter. To check this, switch to the “Console” tab in developer tools and find the log statement highlighted below. The “Adobe Experience Cloud Debugger Plugin” for Chrome generated this log statement that was pre-installed on your lab machine. You can find a link to the plugin in the Links and Resources section.
5.3 Task – Authenticate and see the final experience
Now that everything is set up properly, let’s see how this works for a known user. Sign in as a known user by clicking the “Sign In or Register” link at the top right corner of your page. To log in, use the following credentials, which are assigned with a user account that was prepared for the lab session:
Field Value Username [email protected] Password password

32
The user “Andrew Schaefer” was prepared to have donated an overall amount of $120 in past campaigns. Therefore, once you logged in, you should get the page with the experience that we prepared for “Major Donors”.
If you inspect the data.json request in developer tools now – use the Response tab in the Request details after selecting the request - you will see that it returns a total donation amount of 120.
Furthermore, if you inspect the global mbox request that was made after login, you will find that it now sends the value 120 for the profile.donation parameter. The connection here is made by the Launch data element that we created earlier and which retrieves the value for the current user from Context Hub and maps it to the global mbox request.

33
Now if you also inspect the mbox requests for the targeted components, you will see that it does not contain any profile data parameters. You might wonder how those requests can know about the data and make decisions about what activity and experience to show. The connection is made by the mbox session ID that is sent with every mbox request including the global mbox. If you inspect the mbox requests, you find that all of them have a mboxSession parameter with the same value. This is used by Target to connect those requests and make the data sent via the global mbox available to subsequent mbox requests with the same mboxSession.
Let’s also click on the Adobe Experience Cloud debugger plugin bookmarked on your browser and check out the network activity.
5.4 Optional Task – Track a conversion
If you like you can change the value of the donation amount. To track a conversion, you can just click the “Donate” button in our donation form. This will take you to a thank you page with the donation value from the form being passed over as a parameter.
Once the thank you page is loaded, you can inspect the Analytics call that was made on this page and which we configured in Launch to include the donation amount and the event used to track conversion (event1). See below for the highlighted parameters send with this call. As you can see, event1 is included to notify that a conversion was made and also eVar1 is included containing the amount you entered into the donation form.
To keep things simple for the lab, the donation form just requests the thank you page with a GET. In a real application it would do a POST request which would process the donation and also add the donation value to the current user’s profile, so it an be considered for future campaigns.
34
6.! AEM Data Layer - Context Hub 6.1 Objective
Inspect how Context Hub is integrated in your page template and review its configuration.
6.2 What is Context Hub
Context Hub is the implementation of AEMs pluggable Data Layer. It provides features such a plugging additional store to load data on the page, a fine grained event mechanism that can be used to get updates as soon as data is available, timeouts for data calls and much more.
It provides an optional UI for inspecting and manipulating data. In AEM the Context Hub UI is only active on author instances. Another important point to note is that in Context Hub the UI is configured independently of the stores that manage data. We will see this later when we inspect the Context Hub configuration used in the lab.
Context Hub allows other solutions activated on the page via Launch or another Tag Management solution to retrieve context specific data, such as profile data or browser data through a unified mechanism and consistent API. More information about Context Hub can be found in the Links and Resources section.
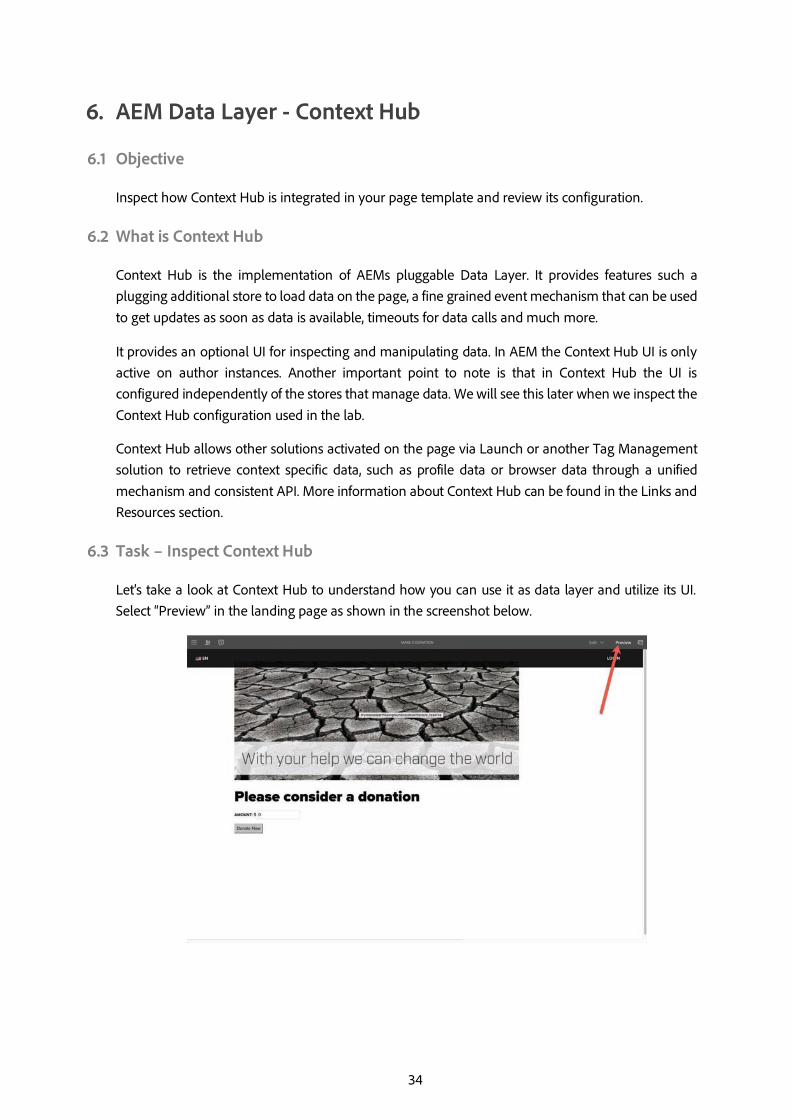
6.3 Task – Inspect Context Hub
Let’s take a look at Context Hub to understand how you can use it as data layer and utilize its UI. Select “Preview” in the landing page as shown in the screenshot below.

35
This will take you into AEMs page preview mode that allows you to see the page as it will be rendered on the publish instance. The Context Hub UI is only available in preview mode in AEM.
After switching to preview mode you will notice a new action in the upper left corner as highlighted in the next screenshot. This action will open the Context Hub UI.
Once you clicked on it, Context Hub UI will open and you can inspect the stores that are defined for the Context Hub configuration used in this lab. We are using a stripped down version that provides a minimal set of data. Throughout the lab we will only you the “Donation” store that loads data about a user’s previous donations. As shown in the next image, currently there are no donations as we are logged in with the admin user.
You can play a bit around with Context Hub, maybe open the second store that allows you to provide geo location information about the current user. The 2 stores, Donation and Geo Location that you see initially are part of what is called the Persona UI mode. Context Hub allows to group UI modules for

36
stores into different modes. If you click the “Device” icon as shown in the next image, you will find additional UI modules that expose device data being handled by Context Hub.
6.4!Optional Task – Inspect Context Hub Donation-store configuration
Next let’s take a look at the configuration of the Donation store that we will be using for our exercise. Go back to the tab where your Sites browser or Cloud Services (if you did the optional review tasks in Lesson 2) is open.
If the black top bar is not visible you may be in selection mode and need to unselect the page. Click on the (x) of the selection marker in the upper right corner.

37
After this you can open the Context Hub configuration by performing the following steps
1.! Open the main navigation 2.! Select Tools 3.! Select Sites 4.! Scroll down if necessary 5.! Click on ContextHub card

38
Select the global conf folder and then click on the “Default” configuration container as seen below.
And subsequently open “ContextHub Configuration”.
What you are seeing now are the configuration items for Context Hub. As mentioned previously stores are independent of the UI modules. Individual store configurations can be found in the list as “ContextHub Store Configuration” items. UI module configurations can be found within the UI mode configurations.

39
In our configuration you can find the 2 different UI modes – Persona and Device – as well as all the stores that are configured to be part of the data layer. For more details on Context Hub features please refer to the Links and Resources section.
Now identify the Donation store configuration and click on it to open the store configuration.
The first screen of the wizard that just started shows the basic store configuration. These include:
1. The Configuration Title of the store configuration. 2. The Store Type that will be used. In our case we are using the generic JSONP store which allows to
load data from standard JSON(P) endpoints. For the purpose of the lab, we created a JSON endpoint that is provided by your local AEM instance and which provides donation data about the current user.
3. The “Required” checkbox tells Context Hub that this store is required and needs to be loaded. You can register several implementations for a store type with a priority. Each implementation comes with that indicates if a store can be used in a given environment or not. If enabled Context Hub will check that at least one corresponding store implementation is available and will pick the one with the highest priority. If no implementation is available, Context Hub will throw an error in the browser console. In future this may also be used to indicate that all required stores are loaded via a separate event.
4. The “Enabled” checkbox tells Context Hub that this store is enabled. Stores can be disabled temporary if required.
Click “Next” to go to the next screen of the configuration wizard.
40
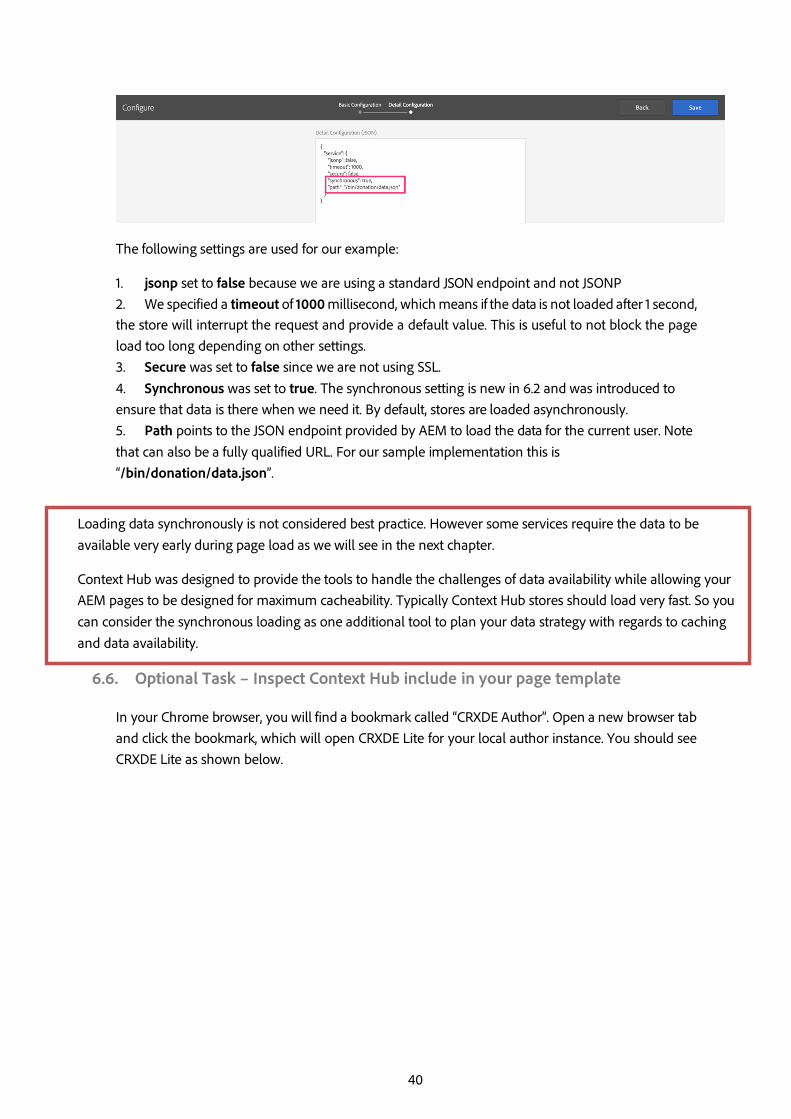
The following settings are used for our example:
1. jsonp set to false because we are using a standard JSON endpoint and not JSONP 2. We specified a timeout of 1000 millisecond, which means if the data is not loaded after 1 second, the store will interrupt the request and provide a default value. This is useful to not block the page load too long depending on other settings. 3. Secure was set to false since we are not using SSL. 4. Synchronous was set to true. The synchronous setting is new in 6.2 and was introduced to ensure that data is there when we need it. By default, stores are loaded asynchronously. 5. Path points to the JSON endpoint provided by AEM to load the data for the current user. Note that can also be a fully qualified URL. For our sample implementation this is “/bin/donation/data.json”.
6.6. Optional Task – Inspect Context Hub include in your page template
In your Chrome browser, you will find a bookmark called “CRXDE Author”. Open a new browser tab and click the bookmark, which will open CRXDE Lite for your local author instance. You should see CRXDE Lite as shown below.
Loading data synchronously is not considered best practice. However some services require the data to be available very early during page load as we will see in the next chapter.
Context Hub was designed to provide the tools to handle the challenges of data availability while allowing your AEM pages to be designed for maximum cacheability. Typically Context Hub stores should load very fast. So you can consider the synchronous loading as one additional tool to plan your data strategy with regards to caching and data availability.

41
Next navigate to /apps/weretail/components/structure/page/customheaderlibs.html
Scroll down and inspect the Context Hub include highlighted in the image above.
For this lab, we will use a modified Context Hub configuration that was simplified to only include a minimal set of Context Hub stores and data required for this lab.
Now, go to
/apps/core/wcm/components/page/v1/page/headlibs.html In
there you will notice
<sly data-sly-include="/libs/cq/cloudserviceconfigs/components/servicelibs/servicelibs.jsp"></sly>
This will include the required code for the Cloud Service configurations that you reviewed in the previous lesson and which are attached to our page.
They include order in your template is important to consider for data availability and page performance. In our setup Context Hub will load the data that is then used by Launch, so it needs to be loaded before the Launch library. Since Launch should be loaded as early as possible, it is best to include Context Hub first in the page followed by the Cloud Services include which will load the Launch library.
It is generally a good idea to adjust the default configuration and only enable the data that you really need to make sure your page and data loads as fast as possible.

42
7.! Appendix 1 – Setup Launch with Experience Cloud, Adobe Target and Adobe Analytics
7.1 Objective
Configure Experience Cloud ID Service, Adobe Analytics, and Adobe Target in Launch so that Analytics and Target calls are being made on our pages.
7.2 Task – Login to Launch
1.! Open a new tab in your browser and login to your Adobe Summit Experience Cloud 2.!Click on Sign In With AdobeID and enter the credentials below
•! Email - [email protected] •! Password - PasswordXXXXX (admin account and instruction will be provided during your lab
exercise)
Launch scripts and other configuration values required for this lab can be found in the TL28 folder on your desktop which contains a folder named “Launch “. We will reference the exact path within this folder throughout the Launch related exercises. All Scripts are also listed in Appendix 8: Launch Scripts.

43
3.! After logging into Adobe Experience Cloud, click on the product icon. and then select Activation. 4.! From the Activation page, Launch the Launch Tag Management system. 5.! You should be able to see the Adobe Experience Cloud Activation - Launch home page with the list of web properties 6.! After you logged in, create a web property by clicking on the New Property button. You web property should be named seat-YOUR NUMBER-YOUR ITERATION. 7.! On the next screen, you will be presented with the following form to compete the property creation.
8.! Type "Adobe Summit" into the "Name" field and "localhost.local" into the "Domains" field. The only required items on this form are the name of the property and domains. The other options on this pertain to visitor tracking across domains, subdomains, and outbound links as well as some of the workflow control options.

44
Data Elements, Extensions, Rules and the Publishing process are the main aspects of Launch which you will use on a day-to-day basis. Before we resume the hands-on exercises, which use these features, let’s do a quick overview of what has changed between DTM and Launch.
7.3 Data Elements
If you are experienced with Data Elements in DTM, you won’t have any problems using Data Elements in Launch.
What is similar to DTM?
• All DTM data element types are available • The main options—Name, Default Value, Force lowercase, cleanText, and duration—are the same • Sub-options of specific element types are also the same
What is different from DTM?
• Data Elements have their own top navigation element and are no longer buried under Rules • There are new data element types— Local Storage, Session Storage, Page Info, and Random Number • Names of Data Element types are different. Here is a full list of the element types in Launch
with their corresponding DTM names in parentheses (): o Cookie (Cookie) o Custom Code (Custom Script) o DOM Attribute (CSS Selector) o Local Storage (did not exist in DTM) o Query String Parameter (URL Parameter) o JavaScript Variable (JS Object)
• The DOM Selector Tool used to select CSS paths for DOM Attributes does not exist • Data element capabilities can be extended with Extensions. For example, the ContextHub
extension allows you to add data elements using features of the extension.
7.4 Extensions
“Tools” in DTM have been replaced by “Extensions”. While on the surface they will feel very similar, there are some subtle, yet extremely powerful differences to be aware of.
Launch is an open and extendable platform. Whereas the Activation team built all of the Adobe and 3rd-party Tools for DTM, Launch allows the Adobe solution teams and 3rd parties to build their own extensions. You can even create your own extensions and share them to the extension marketplace.
Think of Launch as the OS and extensions as the App Store. Extensions on the Launch platform allow Launch to evolve with the digital marketing landscape without Adobe bottlenecks. DTM had eight Tools. Launch already has over thirty extensions and it has only been released for a few months! We expect dozens if not hundreds more to be created over the coming years. No other tag management vendor has similar capabilities.

45
Keep in mind that 3rd party extensions will not be vetted by Adobe. It is up to the customer—and you as their consultant—to thoroughly vet and accept responsibility for any 3rd party extensions used in a Launch implementation. At present, the only way to vet an extension is to add it to a development library and review it.
Over time, expect the BU to add features to the Launch extension marketplace that are common to such marketplaces like ratings, reviews, release notes, usage stats, and other features common in extension and app stores.
Extensions can extend rule actions, rule events, and even data elements—there are many ways which extensions can modify how you set things up in Launch.
The Core extension is preinstalled in every new property and provides all of the rule actions, event types, and data element types you are familiar with from DTM.
Extensions are versioned and each Adobe extension is attached to a specific version of the solution library. At the time of writing, these are the current versions:
1. Experience Cloud ID Service extension v1.0.3 comes with VisitorAPI.js v2.4.0 2. Target extension v0.3.15 comes with at.js v1.2.2 3. Analytics extension v1.0.0 comes with AppMeasurement.js v2.6.0 4. Audience Manager extension v1.1.3 comes with DIL v6.12
In many instances, a migration to Launch will require an updating of solution libraries. In some instances, the library versions that ship with the extensions might be lower than the currently available version downloaded from the UI. It is up to the solution teams to upgrade their extensions as they publish new library versions. The Analytics extension is the only one that currently allows you to use your own customized library, the pros and cons of which will be discussed when we add the Analytics extension.
Another key difference between Launch Extensions and DTM Tools is that Launch Extensions need to be used with Rules in order to fire marketing pixels. For example, in order to fire an Analytics page view call or target-global-mbox, you must use a Rule to instruct Launch to do so. This is an important difference that you will need to keep in mind, and which will make more sense as we continue setting up the property.
7.5 Rules
The Rule builder has been dramatically redesigned and rebuilt in Launch. It shouldn’t be much trouble to start using it, as in most ways it is more intuitive than it was in DTM. Some of the main changes are:
• There is just one rule type and all previous options exist as Core extension event types. Things like “Page Bottom”, “Click”, and “Direct Call” are all just event-types in the Rule builder. This makes it much

46
easier to update a rule, should you need to change the trigger from, say, a DOM Ready event to a custom event.
• Rule Ordering is now possible for rules that are triggered on the same event • There is a new “Custom Code” event-type • New conditions for Date Range and Sampling • “HTML 5 Video->% Complete has been removed • Sub-options within the events appear to be the same • Extensions can add new event types to the Rule builder. For example, perhaps one day the
Target team could add built-in support for its at.js custom events, so custom code wouldn’t be needed to achieve this.
• Extensions can add new actions to the Rule builder, reducing issues by deprecating reliance on custom code
• Rules are required to fire requests associated with any marketing tool. This will require a mindset adjustment, especially for things like setting Customer Ids, firing Analytics beacons, and firing the global mbox.
7.6 Publishing
Perhaps the most dramatic change from DTM to Launch is the Publishing process. Because Launch was designed to meet the requirements of large enterprises with multiple teams using Launch simultaneously, it might feel more cumbersome at first, you will get used to it before long. Here are some key changes to be aware of:
• DTM would automatically save changes to the Staging Library. Launch will automatically save changes to the development library of your choosing.
• The immediate validation of changes that you would have performed in the Staging library in DTM, you will perform in a Development library in Launch.
• Because you can have multiple libraries in your Development environment, each new library must be created and assigned a name (which is actually quite helpful).
• Libraries in Launch need to be “built” before they can be loaded. Sometimes you will have to debug issues that come up during the build process.
7.7 Task – Setup Data Elements in Launch
We will start by creating 5 Data Elements in Launch. Data Elements help abstract data points, which makes it easier for a non-technical audience to select and manage what data they need to track or use for targeting.
47
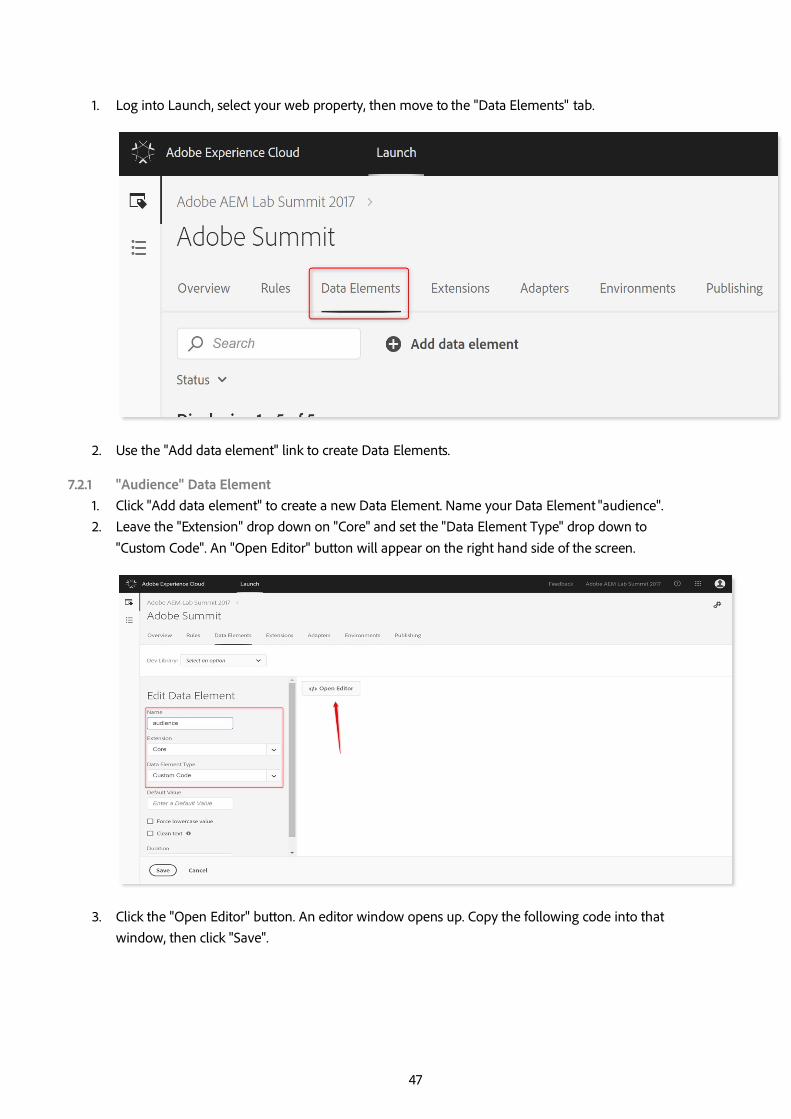
1.! Log into Launch, select your web property, then move to the "Data Elements" tab.
2.! Use the "Add data element" link to create Data Elements.
7.2.1! "Audience" Data Element
1.! Click "Add data element" to create a new Data Element. Name your Data Element "audience". 2.! Leave the "Extension" drop down on "Core" and set the "Data Element Type" drop down to
"Custom Code". An "Open Editor" button will appear on the right hand side of the screen.
3.! Click the "Open Editor" button. An editor window opens up. Copy the following code into that window, then click "Save".

48
4.! Hit "Save" in the bottom left to save your Data Element.
7.2.2! "Donation value" Data Element 1.! Create a new Data Element, call it "donation value", and set the "Data Element Type" to "Custom
Code", again. 2.! Copy the following code into the editor window, then hit "Save".
return Number(window.digitalData.donation.total);

49
3.! Click "Save" to save your Data Element.
7.2.3! "Page name" Data Element
1.! Create a new Data Element, call it "page name". Set the "Data Element Type" to "JavaScript variable". A box will open on the right hand side of the screen.
2.! Copy the following line into the box:
digitalData.page.pageInfo.pageName
3.! Hit "Save" to save your Data Element.

50
7.2.4!"Page URL" Data Element 1.! Create a new Data Element called "Page URL", set it to "Date Element Type" "Custom Code". 2.! Copy the following code into the editor, then click "Save":
var pageURL = window.digitalData.page.pageInfo.destinationURL; return pageURL.toString();
3.!Click "Save" to save your Data Element.

51
7.2.5! "Thank You Page Donation value" Data Element 1.! Create a new Data Element, name it "Thank You Page Donation Value". Set its "Data Element
Type" to "Query String Parameter". A field will appear, along with a check box. 2.! Copy the following word into the field and make sure the check box is ticked:
donation
52
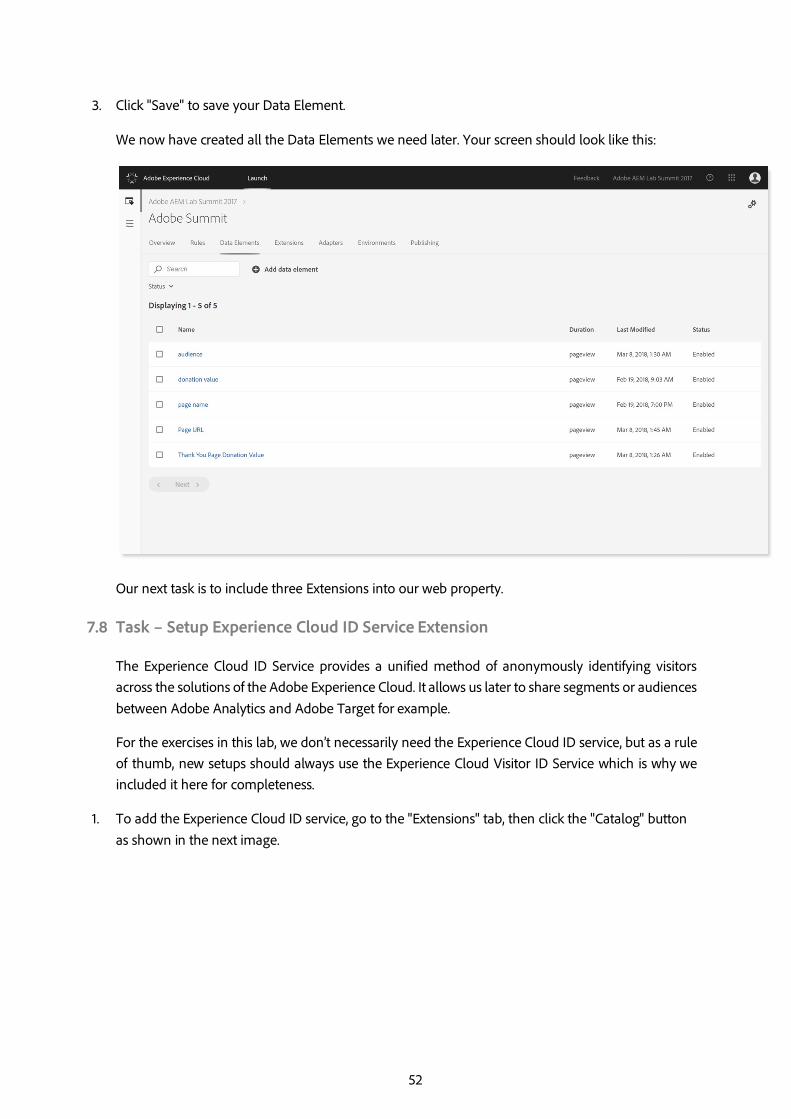
3.! Click "Save" to save your Data Element.
We now have created all the Data Elements we need later. Your screen should look like this:
Our next task is to include three Extensions into our web property.
7.8 Task – Setup Experience Cloud ID Service Extension
The Experience Cloud ID Service provides a unified method of anonymously identifying visitors across the solutions of the Adobe Experience Cloud. It allows us later to share segments or audiences between Adobe Analytics and Adobe Target for example.
For the exercises in this lab, we don’t necessarily need the Experience Cloud ID service, but as a rule of thumb, new setups should always use the Experience Cloud Visitor ID Service which is why we included it here for completeness.
1.! To add the Experience Cloud ID service, go to the "Extensions" tab, then click the "Catalog" button as shown in the next image.

53
2.! Find the Experience Cloud ID Service in the list.

54
3.! When you hover over the tile, the logo is replaced with a text plus an "Install" button. Click the button.
4.! On the configuration screen, leave the Experience Cloud Organization ID as is and enter the following
into the Tracking Server field: aemlabsummit2017.sc.omtrdc.net. The tracking server URL can also be copied and pasted from DESKTOP/TL28/Launch /tools/Analytics-API.txt.

55
5.! Click the "Add" button underneath the drop down. In the new drop down, select "trackingServerSecure" and copy the same value, again.
6.! Now click “Save”. 7.! You have now successfully configured the Experience Cloud ID Service Extension

56
7.9 Task – Setup Adobe Target Extension
Next we set up the Adobe Target Extension. The Target Extension adds Adobe Target to our pages. It will automatically inject a global mbox into every page, which means we can add tests or experience targeting to our site.
1.! Go back to the Extension Catalog.
2.! Hover over the "Adobe Target" Extension, then hit "Install". Leave all settings as they are and hit "Save".

57
7.10 Task – Setup Adobe Analytics Extension
Next, we'll set up the Adobe Analytics Extension. The Adobe Analytics Extension adds Adobe Analytics to the pages on our site, which allows us to track all pages.
1.! To setup the Extension navigate back to the “Extensions” tab of your web property, click “Catalog”, hover over the "Adobe Analytics" extension and click "Install".
2.! On the following page you can further configure your Analytics Extension. Type " aemlab1734dev",
" aemlab1734stage", and " aemlab1734prod" into the respective Report Suite fields.

58
3.! Find and open the General section. Select "UTF-8" in the "Character Set" drop down and "USD" in the "Currency Code drop down". Enter the aemlabsummit2017.sc.omtrdc.net as “Tracking Server” and “SSL Tracking Server” or copy and paste it from DESKTOP/TL28/tools/Analytics-API.txt.
4.! Click “Save” to save the configuration of the Analytics Extension.

59
5.! For Target & Analytics tracking to work, we need to add Rules next.
7.11 Task – Setup Rules in Launch
Launch "Rules" drive the Marketing activity on your site. They let you load scripts, execute targeting or analytics, and much more. For the purposes of this lab, we will create the following Rule
7.12 Initialize Target on Page Load Rule
1.! Go to the "Rules" tab and click the "Create New Rule" button.

60
2.! On the next screen, give the rule a name, by entering a value into the name field, e.g. “Initialize Target on Page Load”.
3.! We want the Rule to fire when pages load, so we add an "Event". Click "Add" under the "Event" label.

61
4.! As the "Event Type", select "Library Loaded (Page Top)".
5.! Click the "Keep Changes" button at the bottom. You'll come back to the Rule configuration screen. 6.! Scroll down to the "Actions" section and click "Add".

62
7.! Select "Adobe Target" in the "Extension" drop down, then as the "Action Type", select "Load Target". Hit "Keep Changes".

63
8.! Hit the little "+" to create another Action.
9.! Select "Adobe Target" as the Extension and "Add Params to all MBoxes" as Action Type. We will
add 3 parameters, so click the "Add" button twice. 10.! In the first field, type "audience", then click the little round icon on the right, select the "audience"
Data Element and click "Select" 11.! For the second field, type "pagename" and use the little round icon, then select the "pagename"
Data Element. 12.! In the third field, type "profile.donation", then click the little round icon on the right to select the
"donation" Data Element.

64
13.! Click "Keep Changes" to save the Action, create yet another one, select "Adobe Target" as the Extension and "Fire Global MBox" as the Action Type, then click "Keep Changes".

65
14.! Your Rule should now have 3 Actions:
15.! With this Rule in place, Target will be loaded, and a Global Mbox with our parameters will be triggered.
7.13 Analytics tracking on Page Load Rule
The next Rule will embed Analytics tracking into all pages of our website, except on our Author environment.
1.! Start by clicking the "Add Rule" link. Give the Rule a name, e.g. "Analytics Call on Page Load". 2.! Add an Event (we use "Page Bottom").

66
3.! We don't want Analytics to track on Author. Scroll down to the Exceptions and click "Add". 4.! Select "Custom Code" in the Exception Type drop down, then copy the following code into the
editor and click "Save".
return window.origin == 'http://localhost:4503';

67
5.! Click "Keep Changes".
6.! Scroll further down to the Actions. Click "Add". 7.! Set the Extension drop down to "Adobe Analytics" and the Action Type to "Set Variables".

68
8.! We want to set the page name as well as 4 eVars and 4 props, so start by clicking the "Add eVar" button 3 times. Then fill in the eVars as follows:
•! eVar1 set as Data Element "page name" •! eVar2 set as Data Element "Page URL" •! eVar3 set as Data Element "donation value" •! eVar4 set as Data Element
"audience" Your screen should
look like this:
9.! Do the same for the props. Hit the "Add prop" button 3 times, then set the 4 props like the eVars
above. You can alternatively set the props to duplicate the eVars, like so:

69
10.! Now scroll down until you find the "Page Name" field and set it to the "page name" Data Element.

70
11.! Click "Keep Changes" to save the Action, then add another one. 12.! The Extension for this one is again "Adobe Analytics", while the Action Type is "Send Beacon"
(which means tracking). The setting on the right hand side is perfect.

71
13.! Click "Keep Changes" to save the Action. Your Rule should now look like this:
14.! Click "Save" to save it.

72
7.14 “ContextHub Listener" Rule
We now build a Rule that adds custom Javascript code. The code will react to changes in the ContextHub module, which will allow us to see Targeting in action in the AEM Author environment.
1.! Create a new Rule, call it something like "ContextHub store updated". 2.! Add an Event, this time chose Event Type "Page Bottom". 3.! Add an Action of Action Type "Custom Code".
4.! Copy and paste the script from DESKTOP/TL28/Launch/rules/pageload/ContextHub.js into the editor field that opens when you click "Open Editor", then click “Save”. Klick "Keep Changes" to save your Rule.
The script we just added via the Rule registers for Context Hub events which indicate that the value of a store was updated. If such an event is detected, the script will check which data elements are mapped as global mbox parameters. It then retrieves the values for these data elements and triggers the required mbox requests again with the new values.

73
7.15 "Thank you Page" or Conversion Rule
In the lab setup we have a thank-you page prepared which will be the Target of the donation form that is part of our landing page. Since we only want to track conversions when a visitor has reached the page, we restrict this rule to the thank you page URL.
1.! Start by giving your rule a name, e.g. “Thank You Page”. 2.! Go to the Event section and click the "Add" button. 3.! Select "Library Loaded (Page Top)" as the Event Type. 4.! Go to the Conditions section and click the "Add" button. 5.! Select "Path and Query String" as the Condition Type, and then type "thank-you.html" into the field
on the right.
6.! Click "Keep Changes" and move down to the Actions section. Click "Add" and select "Adobe
Analytics" as the Extension and "Set Variables" as the Action Type. 7.! Fill in the eVar (eVar5, set as the Data Element "Thank You Page Donation value") and event (event2).
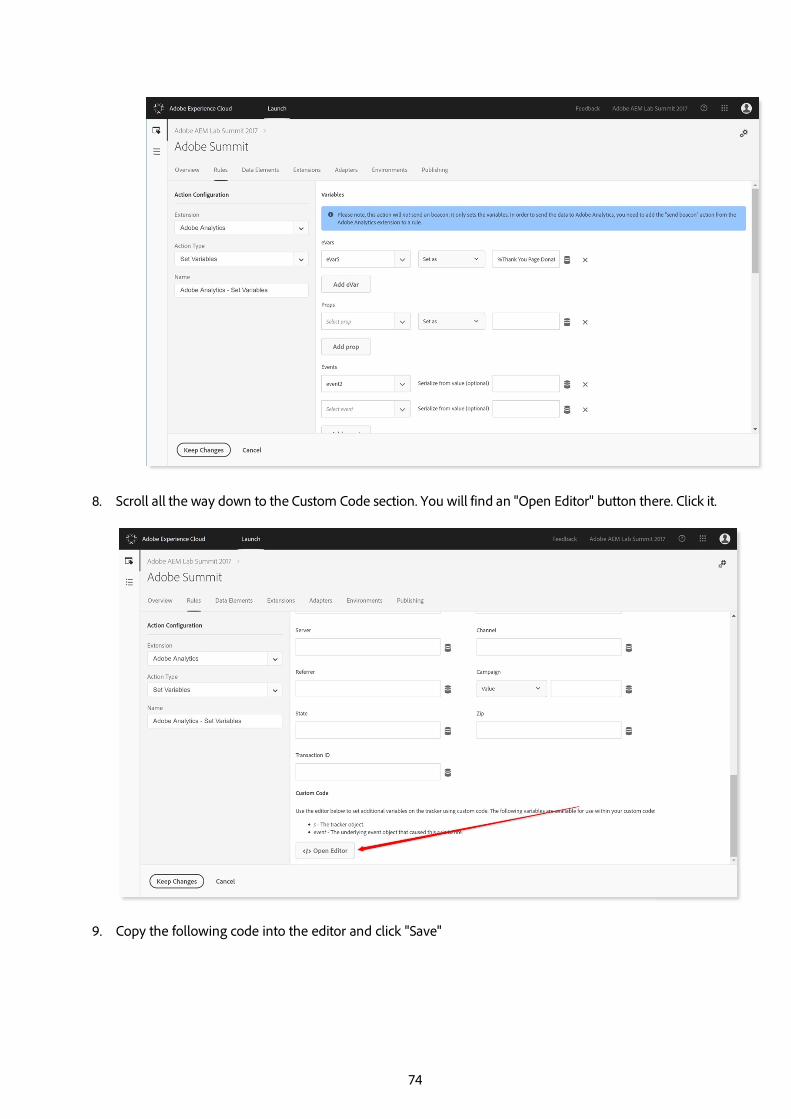
74
8.! Scroll all the way down to the Custom Code section. You will find an "Open Editor" button there. Click it.
9.! Copy the following code into the editor and click "Save"

75
if (s.events) { s.events = s.events + ",";
} s.events = s.events + "event3=" + _satellite.getVar("Thank You Page Donation Value");
10.! Click "Keep Changes" to save the Action, then click "Save" to save your Page Load Rule.

76
Note that this Rule does not have an "Adobe Analytics – Send Beacon" Action. It will only set eVar5 and add event2. The rest of the tracking will be handled by the Analytics Rule we built earlier. Because the other Rule triggers later in the page, meaning it will fire after this Rule, it will have all the relevant data on the Confirmation Page.
You have now successfully configured tracking for conversion of your activity. 7.16 Task – A4T Integration – Target + Analytics
Reach out to Client care and the provisioning team will setup this for you.

77
8. Appendix 2: Setup AEM with Launch , Analytics and Target
A couple of configurations have been implemented by the lab team before the Summit session. This was done because those were configurations which you won’t repeat all the time. In order to provide all details and enable you to get to the full setup yourself, the configurations that were applied are described in this appendix.
8.1 Task – AEM + Launch
8.1.1! Access Launch
1.! Go into Marketing Cloud and select Activation
2.! You should now have the Launch card when you choose Activation (1) from the Solution Switcher

78
3.! When you click the Launch card (1) , it will take you to https://launch.adobe.com. The “Add New Property” button should be available as pictured below.
8.1.2! Create a Property
1.! Create a Property by clicking the “Add New Property” button:
2.! Name your property whatever you’d like, in this case “Adobe Summit” (1). 3.! Use “adobe.com” as the domain (2) since it is the domain of the AEM instance where we will be
implementing. 4.! Don’t change any of the Advanced Settings. 5.! Click “Save” (3).

79
6.! Your new property should display on the list of Properties:
8.1.3! Create Adapters
1.! In this example we will use the Akamai Adapter. 2.! Click “Adapters” in the Property navigation, then click “Create New Adapter:”
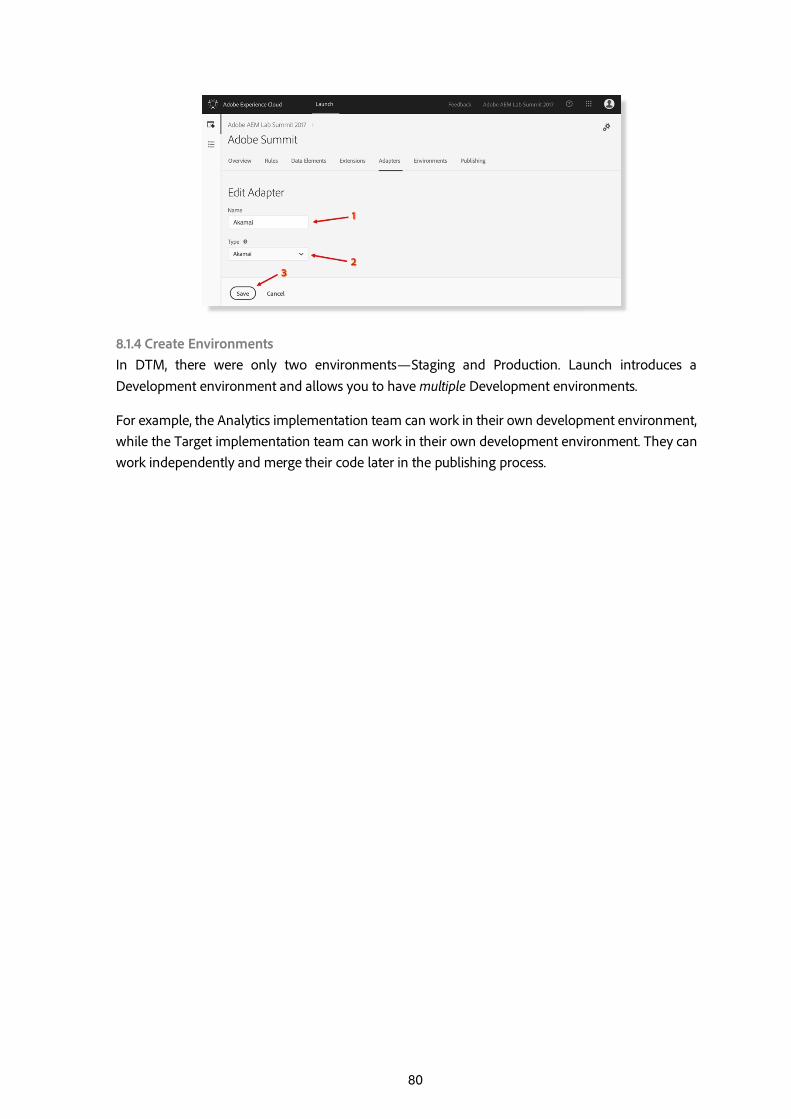
3.! Name the Adapter - “Akamai” is a good name - using the “Akamai” type from the dropdown and
click “Save”.
80
8.1.4!Create Environments In DTM, there were only two environments—Staging and Production. Launch introduces a Development environment and allows you to have multiple Development environments.
For example, the Analytics implementation team can work in their own development environment, while the Target implementation team can work in their own development environment. They can work independently and merge their code later in the publishing process.

81
1.! Click “Environments” (1) in the top navigation and then click “Add Environment” (2).
2.! Under “Development” click “Select” (1).
3.! Name your environment “Development (1), select your “Akamai” adaptor (2), and then click “Create” (3).
4.! The Create archive option is a feature used for self-hosting, which we will not be using in this Quick Start. 5.! Note that as soon as you select the Adapter and hit the create button, the embed code for that
environment is created and displayed. Each environment will have its own unique embed code.

82
6.! Click “Close”. 7.! Add an additional development environment, a staging environment and a production environment. 8.! Once you are done, you should have three Environments:
8.1.5! Asynchronous Embed Codes
In January 2018, an asynchronous loading option (1) was officially added to Launch . You can obtain the asynchronous embed codes by using the toggle. The toggle selection is not saved in the UI, so you will have to be sure to always use the right embed codes. Note that with asynchronous loading of libraries there is no footer embed code to implement. For this reason, avoid using the “Page Bottom” event to trigger rules with an asynchronous deployment.

83
8.1.6! Implement the Launch Embed Codes
While we will not be implementing the Launch Embed Codes in the site code (we will be using Launch Command instead), it would be remiss not to mention how this is done. For each environment, there are two embed codes for synchronous deployments, the Header Embed Code and the Footer Embed Code.
The Header Embed Code should be implemented in the <head> element of all HTML pages. Typically, customers have one or several template files which control the <head> globally across the site.
The best practice is to define your data layer before the Header Embed Code. Otherwise, you will be limited with what you can do in Target, Customer Attributes, and Analytics.

84
The Footer Embed Code goes right before the closing </body> tag.
8.1.7! Integrating Launch with AEM using Adobe I/O
1.! Navigate to Adobe I/O Integrations (https://console.adobe.io/integrations) and login using your Adobe ID
2.! Under the Integrations tab, you should be able to see the list of integrations that already created. You could edit an existing integration or create a new integration. Let’s Create a new integration by clicking on the blue New Integration button.

85
3. Select the new integration Type as – “Accessing an API” and then click Continue. Choose this option to access Adobe products and services via a REST API.

86
4. Select the Adobe product that you would like to integrate as Launch By Adobe and then click Continue.
5. Select a new integration for this service and click Continue

87
6. It should take you to the next window where you need to provide integration details. You need to create a public key from your AEM instance before we procced further with the integration.

88
7. From your AEM Home Page, click on Tools, Security and then select Adobe IMS Configuration.
8. Click on the Create button to set up a new Adobe IMS Configuration. 9. Select the cloud solution as Adobe Launch . We need to create a Public Key in order to move to
the next step. 10. Click on the Create a new Certificate checkbox and provide a name for your certificate. Then press
Create Certificate button.

89
Note : You need to add the newly created public key to the technical account on Adobe I/O.
11. After creating the public key you can download the key by clicking on the Download Public Key option.
12. After successfully downloading the public key to your local machine, lets navigate back to the window where we the Adobe I/O Integration open. Integration Step from Step 6.
13. Provide a name, description and upload the public key. You can upload the public key either by drag dropping the file or you can browse to select the file.
14. For permissions – select the role as Admin and click Create Integration

90
15. You should be able to see an integration success message and an option to get the integration details. Click on Continue to Integration details.
91
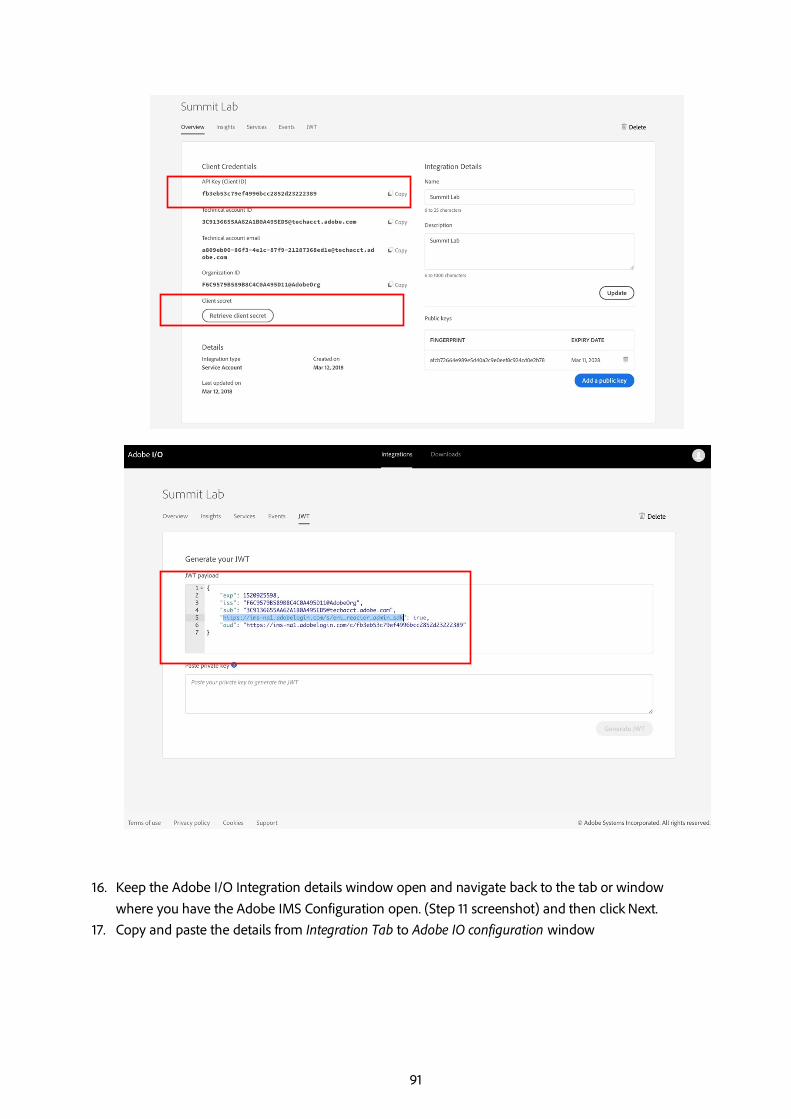
16. Keep the Adobe I/O Integration details window open and navigate back to the tab or window where you have the Adobe IMS Configuration open. (Step 11 screenshot) and then click Next.
17. Copy and paste the details from Integration Tab to Adobe IO configuration window

92
� Provide a Title � From Overview tab, API Key (Client ID) - API Key * � From JWT tab, copy the JWT payload script to Payload field � From JWT tab, copy the JWT payload script > https parameter (https://ims-na1.adobelogin.com) to
Authorization Server field � From Overview tab, click on Retrieve client secret and copy to Client Secret field. � Click on the Create button to complete the Adobe IMS Technical Account Configuration.
18. Once the configure is complete, select it and click on the Check Health option to make sure
everything looks good.
19. You should receive a successful Health Check message if the configuration is complete. 20. Navigate to AEM Home Page > Tools > Cloud Service > Adobe Launch Configuration.

93
21.! Select We.Retail configuration folder and then click on the Create button.
22.! Provide a Title and select the Associated Adobe IMS Configuration we created in step 18. 23.! You should now be able to select the Company and Property created within Adobe Launch .
Covered in section 7.1.3

94
24. Click Next to get the staging and Production library for the Adobe Launch

95
25.! Navigate to AEM Sites, select We.Retail and open properties.
26.!Under Advanced tab, make sure that the cloud configuration points to - /conf/we-retail. (This path stores the configuration for Adobe Launch configuration using Adobe IMS Technical configuration). This step makes sure that the Launch script gets added to we-retail pages.
27.! Navigate to We.Retail home page and inspect your network activity. Search for Launch and you should be able to see the Launch scripts that getting loaded on your page. This completes the AEM + Launch Integration.
96
8.2 Task – AEM + Analytics
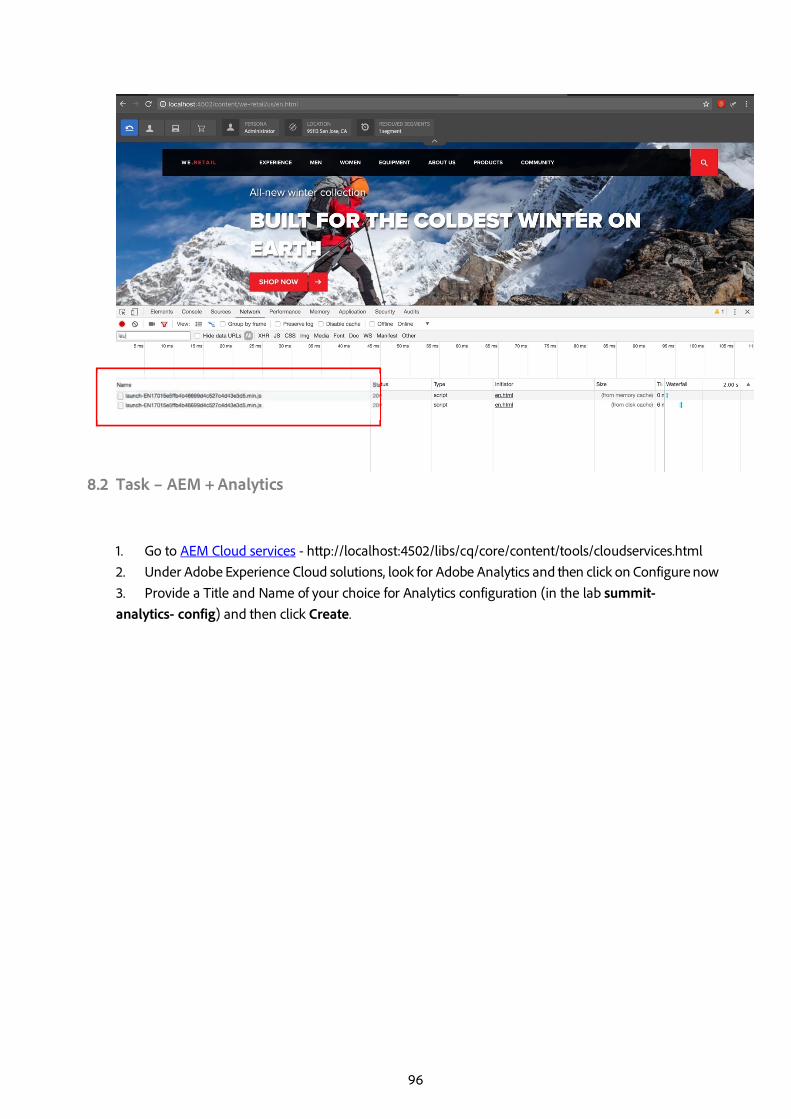
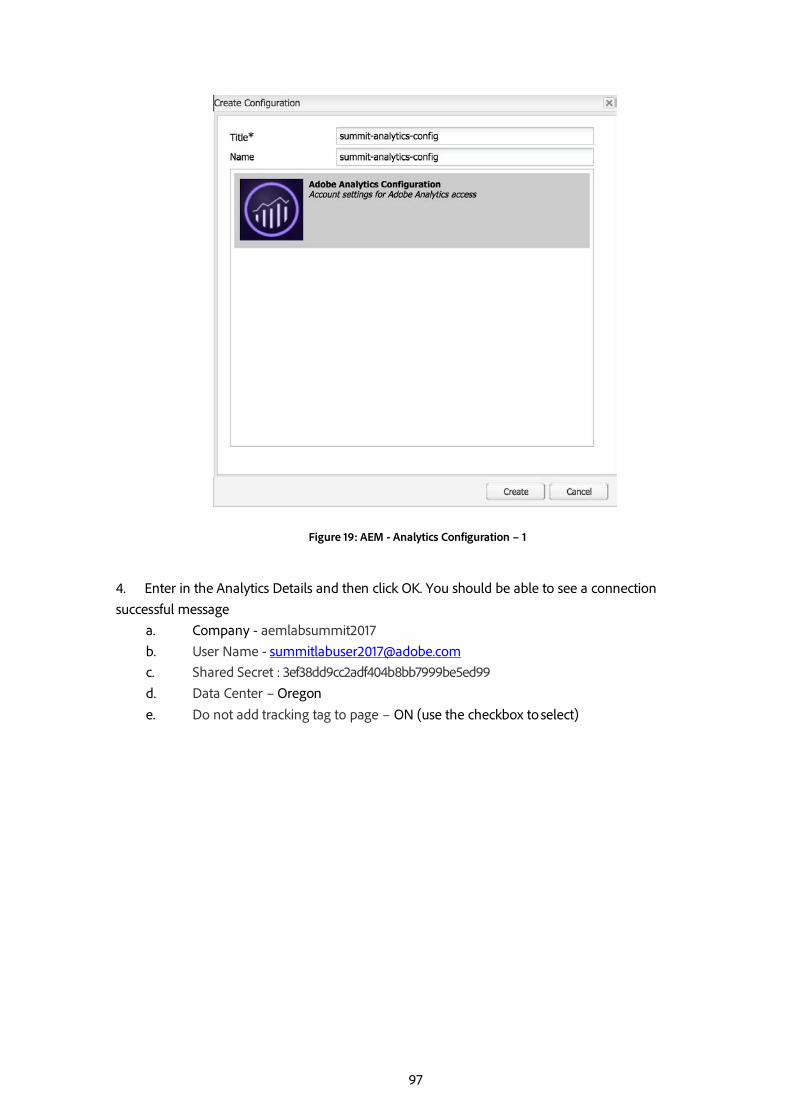
1.! Go to AEM Cloud services - http://localhost:4502/libs/cq/core/content/tools/cloudservices.html 2.! Under Adobe Experience Cloud solutions, look for Adobe Analytics and then click on Configure now 3.! Provide a Title and Name of your choice for Analytics configuration (in the lab summit-analytics- config) and then click Create.
97
Figure 19: AEM - Analytics Configuration – 1
4. Enter in the Analytics Details and then click OK. You should be able to see a connection successful message
a. Company - aemlabsummit2017 b. User Name - [email protected] c. Shared Secret : 3ef38dd9cc2adf404b8bb7999be5ed99 d. Data Center – Oregon e. Do not add tracking tag to page – ON (use the checkbox to select)

98
Figure 20
Property Description Settings used in Lab Setup
Company your Analytics Login Company Our Login Company
Username the Analytics API user Our API user
Shared Secret the Analytics Shared Secret Shared secret of our lab user
Data Center the Analytics data center your account is associated with Our data center
Do not add tracking tag to page
select this option when you use a tag manager like Launch
On
Do not track the page load event
Select this option to prevent the initial page load event. This only applies if you don’t use a tag manager and previous option is Off. Use this if you want to fire your tracking call yourself via Javascript.
Off
Use AppMeasurement Use the new AppMeasurement.js client library instead of the old legacy s_code.js. Only applies if you don’t use a tag manager.
Off
Use ClientContext Option to force usage of ClientContext. If not enforced CQ_Analytics.DataProvider tries to evaluate which data
Off
99
layer is available. Only applies if you don’t use a tag manager.
Do not import page impressions nightly (author)
If checked, the impressions polling importer will no longer import the page impressions on an author instance
Off
Do not import page impressions nightly (publish)
If checked, the impressions polling importer will no longer import the page impressions on a publish instance. The option is checked by default.
Off
Additional context data Additional static Analytics context data (s.contextData). Only applies if you don’t use a tag manager.
None
Segment Option to use an Analytics segment defined in the current reporting suite. The Analytics reports will be filtered based on the segment
None
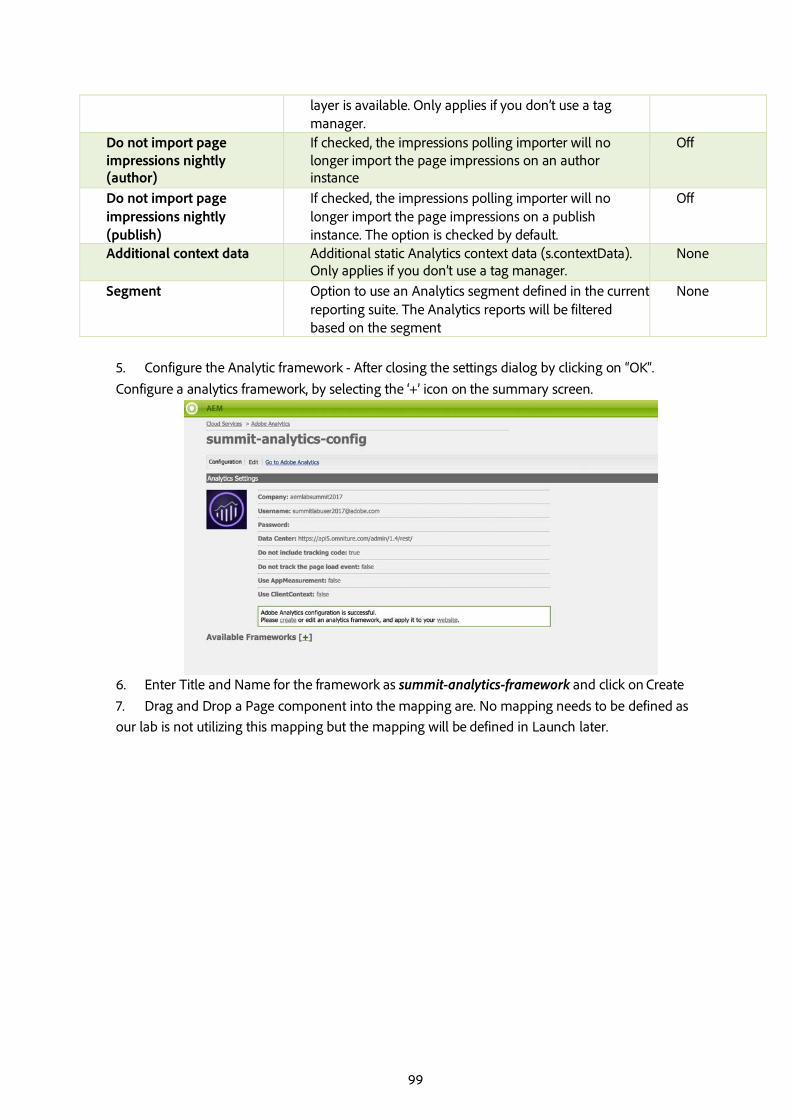
5. Configure the Analytic framework - After closing the settings dialog by clicking on “OK”. Configure a analytics framework, by selecting the ‘+’ icon on the summary screen.
6. Enter Title and Name for the framework as summit-analytics-framework and click on Create 7. Drag and Drop a Page component into the mapping are. No mapping needs to be defined as our lab is not utilizing this mapping but the mapping will be defined in Launch later.

100
8.! Now, from the Report Suite section, choose a report suite (aemlab1734dev) and where to include it (all). This is key to have the A4T integration setup.
8.3 Task – AEM + Target
1.! Go to AEM Cloud services - http://localhost:4502/libs/cq/core/content/tools/cloudservices.html 2.! Under Adobe Marketing Cloud solutions > Adobe Search&Promote, look for Adobe Target and then click on Configure now 3.! Configure an Adobe Target configuration with name of your choice (in the lab summit2017- target-config)
Selecting the report suite is important to enable A4T

101
Figure 21: AEM – Target Configuration – 1
4.! Enter in the Adobe Target Details, Choose the Company, Username, Password, API Type and then click on “Connect to Adobe Target” to test connection, as show in figures below: a.! Client Code: aemlabsummit2017 b.! Email: [email protected] c.! Password: Password2017 d.! API Type: REST e.! Use Accurate targeting: False f.! Synchronize segments from Adobe Target: True

102
Figure 22
Property Description Settings used in Lab Setup Client Code The client code that is associated with your Target
account Our client code
E-Mail The email address that you use to authenticate your Target account
Email API user
Password The password that is associated with your email address Password of our API user
API Type Utilized Target API
•! REST (default) •! XML (legacy, for backwards compatibility)
REST
A4T Analytics Cloud Configuration
Reference to the Analytics configuration utilized for the A4T (Analytics for Target) integration
Our Analytics cloud config
Synchronize segments from Adobe Target
If checked Audiences defined in Adobe Target get automatically synchronized to AEM
On
Use mbox.js delivered by DTM
If selected the injection of mbox.js by AEM is prevented to avoid overlap with injection via DTM
On
Custom mbox.js By default, none is specified so that the default mbox.js file is used. Upload a custom mbox.js file if necessary. Only applies if you don’t use a tag manager.
None
Use DTM to deliver client library
If selected, client libraries for Adobe Target will loaded onto the page by DTM Scripts
True
103
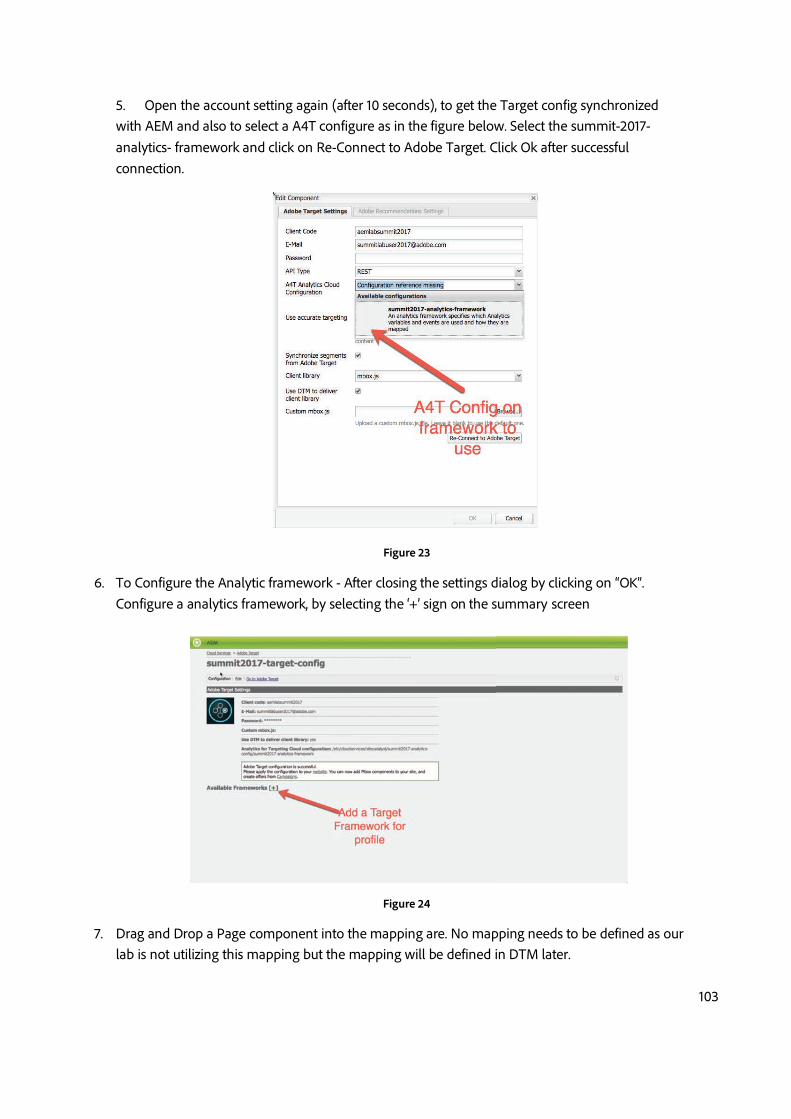
5.! Open the account setting again (after 10 seconds), to get the Target config synchronized with AEM and also to select a A4T configure as in the figure below. Select the summit-2017-analytics- framework and click on Re-Connect to Adobe Target. Click Ok after successful connection.
Figure 23
6.! To Configure the Analytic framework - After closing the settings dialog by clicking on “OK”. Configure a analytics framework, by selecting the ‘+’ sign on the summary screen
Figure 24
7.! Drag and Drop a Page component into the mapping are. No mapping needs to be defined as our lab is not utilizing this mapping but the mapping will be defined in DTM later.

104
Figure 25

105
9. Appendix 3: Analytics Setup
A new report suite was created in Analytics with the settings shown in the screenshot below. This report suite is shared between all labs and attendees. It was created using the default template and just contains some standard settings.
In addition, one success event (event2 - Donations) and four conversion variables (eVar1 – page name, eVar2 – page URL, eVar3 – Donation Value, eVar4 – Donor Audience) were configured and used throughout the lab exercises to track conversions. The following images illustrate how the event and variable was set up.
eVar3 was configured to a simple container for the amount that a site visitor donated.

106
Event1 was configure as a simple counter for donations.
For more information on Analytics setup and configuration please refer to the links provided in the Links and Resources section.

107
10. Appendix 4: Adobe Target Setup
No specific configuration was done in Target besides the creation of the 2 audiences for small and major donors that were used in the lab. One thing to note is that we used the auto creation feature for the global mbox that Target provides. You can find this in Target under “Implementation > Edit Mbox.js Settings” in the left rail.
The setup for the 2 audiences is shown below. It uses the profile parameter that was set up in Launch and which holds the value for provious donations of a user. For small donors we expect a value greater than 0 and smaller than 100. For major donors we expect a value that is greater or equals 100.

108
Figure 26: Small Donor Target Audience
Figure 27: Major Donor Target Audience
For more information on Target setup and configuration please refer to the links provided in the Links and Resources section.
109
11. Appendix 5: AEM and Analytics Page Names
Analytics uses a so called pageName to identify a page. A pageName is basically a string that identifies a page record in Analytics which holds information about page views, visitors, etc. If no pageName is specified, Analytics automatically uses the URL of the page as pageName. But in many cases the URL is not really sufficient as it can change over time. For more details on Analytics pageNames and how to set them when implementing Analytics, see resources in the Links and Resources section.
In AEM the pageName is used when reports for a page are retrieved from Analytics as would it is the case with Content Insight. Content Insight and other places exposing Analytics data in AEM get the info about the Analytics config to be used from the Analytics Cloud service that is associated with a resource. This is why the Cloud Service still needs to be configured even though in the lab scenario we use Launch to activate Analytics on web pages.
If case the pageName is set via Launch, AEM needs to know how to construct the pageName so it can request the correct reports for a page. If you have an AEM-Analytics framework configured for your Cloud Service and mapped one of the provided AEM variables to the pageName in the framework, then the AEM-Analytics integration will use the value of this variable to construct the pageName. Available variables are page title or page path among others. If nothing is mapped to pageName in the AEM framework as it is the case in our lab, AEM generates a default pageName by taking the page path, removing the leading “/” and replacing all other “/” with a “:”. So a sample mapping would look like:
/content/mysite/mypage => content:mysite:mypage
If you choose another pageName for your setup, you can still let AEM know about it by providing your own implementation of com.day.cq.analytics.sitecatalyst.AnalyticsPageNameProvider which allows for more complex page name generation.
You can also refer to the following documentation for more details: https://docs.adobe.com/docs/en/aem/6-1/develop/extending/sitecatalyst/pa-naming.html

110
12. Appendix 8: Launch Scripts
Data Element
Audience
Donation Value
Page Name
Page URL
Thank You Page – Donation Value

111
Rules
Trigger Mbox Update on Context Hub Donation Value Change

112
13. Appendix 10: Key Terminologies
A/B/.../n Testing and Personalization in the Adobe Experience Cloud use the following terminology:
� Activity – a rule set defining which content is shown to which visitor. An activity contains one or more experiences.
� Experience – collection of offers, bound to an audience. � Offer – content to be shown in a location � Audience – a group or class of visitors defined by specific criteria. Often referred to as a "segment" � Location – specific area on the page where content can be targeted

113
14. Links and Resources
1 AEM - Bright Edge Integration- https://docs.adobe.com/docs/en/aem/6- 2/administer/integration/third-party-services/brightedge.html
2 Integrating AEM with Analytics: https://helpx.adobe.com/experience-manager/6- 3/sites/administering/using/adobeanalytics.html
3 Implementing custom page names in AEM: https://helpx.adobe.com/experience-manager/6- 3/sites/developing/using/extending-analytics-pa-naming.html
4 Using the Sling Resource Merger in AEM: https://helpx.adobe.com/experience-manager/6- 3/sites/developing/using/sling-resource-merger.html
5 Experience Cloud Debugger Chrome Extension - https://chrome.google.com/webstore/detail/adobe- experience-cloud-de/ocdmogmohccmeicdhlhhgepeaijenapj
6 Launch Command Chrome Extension – https://chrome.google.com/webstore/detail/launch- command/nkjhamgjeocefocmpbcjfmohkjgildki
7 Experience Cloud Developer Documentation: https://marketing.adobe.com/developer/documentation 8 Analytics Documentation: https://helpx.adobe.com/marketing-cloud/analytics.html 9 Launch Documentation:
https://marketing.adobe.com/resources/help/en_US/experience- cloud/launch/t_quick-start.html
10 Target Documentation: https://helpx.adobe.com/marketing-cloud/target.html 11 AEM Documentation: https://docs.adobe.com/