
ABC's of Design for Digital Printing - Electronics for Imaging
52
TOOLS FOR OPTIMIZING DIGITAL OUTPUT ABC’s of Design for Digital Printing
-
Upload
khangminh22 -
Category
Documents
-
view
0 -
download
0
Transcript of ABC's of Design for Digital Printing - Electronics for Imaging

TOOLS FOR OPTIMIZING DIGITAL OUTPUT
ABC’s of Design for Digital Printing


iii
ABC’s of Design for Digital Printing
Tools for Optimizing Digital Output

iv
ABC’s of Design for Digital Printing
“Once digital printing tips the world of creatives, they will bring the brand managers and the enterprise budgets with them. And the industry will have to spend much less time ‘educating them’ about its benefits. How much ’educating’ do Google and Amazon, or Friendster, have to do, once they get to critical mass?”Michael Josefowicz Special Projects Manager Parsons Communication Design Publishing Center New School University

v
Contents
IntroductionHow to Use this Guide 1What is Digital Printing? 2
Digital Printing BenefitsReal-time proofing 3 Flexibility 3Brilliant color 3Print on Demand 4Integration with traditional printing 4Variable Data Printing 4Other technical advantages 5
Digital Printing ChallengesSolid coverage 7Sharpness of small type 7Ghosting 7Gaps between adjacent colors 7Color crossovers 7Paper sizes 8Special colors and materials 8
Getting it Right from the StartChoosing right tool for the job 9Managing your layout 10
Setting Up a Reliable Color EnvironmentAdvantages of digital printing 13Servicing printers 13Calibration 13Color management 14Creating reliable work space 16

vi
ABC’s of Design for Digital Printing
Designing for Optimum Digital PrintingIntroduction 19Spot color matching dilemma 19Printing solid block colors 20Colors that abut 22Challenges of printing tints and blends 23Font challenges 24
Optimizing Images and PhotographyIntroduction—Importance of images as samples 27Choosing images for digital printing 27Art directing and styling original photography 31Optimizing images 33
The Final ResultSetting up your PDF Workflow 35Adobe Acrobat Presets 36Proof in PDF 37Preparing Your Final Files for PDF 37Putting all the Files Together 38Late Editing 39Choosing Paper 40Output Profiles 40
Example of Digital PrintingNewsletter 41
Glossary 43

1
Digital printing continues to be a major driver of the printing industry’s growth. According to a Caslon & Company analysis, the 2005 North America annual digital print volume of books alone is approximately 20 billion pages and is expected to grow at 20 percent per year over the next two years1.
Digital technology also continues to change the graphics landscape, providing many advantages over traditional offset printing. The technology achieves shorter runs, produces print on demand, reduces waste and decreases inventory, while enabling marketers to personalize their communications for higher response rates. In addition, digital printing today can achieve brilliant color quality, print on a variety of paper stocks and provide finishing options comparable to traditional offset printing without the expense.
These advancements do not come without design challenges, though. Printing solid blocks of color, developing readable smaller fonts, creating special colors and eliminating ghosting (unwanted white lines) remain issues. Luckily, special graphic arts tools and techniques now exist to help overcome these problems.
How to Use this Guide
EFI® has developed the ABC’s of Design for Digital Printing to help you produce digital output with crisp images and vibrant colors. The guide discusses:
• Benefits and challenges.
• Getting digital printing right from the start.
• Setting up reliable color environments.
• Designing for optimum digital printing.
• Hints on achieving high-quality images and photography.
• Producing the final result.
• Examples of digital printing.
Introduction
1 Digital Publishing Solutions, May 2005

2
ABC’s of Design for Digital Printing
In addition, the document provides a glossary to assist you in defining terms used in the guide.
What is Digital Printing?
Digital printing uses computer technology to drive the printing devices to produce color or black and white documents. Digital documents are designed on computers, using layout software and electronic content—representing both text and images such as graphics and photos. In this process, computers also manage the digital printing workflow, from controlling jobs and equipment to billing and accounting.
“…But, most importantly, it (digital printing) is repeatable and reliable. From the point of view of a professional creative, who has to satisfy either an internal or external client, this is the single biggest advantage. It potentially means the end of the great fear of printing: will the printed piece look like the proof that the client approved.”Michael Josefowicz Special Projects Manager Parsons Communication Design Publishing Center New School University

Digital Printing Benefits
In addition to speed, reduced cost and less waste, digital printing provides several advantages over traditional offset printing.
Real-Time Proofing
Proofing, or the trial sheet, offers immediate and accurate feedback on the way a document looks and prints in the digital printing world. Proofing can be done on your computer screen, and colors are easily corrected within minutes using software. The same process takes days and costs more in traditional offset printing.
Flexibility
Digital printing enables marketing documents to become “living entities” that can be easily changed in real time and do not require a “reprint” or advanced planning and warehousing. Unlike traditional printing, information can be added or removed as needed.
Brilliant Color
Today, new digital printing technology produces color that rivals traditional offset quality, which enhances businesses’ competitive edge. This feat has been accomplished by digital printing’s ability to create the same or similar colors using industry color standards established by the International Color Consortium, the ICC. The ICC was created in 1993 by a group of industry vendors to create and promote an open, vendor-neutral, cross-platform color management system. The group developed ICC profiles, or scientific standards describing all parameters of visible colors. ICC profiles ensure that all printing devices translate color data from one device to another device’s native color space.
3

4
ABC’s of Design for Digital Printing
Print on Demand
Digital printing enables print on demand (POD) or the publication of small print runs on demand. This benefit enables businesses to order smaller quantities of items, lowers their printing costs, and alleviates the headache of storing extra stock.
Integration with Traditional Printing
Since many professionals work with offset and digital printing, companies such as EFI are integrating the two processes to provide cross-platform continuity. The seamless integration enables you to proof color, do layout and trappings digitally and do bindery on printed sheets before delivering materials to offset printers. These processes save you time and money, while alleviating the headaches typically associated in having to work with both printing worlds.
Variable Data Printing (VDP)
Marketing studies repeatedly show that personalizing communications boost their effectiveness. Today, VDP enables businesses to personalize their
Variable Data PrintingVDP applications refer to the databases to make each printed piece customized to specific individuals’ taste by changing the images and text on each print.

5
Digital Printing Benefits
communications by using digital technology to link print engines to databases. These databases contain a combination of contact records and varying versions of content for the printed documents. When a document is printed, VDP refers to the databases to make each printed piece customized by changing the images and text on each print. This type of printing is virtually impossible in traditional offset world as it requires a combination of electronic print workflow programs and digital output devices.
Other Technical Advantages
Digital printing also provides other technical advantages:
• Less maintenance and downtime. Digital printers require less upkeep and experience less downtime than traditional presses.
• Saves on manpower. Digital presses may run by alone or require one person to operate them, while offset presses may require a crew of up to eight people.
• More efficient workflow in RGB format. Using RGB format in digital printing is preferable because it creates a more accurate proof that simulates CMYK on-press color. It also produces higher image and text quality, generates more accurate digital output, and ensures a smoother workflow.
• Real-time color changes. Digital printing provides the only flexible environment in which last-minute changes in color, text and images can be executed. It also provides the only environment in which short run printing is possible and more flexible real-time printing options. Products such as EFI Spot-On, enable real-time changes to spot colors, including all major color systems such as PANTONE®. Late editing with EFI’s EnFocus PitStop also allows editing of the final PDF file, while it is in the Fiery®-controlled device. In offset printing, printers must go through the extended process of remaking multiple printing plates, and setting and washing up before adjustments can be made. Also, in offset printing, the CMYK version of specific spot colors cannot be changed.
• Ability to archive files. Final output files and important color calibrations can be stored on digital printing technology such as Fiery color servers, allowing you to print files at a moment’s notice and to easily update and store files again.
• Ability to print at home. Digital printing can be done at home, while this is not possible in offset traditional printing.

6
ABC’s of Design for Digital Printing

Digital Printing Challenges
To generate output, digital printing uses hardware and/or software called raster image processors (RIPs) to convert images and vector graphics (mathematical formulas) into bitmaps (also called pixels). As this conversation takes place, several issues mentioned below can occur. We’ll discuss ways to get around these problems later in the guide.
Solid Coverage
Printing solid blocks of colors remains a challenge in digital printing. Coverage can be uneven and streaked (see Page 20 for more information).
Sharpness of Small Type
Some small type fonts can become fuzzy and unreadable in digital printing. Distribution over the Web causes further limitations because this venue distorts certain font types (see Page 24 for more information).
Ghosting
Two contrasting colors that abut or touch, sometimes create unwanted whitish lines (see Page 22 for more information).
Gaps between Adjacent Colors
Since printing devices vary in tolerance, inaccuracies can occur when combining individual color separations causing unwanted gaps between adjacent graphics, color blocks or type.
Color Crossovers
A crossover graphic spans two or more pages and usually contains a gutter in the middle. If a graphic is not positioned correctly, part of the graphic can disappear into the binding, cracks or fold. Another problem is if crossover graphics are printed on different sheets, it can cause the colors not to match.
7

8
ABC’s of Design for Digital Printing
Paper Sizes
Paper sizes in digital printing remain limited. In fact, many output devices have physical restrictions that prevent them from printing to the papers edge. The maximum page size ranges super A3 or 12” x 18.” This limitation is why we recommend that users do not print to the edge of the paper. Instead, they should print within the paper’s margin then trim for the bleed (see Page 11 and Page 40 for more information).
Special Colors and Materials
In digital printing, spot colors continue to create a challenge because spot color ink doesn’t exist in the digital world. Special effects such as embossing, debossing, foil stamping and metallic inks also are not available and must be simulated. To get around these issues, colors must be printed with some percentage of CMYK to attempt a near match (see Page 19).

Getting It Right from the Start
Several graphic applications exist for digital printing. Coupled with the tips in this guide, these tools offer ways to optimize digital output and to alleviate the issues typically associated with this medium. Below are the key things to remember when designing in digital printing.
Choose the Right Tool for the Job
Use Proper Resolution
Resolution measures how much detail an image or illustration has and is measured in pixels per inch (ppi). In digital printing, recommended resolution for images is 300 ppi at 100 percent size. By selecting this resolution, you can secure a high level of information to render, or digitally produce an image, yet still keep the file size manageable. It is not advisable to work or save your images in 300 ppi at 200 percent because they will have visible defects such as pixelization (visible individual pixels) or jaggies (lines shaped like a step).
Image ResolutionThe sharpness of an image or illustration depends on the number of pixels used to describe it. The 600 ppi image has great detail, but at a price: file size. The 300 ppi image shows plenty of detail while keeping the file size down. Images lower than 150 ppi show signs of fuzziness and pixilation. Note that if you import an image that is 300 ppi and enlarge it 200% you are in effect reducing its resolu-tion by half. Thus, a 300 ppi image would look like the 150 ppi image here.
600 ppi 300 ppi
150 ppi 75 ppi
38 ppi 20 ppi9

10
Digital printing handles type and line art differently. Files are expressed in PostScript, digital shorthand that stores information in coded instructions rather than a mosaic of pixels. PostScript allows you to render files at the maximum resolution of the printer, which ranges between 400–1200 ppi, producing sharper type and illustrations that are easily editable.
Use Layout Applications for Type and Image Handling
Layout applications such as Adobe® InDesign™ or QuarkXPress™ are built to handle large amounts of text and to manage images of varying sources and formats. From a typographic view, these applications help manage kerning—the spacing between letters to make them appear visually balanced. From an image view, layout applications offer an easy way to edit and assemble images and illustrations to pass onto the output device or PDF file.
Use Illustration Programs to Create Line Art and Type Effects
Illustration applications such as Adobe Illustrator™ or Macromedia® FreeHand™ do an excellent job of drawing original art and creating type effects including drop shadows and transparency. Their capabilities also surpass other applications in producing sharper and clearer effects on imported images.
Use Image Editing Applications for Manipulation and Color Correction
Image editing applications make life simpler in digital printing, though users shouldn’t rely solely upon them. Adobe Photoshop® remains the undisputed leader in image editing because the software does an excellent job in working with the various color tags and color spaces used by printers to create optimal color output.
Managing your Layout
Managing your layout from the start eliminates headaches later. Below are tips on how to more efficiently accomplish this task.
Name Spot Colors Consistently with Proper Color Spaces
Since spot color inks don’t exist in the digital world, the naming of these colors without variation becomes a critical step in managing layout. For example, “Logo Red” may be your company’s color but make sure that there isn’t a “logo_RED” that came with the imported file, too. Another example is Pantone 123C, Pantone 123U and Pantone 123CVU sound identical, but they are not the same color. If you remember this rule, you can avoid costly mistakes and adjust spot colors more easily later to print the way you want.
ABC’s of Design for Digital Printing

11
Getting It Right from the Start
In addition, PANTONE or other named colors should be left alone. For more accurate matching, products such as Fiery color servers have special formulas to print more accurate colors.
As you work with spot colors, also remember:
• Convert to CMYK mixes when specifying blends involving a spot color or spot colors, especially if drop shadows or transparency are involved.
• Do not use white as the endpoint of a blend. Instead, express the endpoint as a percentage of the spot color.
• Make the endpoint no lighter than 15 percent to prevent an unattractive band or line where the printer has stopped laying down toner.
Use Style Sheets for Type and Graphic Elements such as Rules
Style sheets make changing color, type style or graphic elements easy and reduce inconsistencies in color, type and line weight.
Use Realistic Margins
When creating margins, always establish three areas on your document before you start:
• Paper size or trim size: This is the actual finished size of the document.
• Image area: This refers to the location of a graphic element on the page. To ensure that the image area is not trimmed in the final printing stage, create a half-inch margin from the edge of the paper on all sides. If the document is going to be cut from a larger sheet, then allow a half-inch safety margin.
Image Area Or Type Sa fety Zone
Trim marks
Bleed area
Image area orsa fety zone
Trim area oredge of paper

• Bleed area: This is the inked area on the page that runs off the paper. If you are creating document that will be trimmed out of a larger sheet of paper, use an eighth-inch margin beyond the trim size around all edges.
Build Reader Spreads
Build your document as if you were reading a book. This process makes it simpler to save single pages and impose them into a booklet later using software such as Adobe Acrobat or EFI BookletMaker later.
Also try to avoid critical crossovers where an image, illustration or large heading span the spread because they are not likely to yield a good match. Registration tolerances on a copier or digital printer are not as exacting as those tolerances on an offset press.
Proof Early and Often
Proofing early and often saves users from troubleshooting later, leaving you free to focus on other important elements.
ABC’s of Design for Digital Printing
12

13
Setting up a Reliable Color Environment
The biggest advantage to digital printing is the ability to proof work often on the actual device printing the final job. The computer monitor can also serve as a
“soft proofing” device. By keeping a reliable color environment on a computer system, you can also proof documents on different copiers and printers and still achieve accurate and predictable results. Below are a few ways to achieve a reliable color environment.
Service
Having your digital printer serviced regularly serves as a starting point for producing consistent color.
When colors mottle, print out of register or streak, it is usually a sign that the printer needs service. Without proper service, the ability to achieve consistent color on digital printers quickly vanishes. Also, the way you handle and store your paper makes a difference. To resolve the paper handling and storage issues, opening a fresh ream of paper before printing and store this paper in a container to avoid humidity.
Calibration
Calibration reads and balances the color output of a device to create an optimum color environment for a particular printer or copier. Once the color is balanced, the printer or copier becomes a reliable tool to produce premium color for images, spot color and illustrations. Digital printing also allows you to return to the file later and achieve the same color output.
Devices that should be calibrated or profiled include:
• Digital camera
• Scanner
• Monitor
• Printer

14
ABC’s of Design for Digital Printing
Apple, EFI and Windows offer applications for calibrating your monitor. These applications require users to follow the step-by-step procedures to adjust color balance, brightness and contrast. The applications then create an ICC profile, describing your monitor’s color. Installations of this ICC profile also ensure that any color coming into your monitor will be adjusted using the established profile.
If greater accuracy is needed, a colorimeter or spectrophotometer can be installed. These devices take color readings directly from your screen then compiles an ICC profile based on the data and automatically installs it for use. An example of this device is the EFI Spectrometer ES-1000. You should calibrate your monitor every month for optimal results.
Another example on how to calibrate printers and copiers involves using EFI’s Fiery technology. EFI provides two ways to calibrate Fiery-connected devices. The company recommends that this calibration be performed daily in production environments.
Calibration works by first printing a page called a target from the Fiery. It consists of patches of the four process colors in diminishing screen percentages from solid, 100 percent, down to zero percent paper color. This page is read by either the copier’s scanner or by an independent device call a densitometer. A table then is used to correct and balance the device.
Color Management
Predictable color requires using the right tools for the job and knowing how to manage them. It also means understanding that each digital color device uses a slightly different way of presenting the color it sees.
To help the color management process, digital printing uses ICC profiles. As described earlier, ICC profiles are based on scientific standards that define the parameters that can be used to describe color rendered by a particular device. These color characteristics are determined by using a spectrometer. Data is compiled into a table of values for that device. This device then refers to these values when it converts the file for output. If an ICC profile is not chosen, a default value is used. If ICC profiles are not used or loaded correctly, colors will not render accurately.

15
Setting up a Reliable Color Environment
When opening a file in Photoshop, you view it in a RGB working color space that has been adjusted by an ICC profile. (A working color space is a common color space that is not device specific.) It is important to note that even if you can view many more colors on a monitor, you should set up Photoshop to display only colors that can be printed on your printing device. A typical RGB work color space is made up of standard RGB (sRGB) to help achieve greater color consistency between hardware devices and on the Web. Adobe RGB is another color space that can be used to display color destined for digital copiers and printers.
When selecting “working CMYK,” Photoshop uses an ICC profile to show you the color your printer will generate. SWOP-Coated is a common ICC profile used by many printing devices. (SWOP stands for Specifications for Web Offset Printing.)
When printing on technology such as Fiery-connected printers or copiers, the device uses the color determined and modified by the previous profiles and makes the transformation to CMYK using its own built-in ICC profile that describes the kind of color it prints. One last adjustment is made through an output profile, which modifies the color for the paper qualities being used.
The Role of ICC Profiles in the Digital Printing Workflow
ICC
ICC
ICC
ICC
ICC
Input Device
ICC Profile for Digital Camera
ICC Profile Tag from Digital Camera
ICC Profile for Monitor
ICC Profile for PrinterICC Output Profile for Paper
ICC Profile for Working Color Space
Digital File
Monitor as a soft proofing device
FIERY Separation to CMYK
Printer
All devices in digital workflow use ICC profiles. Your computer monitor can act as a soft proofing device because of the inter-action of ICC profiles that describe how your monitor sees color and how your printing device prints that color.

Creating a Reliable Color Workspace
Since color management is so critical in the printing process, creating a reliable color workspace is essential. The following sections provide tips on how to create an ideal environment.
Use Trusted Technology for Conversions between RGB and CMYK
Images from scanners and digital cameras, along with stock images and screen shots, are all produced in RGB. Color loss occurs when conversions happen between RGB and CMYK, so you need to manage this process carefully. Modern printing technology, such as Fiery’s ColorWise®, helps in this process.
In Fiery-controlled devices, the entire digital printing workflow can be RGB-based until the very end. When the need to convert to CMYK arises, Fiery technology makes the final conversion to CMYK using the appropriate ICC profiles. By automating this process, your color loss is reduced.
16
ABC’s of Design for Digital Printing
EFI provides intuitive tools for color management with its graphic Color Setup feature. The proper ICC profiles can be easily chosen before the job is printed to assure predictable color every time.

17
Setting up a Reliable Color Environment
Convert Document’s Colors to your RGB Working Color Space Immediately
Photoshop lets the user know if an embedded RGB color profile exists. When this occurs, choose
“convert document’s color to the working place” in the dialogue box. This operation will bring your color files from different sources into a common color environment for image editing. It is highly preferable
to have your color files in RGB format, however, if your files are in CMYK, do not convert them to RGB.
Setup Workspaces in Photoshop
Again, choosing an RGB workspace that you prefer is a key strategy in color management. Adobe RGB is recommended for digital printing, and sRGB is recommended for the Web design. US sheet fed is recommended for the CMYK workspace. These ICC profiles are available from the pull-down menu or can be loaded through the “load...” button in Photoshop.

18
ABC’s of Design for Digital Printing

19
Designing for Optimum Digital Printing
The speed of digital printers can result in a trade-off in color and printing quality, but by adhering to a few parameters, dazzling color printing can be achieved. This section discusses these challenges and provides tips for optimizing color files for output.
Spot Color Matching Dilemma
Spot color matching remains a key challenge in digital printing because fewer colors can be created using a CMYK process than in traditional offset printing, which uses actual spot colors. (Spot colors are specific ink.) The PANTONE matching system was developed before digital printing and has been grandfathered into the graphic arts community. The system provides a standard for specifying colors for printing, as well as fabrics and plastics throughout the industry. Attempts at matching these colors and others, such as TRUMATCH and TOYO, are limited. When picking colors, it helps to keep a few things in mind:
Start with Trusted Technology
In digital printing, it is not always easy to match existing print ink colors viewed in RGB with colors printed on a digital output device. Some formulas, however, achieve closer matches than those in PANTONE’s Solid-to-Process Guide. In the case of Fiery, it licenses Pantone color information to insure correct color across all media when profiles are properly calibrated. When using Fiery technology, users should print out the color pages from the Fiery location and then choose a color that most closely matches their intended color. It also helps to consider a special ink mix to match the Fiery color, if a printing ink is required for some later applications.
Pick Colors that Match Across Printing Devices
As stated earlier, different printing devices print colors different ways, so avoid colors that are problematic. Generally, darker, more saturated colors tend to print closer to their PMS counterparts because they use a mix of all four process colors.

20
ABC’s of Design for Digital Printing
Avoid Colors that Are Consistently Hard to Print
Gray shows flaws more than any other color. In general, four-color grays are the hardest to print because they involve all four process colors in a balance. If one color is off, the gray looks more like brown or blue.
You also can create a richer black by adding screen amounts—Usually 40 percent—of the process colors, but be careful. With some printers, 100 percent black is the richest black you can achieve on this device.
Use Software to Adjust Critical Spot Colors
Using software simplifies the process of adjusting spot colors. The Fiery color server provides two great tools, EFI Spot On and the ES-1000 Spectrometer, for making last minute adjustments to spot colors in a document. You can adjust or change a color throughout the entire document. No tool exists like this in traditional printing.
Printing Solid Blocks of Color
The biggest challenge in toner-based devices remains printing solid blocks of color. Commercial printers spend lots of money and time on ink coverage issues. Large areas of color often print with streaking, mottling and areas where the color varies due to one color printing lighter or darker than it should. The problem can get magnified by the speed requirements of the new printing devices.
Large blocks of solid colors should be avoided or should be interrupted by other colors or designs. If they cannot be avoided, consider the following alternatives:
The four squares all start with the same CMYK formula. However, each square has 5 percent more of just one of each process color.

21
Designing for Optimum Digital Printing
• Add a type block to a solid area.
• Add line art or an illustration to the block.
• Add a texture to the block.
• Add a monochromatic image overlaying the color block.
• Overlay a dithered bitmap image, a ran-dom speckle pattern of the image similar to a mezzotint.
• Add noise to color in Photoshop. Noise is a random speckle pattern of pixels cre-ated from the color.
• Add a “ghost image” as a background.
Key Advantages to Digital PrintingBesides the speed and convenience of printing and distributing technology, digital printing provides other key advantages over traditional offset printing. It is now possible to produce high-quality, customized printed materials cheaper.
Key Advantages to Digital PrintingBesides the speed and convenience of printing and distributing technology, digital printing provides other key advantages over traditional offset printing. It is now possible to produce high-quality, customized printed materials cheaper.
Key Advantages to Digital PrintingBesides the speed and convenience of printing and distributing technology, digital printing provides other key advantages over traditional offset printing. It is now possible to produce high-quality, customized printed materials cheaper.
Key Advantages to Digital PrintingBesides the speed and convenience of printing and distributing technology, digital printing provides other key advantages over traditional offset printing. It is now possible to produce high-quality, customized printed materials cheaper.

22
ABC’s of Design for Digital Printing
Colors that Abut
Under certain conditions, colors that abut, or touch, create undesirable white edges or ghosting. Below are some typical situations when white edges or ghosting occurs:
• Two colors with no common process color touch each other. The
orange color is composed of large amounts of magenta and yellow, while the blue contains large amounts of cyan and a little magenta. Since these colors possess little in common, a ghosted edge results.
• Black type abuts a strong background, a halo around the type
results. Consider lightening the background or reversing the type.
• Strong color type abuts a background of similar color, a halo
around the type results. Consider lightening the background.
Possible Solutions for Fixing Ghosting
The tips below can help resolve the ghosting problem:
• Avoid black type on color backgrounds. Consider lightening the background color, or darkening the background color and reversing the type.
• Avoid color type on contrasting background. Choose colors with at least one strong common process color as a component of each color.
• Manage colors that touch by again choosing colors with at least one strong common process color as a component of each color. Consider adding a white line between the two colors to separate them, or consider “trapping” the colors by adding a thin line of a screen of a combination of the two colors.
• Blur the edges of colors that touch in Photoshop.
Key Advantages to Digital Printing
Key Advantages to Digital Printing
Key Advantages to Digital Printing
Challenge
Challenge
Challenge

23
Designing for Optimum Digital Printing
• Print the document directly from the layout application to technology such as the Fiery with separations “on” and then select “combine separations” in the print set up. This solution prints all automatic trappings included in the document.
• Use software such as EFI Graphic Arts Package, a suite of tools specifically designed for graphic arts, to circumvent these digital printing problems. The Auto Trapping feature specifically is designed for production printing and automatically corrects the mis-registration of ghosting colors that touch. This feature also accommodates special job needs. For example, thicker paper can require a larger trap amount. In addition, the output device condition and job complexity can require last minute adjustments.
Printing Tints and Blends
Color management software, such as EFI’s ColorWise®, has come a long way in creating smoother blends between colors such as PANTONE, TOYO, and DIC. Banding, or undesirable bands of colors on the page, however, still occurs.
Below are a few instances:
• If the blend colors (steps of a color) possess no common process color between them.
• If the blend is too subtle over a long distance of paper because there is simply not enough variation in color tints to fool the eye.
• When a blend is white or zero percent of a spot color. Consider making the end-point of the blend no less than 15% of the color.
Challenge
Challenge
Challenge

24
ABC’s of Design for Digital Printing
Solutions to Banding
• Make sure your blend colors have a common component such as yellow or magenta. To do this, check the formula of each named color in the layout program, in a swatch book, or in software such as EFI’s Spot On.
• Double check that there is an adequate difference between the blend colors to create enough steps between them. Proofing in PDF remains the best method to alleviate problems in the final result.
• Keep the blend colors above 15 percent. If the lighter components of a color drop out too early, consider converting the named color to CMYK and modifying the formula.
• Add noise to color in Photoshop. Noise is a random speckle pattern of pixels created from the color.
Fonts
Small type remains a readability issue in digital printing and on the Web, so keep fonts embedded and as large as possible to ensure correct output. If you must work in small fonts, the following recommendations below provide helpful hints on working around the issues above:
• Select fonts from the top navigation menu as opposed to the bold or italic versions in your tool bar. The reasoning is because “artificial” bolds or italics do not show subtle changes in line weight on curves. This lack of change in the characters often shows inconsistent kerning. (Kerning is the spacing between letters to make them appear visually balanced.)
• Do not specify “rich black” ink for black type because extra tone layers cause fuzziness. Keep all black type at 100 percent black.
• When specifying type in spot colors, make sure the color is dark enough and saturated enough to hold up against the rest of the black type and other elements on the page. The spot color also should contain 80 percent of one of the process colors besides yellow or some black.

25
Designing for Optimum Digital Printing
Key Advantages to Digital Printing...9 pt. Key Advantages to Digital Printing...9 pt. Key Advantages to Digital Printing...9 pt.
Key Advantages to Digital Printing.........8 pt. Key Advantages to Digital Printing.........8 pt. Key Advantages to Digital Printing.........8 pt.
Key Advantages to Digital Printing ............... 7 pt. Key Advantages to Digital Printing ............... 7 pt. Key Advantages to Digital Printing ............... 7 pt.
Key Advantages to Digital Printing..........6 pt. Key Advantages to Digital Printing..........6 pt. Key Advantages to Digital Printing..........6 pt.
Key Advantages to Digital Printing.................... 5 pt. Key Advantages to Digital Printing.................... 5 pt. Key Advantages to Digital Printing.................... 5 pt.
Key Advantages to Digital Printing .................................. 4 pt. Key Advantages to Digital Printing .................................. 4 pt. Key Advantages to Digital Printing .................................. 4 pt.
Key Advantages to Digital Printing...............................................................3 pt. Key Advantages to Digital Printing...............................................................3 pt. Key Advantages to Digital Printing...............................................................3 pt.

26
ABC’s of Design for Digital Printing

27
Optimizing Images and Photography
Imagery in collateral offers one of the most powerful vehicles for communicating product information; however, not every photograph translates clearly in digital printing. It’s always preferable to use original photography for higher quality assurance, however, if your budget does not permit, carefully chosen stock photography works, too. Below are suggestions on how to optimize your images.
Choosing Images for Digital Printing
Selecting the right images reduces the chance of printing marginal results. Below are tips on how to produce the optimal images:
• Work in RGB. Most scanners and cameras can scan RGB, so using RGB format from the start makes sense, especially if you are working with film or transparencies. Be sure to convert your image file into your RGB working color space by selecting the “convert document’s colors to the working space” radio button in the Embedded Profile Mismatch dialog box that appears when opening your file in Photoshop.
• Choose the highest resolution available. Work in a higher resolution initially such as 600 ppi at 100 percent to capture the largest amount of material. Save the image in this large size in Photoshop, and then reduce it later to the appropriate resolution, 300 ppi at 100 percent, to optimize your print output. If this ppi is not available, use 200 ppi at a minimum to preserve the quality of your image. Do not work in 150 ppi because the images may have visible defects such as pixelization or jaggies (see page 9).
• Use a higher bit depth. Bit depth is the smallest unit of data, while a pixel is the smallest unit for images. Bit depth refers to how many bits are used in a single pixel. One bit means the pixel can be only black or white. Eight bits means the pixel can have any of 256 values. For full color, eight bits per color (R,G,B) means the pixel can have any of 16.7 million values (256*256*256). When working with Photoshop, see if you can identify the bit depth of your scanner. If 12-bit, 16-bit or 32-bit depth exists on the scanner, choose to do your color and brightness work in the largest bit depth possible because

it yields more information on images’ gradients, highlights and shadows. Reduce your file down to 8-bit later when doing the effects work in Photoshop.
• Avoid already compressed images. Repeated compression in lossy formats, or formats that reduce image data such as JPEGs, yield unattractive artifacts, fuzzy detail and marginal color quality. Areas of smooth blending in your original files often become rough and uneven when compressed. In addition, skin tones become problematic. If you must use compressed images, save them in TIFF or EPS format, so they don’t get compress again later and consider using them as smaller detail images.
• Avoid images with large light backgrounds. Light areas of gray, putty, and off-white highlight the shortcomings of printers. Instead, choose images with colorful and interesting backgrounds containing textures, shapes, books or posters.
• Use textures. Textures print clearer and demonstrate a printer’s color rendering capabilities better than blends or smooth color. The texture’s colors also excite the human eye and provide distractions from problem areas.
28
ABC’s of Design for Digital Printing
Image with no compression. Image with repeated compression.
Image with no background. Image with background added in Photoshop.

29
Optimizing Images and Photography
EFI solutions were used to create many of the “beauty shots” above with the use of controlled lighting, careful props, interesting objects and textures. The sample images show the potential of digital color printing.

30
ABC’s of Design for Digital Printing
• Avoid poor quality images. No software, including Photoshop, can fix a poor quality photo, especially one that is poorly lit. If you must work with a bad quality photo, consider cropping areas that are too bright or use blasted highlights. You might also try adding a ghosted text block to cover up areas of marginal quality. The rule is to make sure all areas have at least 15 percent tone.
• Choose images that are sharp and in focus. The more color and detail an image shows, the more impressive the results. Areas of rich texture, such as fabric, are also very appealing.
• Avoid images using “selective focus” or blurry area. Blurred areas often print out as banded and uneven images.
• Use Photoshop “sharpening” sparingly. Over-sharpening yields the same problems as compression.
Image with no sharpening. Image over-sharpened in Photoshop.
The effect of selective focus is unforgiving for digital printing. Notice the image above right has been over-sharpened, but the blurred areas remain blurry.

31
Optimizing Images and Photography
• Consider using “Unsharp Mask.” Unsharp Mask is a filter in Photoshop. The tool should be used as a finishing touch after you have saved the image to its final cropped size. Unsharp Mask selectively sharpens an image based on finding areas of contrast and modifying how these colors react to each other.
• Choose and work in the right resolution. Proofing and printing documents in the right resolution ensures consistent color in your final document. Do not work in low resolution then switch to high resolution later because you may not be able to achieve the same affect.
Art Directing and Styling Photography
Careful planning can yield impeccable images. The following tips help in the photography process.
• Avoid shooting outdoors. Weather and lighting almost never cooperate. Sunlight creates bright highlights and dark shadows, so photos usually possess too much contrast. Studio shooting allows for controlled lighting. If an outdoor look is needed, photographers can simulate outdoor lighting to a high degree in a studio, while minimizing the highlights and softening the dark areas.
• Use props with texture, patterns and color to “distract eye.” Use brightly colored objects as highlight pieces. For example, a conference table stacked with papers can be made more interesting by adding brightly colored folders. You also can create a set with areas of texture and interest. Images with fabric, leather and metal all print well on most printers.
Image with no sharpening. Image with Unsharp Mask.

32
ABC’s of Design for Digital Printing
• Avoid areas of light background, such as cubicles and bare walls. Consider adding posters, books, textures or other graphic elements.
• Consider using professional models. Skin tone images remain a challenge for digital printing, so wardrobe and make-up stylists are essential.
• Hire a professional photographer. Lighting is the most important part of a shot, so hiring a professional photographer is essential. If a photographer is not “in the budget,” below are a few helpful hints on how to get around this dilemma:
• Use strobe flash or tungsten (3200K) lamps for additional light. Focus one or two lamps on the ceiling to light the area rather than casting light directly on the subject or scene. Light can also be reflected off a wall as long as the color of the wall does not adversely affect the color of the shot.
• Adjust the white balance on the digital camera when using fluorescent lighting. Additional lighting may affect the overall color of the shot, so be prepared to adjust the color balance in Photoshop.
• Use a “fill card” of white foam core or illustration board. The technique softens dark shadows and reflects additional lighting into a scene.
The set for the shots used in this guide were photographed using a digital camera, a single strobe and a soft light box. However, simple incandescent lights can be used combined with ambient light from the windows. Use a gray card to help balance the color .
33
Optimizing Images and Photography
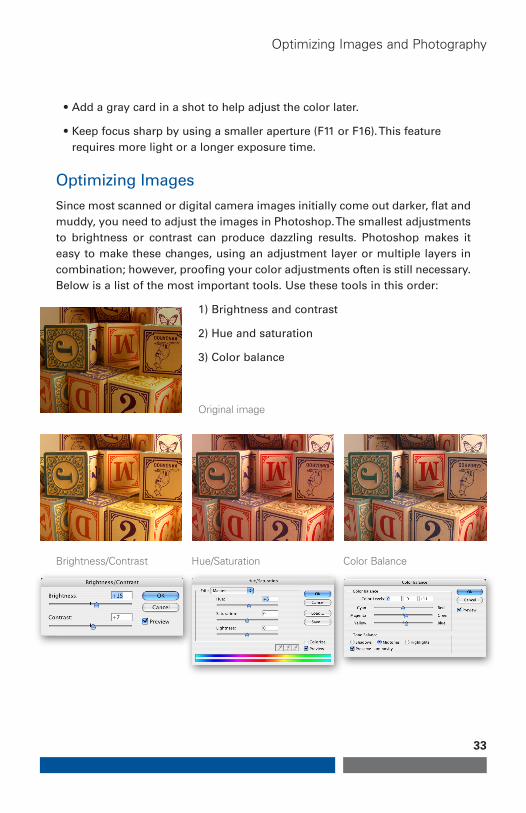
• Add a gray card in a shot to help adjust the color later.
• Keep focus sharp by using a smaller aperture (F11 or F16). This feature requires more light or a longer exposure time.
Optimizing Images
Since most scanned or digital camera images initially come out darker, flat and muddy, you need to adjust the images in Photoshop. The smallest adjustments to brightness or contrast can produce dazzling results. Photoshop makes it easy to make these changes, using an adjustment layer or multiple layers in combination; however, proofing your color adjustments often is still necessary. Below is a list of the most important tools. Use these tools in this order:
1) Brightness and contrast
2) Hue and saturation
3) Color balance
Original image
Brightness/Contrast Hue/Saturation Color Balance
34
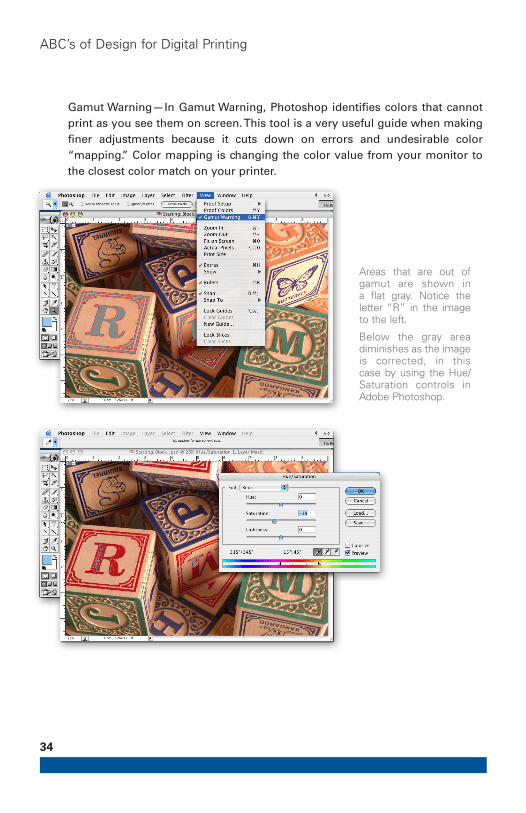
Gamut Warning—In Gamut Warning, Photoshop identifies colors that cannot print as you see them on screen. This tool is a very useful guide when making finer adjustments because it cuts down on errors and undesirable color “mapping.” Color mapping is changing the color value from your monitor to the closest color match on your printer.
ABC’s of Design for Digital Printing
Areas that are out of gamut are shown in a flat gray. Notice the letter “R” in the image to the left.
Below the gray area diminishes as the image is corrected, in this case by using the Hue/ Saturation controls in Adobe Photoshop.

35
The Final Result
When preparing the final file for digital printing, it is important to choose a universal format that anyone can open or print from such as Adobe® PDF. This way, the final product looks the same as the proofs used in the design and production phases.
Setting up your PDF Workflow
Settings in Adobe® Acrobat® are a key way to achieve consistent and accurate color output. Selecting the appropriate “path” to accomplish this task depends on several key factors. If you plan to distribute your document in PDF, determine the purpose of the document. Below are a few guidelines when thinking through the document’s goals:
• If you plan to email a PDF by modem, a compressed file is required. This file type may lower the print quality of the document.
• If you want to output a PDF on a digital color copier or digital press, the printing quality must me unexceptionable. Below are two tips on how to achieve this goal.
Scenario 1: Global Optimized Color In this situation, the user plans to print the PDF on many printer brands and models. This instance requires that the color remain consistent, given that different printers use different ink or toner sets and feature a wide range of color gamut.
Scenario 2: Device Optimized Color In this case, the user wants to print the PDF on a single printer model, so color consistency across printers is not an issue. This situation requires the user to exploit the maximum color gamut of the output device.
• If you plan to send the PDF to an outside vendor for printing, it’s good to check with the vendor to see if he or she has any specific requirements to ensure a high-quality product without errors.

36
Adobe Acrobat Presets
Since there are so many ways to use PDF files, Adobe Acrobat offers “Presets,” “Job Options,” or “Settings” in various versions of Acrobat Distiller or Adobe Creative Suite software. Presets enable you to create PDFs that can be optimized for specific purposes. Below are a few tips on the settings.
• Smallest File Size. Use this setting only when sending your document over email to be viewed on a screen. This PDF version is not meant for printing a document on a color device.
• Press Quality. The setting should be used when you want to achieve consistent color across different output devices. To ensure compatibility across multiple printers, make the following adjustments to the preset by selecting
“Settings/Edit Adobe PDF Settings.” Under the “Advanced” tab, uncheck the “Preserve Overprint Settings” box.
• High Quality Print. This setting achieves the best color from a specific device. To ensure compatibility with a variety of printers, make the following adjustments to the preset by selecting, “Settings/Edit Adobe PDF Settings. Under the “Advanced” tab, uncheck the “Preserve Overprint Settings” box.
ABC’s of Design for Digital Printing

37
The Final Result
• PDF/X-1a. Many vendors require that final PDF files be PDF/X compliant to alleviate problematic color, font and trapping elements that hang up jobs. This setting ensures that all fonts are embedded and stable, and all color management and trapping parameters are fixed.
• PDF/X-3. This setting is similar to the PDF/X-1 feature, but it allows color management flexibility that some printers require during the printing process.
Proof in PDF
Proofing in PDF offers the most accurate view of how the final documents will print. Consider using “Export to PDF” and the PDF presets recommended by this guide to proof your work from the start. In doing so, you are able to make adjustments through the design and production process, saving valuable time and effort at the end of the digital printing process.
Preparing Your Final Files for PDF
After proofing and approving your layout, the flattened illustrations should be saved in EPS, and we recommend that your images saved in RGB EPS or TIFF with no compression. Your colors also should be named correctly.
Now, you are ready to create the final PDF for distribution using Adobe Acrobat. Acrobat employs compression to three different types of files: images, line art and grayscale. The predominant compression used is JPEG. In most cases, Acrobat does a good job in preserving color and detail, while making the files small. A few notable exceptions apply:
• Screen shots should be compressed using ZIP technology or saved as Index.
• Avoid using the automatic PDF solution offered by various applications. The “Make PDF” button should only be used to create “view only” versions of a document. This solution creates a non-editable image of the document similar to a JPEG file. Choose the same “Export to PDF” command using the PDF presets described earlier this section.

38
Writing a PostScript file and then using Adobe Distiller to create the PDF file affords the greatest control over the settings of the job. Your layout application provides an option to print a PostScript file under the file “Print” dialog box. Below are a few tips in this process:
• Check options to “flatten transparencies” (high resolution) and to “simulate overprints.”
• Choose “composite CMYK” as your output color setting, if you want “global optimized color.”
• Select “composite leave unchanged” as your output color setting, if you want to achieve “device optimized color.”
Putting all the Files Together
As you put files together for printing the job, there are several valuable tools in the process.
• Adobe Acrobat Presettings for Printing PDF. Select one of the presettings discussed in previous section, Setting up your PDF Workflow. In the case of the Fiery server, it is preferable to download the files directly to the technology.
• EFI Preflight. Preflight is a diagnostic tool in the Fiery Graphic Arts Package Premium Edition that allows you to do a simple error check to ensure that all files print successfully on a Fiery-driven printing device. Things checked include fonts, spot colors not found on the Fiery or Spot-On libraries, missing VDP resources from the server and File Search Path, missing high resolution files, hairlines below threshold, overprints and PostScript errors.
• EFI Postflight. Postflight is a diagnostic tool in the Fiery Graphics Art Package Premium Edition that provides insight into how a job is processed. The tool provides the user with a report that explains what the files color-coding looks like, the color spaces in the job, and what PPD options affect those spaces. This information saves you time on reprinting jobs later with different color settings to achieve the desired output.
• EFI Hot Folders. Hot Folders supports a wide range of file formats. This feature helps you to automate the printing of complex documents.
ABC’s of Design for Digital Printing

39
The Final Result
Late Editing
Once the files are formatted correctly, late editing occurs. If you are using a Fiery-enabled device, two tools can help you in this process.
• EFI Spot On. This tool enables you to make last minute adjustments to the spot colors and to change colors throughout an entire document.
• Adjustable Auto Trapping. EFI’s Auto Trapping, described earlier on Page 23, is raster-based and can be adjusted for last minute correction gaps between abutting colors.
• EnFocus PitStop. This tool allows editing of text and images in the final PDF file, before the final copies are printed.
Choosing Paper
Paper is an important component to digital printing, so careful consideration should be given to its weight, color, opacity, and the ability to print the paper on the intended machine. Many companies offer proprietary papers for their printers and copiers. Use the recommended papers; however, educate yourself about the characteristics of the paper such as its various measurements. This knowledge becomes useful in reducing potential headaches later if you need to print your final document from a different printing device.
After you’ve chosen your paper, select the appropriate PostScript Printer Description (PPD) and Output profile for the paper you plan to use for printing your job. PPD files contain specific information about how tone is laid down on a specific paper. For instance, coated papers behave differently from uncoated papers. Cover stock behaves differently than text stock. So, choosing the right
40
ABC’s of Design for Digital Printing
PPD has a measurable effect on the print quality of your job. Output ICC files information contains information about the color and brilliance of the actual paper, so choosing the correct ICC output files also greatly affects the final color quality.
In most cases, choose the whitest paper for the best color results. When printing both sides, select opaque paper.
Below are types of papers that can be used to print:
• Types of PaperCoated—gloss, semi-gloss, matts or dull finishes.Uncoated—antique, egg shell, vellum, smooth, lustre finishesNewsprint.Stationery—bond and rag finishes.
• GrainHow the fibers are laid down and rolled causes paper to bend down and roll, causes paper to bend more easily in one direction. It also has a big impact on folding. In addition, many printers have a problem with grain causing cracking and flaking when folded. To avoid these issues, order “grain long” for digital presses and copiers.
• Paper ColorBrightness—measured in grades of #1, 2 and 3. #1 is brightest and best.
• Weights of papers Measure in weight per ream of paper. Book weight—60 lb. To 100 lb. are typical weights.Cover weights—heavier, thicker stock measured in corresponding weights.
• OpacityIs important when printing on both sides (duplexing). More opaque papers minimize “show through” of contents printed on the other side. Paper thickness and additives affect opacity.
Output Profiles
Calibrating the printing device with the paper you’ve chosen for your final document ensures a more accurate result. Some proprietary papers have output ICC profiles, which can be downloaded to the printer to adjust the color output to the paper color. This color adjustment will also be reflected on your monitor. Now, you are ready to produce optimized digital output from your printer with vibrant colors, crisp images and clear fonts!

Example of Design for Digital Printing
The following example of XYZ Enterprise’s newsletter demonstrates the results that can be achieved by following the ABC’s of Design for Digital Printing Guide. The callouts below walk you through the steps in optimizing your output, while also providing recommendations on how to circumvent the challenges associated with digital printing.
Cover page of the four-page newsletter sample.
Issues with printing solid blocks of colors— discussed on page 20.
Working with spot colors vs. process colors—discussed on page 19.
Optimal image resolution—discussed on page 9.
Creating dazzling color images—discussed on pages 27-33.
Using tints and blends—discussed on page 23.
Image area, margins and bleeds—discussed on page 11.
Working with stock images—discussed on page 27.
41

ABC’s of Design for Digital Printing
Back page of the four-page newsletter sample.
Inside spread of the four-page newsletter sample.
Typography and font issues—discussed on page 24.
Solving issues with colors that abut—discussed on pages 22 and 23.
Create stable and reliable files in PDF—discussed on page 35.
Variable Data Printing (VDP)—discussed on page 4.
Create consistent and dependable color matching from proof to print—discussed on pages 13-17.
42
Choosing photography and optimizing images—discussed on page 27-33.

Glossary
Abut Two colors that touch.
Banding Distinct color bands on a page rather than a smooth gradation of colors.
Bitmap An image represented by pixels and stored as a collection of bits in which
one or more bits of color information corresponds to each pixel.
Bleed Area Print term used to indicate the area with a background image that will
be trimmed off after the job is printed and cut down to the finished size.
Blends A smooth gradation between different colors.
Calibration Process that reads and balances the color output of a device to create
an optimum color environment.
CMYK A four-color printing process using cyan, magenta, yellow and black to
produce a range of colors in conventional offset presses, inkjet color printers and
laser printers.
Colorimeter A device that measures the color output of a monitor, printer, copier
or scanner.
Color Mapping Technology that changes an unprintable color value to the closest
printable color for a particular output device.
Color Space Type of system used in describing and rendering the color of an
image or layout. Typical color spaces are RGB, describing the color on monitors
and digital cameras. CMYK is another used for color printers and other output
devices and L*a*b*, used by the human eye.
Debossing Taking an image such as a logo, a title or other design and heat-pressing
it into a paper’s surface with a dye, which creates depressions in the paper.
Densitometer Device for measuring the optical density of ink or toner on a
particular printing device.
Ghosting A whitish line that appears when two contrasting colors touch.
ICC International Color Consortium is a group established in 1993 to promote an
open, vendor-neutral, cross-platform color management approach. The outcome
was the development of the ICC profile specification. 43

44
ABC’s of Design for Digital Printing
Image Area Describes the place where image is on a paper.
Jaggies Unpleasant looking step-like lines in a digital images or graphics.
Kerning Spacing between letters to make them appear visually balanced.
Layout Process of arranging printed or graphic matter on a page.
Lossy A data compression algorithm that reduces the amount of information in
the data. Examples of lossy compression include MPEG and JPEG.
Monitor Computer screen is used for soft proofing documents in digital printing.
Mottle Spots or blotches of different shades or colors.
Paper size Actual size of the sheet of paper.
Pixelization Digitized image where the individual pixels are apparent to a viewer.
PostScript A programming language for printers that stores information in coded
instructions rather than pixels.
PDD Postscript Printer Definition files contain information about the features of a
specific printer.
PDF (Portable Document File) is a device independent electronic file format. PDF
documents are compact single files which can be easily transferred, viewed and
printed from any computer or platform without having the fonts or software
applications used to create the original document.
Process Colors CMYK color model used in offset printing.
Proofing A trial sheet of printed material that is made to be checked and
corrected.
Rasterize Conversion of layout and PostScript information into a grid of pixels with
instructions for the printer to print the resulting image.
RIPs Raster image processors are the hardware and/or software used to convert
images into vector graphics or bitmaps for digital printing output.
Reader Spread Visual reader sees when he or she looks at a document.
Rendering Process of converting electronic information into visible images
on paper.
RGB Term used in printing for red, green and blue or the three colors of light,
which can be mixed to produce other colors.

45
Glossary
Rich Black A mixture containing all four of the cyan, magenta, yellow and black
(CMYK) colors. It also can be just two colors such as 100 percent black and 50
percent magenta.
Resolution Sharpness or fineness of an image or the number of individual pixels
DPI stored and used to re-create the image.
Soft Proof An accurate rendition intended printed material on one’s monitor.
Spectrophotometer An instrument used to determine the intensity of various
wavelengths in a spectrum of light. It is similar to a colorimeter, a device that
measures the color output of a monitor, printer, copier or scanner.
sRGB Standard RGB is a color space that achieves greater color consistency
between hardware devices by defining a gamut of colors that are visible and
printable on many devices such as CRT monitors, LCD screens, scanners,
printers and digital cameras. The proprietary color space for Web browsers.
Streak A line, mark, smear, or band differentiated by color or texture from its
surroundings.
SWOP Specifications for Web Offset Publications are guidelines for the graphic
arts production process when dealing with all forms of magazine advertising and
editorial input.
Trapping Term that describes the manipulation of adjacent color graphics to avoid
unwanted visible gaps in the final digital output.
VDP Variable data printing is a digital printing process that achieves customized
communications by using digital technology to link print engines to databases.
These databases contain a combination of contact records and varying versions
of content for the printed documents. When a document is printed, VDP refers to
the databases to make each printed piece customized by changing the images and
text on each print.
Vector Graphics Mathematical formulas resulting when raster image processors,
hardware and/or software, converts images into digital printing data for output.
Working Color Space A working color space is a common color space that is not
device specific. All incoming files from different RGB sources are adjusted to this
common workspace using color management policies. It provides a consistent
color environment for editing and proofing of color. Typical working spaces are
sRGB used for color destined for the WEB and Adobe RGB for output devices such
as digital color copiers.
Auto-Count, ColorCal, ColorWise, Command WorkStation, DocBuilder Pro, EDOX, EFI, Fiery, the Fiery logo, Fiery Driven, the Fiery Driven logo, Fiery Spark, MicroPress, OneFlow, Printcafe, PrinterSite, PrintMe, Prograph, Proteus, RIP-While-Print, Splash, and Spot-On are registered trademarks of Electronics for Imaging, Inc. in the U.S. Patent and Trademark Office and/or certain other foreign jurisdictions. Bestcolor is a registered trademark of Best GmbH in the U.S. Patent and Trademark Office.
ADS, AutoCal, Balance, Build, Digital StoreFront, DocStream, Estimate, Fiery Link, Fiery Prints, FreeForm, Hagen, Intelligent Device Management, Logic, PrintFlow, PrintSmith, PrintSmith Site, PSI, PSI Flexo, RIPChips, Scan, SendMe, VisualCal, WebvTools, the EFI logo, the Fiery Prints logo, and Essential to Print are trademarks of Electronics for Imaging, Inc. Best, the Best logo, Colorproof, PhotoXposure, Remoteproof, and Screenproof are trademarks of Best GmbH.
All other terms and product names may be trademarks or registered trademarks of their respective owners, and are hereby acknowledged.
© 2005 Electronics for Imaging
303 Velocity WayFoster City CA 94404
(650) 357-3500www.efi.com