7.Remote controller functions - Ideal Air Heating And Cooling
18
14.HIGH/SO Button Used to select HIGH or SOFT operation. 21 22 31 29 32 FRESH HIGH/SO TIMER SET FILTER B A M D HEALTH RESET LOCK SLEEP FAN TEMP ON OFF SWING MODE CLOCK CODE LIGHT OFF A U T O 1 2 3 4 6 7 9 10 11 15 13 5 8 16 17 30 34 35 33 23 24 25 26 27 28 20 12 14 Remote controller 1.TEMP Setting Button (Used to set temperature. Setting ranges: 16 C to 30 C) In Up/Down function, for controlling up and down filter. 2.SWING Button If you press this button once, auto swing will be activated. If you press this button again, the louver will fix in the present position. 3.Power ON/OFF Button Used for unit start and stop After power on, the LCD of remote controller will display the previous operation state (except for TIMER,SLEEP and SWING state). 4.Operation MODE Used to select operation mode. Every time you press MODE button, operation mode changes according to following sequence: 5.HEALTH Button Used to set health mode, if the unit has the negative ion function and oxygen bar function. AUTO FAN HEAT COOL DRY 6.CLOCK Button Used to set correct time. (Note: if time of TIMER ON is the same as TIMER OFF,TIMER ON/OFF cannot be set) 10.RESET Button Press this button by using a sharp article to resume the correct operation of the remote controller in case of need, i.e. for example in case of malfunctions due to electromagnetic noise. 17.SLEEP Button (The clock must be corrected before setting sleep function) Used to set sleep mode. 13.Up and down Button Used to set TIMER and CLOCK up or down. 8. FILTER Button Used to set up/down function of filter. NOTE: 1.Cooling only air conditioner does not have the displays and functions related to heating. 2.HIGH/SO button This button is activated in Cooling/Heating mode, the fan speed is in AUTO mode after pressing it and "high functon" will be cancelled automatically after 15 minutes running. 11.LOCK Button Used to lock operation button and LCD display contents: by pressing this button, other buttons comes out of function and lock state display appears; if you press it again, lock state will be no more active and lock state display will disappear. 7.Remote controller functions 7.CLOCK Button Used to select TIMER ON, TIMER OFF. 9. CODE Button Used to select code A or B, for this unit, the code is A. 18 12.LIGHT Button Used to light the control panel (only for cabinet unit) 15.SET Button Used to confirm TIMER and CLOCK settings. 16.FRESH Button Used to set fresh mode, the unit will draw in fresh air. 19 36
-
Upload
khangminh22 -
Category
Documents
-
view
2 -
download
0
Transcript of 7.Remote controller functions - Ideal Air Heating And Cooling

14.HIGH/SO ButtonUsed to select HIGH or SOFT operation.
21
22
31
29
32
FRESH
HIGH/SOTIMER
SET
FILTER
B A
M D
HEALTH
RESET LOCK
SLEEP
FAN
TEMP
ONOFFSWING
MODE
CLOCK
CODE LIGHT
OFF
AUTO
1
234
67
9
10
11
15
13
5
8
1617
30
34
35
33 2324
25
26
2728
20
12
14
Remote controller
1.TEMP Setting Button(Used to set temperature. Setting ranges:16 C to 30 C)In Up/Down function, for controlling up anddown filter.
2.SWING ButtonIf you press this button once, auto swing willbe activated.If you press this button again, the louver willfix in the present position.
3.Power ON/OFF Button Used for unit start and stopAfter power on, the LCD of remote controllerwill display the previous operation state (exceptfor TIMER,SLEEP and SWING state).
4.Operation MODEUsed to select operation mode.Every time you press MODE button, operation modechanges according to following sequence:
5.HEALTH ButtonUsed to set health mode, if the unit has the negative ion functionand oxygen bar function.
AUTO FANHEATCOOL DRY
6.CLOCK ButtonUsed to set correct time.
(Note: if time of TIMER ON is the same as TIMEROFF,TIMER ON/OFF cannot be set)
10.RESET ButtonPress this button by using a sharp article to resumethe correct operation of the remote controller in caseof need, i.e. for example in case of malfunctions dueto electromagnetic noise.
17.SLEEP Button(The clock must be corrected before setting sleepfunction)Used to set sleep mode.
13.Up and down ButtonUsed to set TIMER and CLOCK up or down.
8. FILTER ButtonUsed to set up/down function of filter.
NOTE: 1.Cooling only air conditioner does not have the displays and functions related to heating. 2.HIGH/SO button This button is activated in Cooling/Heating mode, the fan speed is in AUTO mode after pressing it and "high functon" will be cancelled automatically after 15 minutes running.
11.LOCK ButtonUsed to lock operation button and LCD displaycontents: by pressing this button, other buttons comesout of function and lock state display appears; if you pressit again, lock state will be no more active and lock statedisplay will disappear.
7.Remote controller functions
7.CLOCK ButtonUsed to select TIMER ON, TIMER OFF.
9. CODE ButtonUsed to select code A or B, for this unit, the code is A.
18
12.LIGHT ButtonUsed to light the control panel (only for cabinet unit)
15.SET ButtonUsed to confirm TIMER and CLOCK settings.16.FRESH ButtonUsed to set fresh mode, the unit will draw in fresh air.
1936

Clock Set
Displays when healthy run function is set.
22.TEMPERATURE Display
34.LOCK State Display
33.BATTERY Energy DisplayNotify the user when it is time to changethe batteries.
24.HIGH/SO Display25.SIGNAL SENDING Display26.FRESH AIR Display27.ELECTRICAL HEATING Display
29.HEALTH Display
32.SLEEP State Display
31.Operation MODE DisplayAUTO RUN COOL RUN DRY RUN HEAT RUN FAN RUN
35.FAN SPEED Display
23.AUTO SWING Display
19.TIMER OFF Display
21.FILTER Display
36.TIMER ON Display
When unit is started for the first time and after replacing batteries in remotecontroller, clock should be adjusted as follows:1.Press CLOCK button, clock indication of " AM " or " PM " flashes.2.Press or to set correct time. Each press will increase or decrease 1 min. If the button is kept pressed, time will increase or decrease quickly.3.After time setting is confirmed, press "SET" : AM or PM stop flashing, while clock starts working.Note:AM means morning and PM means afternoon.
When operating the remote controller in an area whereelectronically controlled lights are installed or wireless handsetsare used, please move closer to the indoor unit as the functionof the remote controller might be affected by signals emittedby the above mentioned equipments.
Battery loading
Confirmation indicatorIf no indication is displayed after press ON/OFF button,reload the batteries.
AUTO
LO
MID
HI
AUTO
Remote Controller' OperationWhen in use, direct signal transmissionhead to the receiver placed on the indoorunit
The distance between the remote controller and the receivershould be max 7m and there should be no obstacle between them.Do not throw the remote controller; prevent it from beingdamaged.
18.FAN ButtonUsed to select fan speed:LOW,MID,HIGH,AUTO.
Note:It is recommended that the batteries be removed from thecompartment if the remote controller is not used for an extendedperiod.The remote controller is programmed for automatic test ofoperation mode after the batteries are replaced. When the testis conducted, all icons will appear on the screen and thendisappear if the batteries are properly fitted.
Caution:
If the remote controller does not operate as designed afterfitting new batteries of the sametype, press the Reset button (marked ) with a pointed article.
20.CLOCK Display
30.DEHUMIDIFICATION Display
28.Some other buttonsAll these functions are not available now.
FRESH
HIGH/SOTIMER
SET
FILTER
HEALTH
RESET LOCK
SLEEPMODE
CLOCK
CODE LIGHT
321
Battery loadingBatteries are fitted as follows:
Loading the batteryEnsure that batteries are correctly placed in the compartmentas required for positive and negative terminals.
Replacing the battery compartment lidThe battery compartment lid is reinstalled in the reversesequence.
Display reviewPress the button to see if batteries are properly fitted. Ifno display appears, refit the batteries.
Remove the battery compartment lidSlightly press and disengage the battery compartment lid markedwith ì î and then hold the remote controller by the uppersection and then remove the battery compartment lid by pressingin the direction of the arrow as shown in the figure above.
* ** *

Fan Operation 1.Unit startPress ON/OFF button to start your air conditioner.Previous operation status appears on LCD (except forTIMER, SLEEP, and SWING setting).
2.Select operating modePress MODE button. At each press, operation modechanges as follows:
3. Adjust fan speedPress FAN button. At each press, fan speed changes asfollows:
Air conditioner will run at the selected fan speed.When in AUTO mode, unit will adjust fan speedaccording to room temperature automatically.
4. Unit stopPress ON/OFF button to stop unit.
Then select FAN
About FAN modeWhen the air conditioner runs in FAN mode,it is not possible to select AUTO FAN or toset temperature.
AUTO FANHEATCOOL DRY
A
FRESH
HIGH/SOTIMER
SET
FILTER
HEALTH
RESET LOCK
SLEEP
FAN
TEMP
ONOFFSWING
MODE
CLOCK
CODE LIGHT
AUTO
41 3
2LOW MID HIGH
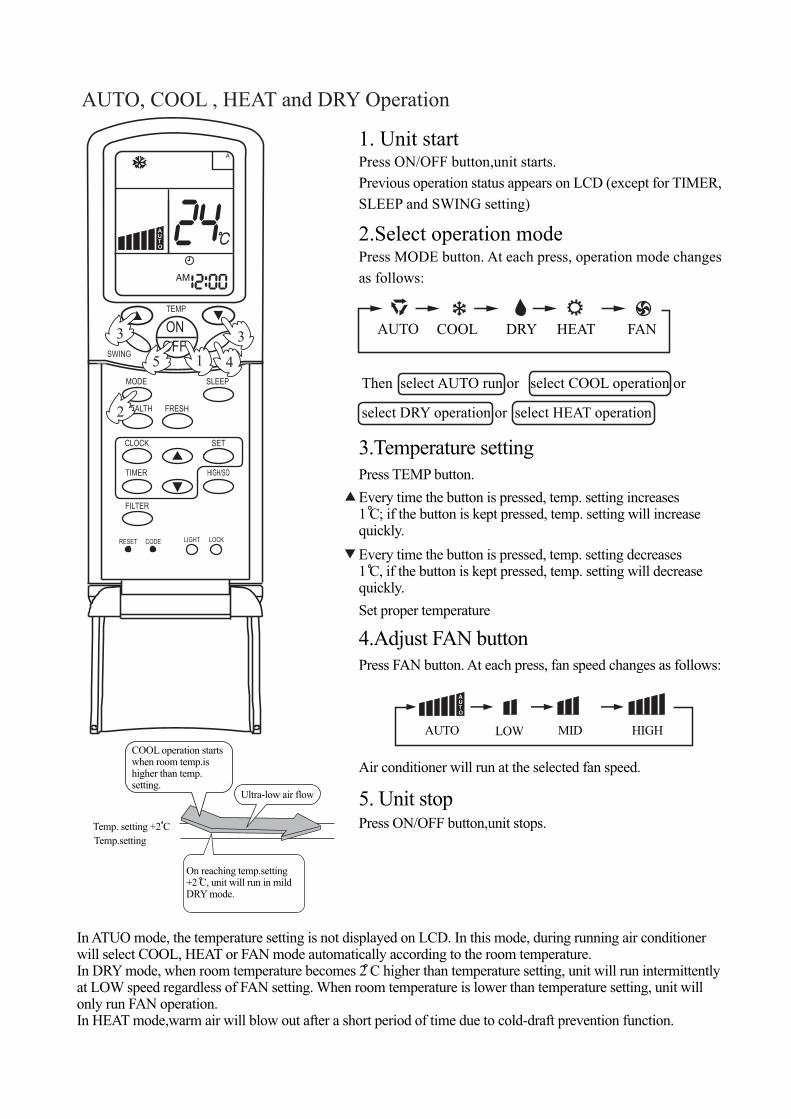
AUTO, COOL , HEAT and DRY Operation
1. Unit startPress ON/OFF button,unit starts.Previous operation status appears on LCD (except for TIMER,SLEEP and SWING setting)
3.Temperature setting
Then select AUTO run or select COOL operation or
select DRY operation or select HEAT operation
2.Select operation modePress MODE button. At each press, operation mode changesas follows:
Press TEMP button.Every time the button is pressed, temp. setting increases1 C; if the button is kept pressed, temp. setting will increasequickly.Every time the button is pressed, temp. setting decreases1 C, if the button is kept pressed, temp. setting will decreasequickly.Set proper temperature
4.Adjust FAN buttonPress FAN button. At each press, fan speed changes as follows:
Air conditioner will run at the selected fan speed.
5. Unit stopPress ON/OFF button,unit stops.
In ATUO mode, the temperature setting is not displayed on LCD. In this mode, during running air conditionerwill select COOL, HEAT or FAN mode automatically according to the room temperature.In DRY mode, when room temperature becomes 2 C higher than temperature setting, unit will run intermittentlyat LOW speed regardless of FAN setting. When room temperature is lower than temperature setting, unit willonly run FAN operation.In HEAT mode,warm air will blow out after a short period of time due to cold-draft prevention function.
AUTO FANHEATCOOL DRY
AUTO LOW MID HIGH
FRESH
HIGH/SOTIMER
SET
FILTER
A
HEALTH
RESET LOCK
SLEEP
FAN
TEMP
ONOFFSWING
MODE
CLOCK
CODE LIGHT
AUTO
Temp. setting +2 CTemp.setting
On reaching temp.setting+2 C, unit will run in mildDRY mode.
Ultra-low air flow
COOL operation startswhen room temp.ishigher than temp.setting.
3
5 13
4
2
AUTO
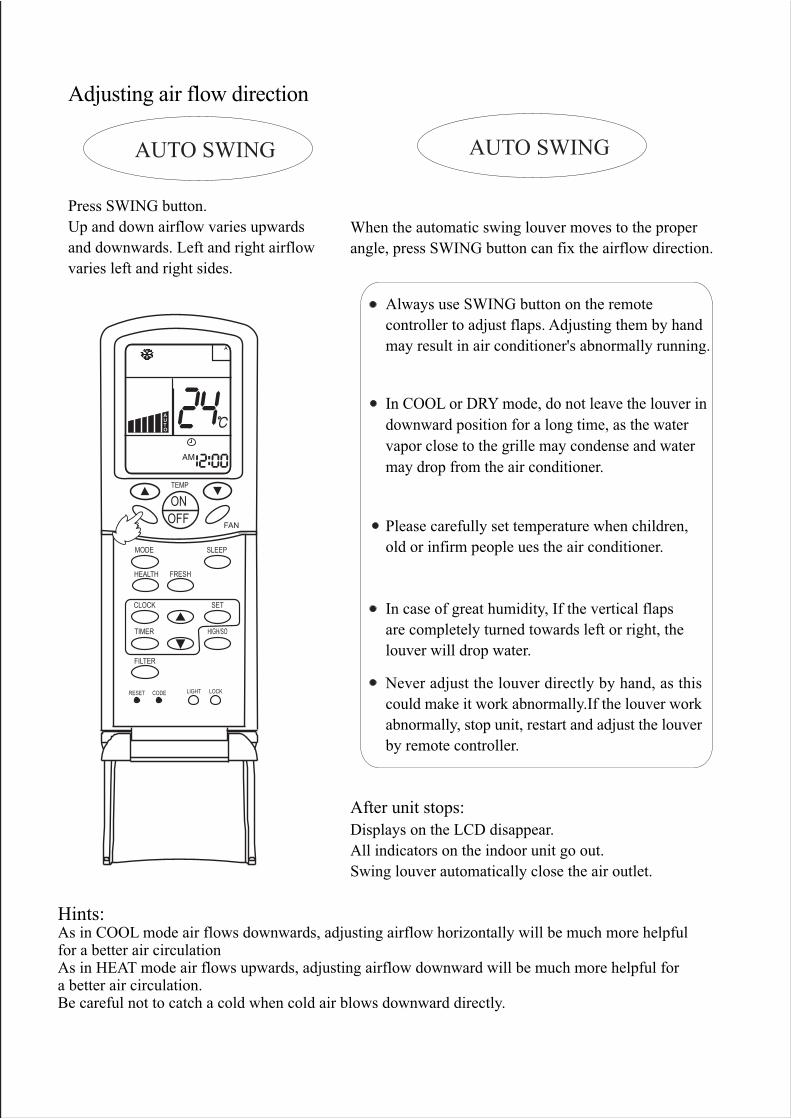
Press SWING button.Up and down airflow varies upwardsand downwards. Left and right airflowvaries left and right sides.
Always use SWING button on the remotecontroller to adjust flaps. Adjusting them by handmay result in air conditioner's abnormally running.
Displays on the LCD disappear.All indicators on the indoor unit go out.Swing louver automatically close the air outlet.
After unit stops:
AUTO SWING
Adjusting air flow direction
AUTO SWING
When the automatic swing louver moves to the properangle, press SWING button can fix the airflow direction.
Please carefully set temperature when children,old or infirm people ues the air conditioner.
In case of great humidity, If the vertical flapsare completely turned towards left or right, thelouver will drop water.
Never adjust the louver directly by hand, as thiscould make it work abnormally.If the louver workabnormally, stop unit, restart and adjust the louverby remote controller.
Hints:As in COOL mode air flows downwards, adjusting airflow horizontally will be much more helpfulfor a better air circulationAs in HEAT mode air flows upwards, adjusting airflow downward will be much more helpful fora better air circulation.Be careful not to catch a cold when cold air blows downward directly.
In COOL or DRY mode, do not leave the louver indownward position for a long time, as the watervapor close to the grille may condense and watermay drop from the air conditioner.
FRESH
HIGH/SOTIMER
SET
FILTER
A
HEALTH
RESET LOCK
SLEEP
FAN
TEMP
ONOFFSWING
MODE
CLOCK
CODE LIGHT
AUTO

Sleep FunctionBefore going to bed you can press down the SLEEP button and the air conditioner will run so as to makeyou sleep more comfortably.Before using this function, the clock must be set.
Use of SLEEP functionAfter the unit's start, set running mode and then press SLEEP button once to make the air conditionerhave the previous-set sleep time (first power-on is "1h"). The sleep symbol will appear. Press time button / : you can choose the time in 1~8 hours. Each time the button is pressed, the time increases/decreases 1hour: "xh" and "OFF" indications appear on the display.
Operation Mode
1.In COOL, DRY modeOne hour after sleeping operation start, the temperatureis 1 C higher than the setting one. After another hour,temperature rises 1 C: sleep run continuously for another6 hours and then stops. The actual temperature is higherthan the setting one which is to prevent from being toocold to your sleep.
2.In HEAT modeOne hour after sleeping operation start, the temperatureis 2 C lower than the setting one. After another hour,temperature decreases by 2 C more. Temperature willautomatically rise by 1 C after another 3 hours'continuous operation. The actual temperature is lowerthan the setting one which is to prevent from being toohot to your sleep.
3.In AUTO mode.The air conditioner will run in corresponding sleepoperation according to the automatically selectedoperation mode.
SLEEP RUN BEGINS SLEEP RUN STOPS
SETTING T SHUT DOWN
about 6 hrs
1 hrs
In COOL,DRY mode
increase 1 C
increase 1 C
SLEEP RUN BEGINS SLEEP RUN STOPS
SETTING T SHUT DOWN
1 hrs1 hrs
3 hrsabout 6 hrs
increase 1 C
decrease 2 C
decrease 2 C
Notes:After setting SLEEP function, it is not possible to set clock.If set-sleep time does not reach 8 hours, unit will automatically stop operationafter set time is reached.Set " TIMER ON " or " TIMER OFF "In COOL,DRY mode function first,then set SLEEP. After set SLEEP function, the TIMER function cannot beset.
In HEAT mode
FRESH
HIGH/SOTIMER
SET
FILTER
A
HEALTH
RESET LOCK
SLEEP
FAN
TEMP
ONOFFSWING
MODE
CLOCK
CODE LIGHT
OFF
AUTO
Every time the button is pressed, time increases 10 minuts.If the button is kept pressed, time changes quickly.
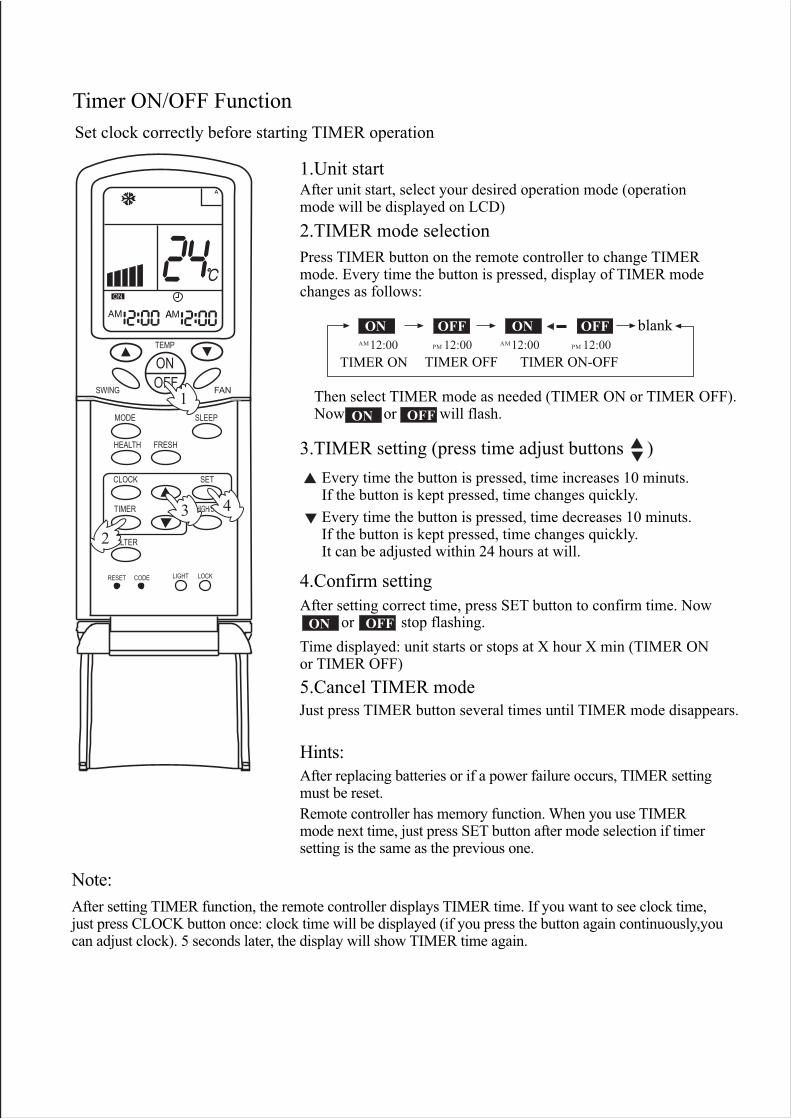
Timer ON/OFF FunctionSet clock correctly before starting TIMER operation
1.Unit startAfter unit start, select your desired operation mode (operationmode will be displayed on LCD)2.TIMER mode selectionPress TIMER button on the remote controller to change TIMERmode. Every time the button is pressed, display of TIMER modechanges as follows:
ON OFF ON OFFAM12:00 AM12:00PM 12:00 PM 12:00
TIMER ON TIMER OFF TIMER ON-OFF
blank
Then select TIMER mode as needed (TIMER ON or TIMER OFF).Now or will flash.
3.TIMER setting (press time adjust buttons )
Every time the button is pressed, time decreases 10 minuts.If the button is kept pressed, time changes quickly.It can be adjusted within 24 hours at will.
4.Confirm settingAfter setting correct time, press SET button to confirm time. Now
Time displayed: unit starts or stops at X hour X min (TIMER ONor TIMER OFF)5.Cancel TIMER modeJust press TIMER button several times until TIMER mode disappears.
Hints:After replacing batteries or if a power failure occurs, TIMER settingmust be reset.Remote controller has memory function. When you use TIMERmode next time, just press SET button after mode selection if timersetting is the same as the previous one.
Note:After setting TIMER function, the remote controller displays TIMER time. If you want to see clock time,just press CLOCK button once: clock time will be displayed (if you press the button again continuously,youcan adjust clock). 5 seconds later, the display will show TIMER time again.
ON OFF
ON OFFor stop flashing.
FRESH
HIGH/SOTIMER
SET
FILTER
A
HEALTH
RESET LOCK
SLEEP
FAN
TEMP
ONOFFSWING
MODE
CLOCK
CODE LIGHT
1
2
3 4

Timer ON-OFF FunctionSet clock correctly before starting TIMER operation
1.Unit startAfter unit start, select your desired operation mode (operationmode will be displayed on LCD)
2.TIMER mode selectionPress TIMER button on the remote controller to change TIMERmode. Every time the button is pressed, display of TIMER modechanges as follows:
OFF
3.Time setting for TIMER ON
4.Timer confirming for TIMER ONAfter setting correct time, press TIMER button to confirm time. Now
5.Timer setting for TIMER OFFPress time buttons and follow the same procedures in " Time settingfor TIMER ON"
Press time button
ON stops to flash, while starts flashing.
Time displayed : unit starts at X hour X min.
6.Time confirming for TIMER OFFAfter time setting, press SET button to confirm time. stops to flash.Time displayed: unit starts at X hour X min.
7.Canel TIMER modeJust press TIMER button several times until TIMER mode disappears.According to the time setting sequence of TIMER ON and TIMER OFF,either start-stops or stops-start can be realized.
If the time setting of TIMER ON is the same as TIMER OFF, TIMERON-OFF function cannot be set.
ONThen select TIMER ON-OFF mode. will flash.
Every time the button is pressed, time increases 10 minuts.If the button is kept pressed, time will changes quickly.
Every time the button is pressed, time decreases 10 minuts.If the button is kept pressed ,time will changes quickly.It can be adjusted within 24 hours at will.AM refers to morning and PM refers to afternoon.
OFF
FRESH
HIGH/SOTIMER
SET
FILTER
A
HEALTH
RESET LOCK
SLEEP
FAN
TEMP
ONOFFSWING
MODE
CLOCK
CODE LIGHT
OFF
1
3 654
2
ON OFF ON OFFAM12:00 AM12:00PM 12:00 PM 12:00
TIMER ON TIMER OFF TIMER ON-OFF
blank
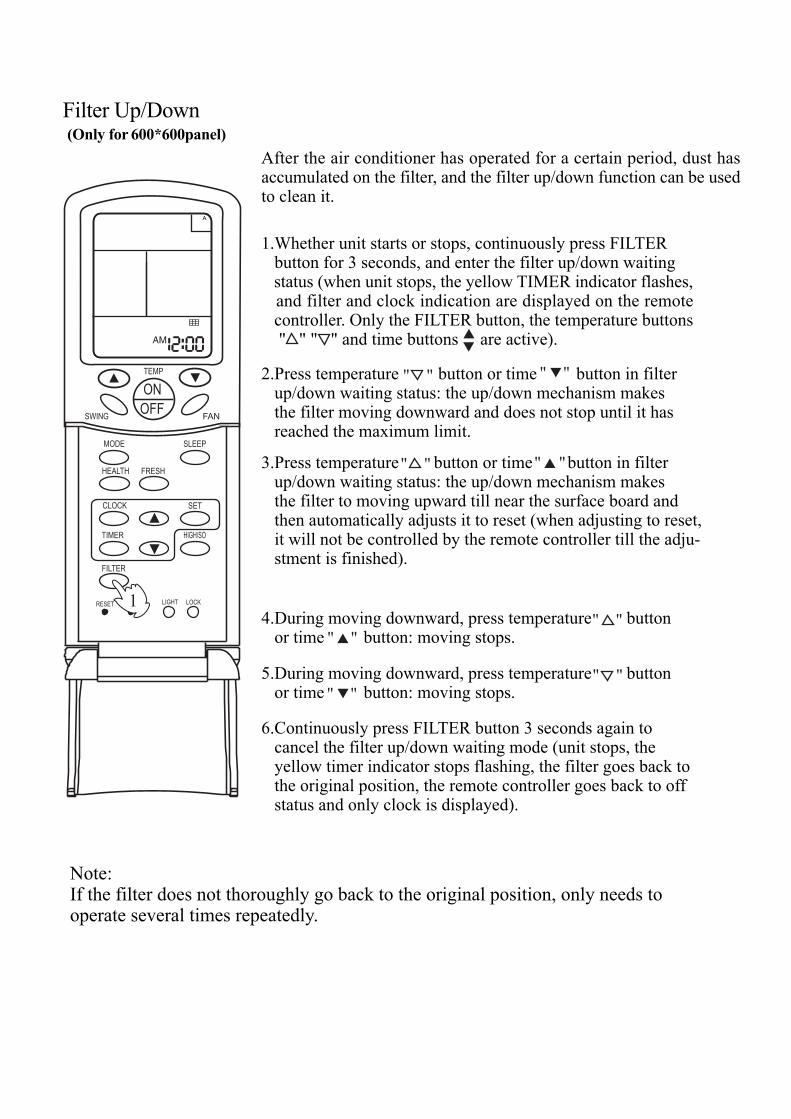
After the air conditioner has operated for a certain period, dust hasaccumulated on the filter, and the filter up/down function can be usedto clean it.
1.Whether unit starts or stops, continuously press FILTER button for 3 seconds, and enter the filter up/down waiting status (when unit stops, the yellow TIMER indicator flashes, and filter and clock indication are displayed on the remote controller. Only the FILTER button, the temperature buttons " " " " and time buttons are active).
2.Press temperature button or time button in filter up/down waiting status: the up/down mechanism makes the filter moving downward and does not stop until it has reached the maximum limit.
3.Press temperature button or time button in filter up/down waiting status: the up/down mechanism makes the filter to moving upward till near the surface board and then automatically adjusts it to reset (when adjusting to reset, it will not be controlled by the remote controller till the adju- stment is finished).
4.During moving downward, press temperature button or time button: moving stops.
5.During moving downward, press temperature button or time button: moving stops.
6.Continuously press FILTER button 3 seconds again to cancel the filter up/down waiting mode (unit stops, the yellow timer indicator stops flashing, the filter goes back to the original position, the remote controller goes back to off status and only clock is displayed).
Note:If the filter does not thoroughly go back to the original position, only needs tooperate several times repeatedly.
Filter Up/Down
" "
" "
" "
" "
" "
" "" "
" "
(Only for 600*600panel)
FRESH
HIGH/SOTIMER
SET
FILTER
A
HEALTH
RESET LOCK
SLEEP
FAN
TEMP
ONOFFSWING
MODE
CLOCK
CODE LIGHT1

Press the HIGH/SO button twice
NOTICE:When the air conditioner is operating in " High Mode " , unevenness of room air temperaturemay occur due to the intensive operation in a short time.Anyway, operation in "High Mode", does not last for more than 15 minutes, then regularoperation is automatically restored.
" High mode " Operation
If the button is pressed once, the indication is displayedon the remote controller. If you press the button once again,the indication disappears, regular operation is restored and fanspeed goes back to the mode set before "High Mode" operation.
Press the HIGH/SO button noceThe indication appears on the display of the remotecontroller and operation in "High Mode" starts.The AUTO fan speed is automatically set and the correspondingindication is also displayed.
Outline of operation in "High Mode"This function is suitable when the set temperature must bereached in the shortest delay.The button "HIGH/SO", referred to this function, is effectivein Cooling/Heating mode (not in Auto/Dry/Fan modes).
ON
OFF
FRESH
HIGH/SOTIMER
SET
FILTER
A
HEALTH
RESET LOCK
SLEEP
FAN
TEMP
ONOFFSWING
MODE
CLOCK
CODE LIGHT
AUTO
1

Press the HIGH/SO button twice
NOTICE:When the air conditioner is operating in " High Mode " , unevenness of room air temperaturemay occur due to the intensive operation in a short time.Anyway, operation in "High Mode", does not last for more than 15 minutes, then regularoperation is automatically restored.
" Soft mode " Operation
If the button is pressed once, the indication is disappearsfrom the remote controller's display. If you press the buttononce again, regular operation is restored and fan speed goesback to the mode set before "Soft Mode" operation.
Press the HIGH/SO button twiceThe indication appears on the display of the remotecontroller and operation in "Soft Mode" starts.The AUTO fan speed is automatically set and the correspondingindication is also displayed.
Outline of operation in "Soft Mode"Operation in "Soft Mode", more silent, is suitable when noisesshould be reduced, e.g.. for reading or sleeping.The button "HIGH/SO", referred to this operation, is effectivein Cooling/Heating mode (not in Auto/Dry/Fan modes).
ON
OFF
FRESH
HIGH/SOTIMER
SET
FILTER
A
HEALTH
RESET LOCK
SLEEP
FAN
TEMP
ONOFFSWING
MODE
CLOCK
CODE LIGHT
OFF
AUTO
1

Auto restart function setting
Setting method (to be applied for a necessary situation) :
Setting Method: When the remote controller is on (excluding timer mode and fan mode), press the "Sleeping" button on the remote controller 10 times within 5 seconds, and after the buzzer rings 4 times, the air conditioner will enter the state of power failure compensation.Cancel Method: Press the "Sleeping" button on the remote controller 10 times within 5
seconds, and after the buzzer rings 2 timer, the power failure compensation mode will be cancelled.Notes: When a power failure suddenly occurs during the air conditioner is working after the powerfailure compensation is set, if the air conditioner will not be used for a long time, please cut off thepower supply to prevent its operation from being resumed after the power is supplied again, or pressthe "Switch On/Off" button after the power comes again.
After the power failure compensation is set, if power failure suddenly occurs while the air conditioneris working, it will resume the previous working state when the power is supplied again.
FRESH
HIGH/SOTIMER
SET
FILTER
A
HEALTH
RESET LOCK
SLEEP
FAN
TEMP
ONOFFSWING
MODE
CLOCK
CODE LIGHT
AUTO

C
HEALTH
SET RECOVERY
CHECK
F
Cautions:On cooling only unit, heatingmode is not available.
Note:The above information is the explanation ofthe displayed information therefore varieswith those displayed in actual operation.
CLOCKUsed to adjust time.
TIMERUsed to set timermode.
stands for time plus/minus,used to adjust time.
Used for unit start andstop.
POWER ON/OFF
MODE
Used for selectindoor operationmode.
FAN SPEEDUsed for select indoorair flow.
HEALTHUsed for settingindoor healthfunction.
TEMP + -
Used for changingset temperature.
RECOVERYused to switchover air-exchanging mode.
SWINGUsed for sett ingindoor swing mode.
Auto-diagnost icbutton.
Filter-cleaned button.
FILTER
RESETReset correctmode button.
Wired controller YR-E12 functions:
CHECK
+ -
Buttons and functions of the wired controller

Buttons functionMODE used for select indoor operation mode. FAN used for select indoor air flow. SWING used for setting indoor swing mode. HEALTH used for setting indoor health function. TEMP + - used for changing set temperature. CLOCK used to adjust time. + - stands for time plus/minus, used to adjust time. TIMER used to set timer mode. RECOVERY used to switch over air-exchanging mode. CHECK auto-diagnostic button. FILTER filter-cleaned button.
RESET reset correct mode button.
Display description[MODE] [AUTO] auto operation mode [MODE] [FAN ONLY] air-throwing mode [MODE] [COOL] Cooling operation mode [MODE] [DRY] Dehumidification mode [MODE] [HEAT] Heating operation mode [MODE] [HEAT] [TES] In heating mode, auxiliary electric heater is running. Only when the
unit with auxiliary electric heater is in auxiliary electric heating mode, it will display. [FAN] [AUTO] auto fan running

[FAN] [HIGH] high fan speed [FAN] [MED] medium fan speed [FAN] [LOW] low fan speed [FAN] [FIX] fixed fan speed, it will display only when fixed fan speed is requested to main
indoor unit. [CENTRAL] central control mode [OPERATION] running mode [STAND BY] waiting mode [PRE-HEAT] pre-heating mode [DEFROST] defrosting mode [FILTER] request of filter to be cleaned [HEALTH] health function [UNIT NO.] [CEN.ADD] central control address, the address number will display on “88[SYS.ADD.] system address, the address number will display on “88[CHECK] auto-diagnostic, trouble shooting [DEMAND] compulsory operation function, when it works, [CENTRAL] will flash [SWING] swing mode [ROOM TEMP.] indoor ambient temperature [SET TEMP.] set admired temperature [TIMER][ON] timer function is on, it will switch over in the sequence below:
[ON][OFF] [ON][OFF][DAILY] [ ] [TIMER][OFF] timer function is off [TIMER][ON][OFF] timer function ON-OFF [TIMER][ON][OFF][DAILY] timer ON-OFF will switch over in turn daily [CLOCK] clock display, the displaying time is the current time of the clock. [UP] [DOWN] indicator of filter elevating [VENTILATION][AUTO] auto ventilation mode [VENTILATION][RECOVERY] fully heat exchanging ventilation mode [VENTILATION][NORMAL] normal ventilation mode
FAN ONLY OPERATION1 Start up operation: press the button of ON/OFF, the system will start up, and will display [MODE][AUTO] [FAN][AUTO] [ROOM TEMP.]+ 24 [CLOCK]+”12 00”.2 Select MODE: press the MODE button, then you will see in the display section [MODE]
switch over in below sequence:[FAN ONLY] [COOL] [DRY] [HEAT] [AUTO][FAN ONLY]. Select [FAN ONLY].
3 Select fan speed: press FAN button, then you see in the display section [FAN] switch over in below sequence: [HIGH] [MED] [LOW] [HIGH]. Select proper fan speed. 4 Power off: press ON/OFF button, indoor unit will be powered off, there are only time and the ambient temperature in the screen.

AUTO operation, COOLING, HEATING and DEHUMIDIFICATION operation
1) Start up operation: press the button of ON/OFF, the system will start up, and will display [MODE][AUTO] [FAN][AUTO] [ROOM TEMP.]+ 24 [CLOCK]+”12 00”.2) Select MODE: press the MODE button, then you will see in the display section [MODE] switch over in below sequence:[FAN ONLY] [COOL] [DRY] [HEAT] [AUTO] [FAN ONLY]. Select [FAN ONLY]. 3) Change set temperature: press TEMP + or – every time, [SET] will display, and set temperature will increase/reduce 1 F .4) Select fan speed: press FAN button, then you see in the display section [FAN] switch over in below sequence: [HIGH] [MED] [LOW] [HIGH]. Select proper fan speed. 5) Select [SWING]: press [SWING] button, swing function is valid. Press again, swing
function is invalid. 6) Set [HEALTH]: used to set the indoor health function. Press it once, [HEALTH] will display in the display section, then indoor health function is valid. Press it again, [HEALTH] will disappear, then the health function is invalid. This function is valid only for the unit with health function. 7) Power off: press ON/OFF button, indoor unit is powered off. There are only time and the ambient temperature in the screen.
Set TIMER operation:
Adjust clock: when powered on, for the first time to set timer function, the clock will be adjusted.Press “CLOCK” button, and set the current clock. Now, “CLOCK” will flash at the frequency of 2Hz every minute. Press the clock +/- button; the current clock can be adjusted. Until the proper time comes, press [SET].
TIMER ON operation: Press TIMER button, and keep pressing it, in the display section [TIMER] will switch over in below sequence: [ON] [OFF] [ON][OFF] [ON][OFF][DAILY] [ ]. Select [TIMER] [ON], then [TIMER] [ON] flashes, press the clock +/- button to adjust the time of TIMER ON, press [SET] button.
TIMER OFF operation: Press TIMER button, and keep pressing it, in the display section [TIMER] will switch over in below sequence: [ON] [OFF] [ON][OFF] [ON][OFF][DAILY] [ ]. Select [TIMER] [OFF], then [TIMER] [OFF] flashes, press the clock +/- button to adjust the time of TIMER OFF, press [SET] button.
TIMER ON-OFF operation: Press TIMER button, and keep pressing it, in the display section [TIMER] will switch over in below sequence: [ON] [OFF] [ON][OFF] [ON][OFF][DAILY] [ ]. Select [TIMER] [ON] [OFF]. Firstly, [TIMER][ON] flashes, press the clock +/- button to adjust the time of

TIMER ON, press [TIMER]. [TIMER][ON] will be constant on. Then [TIMER] [OFF] flashes, press the clock +/- button to adjust the time of TIMER OFF, press [SET]. The time sequence of timer on and timer off will determine the mode is [TIMER] [ON] [OFF] or [TIMER] [OFF]
[ON]. If you want the current time, press [CLOCK] once, current time will display; press again, [CLOCK] will flash, and press [+][-] to adjust the time. Note: 1. If the two times are same, the timer state which is set later will flash, in this case, timer can not be set. 2. When entering TIMER setting state, if you do not input any button in continuous 10 seconds, the unit will quit from the TIMER mode.
Cancel TIMER operation: In the timer operation state, press [TIMER] button, the unit will quit from the current timer operation state, and the set data will be memorized, then enter the next timer mode.
[FILTER] function When the wired controller receives the filter-cleaned signal from indoor unit, [FILTER] will display. After finishing clean, press [FILTER], the sign [FILTER] disappears, and the controller will send the filter reset signal to indoor unit. When the sign [FILTER] not display, it is invalid to press [FILTER] in short time.
FILTER ELEVATING function: (only for the unit with elevating function) When the filter needs to be cleaned, the panel can be lowered to the admired height by the [FILTER][UP][DOWN] function. Method is below: In power off state, press [HEALTH] for 15 seconds to enter filter elevating set state. In this state, the sign [FILTER] will flash and [UP] [DOWN] will display simultaneously, Press TEMP [+], in timer section [UP] will display, while press TEMP [-], in timer section [DOWN] will display. When it arrives the appropriate position, press [UP], [UP][DOWN] will display simultaneously, filter will stop going down. Press [UP] again, filter will go up. Press [FILTER] button to quit the mode.
DEMAND operation function: By this function, all the indoor units can be made in nominal mode. Set the operation mode in cooling and then shut off the unit. In the stop state, press [ON/OFF] button for 5 seconds to enter cooling trial operation state. If it is in heating mode before shut off the unit, then press [ON/OFF] button for 5 minutes, it will enter heating trial operation state.
In cooling, there will be “LL” in the position where the set temperature displays. In heating, there will be “HH” in the position where the set temperature displays. The wired controller will send the [DEMAND] signal to indoor unit. In the [DEMAND] operation, “COOL” or “HEAT” will display at 1Hz frequency. Indoor fan motor will be fixed at “AUTO” mode. The indoor units in the same group will quit the [DEMAND] in turn.
At this time, only the buttons of [ON/OFF] and temperature [+] [-] are valid. Press [ON/OFF] to quit [DEMAND] mode.

CENTRAL control function When the central controller selects [CENTRAL] mode, the buttons in the wired controller except for [CHECK] will be invalid. VENTILATION mode (only for the unit with fresh air function or heat recovery function)Press [RECOVERY] button, then the unit will switch over the ventilation mode: [ ] [VENTILATION][AUTO] [VENTILATION][RECOVERY] [VENTALATION][NORMAL] [ ], please select appropriate ventilation mode.
Query indoor malfunction history: In the state of power on or power off, press [CHECK] button, enter the malfunction-querying mode of all indoor units in the group. Then [CHECK] and [UNIT NO.] will display, and the actual indoor numbers will be displayed in some sequence (unit number is in decimals). At the same time, in the time region, there will be the current malfunction and the latest time malfunction, the displaying format is [XX YY], in which XX stands for the current malfunction, if normal, it will display “ ”; YY stands for the latest time malfunction. The failure code of every unit will display for 3 seconds. After the failure codes of all indoor units in the whole group are displayed, the mode will quit automatically.
Clear abnormal state and malfunction history: In normal state, press [CHECK] button for 5 seconds to clear abnormal states, at the same time, wired controller will send the data of “clear abnormal state”, but the malfunction history still retains. In normal state, press [CHECK] button for 15 seconds, except for malfunction states, the malfunction history in wired controller will be cleared.
Query indoor performance state: In normal state, press both buttons of [CHECK] and [FILTER] for 5 seconds, in the set temperature region in the screen, [XX] will display, XX is indoor number, which can be selected by pressing [TEMP] [+] [-]. In the timer region in the screen, [YZZZ] will display, in which Y stands for data type, ZZZ stands for the corresponding data. which can be selected by pressing [CLOCK] [+] [-].
Y ZZZ Type A Indoor capacity (W) Nominal cooling
capacity/10, decimal B Request of indoor capacity Hz Actual value, decimal C Temperature of indoor ambient
temp. sensor TA Actual value, decimal
d Temperature of indoor gas pipe sensor TC1
Actual value, decimal
E Temperature of indoor liquid pipe sensor TC2
Actual value, decimal
F Open degree of indoor PMV Actual value, decimal