6.1.3 Configuring the Suprema Bioconnect and BioStar ...
26
Page | 1 AN-173 Configuring the Suprema BioConnect and BioStar Enrollment Integrator Last Modified: July 2017 TITLE: Configuring the Suprema Bioconnect and BioStar Enrollment Integrator AN-173 PRODUCTS: SMS Version 6.1.3 and later Suprema BioEntry Plus (Mifare) July 11, 2017 SUMMARY This document provides the steps to configure the Suprema BioConnect and BioStar Enrollment Integrators 6.1.3 Configuring the Suprema Bioconnect and BioStar Enrollment Integrator Table of Contents Introduction .............................................................................................................................................. 1 Prerequisites ............................................................................................................................................. 2 Installing the SMS System ......................................................................................................................... 2 Installing the BioConnect Database and Client Application ..................................................................... 2 Installing the BioStar Database and Client Application ............................................................................ 7 Set a Static IP Address for the BioEntry Plus Device ................................................................................. 9 Configure the BioEntry Plus Device in the BioConnect Client Application ............................................. 10 Configure the BioEntry Plus Device in the BioStar Client Application .................................................... 14 Configure Custom Wiegand Format – 32 Bit Mifare CSN Format .......................................................... 18 Add a Cardholder Record with a 32 Bit CSN (Card Serial Number) Badge in SMS ................................. 20 Enroll (Fingerprint) Biometrics for a Cardholder Record in BioConnect................................................. 21 Troubleshooting Tips, Additional Notes ................................................................................................. 25 Introduction This document will provide the guidelines to set up the Suprema BioConnect and BioStar Database and Client Applications with the Security Management System (SMS), also referred to as the eFusion software version 6.1.3 or later. Please thoroughly review this document before proceeding with any installation. This document is based on the Suprema BioConnect version 4.0.11 and BioStar version 1.92.160722 with the BioEntry Plus (Mifare) device.
-
Upload
khangminh22 -
Category
Documents
-
view
1 -
download
0
Transcript of 6.1.3 Configuring the Suprema Bioconnect and BioStar ...
Page | 1 AN-173 Configuring the Suprema BioConnect and BioStar Enrollment Integrator Last Modified: July 2017
TITLE: Configuring the Suprema Bioconnect and BioStar Enrollment Integrator
AN-173 PRODUCTS: SMS Version 6.1.3 and later
Suprema BioEntry Plus (Mifare)
July 11, 2017 SUMMARY This document provides the steps to configure the Suprema BioConnect and BioStar Enrollment Integrators
6.1.3 Configuring the Suprema Bioconnect and BioStar Enrollment Integrator Table of Contents
Introduction .............................................................................................................................................. 1
Prerequisites ............................................................................................................................................. 2
Installing the SMS System ......................................................................................................................... 2
Installing the BioConnect Database and Client Application ..................................................................... 2
Installing the BioStar Database and Client Application ............................................................................ 7
Set a Static IP Address for the BioEntry Plus Device ................................................................................. 9
Configure the BioEntry Plus Device in the BioConnect Client Application ............................................. 10
Configure the BioEntry Plus Device in the BioStar Client Application .................................................... 14
Configure Custom Wiegand Format – 32 Bit Mifare CSN Format .......................................................... 18
Add a Cardholder Record with a 32 Bit CSN (Card Serial Number) Badge in SMS ................................. 20
Enroll (Fingerprint) Biometrics for a Cardholder Record in BioConnect ................................................. 21
Troubleshooting Tips, Additional Notes ................................................................................................. 25
Introduction This document will provide the guidelines to set up the Suprema BioConnect and BioStar Database and Client Applications with the Security Management System (SMS), also referred to as the eFusion software version 6.1.3 or later.
Please thoroughly review this document before proceeding with any installation.
This document is based on the Suprema BioConnect version 4.0.11 and BioStar version 1.92.160722 with the BioEntry Plus (Mifare) device.

Page | 2 AN-173 Configuring the Suprema BioConnect and BioStar Enrollment Integrator Last Modified: July 2017
Prerequisites
• The eFusion Security Management System (SMS) is running version 6.1.3 or later. • The SMS system must be running on Windows Operating System – Windows 7 or later, x86 or
x64 editions. • The BioConnect database must be using SQL Server Database Engine 2008 or later. • The BioConnect application version 4.0.11 or later. • The BioStar database must be using SQL Server Database Engine 2008 or later. • The BioStar application version 1.92.160722 or later. • A compatible Suprema BioEntry Plus Enrollment reader for enrollment purpose. • Optional, Microsoft SQL Server Management Studio (MSSMS) for executing custom SQLs.
Installing the SMS System Note: All installations must be executed by a user account with administrator privileges.
a. Please refer to the “Installation Guide for eAXxess_eFusion” on the Installation media for details about the (eAXxess or eFusion) SMS installation.
• SMS SQL Server Account sa Password: __________i.e. Default sa Password: DB2axxess • SMS SQL Server Instance: _______________________ i.e. {Computername}\MAXXESS
b. Once the installation or upgrade has been completed, and the database has been initialized,
complete the following steps before continuing.
• Register the SMS\AXxess database with Maxxess Systems, Inc. Contact Maxxess Technical Support for further assistance.
• Set up the SMS System Master or Administrator account with a password.
Installing the BioConnect Database and Client Application Note: All installations must be executed by a user account with administrator privileges.
Note: Follow the installation prompts when directed.
Note: For more information, see the BioConnect ID Enterprise v4.0 Installation Guide.pdf
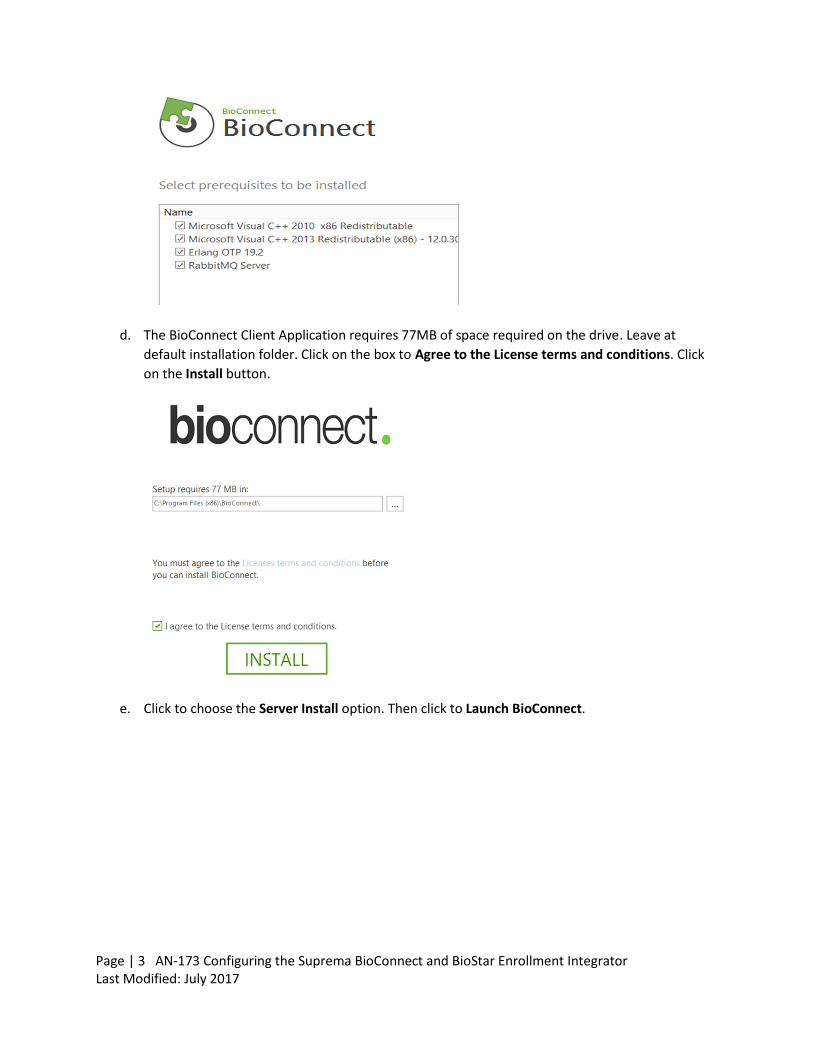
a. Open the BioConnect (Integration Software) Folder. b. Run the BioConnect 4.0.exe. c. At the BioConnect Prerequisites Setup Wizard page, select to install ALL BioConnect
prerequisite software applications.
Page | 3 AN-173 Configuring the Suprema BioConnect and BioStar Enrollment Integrator Last Modified: July 2017
d. The BioConnect Client Application requires 77MB of space required on the drive. Leave at default installation folder. Click on the box to Agree to the License terms and conditions. Click on the Install button.
e. Click to choose the Server Install option. Then click to Launch BioConnect.

Page | 4 AN-173 Configuring the Suprema BioConnect and BioStar Enrollment Integrator Last Modified: July 2017
f. At the Welcome to the BioConnect Setup Assistant page, click on the Next button.
g. At the Version Updates page, click on the Next button. h. At the BioConnect License Setup page, select the appropriate License Setup Activation for the
site i.e. Online Activation, Offline Activation, or Trial. Then click on the Next button. Note: Contact BioConnect Support for more information.
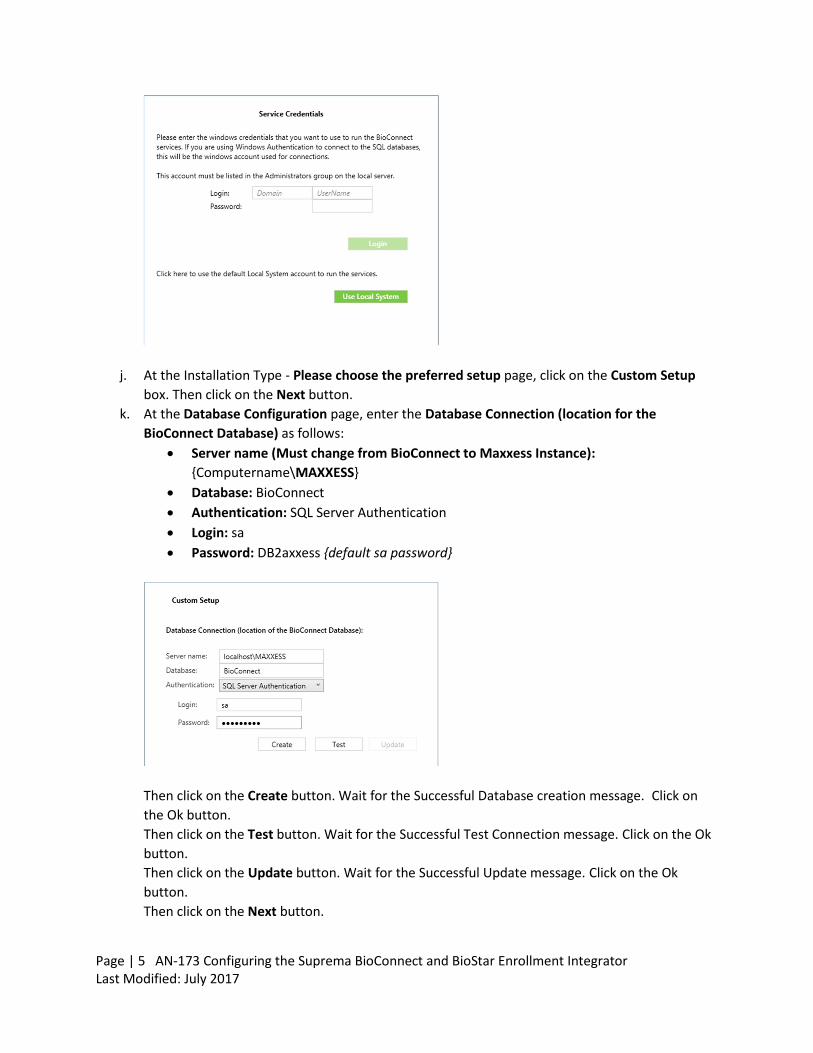
i. At the Service Credentials page, enter the credentials of a Windows Administrator account that you want to run the BioConnect services. Then click on the Next button.
Page | 5 AN-173 Configuring the Suprema BioConnect and BioStar Enrollment Integrator Last Modified: July 2017
j. At the Installation Type - Please choose the preferred setup page, click on the Custom Setup box. Then click on the Next button.
k. At the Database Configuration page, enter the Database Connection (location for the BioConnect Database) as follows:
• Server name (Must change from BioConnect to Maxxess Instance): {Computername\MAXXESS}
• Database: BioConnect • Authentication: SQL Server Authentication • Login: sa • Password: DB2axxess {default sa password}
Then click on the Create button. Wait for the Successful Database creation message. Click on the Ok button. Then click on the Test button. Wait for the Successful Test Connection message. Click on the Ok button. Then click on the Update button. Wait for the Successful Update message. Click on the Ok button. Then click on the Next button.
Page | 6 AN-173 Configuring the Suprema BioConnect and BioStar Enrollment Integrator Last Modified: July 2017
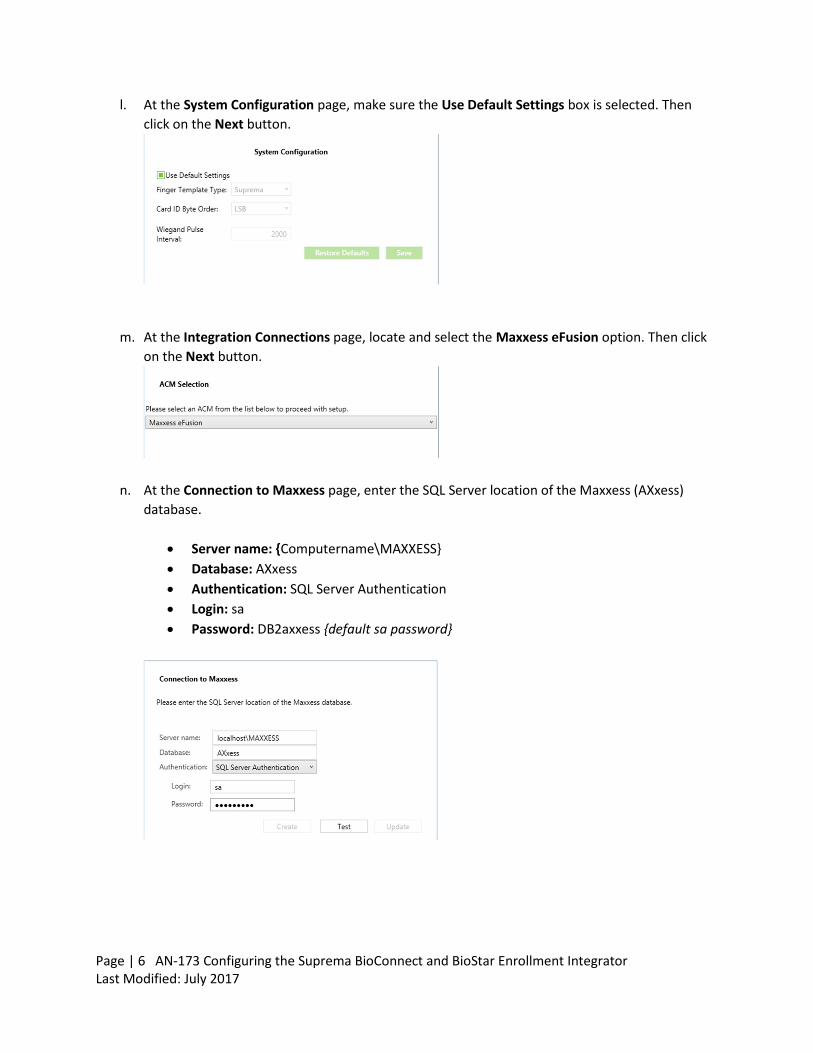
l. At the System Configuration page, make sure the Use Default Settings box is selected. Then click on the Next button.
m. At the Integration Connections page, locate and select the Maxxess eFusion option. Then click on the Next button.
n. At the Connection to Maxxess page, enter the SQL Server location of the Maxxess (AXxess) database.
• Server name: {Computername\MAXXESS} • Database: AXxess • Authentication: SQL Server Authentication • Login: sa • Password: DB2axxess {default sa password}

Page | 7 AN-173 Configuring the Suprema BioConnect and BioStar Enrollment Integrator Last Modified: July 2017
Then click on the Test button. Wait for the Successful Test Connection message. Click on the Ok button. Then click on the Update button. Wait for the Successful Update message. Click on the Ok button. Then click on the Next button.
o. At the Service Port Configuration page, leave all ports at default value. If there are any port conflicts, change as appropriate, and click on the Save button. Then click on the Next button.
p. At the System Startup page, click on the Startup button. Wait for the System Startup Successful message after completing all required checks. Then click on the Next button.
q. At the Finish page, click on the Finish button. This will open the BioConnect application. At this time during this setup, the BioConnect Client Application can be minimized or closed.
Installing the BioStar Database and Client Application Note: All installations must be executed by a user account with administrator privileges.
Note: Follow the installation prompts when directed.
Note: For more information, see the BioStar 1.61 Administrator guide_Eng.pdf.
r. Open the BioStar (Configuration Software) folder. s. Run the BioStar 1.9.2.8 Configuration Software.exe. t. There are prerequisite software applications to be installed. Follow the setup instructions as
directed for the OpenSSL Setup Wizard, and the Erlang OTP 19 Setup Wizard. u. At the Welcome to the InstallShield Wizard for BioStar 1.92 page, click on the Next button. v. At the Setup Type page, select the English features to install. Then click on the Next
button.

Page | 8 AN-173 Configuring the Suprema BioConnect and BioStar Enrollment Integrator Last Modified: July 2017
w. At the Select Features page, click to select all Express items. Then click on the Next button.
x. At the Start Copying Files page, click on the Next button. y. At the Setup Status page, the wizard will prompt to install Microsoft SQL Server Express, click on
the No button. z. At the Create Database [BioStar] page, enter the following DB Server and Authentication
method. Then click on the Setup button.
• Database Type: MS SQL Server • Database Name: BioStar • Authentication: Windows Authentication • Database Server: {Computername\MAXXESS} • ID: sa {Readonly} • Password: Blank {Readonly} • Port: 1433 {Readonly}

Page | 9 AN-173 Configuring the Suprema BioConnect and BioStar Enrollment Integrator Last Modified: July 2017
aa. Wait for the progress bar to complete creating the BioStar database. Then click on the Finish button.
bb. At the InstallShield Wizard Complete page, click on the Finish button. cc. If not already running, make sure the BioStar Server service is running by check the status in the
BioStar Server Config application. The service is required to be running before the BioStar application can be used.
Set a Static IP Address for the BioEntry Plus Device Note: All installations must be executed by a user account with administrator privileges.
Note: Follow the installation prompts when directed.
Note: For more information, see the BEPlus_InstallationGuide_V1_2_English.pdf.
Note: This section will document how to factory reset the device to its default IP Address for the BioEntry Plus device, which is 192.168.0.1. This section will require the PC to be set to the same IP Address Subnet i.e. 192.168.0.2.
dd. Turn off the BioEntry Plus power. ee. At the hardware, set the Dipswitch SW#2 to “ON”. ff. Turn on the BioEntry Plus power. gg. Open the BioStar (Configuration Software) folder. hh. Open the BioStar Config folder. ii. Run the BioStar Config.exe. Then click to Search button to find and locate the BioEntry Plus
device. Set a Static IP Address for the Device under the IP section.
• Uncheck the DHCP box. • Set the Port No: 1471. • Set the static IP Address. • Set the Subnet. • Set the Gateway.
Set the BioConnect Server information for the Device under the Server section.
• Check the Use Server box. • Set the Port No: 8001 (For BioConnect). • Set the BioConnect Server IP Address. Note: This is the IP Address of the PC running the
BioConnect services.

Page | 10 AN-173 Configuring the Suprema BioConnect and BioStar Enrollment Integrator Last Modified: July 2017
jj. Click on the Apply button to set the new Static IP Address and BioConnect Server Address for the BioEntry Plus device.
kk. Close the BioStarConfig application. ll. At the hardware, set the Dipswitch SW#2 to “OFF”. mm. Turn off the BioEntry Plus power. nn. Turn on the BioEntry Plus Power oo. Reset the PC back to the correct IP Address. pp. Run a command window, and perform a PING test to confirm the new Static IP Address for the
BioEntry Plus device.
Configure the BioEntry Plus Device in the BioConnect Client Application Note: All installations must be executed by a user account with administrator privileges.
Note: Follow the installation prompts when directed.
Note: For more information, see the BioConnect ID Enterprise v4.0 Software Configuration Guide.pdf.
qq. If not already running, open the BioConnect Client application. rr. Log in with the default user. Note: It is recommended to change the password after
configuration or add new account logins. Follow any prompts when instructed. Username: Entertech Password: Bobcat

Page | 11 AN-173 Configuring the Suprema BioConnect and BioStar Enrollment Integrator Last Modified: July 2017
ss. Click on the Device Management section. The new BioEntry Plus should be found and loaded.
Click on the Find Devices button, if no devices were found. tt. Expand the Device Details. Change any settings where appropriate.
• Change the Name. • Set the Location: Default • Set the Enrollment Reader: Yes / Box Filled. • Set the Online: Yes / Box Filled. • Device Id: Automatically assigned ID {Read-only}. • Set the Operation Mode: No Change.
uu. Expand the General Information. Review details. Caution: There is no need to make any changes or to Erase All Device Memory, unless instructed by Technical Support.

Page | 12 AN-173 Configuring the Suprema BioConnect and BioStar Enrollment Integrator Last Modified: July 2017
vv. Expand the Network Details. Review details. Note: There is no need to change the static IP Address of the device. Note: Change the Server Port when appropriate for switching the devices between the BioConnect application and the BioStar application. Note: To use the device in BioConnect, Port must be set to 8001. Note: To use the device in BioStar, Port must be set to 1480. Change the current Port 8001 to Port to 1480. Note: This step will allow the unit to be used in the BioStar Client application for the next set of procedures.

Page | 13 AN-173 Configuring the Suprema BioConnect and BioStar Enrollment Integrator Last Modified: July 2017
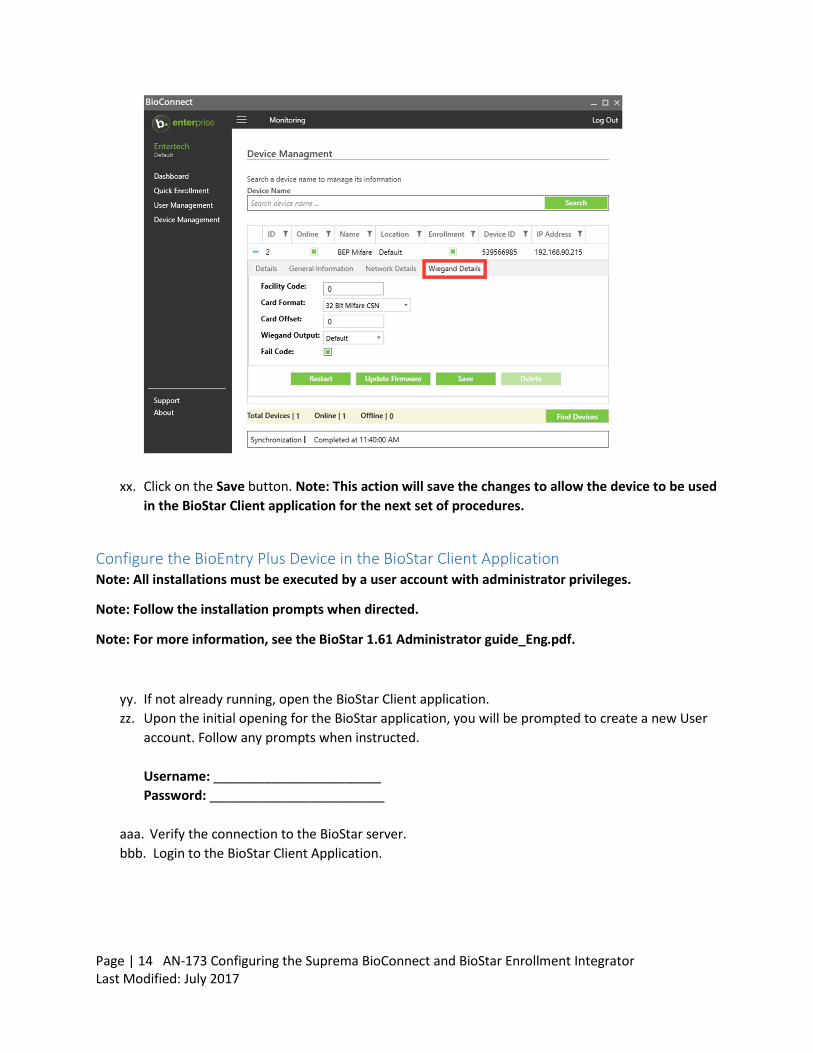
ww. Expand the Wiegand Details. Change any settings where appropriate. • Set the Facility Code: 0 • Set the Card Format: 32 Bit Mifare CSN. • Set the Card Offset: 0 • Set the Wiegand Output: Default • Set the Fail Code box: Yes/Box Filled.
Page | 14 AN-173 Configuring the Suprema BioConnect and BioStar Enrollment Integrator Last Modified: July 2017
xx. Click on the Save button. Note: This action will save the changes to allow the device to be used in the BioStar Client application for the next set of procedures.
Configure the BioEntry Plus Device in the BioStar Client Application Note: All installations must be executed by a user account with administrator privileges.
Note: Follow the installation prompts when directed.
Note: For more information, see the BioStar 1.61 Administrator guide_Eng.pdf.
yy. If not already running, open the BioStar Client application. zz. Upon the initial opening for the BioStar application, you will be prompted to create a new User
account. Follow any prompts when instructed. Username: _______________________ Password: ________________________
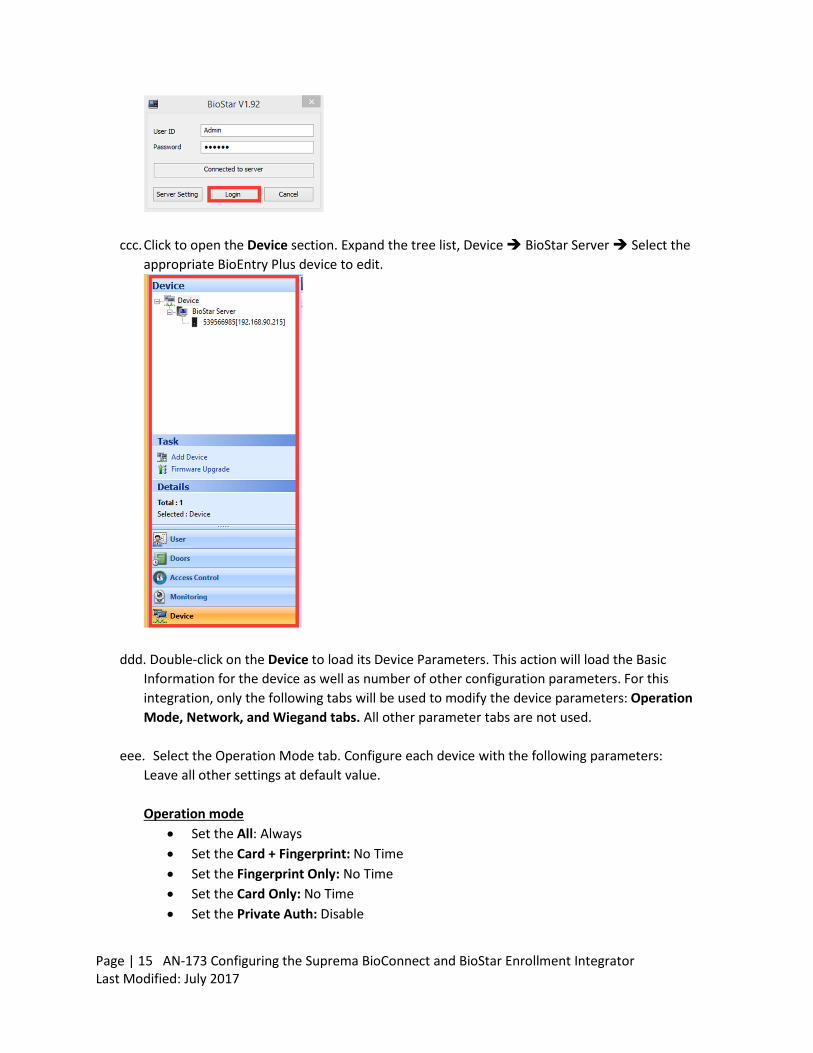
aaa. Verify the connection to the BioStar server. bbb. Login to the BioStar Client Application.
Page | 15 AN-173 Configuring the Suprema BioConnect and BioStar Enrollment Integrator Last Modified: July 2017
ccc. Click to open the Device section. Expand the tree list, Device è BioStar Server è Select the appropriate BioEntry Plus device to edit.
ddd. Double-click on the Device to load its Device Parameters. This action will load the Basic Information for the device as well as number of other configuration parameters. For this integration, only the following tabs will be used to modify the device parameters: Operation Mode, Network, and Wiegand tabs. All other parameter tabs are not used.
eee. Select the Operation Mode tab. Configure each device with the following parameters: Leave all other settings at default value. Operation mode
• Set the All: Always • Set the Card + Fingerprint: No Time • Set the Fingerprint Only: No Time • Set the Card Only: No Time • Set the Private Auth: Disable

Page | 16 AN-173 Configuring the Suprema BioConnect and BioStar Enrollment Integrator Last Modified: July 2017
Mifare/ICLASS
• Uncheck the Not Use Card box • Set the Card Read Mode: Mifare CSN only
Card ID Format
• Set the Format Type: Normal • Set the Byte Order: MSB • Set the Bit Order: MSB
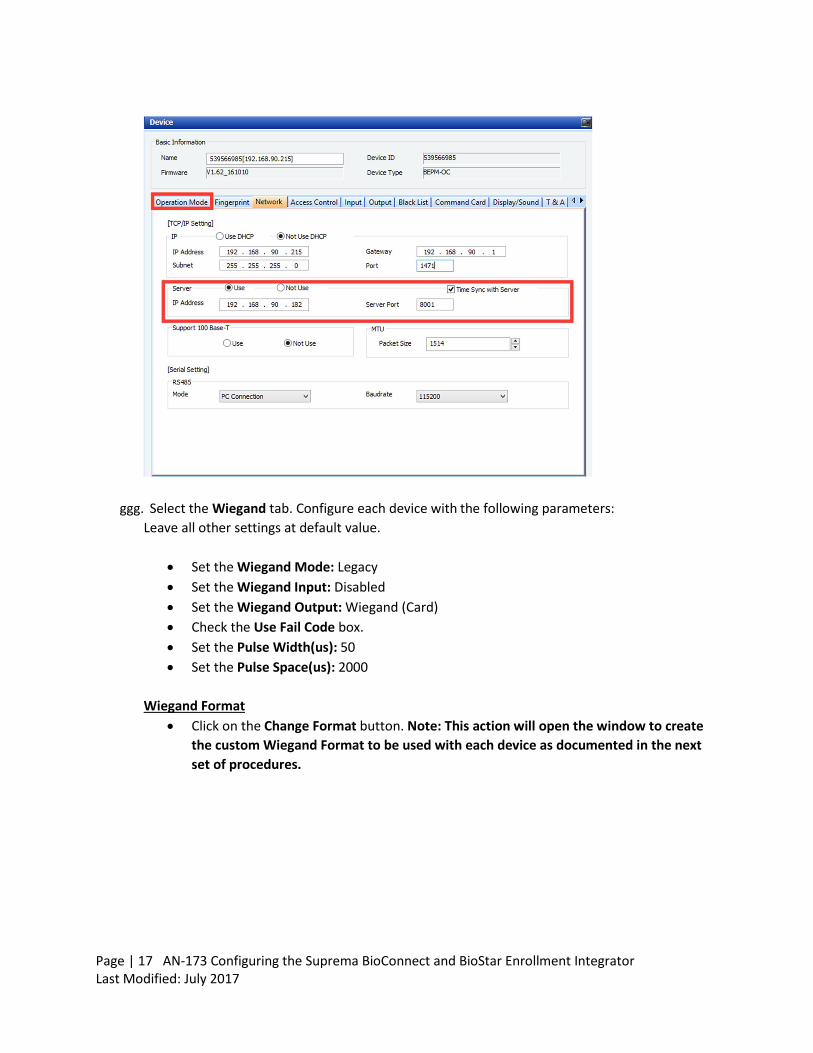
fff. Select the Network tab. Configure each device with the following parameters: Leave all other settings at default value. IP Settings Warning: Do not change any of the current static IP Settings for the Device Server Settings
• Warning: Do not change the Server IP Address. • Set the Server Port: 8001. Note: This action will allow the device to be used in the
BioConnect application. • Check the Time Sync with Server box
Page | 17 AN-173 Configuring the Suprema BioConnect and BioStar Enrollment Integrator Last Modified: July 2017
ggg. Select the Wiegand tab. Configure each device with the following parameters: Leave all other settings at default value.
• Set the Wiegand Mode: Legacy • Set the Wiegand Input: Disabled • Set the Wiegand Output: Wiegand (Card) • Check the Use Fail Code box. • Set the Pulse Width(us): 50 • Set the Pulse Space(us): 2000
Wiegand Format
• Click on the Change Format button. Note: This action will open the window to create the custom Wiegand Format to be used with each device as documented in the next set of procedures.

Page | 18 AN-173 Configuring the Suprema BioConnect and BioStar Enrollment Integrator Last Modified: July 2017
Configure Custom Wiegand Format – 32 Bit Mifare CSN Format Note: Each device must be configured with a custom Wiegand format to properly work with the Maxxess SMS integration.
hhh. At the Wiegand Configuration - Wiegand Format page, select the Custom Wiegand Format radio button. Then click on the Next button.
iii. At the Wiegand Configuration – Format page, configure with the following parameters and then click on the Next button.
• Set the Total bits: 32 • Set the ID bits: 0. Note: This value will automatically change to ID bits: 32 as soon as all
32 User ID fields have been populated. • Set the Format boxes with 32 [User ID] – [I] fields.

Page | 19 AN-173 Configuring the Suprema BioConnect and BioStar Enrollment Integrator Last Modified: July 2017
jjj. At the Wiegand Configuration – Parity page, do not make any changes. Click on the Next button.
kkk. At the Wiegand Configuration - Alternative Value page, do not make any changes. Click on the Finish button.
lll. Click on the APPLY button to save all configuration changes that have been done. The changes will be written to the device. Note: This action will also change and allow the unit to be used in the BioConnect application.

Page | 20 AN-173 Configuring the Suprema BioConnect and BioStar Enrollment Integrator Last Modified: July 2017
mmm. Close the BioStar application.
Add a Cardholder Record with a 32 Bit CSN (Card Serial Number) Badge in SMS Note: This document assumes the eMAX-EP Area Controller(s) with readers have been added, configured and online in the SMS system, utilizing a 32 Bit Mifare Badge Format. If not already done, do so at this time and before proceeding with the next set of procedures.
Note: It is assumed the Suprema BioEntry Plus device is correctly connected to the Reader Port on the eMAX-EP/eMAX-MR door controllers. See the Suprema hardware manual for further assistance.
nnn. Open the SMS Desktop. ooo. In the SMS Desktop, Go to Personnel è Access Level. ppp. If not already done, add a new Access Level with access to the Door/Reader connected with
the Suprema BioEntry Plus device.

Page | 21 AN-173 Configuring the Suprema BioConnect and BioStar Enrollment Integrator Last Modified: July 2017
qqq. Go to Personnel è Cardholder Template. rrr. Add a new Cardholder with a 32 Bit CSN Number with the appropriate Access Level. Then click
on the Save button to save the new Cardholder record.
Enroll (Fingerprint) Biometrics for a Cardholder Record in BioConnect Note: Fingerprint Biometric enrollment can only be done with an Administrator level account in BioConnect. The default Entertech account does not have permission to enroll users.
sss. If not already done, login to the BioConnect Client application with the default Entertech user. Choose the appropriate location. User Name: Entertech Password: Bobcat
ttt. If not already done, the BioConnect database should have already been automatically synchronized with the SMS database. You can confirm this by reviewing the User Management page where the SMS Cardholders have been uploaded to the BioConnect database.
Page | 22 AN-173 Configuring the Suprema BioConnect and BioStar Enrollment Integrator Last Modified: July 2017
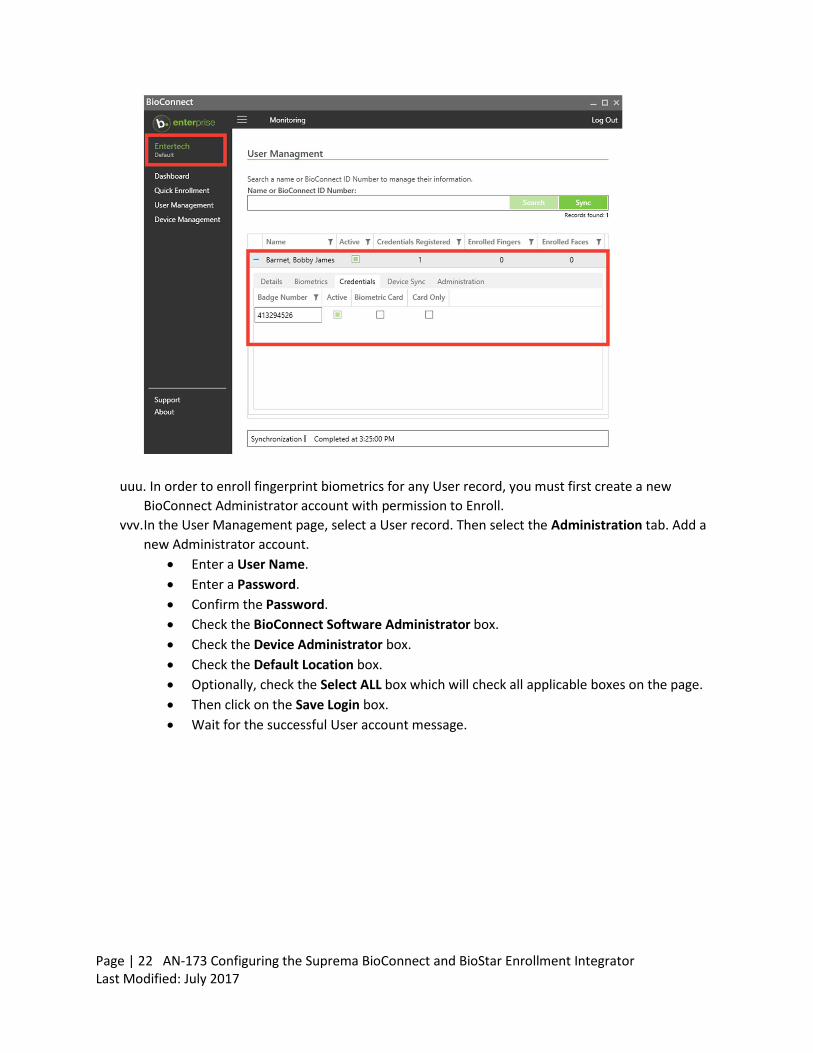
uuu. In order to enroll fingerprint biometrics for any User record, you must first create a new BioConnect Administrator account with permission to Enroll.
vvv. In the User Management page, select a User record. Then select the Administration tab. Add a new Administrator account.
• Enter a User Name. • Enter a Password. • Confirm the Password. • Check the BioConnect Software Administrator box. • Check the Device Administrator box. • Check the Default Location box. • Optionally, check the Select ALL box which will check all applicable boxes on the page. • Then click on the Save Login box. • Wait for the successful User account message.
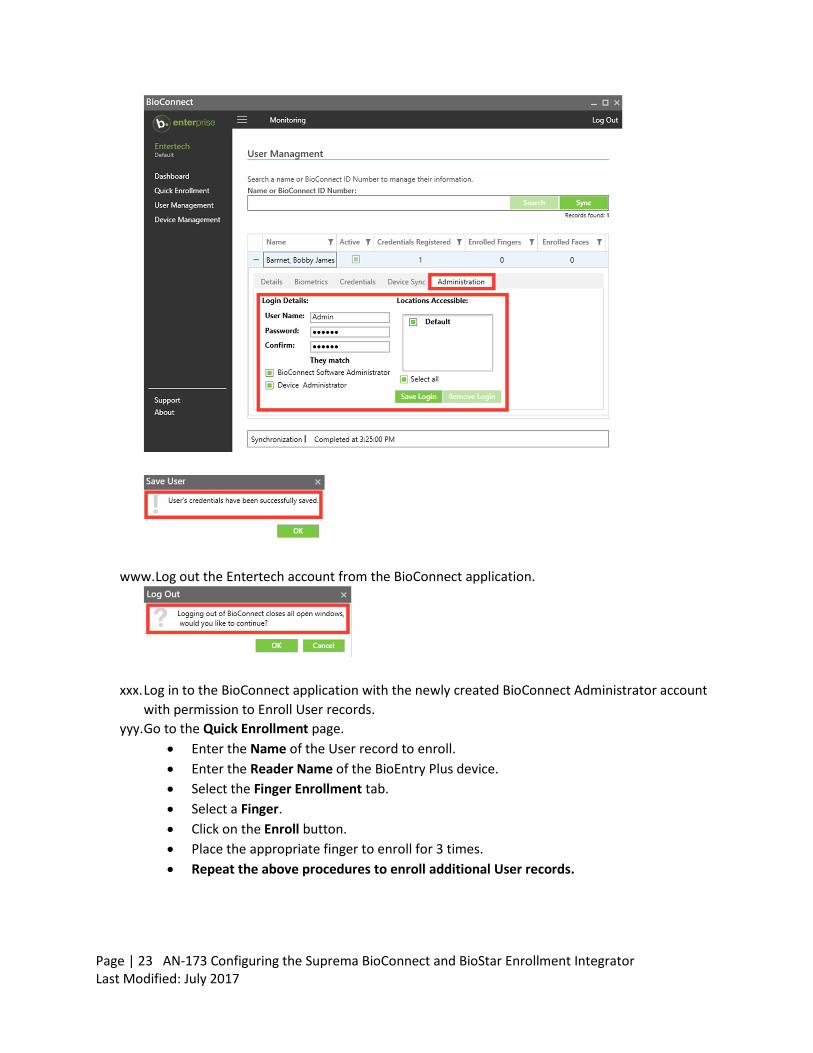
Page | 23 AN-173 Configuring the Suprema BioConnect and BioStar Enrollment Integrator Last Modified: July 2017
www. Log out the Entertech account from the BioConnect application.
xxx. Log in to the BioConnect application with the newly created BioConnect Administrator account with permission to Enroll User records.
yyy. Go to the Quick Enrollment page. • Enter the Name of the User record to enroll. • Enter the Reader Name of the BioEntry Plus device. • Select the Finger Enrollment tab. • Select a Finger. • Click on the Enroll button. • Place the appropriate finger to enroll for 3 times. • Repeat the above procedures to enroll additional User records.

Page | 24 AN-173 Configuring the Suprema BioConnect and BioStar Enrollment Integrator Last Modified: July 2017
Note: For the enrolled User record in this document, the allowed mode of operation at the BioEntry Plus device are: Fingerprint (Biometric) only or Card &Fingerprint access. If other mode of operations is desired, please see the guide for the BioConnect client application.
zzz. For the enrolled User record, test a Fingerprint (Biometric) Only access by presenting the fingerprint to the BioEntry Plus device. Confirm fingerprint only access granted.
aaaa. For the enrolled User record, test a Card and Fingerprint access by presenting the Card first followed by a Fingerprint to the BioEntry Plus device. Confirm Card & Fingerprint access granted. Operation Note: Multiple credentials are allowed per User Record, and does not require fingerprint (Biometrics) to be re-enrolled. Operation Note: For every invalid card and/or fingerprints that are not found by the BioEntry Plus device, the device will output the default Mifare failed code or CSN 4294967295. Operation Note: When the badge number for the Cardholder/User record is removed from the AXxess database, the Active field will be removed for the User record in the BioConnect database. All enrolled fingerprint Biometrics belonging to the User record will still be retained in the database. If biometrics are used by inactive accounts, access will be denied to the inactive account at the Access Control Panel.

Page | 25 AN-173 Configuring the Suprema BioConnect and BioStar Enrollment Integrator Last Modified: July 2017
Operation Note: Removing the Cardholder/User record in AXxess database will cause the User record along with their enrolled fingerprint (Biometrics) to be removed from the BioConnect database.
Troubleshooting Tips, Additional Notes
bbbb. Per BioConnect Technical Support - The BioStar installation does not work with SQL Server Authentication. Windows Authentication must be used to create the BioStar database.
cccc. Per BioConnect Technical Support - To use the BioEntry Plus device in BioConnect, the network port must be set to 8001.
dddd. Per BioConnect Technical Support - To use the BioEntry Plust device in BioStar, the network port must be set to 1480.
eeee. Per BioConnect Technical Support - After using the BioStar to configure custom card formats and operation modes and Reader is moved over to BioConnect, it is very important to ensure there is no additional configuration required on the device as the card configuration will be overwritten if any errors occur.
ffff. In BioConnect, Quick Enrollment [Search By ID] is currently not functional. Please contact BioConnect Technical Support for a status update.
gggg. In BioConnect, User Management [Search by BioConnect ID Number] is currently not functional. Please connect BioConnect Technical Support for a status update.

Page | 26 AN-173 Configuring the Suprema BioConnect and BioStar Enrollment Integrator Last Modified: July 2017
hhhh. BioConnect definition for creating Adminsration Level Account Functionality -
• Root Account: Full Functionality but cannot enroll fingerprints (Configure Devices, Manage Users).
• BioConnect Software Admin: Full access to all functionality within software (Configure Devices, Manage Users, Perform Enrollments).
• BioConnect Device Admin: Where there is a device Admin set, Devices with UI Menu screens will have all Device Menu functionality locked for all users except for users with Device Admin set. (Ability to access Menu and change directly on device UI screens).
iiii. The BioConnect default user account [Entertech] is not allowed to enroll a fingerprint for a user.
You may encounter an error message such as “Scan Template: Error while retrieving template”. You must create a new BioConnect Software and Device Administrator account.
jjjj. Per BioConnect Technical Support - For the Administration tab in User Management in BioConnect section: Users who are to be made administrators of the Devices and Enrollments of other users can be given Administrator credentials. Not all Maxxess Admins require BioConnect Admin rights. Not all BioConnect Admins require Maxxess Admin rights. The Root Level account can always be used to designate other users as Device or Software Admins.
kkkk. Per BioConnect Technical Support - BioConnect does not currently provide all the device configuration options available in BioStar. When a device is configured in BioStar and then moved to BioConnect, any settings will continue to live on the device until additional settings are saved to it. Resetting or restarting the device will cause those configurations to reset.
llll. Per BioConnect Technical Support – BioConnect is automatically set on a 5-minute sync. Any changes that occur in the database will update every 5 minutes. You can also automatically sync the BioConnect database by clicking on the “Sync” button in the User Management page.
mmmm. When upgrading the BioConnect software, be sure to TEST and UPDATE the BioConnect database connection string. Also, TEST and UPDATE the AXxess database connection string. Take extra precautions to NOT SELECT the CREATE database as this option will delete/wipe the existing BioConnect database. If you are unsure about the upgrade process, please contact Maxxess Technical Support or BioConnect Technical Support for further assistance.
nnnn. It is recommended to perform a daily backup of the BioConnect and BioStar database as well as backing up the SMS AXxess database. Note: All enrolled User/biometric data for the BioEntry Plus devices are stored in the BioConnect database.
End of Document