48790 NZSIA - Section 2 Adapting Progressions.indd - NZSIA
43
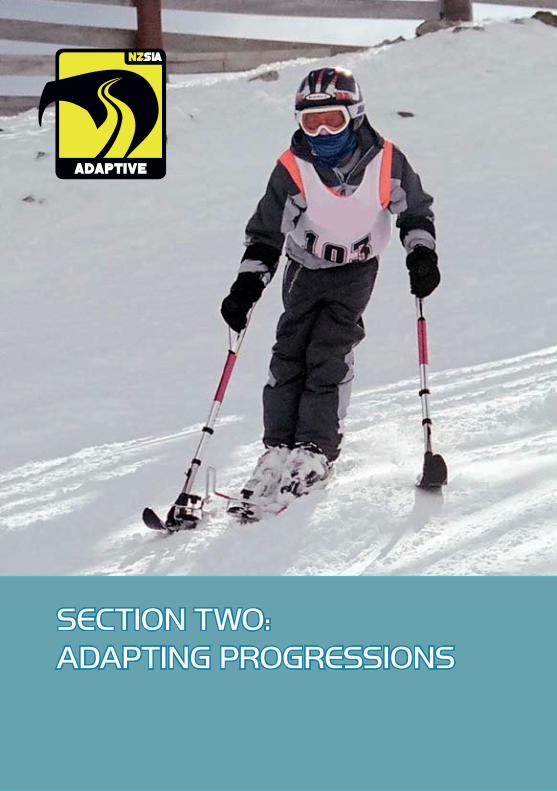
SECTION TWO: ADAPTING PROGRESSIONS
-
Upload
khangminh22 -
Category
Documents
-
view
0 -
download
0
Transcript of 48790 NZSIA - Section 2 Adapting Progressions.indd - NZSIA
Section tWo:AdApting progreSSionS
2
2
Once you have established the student’s goals, assess their strength and mobility so you understand which parts of their body they use to move.
Then observe the student on snow to establish their ability level from 1-6 and their application of stance/balance, rotation, edging, and pressure skills.
Establishing the ability level will give you a starting point from which to build a progression. In general you are assessing the terrain that the student can ride in control, the turn shape they are making, whether it is even on both turns, and the amount of skid in the turn.
Look at the track the student leaves in the snow. At level 2b the turn will be skidded throughout, at level 3 the turn will be skidded above the fall line with some skidding after the fall line especially on intermediate terrain, at level 4 there will only be slight skidding through the turn with some carving occurring through the second half of the turn on easier intermediate and beginner terrain.
Then observe the student’s movements in terms of the skills. Initially this may be one skill at a time but as you get more practised you can observe all the skills at once. As a reference have in your mind what a demonstration turn would look like at that level.
BAlAnce/StAnceThe student wants to maintain a balanced stance through the turn and if they lose balance, be able to recover. If there is limited flexion in lower joints use heel lifts and have the student maintain a centred stance. Aim to have even flexion in the ankle, knee, and hip as much as possible.
rotAtionAlMovements want to be transferred to the ski/board as directly and smoothly as possible. If the predominant force is applied through the hip, complement this with rotation below this point as much as possible. If in a mono ski rotation occurs above the hip, ensure there is sufficient strapping to transfer it through the ski. Aim to have some counter rotation above the part of the body that is creating the rotation.
§ 3
AnAlysis
3
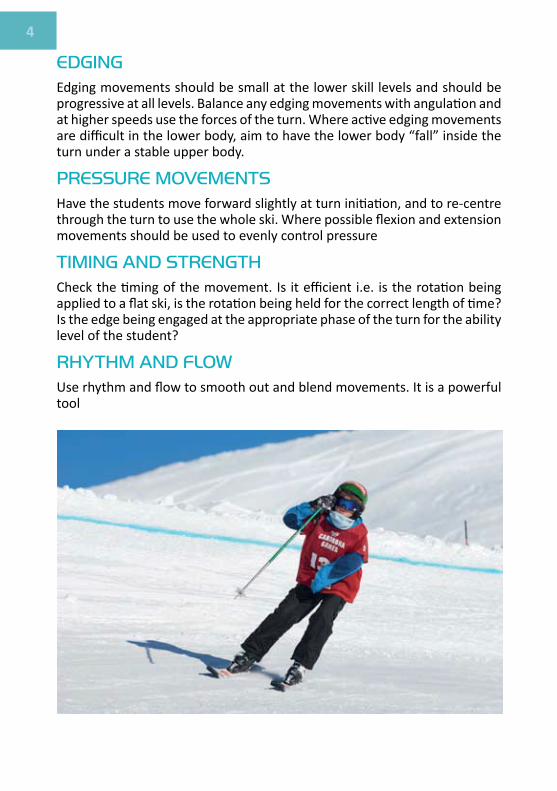
edgingEdging movements should be small at the lower skill levels and should be progressive at all levels. Balance any edging movements with angulation and at higher speeds use the forces of the turn. Where active edging movements are difficult in the lower body, aim to have the lower body “fall” inside the turn under a stable upper body.
preSSure MoveMentSHave the students move forward slightly at turn initiation, and to re-centre through the turn to use the whole ski. Where possible flexion and extension movements should be used to evenly control pressure
tiMing And StrengthCheck the timing of the movement. Is it efficient i.e. is the rotation being applied to a flat ski, is the rotation being held for the correct length of time? Is the edge being engaged at the appropriate phase of the turn for the ability level of the student?
rhythM And FloWUse rhythm and flow to smooth out and blend movements. It is a powerful tool
4
edgingEdging movements should be small at the lower skill levels and should be progressive at all levels. Balance any edging movements with angulation and at higher speeds use the forces of the turn. Where active edging movements are difficult in the lower body, aim to have the lower body “fall” inside the turn under a stable upper body.
preSSure MoveMentSHave the students move forward slightly at turn initiation, and to re-centre through the turn to use the whole ski. Where possible flexion and extension movements should be used to evenly control pressure
tiMing And StrengthCheck the timing of the movement. Is it efficient i.e. is the rotation being applied to a flat ski, is the rotation being held for the correct length of time? Is the edge being engaged at the appropriate phase of the turn for the ability level of the student?
rhythM And FloWUse rhythm and flow to smooth out and blend movements. It is a powerful tool
4 § 5 5
the WedgeleSS progreSSion
This is basically a blend of the NZSIA ski and SBINZ snowboard progressions. It is used where a student is facing their direction of travel but unable to form a wedge (physically or because they are only on one ski). Common situations are monoski, 3 track, and 4 track.
leArning to turnIntroduction to equipmentEnsure the equipment is set up and adjusted so that the student can maintain a centred stance.
Movement on the flatAs this may be tiring it is good to integrate this in with other parts of the lesson. Outriggers are usually used in the flip up/crutch position when the student is pushing themselves on the flat.
Side steppingThis is tiring and may not be achievable. Alternatives are the magic carpet and using outriggers to propel oneself backwards up a slope.
Straight runsIt may be necessary to assist the skier to position themselves facing downhill.
Straight run exercises and outrigger stoppingAllow the skier to explore a full range of movement including outrigger position but be careful to not lift the outriggers too far from the snow. Be in close proximity even with light contact to prevent a fall. Using the outriggers to stop, keep elbows close to the body and push the claws of the outriggers forward and down. The aim is to learn how to slide on a flat ski.
FallingWhere outriggers are used, safe falling techniques should be practised. This involves lifting the outriggers forward and away from the slope to prevent falling on them and to protect the shoulder joint.
Direction changesTrying a mixture of open turns and a shallow fan progression will determine the best approach to take. Focus needs to be on keeping the skis flat and applying turning force from the lowest functional part of the body. Rotational force at this stage needs to be applied around a vertical axis. Both outriggers
6
need to point in the direction of the turn.
Developing Turning
Use a mixture of a fan progression, J turns and C turns as appropriate to the student and the terrain.
Skidded Traverse
The skiers CoM should remain close to the centreline of the skis with the slope determining the edge angle. Where holding an edge is difficult, for example 4 track, allow for a lot of skid in the traverse.
Garlands
Introduce the concept of flattening the skis at turn initiation with the garland
Linking Skidded Turns
Chairlift use
Safety is paramount. Once you start skiing chairlift accessible terrain, it may be necessary to assist the skier hands on during the first few runs due to steeper beginner terrain or busy slopes.
Strengthening the turn Determine the skier’s level based on the terrain they are skiing and timing of their edge engagement. Analyse the skier’s movements carefully and then apply the principle of using the lowest functional part of the body to make a movement. Aim to develop movements that are as close as possible to what you would see in a demonstration turn for that level. Teach the exercises you always use when teaching turning, from the fan progression through to garlands. This will help the student to develop their skills at all levels.
Active edge engagement and release
As the skier does not have a wedge to create an edge angle they will need to actively edge the ski at the end of the turn and actively flatten the ski at turn initiation. As with snowboarding the initial movements will be small and will occur only at the completion of the turn and to initiate the new turn. The ski will be flat through most of the turn with only enough edge to allow the ski(s) to grip through the completion phase.
§ 7 7
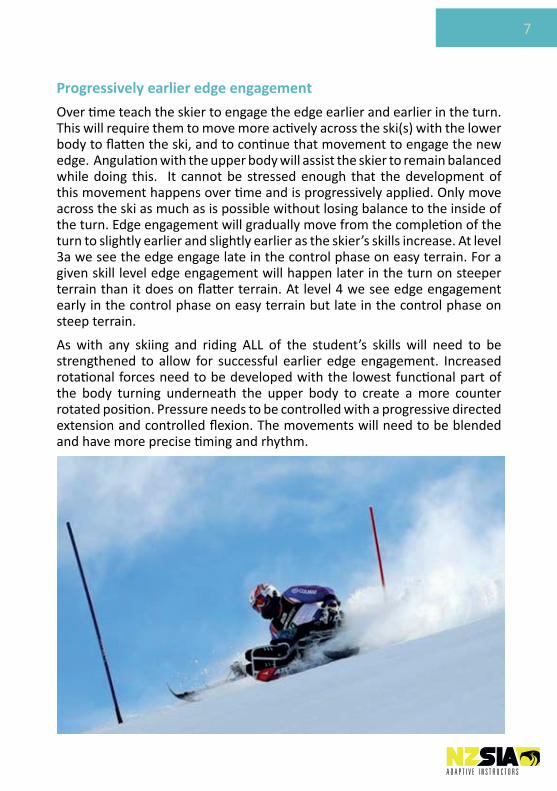
Progressively earlier edge engagement
Over time teach the skier to engage the edge earlier and earlier in the turn. This will require them to move more actively across the ski(s) with the lower body to flatten the ski, and to continue that movement to engage the new edge. Angulation with the upper body will assist the skier to remain balanced while doing this. It cannot be stressed enough that the development of this movement happens over time and is progressively applied. Only move across the ski as much as is possible without losing balance to the inside of the turn. Edge engagement will gradually move from the completion of the turn to slightly earlier and slightly earlier as the skier’s skills increase. At level 3a we see the edge engage late in the control phase on easy terrain. For a given skill level edge engagement will happen later in the turn on steeper terrain than it does on flatter terrain. At level 4 we see edge engagement early in the control phase on easy terrain but late in the control phase on steep terrain.
As with any skiing and riding ALL of the student’s skills will need to be strengthened to allow for successful earlier edge engagement. Increased rotational forces need to be developed with the lowest functional part of the body turning underneath the upper body to create a more counter rotated position. Pressure needs to be controlled with a progressive directed extension and controlled flexion. The movements will need to be blended and have more precise timing and rhythm.
8
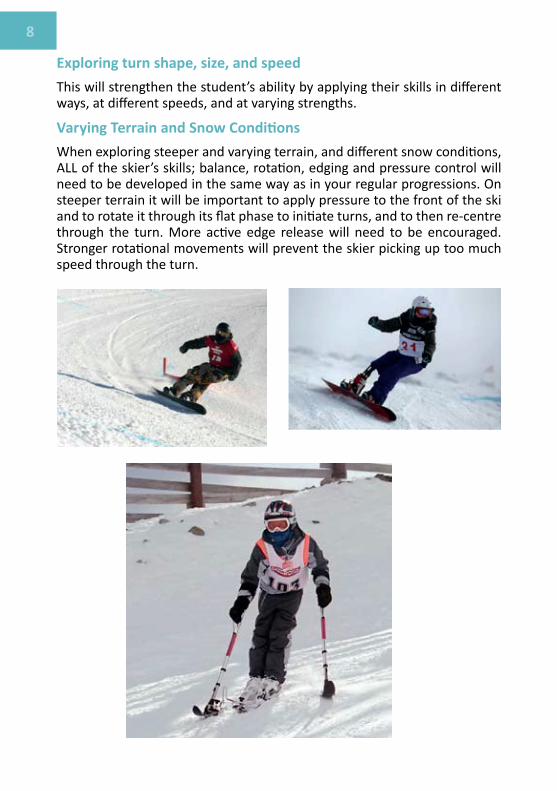
Exploring turn shape, size, and speed
This will strengthen the student’s ability by applying their skills in different ways, at different speeds, and at varying strengths.
Varying Terrain and Snow Conditions
When exploring steeper and varying terrain, and different snow conditions, ALL of the skier’s skills; balance, rotation, edging and pressure control will need to be developed in the same way as in your regular progressions. On steeper terrain it will be important to apply pressure to the front of the ski and to rotate it through its flat phase to initiate turns, and to then re-centre through the turn. More active edge release will need to be encouraged. Stronger rotational movements will prevent the skier picking up too much speed through the turn.
8
Exploring turn shape, size, and speed
This will strengthen the student’s ability by applying their skills in different ways, at different speeds, and at varying strengths.
Varying Terrain and Snow Conditions
When exploring steeper and varying terrain, and different snow conditions, ALL of the skier’s skills; balance, rotation, edging and pressure control will need to be developed in the same way as in your regular progressions. On steeper terrain it will be important to apply pressure to the front of the ski and to rotate it through its flat phase to initiate turns, and to then re-centre through the turn. More active edge release will need to be encouraged. Stronger rotational movements will prevent the skier picking up too much speed through the turn.
§ 9 9
Mono Skiing
Monoskiing is skiing the mountain using a monoski (see equipment section). It can be done anywhere on the mountain from the beginner slope through to the most advanced runs.
Typically the user of a monoski will not have the ability to ski standing up. This may be due to low leg strength and/or coordination, or it may be due to low endurance levels. A monoskier will generally have to be able to control their movements above their sternum (T5 level). No control above this level generally indicates use of the bi ski. Grip on the outriggers is not a necessity, as hands can be strapped to the handles, but having he strength to apply pressure down through the handles is essential.
In assessing whether someone will use a monoski and how to set up the monoski start with the following tests. Try these tests freely at first and then with some resistance.
To assess whether the student will need a high back seat or may be more suited for a bi ski
Assess the student’s balance in various planes. Ask the skier to lean forward and then straighten up. Ask them to lean from side to side and straighten up. Watch for how high in the trunk the movement is coming from and whether they use their arms to assist at all. Note any differences from side to side.
Ask the student to rotate the lowest part of their body they can. Ask permission to place your hands on their trunk as they do this to feel the force they generate.
Kneel down beside the skier with your arm straight and palm upturned. Ask the skier to push down your hand as you resist.
When skiing, the trunk of the skier will need to be supported up to the point at which they move when achieving these tests. This will also give you an
Assesment
What
Who
10
idea of the lowest part of the body that they can use when skiing. If the skier cannot achieve these tests without pivoting from a point at or below sternum area consider a biski.
To assess whether a skier should monoski, or standup ski or snowboard
Is the skier able to walk with or without the use of crutches? If with, ask them for how long they are able to be active while standing with the support of their crutches. Use your judgement as to whether this would enable the student to have an enjoyable and productive time on snow. Check to ascertain whether their natural stance suits the use of skis and boots or a snowboard.
If the answer to these questions supports standup skiing or riding then talk to the person about options. Include information about the availability and cost of monoskis for rental and purchase vs regular gear and possibly outriggers. Discuss the challenges, rewards and independence involved in learning each of the options to assist them in coming to a decision. Any decision can always be revisited at a later time, always taking into account the student’s goals.
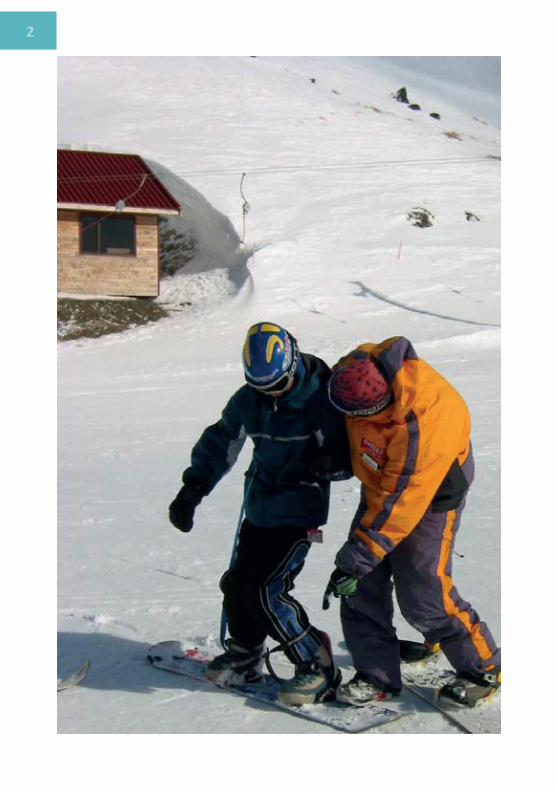
The wedegeless progression is used.
Helmets are essential•
Ensure there are no pressure points from insufficient padding, objects in•the seat or in pockets, twisted straps and buckles, or over tightening of thestraps
Monitor temperature for overheating, hypothermia and for frost bite.•
Ensure there is no pinching of any catheter tubes, or pressure on a colostomy•bag if either of these are present.
Follow safe chairlift loading/unloading practice.•
Bucket the monoski in crowded areas if the user has insufficient skill to•manoeuvre safely.
Teach the mono skier to fall with their outrigger forward and across the body•to protect the shoulder joint.
Progression
Safety
10
idea of the lowest part of the body that they can use when skiing. If the skier cannot achieve these tests without pivoting from a point at or below sternum area consider a biski.
To assess whether a skier should monoski, or standup ski or snowboard
Is the skier able to walk with or without the use of crutches? If with, ask them for how long they are able to be active while standing with the support of their crutches. Use your judgement as to whether this would enable the student to have an enjoyable and productive time on snow. Check to ascertain whether their natural stance suits the use of skis and boots or a snowboard.
If the answer to these questions supports standup skiing or riding then talk to the person about options. Include information about the availability and cost of monoskis for rental and purchase vs regular gear and possibly outriggers. Discuss the challenges, rewards and independence involved in learning each of the options to assist them in coming to a decision. Any decision can always be revisited at a later time, always taking into account the student’s goals.
The wedegeless progression is used.
Helmets are essential•
Ensure there are no pressure points from insufficient padding, objects in•the seat or in pockets, twisted straps and buckles, or over tightening of thestraps
Monitor temperature for overheating, hypothermia and for frost bite.•
Ensure there is no pinching of any catheter tubes, or pressure on a colostomy•bag if either of these are present.
Follow safe chairlift loading/unloading practice.•
Bucket the monoski in crowded areas if the user has insufficient skill to•manoeuvre safely.
Teach the mono skier to fall with their outrigger forward and across the body•to protect the shoulder joint.
Progression
Safety
§ 11 11
All movements are transferred through the seat to the ski so the seat can be considered in the same way as a boot. Equipment set up is critical and many issues a student might have often come back to incorrect set up. Dowel test students on their equipment. Canting can be used in the seat to fill the voids in order to have a flat ski when the student is in their centred stance. Take your time and recheck from time to time especially if there is a change in performance.
StAnce/BAlAnceLearning to turn
In a centred stance the pelvis is tilted forward and square to the ski, the knee joint is flexed, and there is room for the chest to move towards the knees. The outrigger shaft passes the leg about mid thigh with the elbows out from the body. In this position the outrigger ski tips should be lightly touching the snow. The ski is flat on the snow.
If the skier has limited control of their trunk it can be supported with a higher backed seat and/or additional strapping .
During the early stages of learning it may be useful to lightly bucket the skier to prevent falling or collision. Ensure your assistance does not affect the student’s movements and ability to find balance.
After a fall check the skier’s stance and adjust if required
Strengthening the turn
As the skier moves fore/aft and laterally, it is important for the skier to maintain a position in which they can keep their balance without support from the outriggers (occasional correction with the outriggers is fine). Knowing where their centred/neutral position is and being able to return to this between turns will help. Outrigger position should complement the skier’s movements in the same way stand up skiers position their arms.
Technical
12
rotAtionAlLearning to turn
Initial turning is best achieved without technical discussion. Have the student look in the direction they want to turn and point both outriggers in that direction. A follow me approach with the instructor facing the student helps. As much as possible the whole body should move as a block with the eyes looking in the direction of the turn. To keep the ski flat, rotational movement at this stage must happen around the vertical axis.
After the skier has begun making turns, work with them to become aware of the part of their body that is twisting. Rotational movements should come from the lowest functional part of the body, so work towards this goal. Where someone can aid a twist of their trunk with movement in their legs this should be encouraged.
When turning is difficult, the claw of the inside outrigger can also be used to create a point of friction around which the skier can rotate. Be aware that this may encourage poor movement patterns so teach this move with discretion and aim to reduce it as much as possible.
Strengthening the Turn
In between turns, the rotational movement should be relaxed as the skier returns to a neutral position before rotating in the direction of the new turn. As the skier becomes confident linking turns a slight counter rotation of the head and shoulders is encouraged to aid in anticipating the next turn and to assist edging movements. Development of rotational movement from here focuses on varying the application of rotational movements both in strength, duration, and speed to vary turn shape. The lowest part of the body will steer underneath a stable upper body resulting in increased counter rotation. Rotational movement becomes more blended with the other movements.
A leading inside outrigger can assist in stabilising the upper body which allows the lower body to turn underneath. The outside outrigger should also actively move with the turn.
§ 13 13
edging Learning to turn
The focus in learning to turn is to keep the ski flat at the initiation and control phase of the turn. At turn completion when the ski is across the hill, the skier sits in the centred stance with the angle of the slope creating sufficient edge angle. A traverse is a good way to teach this.
Strengthening the turn
Edging movements are achieved by the skier moving the seat across the longitudinal line of the ski while maintaining a level upper body. Even at lower skill levels this will need to happen at turn initiation to flatten the ski. The outriggers need to be just far enough away from the seat to allow room for the seat to move laterally.
As speed and terrain increase, the ski needs more edge angle to maintain good control. Initially the edge will engage at turn completion and from there will progressively engage earlier as the skier increases their skill level and performance. Any time the skier moves, or allows, the lower part of their body to move inside the ski the upper part of the body must counter this by remaining level or in line with the slope (angulation) . This will be more pronounced at lower speed and in shorter turns.
In shorter turns and on steeper slopes the skier will move more aggressively across the ski than in longer turns and on flatter terrain. Outrigger movement occurs in a similar way to poles. The outriggers move both forward and towards the direction of the new turn. In shorter turns they are directed more down the hill than in longer turns. Ensure that both outriggers move together to work in conjunction with the other movements
preSSureLearning to turnThe skier should be encouraged to move forward with the ski to maintain a centred stance. If this stance results in limited pressure on the tip of the ski at run initiation, check the set up with a dowel test, and consider moving the seat/frame forward on the ski.
Strengthening the turnPressure control happens in two directions, longitudinally and vertically. In sit-skiing the vertical movement is mainly controlled through the shock absorber. This should be set up so the skier has maximum travel without bottoming out over rough terrain. The rebound settings on the shock should be set up so that the ski is quick to move out of a turn without too much “bounce” when rapid pressure is applied.
14
As the steepness of the terrain increases, the skier should be encouraged to move forward and across the ski at turn initiation to apply pressure to the tip of the ski and to release the old edge. The skier will then need to return to centred stance through the turn to pressure the whole ski.
outcoMeS And ApproAchUse this section in conjunction with the steps in the wedgeless progression
Learning to turn
outcoMe helpFul exerciSeSStudent learns to maintain a flat ski in a straight run
Check position of pelvis in the seat to ensure that it is level and square to the ski. Cant if necessary.In a stationary position have the skier slightly lift the outriggers and tell you whether the ski is flat. If it is, get them to move to and from this position to recognise what it feels like. If it isn’t, get them to move to the position where the ski IS flat then move to and from that position. Repeat this in a straight run.
Student practices safe falling
Outriggers forward and across the body away from the slope.
Student initiates and completes shallow turns by rotating a flat ski
Check stance and ensure there is pressure on the ski tip. Pick a direction then look and point both outriggers in that direction.Try a shallow fan progression or a ‘follow’ me approach while making shallow turns. Create awareness of rotational movement in the lowest functional part of the body and apply subtly in a shallow turn. Minimise tension in the student’s body with breathing or through distraction.
Student initiates and completes round turns
At turn completion, ask the skier to return to a centred stance, to stop rotating, and to look across or slightly down the hill. Check that the edge is engaged at the end of the turn. Try some traversing with the monoski frame vertical and the skier in a neutral stance Both outriggers are tracking on the snow.
Student links controlled round turns
Encourage the student to move the seat across the ski at the beginning of the turn until the ski is flat. Maintain rotational movement throughout the turn. Check that they are balanced on their edge at the end of the turn. If not, use traversing exercises to find balance. Encourage the student to return to a neutral position between turns.
§ 15 15
Strengthening the turn
As the student progresses reduce the brake on the outriggers and adjust their length according to terrain and speed.
Student applies their skills using varying turn shapes and on steeper beginner terrain.
Ask the student to vary the intensity and duration of their rotational movements. Ensure the ski remains flat through the initiation and control phase of the turn. Encourage a slightly counter-rotated position at the completion of the turn. Adjust the student’s angulation at turn completion so they remain balanced over the edge of the ski. As terrain becomes steeper, these movements needs to be more pronounced and precise.Ensure that the edge is not engaged too early for the skill level of the skier or the steepness of the hill.
Student skis intermediate terrain at greater speed
Analyse the student’s movement patterns. The skills should be applied in a blended and more dynamic way. Encourage a more directed extension with strong rotation through the initiation phase and a strong counter rotated and angulated position through the completion phase. Both outriggers should be stable and move in conjunction with the student’s other movements
Bucketing a monoskiIn certain situations it may be necessary to bucket the monoski to safely negotiate a busy area, a steep section of slope or due to equipment malfunction. This is done with the instructor straddling the ski from behind and gripping the back sides of the seat with both hands. The instructor then pushes down on the back of the seat to flatten the ski and twists the seat to pivot the ski. The ski should remain flat until the very end of the turn. On a snowboard the rider can bucket from beside the monoski, holding the seat back and side.
On cat tracks a single tether can be used for speed control. This will reduce the ability of the skier to turn the ski so only use when there is not enough width to control speed with turn shape.
Bi–Skiing
16
Skiing in a bi ski with hand held outriggers, fixed outriggers, a hand bar or a combination of any of the above. Bi skiing is generally done on beginner and intermediate terrain only. In all circumstances a trained helper must tether the bi-ski if it is rented from a New Zealand adaptive programme.
Students will generally have a high level of impairment with some or all of the following; poor balance, limited trunk control, upper body weakness, brittle bones, and low endurance. Some students with lower levels of impairment who only ski for short periods of time each year may also prefer to use a bi-ski.
When assessing someone the questions to answer are whether the student has enough control of their trunk and/or enough balance to ski in a monoski. 4 tracking may also be an option for students who can stand. Endurance, and weak bones and joints are another consideration in choosing a bi ski.
Use the same assessment tests that you would use for a monoskier.
To fine tune, check arm and hand strength and control to ascertain whether the student can push themselves up to a centred position with hand held outriggers or if they need to use fixed outriggers. Hands can be taped to the outrigger handle if grip is an issue. If the student does not have the strength or control to use outriggers, use a hand bar set up on the bi-ski. Hand held, fixed outriggers, and/or the hand bar can be used on one side only if needed.
Assess for multiple disabilities.
Use the wedgeless progression with an edging focus. (See Bi-Ski technical section).
Who
What
Assesment
Progression
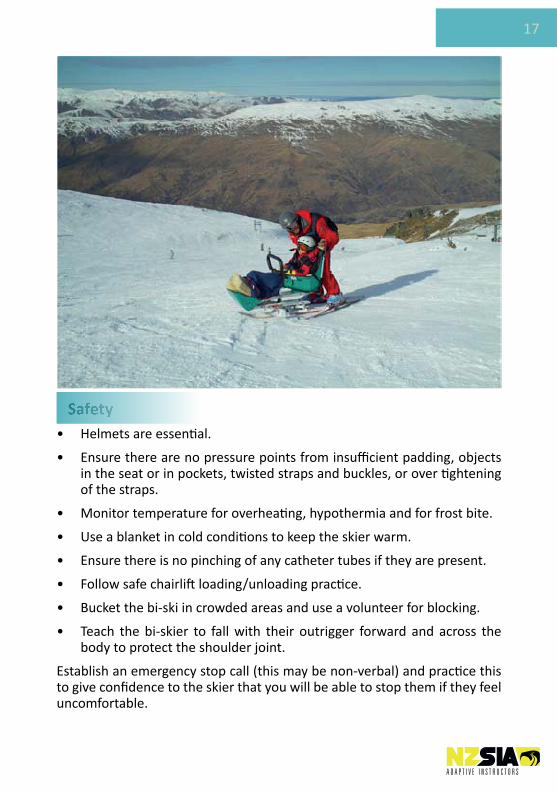
§ 17
Helmets are essential.•
Ensure there are no pressure points from insufficient padding, objects•in the seat or in pockets, twisted straps and buckles, or over tighteningof the straps.
Monitor temperature for overheating, hypothermia and for frost bite.•
Use a blanket in cold conditions to keep the skier warm.•
Ensure there is no pinching of any catheter tubes if they are present.•
Follow safe chairlift loading/unloading practice.•
Bucket the bi-ski in crowded areas and use a volunteer for blocking.•
Teach the bi-skier to fall with their outrigger forward and across the•body to protect the shoulder joint.
Establish an emergency stop call (this may be non-verbal) and practice this to give confidence to the skier that you will be able to stop them if they feel uncomfortable.
17
Safety

Although the movement used in bi-skiing is relatively simple, push/block/drop, it may take the student time to master so adjust your goals accordingly. Moving around on the flat is difficult so intersperse the student’s effort with bucketing.
With soft snow conditions the bi-ski may not carry enough speed through a turn so encourage a more open turn.
leArning to turnBasic stance is similar to the monoski with the pelvis tilted forward and square to the ski, knees slightly flexed with room to move the chest forward, the outrigger shafts passing approx mid thigh and set up at a length that allows the student enough flex in the elbow to be able to push off them. A high brake provides more support.
When this stance is not possible, position the student in the seat as close as possible to centre. If a student has uncontrolled movement in their arms or upper body, strap to allow for this movement to happen, but to prevent injury. In this case extra padding should be considered on the frame to prevent injury.
Practice turning movements in a stationary position first, then while being pushed on the flats, and then on a slope.
To go from a left turn to a right turn ....
PUSH – off the left outrigger to a centred position, from a position that is tipped to the left
BLOCK- any further upper body movement to the right by resisting with the right outrigger
DROP- the hip to the right while continuing to use the right outrigger to support the upper body
Repeat in reverse to go from a right to a left turn. The more the tip the tighter the turn.
If the student is having difficulty break down the move and teach PUSH – BLOCK first, then add the DROP.If the student is not able to use hand held outriggers have them lean their upper body from one side to the other. They can use the handle bar to
18
Technical
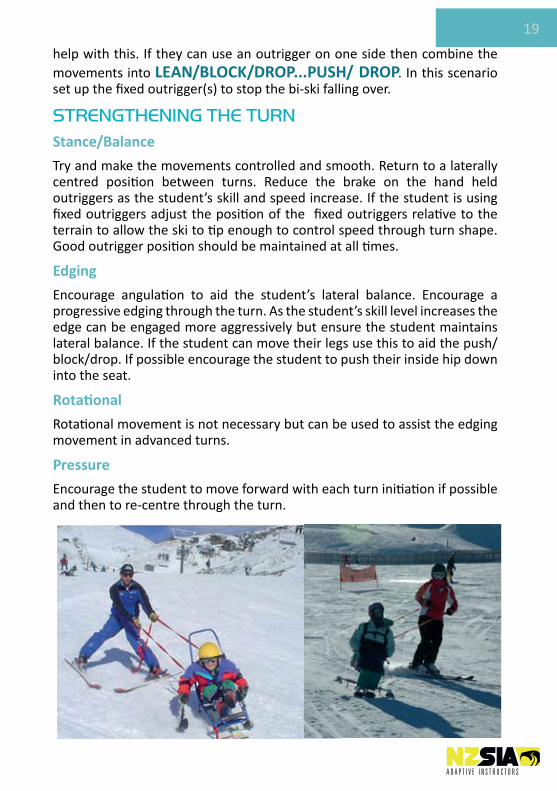
§ 19
help with this. If they can use an outrigger on one side then combine the movements into LEAN/BLOCK/DROP...PUSH/ DROP. In this scenario set up the fixed outrigger(s) to stop the bi-ski falling over.
Strengthening the turnStance/Balance
Try and make the movements controlled and smooth. Return to a laterally centred position between turns. Reduce the brake on the hand held outriggers as the student’s skill and speed increase. If the student is using fixed outriggers adjust the position of the fixed outriggers relative to the terrain to allow the ski to tip enough to control speed through turn shape. Good outrigger position should be maintained at all times.
Edging
Encourage angulation to aid the student’s lateral balance. Encourage a progressive edging through the turn. As the student’s skill level increases the edge can be engaged more aggressively but ensure the student maintains lateral balance. If the student can move their legs use this to aid the push/block/drop. If possible encourage the student to push their inside hip down into the seat.
Rotational
Rotational movement is not necessary but can be used to assist the edging movement in advanced turns.
Pressure
Encourage the student to move forward with each turn initiation if possible and then to re-centre through the turn.
19
outcoMeS And ApproAchStudent has a centred stance in straight run
Dowel Test. Set up the bi ski so that the skis are flat when the student is in a natural stance. Cant as necessary.
Teach good outrigger position with the elbow(s) out and riggers slightly forward while stationary and then moving.
Explore the planes of movement in a stationary and then moving position with emphasis being placed on returning to a centred stance.
Student practices safe falling
Inside outrigger forward and away from slope
Student makes smooth controlled direction changes
Teach PUSH BLOCK DROP or a variation depending on the equipment set up. Encourage slow progressive movement wherever possible especially when the student drops the hip into the turn.
Student varies speed using turn shape
Explore quickness and duration of the movement with the student. Encourage turn completion with a turn shape appropriate to the terrain. Encourage even turn shape on both sides.
Student skis lift accessible terrain
Encourage the student to hold the tipped position until the ski starts to slow down at turn completion. If the student has control of their lower body ask them to push their inside hip down through the turn and to point their knees to the inside of the turn. Ensure the student maintains a strong outrigger position throughout the turns. Reduce outrigger brake as speed increases
tethering And BucketingThis is generally best done on skiis for safety reasons although it can be done on a snowboard if the rider has a high skill level.
Bucketing involves holding the handle of the bi ski and taking close control. For teaching allow the student to move out of balance but correct the movement if they are going to fall. If you are bucketing while moving around on the flats, through crowded spaces, or on steeper slopes have the student hold their outriggers over their legs.
On skis straddle the bi-ski and hold the handle close to your body. On a snowboard position yourself to the side of the bi-ski and either stay on the same side or perform an “end around” move between turns.
The quicker that you tip the bi-ski into the turn the shorter the turn will be and the slower you will go. On very steep slopes rotate the ski as much as possible through the flat ski phase to shorten the turn.
20
outcoMeS And ApproAchStudent has a centred stance in straight run
Dowel Test. Set up the bi ski so that the skis are flat when the student is in a natural stance. Cant as necessary.
Teach good outrigger position with the elbow(s) out and riggers slightly forward while stationary and then moving.
Explore the planes of movement in a stationary and then moving position with emphasis being placed on returning to a centred stance.
Student practices safe falling
Inside outrigger forward and away from slope
Student makes smooth controlled direction changes
Teach PUSH BLOCK DROP or a variation depending on the equipment set up. Encourage slow progressive movement wherever possible especially when the student drops the hip into the turn.
Student varies speed using turn shape
Explore quickness and duration of the movement with the student. Encourage turn completion with a turn shape appropriate to the terrain. Encourage even turn shape on both sides.
Student skis lift accessible terrain
Encourage the student to hold the tipped position until the ski starts to slow down at turn completion. If the student has control of their lower body ask them to push their inside hip down through the turn and to point their knees to the inside of the turn. Ensure the student maintains a strong outrigger position throughout the turns. Reduce outrigger brake as speed increases
tethering And BucketingThis is generally best done on skiis for safety reasons although it can be done on a snowboard if the rider has a high skill level.
Bucketing involves holding the handle of the bi ski and taking close control. For teaching allow the student to move out of balance but correct the movement if they are going to fall. If you are bucketing while moving around on the flats, through crowded spaces, or on steeper slopes have the student hold their outriggers over their legs.
On skis straddle the bi-ski and hold the handle close to your body. On a snowboard position yourself to the side of the bi-ski and either stay on the same side or perform an “end around” move between turns.
The quicker that you tip the bi-ski into the turn the shorter the turn will be and the slower you will go. On very steep slopes rotate the ski as much as possible through the flat ski phase to shorten the turn.
20 § 21 21
Always keep the tether lines attached to your wrist and the bi ski when you are bucketing.
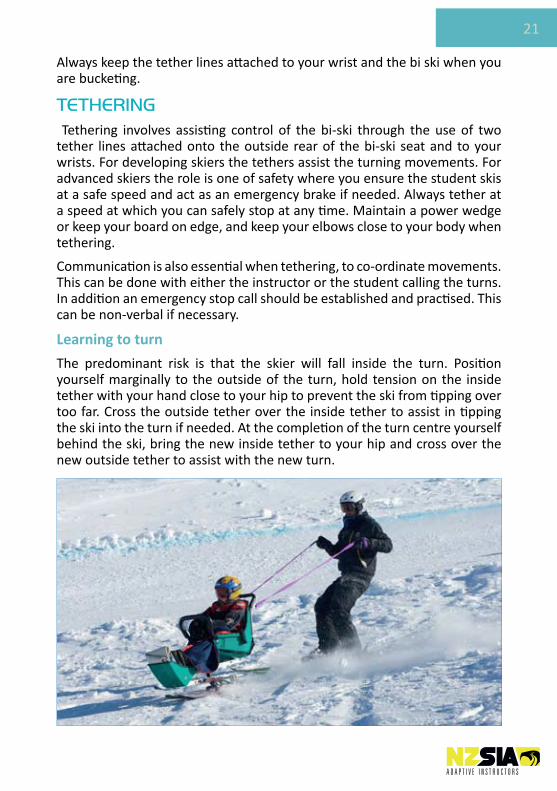
tethering Tethering involves assisting control of the bi-ski through the use of two tether lines attached onto the outside rear of the bi-ski seat and to your wrists. For developing skiers the tethers assist the turning movements. For advanced skiers the role is one of safety where you ensure the student skis at a safe speed and act as an emergency brake if needed. Always tether at a speed at which you can safely stop at any time. Maintain a power wedge or keep your board on edge, and keep your elbows close to your body when tethering.
Communication is also essential when tethering, to co-ordinate movements. This can be done with either the instructor or the student calling the turns. In addition an emergency stop call should be established and practised. This can be non-verbal if necessary.
Learning to turn
The predominant risk is that the skier will fall inside the turn. Position yourself marginally to the outside of the turn, hold tension on the inside tether with your hand close to your hip to prevent the ski from tipping over too far. Cross the outside tether over the inside tether to assist in tipping the ski into the turn if needed. At the completion of the turn centre yourself behind the ski, bring the new inside tether to your hip and cross over the new outside tether to assist with the new turn.
22
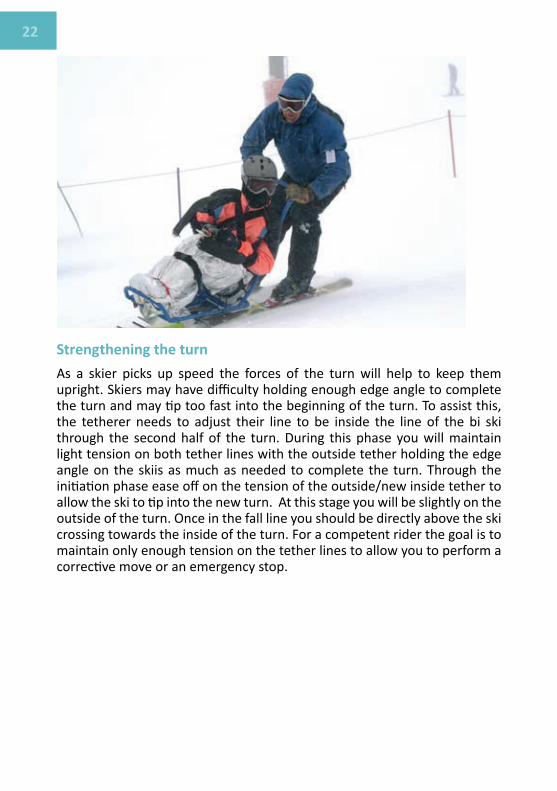
Strengthening the turn
As a skier picks up speed the forces of the turn will help to keep them upright. Skiers may have difficulty holding enough edge angle to complete the turn and may tip too fast into the beginning of the turn. To assist this, the tetherer needs to adjust their line to be inside the line of the bi ski through the second half of the turn. During this phase you will maintain light tension on both tether lines with the outside tether holding the edge angle on the skiis as much as needed to complete the turn. Through the initiation phase ease off on the tension of the outside/new inside tether to allow the ski to tip into the new turn. At this stage you will be slightly on the outside of the turn. Once in the fall line you should be directly above the ski crossing towards the inside of the turn. For a competent rider the goal is to maintain only enough tension on the tether lines to allow you to perform a corrective move or an emergency stop.
22
Strengthening the turn
As a skier picks up speed the forces of the turn will help to keep them upright. Skiers may have difficulty holding enough edge angle to complete the turn and may tip too fast into the beginning of the turn. To assist this, the tetherer needs to adjust their line to be inside the line of the bi ski through the second half of the turn. During this phase you will maintain light tension on both tether lines with the outside tether holding the edge angle on the skiis as much as needed to complete the turn. Through the initiation phase ease off on the tension of the outside/new inside tether to allow the ski to tip into the new turn. At this stage you will be slightly on the outside of the turn. Once in the fall line you should be directly above the ski crossing towards the inside of the turn. For a competent rider the goal is to maintain only enough tension on the tether lines to allow you to perform a corrective move or an emergency stop.
§ 23 23
What
viSion iMpAired
Skiing and riding with a vision impairment. Students will almost always need a sighted guide. Speed and terrain will depend on the student. At an advanced level racers’ with a vision impairment compete in downhill events at Paralympic level
Who
Vision impairments can vary from absolute blindness through to a wide range of vision impairments affecting visual depth and field, and visual acuity. Sometimes there are multiple disabilities so always check on the cause of the vision impairment and for any relevant medical information.
When assessing the vision impairment you are endeavouring to ascertain what will be the best approach to guiding and teaching. This will include knowing where to position yourself relative to your student in terms of direction and distance as well as the type of clothing to wear.
If the student is not totally blind you can assess their depth of vision, visual field, and acuity. Assess both eyes and then one eye at a time. Always check these assessments outside in the conditions you will be skiing in as well as inside.
Walk backwards away from your student until they can’t see you. This is the maximum distance you should be away from your student. It may vary in different positions and light conditions.
Come back to the point at which they can see you. Then with the student looking forward step sideways in both directions until they can’t see you in their peripheral vision. When communicating and guiding the skier you should position yourself inside this zone.
Try these assessments using bright clothing and high contrast clothing, such as black with a white stripe, to see what aids the student’s vision the most.
For some the extra brightness on the slopes may reduce their vision and very dark lenses will help, for others vision may be enhanced with a light coloured UV lens.
Assesment
24
To fine tune you can repeat the exercises holding your hands or fingers up to work out the level of detail the student can see.
Progression
Use the SBINZ snowboard or NZSIA ski progression
Safety
Helmets are strongly recommended•
Wear Vision Impaired Skier/Rider and Sighted Guide vests•
Students must always wear UV safe eye protection•
Always establish and practice an instinctive emergency Stop command.•
Use countdowns for loading and unloading lifts•
If uncrowded slopes are not an option consider using an extra volunteer•as a blocker.
Ensure that there is good communication between you and the student•and all times.
Teaching - Technical
Skill development is no different to what you would teach in a regular lesson.
leArning to turn Time spent showing the student their equipment and explaining how it works is important so the student understands the effect of their movements. Be careful around sharp edges.
Stance/balance
If students are taking a defensive stance, a hands-on approach will help to encourage a more natural centred position. If separation from the student is needed consider using poles, a ski pal, or a sno wing. Once the student gains confidence, aim to have them ride/ski independently. A double or single pole drag while moving will help the student to gauge their speed and adjust their stance accordingly.
§ 25 25
Rotational
These movements tend to be abrupt creating L or Z shaped turns. Encourage even continuous steering movements. Continuous sound through pole tapping, clapping, or talking will help to guide a student through a turn.
Edging
Without a visual reference to the angle of the slope edging movements are challenging to learn. Keep the movements small and use poles or a Delaney pole to assist the student to feel their position relative to the slope. Outriggers can sometimes assist as a teaching tool for a snowboarder to maintain balance until they develop a feeling for the edge change
Pressure
Spend time working with the student to develop their awareness of the different positions, feelings, and movements they make to control pressure. Do this statically, then whilst moving , then apply it in the exercise you are teaching.
Strengthening the turnRhythm and flow are crucial for blending the movements while free riding. Encourage this with your guiding and teaching as much as possible.
Stance/Balance
Have the student lower their stance and strengthen their core to maintain stability when riding on variable terrain and at speed. Use guiding calls to signal terrain changes
Rotational/Edging/Pressure
Teach as per usual incorporating your teaching cues with your guiding calls.
As an instructor it is best to teach with someone else acting a sighted guide. However you may also be teaching while guiding, and you may teach others to guide. The essence of sighted guiding is developing a mutually agreed set of calls and techniques that you use. It is a team effort so good communication and mutually agreed safe decisions are important. Establish effective two way communication both on and off snow and do not deviate from established simple calls.
Off snow a person with a vision impairment will generally have a preferred
GUIDING
26
way of being guided. Ask first, but a common method is having the person hold your elbow. Keep up normal conversation only mentioning obstacles if the person you are guiding needs to take some action to avoid them. In many cases simply moving your elbow in or out will guide the person effectively.
Common phrases to use are steps up/down, last step, step up and over, ramp up/down, handrail on your left/right, door on your left/right, seat etc.
When reaching a seat, place your hand on the back of the seat so that the person you are guiding can reach down your arm and locate the seat for themselves.
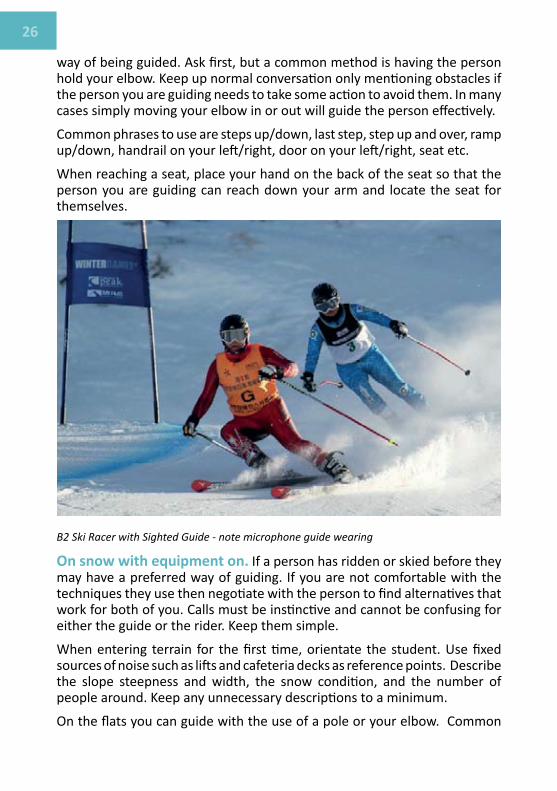
B2 Ski Racer with Sighted Guide - note microphone guide wearing
On snow with equipment on. If a person has ridden or skied before they may have a preferred way of guiding. If you are not comfortable with the techniques they use then negotiate with the person to find alternatives that work for both of you. Calls must be instinctive and cannot be confusing for either the guide or the rider. Keep them simple.
When entering terrain for the first time, orientate the student. Use fixed sources of noise such as lifts and cafeteria decks as reference points. Describe the slope steepness and width, the snow condition, and the number of people around. Keep any unnecessary descriptions to a minimum.
On the flats you can guide with the use of a pole or your elbow. Common
26
way of being guided. Ask first, but a common method is having the person hold your elbow. Keep up normal conversation only mentioning obstacles if the person you are guiding needs to take some action to avoid them. In many cases simply moving your elbow in or out will guide the person effectively.
Common phrases to use are steps up/down, last step, step up and over, ramp up/down, handrail on your left/right, door on your left/right, seat etc.
When reaching a seat, place your hand on the back of the seat so that the person you are guiding can reach down your arm and locate the seat for themselves.
B2 Ski Racer with Sighted Guide - note microphone guide wearing
On snow with equipment on. If a person has ridden or skied before they may have a preferred way of guiding. If you are not comfortable with the techniques they use then negotiate with the person to find alternatives that work for both of you. Calls must be instinctive and cannot be confusing for either the guide or the rider. Keep them simple.
When entering terrain for the first time, orientate the student. Use fixed sources of noise such as lifts and cafeteria decks as reference points. Describe the slope steepness and width, the snow condition, and the number of people around. Keep any unnecessary descriptions to a minimum.
On the flats you can guide with the use of a pole or your elbow. Common
§ 27 27
calls that are used for moving around are step left/right/forward/back, tip (of board/ski) left/right, slow down, stop.
The clock system is also commonly used on the flats whereby a change of direction is indicated by the time on a clock. 12 o’clock is directly in front, so for example, “turn to 9 o’clock” would indicate a 90degree turn to the left.
Once a person is sliding, an emergency stop call has to be established. This needs to be loud, different from your regular slow to a stop call, and must be instinctive for both of you. Some examples are STOP NOW, DOWN, and HALT. Practice a safe way for the student to stop abrubtly after this call to minimise the risk of injury. Remind each other of this call from time to time.
turning Guide from the front if someone has partial vision so they can use you as a reference. Guiding from in front, beside, or behind are all OK if someone has no vision. Take breaks if you are getting tired or struggling to concentrate.
Turning calls involve a preparation call, so the student can anticipate the change, and an execution call. Different execution calls can be used to indicate the length of the turn combined with a change in the cadence of your voice. Repetition of the execution call can be continued until the turn is complete.
Examples of common turning calls are AND short AND short AND short (3 short turns), AND turn turn turn (1 medium turn), AAAAND loooooong (one long turn).
Teaching cues and terrain changes can also be incorporated into the calling such as AND rise rise sink sink, AND twist twist, STEEP turn turn.
Other calls used on the slopes are straight, hold, slow, traverse. These can all be repeated to continue the task.
Continuous pole tapping , clapping, or whistling helps the student to locate your voice or position.
Students with better vision may only need guiding calls in challenging situations preferring just to follow the guide. In all circumstances when you are guiding from in front your goal is to maintain a constant position and distance, relative to the student, that is within their field of vision.
The tone and cadence of your voice will carry a huge message so if you want your student to remain calm keep your voice calm and steady even if you are freaking out.
Wind and hard snow can make it difficult to hear so be LOUD.

28
4 track traditionally refers to skiing on two skiis using two outriggers for support. In reality someone 4 tracking may be on two skiis with one outrigger, might ski with a frame or may be better suited to snowboarding using a sno wing or rider bar. Tethers attached to the ski tips or nose of the board can be used to assist with turning and speed control. The techniques and progressions used in 4 tracking can be a mix of everything you know in adaptive snowsports.
Anyone using supportive equipment to ski or snowboard standing up. This includes a wide range of physical disabilities and combinations of disability.
NZSIA Ski where the student wants to ski and can form a wedge
SBINZ Snowboard where the student wants to snowboard especially when their natural stance suits snowboarding and when independent leg movement is difficult
The wedgeless progression is used where the student wants to ski but can’t form a wedge. This progression may only need to be used on one turn.
The student’s choices may include sit skiing, snowboarding or standup skiing with a range of additional equipment for extra support. Considerations to discuss with them are their preferences and goals, their stamina, their natural stance, their strength and flexibility, and the cost and accessibility of equipment.
When choosing equipment with your student always work towards using the minimum equipment needed to realise your student’s goals. Aim to have the student standing centred on a flat board or ski(s) when they are in their natural stance.
Who
What
4 Track
Progression
Assesment
§ 29 29
If they have no preference towards skiing or snowboarding then guide them to the choice that will bring most success. As a general rule snowboarding offers a platform that stabilises independent leg movement and allows the feet to be placed in a wide range of natural positions. Snowboarding presents challenges where a student has difficulty with edging movements. 4 track skiing offers the ability to support movement of the CoM with the assistance of outriggers or a ski frame. 4 track skiing can present challenges where a student has weakness on one side. These are just general guides. Trial and change through the learning process will lead you and your student to the best solutions.
Observe the student. Do they use a wheel chair or crutches? Is walking difficult? Do they have a swing through or scissor gait? Do they have good core and upper body strength. Are both sides of the body the same?
The use of a wheelchair does not necessarily preclude standup riding/skiing. If the student can stand the defining factor is the student’s stamina and any risks associated with the stress of stand up riding such as weak bones or pressure sores. Standing up will allow the student to access most equipment at regular rental shops without major extra expenditure for equipment that isn’t available to rent.
Knowing how much strength a student has will guide your teaching of the movement patterns. Assess the student by assessing the specific balancing/rotational/edging/pressure control movements they need to make to ride.
Test the strength and movement in the part of the body that is closest to the part that you would normally use using the examples below as a guide. Perform each exercise freely first and then with resistance. Test each side independently and together. Allow your student to use any support they might need such as from their crutches but encourage them to do it with as little support as necessary.
30
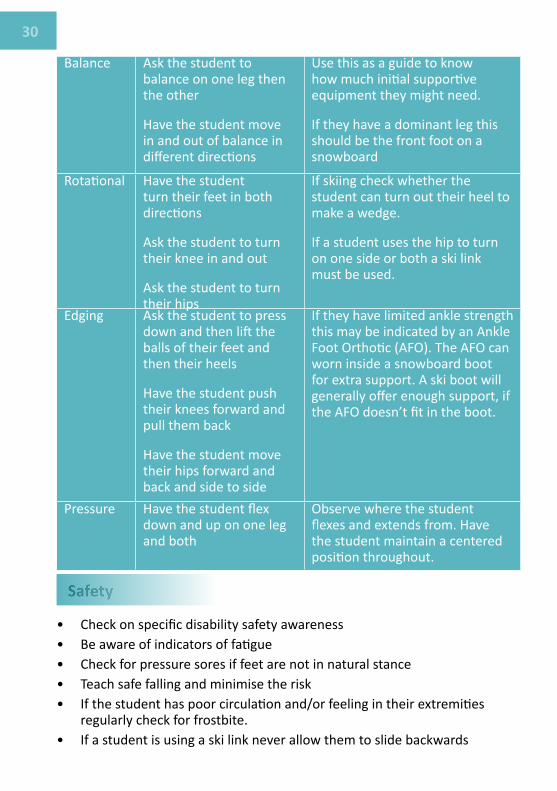
Balance Ask the student to balance on one leg then the other
Have the student move in and out of balance in different directions
Use this as a guide to know how much initial supportive equipment they might need.
If they have a dominant leg this should be the front foot on a snowboard
Rotational Have the student turn their feet in both directions
Ask the student to turn their knee in and out
Ask the student to turn their hips
If skiing check whether the student can turn out their heel to make a wedge.
If a student uses the hip to turn on one side or both a ski link must be used.
Edging Ask the student to press down and then lift the balls of their feet and then their heels
Have the student push their knees forward and pull them back
Have the student move their hips forward and back and side to side
If they have limited ankle strength this may be indicated by an Ankle Foot Orthotic (AFO). The AFO can worn inside a snowboard boot for extra support. A ski boot will generally offer enough support, if the AFO doesn’t fit in the boot.
Pressure Have the student flex down and up on one leg and both
Observe where the student flexes and extends from. Have the student maintain a centered position throughout.
Safety
Check on specific disability safety awareness•Be aware of indicators of fatigue•Check for pressure sores if feet are not in natural stance•Teach safe falling and minimise the risk•If the student has poor circulation and/or feeling in their extremities•regularly check for frostbite.If a student is using a ski link never allow them to slide backwards•
30
Balance Ask the student to balance on one leg then the other
Have the student move in and out of balance in different directions
Use this as a guide to know how much initial supportive equipment they might need.
If they have a dominant leg this should be the front foot on a snowboard
Rotational Have the student turn their feet in both directions
Ask the student to turn their knee in and out
Ask the student to turn their hips
If skiing check whether the student can turn out their heel to make a wedge.
If a student uses the hip to turn on one side or both a ski link must be used.
Edging Ask the student to press down and then lift the balls of their feet and then their heels
Have the student push their knees forward and pull them back
Have the student move their hips forward and back and side to side
If they have limited ankle strength this may be indicated by an Ankle Foot Orthotic (AFO). The AFO can worn inside a snowboard boot for extra support. A ski boot will generally offer enough support, if the AFO doesn’t fit in the boot.
Pressure Have the student flex down and up on one leg and both
Observe where the student flexes and extends from. Have the student maintain a centered position throughout.
Safety
Check on specific disability safety awareness•Be aware of indicators of fatigue•Check for pressure sores if feet are not in natural stance•Teach safe falling and minimise the risk•If the student has poor circulation and/or feeling in their extremities•regularly check for frostbite.If a student is using a ski link never allow them to slide backwards•
§ 31 31
Technical
Getting the right equipment set up is critical. Your goal is to have your student standing in their natural stance with the equipment flat on the snow. Support equipment such as outriggers should be set up so that they provide support when the student is in their natural stance as close as possible to a centered postion. If the skiis or board are not flat when the student is in their natural stance, pack out the gaps under their feet/bindings with cants to allow the board/ski(s) to be flat when the bindings are closed. Where the difference is minimal this can be done inside the boot with such things as sections of shoe insole. When the difference is great then wedges and packers may need to be placed under the ski bindings/snowboard boot or slant boards might need to be used.
leArning to turn
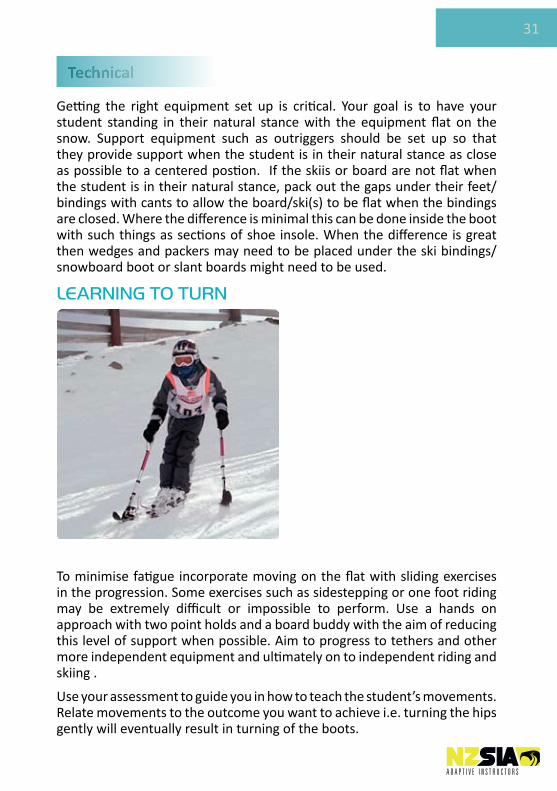
To minimise fatigue incorporate moving on the flat with sliding exercises in the progression. Some exercises such as sidestepping or one foot riding may be extremely difficult or impossible to perform. Use a hands on approach with two point holds and a board buddy with the aim of reducing this level of support when possible. Aim to progress to tethers and other more independent equipment and ultimately on to independent riding and skiing .
Use your assessment to guide you in how to teach the student’s movements. Relate movements to the outcome you want to achieve i.e. turning the hips gently will eventually result in turning of the boots.
32
Stance/balance
The position needs to be as close as possible to a centred stance longitudinally and laterally. Have the student move forward with their equipment when starting to slide, as it will be difficult for them to correct an out of balance position. Outriggers should be positioned to support a centred stance. For skiing this is with the elbows touching the body for support and the outrigger claws just in front of the toe binding. If using outriggers with a snowboard the front outrigger will be placed just behind the tip of the board and the back outrigger will be placed in front of the back foot. Set up the length so they support the rider/skier in a natural stance and screw out the brake so that it provides friction for support. A snowboarder using outriggers will generally need to be set up in a more alpine stance.
Rotational
The hip will be the highest point at from where efficient rotational movements can be made standing up. Ensure the movement is applied around a vertical axis to prevent the edges engaging. Where possible use any movement the rider/skier is able to make below the hip as much as possible. Use the most efficient part of the body for each turn if the strength on each side is different. Outriggers can focus a skier in the turn direction when the tips are pointed in that direction.
Edging
Keep lateral movements as minimal as possible. Traversing is a difficult but still useful skill. Set an easier goal with a greater degree of side slip expected in the traverse.
Pressure
At this level the main emphasis will be to move forward with the equipment to stay centred.
Strengthening the turnA 4 tracker may have less ability to recover from extreme positions. Teach new skills gradually and in small increments. Where a movement is made, follow it up with a counter movement to balance it.
Stance/Balance
Reduce the amount of support as much as possible to strengthen the student’s ability to stay in balance independently. Shorten the brake screw
§ 33 33
on the outriggers as speed increases and shorten the outriggers as the terrain steepens. Become more hands on as necessary when trying new terrain and then encourage independence. As the rider becomes more proficient teach them how to work with the forces of the turn to support their balance.
Rotational
The higher the part of the body to initiate a rotational movement the stronger yet less controlled that movement will be. Explore the timing and force of the movement. Slow the movement earlier in the turn and use counter rotational movement with the upper body to prepare for the new turn. Skiers can lead with the inside outrigger to help prevent over-rotation.
Edging
Where edging movements come from moving the CoM inside the turn, aim to make these movements gradual and only as much as needed. As speed and terrain increase use angulation to stay balanced over the edge. Outriggers help angulation by keeping the shoulders parallel to slope.
Pressure
Students may find it difficult to build pressure on the board/ski. Where speed allows encourage stacking of the joints. Ensure vertical movements are centred and use them to blend the other movements. Aim to keep pressure as even as possible through the turn and where it builds to support against it using both legs. Where vertical movements are difficult encourage fore/aft movements.
34
outcoMeS And ApproAch
SnoWBoArdingLearning to turn
Rider completes a balanced controlled J turn
Use the straight run to establish the level of support a rider needs to maintain a balanced stance, and then to develop that balance. Introduce J turns. Check the rider’s ankles have enough support to be stable. Use a sno wing or be hands on. The rider may need to be two footed at this stage.
Rider maintains balance over the edge while side-slipping and starts to blend skills in garland and the skidded traverse.
Encourage the rider to make small controlled movements. When movements come from above the ankle, ensure that movements are being transferred to the board. Aim to ensure that the rider maintains a balanced stance while making movement.
Rider makes controlled C turns and linked skidded turns
Encourage the rider to make movements as a block to aid with stability. Movements from higher in the body tend to generate large forces. Ensure that that are applied only for as long as necessary and with as small amount of force as necessary. Tethers can be used to assist in the learning process with the goal of the student becoming independent.
Strengthening the TurnRider varies turn shape and speed
Encourage the student to anticipate the movements they will need to make well in advance – pressuring the front of the board, flattening the board and rotating. (twist if possible). Encourage flexion and extension to help blend the movements. Check the equipment set up. As the rider increases speed the forces generated in the turn can be used to assist with balance.
Use garlands and a fan progression as a tactical approach to develop turning on steeper terrain
Skiing - WedgeleSS progreSSionLearning to turn
Student achieves a centred stance while sliding
Re-assess the amount of support the student requires to maintain a balanced position. Encourage the student to support as much of their weight as possible through their legs with an even distribution of weight through both their outriggers. Encourage student to move forward with the skis as they slide to maintain a centred stance. Have the student explore their centred stance with small movement out of centre and recovery to centre in various planes
§ 35 35
Student initiates and completes shallow turns
To prevent edge engagement ensure rotational movements are applied around a vertical axis.
Student initiates and completes round turns
Ensure rotational from the hip movement is slowed once the turn has started. Practice a short skidded traverse between turns to develop edge control.
Student links round turns
Encourage the student to return to a neutral position between turns. Add flexion and extension to aid other fore/aft and rotational movements.
Strengthening the Turn
Student links turns on lift accessible terrain and at greater speed
Encourage more counter rotation at the end of the turn. Encourage a lateral extension to aid edge release but don’t let the hip move further inside the turn than is necessary. Reduce dependence on the outriggers for support and ensure outrigger position that complements the skier’s movements.
Student varies turn shape and skis intermediate terrain.
Develop angulation to stay balanced over the edges and teach the student to use the forces of the turn to balance against. Adjust the timing, power and duration of movements.
4 trAck Skiing With A WedgeStudent achieves a centred stance while sliding
Re-assess the amount of support the student requires to maintain a balanced position. Have the student explore their centred stance with small movement out of centre and recovery to centre in various planes
Student initiates and completes shallow turns
Encourage the student to support their weight as evenly as possible between their legs. If the student uses an outrigger(s) ensure it is kept in a position that doesn’t unnecessarily affect their stance. If after canting the student has different edge angles in their wedge have the student move their hips across their skis to a position that balances the edge angles. If needed use rotation on the flatter ski and edge/pressure on the edged ski to turn
Student initiates and completes round turns
Balance rotational force on both sides by adding movement from the hip on the weaker turn side if necessary.
Student links round turns
Encourage the student to return to a neutral balanced position between turns. Encourage evenly balanced movement on both sides and an even turn shape if possible.
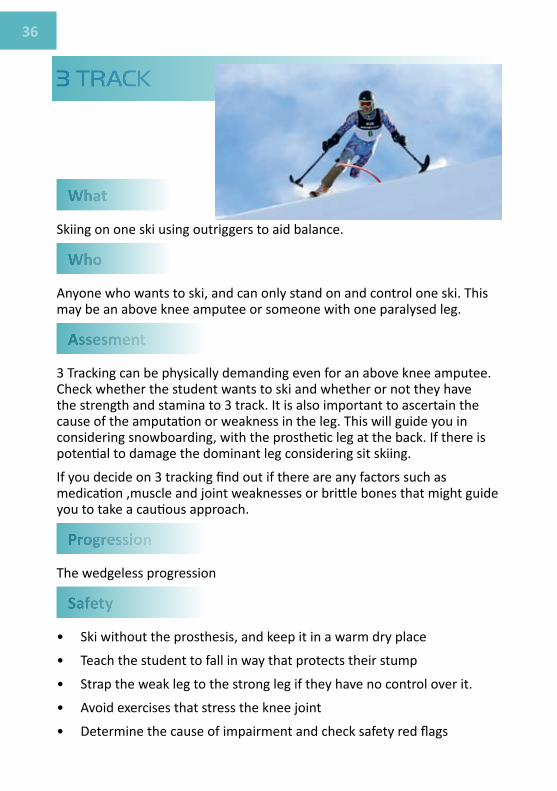
36
What
Skiing on one ski using outriggers to aid balance.
Who
Anyone who wants to ski, and can only stand on and control one ski. This may be an above knee amputee or someone with one paralysed leg.
Assesment
3 Tracking can be physically demanding even for an above knee amputee. Check whether the student wants to ski and whether or not they have the strength and stamina to 3 track. It is also important to ascertain the cause of the amputation or weakness in the leg. This will guide you in considering snowboarding, with the prosthetic leg at the back. If there is potential to damage the dominant leg considering sit skiing.
If you decide on 3 tracking find out if there are any factors such as medication ,muscle and joint weaknesses or brittle bones that might guide you to take a cautious approach.
Progression
The wedgeless progression
Safety
Ski without the prosthesis, and keep it in a warm dry place•
Teach the student to fall in way that protects their stump•
Strap the weak leg to the strong leg if they have no control over it.•
Avoid exercises that stress the knee joint•
Determine the cause of impairment and check safety red flags•
3 Track
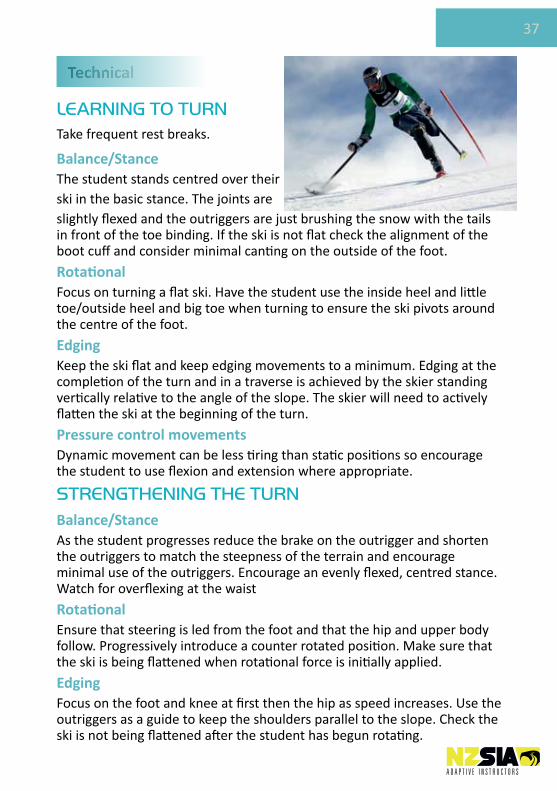
§ 37 37
Technical
leArning to turn Take frequent rest breaks.
Balance/StanceThe student stands centred over their ski in the basic stance. The joints are slightly flexed and the outriggers are just brushing the snow with the tails in front of the toe binding. If the ski is not flat check the alignment of the boot cuff and consider minimal canting on the outside of the foot.
RotationalFocus on turning a flat ski. Have the student use the inside heel and little toe/outside heel and big toe when turning to ensure the ski pivots around the centre of the foot.
EdgingKeep the ski flat and keep edging movements to a minimum. Edging at the completion of the turn and in a traverse is achieved by the skier standing vertically relative to the angle of the slope. The skier will need to actively flatten the ski at the beginning of the turn.
Pressure control movementsDynamic movement can be less tiring than static positions so encourage the student to use flexion and extension where appropriate.
Strengthening the turnBalance/StanceAs the student progresses reduce the brake on the outrigger and shorten the outriggers to match the steepness of the terrain and encourage minimal use of the outriggers. Encourage an evenly flexed, centred stance. Watch for overflexing at the waist
RotationalEnsure that steering is led from the foot and that the hip and upper body follow. Progressively introduce a counter rotated position. Make sure that the ski is being flattened when rotational force is initially applied.
EdgingFocus on the foot and knee at first then the hip as speed increases. Use the outriggers as a guide to keep the shoulders parallel to the slope. Check the ski is not being flattened after the student has begun rotating.
38
Pressure
Move forward into the turn then re-centre through the turn. Ensure flexion and extension happens through the ankle knee and hip.
outcoMeS And ApproAchStudent develops a centred stance in a straight run
The student should be supporting all their weight through their leg with even flexion in every joint and in a relatively tall stance. Outriggers are only used to correct imbalance and should be positioned just in front of the boot to maintain a centred stance. Focus on finding a flat ski
Student makes single turns by rotating a flat ski
Focus on the student steering a flat ski with their whole foot. Rotation needs to be led from the foot and happen around a vertical axis. Try a mix of fan progression and open turns gradually making the turns rounder. Use flexion and extension to aid the turning movement.
Student links round turns
Use garlands and traversing to teach the student edge release and engagement. Ensure edging movements are small, happen from the foot and only occur at turn completion and initiation. The ski should be steered flat through the majority of the turn.
Strengthening the turnStudent skis lift accessible terrain using a mix of turn shapes
Use a follow me approach. Flexion and extension will help blend the movements as the student varies the timing force and duration of their movements. Check that all movement is being led from the foot and that the student is maintaining a good stance. Encourage a slightly counter rotated stance and begin developing angulation as the student skis steeper terrain
Student skis intermediate terrain at greater speed
Gradually encourage a more directed extension with increased angulation as the edge angle increases. Encourage the student to pressure the tip of the ski at the beginning of the turn and to re-centre through the turn.
§ 39 39
AmputAtions
WhatRiding , skiing, and sit skiing with the loss of any limb or part thereof
Who
People lose limbs through accident and disease
Progression
NZSIA SKI, SBINZ Snowboard, Wedgeless
Assesment
Assess which limbs are affected and at what level, the strength and mobility the student has with their unaffected limbs, and the cause of the loss of limb.
From there you can pick any necessary equipment, cant as necessary, and determine any associated risk factors.
There is currently large development being made in the area of specific skiing and riding prosthetics. Discuss these options as this may enable a student to ski/ride standing up on two legs.
Safety
Check medical history.•
Protect stump from impact and cold and keep prosthesis in a warm dry•place if it is not being used.
When a prosthetic is being worn ensure that the fit is strong enough to•cope with the extra forces applied on snow.
Check for rubbing and sores on the stump and ensure that it is kept•clean and dry.
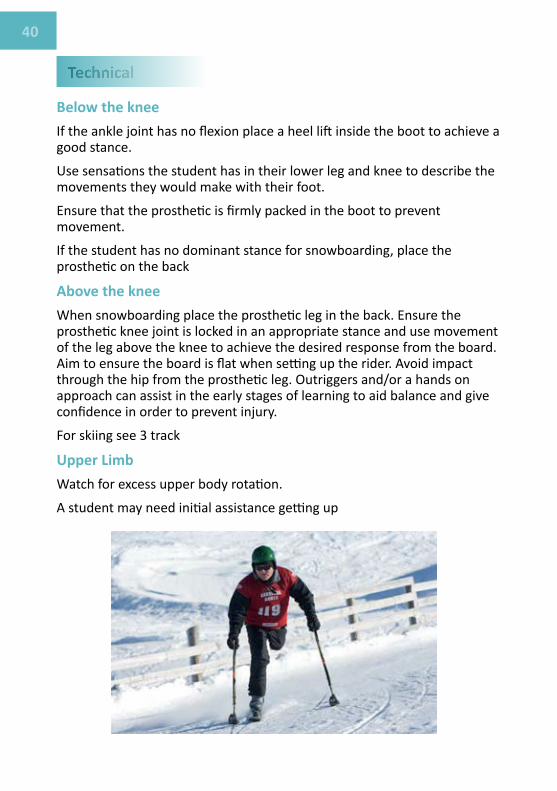
40
Technical
Below the knee
If the ankle joint has no flexion place a heel lift inside the boot to achieve a good stance.
Use sensations the student has in their lower leg and knee to describe the movements they would make with their foot.
Ensure that the prosthetic is firmly packed in the boot to prevent movement.
If the student has no dominant stance for snowboarding, place the prosthetic on the back
Above the knee
When snowboarding place the prosthetic leg in the back. Ensure the prosthetic knee joint is locked in an appropriate stance and use movement of the leg above the knee to achieve the desired response from the board. Aim to ensure the board is flat when setting up the rider. Avoid impact through the hip from the prosthetic leg. Outriggers and/or a hands on approach can assist in the early stages of learning to aid balance and give confidence in order to prevent injury.
For skiing see 3 track
Upper Limb
Watch for excess upper body rotation.
A student may need initial assistance getting up
§ 41 41
Cogntive and developmental
What
This mainly involves adapting your teaching style to suit the needs of the student.
Wh0
Anyone who learns, thinks, behaves, and communicates in a way that is different from what is considered normal for their age. This may be congenital, developmental or through an accident.
Progressions
Progressions are the same as you teach in a regular lesson unless the student also has a physical disability.
Assesment
Find out what the disability is. If you have any concerns with regard to your student being able to realistically communicate their needs then always involve their family and/or carers in the discussion.
You want to know what risks there are, the most effective approach to take to teach the student, how to most effectively communicate with the student, and any behavioural tips that will help in the lesson.
Safety
Communication
Find out what the student’s most successful communication style is. Abstract and complex concepts can be difficult. Some people respond to visual cues such as pictures on a notebook or drawings in the snow. ALWAYS check for understanding in a variety of ways in addition to verbal. Establish vital communication methods for such things as toileting, cold, discomfort.
Distraction
This may happen due to a short attention span or fascination with other
42
people or objects. Be aware of signs that student is not focused on the lesson.
Inappropriate Behaviour
Do not accept inappropriate behaviour and treat it in the same way as you would for anyone of the same age.
Distorted perception of risk both high and low.
This includes environmental risks such as terrain and temperature and personal risks such as speed and control. A student may not feel cold or pain or may not want to upset you or their experience by expressing that need. A student may not understand the need to ride in control or may present an excessive fear of speed.
Distorted perception of ability
Always check the ability level of a student before moving to terrain where there are required skills.
teAching tipSEye contact and touch
Eye contact and appropriate touch can be used to focus a student’s attention. Be aware that eye contact and touch can cause distress in some autistic students.
Imitation
Model the movements you want to make. You might also observe your own habits reflected in the habits of the person you are teaching.
Repetition
This may be finding creative ways to practice the same movement or where short term memory is affected may be continuously repeating the same instruction.
Concrete instruction
Use descriptions that directly relate to what you are teaching.
Reflect areas of interest
Using the student’s area of interest as a basis for your lesson can help build rapport and focus.
§ 43
Always treat people in an age appropriate way. For example, if someone is 28yrs old treat them as a 28 yr old regardless of their intellectual age.
ADHD Keep the lesson calm. Involve the student in finding solutions and always give them choices. Plan ahead so that you have plenty of different ways to teach the same thing. Build self esteem. Give responsibility to the student.
Autism Check to ascertain whether the student is sensitive to eye contact and/or touch. Visual learning is often dominant. Find out areas of interest/fascination to build your lesson from. Use the behavioural cue words the person knows. Language is commonly interpreted literally. Students may have difficulty relating in group situations.
Intellectual Impairment
Use repetition and follow routines. Use eye contact to maintain focus. Be specific and use concrete instruction. Keep it simple.
43
Age Appropriate