
XT2 User Manual - Janam Technologies
68
XT2 User Manual Technology at Work ® ? 2017 Janam Technologies LLC. All rights reserved Version 2 May 2017 Windows 10 IoT Mobile Enterprise
-
Upload
khangminh22 -
Category
Documents
-
view
1 -
download
0
Transcript of XT2 User Manual - Janam Technologies
XT2 User Manual
Technology at Work®
? 2017 Janam Technologies LLC. All rights reserved
Version 2May 2017
Windows 10 IoT Mobile Enterprise
XT2 User Manual
Janam Technologies LLC Version 2, May 2017 II
Copyright 2017 Janam Technologies LLC. All rights reserved.
XT2 Rugged Touch Computer, Janam and the Janam logo are trademarks of Janam Technologies LLCARM and Cortex are registered trademarks of ARM Limited (or its subsidiaries) in the EU and/or else-where. The official name of Windows 10 Mobile is Microsoft Windows 10 Mobile Operating System.The brand names and product names of other Microsoft products are trademarks of Microsoft Corpo-ration in the US and other countries. Other product and brand names may be trademarks or registeredtrademarks of their respective owners.
Janam Technologies LLC assumes no responsibility for any damage or loss resulting from the use ofthis guide.
Janam Technologies LLC assumes no responsibility for any loss or claims by third parties which mayarise through the use of this product.
Janam Technologies LLC assumes no responsibility for any damage or loss caused by deletion of dataas a result of malfunction, dead battery or repairs. To protect against data loss, be sure to makebackup copies (on other media) of all important data.
Follow all usage, charging and maintenance guidelines in the Product User Guide. If you have ques-tions, contact Janam.
Important: Please read the End User License Agreement for this product before using the device orthe accompanying software program(s). Using the device or any part of the software indicates thatyou accept the terms of the End User License Agreement.
There may be certain differences between the user manual description and the device’s operation,depending on the software release of your telephone or specific operator services. Janam TechnologiesLLC shall not be held legally responsible for such differences, if any, nor for their potential conse-quences, which responsibility shall be borne by the operator exclusively.
This device may contain materials, including applications and software in executable or source codeform, which is submitted by third parties for inclusion in this handset (“Third Party Materials”). Allthird party materials in this device are provided “as is”, without warranty of any kind, whether expressor implied, including the implied warranties of merchantability, fitness for a particular purpose oruse/third party application, interoperability with other materials or applications of the purchaser andnon-infringement of copyright.
The purchaser undertakes that Janam Technologies LLC has complied with all quality obligations in-cumbent upon it as a manufacturer of mobile devices and handsets in complying with IntellectualProperty rights.
Janam Technologies LLC will at no stage be responsible for the inability or failure of the Third PartyMaterials to operate on this device or in interaction with any other devices of the purchaser. To themaximum extent permitted by law, Janam Technologies LLC disclaims all liability for any claims, de-mands, suits or actions, and more specifically — but not limited to — tort law actions, under any the-ory of liability, arising out of the use, by whatever means, or attempts to use, such Third PartyMaterials. Moreover, the present Third Party Materials, which are provided free of charge by JanamTechnologies LLC, may be subject to paid updates and upgrades in the future; Janam TechnologiesLLC waives any responsibility regarding such additional costs, which shall be borne exclusively by thepurchaser. The availability of the applications may vary depending on the countries

Contents XT2 User Manual
Janam Technologies LLC Version 2, May 2017 Contents—1
Contents
1 Introduction CH-PG
Introduction 1-1Key Features 1-1Hardware Overview 1-2
2 Getting Started CH-PG
Unpacking the XT2 Touch Computer 2-1Recommended Host PC Requirements 2-1Janam XT2 SDK 2-1Charging the XT2 — Battery Safety 2-2Installing the Battery 2–3Charging the XT2 Battery 2–3 XT2 Battery Condition Information 2–4 Turning the XT2 On 2–5 Turning the XT2 Off 2–6 Touch Screen Navigation 2–6Screen Rotation 2-7Lock Screen 2-7Start Screen 2-8App Screen 2-9Function Keys 2-9
3 Janam XT2 Setup CH-PG
microSD Card Storage 3-1SIM Cards 3-2USB Port 3-2Backup and Restore: Backup 3-3Backup and Restore: Restore/Reset 3-4Security: Adding a Sign-In PIN 3-5Work Access 3-6Privacy Settings 3-7Key User Options and Preferences 3-8Options/Prefs: Display 3-8Options/Prefs: Notifications & Actions 3-8
Options/Prefs: Phone 3-8Options/Prefs: Messaging 3-9Options/Prefs: Battery Saver 3-9Options/Prefs: Storage 3-10Options/Prefs: Encryption 3-11Options/Prefs: Driving Mode 3-11Options/Prefs: Offline Maps 3-11Options/Prefs: Default Camera 3-11Options/Prefs: Date & Time 3-12Options/Prefs: Language 3-12Options/Prefs: Keyboard 3-12Options/Prefs: Speech 3-12Options/Prefs: Narrator 3-13Options/Prefs: Magnify 3-13Options/Prefs: High Contrast 3-13Options/Prefs: Closed Captions 3-13Options/Prefs: More Options 3-13
4 Wireless Network Connection CH-PG
Introduction 4-1Connecting to a Wi-Fi network 4-2
5 Bluetooth CH-PG
Introduction 5-1Bluetooth Concepts 5-2Making Bluetooth Discoverable 5-2Bluetooth Pairing and Connecting 5-3Bluetooth Connect 5-4
6 Camera CH-PG
Introduction 6-1Camera Controls Overview 6-2Camera Settings 6-3Extended Controls 6-5Control Settings and Zoom 6-6Editing Pictures 6-7
Contents XT2 User Manual
Janam Technologies LLC Version 2, May 2017 Contents—2
7 Messaging — Email and Text CH-PG
Introduction 7-1Setting up Email 7-1Advanced Email Setup 7-2Email Settings: Manage Accounts 7-2Email Settings: Personalization 7-3Email Settings: Quick Actions 7-3Email Settings: Automatic Replies 7-3Email Settings: Reading 7-3Email Settings: Signature 7-3Email Inbox 7-4Email Creating and Sending an Email 7-4
10Phone Functionality CH-PG
Introduction 10-1During Call Features 10-2Answering a Call 10-2Using Apps During a Call 10-2Phone Settings 10-2
9 Barcode Scanning CH-PG
Using the Imager 9-1Scanning with the Janam XT2 9-1Scan Settings: Notifications 9-2Scan Settings: Options 9-2Scan Settings: Symbologies 9-3Scan Demo app 9-4Scan Wedge app 9-5
14 Regulatory and Maintenance CH-PG
XT2 Regulatory Information 14-1Regulatory and Safety Approvals 14-1XT2 with WWAN, WLAN and Bluetooth 14-2XT2 with WLAN and Bluetooth 14-2Battery Safety Guidelines 14-4Battery Charger Guidelines 14-4
11 GPS CH-PG
Introduction 11-1Janam XT2 GNSS Support 11-1GPS and Location Services 11-2Location Service by App 11-2
13 Specifications CH-PG
Janam XT2 Specifications 13-1
15 Troubleshooting CH-PG
Troubleshooting the Janam XT2 15-1
12 User Applications CH-PG
Windows Store 12-1My Library 12-1Apps Compatibility 12-2Windows Store Settings 12-2Checking for Updates 12-2Alternate App Sources 12-28 Voice Recorder CH-PG
Introduction 8-1Using the Voice Recorder 8-1Using Flags 8-1Trimming a Voice Recording 8-2Sharing a Voice Recording 8-2File Location/Properties 8-2
Introduction XT2 User Manual
Janam Technologies LLC Version 2, May 2017 Introduction 1—1
XT2 Rugged Touch Computer
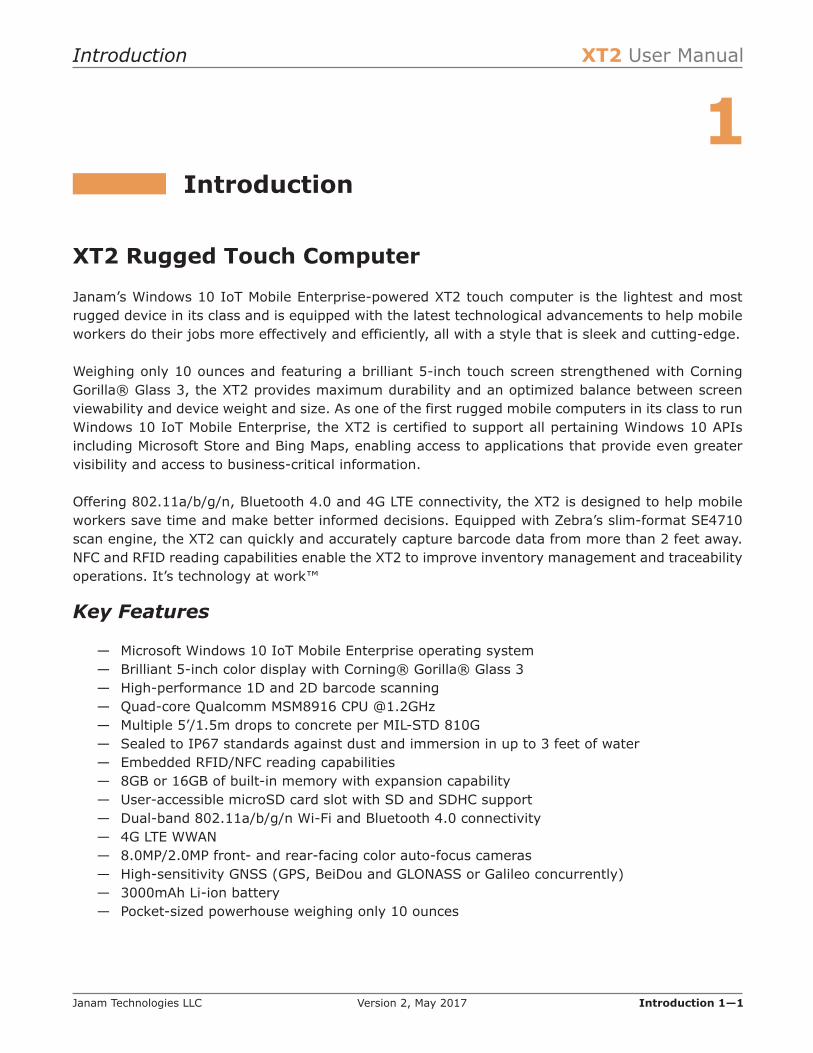
Janam’s Windows 10 IoT Mobile Enterprise-powered XT2 touch computer is the lightest and mostrugged device in its class and is equipped with the latest technological advancements to help mobileworkers do their jobs more effectively and efficiently, all with a style that is sleek and cutting-edge.
Weighing only 10 ounces and featuring a brilliant 5-inch touch screen strengthened with CorningGorilla® Glass 3, the XT2 provides maximum durability and an optimized balance between screenviewability and device weight and size. As one of the first rugged mobile computers in its class to runWindows 10 IoT Mobile Enterprise, the XT2 is certified to support all pertaining Windows 10 APIsincluding Microsoft Store and Bing Maps, enabling access to applications that provide even greatervisibility and access to business-critical information.
Offering 802.11a/b/g/n, Bluetooth 4.0 and 4G LTE connectivity, the XT2 is designed to help mobileworkers save time and make better informed decisions. Equipped with Zebra’s slim-format SE4710scan engine, the XT2 can quickly and accurately capture barcode data from more than 2 feet away.NFC and RFID reading capabilities enable the XT2 to improve inventory management and traceabilityoperations. It’s technology at work™
Key Features
— Microsoft Windows 10 IoT Mobile Enterprise operating system— Brilliant 5-inch color display with Corning® Gorilla® Glass 3— High-performance 1D and 2D barcode scanning— Quad-core Qualcomm MSM8916 CPU @1.2GHz— Multiple 5’/1.5m drops to concrete per MIL-STD 810G— Sealed to IP67 standards against dust and immersion in up to 3 feet of water — Embedded RFID/NFC reading capabilities— 8GB or 16GB of built-in memory with expansion capability— User-accessible microSD card slot with SD and SDHC support— Dual-band 802.11a/b/g/n Wi-Fi and Bluetooth 4.0 connectivity— 4G LTE WWAN— 8.0MP/2.0MP front- and rear-facing color auto-focus cameras— High-sensitivity GNSS (GPS, BeiDou and GLONASS or Galileo concurrently)— 3000mAh Li-ion battery— Pocket-sized powerhouse weighing only 10 ounces
Introduction
1

Introduction XT2 User Manual
Janam Technologies LLC Version 2, May 2017 Introduction 1—2
Hardware Overview
1 3 4 5 6 7 8 92
10
11
12
13
14 15 16 17 18
19 20
21
22
1. Illuminance sensor2. LED indicator3. Barcode scanner4. Front camera5. Lanyard port6. Mag card reader7. Speaker8. Rear camera
9. Camera LED flash10. Audio jack11. Power key12. Scan trigger13. Battery compartment lock14. Recent apps key15. Home key16. Back key
17. Programmable key18. Microphone19. Power jack20. Dock connector21. Scan trigger22. Volume rocker

Getting Started XT2 User Manual
Janam Technologies LLC Version 2, May 2017 Getting Started 2—1
Getting Started
Unpacking the Janam XT2 Rugged Touch Computer
Make sure you have the following:
— Janam XT2 Rugged Touch Computer— Stylus with Tether for Janam XT2— Screen protector for the Janam XT2— Power Supply (includes US Type A, Europe CEE 7/7, UK BS89/13 adapters)
Recommended Host Computer Requirements
— Microsoft® Windows®-compatible host computer with USB port— Microsoft Windows 10, Windows 8/8.1, Windows 7— If installing the Windows 10 SDK, at least 4 GB disk space for the SDK,
headers, libraries, metadata and tools for building Windows 10 apps
Janam XT2 SDK
The Janam XT2 Software Development Kit enables programmers to develop applications for JanamXT2 rugged touch computers running the Windows 10 IoT Mobile Enterprise operating system. Itcontains details and instructions for developing applications that access the XT2 embedded scanner.
The development kit, which can be downloaded from Janam’s Product Zone (login required), isdesigned for use with the Windows 10 SDK.
2
Getting Started XT2 User Manual
Janam Technologies LLC Version 2, May 2017 Getting Started 2—2
Charging the Janam XT2 Rugged Touch Computer
BATTERY SAFETY GUIDELINES
The XT2 has a user-accessible, rechargeable battery. Replace only with a Janam-approved battery.There is the risk of explosion if the battery is replaced by an incorrect type. For more information onbattery replacement visit www.janam.com or contact JanamCare at 866-915-5311. Use only batterychargers approved for the XT2 by Janam. Janam and its affiliates disclaim any liability for damagecaused by the use of other chargers or batteries. Observe the following guidelines for safe use of Li-Ion batteries:
1. Do not expose the battery to excessive heat or cold. Do not short-circuit. Do not incinerate.2. To avoid risk of fire, burn or damage to your battery, do not allow a metal object to touch battery contacts.3. Do not disassemble the battery. There are no user serviceable parts inside.4. If battery leakage is observed, avoid any contact with affected area and properly dispose of the battery.5. If you come in contact with battery leakage, rinse exposed area with soap and water. If it contacts the eye, flush the eye with water for 15 minutes and seek medical attention.6. Dispose of used battery promptly. Keep away from children. Do not disassemble or dispose of in fire.7. When discarding a battery, contact your local waste disposal provider to understand local restrictions for disposal or recycling of batteries.
BATTERY CHARGER SAFETY GUIDELINES
1. Do not use the equipment in or near areas in which sparks are likely or possible.2. Do not let equipment’s metal contacts and electrical sockets come in contact with metal objects.3. For indoor use only. Do not expose the equipment to rain or any liquids.4. Do not use or store the equipment in direct sunlight or in areas that are prone to get hot
such as in a parked vehicle, near a heat duct or close to other heat sources.5. Keep equipment’s metal contacts and electrical sockets free from debris that could
obstruct charging or could cause a short circuit.
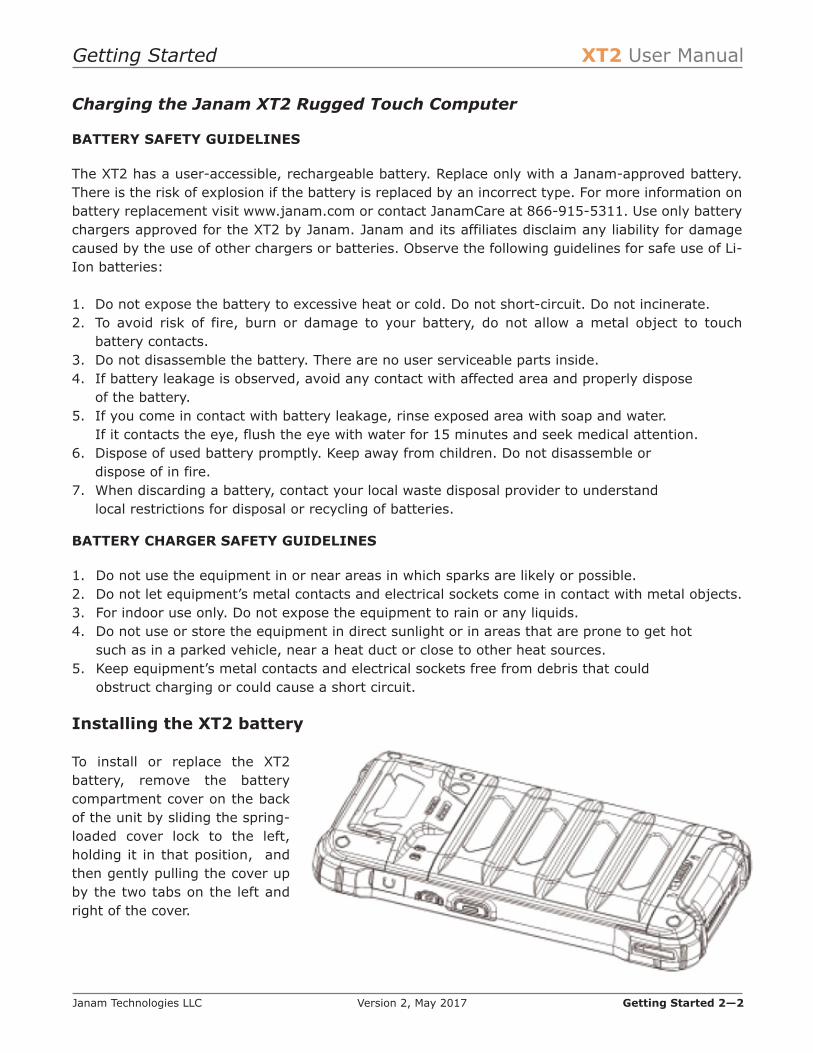
Installing the XT2 battery
To install or replace the XT2battery, remove the batterycompartment cover on the backof the unit by sliding the spring-loaded cover lock to the left,holding it in that position, andthen gently pulling the cover upby the two tabs on the left andright of the cover.
Getting Started XT2 User Manual
Janam Technologies LLC Version 2, May 2017 Getting Started 2—3
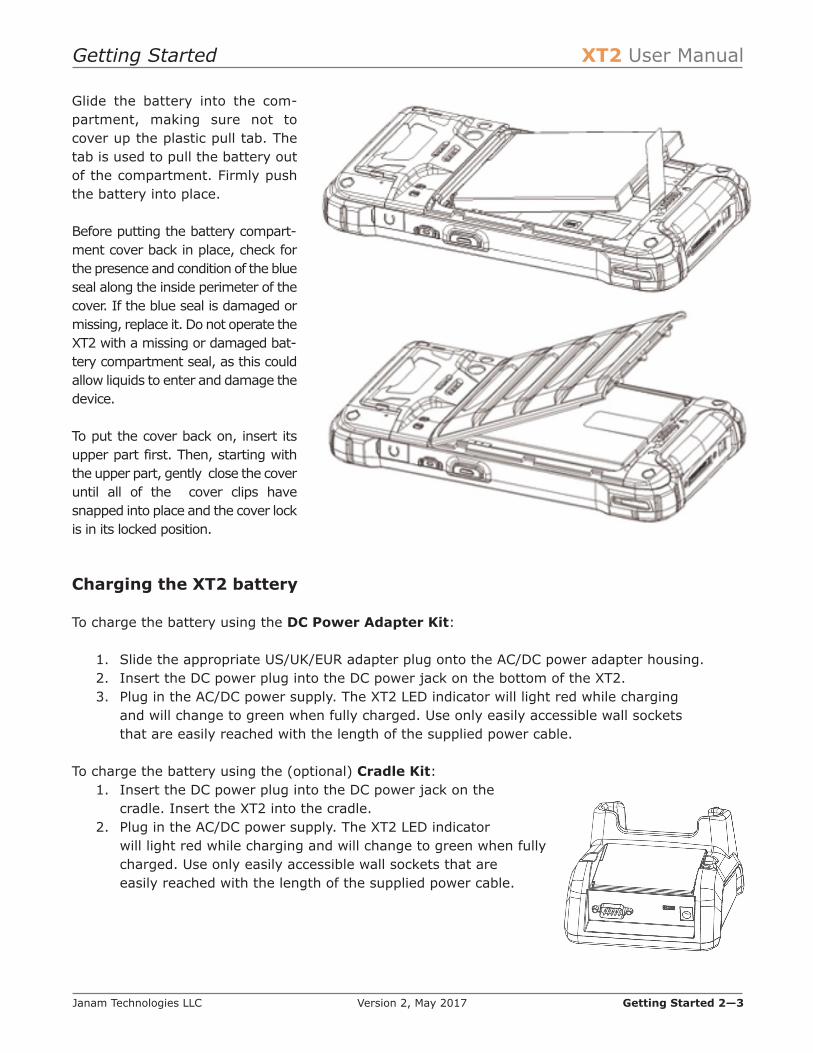
Glide the battery into the com-partment, making sure not tocover up the plastic pull tab. Thetab is used to pull the battery outof the compartment. Firmly pushthe battery into place.
Before putting the battery compart-ment cover back in place, check forthe presence and condition of the blueseal along the inside perimeter of thecover. If the blue seal is damaged ormissing, replace it. Do not operate theXT2 with a missing or damaged bat-tery compartment seal, as this couldallow liquids to enter and damage thedevice.
To put the cover back on, insert itsupper part first. Then, starting withthe upper part, gently close the coveruntil all of the cover clips havesnapped into place and the cover lockis in its locked position.
Charging the XT2 battery
To charge the battery using the DC Power Adapter Kit:
1. Slide the appropriate US/UK/EUR adapter plug onto the AC/DC power adapter housing.2. Insert the DC power plug into the DC power jack on the bottom of the XT2.3. Plug in the AC/DC power supply. The XT2 LED indicator will light red while charging
and will change to green when fully charged. Use only easily accessible wall sockets that are easily reached with the length of the supplied power cable.
To charge the battery using the (optional) Cradle Kit:1. Insert the DC power plug into the DC power jack on the
cradle. Insert the XT2 into the cradle.2. Plug in the AC/DC power supply. The XT2 LED indicator
will light red while charging and will change to green when fully charged. Use only easily accessible wall sockets that are easily reached with the length of the supplied power cable.

Getting Started XT2 User Manual
Janam Technologies LLC Version 2, May 2017 Getting Started 2—4
XT2 Battery Condition and Usage Information
Windows 10 IoT Mobile Enterprise provides information on battery charge level in percent, estimatedamount of battery charge remaining, and how much of the battery capacity has been used by variousapplications and device functions. This information can be accessed as follows:
1. From the start screen (1), swipe left to reveal the apps menu (2).2. On the apps menu (2), swipe up to get to get to the Settings. Tap on Settings.3. On the Settings menu (3), tap on System. 4. On the System menu (4), tap on Battery saver. View battery level and estimated
battery life remaining 5. To view battery usage by application, tap on Battery use.
Tip: Whenever practical, you can conserve battery run time by:
1. Using the AC adapter to plug the XT2 into an external power source.2. Manually or auto-suspend device operation as often as is practical.3. Reduce screen brightness.4. Turn off wireless functionality (Wi-Fi, Bluetooth or GPS) when not in use.

Getting Started XT2 User Manual
Janam Technologies LLC Version 2, May 2017 Getting Started 2—5
Turning the Janam XT2 Rugged Touch Computer on
With the XT2 fully charged:
1. Press and hold the Power Key (marked red in its center) on the top right-hand side of the XT2.
⎯ If the XT2 is being powered on for the first time, follow the on-screen setup instructions.
⎯ When the XT2 is on, pressing the power button briefly will suspend operation until it is pushed again.
2. When powered on, an unsecured XT2 will first display theWindows 10 IoT Mobile Enterprise welcome screen. It isunlocked by swiping up on the screen. The welcome screenwill be replaced with the start screen. For information aboutsecuring the XT2 with a password or pin code, refer toChapter 3.
3. When powered on, a secured XT2 will also first display theWindows 10 IoT Mobile Enterprise welcome screen. Swipe upto get to the pin code keypad. Enter your pin code. Oncethe correct pin code has been entered, the welcome screen with the pin code keypad willbe replaced with the start screen. For information about securing the XT2 with a passwordor pin code, refer to Chapter 3.
Unsecured: just swipe up Secured: enter pin, then swipe up Both ways get to the start screen

Getting Started XT2 User Manual
Janam Technologies LLC Version 2, May 2017 Getting Started 2—6
Turning the Janam XT2 Rugged Touch Computer off
Note that there are different levels of turning off power to the XT2.
1. To simply put the XT2 display to sleep, briefly press the Power Key (marked red in its center).The display will turn off. To turn the XT2 back on from this state of sleep, depress the Power Keyagain. The welcome screen will come up, and a swipe up will return you to the last used app.
2. To put the XT2 display to sleep and also shut down Windows 10 IoT Mobile Enterprise, press andhold the Power Key (marked red in its center) until the “Slide down to power off” overlayappears. Swipe down and the XT2 will power down. To get it back on, press the Power Key toreboot Windows 10 Mobile.
3. To completely power down the XT2 and reboot it from a cold start, press and hold the PowerKey and keep holding it for about ten seconds. The display will go black, and in a few seconds theXT2 will reboot automatically.
Touch Screen Navigation
The Janam XT2 uses capacitive multi-touch technology. Almost all of the XT2’s functions can beaccessed and used by tapping, swiping or dragging with one finger. Some operations, such aszooming in and out, are performed with pinching two fingers together or dragging them fartherapart.
Note that capacitive touch works by sensing your fingers. Don’t use an actual pen, pencil, or anysharp object to operate the touch screen. Those will not work and may damage the touch screen.
Touch
Touch a tile or objectto select or open it.
Touch and hold
Touch and hold a tileor object to bring upavailable options.
Touch and drag
Touch and then drag/swipe an object tomove it in any direc-tion.
Pinch and spread
Put two fingers onthe display, thendrag them togetheror apart to zoom inor out
Getting Started XT2 User Manual
Janam Technologies LLC Version 2, May 2017 Getting Started 2—7
Screen Rotation
The XT2 was designed to be used in portrait (vertical) orientation. Many screens and apps, however,can also be used in landscape (horizontal) orientation. By default, the XT2’s internal sensors willautomatically present a vertical or horizontal view in sync with the physical orientation of the device.If automatic orientation is not desirable, the screen can be locked in its current orientation in Settings.Refer to Chapter 3 for more on screen rotation control.
Lock Screen
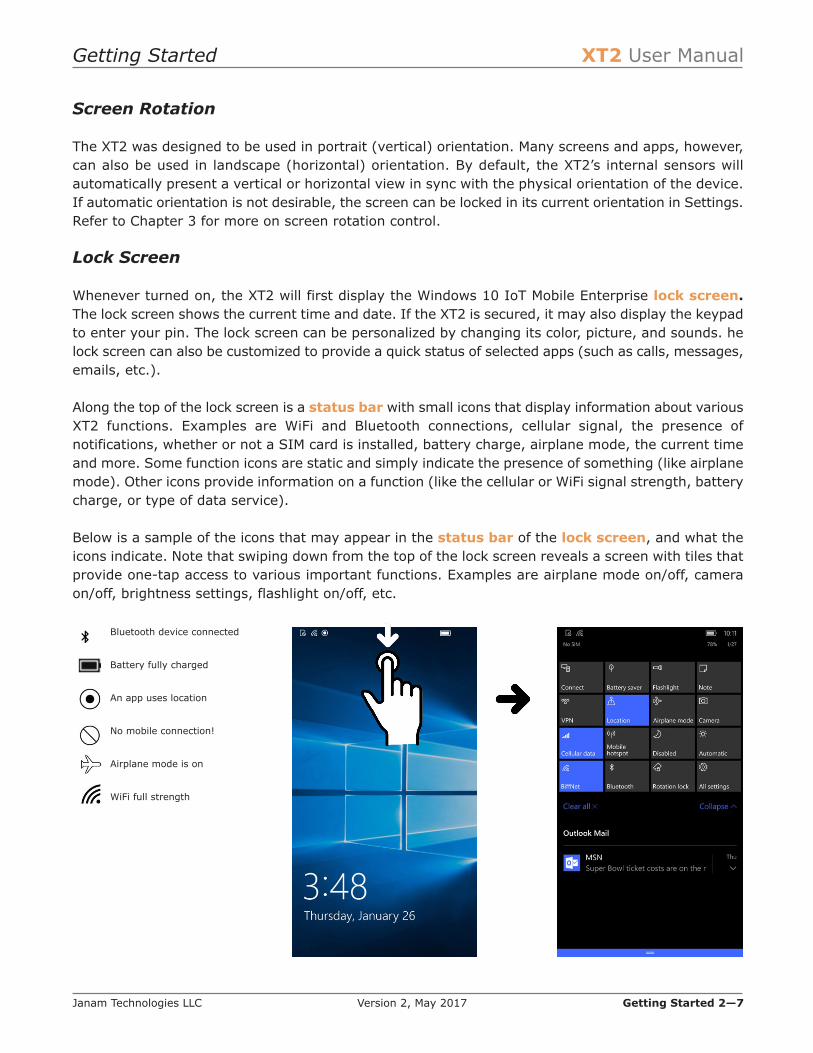
Whenever turned on, the XT2 will first display the Windows 10 IoT Mobile Enterprise lock screen.The lock screen shows the current time and date. If the XT2 is secured, it may also display the keypadto enter your pin. The lock screen can be personalized by changing its color, picture, and sounds. helock screen can also be customized to provide a quick status of selected apps (such as calls, messages,emails, etc.).
Along the top of the lock screen is a status bar with small icons that display information about variousXT2 functions. Examples are WiFi and Bluetooth connections, cellular signal, the presence ofnotifications, whether or not a SIM card is installed, battery charge, airplane mode, the current timeand more. Some function icons are static and simply indicate the presence of something (like airplanemode). Other icons provide information on a function (like the cellular or WiFi signal strength, batterycharge, or type of data service).
Below is a sample of the icons that may appear in the status bar of the lock screen, and what theicons indicate. Note that swiping down from the top of the lock screen reveals a screen with tiles thatprovide one-tap access to various important functions. Examples are airplane mode on/off, cameraon/off, brightness settings, flashlight on/off, etc.
Bluetooth device connected
Battery fully charged
An app uses location
No mobile connection!
Airplane mode is on
WiFi full strength

Getting Started XT2 User Manual
Janam Technologies LLC Version 2, May 2017 Getting Started 2—8
Start Screen
Under Windows 10 IoT Mobile Enterprise, the start screen is the central launchpad for all of the XT2’smost often used features and applications. The start screen is organized as “tiles” of various sizes.
Tiles can be static (displaying just an icon or an icon and a label) or they can be live. Live tilesdisplay information such as news, changing weather forecasts, pictures or other information generatedby the underlying app or service. Tiles can be rearranged on the Start Screen, and they can also bechanged in size. Depending on its purpose, importance and function, a tile may be a small squarewith just an icon in it; a larger square with an icon and label, or live content; or an even largerrectangle with more room for live content such as news or weather forecasts.
The screen captures below show how, depending on the importance of the application to a user,Cortana might have a large tile, a smaller square tile, or a mini tile with just an icon. Touch and holdbrings up the small resizing and pinning icons. Tapping the small resizing icon toggles betweenrectangle, square and small square. Touching and dragging allows tiles to be moved around on thestart screen.
Note that the start screen of the XT2 can be extensively customized by the user. In addition torearranging and resizing, apps and functions can also be combined into directory tiles that expandupon tapping. This way, related and complementary function can be grouped together for easy access.
Also note that apps and functions can easily be added or removed from the start screen. This allowsthe Janam XT2 with Windows 10 IoT Mobile Enterprise to be customized into a tool for the job, withall relevant features available directly from the start screen, and with anything that is not necessaryor may be a distraction (like games or news, etc.) removed.
Getting Started XT2 User Manual
Janam Technologies LLC Version 2, May 2017 Getting Started 2—9
App Screen
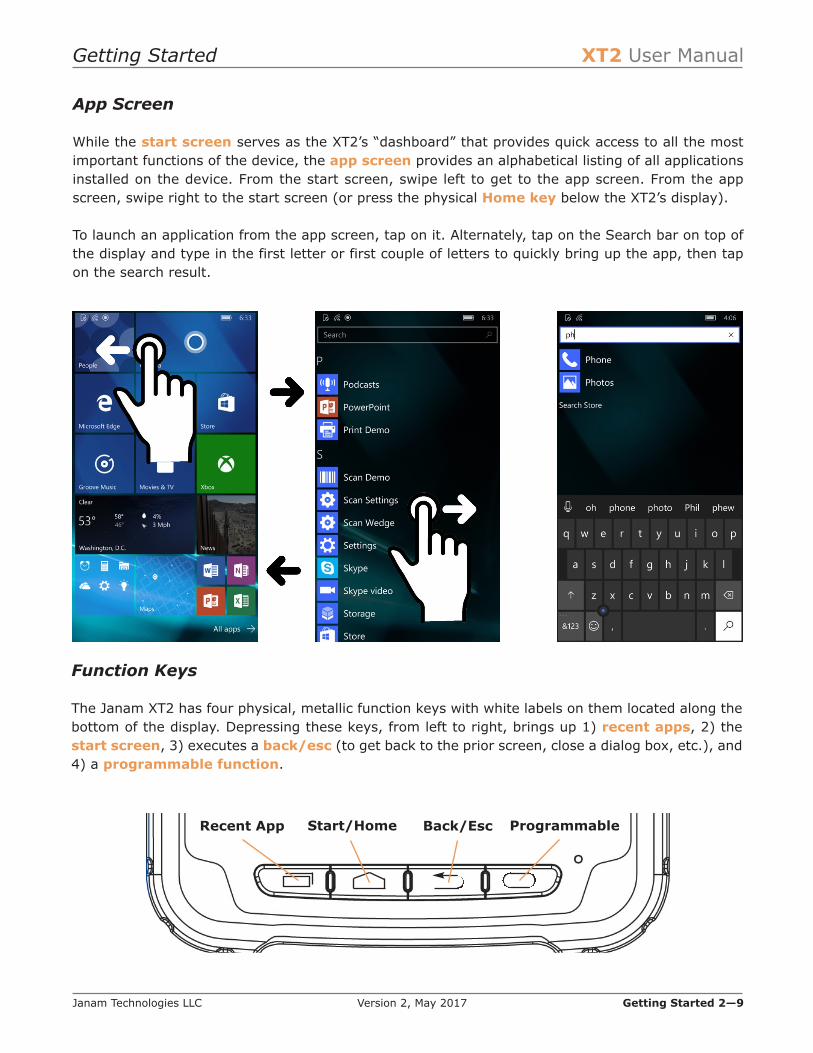
While the start screen serves as the XT2’s “dashboard” that provides quick access to all the mostimportant functions of the device, the app screen provides an alphabetical listing of all applicationsinstalled on the device. From the start screen, swipe left to get to the app screen. From the appscreen, swipe right to the start screen (or press the physical Home key below the XT2’s display).
To launch an application from the app screen, tap on it. Alternately, tap on the Search bar on top ofthe display and type in the first letter or first couple of letters to quickly bring up the app, then tapon the search result.
Function Keys
The Janam XT2 has four physical, metallic function keys with white labels on them located along thebottom of the display. Depressing these keys, from left to right, brings up 1) recent apps, 2) thestart screen, 3) executes a back/esc (to get back to the prior screen, close a dialog box, etc.), and4) a programmable function.
Recent App Start/Home Back/Esc Programmable
XT2 Setup XT2 User Manual
Janam Technologies LLC Version 2, May 2017 XT2 Setup 3—1
Removable Memory
IMPORTANT NOTE!To avoid possible damage to microSD and/or SIM cards or the XT2 itself, ESD(electrostatic discharge) precautions are recommended when installing or removingmicroSD and/or SIM cards. At a minimum before handling, discharge any personalstatic electric buildup to a point of discharge other than the device.
microSD Card
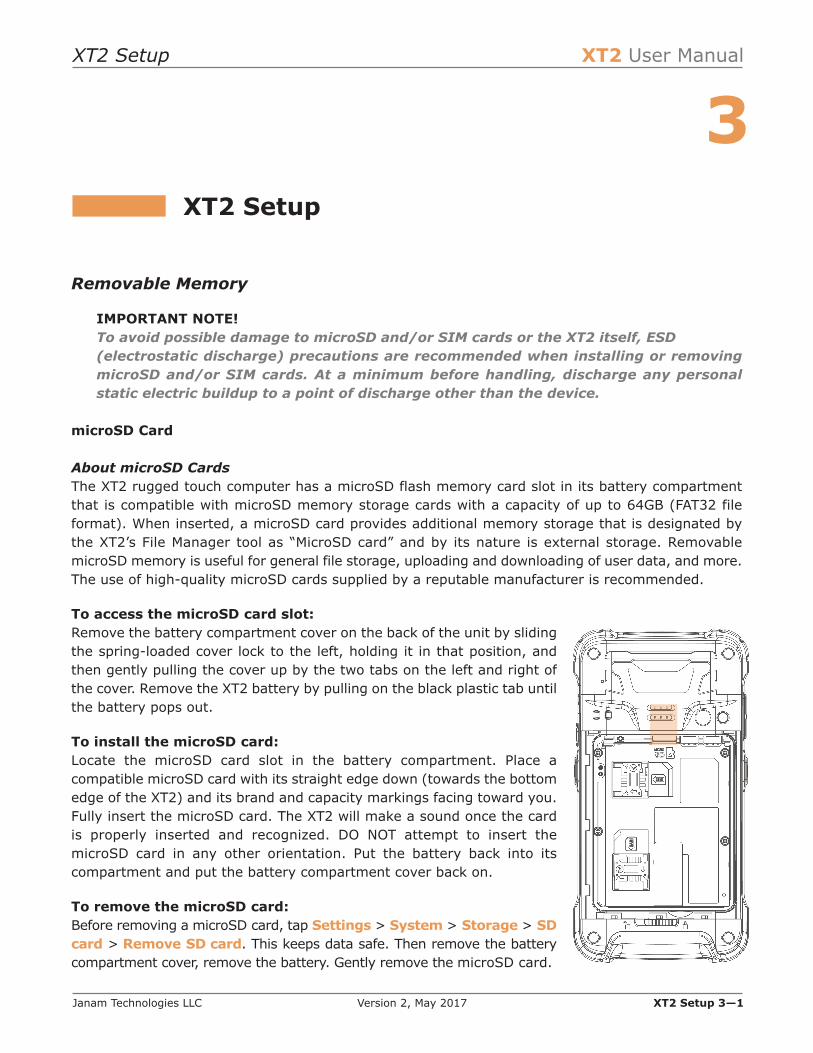
About microSD CardsThe XT2 rugged touch computer has a microSD flash memory card slot in its battery compartmentthat is compatible with microSD memory storage cards with a capacity of up to 64GB (FAT32 fileformat). When inserted, a microSD card provides additional memory storage that is designated bythe XT2’s File Manager tool as “MicroSD card” and by its nature is external storage. RemovablemicroSD memory is useful for general file storage, uploading and downloading of user data, and more.The use of high-quality microSD cards supplied by a reputable manufacturer is recommended.
To access the microSD card slot:Remove the battery compartment cover on the back of the unit by slidingthe spring-loaded cover lock to the left, holding it in that position, andthen gently pulling the cover up by the two tabs on the left and right ofthe cover. Remove the XT2 battery by pulling on the black plastic tab untilthe battery pops out.
To install the microSD card:Locate the microSD card slot in the battery compartment. Place acompatible microSD card with its straight edge down (towards the bottomedge of the XT2) and its brand and capacity markings facing toward you.Fully insert the microSD card. The XT2 will make a sound once the cardis properly inserted and recognized. DO NOT attempt to insert themicroSD card in any other orientation. Put the battery back into itscompartment and put the battery compartment cover back on.
To remove the microSD card:Before removing a microSD card, tap Settings > System > Storage > SDcard > Remove SD card. This keeps data safe. Then remove the batterycompartment cover, remove the battery. Gently remove the microSD card.
XT2 Setup
3

XT2 Setup XT2 User Manual
Janam Technologies LLC Version 2, May 2017 XT2 Setup 3—2
SIM Cards
About SIM CardsSIM (Subscriber Identity Module) cards are needed to add cellular voice and/or data communicationservice to devices equipped for cellular signal functionality. SIM cards carry an identification numberunique to the owner, storing personal data, and preventing operation ifremoved. SIM cards can be transferred between devices supporting the samecommunications standards. SIM cards come in standard, micro, or nanoformat. Most carriers offer SIM cards in all standards, or they have cutouts forall three sizes (the electronics and contacts are the same for all sizes).
Janam XT2 rugged touch computers equipped with optional WWAN (Wireless Wide Area Network)cellular signal functionality include a removable SIM card slot. Neither cellular signal connectivity forinternet access nor optional 3rd party voice telephone applications can function without an activatedSIM card installed. The XT2 SIM card slot is designed for use with a standard SIM card. If a SIMcard provided by your cellular carrier uses the micro or nano format, you need a (readily available)SIM card adapter to use it in the XT2. Contact Janam or your local GSM/GPRS based carrier for moreinformation about SIM cards and wireless service.
To access the SIM card slot:Remove the battery compartment cover on the back of the unit bysliding the spring-loaded cover lock to the left, holding it in thatposition, and then gently pulling the cover up by the two tabs on theleft and right of the cover. Remove the XT2 battery by pulling on theblack plastic tab until the battery pops out.
To install a SIM card:The location of the SIM card slot in the battery compartment is shownin the illustration to the right. Orientate a compatible SIM card (ormicro or nano SIM card in a standard SIM adapter) with its straightedge facing into the slot and its golden contacts surface facing down.Carefully insert the SIM card fully into slot.
NEVER attempt to insert a SIM card in any other orientation or force aSIM card into its slot.
Once the SIM card is installed, replace the battery and carefully putthe battery compartment cover back on.
standard micro nano
USB Port
The Janam XT2 provides USB connectivity through its Direct Sync I/O Connector at the bottom ofthe device. An optional USB Sync cable is required. Wired USB connectivity is also possible throughthe optional Single Slot Cradle.
XT2 Setup XT2 User Manual
Janam Technologies LLC Version 2, May 2017 XT2 Setup 3—3
Backup and Restore
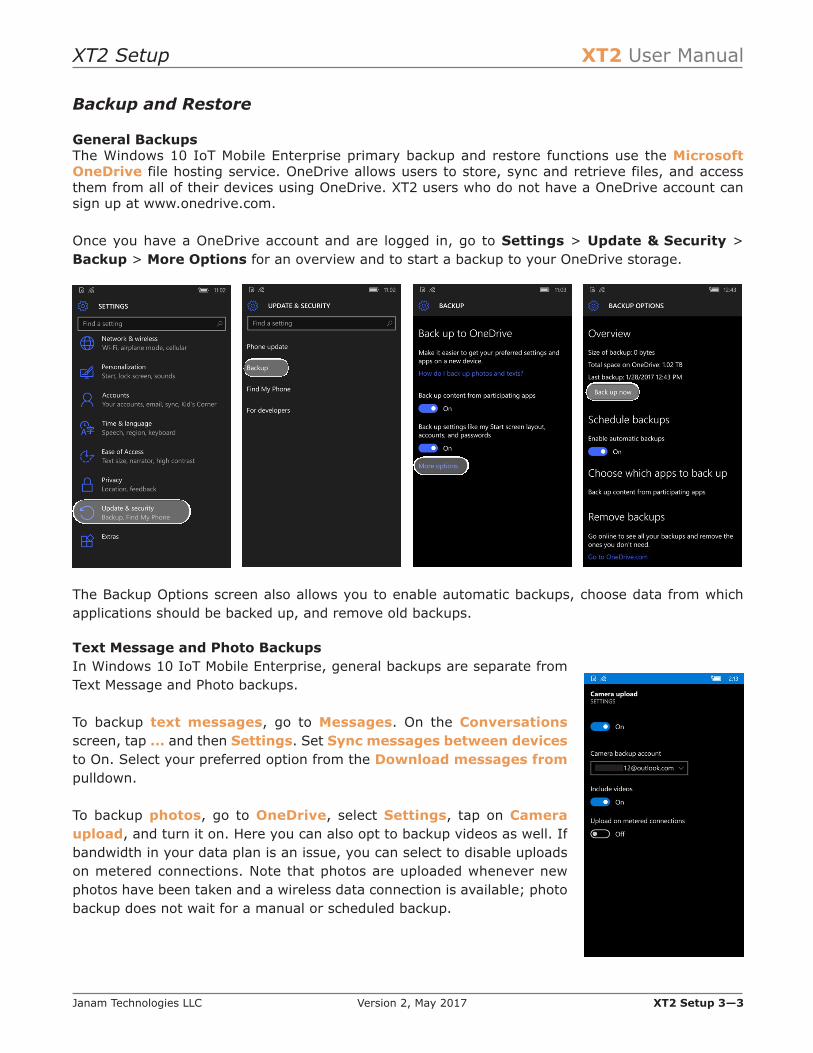
General BackupsThe Windows 10 IoT Mobile Enterprise primary backup and restore functions use the MicrosoftOneDrive file hosting service. OneDrive allows users to store, sync and retrieve files, and accessthem from all of their devices using OneDrive. XT2 users who do not have a OneDrive account cansign up at www.onedrive.com.
Once you have a OneDrive account and are logged in, go to Settings > Update & Security >Backup > More Options for an overview and to start a backup to your OneDrive storage.
The Backup Options screen also allows you to enable automatic backups, choose data from whichapplications should be backed up, and remove old backups.
Text Message and Photo BackupsIn Windows 10 IoT Mobile Enterprise, general backups are separate fromText Message and Photo backups.
To backup text messages, go to Messages. On the Conversationsscreen, tap ... and then Settings. Set Sync messages between devicesto On. Select your preferred option from the Download messages frompulldown.
To backup photos, go to OneDrive, select Settings, tap on Cameraupload, and turn it on. Here you can also opt to backup videos as well. Ifbandwidth in your data plan is an issue, you can select to disable uploadson metered connections. Note that photos are uploaded whenever newphotos have been taken and a wireless data connection is available; photobackup does not wait for a manual or scheduled backup.
XT2 Setup XT2 User Manual
Janam Technologies LLC Version 2, May 2017 XT2 Setup 3—4
Reset and restore
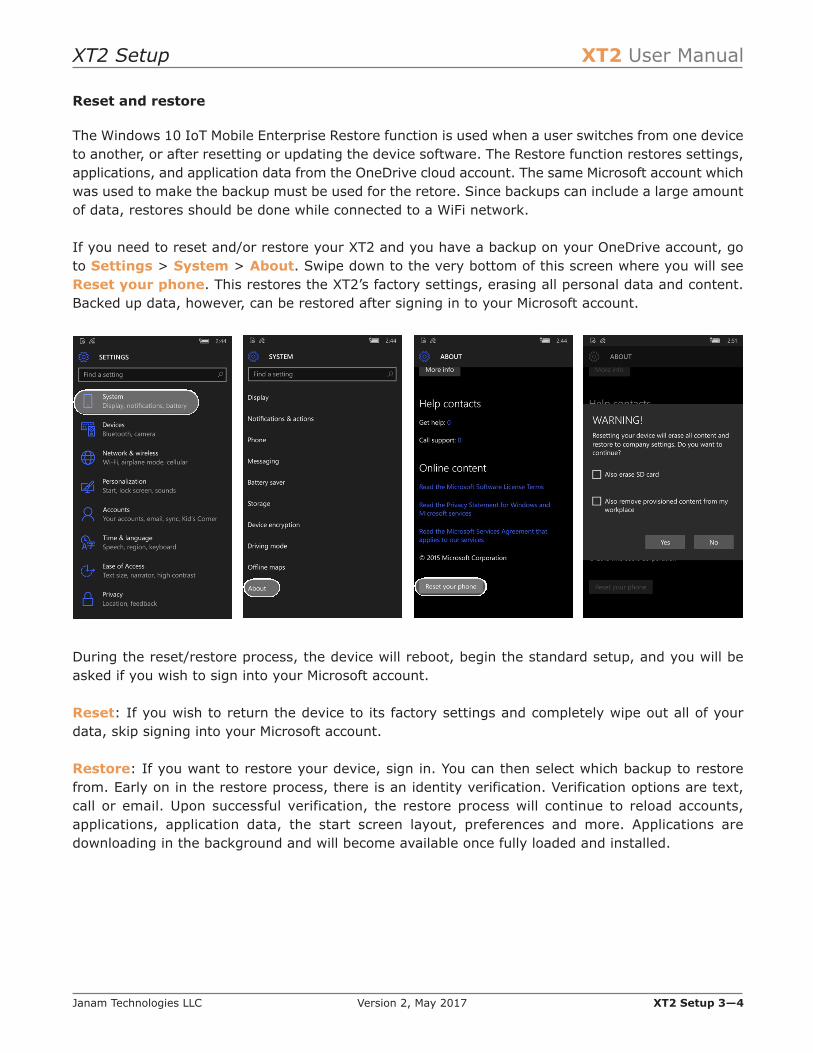
The Windows 10 IoT Mobile Enterprise Restore function is used when a user switches from one deviceto another, or after resetting or updating the device software. The Restore function restores settings,applications, and application data from the OneDrive cloud account. The same Microsoft account whichwas used to make the backup must be used for the retore. Since backups can include a large amountof data, restores should be done while connected to a WiFi network.
If you need to reset and/or restore your XT2 and you have a backup on your OneDrive account, goto Settings > System > About. Swipe down to the very bottom of this screen where you will seeReset your phone. This restores the XT2’s factory settings, erasing all personal data and content.Backed up data, however, can be restored after signing in to your Microsoft account.
During the reset/restore process, the device will reboot, begin the standard setup, and you will beasked if you wish to sign into your Microsoft account.
Reset: If you wish to return the device to its factory settings and completely wipe out all of yourdata, skip signing into your Microsoft account.
Restore: If you want to restore your device, sign in. You can then select which backup to restorefrom. Early on in the restore process, there is an identity verification. Verification options are text,call or email. Upon successful verification, the restore process will continue to reload accounts,applications, application data, the start screen layout, preferences and more. Applications aredownloading in the background and will become available once fully loaded and installed.

XT2 Setup XT2 User Manual
Janam Technologies LLC Version 2, May 2017 XT2 Setup 3—5
Security
Windows 10 IoT Mobile Enterprise Security
The Windows 10 IoT Mobile Enterprise operating system installed on the Janam XT2 can inherentlyprovide the same advanced security technologies as the full desktop version of Windows 10. Securityfeatures include protection against malware, Windows information protection (automatic separationof personal and business data), and Windows Hello for Business (enhanced identity and accesscontrol). Some of these security provisions require extra setup or optional software or equipment.
Adding a Sign-In PIN
Set up a sign-in PIN to so that nobody else can unlock your XT2. An additional benefit of having asign-in PIN is that the XT2 will ask for just the PIN instead of your full Microsoft account passwordwhen changing certain security settings or purchasing an app from the Store.
To initially set up a PIN, go to Settings > Accounts > Sign-In Options. Upon tapping Add you willbe asked for your Microsoft account login. Your IT department may have set PIN length requirements.If not, 4 or 6 digits are commonly used pin lengths.
Changing a Sign-In PIN
Your IT department may have set a periodic PIN change requirement. If not, there may still besituations that require a PIN change. To change a PIN, go to Settings > Accounts > Sign-InOptions. Tap on Change to change your PIN.
Lock Screen Settings
Under Sign-In Options there is a link to Lock Screen settings. On that screen you can set thelength of time before, if unused, the XT2 will ask you for the PIN again. This guards against someonehaving access to your data if the device is lost or left unattended.

XT2 Setup XT2 User Manual
Janam Technologies LLC Version 2, May 2017 XT2 Setup 3—6
Windows 10 IoT Mobile Enterprise Work Access
The Windows 10 IoT Mobile Enterprise operating system installed on the Janam XT2 allows secureaccess to an organization’s resources such as apps, networks, email, etc. Connecting to anorganization may enforce certain policies or set certain limits. There are two ways to gain work access.
The first option is to sign in to corporate data and systems on Azure AD (Active Directory). Theoption is available only to Windows 10 IoT Mobile Enterprise devices registered to a work account.This option is primarily used if an organization uses Office 365 or other business services fromMicrosoft. In order to establish access for your XT2 to such an account, go to Settings >Accounts> Work access > Add or remove a work or school account. Once done, the XT2 can be usedboth for private or work data, settings and applications.
The second way to sign in to corporate data andsystems is to use Mobile Device Management(MDM) which allows XT2 users to work from justabout anywhere. MDM allows organizations tokeep corporate information secure while providingusers all necessary access to data, proceduresand applications.

XT2 Setup XT2 User Manual
Janam Technologies LLC Version 2, May 2017 XT2 Setup 3—7
Privacy Settings
With more and more organization allowing electronic productivitydevices for both private and work use, it has become necessary toclearly differentiate those two uses (see XT2 Setup 3-6 Windows 10IoT Mobile Enterprise Work Access), and also address user data privacyissues. To that extent, the XT2 offers a variety of Privacy settings atSettings > Privacy. These include:
— Location: In today’s connected world, location-based services add significantvalue, but you may not always want your XT2 to record your location. Toaddress that, you can turn Location on or off, you can make a location iconappear if an app uses your location, you can clear location history, and you canallow or disallow individual apps the use of your location.
— Camera: Allows or disallows apps to use the XT2’s camera. This can also be seton a per app basis.
— Microphone: Allows or disallows apps to use the XT2’s microphone. This canalso be set per app.
— Motion data: The XT2 includes motion sensing that’s being used by some apps.This can be turned on or off globally or per app, and motion history can becleared.
— Speech, Inking & Typing: By default, Microsoft collects and processes all sortsof usage data from your XT2. This can improve the way the XT2 works for anindividual user by, for example, adapting to sound of the voice for better voicerecognition with Cortana. This data collection can be turned off.
— Account Info: You can allow or disallow apps to have access to your name,picture and other account info.
— Contacts: Apps may need access to your contacts to work as intended. This canbe turned off per app.
— Calendar: Apps may need access to your calendar data to work as intended.This can be turned off per app.
— Call History: Apps may need access to your call history data to work as intended.This can be turned off per app.
— Email: Allows apps to access and send email. Can be turned on or off per app.
— Messaging: Allows apps to access and send messages. Can be turned on or offper app.
— Radios: Allows apps to control radios. Can be turned on or off per app.
— Background Apps: Some apps continue to update, send and receive data evenif not in use. Turning them off (by app) conserves battery power.
— Other Devices: Extraneous devices (examples: TVs, projectors) mayautomatically share data and sync with the XT2. This can be turned on or off.
— Feedback & Diagnostics: Windows asks for feedback, and diagnostics andusage data is sent to Microsoft so they can optimize features and the workingof Windows. The extent and frequency of this can be adjusted, or turned offentirely.
Learn more about Privacy at Microsoft.
XT2 Setup XT2 User Manual
Janam Technologies LLC Version 2, May 2017 XT2 Setup 3—8
Key User Options and Preferences
The XT2 can be configured according to your personal preferences. Thismakes the device easy and pleasant to use, and may enhance efficiencyand productivity.
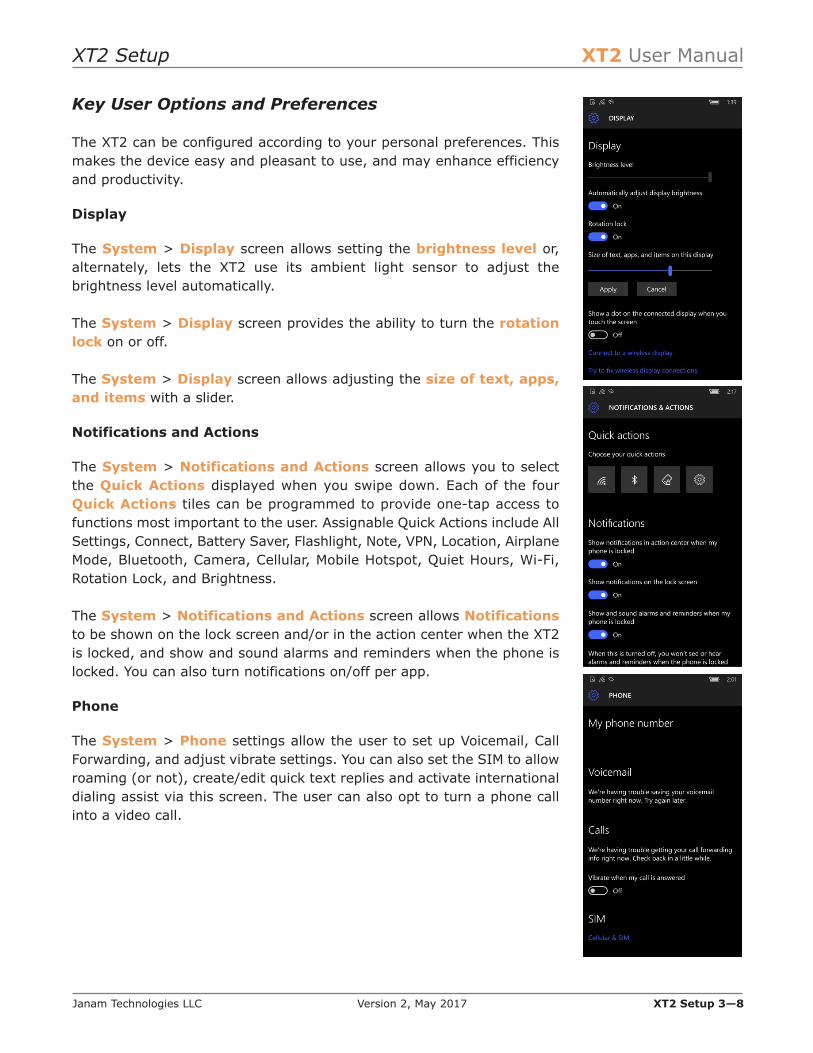
Display
The System > Display screen allows setting the brightness level or,alternately, lets the XT2 use its ambient light sensor to adjust thebrightness level automatically.
The System > Display screen provides the ability to turn the rotationlock on or off.
The System > Display screen allows adjusting the size of text, apps,and items with a slider.
Notifications and Actions
The System > Notifications and Actions screen allows you to selectthe Quick Actions displayed when you swipe down. Each of the fourQuick Actions tiles can be programmed to provide one-tap access tofunctions most important to the user. Assignable Quick Actions include AllSettings, Connect, Battery Saver, Flashlight, Note, VPN, Location, AirplaneMode, Bluetooth, Camera, Cellular, Mobile Hotspot, Quiet Hours, Wi-Fi,Rotation Lock, and Brightness.
The System > Notifications and Actions screen allows Notificationsto be shown on the lock screen and/or in the action center when the XT2is locked, and show and sound alarms and reminders when the phone islocked. You can also turn notifications on/off per app.
Phone
The System > Phone settings allow the user to set up Voicemail, CallForwarding, and adjust vibrate settings. You can also set the SIM to allowroaming (or not), create/edit quick text replies and activate internationaldialing assist via this screen. The user can also opt to turn a phone callinto a video call.

XT2 Setup XT2 User Manual
Janam Technologies LLC Version 2, May 2017 XT2 Setup 3—9
Messaging
The System > Messaging screen allows the user to turn messagesynchronization on/off and also allows the user to indicate whether theywant to download all messages or only those from the last month or year.
You can also set SMS/MMS delivery notifications on or off, and for costreasons set how MMS (messages that include pictures, video and audio)is to be handled.
From the Messaging screen you can also access the Cellular & SIMscreen where you can set data roaming options. Turning off data roamingcan avoid extra carrier charges when inadvertently using cellular data ina roaming area.
Battery Saver
The System > Battery Saver screen shows how much battery time isremaining. A Battery Use link shows how battery usage breaks down forthe past 24 hours, 48 hours, or week. You can see which apps are batterydrains, and even drill down into the usage details for all the apps thathave been used.
From here you can allow/disallow apps to run in the background whenyou are not using them. From here you can also access battery saversettings such as when the battery saver settings should kick in, and whichapps are allowed to continue to operate normally like sending andreceiving push notifications) even when the device is in battery savermode.
If battery life, app performance, or data usage become issues, drilling downinto battery use detailsfor an app can often pro-vide important clues.You’ll learn about howmuch system resourcesan app consumes,whether it’s been usingWi-Fi or cellular data,what percentage of itstime was in backgroundoperation and what inactual use.
XT2 Setup XT2 User Manual
Janam Technologies LLC Version 2, May 2017 XT2 Setup 3—10
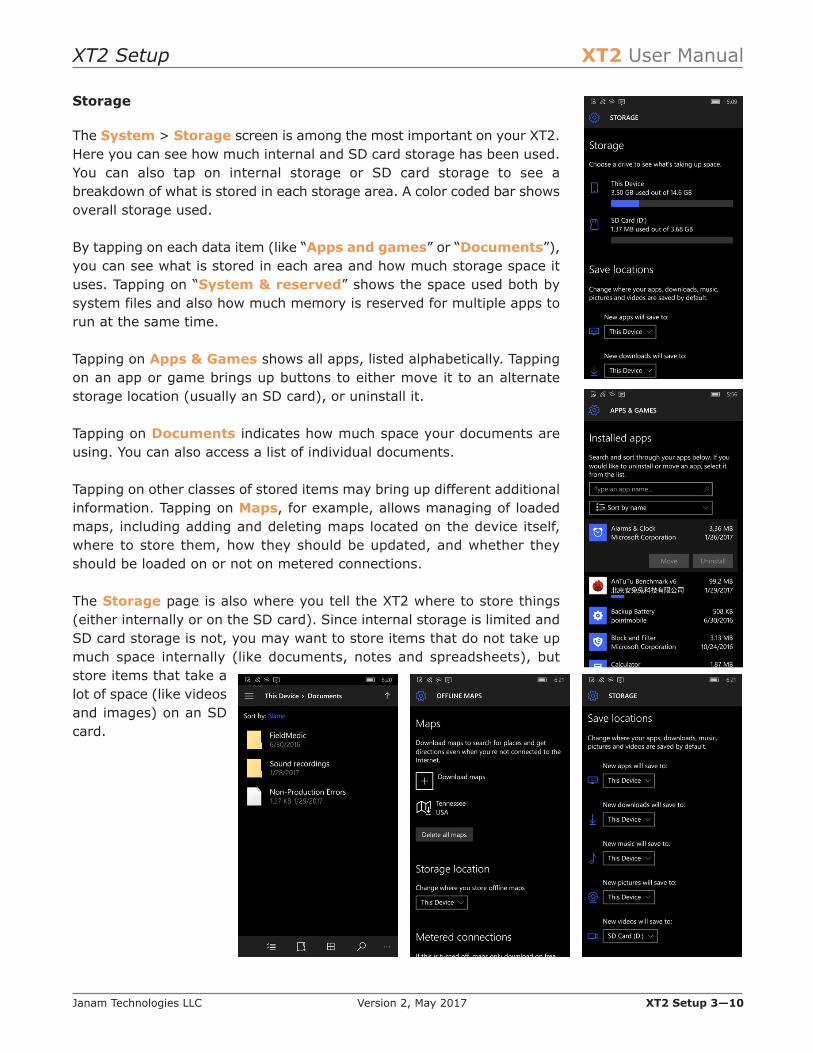
Storage
The System > Storage screen is among the most important on your XT2.Here you can see how much internal and SD card storage has been used.You can also tap on internal storage or SD card storage to see abreakdown of what is stored in each storage area. A color coded bar showsoverall storage used.
By tapping on each data item (like “Apps and games” or “Documents”),you can see what is stored in each area and how much storage space ituses. Tapping on “System & reserved” shows the space used both bysystem files and also how much memory is reserved for multiple apps torun at the same time.
Tapping on Apps & Games shows all apps, listed alphabetically. Tappingon an app or game brings up buttons to either move it to an alternatestorage location (usually an SD card), or uninstall it.
Tapping on Documents indicates how much space your documents areusing. You can also access a list of individual documents.
Tapping on other classes of stored items may bring up different additionalinformation. Tapping on Maps, for example, allows managing of loadedmaps, including adding and deleting maps located on the device itself,where to store them, how they should be updated, and whether theyshould be loaded on or not on metered connections.
The Storage page is also where you tell the XT2 where to store things(either internally or on the SD card). Since internal storage is limited andSD card storage is not, you may want to store items that do not take upmuch space internally (like documents, notes and spreadsheets), butstore items that take alot of space (like videosand images) on an SDcard.
XT2 Setup XT2 User Manual
Janam Technologies LLC Version 2, May 2017 XT2 Setup 3—11
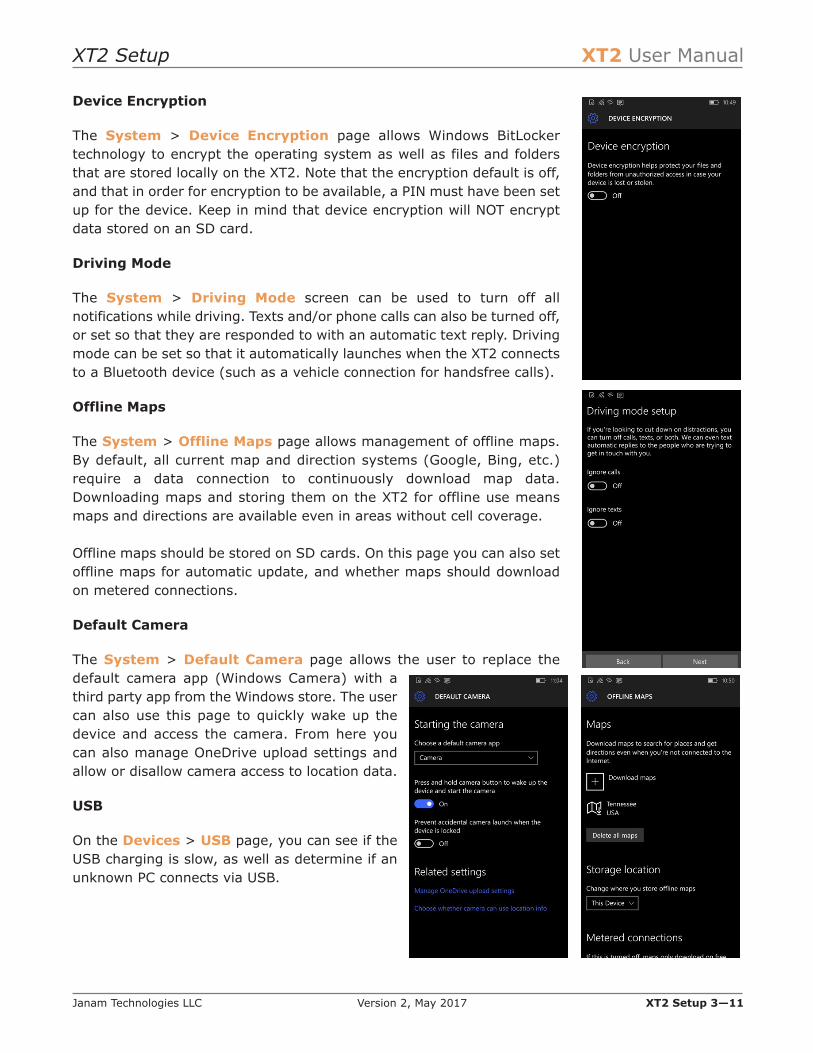
Device Encryption
The System > Device Encryption page allows Windows BitLockertechnology to encrypt the operating system as well as files and foldersthat are stored locally on the XT2. Note that the encryption default is off,and that in order for encryption to be available, a PIN must have been setup for the device. Keep in mind that device encryption will NOT encryptdata stored on an SD card.
Driving Mode
The System > Driving Mode screen can be used to turn off allnotifications while driving. Texts and/or phone calls can also be turned off,or set so that they are responded to with an automatic text reply. Drivingmode can be set so that it automatically launches when the XT2 connectsto a Bluetooth device (such as a vehicle connection for handsfree calls).
Offline Maps
The System > Offline Maps page allows management of offline maps.By default, all current map and direction systems (Google, Bing, etc.)require a data connection to continuously download map data.Downloading maps and storing them on the XT2 for offline use meansmaps and directions are available even in areas without cell coverage.
Offline maps should be stored on SD cards. On this page you can also setoffline maps for automatic update, and whether maps should downloadon metered connections.
Default Camera
The System > Default Camera page allows the user to replace thedefault camera app (Windows Camera) with athird party app from the Windows store. The usercan also use this page to quickly wake up thedevice and access the camera. From here youcan also manage OneDrive upload settings andallow or disallow camera access to location data.
USB
On the Devices > USB page, you can see if theUSB charging is slow, as well as determine if anunknown PC connects via USB.
XT2 Setup XT2 User Manual
Janam Technologies LLC Version 2, May 2017 XT2 Setup 3—12
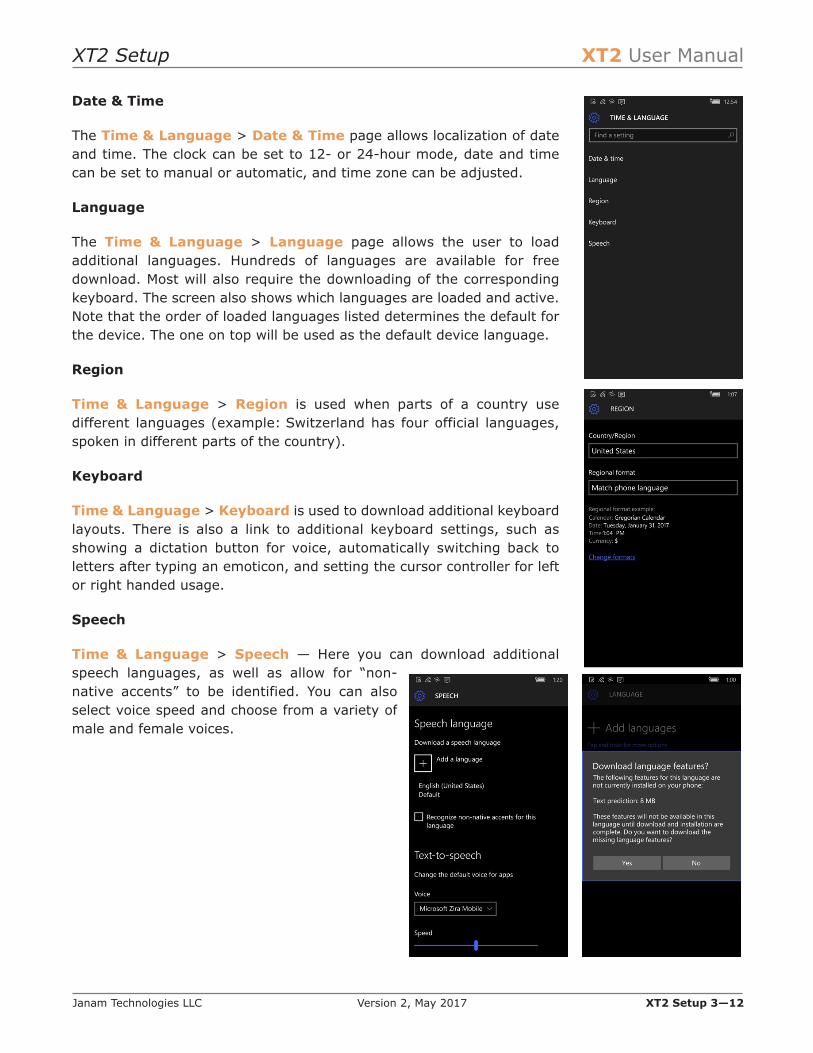
Date & Time
The Time & Language > Date & Time page allows localization of dateand time. The clock can be set to 12- or 24-hour mode, date and timecan be set to manual or automatic, and time zone can be adjusted.
Language
The Time & Language > Language page allows the user to loadadditional languages. Hundreds of languages are available for freedownload. Most will also require the downloading of the correspondingkeyboard. The screen also shows which languages are loaded and active.Note that the order of loaded languages listed determines the default forthe device. The one on top will be used as the default device language.
Region
Time & Language > Region is used when parts of a country usedifferent languages (example: Switzerland has four official languages,spoken in different parts of the country).
Keyboard
Time & Language > Keyboard is used to download additional keyboardlayouts. There is also a link to additional keyboard settings, such asshowing a dictation button for voice, automatically switching back toletters after typing an emoticon, and setting the cursor controller for leftor right handed usage.
Speech
Time & Language > Speech — Here you can download additionalspeech languages, as well as allow for “non-native accents” to be identified. You can alsoselect voice speed and choose from a variety ofmale and female voices.
XT2 Setup XT2 User Manual
Janam Technologies LLC Version 2, May 2017 XT2 Setup 3—13
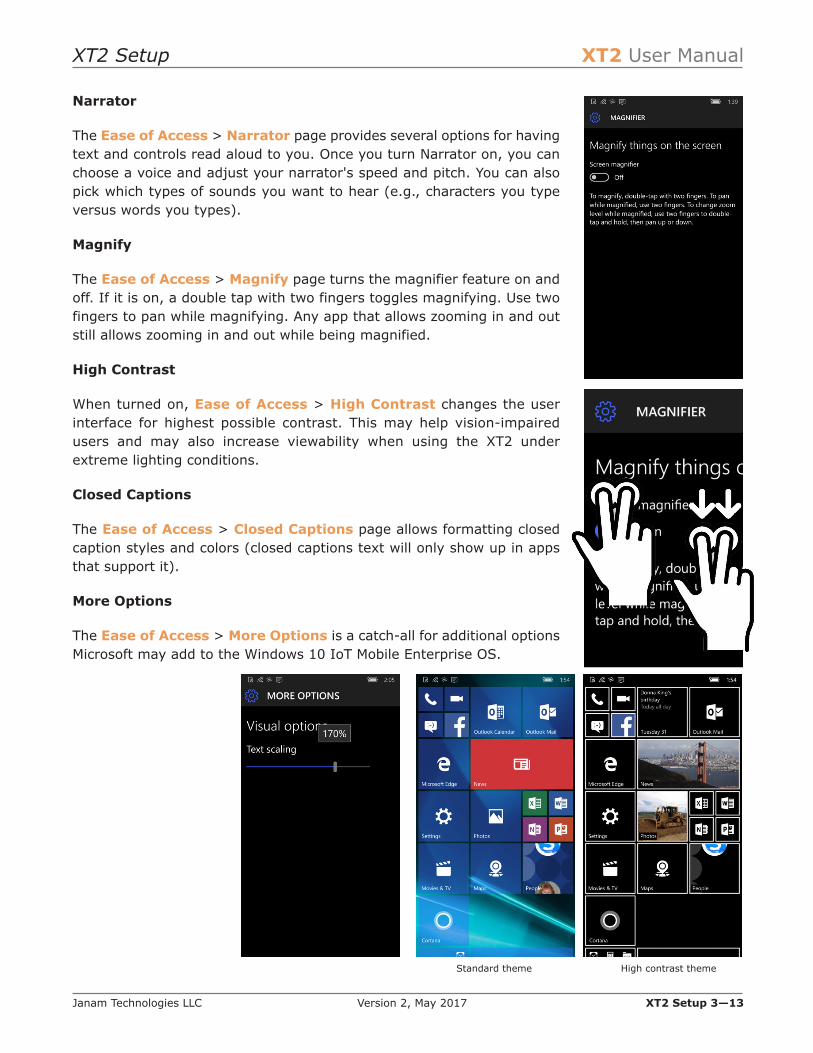
Narrator
The Ease of Access > Narrator page provides several options for havingtext and controls read aloud to you. Once you turn Narrator on, you canchoose a voice and adjust your narrator's speed and pitch. You can alsopick which types of sounds you want to hear (e.g., characters you typeversus words you types).
Magnify
The Ease of Access > Magnify page turns the magnifier feature on andoff. If it is on, a double tap with two fingers toggles magnifying. Use twofingers to pan while magnifying. Any app that allows zooming in and outstill allows zooming in and out while being magnified.
High Contrast
When turned on, Ease of Access > High Contrast changes the userinterface for highest possible contrast. This may help vision-impairedusers and may also increase viewability when using the XT2 underextreme lighting conditions.
Closed Captions
The Ease of Access > Closed Captions page allows formatting closedcaption styles and colors (closed captions text will only show up in appsthat support it).
More Options
The Ease of Access > More Options is a catch-all for additional optionsMicrosoft may add to the Windows 10 IoT Mobile Enterprise OS.
Standard theme High contrast theme
Wireless Network Connection XT2 User Manual
Janam Technologies LLC Version 2, May 2017 Wireless Network Connection 4—1
Wireless Network Configuration
Introduction
IMPORTANT NOTE!Some wireless networks, especially those in public areas, are unsecured, i.e. they donot require a password in order to establish a network connection.
Wireless local area networks (WLANs) allow XT2 rugged touch computers to send and receiveinformation wirelessly within the range of the wireless network they are connected to at a given time.Wireless network connectivity may or may not include access to the Internet, depending on thenetwork’s mission and configuration.
A given physical area may have multiple wireless local area networks (WLANs), sometimes referredto as Wi-Fi hot spots, which the XT2 can see as it scans for available networks.
Typically, wireless local area networks are configured with a security scheme. Wireless devicesconnected to a wireless network must:
A. Be configured for compatibility with the host wireless network’s security requirements. Thesesecurity requirements are necessary to prevent unauthorized access to the wireless network, andalso to present damage to computers using the wireless network.
B. Be granted access to the host wireless network through the use of a security code (password)established by the host wireless network’s administrator to protect the network from unauthorizeduse. Public wireless networks may require both a login and a password for a connection.
4

Wireless Network Connection XT2 User Manual
Janam Technologies LLC Version 2, May 2017 Wireless Network Connection 4—2
Connecting the Janam XT2 to a Wireless Local Area Network (WLAN)
To initially connect the XT2 to a wireless local area network, go to Settings > Network & Wireless> Wi-Fi. Turn Wi-Fi networking on. The XT2 will begin searching for available Wi-Fi networks. Aftera few seconds it will list what it has found, including the approximate signal strength and whether ornot a networks is secured by a password. Tap on your desired network. Enter the password. Theconnection will be established. Upon successful completion, the network link will show up underConnected to.
If you tap on the network you are connected to,a new screen shows you the IP address andother information about the connection. You canalso set whether you want the XT2 to connectautomatically to this network whenever it isavailable.
Bluetooth XT2 User Manual
Janam Technologies LLC Version 2, May 2017 Bluetooth 5—1
Introduction
Bluetooth is a popular PAN (Personal Area Network) technology used for short-range wirelesscommunication. Devices with Class 2 Bluetooth capabilities, such as the Janam XT2, can send and/orreceive information over distances of approximately 10 meters (30 feet).
Unlike older infrared technology, Bluetooth does not rely upon uninterrupted line-of-sight betweendevices that need to exchange information. As a result, you can send information to or receiveinformation from another Bluetooth-capable device even if the two devices are located in differentrooms, as long as they are within range.
Bluetooth can be used to:
― Enjoy the convenience and productivity of a wireless headset.
― Send or receive information such as files, appointments, tasks and contact cards betweenBluetooth-capable devices.
― Bluetooth connectivity provides XT2 users with the ability to print from the device to Bluetooth-enabled printers.
― Use a Bluetooth service. Once you connect to another device or computer using Bluetooth,you can locate and use any of the services available on that device.
There are several ways to set up your computer for wireless access and the following sectiondetails the general instructions needed to set up Bluetooth on your Janam XT2 rugged touchcomputer. Please note that complex or custom installations may require additional expertisefrom Janam’s technical support team and/or the manufacturer of the device to be paired.
Bluetooth Partnerships:
A Bluetooth partnership (often referred to as a pairing) is, as it relates to this chapter, a relationshipcreated between the XT2 and another Bluetooth-capable device to securely exchange information orprovide a Bluetooth function. Creating a partnership involves (A) one Bluetooth device being instructedto discover other Bluetooth devices that have been authorized to be visible and within its range, and(B) entering the same Bluetooth Passcode on both devices. Once a partnership is created, the thenpartnered (or paired) devices need only have Bluetooth turned on and be within range to function.Already partnered Bluetooth devices do not need to be made visible.
Once partnered, the devices can exchange information without re-entering the Passcode.
Bluetooth
5
Bluetooth XT2 User Manual
Janam Technologies LLC Version 2, May 2017 Bluetooth 5—2
Bluetooth Concepts
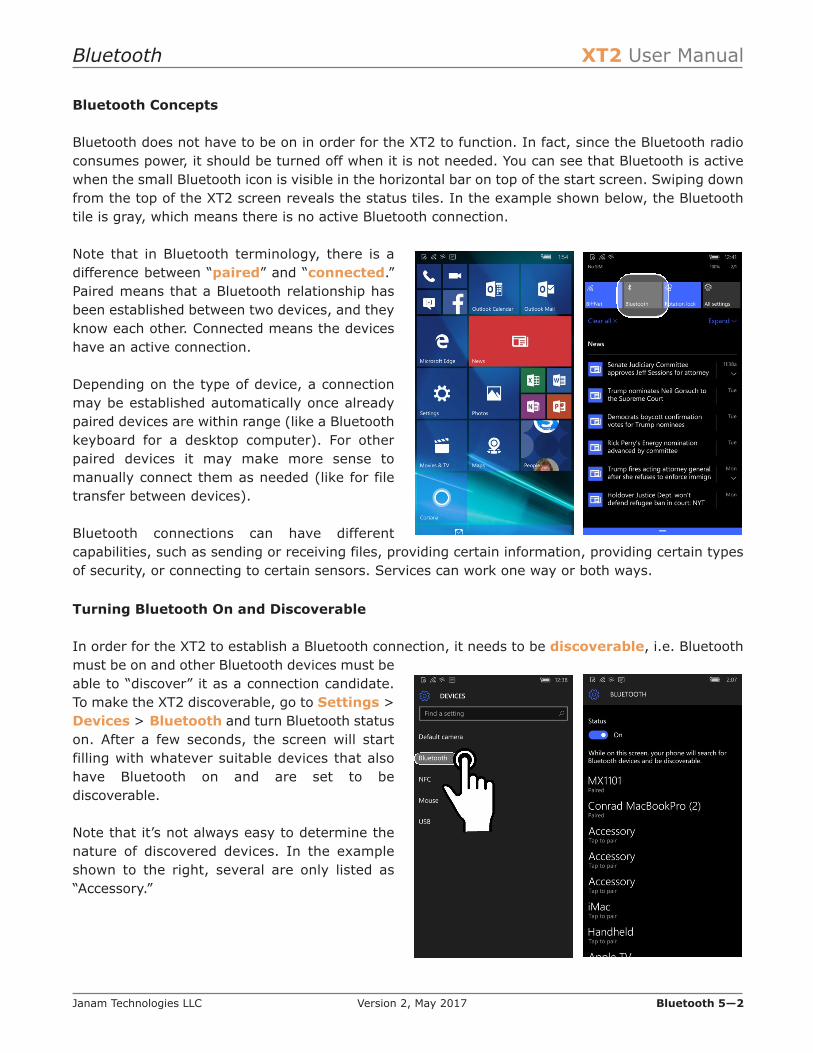
Bluetooth does not have to be on in order for the XT2 to function. In fact, since the Bluetooth radioconsumes power, it should be turned off when it is not needed. You can see that Bluetooth is activewhen the small Bluetooth icon is visible in the horizontal bar on top of the start screen. Swiping downfrom the top of the XT2 screen reveals the status tiles. In the example shown below, the Bluetoothtile is gray, which means there is no active Bluetooth connection.
Note that in Bluetooth terminology, there is adifference between “paired” and “connected.”Paired means that a Bluetooth relationship hasbeen established between two devices, and theyknow each other. Connected means the deviceshave an active connection.
Depending on the type of device, a connectionmay be established automatically once alreadypaired devices are within range (like a Bluetoothkeyboard for a desktop computer). For otherpaired devices it may make more sense tomanually connect them as needed (like for filetransfer between devices).
Bluetooth connections can have differentcapabilities, such as sending or receiving files, providing certain information, providing certain typesof security, or connecting to certain sensors. Services can work one way or both ways.
Turning Bluetooth On and Discoverable
In order for the XT2 to establish a Bluetooth connection, it needs to be discoverable, i.e. Bluetoothmust be on and other Bluetooth devices must beable to “discover” it as a connection candidate.To make the XT2 discoverable, go to Settings >Devices > Bluetooth and turn Bluetooth statuson. After a few seconds, the screen will startfilling with whatever suitable devices that alsohave Bluetooth on and are set to bediscoverable.
Note that it’s not always easy to determine thenature of discovered devices. In the exampleshown to the right, several are only listed as“Accessory.”
Bluetooth Pairing
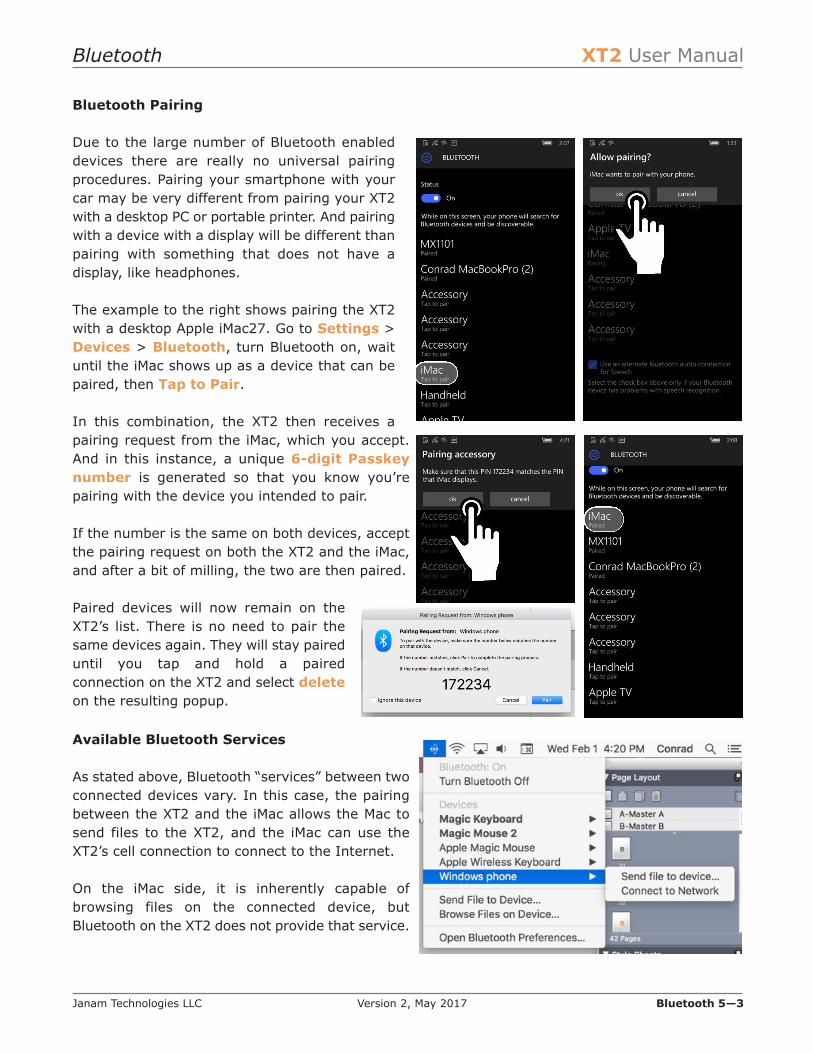
Due to the large number of Bluetooth enableddevices there are really no universal pairingprocedures. Pairing your smartphone with yourcar may be very different from pairing your XT2with a desktop PC or portable printer. And pairingwith a device with a display will be different thanpairing with something that does not have adisplay, like headphones.
The example to the right shows pairing the XT2with a desktop Apple iMac27. Go to Settings >Devices > Bluetooth, turn Bluetooth on, waituntil the iMac shows up as a device that can bepaired, then Tap to Pair.
In this combination, the XT2 then receives apairing request from the iMac, which you accept.And in this instance, a unique 6-digit Passkeynumber is generated so that you know you’repairing with the device you intended to pair.
If the number is the same on both devices, acceptthe pairing request on both the XT2 and the iMac,and after a bit of milling, the two are then paired.
Paired devices will now remain on theXT2’s list. There is no need to pair thesame devices again. They will stay paireduntil you tap and hold a pairedconnection on the XT2 and select deleteon the resulting popup.
Available Bluetooth Services
As stated above, Bluetooth “services” between twoconnected devices vary. In this case, the pairingbetween the XT2 and the iMac allows the Mac tosend files to the XT2, and the iMac can use theXT2’s cell connection to connect to the Internet.
On the iMac side, it is inherently capable ofbrowsing files on the connected device, butBluetooth on the XT2 does not provide that service.
Bluetooth XT2 User Manual
Janam Technologies LLC Version 2, May 2017 Bluetooth 5—3
Bluetooth XT2 User Manual
Janam Technologies LLC Version 2, May 2017 Bluetooth 5—4
Bluetooth Connect and Other Capabilities
Unlike Wi-Fi that has a well-defined purpose — that of providing internet access to a computer —Bluetooth is a much more personal communication protocol. Bluetooth is not simply on or off; itscapabilities and usefulness depend on relationships with other devices. And instead of simply providinga wireless data channel like Wi-Fi does, Bluetooth is part wireless communication and part servicesthat make certain specific features possible and available.
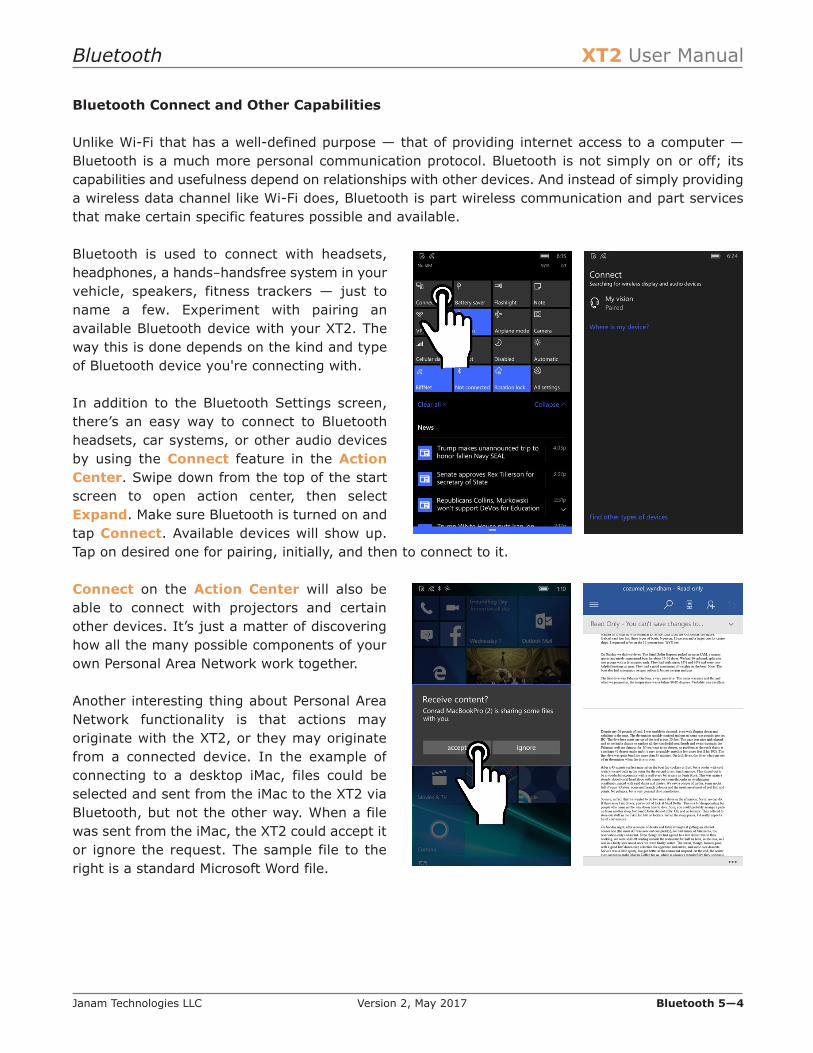
Bluetooth is used to connect with headsets,headphones, a hands-handsfree system in yourvehicle, speakers, fitness trackers — just toname a few. Experiment with pairing anavailable Bluetooth device with your XT2. Theway this is done depends on the kind and typeof Bluetooth device you're connecting with.
In addition to the Bluetooth Settings screen,there’s an easy way to connect to Bluetoothheadsets, car systems, or other audio devicesby using the Connect feature in the ActionCenter. Swipe down from the top of the startscreen to open action center, then selectExpand. Make sure Bluetooth is turned on andtap Connect. Available devices will show up.Tap on desired one for pairing, initially, and then to connect to it.
Connect on the Action Center will also beable to connect with projectors and certainother devices. It’s just a matter of discoveringhow all the many possible components of yourown Personal Area Network work together.
Another interesting thing about Personal AreaNetwork functionality is that actions mayoriginate with the XT2, or they may originatefrom a connected device. In the example ofconnecting to a desktop iMac, files could beselected and sent from the iMac to the XT2 viaBluetooth, but not the other way. When a filewas sent from the iMac, the XT2 could accept itor ignore the request. The sample file to theright is a standard Microsoft Word file.
Camera XT2 User Manual
Janam Technologies LLC Version 2, May 2017 Camera 6—1
Introduction
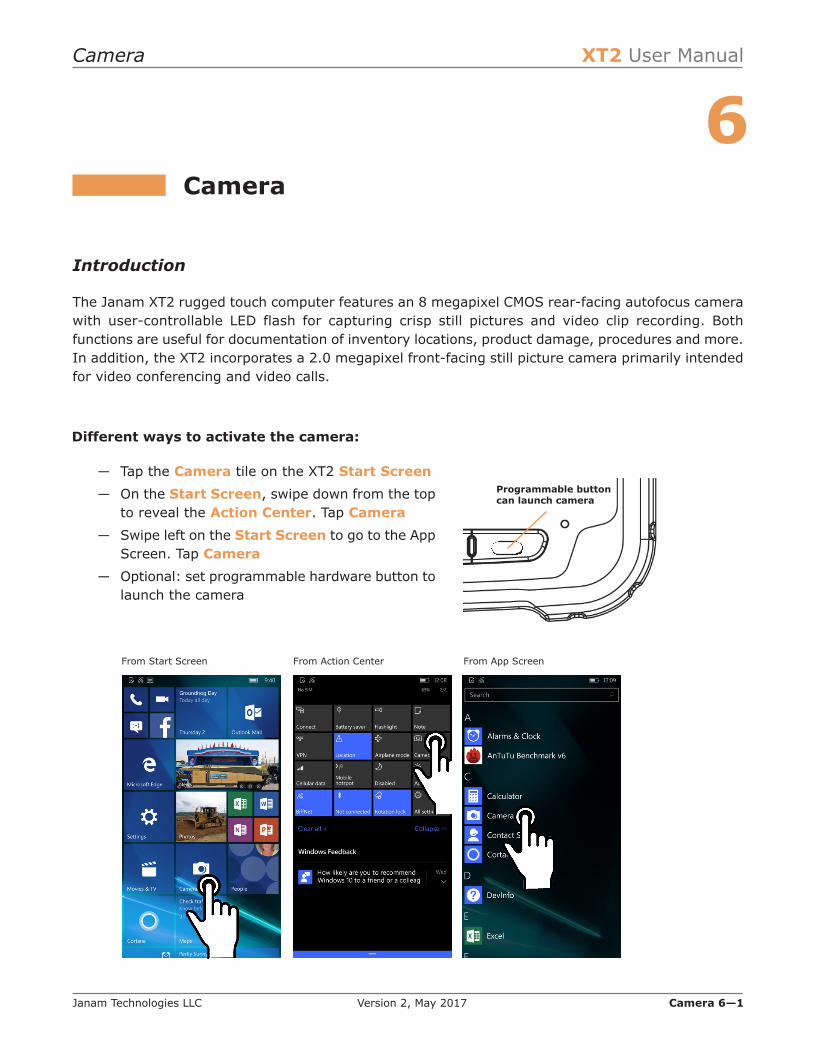
The Janam XT2 rugged touch computer features an 8 megapixel CMOS rear-facing autofocus camerawith user-controllable LED flash for capturing crisp still pictures and video clip recording. Bothfunctions are useful for documentation of inventory locations, product damage, procedures and more.In addition, the XT2 incorporates a 2.0 megapixel front-facing still picture camera primarily intendedfor video conferencing and video calls.
Camera
Programmable buttoncan launch camera
Different ways to activate the camera:
― Tap the Camera tile on the XT2 Start Screen
― On the Start Screen, swipe down from the topto reveal the Action Center. Tap Camera
― Swipe left on the Start Screen to go to the AppScreen. Tap Camera
― Optional: set programmable hardware button tolaunch the camera
From Start Screen From Action Center From App Screen
6
Camera XT2 User Manual
Janam Technologies LLC Version 2, May 2017 Camera 6—2
Camera Controls Overview
1 12
2
3
3
4
4
5
5
6
7
8
9
10
678910
Front camera location Rear camera location
Camera controls in portrait mode
Camera controls in landscape mode
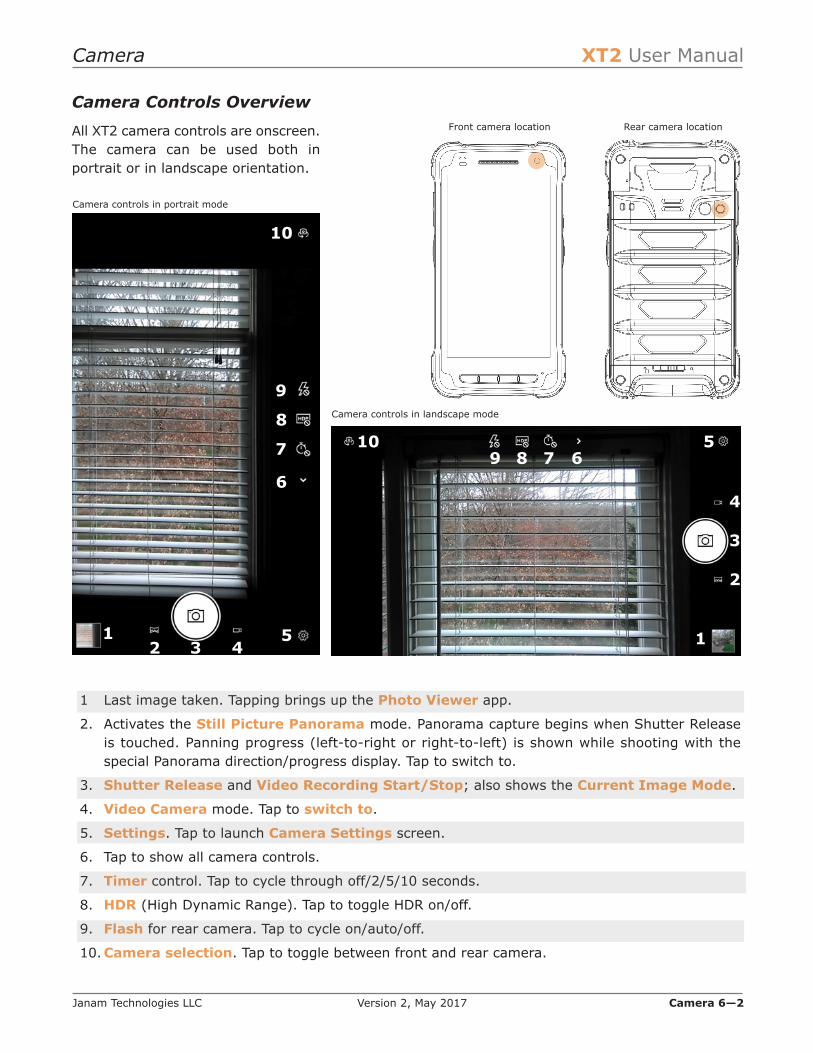
1 Last image taken. Tapping brings up the Photo Viewer app.
2. Activates the Still Picture Panorama mode. Panorama capture begins when Shutter Releaseis touched. Panning progress (left-to-right or right-to-left) is shown while shooting with thespecial Panorama direction/progress display. Tap to switch to.
3. Shutter Release and Video Recording Start/Stop; also shows the Current Image Mode.
4. Video Camera mode. Tap to switch to.
5. Settings. Tap to launch Camera Settings screen.
6. Tap to show all camera controls.
7. Timer control. Tap to cycle through off/2/5/10 seconds.
8. HDR (High Dynamic Range). Tap to toggle HDR on/off.
9. Flash for rear camera. Tap to cycle on/auto/off.
10.Camera selection. Tap to toggle between front and rear camera.
All XT2 camera controls are onscreen.The camera can be used both inportrait or in landscape orientation.
Camera XT2 User Manual
Janam Technologies LLC Version 2, May 2017 Camera 6—3
Camera Settings
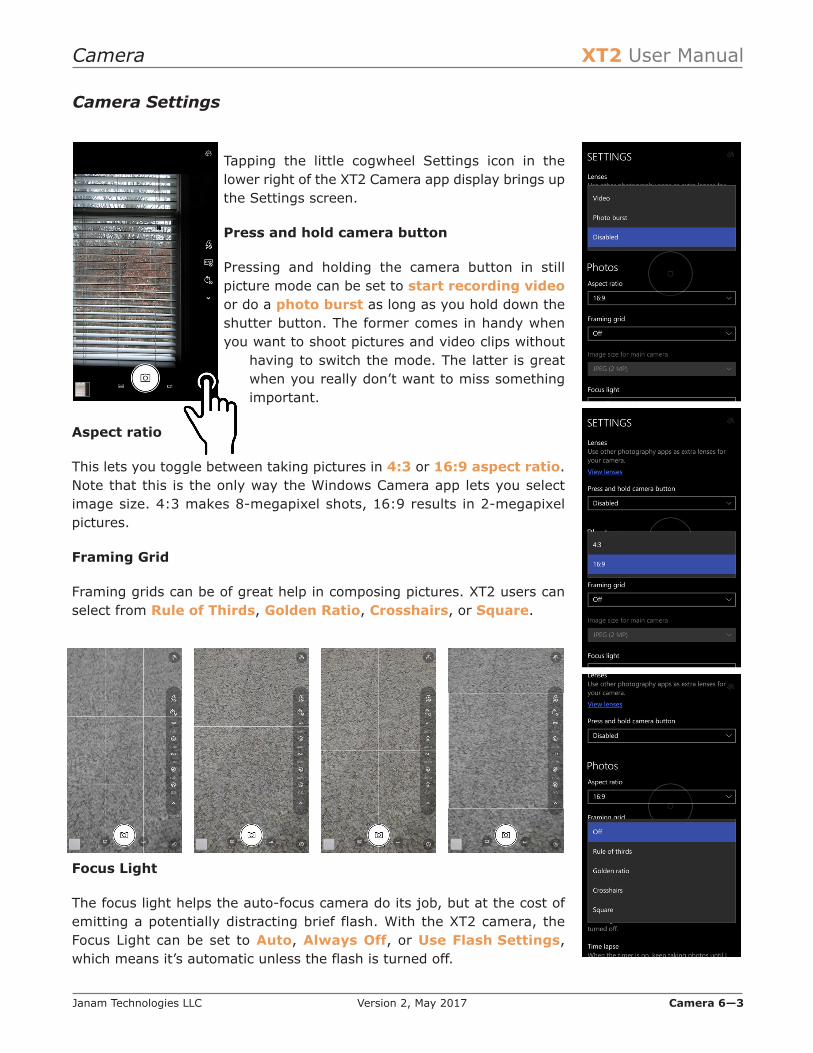
Tapping the little cogwheel Settings icon in thelower right of the XT2 Camera app display brings upthe Settings screen.
Press and hold camera button
Pressing and holding the camera button in stillpicture mode can be set to start recording videoor do a photo burst as long as you hold down theshutter button. The former comes in handy whenyou want to shoot pictures and video clips without
having to switch the mode. The latter is greatwhen you really don’t want to miss somethingimportant.
Aspect ratio
This lets you toggle between taking pictures in 4:3 or 16:9 aspect ratio.Note that this is the only way the Windows Camera app lets you selectimage size. 4:3 makes 8-megapixel shots, 16:9 results in 2-megapixelpictures.
Framing Grid
Framing grids can be of great help in composing pictures. XT2 users canselect from Rule of Thirds, Golden Ratio, Crosshairs, or Square.
Focus Light
The focus light helps the auto-focus camera do its job, but at the cost ofemitting a potentially distracting brief flash. With the XT2 camera, theFocus Light can be set to Auto, Always Off, or Use Flash Settings,which means it’s automatic unless the flash is turned off.
Camera XT2 User Manual
Janam Technologies LLC Version 2, May 2017 Camera 6—4
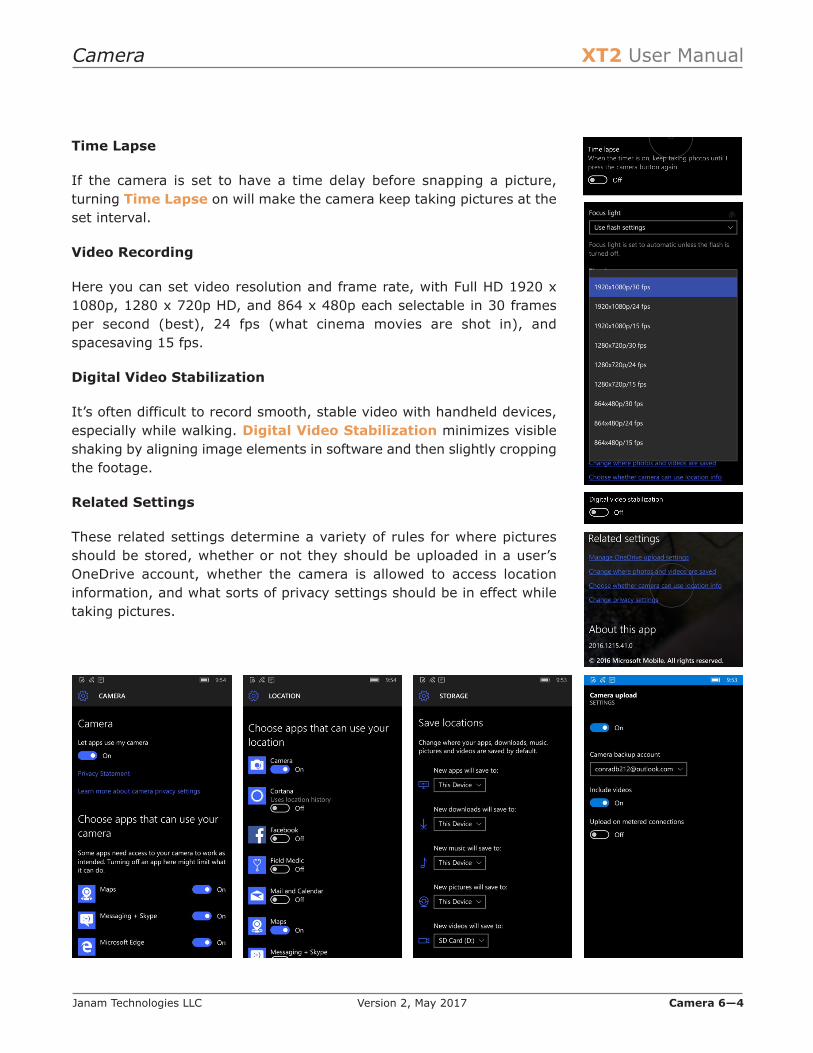
Time Lapse
If the camera is set to have a time delay before snapping a picture,turning Time Lapse on will make the camera keep taking pictures at theset interval.
Video Recording
Here you can set video resolution and frame rate, with Full HD 1920 x1080p, 1280 x 720p HD, and 864 x 480p each selectable in 30 framesper second (best), 24 fps (what cinema movies are shot in), andspacesaving 15 fps.
Digital Video Stabilization
It’s often difficult to record smooth, stable video with handheld devices,especially while walking. Digital Video Stabilization minimizes visibleshaking by aligning image elements in software and then slightly croppingthe footage.
Related Settings
These related settings determine a variety of rules for where picturesshould be stored, whether or not they should be uploaded in a user’sOneDrive account, whether the camera is allowed to access locationinformation, and what sorts of privacy settings should be in effect whiletaking pictures.
Camera XT2 User Manual
Janam Technologies LLC Version 2, May 2017 Camera 6—5
Camera Controls
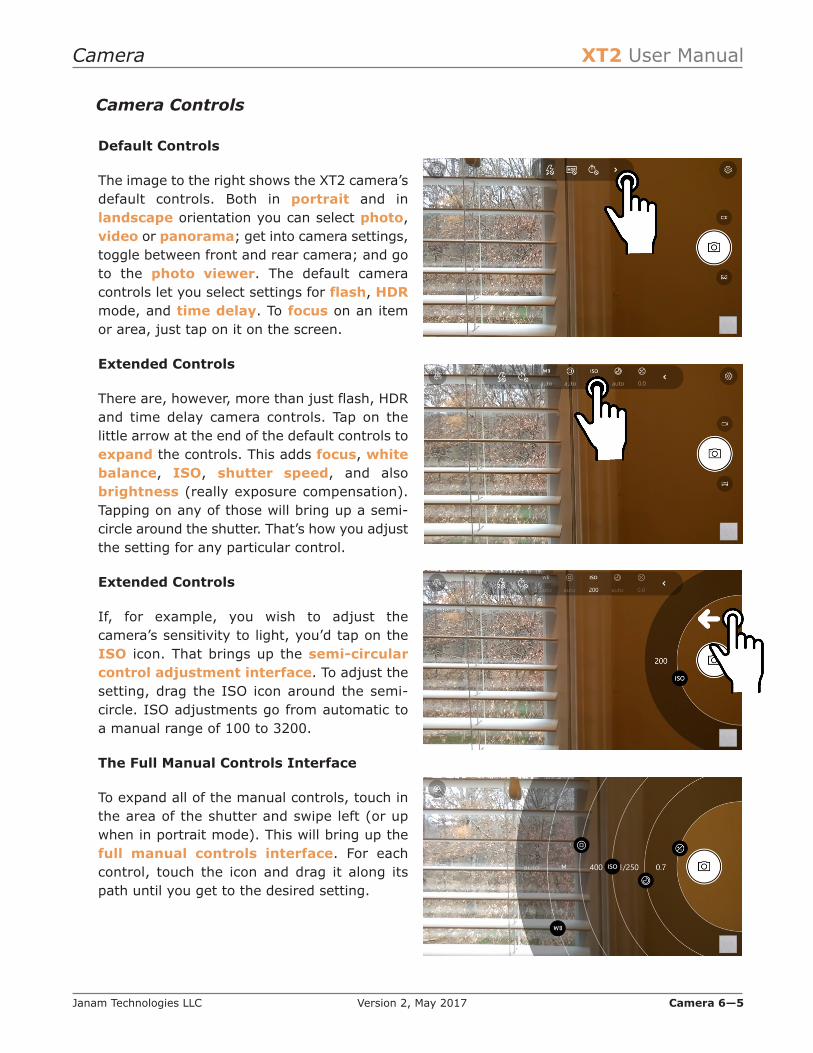
Default Controls
The image to the right shows the XT2 camera’sdefault controls. Both in portrait and inlandscape orientation you can select photo,video or panorama; get into camera settings,toggle between front and rear camera; and goto the photo viewer. The default cameracontrols let you select settings for flash, HDRmode, and time delay. To focus on an itemor area, just tap on it on the screen.
Extended Controls
There are, however, more than just flash, HDRand time delay camera controls. Tap on thelittle arrow at the end of the default controls toexpand the controls. This adds focus, whitebalance, ISO, shutter speed, and alsobrightness (really exposure compensation).Tapping on any of those will bring up a semi-circle around the shutter. That’s how you adjustthe setting for any particular control.
Extended Controls
If, for example, you wish to adjust thecamera’s sensitivity to light, you’d tap on theISO icon. That brings up the semi-circularcontrol adjustment interface. To adjust thesetting, drag the ISO icon around the semi-circle. ISO adjustments go from automatic toa manual range of 100 to 3200.
The Full Manual Controls Interface
To expand all of the manual controls, touch inthe area of the shutter and swipe left (or upwhen in portrait mode). This will bring up thefull manual controls interface. For eachcontrol, touch the icon and drag it along itspath until you get to the desired setting.

Camera XT2 User Manual
Janam Technologies LLC Version 2, May 2017 Camera 6—6
Camera Control Settings
The following is a full list of all camera controls available for the Janam XT2’s front and rear cameras.Note that video is available with both the front and the rear camera. Panorama mode is only availablewith the rear camera.
Photo ModeFlash Auto, On, Off
HDR On, Off
Time Delay Timer-off, 2-second timer, 5-second timer, 10-second timer
White Balance Auto, Cloudy, Sunny, Fluorescent, Incandescent
Focus Auto, Manual, Infinity
ISO Auto, 100, 200, 400, 800, 1600, 3200
Shutter Speed Auto, 1/16000, 1/8000, 1/6400, 1/5000, 1/4000, 1/3200,1/2000, 1/1600, 1/1250, 1/1000, 1/800, 1/640, 1/500, 1/400,1/320, 1/250, 1/200, 1/125, 1/100, 1/80, 1/60, 1/50, 1/40, 1/30,1/25, 1/15, 1/13, 1/10, 1/8, 1/6, 1/5, 0.3s, 0.4s, 0.5s, 0.6s, 0.8s,1s, 1.3s, 1.6s, 2s
Brightness -2.0 to +2.0 in 0.3 increments
Video ModeVideo Light On or Off.
White Balance Auto, Cloudy, Sunny, Fluorescent, Incandescent
Focus Auto, Manual, Infinity
Brightness -2.0 to +2.0 in 0.3 increments
Camera Zoom
Both of the XT2’s cameras have digital zoom. To zoomin and out, touch with two fingers, then pinch themtogether or draw them apart. Alternately, you can alsotouch and then drag the zoom slider at the bottom ofthe display.
Note that there is a difference between digital andoptical zoom. Digital zoom enlarges a part of theimage, thus losing some sharpness. Optical zoom usesoptics, thus retaining sharpness. The XT2 cameras usedigital zoom.

Camera XT2 User Manual
Janam Technologies LLC Version 2, May 2017 Camera 6—7
Editing Pictures
The XT2’s Camera app provides a direct link to the Windows 10 IoT MobileEnterprise Photos app. The Photos app isn’t meant to be a full photoeditor, but allows for some minor editing and manipulation.
To get to the Photos app from the Camera app, tap on the small squarepicture icon in the lower lefthand corner (upper lefthand corner when inlandscape mode). This will open the last captured image. You now have achoice of working with this image or View all photos.
If you tape the share icon, you’ll get to a screen that shows all theavailable ways of sharing the picture (like attaching it to an email ormessage, uploading it to OneDrive or a social media site, sending it viaBluetooth or NFC, or editing it in a full image editor app).
If you tap the small pencil icon, you’ll get the options of crop, rotate, orauto-enhance the image. Auto-enhancing is like a magic wand to makesthe image better. Cropping brings up a selection of various popular aspectratios.
Since the Photos app is very limited in actual editing, it lists otheravailable photo editors on your XT2, and also the option to find moreeditors. The latter gets you to the Store.
Tapping on the ... icon lets you run a slide show of your pictures, set oneas the lock screen, the background, or as the Photos app tile on thestart page. You can also elect to put the picture into a particular album.File Info presents you with an amazing wealth of information about theimage, including file name, date, source, size, shutter speed, f-stop, ISOand even a map of where it was taken.

Messaging — Email and Text XT2 User Manual
Janam Technologies LLC Version 2, May 2017 Messaging — Email and Text 7—1
Introduction
Like a smartphone, laptop or desktop PC, the XT2’s email interface acts as a portal to an alreadyexisting email account with one of the commonly available email service providers such as GoogleGmail, Microsoft Outlook, Yahoo, AOL or a private enterprise (corporate) network. This allows the XT2to receive, read, respond to, and send emails.
Microsoft’s Outlook is the default email app on the XT2 running Windows 10 IoT Mobile Enterprise.The Outlook app can be used to handle multiple existing email accounts.
Before setting up an email account on the XT2, be sure that a core email address is active with anemail service provider or within a private enterprise (corporate) network to which the XT2 user hasaccess and authorization.
Setting up Email
If you have an existing Microsoft account and are signed in with it on the XT2, the Outlook mailboxassociated with it is added automatically. If you want to add other accounts, tap on Outlook Mail,then select ... > Manage accounts. When prompted, enter your email address and password.
Messaging — Email and Text
7
Messaging — Email and Text XT2 User Manual
Janam Technologies LLC Version 2, May 2017 Messaging — Email and Text 7—2
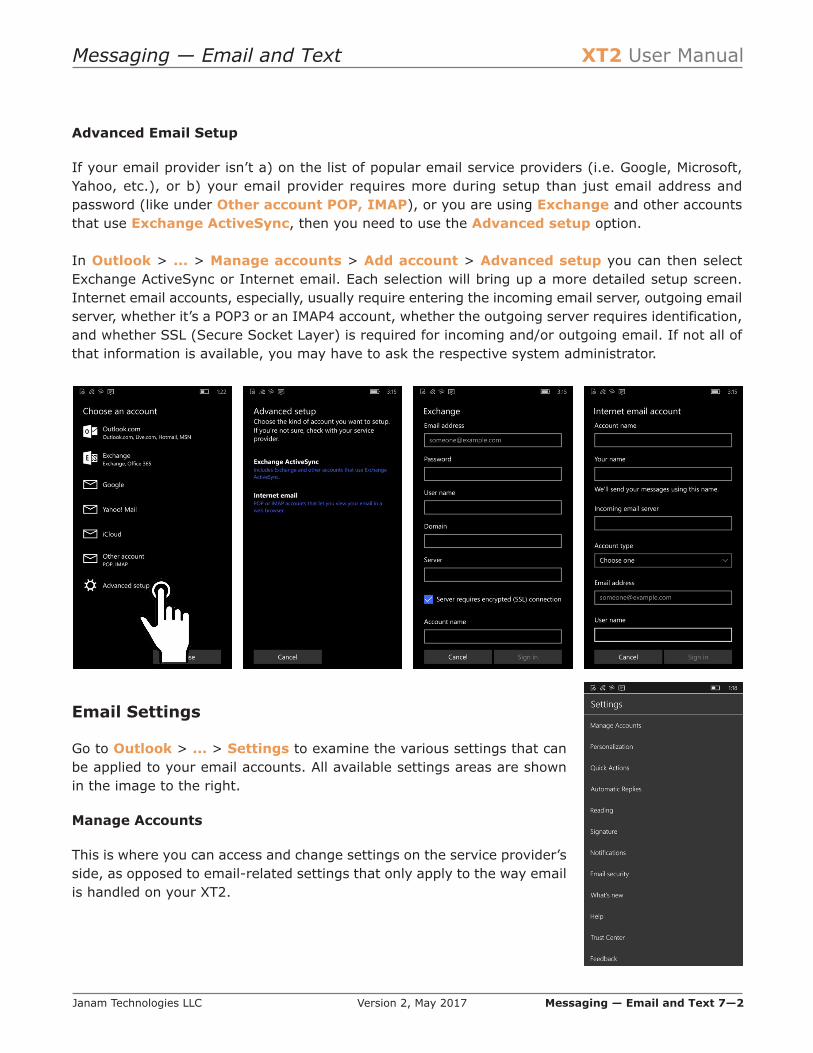
Advanced Email Setup
If your email provider isn’t a) on the list of popular email service providers (i.e. Google, Microsoft,Yahoo, etc.), or b) your email provider requires more during setup than just email address andpassword (like under Other account POP, IMAP), or you are using Exchange and other accountsthat use Exchange ActiveSync, then you need to use the Advanced setup option.
In Outlook > ... > Manage accounts > Add account > Advanced setup you can then selectExchange ActiveSync or Internet email. Each selection will bring up a more detailed setup screen.Internet email accounts, especially, usually require entering the incoming email server, outgoing emailserver, whether it’s a POP3 or an IMAP4 account, whether the outgoing server requires identification,and whether SSL (Secure Socket Layer) is required for incoming and/or outgoing email. If not all ofthat information is available, you may have to ask the respective system administrator.
Email Settings
Go to Outlook > ... > Settings to examine the various settings that canbe applied to your email accounts. All available settings areas are shownin the image to the right.
Manage Accounts
This is where you can access and change settings on the service provider’sside, as opposed to email-related settings that only apply to the way emailis handled on your XT2.
Messaging — Email and Text XT2 User Manual
Janam Technologies LLC Version 2, May 2017 Messaging — Email and Text 7—3
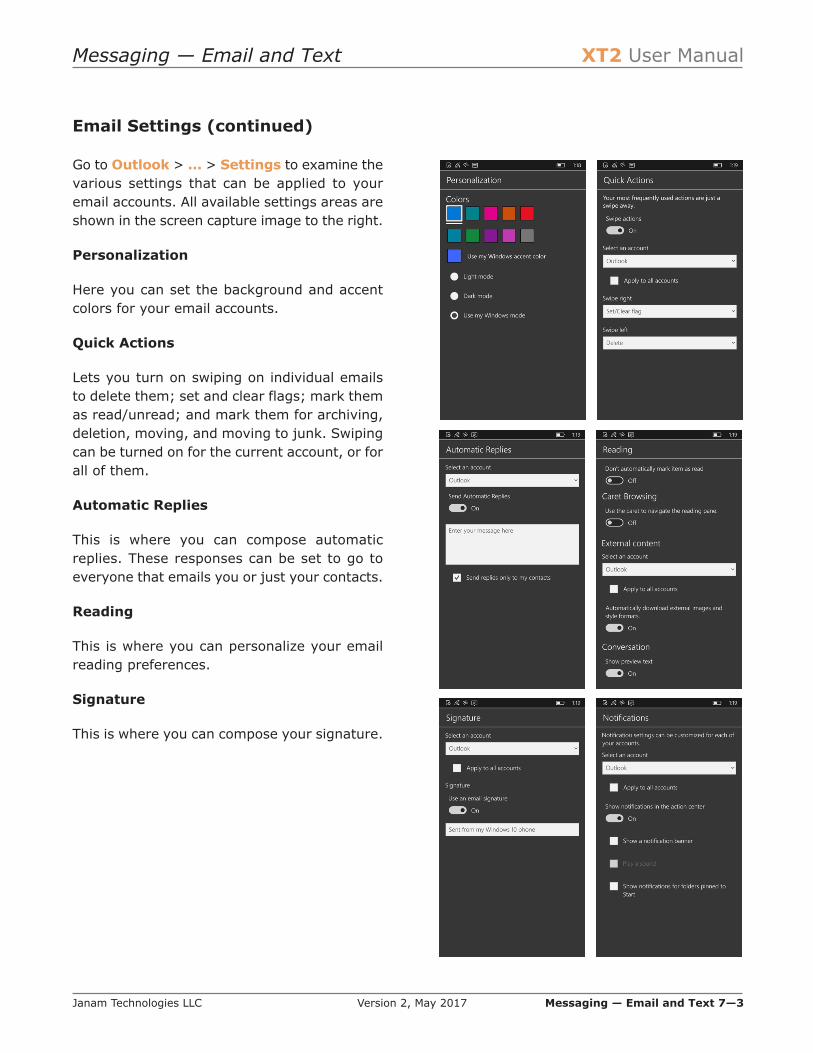
Email Settings (continued)
Go to Outlook > ... > Settings to examine thevarious settings that can be applied to youremail accounts. All available settings areas areshown in the screen capture image to the right.
Personalization
Here you can set the background and accentcolors for your email accounts.
Quick Actions
Lets you turn on swiping on individual emailsto delete them; set and clear flags; mark themas read/unread; and mark them for archiving,deletion, moving, and moving to junk. Swipingcan be turned on for the current account, or forall of them.
Automatic Replies
This is where you can compose automaticreplies. These responses can be set to go toeveryone that emails you or just your contacts.
Reading
This is where you can personalize your emailreading preferences.
Signature
This is where you can compose your signature.

1 Status icons, same as on Start Screen
2. Tap to select which folder and account to use
3. Pull-down to show all/unread/flagged email
4. Toggles single email/whole conversation
5. First line of email text
6. Pin to Start, Manage accounts, and Settings
7. Tap to start a new email
8. Tap to bring up selection check boxes
9. Tap to synchronize with email server
10.Tap to open search
Messaging — Email and Text XT2 User Manual
Janam Technologies LLC Version 2, May 2017 Messaging — Email and Text 7—4
Creating and Sending an Email:
From the Outlook Inbox, tap the + (7) to launch anew email. Tap on To: to bring up the keyboard.Begin typing the email address. Outlook may bringup suggestions from your Contacts.
Tap on the text area to begin typing your email.Tap on ... to access options to format, proof,insert, find, link, mark, list, highlight, and
plenty more.
Tap Attach to bring up ascreen from which youhave access to all sorts offiles and locations fromwhich to choose attach-ments.
When done, hit Send.
2
1
3
7 8 9 10
6
4 5
Email Inbox
This is what the standard Outlook email Inbox looks like:
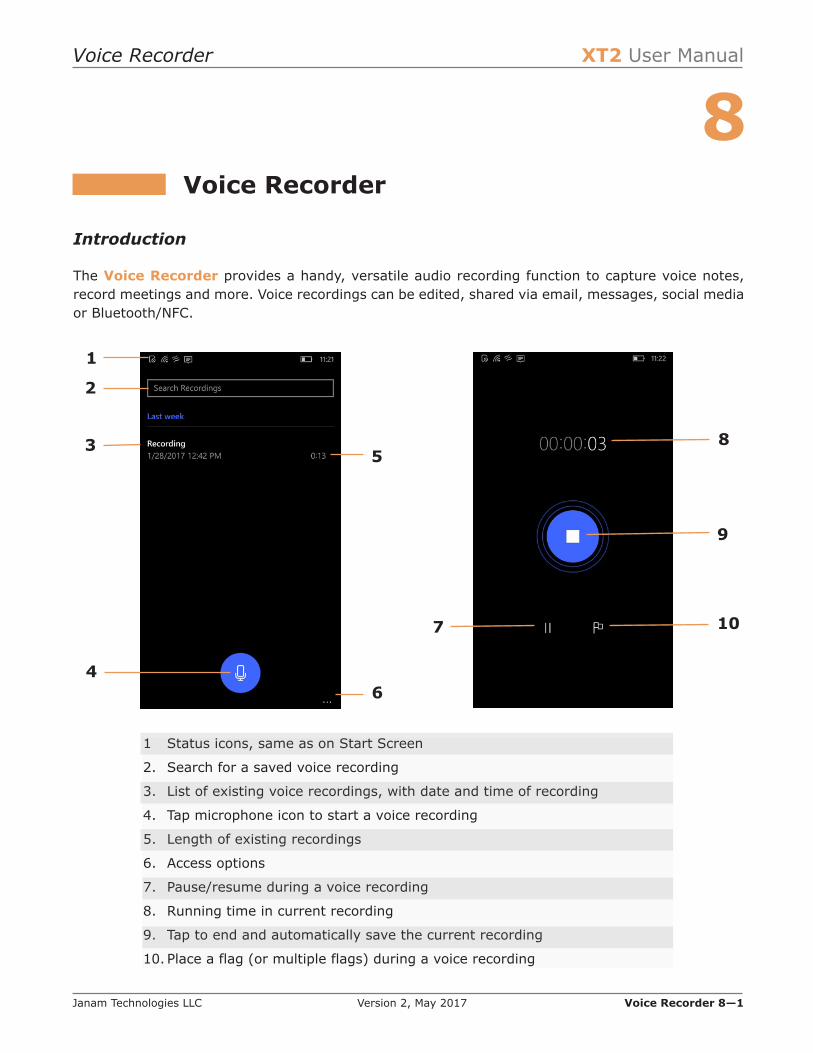
1 Status icons, same as on Start Screen
2. Search for a saved voice recording
3. List of existing voice recordings, with date and time of recording
4. Tap microphone icon to start a voice recording
5. Length of existing recordings
6. Access options
7. Pause/resume during a voice recording
8. Running time in current recording
9. Tap to end and automatically save the current recording
10. Place a flag (or multiple flags) during a voice recording
Voice Recorder XT2 User Manual
Janam Technologies LLC Version 2, May 2017 Voice Recorder 8—1
Voice Recorder
8Introduction
The Voice Recorder provides a handy, versatile audio recording function to capture voice notes,record meetings and more. Voice recordings can be edited, shared via email, messages, social mediaor Bluetooth/NFC.
2
1
8
7
6
3
9
10
4
5

Voice Recorder XT2 User Manual
Janam Technologies LLC Version 2, May 2017 Voice Recorder 8—2
Using the Voice Recorder
To start the Voice Recorder, tap on it on the Start Screen (or locate it in the App Screen). Tap onthe microphone icon to start a recording. Record for as long as you want. Tap the || symbol to pause(it shows a blue circle while paused) and tap || again to resume recording. Tap the square in thecenter of the screen to stop recording. This will also automatically save the recording. To play backthe recording (or any recording), tap on its listing.
Using Flags
The Voice Recorder has a flag feature that letsyou place flags both during recordings andduring playback. Flags come in handy to markimportant spots during a recording, or to placemarks during playback so you can quickly getback to a spot in the recording.
To go to a particular flag during playback, justtap it. To delete a flag, tap and hold it and theDelete this marker selection will pop up.
Voice Recorder XT2 User Manual
Janam Technologies LLC Version 2, May 2017 Voice Recorder 8—3
Trimming a Voice Recording
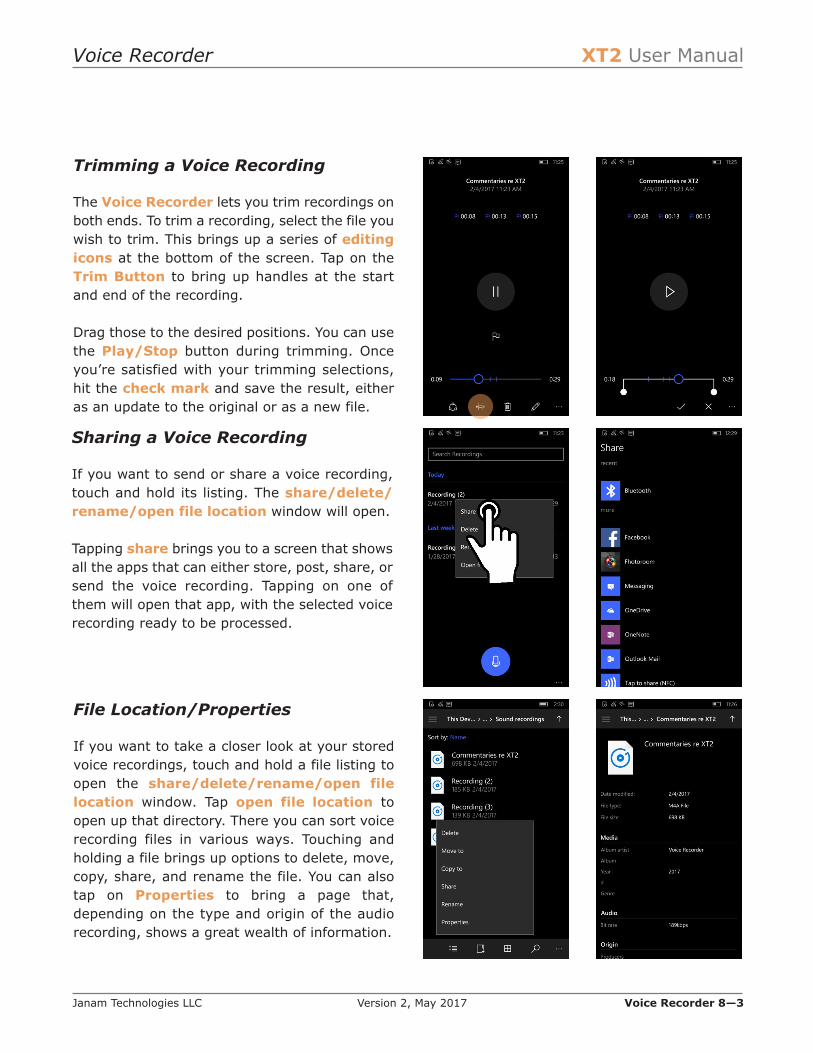
The Voice Recorder lets you trim recordings onboth ends. To trim a recording, select the file youwish to trim. This brings up a series of editingicons at the bottom of the screen. Tap on theTrim Button to bring up handles at the startand end of the recording.
Drag those to the desired positions. You can usethe Play/Stop button during trimming. Onceyou’re satisfied with your trimming selections,hit the check mark and save the result, eitheras an update to the original or as a new file.
Sharing a Voice Recording
If you want to send or share a voice recording,touch and hold its listing. The share/delete/rename/open file location window will open.
Tapping share brings you to a screen that showsall the apps that can either store, post, share, orsend the voice recording. Tapping on one ofthem will open that app, with the selected voicerecording ready to be processed.
File Location/Properties
If you want to take a closer look at your storedvoice recordings, touch and hold a file listing toopen the share/delete/rename/open filelocation window. Tap open file location toopen up that directory. There you can sort voicerecording files in various ways. Touching andholding a file brings up options to delete, move,copy, share, and rename the file. You can alsotap on Properties to bring a page that,depending on the type and origin of the audiorecording, shows a great wealth of information.
Barcode Scanning XT2 User Manual
Janam Technologies LLC Version 2, May 2017 Barcode Scanning 9—1
Barcode Scanning
9Using the Image Scanner Engine
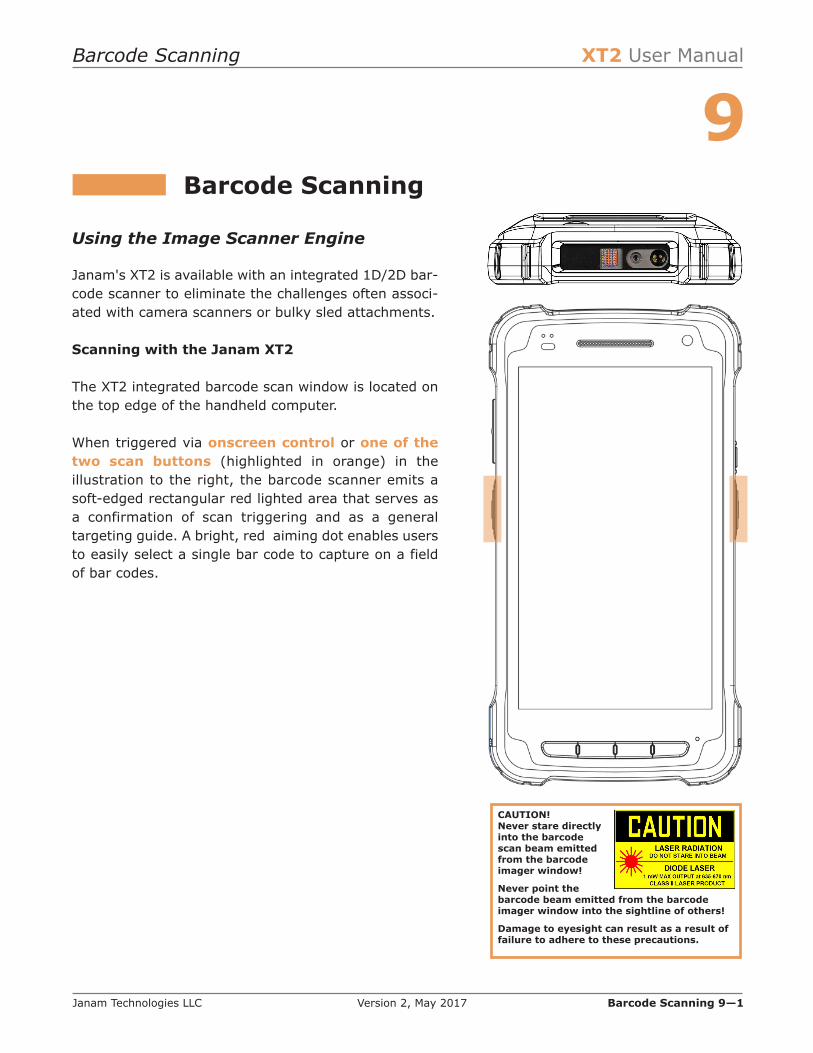
Janam's XT2 is available with an integrated 1D/2D bar-code scanner to eliminate the challenges often associ-ated with camera scanners or bulky sled attachments.
Scanning with the Janam XT2
The XT2 integrated barcode scan window is located onthe top edge of the handheld computer.
When triggered via onscreen control or one of thetwo scan buttons (highlighted in orange) in theillustration to the right, the barcode scanner emits asoft-edged rectangular red lighted area that serves asa confirmation of scan triggering and as a generaltargeting guide. A bright, red aiming dot enables usersto easily select a single bar code to capture on a fieldof bar codes.
CAUTION!Never stare directlyinto the barcodescan beam emittedfrom the barcodeimager window!
Never point thebarcode beam emitted from the barcodeimager window into the sightline of others!
Damage to eyesight can result as a result offailure to adhere to these precautions.

Barcode Scanning XT2 User Manual
Janam Technologies LLC Version 2, May 2017 Barcode Scanning 9—2
Scan Settings
Go to Settings > Scan Settings to configurethe XT2’s scan engine and software. This is whereyou set how the scanner will work, how it willannounce and communicate results, what all thescan operation settings should be and, mostimportantly, which of the numerous codesymbologies the scanner should read.
Notifications
Settings > Scan Settings > Notifications letsyou enable or disable beep notification of goodand bad reads. You can set those to a variety ofsounds. In addition (or instead of) sounds, youcan turn on vibrator notification. Here, you canset the length of the vibration notice for good andbad reads. Finally, LED notification can beturned on or off.
Options
Settings > Scan Settings > Options setsTrigger Timeout (if timeout happens beforedecoded, it’s a fail), limits decoding to codesinside the center window), Redundancy Level(decodes multiple times before reporting, slowerbut more accurate), Security Levels (use highersecurity levels for lower quality bar code prints),regular or Inverse 1D Mode code, 1D QuietZone Level (how hard to try with marginlesscodes), Intercharacter Gap Size, or toTransmit an Aim ID.
Note that these options settings can have greatinfluence on both scan speed and scan decodingaccuracy. For detailed technical information onthe impact of redundancy, security and quietzone levels, as well as other scan-relatedsettings, please contact your Janam technicalrepresentative.

1D Linear 2D MatrixAUSTRALIA POST x AZTEC xBOOKLAND EAN x CHINESE 2 OF 5 Codabar x CODE 11 x CODE 128 x CODE 39 x CODE 93 x COMPOSITE CC-A/B xCOMPOSITE CC-C xCOMPOSITE TLC-39 x DATA MATRIX xDISCRETE 2 OF 5 x EAN 13 x EAN 8 x GS1 128 x GS1 DATABAR EXPANDED x GS1 DATABAR LIMITED x GS1 DATABAR x HAN XIN xINTERLEAVED 2 OF 5 x ISBT 128 x JAPAN POSTAL x KOREAN 3 OF 5 MATRIX 2 OF 5 x MAXICODE xMICRO QR xMICRO PDF417 xMSI x NETHERLANDS KIX CODE x PDF417 xQR CODE xTRIOPTIC CODE 39 x UCC COUPON x UK POSTAL x UPC-A x UPC-E x UPC E1 x UPU FICS POSTAL x US PLANET x US POSTNET x USPS 4CB/ONE CODE/INTELLIGENT MAIL x
Barcode Scanning XT2 User Manual
Janam Technologies LLC Version 2, May 2017 Barcode Scanning 9—3
Symbologies
The XT2’s scanner can read and decode virtuallyany 1D or 2D bar code in milliseconds. Go toSettings > Scan Settings > Symbologies toview more than 40 code types that are not onlysupported, but can additionally be configuredwith their own options and extensions (see someof the option examples).
Only turn on the code(s) that you are actuallyusing on the job. This will speed up recognitionand decoding time.
Below is the list of all 1D and 2D code typesspecifically supported by the Janam XT2:

Barcode Scanning XT2 User Manual
Janam Technologies LLC Version 2, May 2017 Barcode Scanning 9—4
Scan Demo App
The Janam XT2 comes preloaded with the Scan Demo app that demonstrates scanning features ofthe device. Note that a special Scanner SDK is available for the development of custom scanningapplications (inquire with your Janam sales representative).
Launch the Scan Demo from the Apps Screen. Position the XT2 over one of the sample bar codeson this page. A range of 4–10 inches (10–25 cm) from the bar code is recommended. To scan, eitherpush one of the XT2’s two scanner buttons or tap the Scan Start button on the screen. Aim thebarcode imager beam at the target barcode. The aiming dot should be centered in the bar code toachieve quickest nd most accurate decoding. When the bar code is successfully decoded, the littledecode LED in the upper lefthand corner flashes blue and the terminal beeps.
Upon a successful scan, the scanner decoder will report the symbology of the code as well as thescan data. It will also report the decide success/failure rate, as well as read time data and statistics.
SE4710 Example Read Ranges (near to far)
4 mil Code 39 3.3 to 8.8 inches (8.4 to 22.4 cm)
5 mil Code 128 2.8 to 8.2 inches (7.1 to 20.8 cm)
5 mil Code 39 2.0 to 13.5 inches (5.08 to 34.2 cm)
5 mil PDF417 3.1 to 8.4 inches (7.9 to 21.3 cm)
10 mil DataMatrix 2.9 to 10.1 inches (7.4 to 25.7 cm)
100% UPCA 1.8 to 26 inches (4.6 to 66 cm)
20 mil Code 39 2.0 to 30 inches (5.08 to 76 cm)
good scan failed scan
Code 39
PDF 417

Barcode Scanning XT2 User Manual
Janam Technologies LLC Version 2, May 2017 Barcode Scanning 9-5
Scan Wedge App
The Janam XT2 also comes preloaded with the Scan Wedge application. When active, Scan Wedgeruns in the background and can send scanned and decoded data directly into the currently activeforeground application. For example, with Scan Wedge active, the XT2 can be used to scan barcodedata directly into a Microsoft Word or Excel template, or any other app that accepts input data.
To activate Scan Wedge, go to Apps Screen > Scan Wedge and toggle the on/off switch to on.Under Scan Operation you can enable Auto Scan, set the Auto Scan Interval in intervals ofbetween 0.25 and 10 seconds, or enable Continuous Scan. Under Scan Result, you can specify aPrefix, a Suffix, and a Terminator. These can be used to add some formatting to the scans, orbring them into a format suitable for subsequent processing. You can also toggle Transmit BarcodeID on ad off, and specify a Group Separator.
To the right are twoexamples of usingScan Wedge to scanbarcode data rightinto a Word file andan Excel file.
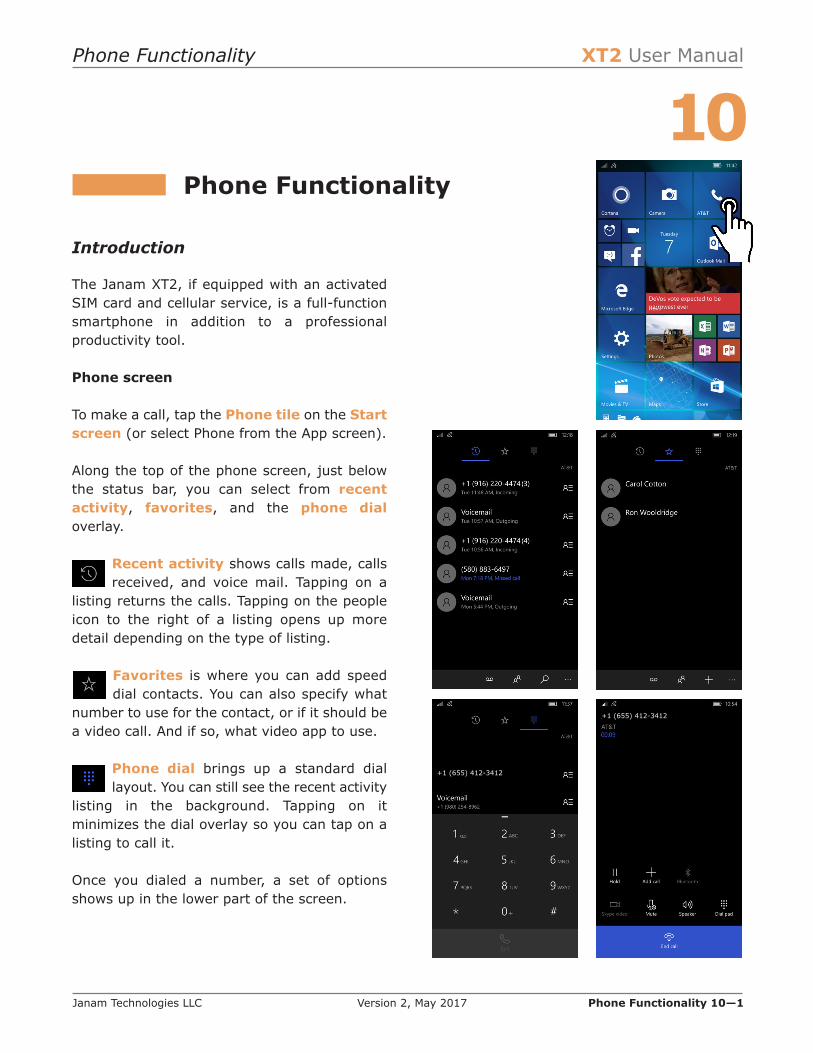
Phone Functionality XT2 User Manual
Janam Technologies LLC Version 2, May 2017 Phone Functionality 10—1
Phone Functionality
10
Introduction
The Janam XT2, if equipped with an activatedSIM card and cellular service, is a full-functionsmartphone in addition to a professionalproductivity tool.
Phone screen
To make a call, tap the Phone tile on the Startscreen (or select Phone from the App screen).
Along the top of the phone screen, just belowthe status bar, you can select from recentactivity, favorites, and the phone dialoverlay.
Recent activity shows calls made, callsreceived, and voice mail. Tapping on a
listing returns the calls. Tapping on the peopleicon to the right of a listing opens up moredetail depending on the type of listing.
Favorites is where you can add speeddial contacts. You can also specify what
number to use for the contact, or if it should bea video call. And if so, what video app to use.
Phone dial brings up a standard diallayout. You can still see the recent activity
listing in the background. Tapping on itminimizes the dial overlay so you can tap on alisting to call it.
Once you dialed a number, a set of optionsshows up in the lower part of the screen.
+1 (655) 412-3412
+1 (655) 412-3412
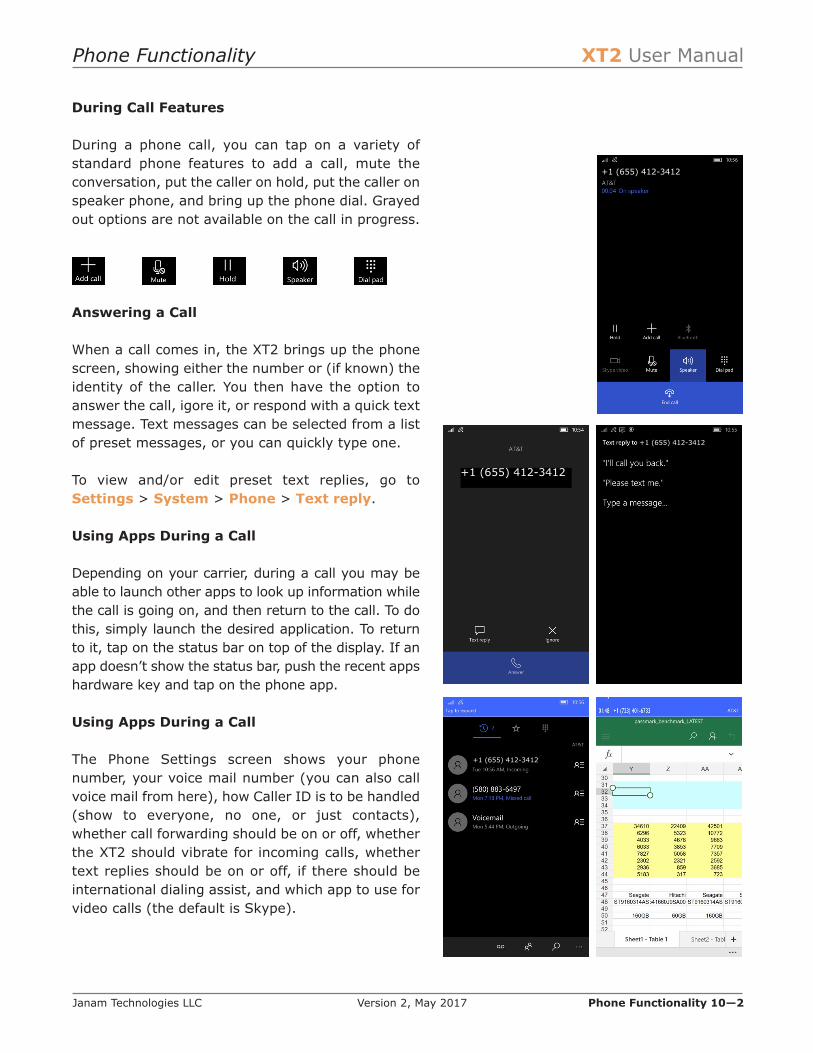
Phone Functionality XT2 User Manual
Janam Technologies LLC Version 2, May 2017 Phone Functionality 10—2
+1 (655) 412-3412
+1 (655) 412-3412
+1 (655) 412-3412
+1 (655) 412-3412
During Call Features
During a phone call, you can tap on a variety ofstandard phone features to add a call, mute theconversation, put the caller on hold, put the caller onspeaker phone, and bring up the phone dial. Grayedout options are not available on the call in progress.
Answering a Call
When a call comes in, the XT2 brings up the phonescreen, showing either the number or (if known) theidentity of the caller. You then have the option toanswer the call, igore it, or respond with a quick textmessage. Text messages can be selected from a listof preset messages, or you can quickly type one.
To view and/or edit preset text replies, go toSettings > System > Phone > Text reply.
Using Apps During a Call
Depending on your carrier, during a call you may beable to launch other apps to look up information whilethe call is going on, and then return to the call. To dothis, simply launch the desired application. To returnto it, tap on the status bar on top of the display. If anapp doesn’t show the status bar, push the recent appshardware key and tap on the phone app.
Using Apps During a Call
The Phone Settings screen shows your phonenumber, your voice mail number (you can also callvoice mail from here), how Caller ID is to be handled(show to everyone, no one, or just contacts),whether call forwarding should be on or off, whetherthe XT2 should vibrate for incoming calls, whethertext replies should be on or off, if there should beinternational dialing assist, and which app to use forvideo calls (the default is Skype).

GPS XT2 User Manual
Janam Technologies LLC Version 2, May 2017 GPS 11—1
GPS
11
Introduction
Janam’s XT2 includes Qualcomm’s “Snapdragon” MSM8916 CPU withIZat Gen 8 support for concurrent GPS, BeiDou and GLONASS.
Unlike separate GPS modules, IZat is built into the processor itselfand uses a combination of positioning, WiFi, and cellular signals fortriangulation.
In addition, IZat can access data from device sensors such asaccelerometers, gyroscopes or an e-compass. Software apps takeadvantage of those capabilities to optimize positioning and evenprovide indoor mapping.
Janam XT2 GNSS Support
The Janam XT2 provides high-sensitivity positioning both in standalone “GPS” mode where it receivesdata from satellites directly, as well as in “A-GPS” (Assisted GPS) mode where satellite data is relatedvia cellular and Wi-Fi networks. In general, direct GPS provides the most accurate positioning whereasA-GPS is less precise but quicker. The source of positioning data varies by app.

GPS XT2 User Manual
Janam Technologies LLC Version 2, May 2017 GPS 11—2
GPS and Location Services
A large number of modern apps use global positioning data as part of their basic functionality. Whatthat means is that GPS has become an inherent part of most computing devices. Maps depend on it,of course, but also search engines, voice assistants, cameras, weather, and social media all rely onit, let alone safety and security systems such as “electronic fences” or “find your device” apps.
GPS and location services have become intertwined. While GPS can be turned on and off (the XT2’sdefault is off), modern operating systems increasingly regulate access via privacy settings. Go toSettings > Privacy > Location to examine the XT2’s available location settings.
Location Service by App
On the to Settings > Privacy >Location screen, scroll down to Choose appsthat can use your location. Here you can setwhether or not an app is allowed to use locationservices or not. In some apps, such as theMicrosoft Edge browser, even if location isallowed, individual sites still need permission.
In the example to the right, the GPS Satelliteapp downloaded from the Microsoft Store wasgiven location access. In addition, the appspecifically asked if it was allowed to turn on theGPS receiver. Once on, the location icon appearsin the status bar
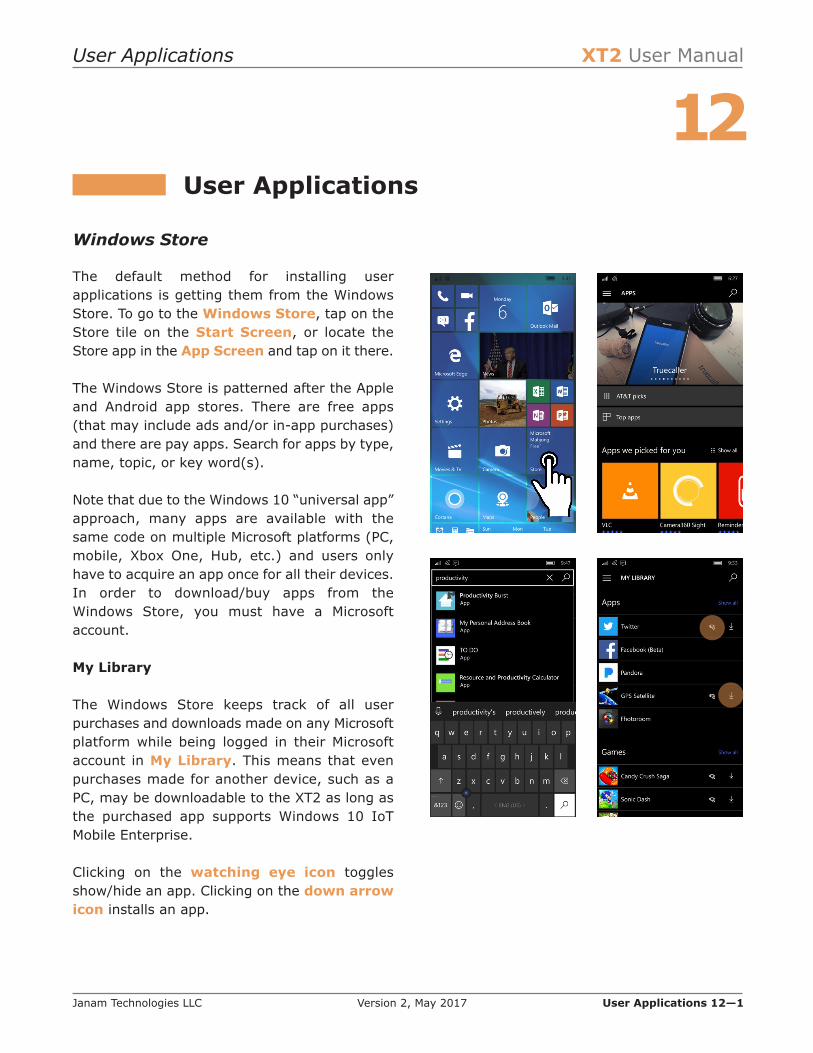
User Applications XT2 User Manual
Janam Technologies LLC Version 2, May 2017 User Applications 12—1
User Applications
12Windows Store
The default method for installing userapplications is getting them from the WindowsStore. To go to the Windows Store, tap on theStore tile on the Start Screen, or locate theStore app in the App Screen and tap on it there.
The Windows Store is patterned after the Appleand Android app stores. There are free apps(that may include ads and/or in-app purchases)and there are pay apps. Search for apps by type,name, topic, or key word(s).
Note that due to the Windows 10 “universal app”approach, many apps are available with thesame code on multiple Microsoft platforms (PC,mobile, Xbox One, Hub, etc.) and users onlyhave to acquire an app once for all their devices.In order to download/buy apps from theWindows Store, you must have a Microsoftaccount.
My Library
The Windows Store keeps track of all userpurchases and downloads made on any Microsoftplatform while being logged in their Microsoftaccount in My Library. This means that evenpurchases made for another device, such as aPC, may be downloadable to the XT2 as long asthe purchased app supports Windows 10 IoTMobile Enterprise.
Clicking on the watching eye icon togglesshow/hide an app. Clicking on the down arrowicon installs an app.
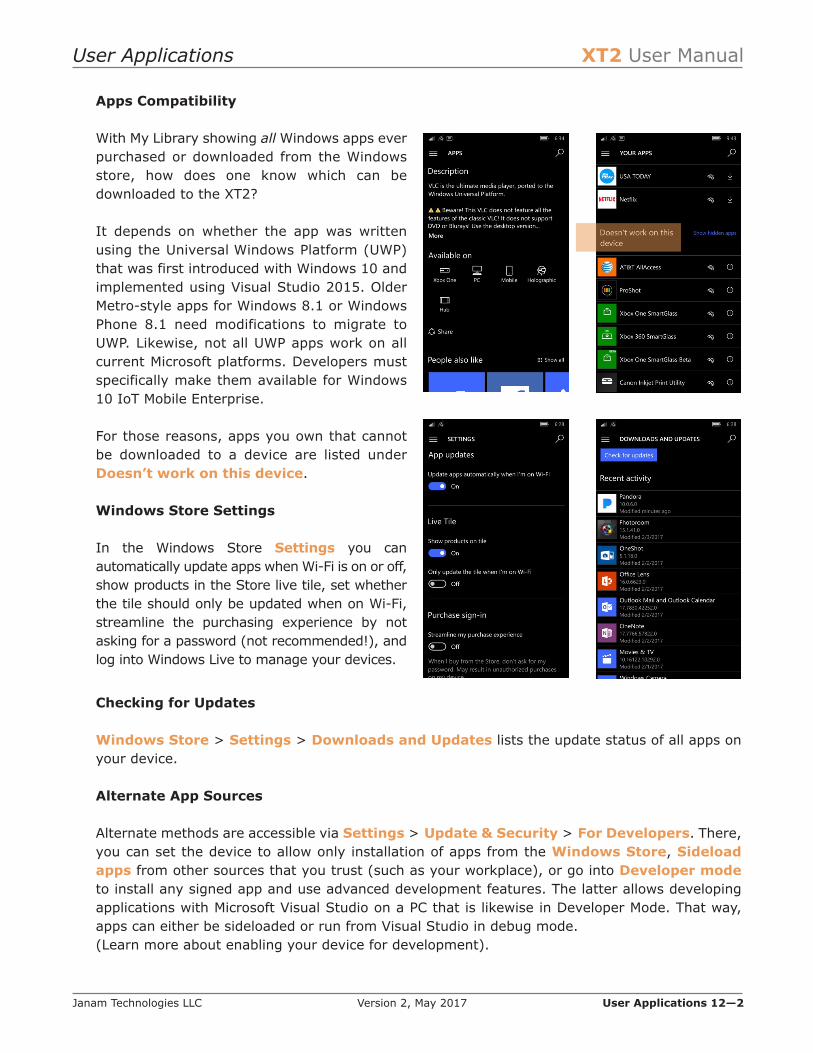
User Applications XT2 User Manual
Janam Technologies LLC Version 2, May 2017 User Applications 12—2
Apps Compatibility
With My Library showing all Windows apps everpurchased or downloaded from the Windowsstore, how does one know which can bedownloaded to the XT2*
It depends on whether the app was writtenusing the Universal Windows Platform (UWP)that was first introduced with Windows 10 andimplemented using Visual Studio 2015. OlderMetro-style apps for Windows 8.1 or WindowsPhone 8.1 need modifications to migrate toUWP. Likewise, not all UWP apps work on allcurrent Microsoft platforms. Developers mustspecifically make them available for Windows10 IoT Mobile Enterprise.
For those reasons, apps you own that cannotbe downloaded to a device are listed underDoesn’t work on this device.
Windows Store Settings
In the Windows Store Settings you canautomatically update apps when Wi-Fi is on or off,show products in the Store live tile, set whetherthe tile should only be updated when on Wi-Fi,streamline the purchasing experience by notasking for a password (not recommended!), andlog into Windows Live to manage your devices.
Checking for Updates
Windows Store > Settings > Downloads and Updates lists the update status of all apps onyour device.
Alternate App Sources
Alternate methods are accessible via Settings > Update & Security > For Developers. There,you can set the device to allow only installation of apps from the Windows Store, Sideloadapps from other sources that you trust (such as your workplace), or go into Developer modeto install any signed app and use advanced development features. The latter allows developingapplications with Microsoft Visual Studio on a PC that is likewise in Developer Mode. That way,apps can either be sideloaded or run from Visual Studio in debug mode. (Learn more about enabling your device for development).
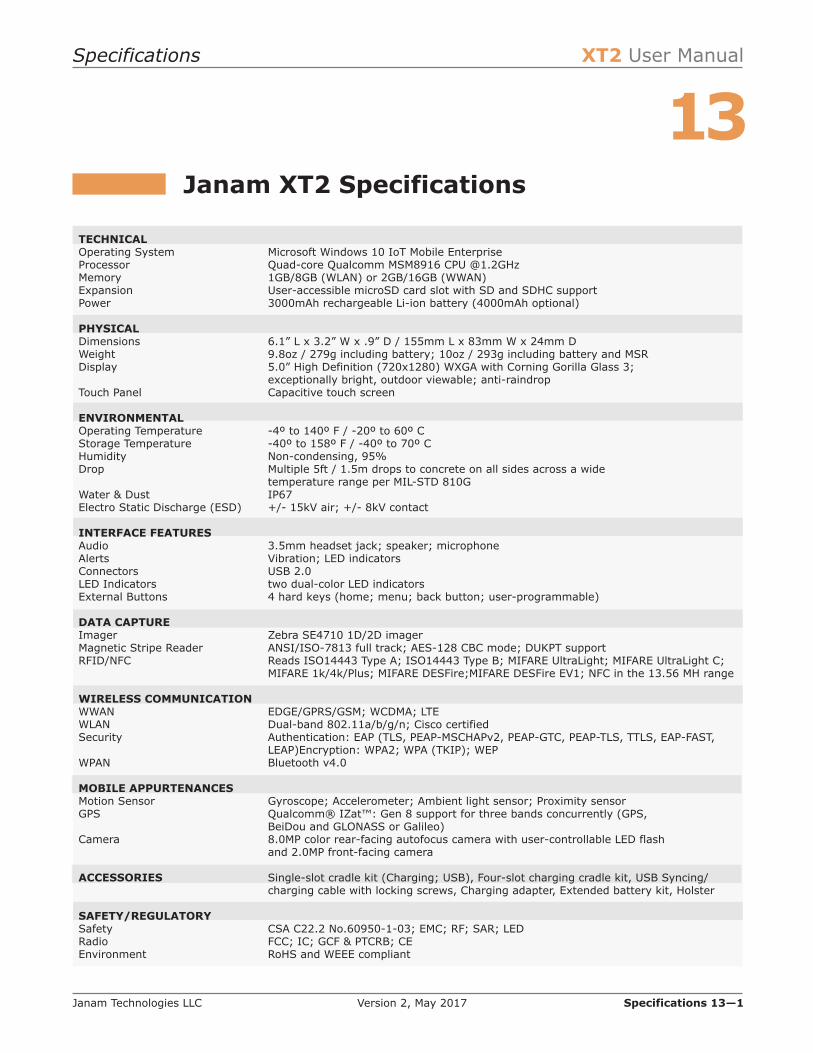
Specifications XT2 User Manual
Janam Technologies LLC Version 2, May 2017 Specifications 13—1
Janam XT2 Specifications
13TECHNICALOperating System Microsoft Windows 10 IoT Mobile EnterpriseProcessor Quad-core Qualcomm MSM8916 CPU @1.2GHzMemory 1GB/8GB (WLAN) or 2GB/16GB (WWAN) Expansion User-accessible microSD card slot with SD and SDHC supportPower 3000mAh rechargeable Li-ion battery (4000mAh optional)
PHYSICALDimensions 6.1” L x 3.2” W x .9” D / 155mm L x 83mm W x 24mm DWeight 9.8oz / 279g including battery; 10oz / 293g including battery and MSRDisplay 5.0” High Definition (720x1280) WXGA with Corning Gorilla Glass 3;
exceptionally bright, outdoor viewable; anti-raindropTouch Panel Capacitive touch screen
ENVIRONMENTALOperating Temperature -4º to 140º F / -20º to 60º CStorage Temperature -40º to 158º F / -40º to 70º CHumidity Non-condensing, 95%Drop Multiple 5ft / 1.5m drops to concrete on all sides across a wide
temperature range per MIL-STD 810GWater & Dust IP67Electro Static Discharge (ESD) +/- 15kV air; +/- 8kV contact
INTERFACE FEATURESAudio 3.5mm headset jack; speaker; microphoneAlerts Vibration; LED indicatorsConnectors USB 2.0LED Indicators two dual-color LED indicatorsExternal Buttons 4 hard keys (home; menu; back button; user-programmable)
DATA CAPTUREImager Zebra SE4710 1D/2D imagerMagnetic Stripe Reader ANSI/ISO-7813 full track; AES-128 CBC mode; DUKPT supportRFID/NFC Reads ISO14443 Type A; ISO14443 Type B; MIFARE UltraLight; MIFARE UltraLight C;
MIFARE 1k/4k/Plus; MIFARE DESFire;MIFARE DESFire EV1; NFC in the 13.56 MH range
WIRELESS COMMUNICATIONWWAN EDGE/GPRS/GSM; WCDMA; LTEWLAN Dual-band 802.11a/b/g/n; Cisco certifiedSecurity Authentication: EAP (TLS, PEAP-MSCHAPv2, PEAP-GTC, PEAP-TLS, TTLS, EAP-FAST,
LEAP)Encryption: WPA2; WPA (TKIP); WEPWPAN Bluetooth v4.0
MOBILE APPURTENANCESMotion Sensor Gyroscope; Accelerometer; Ambient light sensor; Proximity sensorGPS Qualcomm® IZat™: Gen 8 support for three bands concurrently (GPS,
BeiDou and GLONASS or Galileo)Camera 8.0MP color rear-facing autofocus camera with user-controllable LED flash
and 2.0MP front-facing camera
ACCESSORIES Single-slot cradle kit (Charging; USB), Four-slot charging cradle kit, USB Syncing/charging cable with locking screws, Charging adapter, Extended battery kit, Holster
SAFETY/REGULATORYSafety CSA C22.2 No.60950-1-03; EMC; RF; SAR; LEDRadio FCC; IC; GCF & PTCRB; CEEnvironment RoHS and WEEE compliant

Regulatory and Maintenance XT2 User Manual
Janam Technologies LLC Version 2, May 2017 Regulatory and Maintenance 14—1
Regulatory and Maintenance
14XT2 Rugged Touch Computer Regulatory InformationCopyright 2017 Janam Technologies LLC. All rights reserved.
XT2 Rugged Touch Computer, Janam and the Janam logo are trademarks of Janam Technologies LLC.Other product and brand names may be trademarks or registered trademarks of their respective own-ers.
Janam Technologies LLC assumes no responsibility for any damage or loss resulting from the use ofthis guide. Janam Technologies LLC assumes no responsibility for any loss or claims by third partieswhich may arise through the use of this product. Janam Technologies LLC assumes no responsibilityfor any damage or loss caused by deletion of data as a result of malfunction, dead battery or repairs.
Be sure to make backup copies of all important data on other media to protect against data loss.
Follow all usage, charging and maintenance guidelines in the Product User Guide. If you have ques-tions, contact Janam. For a copy of the Product User Guide, visit the online Resource Center atwww.janam.com.
Important: Please read the End User License Agreement with this product before using the device oraccompanying software program(s). Using the device or any part of the software indicates that youaccept the terms of the End User License Agreement. For additional product information, visitwww.janam.com or call +1.877.JANAM.99
Regulatory and Safety ApprovalsThe CE Mark on the product indicates that the system has been tested to and conforms withthe provisions noted within the 2004/108/EEC Electromagnetic Compatibility Directive. For
further information, please contact:
Janam Technologies100 Crossways Park West, Suite 105 Woodbury, NY 11797
Janam Technologies shall not be liable for use of our product with equipment (i.e., power supplies,personal computers, etc.) that is not CE marked and does not comply with the Low Voltage Directive.
Only use Janam approved and UL listed batteries and charging accessories.
FCC and Canadian Compliance
This device meets or exceeds all applicable standards and has been manufactured to the high-est level of quality. To see the specific labels associated with RF terminals configurations, visit
www.janam.com.
Warning: Changes or modifications to this unit not expressly approved by the party responsible forcompliance could void the user authority to operate the equipment.
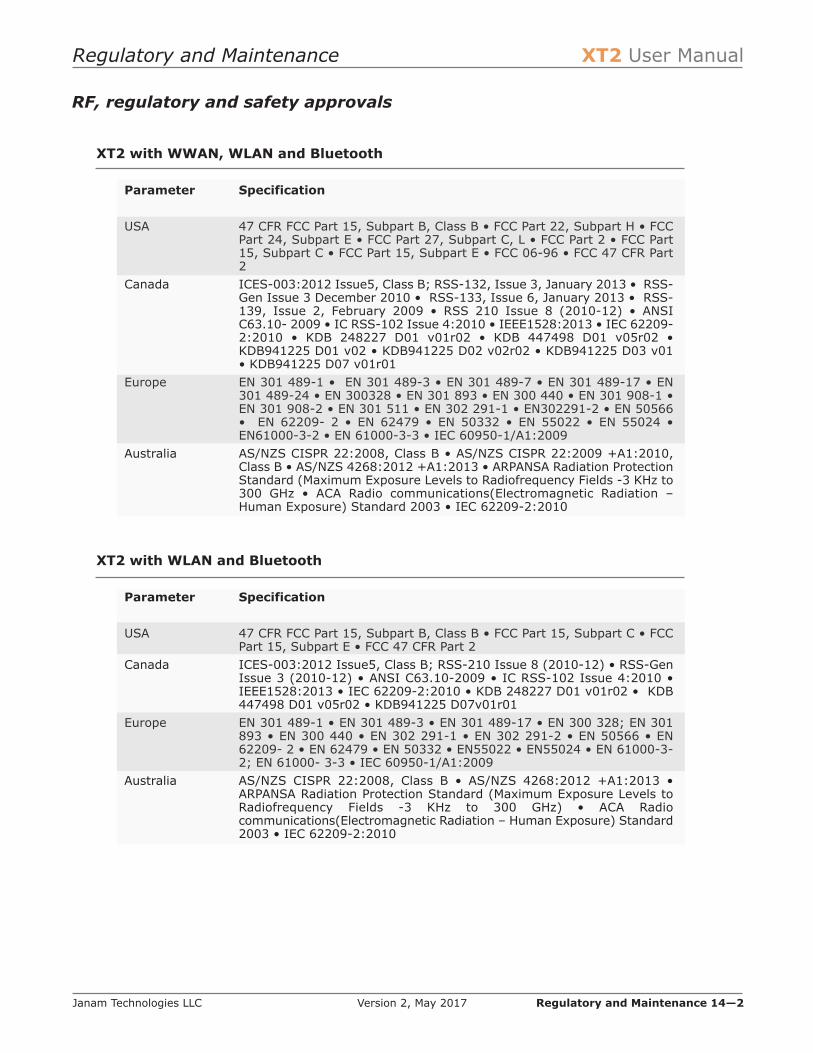
Regulatory and Maintenance XT2 User Manual
Janam Technologies LLC Version 2, May 2017 Regulatory and Maintenance 14—2
RF, regulatory and safety approvals
XT2 with WWAN, WLAN and Bluetooth
Parameter Specification
USA 47 CFR FCC Part 15, Subpart B, Class B • FCC Part 22, Subpart H • FCCPart 24, Subpart E • FCC Part 27, Subpart C, L • FCC Part 2 • FCC Part15, Subpart C • FCC Part 15, Subpart E • FCC 06-96 • FCC 47 CFR Part2
Canada ICES-003:2012 Issue5, Class B; RSS-132, Issue 3, January 2013 • RSS-Gen Issue 3 December 2010 • RSS-133, Issue 6, January 2013 • RSS-139, Issue 2, February 2009 • RSS 210 Issue 8 (2010-12) • ANSIC63.10- 2009 • IC RSS-102 Issue 4:2010 • IEEE1528:2013 • IEC 62209-2:2010 • KDB 248227 D01 v01r02 • KDB 447498 D01 v05r02 •KDB941225 D01 v02 • KDB941225 D02 v02r02 • KDB941225 D03 v01• KDB941225 D07 v01r01
Europe EN 301 489-1 • EN 301 489-3 • EN 301 489-7 • EN 301 489-17 • EN301 489-24 • EN 300328 • EN 301 893 • EN 300 440 • EN 301 908-1 •EN 301 908-2 • EN 301 511 • EN 302 291-1 • EN302291-2 • EN 50566• EN 62209- 2 • EN 62479 • EN 50332 • EN 55022 • EN 55024 •EN61000-3-2 • EN 61000-3-3 • IEC 60950-1/A1:2009
Australia AS/NZS CISPR 22:2008, Class B • AS/NZS CISPR 22:2009 +A1:2010,Class B • AS/NZS 4268:2012 +A1:2013 • ARPANSA Radiation ProtectionStandard (Maximum Exposure Levels to Radiofrequency Fields -3 KHz to300 GHz • ACA Radio communications(Electromagnetic Radiation –Human Exposure) Standard 2003 • IEC 62209-2:2010
XT2 with WLAN and Bluetooth
Parameter Specification
USA 47 CFR FCC Part 15, Subpart B, Class B • FCC Part 15, Subpart C • FCCPart 15, Subpart E • FCC 47 CFR Part 2
Canada ICES-003:2012 Issue5, Class B; RSS-210 Issue 8 (2010-12) • RSS-GenIssue 3 (2010-12) • ANSI C63.10-2009 • IC RSS-102 Issue 4:2010 •IEEE1528:2013 • IEC 62209-2:2010 • KDB 248227 D01 v01r02 • KDB447498 D01 v05r02 • KDB941225 D07v01r01
Europe EN 301 489-1 • EN 301 489-3 • EN 301 489-17 • EN 300 328; EN 301893 • EN 300 440 • EN 302 291-1 • EN 302 291-2 • EN 50566 • EN62209- 2 • EN 62479 • EN 50332 • EN55022 • EN55024 • EN 61000-3-2; EN 61000- 3-3 • IEC 60950-1/A1:2009
Australia AS/NZS CISPR 22:2008, Class B • AS/NZS 4268:2012 +A1:2013 •ARPANSA Radiation Protection Standard (Maximum Exposure Levels toRadiofrequency Fields -3 KHz to 300 GHz) • ACA Radiocommunications(Electromagnetic Radiation – Human Exposure) Standard2003 • IEC 62209-2:2010

Regulatory and Maintenance XT2 User Manual
Janam Technologies LLC Version 2, May 2017 Regulatory and Maintenance 14—3
Compliance with Part 15 of FCC Rules
This device complies with Part 15 of the FCC Rules. Operation is subject to the following twoconditions: (1) this device may not cause harmful interference, and (2) this device must acceptany interference received, including interference that may cause undesired operation.
This equipment has been tested and found to comply with the limits for a Class B digital device,pursuant to Part 15 of the FCC Rules. These limits are designed to provide reasonableprotection against harmful interference in a residential installation. This equipment generates,uses and can radiate radio frequency energy and, if not installed and used in accordance withthe instructions, may cause harmful interference to radio communications.
However, there is no guarantee that interference will not occur in a particular installation. Ifthis equipment does cause harmful interference to radio or television reception, which can bedetermined by turning the equipment off and on, the user is encouraged to try to correct theinterference by one or more of the following measures:
• Reorient or relocate the receiving antenna.
• Increase the separation between the equipment and receiver.
• Connect the equipment into an outlet on a circuit different from that to which thereceiver is connected.
Consult the dealer or an experienced radio/TV technician for help.
If necessary, the user should consult the dealer or an experienced radio/television technicianfor additional suggestions. The user may find the following booklet helpful: “Something aboutInterference.” This is available at FCC local regional offices. Our company is not responsiblefor any radio or television interference caused by unauthorized modifications of this equipmentor the substitution or attachment of connective cables and equipment other than thosespecified by our company. The correction is the responsibility of the user. Use only shieldeddata cables with this system.
This device and its antenna must not be co-located or operating in conjunction with any otherantenna or transmitter. To maintain compliance with the FCC RF exposure guidelines for body-worn operation, do not use accessories that contain metallic components other than specifiedby the manufacturer.
Regulatory and Maintenance XT2 User Manual
Janam Technologies LLC Version 2, May 2017 Regulatory and Mintenance 14—4
This Class B digital apparatus complies with the Canadian ICES-003.
Cet appareil numerique de la Class B est conforme a la norm NMB-003 du Canada.
Operation is subject to the following two conditions: (1) this device may not cause interference,and (2) this device must accept any interference, including interference that may causeundesired operation of the device.
L’utilisation de ce dispositif est autorisee seulement aux deux conditions suivantes : (1) il nedoit pas produire de brouillage, et (2) l’utilisateur du dispositif doit e?tre pre?t a© accepter toutbrouillage radioelectrique rec?u, me?me si ce brouillage est susceptible de compromettre lefonctionnement du dispositif.
To prevent radio interference to the licensed service, this device is intended to be operatedindoors and away from windows to provide maximum shielding. Equipment (or its transmitantenna) that is installed outdoors is subject to licensing.
Hereby, Janam Technologies LLC declares that this product is in compliance with the essentialrequirements and other relevant provisions of Directive, 1999/5/EC. The equipment is intendedfor use throughout the European Community.
Care and Cleaning of Terminals
When needed, clean the screen with a clean, non-abrasive, lint-free cloth. The terminal canbe cleaned with a damp cloth.
Waste Electrical and Electronic Equipment Information
This product has required the extraction and use of natural resources for its production. Itmay contain hazardous substances that could impact health and the environment, if notproperly disposed.
In order to avoid the dissemination of those substances in our environment and to diminishthe pressure on the natural resources, we encourage you to use the appropriate take-backsystems for product disposal. Those systems will reuse or recycle most of the materials of theproduct in a sound way.
The crossed-out wheeled bin symbol informs you that the product should not bedisposed of along with municipal waste and indicates that you should use theappropriate separate take- back systems for product disposal.
If you need more information on the collection, reuse and recycling systems, please contactyour local region waste administration. You may also contact your supplier for moreinformation on the environmental performances of this product.

Regulatory and Maintenance XT2 User Manual
Janam Technologies LLC Version 2, May 2017 Regulatory and Mintenance 14—5
Battery WarningCAUTION:
Unit contains a non-replaceable internal Lithium Ion battery. The battery can burstor explode, releasing hazardous chemicals. To reduce the risk of fire or burns, do
not dissemble, crush, puncture or dispose of in fire or water.
Battery Safety Guidelines
Important instructions for service personnel only:
• Reorient or relocate the receiving antenna.
• Caution: Risk of explosion if battery is replaced by an incorrect type. Dispose of usedbatteries according to the instructions.
• Replace only with the same or equivalent type recommended by the manufacturer.
• The battery must be recycled or disposed of properly.
• Use the battery only in the specified equipment.
Battery Charger Safety Guidelines
• Use only the charger supplied with your device. Use of another type of charger willresult in malfunction and/or danger.
• WARNING! To avoid the risk of electric shock, this device must only be connected tosupply mains with protective earth.
• Do not use the charger in a high moisture environment. Never touch the chargerwhen your hands or feet are wet.
• Allow adequate ventilation around the charger when using it to operate the device orcharge the battery. Do not cover the charger with paper or other objects that willreduce cooling. Do not use the charger while it is inside a carrying case.
• Connect the charger to a proper power source. The voltage requirements are foundon the product case and/or packaging.
• Do not use the charger if the cord becomes damaged.
• Do not attempt to service the unit. There are no serviceable parts inside. Replace theunit if it is damaged or exposed to excess moisture.
• To fully disengage the power to the unit, please disconnect the power cord from theAC inlet.
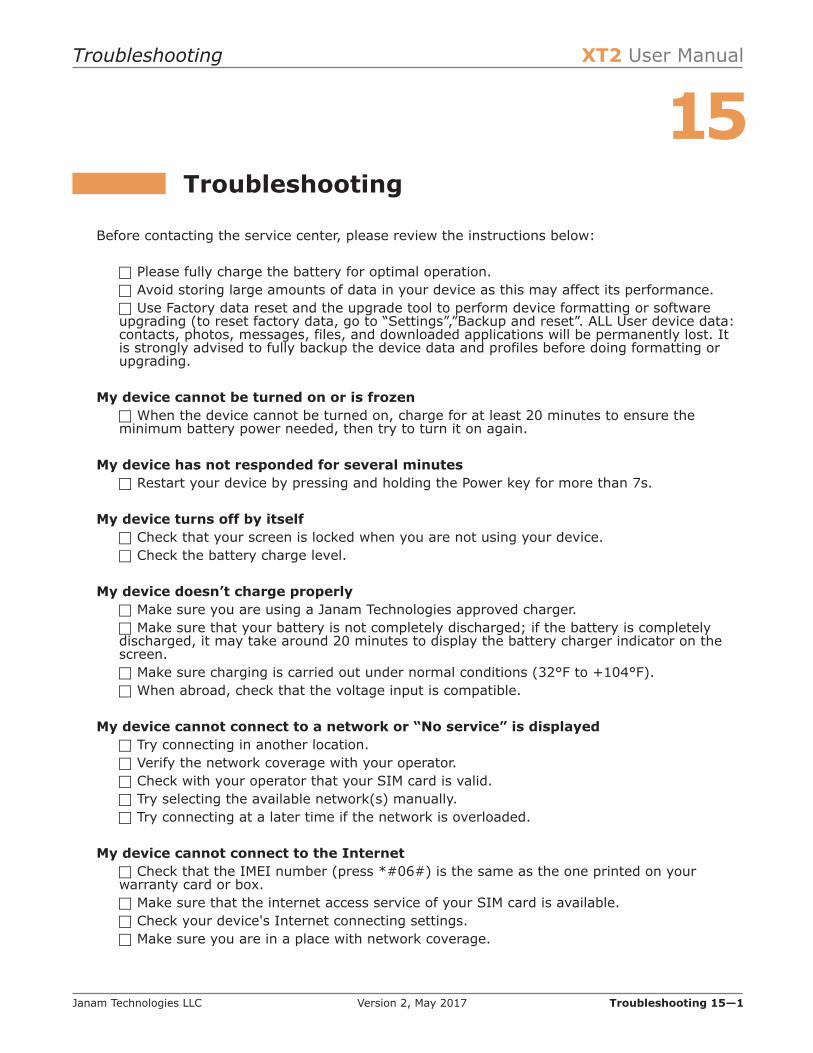
Troubleshooting XT2 User Manual
Janam Technologies LLC Version 2, May 2017 Troubleshooting 15—1
Before contacting the service center, please review the instructions below:
! Please fully charge the battery for optimal operation.! Avoid storing large amounts of data in your device as this may affect its performance.! Use Factory data reset and the upgrade tool to perform device formatting or softwareupgrading (to reset factory data, go to “Settings”,”Backup and reset”. ALL User device data:contacts, photos, messages, files, and downloaded applications will be permanently lost. Itis strongly advised to fully backup the device data and profiles before doing formatting orupgrading.
My device cannot be turned on or is frozen! When the device cannot be turned on, charge for at least 20 minutes to ensure theminimum battery power needed, then try to turn it on again.
My device has not responded for several minutes! Restart your device by pressing and holding the Power key for more than 7s.
My device turns off by itself! Check that your screen is locked when you are not using your device.! Check the battery charge level.
My device doesn’t charge properly! Make sure you are using a Janam Technologies approved charger.! Make sure that your battery is not completely discharged; if the battery is completelydischarged, it may take around 20 minutes to display the battery charger indicator on thescreen.! Make sure charging is carried out under normal conditions (32°F to +104°F).! When abroad, check that the voltage input is compatible.
My device cannot connect to a network or “No service” is displayed! Try connecting in another location.! Verify the network coverage with your operator.! Check with your operator that your SIM card is valid.! Try selecting the available network(s) manually.! Try connecting at a later time if the network is overloaded.
My device cannot connect to the Internet! Check that the IMEI number (press #06#) is the same as the one printed on yourwarranty card or box.! Make sure that the internet access service of your SIM card is available.! Check your device's Internet connecting settings.! Make sure you are in a place with network coverage.
Troubleshooting
15
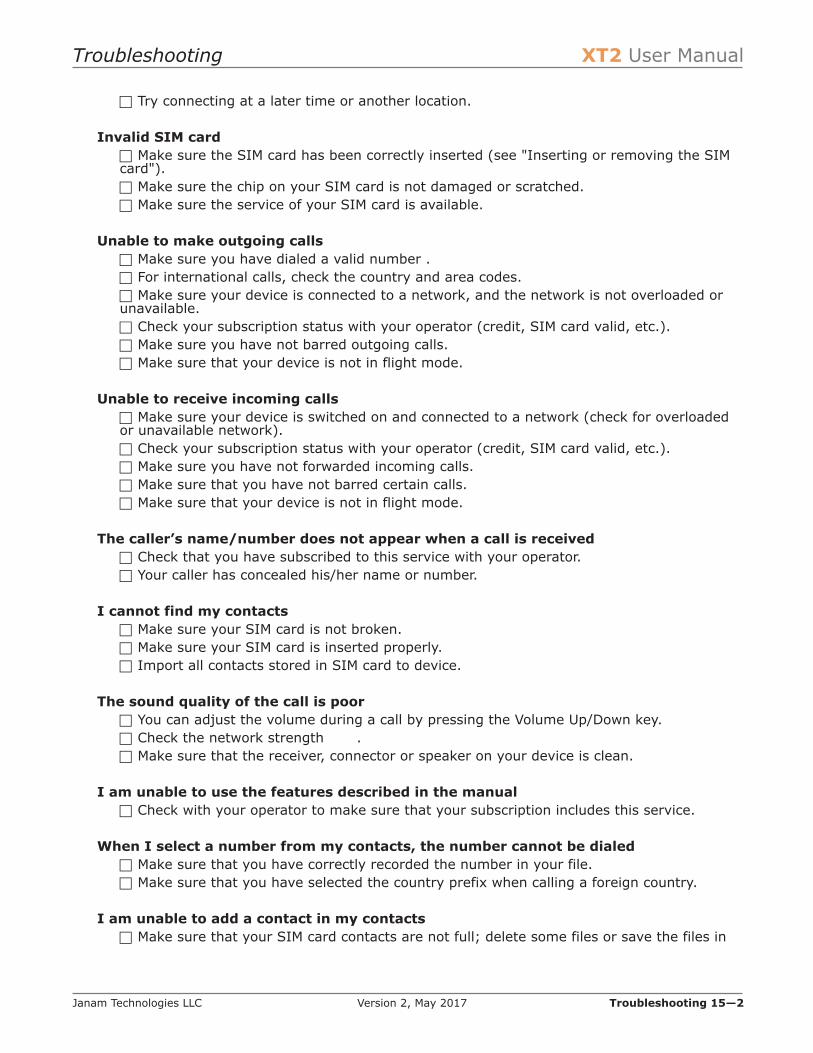
Troubleshooting XT2 User Manual
Janam Technologies LLC Version 2, May 2017 Troubleshooting 15—2
! Try connecting at a later time or another location.
Invalid SIM card! Make sure the SIM card has been correctly inserted (see "Inserting or removing the SIMcard").! Make sure the chip on your SIM card is not damaged or scratched.! Make sure the service of your SIM card is available.
Unable to make outgoing calls! Make sure you have dialed a valid number .! For international calls, check the country and area codes.! Make sure your device is connected to a network, and the network is not overloaded orunavailable.! Check your subscription status with your operator (credit, SIM card valid, etc.).! Make sure you have not barred outgoing calls.! Make sure that your device is not in flight mode.
Unable to receive incoming calls! Make sure your device is switched on and connected to a network (check for overloadedor unavailable network).! Check your subscription status with your operator (credit, SIM card valid, etc.).! Make sure you have not forwarded incoming calls.! Make sure that you have not barred certain calls.! Make sure that your device is not in flight mode.
The caller’s name/number does not appear when a call is received! Check that you have subscribed to this service with your operator.! Your caller has concealed his/her name or number.
I cannot find my contacts! Make sure your SIM card is not broken.! Make sure your SIM card is inserted properly.! Import all contacts stored in SIM card to device.
The sound quality of the call is poor! You can adjust the volume during a call by pressing the Volume Up/Down key.! Check the network strength .! Make sure that the receiver, connector or speaker on your device is clean.
I am unable to use the features described in the manual! Check with your operator to make sure that your subscription includes this service.
When I select a number from my contacts, the number cannot be dialed! Make sure that you have correctly recorded the number in your file.! Make sure that you have selected the country prefix when calling a foreign country.
I am unable to add a contact in my contacts! Make sure that your SIM card contacts are not full; delete some files or save the files in

Troubleshooting XT2 User Manual
Janam Technologies LLC Version 2, May 2017 Troubleshooting 15—3
the phone contacts (i.e. your professional or personal directories).
My callers are unable to leave messages on my voicemail! Contact your network operator to check service availability.
I cannot access my voicemail! Make sure your operator’s voicemail number is correctly entered in "Voicemail number".! Try later if the network is busy.
I am unable to send and receive MMS! Check your device memory availability as it might be full.! Contact your network operator to check service availability and checkMMS parameters.! Verify the server center number or your MMS profile with your operator.! The server center may be busy, try again later.
SIM card PIN locked! Contact your network operator to obtain the PUK code (Personal Unblocking Key).
I am unable to connect my device to my computer! Make sure that you’re using the cable included in the box.
I am unable to download new files! Make sure there is sufficient device memory for your download.! Select the microSD card as the location to store downloaded files.! Check your subscription status with your operator.
The device cannot be detected by others via Bluetooth! Make sure that Bluetooth is turned on and your device is visible to other users.! Make sure that the two devices are within Bluetooth’s detection range.
How to make your battery last longer! Make sure you follow the complete charge time (minimum 3 hours).! After a partial charge, the battery level indicator may not be exact. Wait for at least 20minutes after removing the charger to obtain an exact indication.! Adjust the brightness of screen as appropriate.! Extend the email auto-check interval for as long as possible.! Update news and weather information on manual demand, or increase their auto-checkinterval.! Exit background-running applications if they are not being used for a long time.! Deactivate Bluetooth, WLAN, or GPS when not in use.
The device sometimes gets hot! This heating is a normal consequence of the CPU handling excessive data. Ending aboveactions will make your device return to normal temperatures.