Citizen User Manual
164
Core Application Software – User Manual Confidential CCTNS Page | 1 Crime and Criminal Tracking Network & Systems Core Application Software (CAS) Citizen State Citizen User Manual Submitted to National Crime Records Bureau New Delhi Submitted By Wipro Limited Confidentiality This document is being submitted to National Crime Records Bureau, Ministry of Home Affairs, Government of India, with the explicit understanding that the contents would not be divulged to any third party without prior written consent from Wipro Limited.
-
Upload
khangminh22 -
Category
Documents
-
view
2 -
download
0
Transcript of Citizen User Manual

Core Application Software – User Manual
Confidential CCTNS Page | 1
Crime and Criminal Tracking Network & Systems
Core Application Software (CAS)
Citizen State
Citizen User Manual
Submitted to
National Crime Records Bureau New Delhi
Submitted By
Wipro Limited
Confidentiality This document is being submitted to National Crime Records Bureau, Ministry of Home Affairs, Government of India, with the explicit understanding that the contents would not be divulged to any third party without prior written consent from Wipro Limited.

Core Application Software – User Manual
Confidential CCTNS Page | 2
ABBREVIATIONS
SNo Abbreviation Description
1. ACP Assistant Commissioner of Police
2. APP Assistant Public Prosecutor
3. ASI Assistant Sub Inspector
4. ASP Assistant Superintendent of Police
5. CAS Core Application Software
6. CCIS Crime Criminal Information System
7. CCTNS Crime and Criminal Tracking Network & Systems
8. CID Criminal Investigation Department
9. CIPA Common Integrated Police Application
10. CNCP Child in Need of Care & Protection
11. CO Circle Officer
12. CP Commissioner Of Police
13. CPIO Central Public Information Officer
14. CWC Children Welfare Court
15. DCP Deputy Commissioner of Police
16. DCRB District Crime Record Bureau
17. DGP Director General of Police
18. DIG Deputy Inspector General
19. DM District Magistrate
20. DO Duty Officer
21. DSB District Special Branch
22. DSP Deputy Superintendent of Police
23. EO Enquiry Officer
24. FIR First Information Report
25. FPB Finger Print Bureau
26. FSL Forensic Science Laboratory
27. GD General Dairy
28. GPF General Provident Fund
29. HC Head Constable
30. ID Identification (document)
31. IG Inspector General
32. IIF Integrated Investigation Form
33. IO Investigating Officer
34. JICL Juvenile In Conflict With Law
35. JJB Juvenile Justice Board
36. LIU Local Intelligence Unit
37. NCR Non Cognizable Report
38. NCRB National Crime Record Bureau

Core Application Software – User Manual
Confidential CCTNS Page | 3
39. NOC No Objection Certificate
40. OC Officer In Charge
41. PAN Permanent Account Number
42. PCN Provisional Criminal Number
43. PCR Police Control Room
44. PP Public Prosecutor
45. PS Police Station
46. RCN Regular Criminal Number
47. RTI Right To Information
48. SC/ST Scheduled Caste/Scheduled Tribe
49. SCRB State Crime Record Bureau
50. SDOP Sub Divisional Office of Police
51. SDPO Sub Divisional Police Officer
52. SHO Station House Officer
53. SI Sub Inspector
54. SMS Short Messaging Service
55. SO Supervisory officer/Station Officer/Standing Order/Sections Officer
56. SP Superintendent of Police
57. SSP Senior Superintendent of Police
58. UID Unique Identification Document

Core Application Software – User Manual
Confidential CCTNS Page | 4
Know your ICONS
CAS user manual consists of icons which are used throughout the manual. The icons are described
below and can be use as necessary.
ICON Description ICON Description
Important Item – Keep in mind
Take a print out
Help Tip
Note
Do’s – User should do / perform
this action
Linked to another item
Don’ts – User should not do /
perform this action
Go the main menu
Assumptions & Limitations
1. CAS User Manual has been prepared for the base system that has been prepared on basis of
approved functional and system requirements. Any additional requirements that stem after the
preparation of this documentation shall result in a revision of the CAS User Manual, which shared be
shared subsequently.
2. CAS User Manual assumes that the infrastructure for the project has already been provided to the
users, therefore, any users who are using earlier or old infrastructure such as computers,
networking, and peripherals may face difficulty in getting the desired results from the software.
3. CAS screens are visible/access to user on the basis on his/her role and responsibilities.
All screens are not visible to all users.
4. CAS lite is a subset version of complete CAS. It does not contain the complete functionality.

Core Application Software – User Manual
Confidential CCTNS Page | 5
Let’s Start!! Tools Required
You will be provided with the following basic infrastructure:
1. Computer (CPU, Monitor, Keyboard & Mouse)
2. Network Connection (as per requirement)
3. Peripherals (as per requirement)
4. Browser (Internet Explorer 7.0 or Mozilla 3.6)
5. Uninterrupted Power Supply (UPS)
Starting your Computer
Steps
1. Ensure all cables are connected between the computer, network connection, peripherals & UPS
2. Plug the UPS to the electrical socket
3. Switch ‘ON’ the electrical socket
4. Switch ‘ON’ the UPS
5. Press the (power button) on the computer
6. Allow the system to boot up
Switch ‘ON’ the UPS only after you have switched ‘ON’ the power socket Switch ‘ON’ the computer only after you have switched ‘’ON’ the UPS Switch ‘OFF’ the power socket in there is an electrical spark in the socket
Do not start the computer in case the UPS is not fully charged Do not start the computer in case any of the wires are in contact with water sources /
moisture
In case you are not sure whether the computer is connected in the right way – please contact system engineer

Core Application Software – User Manual
Confidential CCTNS Page | 6
User Manual The purpose of this User Manual is to help users in data entries. The manual consist of steps used for making entries with screen shots. Brief description is also provided before every module for user to understanding.
Before making data entries one should keep the following points in mind:
User should have a valid username and password before login
User can see the pages only if he/she have access to those screens
Make relevant and correct entries only
Mandatory fields (marked with *)cannot be left blank
Do not make false entries
Browse through each & every Tabs to make data entries
Recheck the entries made before click on Submit
Text shown in BLUE colour shows the output for any entry or activity
Example: For making data entries
Steps
1. To open a required page click on links provided on top Example: To open an FIR Registration page
i. First click on Registration
ii. Click on First Information Report
iii. Click on New Registration to open the page
2. Click on tabs one by one to make entries i. Click tabs from left to right

Core Application Software – User Manual
Confidential CCTNS Page | 7
ii. Go to next only when all the necessary entries are made in first one
3. Browse through each tabs within tabs to make data entries
4. Enter the data in textboxes given
5. Select the data from the dropdowns
6. Click on radio buttons to select
7. Select the dates by clicking on
8. Shows the mandatory entries. Entries of these fields are must
9. Click on Add button to add details in grid

Core Application Software – User Manual
Confidential CCTNS Page | 8
10. Click on delete button to remove entry from the list
11. Click on Search button to search for a record or entry made initially i. System will display the recent items in the grid
ii. If the required number is not available in the list, click Search button
iii. Enter the search criteria and click on search
iv. System will display the result
12. User can click on Clear button to remove the entries made
13. User can click on Submit button to save the entries made
14. User can click on Close button to exit the page
15. User can click on Preview button to see the preview of the page
16. User can click on Print button to take out the print
17. User can upload documents by clicking on Browse button and select the required file to be upload

Core Application Software – User Manual
Confidential CCTNS Page | 9
Table of Content
1. CRIME AND CRIMINAL TRACKING & NETWORK SYSTEMS ............................................................................... 11
1.1 ABOUT THE PROJECT .......................................................................................................................................................... 12
2. CORE APPLICATION SOFTWARE (CAS) ............................................................................................................. 13
3. MODULES ........................................................................................................................................................ 15
3.1 GENERAL .................................................................................................................................................................. 15
3.1.1 Citizen’s Login Page .............................................................................................................................................. 15
3.1.2 Create Citizen Login .............................................................................................................................................. 16
3.1.3 Citizen Login .......................................................................................................................................................... 18
3.1.4 Citizen Homepage (After Login)............................................................................................................................. 19
3.1.5 Modify Citizen Login Details .................................................................................................................................. 20
3.1.6 Change Password-Citizen ...................................................................................................................................... 22
3.1.7 Forgot Password-Citizen ........................................................................................................................................ 24
3.2 STATUS SEARCH (FOR COMPLAINTS, SERVICE REQUESTS AND FIR) ........................................................................................ 26
3.3 CITIZEN INFORMATION ................................................................................................................................................ 28
3.4 CITIZEN’S TIP ............................................................................................................................................................. 30
3.5 CITIZEN FEEDBACK ...................................................................................................................................................... 33
3.6 FREQUENTLY ASKED QUESTIONS ................................................................................................................................... 34
3.7 ONLINE LIBRARY ......................................................................................................................................................... 35
3.8 COMPLAINT ............................................................................................................................................................... 38
3.8.1 Add New Complaint ............................................................................................................................................... 38
3.8.2 Modify Complaint .................................................................................................................................................. 46
3.8.3 View Registration of Complaint ............................................................................................................................. 53
3.9 CITIZEN SERVICES ....................................................................................................................................................... 60
3.9.1 Tenant Verification Request .................................................................................................................................. 60
3.9.2 Modification of Tenant verification request ......................................................................................................... 66
3.10 CHARACTER CERTIFICATE ............................................................................................................................................. 73
3.10.1 Character Certificate request ................................................................................................................................ 73
3.10.2 Modification of Character Certificate Request ...................................................................................................... 77
3.11 EVENT/PERFORMANCE REQUEST REGISTRATION .............................................................................................................. 82
3.11.1 Event / Performance Request Registration ........................................................................................................... 82
3.11.2 Modification of Request for Permission for Event / Performance ......................................................................... 90
3.12 PROTEST /STRIKE REQUEST .......................................................................................................................................... 98
3.12.1 Protest / Strike Registration Request .................................................................................................................... 98
3.12.2 Modification of Request for Permission for Protest / Strike ................................................................................ 104
3.13 PROCESSION REQUEST ............................................................................................................................................... 110
3.13.1 Procession Request Registration ........................................................................................................................... 110
3.13.2 Modification of Permission for Procession Request ............................................................................................ 117
3.14 EMPLOYEE VERIFICATION REQUEST .............................................................................................................................. 122
3.14.1 Add Employee Verification Request ..................................................................................................................... 122
3.14.2 Modification of Employee Verification request .................................................................................................. 129

Core Application Software – User Manual
Confidential CCTNS Page | 10
3.15 DOMESTIC HELP VERIFICATION REQUEST ...................................................................................................................... 137
3.15.1 Add Domestic Help Verification Request ............................................................................................................. 137
3.15.2 Modification of Domestic Help verification request ............................................................................................ 147
3.16 C-FORM REQUEST .................................................................................................................................................... 157
3.16.1 Submission of C Form (Foreigner Registration) ................................................................................................... 157
3.16.2 View C-Form (Foreigner Registration) ................................................................................................................. 162

Core Application Software – User Manual
Confidential CCTNS Page | 11
1. Crime and Criminal Tracking & Network Systems
The Crime and Criminal Tracking Network Systems (CCTNS) has been conceptualized by the
Ministry of Home Affairs (MHA) in detailed consultation with all stakeholders, including the National
Crime Records Bureau (NCRB), the State Governments, the Department of Information Technology
(DIT), Government of India and the National Informatics Centre (NIC). It is envisioned to be
implemented as a ‘Mission Mode Project (MMP)’ and will adopt the guidelines of the National e-
Governance Plan (NeGP).
CCTNS aims at creating a comprehensive and integrated system for enhancing the efficiency and
effective policing at all levels and especially at the Police Station level through adoption of principles
of e-Governance, and creation of a nationwide networked infrastructure for evolution of IT-enabled
state-of-the-art tracking system for “investigation of crime and detection of criminals” in real time,
which is a critical requirement in the context of the present day internal security scenario.
The project aims to create infrastructure and mechanism to provide the basis for evolution of an IT
enabled state of the art workflow (Processes) automation system in a planned manner from Police
Station level upwards and also provide public service delivery systems. It will not only automate
police functions at police station and higher levels but will also create facilities and mechanism to
provide public services like registration of online complaints, ascertaining the status of case
registered at the police station, verification of persons etc.
The project includes vertical connectivity of police units (linking police units at various levels within
the States – police stations, district police offices, state headquarters, SCRB and other police
formations – and States/UTs, through state headquarters and SCRB, to NCRB at GOI level) as well as
horizontal connectivity, linking police functions at State and Central level to external entities. CCTNS
also provides for a citizens interface to provide basic services to citizens.

Core Application Software – User Manual
Confidential CCTNS Page | 12
1.1 About the Project
The overall vision of project CCTNS is to create - A State-of-Art System that allows access to real-
time crime and criminal information to all stakeholders. The key objectives of the CCTNS project can
be identified as:
Providing enhanced tools
The project is envisioned to provide for enhanced tools for crime investigation, crime prevention,
law and order maintenance and other functions such as traffic management, emergency response
etc. The enhanced tools would enable the police personnel to conduct activities in an effective and
efficient manner. These tools would in addition help remove non-value adding activities and create
integrated workflows for better management of cases till closure.
Increasing operational efficiency
The project is envisioned to increase the operational efficiency by reducing redundancy in processes
through their streamlining and standardization, increasing communication by providing access to
and availability of additional communication modes such as police messaging, email, mobile
telephony etc., automating back office functions such as information collection, MIS, workflows etc.
Creating national platform to share information and intelligence
The project also envisions the creation of a national platform for sharing information and
intelligence through the use of SSDGs at the state level and NSDG at the national level. This would
allow other interfacing agencies sharing data and information in a two way mode to the last level, at
the police station or a PCR. This would allow the police personnel to better conduct their actions
based on availability of real time information through a chosen communication mode.
Providing services to citizens and policemen
The project envisions to create services that can be availed directly by the citizens through the
nearest available mode such as CSC, internet, police station etc. This also implies that the police
personnel would have access to citizen complaints and requests from different sources in a real time
manner; which means that the resolution to a case can be reached in an effective and timely
manner. Internally the systems would enable the police personnel to register, investigate and
prepare for prosecution of a case online, using minimal paperwork and dependency on traditional
systems.

Core Application Software – User Manual
Confidential CCTNS Page | 13
2. Core Application Software (CAS)
CAS State system will be implemented in the centralized architecture at the State Data Centres and
support the remote managed client environment (at police stations) to work in online/offline mode.
The CCTNS CAS (Central) will be implemented at NCRB. The CCTNS CAS applications have the clear
separation of concern and the architecture layers i.e. presentation, business logic and database
layers as depicted in the above figure.
CCTNS CAS System will be built using following industry standards / guidelines that will facilitate the
coexistence and inter-changeability of multiple hardware and software technologies, tools,
protocols, and interfaces. These standards compliance will give more flexibility to react to changing
business and technology conditions without unnecessarily restricting the architecture direction to
proprietary environments.
CAS State would include modules covering business processes in police stations and higher offices:
i. Registration
The Registrations can be of general service petitions or general complaints. This service is initiated
once the citizens register their complaints or petitions with police personnel. Based on nature of the
petition (General Service Petition, Cognizable Complaint, Non-Cognizable Complaint) the service to
citizens will be honoured by issuing general service petitions like No Objection certificates,
Permissions etc., or registering a complaint and issue FIR/NCR. Based on the evidence and facts, the
police personnel will proceed for investigation.
ii. Investigation
After a complaint is registered, police initiates the investigation process. The identified Investigating
officer will visit the crime scene and record the crime details The Investigating officer will send the
collected evidences to external agencies for further verification. The IO will arrest the accused if any
and proceed for interrogation and later file a charge sheet/final report and submit the accused in
the court.
iii. Prosecution
Interfacing with the courts during the prosecution of cases is an integral part of the responsibilities
of police personnel. After filing the charge sheet the police personnel will update the Trial details
and execute the summons/warrants issued by court. The police personnel will also record the court
disposal details include persons involved, attendance, examination, court order, details about bail
and status of accused.

Core Application Software – User Manual
Confidential CCTNS Page | 14
iv. Search and Basic Reporting
Since the inception of the case the police personal will search different registers to track/identify
the criminals involved in different cases/crimes. This will help the police personal to map the missing
cases with un-known dead bodies and enable them to generate different reports like MCR’s, NBW’s,
PT cases, UI cases etc.

Core Application Software – User Manual
Confidential CCTNS Page | 15
3. Modules Each module can be defined as a set of services grouped together according to the requirements.
3.1 General
The sets of screens shown in this section are common to all users. Every user has to go through these screens
before entering the system.
3.1.1 Citizen’s Login Page
This is the homepage for citizens (before login). User can use the general services shown without registering in the system. For using rest of the services citizen has to create account.
Steps
1. Double click on or icon to open the browser. 2. Enter the URL in the address bar. System will open the Homepage for citizens

Core Application Software – User Manual
Confidential CCTNS Page | 16
3.1.2 Create Citizen Login
This page will allow user to create a user account by registering themselves with the system. User has to create a
Username and Password for login. User has to enter his/her personal details also in the process of registration.

Core Application Software – User Manual
Confidential CCTNS Page | 17
Steps
1. Click on ‘Create Account’ link System will display the registration page 2. Enter/Select the entries to be made
Choose the Username and Password which you can easily remember Two security questions and their answers are mandatory
3. Click on ‘Submit’ button to complete the process 4. Click on ‘Clear’ button to set all the fields as blank 5. Click on ‘Close’ button to return to the main menu
Password should minimum of 8 characters long and maximum limit should be 30 characters Password should have at least 1 special character and 1 number and 1 alphabet Data Field in Password and confirm Password should be same for successful User creation

Core Application Software – User Manual
Confidential CCTNS Page | 18
3.1.3 Citizen Login
This page allows to all registered citizens to ‘login’ in the system.
Steps
1. Enter the ‘Username’ and ‘Password’ 2. Select the Language to be use 3. Click on ‘Login’ button System will validate the username and password After validation, system will let you will enter the application and display the home page
Points to Remember
User can have only one active session at any given time Do not share your Username and Password to anyone Do not enter the incorrect Username and Password more than three times; otherwise system
will block the access for sometime In case of three failed login attempts within <five> minutes, system will not allow the user to login for the
next one hour

Core Application Software – User Manual
Confidential CCTNS Page | 19
3.1.4 Citizen Homepage (After Login)
This page will show the list of services citizen can use. It displays the various services and tasks which users have
access.

Core Application Software – User Manual
Confidential CCTNS Page | 20
3.1.5 Modify Citizen Login Details
This page allows user to modify personal details except his/her login ID.

Core Application Software – User Manual
Confidential CCTNS Page | 21
Steps 1. Click on ‘Modify Citizen Login’ Link 2. Enter/Select the entries to be made
Two security questions and their answers are mandatory 3. Click on ‘Submit’ button to complete the process System will update the details 4. Click on ‘Clear’ button to set all the fields as blank 5. Click on ‘Close’ button to return to the main menu

Core Application Software – User Manual
Confidential CCTNS Page | 22
3.1.6 Change Password-Citizen
This page provides the functionality to change the password in the system.
Steps
1. Click on icon on the top right of the citizen homepage System will display ‘Change Password’ screen 2. Enter/Select the entries to be made
Password will automatically get expire after 60 days of its creation 3. Click on ‘Submit’ button to complete the process System will change the password and update the details 4. Click on ‘Close’ button to return to the dashboard
Points to Remember
Do not set the ‘new password’ from any of the last five consecutive passwords
Please remember the answers given to the Security Questions
Password will minimum of 8 characters long and maximum limit will be 30 characters. Password will have at least 1 special character and 1 number and 1 alphabet. Data Field in Password and confirm Password will be same for successful User creation.
All mandatory fields will be entered

Core Application Software – User Manual
Confidential CCTNS Page | 23
Two security question are mandatory User will not be able to select a security question more than once In case the user enters, any of the last five consecutive passwords as a ‘new password’, system will
display a message – THE NEW PASSWORD SHOULD BE DIFFERENT FROM THE PREVIOUS FIVE PASSWORDS ENTERED
In case the user does not enter the ‘new password’ as per the password characteristics, system will display a message – PASSWORD SHOULD BE AS PER PASSWORD POLICY
In case the user does not enter data in a mandatory field, system will display a message – PLEASE FILL ALL MANDATORY FIELDS
System will display a message ‘Password successfully changed’ and display the login screen

Core Application Software – User Manual
Confidential CCTNS Page | 24
3.1.7 Forgot Password-Citizen
This page provides functionality to the actor to reset the password.
Steps
1. Click on ‘Forgot Password’ link System will display Forgot Password screen 2. Enter/Select the entries to be made System will ask the answers to security questions selected at the time of registration 3. Click on ‘Reset Password’ button to complete the process 4. Click on ‘Close’ button to return to the main menu
Points to Remember
Do not enter wrong answer to the security question more than three times, otherwise, system will lock the account
All mandatory fields will be entered User will answer the security questions

Core Application Software – User Manual
Confidential CCTNS Page | 25
In case the user enters incorrect answers to the security questions, system will display a message – SECURITY QUESTION ANSWERED INCORRECTLY, PLEASE TRY AGAIN; and display the ‘Forgot Password’ screen
In case the user enters incorrect answers to the security questions four times consecutively, system will display a message – YOU HAVE EXCEEDED THE MAXIMUM NUMBER OF TRIES. YOUR ACCOUNT HAS BEEN LOCKED
In case the user does not enter data in a mandatory field, system will display a message – PLEASE FILL ALL MANDATORY FIELDS
System displays a message, ‘Your new password is xxxx, please note it down’

Core Application Software – User Manual
Confidential CCTNS Page | 26
3.2 Status Search (for complaints, service requests and FIR)
This page allows user to search the present status of a Service Request / Complaint / FIR.

Core Application Software – User Manual
Confidential CCTNS Page | 27
Steps 1. Click on ‘Status Search’ link System will open the status search page 2. Enter/Select the entries to be made 3. Select the Type of Service to be view 4. Click on ‘Clear’ button to set all the fields as blank
5. Click on ‘Close’ button to return to the home page

Core Application Software – User Manual
Confidential CCTNS Page | 28
3.3 Citizen Information
This page provides functionality to view information pertaining to - Missing Persons, Proclaimed Offenders, Stolen Vehicles, Recovered Vehicles, Rewarded Criminals, Unidentified Dead Bodies and Abandoned / Unclaimed Property.

Core Application Software – User Manual
Confidential CCTNS Page | 29
Steps
1. Click on ‘Citizen Information’ link. System will display citizen information page 2. Select the type of service and click on ‘Search’ button. System will display the list of Service Request/FIR/Complaint with their information 3. Click on ‘Save as PDF’ button to save the present screen as a PDF document. 4. Click on ‘Print’ button to print the document.
5. Click on ‘Close’ button to return to the home page.

Core Application Software – User Manual
Confidential CCTNS Page | 30
3.4 Citizen’s Tip
This page will allow user to enter the anonyms tip or information about a person, object, location or event.
Steps
1. Click on ‘Citizen’s Tip’ link. System will display Citizen’s Tip page 2. Enter/Select the correct information to be provided. 3. Select the ‘Tip Detail’ tab and enter the tip to be given. 4. Click on ‘Submit’ button to save the details.

Core Application Software – User Manual
Confidential CCTNS Page | 31
Steps
1. Click on ‘Suspect Details’ tab. System will open the Suspect details page 2. Enter/Select the correct information to be provided.
Steps
1. Click on ‘Tip Details’ tab System will display Tip details page 2. Enter/Select the entries to be made 3. Click on ‘Browse’ button to upload the document 4. Click on ‘Clear’ button to set all the fields as blank

Core Application Software – User Manual
Confidential CCTNS Page | 32
5. Click on ‘Close’ button to return to the home page
Steps
1. Click on ‘Tip Submission’ tab System will open the Tip submission page for citizen service 2. Enter/Selects the correct information to be provided 3. Click the ‘Submit’ button to submit the entered details 4. Click the ‘Clear’ button to set all the fields as blank
5. Click the ‘Close’ button to return to the home page

Core Application Software – User Manual
Confidential CCTNS Page | 33
3.5 Citizen Feedback
This page allows you to provide feedback on police services.
Steps
1. Click on ‘Citizen Feedback’ link System will display the Citizen Feedback page 2. Enter/Select the correct information to be provided 3. Click on ‘Submit’ button to submit the entered details 4. Click on ‘Clear’ button to set all the fields as blank
5. Click on ‘Close’ button to return to the home page

Core Application Software – User Manual
Confidential CCTNS Page | 34
3.6 Frequently Asked Questions
This page will allow user to view pertaining to frequently asked questions with regards to registration of complaints and service requests.
Steps
1. Click on ‘FAQ’ link. 2. Select any one from the list. 3. Click on ‘Go’ button. System will display the frequently asked questions with answers

Core Application Software – User Manual
Confidential CCTNS Page | 35
3.7 Online Library
This page will allow user to view the online library.

Core Application Software – User Manual
Confidential CCTNS Page | 36
Steps
1. Click on Citizen Service link.

Core Application Software – User Manual
Confidential CCTNS Page | 37
2. Click on Online Library link. User can see the list of documents like:
State Police Manuals
Code of Criminal Procedure
Indian Penal Code
Indian Evidence Act
Crime in India
Other Acts like Juvenile Justice Act, NDPS act, Arms act, Gambling act and other minor acts
Important judgment rules of SC/HCs
Circulars and standing orders 3. Click on a particular document to see the details. System will display the document with option to view and save.
Core Application Software – User Manual
Confidential CCTNS Page | 38
3.8 Complaint
This service allows citizen to lodge complaint online to the police station. They can also modify and view the
status of the complaint.
3.8.1 Add New Complaint
This page will allow user to register a complaint 1. Online for the Citizen 2. Through system for a police officer
Core Application Software – User Manual
Confidential CCTNS Page | 39

Core Application Software – User Manual
Confidential CCTNS Page | 40

Core Application Software – User Manual
Confidential CCTNS Page | 41

Core Application Software – User Manual
Confidential CCTNS Page | 42

Core Application Software – User Manual
Confidential CCTNS Page | 43
Steps
1. Click on ‘Complaint’ link 2. Click on ‘Register New Complaint’ link System will display register new complaint page 3. Browse within tabs to make or select entries 4. Enter or Select the information to be provided 5. Click on radio button to select when required 6. Click on ‘Submit’ button to save the information

Core Application Software – User Manual
Confidential CCTNS Page | 44
System will save the entries made and generate a complaint number. System will generate a temporary number if he/she click on ‘Save’ button, which will get drop after 48 hours if not modified & submitted permanently (User can submit the complaint permanently by clicking on ‘Submit’ button) or
Click on ‘Clear’ button to remove the entries made System will remove the entries made and set the default entries
or
Click on ‘Close’ button to close the current page System will close the current page and return to the Homepage or
Click on ‘Save as PDF’ button to save the present screen as a PDF document or Click on ‘Print’ button to print the document
Points to Remember
Option to select ‘others’ is not available to a citizen. When ‘Others’ is selected, all fields will become non-mandatory. In case ‘Others’ is selected, the label ‘Complaint number’ should be changed to ‘Reference number’ All mandatory fields should be entered User should enter a minimum of two of the following fields:
Mobile number Landline Address ID type & ID number Email
If an user has submitted an e-Form, the system should forward the application based on same criteria as in the online form
If ‘Complaint’ is selected as 'Against Police Officer', system should forward the application to the queue to the respective SP, of the Police Station
If user is other than citizen, then system should display the name of the police station / higher office System should forward the complaint number to the ‘complainant’ through SMS, based on complainant
details System will forward the complaint number to the ‘complainant’ through email, based on complainant
details System will forward the complaint to the queue of selected police station, police station head’s, ‘Complaint
list’ If an user leaves mandatory fields blank, system should display a message - PLEASE FILL ALL MANDATORY
FIELDS If a user enters data other than permissible data, system should display a message – DATA ENTERED IN
<NAME OF THE FIELD> IS INCORRECT. PLEASE ENTER THE CORRECT DATA System should generate a complaint number and display a message – SERVICE REQUEST NUMBER XX HAS
BEEN REGISTERED System should forward the complaint number to the ‘complainant’ through SMS, based on complainant
details System should forward the complaint number to the ‘complainant’ through email, based on complainant
details System should forward the complaint to the queue of selected police station, police station head’s,

Core Application Software – User Manual
Confidential CCTNS Page | 45
‘Complaint list’ System update Status as ‘Registered’

Core Application Software – User Manual
Confidential CCTNS Page | 46
3.8.2 Modify Complaint
This page will allow user to modify a ‘saved’ complaint, for which a ‘temporary complaint number’ has been generated.

Core Application Software – User Manual
Confidential CCTNS Page | 47

Core Application Software – User Manual
Confidential CCTNS Page | 48

Core Application Software – User Manual
Confidential CCTNS Page | 49

Core Application Software – User Manual
Confidential CCTNS Page | 50

Core Application Software – User Manual
Confidential CCTNS Page | 51
Steps
1. Click on ‘Complaint’ link 2. Click on ‘Modify Complaint’ link 3. Enter the ‘Temporary Complaint Number’ in the required field 4. Click on ‘Modify’ button and see the saved complaint 5. Browse within tabs to make or select entries 6. Enter or Select the information to be provided 7. Click on radio button to select when required 8. Click on ‘Submit’ button to save the information permanently System will save the entries made.

Core Application Software – User Manual
Confidential CCTNS Page | 52
or
Click on ‘Clear’ button to remove the entries made System will remove the entries made and set the default entries
or
Click on ‘Close’ button to close the current page System will close the current page and return to the Homepage
or Click on ‘Save as PDF’ button to save the present screen as a PDF document or
Click on ‘Print’ button to print the document Points to Remember
Temporarily Complaint Number should be active for only 48 hrs from its date of creation Once service request number is allotted, temporary service request number should be deactivated Post 48 hrs from the date of creation, the system should delete the entry All mandatory field should be filled If ‘Complaint’ is selected as 'Against Police Officer', system should forward the application to the queue
to the respective SP, of the Police Station If user is other than citizen, then system should display the name of the police station / higher office If an user leaves mandatory fields blank, system should display a message - PLEASE FILL ALL MANDATORY
FIELDS If a user enters data other than permissible data, system should display a message – DATA ENTERED IN
<NAME OF THE FIELD> IS INCORRECT. PLEASE ENTER THE CORRECT DATA Alert will go to particular senior officer from where the complaint is forwarded System should generate a complaint number and display a message – SERVICE REQUEST NUMBER XX HAS
BEEN REGISTERED System should forward the complaint number to the ‘complainant’ through SMS, based on complainant
details System should forward the complaint number to the ‘complainant’ through email, based on complainant
details System should forward the complaint to the queue of selected police station, police station head’s,
‘Complaint list’ System update Status as ‘Registered’

Core Application Software – User Manual
Confidential CCTNS Page | 53
3.8.3 View Registration of Complaint
This page will allow user to search and view a registered complaint

Core Application Software – User Manual
Confidential CCTNS Page | 54

Core Application Software – User Manual
Confidential CCTNS Page | 55

Core Application Software – User Manual
Confidential CCTNS Page | 56

Core Application Software – User Manual
Confidential CCTNS Page | 57

Core Application Software – User Manual
Confidential CCTNS Page | 58

Core Application Software – User Manual
Confidential CCTNS Page | 59
Steps
1. Click on ‘Complaint’ link 2. Click on ‘View Registration of Complaint’ link System will display the list of recently registered complaint number, click on required number if it is in there otherwise enter the search criteria and click on ‘Search’ button 3. Browse within tabs to view the entries made earlier 4. Click on ‘Close’ button to close the current page System will close the current page and return to the Homepage
or Click on ‘Print’ button to print the document.
Points to Remember
If the user does not enter a valid complaint number, system should display a message – PLEASE ENTER A VALID COMPLAINT NUMBER

Core Application Software – User Manual
Confidential CCTNS Page | 60
3.9 Citizen Services
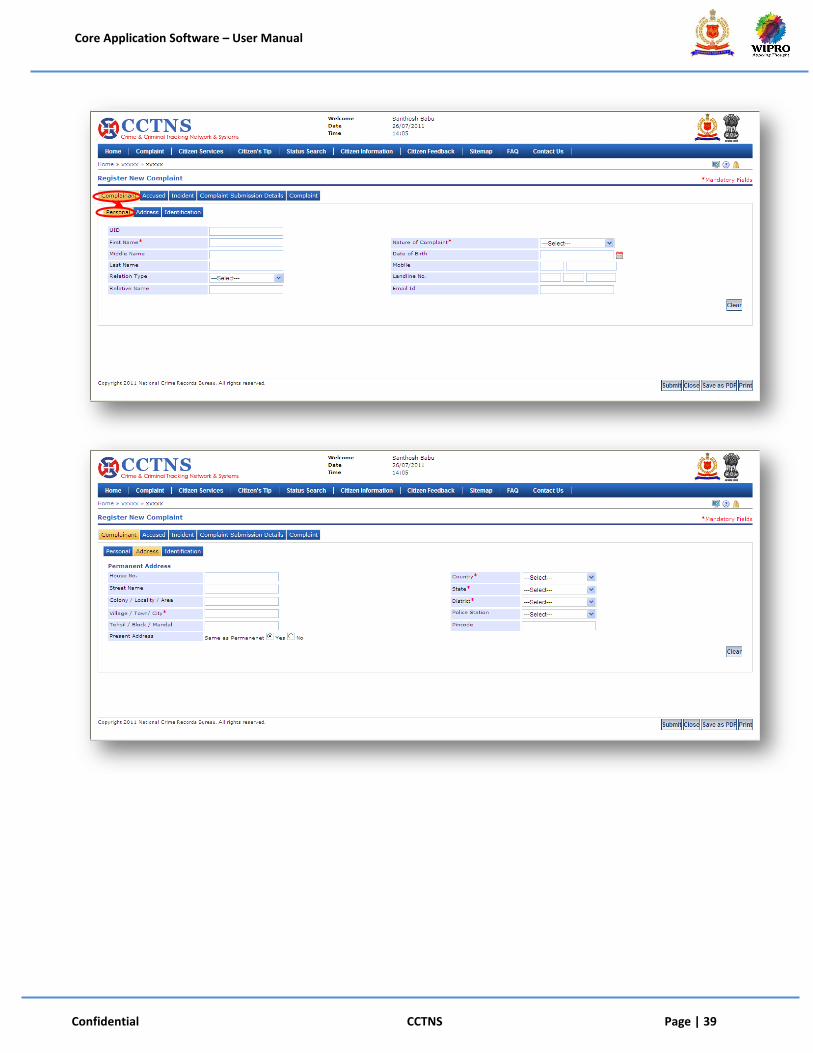
3.9.1 Tenant Verification Request
This page will provide the functionality for adding a new service request for Tenant verification.

Core Application Software – User Manual
Confidential CCTNS Page | 61
Steps 1. Click on ‘Citizen Services’ link. 2. Click on ‘Tenant/PG Verification Request’ link. 3. Click on ‘Add Tenant Verification Request’ link. System will display the Tenant Verification Request page 4. Select / Enter the correct information to be made for owner information. 5. Click on ‘Submit’ button to save the information. System will save the entries made
or
Click on ‘Clear’ button to remove the entries made System will remove the entries made and set the default entries
or
Click on ‘Close’ button to close the current page System will close the current page and return to the Homepage
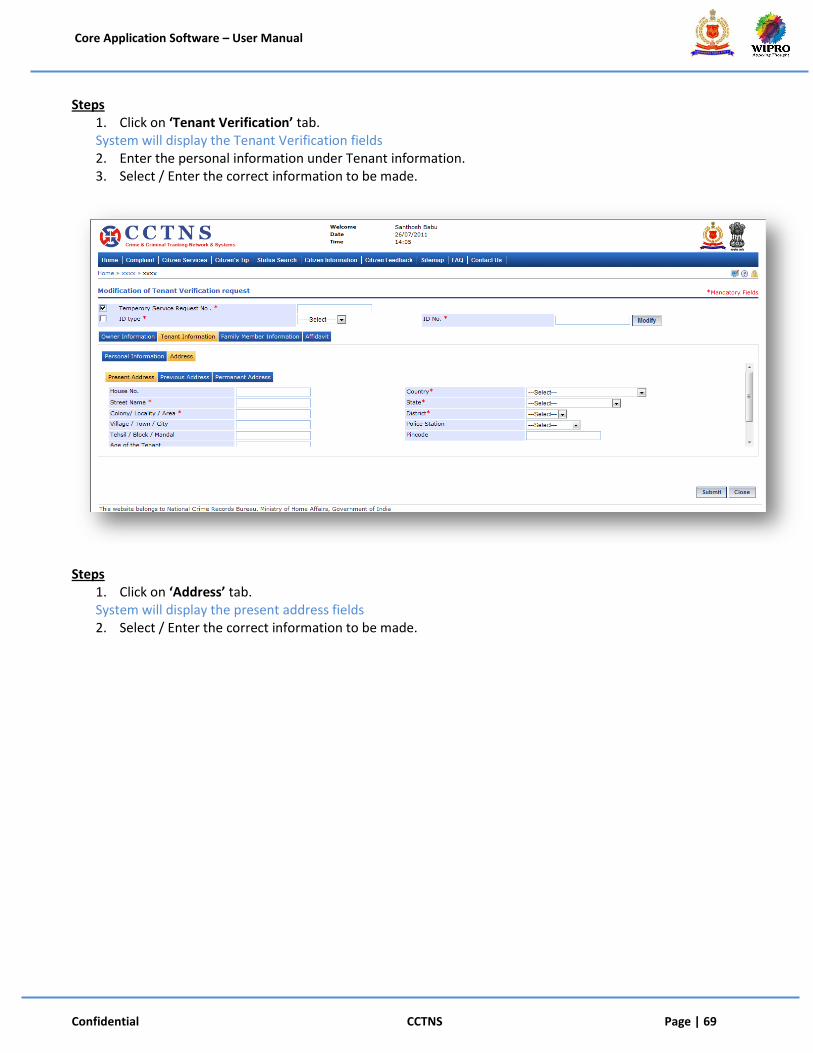
Steps
1. Click on ‘Tenant Verification’ tab. System will display the Tenant Verification fields 2. Enter the personal information under Tenant Information. 3. Select / Enter the correct information to be made.

Core Application Software – User Manual
Confidential CCTNS Page | 62
Steps
1. Click on ‘Address’ tab. System will display the present address fields 2. Select / Enter the correct information to be made.

Core Application Software – User Manual
Confidential CCTNS Page | 63
Steps
1. Click on ‘Previous Address’ tab. System will display the previous address fields 2. Select / Enter the correct information to be made.
Steps
1. Click on ‘Permanent Address’ tab. System will display the permanent address fields 2. Select / Enter the correct information to be made.
Core Application Software – User Manual
Confidential CCTNS Page | 64
Steps
1. Click on ‘Family Member Information’ tab. System will display the Family Member Information fields 2. Select / Enter the correct information to be made.
Steps

Core Application Software – User Manual
Confidential CCTNS Page | 65
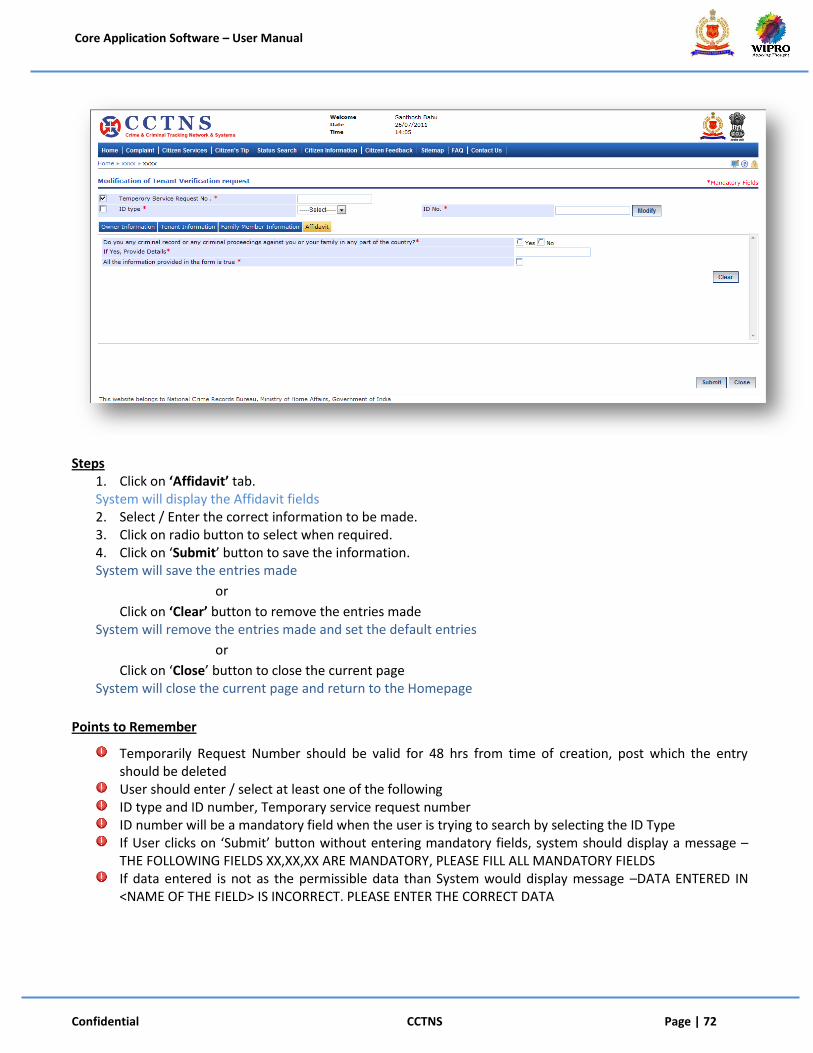
1. Click on ‘Affidavit’ tab. System will display the Affidavit fields 2. Select / Enter the correct information to be made. 3. Click on radio button to select when required. 4. Click on ‘Submit’ button to save the information. System will save the entries made
or
Click on ‘Clear’ button to remove the entries made System will remove the entries made and set the default entries
or
Click on ‘Close’ button to close the current page System will close the current page and return to the Homepage
Points to Remember
Date of leaving should not be greater than the current date If the permanent address and present address are different then the same form will also be submitted to the SHO of the Police station where he permanently resides
If the present and permanent address are same, the form will be submitted at the present address Police station only
System should automatically alert and create a pending task of verification for the SHO of the respective present address and permanent address police station
System generate Service request ID for Tenant Verification Pending task to the permanent, previous and present address SHOs’ to Assign the Enquiry officer for the service request System should set the status of request as ‘Registered’ Citizen should get alert through Email address SMS- mobile phone number
User attempts to enter a future date as the date of leaving The system would respond with the message DATE OF LEAVING CANNOT BE A FUTURE DATE
User attempts to enter age as the future date The system would respond with the message AGE CANNOT BE A FUTURE DATE The age of the tenant should be above 18 years
If the user leaves the mandatory fields blank and clicks on submit, system should display the message- PLEASE FILL ALL MANDATORY FIELDS
If the user clicks the Save button without inputting the mandatory fields. Then System should display a message. (PLEASE FILL ALL MANDATORY FIELDS)
If the user has entered a value in the field that is not according to the permissible data of that field, then
system should display a message. DATA ENTERED IN <NAME OF THE FIELD> IS INCORRECT. PLEASE ENTER
THE CORRECT DATA

Core Application Software – User Manual
Confidential CCTNS Page | 66
3.9.2 Modification of Tenant verification request
This page will provide for modification of saved request for Tenant verification.

Core Application Software – User Manual
Confidential CCTNS Page | 67
Steps
1. Click on ‘Citizen Services’ link. 2. Click on ‘Tenant/PG Verification Request’ link. 3. Click on ‘Modification of Tenant Verification request’ link.

Core Application Software – User Manual
Confidential CCTNS Page | 68
System will display the Modification of Tenant Verification request page 4. Enter the temporary service request number. 5. Click on ‘Modify’ button to update the details entered. 6. Select / Enter the correct information to be made.
Core Application Software – User Manual
Confidential CCTNS Page | 69
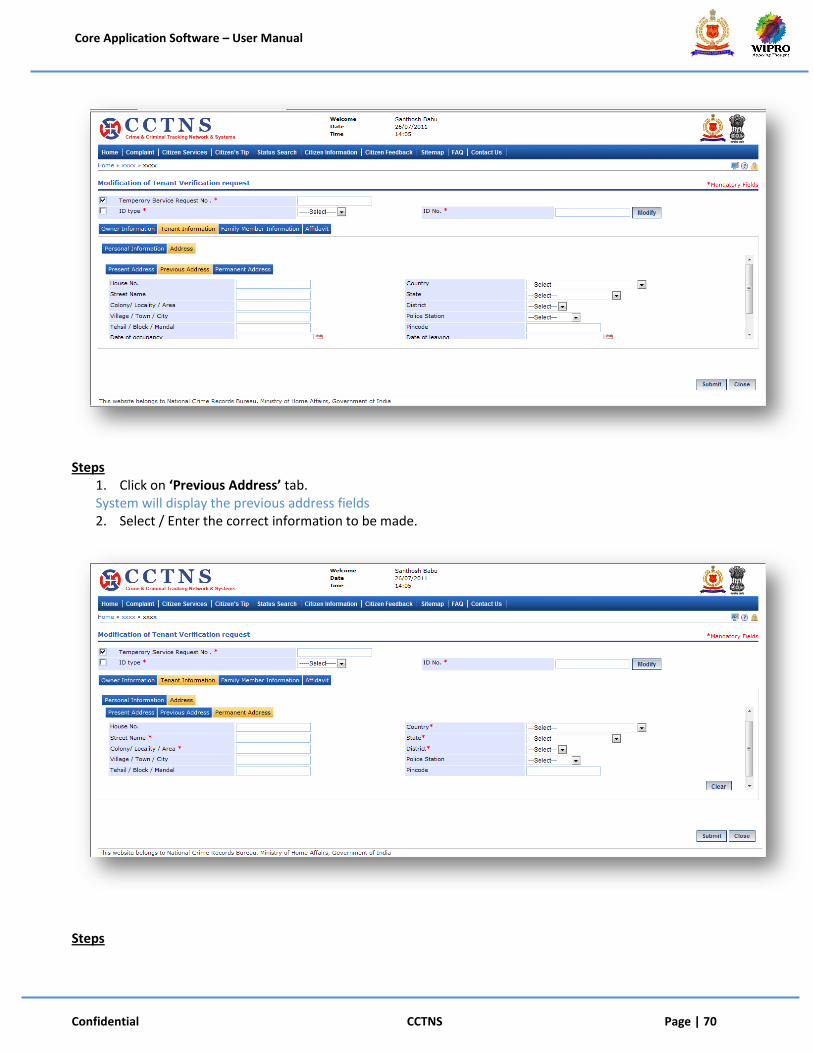
Steps 1. Click on ‘Tenant Verification’ tab. System will display the Tenant Verification fields 2. Enter the personal information under Tenant information. 3. Select / Enter the correct information to be made.
Steps
1. Click on ‘Address’ tab. System will display the present address fields 2. Select / Enter the correct information to be made.
Core Application Software – User Manual
Confidential CCTNS Page | 70
Steps
1. Click on ‘Previous Address’ tab. System will display the previous address fields 2. Select / Enter the correct information to be made.
Steps

Core Application Software – User Manual
Confidential CCTNS Page | 71
1. Click on ‘Permanent Address’ tab. System will display the permanent address fields 2. Select / Enter the correct information to be made.
Steps
1. Click on ‘Family Member Information’ tab. System will display the Family Member Information fields 2. Select / Enter the correct information to be made.
Core Application Software – User Manual
Confidential CCTNS Page | 72
Steps
1. Click on ‘Affidavit’ tab. System will display the Affidavit fields 2. Select / Enter the correct information to be made. 3. Click on radio button to select when required. 4. Click on ‘Submit’ button to save the information. System will save the entries made
or
Click on ‘Clear’ button to remove the entries made System will remove the entries made and set the default entries
or
Click on ‘Close’ button to close the current page System will close the current page and return to the Homepage
Points to Remember
Temporarily Request Number should be valid for 48 hrs from time of creation, post which the entry should be deleted
User should enter / select at least one of the following ID type and ID number, Temporary service request number ID number will be a mandatory field when the user is trying to search by selecting the ID Type If User clicks on ‘Submit’ button without entering mandatory fields, system should display a message –
THE FOLLOWING FIELDS XX,XX,XX ARE MANDATORY, PLEASE FILL ALL MANDATORY FIELDS If data entered is not as the permissible data than System would display message –DATA ENTERED IN
<NAME OF THE FIELD> IS INCORRECT. PLEASE ENTER THE CORRECT DATA

Core Application Software – User Manual
Confidential CCTNS Page | 73
3.10 Character Certificate
3.10.1 Character Certificate request
This page will provide the functionality for adding a new service request for character certificate.

Core Application Software – User Manual
Confidential CCTNS Page | 74
Steps 1. Click on ‘Citizen Services’ link. 2. Click on ‘Character Certificate Request’ link. 3. Click on ‘Add Character Certificate Request’ link. System will display the Character Certificate Request page 4. Select / Enter the correct information to be made for Applicant details. 5. Click on radio button to select when required.
Steps
1. Click on ‘Address’ tab. System will display the permanent address fields 2. Select / Enter the correct information to be made. 3. Select the ‘Yes’ button for same as permanent address. 4. Otherwise, select the ‘No’ button to enter the present address. 5. Enter the present address in the required fields.

Core Application Software – User Manual
Confidential CCTNS Page | 75
Steps
1. Click on ‘Affidavit’ tab. System will display the Affidavit fields 2. Click on radio button to select when required. 3. Select / Enter the correct information to be made. 4. Click on ‘Submit’ button to save the information. System will save the entries made
or
Click on ‘Clear’ button to remove the entries made System will remove the entries made and set the default entries
or
Click on ‘Close’ button to close the current page System will close the current page and return to the Homepage
Points to Remember
Date of Birth should not be greater than the current date System will send the application separately to the SHO’s of permanent and present police station if
permanent and present address is different Citizen can search and modify with the help of temporary request ID and further submit it to generate
permanent Service Request ID within 48 hours of generation of temporary ID System should automatically submit the form for verification to the respective present address and
permanent address police station System generate Service request ID for Character Certificate and trigger a pending task to the concerned
SHOs’ to Assign the Enquiry officer for the service request Status should be updated “Registered”

Core Application Software – User Manual
Confidential CCTNS Page | 76
Citizen should get alert through Email address SMS- mobile phone number
User clicks on ‘Submit’ button without entering mandatory fields, system should display a message – PLEASE FILL ALL MANDATORY FIELDS
If the user has entered a value in the field that is not according to the permissible data of that field, then system should display a message- DATA ENTERED IN <NAME OF THE FIELD> IS INCORRECT. PLEASE ENTER THE CORRECT DATA
Core Application Software – User Manual
Confidential CCTNS Page | 77
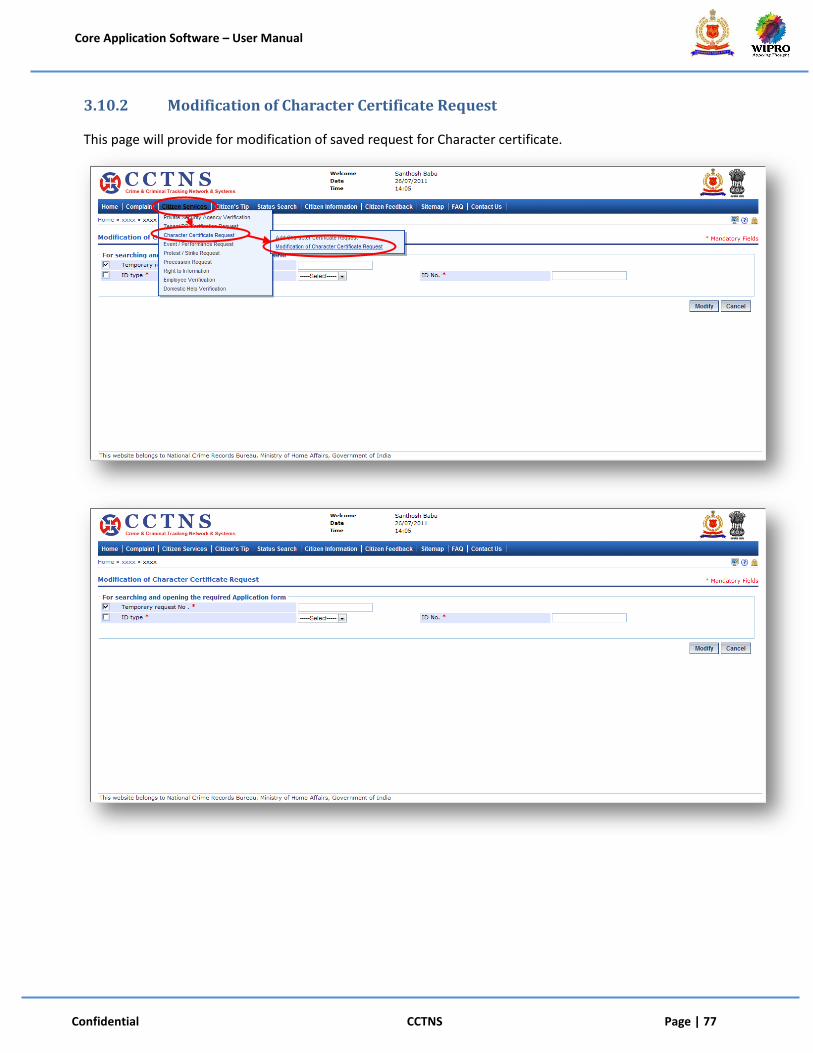
3.10.2 Modification of Character Certificate Request
This page will provide for modification of saved request for Character certificate.

Core Application Software – User Manual
Confidential CCTNS Page | 78
Steps
1. Click on ‘Citizen Services’ link. 2. Click on ‘Character Certificate Request’ link. 3. Click on ‘Modification of Character Certificate Request’ link. System will display the Modification of Character Certificate Request page 4. Enter the temporary request number. 5. Click on radio button to select when required. 6. Click on ‘Modify’ button to update the details entered. 7. Select / Enter the correct information to be made for applicant details.

Core Application Software – User Manual
Confidential CCTNS Page | 79

Core Application Software – User Manual
Confidential CCTNS Page | 80
Steps
1. Click on ‘Affidavit’ tab. System will display the Affidavit fields 2. Browse within tabs to make or select entries. 3. Click on radio button to select when required. 4. Select / Enter the correct information to be made. 5. Click on ‘Save’ button to save the information. System will save the entries made
or
Click on ‘Clear’ button to remove the entries made System will remove the entries made and set the default entries
or
Click on ‘Close’ button to close the current page System will close the current page and return to the Homepage
Points to Remember
Temporarily Request Number should be valid for 48 hrs from time of creation, post which the entry should be deleted
Once system generates a service request number then temporary service request number should be deactivated
User should enter / select at least one of the following ID type and ID number, Temporary service request number
ID number will be a mandatory field when he user is trying to search by selecting the ID type If the request is successfully submitted, an alert “Service Request number XX is submitted for your
perusal” is sent to the relevant SHO for assigning the Enquiry Officer Service request will be forwarded to the queue of the relevant SHO System update status of service request as “Registered”

Core Application Software – User Manual
Confidential CCTNS Page | 81
If User clicks on ‘Submit’ button without entering mandatory fields, system should display a message – THE FOLLOWING FIELDS XX,XX,XX ARE MANDATORY, PLEASE FILL ALL MANDATORY FIELDS
If data entered is not as the permissible data than System would display message –DATA ENTERED IN <NAME OF THE FIELD> IS INCORRECT. PLEASE ENTER THE CORRECT DATA

Core Application Software – User Manual
Confidential CCTNS Page | 82
3.11 Event/Performance Request Registration
3.11.1 Event / Performance Request Registration
This page will allow user to to register an application for seeking permission for an event or performance.
Steps
1. Click on ‘Citizen Services’ link. 2. Click on ‘Event / Performance Request’ link. 3. Click on ‘Event / Performance Request Registration’ link.

Core Application Software – User Manual
Confidential CCTNS Page | 83
System will display the Event / Performance Request Registration page 4. Enter the personal information under applicant details. 5. Select / Enter the correct information to be made. 6. Click on ‘Submit’ button to save the information. System will save the entries made
or
Click on ‘Clear’ button to remove the entries made System will remove the entries made and set the default entries
or
Click on ‘Close’ button to close the current page System will close the current page and return to the Homepage
Steps
1. Click on ‘Address’ tab. System will display the present address fields 2. Select / Enter the correct information to be made. 3. Select the ‘Yes’ button for same as present address. 4. Otherwise, select the ‘No’ button to enter the permanent address. 5. Enter the permanent address in the required fields.

Core Application Software – User Manual
Confidential CCTNS Page | 84
Steps
1. Click on ‘Organization Details’ tab. System will display the Organization Details fields 2. Select / Enter the correct information to be made.

Core Application Software – User Manual
Confidential CCTNS Page | 85
Steps
1. Click on ‘Organization Member Details’ tab. System will display the Organization Member Details fields 2. Select / Enter the correct information to be made.

Core Application Software – User Manual
Confidential CCTNS Page | 86
Steps
1. Click on ‘Location Details’ tab. System will display the Location Details fields 2. Select / Enter the correct information to be made. 3. Click on ‘Click Here’ link. System will open a popup window for address details 4. Click on ‘Save’ button to save the current details. System will save the entries made
or
Click on ‘Close’ button to close the current page System will close the current page and return to the Homepage

Core Application Software – User Manual
Confidential CCTNS Page | 87
Steps
1. Click on ‘Event/Performance Details’ tab. System will display the Event/Performance Details fields 2. Select / Enter the correct information to be made.
Steps
1. Click on ‘Traffic & Security Details’ tab. System will display the Traffic & Security Details fields 2. Select / Enter the correct information to be made.

Core Application Software – User Manual
Confidential CCTNS Page | 88
Steps
1. Click on ‘Safety Arrangement’ tab. System will open the Safety Arrangement fields 2. Select / Enter the correct information to be made. 3. Click on ‘Submit’ button to submit the information permanently System will save the entries made and generate a service request number
or
Click on ‘Save’ button to temporary save the service request System will generate a temporary service request number which will get drop if not submitted permanently in 48 hours (For submit the service request permanently refer next case)
or
Click on ‘Clear’ button to remove the entries made System will remove the entries made and set the default entries
or
Click on ‘Save as PDF’ button to save the information in PDF format System will save the entries made or Click on ‘Close’ button to close the current page
System will close the current page and return to the Homepage or
Click on ‘Print’ button to take printout Points to Remember
Temporarily Request Number should be valid for 48 hrs from time of creation, post which the entry should be deleted
Medical Attendant (Doctors) field should have multiple entry (up to 3)

Core Application Software – User Manual
Confidential CCTNS Page | 89
System should queue the request only to the respective SP or equivalent officer whose jurisdiction district is selected in ‘Address of the Location’ under ‘Location Detail tab’
System should allow to add multiple entry (up to 5) in ‘Organizing committee member details’ tab If the request is successfully submitted, an alert “Service request XX is submitted for your perusal” is sent
to the relevant Superintendent of Police Office, or equivalent officer
Citizen should get alert through Email address SMS- mobile phone number
If User clicks on ‘Submit’ button without entering mandatory fields, system should display a message – THE FOLLOWING FIELDS XX,XX,XX ARE MANDATORY and PLEASE FILL ALL MANDATORY FIELDS
If data entered is not as the permissible data than System would display message –DATA ENTERED IN <NAME OF THE FIELD> IS INCORRECT. PLEASE ENTER THE CORRECT DATA

Core Application Software – User Manual
Confidential CCTNS Page | 90
3.11.2 Modification of Request for Permission for Event / Performance
This page will allow user to provide user for modification of saved request of Permission for Event / Performance.

Core Application Software – User Manual
Confidential CCTNS Page | 91
Steps
1. Click on ‘Citizen Services’ link. 2. Click on ‘Event/Performance Request’ link. 3. Click on ‘Modification of Request for Permission for Event / Performance’ link. System will display the Modification for Permission for Event / Performance page 4. Enter the temporary event/performance request number. 5. Click on ‘Modify’ button to update the details entered. 6. Enter the personal information under applicant details. 7. Select / Enter the correct information to be made.

Core Application Software – User Manual
Confidential CCTNS Page | 92

Core Application Software – User Manual
Confidential CCTNS Page | 93

Core Application Software – User Manual
Confidential CCTNS Page | 94

Core Application Software – User Manual
Confidential CCTNS Page | 95

Core Application Software – User Manual
Confidential CCTNS Page | 96
Steps
1. Select / Enter the correct information to be made. 2. Click on radio button to select when required. 3. Click on ‘Submit’ button to save the information System will save the entries made or
Click on ‘Clear’ button to remove the entries made System will remove the entries made and set the default entries
or
Click on ‘Close’ button to close the current page System will close the current page and return to the Homepage
or Click on ‘Save as PDF’ button to save the present screen as a PDF document. or
Click on ‘Print’ button to print the document. Points to Remember
Temporarily Request Number should be valid for 48 hrs from time of creation, post which the entry should be deleted
Once service request number is allotted, temporary service request number should be deactivated System should queue the request only to the respective SP or equivalent officer whose jurisdiction
district is selected in ‘Address of the Location’ under ‘Location Detail tab’ If the request is successfully submitted, an alert “Service request XX is submitted for your perusal” is sent
to the relevant Superintendent of Police Office, or equivalent officer System should open the form in printable mode

Core Application Software – User Manual
Confidential CCTNS Page | 97
System update status of service request as “Registered” If User clicks on ‘Submit’ button without entering mandatory fields, system should display a message –
THE FOLLOWING FIELDS XX,XX,XX ARE MANDATORY, PLEASE FILL ALL MANDATORY FIELDS If data entered is not as the permissible data than System would display message –DATA ENTERED IN
<NAME OF THE FIELD> IS INCORRECT. PLEASE ENTER THE CORRECT DATA

Core Application Software – User Manual
Confidential CCTNS Page | 98
3.12 Protest /Strike Request
3.12.1 Protest / Strike Registration Request
This page will provide to user with the functionality to register an application for a Protest or Strike.

Core Application Software – User Manual
Confidential CCTNS Page | 99
Steps
1. Click on ‘Citizen Services’ tab. 2. Click on ‘Protest Strike Request’ link. 3. Click on ‘Protest / Strike Registration Request’ link. System will display the Protest / Strike Registration Request page 4. Enter the personal information under applicant details. 5. Select / Enter the correct information to be made. 6. Click on ‘Submit’ button to save the information. System will save the entries made
or
Click on ‘Clear’ button to remove the entries made System will remove the entries made and set the default entries
or
Click on ‘Close’ button to close the current page System will close the current page and return to the Homepage
Steps
1. Click on ‘Address’ tab. System will display the permanent address fields 2. Select / Enter the correct information to be made. 3. Select the ‘Yes’ button for same as permanent address. 4. Otherwise, select the ‘No’ button to enter the present address. 5. Enter the present address in the required fields.

Core Application Software – User Manual
Confidential CCTNS Page | 100
Steps
1. Click on ‘Organization Details’ tab. System will display the Organization Details fields 2. Select / Enter the correct information to be made. 3. Click on ‘Click Here’ link. 4. System will open a popup window for address details 5. Click on ‘Save’ button to save the information. System will save the entries made
or
Click on ‘Close’ button to close the current page System will close the current page and return to the Homepage

Core Application Software – User Manual
Confidential CCTNS Page | 101
Steps
1. Click on ‘Details of Protest / Strike’ tab. System will display the Details of Protest / Strike fields 2. Select / Enter the correct information to be made. 3. Click on ‘Click Here’ link. System will open a popup window for address details 4. Click on ‘Save’ button to save the information. System will save the entries made or
Click on ‘Clear’ button to remove the entries made System will remove the entries made and set the default entries
or Click on ‘Close’ button to close the current page
System will close the current page and return to the Homepage

Core Application Software – User Manual
Confidential CCTNS Page | 102
Steps
1. Click on ‘Traffic & Security Details’ tab. System will display the Traffic & Security Details fields 2. Select / Enter the correct information to be made. 3. Click on ‘Submit’ button to save the information System will save the entries made
or
Click on ‘Clear’ button to remove the entries made System will remove the entries made and set the default entries
or
Click on ‘Close’ button to close the current page System will close the current page and return to the Homepage
Points to Remember
Temporarily Request Number should be valid for 48 hrs from time of creation, post which the entry should be deleted
Specify Protest/Strike (if “Other”) should be visible if the ‘Type of Protest/Strike’ is selected as ‘Other’ System should queue the request only to the respective SP/DCP or equivalent officer whose jurisdiction
district is selected in ‘Address of the Location(Place of Protest / Strike)’ under ‘Detail of Protest/Strike tab’
Details of the medical attendant /doctor proposed field should allow to be entered If the request is successfully submitted, an alert “Service request Number XXX is submitted for you
perusal” is sent to the relevant Service request will be forwarded to the queue of the relevant Superintendent of Police Officer or
equivalent officer

Core Application Software – User Manual
Confidential CCTNS Page | 103
System updates status of service request as “Registered” Citizen should get alert through Email address SMS- mobile phone number

Core Application Software – User Manual
Confidential CCTNS Page | 104
3.12.2 Modification of Request for Permission for Protest / Strike
This page will provide for modification of saved request for permission for Protest/Strike.

Core Application Software – User Manual
Confidential CCTNS Page | 105
Steps
1. Click on ‘Citizen Services’ link. 2. Click on ‘Protest Strike Request’ link. 3. Click on ‘Modification of Request for Permission for Protest / Strike’ link. System will display the Modification of Request for Permission for Protest / Strike page 4. Enter the temporary Protest / Strike request number. 5. Click on ‘Modify’ button to update the details entered. 6. Enter the personal information under applicant details. 7. Select / Enter the correct information to be made. 8. Click on ‘Submit’ button to save the information. System will save the entries made
or
Click on ‘Clear’ button to remove the entries made System will remove the entries made and set the default entries
or
Click on ‘Close’ button to close the current page System will close the current page and return to the Homepage

Core Application Software – User Manual
Confidential CCTNS Page | 106
Steps
1. Click on ‘Address’ tab. System will display the permanent address fields 2. Select / Enter the correct information to be made. 3. Select the ‘Yes’ button for same as permanent address. 4. Otherwise, select the ‘No’ button to enter the present address. 5. Enter the present address in the required fields.

Core Application Software – User Manual
Confidential CCTNS Page | 107
Steps
1. Click on ‘Organization Details’ tab. System will display the Organization Details fields 2. Select / Enter the correct information to be made.

Core Application Software – User Manual
Confidential CCTNS Page | 108
Steps
1. Click on ‘Details of Protest / Strike’ tab. System will display the Details of Protest / Strike fields 2. Select / Enter the correct information to be made. 3. Click on ‘Click Here’ link. System will open a popup window for address details 4. Click on ‘Save’ button to save the information. System will save the entries made
or
Click on ‘Clear’ button to remove the entries made System will remove the entries made and set the default entries
or Click on ‘Close’ button to close the current page
System will close the current page and return to the Homepage

Core Application Software – User Manual
Confidential CCTNS Page | 109
Steps
1. Click on ‘Traffic & Security Details’ tab. System will display the Traffic & Security Details fields 2. Select / Enter the correct information to be made. 3. Click on ‘Submit’ button to save the information System will save the entries made
or
Click on ‘Clear’ button to remove the entries made System will remove the entries made and set the default entries
or
Click on ‘Close’ button to close the current page System will close the current page and return to the Homepage
Points to Remember
Temporarily Request Number should be valid for 48 hrs from time of creation, post which the entry should be deleted
Once service request number is allotted, temporary service request number should be deactivated System should queue the request only to the respective SP or equivalent officer whose jurisdiction
district is selected in ‘Address of the Location (Place of Protest / Strike)’ under ‘Detail of Protest/Strike tab’
If the request is successfully submitted, an alert “Service request Number XXX is submitted for you perusal” is sent to the relevant Superintendent of Police Office, or equivalent officer
System update status of service request as “Registered”
If User clicks on ‘Submit’ button without entering mandatory fields, system should display a message – THE FOLLOWING FIELDS XX,XX,XX ARE MANDATORY, PLEASE FILL ALL MANDATORY FIELDS
If data entered is not as the permissible data than System would display message –DATA ENTERED IN <NAME OF THE FIELD> IS INCORRECT. PLEASE ENTER THE CORRECT DATA

Core Application Software – User Manual
Confidential CCTNS Page | 110
3.13 Procession Request
3.13.1 Procession Request Registration
This page will provide user with the functionality to register an application for Procession request registration.
Steps
1. Click on ‘Citizen Services’ link. 2. Click on ‘Procession Request’ link. 3. Click on ‘Procession Request Registration’ link. System will display the Procession Request Registration page

Core Application Software – User Manual
Confidential CCTNS Page | 111
4. Enter the personal information under applicant details. 5. Select / Enter the correct information to be made. 6. Click on ‘Submit’ button to save the information. System will save the entries made
or
Click on ‘Clear’ button to remove the entries made System will remove the entries made and set the default entries
or
Click on ‘Close’ button to close the current page System will close the current page and return to the Homepage
Steps
1. Click on ‘Address’ tab. System will display the permanent address fields 2. Select / Enter the correct information to be made. 3. Select the ‘Yes’ button for same as permanent address. 4. Otherwise, select the ‘No’ button to enter the present address. 5. Enter the present address in the required fields.

Core Application Software – User Manual
Confidential CCTNS Page | 112
Steps
1. Click on ‘Organization Details’ tab. System will display the Organization Details fields 2. Select / Enter the correct information to be made. 3. Click on ‘Click Here’ link. System will open a popup window for address details 4. Click on ‘Save’ button to save the information. System will save the entries made
or

Core Application Software – User Manual
Confidential CCTNS Page | 113
Click on ‘Close’ button to close the current page System will close the current page and return to the Homepage

Core Application Software – User Manual
Confidential CCTNS Page | 114
Steps
1. Click on ‘Details of the Procession’ tab. System will display the Details of the Procession fields 2. Select / Enter the correct information to be made. 3. Click on ‘Click Here’ link. System will open a popup window for address details 4. Click on ‘Save’ button to save the information. System will save the entries made
or
Click on ‘Close’ button to close the current page System will close the current page and return to the Homepage

Core Application Software – User Manual
Confidential CCTNS Page | 115
Steps
1. Click on ‘Essential arrangements’ tab. System will display the Essential arrangements fields 2. Select / Enter the correct information to be made.
3. Click on ‘Submit’ button to save the information. System will save the entries made
or
Click on ‘Clear’ button to remove the entries made System will remove the entries made and set the default entries
or
Click on ‘Close’ button to close the current page System will close the current page and return to the Homepage
Points to Remember
Temporarily Request Number should be valid for 48 hrs from time of creation, post which the entry should be deleted
‘Specify Procession’ field should be activated only if ‘Type of Procession’ is selected as ‘others’ ‘Name of all major Participant in the Procession’ and ‘Address of all major Participant in the Procession’
should be in pair and System should allow to add more than one The fields ‘Address of the Starting Point’ , ‘Address of the other Point in route’, ‘Address of the Ending
Point’, should come in 1 group System should allow to fill more than one ‘Address of the other Point en route’, ‘Area Pin code of the
other Point in route’ If the ‘Address of the Starting Point’ , ‘Address of the other Point in route’, and ‘Address of the Ending
Point’ in ‘Detail of Procession tab’, belong to more than 1 district than the request should queue in pending list of IG or equivalent officer else should queue in pending list of SP/DCP or equivalent officer

Core Application Software – User Manual
Confidential CCTNS Page | 116
If the request is successfully submitted, an alert “Service Request number XX is submitted for your perusal” is sent to the relevant IG or equivalent officer
OR Superintendent of Police Office or equivalent officer
Service request will be forwarded to the queue of the relevant IG or equivalent officer or Superintendent of Police Office or equivalent officer System should open the filled form in printable mode System update status of service request as “Registered” Citizen should get alert through Email address SMS- mobile phone number
If User clicks on ‘Submit’ button without entering mandatory fields, system should display a message – THE FOLLOWING FIELDS XX,XX,XX ARE MANDATORY, PLEASE FILL ALL MANDATORY FIELDS
If data entered is not as the permissible data than System would display message –DATA ENTERED IN <NAME OF THE FIELD> IS INCORRECT. PLEASE ENTER THE CORRECT DATA

Core Application Software – User Manual
Confidential CCTNS Page | 117
3.13.2 Modification of Permission for Procession Request
This page will provide for modification of saved request for permission for Procession.

Core Application Software – User Manual
Confidential CCTNS Page | 118
Steps
1. Click on ‘Citizen Services’ link. 2. Click on ‘Procession Request’ link. 3. Click on ‘Modification of Permission for Procession Request’ link. System will display the Modification of Permission for Procession Request page 4. Enter the Temporary Procession Request number. 5. Click on ‘Modify’ button to update the details entered. 6. Enter the personal information under applicant details. 7. Select / Enter the correct information to be made.

Core Application Software – User Manual
Confidential CCTNS Page | 119

Core Application Software – User Manual
Confidential CCTNS Page | 120
Steps 1. Click on ‘Organization Details’ tab. System will display the Organization Details fields 2. Select / Enter the correct information to be made. 3. Click on ‘Click Here’ link. System will open a popup window for address details
Steps
1. Click on ‘Details of the Procession’ tab. System will display the Details of the Procession fields 2. Select / Enter the correct information to be made.

Core Application Software – User Manual
Confidential CCTNS Page | 121
Steps
1. Click on ‘Essential arrangements’ tab. System will display the Essential arrangements fields 2. Select / Enter the correct information to be made.
Points to Remember
Temporary Request Number should be valid for 48 hrs from time of creation, post which the entry should be deleted
Once system generates a service request number then Temporary Request Number will be deactivated ‘Specify Procession’ field will be activated only if ‘Type of Procession’ is selected as ‘others’ ‘Name of all major Participant in the Procession’ and ‘Address of all major Participant in the Procession’
should be in pair and System should allow to add more than one The fields ‘Address of the Starting Point’ ,’Area Pin code of the Starting Point’ , ‘Address of the other
Point in route’, ‘Area Pin code of the other Point en route’, ‘Address of the Ending Point’, ‘Area Pin code of the Ending Point’ should come in 1 group
System should allow to fill more than one ‘Address of the other Point in route’, ‘Area Pin code of the other Point in route’
If the ‘Address of the Starting Point’ , ‘Address of the other Point in route’, and ‘Address of the Ending Point’, belong to more than 1 district than the request should queue in pending list of IG or equivalent officer else should queue in pending list of SP/DCP or equivalent officer
If the request is successfully submitted, an alert “Service Request number XX is submitted for your perusal” is sent to the relevant IG or equivalent officer
OR Superintendent of Police Office or equivalent officer
Service request will be forwarded to the queue of the relevant IG or equivalent officer or Superintendent of Police Office or equivalent officer
System update status of service request as “Registered”

Core Application Software – User Manual
Confidential CCTNS Page | 122
3.14 Employee Verification Request
3.14.1 Add Employee Verification Request
This page will provide the functionality for adding a new service request for Employee Verification.
Steps
1. Click on ‘Citizen Services’ link. 2. Click on ‘Employee Verification’ link. 3. Click on ‘Add Employee Verification Request’ link. System will display the Add Employee Verification Request page

Core Application Software – User Manual
Confidential CCTNS Page | 123
4. Select / Enter the correct information to be made for Basic details tab. 5. Click on ‘Submit’ button to save the information. System will save the entries made
or
Click on ‘Clear’ button to remove the entries made System will remove the entries made and set the default entries
or
Click on ‘Close’ button to close the current page System will close the current page and return to the Homepage
Steps
1. Click on ‘Employee Details’ tab. System will display the Employee Details fields 2. Enter the personal information under Employee details. 3. Select / Enter the correct information to be made.

Core Application Software – User Manual
Confidential CCTNS Page | 124
Steps
1. Click on ‘Address’ tab. System will display the permanent address fields 2. Enter the address details under Employee details. 3. Select / Enter the correct information to be made.
Steps
1. Click on ‘Previous Address’ tab. System will display the previous address fields 2. Select / Enter the correct information to be made.

Core Application Software – User Manual
Confidential CCTNS Page | 125
Steps
1. Click on ‘Present Address’ tab. System will display the present address fields 2. Select / Enter the correct information to be made.

Core Application Software – User Manual
Confidential CCTNS Page | 126
Steps
1. Click on ‘Address of the Relatives’ tab. System will display the Address of the Relatives fields 2. Enter the address of the relatives under Employee details. 3. Select / Enter the correct information to be made.
Steps
1. Click on ‘Details of Previous Employer’ tab. System will display the Details of Previous Employer fields 2. Select / Enter the correct information to be made. 3. Click on ‘Click Here’ link. 4. System will open a popup window for address details 5. Click on ‘Save’ button to save the information. System will save the entries made
or
Click on ‘Clear’ button to remove the entries made System will remove the entries made and set the default entries
or

Core Application Software – User Manual
Confidential CCTNS Page | 127
Click on ‘Close’ button to close the current page System will close the current page and return to the Homepage
Steps
1. Click on ‘Details of Current Employer’ tab. System will display the Details of Current Employer fields 2. Select / Enter the correct information to be made. 3. Click on ‘Click Here’ link. System will open a popup window for address details

Core Application Software – User Manual
Confidential CCTNS Page | 128
Steps 1. Click on ‘Other Details’ tab. System will display the Other Details fields 2. Select / Enter the correct information to be made. 3. Click on ‘Submit’ button to save the information. System will save the entries made
or
Click on ‘Clear’ button to remove the entries made System will remove the entries made and set the default entries
or
Click on ‘Close’ button to close the current page System will close the current page and return to the Homepage
Points to Remember
System generate Service request ID for Employee Verification A pending task send to permanent, previous & present address SHOs’ “Assign the Enquiry officer for the
employee verification service request <xx>” System should set the status of request as ‘Registered’ Alert is sent to Citizen and SHO (of concern Police Stations) regarding submission of employee verification
request with Service request number through: E-MAIL SMS
User clicks on ‘Submit’ button without entering mandatory fields, system should display a message –(PLEASE FILL ALL MANDATORY FIELDS)
If the user clicks the Save button without inputting the mandatory fields. Then System should display a message. (PLEASE FILL ALL MANDATORY FIELDS)
If the user has entered a value in the field that is not according to the permissible data of that field, then system should display a message. DATA ENTERED IN <NAME OF THE FIELD> IS INCORRECT. PLEASE ENTER THE CORRECT DATA
User attempts to enter application date as future date The system would respond with the message no 17 (DATE CANNOT BE A FUTURE DATE)

Core Application Software – User Manual
Confidential CCTNS Page | 129
3.14.2 Modification of Employee Verification request
This page will provide for modification of saved request for Employee verification.

Core Application Software – User Manual
Confidential CCTNS Page | 130
Steps
1. Click on ‘Citizen Services’ link. 2. Click on ‘Employee Verification request’ link. 3. Click on ‘Modification of Employee Verification request’ link. System will display the Modification of Employee Verification request page 4. Enter the temporary request number. 5. Select ID type and enter ID number. 6. Click on ‘Modify’ button to update the details entered. 7. Select / Enter the correct information to be made for Basic details tab.

Core Application Software – User Manual
Confidential CCTNS Page | 131
Steps 1. Click on ‘Employee Details’ tab. System will display the Employee Details fields 2. Enter the personal information under Employee details. 3. Select / Enter the correct information to be made.
Steps
1. Click on ‘Address’ tab. System will display the permanent address fields 2. Enter the address details under Employee details. 3. Select / Enter the correct information to be made.

Core Application Software – User Manual
Confidential CCTNS Page | 132
Steps 1. Click on ‘Previous Address’ tab. System will display the previous address fields 2. Select / Enter the correct information to be made.
Steps
1. Click on ‘Present Address’ tab. System will display the present address fields 2. Select / Enter the correct information to be made.

Core Application Software – User Manual
Confidential CCTNS Page | 133
Steps
1. Click on ‘Address of the Relatives’ tab. System will display the Address of the Relatives fields 2. Enter the address of the relatives under Employee details. 3. Select / Enter the correct information to be made.

Core Application Software – User Manual
Confidential CCTNS Page | 134
Steps
1. Click on ‘Details of Previous Employer’ tab. System will display the Details of Previous Employer fields 2. Select / Enter the correct information to be made. 3. Click on ‘Click Here’ link. System will open a popup window for address details

Core Application Software – User Manual
Confidential CCTNS Page | 135
Steps
1. Click on ‘Details of Current Employer’ tab. System will display the Details of Current Employer fields 2. Select / Enter the correct information to be made. 3. Click on ‘Click Here’ link. System will open a popup window for address details

Core Application Software – User Manual
Confidential CCTNS Page | 136
Steps 1. Click on ‘Other Details’ tab. System will display the Other Details fields 2. Select / Enter the correct information to be made. 3. Click on ‘Submit’ button to save the information. System will save the entries made
or
Click on ‘Clear’ button to remove the entries made System will remove the entries made and set the default entries
or
Click on ‘Close’ button to close the current page System will close the current page and return to the Homepage
Points to Remember
Temporarily Request Number should be valid for 48 hrs from time of creation, post which the entry should be deleted
Once system generates a service request number then temporary service request number should be deactivated
User should enter / select at least one of the following ID type and ID number , Temporary service request number
ID number will be a mandatory field when he user is trying to search by selecting the ID type Date of birth should not be greater than current date Date of birth and Age should be equal to or greater than 18 yrs Service request will be forwarded to the queue of the relevant SHO System should open the filled form in printable mode System update status of service request as “Registered” If User clicks on ‘Submit’ button without entering mandatory fields, system should display a message –
THE FOLLOWING FIELDS XX,XX,XX ARE MANDATORY, PLEASE FILL ALL MANDATORY FIELDS If data entered is not as the permissible data than System would display message –DATA ENTERED IN
<NAME OF THE FIELD> IS INCORRECT. PLEASE ENTER THE CORRECT DATA

Core Application Software – User Manual
Confidential CCTNS Page | 137
3.15 Domestic Help Verification Request
3.15.1 Add Domestic Help Verification Request
This page will provide the functionality for adding a new service request for Domestic Help Verification.
Steps
1. Click on ‘Citizen Services’ link. 2. Click on ‘Domestic Help Verification’ link. 3. Click on ‘Add Domestic Help Verification Request’ link. System will display the Domestic Help Request page

Core Application Software – User Manual
Confidential CCTNS Page | 138
4. Enter the personal information details under Domestic Help Information. 5. Select / Enter the correct information to be made. 6. Click on ‘Submit’ button to save the information. System will save the entries made
or
Click on ‘Clear’ button to remove the entries made System will remove the entries made and set the default entries
or
Click on ‘Close’ button to close the current page System will close the current page and return to the Homepage
Steps
1. Click on ‘Address’ tab. System will display the permanent address fields 2. Select / Enter the correct information to be made. 3. Select the ‘Yes’ button for same as permanent address. 4. Otherwise, select the ‘No’ button to enter the present address. 5. Enter the present address in the required fields.

Core Application Software – User Manual
Confidential CCTNS Page | 139
Steps
1. Click on ‘Other Identification’ tab. System will display the Other Identification fields 2. Select / Enter the correct information to be made.
Steps
1. Click on ‘Specialization Details’ tab. System will display the Specialization Details fields 2. Select / Enter the correct information to be made.

Core Application Software – User Manual
Confidential CCTNS Page | 140
Steps
1. Click on ‘Physical Description’ tab. System will display the Physical Description fields 2. Enter the General details under Physical Description tab. 3. Select / Enter the correct information to be made. 4. Click on ‘Clear’ button to remove the entries made.
System will remove the entries made and set the default entries

Core Application Software – User Manual
Confidential CCTNS Page | 141
Steps
1. Click on ‘Other Information’ tab. System will display the Other Information fields 2. Enter the Other Information under Physical Description tab. 3. Select / Enter the correct information to be made. 4. Click on ‘Clear’ button to remove the entries made. System will remove the entries made and set the default entries

Core Application Software – User Manual
Confidential CCTNS Page | 142
Steps
1. Click on ‘Relative Information’ tab. System will display the Relative Information fields 2. Enter the relative information details under Domestic help information. 3. Click on ‘Click Here’ link. System will open a popup window for address details 4. Select / Enter the correct information to be made.

Core Application Software – User Manual
Confidential CCTNS Page | 143
Steps
1. Click on ‘Previous Employer’ tab. System will display the previous employer fields 2. Select within yes or no to be required 3. Select / Enter the correct information to be made.

Core Application Software – User Manual
Confidential CCTNS Page | 144
Steps
1. Click on ‘Master details’ tab. System will display the Master details fields 2. Select / Enter the correct information to be made.

Core Application Software – User Manual
Confidential CCTNS Page | 145
Steps
1. Click on ‘Other Details’ tab. System will display the Other Details fields 2. Select / Enter the correct information to be made. 3. You can upload the document using ‘Upload’ button.
Steps
1. Click on ‘Affidavit’ tab. System will display the Affidavit fields 2. Select / Enter the correct information to be made. 3. Click on ‘Submit’ button to save the information.

Core Application Software – User Manual
Confidential CCTNS Page | 146
System will save the entries made
or
Click on ‘Clear’ button to remove the entries made System will remove the entries made and set the default entries
or
Click on ‘Close’ button to close the current page System will close the current page and return to the Homepage
Points to Remember
Date of birth should not be greater than current date After submitting of the form, this will automatically be submitted to the police stations (present / local
address and permanent address) According to the state selected, relevant district name should be available for selection Only when the user selects yes for the field “ Has the Domestic Help worked any where before”, then
only the system will ask to enter the previous employer details, otherwise they will be non enterable field For the specialization details, only when the user selects “Any other” should the text box for entering the
details of any other specialty be highlighted otherwise it should be non enterable field Date since when employed shouldn’t be greater than current date If the present and permanent address are same, the form will be submitted at the present address Police
station only Citizen can search and modify with the help of temporary request ID and further submit it to generate
permanent Service Request ID within 48 hours of generation of temporary id Citizen should be able to add more than one ID proof. System should automatically create a pending task for the verification to the respective present address and permanent address police station System will display the service request ID for Domestic Help verification A pending task for the permanent and present address SHO’s “Assign the Enquiry officer for the Domestic
Help verification request <xx>” Status updated “ Registered” Citizen should get alert through Email address SMS- mobile phone number
User clicks on ‘Submit’ button without entering mandatory fields, system should display a message –(PLEASE FILL ALL MANDATORY FIELDS)
If the user clicks the Save button without inputting the mandatory fields. Then System should display a message. (PLEASE FILL ALL MANDATORY FIELDS)
If the age of the domestic help is less than <14 years> then system should prompt an alert to the user If the user has entered a value in the field that is not according to the permissible data of that field, then
system should display a message. DATA ENTERED IN <NAME OF THE FIELD> IS INCORRECT. PLEASE ENTER THE CORRECT DATA

Core Application Software – User Manual
Confidential CCTNS Page | 147
3.15.2 Modification of Domestic Help verification request
This page will provide for modification of saved request for Domestic Help verification.
Steps
1. Click on ‘Citizen Services’ link. 2. Click on ‘Domestic Help verification’ link. 3. Click on ‘Modification of Domestic Help verification request’ link. System will display the Modification of Domestic Help verification request page 4. Enter the temporary request number.

Core Application Software – User Manual
Confidential CCTNS Page | 148
5. Click on ‘Modify’ button to update the details entered. 6. Enter the personal information details under Domestic Help Information. 7. Select / Enter the correct information to be made. 8. Click on ‘Submit’ button to save the information. System will save the entries made
or
Click on ‘Clear’ button to remove the entries made System will remove the entries made and set the default entries
or
Click on ‘Close’ button to close the current page System will close the current page and return to the Homepage
Steps
1. Click on ‘Address’ tab. System will display the permanent address fields 2. Select / Enter the correct information to be made. 3. Select the ‘Yes’ button for same as permanent address. 4. Otherwise, select the ‘No’ button to enter the present address. 5. Enter the present address in the required fields.

Core Application Software – User Manual
Confidential CCTNS Page | 149
Steps
1. Click on ‘Other Identification’ tab. System will display the Other Identification fields 2. Select / Enter the correct information to be made.
Steps
1. Click on ‘Specialization Details’ tab. System will display the Specialization Details fields 2. Select / Enter the correct information to be made.

Core Application Software – User Manual
Confidential CCTNS Page | 150
Steps
1. Click on ‘Physical Description’ tab. System will display the Physical Description fields 2. Enter the General details under Physical Description tab. 3. Select / Enter the correct information to be made. 4. Click on ‘Clear’ button to remove the entries made.
System will remove the entries made and set the default entries

Core Application Software – User Manual
Confidential CCTNS Page | 151
Steps
1. Click on ‘Other Information’ tab. System will display the Other Information fields 2. Enter the Other Information under Physical Description tab. 3. Select / Enter the correct information to be made. 4. Click on ‘Clear’ button to remove the entries made.
System will remove the entries made and set the default entries

Core Application Software – User Manual
Confidential CCTNS Page | 152
Steps
1. Click on ‘Relative Information’ tab. System will display the Relative Information fields 2. Enter the relative information details under Domestic help information.

Core Application Software – User Manual
Confidential CCTNS Page | 153
Steps
1. Click on ‘Previous Employer’ tab. System will display the previous employer fields 2. Select within yes or no, as per required 3. Select / Enter the correct information to be made.

Core Application Software – User Manual
Confidential CCTNS Page | 154
Steps
1. Click on ‘Master details’ tab. System will display the Master details fields 2. Select / Enter the correct information to be made.

Core Application Software – User Manual
Confidential CCTNS Page | 155
Steps
1. Click on ‘Other Details’ tab. System will display the Other Details fields 2. Select / Enter the correct information to be made.
Steps
1. Click on ‘Affidavit’ tab. System will display the Affidavit fields 2. Select / Enter the correct information to be made. 3. Click on radio button to select when required 4. Click on ‘Submit’ button to save the information.

Core Application Software – User Manual
Confidential CCTNS Page | 156
System will save the entries made
or
Click on ‘Clear’ button to remove the entries made System will remove the entries made and set the default entries
or
Click on ‘Close’ button to close the current page System will close the current page and return to the Homepage
Points to Remember
Temporarily Request Number should be valid for 48 hrs from time of creation, post which the entry should be deleted
Once system generates a service request number then temporary service request number should be deactivated
User should enter / select at least one of the following ID type and ID number , Temporary service request number
ID number will be a mandatory field when he user is trying to search by selecting the ID Type If the request is successfully submitted, an alert “Service Request number XX is submitted for your
perusal” is sent to the relevant SHO for assigning the Enquiry Officer Service request will be forwarded to the queue of the relevant SHO System update status of service request as “Registered” If user clicks on ‘Submit’ button without entering mandatory fields, system should display a message –
THE FOLLOWING FIELDS XX,XX,XX ARE MANDATORY, PLEASE FILL ALL MANDATORY FIELDS If data entered is not as the permissible data than System would display message –DATA ENTERED IN
<NAME OF THE FIELD> IS INCORRECT. PLEASE ENTER THE CORRECT DATA

Core Application Software – User Manual
Confidential CCTNS Page | 157
3.16 C-Form Request
3.16.1 Submission of C Form (Foreigner Registration)
This page will provide the Submission of C Form online by Citizen.

Core Application Software – User Manual
Confidential CCTNS Page | 158

Core Application Software – User Manual
Confidential CCTNS Page | 159

Core Application Software – User Manual
Confidential CCTNS Page | 160
Steps
1. Click on ‘Foreign Address’ tab. System will display the Permanent Foreigner address fields 2. Select / Enter the correct information to be made. 3. Select the ‘Yes’ button for same as permanent address. 4. Otherwise, select the ‘No’ button to enter the present address. 5. Enter the present address in the required fields. 6. Click on ‘Submit’ button to save the information. System will save the entries made
or
Click on ‘Clear’ button to remove the entries made System will remove the entries made and set the default entries
or
Click on ‘Close’ button to close the current page System will close the current page and return to the Homepage
Points to Remember
System generate Service request ID for C-form submission System will set the status of request as ‘C-form details registered’ User will be able to print the details System will generate following notices

Core Application Software – User Manual
Confidential CCTNS Page | 161
Foreigners (leave India notices) Interpol Immigration (Overstay checks and alerts)
Citizen will get an alert on Email and by SMS User clicks on ‘Submit’ button without entering mandatory fields, system will display a message –(PLEASE
FILL ALL MANDATORY FIELDS) If the user clicks the Save button without inputting the mandatory fields. Then System will display a
message. (PLEASE FILL ALL MANDATORY FIELDS) If the user has entered a value in the field that is not according to the permissible data of that field, then
system will display a message. DATA ENTERED IN <NAME OF THE FIELD> IS INCORRECT. PLEASE ENTER THE CORRECT DATA
User attempts to enter passport date as future date The system would respond with the message – PASSPORT DATE CANNOT BE THE FUTURE DATE User attempts to enter date of arrival as future date The system would respond with the message – DATE OF ARRIVAL CANNOT BE THE FUTURE DATE

Core Application Software – User Manual
Confidential CCTNS Page | 162
3.16.2 View C-Form (Foreigner Registration)
This page will provide the functionality to view the details of a submitted C Form.

Core Application Software – User Manual
Confidential CCTNS Page | 163

Core Application Software – User Manual
Confidential CCTNS Page | 164
Steps
1. Click on ‘Registration’ link. 2. Select the ‘C-Form’ link. 3. Select the ‘View C-Form (Foreigner Registration)’ link. System will display the list of recent registered C-Form, click on required number if it is in there otherwise enter the search criteria and click on ‘Search for More’ button System will display the registered details 4. Click on ‘Close’ button to close the current page.
System will close the current page and return to the Homepage
or
Click on ‘Print’ button to take printout System will give printout of the form