
xk09-dlpkgm_en_ig_vm20120511.pdf - Installation Guide
20
Note that an RFLCHGM Loop may be required for some vehicles and that this component is sold separately. Vehicle Compatibility Chart Installation Type 1 (with T-Harness) ......................................................................................................................................... .............................................................................................................................................. Type 1 (without T-Harness)......................................................................................................................................... Type 2A (with T-Harness)............................................................................................................................................ Type 2A (without T-Harness)....................................................................................................................................... Type 2B (with T-Harness)............................................................................................................................................ Type 2B (without T-Harness)....................................................................................................................................... Vehicle Wiring Reference Chart (Type 2).................................................................................................................... Type 3 (with T-Harness).............................................................................................................................................. Type 3 (without T-Harness)......................................................................................................................................... Door Pin Reference Chart (Type 3)............................................................................................................................. Programming Module Programming - Types 1 & 2............................................................................................................................ Module Programming - Type 3.................................................................................................................................... Type 3 Vehicle Keyless Type Reference Chart........................................................................................................... Resetting the Module.................................................................................................................................................. LED Diagnostics......................................................................................................................................................... 02 04 05 06 07 08 09 10 11 12 13 15 16 17 18 19 Warranty ...................................................................................................................................................................... 20 Index † Buick, Cadillac, Chevrolet, GM, Hummer, Oldsmobile, Pontiac, SAAB, and Saturn are registered trademarks and property of their respective companies. Installation Guide The XK09-DLPKGM is a GM Door lock control and transponder override firmware. It controls and monitors standard factory security and convenience features, such as door locks, alarm, hood and trunk status, tach output plus data transponder interface. Update Alert: Firmware updates are posted to the web on a regular basis. We recommend that you check for firmware and/or install guide updates prior to installing this product. Rev.: 20120511 Platform: XK09 Firmware: DLPKGM © 2012 Directed. All rights reserved.
-
Upload
khangminh22 -
Category
Documents
-
view
3 -
download
0
Transcript of xk09-dlpkgm_en_ig_vm20120511.pdf - Installation Guide

Note that an RFLCHGM Loop may be required for some vehicles and that this component is sold separately.
Vehicle Compatibility Chart
Installation Type 1 (with T-Harness)
.........................................................................................................................................
..............................................................................................................................................Type 1 (without T-Harness).........................................................................................................................................
Type 2A (with T-Harness)............................................................................................................................................Type 2A (without T-Harness).......................................................................................................................................Type 2B (with T-Harness)............................................................................................................................................Type 2B (without T-Harness).......................................................................................................................................Vehicle Wiring Reference Chart (Type 2)....................................................................................................................
Type 3 (with T-Harness)..............................................................................................................................................Type 3 (without T-Harness).........................................................................................................................................Door Pin Reference Chart (Type 3).............................................................................................................................
Programming Module Programming - Types 1 & 2............................................................................................................................Module Programming - Type 3....................................................................................................................................Type 3 Vehicle Keyless Type Reference Chart...........................................................................................................
Resetting the Module..................................................................................................................................................
LED Diagnostics.........................................................................................................................................................
02
0405
0607080910
111213
151617
18
19
Warranty...................................................................................................................................................................... 20
Index
† Buick, Cadillac, Chevrolet, GM, Hummer, Oldsmobile, Pontiac, SAAB, and Saturn are registered trademarks and property of their respective companies.
Installation Guide
The XK09-DLPKGM is a GM Door lock control and transponder override firmware. It controls and monitors standard factory security and convenience features, such as door locks, alarm, hood and trunk status, tach output plus data transponder interface.
Update Alert: Firmware updates are posted to the web on a regular basis. We recommend that you check for firmware and/or install guide updates prior to installing this product.
Rev.: 20120511
Platform: XK09Firmware: DLPKGM
© 2012 Directed. All rights reserved.

Vehicle Compatibility ChartPage 2
Vehicles
2012
2011
2010
2009
2008
2007
2006
2005
2004
2003
2002
2001
2000
1999
1998
AV
-Panic
Mode
Activ
atio
n
DL-A
rmF
acto
ryS
ecurity
DL-D
isarm
Facto
ryS
ecurity
DL-D
oor
Lock
Contr
ol
DL-D
oor
Unlo
ck
DL-D
river
Priority
Unlo
ck
DL-F
uelD
oor
Rele
ase
DL-T
runk
/H
atc
hR
ele
ase
KI-
GM
MU
XX
Resis
tors
Activ
atio
n
PK
-Im
mobilizer
Bypass-D
ata
No
Key
Req'd
PK
-Im
mobilizer
Bypass-R
FID
No
Key
Req'd
RS
-OE
MR
em
ote
Sta
rtA
ctiv
atio
nusin
gX
L-2
02
or
RF
kit
RS
-RA
PS
hutD
ow
n(R
em
ote
AC
CP
ow
er)
RS
-Tach
/R
PM
Outp
ut
SS
-Entr
yM
onito
ring
ALL
Door
Pin
s
SS
-Entr
yM
onito
ring
Driver
Door
Pin
SS
-Entr
yM
onito
ring
Fro
ntD
oor
Pin
s
SS
-Entr
yM
onito
ring
Hood
Pin
SS
-Entr
yM
onito
ring
Tru
nk/H
atc
hP
in
SS
-Facto
ryA
larm
Trigger
Monito
ring
ST
-Bra
ke
Sta
tus
(footbra
ke)
Buick
Enclave 2* 2* 2* 2* 2* • • • • • D • • • D • • • D D • D D
LeSabre 3 3 3 3 3 3 • • • • • D • • • • • D •
Lucerne 2* 2* 2* 2* 2* 2* • • • • • D • • • D • • • D D • D D
Rainier 3** 3** 3** 3** 3** • • • • • D • • • • D • •
Cadillac 12 11 10 09 08 07 06 05 04 03 02 01 00 99 98
CTS 2* 2* 2* 2* 2* • • • • • D • • • D • • • D D • D D
CTS 3 3 3 3 3 • • • • • D • • • • • D •
DeVille 3 3 3 3 3 3 3 3 • • • • D • • • • • • D •
DTS 2* 2* 2* 2* 2* • • • • • D • • • D • • • D D • D D
Escalade 2* 2* 2* 2* 2* 2* • • • • • D • • • D • • • D D • D D
Escalade 3*** 3*** 3*** 3*** • • • • • D • • • • D • •
Seville SLS 3 3 3 • • • • D • • • • • • D •
Seville STS 3 3 3 • • • • D • • • • • • D •
SRX 2* 2* 2* • • • • • D • • • D • • • D D • D D
SRX 3 3 3 • • • • • D • • • • • D •
Chevrolet 12 11 10 09 08 07 06 05 04 03 02 01 00 99 98
Avalanche 2* 2* 2* 2* 2* 2* • • • • • D • • D • • • D D D D
Avalanche 3** 3** 3** 3** • • • • • D • • • D •
CK Pickup 2* 2* 2* • • • • • D • • D • • • D D D D
CK Pickup 3** 3** 3** 3** • • • • • D • • • D •
Cobalt 1 1 1 1 • • • • • D • • • D • • • D D • D D
Equinox 2* 2* 2* • • • • • D • • • D • • • D D • D D
Express Van 2* 2* 2* 2* • • • • • D • • D • • • D D • D D
HHR 1 1 1 1 • • • • • D • • • D • • • D D • D D
Impala 2* 2* 2* 2* 2* 2* 2* • • • • • D • • • D • • • D D • D D
Impala 3† 3† 3† 3† 3† 3† • • • • • D • • • • • D •
Malibu 1 1 1 1 • • • • • D • • • D • • • D D • D D
Malibu MAXX 1 • • • • • D • • • D • • • D D • D D
Monte Carlo 2* 2* • • • • • D • • • D • • • D D • D D
Monte Carlo 3† 3† 3† 3† 3† 3† • • • • • D • • • • • D •
Silverado 2* 2* 2* 2* 2* 2* • • • • • D • • D • • • D D D D
Silverado 3† 3† 3† 3† • • • • • D • • • D •
Silverado Classic 3** • • • • • D • • • D •
SSR 3** 3** 3** 3** • • • • • D • • • D •
Suburban 2* 2* 2* 2* 2* 2* • • • • • D • • • D • • • D D • D D
Suburban 3*** 3*** 3*** 3*** • • • • • D • • • • D • •
Tahoe 2* 2* 2* 2* 2* 2* • • • • • D • • • D • • • D D • D D
Tahoe 3*** 3*** 3*** 3*** • • • • • D • • • • D • •
TrailBlazer 3** 3** 3** 3** 3** 3** 3** 3** • • • • • D • • • • D • •
Traverse 2* 2* 2* • • • • • D • • • D • • • D D • D D
Rev.: 20120511
Platform: XK09Firmware: DLPKGM
© 2012 Directed. All rights reserved.
Page 3
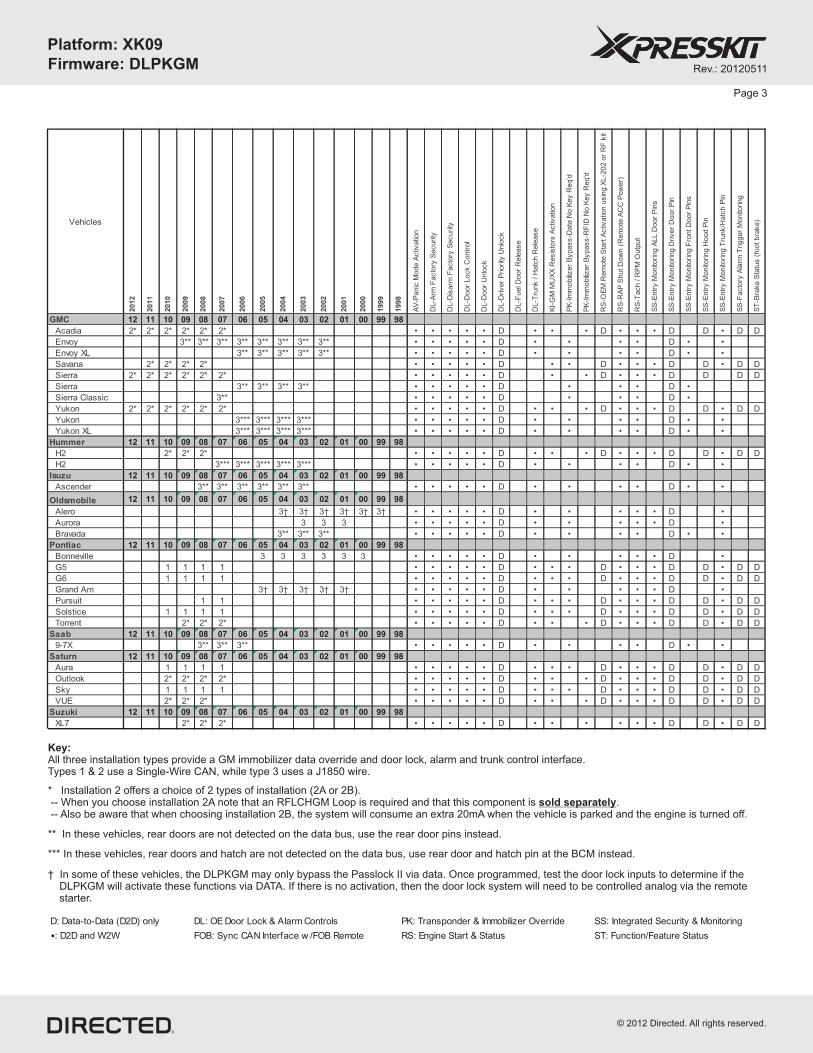
† In some of these vehicles, the DLPKGM may only bypass the Passlock II via data. Once programmed, test the door lock inputs to determine if the DLPKGM will activate these functions via DATA. If there is no activation, then the door lock system will need to be controlled analog via the remote starter.
** In these vehicles, rear doors are not detected on the data bus, use the rear door pins instead.
*** In these vehicles, rear doors and hatch are not detected on the data bus, use rear door and hatch pin at the BCM instead.
Key:
ypes 1 & 2 use a Single-Wire CAN, while type 3 uses a J1850 wire. All three installation types provide a GM immobilizer data override and door lock, alarm and trunk control interface.T
D: Data-to-Data (D2D) only DL: OE Door Lock & Alarm Controls PK: Transponder & Immobilizer Override SS: Integrated Security & Monitoring
•: D2D and W2W FOB: Sync CAN Interface w /FOB Remote RS: Engine Start & Status ST: Function/Feature Status
* Installation 2 offers a choice of 2 types of installation (2A or 2B). -- When you choose installation 2A note that an RFLCHGM Loop is required and that this component is sold separately. -- Also be aware that when choosing installation 2B, the system will consume an extra 20mA when the vehicle is parked and the engine is turned off.
Vehicles
2012
2011
2010
2009
2008
2007
2006
2005
2004
2003
2002
2001
2000
1999
1998
AV
-Panic
Mode
Activ
atio
n
DL-A
rmF
acto
ryS
ecurity
DL-D
isarm
Facto
ryS
ecurity
DL-D
oor
Lock
Contr
ol
DL-D
oor
Unlo
ck
DL-D
river
Priority
Unlo
ck
DL-F
uelD
oor
Rele
ase
DL-T
runk
/H
atc
hR
ele
ase
KI-
GM
MU
XX
Resis
tors
Activ
atio
n
PK
-Im
mobilizer
Bypass-D
ata
No
Key
Req'd
PK
-Im
mobilizer
Bypass-R
FID
No
Key
Req'd
RS
-OE
MR
em
ote
Sta
rtA
ctiv
atio
nusin
gX
L-2
02
or
RF
kit
RS
-RA
PS
hutD
ow
n(R
em
ote
AC
CP
ow
er)
RS
-Tach
/R
PM
Outp
ut
SS
-Entr
yM
onito
ring
ALL
Door
Pin
s
SS
-Entr
yM
onito
ring
Driver
Door
Pin
SS
-Entr
yM
onito
ring
Fro
ntD
oor
Pin
s
SS
-Entr
yM
onito
ring
Hood
Pin
SS
-Entr
yM
onito
ring
Tru
nk/H
atc
hP
in
SS
-Facto
ryA
larm
Trigger
Monito
ring
ST
-Bra
ke
Sta
tus
(footbra
ke)
GMC 12 11 10 09 08 07 06 05 04 03 02 01 00 99 98
Acadia 2* 2* 2* 2* 2* 2* • • • • • D • • • D • • • D D • D D
Envoy 3** 3** 3** 3** 3** 3** 3** 3** • • • • • D • • • • D • •
Envoy XL 3** 3** 3** 3** 3** • • • • • D • • • • D • •
Savana 2* 2* 2* 2* • • • • • D • • D • • • D D • D D
Sierra 2* 2* 2* 2* 2* 2* • • • • • D • • D • • • D D D D
Sierra 3** 3** 3** 3** • • • • • D • • • D •
Sierra Classic 3** • • • • • D • • • D •
Yukon 2* 2* 2* 2* 2* 2* • • • • • D • • • D • • • D D • D D
Yukon 3*** 3*** 3*** 3*** • • • • • D • • • • D • •
Yukon XL 3*** 3*** 3*** 3*** • • • • • D • • • • D • •
Hummer 12 11 10 09 08 07 06 05 04 03 02 01 00 99 98
H2 2* 2* 2* • • • • • D • • • D • • • D D • D D
H2 3*** 3*** 3*** 3*** 3*** • • • • • D • • • • D • •
Isuzu 12 11 10 09 08 07 06 05 04 03 02 01 00 99 98
Ascender 3** 3** 3** 3** 3** 3** • • • • • D • • • • D • •
Oldsmobile 12 11 10 09 08 07 06 05 04 03 02 01 00 99 98
Alero 3† 3† 3† 3† 3† 3† • • • • • D • • • • • D •
Aurora 3 3 3 • • • • • D • • • • • D •
Bravada 3** 3** 3** • • • • • D • • • • D • •
Pontiac 12 11 10 09 08 07 06 05 04 03 02 01 00 99 98
Bonneville 3 3 3 3 3 3 • • • • • D • • • • • D •
G5 1 1 1 1 • • • • • D • • • D • • • D D • D D
G6 1 1 1 1 • • • • • D • • • D • • • D D • D D
Grand Am 3† 3† 3† 3† 3† • • • • • D • • • • • D •
Pursuit 1 1 • • • • • D • • • D • • • D D • D D
Solstice 1 1 1 1 • • • • • D • • • D • • • D D • D D
Torrent 2* 2* 2* • • • • • D • • • D • • • D D • D D
Saab 12 11 10 09 08 07 06 05 04 03 02 01 00 99 98
9-7X 3** 3** 3** • • • • • D • • • • D • •
Saturn 12 11 10 09 08 07 06 05 04 03 02 01 00 99 98
Aura 1 1 1 1 • • • • • D • • • D • • • D D • D D
Outlook 2* 2* 2* 2* • • • • • D • • • D • • • D D • D D
Sky 1 1 1 1 • • • • • D • • • D • • • D D • D D
VUE 2* 2* 2* • • • • • D • • • D • • • D D • D D
Suzuki 12 11 10 09 08 07 06 05 04 03 02 01 00 99 98
XL7 2* 2* 2* • • • • • D • • • • • • D D • D D
Rev.: 20120511
Platform: XK09Firmware: DLPKGM
© 2012 Directed. All rights reserved.

Not required in D2D mode.
* The Tach wire is an optional connection required on some remote starters not supporting tach signal in D2D.
Installation 1 (with T-Harness)(See the vehicle compatibility chart to determine the installation type.)
(-) Door & Trunk Sense Input
4
2
4
Programming Button
XK
09
(AC) Tach Input*
3: Gray: (-)
1: Red/Blue: (-) RAP OFF
2: -
3: -
4: -
Connect to driver door sense trigger
2: Green: (-) Door & Trunk Sense Output
1: Violet/White: (AC) Tach Output*
Re
mo
te
Sta
rter
8: Pink: (+) Ignition Input
13: Violet/Brown: MUX
15: Yellow: Transponder Accessory
16: Brown: Transponder (-) Ground
17: Orange: Transponder (+) 12v
7: Violet: (+) RS Starter Input
6: Red/White: (-) Trunk Input
5: Blue: (-) Unlock Input
3: Light Green: (-) Lock Input
1: Blue/White: (-) GWR (status) Input
(-) Lock Output
(-) GWR (status) Output
(-) Unlock Output
(-) Trunk Output
(+) RS Starter Output
(+) Ignition Output
(+) Accessory Output
20
30
86 8587
87a
BCM Side
KEY Side
Green or Black Connector(located at theignition switch)
R. Code White, Pink or Pink/Black
Red/White
126 5 4 3
(+) 12 V Input
Ground
Parking Lights
Hood SwitchBrake Input
(-) Neutral Safety (DEI platforms only)
You need to connect these wires together. These
connections are required for the module to work properly.
The pin position of the Red/White wire may vary. Test this wire:
at all times§12V
5 4 3 2 1
4
(+) 12v
RX
(-) Ground
TX
(+) 12v
RX
(-) Ground
TX
XKD2D65
Note: Diagnostic Connector (OBDII) functions will remain identical even with the T-Harness installed.
1. Remove the factory Diagnostic Connector (OBDII) from the dash.
2. Screw (#OBDTHXGM1) or clip (#OBDTHXGM2) the black female connector to replace the factory OBDII connector.
Factory Diagnostic Connector (OBDII)
T-Harness Maleconnector
T-Harness Femaleconnector
T-Harness#OBDTHXGM1#OBDTHXGM2
(Optional)
Page 4
The position of the R. Code wire may vary. Test this wire using the following chart:§
§
§
§
12V at Key Input4.3V at Ignition0V at Accessory3V at Start
Rev.: 20120511
Platform: XK09Firmware: DLPKGM
© 2012 Directed. All rights reserved.

Not required in D2D mode.
* The Tach wire is an optional connection required on some remote starters not supporting tach signal in D2D.
Installation 1 (without T-Harness)(See the vehicle compatibility chart to determine the installation type.)
Page 5
OBD2 connector
Gre
en
(-) Door & Trunk Sense Input
4
2
4
Programming Button
XK
09
(AC) Tach Input*
3: Gray: (-)
1: Red/Blue: (-) RAP OFF
2: -
3: -
4: -
Connect to driver door sense trigger
2: Green: (-) Door & Trunk Sense Output
1: Violet/White: (AC) Tach Output*
Re
mo
te
Sta
rter
8: Pink: (+) Ignition Input
(+) 12 V Input 9: Red
10: Black: Ground Input
13: Violet/Brown: MUX
18: Green: Single Wire CAN
7: Violet: (+) RS Starter Input
6: Red/White: (-) Trunk Input
5: Blue: (-) Unlock Input
3: Light Green: (-) Lock Input
1: Blue/White: (-) GWR (status) Input
(-) Lock Output
(-) GWR (status) Output
(-) Unlock Output
(-) Trunk Output
(+) RS Starter Output
(+) Ignition Output
(+) Accessory Output
20
30
86 8587
87a
BCM Side
KEY Side
Green or Black Connector
(located at the ignition switch)
R. CodeWhite, Pink or Pink/Black
Red/White
1 8
169
126 5 4 3
(+) 12 V Input
Ground
Parking Lights
Hood Switch
(-) Neutral Safety (DEI platforms only)
You need to connect these wires together. These
connections are required for the module to work properly.
You need to connect these wires together. These
connections are required for
The pin position of the Red/White wire may vary. Test this wire:
at all times§12V
5 4 3 2 1
The position of the R. Code wire may vary. Test this wire using the following chart:§
§
§
§
12V at Key Input4.3V at Ignition0V at Accessory3V at Start
4
(+) 12v
RX
(-) Ground
TX
(+) 12v
RX
(-) Ground
TX
XKD2D65
Brake Input
15: Yellow: Transponder Accessory
16: Brown: Transponder (-) Ground
17: Orange: Transponder (+) 12v
Rev.: 20120511
Platform: XK09Firmware: DLPKGM
© 2012 Directed. All rights reserved.

KEY Side
126 5 4 3
Not required in D2D mode.
Installation 2A (with T-Harness)(See the vehicle compatibility chart to determine the installation type.)
Page 6
Type 2A does not support Bypass unless you use a RFLOOP, which is sold separately. This is the suggested installation method
* The Tach wire is an optional connection required on some remote starters not supporting tach signal in D2D.** Add only for vehicle not equipped with "Express window up/down" feature, hook up the grey wire to the driver’s door pin wire of the vehicle.
44
Programming Button
XK
09
Re
mo
te
Sta
rter
8: Pink: (+) Ignition Input
13: Violet/Brown: MUX
7: Violet: (+) RS Starter Input
6: Red/White: (-) Pop Glass or Trunk Input
5: Blue: (-) Unlock Input
4: White/Violet: (-) Aux 1 Hatch Input
3: Light Green: (-) Lock Input
1: Blue/White: (-) GWR (status) Input
20
BCM Side
R. Code
2
(-) Lock Output
(-) Aux 1 Hatch Output
(-) GWR (status) Output
(-) Unlock Output
(-) Pop Glass or Trunk Output
(+) RS Starter Output
(+) Accessory Output
(+) Ignition Output
(-) Door & Trunk Sense Input(AC) Tach Input*
2: Green: (-) Door & Trunk Sense Output
3: Gray: RAP OFF**(-)
1: Violet/White: (AC) Tach Output*
RFLCHGMRFLOOP including
a Chrysler/GMtransponder
Refer to the Vehicle Wiring Reference Chart on page 10
for more information on the R. Code, Accessory and Ignition wires.
Parking Lights
(-) Neutral Safety (DEI platforms only)
(+) 12 V Input
Ground
RAP OFF: Refer to the Vehicle Wiring Reference Chart
on page 10 for wire color and location.
The position of the R. Code wire may vary. Test this wire using the following chart:§
§
§
§
12V at Key Input4.3V at Ignition0V at Accessory3V at Start
4
(+) 12v
RX
(-) Ground
TX
(+) 12v
RX
(-) Ground
TX
XKD2D65
Note: Diagnostic Connector (OBDII) functions will remain identical even with the T-Harness installed.
1. Remove the factory Diagnostic Connector (OBDII) from the dash.
2. Screw (#OBDTHXGM1) or clip (#OBDTHXGM2) the black female connector to replace the factory OBDII connector.
Factory Diagnostic Connector (OBDII)
T-Harness Maleconnector
T-Harness Femaleconnector
Note that the RFLCHGM component is sold separately. T-Harness
#OBDTHXGM1#OBDTHXGM2
(Optional)
Brake Input
Hood Input
Rev.: 20120511
Platform: XK09Firmware: DLPKGM
© 2012 Directed. All rights reserved.

KEY Side
126 5 4 3
Not required in D2D mode.
Installation 2A (without T-Harness)(See the vehicle compatibility chart to determine the installation type.)
Page 7
Type 2A does not support Bypass unless you use a RFLOOP, which is sold separately. This is the suggested installation method
* The Tach wire is an optional connection required on some remote starters not supporting tach signal in D2D.** Add only for vehicle not equipped with "Express window up/down" feature, hook up the grey wire to the driver’s door pin wire of the vehicle.
44
Programming Button
XK
09
8: Pink: (+) Ignition Input
9: Red(+) 12 V Input
13: Violet/Brown: MUX
18: Green: Single Wire CAN
7: Violet: (+) RS Starter Input
6: Red/White: (-) Pop Glass or Trunk Input
5: Blue: (-) Unlock Input
4: White/Violet: (-) Aux 1 Hatch Input
3: Light Green: (-) Lock Input
1: Blue/White: (-) GWR (status) Input
20BCM Side
R. Code
2
10: Black: Ground Input
(-) Lock Output
(-) Aux 1 Hatch Output
(-) GWR (status) Output
(-) Unlock Output
(-) Pop Glass or Trunk Output
(+) RS Starter Output
(+) Accessory Output
(+) Ignition Output
Note that the RFLCHGM component is sold separately.
(-) Door & Trunk Sense Input(AC) Tach Input*
2: Green: (-) Door & Trunk Sense Output
3: Gray: RAP OFF**(-)
1: Violet/White: (AC) Tach Output*
RFLCHGMRFLOOP including
a Chrysler/GMtransponder
Refer to the Vehicle Wiring Reference Chart
on page 10 for more information on the R. Code, Accessory and
Ignition wires.
Parking Lights
(-) Neutral Safety (DEI platforms only)
(+) 12 V Input
Ground
RAP OFF: Refer to the Vehicle Wiring Reference Chart
on page 10 for wire color and location.
1 8
169
OBD2 connector
The position of the R. Code wire may vary. Test this wire using the following chart:§
§
§
§
12V at Key Input4.3V at Ignition0V at Accessory3V at Start
4(+) 12v
RX
(-) Ground
TX
(+) 12v
RX
(-) Ground
TX
XKD2D65
Brake Input
Gre
en
Hood InputRe
mo
te
Sta
rter
Rev.: 20120511
Platform: XK09Firmware: DLPKGM
© 2012 Directed. All rights reserved.

Installation 2B (with T-Harness)(See the vehicle compatibility chart to determine the installation type.)
Page 8
WARNING!We recommend the use of Installation Type 2A, especially if the vehicle is not used daily. Type 2B will draw an extra 20-25mA on the vehicle, when it is parked and the engine is turned off.
Please note that pin numbers may vary from vehicle to vehicle. Make sure the wire colors match for a successful installation.
5 4 3 2 1
KEY Side
126 5 4 3
Not required in D2D mode.
* The Tach wire is an optional connection required on some remote starters not supporting tach signal in D2D.** Add only for vehicle not equipped with "Express window up/down" feature, hook up the grey wire to the driver’s door pin wire of the vehicle.
44
Programming Button
XK
09
8: Pink: (+) Ignition Input
13: Violet/Brown: MUX15: Yellow: R. Code Output
16: Brown: MUX17: Orange: R. Code Input
7: Violet: (+) RS Starter Input
6: Red/White: (-) Pop Glass or Trunk Input
5: Blue: (-) Unlock Input
4: White/Violet: (-) Aux 1 Hatch Input
3: Light Green: (-) Lock Input
1: Blue/White: (-) GWR (status) Input
20BCM Side
R. Code
2
(-) Lock Output
(-) Aux 1 Hatch Output
(-) GWR (status) Output
(-) Unlock Output
(-) Pop Glass or Trunk Output
(+) RS Starter Output
(+) Accessory Output
(+) Ignition Output
(-) Door & Trunk Sense Input(AC) Tach Input*
2: Green: (-) Door & Trunk Sense Output
3: Gray: RAP OFF**(-)
1: Violet/White: (AC) Tach Output*
RAP OFF: Refer to the Vehicle Wiring Reference Chart
on page 10 for wire color and location.
Leave car-side of wire disconnected.
(+) A
ccesso
ry, B
row
n o
r Ye
llow
(+) 12v, Red/White
(-) Gro
un
d,
Bla
ck/Wh
ite
Theft Deterrent Module (TDM)(under ignition switch,
black connector)
Refer to the Vehicle Wiring Reference Chart
on page 10 for more information on the R. Code, Accessory and
Ignition wires.
The position of the R. Code wire may vary. Test this wire using the following chart:§
§
§
§
12V at Key Input4.3V at Ignition0V at Accessory3V at Start
4(+) 12v
RX
(-) GroundTX
(+) 12v
RX
(-) Ground
TXXKD2D65
1. Remove the factory Diagnostic Connector (OBDII) from the dash.
2. Screw (#OBDTHXGM1) or clip (#OBDTHXGM2) the black female connector to replace the factory OBDII connector.
Factory Diagnostic Connector (OBDII)
T-Harness Maleconnector
Note: Diagnostic Connector (OBDII) functions will remain identical even with the T-Harness installed.
T-Harness#OBDTHXGM1#OBDTHXGM2
(Optional)
T-Harness Femaleconnector
Parking Lights
(-) Neutral Safety (DEI platforms only)
(+) 12 V Input
Ground
Brake Input
Hood Input
Re
mo
te
Sta
rter
Rev.: 20120511
Platform: XK09Firmware: DLPKGM
© 2012 Directed. All rights reserved.

5 4 3 2 1
KEY Side
126 5 4 3
Not required in D2D mode.
Installation 2B (without T-Harness)(See the vehicle compatibility chart to determine the installation type.)
Page 9
* The Tach wire is an optional connection required on some remote starters not supporting tach signal in D2D.** Add only for vehicle not equipped with "Express window up/down" feature, hook up the grey wire to the driver’s door pin wire of the vehicle.
44
Programming Button
XK
09
Re
mo
te
Sta
rter
8: Pink: (+) Ignition Input
9: Red(+) 12 V Input
13: Violet/Brown: MUX15: Yellow: R. Code Output
16: Brown: MUX17: Orange: R. Code Input
18: Green: Single Wire CAN
7: Violet: (+) RS Starter Input
6: Red/White: (-) Pop Glass or Trunk Input
5: Blue: (-) Unlock Input
4: White/Violet: (-) Aux 1 Hatch Input
3: Light Green: (-) Lock Input
1: Blue/White: (-) GWR (status) Input
20BCM Side
R. Code
2
10: Black: Ground Input
(-) Lock Output
(-) Aux 1 Hatch Output
(-) GWR (status) Output
(-) Unlock Output
(-) Pop Glass or Trunk Output
(+) RS Starter Output
(+) Accessory Output
(+) Ignition Output
(-) Door & Trunk Sense Input(AC) Tach Input*
2: Green: (-) Door & Trunk Sense Output
3: Gray: RAP OFF**(-)
1: Violet/White: (AC) Tach Output*
Refer to the Vehicle Wiring Reference Chart
on page 10 for more information on the R. Code, Accessory and
Ignition wires.
Parking Lights
(-) Neutral Safety (DEI platforms only)
(+) 12 V Input
Ground
RAP OFF: Refer to the Vehicle Wiring Reference Chart
on page 10 for wire color and location.
WARNING!We recommend the use of Installation Type 2A, especially if the vehicle is not used daily. Type 2B will draw an extra 20-25mA on the vehicle, when it is parked and the engine is turned off.
Leave car-side of wire disconnected.
(+) A
ccesso
ry, B
row
n o
r Ye
llow
(+) 12v, Red/White
Single Wire CAN, Green
(-) Gro
un
d,
Bla
ck/Wh
ite
Theft Deterrent Module (TDM)(under ignition switch,
black connector)
Please note that pin numbers may vary from vehicle to vehicle. Make sure the wire colors match for a successful installation.
The position of the R. Code wire may vary. Test this wire using the following chart:§
§
§
§
12V at Key Input4.3V at Ignition0V at Accessory3V at Start
4
(+) 12v
RX
(-) GroundTX
(+) 12v
RX
(-) Ground
TX
XKD2D65
Brake Input
Hood Input
Rev.: 20120511
Platform: XK09Firmware: DLPKGM
© 2012 Directed. All rights reserved.

Make Years R. Code Accessory IgnitionRAP OFF
driver door pin wire
Buick
Enclave 2008-11 White Brown Pink Gray/black in pink Conn. X6 at BCM, pin 10
Lucerne 2006-10 White Brown Pink N.C.
Cadillac
CTS 2008-12 White Brown Pink N.C.
DTS 2006-10 White Brown Pink N.C.
Escalade 2007-12 Pink/Black Yellow or Brown Pink N.C.
SRX 2007-09 White Brown Pink N.C.
Chevrolet
Avalanche 2007-10 Pink/Black Yellow or Brown Pink N.C.
CK Pickup 2007-09 Pink/Black Yellow or Brown Pink N.C.
Equinox 2007-09 White Brown Pink Gray/black in pink Conn. X6 at BCM, pin 10
Express 2008-11 Pink Brown Pink Gray/black in pink Conn. X6 at BCM, pin 10
Impala 2006-12 White Brown Pink Gray/black in pink Conn. X6 at BCM, pin 10
Monte Carlo 2006-09 White Brown Pink N.C.
Silverado 2007-12 Pink/Black Yellow or Brown Pink N.C.
Suburban 2007-12 Pink/Black Yellow or Brown Pink N.C.
Tahoe 2007-12 Pink/Black Yellow or Brown Pink N.C.
Traverse 2009-11 White Brown Pink N.C.
GMC
Acadia 2007-10 White Brown Pink Gray/black in pink Conn. X6 at BCM, pin 10
Savana 2008-10 Pink Brown Pink Gray/black in pink Conn. X6 at BCM, pin 10
Sierra 2007-10 Pink/Black Yellow or Brown Pink N.C.
Yukon 2007-10 Pink/Black Yellow or Brown Pink N.C.
Hummer
H2 2008-10 Pink/Black Yellow or Brown Pink N.C.
Pontiac
Torrent 2007-09 White Brown Pink Gray/black in pink Conn. X6 at BCM, pin 10
Saturn
Outlook 2007-10 White Brown Pink Gray/black in pink Conn. X6 at BCM, pin 10
Vue 2008-10 White/Black Yellow Pink Gray/black in pink Conn. X6 at BCM, pin 10
Suzuki
XL7 2007-09 White Brown Pink Gray/black in pink Conn. X6 at BCM, pin 10
N.C. = Not connected
Vehicle Wiring Reference Chart (Installation 2)Page 10
Rev.: 20120511
Platform: XK09Firmware: DLPKGM
© 2012 Directed. All rights reserved.

Installation 3 (with T-Harness)(See the vehicle compatibility chart to determine the installation type.)
Page 11
Not required in D2D mode.
44
Programming Button
XK
09
(AC) Tach Input*
(-) Door & Trunk Sense Input***
6: Red/White: (-) Trunk Input
5: Blue: (-) Unlock Input
4: White/Violet: (-) Aux 1 Panic or Fuel Door Input
3: Light Green: (-) Lock Input
1: Blue/White: (-) GWR (status) Input
20
2
(-) Lock Output
(-) Aux 1 Panic or Fuel Door Output
(-) GWR (status) Output
(-) Unlock Output
(-) Trunk Output
2: Green: (-) Door & Trunk Sense Output***
1: Violet/White: (AC) Tach Output*
1: Red/Blue: (-) RAP OFF**
Re
mo
te
Sta
rter Ground
Parking Lights
(+) 12 V Input
(-) Neutral Safety (DEI platforms only)
(+) Accessory 2
(+) Ignition 2
(+) Start
(+) Accessory 1
(+) Ignition 1(+) Brake
Hood
RAP OFF: Refer toDoor Pin Reference Chart on page 13-14.
4
(+) 12v
RX
(-) Ground
TX
(+) 12v
RX
(-) Ground
TX
XKD2D65
Note: Diagnostic Connector (OBDII) functions will remain identical even with the T-Harness installed.
1. Remove the factory Diagnostic Connector (OBDII) from the dash.
2. Screw (#OBDTHXGM1) or clip (#OBDTHXGM2) the black female connector to replace the factory OBDII connector.
Factory Diagnostic Connector (OBDII)
T-Harness Maleconnector
T-Harness#OBDTHXGM1#OBDTHXGM2
(Optional)
* The Tach wire is an optional connection required on some remote starters not supporting tach signal in D2D.** Only for vehicle not equipped with "electronic door module".*** On vehicle identified with install type 3*** in the VAG on page 2-3, rear doors and hatch are not detected on the data bus, use rear door and hatch pin at the BCM instead.
T-Harness Femaleconnector
Rev.: 20120511
Platform: XK09Firmware: DLPKGM
© 2012 Directed. All rights reserved.

Installation 3 (without T-Harness)(See the vehicle compatibility chart to determine the installation type.)
Page 12
44
Programming Button
XK
09
9: Red(+) 12 V Input
18: Green: J1850
6: Red/White: (-) Trunk Input
5: Blue: (-) Unlock Input
4: White/Violet: (-) Aux 1 Panic or Fuel Door Input
3: Light Green: (-) Lock Input
1: Blue/White: (-) GWR (status) Input2
0
1 8
169
2
10: Black: Ground Input
(-) Lock Output
(-) Aux 1 Panic or Fuel Door Output
(-) GWR (status) Output
(-) Unlock Output
(-) Trunk Output
1: Red/Blue: (-) RAP OFF**
Re
mo
te
Sta
rter
(+) Brake
OBD2 connector
4
(+) 12v
RX
(-) Ground
TX
(+) 12v
RX
(-) Ground
TX
XKD2D65
RAP OFF: Refer toDoor Pin Reference Chart on page 13-14.
(AC) Tach Input*
(-) Door & Trunk Sense Input***
2: Green: (-) Door & Trunk Sense Output***
1: Violet/White: (AC) Tach Output*
Ground
Parking Lights
(+) 12 V Input
(-) Neutral Safety (DEI platforms only)
(+) Accessory 2
(+) Ignition 2
(+) Accessory 1
(+) Ignition 1
Not required in D2D mode.
* The Tach wire is an optional connection required on some remote starters not supporting tach signal in D2D.** Only for vehicle not equipped with "electronic door module".*** On vehicle identified with install type 3*** in the VAG on page 2-3, rear doors and hatch are not detected on the data bus, use rear door and hatch pin at the BCM instead.
(+) StartHood
Pu
rple
Rev.: 20120511
Platform: XK09Firmware: DLPKGM
© 2012 Directed. All rights reserved.

Door Pin Reference Chart (Installation 3)Page 13
Make YearsRAP OFF
driver door pin wireLocation BCM connector DDM connector
Aurora 2001-2003 tanDDM (driver door), black 8 pin
plug, pin 2
Bonneville 2000-2005 tanDDM (driver door), black 8 pin
plug, pin 2
LeSabre 2000-2005 tanDDM (driver door), black 8 pin
plug, pin 2
9-7X 2006-2008 gray/blackDDM (driver door), gray 24 pin
plug, pin A2
Ascender 2003-2008 gray/blackDDM (driver door), gray 24 pin
plug, pin A2
Bravada 2002-2004 gray/blackDDM (driver door), gray 24 pin
plug, pin A2
Envoy 2002-2009 gray/blackDDM (driver door), gray 24 pin
plug, pin A2
Rainer 2004-2008 gray/black DDM (driver door), gray 24 pin
plug, pin A2
TrailBlazer 2002-2009 gray/blackDDM (driver door), gray 24 pin
plug, pin A2
CTS 2003-2007 tanDDM (driver door), black 12 pin
plug, pin J
Deville 1998-2005 tanDDM (driver door), black 12 pin
plug, pin J
Seville SLS 1998-2000 tanDDM (driver door), black 12 pin
plug, pin C
Seville STS 1998-2000 tanDDM (driver door), black 12 pin
plug, pin C
SRX 2004-2006 tanDDM (driver door), black 12 pin
plug, pin J
Avalanche 2003-2006 gray/blackDDM (driver door), black 26 pin
plug, pin 18
Escalade 2003-2006 gray/blackDDM (driver door), black 26 pin
plug, pin 18
H2 2003-2007 gray/blackDDM (driver door), black 26 pin
plug, pin 18
Suburban 2003-2006 gray/blackDDM (driver door), black 26 pin
plug, pin 18
Tahoe 2003-2006 gray/blackDDM (driver door), black 26 pin
plug, pin 18
Yukon 2003-2006 gray/blackDDM (driver door), black 26 pin
plug, pin 18
Rev.: 20120511
Platform: XK09Firmware: DLPKGM
© 2012 Directed. All rights reserved.

Make YearsRAP OFF
driver door pin wireLocation BCM connector DDM connector
CK Pickup 2003-2006 gray/black
BCM (under driver dash), lt. blue
24 pin plug, pin B4 or DDM
(driver door), black 26 pin plug,
pin 18
Sierra 2003-2006 gray/black
BCM (under driver dash), lt. blue
24 pin plug, pin B4 or DDM
(driver door), black 26 pin plug,
pin 18
Sierra Classic 2007 gray/black
BCM (under driver dash), lt. blue
24 pin plug, pin B4 or DDM(driver
door), black 26 pin plug, pin 18
Silverado 2003-2006 gray/black
BCM (under driver dash), lt. blue
24 pin plug, pin B4 or DDM
(driver door), black 26 pin plug,
pin 18
Silverado Classic 2007 gray/black
BCM (under driver dash), lt. blue
24 pin plug, pin B4 or DDM
(driver door), black 26 pin plug,
pin 18
Alero 1999-2004 lt. green/blackBCM (under passenger dash),
gray 16 pin plug, pin B7
Grand Am 2001-2005 lt. green/blackBCM (under passenger dash),
gray 16 pin plug, pin B7
Impala 2000-2005 dk. blueBCM (under driver dash), gray
16 pin plug, pin A8
Monte Carlo 2000-2005 dk. blueBCM (under driver dash), gray
16 pin plug, pin A8
SSR 2003-2006 gray/blackBCM (rear of center console),
lt. blue 24 pin plug, pin B4
Page 14
Rev.: 20120511
Platform: XK09Firmware: DLPKGM
© 2012 Directed. All rights reserved.

2
3
4
Turn the key back to the OFF position and remove it from the ignition barrel.
Type 1 and 2BThe module is now programmed and ready to use. 4 Program and install the RFLCHGM using the
provided instructions and connect it to the RFLOOP port of the XK09.
Type 2ARFLOOP programming required (sold separately).
Insert and turn the key to ON. After flashing, the LED turns ON solid for 3 seconds and then turns OFF.
Module Programming - Install Types 1 & 2Page 15
KEY
Remove key
ON
START
OF
F
1The LED turns ON solid or flashes rapidly.
If connected in D2D:Connect the 4-pin D2D and the 20-pin harnesses.
If connected in W2W:Connect the 20-pin harness.
Caution! The 20-pin connector can be easily plugged in backwards.
Refer to the LED Diagnostics section on page 19 for more information and for troubleshooting purposes.
4-pin
20-pin
XK09 RFLOOP port
On Solid or Flashes
&
& &On 3 secs Off
KEY
Key at ON
START
OF
F
ON
Rev.: 20120511
Platform: XK09Firmware: DLPKGM
© 2012 Directed. All rights reserved.

2
3 Turn the key back to the OFF position.The LED turns OFF, then starts to flash slowly.
Turn the key to START to program the interface.After flashing, the LED turns ON solid* when the Bypass is programmed.
* On some vehicles, the LED will turn ON solid before the key is turned to the START position.
Module Programming - Install Type 3
WITHOUT Factory Keyless Remote WITH Factory Keyless Remote
Page 16
&&START
OF
F
KEY
Key at OFF
ON
On Solid
&KEY
Key at START
START
OF
F
ON
FlashesOff
1The LED turns ON solid or flashes rapidly.
4-pin
20-pin
On Solid or Flashes
&
4& &
Press Unlock On 3 secs Off
Press the UNLOCK button on the factory keyless remote. The LED turns ON solid for 3 seconds and then turns OFF. The module is now programmed and ready to operate.
Refer to the LED Diagnostics section on page 19 for more information and for troubleshooting purposes.
6
7
To save and exit the keyless Programming, press and hold the Programming button for 3 seconds until the LED turns OFF.
Release the Programming button. The LED turns ON solid for 3 seconds and then turns OFF. The module is now programmed.
4
Press the module Programming Button. The LED will flash quickly for one second and then repeat a one-flash pattern (corresponding to the default keyless type).
&FlashesPress
&
& &
Off
OffOn x3 secs
Press & Hold
Release
5&
Flashes xNPress xN
Press the Programming button to select the keyless type. The LED will repeat the flashing pattern corresponding to the selected keyless type:
- 1 flash = Type A (default value) - 3 flashes = Type C- 2 flashes = Type B - 4 flashes = Type D
To identify your vehicle keyless type, refer to the keyless programming chart on page 17.
If connected in D2D:Connect the 4-pin D2D and the 20-pin harnesses.
If connected in W2W:Connect the 20-pin harness.
Caution! The 20-pin connector can be easily plugged in backwards.
Rev.: 20120511
Platform: XK09Firmware: DLPKGM
© 2012 Directed. All rights reserved.

Page 17
Type 3 Vehicle Keyless Type Reference Chart
Vehicles
2009
2008
2007
2006
2005
2004
2003
2002
2001
2000
1999
1998
Buick
LeSabre B B B B B B
Rainier A A A A A
Cadillac 09 08 07 06 05 04 03 02 01 00 99 98
CTS B B B B B
DeVille B B B B B B B B
Escalade A A A A
Seville SLS B B B
Seville STS B B B
SRX B B B
Chevrolet 09 08 07 06 05 04 03 02 01 00 99 98
Avalanche D D D D
CK Pickup D D D D
Impala B B B B B B
Monte Carlo B B B B B B
Silverado D D D D
Silverado Classic D
SSR A A A A
Suburban D D D D
Tahoe D D D D
TrailBlazer A A A A A A A A
GMC 09 08 07 06 05 04 03 02 01 00 99 98
Envoy A A A A A A A A
Sierra D D D D
Sierra Classic D
Yukon D D D D
Hummer 09 08 07 06 05 04 03 02 01 00 99 98
H2 D D D D D
Isuzu 09 08 07 06 05 04 03 02 01 00 99 98
Ascender A A A A A A
Oldsmobile 09 08 07 06 05 04 03 02 01 00 99 98
Alero B B B B B B
Aurora B B B
Bravada A A A
Pontiac 09 08 07 06 05 04 03 02 01 00 99 98
Bonneville B B B B B B
Grand Am B B B B B
Saab 09 08 07 06 05 04 03 02 01 00 99 98
9-7X A A A
Rev.: 20120511
Platform: XK09Firmware: DLPKGM
© 2012 Directed. All rights reserved.

1
2
3
Disconnect the module from any power source.
Press and HOLD the Integrated Programming Button (IPB).While holding the button, connect the module to the power source.
Wait until the red LED flashes once and release the Integrated Programming Button (IPB).
Flashes Once
&Release
Disconnect from Power
&Press & Hold Connect to Power
Resetting the ModulePage 18
Rev.: 20120511
Platform: XK09Firmware: DLPKGM
© 2012 Directed. All rights reserved.

LED Status Description TroubleshootingDuring Power Up
Off Module has no power.Make sure the D2D harness is connected or the 12V is
present between the red and black wires.
Flashes red once
quicklyModule was reset. Normal operation.
Solid redType 1 & 2: Module not
programmed.
Data bus cannot be detected. Make sure the
connections to the data bus are correct and insert and
turn the key to the ON position..
Solid red Type 3: Module not programmed.
Data bus cannot be detected. Make sure the
connections to the data bus are correct and turn the key
to the START position.
Solid red after flashing
quicklyType 3: Bypass programmed.
Module is waiting for the ignition to be off. Turn the key
to the OFF position.
Flashes red quickly Type 1 & 2: Data bus detected.
The module is waiting for the programming sequence.
Make sure the connections to the data line are correct
and turn the key to the ON position.
Flashes red quickly Type 3: Data bus detected.The module is waiting for the programming sequence.
Turn the key to the START position.
During Keyless Programming
Flashes red slowly Type 3: Waiting for keyless.Press the UNLOCK button on the factory keyless
remote or press the Programming button on the module.
Solid red for 3 seconds
and then offModule programmed. Normal operation.
Remote Start Period
Solid red Incorrect behavior.Data is not processing correctly. Disconnect the power
from the module and power up.
Off Ground while running (status) off.
Make sure the module was programmed, i.e. the D2D
harness is properly connected or the ground while
running (status) wire is connected (if in W2W mode).
Flashes for 1 secondA D2D or W2W command is
processing.Normal operation.
Flashes red Ground while running (status) on. Normal operation.
Programmed & Installed (Idle)
Off Ground while running (status) is off. Normal operation.
Flashes for 1 secondA D2D or W2W command is
processing.Normal operation.
Solid red Incorrect behavior.Data is not processing correctly. Disconnect the power
from the module and power up.
Flashes red Ground while running (status) on.
Module did not receive ground while running (status) off.
Make sure the D2D harness is connected or the ground
while running (status) wire is not shorted to ground.
LED DiagnosticsPage 19
x3secs
x1sec
x1sec
x1
Rev.: 20120511
Platform: XK09Firmware: DLPKGM
© 2012 Directed. All rights reserved.

Page 20
For a period of ONE YEAR from the date of purchase of a Directed Electronics remote start or security product, Directed Electronics. (“DIRECTED”) promises to the original purchaser, to repair or replace with a comparable reconditioned piece, the security or remote start accessory piece (hereinafter the “Part”), which proves to be defective in workmanship or material under normal use, provided the following conditions are met: the Part was purchased from an authorized DIRECTED dealer; and the Part is returned to DIRECTED, postage prepaid, along with a clear, legible copy of the receipt or bill of sale bearing the following information: consumer’s name, address, telephone number, the authorized licensed dealer’s name and complete product and Part description.
This warranty is nontransferable and is automatically void if the Part has been modified or used in a manner contrary to its intended purpose or the Part has been damaged by accident, unreasonable use, neglect, improper service, installation or other causes not arising out of defect in materials or construction.
TO THE MAXIMUM EXTENT ALLOWED BY LAW, EXCEPT AS STATED ABOVE, ALL WARRANTIES, INCLUDING BUT NOT LIMITED TO EXPRESS WARRANTY, IMPLIED WARRANTY, WARRANTY OF MERCHANTABILITY, FITNESS FOR PARTICULAR PURPOSE AND WARRANTY OF NONINFRINGEMENT OF INTELLECTUAL PROPERTY, ARE EXPRESSLY EXCLUDED; AND DIRECTED NEITHER ASSUMES NOR AUTHORIZES ANY PERSON OR ENTITY TO ASSUME FOR IT ANY DUTY, OBLIGATION OR LIABILITY IN CONNECTION WITH ITS PRODUCTS. DIRECTED HEREBY DISCLAIMS AND HAS ABSOLUTELY NO LIABILITY FOR ANY AND ALL ACTS OF THIRD PARTIES INCLUDING DEALERS OR INSTALLERS. IN THE EVENT OF A CLAIM OR A DISPUTE INVOLVING DIRECTED OR ITS SUBSIDIARY, THE PROPER VENUE SHALL BE SAN DIEGO COUNTY IN THE STATE OF CALIFORNIA. CALIFORNIA STATE LAWS AND APPLICABLE FEDERAL LAWS SHALL APPLY AND GOVERN THE DISPUTE. THE MAXIMUM RECOVERY UNDER ANY CLAIM AGAINST DIRECTED SHALL BE STRICTLY LIMITED TO THE AUTHORIZED DIRECTED DEALER’S PURCHASE PRICE OF THE PART. DIRECTED SHALL NOT BE RESPONSIBLE FOR ANY DAMAGES WHATSOEVER, INCLUDING BUT NOT LIMITED TO, ANY CONSEQUENTIAL DAMAGES, INCIDENTAL DAMAGES, DAMAGES FOR THE LOSS OF TIME, LOSS OF EARNINGS, COMMERCIAL LOSS, LOSS OF ECONOMIC OPPORTUNITY AND THE LIKE. NOTWITHSTANDING THE ABOVE, THE MANUFACTURER DOES OFFER A LIMITED WARRANTY TO REPLACE ORREPAIR AT DIRECTED’S OPTION THE PART AS DESCRIBED ABOVE.
Some states do not allow limitations on how long an implied warranty will last or the exclusion or limitation of incidental or consequential damages. This warranty gives you specific legal rights and you may also have other rights that vary from State to State. DIRECTED does not and has not authorized any person or entity to create for it any other obligation, promise, duty or obligation in connection with this Part.
920-0007 2009-09
This Interface kit / Data Bus Interface part has been tested on the listed vehicles. Other vehicles will be added to the select vehicle list upon completion of compatibility testing. Visit website for latest vehicle application guide. DISCLAIMER: Under no circumstances shall the manufacturer or the distributors of the bypass kit / data bus interface part(s) be held liable for any consequential damages sustained in connection with the part(s) installation. The manufacturer and it’s distributors will not, nor will they authorize any representative or any other individual to assume obligation or liability in relation to the interface kit / data bus interface part(s) other than its replacement. N.B.: Under no circumstances shall the manufacturer and distributors of this product be liable for consequential damages sustained in connection with this product and neither assumes nor authorizes any representative or other person to assume for it any obligation or liability other than the replacement of this product only.
Protected by U.S. Patents: 5,719,551; 6,011,460 B1 *; 6,243,004 B1; 6,249,216 B1; 6,275,147 B1; 6,297,731 B1; 6,346,876 B1; 6,392,534 B1; 6,529,124 B2; 6,696,927 B2; 6,756,885 B1; 6,756,886 B2; 6,771,167 B1; 6,812,829 B1; 6,924,750 B1; 7,010,402 B1; 7,015,830 B1; 7,031,826 B1; 7,046,126 B1; 7,061,137 B1; 7,068,153 B1; 7,205,679 B1; Cdn. Patent: 2,320,248; 2,414,991; 2,415,011; 2,415,023; 2,415,027; 2,415,038; 2,415,041; 2,420,947; 2,426,670; 2,454,089; European Patent: 1,053,128; Pat. Pending: 2,291,306. Made in Canada.
Limited One Year Consumer Warranty
Additional information can be found at:
www.xpresskit.comwww.directechs.com
Rev.: 20120511
Platform: XK09Firmware: DLPKGM
© 2012 Directed. All rights reserved.