Ege Bölgesinde Doğum Sonu Dönemde Uygulanan Geleneksel Uygulamalar
Upload
khangminh22Category
view
0download
0
INSTALLATION GUIDE

5 Barcodes on address labels
6 General rules
8 Backings and recommended installation methods
10 Fitting instructions for wall-to-wall carpets
14 Fitting instructions for carpets with more intricate patterns
20 Power stretching (fitting with tack strips)
22 Fitting instructions carpet tiles – Ecotrust
24 Fitting instructions for Figura
26 Fitting instructions for rugs and runners
28 Recommended types of adhesives
CONTENTS
3
These instructions have been made in accordance with the latest available information and are regularly updated.
Please note, ensuring the floor surface is adequately prepared and choosing the cor-rect fitting method are paramount to a successful installation. Ege Carpets can’t be held responsible for performance issues where this hasn’t been considered or ac-tioned, as our instructions assume this is complete for each specific project. The use of adhesives and other materials should always be in accordance with the manufacturer recommendations.
INSTALLATION INSTRUCTIONS

4
5
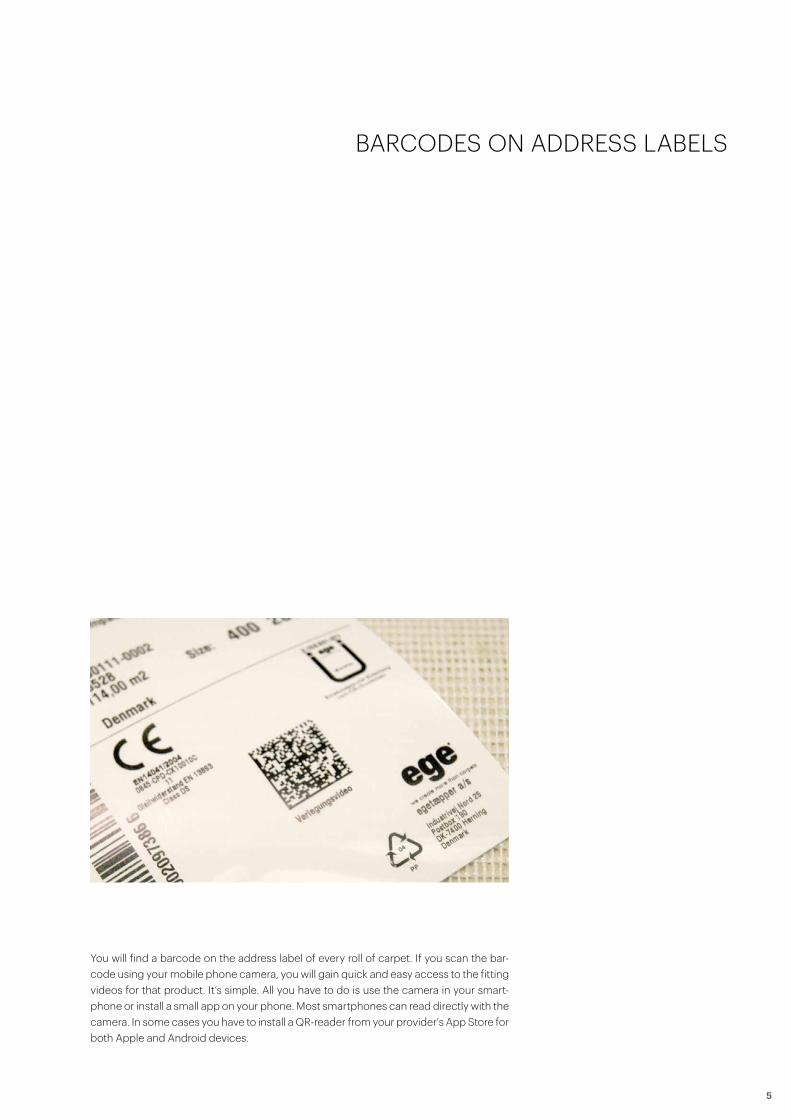
BARCODES ON ADDRESS LABELS
You will find a barcode on the address label of every roll of carpet. If you scan the bar-code using your mobile phone camera, you will gain quick and easy access to the fitting videos for that product. It’s simple. All you have to do is use the camera in your smart-phone or install a small app on your phone. Most smartphones can read directly with the camera. In some cases you have to install a QR-reader from your provider's App Store for both Apple and Android devices.
6
GENERAL CONDITIONS
To achieve the best result, the following must be completed before work begins:
The room• Carpet should be fitted when the indoor climate in the room matches that recom-
mended for the adhesive. The temperature of the room and the underlay should normally be between 17 and 25 degrees centigrade, with relative humidity between 35 and 75%.
The floor• The floor has to be level, solid and firm, without cracks and edges. This is especially
important when fitting woven carpet and carpet with short, even pile, as the struc-ture of the subfloor will otherwise be clearly visible on the carpet surface.
• Like the finished floor, the subfloor must be level, normally ± 2 mm maximum devia-tion on a 2 m straight edge.
• Linoleum and vinyl flooring should be removed before fitting carpet. • The floor must be clean, dry, evenly absorbent, and free from oil and grease. • Heavily absorbent underlay should be treated with a primer. • The humidity of a concrete subfloor must not exceed 75 to 90% RH depending on
the requirements of the adhesive manufacturer. • Any underfloor heating must be off and cooled prior to installation and should re-
main off for two days. Where possible the carpet and subfloor must be protected from direct sunlight during the installation and for two days afterwards.
Materials• Place the carpet and other materials in the room to be fitted a minimum of 24 hours
before the work begins, in order that the carpet and any adhesive being used are ac-climatised. This is especially important during the winter months due to fluctuations in temperature.
• Make sure all carpets are laid out for checking.• Before cutting, the carpet must be inspected for visible faults. If any visible faults are
found, the supplier must be contacted for further discussion and agreement before work continues. If fitting has begun without prior contact and consent, the carpet is considered to have been accepted as is.
• If for any reason it’s necessary to temporarily install defective goods, double-sided adhesive tape should be used, rather than any recommended adhesive.
• Application of adhesive, tape or other material must always take place in accordance with the recommendations of the manufacturer.
Placing• The carpet lengths must always be placed in the same direction and carpet from the
same production run must be used in the same room. • The carpet must be fitted using the correct batch number order. • As a principal rule the lengths must be installed with the joins perpendicular to the
most light-giving windowed wall. • Where possible joins should be avoided in exposed places, such as doorways, en-
trances and under chairs fitted with castors. • Lengths of carpet should be fitted selvedge to selvedge in order to avoid colour
differences.Installationvideos can be found atwww.egecarpets.com
7
Cutting edges• Joins must always be made at trimmed edges and with repeat and pattern-matching
if applicable. The carpet must be fitted selvedge to selvedge to avoid any colour differences. • Joins should always be made by cleanly cutting edges and matching pattern repe-
ats. Lengths should be fitted selvedge to selvedge in order to avoid colour differen-ces.
• When fitting plain colour carpet, calculate based on cutting about 2-3 cm off each side at all joins.
• On patterned carpet, cut cleanly into the pattern so that all lengths match the pattern size. Pattern repeats will typically measure 392 cm wide, meaning 4 cm is cut from each side of a length of carpet 400 cm wide.
• After cutting the edges, it’s important to check for light/dark edges before fixing the carpet to the floor with adhesive. If there are light/dark edges after cutting, the carpet-fitter should try to cut more off the sides. In isolated cases, the fitter may need to cut off more than 2-3 cm. If this means there is too little material, the fitter should contact the factory before continuing work.
• To make professional joins, the fitter needs to use the correct tools. Ege Carpets recommends that fitters use different kinds of cutting tools for different types of carpet.
• When fitting with adhesive the best - and the best looking – joins are achieved by using carpet clamps. Failure to follow the above-mentioned guidelines will mean that the carpet guarantee is voided.
Failure to follow the above-mentioned guidelines will mean that the carpet guarantee is voided.
Stairs• When fitting carpet on stairs they should always be protected by nosings. • On stairs, the pile direction must go downwards at a right angle to the front edge of
the step.
After installation• After installation, carpet should be protected against damage and soiling from traffic
of subsequent craftsmen until all work is complete and it’s ready to be unveiled. The extent and type of covering will depend on the type of load, traffic intensity and whether a dry or wet load can be expected.
NB! Any protective covering used must be dissipative and not rub off on the finished flooring. A laminated moisture-resistant membrane mustn’t be used as a protective covering as it isn’t dissipative.
• No furniture, equipment etc. should be placed on the carpet before the floor ad-hesive is completely dry and tempered, which can take up to 24 hours - otherwise there’s a risk it may result in visible pressure markings.

8
BACKING TYPES AND RECOMMENDEDFITTING METHODS
Recycling/sustainabilityWhen fitting a new carpet from Ege Carpets, we recommend you check the recycling options of your existing carpet and any local recycling initiatives or capability. In many countries, the option exists to contact recyclers who can either reuse or recycle car-pets and carpet tiles. These can usually be found by doing a quick search online.
Ege Carpets recommends that new broadloom carpets are fitted using an easy release primer which facilitates removal and recycling at the end of their lifetime.
The fitting instructions are valid for the following products with:Latex backing (domestic) described as "DL" Domestic LatexContract backing described as "CL" Contract LatexWoven textile backing described as "secondary backing" or "WT" Woven TextileImpervious backing described as "IP" backing Acoustic Back described as "AB" backingEco Comfort described as "ECC"Modular (Ecotrust) described as "ECT" standard backing for Ege Carpets modular
1. Cuts of less than 25 m2 must be edge fixed* with tape or adhesive. Cuts larger than 25 m2 should be full fixated.
2. Cuts of less than 25 m2 can be edge fixed with adhesive or grippers. Cuts larger than 25 m2 should be full fixated.
3. Please note that a special fixation adhesive is required. 4. Please note that Ecopads can’t be used with flat-woven products. Ecopad Strong
must be used for concrete, and Ecopad Light for wood flooring where the surface mustn’t be damaged.
Carpets are textiles, so it’s not always possible to prevent the carpet from expanding at the edge when fitting. This may cause “bulges” to occur after fitting. This can be reme-died by taking up the carpet and tightening the fitting at the edge.
NB! When installing cuts of more than 25 m2, full fixation should always be applied when the carpet is exposed to extra heavy loads, including, but not limited to: castor chairs, trolleys, pallet trucks and areas that are subject to heavy footfall traffic overall.
METHOD FULL ADHESION LOOSE LAYING ON GRIPPERS
WET ADHESION EASY RELEASE WET FIXATION TACKIFYING DRY FIXATION
DL + ++ ++ O + +1 O
CL ++ ++ O O + +1 O
WT/IP ++ ++ O O O +2 +
AB ++ + O O O O O
ECC ++ ++ O O O +1 O
ECT + + O ++3 O O O
O = NOT SUITABLE + = SUITABLE ++ = VERY SUITABLE (RECOMMENDED)
99
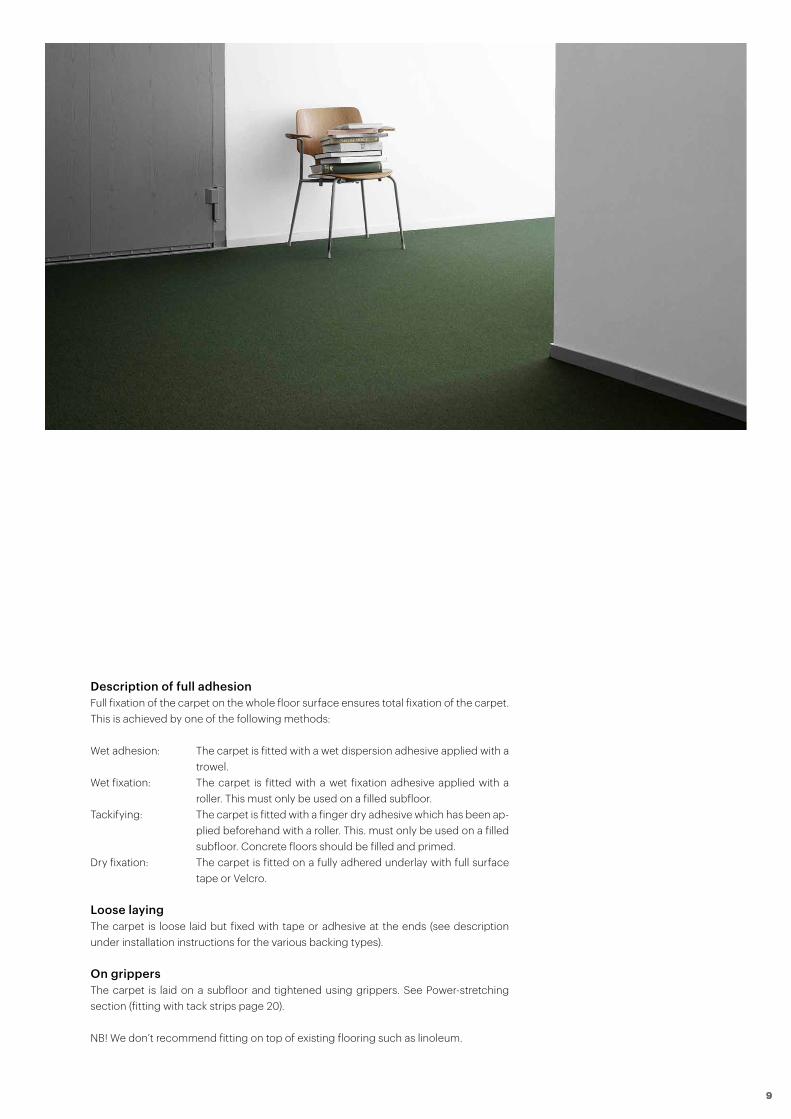
Description of full adhesion Full fixation of the carpet on the whole floor surface ensures total fixation of the carpet. This is achieved by one of the following methods:
Wet adhesion: The carpet is fitted with a wet dispersion adhesive applied with a trowel.
Wet fixation: The carpet is fitted with a wet fixation adhesive applied with a roller. This must only be used on a filled subfloor.
Tackifying: The carpet is fitted with a finger dry adhesive which has been ap-plied beforehand with a roller. This. must only be used on a filled subfloor. Concrete floors should be filled and primed.
Dry fixation: The carpet is fitted on a fully adhered underlay with full surface tape or Velcro.
Loose layingThe carpet is loose laid but fixed with tape or adhesive at the ends (see description under installation instructions for the various backing types).
On grippersThe carpet is laid on a subfloor and tightened using grippers. See Power-stretching section (fitting with tack strips page 20).
NB! We don’t recommend fitting on top of existing flooring such as linoleum.
10
FITTING INSTRUCTIONS FORWALL-TO-WALL CARPET
General rulesPlease observe the general rules on pages 6 & 7.
Loose layingLoose laying should only be used when fitting flooring smaller than 25 m2, for residen-tial use, in light-duty rooms without furnishing on wheels. Loose laying is done by fixing the edge with a minimum of 5 cm wide, double-sided adhesive tape.
• Adhere one stripe of double-sided adhesive tape on the floor along the end walls. • Then roll the carpet out on the floor and cut along the edges. • Remove the cover paper from the tape and press the carpet firmly onto the tape. • In case of possible visibility, double-sided adhesive tape should be applied in the
middle of any join. Further strengthen the joins with two strips of tape.
Edge fixation with glue• Roll the carpet out on the floor and trim it along the edges. • Pull back the carpet along the end walls. • Apply glue in a width of around 30 cm to the subfloor along the end walls and firmly
press down the carpet. • Where there are joins, apply 30 cm of glue on both sides of the join.
Fitting on grippersThis method of fitting is used in places where you wish to give the carpet an extra touch of luxury by using felt as an underlay. Fitting on grippers is a skilled laying technique, which makes the carpet more comfortable to walk on, reduces footstep noise and pro-vides high strength and elasticity to withstand heavy-duty use. It also makes it quick and easy to replace the carpet, see page 20.
Full fixationFull fixation should be used when fitting flooring measuring more than 25 m2 and always in rooms where wheeled furnishings are used on the carpet, including office chairs with castors. Full fixation is done using wet adhesion, slip priming or dry fixation.
11
Double StickWhen fitting on suitable underlay, please ensure that the instructions for the underlay are followed. The carpet should be fitted on the underlay using suitable carpet adhe-sive (as with full fixation, see page 10). It’s important that both the underlay and the carpet are rolled between each process to ensure proper contact with the glue.
Wet adhesionThe strongest fit is always with wet adhesion, but with regard to the underlay the adhe-sive is often applied as "late" wet adhesion in order that water infiltration is diminished.
• The carpet is rolled out and cut roughly to length. Approximately half of the carpet - in the length direction - is rolled back towards the centre and the adhesive is applied to the subfloor with a trowel, after which the carpet is fitted onto the wet adhesive. The process is repeated for the adjoining length.
• When joining the lengths the edges are trimmed and pattern-match established. Af-ter this approximately one third of the carpet is glued down on each side of the join and the edges are pressed together. Use carpet clamps at the join. The rest of the length is glued down.
• Immediately after glue-down the carpet is drum rolled and cut along the edges. Edge cutting must always be done starting from the middle of the carpet length and then cutting towards the edges.
• Second drum rolling should be done 30-40 minutes later in the length direction of the carpet.
Easy release systemThis is the perfect solution if, at a later stage a fast and time-saving change of flooring is desired without damaging the subfloor and to facilitate the recycling process at the end of use.
• • The subfloor is pre-treated with a slip primer. When the primer is dry a dispersion adhesive is applied with a trowel and the procedure mentioned under wet adhesion must be followed.
12
Wet fixation (Only for domestic carpets)• Fixation adhesive is applied with a roller and the carpet is fitted onto the wet adhesive
using the same procedure used for wet adhesion.
Dry fixation• Dry fixation is made by covering the whole floor area with double-sided adhesive
Sigan tape in 75 cm width. • Sigan is rolled out in cuts on the whole floor - the covering paper remains. • The carpet is laid out and roughly cut in length. • When joining cuts the edges are trimmed and pattern-match established. • The carpet is cut and laid loose onto the floor. Edge cutting must always be made
from the middle of the room and cut towards the corners.• More than half of the carpet length should be rolled back towards the centre and
the covering paper removed from the first two Sigan-lengths. Carefully put the car-pet back into position. Continue with the second half of the carpet and subsequent lengths until completion.
Especially for flat-woven products Flat-woven carpet cannot/may not be fitted on underlay and grippers or by using double-sided tape. Flat-woven carpet must be glued directly to the subfloor. • It’s critical that edges of joins are trimmed with a sharp knife at all times to prevent
them from fraying. • The carpet cutter should be held at a slight slant against the length which has to be
joined. • Cross joins are not recommended, but where this is done, they should be glued at
the edges.
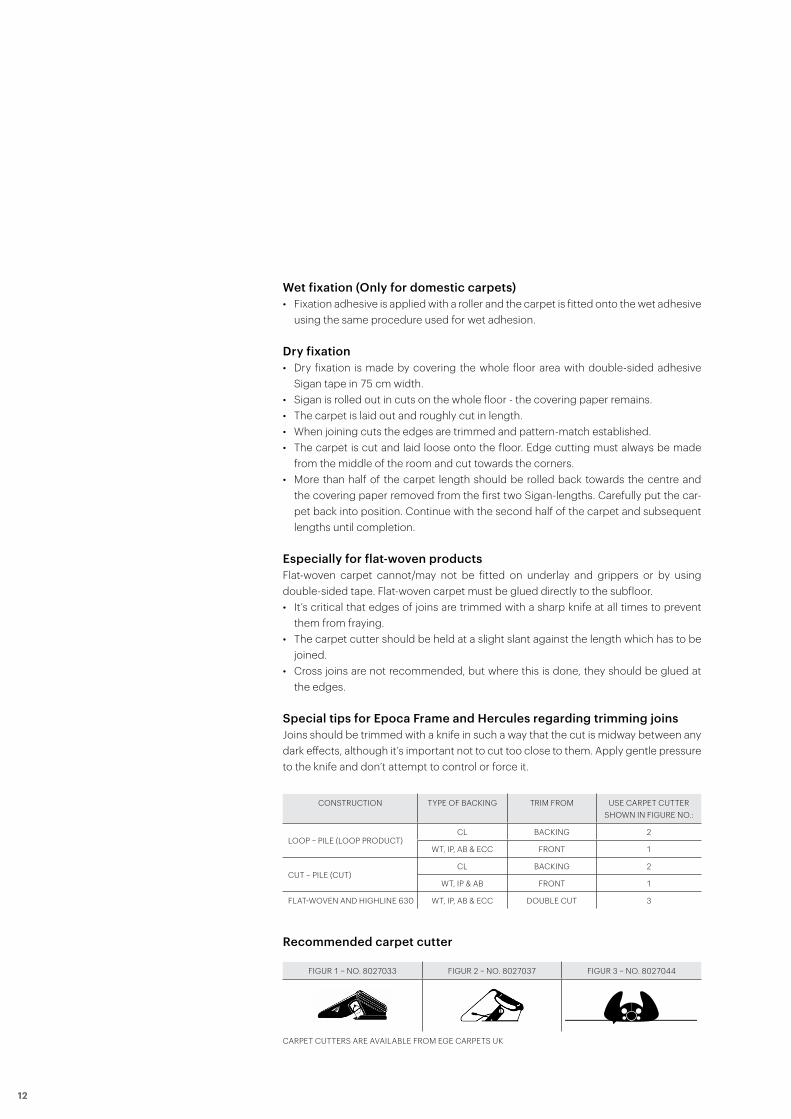
Special tips for Epoca Frame and Hercules regarding trimming joins Joins should be trimmed with a knife in such a way that the cut is midway between any dark effects, although it’s important not to cut too close to them. Apply gentle pressure to the knife and don’t attempt to control or force it.
Recommended carpet cutter
FIGUR 1 – NO. 8027033 FIGUR 2 – NO. 8027037 FIGUR 3 – NO. 8027044
CARPET CUTTERS ARE AVAILABLE FROM EGE CARPETS UK
CONSTRUCTION TYPE OF BACKING TRIM FROM USE CARPET CUTTER SHOWN IN FIGURE NO.:
LOOP – PILE (LOOP PRODUCT)CL BACKING 2
WT, IP, AB & ECC FRONT 1
CUT – PILE (CUT)CL BACKING 2
WT, IP & AB FRONT 1
FLAT-WOVEN AND HIGHLINE 630 WT, IP, AB & ECC DOUBLE CUT 3
13

14
FITTING INSTRUCTIONS FOR CARPETSWITH COMPLEX PATTERNS
PlanningModern tufted carpet with a pattern is produced to strict standards, and if the correct fitting instructions are followed, problems are rarely encountered. Always remember to apply the “view before you glue” principle (assess the flooring BEFORE you glue!).
Never apply adhesive or cut a carpet before it’s been rolled out and you’ve made cer-tain that the pattern-matching is correct.
Large areasWhen carpeting large areas with carpet featuring large pattern repeats, Ege Carpets offers an extra service to ensure minimal wastage when laying the rolls.
This service involves all rolls being designed individually so that the pattern repeats start at the same place at the beginning of the roll.
• Before the rolls are laid, it’s EXTREMELY IMPORTANT that they’re laid out so that they all start with the same pattern repeat from the same end of the roll.
• When laying the rolls, check that the pattern matches before cutting and gluing. If the pattern doesn’t align, this may be because the match is at the wrong end of the roll. Carpets starts with the same pattern on every roll cut for the room.
• ALWAYS check that the pattern starts with the same repeat from the correct end of the roll.
AlignmentTo achieve perfect pattern alignment, follow our straightforward guidelines. It’s easier to fit a patterned carpet when thorough preparation is carried out first.
A standard roll width is 400 cm ± 3 cm. Please bear this in mind when measuring.
• Always check the product on delivery. In many cases, faults can be detected at this point and sorted out before fitting begins.
• When fitting several lengths of carpet, it’s important not to adhere carpet to the subfloor until all pattern lines have been correctly aligned. Cut and align joins for all lengths before starting to apply adhesive.
• Do NOT use the factory-cut edges. ALWAYS trim the edges manually before fitting. • Roll out all lengths, paying attention to the roll numbers and batch order. • On patterned carpet, trim into the pattern, so that all lengths fit the pattern size. The
pattern repeat is typically 392 cm wide, which means that 4 cm must be cut off each side of a 400 cm-wide carpet length.

15
A standard roll width is 400 cm ± 3 cm. Please bear this in mind when measuring.
• Joins must always be trimmed at the edges and any pattern repeat aligned. • Fit the carpet lengths from selvedge to selvedge to avoid colour shade differences. • When possible, cut through plain areas or areas with as little pattern as possible. • Alternatively, an area with a change in colour or texture can be selected to hide the
join. • Avoid cutting through motifs or design elements (see the figure below).
Always start the pattern alignment in the middle of the area where the carpet will be fit-ted. This will reduce the need to stretch the carpet to obtain perfect pattern alignment. When the alignment is done, temporary fixation can be used if necessary.
Trim both the adjoining edges once the carpet’s aligned.Cut through plain areas wherever possible.
Start the pattern alignment here andwork out towards the sides.
Start here
16
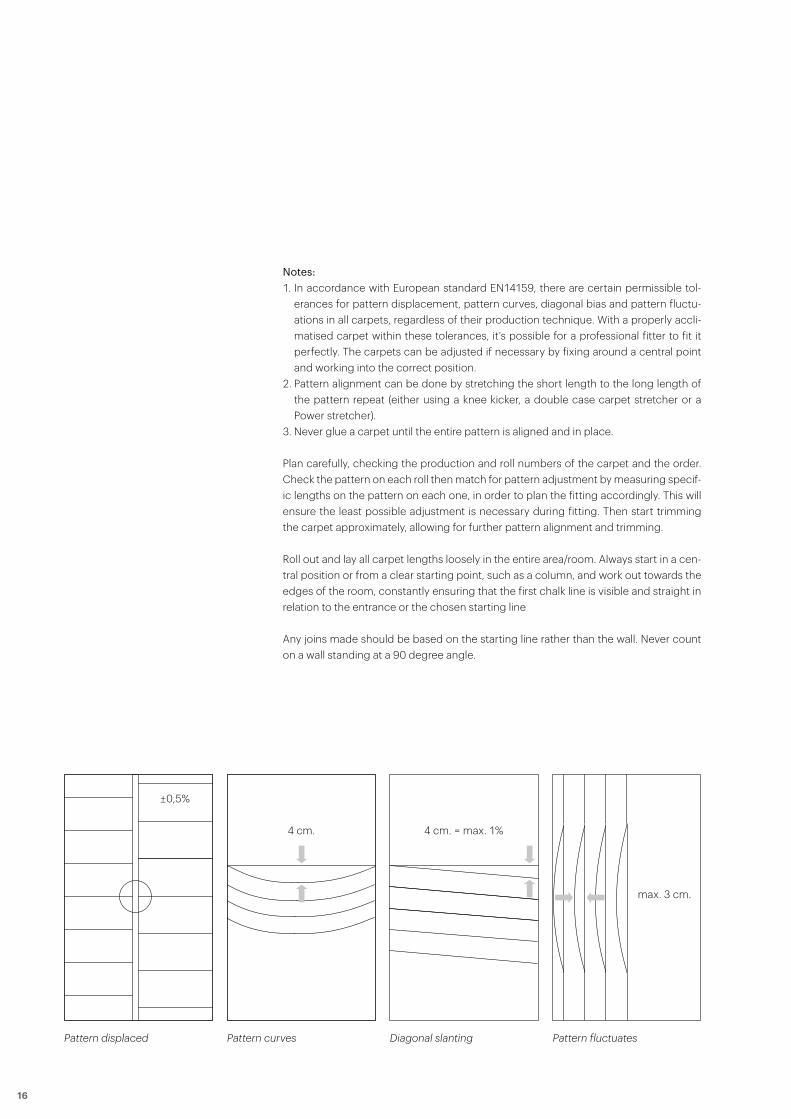
Notes:1. In accordance with European standard EN14159, there are certain permissible tol-
erances for pattern displacement, pattern curves, diagonal bias and pattern fluctu-ations in all carpets, regardless of their production technique. With a properly accli-matised carpet within these tolerances, it’s possible for a professional fitter to fit it perfectly. The carpets can be adjusted if necessary by fixing around a central point and working into the correct position.
2. Pattern alignment can be done by stretching the short length to the long length of the pattern repeat (either using a knee kicker, a double case carpet stretcher or a Power stretcher).
3. Never glue a carpet until the entire pattern is aligned and in place.
Plan carefully, checking the production and roll numbers of the carpet and the order. Check the pattern on each roll then match for pattern adjustment by measuring specif-ic lengths on the pattern on each one, in order to plan the fitting accordingly. This will ensure the least possible adjustment is necessary during fitting. Then start trimming the carpet approximately, allowing for further pattern alignment and trimming.
Roll out and lay all carpet lengths loosely in the entire area/room. Always start in a cen-tral position or from a clear starting point, such as a column, and work out towards the edges of the room, constantly ensuring that the first chalk line is visible and straight in relation to the entrance or the chosen starting line
Any joins made should be based on the starting line rather than the wall. Never count on a wall standing at a 90 degree angle.
Pattern displaced Pattern curves Diagonal slanting Pattern fluctuates
4 cm. 4 cm. = max. 1%
max. 3 cm.
±0,5%
17
Check with a straight line that all the lengths are lying straight. Ensure the pattern is aligned not only length and widthwise, but also diagonally.
If the carpet isn’t straight or appears slanted or curved, make the necessary adjust-ments now. This is where the skill of the fitter and using the right tools comes into play, in order to attain the perfect fit. The extent of what needs to be done to adjust the carpet correctly varies, but as long as it’s within the tolerances allowed under the European standards, it’s possible to fit the carpet perfectly.
Correct pile direction is crucialJoins should be positioned at right angles to the walls from which most light enters the room. In hallways/corridors, the direction of the pile must be the same as the main flow of foot traffic where possible. Pile direction should be towards the main entrance of the room, and all lengths should be laid with the pile in the same direction. On stairs, the pile direction should go downwards at a right angle to the front edge of the step.
When all lengths are properly laid out, you can begin trimming the joins.
The carpet is trimmed by following the rows of pile yarn, possibly using a Rowfinder, to leave a clean edge along the entire join. Position the second length of carpet and trim this length at a corresponding pattern so the carpet matches perfectly on either side of the join. Trim all joins before applying adhesive to the lengths.
Making joinsStart from the middle of the joins and work towards both ends, carefully joining the lengths after cutting and checking pattern alignment. The pattern should be continu-ously checked and adjusted if necessary, using a power stretcher, for example.
Other conditionsThere may be a certain amount of natural shading or pile turning in velvet pile prod-ucts. The term ‘shading’ means areas with patches similar to spots of water, which are due to a change in the original pile direction. In these areas, light will be reflected differently and present dark and light shades that are different from other areas of the carpet. This isn’t a production fault.
Pile turning occurs where there’s a change in the pile direction relative to the original pile direction in a very limited area of the product. The change of pile direction is more distinct than with shading and isn’t considered a production fault. If in any doubt, please contact your supplier before fitting.
ColoursDue to production conditions, some variation in colour can occur, so it’s possible that a colour sample may not be exactly the same shade as the material delivered.
It’s important that rolls fitted in the same room are always ordered as part of the same dye batch. It’s the responsibility of the carpet fitter to check the colour batch code prior to fitting. In certain cases, there may be minor colour differences from roll to roll. This may be due to minor colour differences in production, different pile directions or conditions at the premises.
18
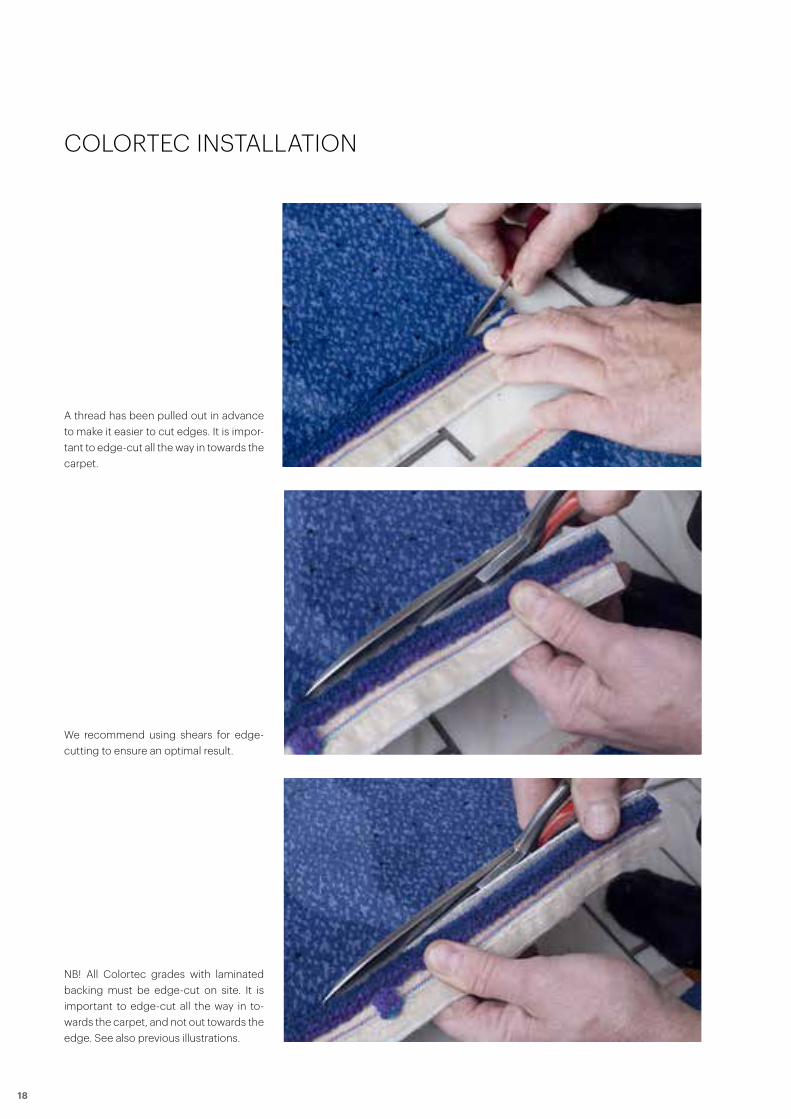
COLORTEC INSTALLATION
11
Herefter lægges den inderste halvdel tilbage igen og fæstnes i limen�
Rulle nummer to rulles ud ved siden af den første rulle og justeres ganske let med henblik på mønstertilpasning�
Fra Hammers side er der trukket en tråd, så det er nemmere at kantskære� Som det ses, er det vigtigt, at dette foregår helt ind mod tæppet�
12
Vi anbefaler, at kantskæringen foregår med saks, så man sikrer sig et optimalt resultat�
VIGTIGT! Alle Colortec kva-liteter fra Hammer tæpper med laminerede bagsider skal kantskæres på stedet� Det er vigtigt, at kantskæringen finder sted ind mod tæppet og ikke ud mod kanten� Se også forrige illustrationer�
Efter kantskæringen grov-tilpasses mønsteret imellem de to baner igen�
A thread has been pulled out in advance to make it easier to cut edges. It is impor-tant to edge-cut all the way in towards the carpet.
We recommend using shears for edge- cutting to ensure an optimal result.
NB! All Colortec grades with laminated backing must be edge-cut on site. It is important to edge-cut all the way in to-wards the carpet, and not out towards the edge. See also previous illustrations.
19
14
Hvis tæppet skal holdes på plads under mønstertilpasning er tæppe-klemmer en god hjælp�
Kommer der ujævnheder i luven under installationen, så klippes de af med saks�
Der rulles henover selve sam-lingen med en pig-valse for at skabe en “lynlås effekt”, som gør samlingen mindre synlig�
15
Værktøj fra venstre mod højre:TæppeklemmerKnæ-strammerTæppesakspig-valse
Værktøj fra venstre mod højre:Krumknivhobbyknivtæppesakstæppeklemme
GOD FORNØJELSE!
15
Værktøj fra venstre mod højre:TæppeklemmerKnæ-strammerTæppesakspig-valse
Værktøj fra venstre mod højre:Krumknivhobbyknivtæppesakstæppeklemme
GOD FORNØJELSE!
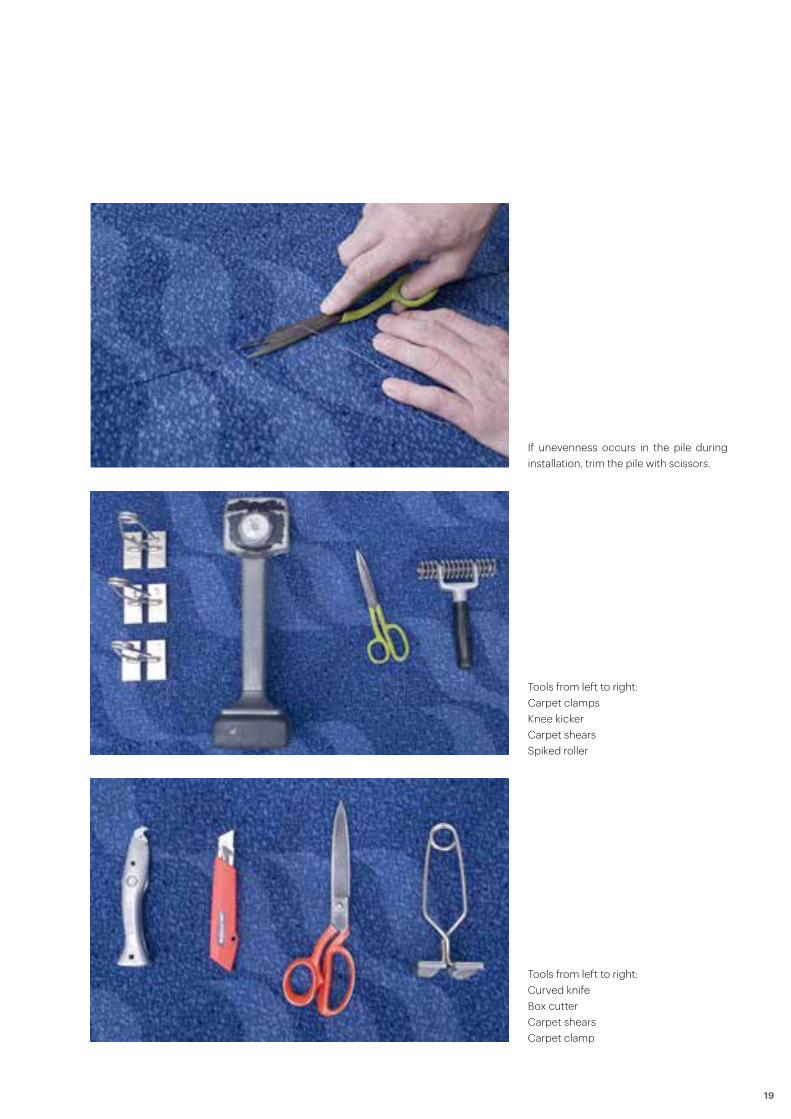
If unevenness occurs in the pile during installation, trim the pile with scissors.
Tools from left to right:Carpet clampsKnee kickerCarpet shearsSpiked roller
Tools from left to right:Curved knifeBox cutterCarpet shearsCarpet clamp
20
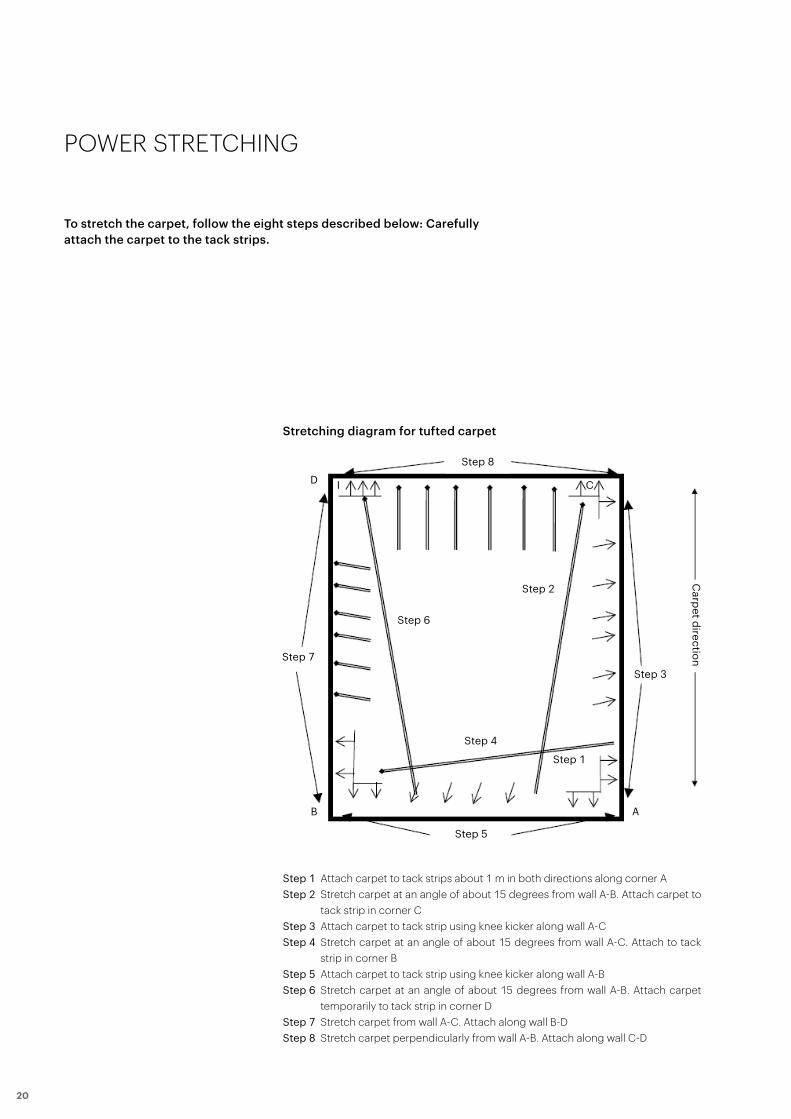
POWER STRETCHING
Stretching diagram for tufted carpet
Step 1 Attach carpet to tack strips about 1 m in both directions along corner AStep 2 Stretch carpet at an angle of about 15 degrees from wall A-B. Attach carpet to
tack strip in corner CStep 3 Attach carpet to tack strip using knee kicker along wall A-CStep 4 Stretch carpet at an angle of about 15 degrees from wall A-C. Attach to tack
strip in corner BStep 5 Attach carpet to tack strip using knee kicker along wall A-BStep 6 Stretch carpet at an angle of about 15 degrees from wall A-B. Attach carpet
temporarily to tack strip in corner DStep 7 Stretch carpet from wall A-C. Attach along wall B-DStep 8 Stretch carpet perpendicularly from wall A-B. Attach along wall C-D
To stretch the carpet, follow the eight steps described below: Carefully attach the carpet to the tack strips.
Step 8
Step 6
Step 7
Step 4
Step 2
Step 5
Step 1
Step 3
B
D
A
CI
Carpet direction
21
1.1A mechanical stretching tool is a tool that can be used to stretch the carpet during the fitting process. A tool of this kind is often called a ”Power Stretcher”. There are several variants on the market.
1.2A mechanical tool (such as a Power Stretcher) MUST be used. Tools used in place of or with a Power Stretcher and which penetrate the carpet backing can damage or ruin the carpet and underlay and result in an inadequate stretch. The use of any other tools is ill-advised.
WARNING: Insufficient mechanical stretching of your carpet can result in: • Rippling and buckling - this result is caused over time by inadequate carpet stretch-
ing with the wrong tool, having an incorrect or inadequate underlay, through temper-ature and humidity issues or by allowing insufficient acclimatisation time.
• Damage to different areas of the carpet • Delamination, where the backing releases from the front of the carpet
1.3Degree of stretch. Due to differences in the different types of carpet backing, tufted carpets which have a synthetic backing must be stretched at least 1% longways and widthways. Patterned carpet may have to be stretched more in order to match the pat-tern.
1.4Join at wall. The carpet must be good and smooth where it meets the wall. The carpet edge must be secured. Cut the carpet without damaging the skirting board/panels. Allow a sufficient length of carpet and tuck it securely into the gap between the tack strip and the wall without pile or backing protruding from the gap.
1.5Carpet runners. To create a safe join where carpet meets other flooring, the join must be protected by a runner that meets all the carpet manufacturer’s requirements.
22
INSTALLATION INSTRUCTIONS FOR STANDARD MODULAR (ECOTRUST)
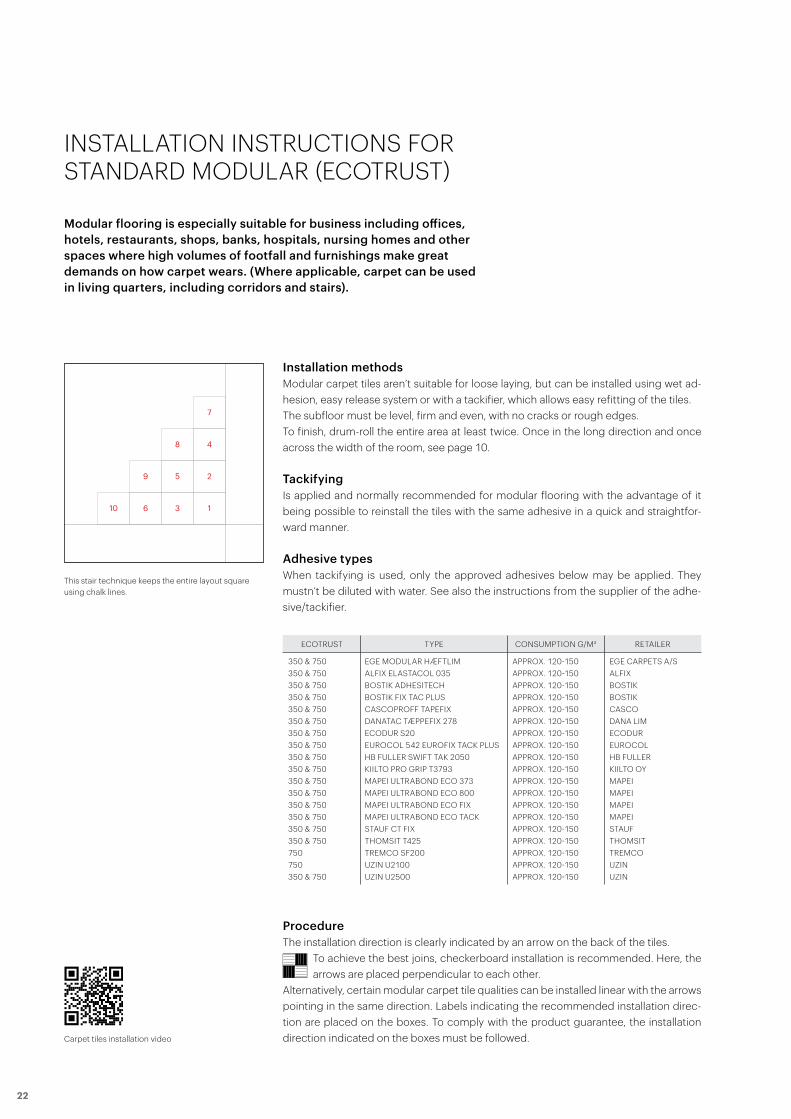
Installation methodsModular carpet tiles aren’t suitable for loose laying, but can be installed using wet ad-hesion, easy release system or with a tackifier, which allows easy refitting of the tiles.The subfloor must be level, firm and even, with no cracks or rough edges.To finish, drum-roll the entire area at least twice. Once in the long direction and once across the width of the room, see page 10.
TackifyingIs applied and normally recommended for modular flooring with the advantage of it being possible to reinstall the tiles with the same adhesive in a quick and straightfor-ward manner.
Adhesive typesWhen tackifying is used, only the approved adhesives below may be applied. They mustn’t be diluted with water. See also the instructions from the supplier of the adhe-sive/tackifier.
ProcedureThe installation direction is clearly indicated by an arrow on the back of the tiles.
To achieve the best joins, checkerboard installation is recommended. Here, the arrows are placed perpendicular to each other.
Alternatively, certain modular carpet tile qualities can be installed linear with the arrows pointing in the same direction. Labels indicating the recommended installation direc-tion are placed on the boxes. To comply with the product guarantee, the installation direction indicated on the boxes must be followed.
Modular flooring is especially suitable for business including offices, hotels, restaurants, shops, banks, hospitals, nursing homes and other spaces where high volumes of footfall and furnishings make great demands on how carpet wears. (Where applicable, carpet can be used in living quarters, including corridors and stairs).
ECOTRUST TYPE CONSUMPTION G/M2 RETAILER
350 & 750350 & 750350 & 750350 & 750350 & 750350 & 750350 & 750350 & 750350 & 750350 & 750350 & 750350 & 750350 & 750350 & 750350 & 750350 & 750750750350 & 750
EGE MODULAR HÆFTLIMALFIX ELASTACOL 035BOSTIK ADHESITECHBOSTIK FIX TAC PLUSCASCOPROFF TAPEFIXDANATAC TÆPPEFIX 278ECODUR S20EUROCOL 542 EUROFIX TACK PLUSHB FULLER SWIFT TAK 2050KIILTO PRO GRIP T3793MAPEI ULTRABOND ECO 373MAPEI ULTRABOND ECO 800MAPEI ULTRABOND ECO FIXMAPEI ULTRABOND ECO TACKSTAUF CT FIXTHOMSIT T425TREMCO SF200UZIN U2100UZIN U2500
APPROX. 120-150APPROX. 120-150APPROX. 120-150APPROX. 120-150APPROX. 120-150APPROX. 120-150APPROX. 120-150APPROX. 120-150APPROX. 120-150APPROX. 120-150APPROX. 120-150APPROX. 120-150APPROX. 120-150APPROX. 120-150APPROX. 120-150APPROX. 120-150APPROX. 120-150APPROX. 120-150APPROX. 120-150
EGE CARPETS A/SALFIXBOSTIKBOSTIKCASCODANA LIMECODUREUROCOLHB FULLERKIILTO OYMAPEIMAPEIMAPEIMAPEISTAUFTHOMSITTREMCOUZINUZIN
This stair technique keeps the entire layout square using chalk lines.
13610
259
48
7
Carpet tiles installation video
23
Procedure• Vacuum the floor thoroughly and apply primer to absorbent subfloors if necessary. • Determine fitting direction. • Determine starting position. The starting position should be somewhere close to the
middle of the room. From this point, two perpendicular lines are plotted by laser, using the 3-4-5 method or the quadrant method. It’s important that the lines through the starting point are exactly at right angles to one another. Extend the lines with chalk lines in all four directions to cover the entire fitting area.
• Apply adhesive with a new or thoroughly cleaned mohair roller. Wait for the adhesive to dry, when transparent.
• If necessary, dampen an area of 2-3 m2 closest to the starting point with water spray. This makes it easier to ease the tiles into the correct position, especially when using large 96 x 96 cm carpet modules.
• Check the direction of the arrow and affix the tiles consecutively. Remember to al-ways slide the modules into position in order to avoid pressing pile down into the joins. The tiles should be butted-up close to each other but not squeezed.
• Roll the joins in cut pile with a spiked roller.• Bend modules along walls and other straight edges over the back, then cut quickly
and easily using a curved knife. Ege Carpets backing will not leave marks on walls or skirting boards. Irregular edges around pipes, pillars, etc should also be cut using a curved carpet knife.
• Don’t forget to mark the pile direction on offcuts. This makes it easier to use them in other parts of the room.
Offcuts measuring less than 20 cm in either direction should be fitted with wet adhe-sive to ensure permanent fixture and stable positioning of even very small offcuts.
• To finish, drum-roll the entire area at least twice. Once in the long direction and once across the width of the room.
• Vacuum the tiles and cover the floor so that it’s protected from dust, subsequent tradesmen or other traffic. See general protective covering recommendations on page 9.
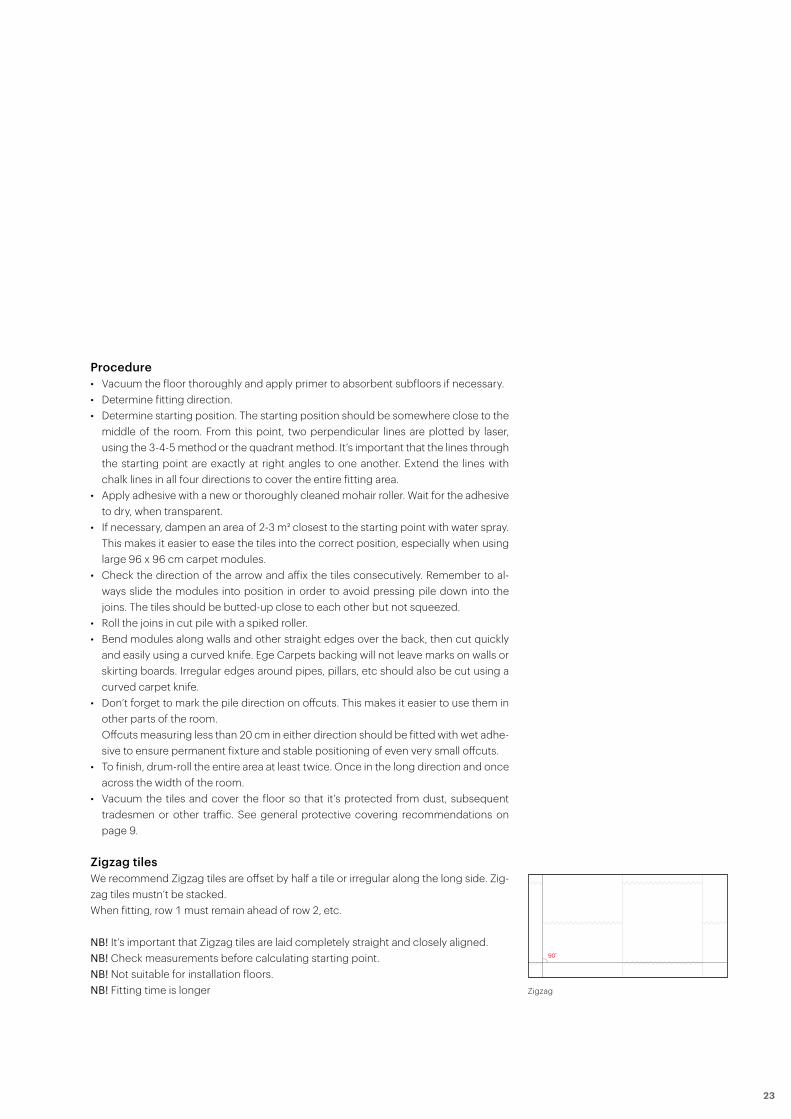
Zigzag tilesWe recommend Zigzag tiles are offset by half a tile or irregular along the long side. Zig-zag tiles mustn’t be stacked.When fitting, row 1 must remain ahead of row 2, etc.
NB! It’s important that Zigzag tiles are laid completely straight and closely aligned. NB! Check measurements before calculating starting point.NB! Not suitable for installation floors.NB! Fitting time is longer Zigzag
90̊
24
FITTING INSTRUCTIONS FOR FIGURA BY EGE®
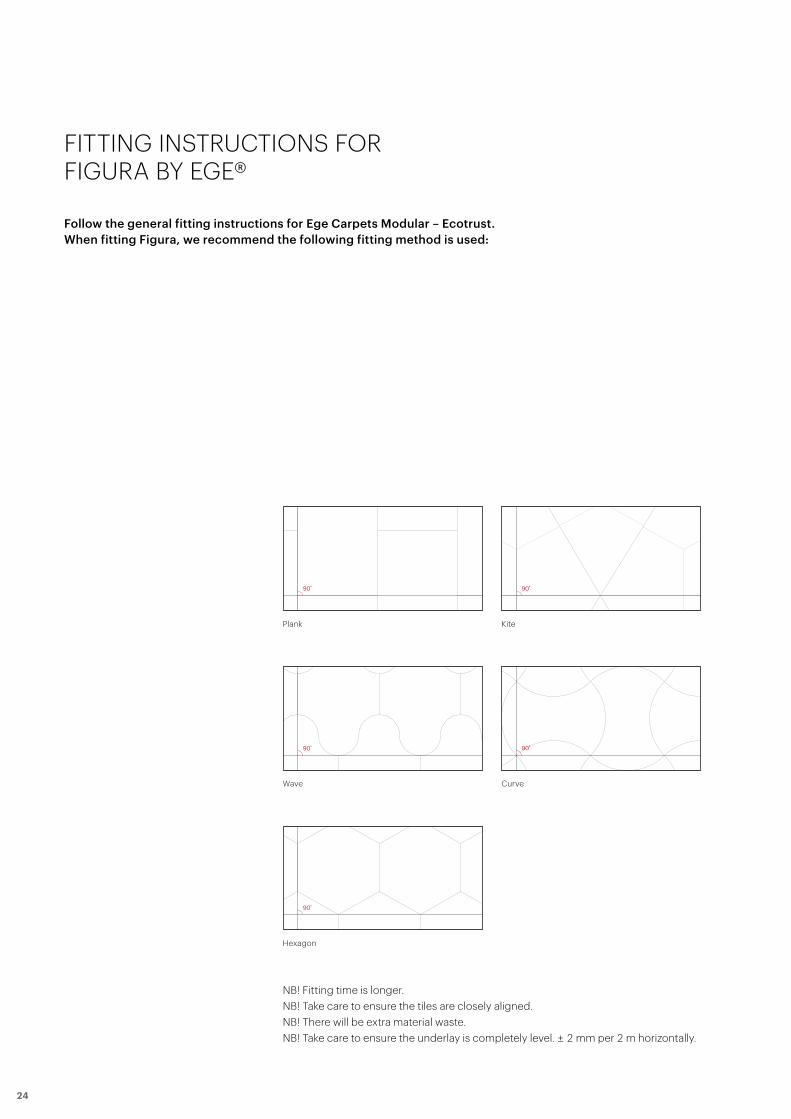
NB! Fitting time is longer.NB! Take care to ensure the tiles are closely aligned.NB! There will be extra material waste.NB! Take care to ensure the underlay is completely level. ± 2 mm per 2 m horizontally.
Follow the general fitting instructions for Ege Carpets Modular – Ecotrust. When fitting Figura, we recommend the following fitting method is used:
Plank
Wave
Hexagon
Kite
Curve
90̊
90̊
90̊
90̊
90̊
25
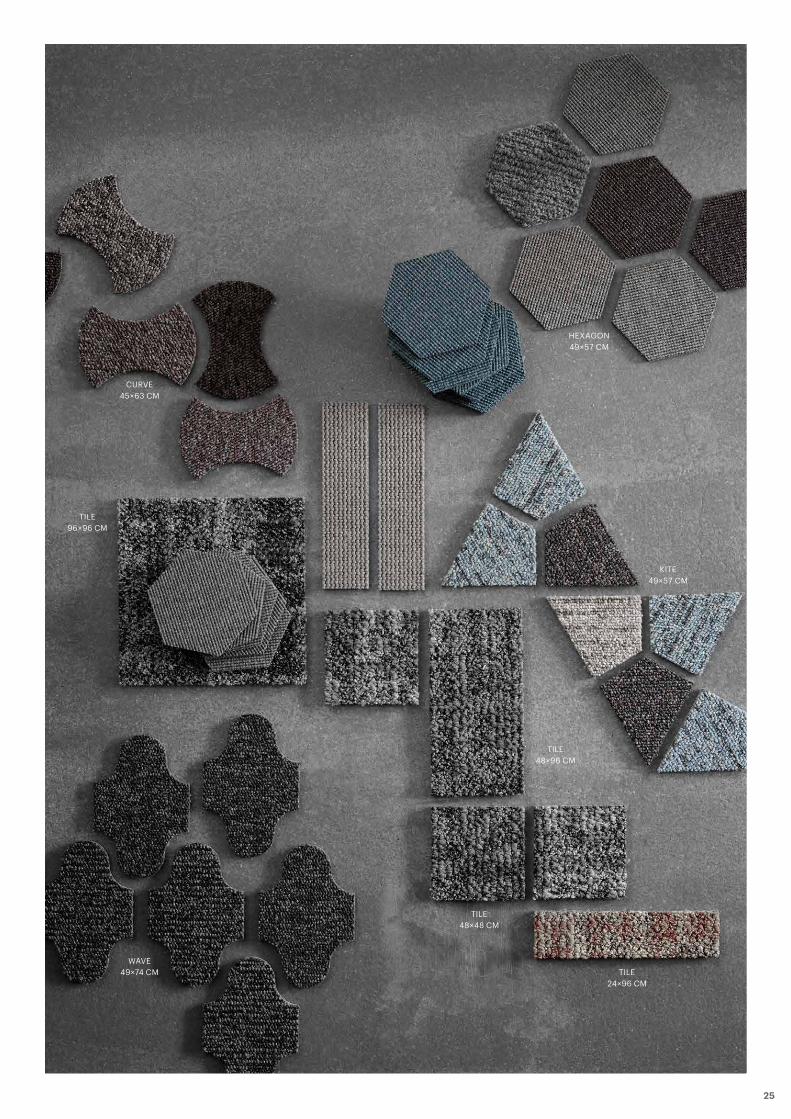
WAVE49�74 CM
HEXAGON49�57 CM
KITE49�57 CM
CURVE45�63 CM
TILE48�48 CM
TILE96�96 CM
TILE24�96 CM
TILE48�96 CM

26
ECOPADS
How to use Ecopads • Define your starting point for laying the tiles.• Remove the film from the back of four Ecopads and place them on the four corners
of the first tile, so they’re spread evenly between the corners of this tile and the cor-ners of the three adjoining tiles
• Secure the first tile on the subfloor • Repeat the process and build up using the staircase principle illustrated
The Ecopads create a strong bond between the subfloor and tile, but if it needs replac-ing the tile can be easily removed by pulling it upwards. A new tile can then be laid. After installation, there’s minimal waste and no adhesive bucket, brush or roller to clean or dispose of. Ecopads can be used on all Ege Carpets tufted carpet tiles.
• Ecopads Strong is used for concrete.• Ecopads Light is used for hardwood floors and other places where the surface
mustn’t be damaged. (The surface may need to be refinished when removing).
NB! Ecopads aren’t suitable for Ege Carpets flat-woven carpet tiles.
Ecopads offer many advantages over adhesive.A pack of Ecopads weighs significantly less than a bucket of adhesive, and there’s no need for brushes or rollers. The subfloor requires no additional preparation, so follow the general rules in Ege Carpets fitting instructions. Recommended for Ege Carpets 48�48 cm tufted carpet tiles.
3 5 8 11
1 2 4 7
6 9 12 14
10 13 15 16
13
10
15
16
27
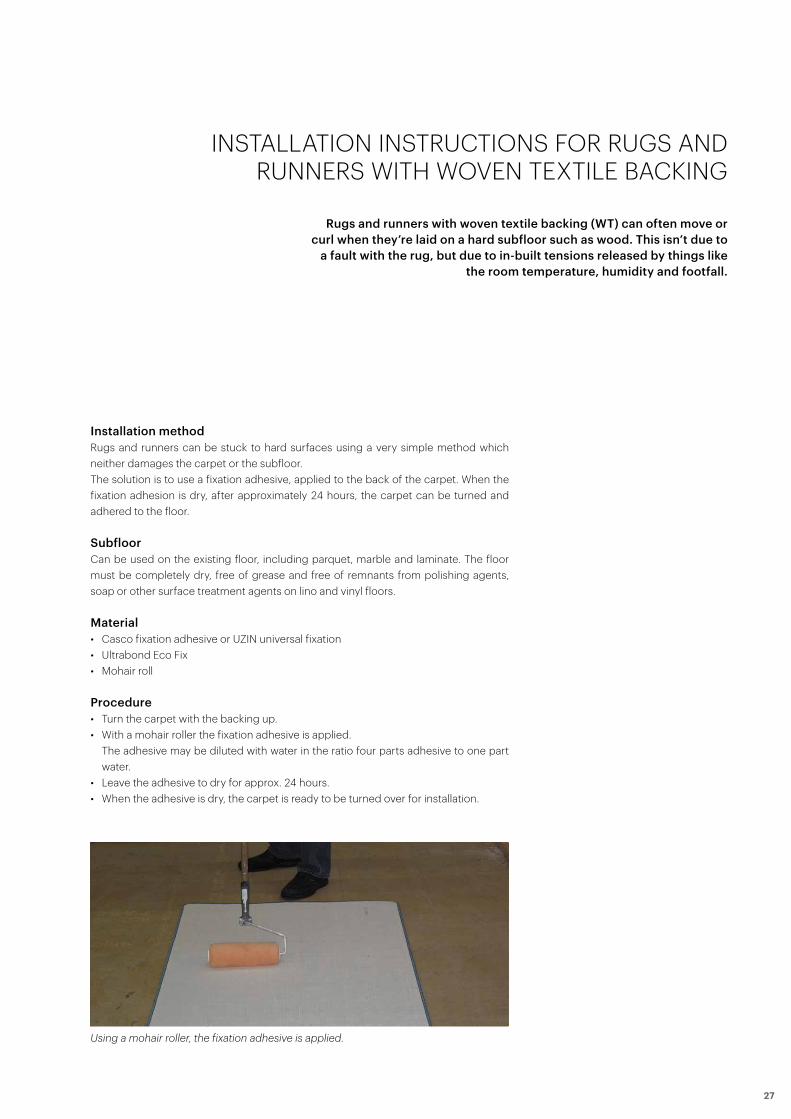
INSTALLATION INSTRUCTIONS FOR RUGS ANDRUNNERS WITH WOVEN TEXTILE BACKING
Installation methodRugs and runners can be stuck to hard surfaces using a very simple method which neither damages the carpet or the subfloor.The solution is to use a fixation adhesive, applied to the back of the carpet. When the fixation adhesion is dry, after approximately 24 hours, the carpet can be turned and adhered to the floor.
SubfloorCan be used on the existing floor, including parquet, marble and laminate. The floor must be completely dry, free of grease and free of remnants from polishing agents, soap or other surface treatment agents on lino and vinyl floors.
Material • Casco fixation adhesive or UZIN universal fixation • Ultrabond Eco Fix• Mohair roll
Procedure • Turn the carpet with the backing up. • With a mohair roller the fixation adhesive is applied. The adhesive may be diluted with water in the ratio four parts adhesive to one part
water. • Leave the adhesive to dry for approx. 24 hours. • When the adhesive is dry, the carpet is ready to be turned over for installation.
Rugs and runners with woven textile backing (WT) can often move or curl when they’re laid on a hard subfloor such as wood. This isn’t due to
a fault with the rug, but due to in-built tensions released by things like the room temperature, humidity and footfall.
Using a mohair roller, the fixation adhesive is applied.
28
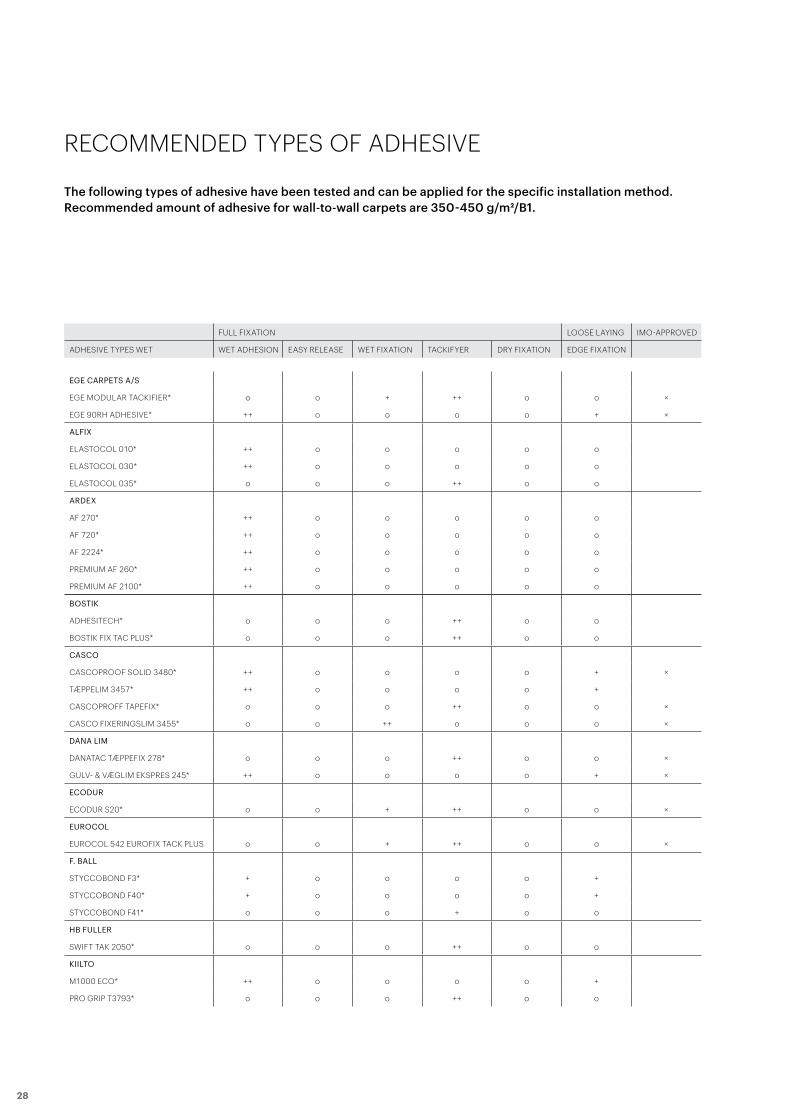
RECOMMENDED TYPES OF ADHESIVE
The following types of adhesive have been tested and can be applied for the specific installation method.Recommended amount of adhesive for wall-to-wall carpets are 350-450 g/m2/B1.
FULL FIXATION LOOSE LAYING IMO-APPROVED
ADHESIVE TYPES WET WET ADHESION EASY RELEASE WET FIXATION TACKIFYER DRY FIXATION EDGE FIXATION
EGE CARPETS A/S
EGE MODULAR TACKIFIER* o o + ++ o o �
EGE 90RH ADHESIVE* ++ o o o o + �
ALFIX
ELASTOCOL 010* ++ o o o o o
ELASTOCOL 030* ++ o o o o o
ELASTOCOL 035* o o o ++ o o
ARDEX
AF 270* ++ o o o o o
AF 720* ++ o o o o o
AF 2224* ++ o o o o o
PREMIUM AF 260* ++ o o o o o
PREMIUM AF 2100* ++ o o o o o
BOSTIK
ADHESITECH* o o o ++ o o
BOSTIK FIX TAC PLUS* o o o ++ o o
CASCO
CASCOPROOF SOLID 3480* ++ o o o o + �
TÆPPELIM 3457* ++ o o o o +
CASCOPROFF TAPEFIX* o o o ++ o o �
CASCO FIXERINGSLIM 3455* o o ++ o o o �
DANA LIM
DANATAC TÆPPEFIX 278* o o o ++ o o �
GULV- & VÆGLIM EKSPRES 245* ++ o o o o + �
ECODUR
ECODUR S20* o o + ++ o o �
EUROCOL
EUROCOL 542 EUROFIX TACK PLUS o o + ++ o o �
F. BALL
STYCCOBOND F3* + o o o o +
STYCCOBOND F40* + o o o o +
STYCCOBOND F41* o o o + o o
HB FULLER
SWIFT TAK 2050* o o o ++ o o
KIILTO
M1000 ECO* ++ o o o o +
PRO GRIP T3793* o o o ++ o o

29
FULL FIXATION LOOSE LAYING IMO-APPROVED
ADHESIVE TYPES WET WET ADHESION EASY RELEASE WET FIXATION TACKIFYER DRY FIXATION EDGE FIXATION
o = Not suitable. + = Suitable. ++ = Recommended.
* Meet the European GEV-Emicode EC 1 demands with as little emission into the surroundings as possible.
(GEV =Gemeinsam Emissionskontrollierte Verlegewerkstoffe e.V.)
LECHNER
POLIPLEX 325* ++ o o o o o
POLIPLEX ECO* ++ o o o o o
HYCOSTIK o o o ++ o o
MAPEI
ULTRABOND ECO 170* ++ o o o o o
ULTRABOND ECO 195* ++ o o o o o
ULTRABOND ECO 200* ++ o o o o o
ULTRABOND ECO 220* ++ o o o o o
ULTRABOND ECO 350* ++ o o o o o
ULTRABOND ECO 373* o o o ++ o o
ULTRABOND ECO 800* o o o ++ o o
ULTRABOND ECO FIX* o o o ++ o o
ULTRABOND ECO TACK* o o o ++ o o
SCHÖNOX
FLOORTEX* ++ o o o o o
EMICLASSIC* ++ o + o o o
COMBI PROOF* ++ o o o o o
MULTIFIX* o o + o o o
STAUF
STAUF CT FIX* o o o ++ o o
TAPE
SIGAN 1* o o o o ++ o
SIGAN 2* o o o o ++ o
SIGAN 3* o o o o ++ o
THOMSIT
THOMSIT T425 o o o ++ o o
TREMCO
TREMCO SF200* o o + ++ o o
UZIN
UZ 57* ++ o o o o o
UZ 90* ++ o o o o o
UNIVERSALFIX* o o ++ o o o
UZIN U2100* o o + ++ o o
UZIN U2500* o o o ++ o o �
WULFF
WULFF AC 11* ++ o o o o +

30

31

Ege
Car
pets
inho
use
082
0 –
80
250
13 –
5th
edi
tion
egecarpets.com
Copyright © 2022 FDOKUMEN