INSTALLATION - Hansgrohe
24
INSTALLATION EN / Installation / User Instructions / Warranty FR / Instructions de montage / Mode d'emploi / Garantie ES / Instrucciones de montaje / Manejo / Garantía AXOR MyEdition 47060XX1 47062001
-
Upload
khangminh22 -
Category
Documents
-
view
0 -
download
0
Transcript of INSTALLATION - Hansgrohe

I N S T A L L A T I O N
EN / Installation/UserInstructions/WarrantyFR / Instructionsdemontage/Moded'emploi/GarantieES / Instruccionesdemontaje/Manejo/Garantía
AXOR MyEdition47060XX147062001

2
TECHNICAL INFORMATION
Water pressure Recommended 15 - 75 PSI (0.1 - 0.5 MPa) Maximum 145 PSI (1 MPa)Hot water temp. Recommended 120°-140° F (48° -60° C)* Maximum 158°F (70° C)*Max. flow rate 1.2 GPM (4.5 L/min)
* Please know and follow all applicable local plumbing codes when setting the temperature on the water heater.
INSTALL ATION CONSIDERATIONS
⁄ For best results, Hansgrohe recommends that this unit be installed by a licensed, professional plumber.
⁄ Please read over these instructions thoroughly before beginning installation. Make sure that you have all tools and supplies needed to complete the installation.
⁄ This trim is for use with rough valve model 13622181 (not included).
⁄ Keep this booklet and the receipt (or other proof of date and place of purchase) for this product in a safe place. The receipt is required should it be necessary to request warranty parts.
DONNÉES TECHNIQUES
Pression d’eau recommandée 15 - 75 PSI (0.1 - 0.5 MPa) maximum 145 PSI /10 BarTempérature d'eau chaude recommandée 120°-140° F (48° -60° C)* maximum 158°F (70° C)*Capacité nominale 1.2 GPM (4.5 L/min)
* Vous devez connaître et respecter tous les codes de plom-berie locaux applicables pour le réglage de la température du chauffe-eau.
À PRENDRE EN CONSIDÉRATION POUR L’ INSTALL ATION
⁄ Pour de meilleurs résultats, Hansgrohe recommande que ce produit soit installé par un plombier profes-sionnel licencié.
⁄ Veuillez lire attentivement ces instructions avant de procéder à l’installation. Assurez-vous de disposer de tous les outils et du matériel nécessaires pour l’installation.
⁄ Ce dispositif requiert une pièce intérieure 13622181.
⁄ Conservez ce livret et le reçu (ou une autre preuve sur laquelle figurent la date et l’endroit de l’achat) pour ce produit dans un endroit sûr. Le reçu est req-uis si vous commandez des pièces sous garantie.
E N G L I S H F R A N A I S

3
DATOS TECNICOS
Presión en servicio recomendada 15 - 75 PSI (0.1 - 0.5 MPa) max. 145 PSI (1 MPa)Temperatura del agua caliente recomendada 120°-140° F (48° -60° C)* max. 158°F (70° C)*Caudal máximo 1.2 GPM (4.5 L/min)
* Debe conocer y cumplir todos los códigos locales apli-cables para ajustar la temperatura del calentador de agua.
CONSIDERACIONES PARA L A INSTAL ACIÓN
⁄ Para obtener mejores resultados, la instalación debe estar a cargo de un plomero profesional matriculado.
⁄ Antes de comenzar la instalación, lea estas instruc-ciones detenidamente. Asegúrese de tener las herra-mientas y los insumos necesarios para completar la instalación.
⁄ La unidad requiere una pieza interior de válvula 13622181.
⁄ Mantenga este folleto y el recibo (u otro compro-bante del lugar y fecha de compra) de este pro-ducto en lugar seguro. El recibo se requiere en caso de ser necesario solicitar piezas bajo garantía.
TO O L S R E Q U I R E D / O U T I L E S U T I L E S / H E R R A M I E N TA S Ú T I L E S
E S P A Ñ O L
17 mm24 mm30 mm
10 mm4 mm3 mm
2.5 mm
¼"(6 mm)

4
AXOR MyEdition47060XX147062001
INSTALL ATION SUGGESTIONS / SUGGESTIONS D' INSTALL ATION / SUGERENCIAS PARA L A INSTAL ACIÓN
3¹⁵⁄₁₆ (100 mm)7⅛" (180 mm)
3⅛" (78 mm)
3⅛" (
78 m
m)
3⅛" (
78 m
m)
3¼" (82 mm)
1⅝"
(40
mm
)
2⅜"(60 mm)
1⅛"(30 mm)
2¾"(69 mm)
2¾"(69 mm)
1¾"
(44
mm
)
¾"
(20
mm
)
9⅝" (245 mm)
10°8¾" (221mm)4¼" (107 mm)3" (77 mm)
3¼" (
82 m
m)
¾"(19 mm)
4" (100 mm)
6"(1
50 m
m)
4" (100 mm)
6"(1
50 m
m)

5
E N G L I S H F R A N A I S E S P A Ñ O L
Remove the caps.
Cut the plaster shields so that they extend ¹⁄₁₆" (1 mm) beyond the surface of the finished wall.
Retirez les capuchons.
Coupez les protecteurs de façon à ce qu’une partie de ¹⁄₁₆ po (1 mm) dépasse de la surface du mur fini.
Retire las tapas.
Corte los protectores de yeso de modo que sobresalgan ¹⁄₁₆" (1 mm) de la superficie de la pared terminada.
I N S T A L L A T I O N / I N S T A L L A T I O N / I N S T A L A C I Ó N
¹⁄₁₆"1 mm
21

6
E N G L I S H F R A N A I S E S P A Ñ O L
Seal the wall around the plaster shields using waterproof sealant.
Remove the nut and the flush insert from the cartridge housing.
Remove the plug from the spout housing.
Scellez le mur autour des protecteurs à l’aide d’un agent d’étanchéité.
Retirez l’écrou et la pièce d’insertion affleurante du compar-timent de cartouche.
Retirez le bouchon du comparti-ment de bec.
Selle la pared alrededor de los protectores de yeso con un sellador impermeable.
Retire la tuerca y el inserto de lavado del alojamiento del cartucho.
Retire el tapón del alojamiento del surtidor.
30 mm
3
17 mm
4

7
E N G L I S H F R A N A I S E S P A Ñ O L
Lightly lubricate the o-ring on the cartridge adapter.
Insert the cartridge adapter in the cartridge housing.
Lubrifiez légèrement le joint torique de l’adaptateur de cartouche.
Insérez l’adaptateur de car-touche dans le compartiment de cartouche.
Lubrique ligeramente el retén anu-lar en el adaptador del cartucho.
Inserte el adaptador del cartucho en el alojamiento del cartucho.
5a 5b

8
E N G L I S H F R A N A I S E S P A Ñ O L
Insert the cartridge and the seal.
Lightly lubricate the threads on the nut.
Install the nut.
Measure the distance from the wall to the end of the nut.
Insérez la cartouche et le joint d’étanchéité.
Lubrifiez légèrement les filets de l’écrou.
Installez l’écrou.
Mesurez la distance entre le mur et l’extrémité de l’écrou.
Inserte el cartucho y el sello.
Lubrique ligeramente las roscas de la tuerca.
Coloque la tuerca.
Mida la distancia desde la pared hasta el extremo de la tuerca.
24 mm 10 f t-lb /14 Nm
6 7

9
Select the approprate handle sleeve.
⁄ If the distance is ⅞"-1¼", select sleeve A.
⁄ If the distance is 1¼"-1⅝", select sleeve B.
⁄ If the distance is 1⅝" - 2", select sleeve C.
Connect the handle escutcheon to the spout sleeve.
Sélectionnez la gaine de poi-gnée appropriée.
Si la distance est de ⅞ po à 1 ¼ po, sélectionnez la gaine A.
Si la distance est de 1 ¼ po à 1 ⅝ po, sélectionnez la gaine B.
Si la distance est de 1 ⅝ po à 2 po, sélectionnez la gaine C.
Raccordez l’écusson de poignée à la gaine du bec.
Seleccione el manguito de la manija adecuado.
Si la distancia es de ⅞"-1¼", seleccione el manguito A.
Si la distancia es de 1¼"-1⅝", seleccione el manguito B.
Si la distancia es de 1⅝"-2", seleccione el manguito C.
Conecte el escudo de la manija al manguito del surtidor.
E N G L I S H F R A N A I S E S P A Ñ O L
1¼"33 mm
A ⅞" - 1¼"22 - 32 mm
⅞"23 mmB
1¼" - 1⅝"32 - 41 mm
½"14 mm
C 1⅝" - 2"41 - 50 mm
8
10
E N G L I S H F R A N A I S E S P A Ñ O L
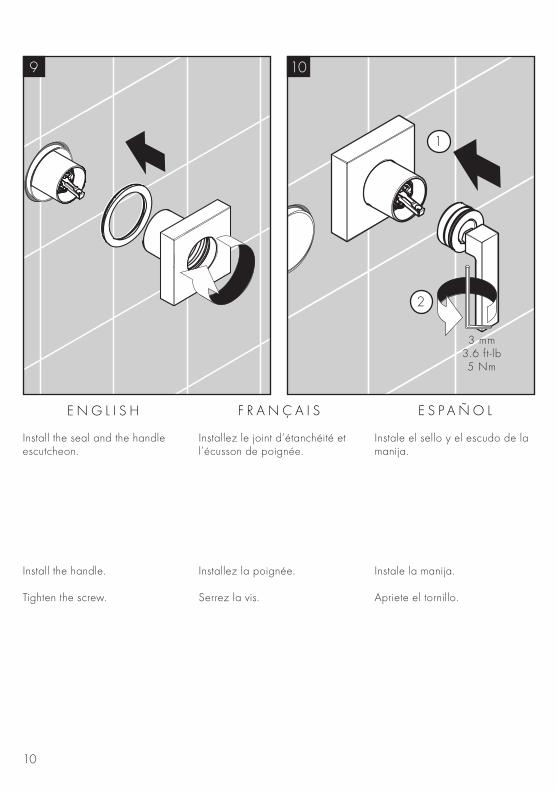
Install the seal and the handle escutcheon.
Install the handle.
Tighten the screw.
Installez le joint d’étanchéité et l’écusson de poignée.
Installez la poignée.
Serrez la vis.
Instale el sello y el escudo de la manija.
Instale la manija.
Apriete el tornillo.
3 mm3.6 f t-lb5 Nm
1
2
9 10

11
E N G L I S H F R A N A I S E S P A Ñ O L
Measure the distance between the outside edge of the spout plaster shield and the spout housing.
Cut the spout nipple so that it is X + ⁹⁄₁₆" (X + 14 mm) long.
Mesurez la distance entre le rebord extérieur du protecteur de bec et le compartiment de bec.
Coupez le raccord de bec de fa-çon à ce qu’il mesure X + ⁹⁄₁₆ po (X + 14 mm) de long.
Mida la distancia entre el borde externo del protector de yeso del surtidor y el alojamiento del surtidor.
Corte el niple del surtidor para que tenga una longitud de X + ⁹⁄₁₆" (X + 14 mm).
X + ⁹⁄₁₆"X + 14 mm
X
11 12

12
E N G L I S H F R A N A I S E S P A Ñ O L
Install the retainer plate and the spout nipple using a 10 mm allen wrench ( not included)
Make sure that the retaining plate is level.
Mark the positions of the screw holes.
Installez la plaque d’arrêt et le raccord de bec en utilisant une clé hexagonale de 10 mm (non fournie)
Assurez-vous que la plaque d’arrêt est de niveau.
Marquez les positions des trous de vissage.
Instale la placa de retención y el niple del surtidor con una llave Allen de 10 mm (no incluida).
Asegúrese de que la placa de retención quede nivelada.
Marque las posiciones de los orificios para tornillos.
10 mm
1413

13
E N G L I S H F R A N A I S E S P A Ñ O L
Remove the nipple and the retainer plate.
Drill the screw holes using a ¼" (6 mm) bit.
Install the anchors.
Seal the wall around the anchors using waterproof sealant.
Retirez le raccord et la plaque d’arrêt.
Percez les trous de vissage à l’aide d’une mèche de ¼ po (6 mm).
Installez les chevilles.
Scellez le mur autour des chevilles à l’aide d’un agent d’étanchéité.
Retire el niple y la placa de retención.
Perfore los orificios para tornillos con una broca de ¼" (6 mm).
Instale los pernos de anclaje.
Selle la pared alrededor de los pernos de anclaje con un sella-dor impermeable.
10 mm
1
2
3Ø 6 mm
1615

14
E N G L I S H F R A N A I S E S P A Ñ O L
Wrap the threads on the nipple using plumber’s tape.
Lightly lubricate the o-ring on the nipple.
Install the retainer plate and the nipple.
Install the washers and screws.
Enroulez les filets sur le raccord à l’aide de ruban de plomberie.
Lubrifiez légèrement le joint torique situé sur le raccord.
Installez la plaque d’arrêt et le raccord.
Installez les rondelles et les vis.
Envuelva las roscas del niple con cinta de plomero.
Lubrique ligeramente el retén anular del niple.
Instale la placa de retención y el niple.
Instale las arandelas y los tornillos.
10 mm
17 18
1
2
3

15
E N G L I S H F R A N A I S E S P A Ñ O L
Flush the hot and cold supplies.
Install the spout connector.
Rincez les conduites d’alimentation de l’eau chaude et de l’eau froide.
Installez le connecteur du bec.
Purgue los suministros de agua caliente y fría
Instale el conector del surtidor.
1 4 mm3.6 f t-lb5 Nm
2
19 20
16
E N G L I S H F R A N A I S E S P A Ñ O L
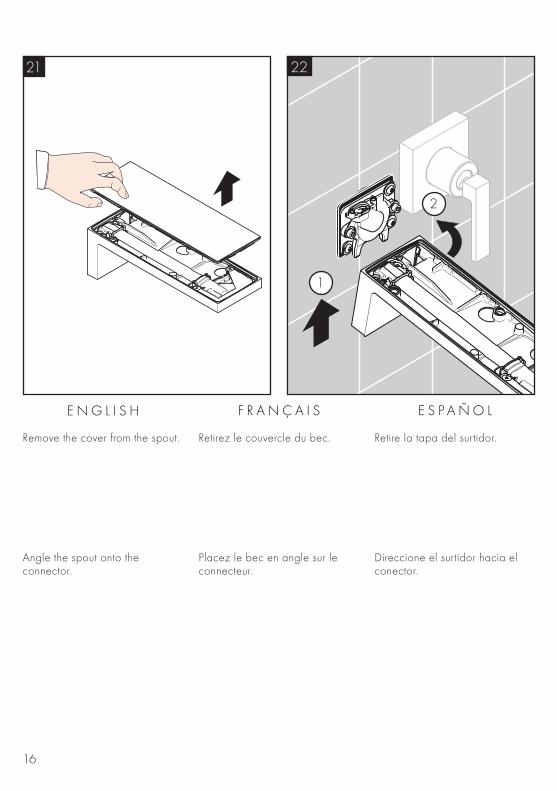
Remove the cover from the spout.
Angle the spout onto the connector.
Retirez le couvercle du bec.
Placez le bec en angle sur le connecteur.
Retire la tapa del surtidor.
Direccione el surtidor hacia el conector.
21 22
1
2

17
E N G L I S H F R A N A I S E S P A Ñ O L
Tighten the screws.
Install the cover.
Serrez les vis.
Installez le couvercle.
Apriete los tornillos.
Instale la tapa.
1
2
2.5 mm3.6 f t-lb5 Nm
2.5 mm1.5 f t-lb2 Nm
23 24

18
R E P L A C E M E N T P A R T S / P I È C E S D É T A C H É E S / R E P U E S T O S
AXOR MyEdition47060XX147062001
XX = Colors / Couleurs / Acabados00 = chrome / mirror glass60 = chrome / black glass
9337
1000
9760
0000
9337
4000
9531
1000
(5 l⁄
min
)93
3870
00
M5x
6 9337
2000
9338
5000
4790
1000
(245
mm
)47
9016
00 (2
45m
m)
4790
4140
(245
mm
)
9338
3000
9676
2000
9617
9000
9290
0000
9337
3000
9814
7000
(26x
2)
9816
4000
(33x
1.5)
9815
6000
(36x
2)98
4750
00(1
3x1.
5)
9847
5000
(13x
1.5)
9337
0000
9797
1000
A
CB
1358
6000
(25
mm
)
9340
7000

19
U S E R I N S T R U C T I O N S / I N S T R U C T I O N S D E S E R V I C E / M A N E J Oonouvertabierto
offfermécerrar
coldfroidfrío
hotchaudcaliente

20
C L E A N I N G / N E T T O Y A G E / L I M P I E Z A
2.5 mm1.5 f t-lb2 Nm
2.5 mm
1
2
3.
2
3.
1
5
3
2
4
1

21
CONSEIL DE NETTOYAGE POUR LES PRODUITS HANSGROHE
Les robinets pour les salles de bains et les cuisines modernes ainsi que les produits récents pour les douches se composent de matériaux différents afin de satisfaire aux besoins du marché en termes de conception et de fonctionnalité. Afin d’éviter d’endommager le produit, il est nécessaire d’en prendre soin.
POUR DE MEILLEURS RÉSULTATS : ⁄ Empêchez l’accumulation de tarte et/ou de résidu de savon en nettoyant votre produit Hansgrohe lorsque c’est
nécessaire. ⁄ Sélectionnez un produit de nettoyage spécifiquement prévu pour ce type de produit. ⁄ N’UTILISEZ PAS ces types de nettoyants car ils peuvent endommager votre produit Hansgrohe :
• Tout produit de nettoyage contenant de l’acide chlorhydrique, de l’acide formique, de la potasse ou de l’acide acétique. • Les poudres de nettoyage, les tampons ou les brosses abrasives. • Les nettoyeurs à vapeur. • Les produits de nettoyage « sans rinçage ».
⁄ NE MÉLANGEZ PAS les produits de nettoyage, à moins que cela soit indiqué par le fabricant. ⁄ NE PULVÉRISEZ PAS les nettoyants directement sur le produit car des gouttes pourraient entrer dans les ouvertures et les
fentes et causer des dommages. Lorsque vous utilisez des nettoyants par pulvérisation, pulvérisez le nettoyant sur un chiffon ou une éponge douce.
⁄ Après le nettoyage rincer abondamment à l’eau clair pour éliminer intégralement les restes de détergent.
C L E A N I N G R E C O M M E N D A T I O N F O R H A N S G R O H E P R O D U C T S
Modern bathroom faucets, kitchen faucets and shower products are made from different materials to comply with the needs of the market with regard to design and functionality. To avoid damage to the product, it is necessary to take proper care of it.
FOR BEST RESULTS:⁄⁄ Prevent the buildup of mineral scale and /or soap residue by cleaning your Hansgrohe product(s) when needed.⁄⁄ Select a cleaning agent specifically intended for the type of product.⁄⁄ DO NOT use these types of cleaners as they will cause damage to your Hansgrohe product:
• Any cleaning agent containing hydrochloric acid, formic acid, lye, or acetic acid.• Abrasive cleaning powders, pads, or brushes.• Steam cleaners.• “No rinse” cleaning agents.
⁄⁄ ALWAYS follow the instructions provided by the manufacturer of the cleaning agent. ⁄⁄ DO NOT mix cleaning agents, unless directed by the manufacturer.⁄⁄ DO NOT spray cleaners directly onto the product as drops could enter openings and gaps and cause damage. When
using spray cleaners, spray the cleaner onto a soft cloth or sponge. ⁄⁄ ALWAYS rinse your Hansgrohe product thoroughly with clear water and polish dry with a soft cloth after cleaning.
IMPORTANT⁄⁄ Residue from soaps and shampoos can cause damage. Rinse the product with clean water after each use. ⁄⁄ Residue from basin/tub/tile cleaner can cause damage to faucets and fittings. Immediately rinse any overspray from the
Hansgrohe product.⁄⁄ Do not store any cleaning agents under your Hansgrohe product, such as in a vanity unit, as the fumes may damage the
product.⁄⁄ DAMAGE TO THE PRODUCT CAUSED BY IMPROPER CARE OR THE USE OF IMPROPER CLEANING AGENTS IS
NOT COVERED BY THE WARRANTY.⁄⁄ IF A COMPONENT OF THE PRODUCT IS DAMAGED, REINSTALL IT, AS THERE IS RISK OF INJURY.

22
RECOMENDACIÓN DE L IMPIEZA PARA LOS PRODUCTOS DE HANSGROHE
Hoy en día, las griferías de baño y de cocina así como duchas modernas se componen de materiales muy distintos para satisfacer las exigencias del mercado respecto al diseño y la funcionalidad. Para evitar daños y reclamaciones hay que tener en cuenta ciertos aspectos tanto en el uso como en su limpieza.
PARA OBTENER MEJORES RESULTADOS: ⁄ Evite la acumulación de restos de jabón o sarro limpiando el producto Hansgrohe cuando sea necesario. ⁄ Seleccione un agente de limpieza diseñado específicamente para el tipo de producto. ⁄ NO USE estos tipos de limpiadores, ya que causarán daño a su producto Hansgrohe:
• Agentes limpiadores que contengan ácido clorhídrico, fórmico, acético o lejía. • Polvos, paños o cepillos de limpieza abrasivos. • Limpiadores a vapor • Agentes de limpieza “sin enjuague”.
⁄ SIEMPRE siga las instrucciones provistas por el fabricante del agente de limpieza. ⁄ NO MEZCLE los agentes de limpieza, a menos que esté indicado por el fabricante. ⁄ No rocíe limpiadores directamente sobre el producto, ya que podrían caer gotas sobre las aberturas y espacios y causar
daños. Cuando use limpiadores en spray, rocíe el limpiador sobre un paño suave o esponja. ⁄ SIEMPRE enjuague su producto Hansgrohe con agua limpia y séquelo y lústrelo con un paño suave después de la
limpieza.
IMPORTANTE ⁄ Los residuos de productos de aseo como jabon liquido, champus, gel de ducha, tintes de pelo, perfumes, lociones de
afeitado y esmalte de unas pueden danar tambien los materiales. Enjuague el producto con agua limpia después de cada uso.
⁄ Los residuos de limpiadores para lavatorios, bañeras o azulejos pueden causar daño a los grifos y accesorios. Enjuague inmediatamente cualquier derrame que haya sobre el producto de Hansgrohe.
⁄ Tampoco pueden generarse depositos de productos de limpieza o quimicos debajo de los productos, p. ej. En un armario de lavabo. De lo contrario, los vapores generados pueden danar los productos.
⁄ LOS DAÑOS QUE RESULTEN DE UN CUIDADO INADECUADO O USO DE AGENTES DE LIMPIEZA INADECUADOS NO ESTÁN CUBIERTOS POR LA GARANTÍA.
⁄ SI SE DAÑA UN COMPONENTE DEL PRODUCTO, REEMPLÁCELO, YA QUE EXISTE RIESGO DE LESIÓN.
IMPORTANT ⁄ Les residus de produits pour le corps comme les savons liquides, shampooings, gels de douche, teintures pour cheveux,
parfums, apres-rasage et vernis a ongles peuvent causer des deteriorations. Rincez le produit avec de l’eau propre après chaque utilisation.
⁄ Le résidu provenant des nettoyants pour cuvette/baignoire/carrelage peut endommager les robinets et les raccords de tuyauterie. Rincez immédiatement toute surpulvérisation sur le produit Hansgrohe.
⁄ De meme, il est interdit de stocker des detergents ou des produits chimiques sous les produits, par ex. dans un meuble sous lavabo, car les vapeurs qui s’en degagent risquent d’abimer les produits.
⁄ LES DOMMAGES AU PRODUIT CAUSÉS PAR UN MAUVAIS ENTRETIEN OU PAR L’UTILISATION DE PRODUITS DE NETTOYAGE INADÉQUATS NE SONT PAS COUVERTS PAR LA GARANTIE.
⁄ SI UN COMPOSANT DU PRODUIT EST ENDOMMAGÉ, REMPLACEZ-LE, CAR IL EXISTE UN RISQUE DE BLESSURE.

23
This warranty is limited to products manufactured by Hansgrohe, Inc. that are purchased by a consumer in the United States or Canada after March 1, 1996, and installed in either the United States or in Canada.
WHO IS COVERED BY THE WARRANT Y
This limited warranty extends to the original purchaser only. This warranty is non-transferable. Hansgrohe, Inc. neither assumes nor authorizes any person to create for it any other obligation or liability in connection with this product.
LENGTH OF WARRANT Y
If you are a consumer who purchased the product for use primarily for personal, family or household purposes, this limited warranty starts on the date of purchase and extends for as long as you own the product and the home in which the product is originally installed. If you purchased the product for use primarily for any other purpose, including, without limitation, a commercial purpose, this limited warranty starts on the date of purchase and extends (i) for 1 year, with respect to hansgrohe brand products and commercial products, and (ii) for 5 years, with respect to AXOR products. The Rubbed Bronze finish is subject to a 3-year limited warranty starting on the date of purchase.
WHAT IS COVERED BY THE WARRANT Y
This limited warranty covers only your manufactured product. Hansgrohe, Inc. warrants this product against defects in material or workmanship as follows:
Hansgrohe, Inc. will replace at no charge for parts only or, at its option, replace any product or part of the product that proves defective because of improper workmanship and/or material , under normal installation, use, service and maintenance. If Hansgrohe, Inc. is unable to provide a replacement and repair is not practical or cannot be made in timely fashion, Hansgrohe, Inc. may elect to refund the purchase price in exchange for the return of the product. REPAIR OR REPLACEMENT (OR, IN LIMITED CIRCUMSTANCES, REFUND OF THE PURCHASE PRICE) AS PROVIDED UNDER THIS LIMITED WARRANTY IS THE EXCLUSIVE REMEDY OF THE PURCHASER.
WHAT IS NOT COVERED BY THE WARRANT Y
A. Conditions, malfunctions or damage not resulting from defects in material or workmanship.
B. Conditions, malfunctions or damage resulting from (1) normal wear and tear, improper installation, improper maintenance, misuse, abuse, negligence, accident or alteration; (2) the use of abrasive or caustic cleaning agents or “no-rinse” cleaning products, or the use of the product in any manner contrary to the product instructions; or (3) conditions in the home such as excessive water pressure or corrosion.
C. Labor and other expenses for disconnection, deinstallation, or return of the product for warranty service (including but not limited to proper packaging and shipping costs), or for installation or reinstallation of the product.
D. Accessories, connected materials and products, or related products not manufactured by Hansgrohe, Inc.
E. Any hansgrohe or AXOR product sold for display purposes.F. Custom products are non-returnable and cannot be
cancelled upon receipt of order confirmation sent from Hansgrohe, Inc.
HANSGROHE, INC. SHALL NOT BE LIABLE TO PURCHASER OR ANY OTHER PERSON FOR ANY INCIDENTAL, SPECIAL OR CONSEQUENTIAL DAMAGES, ARISING OUT OF BREACH OF THIS LIMITED WARRANTY.
Some provinces and some states do not allow the exclusion or limitation of incidental or consequential damages, so the above l im i ta t ion or exc lus ion may no t apply to you.
TO OBTAIN WARRANTY PARTS OR INFORMATION
Contact your Hansgrohe retailer, or contact Technical Service at:
Hansgrohe, Inc.1492 Bluegrass Lakes Parkway
Alpharetta, GA 30004Toll-free 800-334-0455
In requesting warranty service, you will need to provide:
1. The sales receipt or other evidence of the date and place of purchase.
2. A description of the problem.3. Delivery of the product or the defective part, postage
prepaid and carefully packed and insured, to:
Hansgrohe, Inc.1492 Bluegrass Lakes Parkway
Alpharetta, GA 30004Toll-free 800-334-0455
When warranty service is completed, any repaired or replacement product or part will be returned to you postage prepaid. REVISED MAY 1, 2016.
PRODUCT INSTRUCTIONS AND QUESTIONS
Upon purchase or prior to installation, please carefully inspect your product for any damage or visible defect. Prior to installing, alwayscarefully study the enclosed instructions on the proper installation and the care and maintenance of this product. If you have questions at any time about the use, installation or performance of your product, or the Limited Warranty, please write us or call us toll-free at 800-334-0455.
L I M I T E D C O N S U M E R W A R R A N T Y

AXOR ⁄ Hansgrohe, Inc.
1490 Bluegrass Lakes Parkway
Alpharetta, GA 30004
Tel. 800-334-0455
Fax 770-889-1783
axor-design.com US
- Ins
talla
tion
Instr
uctio
ns •
Par
t No.
906
447
21 •
Rev
ised
07/2
019