Windows XP Annoyances for Geeks, 2nd Edition By David A ...
720
• Table of Contents • Index • Reviews • Reader Reviews • Errata • Academic • Going Wireless with Windows XP Windows XP Annoyances for Geeks, 2nd Edition By David A. Karp Publisher: O'Reilly Pub Date : November 2004 ISBN: 0-596-00876-7 Pages : 664 Offering dozens of on-target tips, workarounds, and warnings, Windows XP Annoyances for Geeks allows users to improve their overall experience with the popular XP operating system. And now, with this updated edition, users can also expect detailed coverage of the newly released Service Pack 2 (SP2) technology, which provides protection against viruses, hacker, and worms. It's the ultimate resource for the ever-expanding Windows XP market.
-
Upload
khangminh22 -
Category
Documents
-
view
0 -
download
0
Transcript of Windows XP Annoyances for Geeks, 2nd Edition By David A ...

• Table of
Contents
• Index
• Reviews
• Reader
Reviews
• Errata
• Academic
•
Going Wireless
with Windows
XP
Windows XP Annoyances for Geeks, 2nd Edition
By David A. Karp
Publisher: O'Reilly
Pub Date: November 2004
ISBN: 0-596-00876-7
Pages: 664
Offering dozens of on-target tips, workarounds, and warnings, WindowsXP Annoyances for Geeks allows users to improve their overall experiencewith the popular XP operating system. And now, with this updated edition,users can also expect detailed coverage of the newly released Service Pack2 (SP2) technology, which provides protection against viruses, hacker, andworms. It's the ultimate resource for the ever-expanding Windows XPmarket.

• Table of
Contents
• Index
• Reviews
• Reader
Reviews
• Errata
• Academic
•
Going Wireless
with Windows
XP
Windows XP Annoyances for Geeks, 2nd Edition
By David A. Karp
Publisher: O'Reilly
Pub Date: November 2004
ISBN: 0-596-00876-7
Pages: 664
Copyright
Preface
What IS an Annoyance?
How This Book Came to Be
Organization of This Book
Getting the Most Out of This Book
Software Depository
Using Code Examples
Conventions Used in This Book
Request for Comments
Acknowledgments
Chapter 1. Getting Started with Windows XP
Section 1.1. A Brief History of Time, Re: MS Windows
Section 1.2. Windows Editions and Service Packs
Section 1.3. What You Get with Windows XP
Section 1.4. Installing Windows XP
Section 1.5. Migrating to Windows XP
Chapter 2. Basic Explorer Coping Skills
Section 2.1. Working with Explorer
Section 2.2. Handling Files and Folders
Section 2.3. Customizing the Interface
Chapter 3. The Registry
Section 3.1. The Registry Editor
Section 3.2. The Structure of the Registry

Section 3.3. Registry Procedures
Chapter 4. Tinkering Techniques
Section 4.1. Customizing Your Desktop
Section 4.2. Covering Your Tracks
Section 4.3. File Types: The Link Between Documents and Applications
Section 4.4. Cool Things You Can Do with Drives and Folders
Chapter 5. Maximizing Performance
Section 5.1. Trimming the Fat
Section 5.2. Hard Disk
Section 5.3. System Hardware
Chapter 6. Troubleshooting
Section 6.1. General Troubleshooting Techniques
Section 6.2. Specific Software Issues
Section 6.3. Dealing with Drivers and Other Tales of Hardware Troubleshooting
Section 6.4. Fixing Device-Specific Problems
Section 6.5. Preventive Maintenance and Data Recovery
Chapter 7. Networking andGoing Wireless
Section 7.1. Getting Started with Networking
Section 7.2. Build a Workgroup (Local Area Network)
Section 7.3. Connect to the Internet
Section 7.4. Stuff You Can Do with a Network
Section 7.5. Go Wireless
Section 7.6. Securing Your System on a Network
Chapter 8. User Accounts and Administration
Section 8.1. Managing Users
Section 8.2. Permissions and Security
Section 8.3. Logon Options
Section 8.4. Sharing Files and Printers
Chapter 9. Scripting and Automation
Section 9.1. Building a Script with VBScript
Section 9.2. Object References
Section 9.3. Development Tips
Section 9.4. Wacky Script Ideas
Chapter 10. The Command Prompt
Section 10.1. DOS Commands
Section 10.2. Batch Files: The Other Way to Do It
Section 10.3. Command Prompt Integration
Appendix A. Setting Locator
Section A.1. Alphabetical Listing of All Windows XP Settings
Appendix B. BIOS Settings
Appendix C. TCP/IP Ports
Appendix D. Class IDs (CLSIDs) of System Objects
Colophon
Index

Copyright © 2005 O'Reilly Media, Inc. All rights reserved.
Printed in the United States of America.
Published by O'Reilly Media, Inc., 1005 Gravenstein Highway North, Sebastopol, CA 95472.
O'Reilly books may be purchased for educational, business, or sales promotional use. Online editionsare also available for most titles (http://safari.oreilly.com). For more information, contact ourcorporate/institutional sales department: (800) 998-9938 or [email protected].
Nutshell Handbook, the Nutshell Handbook logo, and the O'Reilly logo are registered trademarks ofO'Reilly Media, Inc. The Annoyances series designation, Windows XP Annoyances for Geeks, theimage of a Surinam toad, and related trade dress are trademarks of O'Reilly Media, Inc.
Many of the designations used by manufacturers and sellers to distinguish their products are claimedas trademarks. Where those designations appear in this book, and O'Reilly Media, Inc. was aware ofa trademark claim, the designations have been printed in caps or initial caps. Microsoft and Windowsare registered trademarks of Microsoft Corporation.
While every precaution has been taken in the preparation of this book, the publisher and authorsassume no responsibility for errors or omissions, or for damages resulting from the use of theinformation contained herein.

PrefaceWhat IS an Annoyance?
How This Book Came to Be
Organization of This Book
Getting the Most Out of This Book
Software Depository
Using Code Examples
Conventions Used in This Book
Request for Comments
Acknowledgments

What IS an Annoyance?
If you're using Microsoft Windows, I shouldn't have to tell you what an annoyance is. To put it simply,an annoyance is a problem to be solved, and Windows certainly has no shortage of those.
An annoyance is the way Windows keeps forgetting your settings, rearranging your desktop icons,and constantly changing the order of items in your Start Menu. An annoyance is the inconsistent wayWindows handles the dragging and dropping of files. An annoyance is the fact that Microsoft gaveWindows a fancy face lift in Windows XP, but didn't bother to fix a nearly decade-old problem withFile Open and File Save dialogs (more on that later). An annoyance is Service Pack 2, whichcontains as many new bugs as it fixes, and only provides superficial protection in an age of viruses,Trojan horses, and spyware.
More often than not, an annoyance is the result of bad design, as opposed to a garden-variety bug.
Now, if we had a large selection of compatible operating systems from which to choose, the pointwould be almost moot; each of us would simply choose the most appropriate (and, of course, leastannoying) software available. However, the real world isn't like that, and most of us who useMicrosoft Windows are doing so out of necessity rather than personal choice. That puts Microsoft in aposition to control what we see and how we work. Realizing you're not alone is the first step toimproving your experience with Windows XP and regaining control of your machine before it assumescontrol of you.
But the purpose of this book is not to complain or criticize, but rather to acknowledge and understandthe problems and shortcomings of the operating system in an effort to overcome them.
Windows XP Annoyances for Geeks presents solutions that enable you to both customize andtroubleshoot Windows. This is an important distinction, because effective problem solving oftenrequires that you know whether an annoyance is an inadvertent bug or an intentional feature of thesoftware, and the dividing line isn't always clear. It's important to realize that if software doesn't actin a way that you think it should, it should be regarded as poor design and not necessarily the resultof a bug. A bug is an action carried out by a piece of software that wasn't intended by the designersof the product. Ultimately, this distinction doesn't make any particular annoyance any less annoying,but it goes a long way toward helping you come up with a solution.
Thinking Inside the Box
Here's a simple, yet not readily apparent, example of an intentional design decision that has led to atangible annoyance in Windows:
Common file dialog boxesthe little windows that appear when you go to File Open or File Save in most applicationslook basically the same, regardless of the application you're using,essentially because they're a function provided by Windows XP. This concept of common dialogs (inthe Windows world, anyway) was introduced in the 1980s in Windows 3.1 and has since undergonean evolutionary process as they've been reworked in each successive version of the operatingsystem.

An annoyance that plagued these boxes from the start was that they were not resizable and weretherefore awkward to use with large displays (or, conversely, too large on small displays).Fortunately, this problem has since been fixed, and in Windows XP, we enjoy resizable file dialogboxes most of the time. And although each application's file dialog will remember its size temporarily,this information is forgotten when the application is closed. Of course, this means that if you want alarger dialog box, you'll have to enlarge it again and again, and do it separately for each application.
However, a more serious problem (in my opinion), still not remedied in XP, is that of the Look in (orSave in) list at the top of these dialogs. When you're opening or saving a file, the only clue to thelocation of the current folder is the namenot the entire pathof the folder. So, for example, if thecurrent folder shown in a file dialog box is called images, there's no way to immediately determine ifthe folder you're looking at is c:\projects\images or d:\webpages\ personal \images.
What's worse is that Microsoft knows about the problem and has done nothing about it; in fact,they've taken steps to hide it. In some earlier versions of Windows, if you clicked the [?] button andthen clicked the Look in list, you would see this note: "To see how the current folder fits in thehierarchy on your computer, click the down arrow." In later releases of Windows, Microsoft simplyremoved the explanatory text, and did so instead of simply improving the interface.
The simple truth is that this would be very easy for Microsoft to remedy, and has been for years. Infact, Explorer has an option that allows you to fix a similar problem with folder windows by going toControl Panel Folder Options View tab and turning on the Display the full path in titlebar option. Yet this option has no effect on file dialog boxes, despite the fact that they've beendesigned to mimic folder windows in most other ways.
So, why has Microsoft neglected to fix this very basic design flaw? One might assume that it's part ofMicrosoft's ongoing strategy to hide as much information as possible from the user, in an effort tomake the computer appear easier to use. This is the same type of backward thinking that resulted inhidden filename extensions (see the discussion of file types in Chapter 4). The goal? Hide as muchinformation as possible from the user, even at the expense of usability.
Perhaps it's merely a matter of priority. Perhaps the decision makers at Microsoft feel that "cute"dialog boxes will sell more copies of Windows than functional ones. Or maybe it's just another aspectof self-preservation in the computer industry: if Microsoft ever released the perfect product, nobodywould upgrade ever again!
Now, we can speculate as to the intentions of the various developers of Windows until we're blue inthe face, but what it really comes down to is attitude. By labeling something a bug, we are placingthe burden of resolving the problem on Microsoft, and waiting for Microsoft developers to fix a bugthat they consider to be a feature can definitely be considered a lost cause.
However, if we lump together the crash-a-day tendency of Windows, the irritating little animations,the clutter on the desktop, the lack of decent documentation, and the fact that performance rarelymeets expectations, and call them all annoyances, we assume the burden of solving our ownproblems. This is a valuable attitude to adopt; it motivates us to learn more about the operatingsystem so that we can work more efficiently. And, more importantly, it gives us the power to resolvethe problems we encounter, so that we can get through the day with some degree of sanity.
Simply put, you should not be required to adjust the way you think in order to complete a task on acomputer; rather, you should learn how to adjust the computer to work in a way that makes sense toyou.

Take the solutions in this book seriously, but don't follow them blindly. Anythingthat indeed improves the interface can streamline your work and make theoverall Windows experience less painful and more enjoyable. However, oneperson's annoyance is another's feature; what's important is to construct theinterface that works best for you.

How This Book Came to Be
Back in early 1995, I was using a beta (pre-release version) of Windows 95 on my machine. Only afew hours after installing it, I became aware of the extent to which the previous version of Windows(Windows for Workgroups 3.11) had stunted my machine. A well-designed operating system canunleash the power of the hardware on which it runs, just as a poorly designed operating system canmake you want to throw all of your expensive hardware in the thresher. Windows is a little bit fromcolumn A and a little bit from column B.
Now, not being the complacent type, I immediately started hacking away at Windows, compiling a listof questions and complaints about the operating system, some of which had solutions and some ofwhich did not. This was the start of the Windows 95 Annoyances web site, which turned out to be oneof the very first web sites devoted to Windows 95. Later, in the summer of 1995, other pre-releaseusers began writing me with their own questions and complaints, and even with occasional solutionsto the problems I hadn't yet solved.
As readers' requests for information and additional solutions became more diverse, so did the website. The site quickly evolved from a simple list of annoyances to an extensive collection of tips andtricks, and eventually to a more comprehensive support center for Windows 95.
Then, in 1996, I wrote the book Windows Annoyances for O'Reilly, followed by Windows 98Annoyances in 1998, and Windows Me Annoyances in 2000. As these books were written andreleased, the web site was expanded to include other versions of Windows, and now, asAnnoyances.org, serves as the home for this book and its predecessors, the ever-increasingcollection of online tips and tricks, and several very popular threaded discussion forums.
The first edition of Windows XP Annoyances was written in 2002 to cover the original release ofWindows XP. This new edition, Windows XP Annoyances for Geeks, covers the benefits and pitfalls ofMicrosoft's latest edition of Windows XP: Service Pack 2.
I've written this book with the philosophy that the more you know about a tool you usespecifically,Microsoft Windows XPthe better your day-to-day experience with it will be. If this contradicts whatyou've seen in other books or the Windows manual, you're getting the idea.
But I prattle on. Feel free to dive in to any part of the book and start eliminating annoyances.

Organization of This Book
Chapter 1, Getting Started with Windows XP, discusses not only some of the more commonannoyances in the operating system and why they're there, but also many of the improvements inthis version over its successors. It's good stuff for gaining perspective on the operating system andits history of annoying behavior. Learn the best ways to install (and reinstall) Windows XP, includingsome advanced tips, such as setting up a dual-boot system and activation.
Chapter 2, Basic Explorer Coping Skills, starts by examining the Windows user interface and some ofthe settings that can significantly impact its usefulness. This is followed by a discussion of the wayyou work with Windows and how to take advantage of some of its lesser-known tricks andcustomization features, including advanced tips on Explorer: file-manipulation tricks, undocumentedinterface tweaks, and, best of all, some workarounds for Explorer's annoying Search tool. Finally,information on customizing skins and creating your own startup screen should whet your appetite forsome of the real meat in the rest of the book.
Chapter 3, The Registry, reveals the structure of the Registry, Windows's giant database of settingsand system configuration data, as well as the use of the Registry Editor application. This informationis especially important, as most of the rest of the book depends on a working knowledge of theRegistry. In addition to Registry basics, this chapter includes some advanced topics, such as effectivesearching techniques, finding the right Registry keys, and even a way to change certain Registrysettings from within Explorer!
Chapter 4, Tinkering Techniques, continues with customization and problem-solving topics that takeadvantage of the Registry techniques discussed earlier. You'll find in-depth solutions for reducingclutter, protecting your file types, and customizing Windows XP beyond Microsoft's intentions; editingthe Start Menu acquires a whole new meaning in this chapter.
Chapter 5, Maximizing Performance, presents an often-neglected topic. The goal is to get the bestpossible performance from your system without spending a lot of money or time. Learn about fine-tuning your applications, hardware, and processes to make your system run its best. Manage yourhard disk space effectively with multiple partitions, advanced NTFS features, and virtual memory.
Chapter 6, Troubleshooting, starts with Windows startup and shutdown issues, error messages,application crashing, and the Windows Update feature. And that's only the first section. The next twosections cover drivers and hardware problems, documentation about which is often neglected.Eliminate the Blue Screen of Death, and use the Recovery Console when Windows won't start. Finally,you'll find tips on safeguarding your data in preparation for the worst disasters, as well as datarecovery tips for those for whom the disasters have already happened.
Chapter 7, Networking and Going Wireless, allows you to expand your desktop and your repertoire bysetting up a local-area network and connecting to the Internet. More than just the basics, thischapter explores protocols, troubleshooting, and advanced technologies, such as Internet ConnectionSharing, Remote Desktop Sharing, virtual private networking, security, and WiFi. Plus, discover theins and outs of the new Windows Security Center in Service Pack 2.
Chapter 8, User Accounts and Administration, covers user accounts, permissions, encryption, as well

as resource sharing. This is essential material for anyone concerned about security, even if you're theonly user on your machine. Bypass the logon box, share files and printers, and implement automaticfile encryption and compression.
Chapter 9, Scripting and Automation, starts with a discussion of simple programming using theflexible Windows Script Host (WSH) included in Windows XP. In addition, you'll find advancedsolutions, such as functions for accessing the Registry, working with files, and even making CGIprograms for a web server. The chapter wraps up with several cool examples and a look at theScheduled Tasks feature and how it can be used in conjunction with scripts for a truly automatedenvironment.
Chapter 10, The Command Prompt, rounds out the book with coverage of what used to be calledDOS. The Command Prompt is still a valuable tool in Windows XP, and can serve as an essentialsafety net in the event of a problem. Here, you'll find coverage of DOS commands, batch files (analternative to the Windows Script Host), and, of course, the system path.
Appendix A, Setting Locator, is a comprehensive list of nearly every setting scattered throughoutWindows XP, from folder options to removing tray icons.
Appendix B, BIOS Settings, is a glossary of the often-neglected motherboard settings that cansignificantly affect the stability and performance of your system.
Appendix C, TCP/IP Ports, is a discussion and listing of network ports, used to identify data travellingon a network (or over the Internet) and essential for networking configuration and security.
Appendix D, Class IDs (CLSIDs) of System Objects, lists the Registry codes used to identify certainsystem objects (such as My Computer and the Recycle Bin), useful when hacking the Registry.

Getting the Most Out of This Book
This book is arranged to be used as a learning tool, as well as a reference. More than just a bag oftricks, it covers a wide range of topics, some informational and some instructional. Although youcertainly don't need to read the chapters in order, it is structured so that you can progress easilyfrom one topic to the next, expanding your knowledge and experience as you go. You should be ableto jump to any topic as needed; if you find that you don't have the proficiency required by aparticular solution, such as knowledge of the Registry, you should be able to learn about it elsewherein the book (Chapter 3, in the case of the Registry). For additional software and corrections, checkout the Annoyances.org web site at http://www.annoyances.org/.
Most topics are presented as problems or annoyances with corresponding solutions. Topics usuallybegin with a few introductory paragraphs explaining something you don't often find in otherreferences: why you'd want to complete the particular solution (and sometimes, why you wouldn't).In some cases, you may want to skip ahead to the actual solution procedure, easily identifiable bybullets or numbered steps.

Software Depository
Throughout this book, various add-on software is mentioned in the solutions to various problems.Now, wherever possible, I try not to make a particular solution absolutely dependent on add-onsoftwareafter all, I'd rather you carry around this book than a CD packed with useless, obsoleteshareware.
In some cases, of course, a solution involving add-on software is either the preferable or onlyrecourse. Fortunately, nearly all the software necessary to fill the holes in Windows as discussed inthis book is freely available on the Internet. However, instead of including a list of web addresseshere, all the software mentioned in this book, as well as software yet to be discovered, can be foundat http://www.annoyances.orgjust click the Software link on your left.
In addition to links for the downloadable software, you'll also find updates and additional informationfor the book. Also available is Creative Element Power Tools, a collection of tools specifically designedto help solve some of the Annoyances discussed in this book. You can download it fromhttp://www.creativelement.com/powertools/.

Using Code Examples
This book is here to help you get your job done. In general, you may use the code in this book inyour programs and documentation. You do not need to contact us for permission unless you'rereproducing a significant portion of the code. For example, writing a program that uses severalchunks of code from this book does not require permission. Selling or distributing a CD-ROM ofexamples from O'Reilly books does require permission. Answering a question by citing this book andquoting example code does not require permission. Incorporating a significant amount of examplecode from this book into your product's documentation does require permission.
We appreciate, but do not require, attribution. An attribution usually includes the title, author,publisher, and ISBN. For example: "Windows XP Annoyances for Geeks, by David A. Karp. Copyright2005 O'Reilly Media, Inc., 0-596-00876-7."
If you feel your use of code examples falls outside fair use or the permission given above, feel free tocontact us at [email protected].

Conventions Used in This Book
The following typographical conventions are used in this book:
Constant width
Indicates command-line computer output, code examples, commands, text to type, and pathsto Registry keys.
Constant width italic
Indicates user-defined elements within constant-width text (such as filenames or command-lineparameters). For example, Chapter 8 discusses a file encryption utility, cipher.exe, which has avariety of command-line options. A particular solution might instruct you to type:
cipher /r:filename
The italic portion of the above code, filename, signifies the element you'll need to replace with
whatever is applicable to your system or needs. The rest the non-italicized portion should be typedexactly as shown.
Bold
Identifies captions, menus, buttons, checkboxes, tabs, keyboard keys, and other interfaceelements. By bolding interface elements, it makes it easy to distinguish them from the rest ofthe text. For example, you may wish to turn off the Force Windows to crash option.
Window/dialog titles and icon captions are typically not bolded, but some objects (such asControl Panel contents) can appear as icons or menu items, and therefore typically appearbolded.
Italic
Introduces new terms and indicates web site URLs, file and folder names, and variables.
"Quotation marks"

Are used sparingly in this book, and are typically used to indicate references to topic headingsand emphasize new concepts. Note that if you see quotation marks around something you'resupposed to type, you should type the quotation marks as well (unless otherwise specified).
Path Notation
Occasionally, the following shorthand path notation is used to show you how to reach a givenuser-interface element or option. The path notation is always presented relative to a well-known location. For example, the following path:
Control Panel Date and Time Internet Time tab
means "Open the Control Panel, then open Date and Time, and then choose the InternetTime tab."
Keyboard shortcuts
When keyboard shortcuts are shown, a hyphen (such as Ctrl-Alt-Del) means that the keysmust be held down simultaneously.
This is an example of a tip, often used to highlight a particularly useful hint ortime-saving shortcut. Tips often point to related information elsewhere in thebook.
This is an example of a warning, which alerts to a potential pitfall of thesolution or application being discussed. Warnings can also refer to a procedurethat might be dangerous if not carried out in a specific way.

Request for Comments
Please address comments and questions concerning this book to the publisher:
O'Reilly Media, Inc.1005 Gravenstein Highway NorthSebastopol, CA 95472(800) 998-9938 (in the United States or Canada)(707) 829-0515 (international/local)(707) 829-0104 (fax)
You can also send us messages electronically. To be put on the mailing list or request a catalog, sendemail to:
To comment or ask technical questions about this book, send email to:
The O'Reilly web site has a section devoted especially to this book, on which can be found errata,sample chapters, reader reviews, and related information:
http://www.oreilly.com/catalog/winxpannoy2/
For software mentioned in this book, as well as additional tips, online discussion forums, andWindows news, visit:
http://www.annoyances.org/
For more information about books, conferences, software, Resource Centers, and the O'ReillyNetwork, see the O'Reilly web site at:
http://www.oreilly.com/

Acknowledgments
I'd like to start by thanking the folks at O'Reilly Media, Inc. It's a supreme pleasure to work withpeople who are dedicated to quality and are passionate about their work. Special thanks to TimO'Reilly for his enthusiasm, support, and commitment to quality. Thanks to Robert Luhn for helpingme get this edition together and out in time.
Thanks also to everyone on the team who worked on this book.
I'd like to thank my family, friends, and well-wishers (in that they didn't wish me any specific harm),all of whom put up with my deadlines and late-night writing binges. Additional thanks to RuthKampmann. Finally, my immeasurable gratitude to Torey Bookstein, the love of my life.
And, as always, I thank you for your continued support. Without the people who read this book, it'snothing more than a test subject for Newton's first law of motion.

Chapter 1. Getting Started with WindowsXPWindows XP is easily the most stable, most powerful, and most seamless operating system ever tocome from Microsoft. Whether or not that's saying something depends on how much time you'vepersonally spent with Windows 95 or DOS.
Do you get a sinking feeling every time you're about to install new software on your computer? Doyou get tired of having to turn off all the bells and whistles integrated into a new product just tomake it usable? Does your day-to-day experience with Windows make you want to chuck the wholesystem out the window? Have you calmly accepted the fact that your new operating system will mostlikely contain more bugs than improvements?
Why fight it? Why not simply join the masses and slip into the mind-numbing abyss of acquiescence,feeling powerless whenever computers don't work as seamlessly as promised by those who marketthem?
Because you know there's a better way. You know there's more to Windows XP than what'smentioned in the documentation, such as it is, and in Microsoft's press clippings. And you knowyou're not alone.

1.1. A Brief History of Time, Re: MS Windows
As time progresses, the lineage of Windows becomes less linear. Windows XP, despite its name, is notthe direct successor to Windows Me, nor is Windows 2000 the direct successor to Windows 98 andWindows 95. Instead, Windows XP is the latest installment to the historically less-consumer-orientedWindows NT line of operating systems, developed in parallel to the Windows 9x/Me line.
So why the distinction between these two product lines? The first release of Windows NT, arbitrarilyassigned the 3.1 version number, was released in the middle of 1993. At the time, Microsoft'smarketing department asserted that NT was an acronym for New Technology, which was actuallyquite an accurate description. The NT kernel, or underlying code upon which the interface (Explorer)runs, was completely new and did not rely on DOS,[1] despite the fact that it shared the same shell(interface) as Windows 3.1. This resulted (theoretically) in a more stable environment, much bettersecurity, and the ability to be easily ported to work on other processors (such as Compaq's Alphachip).
[1] DOS, or "Disk Operating System," was the first operating system available for the IBM PC (released in 1981). The first
versions of Microsoft Windows (Versions 1.x-3.x) were simply applications that ran on top of DOS. Windows 9x and Me are no
different, although Microsoft went to great lengths to hide the dependence on DOS. Historical trivia: Microsoft purchased the code
for DOS 1.0 for $50,000 and used it as the basis for their operating systems for more than twenty years.
Over the years, this "portability" has become much less emphasized. More recently, the NT line(Windows NT 4.0 in 1996 and Windows 2000 in 2000) has been improved and remarketed as a web,intranet, and network server; a challenger to Unix; and now, with Windows XP, a viable home-officeoperating system.
One of the problems with earlier releases of NT (from NT 3.1, which nobody liked, to NT 4.0, mostcommonly used as a web server, to Windows 2000, which made inroads among businesses andpower users) was that they offered the enhanced features of the NT kernel without most of the perksand polish prized by the average consumer. What had plagued NT most, however, was the abysmalindustry support for the platform. Given the overwhelming majority of Windows 9x users, a sizeablepercentage of the hardware and software available for the PCeven released as recently as the time ofthis writingwas simply not supported in Windows NT/2000. The result was a platform that was reallyinappropriate for most users.
Windows XP changed all that way back in 2001. Among other things, Windows XP known internally asWindows NT 5.1 (Windows 2000 is version 5.0) replaces Windows Me completely and marks the endof the DOS-based Windows 9x/Me line. Not that we're sorry to see it go.
XP finally puts the stability and security of NT into the hands of all Windows users, while giving powerusers such perks as Plug and Play,[2] good support for games, and most importantly, the industrysupport that is now possible due to the fact that Windows XP is the sole operating system platformsold by Microsoft (at least at the time of this writing).
[2] Plug and Play was also included in Windows 2000, but has been improved in Windows XP with improved streamlining and
automation, knowledge of far more devices, and much better industry support.

1.2. Windows Editions and Service Packs
Windows XP is actually available in several different flavors, each of which is intended for a differentmarket:
Windows XP Professional
The power-user edition of Windows XP, and the subject of most of this book.
Windows XP Home
This less-expensive edition of Windows XP is nearly identical to the Professional edition, withonly a few minor exceptions. For instance, a few administrative tools present in XP Pro aremissing from the Home edition.
Windows 2003 Server
This edition is designed for those running a web server, domain server, or another mission-critical application (and if you don't like Unix). It's effectively the same platform as WindowsXP, also with only a few minor exceptions when it comes to the end-user experience and thetopic of conversation in this book.
On top of this assortment, Microsoft releases bug fixes and security patches for all editions ofWindows several times a month, and if you have XP's auto-update feature enabled (Chapter 6), youlikely have most or all of those updates already installed.
Now, from time to time, Microsoft consolidates all these patches into Service Packs, theoreticallymaking it easier to assert precisely which version of Windows you're using. As of this writing, twoservice packs have been released for Windows XP:
Service Pack 1 (SP1), released in September 2002
Released roughly a year after Windows XP first hit store shelves, SP1 contained nearly all themaintenance fixes to date, as well as a beefed-up Activation system (explained later in thischapter). Since hoards of phony Microsoft serial numbers floating around the web wereinstantly rendered useless, this update understandably caused a stir.
However, the real problem with SP1 was the fact that it was issued as just another entry in theWindows Update catalog. For those with the aforementioned auto-update feature enabled, this

meant that SP1 was installed automatically on millions of computers. A 160+ MB downloadrequiring at least three times as much free disk space, it brought many otherwise-functioningsystems to their knees for no other reason than insufficient disk space.
Let this be a lesson to you to avoid installing any subsequent service packin this way; instead, download the standalone "network" version and runthe update manually (after backing up your entire system) to avoid theworst of the SP-related problems.
Service Pack 2 (SP2), released in August 2004
SP2 was a more significant update than merely the sum of the bug-fix updates it contained.Among other things, SP2 replaced the weak wireless-networking support found in earlierversions with a new WiFi sniffer and configuration utility (Chapter 7). Plus, Microsoft hasactually started pretending to take security seriously with this release and has changed a fewof the operating system's defaults to plug the holes that so much malware (Chapter 6) hadexploited previously (while, at the same time, opening up a few new ones). Finally, it comeswith an improved firewall and a new Security Center utility to help protect the system. SeeChapter 7 for complete coverage.
If you purchased Windows XP recently, either by itself or preinstalled on a new computer, then youlikely already have either SP1 or SP2 preinstalled and are using a more recent edition than the oneoriginally released in 2001. If you don't yet have Service Pack 2, it's considered essential, especially ifyou use wireless networking. That said, see Chapter 6 for a way to prevent SP2 from being installedon your system.

1.3. What You Get with Windows XP
If Windows XP is your foray into Windows, you're lucky to have escaped the early days of changingjumpers, editing the config.sys file, running out of "system resources," and suffering with theWindows 3.x Program Manager. However, dealing with the problems of the early days of Windows isa good way to build coping skills and is the only way to appreciate some of the things we now takefor granted, such as Plug and Play and fast Internet connections.
Getting under the hood of Windows is not only a great way to take charge of the operating systemand make it conform to the way you work and think, but it's also a very effective method for learningmore about your computer and the technology that makes it work.
The basic "shell" interface (Explorer, the Desktop, and the Start Menu) in Windows XP is not thatdifferent from that of its immediate predecessors, Windows Me and Windows 2000. The new"Windows XP Style" (discussed at more length in Chapter 2) adds an optional new look to all dialogs,controls, windows, and even the Start Menu, but everything still works pretty much the same as itdid in every version of Windows since 95.
What follows are a few highlights and lowlights of Windows XP, most notably for those who haveupgraded or who are thinking of upgrading from a previous version. Some may seem insignificant;others may mean the difference between upgrading to Windows XP and waiting for something betterto come along. All of these, naturally, add up to the total Windows XP experience.
Note that whether any particular thing is actually new to you depends on which version of Windowsyou were using previously.
Drag-and-drop of EXE files finally makes sense
After years of customer complaints, Microsoft has finally fixed the absurd way Windows handledthe drag-and-drop of .exe files. As one visitor to Annoyances.org wrote several years ago,"whoever came up with the `dragging an application creates a shortcut' behavior must be shotimmediately." Now, dragging an .exe file works the same as dragging any other type of file.See Chapter 2 for details on drag-drop, plus a few nasty exceptions and plenty of helpful tips.
Enhanced file dialog boxes
As described in "Thinking Inside the Box" in the preface, nearly all of the file dialog boxes inWindows XP are resizable, fixing a long-standing annoyance with this common interfacecomponent. Unfortunately, however, file dialogs still don't remember their size, position, sortorder, or display format (Details, Large Icons, etc.).
Also relatively new to file dialog boxes is the "Places Bar," a gray stripe down the left side ofmost dialog boxes containing icons for prominent file locations. Introduced first in Microsoft

Office 2000, it contained links to the Desktop, the My Documents folder, and, among otherthings, Web Folders. The default Places Bar in Windows XP is far more useful, doing away withthe useless Web Folders shortcut, instead including direct links to networked resources, MyComputer, the Desktop, and History. See "Customize the Places Bar" in Chapter 10 for detailson making these dialog boxes more useful.
A new look for Find, uh . . . I mean Search
The new Search tool doesn't really add any functionality over the Find tool found in Windows 98and NT 4.0, but the interface has changed. Instead of a separate window, Search appears as apane in Explorer, which tends to be confusing, frustrating, and just plain annoying.
For those users of Windows Me and 2000 who may have become accustomed to the Searchpane in Explorer, XP's Search tool adds several layers of complexity with separate pages ofoptions and a "helpful" puppy-dog assistant.
The good news is that the arbitrary 10,000-file limit on search results has been lifted, but thereare plenty of flaws (such as the fact that the "search for text" feature often doesn't work atall). See "Fix the Search Tool" in Chapter 2 for fixes and workarounds.
Folder Shortcuts
It's finally possible to create a shortcut to a folder that behaves like a folder, instead of like afile. For example, an ordinary shortcut to your c:\windows\temp folder cannot be used as partof a path, but a Folder Shortcut can. Say you have a Folder Shortcut called Cletus, located inc:\, that points to c:\windows\temp. You could then reference a file calledc:\Cletus\filename.txt. The problem is that Folder Shortcuts are difficult to make and havetheir drawbacks as well. See "Mirror a Folder with Folder Shortcuts" in Chapter 4 for details, aswell as some other cool things you can do with folders and drives.
Say goodbye to DOS
If you're coming from Windows 95, 98, or Me, DOS was always a sort of safety net: an easyway to replace system files, reinstall the operating system, or effect other repairs in caseWindows wouldn't start. Although DOS is not part of Windows XP, there are a number of toolsat your disposal, most of which are better than their counterparts in earlier versions ofWindows. See Chapter 2 for details on replacing in-use files, Chapter 6 for troubleshooting asystem that won't boot, including details on the System Recovery Console.
Although some of you may not appreciate it yet, the true death of DOS[3] is a blessing indisguise and is responsible for the stability and security that Windows XP offers. For example,see Chapter 5 for more information on the robust NTFS filesystem, previously unavailable onany DOS-based Windows computer.
[3] Don't confuse the DOS operating system with the Command Prompt, which is still alive and well, anddiscussed in Chapter 10.

Better hardware support
Each new version of Windows comes with more drivers than any of its predecessors, supportinga larger range of hardware, and Windows XP is no exception. In reality, though, we use newcomputers with old sound cards and new sound cards with old computers, meaning thatupgrading is not always as seamless as Microsoft claims on the outside of the box. See Chapter6 for troubleshooting and maintenance tips.
Dynamic system resources
Every time you open an application, it loads all of its visual components, such as windows,menus, text boxes, buttons, checkboxes, and lists, into memory. Windows keeps track of thevisual components of all open applications so that, for example, when you drag a windowacross the screen, it knows what's behind the window and is able to redraw it when it becomesvisible. These visual components are stored in an area of memory called System Resources.
The problem is that the System Resources consumed by an application aren't necessarilyreleased when the application is closed.
In Windows 9x/Me, the amount of memory set aside for System Resources was a fixedamount, regardless of the amount of physical RAM installed in the machine. This meant thatyou could open and close an application several times and actually run out of SystemResources. That's why Windows would complain that it was out of memory, even when you hadonly two or three applications open. Other symptoms included slow performance, applicationwindows not displaying and updating properly, applications hanging, and the entire systemcrashing. The only fix was to clear out the System Resources by restarting Windows. Thisdesign was one of the biggest drawbacks of the platform.
In Windows XP (and Windows 2000), memory is allocated to System Resources dynamically;that is, System Resources grows as needed. This means that instead of having to restart thecomputer every few hours, as needed with Windows 9x/Me, you can theoretically leave aWindows XP machine running for days, weeks, or even months.
Performance, for better or worse
Anyone familiar with software upgrades has come to expect that any new version of anapplication or operating system will require more disk space and will run slower than itspredecessor on the same hardware. This, of course, means lots of dollars spent on lots ofgigabytes and lots of gigahertz. Microsoft is no stranger to what has become known as "bloat-ware," and Windows XP is, of course, no exception.
The reason that successive versions of software products do not get leaner and faster is thatthey don't have to. This is because for every additional megabyte of hard disk space anoperating system requires, the available storage on the average new computer increases byten megabytes.
At the same time, Windows XP actually does have some functionality that may result inimproved performance over previous versions of Windows. For instance, it should outperform aWindows 2000-based system on the same hardware and will definitely boot faster in most

cases. But, there is much more going on "under the hood" in Windows XP, so while it probablywon't outperform its meager DOS-based ancestors on slower hardware, it will take betteradvantage of faster, newer hardware (and will literally scream on a dual-processor system).
An operating system being simultaneously slower and faster than its predecessor may seemlike bit of a paradox, but that's the reality behind the evolution of personal computers. The keyis to make the most of what you've got, and that's what this book is all about.
Suffice it to say, there are actually quite a few goodies that have been added to Windows XP,including lots of little touches here and there that actually work to improve the product.
So, assuming you haven't done so already, let's get right to installing the product on your computer!

1.4. Installing Windows XP
Installing an operating system is not an especially pleasant activity for most Windows users.Depending on your hardware, just booting up the setup CD can be a headache. Then you have totype that ridiculous 25-digit CD key and then make a bunch of choices about your network (all ofwhich really could be made after setup, by the way). You then must sit and wait . . . and wait . . . forWindows to copy some two thousand files to your hard disk and then go through the excruciatingprocess of "configuring" your computer. When it finally boots assuming it even makes it this far youthen have the unenviable task of having to download and install more than a hundred megabytesworth of updates and fixes. And when all is said and done, you still will need to go through and turnoff all of the annoying "features" littered throughout the interface and then fix the myriad of problemsthat are sure to pop up.
But the worst part is the feeling you can't shake: that you chose to install Windows XP on yourmachine, and now you've got to live with it.
Since a significant percentage of Windows XP users will obtain the OSpreinstalled on their computers, many reading this will be fortunate enough tonot have had to endure the installation of an operating system. That doesn'tmean, however, that the task won't come back to haunt you later on, such aswhen you need to reinstall Windows or upgrade to the next version.
Both the steps to begin the installation procedure and the procedure itself can vary, depending onwhat's already installed on your system (if anything) and how you choose to approach the task.
Windows XP setup can be run from within an installed copy of Windows XP, Windows 2000, WindowsNT 4, Windows Me, or Windows 98/95. You can also run setup from DOS (also known as the Windows9x Command Prompt). Or, if you have no operating system at all, you can boot off the CD and installit fresh. The following sections cover the advantages and drawbacks of each type of install.
Anyone installing Windows XP on a hard disk that has data on it would be wiseto back up the entire system before starting the install process. Make sure thebackup software you use will also operate in Windows XP so you can read themedia after the install is complete; otherwise, your backup will be worthless.See Chapter 6 for more information.
1.4.1. Installing on a New (Clean) System
The Windows XP installation CD is bootable, which means you can put it in the drive, turn on yourcomputer, and installation will start automatically.
If you have an older (pre-SP2) installation CD, it's possible to create a new CD with Service Pack 2

preinstalled. See the "Slipstreaming XP and SP2" sidebar for details.
Slipstreaming XP and SP2
Whether you're installing XP on a room full of computers, or only anticipate having toreinstall it on your own machine every six months, you can save a lot of time byintegrating Service Pack 2 with your Windows XP installation CD. This process iscommonly called "slipstreaming." Here's how you do it:
Copy the entire contents of your XP install CD to a folder on your hard disk (e.g. c:\xp);just highlight everything in the root folder and do a drag-drop.
Download the Full Network Install release of Service Pack 2, WindowsXP-KB835935-SP2-ENU.exe, available at http://microsoft.com, and save it to a folder on your hard disk(e.g. c:\sp2).
Open a Command Prompt window (see Chapter 10) and type:
cd c:\sp2
WindowsXP-KB835935-SP2-ENU /integrate:c:\xp
(Naturally, you'll need to change c:\sp2 and c:\xp if you placed the files elsewhere.) If
you get an error stating that "This Service Pack cannot be integrated into a destinationthat also has integrated Software Updates," the CD you're using can't be slipstreamed.
Next, extract the boot loader from your original XP installation CD using IsoBuster(http://www.smart-projects.net/isobuster/). When you start IsoBuster, select your CDdrive from the list and then highlight the Bootable CD folder on the left. Drag the fileBootImage.img from IsoBuster onto your hard disk.
Start your CD burning software. If it's not capable of creating a bootable CD, you can useNero Burning ROM (6.0 or later, available at http://www.nero.com/). Use theBootImage.img file for the boot image data, and add the entire contents of the c:\xpfolder to your project.
Burn the CD, and you're done!
You can now boot off the CD, install Windows XP, and Service Pack 2 will be installedalong with it.
Note that there are a number of utilities that will help you further customize the WindowsXP installation CD. nLite (http://nuhi.msfn.org/nlite.html), for instance, allows you toremove unwanted components before you install XP.
While most modern systems support bootable CDs, very few are configured to actually boot off sucha CD when one is inserted. If your computer doesn't boot off the Windows setup CD, you'll need tochange your BIOS settings accordingly. Start by entering your system's BIOS setup utility (discussed

in Appendix B ), going to the boot section, and changing the "boot device priority" or "boot sequence"so that your CD drive appears before your hard disk.[4] Exit the BIOS setup when you're finished.
[4] If you have a SCSI-based CD drive, look in your SCSI controller's BIOS setup screen and enable support for bootable CDs. If
your SCSI controller is built into your motherboard, you'll probably need to first specify your SCSI controller as a boot priority over
your hard disk, and then enable bootable CDs in your SCSI BIOS.
If you're unable to boot off the Windows XP CD, you'll need to use a bootable floppy, either one madefrom a previous version of Windows (see "Installation from the Command Prompt," later in thischapter) or one that comes with the full version of Windows XP. See "Creating a Bootup Floppy," laterin this chapter, for more information.
Otherwise, Setup will display a welcome screen and spend several minutes loading drivers for yourhardware. This ensures that Setup will properly support your hard drive, CD drive, and mass storagecontrollers; when Windows XP is installed, only the drivers you specifically need are loaded. But sinceSetup hasn't been prepared in this way (for obvious reasons), it must load (or attempt to load) everypossible driver.
When the initialization is done, you'll be presented with several choices. The first screen instructs youto press Enter to set up Windows XP now, or press R to repair a Windows XP installation using theRecovery Console (an advanced diagnostic and repair tool covered in Chapter 6). Unless youspecifically need to use the Recovery Console, press Enter to continue (even if you're here to repaira Windows installation).
Next, Setup will look for an existing Windows XP installation. If one is found, you'll have theopportunity to repair it now (see "Reinstalling Windows XP," later in this chapter for details). Justpress ESC to continue.
The next screen will allow you to choose a drive and partition on which to install Windows. Here,you'll have the option of installing onto an existing drive or making changes to your partition table toadd or remove partitions. See "Working with Partitions," in Chapter 5, for more information. Notethat Setup will not allow you to choose the installation folder, but instead will simply place the files inthe \Windows folder.
During the installation of some earlier versions of Windows, you could choose the name of the folderin which Windows is stored (by default, \Windows). This can be a problem if you're upgrading aWindows 2000 or Windows NT system, which, by default, store their files in \WINNT. If this applies toyou, it's better to use the procedure outlined in "Upgrading from a Previous Version of Windows,"later in this chapter. In this case, Setup will use whatever folder name is used by the currentWindows installation.
If you're installing on a clean system (with a new, empty hard disk), you'll want to create a newpartition using all of the available space (or several partitions, as desired). If your hard disk alreadyhas data on it, you'll be given the opportunity here to repartition your drive or simply install WindowsXP on an existing partition (usually the first one, C:\).
Repartitioning your drive involves deleting one or more existing partitions sothat one or more new partitions can be created. It's important to realize that ifyou delete any partition that has data on it, all of the data will be erased. Andwithout a complete backup, there will be no way to get it back.

When asked about the filesystem, you'll want to choose the NTFS filesystem in most cases; see"Choosing the Right Filesystem" in Chapter 5 for more information.
At this point, Windows setup will begin to copy files and configure your system. The rest of theinstallation process should be fairly straightforward; if you run into a problem, see "Dealing withPotential Problems During Setup," later in this chapter.
1.4.2. Upgrading from a Previous Version of Windows
The preferred way (at least according to Microsoft) to upgrade to Windows XP from a previousversion is to install from within the existing copy of Windows. With Windows running, insert theWindows XP installation CD into your drive, and it should start automatically.[5]
[5] If you have the AutoPlay feature disabled (see Chapter 4), or Setup doesn't start automatically for some reason, open Windows
Explorer, navigate to your CD drive, and double-click Setup.exe.
When Setup starts, you'll be given four choices:
Install Windows XP
This opens the main Windows Setup program (also accessible by launching\i386\Winnt32.exe). When it starts, your first choice will be between Upgrade(Recommended) and New Installation (Advanced). Choose the upgrade option only if youwant to install Windows XP over your existing installation, replacing your current OS withWindows XP and migrating all your settings and applications in one step.
On the other hand, you may wish to choose New Installation if you want to install on anotherpartition or on a clean hard disk (see "Installing on a New (Clean) System," earlier in thischapter). This option is instrumental in setting up a dual-boot system (discussed later in thischapter).
Install Optional Windows Components
This is the same as opening Add or Remove Programs in Control Panel, and clickingAdd/Remove Windows Components. Place a checkmark next to components you wantinstalled, or clear the checkmark next to components you want removed.
Perform Additional Tasks
This page contains links to several, mostly self-explanatory, tasks. Click Set up RemoteDesktop Connection to install the Remote Desktop Connection software (described in"Controlling Another Computer Remotely (Just Like in the Movies)" in Chapter 6) on anothercomputer. Click Set up a home or small office network to run the Network Setup Wizard,also discussed in Chapter 7. Finally, click Transfer files and settings to run the Files andSettings Transfer Wizard, discussed in "Transfer Windows to Another Hard Disk or System," in

Chapter 5.
Check system compatibility
This runs the Microsoft Windows Upgrade Advisor, which looks for potential problems, such asincompatible software and hardware, and lists them in a report. See "Casualties of theUpgrade," later in this chapter, for additional issues.
At this point, Windows Setup will begin to copy files and configure your system. The rest of theinstallation process should be fairly straightforward; if you run into a problem, see "Dealing withPotential Problems During Setup," later in this chapter.
1.4.3. Installing from the Command Prompt
If you need to install Windows XP on a new system and you are unable to boot off the CD, you canoptionally install from a DOS boot disk (created on a Windows 9x/Me system by going to ControlPanel Add/Remove Programs, or from within Windows XP as described in Chapter 6). Justinsert the floppy in your A: drive and power on your computer. If it's a Windows 98 or Windows Mefloppy, it should contain all the necessary drivers for your CD drive,[6] required to access the setupprogram on the Windows XP CD.
[6] If you're using a Windows 95 startup disk, you'll need to obtain DOS drivers from the manufacturer of your CD drive and install
them according to the included instructions.
When you get to the command prompt (A:\>), change to your CD drive by typing D: or E: (includingthe colon), depending on the letter on which the drive is installed. Then, type \i386\winnt.exe to
start the DOS-based setup utility. The setup utility will copy the necessary boot files to your harddisk, reboot your computer, and run the same installer discussed in "Installing on a New (Clean)System," earlier in this chapter.
1.4.4. Reinstalling Windows XP
You may find yourself in a position where you'll need to reinstall Windows XP, either to solve aconfiguration problem or to repair a damaged installation. The procedure you choose depends on thecurrent state of your computer.
If you're able to start Windows XP and access your CD drive, your best bet is to reinstall from withinWindows. See "Upgrading from a Previous Version of Windows," earlier in this chapter, for details.
Otherwise, if Windows XP won't start, you should use the following procedure to repair theinstallation:
Boot off the XP CD, as described in "Installing on a New (Clean) System," earlier in this chapter.1.
When Setup begins, it will display two timed choices (timed, in that they disappear in 2-3seconds if not activated). The first allows you to load a third-party SCSI or RAID controller
2.

1.
driver by pressing F6. Use this only if Setup is unable to access your hard drive without them.
The second option allows you to repair your system with the Automated System Recovery (ASR)feature by pressing F2. If you have a dual-boot system or other special arrangement, Irecommend avoiding ASR, as it will attempt to repair your installation based on a few pre-determined scenarios. The assumptions made by such an "automated" feature can wreak havocif they're wrong.
If you're unable to repair your system using the subsequent steps listedhere, and you're unable to start the Windows Recovery Console due to alost administrator password, you may wish to return here and try ASR as alast resort.
2.
After Setup loads the hardware drivers, you'll then be presented with several choices. Press R atthis point to start the Recovery Console (discussed later in this chapter). If you wish to repairXP without using the Recovery Console, press Enter here instead (I know, it's a bitcounterintuitive). Or press F3 to abort Setup and reboot the computer.
3.
Next, Setup will look for an existing Windows XP installation and will hopefully find the oneyou're trying to repair here. Each Windows XP installation on your system will be listed here(you'll see only one if you don't have a dual-boot system). If it finds the installation you wish torepair, make sure it's highlighted and press R to begin the repair procedure, which, essentially,is an express reinstallation of the OS.
If Setup can't find your installation, it means that one or more key system files are corrupted ormissing. If you have a backup of your system, now would be the time to pull it out and thinkabout restoring said files (see Chapter 6).
Otherwise, your best bet is to use the Windows Recovery Console, discussed in Chapter 6.
If you try to repair Windows by pressing ESC here to start a new install, itmay not work as expected. For example, even if you install to the samepartition as the installation you're trying to repair, Setup may place thenew copy of Windows in a different folder (i.e., \Winnt vs. \Windows).
4.
The rest of the repair procedure should be relatively automated and fairly self-explanatory. Formore troubleshooting information, see "Dealing with Potential Problems During Setup." See alsoChapter 6 for more general troubleshooting tips.
5.
1.4.5. Dealing with Potential Problems During Setup
No single book could possibly document every possible problem and incompatibility you mightencounter while trying to install Windows XP. Luckily, about 95% of the problems you're likely toencounter fall under these six categories.

Motherboard BIOS
The most common cause of a failed installation of Windows XP is an out-of-date BIOS.Fortunately, nearly all motherboards made in the last decade have software-upgradable flashBIOSes. Contact the manufacturer of your system or motherboard for any BIOS updates theyhave available, but don't bother unless a BIOS upgrade is absolutely necessary. (A failed BIOSupgrade will make your motherboard unusable.) See Appendix B for more information.
Video card
Another common stumbling block to a successful Windows XP setup is your video card (displayadapter). If Setup stops with an unintelligible error message, reboots unexpectedly duringsetup, or just hangs at a blank screen, your video card may be at fault. Some older video cardsare simply not supported by Windows XP, but Setup will rarely, if ever warn you about such anincompatibility before you begin. If replacing the video card permits Windows XP to install, thenthe culprit is obvious. Note that while many video cards have upgradable flash BIOSes, I'venever seen an instance where a BIOS upgrade can solve this type of incompatibility (although,it may be worth a shot). See the discussion of video cards in Chapter 6 for moretroubleshooting advice.
Hardware inconsistencies and other problems
Windows XP is a little more touchy about improper hardware configurations than previousversions of Windows. If, for example, your memory (RAM) is not all the same rated speed, isnot the correct type for your motherboard, or is malfunctioning in some way, it will preventWindows XP from installing or running. Other potential problems include insufficient processorcooling, incorrect SCSI termination, improper jumpers on your IDE devices, bad cables, andeven an older power supply. Chapter 6 includes troubleshooting tips for many kinds ofhardware. See also Appendix B for system BIOS settings that may prevent Windows XP frominstalling.
Driver roadblocks
Windows XP attempts to install drivers for all detected hardware towards the end of the setupprocess. If Setup crashes at the same point each time, try temporarily removing anyextraneous devices (unneeded drives, cards, and external peripherals).
CD drive
Since Windows XP installs from a CD, your CD drive may be to blame if the installation fails. Adrive that delivers corrupt data to the computer will certainly cause problems, as will a drivethat isn't accessible during the entire installation process. The same goes for older controllers(RAID and SCSI units, for example).

Dust in the wind
Lastly, I've seen Setup fail from nothing more than excessive dust on the CD. Wipe the diskagainst your shirt and try again.
1.4.6. Setting Up a Dual-Boot System
With a dual-boot (or multiboot) setup, you can install multiple operating systems side by side on thesame computer and simply choose which one to use each time you boot. So, why would you want todo this?
If you rely on some software or hardware that will not operate in Windows XP, you can installWindows XP and the other OS on the same system simultaneously. This includes any previousversion of Windows, as well as Linux, FreeBSD, Unix, BeOS, and even NeXTStep.
If you're in the process of upgrading from an earlier version of Windows to Windows XP, youmay wish to set up a dual-boot system. That way, you can test XP with your existing softwareand hardware without having to commit to the new OS until you're certain it will meet yourneeds.
Some people install two copies of Windows XP on their system, one for normal use, and one asa testbed for new software and hardware. That way, you can try out a potentially buggy productwithout jeopardizing the main OS on which you must rely.
Software developers often have several versions of Windows on the same machine so that theycan test out their products on a variety of configurations without having to purchase a bunch ofseparate computers.
Windows XP comes with built-in support for a dual-boot system. The dual-boot feature (called theBoot Manager) is installed automatically when you install Windows XP. If, at the end of theinstallation, Windows XP is the only operating system on your computer, it will boot automaticallywithout giving you a choice. Otherwise, you'll see a menu of installed operating systems, from whichyou can choose the OS you wish to use.
So, if you're installing Windows XP on a system with another OS, such as Windows 98, and you don'treplace it with Windows XP (instead, you choose to install it into a different directory or partition),you'll get a dual-boot system without even trying.
In most cases, the boot manager of the last operating system installed is theone that will be used for all operating systems. For this reason, the order inwhich you install the operating systems is important; for example, it's typicallydesirable to install older operating systems before newer ones.
Some other operating systems, such as FreeBSD and Windows 2000, have boot managers of theirown and can therefore be installed either before or after XP is installed with little additional fuss.However, operating systems without their own boot managers, such as Windows 9x/Me, will breakthe Windows XP boot manager if installed afterwards.

But what if you already have a Windows XP system and you need to add the dual-boot capability toit? Fortunately, there is a way to install other operating systems on top of an existing Windows XPinstallation, although it takes a little extra preparation.
The following procedure assumes that you already have a working installation of Windows XP:
Each operating system must have its own partition, assuming you have only one hard disk. See"Working with Partitions" in Chapter 5 for details on resizing drives and adding partitions.
Note that since resizing partitions can be difficult without the proper third-party tools, you cansimply add another hard disk instead of repartitioning your existing drive.
It's actually possible for Windows XP to share a partition with a Windows9x/Me installation but only if they're installed into different folders. Sincethey'd share the Program Files folder, though, you'd be opening the doorfor conflicts and other problems.
1.
Create a bootable floppy, as described in Chapter 6. The key is to back up the ntdetect.com,ntldr, and boot.ini files, which are the key to the Windows XP boot manager. See the nextsection for more information on the boot.ini file.
You'd also be wise to back up your entire system at this point (see Chapter 6).
2.
Install the other operating system; naturally, the installation procedure will vary, depending onthe product you're installing. Be extremely careful not to install it into the same folder orpartition as the existing copy of Windows XP.
3.
When installation of the other product is complete, try starting the system. In some cases, theother product will have a suitable boot manager, and everything will work fine. If it doesn't, theprocedure to repair the Windows XP boot manager depends on the other operating systemyou've just installed:
Windows 2000 or Windows NT 4.0
These earlier versions of Windows NT have boot managers similar to Windows XP's, butthey may not work with Windows XP specifically. To repair the boot manager here, justcopy the files ntdetect.com, ntldr, and boot.ini that you backed up in step 2 into the rootdirectory of your boot drive (usually C:\), replacing the older ones that should be there.
Windows 9x/Me
Since these DOS-based versions of Windows (see Chapter 1) don't have boot managers oftheir own, the XP boot manager will be subdued by their installation. Although the filesntdetect.com, ntldr, and boot.ini should remain intact after installation, your hard disk'sMaster Boot Record (MBR) will have to be updated to once again recognize the Windows
4.

XP boot manager.
This is done by starting the Windows Recovery Console (described in Chapter 6). Start byissuing the fixmbr command to restore the Windows XP boot manager, and then bootcfg/rebuild to force the boot manager to recognize the newly installed operating system.
Linux, FreeBSD, and others
Each of these Unix flavors comes with its own boot manager that, for the most part,appears to be compatible with Windows XP. If in doubt, check the documentation for thespecific operating system and version you're installing.
When you're done, create another bootable floppy (repeat step 2), so that you have an up-to-date backup of the boot.ini file.
5.
A Word About Filesystems and Dual-Boot
Windows XP supports both the NTFS and FAT32 filesystems. If you need to set up a dual-boot machine with Windows 9x/Me and Windows XP, you'll need to use FAT32 on anydrives that you want to access from the older Windows, as only Windows 2000, NT, andXP support NTFS.
1.4.6.1 Editing the Boot Manager configuration file (boot.ini)
The Windows XP boot manager is responsible for loading Windows XP, and, optionally, allowing you toboot into any other operating systems you may have installed. If you've set up a dual-boot (ormultiboot) system, as described in the previous section, the list of operating systems that ispresented when you first turn on your computer is stored in the Boot Manager configuration file(boot.ini).
The boot.ini file is, by default, a hidden file, located in the root directory of your primary partition(usually C:\). If you can't see it, you'll have to configure Explorer to display hidden and system filesby going to Control Panel Folder Options View tab, and selecting the Show hiddenfiles and folders option and turning off the Hide protected operating system files option.
If you screw up your boot.ini file, Windows XP won't load. Before editing the filedirectly, make sure to back it up as described in "Create a Boot Disk" inChapter 6, so it can be easily restored if necessary. If worst comes to worst,start the Windows Recovery Console (discussed in Chapter 6) and issue thebootcfg /rebuild command to delete and then rebuild the boot.ini file.
The structure of boot.ini, similar to other .ini files, is explained in "Using INI Files" in Chapter 3. Youcan view and modify boot.ini in any plain-text editor, such as Notepad. A typical boot.ini file is shown

in Example 1-1.
Example 1-1. The Boot Manager configuration file (boot.ini) is used todefine the operating systems available in the boot menu
[boot loader]timeout=20default=multi(0)disk(0)rdisk(0)partition(2)\WINDOWS[operating systems]multi(0)disk(0)rdisk(0)partition(2)\WINDOWS="Windows XP Pro" /fastdetectmulti(0)disk(0)rdisk(0)partition(3)\WINNT="Windows 2000 Pro" /fastdetectC:\="Microsoft Windows Me"
The two sections of the boot.ini file are as follows:
[boot loader]
This section determines the default operating system loaded automatically if no selection ismade and the timeout, the amount of time (in seconds) the Boot Manager waits before saidselection is made.
[operating systems]
This section lists each of the individual operating systems installed on the computer. Thesyntax is fairly simple: a "pointer" to the drive and folder containing the operating system isshown to the left of the equals sign, and the caption shown in the boot menu is shown to theright.
The aforementioned pointer can appear in one of several different ways. The first two entriesshown in Example 1-1 point to Windows NT installations (XP and 2000, respectively); thenumbers in parentheses specify the disk and volume numbers of the respective partition,followed by the folder in which Windows is installed. The third entry points to a DOS partition(Windows Me in this case), where the syntax is merely the drive letter of the volume containingthe OS.
You'll notice that one of these entries matches the value of the default entry in the [bootloader] section.
To change the default OS and the timeout without editing boot.ini directly, go to Control Panel System and click Settings in the Startup and Recovery section. Unfortunately, if you want torename one or more of the captions in the menu, you'll have to open boot.ini and change the text inthe quotation marks.
See "Using the Windows Recovery Console," in Chapter 6, for additional tools you can used to repaira damaged Windows XP installation and rebuild the boot.ini file.

1.4.7. Activating Windows XP
Product Activation is the euphemistic name given to the new system in Windows XP intended to curbsoftware piracy. It effectively requires every Windows XP user to call Microsoft (or connect via theWeb) to obtain a long product activation key for each installation of the product. As though the heftyprice tag and 25-character CD key on the back of the CD package in previous versions of Windowsweren't enough, most users of Microsoft's latest OS are now required to take an additional step tocomplete the installation procedure.
If you don't enter the product key within a certain period after installing, Windows XP will expire andsubsequently cease to function.[7] In theory, you'll only have to do this once for each computerrunning Windows XP, but the activation code is just as susceptible to bugs as any other component ofWindows.
[7] Depending on your outlook, this may be a blessing in disguise.
Here's how activation works:
When Windows XP is installed, the 25-character CD Key printed on the CD sleeve is typed bythe user and stored in the Registry. The CD Key distinguishes one end-user license of WindowsXP from another.
Windows then generates a 20-digit product ID based on the CD Key and the Windows version.
1.
After Windows has been installed, the Activate Windows XP utility is started. The "InstallationID," comprising the 20-digit product ID plus an 8-digit hardware ID, is then transmitted toMicrosoft. This is either done transparently over a network connection or manually over thetelephone.
The hardware ID, a unique number based on values obtained from hardware in your computer,distinguishes one computer from another. The hardware ID is based on a hardware hash, a longsequence of numbers based on information found in your computer's hardware. The specificdevices used are as follows:
Display adapter (video card)
SCSI adapter (if available)
IDE adapter
Network adapter MAC address (if available)
RAM amount range
Processor type
Processor serial number[8]
[8] The processor serial number, in most cases, is not accessible to Windows. See Appendix B forthe BIOS setting that affects this.
2.

Hard drive
Hard drive volume serial number
CD-ROM, CD-RW, or DVD-ROM
Microsoft then generates a 42-digit "Confirmation ID," which is sent back to the ActivateWindows XP application (or read back verbally if you're activating XP over the phone). Themachine is officially activated when the confirmation ID is received, cross-checked with thehardware ID and product ID, and finally stored on your computer.
3.
It should be clear that since the confirmation ID is based upon the unique CD key and the uniquehardware ID, it represents a single, unique combination of hardware and software. Change any ofthese components, and the confirmation ID will no longer be valid.
If you attempt to activate Windows with the same CD Key and a different hardware key (effectivelyinstalling the same copy of Windows on a different computer), the copy protection will kick in and theproduct activation will fail. The gray area is what happens when you upgrade part or all of yoursystem.
Now, there is some margin for error built in, so upgrading only one or two of the aforementionedcomponents should not cause a problem. However, simultaneously upgrading your motherboard,processor, memory, and video card will probably raise a red flag, and you'll probably have to get anew key. Likewise, if you purchase an entirely new computer and install your existing copy of XP onthe new machine, you'll certainly have to obtain a new key from Microsoft.
It probably goes without saying that the automated activation will probably fail at this point, meaningthat you'll have to speak with a Microsoft representative and explain that you're merely reinstallingand not pirating the software. It remains to be seen how much hassle reactivation will be; suffice it tosay that those who upgrade often will bear the brunt of that hassle.
Note that if your system crashes, or if you simply need to wipe everything and reinstall for somereason, the confirmation ID from the previous activation should still be valid. Note that theconfirmation ID is only shown if you activated over the phone, and is otherwise invisible; if you usedthe automated activation over the Internet, all you'll need to do is run the activation again. Since thehardware supposedly is no different, Microsoft shouldn't give you any trouble.
Many users may not be confronted with the hassle of product activation at all, for one of severalpossible reasons. Those systems purchased with Windows XP preinstalled may be preactivated aswell, in one of two possible ways. Either the manufacturer may choose to activate Windows beforeshipping using the method described above, or by a separate mechanism called System Locked Pre-installation (SLP). SLP ties the hardware ID to the system BIOS, rather than the discrete componentslisted earlier. The resulting system may be upgraded more freely, but if the motherboard is replacedor the BIOS is upgraded (see Appendix B), the owner will have to reactivate the software. The otherexception is the version of Windows XP sold with a volume license, usually to large businesses, whichdoesn't include the product activation feature at all.

1.5. Migrating to Windows XP
Migration is typically a term used by system administrators to describe the lengthy process ofupgrading some or all the computers in an organization to a new software product, but nearly all ofthe issues faced apply to anyone upgrading to Windows XP from an earlier version.
While the previous section covered issues dealing with the actual installation of Windows XP, thefollowing topics discuss the steps you may need to take after the upgrade has taken place.
1.5.1. Casualties of the Upgrade
As you've probably discovered on your own, there are a number of hardware and software productsthat simply won't work with Windows XP. Some of these products are simply awaiting driver updatesfrom their respective manufacturers, while others have been abandoned by their manufacturers withno hope of future support.
If you haven't yet upgraded to Windows XP, it's best to first check with the manufacturers of eachand every card, drive, printer, input device, and other peripheral you use to make sure your devicesare supported under Windows XP, either out of the box or via a driver update. Naturally, it wouldn'tbe the least bit practical to try and list each individual incompatible device here, but the following listshould give you an idea of the types of products that may cause problems with Windows XP (or anynew operating system, for that matter).
Also available is the Microsoft Windows Upgrade Advisor (MSUA), mentioned in "Upgrading from aPrevious Version of Windows," earlier in this chapter. The MSUA scans your system and compares itto a list of devices and software known to cause problems with Windows XP. While its internal list isfar from complete, it will certainly warn you of any incompatibilities of which Microsoft is aware. Startit by inserting the Windows XP CD and clicking Check system compatibility and then Check mysystem automatically. You can also download it fromhttp://www.microsoft.com/windowsxp/pro/howtobuy/upgrading/.
As with the move to any new operating system, there are some software and hardware componentsthat either won't be compatible with the new version, or are version-dependant, and must beupdated to work with the new version.
Any versions of the following products not specifically designed to work with Windows XP will mostlikely need to be updated or removed:
Any software that works with settings specific to any single version of Windows, such asMicrosoft TweakUI (versions 1.33 and earlier). See Appendix A for details.
Older backup software, such as Veritas Backup (all versions) and Seagate Backup Exec.However, any backup software made for Windows 2000 should work in Windows XP equallywell. This is of special importance, because whatever software you use to back up Windowsbefore upgrading will need to be supported in Windows XP. Otherwise, the backup you create

will most likely be inaccessible.
Antivirus and low-level disk utility software, such as Norton Utilities and Norton Antivirus, tendto cause problems when used in any operating system other than the one for which they werespecifically designed.
CD-R/DVDR burning and CD-RW packet-writing software not designed specifically for WindowsXP may interfere with the built-in CD burner features in Windows XP, or may stop functioningbecause of said features. Examples include Roxio Easy CD Creator (versions 5.0 and earlier)and any version of DirectCD released before 2002.
Games, especially the more graphic-intensive and 3D-accelerated ones, frequently haveproblems with newer versions of Windows, especially those based on Windows NT (such asWindows 2000, and yes, Windows XP). While you won't have to remove these games before youupgrade to Windows XP, you may need to contact the manufacturers of any games that won'tfunction in XP for any patches, updates, or special settings required for their games to run onWindows XP. Since games are rarely updated to work with newer versions of Windows, you mayneed to set up a dual-boot system (as described later in this chapter) just to run older games.
Any software that requires that you boot directly into DOS will not function on a Windows XPsystem, as DOS is no longer part of the operating system. Try launching the program incompatibility mode, as described in Chapter 6.
Certain types of hardware are more dependent on features found in specific operating systemsand are less likely to be supported under newer versions of Windows. Such devices typicallyinclude TV and radio cards, webcams, video capture devices, digital cameras and memory- cardreaders, flatbed scanners, film scanners, synchronization cradles for handheld computers, olderdigitizers (tablets), oddball printers and pointing devices, CD changers, and DVD decoders. Ifyou can't obtain newer drivers and software for any of these less-common peripherals, theymay not work in Windows XP at all.
Few, if any, of the aforementioned issues should apply to the upgradefrom Windows XP to XP Service Pack 2. However, the security changesdiscussed in Chapter 7 may cause some network-enabled software tobreak. Fortunately, these types of problems can typically be fixed bychanging settings in the Windows Firewall or the software at issue.
If you find that one or more software or hardware products won't work in Windows XP, setting up adual-boot system with an older version of Windows, as described later in this chapter, may be theanswer.
1.5.2. Adjusting Windows XP to Smooth Out the Migration
Aside from the hardware and software incompatibilities discussed in the preceding section, the task ofundoing some of the changes made by Setup is what will be on most users' minds right afterupgrading to Windows XP. Fortunately, there are several things you can do to ease the transition:

Visual style of screen elements
Make Windows XP look more like previous versions of Windows by going to Control Panel Display Appearance tab, and choose Windows Classic style from the Windows andbuttons list.
Overly complex Start Menu
To revert to the simpler single-column Start Menu found in earlier versions of Windows, go toControl Panel Taskbar and Start Menu Start Menu tab, and select the Startmenu option.
Animation and other eye candy
The animation and other eye candy used with windows, menus, lists, and even your mousecursor is more prevalent in Windows XP than any previous version of Windows. See "TameMindless Animation and Display Effects" in Chapter 5 for details.
Categories in Control Panel
The categories in Control Panel, which are somewhat superfluous, can be removed by openingthe Control Panel window (not the Control Panel menu in the Start Menu, nor the Control Panelfolder in Windows Explorer, however), and clicking Switch to Classic View in the CommonTasks pane. If Control Panel appears as a menu in the Start Menu, you can open it in its ownwindow by double-clicking or by right-clicking the Control Panel item and selecting Open. Ifyou don't want a Common Tasks pane, see the next topic.
Common Tasks pane in folder windows
The Common Tasks pane is supposed to show links to additional programs and features,depending on the folder currently being viewed, but most of the time, it's just unnecessaryclutter. If you prefer the simpler, cleaner folders found in earlier versions of Windows, go toControl Panel Folder Options General tab, and select the Use Windows classicfolders option.
Hijacking of file types
Every time you run Windows Setup, it will reclaim a bunch of different file-type associationswithout asking. For example, your default applications for .html files (web pages), .jpg images,and .zip files (archives), are all forgotten in favor of Microsoft's replacements. The fact thatWindows doesn't preserve your associations, or at least ask before overwriting them, should beattributed to nothing more than laziness on the part of Microsoft's developers.
See "File Types: The Link Between Documents and Applications" in Chapter 4 for details. See

"Turn off the Windows Picture and Fax Viewer" in Chapter 4, for more information on thetreatment of image files in Windows XP.
To turn off Windows built-in support for .zip files, wherein they're treated like folders instead offiles, see "Fix the Search Tool" in Chapter 2.
New Search tool
See "Fix the Search Tool" in Chapter 2 to work around the consequences of the changes inWindow XP's Search tool from previous sections.
Icons for system and desktop objects
The icons used for the system objects, such as My Computer and the Recycle Bin, have a newlook in Windows XP. If you prefer the icons used in earlier versions of Windows, see "CleaningUp Desktop Clutter" in Chapter 4. Note that nearly all of the older icons can be found in the file,\Windows\System32\SHELL32.dll.
1.5.2.1 Where to find it in Windows XP
A common problem encountered by those who are new to Windows XP, yet familiar with a previousversion, is that some features are no longer found in the same places or simply have different names.The following lists some of the more major components that have been moved or renamed:
Network Neighborhood
This is now called My Network Places and works pretty much the same (albeit a bit morereliably) as in earlier versions of Windows. Note that the networks and computers previouslydirectly accessible through Network Neighborhood in some earlier versions of Windows are nowburied under Entire Network\Microsoft Windows Network. To counteract this, Windows XP willautomatically place shortcuts to some remote folders right in the My Network Places folder."
My Computer icon on the desktop
By default, the My Computer icon is not shown on the Windows XP desktop, but all the entriesit contained can be found in both the Start Menu and Windows Explorer. To put the icon backon the desktop, go to Control Panel Display Desktop tab CustomizeDesktop, and turn on the My Computer option.
Control Panel in My Computer

By default, Control Panel no longer appears in the My Computer window, but it's still availablein the Start Menu. You can also go to Control Panel Folder Options View tab, andturn on the Show Control Panel in My Computer option. Confusingly, it will still appearunder the My Computer branch in Windows Explorer, regardless of this setting.
Dial-up networking
Dial-up connections are now considered ordinary network connections, and can be found in theNetwork Connections window.
DOS
Although some earlier versions of Windows (e.g., Windows 9x/Me) relied on the old DOSoperating system (described in Chapter 10), Windows XP is based instead on the more robustWindows NT kernel. This means, among other things, that you'll no longer be able to bootdirectly to DOS, unless you've set up a dual-boot system, as described later in this chapter.The good news is that booting to DOS is really not necessary any more.
Boot disk
Mostly because of the absence of DOS, Windows XP has no provision for making a boot diskthat can start Windows XP. See "Create a Boot Disk" in Chapter 6 for applicable alternatives.
Web View
The Web View, at least as it existed in Windows 98, Me, and 2000, is thankfully gone inWindows XP. Although it can't be customized in the way that the Web View could, the CommonTasks pane (described in "Adjusting Windows XP to Smooth Out the Migration," earlier in thischapter) accomplishes most of what Microsoft originally intended the Web View to do. Andfortunately, Common Tasks can be switched off much more easily than the Web View evercould.

Chapter 2. Basic Explorer Coping SkillsThe part of Windows XP with which we interact most frequently is Windows Explorer, commonlyreferred to simply as "Explorer." The Explorer application (Explorer.exe) is known as the shell, sinceit's the pretty face that is used to conceal what lies under the hood of the operating system. AlthoughExplorer is really only an application like any other, it is responsible for the desktop, the Start Menu,Recycle Bin, Control Panel, folder windows, and a million other things.
Given the amount of time you probably spend starting programs, copying files and folders, andlooking for documents not to mention actually writing all those documents it makes sense to invest alittle time to find better ways to accomplish these tasks. By following some of the solutions in thisbook, you can make your experience with Windows a lot more pleasurable, reducing stress and yourrecurring urges to toss your computer out a window seven stories off the ground.
The ideal user interface should adapt to you rather than the other way around. Indeed, one of theprimary goals of this book is to show you how to change the way Windows looks, feels, and operatesso that it is more closely in tune with the way you think and work. The problem is that there aresome fundamental features of the interface that simply can't be changed, so some of the time you'llsimply have to settle for the best compromise between the ideal solution and what is actuallypossible.
A classic example is the Search tool in Windows XP. When you begin a search from an open Explorerwindow, the Search pane replaces the folder tree, forcing you either to open a new Explorer windowor to turn the folder tree back on by going to View Explorer Bar Folders (whichincidentally is the only entry in this menu without a keyboard shortcut). And let's not forget the littlepuppy dog with its incessant scratching noises. Although these problems can't be completely fixedwithout a third-party add-on, there are several workarounds discussed in Section 2.2.7, later in thischapter. A little knowledge of the alternative methods will save you tons of aggravation.
Many of the topics discussed throughout this book require knowledge of the Windows Registry, withthe exception of this chapterI figured you'd want to jump right in. In addition to the Explorer-relatedtips and tricks, many of the topics of this chapter document the subtle interface differences inWindows XP from previous releases, especially useful for those who have recently upgradedit's allgood stuff. Chapter 3 provides thorough coverage of the Registry, a working knowledge of which willbe employed by material found later in this book.
Lastly, it should be pointed out that this chapter assumes that you have a basic working knowledgeof Windows: files and folders, double-clicking, right-clicking, using menus, and so on, although thosewho are just getting started with Windows should be able to catch on without too much effort.

2.1. Working with Explorer
One of the primary roles of Explorer is to provide the basic working interface that allows you tomanage the files, folders, and applications on your system. This is why it's so baffling why Microsofthas buried the Windows Explorer icon so deep in the Start Menu, rather than giving it a moreprominent position.
As stated earlier, the Windows desktop, the My Computer window, the single-folder windows, thefolder-tree pane window, and the Start Menu are all services provided by the single Explorerapplication. However, in most Windows lore and in the solutions in this book, the term Explorer refersspecifically to the window that has the hierarchical tree view in the left pane (referred to by Microsoftas the Folders Explorer bar). This window can be opened by going to Start Programs Accessories System Tools Windows Explorer, or by launching Explorer.exe from the
Start Menu's Run command. All other windows used to browse folderssuch as those windowsaccessible from the My Computer windoware commonly referred to as single-folder windows.
It's important to realize that Explorer, your single-folder windows, and even your desktop are allessentially the same interface (with a few subtle exceptions). File and folder icons look and behavethe same, regardless of the way they're viewed.
Interface consistency is one of the most important aspects of interface design, but, unfortunately, itoften contradicts other factors, such as intuition and historical consistency. For example, drag-drop inExplorer behaves differently when you're dragging from one drive to another (d: to c:) than whendragging from one folder to another on the same drive (c:\docs to c:\files). Why the inconsistency?Because that's the way it has been done in Windows for years, and fixing it would likely confuse toomany users. (At least from the perspective of the company that otherwise would have to answer allthe technical support calls.)
Actually, I've found that Windows XP has better consistency in its interface than most of itspredecessors. In Windows 98, for example, keystrokes that worked in one situation in Explorer didn'twork in other situations, and this has been fixed in this latest version for the most part. And Microsofthas done away with the "drag an EXE file to create a shortcut" behaviorfound in some earlier versionsof Windowswhich was terribly inconsistent with the way other files were drag-dropped, not tomention really annoying. But, XP is still far from perfect; the way Control Panel categories appear insome cases but not in others end up making the tool that much harder to use.
One of Explorer's primary annoyancesand, paradoxically, one of its essential featuresis themandatory use of special combinations of keystrokes and mouse clicks to perform simple operations,such as using the Ctrl key to copy a file or having to make sure the source and destination foldersare both visible before trying to copy or move an object. This behavior, for the most part, can't bechangedbut there's enough flexibility and alternative methods built into the interface to allow you toaccomplish just about any task.
2.1.1. Exploring Basic Explorer Settings

Many aspects of the way Windows works can be controlled by changing certain settings, which arescattered throughout Explorer. These settings can be changed quite easily, quickly making Windowsbehave the way you expectwhich, of course, depends on your level of experience and how you work.The Folder Options dialog box is a good place to start (see Figure 2-1). Select Folder Options fromExplorer's Tools menu (or double-click Folder Options in Control Panel).
Figure 2-1. The Folder Options dialog box is a good place to startmessing around with some basic Explorer settings
The first page or the General tab of the Folder Options dialog box allows you to control threedifferent options; their connection is that they all affect the way Explorer looks. The options areexplained as follows:

Tasks
The Show common tasks in folders option, enabled by default, is responsible for theinformation pane shown on the left side of single- folder windows, or between the tree and thefolder view in Explorer windows. With the exception of the option to enable or disablecategories in Control Panel, the common tasks pane can be turned off (by selecting ClassicFolders) with no loss in functionality.
The common tasks pane takes the place of the Web View found in earlier versions of Windows.
Browse folders
The Browse folders option determines whether or not a new window appears when you opena folder icon from within another open single-folder window. This setting is ignored when thefolder tree pane is visible.
Note that the Ctrl key can be used to override whatever option you chose for Browse folders.For example, if you've opted to Open each folder in its own window, holding the Ctrl keywhile double-clicking a folder icon will force the folder to open in a new window.
Click items as follows
The Single-click to open an item option is included primarily as a hold-over from the WebView feature found in earlier versions of Windows, but it does have the advantage of allowingyou to navigate most of Windows without having to double-click (something you can also dowith the right mouse button).
Note that if you choose the single-click interface, you can no longer click twice slowly on anitem to rename it; instead, you must either right-click on it and select Rename or carefullymove the mouse pointer so that it is hovering over the icon (which is how icons are normallyselected with this option) and press the F2 key.
The Double-click to open an item option can certainly be a pain in the neck for beginnersand experienced users alike, but there are significant advantages of requiring double-clicks toopen icons. For example, it virtually eliminates the possibility of accidentally opening a programor folder when you try to select, delete, move, copy, or rename an item.[1] More importantly,double-clicking is consistent with all other operating systems, such as Macintosh and Unix, aswell as with previous versions of Windows. This may not seem like a great argument, but aprimary factor of good user-interface design is the use of familiar elements.
[1] Most pointing devices (mice, styli, trackballs) with more than two buttons allow the additional buttonsto be programmed. I've found that the third mouse button (or the second barrel switch, if you're using astylus) is ideal for double-clicking.
The next tab, View, shows settings that affect how much information Explorer shows you;unfortunately, the defaults are set in favor of a "simpler" view, which ironically can make Windowsmore difficult to use. Some of the more interesting settings include the following:

The use of some of the following options can be very confusing, in that enablingthem ends up turning something off in the interface, or vice versa. But that'sthe nature of the beast . . .
Display the simple folder view in Explorer's Folders list
This misnamed option is merely responsible for showing or hiding the dotted lines shown inExplorer's folder tree. Although the default is on, you can turn it off to make the tree look morelike earlier versions of Windows. Personally, I feel the lines make the tree a little clearer andeasier to use, so I'd suggest turning this option off.
Display the contents of system folders
Enable this option (the default is off) to eliminate the warning that appears when you attemptto view the contents of certain folders, such as \Windows and \Windows\System.
Display the full path in the Address Bar/titlebar
By default, when viewing the folder, c:\Documents and Settings\Agnes\Documents\Stuff inWindows Explorer, only Stuff will actually appear in the titlebar and Address Bar. This can beextremely confusing, especially when you also have a d:\Other Documents\Maddie\Stuff folder.Why Microsoft insists on hiding pertinent information continually baffles me. I stronglyrecommend enabling both of these options to display the full path in all Explorer and single-folder windows. Note that these options have no affect on File Open/Save dialogs.
Hidden files and folders
Explorer does not show hidden files by default in Explorer. If set to Show hidden files andfolders, any files with the "hidden" file attribute will be shown in Explorer, but their icons willstill appear faded. To hide or unhide a file or folder, right-click it, select Properties, andchange the Hidden option.
Hide extensions for known file types
I believe this feature to be one of Microsoft's biggest blunders; it's turned on by default, andhas been in every Windows release since Windows 95. Filename extensions determine howWindows interacts with your documents, and hiding these extensions limits users'understanding of this technology and how it affects them. See Section 4.3 in Chapter 4 for afurther explanation of why this option should be turned off.

Hide protected operating system files
When this option is turned on, files with the "system" file attribute are hidden in Explorer. Thisis similar to the Hidden files and folders option, discussed earlier. So-called "system" filesinclude the boot.ini file discussed in Chapter 10 and all \Recycler folders (responsible for theRecycle Bin).
Launch folder windows in a separate process
By default, the desktop, Start Menu, and all open Explorer and single-folder windows arehandled by the same instance of Explorer. That is, only one copy of the Explorer.exeapplication is ever in memory. If you enable this option, each Explorer window will use a newinstance of the program. Although this takes slightly more memory and may slightly increasethe time it takes to open Explorer windows, it means that if one Explorer window crashes, itwon't bring them all down. See the What Happens When Explorer Crashes sidebar for moreinformation.
What Happens When Explorer Crashes
There's a little program that runs invisibly in the background that automatically restartsExplorer if it ever crashes. This is what is happening when your desktop spontaneouslydisappears and then reappears a few seconds later.
If you enable the Launch folder windows in a separate process option, it willseparate the process that controls your desktop from those that control all open Explorerwindows. This means that if one Explorer window crashes, they won't all crash. One sideeffect of this is that if the instance of Explorer that controls your desktop and Start Menucrashes, and there's another Explorer window open, that little background program willinstantly open another Explorer window. This is the same thing that happens if you try tolaunch Explorer manually; Explorer will only load your desktop if no other instances ofExplorer are detected. In this circumstance, you can be caught without a desktop orStart Menu at all.
To work around this, start by closing all Explorer windows. Then, press Ctrl-Alt-Del todisplay the Windows Security dialog, and click Task Manager. In the Task Managerwindow that appears, go to File New Task (Run). Type explorer and then click
OK. Your desktop and Start Menu will then appear normally.
Managing pairs of Web pages and folders
The "pair" mentioned here refers to what you get when you save a web page in InternetExplorer and choose the Web Page, complete option in the Save Web Page dialog. Bydefault, all of the images on a page are saved along with the original HTML file in their ownfolder: if you save a page called Homepage of Mr. X, the image folder will be automatically

named Homepage of Mr. X_files.
Internet Explorer (IE) creates an invisible link between web pages saved in this way and theirassociated image folders, in that if you copy, move, or delete the HTML file, the image folderfollows automatically. (Strangely, the same is not true for renaming.) The three options hererelate to how Explorer handles this invisible link. Unfortunately, these options don't really workas you'd expect; they basically all end up doing the same thing.
If you don't want the image folder created when you save a web page in IE, just select WebPage, HTML only from the Save as type list in IE's Save Web Page dialog.
Remember each folder's view settings
This option, when enabled, forces Explorer to remember the "View" settings for the 20-30 mostrecently opened folders, such as the sort- order and icon-size settings. This "memory"overrides the default view settings, but only for the folders you've recently customized. Tochange the defaults used by all folders, see Section 2.1.2, later in this chapter.
Show encrypted or compressed NTFS files in color
Among the additional services provided by the NTFS filesystem (discussed in Chapter 5) aresupport for on-the-fly encryption and compression of certain files. Turn on this option tovisually distinguish encrypted and compressed files and folders by displaying their names inblue. See Chapter 8 for more information on NTFS encryption.
Use Simple File Sharing
Despite the fact that Microsoft apparently recommends enabling this setting, you should disableit immediately for security purposes. See Chapter 7 for more information.
What it comes down to, of course, is that you should use what works best for you. Don't blindlyaccept the defaults just because it came out of the box that way.
The third Folder Options tab, File Types, is discussed in detail in Chapter 4. In addition to thesettings in the Folder Options dialog, there are other, less-conspicuous settings in the main Explorerwindow.
Details
The Details view (go to View Details) is easily the most useful format for folder listings,but not surprisingly, Microsoft has made the prettier but less useful Icons view the default forall versions of Windows since 95. The Details view displays file and folder names, along withtheir sizes, types, and dates in a tabular format.
The list is easily sorted by clicking the appropriate column header. Right-click any column

header to show or hide columns as needed, or go to View Choose Details for thecomplete selection.
You can resize the column widths by dragging between the column headers; double-click thespace between column headers to automatically resize the column to fit its contents. Finally,columns can be rearranged by dragging the column headers.
You can also get the Details view in Windows's File Open and File Save dialog boxes. Just click the right-most icon on the top row of
the dialog, and choose Details from the list that appears. Unfortunately,but not surprisingly, your setting here will not be saved, nor will it followthe defaults set in Explorer, as described later in this section.
Customize This Folder
This opens the Customize tab of the current folder's Properties sheet. These settings affectthe appearance of the folder's icon, but to change the appearance of all folders, see Section4.4.1. Note that the Customize This Folder option is not available for special folders, such asMy Documents and My Pictures.
Arrange Icons By
This is the long-winded way of saying "sort." The quickest way to set the sort order of thecurrent folder is to click the appropriate column header in the Details view, discussed above.
Of note here is the Show in Groups option, which is new in Windows XP. This setting isresponsible for the book-index-like capital letters in file listings and other headings in the MyComputer and My Network Places folders. It doesn't actually change the order in which itemsare displayed, nor does it add any information to the listing. However, it can make a long listingless intimidating for inexperienced users.
See the next section for ways to force Explorer to remember your settings made here.
2.1.2. Force Explorer to Remember Its Own Settings
One of the most common annoyances users have with a lot of different software products is theirinability to remember their state from session to session. For example, how many times have youselected the Details view in Explorer, only to find that it has been turned back to Icons or Tiles thenext time the folder is opened?
For the most part, Explorer's apparent inability to remember settings is fairly easy to fix. All that isrequired is an understanding of the battle between Microsoft's default settings, your most recentchoices, and the preferences you wish to make permanent.
There are two ways to save most of your preferences in Explorer:

Setting defaults for all new folders
Choose the icon size, sort order, and if using the Details view the column widths and positionsyou want to keep as the defaults. Then, go to Tools Folder Options View tab, andclick Apply to All Folders. The settings you've set for the current folder will be used for allnewly opened Explorer and single-folder windows.
The only exception is if you've configured individual folders to remember their settings, asfollows:
Remembering settings for individual folders
Go to Tools Folder Options View tab, and turn on the Remember each folder'sview settings option. With this option enabled, Explorer will temporarily save the settings forapproximately 30 of the most recently viewed folders. These saved settings will override thedefaults (set as described above), at least until Explorer forgets them.
Your choices are stored in the Registry (discussed in Chapter 3) rather than in the foldersthemselves, which not only explains the limit on the number of folders Explorer can rememberbut also exposes a rather annoying system flaw. Say you choose the view settings for a foldercalled Lenny. When you close and reopen Lenny right away, your settings will remain.However, if you rename the Lenny folder to, say, Karl, it will instantly revert to Explorer'sdefaults and forget the settings you made only seconds earlier.
Table 2-1 shows how and when each of the different settings in Explorer are saved.
Table 2-1. Different Explorer preferences are saved in different ways
SettingDefault set
immediately
Default setinFolder
Options[2]
Default set whenwindow is closed
Defaultnever set
Arrange Icons by
Customize Folder
Explorer Bar
Desktop icon layout
Details view columnsettings
Icon size/view
Selected folder

SettingDefault set
immediately
Default setinFolder
Options[2]
Default set whenwindow is closed
Defaultnever set
Sort order
Toolbars/Status
Window size andposition
[2] These settings are also saved independently for the last 20-30 folders when the Remember each folder's view settings
option is enabled.
If you don't use the Apply to All Folders feature after changing Explorer'sview settings, and the Remember each folder's view settings option isturned off, your settings will be forgotten as soon as you close the currentwindow or switch to a different folder.
2.1.3. Helpful Explorer Keystrokes
Certain keyboard shortcuts can be real time savers in Explorer, especially when used in conjunctionwith the mouse.
The following tips assume you're using standard double-clicking, as explained in the previous section.If you've chosen to have icons respond to a single click, just replace "double-click" here with "single-click."
Hold the Alt key while double-clicking on a file or folder to view the Properties sheet for thatobject.
Although this is often quicker than right-clicking and selecting Properties, the right-click menualso known as the context menu has a bunch of other options, most of which are not accessiblewith keystrokes. For more information on context menus, see Section 4.3 in Chapter 4.
Hold the Shift key while double-clicking a folder icon to open an Explorer window at thatlocation (as opposed to a single-folder window). Be careful when using this, because Shift isalso used to select multiple files. The best way is to select the folder first.
Press Backspace in an open folder window or in Explorer to go to the parent folder.
Hold Alt while pressing the left cursor key to navigate to the previously viewed folder. Note thatthis is not necessarily the parent folder, but rather the last folder in Explorer's history. You canalso hold Alt while pressing the right cursor key to move in the opposite direction (i.e.,forward). Explorer's toolbar also has Back and Next buttons by default, which work just liketheir counterparts in Internet Explorer.
With the focus on Explorer's folder tree, use the left and right arrow keys to collapse and

expand folders, respectively. Press the asterisk (*) key to expand all the folders in the currentlyselected branch.
Hold the Shift key while clicking on the close button [X] to close all open folder windows in thechain that was used to get to that folder. (This, of course, makes sense only in the single-folderview and with the Open each folder in its own window option turned on.)
Select one icon, then hold the Shift key while clicking on another icon in the same folder toselect it and all the items in between.
Hold the Ctrl key to select or de-select multiple files or folders, one by one. Note that you can'tselect more than one folder in the folder tree pane of Explorer, but you can in the right pane.
You can also use the Ctrl key to modify your selection. For example, if you've used the Shiftkey or a rubber band to select the first five objects in a folder, you can hold Ctrl while dragginga second rubber band to highlight additional files without losing your original selection.
You can select multiple files without using the keyboard by dragging arubber band around them. Start by holding down the left mouse button ina blank portion of a folder window, then drag the mouse to the oppositecorner to select everything that appears in the rectangle you just drew.
Press Ctrl-A to quickly select all of the contents of a folder: both files and folders.
In Explorer or any single-folder window (even in the folder-tree pane), press a letter key toquickly jump to the first file or folder starting with that letter. Continue typing to jump further.For example, pressing the T key in your \Windows folder will jump to the Tasks folder. Press Tagain to jump to the next object that starts with T. Or, press T and then quickly press A tojump to the first file that starts with TA, taskman.exe. If there's enough of a delay between theT and the A keys, Explorer will forget about the T, and you'll jump to the first entry that startswith A.
Press F6 to jump between the file pane and the address bar (if it's visible). If the Folders tree orSearch Companion pane is open, F6 will also jump to the close [X] button for that pane, but,strangely, not any of the controls within the pane itself. (F6 also works the same way in mostweb browsers, incidentally.)
2.1.4. Convince Explorer to Start with the Folder You Want
There are several ways to open an Explorer window, but the most direct method is to use theWindows Explorer shortcut in the Start Menu. This has the same effect as selecting Run in theStart Menu and typing explorer.exe. That is, the Explorer application is run without any command-
line arguments.
When Explorer is run without any arguments, it opens to its default location, the My Documentsfolder in the Desktop folder (even if you've deleted the My Documents icon from your Desktop). Youmay want to have Explorer open to a custom folder each time, saving the time required to repeatedlynavigate through all the folders on your hard disk.

2.1.4.1 Launch Explorer from a shortcut
The following steps show how to modify your existing Windows Explorer shortcut in your Start Menu.If, instead, you wish to create a new shortcut, right-click on an empty portion of your desktop or thecurrently open folder, and select New and then Shortcut. When prompted for an application, pointto explorer.exe (located in your \Windows folder):
Right-click on the Windows Explorer shortcut, select Properties, and click on the Shortcut tab.1.
Change the text in the Target field so it reads:
explorer.exe /n,/e,d:\myfolder
where d:\myfolder is the full path of the folder where you want Explorer to start. You mightsee the text, %SystemRoot% in front of explorer.exe, which can be left alone or removed, as
desired.
2.
Click OK when you're done. The next time you use the shortcut, Explorer will open to thespecified location.
3.
You may have to use a little trial and error to get the desired results. Now, the full syntax is asfollows:
explorer.exe [/n][,/e][,/root,object][[,/select],subobject]
The square brackets ([...]) show the optional nature of the parameters. Note the use of commas
between parameters, which aren't typical in command-line parameters.
/n
This switch ensures that the folder will always be opened in a new window, even if the specifiedfolder is already open elsewhere.
/e
Use this option to open a standard Explorer window with the folder-tree pane, as opposed tothe default single-folder view. In most cases, you'll want to also specify /n when using /e, but
don't forget the comma.
subobject
Specify subobject to force Explorer to automatically navigate to a particular folder. The folder

is highlighted in the left pane, and its branch is expanded to show any subfolders.
/select
If you also include the /select switch only used in conjunction with the subobject parameter
only the parent of the folder specified by subobject is opened, and subobject is selected on
the right side instead of the left.
/root ,object
Finally, the /root,object parameter allows you to choose what appears as the root of all
folders in the new window, useful if you want an abbreviated tree. The default, of course, is theDesktop. You can specify an ordinary folder to be the root of the tree (i.e., /root,c:\stuff),
or a system object by specifying the Class ID.
So, for example, if you want Explorer to open to the My Computer folder so that no drive branchesare initially expanded (handy if you have several drives), type the following:
explorer.exe /n,/e,/select,c:\
Or, to display an Explorer window rooted at c:\, use this:
explorer.exe /n,/e,/root,c:\
2.1.4.2 Exploring in context
In addition to launching Explorer with any number of parameters, you can open an Explorer windowin the context of any object on the screen and Windows will choose the parameters accordingly.
For example, you can right-click on any visible folder icon (on your desktop, in an open folder, andeven in the tree pane of another Explorer window) and select Explore to open a new Explorerwindow with the folder in question highlighted.
You can also explore from various system objects by right-clicking and selecting Explore. This workson the Start button, the My Computer icon, the My Network Places icon, any folder in your StartMenu, and many other places. Figure 2-2 shows the context menu for the Start button; note thedefault Open command shown in bold.
Figure 2-2. Right-click the Start button for quick access to the currentuser's Start Menu folder

2.2. Handling Files and Folders
Much of the work we do on a computer either involves creating or modifying documents. The rest ofthe time, it seems like all we do is move those documents around. The next few topics will help makefile manipulation easier and hopefully a lot more pleasurable.
2.2.1. Take Charge of Drag-Drop
Intuitively, when one drags an object from one place on the screen to another, it would seemreasonable that the object would then appear in the new place and disappear from the old place. Inother words, what happens to a file when you drag it from the left side of your desktop to the rightside of your desktop should be exactly the same as what happens when you drag a file from onefolder to another or from a floppy disk to your hard drive.
The problem is that drag-drop is handled differently in different situations. The decision of whataction to take in each situation was made by a committee at Microsoft; I'd be willing to bet that youdidn't have a personal representative at that meeting.
So, our aim here is to force Windows to work the way we think, keeping in mind the practicallimitations of the operating system. Here's the way Explorer works (note that "object" is a file, folder,shortcut, system object, or anything else with an icon that can be knocked around with your mouse):
If you drag an object from one place to another on the same physical drive (c:\docs to c:\files),the object is moved.
If you drag an object from one physical drive to another physical drive (c:\docs to d:\files), theobject is copied, resulting in two identical files on your system.
This means that if you drag an object from one physical drive to another physical drive and thenback to the first physical drive, but in a different folder (c:\docs to d:\files to c:\stuff ), you'llend up with three copies of the object.
If you drag an application executable (an .exe file), the same rules apply to it that apply toother objects, with the following unfortunate exceptions:[3]
[3] In Windows 95, 98, and NT 4.0, dragging any .exe file anywhere would cause a shortcut to be created. This behavior,
which nobody liked, has been mostly, but not entirely, abandoned in Windows XP.
If you drag any file named setup.exe or install.exe from one place to another, Windows willcreate a shortcut to the file, regardless of the source or destination folder.
If you drag any file with the .exe filename extension into any portion of your Start Menu orinto any subfolder of your Start Menu folder, Windows will create a shortcut to the file.Dragging other file types (documents, script files, other shortcuts) to the Start Menu willsimply move or copy them there, according to the previous rules.

If these weren't enough, there are further exceptions. If you drag a file named setup.exeinto a recordable CD drive, it will be copied. And if you drag a bunch of files of differenttypes (including, say, setup.exe), then the create-a-shortcut rules above will be ignored,and they'll just be copied or moved as appropriate.
If you drag a system object (such as a Control Panel icon), a warning is displayed, and ashortcut to the item will be created. This, of course, is a consequence of the fact that theseobjects aren't actually files and can't be duplicated or removed from their original locations.
If you drag certain icons that appear on the desktop, such as My Documents, Internet Explorer,or the Recycle Bin, any number of different things can happen, each depending on the specificproperties of the object.
The best way to cope with this confusion is to use a combination of certain keystrokes and the rightmouse button to ensure the desired results every time you drag an object. That way, you don't haveto predict what will happen based on some rules you won't likely remember.
To copy an object in any situation, hold the Ctrl key while dragging. If you press Ctrl before youclick, Windows assumes you're still selecting files (as described earlier in this chapter), so makesure to press it only after you've started dragging but before you let go of that mouse button.Of course, this won't work for system objects like Control Panel itemsa shortcut will be createdregardless.
Using the Ctrl key in this way will also work when dragging a file from one part of a folder toanother part of the same folder. See Section 2.2.3 later in this chapter for more information.
To move an object in any situation, hold the Shift key while dragging. Likewise, if you pressShift before you click, Windows assumes you're still selecting files, so make sure to press it onlyafter you've started dragging but before you let go of that mouse button. Like above, thisdoesn't apply to system objects like Control Panel icons.
To create a shortcut to an object under any situation, hold the Alt key while dragging. Note thatthis is different than in previous versions of Windows.
To choose what happens to dragged files each time without having to press any keys, drag yourfiles with the right mouse button, and a special menu like the one shown in Figure 2-3 willappear when the files are dropped. This context menu is especially helpful, because it willdisplay only options appropriate to the type of object you're dragging and the place whereyou've dropped it.
Figure 2-3. Drag files with the right mouse button for more control

To aid in learning the keystrokes, notice that the mouse cursor changes depending on the actiontaken. A small plus sign [+] appears when copying, and a curved arrow appears when creating ashortcut. If you see no symbol, the object will be moved. This visual feedback is very important; itcan eliminate a lot of stupid mistakes if you pay attention to it.
There is no way to set the default action when dragging files and therefore no way to avoid usingkeystrokes or the right mouse button to achieve the desired results. Even if there were a way tochange the default behavior, you probably wouldn't want to do it. Imagine if someone else sat downat your computer and started dragging icons: oh, the horror.
Explorer's Undo command (in the Edit menu, as well as available by right-clicking in an empty areaof Explorer or the desktop) allows you to undo the last few file operations.[4] If you've copied,moved, or renamed one or more objects, the command will read Undo Copy, Undo Move, or UndoRename, respectively. Additionally, if your Recycle Bin is configured to store files, Undo Delete mayalso appear. However, if you're doing a lot of copying, moving, and deleting of files, it's hard to knowto which particular operation the Undo command refers at any given time. The easiest way to tell isto click and hold the mouse button over the Undo menu item and look in the status bar (selectStatus Bar from the View menu if it's not visible), which will tell you exactly with which files theoperation dealt. This, of course, is not available on the desktop, but luckily, the Undo commandworks the same regardless of the folder from which you use it.
[4] Ctrl-Z is a keyboard shortcut for Undo.
2.2.2. Copy or Move to a Specified Path
Dragging and dropping is generally the quickest and easiest way to copy or move files and foldersfrom one place to another. Typically, you must have both the source folder and the destination folderopen and visible, which can add several steps to what should be a simple process. Furthermore,there's no provision for specifying a destination folder with the keyboard. The following procedurescan be used to overcome these basic limitations.
2.2.2.1 Solution 1: Drag patiently
Open Explorer (with the folder-tree pane), and navigate to the source folder.1.
Drag one or more items over the tree pane on the left, then hold the mouse cursor over thevisible branch of the destination folder. After two or three seconds, Explorer will automaticallyexpand the branch and make the subfolders visible.
2.
3.

2.
If the destination folder you're looking for is buried several layers deep, you'll have to wait forExplorer to expand each level. This requires a steady hand and a lot of patience.
3.
2.2.2.2 Solution 2: Use cut, copy, and paste
This solution isn't exactly intuitive, but it can be convenient if you don't have a mouse or if yourscreen size limits the number of open windows:
Select the file(s) you want to copy, right-click on it, and select Copy to copy the file or Cut tomove the file. The keyboard shortcuts for the cut, copy, and paste operations are Ctrl-X, Ctrl-C, and Ctrl-V, respectively.
If the file is cut, its icon will appear faded (as though it were a hidden file). If the file is copied,there will be no visual distinction.
1.
Open the destination folder (or click on the desktop), right-click on an empty area (or open theEdit menu), and select Paste. Whether the file is copied or movedor a shortcut is madedependson the same criteria as if you had dragged and dropped the item. Unfortunately, modificationkeystrokes discussed earlier in this chapter (Ctrl, Shift, and Alt) have no effect here, so you'llprobably need a little trial and error.
2.
Although Explorer uses the familiar cut, copy, and paste commands to accomplish this solution, theydon't work exactly the same way for files as they do in other applications when you're manipulatingtext, for example.
If you cut a file and never get around to pasting it, or cut a second file without pasting the first, thefirst file that was cut is not deleted as you might expect. Cut, copy, and paste in the context of fileswork with file references rather than the files themselves, so unless you cut a file and then paste itinto the Recycle Bin, there isn't much danger of losing anything. You can abort any cut operation bypressing Esc; the only visual feedback you'll get is that any "faded" file icons will return to theirnormal state.
Also, while you can drag-drop files from Explorer or the desktop into a running application to openthe file in that application, the same isn't necessarily true for copy and paste. If you try to copy a fileand then paste it into an application such as Word or Word Perfect, the file is inserted as an iconobject directly into the document, which is not likely to be of much use to most people.
2.2.2.3 Solution 3: Use the Explorer toolbar
The standard Windows Explorer toolbar has two buttons, Move To and Copy To, that allow you topoint to a location when moving and copying, respectively. Unfortunately, these functions can't befound in Explorer's menus or in the context menus of any files or folders; they're only available onthe toolbar.
If Explorer's toolbar isn't currently visible, go to View Toolbars Standard Buttons to turnit on. By default, the Move To and Copy To buttons are in the sixth and seventh positions on thetoolbar, respectively. If they're not, right-click on the toolbar, and select Customize.

2.2.2.4 Solution 4: Use a third-party add-on
The final solution is to install a separate utility to extend Explorer's capabilities. For example:
Install Creative Element Power Tools (http://www.creativelement.com/powertools/).1.
Enable the Copy or Move files anywhere tool.2.
Right-click on any file or folder, select Move To or Copy To, and then type or point to thedestination folder. You can also create new folders on the fly and duplicate paths in thedestination folder; the software even remembers the last dozen destinations you specified.
3.
2.2.3. Make a Duplicate of a File or Folder
Windows lets you copy and move files from one folder to another by dragging them with differentcombinations of keystrokes, as described earlier in this chapter. You can also rename a file by clickingon its name or highlighting it and pressing the F2 key. However, if you want to make a duplicate of afile in the same directory and assign it a different name, the process might not be as obvious. Thereare several different ways to do it:
Hold the Ctrl key while dragging a file from one part of the window to another part of the samewindow. This works in single-folder windows, on the desktop, and in Explorer.
Use the right mouse button to drag the file from one part of the window to another part of thesame window, and then select Copy Here, as shown in Figure 2-3.
For keyboard enthusiasts, press Ctrl-C and then Ctrl-V to create a duplicate of a file using theclipboard.
Regardless of which solution you use, the duplicate of a file called, say, Myfile.txt will be automaticallynamed Copy of Myfile.txt. An additional copy of Myfile.txt will be called Copy (2) of Myfile.txt, while acopy of Copy of Myfile.txt will be called Copy of Copy of Myfile.txt. Because the filename keepschanging (albeit somewhat inconveniently), you can duplicate multiple files simultaneously to fill adirectory quickly with dozens of identical files.
If you need a bunch of duplicates of a file or folder, start by duplicating it once. Then, select both theoriginal and the copy, and duplicate them both. Then, select the now four objects and duplicate themto make eight. Once you have all the duplicates you need, see Section 2.2.4, later in this chapter, forhelp in giving your duplicates more appropriate names.
If you duplicate a folder, all the contents of the folder will be duplicated, butonly the name of the single folder will be changedthe names of the files andfolders therein will remain intact.

The Power Rename utility, part of Creative Element Power Tools(http://www.creativelement.com/powertools/), allows you to duplicate large numbers of files quickly,while controlling how the duplicates are named. See the next section for details.
2.2.4. More Ways to Rename Files
Renaming files is just as common a task as copying or moving, but it ends up being much moretedious to accomplish, at least when using Explorer.
In its simplest form, Explorer's rename feature works like this: highlight a file, wait a second (toavoid double-clicking) then click the filename, type a new name, and press Enter. You can renamean object by right-clicking and selecting Rename, or by selecting and pressing F2.
However, this method is laborious, especially if you need to rename a whole bunch of files or folders.And if you need to change a filename extension (see Section 4.3 in Chapter 4), then Explorerinterrupts each renaming operation with a stern warning. The following solutions show other ways torename files and overcome these limitations.
2.2.4.1 Solution 1: Select multiple files in Explorer
The following is the result of a new feature for Windows XP, though it leaves a lot to be desired:
Select multiple files in Explorer, on your desktop, in a single-folder window, or in a SearchResults window. See Section 2.1.3, earlier in this chapter, for different ways to select multiplefiles.
1.
Although multiple files will be highlighted, only one file will be the "active" file. At first, there willbe no visual distinction, but if you press and release the Ctrl key, a dotted rectangle will appeararound the name of the active file.
2.
The active file is important, since its name will be used as a template to rename the otherselected files. If the file marked as active is not the one you want to use, hold the Ctrl key whileclicking another file. If the new file was highlighted, it will become de-selected in this case, justCtrl-click the file once more to re-select it.
3.
Press the F2 key to rename the active file. Nothing will happen to the other selected files, atleast not yet.
4.
Rename the active file as desired. When you're done, press Enter (or, press Esc to abort theoperation without renaming any files). The active file will retain the newly typed name.Furthermore, all of the other selected files will assume the name of the active file, plus anumber in parentheses.
5.
The rules that Explorer uses for renaming multiple files are as follows:
Each new filename begins with the full filename of the active file. Then, for all files except theactive file, a blank space followed by a number in parentheses is appended to the filename.

The order in which the files currently appear in the folder is used to determine the numbers. Thefile that appears closest to the top of the listing is numbered "1," followed by "2," and so on.
File extensions are never changed, even if you purposely change the file extension of the activefile. See Section 4.3 in Chapter 4 for more information on filename extensions.
Table 2-2 shows an example of what happens to five files renamed in this way.
Table 2-2. What happens when you try to rename multiple files inExplorer; the first file listed here is the "active" file, as described in
Solution 1
Old filename New filename
My file.doc The Penske File.rtf
Grandma.jpg The Penske File (1).jpg
Readme.1st The Penske File (2).1st
Purchases.mdb The Penske File (3).mdb
Chapter 2 (a folder) The Penske File (4)
Although there's no way to preview what your filenames will look like, you can undo a multiplerename operation as easily as a single rename operation. Simply press Ctrl-Z to revert thefilenames, or in an Explorer or single folder window, go to Edit Undo. Even though multiple filescan be renamed in a single step using this procedure, each file is given its own individual place in the"undo history." This means that if you rename seven files in a single step, you'll have to use the undocommand seven times to revert them all.
2.2.4.2 Solution 2: Use the Command Prompt
This next solution uses the ren command, discussed in Appendix C, to rename any number of files
using the traditional wildcard syntax:
Open a Command Prompt window by going to Start Programs Accessories Command Prompt, or by launching cmd.exe.
1.
Use the cd command, also explained in Appendix C, to change the working directory to the
folder containing the files you wish to rename. For example, type:
cd c:\stuff
to change to the c:\stuff folder. For long folder names, there's a shortcut: just type cd, followed
by a space, and then drag a folder icon onto the Command Prompt window. The full path of the
2.

folder will be typed for you.
Since the ren command only works in one folder at a time, you can't
rename files in multiple folders in a single step, like you can with the othersolutions in this section. However, you can use batch files or WSH scripts,discussed in Appendix C and Chapter 9, respectively, for more flexibilityand automation.
The syntax of the ren command is as follows:
ren source destination
where both source and destination can be any combination of permissible characters andwildcards. Two wildcards are allowed: an asterisk (*), which is used to match any number ofcharacters, and a question mark (?), which is used to match only a single character.
3.
The following examples illustrate the use of the ren command:
Rename a single file
ren oldfile.txt newfile.txt
Change the extension of all .txt files to .doc
ren *.txt *.doc
Rename the first part of a filename without changing the extension
ren document.* documentation.*
Remove the extensions of all files in the folder
ren *.* *.
Change the first letter of all files in a folder to "b"
ren *.* b*.*
Add a zero in front of numbered chapter files

ren "chapter ??.wpd" "chapter0??.wpd"
Note the use of quotation marks here to accommodate the spaces in the filenames. Also, notehow the zero fills the space in the original filenames; "inserting" a zero is a bit morecomplicated.
Rename all files with a "s" in the fourth position so that a "t" appears there instead
ren ???s*.* ???t*.*
Truncate the filenames of all files in the folder so that only the first four characters are used
ren *.* ????.*
Here are few additional notes for using ren to rename files:
Using wildcards takes a bit of practice and patience. The more you do it, the better intuitivesense you'll have of how to phrase a rename operation. To make things simpler, try issuingseveral successive ren commands instead of trying to squeeze all your changes into a single
step.
If a naming conflict occurs, the ren command will never overwrite a file. For example, if you tryto rename Lisa.txt to Bart.txt, and there's already another file called Bart.txt, ren will display
an error and no renaming will occur.
The source is always case-insensitive, in that capitalization doesn't matter when matching files.
However, the capitalization you use for destination is preserved.
ren isn't able to insert characters, only replace them. This makes it difficult to make filenames
shorter or longer using wildcards.
You can use batch files to execute a series of ren statements, as described in Appendix C.
2.2.4.3 Solution 3: Use a third-party add-on
The third solution is to install a separate utility to allow more sophisticated renaming operations:
Install Creative Element Power Tools (http://www.creativelement.com/powertools/).1.
Enable the Rename files with ease tool.2.
Select one or many files to rename, right-click, and select Power Rename. Or open the PowerRename utility and drag-drop the files onto the window.
3.
Select the desired renaming criteria to your right. The first option, As Specified, allows you to4.

3.
type a file specification with wildcards, as described in Solution 2, earlier.
Otherwise, choose With Operation, and then choose the options later, such as Appendfilename, Re-number, Change Case, or Replace.
4.
Turn on the Show what files will look like option to see a preview of the filename(s).5.
Click Apply when you're done.
If you wish to make duplicates (see Section 2.2.3, earlier in this chapter), turn on the Leaveoriginal files (copy) option and click Apply repeatedly, once for each duplicate you wish tocreate.
6.
2.2.5. Make It Easier to Delete Files
Deleting files and folders is something we do every day, but under Windows XP's default settings,deleting a single file or a group of files can incur a whole slew of confirmation messages, and theresults can be somewhat unpredictable.
The number and type of confirmation messages you get depends on settings in your Recycle Bin. Forexample, if your Recycle Bin is configured to store deleted files (the default), but not confirm theirdeletion, you may not see any warning message at all. The key is to cut out the unnecessarymessages without completely eliminating the safeguards that help prevent accidental deletion.
Let's start by examining some of the Recycle Bin settings and their consequences. Right-click theRecycle Bin icon on your desktop, and select Properties. The various options here are pretty self-explanatory, but the following tips may help:
If your Recycle Bin is configured to store deleted objects, you can get back accidental deletionsby opening the Recycle Bin and dragging items out of it. If, instead, you've configured theRecycle Bin to delete files immediately, you'll need an undelete program (such as the one thatcomes with Norton Utilities) to get them back.
You can also right-click any empty area of a folder or the desktop and select Undo Delete(assuming the last thing you did was delete an object), but only if you've configured the RecycleBin to store your deleted objects.
If you highlight an object and press the Del key, or right-click an object and select Delete, ithas the same effect as dropping the object into the Recycle Bin. All the Recycle Bin settingsapply regardless of the method used to actually delete the object. The exception is theCommand Prompt's del command (discussed in Appendix C), which deletes files without
confirmation screens and without storing them in the Recycle Bin.
In fact, you may want to use del to quickly and easily delete one or more files sharing acommon trait, such as the filename extension. Just type del *.tmp to delete all files with the
.tmp extension in the active folder, for example (see Solution 2 in Section 2.2.4, earlier in thischapter for more information on this syntax). The del command often completes its tasks more
quickly than the Recycle Bin, especially for large numbers of files. Command-prompt commandsalso have the added benefit of deleting files without forcing you to stare at the flying-paperanimation.

It's possible to permanently delete an object in Windows XP without any confirmation dialog boxwhatsoever, a feature you should, of course, use with caution. To do this, open the RecycleBin Properties, and turn on the Do not move files to the Recycle Bin option. Next, turn offthe Display delete confirmation dialog box, and click OK when you're done. This doesn'tget rid of all nag windows, though only the ones for ordinary files. See below for exceptions.
If you have more than one drive, the settings for each drive's Recycle Bin (shown as separatetabs in the Recycle Bin Properties window) can be set independently. Settings for a particulardrive apply to all files deleted on that drive. For example, if drive C: is set to store deleted files,but drive D: is not, then only files deleted from drive C: will be recoverable. For this reason, it'susually best to specify Use one setting for all drives in the Recycle Bin Properties.
The amount of disk space devoted to the Recycle Bin is specified as a percentage of the amountof free disk space per drive, rather than a fixed number of megabytes. This means that the sizeof your Recycle Bin will constantly change as the amount of free space changes, and the size ofthe Recycle Bin on each of your drives will always be different. Now, if you delete a 15 MB fileand only 10 MB are available to the Recycle Bin, Windows will delete the file outright instead ofstoring it (it may warn you first).
If you have your Recycle Bin configured to store deleted files, it will hold them until it becomesfull and then will permanently erase the oldest contents to prevent "overflow." This means youwill never be able to predict how long a deleted file will remain in the Recycle Bin: a sensitive filemay stay in there for weeks, presenting a possible security hazard. Likewise, an accidentallydeleted file may disappear after only a few hours (or less), long before it occurs to you todouble-check the contents.
The lesson: be careful when deleting files, be diligent about checking your Recycle Bin, and givesome thought to the Recycle Bin settings.
Why would you want files to be stored in the Recycle Bin? It gives you a way out: if you find that youare careless and delete important files accidentally, you should definitely exploit this feature.
Why would you not want files to be stored in the Recycle Bin? First of all, those files don't exist in avacuum; they take up valuable hard-disk space and can slow system performance. Deleted files are asecurity risk; it's one of the first places I'd look for sensitive information if I were breaking intosomeone's system. And having unwanted files remain on your hard disk can make your system morevulnerable to hard disk crashes (from corrupted files) and viruses (from email attachments youthought you deleted right away).
There are a few workarounds for whatever Recycle Bin settings you choose, allowing more flexibilityand control. For example, if you've configured your Recycle Bin to store deleted files, you can stillhold the Shift key while deleting any given object to permanently erase the object. The files currentlystored in the Recycle Bin (if any) will not be affected.
The following are all of the confirmation and warning messages you may receive when deleting files,and, where applicable, how to bypass them:
By default, you'll get a nag window when you first drop any file or folder onto the Recycle Bin ordelete them with the Del key. This can be bypassed by turning off the Display deleteconfirmation dialog option.
You'll be warned if you try to delete a file that has the read-only or system attributes set. The

only way to curb this is to first turn off said attributes by right-clicking the file(s) and selectingProperties.
Explorer will warn you if the file that's being deleted is an .exe file. However, it won't warn youwhen deleting .dll or .ocx files, even though they're just as necessary as .exe files for theapplications that own them. There's no way to change this behavior.
If you delete certain shortcuts in your Start Menu, Explorer will stop you to explain that you'renot actually deleting the software to which it links. This is actually a property of said shortcutsand cannot be changed globally.
You'll get a warning message if the files you're trying to delete are larger than the space you'veallocated for the Recycle Bin. You can fix this by increasing the allocated space (move the slidebar to the right). This doesn't apply if you've enabled the Do not move files to the RecycleBin option.
Windows will give you a stern warning if you try to delete (or rename) a folder that contains (oronce contained) an application, explaining that the application will no longer work. This onlyhappens if the folder is referenced in the Registry. Since it's easier to just click OK rather thanfirst removing all Registry references, there's no practical workaround to this one, either.
Finally, you'll be asked to confirm that you actually wish to empty the Recycle Bin, regardless ofthe size or number of files currently inside.
2.2.6. How to Delete or Replace In-Use Files
Regardless of the number of confirmation windows Explorer throws at you, eventually you'll beallowed to delete the file or folder you're trying to get rid of. The only case when Windows XP simplywon't allow you to delete (or replace) something is when that file or folder is "in use" by a runningapplication or by Windows itself.
This is a safety mechanism, not only in place to prevent a running application executable or supportfile from being deleted while said application is running, but to prevent a document from beingmodified or deleted by an application other than that which has opened the document.
Remember, Windows makes it difficult to delete files that are in use for areason. If you delete certain files located in your \Windows or\Windows\System folders, you can render Windows inoperable. However, thereare plenty of files that can be deleted or replaced safely. Use these solutions atyour own risk, and check out Chapter 6 for tips on securing your system with abackup.
2.2.6.1 Solution 1: Close the application
The easiest way to delete an in-use file is to simply close the application that owns it. If the filebelongs to an invisible background program, use the Windows Task Manager (taskmgr.exe) to endthe process. If it belongs to a service, use the Services window (services.msc) to stop it.

But what happens if the file is in use by the operating system? If you need to replace a .dll file in the\Windows\System folder, for example, Windows won't let you do it. But never fear! The remainingsolutions should take care of it.
2.2.6.2 Solution 2: Use the Command Prompt
The Command Prompt, discussed in Appendix C, is sometimes able to access files that Explorer won'tlet you touch.
Open a Command Prompt window by going to Start Programs Accessories Command Prompt, or by launching cmd.exe.
1.
Use the cd command to change the working directory to the folder containing the file(s) you
wish to delete. See Solution 2 in Section 2.2.4, earlier in this chapter, for additional tips on thecd command.
2.
Use the del command to delete the file, like this:
del filename.ext
where filename.ext is the name of the file.
3.
If this doesn't work, try the next solution.
2.2.6.3 Solution 3: Brute force
Occasionally, simply renaming the file is enough to break Windows's hold on a shared file. If thisdoesn't work, restart Windows, and then try deleting again.
2.2.6.4 Solution 4: Use the Safe Mode with Command Prompt
Windows XP has a special way to get to the Command Prompt (discussed in Appendix C) withoutloading most of the rest of the operating system. Here's how to get to it:
Restart your computer.1.
Just after the system beep, but before the Windows startup logo appears, press the F8 key todisplay the Windows Advanced Options Menu.
2.
Use the up and down arrow keys to highlight Safe Mode with Command Prompt (the thirdone from the top), and press the Enter key.
3.
When the Command Prompt window appears, use the del or ren commands discussed in
Appendix C to delete or rename the file in question.
4.
5.

4.
When you're done, restart your computer by typing:
shutdown -s -t 0
Or, press Ctrl-Alt-Del and then click Shut Down.
5.
2.2.6.5 Solution 5: Use the Recovery Console
The Recovery Console is essentially a way to get to the Command Prompt when Windows isn'trunning at all. The Recovery Console operates at a lower level than the Safe Mode with CommandPrompt, discussed in the previous solution, and will allow you to delete in-use files that otherwisecan't be touched. It also provides access to your system when Windows won't start. See Chapter 6for more information on the Windows Recovery Console.
2.2.6.6 Solution 6: Use Wininit.ini
The final solution is that which is implemented by the installation programs used to install softwareon your computer.
Open Explorer, and navigate to your \Windows folder.1.
Double-click the Wininit.ini file to open it in Notepad (or any other standard plain-text editor).
If the file isn't there, just create a new empty text file, and name it Wininit.ini, and type thefollowing line at the top:
[rename]
In most cases, the Wininit.ini file will exist but will be empty, with the exception of the [rename]
line. Any other lines here would have been added by a recent application install. See Section3.3.7 for more information on the structure of this type of file.
2.
Under the [rename] section header, type the following line:
NUL=c:\folder\filename.ext
where c:\folder\filename.ext is the full path and filename of the file you wish to delete. You
can specify as many files here as you want, one on each line.
If you wish to replace a file rather than simply deleting it, the syntax is a little different:
c:\folder\existing.ext=c:\folder\replacement.ext
where c:\folder\existing.ext is the full path and filename of the file you're trying to replace,
3.

and c:\folder\replacement.ext is the full path and filename of the new file to take its place.
If the file specified on the right side of the equals sign doesn't exist, then the existing.ext file
will be moved/renamed to c:\folder\replacement.ext.
Restart Windows. The files will be deleted or replaced as specified during the startup procedure.4.
2.2.7. Fix the Search Tool
Most of us rely on the Windows Search tool on a daily basis to find and organize files in Explorer.However, Microsoft has redesigned the Search tool in Windows XP in an effort to make it moreinviting for novice users, but at the expense of the simplicity and efficiency found in earlier versions.
There are two primary issues with the Search tool that we'll address here: the cumbersome newinterface and the fact that starting Search from within Explorer doesn't open it in a new window.Finally, we'll end the discussion with a bunch of Search tips. Together, these solutions should helpmake the Windows XP Search tool a lot more useful and a lot less annoying.
2.2.7.1 Part 1: The new Search interface
Okay, I'll admit it. The dog is cute. Being an animal lover, you'd think I'd appreciate having him downthere wagging his tail and "helping" me find my files. But it took me less than two minutes to gettired of the cumbersome wizard-like interface, the overabundance of unnecessary choices, and thelittle scratching sounds the puppy makes while you're trying to work.
Ideally, when one opens a Search window, all of the important fields and options should be accessibleimmediately, without any additional nonsense and without disrupting the existing workspace.Unfortunately, that's not what Microsoft had in mind, as shown in Figure 2-4.
Figure 2-4. The puppy sleeps while you wade through the cumbersomeSearch menus

When you open the Search tool (see Part 2 for ways to start a Search), you're presented with amenu asking, "What do you want to search for?" and eight possible destinations. The first threedestinations all basically do the same thing, but require that you first make a distinction about whattype of file you're looking for, or rather, try to predict how Windows will categorize the file for whichyou're looking. For example, is that Photoshop document you were working on a "picture" or is it a"document?"
All files and folders is the obvious choice, as it will likely be in most situations. To skip this menu inthe future and go straight to the All files and folders search tool, click Change Preferences, thenChange files and folders search behavior, and then choose Advanced. Fortunately, Explorer willremember your preference, and you won't have to deal with the menu again unless you want to.
You may have noticed that this choice is rather buried in the Change Preferences menu; all theother options here simply affect the Search Companion (the little puppy dog, by default). ClickWithout an animated screen character to say bye-bye to "Rover," or click With a differentcharacter to choose between Rover, Merlin (a wizard), Earl (a surfboarding banana), or Courtney(anybody's guess). Unfortunately, there's no way to disable the sounds the different charactersmake; if it weren't for this limitation, I'd probably still have the puppy on my system.
If you like the puppy, you'll be happy to know that he won't leave if you choose the Advancedoption, described earlier, to bypass the menus and go straight to the Search form. Double-click theanimated character at any time to turn him/her off, choose a different character, or to make him/herdo a trick for you.

Once you're looking at the so-called "Advanced" view of the Search tool, any searches you performwill be relatively open. That is, you won't be restricted by a "type" of file to look for, unless you wantto be. The When was it modified, What size is it, and More advanced options choices allowyou to refine your search beyond simply the filename and location, further filtering the search resultsas needed. See Part 3 for more search tips.
2.2.7.2 Part 2: The Search pane in Explorer
If you've become accustomed to the Find tool in Windows 95/98/NT 4.0, you'll notice that the Searchtool in Windows XP is roughly equivalent, except that the search results appear to the right of thecontrols rather than beneath them. Other than this horizontal layout, more closely resembling thestandard Explorer window, and the extraneous menus discussed previously in Part 1, there's not awhole lot different with this new tool. (Windows Me and Windows 2000 have something much closerto the Windows XP Search tool, though.)
The problem becomes obvious when the Search tool is invoked from within an open Explorer window:the left pane containing the folder tree simply disappears! Furthermore, the contents of the currentlyselected folder remain visible in the right pane, but vanish as soon as a search is performed. The twoways to reproduce this are as follows:
Press Ctrl-F, Ctrl-E, or F3 in Explorer or any single-folder window.
Select Explorer Bar and then Search from Explorer's View menu, or click the Search buttonon the Explorer toolbar.
The fact that the current window is reused for the Search tool has no apparent benefit, yet itinconveniently and frustratingly interrupts your workspace, which is the last thing you want whenyou're looking for something.
The only way to return to the previous view at this point is to select Explorer Bar and then Foldersfrom Explorer's View menuunfortunately, there's no keyboard shortcut, so this procedure isespecially cumbersome. When the folder tree pane is reinstated, a new folder, Search Results,appears at the bottom of the tree. However, if you select another folder and then return to thisSearch Results folder, neither the search criteria nor the search results from your last search areretained. In other words, there's absolutely no point to this design.
The solution is to find a way to activate the Search tool so this doesn't happen, which essentiallyinvolves opening Search in a new window, leaving any open Explorer windows intact. There are fourways to do this:
Select Search and then For Files or Folders from the Start Menu. Local Hard Drives will beautomatically selected in the Look in list. If you want to start your search from the folder youwere viewing, you'll have to select it manually from the Look in list.
Click on the desktop, and then press F3. The Desktop will automatically be selected in the Lookin list. Likewise, you'll have to select another folder manually from the Look in list if theDesktop is not where you wish to search. (Strangely, the Ctrl-F keyboard shortcut doesn't workon the Desktop, even though it works everywhere else.)

Right-click on any folder icon on the desktop or in either pane of an Explorer window (driveicons also work), and select Search. A new window will appear, and the selected folder or drivewill automatically appear in the Look in list.
Obtain Creative Element Power Tools (http://www.creativelement.com/powertools/), whichcomes with a fix for the Search tool. With this utility, pressing Ctrl-F or F3 in an open Explorerwindow will force a new Search window to open and the current folder to be placed in the Lookin list.
2.2.7.3 Part 3: Search tips
Here are some additional tips for working with the Search tool:
Working with Search Results
The Search Results listing is an active list of the files and folders that match your searchcriteria. This means that you can double-click any found document, application, or folder toopen it. You can also drag icons from the Search Results window or right-click them in place toview their context menus, just as though you were looking at them in their native folders.
For broader context, just highlight any single item and select Open Containing Folder fromthe File menu, and its parent folder will be opened with said object selected automatically.
Stretch out
The Search Results window is usually not large enough to display all pertinent information.Make it bigger so you can see the In Folder column, for example (Details view only), whichtells you the full path of each item in the listing.
While we're at it, make sure the Status Bar is visible (go to View Status Bar). The Searchtool displays both its progress and a summary of its results in the Status Bar at the bottom ofthe Search window.
Sometimes it's easier to search for everything
If you initiate a search and leave the All or part of the file name field empty, the searchresults will just fill up with all files and folders in the specified location. This is very useful, as itwill quickly allow you to find the newest or even largest files in the specified location. Just makesure you're using the Details view (select View Details), and then click the appropriatecolumn headers to sort the listing accordingly.
Note that the arbitrary 10,000-file limit imposed in some earlier versions of Windows has beenlifted in Windows XP. For anyone who has been around long enough to remember XTree, this isequivalent to its fabulous "Show All" feature.

Save your search settings
There's also another way to open a Search window without disrupting an Explorer window. Thissolution has the added benefit of allowing you to save the default search location (sort of) andany other search options:
Open a Search window and select a search location and any other search options. Leavethe All or part of the file name field empty for now.
a.
Click Search Now to perform a search. The specific results that appear right now aren'timportant, though.
b.
When the search is complete, select Save Search from the File menu. When prompted,navigate to the Desktop and type whatever you like for the filename; something generic,such as Search.fnd, might be suitable.
c.
Double-click on the new Search.fnd file at any time to open a new Search window withyour settings. You can make as many of these as you like, and place them in on yourDesktop, in your Start Menu, or even on a QuickLaunch toolbar for quick access.
d.
If you want to assign a keyboard shortcut to this new Search icon, start by moving thesaved search file to a safe, out-of-the-way location. Create a shortcut to the file and placeit in the same folder, in your Start Menu, or anywhere else that is convenient.
Right-click on the new shortcut, click Properties, click on the Shortcut key field, andpress the desired keystroke combination. Unfortunately, Windows won't let you choose ashortcut key combination with only the Ctrl key, so you can't redefine Ctrl-F for thiswindow (believe methis is the first thing I tried). However, Ctrl-Shift-F is almost asconvenient and may serve as a suitable compromise. Click OK when you're done, then tryit out!
e.
Looking for text in files
If you're looking for text in a file, as opposed to the filename, the Windows XP Search tooldoesn't actually work that well. Several times I've tested it by looking for text in a folder full ofordinary text files (no exotic file formats or anything), and Search couldn't find the text I knewto be in there. If you run into this problem, try UltraEdit-32 (http://www.ultraedit.com), anduse the Search Find in Files command instead.
Stop Search from looking in ZIP files
As described in the topic "Working with ZIP Files," later in this chapter, support for the ZIP fileformat is built into Windows XP. Whether you like this ZIP integration or not, it does mean thatthe Search tool will include the files inside of any ZIP archives it encounters, just as thoughthey were in ordinary folders.

This negatively impacts the Search tool in two ways. First, it can increase search timeconsiderably; every ZIP file found in your search will have to be opened and its contentsextracted. Second, if any files matching your search criteria are found inside a ZIP file, they willappear normally in the search results, but the In Folder column will be blank for these items,making it that much more difficult to find where said files are actually located.
Unfortunately, there's no way to stop Search from looking in your ZIP files without disablingWindows XP's built-in support for ZIP files. But if you do disable ZIP integration, you can alwaysinstall a separate ZIP utility that won't interfere with searches and may provide morefunctionality as well.
The places Search won't look
The following folders are places in which Search won't look for files:
Your Fonts folder: \Windows\Fonts
Deleted files stored in the Recycle Bin: \Recycler
Restore points for System Restore: \System Volume Information
Furthermore, unless you turn on the Search system folders and Search hidden files andfolders options (located under More advanced options), hidden and system files will beignored in searches. Strangely, these settings are not connected to the settings in the FolderOptions window that affect the visibility of hidden and system files in Explorer (discussed earlierin this chapter).
2.2.8. A Crash Course on File Organization
One of the best ways to improve file searches is to organize your files more efficiently in the firstplace. When you're saving files, Windows takes a few measures to ensure your files are at leastplaced in the My Documents folder, but beyond that, it's up to you.
The "old school" methodology is to place your personal files in folders designated for the applicationsthat created them: all your spreadsheet files in one folder, all your word processor documents inanother, and all photos in yet another. The problem with this is that the context of your files is soeasily lost.
The most efficient way to organize your personal files is to group them by project or topic, ratherthan by the applications that created them. Figure 2-5 shows the tree view of a typical MyDocuments branch organized in this way.
Figure 2-5. An example of how to organize your personal documents intodescriptively named top-level folders

Here are some tips for organizing your files:
Ignore file types
All your files, regardless of the programs that created them, should be organized withoutregard for the file types: your word processor documents, email attachments, database files,photos, drawings, and downloaded Acrobat (.pdf) documents can all sit side by side in thesame folders, separated only by topic.
Just open a folder corresponding to the project on which you wish to work, and double-click adocument to open the appropriate application to edit or view it. See Section 4.3 in Chapter 4for more information on the link between your documents and applications.
The same applies to your Internet Explorer Shortcuts and Netscape Bookmarks. Rather thangrouping all your links in the same place, create Internet Shortcuts in these project folders.Place links to online gardening web sites in the Garden folder, right next to the spreadsheetcontaining an index of all your plants and the email attachments sent by your gardeningfriends. Then, just double-click your Internet Shortcuts to open the corresponding pages inyour default web browser.
Keep it simple

It's best not to introduce too many levels of organization (i.e., folders within folders withinfolders), as these end up just making the data harder to find. For example, I could havegrouped the Furniture, Garden, and Remodel folders and put them in another folder calledHome Improvement, but what would have been the point? This way, all of my categories, so tospeak, are visible right at the top level, and I can find the ones I want without having to huntfor them or open a bunch of intermediate folders.
Keep your Desktop clean
The Desktop is commonly a receptacle for files of all types, but this often leads to a ton ofclutter. Instead of placing your working documents on your Desktop, put them in your projectsfolders right away. Then, to provide quicker access, make Windows Shortcuts to your mostfrequently accessed projects folders; see Section 2.1.4, earlier in this chapter, for instructionson opening an Explorer window rooted in an arbitrary location, like the one shown in Figure 2-5.
A common root pays off down the road
It's a good idea to root all your projects folders in the same place. The My Documents folder isan especially convenient location for this, mostly because many File Open and File Save dialogs open to My Documents by default. Note that you can rename the My Documentsfolder to something a little less cutesy, or you can even change the location of the folder usingTweakUI (see Appendix A). Another advantage to rooting all your projects folders in the sameplace is that it makes it easier to collect all your personal data, both for backups and when itcomes time to upgrade your computer.
When to use My Pictures, My Videos, My eBooks, etc.
Windows XP installs several predefined folders in your My Documents folder, such as MyPictures and My Music, in an attempt to influence you to organize your files by content type,rather than topic or project. This, of course, contradicts the strategy explained here, as well asthe system imposed by some of Microsoft's earlier efforts, such as the My Documents folder.
But why is Microsoft trying to organize your documents for you? Well, there are three reasonsfor the existence of these folders:
First, if you have the common tasks pane enabled (discussed at the beginning of thischapter), certain additional links will appear for different folders. For example, when youopen My Pictures, a special Picture Tasks will appear at the top of the tasks pane, withlinks to such features as View as a slide show and Order prints online.
Next, some folders have different default view settings; for example, the default view inMy Pictures is Thumbnails. This is intended to be convenient but doesn't always end upthat way. See Section 4.3.7 for more information.
Finally, certain applications are designed to look in these folders for the types of files they

typically support. The Windows Movie Maker, for example, opens by default to the MyVideos folder (if it exists).
Naturally, though, it sometimes does make sense to use these folders. For example, any MP3syou've downloaded or ripped from CDs are likely to be all located in the same place anywayand putting them in the My Music folder will afford you these advantages.
Note that you can change the location of any of these system folders using TweakUI (seeAppendix A), either to redirect them to existing folders or to consolidate them into a singlefolder. You can also safely and easily delete any of these folders, allowing you to organize yourdocuments more appropriately. The exception is the My Pictures folder, which, if deleted, willbe automatically re-created the next time Windows starts.
2.2.9. Working with ZIP Files
Phillip Katz conceived of the ZIP file format at his mother's kitchen table in 1986 and soon thereafterwrote a little program called PKZip. Although his program, capable of encapsulating and compressingany number of ordinary files and folders into a single archive file, was not the first of its type, itquickly became a standard and ended up revolutionizing the transfer and storage of computer data.
Although ZIP files have been the de facto standard in file compression for more than fifteen years,Windows XP is the first version of Windows to come with support for ZIP files built into the operatingsystem.
ZIP files work somewhat like folders in that they "contain" files, so its not surprising that they'rerepresented as folders in Explorer. But a ZIP file is typically smaller than the sum of its contents,thanks to the ZIP compression scheme. For example, a folder with ten spreadsheet documents mightconsume 8 MB of disk space, but when zipped might only consume 3 MB (or even less). The level ofcompression varies with the type of data being compressed; zipped text documents can be as smallas 4% or 5% of the size of the original source files, but since movies and images are alreadycompressed, they'll only compress to 95% to 98% of their original size, if that.
This compression makes ZIP files great for shrinking data down before emailing or otherwisetransmitting over an Internet or network connection, since smaller files can be sent more quickly.Furthermore, since a single ZIP file can encapsulate a bunch of separate files, sending ZIPs is thatmuch more convenient.
There are other compression schemes out there, although none have achievedthe popularity of ZIP. In fact, a few years back, a new archive format wasintroduced that claimed much better compression than ZIP: archives made withthis new scheme ended up being roughly one hundredth the size ofcorresponding ZIP files. The only problem was that this was a one-way process;files that were compressed and later extracted unfortunately bore noresemblance to the original source files. Might as well stick with ZIP . . .
To open a ZIP file, just double-click it. You can extract files from ZIP archives by dragging them outof the ZIP folder window. You can also right-click a ZIP file and select Extract All, but you'll have todeal with a more cumbersome wizard interface.

You can create a new ZIP file by right-clicking on an empty portion of the desktop or in any openfolder, and selecting New Compressed (zipped) folder. (The name here is actuallymisleading, since ZIP archives are actually files and not folders.) You can compress new files into ZIParchives by simply dragging them onto the New Compressed (zipped) folder.zip file icon, or into anopen ZIP folder window.
Another way to compress a file, folder, or group of files and folders into a ZIP archive is to selectthem, right-click, select Send To, and then Compressed (zipped) folder. This is especiallyconvenient, as there's no wizard or other interface to get in the way. For example, if you send thefolder CompuGlobalHyperMegaNet to a ZIP file, Windows will compress the folder's contents intoCompuGlobalHyperMegaNet.zip and place the new archive alongside the source folder.
The ZIP archive format has built-in error checking. If you find that certain filetypes become corrupted when emailing or downloading from the web, tryputting them in a ZIP file to "protect" them.
There are some drawbacks to the integration with ZIP files in Windows XP. For example, it caninterfere with searches, as described in Section 2.2.7, earlier in this chapter. It can also interfere withthird-party ZIP utilities, many of which provide more functionality than the rudimentary ZIP supportin Windows XP. For example, the WinZip utility (http://www.winzip.com) adds a bunch of handycommands to your context menus and even to the right-drag menus (discussed in Section 2.2.1,earlier in this chapter). Also, it treats ZIP archives more like files and less like folders, which manyusers may prefer.
If you wish to use another program to work with ZIP files, you should first disable Windows's built-inZIP integration:
Go to Start Run.1.
Type the following at the prompt and click OK when you're done:
regsvr32 /u %windir%\system32\zipfldr.dll
2.
The change will take effect immediately, but you may have to restart Windows for all traces ofthe built-in ZIP support to disappear.
3.
If, at any time, you wish to re-enable Windows XP's built-in ZIP support, just follow these steps:
Go to Start Run.1.
Type the following at the prompt and click OK when you're done:
regsvr32 %windir%\system32\zipfldr.dll
2.
The change will take effect immediately, but you may have to restart Windows for all traces ofthe built-in ZIP support to once again become available.
3.

3.
2.2.10. Clean up Windows Shortcuts
Windows Shortcuts are nothing special; they're just files (with the .lnk extension)[5] that contain"pointers" to the files, folders, programs, or system objects to which they link.
[5] The .lnk extensions for Windows Shortcuts will always be hidden, even if you've configured Windows to display your filename
extensions, as described earlier in this chapter.
Windows gives you four ways of distinguishing shortcuts from other files:
When created, a shortcut's caption begins with the text, "Shortcut to."
The shortcut's icon also has a small curved arrow in the lower-left corner, as shown in the"before" icon in Figure 2-6.
Figure 2-6. Cleaning up Windows shortcuts: before and after
If you're viewing the folder containing the shortcut in Details mode, the Type column will readeither Shortcut, Shortcut to MS-DOS Program, or Internet Shortcut for .lnk, .pif, and .urlshortcut files, respectively. This information is also available in the shortcut's Properties sheet.
Finally, shortcuts are small: typically only a few hundred bytes, regardless of the size of theobjects to which they link.
Naturally, you can rename a single shortcut to get rid of the aforementioned "Shortcut to," butensuring that the text isn't added to newly created shortcuts is a different matter. And there's nosetting anywhere in the Windows interface for removing the little arrow icon. To turn off theseartifacts for good on all shortcuts, use the following instructions.
2.2.10.1 Part 1: Remove the "Shortcut to" prefix
Create a shortcutany shortcut.1.
Rename the shortcut (right-click and select Rename or select and press F2) and manuallyremove the "Shortcut to" portion of the name.
2.
Delete the shortcut when you're done.3.
Repeat these steps eight times in succession. You'll know when the change has been made4.

3.
when the ninth shortcut is created without the "Shortcut to" prefix.4.
Keep in mind that this is a one-way change; there's no way to undo it without using the TweakUIutility, described next.
2.2.10.2 Part 2: More complete control
This next solution uses Microsoft's TweakUI utility for more control over the appearance of WindowsShortcuts.
Open TweakUI (see Appendix A) and expand the Explorer category.1.
The Prefix "Shortcut to" on new shortcuts option appears in the Settings list. If you'veused the previous solution to disable the "Shortcut to" prefix, the option will already be turnedoff. Turn it off or on as desired.
2.
Next, open the Shortcut category (it's under Explorer).3.
To disable or change the curved arrow icon, choose the desired option in the Shortcut overlaysection: Arrow (the default), Light arrow, or None to disable it completely. If you chooseCustom, you can choose any icon, although it should be 16 16 or smaller, or partiallytransparent, so as not to obscure the original icon.
4.
Click OK when you're done. The changes should take effect immediately.5.
Note that if you disable the "Shortcut to" prefix with either of these two solutions, the change will bein effect for newly created shortcuts only; naturally, it won't automatically change the filenames ofexisting shortcuts.

2.3. Customizing the Interface
Microsoft has positioned the Desktop as the root of all other objects in the imaginary hierarchydepicted by Explorer's tree. This includes all drives, the Control Panel, My Network Places, MyDocuments, and in terms of the layout of the interface the Start Menu and all running applications.
The following topics cover some fundamental tasks when dealing with the desktop and other aspectsof the shell, such as making sure your desktop layout remains intact and tweaking the Start Menu.
2.3.1. Dealing with Themes, Schemes, Styles, and Skins
Windows XP has a bunch of ways for you to save and later retrieve your preferences, but theinconsistent way Microsoft uses and names these features can be confusing and irritating. The bestway to deal with schemes, styles, and themes is to understand their scope and learn when to usethem.
2.3.1.1 Part 1: Schemes
A scheme is a saved collection of settings in a single dialog box. For example, you can save yourcurrent mouse pointer selections under a scheme name by going to Control Panel Mouse Pointers. This not only makes it easier to quickly switch between multiple sets of mouse pointers(such as one for when you're wearing your glasses and one for when you're not), but it allows you toquickly undo changes made by Windows and other applications.
Other dialogs that use schemes include Control Panel Power Options Power Schemestab and Control Panel Sounds and Audio Devices Sounds tab. In previous versions ofWindows, you could also save your Display Settings into a scheme, but in Windows XP, thisfunctionality has been replaced with "themes."
2.3.1.2 Part 2: Themes
Themes work similarly to schemes, described above, in that several individual settings can be savedunder a single theme name. The difference is that there's only one place in Windows to save andretrieve themes, and your theme selection affects settings in several dialogs.
Themes can be managed by going to Control Panel Display Themes. To load a theme andreplace your current settings with those found therein, select a theme from the Theme list, and clickApply.
To save your current settings into a new theme (or replace an existing theme), click Save As.Another difference between themes and schemes is that while schemes are saved in the Registry,themes are saved in individual .theme files. By default, new themes are saved in the My Documents

folder, although only themes found in the \Windows\Resources\Themes folder are used to populatethe Theme list, so that's where you really should be placing your custom .theme files.
Settings saved with the current theme include your wallpaper, your custom desktop icons (Desktoptab Customize Desktop), your screen saver, your current style (see below), and colorselections. Themes essentially cover all of the tabs in the Display Properties dialog, except for theSettings tab.
According to the Windows documentation, themes are supposed to alsoencapsulate your mouse pointers, sounds, and Windows Media Player skinsettings. Unfortunately, this simply doesn't work as it's supposed to. When yousave a custom theme, these extra settings are ignored. But when yousubsequently load a theme, the mouse pointers, sounds, and WMP skins are allsimply reverted to their defaults. You'll need to use schemes (as describedearlier) to save your mouse and sound settings and protect them from thethemes feature.
The format of .theme files, should you ever need to edit them, is the same as for standard .ini files,discussed in Section 3.3.7.
2.3.1.3 Part 3: Styles and skins
Styles (sometimes called "skins") are what are responsible for the new, cartoonish interface inWindows XP. They also have the capability to "skin" Windows XP, wherein a new custom look can begiven to all Windows and controls. Rather than a way to save multiple settings, though, the currentstyle is a single setting, found in Control Panel Display Appearance, in the Windowsand buttons drop-down list.
By default in Windows XP, you have a choice between two styles: Windows Classic style andWindows XP style, both of which are pretty self-explanatory.
What isn't obvious is how to customize the new styles feature. Sure, if you select Windows ClassicStyle and then click Advanced, you can choose colors for just about any screen element. However,many of the options in the Advanced Appearance dialog have no effect when used with the WindowsXP style, and, of course, there's no hint to this fact in the interface. About half of the settings in theItem list have meaning with the Windows XP style; for example, if you choose Active Title Bar,you'll be able to change the titlebar thickness (size) but not the color.
The only other choice you have when it comes to style customization is the Color scheme (see thediscussion of schemes, earlier). Regardless of the currently selected style, the Color scheme listcontains several preconfigured color combinations. When used with the Windows Classic Style, youcan select from 22 available color schemes and then customize your choice by clicking Advanced.[6]
But when used with the Windows XP style, your choice is restricted to three measly color schemes,none of which can be customized as much as the Windows Classic Style.
[6] Unlike other dialogs that use schemes, this one doesn't let you save new schemes or delete existing ones, which means the
only way to customize this list is to edit the Registry (discussed in Chapter 3).
Fortunately, all hope is not lost. It is indeed possible to add new styles to Windows XP or even createyour own, but only with a third-party add-on. Probably the best such utility is WindowBlinds

(available at http://www.stardock.com/), which extends the default selection of styles with about adozen new entries and allows you to install any number of freely available skins made by other users(check out http://www.wincustomize.com/). WindowBlinds is not free, but you can try it before youbuy. Figure 2-7 shows an example of a dialog with a custom skin.
Figure 2-7. A third-party program is required to add custom styles(skins) to Windows XP
I've found WindowBlinds and other such utilities to be somewhat buggy. OnceWindows is "skinned" with one of these tools, you may find that applicationsdon't display correctly, and even Windows itself may behave strangely.Typically, the problems aren't that bad, but you may want to play with thesoftware's list of exclusions, so that you can disable skins for applications thatdon't support them.
But many of you will want to create your own styles (skins), and fortunately, there are at least twoways to do it.
2.3.1.4 Solution 1: Create your own styles with WindowBlinds

This solution uses one of the skins that comes with the WindowBlinds program as a template forcreating a new skin. It takes a considerable amount of time to customize a skin, but with a littlepatience and some skill with an image editor, you can give Windows XP a completely uniqueinterface.
Install the WindowBlinds software (discussed previously), but leave it disabled for the timebeing. If it's already running, go to Control Panel Display Appearance and chooseWindows Classic style to ensure that it's not currently loaded.
1.
Open Explorer and navigate to the WindowBlinds program folder (e.g., c:\ProgramFiles\WindowBlinds). In this folder, you'll see several sub-folders, one for each of the exampleskins that come with the program. Choose a skin you'd like to customize, create a duplicate ofthe corresponding folder (see Section 2.2.3, earlier in this chapter, for details), choose adescriptive name for the new folder, and then open it in Explorer.
2.
Each WindowBlinds skin folder has a .uis file that defines the skin. Start by renaming theexisting .uis file so that it matches the folder name. For example, if you're in \ProgramFiles\WindowBlinds\Annoyances, then the skin definition file would be named Annoyances.uis.
3.
Open the Annoyances.uis file (or whatever you've named it) in your favorite text editor (orNotepad). The syntax of this file is the same as for standard .ini files, documented in Section3.3.7.
Most of the fields in the first section, TitlebarSkin, should be self-explanatory. For example,set the SkinName entry to the name you wish to give to the skin you're customizing. Change the
other entries here as needed.
4.
Each screen element (titlebar, title buttons, Start button, etc.) is represented by a single .bmpfile. For example, the file checkbox.bmp contains the images used for standard checkboxcontrols in dialog boxes.
Using your favorite image editor (or MS Paint), open the bitmap you wish to change. Most .bmpfiles here will actually contain several images, each corresponding to a different state of thecontrol. For instance, the aforementioned checkbox.bmp file contains four images, side by side:unchecked with focus, checked with focus, unchecked without focus, and checked without focus.Use the existing .bmp file as a template; naturally, some experimentation will be required.
To make things easier, your custom images should all be the same size as the images they'rereplacing. If, however, you wish to have, say, larger checkboxes than the skin you've used as atemplate, you'll have to make the appropriate change in the .uis file discussed in Step 3 as well.Just search the file for checkbox.bmp (or whatever filename you're changing), and enter newvalues for the TopHeight, BottomHeight, LeftWidth, and RightWidth entries.
5.
When you're at a good stopping place, test your new skin. Enable WindowBlinds by going toControl Panel Display Appearance tab and selecting your newly created skin. Notethat new skins may have to be added using the main WindowBlinds window.
Continue to edit the files that comprise the skin until you achieve the desired results. Createbackups as you work.
6.

2.3.1.5 Solution 2: Poor-man's custom styles
This next solution also requires third-party add-on programs but utilizes only freely available utilities.It would have been nice if Microsoft provided some way to customize the styles (skins) in Windows XPthat didn't require users to purchase additional products, but until they get around to adding thefunctionality to Windows, the following will allow you to customize a skin without spending anymoney.
Another program that allows you to add additional styles to Windows XP is StyleXP (available athttp://www.tgtsoft.com/). Like WindowBlinds, StyleXP is not free, but TGTSoft does make afree "preview" version of the software available. Download and install one of the previewsavailable on their web site.
1.
Open Explorer, and create a new working folder in which to save the files associated with yournew custom skin. Place the folder somewhere convenient, such as on your Desktop or in yourMy Documents folder.
2.
Then, navigate to the \Windows\Resources\Themes folder in Explorer. There should be at leasttwo subfolders here: Luna, corresponding to the default "Windows XP style," and styleXP_1,corresponding to the newly installed StyleXP preview. Open the styleXP_1 folder. (Note that thefolder name may be different for the preview you've downloaded.)
In the styleXP_1 folder, you'll find a single file, stylexp_1.msstyles. Place a copy of this file inthe working folder you created in the previous step.
3.
Download and install the free Resource Hacker utility (available athttp://www.users.on.net/johnson/resourcehacker/). Resource Hacker allows you to modify thebitmaps embedded in certain types of files, including .exe and .dll files, as well as thestylexp_1.msstyles file that concerns us here.
Start Resource Hacker, and drag-drop the newly created copy of stylexp_1.msstyles onto theResource Hacker window to open it (or use File Open).
4.
Highlight the Bitmap branch in the left pane and, if you like, expand the branch to see theentries contained therein.
5.
Select Save [Bitmap] resources from the Action menu and then specify a new filename inthe folder you created above. In addition to the filename you specify, all of the bitmaps in thestylexp_1.msstyles file will be saved into individual .bmp files. The new .bmp files will havegeneric filenames (such as Bitmap_1.bmp), but the .rc file you save contains a "map" that linkseach file with its proper location in the Resource Hacker, and will be used later.
6.
Edit the newly created .bmp files using your favorite image editor (or MS Paint). See theprevious solution in this section for more information on the format of these files.
7.
When you've modified all the bitmaps, return to Resource Hacker, and select Replace Bitmapfrom the Action menu. Select the first entry in the Select bitmap to replace list, click Openfile with the new bitmap, and select the Bitmap_1.bmp file. Finally, click Replace to updatethe library with the new .bmp file.
Repeat this step for each of the bitmaps you've modified. They're in order, so it should go fairly
8.

quickly: Bitmap_2.bmp corresponds to the second entry in the list, Bitmap_3.bmp correspondsto the third, and so-on. If you get confused, open the .rc file you created in Step 6 using yourfavorite text editor (or Notepad) and look up the filename associated with the names of thebitmap entries in the Resource Hacker.
When you're done, close the Replace bitmap dialog and then go to File Save to save yourchanges.
9.
The next step is to replace the existing stylexp_1.msstyles file (located in the\Windows\Resources\Themes\styleXP_1 folder discussed at the beginning of this procedure)with the modified version. Note that if the style you're modifying is active, you'll have to select adifferent style before you can replace the file.
10.
Finally, go to Control Panel Display Appearance tab and select your newly modifiedstyle from the list to see the new changes.
11.
2.3.1.6 Special case: When an application ignores your selected style
The style you choose in Control Panel Display Appearance tab affects not only thetitlebars of your applications, but also the push buttons, menus, toolbars, drop-down lists, and otherscreen elements. Some older applications, however, may not utilize the style you've chosen to itsfullest extent.
To force a single application to update all of its push buttons, menus, etc., follow this procedure:
Start by typing the following into a plain text editor, such as Notepad:
<?xml version="1.0" encoding="UTF-8" standalone="yes"?><assembly xmlns="urn:schemas-microsoft-com:asm.v1" manifestVersion="1.0"><assemblyIdentity version="1.0.0.0" processorArchitecture=
"X86" name="COMPANYNAME.PRODUCTNAME.PROGRAMNAME" type="win32"/><description>
MY DESCRIPTION</description><dependency><dependentAssembly><assemblyIdentity type="win32" name="Microsoft.Windows.Common-Controls" version="6.0.0.0"processorArchitecture="X86" publicKeyToken="6595b64144ccf1df" language="*" /></dependentAssembly></dependency></assembly>
Note that the bits of text appearing in ALL CAPS can be customized, although the rest mustappear exactly as shown. If you don't feel like typing all this yourself, you can simply downloadit from http://www.annoyances.org/downloads/manifest.txt
1.
The name into which this text is to be saved is based on the main application executable (.exefile) of the program you wish to update, followed by .manifest.
For example, if you're trying to update Adobe Photoshop, and it has been installed inc:\Program Files\Adobe\Photoshop, then the application-executable filename would bec:\Program Files\Adobe\Photoshop\Photoshp.exe
2.

In this case, the filename you'd type would be photoshp.exe.manifest, and you'd place it in
the c:\Program Files\Adobe\Photoshop\ folder.
The next time you start the application, all of its screen elements should now utilize the selectedstyle.
3.
Note that not all programs can be forced to use styles in this way, and of those that support it, not allwill do it properly.
2.3.2. Make the Control Panel More Accessible
The settings accessible from the Control Panel affect all parts of the Windows interface, everythingfrom your fonts and screen colors to your computer's network IP address and the refresh rate of yourmonitor. You may find yourself repeatedly returning to some Control Panel dialogs, while neveropening others.
The Control Panel is a system folder, which means that it looks and behaves like a normal folder, butit doesn't actually exist as a folder on your hard drive, nor does it contain any files. That's why youcan't easily add to, rename, or delete any of the Control Panel's contents.
Each icon in your Control Panel is really just a separate program or folder on your system, whichmeans the Control Panel itself is nothing more than a glorified menu. Look through the solutions inthis section for ways to exploit the Control Panel's flexibility.
See Appendix A for an alphabetical index of settings, many of which can be found in the ControlPanel.
2.3.2.1 Part 1: Categories
A new addition in Windows XP is the way Control Panel icons, by default, are organized intocategories. On the surface, it appears as though categories make Control Panel easier, but all theyend up doing is adding an extra, unnecessary step to any task involving the Control Panel. Instead ofsimply opening the icon for the setting you wish to change, you now have to hunt for the icon bytrying to guess how it has been categorized. And some icons don't even have categories, whichmeans you'll need to know the "back-door" method for getting to those items (discussed below).
Probably the most confusing aspect of this new design is that categories are only used under certaincircumstances. In other words, depending on how you access the Control Panel, you may or may nothave to make a category selection. For example, if you open the Control Panel in a single-folderwindow (the default when launched from the Start Menu), you'll only see the category view. But ifyou view the Control Panel folder in Explorer (with the folder-tree pane) or if you've configuredControl Panel to display as a menu in the Start Menu (see Part 3), there will be no sign of categories.
To turn off categories in Control Panel and make its interface more consistent, you'll need to have thetask pane visible: go to Control Panel Folder Options General tab, and select Showcommon tasks in folders. Then, open the Control Panel in a single-folder window and click Switchto Classic View at the top of the task pane. You can then turn off the task pane or leave it enabledas desired.

For the sake of simplicity, the category selection is simply omitted in the solutions in this book. Forexample, if a solution instructs you to open Control Panel System, and you have categoriesenabled, you'll need to open the Performance and Maintenance category before opening System.For the locations of each of the Control Panel icons in the category interface, see Table 2-3, later inthis topic.
2.3.2.2 Part 2: Make shortcuts to Control Panel icons
Creating a shortcut to an individual Control Panel icon is an easy way to provide quick access tocommonly used settings. This solution is really easy to do, but it's fairly limited. Part 3 offers moreflexibility, at the expense of some simplicty.
Open any view of the Control Panel.1.
Drag any item onto your desktop or into an open folder window.2.
Windows will complain that it can't copy or move the item; confirm that you'll settle for ashortcut.
3.
Double-click on the shortcut to quickly access the specific Control Panel icon.4.
2.3.2.3 Part 3: Search tips
Many Control Panel applets have multiple tabs, each with its own collection of settings and sub-dialogboxes. Anything you can do to decrease the steps in a repetitive task can be helpful. Here's how tomake a shortcut to a particular tab of a particular dialog box:
Right-click in an empty area of your desktop or an open folder window, select New, then selectShortcut.
1.
In the field labeled Type the location of the item (they're really looking for the full path andfilename of the item, not just the location), type:
control.exe sysdm.cpl ,3
This command has three parts. The first, control.exe, is the executable that opens the ControlPanel (the .exe extension is optional). The second, sysdm.cpl, is the Control Panel module
you'd like to open, as listed in Table 2-3; omit the module name to open the standard ControlPanel folder. Finally the number is the tab you'd like to switch to, where 0 is the first, 1 is the
second, and so on note the space before the required comma. The command in this exampleopens the fourth tab of the System dialog box, Advanced.
2.
Click Next, type whatever you like for the name of this shortcut, and click Finish when you'redone. To make any changes or to choose an icon for the shortcut, right-click on the shortcutand select Properties.
3.

3.
Table 2-3 shows all the standard Control Panel icons, the categories in which they're located, and theassociated command-line equivalents.
Table 2-3. How to find each of the standard Control Panel icons usingCategories or the Command Prompt
Applet name Category Command line
Accessibility Options Accessibility Options control access.cpl
Add Hardware n/a - see Notes control hdwwiz.cpl
Add or RemovePrograms
Add or Remove Programs control appwiz.cpl
Administrative Tools Performance and Maintenance control admintools
Date and TimeDate, Time, Language, andRegional Options
control timedate.cpl
or
control date/time
Display Appearance and Themes
control desk.cpl
or
control desktop
or
control color (opens the Appearance
tab automatically)
Folder Options Appearance and Themes control folders
Fontsn/a - just open \Windows\Fontsin Explorer
control fonts
Game Controllers Printers and Other Hardware control joy.cpl
Internet OptionsNetwork and InternetConnections
control inetcpl.cpl
Keyboard Printers and Other Hardware
control main.cpl Keyboard
or
control keyboard

Applet name Category Command line
Mouse Printers and Other Hardware
control main.cpl
or
control mouse
Network ConnectionsNetwork and InternetConnections
control ncpa.cpl
or
control netconnections
Phone and ModemOptions
Printers and Other Hardware
control telephon.cpl
or
control telephony
Power Options Performance and Maintenance control powercfg.cpl
Printers and Faxes Printers and Other Hardware control printers
Regional and LanguageOptions
Date, Time, Language, andRegional Options
control intl.cpl
or
control international
Scanners and Cameras Printers and Other Hardware n/a
Scheduled Tasks Performance and Maintenance
control sticpl.cpl
or
control schedtasks
Sounds and AudioDevices
Sounds, Speech, and AudioDevices
control mmsys.cpl
SpeechSounds, Speech, and AudioDevices
control speech
System Performance and Maintenance control sysdm.cpl
Taskbar and Start Menu Appearance and Themes n/a
User Accounts User Accounts
control nusrmgr.cpl
or
control userpasswords
2.3.2.4 Solution 4: Remove unwanted Control Panel icons

To remove almost any icon from the Control Panel, follow these steps:
Open TweakUI (see Appendix A) in Control Panel, and choose the Control Panel category.1.
Uncheck any entries you'd prefer weren't displayed in the Control Panel. Since TweakUI'sdescriptions aren't very good, you may want to look up any questionable items in Table 2-3.Unfortunately, only those entries that have .cpl files can be hidden here, which means you'restuck with such items as Fonts and Scheduled Tasks, whether you want them or not.
2.
Click OK when you're done. Your changes will take effect immediately in the Control Panelfolder, but you may need to log out and log back in to see the change in the Control Panel menuin the Start Menu.
3.
2.3.2.5 Part 5: Add a cascading Control Panel menu to the Start Menu
The following simple solution allows you to turn your Control Panel into a menu in your Start Menu,providing quicker access to Control Panel icons.
Go to Control Panel Taskbar and Start Menu, and choose the Start Menu tab.1.
Click the currently enabled Customize button.2.
If you're using the new Windows XP-style Start Menu (Start menu in the last dialog), choosethe Advanced tab, and then select Display as a menu under the Control Panel entry.
If you're using the Classic Start menu, turn on the Expand Control Panel option in theAdvanced Start menu options list.
3.
Either way, click OK when you're done.4.
Now, instead of a single menu item in the Start Menu, all the Control Panel icons will be listedindividually. To open the separate Control Panel folder window from this interface, simply right-clickControl Panel and select Open. The same goes for its submenus, such as Fonts, NetworkConnections, and Scheduled Tasks.
Another way to get a Control Panel menu in your Start Menu is to make a new Start Menu foldercalled Control Panel, and then create shortcuts to some or all Control Panel icons in the new folder,as described in the previous solutions in this section. This also affords you the opportunity to addadditional icons for items that should have been included in the Start Menu, such as Device Manager(devmgmt.msc), Disk Manager (diskmgmt.msc), and the Volume Control (sndvol32.exe).
2.3.3. Massaging the Start Menu
It's unfortunate that, by default, so many of Windows XP's functions and components are accessibleonly through the Start Menu, because strictly speaking, it's not a very good interface. Now, I neverliked the Start Menu found in earlier versions of Windows, now referred to as the "Classic" Start

Menu, but I'm starting to miss it. The new Windows XP version is just a mess.
Figure 2-8 and Figure 2-10 show the two different Start Menus supported by Windows XP.
Figure 2-8. As though we didn't have enough clutter on our desktops, thenew Windows XP Start Menu is a mess of icons and menus
You can choose between the two by going to Control Panel Taskbar and Start Menu Start Menu tab. Note that this option has no effect on the appearance of the Start button ortaskbar; to change these, you'll need to go to Control Panel Display Appearance tab, asexplained in Section 2.3.1, earlier in this chapter.
2.3.3.1 Customizing the new XP-style Start Menu
While the Classic Start Menu is a simple, single-column list, the new Start Menu is an overblownhodgepodge of icons and buttons that, like the rest of Windows XP, tries too hard to be friendly.
Despite the new problems it introduces, it fortunately fixes several problems with the Classic StartMenu. For example, by placing more items in the main menu, Microsoft has reduced the need todelve into the awkward cascading All Programs menus. Also, the Control Panel has its own menu,

rather than being buried in the Settings menu. Finally, dissimilar items such as Shut Down andControl Panel are physically separated and more easily distinguishable, which helps preventaccidentally clicking the wrong item.
The contents of the new XP-style Start Menu are divided into seven sections:
Across the top is a huge banner simply containing the name of the currently logged-in user. Thiscannot be turned off or customized, except for the name and (optional) picture specified in theUser Accounts window, described in Chapter 8.
The Log Off and Shut Down commands are found along the bottom. Instead of Shut Down,you may see Turn off Computer here instead, depending on your user account settings, of allthings (see Chapter 8). Or you may see Disconnect if you're using the Remote Desktop featurediscussed in Chapter 7.
On your left, above the horizontal line, are permanently installed shortcuts to programs. Youcan add new entries here by right-clicking any program executable (.exe file) or any Shortcut toa program and selecting Pin to Start menu. Such programs can be subsequently removed byright-clicking and selecting Unpin from Start menu.
Although you can place shortcuts to programs here, you can't pin folders to your Start Menu,which means that the only way to organize your programs in folders is to bury them in the AllPrograms menu.
By default, you'll see two special icons in this section that aren't pinned or unpinned like othershortcuts: Internet Explorer and Outlook Express. These items can be changed by going toControl Panel Taskbar and Start Menu Start Menu tab Customize General tab Show on Start menu section, and changing the Internet and E-mailoptions.
Below the permanent program shortcuts on the left side is a dynamic list of recently usedprograms. The problem with this list is that it is always changing never a good sign of a well-thought-out interface. You can control how many programs are shown here in the Programssection of the Customize Start Menu dialog. Set this option to zero (0) to hide the list
completely.
At the very bottom of the left column is a single entry, All Programs, which has the distinctionof being the only menu item here that can't easily be removed from the Start Menu (for goodreason). The contents of this menu mirror the \Documents and Settings\{username}\StartMenu\Programs folder, and can be easily customized by dragging and dropping, either in themenu itself or in Explorer. To quickly open the Start Menu folder in Explorer, right-click any ofthe folders in the All Programs menu and select Explore.
The All Programs menu is the counterpart to the Programs menu found in the Classic StartMenu. In the Classic Start Menu, described in the next section, any shortcuts placed directly inthe Start Menu folder (as opposed to the Programs folder) are shown at the top of the StartMenu itself. In the new XP-style Start Menu, any such shortcuts are placed at the top of the AllPrograms menu instead, separated from the rest of the menu's contents by a horizontal bar.
To remove the All Programs item from the Start Menu, open the Group Policy editor(gpedit.msc) and expand the branches to User Configuration\AdministrativeTemplates\Start Menu and Taskbar. Double click Remove All Programs list from the

Start menu, select Enabled, and click OK. You'll have to log out and then log back in for thischange to take effect.
At the top of the right column are all of the Start Menu elements that begin with "My," which, Isuppose, is Microsoft's way of being cute. These items don't necesssarily belong together, andall can be selectively removed in the Advanced tab of the Customize Start Menu dialog. SeeChapter 4 for more information on the My Recent Documents menu and the My Computericon on the Desktop. See Chapter 7 for more information on My Network Places.
Finally, the standard Windows features are shown in the lower-right, such as Run, Search, andControl Panel. Although every one of these items can be turned off (a welcome change fromthe Classic Start Menu), resulting in a completely empty righthand column (as shown in Figure2-9), there's no way to remove the second column from the Start Menu.
Figure 2-9. After cleaning out all optional items from the Start Menu, agreat deal of empty space remains
Regardless of the Start Menu style you prefer, spending a little time clearing out the junk you don'tuse will result in a simpler, cleaner interface. Figure 2-9 shows an extreme example of this; you'llprobably want to either keep a few of the more useful items here, such as Run, Search, andControl Panel, or revert to the Classic Start Menu.
2.3.3.2 Customizing the Classic Start Menu
The Classic Start Menu style is not quite as flexible as the new XP-style Start Menu in terms of theitems that can be removed, but it's much more flexible in the custom items that can be added. TheClassic Start Menu also has the advantage of greater simplicity and a smaller footprint, both good forthe minimalists among us. Figure 2-10 shows a somewhat slimmed-down Classic Start Menu.

Figure 2-10. The Classic Start Menu is simpler and cleaner than the newXP-style Start Menu but relies more heavily on overly jumpy cascading
menus
The Classic Start Menu is divided into only three sections:
The lower part contains the seemingly "hard-coded" portions of the menu, corresponding tosuch features as Search, Settings, and Run. If you go to Control Panel Taskbar andStart Menu Start Menu tab Customize, you'll be able to turn off the Favorites, LogOff, and Run entries.
To remove the Documents menu, see Section 4.2.1. Some additional entries, such as Searchand some of the items in the Settings menu, can be turned off by opening the Group Policyeditor (gpedit.msc) and expanding the branches to User Configuration\AdministrativeTemplates\Start Menu and Taskbar. The naming of the options here (in the right pane) is
typically self-explanatory. To enable any of these options, double-click, select Enable, and thenclick OK. Depending on the option, you may have to log out and then log back in for the changeto take effect.
Above the so-called "hard-coded" entries is a single entry, Programs, which is the "classic"counterpart to the All Programs menu in the new XP-style Start Menu. The contents of thismenu mirror the \Documents and Settings\{username}\Start Menu\Programs folder and can beeasily customized by dragging and dropping, either in the menu itself or in Explorer. To quicklyopen the Start Menu folder in Explorer, right-click Programs and select Explore.
Finally, the space above the horizontal bar is a fully customizable free-for-all, which can bethought of as the saving grace of the Classic Start Menu. In the example shown in Figure 2-10,there's a single shortcut to Explorer here, but you can place any type of shortcut here, and eveninclude folders for further organization. This portion of the Start Menu mirrors the \Documentsand Settings\{username}\Start Menu folder, with the exception of the Programs folder,discussed earlier.
This compares to the top-left portion of the new XP-style Start Menu, discussed in the previoussection, which can only accept programs (no folders or other file types are allowed there).
Unlike the new XP-style Start Menu, you can drag icons from the Desktop or an open folder windowand drop them on any part of the Classic Start Menu above the horizontal line, or anywhere in the

Programs menu.
The Curse of Personalized Menus
One of the biggest flaws in the Classic Start Menu is a feature called Personalized Menus,which is turned on by default. This remarkably awful feature made its debut in MicrosoftOffice 2000 and, unfortunately, found its way into Windows 2000 and Me, and yes,Windows XP. It's a design by which certain Start Menu entries indiscriminately andsuddenly disappear, based on how recently those options have been used.
It's best to turn off this feature, and then manually and intentionally hide only thoseitems which you know you never use. Go to Control Panel Taskbar and StartMenu Start Menu tab Customize, and turn off the Use Personalized Menusoption.
Note that this option isn't available if you're using the new XP-style Start Menu. Insteadof the Personalized Menus fiasco, there is a slightly more acceptable feature that changesonly specific and well-defined regions of the Start Menu to reflect the most recently usedentries. See "Customizing the new XP-style Start Menu," earlier in this topic, for details.
2.3.3.3 Sorting Start Menu items
One thing you can do to streamline your Start Menu, regardless of the style you've chosen, is torearrange items in the Start Menu, eliminating all the unnecessary levels and superfluous shortcuts.For example, instead of the Photoshop shortcut appearing in Start Programs Adobe Photoshop (four levels deep), you can simply move the shortcut so it appears in the Programsmenu. This isn't a great solution, but it's a good place to start.
A consequence of being able to drag-drop Start Menu items in place is that new items are added tothe ends of menus, rather than sorted alphabetically with the existing entries. To manually resort anysingle menu in the Start Menu, right-click on any menu item, and select Sort by Name. To sort allyour Start Menu folders in one step, you'll need to write a script. (See Section 9.4 for details.)
2.3.3.4 Dealing with overflow: scrolling vs. multiple columns
When there are too many items in a Programs folder to fit on the screen, one of two things canhappen. The default is to "scroll" the menu, forcing you to click the arrow at the bottom of the menuto see more items. The alternative is to display the overflow in multiple columns, which can be a veryclumsy interface. Neither choice is a perfect solution, but everyone has a preference.
If you prefer multiple columns to scrolling, go to Control Panel Taskbar and Start Menu Start Menu tab Customize. If you're using the Classic Start Menu, turn off the ScrollPrograms option in the Advanced Start menu options list; if you're using the new XP-style StartMenu, choose the Advanced tab and turn off the Scroll Programs option in the Start menu itemslist.

2.3.3.5 Alternatives to the Start Menu
The best thing about the Start Menu is that you don't have to use it. You can start programs byopening associated documents, double-clicking shortcuts on the desktop, or any number of othermeans:
Although the desktop is certainly not a great place to store a shortcut to every program on yourcomputer, it's a great location for the most frequently used programs, and certainly better thanburying them under several layers of menus. If you only use your computer for a handful ofapplications, you can move their shortcuts onto the Desktop by dragging (hold the Ctrl key tocopy) and forget about the Start Menu entirely.
As a partial fix for the inaccessibility of items in the Start Menu, Windows has configurable,dockable toolbars. Like the All Programs and Programs menus in the Start Menu, thesetoolbars just reflect the contents of one or more folders on your hard disk. By placing icons foryour most frequently used applications, folders, and documents in these tiny toolbars, you canmake it easier and quicker to open the tasks you need. You can drag toolbars anywhere on thescreen, docking them to the taskbar or any other edge of your desktop.
To display one of the preconfigured toolbars, right-click on an empty area of the taskbar, selectToolbars, and choose the one you want. In addition to the Address and Links toolbars,similar to those found in Internet Explorer, there's the Desktop toolbar that mirrors thecontents of your desktop (good for when the desktop is covered by other windows) and thecustomizable Quick Launch[7] toolbar. Select New Toolbar to make a new, blank toolbar.
[7] The folder containing the Quick Launch shortcuts is \Documents and Settings\{username}\Application
Data\Microsoft\Internet Explorer\Quick Launch. However, when you create a new toolbar, the folder can be located
anywhereodds are you want to put it somewhere more convenient.
The problem with these toolbars is that they're rather inflexible and, by default, are extremelysmall. And although they may be convenient for three or four items, they become clumsier withmore icons.
If you find that you can't drag toolbars on or off the taskbar, your taskbarmay be locked. Right-click an empty area of the taskbar, and turn off theLock the taskbar option to allow dragging and resizing of the taskbartoolbars.
Keyboard shortcuts are a convenient way to supplement whatever scheme you decide to use.Just right-click on any shortcut file, Start Menu entry, or taskbar toolbar icon, and selectProperties. Click in the Shortcut key field, and press the desired keystroke combination. Forexample, you can set up Ctrl-Shift-E to open an Explorer window.
There's nothing stopping you from using another program to augment or replace the StartMenu. In fact, I urge you to explore alternatives to all of the components Microsoft puts in thebox, including Notepad, Outlook Express, and Internet Explorer. Seehttp://www.annoyances.org for a few suggestions.

For example, Route 1 Pro (available at http://www.creativelement.com/route1pro/) implementsone or more simple rows of buttons providing quick access to all your programs and files. It'squite a bit slicker and more flexible than either the Start Menu or the taskbar toolbarsmentioned earlier.
2.3.4. Refresh the Desktop Without Restarting Windows
When Windows starts, it loads the Explorer application, which provides several services, including thedesktop and the Start Menu. While it's loading, Explorer reads its settings from the Registry (seeChapter 3). If you make a change to the Registry, such as when following one of the procedures inthis book, it might not take effect until you reload Explorer, which usually means restarting Windows.
However, restarting Windows can take several minutes and will mean shutting down all runningapplications, which can be a real pain. In many cases, you can put your changes into effect withoutrestarting Windows, as explained in the following solutions. Whether any of these solutions workdepends on the type of setting you've changed.
2.3.4.1 Solution 1
This, the simplest of the solutions in this topic, can be useful to force Explorer to update the contentsof the Desktop with any changes, such as newly added or deleted icons:
Click on any empty area of your Desktop or select any Desktop icon.1.
Press the F5 key.
F5 can be used to refresh the display of most other windows, such asfolders in Explorer, Registry keys in the Registry Editor, and even webpages in Internet Explorer.
2.
2.3.4.2 Solution 2
In cases where Solution 1 is not sufficient to implement your changes, you can force Explorer toreload without restarting:
Open the Windows Task Manager by right-clicking an empty area of your taskbar and selectingTask Manager.
1.
Choose the Processes tab.2.
Select explorer.exe from the list, and click End Process.3.

2.
If you see more than one instance of explorer.exe, it means that one or more Explorer orsingle-folder windows are open and you've enabled the Launch folder windows in aseparate process option described in Section 2.1.1, earlier in this chapter. The one with thelargest value in the Mem Usage column is the one responsible for the Start Menu and Desktop.If you're still not sure, close the extra Explorer windows and then return to the Task Managerwindow.
3.
Your Desktop and Taskbar will disappear and then reappear after a few seconds. This meansthat Explorer has been shut down and that Windows has automatically loaded it back intomemory.
If the desktop doesn't reappear, you'll have to relaunch Explorer as explained in the WhatHappens When Explorer Crashes sidebar in the beginning of this chapter.
4.
2.3.4.3 Solution 3
In cases where Solution 2 is not sufficient to implement your changes, the following solution will notonly reload Explorer, but reinitialize all your user settings for all applications. Unfortunately, it willcause all your running applications to close, but it still doesn't take nearly as long as restarting yourcomputer:
Open your Start Menu, and click Log Off. If you see a warning message, confirm that youindeed wish to log off by answering Yes.
If the Log Off option doesn't appear in your Start Menu, go to Control Panel Taskbarand Start Menu Start Menu tab Customize and turn on the Display Logoff option.
1.
Depending on your user account settings, explained in Chapter 8, one of several different "logon" boxes will appear. Just log on as you normally would at this point.
2.
Typically, the only time when none of these solutions will work is when you've installed a newhardware driver or application that must restart in order to replace one or more in-use files. SeeSection 2.2.6, earlier in this chapter, for details.
2.3.5. Customize the Windows Startup Logo
The pompous Microsoft Windows XP logo that appears for the 30 seconds or so it takes to boot yourcomputer can be replaced with any image you choose; it just takes a little hacking.
In some previous versions of Windows, the logo was stored in an ordinary .bmp file, but in WindowsXP, that bitmap is embedded in a system file. The following procedure shows how to extract thebitmap, modify it, and then reinsert it so it will appear the next time you start up. On the surface, it'sa rather long process, but it's actually simpler than it looks.
Open Explorer, and navigate to your \Windows\System32 folder.1.
2.

1.
Place a copy of the file, ntoskrnl.exe somewhere convenient, such as on your Desktop or in yourMy Documents folder. Then, make another copy of the file, to be used as a backup in casesomething goes wrong.
2.
Download and install the free Resource Hacker utility (available athttp://www.annoyances.org/). Resource Hacker allows you to modify the bitmaps embedded incertain types of files, including .exe and .dll files.
Start Resource Hacker, and drag-drop the newly created copy of ntoskrnl.exe onto the ResourceHacker window to open it (or use File Open).
3.
Expand the branches to Bitmap\1\1033 (click the plus sign next to Bitmap, then 1, then
1033), and then highlight the 1033 entry. In the right pane, you'll see a large black rectangle;although it doesn't look like it yet, this is the startup logo.
4.
Select Save [Bitmap : 1 : 1033] from the Action menu, and then specify a filename for thelogo file, such as Startup Logo.bmp.
5.
Next, you'll need an image editor that has good control over palettes, such as Adobe Photoshop(http://www.adobe.com) or Paint Shop Pro (available at http://www.jasc.com). This was testedwith Photoshop 7.0 and Paint Shop Pro 7.0, but any modern version of either program shouldwork the same. MS Paint, the rudimentary image editor included with Windows XP, isinsufficient for this task.
The subsequent steps assume you're using Paint Shop Pro, since you can download anevaluation copy for free from the Jasc web site. I'm also including instructions for Photoshop forthe graphics nuts among us. If you're using a different image editor, you'll have to adjust thenext few steps for the specific features available in your software.
6.
Open the newly saved Startup Logo.bmp file in your image editor. The image will appear allblack at first; this is normal.
7.
In Paint Shop Pro, select Save Palette from the Colors menu, and save the current colorpalette as Black.pal.
Or, in Photoshop, go to Image Mode Color Table, and click Save. Save the paletteinto Black.act.
Either way, you'll need this later to revert the image when you're done editing.
8.
In Paint Shop Pro, select Edit Palette from the Colors menu.
Or, in Photoshop, go to Image Mode Color Table.
You'll need to change the colors in the palette so that you can distinguish one color fromanother. The first two entries will remain black. Double-click the third entry (Palette Index 2),and change the Red, Green, and Blue values to 32, 26, and 21, respectively. Repeat this step
for the other thirteen colors in this image, using the values in Table 2-4.
Table 2-4. Required color palette entries in order to view andedit the Windows XP startup logo
9.

Palette Index Red Green Blue
0 0 0 0
1 0 0 0
2 32 26 21
3 45 62 210
4 83 101 1
5 178 53 5
6 70 70 70
7 137 146 0
8 74 127 252
9 247 107 32
10 141 166 255
11 142 220 4
12 243 188 27
13 188 188 188
14 255 255 255
15 255 255 255
If you prefer, you can download the required palette file instead of entering it by hand:
Paint Shop Pro
Download the palette file from http://www.annoyances.org/download/startuplogo.pal,then select Load Palette from Paint Shop Pro's Colors menu. Choose the startuplogo.palfile you just downloaded, make sure that the Maintain indexes option is selected below,and click Open.
Photoshop
Download the palette file from http://www.annoyances.org/download/startuplogo.act. InPhotoshop, go to Image Mode Color Table, and click Load. Choose thestartuplogo.act file you just downloaded and click Load.
If you're using an image editor other than Paint Shop Pro or Photoshop, you'll have to hand-enter the palette as described earlier.
10.

Either way you do it, when you're done updating the palette, the Startup logo will be fullyvisible. If you hand-entered the palette in the previous step, take this opportunity to save thepalette for later use:
In Paint Shop Pro, go to Colors Save Palette.
Or, in Photoshop, go to Image Mode Color Table, and click Save.
10.
Modify the image to your heart's content. Note that since this is only a 16-color image, youwon't be able to get nice photographic tones or even gradients, but your logos should appearnice and crisp!
Make sure not to alter the palette of the image. Also, make sure to accommodate the revolvingblue stripe (which incidentally is another bitmap in the ntoskrnl.exe file). Figure 2-11 shows anexample of a customized startup logo.
Figure 2-11. Have a little fun with the Windows startup logo
11.
When you're done editing, you need to revert the color palette back to the all-black palette wesaved at the beginning of this procedure (Black.pal):
In Paint Shop Pro, select Load Palette from the Colors menu. Choose the Black.pal file, makesure that the Maintain indexes option is selected below, and click Open.
In Photoshop, go to Image Mode Color Table, and click Load. Choose the Black.actfile and click Load.
12.
If you haven't done so already, save your work. Then, return to Resource Hacker, and selectReplace Bitmap from the Action menu. Select the first entry in the Select bitmap toreplace list (1), click Open file with the new bitmap, and select the Startup Logo.bmp file
you modified. Finally, click Replace to update the library with the new image.
13.
14.

Close the Replace bitmap dialog, and then go to File Save to save your changes.
If you are wise, you will take this opportunity to make sure you have asafe backup of the original ntoskrnl.exe before you replace it. That way, ifthe modified version is corrupted in any way, you'll be able to repair yoursystem without having to reinstall.
14.
The last step is to replace the in-use version of ntoskrnl.exe with the one you've just modified.You should be able to just drag the modified version right into your \Windows\System32 folder,replacing the one that's there.
If Windows complains that the file is in use and can't be replaced, you'll have to follow the stepsoutlined in Section 2.2.6, earlier in this chapter.
15.
The new logo should appear the next time you start Windows. If, for some reason, the logodoesn't appear or Windows won't start, the problem is most likely caused by a corruptntoskrnl.exe file. This can be repaired by using the instructions in the previous step to replacethe modified version with the original version you backed up you did back it up, didn't you?
16.
See Section 8.3.2 for a related solution.

Chapter 3. The RegistryEvery time you change a setting in Control Panel, add hardware to your system, install anapplication, or even rearrange icons on your desktop, Windows stores the corresponding data in yourRegistry. The Registry is a database containing all the settings for Windows XP, as well as theapplications installed on your system. Knowing how to use the Registry effectively is important forimproving performance in Windows, troubleshooting all kinds of problems, and, most importantly,customizing Windows XP beyond what is possible with the dialog boxes scattered throughout theinterface.
All of your file types (also known as associations; see Section 4.3) are stored in the Registry, as wellas all of the network, hardware, and software settings for Windows XP, and all of the particularconfiguration options for most of the software you've installed. The particular settings and datastored by each of your applications and by the various Windows components vary substantially, butyou can use some special techniques to figure out undocumented settings and uncover hiddenfunctionality, regardless of how the data is stored. What's especially helpful is that most of thesettings stored in the Registry are named in plain English rather than with obscure codes andacronyms. You shouldn't take this fact for granted, as it does help quite a bit in finding settings andtroubleshooting problems.
Word to the wise: you can irreversibly disable certain components of Windows XPor even preventWindows from runningby changing certain settings in the Registry. Now, the vast majority of settingsin the Registry are mostly harmless, but nonetheless, I strongly recommend taking the steps outlinedin this chapter to prevent making irreversible changes, such as taking advantage of Registry patchesto back up portions of the Registry before you edit a single value. Furthermore, backing up yourentire system will ensure that none of your valuable data or programs are compromised and willundoubtedly save you hours of hassle in the event of a stupid mistake. Believe me, I've been there.

3.1. The Registry Editor
Although the Registry is stored in multiple files on your hard disk, it is represented by a single logicalhierarchical structure, similar to the folders on your hard disk. The Registry Editor (Regedit.exe) isincluded with Windows XP to enable you to view and manually edit the contents of the Registry.
Don't confuse the Registry with the Registry Editor. Regedit.exe is just another application; most ofthe access to the Registry is performed behind the scenes by the applications that you run, as well asby Windows; settings and other information are read from and written to the Registry constantly.
When you open the Registry Editor, you'll see a window divided into two panes (as shown in Figure 3-1). The left side shows a tree with folders, and the right side shows the contents of the currentlyselected folder. Now, these aren't really foldersit's just a convenient and familiar method oforganizing and displaying the information stored in your Registry.
Figure 3-1. The Registry Editor lets you view and change the contents ofthe Registry
Each branch (denoted by a folder icon in the Registry Editor) is called a key. Each key can containother keys, as well as values. Values contain the actual information stored in the Registry, and keysare used only to organize the values. Keys are shown only in the left pane; values are shown only inthe right pane (unlike Windows Explorer, where folders are shown in both panes).
To display the contents of a key (folder), simply click the desired key name on the left, and thevalues contained within the key will be listed on the right side. To expand a certain branch to show itssubkeys, click on the plus sign [+] to the left of any folder or double-click on the name of the folder.

Editing the Registry generally involves navigating down through branches to a particular key and thenmodifying an existing value or creating a new key or value. You can modify the contents of any valueby double-clicking it.
To add a new key or value, select New from the Edit menu, select what you want to add (Figure 3-2), and then type a name. You can rename any existing value and almost any key with the samemethod used to rename files in Windows Explorer: right-click on an object and click Rename, click onit twice (slowly), or just highlight it and press the F2 key. Lastly, you can delete a key or value byclicking on it and pressing the Del key or by right-clicking on it and selecting Delete.
Figure 3-2. Select New from the Edit menu to add a new key or value toany part of the Registry
You can't drag-drop keys or values here as you can with files in WindowsExplorer. There is very little reason to drag a key or value from one place toanother in the Registry, as the settings are highly location-dependent. A valuein one key may have a different meaning than the same value in a differentkey. The exception is when you want to duplicate a key and all its contents(such as a file-type key), which is something you can do with Registry patches,explained later in this chapter.
You can search for text in key and value names by selecting Find from the Edit menu. See Section3.3.3, later in this chapter, for tips on using this deceptively simple function. Lastly, select Refreshfrom the View menu to refresh the displayed portion of the Registry, in case another runningapplication has changed, added, or removed a key or value since the Registry Editor last read thedata.
The Registry's notion of a path is similar to Windows Explorer's. A Registry path is a location in theRegistry described by the series of nested keys in which a setting is located. For example, if aparticular value is in the Microsoft key under SOFTWARE, which is under HKEY_LOCAL_MACHINE, the

Registry path would be HKEY_LOCAL_MACHINE\SOFTWARE\Microsoft. Elsewhere in this book, when a
setting is changed in the Registry, this type of Registry path is always provided. If you find thatyou're viewing the same Registry path often, you can use the Favorites menu to bookmark theitem, allowing you to return to it easily (similar to the operation of the Favorites menu in InternetExplorer).

3.2. The Structure of the Registry
There are five primary, or root, branches of the Registry, each containing a specific portion of theinformation stored therein. These root keys can't be deleted, renamed, or moved, because they arethe basis for the organization of the Registry. They are:
HKEY_CLASSES_ROOT
This branch contains the information that comprises your Windows file types. See thediscussion of file types in Chapter 4 for details on the structure of most of the entries in thisbranch. A few special keys here, such as CLSID (short for Class ID), contain "registered"components of Windows and your installed applications. The contents of HKEY_CLASSES_ROOTare generally easy to edit, but it's best not to mess with anything in the CLSID branch, because
almost none of it is in plain English.
This entire branch is a symbolic link,[1] or "mirror," ofHKEY_LOCAL_MACHINE\SOFTWARE\Classes but is displayed separately in this branch for clarity
and easy access.
[1] A symbolic link is different from a Windows shortcut you'd find on your hard disk. Information in alinked branch appears twice and can be accessed at two different locations, even though it's stored onlyonce. This means that Find may stop in both places if they contain something you're looking for and, asyou might expect, changes in one place will be immediately reflected in the mirrored location.
HKEY_USERS
This branch contains a sub-branch for the currently logged-in user, the name of which is a longstring of numbers, which will look something like this:
S-1-5-21-1727987266-1036259444-725315541-500
This number is the SID (security identifier), a unique ID for each user on your system. See Chapter 8for more information on SIDs.
While it may sound like a good idea to edit the contents of this branch, you should instead use theHKEY_CURRENT_USER branch described later, which is a symbolic link, or "mirror," of this branch. Nomatter which user is logged in, HKEY_CURRENT_USER will point to the appropriate portion ofHKEY_USERS.
Because Windows only loads the profile (this portion of the Registry) of the currently logged-in user,only one user branch will ever be shown here. However, there will be a few other branches here,such as .default (used as a template when creating new user accounts), and a few others that will
be of little interest to most users.

HKEY_CURRENT_USER
This branch simply points to a portion of HKEY_USERS, signifying the currently logged-in user.
This way, any application can read and write settings for the current user without having toknow which user is currently logged on.
In each user's branch are the settings for that user, such as Control Panel settings andExplorer preferences. Most applications store user-specific information here as well, such astoolbars, high scores for games, and other personal settings.
The settings for the current user are divided into several categories; among them areAppEvents, Control Panel, Identities, RemoteAccess, Software, and System. The mostuseful of these branches, Software, contains a branch for almost every application installed onyour computer, arranged by manufacturer. Here and in HKEY_LOCAL_MACHINE\SOFTWARE
(discussed later) can be found all of your application settings. As though Windows were justanother application on your system, you'll find most user-specific Windows settings inHKEY_CURRENT_USER\Software\Microsoft\Windows.
HKEY_LOCAL_MACHINE
This branch contains information about all of the hardware and software installed on yourcomputer that isn't specific to the currently logged-in user. The settings in this branch are thesame for all users on your system.
The sub-branch of most interest here is the SOFTWARE branch, which contains all of the
information specific to the applications installed on your computer. Both this branch and theaforementioned HKEY_CURRENT_USER\Software branch are used to store application-specific
information. Those settings that are specific to each user (even if your computer has only oneuser), such as toolbar configurations, are stored in the HKEY_CURRENT_USER branch; those
settings that are not user-dependent, such as installation folders, are stored in theHKEY_LOCAL_MACHINE branch. You'll want to look in both places if you're trying to find a
particular application setting, because most manufacturers (even Microsoft) aren't especiallycareful about which branch is used for any given setting.
HKEY_CURRENT_CONFIG
This branch typically contains a small amount of information, most of which is simply symboliclinks, or "mirrors," of other keys in the Registry. There's little reason to mess with this branch.
3.2.1. The Meat of the Registry: Values
Values are where Registry data are actually stored (keys are simply used to organize values). TheRegistry contains several types of values, each appropriate to the type of data they are intended tohold. There are seven types of values that are displayed in the Registry Editor, each of which isknown by two different names (see Table 3-1).[2] Each type is known by at least two different

names, the common name and the symbolic name (shown in parentheses).
[2] Another type of value, known as REG_LINK, is invisible in the Registry Editor. It facilitates symbolic links; the
HKEY_CURRENT_USER branch, discussed earlier in this chapter, is an example.
Table 3-1. Value types visible in the Registry Editor
Value typeIcon usedin
RegEdit
Can becreatedinRegEdit?
String (REG_SZ) Yes
Multi-String[3] (REG_MULTI_SZ) Yes
Expandable String (REG_EXPAND_SZ) Yes
Binary (REG_BINARY) Yes
DWORD (REG_DWORD) Yes
DWORD (REG_DWORD_BIGENDIAN) No
Resource List (REG_RESOURCE_LIST,REG_RESOURCE_REQUIREMENTS_LIST, orFULL_RESOURCE_DESCRIPTOR)
No
[3] Multi-String values are also sometimes called String Array values.
Although the Registry Editor allows you to view and edit all seven types of values, it only allows youto create the five most common (and not surprisingly, most useful) types.[4] Although each of thesevalue types is explained below, they'll make more sense when discussed in the context of thesolutions throughout the rest of this book.
[4] In previous versions of Windows, the Registry Editor only allowed you to create String, Binary, and DWORD values. The ability
to create Multi-String and Expandable String values is new in Windows XP. Note that you'll find little reason to ever create the
other two available types shown in Table 3-1.
String values
String values contain strings of characters, more commonly known as plain text. Most values ofinterest to us will end up being string values; they're the easiest to edit and are usually in plainEnglish.[5] String values are easy to edit; just double-click and type a string of text into thetext field (Figure 3-3).
[5] Although Windows is available in a wide variety of localized languages, most of the internal Registrydata will still be in English, primarily because Microsoft is located in the United States, but also becausethe programming languages used to write Windows components and applications are all based onAmerican English.

Figure 3-3. Edit a string value by typing text into this box
In addition to standard strings, there are two far less common string variants, used for specialpurposes:
String array value
Contains several strings, concatenated (glued) together and separated by nullcharacters. Although the Registry Editor now lets you create these values, it's impossibleto type null characters (character #0 in the ASCII character set) from the keyboard. Theonly way to place a null character into a Registry value is either programmatically or viacut-and-paste from another application.
Expanded string value
Contains special variables, into which Windows substitutes information before deliveringit to the owning application. For example, an expanded string value intended to point toa sound file may contain %SystemRoot%\Media\doh.wav. When Windows reads this valuefrom the Registry, it substitutes the full Windows path for the variable, %SystemRoot%;
the resulting data then becomes (depending on where Windows is installed)c:\Windows\Media\doh.wav. This way, the value data is correct regardless of the
location of the Windows folder.
Binary values
Similarly to string values, binary values hold strings of characters. The difference is the way thedata is entered. Instead of a standard text box, binary data is entered with hexadecimal codesin an interface commonly known as a hex editor.[6] Each individual character is specified by atwo-digit number in base-16 (e.g., the number 6E in base-16 is the number 110 in good-ol'base-10), which allows characters not found on the keyboard to be entered. See Figure 3-4 foran example. Note that you can type hex codes on the left or normal ASCII characters on theright, depending on where you click with the mouse.
[6] See Section 4.2.2 for an example of how a hex editor is used.

The contents of binary values often don't appear in plain English, making understanding theiruse, not to mention modifying them, that much more difficult. Figure 3-4 shows a binary valuethat just happens to have readable text.
Figure 3-4. Binary values are entered differently from the commonstring values, but the contents are sometimes nearly as readable
Note also the various Resource List value types (see Table 3-1), which are just special cases ofbinary values; you'll find very little reason to ever mess with these.
DWORD values
Essentially, a DWORD is a number. Often, the contents of a DWORD value are easilyunderstood, such as 0 for no and 1 for yes, or 60 for the number of seconds in some timeout
setting. A DWORD value is used where only numerical digits are allowed, whereas string andbinary values allow anything.
In the DWORD value editor (Figure 3-5), you can change the base of the number displayed. Forvalues of 9 or smaller, this option won't make any difference. For 10 and larger, however, thewrong selection will result in the wrong value being entered. In most cases, you'll want toselect Decimal (even though it's not the default), since decimal notation is what we use forordinary counting numbers. Note that if there's already a number in the Value data field, itwill be instantly converted when you switch the Base, which is a good way to illustrate thedifference between the two.
Figure 3-5. DWORD values are just numbers, but they can berepresented in Decimal or Hexadecimal notation

In some circumstances, the particular number entered into a DWORD value is actually made upof several components, called bytes. This way, several values can be represented by a singlenumber. While this notation is often convenient for programmers, it's decidedly inconvenientfor lowly users fishing around in the Registry. The REG_DWORD_BIGENDIAN type is a variantof the DWORD type, wherein said bytes are simply represented in the opposite order.
You can create a value (or key) anywhere in the Registry and by anyname and type that suits your whim. However, unless Windows or anapplication is specifically designed to look for the value, it will be ignoredand your addition will have absolutely no effect.
Most Registry editing involves modifying existing values, as opposed to creating new ones. This oftenmakes things easier, as the existing value and its contents can be used as an example.
The application that creates each value in the Registry solely determines the particular type andpurpose of the value. In other words, no strict rules limit which types are used in whichcircumstances or how values are named. A programmer may choose to store, say, the high scoresfor some game in a binary value called High Scores or in a string value called Lard Lad Donuts.
An important thing to notice at this point is the string value named (default) that appears at the
top of every key.[7] The default value cannot be removed or renamed, although its contents can bechanged; an empty default value is signified by value not set. The (default) value doesn't
necessarily have any special meaning that differentiates it from any other value, apart from whatmight have been assigned by the programmer of the particular application that created the key.
[7] In the more simplistic Registry found in Windows 3.1 and Windows NT 3.x, each key had only one value. Starting in Windows
95, a key could contain any number of values; the default value simply took the place of the lone value from previous versions,
allowing compatibility with older applications that were written before the change took effect. In fact, many things you'll find in the
Registry are designed with such "legacy" support in mind.

3.3. Registry Procedures
The solutions in the rest of this chapter will show you how to use the Windows Registry: how to find keys,how to automate changes, how to back up, and more. Use these techniques throughout the rest of the book,whether you're just playing around or trying to solve a problem.
Note that there are a few programs designed to make working with the Registry and its settings easier. Forinstance:
TweakUI
The options in this little Microsoft add-on make certain Windows settings more accessible, settings thatwould otherwise require editing the Registry. Note that the version of TweakUI used with older versionsof Windows should not be used in Windows XP. TweakUI is available directly from Microsoft, as well asfrom http://www.annoyances.org . See Appendix A for a list of TweakUI settings, arranged by task.
Creative Element Power Tools
This collection of tools for Windows XP, Windows 2000, and Windows Me includes a bunch of settings,utilities, and context-menu add-ons that aren't otherwise possible with simple changes to the Registry.Among other things, a tool allowing you to search and replace in the Registry is included.
3.3.1. Backing Up the Registry
Taking a few minutes to make sure you have a good backup of your Registry now will save you hours ofheadaches later. But backing up the files that contain your Registry data (called hives ) can be tricky.
HKEY_USERS and HKEY_LOCAL_MACHINE are, essentially, the only true root keys, because the Registry's three
other root keys are simply symbolic links, or "mirrors," of different portions of the first two (see Section 3.2 ,earlier in this chapter). This means that only these two branches actually need to be physically stored on yourhard disk.
Since the files in which the Registry is stored are never edited directly, you're likely to never need to knowwhat they're called or where they're located. In fact, they can't even be copied while Windows is running, soyou won't be able to back them up directly. However, sooner or later, you'll run into them, so the following isa list of all of the hive files in which the Registry is physically stored on your hard disk.
HKEY_LOCAL_MACHINE
Each subkey of HKEY_LOCAL_MACHINE is stored in its own file in the folder, \Windows\System32\Config .

For example, the contents of HKEY_LOCAL_MACHINE\Software is stored in the file software (noextension). The only exception to this is HKEY_LOCAL_MACHINE\Hardware , which is a dynamically
generated branch, and therefore not stored on the hard disk at all.
HKEY_USERS\ {SID of current user}
This key, which is the same as HKEY_CURRENT_USER , is stored a file named NTUSER.DAT , located in
the user's home directory, which is usually \Documents and Settings\{username} . See Chapter 8 formore information on user accounts and the SID.
You may notice a copy of NTUSER.DAT in \Documents and Settings\Default User. However, this is not the template used for creating new users, as you mightexpect. Instead, this is merely a remnant of the installation process and does notappear to be used by Windows XP. When a new user account is created, the userhive is built using the data in HKEY_USERS\ .Default , which is stored in thedefault file in \WINDOWS\system32\config .
Now, since these hive files are in use whenever Windows is running, they can't be read or modified by anyother processes. This means that there is no direct way to back up or restore your entire Registry simply bycopying these files (as is possible in some earlier versions of Windows). There are, however, several ways toachieve an effective Registry backup:
Use Registry-enabled backup software
The most painless way to back up your entire Registry is to do so while backing up the rest of yoursystem. Any decent backup software designed for Windows XP, including the Backup utility that comeswith it, will be able to include the Registry in the backup. See Chapter 6 for more information.
Make Registry patches
Registry patches are the quick and easy way to store small portions of your Registry, useful fortransferring Registry data to other computers or simply backing up a key before you mess with it. Thisis similar, at least conceptually, to a local anesthetic. See Section 3.3.5 later in this chapter for details.
Go behind Windows's back
The only time when you are permitted to copy or overwrite the hive files is when Windows isn'trunning. If you have a dual-boot system (Chapter 1 ) or wish to use the Windows Recovery Console(Chapter 6 ), you'll be able to read and modify the hive files.
The exception to this rule is the user hive, NTUSER.DAT , for users other than the one currently loggedon. Say you have three users: Katie, Cat, and Sara. If Cat is currently logged in, the NTUSER.DAT filesin both \Documents and Settings\Katie and \Documents and Settings\Sara will be ripe for the plucking.

The implications of this can be interesting. For example, you can back up or replace your ownNTUSER.DAT hive simply by logging out and then logging in as another user (as long as that user hasadministrative privileges). You can also copy one user's settings to another user's account simply byduplicating the user's hive file, which is a quick and easy way to set the default profiles for a largenumber of user accounts. See Chapter 8 for more information on the administration of user accounts.Note that if you delete a user's hive, it will be reconstructed from data in HKEY_USERS\ .Default thenext time the user logs in.
Use the Windows Recovery Console
The Windows Recovery Console, discussed in Chapter 6 , is a back door of sorts, allowing you to accessWindows files while Windows isn't running and effect repairs if Windows won't start. This means thatyou can use the Recovery Console to copy the hive files.
Now, this isn't exactly the most convenient means of backing up the Registry, but if you create copiesof the hives in another folder on your hard disk, you can use those copies should your Registry everbecome corrupted. For instance, if your HKEY_LOCAL_MACHINE branch gets screwed up, all you'd need
to do is replace the active hive files with backups made on an earlier date. See "How to Delete orReplace In-Use Files" in Chapter 2 for more tips.
If your HKEY_CURRENT_USER branch should ever become corrupted, you canrestore it from a backup, as described here. Or, you can log on as theAdministrator (or another existing account), and effect repairs from withinWindows. Unfortunately, you can't create new user accounts on the fly from theLogon or Welcome screens, as you could in some earlier versions of Windows.
The important thing to realize with all of these backup solutions is that they require advanced planning. Don'twait until your system won't start before you start thinking about backing up. See Chapter 6 for simplebackup tips.
3.3.2. Finding the Right Registry Key
The two main obstacles you'll encounter when trying to make a change to the Registry are (1) finding wherea setting is located in the Registry, and (2) determining what modifications are necessary to affect thedesired changes.
Sometimes it's obvious, such as a theoretical value called ShowSplashScreen , with its contents set to 1(one); changing the 1 to a 0 (zero) would most likely result in turning the option off.[8] Other times you'll see
a long, seemingly meaningless series of numbers and letters. Although there are no strict rules as to howvalues and keys are named or how the data therein is arranged, a little common sense and intuition will getyou through most situations.
[8] Zero and one, with regard to Registry settings, typically mean false and true (or off and on), respectively. However, sometimes the value
name negates thisif the value in the example were instead called DontShowSplashScreen , then a 1 would most likely turn off said
splash screen.
Here's a solution that will help you find the corresponding Registry key for a particular setting in Windows. Forthis example, we'll find the Registry setting associated with showing or hiding hidden files in Windows

Explorer, and then we'll create the appropriate Registry patch.
A Registry patch is a convenient way of automating changes to the Registry, andtherefore to Windows and your applications, and is useful if you frequently change asetting or a group of settings. It's also a convenient way to propagate a group ofsettings on one or more other computers. This solution provides a way to come upwith a Registry patch that corresponds to one or more options in the interface.
The idea is to take snapshots (make Registry patches) of your entire Registry before and after a change ismade in Explorer (or any other program). By comparing the two snapshots, we can easily see which Registrykeys and values were affected:
Make sure no unnecessary applications are running (check your Windows system tray/notification area),because they could write to the Registry at any time, adding unexpected changes.
1.
Open the Registry Editor, and highlight the HKEY_CURRENT_USER branch.2.
Select Export from the File menu. Specify a filename (e.g. User1.reg ), place it somewhere convenient(such as your Desktop), and click Save to export the entire branch to the file.
Then, select the HKEY_LOCAL_MACHINE branch and repeat the steps, exporting it instead to Machine1.reg
.[9]
[9] Although the Registry has five main branches, the others are simply symbolic links of portions of these two. See"Backing Up the Registry," earlier in this chapter, for details.
3.
Next, we will make our desired change. In this case, go to Control Panel Folder Options View tab. In the Advanced Settings list, change the Hidden Files and Folders option, and click OKwhen you're done.
4.
Immediately switch back to the Registry Editor, and re-export the HKEY_CURRENT_USER andHKEY_LOCAL_MACHINE branches into new files, such as User2.reg and Machine2.reg , respectively, as
described earlier in step 2.
5.
What we now have is a snapshot of the entire Registry taken before and after the change (or changes)was made. It's important that the snapshots be taken immediately before and after the change, so thatother trivial settings, such as changes in Explorer window positions, aren't included with the changes wecare about.
6.
All that needs to be done now is to distill the changed information into a useful format. Windows comeswith the command-line utility File Compare ( fc.exe ), which can be used to find the differences betweenour before and after files.[10]
[10] There are several superior, Windows-based third-party alternatives, such as UltraEdit-32 (available athttp://www.ultraedit.com ). See "Windows XP in a Nutshell" (O'Reilly) for complete documentation on the FileCompare utility (fc.exe ).
At the command prompt, first use the cd command to change to the directory containing the Registry
patches, such as \Windows\Desktop , if they're on your desktop (see Chapter 10 for more informationon the cd command), and then type the following two lines:
7.

fc /u user1.reg user2.reg > user.txtfc /u machine1.reg machine2.reg > machine.txt
These commands will instruct File Compare to scan both pairs of files and write only the differencesbetween the files into new text files: user.txt for the changes in HKEY_CURRENT_USER and machine.txtfor the changes in HKEY_LOCAL_MACHINE .
The user.txt file should look something like this:
Comparing files user1.reg and USER2.REG
***** user1.reg[HKEY_CURRENT_USER\Software\Microsoft\Windows\CurrentVersion\ Explorer\Advanced]"Hidden"=dword:00000001"ShowCompColor"=dword:00000000***** USER2.REG[HKEY_CURRENT_USER\Software\Microsoft\Windows\CurrentVersion\ Explorer\Advanced]"Hidden"=dword:00000002"ShowCompColor"=dword:00000000*****
From this example listing, it's evident that the only applicable change was the Hidden value, locateddeep in the HKEY_CURRENT_USER branch. (There may be some other entries, but if you inspect them,
you'll find that they relate only to MRU lists from RegEdit and can be ignored.)[11]
[11] MRU stands for Most Recently Used. Windows stores the most recent filenames typed into file dialog boxes;from this example, you'll notice several references to the filenames you used to save the Registry snapshots.
Note that for this particular setting, no changes were recorded in the HKEY_LOCAL_MACHINE branch, somachine.txt ends up with only the message, "FC: No differences encountered. " This means ourchanges were only reflected in the HKEY_CURRENT_USER branch.
8.
You'll also notice that the lines immediately preceding and following the line we care about are alsoshown; they're included by FC as an aid in locating the lines in the source files. We're lucky in that oneof the surrounding lines in this example happens to be the section header (in brackets), which specifiesthe Registry key in which this value is located.[12]
[12] For more information on section headers, see Section 3.3.5.2 , earlier in this chapter, as well as Section 3.3.7 ,later in this chapter (.ini files have a format similar to Registry patches).
In most cases, you'll have to search the Registry snapshots (often easier than searching the Registry)for the changed line; in this example, you'd search USER2.REG for "Hidden"=dword:00000002 and thenmake note of the line enclosed in square brackets ([...]) immediately above the changed line. Thisrepresents the key containing the Hidden value.
In user2.txt, the Hidden line is located in the section:
[HKEY_CURRENT_USER\Software\Microsoft\Windows\CurrentVersion\ Explorer\Advanced]
9.
10.

The next step is to convert the output from File Compare into a valid Registry patch. Because the FCoutput is originally derived from Registry patches, it's already close to the correct format. Start byremoving all of the lines from user.txt , except the second version of the changed linethis would be thevalue in its after setting, which presumably is our goal. You'll end up with this:
"Hidden"=dword:00000002
10.
Next, paste in the key (in brackets) above the value. (In the case of our example, it was part of the FCoutput and can simply be left in.) You should end up with this:
[HKEY_CURRENT_USER\Software\Microsoft\Windows\CurrentVersion\ Explorer\Advanced]"Hidden"=dword:00000002
11.
Lastly, add the text Windows Registry Editor Version 5.00 followed by a blank line at the beginning
of the file (see Section 3.3.5.2 , earlier in this chapter, for more information). The final result shouldlook something like this:
Windows Registry Editor Version 5.00
[HKEY_CURRENT_USER\Software\Microsoft\Windows\CurrentVersion\ Explorer\Advanced]"Hidden"=dword:00000002
12.
Save this as a new file called User-final.reg .
If the settings you've changed have resulted in changes in the HKEY_LOCAL_MACHINE branch, simply
repeat steps 9-12 for the machine.txt file as well.
13.
If your setting resulted in changes in both HKEY_CURRENT_USER and HKEY_LOCAL_MACHINE , your last
step would be to consolidate the two patches into one file. See Section 4.3.3 for a practical example ofhow this is done. When consolidating, make sure you have only one instance of the Windows RegistryEditor Version 5.00 line.
14.
For some settings (such as the one in this example), you may want to make two patches: one to turn it on,and one to turn it off. Simply double-click the patch corresponding to the setting you desire.
You may notice that some changes involve the actual removal of a key or value, instead of simply themodification of an existing entry. See Section 3.3.5.2 , later in this chapter for details on automating thedeletion of Registry data.
This solution will help you find the appropriate keys and values associated with a particular Windows orapplication setting, and it can also help locate hidden settings (those that don't appear in dialog boxes). Thesetting in the previous example is located in a key that contains other settings, some of which aren't includedin the Folder Options dialog box. Experiment with some of the more interesting sounding values, such asCascadePrinters and ShowSuperHidden .
There are some caveats to this approach, mostly that the File Compare utility will often pull out moredifferences than are relevant to the change you wish to make. It's important to look closely at each key in theresulting Registry patch to see if it's really applicable and necessary.

See Chapter 9 for a discussion on the Windows Script Host, which documents automating changes to theRegistry that don't involve Registry patches.
It's always smart to create a corresponding undo Registry patch while you're using asolution like this. For example, because our Registry patch contains the differences inthe after file, user2.reg , the corresponding undo patch would contain thecorresponding lines in the before file, user1.reg . Applying the undo patch effectivelyreturns the keys and values stored within to their state before the setting waschanged. Obviously, an important caveat is that an undo patch for one computer won'tnecessarily be an effective undo for another computer.
3.3.3. Search the Registry Effectively
The Registry Editor has a simple search feature, allowing you to search through all the keys and values fortext. Just select Find from the Registry Editor's Edit menu, type the desired text (Figure 3-6 ), and click FindNext .
Figure 3-6. Use Registry Editor's Search feature to find text in key names,value names, and value data
Because the Registry can become quite large and have a wide variety of settings and information, it isimportant to learn to search effectively, so you don't miss anything or waste a lot of time wading throughirrelevant results. Additionally, the Registry Editor doesn't have a search-and-replace feature, so doingsomething as simple as changing every occurrence of c:\program files to d:\program files can be amonumental chore. Here are some tips that may help:
Make sure that all three options in the Find window's Look at section are checked, unless you knowspecifically that what you're looking for is solely a Key , Value (value name), or Data (value contents).
You'll also usually want the Match whole string only option turned off, unless you're searching fortext that commonly appears in other words; searching for handle might otherwise trigger entries likePersistentHandler and TeachAndLearn .
Many folder names in the Registry are stored in both long and short versions.[13] For example, say youwant to move your Program Files folder from one drive to another. When you install Windows, any

settings pertaining to this folder may be stored in the Registry as c:\Program Files or c:\Progra~1 .Make sure you search for both.
[13] See Section 5.2.5 for more information on short filename generation.
If you're searching the Registry for both Program Files and Progra~1 , you may want to just search forprogra , which will find both variations. Because this will stumble upon other instances of the wordprogram , TRy limiting the results by placing a backslash ( \ ) in front of it (e.g. \progra ) to limit the
search to only directory names beginning with those letters. A minute of preparation can save you anhour of searching.
You may want to search the Registry for an interface element, such as a new item added to a contextmenu or text in a list in a dialog box. If the text contains an underlined character,[14] you'll need to addan ampersand (& ) to the search string. For example, say you've installed a program that creates .zip
files (such as WinZip, available from http://www.winzip.com ), and the program has added thecommand Add to Zip (with the Z underlined) to the context menu for all files. You'll need to search foradd to &zip to match the text properly; a search for add to zip will probably turn up nothing. Note also
that text searches are not case-sensitive, so you don't have to worry about capitalization.
[14] Underlined letters in dialog box elements (buttons, menu items, etc.) are hints to the shortcut keys that can be used to activate
them. However, by default in Windows XP, underlined letters are hidden in many applications until you press the Alt key. You can
change this behavior by going to Control Panel Display Appearance tab Effects .
Searching begins at the currently selected key. If you want to search the entire Registry, make sure theMy Computer enTRy at the top of the Registry tree is highlighted before you begin. However, if you knowthe setting you want to change is in, for example, HKEY_LOCAL_MACHINE , you should highlight that key
beforehand to reduce search time and eliminate irrelevant results.
Although the Registry Editor has a search feature, it doesn't allow you to search and replace. If youhave a branch of settings you wish to change (for example, if you've moved an application from onedrive to another or want to, say, replace every occurrence of notepad.exe with another application), youcan use a Registry patch; see Section 3.3.5 earlier in this chapter. Just create a patch of the branch inquestion and use your favorite text editor's search-and-replace feature to change the values in thepatch. When you apply the patch, all the settings will be changed for you. Note that you should use thiswith caution, because you can screw up many settings unwittingly by searching and replacing commonpieces of text.
If you want to use search and replace more often and the previous Registry patchtip isn't sufficient, you may want to try the Registry Agent tool, part of CreativeElement Power Tools (http://www.creativelement.com/powertools/ ).
3.3.4. Search and Replace Registry Data
The Registry Editor has no search-and-replace feature, and with good reason: a single poorly chosen replaceoperation could make Windows inoperable. But there are times when you do need to replace all occurrencesof, say, a folder name like c:\stuff\Cory with another folder name like d:\stuff\Henna . Depending on the
number of occurrences, such an operation could take hours.
Registry Agent (part of Creative Element Power Tools, available athttp://www.creativelement.com/powertools/ not only gives you an better way to search the Registry (search

results are shown in a list, instead of one at a time), but supports search-and-replace operations as well.Here's how to replace all occurrences of Microsoft with DaveSoft :
Replacing the word Microsoft in your registry is a really bad idea. Don't try this at
home. Now, ordinary searching with Registry Agent is totally harmless, but theReplace feature can be dangerous if you're not careful.
Open Registry Agent.1.
Type text to search (e.g. Microsoft ), and click Find Now .2.
The results are shown in a list (Figure 3-7 ) with three columns. The left column shows the location(key) where the text was found; you can click it to open the Registry Editor at that location. The middleand right-hand columns show the value name and contents, respectively.
Figure 3-7. Use Registry Agent for a faster Registry search, as well as forsearch-and-replace operations
3.
Select the Replace tab.4.
Place a checkmark next to the occurrences you wish to replace. Use the checkmark above the list tocheck or uncheck the entire list.
5.
Type the new text (which will replace the old text) in the With field.6.

You don't have to replace the same text you searched. For instance, you cansearch for Microsoft and then do a search-and-replace within these results fordifferent text. Type anything you like in the Replace field.
6.
Choose what types of text you'd like to replace by checking or unchecking the Keys , Values , andData options. Note that the Keys checkbox is grayed-out (disabled) by default; refer to thedocumentation to lift this restriction.
The Replace tool has no "undo" feature, which means that if you screw somethingup here, the only way to recover is to restore your Registry from a backup(discussed earlier in this chapter). You can also use the Export tab to export aRegistry patch (see the next section) containing the selected values, but youshouldn't rely on this as a reliable backup.
7.
Click the Replace button to perform the search-and-replace.8.
Even if you don't use the search-and-replace feature, Registry Agent serves as a pretty slick searching tool,and overcomes the annoying hunt-and-peck approach of the Registry Editor's search feature.
3.3.5. Using Registry Patches
In addition to editing the Registry with the Registry Editor (see earlier in this chapter), you can make changesby using Registry patches. A Registry patch is simply a text file with the .reg extension that contains one ormore Registry keys or values. If you double-click on a .reg file, the patch is "applied" to the Registry,meaning that the contents of the patch are merged with the contents of the Registry. This tool is especiallyhandy for backing up small portions of the Registry or distributing Registry settings to other computers.
For example, if a particular application stores its custom toolbar in the Registry, you can use a Registry patchto copy the toolbar to another computer, saving time that would otherwise be spent painstakingly configuringthe 431 toolbar items on the new machine.
A Registry patch is also a handy way to back up Registry data, such as file types, which are constantly at riskof being changed by other applications (see Section 4.3.3 ). More importantly, however, Registry patches canbe used to back up portions of the Registry to safeguard them against modifications you're about to make,such as the modifications suggested throughout the rest of this book.
3.3.5.1 Create a Registry patch
Open the Registry Editor, and select a branch you wish to export.
The branch can be anywhere from one of the top-level branches to a branch a dozen layers deep.Registry patches include not only the branch you select, but all of the values and subkeys in the branch.Don't select anything more than what you absolutely need.
1.
Select Export from the File menu, type a filename, and press OK .2.

All of the values and subkeys in the selected branch will then be stored in the patch file. Make sure thefilename of the new Registry patch has the .reg extension.
2.
Creating a Registry patch is the easy part; the hard part can be determining the Registry key to be exportedin the first place. See Section 3.3.2 earlier in this chapter for details.
Once you've created the patch, you can modify it or apply it to your (or someone else's) system, as describedin the following sections.
3.3.5.2 Edit a Registry patch
Since Registry patches are just plain text files, you can edit them with any plain-text editor, such as Notepad(notepad.exe ). The contents of the Registry patch will look something like the text shown in Example 3-1 .
Example 3-1. Contents of a Registry patch created from HKEY_CLASSES_ROOT\.txt
Windows Registry Editor Version 5.00
[HKEY_CLASSES_ROOT\.txt]@="txtfile""PerceivedType"="text""Content Type"="text/plain"
[HKEY_CLASSES_ROOT\.txt\ShellNew]"NullFile"=""
The first line, Windows Registry Editor Version 5.00 , tells Windows that this file is a valid Registry
patch; don't remove this line. The rest of the Registry patch is a series of key names and values.
The key names appear in brackets ([...] ) and specify the full path of the key. The values contained within
each key follow. The name of the value is given first, followed by an equals sign and then the data stored ineach value. The value names and value data are always enclosed in quotation marks. A value name of @ tellsthe Registry Editor to place the value data in the (default) value (as shown in the fourth line of the
example).
Registry patches created in Windows 95, 98, or Me will have the line REGEDIT4 at the
top of the file. These patches can be imported into the Windows XP Registry without aproblem (that is, not taking into account the settings contained therein). However,older versions of Windows may complain if you try to import Registry patches createdin Windows XP. If you encounter this problem, just replace the header line withREGEDIT4.
If you are familiar with the particular information contained within the Registry patch you've just created, youcan edit anything you wish and save the changes when you're done. Note that only making changes to aRegistry patch doesn't mean anything; your changes won't take effect in the Registry until the Registry patchis applied (described in the next section).

There are several reasons why you might want to edit a Registry patch file:
Streamline a lot of edits
Modifying a large number of Registry values may turn out to be much easier with a text editor thanwith the Registry Editor, since you don't have to open and then close each individual value.
Keep in mind that if you change the name of a value (to the left of the equals sign), as opposed to thevalue contents (on the right side), you'll effectively be creating a new value. See the next section fordetails on how Registry contents are merged.
Search and replace
The Registry Editor has no search-and-replace function (for reasons that shouldn't need explaining).However, most text editors do, so you can quite easily search for and replace text when editing aRegistry patch.
If you have a branch of settings you wish to changefor example, if you've moved an application fromone drive to anotheryou can use a Registry patch. Just create a patch of the branch in question and useyour favorite text editor's search-and-replace feature to change the values in the patch (e.g., replaceall occurrences of c:\big_program with e:\big_program ). When you apply the patch, all the settingswill be changed for you.
Note that it's very easy to change more than you intended with a search-and-replace, so be careful.However, one of the benefits of Registry patches is that you can double-check your changes beforethey're applied to your Registry. Also, a second Registry patch can be used to easily restore themodified portion of the Registry if necessary. See Section 3.3.3 earlier in this chapter for more tips.
If you want to use search and replace more often, you may want to try Registry Agent, described inSection 3.3.4 .
Easily duplicate keys and branches
The Registry Editor provides no way to copy or move a key (such as using drag-drop).[15] If you createa Registry patch of a key, change the key name, and then reimport it, it will effectively duplicate thekey. This can be a handy way to create new file types (described in Chapter 4 ).
[15] Trust me, this is a good thing. Keys and values are referenced by their location; change the location, and asfar as Windows knows, the key is gone. The last thing you'd want to do is inadvertently hose your system bydragging an important key into oblivion.
Automate the deletion of Registry data
Lastly, there's really no way, using the Registry Editor, to create a patch that deletes a Registry key(think about it). However, you can modify a Registry patch to accomplish this feat.

To delete a key with a Registry Patch, place a minus sign before the key name, like this:-[HKEY_CURRENT_USER\Control Panel\don't load]
If you delete a key, all of its values will also be deleted. However, a security feature present in WindowsXP[16] prevents the removal of any key that currently has subkeys. This means that to remove an entirebranch, you'll have to recursively delete all of the subkeys first, which is something typically only possiblefrom within a programming language.
[16] This restriction is not present in Windows 9x/Me.
To delete a value with a Registry Patch (but leave the key untouched), place a minus sign after the equalssign, like this:
[HKEY_CURRENT_USER\Control Panel\don't load]"desk.cpl"=-
Merging multiple patches
One of the advantages of Registry patches is that they enable you to change several Registry settingsin a single step. However, sometimes those settings are located in different parts of the Registry, andsince it isn't practical to export the entire Registry just to catch all of the applicable keys, you can quiteeasily merge two different Registry patches into a single file. See Section 4.3.3 for a practical example.
3.3.5.3 Apply a Registry patch
You can apply a Registry patch at any time and to any computer. There are three ways to do this, but thereis really no difference between them, at least as far as the final results are concerned. Do whatever is mostconvenient.
3.3.5.4 Solution 1: From Explorer
Double-click on a Registry patch file (with the .reg extension) in Explorer or on your desktop. It doesn'tmatter if the Registry Editor is running or not.
1.
Answer Yes to the warning message that asks, "Are you sure you want to add the information inc:\stuff\MyPatch.reg to the Registry?"
Immediately thereafter, you'll see the message, "Information in MyPatch.reg has been successfullyentered into the Registry."
2.
3.3.5.5 Solution 2: From within the Registry Editor
Select Import from the File menu, and select the patch you wish to import.1.
2.

1.
Click OK to merge the file. You won't be prompted to confirm that you actually do want to apply thepatch (as with Solution 1), but you will receive the confirmation message that the patch was successful.
2.
3.3.5.6 Solution 3: From the command line
Open a Command Prompt window (cmd.exe ).1.
Using the cd command, as described in Chapter 10 , navigate to the folder containing the Registry
patch. Note that instead of changing the working directory, you can also simply specify the full path ofthe patch in the next step.
2.
Assuming the Registry patch is named MyPatch.reg , type the following:
regedit mypatch.reg
You'll then receive the same "Are you sure?" message, as when double-clicking the Registry patch insolution 1. However, the advantage of using the command line is the ability to apply Registry patchesfrom a WSH script or batch file, so the preferred method is to bypass the confirmation, like this:
regedit /s mypatch.reg
where the /s switch instructs the Registry Editor to import the patch silently (without the prompt).
3.
If the Registry Editor is currently running and you are viewing a key that was modified by a patch that wasjust applied, RegEdit should refresh the display automatically to reflect the changes. If it doesn't, press theF5 key or go to View Refresh .
When you apply a Registry patch, you are merging the keys and values stored in apatch file with the Registry. Any keys in the applied patch that don't already exist willbe added to the Registry. Pre-existing keys in the patch will be left alone. If a specificvalue already exists, the value will be changed to whatever is in the patch. However,any values already in an existing key that aren't in the Registry patch will remain. Thismeans that if you create a patch, rename a key or value (different from changing itsdata), and then apply it, the original key or value will remain intact and you'll have aduplicate.
If you're creating a Registry patch on your computer for use on another, make sure any folder names ordrive letters are corrected for the new computer. If, for example, a Registry patch created on one computerreferences c:\my_ folder\my_ program.exe , you'll need to make sure to change all occurrences of the text tod:\her_ folder\my_ program.exe to reflect any applicable differences. Using Expandable String values, asdescribed earlier in this chapter, virtually eliminates this problem.
See Chapter 9 for a discussion on the Windows Script Host, which documents how to further automatechanges to the Registry.
3.3.5.7 Using Registry patches on earlier versions of Windows

Many of the Registry patches you create and modify in Windows XP will be applicable in other versions ofWindows. But there are two issues you'll need to address before you can use Registry patches on a computerrunning Windows 9x/Me:
Unicode versus ANSI
Registry patches created in Windows XP and Windows 2000 are encoded as Unicode text, a format notsupported by the Registry Editor in Windows 9x/Me. Unless you convert these files to ANSI or ASCIIfiles, they'll just show up as jibberish in earlier versions of Windows.
The header
As stated previously, the single-line header placed at the beginning of every Registry patch in WindowsXP is Windows Registry Editor Version 5.00 . If you change this to REGEDIT4 , the Registry patch
will be readable in Windows 9x/Me, as well as in Windows 2000/XP.
Here's a quick procedure to convert a Registry patch created in Windows XP so that it can be used inWindows 9x/Me. Note that this procedure won't stop Windows XP and Windows 2000 from recognizing thepatches, which makes one wonder why Microsoft changed the format.
Open a newly created Registry patch file in Notepad (notepad.exe ).1.
Remove the line that reads:
Windows Registry Editor Version 5.00
and replace it with the following:
REGEDIT4
2.
Go to File Save As , and choose ANSI from the Encoding list at the bottom of the Save As dialog.Make sure the filename is correct, and click Save when you're done.
You can also save Registry patches for use in earlier versions of Windows right inthe Registry Editor. Go to File Export , and then choose Win9x/NT 4Registration Files from the Save as type list.
3.
Despite the different format, Registry patches are applied in the same way in all versions of Windows. Referto the instructions earlier in this section for details.
3.3.6. Create an Interface for a Registry Setting

The whole point of accessing the Registry is to view and modify settings that are otherwise inaccessible inExplorer, the Control Panel, or the hundreds of dialogs boxes scattered throughout the operating system.However, there is a way to patch into the interface and add checkboxes and radio buttons that are linked towhatever Registry settings we want.
Start by going to Control Panel Folder Options View menu. At first glance, the Advancedsettings list in this dialog box is presented in a somewhat awkward list format, apparently to accommodatethe large number of options. However, the less-than-ideal presentation is actually designed to allowcustomization, permitting Microsoft (or you) to easily add or remove items from the list. See Figure 3-8 foran example of a customized version of this window.
Figure 3-8. The Advanced Folder Options dialog box is a flexible, customizablelist of Registry settings
Although the "customizability" of this dialog isn't necessarily intended for you to add an option for anyRegistry setting you want, whether it's related to Explorer or not, that's precisely what you can do with it,thanks to the following solution.
The idea of this solution is that you link up a checkbox or radio button to a valueany value you choosein yourRegistry. This would, for example, allow you to make certain Registry changes accessible to yourself or others(such as users in a workgroup that you administer), reducing the need for them to mess around in theRegistry. You can also remove any unwanted options that normally appear here but that you don't wanteasily changed.
The format is actually quite remarkable, because you don't have to be a programmer to utilize this feature.You can add new options to a certain portion of the Registry and then tie those options to other Registrysettings. The downside is that the syntax requires that numerous parameters be typed, which can becumbersome. The following procedure should allow you to make changes to existing settings, as well as add

your own settings fairly easily:
Open the Registry Editor.1.
Expand the branches to:HKEY_LOCAL_MACHINE\Software\Microsoft\Windows\CurrentVersion\Explorer\Advanced\Folder .
Notice that the actual hierarchy in the Folder Options window is reproduced here in the Registry,although the list items may appear in a different order than their corresponding Registry entries. This isbecause the captions in the Folder Options list aren't necessarily the same as the names of thecorresponding Registry keys here, yet both collections are sorted alphabetically. For example, theRemember each folder's view settings option is represented by the ClassicViewState key in the
Registry.
2.
Take this opportunity to back up the entire branch by highlighting the Advanced key and selecting
Export from the File menu. This way, you'll be able to easily restore the defaults without having toreinstall Windows.
3.
At this point, you can remove any unwanted entries by deleting the corresponding keys from thisbranch; the Text value in each key should be enough to explain what each key is for.
4.
To add a new item, start by simply creating a new key, keeping the hierarchy in mindfor example, areyou adding a setting to the top level, or possibly a new setting to an existing group, or are you creatinga new group for additional options?
Name the key anything you want, although the more descriptive, the better.
5.
The values inside each key determine the properties of the corresponding setting. For example, onevalue affects the caption, while another affects the default value. Feel free to fish around the existingkeys for examples.
To add a property, create a new value, name it appropriately (described later), double-click it, and thentype the contents for the value. Table 3-2 lists the properties that affect the visual appearance of aspecific item, and Table 3-3 lists the properties that affect what happens when a specific item is turnedon or off in the Folder Options window.
Table 3-2. Visual properties of Folder Options items
Valuename
Datatype
Description of value contents
Type String
This can be set to either group , checkbox , or radio , representing a
folder, checkbox, or radio button, respectively. Checkboxes are squareoptions and can either be either on or off. Radio buttons are round optionsthat are linked to other radio buttons in the same folder, in that only oneat a time can be selected (you can have multiple groups of radio buttons).And folders, of course, are used to organize the various other options. Thisparameter is required by all items.
6.

Valuename
Datatype
Description of value contents
Text String
This is the actual caption of the option as it will appear in the dialog box.This can be as long as you want (better too descriptive than too vague),but the paradigm dictates that only the first word be capitalized and thatthere be no period. This parameter is required by all items.
Bitmap String
This specifies the icon, used for folder items only. If omitted, it's a ratherugly bent arrow. The syntax[17] is filename ,index , where filename is
the full path and filename of the file containing the icon, and index is the
icon number (starting with zero), if the file contains more than one icon. Tospecify the familiar yellow folder, type%SystemRoot%\system32\Shell32.dll,4 here. This parameter is optional
for all folders and has no effect on checkboxes and radio buttons.
HelpID String
This is the filename and optionally the help context ID, pointing to thedocumentation for this item. If the user selects the item and presses theF1 key, this specifies the help note that will appear. The syntax isfilename #id , where filename is the name of a .hlp or .chm file, and
id is the numeric help context id (commonly used by programmers) of the
topic you want to display. Omit id to simply show the index page of the
specified help file. This parameter is optional.
[17] The Bitmap value uses the same syntax as the DefaultIcon property for file types, as documented in
Section 4.3.2 .
Table 3-3. Registry-related properties of Folder Options items
Value name Datatype Description of value contents
HKeyRoot DWORD
This is an eight-digit number representing the root of the Registry pathcontaining the target Registry setting. Use the hexadecimal number80000000 for HKEY_CLASSES_ROOT , 80000001 for HKEY_CURRENT_USER, 80000002 for HKEY_LOCAL_MACHINE , 80000003 for HKEY_USERS , or80000005 for HKEY_CURRENT_CONFIG . For some reason, it must beseparated from the rest of the Registry path, specified in RegPath ,
later. This parameter is required for all checkbox and radio items.
RegPath String
This is the path specifying the location of the target Registry setting,not including the root (see HKeyRoot , earlier). For example, forHKEY_CURRENT_USER\Software\Microsoft\Windows\CurrentVersion
, you would only enterSoftware\Microsoft\Windows\CurrentVersion here. This parameter
is required for all checkbox and radio items.

Value name Datatype Description of value contents is required for all checkbox and radio items.
ValueName String
This is the name of the target Registry value. This value is where thesetting data is stored when the option is turned on or off in the FolderOptions window. The key containing said value is specified by theRegPath and HKeyRoot parameters, listed earlier. This parameter is
required by all checkbox and radio items.
CheckedValue
Shouldmatchtargetvaluedata type
This holds the data to be stored in the target Registry value (specifiedby the RegPath and ValueName parameters earlier), when said option
is turned on . If you're configuring an option to be used on bothWindows 9x/Me and Windows XP/2000 systems, use both theCheckedValueW95 and CheckedValueNT parameters instead of this
value . Otherwise, this parameter is required by all checkbox and radioitems.
CheckedValueW95
Shouldmatchtargetvaluedata type
Use this instead of CheckedValue , above, if you're configuring an
option to be used on both Windows 9x/Me and Windows XP/2000systems. This value contains the data that will be applied if the systemis running Windows 9x/Me. Used in conjunction with CheckedValueNT ,
below.
CheckedValueNT
Shouldmatchtargetvaluedata type
Use this instead of CheckedValue , above, if you're configuring an
option to be used on both Windows 9x/Me and Windows XP/2000systems. This value contains the data that will be applied if the systemis running Windows XP, 2000, or NT. Used in conjunction withCheckedValueW95 , later.
UnCheckedValue
Shouldmatchtargetvaluedata type
This holds the data to be stored in the target Registry value, when saidoption is turned off . This value is optional; if omitted, it is assumed tobe 0 .
DefaultValue
Shouldmatchtargetvaluedata type
This is the default value, used only if the target Registry value doesnot already exist. As soon as the option in the Folder Options windowis turned on or off at least once, this parameter is ignored, andWindows instead reads the state of the target value, comparing it toCheckedValue and UnCheckedValue to determine if the option should
appear checked or unchecked. This value is optional; if omitted, it isassumed to be 0 .
The value type (String, Binary, DWORD) of the CheckedValue , UnCheckedValue , and DefaultValue
parameters all depend on what the target value requires. For example, if the target value you'rechanging is a DWORD value, then all three of these parameters must also be DWORD values.
After you've created keys and entered the appropriate property values, your Registry should looksomething like Figure 3-9 , and the resulting Folder Options dialog box should look like Figure 3-8 . IfFolder Options is open, you'll have to close it and reopen it for the changes to take effect.
Figure 3-9. Settings that appear in the Advanced Folder Options list are
7.
is required for all checkbox and radio items.
ValueName String
This is the name of the target Registry value. This value is where thesetting data is stored when the option is turned on or off in the FolderOptions window. The key containing said value is specified by theRegPath and HKeyRoot parameters, listed earlier. This parameter is
required by all checkbox and radio items.
CheckedValue
Shouldmatchtargetvaluedata type
This holds the data to be stored in the target Registry value (specifiedby the RegPath and ValueName parameters earlier), when said option
is turned on . If you're configuring an option to be used on bothWindows 9x/Me and Windows XP/2000 systems, use both theCheckedValueW95 and CheckedValueNT parameters instead of this
value . Otherwise, this parameter is required by all checkbox and radioitems.
CheckedValueW95
Shouldmatchtargetvaluedata type
Use this instead of CheckedValue , above, if you're configuring an
option to be used on both Windows 9x/Me and Windows XP/2000systems. This value contains the data that will be applied if the systemis running Windows 9x/Me. Used in conjunction with CheckedValueNT ,
below.
CheckedValueNT
Shouldmatchtargetvaluedata type
Use this instead of CheckedValue , above, if you're configuring an
option to be used on both Windows 9x/Me and Windows XP/2000systems. This value contains the data that will be applied if the systemis running Windows XP, 2000, or NT. Used in conjunction withCheckedValueW95 , later.
UnCheckedValue
Shouldmatchtargetvaluedata type
This holds the data to be stored in the target Registry value, when saidoption is turned off . This value is optional; if omitted, it is assumed tobe 0 .
DefaultValue
Shouldmatchtargetvaluedata type
This is the default value, used only if the target Registry value doesnot already exist. As soon as the option in the Folder Options windowis turned on or off at least once, this parameter is ignored, andWindows instead reads the state of the target value, comparing it toCheckedValue and UnCheckedValue to determine if the option should
appear checked or unchecked. This value is optional; if omitted, it isassumed to be 0 .
The value type (String, Binary, DWORD) of the CheckedValue , UnCheckedValue , and DefaultValue
parameters all depend on what the target value requires. For example, if the target value you'rechanging is a DWORD value, then all three of these parameters must also be DWORD values.
After you've created keys and entered the appropriate property values, your Registry should looksomething like Figure 3-9 , and the resulting Folder Options dialog box should look like Figure 3-8 . IfFolder Options is open, you'll have to close it and reopen it for the changes to take effect.
Figure 3-9. Settings that appear in the Advanced Folder Options list are
7.

configured in the Registry
If you try to add a setting using the previous procedure and it doesn't show up in Folder Options, mostlikely one or more required values are missing.
Close the Registry Editor when you're finished.8.
The examples shown in Figure 3-8 and Figure 3-9 show how another solution in this book (see the discussionof the Recycle Bin in Section 4.1.1 ) can be turned into an advanced Folder Options setting. Here, a singlecheckbox allows you to easily turn on and off the Rename and Delete commands in the Recycle Bin's contextmenu.
When the Folder Options dialog box is first displayed, each option is set according to the current value of thecorresponding settings. More specifically, the current data stored in each target value is compared with thecorresponding CheckedValue and UnCheckedValue , and the option in the Advanced settings list is set
accordingly. When the OK button is pressed in Folder Options, the settings in the Registry are then writtenusing the same criteria.
To reproduce a setting elsewhere in the Windows interface or the interface of a third-party application, you'llfirst need to find the respective Registry setting; see Section 3.3.2 , earlier in this chapter, for moreinformation. Refer also to the section on Registry patches, which offers a very handy way to reproduce thecustomizations made here on any number of computers.
3.3.7. Using INI Files
If you've been using a Windows PC for any length of time, you've probably come across files with the .inifilename extension. Initialization files (or Configuration Settings, as they're known in any recent release ofWindows) were used in the old days to store settings for applications, as well as Windows itself, before theRegistry was implemented. INI files are simply text files (editable with any plain-text editor, such as Notepad)that are specially formatted to store such settings. Because INI files are limited in their maximum file size (64KB) and are not as efficient as the Registry, application developers have been strongly encouraged toabandon INI files and instead store settings in the Registry. Since some applications still use INI files to storecertain settings, it may become necessary to look for and change settings in INI files as well.
An example of an application that may still use an INI file today is an application installer. An INI file wouldallow a program to read and store settings without having to rely on the Registry; that way, the settingswould be accessible regardless of the computer on which the program was run. INI files are also handy (forthe same reason) for programs that run over a network. Windows also includes a few INI files, althoughthey're generally used only to maintain compatibility with older applications.

To edit an INI file, just double-click it, and it will open in Notepad.[18] A typical INI file looks something likethis:
[18] To configure another text editor to be the default INI file editor, see the discussion of file types in Chapter 4 .
[Episodes]2F01=The Last Traction Hero9F22=Spay Anything4f12=Why do Fools fall in Lava?7F09=Porch Pals
[Cities]first=Brockwaysecond=Ogdenvillethird=North Haverbrook
Section names are always enclosed in square brackets ([...] ); the lines that follow are the settings
contained in that section. A section continues until the next section begins or the file ends. Settings include asetting name, followed by an equals sign, and then the data assigned to that setting.
You'll notice that the structure of INI files is similar (but not identical) to that of Registry patches, discussedearlier in this chapter.
3.3.7.1 Searching INI files for settings
In addition to searching the Registry, you may want to search all INI files for a particular setting:
Open a Search window (see Chapter 2 ).1.
Type *.ini in the All or part of the file name field, and type the text for which you want to search in
the A word or phrase in the file field.
2.
Double-click on any file in the search results to view it, and use your text editor's search feature to findthe specific instance of text in the file.
3.
3.3.7.2 Special case: System.ini and Win.ini
INI files can be found in a variety of places; some applications place their INI files in the application folder,while others store them in the Windows folder (the preferred location, recommended by Microsoft many yearsago). Although it's becoming less common, some applications store their settings in the file, Win.ini , which isthe INI-file equivalent of the HKEY_USERS branch of the Registry.
Right alongside Win.ini is the System.ini file, the INI-file equivalent of the HKEY_LOCAL_MACHINE Registry
branch. Both of these files are still included in Windows XP, although it's primarily to maintain compatibilitywith such older applications that expect to find or store certain settings therein.
There's typically little interest anymore in either of these files. If you're familiar, for example, with the now-obsolete Load= and Run= lines in the [Windows] section of Win.ini , that functionality is taken care of by the
Startup folder in the Start Menu, as well as several locations in the Registry (see Chapter 6 for details).

Similarly, the shell= line of System.ini , which was used to specify an alternate Windows shell (replacing
Program Manager in Windows 3.x or Explorer in Windows 95) is no longer supported at all in Windows XP.

Chapter 4. Tinkering TechniquesThe most important part of software design is the interface. The interface is the only link we humanshave with the machines we usethe better the interface, the better the link, and the more useful themachine will be. Because the Windows XP software has already been designed and written, the mostwe can hope to do is to tinker with it so that it works more like we think it should.
The first thing I do when I hit a roadblock or find a "feature" in Windows is jump into the Registry andtry to fix it. The more I hack away at Windows's flaws, the easier it gets, and the leaner, cleaner, andless annoying Windows becomes. The solutions in this chapter illustrate this point.
The unfortunate methodology behind the design of the Windows interface is that it's supposed to beusable by the lowest common denominator: the person who has never seen Windows before. Don'tget me wrong, one of the most important interface design considerations is its ability to be used bythe uninitiated. But there are three main problems with this approach if not done correctly. One, suchan interface can be inherently condescending. Two, no user is a beginner forever. Three, users arenot all the same.
Many people don't realize that it is possible to have an elegant, simple interface that is easy andcomfortable for beginners to use, yet is not limited in its usefulness as users gain experience. Adumbed-down interface is not the answer.
One of Windows's strong points is its flexibility. For example, the fact that you can reprogram almostany system object on the desktop to serve a different function, and this is one of the main reasonsthat Windows enjoys such a large market share. Although the variety of solutions presented here is atestament to the power and flexibility of Windows XP, I'd also like to note the need for such solutionsin the first place.
This chapter takes advantage of the basic topics covered in Chapter 2such as shortcuts, systemobjects, and some of Windows's more obscure settingsas well as usage of Registry, discussed inChapter 3, to customize Windows beyond Microsoft's intentions. We'll start by clearing some of theclutter caused by the installation of Windows and move on to customizing whatever is left over to suityour needs.
Although most of these solutions target specific annoyances in the operating system, each one isused to illustrate broader concepts and methodology.
Now, we certainly don't expect every user to feel compelled to take all the advice in this book: noteveryone is going to want to turn off Windows's built-in support for ZIP files nor disable the WindowsPicture and Fax Viewer application. However, by excavating the Registry and many of the moreobscure dialog boxes, you'll discover other things along the way that will assist you in resolving yourown annoyances.
If you haven't reviewed Chapter 3, I suggest you do so at this point. It covers the Windows Registryand the Registry Editor, which are used extensively in many of the solutions in this and subsequentchapters.

Registry patches, discussed in Chapter 3, are great for backing up portions ofthe Registry and can be used to undo any changes you may decide to makehere. Furthermore, once you've made a change you like, you can back it upwith a Registry patch of its own, making it easy to restore it should it beoverwritten by an application installer or Windows Update.

4.1. Customizing Your Desktop
The default configuration of Windows XPincluding the way the desktop and Start Menu are configuredand which optional Windows components are installedwas decided by a committee at Microsoft. Themotivation was not so much ease of use as it was how to best showcase the features included in thenew operating system. This criterion may be great for the marketing department at Microsoft, but itdoesn't make for a very pleasant experience for the user.
The best place to start when customizing an interface is to throw out all the stuff you don't want,which will make much more room for the stuff you actually use. By not being forced to wade throughdozens of icons or menu items to find the one you want, you can complete your work more easilyand with less aggravation.
4.1.1. Cleaning Up Desktop Clutter
Not only does Windows XP sport fewer icons on the desktop, by default, than any preceding versionof Windows, but the icons that have remained are actually easy to remove. The removal process,however, depends on the type of object you're trying to remove.
There are two types of icons that appear on the desktop (not including the taskbar or Start Menu).Those objects that are physical files or shortcuts to files are simply stored in your desktop folder(typically \Documents and Settings\{username}\Desktop); these items can be deleted, moved,renamed, etc. as easily as any other file on your hard disk. The Desktop Cleanup Wizard, aninteractive program designed to help the truly lazy among us remove less frequently used file andshortcut desktop icons, can be found in Control Panel Display Desktop tab Customize Desktop (shown in Figure 4-1).
Figure 4-1. The Desktop Items window allows you to show or hide a fewprominent desktop objects, as well as customize their icons

Other icons, such as the Recycle Bin and My Computer are virtual objects, in that they don'trepresent physical files on the hard disk, but rather are internal components of the Explorer.exeapplication. These icons are referenced in the Registry and can be removed by deleting thecorresponding Registry keys (details can be found later in this section); the only exception is theRecycle Bin, which is discussed subsequently. The Internet Explorer and My Documents icons are alsovirtual objects, despite the fact that they appear to be functionally identical to shortcuts to theInternet Explorer application and My Documents folder.
You can remove or reinstate the My Documents, My Computer, My Network Places, and InternetExplorer icons by going to Control Panel Display Desktop tab Customize Desktop.This displays the Desktop Items window, shown in Figure 4-1, where you can also change the iconsfor these objects. Additionally, you can rename any of these items (except for the Recycle Bin) asyou would any ordinary file: by selecting and pressing F2, by right-clicking and selecting Rename, orby clicking twice (slowly) on the icon caption.
4.1.1.1 Special case: the Recycle Bin
Having the Recycle Bin icon on your desktop can be convenient, but because there are several otherways to delete an object (such as right-clicking and selecting Delete or highlighting an item andpressing the Del key), it really isn't necessary. Furthermore, there's a Recycler folder on every drive,which works just like the Recycle Bin desktop icon.
The Recycler folder, found on every hard disk and some removable volumes, is actually where theRecycle Bin stores files before they're actually deleted. Dragging items into these folders has thesame effect as dragging them into the Recycle Bin icon. If you don't see it, you'll need to configureExplorer to show hidden files and folders (Control Panel Folder Options View tab).

The following solution allows you to modify the Registry data for the Recycle Bin object, making iteasy to rename or delete it, as shown in Figure 4-2:
Figure 4-2. Adding the Delete option to the Recycle Bin's context menu
Open the Registry Editor (discussed in Chapter 3).1.
Expand the branches to HKEY_CLASSES_ROOT\CLSID\{645FF040-5081-101B-9F08-00AA002F954E}\ShellFolder\. You know you have the right Class ID key if its (Default)value is set to Recycle Bin. It may be easier to locate this key by searching for the first fewcharacters of the Class ID or for the text Recycle Bin.
2.
Double-click the Attributes value, and replace the contents with 70 01 00 20. If you onlywant to add the Rename context menu item (without Delete), type 50 01 00 20 instead.
Note that this is a binary value, and the input box may not behave like a normal text box; if youmess up, just click Cancel and try again.
3.
Close the Registry Editorthe change should take effect immediately.4.
You now have the option of deleting the Recycle Bin at any time by right-clicking on it andselecting Delete, or renaming it just as you'd rename any ordinary file.
5.
To restore your Recycle Bin to its default, removing the Rename and Delete options from its contextmenu, repeat the above process but instead enter an Attributes value of 40 01 00 20. Note that this
won't restore the Recycle Bin's original name, nor will it put it back on the desktop if it has beendeleted (see the following topic for a solution).
If you delete the Recycle Bin, it's still possible to delete files and subsequently retrieve them. Any fileor folder can always be deleted by right-clicking and selecting Delete, or by selecting and pressingthe Del key. If you have the Recycle Bin configured to store recently deleted files, you can retrievethem by opening Explorer and navigating to c:\Recycler.[1] In that folder will be a folder for eachuser on the system, signified by a long numeric code (described in Section 4.2.1, later in thischapter); in most cases, there will be only one such folder here. Open the folder to view recentlydeleted files.
[1] If you don't see the Recycler folder, go to Control Panel Folder Options View tab, and make sure the Show
hidden files and folders option is selected, and the Hide protected operating system files option is turned off.

4.1.1.2 Special Case: really stubborn icons
Once in a while, you'll encounter an icon on your desktop, most likely installed by an older applicationfrom Microsoft or another manufacturer, that you just can't get rid of using the solutions in theproceeding sections.
The easiest way to hide (or show) these icons is to use Microsoft's TweakUI (see Appendix A): justselect the Desktop category and uncheck any desktop item you'd like to hide. If you don't haveaccess to TweakUI, or just don't want to take the time to download and install it, the followingprocedure will do the same thing:
Open the Registry Editor (discussed in Chapter 3).1.
Expand the branches to: HKEY_LOCAL_MACHINE\SOFTWARE\Micro-soft\Windows\CurrentVersion\explorer\ Desktop\NameSpace\.
2.
The key itself will most likely be devoid of values, but it should have a few subkeys, which willbe named something like {645FF040-5081-101B-9F08-00AA002F954E}. These codes are called
Class IDs and point to other parts of the Registry that contain more information about them.Class IDs are stored in the HKEY_CLASSES_ROOT\CLSID branch and are discussed in Appendix D.
3.
Start by clicking on a key and looking at the (Default) value to the right. It should contain a
description of the item. If it doesn't, you can still find out what it is by right-clicking on the keyname in the left pane, selecting Rename, then right-clicking on the text itself, and selectingCopy. This will copy the key name to the Clipboard. Then move to the top of the Registry tree(select My Computer at the root), and select Find from the Edit menu. Right-click on the FindWhat field, and select Paste. Click Find Next to search through the Registry for that key.When you find it, do a little digging in that key and its subkeys to find out what it's really for.
4.
If one of the keys under the ...Namespace branch turns out to match the item you're trying to
get rid of, you can go ahead and delete the key.
Now, deleting an item here is a little like deleting a shortcut in Explorer: it doesn't actuallydelete functionality from your system, it only removes the pointer to the information from thedesktop namespace key. If you're worried that you might want it back some day, highlight thekey, select Export Registry File from the Registry menu to back it up. See Chapter 3 formore information on Registry patches.
5.
When you're done making changes, close the Registry Editor and refresh the desktop. SeeSection 2.3.4 for more information.
6.
4.1.1.3 Hide all desktop icons
To achieve a truly clean UI, you may wish to hide desktop icons altogether. This solution will disablethe display of all icons on the desktop, including any files in your Desktop folder, as well as the virtualicons discussed in the previous sections. It doesn't involve the actual deletion of any data; it merelyinstructs Windows to leave the desktop blank. A benefit of this solution is that, unlike the previoussolutions in this section, it has no effect on the desktop contents when viewed in Explorer:

Right-click an empty area of the desktop.1.
Select Arrange Icons and then turn off the Show Desktop Icons option.2.
If the Show Desktop Icons entry doesn't appear in your right-click menu (possible if you've upgradeda computer on which the "Active Desktop" feature found in some earlier versions of Windows wasdisabled on your system), here's an alternate solution:
Open the Registry Editor (discussed in Chapter 3).1.
Expand the branches to:HKEY_CURRENT_USER\Software\Microsoft\Windows\CurrentVersion\Policies\ Explorer.
2.
Double-click the NoDesktop value. If it's not there, select New from the Edit menu, and thenselect Binary Value; type NoDesktop for the name of the new value.
3.
Replace the contents with 01 00 00 00. If at any time you wish to restore the desktop icons, justdelete the NoDesktop value or replace its contents with 00 00 00 00.
4.
Note that this is a binary value, and the input box may not behave like a normal text box; if youmess up, just choose Cancel and try again.
5.
Click OK and close the Registry Editor. You'll have to log out and then log back in for the changeto take effect.
6.
If you hide all icons on your desktop, it will no longer respond to right-clicks. Toopen the Display Properties dialog, you'll have to go through Control Panel.
4.1.2. Customizing My Computer and Other System Folders
The My Computer and My Documents icons on the desktop, as well as the respective windows theyopen, are both gateways to the files, folders, and drives in your computer. Both their appearance andbehavior can be customized, as illustrated by the following solutions. Likewise, My Network Places isa gateway to the resources available on your network (discussed in Chapter 7) and can be similarlycustomized.
4.1.2.1 Renaming My Computer, My Documents, and My Network Places
As described earlier in this chapter, you can rename any of these items with the same techniqueyou'd use to rename any other object: by selecting and pressing F2, by right-clicking and selectingRename, or by clicking twice (slowly) on the icon caption.
Note that any new name you choose for either of these icons will also be used elsewhere in Windowswhere these objects are referenced. The exception is the folder to which the My Documents icon

points; its name on your hard disk will not change when the icon is renamed.
4.1.2.2 Choosing icons for desktop objects
You can choose new desktop icons for these system objects by going to Control Panel Display Desktop tab Customize Desktop (shown in Figure 4-1). See Section 4.4.1, later in this
chapter, for more solutions.
4.1.2.3 Customize the contents of My Computer
The My Computer window, by default, contains links to all your drives, shortcuts to your MyDocuments and Shared Documents folders, icons for any installed scanners, and, optionally, an iconfor Control Panel.[2] To add more system objects to the My Computer window and, consequently, toExplorer, follow these steps:
[2] To enable or disable the Control Panel icon in the My Computer folder, go to Control Panel Folder Options View
tab.
Open the Registry Editor (discussed in Chapter 3).1.
Expand the branches toHKEY_LOCAL_MACHINE\Software\Microsoft\Windows\CurrentVersion\explorer\MyComputer\NameSpace. Hint: create a Registry patch of this branch before
continuing, in the event that you need to restore the default setup.
2.
Under this branch, you should see one or more keyseach named for a different Class ID. Forhelp in identifying unlabeled keys, see the "Special Case: Really stubborn icons" section.
3.
To add a new key, select New from the Edit menu, and then select Key. You can then enterany Class ID for the name of the key, and the corresponding system object will be added to theMy Computer folder. See Appendix D for a table of Class IDs, or copy and paste a Class ID fromelsewhere in the Registry.
4.
Refresh the My Computer window to see your changes by pressing the F5 key.5.
This solution does not work as you might expect for all system objects. For example, the My NetworkPlaces icon will behave erratically if placed in My Computer. You'll have to use a little trial and error toget the desired results.
You can remove any icon added in this way by deleting the corresponding Registry keys. You can alsouse TweakUI (see Appendix A); just expand the My Computer category and select Drives, anduncheck any drives you want hidden.
4.1.2.4 Customize the contents of My Network Places
You can add items (shortcuts, folders, etc.) to the My Network Places window by simply addingWindows Shortcuts to the \Documents and Settings\{username}\Nethood folder. For example, place

shortcuts to frequently accessed network folders here. The process is similar to the way custom itemsare added to the Start Menu and the Send To menu.
4.1.2.5 Redirect the My Computer desktop icon
All of My Computer's default resources are also available in Explorer and the Start Menu, so you mayprefer to connect another program to the My Computer desktop icon. For example, if you simplyprefer Explorer's hierarchical tree view to My Computer's Macintosh-style, single-folder navigation,you can configure My Computer to launch Explorer:
Open the Registry Editor (discussed in Chapter 3).1.
Expand the Registry branches to: HKEY_CLASSES_ROOT\CLSID\{20D04FE03AEA-1069-A2D8-08002B30309D}\shell. You know you have the right Class ID key if its (Default) value is setto My Computer.
2.
You'll see an existing key already in this branch named find, representing the Search
command in the My Computer icon's context menu. Select New from the Edit menu, and thenselect Key. Type Open for the name of the new key, and press Enter.
3.
Right-click the new Open key, select New again and then Key. Type Command for the name of
this new key, and press Enter.
4.
Click once on the new Command key, double-click the (Default) value in the right pane, typeexplorer.exe in the box, and press Enter. Your Registry Editor window should resemble Figure
4-3, except that I've also included some optional command-line parameters (discussed inSection 2.1.2). You can, of course, replace explorer.exe with the full path and filename of any
other program you'd rather use.
5.
Next, navigate to HKEY_CLASSES_ROOT\CLSID\{20D04FE0-3AEA-1069-A2D8-08002B30309D}\shell, double-click the (default) value, and type open for its contents.
6.
Close the Registry Editor when you're finished. Click on an empty area of the desktop, and pressF5 to refresh the desktop so that this change will take effect. Double-click the My Computericon at any time to start the specified application.
7.
Figure 4-3. Use the Registry Editor to customize the behavior of the MyComputer icon

Using this method, you can also add additional entries to My Computer's context menu; see Section4.3.1, later in this chapter for details.
4.1.2.6 Redirect the My Documents Desktop icon
Right-click the My Documents icon on your Desktop and select Properties. The Target tab, shown inFigure 4-4, allows you to choose any folder to be opened when the My Documents icon is double-clicked. You can also click Move to relocate the "official" My Documents folder, regardless of whetherthe My Documents icon points there or not.
Figure 4-4. The Properties sheet of the My Documents icon allows you toeasily change what happens when it's double-clicked
4.1.2.7 Getting rid of the Shared Documents folder
The following procedure will remove the Shared Documents folder that shows up in Explorer and MyComputer:
1.

Open the Registry Editor (discussed in Chapter 3).1.
Expand the branches to:HKEY_LOCAL_MACHINE\SOFTWARE\Microsoft\Windows\CurrentVersion\Explorer\MyComputer\NameSpace\DelegateFolders.
2.
Under this branch, you should see several subkeys, each named for a different Class ID. Deletethe one named {59031a47-3f72-44a7-89c5-5595fe6b30ee}.
One of the other branches here, {E211B736-43FD-11D1-9EFB-0000F8757FCD}, is responsible
for adding folders for each of your installed scanners and cameras to My Computer andExplorer. It can also be deleted, if desired.
3.
Close the Registry Editor when you're done. The change will take effect immediately, but youmay have to close and reopen any Explorer windows to force them to recognize the change.
4.

4.2. Covering Your Tracks
In nearly every part of the interface, Windows keeps a history of your activity, from a drop-down listof typed commands in the Address Bar to the Recent Documents list in the Start Menu. The problemis there's no apparent way to control this record-keeping. Using the Registry and a number of tricks,it's possible to control some of these features and even wipe out the history at your whim.
Note that the drop-down list that appears in File-Save and File-Open dialogs when you type into theFile name field is not actually a history of previously selected or typed files. Instead, it's an auto-complete mechanism that fills in the field as you type, using the names of the files in the currentfolder.
4.2.1. Taming Recent Documents
Every time you double-click a document in Explorer or on your desktop, Windows places a shortcut tothe file in your Recent Documents folder. At any given time, you might have a few hundred shortcutsin there, effectively tracing your every action when sorted by date.
The contents of this folder are used to populate the Recent Documents menu in the Start Menu(just called Documents if the Classic Start Menu is used), as well as the handful of recentdocuments shown in the File menu of some applications (such as Microsoft Office 2002). Thecontents of the Recent folder are also accessible, by default, from the Places Bar shown in most filedialogs (discussed later in this chapter).
These solutions should help you tame the Recent Documents list.
4.2.1.1 Choose how many recent documents are shown in the Start Menu
Assuming you haven't disabled the Recent folder or hidden the Documents menu, as describedlater, you can control how many of the most recent document shortcuts are shown in the RecentDocuments:
Open the Registry Editor (discussed in Chapter 3).1.
Navigate your way toHKEY_CURRENT_USER\Software\Microsoft\Windows\CurrentVersion\Policies\Explorer.
2.
Create a new DWORD value (go to Edit New DWORD Value), and name the newvalue MaxRecentDocs.
3.
Double-click the new value, select the Decimal option, and type the number of entries to showin the Recent Documents menu. The default is 15.
4.
5.

4.
Close the Registry Editor when you're done. You'll have to log out and log back in for thischange to take effect.
5.
4.2.1.2 Clear out the Recent Documents folder
Since the contents of the Recent folder are just shortcuts, they can be safely and easily deleted onthe fly:
To empty the Recent Documents list, just open Explorer and navigate to \Documents andSettings\{username}\Recent. This folder is hidden, so if you haven't done so already, you'llhave to configure Explorer to show hidden files by going to Control Panel Folder Options
View tab.
1.
Select some or all (using Ctrl-A) of the shortcuts here and delete them. Keep in mind thatthese are only shortcuts, so deleting them won't put any of your data at risk. The change willtake effect immediately.
2.
Note that this solution will erase current shortcuts, but it won't prevent new ones from being created.
4.2.1.3 Turn off the Recent Documents menu in the Start Menu
It's possible to hide the Recent Documents menu altogether, although Microsoft hasn't made it tooeasy for you.
If you have TweakUI (see Appendix A), open the Explorer category and turn off the Allow RecentDocuments on Start Menu option. If you don't have TweakUI, open the Registry Editor, navigateto HKEY_CURRENT_USER\Software\Microsoft\Windows\CurrentVersion\Policies\Explorer, andcreate a new binary value named NoRecentDocsMenu. Double-click NoRecentDocsMenu and enter 0100 00 00 for its data.
Keep in mind that even if the Recent Documents menu is hidden, shortcuts to launched documentswill still be created in the Recent folder. See the next solution for a way to prevent this fromhappening.
4.2.1.4 Permanently disable the Recent Documents folder
Although there is no way to actually disable the creation of shortcuts in the Recent folder, there is away to short-circuit the feature so that newly created shortcuts are deleted immediately. We do thisby instructing Windows to put the shortcuts right into the Recycle Bin; the only requirement is thatyou configure the Recycle Bin to delete files instead of storing them:
Open the Registry Editor (discussed in Chapter 3).1.
Expand the branches to HKEY_CURRENT_USER\Software\Microsoft\Protected StorageSystem Provider. Under this key, you should see a single subkey with a long string of numbers
2.

1.
for its name, which will look something like this:
S-1-5-21-1727987266-1036259444-725315541-500
This code, which will be different on your system, represents the currently logged-in user(namely, you). Since Windows XP maintains a separate Recycle Bin for each user on yoursystem, you'll need to reference this code in the following steps for this solution to work.
2.
Highlight the numeric key, press F2 to pretend you're renaming the key, and then press Ctrl-Cto copy the key name to the clipboard. Lastly, press Esc to abort the renaming process.
3.
Expand the branches to:HKEY_CURRENT_USER\Software\Microsoft\Windows\CurrentVersion\Explorer\ShellFolders.
4.
To the right, you'll see a list of values representing custom user folders. Double-click the Recent
value, and type the following:
c:\recycler\
where c: is the drive on which your copy of Windows is installed. Then, press Ctrl-V to paste
the key name from step 2 into the field, so it looks like this:
c:\recycler\S-1-5-21-1727987266-1036259444-725315541-500
Remember, your numeric code will be different than the one shown here. Click OK when you'redone.
5.
Next, navigate to:HKEY_CURRENT_USER\Software\Microsoft\Windows\CurrentVersion\Explorer\User ShellFolders, and repeat step 5 for this key as well.
6.
Close the Registry Editor when you're done. You'll need to log out and then log back in for thechange to take effect.
7.
Lastly, if your Recycle Bin is set up to store deleted files, you'll have to configure it to erasethem instead. Right-click the Recycle Bin desktop icon, and select Properties. Check the Donot move files to the Recycle Bin option, and click OK.
8.
Test the setup by double-clicking a few documents on your Desktop or in Explorer. Then, open the\Documents and Settings\{username}\Recent folder and verify that it's still empty. Voila!
4.2.2. Thinning Out Explorer's New Menu
If you right-click on the desktop or an open folder (or open Explorer's File menu) and choose New,you will be presented with a special list of registered file types that can be created on the spot.Choose one, and Explorer will create a new, empty file with the appropriate extension in that location(although sometimes a special template file will be used instead; see Section 4.3 in this chapter, for

details).
This list is maintained by certain Registry entries, and since most of us will not need to create newAmi Pro documents on the fly, there is a way to remove these unwanted entries. Having an extraentry here and there is not necessarily a big deal, but it can be quite frustrating if you're forced towade through a long list of file types every time you want to create a new file.
The following two solutions allow you to selectively remove unwanted entries from the New menubut won't prevent applications from adding entries, either when they're first installed or every timethey're run.
4.2.2.1 Solution 1: Using the Registry Editor
Open the Registry Editor (discussed in Chapter 3).1.
Select Find from the Edit menu, type ShellNew, and press OK.2.
Every ShellNew key that is found will be a branch of a particular key named for a file extension
(see Section 4.3.2 later in this chapter). If you don't want that file type in your New menu,delete the entire ShellNew branch.
3.
Repeat this for every unwanted file type, and close the Registry Editor when finished. Thechanges will take effect immediately.
4.
4.2.2.2 Solution 2: Using TweakUI
Open TweakUI (see Appendix A), and select the Templates category.1.
Uncheck any unwanted items, or click Remove for those items you're sure you never want tosee again.
2.
Note: If you investigate what TweakUI actually does to your registry when you turn off a template,you'll see that the ShellNew branch described in Solution 1 has simply been renamed ShellNew-
(making it easy for you to reactivate it later). The corresponding key is only deleted if you clickRemove.
4.2.2.3 Solution 3: Prevent recurring entries (advanced users only)
If either of the previous solutions is ineffective in removing a particularly stubborn entry, in that itkeeps coming back every time you start the associated application, you still have one last resort. Forexample, some applications actually replace this entry every time they're started, completely ignoringyour preferences. Two popular programs known for this annoying behavior are Adobe Photoshop 4.0and 5.0 (they've fixed it in version 6.0 and later) and JASC's Paint Shop Pro 4.0 or later. Thefollowing solution works on both of these applications and should work on any other program thatdoes this as well.

You'll need a good hex editor, such as UltraEdit-32 (http://www.ultraedit.com/), which we'll use toactually change the program executable.
If this is done incorrectly, it can damage an application. But if you back up anyfiles before altering them, you eliminate this possibility.
The following example assumes you're using UltraEdit-32 to fix this problem in Paint Shop Pro 4.0.Although the specifics may change for later versions of the application you're editing, or if you'reusing a different hex editor, the technique should still be applicable:
First, follow the instructions in the previous Solution 1 or Solution 2 to get rid of any existingentries.
1.
Because Paint Shop Pro automatically adds the ShellNew branch (explained earlier in Solution
2) every time it starts, we'll start by assuming that the code responsible resides in the mainexecutable, Psp.exe. Make sure that Paint Shop Pro is not running before you start messingaround with its files.
2.
Make a backup of the Psp.exe file in the Paint Shop Pro installation directory. See Section 2.2.3for more information.
3.
In UltraEdit-32, select Open from the File menu, and select Psp.exe from the Paint Shop Proinstallation directory.
4.
Because this editor is used to edit ASCII (plain text) files as well as binary (hex mode) files,make sure it's in hex mode (make sure the Hex Edit option is checked in the Edit menu).
5.
Select Find from the Search menu, type shellnew in the Find What field, check the Find
ASCII option, and click Find Next. When UltraEdit-32 finds the first occurrence of ShellNew,close the Find box and change the text so it reads ShellNixa change that small (like the "ix")
isn't likely to disrupt anything in the program, but it's enough to fool Explorer.
If you can't find the ShellNew text in the application you're editing or if replacing it asdescribed earlier doesn't do the trick, there are other places to look. For example, manyprograms have several .DLL files in the same directory. Use Explorer's Find feature to lookthrough all the files in the application's directory for the text ShellNew. Repeat the previoussteps in any file in which it's found.
6.
Repeat the process for all additional occurrences of ShellNew. When you're finished, selectSave from the File menu and close UltraEdit-32. The change should take effect the next timeyou start Paint Shop Pro.
7.
Admittedly, Solution 3 is extreme, but sometimes the programmers have been so stubborn that it'syour last resort. Also, if you get a hankering for some tinkering, learning the procedure for this typeof customization can come in very handy.
4.2.3. Customize the Tray/Notification Area

The tray is the little box (usually in the lower-right corner of your screen, at the end of your taskbar)that, by default, contains the clock and the little speaker (plus a few other icons). Microsoft calls thisspace the "Notification Area," because its intended use is to notify you of system status: when you'reconnected to the Internet, when your laptop's battery is low, etc. This area is also often referred toas the System Tray (or systray) for no compelling reason.
If you turn off the clock and remove all tray icons, the tray will disappearcompletely, providing more space for taskbar buttons. It will reappear whenany tray icon is added.
Figure 4-5 shows a more-or-less typical tray. Odds are that you have more icons in your tray thanyou actually want or need. Whether that bothers you or not is anybody's guess. However, tray iconstypically correspond to running programs, and it's usually a good idea to shut down running tasksyou don't need, for the sake of both improved performance and increased system stability.
Figure 4-5. The tray contains several (usually too many) icons, as well asthe clock
The problem is that there doesn't seem to be any sort of consistency or standards for items in thetray; some icons get double-clicked, some require a single right- or left-click, and some don't getclicked at all. Some items can be removed easily, some can be removed with a setting in someobscure dialog box, and some can't be removed at all. Here are some ways to get a little morecontrol of the tray.
4.2.3.1 Remove common items from the tray
Volume control
To remove the yellow speaker icon (the volume control), right-click it and select Adjust AudioProperties, or go to Control Panel Sounds and Audio Devices and turn off the Showvolume icon on the taskbar option. If you remove the yellow speaker, you can still adjustthe volume with the Volume Control utility (sndvol32.exe) included with Windows, as well aswith the volume control on your speakers (if applicable).

Network connections
Each network connection configured on your system can have its own tray icon, showing at aglance when the particular connection is actually connected. This may be handy for dial-up orVPN connections but is probably unnecessary for connections that are always on, such as LANand high-speed Internet connections. To turn off the tray icon for a particular connection, go toControl Panel Network Connections, right-click the connection entry corresponding tothe tray icon you wish to remove, and select Properties. Turn off the Show icon innotification area when connected option at the bottom of the General tab, and click OK.See Chapter 7 for more information on network connections.
Windows Messenger
By default, the Windows Messenger program is loaded automatically when Windows XP starts,even though the vast majority of users will never use this program. To let you know it's there,its icon appears in the tray. To get rid of the icon, you'll have to close the program; to get ridof the icon permanently, you'll have to instruct it not to load automatically:
Double-click the Messenger icon (which looks like two little people) or right-click it andselect Open.
a.
Note that the icon will have a red X over it if you haven't yet set up a Messenger profile.Don't worry; you don't have to set up a profile unless you want to use Messenger.
b.
If a sign-up wizard appears, just click Cancel.c.
Go to Tools Options Preferences tab, and turn off both the Run thisprogram when Windows starts and Allow this program to run in the backgroundoptions.
d.
Click OK and then close Windows Messenger when you're done.e.
See Section 5.1.6 for information explaining how to completely uninstall the WindowsMessenger component from your system.
RealPlayer
Some earlier versions (prior to 9.0) of RealNetworks's RealPlayer utility (http://www.real.com)place a little blue icon in the tray when they're first installed. The program this icon representsdoesn't do anything and can be removed without any adverse effects. (In fact, disabling thisprogram will allow Windows to start a little more quickly next time.) To disable it, start RealPlayer and open the configuration dialog box. Disable the Start Center option, and click OKwhen you're done.
In more recent versions of RealPlayer (9.0 and later), the Start Center has been replaced withsomething called the Message Center, which is responsible for displaying advertisements andannoying update reminders from RealNetworks. To disable this silly accessory, start RealPlayer, go to Tools Preferences, expand the Automatic Services category, select

Message Center, and then click Configure Message Center. Turn off the Check for newmessages and Show Message Center icon in the System Tray options, and then click OKwhen you're done.
Safely Remove Hardware
This icon appears if you have certain types of removable media drives, such as memory cardreaders. Windows suggests that you use it to "stop" a device before ejecting its media, butvery rarely is this step necessary. Unfortunately, there's no way to remove this iconyour onlychoice is to use the solution in the next topic, Section 4.2.3.2.
Windows Security Alerts
Double-click the icon and then click Change the way Security Center alerts me. Turn off allthe settings here and then click OK. See Chapter 7 for details.
4.2.3.2 Hide stubborn icons
A new feature in Windows XP is the ability to hide tray icons that otherwise can't be removed,decreasing clutter and increasing taskbar real estate. Here's how to do it:
Right-click an empty area of the taskbar and select Properties (or go to Control Panel Taskbar and Start Menu).
1.
Turn on the Hide inactive icons option and then click Customize. The Customize Notificationsdialog, shown in Figure 4-6, will appear.
Figure 4-6. The Customize Notifications dialog allows you to hide trayicons that can't otherwise be disabled
2.

Windows keeps a history of every icon that has ever appeared in your tray, and they're allshown in this window. The first section, Current Items, lists the icons that currently appear inyour tray; all others are shown in the Past Items section.
3.
The options in this list are, unfortunately, not terribly intuitive. Start by selecting an entry in thelist. A drop-down list then appears next to its title, from which there are three choices:
Hide when inactive
This is the default for all icons and simply means that the icon is only shown when theapplication that owns it instructs Windows to display it.
Always hide
Choose this to, not surprisingly, hide the icon.
Always show
This option does absolutely nothing; it's no different than the Hide when inactiveoption. The only way to have an icon always appear is to configure your own, using thesolution in the following topic, "Add your own programs to the tray."
4.
When you're done, click OK, and then OK to close the Taskbar and Start Menu Propertieswindow for your changes to take effect. (For some reason, the Apply button doesn't alwayswork here, at least with regard to hidden or unhidden tray icons.)
5.

5.
If at least one active tray icon is hidden, it won't simply disappear. Instead, you'll see a little left-arrow button in its place at the edge of the tray. Click the button to temporarily expand the tray toshow the "hidden" items. The tray automatically collapses when you move your mouse away, hidingthe icons again. Unfortunately, the only way to simultaneously hide this button and hide the trayicons you don't want is to remove the tray completely (explained next).
4.2.3.3 Hide the tray completely
If all you're after is a clean taskbar, and you don't need access to any icons remaining in your tray,you can hide it completely:
Start the Group Policy Editor (Start Run and then type gpedit.msc).1.
Navigate to the User Configuration\Administrative Templates\Start Menu and Taskbar
branch.
2.
Double-click the Hide the notification area setting on the right side.
Don't be afraid to experiment with some of the other settings in the GroupPolicy Editor. Most of the settings are written out in plain English, andmany even have accompanying explanations. Among other things, you canhide certain elements of the Start Menu, customize the appearance of theInternet Explorer toolbars, and turn off some other annoying features.
3.
Select Enabled and then click OK. You'll need to log out of Windows and then log back in forthis change to take effect.
4.
4.2.3.4 Add your own programs to the tray
The icons that appear in the Tray are placed by applications; this area is not really designed to acceptuser icons like the Start Menu. However, there is a way to add your own shortcut icons to the tray,providing quick buttons for a few commonly used programs or folders:
Obtain and install the Tray utility (download it from http://www.annoyances.org/ ).1.
Run Tray.exe, right-click on the new icon in the tray, and select Help for instructions.2.

4.3. File Types: The Link Between Documents andApplications
The term file types describes the collection of associations between documents and the applicationsthat use them. The most apparent use of this feature is that, for example, Windows knows to runNotepad when you double-click on a text document in Explorer (proof that Windows XP is not trulyobject oriented).
True object-oriented design dictates that objects (in this case, files and folders) be aware of their owntraits. This design is only mimicked in Windows XP. Instead of each file knowing which application isused to edit it, Windows determines how to handle a file based solely on the filename extension. Thisdesign has advantages and disadvantages, but Microsoft's decision to hide filename extensions, thebasis for file associations, only makes the whole system more difficult to understand and master.
It all starts with file extensions, the letters (usually three) that follow the period in most filenames.For example, the extension of the file Readme.txt is .txt, signifying a plain-text file; the extension ofResume.wpd is .wpd, signifying a document created in WordPerfect. By default, Windows hides theextensions of registered file types in Explorer and on the desktop, but it's best to have themdisplayed.
File extensions not only allow you to easily determine what kind of file a certain file is (because iconsare almost never descriptive enough), but also allow you to change Windows's perception of the typeof a file by simply renaming the extension. Note that changing a file's extension doesn't actuallychange the contents or the format of the file, only how Windows interacts with it.
To display your file extensions, open Folder Options in Control Panel (or from Explorer's Toolsmenu), choose the View tab, and turn off the Hide extensions for known file types option. ClickOK when you're done.
By hiding file extensions, Microsoft hoped to make Windows easier to usea plan that backfired forseveral reasons. Because only the extensions of registered files are hidden, the extensions of filesthat aren't yet in the File Types database are still shown. What's even more confusing is that, whenan application finally claims a certain file type, it can appear to the inexperienced user as though allof the old files of that type have been renamed. It also creates a "knowledge gap" between thosewho understand file types and those who don't; try telling someone whose computer still has hiddenextensions to find Readme.txt in a directory full of files. Other problems have arisen, such as tryingto differentiate Excel.exe and Excel.xls in Explorer when the extensions are hidden; one file is anapplication and the other is a document, but they may be otherwise indistinguishable.
4.3.1. Customize Context Menus
A context menu (sometimes called a shortcut menu) is the little menu that appears when you use theright mouse button to click on a file, folder, application titlebar, or nearly any other object on thescreen. Most of the time, this menu includes a list of actions appropriate to the object you've clicked.In other words, the options available depend on the context.

The context menu for files, the most commonly used and customized context menu, depends uponthe type of file selected, which is determined by the filename extension. For example, all text files(with the .txt extension) will have the same context menu, regardless of what they contain or whichapplication was used to create them. (This is why Windows gives you a stern warning when you try tochange a file's extension.)
In addition to the standard context menu items, such as Copy, Paste, Delete, Rename, andProperties, you'll usually see Open, Print, and Print To (at the top of the list), which representcustomizable actions that can be performed with the selected file. Each of these actions is linked toan application: if you right-click on a .txt file and select Open, Windows will launch Notepad (bydefault) and instruct it to open the selected file. Customizing this association between the documenttype and the applications installed on your computer is what this section is about.
The default actionthe action that is carried out when a file of a given type is double-clickedappears inbold text in the context menu. If a file type is not registered with Windows, double-clicking on a fileof that type will open the Open With dialog box, allowing you to choose an associated application onthe spot. The exception to this occurs when a file type has been registered, yet has no actionsassociated with it (useful if you want to identify a file type, but not necessarily open it ).[3] In thiscase, nothing will happen when the file is double-clicked.
[3] An example is the way DLL files are registered with Windows by default.
The default action is also what can cause the most controversy. Say you have grown accustomed todouble-clicking .html files on your hard disk and having them opened in Netscape Navigator (in otherwords, Netscape is the default application for that file type). One day, out of necessity or obligationor whatever, you install one of Microsoft's updates to Windows, which happens to contain a newversion of Internet Explorer. Unless you're careful to choose the correct advanced options, suddenly,and without warning, all of your .html associations are changed, making Internet Explorer the defaultapplication.
Although the most obvious reason to customize a file's context menu is to control the default action,what makes context menus so useful is that you can assign as many different actions as you like toany given file type. In the case of .html files, for example, you could add an Edit action to open yourfavorite web page editor, a View with Netscape action, and a View with Internet Exploreractionall in addition to the default action.
It's possible to add, remove, or modify context menu items for nearly any file type. The File Typeswindow, shown in Figure 4-7, is the only dedicated tool provided by Microsoft to manage fileassociations in Windows; it has been somewhat improved in Windows XP from previous versions.Some thought has been given to both experienced and novice users, although it still lacks thestreamlining and advanced functionality such an important feature deserves.
Figure 4-7. The File Types tool has been significantly improved inWindows XP from previous versions, although it has some very annoying
quirks

For the most flexibility in customizing context menus, you'll want to see how file associations areactually stored in the Registry, as described later in this chapter.
4.3.1.1 Use file types to add, remove, or edit context menus
Select Folder Options from Explorer's View menu (or double-click the Folder Options icon inControl Panel), and choose the File Types tab.
The list shows all of the file types that have been configured on your system. You can sort theentries by filename extension or file-type description to make any given file type easier to findby clicking the respective column headers.[4]
[4] The ability to sort the entries is a relatively new and sorely needed feature. In earlier versions ofWindows (before Windows Me), finding file types in this window has been difficult: for example, the entryfor the .xls extension was listed under "Microsoft Excel Spreadsheet," putting it alphabetically under "M"instead of "E" for Excel or "X" for XLS.
Keep in mind that some file types may claim more than one extension. For example, the .htmand .html extensions are most likely associated with the same file type. If you are editing such afile type, it won't matter which extension you select. See Section 4.3.1.2 later in this chapter formore information.
1.
Select a file type from the list, and click Advanced. Don't bother with the Change button; itonly displays the more limited Open With dialog box, discussed in "Choose a file-type
2.

association on the fly," later in this section.
If you see Restore here instead of Advanced, see "What to do when the Advanced button ismissing," also later in this section.
2.
The Actions list, shown in Figure 4-8, contains a list of the customizable context-menu itemsfor the selected file type. Each one has a name and a command line (the application filenamefollowed by command-line parameters, if applicable).
Figure 4-8. The Edit File Type window shows the customizableactions (each of which appears as a context-menu item) for any
given file type
The bold item is the default action, also shown in bold at the top of the context menu. If there'sno bold item, and therefore no default, double-clicking a file of that type will probably donothing. The exception is that if one of the actions is named open, it will be the default whetheror not it appears in bold.
To make no action the default, you'll have to delete the current default (bold) action. If youdon't want to remove any actions, just add a new, temporary action, make it the default, andthen delete it. You might wish to have only non-default actions for a file type if you want toprevent accidental activation.
The Use DDE option, if enabled, means that the action is intended to activate an alreadyrunning instance of an application (if possible), rather than starting a new instance. DDE is apoorly documented yet important feature used by Windows to communicate with applicationsthat are already open; for example, if you right-click one or more Microsoft Word Documents(.doc files) and select Print while Word is already running, Windows simply uses DDE tocommunicate with Word and instruct it to open the file.
3.
Click OK when you're done. The changes should take effect immediately; your desktop and anyopen Explorer or single-folder windows should automatically refresh within a few seconds.
4.

In some cases, your changes will not take effect in any open Explorer windows. If, for example,you rename an existing file type or change its icon, and the old information still appears in filelistings when you're done, just close the Explorer window and then reopen it to force it to utilizeyour new settings.
4.
4.3.1.2 Link a filename extension to an existing file type
Sometimes two filename extensions share the same file typethat way, you don't have to go to thetrouble of creating and modifying a separate set of actions for each extension. In cases where two fileformats are similar enough to warrant file-type sharing, such as .jpg and .jpeg files, or even .jpg and.gif files, follow the upcoming steps.
To see a list of all the extensions owned by a given file type, sort the Registered file types list byfile-type description by clicking on the respective column header. Note that it's possible for twodifferent file types with a different set of actions to have the same description, which wouldunfortunately make then indistinguishable in this view.
In the File Types window (discussed earlier in this section), configure a single file type asdesired (or simply locate an existing file type).
1.
Click New, and type the filename extension without the dot (e.g., txt) in the File Extension
field. If the extension is currently associated with another file type, that link will be broken thenreplaced with the one you choose here.
2.
Click Advanced >> to show a second list of existing file types, and choose any desired file typeto claim ownership of the new extension.
If, instead, you want to create a new file type, either choose <New> or simply make no choicefrom the list. A new file type will be created and named for the extension; if you type xyz, the
new file type will be named "XYZ File."
3.
You can then proceed to edit the new entry. If you've linked the new extension with an existingfile type, all that file type's properties (e.g., actions, icon, description) will appear in the newentry as well.
4.
4.3.1.3 Choose a file-type association on the fly
If you have double-clicked on a file with an extension that has not yet been registered, you may haveseen the dialog box shown in Figure 4-9, which is Windows's way of asking what to do with theselected file. Here, you have two choices:
Use the Web service to find the appropriate program
This option jumps to a page at Microsoft's web site, which is used to look up the extension ofthe selected file to give you a clue as to what type of file it might be. See the "Microsoft

Extension Finder" sidebar for details.
Microsoft Extension Finder
Microsoft has put together a simple "extension finder" web site, intended to provide moreinformation about file types that Windows doesn't recognize. Unfortunately, it's onlyavailable through the interface for unregistered file types, but you can go directly to thisURL to look up any filename extension:
http://shell.windows.com/fileassoc/0409/xml/redir.asp?Ext={your extension}
where {your extension} is the filename extension (without the dot) that you wish to
learn more about. For example, to find out about the .sit extension, you'd go to:
http://shell.windows.com/fileassoc/0409/xml/redir.asp?Ext=sit
The resulting page typically includes a description of the file format and links to one ormore applications that can be used to view or edit files of the requested type.
Select the program from a list
In most cases, you'll want to use this option to choose an application you've already installed toopen the document. The subsequent solution shows how to do this for file types that havealready been registered.
Figure 4-9. Double-click a file of an unknown type (unfamiliar filenameextension), and Windows will display this dialog asking what to do

This is the same box that appears if you open the File Types window, select a file type from the list,and click Change. To get this window for an already registered file type without having to open theFile Types window first, follow these steps:
Right-click the document you wish to open and select Open With.[5]
[5] Previous versions of Windows required that you hold the Shift key to display the Open With item, astep no longer necessary in Windows XP.
You can also right-click the file and select Properties to see which program is configured as thedefault for the type. You can then click Change to display the Open With dialog.
1.
The Open With dialog appears, as shown in Figure 4-9. Choose an application from the list, orclick Browse if the desired application is absent.
2.
Click Always use this program to open these files to assign a new default action using theselected application. This option will be turned off by default, allowing you to choose anapplication without affecting your current associations. Unfortunately, there's no way to add anon-default context-menu item with this method.
3.
This is a quick way to not only create new file types on the fly, but change an existing file typewithout having to return to the File Types window. It's important to realize, however, that when youchange an existing file type's default action using this method, Windows XP considers the change tobe tentative, and displays different controls the next time you view the file type. See the followingtopic, "What to do when the Advanced button is missing," for details.
4.3.1.4 What to do when the Advanced button is missing
Occasionally, the Advanced button in the File Types window will be replaced with a Restore buttonfor a given file type. This is the result of a new built-in mechanism for restoring file types that havebeen overwritten with the "Choose a file-type association on the fly" procedure, explained earlier inthis section. Unfortunately, this mechanism doesn't work very well and ends up causing morefrustration than if it were not present at all.
The problem is that if the Restore button is present, there's no way to edit a file type without firstcompletely reverting it to its earlier configuration.
The cause of this problem is the way file-type information is stored in the Registry when the defaultaction is modified by using Open Withinstead of overwriting the existing file-type data (explained indetail in Section 4.3.2, later in this chapter), the new association is written to this Registry locationinstead:
HKEY_CURRENT_USER\Software\Microsoft\Windows\CurrentVersion\
Explorer\FileExts\{your file extension}
So, for example, if you're editing the .asp file type, and the Registry key,HKEY_CURRENT_USER\Software\Microsoft\Windows\CurrentVersion\Explorer\FileExts\.asp,
exists, the File Types window will display the Restore button. If you delete the key, the Restorebutton will go away, but the new file- type data will be lost as well. Since it would be too much

trouble to move the relevant Registry data to its more permanent location, there's unfortunately nopractical way to get the Advanced button back without first reverting the file type. Let's hopeMicrosoft fixes this in the next version.
4.3.2. Understanding File Types
All active file-type associations are stored in the Registry. Understanding the structure of file-typedata can be very helpful in not only fixing problems, but performing advanced techniques (illustratedlater in this chapter). Examples include backing up your file types and modifying otherwiseinaccessible file types, such as drives and folders.
The HKEY_CLASSES_ROOT branch of the Registry stores information on all your file types. File-
extension keys (preceded by periods) are listed first on the tree, followed by the actual file-type keys.
The first Registry keys, named for file extensions, typically only contain pointers to other keys, whichthen describe the file types. For example, if you navigate to the key HKEY_CLASSES_ROOT\.txt (note
that the period is included here), you'll notice that there's not a lot of information there. Theimportant (and often sole) piece of information is the (default) value, which is set to the name ofanother key, located lower down the tree.[6] In the case of .txt, the (default) value contains onlythe text txtfile (see Figure 4-10). This, in effect, is a reference to HKEY_CLASSES_ROOT\txtfile,
which is the key that contains the actual information for the file type, as shown in Figure 4-11.
[6] The reason the other keys appear lower down on the tree is merely due to alphabetical sorting.
Figure 4-10. The Registry key named for the filename extension containsa pointer to another Registry key (see Figure 4-11)
All of the details of this file type are stored in the txtfile branch, such as the formal name shown in
the Type column in Explorer (in this case, "Text File"), the icon used for all files of this type, and theapplications used to open the file. Many different extension keys can point to this branch, so a singlefile type like txtfile can have many filename extensions associated with it. This architecture can
make it a little tricky to understand the way file types are stored in the Registry, but it does afford afairly flexible system of file associations.

Figure 4-11. The second Registry key contains the file-type information;several file-extension keys can point to this key
The structures shown in Figure 4-10 and Figure 4-11 illustrate the two Registry branches that makeup a typical file type. File types can be created by application installers, through changes made in theFile Types window (explained earlier in this section), or even manually by editing the Registrydirectly. A bunch of file types are also set up automatically when Windows is first installed.
First, a key is created that is named for each extension associated with the file type (usually onlyone, for starters).[7] The (default) value of this key contains the name of the file-type Registry
key; it does not contain the full Registry path, however, nor does it contain the formal name of thefile type (shown in Explorer). For example, put txtfile here and not Text File. The Content Type
value shown in Figure 4-10 may appear for some file types, but it is not necessary for normaloperation.
[7] An example of a file type with two or more extensions is the HTML file type (used by web browsers), typically associated with
.html, .htm, .shtml, and .shtm files.
A key called ShellNew may also appear underneath the file-extension key. The existence of this key
tells Windows to include the extension in Explorer's New menu (discussed earlier in this chapter),allowing the user to create a new, empty file of that type without having to open an application. Thereason that the ShellNew key is located underneath the extension key and not the file-type key
(discussed later in this section) is that a file type may have more than one extension, and Windowsneeds to know which extension to use when creating a new file. The ShellNew key is usually empty,although there may be a value called FileName that points to a template file, a file on your hard disk
that Windows will use to create a new, blank document (stored, by default, in \Documents andSettings\{username}\Templates). In most cases, the FileName value is omitted, and Windows will
create a zero-byte (empty) file with the appropriate extension.
Most of a file type's definition is located in the main file-type key, the name of which is specified ineach of the extension keys listed earlier. In Figure 4-11, the txtfile key contains the rest of thesettings for the Text File file type. First of all, the (default) value in this key specifies the formal,
aesthetic name of the file typethe text that appears in the File Types dialog box in Explorer and inthe Type column in Explorer's Details view (e.g., "Text File").
If the value named AlwaysShowExt is present in this key, the extension for this file type will be
displayed in Explorer, even if the user has elected to hide extensions for file types that are registered(a setting described at the beginning of this section). A related value, NeverShowExt, appears in a
few file-type keys, such as those for Windows Shortcuts (.lnk files), Internet Shortcuts (.url files),and Explorer Commands (.scf files), and means that the extensions for these types are never shown,

even if the user has elected to show all extensions. Simply delete the NeverShowExt value to instruct
Explorer to show the filename extension for the corresponding file type.
You may also see a binary or DWORD value entitled EditFlags, which tells Windows what is allowed
and what is not allowed in the File Types window. See Table 4-1 for some of the possible values andtheir meanings. Feel free to change or simply remove this value to allow changes to a particular FileType. Unfortunately, these restrictions only apply to the File Types window and don't prevent otherapplications from changing your file types.
Table 4-1. Some of the possible values for EditFlags and what they mean
EditFlags bit[8] Meaning
00 00 00 00(or omitted) No restrictions
01 00 00 00 Not shown in the File Types window at all
02 00 00 00 Change button disabled in File Types window
08 00 00 00 Advanced button disabled in File Types window
00 01 00 00 Can't change file type description in Edit File Type window
00 02 00 00 Change Icon button disabled in Edit File Type window
40 00 00 00 Edit button disabled in Edit File Type window
80 00 00 00 Remove button disabled in Edit File Type window
[8] EditFlags values can be summed to implement several restrictions; for example, an EditFlags value of 00 03 0000 will disable the description field and Change Icon button in the Edit File Type window.
In the file-type key are three or four independent subkeys. DefaultIcon contains only the(default) value, set to the filename of the file containing the icon used for the file type. Icons are
specified by filename and icon index, separated by a comma; for example,c:\windows\system32\shell32.dll,152 specifies the 153rd icon in the shell32.dll file. The file that
is specified can be any .ico or .bmp file, as well as an .exe or .dll file containing one or more icons. Touse the first icon in the file, omit the number or specify 0 (zero); use 1 (one) for the second icon, and
so on. The easiest way to choose an icon is with the File Types dialog box in Explorer, which willallow you to browse and choose icons without typing or guesswork.
Internet Shortcuts don't launch applications directly; instead, they redirect theURL contained therein to Windows, which then delegates the task to anapplication suitable to the particular type of URL (e.g., web browser for http://addresses, FTP client for ftp:// addresses, etc.). As part of this design, youwon't be allowed to change the icon for Internet Shortcuts, even if you deletethe EditFlags value (explained earlier in this chapter). To fix this, you'll haveto delete the IconHandler key, located in the shellex branch, as well.

Most of the meat of the file type is stored in the shell key. Its subkeys define the actions, or what
happens when a file of this type is double-clicked and which commands appear in the file type'scontext menu (explained earlier in this section). Underneath shell is a separate key for each
command shown in the context menu; that is, when you right-click on a file of this type, these arethe commands that will appear at the top of the list. Most file types have an Open command (with akey of the same name). You may also see Edit, Print, PrintTo, Play, and View here. You can add,remove, or change any of these commands you wish. In each one of these keys is a key calledcommand. Each command key's (default) value is set to the application filename used to carry out the
respective command. Figure 4-10 and Figure 4-11 illustrate this particular structure.
For example, if Notepad is associated with the Open command for text files, the contents ofHKEY_CLASSES_ROOT\txtfile\shell\open\command will be:
Notepad.exe "%1"
Now, the "%1" (including the quotation marks) is very important%1 is where Windows substitutes the
full path and filename of the clicked file, and the quotation marks are necessary in case there are anyspaces in the filename of the clicked file. So, if you were to right-click on any file with the .txtextension (say, c:\documents\my file.txt) and select Open from the context menu that appears (seeFigure 4-12), Windows would carry out the command:
Notepad "c:\documents\my file.txt"
which will launch Notepad and instruct it to open the document.
Figure 4-12. A context menu for the bitmap file type shows the defaultPreview option, as well as the extra Edit and Power Rename... options

While there can be several available commands for any given file type, only one of the commands willever appear in bold. This command is called the default and is the one that Windows uses when youdouble-click on a file instead of right-clicking. Usually, Open is the default, but any existing commandcan be set as the default.[9] To make a different command the default, specify the name of thecommand in the (default) value of the shell key. For example, if a file type contains Open, Edit,and Print, and you type edit in shell's (default) value, the Edit command will appear bold in the
file type's context menu, and Edit will be the command carried out when you double-click the file. Ifthe (default) value is empty, the Open command (if present) is assumed to be the default.
[9] Note that although the word open is often spelled with all lower-case letters in the Registry, it still appears capitalized in the
context menu. Windows will preserve the case of all other commands as you've typed them, but will automatically capitalize
Open.
The shellex key contains references to shell extensions, programs designed to work especially with
context menus. These are never shown in the File Types window but are nonetheless very important,and it can be very handy to be able to modify or remove them. For example, the Power Renamecommand shown in Figure 4-12 is a shell extension. Unless you're able to write and compile DLLs,however, you won't be able to create new shellex entries. However, you can remove some
unwanted context menu commands and extra tabs in property sheets of certain file types byremoving the corresponding shell extension keys here. I don't have to tell you that it's a good idea toback up any file-type key with a Registry patch before you make any changes.
You might also see a key named CLSID in various parts of file-type keys; these are merely pointers
to registered application components. To find out what a particular entry means, copy the CLSIDcode to the clipboard (hit F2 to rename, Ctrl-C to copy, and then ESC to abort the renamingprocess), and then search the Registry for other references to it.
Lastly, you may see a ddeexec key, which contains DDE commands and associated data. DDE,
discussed earlier in this section, is used to communicate with running applications.
The next few solutions in this chapter illustrate some of the ways you can use the file-type Registryentries to accomplish things otherwise not possible.
4.3.3. Protect Your File Types
One of the most aggravating aspects of using Windows is when the settings you've spent timecustomizing are overwritten or simply forgotten. Sometimes this is the result of a bug, but often, andespecially in the case of file types, there's more to it. Some software developers jury-rig anapplication so that it overwrites your file associations, either when it's first installed or, even worse,every time the program runs. That way, their program becomes the default whether you like it ornot.
For some proprietary file types, such as Excel Files (.xls), this isn't much of a problem, because therereally aren't any other programs that use these files. The impact is greater on more general filetypes, such as the large quantity of graphics formats (.gif, .jpg, .tif, .bmp, and .png ), where thereare literally hundreds of applications that use these files. It's not unusual for several of theseapplications to be installed simultaneously on a single system, all competing for the dubiousdistinction of being the default. Probably the most high-profile example of this competition is thatbetween competing web browsers; not only are file associations in play, but URL associations as well.

Every time you open an Internet Shortcut or click a web link in any application, the URL association iswhat's used to decide which web browser application to use.
Ideally, only you should be in the position to decide which program you use for each task.Unfortunately, it's essentially impossible to write-protect (prevent the overwriting of ) any Registrysettingsincluding file typesin Windows XP. Although it's possible to set user permissions for variousRegistry keys (see Chapter 8), this only restricts access for programs run by other users.
Probably the most effective protection against overwriting file types is to back up the portions of theRegistry that are at risk, allowing you to easily restore them should the need arise. This isaccomplished with Registry patches; see Section 3.3.5 before continuing.
The procedure outlined here would be a good one to follow, for example, before installing anapplication you believe might overwrite an existing file type. Repeat these steps for each file type youwish to protect:
Open the Registry Editor (discussed in Chapter 3).1.
Expand the HKEY_CLASSES_ROOT\ branch, and locate the keys that you wish to protect.
Any given file type is stored as one or more extension keys and a file-type key. For example,the extensions .txt and .log may both be linked to the txtfile file type. So, to save the entire
file type, you'll need to save each of the following Registry branches:
HKEY_CLASSES_ROOT\.txtHKEY_CLASSES_ROOT\.logHKEY_CLASSES_ROOT\txtfile
If you only save the extension keys or the file-type key, the Registry patch will be incomplete.See Section 4.3.2, earlier in this chapter, for details on this structure.
To see a list of all the extensions owned by a given file type, open the File Types window (seeSection 4.3.1 earlier in this chapter), and sort the Registered file types list by file-typedescription.
2.
When you've highlighted a Registry key you want to export, select Export Registry File fromthe Registry menu and specify a filename for the patch. Because you'll be exporting at leasttwo patches, don't worry too much about the filenames just yet. Just make sure not to exporttwo branches to the same file, however, as one will simply overwrite the other.
Also, don't try to export the entire HKEY_CLASSES_ROOT branch, because it contains much more
information than we need for this purpose, and restoration of a patch will have unpredictableeffects.
3.
You can only export one key at a time, so start with one and repeat step 3 for each remainingkey. Once you've exported all the keys you're interested in, close the Registry Editor.
4.
You should have at least two Registry patches from this exercise, perhaps more. Becausethey're just plain text files, we can easily merge them together into a single file with Notepad.Choose one file to be the main patch, and then cut and paste the contents of the other patchesinto it. The only editing you'll have to do is to remove the Windows Registry Editor Version
5.

5.00 line from all but the main patch, so that it only appears onceat the top of the file.
If you're exporting multiple complete file types, you might want to merge the individual patchesinto several separate Registry patchesone for each file type.
Whenever a particular file type that you've backed up becomes overwritten by an errantapplication, just double-click the patch you made to restore it.
In most cases, when you apply a Registry patch, it will simply overwrite the information that'sthere with whatever is in the patch. However, since applying registry patches merges theirinformation with anything that is already in the registry, there may be leftover context-menuitems from any newly installed applications.
6.
To apply the patch automatically whenever you start Windows, create a new Windows Shortcutin your Startup folder (usually \Windows\Start Menu\Programs\Startup), and type the followinginto the shortcut's command line:
regedit /s "filename"
where filename is the full path and filename of the Registry patch you wish to apply (e.g.,
c:\filetypes\text.reg); the quotation marks are included to accommodate any spaces in the fileor folder names. Note the /s switch, which runs the Registry Editor in silent mode, skipping the
two prompts that normally appear when Registry patches are applied.
7.
Although there's unfortunately only so much you can do to prevent your file types from beingoverwritten, other workarounds do exist. Try adding a context-menu item for each program installedon your system, such as "Open with Notepad" and "Open with WordPerfect" for text files. That way,whatever the default is, you'll always have your preferred applications handy.
One sticking point you may encounter when trying to reconfigure file types is that some actions useDynamic Data Exchange (DDE). DDE is a method of communication between applications, sometimesused by Windows to communicate with the applications it launches, and is discussed earlier in thissection. If a particular file type for an application stops working for some reason, it could be that theDDE information has changed or been erased altogether. If this is the case, you'll usually have toreinstall the application to restore the DDE-enabled file types, because there's little standardizationwith DDE. Often, however, simply deactivating the Use DDE option in the Editing action for typewindow is enough to fix the problem.
4.3.4. Customize Context Menus for Drives, Folders,and Desktop Icons
Folders, drives, and desktop icons also have customizable context menus, but the File Types window(described earlier) has limitations on what can actually be changed. However, you can modify thesecontext menus in the Registry. Refer to Section 4.3.2, earlier in this chapter, for more information onthe Registry structure involved in this solution:
Open the Registry Editor (discussed in Chapter 3).1.
The Registry key you'll need to open depends on what object you're customizing:
a.
2.

1.
For folder context menus, expand the branches toHKEY_CLASSES_ROOT\Directory\shell\.
a.
For drive context menus (visible in Explorer and the My Computer window), expand thebranches to HKEY_CLASSES_ROOT\Drive\shell\.
b.
For the context menus of any system objects, such as My Network Places, expand thebranches to HKEY_CLASSES_ROOT\CLSID\{class id}\shell\, where {class id } matches
one of the codes listed in Appendix D, including the braces.
c.
2.
Select New from the Edit menu, select Key, type the name of the new item you want added tothe list, such as Open or Edit, and press Enter.
3.
Highlight the new key, select New from the Edit menu, and then select Key again.4.
Type command for the name of this new key, and press Enter.5.
Double-click the (Default) value in the right pane, and type the full command line (path and
filename of the application executable, followed by any applicable command-line parameters)you want associated with this entry.
6.
Close the Registry Editor when you're finished. These changes should take effect immediately.7.
4.3.5. Print Out a Folder Listing
What would seem to be a simple function, the ability to print out a list of files in any given folder,does not exist in Windows XP. However, there is a way, using folder context menus, to add thisfunctionality to Windows:
Open the Registry Editor (discussed in Chapter 3), and expand the branches toHKEY_CLASSES_ROOT\Folder\shell.
1.
Select New from the Edit menu, select Key, and type Print Contents for the name of this
new key.
2.
Highlight the new Print Contents key, select New from the Edit menu, select Key again, andtype command for the name of this new key.
3.
Double-click the (Default) value in the right pane, and then type the following:
cmd.exe /c dir "%1" > PRN
This line launches the cmd.exe application (also known as the Command Prompt, discussed inChapter 10) and then, using the /c parameter, instructs it to carry out the following command:
dir "%1" > PRN
4.

which generates a folder listing[10] and sends it to the printer object (PRN). You can use any ofthe dir command's optional parameters to further customize the listing it generates. For
example, to specify the desired sort order, change the above to the following:
[10] See the discussion of file types, earlier in this chapter, for an explanation of "%1" as it is used here.
cmd.exe /c dir "%1" /o:xxx > PRN
where xxx can be any or all of the following letters, in the order that you want the sorts to takeplace: N to sort by name, E by extension, S by size, D by date, G to group directories first, and Aby last access date (earliest first). See Chapter 10 for more information on the dir command.
If you wish to send the folder listing to a text file in the folder, navigate toHKEY_CLASSES_ROOT\Folder\shell\Save Contents\command (create the missing keys just likein steps 2 and 3), and then type the following for the command key's (Default) value:
cmd.exe /c dir %1 > "Folder Listing.txt"
5.
Close the Registry Editor when you're done; the change will take effect immediately. Just right-click any folder and select Print Contents to send the contents of the selected folder to thedefault printer.
6.
Creative Element Power Tools (available at http://www.creativelement.com/powertools) comes withseveral similar context-menu add-ons, allowing you to print or copy a folder's contents to theclipboard, among other things. See Windows XP in a Nutshell (O'Reilly) for extensive coverage ofbatch files and DOS commands such as dir.
4.3.6. Turn File Icons into Thumbnail Previews
Windows tries to be as graphical as possible, which is sometimes its downfall. Case in point: whenwas the last time you found the icon for an application or associated document to be the least bithelpful in determining what was inside?
In Explorer, when you view a folder containing cursors (.cur files), animated cursors (.ani files), oricons (.ico files), their file icons are previews of their contents instead of simply generic icons for theapplication with which they're associated. Now, Windows has the capability to generate these types ofthumbnail previews for other kinds of files as well, and a special feature in Windows XP takes it evenfurther.
4.3.6.1 Solution 1: Icon previews for bitmap (.bmp) files
The advantage of this solution is that once the change has been made, it will be enabledautomatically for all folders on your system. The disadvantages are that this solution works only for.bmp files, and the thumbnail previews will never be larger than the rest of your system icons(usually 32 32 pixels):
1.
2.

Open the Registry Editor discussed in Chapter 3.1.
Expand the branches to HKEY_CLASSES_ROOT\Paint.Picture\DefaultIcon.2.
Change the (Default) value to %1. If the .bmp file type is no longer associated with MS Paint,the correct Registry location will be somewhere other than in Paint.Picture. try looking in the(Default) value of HKEY_CLASSES_ROOT\.BMP for the current file type (see Section 4.3.2,
earlier in this chapter, for more information).
3.
Close the Registry Editor and press F5 to refresh any open windows to reread the icons forbitmap files. If it doesn't work right away, you might have to close any open Explorer windowsand reopen them for the change to take effect.
4.
To increase the size of icons, double-click the Display icon in Control Panel, choose the Appearancetab, and click Advanced. Select Icon from the Item menu, and type in a larger value for the size,such as 48 or 64. Note that this will make all icons on your system (those on the desktop, and in the
Large Icons display in Explorer) larger.
4.3.6.2 Solution 2: Use built-in icon previews for all graphic files
The advantages of this solution are that it works for more file types, including .bmp, .jpg, and .giffiles, and that the previews can be larger than normal icons. The disadvantages include that theoption needs to be enabled for each folder you view (you wouldn't want to set it as the default). Also,it's a pretty clumsy interface, and image files that it doesn't understand are shown simply with theirstandard file icons rather than being hidden. If you are viewing a folder containing more than justimage files, the display is less than ideal.
Open Explorer and locate any folder that contains at least one graphic image file (.jpg, .gif, or .bmp).Select Thumbnails from the View menu (this option may not be available if you have InternetExplorer integration disabledsee Chapter 8). Select one of the other view modes (such as Details orLarge Icons) to restore the display to normal.
If you've configured Explorer to display hidden files, you'll notice a new hidden file, thumbs.db (whichcontains the thumbnail data), in any folder you view. As long as this file is present, the folder's viewwill always be set to Thumbnails. If you delete this file, and then reopen the folder, it should revertback to the standard Details or Large Icons view.
To choose the size of Windows Explorer's thumbnail previews, start TweakUI(see Appendix A), expand the Explorer category, and select Thumbnails. Usethe Size (pixels) value to choose the maximum width and height of yourthumbnails (specify 32 to make them the same size as ordinary icons, for
instance). You can also decrease the amount of memory Windows Exploreruses to display thumbnail previews by sliding the Image Quality slider all theway to Low.
If you need a better thumbnail preview, try a third-party application, such as ACDSee(http://www.acdsee.com/). It not only has a far superior thumbnail viewer, but is a much better andfaster image viewer than XP's Windows Picture and Fax Viewer (discussed later in this chapter).

4.3.7. Disable the Automatic Display of Thumbnails in Certain Folders
One of the new marketing gimmicks Microsoft is using to promote Windows XP is that it is supposedly"task oriented," which means that the design elements are first and foremost designed to helpaccomplish tasks. Unfortunately, this is more lip service than anything else; most of the time,Windows XP tends to be more component-oriented than task oriented. What Microsoft is actuallyreferring to is the added assumptions Windows makes, many of which are just plain wrong and endup simply annoying us.
For example, if you view certain folders (such as My Pictures) in Explorer or the File Open/Savedialog, its contents will be shown using the Thumbnails view instead of the standard List or Detailsviews. Although you can manually switch the view each time you open the folder, there are severalways to turn it off.
4.3.7.1 Solution 1: Modify the assumptions made about a given folder
Right-click on any given folder icon, and select Properties.1.
Choose the Customize tab, and choose Documents (for any file type) from the list.2.
Click OK when you're done. You'll probably have to close the folder and reopen it for the changeto take effect.
3.
This feature should be available for every folder on your system except your system folders.Unfortunately, you can't customize system folders (such as My Pictures), so you'll have to settle forone of the remaining solutions.
4.3.7.2 Solution 2: Change the way thumbnails look (requires TweakUI)
Open TweakUI (see Appendix A).1.
Expand the Explorer category branch, and select Thumbnails.2.
Change the value of Size to 32.3.
Unfortunately, this won't disable the thumbnails, but it will make them the same size as standardicons. The result is a less cumbersome and easier-to-use interface, but it's not perfect. See thefollowing solution if this isn't suitable.
4.3.7.3 Solution 3: Relocate your system folders
Open TweakUI (see Appendix A).1.
2.
3.

1.
Expand the My Computer category branch, and select Special Folders.2.
Change the locations of the special folders (such as My Pictures) you wish to have point todifferent locations. This lifts the restriction noted in Solution 1.
3.
While this returns the display of your folders to the standard icon view, it does cause any applicationsthat default to your My Pictures folder (when using File Open/Save dialogs, for instance) to look in adifferent location, which means that you'll have to manually navigate to the desired folder each time.See Section 4.4.3, later in this chapter, for a further workaround.
4.3.8. Turn off the Windows Picture and Fax Viewer
The Windows Picture and Fax Viewer is set as the default image viewer for all sorts of file types inWindows XP. Unfortunately, choosing another program as the default in the File Types window(described earlier in this chapter) won't change this, and there's no option in the interface that candisable this component. It's a really stupid design, and it takes a Registry change to fix it:
Open the Registry Editor (discussed in Chapter 3).1.
Expand the branches toHKEY_CLASSES_ROOT\SystemFileAssociations\image\ShellEx\ContextMenuHandlers.
2.
Delete the ShellImagePreview key.3.
Close the Registry Editor when you're done; the change will take effect immediately.4.

4.4. Cool Things You Can Do with Drives and Folders
Given the important role of folders in Windows, not only in their ability to store our personal data, butin the way they're used to organize the files that comprise the operating system, it should not besurprising that there are lots of cool things you can do with them. The next few solutions shouldillustrate the flexibility of Windows XP, and the lengths one can go to accomplish just about anything.
4.4.1. Customize Drive and Folder Icons
There may come a time when you may get a little sick of the generic icons used for drives and foldersin My Computer and Explorer (personally, I'm not a big fan of the liberal use of yellow in the WindowsXP interface). Now, you've probably figured out that you can create a shortcut to any drive or folder,choose a pretty icon, and place it on the desktop or in some other convenient location. Unfortunately,the icon you choose doesn't propagate to the target object. Here's how to make the change a littlemore universal.
4.4.1.1 Solution 1: Customize drive icons
Using the functionality built into Windows CD auto-insert notification featurefunctionality that allowsWindows to determine the name and icon of a CD as soon as it's inserted in the reader (see Section4.4.4 later in this chapter)there's a simple way to customize the icons of all your drives:
Open a plain-text editor, such as Notepad.1.
Type the following:
[autorun]
icon=filename, number
where filename is the name of the file containing the icon, and number is the index of the icon
to use (leave number blank or specify 0 [zero] to use the first icon in the file, 1 for the second,
and so on).
2.
Save the file in the root directory of the hard disk, floppy, or removable drive you wish tocustomize, naming it Autorun.inf .
3.
This change will take effect the next time the My Compute r view is refreshed; with Explorer orthe My Computer window open, press the F5 key to refresh the display and read the new icons(Figure 4-13 ).
4.
Figure 4-13. Make Explorer and My Computer less drab by customizingdrive and folder icons

4.4.1.2 Solution 2: Customize individual folder icons
The icon for any individual folder can be customized to suit your taste:
Open a plain-text editor, such as Notepad.1.
Type the following:
[.ShellClassInfo]
IconFile=filename
IconIndex=number
where filename is the name of the file containing the icon, and number is the index of the iconto use; leave the IconIndex line out or specify 0 (zero) to use the first icon in the file, 1 for thesecond, and so on. Note the dot (.) in [.ShellClassInfo] .
2.
Save the file directly in the folder you wish to customize, naming it desktop.ini .3.
Open a command-prompt window (cmd.exe ), and type the following at the prompt:
attrib +s foldername
where foldername is the full path of the folder containing the desktop.ini file (i.e., c:\docs ).
This command turns on the System attribute for the folder (not the desktop.ini file), somethingyou can't do in Explorer.
Note that turning on the System attribute for a folder will have no adverse effect on yoursystem, your data, or any other applications.
4.
Close the Command Prompt window when you're done. You'll have to close and reopen theExplorer or single-folder window to see the change (pressing F5 won't do it).
5.
If you're customizing a drive icon for a removable drive (i.e., Zip, CD-R, floppies), you may need torefresh the My Computer or Explorer window every time the media is inserted by pressing the F5 key,

because Windows can only detect the insertion of CDs and DVDs, and then only when the auto-insertnotification feature is enabled.
To turn the display of certain drive icons on or off in the My Computer window, open Drives in the MyComputer category in TweakUI (see Appendix A ).
4.4.1.3 Solution 3: Customize all folder icons
The more global and far-reaching a change is, the more likely it is to be difficult or impossible toaccomplish without some serious tinkering in the Registry. An example are the icons used by some ofthe seemingly hard-coded objects in Windows, such as the icons used for ordinary, generic folders:
Open the Registry Editor (discussed in Chapter 3 ).1.
Expand the branches to HKEY_CLASSES_ROOT\Folder\DefaultIcon (you can also customizedrive icons by going to HKEY_CLASSES_ROOT\Drive\DefaultIcon ).
2.
Double-click the (Default) value in the right pane. This value contains the full path[11] and
filename of the file containing the icon, followed by a comma, and then a number specifying theindex of the icon to use (0 being the first icon, 1 being the second, and so on). The file you usecan be an icon file (*.ico ), a bitmap (*.bmp ), a .dll file, an application executable (*.exe ), orany other valid icon file.
[11] You can omit the full path if the file you wish to use is in the system path, as described in Chapter 6 .
The default for folders is %SystemRoot%\System32\shell32.dll,3 , and the default for drives is%SystemRoot%\System32\shell32.dll,8 .
3.
When you're done, close the Registry Editor. You may have to log out and then log back in forthis change to take effect.
4.
There's a bug in Windows Explorer that may prevent your custom icon from being used in certaincircumstances. The icon will appear whenever you view folders on the desktop or in single-folderwindows, but if you open an Explorer window directly (explorer.exe ), the old yellow icons will stillappear. The way around this is to right-click a folder icon and select Explore , which will display a trueExplorer window (with the tree) using your custom icon.
4.4.1.4 Solution 4: Just about any system object
Open the Registry Editor discussed in Chapter 3 .1.
Expand the Registry branches to: HKEY_CLASSES_ROOT\CLSID\{ class id }\DefaultIcon ,
where {class id } is the Class ID of the object you wish to change. To find the class id of anobject, do a search in the HKEY_CLASSES_ROOT\CLSID\ branch for the formal name of the object(e.g., Recycle Bin ).
2.
Double-click the (Default) value in the right pane. The icon is specified here the same way it is
for folders and drives (see the previous solution).
3.
4.

3.
This change should take effect the next time you refresh the folder containing the object you'vejust customized. For example, press the F5 key while the desktop is active to refresh anydesktop icons.
4.
4.4.1.5 Solution 5: Applications (.exe and .dll files)
For most people, all that will be necessary to change the icon for an application is to change the iconfor the application's shortcut, usually found in the Start Menu or on the desktop. Just right-click thedesired shortcut, click Properties , choose the Shortcut tab, and click Change Icon . But there isactually a way to change the icon resource embedded in any .exe or .dll file, using the followingprocedure:
Download and install Microangelo (http://www.microangelo.us/ ).1.
Start the Microangelo Librarian, and open the file you wish to change. All of the file's icons areshown in the window here. Just double-click an icon to edit it (the one shown in Explorer istypically the first one shown here).
2.
When you're done in the editor, just select Update Librarian from the File menu, and selectFile Save in the Librarian window to write the changes to disk.
3.
Note that another way to change the icon used for a system object is to edit the icon directly in theshell32.dll file (found in \Windows\System32 ). However, since this file is in use while Windows isrunning, you'll need to edit a copy of the file, and then replace the original with the modified copyusing the System Recovery Console, described in Chapter 6 .
4.4.2. Mirror a Folder with Folder Shortcuts
Windows Shortcuts are tiny files that link to applications, documents, drives, folders, and some systemobjects. They're convenient in that they usually behave the same way as the objects to which they'relinked when you double-click them or drag-drop other objects on them. If you drag a file into a folder'sshortcut, for example, it's the same as dragging the file into the folder.
The inherent problem with Window Shortcuts is that they are files, and as such, have the samelimitations as files. They are sorted in Explorer with the rest of the files; shortcuts to folders are notgrouped with folders as you might expect. Furthermore, shortcuts to folders cannot be specified in apath. For example, if you were to create a shortcut to the folder d:\Yokels\Cletus , name the shortcutCletus , and then place the shortcut in c:\Brandine , you wouldn't be able to reference files stored ind:\Yokels\Cletus by using the path c:\Brandine\Cletus .
Enter Folder Shortcuts , an undocumented feature in Windows XP.[12] Folder Shortcuts behaveexactly like folders because they are folders. With a little tweaking, any empty folder can be turnedinto a Folder Shortcut, a mirror[13] of any other drive or folder on your system, on your network, oreven on the Internet!
[12] Folder Shortcuts are also supported in Windows 2000 and Windows Me.
[13] Strictly speaking, a "mirror" of the folder would create copies of all the source folder's contents. A Folder Shortcut doesn't
actually duplicate any data; it only makes the existing data accessible from two different locations.

If you create a Folder Shortcut and then try to delete it, you will be deleting thetarget folder and all of its contents. Folder Shortcuts must be dismantled beforethey can be removed. Be sure to read the entire solution for details.
Folder Shortcuts, once in place, are practically indistinguishable from the folders to which they link. If,revisiting the aforementioned example, you create a Folder Shortcut to d:\Yokels\Cletus and place itin c:\Brandine , then it will appear as though there's a folder called Cletus located in c:\Brandine ; inother words, c:\Brandine\Cletus will be a valid path. (For those of you familiar with Unix, FolderShortcuts are very similar to symbolic links.)
Why would you want to do this? Among other things, a Folder Shortcut can be used to trick Windowsor an application into thinking that a folder contained on a different drive or computer is actuallysomewhere else. For example, you could replace your My Documents folder with a Folder Shortcutpointing to a folder on your network, allowing you to access the same group of files on any number ofcomputers as easily as on the computer on which the files are actually stored. Or say you're using anolder application that only permits its datafiles to be stored in a specific location. Using a FolderShortcut, you can trick the application into storing them elsewhere.
Use the following solutions to create and manage folder shortcuts.
4.4.2.1 Create a Folder Shortcut
Here's how to make a Folder Shortcut to an existing folder on your hard disk or on your local network:
Choose an existing folder in Explorerit can be located on any drive, including your network.Create a standard Windows Shortcut to that folder on your desktop, and name the new shortcuttarget . (The shortcut filename will actually be target.lnk , although the .lnk filename extension
won't be visible in Explorer.)
The easiest way to create this shortcut is to drag-drop the folder icon usingyour right mouse button, and then select Create Shortcut(s) Here fromthe menu that appears. See Section 2.2.2 for more information on thisprocess.
1.
Next, make a new folder on your desktop; the name actually doesn't matter, but for sake ofargument, I choose to call my example folder, Dingus .
2.
To help protect a Folder Shortcut from accidental deletion, make the folder read-only: right-clickthe Dingus folder icon and select Properties . Turn on the Read-only option and click OK .
3.
Drag-drop the target shortcut you made in Step 1 into the newly created folder.4.
Open a plain-text editor, such as Notepad, and type the following four lines:
[.ShellClassInfo]CLSID2={0AFACED1-E828-11D1-9187-B532F1E9575D}Flags=2
5.

ConfirmFileOp=0
Save this into the Dingus folder and name the file desktop.ini .
You may notice that the text in desktop.ini contains no specific informationabout Dingus or our target folder. This means that you only need to typethis once; thereafter, you can use the same desktop.ini file again andagain.
Open a Command Prompt window (cmd.exe ), and change the active/working directory to thenew Dingus folder. The easiest way to do this is to type cd , followed by a space, at the prompt.
Drag-drop the Dingus folder onto the Command Prompt window, and the full path of the folderwill be typed for you. It'll probably look something like this:
cd c:\Documents and Settings\{username}\Desktop\dingus
Then, just press Enter this changes the active directory to the new Dingus folder. (See Chapter10 for more information on the cd command.)
6.
Next, type:
attrib +h +s desktop.ini
and then press Enter . This will turn on the Hidden and System attributes for the desktop.inifile, a task not possible from within Explorer. (See Chapter 10 for more information on theattrib command.)
7.
Type exit and then press Enter when you're done with the Command Prompt.8.
If the new folder is open, close it now. The next time you open the folder, you'll see the contentsof the target folder, rather than the two files, desktop.ini and target .
9.
The new Folder Shortcut can now be copied or moved anywhere you like. For the sake of safety, youshould take certain steps to mark this new folder as a Folder Shortcut. Although it will be described asa "Folder Shortcut" in Explorer's Type column, as well as in the folder's Properties dialog box, it will beotherwise indistinguishable from a standard folder. In addition to naming it something like Shortcut toDingus , you can also customize the icon for the new Folder Shortcut in the same way as for astandard folder (described earlier in this chapter). If you don't choose an icon, the Folder Shortcut willassume the icon of the folder to which it's linked.
You should only use an empty folder to transform into a Folder Shortcut. If thereare any objects stored in said folder (e.g. Dingus ), they will become inaccessiblein Windows when the folder becomes a Folder Shortcut; they will otherwise onlybe visible from the command prompt, or after you dismantle the FolderShortcut, as explained next. There should be no adverse effect on the contentsof either folder, however.

If you find the need to create Folder Shortcuts more easily, see Section 9.4.6 for a Windows ScriptHost (WSH) script that automates this process.
A Folder Shortcut can also be used to mirror an FTP site, effectively allowing you to transfer filesacross the Internet using Explorer. See Section 7.4.2 for details.
4.4.2.2 Dismantle a Folder Shortcut
It's important to realize that once you create a Folder Shortcut, you should never try to delete it usingtraditional methods. If you try to delete a Folder Shortcut by dragging it into the Recycle Bin, forexample, Windows will actually delete all the contents of the target folder! To remove a FolderShortcut, you must first dismantle it. Because the command prompt doesn't recognize FolderShortcuts, you can use it to delete the two files you created when you constructed the FolderShortcut:
Open a Command Prompt window (cmd.exe ), and change the active directory to the FolderShortcut (not the target folder). See step 5 in the previous solution on how to do this with the cd
command.
1.
Type:
attrib -h -s desktop.ini
which will turn off the Hidden and System attributes for the desktop.ini file, a task not possiblefrom within Explorer. Note that this is similar to the use of the attrib command in Step 6 in theprevious solution, except that we're using minus signs (- ) to turn off the attributes instead ofplus signs (+ ).
2.
Next, type the following two commands:
del desktop.inidel target.lnk
3.
Type exit when you're done. (See Chapter 10 for more details on the CD , ATTRIB , and DEL
commands used here.)
4.
If the new folder is open, close it now. The next time you open the folder, it should be empty,and can be safely deleted.
5.
4.4.3. Customize the Places Bar
The Places Bar is the gray bar along the left edge of the File Open and File-Save dialog boxesused by most applications in Windows XP. Like many of the dialog boxes and controls (pushbuttons,menus, etc.) in most applications, these file dialogs are a function provided by Windows, and are usedfor the following reasons:
Application developers don't have to reinvent the wheel with their own file dialogs.

Users get a common experience and don't have to learn a new interface for each application.
Microsoft can add new features to file dialogs (like the Places Bar), which are immediately andautomatically propagated to all applications that use the feature properly.
The Places Bar has a maximum of five buttons, each of which points to a different folder on yoursystem. By default, these places are Desktop, My Documents, Favorites, My Computer, and RecycleBin. If you don't see the Places Bar on your system, the feature may simply be disabled (as describedin the following Solution 1) or the particular application you're using uses nonstandard or obsoleteversions of the file dialogs.
There are three solutions that allow you to customize the Places Bar; the first works for mostapplications, but not Microsoft Office. Solutions 2 and 3 apply only to Microsoft Office XP and Office2000, respectively. To customize all instances of the Places Bar, you may have to use all threesolutions on your system. Note that Creative Element Power Tools (available athttp://www.creativelement.com/powertools ) allows you to customize the places bar for allapplications simultaneously, including Office.
4.4.3.1 Solution 1: Places Bar for most applications
Start TweakUI (see Appendix A ), and then open the Common Dialogs category.1.
Select Custom places bar , and then choose the desired system folders from each of the lists.Your selections will appear in the Places Bar in the same order as you choose them here. You canalso type the full path of any existing local or network folder here; the folder's actual name andicon will appear on the corresponding button.
You can also choose either Show default places or Hide places bar at this point, both ofwhich should be self-explanatory.
2.
Click OK when you're done. You'll have to close and reopen any currently open applications forthe change to take effect.
3.
4.4.3.2 Solution 2: Places Bar in Microsoft Office XP and later versions
The following works in Office XP (aka Office 2002 or Office 10.0) and later versions, and requires noRegistry editing. However, it's somewhat limited; for more control, or if you're using Microsoft Office2000, use Solution 3, explained next.
Open any Office application, and go to File Open .1.
To add a new place to the Places Bar, navigate to the parent folder of the folder you would like toadd (not to the folder itself) and highlight it in the window.
2.
Click Tools (in the upper right) and select Add to "My Places ."3.
To rearrange places, right-click any existing place icon in the Places Bar, and select Move Up orMove Down .
4.
5.

4.
You can delete any custom places by right-clicking their icons on the bar and selecting Remove ,but you won't be able to remove the standard Places Bar entries without editing the Registry, asdescribed in Solution 3.
5.
4.4.3.3 Solution 3: Places Bar in Microsoft Office 2000 and later versions
Close any open Microsoft Office applications.1.
Open the Registry Editor, discussed in Chapter 3 .2.
If you have Office 2002 (also known as Office XP or Office 10), expand the branches to:
HKEY_CURRENT_USER\Software\Microsoft\Office\10.0\Common\Open Find\Places
If you have Office 2000 (also known as Office 9.0), expand the branches to:
HKEY_CURRENT_USER\Software\Microsoft\Office\9.0\Common\Open Find\Places
Either way, you should see two subkeys here: StandardPlaces and UserDefinedPlaces .
3.
First, you'll have to disable the existing items; otherwise, your custom items won't be shown.This is done by adding a new value, not by deleting existing data. Don't worry if you want tokeep one or more of the defaults; it's easier in the long run to disable them all here and then re-create the five you want to keep.
One by one, highlight each key under the StandardPlaces key (e.g., Desktop , Recent ), and
select New and then DWORD Value from the Edit menu. Name the new value Show , andleave the value of 0 unchanged. Make sure the values you add are DWORD values; otherwise, this
won't work.
4.
Next, highlight the UserDefinedPlaces key and add five new keys. Name them Place1 , Place2, Place3 , Place4 , and Place5 . You can add more if you like (see Step 7).
5.
In each of these new keys, you'll want to create the following values, filling in the appropriateinformation in each value:
A String value called Name
This value contains the caption that will appear under this place (example: Desktop ).
A String value called Path
This value contains the full folder path for the place (for example: c:\windows\desktop ).
6.

A DWORD value called Index
This value allows you to choose how your places are sorted. Enter 0 for the first place, 1for the second, 2 for the third, and so on. The key names typed in the previous step(Place1 , Place2 , etc.) do not determine the sort order.
Even if you add more entries here, only the first five will be shown. To allow more than fivebuttons on the Places Bar, go back toHKEY_CURRENT_USER\Software\Microsoft\Office\10.0\Common\Open Find\Places (replacethe 10.0 here with 9.0 if you're using Office 2000). Select New and then DWORD Value fromthe Edit menu. Name the new value ItemSize , and leave the value of 0 unchanged (regardless
of the number of items you want to appear). Now, any additional keys you add using the aboveprocedure will also appear in the file dialog.
7.
After you've entered all the new places, open any Office application to try it out. This may requiresome trial and error to get it right.
One of the things that makes this difficult is that Office tends to indiscriminately add new keysand values, which can clutter up what you're working on. If you've done it right, however, theseemingly random keys and values that appear will have no effect on what actually appears inthe dialog boxes.
8.
When you're done, you'll want to make a Registry patch to back up your settings, just in case asubsequent Office update overwrites them. See Section 3.3.5 for more information.
4.4.4. Curb AutoPlay for CDs and DVDs
AutoPlay (also called Autorun) is a feature intended to make using CDs and other removable mediaeasier for inexperienced Windows users, but more experienced users may end up simply beingirritated by it. AutoPlay is responsible for starting an audio CD, data CD, or DVD the moment it isinserted into your drive. If you wish to insert a disk for browsing or any other purpose than playing it,you'll be forced to wait for Windows to load the AutoPlay application before you can close it andcontinue with your work.
What's worse is that even after all this has happened, the AutoPlay process starts over again if youdouble-click on the CD icon in your My Computer windowcontrary, of course, to the normal folderwindow that one would expect to see. (You can get around this on a disk-by-disk basis by right-clicking on the disk icon and selecting Open or by using Explorer and navigating to the disk in thefolder tree.)
The AutoPlay feature works by polling the CD or DVD drive every few seconds to see if a disk has beeninserted. If Windows detects a disk that wasn't there a few seconds ago, it reads the label of the diskand looks for a file called Autorun.inf in the disk's root directory. Autorun.inf usually contains twopieces of information: a reference to an icon file (to display, along with the disk label, in My Computerand Explorer) and a reference to an AutoPlay application.[14] If an AutoPlay application is specified,Windows proceeds to run the program, which is usually a large, brightly colored window with links tothe application's setup program, documentation, the manufacturer's web site and, hopefully, an Exitbutton. Otherwise, any of several predefined "player" applications may be launched, depending on thetype of content detected on the disk. In addition to CDs and DVDs, the AutoPlay system also supportssome removable media drives, such as digital-camera memory-card readers.

[14] See Section 4.4.1 earlier in this chapter for another solution that uses the Autorun.inf file.
There are several different solutions available to control this feature in Windows, all of which perfectlyillustrate the advantage of tweaking Windows to get around all its annoyances.
4.4.4.1 Solution 1: Disable AutoPlay on the fly
If you hold down the Shift key when inserting the disk, the AutoPlay feature is bypassed (although it'snot exactly graceful trying to insert a CD while holding down keys on the keyboard).
Depending on the speed of your drive, you may have to hold Shift for only a few seconds, or longer ifit's slow. This feature can be especially aggravating if you hold Shift while inserting a disk, as well asfor 5-6 seconds thereafter, only to have the AutoPlay application start when you let go of the Shiftkey.
4.4.4.2 Solution 2: Choose AutoPlay preferences on a per-content basis
This next solution allows you to choose what happens when Windows detects a newly inserted disk,based on the type of content the media contains. Note that this feature has bugs in it, and Windowsdoesn't always pay attention to your selection made here.
Right-click the drive icon for your CD drive, CD recorder, or DVD drive, select Properties , andchoose the AutoPlay tab.
1.
At the top of the dialog is a list of content types, allowing you to choose an AutoPlay actiondepending on the type of files on an inserted disk. Among the available content types are thefollowing:
Music files (e.g., mp3 , wma )
Pictures (e.g., jpg , gif , tif , bmp )
Video files (e.g., avi , mpg , asf )
Mixed content (used when no Autorun.inf file is found, and either no media files are foundor more than one type of media files are detected)
Music CD
DVD movie (appears only for DVD players)
Blank CD[15] (appears only for CD/DVD recorders)
[15] Although it doesn't say it, "Blank CD" implies "Blank DVD" as well.
You may have noticed that "Data CD" is absent from this list, meaning that this window won'tallow you to modify AutoPlay behavior for CDs or DVDs containing an Autorun.inf file.Unfortunately, there's no way to modify or add to this list.
2.
Select an entry in the content-type list, and then select an appropriate action to take. Each3.

action is linked to an application, similar to File Type actions (discussed earlier in this chapter).Unlike the content types, though, the actions can be customized, and the procedure to do so isexplained in the next solution.
3.
Click OK when you're done; the change will take effect the next time a disk is inserted in thedrive. Note that you will have to repeat this for each of your removable media drives: CD, DVD,and memory-card readers included.
4.
4.4.4.3 Solution 3: Selectively control AutoPlay actions, or disable it altogether
This next procedure adds more customizability to the AutoPlay feature, including a quicker way todisable AutoPlay than the previous solution, as well as a way to customize the list of actions in theAutoPlay tab of the drive-properties dialog. It also allows you to disable AutoPlay completely for agiven drive (or drive type), including data CDs (something not possible with the previous solution).
Open TweakUI (see Appendix A ), expand the My Computer category, and then expandAutoPlay . There are three subcategories here: Drives , Types , and Handlers .
1.
Select Drives to selectively disable AutoPlay for individual drives. Any unchecked drive will notAutoPlay inserted media, regardless of content.
2.
Select Types to more globally disable AutoPlay for CD and DVD drives and removable drives.3.
Lastly, the Handlers category allows you to customize the actions shown in the AutoPlay tab ofthe drive-properties dialog, as described in the previous solution.
4.
TweakUI won't let you delete any of the predefined actions, but it will change the content typesfor which each is available. For example, you can choose whether or not the Copy pictures to afolder on my computer action is shown when you select Video files in the AutoPlay tab ofthe drive-properties dialog.
If you want to remove one of the predefined actions, you can do so in the Registry.Just go toHKEY_LOCAL_MACHINE\SOFTWARE\Microsoft\Windows\CurrentVersion\Explorer\AutoplayHandlers\Handlers , and delete the corresponding key there.
5.
Click Create here to add a new action, which can subsequently be selected for any removablemedia drive, and nearly any content type. Figure 4-14 shows the Autoplay Handler dialog.
Figure 4-14. Use the Autoplay Handler dialog to add new handlerapplications to be automatically launched when certain types of
removable media are inserted
6.

The first two fields are decorative; the text you type for <description> and <program name>are merely the captions to be displayed next to the action. Click Change Program to choose anapplication executable (.exe file).
7.
Lastly, the Args field, filled by default with "%L ", allows you to specify one or more command-
line parameters. Whatever you type here should be supported by the application you've selected(more details may be available in the application's documentation).
Similar to %1 , discussed in the File Types section earlier in this chapter, %L represents the full
path of the drive that was activated by the AutoPlay feature. The quotes are simply included forgood measure, intended to allow for any spaces in the path name. For example, if you choseWindows Explorer (explorer.exe ) as the program, and change Args to:
/n, /e, "%L"
then Windows will execute the following command when, say, a CD is inserted in drive g :
\Windows\explorer.exe /n, /e, "g:"
8.
Click OK and close TweakUI when you're done. To take advantage of any newly created AutoPlayactions, see Solution 2.
9.
If you disable the AutoPlay feature for data CDs, the AutoPlay application on any given CD will, asyou'd expect, not run automatically. Fortunately, it's easy to run the setup application or any otherapplication on the CD manually. To do this, right-click on the drive icon in Explorer and selectAutoPlay . Alternatively, you can open the root directory of the CD drive in Explorer: on most data

CDs that contain software, you'll see something like Setup.exe or Autorun.exe . Double-click the file torun it. Sometimes, however, the AutoPlay application file is not obvious, in which case you can openthe Autorun.inf file and look at the line that begins with open= . If you don't see an Autorun.inf file in
the root directory of the CD, it doesn't support the AutoPlay feature and wouldn't have started on itsown even if AutoPlay was still enabled.
4.4.4.4 Solution 4: Turn off CD polling
If you want a quick and dirty way to disable all AutoPlay functionality for CD and DVD drives, as wellas the system that polls the drive every few seconds (as described at the beginning of this section),use the following solution.
Open the Registry Editor discussed in Chapter 3 .1.
Expand the branches to HKEY_LOCAL_MACHINE\SYSTEM\CurrentControlSet\Services\Cdrom .2.
Double-click the Autorun value and type 0 for its value. If it's not there, create it by selecting
Edit New DWORD Value , and typing Autorun for the name of the new value.
3.
Close the Registry Editor when you're finished. You'll have to log out of Windows and then logback in for this change to take effect.
4.
Note that with this solution, Windows will no longer be notified when you insert a new CD. To makesure the correct icon and title for the current CD are displayed in My Computer and Explorer, press F5to refresh the window.

Chapter 5. Maximizing PerformanceAlthough your computer spends 99.9% of the time waiting for you to do something, the biggestconcern is that other 0.1% of the time when eight seconds can seem like an eternity.
A common misconception is that with all else being equal a computer with a fast processor, say 3GHz, will naturally be faster than a 2 GHz system, and the microprocessor industry wouldn't have itany other way. Sure that new system you're eyeing seems a whole lot faster than your year-oldmachine, but how much is due merely to the processor's clock speed and how much is determined byother factors?
Now, the increased processor speed is an obvious benefit in some specific circumstances, such aswhen you're performing intensive statistical calculations, using 3D modeling software, or playingparticularly processor-intensive games. But in most cases, one's qualitative assessment of acomputer's speed is based on its ability to respond immediately to mouse clicks and keystrokes, startapplications quickly, open menus and dialog boxes without a delay, start up and shut down Windowsquickly, and display graphics and animation smoothly. For the most part, all of these things dependfar more upon correctly optimized software, the amount of installed memory, the speed of your harddrive, and the amount of free disk space than on mere processor power.
Probably the biggest drag on an older system's performance, and the primary reason it may seem somuch slower than a new system (not to mention slower than it might have been only last year), isthe glut of applications and drivers that have been installed. Any computer that has been around fora year or more will likely suffer a slowdown, the only remedy being either a thorough cleansing or acomplete reinstall of the operating system (see "Reinstalling Windows XP" in Chapter 1).
Because financial limitations prevent most people from replacing all their hardware every threemonths (or whenever the proverbial ashtray gets full), most of this chapter is devoted to solutionsthat will help improve the performance of your existing system without spending a fortune on newgadgets. For example, the way Windows uses the swapfile (virtual memory) can be inefficient, andspending a few minutes fixing this bottleneck can result in performance increases all across thesystem.
Of course, this doesn't mean it never makes sense to upgrade, only that it's not always the bestanswer to a performance problem. Even if money were no object and you could simply buy a newcomputer or component without thinking twice, you'd still have to take the time to install andtroubleshoot the new hardware and reconfigure your software.
Naturally, there is a certain point past which your computer is going to turn into a money and timepit. The older your system is, the less vigorously you should try to keep it alive. It's easy to calculatethe point of diminishing returns: just compare the estimated cost of an upgrade (both the monetarycost and the amount of time you'll have to commit) with the cost of a new system (minus what youmight get for selling or donating your old system). I stress this point a great deal, because I've seenit happen time and time again: people end up spending too much and getting too little in return. Asimple hardware upgrade ends up taking days of troubleshooting and configuring, only to result inthe discovery that yet something else needs to be replaced as well. Taking into account thatwhatever you end up with will still eventually need to be further upgraded to remain current, it is

often more cost effective to replace the entire system and either sell or donate the old parts.

5.1. Trimming the Fat
In many ways, Windows XP is able to better take advantage of your hardware than Windows 9x/Me,but that doesn't mean it's configured for optimal performance right out of the box. Because all thesoftware you run is dependent upon the operating system, tweaking Windows for better performancecan result in performance gains across the board.
To start off, there are several easy settings that can have a substantial effect on Windowsresponsiveness. The next few sections explain these settings.
5.1.1. Tame Mindless Animation and Display Effects
Windows XP adds animation to almost every visual component of the operating system. While theseaffectations may be cute, they can easily make a 2 GHz computer perform as though it were anantiquated 386. Rather than watch your Start Menu crawl to its open position, you can configure yourmenus and list boxes to snap to position. You'll be surprised at how much faster and more responsiveWindows will feel.
The settings that can affect performance are scattered throughout the interface, but the ones thatcontrol display effects are the ones that concern us here. Double-click the System icon in ControlPanel, choose the Advanced tab, and click Settings in the Performance section. The Visual Effectstab, shown in Figure 5-1, contains sixteen settings, all explained later.
Figure 5-1. The Performance Options window is a good place to startwhen looking for Windows bottlenecks to eliminate

Unfortunately, the four selections above the list are rather misleading. For example, the LetWindows choose what's best for my computer option reverts all settings to their defaults,chosen by a marketing committee at Microsoft to best showcase their product's features. The Adjustfor best appearance option simply enables all features in the list, while the Adjust for bestperformance option just disables them.
Keep in mind that disabling some of these options will definitely improve Windows performance, whileothers may only be of benefit if you are using older video hardware.
Newer video cards (display adapters), especially better 3D-accelerated AGPcards, have built-in processors that handle drawing routines, such as shadowsand translucent effects. If your video card is fast enough, these effects won'tcause a performance hit. Other settings, such as animated menus, rely ontime-based delays and slow down everyone's system, regardless of hardware.
Ultimately, the choice comes down to personal preference: some of these features are just plainannoying, and turning them off can be beneficial to your sanity. Others are actually kinda cool:
Animate windows when minimizing and maximizing
If enabled, this option causes windows to appear to shrink into their respective taskbar buttons

when minimized, and expand to their full- size windows when restored or maximized. Althoughnot as slick as the minimize/maximize animation in Apple's OS X, it can nonetheless give aquick clue as to where your window goes when it's minimized. If you see excessive flickeringwhen you minimize or maximize, try turning this one off.
If you have both the Auto-hide the taskbar setting in Taskbar and Start Menu Properties andthe Show window contents while dragging option (described later) enabled, turning off theAnimate windows option will also disable the animation for the disappearing taskbar.
Fade or slide menus / ToolTips into view
This is the option that enables or disables animation shown when menus are opened. Turn thisoption off to have menus "snap" open.[1]
[1] By default, there will still be a short delay before a menu is opened. See "Speed Up MenuResponsiveness," later in this chapter, for more information.
If you choose to keep menu animation, you can change the type of animation used by double-clicking on the Display icon in Control Panel, choosing the Appearance tab, and clickingEffects.
Show shadows under menus / mouse pointer
If you have a newer video card, disabling this option should have no discernible effect onperformance.
Show translucent selection rectangle
The translucent selection rectangle (referred to as a "rubber band" in Chapter 2) takesadvantage of extended support for alpha channels in your display driver. Only those systemswith older video cards will see a performance hit from this feature. With this option disabled,rubber bands appear as dotted rectangles.
Show window contents while dragging
Disable this option to show only window outlines when dragging and resizing windows. Unlessyou have a very old video card, you most likely won't see any difference in performance withthis turned off. In fact, your system is likely to seem more responsive with this featureenabled, as windows will appear to respond immediately to dragging rather than respondingonly after you let go of the mouse button.
Slide open combo boxes
This option controls the animation of drop-down listboxes, similar to the fade or slide menus

option described earlier.
Slide taskbar buttons
When a window is closed, its taskbar button disappears. If this option is enabled, the taskbarbuttons to its right will slide to the left to close the gap. Since this animation doesn't cause anydelays, you're unlikely to achieve any performance gains by disabling this option. However, Ifind the taskbar animation rather annoying and personally prefer to have this one turned off.
Smooth edges of screen fonts
Using a process called anti-aliasing, Windows fills in the jagged edges of larger text on thescreen with gray pixels, making the edges appear "smooth." Turn this option off to slightlyimprove the speed at which larger fonts are drawn on the screen.
If you're using a flat-panel display (laptop or otherwise), you may find smoothed fonts moredifficult to read. Instead of simply turning the option off, you may wish to try an alternate anti-aliasing method. Double-click the Display icon in Control Panel, choose the Appearance tab,and click Effects to choose between the Standard and Clear Type smoothing methods.Experiment with this setting to see which one looks best on your display.
Smooth-scroll list boxes
Just because standard listboxes don't "open" like menus and drop-down listboxes doesn't meanthey're not animated. By default, when you scroll a listbox, its contents move slowly. Turn thisoption off to improve the responsiveness of listboxes.
Use a background image for each folder type
Turn this off to disable the background image shown in some system folders, such as ControlPanel (category view only) and the My Pictures folder. These folders will not only open morequickly without the background images, but they'll be more readable as well.
Use common tasks in folders
The common task pane can also be disabled by opening Folder Options in Control Panel, andselecting Use Windows classic folders. Common tasks, described in more detail in Chapter2, are the panes shown on the left of single-folder windows and contain links to related areasand features.
Use drop shadows for icon labels on the desktop

This option does more than simply enable or disable shadows for desktop icon captions. If youturn this option off, not only will the shadows disappear, but the background behind the textwill no longer be transparent. Windows XP is the first version of Windows to offer this option.See Figure 5-2 for an illustration of this setting.
Figure 5-2. If you turn off shadows for desktop icon labels andyou're using a background image, desktop icon labels will be shown
over rectangles of the current background color
Use visual styles on windows and buttons
Turning this option off is essentially the same as choosing Windows Classic style from theWindows and buttons list in Control Panel Display Appearance tab. See"Dealing with Themes, Schemes, Styles, and Skins" in Chapter 2 for more information.
Other settings that affect your display performance can be found by going to Control Panel Display Settings tab Advanced. The Troubleshoot tab has a couple of settings that allowyou to disable some video functionality, useful to help isolate video driver problems. See also "Getthe Most Out of Your Games, Speed-Wise" for more settings, including those that affect the Direct3Dand OpenGL subsystems.
You'll find additional settings in TweakUI, although many are simply duplicates of the settingsdescribed above. See also Appendix A, for details on TweakUI and additional performance-relatedsettings.
5.1.2. Speed Up Menu Responsiveness
In addition to turning off the menu animation, as described in the previous section, there's anothersetting that affects how responsive menus (including the Start Menu) are. By default, there's a half-second or so delay between the time you move the mouse over a menu item and the time the menuis opened. If you reduce this value, your menus will open much more quickly.

There's another feature that is incidentally affected by this setting. In all releases of MicrosoftWindows since Windows 95, all menus "follow" the mouse, which allows you to navigate throughmenus without having to click repeatedly. The problem with this design is that it can be very difficultto navigate menus unless you're able to hold your mouse or other pointing device very steadily. Eventhe smallest unintentional move in the wrong direction can cause the menu you're using to disappear.This can be even more annoying to those with more sensitive pointing devices, such as touch pads,pens, and other digitizers. This behavior can be completely disabled by increasing the menu opendelay to a sufficiently large value:
Open the Registry Editor (described in Chapter 3).1.
Expand the branches to HKEY_CURRENT_USER\Control Panel\Desktop.2.
Double-click the MenuShowDelay value. If it's not there, go to Edit New String Valueand type MenuShowDelay for the name of the new value.
3.
The numeric value you enter here is the number of milliseconds (thousandths of a second)Windows will wait before opening a menu. The default is 400 (a little less than half a second).Enter 0 (zero) here to eliminate the delay completely, or a very large value (65534 is the
maximum) to disable the automatic opening of menus.
4.
Click OK and close the Registry Editor when you're finished. You may have to log out and thenlog back in for this change to take effect.
5.
This setting can also be changed in the Mouse category of TweakUI (see Appendix A) or in CreativeElement Power Tools (available at http://www.creativelement.com/powertools/).
5.1.3. Speed Up System Startup
Several factors can impact the amount of time it takes for your computer to load Windows anddisplay the desktop so you can start working. As you install software and add devices, Windows getsmore and more bogged down. The most effective way to combat this is to routinely format your harddisk and reinstall the operating system and all applications. In fact, the computer on which I wrotethis book was wiped clean before I began the project. Initially, I had upgraded a Windows 2000system with XP, and it took 2-3 minutes to boot each time. After wiping it clean and reinstalling, theboot time dropped to about 45 seconds.
Unfortunately, reinstalling is a whole lot easier said than done, and is simply not practical for many ofus. The following is a checklist of ways to more easily (although less substantially) reduce Windowsboot time.
5.1.3.1 Add more memory
You should have a minimum of 256 MB of memory (RAM) to run Windows XP, but 384 MB to 512 MBis better. Many systems can accept up to 768MB or even 1 GB (1024 MB), although only users ofgraphic-intensive applications (such as Photoshop) are likely to benefit from that much memory.
Memory prices are always dropping, typically making it remarkably inexpensive to add more RAM to

your system, and doing so will significantly improve performance across the board.
5.1.3.2 Make more free disk space
You may not have sufficient free disk space for your swap (paging) file. Windows uses part of yourhard disk to store portions of memory; the more disk space you devote to your swapfile, the easier itwill be for Windows to store data there. See "Optimize Virtual Memory and Cache Settings" later inthis chapter for more information.
The easiest way to create more free disk space is to delete the files on your hard disk that you nolonger need. It's best to back up your system before deleting anything, or at least to rename (ormove) files to see if they're being used before you get rid of them permanently. See "Increasing DiskSpace (or What to Throw Away)," later in this chapter, for more information.
Lastly, a new hard disk will give you dramatically more disk space. A faster hard disk can alsoimprove boot time. If you're on the fence about replacing that older drive, consider the performanceboost of getting a larger, faster drive.
5.1.3.3 Clean out your Temp folder
Sometimes having too many files in your \Windows\Temp folder can not only slow Windows startupbut, in extreme cases, can prevent Windows from loading at all. Windows and your applications usethis folder to temporarily store data while you're working with documents. When those applicationsand documents are closed (or when the applications just crash), they often leave the temporary filesbehind, and they accumulate fast.
See "Mirror a Folder with Folder Shortcuts" in Chapter 4 for more information on the Temp folder,including a hint on automatically clearing out the Temp folder when Windows starts.
5.1.3.4 Thin out your fonts
If you have more than 600 fonts installed on your system, it may be negatively impacting the time ittakes to load Windows. If you can survive without 400 different decorative fonts (especially if all youever use is Times Roman), try temporarily removing them. If you periodically need a lot of fonts, youmight want to invest in font-management software, such as Adobe Type Manager, which can removeand reinstall fonts in groups at the click of a button.
5.1.3.5 Tame antivirus software
Antivirus programs are typically configured to be run whenever you turn on your computer. Theseprograms are always in memory, scanning programs as you open them and files as you downloadthem. In some cases, this is overkill. For most usersespecially those who take the properprecautionsgetting a computer virus is about as likely as getting struck by lightning.
I certainly wouldn't recommend getting rid of all antivirus programs; just restrict their use tomanually scanning your system when you want by disabling the automatic feature. You'll notice a

faster startup for Windows and applications alike. See "Viruses, Malware, and Spyware" in Chapter 6for details.
5.1.3.6 Eliminate autostart programs
Probably the most common thing that slows down the loading of Windows is all of the programs thatare configured to load at boot time. Not only do they take a while to load, but they commonly eat upprocessor cycles while they're running. There are several places such programs are specified. Lookcarefully in each location, and feel free to remove anything you don't want running. See "ProgramsRun by Windows when It Starts" in Chapter 5 and "Eliminate Unwanted Windows Components" laterin this chapter for details.
5.1.3.7 Nitpicking
Leaving removable media (such as memory cards and removable hard disks) connected when youboot up may add boot delays. This is reportedly fixed in Service Pack 2, but it's still good practice toremove all CDs, disks, and cards from your computer when you're not using them.
Some people recommend using Microsoft's free BootVis tool to analyze yoursystem's boot time and make appropriate changes to speed things up. Althoughit has some snazzy graphs, it has not been proven to have any noticeable effecton your system's boot time. Of course, because of the interest in this tool,Microsoft has decided to remove it from their site (seehttp://www.microsoft.com/whdc/system/sysperf/fastboot/bootvis.mspx),although you will likely be able to find it elsewhere.
Another thing that can increase boot time is network adapters that aren't plugged in. Windows pollseach active network connection on your system when you boot your system and quits as soon as aconnection is confirmed. If Windows can't establish a connection, it waits as long as 30 secondsbefore it gives up and moves on. (You can tell that Windows is doing this when hard disk activityceases and the activity lights on your network devices start to blink.) To solve this problem, open theNetwork Connections window (see Chapter 7), right-click on each network connection you're notusing, and select Disable.
While you're at it, disable any other networking components you don't need, including unnecessaryprotocols and drivers. Also, disable drive-letter mapping (discussed in Chapter 8) unless you usethose drive letters all the time.
5.1.4. Start Windows Instantly
You can optimize Windows all you want, possibly shaving ten to fifteen seconds off your boot time(see the last section), or you can approach the problem from a different angle. Most new computers,and nearly all laptops, have a functional Stand by mode, allowing you to shut down Windows quickly,and more importantly, start it back up in only a few seconds.
Start by going to Control Panel and opening Power Options. Choose the Advanced tab, and then

choose Stand by from all available listboxes in your Power buttons section, as shown in Figure 5-3.Click OK when you're done.
Figure 5-3. Make the Stand By mode more accessible to facilitate near-instant boots
If any of these options (or the entire Advanced tab) isn't available in yourPower Options Properties window, then your computer's support for AdvancedPower Management (APM) is likely disabled in your system's BIOS. SeeAppendix B for details on APM and APM-related settings, or jump to the nextsection for APM troubleshooting.
Then, while Windows is still running, press your computer's power switch (or, if it's a laptop, close itslid). Don't go through the normal shut down process via the Start Menu; just turn it off. Windows willbriefly display a "Preparing to stand by . . . " message, and then your computer should shut itself off.
Now, press the power switch again. Your computer should power itself on, and the Windows desktopshould appear in less than five seconds, allowing you to pick up where you left off. You can evenleave applications open. The problem, of course, is when this doesn't work like it's supposed to,which, as it turns out, is most of the time.
5.1.4.1 Hibernate vs. Stand by

When you place a computer into Stand by mode, you're placing it into a "deep sleep" power-savingmode (known as the S3 sleep state), instead of actually turning it off. During Stand by, power to yoursystem memory is maintained while power is cut to most of the rest of your system's hardware. Thisallows your computer to resume to the exact state it was in before it entered Stand by mode with aminimum of power consumption. Unfortunately, if power is cut completely, which can happen if youunplug your desktop system or remove the battery from your laptop, it will be equivalent to poweringit off without going through the shutdown procedure, and you may lose data.
The other option is to have your computer enter hibernation mode (S4 sleep state), which saves animage of your system memory into a file on your hard disk (known as a memory dump) before powerto the computer is completely shut off. The obvious benefit over Stand by mode is that the systemmemory isn't being kept alive with electricity, making it a better choice if you're shutting thecomputer down for the weekend. The downside is that writing to disk takes more time, as doesreading the image file from disk when you wake up the system.
To enable hibernation mode, go to Control Panel Power Options Hibernate tab (Figure 5-4).Turn on the Enable hibernation option, and you'll see that the disk space required to hibernateis equal to the amount of installed RAM in your computer.
Figure 5-4. Use Hibernate instead of Stand by to enable more robust, yetslightly slower system boots

Other Ways to Wake Your Computer
You can use your computer's power switch to wake up your system from Stand by orHibernate mode, but it may not be your only choice. Provided that your mouse and itsrespective driver supports it, you can wake up a sleeping system as though it werenothing but a screensaver. To configure your mouse to wake your system, follow thesesteps:
Open Device Manager (devmgmt.msc).
Expand the Mice and other pointing devices category, right-click the entry for yourmouse, and select Properties.
Choose the Power Management tab, and turn on the Allow this device to bring thecomputer out of standby option. (If this Properties box doesn't have a PowerManagement tab, then your mouse driver doesn't support this feature.)
Click OK when you're done.
These other devices may also be capable of waking up your computer:
Network adapters
Using the Wake-on-LAN protocol (sometimes called Remote Wake Up), you canwake a computer remotely over a network connection.
Modems
Wake your computer every time your phone rings. Of course, this may be anannoyance you're trying to solve, rather than a feature you're trying to enable,but, nevertheless, now you know where it is.
IEEE 1394 (FireWire) devices
Actually, you'll probably never have a reason to enable this option for FireWirecontrollers or devices, but the option can appear by mistake in some circumstancesand can cause problems if it's enabled. Make sure it's turned off on your system.
Next, choose the Advanced tab and change all the Power buttons options to Hibernate (just likein the last section). Click OK when you're done. You can make your computer hibernate at any timeby simply pressing the power switch (or closing the lid, if you're using a laptop).
Whether you choose to have your computer Stand by or Hibernate, you can configure Windows to go

to sleep after a certain period of inactivity. It works like a screensaver, but saves power instead ofdisplaying a cheerful animation. Just choose the Power Schemes tab of the aforementioned PowerOptions properties dialog, and set the System standby (or System hibernates) option to asuitable amount of time (e.g., "After 30 mins").
You can also make your computer enter Stand by mode by selecting ShutDown (or Turn Off Computer) from the Start menu and then selecting Standby. If you're using the classic log-off screen, you'll also see a Hibernate optionin the list (assuming the option above has been enabled). But if you're usingthe default Welcome screen and the corresponding Turn Off Computer dialog(discussed in Chapter 8), you'll only see the Stand by option. Just press andhold the Shift key to temporarily switch the button to Hibernate, should youneed it.
5.1.4.2 Troubleshooting Stand by and Hibernate modes
If you experience a problem with one of the sleep modes (Stand by or Hibernate), it's likely one ofthe following:
Windows won't go to sleep at all; either nothing happens when you try to stand by, or thesystem just crashes in the middle of the process.
Windows wakes up after going to sleep, or Windows simply boots normally instead of recoveringyour previous session.
Some features stop working after waking from hibernation or Stand by, such as the Internetconnection. (Hint: restart Windows to fix the problem.)
Once Windows has been placed in Stand by or Hibernate mode and is then woken up, it's unableto go back to sleep.
Some or all of the power-management features and settings discussed here are grayed-out(disabled) or missing.
Unfortunately, all of these problems are extremely common, mostly because of the sloppy andinconsistent support for Advanced Power Management (APM) and Advanced Configuration and PowerInterface (ACPI) in the computer industry. The good news is that there are a few things you can doto help improve your computer's support for APM and ACPI, should you be experiencing any of theabove problems:
Get a BIOS update
Check with the manufacturer of your computer system (or motherboard) for a BIOS update,the most likely fix (if available) for any power-management problems you might be having. SeeAppendix B for details.

Here's a little Microsoft-sponsored paradox for you: you'll know that yourmotherboard isn't fully APM-compliant if your Power Options dialog boxhas an APM tab. If the APM tab is present on your system, try turning onthe Enable Advanced Power Management support option and thenclicking Apply. (If there's no tab, then your computer does indeedsupport ACPI and APM, and you don't have to do anything.)
Look for incompatible hardware or drivers
The second-most common cause of power-management problems is a hardware device ordriver that isn't fully APM-compliant, meaning that it doesn't support S3 sleep mode or can't bewoken up after entering this power-saving state. Video cards (display adapters) and many USBdevices are common culprits; check with their respective manufacturers for firmware anddriver updates (see Chapter 6). See the "Increase the USB Polling Interval" sidebar for anothersolution.
Increase the USB Polling Interval
One of the things that can prevent your computer from entering its Stand by orHibernate modes is Windows's support for USB. In order to detect newly connected USBdevices, Windows polls your USB controller(s) once each millisecond by default.Unfortunately, this frequent polling may prevent your processor from believing that it isidle, a necessary condition before it can initiate any power-saving features.
The solution is to give your CPU a rest by increasing the interval between polls to theUSB controller. Open the Registry Editor (see Chapter 3) and expand the branches toHKEY_LOCAL_MACHINE\SYSTEM\CurrentControlSet\Control\Class\{36FC9E60-C465-11CF-8056-444553540000}. You'll know you have the right key if its (default) value is
"Universal Serial Bus controllers."
In this key, you'll find one or more numbered subkeys (e.g. 0000, 0001, 0002), each of
which represents a USB controller. Now, if you've ever upgraded the motherboard inyour computer, you'll likely see a lot of subkeys here. Most represent controllers nolonger installed on your system; only the last couple (with the highest numbers) arelikely still active. To find out which ones are currently active, cross-reference the names(in the DriverDesc value) with the USB controllers that currently show up in Device
Manager (devmgmt.msc). If in doubt, you can always repeat this procedure for all thesubkeys displayed here.
Select a subkey for an active USB controller, and create a new DWORD value inside (Edit New DWORD value) called IdleEnable. Double-click the new value and set its
data to 1. (To undo this setting, just delete the IdleEnable value.) You'll need to restart
Windows for this change to take effect.

Make room for the hibernation file
As explained earlier, the Hibernate feature creates an image file on your hard disk equal in sizeto the amount of installed memory. If you have 384 megabytes of RAM, then Windows willneed 402,653,184 bytes of free space. This feature may not work reliably if you don't haveenough disk space, or if there's excessive fragmentation, so try deleting some unnecessaryfiles and running Disk Defragmenter (dfrg.msc, discussed later in this chapter) if your PC ishaving difficulty hibernating.
Turn off the Indexing Service
If your hard disk won't turn off after a certain period of inactivity, Windows Indexing Servicemay be keeping them awake. See Microsoft Knowledge Base article 313300(http://support.microsoft.com/?id=313300) for more information.
Use Sleeper
Go to http://www.passmark.com/products/sleeper.htm and download the free PassMarkSleeper utility to help test your computer's ability to enter and recover from sleep andhibernation modes.
Keep in mind that you may never get your system to reliably go to sleep and wake up, but if you areable to get it working, it can be very convenient.
5.1.5. Speed Up System Shutdown
Theoretically, when you shut down Windows, your computer should be powered down in under fifteenseconds. The problem is that all of the cleanup that is done before Windows considers it "safe" topower the system downincluding shutting down your open applications, stopping any runningservices, and writing any pending cache data to the diskcan sometimes delay the shutdownprocedure.
In the course of using your computer, Windows sometimes postpones writingdata to the disk to improve performance. This is called write caching, and as aconsequence, Windows must take a few seconds before you shut down to makesure all data queued to be written is actually, physically written to the diskbefore power is lost. See the discussion of removable drives in Chapter 6 for away to disable this feature.
The following solutions should help eliminate the sometimes-unnecessary delays that can accompanysystem shutdown.

5.1.5.1 Part 1: Reduce the hung application timeout
When shutting down, Windows attempts to stop all running tasks. If a task is not responding orrefuses to shut down, there's a built-in delay before Windows will force the task to end. This delay iscalled the timeout, and it can be shortened if you're experiencing problems or unreasonable delayswhen shutting down your system:
Open the Registry Editor (described in Chapter 3 ).1.
Expand the branches to HKEY_CURRENT_USER\Control Panel\Desktop.2.
Double-click the WaitToKillAppTimeout value. This number controls the time to wait, inmilliseconds, before unresponsive applications are forced to close. The default is 20000 (twenty
seconds), but it can be decreased to any value; the minimum is 1 millisecond, although it'simpractical to use any value smaller than about 2000 (two seconds) here.
3.
Also in this key is the HungAppTimeout value, which does pretty much the same thing asWaitToKillAppTimeout; just enter the same number for both values.
4.
Expand the branches to HKEY_LOCAL_MACHINE\SYSTEM\CurrentControlSet\Control.5.
Double-click the WaitToKillServiceTimeout value. This works the same as theWaitToKillAppTimeout value described above, except that it applies to services instead of
applications. See Chapter 7 for more information on services.
6.
Close the Registry Editor when you're done. You'll have to restart Windows for the change totake effect.
7.
These values also affect the timeouts at times other than just shutting down, such as when you clickEnd Process in the Windows Task Manager.
5.1.5.2 Part 2: Use the User Profile Hive Cleanup Service
Occasionally, Windows has trouble unloading the hive containing the HKEY_CURRENT_USER branchof the Registry (see Chapter 3). If your system appears to repeatedly take a long time to log out andshut down, download and install Microsoft's UPHClean utility. See Microsoft Knowledge Base article#837115 (http://support.microsoft.com/default.aspx?scid=kb;en-us;837115) for details.
5.1.5.3 Part 3: Have Windows power down your computer automatically
You may have noticed that some computersespecially laptopsare able to power themselves off whenyou choose Shut Down from the Start Menu, rather than displaying the "It's now safe to turn offyour computer" screen. This is convenient and makes for faster shutdowns.
In order to configure your computer to behave this way, you'll need the following: if you're using adesktop (as opposed to a portable) computer, you must have an ATX-compliant case andmotherboard. You can tell an ATX system from the power button; if it's a momentary pushbutton(that doesn't stay in when you press it), you've likely got an ATX case. The difference is that power

switches in ATX systems send a "shut down" command to the motherboard, rather than simplycutting power. All new computers are ATX-compliant, as is any machine that is likely to be capable ofrunning Windows XP.
Secondly, you must have Advanced Power Management (APM) enabled in your system BIOS. Enteryour system BIOS setup screen when first starting your computer (usually by pressing the Del key),and make sure any options labeled "Advanced Power Management," "APM," or "APM-aware OS" areenabled. See Appendix B for more information on BIOS settings, and the previous section for moredetails on APM troubleshooting.
If these two conditions are met, Windows should automatically power down your system the nexttime you shut down.
5.1.6. Eliminate Unwanted Windows Components
In addition to the settings and tweaks described elsewhere in this chapter, a common and effectivetechnique for removing the bottlenecks in Windows is to eliminate the programs and Windowscomponents you don't use.
Most optional Windows components can be removed by double-clicking on the Add or RemovePrograms icon in Control Panel, clicking Add/Remove Windows Components, and unchecking anyunwanted components. Single programs may not seem to make much of a difference, but they doadd up. Note, however, that not all optional components are listed here. To add unlisted Windowscomponents to your Control Panel, follow these steps:
Start Notepad (or your favorite plain-text editor), and open \Windows\Inf\Sysoc.inf.1.
The structure of this file is that of an .ini file, discussed in Chapter 3. The [Components] section
lists the components shown in the Windows Components Wizard. Each entry in this section hasthis format:
name=options
where options is a list of parameters, separated by commas. The second to last parameter is
the one that interests us. If it's empty (nothing between the surrounding commas), thecorresponding entry will appear in the Windows Components Wizard. Otherwise, if theparameter is hide, the entry will not appear. To "unhide" the entry, simply delete the hide
keyword. For example, the entry for Windows Messenger looks like this:
msmsgs=msgrocm.dll,OcEntry,msmsgs.inf,hide,7
To add Windows Messenger to the list, allowing you to remove the component, simply changethe line so it reads:
msmsgs=msgrocm.dll,OcEntry,msmsgs.inf,,7
2.
When you're done, save the file, and reopen the Windows Components Wizard to see the new3.

entries.3.
5.1.7. Get the Most Out of Your Games, Speed-Wise
Dude, don't tell me only kids play games. I know you play Freecell more often than you check youremail. The catch, of course, is that Freecell spends much more time waiting for you to move a cardthan it spends on any calculations. Speed is primarily a concern with the more processor-intensivegames, such as 3D games or anything with full-screen animation.
Improving game performance, as with improving performance in any other application, involvesremoving software bottlenecks and upgrading hardware where necessary. However, games areunique in that they can benefit greatly from certain types of hardware, such as 3D accelerators andsound cards with digital signal processors. Games also suffer the most from background applicationsand out-of-date drivers. Here are some ways to improve performance in the more processor-intensive games:
Most high-end games rely on DirectX, essentially a set of optimized video, sound, and gameinput drivers supported by Microsoft. Make sure you have the latest DirectX drivers by using theWindows Update feature (see Chapter 6) or going to http://www.microsoft.com/directx /.
Many games are also optimized to work with specific types of video and sound hardware. Forexample, a particular game's setup screen might allow you to choose between Direct3D andOpenGL for the video output; sometimes you even need to choose a particular video chipset(e.g., nVidia GeForce4). Your 3D accelerator might support several standards, but a given gamemight run better using the DirectX drivers, and another game might prefer the OpenGL setting.
The speed at which a video card can draw to your screen is somewhat dependent on the currentcolor mode and resolution. If your games are running slowly, try reducing the color depth andresolutioneither globally in Windows or in a particular game's setup screen (if it supports it)toincrease the speed. It's funny, thoughI've seen some games run smoother in 24-bit mode than16-bit mode, even though in theory the extra colors should cause a performance hit. Bettervideo cards will not show any performance hit when run at higher resolutions or color depths.
Games are highly optimized for speed, which tends to make them finickya game might runbeautifully with one video card but horribly with another. Check the documentation (manual,readme file, online FAQs) released by the game manufacturer for details that may affect you.Also look for updates to the game software that can fix performance issues, as well as addfeatures and even new levels. Check the web sites of both the video card manufacturer and thegame manufacturer for tips and patches.
Most 3D accelerators and even some games allow you to modify or disable certain 3D features,such as 8-bit palletized textures, gamma adjustment, zbuffer, and bilinear filter. In most cases,you'll probably just end up leaving these alone. However, some games might have conflicts withsome hardware, and fiddling with these settings may make one or more of your games runsmoother. Game fan web sites and discussion boards are the best places to find recommendedsettings relating to particular games and hardware.
Any unnecessary background applications should be disabled, either temporarily orpermanently. Each program that runs invisibly or in your system tray takes precious CPU cyclesaway from the processor-intensive games and can make the difference between 20 frames per

second and 30 frames per second. See "Speed Up System Startup" elsewhere in this chapter fordetails.
If a game runs off a CD or DVD, the Windows Autorun feature, which continually polls the CDdrive, can sometimes interrupt data transfer. Symptoms include hiccups in video clips and musicand slow loading of levels. See "Curb AutoPlay for CDs and DVDs" in Chapter 4 for details. Notethat old CD drives can also cause problems like this. Also, try gently rubbing the disk against asoft, clean cloth (or barring that, your shirt) to remove dust and fingerprints.
If you're playing a network game, either on a local network or over the Internet, you canimprove performance by optimizing your network settings. See Chapter 7 for details.
Lastly, the performance of high-end games is extremely dependent on game hardware, such as3D accelerators and sound cards. High-end video and sound cards not only will add features,but also will handle many of the calculations themselves, freeing up your processor significantly.A good 3D accelerator does more than just make 3D performance acceptable at highresolutions; it can even make the renderings look better, too. Your gaming system will actuallybenefit much more from a fast 3D card than from a doubling of processor power. Likewise, agood sound card with 3D environmental audio and a good digital signal processor (DSP) can addbackground sounds that will bring any game alive, without eating up processor cycles. I'm nottrying to sell you any hardware, but don't overlook the value of dedicated hardware if you'reserious about gaming.

5.2. Hard Disk
Your hard disk is more than just a storage device; it's used to hold your operating system and tosupplement your system's memory. The speed and health of your hard disk is a major factor in yourcomputer's performance, not to mention its reliability and security. The following topics all deal withdifferent aspects of your hard disk and how effectively Windows uses it.
Inevitably, the storage in your computer will need to be expanded, either to make room for a newerversion of Windows, or to make room for all your stuff after installing Windows. Later in this section,you'll find tips on upgrading and repartitioning your hard disk, allowing you to keep your disk and itsdata in tip-top shape.
5.2.1. A Defragmentation Crash-Course
The best way to ensure maximum performance from your drive is to regularly (weekly or biweekly)defragment it (also called optimizing). Figure 5-5 shows how frequent use of the hard drive can causefiles to become fragmented (broken up), which can slow access and retrieval of data on the drive, aswell as increase the likelihood of lost data.
Figure 5-5. File fragmentation on your hard disk can slow performanceand decrease reliability
To defragment your drive, run the Disk Defragmenter (dfrg.msc), which rearranges the files on yourhard disk to make them contiguous (not broken into pieces). It also defragments the free space, andoptionally places the files you access more frequently (such as programs and recently modifieddocuments) at the start of the drive and less frequently accessed files at the back of the drive.
If you find that Disk Defragmenter is having trouble completing its job, either continually restarting,or simply defragmenting your drive only partially, the culprit may be either of the following:
To avoid corrupting data, Disk Defragmenter stops what it's doing and restarts whenever itdetects that another process has written to the drive. To allow Disk Defragmenter to do its job,make sure to close all nonessential programs and background processes. Also, if necessary,

disable the Disk Indexing service by right-clicking the drive icon in Windows Explorer, selectingProperties, and turning off the Allow Indexing Service to index this disk for fast filesearching option.
If the amount of free disk space is low (less than 15% of the size of the drive), DiskDefragmenter may refuse to run. You can force it to defragment your drive by opening aCommand Prompt window (Chapter 10) and typing defrag c: /F, where c: is the drive letter of
the hard drive you want to defragment. Better yet, delete some files (see "Increasing DiskSpace (or What to Throw Away)") and try again.
If you're compulsive about disk defragmentation, superior alternatives to Disk Defragmenter includeNorton Speed Disk (included with Norton Utilities, http://www.symantec.com) and Diskeeper(http://www.executive.com/).
5.2.1.1 Enable automatic boot defragments
Here's a funny little setting in the Registry that seems as though it's supposed to instruct Windows todefragment your hard disk automatically each time it starts:
Open the Registry Editor (described in Chapter 3).1.
Expand the branches toHKEY_LOCAL_MACHINE\SOFTWARE\Microsoft\Dfrg\BootOptimizeFunction.
2.
Double-click the Enable value, and type Y for its data (or type N to disable it).3.
The funny part is that this setting is probably already enabled on your system (it's enabled by defaulton most XP systems). Now, have you ever seen Windows run Disk Defragmenter at startup?
The reason you don't see it is because it isn't a full defragment. Instead, it's only a boot defragment,which only affects the files registered with the Windows Prefetch feature (see the "Keeping an Eye onPrefetch" sidebar) and listed in the Layout.ini file (not a standard INI file). You can perform this bootdefragment at any time by opening a Command Prompt window (see Chapter 10) and typing defragc: -b.

Keeping an Eye on Prefetch
Prefetch is a new feature, introduced in Windows XP, that stores specific data about theapplications you run, in order to help them start faster. Prefetch is an algorithm thathelps anticipate cache misses (times when Windows requests data that isn't stored in thedisk cache), and stores that data on the hard disk for easy retrieval.
This data is located in \Windows\Prefetch, and, as the theory goes, periodically clearingout the data in this folder (say, once a month) will improve performance. As newapplications are subsequently started, new prefetch data will be created, which maymean slightly reduced performance at first. But with older entries gone, there will be lessdata to parse, and Windows should be able to locate the data it needs more quickly. Anyperformance gains you may see will be minor (if you see any at all), but those wishing tosqueeze every last CPU cycle out of their computer will want to try this one.
Note that deleting Prefetch data may increase boot time slightly, but only the next timeyou boot Windows. Each subsequent boot should proceed normally, since the prefetchdata will already be present for the programs Windows loads when it boots.
If you want to disable Prefetch, open your Registry Editor (Chapter 3), navigate toHKEY_LOCAL_MACHINE\SYSTEM\CurrentControlSet\Control\Session Manager\MemoryManagement\PrefetchParameters, and change the EnablePrefetcher value to 0.(Other supported values: 1 to Prefetch applications only, 2 to Prefetch boot processes,and 3 to Prefetch both.)
5.2.2. Increasing Disk Space (or What to Throw Away)
Parkinson's law states that work expands so as to fill the time available for its completion. Along thesame lines, it's safe to say that files will quickly expand to fill the amount of available disk space.
Low disk space doesn't just make it harder to store files, however; without ample room for virtualmemory (discussed earlier in this chapter), Windows performance will slow to a crawl. Less diskspace also increases file fragmentation, as Windows scrambles to find places to place the data; this,in turn, greatly lowers performance. Keeping a healthy amount of free disk space is vital to a well-performing system.
Additionally, removing drivers and applications that are no longer used clears more memory andprocessor cycles for your other applications, which can substantially improve overall systemperformance.

If your PC is low on disk space, try enabling NTFS compression.[2] Right-clickany folder, select Properties, click Advanced, and turn on the Compresscontents to save disk space option. Note that this can degrade performanceslightly, so you'd be wise to only use it for data that you don't access or modifyoften.
[2] This feature is only available on NTFS-formatted drives. See "Choosing the Right Filesystem,"
later in this chapter, for details. It's also mutually exclusive of the Encrypt contents to secure data
option discussed in Chapter 8.
Even before you install your first application, your hard disk is littered with files from the Windowsinstallation that you most likely don't need. The standard installation of Windows XP puts about10,000 files in more than 600 folders, consuming more than a gigabyte of disk space.
Whether you need a particular file can be subjective; the 2.5 MB of .wav files that one person mightconsider excessive might be valued by another. Naturally, it makes sense to be cautious whenremoving any files from your system. The removal of certain files can cause some applications, oreven Windows itself, to stop functioning. It's always good practice to move any questionable files to ametaphorical purgatory folder before committing to their disposal. And I don't have to tell you thatroutinely backing up your entire hard disk (see Chapter 6 ) is very important. What follows are sometips to help you identify the more common files and folders that can be safely removed, as well asthose that should be left alone.
Disable Disk Cleanup
When your PC starts running out of disk space, Windows will prompt you to run the DiskCleanup Wizard, which presents a list of some of the files you can delete to recover freedisk space (the solutions in this book are much more comprehensive).
To disable this annoying warning, open the Registry Editor (see Chapter 3) and expandthe branches toHKEY_CURRENT_USER\Software\Microsoft\Windows\CurrentVersion\Policies\Explorer. Ifit's not already there, create a new DWORD value (Edit New DWORD value)called NoLowDiskSpaceChecks. Double-click the new value and type 1 for its data. The
change will take effect immediately.
5.2.2.1 Windows XP files that can be deleted
The following tips apply to files located in your Windows folder or a subfolder thereof. Select Searchand then For Files or Folders from the Start Menu, type c:\windows in the Look in field (assuming
Windows is installed on drive c:), and type the filename as described later in the Search for files orfolders named field. For example, to search for all files with the .tmp filename extension, you woulduse the asterisk wildcard character, like this: *.tmp.
Note that this is only a guideline; I'm not instructing you to delete all of these files (okay, maybe I

am a little). If you're in doubt about a specific file, see the "If in doubt" section that follows for detailson finding out what's inside of most types of files. The following files are typically safe to delete:
Any file with the filename extension: *.log, *.old, *.- - -, *.bak, and *.000, *.001, *.002, and soon.
Any files with the extensions *.bmp (bitmap files), *.wav (sound clips), and *.avi (video clips).These can take up a great deal of space and are usually superfluous.
In the Windows folder only, there are a ton of text files (*.txt), which are essentially "Readme"and log files and can be safely deleted. Double-click any text file to view its contents.
Any files or folders found in your \Windows\Temp folder. You won't be able to delete some filesin this folder, because they will be in use by whatever applications you may have open. Butapplications in previous Windows sessions may not have deleted files there, and those types offiles tend to accumulate very rapidly. It's not uncommon to find dozens of megabytes of uselessfiles here. If you find files in your Temp folder that have a date and time earlier than the lasttime you started your computer, you can safely delete them. See "Mirror a Folder with FolderShortcuts" in Chapter 4 for more information on the Temp folder.
The following file dates are common to older versions of Windows (releases other than theAmerican English editions may have different dates); some files with these dates may still bearound if you've upgraded to Windows XP:
July 11, 1995, 9:50 AM Windows 95
August 2, 1996, 1:30 AM Windows NT Workstation 4.0
August 12, 1996, 3:50 PM Windows 95 OSR2
May 11, 1998, 8:01 PM Windows 98
April 23, 1999, 10:22 PM Windows 98 Second Edition
December 7, 1999, 5:00 AM Windows 2000 Professional
June 8, 2000, 5:00 PM Windows Me
See "Mirror a Folder with Folder Shortcuts" in Chapter 4 for more information on all the extraempty folders that Windows won't let you delete.
5.2.2.2 Files found elsewhere on your system
In addition to those files in your Windows folder, there are plenty of files elsewhere that you canconsider deleting:
There are some unnecessary files in the root directory of your boot drive (usually c:\); theseinclude files with the extensions *.txt, *.prv, *.log, *.old, and *.- - -. Most files with the *.dos

extension (except for Bootsect.dossee "Files NOT to delete" later in this chapter) are also safeto delete.
Other files that can be deleted include Mscreate.dir, an absolutely useless, empty, hidden filecreated by older Microsoft application installers. There may be hundreds of these empty files onyour hard disk.
Folders named ~Mssetup.t, msdownld.tmp, WUTemp, or something similar are temporaryfolders created when some applications or Windows updates are installed. They can all beremoved, as long as you've restarted your computer since said installation took place.
If you're trying to create more disk space, you can also delete application help files (*.hlp and*.chm) you may never need (as a last resort). Also, many applications include bitmaps (*.bmp),sound clips (*.wav), and video clips (*.avi , *.mov, and *.mpg), which take up enormousamounts of disk space for virtually no reason. To view a video clip before deleting it, justdouble-click the file icon.
5.2.2.3 Files NOT to delete
In your travels, you may encounter some of the following files, all of which should be left alone:
Any files in your root directory not mentioned earlier should be left alone. This includesBootsect.dos, Boot.ini, Ntldr, and Ntdetect.com, all parts of the Boot Manager (discussed inChapter 1). You may also see Io.sys, Msdos.sys, and Command.com, if you've set up a dual-boot system with Windows 9x/Me.
Be extremely careful with anything in the \Windows, \Windows\System, and\Windows\System32 folders, as these files may be vital Windows support files.
Your Registry hive files, discussed in Chapter 3, should never be moved or deleted.
Any files and folders in your \Program Files or \Windows\MSAPPS directories that have nameslike Microsoft Shared and Common Files. These files can be used by several applicationssimultaneously, which is why they haven't been placed in the folders of the applications that putthem there.
5.2.2.4 If in doubt
Before you delete any questionable file, there are several things you can do to get a better idea ofwhat the file contains:
Start by double-clicking a suspicious file to open it in its default application. If you then see theOpen With dialog box, it means the specific filename extension has not yet been registered. Inthat case, your best bet is to drag-drop the file into an open Notepad window.
Right-click the file, and select Properties. If the file has a Version tab, it's likely anapplication, driver, DLL, or other support file. Choose it to view the manufacturer, copyrightdate, and possibly the application it accompanies.

If you're not sure if something should be deleted but want to try anyway, move it to anotherdirectory first to see if everything works without it for a week or so. If all is clear, toss it.
Check the file's Last Accessed date (right-click it, and select Properties). The more recentthe date, the more likely it's still being used. For information on removing a particularapplication, contact the manufacturer of that application or refer to the application'sdocumentation.
5.2.2.5 Special consideration: hidden files
Some files on your hard disk are hidden filesfiles that, by default, can't be seen in Explorer. Toconfigure Explorer to show hidden files, go to Control Panel Folder Options View tab,and select the Show hidden files and folders option. All hidden files will become visible, but theiricons will remain somewhat transparent.
Most hidden files have been hidden to protect them from deletion. If you see a hidden file, think twicebefore deleting it for this reason. On the other hand, some hidden files are truly unnecessary and arehidden only to reduce the clutter they would otherwise generate. An example is the temporary hiddenfile Microsoft Word creates alongside every open document.
To hide or unhide a file, right-click its icon and select Properties. Check or uncheck the Hiddenoption as desired, and click OK.[3]
[3] The Attrib command in DOS is used to list the attributes of files (e.g., Hidden, Read-only), as well as to turn those attributes on
or off. It's also the only way to turn on or off a file's System attribute. See Chapter 10 for details.
5.2.2.6 Special consideration: System File Protection and System Restore
When I first installed Windows XP, I proceeded to delete the superfluous Internet Connection Wizardfolder,[4] as I do whenever I install a new version of Windows. This time, I was in for asurpriseseconds after I deleted it, I saw it reappear as though Windows was telling me, "Justkidding!"
[4] Windows runs the Internet Connection Wizard once: the first time you try to access the Internet after installing Windows XP,
regardless of whether you already have a dial-up Networking connection configured. In some cases, you'll see this useless
wizard appear again and again.
It turned out to be the System File Protection feature, which continually scans your system, replacingsystem files as it sees fit. Unfortunately, this approach creates several problems, not the least ofwhich is the 12% of your hard drive's total capacity it consumes. See "Working with Restore Points"in Chapter 6 for more information on this feature, as well as on the related feature, System Restore.
If you do decide to disable System File Protection, you can then safely delete the Internet ConnectionWizard.
5.2.3. Optimize Virtual Memory and Cache Settings
One of the most frustrating and irritating things about Windows is the way that it can seize up for

several seconds with seemingly random, pointless disk activity. This is caused by the way thatWindows handles disk virtual memory by default.
Normally, Windows loads drivers and applications into memory until it's full and then starts to usepart of your hard disk to "swap" out information, freeing up more memory for higher-priority tasks.The file that Windows uses for this type of "virtual memory" is the paging file (aka swapfile),pagefile.sys, and is stored in the root folder of your hard disk.
Because your hard disk is so much slower than physical memory, the more Windows does thisswapping, the slower your computer will be. Naturally, adding more memory will reduce Windows'sappetite for virtual memory. But regardless of the amount of installed physical memory in yoursystem, there are always things you can do to improve virtual memory performance.
Windows's defaults here are rather conservative and can fortunately be modified for betterperformance. It's important to realize, though, that some experimentation may be required toachieve the best configuration for your setup. Different hardware, software, and work habits requiredifferent settings; those with ample hard disks, for instance, can afford to devote more disk space tovirtual memory, while others may simply wish to place a cap on the disk space Windows consumes.
5.2.3.1 Part 1: Virtual memory settings
One of the reasons the default settings yield such poor performance is that the swapfile grows andshrinks with use, quickly becoming very fragmented (as illustrated by Figure 5-5, earlier in thischapter). The first step is to eliminate this problem by setting a constant swapfile size.
Note that making the swapfile constant will also result in a more constant amount of free disk space.If your hard disk is getting full, consider this solution to restrict Windows from using up every bit offree space:
Double-click the System icon in the Control Panel, choose the Advanced tab, and clickSettings in the Performance section. Choose the Advanced tab here, and then click Change.You'll see the Virtual Memory window, shown in Figure 5-6.
Figure 5-6. Change the way Windows handles virtual memory toimprove overall system performance
1.

The virtual memory settings are set for each drive in your system independently. If you haveonly one drive, virtual memory will be enabled for that drive. If you have more than one drive,virtual memory will be enabled, by default, only on the drive on which Windows is installed.
For each drive, you have three choices, all of which should be pretty self-explanatory. The totaldisk space for all drives is shown at the bottom of the window.
Important: after you've made a change for any drive, click Set to commit the change beforemoving onto another drive or clicking OK.
2.
To specify a constant size, select Custom size, and then type the same value for both Initialsize and Maximum size.
The size, specified in megabytes, is up to you. I typically use three times the amount of installedRAM (e.g., 1536 MB of virtual memory for 512 MB of physical memory), but you may wish toexperiment with different sizes to find the one that works best for you.
Some users have had limited success disabling virtual memory altogether,although I wouldn't recommend it. The theory is that if there's enoughphysical memory installed, and virtual memory is completely disabled,Windows will access the hard disk much less often. It may be worth a try ifyou have at least 512 MB of physical memory, but you may find thatcertain programs won't run without at least some virtual memory. It'seven possible that eliminating the swapfile will prevent Windows fromloading altogether.
3.
Press OK on each of the three open dialogs. If you have only resized your swapfile, you won't4.

have to restart. However, if you've added (or removed) a swapfile on a different drive, Windowswill prompt you to restart at this point.
4.
5.2.3.2 Part 2: Defragment the paging file
Part 1 will eliminate the possibility of your swapfile becoming fragmented, but it won't defragment analready fragmented swapfile. You'll need to defragment it at least once for it to remain that way inthe future. See Figure 5-5, earlier in this chapter, for details on file fragmentation. Note that this isnot an easy task if you don't have the right tools. Here are several ways to accomplish this:
If you have Norton Utilities (http://www.symantec.com), you'll be able to optimize the swapfilefairly easily using its Speed Disk utility. Speed Disk is also able to move your swapfile to thephysical beginning of your partition, which can also theoretically improve performance. The DiskDefragmenter utility that comes with Windows XP (dfrg.msc) is actually a scaled-down versionof Norton Speed Disk, but it is not capable of defragmenting the swapfile.
If you don't have software capable of defragmenting your swapfile, there are two alternatives. Ifyou have more than one partition or hard disk in your system, start by moving your swapfile toa different drive letter (see the previous section for details). Then, run Disk Defragmenter(dfrg.msc) on the partition you wish to hold the swapfile permanently, which will set aside alarge chunk of contiguous free space. Lastly, move the swapfile back to the original partition,making sure its size is set constant.
If you don't have a second partition, your other choice is to disable virtual memory temporarilyby clicking No paging file and then Set in the Virtual Memory window (see Figure 5-6). Afterrestarting Windows, run Disk Defragmenter (dfrg.msc) to set aside a large chunk of contiguousfree space. When you're done, go back to the Virtual Memory window, and re-enable the pagingfile, making sure to set a constant size.
Note that if you have fewer than 256 MB of physical memory, there is a riskthat Windows may not boot properly without a paging file. If this happens, youshould be able to load Windows in Safe Mode and re-enable your swapfile. See"What to Do when Windows Won't Start" in Chapter 6 for details.
5.2.3.3 Part 3: Clear the paging file on shutdown
It's possible to have Windows delete your paging file whenever you shut down Windows. There arethree reasons you might want to do this:
If you have a multiboot system, as described in Chapter 10, each operating system on yourcomputer will have its own virtual memory settings. If the paging file from one OS is presentwhile the other is running, it may cause a conflict and will certainly waste a lot of disk space.
If your paging file becomes corrupted or highly fragmented, Windows may load more slowly (ornot at all). Deleting the paging file will force Windows to re-create it the next time it starts,which may alleviate this problem.

If you're concerned about the security of your data, it is theoretically possible for a hacker toextract sensitive information from your paging file.
Naturally, if you've gone through the steps to defragment your paging file, as described earlier in thistopic, you probably won't want it to be deleted (lest it become fragmented when it is re-created).
Here's how to do it:
Open the Local Security Settings console (secpol.msc). See Chapter 7 for more information onthe settings in this window.
1.
Navigate to Security Settings\Local Policies\Security Options .2.
Double-click the Shutdown: Clear virtual memory pagefile entry on the right.3.
Select Enabled and then click OK. You'll need to restart Windows for the change to take effect.4.
5.2.3.4 Part 4: Advanced settings for the adventurous
Like virtual memory settings, disk cache settings in Windows XP aren't necessarily optimized for thebest performance, but rather for the best compromise between performance and compatibility witholder computers.
Each of these settings, as described here, will typically benefit only those with large amounts ofphysical memory (at least 384 MB). Those with less memory (under 256 MB) may not see anyperformance increase; in fact, some of these settings may actually degrade system performance ifyour system has too little RAM. Essentially, you'll want to experiment with different values until youfind ones that work best for your system.
Entering incorrect values for some of these settings can render Windowsinoperable. Make sure you have a recent backup before you continue, not onlyof your system, but of the specific Registry key discussed (using a Registrypatch, explained in Chapter 3).
Start by opening the Registry Editor (described in Chapter 3) and expanding the branches toHKEY_LOCAL_MACHINE\SYSTEM\CurrentControlSet\Control\Session Manager\MemoryManagement. Some of the more interesting values in this key include the following:[5]
[5] If any of the keys listed here are not present, they can be added by going to Edit New DWORD Value and then
typing the name exactly as shown.
DisablePagingExecutive
Values: 0 = disabled (default), 1 = enabled
Enabling this setting will prevent Windows from paging certain system processes to disk, which

effectively will keep more of the operating system in the faster physical memory, which, inturn, will make Windows much more responsive.
IoPageLockLimit
Values: varies
This value, in bytes, specifies the maximum amount of memory that can be used forinput/output operations. Since this setting deals with the transfer of data into and out of yourcomputer, it will be of the biggest benefit to those running servers and those who use theirnetwork or Internet connections most heavily.
The default value is 512 KB (524,288 bytes), but increasing it should improve performance.This value is specified in bytes (not MB) and must be entered in Hexadecimal mode.[6]
Recommended values, based on the amount of physical memory in your system, are shown inTable 5-1.
[6] When editing DWORD Values in the Registry, you can choose the Base to use (Hexadecimal orDecimal). If you use the incorrect base, the value you type will have a different meaning. See Chapter 3for details.
Table 5-1. Recommended values for the IoPageLockLimit setting
Amount of physical RAM Recommended value Maximum value
128 MB 4194304 bytes (4 MB) physical RAM minus 16MB
256 MB 10485760 bytes (10 MB) physical RAM minus 32MB
512 MB or more 41943040 bytes (40 MB) physical RAM minus 64MB
LargeSystemCache
Values: 0 = standard (default), 1 = large
By default, Windows uses only 8 MB of memory for the filesystem cache. Enabling this optionwill allow Windows to use all but 4 MB of your computer's memory for the filesystem cache.This will improve Windows performance, but potentially at the expense of the performance ofsome of your more memory-intensive applications.
This option can also be changed by going to Control Panel System Advanced tab,clicking Settings in the Performance section, and then choosing the Advanced tab. TheMemory usage section has two settings: Programs and System cache, which correspond tothe 0 and 1 values here.
Other values in this key include PagingFiles, which is more easily set in the Virtual Memory windowdescribed in "Part 1: Virtual memory settings" and ClearPageFileAtShutdown, more easily set in the

Local Security Settings console, as described in "Part 3: Clear the paging file on shutdown."
5.2.4. Choosing the Right Filesystem
The filesystem is the invisible mechanism on your hard disk that is responsible for keeping track of allthe data stored on the drive. Think of the filesystem as a massive table of contents, matching upeach filename with its corresponding data stored somewhere on the disk surface. Windows XPsupports three different filesystem types:[7]
[7] There's actually a fourth type, CDFS, used by CD-ROMs.
FAT (File Allocation Table, 16-bit)
FAT is used for all drives under 512 MB, including floppy and ZIP disks. The largest drivesupported by the FAT filesystem is 2GB, which is why older drives larger than 2GB were oftendivided into several partitions.
FAT32 (File Allocation Table, 32-bit)
Designed to overcome the 2 GB partition limit of the FAT system, FAT32 is supported by neweroperating systems. In addition to the support for larger drives, it also supports smaller fileclusters (described later), so it's more efficient than FAT.
NTFS (NT Filesystem)
NTFS was designed from the ground up to completely replace FAT/FAT32. It supportsencryption, compression, and robust security,[8] and is typically more reliable than FAT/FAT32as well.
[8] The encryption and security features of NTFS are discussed in Chapter 7. NTFS compression isdiscussed in "Increasing Disk Space (or What to Throw Away)" earlier in this chapter.
If Windows XP is the only operating system on your computer, you should be using NTFSno question.The only compelling reason to use another filesystem is if you have a dual-boot setup with an earlierversion of Windows, in which case you'd need to choose a filesystem recognized by all operatingsystems on your computer. See the "Filesystems and Multiple Drives" sidebar for more information.Table 5-2 shows which filesystems are supported by recent versions of Microsoft Windows.
Table 5-2. Filesystems supported by recent versions of Windows

FAT FAT32 NTFS
Windows XP
Windows 2000
Windows Me, 98, and 95 ORS2
Windows NT 4.0
Windows 95
To find out which filesystem is currently being used by a particular drive, just right-click the drive inExplorer (or My Computer), and select Properties. Figure 5-7 shows the drive-properties window foran NTFS partition. You can also open the Disk Management utility (diskmgmt.msc) to see anoverview of all of your drives.
Figure 5-7. Use a drive's properties sheet to see which filesystem it'scurrently using
Note that some of the elements on the drive-properties window won't be present for non-NTFSdrives, such the Security and Quota tabs and the Compress drive and Allow Indexing options.

Filesystems and Multiple Drives
If you have more than one drive on your system, whether they're separate physicaldrives or separate partitions of the same drive, they can have different filesystems. Thisis common on multiboot systems (discussed in Chapter 1 ), where each OS will reside ona different partition. Just keep in mind the filesystem compatibility shown in Table 5-2; ifyou have Windows 98 on a FAT32 partition and Windows XP on an NTFS partition, the XPpartition will be invisible to the 98 installation but both drives will be visible andaccessible from the XP installation.
5.2.4.1 Convert your drives to NTFS
If you're not using NTFS on your drive and you don't need to support FAT/FAT32 for compatibilitywith other operating systems, you can convert your drive to NTFS quite easily, and without harmingyour data. For example, if you've upgraded to Windows XP from Windows 9x/Me, and you didn't electto convert your drive(s) to NTFS during setup, you are likely still using FAT32.
Windows XP comes with the FAT to NTFS Conversion Utility (convert.exe), which is used as follows.To convert drive c:, for example, just open a command-prompt window (cmd.exe) and type thefollowing:
convert c: /fs:ntfs
The following options are also available for this utility:
/v
Run in verbose mode (provide more information).
/cvtarea :filename
Specifies a contiguous file, filename, in the root directory as the placeholder for NTFS system
files.
/nosecurity
Include this parameter if you want the initial security privileges for all files and folders on thenewly converted volume to be set so the files and folders are accessible by everyone.

/x
Forces the volume to dismount first, if necessary closing any opened files on the volume. Usethis option if you're on the network and there's concern that other users may attempt to accessthe drive during the conversion process.
Note that this is a one-way conversion, at least when using the software included with Windows XP. Ifyou need to convert an NTFS drive to FAT32 for some reason, you'll need a third-party utility such asPartitionMagic (http://www.symantec.com/partitionmagic/).
5.2.4.2 Understanding cluster sizes
Clusters are the smallest units into which a hard disk's space can be divided. A hard disk formattedwith the traditional FAT system, found in Windows 95 and all previous versions of Windows and DOS,can have no more than 65,536 clusters on each drive or partition. This means that, the larger thehard disk, the larger the size of each cluster. The problem with large clusters is that they result in alot of wasted disk space. Each cluster can store no more than a single file (or a part of a single file); ifa file does not consume an entire cluster, the remaining space is wasted. For example, a 2 GB drivewould have a cluster size of 32 KB; a 1 KB file on a disk with a 32 KB cluster size will consume 32 KBof disk space; a 33 KB file on the same drive will consume 64 KB of space, and so on. The extra 31KB left over from the 33 KB file is called slack space, and it can't be used by any other files. Withthousands of files (especially those tiny shortcuts littered throughout a Windows installation), theamount of wasted slack space on a sizeable hard disk can add up to hundreds of megabytes ofwasted space.
The NTFS and FAT32 filesystems supported by more recent versions of Windows can handle over fourbillion clusters,[9] resulting in much smaller cluster sizes. The same 2 GB drive formatted with FAT32or NTFS will have only a 4 KB cluster size. Figure 5-8 illustrates the slack space created by filesstored on a traditional FAT system versus the same files stored on a FAT32 or NTFS drive.
[9] Four billion clusters, at 4 KB each, results in a maximum partition size of 14.9 terabytes (15,259 GB) for FAT32 and NTFS
volumes. Of course, if this drive were commercially available, its manufacturer would contend that 1 terabyte is equal to
1,000,000,000,000 bytes, and advertise the unit as a 16.4 TB (16,384 GB) drive.
Figure 5-8. FAT32 stores files more efficiently by allowing smaller clustersizes

You can see how much space is wasted by any given file by right-clicking on the file icon, selectingProperties, and comparing the Size value with the Size on disk value. The same works for multipleselected files and folders; highlight all the objects in your root directory to see the total amount ofwasted space on your drive. To find the current cluster size of your drive, just open the propertiessheet for a small file you know will only consume a single cluster (such as a Windows Shortcut); itsSize on disk will be equal to the size of one cluster.
So, what does this all mean? It means that if you convert a drive from FAT to FAT32, you willdefinitely reclaim some wasted space. But, since FAT32 and NTFS drives have the same cluster size(4 KB), there is no slack-space incentive to convert to NTFS. In fact, the extra features of NTFS(discussed earlier in this section) have slightly more overhead, and thus a conversion from FAT32 toNTFS will most likely result in slightly less overall free disk space.
5.2.5. Advanced NTFS Settings
As mentioned in the last section, the extra features of the NTFS filesystem come at a price: a smallamount of disk space and performance overhead. The following settings allow you to fine-tune NTFSto squeeze the most performance out of your NTFS drive; experiment with these settings to find theconfiguration that works best for you.
Note that these settings will have no effect for non-NTFS drives. See "Choosing the Right Filesystem,"earlier in this chapter, for more information.
Start by opening the Registry Editor (described in Chapter 3), and expanding the branches toHKEY_LOCAL_MACHINE\SYSTEM\CurrentControlSet\Control\Filesystem. There are three values
here that concern us:[10]
[10] If any of the keys listed here are not present, they can be added by going to Edit New DWORD Value, and then
typing the name exactly as shown.
NtfsDisable8dot3NameCreation
Values: 0 = enabled (default), 1 = disabled
Early versions of Windows and DOS did not support long filenames, but rather allowed onlyeight-character filenames followed by three-letter filename extensions. Although Windows 95and all subsequent versions of Windows eliminated this restriction,[11] an eight-dot-threeversion of the filename was always generated to maintain compatibility with older applications.For example, the file, A letter to Mom.wpd would also be referenced as alette~1.wpd. If youdon't use older 16-bit programs, either on your computer or on your network, you can disableWindows XP's creation of these 8.3 aliases by changing this value to 1 (the default is zero).
[11] Long filenames can be practically as long as you like, and can, for example, include spaces.
NtfsDisableLastAccessUpdate
Values: 0 = enabled (default), 1 = disabled

Windows keeps a record of the time and date every file and folder on your hard disk wascreated, as well as when it was last modified and last accessed. You can stop Windows fromupdating the "last accessed" date for folders every time they're opened by changing the valueto 1 (the default is zero), which should improve drive performance. This setting has no effect
on files.
NtfsMftZoneReservation
Values: 1 = small (default), 2 = medium, 3 = large, 4 = maximum
The core of the NTFS filesystem is the master file table (MFT), a comprehensive index of everyfile on the disk (including the MFT itself). Since disk defragmenters can't defragment the MFT(also known as $mft), Windows reserves a certain amount of extra space for it to grow, in aneffort to reduce its eventual fragmentation. The more fragmented the MFT gets, the more it willhamper overall disk performance.[12]
[12] See "A Defragmentation Crash Course," earlier in this chapter, for more information.
You can determine the current size and fragmentation level of the MFT on any drive by openingDisk Defragmenter (dfrg.msc). Select a drive from the list, click Analyze, and then ViewReport (see Figure 5-9). The numbers relating to the MFT are shown at the end of theVolume Information report. Probably the most interesting statistic here, though, is PercentMFT in use. The higher the number, the less space the MFT has to grow (and it will).[13]
[13] For example, a 40 MB MFT file with 88 percent in use has 4.8 MB of empty space reserved for it,which means roughly 4,800 more files can be added to the volume before Windows increases the MFT,probably creating more fragments.
Figure 5-9. Find the size and fragmentation of the Master File Table(MFT) by viewing Disk Defragmenter's report for NTFS volumes

The NtfsMftZoneReservation setting allows you to increase the space reserved for the MFT.
Although the default is 1, values of 2 or 3 are probably better for most systems with large harddisks; the maximum value of 4 is good for very large drives with a lot of small files. Specify toosmall of a value here, and the MFT will become fragmented more quickly as it grows; too largeof a value, and it will consume (waste) too much disk space.
The problem is that changing this setting will not result in any modification of the current MFT,but rather only influence its future growth. For this reason, the earlier this value is increased inthe life of a disk, the better. Unfortunately, the only way to defragment or rebuild the MFT is toformat the drive.
You'll need to restart Windows for any of these changes to take effect.
5.2.6. What to Look for in a New Hard Disk
The speed of your hard disk is a major factor of your system's overall performance. After all, thefaster it's able to find data and transfer it to your system's bus, the faster Windows will load, thefaster your virtual memory will be, and the faster you'll be able to copy files.
If you're thinking of upgrading your hard disk (see "Transfer Windows to Another Hard Disk orSystem" in Chapter 5), there are several measures of speed that you should scrutinize whenchoosing a drive:
Seek time (measured in milliseconds)

The seek time (or access time) is the average length of time required to find a piece ofinformation; lower times are faster. There are a few variants, such as track-to-track and fullstroke, and there are often separate measurements for reading and writing data. But theaverage seek time is the one that is most often advertised; don't settle for anything slowerthan about 9 ms.
Transfer rate (measured in megabytes per second)
This is the amount of data the drive can transfer to your motherboard's data bus in a second;higher transfer rates are faster. Although the maximum burst transfer rate is the one mostoften advertised (typically in the hundreds of megabytes per second), the maximum sustainedtransfer rate is probably the more important of the two.
RPM (measured in revolutions per minute)
This is the speed at which the disk spins; higher numbers are faster. Cheaper drives spin at5400 rpm, but don't settle for anything less than 7200 rpm. If you're serious aboutperformance, look for a more expensive 10,000 rpm (10k) or 15,000 rpm (15k) drive.
Buffer (measured in megabytes)
The buffer is memory (RAM) installed in the drive's circuitry, allowing it to accept data fromyour computer faster than it is able to physically write to the disk surface, and read data fromthe disk surface faster than it's able to transfer data to your computer. A larger buffer isbetter; don't settle for less than 8 megabytes.
Whether you're shopping for a new hard drive or just trying to determine if your existing drive is asfast as it should be, these measurements should give you enough to go on. If your drive seemsexcessively slow, you can either replace it or try some of these solutions:
Add more RAM (see "Memory" earlier in this chapter).
Get more free space. Either delete some files or replace your hard disk with a larger one (or addanother drive). Regardless of the amount of RAM you have, Windows will still need a substantialamount of space for virtual memory and temporary files. If you run out of space, Windows willslow down and will be more likely to crash.
Defragment your hard disk by running Disk Defragmenter (dfrg.msc).
Put your hard disk on its own controller, so it isn't sharing the cable with any other drives. Forinstance, if your hard disk is connected to your primary IDE controller, plug your CD/DVD driveinto your secondary IDE controller.
Scan your system for spyware, discussed at the beginning of this chapter.

5.2.7. Transfer Windows to Another Hard Disk or System
With the release of an operating system as large and power-hungry as Windows XP, it shouldn't besurprising that many users need to upgrade their hard disks or even their entire systems just toaccommodate the new version.
Either way, some or all of the files on the old hard disk will need to be transferred to the new harddisk, and this can be a difficult task. Sure, you can simply install Windows XP from scratch and thenproceed to reinstall all your applications, configure all your settings, and rewrite all your documents,but that's not exactly the most practical solution. Besides, your Freecell statistics would be lostforever.
You can transfer the data from one drive to another (or one system to another) in several ways,explained in the following solutions. The one you choose depends on your available hardware andspecific needs. If you just purchased a new hard disk, you need to prepare it by partitioning andformatting it before you continue. See "Working with Partitions," later in this chapter, for details.
5.2.7.1 Solution 1: Using a disk-cloning utility
The following procedure is probably the most pain-free solution of those in this section, at least interms of the amount of interaction and work involved. However, you will need to crack open yourcase and fuss with cables (something you'll have to do anyway if you're only upgrading your harddisk, versus the entire system). Also, it requires that you purchase a third-party utility, although theaggravation and time it saves can offset the cost (even if you only use it this once). Note also thatany data on the new hard disk will be lost as it is replaced with the data on the old disk:
Obtain a disk-cloning utility such as Norton Ghost (http://www.symantec.com).[14]
[14] Now-defunct alternatives to Norton Ghost include the excellent DriveCopy and Drive Image utilitiesfrom PowerQuest (now Symantec). Although they're not commercially available anymore, if you can findXP-compliant versions of either tool (in your closet or perhaps on eBay), they're worth a try.
If you purchased the product online and have only the downloadableedition, you may have to create a bootable diskette as described in thedocumentation included with the product you're using.
1.
Connect both your old hard disk and your new hard disk to the same computer simultaneously.If you're upgrading to a new system, it usually doesn't matter which computer you use for thisprocess. However, drive configurations in the following list are usually required by this type ofutility (see the software's documentation for details):
If you're using IDE drives, the old hard disk should be connected as "master" and the newhard disk should be connected as "slave."
If you're using SCSI drives, configure the SCSI controller BIOS to boot off the old drive.
If you're using one IDE and one SCSI drive, the configuration shouldn't matter.
2.
3.

If your disk controller doesn't have enough free ports, just temporarily disconnect a CD drive orother storage device to make room for the new drive.
3.
Insert the boot disk from the disk-cloning utility you're using and boot your computer. Theprogram should start up and walk you through the rest of the process. Just be careful whenchoosing the "from" and "to" drives.
4.
While this sounds complicated, it's actually quite fast, as data transfer between two hard disks on thesame system is much faster than over a network or using removable media.
The particular procedure from this point forward depends on the type of disk-cloning utility youchose. There are typically two types:
The more traditional disk-cloning programs simply copy all data on one drive, byte for byte, toanother drive. Any partitions (discussed later in this chapter) are duplicated as well but areexpanded proportionally. For example, if you have a 10 GB drive with two 5 GB partitions, andyou transfer the data to a 60 GB drive, you'll end up with two 30 GB partitions (which can laterbe combined, if desired, with the solutions found later in this chapter).
Newer "image" utilities take a slightly different approach. Instead of copying data betweendrives, these programs start by creating an image of the old drive, which is essentially a single,enormous file that contains every byte of data on the drive. The new drive is then reconstructedfrom the image.
This can be especially useful if you need to create several exact copies of asingle drive, a common practice for network administrators who don't wantto spend days individually configuring a bunch of otherwise identicalcomputers.
The problem with this intermediate step is that you need somewhere to store this image file. Ifyou're creating an image of a 10 GB drive with 8 GB of data on it, there will only be 2 GB of freespace, which won't be enough to store an 8 GB image file. Since you won't be able to store theimage file on the target (new) disk, you'll actually need a third hard disk to hold the image.
5.2.7.2 Solution 2: Use a backup device
If you have a tape drive or other large-capacity backup device, another thing you can do is back upyour entire system and then restore it to the new drive. Here's how to do it:
Back up your entire system, making sure to include every file on your hard disk. See Chapter 6for more information on backup devices and procedures.
1.
If you're only upgrading your hard disk, shut down your computer, remove the old hard disk,and install the new hard disk. Then, install Windows using the "Installing on a New (Clean)System" procedure in Chapter 1.
2.

If you're upgrading to an entirely new machine, you'll need to install your backup device on thenew system.
2.
Install the backup software (the same as the one you used in Step 1) onto the new drive or newsystem.
3.
Restore the files from the backup media onto the new drive, but make sure you restore theentire tree of files into a temporary folder, rather than into the root directory. For example, ifyour temporary folder is named Old Hard Disk, then the path to the restored Documents andSettings folder will actually be \Old Hard Disk\Documents and Settings. This prevents errors youmay encounter trying to replace files and folders in use by the current installation of Windows.
4.
When the restore process is complete, selectively (one-by-one) drag the old folders out of yourOld Hard Disk folder and into the root directory of your new hard disk.
5.
In the cases of your Windows folders (such as the \Windows, \Program Files, and \Documents andSettings branches), you won't be able to drag them if they're replacing existing in-use folders.Instead, you have two options: either don't copy every folder (instead, only move selected files andfolders) or use the following workaround.
Here are the optional additional steps to replace your Windows folders:
Start by renaming the three conflicting folders, all still located in the Old Hard Disk folder, asfollows:
Windows becomes oldwin
Program Files becomes oldprogs
Documents and Settings becomes olddocs
1.
Drag the three folders into your root directory, so they're right alongside the folders they'reintended to replace.
2.
Restart the computer and load the Windows Recovery Console (described later in this chapter).3.
After logging in, issue the commands in the following list:
ren Windows newwinren "Program Files" newprogsren "Documents and Settings" newdocsren oldwin Windowsren oldprogs "Program Files"ren olddocs "Documents and Settings"
See Chapter 10 for more information on the ren command. Note the use of quotation marks to
accommodate the folder names with spaces.
4.
Restart your computer when you're done. The old installation of Windows will now be used tostart your computer. If you're upgrading to an entirely new computer, Windows will detect a
5.

bunch of new hardware the first time it starts.
The new, temporary Windows installation is now stored in the newwin, newprogs, and newdocsfolders, which can be deleted or stored as you see fit.
5.
Alternate Method of Shuffling Restored Files
While we're at it, another way to accomplish all of this is to divide your new drive intotwo partitions (as discussed later in this chapter). When installing the new copy ofWindows, put it on the second partition (usually D:). Then, restore the backed-up filesonto the first partition (usually C:). Since the restore process will replace the boot.ini filein the root directory of drive C: with the one from your backup, your computer will bootto the restored Windows installation on drive C: the next time you restart. You'll then beable to delete the extraneous, temporary second partition. (See "Set up a Dual-BootSystem" in Chapter 1 for more information on the boot.ini file.)
5.2.7.3 Solution 3: Transferring data manually
Although the previous two solutions are preferred, since they allow you to move a great deal of datafrom one drive to another, they're also more involved than the following solution. If you don't reallyneed to move everything from the old drive to the new one, but instead only wish to copy personaldocuments and perhaps some settings, consider the following tips:
The File and Settings Transfer Wizard is included with Windows XP for the specific purpose oftransferring files from one computer to another. Unfortunately, it doesn't work very well, andcan even end up being more trouble than it's worth. Essentially, everything it does can beaccomplished manually with a network connection or removable media storage device.
Be careful when installing two drives in the same computer, as Windows XP has a tendency ofpermanently changing drive letters in a way that is difficult to undo. For example, if you havetwo drives, each known as C: in their respective computers, and you install both in the samecomputer, the secondary (or slave) drive will be changed so that it shows up as D:, so as not toconflict with the existing drive C: that has priority. If you then remove the drive and put it backin the original computer, it will still think of itself as drive D:, and may not boot because of it.For this reason, only put the "old" drive in this position, so you don't risk the "new" drive getting"re-lettered." See "Working with Partitions," later in this chapter, for more information on thisparadox.
If you have two separate computers, transferring the files over your network may be the bestway to avoid the complexities of hooking up both drives to the same machine. Although thenetwork connection will be slower, it's easier and less risky. See Chapter 7 for more informationon networking.
Since Windows XP won't let you copy certain system files that are in use, you won't be able tocopy your Windows Installation simply by dragging and dropping files in Explorer, whetheryou're using a network connection or removable media drive. To do this, you'll have to use one

of the first two solutions in this section. The alternative is to install Windows on the new driveand then find a way to be satisfied copying only some files.
You can copy user profiles from one computer to another. User profiles are stored in theDocuments and Settings folder, and include the Desktop, Start Menu, and many personalsettings. However, you won't be able to overwrite the user profile in use by the currentlylogged-in user. See "Backing Up the Registry" in Chapter 3 for more information user settings,and all of Chapter 7 for more information on user accounts.
To copy selected settings, such as application toolbars and other personal preferences, you canuse Registry patches, as described in Chapter 3.
5.2.8. Working with Partitions
Most hard disks are known by a single drive letter, usually C:. However, any hard disk can be dividedinto several drive letters, known as partitions.
For example, if you have an 240 GB hard disk, you may wish to have three 80 GB partitions, orperhaps a 100 GB partition and two 70 GB partitions. There are several reasons why you might wantto do something like this:
Organization
Use multiple partitions to further organize your files. For example, put Windows on one drive,work documents on another, games on another, and music and other media on yet another.
Isolation of system and data
Partitions can be used to isolate your programs from your data. For example, place Windowson drive C:, your personal documents on drive D:, and use drive E: for your swapfile. Thisgives you the distinct advantage of being able to format your operating system partition andreinstall Windows without touching your personal data. (See Chapter 8 for help relocatingpersonal folders, such as My Documents.)
Performance
As illustrated in "A Defragmentation Crash Course," earlier in this chapter, your hard drive canbecome fragmented very quickly, which can decrease performance and increase the chances ofdata corruption. Because files cannot become fragmented across partition boundaries, splittingyour drive into several partitions will isolate groups of files and thus help curb theirfragmentation. Plus, in the event that a single partition becomes significantly fragmented, itssmaller size will mean it can be defragmented in much less time.

Isolate your swapfile on its own partition to allow it to grow and shrink asneeded, without becoming fragmented as it would if it shared a drive withother files. See "Optimize Virtual Memory and Cache Settings," earlier inthis chapter, for details.
Dual-boot
To set up a dual-boot partition, described in Chapter 1, you'll want to create a separatepartition for each operating system you wish to install.
Multiple users
If you have several users, you can isolate their personal data from the operating system bycreating a separate partition for each user.
Web Server
If you're setting up a web server (or other type of network file server) or if you're participatingin peer-to-peer file sharing, it's good practice to put the publicly accessible folders on their ownpartition. This not only helps to secure the operating system from unauthorized access, butallows the OS to be upgraded or replaced without disrupting the shared folders and programs.
Consolidation
If you're using an older computer that has been upgraded to Windows XP, your hard disk mayhave been partitioned to work around a limitation in the earlier version of Windows (describedin "Choosing the Right Filesystem," earlier in this chapter). Using the tools discussed in thissection, you can consolidate those drives into a single partition and possibly make moreefficient use of your free space.
5.2.8.1 The Disk Management tool
Windows XP comes with an all-encompassing utility, Disk Management (diskmgmt.msc), which isused to view the partition table of any drive on your system, as well as create and delete partitionsand even change the drive letters for existing drives.[15]
[15] Disk Management effectively replaces the FDISK utility, used in some earlier versions of Windows to prepare a hard disk
before installing the operating system.
The main Disk Management window, as shown in Figure 5-10, is divided into two parts. You canchange the arrangement of the panes in this window by going to View Top or View Bottom.

Figure 5-10. Open the Disk Management utility to add or removepartitions, shuffle drive letters, and even change the way volumes are
mounted
There are three possible views, each displaying some redundant and some unique information, but bydefault, only the Volume List and Graphical View are shown (in the top and bottom positions,respectively):
Volume List
Use this view to show a summary of all the currently mounted logical drives on your system.This includes all active partitions on all hard disks, as well as any media currently inserted intoyour removable drives (which include CD and DVD drives, memory card readers, andremovable cartridge drives). Removable drives without media (e.g., an empty CD drive) willnot show up here, as these volumes are not mounted. See the subsequent discussion for moreinformation on mounting drives.
This view is called the Volume List because it lists volumes, not disks. The term volume isessentially another word for partition. A single disk can contain several volumes (such as theone shown in Figure 5-10), although most hard disks (and all CDs, for instance) only contain asingle volume. The way that each volume is accessed in Explorer (usually with a drive letter) isdetermined by how the volume is mounted (explained below).
Graphical View
Probably the most useful view in Disk Management, the Graphical View lists a single entry foreach physical drive in your system. Then, next to each device is shown all of the currently

mounted volumes associated with the respective disk.
By default, the boxes representing multiple partitions (volumes) are not sized proportionally totheir size (i.e., a 2 GB partition will appear to be roughly the same size as a 10 GB partition).To fix this, go to View Settings Scaling tab, and choose the According tocapacity, using linear scaling option in both sections. You can also customize the colorsused in the Graphical View by choosing the Appearance tab in this dialog.
Disk List
The Disk List is similar to the Graphical View but abandons the display of the volumes for eachdisk in favor of additional technical information about each disk. The only information displayedhere that is not available in the Graphical View is the Device Type (e.g. IDE, SCSI, USB) andPartition Style.[16]
[16] For nearly all disks on a Windows system, the Partition Style will be MBR (Master Boot Record). Theexception is GPT (GUID partition table) drives, used by Windows XP 64-Bit Edition.
Hidden
Select this option to turn off the lower pane (it's not available for the upper pane), leaving theremaining selection to consume the entire window.
Press F5 or go to Action Refresh to refresh all views, necessary if you've inserted or removed aCD, for example. Use Action Rescan Disks for a more thorough refresh.
Feel free to customize the view of this window, but be aware that Disk Management won't save yourcustomization settings, unless you first create a custom console file, described as follows.
5.2.8.2 Customizing Disk Management
The Disk Management tool is actually what Microsoft calls a "snap-in" for the Microsoft ManagementConsole (MMC) application.[17] Other snap-ins include Disk Defragmenter, Device Manager, and theGroup Policy Editor. The .msc file you launched to open the Disk Management tool is not actually theprogram, but rather just a small console file, which contains only the settings for the current view.The following procedure not only shows how to create a new console file that you can customize in away that be saved, but shows how to create custom console files for all sorts of purposes.
[17] For more information on the Microsoft Management Console, as well as the available snap-ins, see Windows XP in a Nutshell
(O'Reilly).
Open the Microsoft Management Console (mmc.exe). A new, blank "Console Root" window willappear in the MMC window.
1.
Go to File Add/Remove Snap-in, and then click Add.2.
Select Disk Management from the Available Standalone Snap-ins list, and then click Add.3.
4.

2.
3.
Another window will appear, giving you a choice between This Computer and The followingcomputer. Although it's possible to view the partition table to another computer using anetwork connection, you'll want to choose This Computer for the time being.
4.
You can add other snap-ins at this point, or simply click Close when you're done. Finally, clickOK to close the Add/Remove Snap-in window.
5.
Highlight the Disk Management entry in the tree in the left pane, and then go to View Customize and turn off the Console tree option to simplify this window. You won't want tohide the console tree if you added more than one snap-in in the previous step. Figure 5-11shows a custom console file with a bunch of useful snap-ins, all accessible from the samewindow.
Figure 5-11. If you find yourself using Disk Management or otherMMC snap-ins frequently, you can create your own custom console
file to provide quicker access to your favorite tools
6.
You can further customize this window as you see fit. When you're done customizing, go to File Save to save your custom console view into a new .msc file.
7.
The next time you use the Disk Management tool, just open your custom .msc file instead of thediskmgmt.msc file included with Windows XP.

Alternatives to the Disk Management Tool
The Disk Management utility is not your only choice when it comes to repartitioningdrives, but as far as the tools included with Windows XP are concerned, it's the best one.
One alternative is the DiskPart utility (diskpart.exe), a way of viewing, adding, andremoving partitions from the command prompt. DiskPart is essentially the command-lineequivalent to the Disk Management tool, although it has a few extra features (see"Resizing and moving partitions," later in this section). The biggest advantage to DiskPartis that it can also be run from the Windows Recovery Console, discussed later in thischapter. This allows you to modify your boot and system partitions, as well as work onyour partition table when Windows XP won't start.
The other alternative is the disk partitioning tool built into Windows Setup. It's quick andsimple, but it's only available while installing Windows XP. See "Installing the OperatingSystem" in Chapter 1 for more information.
Finally, PartitionMagic (http://www.symantec.com/partitionmagic/) is a third-partyutility, discussed in other parts of this chapter, that allows you to resize existingpartitions on the fly, and without erasing the data they hold something Disk Managementcan't do.
5.2.8.3 Mounting volumes
As stated in the previous section, a hard disk can have one partition or many. Other types of storagedevices, such as CD drives, only have single partitions. These partitions, regardless of the nature ofthe physical device on which they're located, are all recognized as volumes by the Disk Managementtool and by Windows Explorer.
Mounting is the method by which a volume is made accessible to Explorer and all your applications.In most cases, each volume has its own drive letter, such as C: or D:. But a volume can also beaccessed through a folder on a different volume, called a mount point (NTFS only). Finally, there canbe volumes on your system that aren't mounted at all, typically including volumes withfilesystems[18] not recognized by Windows XP and volumes simply not currently in use. Suchunmounted drives will be shown in the Disk Management window but won't appear in WindowsExplorer.
[18] See "Choosing the Right Filesystem" in for more information on filesystems. Examples of filesystems not supported by
Windows XP include Linux and Unix partitions
You can change how any volume on your system is mounted,[19] except for the system volume (theone containing your boot files) and the boot volume (the one on which Windows is installed).[20] Thisis one of the reasons I like to partition my disks into several partitions: so I can more easily makechanges to my other drives as needed. With all my data on the same volume as Windows, I wouldhave very little flexibility in this area.
[19] In some earlier versions of Windows, the drive letters of hard disks were controlled by DOS, but in Windows XP, you have
much more control. See the "Designate Drive Letters" solution in any of my earlier Annoyances books for more information on the

limitations involved in the assignment of drive letters in Windows 9x/Me systems.
[20] Note that the naming of the boot and system volumes is counterintuitive. The DiskPart utility, described later in this section,
can be used to operate on the boot and system volumes.
In most cases, changing how a volume is mounted involves changing the drive letter. The easiestway to start is to change the drive letter of a removable or CD drive, and since applications aretypically not installed on removable drives, there shouldn't be any adverse effects. For example,Figure 5-10, shown earlier in this chapter, shows a system with a DVD drive set to F:, a recordableCD drive set to R:, and a digital camera memory card reader set to X: (drives R: and X: are notshown).
To change the drive letter of any volume on your system, start by right-clicking any volume in theGraphical View or Volume List, and select Change Drive Letter and Paths. The Change DriveLetter and Paths dialog, as shown in Figure 5-12, lists the mount points for the selected volume. Avolume can have as many mount points as you like, but only one of them can be a drive letter. (Avolume can also have no drive letter or even no mount points at all.)
Figure 5-12. You can change the drive letter for any device, as well as asmount the volume as a folder on another drive, using the Change Drive
Letter and Paths dialog
Click Add to display the Add Drive Letter or Path dialog. Here, you'll have two choices:
Assign the following drive letter
Select this option and then choose an unused drive letter from the list to mount the drive usingthe selected letter. If the selected volume already has a drive letter, this option will be grayedout, and you'll have to select the drive letter in the previous dialog and select either Change orRemove.
The only roadblock you may encounter when trying to change a drive letter is when one ormore applications are installed on the drive in question. You should still be able to change the

drive letter, but said application(s) may no longer work on the newly lettered drive.
Mount in the following empty NTFS folder
This option is used to link up the volume with a folder on a different drive. For example, say thecurrent volume already is using the drive letter E:. If you were to mount the volume in thefolder d:\backdoor, then the contents of E: would be identical to the contents of d:\backdoor,and e:\some folder would be the same as d:\backdoor\some folder.
Any drive on your system can be mounted in this way, but the mount point (the target folder)must be on an NTFS drive (discussed in "Choosing the Right Filesystem," earlier in this chapter)and must be empty. You can even mount a CD in a folder on your desktop. You can view all ofthe drives mounted in folders by going to View Drive Paths.
There are a few reasons why you might want to do this. For example, if your hard disk isrunning low on space, and you don't wish to take the time to replace it and transfer all yourdata over (as described in "Transfer Windows to Another Hard Disk or System," earlier in thischapter), you can install a new drive and mount it in, say, your Documents and Settings folder.That way, the role of storing all personal files will be assumed by the new drive, and the olddrive should regain a great deal of disk space.
Features similar to this one include network-drive mapping, explained in Chapter 7, and FolderShortcuts, explained in Chapter 4.
5.2.8.4 Creating and deleting partitions
Every hard disk must be partitioned before it can be used, even if that disk is to have only a singlepartition.
During the installation process, explained at the beginning of this chapter, the disk-partitioning utilityincluded with Setup allows you to partition the drive on which Windows is to be installed before thefiles are copied. From within Windows, the Disk Management tool is used to create and deletepartitions. The following procedure shows how to create and delete partitions with Disk Management,although the methodology applies to either tool.
Open the Disk Management tool (diskmgmt.msc). Make sure the Graphical View, explained inthe previous section, is visible.
1.
Select the physical drive you wish to partition. Any existing partitions (volumes) for the currentdrive will be shown to the right. At this point, you can delete or add partitions, or change thedrive letters (as explained previously).
2.
To delete a partition, right-click the blue box representing the partition and select DeletePartition or Delete Logical Drive.
This option will be grayed out if you're trying to delete the system volume (the one containingyour boot files) or the boot volume (the one on which Windows is installed).[21]
3.

[21] Note the counterintuitive naming of the boot and system volumes. You can use the DiskPart utility,described later in this section, to operate on the boot and system volumes.
If you delete a partition, all the data on that volume will be permanentlylost. This happens immediately, and there is no undo. Data on otherpartitions of the same drive, however, won't be affected. If you wish tomake a partition smaller or larger without erasing the data, see the"Resizing and moving partitions," which follows.
To create a new partition, right-click the green box representing the remaining free space onthe drive, and select New Partition or New Logical Drive.
4.
A wizard will appear, asking several questions about the new volume, including how much spaceto use, what kind of volume to create, and which filesystem to use.
When choosing the size of the volume, you can specify any size you want, from only a fewmegabytes to the total amount of contiguous free space on the drive. As for the filesystem,you'll want to use the NTFS filesystem in most cases (see "Choosing the Right Filesystem"earlier in this chapter).
The type of volume to create is probably the most confusing setting here. The three volumetypes,[22] as illustrated in Figure 5-13, are explained in the following list.
[22] There are actually other partition types, but such types are only available with dynamic disks, whichare beyond the scope of this topic.
Figure 5-13. There are three basic types of partitions, each usedunder a specific circumstance
Primary partition
5.

The first partition on a drive should always be a primary partition. If all your partitions areto be used by Windows, then there should never be more than one primary partition on adrive. The exception is when you're setting up a dual-boot system, as described later inthis chapter, where each non-Windows OS will need it's own primary partition. You canhave up to four primary partitions on a drive, or up to three primary partitions and oneextended partition.
If you have more than one drive, each drive should have one primary partition. Additionalpartitions should be defined as "logical drives."
Primary partitions are, by default, shown in dark blue.
Extended partition
The extended partition does not actually contain data; it only encapsulates the logicaldrives (below). A drive can contain only one extended partition.
The extended partition is, by default, shown in green, and only appears as a thick stripesurrounding any defined logical drives.
Logical drive
If you want more than one partition on a drive, the second, third, fourth, and so on,should all be defined as logical drives (since the first is a primary partition). You mustdefine an extended partition before you can create any logical drives.
Logical drives are, by default, shown in light blue, and appear within the green boxrepresenting the extended partition.
For example, to create three 10 GB partitions on a 30 GB drive, you would create one 10 GBprimary partition, followed by one 20 GB extended partition. Then, you'd create two 10 GBlogical drives in the extended partition.
Disk Management will typically format new partitions as they're created (a required step if youwish to store data on them). However, you can format any volume (which will erase any datacurrently stored on it) by right-clicking and selecting Format.
6.
In most cases, newly created or deleted partitions will appear (or disappear) in Explorerimmediately, although you may be required to reboot for Windows to recognize some drivetypes.
7.
5.2.8.5 Resizing and moving partitions
You may encounter a situation when you need to resize a partition, either to consume the space leftover from another deleted partition, or to make a partition smaller to make room for a new one.Unfortunately, support for this type of partition manipulation is extremely limited with the toolsincluded with Windows XP.

Now, the simplest way to resize a partition is to delete it and then create a new one. Unfortunately,this has the rather undesirable side effect of completely erasing any data stored on the volume.
There is, however, one case where you can resize a partition in Windows XP without erasing the datacontained therein. Say you have three 10 GB partitions on a 30 GB drive (just like the example in theprevious section). If you delete the third partition, it's possible to "extend" the second one so that itwill consume the newly available free space. Note that a volume can only be extended to the"right"using the paradigm employed by the Graphical View in the Disk Management tool. (If youhaven't yet deleted the extraneous volume, do so now using Disk Management.):
Open a Command Prompt window (cmd.exe), and type diskpart at the prompt to start the
DiskPart utility.[23]
[23] For some reason, the "extend" feature is not available in the Disk Management tool, which is why wemust use the other disk partitioning tool included with Windows XP, DiskPart.
1.
At the DISKPART> prompt, type:
list disk
to display all the drives on your computer. Each disk will have a disk number, starting with 0(zero). Unless you have only one drive, you'll have to tell DiskPart which drive you wish tomodify. Do this by typing:
select disk n
where n represents the number of the disk you wish to modify. For example, type select disk0 to select the first disk.
2.
Next, at the DISKPART> prompt, type:
list volume
to display all the volumes on the selected disk. Each volume will have a volume number,starting with 0 (zero). Even if you have only one volume on this drive, you'll have to tellDiskPart which volume to extend by typing:
select volume n
where n represents the number of the volume you wish to modify. For example, type selectvolume 2. Remember, there must be free space immediately after the selected volume for this
to work (double-check this by using Disk Management's Graphical View).
3.

Why It's Difficult to Resize Partitions
When it comes to resizing partitions, the disk partitioning tools in Windows XP areonly able to make them larger, and then only in specific circumstances. But why thelimitation?
The reason for this is fairly simple. Open Disk Defragmenter (dfrg.msc), select avolume with a lot of files on it, and click Analyze. You'll then see a map labeledEstimated disk usage before defragmentation showing how the files arephysically distributed on the selected volume. Notice how they appear to bescattered throughout the volume from beginning to end (left to right, respectively)?Using Disk Defragmenter (see "A Defragmentation Crash Course") will reduce thescatter somewhat, but it's designed mainly to rearrange files to improveperformance, rather than prepare a partition to be resized.
The process to "extend" a volume, explained in this section, simply involves movingthe partition boundary to the right, and as long as it doesn't hit another partition (orthe end of the drive), there should be no problem.
In order to make a partition smaller, however, Windows would have to rearrangethe files so that sufficient free space is grouped into a single, contiguous block at thevery end of the partition. That way, the partition boundary could be moved to theleft, making the partition smaller, without losing any file data. Unfortunately, neitherthe Disk Management or DiskPart tools are capable of this advanced manipulation,which is why you'll need another tool, such as PartitionMagic, to accomplish this.
When you're ready, type
extend
to extend the volume. The extend command takes no options and displays no warning message
or confirmation. The process begins immediately after pressing the Enter key and should takeonly a few seconds.
4.
When it's done, type exit to quit the DiskPart utility, and then type exit again to close the
Command Prompt window.
5.
Unfortunately, resizing a partition in the opposite direction (i.e., shrinking a volume) without erasingits data is not supported by Disk Management or the DiskPart utility. For this, you'll need thePartitionMagic utility (available at http://www.symantec.com/partitionmagic/), which can not onlyexpand and shrink partitions, but move them as wellall without erasing the data they contain.PartitionMagic can even be used to make changes to the system and boot volumes, something thatneither Disk Management nor DiskPart will let you do.

5.3. System Hardware
Not every performance problem can be fixed from within Windows. Here are some things you can doto your hardware to improve performance.
5.3.1. Managing IRQ Priority
Most components directly attached to your motherboard, including PCI slots, IDE controllers, serialports, the keyboard port, and even your motherboard's CMOS, have individual IRQs assigned tothem. An IRQ, or interrupt request line, is a numbered hardware line over which a device caninterrupt the normal flow of data to the processor, allowing the device to function. Windows XP allowsyou to prioritize one or more IRQs (which translate to one or more hardware devices), potentiallyimproving the performance of those devices:
Start by opening the System Information utility (msinfo32.exe) and navigating to SystemSummary\Hardware Resources\IRQs to view the IRQs in use on your system.
1.
Next, open the Registry Editor (see Chapter 3) and navigate toHKEY_LOCAL_MACHINE\SYSTEM\CurrentControlSet\Control\PriorityControl.
2.
Create a new DWORD value in this key, and call it IRQ#Priority, where # is the IRQ of thedevice you wish to prioritize (e.g., IRQ13Priority for IRQ 13, which is your numeric
processor).
3.
Double-click the new value, and enter a number for its priority. Enter 1 for top priority, 2 for
second, and so on. Make sure not to enter the same priority number for two entries, and keep itsimple by experimenting with only one or two values at first. Some users have gotten goodresults prioritizing IRQ 8 (for the system CMOS) and the IRQ corresponding to the video card.
4.
Close the Registry Editor and reboot your computer when you're done.5.
5.3.2. Overclock Your Processor
The processor is the highest-profile component (at least where marketing is concerned), as a fastprocessor often translates into a fast overall computer, especially with respect to games. Butprocessors also become obsolete the fastest, and given how expensive they can be, it's often smartnot to buy the fastest processor available.
Now, a processor's clock speed is just one of several factors upon which overall system speed isdependent. For example, jumping from a 1.5 GHz CPU to a 3 GHz unit will not double the speed ofthe computer. In fact, clock speed can be very misleading; a dual 800-Mhz system may outpace a 1Ghz system, and a 1.4 GHz Pentium-III may outpace a 1.4 GHz Pentium-4. So keep this in mind

when deciding how to spend your time and money on performance enhancements. That said, youmay be able to squeeze a little more life out of your existing CPU at a fraction of the cost of a newone.
Overclocking is the process of instructing your processor to run at a higher clock speed (MHz) than itsrated speed.[24] For example, you may be able to overclock a 900 MHz chip to run at 950 MHz, oreven faster. Supposedly, Intel and other chip makers have taken steps to prevent overclocking(theoretically prompting purchases of faster CPUs instead), but some motherboard manufacturershave found ways to do it anyway. Settings allowing you to overclock your CPU can be found in yourBIOS setup (see Appendix B), assuming your motherboard supports it.
[24] There's also the lesser-known practice of under-clocking a CPU. While this may seem silly, it's done to decrease power
consumption and increase battery life on portable computers.
Now, over-overclocking a CPU (overclocking past the point where it's stable) can cause it to overheatand crash your PC frequently. The most important aspect of overclocking your system involvescooling; make sure you beef up your computer's internal cooling system if you plan on messingaround with overclocking. (Obviously, your options will be limited here if you're using a laptop.)
Increase your CPU's speed in stages, if possible; don't start off with the fastestsetting, or you may end up with a fried processor and lightly singed eyebrows.
If you feel that your system isn't adequately cooled, don't be afraid to add more fans. Some fansconnect directly to special plugs on your motherboard, and are activated when internal thermometersdetect too high of a temperature; these do a good job of cooling your system without generatingexcessive noise. Fans that connect to your power supply's drive cables run all the time, and will makemore noise, but will do a better job of cooling your system. Peltier cooling units (also known asthermoelectric heat pumps) will do a great job without making any noise, but they are expensive anda little hard to find.

Chapter 6. TroubleshootingMost Windows users would probably consider the barrage of incomprehensible error messages andcrashing to be the operating system's biggest annoyance, and I'd be the last one to argue with them.But the problems that plague our computers vary widely from simple features not working to massivedata loss, with a whole range of annoying quirks in between.
No single resource could possibly document every bug and every error message produced byWindows and every possible combination of drivers and applications, and this chapter is no exception.Instead, the topics in this chapter use many of the more common problems to show you how totroubleshoot your Windows system by isolating the problem and then using the tools available to finda solution.
First off, if you remember only two pearls of wisdom from this chapter, let them be the following:
99% of all computer problems are solved by pressing your computer's Reset button.1.
Insanity can be defined as repeating the same actions over and over again, expecting differentresults. (Or, worse, repeating the same actions over and over again, knowing that you'll neverget different results.)
2.
Naturally, a corollary to these principles is that resetting your computer repeatedly will get younowhere. Herein lies the rub: what do you do during that remaining 1% of the time when restartingyour computer doesn't help?

6.1. General Troubleshooting Techniques
Troubleshooting a computer involves more than just whining about it. One of the first things youneed to do to solve a problem is to find the right words to describe the problem. You don't know howmany people have come to me simply saying, "It doesn't work." I have to prod them to find whatthey did (or didn't do), whether or not they received an error message, if they saw smoke billowingout of one of their drives, or if the computer simply didn't do what they expected.
Like it or not, most problems are simply caused by poorly written software. As soon as you removeyourself (the user) as a potential cause of the problem, it makes it much easier to track down thereal source of the problem and fix it.
Computer problems can come in many forms: error messages, crashes, lock-ups, unexpected results,and corrupted data. A crash is usually accompanied by a cryptic error message of some sort (GeneralProtection Fault, Blue Screen of Death, etc.), followed by having the applicationor the entireoperating systemshut down abruptly. A lock-up is what happens when an application (or Windows)stops responding to the mouse and keyboard; sometimes you can recover from a lock-up (often bypressing Ctrl-Alt-Del or just waiting a few seconds), and sometimes you can't.
Much of this chapter focuses on some specific problems and their solutions, but most troubleshootingrequires nothing more than a little reasoning. If you're looking for a chart of every conceivable errormessage and its cause, you're out of luck: such a thing simply doesn't exist. There are infinitelymany combinations of computer systems, add-on devices, application software, and drivers;unfortunately, some of those combinations can be fraught with headaches. However, later in thischapter, you'll find a list of common BSoD (Blue Screen of Death) error messages, typicallyconsidered the most extreme you'll encounter.
The most important stepand usually the most difficultin troubleshooting a computer system is toisolate the problem. Here are some questions to ask yourself when you're trying to isolate a problem:
Is this an isolated incident, or does this problem occur every time I perform some action?
As much as Microsoft will deny it, crashing is a fact of life on a Windows system, even whenusing Windows XP (although some users will swear up and down that their systems are "rock-solid").
An isolated incident is often just that, and, if nothing else, is a good reminder to save yourwork often. On the other hand, if a given error message or crash repeatedly occurs at thesame time, in the same place, or as a result of the same mouse click, you need to be aware ofthat fact if you hope to solve the problem.
Did I install or remove any software or hardware around the time this problem startedoccurring?
Sudden changes in your computer's behavior are almost never spontaneous; if somethingsuddenly stops working, you can bet that there was a discernible trigger.

Is the problem with a specific application or hardware device, or is Windows at fault?
You can rule out specific applications if the crash or another problem doesn't just occur in oneprogram. You can rule out most hardware by removing or disabling the unnecessary devicesattached to your system. And you can rule out Windows by installing a second copy of theoperating system on a different drive, as described in Chapter 1.
Did I read the directions?
Unfortunately, a well-designed interface is still something not implemented by many softwaremanufacturers these days, so if you're not getting the results you expect from your wordprocessor, printer, scanner, mouse, web browser, or other hardware device or application,make sure that you have read the directions (and release notes) that accompany suchproducts and that the product in question is installed properly. Also, software manufacturersfrequently release updates and fixes, so it's always a good idea to check to see if you have thelatest versions of all applications and drivers. See Section 6.3, later in this chapter, for details.
How likely is it that someone else has encountered the same problem I have?
This is often the most useful question to ask, because the odds are that someone else not onlyhas encountered the same problem (anything from an annoying software quirk to a deafeningapplication crash), but has already discovered a solution and written about it in some onlineforum. For example, there's a Windows XP discussion forum at http://www.annoyances.org forspecifically this purpose!
Am I asking the right people?
If you just installed a new version of America Online and now your Internet connection doesn'twork, you shouldn't be calling your plumber. On the other hand, nothing compares to trying toconvince a technical support representative that the problem you're experiencing is actuallytheir company's fault and not someone else's.
Am I using the latest version of the software or drivers for the product in question?
Most manufacturers routinely place software patches, updated drivers, and other fixes on theirweb sites. In many cases, the manufacturer has fixed the problem you're having and all that'sleft to do is download and install the new version.
The last tidbit of wisdom comes from years of experience. Some problems require hours and hours offruitless troubleshooting and needless headaches. In some cases, it makes more sense to replace the

product that's giving you trouble than to try to fix it. Keep that in mind when it's four o'clock in themorning, and Windows refuses to recognize your ninety-dollar scanner.
6.1.1. Where to Go from Here
More specific troubleshooting information can be found throughout this book:
Software issues
The first part of this chapter is devoted to software troubleshooting, such as issues involvingstarting and shutting down Windows, error messages, and crashes.
Hardware issues
See Section 6.3, later in this chapter, for topics such as hardware conflicts and Plug and Playissues. This is followed by Section 6.4, which covers each device in your system, one by one.
See also Chapter 7 for help with troubleshooting a network or Internet connection.
Backups and data recovery
In addition to isolating and solving problems, the other important aspect of troubleshootinginvolves data loss caused by those problems. See Section 6.5, later in this chapter, for detailson what do when a problem is bad enough to corrupt or erase important documents or otherdata, and how to protect yourself from this eventuality.

6.2. Specific Software Issues
Once you start peeking under the hood of Windows XP, you'll notice some of the tools that have beenincluded to help the system run smoothly. Some of these tools actually work, but it's important toknow which ones to use and which ones are simply gimmicks. A good example is System Restore, afeature intended to solve certain file-version conflicts automatically; its brute-force method oftenends up causing more problems than it solves. See the discussion of System Restore later in thischapter for details.
Here are some software-specific issues that should help you solve most problems with Windows XPand the applications that run on it.
6.2.1. Patching Windows with Windows Update
If software manufacturers waited until their products were completely bug-free before releasingthem, then we'd all still be using typewriters.
Windows XP has a fairly automated update system, wherein patches to the operating system thatMicrosoft considers to be important are made available on their web site and, by default,automatically downloaded and installed on your computer.
Just open Internet Explorer (other web browsers won't work) and visithttp://www.windowsupdate.com (or go to Tools Windows Update) to load the WindowsUpdate program. Click Scan for updates to compile a list of the updates you haven't yet installedfrom which you can selectively download those updates you want or need.
This is a fairly straightforward procedure, and one you should do regularly. Here are a few tips toimprove your experience with this tool:
Disable automatic Windows Update
Depending on your settings, Windows XP may routinely activate the Windows Update feature toscan for and download updates to Windows XP automatically. If you have a fast Internetconnection and usually don't remember to check for updates yourself, you'll probably want thisfeature turned on. However, if you already check for updates and would rather not haveWindows interrupt you while you work, you'll probably want to disable automatic updating bygoing to Control Panel System Automatic Updates.
Even if you've enabled full automatic updating, Windows XP may onlyinstall critical updates. It's a good idea to check with Windows Updatemanually to make sure the updates you want are installed.

See the "Block Service Pack 2" sidebar for a way to take advantage of automatic updateswithout automatically updating Microsoft's Service Packs.
Block Service Pack 2
Microsoft distributes its service packs through the Windows Update service. Thismeans that if you have the Automatic Updates feature enabled, your system maydownload and install SP2 (or a subsequent Service Pack) without your knowledge orexpress permission. This can cause serious problems, both in the installationprocess itself and in the subsequent use of the new version of Windows.
(Service Pack 1, released in 2001, gained an unfavorable reputation for the factthat this 250+ megabyte update was automatically installed on many Windows XPsystems, whether or not your computer had sufficient free disk space.)
Fortunately, there's a way to block Windows Update, at least temporarily, frominstalling Service Pack 2 on your system:
Open the Registry Editor (described in Chapter 3).1.
Expand the branches toHKEY_LOCAL_MACHINE\Software\Policies\Microsoft\Windows.
2.
If it's not already there, add a new subkey to this branch (Edit New Key) and name it WindowsUpdate.
3.
Open the new WindowsUpdate key.4.
Add a new DWORD value (Edit New DWORD Value) and name itDoNotAllowXPSP2.
5.
Double-click the new DoNotAllowXPSP2 value and type 1 for its data. Click OK
and close the Registry Editor when you're done.
6.
Now, here's the catch: Microsoft will only respect this setting until April 12, 2005.After that time, Windows XP SP2 will be "delivered" (as Microsoft puts it) to allWindows XP and Windows XP Service Pack 1 systems.
In order to block Service Pack 2 permanently, you'll have to disable the AutomaticUpdates feature, and then subsequently only install updates by manually visitingthe Windows Update web site.
Dealing with missing files

During the installation of updates, Windows may occasionally inform you that it can't find oneor more files. This, of course, is a bug in the installer, but the workaround is easy. Open aSearch window (see Section 2.2.7), and type the name of the specified file in the All or part ofthe file name field. If the file is already on your hard disk, it will show up in the searchresults; just type the full path of the folder containing the file into the Copy files from field,and click OK (or Retry). In most cases, such files will already be on your system, typically inthe \Windows\System32 and \Windows\System32\drivers folders.
Whether or not to install Driver Updates
For the most part, it's a good idea to install all of the updates in the Critical Updates andWindows XP categories, but use your judgment when installing items in the Driver Updatescategory. The drivers recommended in here (typically only for devices already using a Microsoftdrivers) may be older than the ones you're using, or may even be inappropriate for yourhardware. If Windows Update is recommending a driver update, check with the manufacturerof the corresponding device and install their latest driver instead.
Managing Windows Updates for a large number of computers
If you're a system administrator and are responsible for a large number of Windows XPmachines, you may not want your users to have access to Windows Update. Otherwise, youmay have to deal with increased network traffic whenever a new update becomes available,and you may have to clean up the mess left behind by a bad update.
The solution lies in Microsoft's Software Update Services (SUS), a system by whichadministrators can deploy critical updates to their Windows XP and Windows 2000-basedsystems. More information on SUS can be found athttp://www.microsoft.com/windows2000/windowsupdate/sus/.
One other way to prevent your users from accessing the Windows Update site is to set upfirewall rules to restrict access to the server. You can also set up the hosts file on eachcomputer to redirect any requests to www.windowsupdate.com andwindowsupdate.microsoft.com to a different location, as described in Section 7.4.4.
Download updates for installation on other computers
If you have more than one XP machine to update, you may not want to download the sameupdates again and again. Start by loading Windows Update, as described earlier. Then, clickPersonalize Windows Update on the left side and turn on the Display the link to theWindows Update Catalog under See Also option. Finally, click Windows Update Catalog(which should now appear to your left) to enter the catalog and selectively download self-installing updates.
6.2.2. What to Do when Windows Won't Start
Unfortunately, Windows's inability to start is a common problem, usually occurring without an error

message or any obvious way to resolve it. Sometimes you'll just get a black screen after the startuplogo, or your computer may even restart itself instead of displaying the desktop. Of the many causesof this problem, many deal with hardware drivers, conflicts, or file corruptionall of which arediscussed elsewhere in this chapter.
In previous versions of Windows, up until Windows 98, one could start a DOS session before loadingWindows, which was a gateway to several effective troubleshooting techniques. In Windows XP, thislifeline is gone, but, fortunately, there are several other tools in place to take up the slack:
Windows Recovery Console
The Windows Recovery Console, discussed later in this chapter, is a way to repair youroperating system or boot manager. It also lets you delete or replace system files, somethingnot possible from within Windows. Use the WRC when Windows won't start at all.
Safe Mode with Command Prompt
The Safe Mode with Command Prompt, explained in Section 2.2.6, is somewhat of a hybrid ofthe Windows Recovery Console and a standard Command Prompt window. (It's also describedlater.) Use it to effect minor repairs when the Windows Recovery Console is overkill.
In either case, you'll get a Command Prompt interface that allows you to copy, move, rename, ordelete files, as well as start certain programs. The specific steps you take depend on what you'retrying to accomplish.
If you don't know where to start, you'll probably want to scan your hard disk for errors, sincecorrupted files can prevent Windows from loading. See Section 6.2.6, later in this chapter, for details.
The other choice you have, instead of using one of these Command Prompt variants, is to use one ofWindows's built-in troubleshooting startup modes. Press the F8 key when Windows begins to load (orduring the Boot Manager menu, if you're using a dual-boot system, as described in Chapter 1). You'llsee a menu with the following choices:
Safe Mode (also with Networking support or Command Prompt)
This forces Windows to start up in a hobbled, semifunctional mode, useful for troubleshootingor removing software or hardware drivers that otherwise prevent Windows from bootingnormally.
Enable Boot Logging
This starts Windows normally, except that a log of every step is recorded into the ntbtlog.txtfile, located in your \Windows folder. If Windows won't start, all you need to do is attempt tostart Windows with the Enable Boot Logging option at least once. Then, boot Windows into

Safe mode (or Safe mode with Command Prompt) and read the log with your favorite texteditor (or Notepad). The last entry in the log is most likely the cause of the problem.
Enable VGA Mode
Start Windows normally, but in 640 480 mode at 16 colors. This is useful for troubleshootingbad video drivers or incorrect video settings by allowing you to boot Windows with the mostcompatible display mode available.
Last Known Good Configuration
This starts Windows with the last set of drivers and Registry settings known to work. Use this ifa recent Registry Change or hardware installation has caused a problem that prevents Windowsfrom starting.
Directory Services Restore Mode
Used only if your computer is a Windows NT domain controller.
Debugging Mode
This option, typically of no use to end-users, sends debug information to your serial port to berecorded by another computer.
Start Windows Normally
Use this self-explanatory option to continue booting Windows normally, as though you neverdisplayed the F8 menu.
Lastly, you should look for error messages, both fleeting ones that quickly disappear, and onesdisplayed when the Windows startup procedure comes to a screeching halt. See the next section fordetails.
6.2.3. Error Messages During Startup
You may have seen a strange message when loading Windows, either during the display of theWindows logo screen or after the taskbar appears. Many different things can cause this, but there area few common culprits. If you're having trouble starting Windows, see Section 6.1.1 earlier in thischapter.

A driver won't load
When Windows starts, it loads all of the installed drivers into memory. A driver may refuse toload if the device for which it's designed isn't functioning or turned on, if there's a hardwareconflict, if the driver itself isn't installed properly, or if the driver file is misconfigured orcorrupted in some way. If you remove a device, make sure to take out the driver file aswelleven if it isn't generating an error message, it could be taking up memory. See Section 6.3later in this chapter.
A program can't be found
After Windows loads itself and all of its drivers, it loads any programs configured to load atstartup. These include screen savers, scheduling utilities, Palm HotSync software, all thoseicons that appear in your notification area (tray), and any other programs you may haveplaced in your Startup folder or that may be been configured to load automatically in thesystem Registry. If you removed an application, for example, and Windows continues toattempt to load one of its components at startup, you'll have to remove the referencemanually. See Section 6.2.4 later in this chapter, for details.
A file is corrupt or missing
If one of Windows's own files won't load and you're sure it isn't a third-party driver orapplication, you may actually have to reinstall Windows to alleviate the problem. I'll take thisopportunity to remind you to back up frequently.
An error message of this sort will usually include a filename. To help isolate the problem, writedown the filename when you see the error message, and then try searching your hard disk forthe reported file, as well as looking for places where the file may be referenced (see Section6.2.4 later in this chapter for details). If you don't know what the error means exactly, youshould definitely do both; a lot can be learned by finding how and where Windows is trying toload a program. However, if you know that the file or files are no longer on your system, youcan proceed simply to remove the reference.
Conversely, if you know the file is still on your system and you want to get it working again,you'll probably need to reinstall whatever component or application it came with in order to fixthe problem. Once you've located a particular file, it may not be obvious to which program itbelongs. You can usually get a good clue by right-clicking on the file, selecting Properties, andchoosing the Version tab.
Please wait while Windows updates your configuration files
This isn't an error but rather a message you may see occasionally when Windows is starting. Itsimply means that Windows is copying certain files that it couldn't otherwise copy whileWindows was loaded, most often as a result of software being installed during the last Windowssession. For example, if a program you install needs to replace an old DLL in your\Windows\System32 folder with a newer version, but the DLL is in use and can't beoverwritten, the program's setup utility will simply instruct Windows to do it automatically the

next time it's restarted. The mechanism responsible is discussed in the discussion of theWininit.ini file in Section 2.2.6.
If the name of a driver, service, or application is specified in the error message, there are threeplaces you can look for more information:
In the startup log, ntbtlog.txt, located in your \Windows folder. See Section 6.2.2, earlier in thischapter, for details.
In the Event Viewer (eventvwr.msc); open the System branch, and then sort the listing byclicking the Source column header.
In one of the places Windows looks for startup programs, discussed in the next section.
6.2.3.1 Silence the error messages altogether
Obviously, the best way to deal with a startup message is to fix the cause. But if you can't locate theproblem (or if you just don't want to bother), you can suppress many of the messages completely:
Open the Registry Editor (discussed in Chapter 3).1.
Expand the branches to:HKEY_LOCAL_MACHINE\SYSTEM\CurrentControlSet\Control\Windows.
2.
Create a new value by going to Edit New DWORD Value, and type NoPopupsOnBoot
for the name of the new value.
3.
Double-click the new NoPopupsOnBoot value, enter 1 for the Value data, and click OK.4.
Note that this solution treats the symptoms rather than the underlying problem and, in doing so, maymean you might miss an important error message later on.
6.2.4. Programs Run by Windows when It Starts
Any driver or program that Windows loads when it boots will be listed in at least one of the followingplaces. Access to these locations is useful not only for adding your own startup programs, buteliminating ones that are either causing problems or are simply unnecessary and slowing down theboot process.
The Startup folder
Your Startup folder (usually \Documents and Settings\{username}\Start Menu\Startup)contains shortcuts for all the standard programs you wish to load every time Windows starts.You should routinely look for and eliminate shortcuts to outdated or unwanted programs. Ifyou're not sure of the application with which the shortcut is associated, right-click it, select

Properties, and then click Find Target.
The Registry
There are several places in the Registry (see Chapter 3) in which startup programs arespecified. Such programs are specified here for several reasons: to prevent tinkering, for moreflexibility, orin the case of viruses, Trojan horses, and spywareto hide from plain view.
These keys contain startup programs for the current user:HKEY_CURRENT_USER\SOFTWARE\Microsoft\Windows\CurrentVersion\RunHKEY_CURRENT_USER\SOFTWARE\Microsoft\Windows\CurrentVersion\RunOnce
These keys contain startup programs for all users:
HKEY_LOCAL_MACHINE\SOFTWARE\Microsoft\Windows\CurrentVersion\RunHKEY_LOCAL_MACHINE\SOFTWARE\Microsoft\Windows\CurrentVersion\RunOnce
The naming of the keys should be self-explanatory. Programs referenced in either of the Run keyslisted above are run every time Windows starts. Likewise, an entry referenced in one of the RunOnce
keys is run only once and then removed from the key.
Services
The Services window (services.msc) lists dozens of programs especially designed to run in thebackground in Windows XP. The advantage of services is that they remain active, even whenno user is currently logged in. That way, for example, your web server can continue to serveweb pages when the Welcome screen (or Log On dialog) is shown.
By default, some services are configured to start automatically with Windows and others arenot; such information is found in the Startup Type column. Double-click any service andchange the Startup type option to Automatic to have it start with Windows, or Manual todisable it.
However, changing the Startup type for a service won't load (start) or unload (stop) theservice. Use the Start and Stop buttons on the toolbar of the Services window, or double-clicka service and click Start or Stop. For an example, see the discussion of Universal Plug and Playin Section 7.6.1.
The WIN.INI file
Although it's uncommon, you may occasionally see a program referenced at the top of theWIN.INI file, on the lines that start with LOAD= or RUN=. See Section 3.3.7 for details on the
structure of files of this type.

Although you may want to disable or eliminate unwanted startup programs inan effort to solve a problem or just improve system performance, you shouldnot blindly disable any program you don't immediately recognize. Keep in mindthat some of the startup programs referenced in the Registry and some of theservices configured to start automatically are there for a reason, and arerequired for Windows XP to function. See Section 6.2.9, later in this chapter, fora list of programs you should not close with the Task Manager.
In many cases, it should be obvious what a particular startup program is for. If not, try these steps:
Search your system for the filename(s) specified. Once you find it, right-click it, selectProperties, and choose the Version tab. The manufacturer name, and sometimes the productname, will be listed here. If there's no Version tab, it means the file has no versioninformation, which may suggest that it's a virus or some form of malware (see the nextsection).
1.
Search Google (http://www.google.com) for the filename. In nearly all cases, you'll find a website that describes what it's for and, in the case of malware, how to remove it.
Among Google's search results, you'll likely encounter some sites thatspecialize in cataloging startup programs, both benign and malicious,commonly found on Windows systems. Two of the best arehttp://www.processlibrary.com/ and http://www.2-spyware.com/files.php,both of which allow you to search their databases by filename.
2.
If you have a hunch it doesn't belong, try temporarily relocating it.
If it's a shortcut in your Startup folder, move the shortcut to a temporary folder rather thandeleting it, allowing easy retrieval if it turns out to be necessary. Likewise, for entries in yourRegistry, create a Registry patch (see Chapter 3) of the entire Registry key in question beforeremoving the questionable entry. If anything goes wrong, you can reapply the Registry patch torestore the setting.
3.
Restart your system, and look for abnormalities (as well as normalities). If all is well, you canprobably discard the removed entries.
4.
6.2.5. Viruses, Malware, and Spyware
Malware, or malicious software, is a class of software specifically designed to wreak havoc on acomputer. Malware includes such nasty entities as viruses, Trojan horses, worms, and spyware.
If you're experiencing frequent crashing, nonsensical error messages, pop-up advertisements (otherthan when surfing the Web), or slower-than-normal performance, the culprit may be one of thefollowing types of malware (as opposed to a feature authored by Microsoft):

Viruses
A virus is a program or piece of code that "infects" other software by embedding a copy of itselfin one or more executable files. When the software runs, so does the embedded virus, thuspropagating the "infection." Viruses can replicate themselves, and some (known aspolymorphic viruses) can even change their virus signatures each time to avoid detection byantivirus software.
Unlike worms, viruses cannot infect other computers without assistance from people (aka you),a topic discussed in detail in the next section. One particular type of virus, a Trojan Horse,spreads itself by masquerading as a benign application (as opposed to infecting an otherwisevalid file), such as a screensaver or even a virus removal tool.
Worms
A worm[1] is a special type of virus that can infect a computer without any help from its user,typically through a network or Internet connection. Worms can replicate themselves likeordinary viruses, but do not spread by infecting programs or documents. A common example isthe W32.Blaster.Worm, which exploited a bug in Windows (eventually fixed as part of update#824146), causing it to restart repeatedly or simply seize up.
[1] The term worm is said to have its roots in J.R.R. Tolkien, who described dragons in Middle Earth thatwere powerful enough to lay waste to entire regions. Two such dragons (Scatha and Glaurung) wereknown as "the Great Worms." The Great Worm, a virus written by Robert T. Morris in 1988, wasparticularly devastating, mostly because of a bug in its own code. Source: Jargon File 4.2.0.
Spyware and adware
Spyware is a little different than the aforementioned viruses and worms, in that its intent is notnecessarily to hobble a computer or destroy data, but rather something much more insidious.Spyware is designed to install itself transparently on your system, spy on you, and then sendthe data it collects back to an Internet server. This is sometimes done to collect informationabout you, but most often to serve as a conduit for pop-up advertisements (known as adware).
Many of these advertisements are pornographic in nature, and will makeno exceptions for the age or personal preference of those viewing them.The good news is that this type of attack, whether designed to changeyour default home page, display pop-up ads, or glean sensitiveinformation from your hard disk, is stoppable and even preventable.
Aside from the ethical implications, spyware can be particularly troublesome because it'stypically very poorly written and, as a result, ends up causing error messages, performanceslowdowns, and seemingly random crashes. Plus, it uses your computer's CPU cycles andInternet connection bandwidth to accomplish its goals, leaving fewer resources available for theapplications you actually want to use.
Now, it's often difficult to tell one type of malicious program from another, and in some ways, it

doesn't matter. But if you understand how these programs work how they get into your computerand what they do once they've taken root you can eliminate them and keep them from ever comingback.
6.2.5.1 How malware spreads
Once they've infected a system, viruses and the like can be very difficult to remove. For that reason,your best defense against them is to prevent them from infecting your computer in the first place.
The most useful tool you can use to keep malware off your computer is your cerebral cortex. Just asmalware is written to exploit vulnerabilities in computer systems, the distribution of malware exploitsthe stupidity of users.
Malware is typically spread in the following ways:
Email attachments
One of the most common ways viruses make their way into computers is through spam.Attachments are embedded in these junk email messages, sent by the millions to every emailaddress in existence, which unsuspecting recipients click, open, and execute. But how canpeople be that dumb, you may ask? Well, consider the filename of a typical Trojan horse:
kittens playing with yarn.jpg .scr
Since Windows, by default, has its filename extensions hidden (see Section 4.3 in Chapter 4),most people wouldn't see that this is an .scr (screensaver) file and not a photo of kittens. (Thelong space in the filename ensures that it won't be easy to spot, even if extensions are visible.)And since most spam filters and antivirus programs block .exe files, but not .scr files (whichare just renamed .exe files, by the way), this innocuous looking file is more than likely tospawn a nasty virus on someone's computer.
So, how do you protect yourself from these? First, don't open emailattachments you weren't expecting, and manually scan everything elsewith an up-to-date virus scanner (discussed later in this section). Notethat you may also want to employ a spam filter to throw away most ofthese messages before they reach your in-box. (If you're worried aboutvalid messages being deleted as well, use a filter that only markssuspected spam instead of deleting it, such as SpamPal, available athttp://www.spampal.org/.)
Peer-to-peer (P2P) file sharing
Napster started the P2P file-sharing craze, but file sharing goes far beyond the trading ofharmless music files. It's estimated that 40% of the files available on these P2P networkscontain viruses, Trojan horses, and other unwelcome guests, but these aren't even the biggest

cause of concern.
In order to facilitate the exchange of files, these P2P programs open network ports (Chapter 7)and create gaping holes in your computer's firewall, any of which can be exploited by a varietyof worms and intruders. And since people typically leave these programs running all the time(whether they intend to or not), these security holes are constantly open for business.
But wait . . . there's more! If the constant threat of viruses and Trojan horses isn't enough,many P2P programs come with a broad assortment of spyware and adware, intentionallyinstalled on your system along with the applications themselves. Kazaa, one of the mostpopular file-sharing clients, is also the biggest perpetrator of this, and the likely culprit if yoursystem has become infected with spyware. (Note that other products like Morpheus,BearShare, Imesh, and Limewire do this too, just in case you were thinking there was acompletely "safe" alternative.)
There are some spyware-free P2P file-sharing programs out there,although it's a bit of a mixed bag at best. For instance, a group of hackershave released a stripped-down version of the spyware-ridden Kazaa,called Kazaa Lite (http://www.klitesite.com), and there are so-called "lite"versions of other applications as well. But if you want a non-hacked P2Pclient, try WinMX (http://www.winmx.com) or Shareaza(http://www.shareaza.com), both of which are free and completelyspyware-free. Be warned, however, that even without the spyware, P2Psoftware will nonetheless compromise the security of your system.
Infected files
Viruses don't just invade your computer and wreak havoc; they replicate themselves and burycopies of themselves in other files. This means that once your computer has been infected, thevirus is likely sitting dormant in any of the applications and even personal documents stored onyour hard disk. This not only means that you may be spreading the virus each time you emaildocuments to others, but that others may be unwittingly sharing viruses with you.
As part of a virus's objective to duplicate and distribute itself, many hijackyour email program and use it to send infected files to everyone in youraddress book. In nearly all cases, these viruses are designed to work withthe email software most people have on their systems, namely MicrosoftOutlook and Outlook Express. If you want to significantly hobble yourcomputer's susceptibility to this type of attack, you'd be wise to use anyother email software, such as Eudora (http://www.eudora.com).
One of the most common types of viruses utilizes macros, small scripts (programming code)embedded in documents. By some estimates, roughly 3 of every 4 viruses is actually a macrowritten for Microsoft Word or Excel. These macros are executed automatically when thedocuments that contain them are opened, at which point they attach themselves to the globaltemplate so that they can infect every document you subsequently open and save. Both Wordand Excel have security features that restrict this feature, but these measures are clumsy and

most people disable them so they can work on the rest of their documents. In other words,don't rely on the virus protection built into Microsoft Office to eliminate the threat of thesetypes of viruses.
Web sites
It may sound like the rantings of a conspiracy theorist, but even the act of visiting some websites can infect your system with spyware and adware. Not that it can happen transparently,but many people simply don't recognize the red flags even when they're staring them in theface. Specifically, these are the "add-ins" employed by some web sites that provide customcursors, interactive menus, and other eye candy. While loading a web page, you may see amessage asking you if it's okay to install some ActiveX gadget "necessary" to view the page(e.g. Comet Cursor); here, the answer is simple: no.
Just as many viruses are written to exploit Microsoft Outlook, mostspyware and adware is designed to exploit Microsoft Internet Explorer. Bymerely switching to a different browser, such as Netscape, Mozilla, orFirefox, you can eliminate the threat posted by many of these nastyprograms. Plus, Netscape and Mozilla (both of which are free) have built-in features that disable pop-up ads and some of the more malicious (orjust annoying) JavaScript features.
Network and Internet connections
Finally, your network connection (both to your LAN and to the Internet) can serve as a conduitfor a worm, the special kind of virus that doesn't need your help to infect your system.Obviously, the most effective way to protect your system is to unplug it from the network, buta slightly more realistic solution is to use a firewall. Windows XP comes with a built-in firewall(significantly improved in Service Pack 2), although a router will provide much betterprotection. See Chapter 7 for details.
6.2.5.2 Protecting and cleaning your computer
The most popular and typically the most effective way to rid your computer of malware is to usededicated antivirus software and antispyware software. (At the time of this writing, no single productclaims to do both.) These programs rely on their own internal databases of known viruses, worms,Trojans, spyware, and adware, and as such must be updated regularly (daily or weekly) to be able todetect and eliminate the latest threats.
Windows XP doesn't come with any antivirus or antispyware software, but Windows XP Service Pack2 does includes the Security Center utility (found in Control Panel, and shown in Figure 6-1), whichcan interface with newer third-party software designed to do so.

Figure 6-1. New in Service Pack 2, the Security Center serves as a centralinterface for Windows Update, Windows's own built-in firewall, and
whatever antivirus software you provide
As stated above, you'll need to provide your own antivirus software. Keep in mind that not allantivirus programs are created equal; visit http://www.software-antivirus.com for in-depth reviewsand http://www.av-test.org for independent antivirus testing. Among the more popular antivirusproducts are:
Kaspersky Antivirus Personal (http://www.kaspersky.com)
Very highly-regarded solution with an excellent detection record
McAfee VirusScan (http://www.mcafee.com)
Trusted and well-established all-around virus scanner with an intuitive interface and fewlimitations
Panda Anti-Virus Titanium & Platinum (http://www.pandasecurity.com)
Lesser-known but capable antivirus software

Symantec Norton AntiVirus (http://www.symantec.com)
Mediocre, slow antivirus program with a well-known name; beware expensive subscription planto keep virus definitions updated
AntiVir (http://www.free-av.com)
Freeware, with frequent updates but only average detection rates
Avast Home Edition (http://www.asw.cz)
Freeware, with slick interface and good feature set
AVG (http://free.grisoft.com)
Freeware, a popular yet poor-performing antivirus solution
Antispyware software is a newer phenomenon and, as a result, there are fewer offerings. However,they do their job well and complete their scans in only a few minutes (compared with the hours ittakes to scan all your files for viruses). The top antispyware products include:
Ad-Aware Personal Edition (http://www.lavasoft.de)
Ad-Aware (Figure 6-2), along with Spybot, is probably the most frequently suggested solutionto spyware problems on the Annoyances.org forums, for good reason. The personal edition isfree, very slick, and works well.
Figure 6-2. Use Lavasoft's Ad-Aware to rid your system for all sortsof spyware and adware

When using Ad-Aware, make sure you click Check for updates nowbefore running a scan. Also, to turn off the awful, jarring sound Ad-Awareplays when it has found spyware, click the gear icon to open the settingswindow, click the Tweak button, open the Misc Settings category, andturn off the Play sound if scan produced a result option.
Spybot - Search & Destroy (http://www.spybot.info)
When used along with Ad-Aware, this free software can be counted on to remove virtually alltypes of spyware and adware from your computer. While both Ad-Aware and Spybot removetracking cookies (used to deliver ads in web pages) from Internet Explorer, only Spybotsupports Mozilla and Firefox as well.
HijackThis (http://www.spychecker.com/program/hijackthis.html)
Use this tool to generate a report listing all the browser add-ons and startup programs installedon your system. You can then either scrutinize the report yourself or send the resultingHijackThis Log to someone else for their help.
Spy Sweeper (http://www.webroot.com)
This highly-regarded antispyware tool, while not free like the first two, is still a welcomeaddition to any spyware-fighter's toolbox.
SpywareBlaster/SpywareGuard (http://www.javacoolsoftware.com/)

Use these tools to help prevent future malware infestations.
So, armed with proper antivirus and antispyware software, there are four things you should do toprotect your computer from malware:
Place a router between your computer and your Internet connection, as described in Chapter 7.1.
Scan your system for viruses regularly, and don't rely entirely on your antivirus program's auto-protect feature (see the next section). Run a full system scan at least every two weeks.
2.
Scan your system for spyware regularly, at least once or twice a month. Do it more often if youdownload and install a lot of software.
3.
Use your head! See the previous section for ways malware spreads and the next section forsome of the things you can do to reduce your exposure to viruses, spyware, adware, and othermalware.
Malware is constantly evolving, perpetually taking on new forms andexploiting new vulnerabilities. To keep tabs on the latest threats, check outCounterexploitation (http://www.cexx.org/) and the Adware Report(http://www.adwarereport.com/). And don't forget to keep your antivirusand antispyware software updated.
4.
6.2.5.3 The perils of auto-protect
Antivirus software is a double-edged sword. Sure, viruses can be a genuine threat, and for many ofus, antivirus software is an essential safeguard. But antivirus software can also be real pain in theneck.
The most basic, innocuous function of an antivirus program is to scan files on demand. When youstart a virus scanner and tell it to scan a file or a disk full of files, you're performing a useful task. Theproblem is that most of us don't remember or want to take the time to routinely perform scans, sowe rely on the so-called "auto-protect" feature, where the virus scanner runs all the time. This cancause several problems:
Loading the auto-protect software at Windows startup can increase boot time; also, becauseeach and every application (and document) you open must first be scanned, load times canincrease. In addition, a virus scanner that's always running consumes memory and processorcycles, even though you're not likely to spend most of your time downloading new andpotentially hazardous files for it to scan.
If the antivirus software or virus definitions become corrupted, the application auto-scannermay prevent any application on your system from loading, including the antivirus softwareitself, making it impossible to rectify the situation without serious headaches. (Yes, this actuallyhappens.)
Some antivirus auto-protect features include web browser and email plug-ins, which scan all

files downloaded and received as attachments, respectively. In addition to the performance hit,these plug-ins sometimes don't work properly, inadvertently causing all sorts of problems withthe applications you use to open these files.
The constant barrage of virus warning messages can be annoying, to say the least. Forinstance, if your antivirus software automatically scans your incoming email, you may be forcedto click through a dozen of these messages warning you of virus-laden attachments, eventhough your spam filter will likely delete them before you even see them.
Lastly, and most importantly, having the auto-protect feature installed can give you a falsesense of security, reducing the chances that you'll take the precautions listed elsewhere in thissection and increasing the likelihood that your computer will become infected. Even if you arediligent about scanning files manually, no antivirus program is foolproof and certainly is nosubstitute for common sense.
Now, if you take the proper precautions, your exposure to viruses will be minimal, and you will havevery little need for the auto-protect feature of your antivirus software. Naturally, whether you disableyour antivirus software's auto-protect feature is up to you. If you keep the following practices inmind, regardless of the status of your antivirus autoprotect software, you should effectively eliminateyour computer's susceptibility to viruses:
If you don't download any documents or applications from the Internet, if you're not connectedto a local network, if you have a firewalled connection to the Internet, and the only type ofsoftware you install is off-the-shelf commercial products, your odds of getting a virus are prettymuch zero.
Viruses can only reside in certain types of files, including application (.exe) files, document filesmade in applications that use macros (such as Microsoft Word), Windows script files (.vbs), andsome types of application support files (.dll, .vbx, .vxd, etc.). And because ZIP files (describedin Chapter 2) can contain any of the aforementioned files, they're also susceptible.
Conventional wisdom holds that plain-text email messages, text files(.txt), image files (.jpg, .gif, .bmp, etc.), video clips (.mpg, .avi, etc.) andmost other types of files are benign in that they simply are not capable ofbeing virus carriers. However, things aren't always as they seem. Case inpoint: a new type of threat discovered in September 2004 involves certainJPG files and a flaw in Internet Explorer (and most other Microsoftproducts) that can exploited.[2] Fortunately, the bug has been fixed inService Pack 2, but it's not likely to be the last.
[2] For more information, search Google for Exploit-MS04-028 or Bloodhound.Exploit.13.
Actually, it is possible to embed small amounts of binary data into image files, which means,theoretically, that an image could contain a virus. However, such data would have to bemanually extracted before it could be executed; a virus embedded in an image file would neverbe able to spontaneously infect your system.
Don't ever open email attachments sent to you from people you don't know, especially if theyare Word documents or .exe files. If someone sends you an attachment and you wish to openit, scan it manually before opening it. Most antivirus software adds a context-menu item to all

files (see Section 4.3 in Chapter 4), allowing you to scan any given file by right-clicking on it andselecting Scan for Viruses (or something similar).
Note that there are some types of viruses that will hijack a user's address book (typically MSOutlook users only) and automatically send an infected email to everyone that person has everemailed. This means that you may get a virus in an email attachment from someone you know,but it will have a nonsensical filename and a generic, poorly written message body, like "I sendyou this file in order to have your advice." If you get an email from someone you know, and itdoesn't look like something that person would send you, it likely wasn't sent intentionally, andshould be deleted. The worst thing that could happen if you're wrong is that the sender will justhave to send it again.
If you're on a network, your computer is only as secure as the least secure computer on the network.If it's a home network, make sure everyone who uses machines on that network understands theprevious concepts. If it's a corporate network, there's no accounting for the stupidity of yourcoworkers, so you may choose to leave the auto-protect feature of antivirus software in place.
6.2.6. Check Your Drive for Errors with Chkdsk
The Chkdsk utility (chkdsk.exe, pronounced "check disk") is used to scan your hard disk for errorsand optionally fix any that are found. To run Chkdsk, open a Command Prompt window (cmd.exe) bygoing to Start Run and typing cmd, and then type chkdsk at the prompt and press Enter.
Chkdsk can also be run from either the Windows Recovery Console (discussedlater in this chapter) or the Safe Mode with Command Prompt (discussed inSection 2.2.6, respectively).
When you run Chkdsk without any options, you'll get a report that looks something like this:
The type of the file system is NTFS.Volume label is SHOEBOX.
WARNING! F parameter not specified.Running CHKDSK in read-only mode.
CHKDSK is verifying files (stage 1 of 3)...File verification completed.CHKDSK is verifying indexes (stage 2 of 3)...Index verification completed.CHKDSK is verifying security descriptors (stage 3 of 3)...Security descriptor verification completed.
87406395 KB total disk space. 26569944 KB in 42010 files. 23844 KB in 896 indexes. 0 KB in bad sectors. 114839 KB in use by the system. 65536 KB occupied by the log file.

60632232 KB available on disk.
4096 bytes in each allocation unit. 4351598 total allocation units on disk. 176942 allocation units available on disk.
If any errors are found, such errors will be listed in the report along with the statistics in the exampleabove. However, unlike the Scandisk utility found in some earlier versions of Windows, Chkdskdoesn't make any changes to your drive (repairs or otherwise) unless you specifically request them.As suggested by the "F parameter" warning in the report, you'll need to type chkdsk /f to effect any
necessary repairs on the drive.
The /f parameter is not available in the Windows Recovery Console; instead,you'll need to use the more powerful /r option to effect repairs, as described
below. The other exception when Chkdsk is run from the WRC is that it won'tusually scan for errors unless you include the /p option (which has no meaningoutside the WRC).
The following terms describe most of the different types of problems that Chkdsk might report:
Lost clusters
Lost clusters are pieces of data that are no longer associated with any existing files.
Bad sectors
Bad sectors are actually physical flaws on the disk surface. Use the /r option, below, to
attempt to recover data stored on bad sectors. Note that recovery of such data is notguaranteed (unless you have a backup somewhere). Typical symptoms of bad sectors includeseeing gibberish when you view the contents of a directory, or your computer crashing orfreezing every time you attempt to access a certain file.
Cross-linked files
If a single piece of data has been claimed by two or more files, those files are said to be cross-linked.
Invalid file dates or times
Chkdsk also scans for file dates and times that it considers "invalid," such as missing dates orthose before January 1st, 1980.

By default, Chkdsk will only scan the current drive (shown in the promptC:> for drive C:). To scan a different drive, include the drive letter as oneof the command-line options, like this: chkdsk d: /f.
The other important options available to Chkdsk are the following:
/r
The /r parameter is essentially the same as /f, except that it also scans for and recovers data
from bad sectors, as described earlier. When using Chkdsk from within the Windows RecoveryConsole, the /f option is not available, which means the /r option is your only choice if you
need to effect repairs.
/x
Include this option to force the volume to dismount before scanning the drive; otherwise,Windows will have to schedule the drive to be scanned during the next boot. This has the effectof temporarily disconnecting the drive from Explorer and all other programs, and closing anyopen files stored on the drive. The /x parameter implies the /f option; the /x option is not
available in the Windows Recovery Console.
Additionally, the /i and /c options, which are applicable only on NTFS volumes, are used to skip
certain checks in order to reduce the amount of time required to scan the disk. There is typically verylittle reason to use either of these options. Finally, you can run Chkdsk on a specific file (or group offiles), but only on FAT or FAT32 disks (not NTFS drives). This is used to check a single file or aspecific group of files for fragmentation, subsequently fixed by Disk Defragmenter (dfrg.msc).
To run Chkdsk from Explorer, right-click any drive, select Properties, choosethe Tools tab, and click Check Now. Here, the Automatically fix filesystem errors option corresponds to the /f parameter, and the Scan for andattempt recovery of bad sectors option corresponds to the /r parameter.
6.2.6.1 Special case: dirty drives and automatic Chkdsk
When a volume is marked "dirty," Windows scans it with Chkdsk automatically during the bootprocess. A drive can become dirty if it's in use when Windows crashes or if Chkdsk schedules a scanwhen you attempt to check a disk that is in use. A drive not considered dirty is marked "clean."
The Fsutil (Fsutil.exe) utility is used to manage dirty drives. Open a Command Prompt window(cmd.exe) and type fsutil (without any arguments) to display a list of commands that can be usedwith Fsutil. As you might expect, the dirty command is the one that concerns us here. Here's how it
works:

To see if drive G: is currently marked as dirty, type:
fsutil dirty query g:
To mark drive H: as dirty, so it will be scanned by Chkdsk the next time Windows starts, type:
fsutil dirty set h:
Note that Fsutil has been found to be unreliable when used on FAT or FAT32 drives, so you may onlywish to use it on NTFS disks.
Another utility, Chkntfs, is used to choose whether or not Windows runs Chkdsk automatically atWindows startup. (It is not used to check NTFS drives, as its name implies, however.) Here's how itworks:
To display a dirty/clean report about any drive (say, drive G:), type:
chkntfs g:
To exclude drive H: from being checked when Windows starts (which is not the default), type:
chkntfs /x h:
To include (un-exclude) drive H: in the drives to be checked when Windows starts, type:
chkntfs /c h:
To force Windows to check drive H: the next time Windows starts, type:
chkntfs /c h:fsutil dirty set h:
To include all drives on your system, thereby restoring the defaults, type:
chkntfs /d
Finally, when Windows detects a dirty drive, it starts a timed countdown (10 seconds by default),allowing you to skip Chkdsk by pressing a key. To change the duration of this countdown to, say, fiveseconds, type:
chkntfs /t:5

The Registry location of the timeout setting is stored in the AutoChkTimeOut
value in theHKEY_LOCAL_MACHINE\SYSTEM\CurrentControlSet\Control\SessionManager key.
You'll have to restart Windows for any of these changes to take effect.
6.2.7. Error Messages and Crashing Applications
There are basically two different types of error messages:
An error that tells you that you've done something wrong, such as trying to delete or rename anfile that is being used by an open application.
Obviously, the best way to alleviate these problems is to stop doing things wrong. But, ofcourse, what's "wrong" is often a matter of interpretation, so in this case, it typically makesmore sense to simply talk about making the resulting error messages less annoying (forexample, by turning off the sounds associated with them), or making them go away altogether(by making liberal use of the Don't show this again options that sometimes appear).
An error that is the result of an application crash, hardware error, or problem with Windows'sconfiguration.
Such errors are the subject of this section and many of the topics in this chapter. These errorscan range from a single error message appearing and then disappearing with no discernibleaftereffects, to the more severe Blue Screen of Death (BSoD) errors, discussed later in thischapter.
Now, it's important to realize that error messages of both types are essentially canned responses topredetermined criteria, and any given error message may be used in a variety of instances. Thismeans that error messages are typically verbose, yet rarely helpful. And software developers arerarely English majors.
For example, a message might report that a program has crashed or isn't able to load, but the actualproblem may be something completely unrelated to what the message is reporting. For example, youmay see a "file not found" error when trying to start an application, if, perhaps, one of the supportfiles has the incorrect file permissions (explained in Chapter 8).

Using Compatibility Mode
If you find that you're having trouble with a specific application, you can try running it inCompatibility Mode.
Right-click any .exe file (or a shortcut to any .exe file), select Properties, and choosethe Compatibility tab. The display settings allow you to limit the screen resolution andcolor depth, and disable visual themes, if they appear to be causing a problem.
However, the real meat is the Run this program in compatibility mode for list, fromwhich you can choose Windows 95, Windows 98/Me, Windows NT 4.0 w/SP5, or Windows2000. This is useful if the program you're trying to run was specifically designed for anearlier version of Windows, and either refuses to run on Windows XP or simply doesn'twork as well as it did in earlier versions of the operating system.
This also applies when installing applications. Some application installers are designedonly to allow installation on certain versions of Windows, even though the application,once installed, will actually work on Windows XP. Just enable Compatibility Mode for theinstaller executable (usually setup.exe or install.exe) to fool it into thinking you'reinstalling on an earlier version of Windows.
6.2.7.1 Error messages resulting from application crashes
Sometimes, a problem is severe enough to cause an application to close immediately. Fortunately,Windows XP isolates applications from one another, and from the operating system itself, whichmeans that a single application crash is much less likely to bring down the entire system.[3]
[3] This is one of the advantages of Windows XP/2000 over its DOS-based predecessors, such as Windows 9x/Me. See Section
2.1.1 for an option to isolate separate instances of Windows Explorer from one another.
When an application crashes, Windows will close it and then, by default, display an error messageexplaining what happened. Naturally, as you'd expect, this error message doesn't really explain whathappened, but rather only informs you that something happened.
Often, this type of error is accompanied by lists of numbers (accessible byclicking Details), although these numbers will never be the least bit helpful formost users. Now, don't be fooled: the Details view also often lists a specificexecutable, blaming it for the problem. However, this doesn't necessarily meanthat the program listed actually caused the problem; it only means that itcrashed as a result of the problem.
When you see one of these errors, the first thing to do is determine if any action is necessary. Youshould expect this to happen occasionally, due to the complexity of today's software, but if it happensmore frequently than, say, once a day, it could be the sign of a more serious problem. See if you canreliably reproduce the problem. If it seems to be application- or device-specific, where the sameaction in a program or the repeated use of a certain device causes the crash, then you've found the

culprit.
If the occurrences instead appear to be random and not associated with any piece of hardware orsoftware, there are some remaining possibilities. Errors in your system's memory and on your harddisk can cause these problems as well. To diagnose and repair problems on your hard disk, seeSection 6.2.6, earlier in this chapter, or see Section 6.3, later in this chapter, for help withmisbehaving devices.
Not only will Windows XP usually display an error message when a program crashes, but will ask youif you wish to report the problem to Microsoft. If you actually believe that Microsoft will use the datayou send them to fix bugs in Windows, I have some beachfront property in Wyoming to sell you.
Fortunately, not only can you turn off error reporting, you can disable the error messages entirely.Here's how to control this behavior:
Open Control Panel System, and choose the Advanced tab1.
Click Error Reporting, and select the Disable error reporting option.2.
To also turn off the error messages associated with application crashes, turn off the But notifyme when critical errors occur option.
If you turn off these error messages, and a program subsequently crashes, its window willsimply disappear. It may be a little disconcerting at first to see programs spontaneously vanish,but you'll quickly grow to appreciate the fact that Windows will no longer add insult to injury byhassling you with unnecessary error messages.
3.
Click OK and then OK again when you're done; the change will take effect immediately.4.
Details on Blue Screen of Death (BSoD) errors, as well as how to stop Windows from restartingimmediately after one occurs, can be found later in this chapter.
6.2.8. Closing Hung Applications
Not all programs that crash are closed automatically by Windows. Such applications are said to be"hung," "frozen," or "locked up."
When an application hangs, you have two choices. First, you can wait patiently to see if theapplication is simply busy and will eventually start responding again. This actually is the case moreoften than you'd expect, even on very fast computers. For example, if you're using a CD burner, theprogram may stop responding for up to a minute while it waits for your hardware to respond.
The other choice is to take matters into your own hands and close hung applications yourself. Thereare two ways to do this:
6.2.8.1 Solution 1: Close the program window
Although the program will not respond normally, Windows will typically still allow you to move or

close the window of a hung application. Just click the small [X] button on the application toolbar, orright-click the taskbar button corresponding to the hung application, and select Close.
6.2.8.2 Solution 2: Use the Windows Task Manager
The Windows Task Manager (taskmgr.exe) allows you to close any running process, which includesany visible application or even any program running invisibly in the background.
To start the Task Manager, right-click an empty area of the taskbar, and select Task Manager. Orpress Shift-Ctrl-ESC to open the Task Manager more quickly.[4]
[4] You can also press Ctrl-Alt-Del to open the Task Manager if you've enabled the Welcome screen, as described in Chapter 8.
If the Welcome screen is disabled, you can press Ctrl-Alt-Del to display the Windows Security dialog, at which point you can
click the Task Manager to launch it.
To close any program, choose the Processes tab, select the application in the list, and click EndProcess. To make it easier to find a particular program, click the Image Name column header tosort the programs alphabetically.
See the next section, "Programs Commonly Running in the Background," for a list of programs youshould not close with the Task Manager.
6.2.8.3 Special case: Change the "Not Responding" timeout
Windows XP waits a predetermined amount of time before it considers an application to be hung("Not Responding," in Microsoft vernacular). To change this timeout, follow these steps:
Open the Registry Editor (discussed in Chapter 3).a.
Expand the branches to HKEY_CURRENT_USER\Control Panel\Desktop.b.
Double-click the HungAppTimeout value in the right pane, and enter the number of millisecondsfor the timeout. For example, type 4000 to set the timeout to 4 seconds.
c.
Click OK, and then close the Registry Editor when you're done; you'll have to restart yourcomputer for the change to take effect.
d.
6.2.8.4 Special case: Choose how Windows closes hung applications when you shut
down
Windows XP attempts to close all running programs, services, and other background processes beforeit shuts down. If it encounters an application that does not appear to be responding, it will wait apredetermined amount of time, and then it will force the program to close. You can change thisbehavior with the following procedure:
1.
2.

Open the Registry Editor (discussed in Chapter 3).1.
Expand the branches to HKEY_CURRENT_USER\Control Panel\Desktop.2.
Double-click the AutoEndTasks value in the right pane, and enter 1 (one) to automatically end
tasks or 0 (zero) to prompt before ending tasks.
3.
Double-click the WaitToKillAppTimeout value, and enter the number of milliseconds for thetimeout. For example, type 7000 to set the timeout to 7 seconds. (This setting is also discussed
in Section 5.1.5.)
4.
Click OK, and then close the Registry Editor when you're done; you'll have to restart yourcomputer for the change to take effect.
5.
6.2.9. Programs Commonly Running in the Background
Windows is basically just a collection of components, and at any given time, some of thosecomponents may be loaded into memory and listed as running processes in Task Manager (discussedin the previous topic).
As you might expect, the programs required by one system won't necessarily be the same as thoserequired by another. Table 6-1 lists the those items commonly found on most Windows XP systems.
Table 6-1. Processes you should expect to find running on your system
Process Description
csrss.exe
Called the Client Server Runtime Process, csrss.exe is an essential Windowscomponent, as it handles the user-mode portion of the Win32 subsystem. It is alsoa common target for viruses, so if this process appears to be consuming a lot ofCPU cycles on your system, you should update and run your antivirus software.
explorer.exe
This is simply Windows Explorer, which is responsible for your Desktop and StartMenu. If this program crashes or is closed, Windows will usually start it againautomatically. If you see more than one instance of explorer.exe, it means thateach folder window is being launched as a separate process (see Section 2.1.1 fordetails).
lsass.exeThis is the Local Security Authority subsystem, responsible for authenticating userson your system.
rundll32.exeThis program, the purpose of which is to launch a function in a DLL as though itwere a separate program, is used for about a million different things in Windows.
services.exeThis is the Windows NT Service Control Manager; it works similarly to svchost.exe,below. The difference is that services.exe runs services that are processes, andsvchost.exe runs services that are DLLs.

Process Description
smss.exe
Called the "Windows NT Session Manager," smss.exe is an essential Windowscomponent. Among other things, it runs programs listed in theHKEY_LOCAL_MACHINE\SYSTEM\CurrentControlSet\Control\Session Manager
key in the Registry.
spoolsv.exe This handles printing and print spooling (queuing).
svchost.exeThe application responsible for launching most services (listed in services.msc). Seethe "What is Svchost" sidebar for details. See also services.exe, above.
System The System process, an essential Windows component.
System IdleProcess
The "idle" process is a 16k loop, used to occupy all CPU cycles not consumed byother running processes. The higher the number in the CPU column (99% being themaximum), the less your processor is being used by the currently runningprograms.
winlogon.exeThis process manages security-related user interactions, such as logon and logoffrequests, locking or unlocking the machine, changing the password, and the remoteregistry service.
wmiprvse.exe
This is responsible for WMI (Windows Management Instrumentation) support inWindows XP, also known as WBEM. Like csrss.exe, above, wmiprvse.exe is acommon target for viruses, so if this process appears to be consuming a lot of CPUcycles on your system, you should update and run your antivirus software.
Naturally, you shouldn't interfere with the components Windows requires tooperate while you're looking for errant programs or programs you can getalong without. And just because something isn't listed here doesn't mean itisn't required by your system, so use caution when ending a process with whichyou're not familiar.
What Is Svchost?
Svchost.exe and services.exe are the programs responsible for launching the processesassociated with the behind-the-scenes programs controlled by the Services window(services.msc).
A single instance of Svchost.exe may be responsible for a single service or several. Youshould never interfere with any instances of svchost.exe or services.exe you might seelisted in Task Manager. Instead, use the Services window (services.msc) to start or stopa service or choose whether or not a service is started automatically when Windowsstarts.
If you're using Windows XP Professional edition, you can use the TaskList utility(tasklist.exe) to see which services are handled by any given instance of svchost.exe.
smss.exe
Called the "Windows NT Session Manager," smss.exe is an essential Windowscomponent. Among other things, it runs programs listed in theHKEY_LOCAL_MACHINE\SYSTEM\CurrentControlSet\Control\Session Manager
key in the Registry.
spoolsv.exe This handles printing and print spooling (queuing).
svchost.exeThe application responsible for launching most services (listed in services.msc). Seethe "What is Svchost" sidebar for details. See also services.exe, above.
System The System process, an essential Windows component.
System IdleProcess
The "idle" process is a 16k loop, used to occupy all CPU cycles not consumed byother running processes. The higher the number in the CPU column (99% being themaximum), the less your processor is being used by the currently runningprograms.
winlogon.exeThis process manages security-related user interactions, such as logon and logoffrequests, locking or unlocking the machine, changing the password, and the remoteregistry service.
wmiprvse.exe
This is responsible for WMI (Windows Management Instrumentation) support inWindows XP, also known as WBEM. Like csrss.exe, above, wmiprvse.exe is acommon target for viruses, so if this process appears to be consuming a lot of CPUcycles on your system, you should update and run your antivirus software.
Naturally, you shouldn't interfere with the components Windows requires tooperate while you're looking for errant programs or programs you can getalong without. And just because something isn't listed here doesn't mean itisn't required by your system, so use caution when ending a process with whichyou're not familiar.

What Is Svchost?
Svchost.exe and services.exe are the programs responsible for launching the processesassociated with the behind-the-scenes programs controlled by the Services window(services.msc).
A single instance of Svchost.exe may be responsible for a single service or several. Youshould never interfere with any instances of svchost.exe or services.exe you might seelisted in Task Manager. Instead, use the Services window (services.msc) to start or stopa service or choose whether or not a service is started automatically when Windowsstarts.
If you're using Windows XP Professional edition, you can use the TaskList utility(tasklist.exe) to see which services are handled by any given instance of svchost.exe.Just open a Command Prompt window (cmd.exe) and type:
tasklist /svc
Then, match up the numbers in the PID column of TaskList's output with those in thePID column of Task Manager's Processes tab.
If you're not familiar with a particular program that is running, there's a relatively easy way to learnmore about it. First, right-click the associated .exe file (easily located with the Search tool), andselect Properties. Choose the Version tab, and look under the various resources listed in thisdialog; typically, the most useful information will be listed under the Company and Product Nameentries. If no Version tab is present, it means the file has no version information, and you'll have touse other means to find out what the file is for. For example, if the file is located in a particularapplication directory, odds are it belongs to that application. Often, you can learn quite a bit bysimply searching the Web for the name of the file.
6.2.10. What to Do when Windows Won't Shut Down
Most of the problems that prevent Windows from shutting down properly have to do with powermanagement and faulty drivers, although there are plenty of other causes to consider. The followingsolutions should help fix most shutdown problems.
6.2.10.1 Part 1: Power management issues
Start by checking out the solutions in Section 5.1.5, which explain the power management settingsthat can affect shutdown performance, as well as the problems associated with such settings.
Power management settings in Windows XP can be set by going to Control Panel PowerOptions. For example, if there's a tab named APM, it means Windows correctly identifies yourmotherboard's APM (Advanced Power Management) support. Choose the APM tab and make sure the

Enable Advanced Power Management Support option is enabled.
If the aforementioned APM tab is not present, though, you'll need to check your computer's BIOSsetup (see Appendix B) and make sure that APM (Advanced Power Management) or ACPI (AdvancedConfiguration and Power Interface) support is enabled. You'll also need to make sure you're using thecorrect HAL (Hardware Abstraction Layer) for your computer.
Next, check these two power-management-related settings in the Registry:
Open the Registry Editor (discussed in Chapter 3).1.
Expand the branches toHKEY_CURRENT_USER\Software\Microsoft\Windows\CurrentVersion\Explorer.
2.
Double-click the CleanShutdown value. The default is 0 (zero) for this value, but you canchange it to 1 (one) if you're experiencing shutdown problems, such as your system restarting
instead of shutting down.
3.
Click OK, and then expand the branches toHKEY_LOCAL_MACHINE\SOFTWARE\Microsoft\Windows NT\CurrentVersion\Winlogon. (Notethe use of the Windows NT branch here, as opposed to the more common Windows branch).
4.
Double-click the PowerdownAfterShutdown value in the right pane, and enter 1 (one) to haveWindows power down your computer or 0 (zero) to disable this feature.
5.
Click OK, and then close the Registry Editor when you're done; you'll have to restart yourcomputer for the change to take effect.
6.
Finally, the following steps have been known to work on some computers:
Open the Device Manager (devmgmt.msc).1.
Select Show Hidden Devices from the View menu. (See "Show Hidden Devices in DeviceManager," later in this chapter, for details.)
2.
If an entry named APM/NT Legacy Node appears in the System devices category, and
there's a red over its icon, right-click it and select Enable. (If the entry isn't there, then this
solution doesn't apply to you.)
3.
Close the Device Manager when you're done.4.
6.2.10.2 Part 2: Look for shutdown scripts
If you have a shutdown script configured, it may be preventing Windows from shutting downproperly.
Open the Group Policy window (gpedit.msc).1.
2.

1.
Expand the branches to Computer Configuration\Windows Settings\Scripts(Startup/Shutdown).
2.
Double-click the Shutdown entry in the right-hand pane to show the Shutdown Properties dialog.
If there are any entries in the list, make a note of them (in case you need to re-establish them),and then remove them.
3.
Click OK and close the Group Policy window when you're done.4.
6.2.10.3 Part 3: Virtual memory problems
There's a setting in Windows XP that forces the swapfile (paging file) to be cleared when you shutdown, which can cause problems on some systems. To disable this, try the following:
Open the Group Policy window (gpedit.msc).1.
Expand the branches to Computer Configuration\Windows Settings\SecuritySettings\Local Policies\Security Options.
2.
Double-click the Shutdown: Clear virtual memory page entry in the right-hand pane, and
select Disabled.
3.
Click OK and close the Group Policy window when you're done.4.
See Section 5.2.3 for more information on virtual memory and your computer's swapfile.
6.2.10.4 Part 4: Other causes
Some other things that can cause Windows XP shutdown problems:
Antivirus software has been known to prevent Windows from shutting down; see Section 6.2.4,earlier in this chapter, for more information.
If shutting down results in a Blue Screen of Death (BSoD), see the discussion of the Section6.2.11 later in this chapter.
See Section 6.2.8, earlier in this chapter, for solutions concerning the way Windows XPautomatically shuts down running programs and processes during shut down.
Make sure you have the latest XP updates from Microsoft; see Section 6.2.1, earlier in thischapter, for details.
If you have a desktop computer with at least one network card, try moving the card to adifferent slot.
Your power supply could be to blame; see the discussion of power supplies later in this chapterfor tips.

If Windows is allowed to shut down your USB controller to save power, it may prevent Windowsfrom shutting down. See Section 6.4.6, later in this chapter, for details.
Here are some examples of popular products whose early drivers were notorious for causingshutdown problems, fixed, in all cases, by updates available at the manufacturers' web sites:
Adaptec/Roxio Easy CD Creator
http://www.roxio.com
nVidia-based video cards (nVidia Driver Helper Service)
http://www.nvidia.com
Sound Blaster Live! (Devldr32.exe)
http://www.creaf.com
6.2.11. Blue Screen of Death
The Blue Screen of Death (BSoD) is aptly named. It's blue, it fills the screen, and it means death forwhatever you were working on before it appeared. Microsoft refers to BSoD errors as "StopMessages," a euphemism for the types of crashes that are serious enough to bring down the entiresystem.
A single error is no cause for concern. Only if an error happens a few times, orrepeatedly, do you need to pursue any of the solutions listed here.
By default, Windows restarts your computer as soon as the BSoD appears, leaving almost no time toread the error message before it vanishes. To change this, go to Control Panel System Advanced tab, click Settings in the Startup and Recovery section, and turn off theAutomatically restart option. (See below for more information on the Write debugginginformation options.)
However, turning off the Automatically restart option may not really be necessary. Every time youget a BSoD, Windows logs the error, although not in the standard Event Log (eventvwr.msc) as youmight expect. Instead, a single .wdl (WatchDog Log) file is created in the\Windows\LogFiles\Watchdog folder for each crash. Just open the most recently dated file in yourfavorite text editor (or Notepad) to view details of the crash and some related information.
In addition to the .wdl file created for each crash, a .dmp file is created in the \Windows\Minidump

folder. These files are known as memory dumps and contain some (or all) of the information in yourcomputer's memory when the crash occurred. Typically only developers will be able to make use ofthis information, but it might be worth investigating if you're trying to solve a problem. To read the.dmp files, open a Command Prompt window (cmd.exe) and type dumpchk filename, where
filename is the full path and filename of the .dmp file. To control how much information is written to
the .dmp files, or to disable .dmp file creation altogether, return to the aforementioned Startup andRecovery Settings window.
6.2.11.1 Alphabetical List of BSoD Errors
There are a whole bunch of possible BSoD messages, probably more than 100. However, only about20 happen frequently enough that they might imply that an actual problem exists. More than likely,you've seen at least one of the following stop messages on your own system:
Attempted Write To Readonly Memory (stop code 0X000000BE)
A faulty driver or service is typically responsible for this error, as is outdated firmware. If thename of a file or service is specified, try uninstalling the software (or rolling back the driver ifit's an upgrade).
Bad Pool Caller (stop code 0X000000C2)
Causes and remedies are similar to "Attempted Write To Readonly Memory," above.Additionally, this error might also be the result of a defective hardware device.
If you encounter this message while upgrading to Windows XP (see Chapter 1), it may meanthat one or more devices in your system are not compatible with XP. Try disconnectingunnecessary devices, or at least look for updated drivers and firmware. Also, disable anyantivirus software you may have running.
Data Bus Error (stop code 0X0000002E)
This can be caused by defective memory (see Section 6.4 later in this chapter), includingsystem RAM, the Level 2 cache, or even the memory on your video card. Other causes of thiserror include serious hard disk corruption, buggy hardware drivers, or physical damage to themotherboard.
Driver IRQL Not Less Or Equal (stop code 0X000000D1)
Drivers programmed to access improper hardware addresses typically cause this error. Causesand remedies are similar to "Attempted Write To Readonly Memory," earlier.

Driver Power State Failure (stop code 0X0000009F)
This error is caused by an incompatibility between your computer's power management andone or more installed drivers or services, typically when the computer enters the "hibernate"state (discussed at length in Chapter 5). If the name of a file or service is specified, tryuninstalling the software (or rolling back the driver if it's an upgrade). Or try disabling Windowssupport for power management.
Driver Unloaded Without Cancelling Pending Operations (stop code 0X000000CE)
Causes and remedies are similar to "Attempted Write To Readonly Memory," earlier in thissection.
Driver Used Excessive PTEs (stop code 0X000000D8)
Causes and remedies are similar to "No More System PTEs," later in this section.
Hardware Interrupt Storm (stop code 0X000000F2)
This error occurs when a hardware device (such as a USB or SCSI controller) fails to release anIRQ, a condition typically caused by a buggy driver or firmware. This error can also appear iftwo devices are incorrectly assigned the same IRQ (discussed later in this chapter).
Inaccessible Boot Device (stop code 0X0000007B)
You may see this error during Windows startup if Windows cannot read data from the systemor boot partitions (described in Chapter 1). Faulty disk controller drivers are often to blame,but this problem can also be caused by hard disk errors, or even a corrupted boot.ini file (alsodescribed in Chapter 1).
If all is well with your drivers and your drive and you haven't been messing with the boot.ini file(such as while installing multiple operating systems), check your system BIOS settings(described in Appendix B).
If you encounter this message while upgrading to Windows XP (see Chapter 1), it may meanthat one or more devices in your system are not compatible with XP. Try disconnectingunnecessary devices, or at least look for updated drivers and firmware. Also, disable anyantivirus software you may have running.
Kernel Data Inpage Error (stop code 0X0000007A)
This error implies a problem with virtual memory (discussed in Chapter 5), often that Windowswasn't able to read data from or write data to the swapfile. Possible causes include bad sectors,a virus, improper SCSI termination, bad memory, or physical damage to the motherboard.

Kernel Stack Inpage Error (stop code 0X00000077)
Causes and remedies are similar to "Kernel Data Inpage Error," earlier in this section.
Kmode Exception Not Handled (stop code 0X0000001E)
A faulty driver or service is sometimes responsible for this error, as are memory and IRQconflicts and faulty firmware. If the name of a file or service is specified, try uninstalling thesoftware (or rolling back the driver if it's an upgrade).
If the Win32k.sys file is mentioned in the message, the cause may be third-party remotecontrol software (discussed in Chapter 7).
This error can also be caused if you run out of disk space while installing an application or ifyou run out of memory while using a buggy application with a memory leak. Developers maywish to use the poolmon.exe utility to help isolate the problem, as described in MicrosoftKnowledge Base article Q177415.
Mismatched Hal (stop code 0X00000079)
The currently installed Hardware Abstraction Layer (HAL) must match the type of computer onwhich Windows XP is installed, or you may see this error. For example, if you use a HALintended for a dual-processor system on a single-processor motherboard, Windows may notstart. The best way to correct problems with the HAL is to reinstall Windows XP.
This error can also be caused by out-of-date Ntoskrnl.exe or Hal.dll files, so if you've recentlyattempted to repair these files on your system, look for backups of the original versions.
No More System PTEs (stop code 0X0000003F)
Page Table Entries (PTEs) are used to map RAM as it is divided into page frames by the VirtualMemory Manager (VMM). This error usually means that Windows has run out of PTEs.
Aside from the usual assortment of faulty drivers and services that can cause all sorts ofproblems, this error can also occur if you're using multiple monitors.
If you find that you're experiencing this error often, you can increase Windows's allocation ofPTEs with this procedure:
Open the Registry Editor (discussed in Chapter 3).a.
Expand the Registry branches toHKEY_LOCAL_MACHINE\SYSTEM\CurrentControlSet\Control\Session Manager\MemoryManagement
b.
c.

b.
Double-click the PagedPoolSize value, enter 0 for its value data, and click OK.c.
Next, double-click the SystemPages value. If you're using multiple monitors, enter a valueof 36000 here. Otherwise, enter 40000 if you have 128MB of system RAM or less, or110000 if you have more than 128MB of RAM.
d.
Click OK and then close the Registry Editor when you're done. The change will take effectwhen you restart Windows.
e.
NTFS File System (stop code 0X00000024)
This is caused by an problem reported by Ntfs.sys, the driver responsible for reading andwriting NTFS volumes (see Chapter 5). If you're using the FAT32 filesystem, you may see asimilar message (with stop code 0X00000023).
Causes include a faulty IDE or SCSI controller, improper SCSI termination, an overlyaggressive virus scanner, or errors on the disk (try testing it with Chkdsk). See the discussionof SCSI controllers in Section 6.4, later in this chapter.
To investigate further, open the Event Viewer (eventvwr.msc) and look for error messagesrelated to SCSI or FASTFAT (in the System category), or Autochk (in the Applicationcategory).
Page Fault In Nonpaged Area (stop code 0X00000050)
Causes and remedies are similar to "Attempted Write To Readonly Memory," earlier in thissection.
Status Image Checksum Mismatch (stop code 0Xc0000221)
Possible causes for this error include a damaged swapfile (see the discussion of virtual memoryin Chapter 5) or a corrupted driver. See "Attempted Write To Readonly Memory," earlier in thissection, for additional causes and remedies.
Status System Process Terminated (stop code 0Xc000021A)
This error indicates a problem with either Winlogon.exe or the Client Server RuntimeSubsystem (CSRSS). It can also be caused if a user with administrator privileges has modifiedthe permissions (see Chapter 8) of certain system files such that Windows cannot read them.In order to fix the problem, you'll have to install a second copy of Windows XP (see "Setting upa Dual-Boot System" in Chapter 1) and then repair the file permissions from there.
Thread Stuck In Device Driver (stop code 0X000000EA)

Also known as the infamous "infinite loop" problem, this nasty bug has about a hundreddifferent causes. What's actually happening is that your video driver has essentially entered aninfinite loop because your video adapter has locked up. Microsoft has posted a solution on theirweb site that involves disabling certain aspects of video acceleration, but I've neverencountered an instance where this worked. Instead, try the following:
Try upgrading your computer's power supply. A power supply of poor quality orinsufficient wattage will be unable to provide adequate power to all your computer'scomponents and may result in a "brownout" of sorts in your system. Note that newer,more power-hungry video adapters are more susceptible to this problem. See thediscussions of power supplies later in this chapter.
Make sure you have the latest driver for your video card. If you already have the latestdriver, try "rolling back" to an older driver to see if that solves the problem.
Make sure you have the latest driver for your sound card, if applicable. Also, make sureyour sound card is not in a slot immediately adjacent to your video card.
Make sure your video card is properly seated in its AGP or PCI slot. If it's a PCI card, trymoving it to a different slot.
Inspect your video card and motherboard for physical damage.
Try messing with some of your system's BIOS settings, especially those concerning yourAGP slot or video subsystem, as described in Appendix B. For example, if your AGP slot isset to 2x mode and your video adapter only supports 1x AGP mode, then you'll want tochange the setting accordingly.
Make sure your computer and your video card are adequately cooled. Overheating cancause the chipset on your video card to lock up.
Check with the manufacturer of your motherboard for newer drivers for yourmotherboard chipset.
For example, the "infinite loop" problem is common among motherboards with VIAchipsets and nVidia-based video cards. Visit the VIA web site (http://www.viaarena.com/?PageID=64) for updated drivers and additional solutions.
Try replacing your system's driver for the Processor-to-AGP Controller. Open DeviceManager (devmgmt.msc), expand the System devices branch, and double-click theentry corresponding to your Processor-to-AGP Controller. Choose the Driver tab, andclick Update Driver to choose a new driver. Unless you can get a newer driver from themanufacturer of your motherboard chipset, try installing the generic "PCI standard PCI-to-PCI bridge" driver shown in the Hardware Update Wizard.
If your motherboard has an on-board Ethernet adapter, try disabling the "PXEResume/Remote Wake Up" option in your system BIOS (see Appendix B).
If you're using a dual-processor motherboard, Windows XP is probably loading a HAL(Hardware Abstraction Layer) for a MPS (Multiple Processor System). Such HALs supportthe I/O APIC (Advanced Programmable Interrupt Controller), a method of accommodatingmore than 15 IRQs in a single system. Unfortunately, APIC can cause problems with AGP-

based video cards. Try changing your HAL to "Standard PC" to see if that solves theproblem.
Unexpected Kernel Mode Trap (stop code 0X0000007F)
Typical causes of this error include defective memory, physical damage to the motherboard,and excessive processor heat due to overclocking (running the CPU faster than its specifiedclock speed).
Unmountable Boot Volume (stop code 0X000000ED)
This means that Windows was unable to mount the boot volume, which, if you have more thanone drive, is the drive containing Windows (see Chapter 1 for more information on the boot andsystem volumes). This can be caused by using the wrong cable with a high-throughput IDEcontroller (more than 33 MB/second); try an 80-pin cable instead of the standard 40-pin cable.See also "Inaccessible Boot Device," earlier in this section.

6.3. Dealing with Drivers and Other Tales of HardwareTroubleshooting
A driver is the software that allows your computerand all of its applicationsto work with a hardwaredevice, such as a printer or video adapter. That way, for example, each word processor doesn't needto be preprogrammed with the details of all available printers (like in the early days of PCs). Instead,Windows manages a central database of drivers, silently directing the communication between allyour applications and whatever drivers are required to complete the task at hand.
Let's get one thing straight before we begin: if it ain't broke, don't fix it. Manyproblems are actually caused by people looking for problems to solve. Forexample, installing a new driver just for the sake of having the "latest andgreatest" version on your system may introduce new bugs or uncover somebizarre incompatibility. This doesn't mean that updating your drivers isn't agood idea, but you'll typically only want to do this if something isn't working orperforming at its best.
Problems arise when a driver is buggy or outdated, or when one of the files that comprise a driver ismissing or corrupted. Outdated drivers designed either for a previous version of Windows or aprevious version of the device can create problems. Additionally, manufacturers must continuallyupdate their drivers to fix incompatibilities and bugs that surface after the product is released. It'susually a good idea to make sure you have the latest drivers installed in your system whentroubleshooting a problem. Furthermore, newer drivers sometimes offer improved performance,added features and settings, better stability and reliability, and better compatibility with othersoftware and drivers installed in your system.
The other thing to be aware of is that some drivers may just not be the correct ones for your system.For example, when installing Windows, the setup routine may have incorrectly detected your videocard or monitor and hence installed the wrong driver (or even a generic driver). A common symptomof this is if Windows does not allow you to display as many colors or use as high a resolution as thecard supports. Make sure that Device Manager (devmgmt.msc) lists the actual devices, by name,that you have installed in your system.
Device drivers worth investigating include those for your video card, monitor, sound card, modem,printer, network adapter, scanner, SCSI controller, camera, backup device, and any other devicesyou may have. If you're not sure of the exact manufacturer or model number of a device installedinside your computer, take off the cover of your computer and look, or refer to the invoice ordocumentation that came with your system. However, most hard disks, floppy drives, CD-ROMdrives, keyboards, mice, power supplies, memory, and CPU chips don't need special drivers (exceptin special circumstances).
6.3.1. Looking for a Driver

Windows XP comes with a huge assortment of drivers for hardware available at the time of itsrelease, but as time passes, more third-party devices are released, requiring drivers of their own.Most hardware comes packaged with instructions and a driver disk; if in doubt, read the manual. If,on the other hand, you acquired a peripheral without the driver or manual, both of these are almostalways available from the manufacturer's web site.
When you connect a device for which Windows has a driver, Windows will automatically install thedriver when it first detects the device. However, you may wish to find out if Windows comes with adriver for a specific piece of hardware before you try to install it (or even before you purchase it).Here's how to do it:
Start the Add Hardware Wizard by going to Control Panel Add Hardware, and click Nexton the first page.
1.
The wizard begins by scanning your system for any newly attached Plug and Play devices. If oneor more devices are found, the appropriate drivers are located and installed. This same processhappens every time Windows is started. If no new devices are found, you'll be asked if thedevice has been connected to the system. If you choose No, the wizard quits.
2.
The next step, assuming you selected Yes on the previous page, displays a list of all of yourexisting devices. If you select one of the devices and click Next, the wizard will quit. So, scrollto the bottom of the list, select Add a new hardware device, and click Next.
3.
Your next choice is between having Windows search for and install your new hardware or havingWindows present a list from which you can manually select a driver. Only choose the firstoption, Search for and install . . . , if you don't already have a driver. Otherwise, choose thesecond option, Install the hardware . . . , and click Next.
4.
Chose the category of the device, or just select Show All Devices if you're feeling lazy, andclick Next.
5.
This next page, shown in Figure 6-3, is essentially a list of every hardware device driverincluded with Windows XP. Choose a manufacturer from the list on the left, and then the specificmodel number from the list on the right.
6.
Figure 6-3. Use the Add Hardware Wizard to list the devices thatWindows supports out of the box

If the driver you seek is not listed and you don't see a driver for a similar device that may be used,you'll have to obtain a driver from the manufacturer.
If you find yourself in the unenviable position of searching for support for anunsupported product, you may find help at http://driverguide.com. In additionto drivers for older products, you'll find tips from others who have tried(successfully or otherwise) to get the same hardware working with WindowsXP. You can also often find older versions of drivers and other software athttp://oldversion.comhandy if the latest release of a program causes moreproblems than it solves.
6.3.2. Updating and Verifying Drivers
Assuming you've already installed a driver for a given device, the next hurdle is to see how recent itis and, if necessary, to update it. Although many drivers will never need to be updated manually, youmay need to do just that to solve some hardware problems.
Video drivers are notoriously buggy, especially the ones that come with newlyreleased video cards. (Drivers are often rushed to completion to coincide withthe release of a video adapter.) If you're experiencing problems with windowsnot updating their displays properly, frequent system crashes, odd mouse-cursor behavior, or any number of other seemingly unexplainable glitches, abuggy video driver is a likely culprit. In addition, video drivers are very complexand can always benefit from additional tweaking.
If a specific piece of hardware is already installed and the driver has already been chosen, there aretwo ways to figure out if the correct driver is being used. First of all, the name used to identify thedevice in Device Manager (devmgmt.msc) is a good clue. For example, if under the Display Adapter

category, your video card is listed as an "NVIDIA GeForce3 Ti 200," then that's the driver that's beingused, even if that's not really the video card you have physically installed.
However, there's more to the driver than just the name; to find the date and revision number of thedriver, double-click on the device in Device Manager and choose the Driver tab.
Although Windows does come with plenty of drivers, very few of them are actually written byMicrosoft, even though "Microsoft" may be listed in the Driver Provider field. Instead, most aresimply submitted by their respective manufacturers for inclusion in the Windows distribution.
You can usually assume the following about the drivers included on the Windows CD (versus thosethat come with your hardware devices):
The drivers included with Windows are usually fairly stable.
The dates are usually consistent with the release of Windows, not with the historical release ofthe manufacturers' drivers.
The version numbers are usually consistent with the version numbers of the manufacturers'drivers.
Any special features or extras present in the manufacturers' version of the drivers have beenleft out. For example, many aftermarket display drivers include better performance, support formore colors and higher resolutions, and other goodies.
An easy (but certainly not foolproof) way to tell if you're using the driver that came with Windows isto look at the driver dateit should be July 1, 2002 (if you're using the initial release of Windows XP).If not, it probably came from another source, such as a driver disk, from the Web, from WindowsUpdate, or from a previous installation of Windows. Drivers with newer dates are usuallybut notalwaysmore recent, but the date alone is not a reliable indicator.
More importantly, the Driver Version shows the official revision number of the driver; you can alsoclick Driver Details to see the versions of the individual components of the driver.
To change the driver for the selected device, either to install a newer version or to replace it with adriver for a different device, click Update Driver. This opens the Hardware Update Wizard, whichallows you to specify the location of the new driver to install. However, you may wish to consult thedocumentation (if any) that comes with your device, because not all drivers can be installed in thisway.
6.3.2.1 Watch out for driver installer inconsistencies
Note that some drivers have their own installation programs, to be used either before or after thedevice has been attached, while other drivers require that they be installed at the moment thehardware is automatically detected by Windows. If the driver has no install program and you aren'tasked to locate the driver when you first start Windows, you can almost always update the driver byusing the Update Driver feature explained here.
If in doubt, check the driver's documentation (usually in a readme.txt file or on the manufacturer'sweb site). Not many manufacturers follow the standards closely, which can be very frustrating. As alast resort, try removing the driver from Device Manager, which will allow the hardware to be re-

detected and its driver reinstalled the next time Windows is started.
6.3.2.2 The importance of .inf files
A common scenario involves downloading a zipped driver from the Web, unzipping it to a separatefolder on your hard disk, and then using the Hardware Update Wizard to instruct Windows to load thedriver from the folder. Windows will accept a folder containing any valid driver, which is detected bythe presence of an appropriate .inf file. Actually, all the drivers already installed on your system havea corresponding .inf file in the \Windows\INF folder.
The .inf file is the heart of each Windows driver. Sometimes it contains all the necessary deviceinformation (most modems only require this single file), and other times it contains information andlinks to other files (.dll and .vxd files) that do the actual work of the driver. Unfortunately, eachdevice is differentdon't expect a set of tricks that worked for one driver to necessarily work foranother.
Supporting Unsupported Hardware
You may be disappointed to discover either that a manufacturer of a discontinuedproduct has stopped supporting the product or has just gone out of business. If thishappens, you may be out of luck and forced to replace the device if it isn't supported inyour version of Windows; see Chapter 5 for more information on upgrading your system.
There is a way out, however. Many productssuch as video cards, modems, and SCSIcontrollersuse similar components that are widely supported by the industry. Forexample, many video cards use controller chips manufactured by a single company; bylooking at your video card, you should be able to determine which variety of chipset ituses (look for the brand and model number). Even if the manufacturer of your video cardhas gone out of business, there may be other video cards that use the same chipset and,therefore, may use the same driver.
Note that an indicator of a good manufacturer is one that makes drivers freely availablefor all their products, even discontinued ones. If they are supporting yesterday'sproducts today, they'll be likely supporting your product tomorrow.
6.3.3. Handling Misbehaving Drivers
Never install or upgrade more than one new device at once. By installing one driver at a time, youcan easily spot any potential new problems, as well as recognize when an existing problem has beensolved. Wait for Windows to restart (if applicable) and try starting an application or two. If you installseveral new drivers at once, you'll have a hard time trying to find where you went wrong.
When you install a driver, Windows first copies the various driver files to a handful of differentfolders. The Registry is then updated with the driver filenames, the specific resources used by thedevice (interrupt request lines [IRQs], I/O addresses, etc.), and any special hardware-specific

settings. One problem, typically common with older devices, is that the special settings can beincorrect, and no amount of fiddling with them can straighten out a misbehaving device.
This often happens with network cards and SCSI adapters; either the device doesn't function at all,Windows doesn't recognize the device's resources correctly, or an attempt to use the device hangsthe system. The solution is simply to reinstall the driver. The best way to go about this is to locateand select the device in Device Manager (devmgmt.msc) and click Remove. Then close DeviceManager and restart your computer.
The next time Windows starts, it will redetect the hardware and reinstall the corresponding driver,the purpose of which becomes evident when you discover that the settings for the driver have beenreverted to their defaults.
More drastic measures include removing all the actual driver files from the hard disk before allowingWindows to install new ones. Because all drivers are different, however, there are no standard files toremove. More conscientious developers will either provide an uninstall utility for their drivers, or atleast provide a list of the supported files so you can find them easily. If in doubt, visit themanufacturer's web site and wade through the miles of FAQs, looking for some assistance.
My last piece of advice is to put a copy of the latest drivers for all of your devices on a recordable CDor other removable drive for easy access the next time you need them. You'll be glad you did whenyou realize that you can't download the right driver for your network adapter if said network adapterhas stopped working and is responsible for your Internet connection.
6.3.4. Interpreting Device Manager Errors
From time to time, Device Manager will report a problem with one of your devices by marking it with
a yellow exclamation mark (!) or a red . Double-click the device name, and you'll likely see one of
the following errors (based on Microsoft Knowledge Base Article 310123):
This device is not configured correctly. (Code 1)
This is a driver problem; click Update Driver to install a new driver.
Windows could not load the driver for this device . . . (Code 2)
Again, try installing a new driver. If that doesn't work, contact the manufacturer of yourmotherboard for a BIOS update.
The driver for this device may be bad, or your system may be running low on memory or otherresources. (Code 3)
Try removing the device (right-click and select Uninstall), restarting Windows, and thenreinstalling the driver.

This device is not working properly because one of its drivers may be bad, or your registry may bebad. (Code 4)
Of course, try updating the drivers. (Laughably, Microsoft suggests running Scanregw.exe, aprogram designed for Windows Me and not included in Windows XP, to fix this error.) If a newdriver doesn't fix the problem, try the solution for Code 3, above.
The driver for this device requested a resource that Windows does not know how to handle. (Code 5)
Remove the device (right-click and select Uninstall) and then run the Add New Hardwarewizard from Control Panel.
Another device is using the resources this device needs. (Code 6)
You'll see this error if you've installed a device that doesn't support Plug and Play. See"Resolving Hardware Conflicts" later in this Chapter.
The drivers for this device need to be reinstalled. (Code 7)
Click Update Driver to reinstall the drivers. Duh.
This device is not working properly because Windows cannot load . . . (Code 8)
This may indicate a missing or damaged .inf file, described in "Updating and Verifying Drivers"earlier in this chapter, which may make it difficult to reinstall the driver for this device. If theReinstall Device button doesn't work (or isn't there) and installing drivers provided by themanufacturer fails, you may have to run Windows setup again.
This device is not working properly because the BIOS in your computer is reporting the resources forthe device incorrectly. (Code 9)
This indicates a problem with your motherboard's support for ACPI power management(discussed in Chapter 5). Contact the manufacturer of your motherboard for a BIOS update.Next, try removing the device (right-click and select Uninstall) and then restarting Windows.
This device is either not present, not working properly, or does not have all the drivers installed.(Code 10)
If the device is a PCI or ISA card inserted in your computer, make sure it's firmly seated in itsslot. Otherwise, make sure it's plugged in and powered up. If it's an external device, try turning

it off and then on again. Then, of course, try removing the drivers (right-click and selectUninstall) and then run the Add New Hardware wizard from Control Panel.
Windows stopped responding while attempting to start this device, and therefore will never attemptto start this device again. (Code 11)
Windows may disable devices that prevent it from loading. To re-enable this device, right-clickthe device name and select Uninstall, and then restart Windows.
This device cannot find any free {type} resources to use. (Code 12)
See the solution for error code 6.
This device is either not present, not working properly, or does not have all the drivers installed.(Code 13)
See the solution for error code 10.
This device cannot work properly until you restart your computer. (Code 14)
Do I need to tell you what to do here?
This device is causing a resource conflict. (Code 15)
See the solution for error code 10.
Windows could not identify all the resources this device uses. (Code 16)
Right-click the device, select Properties, and then choose the Resources tab. You may haveto fill in some information provided by your hardware documentation. See also the solution forerror code 10.
The driver information file {name} is telling this child device to use a resource that the parent devicedoes not have or recognize. (Code 17)
You'll need to obtain and install newer drivers for this device.
The drivers for this device need to be reinstalled. (Code 18)

See the solution for error code 7.
Your registry may be bad. (Code 19)
This extremely helpful message will appear if there is any corrupt data in your Registrypertaining to this device. Note that if you restart Windows, it may revert to an earlier copy ofyour Registry, which you may or may not want to happen. See Chapter 3 for help with backingup your Registry.
Windows could not load one of the drivers for this device. (Code 20)
The driver you're using is likely designed for an earlier version of Windows; contact themanufacturer of the device for a driver written for Windows XP.
Windows is removing this device. (Code 21)
This temporary message will appear immediately after you've attempted to uninstall a device.Close the Properties window, wait a minute or two, and then try again. If it doesn't go away,try restarting Windows.
This device is disabled. (Code 22, version 1)
This means you've manually disabled the device by right-clicking and selecting Disable. ClickEnable Device to re-enable the device. If you can't enable the device, try removing it (right-click and select Uninstall) and then restarting Windows
This device is not started. (Code 22, version 2)
Some devices can be stopped, either manually or via its drivers. Click Start Device to re-enable the device. If this persists, look for updated drivers and see if the device has any powermanagement features you can disable.
This display adapter is functioning correctly. (Code 23)
Despite the fact that the message states the device is functioning correctly, there's obviously aproblem. This typically occurs in systems with two display adapters (video cards), wherein onedoesn't fully support being installed in a system with two display adapters. Try updating thedrivers for both cards and look for an updated BIOS for either card.
This device is either not present, not working properly, or does not have all the drivers installed.

(Code 24)
See the solution for error code 10.
Windows is in the process of setting up this device. (Code 25 and Code 26)
You'll see this if Windows is waiting until the next time it starts to complete the installation ofthe drivers for this device. Restart Windows to use the device. Note that you may have torestart twice. If that doesn't help, remove the device (right-click and select Uninstall), restartWindows one more time, and then try again.
Windows can't specify the resources for this device. (Code 27)
See the solution for error code 16.
The drivers for this device are not installed (Code 28).
Click Reinstall Driver to install the drivers currently on your system, or obtain new drivers fromthe manufacturer of the device.
This device is disabled because the BIOS for the device did not give it any resources. (Code 29)
This message appears for devices on your motherboardsuch as on-board hard disk controllers,network adapters, or video adaptersthat have been disabled in your computer's BIOS setup.See Appendix B for more information. (Note that this error may also appear for the device'sfirmware if it's not on your motherboard; in this case, refer to the hardware documentation.)
This device is using an Interrupt Request (IRQ) resource that is in use by another device and cannotbe shared. (Code 30)
See the solution for error code 10.
This device is not working properly because {device} is not working properly. (Code 31)
This means that the device is dependent on another device. For instance, this message mayappear for a joystick (game) port that is physically installed on a sound card that is havingproblems. To fix this error, troubleshoot the hardware on which this device is dependent.
Windows cannot install the drivers for this device because it cannot access the drive or networklocation that has the setup files on it. (Code 32)

First, restart your computer. If that doesn't fix the problem, copy the relevant drivers directlyto your hard disk and try installing them again.
This device isn't responding to its driver. (Code 33)
This may indicate a problem with the hardware, or simply a bad driver. Start by removing thedevice (right-click and select Uninstall), restarting Windows, and then reinstalling the drivers.If that doesn't help, you may have a dead device on your hands.
Currently, this hardware device is not connected to the computer. (Code 45)
This message will appear for any hidden, or ghosted, device, described in "Show HiddenDevices in Device Manager" later in this chapter. This means the driver is installed, but thehardware has been physically disconnected or removed.
6.3.5. Working with Restore Points
The System Restore feature is used to roll back your computer's configuration to an earlier state,with the intention of undoing a potentially harmful change.
For the most part, System Restore runs invisibly in the background, routinely backing up drivers,important system files, and certain Registry settings. The idea is that at some point, you may wish toroll back your computer's configuration to a time before things started going wrong. This can be veryhandy, especially if you frequently install new hardware or applications.
The problem is that System Restore can indiscriminately replace files on your PC with potentiallyearlier versions, reset Registry preferences, and, in some cases, uninstall software. While theintention is to solve problems without requiring user interaction, it can inadvertently cause other,more serious problems. If you suspect that a particular application is causing a problem, your bestbet is to uninstall that single application rather than to attempt a System Restore. In other words,use System Restore as a last-ditch effort to return your system to a state of normalcy.
Furthermore, System Restore, when enabled, uses up to 12% of your computer's hard disk space; ona 80 GB hard drive, that means that nearly 10 GB are devoted to a feature that typically needs nomore than a few hundred megabytes.
To configure System Restore, go to Control Panel System System Restore tab. Here,you can turn off the feature, change the amount of disk space that is used (on a per-drive basis), andview the status of the System Restore service.
If you decrease the disk space made available to System Restore, you may bereducing the number of available "restore points," theoretically reducing theeffectiveness of this tool.
Start the System Restore application (\Windows\System32\restore\rstrui.exe) if you wish to restorean earlier configuration or create a new restore point. Restore Points are "snapshots" of your system:

packages containing important files and settings, created at regular intervals. To roll back yourcomputer's configuration, simply choose a date during which a restore point was created. You canalso create a restore point at any time to "lock in" today's configuration.
Restore points are stored in the hidden System Volume Information folder on your drive (if you havemore than one drive, there will be one such folder on each drive). However, these folders will beinaccessible in Explorer, even if you've configured Explorer to show hidden files. (You can use theCommand Prompt, cmd.exe, to view these files.)
To delete all restore points, just disable the System Restore feature by turning on the Turn offSystem Restore on all drives option and clicking OK. You can then re-enable System Restore ifdesired. It can become necessary to delete your restore points if System Restore is preventing youfrom upgrading (or downgrading) one or more of your drivers.
6.3.6. Understanding Version Control
One of the cornerstones of the Windows architecture is the use of Dynamic Link Libraries (.dll files),which are encapsulated application components that can be shared by severalsometimes allWindowsapplications.
Naturally, in the life cycle of an application or operating system, DLLs are constantly updated withbug fixes and new functionality. When you install an application, all of the most recent .dll files areinstalled along with it, at least in theory. The problem arises when one errant application overwrites anewer version of a DLL with an older (or just different) version. This problem has been partiallyaddressed by the System Restore feature, discussed in the previous section, but it's not perfect.
Although each .dll file has a "last modified" date stamp (like any other file), what Windows relies on isactually the version information stored inside the file. In theory, this works quite well. However, olderapplications don't always follow the rules, and newer applications sometimes come with shared filesthat introduce new bugs. And, because the .dll files that come with Windows are used by the majorityof applications (as opposed to a .dll used by only a single program), Microsoft DLLs are under themost scrutiny.
To determine the version of any file, right-click on it in Explorer and click Properties. You should seea Version tab (if not, the file you've chosen is either corrupted or simply doesn't contain any versioninformation). This tab displays the version of the file, some copyright information, usually the nameof the manufacturer, and a short description of the file. Just shuffle through the items in the Itemname list to see the various clues.
File types that usually contain version information include .dll files, .exe files, .drv files, .vxd files, and.ocx files.
Usually, newer versions of .dll files are just that; they serve the same purpose as the original version,but add more functionality, include bug fixes, or improve performance. In some isolated situations, acertain .dll file can be replaced with a completely different file, with which all it has in common is thefilename.
6.3.7. Firmware: Software for Your Hardware

User-upgradable firmware is a feature found in many modern devices. Firmware is software stored inthe device itself, used to control most hardware functions. Although it's not possible to, say, increasea hard disk's capacity by upgrading its firmware, it is possible to improve performance of an adapteror storage device, as well as solve some compatibility problems that may have been discovered afterthe product shipped.
The beauty of firmware is that if you purchase a peripheral and the manufacturer subsequentlyimproves the product, you can simply update the firmware to upgrade the product. While user-upgradable firmware can increase the initial cost of a product slightly, such an increase isdramatically outweighed by the money the manufacturer can save by not having users send inequipment to be updated. Naturally, user-upgradable firmware also is a boon to the end user, whocan make simple updates in a matter of minutes without having to send in the product or even openup the device.
Devices that commonly have user-upgradable firmware include modems, CD/DVD recorders,removable drives, tape drives, motherboards (in the form of an upgradable BIOS), SCSI controllers,and network adapters, hubs, and routers.
Some older devices allow you to change the firmware by upgrading a chip. It's not as convenient assoftware-upgradable firmware, but it's better than tossing the whole thing in the trash.
6.3.8. Resolving Hardware Conflicts
Most hardware and software problems are caused by incompatibilities or conflicts, where two or morecomponents simply don't work togethereven though they may work perfectly well on their own.
A conflict occurs when two devices try to use the same resource, such as an IRQ or memory address;other conflicts can happen between two drivers as well. The telltale signs of a conflict include one ormore devices not working, one or more devices not showing up in Device Manager, or your systemcrashing every time one or more devices are used. Now, as Plug and Play (PnP) technology slowlyimproves in the number of devices that it supports, the problem of hardware conflicts diminishes; butconflicts will continue to be a thorn in our sides for quite some time to come.
Each installed device can use one, several, or, occasionally, no resources. An expansion card, such asa sound card or modem, usually uses a single IRQ, a single I/O address range, and sometimes adirect memory access (DMA) address. Other devicessuch as memory addresses, SCSI IDs, integrateddrive electronics (IDE) channels, and serial and parallel portscan consume more than one of each, aswell as other resources.
If two or more devices try to use the same resource, problems can occur that range from slowperformance to system crashes. Most older, pre-PnP devices (called legacy devices) allow you toconfigure which resources they use by setting appropriate jumpers or switches on the devicesthemselves. Nearly all devices made since 1995 allow their settings to be changed with software, andthereby automatically changed by a PnP-compliant operating system like Windows XP.
Note that some devicessuch as pointing devices, scanners, cameras, and printers, which connect toyour computer's external portsdon't technically use any resources of their own; however, the ports towhich they're connected do use resources. You can usually change the resources used by any givendevice (ports included). The trick is to configure all of your devices to use different resources so thatno conflicts occur. All devices are different; refer to the documentation included with each device, orcontact the manufacturer for specific configuration instructions and possible conflict warnings.

To determine which resources are available in your system, as well as which devices are using therest of the resources, open System Information (msinfo32.exe) and expand the HardwareResources branch.
Be aware that some devices can share resources. For example, your communication ports share IRQs(COM1 and COM3 both use IRQ 4, and COM2 and COM4 both use IRQ 3). And most PCI slots canshare IRQs, which only occasionally causes problems.
If you discover a conflict, start by either removing or reconfiguring one of the devices involved. Youmay be required to reconfigure several devices, delegating resources around until all the conflicts areresolved. Again, the method used to change the resources used by a particular device depends uponthe device itself. You should be able to see all the resources used by a given device by double-clickingit in Device Manager and choosing the Resources tab. Figure 6-4 shows the Resources tab of acommon SCSI controller.
Figure 6-4. The Resources tab of a device's Properties sheet shows thehardware resources currently in use by the device
6.3.8.1 Tips for installing new hardware
If you're installing more than one device, do so one at a time; it's much easier to isolate problemswhen you know which device has caused them. You should expect installation of Plug and Playdevices to be quick, automatic, and painlessat least in theory. However, many devices, while able toconfigure themselves automatically, may not be able to adapt entirely to your system. Be preparedto reconfigure or even remove some of your existing devices to make room for new ones.
If you're trying to get an existing device to work, try removing one of the conflicting pieces of

hardware to see if the conflict is resolved. Just because two devices are conflicting doesn't mean thatthey are intrinsically faulty. It's possible a third, errant device could cause two other devices tooccupy improper resources and therefore conflict with each other or simply not function.
If removing a device solves a problem, you've probably found the conflict. If not, try removing alldevices from the system and then reconnect them one by one until the problem reappears. Althoughit may sound like a pain in the neck to remove all the devices from your system, it really is theeasiest and most surefire way to find the cause of a problem like this. Because there are so manydifferent combinations of resource settings, it can be a laborious task to resolve conflicts.
6.3.9. The Trials and Tribulations of Plug and Play
Most internal peripherals (cards, drives, etc.), as well as some external devices (printers, scanners,etc.), will be automatically detected when Windows boots up. Ideally, Windows should notify you thatthe new device has been identified and give you the option of using the driver that comes withWindows (if available) or providing the driver on your own (either with a diskette or a folder on yourhard disk). Windows should then load the driver, configure the device, and restart with no ill effects.
The problem is when the new device either doesn't work or causes something else to stop working.Even the newest devices can sometimes cause conflicts, although with the passage of time, the PnP-compliance of most new devices has generally improved. To aid in troubleshooting conflicts wherePnP devices are involved, it's important to realize first exactly what Plug and Play technology is. PnP-compliant devices must have the following characteristics:
The device must have a signature that is returned when Windows asks for it. Windows thenlooks up this signature in its driver database and either finds a driver that matches it or asksyou to insert a disk with a compatible driver. If a driver is not required or a suitable driver is notfound, no driver will be loaded for the device.
All configurable resources (applicable primarily to internal devices) of the device must besoftware-adjustable, meaning it is not necessary to physically set jumpers or switches on thehardware to reconfigure it. This doesn't mean, however, that the device can't come withjumpers; some cards let you disable their Plug and Play features and set resourcesmanuallysometimes a very handy feature.
The driver, if supplied, must be capable of instructing Windows which resources the device canoccupy (if any) and must be able to receive instructions from Windows and reconfigure the cardaccordingly. That way, Windows can read all the possible configurations from all the drivers andthen reconfigure each one so that there are no conflicts.
You can see, then, how dependent PnP devices are on their drivers and why a buggy driver can causeproblems with the entire system, regardless of how PnP-compliant all the components in your systemare. One bug commonly found in some drivers is that they are unable to configure the correspondingdevice reliably. For example, say a sound card requires a single IRQ and is capable of being set toIRQ 5, 7, 9, 10, or 11, but the driver is incorrectly programmed to also accept IRQ 13. WhenWindows attempts to shuffle all the devices around, it may then ask the sound card to occupy IRQ13; because this is impossible, it will remain at its previous setting (or at no setting at all), mostlikely causing a conflict with another device (say, a modem or parallel port). In this scenario, a tinybug in a single driver has caused two separate devices to stop functioning.

Now, it's also possible that Windows will be unable to find a mutually agreeable configuration for allinstalled deviceseven if one does existwhich means that Windows will simply boot with one or moreconflicts. I've encountered this scenario when trying to install an additional IDE controller in a systemotherwise full and completely out of resources. In most cases, Windows won't even tell you that PnPhas failed. This is where you have to take matters into your own hands: learn to recognize thesymptoms (crashing, hanging, slow performance) and know how to look for conflicts. See Section6.3.8, earlier in this chapter, for details.
One of the loopholes that you can take advantage of is the way that Plug and Play systems assignresources (IRQs in particular) to PCI devices. Your BIOS will assign a different IRQ to each PCI slot,rather than having each device try to grab an IRQ for its own; this ensures that PCI cards don'tconflict. The funny thing about PnP BIOSes and Windows XP is that, occasionally, some IRQs areneglected. If you have a full system and find yourself running out of IRQs, this can be a real problem.The good news is that you can enter your system's BIOS setup (see the next section) and manuallyassign an IRQ to each PCI slot, often even specifying previously ignored IRQs, such as IRQs 12, 14,and 15.[5] This will then leave spaces open (usually lower IRQs), which other devices in your systemcan then occupy.
[5] Note that IRQs 12, 14, and 15 aren't always available and sometimes can be occupied by other motherboard components or
non-PCI devices. In most cases, trial and error is the best approach to take.
Finally, a common problem with Plug and Play is its occasional propensity to detect devices that havealready been configured. For example, after you've hooked up a printer, installed the drivers, andeven used it successfully, Windows may inform you that it has detected a new printer the next timeyou boot. The cause of this is almost always an incorrect initial installation (that is, contrary to themanufacturer's recommended installation procedure); for example, you may have connected yourprinter after Windows had started. The best course of action is to remove the drivers for the device(usually through Device Manager), reboot, and allow Windows to detect and set up the printerautomatically. Naturally, you should check the printer's documentation for any abnormalities of theinstallation process.
6.3.9.1 Special case: Stop Plug and Play from detecting devices
One of the problems with Plug and Play is its tendency to detect and load drivers for devices youdon't want to use. Although there is no way to prevent the Windows Plug and Play feature fromdetecting and installing drivers for some devices, you can disable most devices that may be causingconflicts. The best use for this is in conjunction with multiple hardware profiles, where you mightwant to disable a device in one profile, yet enable it in another. (See Section 6.3.11 later in thischapter for more information.)
To disable a device and prevent Windows from detecting it again, right-click it in Device Manager
(devmgmt.msc), and select Disable. A red will then appear over the device's icon to signify that
it has been disabled. You can later re-enable the device by right-clicking and selecting Enable.
6.3.10. Show Hidden Devices in Device Manager
By default, Device Manager doesn't show devices that aren't connected to your computer, even if thedrivers for those devices are installed and loaded. But why would you want to do this?

First of all, when you disconnect or remove a device from your system without first right-clicking itsentry in Device Manager and selecting Uninstall, its driver will remain installed on your system. Theonly way to remove it is to either reattach the device or show hidden devices.
If the device is preventing you from starting Windows, showing hidden deviceswill be the only way to uninstall the driver, possibly allowing you tosubsequently reinstall it to get it working.
Plus, even when a device isn't connected, some of its drivers may still be loaded and causing conflictswith other devices. Merely disconnecting a device may not be sufficient to fix the problem.
Now, in Device Manager, you can select Show hidden devices from the View menu, but all this willadd to the listing are non-Plug and Play devices. To have Device Manager show all hidden devices,follow these steps:
Open System Properties in Control Panel (or right-click the My Computer icon and selectProperties).
1.
Choose the Advanced tab and then click Environment Variables.2.
In the lower System variables section, click New.3.
Type devmgr_show_nonpresent_devices for the Variable name, and enter 1 for the Variable
value. Click OK when you're done, and click OK to close System Properties.
4.
If Device Manager is open, close it and reopen it.5.
In Device Manager, select Show hidden devices from the View menu.6.
Hidden devices (sometimes called ghosted devices) will appear in Device Manager with grayed-outicons. Other than the fact that they represent non-present hardware, these hidden entries shouldbehave normally, in that you can uninstall them, change their properties, or update their drivers.
6.3.11. Using Multiple Hardware Configurations
In many cases, solving a problem with a computer simply means finding the correct configuration.It's unfortunately not unusual to spend hours shuffling around the various devices in your system inan effort to resolve all the conflicts, or even just to get it all to fit in the box at the same time.
Sometimes, if you can't come to an acceptable resolution, you may have to set up multipleconfigurations, just to get everything to work. Start by going to Control Panel System Hardware tab Hardware Profiles.
By default, you'll see only one entry here: Profile 1 (Current). Any settings made in DeviceManager will be saved under this profile.
To create a new profile, just click Copy, and then make the desired changes in Device Manager.

If you have more than one profile, you'll be prompted to choose one every time Windows starts. Todisable this prompt without eliminating any hardware profiles, first choose a profile to be yourdefault. Then, highlight one of the other profiles, click Properties, turn off the Always include thisprofile as an option when Windows starts option, and click OK. Repeat this for all profiles exceptyour default, and the only one left will be the one used automatically the next time Windows starts.
6.3.12. Which Slots to Use for Internal Devices
Theoretically, the slot in which you install a particular expansion card shouldn't matter; they're allsupposed to be the same. In practice, however, this isn't necessarily true. (Naturally, this doesn'tapply to laptops.)
Most modern computers come with a handful of PCI slots, one AGP slot, andoccasionally one or two ISA slots for compatibility with older devices. PCI slotsare usually numbered right on the board or at least in the manual; if you can'tdetermine the numbers for your slots, assume the first is on the far left (whenviewed from the front of your computer), and the last is closest to theprocessor and keyboard port.
Here are a few tips to help you put internal cards in the most suitable locations inside your computer:
If you're using an AGP video adapter, avoid placing your sound card in the PCI slot immediatelyadjacent to it, usually slot 5. Also, avoid putting any card in slot 1 (furthest from the AGP slot).
If your motherboard has a built-in SCSI controller or Ethernet (LAN) adapter, then theseintegrated devices may share resources (IRQs, etc.) with one or more of your PCI slots(typically slots 4 and 5; see your manual for details). You should avoid placing cards in theseslots, if possible.
Cooling is important for your cards as well as your motherboard. By spreading your cards as farapart as possible, you allow air to move more easily between them. Cooling is most importantfor your video adapter, so make sure that no other cards or stray cables are impeding the flowof air around it.
Place your sound card in PCI slot 2, which is typically assigned to IRQ 5 (commonly used bysound cards).
Place your modem, if you have one, in PCI slot 4, typically assigned to IRQ 9 or 10.
The rest of your cards can be stuck in whatever slots are left over.

6.4. Fixing Device-Specific Problems
More often than not, problems are unique to a particular type of component. For example, modemsoften suffer similar types of problems, and not necessarily the same as those that affect other typesof hardware. The following guidelines should help you solve most component-specific problems (asopposed to general lockups or application error messages).
A non-functioning component can be a great excuse for an upgrade, especiallyconsidering the amount of time and money involved in getting your oldhardware to work properly. Consider the fact that a new device may workbetter or may be faster than the component it replaces, often at half the cost.
6.4.1. Video Cards (Display Adapters)
Most likely, without the correct video driver installed, you still should be able to use Windows at abare-minimum resolution of 640 480 with an 8-bit color depth (256 colors); this is a standard modesupported by all video adapters and is Windows's default display mode. If you can display this modebut no others, odds are you don't have the proper drivers installed. In fact, nearly all video cardproblems are caused by faulty or incorrect video drivers.
Whether or not you're currently experiencing problems with your video, you can often significantlyimprove your video card's performance and possibly the stability of your entire system by installingthe latest drivers available from the manufacturer of your video card. Such optimized drivers canincrease speed, offer higher resolutions with more colors, give you more control over advancedsettings, yield superior performance in games (discussed in Chapter 5), and offer better stability thanthe plain-vanilla drivers that come with Windows (likely the ones you're using now).

Understanding Color Depth
Have you ever noticed that photos appear excessively grainy or contain ugly bands orstreaks where a smooth sky or gradient should appear? Do all the colors on your screenbecome distorted when new images or web pages are displayed? These problems aresymptoms of an adaptive palette. When your display is set to 256 colors, it means thatthere can never be more than 256 individual colors in use at any given time. Because256 isn't nearly enough to represent all the colors in the spectrum, Windows simplychooses the best 256 colors each time you display an image. The more images displayed,the more horrendous it can look.
However, since 65,536 colors (16-bit mode, or 216 colors; sometimes called High Color )is sufficient to display photographic images (as are the even-better 24- and 32-bitmodes), the palette is fixed and does not have to adapt to what is on the screen. Thisgives a richer, faster display; web pages, games, and photos look better; and you don'thave to put up with the bother of a constantly changing palette.
To set the color depth, double-click the Display icon in Control Panel, and choose theSettings tab. Move the Screen resolution slider to the right to increase your display'sresolution (more dots equals more screen real estate, but smaller screen elements). Tothe right is a drop-down list labeled Color quality, with all of the color depth settingsyour video card supports. Select the highest color quality setting your video hardwaresupports (at least Medium (16-bit)).
Note, as you adjust your color depth, that Windows may automatically adjust othersettings depending on your card's capabilities, especially if you're using an older videocard. The amount of memory on your video card dictates the maximum color depth andresolution you can use. The memory required by a particular setting is calculated bymultiplying the horizontal size times the vertical size times the bytes per pixel. If you'rein 32-bit color mode, then each pixel will require 32 bits, or 4 bytes (there are 8 bits to abyte). At a resolution of 1600 1024, that's 1600 1024 4 bytes/pixel, or 6.25 MB.Therefore, a video card with 8 MB of memory will be able to handle the display setting,but a card with only 4 MB will not. The card's refresh rate (explained in this section) canalso limit the maximum resolution and color depth. Most newer cards easily exceed theserestrictions, so the case may be moot.
In most cases, you should choose the highest color depth your system supports atwhatever resolution you're currently using. However, since higher color depths maycause your applications to run a little more slowly and eat up more system memory (atleast on slower systems), you may wish to drop down to 16-bit color if you'reexperiencing any video slowdowns.
Most modern video cards are based upon a certain chipset (controller), usually identifiable by thelarge, square chip in the center of the card itself. (Obviously, the chipset will be nearly impossible toidentify in a laptop, at least without the manual or original invoice within reach.) If the chip is coveredwith a sticker or cooling fan, you should be able to remove it to see what's printed on the chipsurface. Common chipset manufacturers include nVidia, ATI, and 3D Labs. In many cases, Windowswill be able to detect the type of chip even if it can't determine the specific make and model of the

card. If you can determine the type of chipset your video adapter uses, you should be able to useeither a generic video driver made for that chipset (typically available at the chipset manufacturer'sweb site), as well as a driver for another card that uses the same chipset.
If you know you are using the correct video driver but can't use all of theresolutions it supports, make sure Windows is identifying your monitor correctly(see the next topic).
If you're experiencing general video problems, such as display corruption, crashing, or poorperformance, try disabling some features of your video driver. Such settings are typically found inControl Panel Display tab Settings Advanced. Other settings that can affect yourdisplay's stability and performance are located in Control Panel System Advanced Performance Settings Custom, discussed in Chapter 5.
If you're trying to use Windows XP's support of multiple monitors, you need to be aware of a fewthings. Your system BIOS (see Appendix B) chooses which video card is your primary adapter(marked with a 1 in Display Properties) and which card is your secondary adapter (marked 2). Somemotherboards allow you to choose, and some do not. If yours doesn't, you may have to physicallyswap their positions in your computer if you want to make the other card the primary adapter.Because your primary video card does not need to support multiple adapters explicitly, although thesecondary card does, you may have to swap them to get multiple-monitor support to work at all. Oneproblem you may encounter is trying to negotiate one PCI card and one AGP card; if yourmotherboard's BIOS initiates PCI before AGP, your AGP card probably will never be the primary card.In this case, you'll either have to make do with what you've got or replace both cards with a singleAGP adapter that can drive two monitors.
6.4.2. Monitors
If Windows knows what type of monitor you're using, it can determine which resolutions and colordepths it's able to support. In Windows XP, monitors have drivers, although they do little more thaninform Windows of the monitor's capabilities. Plug and Play monitors allow Windows to automaticallyidentify them, though you may still have to supply a driver when prompted. To see if your monitor isproperly identified, go to Control Panel Display Settings tab Advanced Monitortab (see Figure 6-5).
Figure 6-5. Change your display driver and adjust your video refresh rateto solve some video problems

Don't be alarmed if it says only "Plug and Play Monitor" here, although you canalways replace the generic driver with one for your specific monitor (if it'savailable from the manufacturer) to possibly get support for more video modes.
One of the lesser-known settings that can affect your display quality is the refresh rate (also underthe Monitor tab), although the setting is less important when you're using a flat-panel display (andis practically meaningless for digital flat-panels). Although the maximum refresh rate is notdependent on the amount of your card's memory, you may have to lower your resolution to achievea higher refresh rate, especially for older video cards. Windows should theoretically automaticallyadjust your refresh rate to the highest setting your card supports, but this is not always the case. Ifyou notice that your display appears to be flickering, especially under florescent lights, you'll need toraise your refresh rate, either by adjusting the refresh rate setting directly or by lowering yourresolution or color depth. Consequently, if you hear a slight whine from your monitor, it actuallymeans your refresh rate is too high. The minimum refresh rate you should tolerate is 72 Hz. Peoplewith corrective lenses seem to be more sensitive and might require a higher setting to becomfortable. Most cards available today support refresh rates of 75 Hz and higher, so this is usuallynot a problem. To change the refresh rate, go to Control Panel Display Settings tab Advanced Monitor tab. If your display driver supports it, you can adjust your refresh rate withthe Screen refresh rate setting. If the setting is not there, you'll either need to obtain a morerecent video driver, reduce your resolution or color depth, or get yourself a better video card.
If the colors displayed on your monitor look washed out or too saturated, try playing with yourmonitor's contrast and brightness controls. Calibrate your monitor so that black appears dark blackand not washed-out gray, and everything else should pretty much fall into place. (The easiest way todo this is to open a Command Prompt window, discussed in Chapter 10, and press Alt-Enter toswitch to full-screen mode.) Try turning the contrast control all the way up and the brightness controlsomewhere between its minimum and middle positions. Some better monitors also have colortemperature and gamma adjustments; don't be afraid to mess around with these to fine-tune yourdisplay.

If the colors on your screen don't match those produced by your color printer,consider using a colorimeter to measure the way your monitor displays colors.This color correction allows your graphics software (such as Adobe Photoshop)to adjust your monitor so that your images are displayed more accurately.
For problems using multiple monitors, see the discussion of video cards earlier in this section.
6.4.3. Motherboards
Motherboards can be finicky, but most problems are indeed caused by the components on the board,such as processors, memory, add-on cards, and the power supply, all discussed elsewhere in thissection. Here are some motherboard-specific troubleshooting tips.
It's possible that a problem you're experiencing is caused by nothing more thana misconfiguration in your motherboard's BIOS setup; see Appendix B fordetails.
Your motherboard's chipset is responsible for coordinating the flow of data between your processor,memory, and PCI/AGP bus. Chipset manufacturers (commonly including Intel, VIA, and Serverworks)sometimes have newer drivers for some of the system devices upon which Windows depends; it's agood idea to look for such drivers if you're experiencing crashing or other problems.
Some motherboards support two (or more) processors, which use symmetric multiprocessing (SMP)to boost performance. Unlike Windows 9x/Me, Windows XP fully supports SMP, and is able to workwith the motherboard's chipset to distribute processing load among the CPUs. For instance, one CPUhandles the foreground process while the other handles the background processes, making WindowsXP extraordinarily responsive on a multiprocessor machine. Or, if a program crashes and eats up allyour CPU cycles on a single-processor system, your computer hangs; on a multiprocessor system,the other CPU just takes over and you can safely shut down the errant task or even continueworking. The problem is that multiprocessor motherboards require special chipsets that typically havemuch less industry support than their single-CPU cousins, making them especially finicky andtroublesome when it comes to add-ons (like high-performance video cards). If you're having troublegetting a multi-CPU system to work, check with the manufacturer for a list of approved hardware.See http://www.2cpu.com for more information on SMP.
Check with the manufacturer of the motherboard to see if newer firmware (see Section 6.3.7, earlierin this chapter) for your motherboard is available; newer motherboards allow you to update the BIOSby simply downloading and running a small program.
Upgrading your BIOS firmware can solve some problems, but you should onlydo so if absolutely necessary. Never install a BIOS not specifically written foryour exact motherboard. A mistake can fry your motherboard and yourwarranty, leading to another, rather expensive, solution: replacement.

Even the newest motherboards come with jumpers. If you're trying to solve a nasty problem, it'sbest to go through the "setup" portion of your motherboard's manual and verify that each jumper isset correctly.
Finally, all motherboards have built-in hard-disk controllers, serial, parallel, and USB ports. Manyboards also have integrated SCSI controllers, network adapters, video cards, and sound cards, all ofwhich can save money and open up additional PCI slots for other devices. Problems arise when thesedevices conflict with other hardware in your system; for instance, if you install a video card, makesure you disable the on-board video if applicable. See "Which Slots to Use for Internal Devices,"earlier in this chapter, for other ways to avoid conflicts.
6.4.4. Processors
There's really nothing you can do to diagnose a bad CPU chip (recognizable by frequent systemcrashes or your machine's inability to boot up at alll) other than to simply replace it. If you have adual-processor motherboard, you're fortunate in that you can remove only one of the processors tosee if that solves the problem.
Otherwise, your best bet may be to take your motherboard, complete with CPU and memory, to yourlocal mom-and-pop computer store, ask them to test it for you, and replace components as needed.
Improper or inadequate cooling is the main cause of a malfunctioning processor (e.g., your computerwill crash if the CPU gets too hot), so make sure those fans are firmly attached, free of excessivedust, and running smoothly. See "Overclock Your Processor" in Chapter 5 for CPU cooling tips.
6.4.5. Memory
Bad memory can manifest itself in anything from frequent error messages and crashes to yoursystem simply not starting. Errors in your computer's memory (RAM) aren't always consistent,either; they can be intermittent and can get worse over time.
Any modern computer will use memory modules, but don't be fooled into thinking there's a well-established standard. Older machines use EDO or FPM SIMMs, newer ones use PC100 or PC133DIMMs, and the newest machines, at the time of this writing, use RDRAM. Within each of thesecategories are different speeds, capacities, and even standards.
Problems due to using the wrong kind of memory are not uncommon, especially in generic andnoncommercially built machines. To find out the type of memory you should use, consult thedocumentation that accompanies your computer or motherboard. If you have no such literature,check the web site of the computer or motherboard manufacturer and find out for sure before youjust jam something in there. Odds are your friend's old memory modules will not only not work inyour system, but may also potentially cause permanent damage.
The first thing you should do is pull out each memory module and make sure there isn't any dust orother obstruction between the pins and your motherboard (use a dry tissue or lens cleaning paper;don't use any liquids or solvents). Look for broken or bent sockets, metal filings or otherobstructions, and, of course, any smoke or burn marks. Make sure all your modules are seatedproperly; they should snap into place and should be level and firm (don't break them testing theirfirmness, of course).

If all that is in order, there are three ways to determine if your RAM is actually faulty. The first way isto use a software testing program capable of checking physical memory. Use the program to run acontinual test of your RAM and have it repeat the test many times, perhaps overnight. The problemwith testing your RAM with any type of software is that not only are they not 100% reliable, but onceyou've found a problem, you need to follow the next method anyway to find and replace the faultymodule.
The second method requires a friendly, patient, and helpful person at a small computer storea rarecommodity these days, especially with the popularity of the large, faceless mega-super computermarts filled with inexperienced technicians. Look for a local mom-and-pop store, and see if they havea memory-testing device. These devices are too expensive for the average user, but most peoplewho sell computer memory should have one. Take all your memory modules in and ask them tocheck them for you. Not only is this test very reliable, but they'll be able to instantly match whatevermemory you need, at least in theory. Hopefully they won't charge you for this service, especiallybecause they'll likely be selling you a replacement.
The third method of finding and replacing bad memory is to go to your local computer store and justbuy more. It may only be necessary to buy a single additional module, because most likely only onemodule in your system is actually faulty (make sure you get the right kind). Next, systematicallyreplace each module in your computer with the one you've just acquired, and test the system byturning it on. If the problem seems to be resolved, you've most likely found the culpritthrow it outimmediately. If the system still crashes, try replacing the next module with the new one, and repeatthe process. If you replace all the memory in your system and the problem persists, there may bemore than one faulty memory module, or the problem may lie elsewhere, such as a bad CPU ormotherboard (or you may even find that you're not using the correct memory in the first place).
To eliminate the possibility of a given problem being caused by a device otherthan your memory, remove all unnecessary devices (internal and external)from your system before testing your memory.
You can, of course, also take this opportunity to add more memory to your system (possiblyreplacing all your existing modules). Adding memory is one of the best ways to improve overallsystem performance; see the "How to Buy Memory" sidebar for more information.

How to Buy Memory
There are no two ways about it: the more memory, the better (at least up to a point).Adding more memory to a computer will almost always result in better performance, andwill help reduce crashes as well. Windows loads drivers, applications, and documents intomemory until it's full; once there's no more memory available, Windows starts pullinglarge chunks of information out of memory and storing them on your hard disk to makeroom for the applications that need memory more urgently. Because your hard disk issubstantially slower than memory, this "swapping" noticeably slows down your system.The more memory you have, the less frequently Windows will use your hard disk in thisway and the faster your system will be. (See Section 5.2.3 in Chapter 5 for moreinformation on this mechanism.)
The nice thing about memory is that it is a cheap and easy way to improve performance.When Windows 3.x was first released, 32 MB of RAM cost around a thousand dollars. Thesame quantity of memory (of a faster variety) when Windows XP was released cost lessthan a ticket to the movies.
The type of memory you should get depends solely on what your motherboarddemandsrefer to the documentation that came with your motherboard or computersystem for details. There are different brands of memory out there, and some are simplyknown for better reliability and stability. Some motherboards require more expensivevarieties (and some even demand certain brands), so do your research before you buy.
That simply leaves one thing to think about: quantity. In short, get as much memory asyou can afford. Like everything else, though, there is a point of diminishing returns. 384MB is probably the lowest amount you should tolerate on a Windows XP system.Depending on how you use your computer, 512 MB or 768 MB might be enough for moreuses, whether it's doing light work in Photoshop or playing streaming audio over the Net.But if you get into something like heavy-duty digital-video editing, you'd need even morememory.
Lastly, memory comes in individual modules, which are inserted into slots on yourmotherboard. The higher the capacity of each module, the fewer you'll need; the fewermodules you use, the more slots you'll leave open for a future upgrade. Sometimes,however, lower-capacity modules can be a better deal (costing fewer dollars permegabyte).
6.4.6. USB Controllers and Devices
USB is the answer to most of the headaches caused by serial (COM) ports, parallel (printer) ports,keyboard and mouse ports, and, in some circumstances, SCSI ports. USB is fully PnP-compliant, sonot only should a USB controller not give you any trouble, neither should any USB devices (at least intheory). In fact, if you're having trouble with a device that connects to a serial or parallel port or ifyou've simply run out of free ports, get an inexpensive serial-to-USB or parallel-to-USB adapter, andplug your "vintage" device into it.

Although most computers only come with one or two USB plugs, the USB system can handle up to128 devices; if you've run out of plugs, a USB hub will expand your USB bus easily. Note that hubscan cause problems for some devices (such as uninterruptible power supplies) that may not supportbeing plugged into a hub. Some hubs have their own power supplies, necessary to provide adequatepower to devices that get their power from the USB bus, so check the hub power if you'reexperiencing problems with any of the devices plugged into it.
If you need more USB ports, but your devices won't tolerate a hub, consideradding a USB card with 4 more ports.
If can't get Windows to recognize your USB controller or any USB devices attached to it, try enteringyour computer's BIOS setup program (see Appendix B) and look for USB settings. Usually, it's simplya matter of enabling the USB hardware already in your system.
Most systems also have a BIOS setting for USB "legacy" support; enable thisfeature only if you have a USB mouse or keyboard and you need to use them inan environment that doesn't support USB, such as DOS, Unix, or an earlierversion of Windows.
6.4.6.1 USB power management issues
Power management is a common cause of USB problems; if Windows is able to shut down your USBcontroller to save power, it sometimes won't be able to power it back up again, which will preventsome USB devices (especially scanners) from working. To prevent Windows from "managing" powerto your USB controller or devices, follow these steps:
Open Device Manager (devmgmt.msc).1.
Expand the Universal Serial Bus controllers branch.2.
Double-click the USB Root Hub device, and choose the Power Management tab.3.
Turn off the Allow the computer to turn off this device to save power option, and clickOK when you're done.
4.
6.4.6.2 What about FireWire?
FireWire, or IEEE-1394, is an alternative to USB, favored for more data-intensive applicationsbecause of its speed (though USB 2.0 is now roughly on par). FireWire devices are typically moreexpensive and less common than USB devices, and can sometimes be a little finicky, but areotherwise fairly straightforward. If you're having trouble getting a FireWire device to work, it's almostcertainly the fault of the device's driver software. The controller itself shouldn't need anytroubleshooting, especially if it's built in. But cheaper add-on FireWire controllers have been known to

be problematic, so if all else fails, try replacing your FireWire controller.
6.4.7. Hard Disks
These drives almost never need special drivers, unless they use some proprietary interface (such asexternal drives hooked up to a parallel, USB, or FireWire port). Windows will support virtually all IDEdrives right out of the box, as well as most SCSI controllers and devices.
To get Windows to recognize an IDE hard disk connected to your system, you'll need to do threethings:
Specify whether your IDE hard disk is a "slave" or "master" by setting the appropriatejumper.[6] Your system likely has two IDE controllers (primary and secondary), each of whichhas its own IDE cable. Each controller is capable of controlling two IDE drives (one master andone slave), so unless you install extra controllers, your system will be able to support amaximum of four IDE drives: a primary master, a primary slave, a secondary master, and asecondary slave. If your system won't recognize a drive, it's likely a jumper conflict (i.e., twodrives set as the master on the primary controller). Remember, your IDE hard disk mustpeacefully coexist with any other IDE drives (e.g., CD/DVD drives, ZIP drives, tape drives).
[6] Most IDE drives have an "auto" or "cable select" jumper setting as well. If you're having trouble getting your computer to
recognize any of your drives with these settings, your best bet is to use only the "slave" and "master" settings for all drives.
In your system BIOS screen, enable the IDE controller to which the drive is connected (seeAppendix B) and set the drive type. In nearly all cases, the drive type should be set to "auto-detect." At this point, your BIOS may confirm that it recognizes your drive by displaying its sizeright in the BIOS setup screen. All drives recognized by your BIOS will also be listed when youfirst boot your system, just before the beep. (Press ESC to see all BIOS messages if you onlysee a corporate logo when you first boot your system.)
A brand-new hard disk must be partitioned, as described in "Working with Partitions" in Chapter5, and formatted with a filesystem Windows XP can understand, as explained in "Choosing theRight Filesystem," also in Chapter 5.
Occasionally, a system will be in bad enough shape that it won't even boot. Although it's possible thatthe hard disk has crashed and is unrecoverable, it's just as likely that the motherboard or hard-diskcontroller has died. In this case, your best bet at recovering the data on that drive is to connect thedrive to another functioning system and attempt to access the data there. See Section 6.5 later inthis chapter for related information.
If you're building or maintaining a critical system, you'll be wise to consider thepossibility that your hard disk may fail. RAID, or Redundant Array ofInexpensive Disks, allows you to have two or more drives with exactly thesame data on them. The redundancy is for fault tolerance, allowing thecomputer to continue working even if one drive bursts into flames.
6.4.8. IDE Controllers

Most hard drives available today are the IDE/ATA /Ultra DMA type; the controllers for these drivesare almost always built into the motherboard. If your motherboard develops a problem with thecontroller, you should be able to disable the controller and obtain a separate controller for a fewbucks.
The most common problem, though, is with IDE cables. The cheap cables that come with mostcomputers can develop flaws, causing symptoms ranging from occasional errors to Windows notbeing able to recognize a drive at all.
6.4.9. SCSI Controllers
Most SCSI controllers are either supported by Windows out of the box or have native Windowsdrivers you can use (which either come with the card or are available from the manufacturer's website). For the most part, all SCSI controllers are fairly well supported, with recent drivers nearlyalways available. If you're experiencing a SCSI problem, you should first check to see if newer driversfor your card are available.
If you're unable to find drivers for your SCSI card, you may still be able to use it in Windows if youcan find a driver for another card that uses the same SCSI controller chip (sometimes called aminiport driver). For example, you may have a sound card that has a built-in SCSI controllerintended for your CD drive. If that SCSI controller chip just happens to be made by Adaptec, forexample, you should be able to use a driver for the corresponding Adaptec product that runs off thesame chip.
Next to drivers, the two most common problems with SCSI controllers and the devices that attach tothem are bad cables and incorrect termination. When diagnosing any SCSI problems, it's best tohave replacements handy for your SCSI cable(s), so you can easily swap them to help isolate theproblem. The use of improper or non-SCSI adapters and connectors is also a common culprit; forexample, you can't use a standard SCSI-III cable to connect Ultra160 SCSI devices.
The art of SCSI is in the cabling. You may experience slow performance withyour SCSI devices if your SCSI termination is incorrect or if your SCSI chain(the length of all your SCSI cables added up) is more than the recommendedmaximum for your adapter type. For standard SCSI (10-20 MB/sec), the chainshould be no longer than 3.0 meters (9.8 feet); for Ultra SCSI (20-40 MB/sec),the maximum chain length is 1.5 meters (4.9 feet); for Low Voltage Differential(LVD) Ultra2 and Ultra160 (80-160 MB/sec) SCSI chains, the chain should beno more than 12 meters (39.2 feet).
As for termination, a SCSI chain (the long string of devices connected by cables) won't work properlyunless it's correctly terminated. By either using the built-in termination on your SCSI controller andSCSI devices or attaching standalone terminators, make sure that both ends of the chain (butnothing in the middle) are terminated. Active terminators are best and are absolutely required forUltra160 and Ultra320 SCSI buses.
The SCSI card itself should be terminated (or its self-termination feature be turned on), unless youhave both internal and external devices, in which case only the devices at the end of each side shouldbe terminated.

All SCSI controllers also have a built-in BIOS, and most have a corresponding setup page (accessiblewhen your computer boots) that let you configure a bunch of different SCSI parameters. Each SCSIdevice attached to your SCSI controller may have different requirements, so check thedocumentation that came with your devices and make sure the SCSI controller's settings (max datarate, sync-negotiation, termination power, etc.) match the requirements of each specific device.
For problems with specific devices connected to SCSI controllerssuch as CD drives, scanners, harddisks, and removable drivesrefer to the corresponding topics elsewhere in this section.
6.4.10. CD and DVD Drives, Recordable and Otherwise
Most CD drives don't need special drivers. In fact, if you plug in a CD drive and then start upWindows, it should detect it and display an icon for it in My Computer automatically. If your driveisn't detected, first check the controller. Most CD-ROMs connect to your IDE or SCSI controller; ifyour drive isn't recognized, most likely the controller isn't working or you don't have the right driversfor your controller installed, as mentioned earlier.
Common causes of problems include dirt and dust, not only in the drive but on the discs as well. Acan of compressed air is a good solution to this problem, as is a clean shirt,[7] against which you canrub the occasional dirty disc.
[7] Or better yet, a clean, dry, lint-free cloth. Strictly speaking, you should gently rub a disc from the center outward (along the
radii), but if you just want to use a dirty dishrag, I won't tell anyone.
Most CD drives are cheap and easily replaceable; if yours is giving you any trouble, throw it out andget a new one. Most of the more annoying problems with these drives involve CD and DVD writers,and those are a little more difficult to solve. Here are a few tips:
Most CD burning problems are caused by poor-quality media. If your recorder won't recognizeany of your blank discs, try a different brand. Verbatim and 3M are both known for producingreliable CD media; avoid the no-name bargains like the plague.
Bad media can also be responsible for poor-quality audio CDs. If you hear cracks and pops thatweren't present in the source audio, or if the sound quality appears to degrade over time, thenthe media is probably to blame.
Watch out for incompatible media. Blank CDs rated for 12x drives may be unreliable whenburned with 24x drives, even if you're only burning at a speed of 12x. (Some people reportedproblems burning 24x discs on 12x drives, although in theory, this shouldn't be a problem.Likewise, don't try to use a DVD+R disc in a recorder that only supports DVD-R media.
So-called combo drives, which are both DVD readers and CD writers, tend to be less reliable andmore picky about the types of media they like. If you're having continuing trouble with a combodrive, consider replacing it with a dedicated CD writer and separate DVD reader. Better yet,upgrade to a fullblown DVD+/-R writer, and burn both CDs and DVDs.
A buffer overrun occurs when your recorder's buffer (the memory in your recorder used totemporarily store data to be burned to the CD) is full. This happens when the recorder is unableto write to the CD for some reason. Look for updates to your CD burning software (see below)and try different media if this keeps happening.

A buffer underrun occrurs when your computer can't supply data to the recorder as quickly as itneeds it. This is more common on older, slower computers and older CD burners with smallerdata buffers. If this happens to you, close all nonessential applications (any of which can slowdown your computer) and try again. Note that newer recorders have larger buffers to preventthis from happening, as well as features to recover otherwise-ruined discs if it ever does happenagain.
If you continue to get this error, try different media or a different recorder, and make sure thedrive containing the source data is able to deliver it quickly enough for your CD burner. Forinstance, if you're having trouble copying data from CD to CD, try copying the data to your harddrive first.
As long as your burner and burner software support BurnProof (Sanyo's"Buffer Under RuN-Proof" technology), you should never ruin another discas a result of a buffer underrun. For instance, Easy CD Creator and NeroBurning Rom, versions 4.02 and 5.0, respectively, and later versions,reportedly support this feature. Seehttp://www.roxio.com/en/support/recorders/burnproof.html for details.
Don't forget the software! Windows XP's built-in support for CD burning is rudimentary at best,so if you can't get it to work, give a third-party solution a try. Nero Burning ROM(http://www.nero.com/) and Easy Media Creator (http://www.roxio.com/) are both goodchoices.
6.4.11. Tape Drives
The best thing you can do to keep a tape drive running smoothly and reliably is to keep it clean. Dustand dirt translate into poor performance, lost data, or even an early death. Some (but not all) tapedrives require that you use cleaning tapes on a regular basis; consult with your drive'sdocumentation for details.
Most tape devices require proprietary drivers from their manufacturers, mostly because there iscurrently no "standard" driver for them. The common exception is SCSI; all you should need to do isplug in your SCSI tape drive and make sure the drivers for the SCSI controller are installed andworking. The backup program you use will then come with generic drivers for SCSI tape drives (asdoes the backup software that comes with Windows XP).
See Section 6.5, later in this chapter, for more information on backup software.
6.4.12. Flash Cards and Other Removable Drives
Removable drives are as varied as the problems you're likely to have with them. As with otherhardware, the first step in troubleshooting these drives is to make sure the drivers are correct andup-to-date.
If you're using a USB flash card reader, and you've eliminated the possibility of a problem with theUSB controller or cable, then the culprit is likely the flash media itself. If you're having trouble

reading from or writing to a flash card, try formatting it, not with Windows but with the camera, MP3player, or PDA with which it's used. The most common cause of problems with flash cards is anincorrect or unsupported filesystem (e.g., a card formatted as FAT32 in a camera that can only readFAT). See Chapter 5 for more information on filesystems.
One important option that is available for some removable media drives, such as digital cameramemory card readers, is write caching. Write caching, typically disabled by default in Windows XP,can improve performance by waiting until your computer is in an idle state before physically writingdata to the drive. While write caching is always enabled for hard disks, it's not always advisable forremovable drives because the media can be ejected when there's still data waiting to be written,which can mean lost data. Open Device Manager (devmgmt.msc), right-click the drive, and choosethe Policies tab (if the tab isn't there, this option isn't available for the selected drive). TheOptimize for quick removal option disables write caching, and the Optimize for performanceoption enables it. While the second option will improve performance, it should only be used for drivesand readers with electronic (not mechanical) eject buttons; such drives will be capable of requestingthat any pending data be written before the media is actually ejected, thereby preventing any lostdata.
6.4.13. Modems
If you're having trouble with an analog modem that is 32 Kbps or slower, throw it out immediately.You can get a brand new 56 Kbps modem for less money than it would cost in long-distance supportcalls to find drivers for the old one. If you only use your modem to connect to the Internet, considera malfunctioning modem an excuse to get DSL or cable Internet.
Settings for your modem can be found in Device Manager (devmgmt.msc); just open the Modemscategory, and double-click your modem to view its Properties sheet. The more interesting settingsare as follows:
The Speaker volume (in the Modem tab) is obviously self-explanatory. But not all modemsrespond to this setting. Furthermore, some modems use your PC speaker, which is controlled bythe Volume Control (sndvol32.exe).
The Maximum Port Speed (in the Modem tab) is the speed of the COM port used by yourmodem, not by the modem itself. Set it to 115200 in all cases. The COM port used by themodem is hidden in the Advanced Settings dialog; go to Advanced tab Advanced PortSettings. While you're here, set the FIFO (First In, First Out) buffers; push both sliders all theway to the right.
The diagnostics tab provides information you can use to determine the model and capabilities ofyour modem. The upper field contains the Hardware ID, which is your modem's Plug and Playsignature (explained in Section 6.3.9, earlier in this chapter). The lower field (assuming you'vepressed Query Modem) contains the results of several AT commands sent to it.
The initialization string (required by some modems) is specified in the Extra initializationcommands field under the Advanced tab. If you don't have an initialization string, leave thisfield blank.
Finally, like other devices, the modem's driver and resources can be configured in the Driverand Resources tabs, respectively.

6.4.13.1 Getting the right driver for your modem
Windows might simply recognize your modem as a "standard modem" if it can't autodetect the makeand model, even though a driver for your modem may be included with Windows. Although the"standard modem" driver isn't ideal, you can often get by with it in a pinch.
A driver made especially for your modem will usually yield the best performance and reliability, but ifit's not available, you can sometimes use a driver for another product by the same manufacturer, aslong as it's rated the same speed (e.g., 56 K).
If Windows doesn't identify your modem or if it identifies it as an "unknown device," there are twopossibilities that could cause this problem. First, your modem could be a proprietary model (alwayssomething to avoid, although often inevitable in laptops), which you simply won't be able to usewithout a manufacturer-supplied driver. Second, the serial port to which your modem is connectedmay be misconfigured or conflicting with another serial port in your system; see the discussion ofserial ports in Appendix B for a solution.
Occasionally, a functioning modem can stop working temporarily. Modems constantly receivecommands from your computer, so it's possible for the modem to become confused if it is sent agarbled or incomplete command. The easiest way to correct a confused modem is to turn it off andthen on again. If the modem is an internal model, you'll need to completely power down yourcomputer and then turn it on again; simply pressing the reset button or restarting Windows may notbe sufficient.
If you know the software is installed and configured correctly, there are external factors that caneither prevent modems from working or slow their performance. Start by removing all otherelectronic devices from the phone line, including answering machines, fax machines, autodialers, andstandard telephone handsets. Any of these can actually interfere with the modem, preventing it fromdetecting the dial tone or causing it to hang up prematurely. Other factors include bad phone cablesand wall sockets; try replacing your old phone cord with a brand new one, just long enough to reachthe wall jack. A noisy phone line can also cause slow performance and frequent disconnects; contactthe phone company to investigate.
If you have a DSL adapter or cable modem, these techniques most likely won'tapply, because neither of these are technically modems; see Chapter 7 for helptroubleshooting network and Internet connections.
6.4.13.2 Diagnosing slow or unreliable modem connections
The most common cause for slow connection speeds is a noisy phone line. Noise can corrupt the databeing transferred; if your modem gets corrupted data, the data must be sent again. If 15% of thedata needs to be resent, it will take 15% longer to transfer any given file. Start by connecting atelephone handset to the phone line or to the jack labeled "phone" on the back of your modem, andmake a normal call. If you hear any crackling or interference, it means the line is very noisy (youmay not be able to hear low-to-moderate noise, however). If you suspect line noise, try replacing thephone cord or even the entire wall jack. Note that the phone cord shouldn't be any longer than isabsolutely necessary.

Also, make sure there isn't anything else connected to the line, especially between the computer andthe wall. That is, any answering machines, fax machines, and telephones should be plugged into theback of your modem (the jack labeled "phone"), and your modem should be plugged directly into thewall. These devices can interfere with transmission since the signal must pass through them in orderto reach your computer.
6.4.14. Network Interface Cards (NICs)
In most cases, Windows will detect your network adapter and install the correct drivers for itautomatically. However, there are so many different types and manufacturers of network cards, andso many of those are completely proprietary that you may be out of luck if you can't obtain driversmade specifically for yours.
Isolating networking problems can be especially difficult, because you're not dealing with astandalone device. If your printer stops working, you know immediately where the problem is, but ifyour network stops working, it could be your card, the network cable, the hub, your colleague'snetwork card, your network drivers, your colleague's network drivers, or any number of other things.See Chapter 7 for detailed network troubleshooting assistance.
Because there are no "generic" or "standard" network drivers, if you can't find a driver for yournetwork adapter, or if it has stopped working, just throw it out. Brand-new Ethernet adapters areridiculously cheap and most likely superior to the antique you'd be replacing.
If you're having problems with your network card in a desktop computer, try moving it to a diffrerentslot. If you're dealing with a network adapter built into your motherboard or laptop, check your BIOS(see Appendix B) for applicable settings, and contact your motherboard or laptop manufacturer forthe latest drivers.
6.4.15. Wireless NICs and Routers
Everything that applies to network cards, discussed in the previous topic, applies to wireless networkcards as well. However, there's a peculiarity that affects both wireless NICs and wireless routersalike, and it has to do with the fact that most manufacturers of wireless equipment rush theirproducts to market before they're ready.
For this reason, the first thing you should do when you set up any wireless equipment, as well as theinstant you start experiencing problems, is to download and install the most recent version of thefirmware available (discussed earlier in this chapter). Not only will this likely fix connection andperformance problems, but it will sometimes provide more features and interface improvements(where applicable).
6.4.16. Sound Cards
It seems that the better sound card technology gets, the more troublesome these devices are.
In the old days, troubleshooting a sound card involved only eliminating conflicts by finding an IRQthat wasn't used by another device in your system. All modern sound cards are now Plug and Play,

which leaves only the driver and its physical placement in your system to contend with.
If you're having problems, such as crashing when you try to play sound, or ifyou only suspect that your sound card is causing other, seemingly unrelatedproblems with your system, start by moving it to a different slot. See Section6.3.12, earlier in this chapter, for tips.
Many sound cards come with extra drivers that offer support for older DOS games. Unless youspecically need these, it's best to remove them entirely. Sound drivers intended for Windows XP willbe different than those written for earlier versions of Windows, so make sure you have yourmanufacturer's latest drivers installed. If you can't get Windows XP-specific drivers, it may be timefor a new sound card.
If you're getting poor sound quality in games, make sure you have the latest version of Microsoft'sDirectX layer (available at http://www.microsoft.com/directx). To solve game-specific problems,check the game developer's web site for suggested settings and workarounds; see "Get the Most Outof Your Games, Speed-Wise" in Chapter 5 for more tips.
6.4.17. Printers
Whether you're using USB or an older parallel cable, bad cables are a frequent cause of problems. IfWindows is having trouble recognizing your printer, or it seems to be printing too slowly, try replacingthe cable.
Although USB doesn't have a practical limit on distance, parallel cables do. Some parallel-basedprinters won't function if they're too far away from your computer, so try a shorter cable. Removeany switching boxes, printer-sharing devices, and extraneous connectors unless they're absolutelynecessary. If your parallel port is built into your motherboard (as most are), you should go to yoursystem BIOS setup screen (see Section 6.4.3 topic earlier in this chapter) to make sure your parallelport is configured for its optimal setting (usually ECP). Refer to Appendix B for details.
If you must keep your printer some distance from your computer, considerusing a network print server, which allows you to connect your printer directlyto your LAN (see Chapter 7). Note that this isn't the same as sharing a printerwith others over your network, a task explained in Chapter 8.
If you're experiencing poor printing speed or frequent errors with a USB printer, try eliminating anyUSB hubs, if applicable. See the discussion of USB controllers earlier in this chapter.
As with most other peripherals, getting the right drivers is essential. Now, Windows can print plaintext (without fonts or graphics) on nearly any printer without knowing what kind of printer you have.If you don't have a driver made especially for your model, you still may be able to substitute anotherprinter's driver. For example, if you have a Hewlett Packard 700-series inkjet printer, you might beable to get it to work with drivers for HP's 600 series.
A problem that plagues many printers is that the drivers provided by the printer manufacturer try todo too much and, as a result, bog down your system (and your printing) with extraneous programs

and dialog boxes. If Windows XP supports your printer out of the box, consider abandoning the fancydrivers that came with your printer in favor of the plain-vanilla ones Microsoft provides.
Also, since many printers are compatible with Hewlett Packard's PCL printer control language (PCL3,PCL5, etc.), you may be able to use the driver for the classic Hewlett Packard Laserjet Series II (forolder laser printers) or the Hewlett Packard Deskjet (for older inkjet printers). If you have aPostscript laser printer, you should be able to use the driver for one of the Apple LaserWritervarieties.
Aside from drivers and cabling, common printer problems involve incorrect paper: use laser paper forlaser printers and inkjet paper for inkjet printersavoid the "multipurpose" junk. Also, the inkcartridges in inkjet printers are usually cheaply made and therefore are one of the first things to fail;simply installing a new ink cartridge will fix many printing problems.
6.4.18. Scanners and Cameras
Scanners not only require the appropriate drivers to function in Windows, but special scanningsoftware as well; as with tape drives, the software and hardware are typically sold as a pair. If youcan't find a driver or software that specifically supports your scanner, you're probably out of luck.However, because many companies simply repackage scanners made by other manufacturers, youmay be able to obtain a driver from the original equipment manufacturer (OEM) of the stuff underthe hood.
As for cameras, because there are so many different kinds, probably the only productive discussioninvolves how they connect to your computer. Modern digital cameras either connect through a serialport, a USB port, or a FireWire port; any communication problems will probably be addressed byfixing the ports (or adapters, where applicable) themselves.
Scanners commonly are connected through USB ports but can also plug into parallel and SCSI ports;an older scanner may connect to a proprietary controller card. See Section 6.4.17 for help withparallel ports, Section 6.4.9 for help with SCSI, and Section 6.4.6 for help with USB, all earlier in thissection.
6.4.19. Keyboards
Most keyboards are exceptionally cheap and flimsy, a fact that has its pros and cons. On the plusside, if something goes wrong, the keyboard will be easy and inexpensive to replace. However,cheapness has its price, and a cheap keyboard typically won't last that long.
Double-click the Keyboard icon in Control Panel to adjust the various settings of your keyboard.Moving the Repeat Rate slider all the way to the right will do wonders to make your computer seemfaster, especially when scrolling through a long document or moving the cursor through a lot of text.The Repeat Delay is different, thoughjust adjust this to your liking, and test the setting in the boxbelow.
Sticky or dirty keys can slow things down when you're typing; you can pull your keys off one by oneand remove whatever is caught underneath. Some people have actually been successful cleaning theentire keyboard by immersing it in plain water (unplugged, of course) and reconnecting it whencompletely dry. Another suggestion is to lay out a piece of newspaper, invert the keyboard, and give

it a good spanking to dislodge dust, food, and any small critters that might be living inside.
6.4.19.1 Ergonomics
Keep in mind that most keyboards haven't been effectively designed for use with the human hand, nomatter what Microsoft says in trying to market their "Natural" keyboard; true ergonomic keyboardsare adjustable, not just shaped funny. True ergonomic keyboards are now getting more affordableand more popular. Some of the more radical designs have split, movable keypads, curved to fit themotion and shape of your hands, and reduce the distance your wrists and fingers have to travel topress the keys. Try one before buying, though: they aren't for everyone.
Your best defense in reducing hand and back strain is to position your keyboard (and yourself, if youhave an adjustable chair) so that your elbows are at the same level (distance from the floor) as yourhands and your arms are well supported. And if your chair tilts forward, it may induce a morecomfortable sitting and typing position.
Another way to reduce typing strain is to just not use your keyboard at all. Products like DragonNaturallySpeaking (http://www.dragonsys.com) and IBM ViaVoice (http://www.ibm.com) support so-called "natural-speech" dictation, which allow you to speak comfortably into a microphone and dictateas you would to a human assistant or inhuman tape recorder, often at much higher speeds than arepossible with hand entry. These can be quite effective but, like everything else, aren't for everyone.Some of the material in this book was actually dictated with such software (fry two guest witch centounces).
A wrist rest may be comfortable, but they sometimes put too much pressure on the median nerves inyour wrists. If you're experiencing wrist pain or numbness, try eliminating the wrist rest for a day ortwo, or simply move it so that it supports your palms instead of your wrists. If you're experiencingany pain or numbness in your hands, wrists, arms, back, or neck, drop this book immediately andtalk with a physician. In short, take repetitive stress injuries seriously.
6.4.19.2 The Num Lock, Scroll Lock, and Caps Lock keys
Ever since IBM introduced the "enhanced" 101-key keyboard with two sets of cursor keys back in1984, the Num Lock key on most keyboards is turned on by default, nudging people to use thestandard cursor keys rather than the numeric keypad to control the cursor. This may seem aninconsequential setting, but it affects a basic function of the primary input device, the keyboard, andcan therefore be quite important. Some of us prefer the numeric keypad, and therefore preferNumLock to be turned off; others prefer the opposite.
In most cases, you can choose the default (on or off) in your computer's BIOS setup, as described inAppendix B. However, this doesn't always work, and Windows may override the setting. To overrideWindows, and choose the default setting for your Num Lock, Scroll Lock, and Caps Lock keys, followthese steps:
Open the Registry Editor (discussed in Chapter 3).1.
Expand the branches to HKEY_CURRENT_USER\Control Panel\Keyboard.2.
3.

1.
2.
Double-click the InitialKeyboardIndicators string value, and replace its data with a numberbetween 0 (zero) and 7. The number is the sum of up to three values: 1 to turn on Caps Lock, 2to turn on Num Lock, or 4 to turn on Scroll Lock. Here is a summary of the possible values:
Value Caps Lock Num Lock Scroll Lock
0
1
2
3
4
5
6
7
3.
Click OK when you're done.4.
Expand the branches to HKEY_USERS\.Default\Control Panel\Keyboard, and enter the same
value.
5.
Close the Registry Editor when you're done.6.
6.4.20. Mice and Other Pointing Devices
If you have any software that came with your mouse (such as "Intellipoint" for Microsoft mice and"Mouseware" for Logitech mice), it's probably unnecessary and just taking up memory and diskspace. Unless you need the advanced features, such as programming a third mouse button, youprobably should remove said software, because Windows supports nearly all mice out of the box.
If you work in a dusty or otherwise filthy environment, consider replacing thatold mechanical mouse with a shiny new "optical" mouse with no moving partsto clean.
Double-click the Mouse icon in Control Panel to adjust the sensitivity of your mouse. You can alsoadjust the double-click speed and turn on "pointer-trails" to increase visibility on laptop displays. Themouse is a primary method of input, and fine-tuning these settings can go a long way toward

improving your relationship with your mouse.
One of the most common problems with mice is the pain they can cause in your wrist and hand, dueto the unnatural position in which they force your hand to rest. A stylus (pen) will afford a morenatural and comfortable position, not to mention more precise control over the pointer on yourscreen. You can get a pressure sensitive, cordless, battery-less stylus and a tablet for under ahundred bucksmore than a mouse, but worth it if you use Photoshop or other graphics software. Myadvice: try a tablet before you invest in another rodent.
6.4.21. Power Supplies
Don't overlook the power supply! Every time I encounter a problem that seems to have noreasonable explanation, the culprit has been the power supply. I'm beginning to think it's aconspiracy.
Say, all of a sudden, one of your storage devices (hard disk, tape drive, etc.) starts malfunctioning,either sporadically or completely. You try removing and reinstalling the drivers (if any), you replaceall the cables, and you take out all the other devices. You may even completely replace the devicewith a brand new oneand it still doesn't work. Odds are your power supply needs to be replaced.
Your computer's power supply powers all of your internal devices, as well as some of your externalones (i.e., the keyboard, the mouse, and most USB devices). If your power supply isn't able toprovide adequate power to all your hardware, one or more of those devices will suffer.
The power supplies found in most computers are extremely cheap, a fact that ends up being thecause of most power supply problems. This means that it doesn't make too much sense to replaceone cheap unit with another cheap unit, even if the replacement has a higher wattage rating.
Power supplies are rated by the amount of power they can provide (in watts); most computers comewith 200-300W supplies, but many power users end up needing 350-400W. The problem with powerratings, however, is that most of those cheap power supplies don't hold up under the load. A cheap400W unit may drop under 300W when you start connecting devices, but better supplies can supplymore than enough power for even the most demanding systems, and will continue to provide reliableoperations for years to come. A well-made power supply will also be heavy and have multiple fans, aswell as being a bit more expensive than the 20-dollar landfill fodder lining most store shelves.
Possible exceptions are portable computers, which may not have user-replaceable power supplies.However, the need for increased power is generally only applicable to a desktop system that canaccommodate several additional internal devices, so the matter is pretty much moot.

6.5. Preventive Maintenance and Data Recovery
Face it: some sort of data loss is inevitable. Whether it's a single lost file or a dead hard diskwhetherit's tomorrow or twelve years from nowit will happen. On that happy note, there is plenty you can doabout it.
First and foremost, there's no better method of disaster recovery than having a good backup copy ofall your data. Any stolen or damaged hardware is easily replaced, but the data stored on your harddisk is not. Unfortunately, hindsight is 20/20, and if you didn't back up, there's not much you can doabout it after the fact; even if your computer equipment is insured with Lloyds of London, once yourdata is gone, it's gone. So, we'll begin our discussion with some preventive maintenance beforecovering any disaster recovery techniques.
6.5.1. Quick, On-the-Fly Backups
In its simplest form, a backup is a copy of your data. Now, a full system backup, as described later inthe next topic, is obviously valuable, but often too involved of a procedure to practice often enoughto be entirely effective.
While you might perform a full backup once a week or once a month, you can do a quick backup ofyour most important files several times a day. No special software or hardware is required, and, bestof all, it will only take a few seconds.
The following two solutions are remarkably simple, but the idea is sound, and if you make a habit ofmaking these quick, on-the-fly backups, it will save you hours of work.
6.5.1.1 Solution 1: Simple copy
The next time you've put a few hours into a document, open the folder in Explorer, and make aduplicate of the file by dragging it to another part of the same folder with the right mouse button andselecting Copy Here. See Section 2.2.3 for more information on this function.
Then, if you screw up a file you're working on, if it gets accidentally deleted, or if it gets corrupted bya system crash, you'll have a fresh backup right in the same folder.
6.5.1.2 Solution 2: Simple ZIP
If you've followed the advice in Section 2.2.8, your files will be organized by project rather thanapplication.
At the end of the day (or even several times a day), just right-click the folder of a project on whichyou've been working, select Send To, and then select Compressed (zipped) Folder. A new .zip filecontaining compressed versions of all of its contents will appear next to the folder in a few seconds.

If you then need to retreive a file from the backed-up folder, just double-click the new .zip file.
If you've disabled Windows XP's built-in support for ZIP files, and have insteadinstalled a third-party utility, such as WinZip (http://www.winzip.com), theprocedure may be slightly different. In the case of WinZip, all you'd have to dois right-click the folder and select Add to foldername.zip.
See Section 2.2.9 for more information on this mechanism.
6.5.2. Back Up Your Entire System
There are more ways to back up your data than to store it in the first place. The sole purpose of abackup is to have a duplicate of every single piece of data on your hard disk that can be easilyretrieved in the event of a catastrophe (or even just an accidental deletion). Imagine if yourcomputer were stolen and you had to restore a backup to a brand-new computer. Could you do it? Ifthe answer is no, you're not backed up.
You need to be able to complete a backup easily and often, to store the backup in a safe place, awayfrom the computer, and to retrieve all your data at any time without incident. If it's too difficult ortime-consuming, odds are you won't do itso make it easy for yourself.
A bare-minimum backup could be little more than a single CD or floppy diskette with your last threeor four important documents on it. It's better than nothing, and it does protect your most recentwork, but what about your email, your web browser bookmarks, and the documents you wrote sixyears ago?
I know what you're thinking, because I've heard it a thousand times: nothing on my computer isreally that important, so it's really not worth the time to back up. Okay, assume that's truehow longwould it take you to reinstall Windows and all your applications, install all your drivers, reconfigure allyour hardware, and customize all your toolbars? If you have a full backup of your system, the answeris not only "not long," but "no problemo" as well.
Ideally, you should be able to back up your entire hard disk on a single piece of media. We won'teven entertain the idea of floppies, so think about investing in a dedicated backup solution. Thehardware you use should be fully supported by Windows XP, and the backup media (tapes,cartridges, or disks) should be cheap, reliable, and readily available, and you should be able to usethem over and over again.
The backup solution that is appropriate for you depends on your work habits and your availablefunds. Tape drives, optical drives, removable cartridges, and recordable CDs are all getting cheaper,and manufacturers are competing for your business.
While removable cartridge drives (Iomega Zip drives, recordable or rewritable CDs, and evenrecordable DVDs) are great for quickly archiving data (long-term storage of important documents orprojects), they still aren't as appropriate as tape drives for repeatedly backing up entire systems andrestoring them in the event of a disaster. Removable drives and CDs use random access, meaningthat you can simply open Explorer and read or write to any file on the media immediately. This maybe convenient in the short run, but this convenience comes at a price: the media used for these types

of backups can be quite expensive (per megabyte) and, more importantly, the backup procedures forrandom-access drives can be more labor-intensive than for tape drives.
Tape backup drives are still the most cost-effective, reliable, and convenient method for backing upand recovering your system after a disaster. The most obvious caveat is that tape drives usesequential access, rather than random access, meaning that they require special backup softwareand tend to be slower than comparably priced removables, especially when used for restoring singlefiles. However, remember their key advantage: you can easily and painlessly duplicate the contentsof your entire system on one piece of removable media and restore some or all of that data just aseasily.
Although tape backup software may seem awkward on the surface, it's designed to allow you toperform a backup in a single step and without user intervention. Good backup software will also makerestoring easy; the best programs keep catalogs of your backups, allowing you to find a single,previously backed-up file and get it back quickly and painlessly.
Now, many manufacturers of the various competing products and technologies market their productsas backup devices, which isn't necessarily accurate. Basically, you need to find the system that worksbest for you and fits in your budget. Do some research before investing in any one technology, andmake sure it truly suits your needs for a backup device.
Try this: add the cost of the drive you're considering with the media required to store the entirecontents of your hard drive twice, and compare it with other solutions. Table 6-2 shows six exampletechnologies and the estimated costs associated with each, at the time of this writing, to back up a30 GB hard drive. These show that initial bargains are rarely good deals.
Table 6-2. A comparison of the actual costs associated with differenttypes of backup hardware
TechnologyCost ofdrive
Cost ofsingle
cartridge
Capacity ofsingle
cartridge
Cartridges per30 GB backup
Cost of drive andmedia for two
backups
Rewritable CDdrive
$100 30 cents 700 MB 43 = $13 $126
RemovableHard Disk
$250 n/a 200 GB n/a $250
Recordable DVDdrive
$300 $1 4.7 GB 7 = $7 $314
AIT tape drive $325 $40 70 GB 1 = $40 $405
DDS4 (4mm)tape drive
$400 $15 40 GB 1= $15 $430
Zip drive (750) $80 $10 750 MB 41 = $410 $900
Floppies n/a $0.20 1.4 MB 21,429 = $4,286 $8,572

Naturally, the prices and capabilities of the various technologies will change as quickly as theweather, but the methodology is always the same. Aside from the price, the most important figure tolook at is the "Cartridges per 30GB backup"; if it's more than one, it means you're going to have tosit and swap cartridges during each backup. If it's that difficult, odds are you'll never do it.
Do your research, and it will save you time and money in the long run, not to mention that extrapeace of mind.
6.5.3. Installing Microsoft Backup
Some sort of backup software has been included with every version of Windows since Windows 3.1more than a decade ago.
Microsoft Backup (ntbackup.exe), a scaled-down version of the now-defunct, yet excellent BackupExec Desktop by Veritas (http://www.veritas.com), is installed by default in Windows XP Professionaledition, but not in Windows XP Home edition. The implication that backing up is a feature requiredonly by "professional" users and network administrators is one of the reasons nobody backs up theirdata.
Backup is not available in Control Panel Add or Remove Programs; instead, you'll need toinstall it manually from the Windows XP CD:
Insert your Windows XP installation CD, and close the annoying welcome screen that appears ifyou haven't disabled CD AutoPlay, as described in Chapter 4.
1.
Open Explorer and navigate to \valueadd\msft\ntbackup.2.
Double-click the Ntbackup.msi file to install the software (or right-click the file and selectInstall).
3.
When installation is complete, a new Backup entry will appear in your Start Menu, in AllPrograms Accessories System Tools. Or, you can launch it by going to Start Run and typing ntbackup.
4.
When Backup first starts, you'll get the cumbersome Backup Wizard. To get out of the wizard and usethe more straightforward main window, turn off the Always start in wizard mode option, and thenclick Cancel. Then, start Backup again, and choose the Backup tab to get started.
Although this is a good program, it does lack some of the capabilities of the full-featured software,such as a catalog of all backed-up files, a dedicated scheduler, and support for additional hardware.Catalogs, for example, keep track of all your backups, allowing you to choose a single file to berestored and have the software tell you which tape to insert.
Microsoft Backup supports backing up to a hard disk, floppy, or tape drive, butit can't back up to CD, despite Windows XP's built-in support for CD writers. Toget around this, select File from the Backup Destination listbox, and Backupwill store your data in a file on your hard disk. Then, use your CD or DVD writersoftware to burn the single file to disc.

Because most backup devices come with some sort of dedicated backup software, you may neverneed Microsoft Backup. Since most backup software is pretty awful, however, you should try all thealternatives available to you before committing to a single solution.
6.5.4. Tips for a Better Backup
The following tips should help ensure you will never be without adequate data protection, whetheryou've already invested in a backup solution or not.
Keep it simple
The problem with backups is that most people don't do them. A few minutes every couple ofweeks is all it takes, and it can save many, many hours in the long run. A good time to do abackup is just before lunch, just before you go home (if the computer is at work), or justbefore you go to bed (if the computer is at home). You can also schedule your backup to occurautomatically and repeatedly at any time, although you'll need to leave your computer on forthat to work.
Do it after-hours
Don't do a backup while you're working on the computer. Your backup program will not be ableto reliably back up any files that are in use, and your system will be slower and more likely tocrash if you are doing too many things at once.
Use at least two cartridges
Maintain at least two sets of backups, alternating media each time you back up. If you back upto tape, for example, use the tape "A" for the first backup, tape "B" for the second backup, andthen use tape "A" again. That way, if one of the tapes develops a problem or your backup isinterrupted, you'll still have an intact, fairly recent backup.
Name your tapes correctly
Most backup programs allow you to specify a name for the media the first time you use them(or whenever you initialize the media), which allows the cataloging feature to tell you on whichcartridge a certain file resides.

Make sure each of your tapes or cartridges has a unique name thatmatches the tape's handwritten label, which will ensure that your softwareidentifies each tape the same way you do. Call your tapes something like"Backup A" and "Backup B," or "Kearney," "Jimbo," and "Nelson." Butdon't use dates, and don't use the same name for two differentcartridges.
Keep your cartridges off-site
Your backups should not be kept near your computer, and especially not inside the computer.If your computer is stolen or if there's a fire, your backups would go with it. Keeping one of thebackups (see alternating backups earlier in this list) somewhere off-premises is a really goodidea.[8] And if you make your living off a computer, you might consider keeping a backup in asafe deposit box.
[8] Some people keep an extra backup cartridge in their car, which can be handy if you want to keep it offpremises, yet still accessible if you need it in a pinch. This is fine, as long as you don't park in the sun,and as long as you don't care if you car gets stolen (from a data privacy point of view).
Lock 'em up
Remember that your tape will typically contain a copy of every file on your system, includingsensitive data. Even if you protect your data with passwords and encryption (see Chapter 8),anyone could have access to your data if you leave a backup tape sitting right in the drive or ina nearby unlocked drawer. While you're at it, you may wish to employ your backup software'ssecurity features, such as password-protecting your backups.
Back up the System State
Most backup utilities designed especially for Windows XP give you the option of backing up your"System State," which is essentially a euphemism for the files that make up your Registry (seeChapter 3). You should always take advantage of this feature; without a valid Registry backup,all those backed-up applications won't do you any good.
Forget floppies
Don't back up to floppies if you can avoid it. Floppies are much more likely to fail than yourhard disk, although it's marginally better than no backup at all. Floppies should only be used totransfer information from one computer to another, and then only if there's no networkconnection between them and you don't have a CD writer.
Back up your backup software

Make sure you have a copy of your backup software handy at all times. If you can't install yourbackup software, you won't be able to access your backups.
Automate your backups
Configure your system for unattended backups. Ideally, you should only have to insert a singlecartridge and click "Go" to complete a backup. Don't put up with lower-capacity backup devicesthat require you to swap cartridges in order to do a single backup. Additionally, most backupsoftware has options to bypass any confirmation screens; by taking advantage of them, youeliminate the possibility of starting a backup before you go home and coming to work the nextday only to see the message, "Overwrite the data on tape?"
Don't bother with incremental backups
Most backup software allows you to do a full-system backup and then supplement it withincremental backups that only store the files that have changed since the last backup. Thismay mean that you can do some backups in less time, but it also means that you'll have torestore each of those backups when recovering from a disasterone full backup and tenincremental backups adds up to eleven restores. More importantly, incremental backupsrequire that the original full backup be intact. If something happens to that one backup, allsubsequent incremental backups will be rendered completely useless.
Prepare for the worst
Throughout this book, you'll find tips to help you prepare for a catastrophe, such as a hard diskcrash or virus attack. For example, Chapter 10 explains how to repair a Windows installationand even create a boot diskette so you can start Windows even if something goes wrong. Ifyou take the time to prepare for these problems now, rather than after they happen, you won'thave to say "I should've . . . "
Test your system
Don't wait until it's too late to find that the restore process doesn't work or requires a step youhadn't considered. Just do a simple trial backup of a single folder or group of files. Then, try torestore the backup to a different drive or folder. Only after you've successfully and completelyretrieved a backup can you truly consider your data safe.
6.5.5. Recovering Your System After a Crash
The purpose of backing up is to give you the opportunity to restore your system to its original state ifsomething unforeseen should happen to your hard disk, whether it be theft, fire, malfunction, or justuser error. You'd be surprised at how many people back up their system without having any idea howto restore it later should the need arise. The backup doesn't do you any good if you can't get at yourfiles later, so it's important to take steps to make sure you can restore your system from scratch if

necessary.
The most important consideration is that the software you use to restore your files be the same oneyou used to back them up. This means installing Windows and then installing your backup softwarebefore you can even begin the restoration process.
Now, reinstalling Windows doesn't necessarily mean that you lose your Windows preferences andmust reinstall all your applications. All you need to do is to reinstall Windows (as well as the softwareand drivers for your backup device, if necessary) to a state sufficient only to run your backupsoftware. You'll also want to install this temporary version of Windows in a different folder name thanwhat was used previously. See Chapter 1 for issues concerning installing and repairing Windows, aswell as setting up a dual-boot system for the purposes of this solution. You may also need theWindows Recovery Console, discussed at the end of this chapter, to help recover a broken system.
6.5.6. Protecting Your Hardware
Although this section focuses mostly on backups, you shouldn't neglect your hardware. All hardwareis sensitive to heat, light, dust, and shock. Don't block any vents on your computer or your monitor,and routinely vacuum all around to remove dust (too much dust can cause your components tooverheat and your disk drives to fail).
For desktop computers, make sure you have at least one functioning fan in your computer's powersupply (preferably two), one mounted directly on top of your processor and one mounted on themain chip on your video card; an additional fan in front won't hurt, either. If you can't hear yourcomputer, odds are it isn't being adequately cooled. Make sure that air can flow freely inside from thefront of the computer to the back; look for a mass of cables blocking the passage of air. Overheatedcomponents can cause system crashes, slow performance, and data loss.
If your computer and every external peripheral are connected to a surge protector, the possibility ofdamage by an electrical surge is virtually eliminated. Many surge protectors also allow you to runyour phone cables through them, protecting them from phone line surges that can damage yourmodem. And if you live in an area susceptible to blackouts or brownouts, you might consider anuninterruptible power supply (UPS), which will eliminate the problem of lost data due to lost power.(Naturally, your battery-powered laptop has a UPS built in.)
Make sure all your cables are tied neatly behind the computer so pins and plugs don't get broken andplugs don't become loose; pets love to chew on cables, pulling them out and otherwise manglingthem. And tighten all those cable thumbscrews.
Keep floppies, tapes, and other magnetic cartridges away from your monitor and speakers; they'rejust big magnets that can turn disks into coasters in no time. And sit up straightno slouching!
6.5.7. Create a Boot Disk
Long gone are the days when an entire operating system can be fit on a single floppy diskette.Actually, many would argue that the floppy drive is essentially obsolete, with no real purpose in amodern computer, at least as long as there a network connection or CD writer is available to transferfiles. However, from time to time, a floppy can still prove useful.

In some earlier versions of Windows (e.g., Windows 9x/Me), there was a built-in feature for making abootable floppy, but it only installed a few files on a blank disk that essentially allowed you to bootinto DOS and then start or repair the Windows installation on your hard disk. Being able to boot off afloppy also meant that you could access your files if Windows wouldn't start at all.
Now, if you have a bootable floppy made on a Windows 9x/Me system, you can use it to boot anymodern system, even if it is running Windows XP. However, if your hard disk uses the NTFSfilesystem (discussed in Chapter 5), you won't be able to access your hard drive from the DOS floppy(since NTFS isn't supported in those versions of Windows). And even if you're still using the FAT32filesystem, which will be readable from a Windows 9x/Me boot disk, you won't be able to startWindows XP or effect any substantial repairs from such a floppy.
Essentially, if you've become accustomed to being able to boot to DOS in earlier versions of Windows,you'll have to adjust your strategy, but that doesn't mean you'll have to live without any safety netat all. There are several ways in Windows XP to fill the holes left by the absence of DOS:
Running old programs
One reason to use a boot disk in the early days was to run old DOS software that refused tooperate from within Windows. Although this is no longer practical in Windows XP, you can runany such software in "compatibility mode" (discussed earlier in this chapter). Another way toaccess old software that won't run in Windows XP is to set up a dual-boot system, discussed inChapter 1.
Repairing Windows
The best way to repair a Windows installation that won't start is to use the Windows RecoveryConsole, covered later in this chapter.
Installing Windows
Since Windows XP comes on a bootable CD (see Chapter 1), you don't need a floppy to installit.
Accessing files
If you can't start Windows, and attempts to repair it have failed, you'll still need to access yourpersonal files. Installing Windows XP in a second directory is probably your best bet here. See"Setting up a dual-boot system" in Chapter 1 for instructions.
Now that I've effectively talked you out of creating a bootable floppy in Windows XP, I'll show youtwo ways to do it.
6.5.7.1 Make a Windows XP boot disk

Follow these steps to make a boot diskette that will load the copy of Windows XP on your hard disk.Use this when your hard disk won't boot by itself, but Windows appears to be undamaged. Use theWindows Recovery Console (see the next section) to repair the problem.
Obtain a blank diskette, and insert it into your floppy drive. Floppies can typically be foundbehind file cabinets, under coffee cups, and at the bottom of "junk" drawers.
1.
If you haven't done so already, you'll need to configure Explorer to show your hidden andsystem files. Go to Control Panel Folder Options View tab, and select Showhidden files and folders. Next, turn off the Hide protected operating system files option,and click OK when you're done.
2.
Open Windows Explorer, and navigate to the root directory of your boot drive (usually C:\).3.
Copy the following three files from this folder to your floppy (usually A:\): ntdetect.com, ntldr,and boot.ini.[9]
[9] See "Setting up a dual-boot system" in Chapter 1 for details on the boot.ini file.
4.
Close Explorer and eject the floppy when you're done.5.
This bootable floppy won't get you to a command prompt, as you might expect. If you need access toa non-Windows command prompt, you have two options: use the Windows Recovery Console (seethe next section), or create a Windows 9x boot disk.
6.5.7.2 Make a DOS boot disk
Here's how to make a diskette from within Windows XP that will boot you into DOS, just like the olddays:
Insert a diskette into your floppy drive.1.
Open Windows Explorer, right-click your floppy drive icon, and select Format.2.
Turn on the Create an MS-DOS startup disk option and click Start.3.
Wait.4.
When you're done, you'll have a disk that will boot into the last version of MS-DOS ever released byMicrosoft: Windows Millenium (also known as Windows Me).
This can be really handy if you're trying to resurrect an older computer running Windows 9x/Me, butit will be of minimal use in Windows XP. Even if you were to boot a Windows XP system with this disk,you most likely wouldn't be able to see any of its drives, because Windows Me isn't compatible withNTFS volumes. See "Choosing the Right Filesystem" in Chapter 5 for more information.

If you need another specific version of DOS (e.g., Windows 98 Second Edition,Windows 95, MS-DOS 3.3), go to http://www.bootdisk.com/ and download thespecific disk image you need.
6.5.8. Using the Windows Recovery Console
The Windows Recovery Console (WRC) is a tool included with Windows XP, used to repair theoperating system when it won't start, as well as perform some other tasks not otherwise possiblefrom within Windows.
For those accustomed to being able to boot into DOS to effect repairs in someearlier versions of Windows, the WRC is the Windows XP equivalent; seeSection 6.5.7, earlier in this chapter, for more information.
The Windows Recovery Console allows you to do the following:
Repair certain parts of a Windows XP installation, including the filesystem boot sector, theMaster Boot Record (MBR), and the Boot Manager configuration
Copy, rename, delete, or replace operating system files or any "in-use" files for that matter thatotherwise can't be modified while Windows is running.
Enable or disable services or devices for the next time Windows is started.
Create and format hard drive partitions (discussed in Chapter 5).
The whole point of the Windows Recovery Console is that it can be started when Windows isn'trunning. To get into the WRC, start by booting up off the Windows CD, as described in "InstallingWindows XP" in Chapter 1. After Setup loads all of its drivers, press R to start the Windows RecoveryConsole.

Recovery Console as a Boot Option
You can install the Recovery Console on your hard disk so that you can get to it withouthaving to boot off the CD. Given how useful the WRC can be in a jam, you may want todo this now as a preventative measure, especially if you're unable to reliably boot from aCD. And if you use the Recovery Console frequently, you'll be able to start it morequickly if it's installed on your hard disk.
To install the WRC, go to Start Run and type the following:
d:\i386\winnt32.exe /cmdcons
where d: is the drive letter of your CD drive. This adds the Recovery Console to your
Boot Manager menu (see "Setting up a dual-boot system" in Chapter 1), giving you theoption to start it every time your computer boots.
For security purposes, the Recovery Console has been intentionally hobbled toprevent access to most of the folders on your hard disk. Before you findyourself in the inevitible position of not being able to get into Windows, youshould take this opportunity to lift these restrictions. Start the Local SecuritySettings editor (secpol.msc), and navigate to \Security Settings\LocalPolicies\Security Options in the tree. Double-click the Recovery Console:Allow floppy copy and access to all drives and all folders entry, clickEnabled, and then click Ok.
Regardless of how the WRC is started, you'll be greeted with the following friendly welcome message:
Windows NT(TM) Boot Console Command Interpreter.
WARNING:This is a limited function command prompt intended only as a systemrecovery utility for advanced users. Using this utility incorrectly cancause serious system-wide problems that may require you to reinstallWindows to correct them.
Type 'exit' to leave the command prompt and reboot the system.
1: C:\WINDOWS2: D:\WINDOWS3: E:\WINNT
Which Windows installation would you like to logon to (enter to abort)?
Naturally, the operating systems installed on your system (and thus the options available to you)

may be different. In most cases, choose 1 here; if you have more than one Windows installation,
choose the one you wish to repair, and log in using your Administrator password.
If you've forgotten your Administrator password (set when Windows XP wasinstalled), WRC won't let you in. You'll have three tries before WRC rebootsyour system. If this is the case, and Windows won't start, your best bet is totry one of the other repair options described in "Reinstalling Windows XP" inChapter 1.
Once you've logged in, the WRC looks and feels like the Windows XP Command Prompt (see Chapter10). However, it's important to realize that it's not exactly the same: for example, you can executesome of the standard DOS commands (albeit in a more limited fashion), but you won't be able tolaunch DOS or Windows programs.
6.5.8.1 Windows Recovery Console commands
The following DOS commands, documented in Chapter 10, can be used in the Windows RecoveryConsole: attrib, cd, cls, copy, del, dir, exit, md, more, ren, rd, set, and type. In addition, you'llbe able to use the chkdsk utility discussed earlier in this chapter, the DiskPart utility discussed in"Working with Partitions," earlier in this chapter, as well as the expand, format, and net utilities.[10]
[10] These commands are documented in detail in Windows XP in a Nutshell (O'Reilly).
The following special commands are available in the Windows Recovery Console:
batch filename [ outputfile]
Executes a batch file, where filename is the name of the batch file to run, and outputfile is
the name of an optional file into which the output from the job is stored. Note that you can'texecute batch files simply by typing the filename, as you can in the real Command Prompt; seethe discussion of batch files in Chapter 10.
bootcfg / command
Starts the Boot Manager configuration and recovery tool. This tool is used to view, edit, andrebuild the boot.ini file, discussed in "Setting up a Dual-Boot System" in Chapter 1. Thecommand can be any of the following:
add
Adds a new entry to the boot.ini file.

copy
Creates a backup of the boot.ini configuration file.
default
Sets the default boot entry.
disableredirect
Disables redirection instigated by the redirect command.
list
Displays the entries currently specified in boot.ini.
rebuild
Lists all of the Windows installations and rebuilds the boot menu by selectively adding entries.Note that it's a good idea to use bootcfg /copy to create a backup of boot.ini before usingrebuild.
redirect [ port baudrate | useBiosSettings]
Enables redirection of the boot loader output to the specified serial port, using the specified
baudrate. Alternately, specify bootcfg /redirect useBiosSettings to use the default COM
port settings in the system BIOS (see Appendix B).
scan
Scans your hard disk for all Windows installations and displays a list of the results. This list isnot dependent on the contents of the boot.ini file, but rather on the actual operating systemsfound on the system. The rebuild command incorporates the scan function.
disable [ service | device_driver]
Disables a system service or a device driver for the next time Windows starts. See enable,
next, for details.

enable service | device_driver [ startup_type]
Starts or enables a system service or a device driver for the next time Windows starts. Use thelistsvc command to list the names of all available services and device drivers. The
startup_type option can be SERVICE_BOOT_START, SERVICE_SYSTEM_START,SERVICE_AUTO_START, or SERVICE_DEMAND_START.
fixboot [ drive]
Writes a new partition boot sector onto the specified partition, where drive is the drive letter.
In most cases, you can omit drive to use the current partition. Use this command to fix the
partition boot sector if it has been damaged, typically by a virus or the installation of anotheroperating system.
fixmbr [ device]
Repairs the master boot record of the specified disk. Use the map command to display the
entries for device. In most cases, you can omit device to use the default boot device, upon
which your primary operating system is installed. Use this if the boot record has beendamaged, typically by a virus or the installation of another operating system. See "Creating aDual-Boot System" for a practical example of this command.
listsvc
Lists the services and drivers available on the computer, for use with the enable and disable
commands.
logon
Logs on to another Windows XP/2000 installation (assuming you have more than one) withouthaving to reboot and re-enter the Recovery Console. Naturally, you'll need the administratorpassword for any such installation.
map
Displays the drive-letter mappings for use with the fixmbr command.
systemroot
Changes the current directory (like the cd command explained in Chapter 10) to the
"systemroot" directory of the operating system to which you are currently logged on (usually

c:\windows).
6.5.8.2 Lifting Recovery Console restrictions
By default, the attrib, copy, del, dir, and ren commands don't support wildcards (* and ?) when
used in the Windows Recovery Console. While this is a safety feature intended to preventunintentional damage to the system, it can be frustrating (to say the least) when you actually needto get something done. To lift this restriction, type:
set AllowWildcards = true
Make sure to include spaces before and after the equals sign whenever usingthe set command (e.g., "AllowWildcards = true" instead of"AllowWildcards=true"); otherwise, you'll get an error as well as a little
insight into precisely how dense some Microsoft developers can be.
Another restriction is one placed on the cd command, where WRC will only allow you to change to
certain directories. To fix this, type:
set AllowAllPaths = true
To enable access to the floppy drive, type:
set AllowRemovableMedia = true
Finally, to turn off the prompt that appears when you try to replace a file with the copy command,
type
set NoCopyPrompt = true
Unfortunately, these are only temporary settings and are lost as soon as the system is restarted. Formore information, see the set command in Chapter 10.
If you haven't already enabled the Allow floppy copy and access to alldrives and all folders option from within Windows (as described in thebeginning of this section), you may encounter a "Set command is currentlydisabled" error. This, unfortunately, can only be fixed by returning to Windows,thus becoming somewhat of a Catch-22 if your computer currently won't boot.Probably the best solution is to install a second copy of Windows XP into adifferent directory (see Chapter 1 ), and effect your repairs from there.

Chapter 7. Networking andGoing WirelessA network is the interconnection of two or more computers, facilitating the exchange of informationbetween them. Networking whether it's between two computers in the same room or amonghundreds of millions of machines around the globe can open a host of possibilities not feasible on astandalone system.
Connect your computer to the Internet to exchange email and files with others around the world, usevideo and audio conferencing software, surf the Web, and even host your own web site. Connect thecomputers in your home or office to exchange files, share printers, play networked games, and sharean Internet connection. Nearly everything you need to do these things is present in a basicinstallation of Windows XP, with the exception of a clear and easy way to set them up withoutcompromising the security of your system.
Connecting your computer to a network exposes its vulnerabilities to anynumber of different types of attacks, all of which can be avoided or prevented.See "Securing Your System on a Network," later in this chapter, for details. SeeChapter 6 for details on dealing with spyware and viruses, and see Chapter 8for user security.
Use the solutions in this chapter to set up a network, overcome the hurdles and annoyances ofWindows support for networking, and do more with your network than you ever thought possible.
7.1. Getting Started with Networking
There are several different kinds of networks, each with their own limitations and advantages. Asimple "peer-to-peer" workgroup can comprise as few as two computers connected with a singlecable or pair of wireless adapters. This is ideal in a home office or small business setting, whereindividual systems can be linked together with minimal effort and configured to share resources. Ashared folder, for example, is merely a standard folder residing on a single computer, madeaccessible to any other computer on the network through Windows Explorer as though it wereactually on each computer's hard disk.
Larger organizations typically deploy networks based on the client/server topology. Client/servernetworks are different from peer-to-peer networks not so much in technology employed as in theroles the different computers play. For example, one computer on the network, which might berunning Unix or Windows, takes on the role of the mail server, while another is configured to handlesuch tasks as printing, storage of data and applications, backup, and user authentication. The rest ofthe computers the clients are used to retrieve email from the mail server, send print jobs to the printserver, and store data on the file server.
A seemingly different kind of connection, usually involving a measly telephone line or a more modernhigh-speed broadband connection, allows access to the Internet from a single PC. Again, this is moreof a matter of the roles the different computers play than the actual technology involved inestablishing the connection.
It can get more complicated, say, if you want to connect a workgroup to theInternet or create a workgroup across the Internet. Both of these tasks involvethe combination of several different technologies, the results of which can bevery interesting and are all discussed later in this chapter.
Windows supports most types of networking out of the box, but the actual process involved in settingup a given form of networking can be quite confusing, and troubleshooting a network can drive younuts.
7.1.1. Terminology Primer
To start building a network, you should understand a few basic networking concepts:
The distinction between local and remote resources
A local resource (such as a directory or printer) is one that resides on or is physically connectedto your computer. Conversely, a remote resource is one that resides on another computerconnected to yours over a network. For example, a particular web page on

http://www.annoyances.org is a remote file, but an HTML file on your own hard disk is a localfile. And a printer connected to your PC's USB port is a local printer, while one that is wired toanother computer on your network is a remote printer. (And naturally, what's local to you maybe remote to someone else.) In some cases, local and remote resources may appearindistinguishable on the surface, but details concerning how each is accessed and configuredmay be different. And, as they say, the devil is in the details.
LAN versus WAN
LAN stands for Local Area Network, a designation typically referring to a network contained in asingle room or building. A peer-to-peer workgroup is an example of a LAN.
Likewise, WAN stands for Wide Area Network, or a network formed by connecting computersover large distances. The Internet is an example of a WAN.
Ethernet
Ethernet is the technology upon which the vast majority of local area networks is built. Astandard Ethernet connection is capable of transferring data at a maximum of 10 Mbps (seeBandwidth), and a Fast Ethernet connection can transfer data at 100 Mbps. A device capable ofcommunicating at both speeds is typically labelled "10/100."
Most modern Windows computers come with Ethernet adapters (also called NICs, or NetworkInterface Cards) preinstalled; for older computers, NICs are cheap and commonly available.
WiFi
WiFi is a trendy shorthand term for wireless networking based on the 802.11b standard, whichallows data to be transferred at a maximum of 11 Mbps (real-world speeds tend to be closer3.5-4.5 Mbps, however). The newer 802.11g standard is much faster (54 Mbps), backward-compatible with 802.11b, and only marginally more expensive than its slower cousin. (WiFi isnow used to describe both standards.) Windows XP Service Pack 2 improves Windows built-insupport for WiFi dramatically, as discussed throughout the rest of this chapter.
Almost everything in this book that applies to wired networks also appliesto wireless connections. See the wireless section later in this chapter for abunch of wireless-only tips and tricks.
Bluetooth is a different wireless networking standard, incompatible with WiFi. It's aninexpensive, low-power technology and is commonly used in high-end cell phones, handheldPDAs, and some laptops (typically via a USB Bluetooth dongle). For instance, you can use aBluetooth headset with a Bluetooth-enabled cell phone, and dispense with the cumbersomecord. Or, you can surf the web with your Bluetooth-enabled handheld PC connected to theInternet wirelessly via your Bluetooth phone. There are even tiny remote-controlled toy carsthat you can drive with your Bluetooth phone (truly illustrating the noble role of technology in

our lives).
Bandwidth
Bandwidth is the capacity of a network connection to move information (the size of the pipe, soto speak). Bandwidth is measured in Kbps (kilobits per second) for slow connections, such asanalog dialup Internet connections; Mbps (megabits per second) for fast connections such asDSL, cable, or Ethernet LAN connections; and Gbps (gigabits per second) for the kinds ofconnections used by huge corporations and Internet providers.
Bandwidth can be shared. If a network connection is capable oftransferring data at, say, 1.5 Mbps, and two users are simultaneouslydownloading large files, each will only have roughly 0.75 Mbps (or 768Kbps) of bandwidth at their disposal.
Ethernet-based local networks can support transfer rates at either 10 Mbps or up to 100 Mbps.High-speed T1, DSL, and cable modem connections typically transfer data up to 1.0 to 1.5Mbps, while the fastest analog modems communicate at a glacial 56 Kbps, or 0.056 Mbps.
To translate a bandwidth measurement into more practical terms, you'll need to convert bits tobytes. There are eight bits to a byte, so you can determine the theoretical maximum data-transfer rate of a connection by simply dividing by 8. For example, a 384 Kbps connectiontransfers 384 / 8 = 48 kilobytes of data per second, which should allow you to transfer a 1megabyte file in a little more than 20 seconds. However, there is more going on than just datatransfer (such as error correction), so actual performance will always be slower than thetheoretical maximum.
Protocols
A protocol is the language, so to speak, that your computer uses to communicate with othercomputers on the network. A network is built by installing hardware and configuring variousnetwork protocols, most of which are named with cryptic acronyms.
TCP/IP
TCP/IP is a protocol, or more accurately, a collection of protocols, used in all Internetcommunications and by most modern LANs. For those of you excited by acronyms, the TCP/IPspecification includes TCP (Transmission Control Protocol), IP (Internet Protocol), UDP (UserDatagram Protocol), and ICMP (Internet Control Message Protocol).
The amazing thing about TCP/IP, and the reason that it serves as the foundation of everyconnection to the Internet, is that data is broken up into packets before it's sent on its way.The packets travel to their destination independently, possibly arriving in a different order thanthe one in which they were sent. The receiving computer then reassembles the packets (in thecorrect order) into data.

TCP Ports
TCP/IP data moves into and out of your computer through ports, which are opened by thesoftware that use your network connection. For example, your email program uses port 25 tosend mail (using the SMTP protocol) and port 110 for retrieving email (using the POP3protocol). Other commonly used ports are listed in Appendix C.
Windows XP typically has more ports "open" than you probably need,meaning that it's vulnerable to spyware, popups, viruses, intruders, andother annoyances. See "Securing Your System on a Network," later in thischapter, for the solution.
IP addresses
An IP address is a set of four numbers (e.g., 207.46.230.218) that corresponds to a single
computer or device on a TCP/IP network. Each element of the address can range from 0 to255, providing 2564 or nearly 4.3 billion possible combinations. On the Internet, dedicatedmachines called domain name servers are used to translate named hosts, such aswww.microsoft.com, to their respective numerical IP addresses and back again.
No two computers on a single network can have the same IP address, but a single computercan have multiple IP addresses (one for each network to which it's connected).
To connect two different networks to each other, while still maintaining two separate sets of IPaddresses, you'll need either a bridge or a router. Provided that you install two networkadapters in your PC, Windows XP can act as a bridge; just highlight two connections in yourNetwork Connections window (discussed later in this chapter), and select Bridge Connectionsfrom the Advanced menu. A router, on the other hand, is a physical device you can use toconnect your LAN to the Internet; since it acts as an effective firewall, though, it's a good ideaeven if you have only one PC.
Firewalls, and why you need one
A firewall can be used to restrict unauthorized access to your system from intruders, closebackdoors opened by viruses and other malicious applications, and eliminate wasted bandwidthby blocking certain types of network traffic.
A firewall is a layer of protection that permits or denies network communication based on apredefined set of rules. These rules are typically based on the TCP port through which the datais sent, the IP address from which the data originated, and the IP address to which the data isdestined.
The problem is that an improperly configured firewall can cause more problems than it ends uppreventing. Windows XP includes a rudimentary firewall feature, described later in this chapter,but software-based firewalls simply don't work as well as hardware firewalls, such as routers.

Switches, access points, and routers
A switch allows you to connect more than two computers together using cables to form a localnetwork (Figure 7-1). (Note that a hub does pretty much the same thing as a switch, but muchless efficiently.) Without a hub or switch, the most you could do is connect two computers toeach other with a crossover cable (discussed later in this chapter).
A wireless access point is essentially a switch (or a hub) for a wireless network, allowing you toconnect multiple computers wirelessly. Without an access point, you could only connect twocomputers wirelessly in "ad hoc" mode (more on wireless access points later in this chapter).
Finally, a router is a device that connects two networks, and routes traffic between them. Forexample, a router can connect a peer-to-peer workgroup to the Internet, allowing you to sharean Internet connection with all the computers in your office (see Section 7.3.2, later in thischapter, for details). Most routers also double as switches, just as wireless routers double aswireless access points. Plus, any modern router (wireless or otherwise) will have a built-infirewall (typically superior to a software firewall that runs on your computer), so you canbasically get everything you need in one inexpensive package.
Now, this book only touches the surface of a large and complex topic, but it should help you get ahandle on the drivers, hardware, and workarounds required to set up some of the more commontypes of networks quickly and painlessly. Maybe, once all the frustrations are whisked away, youmight even have some fun.
7.1.2. Planning Your Network
There are many types of networks and nearly limitless combinations of networking technologies, butfor the purposes of this chapter, most situations can be covered by considering two basic types ofnetwork setups: workgroups and Internet connections. Strictly speaking, there isn't a lot of differencebetween these two, at least as far as Windows XP is concerned. The distinction is made primarily tohelp you plan the topology of your networking environment.
Drawing a diagram of the physical layout of the computers and devices on yournetwork can help you visualize the topology and plan the cables, routers,antennas, and aspirin you'll need to complete the job.
Wiring can vary in complexity and cost, depending on your needs, budget, and the layout of youroffice. (See the Cabling Tips sidebar for additional help.) For example, if you have two or moredesktop computers in the same room, wiring is a simple matter of adding a switch (or hub) and onecategory-5 patch cable for each machine, as shown in Figure 7-1.
Figure 7-1. An example of a peer-to-peer network (LAN) comprised ofthree computers connected with a switch (or hub); the printer is
connected to one of the computers, which shares it with the others

If you only have two computers, you can eliminate the hub and simply connect them with aninexpensive category-5 crossover cable, as shown in Figure 7-2. Total cost: $3.99.
Figure 7-2. A quick-and-dirty hubless workgroup; given its limitations,however, it's best suited as a temporary solution
Cabling Tips
Within a second or two of connecting both ends of a network cable, the correspondinglights on your hardware should light up. Lights should be visible right on the networkadapter, whether it's in the back of your desktop computer or in the side of your laptop.If you are using a laptop and your network adapter requires a dongle, the light may beon the adapter or on end of the dongle. (Note that some devices use multicolor LEDs thatlight green if the connection is correct, and red if it's wrong.)
Connect all your cables while your hub/switch and any other equipment is turned on andWindows is running. That way, you'll see the corresponding indicator lights go on,indicating that the hub, switch, router, or Ethernet adapter has detected the newconnection. Note that the lights only confirm the cabling is correct; they won't tell you ifthe drivers and protocols are correctly installed.
Use only category-5 (Cat-5) patch cables, except for a few specific situations that requirecategory-5 crossover cables. Use a crossover cable to connect two computers directly(without a hub, switch, or router), or to connect multiple hubs/switches to one another.In some cases where a DSL/cable modem connects directly to a computer with a patchcable, a crossover cable may be required to connect either of these devices to a hub orswitch (consult the documentation to be sure). Either way, if the lights go on, you're

using the right kind of cable.
When measuring for cables, always add several extra feet to each cable; too long isbetter than too short. Also, bad cables are not uncommon, so have a few extras aroundin case any of those lights don't light up.
Shop around when looking for cables. Most of the huge mega-computer stores chargetoo much for cables; you can often find longer, better cables at a fraction of the price(sans the fancy packaging) by shopping at smaller mom-and-pop computer stores.
Finally, if your cables are to pass through walls, you may want to install category-5 walljacks for the tidiest appearance. Note that these accessories can be expensive andcumbersome to wire properly, and are typically unnecessary for all but the mostcompulsive neatness freaks among us.
Of course, thanks to wireless technology (e.g., WiFi or 802.11), the whole concept of wiring anetwork can be considered optional. However, there are a few drawbacks. First of all, wirelessequipment is more expensive than simple cabling, and the technology can be temperamental,resulting in a lot of frustration until you get it working.
Wireless networking is not as fast as wired Ethernet. Wireless data istransferred at a maximum throughput of 11 Mbps (or 54 Mbps for "wireless-G"connections), and this speed decreases rapidly as reception worsens. FastEthernet connections allow data to be transferred at 100 Mbps, receptionnotwithstanding. While the speed difference won't matter for an Internetconnection (typical broadband is only about 0.5-1.5 Mbps), an Ethernetconnection will allow you to transfer files between computers in your workgroupin half the time.
The most compelling reasons to use a wireless LAN are portability, distance, and convenience. Awireless LAN adapter in your laptop would mean, for example, that you could have Internet accessanywhere in your house or office, and without having to hassle with wires. (Naturally, your mileagewill vary with any interference or natural obstacles present in your environment). Distance is anissue, for instance, when you'd otherwise have to extend a wire from one end of a building toanother, drilling holes in walls and such. Of course, distance also degrades wireless signals, but thiscan be dealt with by adding aftermarket antennas or a repeater (also called a "range expander").Figure 7-3 shows a typical wireless network with four computers (three PCs and one PDA).
Figure 7-3. A wireless router acts as both a wireless access point and aswitch, allowing you to connect any number of computers (and even
WiFi-enabled PDAs) to form a wireless LAN (WiFi antennas are typicallyinternal, and are shown here only for illustrative purposes)

It's also important to realize that you don't have to commit solely to one technology or another. Forinstance, you can mix and match wireless and wired networks, which may mean only purchasingwireless equipment for laptops, or those computers that would otherwise be very difficult to wire.Figure 7-4 shows a simple peer-to-peer network with two wired desktop computers and a wirelessconnection to a laptop.
Figure 7-4. You can mix and match wired and wireless devices with awireless router; these three computers are on the same network, despite
the different means of connection
There's one crucial aspect of wireless networking that simply doesn't exist on a wired network:intruders. By default, most wireless routers have no security features enabled, meaning that anyWiFi-enabled computer within range can connect to your workgroup and use your Internetconnection. See Section 7.5.1 and Section 7.5.2, both later in this chapter, for help securing yourwireless network and connecting to someone else's unsecured wireless network, respectively.
7.1.2.1 Adding Internet to the Mix
When including an Internet connection, you have several choices. The old-school approach, illustratedin Figure 7-5, involves a single computer connected directly to the Internet (via broadband, dial-up,

or whatever). The aforementioned PC then serves as a gateway (thanks to Internet ConnectionSharing, discussed later in this chapter) and shares the Internet connection with the other computerson the LAN.
Figure 7-5. A simple workgroup with three computers, one of which has ashared Internet connection (see the next section, "Configuring Network
Connections," for the significance of the dotted rectangle)
There are several downsides to Internet Connection Sharing. For one, it can be temperamental andfrustrating to set up. Performance and security leave a lot to be desired, and it tends to be slow.Also, one computer (the gateway) must always be on for the others to have Internet access, and thatcomputer must have two network adapters.
The preferred method is to use a wireless router, as shown in Figure 7-6.
Figure 7-6. A wireless router makes it easy to share an Internetconnection and offers better security than the old-school gateway
approachnote the wireless print server

The router is a sole unit (the little box with two antennas in Figure 7-6) that plays a whole bunch ofvaluable roles on your network:
A switch,
through which a local network (LAN) consisting of wired and wireless computers is built.
A wireless access point,
connecting any number of wireless PCs, handhelds, and other devices to your LAN.
A router,
bridging your local network to the Internet, thus providing Internet access to all the computerson your LAN. Plus, if you're using a broadband connection that requires a username andpassword (e.g., PPPoE), the router will log in automatically for you, and keep you logged in.
A DHCP server,
which automatically assigns IP addresses to computers in your local network (typically startingwith 192.168.1.2, where 192.168.1.1 is the router itself), allowing them to peacefully coexiston your network.
A firewall,
preventing any and all communication from the outside world, except that which youspecifically allow. (This is done through your router's port-forwarding feature.)

A print server,
to which you can connect a USB or parallel-port printer, and print from any computer (withoutsharing).
Historically, the print server tended to be the proverbial straw that broke theproverbial camel's back, in that such all-in-one devices tended to be unreliable.Some people have had great success with routers with built-in print servers,while others haven't been so lucky. For this reason, you may wish to use astandalone (or even wireless) print server, separate from your router.
Routeres are discussed throughout the rest of this chapter. If you don't yet have one, do yourself afavor and pick one up. They're cheap and, as shown here, do quite a lot. Even if you only have asingle PC (no network), the firewall feature of a router provides excellent security, far betterprotection than Windows XP's built-in firewall (even the one that comes with Service Pack 2).
7.1.3. Configuring Network Connections
The Network Connections window, shown in Figure 7-7, is the central interface you use to configurethe networking features in Windows XP. Go to Control Panel Network Connections or right-click the My Network Places icon and select Properties to open the Network Connections Window.
Figure 7-7. The Network Connections window, shown here with thedefault common tasks pane, is where you configure and manipulate all
network resources in Windows XP
If you haven't done so already, select Details from the View menu to see all the pertinentinformation at once. Then, simplify the listing by going to View Arrange Icons by and turn offthe Show in Groups option.

If you don't see Network Setup Wizard or New Connection Wizard here, you'reprobably viewing Network Connections from Windows Explorer (with the folder-tree pane). To fix the problem, go to Tools Folder Options Generaltab, select Use Windows classic folders, and click OK.
As its name implies, Network Connections lists all of the networking connections configured on yourcomputer. In the rather-full example window in Figure 7-7, there are two wired Ethernet connections,one WiFi wireless connection, one analog (dial-up) connection, a IEEE-1394 (Firewire) connection,and a Bluetooth wireless connection. The computer that owns these connections is illustrated inFigure 7-5 earlier in this chapter, the one encapsulated by the dotted rectangle. This rectangle, calleda control volume, shows the scope of Windows XP's awareness of its role in your network.
Windows doesn't care how many computers are on your network, whether your network is wired orwireless, or even what kind of broadband Internet connection you have. The only thing you need toworry about in the context of this window is the individual connections attached to your PC.
7.1.3.1 Part 1: Adding new connections
A connection icon for each network adapter (NIC) installed in your system should appearautomatically in your Network Connections window. Install a new network adapter, andassuming ithas been properly set upit will show up there as well.
Additionally, you might have one or more connection icons for any virtual connections, such as dial-up connections (for your analog or ISDN modem), PPPoE connections (for broadband connectionsrequiring a login), and VPN (Virtual Private Networking) connections. You can add a new virtualconnection by double-clicking New Connection Wizard, or, if you if you have the common taskspane enabled, by clicking Create a new connection. You can also go to Start Run, typeicwconn1, and click OK.
The New Connection Wizard is fairly self-explanatory, but what may not be obvious is that you cannotuse it to add a new hard-wired connection. Instead, as mentioned above, such connections are addedautomatically as soon as Windows detects the corresponding hardware. If you're having troublegetting Windows to recognize a hard-wired network connection, see Chapter 6.
The four options on the first page of New Connection Wizard are:
Connect to the Internet
You'll only need this option to add a dial-up Internet connection or to configure PPPoE (used byDSL or cable connections that require a username and password, as discussed later in thischapter). If you have a high-speed connection with a static IP address (including many DSL orcable connections), you won't need this wizard.
The next page has three choices, the second of which, Set up my connection manually, willbe the appropriate choice in most cases. The first option is basically only for those who wish tosign up for MSN (Microsoft's online service), and the third simply starts the setup program onwhatever CD is inserted in your drive.

Connect to the network at my workplace
This option is only used to set up a remote connection to a business network, either through adial-up connection or through VPN (Virtual Private Networking). See Section 7.4.1, later in thischapter, for details.
Set up a home or small office network
This simply closes the New Connection Wizard and starts the Network Setup Wizard, discussedin the next section.
Set up an advanced connection
The last entry here is used to set up other types of connections, such as PC-to-PC connectionsusing a serial or parallel cable, and setting up your computer as a VPN host (discussed later inthis chapter).
After creating a new connection, rename it so that it is easier to distinguish from any otherconnections you may have. To make other changes to the new connection, right-click it and selectProperties, as described next
Any network connection that can be added with the New Connection Wizard canbe copied by right-clicking and selecting Create copy. Create a copy of a dial-up connection, for example, to set up two similar connection profiles withouthaving to enter all the information twice. Copies are also handy for creatingbackups of connections so that you can experiment with different settingswithout losing a working profile. Note that if you only want to add alternatephone numbers, you can right-click the connection, select Properties, and clickAlternates.
7.1.3.2 Part 2: Working with connection properties
The Network Connections window lists all hardware and software connections currently configured onyour computer. And if you're using the Details view, as shown in Figure 7-7, you'll also see suchpertinent information as the type of connection, whether or not it is enabled and connected, thename of the hardware device to which it corresponds, and a few other useful tidbits.
Right-click any connection icon and then select Properties to view the settings for the particularconnection. This is where most of your network settings will be configured. A typical connectionproperties sheet is shown in Figure 7-8.
Figure 7-8. Right-click a connection and select Properties to view and

modify the settings for the connection
If you've configured your Start Menu to "expand" Network Connections(Control Panel Taskbar and Start Menu Start Menu tab Customize), you can also right-click the menu items right in your NetworkConnections menu and select Properties.
Depending on the type of connection you're viewing, the tabs that appear across the top of the dialogwill vary. In addition, tabs by the same name will have different meanings for different connections,which can make things even more confusing. For example, for LAN or high-speed Internetconnections, the list of the currently installed services and protocols is shown in the middle of theGeneral tab page, but it appears in the Networking tab for any dial-up or broadband connections.Fortunately, the list itself is the same in all situations, and that's what matters. Figure 7-8 shows theentries installed for a typical network connection.

Prioritizing Network Connections and Services
There's a little-known setting you can play with that may improve performance on yournetwork. In the Network Connections window, select Advanced Settings from theAdvanced menu.
The Adapters and Bindings tab allows you to prioritize your network connections. Usethe up and down arrow buttons to the right of the upper list on this page to move theconnection you use most to the top of the list.
Likewise, the Provider Order tab allows you to prioritize your network services. In mostcases, you'll want the Microsoft Windows Network entry to appear at the top of thelist (although it typically won't be there by default), but you can prioritize any service youwish here.
Click OK when you're done; the change will take effect immediately.
Among the usual suspects here are Client for Microsoft Networks, an essential component forconnecting your computer to a Microsoft network, File and Printer Sharing for MicrosoftWindows, the service responsible for sharing files and printers over the aforementioned MicrosoftNetwork, and Internet Protocol (TCP/IP).
Highlight Internet Protocol (TCP/IP) in the list, and click Properties to view the TCP/IPProperties window shown in Figure 7-9. This dialog is used, among other things, to either specify theIP address for static IP connections or to instruct Windows to accept whatever IP address it isassigned.
Figure 7-9. The properties sheet for the TCP/IP protocol allows you toset the IP address, DNS server addresses, and other settings required by
some connections

All network connections that use the TCP/IP protocol (explained at the beginning of this chapter)have an IP address, including your Internet connection and any connections to your local workgroup.However, it's not always necessary to actually set an IP address. Use the following tips to help youdetermine whether or not you need to set the IP address for a particular connection, as well as whichIP address you should use should the need arise.
No two computers on the same network should have the same IP address. Thisapplies to two computers on your local network and two computers on theInternet on opposite ends of the planet.
Internet connection
If your Internet connection has a dynamic (changing) IP address, select the Obtain an IPaddress automatically option and leave the rest of the fields blank. These fields typicallyapply to dial-up connections, as well as DSL and cable connections that require a login with ausername and password (see the discussion of PPPoE, later in this chapter).
In some cases, Windows will be able to detect the IP address and other settings for Internetconnections that have static IP addresses. If Windows cannot auto-detect your settings, you'llhave to enter the IP address, subnet mask, gateway, and nameserver addresses, as providedby your Internet service provider.

Workgroup (LAN) connection
In the example in Figure 7-9, the IP address is set to 192.168.0.1, which implies that this
connection is used to hook the computer up to a Microsoft workgroup. In fact, the entire192.168.0.xxx subnet which includes 192.168.0.1, 192.168.0.2, 192.168.0.3, and so on is
typically used by Windows to form its workgroups.
It's up to you whether or not the computers in your local workgroup have fixed IP addresses. Ifyou leave these fields blank, you'll be relying on your router or switch to automatically assignan unused IP address to your computer each time it's powered on. If you specify fixed IPaddresses for all of the computers in your LAN, it will take a little bit of extra initial effort, butthe reward will typically be a more reliable and responsive peer-to-peer workgroup. Unless youhave a specific reason to do otherwise, you'll usually be better off specifying IP addresses forall the PCs in your LAN.
It's also possible to mix and match static-IP and dynamic-IP computers on the same network,but you'd be asking for trouble. For example, say you have three computers, one set to192.168.0.1, one set to 192.168.0.2, and the third set to nothing. Then, say you boot up thefirst and third computers, and the third automatically assumes the 192.168.0.2 address, since
it's available. The result: when the second computer is eventually booted, it will be unable tojoin the network since its fixed IP address will have already been taken.
It's possible for a computer to have more than one IP address. For example, the right-mostcomputer in Figure 7-5 has two connections: one for the workgroup and one for the Internetconnection. Each connection will have its own IP address, either specified in the TCP/IPproperties window or assigned automatically.
Windows 95/98/Me computers can have trouble connecting to XP machines inthe same network, although, in theory, they're supposed to be compatible withone another. If this happens, try specifying static IP addresses for allcomputers in your LAN, and then make sure that no computers are using theobsolete NetBEUI protocol.
Also of interest in the connection-properties windows is the Advanced tab, used to enable InternetConnection Sharing and Windows XP's built-in firewall feature, both described later in this chapter.
The Authentication tab, found in the properties windows of LAN or high-speed Internet connections,is used only for wireless networks, despite the rather ubiquitous-sounding name. (This has nothing todo with user authentication, which is discussed in Chapter 8.) Likewise, the Security tab, found indial-up and broadband connections, is used only to control how the username and password aretransmitted across the connection, and is not related to any actual security features in Windows XP.
7.1.3.3 Part 3: Connection status and other ways to manipulate network connections
By default, all hard-wired network connections (also known as LAN or high-speed Internetconnections) are enabled when Windows starts, and are connected (if possible).
Dial-up and broadband (including PPPoE) connections, on the other hand, need to be manuallyconnected before they will function. Simply double-click (or right-click and select Connect) to initiate

a manual connection. And when you're done, right-click the entry and select Disconnect.
Double-click any connected connection to view its Status window, shown in Figure 7-10. Among theitems of interest are Duration, which shows how long the connection has been active, and Activity,which shows how much data has been sent and received (in packets). The size of each packetdepends on your MTU setting (discussed later in this chapter), but this value is usually in theneighborhood of 1500 bytes. So, this example Status window shows that 484 packets (roughly 726kb) have been sent and 371 packets (roughly 557 kb) have been received.
Figure 7-10. Double-click a connection icon in the Network Connectionswindow or system tray to view its connection status
If you're working with a wireless connection, the Status window will also show the strength of theconnection signal (up to five little green bars), plus the View Wireless Networks button. See theWireless section of this chapter for more information on the Choose a Wireless Network window.
All connections, by default, have an icon that appears in the notification area (tray) when they'reconnected; double-click this icon to view the Status window, or right-click the icon for other options.To enable or disable the tray icon for any type of connection, right-click the connection in theNetwork Connections window, select Properties, and change the Show icon in notification areawhen connected option (located under the General tab) as needed.
LAN or high-speed Internet connections can be enabled or disabled by right-clicking their icons andselecting Enable or Disable, respectively. (You can also double-click a connection and click Enableor Disable in its Status window.) Disabling devices in this way is the same as disabling them from

Device Manager and has the same effect as physically uninstalling them from your computer.
In addition to Properties, Enable/Disable, and Connect/Disconnect, there are other itemsavailable on some connection icons' context menus, depending on the connection type:
Repair
The Repair command reinstalls the drivers associated with the connection. If a connectiondoes not appear to be working, try disabling it and then re-enabling it (or disconnecting andthen reconnecting, if applicable). If that doesn't work, you can try using the Repair feature,but the odds that it will do anything useful are fairly remote.
Set as Default Connection/Cancel as Default Connection
This option is available only for dial-up and broadband (PPPoE) connections, and is used todecide which connection is "dialed" when Windows needs to automatically connect to theInternet. Go to Control Panel Internet Options Connections tab to configure thisfeature. A black checkmark in a circle will appear over the connection icon for any connectionthat is set as the default.
Bridge Connections
Simply put, a network bridge allows data to be transferred between two (or more) differentnetworks. In effect, a bridge turns your computer into a router of sorts, but with the advantageof allowing you to combine two otherwise incompatible networks. Windows XP supports onlyone bridge at any given time, but a single bridge can contain as many different connections asyou want. Most users will have absolutely no use for this feature. To initiate a network bridge,select at least two connection icons, right-click, and select Bridge Connections (or go toAdvanced Bridge Connections) to create a network bridge between the connections.
View Available Wireless Networks
This opens the Choose a Wireless Network window; see the Wireless section of this chapter formore information.
That about does it for the Network Connections window. You can use the tools in this window to buildand configure your network, as described throughout the rest of this chapter.

7.2. Build a Workgroup (Local Area Network)
As explained earlier in this chapter, Windows is really only concerned with the connections directlyattached to the computer, so building a network or connecting a computer to the Internet essentiallyinvolves hooking things up and then configuring the connections in the Network Connections windowfor each computer involved.
7.2.1. Building a Peer-to-Peer Workgroup
A peer-to-peer workgroup is comprised of two or more computers and the necessary networkinghardware to connect them. Or, in broader terms, you'll need:
At least two computers, each presumably running Windows XP. Naturally, you can connect anXP system to one running any other networkable operating system (Windows 9x/Me, WindowsNT/2000, Mac, Linux, FreeBSD, BeOS, Unix, etc.), but for the purposes of this book, we'llassume both machines are running Windows XP.
At least one Ethernet adapter installed in each computer. NICs are cheap and readily available,and are even built into most modern systems (anything capable of running XP, anyway).
If you're not sure what to get, just purchase a standard, Plug and Play 10/100 Ethernet adapterwith an RJ45 connector (or an 802.11b/g-compliant card if you're going wireless). If you have adesktop system, get a PCI card; if you have a laptop, get a CardBus adapter. USB-to-Ethernetadapters are also available, and while they're easier to install (you don't have to take yourdesktop apart), they tend to be slower and more temperamental than the aforementionedtypes.
Lastly, you'll need a hub (or switch) and two category-5 patch Ethernet cables. Alternately, youcan use just a single category-5 crossover Ethernet cable and skip the hub, but this will limityour network to only two computers. Figure 7-1 shows a workgroup of four computersconnected to a hub (or switch), and Figure 7-2 shows a simpler, hubless LAN with only twosystems. An alternative to the cables and hub is wireless equipment, discussed in Section 7.1.2,earlier this chapter.
Once you have all of the components, you can begin with the following procedure. Naturally, differenttypes of hardware will require a modified procedure, but the methodology is the same.
Plan your network by drawing a quick diagram similar to the ones shown in the figures in thischapter.
1.
Install a network adapter in each computer, according to the instructions that accompany yourhardware.
2.

A connection icon labeled Local Area Connection should appear in your Network Connectionswindow for each installed adapter. See Section 7.1.3, earlier in this chapter, for details onworking with these connections, checking their status, and so on. If the icons don't show up,make sure Windows recognizes your network cards in Device Manager, as explained in Chapter6, and doesn't report any problems with the devices.
2.
Next, hook up your cables (unless, of course, you're using wireless equipment). Nearly allnetwork adapters, hubs, and switches have lights next to their RJ45 ports. When a cable isproperly plugged in to both ends, the lights goes on. If the lights don't go on, you're either usingthe wrong type of cable, you've plugged the cable into the wrong port, or the cable is defective.Until the lights are lit, don't go any further. Hint: Use a different color cable for each computerto make troubleshooting easier. See the discussion of cabling, earlier in this chapter, for moreinformation on the types of cables you'll need.
3.
Go to Control Panel System, choose the Computer Name tab, and click Network ID torun the Network Identification Wizard.
4.
Click Next on the first page, choose This computer is for home use and not part of abusiness network and click Next, and then click Finish.
5.
Next, click Change to open the Computer Name Changes window, as shown in Figure 7-11, andenter something for both the Computer name and Workgroup. The name you give to yourworkgroup should be the same for all computers on your local network, but the computer name(like the IP address) must be different for each computer.
Figure 7-11. You'll need to open the Computer Name Changes dialogto identify your computer on your network
6.
Click OK when you're done; if Windows informs you that you need to restart your computer, do7.
8.

so now. Repeat steps 4-6 for the other computers on your network.7.
Your connection should now be active. Double-click the LAN or high-speed icon corresponding tothe connection to your workgroup to display that connection's Status window, from where youcan determine the IP address of your computer. See Section 7.1.3, earlier this chapter, for anexplanation of IP addresses, as well as how and when to set them manually.
8.
The quickest way to test your connection is to use the Ping utility, which essentially sends smallpackets of information to another computer on your network and reports on its success (if any).
Go to Start Run, and type ping address, where address is the IP address of the othercomputer the one to which you're trying to connect. For example, to ping 192.168.0.1 from thecomputer at 192.168.0.2, you would type:
ping 192.168.0.1
If the network is working, the Ping transaction will be successful, and you'll get a result thatlooks like this:
Pinging 192.168.0.1 with 32 bytes of data:Reply from 192.168.0.1: bytes=32 time=24ms TTL=53Reply from 192.168.0.1: bytes=32 time=16ms TTL=53
If you have more than two computers, you'll want to ping them all since the test only covers thespecific machines involved. On the other hand, if you get this result:
Pinging 192.168.0.1 with 32 bytes of data:Request timed out.Request timed out.
it means that Ping never got a response from the other computer. A failed ping can mean thatthe connection to the computer you're using is not working, the connection to the computeryou're pinging is not working, the remote computer is simply down, or there's some otherproblem with the network.
9.
If, at this point, your network appears to be functioning, you can proceed to set up the variousservices you need, such as file and printer sharing (described in Chapter 8) and Internet ConnectionSharing (described later in this chapter). Otherwise, look through the checklist in the followingsection for possible solutions to the problem you're having.
7.2.2. Troubleshooting Your Workgroup
The following tips should help you get around most of the common hurdles you'll encounter whensetting up a LAN:
Heed the advice at the beginning of Chapter 6: restarting your computer will fix 99% of allproblems. This is never more true than when diagnosing a networking problem.

Run the Network Setup Wizard, as described in "The Network Setup Wizard" sidebar. While thisstep isn't always required, it does occasionally fix errant settings that otherwise would prevent anetwork from working properly.
Try replacing one or more of the cables, especially if they're old or their connectors are worn.
Make sure the appropriate lights are lit. See "Planning your Network" earlier in this chapter for adescription of the way lights work on network devices.
The Network Setup Wizard
The Network Setup Wizard is an optional tool you can use to configure yourconnections to work with your particular network setup. Start it by double-clickingthe Network Setup Wizard icon in your Network Connections window, or byclicking Set up a home or small office network (if the Tasks pane is visible).
The first page of the Network Setup Wizard explains that the wizard will set up anetwork for you, help you set up Internet connection sharing, install a firewall, andshare files and printers. In fact, it will do none of these things; rather, it will simplyensure that some of the necessary protocols are installed and properly configuredfor the type of network to which you are connecting your computer.
In most cases, the Network Setup Wizard is not needed. However, if you're runninginto trouble configuring your network, it can't hurt to try it and see if it catchessomething you may have forgotten. Just answer the questions the best you can,and don't be afraid to choose Other on the Select a connection method page ifthe first two don't apply to your setup.
Note that if the Network Setup Wizard prompts you to create a setup disk for use onother computers, choose Just finish the wizard, as it will be of no use.
When you transfer data across a network connection, each network card and the hub (if youhave one) should have an "activity" light that flashes. Some devices have separate lights forreceiving and transmitting data, while others have only a single light for all incoming andoutgoing communication. Activity lights tend to flash intermittently and irregularly; if they flashvery regularly or not at all, it could be a sign of a problem with one of the devices.
Windows XP is designed to implement most changes you make to your network settings withoutrestarting. However, if you encounter problems, try restarting one or all of your machines toforce them to recognize a newly configured network.
Make sure no two computers on your network are attempting to use the same Computer nameor IP address.
Make sure you have the latest drivers for your NIC (network adapter); check with themanufacturer for details. Note that hubs, routers, and switches typically don't require anyspecial drivers, but most have firmware that may need to be updated to fix bugs or support thelatest hardware and features. See Chapter 6 for more information on firmware.

Right-click the connection icon in the Network Connections window corresponding to yourEthernet adapter, and select Repair. Note that this feature essentially reinstalls drivers, butdoesn't necessarily investigate other sources of problems. It's worth trying if all else fails, butdon't expect any magic.
Some problems are caused by improper hardware settings, usually attributed to the networkcard itself. Open Device Manager (discussed in Chapter 6), double-click the icon for yourEthernet adapter, and choose the Advanced tab. Choose a property in the list on the left andconfigure the selected property on the right. Try not to fuss with any settings you don'tunderstand.
If you're using an older network card that has more than one type of connector (commonlycalled a combo card), only one connector will be in use at any given time. The Windows defaultfor the setting that governs this may be "autodetect," which may impair performance or evencause the device to stop working. Change this option so that it matches the connector you'reusing: for example, choose "coaxial" for round, 10base-2 cables and RJ-45 for the morecommon 10base-T cables.
Another commonly misconfigured setting is the choice between full-duplex, half-duplex, andautodetection. Full-duplex is a connection where information can flow in both directionssimultaneously; half-duplex only allows unidirectional communication. The wrong setting cancause a network connection to malfunction or just operate very slowly, especially with olderadapters. Try experimenting with different settings.
If the Ping test described in the previous section is successful, then your network is working.Other problems you may be having, such as not being able to "see" other computers inExplorer, are not necessarily the result of a network problem that can be solved here. For moreinformation on shared resources, see Chapter 8.

7.3. Connect to the Internet
Although connecting to the Internet is really not any different than connecting to a workgroup, at leastas far as Windows is concerned, you'll typically encounter different types of problems. Use theseprocedures to connect your computer (or your workgroup) to the Internet.
7.3.1. Connection Types
The procedure to initiate an Internet connection varies with the type of connection you wish to establish:
DSL, cable, T1, or other high-speed connection with a static IP address (no username andpassword)
DSL, cable, or other high-speed connection via PPPoE (username and password required)
Connection provided by a router or another computer via Internet Connection Sharing
Dial-up connection, including analog modems over standard phone lines
If your connection doesn't fit neatly into one of the above categories, your setup may still be similar toone of the following sections anyway. Otherwise, you'll need to contact your service provider for specificinstructions and software for Windows XP. Details on each of these connection types are as follows.
7.3.1.1 DSL, cable, or other high-speed connection with a static IP address
High-speed connections with static IP addresses are probably the easiest of the aforementionedconnections to set up in Windows XP.
A static IP address means you have the same IP address on the Internet every time you start yourcomputer. If you're not sure if you have such a connection, check to see if your connection requires ausername and password to log on; if so, you most likely have a PPPoE connection, described in the nextsection. Otherwise, proceed with these steps:
If you're using a router, don't use this procedure. Instead, enter your connection'sIP address directly into your router's setup page (explained later in this chapter).Then, use the procedure later in this section to set up each workstation.
Connect your network adapter directly to the device that supplies your Internet connection,whether it's connected to a DSL adapter, a cable modem, or an Ethernet outlet in your wall. (Ifyou're connecting to a router, see the section on routers later in this chapter.)
1.
Open the Network Connections window, locate the connection icon corresponding to the network2.
3.
adapter plugged in to your Internet connection, and rename it "Internet Connection." Then, right-click the newly named Internet Connection icon and select Properties .
2.
Under the General tab, make sure only the following entries are enabled (checked):
Client for Microsoft Networks
Internet Protocol (TCP/IP)
If there are any other entries enabled here, clear their checkmarks.
3.
Highlight Internet Protocol (TCP/IP) and click Properties . Click the Use the following IPaddress option and enter the IP address, subnet mask, default gateway, and preferred (primary)DNS server and alternate (secondary) DNS server addresses provided by your Internet serviceprovider.
4.
Click OK , and then click OK again; the change should take effect immediately. Test yourconnection by loading a web page or using Ping (as described in the previous section).
If, after completing these steps, Windows ever prompts you to connect to theInternet, go to Control Panel Internet Options Connections tab,and select the Never dial a connection option.
5.
7.3.1.2 DSL, cable, or other high-speed connection via PPPoE
PPPoE is used to establish temporary, dynamic-IP Internet connections over high-speed broadband lines.If your Internet connection has a dynamic IP address, it means your Internet service provider assignsyou a different IP address every time you connect to the Internet. The PPPoE (Point-to-Point Protocolover Ethernet) protocol facilitates this connection by sending your username and password to yourprovider.
If your ISP provides special software that connects to the Internet (such asEfficient Networks's truly awful NTS Enternet 300 software or RASPPPoE), you canabandon it in favor of Windows XP's built-in support for PPPoE, explained here.
One of the differences between this type of connection and the static IP connection discussed in theprevious section is that PPPoE connections must be initiated every time you start Windows or every timeyou wish to use the Internet, which is somewhat like using old-fashioned dial-up connections (discussedin a subsequent section). Such connections are automatically disconnected when you shut downWindows.
If you have a PPPoE connection and you're using a router to share your Internetconnection (explained later in this section), don't use this procedure. Instead,you'll need to enter your username and password into your router's configurationscreen, as described in Section 7.5.1 later in this chapter.

Here's how to set up a PPPoE connection in Windows XP:
If you have PPPoE software (such as Enternet 300) installed, remove it from your system now. Thisis typically accomplished by going to Control Panel Add or Remove Programs . Refer to thedocumentation that came with said software for details.
1.
Open the Network Connection Wizard, as explained in Section 7.1.3 , earlier in this chapter.2.
Click Next to skip the introductory page, choose the Connect to the Internet option, and thenclick Next again.
3.
Choose the Set up my connection manually option, and click Next .4.
Choose the Connect using a broadband connection that requires a user name andpassword option, and click Next .
5.
Type a name for this connection, and click Next . A good choice is the name of your ISP, or just"DSL" or "cable."
6.
Enter your username and password, choose the desired options underneath (if you're not sure, turnthem all on), and click Next .
7.
Click Finish to complete the wizard.8.
To start the connection, double-click the icon you just created in the Network Connections folder. Ifyou elected to create a desktop shortcut in the wizard, double-click the desktop icon.
9.
By default, a Connect dialog will appear at this point. Click Connect to initiate the connection.10.
Here are some tips for working with PPPoE connections.
To skip the Connect dialog, right-click the connection and select Properties (or click theProperties in the Connect window itself), choose the Options tab, and turn off the Prompt forname and password, certificate, etc . option.
To have Windows connect automatically whenever the connection is needed, first right-click theconnection icon and select Set as Default Connection . Then, go to Control Panel InternetOptions Connections tab, and select the Always dial my default connection option.
To have Windows connect automatically when you first start your computer, place a shortcut to theconnection in your Startup folder. You'll also need to make sure that the Prompt for name andpassword, certificate, etc . option is turned off, as described earlier.
If you need to make several similar PPPoE connections, you can save time by right-clicking theconnection you just created and selecting Create Copy . Then, right-click the newly copiedconnection and select Properties to modify it.
If you're having trouble getting your new PPPoE connection to work, check your DSL or cablemodem first to see if the correct lights are lit (refer to your documentation). Sometimes, turning offthe adapter, waiting several minutes, and then turning it back on solves the problem.

If you're using PPPoE in conjunction with Internet Connection Sharing, discussed later in thischapter, and you've found that some web pages won't load on the client computers, see Section7.3.3 , later in this chapter.
7.3.1.3 Connection provided by a router or another computer via Internet Connection
Sharing
If you're using Internet Connection Sharing, described later in this chapter, the setup for the clients (allthe computers on your network, other than the one with the physical Internet connection) is a snap. Thisprocedure is also appropriate if you're using a router to share an Internet connection.
This procedure assumes you've already set up the aforementioned shared Internet connection(facilitated by either ICS or a router), as well as a properly functioning peer-to-peer workgroup, asdescribed in Section 7.2.1 , earlier in this chapter.
Follow these steps to connect a computer to an existing shared Internet connection:
Open the Network Connections window, right-click the connection icon corresponding to thenetwork adapter plugged into your workgroup, and select Properties .
1.
Under the General tab, make sure that at least the following entries are enabled (checked):
Client for Microsoft Networks
Internet Protocol (TCP/IP)
Any other protocols and services enabled here should be left alone, as they may be needed forother purposes.
2.
Highlight Internet Protocol (TCP/IP) and click Properties .3.
If you're not using fixed IP addresses on your LAN (which will be the most common case), selectboth the Obtain an IP address automatically and Obtain DNS server address automaticallyoptions, and click OK . Skip the next two steps, and proceed directly to step 7.
4.
Otherwise, if you've set up your network with fixed IP addresses such as 192.168.0.1 ,192.168.0.2 , and so on (explained in Section 7.1.2 , earlier in this chapter), select the Use the
following IP address option and enter the IP address you wish to assign the machine. (Note thatmost routers use the 192.168.1.x subnet instead of 192.168.0.x .) Remember, this is the IP
address of your computer in your workgroup , not the IP address of your Internet connection.
5.
Type 255.255.255.0 for the subnet mask.6.
For the gateway, type the IP address of the computer hosting the shared Internet connection. Ifyou're using a router to share your Internet connection, type the IP address of the router (refer tothe instructions that came with the router for possible exceptions).
7.
Lastly, type the Preferred (primary) DNS server and Alternate (secondary) DNS server addressesprovided by your Internet service provider. Click OK when you're done.
8.
9.
10.

8.
Click OK , and then click OK again; the change should take effect immediately. Test yourconnection by loading a web page or using Ping (as described earlier in this chapter).
9.
If the connection doesn't work at this point, open the Network Setup Wizard, as described in "TheNetwork Setup Wizard" sidebar, earlier in this chapter. Click Next on the first two pages, andchoose the This computer connects to the Internet through another computer and clickNext on the third page. Depending on your network configuration, the remaining pages will varyhere; answer the questions the best you can and complete the wizard.
10.
If you're able to view some web sites but not others, and you're connecting to a shared Internetconnection facilitated by PPPoE (described in the previous section), you may have to change theMTU setting. See Section 7.3.3 , later in this chapter.
11.
7.3.1.4 Dial-up connection, including analog modems over standard phone lines
Of the connection types listed here, dial-up is the least expensive and probably still the most common.All you need is an ordinary analog modem, a standard telephone line, and a dial-up account with anInternet service provider. You can have as many dial-up connections configured at one time as you like,especially useful if you travel; just repeat these steps for each subsequent connection.
If you're using America Online, MSN, or some other proprietary service, theseinstructions may not apply to you. Contact your service provider for setupinstructions for Windows XP.
Open the Network Connection Wizard, as explained in Section 7.1.3 , earlier in this chapter.1.
Click Next to skip the introductory page, choose the Connect to the Internet option, and thenclick Next again.
2.
Choose the Set up my connection manually option, and click Next .3.
Choose the Connect using a dial-up modem option, and click Next .4.
Type a name for this connection and click Next . A good choice is the name of your ISP, or just"Analog." If you're setting up multiple dial-up connections, choose descriptive names, such as "Onthe road" and "At home."
5.
Enter the phone number for the connection, obtained by your service provider, and click Next .
If your ISP provides two or more phone numbers, you have the option of creating multipleconnections (one for each phone number), or creating a single connection that cycles through a listof phone numbers until a connection is established. If you choose the latter, you'll have theopportunity to enter additional phone numbers for the connection at the end of the procedure.
6.
Enter your username and password, choose the desired options underneath (if you're not sure, turnthem all on), and click Next .
7.
Click Finish to complete the wizard.8.
To start the connection, double-click the icon you just created in the Network Connections folder. If9.
10.

8.
you elected to create a desktop shortcut in the wizard, double-click the desktop icon.9.
By default, a Connect dialog will appear at this point. Click Dial to initiate the connection.10.
Here are some tips for working with Dial-up connections.
To skip the Connect dialog, right-click the connection and select Properties (or click theProperties in the Connect window itself), choose the Options tab, and turn off the Prompt forname and password, certificate, etc . option.
To have Windows connect automatically whenever the connection is needed, first right-click theconnection icon and select Set as Default Connection . Then, go to Control Panel InternetOptions Connections tab, and select the Always dial my default connection option.
To have Windows connect automatically when you first start your computer, place a shortcut to theconnection in your Startup folder. You'll also need to make sure that the Prompt for name andpassword, certificate, etc . option is turned off, as described above.
If you need to make several similar dial-up connections, you can save time by right-clicking theconnection you just created and selecting Create Copy . Then, right-click the newly copiedconnection and select Properties to modify it.
To enter additional phone numbers for this connection (as opposed to making several separateconnections), right-click the new connection icon, select Properties , choose the General tab, andclick Alternates . Use the up and down arrow buttons to the right to change the priority of eachphone number entered; numbers appearing higher on the list will be dialed first. Make sure to turnon the If number fails, try next number option.
7.3.2. Sharing an Internet Connection
Naturally, it doesn't make much sense to invest in a separate Internet connection for each computer inyour home or office. Instead, you can use one of several different methods to share a single Internetconnection among many separate computers.
The first solution utilizes the Internet Connection Sharing feature built into Windows XP. If you used theICS feature found in Windows 98 Second Edition or Windows Me, you'll find that the system in XP makesa lot more sense and is much easier to set up. The advantage to ICS is that it is free; no additionalsoftware or hardware is required, but it does have its limitations. Alternatives to ICS are discussedsubsequently.
7.3.2.1 Setting up Internet Connection Sharing
ICS is a system by which a single computer with an Internet connection acts as a gateway, allowing allother computers in the workgroup to use its connection to access the Internet. The computer that isconnected directly to the Internet is called the host ; all the other computers are called clients .
If you're using Windows XP Home Edition, you can share your Internet connectionwith a maximum of five other computers. If you're using Windows XP Professional,that limit is increased to 10.

In order to get ICS to work, you'll need the following:
At least two computers, each with an Ethernet adapter properly installed and functioning. ICS canbe used with both conventional and wireless networks.
It is assumed you've already set up your local network, as described in Section 7.2.1 , earlier in thischapter. Your Internet connection can be shared with as many clients as your LAN will support.
One of the computers must have an Internet connection properly set up, as described in Section7.3 , earlier in this chapter.
You do not need a special type of Internet connection, nor do you need to payyour Internet service provider extra fees to use Internet Connection Sharing.The whole point of ICS is to take a connection intended for a single computerand share it with several other machines.
There is no minimum connection speed, but you should keep in mind that when two users aredownloading using the shared connection simultaneously (the worst-case scenario), each user willexperience half of the original performance. In other words, you probably don't want to bothersharing a 14.4 Kbps analog modem connection; see the discussion of "Bandwidth" at the beginningof this chapter, and Section 7.3.4 , later in this chapter, for more information.
If you're sharing a DSL, cable modem, or other high-speed, Ethernet-based Internet connection,the computer with the Internet connection must have two Ethernet cards installed. See Figure 7-5for a diagram of this setup.
If your Internet connection is accessed through a router or you've allocatedmultiple IP addresses, you don't need Internet Connection Sharing; see Section7.3.2.3 , later in this chapter, for details.
The first step in setting up ICS is to configure the host, the computer with the Internet connection thatwill be shared:
Open the Network Connections window. If you haven't already done so, select Details from theView menu.
1.
Here, you should have at least two connections listed: one for your Internet connection, and onefor the Ethernet adapter connected to your LAN. If they're not there, your network is not ready.See the tips above for what you need, and try again.
For clarity, I recommend renaming the two connections to "InternetConnection" and "Local Area Connection," respectively, as illustrated in Figure7-7 .
2.
3.

Right-click the connection icon corresponding to your Internet connection, and select Properties .In most cases, it will be the Ethernet adapter connected to your Internet connection device.
However, if you're using a DSL or cable connection that requires a login with a username orpassword, the icon to use is the broadband connection icon corresponding to your PPPoEconnection. See Section 7.3 , earlier in this chapter, for further instructions.
3.
Choose the Advanced tab, and turn on the Allow other network users to connect throughthis computer's Internet connection option, as shown in Figure 7-12 .
Figure 7-12. Any Internet connection can be shared with othercomputers in your workgroup
(For more information on the Firewall option shown here, see Section 7.6.2 , later in this chapter.)
4.
Click OK when you're done. Verify that Internet Connection Sharing is enabled; it should say"Enabled, Shared" in the Type column of the Network Connections window, as shown in theexample in Figure 7-7 .
5.
That's it! The change will take effect immediately. Verify that the Internet connection still works onthe host by attempting to open a web page. If the Internet connection doesn't work on the host, itdefinitely won't work on any of the clients.
6.
The next step is to configure each of the client computers to use the shared connection. The onlyrequirements of the client machines are that they are running an operating system that supportsnetworking and that their network connections are properly set up. The clients can be running Windows

2000, Windows Me, Windows 9x, Windows NT, Windows 3.x for Workgroups, or even Mac OS, Unix,Linux, or FreeBSD.
See Section 7.3 , earlier in this chapter, and follow the instructions in Section 7.3.1.3 . Do this for each"client" machine on your network. While the instructions are specific to Windows XP, the settingsexplained therein can be adapted to any OS; refer to your operating system's documentation for moreinformation.
7.3.2.2 Troubleshooting Internet Connection Sharing
Here are some tips that should help you fix the problems you might encounter with ICS:
If the Internet is accessible by one client machine, it should work for them all. If none of the clientswork, the problem is most likely with the host; if some of the clients work and others don't, it's aproblem with clients that don't work.
ICS works over existing network connections, so those connections must be functioning before ICSwill operate. Refer to Section 7.2.1 , earlier in this chapter, for further troubleshooting details.
Check to see if you have any firewall software installed on the host or clients that might beinterfering with the connection. The Windows Firewall included with XP SP2 (discussed later in thischapter) won't interfere with ICS, however.
The IP address of the host on the workgroup must be set to 192.168.0.1 , or ICS won't work.
Among other things, this means that no other computers can be using that address. If you can'tget ICS to work with the default Windows XP configuration, try assigning a fixed IP address to eachof your clients, as described in Section 7.1.3 , earlier in this chapter.
If you're experiencing poor performance, it's important to realize that whatever bandwidth isavailable though a given Internet connection will be shared among all of the computers activelyusing the connection. The worst-case scenario is when two or more users simultaneously downloadlarge amounts of data; in this case, they would each receive only a portion of the total connectionbandwidth. Bandwidth sharing is dynamic, though, so most of the time you shouldn't notice muchof a decrease in speed.
If you're using special connection software for use with your DSL or cable (such as EfficientNetworks's NTS Enternet 300 software), it's best to remove it and use Windows XP's built-insupport for PPPoE (described earlier in this chapter).
If you're using PPPoE and find that you can access some web sites but not others from the clientmachines, see Section 7.3.3 , later in this chapter.
7.3.2.3 Alternatives to Internet Connection Sharing
The Internet Connection Sharing feature built into Windows XP has its limitations. For example, the hostcomputer must be on and connected to the Internet for the other computers to have Internet access. Ifthis "host" computer crashes or is shut down, Internet access will be cut off for the whole workgroup.This may be a small price to pay, considering that ICS is free, simple, and pretty convenient, but if youdon't want your network's Internet connection to rely on any single computer, you may wish to considerthe following alternatives to see if they make sense for you:

Use a router
A router works similarly to a hub or switch, both discussed at the beginning of this chapter, exceptthat it will also be capable of sharing a single Internet connection with all members of yourworkgroup (and without the arbitrary 5- or 10-computer limits imposed by XP). Routers haveadded advantages, such as built-in firewalls and wireless access points; see Section 7.1.2 earlier inthis chapter for details. Figure 7-13 illustrates a workgroup connected to the Internet with awireless router.
Figure 7-13. Instead of connecting a single computer to the Internetand then sharing the connection, a router allows you to plug an
Internet connection directly into your LAN, providing Internet accessto all your PCs, whether wired or wireless
Just plug your broadband modem into the WAN or Internet port in the back of the router, and thenplug your PCs into any of the numbered ports (or connect them wirelessly, if applicable).
Avoid installing the software that comes with your router, as it will be almostcertainly unnecessary. Instead, open a web browser and go to 192.168.1.1(or whatever IP address your router uses by default), and complete yoursetup there. See the Wireless section later in this chapter for moreinformation, including some important security precautions.
Refer to the documentation that comes with the router for basic setup instructions, and see theSection 7.3.1.3 , earlier in this chapter, for instructions on connecting a Windows XP system to arouter.

If you're shopping for a router, get one with wireless support, even if youdon't need it. Wireless-G (802.11g) is faster than Wireless-B (802.11b), onlymarginally more expensive, and backwards-compatible, so there's littlereason to go with the slower standard. Avoid routers that only work withspecific Internet connections (e.g., DSL, cable), and instead get one that willwork with any connection type.
Use multiple IP addresses
Some ISPs may provide, at extra cost, multiple IP addresses, with the specific intent that Internetaccess be provided for more than one computer. Since each computer has its own true IP address,there's no need for any "sharing" software or hardware. Instead, your hub or switch is pluggeddirectly into your Internet device (DSL, cable, T1, or whatever), and each computer will effectivelyhave its own Internet connection.
Refer to the instructions in Section 7.3.1.1 , earlier in this chapter, to set up each of yourcomputers to access the Internet.
The advantages of multiple IP addresses over ICS or using a router, as described earlier, is thatthe setup is very easy, and no additional hardware or software is required. The downside is thatInternet connections with multiple IP addresses are often much more expensive (in noncorporateenvironments, that is) than standard Internet connections, and provide no additional security. Infact, the added monthly cost will most likely exceed the one-time cost of a router very quickly.
7.3.3. Fix Your Shared Internet Connection with a New MTU
There are some circumstances when a shared Internet connection doesn't quite work as it's supposed to.The problem, where some web pages load and some do not, typically affects client computers thataccess a shared Internet connection facilitated by PPPoE.
Although all web sites will be accessible on the host computer, certain web sites will never loadsuccessfully from any of the client machines. If you don't know what "hosts" or "clients" are with regardto Internet Connection Sharing, you'll want to review the previous section before you proceed. Also, seeSection 7.3.1.2 , earlier in this chapter for more information on PPPoE connections. Note that this appliesto Windows XP's built-in PPPoE support, as well as PPPoE provided by third-party software and evensome routers.
The following solution is intended to fix this specific problem.
Sit down in front of one of your client machines, and type the following:
PING -f -l 1500 192.168.0.1
This assumes that 192.168.0.1 is the IP address of the host computer (or router); substitute the
correct address if it's different. If you don't know the IP address of the host computer, open a
1.
Command Prompt window (cmd.exe ) on the host, and type ipconfig at the prompt. (If a router is
providing your Internet connection, consult the router documentation for details on obtaining its IPaddress.)
You'll probably get an error message indicating that it must be fragmented. (If not, then thissolution doesn't apply to you.) Next, type the following:
ping -f -l 1492 192.168.0.1
If that results in the same error message, try this instead:
ping -f -l 1480 192.168.0.1
If you still get an error, try:
ping -f -l 1454 192.168.0.1
The numbers in each of these examples (1500 , 1492 , 1480 , and 1454 ) are values for the MTU
(Maximum Transmission Unit). Continue issuing this command with lower and lower MTU numbersuntil you get normal ping responses instead of an error message. The highest MTU value that doesnot result in an error is the correct one for your network. It's not unheard of for an MTU as low as576 to be required, although Microsoft recommends no value smaller than 1400 for Windows XP.
2.
Once you've found an MTU that works for you, open the Registry Editor (see Chapter 3 ) on theclient machine.
3.
Expand the branches toHKEY_LOCAL_MACHINE\SYSTEM\CurrentControlSet\Services\Tcpip\Parameters\Interfaces .
There should be several subkeys under the Interfaces key; most likely, you'll find three. View
each key's contents, and find the one that corresponds to your primary network adapter; it will bethe one with more values than the other two, and will have an IP address value set to the IP
address of the machine.
4.
Once you've found the correct subkey, create a new DWORD value in it by selecting New and thenDWORD Value from the Edit menu. Name the value MTU .
5.
Double-click the new value, choose the Decimal option, type the MTU value you earlier in thisprocedure, and click OK .
6.
Close the Registry Editor when you're done; you'll need to restart Windows for this change takeeffect.
7.
Repeat steps 3-7 for each client machine on your network (but not the host).8.
In most cases, this should solve the problem. However, on some systems, you may need to set the MTUin another registry location as well. If you've found that a lower MTU value is what you need, but theabove procedure didn't work, try this as well:
1.

Navigate toHKEY_LOCAL_MACHINE\System\CurrentControlSet\Services\Ndiswan\Parameters\Protocols\0
. If any keys in this Registry path aren't there, just create them by going to Edit New Key
.
1.
Once you're in the key, create a new DWORD value called ProtocolType and give it a Decimalvalue of 2048 .
2.
Then, create a new DWORD value called PPPProtocolType and give it a Decimal value of 33 .3.
Finally, create a new DWORD value called ProtocolMTU and give it a Decimal value of the MTU you
determined above.
4.
Close the Registry Editor and restart your system when you're done.5.
7.3.4. Test Your Throughput
Throughput is the practical measurement of bandwidth: the quantity of data you can transmit over aconnection in a given period of time.
Now, most types of connections are classified for their bandwidth (discussed at the beginning of thischapter); a good ol' 33.6 Kbps modem is so-named because at its best, it can transmit and receive33,600 bits per second. Because there are eight bits to the byte, this connection would give us atheoretical throughput of 4.1 kilobytes per second.
In reality, however, you're not likely to see a throughput any faster than about 3.6 kilobytes per secondwith the connection in this example. That's a difference of about 14%; a file that you would expect totake a minute to download will actually take about 70 seconds. The reason for this discrepancy is thatthere are other things that get transferred along with your data; error correction and lost packetsbecause of noise on the line can make the actual throughput lower as well. Unfortunately, most of thefactors that affect the actual throughput are beyond our control.
Broadband connections, such as DSL, cable, and T1, are also rated similarly and suffer the samethrottling effect, but generally these connections are fast enough that the discrepancy isn't really thatnoticeable.

Throttling Quality of Service
The Quality of Service (QoS) Packet Scheduler is a service included with Windows XPProfessional that, when connected to a QoS-enabled network, reserves about 20% of yourbandwidth for certain applications. Since this could mean that a rather large amount of yourprecious bandwidth is being wasted, you may wish to throttle or disable it. Note that thisdoes not apply to Windows XP Home Edition or any computer connected to a network thatdoes not use the QoS service .
You must be logged into the Administrator account (see Chapter 8 ).1.
Open the Group Policy Editor (gpedit.msc , available in Windows XP Professional only).2.
Expand the branches to Computer Configuration\AdministrativeTemplates\Network\QOS Packet Scheduler .
3.
Double-click the Limit reservable bandwidth entry in the right pane, and choosethe Setting tab.
4.
Select Enabled , and change the Bandwidth limit (%) value to 0 (or whatever
value you prefer).
5.
Click OK and close the Group Policy Editor when you're done. You'll need to restartWindows for the change to take effect.
6.
Note that disabling the QoS Packet Scheduler (by unchecking the QoS Packet Scheduleroption in General tab of the Properties sheet for your network connection) won'taccomplish this.
Among the factors within our control are the hardware and software we use and various settings andconditions in which we work. So it is often advantageous to test the throughput under differentconditions and with different equipment so that you can achieve the best performance.
The simplest way to measure the throughput is to transfer a compressed binary file (such as a large .jpgor .zip file) from your computer to another location and then back again, recording the time it takes tocomplete the transfer each way. Just divide the file size by the transfer time to get the throughput,typically in kilobytes per second.
Note that we test the "upload" as well as the "download" speed. Many types of connections areasymmetrical; 56 K modems, for example, download at around 53.2 Kbps, but upload at only 33.6 Kbps.Likewise, a midrange DSL connection might be rated at 768 Kbps download and 128 Kbps upload. Notealso that you wouldn't want to use ASCII files (such as plain-text files and web pages) to test thethroughput, because compression will yield uncharacteristic results.
Average throughputs for common connection speeds are shown in Table 7-1 .

Table 7-1. Ideal download/upload throughputs for various connectionspeeds
Connection method Ideal throughput (KB per sec)
14.4 Kbps modem 1.6 download, 1.6 upload
28.8 Kbps modem 3.2 download, 3.2 upload
33.6 Kbps modem 3.6 download, 3.6 upload
56 Kbps modem 5.4 download, 3.6 upload
ISDN (dual channel, 128 Kbps) 14 download, 14 upload
Cable Modem (~800 Kbps synchronous) 84 download, 84 upload
DSL (asynchronous 1.2 Mbps/384 Kbps) 128 download, 42 upload
T1, fast DSL (1.5 Mbps) 160 download, 160 upload
Note that you shouldn't fret if your throughput doesn't exactly match the values in the table they're onlyexamples. If you find that you're getting substantially slower performance, however, you should testyour equipment and cabling and see if there's any software that could be interfering with the connection.For example, a noisy phone line is the most common cause of poor performance of a dial-up connection.For DSL or cable, try turning off your modem for a minute or two and then turning it back on.
Do Download Accelerators Really Work?
There are a number of "download accelerator" software products available, all of whichpromise to speed up the transfer of files downloaded to your computer. As you might haveguessed, none of them are actually capable of increasing the bandwidth or throughput ofyour Internet connection. Rather, they employ download managers that compensate forinefficiencies in the download process.
These programs work by downloading a file in pieces, via multiple concurrent downloadstreams (not unlike the TCP/IP protocol that powers the transfer explained at the beginningof this chapter). While two concurrent downloads would each be allotted half the bandwidthnormally consumed by a single download, this boundary only applies when your Internetconnection is the bottleneck. So, in theory, a download manager may improve yourdownload speed if the other computer's connection is slower than yours.
Any speed advantage you notice may be offset by the annoying and cumbersome interfacesthese programs add to the mix, but in the end, the convenience afforded by some of theseprograms' extra features may make them worth the hassle.
Here are a few recommended download managers:
Fresh Download (freeware, http://www.freshdevices.com )

Download Express (freeware, http://www.metaproducts.com )
Free Download Manager (freeware, http://www.freedownloadmanager.org )
Download Accelerator Plus (http://www.speedbit.com )
Be aware that some download accelerators contain spyware (seeChapter 6 ), so use caution when trying an unproven product.
Some programs also can resume aborted downloads, find alternative servers from which todownload your files, and schedule downloads for off-peak times. At the time of this writing,however, there was no "perfect" download manager, or even one that I'd necessarilyrecommend over using no manager at all. But if you're so inclined, you'll probably it findworth the time experimenting with these tools, if only to get some of the aforementionedspecial features.
Another way to test the actual bandwidth of your connection is to visit one of the many bandwidth-testing web sites:
http://bandwidthplace.com/speedtest/
http://www.dslreports.com/stest
In addition to calculating your bandwidth and reporting the results, these services typically ask for yourzip code and connection type to compile statistics on typical connection speeds in your area.
See Chapter 5 for solutions on improving overall system performance, some of which will also have anoticeable impact on your connection speed.

7.4. Stuff You Can Do with a Network
Now that you've get your network functioning, it's time to start taking advantage of the features itprovides. In this section:
Virtual Private Networking
Accessing an FTP Site in Explorer
Controlling Another Computer Remotely
Managing the Nameserver Cache
See the section, Section 7.5, for some cool things you can do with a wireless network.
7.4.1. Virtual Private Networking
Virtual Private Networking (VPN) is a system whereby a workgroup of two or more computers can beconnected by an Internet connection rather than a physical cable. In theory, VPN provides thesecurity and privacy of a closed environment, without the astronomical cost of a private wide-areanetwork.
The technology used in Virtual Private Networking either the Point-to-Point Tunneling Protocol (PPTP)or the Layer Two Tunneling Protocol (L2TP) allows you to create a private "tunnel" across yourInternet connection. With a VPN, you can accomplish tasks previously available only over a LAN, suchas file and printer sharing, user authentication, and even networked gaming. Figure 7-14 illustrates atypical scenario with a tunnel connecting a single computer to a remote workgroup.
Figure 7-14. Form a virtual private workgroup through a tunnel acrossthe Internet

Before you can set up VPN, you need a tunnel server. If you're connecting to a large company, theVPN administrator will provide the necessary settings (and software, if necessary) to establish aconnection. If, however, you're building your own VPN, follow these instructions.
The following process briefly shows how to set up a simple VPN workgroup. Select one of thefollowing procedures, depending on the operating system you're using for the tunnel server: Part 1afor Windows XP, Part 1b for Windows 2000, or Part 1c for Windows NT. Then, Part 2 shows you howto configure a Windows XP machine as a VPN client.
7.4.1.1 Part 1a: Set up the tunnel server (Windows XP Professional only)
Here are instructions on setting up a tunnel server in Windows XP Professional:
Log in as the Administrator.1.
Open the Network Connections window, and double-click New Connection Wizard (or clickCreate a new connection in the task pane to the left).
2.
Click Next when you see the introductory page.3.
Select Set up an advanced connection and click Next.4.
Select Accept incoming connections and click Next.5.
The next page asks you to select devices you want to use for incoming connections. Don't selectanything here; just click Next to skip this step.
6.
Select Allow virtual private connections and click Next.7.
You'll then be presented with a list of configured users. Place a checkmark next to eachusername to whom you wish to grant VPN access, and click Next.
8.
9.

8.
The next step allows you to choose which services, clients, and protocols are allowed withincoming VPN connections. These are the same components you'd use when building aworkgroup (see Section 7.2.1, earlier in this chapter, for details). Highlight Internet Protocol(TCP/IP) and click Properties.
9.
Turn on the Allow callers to access my local area network option, and then specify howyou'd like to assign IP addresses to incoming connections, as shown in Figure 7-15.
Figure 7-15. Windows XP, when set to accept incoming VPNconnections, can act as a DHCP server and assign IP addresses to
remote computers automatically; you can optionally assign a rangeof addresses here
10.
Click OK and then Next when you're done.11.
Click Finish to complete the wizard.
If you're using a router on the server end, you'll need to set up PortForwarding to route VPN traffic to the IP address for your tunnel server.VPN over PPTP uses port 1723, and IPSec uses 500, 50, and 51. If you're
using Windows XP's built-in firewall (described later in this chapter), you'llprobably need to enter these exceptions there as well. See Appendix C formore information on TCP/IP Ports.
12.
7.4.1.2 Part 1b: Set up the tunnel server (Windows 2000 Server/Advanced Server only)
Here are instructions on setting up a tunnel server in Windows 2000, required before you can initiate

a VPN connection with a Windows XP client. See parts 1a and 1c for similar instructions for WIndowsXP and NT 4.0, respectively.
Log in as the Administrator.1.
Double-click the Network and Dial-Up Connections icon in Control Panel, and then double-click the Make New Connection icon. Note that all of the settings in this cumbersome wizardcan be adjusted later by double-clicking on the Incoming Connections icon you're creating.
2.
Click Next, select Accept incoming connections, and click Next again.3.
Place a checkmark next to the network adapter that you use to accept incoming VPNconnections, and click Next.
4.
Select Allow virtual private connections, and click Next.5.
You'll then be presented with a list of configured usersplace a checkmark next to each usernameto whom you wish to grant VPN access, and click Next.
6.
The next step allows you to choose which services, clients, and protocols are allowed withincoming VPN connections. These are the same components you'd use when building aworkgroup (see Section 7.2.1, earlier in this chapter, for details).
7.
Click Next and then Finish when you're done.8.
7.4.1.3 Part 1c: Set up the tunnel server (Windows NT 4.0 Server/Advanced Server
only)
Here are instructions on setting up a tunnel server in Windows NT 4.0, required before you caninitiate a VPN connection with a Windows XP client. See parts 1a and 1b for similar instructions forWindows XP and 2000, respectively.
Log in as the Administrator.1.
Double-click the Network icon in Control Panel, and choose the Protocols tab.2.
Click Add, select Point To Point Tunneling Protocol from the list, and click OK. When askedhow many simultaneous VPNs you want the server to support, choose a nice, big, healthynumber, and click OK.
3.
Next, you'll need to add one or more the VPN devices to Remote Access Service (RAS): choosethe Services tab and select Remote Access Service.
4.
Click Properties, and then click Add.5.
From the RAS Capable Devices list, select a VPN device, and click OK. Once all the VPNdevices have been added, select a VPN port, and click Configure. Check the Receive callsonly option, and click OK.
6.

6.
Repeat this step for each VPN device you've selected. You'll have to restart Windows NT when you'redone.
7.4.1.4 Part 2: Set up the VPN client (Windows XP)
Although there only needs to be one VPN tunnel server, you can have as many clients as you like(that is, until you reach the limit specified in the tunnel server's configuration). Here's how to set upa Windows XP machine as a VPN client:
Open the New Connection Wizard, as described in Section 7.1.3, earlier in this chapter.1.
Click Next on the first page. Select Connect to the network at my workplace on the secondpage, and then click Next.
2.
Choose Virtual Private Network connection, and click Next.3.
Next, choose a name for the new connection (it can be anything you want), type it into theCompany Name field, and click Next.
4.
Since VPN relies on an existing Internet connection, you have the option at this point ofautomatically connecting to the Internet before initiating this VPN connection. If you're using ahigh-speed Internet connection that is always on, choose Do not dial the initial connectionhere. If, however, you're using a PPPoE connection or analog dial-up connection that must bedialed to connect (as described in Section 7.3, earlier in this chapter), choose Automaticallydial this initial connection and then select the desired connection from the list. Click Nextwhen you're done.
5.
The next page is where you specify the network name or IP address of the tunnel server towhich you want to connect. If you didn't set up the tunnel server yourself, you'll have to obtainthe address from your network administrator.
6.
Click Next and then Finish when you're done.7.
To initiate a VPN connection, double-click the new VPN connection icon, enter your usernameand password, and click Connect. As soon as you're connected, you should have access to theadditional resources shared on the remote network; see Chapter 8 for details on accessingremote resources.
If you're using a router on the client side, you'll most likely need to turn onthe IPSec option in your router's setup to get VPN to work. Refer to yourrouter's documentation for details.
8.
Note that in previous versions of Windows, it was necessary to "join" a domain (by going to ControlPanel System Computer Name tab Change) before you could connect to it with VPN.In most cases in Windows XP, this is no longer necessary; check with your system administrator fordetails.
For additional tips for working with VPN connections, such as how to bypass the Connect dialog, see

Section 7.3.1.2 in Section 7.3, earlier in this chapter.
7.4.2. Accessing an FTP Site in Explorer
For years, FTP has been the quickest and most efficient way to move files from one machine toanother across the Internet. Whether you're downloading drivers from a manufacturer's FTP site oruploading HTML files to a web server, FTP is often the preferred transfer method.
To access an FTP server, either to upload or download, you need an FTP application. Windows XPactually comes with three such applications:
FTP, a traditional, command-line-based FTP client (ftp.exe)
Internet Explorer (iexplore.exe) or any web browser, for that matter supports downloading filesfrom FTP servers. Just go to an address like this:ftp://ftp.mozilla.org/pub/mozilla.org/firefox/releases/ to view the contents of the specifieddirectory or download the specified file, as the case may be.
Windows Explorer[1] (explorer.exe) allows you to view any web site as though it were justanother folder and is explained in the rest of this section.
[1] Microsoft and others might contend that Windows Explorer and Internet Explorer are actually the same program.
Personally, I find this to be a matter of semantics (one could argue that all Windows applications are the same program,
for they all share DLLs). For the purposes of this solution, and since both applications have distinctly different interfaces, it
makes more sense to think of them as distinct and separate applications.
Here are three different ways to hook up to an FTP site in Explorer:
7.4.2.1 Solution 1: Open a temporary FTP folder
This procedure is the quick-and-dirty way to open an FTP folder in Explorer:
Open Windows Explorer (explorer.exe).1.
If the Address Bar is not currently visible, go to View Toolbars Address Bar.2.
Type an address into the Address Bar, like this:
ftp://host.com
where host.com is the name of the FTP server. Note the syntax, similar to web page addresses.
Press Enter to log in.
Since you're not specifying a username or password here, Explorer assumes you wantanonymous access (see the "Understanding Anonymous FTP" sidebar). If the specified serverdoes not provide anonymous access, you'll see an error like this:
3.

Windows cannot access this folder . . . User anonymous unknown.
Understanding Anonymous FTP
If you have a personal account on the server to which you're connecting, you'll needto specify your username and password in order to gain access to your personalfiles.
However, many FTP servers also provide "anonymous" access to a special, publicfolder; to log in to this public folder, you just type anonymous for the username and
an email address (or nothing) for the password. When you use a web browser todownload from an FTP server, as described earlier, it's usually done through ananonymous account.
Note that not all hosts are FTP servers, and not all FTP servers allow anonymousaccess.
If you do indeed have an account on the server, select Login As from the File menu, type yourusername and password, and then click Log On.
See the next solution for a way to specify the username and (optionally)the password right in the address so that you don't have to deal with theLog On As dialog.
4.
As soon as you're logged in, you'll see a standard folder and file listing. You can rename, drag-drop, and even delete files and folders, just as though they were on your own hard disk.
The connection will remain active as long as you use it, but will likely become disconnected if leftidle for more than a few minutes. It will also be disconnected when you shut down Windows, butit won't be automatically connected when Windows starts.
5.
When you're done, you can make an Internet Shortcut to this location, using the same methodas you would for a web page. However, if Internet Explorer is not your default FTP client (seeSection 4.3 in Chapter 4), it won't work as expected. See the next solution for a more robustand permanent way to hook up an FTP site to Explorer.
6.
7.4.2.2 Solution 2: Create a more permanent "place" in My Network Places
If you'd like to set up a more permanent FTP connection to use again and again, follow these steps:
Open My Network Places by double-clicking the icon on your desktop or by navigating to it inExplorer.
1.
2.

1.
If you have the common-tasks pane enabled (Tools Folder Options General tab),click Add a network place in the Network Tasks box.
Otherwise, simply double-click the Add Network Place icon.
2.
When the Add Network Place Wizard appears, click Next to skip the intro page.3.
On the second page, you'll be given a choice of service providers. Make sure you select Chooseanother network location here, and click Next.
4.
Next, you'll be prompted for the Internet or network address of the FTP server. If you'reconnecting to an anonymous FTP site, type:
ftp://host.com
where host.com is the address (or IP address) of the FTP server (see Solution 1, earlier). Or, if
you want to log in to a personal FTP account, type:
ftp://[email protected]
Finally, if you want to log in to a personal FTP account, but do not wish to be prompted for apassword, you can specify it here, like this:
ftp://username:[email protected]
Click Next when you're done.
5.
If you didn't specify a username in the address you typed in the previous step, you'll beprompted for one now. Turn off the Log on anonymously option if you wish to specify ausername now; otherwise, leave it enabled and click Next.
6.
On the last page, you'll be asked to type a name for this connection, which will also be name ofthe folder as it appears in Explorer. The name can be anything you want, but it has to conformto Windows file- naming rules (e.g., no slashes, double-quotation marks, etc.).
7.
Click Next and then Finish to create the connection.8.
If successful, you'll see the new entry in your My Network Places folder. Just open it to connectto the FTP site.
Windows provides no simple mechanism of changing the location or otherproperties of an FTP folder, which means that you'll have to delete and re-create an FTP folder in order to modify it. See Solution 3, next, for aworkaround.
9.
The connection created in this solution is simply a folder or, more precisely, a Folder Shortcut(discussed later), located in your \Documents and Settings\{username}\NetHood folder. Ifyou'd prefer that the FTP folder be located elsewhere, open Explorer and move the folder toanother location on your hard disk.
10.

7.4.2.3 Solution 3: Another way to create an FTP folder
The functionality that allows you to link up a folder to an FTP site, as explained in Solution 2 earlier, isessentially that of Folder Shortcuts, as seen in Section 4.4.2. This next solution has essentially thesame result, but shows how to create such a folder manually. This can be useful, for example, whenthe Add Network Place wizard (which can be unreliable) doesn't work. It also lets you modify thelocation of an FTP folder without having to delete and re-create it. Finally, it can be used inconjunction with a WSH script to automate the creation of FTP folders.
Start by following the instructions for making a Folder Shortcut in Section 4.4.2. (You can alsouse the example WSH script in Section 9.4.6, although it will have to be altered slightly toaccommodate FTP shortcuts.)
1.
When it comes time to make the shortcut to a folder, though, make an Internet Shortcut to anFTP site instead. Open your favorite web browserany web browser capable of making InternetShortcuts will doand type the URL address of any valid FTP server, as explained in either of theprevious solutions in this topic.
2.
Once the page loads successfully, create an Internet Shortcut, and name it target.
Because Internet Shortcuts use the extension .url (which is not visible) and we need theextension to be .lnk (also not visible), we must rename the file. And because Windows will notlet you change the filename extension when the extension isn't visible, you'll need to do it fromthe Command Prompt.
3.
Open a Command Prompt window (cmd.exe), and type the following:
cd foldername
where foldername is the full path of the folder containing the target shortcut.
Hint: to save typing, type only cd, followed by a space, and then drag-drop the folder icon (or
even the shortcut itself) right onto the Command Prompt window, and the full path will be typedfor you. (If you dragged the shortcut, you'll have to remove the shortcut filename, target.url,before you press Enter.)
4.
Then, use the ren command to rename the file, like this:
ren target.url target.lnk
5.
Leave the prompt window open, if needed, for the rest of the solution in Section 4.4.2.6.
7.4.2.4 Notes

Regardless of the solution you use, the resulting FTP connection will remain active as long asyou use it, but will likely become disconnected if left idle for more than a few minutes. It willalso be disconnected when you shut down Windows. In either case, Windows will automaticallyreconnect as soon as you attempt to use the folder. Note that there's no way to manuallydisconnect an FTP folder (unless you delete it).
You can access files contained in an FTP folder (created in either Solution 2 or Solution 3) fromany 32-bit Windows application, and even save files there as well.
Create a standard Windows shortcut to a subfolder of an FTP folder (created in either Solution 2or Solution 3), and place it in your Send To folder (typically \Documents andSettings\{username}\SendTo). That way, you can right-click one or more files or folders, anduse the Send To menu to quickly copy the selected items to the FTP location.
The FTP protocol does not use encryption or any other method of security, which not onlymeans that your data will not be transferred securely, but your username and password willalso not be encrypted when you log in. More secure alternatives include Web Folders, describednext; Virtual Private Networking, described earlier in this chapter; or a program that supportsSCP (Secure Copy Protocol).
Windows also supports a protocol called Web Folders, which works very similarly to the FTPfolders feature described here. Although Web Folders also support encryption, very few serverssupport the WebDAV (Web Distributed Authoring and Versioning) protocol, which means you'llmost likely want to stick with FTP or SCP (see Table 7-2).
There are other programs you can use for transferring files (FTP and otherwise), any of whichmay be more or less convenient than Explorer, depending on your needs. See Table 7-2 for alist of alternatives.
Table 7-2. These programs can be used instead of Windows built-insupport for FTP
Product Notes
Creative Element PowerToolshttp://www.creativelement.com
Comes with a context-menu add-on that allows youto right-click any number of files, select FTP To, andquickly transfer them to a custom FTP location.
WS_FTPhttp://www.ipswitch.comAlthough it's a rather old-school implementation ofFTP, it's side-by-side layout can be extremelyconvenient for those who use FTP frequently.
SSH Secure Shell forWorkstationshttp://www.ssh.com
A secure terminal (replacement for Telnet), whichalso comes with an SCP (secure copy) client.
WinSCPhttp://winscp.vse.czAn implementation of SCP, it uses a convenient side-by-side layout similar to WS_FTP.
7.4.3. Controlling Another Computer Remotely(Just Like in the Movies)

A network is good for much more than simply transferring data. Although Windows does let youtransfer files to and from other computers in Explorer (see Chapter 8), it's a far cry from actuallysitting in front of the remote computer.
One of the severe limitations of the Windows platform is that only one user is allowed to operate thecomputer at any given time. Unix, on the other hand, allows many simultaneous remote users (evenin addition to a user sitting right at the workstation), each with their own graphical X-Windowsterminal connection.
Enter the new Remote Desktop feature in Windows XP. Although it still does not allow more than onesimultaneous user per machine, it does allow you to view the desktop of another Windows XPcomputer on your network or over the Internet, just as though you were sitting in front of it.
There are almost limitless uses to this technology; a few examples include:
Do you travel frequently, yet prefer to use a desktop (nonportable) computer at home? Ratherthan duplicating all your programs, documents, and settings on a laptop, or trying to carry allyour files and programs with you to use on someone else's computer, just use Remote Desktopto connect to your home computer from the road, and check your email, fax, etc., as thoughyou were sitting at your own desk.
Do you need to access your work documents and programs while you're at home, or accessyour home documents and programs while you're at work? Use Remote Desktop to bridge thelink and stop worrying about carrying so much stuff back and forth to work every day.
Are you the person family members and friends call with their computer problems? Instead ofspending hours on the phone, trying to explain to them how to fix their computers, just connectwith Remote Desktop and fix the problem yourself in minutes.
Do you administer several computers in different locations? Rather than having to go to theother side of the building (or the other side of the state) to access a computer, use RemoteDesktop and get it done in half the time.
Are you a software developer? If you need to test your software on different operating systemsor platforms, it simply isn't practical to use a multiboot computer;[2] you'll just spend all yourtime rebooting. Instead, set up a second (or even third) computer with the necessary testenvironments, and then control them remotely right from your development machine.
[2] See Chapter 1 for information on setting up more than one operating system on a single PC.
Well, now that this chapter has essentially become a commercial for Remote Desktop, here are someof the disadvantages. First of all, while both Windows XP Home and Professional editions can beRemote Desktop "servers," only XP Professional can be used as a "client" to access remotecomputers. And although you can use Remote Desktop with some previous versions of Windows,you'll need a different program (like VNC, discussed later in this chapter) to remotely access Mac andUnix machines.
You'll also need a relatively fast connection to use remote control software like Remote Desktop,since a lot of data is transferred to update the screen image. For example, a direct Ethernet (LAN)connection will provide nearly instantaneous response rates, while a DSL or cable connection will be alittle more sluggish. Don't even bother using Remote Destop over an analog (dial-up) connection,though.

Overall, the technology included with Windows XP is pretty good. It's not entirely new, however; thesame feature, called Terminal Services, is included in Windows 2000. It's also not your only choice;see the discussion of alternatives at the end of this section for more information.
Here's how to use the Remote Desktop feature built into Windows XP.
7.4.3.1 Part 1: Enable the Remote Desktop server
Allowing others to connect to a computer with Remote Desktop is easy. Use the following steps to setup your own computer to be accessed remotely, or you can read them over the phone to the ownerof a computer you wish to access remotely.
Go to Control Panel System Remote tab.1.
Turn on the Allow users to connect remotely to this computer option.2.
By default, all users currently configured on the machine can connect to it remotely. If you wishto restrict access to only certain users, click Select Remote Users. See Chapter 8 for moreinformation on user accounts.
3.
Also available in this window is the Remote Assistance option; see the "Using RemoteAssistance" sidebar for details.
Using Remote Assistance
The Remote Assistance feature is optional, but can make it easier for lessexperienced users to transmit the required information to the person who will beaccessing their computer remotely, including the IP address and user account.
Turn on the Allow Remote Assistance invitations to be sent from thiscomputer option, and then click the Remote Assistance link in this window toopen the Remote Assistance dialog (or launch rcimlby -launchra). Here, you have
the option of using Windows Messenger (MSN or .NET passport account required) oryour default email program (set in Control Panel Internet Options Programs tab) to send the invitation. In most cases, email will be the best choice.When asked to type a personal message, just leave it blank. The final option is tochoose a special password for the person connecting to your computer, useful if youdon't want to give them your normal password.
Since these "invitations" can be a security hazard, there are two safeguards in placeto automatically disable the feature after a specified amount of time. In the Remotetab of the System Properties dialog, click Advanced to disable the featurecompletely after a few days. Plus, when sending an invitation, you can configure itto expire only an hour or two after being sent.
4.
5.

Click OK when you're done.
If you're using a router and you're connecting across an Internetconnection, you'll have to set up your router's port- forwarding feature topermit this service. This allows your router to "route" incoming signals(from port 3389) to the IP address of the computer of your choice. Ifyou're using Windows XP's built-in firewall, you'll need to include anexception for port 3389 there as well. See Appendix C for moreinformation on TCP/IP Ports.
5.
7.4.3.2 Part 2: Connect to a remote computer
Once you've set up a machine to accept remote connections, follow these steps on the client side toconnect to that computer remotely:
Start Remote Desktop Connection (mstsc.exe).1.
The default Remote Desktop Connection dialog is very simple, with only a single field. Thistypically will not be adequate, however, so click Options to display the full dialog, shown inFigure 7-16.
Figure 7-16. Use Remote Desktop Connection to initiate a connectionto another computer and view and interact with its desktop as
though you were sitting in front of it
2.

If you're connecting to another computer in your workgroup, type the name of the computer inthe Computer field, or if you're connecting to another computer on the Internet, type its IPaddress here.
3.
Next, type the User name and Password of a valid user account on the remote computer. TheDomain field is only used if you're connecting to a computer in a Windows NT/2000 domain;leave it blank otherwise.
4.
If you're connecting to someone else's computer, you'll have to get their IP address, plus theusername and password of an account on their computer (see Chapter 8).
The easiest way to get someone else's IP address is to ask them to visithttp://www.annoyances.org/ip, and then have them read aloud thenumbers on the page or email them to you. This is usually easier (andmore foolproof) than other methods, such as using the NetworkConnections window or typing ipconfig at the Command Prompt.
Finally, you can have the remote user send you an invitation using Remote Assistance,described in the Using Remote Assistance sidebar. When you receive your invitation via email, itwill come with a file attachment, rcBuddy.MsRcIncident, which you can double-click to initiate aconnection to the sender's computer.
5.
The rest of the options in this dialog are optional. The settings in the Display and Experiencetabs deal with performance issues, and the Programs tab lets you start programs on theremote computer automatically. The Local Resources tab has similar options, plus a Local
6.
7.

devices section, which lets you share remote drives, printers, and even serial ports.
6.
If you plan on reconnecting to the remote computer at a later time, click Save As to create an.rdp file with all the information in this dialog. You can subsequently double-click the file toinitiate a connection, or right-click and select Edit to modify its properties.
Keep in mind that many users' Internet connections use dynamic-IPaddresses, explained earlier in this chapter, which would mean that savingsomeone's IP address would be pointless.
7.
Click Connect to initiate a connection to the remote computer. If all is well, a window willappear with an image of the desktop of the remote computer. You can interact with this desktopby pointing, clicking, and dragging, just as if you were sitting in front of it.
8.
Simply close the window or go to Start Disconnect (in the Remote Desktop window, not inyour own Start Menu) to close the connection.
9.
7.4.3.3 Notes
Since Windows can only have one user logged in at a time, as mentioned at the beginning of thissection, the user currently logged in to the remote computer will be automatically logged out to makeway for the remote connection. This poses a significant problem if you wish to use the remotecomputer with its owner watching. VNC, described below, overcomes this limitation.
The Telnet service (enabled through services.fmsc) does allow multiple users tolog on to a single Windows XP machine simultaneously. But since Telnet is littlemore than a Command Prompt window accessed remotely (via telnet.exe), itdoesn't allow you to control any Windowed applications.
As suggested in the final step, above, a new item will appear in the remote computer's Start Menu,Disconnect. This takes the place of the Shut Down (or Turn off Computer) command normallyfound here. A consequence of this is that there's no obvious way to shut down a remote computer;this is obviously done intentionally, since a shut-down computer will not accept remote connections.To shut down a remote computer, open a Command Prompt window (cmd.exe) on the remotemachine, and type:
shutdown -s -t 5
where 5 is the number of seconds to wait before shutting down; specify 0 here to shut down
immediately.
It's helpful to have the resolution of the remote desktop lower than the resolution of the localdesktop. That way, you'll be able to see the entire remote desktop and still be able to use the localcomputer's desktop. For example, if you're using a computer with a display resolution of 1280 1024,set the remote desktop to no more than 1024 768. Use the Display tab of the Remote DesktopConnection dialog to set the desktop size; note that this setting will have no effect on the remote

computer's normal desktop size.
As nice as it would be to drag files into (and out of) the Remote Desktop window to transfer them,the Remote Desktop feature doesn't include any provision for transferring files. Instead, you'll needto use more traditional means of transferring files. If the remote computer is on your own LAN, youcan drag and drop files right in Windows Explorer, as described in Chapter 8. Otherwise, if you'reconnected to the remote computer over the Internet, you'll either need to set up VPN to mimic aworkgroup (described earlier in this chapter) or use FTP.
7.4.3.4 Alternatives to Remote Desktop Connection
Remote Desktop Connection is not your only choice when it comes to controlling a computerremotely. Since it's built into Windows XP, though, it's obviously a very convenient and cost-effectivesolution; if you want more flexibility or if you want to control (or be controlled by) a PC running adifferent operating system, you may wish to use a different program.
Although there are several commercial alternatives available, one of the best is a free program calledVNC, available from http://www.realvnc.com/. Among other things, VNC has the advantage of a verysmall "viewer" executable. That is, the client software, used on the remote system to access thehost, is only a single file, small enough to fit on a floppy. This makes it easy to carry it around withyou and run it on any machine you come across with an Internet connection.
One of the drawbacks of Windows's Remote Desktop feature is that the personwhose computer is being controlled won't be able to see their own desktopduring a Remote Desktop session. VNC, on the other hand, runs transparentlyon the host computer, so that both people can see and interact with the samedesktop simultaneously.
VNC also works on any version of Windows, Macintosh, UNIX, Linux, or FreeBSD, in addition to goodol' Windows XP. Someone has even made a Palm-based client(http://www.btinternet.com/~harakan/PalmVNC/), allowing you to control a remote computer froman Internet-enabled handheld device!
Otherwise, the system requirements are basically the same as Remote Desktop, described earlier inthis section. You'll still need the remote computer's IP address, and some way of logging in to theremote computer. VNC has its own user-authentication system, while others such as pcAnywhere(http://www.symantec.com) use existing Windows user accounts.
Windows XP's Remote Desktop feature, when enabled, will remain enabled even if the computer isrestarted. But third-party programs must be specifically configured to start automatically withWindows, in case the computer crashes or the power goes out. If the software you're using has anoption to be started as a "service" (accessible in services.msc), you'd be wise to use it rather thanadding it to your Start Menu's Startup folder. (VNC has such an option.)
If you run into a problem getting Remote Desktop or VNC working through a firewall, proxy, orrouter, or you simply need to get a connection up and running fast, you have another option.GoToMyPC (http://www.gotomypc.com) is a web-based service that tends to work when the othersfail. Short sessions are free; longer sessions require a paid subscription.

7.4.4. Managing the Nameserver (DNS) Cache
As mentioned a few times elsewhere in this chapter, a nameserver is a machine that translates IPaddresses to domain names and back again. For example, when you type http://www.oreilly.cominto your web browser's address bar, Windows sends a request to your service provider'snameserver, and the nameserver responds with something like 209.204.146.22, allowing your
browser to contact the web server directly and download the requested page.
Each time such a DNS (Domain Naming System) lookup is performed, the information is stored in theDNS cache so Windows doesn't have to query the nameserver every time you access a page on thatsite. The DNS cache is emptied when you shut down Windows.
The following solutions allow you to change the way Windows interacts with its DNS cache, and willaffect all applications that access the Internet (not just your web browser).
7.4.4.1 Part 1: Increase the size of the DNS cache
A larger DNS cache will mean fewer trips to the nameserver, and faster overall performance:
Open the Registry Editor (see Chapter 3).1.
Expand the branches toHKEY_LOCAL_MACHINE\SYSTEM\CurrentControlSet\Services\Dnscache\Parameters.
2.
Add the following four DWORD values by going to Edit New DWORD Value. Then,enter the numeric values specified by double-clicking and selecting the Decimal option:
CacheHashTableBucketSize, set to 1
CacheHashTableSize, set to 384
MaxCacheEntryTtlLimit, set to 64000
MaxSOACacheEntryTtlLimit, set to 301
Remember, these are Decimal values (not Hexadecimal values).
3.
Close the Registry Editor when you're done. You'll have to restart Windows for this change totake effect.
4.
7.4.4.2 Part 2: Add a permanent entry to the DNS cache
When you add a permanent entry to the DNS cache, it will always override the information providedby the nameserver. Here are a few reasons why you might want to do this:
If a nameserver gives the wrong address for a domain or provides no information at all, you can

still access the domain if it's listed as a permanent entry.
A permanent entry with intentionally incorrect information will block requests sent to thecorresponding servers. This can be an effective way to prevent some web sites from trackingyou, stop some "spyware" software from recording your personal information, and even stopsome pop-up ads when you visit web pages. A list of known "tracking" hosts can be downloadedfrom http://www.accs-net.com/hosts/.
If you frequently access a particular server, and you know its IP address isn't likely to changeanytime soon, you can add a permanent entry to eliminate the initial delay as Windows looks itup. For example, add an entry for your mail server to decrease the time it takes to check youremail.
If you frequently visit a remote server without a domain name (accessing it only by its IPaddress), you configure a custom domain name, for your use only, to be used as a kind of"shortcut" to the server.
Providing incorrect information here can prevent you from accessing certainremote servers. Use care when modifying the permanent DNS entry table.Coincidentally, some malware (see Chapter 6) adds entries to your DNS cache,such that you'll be intentionally redirected to the wrong server when you try tovisit some web sites.
Here's how to create and modify the list of permanent DNS entries:
Open Explorer, and navigate to the \windows\system32\drivers\etc folder.1.
Look for a file called hosts (no filename extension). If it's not there, create it by going to File New Text Document, and typing hosts for the filename.
2.
The hosts file is just a plain-text file; open it in your favorite text editor (or Notepad).3.
A standard entry looks like this:
207.46.230.218 www.microsoft.com
The first part is the IP address, and the second part (separated by a tab or several spaces) isthe domain name.
Keep in mind that variations, such as www.microsoft.com and microsoft.com, aren't necessarilythe same server, and represent different DNS entries. You'll need to add a separate hosts entryfor each variation if you want to access them all, like this:
207.46.230.218 www.microsoft.com207.46.230.218 microsoft.com
Using this syntax, add an entry for each domain you wish to hard-code into Windows's DNStable. Note that these addresses affect your machine only; other machines, such as those in
4.
5.

your workgroup or others on the Internet, will not be affected.
You may also see some lines that begin with the # character. These are comments, and are
ignored by Windows.
5.
Save the hosts file when you're done. The change should take effect immediately.6.
The next time you type one of the web addresses listed in your hosts file, Windows will use the IPaddress you've specified instead of contacting the DNS server.

7.5. Go Wireless
If you're on a wireless network and you're not using Windows XP Service Pack 2, it means you're stillsuffering with the weak WiFi support built into the original release of Windows XP. Go ahead andupgrade to SP2 now; don't worry, I'll wait.
{Sounds of fingers tapping and whistling off-key.}
Got it? Good. The solutions in this section show you how to set up a simple wireless network andconnect that network to the Internet, as well as connect your wireless devices to other people'swireless networks, and prevent others from sneaking on to your network. All of this is possiblewithout wires, and the most amazing thing is that it actually works.
If you want to do a whole lot more with your wireless network, check outWireless Hacks (O'Reilly). Among other things, it shows you how to extend therange of your wireless network from a few yards to several miles with home-made antennas. Very cool.
7.5.1. Set Up a Wireless Router
If you've read other solutions in this chapter, you've probably seen routers mentioned several times(if not, drop back to Section 7.1.2 to read up).
A router allows you to connect your computer (or your workgroup) to the Internet, whilesimultaneously protecting you with its built-in firewall. A wireless router does the same thing, but italso adds a wireless access point, allowing you to connect any number of WiFi devices to each otherand to the Internet.
A typical WiFi setup is shown in Figure 7-3 (see, no wires), but you'll probably want something closerto the setup shown in Figure 7-6, in which a wireless router provides Internet access to all yourcomputers. Here's how to set this up and configure the security measures that should have beenenabled out of the box:
Plug your DSL or cable modem (or whatever broadband connection you're using) into yourrouter's WAN or Internet port.
1.
Plug one or more computers into the numbered ports on your router. Or, if you want to connectwirelessly, see Section 7.5.2 later in this chapter.
2.
Dispense with the software that comes with your router. Instead, open a web browser on one ofthe computers and type the IP address of your router into the address bar. In most cases, thisis 192.168.1.1, but your router may be different; refer to your router's documentation for
details. (You may also need to log in with a username and password at this point.)
3.
4.

Assuming your connection to your router is working, your router's setup page will looksomething like the one in Figure 7-17. Of course, your router's setup page will probably lookdifferent, but most of the same settings will still be there.
Figure 7-17. Most routers use a web-based setup, meaning that youcan configure your router from any computer, running on any
platform, as long as it has a web browser
If you can't connect to your router, the most likely cause is that yourcomputer is not on the same subnet as the router. The first three numbersof your computer's IP address must mach the first three numbers of yourrouter's IP address, but the fourth number must be different. For instance,if your router is at 192.168.0.5, then the example here won't work;change the IP address of your computer to somethjng like 192.168.1.17
to connect to the router. Of course, you can try the Obtain an IP addressautomatically in your TCP/IP settings as described in Section 7.1.3 earlierin this chapter, but this doesn't always work.
4.
Choose your connection type from the list. If your Internet connection requires a username andpassword, select PPPoE. If your ISP has provided an IP address for your connection, selectStatic IP. Otherwise, choose Automatic Configuration - DHCP.
5.
6.

5.
If you've selected PPPoE or Static IP, you'll probably need to enter the IP addresses of yourISP's DNS servers (your ISP should provide these numbers for you).
6.
Click Apply or Save Settings at the bottom of the page when you're done.7.
At this point, you should have Internet access; go ahead and test it by opening a secondbrowser window (Ctrl-N) and visiting any web site.
8.
Next, go to your router's wireless setup page. This is either a link in the main menu or a tabacross the top of the page, as shown in Figure 7-18.
Figure 7-18. Use your router's wireless setup page to configure thesecurity settings for your wireless network
9.
Choose a new name (SSID) for your wireless network, and turn off the Wireless SSIDBroadcast option.
Your SSID is the backdoor into your wireless network. If you broadcastyour SSID, anyone with an SSID sniffer will be able to find it in a matter ofseconds (see Section 7.5.2 later in this chapter), and connect to yournetwork. The same danger exists if you use your router's default; probablya million people around the globe are using the SSID "linksys," whichmakes it a good guess for anyone trying to gain access to your network.
10.
Next, you'll want to set up encryption for the best wireless security. This page will either beaccessible through a button on the current page entitled WEP or Encryption, or (in the case ofthe example in Figure 7-18), a separate tab. Make sure to click Apply or Save Settings on thispage first, if needed.
WEP, or Wireless Encryption Protocol, prevents anyone from connecting to or spying on your
11.

wireless network unless they have your WEP key. Figure 7-19 shows a typical WEP setup page.
Figure 7-19. Configure your wireless router's WEP settings to preventothers from connecting to your wireless network without your
permission
Choose WEP for the security mode (if available), and then choose the highest WEP encryptionlevel supported by your router (here, it's 128-bit). Higher levels provide better protection, butalso mean longer (and harder to type) WEP keys.
12.
Some routers allow you to choose a passphrase, a word on which the WEP keys are based.Although Windows XP doesn't support the passphrase, some third-party devices do. In theexample shown in Figure 7-19, I typed annoyances and clicked Generate to create the 26-digit
WEP keys.
13.
Once you commit this change, you'll need to enter one of the keys that appear here into eachcomputer that connects to your wireless network, so take this opportunity to record the keybefore you save changes.
Highlight the first key (Key 1), and press Ctrl-C to copy it to the clipboard. Then, open yourfavorite text editor (e.g., Notepad), and press Ctrl-V to paste it into a new, empty document.Save the file on your desktop; this will allow you to easily paste it into various dialog boxes lateron, which is easier than having to type it.
14.

If you enable WEP for your wireless network, but you subsequently can'tconnect to it wirelessly, it most likely means that you've gotten the WEPkey wrong. To fix the problem, you'll have to either connect to it with acable and change the settings or, as a final resort, reset the router asdescribed in your router's documentation.
Click Apply or Save Settings at the bottom of the page when you're done.15.
See the next section, Section 7.5.2, for help connecting your computer to your (or someone else's)wireless network. See Section 7.5.4, later in this chapter, for ways to take advantage of your newwireless network. See the Router Placement 101 sidebar for ways to improve reception (and thusperformance of your wireless network).
Router Placement 101
The tiny WiFi transceiver in your laptop should be capable of picking up any wirelessnetwork within about 100 feet. If indoors, this typically includes no more than about 2 or3 walls, and perhaps one floor or ceiling. But the placement of your wireless router andthe arrangement of natural obstactles near it will have a significant effect on the strengthand range of your WiFi signal.
Assuming you're using a setup like the one pictured in Figure 7-6, your router will needto be within spitting distance of your DSL or cable modem. But provided that the cablefrom your modem to your router is long enough, you should have a little leeway here.
Your router should be out in the open; don't put it under your desk, in a drawer, orbehind a metal file cabinet. If you're feeding more than one computer, it should beplaced in a central location, if possible. Use the signal strength indicator (Figure 7-10) totest various configurations. Consider cabling stationary computers so that you canoptimize the placement of the router for your portable ones.
Both the 802.11b and 802.11g standards operate over the 2.4Ghz band, which is alsoinhabited by cordless phones and microwave ovens. (The black sheep of the family,802.11a solves this problem by using the 5Ghz band, but its short range and limitedcompatibility make it an unpopular choice.) This means that you'll get better results ifyou move the router away from any cordless phone base stations, televisions, radios, orTV dinners.
If, after adjusting the placement of your router, you still need more range that it seemsto be able to provide, consider either a repeater (range extender) or an aftermarketantenna.
7.5.2. Sniff Out WiFi Networks
Probably the most significant change in SP2 is the substantial improvement of the WiFi support built

into Windows XP. The centerpiece of these improvements is the "Choose a wireless network" windowshown in Figure 7-20.
Figure 7-20. The WiFi sniffer in Windows XP SP2 lets you connect to anyavailable WiFi network
A WiFi sniffer is a program (or device) that scans for and lists the WiFi networks within range. This iswhere the Broadcast SSID setting discussed in the previous section, Section 7.5.1, comes into play. Ifyou're broadcasting your SSID, any sniffer within range will see it.
In the Network Connections window, double-click an unconnected Wireless connection to open the"Choose a wireless network" window. (You can also right-click the icon in your system tray orNetwork Connections window and select View Available Wireless Networks.) Windows XP willautomatically perform a scan and display the results; in all, it should take less than 5 seconds. ClickRefresh network list to repeat the scan.
To connect to a network in the list, highlight it and click Connect. If no security is in effect, Windowswill establish a connection without any further ado. But if there's any WEP encryption, you'll be askedto type a WEP key. Note the little padlock next to the first network listed in the dialog box in Figure7-20, which tells you that the only network with encryption is annoyances; you'll be able to connect
to the other networks without any special permission or additional information.
7.5.2.1 Sniffing hidden networks
But what if you've turned off the SSID broadcast feature, as described in Section 7.5.1 earlier in thischapter? If your network doesn't show up in the list, simply click Set up a wireless network for ahome or small office (on the left side of the "Choose a wireless network" window shown in Figure7-20). This will start the Wireless Network Setup Wizard (which is also accessible through MyNetwork Places).
Click Next and then type your network's SSID in the Network name (SSID) field, as shown in

Figure 7-21.
Figure 7-21. You'll need to run the Wireless Network Setup Wizard toconnect to your wireless network if you've opted not to broadcast your
SSID
If you've enabled WEP encryption, select Manually assign a network key and click Next. On thenext page, type (or paste) your WEP key into the Network key field.
As illustrated in Figure 7-19, many routers allow you to set more than one key; unless you havespecific reason to do otherwise, just use the first one (Key 1) in Windows XP.
The length of the key you type is shown to the right of the field. If you're using 64-bit encryption, thekey will be 10 characters long (or 5 if you're not typing hex codes); if you're using 128-bitencryption, the key will be 26 characters long (or 13 if you're not typing hex codes).
Unless you enjoy typing incomprehensible hex codes, turn off the Hidecharacters as I type option. Then, highlight the text in the Network keyfield, press Ctrl-C to copy it to the clipboard, click in the Confirm networkkey field, and press Ctrl-V to paste a copy of the key. If you stored your WEPin a text file, as suggested in Section 7.5.1, you can paste it into both boxeshere, and avoid the tedious typing altogether.

Click Next. You'll then be given the opportunity to save your settings on a USB flash drive,theoretically making subsequent setups easier; why there's no option to save to a CD writer, floppydrive, or simply a file on your desktop is a mystery. Select Set up a network manually if you don'thave a USB flash drive handy, or if you don't need to set up any more computers. Click Finish whenyou're done.
From now on, your wireless network will show up in the "Choose a wireless network" list wheneverit's detected, even if you've chosen not to broadcast your SSID. If it doesn't show up at this point, itmeans you've either mistyped the SSID here or in the router setup page (an incorrect WEP key won'tcause a problem until you try to connect.)
7.5.2.2 Configuring WiFi networks
If there's a problem with your newly added network, click Change advanced settings (on the leftside of the "Choose a wireless network" window) to open the Properties window for your wirelessconnection. Choose the Wireless Networks tab, highlight your network in the list, and clickProperties (as shown in Figure 7-22).
Figure 7-22. You may have to fiddle with XP's WiFi settings to get it toconnect to secure WiFi networks
Here, you'll have a second chance to enter your WEP key, but you won't have the luxury of beingable to see the characters as you type them (as in the Wireless Network Setup Wizard). The easiestway to deal with this is to open Notepad, type (or paste) your key there, and then copy (Ctrl-C) andpaste (Ctrl-V) it into both the Network key and Confirm network key fields.

While you're here, choose the Connection tab. The Connect when this network is in rangeoption (it's on by default) determines whether or not Windows XP will automatically connect to thisnetwork when it's available. In most cases, you'll want to leave this option checked.
Now, if you're in the enviable position of having access to more than one WiFinetwork regularly, and wish to have Windows connect automatically to morethan one network, you can prioritize them. Just return to the WirelessNetworks tab (Figure 7-22), highlight a network, and click Move up or Movedown.
Click OK to save your settings when you're done. If all is well, Windows should reattempt the wirelessconnection automatically. If it doesn't, you'll need to return to the "Choose a wireless network"window (Figure 7-20), highlight the network, and click Connect.
See the next section, Section 7.5.3, for ways to protect your computer when using someone else'sInternet connection.
7.5.2.3 Troubleshooting
WiFi tends to be temperamental, not to mention annoying and tear-your-hair-out frustrating. Amongthe things that can make it difficult to connect to a wireless access point, these are the mostcommon:
Drivers and firmware
If you ever have any trouble with your wireless router, visit the manufacturer's web site andsee if there's newer firmware available for it. Likewise, make sure you're using the latestdrivers for your WiFi PCI and PC Card adapters.
WiFi settings
Make sure both your router and your other equipment are communicating on the same channel(channel 6, 2.437 Ghz, is the typical default) and are using the same SSID.
Encryption
Are you using encryption, as described in Section 7.5.1? If so, you'll need to make sure thatthe Windows encryption settings exactly match those in your router's setup page. Check thesecurity mode (e.g., WEP or WPA), the encryption level (40-bit, 64-bit, or 128-bit), and theWEP keys (use Key 1 unless you have reason to do otherwise). If all else fails, try disablingencryption all around to see if it works at all. Then, add one security feature at a time.

Speed
Are you using an 802.11g router? If so, you can probably set it to operate only at 802.11bspeeds, only at 802.11g speeds, or both. Note that if you select "G-only," no older 802.11bequipment will be able to connect to it.
Reception, Interference, and Performance
Your wireless network relies on good reception to achieve reliable performance. See the RouterPlacement 101 sidebar, earlier in this chapter, for ways to improve reception.
7.5.2.4 Other WiFi sniffers
Since one of the biggest advantages of wireless networking is portability, it should stand to reasonthat you should be able to connect to your wireless network with something you can hold in the palmof your hand.
To that end, a number of handheld computers now come with WiFi support. Figure 7-23 shows theWiFi sniffer that comes with some Palm OS-powered handheld computers, allowing you to identifyand connect to any available WiFi network.
Figure 7-23. The WiFi sniffer on a Palm OS-powered handheld PDA showsthe same wireless SSIDs as Windows XP's built-in WiFi sniffer
A handheld sniffer can be a very valuable tool when setting up a wireless network. Among otherthings, you can test the range of your wireless router with a handheld sniffer more easily than bylugging around a laptop or desktop PC, allowing you to subsequently adjust the placement of yourrouter for optimal range.

7.5.3. Connect to a Public Wireless Network
The point of wireless networking is not necessarily to do away with a few feet of cables, but to makea network do things it could never do before. For instance, if you have a portable computer equippedwith wireless, you should be able to walk into any airport, coffee shop, hotel, or college dormitoryand connect to the Internet in a matter of seconds. In more populated areas, it's not uncommon towalk down the street and have your pick of WiFi networks. (See the The Ethics of WiFi sidebar for anextra consideration.)
The Ethics of WiFi
Once you get the technical details out of the way, the one remaining hurdle whenconsidering using someone else's Internet connection is a question of ethics. There arecountless personal wireless networks around the globe, and most of them, you'll find, areunsecured. This means that you can literally walk down the street in a populated areaand probably find a working wireless Internet connection before you reach the end of theblock. Some will have been left open intentionally, but most will be unsecured merelybecause their owners don't have the benefit of the Section 7.5.1 procedure detailedearlier in this chapter.
Now, just because you can connect to these networks, does it mean you should? Are youtaking advantage of someone else's ignorance by breaking into their private network, orare you simply making use of a public resource that you'd be equally eager to share?
I'm not about to try to solve this dilemma in these few pages; I only wish to raise thequestion, and to suggest that if you do ever decide to utilize someone else's wirelessnetwork, do not do any harm. Think about your impact, both on the bandwidth of theforeign network and the privacy of those who operate it. And then tread lightly.
As described in Section 7.5.2 earlier in this chapter, you can connect to any unsecured wirelessnetwork that Windows XP's built-in WiFi sniffer is able to detect. (The exceptions, of course, are thosenetworks requiring a paid subscription or account access, but that's a different story.) This applies tonetworks you encounter while you're on the road, as well as those that are in range of your home oroffice.
The problem is that by connecting to these networks, you're exposing your computer to the full arrayof viruses, hackers, and other dangers present on any network.[3] The solution is to take action toprotect your computer (or workgroup), and the necessary steps depend on the scenario.
[3] This may be reason enough to keep strangers out of your own WiFi network; see Section 7.5.1, earlier in this chapter, for help
securing your network.
7.5.3.1 Scenario 1: Single-serving Internet

Say you've just sat yourself down at a sidewalk cafe, and pulled out your laptop. (This scenario alsoapplies to hotel rooms, airports, and coffee shops.) You boot up Windows, open the "Choose awireless network" window as described in Section 7.5.2, find a local network, and connect forapproximately 20 minutes to check your email. When you're done, you'll likely never use this networkagain.
Now, if you typically use your laptop from behind a wireless router at home (as described in Section7.5.1 earlier in this chapter), you'll want to take some extra steps to secure your computer beforeyou connect elsewhere. Since you won't have your router with you on the road, and thus won't haveany dedicated firewall hardware, you'll want to employ the built-in Windows Firewall software (or athird-party firewall solution), as described in Section 7.6.2 later in this chapter. This will provideminimal protection, insufficient for the long haul.
7.5.3.2 Scenario 2: The long haul
Say you just moved into an apartment complex (or have a small business in an office building) thatprovides free wireless Internet. Naturally, you would never want to connect your computer orworkgroup to this wireless free-for-all without some sort of reliable, long-term firewall solution. Now,since this is not your own private Internet connection, you can't just plug in a router to facilitate yourfirewall. But you can add another device, a wireless bridge, in order to build an "island" of sorts, in asea otherwise filled with danger.
Figure 7-24 shows a sample setup involving a wireless bridge and a router. The two dotted rectanglesrepresent the scope of the two different WiFi networks in effect: your own private, encrypted wirelessnetwork is shown on the right, and the public network is illustrated on the left. (Your bridge androuter actually form a tiny, third network, complete with its own set of IP addresses separate fromthose in either of the two wireless networks.)
Figure 7-24. Use a wireless bridge in conjunction with a wireless routerto protect your workgroup when connecting to a public Internet
connection

This can be tricky to set up, and may require some trial and error to get itright. Depending on your specific hardware and your needs, you may need toadjust this procedure somewhat. For the simplest setup, make sure your bridgeand router are manufactured by the same company.
Here's how you set it up:
Use the "Choose a wireless network" window as described in Section 7.5.2 to find the name(SSID) of the wireless network to which you'd like to connect. Connect to the networktemporarily to confirm that it actually works.
1.
Obtain a wireless bridge, and follow the procedure laid out in its documentation to set it up withthe aforementioned public wireless network. (This typically involves plugging it directly into yourPC or one of the numbered ports of your router.) While you're here, obtain the IP address ofyour bridge; it'll be something like 192.168.1.1 or 192.168.0.1.
2.
When you're done setting up the bridge, connect it directly to the WAN port of your wirelessrouter. (This is the port into which you'd normally plug a DSL or cable modem.)
3.
Connect your PC to your router and use a web browser to open up your router's setup page, asdescribed in Section 7.5.1, earlier in this chapter.
4.
Configure your wireless router so that it has a Connection Type of Static IP. (Refer to yourrouter's documentation for the specific details on this and the next few settings.)
5.
In the router setup, set the Gateway address to the IP address of your bridge that youobtained in step 2.
6.
Then, set the IP address of the Internet connection (as the router sees it) to a fictitious IPaddress in the same subnet as your bridge. This means that the first three numbers of both IPaddresses should be the same, but the fourth should be different. That is, if your router islocated at 192.168.1.1, then you could set the IP address of your Internet connection tosomething like 192.168.1.2 or 192.168.1.73.
7.
Finally, set the DNS server addresses in your router setup to the IP addresses of your InternetService Provider's DNS servers.
8.

If you don't know what Internet Service Provider you're using, connectyour PC directly to the wireless network in question. Open a web browser,type http://annoyances.org/ip in the address bar, and press Enter; thiswill show the IP address of your Internet connection. Then, open aCommand Prompt window (see Chapter 10) and type nslookup
ip_address, where ip_address is the set of four numbers reported by
Annoyances.org. This should give you the name of your ISP, plus someextra stuff. So, you might see something likedsl456.eastcoast.superisp.net, which means your ISP is"superisp.net." Then, it's only a matter of visiting their web site and
determining their DNS server addresses from their online documentation!
8.
Complete the setup of your router as explained in Section 7.5.1, earlier in this chapter, andmake sure to enable WEP encryption and any other security settings at your disposal.
9.
This should do it. The bridge funnels the public Internet connection into your router, and your routerfunnels it to the computers in your workgroup. The router acts like a firewall, provided that youconnect all your computers directly to your personal WiFi network, and not the public, unsecured one.
Among other things, your bridge/router combination will serve as a repeater (aka range extender),and should boost the signal strength and might even improve performance over connecting directly.
7.5.4. Add Wireless Support to Any Device
As soon as you have your wireless network up and running, you'll probably be inclined to do awaywith as many cables as you can. This feeling is normal; there's no need to seek psychiatric help orpsychic guidance.
There are ways to add support for wireless networking to nearly any computer or device, furtherillustrating what you can do with a wireless network:
Desktop computer
Add a wireless PCI card just as you would an Ethernet NIC (network interface card). Whenshopping for a WiFi NIC, look for a card with an adjustable, external antenna (versus merely anub.) Another alternative is a USB-based WiFi adapter, which will be easier to install, butprobably at the expense of some performance.
Laptop computer
WiFi PC Cards (PCMCIA adapters) have been available for some time, but if you have a modernlaptop, you most likely have a better choice. For about the same price as the aforementionedPC Card, an internal Mini-PCI adapter will typically offer better range (thanks to the internalantenna that is likely already present in your laptop), without the clumsy protrusion of a PCCard. (See the "Handheld PDA" entry below for information on using Bluetooth with your

laptop.) Another solution can be found in the Quick and Dirty WiFi Piggyback sidebar.
Quick and Dirty WiFi Piggyback
Let's say a friend visits your home or office and wants to check her email with herlaptop. What do you do if you want to connect this laptop (or any desktop PC forthat matter) to your wireless network temporarily, without having to purchase andinstall any costly additional hardware?
Assume you have a sample wireless network like the ones illustrated in Figure 7-3and Figure 7-4. Now, you can, of course, plug any computer (provided that it hasan Ethernet port) directly into your wireless router with an ordinary category-5patch cable, and give it instant access to the Internet. But what if the computerdoesn't have an Ethernet port? Or what if the router isn't in a convenient location?
Fortunately, any Windows PC can act as a gateway, funneling Internet access toany computer to which it is physically connected using Windows XP's built-inInternet Connection Sharing feature (discussed earlier in this chapter). All you needto do is connect this new laptop directly to your own desktop or laptop PC, and thistypically requires only a single cable.
If said laptop has an Ethernet port, and your PC has an unused Ethernet port (likelyif you're on a wireless network), just connect the two computers with a category-5crossover cable, and you've got yourself something like the wired network shown inFigure 7-5. (If both computers have FireWire ports, you can also create animpromptu network with a simple FireWire cable.) Just activate Internet ConnectionSharing on your PC, and the guest PC will have Internet access.
If you're in a pinch, you can also network the two computers with an old-schoolnull-modem (LapLink) cable, which uses only serial ports. To do this, open the NewConnection Wizard on both computers (see Section 7.1.3 earlier in this chapter),select Set up an advanced connection, then select Connect directly toanother computer, and then complete the wizard as instructed by Windows.
Not that you'd want to use this as a long-term solution, but it works great andtakes only a few minutes and a $4.00 cable.
Printer
Although you can connect a printer to a WiFi-equipped PC and share it with the rest of yournetwork (as explained in Chapter 8), a better choice is to connect your printer directly to yourwireless network. Among other things, this means you don't have to connect any cables toyour laptop to print a document,[4] and you have the option of placing the printer in a moreconvenient location. To do this, you'll need a wireless print server, either a standalone unit orone integrated with your wireless router. Then, simply install the software that comes with yourprint server to create a virtual printer port on your PC, to which your printer's drivers connect

and send documents.
[4] A number of years ago, printer manufacturers started including infrared ports on some printers,allowing laptops with infrared port to print to them wirelessly. This was never much of a success, whichprobably explains why it's now nearly impossible to find a laptop (or printer, for that matter) with aninfrared port.
TiVo
One of the biggest hassles of using a Digital Video Recorder (DVR) is that you need to connectit to a phone line so that it can download the latest program data. If you have a newer DVR(such as Series-2 TiVo) that comes with built-in networking support, you can use a USB-basedWiFi adapter and finally cut the cord. If you have an older Series-1 TiVo, you'll need to add aTurboNet card (available at http://www.9thtee.com/) and then connect that to an external WiFibridge. Alternatively, you can use a AirNet card (also available at http://www.9thtee.com/)along with a PCMCIA 802.11b adapter you provide, but its range will be more limited than theaforementioned bridge. See TiVo Hacks (O'Reilly) for more ways to modify your TiVo.
Video Game Console
Own a Playstation2, XBox, or other network-capable video game console? Just plug a wirelessbridge (sometimes called a wireless game adapter) into your console's Ethernet port, and playhead-to-head games without the network cables stretched across your living room.
Handheld PDA
As introduced in the beginning of this chapter, there are two prevailing wireless technologies:WiFi and Bluetooth. While some handhelds come with built-in WiFi, a larger percentage supportBluetooth (and only a select few play for both teams). Although only WiFi-equipped handheldscan connect to the WiFi networks discussed throughout this chapter, you'll need Bluetoothsupport if you want to connect to the Internet with your Bluetooth-equipped cell phone. (Thesame goes for laptops; get an inexpensive Bluetooth USB dongle to connect your Windows PCto your cell phone wirelessly and surf the web from the park or even the train!)
Now, some higher-end PDAs come with WiFi or Bluetooth support built in, while others havespecial expansion cards that provide connectivity. You can get a WiFi SecureDigital (SD) cardor a Bluetooth SD card that will fit in many PalmOS and PocketPC handhelds, but if you onlyhave one SD slot, you'll have to remove your memory card. If you need the wireless support,you may prefer to replace your PDA with one that has WiFi or Bluetooth (or both) built in, anddo away with the awkward protrusion of the expansion card.
Digital camera
Some high-end digital cameras now have WiFi options, allowing you to send your photos to thehard disk of a nearby computer wirelessly, either in batches or immediately after you takethem. Unfortunately, this only works in the studio (as opposed to outdoors), where you'd be in

range of your wireless router. At the time of this writing, there are no wireless cards you canconveniently insert in place of your digital film, but it shouldn't be long.
Video camera (webcam)
Get a WiFi-enabled Internet video camera, and place it anywhere within range of your network.Then, use your PC to view a live video feed wirelessly. Or, use it in its server mode, and letanyone in the world see how much coffee is left in your coffee pot. (See Chapter 9 for a simpleWSH script that works with webcams.)
Home stereo
Several companies sell WiFi music players that connect your MP3 collection on your computerto your component stereo system and allow you to hear your music on something better thanthe tinny computer speakers you're likely using now.
Car stereo
At the time of this writing, a WiFi-enabled MP3 player in your car is only vaporware, but keepyour eyes open. Soon, manufacturers promise us, you'll be able to send digital music to yourcar wirelessly. I can't wait for my car stereo to catch an airborne virus.
There's virtually no limit to the number of devices you can make wireless, provided that they supportsome form of networking already. If all else fails, a wireless bridge, as illustrated in Section 7.5.3,earlier in this chapter, should allow you to connect just about anything to your wireless network.

7.6. Securing Your System on a Network
Security is a very real concern for any computer connected to a network or the Internet. There arethree main categories of security threats:
A deliberate, targeted attack through your network connection
Ironically, this is the type of attack most people fear, even though realistically, it is the leastlikely to occur, at least where home and small office networks are concerned. It's possible for aso-called hacker to obtain access to your computer, either through your Internet connection orfrom another computer on your local network; it's just not terribly likely that such a hacker willbother.
An automated invasion by a virus, worm, Trojan horse, or robot
A virus is simply a computer program that is designed to duplicate itself with the purpose ofinfecting as many computers as possible. If your computer is infected by a virus, it may useyour network connection to infect other computers; likewise, if another computer on yournetwork is infected, your computer is vulnerable to infection. The same goes for Internetconnections, although the method of transport in this case is typically an infected emailmessage. (See Chapter 6 for complete coverage of viruses, worms, trojan horses, andspyware.)
There also exist so-called robots, programs that are designed to scan large groups of IPaddresses, looking for vulnerabilities. The motive for such a program can be anything fromexploitation of credit card numbers or other sensitive information to the hijack of computers forthe purpose of distributing spam, viruses, or extreme right-wing propaganda.
Finally, a Trojan horse is a program that works somewhat like a virus, except that its specificpurpose is to create vulnerabilities in your computer that can subsequently be exploited by ahacker or robot. For example, a program might open a port on your computer (see AppendixC) and then communicate with a remote system to announce its presence.
A deliberate attack by a person sitting at your computer
A person who sits down at your computer can easily gain access to sensitive information,including your documents, email, and even various passwords stored by your web browser. Anintruder can be anyone, from the jerk who has just stolen your laptop to a coworker casuallywalking by your unattended desk. Naturally, it's up to you to determine the actual likelihood ofsuch a threat and to take the appropriate measures (such as password-protecting your screensaver). Several examples are discussed in Chapter 8.

Defending your computer (and your network) against these attacks essentially involves fixing thevulnerabilities they exploit, as described in the next section.
See Section 7.5.3, earlier in this chapter, for ways to protect your computerand your workgroup if you're using someone else's Internet connection.
7.6.1. Closing Back Doors in Windows XP
Windows XP includes several features that will enable you to implement a reasonable level of securitywithout purchasing additional software or hardware. Unfortunately, none of these features areproperly configured by default.
The following steps will help you close some of these "back doors:"
By default, the file-sharing service is enabled for Internet connections, but in most cases,there's no reason for this. Open the Network Connections window, right-click the iconcorresponding to your Internet connection, and select Properties. In the General tab, clear thecheckmark next to the File and Printer Sharing for Microsoft Networks entry, and thenclick OK. If you have more than one Internet connection icon, repeat this procedure for each ofthe others. Make sure to leave it enabled for the connection to your workgroup (if applicable).
One of the main reasons to set up a workgroup is to share files and printers with othercomputers. But it's wise to share only those folders that need to be shared, and disable sharingfor all others.
A feature called Simple File Sharing, which could allow anyone, anywhere, to access yourpersonal files without your knowledge, is turned on by default in Windows XP. Go to ControlPanel Folder Options View tab, and turn off the Use simple file sharing option.
Details on sharing resources can be found in Chapter 8.
Another feature, called Universal Plug and Play (UPnP), can open additional vulnerabilities onyour system. UPnP would more aptly be called Network Plug and Play, since it only deals withnetwork devices. UPnP is a collection of standards that allow such devices to announce theirpresence to UPnP servers on your network, much in the same way as your PnP sound cardannounces its presence to Windows when you boot your system.
Windows XP supports UPnP out of the box, which, on the surface, sounds like a good idea.However, UPnP is a service that most users don't need, and unless you specifically need toconnect to a UPnP device on your network, you should disable UPnP on your systemimmediately. Leaving a service like UPnP running unnecessarily exposes your system to severalsecurity threats.
To disable UPnP, open the Services window (services.msc). Find the SSDP Discovery Servicein the list and double-click it. Click Stop to stop the service, and change the Startup type toDisabled to prevent it from loading the next time Windows starts. Click OK and then do thesame for the Universal Plug and Play Device Host. Close the Services window when you'redone.

The Remote Desktop feature, described in Section 7.4.3, earlier in this chapter, is enabled bydefault in Windows XP. Unless you specifically need this feature, it should be disabled. Go toControl Panel System Remote tab, and turn off both of the options in this window.
Make sure each and every user account on your system has a unique password. Even thoughyou may not be concerned about security between users, unprotected accounts can be exploitedby an attack over a network. See Chapter 8 for more information on user accounts.
Set up a firewall, as described in the next section, to further protect your computer by strictlycontrolling network traffic into and out of your computer.
Finally, look for vulnerabilities in your system by scanning for open ports, as explained at theend of this chapter.
7.6.2. Using the Windows Security Center
Next to the new wireless support highlighted in Section 7.5.2 earlier in this chapter, one of thebiggest changes in Windows XP Service Pack 2 is the addition of the Windows Security Center, shownin Figure 7-25. You can get to the Security Center from the Windows Control Panel.
Figure 7-25. The new Security Center that comes with Service Pack 2goes a long way to make Windows appear safer (not that it does
anything to actually improve security . . . )

The Windows Security Center, unfortunately, is big on appearances and short on functionality. Infact, it's dangerous in that it may lull users into a false sense of security (it's effectively a placebo).The Security Center does nothing more than report the status of these three so-called "securityessentials":
Firewall
The Windows Firewall, discussed in the next section, is the firewall software built into WindowsXP SP2. If you're already using firewall software, or are relying on a router to protect yournetwork, click Recommendations and then turn on the I have a firewall solution that I'llmonitor myself option. Click OK, and the firewall status will change to NOT MONITORED.
Automatic Updates
The Automatic Updates feature is responsible for periodically contacting Microsoft to see if newWindows updates are available. In its most automated setting, Windows downloads and installsso-called "high priority" updates automatically. (Others, falling under the "optional" and"hardware" categories, will only be installed if you do so manually.) You can configure thissetting by going to Control Panel System Automatic Updates tab. See "PatchingWindows with Windows Update" in Chapter 6 for more information.
Virus Protection
This one's funny, because Windows XP doesn't come with antivirus software of any kind, nor isit able to scan your system and confirm that any antivirus software is actually installed andfunctioning! Rather, it simply reports whether or not antivirus software has been properlyregistered with the Security Center. (And of course, it won't take long for someone to figureout how to spoof the Security Center and report that your system is protected when it actuallyisn't.) See Chapter 6 for effective ways to protect your system against viruses and the like.
Some newer antivirus software may support the Security Center, but you maynot want to start hunting for such products just yet. The Security Center hasbeen known to initiate virus scans unnecessarily, including for some usersevery time Windows starts. Even if you already have Security Center-awareantivirus software installed, you may wish to disable monitoring for this reason.Click Recommendations and then turn on the I have a antivirus programthat I'll monitor myself option. Click OK, and the antivirus status will changeto NOT MONITORED. See the Disable the Security Center sidebar for anothersolution.

Disable the Security Center
If you find that the Security Center is hassling you with unnecessary scans and warningmessages, your only resort may be to disable it completely. Here's how to do it:
Open the Services window (services.msc).1.
Locate Security Center in the list, double click it, and change the Startup type toDisabled.
2.
Click OK and close the Services window when you're done.3.
Note that this doesn't actually disable the firewall, antivirus, or automatic updatesfeatures you may have employedonly the "monitoring" effects of the Windows SecurityCenter.
So, if you really want to protect your system, you'll basically ignore the Security Center andscrutinize each of these "essentials" individually. See the next section, for instance, for help settingup the Windows Firewall.
7.6.2.1 Setting up the Windows Firewall
A firewall is a layer of protection that permits or denies network communication based on apredefined set of rules. These rules restrict communication so that only certain applications arepermitted to use your network connection. This effectively closes backdoors to your computer thatotherwise might be exploited by viruses, hackers, and other malicious applications.
The Windows Firewall is the firewall software built into Windows XP Service Pack 2. It replaces thenearly worthless Internet Connection Firewall (ICF) found in earlier versions of Windows XP; while it'sbetter than its predecessor, it's not nearly as effective as a router. See Section 7.1.2 and Section7.5.1, both earlier in this chapter, for more information on routers.
The Windows Firewall only blocks incoming data, not outgoing data. This meansthat, by default, it will not allow you to host an FTP server, but it won't hinderyour ability to connect to other, remote FTP servers. See "Alternatives to theWindows Firewall," later in this chapter, for other solutions that may providebetter protection.
To illustrate the difference between the security offered by the Windows Firewall and that afforded bya router, consider Figure 7-26.

Figure 7-26. The larger dotted box shows the scope of protection offeredby a router; the smaller box shows the scope of the Windows Firewall
The larger dotted rectangle shows what's protected by your router's firewall, and the smallerrectangle shows what's protected by Windows. In addition to the larger scope of the router'sprotection, it's also much less likely to be compromised than a software-based solution like theWindows Firewall.
Now, assuming you've bought the previous argument, you might think that more firewall is better,that using Windows Firewall along with a router will protect your system better than a router alone.The problem with this approach is that, again referring to Figure 7-26, the Windows Firewall isolatesyour PC somewhat from the other computers in your workgroup. This causes real problems when youtry to share files across your workgroup, among other things.
Now, there is the chance that another computer in your workgroup can become infected with a virus(presumably through someone else's carelessness) and then infect yours if you're not using theWindows Firewall. Naturally, you'll need to assess the risk of such an attack and decide for yourself ifenabling the Windows Firewall is worth the hassle.
If you're not using a router or other firewall solution, the Windows Firewall isbetter than nothing. For instance, you'll definitely want to employ a firewall toprotect you if you're "roaming" on a portable computer and connecting to anunknown or public wireless connection.
Should you decide to use the Windows Firewall, here's how to enable it:
Open the Network Connections window.1.
2.

1.
If you haven't already done so, select Details from the View menu; this will allow you to seewhich connections are firewalled (and which aren't) at a glance.
2.
Right-click the connection icon corresponding to your Internet connection, and selectProperties. In most cases, it will be the Ethernet or wireless adapter connected to yourInternet adapter or router.
If you're using a DSL or cable connection that requires a login with ausername or password, the icon to use is the broadband connection iconcorresponding to your PPPoE connection. See Section 7.3.1.2, earlier inthis chapter, for further instructions.
3.
Choose the Advanced tab, and click the Settings button in the Windows Firewall section.The Windows Firewall window is shown in Figure 7-27.
Figure 7-27. The new Windows Firewall included in Service Pack 2has a simpler interface and is more configurable than its
predecessor, the Internet Connection Firewall
4.
Click On to enable the Windows Firewall, or Off to disable it.5.
By default, Windows will apply the firewall to all network connections as soon as you enable itfor any single connection. Since it's unlikely that this is what you want, choose the Advancedtab and remove the checkmarks next to the connections you don't need to protect. For
6.

instance, turn off the firewall for your 1394 Connection (Firewire), unless you want Windowsto block data from your FireWire camcorder.
6.
Windows XP does not log communication blocked by its firewall, unless you specifically request itto do so. To enable firewall logging, choose the Advanced tab, click Settings in the SecurityLogging section, and turn on the Log dropped packets option. The log is simply a text filethat can be opened in your favorite text editor (or Notepad); by default, it's stored in\Windows\pfirewall.log.
7.
Click OK, and then OK again when you're done. The change will take effect immediately (or atleast after a several-second delay).
8.
Verify that Internet Connection Sharing is enabled; it should say "Enabled, Firewalled" or "Enabled,Shared, Firewalled" in the Type column of the Network Connections window.
The real test, however, is to see if the Windows Firewall has broken anything. Verify that yourInternet connection still works by attempting to open a web page.
7.6.2.2 Poking holes in the firewall
As you use your computer, you may find that a particular network program or task no longer worksproperly after enabling the Windows Firewall (or after installing SP2). For example, you may loseyour ability to access shared files and folders (as described in Chapter 8) when the firewall isactivated. Or, if you use the Internet Time feature (Control Panel Date and Time Internet Time tab), you may find that it won't work from behind the firewall.
When Service Pack 2 was initially released, it got a bad rap for breaking manydifferent kinds of network-sensitive applications. In reality, this was simply dueto the firewall doing what it was designed to do, combined with the fact that ithas different exceptions than its predecessor, the Internet Connection Firewall.
If you suspect that the Windows Firewall is preventing an application from working, verify that thefirewall is actually causing the problem by temporarily disabling it (as described in the previoussection) and then trying the task again.
Assuming the firewall is indeed the culprit, you can add a new rule to permit the program tocommunicate over your Internet connection.
Open the Network Connections window.1.
Right-click the connection icon corresponding to your Internet connection, select Properties,and choose the Exceptions tab.
2.
There will likely be a few entries already present in your Programs and Services list, shown inFigure 7-28.
3.

Figure 7-28. The Exceptions tab lists the programs and servicespermitted to receive data through all your network connections
This dialog can be a little misleading. Placing a checkmark next to an entryhere won't turn on the service, but rather only lift the firewall's restrictionfor that service. Open the Services window (services.msc) to actuallyenable or disable services like the FTP server or Telnet server on yoursystem.
At this point, you can modify an existing exception by highlighting it and clicking Edit, butyou're here to add a new exception, so click one of the Add buttons:
Add Program
Use this to give a specific application free rein over your Internet connection. This is theeasiest way to fix an application that has been broken by the Windows Firewall'srestrictions. Just select an application from the list, or click Browse to choose oneanywhere on your hard disk.
Add Port
4.

Click Add Port to create a new rule based on a TCP/IP port. Use this to permit incomingdata based on the type of data, as opposed to the application that uses the data. Type aName for the new exception (it can be anything you want) and then specify a Portnumber, as illustrated in Figure 7-29. For instance, type 123 here to get the Internet
Time feature to work. See Appendix C for more information on TCP/IP port numbers.
Figure 7-29. Add a new rule to the Windows Firewall to permitcertain types of incoming data
Click OK when you're done. Place a checkmark next to the new exception to activate it, or clearthe checkmark at any time to ignore it.
5.
Click OK to close the Windows Firewall window, and then click OK to close the propertieswindow.
6.
The new exception will take effect as soon as all the windows are closed, at which point you can testthe new exception. You may have to experiment with different firewall rules until your software orservice works properly.
The Windows Firewall in SP2 only maintains one list of exceptions. This meansthat if you have more than one network connection, you won't be able toenable some services for one connection while blocking those same services foranother connection. This is yet another reason that you shouldn't rely solely onthe Windows Firewall to protect your computer.
7.6.2.3 Alternatives to the Windows Firewall
Strictly speaking, the Windows Firewall is pretty feeble. For example, it's only capable of blockingincoming communication; it won't block any communication originating from your computer, whichmeans it may not protect you (or the other computers on your network) from viruses and Trojanhorses (described in Chapter 6). It's also incapable of allowing incoming data from some remotecomputers while restricting data from others, which means that in order to enable a service, such asfile sharing (explained in Section 7.6.2.2, earlier), for one computer, you'll have to enable it for any

and every computer that has access to your PC.
Probably the best firewall available, at least one that's reasonably affordable, is that built into anordinary router, described in Section 7.1.2 and Section 7.5.1, earlier in this chapter. In addition toprotecting your Windows XP machine, however, a router will also protect all the computers on yournetwork from a single interface, which means that you don't have to install and configure a firewallon each computer individually.
There are also third-party firewall software products available for Windows XP, all of which promise todo a better job protecting your PC than the Windows Firewall.
Be careful, however, when installing and configuring a third-party firewallsolution, including the ones discussed here. Overly strict firewall rules maybreak some software on your system. Worse yet, overly lenient rules may notprotect your computer adequately and give you a false sense of security.
Here are a few third-party firewall solutions, most of which have free versions available:
Agnitum Outpost. http://www.agnitum.com
Kerio Personal Firewall. http://www.kerio.com
Norton Personal Firewall. http://www.symantec.com
Sygate Personal Firewall. http://soho.sygate.com
Tiny Firewall. http://www.tinysoftware.com
No matter which firewall solution you choose, however, you'll most likely still need to take the time toconfigure custom rules using a similar procedure to the one described earlier in this section. Forexample, a common problem when installing an incorrectly configured firewall is that images will stopappearing in web pages, a situation that can be remedied by massaging the firewall's settings.
If you're currently using another firewall solution, such as firewall software or afirewall-enabled router, you'll probably want to disable the Windows Firewall.Although some people claim to have successfully used the Windows Firewall inconjunction with one of the third-party firewalls listed here, you're essentiallyasking for trouble if you do so.
7.6.3. Scan Your System for Open Ports
Each open network port on your computer is a potential security vulnerability, and Windows XP'stendency to leave more ports open than it needs is a common cause for concern (even with XPService Pack 2). Fortunately, there's a way to scan your computer for open ports so you know whichholes to patch.
Start by opening a Command Prompt window (cmd.exe). Then, run the Active Connections utility bytyping:

netstat /a /o
The /a option is included so that all open ports are shown. Without it, only ports participating inactive connections would appear. The /o option instructs the Active Connections utility to show the
owning process of each port (explained below). The report will be displayed in the Command Promptwindow, and will look something like this:
Active Connections
Proto Local Address Foreign Address State PIDTCP annoy:pop3 localhost:4219 TIME_WAIT 0TCP annoy:3613 javascript-of-unknown:0 LISTENING 1100TCP annoy:3613 localhost:3614 ESTABLISHED 1100TCP annoy:3614 localhost:3613 ESTABLISHED 1100UDP annoy:1035 *:* 1588UDP annoy:1036 *:* 1588UDP annoy:1037 *:* 1588UDP annoy:1038 *:* 1588UDP annoy:1039 *:* 1588
The width of the Command Prompt window is typically limited to 80 characters,causing some pretty ugly word wrapping. To send the report to a text file (say,report.txt) for easier viewing, type netstat /a /o > report.txt at the
prompt.
The Active Connections utility displays information in these five columns:
Proto
This will either be TCP or UDP, representing the protocol being used, as explained in AppendixC.
Local Address
This column has two components, separated by a colon. The first part is the computer name,which will typically be the name of your computer. The second part will be either a port numberor the name of a service. See Appendix C for help deciphering the port numbers that appearhere (and in the Foreign Address column).
Foreign Address
For active connections, this will be the name or IP address of the remote machine, followed by

a colon, and then the port number being used. For inactive connections (showing only the openports), you'll typically see only *:*.
State
This shows the state of the connection (TCP ports only). For example, for server processes,you'll usually see LISTENING here, signifying that the process has opened the port and is
waiting for an incoming connection.
For connections originating from your computer, such as a web browser downloading a page oran active Telnet session, you'll see ESTABLISHED here.
PID
This is the Process Identifier of the application or service that is responsible for opening theport.
To find out more, open Task Manager (launch taskmgr.exe or right-click an empty area of yourtaskbar and select Task Manager), and choose the Processes tab. If you don't see a columnlabelled PID, go to View Select Columns, turn on the PID (Process Identifier) option,and click OK. Finally, turn on the Show processes from all users option at the bottom of theWindows Task Manager window.
You can then sort the listing by PID by clicking the PID column header. The program filenameis shown in the Image Name column.
This means that you can use the Active Connections utility in conjunction with the WindowsTask Manager, as described here, to look up the program responsible for opening any networkport on your computer.
Don't be alarmed if you see a lot of open ports. Just make sure you thoroughlytrack down each one, making sure it doesn't pose a security threat.
You may see svchost.exe listed in the Windows Task Manager, and reported by the ActiveConnections utility as being responsible for one or more open ports. This program is merely used tostart the services listed in the Services window (services.msc). For an example of a service that isrunning by default, but should be disabled for security reasons, see the discussion of Universal Plugand Play in Section 7.6.1, earlier in this chapter.
7.6.3.1 Using an external port scanner
If you're using a firewall, such as the Windows Firewall feature built into Windows XP SP2 (discussedin the previous section), it should block communication to most of the currently open ports, eventhough they're listed by the Active Connections utility.
For this reason, you may prefer to use an external port scanner, a program that can connect to your

computer through its Internet connection to check for all open ports, and do it more aggressivelythan the Active Connections utility. Here are some utilities that you can run from your own computer:
Nmap Security Scanner. http://www.insecure.org
AATools Port Scanner. http://www.glocksoft.com/port_scanner.htm
Furthermore, these web sites will allow you to perform port scans right from your web browser:
Sygate Security Scan. http://scan.sygatetech.com
PCFlank http://www.pcflank.com
Among other things, you can use these services to test the effectiveness of your firewall. If a portscanner cannot detect any open ports, cannot determine your computer name, and cannot detectany running services, then you're in pretty good shape!

Chapter 8. User Accounts andAdministrationUser accounts have a much more prominent role in Windows XP than they've had in any previousversion of Windows. Microsoft faced an interesting challenge with the release of this product, in thatsupport for multiple users is typically a feature of server-type operating systems, and is often seen asa feature used only by network administrators. Since Windows XP is supposed to be a robust,networkable operating system, healthy support for multiple user accounts is a must.
But Windows XP is also intended to be suitable for so-called "home" users, who typically have little orno interest in user accounts, administration, or security. Whether or not Microsoft found anappropriate balance between the high level of interuser security administrators demand, and thestreamlining and simplicity that single users expect, is really a matter of perspective.
Support for multiple users is built into Windows XP from the ground up, which is one of theadvantages of the Windows NT/2000/XP platform over the older (and now-defunct) DOS-basedplatform used by Windows 9x/Me. (See Chapter 1 for more information.)
On its simplest level, multiple user accounts can be used to allow each member of a household oreach employee in an office to have his or her own set of documents, display settings, applicationsettings, Start Menu programs, and even Desktop icons.
But proper use of user accounts can also protect your computer from unauthorized intruders,whether they are sitting at your keyboard or connecting remotely from thousands of miles away.Having separate user accounts for each person allows them to protect their personal and sensitivedocuments from other users on the machine, as well as from other computers in a workgroup.
The solutions in this chapter not only show you how to set up and manage user accounts, but usethem in conjunction with file and folder sharing to strike the balance between security andconvenience that works best for you.

8.1. Managing Users
There are actually three different User Accounts dialogs in Windows XP, each with a different designand "intended audience," so to speak. The problem is that each window has a few options not foundin the other, so no single window can be used exclusively to handle all tasks.
User Accounts
The primary user accounts interface, accessible by going to Control Panel UserAccounts and shown in Figure 8-1, is the one that most users see. It's large, friendly, and,unfortunately, somewhat cumbersome. But, given the "administrator" stigma behind useraccounts, it's not surprising that Microsoft has gone to great lengths (some feel too far) tomake this window less intimidating and easier to use than its counterparts in earlier versions ofWindows.
Figure 8-1. You can add, delete, or modify user accounts in the UserAccounts dialog, but not much else
Adding, customizing, and removing user accounts is extremely easy and, for the most part,self-explanatory in this window, and that is admirable. But sometimes you'll need one of thealternate dialogs, listed below, to accomplish some of the more advanced tasks, such asmanaging groups and configuring Windows to log in a password-protected accountautomatically.

Avoiding .NET Passport Accounts
Littered throughout the operating system are various links and tie-ins to Microsoft's.NET online service. It seems as though no matter where you turn, there's anotherbutton that suggests that you need to sign up for a .NET "passport" in order to usethe feature.
The point is to try to make .NET passports seem as ubiquitous as the MyDocuments folder, so that customers will feel more comfortable using the service.That way, Microsoft can try to push its MSN online service and much-hyped .NETtechnology onto other companies, so that soon, any web site you visit and everyprogram you start will require a .NET passport password.
Fortunately, we haven't reached that stage yet. In fact, the only component inWindows XP that absolutely requires a .NET passport is Windows Messenger. In allother cases, signing up for MSN or .NET is purely optional, despite what theinstructions in the dialog may suggest.
Note that this window is the only place you can choose a user's picture, shown in both the logindialog and at the top of the new-style Start Menu (see "Massaging the Start Menu" in Chapter2). The primary User Accounts dialog is also the only place you can choose between theWelcome Screen and the standard Login screen, as discussed in Section 8.3.1, later in thischapter.
User Accounts 2
Some additional settings, discussed later in this chapter, can be changed only with thealternate User Accounts window, which, incidentally, is identical to the one found in Windows2000. To open the old-style User Accounts dialog, select Run from the Start Menu, typecontrol userpasswords2, and click OK. This dialog is shown in Figure 8-2.
Figure 8-2. The "other" User Accounts dialog can do many thingsotherwise impossible in the standard User Accounts window

Like the primary User Accounts window, you can add new users, as well as rename or removeexisting accounts. But here, you have more control over a user's permissions and restrictions.You can access accounts that would otherwise be hidden in the User Accounts window, such asthe Administrator account (see Section 8.3.5, later in this chapter) and the IUSR account usedby the IIS web server. See Section 8.3.1, also later in this chapter, for another use of thisdialog.
Local Users and Groups
The third way to manage user accounts in Windows is to use the Local Users and Groups policyeditor (lusrmgr.msc), shown in Figure 8-3. The Local Users and Groups window (LUaG) isactually a Microsoft Management Console (mmc.exe) snap-in, like the Disk Management utility(see Chapter 5), and therefore can be accessed remotely if necessary. Figure 8-3 shows theLUaG dialog in all its glory.
Figure 8-3. The Local Users and Groups window gives you the mostcontrol over user accounts, but at the expense of a rather sparse and
intimidating Registry Editor-like interface

LUaG is where you'll want to go to manage groups, set the automatic expiration of passwords,and change the location of a user's home directory. Just double-click any entry in the Users orGroups categories to change their properties. Or, right-click in an empty area of the right paneto add a new user or group.
Groups can be useful when you have a bunch of users. For example, say you wish to make afolder accessible to several users (as described later in this chapter); instead of having tospecify each one individually, all you would need to do is specify the group. Note that once thegroup has been set up here, you can use the User Accounts 2 dialog to assign new or existingmembers to that group.
Use the alternate User Accounts dialog and the Local Users and Groups windowwith caution, as both allow you to disable all accounts with administratorprivileges. If this happens, the computer will be completely inaccessible by anyadministrator, and you'll probably have to reinstall just to log in.
What can be confusing is finding the right place to accomplish a specific task regarding user accounts.Table 8-1 shows a bunch of different tasks and where to go to accomplish them.
Table 8-1. The various places user-account tasks can be performed
Task User Accounts User Accounts 2 Local Users and Groups
Add groups
Add users
Assign a user to a group
Assign a user to multiple groups
Change a user's description
Change a user's home folder
Change a user's password
Change a user's picture

Task User Accounts User Accounts 2 Local Users and Groups
Choose a logon script
Disable a user or group account
Manage network passwords
Modify groups
Prevent forgotten passwords
Remove almost any user
Remove any user
Rename a user
Require Ctrl-Alt-Del to log on
Set password expiration
Turn off login window
Turn off welcome screen
Use Fast User Switching
View members of groups
For the most part, adding, removing, and modifying user accounts is a fairly self-explanatoryprocess, so I won't go into every excruciating detail here. Here are some tips for working with useraccounts:
Press Ctrl-Alt-Del and then click Change Password to change your own password. This is theonly way to change the password of an account when you're not an administrator.
If you have a lot of users coming and going, use the Local Users and Groups window to havepasswords automatically expire. This not only forces users to change their own passwordsregularly, but automatically blocks users who haven't logged in a while.

Security Identifiers (SIDs)
Every user on your machine has a unique Security Identifier (SID), which is used inconjunction with most of the features discussed in this chapter, such as permissions andencryption, as well as some of the solutions in other chapters in this book. For example,your personal settings in the Registry (Chapter 3) are stored in a branch that lookssomething like this:
HKEY_USERS\S-1-5-21-1727987266-1036259444-725315541-500
The numeric portion is your SID, and is composed of the following elements:
S-r-i-sa-xxxxxxxxxx-yyyyyyyyyy-zzzzzzzzz-uid
where S stands for security identifier, r is the revision level and is always set to 1, i is
the identifier authority, and sa-xxxxxxxxxx-yyyyyyyyyy-zzzzzzzzz, is the sub-
authority. Finally, uid is the user id.
For example, the identifier authority (i) can tell you something about the type of user to
which an SID corresponds:
S-1-0 . . . is an unknown group or a group with no members
S-1-1 . . . is the "world" group that includes all users
S-1-2 . . . a local user logged into "terminal"
S-1-3 . . . is the creator of an object (file, folder, etc.)
S-1-4 . . . is a non-unique user identifier
S-1-5 . . . a standard user account
Aside from some of the solutions that use SIDs, they can be an issue if you clone yourmachine, at which time you may have to change your SID. Microsoft's SystemPreparation Tool (SysPrep) can be used to do this.

8.2. Permissions and Security
Setting the permissions for a file or folder allows you to permit access to some users while restrictingaccess to others.
Before you start messing with permissions, you'll need to turn off Simple File Sharing. Go to ControlPanel Folder Options View tab, and turn off the Use simple file sharing option. ClickOK when you're done.
Note that permissions can only be used on files and folders stored on NTFS volumes (see thediscussion of NTFS in Chapter 5).
8.2.1. Setting Permissions for an Object
By default, everyone on your computer has access to every file on your hard disk. In order to restrictaccess, you'll have to change the permissions for your folders, files, and drives that contain moresensitive data. It gets a little confusing when you realize that there are two different Permissionswindows for any given object (file, folder, printer, etc.).
Object permissions
Right-click any file, folder, drive, or printer, select Properties, and choose the Security tab toview or change the permissions for the selected object(s). These settings affect how the objectis accessed by users on your machine.
Share permissions
Right-click any file, folder, drive, or printer, select Properties, choose the Sharing tab, andclick Permissions to view or change the share permissions for the selected object(s). Thesesettings affect how the object is accessed by users on other machines on your network. Notethat the Permissions button will only be available for objects currently shared on yournetwork. See Section 8.4.3, later in this chapter, for more information on sharing resources.
You can also right-click any Registry key in the Registry Editor (see Chapter 3)and select Permissions to restrict or permit viewing and/or modification of thekey by the users on your machine.
Fortunately, all Permissions windows look and work the same; the only difference is their scope.Figure 8-4 shows a typical Permissions window.

Figure 8-4. The standard Permissions window allows you to permit ordeny access to other users on your computer or in your workgroup
Typically, a single entry, "Everyone," will appear at the top of the list. In the example in Figure 8-4,only five single users are shown here. Any user not in the list will not be allowed to view or modifythe object.
Select any user in the list, and then use the checkboxes in the list below to modify the permissionsfor that user. In this example, the user named Sara is allowed to read the selected file, but notallowed to write to it. Although this window only shows the permissions for one user or group at atime, you can click Advanced to see a better overview, as shown in Figure 8-5.
Figure 8-5. Open the Advanced Security Settings window to see all usersand permissions for an object at once

In some cases, when you attempt to remove or modify permissions in the standard Permissionswindow (Figure 8-4), Windows will complain about the fact that the object is inheriting permissions.The reason is the Inherit from parent option in the Advanced Security Settings dialog (Figure 8-5).
8.2.1.1 Inheritance and other advanced options
Inheritance can be confusing at first, but it does save time in the long run. Essentially, if you set thepermissions of a folder, those permissions will propagate to all of the files and subfolders containedtherein (although Windows will usually ask you whether or not you want this to happen). When thepermissions for a parent folder propagate to a child folder or file, that child object is said to inheritthe permissions of its parent folder. Furthermore, these permissions are locked, at least until youturn off the aforementioned Inherit from parent option.
The Auditing tab in the Advanced Security Settings window allows you to log access activity relatingto the selected object. Before Auditing will work, you'll need to set up an Auditing policy by openingthe Group Policy window (gpedit.msc). Then, navigate to Computer Configuration\WindowsSettings\Security Settings\Local Policies\Audit Policy . Then, open the Event Viewer
(eventvwr.msc) to view the corresponding logs. Note that settings in the Auditing tab obeyinheritance like Permissions, discussed earlier.
The Owner tab is used to assume ownership of one or more objects. I use this option most when Ihave a dual-boot system (see Chapter 1), and I have to access files that were placed on the harddisk by the other operating system. In most cases, Windows won't let you access such files until you"take ownership" using the Owner tab of this window.
8.2.1.2 Adding new users to the Permissions window
Typically, a single entry, "Everyone," will appear at the top of the Group or user names list in thePermissions window. More than likely, though, you'll want to eliminate the "Everyone" entry and add

only those users and groups to which you need to specifically grant access.
Start by deleting any unwanted users by selecting them and clicking Remove. Then, click Add toadd new users and groups. The Select Users or Groups window appears, as shown in Figure 8-6.
Figure 8-6. New users and groups are added to a Permissions list withthis rather confusing dialog
Most users visiting this dialog for the first time will expect a list of the users on their machine;unfortunately, such a list isn't here. Instead, you'll have to type the name(s) of the users and groupsyou wish to add in the Enter the object names to select field. If you enter more than one user,simply separate them with semicolons.
In the example in Figure 8-6, you'll notice that the third entry, SCHOOLBUS\Wendell, is unlike the
others. While "Seth" and "Munchie" are users on the machine (or in the domain to which the machinebelongs), the third entry shows how a user on a different machine is specified; in this case, the user"Wendell" on the computer SCHOOLBUS is to be added.
So, why aren't user and group names listed here? The reason is that this dialog has been designed toaccommodate a single computer with two users, as well as a company-wide network with thousandsof users, and everything in between. Naturally, you can always open the User Accounts window tolook up the users on the local machine. Or, if you're part of a Windows domain, you can clickAdvanced to search for users on your network.
When you click OK, Windows will verify the user and group names you've entered and, if all is well,will add them to the Permissions window. You can also click Check Names here to verify yourentries without closing the window.
When a new user has been added to the Permissions window (Figure 8-4), highlight the user or groupname, and selectively click the checkmarks in the Allow or Deny columns. Note that Deny entriestake precedence over Allow entries.
Depending on the type of object you've selected, you may see any number of different types ofentries here, such as Full Control, Read, Write, and Modify. After playing with the checkmarks,you'll notice that there is quite a bit of redundancy in this list; for example, Modify is an umbrellaterm that includes Read & Execute, Read, and Write.

For more control over permissions, click Advanced to show the Advanced Security Settings window(Figure 8-5), select the user, and click Edit. The Permission Entry window, shown in Figure 8-7, willallow you to fine-tune permissions and allow only those permissions that are absolutely necessary forthe object.
Figure 8-7. The Permission Entry window lets you fine-tune permissions
When you're done choosing permissions, click OK. If you're modifying the permissions for a folder,Windows may or may not prompt you to have your changes propagated to all subfolders and files.
8.2.1.3 Notes
In most cases, you'll want to set permissions to protect your files and folders from unauthorizedaccess. But some permissions are necessary to get some programs to work.
For example, if you're writing a CGI or ASP program for the IIS web server (see Chapter 9),you'll need to set the permissions of your files to give the Internet Guest Account full access.The Internet Guest Account user account name is based on the machine name: for a systemnamed SERVER, you'd enter SERVER\IUSR_SERVER into the Select Users or Groups dialog
(Figure 8-6).

For better security, Windows XP Professional supports encryption, a feature used in conjunctionwith permissions. See Section 8.2.2, later in this chapter, for details.
Permissions protect files from other user accounts only. If you walk away from your computerwhile it's logged in to your account, for example, someone else sitting down at your computerwill have full access to all your files, regardless of permissions or even encryption.
8.2.2. Protecting Your Files with Encryption
Encryption effectively adds another layer of protection for your especially sensitive data, ensuringthat a file can only be viewed by its creator. If any other user even someone with administratorprivileges attempts to view the file, they will see only gibberish.
When a file is marked for encryption, the encryption and decryption of the file are handled byWindows invisibly in the background when its creator writes and views the file, respectively. Theproblem is that Windows XP's on-the-fly encryption can be somewhat unpredictable, and security isone place where you don't want there to be any guesswork.
Encryption is a feature of the NTFS filesystem (discussed in "Choosing the RightFilesystem" in Chapter 5) and is not available with any other filesystem. Thismeans that if you copy an encrypted file onto, say, a floppy disk, CD, or otherremovable media, the file will become unencrypted, since none of these drivessupport NTFS.
Here's how to encrypt a file:
Right-click one or more files in Explorer and select Properties.1.
Click Advanced in the General tab.2.
Turn on the Encrypt contents to secure data option, click OK, and click OK again.
See "Add Encrypt/Decrypt commands to context menus," later in thissection, for a quicker way to encrypt and decrypt files.
3.
If you encrypt a folder that contains files or other folders, Windows will ask you whether or notyou want those contents to be encrypted as well. In most cases, you'll want to answer Yes. Ifyou decline, the folder's current contents will remain unencrypted, but newly created files will beencrypted. See "The ins and outs of folder encryption," later, for details.
4.
After a file has been encrypted, you can continue to use it normally. You'll never have to manuallydecrypt an encrypted file in order to view it.
Encrypting a file may not guarantee that it remains encrypted forever. For example, some

applications, when editing and saving files, will delete the original file and then re-create it in thesame place. If the application is unaware of the encryption, then it will be lost. The workaround is toencrypt the folder containing the file, rather than the file itself.
If you change the ownership of a file, as described in Section 8.2.1, earlier in this chapter, and thefile is encrypted, the encryption will remain active for the original owner and creator of the file, eventhough that user no longer technically "owns" the file.
Since all users need to access files in certain folders, such as the \Windows and \Windows\Systemfolders, Windows won't let you encrypt system files in system folders or the root directories of anydrives.
Compression, another feature of the NTFS filesystem, reduces the amount ofspace consumed by a file or folder. The rules that apply to compression are thesame as those that apply to encryption. Note that you cannot simultaneouslyuse encryption and compression on any object; turn on one option in theProperties window, and the other will be turned off. See "Increasing Disk Space(or What to Throw Away)" in Chapter 5 for more information.
8.2.2.1 Highlighting encrypted files
Windows Explorer has an option to visually differentiate encrypted files, which can be very handy,especially if you're just getting started with encryption. Start by going to Control Panel FolderOptions View tab, and turn on the Show encrypted or compressed NTFS files in coloroption. Click OK when you're done.
By default, encrypted files appear in green, and compressed files appear in blue (except for icons onthe Desktop). Note that files can't be simultaneously compressed and encrypted (as mentioned in theprevious section), so you'll never see any turquoise files. If you wish to change these colors, openTweakUI (see Appendix A), and select Colors in the Explorer category.
8.2.2.2 Allowing others to view encrypted files
By default, only you can access your own encrypted files. The easiest way to allow other users onyour machine (or network) to view one of your encrypted files is to unencrypt it. A more elegant (andsafer) solution is to modify the file's permissions:
Right-click one or more files, and select Properties.1.
Click Advanced (under the General tab), and then click Details.
The Details button will be disabled (grayed out) if the Encrypt contentsto secure data option is turned off. Of course, you can turn it on, but youwon't be able to click Details until you've clicked OK, then Apply, andthen Advanced again.
2.
3.

Click Add to select a user who can view your encrypted files, as shown in Figure 8-8. Note thatthe Expiration Date shown here represents the date the user's security certificate expires, andhas nothing to do with the permissions you're setting up.
Now, only those users who have security certificates installed on your machine will appear inthis list. This means that there's no way to add users on other machines who don't already haveaccounts on your computer. To add a user from another machine, first create a user account,and then have that user encrypt at least one file on your computer.
3.
Click OK when you're done.4.
Figure 8-8. Use the Encryption Details dialog to choose other users whocan view your encrypted files
So, how do you view someone else's encrypted files without their permission? (This is an importantquestion to ask if you care about the security of your data.) If you try to view someone's encryptedfiles, you'll get an "Access is Denied" error message, as shown in Figure 8-9.
Figure 8-9. Try to access someone else's encrypted file, and you'll getthis error

First of all, not even administrators can view files encrypted by other users. However, anadministrator can change any user's password, and then subsequently log in to that user's accountand view (or unencrypt) any of his protected files. This means that your files won't be totally secureunless you're the only administrator on the machine.
There is a little-known exception: if the owner of encrypted files deletes his or her encryption keys,neither the user nor any administrator will be able to read the encrypted files until the key isreinstalled. See Section 8.2.2.5, later in this chapter, for more information.
8.2.2.3 The ins and outs of folder encryption
You can also encrypt a folder and all of its contents using the procedure for files shown earlier. It getsa little more complicated, though, when you mix and match encrypted and unencrypted files andfolders, and it can be difficult to predict what will happen to the contents of the folders.
Now, if a file contained in an encrypted folder is moved into an unencrypted folder, the file willbecome unencrypted. The exception is when you've specifically encrypted a single file; in this case,the file will remain encrypted, no matter where you put it. Whenever you try to encrypt a file locatedin an unencrypted folder, Windows warns you and gives you the option to encrypt the folder as well(shown in Figure 8-10).
Figure 8-10. Windows displays this warning if you encrypt a file locatedin an unencrypted folder

Be especially careful here, as the default is to encrypt the containing (parent)folder in addition to the selected file, which can be counterintuitive. Check theAlways encrypt only the file option to prevent this from happening in thefuture.
If you ever inadvertently encrypt your desktop (by encrypting an item on yourdesktop, and then accepting the default in this box), the only way to unencryptit is to open Windows Explorer and unencrypt the source desktop folder (usually\Documents and Settings\{username}\Desktop).
Moving encrypted files around is complicated, too. If an unencrypted file is placed in an encryptedfolder, the file will become encrypted. The catch is when one user has encrypted a folder and anotheruser places a file in that folder; in this case, the file is encrypted for the creator of the file, whichmeans that the owner of the folder, the one who originally implemented the encryption, will not beable to read it.
On the other hand, if the user places a file in a folder, and a different user comes along and encryptsthe folder, only the user who implemented the encryption will be able to subsequently read the file,even though the file is technically owned by a different user.
8.2.2.4 Add Encrypt/Decrypt commands to context menus
If you find yourself frequently encrypting and decrypting files, having to repeatedly open theProperties window can be a pain. Instead, use this next solution to add Encrypt and Decryptcommands to the context menus for every file and folder.
Open the Registry Editor (discussed in Chapter 3).1.
Expand the branches to:HKEY_LOCAL_MACHINE\SOFTWARE\Microsoft\Windows\CurrentVersion\Explorer\Advanced.
2.
Create a new value by going to Edit New DWORD Value, and typeEncryptionContextMenu for the name of the new value.
3.
Double-click the new EncryptionContextMenu value, enter 1 for the Value data, and click OK.4.
Close the Registry Editor when you're done. The change will take effect immediately.5.
To use this new trick, right-click any unencrypted file in Explorer or on your Desktop, and selectEncrypt. Or right-click an already-encrypted file, and select Decrypt.
6.
If at least one of the selected items is a folder, you'll have the option of encrypting only the folder orall the folders contained therein. If encrypting any individual files, you'll also be asked if you wish toencrypt only the file or the parent folder as well.
8.2.2.5 Using the NTFS Encryption Utility and working with keys

The NTFS Encryption Utility (cipher.exe) is the command-line equivalent of the Encrypt contents tosecure data option discussed earlier, but it adds several powerful features not normally availablethrough Explorer. Note that the NTFS Encryption Utility is included with Windows XP Professionalonly.
Open a Command Prompt window (cmd.exe) and type cipher without any arguments to display theencryption status for all the files in the current folder. (Use the cd command discussed in Chapter 10to change to a different working folder.) Encrypted files will be marked with an E; all others willmarked with a U.
To encrypt a file, type cipher /e filename, where filename is the name of the file or folder (include
the full path if it's in a different folder). Likewise, type cipher /d filename to turn off encryption for
the item. These functions are no different than using Explorer to control encryption, except that theyhave the advantage of being able to be executed from scripts (see Chapter 9) or batch files (seeChapter 10). Type cipher /? for more options.
The real meat, however, is in cipher's ability to work with cryptographic keys.[1] Windows XP'sencryption system employs symmetric key cryptography, which uses the same key to encrypt anddecrypt data. Windows generates a unique key for each user, so that no user can decrypt anotheruser's data.
[1] The classic example of cryptographic keys is how Julius Caesar encoded messages to his allies. Each letter in the message
was shifted by three: A became D, B became E, C became F, and so on. Only someone who knew to shift the letters back by
three could decode the messages. Cryptographic keys work the same way, except they're much more complicated.
So, what happens if your computer crashes, and you need to retrieve your encrypted data? As longas you've backed up your encryption key, it's not a problem. At the command prompt, type thefollowing:
cipher /r:filename
where filename is the prefix of the output filename (the filename without its extension). Cipher ask
for a password, and then generate two separate files based on the specified filename. For example, ifyou type cipher /r:julius, you'll end up with two files:
julius.pfx
This file contains the EFS (Encrypting File System) recovery agent key and certificate. Storethis file in a safe place. If you ever need to retrieve the key, such as if your system crashes andyou need access to encrypted data, just reimport the .pfx file by double-clicking it in Explorer.
julius.cer
This file contains the EFS recovery agent certificate only (without the key). Double-click this fileto open it in an official Certificate window, and optionally install it in another system. Open theCertificates window (certmgr.msc) to manage your installed certificates. Note that certificates

are also used by Internet Explorer to communicate with secure web sites.
You can also generate a new key at any time by typing cipher /k (without any other options). Then,type cipher /u to update the encrypted files on your system with the new key.
8.2.2.6 Securing free space
Normally, when a file is deleted, only the file's entry in the filesystem table is deleted; the actual datacontained in the file remains in the folder until it is overwritten with another file.
Cipher allows you to wipe a folder, which means that it goes back and cleans out any recently deletedfiles, overwriting the leftover data with random bits. This effectively makes it impossible tosubsequently recover deleted data with an "undelete" utility. Think of the wipe feature as a virtualpaper shredder.
To wipe a folder, type cipher /w:foldername, where foldername is the full path of the folder towipe. Note that the /w option does not harm existing data, nor does it affect any files currently stored
in the Recycle Bin. It also works on unencrypted folders and encrypted folders alike.
Set up cipher to wipe folders containing sensitive data at regular intervals (orwhen Windows starts) to automatically protect deleted data. See Chapter 9 forinformation on the Scheduled Tasks feature and WSH scripts, both of which canbe used to automate cipher.

8.3. Logon Options
Here's the dilemma: you've set up multiple user accounts on a machine, and you've gone the extramile to ensure that your data is properly protected by configuring permissions and employingencryption. Now you find Windows so locked down that you can't do anything without having to entera password first. Fortunately, you can customize the logon process to suit your needs and tolerancefor cumbersome logon procedures.
8.3.1. Use the Traditional Log On DialogInstead of the Welcome Screen
The new, friendly Welcome screen is the default interface used when logging on to Windows XP.
The traditional Log On dialog forces you to type both the username and password of a user accountto log in. Since a list of active users is not shown, it's more secure than the default Welcome screen.Here's how to switch:
Open the User Accounts window in Control Panel.1.
Click Change the way users log on or off.2.
Turn off the Use the Welcome screen option, and click Apply Options.3.
This change will take effect the next time you log off or restart your computer.4.
When you switch from the Welcome screen to the Log On screen, several other aspects of theWindows interface will be affected. Table 8-2 shows the differences between these two options of thisdeceptively simple setting.
Table 8-2. How disabling the Welcome screen affects other features inWindows
Welcome screen Log On screen
Look and feel ofShut Down dialog:
Large, friendly, colorful buttonsfor Stand By,[2] Turn Off, andRestart
A simple drop-down list, like the ShutDown dialog found in earlier versions ofWindows
Start Menucommand to shutdown:
Turn Off Computer Shut Down

Welcome screen Log On screen
What happenswhen you pressCtrl-Alt-Del:
Opens Task Manager; securityfeatures shown in Shut Downmenu (except for ChangePassword)
Opens the Windows Security dialog, fromwhere you can log off, shut down, startTask Manager, change your password, orlock the computer
Access to hiddenuser accounts:
No access to hidden usersLog in to any user account by typing username
[2] Hold the Shift key to display a Hibernate button instead of Stand By on the Welcome screen.
8.3.2. Customize the Welcome Screen
Although you can easily customize the look and feel of your own account, it's not so easy tocustomize the Welcome screen. The following solutions allow you change a few things about theWelcome screen. Note that these solutions have no affect on the Log On screen (discussed in thenext section).
8.3.2.1 Choose new pictures for users
When a new account is created in Windows XP, a picture is chosen at random from a collectionincluding a Monopoly racecar, a soccer ball, a butterfly, and others. Here's how to change the picturefor any account:
Open the User Accounts window in Control Panel, and then choose an account to modify in thelist below.
1.
Click Change my picture.2.
Choose a picture from the collection, or click Browse for more pictures to choose your ownimage. Windows supports .bmp, .jpg, .gif, and .png image files.
Note that the image you choose here will also be the one that appears at the top of the StartMenu (not applicable if you're using the Classic Start Menu).
3.
Click Change picture when you're done. The new picture(s) will show up the next time you logoff or restart Windows.
4.
8.3.2.2 Create a new Welcome screen
Although changing the little picture for each user (as described earlier) is quite easy, it's an entirelydifferent matter to customize the actual Welcome screen. The screen is embedded in a Windows .exefiles, which means you'll need to extract the components of the screen to customize them.
1.

Open Explorer, and navigate to your \Windows\System32 folder.1.
Place a copy of the file logonui.exe somewhere convenient, such as on your Desktop or in yourMy Documents folder. Then, make another copy of the file, to be used as a backup in casesomething goes wrong.
2.
Download and install the free Resource Hacker utility (available athttp://www.annoyances.org/). Resource Hacker allows you to modify the bitmaps embedded incertain types of files, including .exe and .dll files, and is also used in a few solutions in Chapter2.
3.
Start Resource Hacker, and drag-drop the newly created copy of logonui.exe onto the ResourceHacker window to open it (or use File Open).
4.
Expand the Bitmap branch to show the various images used on the Welcome page. Forexample, bitmap 100 is the blue gradient background, bitmap 125 is the horizontal line thatappears above and below, and bitmaps 123 and 127 both contain the Windows logo.
Optional: you can export any of these bitmaps to .bmp files by selecting them in the tree, andthen going to Action Save [Bitmap : ### : ###]. Do this if you wish to modify theexisting images rather than (or in addition to) creating your own.
5.
Create new images or modify images you've extracted to your heart's content. Save yourimages as .bmp files.
Try to make your replacement images the same size (width height) as thedefault images in this file. If you need to change the size of an image,you'll need a working knowledge of XML. See Step 10, below, for theadditional modifications you'll need to make if your images have differentsizes than the ones they're replacing.
6.
When you're ready, go to Action Replace Bitmap. Highlight an entry in the Selectbitmap to replace list, then click Open file with new bitmap, and then locate the .bmp fileyou've created or modified.
Repeat this for all the images you wish to replace.
7.
Next, to customize any of the text shown in the Welcome screen, such as "To begin, click youruser name," open the String Table branch, and choose one of the five categories shown.
When you've found the text you want to change, just click in the right pane and start typing.
It's important that you keep the formatting of the text intact. Forexample, quotation marks, commas, and curly braces are used toseparate and organize strings. Make sure you don't mess them up.
Here are some tips for modifying the text strings here:
To include a line break, type \n.
8.

To include a double-quotation mark, type \" (necessary, since a quotation mark without
the slash will be interpreted as the closing quotes that mark the end of the string).
To insert the username of the selected user, type %s.
Some of the strings have names of fonts; as you might expect, you can modify these tochange the fonts used in the Welcome screen.
When you're done typing, click the Compile Script button.9.
The last component that can be modified is the actual layout of the Welcome page. This can befound in the UIFILE\1000 branch. The beginning of the text in this branch is blank, but if you
scroll down (in the right-hand pane), you'll see the content. This, essentially, is an XML file, andunless you are familiar with XML (similar to HTML), you won't want to touch it.
However, you may need to modify one or more of the entries here if any of your new bitmapshave different dimensions than the ones they're replacing. Start by locating the <element . . . >
tag that corresponds to the image you wish to resize; for image 100, for example, it will be theone that has this attribute:
content=rcbmp(100,0,0,219rp,207rp,1,0)
Here, the first number is the image number, and the numbers ending in "rp" are thedimensions.
10.
When you're done editing, go to File Save to save your changes.
If you are wise, you will take this opportunity to make sure you have asafe backup of the original logonui.exe before you replace it. That way, ifthe modified version is corrupted in any way, you'll be able to repair yoursystem without having to reinstall.
11.
The last step is to replace the in-use version of logonui.exe with the one you've just modified.You should be able to just drag the modified version right into your \Windows\System32 folder,replacing the one that's there.
If Windows complains that the file is in use and can't be replaced, you'll have to follow the stepsoutlined in Section 2.2.6.
12.
The new logo should appear the next time you start Windows. If, for some reason, the Welcomescreen is corrupted or won't load at all, the problem is most likely caused by a corruptlogonui.exe file. This can be repaired by using the instructions in the previous step to replaceThe modified version with the original version you backed up you did back it up, didn't you?
13.
See Section 2.3.5 for a related solution.
8.3.2.3 Turn off the mail notification

By default, Windows will display the number of unread messages underneath each name on theWelcome screen, but only if you're using Outlook or Outlook Express to retrieve your email. To turnoff this notification, follow this procedure:
Open the Registry Editor (discussed in Chapter 3).1.
Expand the branches toHKEY_CURRENT_USER\Software\Microsoft\Windows\CurrentVersion\UnreadMail.
2.
Double-click the MessageExpiryDays value in this key.
If it's not there, go to Edit New DWORD Value, and type MessageExpiryDays for the
name of the new value.
3.
Type 0 for its value data, click OK, and then close the Registry Editor when you're done. You'll
have to log off and then log back on for the change to take effect.
4.
Instead of disabling the feature, you can merely adjust how far back Windows will "look" for unreadmessages, if you like. For example, change the MessageExpiryDays value to 5 to ignore any unreadmessages more than five days old. The default is 3.
This feature has been known to stop working if two or more email accounts have been configured inOutlook for a single user account.
8.3.3. Customize the Log On Screen
Although you can easily customize the look and feel of your own account, it's not so easy tocustomize the Log On screen. The following solutions allow you to customize various aspects of thiswindow and the desktop that appears in the background. Note that these solutions have no affect onthe Welcome screen (discussed in the previous section).
8.3.3.1 Customize the appearance of the Log On dialog and the desktop background
Follow these steps to customize the colors used by the Log On dialog, as well as the colors and(optionally) the wallpaper of the desktop that appears behind it:
Open the Registry Editor (discussed in Chapter 3).1.
Expand the branches to HKEY_USERS\.DEFAULT\Control Panel\Colors.2.
Each of the values in this key represents the color of a different screen element. Each value hasthree numbersthe red, green, and blue values, respectivelythat indicate the color of thecorresponding object.
For example, double-click the Background value and type 255 0 128 (note the spaces between
the numbers) to have a hot-pink background behind the Log On dialog.
3.

To determine the RGB values for your favorite colors, open a Color dialog by going to ControlPanel Display Appearance tab Advanced Color 1 Other.
While you're here, you can also turn on the ClearType feature for the Log On screen. ClearTypehelps make text more readable on laptop and flat-panel displays. Double-click theFontSmoothingType value and change its value data to 2 to enable ClearType. A setting of one(1) will enable standard font smoothing, and a setting of zero (0) will turn it off entirely.
4.
If you wish to use wallpaper on the Log On desktop instead of a solid color, expand thebranches to HKEY_USERS\.DEFAULT\Control Panel\Desktop. Double-click the Wallpaper
value, and type the full path and filename of a .bmp or .jpg file to use as the wallpaper. To tilethe wallpaper, set the TileWallpaper value to 1, or to stretch the wallpaper, set theWallpaperStyle value to 2.
5.
Close the Registry Editor when you're done. The change will take effect the next time you log offor restart Windows.
6.
8.3.3.2 Hide the last-typed username
By default, the username of the previously logged-in user is shown in the Log On screen. To disablethis, follow these steps:
Open the Registry Editor (discussed in Chapter 3).1.
Expand the branches to HKEY_LOCAL_MACHINE\SOFTWARE\Microsoft\WindowsNT\CurrentVersion\Winlogon. (Note the Windows NT branch here, as opposed to the morecommon Windows branch).
2.
Create a new string value here by going to Edit New String Value, and typeDontDisplayLastUserName for the name of the new value. If the value exists, it may be aDWORD value. Either value type is supported here.
3.
Double-click the new value, type 1 for its value data, and click OK.4.
Note that hiding the last-typed username will disable the automatic login, described in the nextsection, "Logging on Automatically."
8.3.3.3 Customize the logon message (Log On screen only)
The following solution allows you to place your own message above the User name and Passwordfields in the Log On dialog:
Open the Registry Editor (discussed in Chapter 3).1.
Expand the branches to HKEY_LOCAL_MACHINE\SOFTWARE\Microsoft\WindowsNT\CurrentVersion\Winlogon. (Note the Windows NT branch here, as opposed to the morecommon Windows branch).
2.
3.

2.
Create a new string value here by going to Edit New String Value, and typeLogonPrompt for the name of the new value.
3.
Double-click the new value, type the message you'd like to appear, and click OK.4.
8.3.4. Logging on Automatically
Depending on your settings, you may or may not see the Welcome screen or the Log On to Windowsdialog when Windows first starts. For example, if your computer only has one user account (inaddition to the Administrator account, discussed in previous solution), and you haven't specified apassword for that account, Windows will log you in automatically.
But it's never a good idea to have any accounts on your system set up without passwords, not somuch because someone could break into your computer while sitting at your desk, but because ifyou're connected to a network or the Internet, an account any account without a password is a bigsecurity hole. See Section 7.6.1 for more information.
The problem with setting up a password, however, is that Windows will then prompt you for thepassword every time you turn on your computer, which can be a pain if you're the only person whouses the machine. Fortunately, there is a rather easy way to password-protect your computer andnot be bothered with the Log On screen.
Open the alternate User Accounts window (described at the beginning of this chapter) by goingto Start Run, typing control userpasswords2, and clicking OK.
1.
Select the username from the list that you'd like to be your primary login, and then turn off theUsers must enter a username and password to use this computer option.
2.
The Automatically Log On dialog will appear, prompting you to enter (and confirm) thepassword for the selected user.
3.
Click OK when you're done. The change will take effect the next time you restart yourcomputer.
4.
Note that this solution will not disable your ability to log out and then log into another user account(see below). Furthermore, logging out and then logging back in will not disable the automatic login;the next time you restart Windows, you'll be logged in automatically to the user account youspecified.
8.3.4.1 Prevent users from bypassing the automatic login
Automatic logins are also good for machines you wish to use in public environments (typically called"kiosks"), but you'll want to take steps to ensure that visitors can't log in as more privileged users.There are two ways for a user to skip the automatic login and log into another user account:
Hold the Shift key while Windows is logging in.

Once Windows has logged in, log out by selecting Log Off from the Start Menu or pressing Ctrl-Alt-Del and selecting Log Off.
This next solution eliminates both of these back doors:
Open the Registry Editor (discussed in Chapter 3).1.
Expand the branches to HKEY_LOCAL_MACHINE\SOFTWARE\Microsoft\WindowsNT\CurrentVersion\Winlogon. (Note the Windows NT branch here, as opposed to the morecommon Windows branch).
2.
Create a new string value here by going to Edit New String Value, and name the newvalue IgnoreShiftOverride. Double-click the new value, type 1 for its value data, and click
OK. (This disables the Shift key during the automatic login.)
3.
Create a new DWORD value here by going to Edit New DWORD Value, and name thenew value ForceAutoLogon. Double-click the new value, type 1 for its value data, and click OK.
(This automatically logs back in if the user tries to log out.)
4.
Close the Registry Editor when you're done. The change will take effect immediately.5.
To remove either or both of these restrictions, just delete the corresponding registry values.
8.3.4.2 Limit automatic logins
It's possible to limit the automatic login feature, so that the Log On dialog (or Welcome screen)reappears after a specified number of boots:
Open the Registry Editor (discussed in Chapter 3).1.
Expand the branches to HKEY_LOCAL_MACHINE\SOFTWARE\Microsoft\WindowsNT\CurrentVersion\Winlogon. (Note the Windows NT branch here, as opposed to the morecommon Windows branch).
2.
Create a new DWORD value here by going to Edit New DWORD Value.3.
Type AutoLogonCount for the name of the new value.4.
Double-click the new AutoLogonCount value, and type the number of system boots for which
you'd like the automatic login to remain active.
5.
Every successive time Windows starts, it will decrease this value by one. When the value is zero, theusername and password entered at the beginning of this topic are forgotten, and theAutoLogonCount value is removed.
8.3.5. Logging in as the Administrator

When you first install Windows XP, Setup walks you through the process of setting up two separateuser accounts. First, you're asked to choose an Administrator password, which is used for an actualaccount called "Administrator." Setup then requires you to enter the name of at least one user thatwill be using the computer; that second username is what is used to subsequently log you intoWindows XP.
Although the second user has administrator privileges, it's not the true Administrator account, whichis occasionally required for advanced solutions. What makes things more difficult is that theAdministrator account is hidden from the Welcome screen and the User Accounts window. If you wishto log into the Administrator account, either to complete some solution or just to use it as yourprimary login, you should follow these instructions:
Get to the traditional Log On dialog, which requires you to type a username rather than simplyclicking it. Not only is this window more secure than the Welcome screen, it's the only way toget to the Administrator account. There are two ways to open the Log On dialog:
If you're currently logged in, select Log Off from the Start Menu. When the Welcomescreen appears, press Ctrl-Alt-Del twice.
a.
To make the traditional Log On dialog your default, see Section 8.3.2, earlier in thischapter.
b.
1.
When the old-style Log On to Windows dialog appears, type Administrator into the User
name field, and your administrator password into the Password field.
2.
If, after logging in as the Administrator, you wish to delete the secondary account createdduring Setup, use the alternate User Accounts window by launching control userpasswords2,
as described at the beginning of this chapter.
3.
8.3.5.1 Notes
Despite the fact that the Administrator account is hidden by default, it's perfectly acceptable touse it as your primary login. You may wish to do this simply if you've gotten tired of seeing yourname in huge, blazing letters in the Start Menu.
If you wish to use the Administrator account as your primary login, but don't wish to enter thepassword every time you turn on your computer, see the previous solution, "Logging onAutomatically."
After you log in to the Administrator account a few times, it will start showing up on theWelcome screen, at which point you can re-enable the Use the Welcome screen option if youso desire.
8.3.6. Hiding User Accounts

By default, several user accounts are hidden from the User Accounts window and the Welcomescreen. Although you can access these accounts using the alternate User Accounts dialog as well asthe Local Users and Groups window (both described at the beginning of this chapter), you can alsosimply unhide these accounts. Naturally, you can also hide additional accounts with this procedure.
Open the Registry Editor (discussed in Chapter 3).1.
Expand the branches to HKEY_LOCAL_MACHINE\SOFTWARE\Microsoft\WindowsNT\CurrentVersion\Winlogon\SpecialAccounts\UserList. (Note the Windows NT branchhere, as opposed to the more common Windows branch).
2.
In this key, there's a DWORD value named for each hidden user. To unhide a user account,simply delete a corresponding value here.
3.
To hide a user, start by creating a new DWORD value by going to Edit New DWORDValue. Name the new value after the user you wish to hide.
4.
Setting any of these values to zero (0) will hide the corresponding accounts from both the
standard User Accounts window and the alternate User Accounts window, enabling access onlythrough the Local Users and Groups window.
However, if a value is set to 65536 (hex 10000), it will only be hidden from the User Accounts
window, allowing access through either the alternate User Accounts dialog or Local Users andGroups.
5.
Close the Registry Editor when you're done. The change should take effect the next time any ofthe user-account dialogs are opened.
6.
8.3.7. Prevent Users from Shutting Down
Among the restrictions you may want to impose on others who use your computer is one on shuttingdown Windows. For instance, if you're logging in remotely, as described in "Controlling AnotherComputer Remotely (Just Like in the Movies)" in Chapter 7, you'll want to make sure that your PC isalways on. Or, if you're setting up a system to be used by the public, you won't want to allow anyoneto shut down or reboot the system in an effort to compromise it. Here's how to do it:
Open the Registry Editor (discussed in Chapter 3).1.
Expand the branches toHKEY_CURRENT_USER\Software\Microsoft\Windows\CurrentVersion\Policies\Explorer.
2.
Create a new DWORD value (Edit New DWORD value), and name it NoClose.3.
Double-click the new value and type 1 for its data.4.
Close the Registry Editor when you're done. You'll need to restart Windows for this change totake effect.
5.

5.
Keep in mind that this isn't a bulletproof solution. For instance, anyone will be able to shut downwindows by pressing Ctrl-Alt-Del and clicking Shut Down there. Also, someone with ready accessto your computer's on/off switch, reset button, or power cord will be able to circumvent thisrestriction. At the very least, though, it'll provide some reasonable assurance that your PC will remainpowered on.
8.3.8. Working with User Folders
Every user account on your system has its own profile (home) folder, stored, by default, in the\Documents and Settings folder. In this folder are such special user folders as Desktop, Send To,Start Menu, My Documents, and Application Data, among others. Files placed in the Desktop folderappear as icons on the user's desktop, shortcuts placed in the Start Menu folder appear as Startmenu items, and so on. This arrangement lets each user have her own Desktop, Start Menu, etc.
There's also an All Users folder, used, for example, to store icons that appear on all users' Desktops.Likewise, the Default User folder is a template of sorts, containing files and settings copied for eachnewly created user. All in all, the use of these folders is pretty self-explanatory.
See "Backing Up the Registry" in Chapter 3 for more information on theNTUSER.DAT file found in each user folder.
8.3.8.1 Modifying folder locations
You can change the default locations for any user's special folders, but the process is different fordifferent folder types:
Home folder
To change the location of any user's home folder, start the Local Users and Groups window(lusrmgr.msc, described at the beginning of this chapter). Open the Users category, double-click a user, and choose the Profile tab.
Documents, Send To, etc.
To change the location of any system folder in a user's home folder, such as the My Documentsfolder or the Send To folder, you must be logged in as that user. Start TweakUI (see AppendixA), open the My Computer category branch, select Special Folders, and choose the folder torelocate from the Folder list. Note that this only changes the place that Windows looks for theassociated files; you'll have to create the folder and place the appropriate files in it yourself.
For folders not listed in TweakUI, you'll need to edit the Registry. Most user folders arespecified in these two Registry keys:

HKEY_CURRENT_USER\Software\Microsoft\Windows\CurrentVersion\ Explorer\Shell FoldersHKEY_CURRENT_USER\Software\Microsoft\Windows\CurrentVersion\ Explorer\User Shell Folders
One of the exceptions is the Application Data folder, which is defined by the DefaultDir value in:
HKEY_CURRENT_USER\Software\Microsoft\Windows\CurrentVersion\ ProfileReconciliation\AppData.
You'll need to log out and then log back in for any these changes to take effect.
Program Files
The Program Files and Common Files folders (shared by all users) are both defined in:HKEY_LOCAL_MACHINE\SOFTWARE\Microsoft\Windows\CurrentVersion
For Program Files, you'll need to change both the ProgramFilesDir and ProgramFilesPath values;for Common Files, just change the CommonFilesDir value.
When relocating system folders, keep in mind that there can be hundreds ofreferences to them throughout the Registry, especially Program Files andCommon Files. You'll probably need to use a program like Registry Search andReplace (available at http://www.annoyances.org ) to easily get them all.
8.3.8.2 Consolidating user folders
To effectively remove a user's system folder, the best thing to do is simply to consolidate it withanother system folder. After specifying the new location, as described earlier, just drag-drop thecontents of one into the other, and then restart Windows.
The benefits of doing this are substantial. For example, Windows XP comes with the My Documentsfolder, which helps to enforce a valuable strategy for keeping track of personal documents byproviding a single root for all documents, regardless of the application that created them (see Section2.2.8 for details). The problem is that this design is seriously undermined by the existence of othersystem folders with similar uses, such as My Pictures, Favorites, Personal, Received Files, and MyFiles.[3] Consolidating all of these system folders so that they all point to the same place, such asc:\Documents or c:\Projects, causes several positive things to happen. Not only does it provide acommon root for all personal documents, making your stuff much easier to find and keep track of, italso allows you to open any document quickly by using the Favorites menu in the Start Menu.
[3] My Files is the counterpart to My Documents that is used by some older versions of WordPerfect and other non-Microsoft
application suites. The Personal folder was used by Microsoft Office 95, but not so much in subsequent releases. Depending on
which programs you've installed or have used in the past, these folders may or may not appear on your system.

8.4. Sharing Files and Printers
One of the main reasons you might want to set up a workgroup between two or more computers in your home oroffice is to share files and printers between them, eliminating the need to "walk" a disk from one computer to another.
Once you've established a working network connection with another Windows computer, as described in Chapter 7 ,you can start sharing resources on your computer so that they can be accessed by other computers on the network.
A shared folder, for example, would allow anyone on your network to read and (optionally) write files to it, as thoughthe folder were on their own hard disks. This effectively eliminates the need for multiple versions of documents onwhich more than one person is collaborating, since any number of people can open and edit the same document(sometimes even simultaneously). The primary limitation is that the computer hosting the file must be turned on foranyone to access it.
A printer physically connected to your computer can be shared on your network so any computer can print to it. Notethat this is not the same as a network printer, which is connected directly to your network (and not through acomputer).
Whenever you share a folder, you are essentially opening a "back door" to your computer,allowing access to potentially sensitive data. It's important to keep security in mind at alltimes, especially if you're connected to the Internet. Otherwise, you may be unwittinglyexposing your personal data to intruders looking for anything they can use and abuse.Furthermore, an insecure system is more vulnerable to viruses, Trojan horses, and othermalicious programs. This doesn't mean that you shouldn't use file sharing, just that you'll wantto use common sense if security is important to you.
8.4.1. Sharing Folders
Sharing resources is easy, but you'll need to disable the Simple File Sharing feature before you proceed. Go toControl Panel Folder Options View tab, and turn off the Use simple file sharing option. Click OK whenyou're done.
To share a folder with others on your network, simply right-click its icon and select Sharing and Security (or selectProperties and choose the Sharing tab). Figure 8-11 shows a sharing window for a user's Desktop folder (sharingprinters is discussed later).
Figure 8-11. Use the Sharing tab of a folder's Properties window to control how it'saccessed by other computers on a network

Select the Share this folder option to start sharing the selected folder and all of its contents. The Share name isthe name under which the folder will be accessed from other computers; although the name can be anything, itusually makes sense to use the default, which is identical to the local name of the object.
A drive can be shared as easily as any folder. However, if you're trying to share a drive and you're using Windows XPProfessional, you'll see that the drive will already appear to be shared. This is called an Administrative Share, andalthough it cannot be disabled, it is fairly harmless (as long as you've properly set up passwords for all your accountsas described earlier in this chapter). If you want to proceed to share a drive, you'll have to first click New Share atthe bottom of the dialog. Make any desired changes in the New Share dialog or leave the default settings, and clickOK when you're done. The new share name you've typed, as well as the default share (such as D$ ), will both appearin a drop-down list. Select either share to subsequently modify its settings.
As soon as you've chosen the desired sharing options, click OK to begin sharing the folder or drive (and all of itscontents) over your network. When a folder or drive is shared, a small hand appears over its icon in Explorer.
The aforementioned Administrative Share illustrates an interesting, undocumented feature ofshare naming. If you place a dollar sign ($) at the end of a share name, it will be hidden whenviewed from all remote computers. The only way, then, to access the share would be to typeits address into Explorer's Address Bar.
8.4.2. Accessing Shared Resources Remotely
As soon as a folder or drive has been shared, it can be accessed from another computer. Here's how to access aremote folder:
1.

Open the My Network Places folder in Explorer, or double-click the My Network Places icon on the Desktop.1.
Expand the branches to Entire Network\Microsoft Windows Network .2.
A branch for each workgroup detected by your computer will appear in the Microsoft Windows Network folder.For most smaller workgroups, you'll only see a single entry here, corresponding to the workgroup name enteredin Control Panel System Computer Name tab Change . If all computers in your LAN belong tothe same workgroup, they'll all be listed under the corresponding workgroup folder here.
Open any computer listed here to view the shared resources on that computer. In addition to any foldersintentionally shared using the process earlier, you'll also see a Printers and Faxes folder and a Scheduled Tasksfolder.
If you're looking for a particular computer or workgroup, and it's not shown here, try pressing F5 to refresh theview. If that doesn't work, use the Search tool to look for the computer.
3.
Every user who wishes to access data on a remote computer (that is, through a local network or VPNconnection), must have a user account on the computer. For example, if you're logged in to a computer as"Mel," you'll only be able to access resources on other computers that also have an account called "Mel" and thathave the same corresponding password. If you have two Windows XP machines, one with a "Mel" account andone with a "Mel" and a "Bob" account, a user logged in as "Bob" will only be able to access resources on thesecond machine.
To restrict access to users, beyond simply removing their accounts, click Permissions in the Sharing tab of theobject's Properties window. Note that although this Permissions window looks and works identically to the onediscussed earlier in this chapter, the permissions set here only apply to those that access the object remotely,while standard, local permissions only apply to local users that access the object from the same machine.
4.
Continue to navigate the tree and open folders as desired. Files and folders can be dragged and dropped,documents opened, etc., as though they were stored on your own hard disk.
5.
The full path to a network resource (called a UNC path, for Universal Naming Convention) works like a standard folderpath, but looks a little different.
For example, on a computer called "Luke," you might have a folder called Sideshow , stored in a folder called ObscureReferences , stored on drive C: . The Sideshow folder would then be referenced by this local path:
c:\Obscure References\Sideshow
But the same folder, when accessed from another computer, would be referenced by this UNC path:
\\Luke\Sideshow
What this shows is that only the Sideshow folder is actually shared. If, instead, the Obscure References folder wereshared, the UNC path to the same Sideshow folder would look like this:
\\Luke\Obscure References\Sideshow
In neither of the above UNC examples does a reference to drive C: appear. This is because we're only sharing thefolder instead of the whole drive. If drive C: were shared, the UNC path to Sideshow would look like this:
\\Luke\c\Obscure References\Sideshow

Note the absence of the expected colon after c in this path.
As stated earlier in this section, you'll typically want to limit the scope of your shared foldersthat is, only share thosefolders you specifically want shared. In the final example, above, an entire drive is shared, which means that any filein any folder can be accessed by simply navigating. Naturally, employing permissions and encryption, both describedearlier in this chapter, will further safeguard your data and the system on which it's stored.
Mapping Drives
In most cases, you'll want to access remote folders through the My Network Places folder, as describedelsewhere in this section. However, there's another system in place in Windows XP, included mostly as aholdover from years past.
In Explorer, go to Tools Select Map Network Drive to map a remote folder to a virtual driveletter on the local system. For example, choose an unused drive letter from the Drive list, such as N: ,and then specify the UNC path to an existing network folder, such as \\Luke\Sideshow . Turn on theReconnect at logon option if you want Windows to re-establish the mapped drive every time you startWindows. Click Finish when you're done.
Alternatively, you can use Windows Explorer to navigate to the remote folder inMy Network Places, right-click the folder, and then select Map Network Drive .Note that the Map Network Drive option will only appear for folders highlightedin the folder tree (the left pane).
A new drive will appear in Explorer, and its contents will mirror the remote folder you've selected. This isuseful mostly for compatibility with older applications that don't support UNC paths, so that you can"fool" them into thinking that they're accessing only local folders.
The other reason one might want to map a drive is to provide quick access to a remote folder. However,it's typically just as easy (and often more useful) to create a Windows Shortcut to a remote folder forthis purpose.
8.4.3. Sharing Printers
As soon as you share a printer, anyone on your workgroup can print to it.
Using the same procedure as sharing folders, described above, you can share almost any printer. Go to ControlPanel Printers and Faxes , right-click the printer you wish to share, and select Sharing . You'll notice that theSharing window for printers, shown in Figure 8-12 , is much simpler than its counterpart for folders. Select the Sharethis printer option, choose a share name, and then click OK to begin sharing the printer.
Figure 8-12. You can share a printer in much the same way as sharing a folder

Unlike folders, however, a shared printer must be installed on each remote computer before it can be accessed. Here'show to install a remote printer from a computer other than the one to which it's physically connected.
Open Control Panel Printers and Faxes .1.
Double-click the Add Printer icon (or, if you have common tasks enabled, click Add a printer in the PrinterTasks pane).
2.
Click Next on the first page, select A network printer, or a printer attached to another computer on thesecond page, and then click Next .
3.
On the next page, leave the default setting of Browse for printer selected, and click Next .4.
On the next page, you'll see a nonstandard collapsible tree, from which you'll need to navigate to the remoteprinter you wish to install. Navigation is a little different here than in Explorer; instead of the usual plus signs,you'll have to double-click branches to expand them. When you've found the printer, highlight it and click Next .
If the printer does not appear under the computer to which it's attached, either the printer has not yet beenshared, the computer to which the printer is attached is not turned on, or the printer's driver does not supportnetwork sharing.
5.
6.

Some printers can't be shared over a network, which is usually a limitation of theprinter's driver. Most printer manufacturers will make networkable drivers available fortheir printers, but some will intentionally disable this feature, especially for their less-expensive printers. In this case, your only recourse would either be to purchase aseparate print-server device, or simply replace the printer.
Click Finish to complete the wizard.
In most cases, Windows will simply copy the driver files from the host computer and install them automatically.But if the computer on which you're installing the printer is not running Windows XP, you may have to locatedifferent drivers. You can eliminate this step by clicking Additional Drivers in the Sharing window (Figure 8-12) of the host computer and preparing versions of the printer's drivers for other operating systems, such asWindows 9x/Me.
6.
Assuming all goes well, an icon for the new printer will appear in the Printers and Faxes window, and you'll beable to print to that printer from any Windows application. You'll need to repeat these steps for each computerfrom which you need to print to the new printer.
7.
Note that the host computer, the one to which the printer is physically attached, must be turned on and connected tothe workgroup in order to allow other computers to print. You can overcome this limitation by using a print-serverdevice, which connects most types of printers directly to your network.
8.4.4. Stop Sharing Scheduled Tasks
As explained earlier in this section, you can access the shared printers and folders as well as access the ScheduledTasks folder of any other computer in your workgroup. The problem is that sharing Scheduled Tasks slows networkbrowsing considerably. Use this solution on each computer in your workgroup to stop the sharing of Scheduled Tasksand increase your network performance:
Open the Registry Editor (discussed in Chapter 3 ).1.
Expand the branches toHKEY_LOCAL_MACHINE\SOFTWARE\Microsoft\Windows\CurrentVersion\Explorer\RemoteComputer\NameSpace
.
2.
Under this key, there will be at least two keys named for Class IDs. The (default) value inside each key will tellyou what the key is for. Find the key for "Scheduled Tasks" (it will be {D6277990-4C6A-11CF-8D87-00AA0060F5BF} ), and delete it.
3.
Close the Registry Editor when you're done.4.
The change will take effect immediately, and you'll notice that Windows is now much more responsive when browsingshared folders.

Chapter 9. Scripting and AutomationOne of the ways to improve your experience with Windows XP is to reduce the time it takes toperform repetitive tasks, whether that involves backing up important files once a week, or generatingcustom web pages once every three seconds. Scripting, a form of very simple programming, is wellsuited to quick-and-dirty tasks, such as simple file operations, managing network connections, andeven starting several programs with a single click of a button.
Scripts are plain-text files that can be written and executed without a special developmentenvironment and don't require a compiler just use your favorite text editor, or Notepad. (Simply put,a compiler is a program that translates editable program source code into application executables,such as .exe and .dll files. Scripts are interpreted rather than compiled, which means that anotherprogram reads and executes the commands in the script, line by line.)
Windows comes with two forms of scripting: the Windows Script Host (WSH) and batch files. Bothtechnologies have their strengths and limitations. Batch files are somewhat simpler to write, but WSHscripts are much more flexible and powerful and offer better user interaction. WSH scripts areWindows-based, and can take advantage of Windows services, such as printing, networking, andRegistry access. DOS batch files can be run on any PC made after 1982, regardless of the version ofWindows being used, but WSH scripts run only on Windows 98/Me, Windows 2000, and Windows XP.(Windows 95 and Windows NT 4.0 can also run WSH scripts, but only after installing Microsoft's freelyavailable WSH add-on.)
The Windows Script Host is the engine behind the execution of scripts. Rather than being a tangible,interactive application like Notepad or Internet Explorer, WSH is simply an extensible collection ofsupport files. The beauty of the Windows Script Host (yes, I said beauty in regard to a Microsoftproduct) is that it is language-independent, meaning that it will work with any modern scriptinglanguage. It has built-in support for JavaScript and VBScript, but it can be extended (with third-partyadd-ons) to use almost any other language, such as Perl and Python. This extensibility is a welcomechange from Microsoft's usual narrow support of only its own proprietary technologies.
VBScript is based on another Microsoft programming language, Visual Basic (VB), which, in turn, isloosely based on Beginner's All-purpose Symbolic Instruction Code (BASIC). If you're at all familiarwith BASIC, taught in grade school since the seventies, the basics of VBScript won't be much of achallenge. VBScript will be used primarily in this chapter because it's easy to learn; it supports easyaccess to the features we need, like Registry access and file operations; and its cousin, VB, is one ofthe most widely used programming environments in the world.
So where does the Windows Script Host end and the VBScript language begin? From the point of viewof the end user, WSH is started when you double-click on a script file, at which point it automaticallychooses an appropriate language interpreter based upon the script filename extension. From thepoint of view of the developer, WSH provides special functionality to all languages through the use ofobjects (see Section 9.2 later in this chapter); that way, each WSH-supported language needn'tbother including functionality for advanced functions, such as Registry access and filesystemoperations.
The primary goals of this chapter are to provide an orientation for using the Windows Script Host and

to show useful problem-solving applications that illustrate the power and flexibility of WSH.

9.1. Building a Script with VBScript
A script is simply a list of commands that are placed one after another and stored in a text file. Scriptcommands are like building blocks: the more commands and programming techniques you learn, thebroader your palette will be for making useful scripts. Some of the simpler building blocks will be usedin this section of the chapter to illustrate the way scripts are built. Advanced users may prefer to skipto subsequent sections, which cover more advanced topics.
To run a script, just double-click on the script file icon; you'll probably never need to run the ScriptingHost program (wscript.exe) directly.
There are actually two script interpreters (engines) included with Windows XP.WScript.exe is a native Windows interpreter and is used in most cases.CScript.exe is a console interpreter, which is used when you want the scriptoutput to be sent to the console (Command Prompt). You can use CScript.exeat any time by right-clicking a script file and selecting Open with CommandPrompt.
When the Scripting Host runs the script, the commands are executed in order, one by one. You canleave Notepad open to make changes and additions while you test the script (big screens areespecially handy for this sort of thing).
You can quickly open an existing script file for editing by right-clicking on it and selecting Edit. Thiswill, by default, open Notepad, although you might want to associate the Edit action for .vbs files witha more powerful text editor (see Section 4.3.3).
The process of putting a script together essentially involves typing commands and then running thescripts to test them. In the following topics, we'll cover the background concepts necessary tocomplete many tasks with scripts:
Using variables to store and manipulate information
Asking for and displaying information with the InputBox and MsgBox commands
Creating interactive scripts with conditional statements
Using loops to repeat a series of commands
Making building blocks with subroutines and functions
Extending scripts with object references
9.1.1. Using Variables to Store and Manipulate Information

The use of variables is essential when some interaction is required by a script. A variable can beassigned a value, which is subsequently used or simply recalled later in the script. For example, thefollowing two commands:
MyName = "joe user"MyShoeSize = 12
assign two different variables to two different values. The first variable, MyName, is assigned a textstring, while the second, MyShoeSize, is assigned a numeric value. You can also assign variables tovalues in terms of other variables:
MyIQ = MyShoeSize + 7
This statement, when placed after the two preceding lines, will result in the variable MyIQ having avalue of 19 (12 plus 7). When a variable name appears on the left side of an equals sign, its value isbeing manipulated. When it appears on the right side of an equals sign or within some othercommand, its value is simply being read. You can carry out more complex mathematical operationsusing various combinations of parentheses and the standard operators (+, -, *, /, and ^ for addition,
subtraction, multiplication, division, and exponentiation, respectively).
9.1.2. Giving Your Scripts an Interface with the InputBox and MsgBoxCommands
Some scripts are ideally suited to run in the background and perform a sequence of tasks, and thensimply exit when those tasks are complete. Others require some sort of user interaction, either in theform of asking the user for input or informing the user when something has gone wrong. Forexample, this command:
MyName = InputBox("Please enter your name.")
will display a prompt on the screen when the script is run, asking for some text to be typed. Whenyou enter some text and click OK, the script places the text you've typed into the variable MyNameand continues on to the next command.
Now, collecting and rearranging information does no good without the ability to spit out a result. Theversatile MsgBox function allows you to display a simple message, as follows:
MsgBox "Hello, Hello Again."
Combining the principles we've covered so far, consider the following code:
MyAge = InputBox("Please type your age.")NewAge = MyAge + 5MsgBox "In 5 years, you will be " & NewAge & "."

The first line does two things: it first asks the user to type something, and then assigns the typedtext to the variable MyAge. The second line creates a new variable, NewAge, assigns the user's inputto it, and adds five. Note the lack of any error checking in this example: if the user enters somethingother than a number, this code will cause a WSH error, and the script will end early. The third linethen uses the & operator to concatenate (glue together) a text string and the NewAge variable and
displays the result in a message box. Notice that plain text is always enclosed in quotation marks, butvariables are not. If we were to enclose the NewAge variable in quotation marks, the script wouldsimply print out the text NewAge instead of whatever value is stored in the variable.
The MsgBox statement can also be used like this:
Response = MsgBox("Here's My Message", 17, "Message Title")
which allows it to be used for not only displaying a message, but recording the response as well. The17 is the sum of a few different values, which specify the options used to customize the message box.
Figure 9-1 shows two sample message boxes, each with different buttons and icons.
Figure 9-1. Various options can be combined to produce a variety ofmessage boxes
To choose the buttons that are displayed by the MsgBox function, specify:
0 for OK1 for OK & Cancel2 for Abort, Retry, & Ignore3 for Yes, No, & Cancel4 for Yes & No5 for Retry & Cancel
To choose the icon that is displayed, specify:
16 for a red "X" (error)32 for a question mark (query)48 for an exclamation mark (warning)64 for a blue "I" (information)
Additionally, you can add:
256 to give the second button the focus (dotted lines)512 to give the third button the focus4096 to make the message box "system modal" (i.e., all applications are suspended until the
user responds to the message box)

So, to have a message box with the Yes and No buttons, to have the question mark icon, and tohave No be the default, you would specify a value of 4 + 32 + 256 = 292. The two message boxes inFigure 9-1 have values of 17 (that's OK, Cancel, and the "X" icon) and 292, respectively. Note thatit's good practice not to add the values together (like I did in the first example with 17), but rather to
leave them separated, like this:
Response = MsgBox("Here's My Message", 16 + 1, "Message Title")
This way, it's easier to understand and modify later on.
When the user responds to the message box, the Response variable will be set to:
1 if the user clicked OK2 for Cancel3 for Abort4 for Retry5 for Ignore6 for Yes7 for No
The next step is to write code that can perform different functions based on this recorded response.See the subsequent "Creating Interactive Scripts with Conditional Statements" topic for details onusing the results from a MsgBox statement to determine what happens next in a script.
9.1.3. Creating Interactive Scripts with Conditional Statements
Conditional statements allow you to redirect the flow depending on a condition you determine, suchas the value of a variable. Take, for example, the following script:
Response = MsgBox("Do you want to continue?", 32 + 4, "Next Step")If Response = 7 Then WScript.QuitMsgBox "You asked for it..."
The first statement uses the MsgBox function, described in the previous topic, to ask a question. Thevalue of 32 + 4 specifies Yes and No buttons, as well as the question mark icon. If the user choosesYes, the value of the Response variable is set to 6; if No is chosen, Response is set to 7.
The next statement uses the vital If...Then structure to test the value of the Response variable. If
it's equal to 7 (meaning the user clicked No), then the script exits immediately (using theWScript.Quit statement). Otherwise, script execution continues to the next command.
Here's another example using a slightly more complex version of the If statement:
MyShoeSize = InputBox("Please type your shoe size.")MyIQ = InputBox("Please type your IQ.")If MyShoeSize > MyIQ Then MsgBox "You need to read more."Else MsgBox "You need larger shoes."

End If
One of the nice things about VBScript is that most of the commands are in plain English; you shouldbe able to follow the flow of the program by just reading through the commands. Before you run theprevious script, try to predict what will happen for different values entered at each of the twoInputBox statements.
This script uses the If...Then structure to redirect output depending on the two values entered at
runtime (when the script is actually being executed). It should be evident that the first message isdisplayed if the value of MyShoeSize is larger than the value of MyIQ. In all other cases (includingwhen both values are equal), the second message is displayed. Note also the use of End If, which isrequired if the If...Then structure spans more than one line, as it does in this example.
The If...Then structure can have as many elements as you need. For example:
Crashes = InputBox("How many times a day does Windows crash?")If Crashes <= 3 Then MsgBox "You lucky sod..."ElseIf Crashes = 4 or Crashes = 5 Then MsgBox "The national average: good for you!"Else MsgBox "Take two aspirin and call me in the morning."End If
accommodates three different ranges of answers to the question posed by the first line of code(thanks to the ElseIf line). Note also the use of or on the fourth line; you can also use the and
operator, or a combination of the two, in your scripts. Use parentheses to group conditions in morecomplex statements.
9.1.4. Using Loops, Using Loops, Using Loops
Another useful structure is the For...Next loop, allowing you to repeat a series of commands a
specified number of times:
SomeNumber = InputBox("How many lumps do you want?")TotalLumps = ""For i = 1 To SomeNumber TotalLumps = TotalLumps & "lump "Next
Rem -- The next line displays the result --MsgBox TotalLumps
The For...Next loop repeats everything between the two statements while incrementing the value of
the variable i with each iteration, ending the loop when i equals the value of the variableSomeNumber. Each time we go through the loop, another "lump" is added to our variable,TotalLumps. When the loop is finished, the contents of the TotalLumps variable are displayed.

Notice the use of the concatenation operator (&) in the middle of the loop, which adds a new lump to
the variable. Those new to programming might be put off by the fact that we have the TotalLumpsvariable on both sides of the equals sign.[1] This works because the scripting host evaluateseverything on the right side of the equals sign (adds it all up) and then assigns it to the variable onthe left side.
[1] In traditional algebra, we couldn't have a statement like this; it would be like saying x=x+1, which has no solution. However, this
is not an equation; it's a instruction that you want carried out. Besides, you're supposed to have forgotten algebra years ago.
Note also the TotalLumps="" statement before the For...Next loop; this empties the variable before
we start adding stuff to it. Otherwise, whatever might be assigned to that variable before the loopwould still be kept aroundsomething we didn't anticipate or want. It's good programming practice toprepare for as many different situations as can be imagined.
Also good practice is the use of spaces, indentations, and remarks to make the code easier to readwithout affecting the execution of the script. The Rem command (shown earlier) is used to includeremarks (comments that are ignored when the script is run), allowing you to label any part of thescript with pertinent information. In place of the Rem command, you can also use a single apostrophe
('), which has the advantage of being used on the same line as another command.
As you write these scripts, think about the formatting as you would in writing a word-processordocument; scripts that are easier to read are easier to debug and easier to come back to six monthslater.
9.1.5. Making Building Blocks with Subroutines and Functions
A subroutine allows you to encapsulate a bit of code inside a single command, making it easy torepeat that command as many different times as you want, just as if it were a built-in command inVBScript. Simply include the entire subroutine anywhere in a script, and then type the name of thesubroutine elsewhere in the script to execute the subroutine.
A function is essentially the same thing as a subroutine, except that it has a result, called a returnvalue. Both subroutines and functions accept input variables, listed in parentheses after theirrespective Sub and Function statements.
To those who are familiar with macros in a word processor, subroutines aresimilar. In fact, Microsoft Word, Excel, and Access (in Office 95 and later) savetheir macros as VB subroutines.
Consider Example 9-1, which compares the contents of two text files. At the heart of this exampleare the two structures at the end of the script, although their specific position in the script is notimportant. WSH separates all subroutines and functions before executing the script; they won't beexecuted unless they're called, and the variables used therein are unrelated to variables usedelsewhere in the main script. Whenever it encounters the name of a subroutine or function in thescript body, it executes it as though it were a separate script. Try to follow the execution of thescript, command by command.
Example 9-1. Using functions and subroutines

Filename1 = InputBox("Enter the first filename")Filename2 = InputBox("Enter the second filename")
If Not FileExists(Filename1) Then MsgBox Filename1 & " does not exist."ElseIf Not FileExists(Filename2) Then MsgBox Filename2 & " does not exist."Else Call RunProgram("command /c fc " & filename1 & _ " " & filename2 & " > c:\temp.txt", True) Call RunProgram("notepad c:\temp.txt", False)End If
Function FileExists(Filename) Set FileObject = CreateObject("Scripting.FileSystemObject") FileExists = FileObject.FileExists(Filename)End Function
Sub RunProgram(Filename, Wait) Set WshShell = WScript.CreateObject("WScript.Shell") RetVal = WshShell.Run(Filename, Wait)End Sub
One of the most important aspects of both subroutines and functions is that they can accept one ormore input variables, called parameters or arguments. The parameters that a subroutine accepts arelisted in parentheses after the subroutine definition and are separated with commas (if there aremore than one). Then, using the Call statement, the values you wish to pass to the subroutine
(which are placed in the parameter variables when the script is run) are listed in parentheses.
This way, the same subroutine or function can be called repeatedly, each time with one or moredifferent variables. Functions (such as FileExists in this example) can also return a single variable
(usually dependent on the outcome of some operation).
The first structure defines the FileExists function (discussed later in this chapter), which is passed
a filename and returns a value of True (-1) if the file exists and False (0) if it does not. TheFileExists function is called twice, once for each filename entered when the script is run (Filename1and Filename2 ). The If...Then structures (see Section 9.1.3 earlier in this chapter) first call the
function, then redirect the flow based on the result of the function.
The second structure defines the RunProgam subroutine, also called from the script two times.RunProgram simply runs the program filename passed to it; because it's a subroutine and not a
function, there is no return value. In theory, you could use functions exclusively, and simply ignorethe return values of those functions that don't use them; the benefit of subroutines, though, is thatyou don't have to think about handling a return value at all.
In FileExists and RunProgram, Filename is a variable (shown in parentheses) in which passed data
is placed so that it can be used inside the subroutine or function. It's considered a local variable; thatis, it has no value outside of the subroutine or function.
The most important consequence of this designthe separation of the code into subroutines and

functionsis that it makes it easy to reuse portions of code. Experienced programmers will intentionallyseparate code into useful subroutines that can be copied and pasted to other scripts. Just think ofprogramming as building something out of Lego© blocks; the smaller the blocks, the more versatilethey become.
It's worth mentioning that, in the case of subroutines, the Call statement is not strictly necessary.
For example, the line:
Call RunProgram("notepad c:\temp.txt", False)
is equivalent to:
RunProgram "notepad c:\temp.txt", False
Note that in removing the Call keyword, I've also had to remove the parentheses around thearguments. Personally, I like using the call command, as it makes references to my custom
subroutines more distinct and easier to find, but others might prefer the simpler form.
The solutions in the subsequent topics are presented as either subroutines or functions. I've usedsubroutines for code that performs an action, such as copying a file or writing information to theRegistry. When a result is expected, such as reading information from the Registry or finding the dateof a file, a function is used instead.
You should be able to place these subroutines and functions directly into your scripts and call themwith a single command. It's up to you to put the pieces together to accomplish whatever tasks youhave in mind. Feel free, also, to alter these routines to suit your needs.

9.2. Object References
There are some operations that can be performed with the Windows Script Host regardless of thelanguage being used. These operations, such as accessing the filesystem, are made possible byextending the language with objects. For the time being, we can consider an object to be simply acontext that is referred to when carrying out certain commands.
Admittedly, this can make carrying out some tasks rather difficult and convoluted, but it is necessarygiven the modular architecture of WSH. For example, many scripts will require a line similar to thefollowing (using VBScript syntax in this case):
Set WshShell = WScript.CreateObject("WScript.Shell")
which creates and initializes the WshShell object. WshShell is not a visible object like a file or other
component of Windows, but rather a required reference used to accomplish many tasks with WSH,such as running programs, creating Windows shortcuts, and retrieving system information.
If you're unfamiliar with object references, your best bet is to simply type them as shown and worryabout how they actually work when you're more comfortable with the language. The subsequenttopics include many solutions that take advantage of objects, such as WScript.Shell, which hasmany uses, and Scripting.FileSystemObject, used for accessing files, folders, and drives.
9.2.1. Running Applications from Scripts
This code is used to run a program, which can be a DOS program, a Windows application, an Internetor mailto URL, or anything else you might normally type in the Start Menu's Run command orExplorer's Address Bar. Place this subroutine in your scripts:
Sub RunProgram(Filename, Wait) Set WshShell = WScript.CreateObject("WScript.Shell") RetVal = WshShell.Run(Filename, Wait)End Sub
and call the routine like this:
Call RunProgram("c:\windows\notepad.exe", True)
You can replace true with False if you don't want to wait for the program to finish before the next
script command is executed.
9.2.2. Accessing the Registry from Scripts

The following code is used to write, read, and delete information in the Registry. Include the followingthree routines in your script:
Sub RegistryWrite(KeyName, ValueName, ValueData, ValueType) ValueType = UCase(ValueType) If ValueType <> "REG_DWORD" and ValueType <> "REG_BINARY" Then _ ValueType = "REG_SZ" Set WshShell = WScript.CreateObject("WScript.Shell") WshShell.RegWrite KeyName & "\" & ValueName, ValueData, ValueTypeEnd Sub
Function RegistryRead(KeyName, ValueName) Set WshShell = WScript.CreateObject("WScript.Shell") RegistryRead = WSHShell.RegRead(KeyName & "\" & ValueName)End Function
Sub RegistryDelete(KeyName, ValueName) Set WshShell = WScript.CreateObject("WScript.Shell") WshShell.RegWrite KeyName & "\" & ValueName, "" WshShell.RegDelete KeyName & "\" & ValueNameEnd Sub
Using these three routines, you can accomplish nearly all Registry tasks. To create a Registry key,type this (note that all HKEY... roots must appear in uppercase):
Call RegistryWrite("HKEY_LOCAL_MACHINE\Software\My Key", "", "", "")
To assign data to a Registry value:
Call RegistryWrite("HKEY_LOCAL_MACHINE\Software\My Key", "My Value", _
"Some Data", "")
Leave "My Value" blank to set the (default) value. To read the data stored in a given value:
Variable = RegistryRead("HKEY_LOCAL_MACHINE\Software\My Key", " My Value")
Leave "My Value" blank to read the (default) value. To delete a key:
Call RegistryDelete("HKEY_LOCAL_MACHINE\Software\My Key", "")
To delete a value:
Call RegistryDelete("HKEY_LOCAL_MACHINE\Software\My Key", "My Value")
To delete the (default) value in a key, we just set the value to nothing:

Call RegistryWrite("HKEY_LOCAL_MACHINE\Software\My Key", "", "", "")
You'll notice that, in the RegistryDelete subroutine, there's a RegWrite statement. This is
necessary to ensure that the key or value that you're trying to delete actually exists. If you don'tinclude this statement and try to delete a nonexistent key or value from the Registry, the WindowsScript Host will give an error to the effect that "The system cannot find the file specified." (A helpfulMicrosoft error message, as always.) This way, the subroutine will create the key or value entry to bedeleted if it doesn't already exist.
As part of a security/safety feature present in Windows XP (and Windows2000), you won't be able to delete a key that contains subkeys (this is not trueof Windows 9x/Me) using the RegistryDelete routine. See Section 3.3.5 in
Chapter 3 for a workaround using Registry patch files.
See Chapter 3 for more information on Registry keys and values.
9.2.3. Manipulating Files from Scripts
One of the myths surrounding the Windows Script Host, and VBScript in particular, is that there's noprovision for accessing the filesystem (copying, deleting, and writing to files). This assumption isbased on the fact that VBScript, when used in web pages, is not permitted to access the filesystemfor security reasons.
The following routines, all of which rely on the FileSystemObject object, should allow you to script
most necessary file operations. The names I've chosen for these functions and subroutines are basedon what they act upon and what they're used for; for example, the FolderCopy subroutine is used tocopy a folder, and the FileCopy subroutine is used to copy a file.
The following two functions return properties of driveswhether a specific drive letter exists and howmuch free space a specified drive has, respectively:
Function DriveExists(DriveLetter) Set FileObject = CreateObject("Scripting.FileSystemObject") DriveExists = FileObject.DriveExists(DriveLetter)End Function Function DriveFreeSpace(DriveLetter) If Left(DriveLetter,1) <> ":" Then DriveLetter = DriveLetter & ":" Set FileObject = CreateObject("Scripting.FileSystemObject") Set DriveHandle = _ FileObject.GetDrive(FileObject.GetDriveName(DriveLetter)) DriveFreeSpace = DriveHandle.FreeSpaceEnd Function
These next seven subroutines and functions are used to manipulate folders. The functions are used toretrieve information about a folder, and the subroutines are used to perform actions on a folder. The

arguments should all be full folder names (e.g., "D:\Documents and Settings\All Users\Desktop").Note that the FolderSize function returns the combined size of all the contents of a folder, including
all subfolders, and may take a few seconds to return a result for large folders. You may want to usethe FolderExists function before any others to prevent errors:
Sub FolderCopy(Source, Destination) Set FileObject = CreateObject("Scripting.FileSystemObject") FileObject.CopyFolder Source, DestinationEnd Sub
Function FolderCreate(Foldername) Set FileObject = CreateObject("Scripting.FileSystemObject") Set Result = FileObject.CreateFolder(FolderName) If Result.Path = "" Then FolderCreate = False 'failure Else FolderCreate = True 'success End IfEnd Function
Sub FolderDelete(Foldername) Set FileObject = CreateObject("Scripting.FileSystemObject") FileObject.DeleteFolder(Foldername)End Sub
Function FolderExists(Foldername) Set FileObject = CreateObject("Scripting.FileSystemObject") FolderExists = FileObject.FolderExists(Foldername)End Function
Sub FolderMove(Source, Destination) Set FileObject = CreateObject("Scripting.FileSystemObject") FileObject.MoveFolder Source, DestinationEnd Sub
Function FolderSize(Foldername) Set FileObject = CreateObject("Scripting.FileSystemObject") Set FolderHandle = FileObject.GetFolder(Foldername) FolderSize = FolderHandle.SizeEnd Function
Function FolderParent(Foldername) Set FileObject = CreateObject("Scripting.FileSystemObject") FolderParent = FileObject.GetParentFolderName(Foldername)End Function
These next seven subroutines and functions are used to manipulate files, and are similar to theirfolder counterparts listed above. And likewise, the functions are used to retrieve information about afile, and the subroutines are used to perform actions on a file. The arguments should all be fullyqualified filenames (e.g., "c:\windows\notepad.exe"). You may want to use the FileExists function
before any others to prevent errors:

Sub FileCopy(Source, Destination) Set FileObject = CreateObject("Scripting.FileSystemObject") FileObject.CopyFile Source, DestinationEnd Sub
Function FileDate(Filename) Set FileObject = CreateObject("Scripting.FileSystemObject") Set FileHandle = FileObject.GetFile(Filename) GetFileDate = FileHandle.DateCreatedEnd Function
Sub FileDelete(Filename) Set FileObject = CreateObject("Scripting.FileSystemObject") FileObject.DeleteFile(Filename)End Sub
Function FileExists(Filename) Set FileObject = CreateObject("Scripting.FileSystemObject") FileExists = FileObject.FileExists(Filename)End Function
Function FileExtension(Filename) Set FileObject = CreateObject("Scripting.FileSystemObject") GetFileExtension = FileObject.GetExtensionName(Filename)End Function
Sub FileMove(Source, Destination) Set FileObject = CreateObject("Scripting.FileSystemObject") FileObject.MoveFile Source, DestinationEnd Sub
Function FileSize(Filename) Set FileObject = CreateObject("Scripting.FileSystemObject") Set FileHandle = FileObject.GetFile(Filename) FileSize = FileHandle.SizeEnd Function
These next two functions can be used on either files or folders and allow you to retrieve and set fileattributes (Archive, Read-Only, System, and Hidden, respectively).
File attributes are specified numerically: Read-Only = 1, Hidden = 2, System = 4, and Archive = 32.So, to set the Hidden and System attributes for a file, the Attrib parameter would be set to 6 (or2+4). To read a file's attributes, the same constants are used, but only individually. For example, tosee if a file had, say, the System attribute turned on, you would use this statement: IfGetAttributes("c:\somefile.txt",4) = True Then Msgbox "This is a system File. " :
Function GetAttributes(Filename, Attrib) Set FileObject = CreateObject("Scripting.FileSystemObject") Set FileHandle = FileObject.GetFile(Filename) If FileHandle.Attributes And Attrib Then GetAttributes = True

Else GetAttributes = False End IfEnd Function
Sub SetAttributes(Filename, Attrib) Set FileObject = CreateObject("Scripting.FileSystemObject") Set FileHandle = FileObject.GetFile(Filename) FileHandle.Attributes = AttribEnd Sub
The following four functions are used to obtain the locations of special Windows folders, or, in thecase of GetTempFilename, to generate a new filename in the current user's Temp folder. (Ratherthan simply returning the location of the Temp folder, the GetTempFilename function returns the full
path of a newly generated temporary filename. The corresponding file is guaranteed not to exist, soyou can use it for the purposes of temporary storage without fear of conflicting with another openapplication.)
So, for example, to get the full path of the current user's Desktop folder, you would useGetSpecialFolder("Desktop"). The folders accessible with this function include AllUsersDesktop,
AllUsersStartMenu, AllUsersPrograms, AllUsersStartup, Desktop, Favorites, Fonts, MyDocuments,NetHood, PrintHood, Programs, Recent, SendTo, StartMenu, Startup, and Templates. (See Section9.4 later in this chapter for several examples using these functions.):
Function GetSpecialFolder(Foldername) set WshShell = WScript.CreateObject("WScript.Shell") GetSpecialFolder = WshShell.SpecialFolders(Foldername)End Function
Function GetSystemFolder( ) Set FileObject = CreateObject("Scripting.FileSystemObject") GetSystemFolder = FileObject.GetSpecialFolder(1) & "\"End FunctionFunction GetTempFilename( ) Set FileObject = CreateObject("Scripting.FileSystemObject") GetTempFile = FileObject.GetSpecialFolder(2) & "\" _ & FileObject.GetTempNameEnd Function
Function GetWindowsFolder( ) Set FileObject = CreateObject("Scripting.FileSystemObject") GetWindowsFolder = FileObject.GetSpecialFolder(0) & "\"End Function
While the previous functions and subroutines are used to manipulate files, the following two are usedto manipulate the contents of files. The ReadFromFile function will transfer the contents of any fileinto a variable (naturally, this is most useful with plain-text files). Likewise, the WriteToFile
subroutine will transfer the contents of a variable (called Text) into a file. If the file doesn't exist, itwill be created; if the file already exists, the text will be appended to the end of the file:

Function ReadFromFile(Filename) Const ForReading = 1, ForWriting = 2, ForAppending = 8 Set FileObject = CreateObject("Scripting.FileSystemObject") Set FileHandle = FileObject.OpenTextFile(Filename, ForReading) Buffer="" Do Until FileHandle.AtEndOfStream Buffer = Buffer & FileHandle.ReadLine & vbCrLf Loop FileHandle.Close ReadFromFile = BufferEnd Function
Sub WriteToFile(Filename, Text) Const ForReading = 1, ForWriting = 2, ForAppending = 8 Set FileObject = CreateObject("Scripting.FileSystemObject") If FileObject.FileExists(Filename) Then Set FileHandle = FileObject.OpenTextFile(Filename, _ ForAppending) FileHandle.Write vbCrLf Else Set FileHandle = FileObject.CreateTextFile(Filename) End If FileHandle.Write Text FileHandle.CloseEnd Sub
The use of all of the "file operations" subroutines and functions listed earlier should be fairly self-explanatory, and they all work similarly. For example, the FolderExists function and theFileExists function are both nearly identical, except that FolderExists checks for the existence ofa folder, while FileExists checks for the existence of a single file. See the Section 9.4.5 script at the
end of this chapter for an example of these functions and subroutines in action.
9.2.4. Creating Windows Shortcuts and Internet Shortcuts in Scripts
Include the following subroutine in your script to allow easy creation of Internet Shortcuts (*.url )and Windows Shortcuts (*.lnk):
Sub Shortcut(LinkFile, CommandLine) Set WshShell = WScript.CreateObject("WScript.Shell") If LCase(Right(LinkFile, 4)) <> ".lnk" And _ LCase(Right(LinkFile, 4)) <>".url" Then _ LinkFile = LinkFile & ".LNK" Set ShortcutHandle = WshShell.CreateShortcut(LinkFile) ShortcutHandle.TargetPath = CommandLine ShortcutHandle.SaveEnd Sub
To create a shortcut to a program or file, use the following statement:

Call Shortcut("C:\Documents and Settings\All Users\SendTo\Notepad.lnk", _ "Notepad.exe")
To create a shortcut to an Internet address:
Call Shortcut("D:\Prjects\Important\Annoyances.url", _ "http://www.annoyances.org/")
If the first parameter, LinkFile, ends in .lnk (case doesn't matter), the Shortcut subroutine will
automatically create a standard Windows shortcut; if LinkFile ends in .url, however, an InternetShortcut file will be created. Note the If...Then structure in the routine, which automatically adds
the .lnk filename extension if no proper extension is found.
The LCase function, which transforms the contents of any variable to
lowercase, is vital here, and completely compensates for .URL, .url, .Url, andany other case mismatch in the specified filename.
If you specify a nonexistent folder in the path for the new shortcut file, an "Unspecified Error" willoccur. You may want to use the FolderExists function, detailed in the Section 9.2.3 topic earlier in
this chapter, to supplement this routine and eliminate the possibility of this error.
9.2.5. Networking with Scripts
VBScript has a few limited networking functions built in that can be used for mapping network drivesand connecting to network printers. For advanced network functionality (such as communication andnetwork traffic monitoring), you'll have to look into a different scripting language. For moreinformation on networking, see Chapter 7.
The following routines provide access to some of the more useful network-related functions inVBScript.
The following function checks a given drive letter to see if it has already been mapped. It returnstrue (-1) if the drive letter has been mapped, False (0) if it hasn't:
Function AlreadyMapped(DriveLetter) Set WshShell = WScript.CreateObject("WScript.Shell") Set WshNetwork = WScript.CreateObject("WScript.Network") Set AllDrives = WshNetwork.EnumNetworkDrives( )
If Left(DriveLetter,1) <> ":" then DriveLetter = DriveLetter & ":" ConnectedFlag = False For i = 0 To AllDrives.Count - 1 Step 2 If AllDrives.Item(i) = UCase(DriveLetter) Then ConnectedFlag = True Next
AlreadyMapped = ConnectedFlag

End Function
This subroutine maps a drive letter to any valid remote path:
Sub MapNetDrive(DriveLetter, RemotePath) Set WshShell = WScript.CreateObject("WScript.Shell") Set WshNetwork = WScript.CreateObject("WScript.Network") WShNetwork.MapNetworkDrive DriveLetter, RemotePathEnd Sub
This subroutine maps an unused printer port (e.g., LPT3) to any valid remote network printer:
Sub MapNetPrinter(Port, RemotePath) Set WshShell = WScript.CreateObject("WScript.Shell") Set WshNetwork = WScript.CreateObject("WScript.Network") WshNetwork.AddPrinterConnection Port, RemotePathEnd Sub
This subroutine removes the mapping for a previously mapped drive letter:
Sub UnMapNetDrive(DriveLetter) Set WshShell = WScript.CreateObject("WScript.Shell") Set WshNetwork = WScript.CreateObject("WScript.Network") WShNetwork.RemoveNetworkDrive DriveLetterEnd Sub
This subroutine removes the mapping for a previously mapped network printer:
Sub UnMapNetPrinter(Port) Set WshShell = WScript.CreateObject("WScript.Shell") Set WshNetwork = WScript.CreateObject("WScript.Network") WshNetwork.RemovePrinterConnection PortEnd Sub
The following script serves as an example using these subroutines. It's used to map a network drive ifit's not already mapped or to disconnect a currently mapped drive. The previous routines arerequired.
DriveLetter = "N:"RemotePath = "\\server\c"
If AlreadyMapped(DriveLetter) then Call UnMapNetDrive(DriveLetter) Msgbox "Drive " & DriveLetter & " disconnected."Else Call MapNetDrive(DriveLetter, RemotePath) Msgbox "Drive " & DriveLetter & " connected."

End if
This script requires no user interaction once it has been executed and displays only a singleconfirmation message when it's done. The first two lines contain the drive letter and network path tobe mapped together. Then, the AlreadyMapped function is used to determine if the drive mapping
already exists. The script then maps or disconnects the drive, depending on what's needed.
9.2.6. Manipulating Internet Explorer from Scripts
Because VBScript owes its existence, in part, to Internet Explorer (IE), it seems only fair that therewould be some integration between WSH and IE. The key is the Internet Explorer object and theproperties and methods associated with it.
Note that the code in this section is not presented as a subroutine, mostly because all of thesubsequent statements that reference the IEObject object (such as IEObject.Document.Write)would fail if the initial Set statement were isolated in its own routine.
Begin with the following lines in your script, which start the Internet Explorer application, initialize anobject to reference, and open a blank IE window:
Set IEObject = CreateObject("InternetExplorer.Application")If Err.number <> 0 Then MsgBox "There was a problem starting Internet Explorer." wScript.QuitEnd IfIEObject.Left = 75IEObject.Top = 75IEObject.Width = 400IEObject.Height = 300IEObject.Menubar = 0IEObject.Toolbar = 0IEObject.Navigate "About:Blank"IEObject.Visible=1Do while IEObject.Busy Rem -- wait for window to open --Loop
Note the error checking at the beginning, which quits if there's a problem loading Internet Explorer.The subsequent commands customize the window to our needs. The Left, Top, Width, and Heightproperties are all in pixels; for the MenuBar and Toolbar properties, 0 means hidden and 1 meansvisible. Lastly, the Navigate property specifies the URL to load; in this case, we specify About:Blank
to show a blank page.
Once the IEObject.Visible=1 command is issued, the window appears, and the real fun begins.
(Okay, maybe fun is too strong of a word.) The following lines send HTML code to the active IEwindow, and form a simple web page:
IEObject.Document.Write "<html>"IEObject.Document.Write "<h1>Hello World</h1>"

IEObject.Document.Write "<p>"IEObject.Document.Write "<i>Aren't we sick of that phrase yet?</i>"IEObject.Document.Write "</html>"
This has nearly limitless possibilities, not the least of which is a more elegant way to displayinformation than the MsgBox command, a much more sophisticated way of gathering informationthan the InputBox command (using fill-out forms), and a way to display an ongoing log of a script's
activities without interrupting script flow. To clear the page at any time, simply issue anotherIEObject.Navigate "About:Blank" command.
Note that the IE window stays open after the script completes; use the IEObject.Quit command to
close the window during script execution.
9.2.7. Using Command-Line Parameters in Scripts
A command-line parameter is a bit of text specified after the filename of a script when it is executedfrom a command prompt (see the following examples). The function used to convert a singlecommand-line parameter into a variable is the following:
Function CommandLine(Number) Set Arguments = WScript.Arguments If Number <= Arguments.Count Then CommandLine = Arguments(Number - 1) Else CommandLine = "" End IfEnd Function
For example, to display the second command-line parameter passed to a script, issue the followingstatement:
MsgBox CommandLine(2)
Although the command line may seem to be an antiquated concept, it's still very much a part ofWindows. When you double-click on a .vbs file, for example, Windows actually executes the followingcommand:
wscript.exe filename.vbs
where filename.vbs (the file that was double-clicked) is the command-line parameter for
wscript.exe, telling it which script to run. Scripts also accept command-line parameters, which isaccomplished like this:
wscript.exe filename.vbs param1 param2

The two additional parameters,[2] param1 and param2, are both passed to the script as command-lineparameters, and can be retrieved during runtime by referencing CommandLine(1) andCommandLine(2), respectively.
[2] You can have as many or as few parameters as you like.
One of the most common uses of command-line parameters in scripts is to accept filenames, andthere are two circumstances when this is most useful:
When you drag one or more items onto the script file icon. Note that this didn't work in earlierversions of Windows, as scripts were considered to be documents instead of programs.
When you place the script in your Send To folder; then, right-click one or more items inExplorer, select Send To, and then select the name of the script. You can also place the ashortcut to the script in your Send To folder, which eliminates the .vbs filename extension thatwould otherwise appear in the Send To menu.
In either case, the script is executed, and the names of the input file(s) are accessible as command-line parameters, one for each filename. The following script shows the names of all files and foldersdrag-dropped on the script icon:
Report = ""Set Arguments = WScript.ArgumentsFor i = 1 to Arguments.Count Report = Report + Arguments(i - 1) + vbCrLfNextMsgbox Report
The script starts off by clearing the Report variable, and then borrows some code from theCommandLine function listed earlier[3] to initialize the Arguments object and determine the number ofdropped files. Next, a For...Next structure is used to run through the arguments, adding each oneto the Report variable, followed by a linefeed (using vbCrLf, a handy built-in constant containingcarriage-return and linefeed characters). Note that the Arguments array is zero-based (the first itemis Arguments(0), the second is Arguments(1), and so on), so we need to include the (i - 1) part tocompensate. Lastly, a Msgbox command is used to display the list of dropped files.
[3] It's actually possible to use the CommandLine function itself here instead, but doing so would make the script more
cumbersome. And exactly who are you going to impress with a cumbersome script?
9.2.8. Managing Services with Scripts
Windows XP Services, such as the IIS web server service, the FTP daemon service, or the RemoteDesktop service, can be managed with the Services window (services.msc). Rudimentary servicecontrol is also possible with WSH scripts. The following routine allows you to start and stop anyservice, or just see if a service is running:
Function Service(ServiceName, Action) Const SERVICE_STOPPED = 1 Const SERVICE_RUNNING = 4

Set WshShell = WScript.CreateObject("WScript.Shell") Set EnvObject = WshShell.Environment("PROCESS") ComputerName = EnvObject("COMPUTERNAME") Set ComputerObject = GetObject("WinNT://" & ComputerName & ",computer") Set ServiceObject = ComputerObject.GetObject("Service",ServiceName) If Action = 1 and ServiceObject.Status = SERVICE_STOPPED Then ServiceObject.Start ElseIf Action = 2 and ServiceObject.Status = SERVICE_RUNNING Then ServiceObject.Stop End If If ServiceObject.Status = SERVICE_RUNNING Then Service = True Else Service = False End IfEnd Function
This general-purpose routine accepts two parameters: ServiceName and Action. ServiceName is asingle word that represents the service you wish to start, stop, or query, and Action is just a
number, representing what you want the routine to do. To find the service name for a given service,open the Services window (services.msc) and double-click the service in question. The service nameis listed at the top of the General tab; for example, the service name for the IIS service isIISADMIN, the name for the FTP service is MSFTPSVC, and the name for the Remote Desktop (akaTerminal Services, discussed in Chapter 7) service is TermService.
So, to start the FTP service, you would type:
Result = Service("MSFTPSVC", 1)
or, to stop the service, you would type:
Result = Service("MSFTPSVC", 2)
Either way, the function returns true (-1) if your action resulted in the service being started, orFalse (0) if your action resulted in the service being stopped. To simply query the service, withoutstarting or stopping it, specify any other number for Action, like this:
Result = Service("MSFTPSVC", 0)
Including this routine in your script allows you to start and stop a service with a single click (ratherthan having to wade through the Services window). Or, using these script routines in conjunctionwith Scheduled Tasks (explained later in "Automating Scripts with Scheduled Tasks"), for example,you could schedule your web server service to operate only during certain hours of the day.
9.2.9. Writing CGI Scripts for a Web Server

WSH scripts have the potential to produce simple, yet quite capable CGI (Common GatewayInterface) applications for use with web servers: programs that are run by web-server software togenerate dynamic web content. For example, CGI programs can be used to process data entered inweb-based fill-out forms or to read data from files and produce web content on the fly. Although a fulldiscussion of web-server implementation and CGI programming is beyond the scope of this book,there are some extra steps and additional commands necessary to write CGI programs with WSHscripts.
The first step is to set up your web server software to execute WSH scripts. There is a variety ofdifferent web-server software packages (such as IIS, included with Windows XP, and Apache, freelyavailable at http://www.apache.org), and naturally the configuration varies with each package. Thefollowing procedure shows how to set up IIS and configure it to execute WSH scripts as CGIprograms.
If IIS is not currently installed, go to Add or Remove Programs in Control Panel, and clickAdd/Remove Windows Components. Highlight Internet Information Services (IIS)from the list, and click Details. Place a checkmark next to Common Files, InternetInformation Services Snap-In, World Wide Web Service, and any other components youwant installed. Click OK and then click Next to complete the wizard.
1.
Start the IIS Snap-In (\Windows\system32\inetsrv\iis.msc), and then expand the branches toInternet Information Services\My Computer\Web Sites\Default Web Site . The files and
folders that make up your web site are shown here (note that your setup may be different).
2.
Scripts to be executed cannot be placed in ordinary folders; otherwise, the web server willsimply display their contents instead of running them. So, they must be placed in a virtualdirectory with executable permissions; if you've already set up such a folder, you can continueto the next step. Otherwise, go to Action New Virtual Directory, and follow theprompts. The Alias option is the folder name that appears in the URL when referencing thescript from a browser (described subsequently), and the Directory option is the full path of thephysical folder on your hard disk containing your script. Finally, when asked about AccessPermissions, make sure to turn on the Execute option.
3.
Once you have a virtual directory configured, right-click the folder, click Properties, choose theVirtual Directory tab, and then click Configuration.
For a CGI program to work, its output must be sent to the "console," atext-based display which works like the Command Prompt. For this reason,the CScript.exe script interpreter (engine), mentioned earlier in thischapter, must be used instead of the standard WScript.exe Windows-based interpreter.
4.
Click Add, and type the following:
c:\windows\system32\cscript.exe "%s" "%s"
in the Executable field (change the path to match your system, if necessary), and type .vbs in
the Extension field (make sure to include the dot).
5.

Naturally, the filename extension will be different for JavaScript or Perl script files. Or, if youlike, you can even make up a new filename extension for use with your VBScript CGI scripts(such as .vbsc or .vbcgi), as long as what you type doesn't conflict with another entry in the list.
The All Verbs, Script engine, and Check that file exists options should all be selected. ClickOK, and then OK again when you're done.
6.
The next step is to write a CGI script and place it in your executable folder. CGI scripts can use anyof the commands and routines discussed elsewhere in this chapter, except, of course, for those thatcreate dialog windows, such as MsgBox and InputBox.
The key to a CGI script, though, is the WScript.Echo command, which is used to send your text
output to the web server. Here's an example of a simple four-line script that generates a basic HTML-formatted[4] web page:
[4] A discussion of HTML (Hypertext Markup Language) is beyond the scope of this book, but there are many adequate HTML
references on the web.
WScript.Echo "<html>"WScript.Echo "<body>"WScript.Echo "<h1>Here Comes the Metric System!</h1>"WScript.Echo "<body></html>"
To run the script, first save it in the executable folder you configured earlier. If the IISAdmin serviceis not currently running, start it now (via Services.msc). Then, open a web browser, and type thisURL into the address bar:
http://localhost/foldername/script.vbs
where foldername is the Alias you chose for the executable folder, and script.vbs is the filename
of the script. If all goes well, you should see our message, "Here Comes the Metric System!" right inthe browser window. If it doesn't work, check the permissions of the script file and executable folder(right-click, select Properties, and choose the Security tab). See Chapter 8 for more information onuser accounts, ownership, and file permissions.
Since we are talking about a web server, you can just as easily call the script from a remotecomputer, as long as you're connected to a network or to the Internet, and you know the IP addressor URL of your machine (visit http://www.annoyances.org/ip to find out your computer's IP address).For example, if your IP address is 207.46.230.218, you'd simply typehttp://207.46.230.218/foldername/script.vbs.
Naturally, you'll probably want to generate dynamic (rather than static) content with your CGI script.Here's a script that displays the current date and time in the browser window:
WScript.Echo "<html><body>"WScript.Echo "Today's date is: " & DateWScript.Echo "and the current time is: " & TimeWScript.Echo "<body></html>"

For those familiar with writing CGI programs, you may be confused by thehandling of any HTTP headers you include in your WSH CGI scripts. Althoughthe CGI specification requires that a CGI program produce its own HTTPheaders (such as "Content-type: text/html"), IIS 5.x automatically
generates the headers, based on the type of content it thinks you're sending(text/html for HTML or text/plain for plain text, for example). This not onlymeans that any headers you include (with WScript.Echo) will simply appear as
part of the generated page, but that there's no way to include your ownheaders.
If you need to obtain the value of a browser environment variable in your script, include thisfunction:
Function Environment(EnviroName) Set WshShell = Wscript.CreateObject("Wscript.Shell") Set EnvHandle = WshShell.Environment("Process") Environment = EnvHandle(EnviroName)End Function
For example, you can display the user's web browser version with this short script:
WScript.Echo "Your browser's signature is:"WScript.Echo Environment("HTTP_USER_AGENT")
Some other useful environment variables include QUERY_STRING (for retrieving form input or anytext after a question mark in the URL) and HTTP_COOKIE (for reading HTTP cookies).
You can, of course, use other routines in your CGI scripts. For example, here's a script that displaysthe contents of a text file, using the ReadFromFile function (see Section 9.2.3 earlier in this
chapter):
OrderNum = "234323"WScript.Echo "Here is your order (number " & OrderNum & "):"WScript.Echo "<p>"WScript.Echo "<img src=""/pictures/smiley.jpg""><br>"WScript.Echo ReadFromFile("d:\data\orders\" & OrderNum & ".txt")
Note the use of Hypertext Markup Language (HTML) to include an image in the output. Althoughmany HTML tags require quotation marks, adding a quotation mark in the middle of a line wouldcause WSH to confuse it with the beginning and trailing quotes. To tell VBScript to treat a quotationmark as a character to print, just put two of them together (as shown on the "smiley" line).

9.3. Development Tips
As you develop WSH scripts, you'll quickly discover that you'll need more than just ephemeralknowledge of the commands and references to complete most tasks. Windows is a complex system,and your scripts don't exist in a vacuum. The rest of the solutions and examples in this chapter willhelp you write scripts that operate in the broader context of the fully functioning Windows XPenvironment.
9.3.1. Deciphering Script Errors
One of the general disadvantages of scripts is that they are typically created with a plain-text editor,rather than a rich debugging environment used with many more sophisticated programminglanguages (see Section 9.3.2 later in this chapter). Because Notepad isn't specifically designed tounderstand VBScript, it can't offer any assistance with syntax (grammar) or errors while you'reediting. Therefore, you must wait until you run the script to see if there are any problems. If WSHencounters an error, it will display a message similar to that shown in Figure 9-2.
Figure 9-2. The Windows Script Host displays a message like thiswhenever it encounters an error
Surprisingly, this sparse message box actually provides enough information to resolve mostproblems. Naturally, the first field, Script, shows the script filename in which the error occurred. Thisis especially useful if the script was run from a scheduled task or from your Startup folder, and youmight not otherwise know which script caused the error.
The Line field shows on which exact line of your script the error occurred and includes blank linesand remarks. Likewise, the Char field shows the column of the first character of the cause of theerror, including any indent.

If you're using Notepad, select Status Bar from the View menu to display theline number (Ln) and column (Col) at which the insertion point (text cursor) isresting. Or, select Go To from Notepad's Edit menu to quickly jump to any line.Better yet, switch to a better text editor (discussed later in this chapter) thathas line numbering and other handy debugging tools.
The Source field describesmore than anything elsewhat the WSH engine was doing when itencountered the error. A compilation error occurs when WSH is first reading the file and making sureall of the commands are correctly entered; you'll see this if you forgot a parenthesis or quotationmark, misspelled a command, or left out some other important keyword. A Microsoft VBScriptruntime error, on the other hand, is an error encountered while the script was being executed; this iscaused by errors that WSH doesn't know are errors until it actually tries them, such as trying to readfrom a file that doesn't exist or trying to calculate the square root of a negative number.
Lastly, the Error field shows a brief explanation of the error encountered, and the Code field showsthe corresponding numeric error code (useful for searching Google or the Microsoft Knowledge Base ifyou can't figure out the problem yourself). Sometimes the error description is helpful, but most of thetime it's either too vague or too cryptic to be of much help. This is where programming experiencecomes in handy for interpreting these messages and figuring out what caused them. The followingare a few of the more common Error descriptions and what they mean:
Expected ̀ )'
Compilation error: you left out a closing parenthesis, such as at the end of an InputBox
statement (see earlier). Note that sometimes you can have nested parentheses (e.g.,x=1+(6+7*(3-4))), and you need to make sure you have an equal number of open and close
parentheses.
Expected `End'
Compilation error: you left out a closing statement for a structure, such as If, Sub, or For.Make sure you include End If, End Sub, and Next, respectively. Note that WSH might report
that the error occurred on line 37 of a 35-line file; this happens because in looking for a closingstatement, WSH continues to search all the way to the end of the script, at which time, if thestatement was not found, it will report the error. You'll have to look through the entire scriptfor the unpaired beginning statement. See the topics on flow control earlier in this chapter(Section 9.1.3, Section 9.1.4, and Section 9.1.5) for more information on these commands.
Unterminated string constant
Compilation error: you left out a closing quotation mark, usually required at the end of a"string of text."

Invalid procedure call or argument
Runtime error: this usually means that a subroutine or function has been called with one ormore improper parameters. This can occur, for example, if you try to do something WSH isn'tcapable of, such as calculating the square root of a negative number.
Type mismatch: `[undefined]'
Runtime error: this means you've tried to use a command or function that VBScript doesn'trecognize. You'll get this error whenever you try to use a VB command that doesn't exist inVBScript.
Object doesn't support this property or method
Runtime error: because it can be difficult to find documentation on the various objects used inVBScript, you're likely to encounter this error frequently. It means that you've tried to refer toa property or method of an object (such as WScript) that doesn't exist (such asWScript.Dingus).
The system cannot find the file specified
Runtime error: This error, obviously reporting that you've tried to access a file on your harddisk that doesn't exist, also appears when you try to delete a Registry key that doesn't exist.See Section 9.2.2 earlier in this chapter for a Registry function that solves this problem.
ActiveX component can't create object
Runtime error: you'll get this when you try to use the Set statement (as described throughout
this chapter) and, for whatever reason, WSH isn't familiar with the object you're trying toinitialize. Typically, objects are extensions to WSH: some of which come with Windows XP,some of which are installed through Add or Remove Programs, and some of which come withthird-party programs. The resolution usually involves installing the missing component (whichusually can be found on the Web) but depends entirely upon the specific object reported by theerror.
If you plan on distributing your scripts, you'll want to take steps to eliminate any error messages thatmay pop up. See the Section 9.2.3 script earlier in this chapter for more information on errortrapping and the On Error Resume Next statement.
9.3.2. Finding a Better Editor
Notepad is a very rudimentary text editor. Although it serves our purpose, allowing us to write andsave VBScript files, it doesn't go any further than it absolutely needs to. It has no toolbar, no syntaxhighlighting, no visible line numbers, and no macro feature. If you find yourself writing VBScript files

often, you'll want to use a better editor. Now, Windows also comes with WordPad, although it doesn'tdo much more than Notepad in helping to write scripts, and it has that creepy Microsoft Word-likeinterface.
One direction to go is simply to use a better plain-text editor, such as UltraEdit-32(http://www.ultraedit.com). It has many features prized by programmers, such as column selections,visible line numbers, a terrific multi-file search-and-replace, and many other goodies. However, it'sstill just a text editor and therefore doesn't provide any VBScript-specific assistance.
Most full-featured programming languages come with a rich programming environment that providesreal-time syntax checking (similar to a spellchecker in your word processor; some even tell you rightaway if you missed a parenthesis), as well as context-sensitive help (you can get technical assistanceas you're typing code). The problem is that Windows doesn't come with such an editor, nor am Iaware of any decent VBScript editor at the time of this writing.
Some may suggest that you can use either the Visual Basic editor or the VBA editor that comes withMicrosoft Office 97 or Office 2000 to write your scripts, but this should be taken with a grain of salt.Although VB and VBA do have a similar syntax to VBScript and even share many commands, theenvironments are different enough that it's more trouble than it's worth.
9.3.3. Further Study
Given that writing scripts for the Windows Script Host is a language-dependent endeavor, the mosthelpful reference material will be specific to the particular language you're using. Microsoft's supportweb site for all their scripting technologies, including WSH, can be found athttp://msdn.microsoft.com/scripting/. In addition to documentation on VBScript and JScript, you candownload updates to the WSH engine. Note that if you distribute scripts to other machines, you'llneed to be careful about supporting features found only in newer releases of WSH.
Before committing to VBScript for a project, you may want to do some research on other supportedlanguages listed here. Due to VBScript's heritage in web pages, security concerns have resulted insome limitations in the VBScript language, such as its inability to access the clipboard or link toexternal .dll files.
Given that JavaScript (which actually has nothing whatsoever to do with Sun Microsystems' Javaprogramming language) was created by Netscape, you can find a lot of developer information at:http://developer.netscape.com/tech/javascript/. Keep in mind, however, that JScript is Microsoft'sbastardized version of JavaScript and therefore not exactly the same language.
The Practical Extract and Report Language (Perl) is probably the most powerful and flexible scriptinglanguage available for the Windows Script Host at the time of this writing. It's traditionally verypopular among the Unix crowd and has gained tremendous popularity for its use in writing CGIprograms for web servers.
Unfortunately, Windows XP doesn't come with the Perl engine; you'll have to obtain a separate Perladd-on module from http://www.activestate.com. More information is available athttp://www.perl.com.
9.3.4. Making a Startup Script

The process of making a startup scripta script that is executed automatically when Windows startsisquite simple. Essentially, you create a script as you normally would, and then take steps to have itexecuted when Windows starts. There are a few different ways to do this:
Use the Startup folder
Put a shortcut to the script in your Startup folder (usually C:\Documents andSettings\{username}\Start Menu\Programs\Startup). This is by far the easiest to implementbut also the most fragile, because it's equally easy to disable (important if you're setting up acomputer for someone else).
If there is more than one user account on a computer, and you want thescript to be executed regardless of the currently logged-in user, you canuse the "All Users" Startup folder (usually C:\Documents and Settings\AllUsers\Start Menu\Programs\Startup) instead.
Use the Registry
Open the Registry Editor (see Chapter 3), and expand the branches toHKEY_CURRENT_USER\Software\Microsoft\Windows\CurrentVersion\Run. Select New andthen String Value from the Edit menu, and type startup script. Double-click the newStartup Script value, type the name of your script (e.g., c:\scripts\myscript.vbs), and
click OK. Although a little more difficult to implement, this setup is a little more robust andtransparent than using the Startup folder.
Many viruses and spyware install themselves in this Registry key preciselybecause it's so transparent. See Chapter 6 for tips on how to removemalware from this key.
Likewise, you can implement this solution for all users rather than just the current user byadding the Registry value toHKEY_LOCAL_MACHINE\Software\Microsoft\Windows\CurrentVersion\Run instead.
Use the Group Policy Editor
This is probably the coolest solution, as it gives you the most control over precisely when thescript is run, and it's the only way to facilitate a shutdown or logoff script as well. Open theGroup Policy Editor (gpedit.msc), and expand the branches to ComputerConfiguration\Windows Settings\Scripts (Startup/Shutdown). Double-click the Startup
entry on the right side, and then click Add. Click Browse to locate a script file, and click OKwhen you're done. The script will be run every time you start your computer, but before thelogon or Welcome screen appears (and before scripts specified in the Registry or Start Menu

are ever run).
Likewise, double-click the Shutdown entry to specify a script to be run every time yourcomputer shuts down.
Now, there's a similar folder called Scripts (Logon/Logoff), located in the UserConfiguration branch. Like everything in the User Configuration branch, these settings
apply only to the currently logged-on user (as opposed to all users). If you specify your startupscript here (under Logon), instead of under Computer Configuration, the script will run after
you log in. And, of course, a script specified under Logoff will be run when you log off, whetheror not you actually shut down the computer.
A startup script can contain a list of programs that you want run in a specific order when Windowsstarts, such as connecting to the Internet and then checking your email. (Neither Explorer's Startupfolder nor the Registry allow you to choose the order in which programs are run.) But there areother, less apparent uses for a startup script, such as for security or remote administration.
For example, say you've discovered a virus that has infected some or all the computers on anetwork. By writing a script that eliminates the virus by deleting key files or running an antivirusutility automatically with a startup script, you can effectively eliminate the virus from each computer.
But with scripts, you can take it even further: utilize a single script stored on a single computer thatis run over the network on all computers. This way, you can make changes to the script once andhave those changes propagated to all computers effortlessly. So, if you place the script Startup.vbson a machine called Server in a folder called c:\scripts (drive c: would be shared as "c"), then eachclient machine should be configured to automatically execute \\server\c\scripts\startup.vbs (usingone of the previous methods). The beauty of this is that when you don't want the script to doanything, you can simply leave it intact yet empty. If you find that you need to, say, make a Registrychange or copy a group of files onto each computer, just type the appropriate commands into thescript and turn on (or reboot) all the client computers. This can turn some administration tasks intovery short work.
9.3.5. Automating Scripts with Scheduled Tasks
The Scheduled Tasks feature is fairly simple, allowing you to schedule any program ormoreimportantly in the context of this chapterany script.
What's nice about the Scheduled Tasks feature is that it's actually a technology that is somewhat wellintegrated into the operating system. Any application can create a schedule for itself, and you canplainly see those that are in effect simply by opening the Scheduled Tasks folder. For the moreforgetful among us, you can use it to schedule Disk Defragmenter to run once a month, Backup torun once a week, or Windows Update to check for new updates every morning.
The Scheduled Tasks feature also has its pitfalls. The Add Scheduled Task tool is cumbersome andvery limited. It's also a rather passive service, and while that's an aspect I like, at least idealistically,it means that tasks can very easily be missed. Any scheduled tasks will not be performed if you'veselected the Stop Using Task Scheduler option (in the Advanced menu), if your computer isturned off, if Windows isn't running, or if your portable computer is running off its battery. Thesesituations may be obvious, but they can be easy to forget, and Windows will only tell you if youmissed any tasks if you manually enable the Notify Me of Missed Tasks option.

There are several ways to create a new scheduled task, the most obvious of which is to double-clickthe Add Scheduled Task icon in the Scheduled Tasks folder. The overly verbose wizard should thenwalk you through the process of creating a new task. When the wizard prompts you to select aprogram (it just displays a list of all the applications listed in your Start Menu), click Browse, selectan existing script or other application on your hard disk, and click OK when you're done. At thispoint, I recommend just clicking Next repeatedly here until the wizard is finished. Then right-click onthe new task, and select Properties to configure the task with a more suitable and convenienttabbed interface.
Fortunately, there is a shortcut you can use to bypass the wizard entirely: just go to File New Scheduled Task, or right-click an empty area of the Scheduled Tasks folder, and select New
and then Scheduled Task. Then, right-click the new task, and select Properties.
Finally, you can create a new task on the fly from the command prompt (or the Address Bar). Usethe at command, like this:
at 11:15 /interactive c:\scripts\myscript.vbs
Naturally, you'll want to replace 11:15 with the time you actually want the task to run, and replace
c:\scripts\myscript.vbs with the full path and filename of the application or script you wish toschedule. You can also use the /every option to specify a repeating day or date, or the /next option
to specify only a single day:
at 15:45 /interactive /every:tuesday,thursday c:\scripts\myscript.vbsat 15:45 /interactive /next:saturday c:\scripts\myscript.vbs
Type at /? at the command prompt for more options, or see Windows XP in a Nutshell (O'Reilly) for
full documentation.
One thing to note is the two Power Management settings in the Settings tab of the Task'sProperties dialog box. By default, tasks won't be run if your computer is running on batteriesasetting you may want to change if you need the task performed regardless of your computer's powersource.
The use of a scheduler opens up some interesting possibilities. Scheduling helps with repetitivechores, such as running Disk Defragmenter or synchronizing network files; it also helps by takingcare of things you may not remember to do yourself, such as backing up or sending an email to yourgrandmother on her birthday. See the following topics for more ideas.

9.4. Wacky Script Ideas
The point of scripting is that instead of using a canned application to perform a certain task, you caneasily and quickly throw together a script that does exactly what you need. That said, you may needsome inspiration to get you cooking.
The following examples use many of the custom subroutines and functions outlined earlier in thisbook, but for brevity and sanity, they won't be repeated in the forthcoming snippets of code.
9.4.1. Quick Floppy Backup Tool
The script in Example 9-2 starts by prompting you for the name of a folder to back up and checks tosee if it exists. If not, it gives you an opportunity either to type another folder name or exit. Once avalid folder name has been entered, the script creates a backup of the entire folder on your floppydrive.
Example 9-2. Quick floppy backup tool
On Error Resume NextAccepted = FalseDo Until Accepted MyFolder = InputBox("Please enter the name of the folder _ you want to back up.") If Not FolderExists(MyFolder) Then Answer = MsgBox("The folder you typed doesn't exist. _ Try again?", 36, "") If Answer = 7 Then WScript.Quit Else Accepted = True End IfLoop
Answer = MsgBox("Please put a diskette in your floppy drive.", 33, "")If FolderSize(MyFolder) > DriveFreeSpace("a") Then MsgBox "The folder you specified won't fit on the floppy.", 16 WScript.QuitEnd If
If FolderCreate("a:\Backup\") = False Then MsgBox "There was a problem writing to the diskette.", 16 WScript.QuitEnd If
Call FolderCopy(MyFolder, "a:\Backup\")

If Right(MyFolder, 1) <> "\" Then MyFolder = MyFolder & "\"Call WriteToFile(MyFolder & "backuplog.txt", _ "Last backed up: " & Now)
This script uses several MsgBox prompts and, if used unaltered, will probably irritate most users.
(Hint: think about who will be using the scripts you write when you decide how much error checkingand prompting is appropriate.) However, it also shows part of the power of interactive scripting. Alittle intelligent planning and error trapping can keep your scripts running smoothly, interrupting youonly when necessary. Note the use of the FolderExists function at the beginning of the script;
rather than risking encountering an error, the script checks for a potential problem (a missing file)and then takes the necessary steps to resolve it. Note also that if the folder doesn't exist and theuser doesn't want to try again, the user can exit; always give your users a choice to get out if theywant.
Because we have implemented some degree of error checking in this script, we include the line OnError Resume Next at the beginning of the script. This statement instructs WSH to simply ignore any
errors it finds. This doesn't automatically resolve any errors; it just eliminates the error message thatwould otherwise appear in the event of an error, allowing the script to continue uninterrupted. Thisway, we're only bothered with the errors that concern us.
This example also uses the Do...Loop loop structure (which is similar to the For...Next loop,
documented earlier in this chapter) at the beginning of the script. The code inside such a loop isrepeated until a specific condition is met; in this case, the loop will repeat until the Accepted variablehas a value of True (notice that it's set to False at the beginning of the script). The If...Then
structures insure that the Accepted variable is only set to True if the folder actually exists.
The second part of the script compares the total size of the folder and all its contents with theamount of free space on the diskette currently inserted in the floppy drive. You could expand thescript, so that if the diskette is not sufficient to store the folder, the user is given the opportunity toinsert another diskette and try again. You'd need to use a similar Do...Loop, as described earlier.
Once the script has gone through all of the tests (eliminating the possibility of many errors), theFolderCopy subroutine is used to copy the folder to the floppy. Finally, the WriteToFile subroutine
is used to record in a logfile that the folder was backed up. Note also the preceding line that adds abackslash ( \) to the end of the MyFolder variable; this way, we can pass a valid filename (the foldername followed by a backslash and then the filename) to the WriteToFile subroutine.
This script requires the following subroutines, which are found earlier in this book: DriveFreeSpace,FolderCopy, FolderCreate, FolderExists, FolderSize, and WriteToFile.
9.4.2. Internet Fish Tank
Nothing exemplifies the power of the Internet more than an Internet-enabled fish tank. This,essentially, is a web page with a dynamic picture of the contents of a fish tank. There are severalways to do this, but the following instructions show that it can be done with nothing more than ascript, a camera,[5] and a common FTP account.
[5] See "Add Wireless Support to Any Device" in Chapter 7 for information on wireless webcams.

These listings assume that all files are stored in the folder c:\camera. Start with the script shown inExample 9-3.
Example 9-3. Internet fish tank script
On Error Resume Next
ImageFile = "c:\camera\fish.jpg"Call FileDelete(ImageFile)Call RunProgram("c:\camera\camera.exe " & ImageFile, True)If Not FileExists(ImageFile) Then WScript.Quit
Call RunProgram ("ftp -n -s:c:\camera\ftpscript.txt myhost.com", False)
The script starts by suppressing all error messages, as described in the previous example. Thesubsequent lines use the snapshot utility that comes with nearly all cheap video-conferencing digitalcameras to take a photo and save it into a .jpg image file.[6] Note also the line that deletes the oldfile before the photo is taken, and the line thereafter that checks for the existence of the file beforeproceeding (in case something went wrong ); this way, we never send the same photo twice. Theinclusion of true in the RunProgram line instructs the script to wait for the camera.exe program to
complete before the script continues, necessary for a script like this to work. You could alternativelyincorporate a Do...Loop loop instead of the simple If statement to repeatedly check for the file over
the course of several seconds.
[6] Refer to the instructions that come with your camera for the specific command-line syntax you should use. Alternatively, you
could use the Timershot program, one of Microsoft's PowerToys for Windows XP, freely available at
http://www.microsoft.com/windowsxp/pro/downloads/powertoys.asp, to automatically photograph your fish tank at regular
intervals. You could then use a similar script to upload the file.
The last line then runs the FTP utility that comes with Windows XP to transfer the JPG file to a webserver (available for free from nearly all Internet service providers). Normally, FTP is an interactiveprogram, requiring that the user type commands into the console, but the -n and -s options shown
here eliminate the need for user interaction. Replace myhost.com with the name of the server
containing your web account. Example 9-4 shows the FTP script used by the WSH script in Example9-3; type it into a plain-text file, and save it as ftpscript.txt.
Example 9-4. FTP script for use with Internet-fish-tank script
user mylogin
pass mypasswordbin
cd public_htmlput c:\camera\fish.jpgbye
The FTP script, like a batch file (see Chapter 10), is simply a text file containing the commands (inorder) that otherwise would be typed manually into the FTP console window. Naturally, you'll want to

replace the specifics, like mylogin and mypassword, with your own login and password, respectively,
and public_html with the directory containing your public HTML files. Note that all commands mustbe typed in lowercase. Type FTP -? at the command prompt for more command-line parameters, or
see Windows XP in a Nutshell (O'Reilly) for more information on FTP.
Next, you'll want to set up a scheduled task to repeatedly run the script; the interval (5 seconds, 5minutes, etc.) depends on your needs and the capabilities of your system. Lastly, if you haven'talready done it, create a web page that references the fish.jpg photo; just visit the page to view acurrent picture of your fish tank, from anywhere in the world. You can even include JavaScript codein the page to automatically reload itself and update the picture after a certain delay.
This script requires the following subroutines, found earlier in this book: FileDelete, FileExists,and RunProgram.
9.4.3. Smart Phone Dialing
One of the things that scripting can add to a normal task is to make it conditionalthat is, performcertain tasks based on predetermined conditions, eliminating user interaction. A simple example isthat of a phone dialer that chooses a different phone number depending on the time of day. Thatphone number can be the prefix for a long-distance carrier or the number of an Internet serviceprovider. Example 9-5 shows such a script.
Example 9-5. Smart dialer script
On Error Resume Next
If Hour(Now( )) >= 8 and Hour(Now( )) <= 17 then Rem -- During the Day -- Call RunProgram ("c:\links\daytime.lnk", False)Else Rem -- At Night -- Call RunProgram ("c:\links\nighttime.lnk", False)End If
The script starts by suppressing all error messages, as described in the first script example. The restof the script is one big If...Then structure, which executes a particular part of the script based on
the time of day.
The test is performed with the Hour() function, which is built into VBScript.[7] Similar to theMinute(), Second(), Day(), Week(), Month(), and Year() functions, the expected parameter is avalid time/date string. Here, I've used another built-in function, Now(), which, not surprisingly,returns the current date and time in the proper format. Hence, Hour(Now( )) returns the current
hour in 24-hour time; for 7:00 p.m., it would return 19.
[7] A Visual Basic or VBScript reference will document more cool built-in functions like these.
If it is determined to be daytime (between 8:00 a.m. and 5:00 p.m.), the first code block is used;otherwise, the second code block is used. Naturally, you could put anything you want inside this

structure, but for the sake of simplicity, this script just launches one of two shortcuts. The shortcutscould point to dial-up network connections or a phone-dialer utility.
This script requires the RunProgram subroutine, found earlier in this book.
9.4.4. Quick SendTo Shortcut Creator
Explorer's SendTo menu contains a list of programs and shortcuts to which any selected file can besent. The idea is to list programs that could be used with any type of file, such as an email programor file viewer, without having to specifically set up file associations for each supported file type. Thefollowing script (Example 9-6) allows you to right-click on any application executable (.exe file),folder, or drive and create a shortcut in the SendTo folder on the spot.
Example 9-6. SendTo shortcut creator
SendToFolder = GetSpecialFolder("SendTo")Call Shortcut("SendToFolder\Notepad.lnk", CommandLine(1))
Whenever we can, we want to make our scripts "smart." If we wanted to be lazy, all we would reallyneed is the second line of this script, which creates a shortcut based on the command-line parameter(see Section 9.2.7 earlier in this chapter for details). However, the first line uses theGetSpecialFolder function to obtain the location of the SendTo folder from the Registry, which is
handy if there's more than one user account (each with its own SendTo folder), if you intend to usethis script on more than one computer, or if you don't want to have to modify the script whenMicrosoft changes the location of the SendTo folder in the next version of Windows.
Once the script has been written, you'll need to associate it with all file types. The "*" file type(located in HKEY_CLASSES_ROOT\*) is a wildcard key, used to install context-menu items that affect
all registered file types (discussed in "File Types: The Link Between Documents and Applications" inChapter 4).
This script requires the following subroutines, found earlier in this book: CommandLine,GetSpecialFolder, and Shortcut.
9.4.5. Rename Files with Search and Replace
Although Explorer lets you rename more than one file at a time (as described in Chapter 2), it's notterribly flexible or intuitive. The Command Prompt provides a better multiple file-renaming tool (seethe Ren command in Chapter 10), but it's not always convenient. Example 9-7 shows a script that will
rename all the files in a given folder based on rules you choose.
Example 9-7. File renaming script
On Error Resume NextFolderName = InputBox("Enter the name of the folder:")

If Not FolderExists(FolderName) Then WScript.QuitSearchText = InputBox("Type the text to look for:")ReplaceText = InputBox("Type the text with which to replace" _ & SearchText & ":")If SearchText = "" or ReplaceText = "" Then WScript.Quit
Set FileObject = CreateObject("Scripting.FileSystemObject")Set FolderObject = FileObject.GetFolder(FolderName)Set FilesObject = FolderObject.Files
FileCount = 0For Each Filename in FilesObject If InStr(Filename.Name,SearchText) Then Filename.Name = Replace(Filename.Name,SearchText,ReplaceText) FileCount = FileCount + 1 End IfNext
If FileCount > 0 Then MsgBox FileCount & " files were renamed."Else MsgBox "No filenames containing " & SearchText & " were found."End If
The first section of code is responsible for asking the user for input, including the folder name, thetext to look for, and the text with which to replace it. The next three lines set the appropriate objects(for further documentation on these objects, see http://msdn.microsoft.com/scripting/).
The For...Next structure that follows does the real work: this particular example uses a special form
of the loop intended to cycle through all the elements of an object array. In this case, the arraycontains the filenames of all the files in the active folder. The Replace function (built into VBScript)then does the search and replace for each individual filename. Lastly, the FileCount variable keeps
track of the number of files renamed, the result of which is tallied in the final code section.
Now, it may take some experience to understand the extensive use of objects in this example, but forthe time being, just typing it in will serve as a good example that can be used in other circumstances.
This script requires the FolderExists subroutine, found earlier in this book.
Note that a far more powerful file-renaming utility, Power Rename (part of Creative Element PowerTools), is available for Windows XP (download it from http://www.creativelement.com/powertools/ ).
9.4.6. Mirror a Folder with Folder Shortcuts
This script is an automated way to perform the solution described in Section 4.4.2. If you haven'tread that section, it's very important that you do so before using this script (see Example 9-8).

If you create a Folder Shortcut and then try to delete it, you will be deleting thetarget folder and all of its contents. Folder Shortcuts must be dismantled beforethey can be removed.
The solution in Chapter 4 essentially involves creating a folder, creating a shortcut, and creating atext fileall possible with a script.
Example 9-8. Folder Shortcut script
TargetName = CommandLine(1)If TargetName = "" Then TargetName = InputBox("Type the name of the folder to link:")End IfIf FolderExists(TargetName) = False Then MsgBox "TargetName does not appear to be a valid folder." WScript.QuitEnd IfIf Right(TargetName,1) = "\" Then TargetName = Left(TargetName, Len(TargetName) - 1)
DesktopFolder = GetSpecialFolder("Desktop")If Right(DesktopFolder,1) <> "\" Then DesktopFolder = DesktopFolder + "\"
X = 0Do Y = X X = InStr(X + 1, TargetName, "\")Loop until X = 0NewTargetName = DesktopFolder + "Shortcut to " + Mid(TargetName, Y + 1)
If FolderExists(NewTargetName) = False Then MsgBox "NewTargetName already exists." WScript.QuitEnd If
FolderCreate(NewTargetName)Call Shortcut(NewTargetName + "\target.lnk", TargetName)
Text = "[.ShellClassInfo]" + chr(13) + chr(10) + _"CLSID2={0AFACED1-E828-11D1-9187-B532F1E9575D}" + chr(13) + chr(10) + _ "Flags=2" + chr(13) + chr(10) + _"ConfirmFileOp=0" + chr(13) + chr(10)
Call WriteToFile(NewTargetName + "\desktop.ini", Text)Call SetAttributes(NewTargetName + "\desktop.ini", 6)
This script is complex, but when broken down, it should be fairly easy to understand. First, the script

asks for the name of an existing folder and checks to see if that folder exists. If a trailing slash isfound, it is removed. The script then uses the GetSpecialFolder function to read the Registry and
obtain the location of the current user's Desktop folder (where the new Folder Shortcut will beplaced). The next block of code extracts the name of the folder from the path: if c:\windows\temp istyped, this code extracts the text temp. The script then forms a new path, checks to see if it already
exists, and then creates the new folder.
Then, according to the steps described in Section 4.4.2, a shortcut is created and several lines arewritten to the file desktop.ini. Lastly, the Hidden and System attributes for desktop.ini are turned on.
The beauty of this script is that it is almost entirely automated. It doesn't ask for any information it'sable to safely retrieve itself. The very first line also checks to see if there's a command-lineparameter specified. This enables you to use this script in a folder's context menu, so that you couldright-click on any folder and select Make Folder Shortcut, and the script would do the rest. See"Using Command-Line Parameters in Scripts" earlier in this chapter and Section 4.3.1 for details. Foranother similar example, see Section 4.3.5.
This script requires the following subroutines, which are found earlier in this book: CommandLine,FolderCreate, FolderExists, GetSpecialFolder, RegistryRead, SetAttributes, andWriteToFile.
This sample script does not accommodate Folder Shortcuts for FTP sites, although it can be modifiedto work with Internet Shortcut files instead of Folders.
Regardless, I leave it to you to put the final pieces together!

Chapter 10. The Command PromptIf you don't quite have a grasp on the concept of DOS or the Command Prompt, here's a quick primeron this useful but oft-forgotten interface.
The Command Prompt in Windows XP is based on MS-DOS (Microsoft Disk Operating System), theoperating system used by the first PCs and the basis for many versions of Windows, including 9x/Me.As explained in Chapter 1, however, the Windows XP/2000/NT platform has been designed from theground up to be completely independent of DOS.
Fortunately, the DOS-like Command Prompt is still available from within Windows. If you don't have aCommand Prompt item in your Start Menu, go to Start Run, type cmd, and press Enter.
Windows XP also comes with the Command Prompt application found inWindows 9x/Me (command.com), but this should only be used if some DOSprogram won't work in the superior XP version (cmd.exe). Among other things,the XP Command Prompt has better support for long filenames and supportscommand-prompt extensions, used by some of the commands listed here.
When you open a Command Prompt window, you'll see a window that looks like the one shown inFigure 10-1. The cursor indicates the command line (where commands are typed), and the promptusually shows the current working directory (here, C:\Documents andSettings\Administrator\Desktop), followed by a caret/angle bracket (>).
Figure 10-1. The Command Prompt is used to implement some solutionsin this book
To run a program or execute a command, just type the name of the program or command at thecommand line (also called the C prompt because it usually looks like C:\>), and press Enter.
Some command-prompt applications simply display information and then exit immediately. Forexample, Figure 10-1 shows some output from the Active Connections utility (netstat.exe) discussed

10.1. DOS Commands
You should know the following basic DOS commands to be able to complete some of the solutions inthis book and get by in the world of Windows.
This, however, should not be considered a comprehensive list of all DOS commands and their options.See Windows XP in a Nutshell (O'Reilly) for a more thorough reference, not only on the CommandPrompt, but on all of the various utilities included with Windows XP that use the Command Prompt.
The commands shown here are in constant width, and any parameters (the information you supply
to the command) are in constant width italic. It doesn't matter which case you use when you
type them in the command prompt (DOS, like Windows, is not case-sensitive). If there is more thanone parameter, each is separated by a space:
attrib attributes filename
Changes the attributes of a file or folder. The four attributes are R for read only, S for system,A for archive, and H for hidden.
In Explorer, you can right-click a file or group of files and select Properties to change theattributes; attrib is the DOS counterpart to this functionality. In addition, attrib lets youchange the S (system) attribute, something Explorer doesn't let you do. Here are some
examples:
attrib +h myfile.txt
This turns on the H parameter for the file myfile.txt, making the file hidden.
attrib -r "another file.doc"
This turns off the R (read-only) parameter for the file another file.doc (note that
quotation marks are used because of the space in the filename).
Type attrib /? for additional options.
cd foldername
Changes the working directory to foldername. If the prompt indicates you are in C:\Windowsand you want to enter the c:\Windows\System32 folder, type cd system32. You can alsoswitch to any folder on your hard disk by including the full path of the folder. Type cd .. to go

to the parent folder. Type cd by itself to display the current directory.
To switch to another drive, just type the drive letter, followed by a colon (:). For example, typea: to switch to the floppy drive.
cls
Clear the display and empty the buffer (the history of output accessible with the scrollbar.)
copy filename destination
Copies a file to another directory or drive, specified by destination. This is the same as
dragging and dropping files in Explorer, except that the keyboard is used instead of the mouse.For example, to copy the file myfile.txt (located in the current working directory) to your floppydrive, type copy myfile.txt a:\. Type copy /? for additional options.
del filename
Deletes a file. For example, in order to delete the file myfile.txt, type del myfile.txt. This is
not exactly the same as deleting a file in Windows, because the file will not be stored in theRecycle Bin. The advantage of the DOS variant is that you can more easily and quickly delete agroup of files, such as all the files with the .tmp extension: del *.tmp. Type del /? for
additional options.
dir name
Displays a listing of all the files and directories in the current working directory. Use cd tochange to a different directory, or type dir c:\files to display the contents of C:\Fileswithout having to first use the cd command. Type dir /p to pause the display after each page,useful for very long listings. You can also specify wildcards to filter the results; type dir *.tmpto display only files with the .tmp filename extension. Type dir /? for additional options.
echo text
Displays the specified text, text, on the screen, See "Variables and the Environment," later in
this chapter.
exit
Closes the Command Prompt window. In most situations, you can just click the close button[x] on the upper-right corner of the Window, but the exit command works just as well.

md foldername
Stands for make directory. This command creates a new directory with the name foldername.
The command will have no effect if there's already a directory or file with the same name.
move filename destination
Is the same as copy, except that the file is moved instead of copied. Type move /? for
additional options.
rd foldername
Stands for remove directory. This command removes an existing directory with the namefoldername. The command will have no effect if the directory is not empty. To remove adirectory and all of its contents, use deltree.
ren oldfilename newfilename
Renames a file to newfilename. This is especially useful, because you can use the ren
command to rename more than one file at oncesomething Explorer doesn't let you do. Forexample, to rename hisfile.txt to herfile.txt, type ren hisfile.txt herfile.txt. To changethe extensions of all the files in the current working directory from .txt to .doc, type ren *.txt*.doc. Type ren /? for additional options.
set [ variable=[ string]]
When used without any arguments, displays a list of active environment variables (described inSection 10.2.1, later in this appendix). The set command is also used to assign data toenvironment variables.
TYPE filename
Displays the contents of a text file. Type type filename | more to display the file and pause
between each page of information rather than display the whole file at once.

Using Long Filenames in the Command Prompt
Unlike the DOS window in Windows 9x/Me, the Windows XP Command Prompt fullysupports long filenames. However, given the nature of the command line, there are timeswhen specifying long filenames will cause a problem. Specifically, if the file or foldername you're typing contains a space, you may need to enclose the filename in quotes.
Say you wish to rename a file named my stuff.txt to her stuff.doc. Instinctively, youmight type:
ren my stuff.txt her stuff.doc
However, this won't work, since the ren command believes that you've typed four
parameters. Instead, you'll need to use quotation marks, like this:
ren "my stuff.txt" "her stuff.doc"
Now, this isn't always the case. For example, if you want to use the cd command to
change the current working directory to Program Files, like this:
cd Program Files
the Command Prompt is smart enough to interpret this correctly, and no quotationmarks are needed.

10.2. Batch Files: The Other Way to Do It
When it comes to quick-and-dirty scripting, it's hard to beat DOS batch files. Batch files, similar toWSH scripts (discussed in Chapter 9), are plain-text files with the .bat filename extension. However,rather than relying on a complex, unfamiliar scripting language, batch files simply consist of one ormore DOS commands, typed one after another.
One of the problems with Windows-based scripting (see Chapter 9) is that it tries to control agraphical environment with a command-based language. Because DOS is a command-basedinterface, DOS-based scripting (batch files) is a natural extension of the environment.
Consider the following four DOS commands:
c:cd \windows\tempattrib -r *.tmpdel *.tmp
If you type these commands into a plain-text editor, such as Notepad, save it into a .bat file, andthen execute the batch file by double-clicking or typing its name at the Command Prompt, it will havethe same effect as if the commands were manually typed consecutively at the prompt. Obviously,this can be a tremendous time saver if you find yourself entering the same DOS commandsrepeatedly.
When you run a batch file, each command in the file will be displayed (echoed) on the screen beforeit's executed, which can be unsightly for the more compulsive among us. To turn off the echoing ofany given command, precede it with the @ character. To turn off the printing of all commands in abatch file, place the command @echo off at the beginning of the batch file.
Batch files can be executed by double-clicking them in Explorer or by typing their names at a DOSprompt. You'll want to put more frequently used, general-purpose batch files in a folder specified inthe system path (see Section 10.3.3, later in this chapter), so that they can be executed from thecommand prompt, regardless of the current working directory.
Although batch files can run Windows programs (just type notepad to launch Notepad), it's
preferable to run Windows programs with Windows Script Host scripts, because they'll be able to runwithout having to first load a Command Prompt window.
In addition to the standard DOS commands, most of which are documented earlier in this chapter,batch files use a couple of extra statements to fill the holes. Variables, conditional statements, andFor...Next loops are all implemented with statements that are ordinarily not much use outside of
batch files.
The following topics cover the concepts used to turn a task or a string of DOS commands into acapable batch file.

10.2.1. Variables and the Environment
The use of variables in batch files can be somewhat confusing. All variables used in a batch file (withthe exception of command-line parameters) are stored in the environmentan area of memory that iscreated when you first boot and is kept around until the computer is turned off. The environmentvariable space is discussed in more detail in Section 10.3.3, later in this chapter.
To view the contents of the environment, type set without any arguments. To set a variable to a
particular value, type this command:
set VariableName=Some Data
Unlike VBScript (see Chapter 9), the set command is required and no quotation marks are used
when setting the value of a variable. To remove the variable from memory, you set its value tonothing, like this:
set VariableName=
To then display the contents of the variable, use the echo command, as follows:
echo %VariableName%
Here, the percent signs (%) on both ends of the variable name are mandatory; otherwise, the echo
command would take its arguments literally and display the name of the variable rather than thedata it contains.
What's confusing is that in some cases, variables need no percent signs; sometimes they need one,sometimes two at the beginning, or sometimes one on each end. See the following topics for details.
10.2.2. Flow Control
Batch files have a very rudimentary, but easy-to-understand flow-control structure. The followingexample exhibits the use of the goto command:
@echo offecho Griffecho Asagoto LaterOnecho Ox:LaterOnecho Etch
The :LaterOn line (note the mandatory colon prefix) is called a label, which is used as a target forthe goto command. If you follow the flow of the script, you should expect the following output:
Griff

AsaEtch
because the goto command has caused the Ox line to be skipped. The label can appear before orafter the goto line in a batch file, and you can have multiple goto commands and multiple labels.
10.2.3. Command-Line Parameters
Suppose you executed a batch file called Demo.bat by typing the following at the DOS prompt:
Demo file1.txt file2.txt
Both file1.txt and file2.txt are command-line parameters and are automatically stored in two
variables, %1 and %2, respectively, when the batch file is run.
The implication is that you could run a batch file that would then act with the parameters that havebeen passed to it. A common use of this feature is, as shown in the previous example, to specify oneor more filenames, which are then manipulated or used in some way by the batch file. Section10.3.1, later in this chapter, shows a batch file that utilizes command-line parameters.
The following two-line example uses command-line parameters and the FC utility to compare two text
files. A similar example using the Windows Script Host, shown in Section 9.1.5, takes 22 lines toaccomplish approximately the same task:
fc %1 %2 >c:\windows\temp\output.txtnotepad c:\windows\temp\output.txt
Save this batch file as compare.bat, and execute it like this:
compare c:\windows\tips.txt c:\windows\faq.txt
which will compare the two files, tips.txt and faq.txt (both located in your Windows folder), save theoutput to a temporary file, and then display the output by opening the file in Notepad. Note that the> character on the first line redirects the output of the FC program to the output.txt file, which would
otherwise be displayed on the screen. The second line then opens the output.txt file in Notepad foreasy viewing.
There are ways, other than typing, to take advantage of command-line parameters. If you place ashortcut to a batch file (say, Demo.bat) in your SendTo folder, then right-click on a file in Explorer,select Send To and then Demo, the Demo.bat batch file will be executed with the file you'veselected as the first command-line parameter. Likewise, if you drag-drop any file onto the batch-fileicon in Explorer, the dropped file will be used as the command-line parameter.[1]
[1] If you drop more than one file on a batch-file icon, their order as arguments will be seemingly random, theoretically mirroring
their ordering in your hard disk's file table.
Batch files have a limit of 9 command-line parameters (%1 tHRough %9), although there's a way to

have more if you need them. Say you need to accept 12 parameters at the command line; yourbatch file should start by acting on the first parameter. Then, you would issue the shift command,which eliminates the first parameter, putting the second in its place. %2 becomes %1, %3 becomes %2,
and so on. Just repeat the process until there are no parameters left. Here's an example of thisprocess:
:StartOfLoopif "%1"=="" exitdel %1shiftgoto StartOfLoop
Save these commands into MultiDel.bat. Now, this simple batch file deletes one or more filenameswith a single command; it's used like this:
MultiDel file1.txt another.doc third.log
by cycling through the command-line parameters one by one using shift. It repeats the same twolines (del %1 and shift) until the %1 variable is empty (see Section 10.2.4, next, for the use of theif statement), at which point the batch file ends (using the exit command).
10.2.4. Conditional Statements
There are three versions of the if statement, which allow you to compare values and check the
existence of files. The first version, which is usually used to test the value of a variable, is used asfollows:
if "%1"=="help" goto SkipIt
Note the use of quotation marks around the variable name and the help text, as well as the doubleequals signs, all of which are necessary. Notice also there's no then keyword, which those of you who
are familiar with VBScript (see Chapter 9) might expect. If the batch file finds that the two sides areequal, it executes everything on the right side of the statement; in this case, it issues the goto
command.
The second use of the if command is to test for the existence of a file:
if exist c:\windows\tips.txt goto SkipIt
If the file c:\windows\tips.txt exists, the goto command will be executed. Similarly, you can you can
test for the absence of a file, as follows:
if not exist c:\autoexec.bat goto SkipIt
The third use of the if command is to check the outcome of the previous command, as follows:

if errorlevel 0 goto SkipIt
If there was any problem with the statement immediately before this line, the errorlevel (which issimilar to a system-defined variable) will be set to some nonzero number. The if statement shownhere tests for any errorlevel that is greater than zero; if there is no error, execution will simply
continue to the next command.
Here's a revised version of the file-compare example first shown in the Section 10.2.3 section earlierin this chapter:
if "%1"=="" goto problemif "%2"=="" goto problemif not exist %1 goto problemif not exist %2 goto problemfc %1 %2 >c:\windows\temp\output.txtif errorlevel 0 goto problemif not exist c:\windows\temp\output.txt goto problemnotepad c:\windows\temp\output.txtexit:problemecho "A problem has been encountered."
This batch file is essentially the same as the original two-line example shown earlier, except thatsome error-checking statements that utilize the if statement have been added to make the batch file
a little more robust. If you neglect to enter one or both command-line parameters, or if the files youspecify as command-line parameters don't exist, the batch file will display the error message. Aneven more useful version might have multiple error messages that more accurately describe thespecific problem that was encountered.
10.2.5. Loops
Batch files have a very simple looping mechanism, based loosely on the For...Next loop used inother programming languages. The main difference is that the batch file for loop doesn't increment a
variable regularly, but rather cycles it through a list of values. Its syntax is as follows:
for %%i in ("Abe","Monty","Jasper") do echo %%i
Here, the variable syntax gets even more confusing; the reference to the i variable when used inconjunction with the for...in...do statement gets two percent signs in front of the variable name
and none after. Note also that only single-letter variables can be used here.
If you execute this batch file, you'll get the following output:
AbeMontyJasper

Note also the use of the quotation marks; although they aren't strictly necessary, they're helpful ifone or more of the values in the list has a comma in it.
To simulate a more traditional For...Next statement in a batch file, type the following:
for %%i in (1,2,3,4,5) do echo %%i
10.2.6. Simulating Subroutines
Batch files have no support for named subroutines (as described in Section 9.1.5). However, you cansimulate subroutines by creating several batch files: one main file and one or more subordinate files(each of which can accept command-line parameters). You probably won't want to do this ifperformance is an issue.
This is useful in cases like the for...in...do statement (described in the preceeding section), which
can only loop a single command.
In one batch file, called WriteIt.bat, type:
if "%1"=="" exitif exist %1.txt del %1.txtecho This is a text > %1.txt
Then, in another batch file, called Main.bat, type the following:
for %%i in ("Kang","Kodos","Serak") do call WriteIt.bat %%i
The single-line Main.bat batch file uses the call command to run the other batch file, WriteIt.bat,three times. The call command allows one batch file to run another batch file; if it's omitted, one
batch file can still run another, but the first batch file will abruptly end upon running the second batchfile.
When this pair of batch files is run, you should end up with three files, Kang.txt, Kodos.txt, andSerak.txt, all containing the text, "This is a text." The if statement, as well as the for...in...do
loop, are explained in earlier sections.

10.3. Command Prompt Integration
Now that you know how to use the Command Prompt, you'll need to find ways to get to it quickly, sothat it can be as useful as possible.
10.3.1. Turn the Address Bar into a Command Prompt
If you select Run from the Start Menu, the box that appears is essentially a limited commandprompt; you can execute any program, open any folder, or launch any Internet URL simply by typingit here. Explorer and your taskbar also have the Address Bar, which essentially accomplishes thesame thing as Run.
The problem with both the Run command and the Address Bar is that they can only be used tolaunch programs; they don't understand intrinsic DOS commands, like dir and copy (discussed
earlier in this chapter). However, there is a way to have the Address Bar mimic all the functions ofthe Command Prompt and therefore have a true command prompt always within reach:
Start by making the Address Bar visible, if it's not already. Right-click on an empty area of yourtaskbar; select Toolbars and then Address Bar.[2]
[2] This solution focuses on the Address Bar on the taskbar, although it also works for the Address Bar inExplorer.
Your taskbar will then contain the Address Bar, which is dockable, resizable, and removable:you can move it around the taskbar or even tear it off by dragging it. Your taskbar will looksomething like Figure 10-1.
Figure 10-2. The Address Bar can be put to good use as a handycommand prompt
1.
You'll immediately be able to run programs, open folders, and launch URLs simply by typingthem and pressing Enter.
2.
To add DOS command functionality, you'll need the assistance of a batch file (discussed earlierin this appendix). Open a text editor, such as Notepad, and type the following:
@echo offif "%1"=="" exitif exist c:\windows\temp\temp.bat del c:\windows\temp\temp.bat
3.

echo %1 %2 %3 %4 %5 %6 %7 %8 %9 > c:\windows\temp\temp.batcall c:\windows\temp\temp.batif exist c:\windows\temp\temp.bat del c:\windows\temp\temp.bat
You may have to change the references to c:\windows\temp to match the location of your Tempfolder.
Save it as +.bat (just the plus sign followed by the .bat filename extension) in a convenientlocation, such as your \Windows folder.
4.
Now, to run a DOS command from the Address Bar, simply precede it with a plus sign (+) and asingle space, like this:
+ copy c:\bootlog.txt a:\
You can even have the output of a DOS command redirected to a file, as follows:
+ dir c:\windows > c:\windir.txt
5.
Here's how it works: the batch file reads what you've typed after the + and writes it to a new, buttemporary, batch file. The new batch file is then executed, and the command you've typed is carriedout. When it's finished, the temporary batch file is deleted.
The plus key was chosen for the name of the batch file because it's convenient and not likely toconflict with any other software or commands; the one on your keyboard's numeric keypad is usuallymore convenient than the one near your backspace key (Shift-=). However, you can certainlyreplace + with any other character, such as ̀ or -, as long as you rename the batch file accordingly.
There are some limitations to this design. Although it does mimic the Command Prompt, it onlyallows a single command at a time, after which the context is forgotten. What this means is that suchcommands as cd won't have much meaningyou can certainly type + cd directoryname, but the
"current directory" will be forgotten once the command has been executed. To get around this,include the full path with your commands. Instead of the following series of statements:
d:cd \myfolderdel *.tmp
just type this:
+ del d:\myfolder\*.tmp
Of course, if you find that you need to type several consecutive commands, you can always just typecmd in the Address Bar to launch a full-fledged Command Prompt window.
10.3.2. Open a Command Prompt window in any folder

If you find yourself using the Command Prompt frequently, you'll probably benefit from the followingsolution. Instead of having to use the cd command to change to a given folder, you can simply open
a Command Prompt window on the fly in Explorer, already rooted in the selected folder:
Open the Registry Editor (discussed in Chapter 3).1.
Expand the branches to: HKEY_CLASSES_ROOT\Directory\shell. See the discussion of file
types in Chapter 4 for more information on the structure of this branch of the Registry.
2.
Create a new key by going to Edit New Key, and type cmd for the name of this new
key.
3.
Double-click the (default) value in the new cmd key, and type the following for its contents:
Open Command &Prompt Here
4.
Next, create a new key here by going to Edit New Key, and type command for the
name of the new key.
5.
Double-click the (default) value in the new command key, and type the following for its
contents:
cmd.exe /k "cd %L && ver"
This line launches the cmd.exe application, and then, using the /k parameter, instructs it to
carry out the following two commands:
cd %1ver
The first command changes the working directory to the folder that has been right-clicked, andthe second displays the Windows version.
6.
Close the Registry Editor when you're done; the change will take effect immediately. Just right-click any folder and select Open Command Prompt Here to open a Command Prompt at theselected folder.
7.
10.3.3. The Path Less Traveled
Although it isn't really emphasized as much as it was in the heyday of DOS and Windows 3.x, thesystem path is still an important setting in Windows XP. It can be helpful as well as detrimental,depending on how it's used.
The system path is simply a listing of folder names kept in memory during an entire Windowssession. If a folder name is listed in your system path, you'll be able to run a program contained inthat folder without having to specify its location. This is most apparent when you use the StartMenu's Run command, Explorer's Address Bar, or a Command Prompt window, and type a program

filename, such as Notepad. If all is well, Notepad will start, even though you didn't specify the full
path (e.g. c:\Windows) of the folder containing the notepad.exe file. This is because Notepad.exe islocated in a folder that, by default, is listed in the system path.
The path is one of several environment variables that are kept in memory from Windows startup untilyou shut down. In previous versions of Windows, the path was set with a line in the Autoexec.bat file(now obsolete); in Windows XP, all environment variables are set by going to Control Panel System Advanced tab Environment Variables.
By default, the system variable, Path, contains the following folders:
%SystemRoot%%SystemRoot%\system32%SystemRoot%\system32\WBEM
This means that an executable (.exe file) placed in any of these folders is instantly accessible fromany folder on the system. The %SystemRoot% element represents the Windows folder, usually
c:\Windows, and is so specified to account for systems where the Windows folder has been placed ona different drive or in a different folder.
One of the consequences of this design is that if two different versions of the same file are placed intwo different folders in the path, only one of the available versions of the fileand not necessarily themost recent onemay be in use at any given time. Now, the same rules that apply to programexecutables also apply to shared files, such as .dll, .vbx, and .vxd files, so the issue of version controlis an important one that can affect any application on your system.
How do you escape this trap? First, remove any unnecessary directories from your path variable.Next, if you suspect a conflict with a specific file, try searching your hard disk for the filename (selectSearch and then For Files or Folders from the Start Menu, and select Local Hard Drives from theLook in list). If you see more than one copy of the file in the search results window, it couldpotentially cause a conflict. Widen the In Folder column in the Search Results window so you cansee where each file is located. If one of them is in \Windows\System (or any other Windowssubdirectories, for that matter), then it most likely belongs there. Compare the versions of the filesby right-clicking, selecting Properties, and clicking on the Version tabs. Now, you want to end upwith only the newest file on your system, so what you can do at this point is simply delete (ortemporarily rename, to be on the safe side) all versions but the most recent. Then move the newestfile to your \Windows\System32 folder if it's not already there.
Note that this solution by no means applies to all .dll files, which is why it's smart to back up any filesbefore continuing. Some files have identical names only by coincidence, although this is rare. Ofcourse, deleting a file just because there's another around by the same name is not a good ideaunless you know that the files serve the same purpose. One way to make sure is to look through allthe information in the Version tab; if the Company Name and Product Name are the same, youcan be pretty sure that the files are duplicates. On the other hand, if the files have vastly differentsizes, odds are that one is not a suitable replacement for the other.

Appendix A. Setting LocatorIt shouldn't take you too long to find that the various options, switches, and adjustments that allowyou to customize Windows are scattered throughout dozens of dialog boxes, property sheets, andadd-on utilities. Understandably, this can turn a simple task into a monumental wild-goose chase.The following list contains more than 700 individual Windows XP settings and where to find them.
The settings are listed alphabetically and named in such a way that they should be easy to locate bycontext. For example, to find out how to turn off the Power Management icon in the TaskbarNotification Area, look under "Taskbar Notification Area, Power Icon." Note that a few settings havebeen duplicated with different labels to make them easier to find.
Settings made in the Registry (see Chapter 3) are not included here because of their complexity.Most Registry settings can be found by using the Registry Editor's Find tool or by looking through thisbook.
Of special note here is TweakUI, a special utility that Microsoft has made available to allow you tochange some settings otherwise inaccessible in the Windows interface. TweakUI can be downloadedfrom the Microsoft web site or from http://www.annoyances.org.

A.1. Alphabetical Listing of All Windows XP Settings
Accessibility, additional settings for web pages
Control Panel Internet Options General tab Accessibility
Accessibility, enable / disable warnings & notifications
Control Panel Accessibility Options General tab
Accessibility, move Magnifier with focus change in web pages
Control Panel Internet Options Advanced tag Accessibility Move system caretwith focus/selection changes
Address Bar, Go button
See "Go button"
Address Bar, history settings
Control Panel Internet Options General tab History section
Address Bar, search settings
Control Panel Internet Options Advanced tag Search from the Address bar
Address Bar, show in Explorer
Explorer View Toolbars Address Bar
Address Bar, show on taskbar
Right-click on empty area of taskbar Toolbars Address

Address Bar, show the full path of current folder
Control Panel Folder Options View tab Display the full path in the address bar
Address Book, make the default contact list
Control Panel Internet Options Programs tab Contact list
Address Book, profile assistant (enable/disable)
Control Panel Internet Options Advanced tag Security Enable Profile Assistant
Address Book, set default profile for AutoComplete
Control Panel Internet Options Content tab My Profile
Administrative Tools, show in Start Menu (Classic Start Menu only)
Control Panel Taskbar and Start Menu Start Menu tab Customize "AdvancedStart menu options" section Display Administrative Tools
Administrative Tools, show in Start Menu (XP Start Menu only)
Control Panel Taskbar and Start Menu Start Menu tab Customize Advancedtab "Start menu items" section System Administrative Tools
Advanced Power Management, additional settings
Your computer's BIOS setup; see Appendix B
Advanced Power Management, effect on Offline files
Explorer Tools Synchronize Setup On Idle tab Advanced Preventsynchronization when my computer is running on battery power

Advanced Power Management, effect on Scheduled Tasks
Control Panel Scheduled Tasks right-click task Properties Settings tab Power Management section
Advanced Power Management, enable / disable
Control Panel Power Options APM tab Enable Advanced Power Managementsupport
Alt Key, make it "sticky"
Control Panel Accessibility Options Keyboard tab Use StickyKeys
Animation, enable / disable selectively
Control Panel System Advanced tab Performance section Settings VisualEffects tab Custom
TweakUI General
Animation, fading between web pages
Control Panel Internet Options Advanced tag Browsing Enable pagetransitions
Animation, show animated GIFs in web pages
Control Panel Internet Options Advanced tag Multimedia Play animations inweb pages
Animation, smooth scrolling of lists
TweakUI Explorer Enable smooth scrolling
Animation, smooth scrolling of web pages
Control Panel Internet Options Advanced tag Browsing Use smooth scrolling

Applications, ending
Task Manager (taskmgr.exe) Applications tab
Applications, ending background processes
Task Manager (taskmgr.exe) Processes tab
Applications, prevent from loading
Control Panel Advanced tab Performance Settings Data Execution Preventiontab
Applications, list loaded DLLs
System Information (winmsd.exe) Software Environment Loaded Modules
AutoComplete, edit data
Control Panel Internet Options Content tab My Profile
AutoComplete, enable / disable
Control Panel Internet Options Advanced tag Browsing Use inlineAutoComplete
AutoComplete, Profile Assistant (enable/disable)
Control Panel Internet Options Advanced tag Security Enable Profile Assistant
AutoComplete, settings
Control Panel Internet Options Content tab AutoComplete
Autodial
See "Dialing"

Autoexec.bat, parse at logon
TweakUI Logon
Automatic Windows Update settings
Control Panel System Automatic Updates tab
Autoplay
Explorer right-click CD drive icon Properties AutoPlay tab
TweakUI My Computer AutoPlay
Background, create and modify
Paint (mspaint.exe) save as .bmp in Windows folder
Background, select and configure
Control Panel Display Desktop tab
Balloon tips (big tooltips that pop up from taskbar notification area)
TweakUI Taskbar Enable balloon tips
Browser, set default
Control Panel Internet Options Programs tab Internet Explorer should check tosee whether it is the default browser
Button color
Control Panel Display Appearance tab Advanced Item list choose "3dObjects"

Calendar, default application
Control Panel Internet Options Programs tab Calendar
Calling
See "Dialing"
Cascading Style Sheets
See "Style Sheets"
CD, autoplay
See "Autoplay"
CD Burning, folder location
TweakUI My Computer Special Folders
Certificates, check for revocation in Internet Explorer
Control Panel Internet Options Advanced tag Security
Certificates, Internet Explorer settings for secure sites
Control Panel Internet Options Content tab Certificates section
Certificates, warn about invalid certificates in Internet Explorer
Control Panel Internet Options Advanced tag Security Warn about invalid sitecertificates
Clock, show on the taskbar
Control Panel Taskbar and Start Menu Taskbar tab Show the clock

Code page conversion table
Control Panel Regional and Language Options Advanced tab Code pageconversion tables
Color profiles, associate with device
Right-click on .icm file Properties Associate Device tab
Color profiles, management
Control Panel Display Settings tab Advanced Color Management tab
Colors, change for all display elements
Control Panel Display Appearance tab Advanced
Colors, encrypted and compressed files
TweakUI Explorer Colors
Colors, in web pages
Control Panel Internet Options General tab Colors
Colors, increase or decrease number of supported colors (color depth)
Control Panel Display Settings tab Color Quality
Colors, show high contrast screen colors
Control Panel Accessibility Options Display tab Use High Contrast
Combo boxes, enable / disable animation
Control Panel System Advanced tab Performance section Settings VisualEffects tab Custom

Command keys, customize
TweakUI Explorer Command Keys
Command Prompt, filename completion
TweakUI Command Prompt
Command Prompt, settings
Command Prompt window Control Menu
Compressed NTFS files, choose color
TweakUI Explorer Colors
Compressed NTFS files, differentiate with a different color
Control Panel Folder Options View tab Show encrypted or compressed NTFS filesin color
Contact list, default
Control Panel Internet Options Programs tab Contact list
Control Panel, security policies
Group Policy (gpedit.msc) User Configuration Administrative Templates ControlPanel
Control Panel, categories (show/hide)
Control Panel Tools Options General tab Show common tasks in folders Ok Switch to Classic View or Switch to Category View

Control Panel, icons (show/hide)
TweakUI Control Panel
Control Panel, show as menu in Start Menu (Classic Start Menu only)
Control Panel Taskbar and Start Menu Start Menu tab Customize "AdvancedStart menu options" section Expand Control Panel
Control Panel, show as menu in Start Menu (XP Start Menu only)
Control Panel Taskbar and Start Menu Start Menu tab Customize Advancedtab "Start menu items" section Control Panel
Control Panel, show in My Computer
Control Panel Folder Options View tab Show Control Panel in My Computer
TweakUI My Computer
Cookies, change settings (block, allow, prompt)
Control Panel Internet Options Privacy tab Advanced Override automaticcookie handling
Cookies, change settings for specific web sites (block, allow, prompt)
Control Panel Internet Options Privacy tab Edit
Cookies, delete all
Control Panel Internet Options General tab Temporary Internet Files section Delete Cookies
Country, choose for dialing preferences
Control Panel Phone and Modem Options Dialing Rules tab select location Edit Country/region

Country, choose for localized information
Control Panel Regional and Language Options Regional Options tab Locationsection
Crashes, send reports to Microsoft
Control Panel System Advanced tab Error Reporting
Critical Update Notification
Control Panel System Automatic Updates tab
Ctrl Key, make it "sticky"
Control Panel Accessibility Options Keyboard tab Use StickyKeys
Ctrl-Alt-Del window, settings
Group Policy (gpedit.msc) User Configuration Administrative Templates System Ctrl+Alt+Del Options
Currency, customize display
Control Panel Regional and Language Options Regional Options tab Customize Currency tab
Cursor, mouse cursor
See "Mouse Cursor"
Cursor, text cursor
See "Text Cursor"
Data Execution Prevention (DEP) (enable/disable)

Control Panel Advanced tab Performance Settings Data Execution Preventiontab
Date, customize display
Control Panel Regional and Language Options Regional Options tab Customize Date tab
Date, set
Control Panel Date and Time Date & Time tab
Daylight Savings, enable / disable
Control Panel Date and Time Time Zone tab
Desktop, Cleanup Wizard runs every 60 days
Control Panel Display Desktop tab Customize Desktop General tab RunDesktop Cleanup every 60 days
Desktop, color
Control Panel Display Desktop tab Color
Control Panel Display Appearance tab Advanced Item list choose"Desktop"
Desktop, folder, change location
TweakUI My Computer Special Folders
Desktop, icons
See "Icons"
Desktop, refresh

click on an empty portion of the desktop press F5
Desktop, restrict installation of items
Control Panel Internet Options Security tab Custom Level
Desktop, security policies
Group Policy (gpedit.msc) User Configuration Administrative Templates Desktop
Desktop, show contents without minimizing applications
Right-click on taskbar Toolbars Show Desktop
Right-click on taskbar Toolbars Show Open Windows (to restore)
Explorer open Desktop folder
Desktop, version (show/hide)
TweakUI General Show Windows version on desktop
Desktop, web content (enable/disable)
TweakUI Explorer Allow Web content to be added to the desktop
Desktop, web content, lock
TweakUI Explorer Lock Web content
Desktop, web pages, add / remove / hide
Control Panel Display Desktop tab Customize Desktop Web tab
Desktop, web pages, allow moving and resizing
Control Panel Display Desktop tab Customize Desktop Web tab Lockdesktop items

Desktop, web pages, automatic download of linked pages
Control Panel Display Desktop tab Customize Desktop Web tab selectitem Properties Download tab
Desktop, web pages, automatic updates
Control Panel Display Desktop tab Customize Desktop Web tab selectitem Properties Schedule tab
Desktop, web pages, automatic updates (enable/disable)
Control Panel Internet Options Advanced tag Browsing Enable offline items tobe synchronized on a schedule
Devices
See "Hardware"
Dialing, area code settings
Control Panel Phone and Modem Options Dialing Rules tab select location Edit
Dialing, call waiting
Control Panel Phone and Modem Options Dialing Rules tab select location Edit General tab To disable call waiting...
Dialing, calling card
Control Panel Phone and Modem Options Dialing Rules tab select location Edit Calling Card tab
Dialing, connect to the Internet when needed
Control Panel Internet Options Connection tab Dial whenever / Always dial

Dialing, connect to the Internet when needed, depending on location
Control Panel Network Connections Advanced Dial-Up Preferences
Dialing, default Internet connection
Control Panel Internet Options Connection tab select connection Set Default
Dialing, disconnect Internet connection when no longer needed
Control Panel Internet Options Connection tab select connection Settings
Dialing, operator-assisted dialing
Control Panel Network Connections Advanced Operator-Assisted Dialing
Digital Camera, add as drive in Explorer (still camera only)
Control Panel Scanners and Cameras Add Device
Disconnect from Internet automatically
Control Panel Internet Options Connection tab select connection Settings
Display, force restart after changing resolution or color depth
Control Panel Display Settings tab Advanced General tab Compatibilitysection
Display, list all possible combinations of resolution and color depth
Control Panel Display Settings tab Advanced Adapter tab List All Modes
Display, refresh rate
Control Panel Display Settings tab Advanced Monitor tab Screen refresh

rate
Display, resolution
Control Panel Display Settings tab Screen resolution
Display, show amount of memory installed on display adapter
Control Panel Display Settings tab Advanced Adapter tab AdapterInformation section
Display, size
Control Panel Display Settings tab Screen resolution
Display, style
Control Panel Display Appearance tab Windows and buttons list
Display, style, apply to controls in web pages
Control Panel Internet Options Advanced tag Browsing Enable visual styleson buttons and controls in web pages
Display, troubleshooting
Control Panel Display Settings tab Advanced Troubleshoot tab
Display, turn off to save power
Control Panel Power Options Power Schemes tab Turn off hard disks
Document templates, manage
TweakUI Templates

Document templates, relocate folder
TweakUI My Computer Special Folders
Documents, history, clear on exit
TweakUI Explorer Clear document history on exit
Documents, history, maintain
TweakUI Explorer Maintain document history
Documents, show on Start Menu (Classic Start Menu only)
TweakUI Explorer Show My Documents on classic Start Menu
Documents, show on Start Menu (XP Start Menu only)
TweakUI Explorer Allow Recent Documents on Start Menu
Double-click required to open icons
Control Panel Folder Options General tab Double-click to open an item
Download Complete message, enable / disable
Control Panel Internet Options Advanced tag Browsing Notify whendownloads complete
Drivers
See "Hardware"
Drives, show/hide in My Computer
TweakUI My Computer Drives

Drives, warn when low on free space
TweakUI Taskbar Warn when low on disk space
DVD drive, autoplay enable / disable
Explorer right-click DVD drive icon Properties AutoPlay tab
Effects, display settings
Control Panel Display Appearance tab Effects
Email icon, show in Start Menu (XP Start Menu only)
Control Panel Taskbar and Start Menu Start Menu tab Customize General tab E-mail
Email program, default
Control Panel Internet Options Programs tab E-mail
Encrypted NTFS files, customize color
TweakUI Explorer Colors
Encrypted NTFS files, differentiate with a different color
Control Panel Folder Options View tab Show encrypted or compressed NTFS filesin color
Encrypted NTFS files, use with Offline files
Control Panel Folder Options Offline Files tab Encrypt offline files to secure data
Environment variables
Control Panel System Advanced tab Environment variables

Error messages, font
Control Panel Display Appearance tab Advanced Item list choose"Message Box"
Error messages, sound
Control Panel Sounds and Audio Devices Sounds tab
Error messages, text color
Control Panel Display Appearance tab Advanced Item list choose"Window"
Error Reporting, advanced settings
Group Policy (gpedit.msc) Computer Configuration Administrative Templates System Error Reporting
Error Reporting, enable / disable
Control Panel System Advanced tab Error Reporting
Explorer
See "Windows Explorer"
Extensions, show/hide filename extensions
Control Panel Folder Options View tab Hide extensions for known file types
Favorites, hide infrequently used items
Control Panel Internet Options Advanced tag Browsing Enable PersonalizedFavorites Menu

Favorites, links (show/hide)
TweakUI Explorer Show Links on Favorites menu
Favorites, navigation key
TweakUI Explorer Command Keys
Favorites, relocate folder
TweakUI My Computer Special Folders
Favorites, show in Start Menu (Classic Start Menu only)
Control Panel Taskbar and Start Menu Start Menu tab Customize "AdvancedStart menu options" section Display Favorites
Favorites, show in Start Menu (XP Start Menu only)
Control Panel Taskbar and Start Menu Start Menu tab Customize Advancedtab "Start menu items" section Favorites menu
Fax service, install support
Control Panel Printers and Faxes File Set Up Faxing
File dialogs, options
TweakUI Common Dialogs
Files, differentiate encrypted or compressed NTFS files with a different color
Control Panel Folder Options View tab Show encrypted or compressed NTFS filesin color
Files, display size in folder tips
Control Panel Folder Options View tab Display file size information in folder tips

Files, double-click sensitivity
TweakUI Mouse
Files, downloads (enable/disable)
Control Panel Internet Options Security tab Custom Level
Files, drag-drop (enable/disable)
Control Panel Internet Options Security tab Custom Level
Files, drag-drop sensitivity
TweakUI Mouse
Files, extensions (show/hide)
Control Panel Folder Options View tab Hide extensions for known file types
Files, filename completion in Command Prompt
TweakUI Command Prompt
Files, hidden files (show/hide)
Control Panel Folder Options View tab Hidden files and folders
Files, Indexing Service
See "Indexing Service"
Files, system files (show/hide)
Control Panel Folder Options View tab Hide protected operating system files

Firewall
See "Windows Firewall"
Focus, prevent applications from stealing
TweakUI General Focus
Folders, cache settings for offline access
Explorer right-click folder icon Sharing Caching
Folders, close automatically when Favorites or History folder is shown
Control Panel Internet Options Advanced tag Browsing Close unused foldersin History and Favorites
Folders, columns in details view
Folder window View Details View Choose Details
Folders, display file size in folder tips
Control Panel Folder Options View tab Display file size information in folder tips
Folders, group similar items
Folder window View Arrange Icons by Show in Groups
Folders, history settings
Control Panel Internet Options General tab History section
Folders, Indexing Service

See "Indexing Service"
Folders, open each folder in its own window
Control Panel Folder Options General tab Open each folder in its own window
Folders, open in separate process
Control Panel Folder Options View tab Launch folder windows in separate process
Folders, refresh view
Folder window View Refresh or press F5
Folders, remember individual settings
Control Panel Folder Options View tab Remember each folder's view settings
Folders, reopen all folder windows that were left open when system was last shut down
Control Panel Folder Options View tab Restore previous folder windows at logon
Folders, reset default appearance to Windows default
Control Panel Folder Options View tab Reset All Folders
Folders, reuse folder windows
Control Panel Folder Options General tab Open each folder in the same window
Folders, reuse folder windows when launching Internet shortcuts
Control Panel Internet Options Advanced tag Browsing Reuse windows forlaunching shortcuts
Folders, set default appearance

Open any folder and configure it as you wish Tools Folder Options View tab Apply to All Folders
Folders, share on network
Explorer right-click folder icon Sharing Share this folder
Folders, show/hide hidden folders
Control Panel Folder Options View tab Hidden files and folders
Folders, show background images
Control Panel System Advanced tab Performance section Settings VisualEffects tab Custom
Folders, show common tasks
Control Panel System Advanced tab Performance section Settings VisualEffects tab Custom
Folders, show contents of system folders
Control Panel Folder Options View tab Display the contents of system folders
Folders, show Digital Camera memory as a folder (still camera only)
Control Panel Scanners and Cameras Add Device
Folders, show FTP site as folder in Internet Explorer
Control Panel Internet Options Advanced tag Browsing Enable folder view forFTP sites
Folders, show lines in Explorer tree view
Control Panel Folder Options View tab Display simple folder view in Explorer's

Folders list
Folders, show the full path in the address bar
Control Panel Folder Options View tab Display the full path in the address bar
Folders, show the full path in the titlebar
Control Panel Folder Options View tab Display the full path in the title bar
Fonts, change DPI of all screen fonts
Control Panel Display Settings tab Advanced General tab DPI setting list select "Custom setting"
Fonts, determine link between font filename and font screen name
Control Panel Fonts View Details
Fonts, downloads (enable/disable)
Control Panel Internet Options Security tab Custom Level
Fonts, eliminate duplicates
Control Panel Fonts View List Fonts by Similarity
Fonts, in web pages
Control Panel Internet Options General tab Fonts
Fonts, in windows, menus, and icons
Control Panel Display Appearance tab Advanced
Fonts, install

Control Panel Fonts File Install New Font
Fonts, repair folder
TweakUI Repair
Fonts, size in applications
Control Panel Display Appearance tab Font size
Fonts, smooth edges (enable/disable)
Control Panel System Advanced tab Performance section Settings VisualEffects tab Custom
Fonts, smooth edges (settings)
Control Panel Display Appearance tab Effects Use the following method tosmooth edges of screen fonts
Fonts, uninstall
Control Panel Fonts delete a font file to uninstall it
Fonts, view & compare
Control Panel Fonts double-click any font
FTP, server restrictions
Control Panel Network Connections right-click connection Properties Advanced tab Settings Services tab
FTP, show as folder in Internet Explorer
Control Panel Internet Options Advanced tag Browsing Enable folder view forFTP sites

FTP, use passive mode
Control Panel Internet Options Advanced tag Browsing Use Passive FTP
Go button, show in Address Bar
Control Panel Internet Options Advanced tag Browsing Show Go button inAddress Bar
Right-click on empty portion of address bar Go Button
Hang up Internet Connection automatically
Control Panel Internet Options Connection tab select connection Settings
Hard Disk, cache settings for offline access
Explorer right-click drive icon Sharing Caching
Hard Disk, check for errors
Explorer right-click drive icon Properties Tools tab Check Now
Hard Disk, clean up
Explorer right-click drive icon Properties General tab Disk Cleanup
Hard Disk, compress drive
Explorer right-click drive icon Properties Compress drive to save disk space
Hard Disk, convert to dynamic disk
Disk Management (diskmgmt.msc) View Top Disk List right-click on drive intop pane Convert to Dynamic Disk

Hard Disk, defragment
Explorer right-click drive icon Properties Tools tab Defragment Now
Hard Disk, enable / disable write caching
Device Manager right-click drive Properties Policies tab Enable write cachingon the disk
Hard Disk, Indexing Service
See "Indexing Service"
Hard Disk, list volumes
Device Manager right-click drive Properties Volumes tab Populate
Hard Disk, quota management
Explorer right-click folder icon Properties Quota tab
Hard Disk, quota security policies
Group Policy (gpedit.msc) Computer Configuration Administrative Templates System Disk Quotas
Hard Disk, share on network
Explorer right-click drive icon Sharing Share this folder
Hard Disk, turn off to save power
Control Panel Power Options Power Schemes tab Turn off monitor
Hardware, change the driver for a device
Device Manager right-click on device Properties Driver tab Update Driver

Hardware, driver information for a device
Device Manager right-click on device Properties Driver tab Driver Details
Hardware, driver signing options
Control Panel System Hardware tab Driver Signing
Hardware, enable / disable
Device Manager right-click on device Properties General tab Device usage
Hardware, install
Control Panel Add Hardware
Hardware, IRQ Steering settings
Device Manager Computer right-click sole entry Properties IRQ Steering tab
Hardware, list devices
System Information (winmsd.exe) Components
Hardware, list drivers
System Information (winmsd.exe) Software Environment
Hardware, list resources used
System Information (winmsd.exe) Hardware Resources
Hardware, places to look for drivers
Group Policy (gpedit.msc) User Configuration Administrative Templates System

Hardware, profile settings
Control Panel System Hardware tab Hardware Profiles
Hardware, resources in use by a device
Device Manager right-click on device Properties Resources tab
Hardware, security policies
Group Policy (gpedit.msc) Computer Configuration Windows Settings SecuritySettings Local Policies Security Options
Hardware, show all installed devices
Device Manager
Hardware, uninstall
Device Manager right-click on device Uninstall
Hardware, Universal Plug and Play support
Control Panel Network Connections Advanced Optional Networking Components Networking Services
Help, pop-up help windows
See "Tooltips"
Help, show in Start Menu (XP Start Menu only)
Control Panel Taskbar and Start Menu Start Menu tab Customize Advancedtab "Start menu items" section Help and Support
TweakUI Explorer Allow Help on Start Menu

Hibernation, enable / disable
Control Panel Power Options Hibernate tab Enable hibernation
Hidden files and folders, show/hide
Control Panel Folder Options View tab Hidden files and folders
Hourglass, change icon
Control Panel Mouse Pointers tab
HTML editor, default
Control Panel Internet Options Programs tab HTML Editor
Icons, desktop icons (show/hide)
Control Panel Display Desktop tab Customize Desktop
TweakUI Desktop
Icons, highlight color & font
Control Panel Display Appearance tab Advanced Item list choose"Selected Items"
Icons, repair
TweakUI Repair
Icons, show shadows under icon captions
Control Panel System Advanced tab Performance section Settings VisualEffects tab Custom
Icons, show translucent selection rectangle when highlighting multiple icons

Control Panel System Advanced tab Performance section Settings VisualEffects tab Custom
Icons, single-click or double-click
Control Panel Folder Options General tab Click items as follows
Icons, size on desktop and in folders
Control Panel Display Appearance tab Effects Use large icons
Control Panel Display Appearance tab Advanced Item list choose "Icon"
Icons, spacing on desktop and in folders
Control Panel Display Appearance tab Advanced Item list choose "IconSpacing (Horizontal)" or "Icon Spacing (Vertical)"
Icons, underline captions
Control Panel Folder Options General tab Click items as follows
Images, show as thumbnails in Explorer
Explorer View Thumbnails
Images, show in web pages
Control Panel Internet Options Advanced tag Multimedia Show pictures
Images, show placeholders in web pages (if pictures are disabled in web pages)
Control Panel Internet Options Advanced tag Multimedia Show imagedownload placeholders
Indexing Service, enable / disable for individual drives
Explorer right-click drive icon Properties General tab Allow Indexing Service

to index this disk for fast file searching
Insertion Point, change
Control Panel Mouse Pointers tab choose "Text Select" from "Customize" list
Install On Demand, enable / disable
Control Panel Internet Options Advanced tag Browsing Enable Install OnDemand
Internet Call, default application
Control Panel Internet Options Programs tab Internet Call
Internet Connection, set up
Control Panel Internet Options Connection tab Setup
Internet Control Message Protocol (ICMP)
Control Panel Windows Firewall Advanced tab Network Connection Settings select connection Settings ICMP tab
Control Panel Windows Firewall Advanced tab ICMP Settings
Internet Explorer, abbreviate link addresses in status bar
Control Panel Internet Options Advanced tag Browsing Show friendly URLs
Internet Explorer, ActiveX settings
Control Panel Internet Options Security tab Custom Level
Internet Explorer, additional security policies
Group Policy (gpedit.msc) Computer Configuration Administrative Templates Windows Components Internet Explorer

Group Policy (gpedit.msc) User Configuration Administrative Templates WindowsComponents Internet Explorer
Internet Explorer, animated GIFs (enable/disable)
Control Panel Internet Options Advanced tag Multimedia Play animations inweb pages
Internet Explorer, AutoComplete settings
See "AutoComplete"
Internet Explorer, automatically check for updates
Control Panel Internet Options Advanced tag Browsing Automatically checkfor Internet Explorer updates
Internet Explorer, automatically download linked pages for desktop web pages
Control Panel Display Desktop tab Customize Desktop Web tab selectitem Properties Download tab
Internet Explorer, automatically update desktop web pages
Control Panel Display Desktop tab Customize Desktop Web tab selectitem Properties Schedule tab
Internet Explorer, buttons & controls, use display settings
Control Panel Internet Options Advanced tag Browsing Enable visual styleson buttons and controls in web pages
Internet Explorer, cache settings
Control Panel Internet Options General tab Temporary Internet Files section Settings

Internet Explorer, cache settings for encrypted pages
Control Panel Internet Options Advanced tag Security Do not save encryptedpages to disk
Internet Explorer, cache, clear automatically when browser is closed
Control Panel Internet Options Advanced tag Security Empty TemporaryInternet Files folder when browser is closed
Internet Explorer, certificates for secure sites
See "Certificates"
Internet Explorer, check to see if it is the default browser
Control Panel Internet Options Programs tab Internet Explorer should check tosee whether it is the default browser
Internet Explorer, colors & fonts
Control Panel Internet Options General tab
Internet Explorer, cookies
See "Cookies"
Internet Explorer, default home page
Control Panel Internet Options General tab Home page
Internet Explorer, desktop icon
Control Panel Display Desktop tab Customize Desktop
Internet Explorer, disable compositing effects when using Terminal Server
Control Panel Internet Options Advanced tag Browsing Force offscreen

compositing even under Terminal Server
Internet Explorer, download-complete notification
Control Panel Internet Options Advanced tag Browsing Notify whendownloads complete
Internet Explorer, enable / disable HTTP 1.1
Control Panel Internet Options Advanced tag HTTP 1.1 settings
Internet Explorer, enable / disable moving or resizing web page items on desktop
Control Panel Display Desktop tab Customize Desktop Web tab Lockdesktop items
Internet Explorer, enlarge picture boxes to accommodate "ALT" captions (if pictures aredisabled in web pages)
Control Panel Internet Options Advanced tag Accessibility Always expand ALTtext for images
Internet Explorer, explain server error messages
Control Panel Internet Options Advanced tag Browsing Show friendly HTTPerror messages
Internet Explorer, fading animation when moving from one web page to another
Control Panel Internet Options Advanced tag Browsing Enable pagetransitions
Internet Explorer, Go button
See "Go button"
Internet Explorer, hand icon (change)

Control Panel Mouse Pointers tab choose "Link Select" from "Customize" list
Internet Explorer, hide infrequently used Favorites
Control Panel Internet Options Advanced tag Browsing Enable PersonalizedFavorites Menu
Internet Explorer, History settings
Control Panel Internet Options General tab History section
Internet Explorer, icon, change
Control Panel Display Desktop tab Customize Desktop General tab selecticon Change Icon
Internet Explorer, icon, show on desktop
Control Panel Display Desktop tab Customize Desktop General tab Internet Explorer
Internet Explorer, image placeholders (if pictures are disabled in web pages)
Control Panel Internet Options Advanced tag Multimedia Show imagedownload placeholders
Internet Explorer, Image Toolbar (enable/disable)
Control Panel Internet Options Advanced tag Multimedia Enable ImageToolbar
Internet Explorer, Java
See "Java"
Internet Explorer, Link underline
Control Panel Internet Options Advanced tag Browsing Underline links

Internet Explorer, list additional settings
System Information (winmsd.exe) Internet Settings Internet Explorer
Internet Explorer, Media Bar content
Control Panel Internet Options Advanced tag Multimedia Don't display onlinemedia content in the media bar
Internet Explorer, navigation keys
TweakUI Explorer Command Keys
Internet Explorer, plug-ins (enable/disable)
Control Panel Internet Options Advanced tag Browsing Enable third-partybrowser extensions
Internet Explorer, print background colors and images when printing web pages
Control Panel Internet Options Advanced tag Printings Print backgroundcolors and images
Internet Explorer, profile assistant (enable/disable)
Control Panel Internet Options Advanced tag Security Enable Profile Assistant
Internet Explorer, restrict certain sites
Control Panel Internet Options Content tab Content Advisor section
Internet Explorer, reuse folder windows when launching shortcuts
Control Panel Internet Options Advanced tag Browsing Reuse windows forlaunching shortcuts

Internet Explorer, save form data
Control Panel Internet Options Content tab AutoComplete
Internet Explorer, saved web pages, link to image folder
TweakUI Explorer Manipulate connected files as a unit
Internet Explorer, saved web pages, link to image folder
Control Panel Folder Options View tab Managing pairs of Web pages and folders
Internet Explorer, script debugging
Control Panel Internet Options Advanced tag Browsing Disable scriptdebugging
Internet Explorer, script error notification
Control Panel Internet Options Advanced tag Browsing Display a notificationabout every script error
Internet Explorer, search, choose prefixes
TweakUI Internet Explorer Search
Internet Explorer, search, from the Address Bar
Control Panel Internet Options Advanced tag Search from the Address bar
Internet Explorer, search, use classic
TweakUI Explorer Use Classic Search in Internet Explorer
Internet Explorer, show web page on desktop
Control Panel Display Desktop tab Customize Desktop Web tab

Internet Explorer, shrink large images to fit browser window
Control Panel Internet Options Advanced tag Multimedia Enable AutomaticImage Resizing
Internet Explorer, smooth scrolling
Control Panel Internet Options Advanced tag Browsing Use smooth scrolling
Internet Explorer, sounds (enable/disable)
Control Panel Internet Options Advanced tag Multimedia Play sounds in webpages
Internet Explorer, SSL settings
Control Panel Internet Options Advanced tag Security
Internet Explorer, status bar shows abbreviated link addresses
Control Panel Internet Options Advanced tag Browsing Show friendly URLs
Internet Explorer, toolbar background
TweakUI Internet Explorer
Internet Explorer, underline links
Control Panel Internet Options Advanced tag Browsing Underline links
Internet Explorer, use passive mode in FTP
Control Panel Internet Options Advanced tag Browsing Use Passive FTP
Internet Explorer, video clips (enable/disable)

Control Panel Internet Options Advanced tag Multimedia Play videos in webpages
Internet Explorer, view source, choose program
TweakUI Internet Explorer View Source
Internet Explorer, warning for redirected form submission
Control Panel Internet Options Advanced tag Security Warn if formssubmittal is being redirected
Internet Explorer, warnings, enable / disable
Control Panel Internet Options Security tab Custom Level
Internet icon, show in Start Menu (XP Start Menu only)
Control Panel Taskbar and Start Menu Start Menu tab Customize General tab Internet
Internet Shortcuts, use same folder window or Explorer window to open web page
Control Panel Internet Options Advanced tag Browsing Reuse windows forlaunching shortcuts
Java, compile applets before running using the JIT (Just In Time) compiler
Control Panel Internet Options Advanced tag Microsoft VM JIT compiler forvirtual machine enabled
Java, console
Control Panel Internet Options Advanced tag Microsoft VM Java consoleenabled
Java, logging

Control Panel Internet Options Advanced tag Microsoft VM Java loggingenabled
Java, security settings
Control Panel Internet Options Security tab Custom Level
Joystick settings
Control Panel Game Controllers
Keyboard shortcuts, hide until Alt key is pressed
Control Panel Display Appearance tab Effects Hide underlined letters forkeyboard navigation until I press the Alt key
Keyboard shortcuts, show in menus and windows
Control Panel Accessibility Options Keyboard tab Show extra keyboard help inprograms
Keyboard, choose international layout
Control Panel Regional and Language Options Language tab Details
Keyboard, enable alternative device
Control Panel Accessibility Options General tab Use Serial Keys
Keyboard, ignore brief or repeated keystrokes
Control Panel Accessibility Options Keyboard tab Use FilterKeys
Keyboard, specify type
Control Panel Keyboard Hardware tab Properties Driver tab UpdateDriver Install from a list of specific location Next Don't search Next

Keyboard, speed (repeat rate and delay)
Control Panel Keyboard Speed tab Character repeat section
Keyboard, Windows logo key combinations (enable/disable)
TweakUI Explorer Enable Windows+X hotkeys
Language settings in web pages
Control Panel Internet Options General tab Languages
Language, settings for non-Unicode applications
Control Panel Regional and Language Options Advanced tab Language for non-Unicode programs
Language, settings for text entry
Control Panel Regional and Language Options Language tab Details
Language, use more than one
Control Panel Regional and Language Options Language tab Details Settingstab Add
Listboxes, enable / disable animation
Control Panel System Advanced tab Performance section Settings VisualEffects tab Custom
Log off, show in Ctrl-Alt-Del window
Group Policy (gpedit.msc) User Configuration Administrative Templates System Ctrl+Alt+Del Options

Log off, show in Start Menu (Classic Start Menu only)
Control Panel Taskbar and Start Menu Start Menu tab Customize "AdvancedStart menu options" section Display Log Off
TweakUI Explorer Allow Logoff on Start Menu
Log on, automatic log on
TweakUI Logon
Log on, parse Autoexec.bat
TweakUI Logon
Log on, scripts policies
Group Policy (gpedit.msc) Computer Configuration Administrative Templates System Scripts
Group Policy (gpedit.msc) User Configuration Administrative Templates System Scripts
Log on, security policies
Group Policy (gpedit.msc) Computer Configuration Windows Settings SecuritySettings Local Policies Security Options
Group Policy (gpedit.msc) Computer Configuration Administrative Templates System Logon
Group Policy (gpedit.msc) User Configuration Administrative Templates System Logon
Log on, use Welcome screen
Control Panel User Accounts Change the way users log on or off Use the Welcomescreen
Magnifier, move with focus change in web pages
Control Panel Internet Options Advanced tag Accessibility Move system caret

with focus/selection changes
Mail Server, restrictions
Control Panel Network Connections right-click connection Properties Advanced tab Settings Services tab
Memory, priorities
Control Panel System Advanced tab Performance section Settings Advanced tab Memory usage section
Memory, show amount of memory installed on display adapter
Control Panel Display Settings tab Advanced Adapter tab AdapterInformation section
Memory, show amount of system memory installed
Control Panel System General tab
Memory, virtual memory
See "Virtual Memory"
Menus, animation (enable/disable)
Control Panel Display Appearance tab Effects Use the following transitioneffect for menus and tooltips
Control Panel System Advanced tab Performance section Settings VisualEffects tab Custom
TweakUI General Enable menu animation
Menus, fading (enable/disable)
TweakUI General Enable menu fading

Menus, fonts & colors
Control Panel Display Appearance tab Advanced Item list choose "Menu"
Menus, highlight color & font
Control Panel Display Appearance tab Advanced Item list choose"Selected Items"
Menus, shadows (enable/disable)
Control Panel Display Appearance tab Effects Show shadows under menus
Menus, size
Control Panel Display Appearance tab Advanced Item list choose "Menu"
Menus, speed
TweakUI Mouse
Menus, underlined keyboard shortcuts (show/hide)
Control Panel Display Appearance tab Effects Hide underlined letters forkeyboard navigation until I press the Alt key
Message boxes, font
Control Panel Display Appearance tab Advanced Item list choose"Message Box"
Message boxes, sound
Control Panel Sounds and Audio Devices Sounds tab
Message boxes, text color

Control Panel Display Appearance tab Advanced Item list choose"Window"
Modems, settings
Control Panel Phone and Modem Options Modems tab
Mouse, auto-raise windows
TweakUI Mouse X-Mouse
Mouse, control with keyboard
Control Panel Accessibility Options Mouse tab
Mouse, detect accidental double-clicks
TweakUI Explorer Detect accidental double-clicks
Mouse, double-click speed
Control Panel Mouse Buttons tab Double-click speed section
Mouse, double-click sensitivity
TweakUI Mouse
Mouse, drag-drop sensitivity
TweakUI Mouse
Mouse, drag without holding down buttons
Control Panel Mouse Buttons tab ClickLock section
Mouse, enable alternative device

Control Panel Accessibility Options General tab Use Serial Keys
Mouse, hide when typing
Control Panel Mouse Pointer Options tab Hide pointer while typing
Mouse, hot-tracking effects
TweakUI General Enable mouse hot tracking effects
Mouse, hot-tracking effects color
TweakUI Explorer Colors
Mouse, hover sensitivity
TweakUI Mouse Hover
Mouse, left-handed use
Control Panel Mouse Buttons tab Switch primary and secondary buttons
Mouse, move to default button when window is opened
Control Panel Mouse Pointer Options tab Automatically move pointer to thedefault button in a dialog box
Mouse, pointer
Control Panel Mouse Pointers tab
Mouse, precise control enhancement
Control Panel Mouse Pointer Options tab Enhance pointer precision
Mouse, sensitivity

TweakUI Mouse
Mouse, shadow
Control Panel Mouse Pointers tab Enable pointer shadow
TweakUI General Enable cursor shadow
Mouse, show location with animated circles when Ctrl is pressed
Control Panel Mouse Pointer Options tab Show location of pointer when I pressthe Ctrl key
Mouse, specify type
Control Panel Mouse Hardware tab Properties Driver tab Update Driver Install from a list of specific location Next Don't search Next
Mouse, speed
Control Panel Mouse Pointer Options tab Motion section
Mouse, switch left and right buttons
Control Panel Mouse Buttons tab Switch primary and secondary buttons
Mouse, trails
Control Panel Mouse Pointer Options tab Display pointer trails
Mouse, wheel, use for scrolling
TweakUI Mouse Wheel
My Computer, change icon
Control Panel Display Desktop tab Customize Desktop General tab select

icon Change Icon
My Computer, show Control Panel
Control Panel Folder Options View tab Show Control Panel in My Computer
My Computer, show first on desktop
TweakUI Desktop First Icon
My Computer, show icon on desktop
Control Panel Display Desktop tab Customize Desktop General tab MyComputer
My Computer, show in Start Menu (XP Start Menu only)
Control Panel Taskbar and Start Menu Start Menu tab Customize Advancedtab "Start menu items" section My Computer
My Documents, change icon
Control Panel Display Desktop tab Customize Desktop General tab selecticon Change Icon
My Documents, clear recently opened documents from Start Menu (Classic Start Menuonly)
Control Panel Taskbar and Start Menu Start Menu tab Customize Clear
My Documents, clear recently opened documents from Start Menu (XP Start Menu only)
Control Panel Taskbar and Start Menu Start Menu tab Customize Advancedtab Clear List
My Documents, folder location
TweakUI My Computer Special Folders

My Documents, show as menu in Start Menu (XP Start Menu only)
Control Panel Taskbar and Start Menu Start Menu tab Customize Advancedtab "Start menu items" section Expand My Documents
My Documents, show first on desktop
TweakUI Desktop First Icon
My Documents, show icon on desktop
Control Panel Display Desktop tab Customize Desktop General tab MyDocuments
My Documents, show in Start Menu (Classic Start Menu only)
Control Panel Taskbar and Start Menu Start Menu tab Customize "AdvancedStart menu options" section My Documents
My Documents, show recently opened on Start Menu (XP Start Menu only)
Control Panel Taskbar and Start Menu Start Menu tab Customize Advancedtab "Recent documents" section
My Music, repair folder
TweakUI Repair
My Music, show as menu Start Menu (XP Start Menu only)
Control Panel Taskbar and Start Menu Start Menu tab Customize Advancedtab "Start menu items" section My Music
My Network Places, history (enable/disable)
TweakUI Explorer Maintain network history

My Network Places, icon, change
Control Panel Display Desktop tab Customize Desktop General tab selecticon Change Icon
My Network Places, icon, show on desktop
Control Panel Display Desktop tab Customize Desktop General tab MyNetwork Places
My Network Places, show in Start Menu (XP Start Menu only)
Control Panel Taskbar and Start Menu Start Menu tab Customize Advancedtab "Start menu items" section My Network Places
My Network Places, View workgroup computers in common task pane (show/hide)
TweakUI Explorer Show "View workgroup computers" in Net Places
My Pictures, folder location
TweakUI My Computer Special Folders
My Pictures, repair folder
TweakUI Repair
My Pictures, show as menu in Start Menu (Classic Start Menu only)
Control Panel Taskbar and Start Menu Start Menu tab Customize "AdvancedStart menu options" section Expand My Pictures
My Pictures, show in Start Menu (Classic Start Menu only)
TweakUI Explorer Show My Pictures on classic Start Menu

My Pictures, show in Start Menu (XP Start Menu only)
Control Panel Taskbar and Start Menu Start Menu tab Customize Advancedtab "Start menu items" section My Pictures
My Videos, repair folder
TweakUI Repair
Navigation keys on special keyboards, customize
TweakUI Explorer Command Keys
NetMeeting, make the default for Internet Calls
Control Panel Internet Options Programs tab Internet Call
Network, add new connection
Control Panel Network Connections New Connection Wizard
Network, advanced adapter settings
Device Manager right-click adapter Properties Advanced tab
Network, Authentication
Control Panel Network Connections right-click connection Properties Authentication tab
Network, bindings
Control Panel Network Connections Advanced Advanced Settings Adaptersand Bindings tab
Control Panel Network Connections right-click connection Properties Generaltab turn on or off listed protocols and services

Network, bridge two connections
Control Panel Network Connections select two connections Advanced Network Bridge
Network, computer description
Control Panel System Computer Name tab
Network, computer name
Control Panel System Computer Name tab Change
Network, connect to shared printer
Control Panel Printers and Faxes Add Printer Next A network printer, or aprinter attached to another computer
Network, connection status
Control Panel Network Connections double-click connection General tab
Network, disconnect mapped network drive
Explorer Tools Disconnect Network Drive
Network, DNS settings
Control Panel Network Connections right-click connection Properties Generaltab Internet Protocol (TCP/IP) Properties Advanced DNS tab
Network, enable / disable
Control Panel Network Connections right-click connection Enable or Disable
Network, Firewall
See "Internet Connection Firewall"

Network, include in Files or Folders search
Control Panel Folder Options View tab Automatically search for network foldersand printers
Network, install a network protocol or service
Control Panel Network Connections right-click connection Properties Generaltab Install
Network, IP address and other connection information
Control Panel Network Connections double-click connection Support tab
Network, join a Windows NT domain
Control Panel System Computer Name tab Change
Network, map network drive
Explorer Tools Map Network Drive
Network, preliminary setup
Control Panel Network Connections Network Setup Wizard
Network, priorities
Control Panel Network Connections Advanced Advanced Settings ProviderOrder tab
Network, protocol, enable or disable for a connection
Control Panel Network Connections right-click connection Properties Generaltab check or uncheck entries in list

Network, security policies
Group Policy (gpedit.msc) Computer Configuration Windows Settings SecuritySettings Local Policies Security Options
Group Policy (gpedit.msc) Computer Configuration Administrative Templates Network
Group Policy (gpedit.msc) User Configuration Administrative Templates Network
Network, set IP address
Control Panel Network Connections right-click connection Properties Generaltab Internet Protocol (TCP/IP) Properties Use the following IP address
Network, set multiple IP addresses
Control Panel Network Connections right-click connection Properties Generaltab Internet Protocol (TCP/IP) Properties Advanced IP Settings tab
Network, share printer
Control Panel Printers and Faxes right-click printer Sharing Shared as
Network, show icon in taskbar notification areawhen connected
Control Panel Network Connections right-click connection Properties Generaltab Show icon in notification area when connected
Network, SNMP components (install / uninstall)
Control Panel Network Connections Advanced Optional Networking Components Management and Monitoring Tools
Network, TCP/IP filtering
Control Panel Network Connections right-click connection Properties Generaltab Internet Protocol (TCP/IP) Properties Advanced Options tab TCP/IPfiltering Properties

Network, TCP/IP settings
Control Panel Network Connections right-click connection Properties Generaltab Internet Protocol (TCP/IP) Properties
Network, uninstall a protocol or service
Control Panel Network Connections right-click connection Properties Generaltab Uninstall
Network, WINS settings
Control Panel Network Connections right-click connection Properties Generaltab Internet Protocol (TCP/IP) Properties Advanced WINS tab
Network Connections, automatically dial
Control Panel Internet Options Connection tab
Network Connections, security policies
Group Policy (gpedit.msc) User Configuration Administrative Templates Network Network Connections
Network Connections, show as menu in Start Menu (Classic Start Menu only)
Control Panel Taskbar and Start Menu Start Menu tab Customize "AdvancedStart menu options" section Expand Network Connections
Network Connections, show in Start Menu (Classic Start Menu only)
TweakUI Explorer Show Network Connections on classic Start Menu
Network Connections, show in Start Menu (XP Start Menu only)
Control Panel Taskbar and Start Menu Start Menu tab Customize Advancedtab "Start menu items" section Network Connections

Newsgroup reader, default
Control Panel Internet Options Programs tab Newsgroups
Notification Area
See "Taskbar Notification Area"
Numbers, customize display
Control Panel Regional and Language Options Regional Options tab Customize Numbers tab
ODBC data sources, restrict access
Control Panel Internet Options Security tab Custom Level
Offline Files, action to take when network connection is lost
Control Panel Folder Options Offline Files tab Advanced
Offline Files, automatic synchronization
Explorer Tools Synchronize Setup Logon/Lofoff tab Automaticallysynchronize the selected items...
Offline Files, automatic synchronization on idle
Explorer Tools Synchronize Setup On Idle tab Advanced
Offline Files, compatibility with computers running on batteries
Explorer Tools Synchronize Setup On Idle tab Advanced Preventsynchronization when my computer is running on battery power
Offline Files, enable scheduling of desktop web page updates
Control Panel Internet Options Advanced tag Browsing Enable offline items to

be synchronized on a schedule
Offline Files, security policies
Group Policy (gpedit.msc) User Configuration Administrative Templates Network Offline Files
Offline Files, settings
Control Panel Folder Options Offline Files tab
Explorer Tools Synchronize Setup
Offline Files, synchronize
Explorer Tools Synchronize
Outlook Express, make the default
Control Panel Internet Options Programs tab E-mail or Newsgroups
Outlook Express, repair unread mail count
TweakUI Repair
Parental Control of web sites
Control Panel Internet Options Content tab Content Advisor section
Passwords, automatic logon
Control Panel Internet Options Security tab Custom Level UserAuthentication
Passwords, change
Control Panel User Accounts select an account Change my password

Passwords, expiration
Group Policy (gpedit.msc) Computer Configuration Windows Settings SecuritySettings Account Policies Password Policy
Passwords, prevent forgotten passwords
Control Panel User Accounts select an account Related Tasks section Preventa forgotten password
Passwords, require for exiting screensaver
Control Panel Display Screen Saver tab On resume, password protect
Passwords, require for resuming from standby mode
Control Panel Power Options Advanced tab Prompt for password when computerresumes from standby
Passwords, saving in web pages
Control Panel Internet Options Content tab AutoComplete
Passwords, security policies
Group Policy (gpedit.msc) Computer Configuration Windows Settings SecuritySettings Account Policies Password Policy
Passwords, show "Change Password" in Ctrl-Alt-Del window
Group Policy (gpedit.msc) User Configuration Administrative Templates System Ctrl+Alt+Del Options
Path, show full path in folder windows
Control Panel Folder Options View tab Display the full path in the title bar /Display the full path in the address bar

Personalized menus, Favorites
Control Panel Internet Options Advanced tag Browsing Enable PersonalizedFavorites Menu
Pictures
See "Images"
Places bar, customize
TweakUI Common Dialogs
Pointer
See "Mouse"
Pop-up help windows
See "Tooltips"
Power Management
See "Advanced Power Management"
Print Server settings
Control Panel Printers and Faxes File Server Properties
Printers, advanced settings
Group Policy (gpedit.msc) Computer Configuration Administrative Templates Printers
Group Policy (gpedit.msc) User Configuration Administrative Templates Printers

Printers, cancel printing of all documents
Control Panel Printers and Faxes right-click printer Cancel All Documents
Printers, cancel printing of one document
Control Panel Printers and Faxes double-click printer right-click document Cancel
Printers, change settings for a single application
Open application File Print or Printer Setup
Printers, change settings for all applications
Control Panel Printers and Faxes right-click printer Properties
Printers, connect to a printer on your network
Control Panel Printers and Faxes Add Printer Next A network printer, or aprinter attached to another computer
Printers, install
Control Panel Printers and Faxes Add Printer
Printers, pause printing
Control Panel Printers and Faxes right-click printer Pause Printing
Printers, print background colors and images when printing web pages
Control Panel Internet Options Advanced tag Printings Print backgroundcolors and images
Printers, set default printer
Control Panel Printers and Faxes right-click printer Set as Default Printer

Printers, share with other computers on network
Control Panel Printers and Faxes right-click printer Sharing Shared as
Printers, show as menu in Start Menu (Classic Start Menu only)
Control Panel Taskbar and Start Menu Start Menu tab Customize "AdvancedStart menu options" section Expand Printers
Printers, show in Start Menu (XP Start Menu only)
Control Panel Taskbar and Start Menu Start Menu tab Customize Advancedtab "Start menu items" section Printers and Faxes
Printers, uninstall
Control Panel Printers and Faxes right-click printer Delete
Printers, view status
Control Panel Printers and Faxes double-click printer
Processor, priorities
Control Panel System Advanced tab Performance section Settings Advanced tab Processor scheduling section
Processor, show details
Control Panel System General tab
Profile Assistant, enable / disable
Control Panel Internet Options Advanced tag Security Enable Profile Assistant

Proxy settings
Control Panel Internet Options Connection tab LAN Settings
Quick Launch toolbar, show on Taskbar
Control Panel Taskbar and Start Menu Taskbar tab Show Quick Launch
Right-click on taskbar Toolbars Quick Launch
Recent Documents
See "Documents"
Recycle Bin, desktop icon
Control Panel Display Desktop tab Customize Desktop
Registered User, view
Control Panel System General tab
Registry Editor, repair
TweakUI Repair
Remote Assistance, allow invitations to be sent
Control Panel System Remote tab Remote Assistance tab
Remote Desktop, enable incoming connections
Control Panel System Remote tab Remote Desktop tab
Report crashes to Microsoft
Control Panel System Advanced tab Error Reporting

Run, show in Start Menu (Classic Start Menu only)
Control Panel Taskbar and Start Menu Start Menu tab Customize "AdvancedStart menu options" section Display Run
Run, show in Start Menu (XP Start Menu only)
Control Panel Taskbar and Start Menu Start Menu tab Customize Advancedtab "Start menu items" section Run Command
Scheduled Tasks, add a task
Control Panel Scheduled Tasks Add Scheduled Task
Scheduled Tasks, choose user for a single task
Control Panel Scheduled Tasks right-click task Properties Task tab Runas
Scheduled Tasks, choose user for AT service
Control Panel Scheduled Tasks Advanced AT Service Account
Scheduled Tasks, compatibility with computers running on batteries
Control Panel Scheduled Tasks right-click task Properties Settings tab Power Management section
Scheduled Tasks, delete a task
Control Panel Scheduled Tasks right-click task Delete
Scheduled Tasks, delete completed tasks automatically
Control Panel Scheduled Tasks right-click task Properties Settings tab Delete the task if it is not scheduled to run again

Scheduled Tasks, enable / disable
Control Panel Scheduled Tasks Advanced Stop Using Task Scheduler or StartUsing Task Scheduler
Scheduled Tasks, enable / disable a single task
Control Panel Scheduled Tasks right-click task Properties Task tab Enabled
Scheduled Tasks, log
Control Panel Scheduled Tasks Advanced View Log
Scheduled Tasks, missed task notification
Control Panel Scheduled Tasks Advanced Notify Me of Missed Tasks
Scheduled Tasks, pause
Control Panel Scheduled Tasks Advanced Pause Task Scheduler
Scheduled Tasks, perform only if computer is idle
Control Panel Scheduled Tasks right-click task Properties Settings tab Idle Time section
Scheduled Tasks, repeat settings for a single task
Control Panel Scheduled Tasks right-click task Properties Schedule tab Advanced
Scheduled Tasks, schedule settings for a single task
Control Panel Scheduled Tasks right-click task Properties Schedule tab
Scheduled Tasks, security policies

Group Policy (gpedit.msc) Computer Configuration Administrative Templates Windows Components Task Scheduler
Group Policy (gpedit.msc) User Configuration Administrative Templates WindowsComponents Task Scheduler
Scheduled Tasks, stop hung tasks
Control Panel Scheduled Tasks right-click task Properties Settings tab Stop the task if it runs for...
Screen
See "Display"
Screensaver settings
Control Panel Display Screen Saver tab
Scrollbars, color
Control Panel Display Appearance tab Advanced Item list choose "3dObjects"
Scrollbars, size
Control Panel Display Appearance tab Advanced Item list choose"Scrollbar"
Search, Address Bar
Control Panel Internet Options Advanced tag Search from the Address bar
Search, classic search in Explorer
TweakUI Explorer Use Classic Search in Explorer
Search, customize navigation key

TweakUI Explorer Command Keys
Search, include network folders and printers
Control Panel Folder Options View tab Automatically search for network foldersand printers
Send To, folder location
TweakUI My Computer Special Folders
Services, allow only essential services
Control Panel Advanced tab Performance Settings Data Execution Preventiontab
Setup, location of setup files
TweakUI My Computer Special Folders Installation Path
Shared folders, include in searches
Control Panel Folder Options View tab Automatically search for network foldersand printers
Shared folders, make accessible to all users
Control Panel Folder Options View tab Use simple file sharing
(Turn this off to further restrict access to shared resources.)
Shift Key, make it "sticky"
Control Panel Accessibility Options Keyboard tab Use StickyKeys
Shortcuts, overlay icon

TweakUI Explorer Shortcut
Shortcuts, show "Shortcut to" prefix
TweakUI Explorer Prefix "Shortcut to" on new shortcuts
Single-click required to open icons
Control Panel Folder Options General tab Single-click to open an item
Software, install or uninstall
Control Panel Add or Remove Programs
Software, install or uninstall (network components)
Control Panel Network Connections Advanced Optional Networking Components
Software, installation security policies
Group Policy (gpedit.msc) Computer Configuration Administrative Templates Windows Components Windows Installer
Group Policy (gpedit.msc) User Configuration Administrative Templates WindowsComponents Windows Installer
Sounds, beep on errors
TweakUI General Beep on errors
Sounds, default audio devices for playback, recording, and MIDI
Control Panel Sounds and Audio Devices Audio tab
Sounds, disable unwanted audio devices
Control Panel Sounds and Audio Devices Audio tab Use only default devices

Sounds, events that trigger sounds
Control Panel Sounds and Audio Devices Sounds tab
Sounds, list devices
Control Panel Sounds and Audio Devices Hardware tab
Sounds, mute all
Control Panel Sounds and Audio Devices Volume tab Mute
Sounds, navigation keys on special keyboards
TweakUI Explorer Command Keys
Sounds, play in web pages
Control Panel Internet Options Advanced tag Multimedia Play sounds in webpages
Sounds, play sounds when Caps Lock, Num Lock, or Scroll Lock is pressed
Control Panel Accessibility Options Keyboard tab Use ToggleKeys
Sounds, show visual notification
Control Panel Accessibility Options Sound tab
Sounds, speaker, enable/disable PC speaker
TweakUI General Beep on errors
Sounds, speaker orientation
Control Panel Sounds and Audio Devices Volume tab Speaker settings section

Advanced Speakers tab
Sounds, speaker troubleshooting
Control Panel Sounds and Audio Devices Volume tab Speaker settings section Advanced Performance tab
Sounds, speaker volume
Control Panel Sounds and Audio Devices Volume tab Speaker settings section Speaker Volume
Sounds, surround-sound setup
Control Panel Sounds and Audio Devices Volume tab Speaker settings section Advanced Speakers tab
Sounds, volume
Control Panel Sounds and Audio Devices Volume tab
Sounds, volume from keyboard
TweakUI Explorer Command Keys
Speech, recording voice
See "Voice"
Speech, select preferred audio device
Control Panel Speech Text to Speech tab Audio Output
Speech, speed
Control Panel Speech Text to Speech tab Voice speed section

Speech, voice selection
Control Panel Speech Text to Speech tab Voice selection section
Speech, volume
Volume Control (sndvol32.exe) adjust master or "Wave" controls
Start Menu, button look and feel
Control Panel Display Appearance tab Windows and buttons list
Start Menu, clear list of recently opened applications
Control Panel Taskbar and Start Menu Start Menu tab Customize General tab Clear List
Start Menu, enable dragging and dropping (Classic Start Menu only)
Control Panel Taskbar and Start Menu Start Menu tab Customize "AdvancedStart menu options" section Enable Dragging and Dropping
Start Menu, enable dragging and dropping (XP Start Menu only)
Control Panel Taskbar and Start Menu Start Menu tab Customize Advancedtab "Start menu items" section Enable Dragging and Dropping
Start Menu, folder location
TweakUI My Computer Special Folders
Start Menu, Frequently Used Programs, ban items from list
TweakUI Taskbar XP Start Menu
Start Menu, hide infrequently accessed applications (Classic Start Menu only)
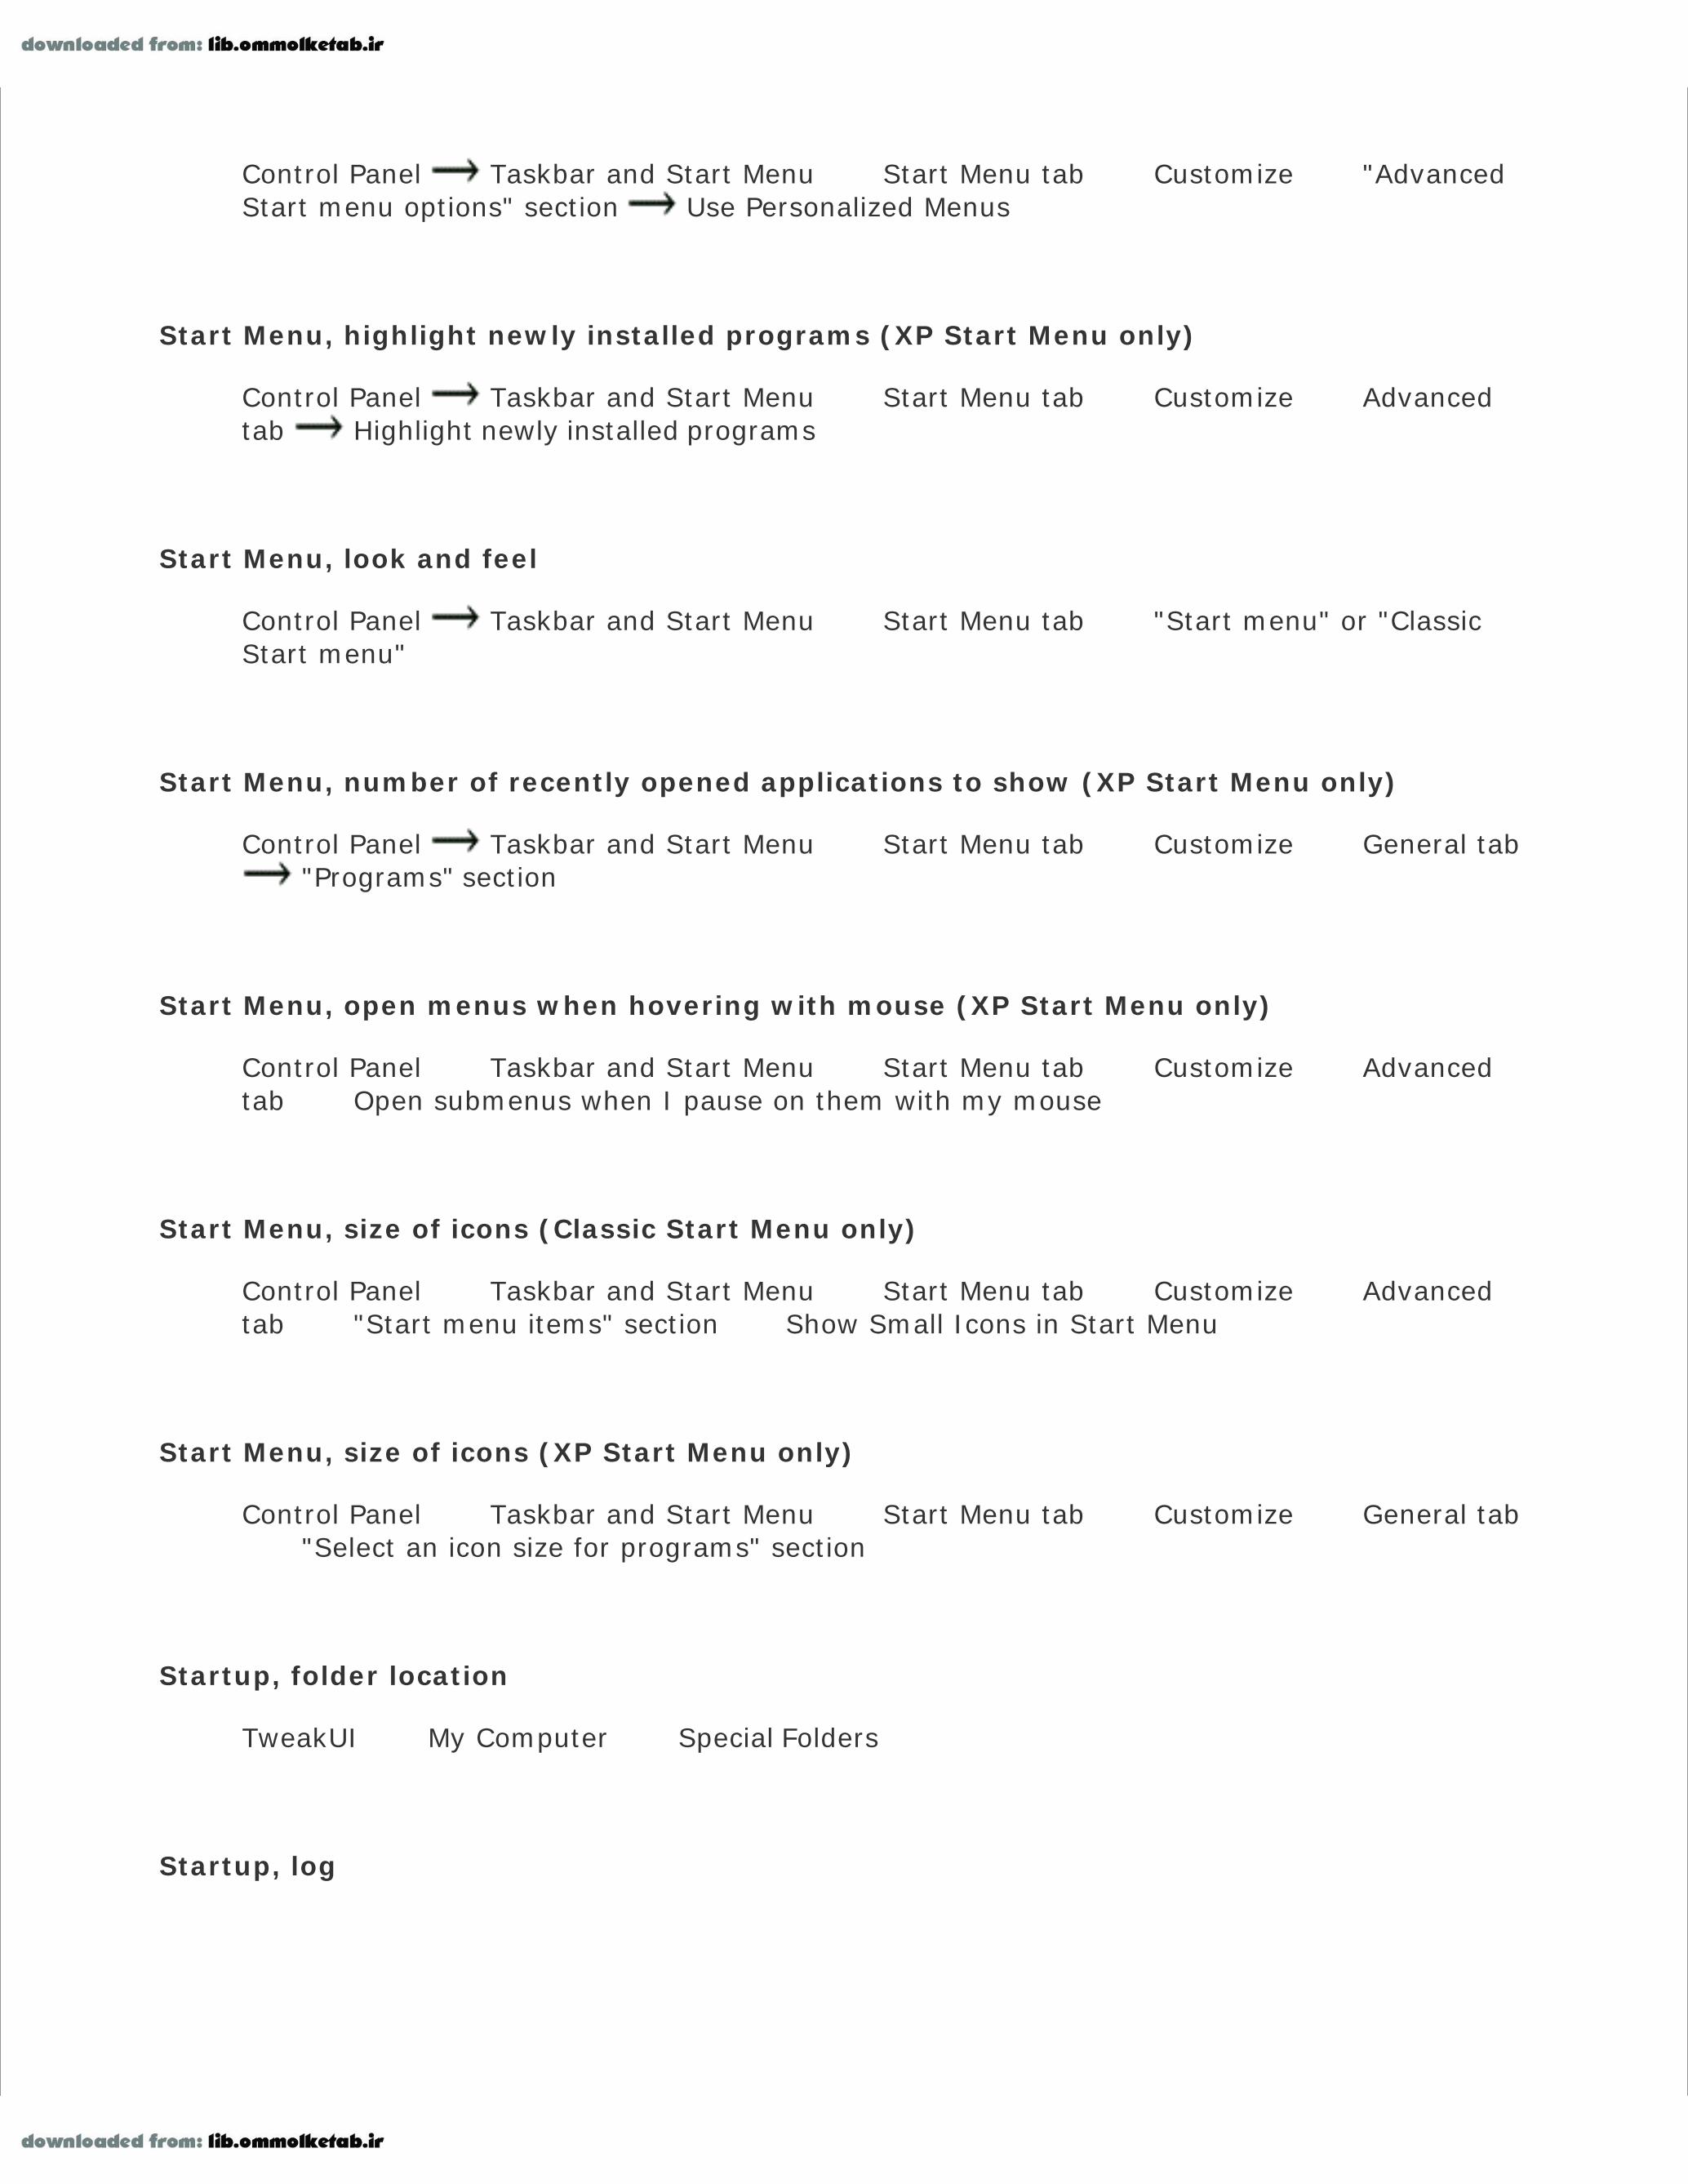
Control Panel Taskbar and Start Menu Start Menu tab Customize "AdvancedStart menu options" section Use Personalized Menus
Start Menu, highlight newly installed programs (XP Start Menu only)
Control Panel Taskbar and Start Menu Start Menu tab Customize Advancedtab Highlight newly installed programs
Start Menu, look and feel
Control Panel Taskbar and Start Menu Start Menu tab "Start menu" or "ClassicStart menu"
Start Menu, number of recently opened applications to show (XP Start Menu only)
Control Panel Taskbar and Start Menu Start Menu tab Customize General tab "Programs" section
Start Menu, open menus when hovering with mouse (XP Start Menu only)
Control Panel Taskbar and Start Menu Start Menu tab Customize Advancedtab Open submenus when I pause on them with my mouse
Start Menu, size of icons (Classic Start Menu only)
Control Panel Taskbar and Start Menu Start Menu tab Customize Advancedtab "Start menu items" section Show Small Icons in Start Menu
Start Menu, size of icons (XP Start Menu only)
Control Panel Taskbar and Start Menu Start Menu tab Customize General tab "Select an icon size for programs" section
Startup, folder location
TweakUI My Computer Special Folders
Startup, log

Control Panel System Advanced tab Startup and Recovery section Settings System failure section
Startup, multiboot menu settings
Control Panel System Advanced tab Startup and Recovery section Settings System startup section
Startup, sound
See "Sounds"
Status Bar, show in Explorer
Explorer View Status Bar
Style sheets, impose a single style sheet for all web pages
Control Panel Internet Options General tab Accessibility Format documentsusing my style sheet
Style, apply to controls in web pages
Control Panel Internet Options Advanced tag Browsing Enable visual styleson buttons and controls in web pages
Style, enable / disable all styles
Control Panel System Advanced tab Performance section Settings VisualEffects tab Custom
Style, visual style of windows and buttons
Control Panel Display Appearance tab Windows and buttons list
Swapfile, size and location

See "Virtual Memory"
Synchronize
See "Offline Files"
System Restore, disk space usage
Control Panel System System Restore tab Disk space usage section
System Restore, enable / disable
Control Panel System System Restore tab Turn off System Restore
System Restore, policies
Group Policy (gpedit.msc) Computer Configuration Administrative Templates System System Restore
System Restore, status
Control Panel System System Restore tab Status section
Task, show extra task pane in folder windows
Control Panel Folder Options General tab Tasks section
Task Manager, show in Ctrl-Alt-Del window
Group Policy (gpedit.msc) User Configuration Administrative Templates System Ctrl+Alt+Del Options
Task Scheduler
See "Scheduled Tasks"

Taskbar, flash buttons
TweakUI General Focus
Taskbar, group buttons by application
Control Panel Taskbar and Start Menu Taskbar tab Group similar taskbar buttons
Taskbar, group buttons by application (customize)
TweakUI Taskbar Grouping
Taskbar, hide when not in use
Control Panel Taskbar and Start Menu Taskbar tab Auto-hide the taskbar
Taskbar, keep on top of other windows
Control Panel Taskbar and Start Menu Taskbar tab Keep the taskbar on top ofother windows
Taskbar, move to a different screen location
Click on an empty portion of the taskbar and drag
Taskbar, prevent moving and resizing
Control Panel Taskbar and Start Menu Taskbar tab Lock the taskbar
Right-click on taskbar Toolbars Lock the taskbar
Taskbar, resize
Drag the border of the taskbar to make it larger or smaller
Taskbar, sliding button animation (enable/disable)
Control Panel System Advanced tab Performance section Settings Visual

Effects tab Custom
Taskbar, style
Control Panel Display Appearance tab Windows and buttons list
Taskbar Notification Area, hide infrequently accessed applications
Control Panel Taskbar and Start Menu Taskbar tab Hide inactive icons
Taskbar Notification Area, network icon
Control Panel Network Connections right-click connection Properties Generaltab Show icon in notification area when connected
Taskbar Notification Area, power icon
Control Panel Power Options Advanced tab Always show icon on the taskbar
Taskbar Notification Area, volume control (yellow speaker)
Control Panel Sounds and Audio Devices Volume tab Place volume icon in thetaskbar
Telephony settings
Control Panel Phone and Modem Options Advanced tab
Telnet Server, restrictions
Control Panel Network Connections right-click connection Properties Advanced tab Settings Services tab
Temporary Internet Files, clear automatically when browser is closed
Control Panel Internet Options Advanced tag Security Empty TemporaryInternet Files folder when browser is closed

Temporary Internet Files, policy regarding encrypted pages
Control Panel Internet Options Advanced tag Security Do not save encryptedpages to disk
Temporary Internet Files, settings
Control Panel Internet Options General tab Temporary Internet Files section Settings
Terminal Server, disable compositing effects in Internet Explorer
Control Panel Internet Options Advanced tag Browsing Force offscreencompositing even under Terminal Server
Terminal Server, security policies
Group Policy (gpedit.msc) Computer Configuration Administrative Templates Windows Components Terminal Services
Group Policy (gpedit.msc) User Configuration Administrative Templates WindowsComponents Terminal Services
Text Cursor, blink rate
Control Panel Keyboard Speed tab Cursor blink rate
Text Cursor, blink rate & size
Control Panel Accessibility Options Display tab Cursor Options section
Text Cursor, change mouse "I-beam" cursor
Control Panel Mouse Pointers tab choose "Text Select" from "Customize" list
Themes
Control Panel Display Themes tab

Thumbnails, cache (enable/disable)
Control Panel Folder Options View tab Do not cache thumbnails
Thumbnails, image quality
TweakUI Explorer Thumbnails
Thumbnails, show in Explorer
Explorer View Thumbnails
Thumbnails, size
TweakUI Explorer Thumbnails
Time, customize display
Control Panel Regional and Language Options Regional Options tab Customize Time tab
Time, set
Control Panel Date and Time Date & Time tab
Time, synchronize with Internet time server automatically
Control Panel Date and Time Internet Time tab
Time, time service policies
Group Policy (gpedit.msc) Computer Configuration Administrative Templates System Windows Time Service
Time, time zone

Control Panel Date and Time Time Zone tab
Titlebar, font, color, and size
Control Panel Display Appearance tab Advanced Item list choose "ActiveTitle Bar" or "Inactive Title Bar"
Titlebar, size only
Control Panel Display Appearance tab Advanced Item list choose"Caption Buttons"
Toolbar, size and font for floating toolbar captions
Control Panel Display Appearance tab Advanced Item list choose "PaletteTitle"
Tooltips, animation
Control Panel Display Appearance tab Effects Use the following transitioneffect for menus and tooltips
TweakUI General Enable tooltip animation
Tooltips, animation (enable/disable)
Control Panel System Advanced tab Performance section Settings VisualEffects tab Custom
Tooltips, enable / disable (desktop, taskbar, and Explorer only)
Control Panel Folder Options View tab Show pop-up description for folder anddesktop items
Tooltips, fade (enable/disable)
TweakUI General Enable tooltip fade

Tooltips, font & color
Control Panel Display Appearance tab Advanced Item list choose"ToolTip"
Tooltips, big "balloon" tooltips that pop up from taskbar notification area
See "Balloon tips"
Transition effects, enable / disable
Control Panel Display Appearance tab Effects Use the following transitioneffect for menus and tooltips
Tray
See "Taskbar Notification Area"
Uninstall Hardware
Control Panel Add Hardware
Uninstall Software
Control Panel Add or Remove Programs
Uninterruptible Power Supply (UPS) settings
Control Panel Power Options UPS tab
User names in web pages, saving
Control Panel Internet Options Content tab AutoComplete
Users, add new user account
Control Panel User Accounts Create a new account

Users, allow fast switching between users
Control Panel User Accounts Change the way users log on or off Use Fast UserSwitching
Users, multiple profiles for each user account
Control Panel System Advanced tab User Profiles section Settings
Users, passwords
See "Passwords"
Users, registered user
See "Registered User"
Users, security policies
Group Policy (gpedit.msc) Computer Configuration Windows Settings SecuritySettings Local Policies User Rights Assignment
Group Policy (gpedit.msc) Computer Configuration Administrative Templates System User Profiles
Group Policy (gpedit.msc) User Configuration Administrative Templates System User Profiles
Users, security policies for groups
Group Policy (gpedit.msc) Computer Configuration Administrative Templates System Group Policy
Group Policy (gpedit.msc) User Configuration Administrative Templates System Group Policy
Video, play in web pages
Control Panel Internet Options Advanced tag Multimedia Play videos in webpages

Virtual memory, settings
Control Panel System Advanced tab Performance section Settings Advanced tab Change
Voice, calibrate volume settings
Control Panel Sounds and Audio Devices Voice tab Test hardware
Voice, playback and recording volume
Control Panel Sounds and Audio Devices Voice tab
Voice, speech synthesis
See "Speech"
Volume
See "Sounds"
Wallpaper
See "Background"
Warnings in web pages, enable / disable
Control Panel Internet Options Security tab Custom Level
Web pages
See "Internet Explorer"
Web pages, set default browser

Control Panel Internet Options Programs tab Internet Explorer should check tosee whether it is the default browser
Web pages, set default editor
Control Panel Internet Options Programs tab HTML Editor
Web Server, restrictions
Control Panel Network Connections right-click connection Properties Advanced tab Settings Services tab
Welcome screen, enable / disable
Control Panel User Accounts Change the way users log on or off Use the Welcomescreen
Windows, background of MDI (multiple document interface) windows
Control Panel Display Appearance tab Advanced Item list choose"Application Background"
Windows, background of non-MDI windows
Control Panel Display Appearance tab Advanced Item list choose"Window"
Windows, cascade all open application windows
Right-click on taskbar Cascade Windows
Windows, closing crashed applications
Task Manager (taskmgr.exe) Applications tab
Windows, closing hidden applications
Task Manager (taskmgr.exe) Processes tab

Windows, color of borders
Control Panel Display Appearance tab Advanced Item list choose "3dObjects"
Windows, minimize all open application windows
Windows Logo Key + D
Windows, minimize/maximize animation
TweakUI General Enable window animation
Windows, show outline or full window when dragging
Control Panel Display Appearance tab Effects Show window contents whiledragging
Windows, tile all open application windows
Right-click on taskbar Tile Windows Horizontally or Tile Windows Vertically
Windows, titlebar font, color, and size
Control Panel Display Appearance tab Advanced Item list choose "ActiveTitle Bar" or "Inactive Title Bar"
Windows Explorer, access digital-camera memory as a drive (still camera only)
Control Panel Scanners and Cameras Add Device
Windows Explorer, additional security policies
Group Policy (gpedit.msc) User Configuration Administrative Templates WindowsComponents Windows Explorer

Windows Explorer, columns in details view
Explorer View Details View Choose Details
Windows Explorer, group similar items
Explorer View Arrange Icons by Show in Groups
Windows Explorer, refresh view
Explorer View Refresh or press F5
Windows Explorer, reuse window when launching Internet shortcuts
Control Panel Internet Options Advanced tag Browsing Reuse windows forlaunching shortcuts
Windows Explorer, search
See "Search"
Windows Explorer, show lines in tree view (Folders Explorer bar)
Control Panel Folder Options View tab Display simple folder view in Explorer'sFolders list
Windows Explorer, show Status Bar
Explorer View Status Bar
Windows Explorer, toolbar, background
TweakUI Internet Explorer
Windows Explorer, toolbar, customize
Explorer View Toolbars Customize

Windows Explorer, toolbar, icon size
Explorer View Toolbars Customize Icon options
Windows Explorer, toolbar, prevent being moved
Explorer View Toolbars Lock the Toolbars
Windows Explorer, toolbar, text captions
Explorer View Toolbars Customize Text options
Windows File Protection, advanced settings
Group Policy (gpedit.msc) Computer Configuration Administrative Templates System Windows File Protection
Windows Firewall, allow Internet server services
Control Panel Windows Firewall Advanced tab Network Connection Settings select connection Settings
Windows Firewall, allow programs to run
Control Panel Windows Firewall Exceptions tab
Windows Firewall, enable / disable
Control Panel Windows Firewall
Control Panel Network Connections right-click connection Properties Advanced tab Settings
Windows Firewall, Internet Control Message Protocol (ICMP)
See "Internet Control Message Protocol (ICMP)"

Windows Firewall, logging
Control Panel Windows Firewall Advanced tab Security Logging Settings
Windows Media Player, change as default for CDs
TweakUI My Computer AutoPlay
Windows Registered User information
Control Panel System General tab
Windows Update
Internet Explorer Tools Windows Update
Windows Update, automatic updating
Control Panel System Automatic Updates tab
Windows version
Control Panel System General tab
Windows XP Style for screen elements
Control Panel Display Appearance tab Windows and buttons listbox

Appendix B. BIOS SettingsThe BIOS, or Basic Input-Output System, is the program (stored in a chip on your motherboard)responsible for booting your computer and starting your operating system. It also handles the flow ofdata between the operating system and your peripherals (keyboard, mouse, hard disk controller,video adapter, etc.). Your BIOS has a special "setup" screen that allows you to customize its settingsto enable or disable motherboard features, improve performance, and, sometimes, fix problems.
The BIOS setup is usually accessed by pressing a keysuch as Del, F2, orEscimmediately after powering on your system and before the initial beep. Thescreen that appears before the Windows logo typically identifies the key youneed to press to enter setup; consult your computer's manual if you needfurther help.
The settings available in a computer's BIOS setup screen will vary significantly from one system toanother, but there are some settings that are common among them all. The problem is thatmotherboard and computer manufacturers are notorious for poorly documenting BIOS settings, so itcan be difficult to determine what the settings mean, let alone how they should be set.
Here are some tips for working with BIOS settings and the descriptions in this appendix:
If you're trying to fix a problem, don't change more than one BIOS setting at a time. Although itmay take longer, it means you can determine which setting is responsible for fixing the problem(or causing a new one).
The BIOS is typically stored on a "flash" chip, which means it can be updated with newerversions. Check with your motherboard manufacturer to see if a newer BIOS is available foryour system. In most cases, BIOS updates only fix bugs, but they occasionally can improveperformance or add support for new hardware. If you're unable to install Windows XP (or itssuccessor) on your system, an outdated BIOS may be to blame.
Flashing (updating) a BIOS is a risky procedure. If something goes wrong(i.e., if the power goes out, or the BIOS turns out to be corrupted or thewrong version), your computer will probably not boot. Most motherboardmanufacturers provide a BIOS recovery method, typically involving afloppy diskette and a special keystroke combination, but if the computerwon't boot, you won't be able to look up the solution on the Web after thefact. For this reason, you'll want to make sure you've familiarized yourselfwith the procedure before you attempt to update your BIOS.
Keep in mind that the names of BIOS settings listed here may vary, and one appendix can't

possibly accommodate them all. For example, a setting named Event Log on one system mightbe called System Event Log on another. If you can't find a particular setting, try lookingthrough the list for variations.
One of the problems with the BIOS setup screen is that you can't access it from withinWindows, which means you can't look up settings on the Web, you can't take screenshots, andyou can't take notes without using a pen and paper. However, a digital camera can be veryhandy in this situation; just take one or more photos of your screen (with the flash turned off,of course) to quickly record all your BIOS settings.
Table B-1 lists many common BIOS settings, along with brief explanations and some tips. For moreextensive BIOS setting information and advice, check out the "The Definitive BIOS OptimizationGuide" at http://www.rojakpot.com/bog.aspx.
Table B-1. Common BIOS settings and what they do
Setting Description
AC Power RecoveryDetermines whether or not the computer turns on automatically whenpower is applied (such as recovering from a power loss or using anexternal power switch).
ACPI Aware O/S See "Power Management."
AddOn ROM DisplayMode
Choose whether the startup screen is handled by the primary BIOS or asecondary "add-on" BIOS. In most cases, you'll want to disable thisoption.
Address RangeShadowing
Various hardware address ranges can be "shadowed," which means thatpieces of faster system RAM are substituted for them. In most cases, thisis not a good idea, so it is recommended that shadowing be disabled forall address ranges.
AGP 2X/4X ModeThe AGP 2X and 4X modes double and quadruple the bandwidth to yourAGP video card, respectively, but can only be used if your video cardsupports 2X or 4X.
AGP Aperture/DeviceAddress Space Size
This sets the amount of system memory used to store textures for 3Dgraphics. The more video memory you have, the lower this settingshould be. Many video problems are caused by this value being set toohigh. Try a value of 32MB.
Anti-Virus ProtectionActively scans your hard disk for boot sector viruses. Despite theapparent usefulness of a feature like this, you should always disable it, asit typically interferes with Windows and causes all sorts of problems.
APM Enable See "Power Management."
Assign IRQ For USB See "Legacy USB Support."
Assign IRQ For VGAThis should be enabled only if your video card does not need its own IRQand you need an extra IRQ for another device.

Setting Description
Auto Power On See "AC Power Recovery."
Boot DevicePriority/Boot Sequence
Specifies the order in which your computer looks through the variousdrives in your system for a drive with a bootable operating system. Forexample, if your CD drive has a higher boot priority than your hard drive,then your computer will look for a bootable CD in your CD drive before itattempts to boot off the hard disk. If the CD drive has a lower bootpriority, and Windows is installed on your hard disk, your computer willignore bootable CDs.
Boot Other DeviceIf an operating system isn't found on the first boot drive (see "BootDevice Priority/Boot Sequence") and this setting is enabled, yourcomputer will attempt to boot off of other drives.
Boot Sector VirusProtection
See "Anti-Virus Protection."
Boot to OS/2Changes how memory above 64 MB is handled for compatibility withIBM's defunct OS/2 operating system. For obvious reasons, this optionshould be disabled.
Bootup CPU SpeedThis is a remnant of the "turbo" button found on old 486 computers,allowing you to slow down the machine for old games. There's littlereason you'd want any setting other than Fast here.
Bootup Numlock Status See "Numlock State."
C000/C400/C800/CC0016k Shadow
See "Address Range Shadowing."
Chassis FanThis shows the RPM of the fan connected to the "Chassis Fan" connectoron your motherboard. This is typically a read-only setting.
CPU CurrentTemperature
This shows the measured temperature of your processor. For dual-processor systems, you'll see two such settings. This is typically a read-only setting.
CPU FanThis shows the RPM of the fan connected to the "CPU Fan" connector onyour motherboard. For dual-processor systems, you'll see two suchsettings. This is typically a read-only setting.
CPU Level 1 Cache/Level2 Cache
These settings allow you to disable your processor's primary (level 1)and secondary (level 2) cache, respectively. These settings should alwaysbe enabled.
CPU to PCI Write BufferEnables or disables the buffer used for data sent to the PCI bus by theprocessor. This should be enabled.
D000/D400/D800/DC0016k Shadow
See "Address Range Shadowing."
Delayed Transaction See "PCI 2.1 Compliance."
Diskette See all "Floppy" entries.

Setting Description
DRAM Data IntegrityMode
If you're using ECC (Error Checking and Correction) memory, set this toECC. Otherwise, choose Non-ECC.
EMM386 SupportEnable this only if you're booting to DOS and need to support the now-defunct EMM386.SYS driver.
Event LogYour motherboard can log errors (such as BIOS problems and hard diskboot problems) it encounters during startup. Settings in this section allowyou to enable or disable logging, view the log, erase the log, etc.
Fast Boot See "Quick Boot."
First Boot Device See "Boot Device Priority/Boot Sequence."
Flash BIOS Protection
This prevents the BIOS from being overwritten or updated. You'll need todisable this to update your BIOS, as explained at the beginning of thisappendix. Otherwise, leave this enabled to protect against viruses thatattack BIOSes.
Floppy Drive A/BUse these settings to define the floppy diskette drives you haveconnected to your computer.
Floppy Drive SeekWhen enabled, this option will send a signal to your floppy drive(s) tohelp detect certain drive characteristics. Leave this off for a quicker boot.
Floppy Write ProtectThis prevents anyone from writing data to a diskette in your floppy drive,useful if the computer is in a public place and you don't want peoplecopying data to floppies.
GART W2K MiniportDriver
The GART (Graphics Address Remapping Table) is part of the AGPsubsystem. In most cases, you want to disable this option.
Green PC Monitor PowerState
If you're using an APM (advanced power management)-compliant "GreenPC" monitor, this setting allows you to automatically shut it off after acertain perioud of inactivity, in lieu of a screensaver. With these types ofsettings, it's best to let Windows XP control how and when devices areshut off.
Hard Disk Power DownMode
Windows can shut down your hard disk to save power after a certainperiod of inactivity. With these types of settings, it's best to let WindowsXP control how and when devices are shut off.
Hard Disk Write ProtectThis option write-protects your hard disk so data can't be written to it.You won't want to use this on a Windows XP machine.
Hard-Disk DriveSequence
If you have more than one hard disk drive on your IDE controller, thisoption allows you to choose the order in which your computer looks forbootable drives. Used in conjunction with "Boot Device Priority/BootSequence."
Hardware Reset ProtectPrevent the computer from being restarted with the Reset button on thefront of your computer's case. Helpful if you have a dog who likes to waghis/her tail while standing next to your computer.

Setting Description
HDD S.M.A.R.T.Capability
Enables the S.M.A.R.T. (Self Monitoring Analysis And ReportingTechnology) feature, supported by most modern hard disks, that helpspredict potential problems before they happen. Most users don't need itand are probably better off disabling this feature.
Hit DEL Message DisplayTurns on or off the message on the POST (Power On Self Test) screenthat says "Press DEL to enter Setup."
IDE BusMaster See "PCI IDE BusMaster."
IDE Controller
Enable or disable either or both of the IDE controllers on themotherboard. Each controller supports up to two devices (a "master" anda "slave"), but if you only have two devices, you can hook them both upto your primary IDE controller and disable the secondary controller.Disabling the controllers you don't need frees IRQs for other devices inyour system, but distributing your devices across your controllers canimprove performance.
IDE HDD Block ModeAlthough enabling this option should improve performance on somesystems, it should not be used with Windows XP.
Internal Cache See "CPU Level 1 Cache/Level 2 Cache."
IRQ3, IRQ4, IRQ5, etc.
There are two different settings named for IRQs. One, used with powermanagement, determines whether or not your computer monitors agiven IRQ for activity (used to "wake up" the system). The other,typically found in the PCI section, allows to you "reserve" an IRQ andprevent the Plug and Play system from automatically assigning it to adevice.
Legacy USB SupportEnable this option if you're using a USB keyboard or USB mouse and youwant to use them in the BIOS setup screen, DOS, or some otherenvironment outside of Windows.
Master/Slave DriveUltraDMA
This should be enabled for drives that support UltraDMA, and disabledotherwise. In most cases, it should be set to Auto.
Memory Hole at 15M-16M
Enable this option to reserve this segment of your computer's memoryfor use by some older ISA cards. Unless you specifically need it, thisoption should be disabled.
Memory Write PostingThis option may improve performance on older systems, but will likelydegrade performance and even cause video corruption on newersystems. Disable this option unless you're willing to experiment with it.
MPS Version ControlThis allows you to choose the multiprocessor specification versionsupported by your operating system. Windows XP supports version 1.4,although some other operating systems do not.
Numlock StateTurn this on if you want the Num Lock keyboard light turned on whenthe system starts. Turn this off if you typically use the numeric keypad tomove your cursor, instead of the "inverted T" cursor keys.

Setting Description
Onboard FDD ControllerThis enables or disables the floppy diskette drive controller on yourmotherboard.
Onboard IR Function This enables or disables the infrared port on your motherboard.
Onboard SCSI
This enables or disables the SCSI controller on your motherboard. Notethat SCSI settings will typically be set with a separate SCSI BIOS utility.For instance, most Adaptec controllers are configured by pressing Ctrl-Aat the screen that lists SCSI devices during bootup.
Overheat WarningTemperature
This sets the temperature above which the overheat warning is triggered.See "rimary>System Overheat Warning," later in this appendix, for moreinformation.
Parallel Port This enables or disables the parallel (printer) port on your motherboard.
Parallel Port Mode
Use this to choose between the various parallel (printer) port modes:ECP, EPP, ECP+EPP, Normal (SPP). In most cases, you'll want ECP; only
choose one of the lesser options if you run into a compatibility problem.Note that such problems are more commonly caused by incorrect orfaulty printer cables.
PCI 2.1 ComplianceThis should be enabled, unless you have one or more PCI cards that arenot compatible with the PCI 2.1 specification.
PCI IDE BusMaster
Enables or disables bus mastering for the IDE controller, which helpsreduce load on the processor when data is transferred to and from IDEdevices. Disable if you're using older drives that don't support busmastering.
PCI IRQ AssignmentThis setting (usually a group of settings) allows you to assign IRQs tospecific PCI slots.
PCI Latency Timer
This sets the number of cycles during which a single PCI device canmonopolize the PCI bus. Increase this value for better performance, ordecrease it if you run into problems. The default is typically 32 cycles,but you may have success with 64 or 128 cycles.
PCI Pipelining Enable this to improve performance with your video adapter.
PME Resume See "Remote Wake Up."
PnP OS Installed
This allows your operating system's Plug and Play feature to control theresources used by the various devices in your system. Enable this optionfor Windows XP, or disable it if you're using an OS that doesn't supportPnP.
Power Button ModeThis allows you to choose whether your computer's power button shutsoff the computer (after holding it for four seconds) or forces yourcomputer to enter a "hibernate" state.

Setting Description
Power Lost Control
Determines what happens when power is lost and then reapplied to thesystem. Choose Always On if you want the system to power upautomatically(useful for servers), or Always Off to leave it off until the
power button is pressed. Note that some systems will power themselveson after a power outage, even if they were powered down beforehand.
Power Management
This allows your operating system's APM (Advanced Power Management)feature to turn off the various devices in your system to save power.Enable this option for Windows XP, or disable it if you're using an OS thatdoesn't support APM.
Power On FunctionUse this option to enable other ways to turn on your computer, such asthe "power on" button on your keyboard (if applicable).
Primary DisplayAllows you to choose whether your PCI or AGP adapter is used as yourprimary display when using multiple video cards.
Primary IDE MasterSpecify the type of drive connected to your primary IDE controller, andset as the "master" (typically with a jumper).
Primary IDE SlaveSpecify the type of drive connected to your primary IDE controller, andset as the "slave" (typically with a jumper).
Processor Serial Number
Enable this only if you want your operating system to be able to read theserial number of your processor. Since this can cause substantial securityand privacy problems, this option should be disabled unless youspecifically need it.
Processor SpeedThis is typically a read-only setting that shows the speed of yourprocessor (in Mhz or Ghz). Some motherboards allow you to "overclock"your processor, forcing it to run faster than its rated speed.
Processor TypeThis read-only setting tells you what type of processor is currentlyinstalled.
PS/2 Mouse SupportUse this to enable or disable your PS/2 mouse port. Disable this if you'reusing a USB or serial-port mouse, and wish to free up IRQ 12 for anotherdevice.
PXE Resume See "Remote Wake Up."
Quick Boot
Turn this on to skip the thorough, slow memory test performed when thecomputer is first turned on, allowing a faster boot. It's a good idea todisable this option and sit through the test when first installing new RAM,but once the memory has been tested, it's fine to skip it.
Quiet Boot
A "quiet" boot is one in which your motherboard manufacturer's logo isdisplayed on the screen instead of the details, such as the amount ofmemory, detected disks, and BIOS revision date. Disable this option (orpress ESC while looking at the logo) to show this information.
Read-Around-WriteWhen this setting is enabled, your processor can read directly from thecache, without waiting for it to be written to memory first. Enable thisfeature for better performance.

Setting Description
Remote Wake Up
This feature allows your computer to be turned on by a signal fromanother computer on your network. Disable this feature unless youspecifically need this functionality. Seehttp://www.annoyances.org/exec/show/article04-101 for details.
Report no FDD forWin95
If this setting is disabled, your BIOS will not identify a missing floppydiskette drive in a Windows 9x/Me system. Enable this option forWindows XP.
Reset Config DataIf enabled, the PnP (Plug and Play) subsystem will reset and reconfigureall of your PnP devices every time your system starts. Use this only if oneor more devices needs to be reset to function.
SDRAM CAS Latency
In theory, set this to CAS2 if your memory is rated at CAS Latency 2;otherwise, use CAS3. Interestingly, you should be able to use the fasterCAS2 setting regardless of the type of installed memory; use CAS3 only if
instability results.
Second Boot Device See "Boot Device Priority/Boot Sequence."
Secondary IDE MasterSpecify the type of drive connected to your secondary IDE controller, andset as the "master" (typically with a jumper).
Secondary IDE SlaveSpecify the type of drive connected to your secondary IDE controller, andset as the "slave" (typically with a jumper).
Serial Port 1/2Serial PortA/B
The numbers (or letters) have no correlation to the well-knownCOM1/COM2 designations, but rather to each of the two physical portson your motherboard. Set the ports as follows: 3F8/IRQ4 to assign theport to COM1, 2F8/IRQ3 for COM2, 3E8/IRQ4 for COM3, or 2E8/IRQ3 to
make it COM4. Disable any port you're not using so it won't consume anyresources you can use for other devices. Make sure the two ports don'tconflict with each other, or any other devices in your system (such asyour modem).
Supervisor Password
This setting allows you to password-protect your BIOS setup. Note that ifyou forget the password (or simply wish to bypass such a restriction),just reset the BIOS configuration; this is typically done with a jumper,but can also be accomplished by disconnecting the motherboard batteryfor about twenty minutes.
Suspend ModeChoose whether the computer is placed in suspend or hibernate power-
saving modes.
Suspend TimeoutSpecifies the number of minutes of inactivity before the system is placedin suspend power-saving mode.
System BIOS CacheableThis is similar to "Address Range Shadowing," except that it works withyour motherboard's BIOS. Disable this option for best performance.
System Date/TimeSets your computer's internal clock. This can also be changed by going toControl Panel Date and Time.
System Keyboard Disable this option if there's no keyboard attached.

Setting Description
System Memory
In most computers, this will be a read-only setting that displays theamount of installed RAM. However, as a holdover from older computers,you may have to enter the BIOS setup screen and then exit for thecomputer to recognize newly installed memory, even though you won'tbe able to directly modify this setting.
System OverheatWarning
Enable this to sound an alarm or flash a light if your computer's internaltemperature exceeds the value set with the "Overheat WarningTemperature"
Third Boot Device See "Boot Device Priority/Boot Sequence."
Typematic Rate/DelayFaster settings will make your keyboard more responsive outside ofWindows, but within Windows, these settings are overridden by thosefound in Control Panel Keyboard.
USB Function See "Legacy USB Support"
VGA Palette SnoopEnable this only if you're using an add-on card that connects to the"Feature Connector" found on older video cards, and then only if thedevice specifically requires this setting.
Video BIOSShadow/Video BIOSCacheable
This is similar to "Address Range Shadowing," except that it works withthe BIOS of your video adapter. This is a holdover from early videocards, and should be disabled in any modern system.
Video Power DownIf enabled, your computer will be able to shut down your video card andmonitor to save power. Typically, it's best to have Windows controlpower-saving features by going to Control Panel Power Options.
Video RAM CacheableThis is similar to "Address Range Shadowing," except that it works withthe memory installed on your video card. This option should always bedisabled.
Virus Warning See "Anti-Virus Protection."
Wait for F1 if Error
If this option is disabled, your computer will continue to boot, even if anerror is found; otherwise, you'll have to press F1 before the system willboot. Such errors include a missing keyboard, a missing video adapter,and an unexpected quantity of installed memory.
Write combining
Enable this option for better video performance, but disable it if youencounter video corruption or system crashes. A related setting can befound in Control Panel Display Settings tab Advanced
Troubleshoot tab.

Appendix C. TCP/IP PortsWhen your web browser or email program connects to another computer on the Internet, it does sothrough a TCP/IP port. If you have a web server or FTP server running on your computer, it opens aport to which other computers can connect. Port numbers are used to distinguish one network servicefrom another.
Mostly, this is done invisibly behind the scenes. However, knowing which programs use a specific portnumber becomes important when you start considering security. A firewall uses ports to form itsrules about which types of network traffic to allow and which to prohibit. And the Active Connectionsutility (netstat.exe), used to determine which ports are currently in use, allows you to uncovervulnerabilities in your system using ports. Ports, firewalls, and the Active Connections utility are alldiscussed in Chapter 7.
Some firewalls make a distinction between TCP (Transmission Control Protocol) and UDP (UserDatagram Protocol) ports, which is usually unnecessary. In most cases, programs that use the morecommon TCP protocol will use the same port numbers as their counterparts that use the less-reliableUDP protocol.
Ports are divided into three ranges:
Well-known ports: 0-1023Registered ports: 1024-49151Dynamic and/or private ports: 49152-65535
Since a complete port listing would consume about a hundred pages of this book, only the mostcommonly used ports are listed here. For a more complete listing, see any of these resources:
http://www.portsdb.org/http://www.iana.org/assignments/port-numbershttp://www.faqs.org/rfcs/rfc1700.html
Table C-1 lists the more commonly used TCP/IP ports.
Those ports marked with an in Table C-1 are commonly exploited by worms
and other types of remote attacks. Unless you specifically need them, youshould block them in your firewall or router.
Table C-1. Commonly used TCP/IP Ports and how they're used
Port number Description
21 FTP (File Transfer Protocol)

Port number Description
22 SSH (Secure Shell)
23 Telnet
25 SMTP (Simple Mail Transfer Protocol), used for sending email
43 WhoIs
50-51 IPSec (PPTP Passthrough for VPN, Virtual Private Networking)
53 DNS (Domain Name Server), used for looking up domain names
69 TFTP
70 Gopher
79 Finger
80HTTP (Hypertext Transfer Protocol), used by web browsers to downloadstandard web pages
81 Kerberos
110 POP3 (Post Office Protocol, version 3), used for retrieving email
119 NNTP (Network News Transfer Protocol), used for newsgroups
123 NTP (Network Time Protocol), used for XP's Internet Time feature
135 RPC (Microsoft Windows Remote Procedure Call)
139 NETBIOS Session Service
143 IMAP4 (Internet Mail Access Protocol version 4)
161, 162 SNMP (Simple Network Management Protocol)
220 IMAP3 (Internet Mail Access Protocol version 3)
443HTTPS (HTTP over TLS/SSL), used by web browsers to download secure webpages
445 File sharing for Microsoft Windows networks
500 IPSec (PPTP Passthrough for VPN, Virtual Private Networking)
563NNTPS (Network News Transfer Protocol over SSL), used for securenewsgroups
593 RPC (Microsoft Windows Remote Procedure Call) over HTTP
1026 Windows Messenger - pop-ups (spam)
1352 Lotus Notes mail routing
1503 Windows Messenger - application sharing and whiteboard
1701 VPN (Virtual Private Networking) over L2TP

Port number Description
1723 VPN (Virtual Private Networking) over PPTP
1863 Windows Messenger - instant messenging
3389Remote Desktop Sharing (Microsoft Terminal Services), used for remotecontrol
4444 W32.BLASTER.WORM virus
5004 and upWindows Messenger - audio and video conferencing (port is chosendynamically)
5010 Yahoo! Messenger
5190 AOL Instant Messenger
5631, 5632 pcAnywhere, used for remote control
5800, 58015900,5901
VNC (Virtual Network Computing), used for remote control
6699 Peer-to-peer file sharing, used by Napster-like programs
6891-6900 Windows Messenger - file transfer
7648, 7649 CU-SeeMe video conferencing

Appendix D. Class IDs (CLSIDs) of SystemObjectsWindows keeps track of its various components with Class IDs, 33-digit codes consisting of bothletters and numbers, enclosed in curly braces { }. Table D-1 shows a list of commonly used systemobjects.
Table D-1. Commonly used system objects and their corresponding ClassIDs
Object CLSID
ActiveX Cache Folder{88C6C381-2E85-11d0-94DE-444553540000}
Briefcase{85BBD920-42A0-1069-A2E4-08002B30309D}
Compressed Folder{E88DCCE0-B7B3-11d1-A9F0-00AA0060FA31}
Control Panel{21EC2020-3AEA-1069-A2DD-08002B30309D}
Desktop{00021400-0000-0000-C000-000000000046}
Dial-Up Networking{992CFFA0-F557-101A-88EC-00DD010CCC48}
Favorites{1A9BA3A0-143A-11CF-8350-444553540000}
Fonts{BD84B380-8CA2-1069-AB1D-08000948F534}
Internet Explorer{FBF23B42-E3F0-101B-8488-00AA003E56F8}
Internet Explorer Cache{7BD29E00-76C1-11CF-9DD0-00A0C9034933}
My Computer{20D04FE0-3AEA-1069-A2D8-08002B30309D}

Object CLSID
My Documents{450D8FBA-AD25-11D0-98A8-0800361B1103}
My Network Places{208D2C60-3AEA-1069-A2D7-08002B30309D}
Printers{2227A280-3AEA-1069-A2DE-08002B30309D}
Recycle Bin{645FF040-5081-101B-9F08-00AA002F954E}
Scheduled Tasks{D6277990-4C6A-11CF-8D87-00AA0060F5BF}
Subscriptions{F5175861-2688-11d0-9C5E-00AA00A45957}
The Internet{3DC7A020-0ACD-11CF-A9BB-00AA004AE837}
The Microsoft Network{00028B00-0000-0000-C000-000000000046}
URL History Folder{FF393560-C2A7-11CF-BFF4-444553540000}
Here are some tips for working with Class IDs:
Class IDs are stored in the Registry under HKEY_CLASSES_ROOT\CLSID. Locate the key named
for a Class ID under this branch to change any settings or behavior of the corresponding object.Use the Registry Editor's search feature to find the Class ID for an object not listed here bysearching for the name of the object.
A good way to avoid having to type these codes is to do a search in the Registry. For example,if you're looking for the Recycle Bin Class ID, do a search in the Registry Editor for RecycleBin. When it's found, make sure the code matches the one listed here (because there may be
more than one). Right-click on the key named for the code, then select Rename. Next, right-click on the highlighted text in the rename field, and select Copy. The Class ID will then beplaced on the clipboard, waiting to be copied anywhere you please.
To create a copy of a virtual folder or system object, such as Dial-Up Networking, create a newfolder anywhere (such as on your Desktop or anywhere on your hard disk), and call it Dial-UpNetworking.{992CFFA0-F557-101A-88EC-00DD010CCC48}. Make sure to include the dot
between the name and the Class ID. Replace the name and ID with any others from the table.Note that all objects listed here should be able to exist as movable folders, except for NetworkNeighborhood. See Section 2.3.2 for more information.
By placing references to Class IDs in other parts of the Registry, you can make Windows do cooltricks. See Section 4.1.2 for more information.

Colophon
Our look is the result of reader comments, our own experimentation, and feedback from distributionchannels. Distinctive covers complement our distinctive approach to technical topics, breathingpersonality and life into potentially dry subjects.
The animal on the cover of Windows XP Annoyances for Geeks, Second Edition is a Surinam toad(also known as Pipa Pipa). Surinam toads are entirely aquatic, never venturing onto land from thedark, muddy South American rivers where they dwell. Adapted to life in a constantly murkyenvironment, the eyes of the Surinam toad are little more than small dark spots on its evenly brownbody. Adult toads are about six inches long with a broad, flat, almost rectangular appearance. Theyhave large, heavily webbed hind feet and small sensory feelers on their front feet and around theirmouths. They use these feelers to aid in the search for food along the muddy river bottom. Once amorsel is located, the toad uses its front feet to stir up the water and swish the food into its gaping,tongueless mouth. It will consume anything it can swallow, dead or alive.
Surinam toads are remarkable even among the several other similar species of aquatic frogs. Ratherthan depositing her eggs in a secluded location and leaving their fate to chance, the female toadrelies on the male to direct the fertilized eggs onto the softened skin of her back. Over the course ofseveral hours the skin swells and completely envelops the eggs. Here the young remain for severalmonths until metamorphosis is complete, emerging as tiny, fully developed toads.
Sanders Kleinfeld was the production editor and proofreader for Windows XP Annoyances for Geeks,Second Edition . Genevieve d'Entremont and Colleen Gorman provided quality control. Julie Hawkswrote the index.
Ellie Volckhausen designed the cover of this book, based on a series design by Edie Freedman. Thecover image is a 19th-century engraving from the Dover Pictorial Archive. Emma Colby produced thecover layout with QuarkXPress 4.1 using Adobe's ITC Garamond font.
David Futato designed the interior layout. This book was converted to FrameMaker 5.5.6 with aformat conversion tool created by Erik Ray, Jason McIntosh, Neil Walls, and Mike Sierra that uses Perland XML technologies. The text font is Linotype Birka; the heading font is Adobe Myriad Condensed;and the code font is LucasFont's TheSans Mono Condensed. The illustrations that appear in the bookwere produced by Robert Romano and Jessamyn Read using Macromedia FreeHand MX and AdobePhotoshop CS. The tip and warning icons were drawn by Christopher Bing. This colophon was writtenby Sarah Sherman.
The online edition of this book was created by the Safari production group (John Chodacki, KenDouglass, and Ellie Cutler) using a set of Frame-to-XML conversion and cleanup tools written andmaintained by Erik Ray, Benn Salter, John Chodacki, Ellie Cutler, and Jeff Liggett.

Index
[SYMBOL] [A] [B] [C] [D] [E] [F] [G] [H] [I] [J] [K] [L] [M] [N] [O] [P] [Q] [R] [S] [T] [U] [V] [W] [Y] [Z]

Index
[SYMBOL] [A] [B] [C] [D] [E] [F] [G] [H] [I] [J] [K] [L] [M] [N] [O] [P] [Q] [R] [S] [T] [U] [V] [W] [Y] [Z]
$ (dollar sign), in share names
% (percent sign) in variable names
& (ampersand) concatenation operator (VBScript) 2nd
+ (plus sign), running batch files from Address Bar
10base-2 and 10base-T cables, connectors
2-spyware.com
802.11a
802.11b and 802.11g standards
802.11g routers
@ (at sign), turning off command echoing
ÒtrackingÓ hosts, list of known
{ } (curly braces)

Index
[SYMBOL] [A] [B] [C] [D] [E] [F] [G] [H] [I] [J] [K] [L] [M] [N] [O] [P] [Q] [R] [S] [T] [U] [V] [W] [Y] [Z]
AATools Port Scanner web site
AC Power Recovery (BIOS setting)
access points, wireless
Accessibility command
accounts (user), types
ACDSee
ACPI Aware O/S (BIOS setting)
activation
Active Connections utility (netstat.exe)
information columns
scanning for open ports
starting
ActiveX Cache Folder (CLSID)
Ad-Aware Personal Edition
Adaptec/Roxio Easy CD Creator
Adapters and Bindings options (network connections)
adaptive palettes, problems caused by
Add Hardware Wizard
Add/Remove Programs (Control Panel), removing Windows components
AddOn ROM Display Mode (BIOS setting)
Address Bar
batch files, running from
as command prompt
history settings
search settings
show full path of current folder
show in Explorer
show on taskbar
Address Book
make default contact list
profile assistant (enable/disable)
set default profile for AutoComplete
Address Range Shadowing (BIOS setting)
Administrative Tools, show in Start Menu
Administrator account, logging in
Adobe Photoshop [See Photoshop]
Advanced button (File Types window)
Advanced Configuration and Power Interface (ACPI)
Advanced Power Management [See APM]
Adware Report
Agnitum Outpost
AGP 2X/4X Mode (BIOS setting)
AGP Aperture/Device Address Space Size (BIOS setting)

AGP video cards
AIM (AOL Instant Messenger)
AirNet card
AlreadyMapped function (VBScript)
Alt Key, making it ÒstickyÓ
AlwaysShowExt value (Regisrty)
Animate windows when minimizing and maximizing setting
animated screen characters, Search tool
animation
enable/disable selectively
fading between web pages
show animated GIFs in web pages
smooth scrolling of lists
smooth scrolling of web pages
turning off
anonymous FTP
Anti-Virus Protection (BIOS setting)
antispyware software
AntiVir
antivirus software 2nd
autoprotect software
disabling for startup
troubleshooting
AOL Instant Messenger (AIM)
APM (Advanced Power Management)
additional settings
automatic shutdown
effect on Offline files
effect on Scheduled Tasks
enable/disable
shutdown issues
APM Enable (BIOS setting)
Application Data folder
application icons, adding to taskbar tray
application installers, INI files
applications
Compatibility Mode
crashes, error messages
custom styles, forcing update
ending
ending background processes
file types
file types, protecting
file-type associations, protecting
frozen, closing
icons, customizing
launching
Prefetch and
Start Menu alternatives
list loaded DLLs
loading at startup, performance issues
locating information about

not found (startup error)
overwriting DLLs
prevent from running
running with VBScript
shutdown timeout, reducing
Windows components running in background
Windows components, removing
Apply to All Folders option (Explorer Folder Options)
Arrange Icons By option (Explorer)
ASP program for IIS web server
Assign IRQ For USB (BIOS setting)
Assign IRQ For VGA (BIOS setting)
attachments (email), viruses and
Attempted Write To Readonly Memory (BSoD error)
attrib command (DOS)
Folder Shortcuts, creating 2nd
hidden files and
ATX systems, shutdown
audio
deleting WAV files
sound cards
digital signal processors (DSPs)
troubleshooting
volume control icon (taskbar), deleting
auditing object access
Authentication tab (network connections)
Auto Power On (BIOS setting)
auto-insert notification feature
AutoComplete
edit data
enable/disable
Profile Assistant (enable/disable)
settings
autodetect hardware setting
Autodial
Autoexec.bat, parse at logon
autohide setting (Taskbar Properties)
automatic expiration (user passwords)
automatic shutdown
Automatic Windows Update settings
automation and scripting
DOS batch files 2nd
ideas for scripts
Scheduled Tasks
Windows Script Host
AutoPlay 2nd 3rd
CD polling, disabling
disabling
enabling based on content
selective control of
autoprotect software (virus scanners)
Autorun.inf file

Index
[SYMBOL] [A] [B] [C] [D] [E] [F] [G] [H] [I] [J] [K] [L] [M] [N] [O] [P] [Q] [R] [S] [T] [U] [V] [W] [Y] [Z]
backdoors (security), eliminating
background
create and modify
select and configure
background applications
Backup Exec (Seagate)
backups
complete 2nd
costs involved in
data storage media
Microsoft Backup, installing
Registry
data
patches and
as scheduled tasks
simple
with tape drives 2nd
tips and strategies
unattended
utilities for
Bad Pool Caller (BSoD error)
BAK files, deleting
balloon tips (big tooltips that pop up from taskbar notification area)
bandwidth
bandwidth-testing web sites
batch files
command-line parameters
compared to WSH 2nd
conditional statements
flow control
loops
running from Address Bar
simulating subroutines
variables
binary values (Registry Editor)
BIOS
accessing
automatic system shutdown
The Definitive BIOS Optimization Guide
enabling USB controllers
fine-tuning/upgrading motherboards
flashing (updating)
SCSI controllers

settings
list of
working with
troubleshooting Windows XP installation problems
upgrading
video card priority, selecting
bitmap files
creating icon previews for
deleting
Blue Screen of Death (BSoD)
errors
Attempted Write To Readonly Memory
Bad Pool Caller
Data Bus Error
Driver IRQL Not Less Or Equal
Driver Power State Failure
Driver Unloaded Without Cancelling Pending Operations
Driver Used Excessive PTEs
Hardware Interrupt Storm
Inaccessible Boot Device
Kernel Data Inpage Error
Kernel Stack Inpage Error
Kmode Exception Not Handled
logging
Mismatched Hal
No More System PTEs
NTFS filesystem
Page Fault In Nonpaged Area
Status Image Checksum Mismatch
Status System Process Terminated
Thread Stuck In Device Driver
Unexpected Kernel Mode Trap
Unmountable Boot Volume
Bluetooth SD card
boot delays
Boot Device Priority/Boot Sequence (BIOS setting)
boot disks
boot manager configuration file, editing
Boot Other Device (BIOS setting)
Boot Sector Virus Protection (BIOS setting)
Boot to OS/2 (BIOS setting)
bootable
CDs, enabling bootup from
floppy disks, creating
Bootup CPU Speed (BIOS setting)
Bootup Numlock Status (BIOS setting)
branches, Registry [See Registry, branches]
Bridge Connections
Briefcase (CLSID)
broadband Internet connections
PPPoE
Browse folders option (Explorer Folder Options)

browser, setting default
bugs, compared to poor feature design
button color

Index
[SYMBOL] [A] [B] [C] [D] [E] [F] [G] [H] [I] [J] [K] [L] [M] [N] [O] [P] [Q] [R] [S] [T] [U] [V] [W] [Y] [Z]
C000/C400/C800/CC00 16k Shadow (BIOS setting)
cables
protecting hardware
SCSI devices
setting up a workgroup
cabling tips
cache settings, optimizing
caches, DNS, increasing size
calendar
call command (DOS)
Call statement (VBScript)
calling
cameras
creating an Internet fish tank
troubleshooting
Cascading Style Sheets
categories (Control Panel)
removing
turning off
CD burning
folder location
software
cd command (DOS)
CD drives
auto-insert notification feature
AutoPlay feature 2nd
troubleshooting
Windows XP installation problems
writers
backups
CDs
autoplay
bootable, enabling bootup from
certificates
check for revocation in Internet Explorer
Internet Explorer settings for secure sites
warn about invalid certificates in Internet Explorer
CGI program for IIS web server
CGI programs, produced by WSH scripts
characters (animated), Search tool and
Chassis Fan (BIOS setting)
Check system compatibility (install option)
chipsets for video cards

Chkdsk utility
dirty drives
Chkntfs utility
CHM files, deleting
cipher command
wiping folders
Class IDs (CLSIDs) 2nd 3rd
searching for
tips for working with
where stored
classic screen elements, converting to
classic Start Menu 2nd
Click items as follows option (Explorer folder options)
Client Server Runtime Process
Client Server Runtime Subsystem (CSRSS)
client/server workgroups [See workgroups]
clock speeds, processor
clock, showing on taskbar
CLSID key 2nd
clusters
Chkdsk utility and
hard drives
cmd.exe [See Command Prompt]
coaxial setting for 10base-2 cables
code page conversion table
collapsing Explorer folder tree
color profiles
associate with device
management
colorimeters, adjusting monitors with
colors
change for all display elements
encrypted and compressed files
in web pages
increase or decrease number of supported colors (color depth)
show high contrast screen colors
COM (communication) ports
combo boxes, enable/disable animation
command keys
creating file types
customizing
command line
Control Panel equivalents
files, renaming multiple
parameters
handling in batch files
VBScript and
Registry patches, applying from
switches, Explorer
tutorial
Command Prompt (cmd.exe)
filename completion

opening in any folder
reading .dmp files
running Active Connections utility
Safe Mode with
settings
using long filenames in
command-prompt window
files, renaming multiple
installing Windows XP
NTFS filesystem, converting to
CommandLine function
commands, DOS
common dialog boxes
design issues
enhancements to
Common Files folder
Common Tasks pane, disabling
Compatibility Mode
compatibility, migration issues
troubleshooting
compilation errors (WSH)
components (Windows)
common background applications
removing
Compressed Folder (CLSID)
compressed NTFS files
choose color
differentiate with a different color
compression [See ZIP files]
computer, adding WiFi support
conditional statements
DOS batch files
VBScript scripts
configuration
context menus
file icons as thumbnail previews
files
protecting file types
Folder Options dialog box, adding options
hardware devices 2nd [See also hardware]
Internet Connection Sharing
IP addresses
multibooting
Network Connections window
New menu (Explorer)
printers, sharing
settings
system object icons
System Restore
tray
confirmation messages, Recycle Bin
conflicts (hardware), resolving

Connection tab
connections
download/upload throughputs
full-duplex
half-duplex
Internet Connection Sharing
Network Connections window
network, dial-up
networks
changing status
properties
troubleshooting
Remote Desktop and
troubleshooting network card
console files, creating
Contact list command
contact list, default
Content Type value
context menus
customizing
dragging and dropping objects
Encrypt and Decrypt, adding
file types and
printing directory listings
protecting file types
removing New option items
Control Panel
categories
removing
turning off
categories (show/hide)
command line equivalents
drivers, installing
Folder Options dialog box
icons (show/hide)
icons, removing
security policies
shortcuts, creating
show as menu in Start Menu (Classic Start Menu only)
show as menu in Start Menu (XP Start Menu only)
show in My Computer
Start Menu, listing items separately
Windows components, removing
Control Panel (CLSID)
converting to NTFS filesystem
cookies
change settings (block, allow, prompt)
change settings for specific web sites (block, allow, prompt)
delete all
cooling processors
copy command (DOS)
copying

files/folders, methods
network connections
objects 2nd
corrupted files
startup errors and
Counterexploitation
country
choose for dialing preferences
choose for localized information
CPU Current Temperature (BIOS setting)
CPU Fan (BIOS setting)
CPU Level 1 Cache/Level 2 Cache (BIOS setting)
CPU to PCI Write Buffer (BIOS setting)
CPUs
preventing overheating
troubleshooting chips
crashes
Blue Screen of Death [See Blue Screen of Death]
encrypted files, recovering
error messages
Explorer, recovering from
restoring Windows
send reports to Microsoft
Creative Element Power Tools 2nd 3rd 4th 5th 6th 7th
Registry Agent tool
Critical Update Notification
cross-linked files
crossover cables
csrss.exe (background process)
Ctrl Key, making it ÒstickyÓ
Ctrl-Alt-Del window, settings
CU-SeeMe video conferencing
curly braces ({ })
currency, customize display
cursors
mouse
style when dragging dropping
text
Customize This Folder option (Explorer)
customizing [See configuration]
cut/copy/paste, files and folders

Index
[SYMBOL] [A] [B] [C] [D] [E] [F] [G] [H] [I] [J] [K] [L] [M] [N] [O] [P] [Q] [R] [S] [T] [U] [V] [W] [Y] [Z]
D000/D400/D800/DC00 16k Shadow (BIOS setting)
DAT files
data
corruption and noisy phone lines
storage media
Data Bus Error (BSoD error)
Data Execution Prevention (DEP)
date
customize display
set
Day() (VBScript)
Daylight Savings, enable/disable
DDE (Dynamic Data Exchange) commands, reconfiguring file types
Debugging Mode startup mode
debugging VBScript programs
Decrypt command, adding to context menus
default action (double-clicking files), controlling
default values, Registry keys 2nd
DefaultIcon key (Registry)
The Definitive BIOS Optimization Guide
Defrag.exe file 2nd
defragmenting
hard disks
swapfile
del command (DOS)
Delayed Transaction (BIOS setting)
Delete command (Recycle Bin)
deleting
Control Panel icons
desktop icons
devices
files
disabling storage function of Recycle Bin
in-use
Recycle Bin settings
files and folders
files in Windows folder
Folder Shortcuts
folders, wiping
hidden files
New option items in context menus
Recent Documents from Start Menu
Recent Documents shortcuts

Recycle Bin desktop icon
restore points
Shared Documents folder
tray icons
user system folders
Windows components
DEP (Data Execution Prevention)
design issues
interface consistency, Explorer and
networks
peer-to-peer workgroups
desktop
Cleanup Wizard runs every 60 days
color
folder, change location
icons
classic style
customizing context menus
deleting
hiding all
removing default
selecting for objects
sorting
mapping drives/folders
My Computer window, adding objects
My Network Places window, adding objects
refreshing 2nd
restrict installation of items
schemes
security policies
Shared Documents folder, deleting
shortcuts as Start Menu alternative
show contents without minimizing applications
styles
themes
toolbars as Start Menu alternative
version (show/hide)
virtual objects
web content (enable/disable)
web content, lock
web pages
add/remove/hide
allow moving and resizing
automatic download of linked pages
automatic updates (enable/disable)
Desktop (CLSID)
Details view (Explorer)
device drivers [See drivers]
Device Manager
errors
reinstalling drivers
resolving conflicts

showing hidden devices in
verifying drivers
devices
dial-up connections 2nd
Dial-Up Networking
CLSID
dialing
area code settings
call waiting
calling card
connect to Internet when needed, depending on location
default Internet connection
disconnect Internet connection when no-longer needed
operator-assisted dialing
dialog boxes
design issues
enhancements to
digital cameras
add as drive in Explorer (still camera only)
adding WiFi support
creating an Internet fish tank
troubleshooting
digital signal processors (DSPs), sound cards with
DIMMs (dual inline memory modules)
dir command (DOS)
Direct3D API
Directory Services Restore Mode startup mode
DirectX
dirty drives
disk cloning software
Disk Defragmenter (Defrag.exe) utility 2nd 3rd
disk drives [See also hard disks]
troubleshooting, Chkdsk utility
Disk Management utility
alternatives
customizing
partitions
creating and deleting
resizing
volumes, mounting
disk space
deleting unnecessary files
swapfile, enlarging
Diskeeper
Diskette (BIOS setting)
DiskPart utility
display
adapters [See video cards]
force restart after changing resolution or color depth
list all possible combinations of resolution and color depth
refresh rate
resolution

show amount of memory installed on display adapter
size
style, apply to controls in web pages
troubleshooting
turn off to save power
Display the contents of system folders option (Explorer Folder Options)
Display the full path in the Address Bar/titlebar option (Explorer Folder Options)
Display the simple folder view in Explorer's Folder list option (Explorer Folder Options)
DLLs (Dynamic Link Libraries), version control
.dmp files, reading
DNS (Domain Name Server)
DNS (Domain Naming System)
cache, increasing size
entries, adding permanent
Do not move files to the Recycle Bin option
Do...Loop loop (VBScript)
document templates
managing
relocating folder
documents
history, clear on exit
history, maintain
show on Start Menu (Classic Start Menu only)
show on Start Menu (XP Start Menu only)
DOS 2nd
basic commands
attrib
cd
copy
del
dir
exit
md
move
rd
ren
set
type
batch files [See batch files]
environment
Folder Shortcuts, changing filename extension for
prompt [See command line command-prompt window]
tutorial
double-click required to open icons
Double-click to open an item option (Explorer Folder Options)
double-clicking
adjusting speed of
icons
Download Accelerator Plus
Download Complete message, enable/disable
Download Express
download managers

dragging and dropping
displaying context menu
executable files 2nd
Explorer, rules about
folder icons
Dragon NaturallySpeaking
DRAM Data Integrity Mode (BIOS setting)
drive icons, customizing
drive properties window, NTFS partitions
DriveExists function
DriveFreeSpace function
Driver IRQL Not Less Or Equal (BSoD error)
Driver Power State Failure (BSoD error)
Driver Unloaded Without Cancelling Pending Operations (BSoD error)
Driver Used Excessive PTEs (BSoD error)
driverguide.com
drivers
changing
faulty disk controller
included on Windows CD
incompatibility
installing
advice about
troubleshooting
load failure (startup error)
locating
modems
monitors
printer
troubleshooting
Windows XP installation problems
unsupported hardware
updating and verifying
versions of
video, updating
drives [See also CD drives; DVD drives; hard disks]
mapping
show/hide in My Computer
slack space
warn when low on free space
DSPs (digital signal processors), sound cards with
dumpchk command
duplicating files within folders
DVD drives
auto-insert notification feature
AutoPlay feature 2nd
enable/disable
DWORD values (Registry Editor)
Dynamic Data Exchange (DDE) commands, reconfiguring file types
Dynamic Link Library files (DLLs), version control

Index
[SYMBOL] [A] [B] [C] [D] [E] [F] [G] [H] [I] [J] [K] [L] [M] [N] [O] [P] [Q] [R] [S] [T] [U] [V] [W] [Y] [Z]
e-mail icon, show in Start Menu (XP Start Menu only)
Easy Media Creator
echo command (DOS)
EditFlags value
effects, display settings
email attachments and antivirus software
Email program, default
email, retrieving
EMM386 Support (BIOS setting)
Enable Boot Logging startup mode
Enable Profile Assistant command
Encrypt command, adding to context menus
encrypted NTFS files
customize color
differentiate with a different color
use with Offline files
encryption
allowing access to encrypted files
files 2nd
folders 2nd
NTFS Encryption utility
protecting files with
WEP
WiFi
environment variables
DOS
system path
ergonomic keyboards
error messages
application crashes
font
sound
startup
finding additional information
silencing
text color
types of
error reporting
advanced settings
enable/disable
ERRORLEVEL variable (DOS) 2nd
errors [See also troubleshooting]
Blue Screen of Death , errors) [See Blue Screen of Death (BSoD]

Device Manager
DLL-related
startup
VBScript scripts
ActiveX component can't create object
Expected Ô)'
Expected ÔEnd'
Invalid procedure call or argument
Object doesn't support this property or method
The system cannot find the file specified
Type mismatch: Ô[undefined]'
Unterminated string constant
WSH scripts, debugging
Ethernet
adapters
Eudora
Event Log (BIOS setting)
Event Log (eventvwr.msc)
eventvwr.msc (Event Log)
executable files
dragging and dropping 2nd
icons, customizing
exit command (DOS)
expanded string values (Registry Editor)
expanding Explorer folder tree
expansion cards
slots, deternining best for particular cards
Explorer
access digital camera memory as a drive (still camera only)
additional security policies
changing default folder
columns in details view
command-line switches
crashes, recovering
Desktop, refreshing
dragging and dropping, rules about
encrypting files
FTP sites, accessing
group similar items
hidden files, showing
how settings are saved
keyboard shortcuts
launching
launching from My Computer
New menu, customizing
overview
refresh view
Registry patches, applying
reloading without restarting
reuse window when launching Internet shortcuts
search
Search tool

interface
searching from Explorer window
searching outside of Explorer window
SendTo folder, creating shortcuts in
settings
overview
persisting
shortcuts
creating for
show lines in tree view (Folders Explorer bar)
show Status Bar
system objects
toolbar
background
copying/moving files and folders
customize
icon size
prevent being moved
text captions
Undo command
ZIP files
explorer.exe (background process)
extended partitions
extension keys (Registry)
creating file types
protecting file-type associations
extensions, show/hide filename extensions
extracting ZIP files

Index
[SYMBOL] [A] [B] [C] [D] [E] [F] [G] [H] [I] [J] [K] [L] [M] [N] [O] [P] [Q] [R] [S] [T] [U] [V] [W] [Y] [Z]
Fade or slide menus/ToolTips into view option
fans, improving processor performance with
Fast Boot (BIOS setting)
Fast User Switching
FAT (File Allocation Table) filesystem
FAT to NTFS Conversion Utility
FAT32 (File Allocation Table, 32-bit) filesystem
Favorites
hide infrequently used items
links (show/hide)
navigation key
relocate folder
show in Start Menu (Classic Start Menu only)
show in Start Menu (XP Start Menu only)
Favorites (CLSID)
Fax service, install support
features
poor design compared to bugs
upgrading considerations
File and Settings Transfer Wizard, backing up before installing
File Compare utility
file compression [See ZIP files]
file dialogs, options
file extensions
context menus and
displaying
identifying, web site for
shared, linking to existing type
File sharing for Microsoft Windows networks
file sharing, peer-to-peer (P2P)
file-type keys
protecting file types
file types
containing version information
customizing context menus and
DDE (Dynamic Data Exchange) and
overview
protecting
File Types dialog box
context menus and
icons, selecting
File Types window, missing Advanced button
file-type associations

changing
extension keys/file-type keys
preserving
protecting
FileCopy subroutine
FileDate function
FileDelete subroutine
FileExists function
FileExtension function
FileMove subroutine
FileName value (Registry)
filenames, using long in Command Prompt
files
accessing FTP sites in Explorer
Autorun.inf
boot manager configuration file, editing
comparing contents
VBScript example
configuration files
console, creating
copying/moving, methods
corrupted
startup errors
customizing
protecting file types
thumbnail previews as icons
defragmenting
deleting
in-use
Recycle Bin settings
unnecessary files
what not to
Windows folder
determining version of
differentiate encrypted or compressed NTFS files with a different color
display size in folder tips
double-click sensitivity
downloads (enable/disable)
drag-drop (enable/disable)
drag-drop sensitivity
duplicating within folders
encrypting
executable, dragging and dropping 2nd
extensions (show/hide)
filename completion in Command Prompt
hidden
hidden files (show/hide)
Indexing Service
missing (startup errors)
offline [See offline files]
operating on with VBScript
organizing

printing directory listings
Properties sheets, viewing
renaming
methods
renaming with search and replace
right-clicking [See context menus]
sharing over networks
system files (show/hide)
system path and
System.ini
virus carriers
Win.ini
ZIP
Search tool and
working with
FileSize function
FileSystemObject object
filesystems
choosing right
multiboot systems and
compatibility
multiple drives and
supported types
Finger
firewalls 2nd
logging
reasons for
routers
solutions
Windows Firewall
alternatives
poking holes in
setting up
firmware
First Boot Device (BIOS setting)
fish tank, Internet
Flash BIOS Protection (BIOS setting)
flashing (updating) BIOS
floppy disks
backups 2nd 3rd
bootable, creating
Floppy Drive A/B (BIOS setting)
Floppy Drive Seek (BIOS setting)
floppy drives, troubleshooting
Floppy Write Protect (BIOS setting)
flow control
DOS batch files
VBScript scripts
focus, preventing applications from stealing
Folder Options (Explorer)
customizing context menus
file extensions, displaying

General tab
hidden files, showing
properties
Registry customization options, adding
View tab
Folder Shortcuts
creating
deleting, cautions about
dismantling and removing
enhancements to
FTP sites, accessing in Explorer
mirroring a folder with 2nd
folder tree (Explorer), expanding/collapsing
FolderCopy subroutine
FolderCreate function
FolderDelete subroutine
FolderExists function
FolderMove subroutine
FolderParent function
folders
accessing FTP sites in Explorer
cache settings for offline access
close automatically when Favorites or History folder is shown
closing all open
columns in details view
context menus, customizing
copying/moving, methods
customizing
icons
New items in context menus
deleting
unnecessary
what not to
display file size in folder tips
duplicating
encrypting
Explorer window, opening
files, duplicating
group similar items
history settings
Indexing Service
movable [See moveable folders]
My Music
My Pictures
My Videos
open each folder in its own window
open in separate process
opening, changing Explorer default
operating on with VBScript
parent windows, opening
permissions, inheritance
previously opened, navigating to

printing directory listings
Properties sheets, viewing
Recent, disabling
Recycle
refresh view
remember individual settings
renaming multiple files
renaming, effect on view settings
reopen all folder windows that were left open when system was last shut down
reset default appearance to Windows default
reuse folder windows
reuse folder windows when launching Internet shortcuts
right-clicking [See context menus]
selecting all contents
selecting items by letter
selecting multiple items within
set default appearance
settings, changing defaults
share on network
Shared Documents, deleting
sharing over networks
show background images
show common tasks
show contents of system folders
show Digital Camera memory as a folder (still camera only)
show FTP site as folder in Internet Explorer
show full path in address bar
show full path in titlebar
show lines in Explorer tree view
show/hide hidden folders
Startup, performance and
system path and
Temp, performance issues
thumbnail display, disabling
user system
removing
virtual [See virtual folders]
wiping
FolderSize function
fonts
change DPI of all screen fonts
determine link between font filename and font screen name
downloads (enable/disable)
eliminate duplicates
in web pages
in windows, menus, and icons
install
performance issues
repair folder
size in applications
smooth edges (enable/disable)
smooth edges (settings)

uninstall
view & compare
Fonts (CLSID)
FOR...IN...DO statement (DOS)
For...Next loop (VBScript) 2nd
Free Download Manager
Fresh Download
frozen applications, closing
FTP (File Transfer Protocol)
accessing sites in Explorer
script for creating Internet fish tank
server restrictions
show as folder in Internet Explorer
use passive mode
full-duplex connections
Function statement (VBScript)
functions
in VBScript
that return properties of drives
used to manipulate files
used to manipulate folders

Index
[SYMBOL] [A] [B] [C] [D] [E] [F] [G] [H] [I] [J] [K] [L] [M] [N] [O] [P] [Q] [R] [S] [T] [U] [V] [W] [Y] [Z]
games, performance enhancement
GART W2K Miniport Driver (BIOS setting)
gateway
General tab (Explorer Folder Options)
GetAttributes( )function
GetSpecialFolder function
GetSystemFolder( ) function
GetTempFilename( ) function 2nd
GetWindowsFolder( ) function
GIF files, icon previews for
Go button, show in Address Bar
Gopher
goto command (DOS)
GoToMyPC
graphics files, icon previews for
Green PC Monitor Power State (BIOS setting)
Group Policy window
groups
adding
disabling account
modifying
viewing members

Index
[SYMBOL] [A] [B] [C] [D] [E] [F] [G] [H] [I] [J] [K] [L] [M] [N] [O] [P] [Q] [R] [S] [T] [U] [V] [W] [Y] [Z]
half-duplex connections
hand strain, reducing
Hard Disk Power Down Mode (BIOS setting)
Hard Disk Write Protect (BIOS setting)
hard disks
backing up entire system
cache settings for offline access
changing drive letters
check for errors
clean up
clusters
compress drive
controllers, troubleshooting
convert to dynamic disk
defragmenting 2nd
enable/disable write caching
Indexing Service
list volumes
partitions
creating and deleting
disk fragmentation and resizing
Disk Management utility
resizing
quota management
quota security policies
random disk activity, eliminating
removing unnecessary files
share on network
slack space
transferring Windows onto
troubleshooting
turn off to save power
volumes, mounting
Hard-Disk Drive Sequence (BIOS setting)
hardware
CD/DVD drives, AutoPlay and
change driver for a device
configuration options
conflicts, resolving
Device Manager [See Device Manager]
devices failing to release IRQ
driver information for a device
driver signing options

enable/disable
expansion cards, determining best slot for installation
firmware, upgrading
games, improving performance
icons (taskbar), deleting
install
installation
IRQ Steering settings
list devices
list drivers
list resources used
migration compatibility issues
network cards [See networking, network cards]
places to look for drivers
PnP, troubleshooting
preventative maintenance
profile settings
resources in use by a device
security policies
show all installed devices
support
troubleshooting Windows XP installation problems
uninstall
Universal Plug and Play support
unsupported, finding drivers
Hardware Abstraction Layer (HAL)
Hardware Interrupt Storm (BSoD error)
Hardware Reset Protect (BIOS setting)
HDD S.M.A.R.T. Capability (BIOS setting)
help
pop-up help windows
show in Start Menu (XP Start Menu only)
Hewlett-Packard printers
hex editors
removing New items in context menus
Hibernate mode
troubleshooting
versus Stand by mode
hibernation, enable/disable
hidden devices, showing in Device Manager
Hidden files and folders option (Explorer Folder Options)
hidden files and folders, show/hide
hidden settings (Registry), locating
Hide extensions for known file types option (Explorer Folder Options)
Hide protected operating system files option (Explorer Folder Options)
High Color
high-speed Internet connections 2nd
PPPoE
HijackThis
history lists, Recent Documents
history of Windows OSes
Hit DEL Message Display (BIOS setting)

hive files
HKEY_CLASSES_ROOT branch
file-type information and
HKEY_CURRENT_CONFIG branch
HKEY_CURRENT_USER branch
locating keys for particular settings
HKEY_LOCAL_MACHINE branch
locating keys for particular settings
HKEY_USERS branch
HLP files, deleting
Hour() (VBScript)
hourglass, change icon
HTML editor, default
HTTP (Hypertext Transfer Protocol)
HTTPS (HTTP over TLS/SSL)
hubs
hung applications, closing

Index
[SYMBOL] [A] [B] [C] [D] [E] [F] [G] [H] [I] [J] [K] [L] [M] [N] [O] [P] [Q] [R] [S] [T] [U] [V] [W] [Y] [Z]
IBM ViaVoice
IconHandler key (Registry)
icons
Control Panel, removing
desktop
classic style
customizing context menus
deleting
deleting Recycle Bin
hiding all
removing default
renaming
selecting for objects
desktop icons (show/hide)
drive icons, customizing
folders, customizing
highlight color & font
increasing size of
removing stubborn icons
repair
show shadows under icon captions
show translucent selection rectangle when highlighting multiple icons
single-click or double-click
size on desktop and in folders
spacing on desktop and in folders
for system objects
taskbar tray
adding
deleting
hiding
thumbnail previews as
tray, deleting
underline captions
IDE BusMaster (BIOS setting)
IDE Controller (BIOS setting)
IDE controllers
CD/DVD drives and
troubleshooting
IDE HDD Block Mode (BIOS setting)
if command (DOS)
If...Then statement (VBScript)
creating smart phone dialing
images

show as thumbnails in Explorer
show in web pages
show placeholders in web pages (if pictures are disabled in web pages)
IMAP3 (Internet Mail Access Protocol version 3)
IMAP4 (Internet Mail Access Protocol version 4)
importing Registry patches
in-use files, deleting
Inaccessible Boot Device (BSoD error)
Indexing Service
turning off
Indexing Service, enable/disable for individual drives
INF files (drivers)
infinite loop problem 2nd
inheritance, permissions
INI files
initialization files (INI files)
application installers and
InputBox command (VBScript) 2nd
insertion point
change
Install On Demand, enable/disable
Install Optional Windows Components option
Install Windows XP option
install.exe files, dragging and dropping
installation
backups and
on clean systems
from Command Prompt
device drivers
drivers
Microsoft Backup
migration
compatibility issues
troubleshooting compatibility issues
new hardware
reinstalling Windows XP
troubleshooting
upgrading from previous Windows versions
interfaces [See also desktop]
design issues, Explorer and
Registry and, adding options to Folder View dialog box
Search tool
Windows design issues
Internal Cache (BIOS setting)
Internet
disconnecting from automatically
The Internet (CLSID)
Internet Call, default application
Internet Connection
hanging up automatically
set up
Internet Connection Firewall (ICF)

Internet Connection Sharing
alternatives to
configuration
downsides
troubleshooting
verifying enabled
Internet connections
fixing with new MTU
sharing
using Virtual Private Networking
Internet Control Message Protocol (ICMP)
Internet Explorer
abbreviate link addresses in status bar
ActiveX settings
additional security policies
animated GIFs (enable/disable)
AutoComplete settings
automatically check for updates
automatically download linked pages for desktop web pages
automatically update desktop web pages
buttons & controls, use display settings
cache settings
cache settings for encrypted pages
cache, clear automatically when browser is closed
certificates for secure sites
check to see if it is default browser
colors & fonts
cookies
default home page
desktop icon
disable compositing effects when using Terminal Server
download complete notification
enable/disable HTTP 1.1
enable/disable moving or resizing web page items on desktop
enlarge picture boxes to accommodate ÒALTÓ captions (if pictures are disabled in web pages)
explain server error messages
fading animation when moving from one web page to another
Go button
hand icon (change)
hide infrequently used Favorites
History settings
icon, change
icon, show on desktop
image placeholders (if pictures are disabled in web pages)
Image Toolbar (enable/disable)
Java
Link underline
list additional settings
Media Bar content
navigation keys
plug-ins (enable/disable)
print background colors and images when printing web pages

profile assistant (enable/disable)
restrict certain sites
reuse folder windows when launching shortcuts
save form data
saved web pages, link to image folder 2nd
script debugging
script error notification
search, choose prefixes
search, from Address Bar
search, use classic
show web page on desktop
shrink large images to fit browser window
smooth scrolling
sounds (enable/disable)
SSL settings
status bar shows abbreviated link addresses
toolbar background
underline links
use passive mode in FTP
video clips (enable/disable)
view source, choose program
warning for redirected form submission
warnings, enable/disable
Internet Explorer (CLSID)
Internet Explorer Cache (CLSID)
Internet Explorer, VBScript and
Internet fish tank, creating
Internet icon, show in Start Menu (XP Start Menu only)
Internet Shortcuts
accessing FTP sites
changing icon for
creating using scripts
using same folder window or Explorer window to open web page
Internet Time feature
IP addresses
configuring
determining
multiple
as alternative to Internet Connection Sharing
static
versus PPPoE connections
ipconfig command 2nd
IPSec (PPTP Passthrough for VPN, Virtual Private Networking) 2nd
IRQ3, IRQ4, IRQ5, etc. (BIOS setting)
IRQs
Assign IRQ For USB (BIOS setting)
Assign IRQ For VGA (BIOS setting)
communication ports and
hardware devices failing to release
Plug and Play and
IsoBuster

Index
[SYMBOL] [A] [B] [C] [D] [E] [F] [G] [H] [I] [J] [K] [L] [M] [N] [O] [P] [Q] [R] [S] [T] [U] [V] [W] [Y] [Z]
Java
compile applets before running using JIT (Just In Time) compiler
console
logging
security settings
JavaScript, WSH support for 2nd
joystick settings
JPG files, icon previews for
jumpers
configuring resources 2nd
motherboard problems and

Index
[SYMBOL] [A] [B] [C] [D] [E] [F] [G] [H] [I] [J] [K] [L] [M] [N] [O] [P] [Q] [R] [S] [T] [U] [V] [W] [Y] [Z]
Kaspersky Antivirus Personal
Katz, Phillip
Kazaa Lite
Kerberos
Kerio Personal Firewall
Kernel Data Inpage Error (BSoD error)
Kernel Stack Inpage Error (BSoD error)
keyboard
choose international layout
enable alternative device
ignore brief or repeated keystrokes
specify type
speed (repeat rate and delay)
Windows logo key combinations (enable/disable)
keyboard shortcuts
Explorer
hide until Alt key is pressed
show in menus and windows
keyboards
fine-tuning/upgrading
NumLock key behavior
keys, Registry [See Registry, keys]
Kmode Exception Not Handled (BSoD error)

Index
[SYMBOL] [A] [B] [C] [D] [E] [F] [G] [H] [I] [J] [K] [L] [M] [N] [O] [P] [Q] [R] [S] [T] [U] [V] [W] [Y] [Z]
L2TP (Layer Two Tunneling Protocol)
LAN (Local Area Network)
LAN connections
LAN wireless, reasons for using
language settings
for non-Unicode applications
for text entry
in web pages
languages, using more than one
laptops, adding WiFi support
Last Known Good Configuration startup mode
Launch folder windows in a separate process option (Explorer Folder Options)
Layer Two Tunneling Protocol (L2TP)
LCase function
legacy devices
Legacy USB Support (BIOS setting)
lights, indicating active connections
listboxes, enable/disable animation
LNK files
local resources (networks)
Local Security Authority subsystem
Local Users and Groups policy editor
Lock the taskbar option
lock-ups compared to crashes
LOG files, deleting
log off
show in Ctrl-Alt-Del window
show in Start Menu (Classic Start Menu only)
log on
Administrator account
automatic log on
automatically
limiting
preventing bypassing
options
parse Autoexec.bat
requiring Ctl-Alt-Del
scripts policies
security policies
use Welcome screen
Log On dialog
customizing
changing colors

log on message
last typed username, hiding
replacing Welcome screen
logical drives
login window, turning off
logo (startup), changing
logon script, changing
long filenames in Command Prompt
loops
in DOS batch files
in VBScript scripts
Lotus Notes mail routing
Low Voltage Differential (LVD) Ultra2/Ultra 160 SCSI chains
lsass.exe (background process)

Index
[SYMBOL] [A] [B] [C] [D] [E] [F] [G] [H] [I] [J] [K] [L] [M] [N] [O] [P] [Q] [R] [S] [T] [U] [V] [W] [Y] [Z]
magnifier, move with focus change in web pages
mail notification (Welcome screen), turning off
Mail Server, restrictions
maintenance (preventative), hardware
malicious software
malware
Managing pairs of Web pages and folders option (Explorer Folder Options)
MapNetDrive subroutine (VBScript)
MapNetPrinter subroutine (VBScript)
mapping drives 2nd
Master/Slave Drive UltraDMA (BIOS setting)
McAfee VirusScan
md command (DOS)
memory
adding 2nd
determining if faulty
modules
priorities
random hard disk activity, eliminating
RDRAM
selecting
show amount of memory installed on display adapter
show amount of system memory installed
SIMMs/DIMMs
system requirements
system resources
troubleshooting
video cards and
virtual memory
eliminating
optimizing performance
Memory Hole at 15M-16M (BIOS setting)
Memory Write Posting (BIOS setting)
menus [See also Start Menu]
animation (enable/disable)
context
adding Encrypt and Decrypt
dragging and dropping and
fading (enable/disable)
fonts & colors
highlight color & font
optimizing
shadows (enable/disable)

size
speed
stopping from following mouse
underlined keyboard shortcuts (show/hide)
message boxes
adding to scripts 2nd
font
sound
text color
Microangelo, customizing icons
Microsoft Backup program, installing
The Microsoft Network (CLSID)
Microsoft Office 2000, editing Places Bar
Microsoft Windows Upgrade Advisor (MSUA)
Microsoft's PowerToys for Windows XP
Microsoft's Software Update Services (SUS)
Microsoft's support web site for scripting technologies
migration
compatibility issues
troubleshooting
miniport drivers
Minute() (VBScript)
Mismatched Hal (BSoD error)
modems
dial-up networking
phone-line surge protectors
settings
slow connection speeds for
troubleshooting
using to wake computer
modules
memory
monitors
troubleshooting
video cards and multiple monitors
Month() (VBScript)
Most Recently Used (MRU) lists
motherboards
BIOS, troubleshooting Windows XP installation problems
configuring parallel port
troubleshooting 2nd
mounting volumes
mouse
auto-raise windows
configuring to wake your system
control with keyboard
cursor, symbols when dragging and dropping
detect accidental double-clicks
double-click sensitivity
double-click speed
drag without holding down buttons
drag-drop sensitivity

enable alternative device
fine-tuning/upgrading
hide when typing
hot tracking effects
hot tracking effects color
hover sensitivity
left-handed use
move to default button when window is opened
pointer
precise control enhancement
sensitivity
shadow
show location with animated circles when Ctrl is pressed
specify type
speed
stopping menus from following
switch left and right buttons
trails
wheel, use for scrolling
movable folders and CLSIDs
move command (DOS)
Move system caret with focus/selection changes command
moving
files/folders, methods
objects 2nd
MPS Version Control (BIOS setting)
MRU (Most Recently Used) lists
MS-DOS [See DOS]
Msbexp.exe file
Mscreate.dir file, deleting
msdownld.tmp folder, deleting
MsgBox command (VBScript) 2nd
~Mssetup.t folder, deleting
MTU (Maximum Transmission Unit), troubleshooting shared connections
multibooting
configuring
filesystem compatibility
multiple hard drives
multiple files, renaming
My Computer
change icon
CLSID
interaction with My Network Places
launching Explorer
objects, adding
removing from desktop
renaming icon
show Control Panel
show first on desktop
show icon on desktop
show in Start Menu (XP Start Menu only)
My Documents

advantages of
change icon
changing target for
clear recently opened documents from Start Menu (Classic Start Menu only)
clear recently opened documents from Start Menu (XP Start Menu only)
CLSID
folder location
renaming icon
show as menu in Start Menu (XP Start Menu only)
show first on desktop
show icon on desktop
show in Start Menu (Classic Start Menu only)
show recently opened on Start Menu (XP Start Menu only)
My Music
repair folder
show as menu Start Menu (XP Start Menu only)
My Network Places
CLSID
history (enable/disable)
icon, change
icon, show on desktop
interaction with My Computer
objects, adding
renaming icon
show in Start Menu (XP Start Menu only)
View workgroup computers in common task pane (show/hide)
My Pictures
folder location
repair folder
show as menu in Start Menu (Classic Start Menu only)
show in Start Menu (Classic Start Menu only)
show in Start Menu (XP Start Menu only)
My Videos
repair folder

Index
[SYMBOL] [A] [B] [C] [D] [E] [F] [G] [H] [I] [J] [K] [L] [M] [N] [O] [P] [Q] [R] [S] [T] [U] [V] [W] [Y] [Z]
nameservers
naming
desktop icons
files
methods
Napster-like programs
ÒNaturalÓ keyboards from Microsoft
natural-speech dictation
Navigation keys on special keyboards, customize
navigation, stopping menus from following mouse
Nero Burning ROM
.NET passwords
NetBEUI protocol
NETBIOS Session Service
NetMeeting, make default for Internet Calls
Netscape developer information
netstat.exe [See Active Connections utility]
network adapter (NIC)
network connection icons (taskbar), deleting
network connections
automatically dial
prioritizing
security policies
show as menu in Start Menu (Classic Start Menu only)
show in Start Menu (Classic Start Menu only)
show in Start Menu (XP Start Menu only)
testing
Network Connections window
configuration
Internet Connection Sharing
Network Identification Wizard
Network Neighborhood
Network Setup Wizard
networking
add new connection
advanced adapter settings
Authentication
bindings
bridge two connections
computer description
computer name
connect to shared printer
connection status

connections, changing status
dial-up connections
disconnect mapped network drive
DNS settings
enable/disable
file and printer sharing
firewalls 2nd
include in Files or Folders search
install a network protocol or service
Internet Connection Sharing
alternatives to
configuration
troubleshooting
IP address and other connection information
IP addresses, configuring
join a Windows NT domain
local resources compared to remote resources
map network drive
mapping drives
network cards
drivers for
troubleshooting
network types
peer-to-peer workgroups, creating
preliminary setup
priorities
protocol, enable or disable for a connection
Quality of Service (QoS) Packet Scheduler, disabling
remote-control software
security
eliminating backdoors
threat categories
security policies
set IP address
set multiple IP addresses
share printer
shared resources, accessing
sharing folders
show icon in taskbar notification areawhen connected
SNMP components (install/uninstall)
TCP/IP filtering
TCP/IP settings
terminology
throughput, testing
uninstall a protocols or service
VBScript for
Virtual Private Networking (VPN)
Windows Firewall
alternatives
WINS settings
wireless [See WiFi]
New Connection Wizard

dial-up connections
new-style Start Menu
contents
customizing
newsgroup reader, default
newsgroups
NICs (Network Interface Cards), troubleshooting
nLite
Nmap Security Scanner
NMap web site
NNTP (Network News Transfer Protocol)
NNTPS (Network News Transfer Protocol over SSL)
No More System PTEs (BSoD error)
Norton Ghost
Norton Personal Firewall
Norton Speed Disk
Norton Utilities
Notepad
launching
using with VBScript 2nd
Notification Area
notification feature, auto-insert
Now() (VBScript)
NTFS (NT filesystem)
converting to
performance optimization
NTFS Encryption Utility
NTFS filesystem (BSoD error)
NTP (Network Time Protocol)
NTUSER.DAT file, backing up
numbers, customize display
NumLock key, behavior of
Numlock State (BIOS setting)
nVidia-based video cards

Index
[SYMBOL] [A] [B] [C] [D] [E] [F] [G] [H] [I] [J] [K] [L] [M] [N] [O] [P] [Q] [R] [S] [T] [U] [V] [W] [Y] [Z]
object permissions, setting
object references (WSH)
objects
copying 2nd
moving 2nd
ownership
shortcuts, creating
ODBC data sources, restrict access
Office 2000, Places Bar
Office XP, Places Bar
offline files
action to take when network connection is lost
automatic synchronization
automatic synchronization on idle
compatibility with computers running on batteries
enable scheduling of desktop web page updates
security policies
settings
synchronize
OLD files, deleting
oldversion.com
Onboard FDD Controller (BIOS setting)
Onboard IR Function (BIOS setting)
Onboard SCSI (BIOS setting)
Open dialog box, Details view
Open With dialog box
OpenGL API
optical drives, as backup solution
optimized drivers for video cards
organization of files
Outlook Express
make default
repair unread mail count
overclocking, improving processor performance with
Overheat Warning Temperature (BIOS setting)
overwritten file types, protecting against

Index
[SYMBOL] [A] [B] [C] [D] [E] [F] [G] [H] [I] [J] [K] [L] [M] [N] [O] [P] [Q] [R] [S] [T] [U] [V] [W] [Y] [Z]
Page Fault In Nonpaged Area (BSoD error)
Page Table Entries (PTEs)
paging file [See swapfile]
Paint Shop Pro 2nd
changing Windows startup logo
Panda Anti-Virus Titanium & Platinum
Parallel Port (BIOS setting)
Parallel Port Mode (BIOS setting)
parallel ports, configuring
parameters
Chkdsk utility
subroutines (VBScript)
parental control of web sites
PartitionMagic 2nd
web site
partitions
creating and deleting
creating when installing Windows XP
Disk Management utility
extended
installing Windows XP, backups and
logical drives
primary
resizing
disk fragmentation and
volumes, mounting
PassMark Sleeper utility
passphrase
passwords
automatically logging on 2nd
limiting
preventing bypassing
change
changing 2nd
expiration
managing network
.NET
preventing forgotten
preventing forgotten passwords
require for exiting screensaver
require for resuming from standby mode
saving in web pages
security policies

setting expiration
show ÒChange PasswordÓ in Ctrl-Alt-Del window
user accounts, automatic expiration
patches
Registry [See Registry, patches]
Windows Update
paths
Registry
show full path in folder windows
system
PC Flank
pcAnywhere 2nd
PCI
slots
video cards
PCI 2.1 Compliance (BIOS setting)
PCI IDE BusMaster (BIOS setting)
PCI IRQ Assignment (BIOS setting)
PCI Latency Timer (BIOS setting)
PCI Pipelining (BIOS setting)
PCL language
PDAs, adding WiFi support
peer-to-peer (P2P)
creating workgroups
file sharing 2nd
Perform Additional Tasks (install option)
performance
animations, disabling
application timeout, reducing
BIOS, list of settings
CD/DVD drives, AutoPlay and 2nd
compared to previous Windows versions
games
hard disks
defragmenting
eliminating random activity
slack space
increasing typing
memory requirements
menus, optimizing
networks, testing throughput
NTFS filesystem
converting to
optimizing
overview
Remote Desktop, connection speeds
SCSI chain length
shared resources
shutdown
automatic
optimizing
speeding up system startup

startup shortcuts, removing for performance optimization
swapfile, deleting
transferring Windows to hard disk
virtual memory
eliminating
peripherals [See drivers hardware]
Perl add-on module
Perl, WSH support for
Permissions window, adding users
permissions, user accounts
inheritance
setting
Personalized Menus option (Start Menu), disabling
personalized menus, Favorites
Photoshop 2nd 3rd
Color Table command
Photoshop, changing Windows startup logo
Picture and Fax Viewer, disabling
Pictures
pictures
user's, selecting
Welcome screen, customizing
PID (Process Identifier)
Ping utility
Places Bar
customizing 2nd
features
Plug and Play (PnP)
characteristics of
detection, preventing
troubleshooting
PME Resume (BIOS setting)
PnP OS Installed (BIOS setting)
Point-to-Point Tunneling protocol
pointer
pointing devices
fine-tuning/upgrading
polling for AutoPlay-enabled CD/DVD drives 2nd
pop-up help windows
POP3 (Post Office Protocol, version 3)
port scanners, external
ports
commonly exploited by worms
TCP/IP
Power Button Mode (BIOS setting)
Power Lost Control (BIOS setting)
power management
shutdown issues
Power Management (BIOS setting)
Power On Function (BIOS setting)
Power Rename utility
power supplies

troubleshooting
PPPoE (Point-to-Point Protocol over Ethernet)
connections
versus static IP addresses
preferences
Explorer, saving
Search tool
Prefetch, launching applications
preventive maintenance
hardware
Primary Display (BIOS setting)
Primary IDE Master (BIOS setting)
Primary IDE Slave (BIOS setting)
primary partitions
Print Server settings
printers
adding WiFi support
advanced settings
cancel printing of all documents
cancel printing of one document
change settings for a single application
change settings for all applications
connect to a printer on your network
install
pause printing
print background colors and images when printing web pages
set default printer
sharing
configuring for
over networks
with other computers on network
show as menu in Start Menu (Classic Start Menu only)
show in Start Menu (XP Start Menu only)
uninstall
view status
printers (CLSID)
printing
directory listings
PCL language
prioritizing network connections
Process Identifier (PID)
processlibrary.com
processor
priorities
show details
Processor Serial Number (BIOS setting)
Processor Speed (BIOS setting)
Processor Type (BIOS setting)
Product Activation
Profile Assistant, enable/disable
profiles (hardware configurations), troubleshooting multiple
Program Files folder

properties
Folder Options
network connections
Recycle Bin
Properties sheets, viewing
protocols
Point To Point Tunneling
PPPoE
seeing which ones are installed
TCP/IP [See TCP/IP]
Wake-on-LAN
proxy settings
PS/2 Mouse Support (BIOS setting)
PXE Resume (BIOS setting)

Index
[SYMBOL] [A] [B] [C] [D] [E] [F] [G] [H] [I] [J] [K] [L] [M] [N] [O] [P] [Q] [R] [S] [T] [U] [V] [W] [Y] [Z]
Quality of Service (QoS) Packet Scheduler, disabling
Quick Boot (BIOS setting)
Quick Launch toolbar, show on Taskbar
Quiet Boot (BIOS setting)

Index
[SYMBOL] [A] [B] [C] [D] [E] [F] [G] [H] [I] [J] [K] [L] [M] [N] [O] [P] [Q] [R] [S] [T] [U] [V] [W] [Y] [Z]
RAM [See memory]
rd command (DOS)
RDRAM (Rambus dynamic random-access memory)
Read-Around-Write (BIOS setting)
ReadFromFile function
Readme files, deleting
Real Player, deleting taskbar icon
Recent Documents 2nd
display, controlling
shortcuts, deleting
Start Menu, deleting from
Recent folder, disabling
recordable CD drives [See CD drives, writers]
Recovery Console 2nd
commands
using wildcards
Recycle Bin
deleting
deleting from desktop
file storage, disabling
messages
removing from desktop
security considerations
settings
Recycle Bin (CLSID)
Recycle Bin Properties
Recycle Bin, desktop icon
referenced objects (WSH)
refreshing desktop
REG_DWORD_BIGENDIAN value type
registered user, view
Registry
accessing with VBScript
backing up
branches
backing up
customizing, adding options to Folder Options dialog box
DAT files
editing
file types and
file-type associations, preventing overwrites 2nd
hidden settings, locating
hive files

keys
adding 2nd 3rd
adding properties
default values 2nd
exporting
locating for particular settings
overview
patches
applying 2nd
automation and
backing up Registry
backward compatibility
changing settings
creating
customizing Places Bar
duplicate keys and values
editing Registry
exporting keys and
importing
search and replace
undo patches
paths
Recycle Bin, deleting/renaming
root branches
searching for CLSIDs
searching for specific data
snapshots of
startup programs
structure and contents
tools
values 2nd 3rd
adding new folder options
Registry Agent tool (Creative Element Power Tools)
Registry Editor
application timeout, reducing 2nd
binary values
desktop icons, customizing context menus
DWORD values
Encrypt and Decrypt commands, adding to context menus 2nd
expanded string values
file listing, printing
file-type associations, protecting
hiding all desktop icons
making a startup script
menus, changing response time
My Computer
adding objects
redirecting
New menu (Explorer), customizing
NTFS, optimizing performance
Picture and Fax Viewer, disabling
Recent Documents menu, hiding

Recent folder, disabling
Recycle Bin, deleting/renaming 2nd
Registry patches
applying
creating
removing stubborn desktop icons
repair
searching Registry
Shared Documents folder, deleting
string array values
virtual memory, optimizing
Registry Search and Replace utility
relocating user system folders
RegistryDelete subroutine
RegistryRead function
RegistryWrite subroutine
reinitializing user settings without restarting
reinstalling Windows XP
Rem command (VBScript)
Remember each folder's view settings option (Explorer Folder Options) 2nd
Remote Assistance
allow invitations to be sent
remote control
Remote Desktop
alternatives
disabling
enable incoming connections
Remote Desktop Sharing (Microsoft Terminal Services)
remote resources (networks)
Remote Wake Up
Remote Wake Up (BIOS setting)
remotely controlling a computer
removable cartridge drives
as backup solution
troubleshooting
removing [See deleting]
ren command (DOS) 2nd
Rename command (Recycle Bin)
renaming
files
methods
multiple files using scripts
Repair command
repeat rate, adjusting
report crashes to Microsoft
Report no FDD for Win95 (BIOS setting)
Reset Config Data (BIOS setting)
resolution
adjusting
troubleshooting video cards
Resource Hacker
changing Windows startup logo

creating new welcome screen
customizing styles and themes
customizing Windows startup logo
resources
assigning to PCI devices
local compared to remote
restarting Windows, Safe Mode
Restore button (File Types window)
restore points, deleting
restoring
after a crash
entire system from backups
RJ-45 setting for 10base-T cables
root branches (Registry)
root directory
files not to delete
unnecessary files
Route 1 Pro
routers
802.11g
as alternative to Internet Connection Sharing
built-in firewalls
firewall feature
roles
wireless
RPC (Microsoft Windows Remote Procedure Call)
over HTTP
rubber bands, selecting items
Run
show in Start Menu (Classic Start Menu only)
show in Start Menu (XP Start Menu only)
Run command
as command prompt
using scripts instead
rundll32.exe (background process)
runtime errors (WSH)

Index
[SYMBOL] [A] [B] [C] [D] [E] [F] [G] [H] [I] [J] [K] [L] [M] [N] [O] [P] [Q] [R] [S] [T] [U] [V] [W] [Y] [Z]
Safe Mode
restarting Windows in
with Command Prompt
Save dialog box, Details view
saving file-type associations
scanners, troubleshooting
Scheduled Tasks
add a task
choose user for a single task
choose user for At service
compatibility with computers running on batteries
creating an Internet fish tank
delete a task
delete completed tasks automatically
enable/disable
enable/disable a single task
log
missed task notification
pause
perform only if computer is idle
repeat settings for a single task
schedule settings for a single task
security policies
sharing, performance considerations
stop hung tasks
Scheduled Tasks (CLSID)
schemes, desktop
screen
screensaver settings
scripting and automation
DOS batch files 2nd
ideas for scripts
Scheduled Tasks
Windows Script Host
scrollbars
color
size
scrolling Start Menu items
SCSI chains
performance issues
terminating
SCSI controllers
cables for

CD/DVD drives and
drivers for
troubleshooting
SDRAM CAS Latency (BIOS setting)
Search and Replace Utility [See Registry Search and Replace Utility]
Search Results listing
Search tool
Explorer windows
interface
limitations
outside of Explorer windows
settings, saving
text in files, limitations
tips
ZIP file support
searching
Address Bar
classic search in Explorer
customize navigation key
include network folders and printers
Registry
Second Boot Device (BIOS setting)
Second() (VBScript)
Secondary IDE Master (BIOS setting)
Secondary IDE Slave (BIOS setting)
sectors, Chkdsk utility and
security
automatically logging on
limiting
preventing bypassing
DOS and
encryption [See encryption]
firewalls [See firewalls]
networks
eliminating backdoors
threat categories
Windows Firewall [See Windows Firewall]
Windows Firewall alternatives
Recycle Bin
shared folders
user accounts, permissions
Windows NT
Security Center 2nd
Automatic Updates
disabling
Firewall
virus protection
Security tab
security threats
backdoors
categories of
selecting

all items in folder
multiple items within folders
using rubber bands
Send To folder
creating shortcuts in
location
sensitivity, mouse
Serial Port 1/2Serial Port A/B (BIOS setting)
Service Pack 2
blocking
downloading Full Network Install release
firewall
improved WiFi support 2nd
initial bad reputation
integrating with Windows XP installation
Security Center utility [See Security Center]
Windows Firewall [See Windows Firewall]
services window, startup programs
services.exe (background process)
set command (DOS) 2nd
SetAttributes subroutine
settings
alphabetic list
BIOS
list of
working with
Explorer
overview
persisting
finding Registry keys for
Recycle Bin
reinitializing without restarting
Search tool
changing defaults
saving
troubleshooting hardware
virtual memory
setup
location of setup files
setup.exe files, dragging and dropping
SFP [See System File Protection]
share permissions, setting
Shareaza
Shared Documents folder, deleting
shared folders
include in searches
make accessible to all users
sharing resources
shell extensions
shell icons, editing
shell keys (Registry), creating file types
shellex keys (Registry), creating file types

ShellNew key
removing New items in context menus
Shift Key, making it ÒstickyÓ
shortcut menus [See context menus]
shortcuts 2nd [See also keyboard shortcuts, Explorer]
Control Panel, creating
creating
in SendTo folder
with VBScript
desktop, as Start Menu alternative
executable files, dragging and dropping
Explorer, creating for
folders, enhancements to
overlay icon
show ÒShortcut toÓ prefix
Show common tasks in folders option (Explorer Folder Options)
Show encrypted or compressed NTFS files in color option 2nd
Show Hidden Devices command
Show hidden files and folders option 2nd
Show shadows under menus/mouse pointer option
Show translucent selection rectangle option
Show window contents while dragging
Show window contents while dragging option
shutdown
automatic
automatic with APM
optimizing
scripts
troubleshooting
shutting down Windows, preventing users from
SID (Security Identifier)
SIMMs (single inline memory modules)
Simple File Sharing
single-click required to open icons
Single-click to open an item option (Explorer Folder Options)
Slide open combo boxes option
Slide taskbar buttons option
slipstreaming
slots [See expansion cards, slots]
Smooth edges of screen fonts option
Smooth-scroll list boxes option
SMP
smss.exe (background process)
SMTP (Simple Mail Transfer Protocol)
snapshots of Registry
SNMP (Simple Network Management Protocol)
software
disk cloning
hard disk partitioning
install or uninstall
install or uninstall (network components)
installation security policies

migration compatibility issues
Registry backups
third-party
Explorer enhancements 2nd 3rd
port scanners
Registry tools
Search-tool enhancements
styles and skins 2nd 3rd
viruses [See antivirus software]
software depository web site
sorting
desktop icons
Start Menu items
Sound Blaster Live!
sound cards, troubleshooting
sounds
beep on errors
default audio devices for playback, recording, and MIDI
disable unwanted audio devices
events that trigger sounds
list devices
mute all
navigation keys on special keyboards
play in web pages
play sounds when Caps Lock, Num Lock, or Scroll Lock is pressed
show visual notification
speaker orientation
speaker troubleshooting
speaker volume
speaker, enable/disable PCspeaker
surround-sound setup
volume
volume from keyboard
SP2 [See Service Pack 2]
SpamPal
speech
recording voice
select preferred audio device
speed
voice selection
volume
Speed Disk utility, optimizing swapfile with
spoolsv.exe (background process)
Spy Sweeper
Spybot - Search & Destroy
spyware
SpywareBlaster/SpywareGuard
SSH (Secure Shell)
for Workstations
Stand by mode
troubleshooting
versus Hibernate mode

Start Menu
alternatives
button look and feel
changing style of
classic
contents
customizing
clear list of recently opened applications
Control Panel items, listing separately
dragging and dropping, executable files
enable dragging and dropping (Classic Start Menu only)
enable dragging and dropping (XP Start Menu only)
folder location
Frequently Used Programs, ban items from list
hide infrequently accessed applications (Classic Start Menu only)
highlight newly installed programs (XP Start Menu only)
items, sorting
look and feel
new style
contents
customizing
number of recently opened applications to show (XP Start Menu only)
open menus when hovering with mouse (XP Start Menu only)
Personalized Menus option, disabling
Recent Documents, deleting
scrolling compared to multiple columns
size of icons (Classic Start Menu only)
size of icons (XP Start Menu only)
Start Windows Normally startup mode
startup
error messages
finding additional information
failure, troubleshooting
folder location
improving speed of
log
logging on automatically
limiting
preventing bypassing
multiboot menu settings
programs run during
replacing Welcome screen with Log On dialog
shortcuts, removing for performance optimization 2nd
sound
troubleshooting modes
VBScript for
startup logo, changing
startup programs, cataloging
static IP addresses
Status Bar, show in Explorer
Status Image Checksum Mismatch (BSoD error)
Status System Process Terminated (BSoD error)

storage media
string array values (Registry Editor)
string values (Registry Editor)
style sheets, impose a single style sheet for all web pages
styles
apply to controls in web pages
creating
Desktop
enable/disable all styles
forcing applications to update
visual style of windows and buttons
StyleXP
stylus/tablet vs. mouse
Sub statement (VBScript)
subroutines
manipulating files from scripts
simulating in batch files
used to manipulate folders
in VBScript scripts
subroutines used to manipulate files
Subscriptions (CLSID)
Supervisor Password (BIOS setting)
support
hardware
Windows NT
surge protectors
Suspend Mode (BIOS setting)
Suspend Timeout (BIOS setting)
svchost.exe (background process)
Svchost.exe file
swapfile
damaged
defragmenting
deleting
enlarging
optimizing virtual memory
setting a constant size
size and location
switches
Sygate Personal Firewall
Sygate Security Scan
Symantec Norton AntiVirus
symbolic links for Registry branches
symbols (mouse cursor), when dragging and dropping
synchronize
System (background process)
System BIOS Cacheable (BIOS setting)
System Date/Time (BIOS setting)
System File Protection (SFP)
system folders, user accounts
System Idle Process (background process)
System Keyboard (BIOS setting)

System Memory (BIOS setting)
system objects
changing icons of
dragging and dropping
Explorer and
icons, customizing
System Overheat Warning (BIOS setting)
system path
system requirements, memory
system resource memory
System Restore 2nd
configuring
disk space usage
enable/disable
policies
status
system tray [See tray]
System.ini file

Index
[SYMBOL] [A] [B] [C] [D] [E] [F] [G] [H] [I] [J] [K] [L] [M] [N] [O] [P] [Q] [R] [S] [T] [U] [V] [W] [Y] [Z]
tape drives
as backup solution
backups and
troubleshooting
targets, changing for Explorer shortcut
Task Manager
frozen applications, closing
reloading Explorer without restarting
show in Ctrl-Alt-Del window
Task Scheduler
taskbar
Address Bar on
flash buttons
group buttons by application
customize
hide when not in use
keep on top of other windows
move to a different screen location
prevent moving and resizing
resize
sliding button animation (enable/disable)
style
tray
customizing
hiding icons
unlocking
Taskbar Notification Area
hide infrequently-accessed applications
network icon
power icon
volume control (yellow speaker)
Tasks option (Explorer Folder Options)
tasks, show extra task pane in folder windows
TCP/IP
filtering
ports 2nd
settings
Telephony settings
Telnet
Telnet Server restrictions
Temp folder
performance issues
Temporary Internet files

clear automatically when browser is closed
policy regarding encrypted pages
settings
Terminal Server
disable compositing effects in Internet Explorer
security policies
terminators for SCSI chains
testing throughput
text cursor
blink rate
blink rate & size
change mouse ÒI-beamÓ cursor
text, searching for in files
TFTP
themes
desktop
Third Boot Device (BIOS setting)
third-party devices
third-party software
Explorer enhancements 2nd 3rd
hard disk partitioning
port scanners
Registry tools
Search-tool enhancements
styles and skins 2nd 3rd
Thread Stuck In Device Driver (BSoD error)
throughput, testing
thumbnail display
file icons
folders, disabling
thumbnails
cache (enable/disable)
image quality
show in Explorer
size
time
customize display
set
synchronize with Internet time server automatically
time service policies
time zone
timeout
application shutdown, reducing
frozen applications
Tiny Firewall
titlebar
font, color, and size
size only
TiVo, adding WiFi support
toolbars
desktop, as Start Menu alternative
Explorer, copying/moving files/folders

size and font for floating toolbar captions
Tools menu (Explorer), Folder Options
Tooltips
animation
animation (enable/disable)
big ÒballoonÓ tooltips that pop up from taskbar notification area
enable/disable (desktop, taskbar, and Explorer only)
fade (enable/disable)
font & color
transferring files, programs for
Transition effects, enable/disable
tray (taskbar)
customizing
icons, hiding
troubleshooting 2nd [See also errors/error messages]
antivirus software
applications, frozen
cameras
CD drives
Chkdsk utility and
debugging WSH scripts
disk drives
drivers
installation
locating
updating and verifying
error messages, finding additional information
hardware
configurations
resolving conflicts
unsupported
Hibernate mode
IDE controllers
installing Windows XP
Internet Connection Sharing
isolating problems
keyboards
memory
modems
monitors
motherboards
power supplies
preventive maintenance
Recovery Console and
commands
using wildcards
scanners
SCSI controllers
shutdown
sound cards
Stand by mode
startup failure

startup modes
tape drives
throughput
USB ports
video cards
workgroup connections
tunnel servers
TurboNet card
TweakUI
AutoPlay, selectively controlling
downloading
Explorer New menu, customizing
folder thumbnail display, customizing
Places Bar, customizing
Windows Shortcuts and
TXT files, deleting
type command (DOS)
Typematic Rate/Delay (BIOS setting)
typing performance, increasing

Index
[SYMBOL] [A] [B] [C] [D] [E] [F] [G] [H] [I] [J] [K] [L] [M] [N] [O] [P] [Q] [R] [S] [T] [U] [V] [W] [Y] [Z]
UltraEdit-32 utility 2nd
removing New items in context menus
VBScript and
web site
Undo command, Explorer
undo, Registry patches for
Unexpected Kernel Mode Trap (BSoD error)
uninstalling hardware/software
uninterruptible power supply (UPS)
Uninterruptible Power Supply (UPS) settings
Universal Plug and Play (UPnP)
UnMapNetDrive subroutine (VBScript)
UnMapNetPrinter subroutine (VBScript) 2nd
Unmountable Boot Volume (BSoD error)
updates
drivers
patching Windows XP
upgrading
BIOS
device drivers 2nd
firmware
installing Windows XP over previous versions
XP, highlights of
UPHClean utility
UPS (uninterruptible power supply)
URL History Folder (CLSID)
URLs
running with VBScript
USB Function (BIOS setting)
USB ports, troubleshooting
USB power management issues
USB, increasing polling interval
Use a background image for each folder type option
Use common tasks in folders option
Use drop shadows for icon labels on the desktop option
Use one setting for all drives option (Recycle Bin)
Use simple file sharing option (Explorer Folder Options)
Use StickyKeys command
Use visual styles on windows and buttons option
user accounts
Administrator, logging in as
common tasks
hiding

passwords
automatic expiration
automatically logging on 2nd 3rd
changing
permissions
inheritance
setting
system folders
User Accounts dialog, types available
user profiles, copying between computers
user-upgradable firmware
usernames in web pages, saving
users
add new user account
adding
allow fast switching between users
assigning to group(s)
changing description
changing home folder
changing password
changing picture
disabling account
multiple profiles for each user account
passwords
pictures, selecting
registered user
removing
renaming
Security Identifiers (SIDs)
security policies
security policies for groups

Index
[SYMBOL] [A] [B] [C] [D] [E] [F] [G] [H] [I] [J] [K] [L] [M] [N] [O] [P] [Q] [R] [S] [T] [U] [V] [W] [Y] [Z]
values, Registry [See Registry, values]
variables
in batch files
in VBScript
VBS files
VBScript scripts 2nd [See also Windows Script Host (WSH)]
accessing Registry
AlreadyMapped function
building
Call statement
compilation errors
conditional statements
creating Windows/Internet shortcuts
debugging
file operations
flow control
functions in
handling command-line parameters
ideas for scripts
InputBox command in
Internet Explorer and
loops in
MsgBox command in
networking functions
Notepad and
object references
resources on
running programs with
runtime errors
startup scripts, making
subroutines in
using variables
writing CGI scripts for web servers
versions
DLLs
drivers
VGA Palette Snoop (BIOS setting)
VIA web site
Video BIOS Shadow/Video BIOS Cacheable (BIOS setting)
video cameras, adding WiFi support
video cameras, troubleshooting
video cards
chipsets for

high-end
improving performance of
memory requirements
optimized drivers and
troubleshooting
Windows XP installation problems
updating drivers for
video clips, deleting AVI files
video game console, adding WiFi support
Video Power Down (BIOS setting)
Video RAM Cacheable (BIOS setting)
video, play in web pages
View tab (Explorer Folder Options)
virtual folders, creating copies
virtual memory
eliminating
optimizing
problems with
settings
settings for optimization
shutdown issues
virtual objects (desktop)
Virtual Private Networking [See VPN]
Virus Warning (BIOS setting)
viruses 2nd [See antivirus software]
Visual Basic (VB)
VNC
VNC (Virtual Network Computing)
voice
calibrate volume settings
playback and recording volume
speech synthesis
volume
volume control icon (taskbar), deleting
VPN (Virtual Private Networking)
connections
over L2TP
over PPTP

Index
[SYMBOL] [A] [B] [C] [D] [E] [F] [G] [H] [I] [J] [K] [L] [M] [N] [O] [P] [Q] [R] [S] [T] [U] [V] [W] [Y] [Z]
W32.BLASTER.WORM virus
Wait for F1 if Error (BIOS setting)
Wake-on-LAN protocol
waking up your system
waking your computer
wallpaper
WAN (Wide Area Network)
warning messages, Recycle Bin
warnings in web pages, enable/disable
WAV files, deleting
.wdl (WatchDog Log) file
web pages
set default browser
set default editor
web server, restrictions
web sites
2-spyware.com
AATools Port Scanner
ACDSee
Ad-Aware Personal Edition
Adaptec/Roxio Easy CD Creator
Adobe Photoshop
Adware Report
Agnitum Outpost
AirNet card
Annoyances.org
AntiVir
antivirus programs
Avast Home Edition
AVG
bandwidth-testing
Counterexploitation
Creative Element Power Tools 2nd
The Definitive BIOS Optimization Guide
DirectX
disk cloning software
Diskeeper
Download Accelerator Plus
Download Express
Dragon NaturallySpeaking
driverguide.com
Easy Media Creator
Eudora

file extension identification
Free Download Manager
Fresh Download
GoToMyPC
HijackThis
IBM ViaVoice
IsoBuster
Kaspersky Antivirus Personal
Kazaa Lite
Kerio Personal Firewall
list of known ÒtrackingÓ hosts
McAfee VirusScan
Microangelo 2nd
Microsoft scripting technologies
Microsoft Windows Upgrade Advisor (MSUA)
Nero Burning ROM
Netscape developer information
nLite
Nmap Security Scanner
Norton Ghost
Norton Personal Firewall
Norton Utilities
nVidia-based video cards
O'Reilly
oldversion.com
Paint Shop Pro
Panda Anti-Virus Titanium & Platinum
PartitionMagic
PartitionMagic utility
PassMark Sleeper utility
PC Flank
pcAnywhere
Perl add-on module
port scanning software
PowerToys for Windows XP
processlibrary.com
RealPlayer utility
Resource Hacker 2nd
Route 1 Pro
Service Pack 2
Shareaza
SMP
software depository of
Sound Blaster Live!
SpamPal
Spy Sweeper
Spybot - Search & Destroy
SpywareBlaster/SpywareGuard
SSH Secure Shell for Workstations
StyleXP
Sygate Personal Firewall
Sygate Security Scan

Symantec Norton AntiVirus
TCP-IP port listings
Tiny Firewall
TurboNet card
TweakUI
UltraEdit-32 2nd
VIA
VNC
WindowBlinds 2nd
Windows Update
WinMX
WinSCP
WinZip utility
WS_FTP
Web View
webcams, adding WiFi support
Week() (VBScript)
Welcome screen
customizing
creating new
pictures
how disabling affects other features in Windows
mail notification, turning off
replacing with Log On dialog
Welcome screen, enable/disable
welcome screen, turning off
WEP encryption
WEP keys 2nd 3rd
WhoIs
WiFi
adding support to any device
configuring networks
connecting automatically to multiple networks
connecting to public wireless network
encryption
ethics of
music players
sniffers
sniffing out networks
troubleshooting
typical setup
WEP and problems connecting
WIN.INI file
startup programs
WindowBlinds 2nd
web site
windows
background of MDI (multiple document interface) windows
background of non-MDI windows
cascade all open application windows
closing crashed applications
closing hidden applications

color of borders
minimize all open application windows
minimize/maximize animation
show outline or full window when dragging
tile all open application windows
titlebar font, color, and size
Windows 95/98/Me computers connecting to XP machines
Windows Explorer [See Explorer]
Windows File Protection, advanced settings
Windows Firewall
allow Internet server services
allow programs to run
alternatives
enable/disable
Internet Control Message Protocol (ICMP)
logging
poking holes in
setting up
Windows folder
deleting files in
Nethood folder
System folder, files not to delete
Temp folder
Windows Media Player, change as default for CDs
Windows Messenger
application sharing and whiteboard
audio and video conferencing (port is chosen dynamically)
file transfer
instant messenging
pop-ups (spam)
Windows Messenger taskbar icon, deleting
Windows NT Service Control Manager
Windows NT Session Manager
Windows OSes, history of
Windows Recovery Console 2nd
commands
using wildcards
Windows Registered User information
Windows Script Host (WSH) 2nd [See also VBScript scripts]
compared to. batch files 2nd
compilation errors
Internet Explorer and
object references
producing CGI programs for web servers
runtime errors
Windows Security Center [See Security Center]
Windows Security dialog, restarting Explorer
Windows Shortcuts
creating using scripts
Windows Task Manager
using Active Connections utility
Windows Update

automatic updating
downloading
Windows version
Windows XP installation CD, customizing
Windows XP installation, integrating Service Pack 2 with
Windows XP Style for screen elements
Wininit.ini, deleting files with
winlogon.exe (background process) 2nd
WinMX
WinSCP
WinZip utility
wiping folders
wireless
access points
bridge
LAN
networking 2nd [See also WiFi]
Authentication tab
routers
placement
setting up
Wireless Networks tab
wiring, networks
wmiprvse.exe (background process)
workgroups
cable issues for
peer-to-peer, creating
Virtual Private Networking
worms
ports commonly exploited by
wrist rests
write caching
Write combining (BIOS setting)
WriteToFile subroutine
WS_FTP

Index
[SYMBOL] [A] [B] [C] [D] [E] [F] [G] [H] [I] [J] [K] [L] [M] [N] [O] [P] [Q] [R] [S] [T] [U] [V] [W] [Y] [Z]
Yahoo! Messenger
Year() (VBScript)

Index
[SYMBOL] [A] [B] [C] [D] [E] [F] [G] [H] [I] [J] [K] [L] [M] [N] [O] [P] [Q] [R] [S] [T] [U] [V] [W] [Y] [Z]
ZIP files
Search tool and
working with


![[GSW] Windows - Stata](https://static.fdokumen.com/doc/165x107/63274b65051fac18490e2cc7/gsw-windows-stata.jpg)