VIENNESE WALTZ - Michael Miller Fabrics
15
PLEASE NOTE: BEFORE BEGINNING YOUR PROJECT, CHECK FOR ANY PATTERN UPDATES AT MICHAELMILLERFABRICS.COM’S FREE PROJECTS SECTION. VIENNESE WALTZ SIZE: 85” x 85” • LEVEL: ADVANCED • PATTERN BY: NATALIE CRABTREE • STARDUST COLLECTION PATTERN AVAILABLE ON: WWW.MICHAELMILLERFABRICS.COM THIS IS A DIGITAL REPRESENTATION OF THE QUILT TOP, FABRIC MAY VARY. p.212.704.0774 | [email protected] | www.michaelmillerfabrics.com
-
Upload
khangminh22 -
Category
Documents
-
view
2 -
download
0
Transcript of VIENNESE WALTZ - Michael Miller Fabrics

please note: before beginning your project, check for any pattern updates at MichaeLMiLLerfabrics.coM’s free projects section.
VIENNESE WALTZSIZE: 85” x 85” • LEVEL: ADVANCED • PATTERN BY: NATALIE CRABTREE • STARDUST COLLECTIONPATTERN AVAILABLE ON: WWW.MICHAELMILLERFABRICS.COM
this is a digital representation of the quilt top, fabric may vary.
p.212.704.0774 | [email protected] | www.michaelmillerfabrics.com

VIENNESE WALTZ
1
www.michaelmillerfabrics.com
FABRIC FHM8820
Stardust Grape1 1/4 yards
FABRIC GHM8820
Stardust Basil1 1/2 yards
FABRIC HHM8820
Stardust Antique2 3/4 yards
FABRIC ACotton Couture
SC5333Vanilla
4 1/4 yards
FABRIC CHM8820
Stardust Teal1 yard
FABRIC DHM8820
Stardust Saturn1 yard
FABRIC JHM8820
Stardust Dirt1 1/8 yards
FABRIC KHM8820
Stardust Currant1 yard
(includes binding)
FABRIC EHM8820
Starcust Graphite 1 1/4 yards
FABRIC IHM8820
Stardust Denim1 1/8 yards
FABRIC ACotton Couture
SC5333Starlight
2 1/4 yards

VIENNESE WALTZ
2
www.michaelmillerfabrics.com
Additional supplies needed: Backing: 7 3/4 yards giving you 3” additional inches on each sideBatting: 91” x 91” piece of batting giving you 3 inches overage on each sideBasic Sewing Supplies, Template Plastic Optional
(WOF = Width of Fabric)
KEY CUTTING INTRUCTIONS
A• Cut (12) 11” x WOF strips. Subcut (72) Curved Template A. Turn the Template 180° after each
cut to best utilize fabric. • Cut (5) 2 5/8” x WOF strips. Cut (72) Template C.
B • Cut (6) 12 ½” x WOF strips. Subcut (36) Curved Template B.
C • Cut (8) 3 ½” x WOF strips. Subcut (112) 3 ½” x 3” rectangles for Colorway 2.
D • Cut (8) 3 ½” x WOF strips. Subcut (112) 3 ½” x 3” rectangles for Colorway 2.
E • Cut (11) 3 ½” x WOF strips. Subcut (144) 3 ½” x 3” rectangles for Colorway 3.
F • Cut (11) 3 ½” x WOF strips. Subcut (144) 3 ½” x 3” rectangles for Colorway 3.
G • Cut (14) 3 ½” x WOF strips. Subcut (192) 3 ½” x 3” rectangles for Colorway 1.
H• Cut (9) 4 ½” x WOF strips for Border 2. • Cut (14) 3 ½” x WOF strips. Subcut (192) 3 ½” x 3” rectangles for Colorway 1.
I • Cut (10) 3 ½” x WOF strips. Subcut (128) 3 ½” x 3” rectangles for Colorway 4.
J • Cut (10) 3 ½” x WOF strips. Subcut (128) 3 ½” x 3” rectangles for Colorway 4.
K• Cut (9) 2 ¼” WOF strips for binding. • Cut (8) 1 ½” x WOF strips for Border 1.
Printing or Copying the Foundation Templates: • Using Foundation Paper Piecing Paper or lightweight computer paper, print or copy (72) Foundation
Templates. Print or copy at 100% or ‘Actual Size’.
• The curved Foundation Template is separated into (2) pieces in order to fit onto standard letter size paper. Both pieces will be sewn together using a ¼” seam during the piecing instructions.
• 1” square included on each page must measure at 1”. The seam allowances included on each foun-dation templates must measure at ¼”. Ensure both measures correctly before proceeding.
(Please Note: The Blocks are featured in (4) colorways. Each cutting instruction listed for Fabrics A-K lists what Colorway it is used for. Separate cut fabric pieces by Colorway.)

VIENNESE WALTZ
3
www.michaelmillerfabrics.com
Foundation Paper Piecing Techniques
(Use the following general foundation paper piecing instructions when creating the curved Foundation Templates. Shorten your stitch length to approximately 1 - 1.5 to create a tighter, more secure seam. This will make paper removal easier. Backstitch frequently to secure fabrics.)
• Refer to the diagrams for fabric placement.
• Print or copy (72) complete Foundation Template Pages using Foundation Paper Piecing Paper. If Foundation Paper Piecing Paper is not available, use thin or recycled printer paper.
• Print or copy foundation templates at 100% or actual size. Be sure that the printer does not scale down your foundation templates. The 1” square must measure at 1”, and the seam allowances in-cluded on each foundation template must measure at ¼”. Ensure both measure correctly before proceeding.
• Cut out the paper piecing templates from all sheets making sure to include the outermost line for the ¼” seam allowance. Group individual foundation papers together for organization. (1) A Tem-plate and (1) B Template create a whole curved piece.
• Complete the paper piecing blocks in order numerically and alphabetically. Use ¼” seams and snip threads for a nice finish.
• When trimming each paper pieced block, be sure that fabric extends to the edge of the paper to secure your block with a ¼” seam.
Foundation Paper Piecing instructions for Colorways 1-4 (Diagrams are shown using Colorway 1.)
1. Place the assigned A1 piece of fabric with the foundation template, wrong sides together. The printed side of paper should be facing up. Ensure that the piece of fabric covers all the neighboring printed lines by at least ¼”. (All cut pieces in this pattern allow for plenty of space for trimming.) Pin in place.
2. Begin by trimming the fabric a ¼” from the printed line between sections A1 & A2 as shown. The trimmed portion of the fabric should hang over the line, and into section A2.
3. Place the assigned A2 piece of fabric, right sides together and edges aligned with the A1 piece of fabric. Pin in place if necessary. Ensure that once sewn, fabrics will cover all neighboring lines by at least ¼”.
4. Sew along the printed line between A1 and A2 using a short stitch length, backstitching at the beginning and end of the seam. Press A2 fabric out and away from A1.
5. Continue using these methods to complete a full foundation template. Repeat for both the A and B templates.
6. Trim sides, making sure not to cut into the ¼” seam allowance. Snip threads.7. Sew A and B Templates together as shown using the ¼” seam lines provided on the templates.
Press.
VIENNESE WALTZ
4
www.michaelmillerfabrics.com
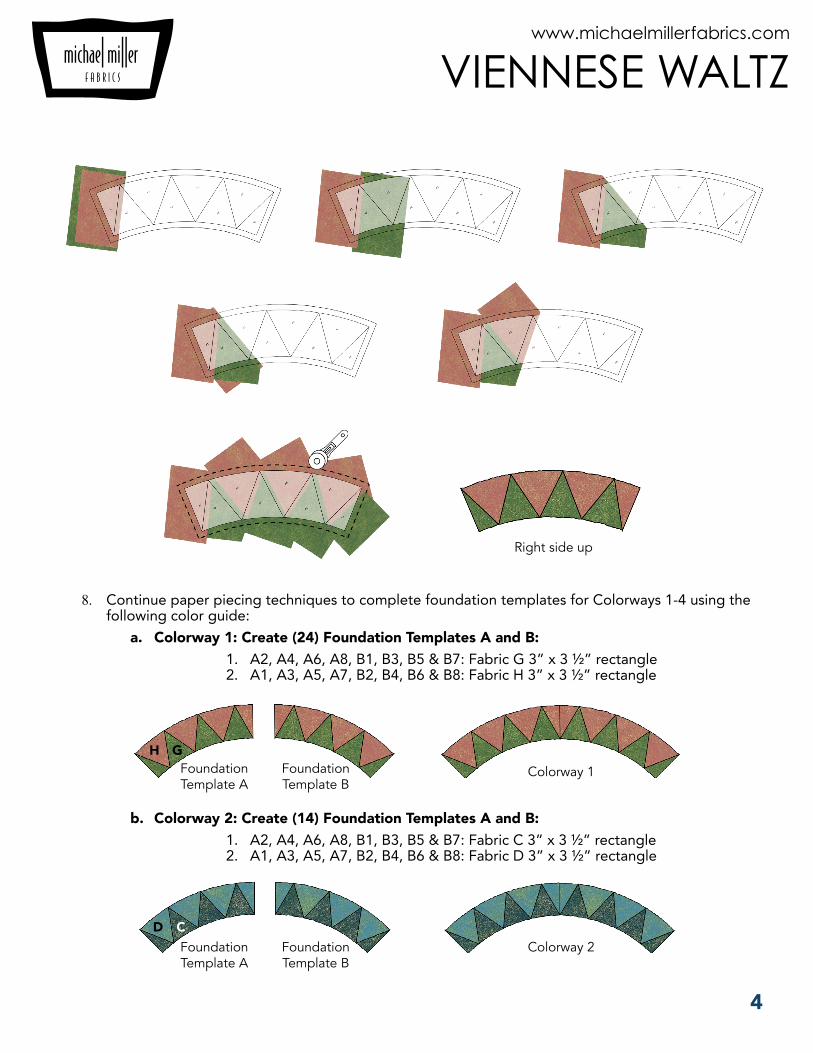
8. Continue paper piecing techniques to complete foundation templates for Colorways 1-4 using the following color guide:
a. Colorway 1: Create (24) Foundation Templates A and B: 1. A2, A4, A6, A8, B1, B3, B5 & B7: Fabric G 3” x 3 ½” rectangle2. A1, A3, A5, A7, B2, B4, B6 & B8: Fabric H 3” x 3 ½” rectangle
b. Colorway 2: Create (14) Foundation Templates A and B: 1. A2, A4, A6, A8, B1, B3, B5 & B7: Fabric C 3” x 3 ½” rectangle2. A1, A3, A5, A7, B2, B4, B6 & B8: Fabric D 3” x 3 ½” rectangle
Right side up
Colorway 1
Colorway 2
GH
CD
Foundation Template A
Foundation Template B
Foundation Template A
Foundation Template B

VIENNESE WALTZ
5
www.michaelmillerfabrics.com
c. Colorway 3: Create (18) Foundation Templates A and B: 1. A2, A4, A6, A8, B1, B3, B5 & B7: Fabric E 3” x 3 ½” rectangle2. A1, A3, A5, A7, B2, B4, B6 & B8: Fabric F 3” x 3 ½” rectangle
d. Colorway 4: Create (16) Foundation Templates A and B: 1. A2, A4, A6, A8, B1, B3, B5 & B7: Fabric J 3” x 3 ½” rectangle2. A1, A3, A5, A7, B2, B4, B6 & B8: Fabric I 3” x 3 ½” rectangle
9. Sew (1) Fabric A Template C onto either side of a complete curved Foundation Template unit as shown. Press seams toward Fabric A Template C.
10. Complete this step on the following quantity of complete curved Foundation Templates for each Colorway.
a. Colorway 1: Repeat on (12) curved Foundation Templates. b. Colorway 2: Repeat on (7) curved Foundation Templates. c. Colorway 3: Repeat on (9) curved Foundation Templates.
d. Colorway 4: Repeat on (8) curved Foundation Templates.
Colorway 3
Colorway 4
Template C Template C
Colorway 1 Colorway 2 Colorway 3 Colorway 4
EF
IJ
Foundation Template A
Foundation Template B
Foundation Template A
Foundation Template B

VIENNESE WALTZ
6
www.michaelmillerfabrics.com
Block Assembly
11. Fold all Template A, Template B and completed curved Foundation Templates in half as shown in the diagram. Use an iron to press a crease marking the exact centers of each template as shown.
12. Use pins to align the exact centers of (1) Template B and (1) curved Foundation Template without Template C as shown. Use pins to align the ends of each template. The curved Foundation Tem-plate may appear bunched up at this stage, however it will become smooth while sewing.
13. Using a curved seam, sew Template B and the curved Foundation Template together as shown. Sew slowly for accuracy and use your fingers to smooth template edges together as you sew.
14. Press seams toward Template B.15. Use pins to align the exact centers of (1) Template A with (1) side of the unit created in the above
steps. Because Template A is not meant to extend to the ends of the curved Foundation Tem-plates, do not pin Template A to the ends. Instead, pin thoroughly working your way to the ends of Template A from the center pin. This will allow for Template A to be as smooth as possible and properly aligned.
16. Using a curved seam, sew Template A onto the unit. Press seams toward Template A. 17. Repeat curved piecing techniques to attach the curved Foundation Templates with Template C
present on the ends. Press seams toward Template B.18. Repeat on the remaining side of the unit to complete a block. All blocks should measure 12 ½” x
12 ½” unfinished.
Template A
Template B
1/4” seam allowance

VIENNESE WALTZ
7
www.michaelmillerfabrics.com
19. Repeat to create the following quantity of blocks for each Colorway. Total number of blocks is (36). a. Colorway 1: Create (12) b. Colorway 2: Create (7) c. Colorway 3: Create (9) d. Colorway 4: Create (8)
Quilt Assembly
20. Lay out all Block Colorways as shown in the diagram. Various blocks are turned throughout the quilt top to create a curved effect.
21. Begin piecing the quilt top center together in horizontal block rows. Press seams open to reduce bulk.
22. Sew horizontal block rows together to complete the quilt top center.
Create (12) Create (7) Create (9) Create (8)
Colorway 1 Colorway 2 Colorway 3 Colorway 4
VIENNESE WALTZ
8
www.michaelmillerfabrics.com
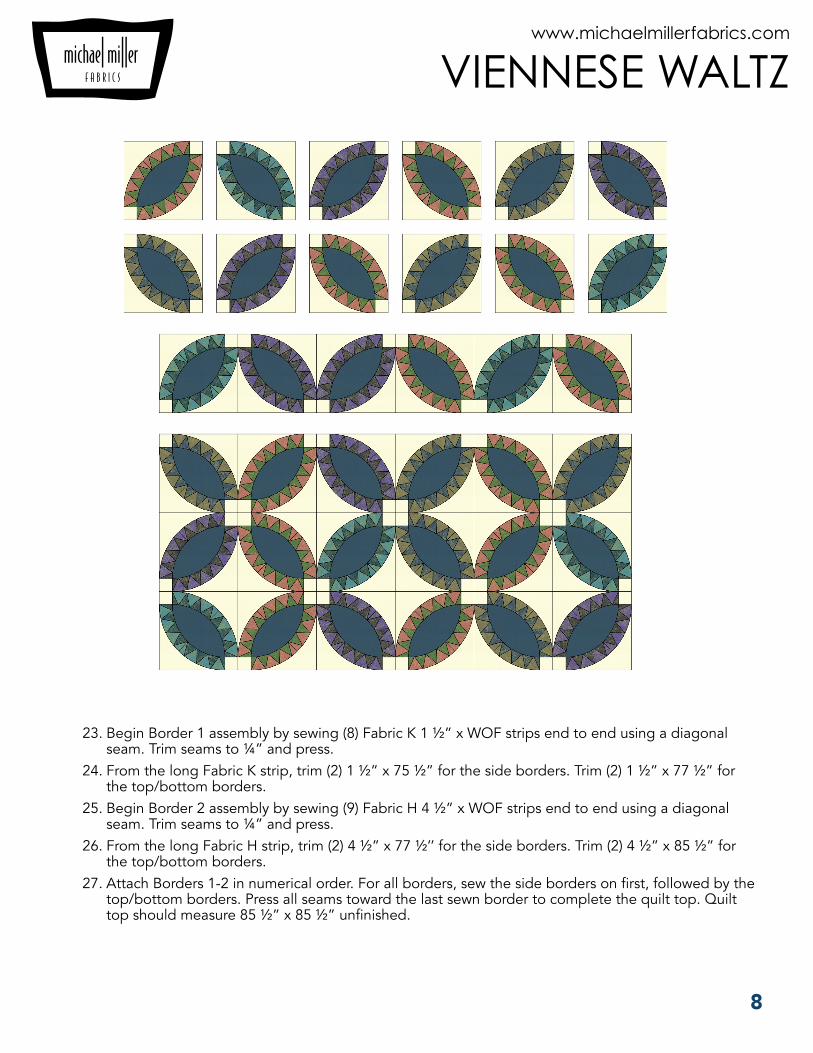
23. Begin Border 1 assembly by sewing (8) Fabric K 1 ½” x WOF strips end to end using a diagonal
seam. Trim seams to ¼” and press. 24. From the long Fabric K strip, trim (2) 1 ½” x 75 ½” for the side borders. Trim (2) 1 ½” x 77 ½” for
the top/bottom borders. 25. Begin Border 2 assembly by sewing (9) Fabric H 4 ½” x WOF strips end to end using a diagonal
seam. Trim seams to ¼” and press. 26. From the long Fabric H strip, trim (2) 4 ½” x 77 ½’’ for the side borders. Trim (2) 4 ½” x 85 ½” for
the top/bottom borders. 27. Attach Borders 1-2 in numerical order. For all borders, sew the side borders on first, followed by the
top/bottom borders. Press all seams toward the last sewn border to complete the quilt top. Quilt top should measure 85 ½” x 85 ½” unfinished.
VIENNESE WALTZ
9
www.michaelmillerfabrics.com
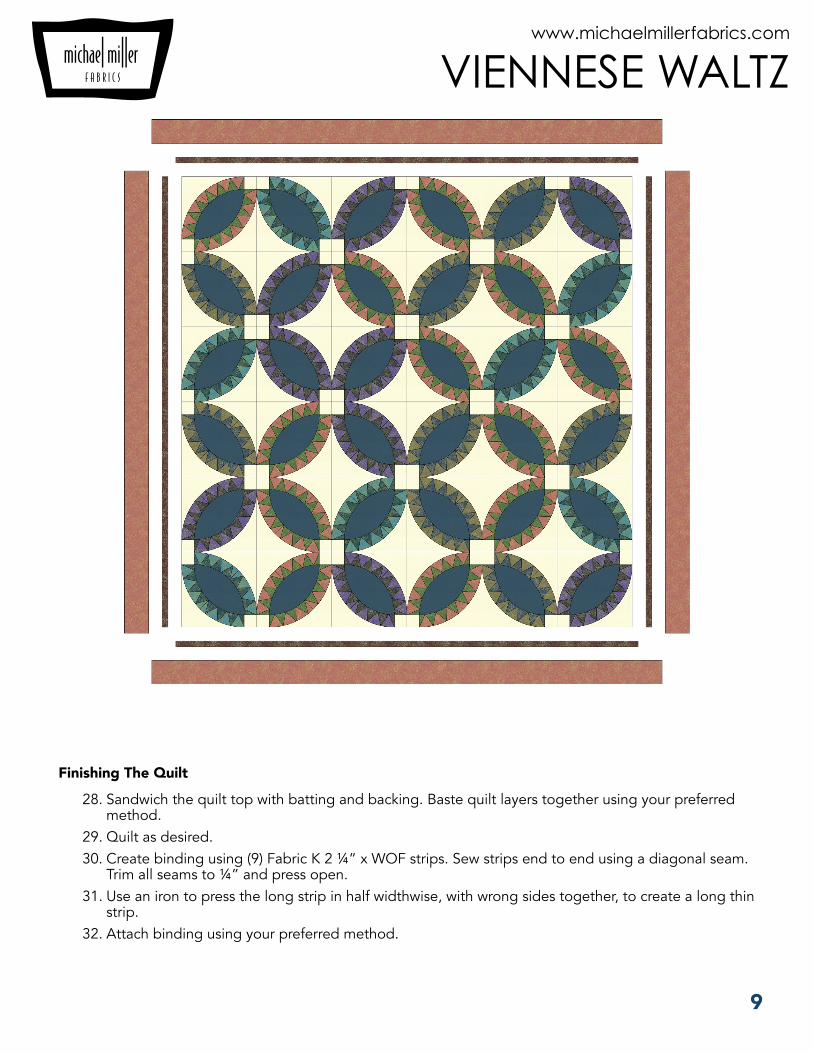
Finishing The Quilt
28. Sandwich the quilt top with batting and backing. Baste quilt layers together using your preferred method.
29. Quilt as desired. 30. Create binding using (9) Fabric K 2 ¼” x WOF strips. Sew strips end to end using a diagonal seam.
Trim all seams to ¼” and press open. 31. Use an iron to press the long strip in half widthwise, with wrong sides together, to create a long thin
strip. 32. Attach binding using your preferred method.

A1
A2A3
A4A5
A6A7
A8
B1 B2
B3 B4
B5 B6
B7 B8
Viennese Waltz by Natalie Crabtree for Michael Miller Fabrics
Foundation Templates
Print or copy (72) of this page at 100% or Actual Size. 1" square must measure at 1", and seam
allowances on foundation templates must measure at 1/4" before proceeding.
1 inch

C
A
C
A
B
Template C
Template B Part 1
Viennese Waltz by Natalie Crabtree for Michael Miller Fabrics
Foundation Templates
1 inch
Templates are printed across multiple pages. Use diagram for reference when taping templates
together.
Template A Part 4

Template B Part 2
Template A Part 1

Template A Part 2

Template A Part 3