Verint Financial Compliance Capture (Verba)
123
Verint Verba Collaboration Compliance Platform 1 Verint Financial Compliance Capture (Verba) This document includes chapters exported from the online Knowledge Base. For the latest online version of the content ofthis document, please visit kb.verba.com © 2021 Verint Systems Inc. © 2021 Verba Technologies Ltd. All Rights Reserved Worldwide.
-
Upload
khangminh22 -
Category
Documents
-
view
0 -
download
0
Transcript of Verint Financial Compliance Capture (Verba)

Verint Verba Collaboration Compliance Platform
1
Verint Financial Compliance Capture (Verba)
This document includes chapters exported from the online Knowledge Base. For the latest online version of the content ofthis document, please visit kb.verba.com
© 2021 Verint Systems Inc. © 2021 Verba Technologies Ltd. All Rights Reserved Worldwide.

Verint Verba Collaboration Compliance Platform
2
1. Install . . . . . . . . . . . . . . . . . . . . . . . . . . . . . . . . . . . . . . . . . . . . . . . . . . . . . . . . . . . . . . . . . . . . . . . . . . . . . . . . . . . . . . . . . . 31.1 Installing the Verba Desktop Agent . . . . . . . . . . . . . . . . . . . . . . . . . . . . . . . . . . . . . . . . . . . . . . . . . . . . . . . . . . . . . . . 51.2 Installing Verba Unified Media Codec . . . . . . . . . . . . . . . . . . . . . . . . . . . . . . . . . . . . . . . . . . . . . . . . . . . . . . . . . . . . 81.3 Installing your Verba servers . . . . . . . . . . . . . . . . . . . . . . . . . . . . . . . . . . . . . . . . . . . . . . . . . . . . . . . . . . . . . . . . . . . . . 11
1.3.1 Prepare your server . . . . . . . . . . . . . . . . . . . . . . . . . . . . . . . . . . . . . . . . . . . . . . . . . . . . . . . . . . . . . . . . . . . . . 131.3.1.1 Operating system configuration . . . . . . . . . . . . . . . . . . . . . . . . . . . . . . . . . . . . . . . . . . . . . . . . . . . . . . . . . 181.3.1.2 Firewall configuration . . . . . . . . . . . . . . . . . . . . . . . . . . . . . . . . . . . . . . . . . . . . . . . . . . . . . . . . . . . . . . . 20
1.3.1.2.1 Firewall configuration for Skype for Business - Lync deployments . . . . . . . . . . . . . . . . . . . . . . . . 211.3.1.2.2 Firewall configuration for Ethical Wall deployments . . . . . . . . . . . . . . . . . . . . . . . . . . . . . . . . . . . . 241.3.1.2.3 Firewall configuration for Avaya recording deployments . . . . . . . . . . . . . . . . . . . . . . . . . . . . . . . . . 251.3.1.2.4 Firewall configuration for Cisco recording deployments . . . . . . . . . . . . . . . . . . . . . . . . . . . . . . . . . 261.3.1.2.5 Firewall Configuration for IPC Unigy recording deployments . . . . . . . . . . . . . . . . . . . . . . . . . . . 281.3.1.2.6 Firewall configuration for BT IP Trade recording deployments . . . . . . . . . . . . . . . . . . . . . . . . . . . 291.3.1.2.7 Firewall configuration for BT ITS recording deployments . . . . . . . . . . . . . . . . . . . . . . . . . . . . . . 301.3.1.2.8 Firewall configuration for Speakerbus recording deployments . . . . . . . . . . . . . . . . . . . . . . . . . . . 311.3.1.2.9 Firewall configuration for Microsoft Teams recording deployments . . . . . . . . . . . . . . . . . . . . . . . . 321.3.1.2.10 Firewall configuration for SIPREC recording deployments . . . . . . . . . . . . . . . . . . . . . . . . . . . . . . 351.3.1.2.11 Firewall configuration for Genesys active recording deployments . . . . . . . . . . . . . . . . . . . . . . . . 36
1.3.1.3 Antivirus scanning exclusions for Verba servers . . . . . . . . . . . . . . . . . . . . . . . . . . . . . . . . . . . . . . . . . . 371.3.2 SQL Server installation . . . . . . . . . . . . . . . . . . . . . . . . . . . . . . . . . . . . . . . . . . . . . . . . . . . . . . . . . . . . . . . . . . 411.3.3 Install the Verba software . . . . . . . . . . . . . . . . . . . . . . . . . . . . . . . . . . . . . . . . . . . . . . . . . . . . . . . . . . . . . . . . . . 43
1.3.3.1 Prerequisites . . . . . . . . . . . . . . . . . . . . . . . . . . . . . . . . . . . . . . . . . . . . . . . . . . . . . . . . . . . . . . . . . . . . . 441.3.3.2 Installing the required prerequisites . . . . . . . . . . . . . . . . . . . . . . . . . . . . . . . . . . . . . . . . . . . . . . . . . . . . . . 481.3.3.3 Installing a Verba Media Repository . . . . . . . . . . . . . . . . . . . . . . . . . . . . . . . . . . . . . . . . . . . . . . . . . . . 501.3.3.4 Installing a Verba Recording Server . . . . . . . . . . . . . . . . . . . . . . . . . . . . . . . . . . . . . . . . . . . . . . . . . . . 581.3.3.5 Installing a Verba Single Server solution . . . . . . . . . . . . . . . . . . . . . . . . . . . . . . . . . . . . . . . . . . . . . . . . 621.3.3.6 Installing a Verba Announcement Server . . . . . . . . . . . . . . . . . . . . . . . . . . . . . . . . . . . . . . . . . . . . . . . . 711.3.3.7 Installing a Verba Speech Analytics Server . . . . . . . . . . . . . . . . . . . . . . . . . . . . . . . . . . . . . . . . . . . . . . . . 751.3.3.8 Installing the Verba Media Collector and Proxy component . . . . . . . . . . . . . . . . . . . . . . . . . . . . . . . . . 791.3.3.9 Installing the Verba Skype for Business - Lync Filter . . . . . . . . . . . . . . . . . . . . . . . . . . . . . . . . . . . . . . . 831.3.3.10 Changing the role of a Verba server . . . . . . . . . . . . . . . . . . . . . . . . . . . . . . . . . . . . . . . . . . . . . . . . . . . 891.3.3.11 Installer Parameters and Unattended Installation . . . . . . . . . . . . . . . . . . . . . . . . . . . . . . . . . . . . . . . . . . 91
1.3.4 Upgrading your Verba system . . . . . . . . . . . . . . . . . . . . . . . . . . . . . . . . . . . . . . . . . . . . . . . . . . . . . . . . . . . . . . . 941.4 Upgrade procedure from Carin recorders . . . . . . . . . . . . . . . . . . . . . . . . . . . . . . . . . . . . . . . . . . . . . . . . . . . . . . . . . 971.5 Verba Remote Installation Service Description . . . . . . . . . . . . . . . . . . . . . . . . . . . . . . . . . . . . . . . . . . . . . . . . . . . . . . 991.6 Installing the Verba Lync extension for Lync 2010 . . . . . . . . . . . . . . . . . . . . . . . . . . . . . . . . . . . . . . . . . . . . . . . . . . . 1011.7 Installing the Verba Lync extension for Lync 2013 . . . . . . . . . . . . . . . . . . . . . . . . . . . . . . . . . . . . . . . . . . . . . . . . . . . 1021.8 Setting up a Verba demo environment . . . . . . . . . . . . . . . . . . . . . . . . . . . . . . . . . . . . . . . . . . . . . . . . . . . . . . . . . . . . 1031.9 Requesting and assigning certificates . . . . . . . . . . . . . . . . . . . . . . . . . . . . . . . . . . . . . . . . . . . . . . . . . . . . . . . . . . . . 1041.10 Verba PowerShell Deployment Toolkit . . . . . . . . . . . . . . . . . . . . . . . . . . . . . . . . . . . . . . . . . . . . . . . . . . . . . . . . . . . . 109
1.10.1 Verba PowerShell Deployment Library . . . . . . . . . . . . . . . . . . . . . . . . . . . . . . . . . . . . . . . . . . . . . . . . . . . . . . 1141.11 How to Install your Verba license . . . . . . . . . . . . . . . . . . . . . . . . . . . . . . . . . . . . . . . . . . . . . . . . . . . . . . . . . . . . . . . 1191.12 Adding the Logon As A Service Right . . . . . . . . . . . . . . . . . . . . . . . . . . . . . . . . . . . . . . . . . . . . . . . . . . . . . . . . . . . . 1211.13 How to switch from Oracle to OpenJDK Java Runtime Environment . . . . . . . . . . . . . . . . . . . . . . . . . . . . . . . . . . . . 122

Verint Verba Collaboration Compliance Platform
3
Install
Installing your Verba Recording System
Correct installation of your Verba Recording System ensures stable operation of your system.
Installation steps:
Step 1 - Download your Verba Install KitStep 2 - Install your Verba Server(s)Step 3 - (Optional) Install your Verba Desktop Recorders
Step 1 - Download your Verba Install Kit
Download your from support site (requires login) and place it on your servers.Verba Install Kit
If you have no login for the Support Site register here: http://support.verba.com
Step 2 - Install your Verba Server(s)
Make sure your servers fulfill the requirements of our Select your server page. The Verba Recording System supports Virtualiz.ation
Based on the choosed , you can start installing the Verba servers and components.deployment archiceture and recording method
Single server - your Media Repository and Recording Server components will be installed .on a single serverMultiple servers - you will install a Media Repository and standalone Recording Servers .on multiple servers
After all servers are prepared, start .Installing your Verba servers
Step 3 - (Optional) Install your Verba Desktop Recorders
The Verba Desktop Recorder component provides desktop recording services. It deployed in your network for requires a Verba serveroperation. This component is required if you plan to use .desktop screen capturing
Start .Installing the Verba Desktop Agent
Table of contents
Installing the Verba Desktop AgentInstalling Verba Unified Media CodecInstalling your Verba serversUpgrade procedure from Carin recordersVerba Remote Installation Service DescriptionInstalling the Verba Lync extension for Lync 2010Installing the Verba Lync extension for Lync 2013Setting up a Verba demo environmentRequesting and assigning certificatesVerba PowerShell Deployment ToolkitHow to Install your Verba licenseAdding the Logon As A Service RightHow to switch from Oracle to OpenJDK Java Runtime Environment
Do you need installation help?
You can with our support team.book a remote installation session

Verint Verba Collaboration Compliance Platform
4

Verint Verba Collaboration Compliance Platform
5
Installing the Verba Desktop Agent
A before starting Desktop Agent installation. Verba Media Repository must be installed The desktop agent installer , it is very important to fully understand kit checks only a limited set of hardware and 3rd party software prerequisites
the before the installation procedure.requirements
Make sure that the following on the desktops where the Verba Desktop Agent is deployed: TCP ports are open 10012 . See .(TCP), 4433 (TCP) Firewall configuration
Manual installation
Installation
Please follow the steps below to install the Verba Desktop Agent:
Step 1 - Launch the installer VerbaDesktop.msi as Administrator
Step 2 - The install kit starts installing Verba components. Simply press the button to start the installation.Next
Step 3 - Read the Verba license agreement carefully before you click button.Next
Step 4 - Select the destination folder for the Verba Desktop Agent. You can change the default setting by clicking on the Change button and selecting another folder. If you have finished the destination folder configuration, press the button.Next
Step 5a - If a Verba CA is being used, then select the "Gen erate Certificate Signed by Verba Media Repository CA"
option, then click on the button. In the Generate Generatethe Verba Server Certificate window provide the address of the first Media Repository server, the Verba administrator username and password, then click . Finally, click Generateon the button. (If this option is being used, Step 5b Nextcan be skipped.)
Step 5b - If there is an existing certificate from a previous Verba Desktop Agent installation (in case of reinstall or upgrade), or a pre-generated certificate for the desktop exists (requested from a local or a 3rd party CA), then select the option, then click on the "Select Certificate" Bro
button.wse
Step 6 - Select the service account type. If the Domain Account is selected then please note the followings:
The account name has to be entered with the domain
Certificates generated by the Verba CA
Based on the Friendly Name of the certificates the server and the CA certificate can be identified easily. On the screenshot, the first one is the server certificate and the second one is the CA certificate.
When do I need domain account?
Ifthemediafileswillbestoredonanetworklocation. In this case, make sure that the service account has rights to the folder.
Verint Verba Collaboration Compliance Platform
6
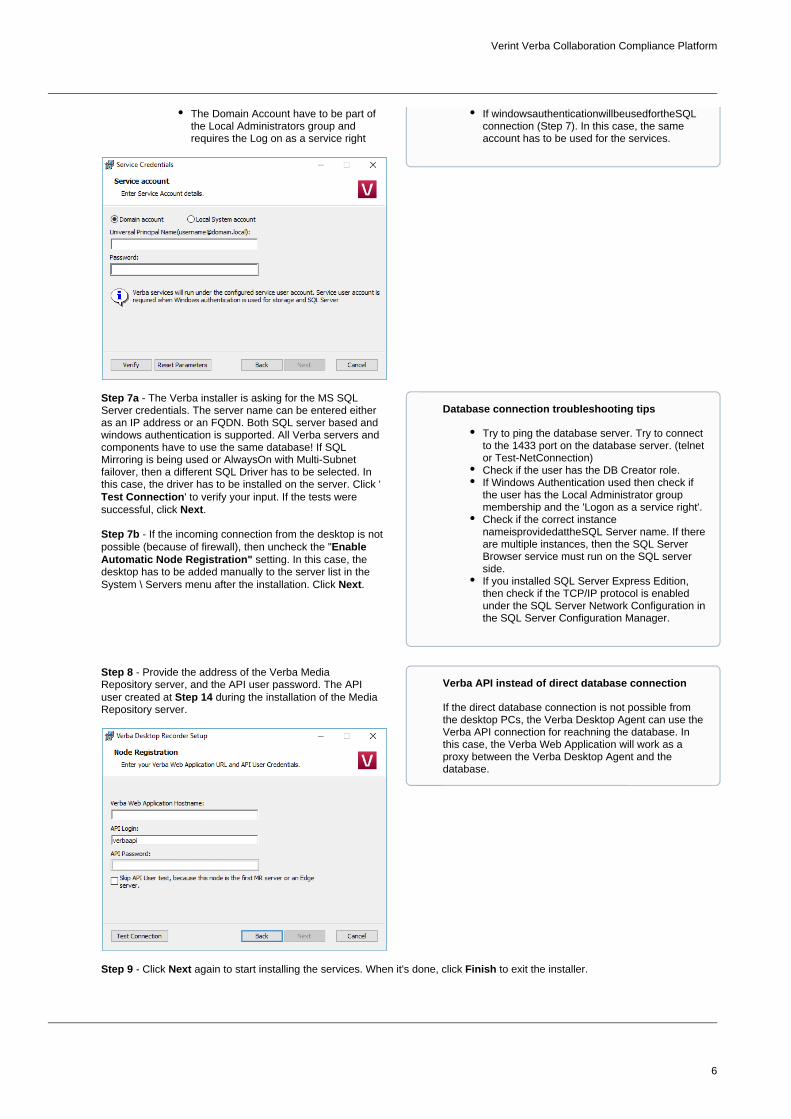
The Domain Account have to be part of the Local Administrators group and requires the Log on as a service right
Step 7a - The Verba installer is asking for the MS SQL Server credentials. The server name can be entered either as an IP address or an FQDN. Both SQL server based and windows authentication is supported. All Verba servers and components have to use the same database! If SQL Mirroring is being used or AlwaysOn with Multi-Subnet failover, then a different SQL Driver has to be selected. In this case, the driver has to be installed on the server. Click '
' to verify your input. If the tests were Test Connectionsuccessful, click .Next
Step 7b - If the incoming connection from the desktop is not possible (because of firewall), then uncheck the "Enable
setting. In this case, the Automatic Node Registration"desktop has to be added manually to the server list in the System \ Servers menu after the installation. Click .Next
Step 8 - Provide the address of the Verba Media Repository server, and the API user password. The API user created at during the installation of the Media Step 14Repository server.
Step 9 - Click again to start installing the services. When it's done, click to exit the installer.Next Finish
If windowsauthenticationwillbeusedfortheSQL connection (Step 7). In this case, the same account has to be used for the services.
Database connection troubleshooting tips
Try to ping the database server. Try to connect to the 1433 port on the database server. (telnet or Test-NetConnection)Check if the user has the DB Creator role.If Windows Authentication used then check if the user has the Local Administrator group membership and the 'Logon as a service right'.Check if the correct instance nameisprovidedattheSQL Server name. If there are multiple instances, then the SQL Server Browser service must run on the SQL server side.If you installed SQL Server Express Edition, then check if the TCP/IP protocol is enabled under the SQL Server Network Configuration in the SQL Server Configuration Manager.
Verba API instead of direct database connection
If the direct database connection is not possible from the desktop PCs, the Verba Desktop Agent can use the Verba API connection for reachning the database. In this case, the Verba Web Application will work as a proxy between the Verba Desktop Agent and the database.

Verint Verba Collaboration Compliance Platform
7
The Verba Desktop Agent from the central web interface before it can work. For more information must be configuredsee Configuring the Verba Desktop Agent
Unattended installation
The Verba Desktop Agent installation package provides an to support automated, enterprise-unattended installation featurewide installation of the software. The installer is MSI based. For more information see Installer Parameters

Verint Verba Collaboration Compliance Platform
8
Installing Verba Unified Media CodecThe Verba system is able to store recorded video and telepresence calls in a unique format called VF (Verba Media Format). Standard Windows Media Player cannot support this file type, so the Verba Unified Media Codec has to be installed on every computer, which would like to playback VF files.
You will need this codec for (listening to ongoing calls) over the web application. For silent monitoring, silent monitoringplease make sure to where you install the Verba Unified Media open UDP port range 16384-16500 on your client PCs,Codec.
Manual installation
Installation
Please follow the steps below to install the Verba Unified Media Codec:
Step 1 - Launch the installerVerbaCodec.msi
Step 2 - Press the button to start the installationNext
Step 3 Read the Verba license agreement and it, before you click button- accept Next
Step 4 - Installer asks for the destination folder(default: C:\Program Files\Verba Media Codec\), click the button to change it.Change
Step 5 - Press the button. Verba setup will copy and install the codec files.Install
Update
Please follow the steps below to update the Verba software:
Step 1 - Launch the installer fileVerbaCodec.msi
Step 2 - Press the button to start the update (If the installer finds a newer or the same version of the product on the computer, the Nextupdate is not possible. Press the button.) Finish
Step 3 - Please press the button. Verba setup will copy and update the components onto the server.Install
Step 4 - After the successful update, please the computer to start the updated services. Restart
Unattended installation
The Verba Unified Media Codec installation package provides an to support the automated, enterprise-wide unattended installation featureinstallation of the software. The installer is MSI based.
Installation
The MSI installer file can be located in the Verba Recording System installation package.
Put the Verba Unified Media Codec MSI installer into a local folder on your desktop PC. Customize the following command for your environment:
msiexec /i VerbaCodec.msi /quiet /LE verbacodec_install.txt
Parameters:
Command Line Parameter Description
/i Installation action.
VerbaCodec.msi Name of the Verba Unified Media Codec MSI package.
/quiet Invokes quiet/unattended installation.
/LE verbacodec_install.txt Write the error log into the verbacodec_install.txt file.

Verint Verba Collaboration Compliance Platform
9
Update
The MSI installer file can be located in the Verba Recording System installation package.
Put the Verba Unified Media Codec installer into a local folder on your desktop PC. Customize the following command for your environment:
msiexec /i VerbaCodec.msi /quiet /LE verbacodec_update.txt
Parameters:
Command Line Parameter Description
/i Installation action.
VerbaCodec.msi Name of the Verba Unified Media Codec MSI package.
/quiet Invokes quiet/unattended installation.
/LE verbacodec_update.txt Wite the error log into the file.verbacodec_install.txt
Troubleshooting
For more verbose logging in case of an installation error use /L*v instead of /LE.
Uninstallation
Command example:
msiexec /X VerbaCodec.msi /quiet /LE verbacodec_uninstall.txt
Parameters:
Command Line Parameter Description
/X Uninstallation action.
VerbaCodec.msi Name of the Verba Desktop Recorder MSI package.
/quiet Invokes quiet/unattended installation.
/LE _uninstall.txtverbacodec Write the error log into the file.verbacodec_install.txt
Troubleshooting
After you've installed the Verba Media Codec and you are still not able to playback Verba video files or start Silent Monitoring, please follow the instructions below:
Step 1 Close all browser window and media player
Step 2 Open a command prompt as administrator
Step 3 Navigate to Verba Media Codec's folder with the following command: cd C:\Program Files\Verba Media Codec
Step 4 Run the following command in the codec's folder: (If registration was successful a dialog panel is regsvr32 verbacodec.dll prompted)
Step 5 Test the playback
If the playback works with a downloaded file, but not in Internet Explorer, please follow the instructions below:
Step 1 Close all browser window and media player

Verint Verba Collaboration Compliance Platform
10
Step 2 Open the Start menu, type "regedit" and press Enter.
Step 3 Locate and then select the following registry entry HKLM\SOFTWARE\Microsoft\Internet Explorer\Main\TabProcGrowth
Step 4 Delete the selected key
Test the playbackStep 5

Verint Verba Collaboration Compliance Platform
11
1. 2. 3. 4.
Installing your Verba servers
Overview of installation typesIn your Verba Recording System you have components for media repository, network-based recorders and desktop recorders. Correct installation is crucial.
Step 1 - Prepare your server
Prepare your server based on the following steps:
Operating system configurationFirewall configurationAntivirus scanning exclusions for Verba servers
For all installation types you will :start with the following steps
Unzip the Verba Install KitRun the program, it will open the installer framework windowautorunClick under point Open Prerequisites Installer Tool 2 Install PrerequisitesInstall all missing prerequisites from top to bottom
We recommend you turn off
Step 2 - Install SQL Server
Please refer to the article.SQL Server installation
Step 3 - Install the Verba software
Your Verba Recording System can have one central component, the and multiple .Media Repository Recording Servers
The following diagram shows the major installation steps for the three major Verba installation types:
Installing the Verba Media Repository - Database and the web application without the recording engineInstalling a Verba Recording Server - Recording engine without database and web applicationInstalling a single server Verba solution - When the Media Repository and Recording Server are installed on a single server
Server installation overview

Verint Verba Collaboration Compliance Platform
12
The following topics guide you through the installation:
Prepare your serverSQL Server installationInstall the Verba softwareUpgrading your Verba system

Verint Verba Collaboration Compliance Platform
13
Prepare your server
Overview
The Verba Recording System has specific server requirements that must be met before the installation of the Verba components can be started. The includes the tool that opens when you start your Verba server installation pack Verba Recording System Prerequisites installation.
We also provide standalone tool to evaluate if all software requirements are met by Verba Recording System Prerequisitesyour system without download the entire installation pack. The exact same functionality can be found in the installation pack, this is provided for installations where server OS and Verba installation are done by different teams.
You can download the installation files from the .support site
Verba Recording System Prerequisites tool
We recommend you to install your system, it guides you through the requirements below.use our installation packThis chapter is only for documentation purposes.
This tool asks a couple of about your installation before it creates a customized prerequisite list.questions('-' means that the question does not have any effect whether the requirement is shown or not, or it is not applicable.)
Question 1:Verba components
Question 2:SQL Server
Question 3:SQL Server Management Studio
Prerequisite title Hint provided by the tool
Mode Installer in the installation pack
- - - Verify Windows version
The Verba Recording System server components require one of the following operating systems:
Windows Server 2012 R2Windows Server 2016Windows Server 2019
The Verba Desktop Recorder supports Windows 8, Windows 8.1, Windows 10
Mandatory -
- - - No existing Verba installation
If you are installing a new system, you should uninstall your existing Verba Recording System before installation.
If you are upgrading this system, you do not have to use this Deployment Planner, just exit and run the Verba MSI Installer directly.
Mandatory -
- - - Verify Administrator Privileges
The Windows User that installs the Verba Recording System must have
Mandatory -
Verint Verba Collaboration Compliance Platform
14
Administrator privileges.
Please add your user to the Administrators group.
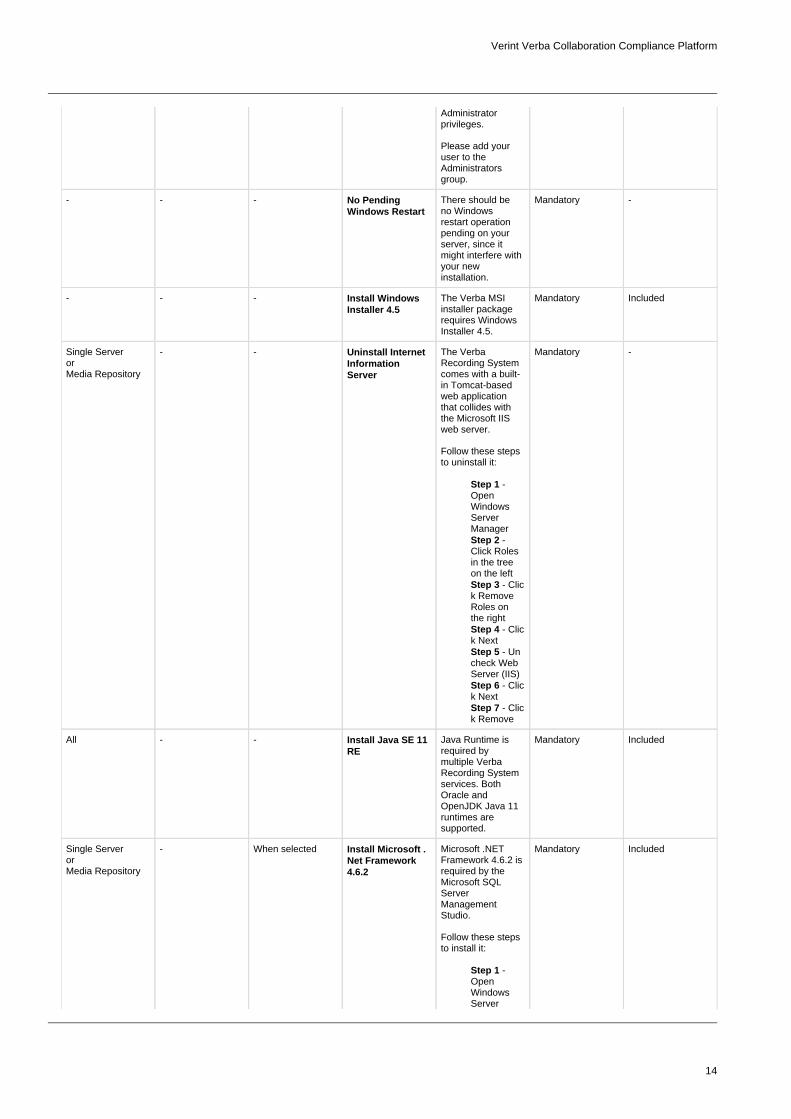
- - - No Pending Windows Restart
There should be no Windows restart operation pending on your server, since it might interfere with your new installation.
Mandatory -
- - - Install Windows Installer 4.5
The Verba MSI installer package requires Windows Installer 4.5.
Mandatory Included
Single ServerorMedia Repository
- - Uninstall Internet Information Server
The Verba Recording System comes with a built-in Tomcat-based web application that collides with the Microsoft IIS web server.
Follow these steps to uninstall it:
Step 1 - Open Windows Server Manager
- Step 2Click Roles in the tree on the left
ClicStep 3 - k Remove Roles on the right
ClicStep 4 - k Next
UnStep 5 - check Web Server (IIS)
ClicStep 6 - k Next
ClicStep 7 - k Remove
Mandatory -
All - - Install Java SE 11 RE
Java Runtime is required by multiple Verba Recording System services. Both Oracle and OpenJDK Java 11 runtimes are supported.
Mandatory Included
Single ServerorMedia Repository
- When selected Install Microsoft .Net Framework 4.6.2
Microsoft .NET Framework 4.6.2 is required by the Microsoft SQL Server Management Studio.
Follow these steps to install it:
Step 1 - Open Windows Server
Mandatory Included

Verint Verba Collaboration Compliance Platform
15
Manager ClicStep 2 -
k Features in the tree on the left
ClicStep 3 - k Add Features on the right
ClicStep 4 - k Next
SelStep 5 - ect .Net Framework 4.6.2 Features
OpStep 6 - en the tree below the .Net feature and uncheck WCF activation (important)
ClicStep 7 - k Next
ClicStep 8 - k Install
Single ServerorMedia Repository
When SQL Server Express is selected
- Install SQL Server 2012 Express or newer
Microsoft SQL Server Express Edition provides free of charge SQL database server backend for the Verba Recording System.We recommend to use Standard or Enterprise edition if you are planning to store and search more than 500.000 calls in your recording system.
Mandatory Included
Single ServerorMedia Repository
When SQL Server is selected
- Install SQL Server 2012 or newer
Microsoft SQL Server provides SQL database server functionality for the Verba Recording System
Mandatory Not included
Single ServerorMedia Repository
- When selected Install SQL Server Management Studio
The Microsoft SQL Server Management Studio provides management capabilities for Microsoft SQL Server.
Optional Not included
Single ServerorMedia Repository
When installed on other server
When not selected Install SQL Server Native Client x64
The Verba Recording System uses Microsoft SQL Server to store data and is capable of using the advanced failover functionality of the SQL Server Native Client 10.0 database driver.
Mandatory Included
Single ServerorMedia Repository
When installed on other server
When not selected Install SQL Server Native Client
The Verba Recording System uses Microsoft SQL Server to
Mandatory Included

Verint Verba Collaboration Compliance Platform
16
store data and is capable of using the advanced failover functionality of the SQL Server Native Client 10.0 database driver.
Single ServerorMedia Repository
- - Install Windows Desktop Experience (Windows Server 2012 R2)
In case you plan to use PC desktop screen and video call recording features your Verba Media Repository requires the Windows Desktop Experience feature.
Follow these steps to install it:
Step 1 Op- en Windows Server Manager
ClicStep 2 - k Features in the tree on the left
ClicStep 3 - k Add Features on the right
ClicStep 4 - k Next
SelStep 5 - ect Desktop Experience
ClicStep 6 - k Next
ClicStep 7 - k Install
- Step 8Restart the server (Important)
Recommended -
Single ServerorMedia Repository
- - Configure Virus Scanning
If not configured properly, any virus scanner on this server can severely impact the performance and reliability of your recording system.
Please make sure you turn off background virus scanning of all your Verba media and log folders.
Recommended -
Single ServerorMedia Repository
- - Verify Time Settings
The Verba Recording System stores all dates in timezone independent UTC time and presents correct local time to each user.
Please verify:
Recommended -

Verint Verba Collaboration Compliance Platform
17
Server time zone matches your local time zoneServer time is correct
Single ServerorMedia Repository
- - Use Separate System and Media Disk
For reliability, performance and backup reasons, we recommend you use separate disk volumes for system and recorded media.
C: (System Disk)D: (Media Disk)
Recommended -
Further information
Find more information in these articles:
Operating system configurationFirewall configurationAntivirus scanning exclusions for Verba servers

Verint Verba Collaboration Compliance Platform
18
Operating system configuration
Please read the following topic carefully before you begin Verba installation! In order to maximize your satisfaction with the Verba recording system please read the following carefully and follow the guidelines of this topic before you begin software installation.
It is important that you follow this topic when you build your Verba servers. Failure to comply with the guidelines in this topic may lead to degraded performance and eventual data loss in your Verba environment. Verba Technologies is not responsible for the security of the HW, operating system and database layers of the Verba recording system. The customer shall install and configure these in accordance with industry best practices for security.
Please follow the following guidelines during the installation of your Windows operating system.
In case you install your server from a customized Windows installer or image please try to configure the installed server according to the guidelines below.
Disk partitioning
The Verba Recording System does not require special disk partitioning, but in order to achieve the best performance and better serviceability we have some recommendations.
System (e.g. C:\) - Operating System and application binaries: minimum 80 GBMedia (e.g. D:\) - Media and database files: the rest of the capacity, please use the storage calculator tool to properly size the hard disks
Regional and Language Options
Set these options to your normal local settings.
Date and Time Settings
For correct time handling please set timezone properly on all servers.
NTP-based time synchronization is strongly recommended.
It is important to note that most date/time information is stored in UTC standard time format in Verba. On the web interface these times are converted to the actual users local time zone. The following table summarizes the time zones used by Verba's different system elements to present date information:
System elements Time zone
User interfaces Web interfaces Time zone setting of the Verba user that logs into the web interface.
Configuration interfaces Time zone setting of the computer that runs the configuration tools.
Log files Local time on the computer that writes the log.
Internal storage SQL database (e.g. call data) UTC time
Configuration data UTC time
Network settings (during installation)
During installation just pick the "typical" settings or configure the network according to your policies. Network settings shall be reconfigured for Verba after the Windows installation is complete.
Install Critical Security Updates and disable automatic updates
After installation please use Windows Update to install the latest patch level for your Windows Server. Be sure that the automatic updates are disabled.
Update firmware and driver versions

Verint Verba Collaboration Compliance Platform
19
Please consult the hardware vendors support site and verify that the following most important items are upgraded to the latest recommended version:
chipset drivernetwork card driverthe RAID controller drivers, RAID controller firmwaredisk firmware
Since Verba is a high disk I/O application you should be extra careful with your disk I/O subsystems, such as RAID controllers and disks.
Network configuration
The following configuration in this topic should only be applied to Recording Server servers or servers where the Media Repository and Recording Server are installed together.
Step 1 Rename network interfaces
In the Network Connections window change the name of the recording interface to , the other interface can get the name Recording PortNetwork access. These new interface names are not used by the Verba system. Verba recording ports must be configured later on. Naming the interface will however avoid confusion in your IT team.
Step 2 Configure the "Recording" interface
If passive recording technology is used, open the properties sheet of this interface and disable Client for Microsoft Networks and File and Printer Sharing. For other recording methods, use the default settings.
Click Show icon in notification area when connected to show the icon to administrators.
Disable Windows Firewall
Disable Windows Firewall on the server in order to provide communication among the networked system components. If your company policy does not allow you to do this, carefully open all ports, which are required for Verba (more information: ).Firewall configuration
Make sure you are reactivating your Windows Firewall after the installation with the proper port and executable exception rules.

Verint Verba Collaboration Compliance Platform
20
Firewall configuration
The components of the system use several network ports for communication. These ports must be open and accessible and not blocked by network or server firewalls. The firewall requirements are available for the following integrations:
Firewall configuration for Skype for Business - Lync deploymentsFirewall configuration for Ethical Wall deploymentsFirewall configuration for Avaya recording deploymentsFirewall configuration for Cisco recording deploymentsFirewall Configuration for IPC Unigy recording deploymentsFirewall configuration for BT IP Trade recording deploymentsFirewall configuration for BT ITS recording deploymentsFirewall configuration for Speakerbus recording deploymentsFirewall configuration for Microsoft Teams recording deploymentsFirewall configuration for SIPREC recording deploymentsFirewall configuration for Genesys active recording deployments

Verint Verba Collaboration Compliance Platform
21
Firewall configuration for Skype for Business - Lync deployments
This chapter summarizes the required inbound firewall configuration for Lync recording deployments. For more general information see Firewa.ll configuration
Server Verba Server Role
Service name Source Port Protocol Notes
SQL Server - - All Verba Servers 1433 TCP SQL connection
Lync Front-End Server / SBA
Lync Filter Verba Node Manager Agent
Verba Media Repository
4433 TCP Central configuration from Verba Web Application
Verba Lync Filter Service
All Verba Servers 10017 TCP Service API port
Verba Lync IM Filter Service
All Verba Servers 10019 TCP Service API port
Lync Front-End Server / SBA with Mediation Server role
Media Collector and Lync Filter
Verba Node Manager Agent
Verba Media Repository
4433 TCP Central configuration from Verba Web Application
Verba Lync Filter Service
All Verba Servers 10017 TCP Service API port
Verba Lync IM Filter Service
All Verba Servers 10019 TCP Service API port
Verba Media Collector and Proxy Service
All Verba Servers 10024 TCP Service API port
Verba Media Collector and Proxy Service
Lync Front-End Server / SBA
10201 TCP Communication with the Verba Lync Filter services
Verba Media Collector and Proxy Service
Verba Recording Server
11112 TCP Communication with Verba Passive Recording services
Lync Mediation Server
Media Collector and Proxy Server
Verba Node Manager Agent
Verba Media Repository
4433 TCP Central configuration from Verba Web Application
Verba Media Collector and Proxy Service
All Verba Servers 10024 TCP Service API port
Verba Media Collector and Proxy Service
Lync Front-End Server / SBA
10201 TCP Communication with the Verba Lync Filter services
Verba Media Collector and Proxy Service
Verba Recording Server
11112 TCP Communication with Verba Passive Recording services
Lync Edge Server Media Collector and Proxy Server
Verba Node Manager Agent
Verba Media Repository
4433 TCP Central configuration from Verba Web Application
Verba Media Collector and Proxy Service
All Verba Servers 10024 TCP Service API port
Verba Media Collector and Proxy Service
Lync Front-End Server / SBA
10201 TCP Communication with the Verba Lync Filter services
Verint Verba Collaboration Compliance Platform
22
Verba Media Collector and Proxy Service
Verba Recording Server
11112 TCP Communication with Verba Passive Recording services
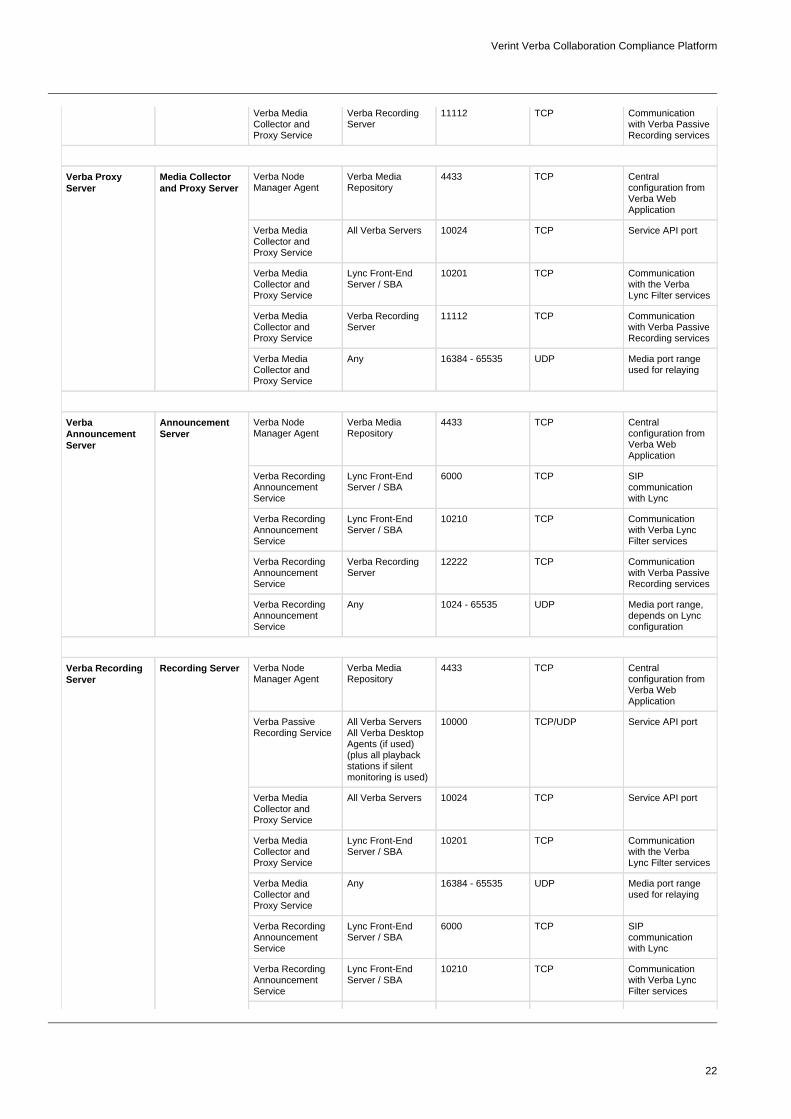
Verba Proxy Server
Media Collector and Proxy Server
Verba Node Manager Agent
Verba Media Repository
4433 TCP Central configuration from Verba Web Application
Verba Media Collector and Proxy Service
All Verba Servers 10024 TCP Service API port
Verba Media Collector and Proxy Service
Lync Front-End Server / SBA
10201 TCP Communication with the Verba Lync Filter services
Verba Media Collector and Proxy Service
Verba Recording Server
11112 TCP Communication with Verba Passive Recording services
Verba Media Collector and Proxy Service
Any 16384 - 65535 UDP Media port range used for relaying
Verba Announcement Server
Announcement Server
Verba Node Manager Agent
Verba Media Repository
4433 TCP Central configuration from Verba Web Application
Verba Recording Announcement Service
Lync Front-End Server / SBA
6000 TCP SIP communication with Lync
Verba Recording Announcement Service
Lync Front-End Server / SBA
10210 TCP Communication with Verba Lync Filter services
Verba Recording Announcement Service
Verba Recording Server
12222 TCP Communication with Verba Passive Recording services
Verba Recording Announcement Service
Any 1024 - 65535 UDP Media port range, depends on Lync configuration
Verba Recording Server
Recording Server Verba Node Manager Agent
Verba Media Repository
4433 TCP Central configuration from Verba Web Application
Verba Passive Recording Service
All Verba ServersAll Verba Desktop Agents (if used)(plus all playback stations if silent monitoring is used)
10000 TCP/UDP Service API port
Verba Media Collector and Proxy Service
All Verba Servers 10024 TCP Service API port
Verba Media Collector and Proxy Service
Lync Front-End Server / SBA
10201 TCP Communication with the Verba Lync Filter services
Verba Media Collector and Proxy Service
Any 16384 - 65535 UDP Media port range used for relaying
Verba Recording Announcement Service
Lync Front-End Server / SBA
6000 TCP SIP communication with Lync
Verba Recording Announcement Service
Lync Front-End Server / SBA
10210 TCP Communication with Verba Lync Filter services

Verint Verba Collaboration Compliance Platform
23
Verba Recording Announcement Service
Any 1024 - 65535 UDP Media port range, depends on Lync configuration
Verba Lync IM Recorder Service
Lync Front-End Server / SBA
10220 TCP Communication with Verba Lync IM Filter services
Verba Dial-in Recorder Service
All Verba ServersAll Verba Desktop Agents (if used)(plus all playback stations if silent monitoring is used)
10006 TCP Service API port
Verba Dial-in Recorder Service
Lync Front-End Server / SBA
5065 TCP SIP communication with Lync
Verba Dial-in Recorder Service
Any 16384 - 65535 UDP Media port range, depends on Lync configuration
Verba Media Repository Server
Media Repository Verba Web Application
Any 80 TCP Used for HTTP-based web access
Verba Web Application
Any 443 TCP Used for HTTPS-based web access
Verba Media Streamer and Content Server Service
Any 10105 TCP Media port for playback via HTTP
Verba Media Streamer and Content Server Service
Any 10106 TCP Media port for playback via HTTPS
Verba Storage Management Service
Verba Recording Server
20111 TCP Communication with Verba Storage Management services, used for secure file upload
Verba Recording Announcement Service
Lync Front-End Server / SBA
6000 TCP SIP communication with Lync
Verba Recording Announcement Service
Lync Front-End Server / SBA
10210 TCP Communication with Verba Lync Filter services
Verba Recording Announcement Service
Verba Recording Server
12222 TCP Communication with Verba Passive Recording services
Verba Recording Announcement Service
Any 1024 - 65535 UDP Media port range, depends on Lync configuration
SQL Server(if co-located on Verba Media Repository)
All Verba Servers 1433 TCP SQL connection
Verint Verba Collaboration Compliance Platform
24
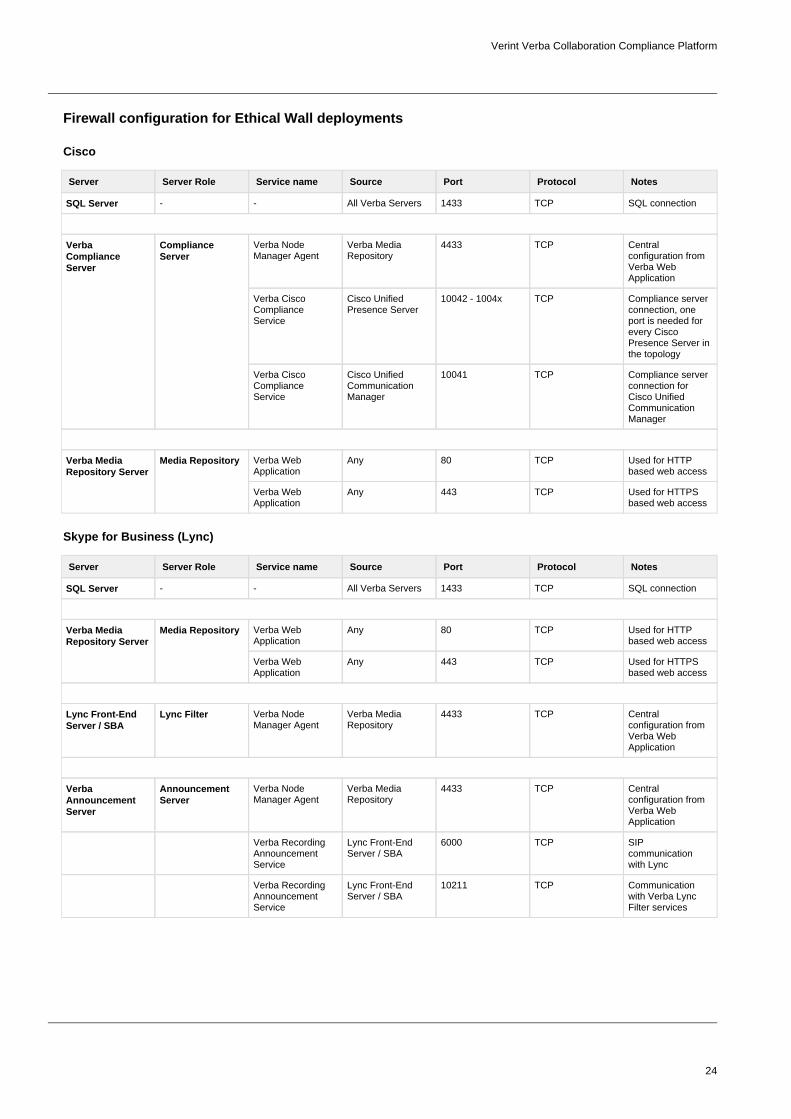
Firewall configuration for Ethical Wall deployments
Cisco
Server Server Role Service name Source Port Protocol Notes
SQL Server - - All Verba Servers 1433 TCP SQL connection
Verba Compliance Server
Compliance Server
Verba Node Manager Agent
Verba Media Repository
4433 TCP Central configuration from Verba Web Application
Verba Cisco Compliance Service
Cisco Unified Presence Server
10042 - 1004x TCP Compliance server connection, one port is needed for every Cisco Presence Server in the topology
Verba Cisco Compliance Service
Cisco Unified Communication Manager
10041 TCP Compliance server connection for Cisco Unified Communication Manager
Verba Media Repository Server
Media Repository Verba Web Application
Any 80 TCP Used for HTTP based web access
Verba Web Application
Any 443 TCP Used for HTTPS based web access
Skype for Business (Lync)
Server Server Role Service name Source Port Protocol Notes
SQL Server - - All Verba Servers 1433 TCP SQL connection
Verba Media Repository Server
Media Repository Verba Web Application
Any 80 TCP Used for HTTP based web access
Verba Web Application
Any 443 TCP Used for HTTPS based web access
Lync Front-End Server / SBA
Lync Filter Verba Node Manager Agent
Verba Media Repository
4433 TCP Central configuration from Verba Web Application
Verba Announcement Server
Announcement Server
Verba Node Manager Agent
Verba Media Repository
4433 TCP Central configuration from Verba Web Application
Verba Recording Announcement Service
Lync Front-End Server / SBA
6000 TCP SIP communication with Lync
Verba Recording Announcement Service
Lync Front-End Server / SBA
10211 TCP Communication with Verba Lync Filter services

Verint Verba Collaboration Compliance Platform
25
Firewall configuration for Avaya recording deployments
This chapter summarizes the required firewall configuration for Avaya recording deployments. For more general information see Firewall configuration.
Common ports
Server Server Role Service name Source Port Protocol Notes
SQL Server - - All Verba Servers 1433 TCP SQL connection
Verba Media Repository Server
Media Repository Verba Web Application
Any 80 TCP Used for HTTP-based web access
Verba Web Application
Any 443 TCP Used for HTTPS-based web access
Verba Storage Management Service
Verba Recording Server
20111 TCP Communication with Verba Storage Management services, used for secure file upload
Verba Media Streamer and Content Server Service
Any 10105 TCP Media port for playback via HTTP
Verba Media Streamer and Content Server Service
Any 10106 TCP Media port for playback via HTTPS
Avaya Central Recording
Server Server Role Service name Source Port Protocol Notes
Verba Recording Server
Recording Server Verba Node Manager Agent
Verba Media Repository
4433 TCP Central configuration from Verba Web Application
Verba Unified Call Recorder Service
Avaya Media Resource
16384 - 65535 UDP Media port range
Verba Avaya Recorder Service
All Verba ServersAll Verba Desktop Agents (if used)(plus all playback stations if silent monitoring is used)
10003 TCP Service API port
Verba Avaya Recorder Service
Any 10014 TCP Recording control port
Verba Avaya Recorder Service
Any 10013 TCP Service API port
Verba Avaya Recorder Service
Any 10099 TCP Service API port
Avaya Application Enablement Services
CTI Server Avaya Application Enablement Services
Verba Avaya Recorder Service
4721 TCP AES communication port (unsecured)
Avaya Application Enablement Services
Verba Avaya Recorder Service
4722 TCP AES communication port (secure)
Verint Verba Collaboration Compliance Platform
26
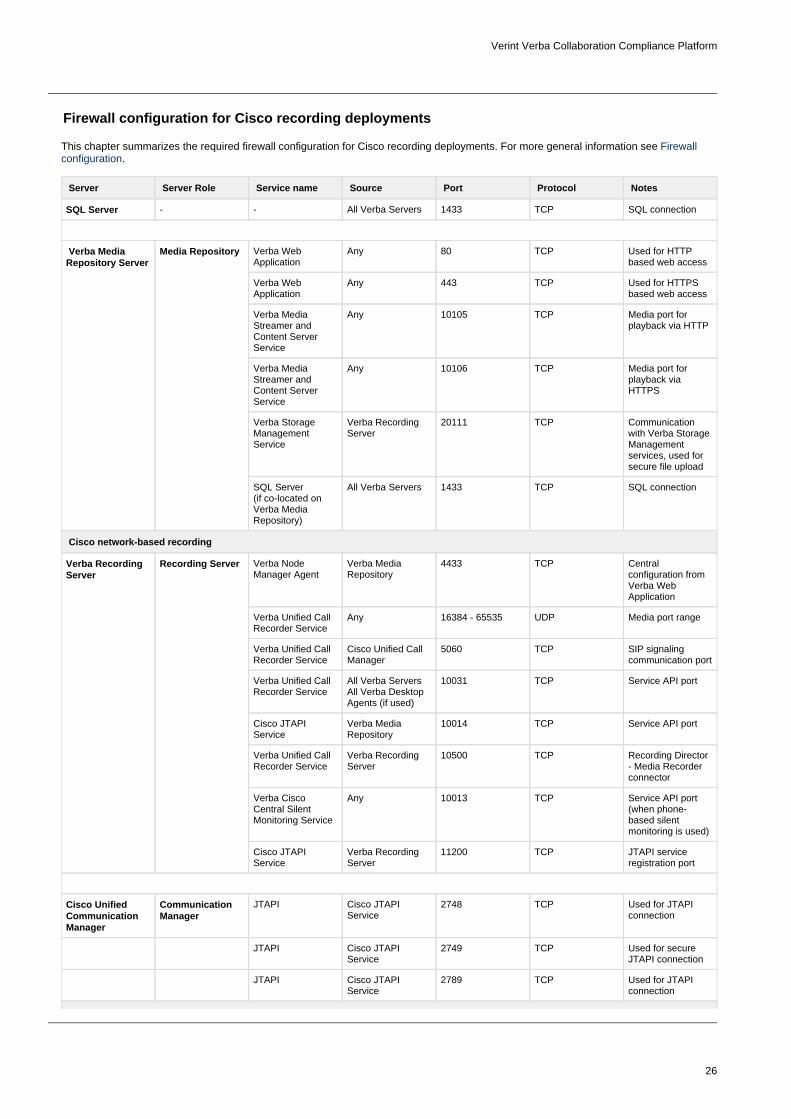
Firewall configuration for Cisco recording deployments
This chapter summarizes the required firewall configuration for Cisco recording deployments. For more general information see Firewall .configuration
Server Server Role Service name Source Port Protocol Notes
SQL Server - - All Verba Servers 1433 TCP SQL connection
Verba Media Repository Server
Media Repository Verba Web Application
Any 80 TCP Used for HTTP based web access
Verba Web Application
Any 443 TCP Used for HTTPS based web access
Verba Media Streamer and Content Server Service
Any 10105 TCP Media port for playback via HTTP
Verba Media Streamer and Content Server Service
Any 10106 TCP Media port for playback via HTTPS
Verba Storage Management Service
Verba Recording Server
20111 TCP Communication with Verba Storage Management services, used for secure file upload
SQL Server(if co-located on Verba Media Repository)
All Verba Servers 1433 TCP SQL connection
Cisco network-based recording
Verba Recording Server
Recording Server Verba Node Manager Agent
Verba Media Repository
4433 TCP Central configuration from Verba Web Application
Verba Unified Call Recorder Service
Any 16384 - 65535 UDP Media port range
Verba Unified Call Recorder Service
Cisco Unified Call Manager
5060 TCP SIP signaling communication port
Verba Unified Call Recorder Service
All Verba ServersAll Verba Desktop Agents (if used)
10031 TCP Service API port
Cisco JTAPI Service
Verba Media Repository
10014 TCP Service API port
Verba Unified Call Recorder Service
Verba Recording Server
10500 TCP Recording Director - Media Recorder connector
Verba Cisco Central Silent Monitoring Service
Any 10013 TCP Service API port (when phone-based silent monitoring is used)
Cisco JTAPI Service
Verba Recording Server
11200 TCP JTAPI service registration port
Cisco Unified Communication Manager
Communication Manager
JTAPI Cisco JTAPI Service
2748 TCP Used for JTAPI connection
JTAPI Cisco JTAPI Service
2749 TCP Used for secure JTAPI connection
JTAPI Cisco JTAPI Service
2789 TCP Used for JTAPI connection

Verint Verba Collaboration Compliance Platform
27
Cisco gateway recording
Verba Recording Server
Recording Server Verba Node Manager Agent
Verba Media Repository
4433 TCP Central configuration from Verba Web Application
Verba Cisco UC Gateway Recorder Service
Gateway 16384 - 65535 UDP Media port range
Cisco Instant Message capture
Verba Recording Server
Recording Server Verba Node Manager Agent
Verba Media Repository
4433 TCP Central configuration from Verba Web Application
Verba Cisco Compliance Service
Cisco Unified Presence Server
10042 - 1004x TCP Compliance server connection, one port is needed for every Cisco Presence Server in the topology
Cisco ethical wall
Verba Recording Server
Compliance Server
Verba Node Manager Agent
Verba Media Repository
4433 TCP Central configuration from Verba Web Application
Verba Cisco Compliance Service
Cisco Unified Presence Server
10042 - 1004x TCP Compliance server connection, one port is needed for every Cisco Presence Server in the topology
Verba Cisco Compliance Service
Cisco Unified Communication Manager
10041 TCP Compliance server connection for Cisco Unified Communication Manager

Verint Verba Collaboration Compliance Platform
28
Firewall Configuration for IPC Unigy recording deployments
This chapter summarizes the required firewall configuration for IPC Unigy recording deployments.
Server Server Role Service name Source Port Protocol Notes
SQL Server - - All Verba Servers 1433 TCP SQL connection
All Verba Servers - Verba Node Manager Agent
Verba Media Repository
4433 TCP Central configuration from Verba Web Application
Verba Media Repository Server
Media Repository Verba Web Application
Any 80 TCP Used for HTTP-based web access
Verba Web Application
Any 443 TCP Used for HTTPS-based web access
Verba Media Streamer and Content Server Service
Any 10105 TCP Media port for playback via HTTP
Verba Media Streamer and Content Server Service
Any 10106 TCP Media port for playback via HTTPS
Verba Storage Management Service
Verba Recording Server
20111 TCP Communication with Verba Storage Management services, used for secure file upload
SQL Server (if co-located on Verba Media Repository)
All Verba Servers 1433 TCP SQL connection
Verba Recording Server
Recording Director
Verba Unified Call Recorder Service
IPC CCM 1024 - 65535 TCP CTI communication port range
Verba Unified Call Recorder Service
IPC CCM 5060 / 5061 TCP SIP signaling communication port (non-secure / secure)
Media Recorder Verba Unified Call Recorder Service
Any 16384 - 65535 UDP Media port range
Verba Unified Call Recorder Service
Verba Recording Server
10500 TCP Recording Director - Media Recorder connector
Recording Director
Media Recorder
Verba Unified Call Recorder Service
All Verba ServersAll Verba Desktop Agents (if used)
10031 TCP Service API port

Verint Verba Collaboration Compliance Platform
29
Firewall configuration for BT IP Trade recording deployments
This chapter summarizes the required firewall configuration for BT IP Trade recording deployments.
Server Server Role Service name Source Port Protocol Notes
SQL Server - - All Verba Servers 1433 TCP SQL connection
All Verba Servers - Verba Node Manager Agent
Verba Media Repository
4433 TCP Central configuration from Verba Web Application
Verba Media Repository Server
Media Repository
Verba Web Application
Any 80 TCP Used for HTTP-based web access
Verba Web Application
Any 443 TCP Used for HTTPS-based web access
Verba Media Streamer and Content Server Service
Any 10105 TCP Media port for playback via HTTP
Verba Media Streamer and Content Server Service
Any 10106 TCP Media port for playback via HTTPS
Verba Storage Management Service
Verba Recording Server
20111 TCP Communication with Verba Storage Management services, used for secure file upload
SQL Server (if co-located on Verba Media Repository)
All Verba Servers 1433 TCP SQL connection
Verba Recording Server
Recording Director
Verba Unified Call Recorder Service
Any 8000 / 8001 TCP CTI/Call Control communication port range (Primary / Secondary Server)
Media Recorder Verba Unified Call Recorder Service
Any 16384 - 65535 UDP Media port range
Verba Unified Call Recorder Service
Verba Recording Server
10500 TCP Recording Director - Media Recorder connector
Recording Director
Media Recorder
Verba Unified Call Recorder Service
All Verba ServersAll Verba Desktop Agents (if used)
10031 TCP Service API port

Verint Verba Collaboration Compliance Platform
30
Firewall configuration for BT ITS recording deployments
This chapter summarizes the required firewall configuration for BT ITS recording deployments.
Server Server Role Service name Source Port Protocol Notes
SQL Server - - All Verba Servers 1433 TCP SQL connection
All Verba Servers - Verba Node Manager Agent
Verba Media Repository
4433 TCP Central configuration from Verba Web Application
Verba Media Repository Server
Media Repository Verba Web Application
Any 80 TCP Used for HTTP-based web access
Verba Web Application
Any 443 TCP Used for HTTPS-based web access
Verba Media Streamer and Content Server Service
Any 10105 TCP Media port for playback via HTTP
Verba Media Streamer and Content Server Service
Any 10106 TCP Media port for playback via HTTPS
Verba Storage Management Service
Verba Recording Server
20111 TCP Communication with Verba Storage Management services, used for secure file upload
SQL Server (if co-located on Verba Media Repository)
All Verba Servers 1433 TCP SQL connection
Verba Recording Server
Media Recorder Verba Unified Call Recorder Service
IPSI Card 53250-53251 UDP Default media port range; can be configured in global_config
BT Heartbeat and Directory Service
For additional information, please consult BT
Verba Unified Call Recorder Service
Verba Recording Server
10500 TCP Recording Director - Media Recorder connector
Recording Director
Media Recorder
Verba Unified Call Recorder Service
All Verba ServersAll Verba Desktop Agents (if used)
10031 Service API port

Verint Verba Collaboration Compliance Platform
31
Firewall configuration for Speakerbus recording deployments
This chapter summarizes the required firewall configuration for Speakerbus recording deployments.
Server Server Role Service name Source Port Protocol Notes
SQL Server - - All Verba Servers 1433 TCP SQL connection
All Verba Servers - Verba Node Manager Agent
Verba Media Repository
4433 TCP Central configuration from Verba Web Application
Verba Media Repository Server
Media Repository
Verba Web Application
Any 80 TCP Used for HTTP-based web access
Verba Web Application
Any 443 TCP Used for HTTPS-based web access
Verba Media Streamer and Content Server Service
Any 10105 TCP Media port for playback via HTTP
Verba Media Streamer and Content Server Service
Any 10106 TCP Media port for playback via HTTPS
Verba Storage Management Service
Verba Recording Server
20111 TCP Communication with Verba Storage Management services, used for secure file upload
SQL Server (if co-located on Verba Media Repository)
All Verba Servers 1433 TCP SQL connection
Verba Recording Server
Recording Director
Verba Unified Call Recorder Service
Speakerbus iCDS Service
7788 TCP CTI communication port
Media Recorder Verba Unified Call Recorder Service
Any 3000-3007 UDP Media port range
Verba Unified Call Recorder Service
Verba Recording Server
10500 TCP Recording Director - Media Recorder connector
Recording Director
Media Recorder
Verba Unified Call Recorder Service
All Verba ServersAll Verba Desktop Agents (if used)
10031 TCP Service API port

Verint Verba Collaboration Compliance Platform
32
Firewall configuration for Microsoft Teams recording deployments
This chapter summarizes the required firewall configuration for Microsoft Teams recording deployments.
Inbound rules
Server Server Role Service name Source Port Protocol Notes
SQL Server - - All Verba Servers 1433 TCP SQL connection
All Verba Servers - Verba Node Manager Agent
Verba Media Repository
4433 TCP Central configuration from Verba Web Application
Verba Media Repository Server
Media Repository
Verba Web Application
Any 80 TCP Used for HTTP-based web access
Verba Web Application
Any 443 TCP Used for HTTPS-based web access
Verba Media Streamer and Content Server Service
Any 10105 TCP Media port for playback via HTTP
Verba Media Streamer and Content Server Service
Any 10106 TCP Media port for playback via HTTPS
Verba Storage Verba Recording 20111 TCP Communication

Verint Verba Collaboration Compliance Platform
33
Management Service
Server with Verba Storage Management services, used for secure file upload
SQL Server (if co-located on Verba Media Repository)
All Verba Servers 1433 TCP SQL connection
Verba Recording Server
Recording Server Verba Microsoft Teams Bot Service
Any
It can be only restricted to Azure networks, Microsoft cannot restrict the Teams side to specific IP ranges at the moment. To download Azure IP ranges, see https://www.microsoft.com/en-us/download/details.aspx?id=56519
Make sure that the IP addresses of the VMs running the bot service are allowed.
8445 TCP Media control port for Teams
Recording Server Verba Microsoft Teams Bot Service
Any
It can be only restricted to Azure networks, Microsoft cannot restrict the Teams side to specific IP ranges at the moment. To download Azure IP ranges, see https://www.microsoft.com/en-us/download/details.aspx?id=56519
Make sure that the IP addresses of the VMs running the bot service are allowed.
9440 TCPCall invite from TeamsHTTPS health probe for Azure Traffic Manager and Application Gateway
Recording Server Verba Microsoft Teams Bot Service
Any
It can be only restricted to Azure networks, Microsoft cannot restrict the Teams side to specific IP ranges at the moment. To download Azure IP ranges, see https://www.microsoft.com/en-us/download/details.aspx?id=56519
Make sure that the IP addresses of the VMs running the bot service are allowed.
10100 TCP Call control port for Teams
Recording Server Verba Microsoft Teams Bot Service
Verba Recording Server / Verba
10501 TCP Recording Director connection (it is

Verint Verba Collaboration Compliance Platform
34
Unified Call Recorder Service
recommended to deploy the bot and the recording service on the same VM)
Recording Server Verba Microsoft Teams Bot Service
Verba Recording Server / Verba Unified Call Recorder Service
10502 TCP Media Recorder connection (it is recommended to deploy the bot and the recording service on the same VM)
Recording Server Verba Microsoft Teams Bot Service
52.112.0.0/14
https://docs.microsoft.com/en-us/office365/enterprise/urls-and-ip-address-ranges#skype-for-business-online-and-microsoft-teams
16384 - 65535 UDP Media port range
Recording Server Verba Microsoft Teams Bot Service
Any 10038 TCP Bot service API port
Recording Server Verba Unified Call Recorder Service
All Verba ServersAll Verba Desktop Agents (if used)(plus all playback stations if silent monitoring is used)
10031 TCP Service API port
Outbound rules
The Microsoft Teams Bot Service is considered as a standard Microsoft Teams endpoint and the standard firewall rules can be applied.
The following Microsoft documentation contains all the required endpoints and ports which has to be accessible for a Teams endpoint: Office (section Skype for Business Online and Microsoft Teams)365 URLs and IP address ranges
In addition, the Microsoft Teams Bot Service uses Microsoft Graph API via the endpoint for sending requests https://graph.microsoft.com/v1.0to Microsoft Teams (e.g.: Call answer, Azure AD queries)

Verint Verba Collaboration Compliance Platform
35
Firewall configuration for SIPREC recording deployments
This chapter summarizes the required firewall configuration for Microsoft Teams recording deployments.
Server Server Role Service name Source Port Protocol Notes
SQL Server - - All Verba Servers 1433 TCP SQL connection
All Verba Servers - Verba Node Manager Agent
Verba Media Repository
4433 TCP Central configuration from Verba Web Application
Verba Media Repository Server
Media Repository
Verba Web Application
Any 80 TCP Used for HTTP-based web access
Verba Web Application
Any 443 TCP Used for HTTPS-based web access
Verba Media Streamer and Content Server Service
Any 10105 TCP Media port for playback via HTTP
Verba Media Streamer and Content Server Service
Any 10106 TCP Media port for playback via HTTPS
Verba Storage Management Service
Verba Recording Server
20111 TCP Communication with Verba Storage Management services, used for secure file upload
SQL Server (if co-located on Verba Media Repository)
All Verba Servers 1433 TCP SQL connection
Verba Recording Server
Recording Director
Verba Unified Call Recorder Service
Verba Recording Server
10500 TCP Recording Director - Media Recorder connection
Media Recorder Verba Unified Call Recorder Service
Any 16384 - 65535 UDP Media port range
Recording Director
Verba Unified Call Recorder Service
Any 5060 TCP SIP signaling communication port
Recording Director
Verba Unified Call Recorder Service
Any 5061 TCP Secure SIP signaling communication port
Recording Director
Media Recorder
Verba Unified Call Recorder Service
All Verba ServersAll Verba Desktop Agents (if used)(plus all playback stations if silent monitoring is used)
10031 TCP Service API port

Verint Verba Collaboration Compliance Platform
36
Firewall configuration for Genesys active recording deployments
This chapter summarizes the required firewall configuration for Genesys active recording deployments.
Server Server Role Service name Source Port Protocol Notes
SQL Server - - All Verba Servers 1433 TCP SQL connection
All Verba Servers - Verba Node Manager Agent
Verba Media Repository
4433 TCP Central configuration from Verba Web Application
Verba Media Repository Server
Media Repository
Verba Web Application
Any 80 TCP Used for HTTP-based web access
Verba Web Application
Any 443 TCP Used for HTTPS-based web access
Verba Media Streamer and Content Server Service
Any 10105 TCP Media port for playback via HTTP
Verba Media Streamer and Content Server Service
Any 10106 TCP Media port for playback via HTTPS
Verba Storage Management Service
Verba Recording Server
20111 TCP Communication with Verba Storage Management services, used for secure file upload
SQL Server (if co-located on Verba Media Repository)
All Verba Servers 1433 TCP SQL connection
Verba Recording Server
Recording Server Verba Unified Call Recorder Service
Genesys Media Server
5060 TCP SIP signaling communication port
Verba Unified Call Recorder Service
Any 16384 - 65535 UDP Media port range
Verba Unified Call Recorder Service
All Verba ServersAll Verba Desktop Agents (if used)(plus all playback stations if silent monitoring is used)
10031 TCP Service API port
Verba Genesys CTI Service
Verba Recording Server
11300 TCP CTI service registration port
Verba Genesys CTI Service
Verba Media Repository
10040 TCP Service API port

Verint Verba Collaboration Compliance Platform
37
Antivirus scanning exclusions for Verba servers
To ensure that the antivirus scanner does not interfere with the operation of the Verba system, you must exclude specific processes and directories for each Verba server or server role on which you run an antivirus scanner. The following processes and directories should be excluded:
Directory and file locations listed below are the default locations for the Verba system. For any locations for which you did not use the default, exclude the locations you specified instead of the default locations specified in this article.
Media Repository and Recording Server Role:
Verba Processes:
Verba Service Name Executable Name
Requirement for Java Services:
Verba Avaya DMCC/JTAPI ServiceVerba Cisco JTAPI ServiceVerba Cisco Central Silent Monitoring ServiceVerba Cisco Compliance ServiceVerba Web Application
wrapper.exe
Verba Passive Recorder Service verbaengine.exe
Verba Media Collector and Proxy Service recorderproxy.exe
Verba Legacy Cisco Central Recorder Service nativerecorder.exe
Verba Analogue and Radio Recorder Service (Verba General Media Recorder Service)
mediareceiver.exe
Verba Legacy Cisco Gateway Recorder Service ciscogatewayrec.exe
Verba Labeling Service label-processor.exe
Verba Media Utility Service (Verba Waveformatter Service) waveform.exe
Verba Media Streamer and Content Server Service mediastreamer.exe
Verba Legacy IP Trade Recorder Service verbaiptrade.exe
Verba Screen Capture Multiplexer Service multiplexer.exe
Verba Unified Call Recorder Service unifiedrec.exe
Verba Active Recorder and Streamer Service activerecorder.exe
Verba Storage Management Service = verbastorage.exe verbastorage.exe
Verba Media Transcoder Service transcoder.exe
Verba System Monitor Service verbasysmon.exe
Verba Centile Connector centile-connector.exe
Verba Node Manager Agent Service verbaagent.exe
Verba SfB/Lync Announcement Service rec-announcement.exe
Verba CDR and Archived Content Importer Service cdrimport.exe
Verba SfB/Lync IM Recorder Service lyncchatrecorder.exe
Verba Cisco MediaSense Connector mediasense-connector.exe
Verba Speech Analytics Service speech-analytics.exe
(Verba TroubleshootingTool) verbacapture.exe
Verint Verba Collaboration Compliance Platform
38
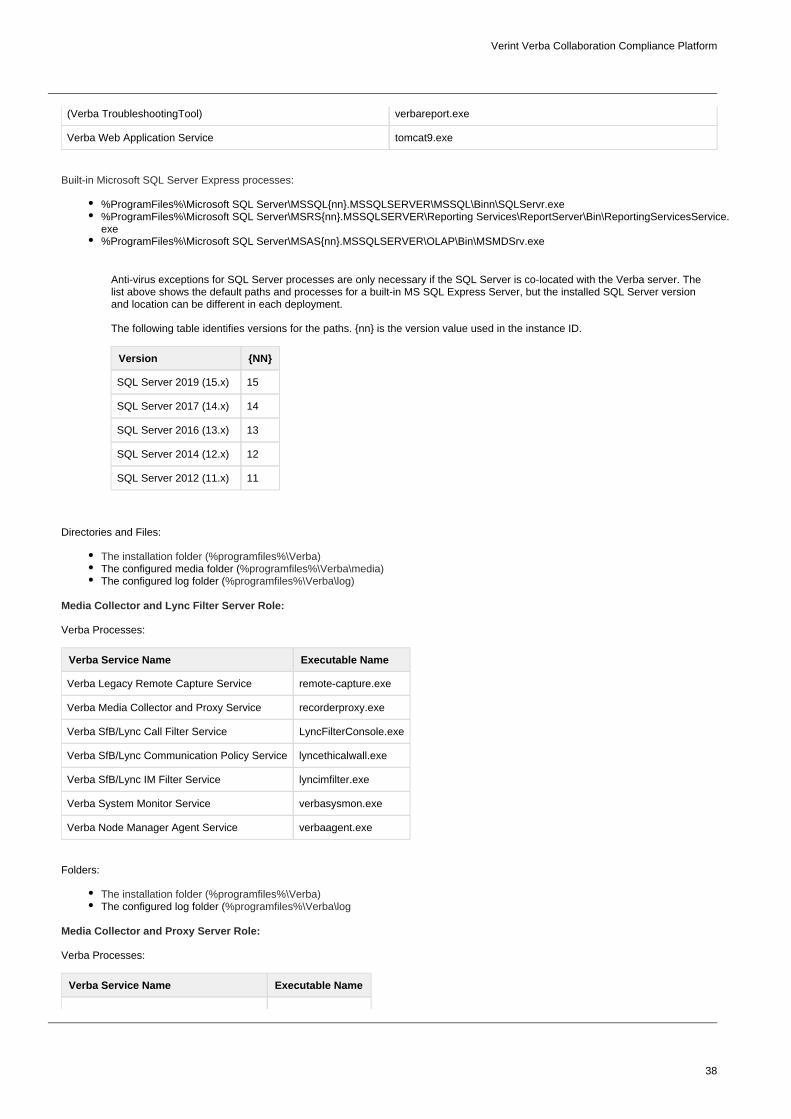
(Verba TroubleshootingTool) verbareport.exe
Verba Web Application Service tomcat9.exe
Built-in Microsoft SQL Server Express processes:
%ProgramFiles%\Microsoft SQL Server\MSSQL{nn}.MSSQLSERVER\MSSQL\Binn\SQLServr.exe%ProgramFiles%\Microsoft SQL Server\MSRS{nn}.MSSQLSERVER\Reporting Services\ReportServer\Bin\ReportingServicesService.exe%ProgramFiles%\Microsoft SQL Server\MSAS{nn}.MSSQLSERVER\OLAP\Bin\MSMDSrv.exe
Anti-virus exceptions for SQL Server processes are only necessary if the SQL Server is co-located with the Verba server. The list above shows the default paths and processes for a built-in MS SQL Express Server, but the installed SQL Server version and location can be different in each deployment.
The following table identifies versions for the paths. {nn} is the version value used in the instance ID.
Version {NN}
SQL Server 2019 (15.x) 15
SQL Server 2017 (14.x) 14
SQL Server 2016 (13.x) 13
SQL Server 2014 (12.x) 12
SQL Server 2012 (11.x) 11
Directories and Files:
The installation folder (%programfiles%\Verba)The configured media folder (%programfiles%\Verba\media)The configured log folder (%programfiles%\Verba\log)
Media Collector and Lync Filter Server Role:
Verba Processes:
Verba Service Name Executable Name
Verba Legacy Remote Capture Service remote-capture.exe
Verba Media Collector and Proxy Service recorderproxy.exe
Verba SfB/Lync Call Filter Service LyncFilterConsole.exe
Verba SfB/Lync Communication Policy Service lyncethicalwall.exe
Verba SfB/Lync IM Filter Service lyncimfilter.exe
Verba System Monitor Service verbasysmon.exe
Verba Node Manager Agent Service verbaagent.exe
Folders:
The installation folder (%programfiles%\Verba)The configured log folder (%programfiles%\Verba\log
Media Collector and Proxy Server Role:
Verba Processes:
Verba Service Name Executable Name

Verint Verba Collaboration Compliance Platform
39
Verba Legacy Remote Capture Service remote-capture.exe
Verba Media Collector and Proxy Service recorderproxy.exe
Verba System Monitor Service verbasysmon.exe
Verba Node Manager Agent Service verbaagent.exe
Folders:
The installation folder (%programfiles%\Verba)The configured log folder (%programfiles%\Verba\log)
Announcement Server Role:
Verba Processes:
Verba Service Name Executable Name
Verba SfB/Lync Announcement Service rec-announcement.exe
Verba System Monitor Service verbasysmon.exe
Verba Node Manager Agent Service verbaagent.exe
Directories and Files:
The installation folder (%programfiles%\Verba)The configured log folder (%programfiles%\Verba\log)
Speech Analytics Server Role:
Verba Processes:
Verba Service Name Executable Name
Verba Labeling Service label-processor.exe
Verba Speech Analytics Service speech-analytics.exe
Verba System Monitor Service verbasysmon.exe
Verba Node Manager Agent Service verbaagent.exe
Directories and Files:
The installation folder (%programfiles%\Verba)The configured media folder (%programfiles%\Verba\media)The configured log folder (%programfiles%\Verba\log)
Desktop Agent Role:
Verba Processes:
Verba Service Name Executable Name
Verba Screen Capturing Service agentcontroller.exe
Verba Screen Capturing Service captureagent.exe
Verba Storage Management Service verbastorage.exe
Verba System Monitor Service verbasysmon.exe
Verba Node Manager Agent Service verbaagent.exe
Directories and Files:

Verint Verba Collaboration Compliance Platform
40
The installation folder (%programfiles%\Verba)The configured media folder (%programfiles%\Verba\media)The configured log folder (%programfiles%\Verba\log)
Offline Player Role:
Verba Processes:
verbaplayer.exe
Directories and Files:
The installation folder (%programfiles%\Verba)

Verint Verba Collaboration Compliance Platform
41
SQL Server installation
To learn more about selecting the SQL Server version, editions and requirements, see .SQL Server requirements
Installing a Microsoft SQL Server instance
In the Verba install kit, we provide a simple, unattended installation procedure for Microsoft SQL Server Express (see the Prerequisites Installer Tool).
For information on how to install other Microsoft SQL server editions, please refer to the following articles.
https://technet.microsoft.com/en-us/library/bb500395(v=sql.110).aspx
https://msdn.microsoft.com/library/bb500469(v=sql.120).aspx
When installing .NET framework as a prerequisite of MS SQL server, make sure that installed (can HTTP Activation is NOTbe found under WCF Services)
Feature selection
The following features need to be selected during the install:
Database Engine ServicesFull -Text and Semantic Extractions for Search(Management Tools - Complete) Not necessary but recommended.
On the tab please make sure that the checkbox is left UNCHECKED. Verba requires a case-insensitive database.collation case-sensitive
Some of the options may be part of the MS SQL Management Studio install pack if you are using a separate installer.
After the Full-Text Search feature added or removed from an existing SQL Server installation, the Verba Web Application Service has to be restarted.
Instance configuration
It is recommended to install the Verba database as the default instance, however, the system supports named instances as well.
Database configuration
The setting of the Verba database has to be left on .Containment type None
Services
For the Verba system, the following SQL Server services must be enabled and running (other services are not required):
SQL ServerSQL Server Browser if named instances are usedSQL Server Agent to run the maintenance jobs (not available on Express Edition)
Services accounts
Use the built-in System account and set it to Network service and check the SQL Server Agent to start at the end of the setup.
Collation
Choose the collation based on the requirement. The system does not support Case Sensitive (CS) collations, only Case Insensitive (CI) collations are supported.
Account provisioning
Verint Verba Collaboration Compliance Platform
42
If you would like to use SQL authentication, then select . Set the sa password and . The Verba Mixed Mode authentication make a note of itinstaller will need this information.
If you would like to use Windows Authentication, then select Windows Authentication.
Make sure you have the necessary database roles assigned to the user account which is configured for the system. For more information see .SQL Server requirements
Using the Verba Prerequisites tool to install SQL Server Express edition
MS SQL Server Express Edition unattended installer is included in the Verba install media.
Please, follow the steps below to install MS SQL Server Express Edition:
Step 1 - Copy the Verba Installation kit to the appropriate drive.
Step 2 - Click on the filesetup.exe
Step 4 - Select the type of Verba server that you will be installing on this machine. (Single server solution or Media Repository)
Step 5 - Click on and then on the button with the same nameInstall SQL Server Express
Step 6 - The unattended installation starts automatically.
Set the sa password in the corresponding batch file. This information will need to be entered during the installation process of the Verba servers.
Verba utilizes the SQL Server's full-text index feature when searching for specific phrases in Instant Message recordings. The full-text index feature is not part of SQL Server Express edition by default, it is only included in SQL Server Express with Advanced Services.

Verint Verba Collaboration Compliance Platform
43
Install the Verba software
PrerequisitesInstalling the required prerequisitesInstalling a Verba Media RepositoryInstalling a Verba Recording ServerInstalling a Verba Single Server solutionInstalling a Verba Announcement ServerInstalling a Verba Speech Analytics ServerInstalling the Verba Media Collector and Proxy componentInstalling the Verba Skype for Business - Lync FilterChanging the role of a Verba serverInstaller Parameters and Unattended Installation

Verint Verba Collaboration Compliance Platform
44
Prerequisites
The following table lists all required prerequisites for the available Verba server roles:
Verba Server Role Prerequisite Mandatory / Optional Download / Notes Included in the installer package
Application Server / Media Repository and Recording Server
Java SE 11 Runtime Environment ( )Windows x64
Mandatory Both Oracle and OpenJDK Java 11 runtimes are supported.
OpenJDK JRE 11 download: https://adoptopenjdk.net/releases.html?variant=openjdk11&jvmVariant=hotspot#x64_win
Yes (OpenJDK)
Visual Studio C++ Runtime 2015, 2017 and 2019 (x64)
Mandatory https://aka.ms/vs/16/release/VC_redist.x64.exe
If the installer fails you need to download and install the following Windows Update packages:
KB2919355KB2999226
Yes
Microsoft .Net Framework 4.8
Mandatory https://dotnet.microsoft.com/download/dotnet-framework/net48
Yes
Media Foundation Optional Required for screen capture multiplexing and media transcoding for the following services:
Verba Storage Management ServiceVerba Screen Capture Multiplexer ServiceVerba Import ServiceVerba Speech Analytics ServiceVerba Media Streamer and Content Server ServiceVerba Media Utility Service
No
WinPcap Service Optional Required for Skype for Business / Lync recording and network port mirroring based recording
http://www.winpcap.org/install/bin/WinPcap_4_1_3.exe
Yes
Microsoft ODBC Driver 17 (x64)
Mandatory https://www.microsoft.com/en-us/download/details.aspx?id=56567
Yes
Skype for Business/Lync Management Shell
Optional Required for Skype for Archive Business / Lync
import
https://technet.microsoft.com/en-us/library/dn933921.aspx
No
Application Server / Media Repository
Java SE 11 Runtime Environment (Windows x64)
Mandatory Both Oracle and OpenJDK Java 11 runtimes are supported.
OpenJDK JRE 11 download: https://adoptopenjdk.net/releases.html?
Yes (OpenJDK)

Verint Verba Collaboration Compliance Platform
45
variant=openjdk11&jvmVariant=hotspot#x64_wi
Visual Studio C++ Runtime 2015, 2017 and 2019 (x64)
Mandatory https://aka.ms/vs/16/release/VC_redist.x64.exe
If the installer fails you need to download and install the following Windows Update packages:
KB2919355KB2999226
Yes
Microsoft .Net Framework 4.8
Mandatory https://dotnet.microsoft.com/download/dotnet-framework/net48
Yes
Media Foundation Optional Required for screen capture multiplexing and media transcoding for the following services:
Verba Storage Management ServiceVerba Screen Capture Multiplexer ServiceVerba Import ServiceVerba Speech Analytics ServiceVerba Media Streamer and Content Server ServiceVerba Media Utility Service
No
Microsoft ODBC Driver 17 (x64)
Mandatory https://www.microsoft.com/en-us/download/details.aspx?id=56567
Yes
Skype for Business/Lync Management Shell
Optional Required for Skype for Archive Business / Lync
import
https://technet.microsoft.com/en-us/library/dn933921.aspx
No
Recording Server Java SE 11 Runtime Environment (Windows x64)
Mandatory Both Oracle and OpenJDK Java 11 runtimes are supported.
OpenJDK JRE 11 download: https://adoptopenjdk.net/releases.html?variant=openjdk11&jvmVariant=hotspot#x64_wi
Yes (OpenJDK)
Visual Studio C++ Runtime 2015, 2017 and 2019 (x64)
Mandatory https://aka.ms/vs/16/release/VC_redist.x64.exe
If the installer fails you need to download and install the following Windows Update packages:
KB2919355KB2999226
Yes
Microsoft .Net Framework 4.8
Mandatory https://dotnet.microsoft.com/download/dotnet-framework/net48
Yes
WinPcap Service Optional Required for Skype for recording Business / Lync
and network port mirroring based recording
Yes

Verint Verba Collaboration Compliance Platform
46
http://www.winpcap.org/install/bin/WinPcap_4_1_3.exe
Microsoft ODBC Driver 17 (x64)
Mandatory https://www.microsoft.com/en-us/download/details.aspx?id=56567
Yes
Media Foundation Optional Required for screen capture multiplexing and media transcoding for the following services:
Verba Import Service
No
Lync Filter Microsoft .Net Framework 4.8
Mandatory https://dotnet.microsoft.com/download/dotnet-framework/net48
Yes (in the main package)
Verba Media Collector and Lync Filter
Microsoft .Net Framework 4.8
Mandatory https://dotnet.microsoft.com/download/dotnet-framework/net48
Yes (in the main package)
WinPcap Service Mandatory Required for Lync recording and network port mirroring based recording
http://www.winpcap.org/install/bin/WinPcap_4_1_3.exe
Yes (in the main package)
Verba Media Collector and Proxy Server
Microsoft .Net Framework 4.8
Mandatory https://dotnet.microsoft.com/download/dotnet-framework/net48
Yes (in the main package)
WinPcap Service Mandatory Required for Skype for recording Business / Lync
and network port mirroring based recording
http://www.winpcap.org/install/bin/WinPcap_4_1_3.exe
Yes (in the main package)
Verba Announcement Server
Microsoft .Net Framework 4.8
Mandatory https://dotnet.microsoft.com/download/dotnet-framework/net48
Yes (in the main package)
Unified Communications Managed API 4.0 Runtime
Mandatory https://www.microsoft.com/en-us/download/details.aspx?id=34992
No
Verba Speech Analytics Server
Microsoft .Net Framework 4.8
Mandatory https://dotnet.microsoft.com/download/dotnet-framework/net48
Yes (in the main package)
Microsoft ODBC Driver 17 (x64)
Mandatory https://www.microsoft.com/en-us/download/details.aspx?id=56567
Yes (in the main package)
Media Foundation Optional Required for media transcoding for the following services:
Verba Speech Analytics Service
No
Visual Studio C++ Runtime 2015, 2017 and 2019 (x64)
Mandatory https://aka.ms/vs/16/release/VC_redist.x64.exe
If the installer fails you need to download and install the following Windows Update packages:
KB2919355KB2999226
Yes (in the main package)
Verba Desktop Recorder Visual Studio C++ Runtime Mandatory Yes (in the main package)

Verint Verba Collaboration Compliance Platform
47
2015, 2017 and 2019 (x64) https://aka.ms/vs/16/release/VC_redist.x64.exe
If the installer fails you need to download and install the following Windows Update packages:
KB2919355KB2999226
Microsoft ODBC Driver 17 (x64)
Mandatory Required for advanced SQL Server features: always-on, failover partner
https://www.microsoft.com/en-us/download/details.aspx?id=56567
Yes (in the main package)
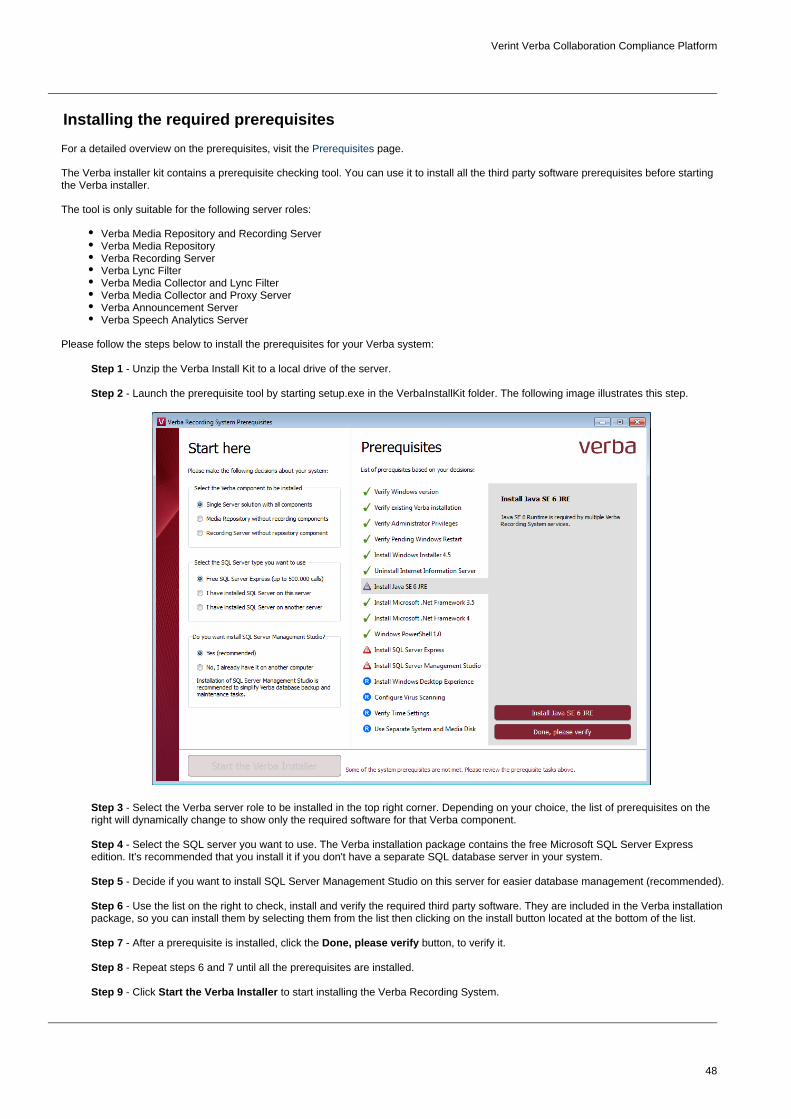
Verint Verba Collaboration Compliance Platform
48
Installing the required prerequisites
For a detailed overview on the prerequisites, visit the page.Prerequisites
The Verba installer kit contains a prerequisite checking tool. You can use it to install all the third party software prerequisites before starting the Verba installer.
The tool is only suitable for the following server roles:
Verba Media Repository and Recording ServerVerba Media RepositoryVerba Recording ServerVerba Lync FilterVerba Media Collector and Lync FilterVerba Media Collector and Proxy ServerVerba Announcement ServerVerba Speech Analytics Server
Please follow the steps below to install the prerequisites for your Verba system:
Step 1 - Unzip the Verba Install Kit to a local drive of the server.
Step 2 - Launch the prerequisite tool by starting setup.exe in the VerbaInstallKit folder. The following image illustrates this step.
Step 3 - Select the Verba server role to be installed in the top right corner. Depending on your choice, the list of prerequisites on the right will dynamically change to show only the required software for that Verba component.
Step 4 - Select the SQL server you want to use. The Verba installation package contains the free Microsoft SQL Server Express edition. It's recommended that you install it if you don't have a separate SQL database server in your system.
Step 5 - Decide if you want to install SQL Server Management Studio on this server for easier database management (recommended).
Step 6 - Use the list on the right to check, install and verify the required third party software. They are included in the Verba installation package, so you can install them by selecting them from the list then clicking on the install button located at the bottom of the list.
Step 7 - After a prerequisite is installed, click the button, to verify it.Done, please verify
Step 8 - Repeat steps 6 and 7 until all the prerequisites are installed.
Step 9 - Click to start installing the Verba Recording System.Start the Verba Installer

Verint Verba Collaboration Compliance Platform
49
After this point please refer to the corresponding article depending on the server role you chose to install.
Media Repository: http://kb.verba.com/display/docs/Installing+a+Verba+Media+RepositoryRecording Server: http://kb.verba.com/display/docs/Installing+a+Verba+Recording+ServerSingle Server: http://kb.verba.com/display/docs/Installing+a+Verba+Single+Server+solution

Verint Verba Collaboration Compliance Platform
50
Installing a Verba Media Repository
If you haven't already done so, please make sure all the prerequisites are installed for your Media Repository. Refer to http://kb.verba.com/display/docs/Installing+the+required+prerequisites
The Verba Media Repository is the central controlling component of the Recording System. It contains the management web application and various other services necessary for the system to function. This component should always be installed first when deploying a new system. If you don't have a separate SQL server to install the database on, this server will run the Verba database services as well.
Please follow the steps below to install a Verba Media Repository. Note that, all Installer components must be run as Administrator.
Step 1 - The install kit starts installing Verba components. Simply press the button to start the installation.Next
Step 2 - Read the Verba license agreement carefully before you check the "I accept the terms in the License Agreement" checkbox, then click button.Next
Step 3 - Select the role from the list. Click Media Repository Next.
Step 4 - Select the destination folder for Verba system and the desired location of the media files. You can change the default setting by clicking on the Change button and selecting another folder. Network share also can be provided for the media folder. If you have finished the destination folder configuration, press the button.Next
Drive root cannot be provided for the media folder (ex: D:\). A folder has to be created.
Step 5a - If the server is going to be the first Media Repository server in the deployment, and pre-generated certificates won't be used, then select the "Generate
Certificate Signed by Verba Media Repository CA"option, and check the "First Media Repository in the
checkbox. Click on the button, and deployment" Generatein the Generate the Verba Server Certificate window click G
. Finally, click on the button. (If this option is enerate Nextbeing used, then Step 5b and Step 5c can be skipped.)
Step 5b - If the server won't be the first Media Repository server in the deployment, and pre-generated certificates won't be used, then select the "Generate Certificate
option, then click Signed by Verba Media Repository CA"on the button. In the Generate the Verba Server GenerateCertificate window provide the address of the first Media Repository server, the administrator username and password, then click . Finally, click on the butGenerate Nextton. (If this option is being used, Step 5c can be skipped.)
Step 5c - If there is an existing certificate from a previous Verba installation (in case of reinstall or upgrade), or a pre-generated certificate for the server exists (requested from a local or a 3rd party CA), then select the "Select Certificate"option, then click on the button. If the server was a BrowseCA previously, then select the CA certificate also by clicking on the button under the CA Certificate Thumbrint.Browse
Certificates generated by Verba CA vs pre-generated certificates
In case of using the Verba-generated certificates, the first Media Repository server becomes a CA also. During the installation of the other Verba components, the server certificates will be requested from this CA. This is done through the TCP port 443 with SSL. The server certificates and the CA certificate will be placed in the certificate stores of the servers automatically, to the Personal folder. The certificates generated by the Verba CA uses SHA512 for the signature algorithm, and RSA2048 for the public key.
If certificates are generated for the Verba servers in advance using an other CA, then make sure that the certificates are placed into the certificate stores of the servers under the Personal folder, and the CA certificates are placed into the Personal or into the Trusted Root Certification Authorities folder. The only requirement for the server certificates is making the private key exportable.
Certificates generated by the Verba CA
Based on the Friendly Name of the certificates the server and the CA certificate can be identified easily. On the screenshot, the first one is the server certificate and the second one is the CA certificate.

Verint Verba Collaboration Compliance Platform
51
Step 6.1 - The Verba installer is asking for the MS SQL Server connection details. These settings will be used for all Verba services on the server, and the same settings has to be used during the installation of the other Verba components also.
Both SQL server based and windows authentication is supported. If a domain account will be used for the SQL connection, then select Windows
. In case of windows authentication, the AuthenticationAccount name has to be provided in UPN or domain\username format. Please provide a roDB Creatorle user account for the connection.The server name can be entered either as an IP address or an FQDN.The Verba database doesn't have to be created in advance. The installer will create a database with the name given in the "Database Name" setting, and build the schema.If SQL Mirroring is being used or AlwaysOn with Multi-Subnet failover, then a different SQL Driver has to be selected. In this case, the driver has to be installed on the server.
Step 6.2 - Click ' ' to verify your input.Test Connection
Step 6.3 - If the test was successful, click on the bExecuteutton. The installer will start executing the scripts on the database, so it created thte database schema. In the case of upgrade, the installer upgrades thte existing schema. The script log will be save to C:\Users\[user]\AppData\Local\Temp\ folder. If an error occours during the
Database connection troubleshooting tips
Try to ping the database server. Try to connect to the 1433 port on the database server. (telnet or Test-NetConnection)Check if the user has the necessary roles assigned, refer to for SQL Server requirementsmore informationIf Windows Authentication used then check if the user has the Local Administrator group membership and the 'Logon as a service right'.Check if the correct instance name is provided at the SQL Server name. If there are multiple instances, then the SQL Server Browser service must run on the SQL server side.If you installed SQL Server Express Edition, then check if the TCP/IP protocol is enabled under the SQL Server Network Configuration in the SQL Server Configuration Manager.
Upgrading from Verba 8.x to Verba 9.x
From version 9.0, the Verba software changed to x64 platform from x86, and also introduced a new Windows certificate-based secure API for the internal connection between the Verba services. When upgrading from

Verint Verba Collaboration Compliance Platform
52
script execution, it can be restarted by closing the window, then clicking on the Execute button again in the installer window.
Step 6.3 - Click on the button. In the installer Closewindow, click .Next
Step 7 - Please specify the ports for running the Verba web server. Click the button to check if they are free. If Test Connectionone of them is taken you will be asked for another port number (you are not allowed to run more than one HTTP server on the same port). It is recommended to use the default 80 and 443 port numbers. If successful, click Next.
Verba 7.x or 8.x, the installer offers changing the configuration stored in the database according to the new settings. In this case, all settings pointing to the "Program Files (x86)" folder will be changed to "Program Files", and all settings related to the old security configuration will be removed.
The installer also offers upgrading the schema of the IM recordings. If this step is skipped, then the old recordings won't be visible in the Verba web interface.Note that this step can take hours to execute!

Verint Verba Collaboration Compliance Platform
53
Step 8a - If this is a new Verba installation, and there is no pre-created SSL certificate for the HTTPS connection, then select the option, then "Generate Self-signed Certificate"click on the button. In the "Generate the Verba GenerateWeb server SSL Certificate" window, enter a for passwordthe certificate, provide the Subject Alternative names, then click . In this case a verba-tomcat.crt and a verba-Generatetomcat.key file will be generated in the C:\ root. Click on the
button. (If this option is being used, then Step 9b can Nextbe skipped)
Step 8b - If this is not a new Verba installation (in case of reinstall or upgrade), or there is a pre-created SSL certificate for the HTTPS connection, then select the "Selec
option. Under the Certificate Path, click on t Certificate"the button, and provide the . Under the Browse .crt fileCertificate Key Path click on the button, and Browseprovide the . Provide the password of the SSL .key filecertificate. Click on the button.Next
Step 9 - Please specify a free port for the Verba storage server. Use the button to check the port's availability. If Test Connectionsuccessful, click .Next
Subject Alternatives Names for the SSL Certificate
To make sure that the browser always going to trust the certificate, provide every possible address at the Subject Alternative Names. The recommended addresses are:
The hostname of the server.The FQDN of the server.The IP address of the server."localhost"AliasesIf load-balancer is being used, then it's hostname, FQDN and IP address.
Certificates in .pfx or .p12 format
If the SSL certificate is in .pfx or .p12 format, then it has to be converted to a pair of .crt and .key files. For the conversion process, please refer to the "Creating .key and .crt files from .p12 or .pfx file" section in the Installin
article.g an SSL certificate for HTTPS access

Verint Verba Collaboration Compliance Platform
54
Step 10 - Select the primary IP address of the server from the list, then click .Next
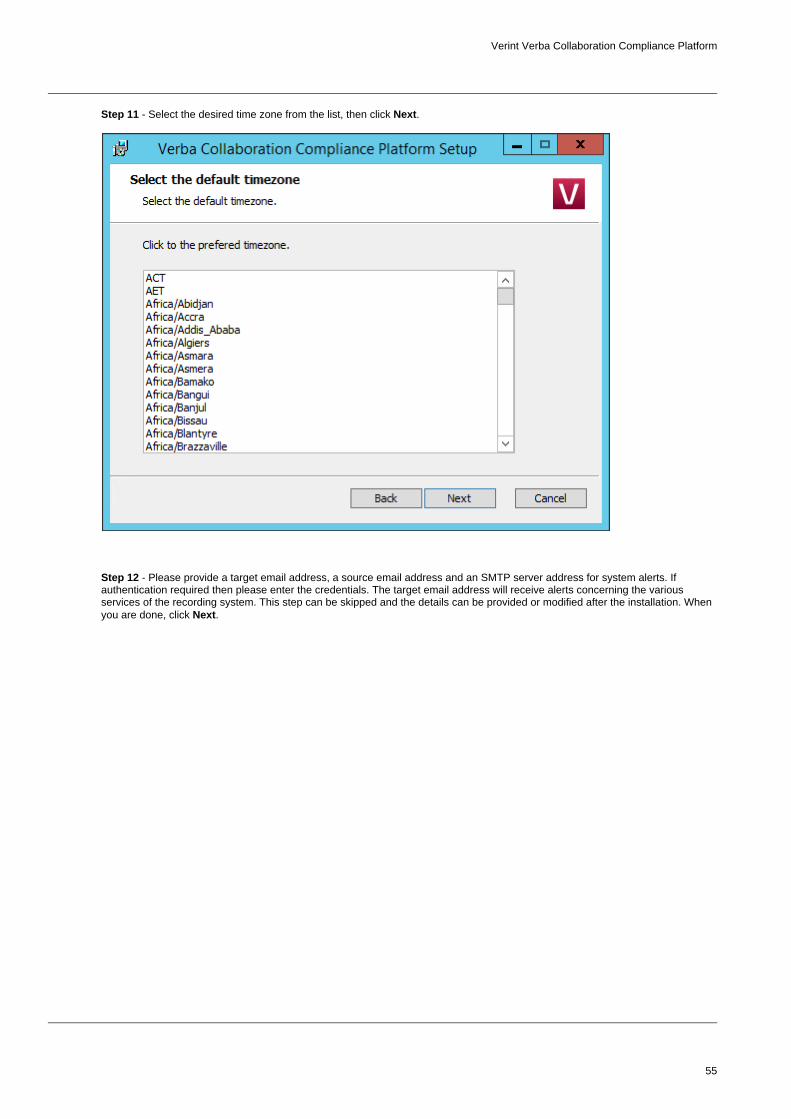
Verint Verba Collaboration Compliance Platform
55
Step 11 - Select the desired time zone from the list, then click .Next
Step 12 - Please provide a target email address, a source email address and an SMTP server address for system alerts. If authentication required then please enter the credentials. The target email address will receive alerts concerning the various services of the recording system. This step can be skipped and the details can be provided or modified after the installation. When you are done, click .Next

Verint Verba Collaboration Compliance Platform
56
Step 13 - Enter a password for the Administrator login then click Next.

Verint Verba Collaboration Compliance Platform
57
Step 14 - Enter a password for the Verba API user then click Note that this user going to be required at the installation of the Next. other Verba components.
Step 15 - Click again to start installing the services. When it's done, click to exit the installer.Next Finish

Verint Verba Collaboration Compliance Platform
58
Installing a Verba Recording Server
If you haven't already done so, please make sure all the prerequisites are installed for your Recording Server. Refer to http://kb.verba.com/display/docs/Installing+the+required+prerequisites
The Verba Recording Server role is responsible for the various recording tasks. The media files will only be stored temporarily on these servers, they will upload the media files to the configured media repository and apply updates to the Verba database (usually located on the Media Repository server or a separate SQL server).
Before starting to install a Recording Server, please make sure that you already have a Media Repository installed and that the PC you are installing the Recording Server on can reach the server containing the database.
Step 1 - The install kit starts installing Verba components. Simply press the button to start the installation.Next
Step 2 - Read the Verba license agreement carefully before you click button.Next
Step 3 - Select the role from the list. Click Recording Server Next.
Step 4 - Select the destination folder for Verba system and the desired location of the media files. You can change the default setting by clicking on the Change button and selecting another folder. Please note that this is just a temporary folder for the media files. After the recording completed the files will be uploaded to the right location. If you have finished the destination folder configuration, press the button.Next
Drive root cannot be provided for the media folder (ex: D:\). A folder has to be created.
In case of the Recording Server, the media folder is just a temporary folder. The recording services are working in this folder during the recording, but when the recording completes, the files usually uploaded to a Media Repository server or to another location. Therefore, this always should be on the local disk.
Step 5a - If a Verba CA is being used, then select the "Gen erate Certificate Signed by Verba Media Repository CA"
option, then click on the button. In the Generate Generatethe Verba Server Certificate window provide the address of the first Media Repository server, the Verba administrator username and password, then click . Finally, click Generateon the button. (If this option is being used, Step 5b Nextcan be skipped.)
Step 5b - If there is an existing certificate from a previous Verba installation (in case of reinstall or upgrade), or a pre-generated certificate for the server exists (requested from a local or a 3rd party CA), then select the "Select Certificate" option, then click on the button.Browse
Certificates generated by the Verba CA
Based on the Friendly Name of the certificates the server and the CA certificate can be identified easily. On the screenshot, the first one is the server certificate and the second one is the CA certificate.

Verint Verba Collaboration Compliance Platform
59
Step 6 - The Verba installer is asking for the MS SQL Server credentials. The server name can be entered either as an IP address or an FQDN. Both SQL server based and windows authentication is supported. In case of windows authentication, the Account name has to be provided in UPN or domain\username format. All Verba servers and
If SQL components have to use the same database!Mirroring is being used or AlwaysOn with Multi-Subnet failover, then a different SQL Driver has to be selected. In this case, the driver has to be installed on the server. Click '
' to verify your input. If the tests were Test Connectionsuccessful, click .Next
Step 7 - Provide the address of the Verba Media Repository server, and the API user password. The API user created at Step 14during the installation of the Media Repository server.
Database connection troubleshooting tips
Try to ping the database server. Try to connect to the 1433 port on the database server. (telnet or Test-NetConnection)Check if the user has the necessary roles assigned, refer to for SQL Server requirementsmore informationIf Windows Authentication used then check if the user has the Local Administrator group membership and the 'Logon as a service right'.Check if the correct instance name is provided at the SQL Server name. If there are multiple instances, then the SQL Server Browser service must run on the SQL server side.If you installed SQL Server Express Edition, then check if the TCP/IP protocol is enabled under the SQL Server Network Configuration in the SQL Server Configuration Manager.

Verint Verba Collaboration Compliance Platform
60
Step 8 - Select the primary IP address of the server from the list, then click .Next
Step 9 - Please provide a target email address, a source email address and an SMTP server address for system alerts. If authentication required then please enter the credentials. The target email address will receive alerts concerning the various services of the recording system. This step can be skipped and the details can be provided or modified after the installation. When you are done, click .Next

Verint Verba Collaboration Compliance Platform
61
Step 10 - Click again to start installing the services. When it's done, click to exit the installer.Next Finish

Verint Verba Collaboration Compliance Platform
62
Installing a Verba Single Server solution
If you haven't already done so, please make sure all the prerequisites are installed for your Single Server. Refer to http://kb.verba.com/display/docs/Installing+the+required+prerequisites
The Single Server role combines the features and functions of a Verba Recording Server and Media Repository in one server. The management interface, system services, and recording functions will all run on the same server. If you don't use a separate SQL server, the database will be located on this server as well.
Please follow the steps below to install a Verba Single Server solution. Note that, all Installer components must be run as Administrator.
Step 1 - The install kit starts installing Verba components. Simply press the button to start the installation.Next
Step 2 - Read the Verba license agreement carefully before you click button.Next
Step 3 - Select the role from the list. Click Single Server Next.
Step 4 - Select the destination folder for Verba system and the desired location of the media files. You can change the default setting by clicking on the Change button and selecting another folder. If you have finished the destination folder configuration, press the button.Next
Drive root cannot be provided for the media folder (ex: D:\). A folder has to be created.
Step 5a - If the server is going to be the first Single Server (Media Repository) server in the deployment, and pre-generated certificates won't be used, then select the "Gener
oate Certificate Signed by Verba Media Repository CA"ption, and check the "First Media Repository in the
checkbox. Click on the button, and deployment" Generatein the Generate the Verba Server Certificate window click G
. Finally, click on the button. (If this option is enerate Nextbeing used, then Step 5b and Step 5c can be skipped.)
Step 5b - If the server won't be the first Singe Server (Media Repository) server in the deployment, and pre-generated certificates won't be used, then select the "Gener
oate Certificate Signed by Verba Media Repository CA"ption, then click on the button. In the Generate Generatethe Verba Server Certificate window provide the address of the first Media Repository server, the administrator username and password, then click . Finally, click Generateon the button. (If this option is being used, Step 5c Nextcan be skipped.)
Step 5c - If there is an existing certificate from a previous Verba installation (in case of reinstall or upgrade), or a pre-generated certificate for the server exists (requested from a local or a 3rd party CA), then select the "Select Certificate" option, then click on the button. If the server was a BrowseCA previously, then select the CA certificate also by clicking on the button under the CA Certificate Thumbrint.Browse
Certificates generated by Verba CA vs pre-generated certificates
In case of using the Verba-generated certificates, the first Singe Server (Media Repository) server becomes a CA also. During the installation of the other Verba components, the server certificates will be requested from this CA. This is done through the TCP port 443 with SSL. The server certificates and the CA certificate will be placed in the certificate stores of the servers automatically, to the Personal folder. The certificates generated by the Verba CA uses SHA512forthesignaturealgorithm,andRSA2048 for the public key.
If certificates are generated for the Verba servers in advanceusinganotherCA, then make sure that the certificates are placed into the certificate stores of the servers under the Personal folder, and the CA certificates are placed into the Personal or into the Trusted Root Certification Authorities folder. The only requirement for the server certificates is making the private key exportable.
Certificates generated by the Verba CA
Based on the Friendly Name of the certificates the server and the CA certificate can be identified easily. On the screenshot, the first one is the server certificate and the second one is the CA certificate.
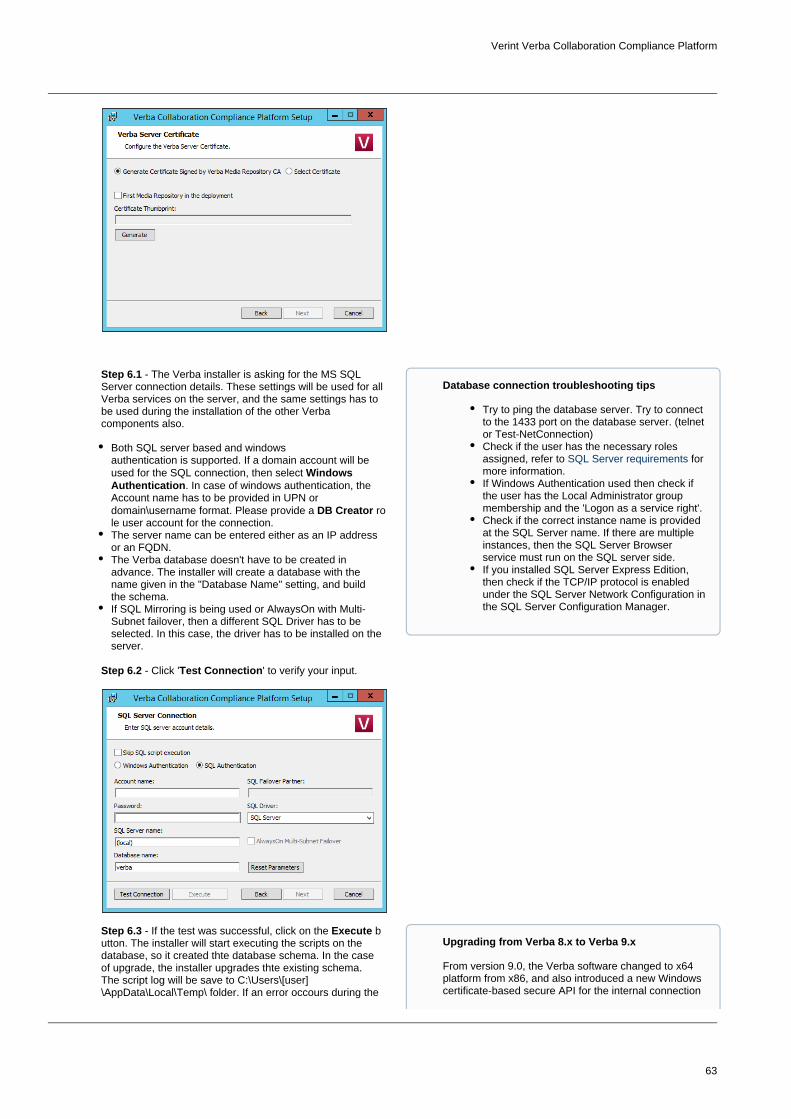
Verint Verba Collaboration Compliance Platform
63
Step 6.1 - The Verba installer is asking for the MS SQL Server connection details. These settings will be used for all Verba services on the server, and the same settings has to be used during the installation of the other Verba components also.
Both SQL server based and windows authentication is supported. If a domain account will be used for the SQL connection, then select Windows
. In case of windows authentication, the AuthenticationAccount name has to be provided in UPN or domain\username format. Please provide a roDB Creatorle user account for the connection. The server name can be entered either as an IP address or an FQDN.The Verba database doesn't have to be created in advance. The installer will create a database with the name given in the "Database Name" setting, and build the schema.If SQL Mirroring is being used or AlwaysOn with Multi-Subnet failover, then a different SQL Driver has to be selected. In this case, the driver has to be installed on the server.
Step 6.2 - Click ' ' to verify your input.Test Connection
Step 6.3 - If the test was successful, click on the bExecuteutton. The installer will start executing the scripts on the database, so it created thte database schema. In the case of upgrade, the installer upgrades thte existing schema. The script log will be save to C:\Users\[user]\AppData\Local\Temp\ folder. If an error occours during the
Database connection troubleshooting tips
Try to ping the database server. Try to connect to the 1433 port on the database server. (telnet or Test-NetConnection)Check if the user has the necessary roles assigned, refer to for SQL Server requirementsmore information.If Windows Authentication used then check if the user has the Local Administrator group membership and the 'Logon as a service right'.Check if the correct instance name is provided at the SQL Server name. If there are multiple instances, then the SQL Server Browser service must run on the SQL server side.If you installed SQL Server Express Edition, then check if the TCP/IP protocol is enabled under the SQL Server Network Configuration in the SQL Server Configuration Manager.
Upgrading from Verba 8.x to Verba 9.x
From version 9.0, the Verba software changed to x64 platform from x86, and also introduced a new Windows certificate-based secure API for the internal connection

Verint Verba Collaboration Compliance Platform
64
script execution, it can be restarted by closing the window, then clicking on the Execute button again in the installer window.
Step 6.3 - Click on the button. In the installer Closewindow, click .Next
Step 7 - Please specify the ports for running the Verba web server. Click the button to check if they are free. If Test Connectionone of them is taken you will be asked for another port number (you are not allowed to run more than one HTTP server on the same port). It is recommended to use the default 80 and 443 port numbers. If successful, click Next.
between the Verba services. When upgrading from Verba 7.x or 8.x, the installer offers changing the configuration stored in the database according to the new settings. In this case, all settings pointing to the "Program Files (x86)" folder will be changed to "Program Files", and all settings related to the old security configuration will be removed.
The installer also offers upgrading the schema of the IM recordings. If this step is skipped, then the old recordings won't be visible in the Verba web interface.Note that this step can take hours to execute!

Verint Verba Collaboration Compliance Platform
65
Step 8a - If this is a new Verba installation, and there is no pre-created SSL certificate for the HTTPS connection, then select the option, then "Generate Self-signed Certificate"click on the button. In the "Generate the Verba GenerateWeb server SSL Certificate" window, enter a for passwordthe certificate, provide the Subject Alternative names, then click . In this case a verba-tomcat.crt and a verba-Generatetomcat.key file will be generated in the C:\ root. Click on the
button. (If this option is being used, then Step 9b can Nextbe skipped)
Step 8b - If this is not a new Verba installation (in case of reinstall or upgrade), or there is a pre-created SSL certificate for the HTTPS connection, then select the "Selec
option. Under the Certificate Path, click on t Certificate"the button, and provide the . Under the Browse .crt fileCertificate Key Path click on the button, and Browseprovide the . Provide the password of the SSL .key filecertificate. Click on the button.Next
Subject Alternatives Names for the SSL Certificate
To make sure that the browser always going to trust the certificate, provide every possible address at the Subject Alternative Names. The recommended addresses are:
The hostname of the server.The FQDN of the server.The IP address of the server."localhost"AliasesIf load-balancer is being used, then it's hostname, FQDN and IP address.
Certificates in .pfx or .p12 format
If the SSL certificate is in .pfx or .p12 format, then it has to be converted to a pair of .crt and .key files. For the conversion process, please refer to the "Creating .key and .crt files from .p12 or .pfx file" section in the Installin
article.g an SSL certificate for HTTPS access

Verint Verba Collaboration Compliance Platform
66
Step 9 - Please specify a free port for the Verba storage server. Use the button to check the port's availability. If Test Connectionsuccessful, click .Next
Step 10 - Select the primary IP address of the server from the list, then click .Next

Verint Verba Collaboration Compliance Platform
67
Step 11 - Select the desired time zone from the list, then click .Next

Verint Verba Collaboration Compliance Platform
68
Step 12 - Please provide a target email address, a source email address and an SMTP server address for system alerts. If authentication required then please enter the credentials. The target email address will receive alerts concerning the various services of the recording system. This step can be skipped and the details can be provided or modified after the installation. When you are done, click .Next
Step 13 - Enter a password for the Administrator login then click Next.

Verint Verba Collaboration Compliance Platform
69
Step 14 - Enter a password for the Verba API user then click Note that this user going to be required at the installation of the Next. other Verba components.

Verint Verba Collaboration Compliance Platform
70
Step 15 - Click again to start installing the services. When it's done, click to exit the installer.Next Finish

Verint Verba Collaboration Compliance Platform
71
Installing a Verba Announcement ServerYou can install the server using the provided MSI installation package (VerbaAdditionalServices.msi):
Do not install the VerbaAdditionalRoles.msi on a Combo, Media Repository or Recording server because the Verba Announcement Service is already installed there and you will end up with corrupt registry settings.
Step 1 - The install kit starts installing Verba components. Simply press the button to start the installation.Next
Step 2 - Read the Verba license agreement carefully before you click button.Next
Step 3 - Select the role from the list. Click Announcement Server Next.
Step 4 - Select the destination folder for Verba software. You can change the default setting by clicking on the Change button and selecting another folder. If you have finished the destination folder configuration, press the button.Next
Step 5a - If a Verba CA is being used, then select the "Gen erate Certificate Signed by Verba Media Repository CA"
option, then click on the button. In the Generate Generatethe Verba Server Certificate window provide the address of the first Media Repository server, the administrator username and password, then click . Finally, click Generateon the button. (If this option is being used, Step 5b Nextcan be skipped.)
Step 5b - If there is an existing certificate from a previous Verba installation (in case of reinstall or upgrade), or a pre-generated certificate for the server exists (requested from a local or a 3rd party CA), then select the "Select Certificate" option, then click on the button.Browse
Step 6a - The Verba installer is asking for the MS SQL Server credentials. The server name can be entered either as an IP address or an FQDN. Both SQL server based and windows authentication is supported. In case of windows authentication, the Account name has to be provided in UPN or domain\username format. All Verba servers and components have to use the same database! If SQL Mirroring is being used or AlwaysOn with Multi-Subnet failover, then a different SQL Driver has to be selected. In this case, the driver has to be installed on the server. Click '
' to verify your input. If the tests were Test Connectionsuccessful, click .Next
Step 6b - If the incoming connection from the server is not possible (because the server is in DMZ for example), then uncheck the " settinEnable Automatic Node Registration"g. In this case, the server has to be added manually to the server list in the System \ Servers menu after the installation. Click .Next
Certificates generated by the Verba CA
Based on the Friendly Name of the certificates the server and the CA certificate can be identified easily. On the screenshot, the first one is the server certificate and the second one is the CA certificate.
Database connection troubleshooting tips
Try to ping the database server. Try to connect to the 1433 port on the database server. (telnet or Test-NetConnection)Check if the user has the necessary roles assigned, refer to for SQL Server requirementsmore informationIf Windows Authentication used then check if the user has the Local Administrator group membership and the 'Logon as a service right'.Check if the correct instance name is provided at the SQL Server name. If there are multiple instances, then the SQL Server Browser service must run on the SQL server side.If you installed SQL Server Express Edition, then check if the TCP/IP protocol is enabled under the SQL Server Network Configuration in the SQL Server Configuration Manager.

Verint Verba Collaboration Compliance Platform
72
Step 7 - Provide the address of the Verba Media Repository server, and the API user password. The API user created at dStep 14uring the installation of the Media Repository server.
Step 8 - Select the primary IP address of the server from the list, then click .Next
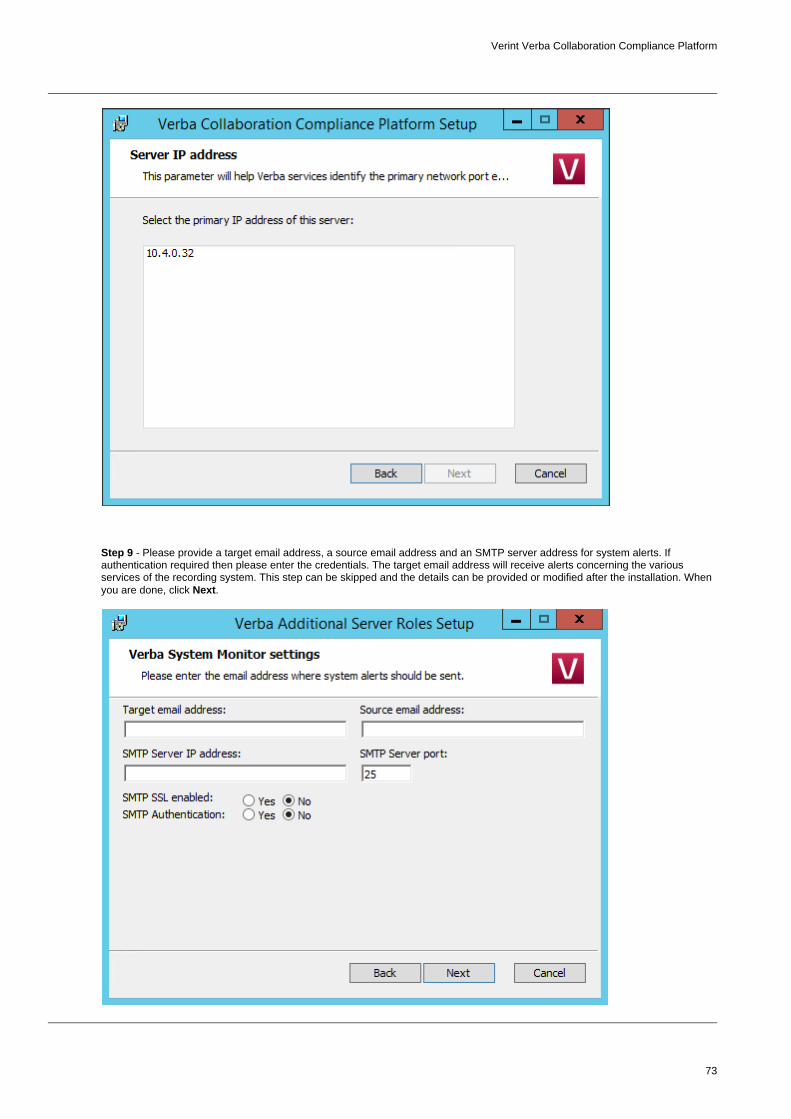
Verint Verba Collaboration Compliance Platform
73
Step 9 - Please provide a target email address, a source email address and an SMTP server address for system alerts. If authentication required then please enter the credentials. The target email address will receive alerts concerning the various services of the recording system. This step can be skipped and the details can be provided or modified after the installation. When you are done, click .Next

Verint Verba Collaboration Compliance Platform
74
Step 10 - Click again to start installing the services. When it's done, click to exit the installer.Next Finish
For the configuration of the Verba Announcement service, refer to Installing and configuring the Verba SfB - Lync Announcement service

Verint Verba Collaboration Compliance Platform
75
Installing a Verba Speech Analytics ServerYou can install the server using the provided MSI installation package (VerbaAdditionalServices.msi):
Do not install the VerbaAdditionalRoles.msi on a Combo or Media Repository server because the Verba Speech Analytics Service is already installed there and you will end up with corrupt registry settings.
Step 1 - The install kit starts installing Verba components. Simply press the button to start the installation.Next
Step 2 - Read the Verba license agreement carefully before you click button.Next
Step 3 - Select the role from the list. Click Speech Analytics Server Next.
Step 4 - Select the destination folder for Verba software. You can change the default setting by clicking on the Change button and selecting another folder. If you have finished the destination folder configuration, press the button.Next
Step 5a - If a Verba CA is being used, then select the "Gen erate Certificate Signed by Verba Media Repository CA"
option, then click on the button. In the Generate Generatethe Verba Server Certificate window provide the address of the first Media Repository server, the administrator username and password, then click . Finally, click Generateon the button. (If this option is being used, Step 5b Nextcan be skipped.)
Step 5b - If there is an existing certificate from a previous Verba installation (in case of reinstall or upgrade), or a pre-generated certificate for the server exists (requested from a local or a 3rd party CA), then select the "Select Certificate" option, then click on the button.Browse
Step 6a - The Verba installer is asking for the MS SQL Server credentials. The server name can be entered either as an IP address or an FQDN. Both SQL server based and windows authentication is supported. In case of windows authentication, the Account name has to be provided in UPN or domain\username format. All Verba servers and components have to use the same database! If SQL Mirroring is being used or AlwaysOn with Multi-Subnet failover, then a different SQL Driver has to be selected. In this case, the driver has to be installed on the server. Click '
' to verify your input. If the tests were Test Connectionsuccessful, click .Next
Step 6b - If the incoming connection from the server is not possible (because the server is in DMZ for example), then uncheck the " settinEnable Automatic Node Registration"
Certificates generated by the Verba CA
Based on the Friendly Name of the certificates the server and the CA certificate can be identified easily. On the screenshot, the first one is the server certificate and the second one is the CA certificate.
Database connection troubleshooting tips
Try to ping the database server. Try to connect to the 1433 port on the database server. (telnet or Test-NetConnection)Check if the user has the necessary roles assigned, refer to for SQL Server requirementsmore information.If Windows Authentication used then check if the user has the Local Administrator group membership and the 'Logon as a service right'.Check if the correct instance name is provided at the SQL Server name. If there are multiple instances, then the SQL Server Browser service must run on the SQL server side.If you installed SQL Server Express Edition, then check if the TCP/IP protocol is enabled

Verint Verba Collaboration Compliance Platform
76
g. In this case, the server has to be added manually to the server list in the System \ Servers menu after the installation. Click .Next
Step 7 - Provide the address of the Verba Media Repository server, and the API user password. The API user created at dStep 14uring the installation of the Media Repository server.
Step 8 - Select the primary IP address of the server from the list, then click .Next
under the SQL Server Network Configuration in the SQL Server Configuration Manager.

Verint Verba Collaboration Compliance Platform
77
Step 9 - Please provide a target email address, a source email address and an SMTP server address for system alerts. If authentication required then please enter the credentials. The target email address will receive alerts concerning the various services of the recording system. This step can be skipped and the details can be provided or modified after the installation. When you are done, click .Next

Verint Verba Collaboration Compliance Platform
78
Step 10 - Click again to start installing the services. When it's done, click to exit the installer.Next Finish

Verint Verba Collaboration Compliance Platform
79
Installing the Verba Media Collector and Proxy componentThe Verba Media Collector and Proxy component is responsible for capturing the media streams on the node it's installed on and forwarding it to a Verba Recording Server. In a Lync environment, it's typically installed on the Edge server or the Mediation server depending on your recording needs.
Do not install the VerbaAdditionalRoles.msi on a SingeServer or Recording Server because the Verba Media Collector and Proxy Service is already installed there and you will end up with corrupt registry settings.
Please follow the steps below to install the component:
Step 1 - The install kit starts installing Verba components. Simply press the button to start the installation.Next
Step 2 - Read the Verba license agreement carefully before you click button.Next
Step 3 - Select the role from the list. Click Media Collector & Proxy Server Next.
Step 4 - Select the destination folder for Verba software. You can change the default setting by clicking on the Change button and selecting another folder. If you have finished the destination folder configuration, press the button.Next
Step 5a - If a Verba CA is being used, then select the "Gen erate Certificate Signed by Verba Media Repository CA"
option, then click on the button. In the Generate Generatethe Verba Server Certificate window provide the address of the first Media Repository server, the administrator username and password, then click . Finally, click Generateon the button. (If this option is being used, Step 5b Nextcan be skipped.)
Step 5b - If there is an existing certificate from a previous Verba installation (in case of reinstall or upgrade), or a pre-generated certificate for the server exists (requested from a local or a 3rd party CA), then select the "Select Certificate" option, then click on the button.Browse
Step 6a - The Verba installer is asking for the MS SQL Server credentials. The server name can be entered either as an IP address or an FQDN. Both SQL server based and windows authentication is supported. In case of windows authentication, the Account name has to be provided in UPN or domain\username format. All Verba servers and components have to use the same database! If SQL
Servers in DMZ and Verba CA
If the server is in DMZ (for example in case of Edge servers), then the server certificate cannot be requested directly from the Verba CA, and has to be Step 5bselected. In this case, there are two prerequisites:
The server certificate has to be downloaded from the Verba Web Interface, and imported into the server's certificate store manually. For the certificate downloading guide see: Server CertificatesThe CA certificate of the Verba CA has to be manually exported from thecertificate store of the first Media Repositroy (or Singel) server, then imported manually into the server's certificate store.
Certificates generated by the Verba CA
Based on the Friendly Name of the certificates the server and the CA certificate can be identified easily. On the screenshot, the first one is the server certificate and the second one is the CA certificate.
Database connection troubleshooting tips
Try to ping the database server. Try to connect to the 1433 port on the database server. (telnet or Test-NetConnection)

Verint Verba Collaboration Compliance Platform
80
Mirroring is being used or AlwaysOn with Multi-Subnet failover, then a different SQL Driver has to be selected. In this case, the driver has to be installed on the server. Click '
' to verify your input. If the tests were Test Connectionsuccessful, click .Next
Step 6b - If the incoming connection from the server is not possible (because the server is in DMZ for example), then uncheck the " settinEnable Automatic Node Registration"g. In this case, the server has to be added manually to the server list in the System \ Servers menu after the installation. Click .Next
Step 7 - Provide the address of the Verba Media Repository server, and the API user password. The API user created at dStep 14uring the installation of the Media Repository server.
Check if the user has the necessary roles assigned, refer to for SQL Server requirementsmore information.If Windows Authentication used then check if the user has the Local Administrator group membership and the 'Logon as a service right'.Check if the correct instance name is provided at the SQL Server name. If there are multiple instances, then the SQL Server Browser service must run on the SQL server side.If you installed SQL Server Express Edition, then check if the TCP/IP protocol is enabled under the SQL Server Network Configuration in the SQL Server Configuration Manager.

Verint Verba Collaboration Compliance Platform
81
Step 8 - Select the primary IP address of the server from the list, then click .Next
Step 9 - Please provide a target email address, a source email address and an SMTP server address for system alerts. If authentication required then please enter the credentials. The target email address will receive alerts concerning the various services of the recording system. This step can be skipped and the details can be provided or modified after the installation. When you are done, click .Next

Verint Verba Collaboration Compliance Platform
82
Step 10 - Click again to start installing the services. When it's done, click to exit the installer.Next Finish

Verint Verba Collaboration Compliance Platform
83
Installing the Verba Skype for Business - Lync Filter
Overview
For the complete overview of the installation process, visit Microsoft Skype for Business
The Verba system uses the Microsoft Skype for Business / Lync Server SDK and specific components have to be installed on all where recorded/controlled users are located. For mediation and Microsoft SfB/Lync Front-End servers (including SBSs and SBAs)
AVMCU based recording, the Media Collector component needs to be installed as well. There are two different Verba server roles available:
The server role contains the following services: Lync Filter
Verba SfB/Lync Call Filter Service: required for voice/video call recordingVerba SfB/Lync IM Filter Service: required for IM and persistent chat recordingVerba SfB/Lync Communication Policy Service: required for ethical wall deployments
The server role contains the following services:Media Collector and Lync Filter
Verba Media Collector & Proxy Service: required for mediation and AVMCU based recordingVerba SfB/Lync Call Filter Service: required for voice/video call recordingVerba SfB/Lync IM Filter Service: required for IM and persistent chat recordingVerba SfB/Lync Communication Policy Service: required for ethical wall deployments
Follow the guidelines of this chapter to install the Verba SfB/Lync Filter component on the Microsoft SfB/Lync servers:
PrerequisitesInstalling the Verba componentsRegistering the Verba components into the SfB/Lync environment
Verba SfB/Lync Call Filter ServiceVerba SfB/Lync IM Filter ServiceVerba SfB/Lync Communication Policy Service
Verifying and removing the Verba components
Prerequisites
There is at least one Verba Media Repository or Verba Media Repository & Recording Server installedUse a Windows user account for the installation with the following privileges:
Local AdministratorRTCUniversalServerAdmins
Create a new service user account in the domain for the Verba services (e.g.svcverbalync):The service user account can be the same as the one used on other Verba servers. Add the service user account to the following groups on :local all Front-End server(s), SBSs and SBAs
AdministratorsRTC Server Applications
Add the Logon As A Service Right for the service user account
in a way, that it . If the Configure the service user account and group memberships does not violate your Group Policiesgroup membership or privileges of the service user account is modified during regular Group Policy processing, the Verba system will .stop recording conversations or enforcing communication policies
Install the software prerequisites: Installing the required prerequisitesConfigure the firewall on the SfB/Lync servers: Firewall configuration for Skype for Business - Lync deployments
Installing the Verba components
Make sure you are running the MSI package from an administrator command prompt.
Step 1 - Locate and run the package from administrator command prompt. The install kit starts VerbaAdditionlRoles.msiinstalling Verba components. Simply press the button to start the installation.Next
Step 2 - Read the Verba license agreement carefully before you click the button.Next

Verint Verba Collaboration Compliance Platform
84
Step 3 - Select the server role and click Next.
Lync Filter for proxy based recording and ethical wall deployments. Media Collector & Lync Filter role for mediation and AVMCU based recording deployments.
Step 4 - Select the destination folder for the Verba SfB/Lync Filter. You can change the default setting by clicking on the Changebutton and selecting another folder. If you have finished the destination folder configuration, press the button.Next
Step 5a - If a Verba CA is being used, then select the "Gen erate Certificate Signed by Verba Media Repository CA"
option, then click on the button. In the Generate Generatethe Verba Server Certificate window provide the address of the first Media Repository server, the administrator username and password, then click . Finally, click Generateon the button. (If this option is being used, Step 5b Nextcan be skipped.)
Step 5b - If there is an existing certificate from a previous Verba installation (in case of reinstall or upgrade), or a pre-generated certificate for the server exists (requested from a local or a 3rd party CA), then select the "Select Certificate" option, then click on the button.Browse
Step 6a - The Verba installer is asking for the MS SQL Server credentials. The server name can be entered either as an IP address or an FQDN. Both SQL server based and windows authentication is supported. In case of windows authentication, the Account name has to be provided in UPN or domain\username format. All Verba servers and components have to use the same database! If SQL Mirroring is being used or AlwaysOn with Multi-Subnet failover, then a different SQL Driver has to be selected. In this case, the driver has to be installed on the server. Click '
' to verify your input. If the tests were Test Connectionsuccessful, click .Next
Step 6b - If the incoming connection from the server is not possible (because the server is in DMZ for example), then uncheck the " settinEnable Automatic Node Registration"g. In this case, the server has to be added manually to the server list in the System \ Servers menu after the installation. Click .Next
Certificates generated by the Verba CA
Based on the Friendly Name of the certificates the server and the CA certificate can be identified easily. On the screenshot, the first one is the server certificate and the second one is the CA certificate.
Database connection troubleshooting tips
Try to ping the database server. Try to connect to the 1433 port on the database server. (telnet or Test-NetConnection)Check if the user has the necessary roles assigned, refer to for SQL Server requirementsmore information.If Windows Authentication used then check if the user has the Local Administrator group membership and the 'Logon as a service right'.Check if the correct instance name is provided at the SQL Server name. If there are multiple instances, then the SQL Server Browser service must run on the SQL server side.If you installed SQL Server Express Edition, then check if the TCP/IP protocol is enabled under the SQL Server Network Configuration in the SQL Server Configuration Manager.
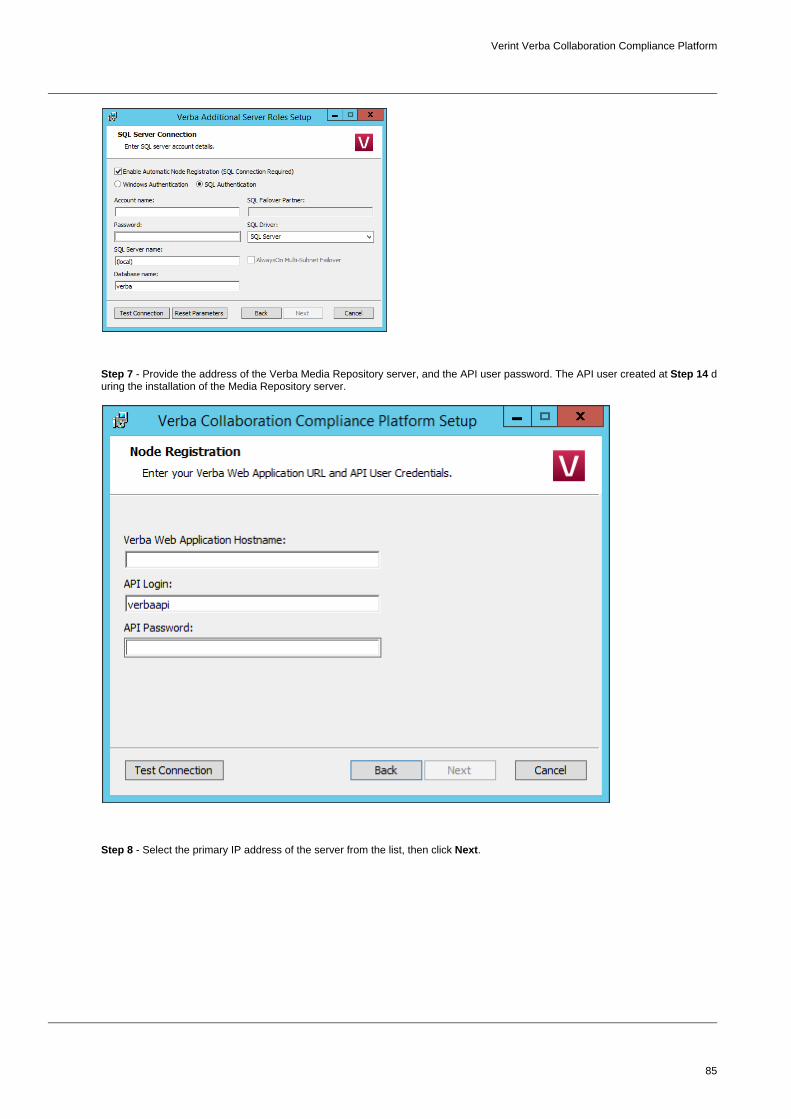
Verint Verba Collaboration Compliance Platform
85
Step 7 - Provide the address of the Verba Media Repository server, and the API user password. The API user created at dStep 14uring the installation of the Media Repository server.
Step 8 - Select the primary IP address of the server from the list, then click .Next

Verint Verba Collaboration Compliance Platform
86
Step 9 - Provide the username and the password for the service user. Use the and the buttons Verify logon Verify membershipsto check if the service user account has sufficient rights. If either of the tests fails, please make sure it has all the necessary privileges mentioned at of the section. If the service user account has the proper privileges and the test Step 2 Prerequisites keeps failing, then you can also click the checkbox. Click to continue.Skip Role Check Next

Verint Verba Collaboration Compliance Platform
87
Step 10 - Please provide a target email address, a source email address and an SMTP server address for system alerts. If authentication required then please enter the credentials. The target email address will receive alerts concerning the various services of the recording system. This step can be skipped and the details can be provided or modified after the installation. When you are done, click .Next
Step 11 - Click again to start installing the services. When it's done, click to exit the installer.Next Finish
Registering the Verba components into the SfB/Lync environment
The Verba applications have to be added as new server applications to the SfB/Lync system. Open the Skype for Business / Lync from the Start Menu and use the following command(s):Server Management Shell
The Verba applications needs to be registered only once per frontend pool.
Verba SfB/Lync Call Filter Service
Required for voice/video call recording.
New-CsServerApplication -Identity "Service:Registrar:lync-pool-address.yourdomain.com/VerbaLyncFilter" -Uri http://www.verba.com/LyncFilter -Enabled $True -Critical $False
Verba SfB/Lync IM Filter Service
Required for IM and persistent chat recording.

Verint Verba Collaboration Compliance Platform
88
New-CsServerApplication -Identity "Service:Registrar:lync-pool-address.yourdomain.com/LyncChatRecorder" -Uri http://www.verba.com/LyncChatRecorder -Enabled $True -Critical $False
Verba SfB/Lync Communication Policy Service
Required for ethical wall deployments.
New-CsServerApplication -Identity "Service:Registrar:lync-pool-address.yourdomain.com/EthicalWall" -Uri http://www.verba.com/EthicalWall -Enabled $True -Critical $FalseNew-CsServerApplication -Identity "Service:Registrar:lync-pool-address.yourdomain.com/EthicalWallInit" -Uri http://www.verba.com/EthicalWallInit -Enabled $True -Critical $False -Priority <UserServicesPriority>
<UserServicesPriority> is the current priority of the User Services Lync server application. The reason for this is that the EthicalWallinit application needs to run before this. After this, the User Services application will have the priority of its initial priority+1.You can use the command to see what priority that service currently has.Get-CsServerApplication
Verifying and removing the Verba components
You can verify the list of the registered server applications using this command from the :Lync Server Management Shell
Get-CsServerApplication
You can always remove these filters if you make a configuration mistake:
Remove-CsServerApplication -Identity "Service:Registrar:lync-pool-address.yourdomain.com/VerbaLyncFilter"Remove-CsServerApplication -Identity "Service:Registrar:lync-pool-address.yourdomain.com/LyncChatRecorder"Remove-CsServerApplication -Identity "Service:Registrar:lync-pool-address.yourdomain.com/EthicalWall"Remove-CsServerApplication -Identity "Service:Registrar:lync-pool-address.yourdomain.com/EthicalWallInit"

Verint Verba Collaboration Compliance Platform
89
Changing the role of a Verba serverIf the requirements are changing, or if the wrong role was installed because of a mistake, the role of an already installed Verba server or component can be changed.
The optional steps are required only when the existing configuration needs to be preserved.
Step 1 (Optional) - If the existing settings of the installed services are required after the role change, the Verba registry has to be exported. Open the Start menu, type "regedit" and press Enter. The Registry Editor opens. Go to the node. HKEY_LOCAL_MACHINE\SOFTWARE\VerbaRight-click on the Verba key, then select .Export
Step 2 - Uninstall the Verba application from the server.
During the uninstallation, the Verba registry set also becomes removed. If the configuration needs to be preserved, then export the registry set as described at .Step 1
Step 3 - Install the Verba application as usual, but now by using the desired role. For the installation guides, see: Install the Verba software
Step 4 (Optional) - Open the Start menu, type "regedit" and press Enter. The Registry Editor opens. Click on the File \ Importmenu, and import the registry set previously exported at .Step 1
Step 5 (Optional) - Edit the value. The new value should represent HKEY_LOCAL_MACHINE\SOFTWARE\Verba\Storage\Role the new role of the server.
Verba role Registry code
Single Server Combo
Media Repository MR
Recording Server RS
Examples
The configuration usually needed to be preserved when:
Changing between Single Server and Recording Server roles, and the configuration of the recording services are required.Changing from SfB/Lync Filter to Media Collector and Filter role, and the configuration of the filter service(s) is required.

Verint Verba Collaboration Compliance Platform
90
Lync Filter LF
Media Collector and Proxy RC
Medica Colelctor and Lync Filter LFRC
Announcement Server AS
Step 6 - Open the Verba Web Interface and go to the menu.System \ Servers
Step 7 - Select the changed Verba server node from the list, then click on the button.Delete
When deleting a server from the list, the configuration stored in the central database will be removed. If the configuration setneeds to be preserved, then export the registry as described at .Step 1
Step 8 - On the Verba server list page, click on the link at the upper right corner.Add New Verba Server
Step 9 - Provide the FQDN of the server at the , select the new role at the setting, select a , Hostname Role Configuration Profilethen click .Save
Step 10 - Go to the tab.Change Configuration Settings
Step 11 - Select the " " option, then click on the button.Use configuration only from the server's local registry Start
When selecting the local registry, the configuration is copied into the central database.
Step 12 (Optional) - Go to the tab and activate the previously used services. Start the services at the Service Activation Service tab.Control

Verint Verba Collaboration Compliance Platform
91
Installer Parameters and Unattended Installation
The Verba msi installers files can be started from the command line with additional parameters. The installers can be started the following way:
msiexec /i VerbaRecording.msi [logging setting] [/quiet] [verba parameters]
Logging setting
Loggin can be added by the /L parameter, plus the letters which specify the required information. For example /LE means logging the errors only, or /LEI means logging the errors and the status messages. For Verba, the recommended setting is /L*V. After the logging setting, a file name also has to be specified for the output, for example "/L*V installer.log". The following table describes the available options:
Letter Log entries
V Verbose output
O Out-of-disk-space messages
I Status messages
C Initial UI parameters
E All error messages
W Non-fatal warnings
A Startup of actions
R Action-specific records
M Out-of-memory or fatal exit information
U User requests
P Terminal properties
X Extra debugging information.
* Wildcard for adding all parameters, except the V and X.
+ Append to existing file
! Flush each line to the log
Quiet Mode
Quiet mode enables the installation of the Verba software with a single command, without using the GUI. In this case, all settings going to be set based on the provided parameters.
If quiet mode is used, the SKIPSQLSEQUENCE=1 parameter is mandatory!
Verba parameters
Parameter Description Mandatory Default value Sample
SELECTEDROLE The role to be installed on the server. Available values:
MR - Media RepositoryRS - Recording ServerCombo - Single ServerAS - Announcement Server
Yes SELECTEDROLE=RS
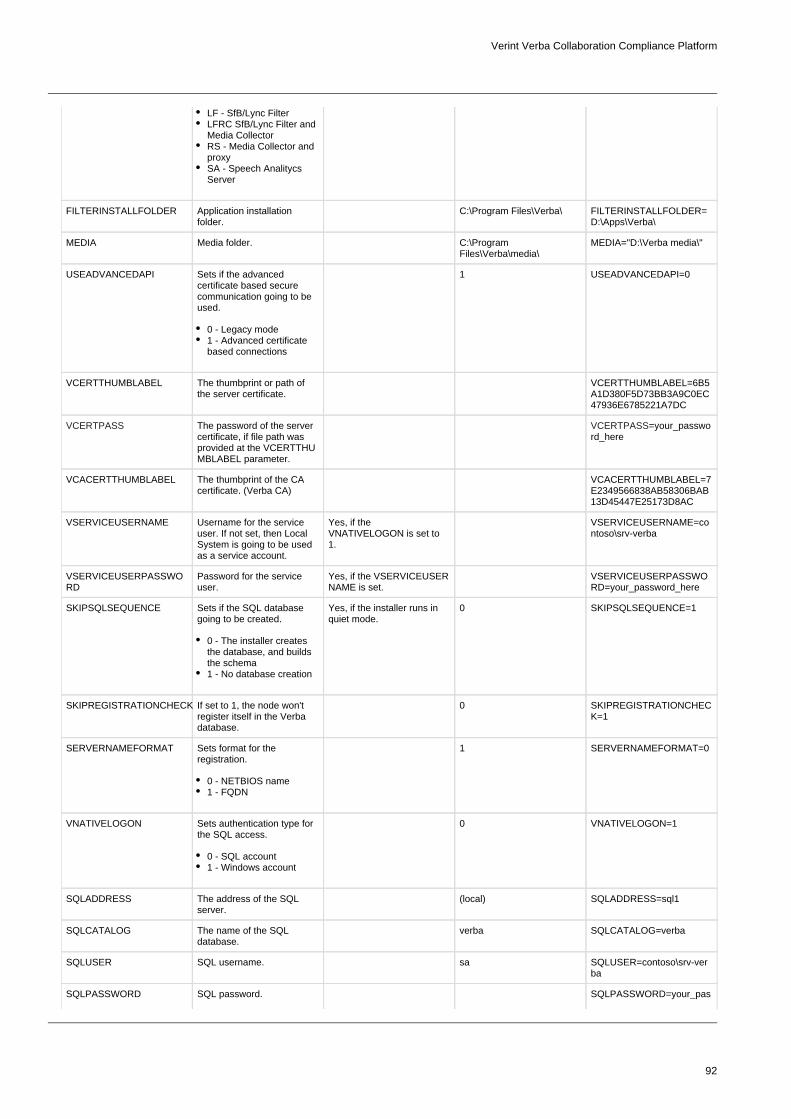
Verint Verba Collaboration Compliance Platform
92
LF - SfB/Lync FilterLFRC SfB/Lync Filter and Media CollectorRS - Media Collector and proxySA - Speech Analitycs Server
FILTERINSTALLFOLDER Application installation folder.
C:\Program Files\Verba\ FILTERINSTALLFOLDER=D:\Apps\Verba\
MEDIA Media folder. C:\Program Files\Verba\media\
MEDIA="D:\Verba media\"
USEADVANCEDAPI Sets if the advanced certificate based secure communication going to be used.
0 - Legacy mode1 - Advanced certificate based connections
1 USEADVANCEDAPI=0
VCERTTHUMBLABEL The thumbprint or path of the server certificate.
VCERTTHUMBLABEL=6B5A1D380F5D73BB3A9C0EC47936E6785221A7DC
VCERTPASS The password of the server certificate, if file path was provided at the VCERTTHUMBLABEL parameter.
=VCERTPASS your_password_here
VCACERTTHUMBLABEL The thumbprint of the CA certificate. (Verba CA)
VCACERTTHUMBLABEL=7E2349566838AB58306BAB13D45447E25173D8AC
VSERVICEUSERNAME Username for the service user. If not set, then Local System is going to be used as a service account.
Yes, if the VNATIVELOGON is set to 1.
VSERVICEUSERNAME=contoso\srv-verba
VSERVICEUSERPASSWORD
Password for the service user.
Yes, if the VSERVICEUSERNAME is set.
VSERVICEUSERPASSWORD=your_password_here
SKIPSQLSEQUENCE Sets if the SQL database going to be created.
0 - The installer creates the database, and builds the schema1 - No database creation
Yes, if the installer runs in quiet mode.
0 SKIPSQLSEQUENCE=1
SKIPREGISTRATIONCHECK If set to 1, the node won't register itself in the Verba database.
0 SKIPREGISTRATIONCHECK=1
SERVERNAMEFORMAT Sets format for the registration.
0 - NETBIOS name1 - FQDN
1 SERVERNAMEFORMAT=0
VNATIVELOGON Sets authentication type for the SQL access.
0 - SQL account1 - Windows account
0 VNATIVELOGON=1
SQLADDRESS The address of the SQL server.
(local) SQLADDRESS=sql1
SQLCATALOG The name of the SQL database.
verba SQLCATALOG=verba
SQLUSER SQL username. sa SQLUSER=contoso\ versrv-ba
SQLPASSWORD SQL password. SQLPASSWORD=your_pas

Verint Verba Collaboration Compliance Platform
93
sword_here
VSSLCERTIFICATEPATH Path to the SSL certificate .crt file.
VSSLCERTIFICATEPATH=C:\certs\verbassl.crt
VSSLKEYPATH Path to the SSL certificate .key file.
VSSLKEYPATH=C:\certs\verbassl.key
VSSLPASSWORD SSL certificate key password.
VSSLPASSWORD=your_password_here
LOGON_USERNAME Username for the service user at the filter services.
Yes, if the SELECTEDROLE is set to LF or LFRC.
LOGON_USERNAME=contverbaoso\srv-
LOGON_PASSWORD Password for the service user at the filter services.
Yes, if the SELECTEDROLE is set to LF or LFRC.
LOGON_PASSWORD=your_password_here
RESOLVEDIPV4 The IP address of the server.
RESOLVEDIPV4=192.168.1.13
ADMIN_PASSWORD Administrator password. Yes, if the SELECTEDROLE is set to MR or Combo.
ADMIN_PASSWORD=your_password_here
MRHOST First Media Repository server address.
MRHOST=testmr1
API_PASSWORD API user password. API_PASSWORD=your_password_here

Verint Verba Collaboration Compliance Platform
94
Upgrading your Verba system
Upgrading a Verba system consist of various steps executed by the installer and includes some manual step also. Before starting the upgrade make sure you have the followings available:
New Verba system installersValid license fileExisting Verba system installer in case you need to roll back during the upgrade processServers, OS, database, and meeting the requirements of the new system prerequisites (Java, .Net, etc.)A clear and definite plan for the upgrade including backup plan, upgrade plan and rollback planSince the upgrade might require to stop recording for a while, make sure it does not interfere with your business and regulationsWhen you have a complex deployment, make sure you have the right engineering resources available knowledgeable of Verba deployments
Verba does not support partial upgrades, all system components and servers need to be upgraded at once. There might be exceptions, but it needs to be authorized and confirmed by a Verba representative.
Verba supports upgrade from version 5 up to the latest version following the procedures described in this document.
If you are aware of any customization (custom database procedures, triggers or customized web interface including branding) in your system, please contact your Verba representative before the upgrade.
The following list briefly outlines the upgrade process:
Backup Verba database and prepare it for the upgrade processBackup existing servers and verify server and OS compatibilityUninstall the existing Verba softwareInstall the new Verba softwareConfigure serversTest the new system
Backup Verba database and prepare it for the upgrade process
During the upgrade process, the database has to be altered to support the new version of the software. In order to ensure a fallback option is available, it is mandatory to create a full backup of your Verba database.
For more information, see https://docs.microsoft.com/en-us/sql/relational-databases/backup-restore/create-a-full-database-backup-sql-server
Upgrading from 9.3 or earlier
With version 9.4, several database performance improvements were implemented, and this caused major changes in the database. The upgrade process may take significantly longer, (up to 30 minutes for every million records, depending on the resources of the SQL server)
you upgrade from version 9.3 or earlier to version 9.4 or later. when
The number of the records currently in the database can be checked by running the following SQL query:
Query for the number of entries in the database
SELECT COUNT(*) FROM v_section
Based on the number of the database records, SQL version and available free space the following configurations are required.
Step 1 - Optionally set the recovery mode to simple. When the upgrade is complete, you can change it back to its original setting. This step is recommended if the disk space available for the transaction log is limited.For more information, see https://docs.microsoft.com/en-us/sql/relational-databases/backup-restore/view-or-change-the-recovery-model-of-a-database-sql-server
Step 2 - Set the SQL Server Agent service to automatic start and start it (except when using SQL Express Edition, which does not include the SQL Server Agent service). For more information, see https://docs.microsoft.com/en-us/sql/ssms/agent/autostart-sql-server-agent-sql-server-management-studio
Step 3 - Optionally rebuild the indexes on the database tables. If the database contains more than one million entries, it is recommended to run the on the Verba database before the upgrade. This script should be run outside of manual-index-rebuild.sqlbusiness hours.
Database partitioning (9.5 or earlier)
Verint Verba Collaboration Compliance Platform
95
With version 9.6 partitioning was added as a recommended step during the installation, when more than 100 million conversations are expected to be stored in the database. The installer configures database partitioning only for future conversations. In order to improve performance for the already recorded conversations, it is possible to add partitioning for historical records.
For more information, see: Database table partitioning
Backup Verba servers and verify server and OS compatibility
In order to ensure that you can restore the system at any point during the upgrade procedure, you need to make a backup of the entire system.
The easiest and most efficient way to backup your current system is to create snapshots of your (virtual) servers. If your upgrade fails, you can simply restore the system by loading the snapshots.
The uninstall process does not affect or delete the database and the media folders. However, other data needs to be removed from the server. If you would like to keep the application log files for some reason, you need to back the log folder to an external location first.
Follow the steps below to backup the servers to be able to restore the system if you need to roll back changes.
Step 1 - Make a note of all active Verba services on the servers by navigating to tab under for 9.Service Activation System / Servers x or later versions and under in earlier versions. You will need this information when you re-apply the Administration / Verba Serves configuration on the servers running the new version.
Step 2 - Stop all Verba services on all servers. If you need to continue recording or you want to minimize downtime, you can continue recording on the Verba Recording Servers by disabling the database access. Before doing so, please consult your Verba representatives to confirm the available options and compatibility issues between the existing and the new system.
Step 3 - Check if your media folders or storage targets are not under C:\Program Files (x86)\Verba. If your media folders or storage targets are under C:\Program Files (x86)\Verba, move the folder to another, more appropriate location.
Step 4 - Optionally make a copy of your log folders to an external location on all servers.
Step 5 - Optionally make a copy of the C:\Program Files (x86)\Verba\resources\webapp\ folder on the Media Repository server to backup branding and other web application customization.
Step 6 - Make a copy of the server registry under HKLM\SOFTWARE\Wow6432Node\Verba key.
Step 7 - Check server configuration (CPU, memory, disk, network), operating system and database version compatibility for the new Verba version.
Uninstall Verba servers
Step 1 - Check that you have valid and up to date backups of your servers, and you verified server and OS compatibility with the new version.
Step 2 - Uninstall the Verba Media Repository Server first, unless you have a single server in your deployment.
Step 3 - Check that you do not have remaining files under If you have, check that no media folder C:\Program Files (x86)\Verba folder. is used under this folder and you made a backup of all relevant content (for instance log files). After checking all of these, delete the content of the folder.
Step 4 - HKLM\SOFTWARE\Wow6432Node\Verba key. If you have, delete them Check that you do not have remaining entries under completely.
Step 5 - Repeat Step 2 through Step 4 for all other Verba servers, including the ones installed on external servers such as Lync/SfB servers.
Install Verba servers
Once you completed the uninstall of your servers, you can go ahead and install the new version.
Step 1 - Run the prerequisites tool from the new installer package to check if there is any missing prerequisite. Install the missing ones and make sure you have Java Runtime version 11 installed on Verba Media Repository and Verba Recording Servers.
Step 2 - Install the new version on the Verba Media Repository server first. The installer will automatically update your database, it can take hours depending on the size of your database.
Step 3 - Install the new version on all Verba Recording Servers and other server roles.
Configure Verba servers and test

Verint Verba Collaboration Compliance Platform
96
Once you installed the new version on your servers, you need to apply the previous configuration and test the new system.
Step 1 - Login to the web interface and navigate to the Verba server and select the tab. Activate all Verba service Service Activationaccording to the previous configuration.
Step 2 - Navigate to tab. The system will offer you an option to apply the previous configuration (the Change Configuration Settingsconfiguration in the database) on the server. Select the option, or you can manually Use configuration only from central databaseselect the appropriate option below.
If you select the option, you will overwrite the working configuration and the Use configuration only from server's registrysystem needs to be set up again. Use this with care.
- Press and follow the instructions on the screen to apply the new configuration on the server.Step 3 Start
Step 4 - Repeat these steps for all Verba servers in your deployment.
Step 5 - If you have added new servers during the upgrade, simply configure them using an existing configuration template or direct server configuration.
Step 6 - Now you have finished the upgrade. Check all configuration settings (especially the new ones) and execute your test plan to ensure that your system is functioning properly.
Roll back to the previous version
If you encounter any issues during the upgrade and you are unable to resolve them, you need to roll back to the previous, working copy. If you have managed to create server snapshots, you can simply restore them. If you need to manually restore the system, follow the steps below:
Step 1 - Uninstall the new Verba servers by following the uninstall steps above. Make sure you execute the manual checks also.
Step 2 - Run the prerequisites tool from the previous installer package. Make sure you have the right Java Runtime on the server.
Step 3 - Restore the Verba database from the backup.
Step 4 - Install the Verba Media Repository server first.
Step 5 - Install the previous version on all other servers.
Step 6 - Apply the configuration on the servers and test the configuration by following the steps described above.

Verint Verba Collaboration Compliance Platform
97
Upgrade procedure from Carin recordersThe Carin - Verba upgrade procedure consists of three essential steps.
Making a backup of the existing Carin installationRemoving the existing Carin installationInstalling and configuring Verba Recording System and restoring from backup
Making a backup of the existing Carin installation
Step 1 - Launch from Start - Run..., Navigate to , right click on Registry backup regedit HKEY_LOCAL_MACHINE/SOFTWARE Carinand choose Export
Step 2 - After the registry backup is done, close regedit, open a file manager, navigate to the Carin media folder (by Media backupdefault it is ) and backup all files and directoriesC:\Program Files\Carin\media
Step 3 - After the media file copying procedure is finished, open , connect to Database backup Microsoft SQL Management Studiothe database engine, right click on the database named , select and choose .carin Tasks Detach...Navigate the file manager to the Microsoft SQL Server Data directory (default: C:\Program Files\Microsoft SQL Server\MSSQL.
) and backup the database file.1\MSSQL\Data carin.mdf
Removing the existing Carin installation
Before starting the uninstallation procedure, please make sure that you have completed the steps in the previous part, and you have a valid backup of the registry values, the media files and the database.
Step 1 Launch from , select and choose Add or Remove Programs Control Panel Carin Uninstall
Step 2 Make sure you backed up the media files from this directory before! Start a file manager, navigate to C:\Program Files(assuming default installation path) and delete the directory.Carin
Make sure you have read and done everyting in the Making backups of existing installation part, and also have valid backups of registry data, database and media files.
Verba Technologies does not take responsibility for any data loss occuring during self-made upgrade.
Installing and configuring Verba Recording System and restoring from backup
In order to install the new Verba Recording System, please see . Installation OverviewAfter the regular installation procedure is finished, please follow these steps to restore the backups. The SQL script files mentioned in this topic can be located and downloaded from the Verba Technologies Portal's Support site
Step 1 Open and launch Control Panel, Administrative Tools Services
Step 2 Select all running services and stop them one by oneVerba
Step 3 Start and connect to the database serverMicrosoft SQL Management Studio
Step 4 Right click on the database named , select and choose verba Tasks Detach...
Step 5 Attach the database from the backup, by right clicking on , and selecting carin Databases Attach...
Step 6 After the attachment is finished, rename the database to , or run carin verba rename-database.sql
Step 7 Execute the SQL script .update-from-carin.sql
This procedure can take several hours, depending on the database size and record count.
Step 8 Execute update.sql
Step 9 After the update script has stopped, start the previously stopped Verba services in Services

Verint Verba Collaboration Compliance Platform
98
Step 10 Configure the Verba Recording System and the Verba services via the .Web Interface
Step 11 Copy the media files from the backup to (assuming default installation path)C:\Program Files\Verba\media
After these steps are completed, every password stored in the system, including the database connection's password has to be re-entered, and saved!

Verint Verba Collaboration Compliance Platform
99
Verba Remote Installation Service DescriptionThis document describes how Verba Technologies will help you with your software installations when you are ordering installation services.
The purpose of this document is to outline the information needed and tasks to be completed during the Installation services for the Verba Recording System product line. Since this installation will be conducted by Verba Technologies personnel from an off-site location (in order to reduce installation fees and expenses) Remote Desktop software will be utilized to complete these tasks. Verba Technologies uses the services of LogMeIn, a web based remote desktop support service. Verba Technologies can support additional forms of remote desktop or temporary VPN access at the client’s request.
Verba Technologies respects your confidentiality and acknowledges the trust bestowed when 3rd party vendors access your network, and will only use this connection to fulfill the installation requirements of the Client. For further information on Verba Technologies’ remote support services please see: http://www.verba.com/group/support/service-description
About the information below:
Information to be collected before installationClient’s Responsibilities
Pre-installation tasksInstallation TasksPost Installation Tasks
Verba Technologies’ ResponsibilitiesPre-InstallationInstallation TasksPost Installation Tasks
Information to be collected before installation
To complete the installation the Verba Technologies support engineer will need the following information from the client, prior to scheduling the installation.
Verba Server Hardware/Software information
CPU type:RAM size:HDD size/drives:Operating System:IP Address:Hostname:
Cisco UCM Admin information:
Version:IP/Hostname:Administrator user:Administrator password: (can be kept confidential and entered by Client)
Gateway information:
Gateway Model(s):IP address(es):Cisco Switch Model(s):Cisco IP Phone Models:
Verba Installation/Configuration settings
Log File location:Database File location:Media File location:Outgoing SMTP Server:Email account for system alerts:SNMP server:Type of Recording Method: (Passive or Central)
Client’s Responsibilities
Pre-installation tasks
Verint Verba Collaboration Compliance Platform
100
Verba Server is ready (hardware is configured and Operating System installed) and can be accessed via the internet or via a remote desktop from a computer with internet accessProvide installation information to Verba (see above)Configure Monitor Session/SPAN port to capture traffic from the applicable VLAN/switchesProvide list of users and extensions/directory numbers Provide User/Group mapping and which users are Group Supervisors and/or Group Administrators (All users are members of the default group when created)Download the installation files and put them onto the server computer (provide location information to Verba if different from C:\Downloads\)
Installation Tasks
Have a knowledgeable IT person responsible for this implementation who is available during the agreed upon days/timesAccess the Verba Support website to initiate a Remote Desktop Session ( - login required)http://support.verba.comThe computer to be controlled needs to have access to: (Verba server or Desktop)
Remotely control the serverThe internetThe Cisco UCM Administration webpage
Post Installation Tasks
Complete and sign user acceptance testing script from a PC (other than the Verba Server) and return to VerbaConfigure Additional Users, Groups, Extensions as neededConfigure Additional IP Phones for XML Service access as neededConfigure SQL Server and Media file backup schedule and archiving schedule as desired
Verba Technologies’ Responsibilities
Pre-Installation
Set time/date for Remote Desktop Support SessionSend client server requirement information and other information neededMake installation files available to client (secured web access) to download
Installation Tasks
Install Prerequisite items: Java, .NET etc.Install and configure SQL Server databaseInstall and configure Verba Server ComponentsInstall and configure the Verba Node ManagerValidate initial settings and database connectivityValidate SPAN port data captureConfigure Users and user privilegesConfigure User to Extension mapping with recording modeConfigure User to Group mapping with privileges
Post Installation Tasks
Configure Cisco UCM phone service for Verba phone service users (Optional)Configure Email/SNMP Alerts for basic system monitoringKnowledge transfer: Walk through basic user navigationKnowledge transfer: Walk through basic system administration and node managerProvide Client with Product Support Online access account information

Verint Verba Collaboration Compliance Platform
101
Installing the Verba Lync extension for Lync 2010The Verba Lync Extension allows to control Lync conference recording directly in the Lync desktop client running Windows OS.
Client registry settings
The extension can be enabled by entering the following registry entries:
Windows Registry Editor Version 5.00
[HKEY_CURRENT_USER\Software\Microsoft\Communicator\ContextPackages\{8551F06A-BCA1-40ED-A57F-04EE5E8C59A3}]
"Name"="Meeting Recorder"
"InternalURL"="http://verbaMR.contoso.com/verba/silverlight/LyncMeetingRecorderExtension2010.jsp"
"ExternalURL"="http://verbaMR.contoso.com/verba/silverlight/LyncMeetingRecorderExtension2010.jsp"
"ExtensibilityWindowSize"=dword:00000001
Description of the fields:
Name Description
Name The name of the application. It is displayed in the Lync menu and at the bottom of the Extension window.
InternalURLExternalURL
Specifies the application URL in the Microsoft Lync Server 2010 domain. The application automatically detects which URL to use, InternalURL or ExternalURL, based on the client location.
ExtensibilityWindowSize Sets the minimum size of the extension window. 0 = small (300 x 200 pixels), 1 = medium (400 x 600 pixels), 2 = large (800 x 600 pixels).
For more detailed information, please refer to the documentation at http://msdn.microsoft.com/en-us/library/office/hh378557(v=office.14).aspx
Adding the server to Trusted Sites
In addition to applying the configuration to the local registry on the client computers, the http://verbaMR.contoso.com address needs to be added to the Trusted Sites in the Internet Explorer.

Verint Verba Collaboration Compliance Platform
102
Installing the Verba Lync extension for Lync 2013The Verba Lync Extension allows to control Lync conference recording directly in the Lync desktop client running Windows OS.
Client registry settings
The extension can be enabled by entering the following registry entries:
Windows Registry Editor Version 5.00
[HKEY_CURRENT_USER\Software\Microsoft\Communicator\ContextPackages]
[HKEY_CURRENT_USER\Software\Microsoft\Communicator\ContextPackages\{8551F06A-BCA1-40ED-A57F-04EE5E8C59A3}]
"Name"="Meeting Recorder"
"InternalURL"="http://verbaMR.contoso.com/verba/silverlight/LyncMeetingRecorderExtension2010.jsp"
"ExternalURL"="http://verbaMR.contoso.com/verba/silverlight/LyncMeetingRecorderExtension2010.jsp"
"ExtensibilityWindowSize"=dword:00000001
Description of the fields:
Name Description
Name The name of the application. It is displayed in the Lync menu and at the bottom of the Extension window.
InternalURLExternalURL
Specifies the application URL in the Microsoft Lync Server 2013 domain. The application automatically detects which URL to use, InternalURL or ExternalURL, based on the client location.
ExtensibilityWindowSize Sets the minimum size of the extension window. 0 = small (300 x 200 pixels), 1 = medium (400 x 600 pixels), 2 = large (800 x 600 pixels).
For more detailed information, please refer to the documentation at http://msdn.microsoft.com/en-us/library/office/jj933101(v=office.15).aspx
Adding the server to Trusted Sites
In addition to applying the configuration to the local registry on the client computers, the address needs to be http://verbaMR.contoso.comadded to the Trusted Sites. Lync 2013 has its own location for trusted sites in the registry. This means that you cannot add the server to Trusted Site using Internet Explorer / Internet Options (like in Lync 2010); you need to use a separate registry key. The format for the registry key looks like this:
Windows Registry Editor Version 5.00
[HKEY_CURRENT_USER\Software\Microsoft\Office\Lync\Security\Trusted Sites]
[HKEY_CURRENT_USER\Software\Microsoft\Office\Lync\Security\Trusted Sites\verbaMR.contoso.com]
"https"=dword:00000001
"http"=dword:00000000
This sample indicates that https://verbaMR.contoso.com will be trusted. If the same URL with HTTP should be trusted, then flip the “http” part to a 1.

Verint Verba Collaboration Compliance Platform
103
Setting up a Verba demo environment
Using an OVA template
Please contact Verba Support regarding the OVA template.
Installing Verba and importing demo data into your environment.
To install a Verba demo environment and import the demo data, please follow the instructions below.
The demo scripts can only be run with fresh Verba installs. Do not change anything in the web application before you run the demo scripts.
Step 1 - Install the Verba system. The demo scripts have been verified to work with 8.4 releases. Use the default name for the database (verba).
Step 2 - Download the demo media and scripts. Please contact Verba Support to request the items.
Step 3 - Unzip the media package directly under exactly as they are in the zip file.DRIVE:\verba_install_path\media
Step 4 - Connect to the Verba database using SQL Management Studio and run the SQL scripts in the order shown in the filenames. "1_..." should be run first, "2_..." should be run second, and so on.
If there is an error with one of the scripts, do not continue executing the other scripts. Repair the problem at hand, only then continue.
Step 5 - Request an NFR license from your Verba sales representative.
The complete demo environment contains
Voice, IM, Video, Desktop Screen conversationsUser-Group assignmentData Retention Policies, with Storage TargetsLabels, Legal Hold and Automatic LabelingActive Directory ProfilesSpeech SearchCommunication Policies and Content Policies

Verint Verba Collaboration Compliance Platform
104
Requesting and assigning certificatesCertificates are required in several cases when configuring Verba. An SSL certificate is required when a trusted HTTPS access have to be configured to the web application. Certificates are used as well when file encryption and integrity protection or the recording announcement is a requirement. Anyway, all certificates can be replaced used between the Verba services to establish a secure connection.
Certificates can be requested from a 3rd party provider, or from the local CA.
Request a new certificate from the local CA using Microsoft Management Console
Step 1 - Right click (or open it in Windows Server 2008 R2) on the menu and click on . Type and press enter.Start Run mmc.exe
Step 2 - Go to the menu.File / Add/Remove Snap-in...
Step 3 - From the list on the left side select and click on the button. Certificates Add
Step 4 - Select then click . On the next page, select then click . In the MMC windows press Computer Account Next Local Computer Finish.OK
Step 5 - Expand the and right click on the node. Select the menu.Certificates Personal All Tasks / Request New Certificate
Step 6 - On the first page click . Select a then click .Next Certificate Enrollment Policy Next
Step 7 - Select a certificate type. On the right side expand the then click on the .Details Properties
Step 8 - Set the properties of the certificate based on the purpose:
Type of Certificate Properties
Certificate for SSL connection for trusted HTTPS access Subject tab:
Under the Subject name section set the Type to Full DN and Add the server FQDN as Value in the following format: CN=serve
Under the Alternative name section set rname.yourdomain.comthe Type to DNS and add the following Values:
The IP address of the server where the web application hosted.The hostname of the server where the web application hosted.The FQDN of the server where the web application hosted.(Optional) The loadbalancer hostname and/or FQDN.(Optional) External URL.
Certificate for Encryption Private Key tab:
Under the Key options section turn on the 'Make private key exportable' setting.
Certificate for Signing Private Key tab:
Under the Key options section turn on the 'Make private key exportable' setting
Certificate for the Announcement serviceSubject tab:
Under the Subject name section set the Type to Full DN and Add the trusted application server pool FQDN as Value in the following format: CN=poolfqdn.yourdomain.comUnder the Alternative name section set the Type to DNS and add the following Values:
The FQDNs of the Announcement servers.The FQDN of the trusted application pool.
General tab:Provide a friendly name. This name have to be configured in the Announcement Service configuration.
Step 9 - In the Certificate Properties window click , then click .OK Enroll

Verint Verba Collaboration Compliance Platform
105
Request a new certificate from the local CA for Announcement service using PowerShell
Certificate can be requested by the following command in PowerShell:
Request-CsCertificate -New -Type default -FriendlyName "Announcement service" -CA ca.contoso.com\ContosoCA -ComputerFQDN servername.yourdomain.com
If there is more than one nodes in the Trusted Application pool then an additional parameter required for the other nodes:
Request-CsCertificate -New -Type default -FriendlyName "Announcement service" -CA ca.contoso.com\ContosoCA -ComputerFQDN servername.yourdomain.com -DomainName "server2.yourdomain.com,server3.yourdomain.com"
Description of the parameters:
Parameter Description Sample value
-FriendlyName The friendly name of the certificate "Announcement Service"
-CA The address of the local Certificate Authority
ca.contoso.com\ContosoCA
-ComputerFQDN The FQDN of the Trusted Application pool servername.yourdomain.com
-DomainName The FQDNs of the other Announcement Server nodes
"server2.yourdomain.com server3.,yourdomain.com"
Generating a key pair and Certificate Signing Request with Java Keytool, then signing it with the CA and exporting the certificate
When requiesting a certificate from the CA dicetly is not possible, then a custom request have to be created and sign it with the CA. Then it will be possible to create certificate signed with the CA.
Step 1 - Generating a key pair.
Run the following command for generating a new key pair (public and private):
"%JAVA_HOME%\bin\keytool" -genkey -keysize 1024 -keyalg RSA -validity 36500 -keystore verba.jks -alias tomcat -dname "CN=verbaserver-fqdn, OU=IT, O=IT, L=Little Rock, ST=Arkansas, C=US"
Parameter name Description Sample values
-keysize The size of the key. The bigger the size, the strongest the encryption.
1024
2048
-keyalg The algorithm used for the key. RSA
-keypass The password used for protecting the private key.
P@ssw0rd123

Verint Verba Collaboration Compliance Platform
106
-validity The validity of the keys in days. 365
3650
-keystore The store where the keys will be stored. It can be a new keystore (it will be created) or an existing one.
verba.jsk
C:\verba.keystore
-storepass The password used to protect the keystore. This must be specified if we using an existing keytore which is proteted.
P@ssw0rd123
-alias An alias for the generated key pair. tomcat
-dname The subject of the certificate. "CN=verbaserver-fqdn"
"CN=verbaserver-fqdn, OU=IT, O=IT, L=Little Rock, ST=Arkansas, C=US"
Step 2 - Generating a Certificate Signing Request (CSR).
Run the following command:
"%JAVA_HOME%\bin\keytool" -certreq -alias tomcat -keyalg RSA -file request.csr -keystore verba.jks
Parameter name Description Sample values
-alias The alias for the generated key pair. It has to match to the one provided at the previous step.
tomcat
-keyalg The algorithm used for the key. It has to match to the one provided at the previous step.
RSA
-file The name of the generated CSR file. request.csr
C:\temp\request.csr
-keystore The store where the keys are stored. It has to match to the one provided at the previous step.
verba.jsk
C:\verba.keystore
Step 3 - Sign the CSR file with the CA.
Step 4 - Add the signed certificate to the keystore.
Run the following command for adding the root CA certificate to the keystore:
"%JAVA_HOME%\bin\keytool" -import -alias root -keystore verba.jks -trustcacerts -file root.cer
(Optional) Run the following command for adding the intermediate CA certificate to the keystore:
"%JAVA_HOME%\bin\keytool" -import -alias inter -keystore verba.jks -trustcacerts -file intermediate.cer
Parameter name Description Sample values
-alias The alias for the generated key pair. It has tomcat

Verint Verba Collaboration Compliance Platform
107
to match to the one provided at the previous step.
-keystore The store where the keys will be stored. It has to match to the one provided at the previous step.
verba.jsk
C:\verba.keystore
-file The CA certificate file. ca-certificate.cer
C:\temp\ca-certificate.cer
Run the following command for adding the signed certificate to the keystore:
"%JAVA_HOME%\bin\keytool" -import -alias tomcat -keystore verba.jks -file signed-certificate.cer
Parameter name Description Sample values
-alias The alias for the generated key pair. It has to match to the one provided at the previous step.
tomcat
-keystore The store where the keys will be stored. It has to match to the one provided at the previous step.
verba.jsk
C:\verba.keystore
-file The signed certificate file. signed-certificate.cer
C:\temp\signed-certificate.cer
Step 5 - Export the signed certificate with the private key.
Run the following command:
"%JAVA_HOME%\bin\keytool" -importkeystore -srckeystore verba.jks -alias tomcat -destkeystore verba.p12 -deststoretype PKCS12
Parameter name Description Sample values
-srckeystore The store where the keys are stored. It has to match to the one provided at the previous step.
verba.jsk
C:\verba.keystore
-alias The alias for the generated key pair. It has to match to the one provided at the previous step.
tomcat
-destkeystore The name of the certificate file. verba.p12
-deststoretype The type of the exported certificate file. PKCS12
Step 6 (Optional) - Import the certificate to the Windows Certificate Store.
Double click on the exported .p12 file, then click on the button. Select then click . On the next Install Certificate... Local Computer Nextpage click , then .Next Finish
Private Key tab:
Under the Key options section turn on the 'Make private key exportable' setting.
Subject tab:

Verint Verba Collaboration Compliance Platform
108
Under the Subject name section set the Type to Full DN and Add the trusted application server pool FQDN as Value in the following format: CN=poolfqdn.yourdomain.comUnder the Alternative name section set the Type to DNS and add the following Values:
The FQDNs of the Announcement servers.The FQDN of the trusted application pool.
General tab:Provide a friendly name. This name has to be configured in the Announcement Service configuration.
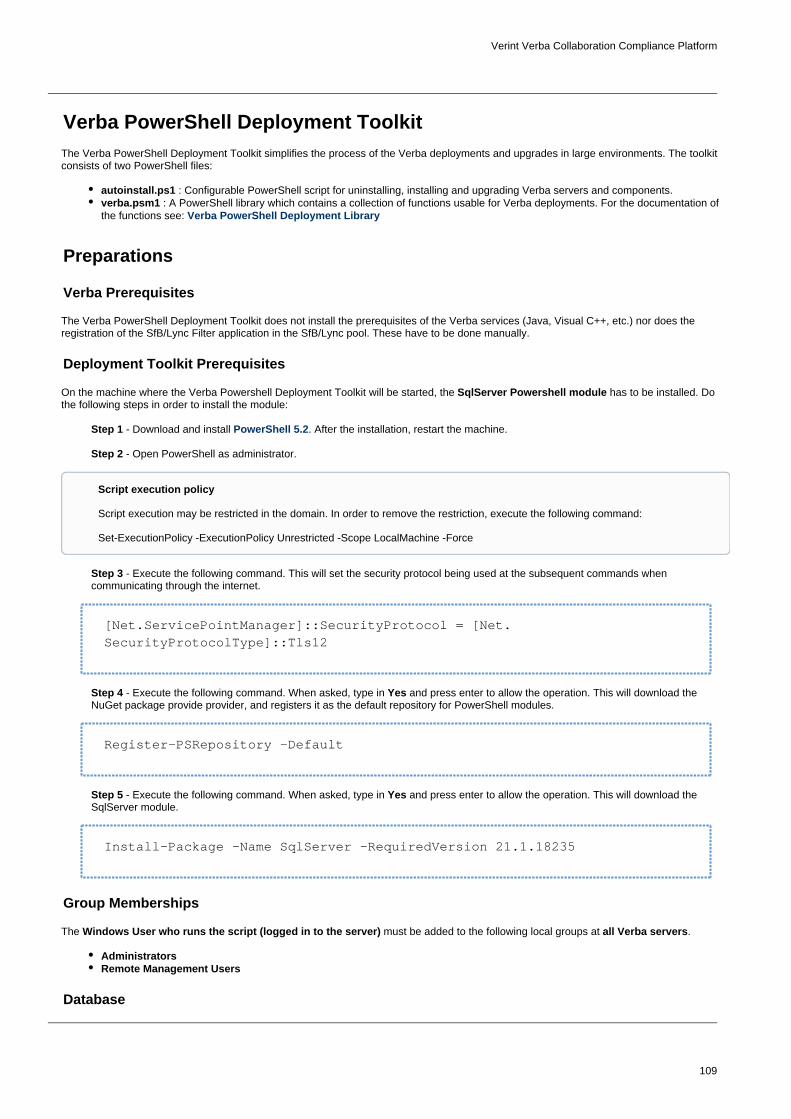
Verint Verba Collaboration Compliance Platform
109
Verba PowerShell Deployment ToolkitThe Verba PowerShell Deployment Toolkit simplifies the process of the Verba deployments and upgrades in large environments. The toolkit consists of two PowerShell files:
autoinstall.ps1 : Configurable PowerShell script for uninstalling, installing and upgrading Verba servers and components.verba.psm1 : A PowerShell library which contains a collection of functions usable for Verba deployments. For the documentation of the functions see: Verba PowerShell Deployment Library
Preparations
Verba Prerequisites
The Verba PowerShell Deployment Toolkit does not install the prerequisites of the Verba services (Java, Visual C++, etc.) nor does the registration of the SfB/Lync Filter application in the SfB/Lync pool. These have to be done manually.
Deployment Toolkit Prerequisites
On the machine where the Verba Powershell Deployment Toolkit will be started, the has to be installed. Do SqlServer Powershell modulethe following steps in order to install the module:
Step 1 - Download and install . After the installation, restart the machine.PowerShell 5.2
Step 2 - Open PowerShell as administrator.
Step 3 - Execute the following command. This will set the security protocol being used at the subsequent commands when communicating through the internet.
[Net.ServicePointManager]::SecurityProtocol = [Net.SecurityProtocolType]::Tls12
Step 4 - Execute the following command. When asked, type in and press enter to allow the operation. This will download the YesNuGet package provide provider, and registers it as the default repository for PowerShell modules.
Register-PSRepository -Default
Step 5 - Execute the following command. When asked, type in and press enter to allow the operation. This will download the YesSqlServer module.
Install-Package -Name SqlServer -RequiredVersion 21.1.18235
Group Memberships
The must be added to the following local groups at .Windows User who runs the script (logged in to the server) all Verba servers
AdministratorsRemote Management Users
Database
Script execution policy
Script execution may be restricted in the domain. In order to remove the restriction, execute the following command:
Set-ExecutionPolicy -ExecutionPolicy Unrestricted -Scope LocalMachine -Force
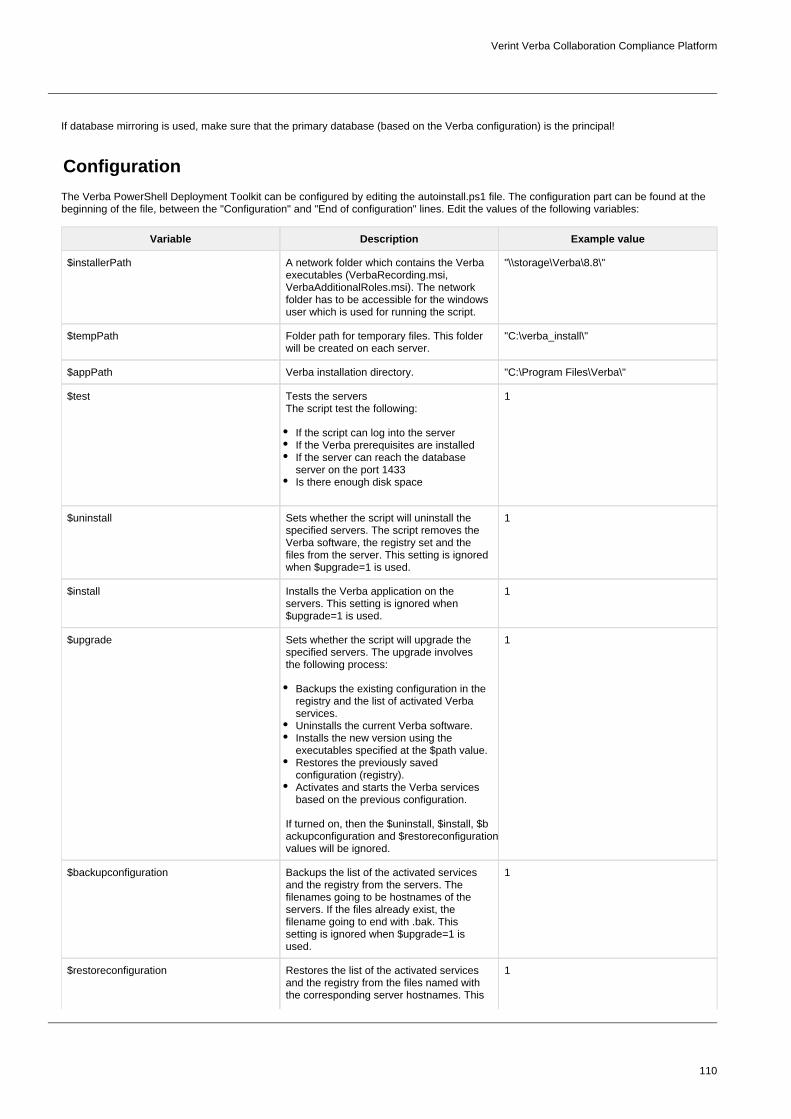
Verint Verba Collaboration Compliance Platform
110
If database mirroring is used, make sure that the primary database (based on the Verba configuration) is the principal!
Configuration
The Verba PowerShell Deployment Toolkit can be configured by editing the autoinstall.ps1 file. The configuration part can be found at the beginning of the file, between the "Configuration" and "End of configuration" lines. Edit the values of the following variables:
Variable Description Example value
$installerPath A network folder which contains the Verba executables (VerbaRecording.msi, VerbaAdditionalRoles.msi). The network folder has to be accessible for the windows user which is used for running the script.
"\\storage\Verba\8.8\"
$tempPath Folder path for temporary files. This folder will be created on each server.
"C:\verba_install\"
$appPath Verba installation directory. "C:\Program Files\Verba\"
$test Tests the serversThe script test the following:
If the script can log into the serverIf the Verba prerequisites are installedIf the server can reach the database server on the port 1433Is there enough disk space
1
$uninstall Sets whether the script will uninstall the specified servers. The script removes the Verba software, the registry set and the files from the server. This setting is ignored when $upgrade=1 is used.
1
$install Installs the Verba application on the servers. This setting is ignored when $upgrade=1 is used.
1
$upgrade Sets whether the script will upgrade the specified servers. The upgrade involves the following process:
Backups the existing configuration in the registry and the list of activated Verba services.Uninstalls the current Verba software.Installs the new version using the executables specified at the $path value.Restores the previously saved configuration (registry).Activates and starts the Verba services based on the previous configuration.
If turned on, then the $uninstall, $install, $b ackupconfiguration and $restoreconfiguration
values will be ignored.
1
$backupconfiguration Backups the list of the activated services and the registry from the servers. The filenames going to be hostnames of the servers. If the files already exist, the filename going to end with .bak. This setting is ignored when $upgrade=1 is used.
1
$restoreconfiguration Restores the list of the activated services and the registry from the files named with the corresponding server hostnames. This
1

Verint Verba Collaboration Compliance Platform
111
setting is ignored when $upgrade=1 is used.
$apiUsername Verba API username. verbaapi
$apiPassword Verba API password.
$AdministratorUsername Verba Administrator username. administrator
$AdministratorPassword Verba Administrator password.
$keepLogs Sets whether the script should remove the log folder in case of uninstalling or upgrading.
1
$resetApiPassword Set to $true if you want to reset the API user's password. It is recommended when you are upgrading from 8.9.
$false
$removeLegacyCertificateSettings Set to $true if you want to delete old legacy certificate settings from the profiles. It is recommended when you are upgrading from 8.9.
$true
$sslCertificate The properties of the SSL certificate generated for the Media Repository or Single server. In case of multiple Media Repository server, this setting also has to be multiplied. ($sslCertificate1, $sslCertifica
) Usage:te2, ...
New-VerbaCertificateRequest -Subject <str-SAN -FirendlyName ing> [ <string> <string
-Country -State -City > <string> <string> <st -Organization -ring> <string>
OrganizationUnit ]<string>
New-VerbaCertificateRequest -Subject "testmr1.verbatest.local" -SAN "testm1, 10.4.0.12"
$skipNodeRegistrationCheck If enabled, it turns off the automatic node registration at the installed Verba servers.
$false
$servers List of Verba servers and their role and certificate configuration.
Install server with legacy configuration without Advanced APINew-VerbaServer -FQDN <string> -Role <string> -UseLegacyAPI [<CommonParameters>]
Install server with Advanced API with existing certificateNew-VerbaServer -FQDN <string> -Role <string> -ServerCertThumbprint <string> [-UseAdvancedAPI] [<CommonParameters>]
Install server with Advanced API and generate Verba signed certificateNew-VerbaServer -FQDN <string> -Role <string> [-UseAdvancedAPI] [-GenerateCertificates] [-CA] [-CAFQDN <string>] [-CertificateRequest <CertificateRequest>] [-SSLCertificateRequest <CertificateRequest>] [<CommonParameters>]
ExamplesInstall server with legacy configuration (Verba 8.x) without Advanced API$servers = @((New-VerbaServer -FQDN "testmr2.verbatest.local" -Role MR -UseLegacyAPI -SSLCertificateRequest $sslCertificate),(New-VerbaServer -FQDN "testrs1.

Verint Verba Collaboration Compliance Platform
112
verbatest.local" -Role RS -UseLegacyAPI) }
Install Verba 9.x with Verba signed certificates$servers = @((New-VerbaServer -FQDN "testmr1.verbatest.local" -Role MR -CA -UseAdvancedAPI -GenerateCertificates -SSLCertificateRequest $sslCertificate),(New-VerbaServer -FQDN "testrs1.verbatest.local" -Role RS -CAFQDN "testmr1.verbatest.local" -UseAdvancedAPI -GenerateCertificates),(New-VerbaServer -FQDN "testrs2.verbatest.local" -Role RS -CAFQDN "testmr1.verbatest.local" -UseAdvancedAPI -GenerateCertificates),(New-VerbaServer -FQDN "testfe1sfb.verbatest.local" -Role LF -CAFQDN "testmr1.verbatest.local" -UseAdvancedAPI -GenerateCertificates),(New-VerbaServer -FQDN "testfe2sfb.verbatest.local" -Role LF -CAFQDN "testmr1.verbatest.local" -UseAdvancedAPI -GenerateCertificates) )
Install Verba 9.x with existing certificates$servers = @((New-VerbaServer -FQDN "testmr1.verbatest.local" -Role MR -ServerCertThumbprint 7E3C477D6A308ADAAE1AA9E2C5AE8BE0744A6BD1 -UseAdvancedAPI -SSLCertificateRequest $sslCertificate),(New-VerbaServer -FQDN "testrs1.verbatest.local" -Role RS -ServerCertThumbprint 7E3C477D6A308ADAAE1AA9E2C5AE8BE0744A6BD1 -UseAdvancedAPI),(New-VerbaServer -FQDN "testrs2.verbatest.local" -Role RS -ServerCertThumbprint 7E3C477D6A308ADAAE1AA9E2C5AE8BE0744A6BD1 -UseAdvancedAPI),(New-VerbaServer -FQDN "testfe1sfb.verbatest.local" -Role LF -ServerCertThumbprint 7E3C477D6A308ADAAE1AA9E2C5AE8BE0744A6BD1 -UseAdvancedAPI),(New-VerbaServer -FQDN "testfe2sfb.verbatest.local" -Role LF -ServerCertThumbprint 7E3C477D6A308ADAAE1AA9E2C5AE8BE0744A6BD1 -UseAdvancedAPI) )
$startupType The startup type of the Verba services:
0: Disabled1: Manual2: Automatic3: AutomaticDelayed
2
$serviceUsername The Windows domain account used as a service account in the case of the Verba SfB/Lync Filter installation.
"contoso\verba-service"
$servicePassword The password of the Windows domain account.
"P@ssw0rd"

Verint Verba Collaboration Compliance Platform
113
$databaseHost The hostname of the server where the Verba database hosted.
"SQLSERVER"
$databaseName The name of the Verba database. "Verba"
$sqlAuth Sets whether SQL Authentication will be used for the SQL connection. If set to 0, then Windows authentication will be used for the SQL connection.
1
$sqlUsername Username for the SQL connection. If the $sqlAuth setting is set to 1, then a SQL user has to be provided. If the $sqlAuth setting is set to 0, then a Windows domain user has to be provided in "domain\user" format.
"verba-user"
$sqlPassword The password of the SQL connection. "P@ssw0rd"
$enableCouldMode Sets whether cloud mode will be used for the Node Manager
1
$mrPoolName The Media Repository pool name. "testmr1"
$mrPortNumber The port used at the Media Repository for the incoming registration requests.
4432
$tokenPassword The password of the registration token. "P@ssw0rd"
When the configuration is done, the script can be started.
Running the Deployment Toolkit
In order to run the Deployment Toolkit, start the autoinstall.ps1 script with an administrator PowerShell.
At the start of the execution, the script will ask if you want to enable CredSSP authentication. This is required if Windows authentication is being used for the SQL Server access.

Verint Verba Collaboration Compliance Platform
114
Verba PowerShell Deployment Library
The Verba PowerShell library makes it possible to automate functions, that would normally need to be done manually.
The available commands are detailed in the table below.
Syntax Parameters Description
Install-RemoteVerbaServer -Host $host -Role $role [-WindowsAuth] [-sqlAuth]-SqlServerAddress $sqlserveraddress-DatabaseName $databasename-SqlUser $sqluser -SqlPassword $sqlpassword -WindowsUser $windowsuser-WindowsPassword $windowspassword -Installerpath $installerpath-ManagementAddress $managementaddress -MrPoolName $mrpoolname-MrPort $mrport -Cloudmode $cloudmode -TokenPassword $tokenpassword-Path $path
HostType: StringThe hostname of the server where the Verba software will be installed RoleTyte: StringThe Verba server role to be installed.WindowsAuthType: SwitchSets whether windows authentication will be used for the SQL access.sqlAuthType: SwitchSets whether SQL authentication will be used for the SQL access.SqlServerAddressType: StringThe hostname of the server where the Verba database hosted.DatabaseNameType: StringThe name of the Verba database.SqlUserType: StringThe SQL user name to be used if the -sqlAuth switch is usedSqlPasswordType: StringThe SQL password to be used if the -sqlAuth switch is usedWindowsUserType: StringThe windows user name to be used if the -WindowsAuth switch is usedWindowsPasswordType: StringThe windows password to be used if the -WindowsAuth switch is usedInstallerPathType: StringThe path to the Verba executables.ManagementAddressType: StringThe IP address of the serverMrPoolNameType: StringThe name of the Media Repository pool if the -Cloudmode is set to 1MrPortType: IntDefault: 4432The registration port of the Media Repository if the -Cloudmode is set to 1CloudmodeType: IntDefault: 0Sets whether the cloud mode is turned on.TokenPasswordType: StringThe token password if the -Cloudmode is set to 1.
Installs the Verba software on the provided host based on the provided parameters.

Verint Verba Collaboration Compliance Platform
115
PathType: StringDefault: "C:\Program Files (x86)\Verba"The installation folder
Install-VerbaApplication -Role $role [-WindowsAuth] [-sqlAuth]-SqlServerAddress $sqlserveraddress -DatabaseName $databasename-SqlUser $sqluser -SqlPassword $sqlpassword -WindowsUser $windowsuser-WindowsPassword $windowspassword -Installerpath $installerpath-ManagementAddress $managementaddress -MrPoolName $mrpoolname-MrPort $mrport -Cloudmode $cloudmode -TokenPassword $tokenpassword
-Path $path
RoleTyte: StringThe Verba server role to be installed.WindowsAuthType: SwitchSets whether windows authentication will be used for the SQL access.sqlAuthType: SwitchSets whether SQL authentication will be used for the SQL access.SqlServerAddressType: StringThe hostname of the server where the Verba database hosted.DatabaseNameType: StringDefault: "verba"The name of the Verba database.SqlUserType: StringDefault: "sa"The SQL user name to be used if the -sqlAuth switch is usedSqlPasswordType: StringThe SQL password to be used if the -sqlAuth switch is usedWindowsUserType: StringDefault: "VERBALABS\Administrator"The windows user name to be used if the -WindowsAuth switch is usedWindowsPasswordType: StringThe windows password to be used if the -WindowsAuth switch is usedInstallerPathType: StringThe path to the Verba executables.ManagementAddressType: StringDefault: The IP address of the host provided at the -SqlServerAddressThe IP address of the serverMrPoolNameType: StringThe name of the Media Repository pool if the -Cloudmode is set to 1MrPortType: IntDefault: 4432The registration port of the Media Repository if the -Cloudmode is set to 1CloudmodeType: IntDefault: 0Sets whether the cloud mode is turned on.TokenPasswordType: StringThe token password if the -Cloudmode is set to 1.PathType: String
Installs the Verba software on the local host based on the provided parameters.

Verint Verba Collaboration Compliance Platform
116
Default: "C:\Program Files (x86)\Verba"The installation folder
Get-VerbaManageemntIP -Hostname $hostname Hostname
Type: StringThe hostname of the server
Returns the IP address of the provided host.
Set-MultstringRegValue -Hostname $hostname -Subkey $subkey-Value $value -Arr $arr
HostnameType: StringThe hostname of the server SubkeyType: String The path to the registry keyValueType: StringThe name of the value to changeArrType: String[] The multi-string data to set
Sets a multi-string registry value on the provided host.
Copy-VerbaInstaller -Hostname $hostname -Role $role-WorkingFolder $workingfolder $Source $source
HostnameType: StringThe hostname of the serverRoleType: StringThe role to be installedWorkingFolderType: StringThe temporary folder to be created on the serverSourceType: StringThe path to the folder where the executables can be found
Copyes the executables from the source folder to the work folder on the provided host.
Install-VerbaDatabase -DbHost $dbhost -DbName $dbname -SqlUser $sqluser-SqlPassword $sqlpassword -sqlScriptFolder [-WinAuth]
DbHostType: StringThe hostname of the SQL serverDbNameType: StringThe name of the Verba databaseSqlUserType: StringThe username to be used for the SQL connectionsqlPasswordType: StringThe password to be used for the SQL connectionsqlScriptFolderType: StringDefault: "C:\Program Files (x86)\Verba\resources\db"The path to the folder where the SQL scripts can be found
Installs a Verba database using the scripts found in the provided folder.
Get-VerbaSQLExecutionInfo -DbHost $dbhost -DbName $dbname-SqlUser $sqluser -SqlPassword $sqlpassword -sqlScriptName $sqlscriptname
DbHostType: StringThe hostname of the SQL serverDbNameType: StringThe name of the Verba database
Provides execution info about the provided SQL script.

Verint Verba Collaboration Compliance Platform
117
SqlUserType: StringThe username to be used for the SQL connectionsqlPasswordType: StringThe password to be used for the SQL connectionsqlScriptNameType: StringThe name of the SQL script
Uninstall-VerbaApplication -Hostname $hostname [-keepLogs] Hostname
Type: StringThe hostname of the serverkeepLogsType: SwitchSets whether the log files should be kept or not
Uninstalls the Verba software from the provided host.
Copy-VerbaDatabaseScripts -Hostname $hostname -TargetFolder $targetfolder Hostname
Type: StringThe hostname of the serverTargetFolderType: StringThe target folder on the provided host
Copyes the Verba database scripts from the local Verba installation folder to the provided host.
Export-VerbaRegistry -Hostname $hostname -BackupPath $backuppath-KeyName $keyname
HostnameType: StringThe hostname of the serverBackupPathType: StringThe path where the registry will be saved to.KeyNameType: StringDefault: "SOFTWARE\Wow6432Node\Verba"The key which will be exported.
Exports the specified registry set to the provided path from the provided host.
Import-VerbaRegistryBackup -Hostname $hostname -BackupPath $backuppath Hostname
Type: StringThe hostname of the serverBackupPathType: StringThe path where the registry is saved.
Imports the provided registry set on the provided host.
Set-VerbaServices -Hostname $hostname -BackupPath $backuppath-StartupType $startuptype [-Restart]
HostnameType: StringThe hostname of the serverBackupPathType: StringThe path where the backup of the activated services can be found.StartupTypeType: IntThe startup type of the restored services: 0 - disabled, 1 - manual, 2 - Automatic, 3 - AutomaticDelayedRestartType: SwitchSet whether the services will be started
Sets the startup type of the Verba services based on the provided backup on the provided host.

Verint Verba Collaboration Compliance Platform
118
Export-VerbaActiveServices -Hostname $hostname -BackupPath $backuppath Hostname
Type: StringThe hostname of the serverBackupPathType: StringThe path where the list of the activated services will be saved to.
Creates a backup about the activated Verba services on the provided host.
Get-VerbaRegistryEntry -key $keykeyType: .RegistryKey32Microsoft.WinThe registry key which will be red
Writes out the registry set under the provided key.

Verint Verba Collaboration Compliance Platform
119
How to Install your Verba license
If you logging into the Verba Web Interface for the first time after the initial installation, the Upload License File page will appear by default. Skip to .Step 3
If you have received a , you can just that into Verba.long coded license string copy/pasteIf you have a , you can .license file upload itSee the detailed steps below.
Please follow the guidelines below to install your Verba license:
Step 1 - Navigate to the menu item.System/License
Step 2 - On the top right corner of the screen click on the link.Upload License File
Step 3 - On the screen there are two possibilities:Upload License File
Paste License - You can simply copy/paste the received license string.Upload License File - Upload the received .lic license file that includes the license string.
Step 4 - If the license string or file is proper and the upload was successful, the Web application will show the updated License Information.
- Once the license is uploaded, it . There are 60 days to do this. Open a support Step 5 needs activationticket at , and send the activation code. The Verba support team will provide an support.verba.comactivated license shortly.
- If the Verba support team provided the activated license, open the Verba Web Interface, and Step 6navigate to the menu again.System/License
- On the top right corner of the screen click on the linkStep 7 Upload License File

Verint Verba Collaboration Compliance Platform
120
- Upload the activated license.Step 8
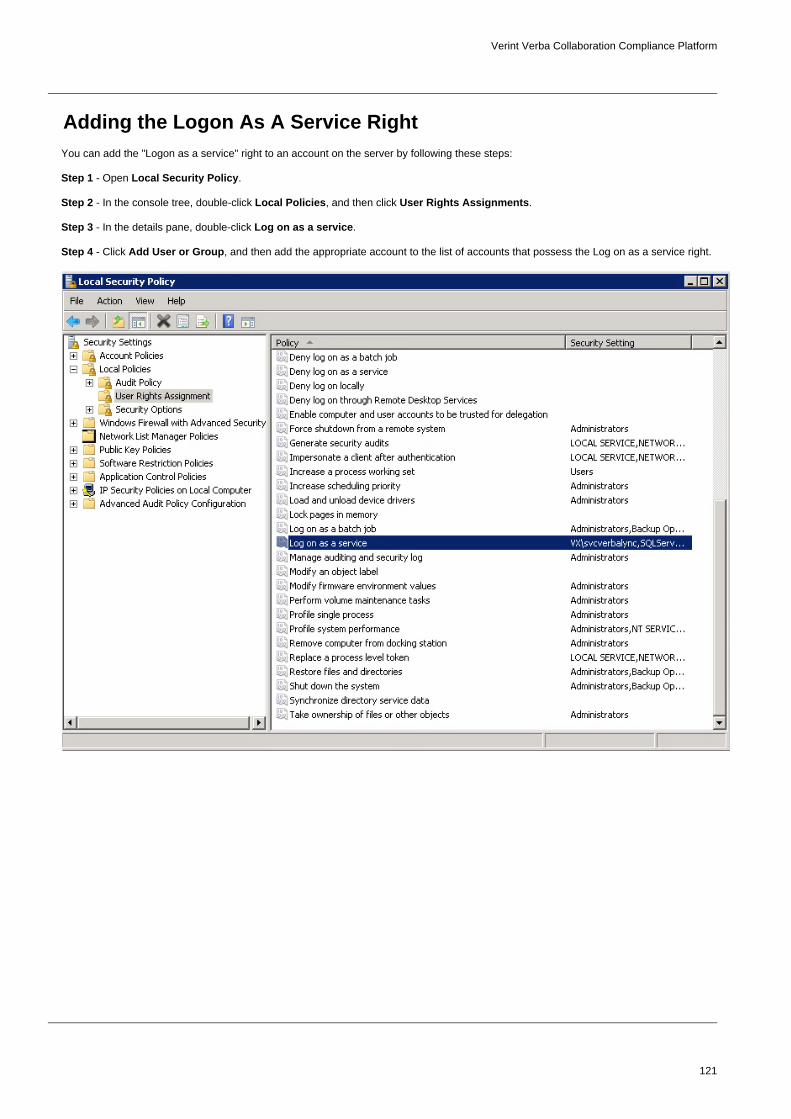
Verint Verba Collaboration Compliance Platform
121
Adding the Logon As A Service RightYou can add the "Logon as a service" right to an account on the server by following these steps:
Step 1 - Open .Local Security Policy
Step 2 - In the console tree, double-click , and then click .Local Policies User Rights Assignments
Step 3 - In the details pane, double-click .Log on as a service
Step 4 - Click , and then add the appropriate account to the list of accounts that possess the Log on as a service right.Add User or Group

Verint Verba Collaboration Compliance Platform
122
How to switch from Oracle to OpenJDK Java Runtime EnvironmentThis article describes the steps required to replace Oracle Java Runtime Environment (JRE) to the OpenJDK equivalent.
Step 1 - Verify your Verba version and check the supported Java version and download the OpenJDK runtime as follows:
Verba version Java version Download link
8.x Java SE 8 Runtime Environment 32 bit https://adoptopenjdk.net/releases.html?variant=openjdk8&jvmVariant=hotspot#x32_win
Choose the Install JRE option
9.0, 9.1 and 9.2 Java SE 8 Runtime Environment 64 bit https://adoptopenjdk.net/releases.html?variant=openjdk8&jvmVariant=hotspot#x64_win
Choose the Install JRE option
9.3 or later Java SE 11 Runtime Environment 64 bit https://adoptopenjdk.net/releases.html?variant=openjdk11&jvmVariant=hotspot#x64_win
Choose the Install JRE option
Step 2 - Copy the downloaded OpenJDK package (msi) to the Verba server and install it using the following command-line command:
msiexec /i [OpenJDK_installer.msi] INSTALLLEVEL=2
Step 3 - Check the JAVA_HOME variable in a new command line window using the command::
echo %JAVA_HOME%
You should see the path to your OpenJDK installation.
Step 4 - Change the following Windows Registry setting:
HKLM\SOFTWARE\WOW6432Node\Apache Software Foundation\Procrun 2.0\VerbaWebApp\Parameters\Java\Jvm
to
Verba 8.x C:\Program Files (x86)\AdoptOpenJDK\jre-[version]-hotspot\bin\server\jvm.dll
Verba 9.x C:\Program Files\ jvAdoptOpenJDK\jre-[version]-hotspot\bin\server\m.dll
Change the [version] part to the actual folder name!
Step 5 - Restart all Verba services using Java:
Verba Cisco JTAPI ServiceVerba Avaya DMCC/JTAPI ServiceVerba Web Application ServiceVerba Cisco Central Silent Monitoring ServiceVerba Cisco Compliance ServiceVerba Cloud Compliance Service
Step 6 - Verify functionality by making tests covering your basic use cases.

Verint Verba Collaboration Compliance Platform
123
Rolling back changes
In case the system does not work properly after switching to OpenJDK or you want to continue using Oracle JRE, follow the steps below to roll back the changes:
Step 1 - Verify that you have Oracle JRE still installed on the Verba server. If not, install the required Oracle JRE depending on the Verba version.
Step 2 - Change the JAVA_HOME and PATH variables back to the original values pointing to the Oracle JRE installation.
Step 3 - Change the HKLM\SOFTWARE\WOW6432Node\Apache Software Foundation\Procrun 2.0\VerbaWebApp\Parameters\Java\Jvm registry setting back to 'auto'.
Step 4 - Restart all Java services using Java.