UUM ePortfolio Guideline - UTLC Helpdesk
38
UUM ePortfolio Page 1 of 38 UUM ePortfolio Guideline Teaching Portfolio A teaching portfolio is a selective set of online, reflective, integrative, and personal documents that shows how you have developed as an educator in your discipline. A teaching portfolio can be used to showcase evidence of your academic accomplishments and activities. Think of a portfolio as an extension of your CV which provides others with a comprehensive portrait of your academic training, achievements, and future career goals. According to Bauer (2010), the teaching portfolio is a selection of online, reflective, integrative, and personal documents that present how you have developed as a teacher-scholar in your discipline. Teaching portfolios showcase artifacts representing your accomplishments related to teaching, research, community-engagement and other service in order to highlight your growth. Portfolios are constantly evolving, and can be described as a process as much as a product, and need to be modified over time. Online User Manual: https://manual.mahara.org/en/19.10/index.html
-
Upload
khangminh22 -
Category
Documents
-
view
1 -
download
0
Transcript of UUM ePortfolio Guideline - UTLC Helpdesk

UUM ePortfolio
Page 1 of 38
UUM ePortfolio Guideline Teaching Portfolio
A teaching portfolio is a selective set of online, reflective, integrative, and personal documents that shows how you have developed as an educator in your discipline. A teaching portfolio can be used to showcase evidence of your academic accomplishments and activities. Think of a portfolio as an extension of your CV which provides others with a comprehensive portrait of your academic training, achievements, and future career goals.
According to Bauer (2010), the teaching portfolio is a selection of online, reflective, integrative, and personal documents that present how you have developed as a teacher-scholar in your discipline. Teaching portfolios showcase artifacts representing your accomplishments related to teaching, research, community-engagement and other service in order to highlight your growth. Portfolios are constantly evolving, and can be described as a process as much as a product, and need to be modified over time.
Online User Manual: https://manual.mahara.org/en/19.10/index.html

UUM ePortfolio
Page 2 of 38
Contents 1.0 Dashboard ............................................................................................................................................................. 3
2.0 Navigation ............................................................................................................................................................. 6
3.0 Create .................................................................................................................................................................... 9
3.1 Pages and Collections........................................................................................................................................ 9
3.1.1 Overview page ................................................................................................................................................. 9
3.1.2 Profile page .................................................................................................................................................... 10
3.1.3 Add a page and edit its settings ..................................................................................................................... 10
3.1.4 Edit a page ...................................................................................................................................................... 12
3.1.5 Edit access ...................................................................................................................................................... 12
3.1.6 View a page .................................................................................................................................................... 13
3.1.7 Add a collection .............................................................................................................................................. 15
3.1.8 Add pages to a collection ............................................................................................................................... 16
3.1.9 Copy a portfolio.............................................................................................................................................. 17
3.1.10 Delete a portfolio ......................................................................................................................................... 18
3.2 Blocks .............................................................................................................................................................. 20
3.2.1 Files, images and video .................................................................................................................................. 20
4.0 Share ................................................................................................................................................................... 33
4.1 Shared by me .................................................................................................................................................. 33
4.2 Shared with me ............................................................................................................................................... 34
5.0 Engage ................................................................................................................................................................. 36
5.1 People ............................................................................................................................................................. 36
5.2 Group .............................................................................................................................................................. 37
5.3 Inside Groups .................................................................................................................................................. 38
UUM ePortfolio
Page 3 of 38
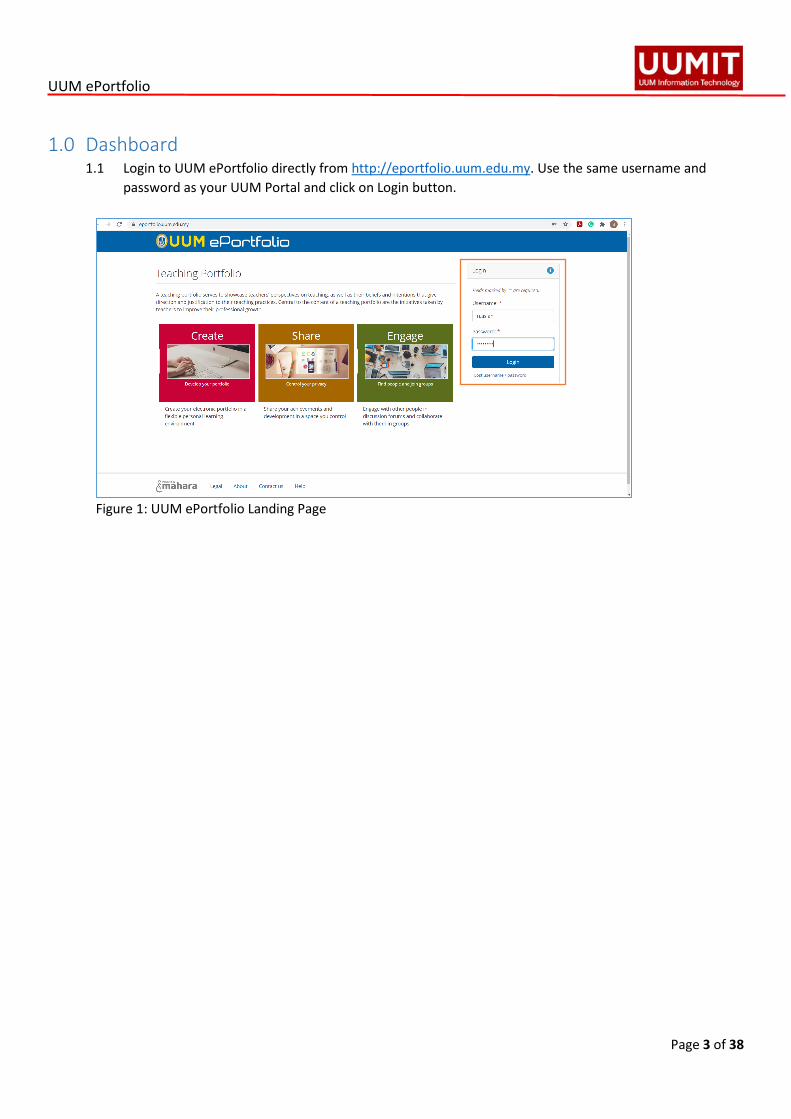
1.0 Dashboard 1.1 Login to UUM ePortfolio directly from http://eportfolio.uum.edu.my. Use the same username and
password as your UUM Portal and click on Login button.
Figure 1: UUM ePortfolio Landing Page

UUM ePortfolio
Page 4 of 38
1.2 Once you successfully login, you can see the overview of your dashboard as in Fig. 2. Quick links: These quick links take you directly to certain areas of UUM ePortfolio.
Figure 2: User Dashboard – The Overview
1.3 You can change certain aspects of your dashboard, namely the user-specific information, but a lot of what you see is static to allow you to quickly access other parts of UUM ePortfolio.
2 4
5
6
7
8 9
3 1

UUM ePortfolio
Page 5 of 38
Search: Search for users who have an account to view their profile page and check which pages they have made accessible to you.
Inbox: Click the Inbox icon to view all your notifications and send messages.
User menu: Click the User menu navigation icon to reach your account settings, profile, profile pictures, legal statements, connected apps, notification settings, and the logout link, or click your profile picture to be taken to your profile page.
Main menu: Use the Main menu navigation icon to navigate to other areas of your portfolio.
Quick links: These quick links take you directly to certain areas of UUM ePortfolio.
Personal information: This sidebar block contains static and dynamic information: o Your name is linked to your profile page. o Your profile picture is linked to your profile pictures page for easy uploading of new profile
pictures. o If you are a member of any groups, they are displayed here. o Pending friend requests and group invitations are displayed. o If you tagged artefacts or pages with the tag “profile”, a link to them is placed here.
Online users: If this sidebar block is enabled, you see users who have been logged in during the last 10 minutes. Depending on the settings for your institution that the administrator chose, you may see all users, only users from your institution(s) or no users at all.
Edit dashboard: The Edit dashboard button allows you to jump directly into the edit screen for your dashboard without having to go to Main menu → Create → Pages and Collections first.
User-specific information: You can customise this area on your dashboard to put blocks there that you want to see every time you log in.
1
2
3
4
5
6
7
8
9
UUM ePortfolio
Page 6 of 38
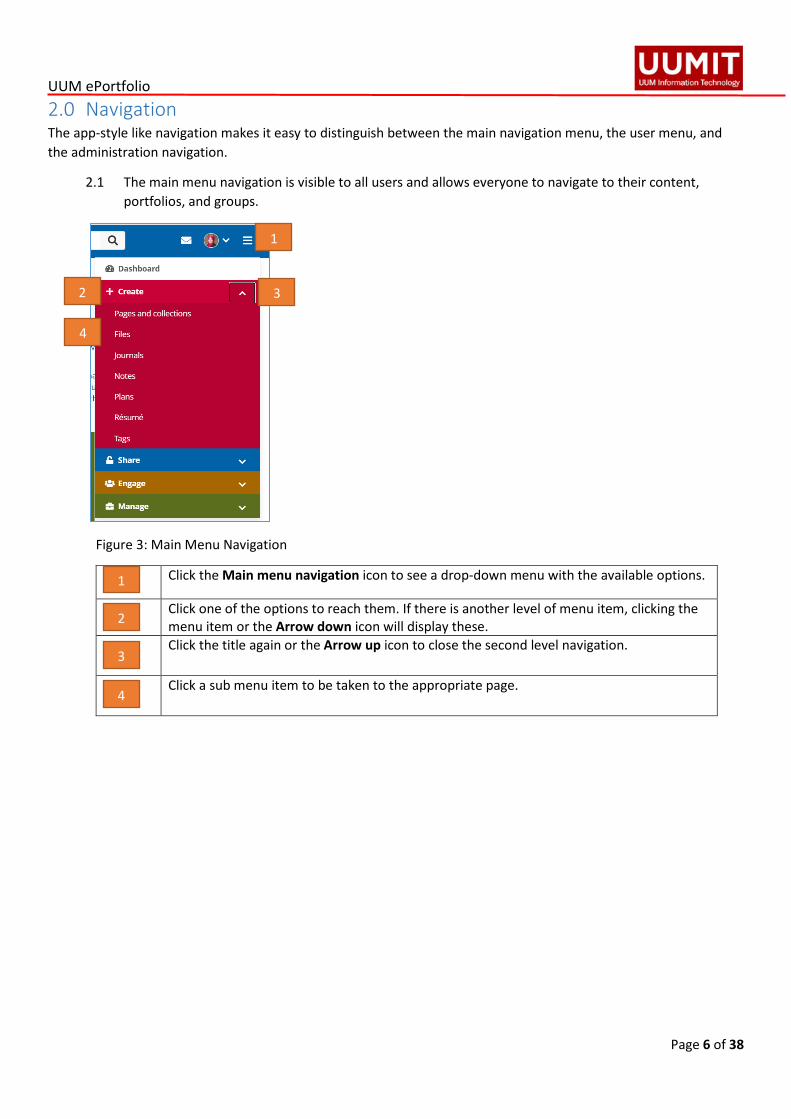
2.0 Navigation The app-style like navigation makes it easy to distinguish between the main navigation menu, the user menu, and the administration navigation.
2.1 The main menu navigation is visible to all users and allows everyone to navigate to their content, portfolios, and groups.
Figure 3: Main Menu Navigation
Click the Main menu navigation icon to see a drop-down menu with the available options.
Click one of the options to reach them. If there is another level of menu item, clicking the menu item or the Arrow down icon will display these.
Click the title again or the Arrow up icon to close the second level navigation.
Click a sub menu item to be taken to the appropriate page.
1
2 3
4
1
2
3
4

UUM ePortfolio
Page 7 of 38
2.2 The User menu navigation is visible to all users. It allows you to access your account settings, inbox, and profile easily.
Figure 4: User Menu Navigation
Click your profile picture to be taken to your profile page.
Click the Arrow down icon in the user menu to see additional options.
Your name: Your name is displayed to indicate who is logged in esp. when viewing portfolio pages where the profile block is not visible. You can click on it to go to your profile page.
Profile: Jump to the settings page of your profile where you can change vital basic information.
Profile pictures: Click this menu item to be taken to the page where you can manage your profile pictures.
Settings: Top level navigation item that gives you access to more options. Click the text or the Arrow down icon to see the secondary navigation: o Settings: This link gives you access to your account settings and notifications o Legal: The legal texts, i.e. the privacy statement and the terms and conditions, are
displayed that you have either actively or implicitly agreed to. o Notifications: Change your notification preferences. o Apps: See which apps you have connected to your account.
Logout: Link to log out of your current session.
1 2
4
3
7
6
5
1
2
3
4
5
6
7

UUM ePortfolio
Page 8 of 38
2.3 When you log in to UUM ePortfolio, you see three new boxes with quick links:
Create: Create your electronic portfolio in a flexible personal learning environment. This takes you to Main menu → Create → Pages and collections.
Share: Share your achievements and development in a space you control. Clicking on this box takes you to Main menu → Share → Shared by me.
Engage: Engage with other people in discussion forums and collaborate in groups. This takes you to Main menu → Engage → Groups.
Figure 5: Quick Links
2.4 The default dashboard includes the following blocks: About Me My portfolios Latest changes I can view
These blocks are filled with content once you start using UUM ePortfolio and create pages, receive messages from other users, have access to others’ portfolio pages and use the forums for discussions.
You can customize these blocks to your liking by editing your dashboard. Click the Edit dashboard button directly on your dashboard or go to Portfolio in the navigation menu, click the Edit button next to the dashboard page and change the blocks like you would change them on any page.

UUM ePortfolio
Page 9 of 38
3.0 Create The Create menu item contains all the actions relating to the creation of your personal portfolios.
This includes the artefacts (or “learning evidence”) that you create or collect to be used in your portfolios. It also includes the pages and collections that hold your artefacts for you to share with other people.
You can only share artefacts with individuals or groups of people when you placed them on a page and give others the permission to view that portfolio. The page can be part of a collection.
3.1 Pages and Collections 3.1.1 Overview page
Figure 6: Create -Pages and Collections
Click the Add button to start a new page or collection from scratch.
Click the Copy button to choose an existing page or collection of yours or from another user as basis for a new portfolio.
Search: Type your search term into the search field.
Click the Locked icon or the Unlocked icon to manage the access to your portfolio.
Collections display the number of pages that they contain.
Click the More options icon to reach more options for the page or collection.
Dashboard page: Click the More options icon to make changes to your dashboard page. You cannot delete your dashboard page though.
Profile page: Click the More options icon to make changes to your profile page. You cannot delete your profile page, but you can decide on different sharing options.
4
5
8 7
1
2
3
4
5
6
7
1 2
3
6
8

UUM ePortfolio
Page 10 of 38
3.1.2 Profile page Your profile page is visible to other users on UUM ePortfolio by default. The following information is put onto your profile page: Your display name (or real name if you do not have a display name) Your portfolios that are visible to the person viewing your profile page Your groups Your wall Your friends
When other people have access to your profile page, they can perform a number of actions or get in touch with you, depending on their permissions.
3.1.3 Add a page and edit its settings You add a new page in your portfolio when you want to display artefacts together, e.g. for presenting them to others, for showing your progress in a project etc.
Figure 7: Page Editing
1
2
3
4
6
7
8
5

UUM ePortfolio
Page 11 of 38
Page title: Provide a title for your page. This field cannot be left empty. If you do not enter a title, the default “Untitled” will appear.
Page description: Write a brief description summarising your objective of this page. It will appear on the page itself.
Tags: Enter tags to find your page more easily at a later stage. You can choose from your existing tags by starting to type a letter and then selecting the tag you want to use. You can also type a new tag, select it, and it is added to your list of tags.
Accessible layout: This option is available if you set the Accessible page creation option in your account settings to “Yes”. The following will happen:
o The page is set to one column. All blocks will be placed underneath each
other. o The Add block button can be clicked or navigated to via the keyboard and
will add a block at the top or bottom of the page. Drag-and-drop is disabled.
o You can change the position of a block by navigating to it, holding the Enter key pressed, and using the Up and Down arrow on your keyboard to change its position.
Page instructions: Write your instructions for setting up the page in the editor to scaffold the portfolio creation.
Lock blocks: If you set this option to “Yes”, you cannot remove blocks from the page. You can still add new blocks, re-arrange them, but cannot delete any blocks.
Name display format: Choose how you want your name to appear on the page to others.
Click the Save button to save your changes and to continue to the “Edit” screen.
1
2
3
4
5
6
7
8

UUM ePortfolio
Page 12 of 38
3.1.4 Edit a page Navigation bar - You can add and remove content from a portfolio page on the Edit page screen. The page navigation bar stays fixed in place on the right-hand side of the screen. That way, the buttons can be accessed on short and long pages without scrolling.
Figure 8: Edit a Page
Click the Drag to add a new block button onto the page to place a block.
Click the Settings button to add and modify page settings like title and description and skin.
Click the Display page button to review your page to see how others, who have access to it, will see it. When you are in edit mode, this button is highlighted.
Click the Share button to decide who shall have access to your page (or collection if the page is part of one). See “Edit access” for more details.
Click the Return to pages and collections button to return to the pages and collections overview page.
3.1.5 Edit access The Edit access screen is displayed for the selected page. You can only select the sharing options for the page that you are editing (and the collection if the page is in a collection). You can set a secret URL immediately rather than having to provide a secret URL separately from the other sharing options.
1
2
5
4
1 2
3
4
3
1
2
3
4
5

UUM ePortfolio
Page 13 of 38
Figure 9: Edit Access Click the Share button.
Secret URLs: Give your page a secret URL. For all available options, check out how to set up a secret URL.
Share with others: You can share your page with people who have an account on the site.
Click the Save button to save your changes and to continue to the “Edit” screen.
3.1.6 View a page You can view a page to check what it looks like when somebody else sees it. Go to the Pages and collections overview page and click on the title of a page.
Figure 10: Viewing a Page
4
5
8
9
11 12
1
2
3
4
1
2 3
6
7
10

UUM ePortfolio
Page 14 of 38
Collection title and navigation if the page is part of a collection.
Title of the page.
Author of the page.
Tags which you provided for your page. Certain artefact tags are also displayed here.
Click the Details button to see on which artefacts you can comment and where there are details available such as metadata or download links.
The Edit button is only visible if you are the page owner or belong to a group of people who can make changes to the page if it is a group, institution, or site page.
Click the More options button to reach lesser used functionality on a page.
Description of the page.
The artefacts that you placed in the page.
Comments from people are displayed at the bottom of the page unless you display them with the comments block elsewhere on the page. The total number of comments is displayed.
You and others can use the Add comment section to leave comments on the page.
Display the last update date and time of the page and also the view how many times your page was accessed.
1
2
3
4
5
6
7 o Click the Copy link to copy the page or collection. o Click the Print link to open the print dialogue. Using
this print functionality, your portfolio page is printed in the current layout, with collapsed blocks or artefacts uncollapsed so you can see their content easily. Note: Links are not yet active and linked files or embedded media are not accessible.
o Click the Delete link to delete your page. o Click the Save to timeline link when you want to
save a particular state of your page to your timeline so you can go back to it later and compare it to your current state. The comparison would be manual.
8
9
10
11
12

UUM ePortfolio
Page 15 of 38
3.1.7 Add a collection If you want to organize your portfolio into multiple pages so as to find individual sections more easily, you can create a collection that holds multiple pages. On the Pages and collections page, click the Add button. In the modal that comes up, click the Collection button. On the next screen…
Figure 11: Adding Collection
Collection name: Provide a title for your collection.
Collection description: Optionally, you can write a short description about your collection. You do not have a visual editor, but just a plain text box.
Tags: Enter tags to find your collection more easily at a later stage. You can choose from your existing tags by starting to type a letter and then selecting the tag you want to use. You can also type a new tag, and it is added to your list of tags.
Page navigation bar: Choose whether you wish to display a tabbed navigation or not. If you choose not to, you will have to include the navigation block for you to go from one page to the next on the individual pages that belong to this collection.
Click the Next: Edit collection pages button or click Cancel if you want to abort adding your collection.
1
2
5
3
1
2
3
4
5
4

UUM ePortfolio
Page 16 of 38
3.1.8 Add pages to a collection In the next step after you have created your collection, you choose which portfolio pages you wish to include in this collection. You see all the potential pages that you can use. If you had already placed a page into another collection, it is not shown here. On Main menu → Create → Pages and collections, click the More options icon for the collection and then the Manage icon. On the next screen…
Figure 12: Add Pages to a Collection
Put a check mark next to each page that you wish to include in your collection.
Alternatively, you can click the All link to add all pages available to the collection or the None link to revert your selection.
Click the Add pages button to add the pages to your collection. If you do not wish to click all pages, you can also drag and drop them into the collection by clicking their title and dragging them to the area Pages already in collection.
Click the Done button.
When you add pages to your collection that have different access permissions than the collection has, the page’s access permissions get added to the collection and the page is available under the same access permissions as the entire collection because it is part of the collection.
1
3
4
2
1
2
3
4

UUM ePortfolio
Page 17 of 38
3.1.9 Copy a portfolio You can copy a portfolio by:
o Clicking the Copy button when you view a portfolio and are allowed to copy it. o Searching for it.
Figure 13: Copy a Portfolio
Click the Copy icon in the More options menu when you want to copy a page or collection that you can duplicate.
If the page is part of a collection, you need to decide in the pop-up window whether you want to copy the entire collection by clicking the Collection button…
Or just the page that you can see currently by clicking the Page button.
Edit the page or collection as you would do any other.
Copy a portfolio by searching for it You can duplicate your own pages or pages of other users if they allowed you to do that. Click the Copy button under Main menu → Create → Pages and collections. On the next screen…
Figure 14: Copy a portfolio by searching for it
1 2 3
1
2 3 4 6
5
8
1
2
3
7

UUM ePortfolio
Page 18 of 38
Search: If there are many pages or collections from which you can choose,
search here for a keyword in the page or collection title or for the name of the page owner.
Collection title: Click on the title of a collection to preview it before copying it.
Page name: Click on the title of the page to see a preview of it before you copy it.
Owner: Click on the name of the owner to view a larger profile picture and the self description if the owner provided one or to see information about a group it that is the owner.
Click the Copy page button to copy one page only into your own portfolio or
Click the Copy collection button to copy an entire collection with multiple pages into your portfolio. All pages within this collection are copied.
You can navigate through the list of pages and collections to which you have access.
You see the total number of pages you can copy.
3.1.10 Delete a portfolio You can delete a portfolio at any time unless it has been submitted for feedback.
If you are allowed to delete a page, you see the Delete this page option in the More options button when you view your page directly.
Figure 15: Delete a page
When you delete a page, text blocks and external content blocks are completely deleted. You cannot recover them. There is no revision history. All other artefacts are not deleted because they reside in your Content area.
When you delete a collection, the pages and artefacts within it are not deleted.
1
2
3
4
5
6
7
8

UUM ePortfolio
Page 19 of 38
If you want to delete an entire collection, you can do so on Main menu → Create → Pages and collections by clicking the More options icon and then the Delete icon .
When you attempt to delete a page or collection, you get the chance to export the portfolio first so that you can make an archive. If your page is part of a collection, the warning message also contains the title and a link to the collection for you to check whether you really want to delete the page and thus make changes to your collection.

UUM ePortfolio
Page 20 of 38
3.2 Blocks Blocks for internal and external artefacts are used to compose portfolio pages and group pages. There is a large number of blocks available in UUM ePortfolio. More can be used when plugins are installed. Content of blocks can be shown on a page immediately, or just the block’s heading can be displayed. The retractable blocks allow you to be more flexible in what you want to show immediately on a page. When you started editing information in a block and you navigate away from it accidentally without having saved your block, you are being asked whether you wish to stay on the page or leave the page. This does not only apply to editing of blocks, but also pages.
3.2.1 Files, images and video These artefacts are internal UUM ePortfolio ones to display: o links to files that you have uploaded o folders that contain files o show images o embed audio and video files If you are on a mobile device and select to upload a file, you can take a photo or make a video or audio recording (Android only for audio) directly.
3.2.1.1 Embedded media Display an embedded video or audio file from your uploaded files. UUM ePortfolio comes with the Video.js media player that allows for the display of a number of file formats without having another player installed on the device. Videos placed onto a page in this block scale to the width of their column. They also scale automatically when your browser space gets smaller.
9 1
2
3 4
5 6
7
8

UUM ePortfolio
Page 21 of 38
Figure 16: Embedded Media
Block title: Choose a title for your block.
Files area: Choose from which files area you would like to select a media file:
o My files: You see all the folders and files that you have created. o Group files: You see all the folders and files that you are allowed to publish. o Institution files: If you are an institution administrator, you will see
institution folders and files. o Site files: If you are a site administrator, you will see all site folders and
files. Otherwise, you can only see the ones that are in the folder public in the Site files.
License information: You see these fields if the site administrator turned on
license metadata. Additionally, if you are in an institution, your institution administrator may require you to provide a license. o License: Your default license is displayed. You can set your default license in
your account settings. You may choose a different license for each individual artefact.
o Licensor: If you are uploading a file that somebody else created, you can attribute the work to them here and provide their name for example.
o Original URL: If you are uploading somebody else’s file, provide a link to the original Internet address so that others can go there and view the original file.
File: You do not have to go back to your Files area in Create in order to upload a
file. You can do so directly from this screen. Folder path: The breadcrumbs show in which folder you are currently.
Click the Edit button to change any component of a folder or file, i.e. its name, description and tags. If you have a folder or file included in a page that you submitted for feedback, you will not be able to edit them.
Retractable: Choose whether you want to allow users to reduce the block to its heading on a page or see just the heading only automatically. The options are: o No: The block and its content is displayed at all times. o Yes: Allow users to reduce the block to just the heading by clicking the
Retractable icon . o Automatically retract: Only the heading of the block is visible, and the user
can click the Retracted icon to view its content.
Click the Save button to accept your changes, or click Cancel to leave the block’s content as it is. Remove is shown only when you place the block into the page for the first time.
You can also click the Close button in the top left-hand corner of the modal window to either remove a newly created block before it is being saved or to cancel any changes and leave the block’s content as it is.
1
2
3
4
5
6
7
8
9

UUM ePortfolio
Page 22 of 38
3.2.1.2 File(s) to download Select files that viewers of your portfolio can download.
Figure 17: Files to Download
Block title: Choose a title for your files block.
Files area: Choose from which files area you would like to select a file: o My files: You see all the folders and files that you have created. o Group files: You see all the folders and files that you are allowed to publish. o Institution files: If you are an institution administrator, you will see
institution folders and files.
11
1
2
3 4
6
7
8
9
1
2
5
10
UUM ePortfolio
Page 23 of 38
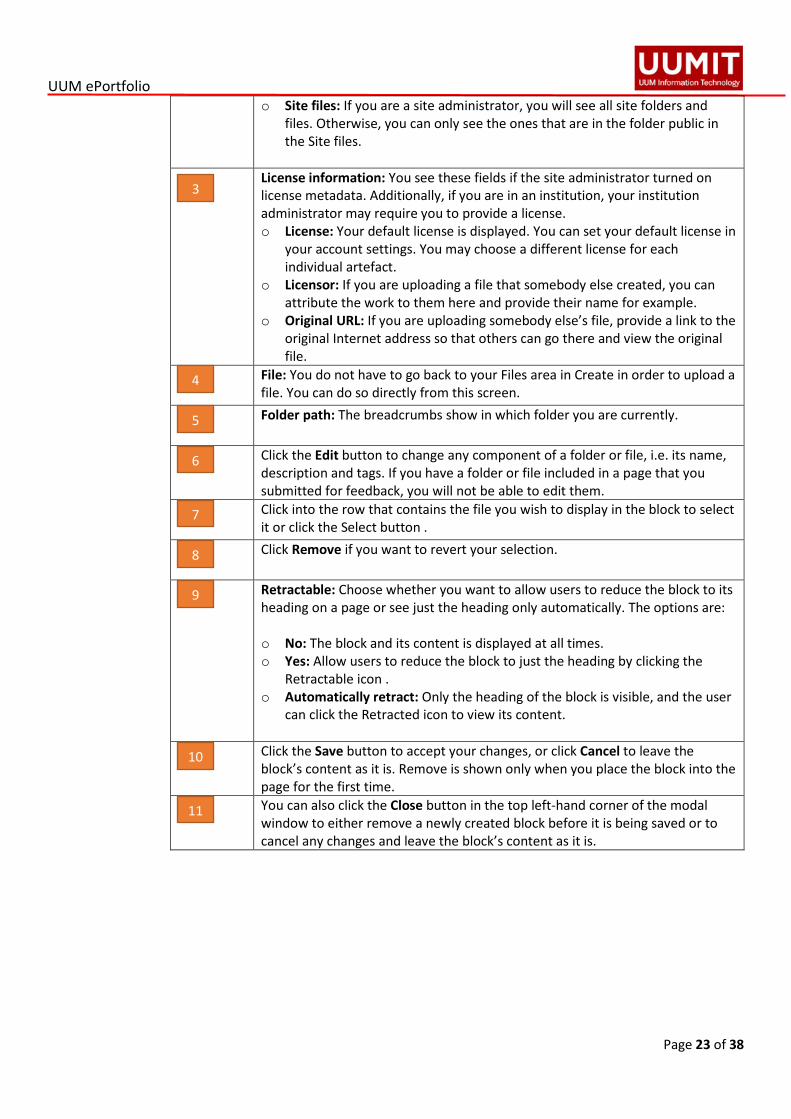
o Site files: If you are a site administrator, you will see all site folders and files. Otherwise, you can only see the ones that are in the folder public in the Site files.
License information: You see these fields if the site administrator turned on
license metadata. Additionally, if you are in an institution, your institution administrator may require you to provide a license. o License: Your default license is displayed. You can set your default license in
your account settings. You may choose a different license for each individual artefact.
o Licensor: If you are uploading a file that somebody else created, you can attribute the work to them here and provide their name for example.
o Original URL: If you are uploading somebody else’s file, provide a link to the original Internet address so that others can go there and view the original file.
File: You do not have to go back to your Files area in Create in order to upload a file. You can do so directly from this screen.
Folder path: The breadcrumbs show in which folder you are currently.
Click the Edit button to change any component of a folder or file, i.e. its name, description and tags. If you have a folder or file included in a page that you submitted for feedback, you will not be able to edit them.
Click into the row that contains the file you wish to display in the block to select it or click the Select button .
Click Remove if you want to revert your selection.
Retractable: Choose whether you want to allow users to reduce the block to its heading on a page or see just the heading only automatically. The options are: o No: The block and its content is displayed at all times. o Yes: Allow users to reduce the block to just the heading by clicking the
Retractable icon . o Automatically retract: Only the heading of the block is visible, and the user
can click the Retracted icon to view its content.
Click the Save button to accept your changes, or click Cancel to leave the block’s content as it is. Remove is shown only when you place the block into the page for the first time.
You can also click the Close button in the top left-hand corner of the modal window to either remove a newly created block before it is being saved or to cancel any changes and leave the block’s content as it is.
3
4
5
6
7
8
9
10
11

UUM ePortfolio
Page 24 of 38
3.2.1.3 Folder Select a folder to display all files within it as links on your page.
Figure 18: Folder
Block title: If you do not set a title, the name of the folder that you choose to display will be used.
Files area: Choose from which files area you would like to select a folder: o My files: You see all the folders and files that you have created. o Group files: You see all the folders and files that you are allowed to publish. o Institution files: If you are an institution administrator, you will see
institution folders and files. o Site files: If you are a site administrator, you will see all site folders and
files. Otherwise, you can only see the ones that are in the folder public in the Site files.
Folder path: The breadcrumbs show in which folder you are currently. file.
Click the Expand icon if you want to reach a sub folder.
You can edit any component of the folder, i.e. its name, description and tags by clicking the Edit button.
1
2
3
4
5
8
6
7
9
10
11
12
1
2
3
4
5

UUM ePortfolio
Page 25 of 38
Click into the row that contains the folder you wish to display in the block to select it or click the Select button.
Click Remove if you wish to revert your choice.
Sort order of files: Decide on the sort order of files in the block when they are displayed on the page. You can choose between: o Ascending o Descending
Show download link: Switch this option to “Yes” if you wish to allow the viewers of your page to download the folder contents as zip file.
Retractable: Choose whether you want to allow users to reduce the block to its heading on a page or see just the heading only automatically. The options are: o No: The block and its content is displayed at all times. o Yes: Allow users to reduce the block to just the heading by clicking the
Retractable icon . o Automatically retract: Only the heading of the block is visible, and the user
can click the Retracted icon to view its content.
Click the Save button to accept your changes, or click Cancel to leave the block’s content as it is. Remove is shown only when you place the block into the page for the first time.
You can also click the Close button in the top left-hand corner of the modal window to either remove a newly created block before it is being saved or to cancel any changes and leave the block’s content as it is.
6
7
8
10
11
11
9

UUM ePortfolio
Page 26 of 38
3.2.1.4 Image Display a single image in a block.
Figure 19: Image
Block title: Choose a title for your block.
Files area: Choose from which files area you would like to select a folder: o My files: You see all the folders and files that you have created. o Group files: You see all the folders and files that you are allowed to publish. o Institution files: If you are an institution administrator, you will see
institution folders and files.
1
2
3 4
5
6 7
8
9
11
12
13
10
1
2

UUM ePortfolio
Page 27 of 38
o Site files: If you are a site administrator, you will see all site folders and files. Otherwise, you can only see the ones that are in the folder public in the Site files.
License information: You see these fields if the site administrator turned on
license metadata. Additionally, if you are in an institution, your institution administrator may require you to provide a license. o License: Your default license is displayed. You can set your default license in
your account settings. You may choose a different license for each individual artefact.
o Licensor: If you are uploading a file that somebody else created, you can attribute the work to them here and provide their name for example.
o Original URL: If you are uploading somebody else’s file, provide a link to the original Internet address so that others can go there and view the original file.
File: You do not have to go back to your Files area in Create in order to upload a
file. You can do so directly from this screen. Folder path: The breadcrumbs show in which folder you are currently.
Click into the row that contains the file you wish to display in the block to select it or click the Select button. You only see image files that you are allowed to use in the block.
Click the Edit button to change any component of a folder or file, i.e. its name, description, rotation, and tags. If you have a folder or file included in a page that you submitted for feedback, you will not be able to edit them.
Click Remove if you want to revert your selection.
Show description: Set the switch to “Yes” if you wish to display the description of your photo. It could contain the source of it for example.
Width: Choose the width (in pixels) for your image. If you do not provide a number, the image will be scaled to the width of the block.
Retractable: Choose whether you want to allow users to reduce the block to its heading on a page or see just the heading only automatically. The options are: o No: The block and its content is displayed at all times. o Yes: Allow users to reduce the block to just the heading by clicking the
Retractable icon . o Automatically retract: Only the heading of the block is visible, and the user
can click the Retracted icon to view its content.
Click the Save button to accept your changes, or click Cancel to leave the block’s content as it is. Remove is shown only when you place the block into the page for the first time.
You can also click the Close button in the top left-hand corner of the modal window to either remove a newly created block before it is being saved or to cancel any changes and leave the block’s content as it is.
3
4
5
6
7
8
11
12
13
9
10

UUM ePortfolio
Page 28 of 38
3.2.1.5 Image gallery Select a folder with images or individual images to show in a gallery or embed an external image gallery.
Figure 20: Image Gallery
Block title: Choose a title for your image gallery block.
Image selection: You can choose to display all images from a specific folder or you can select the images individually. See embedding images from an external gallery for that option.
Image selection: If you choose Select the option “Display images from external gallery”. Gallery URL or RSS: Copy the link to the external gallery and past it into the text box. You can embed the following external galleries:
o Flickr, e.g. https://www.flickr.com/photos/12345678@N01/sets/98765432123456789/
o Picasa, e.g. http://picasaweb.google.com/user.name/AlbumName#
Files area: Choose from which files area you would like to select a folder: o My files: You see all the folders and files that you have created. o Group files: You see all the folders and files that you are allowed to publish.
1
2
3
4
5 6 7
8
9
10
11
12
13
14
15
1
3
2

UUM ePortfolio
Page 29 of 38
o Institution files: If you are an institution administrator, you will see institution folders and files.
o Site files: If you are a site administrator, you will see all site folders and files. Otherwise, you can only see the ones that are in the folder public in the Site files.
Folder path: The breadcrumbs show in which folder you are currently.
Click the Expand icon if you want to reach a sub folder.
Click into the row that contains the file you wish to display in the block to select it or click the Select button. You only see image files that you are allowed to use in the block.
Click the Edit button to change any component of a folder or file, i.e. its name, description, rotation, and tags. If you have a folder or file included in a page that you submitted for feedback, you will not be able to edit them.
Click Remove if you want to revert your selection.
Style: Decide to show all selected images as thumbnails or as slideshow where you only see one image at a time. If you select the option “Thumbnails (square)”, all your images will be displayed in the same size as thumbnails.
Show descriptions: Turn this option on if you want to display the image descriptions in the gallery.
Use photo frame: Using this option will put a frame around each photo.
Width: Specify the width (in pixels) for your images. The images are scaled to this width.
Retractable: Choose whether you want to allow users to reduce the block to its heading on a page or see just the heading only automatically. The options are: o No: The block and its content is displayed at all times. o Yes: Allow users to reduce the block to just the heading by clicking the
Retractable icon . o Automatically retract: Only the heading of the block is visible, and the user can
click the Retracted icon to view its content.
Click the Save button to accept your changes, or click Cancel to leave the block’s content as it is. Remove is shown only when you place the block into the page for the first time.
You can also click the Close button in the top left-hand corner of the modal window to either remove a newly created block before it is being saved or to cancel any changes and leave the block’s content as it is.
5
6
7
8
13
14
15
9
4
10
11
12

UUM ePortfolio
Page 30 of 38
3.2.1.6 PDF Embed PDFs into a page.
Figure 21: PDF
Block title: Choose a title for your PDF block.
Files area: Choose from which files area you would like to select a folder: o My files: You see all the folders and files that you have created. o Group files: You see all the folders and files that you are allowed to publish. o Institution files: If you are an institution administrator, you will see institution
folders and files. o Site files: If you are a site administrator, you will see all site folders and files.
Otherwise, you can only see the ones that are in the folder public in the Site files.
License information: You see these fields if the site administrator turned on license metadata. Additionally, if you are in an institution, your institution administrator may require you to provide a license. o License: Your default license is displayed. You can set your default license in
your account settings. You may choose a different license for each individual artefact.
o Licensor: If you are uploading a file that somebody else created, you can attribute the work to them here and provide their name for example.
1
2
12
5
3 4
8
6 7
10
9
11
1
2
3

UUM ePortfolio
Page 31 of 38
o Original URL: If you are uploading somebody else’s file, provide a link to the original Internet address so that others can go there and view the original file.
File: You do not have to go back to your Files area in Create in order to upload a file. You can do so directly from this screen.
Folder path: The breadcrumbs show in which folder you are currently.
Click the Expand icon if you want to reach a sub folder.
Click the Edit button to change any component of a folder or file, i.e. its name, description, rotation, and tags. If you have a folder or file included in a page that you submitted for feedback, you will not be able to edit them.
Click into the row that contains the file you wish to display in the block to select it. You only see PDF files.
Click Remove if you want to revert your selection.
Retractable: Choose whether you want to allow users to reduce the block to its heading on a page or see just the heading only automatically. The options are: o No: The block and its content is displayed at all times. o Yes: Allow users to reduce the block to just the heading by clicking the
Retractable icon . o Automatically retract: Only the heading of the block is visible, and the user can
click the Retracted icon to view its content. Click the Save button to accept your changes, or click Cancel to leave the block’s
content as it is. Remove is shown only when you place the block into the page for the first time.
You can also click the Close button in the top left-hand corner of the modal window to either remove a newly created block before it is being saved or to cancel any changes and leave the block’s content as it is.
5
4
6
7
8
9
10
11
12

UUM ePortfolio
Page 32 of 38
3.2.1.8 Some HTML Display the content of an HTML file in a page.
Figure 22: HTML
Block title: Choose a title for your block.
Files area: Choose from which files area you would like to select a folder: o My files: You see all the folders and files that you have created. o Group files: You see all the folders and files that you are allowed to publish. o Institution files: If you are an institution administrator, you will see institution
folders and files. o Site files: If you are a site administrator, you will see all site folders and files.
Otherwise, you can only see the ones that are in the folder public in the Site files.
License information: You see these fields if the site administrator turned on license metadata. Additionally, if you are in an institution, your institution administrator may require you to provide a license. o License: Your default license is displayed. You can set your default license in
your account settings. You may choose a different license for each individual artefact.
o Licensor: If you are uploading a file that somebody else created, you can attribute the work to them here and provide their name for example.
o Original URL: If you are uploading somebody else’s file, provide a link to the original Internet address so that others can go there and view the original file.
1
2
3 4
5
6 7
10
9
10
11
8
1
2
3

UUM ePortfolio
Page 33 of 38
Upload file: You do not have to go back to your Files area in Create in order to upload a file. You can do so directly from this screen.
Folder path: The breadcrumbs show in which folder you are currently.
Click the Expand icon if you want to reach a sub folder.
Click the Edit button to change any component of a folder or file, i.e. its name, description, rotation, and tags. If you have a folder or file included in a page that you submitted for feedback, you will not be able to edit them.
Click into the row that contains the file you wish to display in the block to select it. You only see PDF files.
Click Remove if you want to revert your selection.
Retractable: Choose whether you want to allow users to reduce the block to its heading on a page or see just the heading only automatically. The options are: o No: The block and its content is displayed at all times. o Yes: Allow users to reduce the block to just the heading by clicking the
Retractable icon . o Automatically retract: Only the heading of the block is visible, and the user can
click the Retracted icon to view its content. Click the Save button to accept your changes, or click Cancel to leave the block’s
content as it is. Remove is shown only when you place the block into the page for the first time.
You can also click the Close button in the top left-hand corner of the modal window to either remove a newly created block before it is being saved or to cancel any changes and leave the block’s content as it is.
4.0 Share 4.1 Shared by me
Main menu → Share → Shared by me
When you have created portfolio pages (and collections), you may wish to share them with others, e.g. to receive feedback. You can set the access permissions on the Edit access page. It is accessible via Main menu → Share → Shared by me or directly from the “Edit” screen of a page.
5
4
6
7
8
9
10
11
12

UUM ePortfolio
Page 34 of 38
Figure 23: Shared by Me
Decide whether you want to change sharing permissions for a collection or a page.
Collection name (or Page title): Your collections / pages are sorted alphabetically
Access list: The list of users, groups or institutions who have access to a particular collection or page.
Edit access: The Edit access icon next to each collection or page allows you to change the permission of who can view a page or collection.
Secret URLs: The Secret URL edit icon next to each collection or page allows you to set up one or more secret URLs for a page or collection. The number of secret URLs that you have generated is displayed next to the icon.
4.2 Shared with me Main menu → Share → Shared with me On this page you can list the most recently modified or commented on pages and collections that have been shared with: o You directly o You as a friend o You as a member of a group o You as a member of an institution o All registered users o The public (excluding secret URLs)
Shared with me is a place where you can find the portfolios that you may be most interested in.
1
3 4
2
5
1
2
5
3
4

UUM ePortfolio
Page 35 of 38
Figure 24: Shared with me
Search: Type your search term into the search field. Per default, you search by title, description, tags and the owner of a portfolio. Use the drop-down arrow to limit your search to tags only.
Sort results by: You can sort the results by the following options: o Last update or comment o Last update o Owner o Title
Click the Search button to perform your search.
Select the group of people with whom the porfolio(s) you search for must have been shared. You can select multiple options: o Me o Friends o My groups o My institutions o Registered users o Public: You only see this option if the site / institution administrator allowed
public pages. The title links directly to the portfolio.
The description of the page is displayed if the author provided one.
5
2 1 3
4
1
2
5
3
4

UUM ePortfolio
Page 36 of 38
5.0 Engage The Engage menu item holds all parts of UUM ePortfolio that you need to engage with other people. That can be through sharing your own portfolios, viewing other people’s portfolios, and collaborating in groups.
5.1 People Main menu → Engage → People Your friends are a special group of people. You can share your portfolio pages or collections easily with them and get in touch with them quickly. They differ from a regular group in that they do not have discussion forums, pages, or shared files. If you want to use those with your friends, you have to create a group for them. You can request other people’s friendship in a couple of ways: Go to their profile page and click the Request friendship or Add to friends button. Go to the People page and search for potential friends.
Figure 25: Engage-People
Use the search box to search for a name of a person. If there are lots of people, you can narrow down your search by selecting from the drop-down menu: o Everyone o My institutions: This is the default option for members in an institution. o Friends o Friend requests
Click the Search button to start your search.
All results are listed. You can click on the name to view that person’s profile page. You also see if a person is already a friend of yours, if they are an administrator or staff member, and in which institution they are.
If somebody sent you a friend request, you can see the details, including their reason for wanting to add you to their friends.
1 2
4 3
1
2
3
4

UUM ePortfolio
Page 37 of 38
5.2 Group Main menu → Engage → Groups Groups can be used for collaboration amongst people as they offer the possibilities to: o discuss topics in forums o create and edit pages and collections together o share files o share pages o submit portfolios for assessment / feedback
Figure 26: Groups
Search: Search for a certain group using a word or words from its title or description. Per default, you search in “All my groups”. Use the drop-down menu to select a different search context. You can search within: o All my groups: This option displays all groups in which you are a member or to
which you have been invited. o Groups I’m in: This is a list of all groups in which you are a member, no matter
your role in the group. o Groups I own: Only the groups in which you are a group administrator are
displayed. o Groups I’m invited to: Only groups to which you have been invited to are
shown. o Groups I can join: Only groups in which you are not a member and that you can
join are displayed. It does not show any groups that have controlled membership.
o Groups I’m not in: This shows all groups in which you are currently not a member. It shows groups to which you have been invited but not yet accepted.
o All groups: This is a list of all groups that you can see no matter whether you are a member in them or not.
Click the Search button to start your search.
1 2
3
4
1
2
1
5
UUM ePortfolio
Page 38 of 38
All the groups to which you have access are listed with group title, administrator, description, group type, and number of members if the administrator discloses that information.
Click the Settings button when you want to update the details for a group in which you are the administrator.
Click the Delete button only when you want to delete your group permanently. Group members receive a notification that the group has been deleted.
5.3 Inside Groups o Group homepage
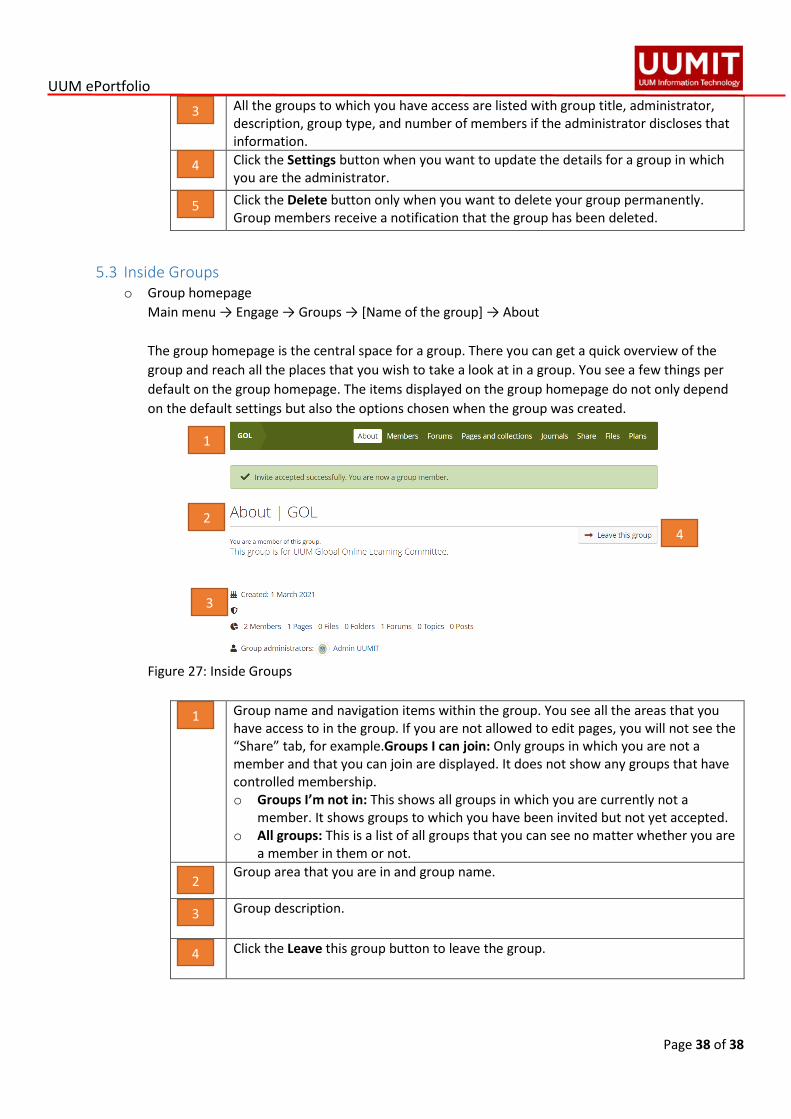
Main menu → Engage → Groups → [Name of the group] → About The group homepage is the central space for a group. There you can get a quick overview of the group and reach all the places that you wish to take a look at in a group. You see a few things per default on the group homepage. The items displayed on the group homepage do not only depend on the default settings but also the options chosen when the group was created.
Figure 27: Inside Groups
Group name and navigation items within the group. You see all the areas that you have access to in the group. If you are not allowed to edit pages, you will not see the “Share” tab, for example.Groups I can join: Only groups in which you are not a member and that you can join are displayed. It does not show any groups that have controlled membership. o Groups I’m not in: This shows all groups in which you are currently not a
member. It shows groups to which you have been invited but not yet accepted. o All groups: This is a list of all groups that you can see no matter whether you are
a member in them or not.
Group area that you are in and group name.
Group description.
Click the Leave this group button to leave the group.
1
2
3
4
3
4
5
1
2
3
4