Using Avaya Aura Conferencing Collaboration Agent
126
Using Avaya Aura ® Conferencing Collaboration Agent February 2013
-
Upload
khangminh22 -
Category
Documents
-
view
4 -
download
0
Transcript of Using Avaya Aura Conferencing Collaboration Agent

Using Avaya Aura® ConferencingCollaboration Agent
February 2013
© 2013 Avaya Inc.
All Rights Reserved.
Notice
While reasonable efforts have been made to ensure that theinformation in this document is complete and accurate at the time ofprinting, Avaya assumes no liability for any errors. Avaya reserves theright to make changes and corrections to the information in thisdocument without the obligation to notify any person or organization ofsuch changes.
Documentation disclaimer
“Documentation” means information published by Avaya in varyingmediums which may include product information, operating instructionsand performance specifications that Avaya generally makes availableto users of its products. Documentation does not include marketingmaterials. Avaya shall not be responsible for any modifications,additions, or deletions to the original published version ofdocumentation unless such modifications, additions, or deletions wereperformed by Avaya. End User agrees to indemnify and hold harmlessAvaya, Avaya's agents, servants and employees against all claims,lawsuits, demands and judgments arising out of, or in connection with,subsequent modifications, additions or deletions to this documentation,to the extent made by End User.
Link disclaimer
Avaya is not responsible for the contents or reliability of any linkedwebsites referenced within this site or documentation provided byAvaya. Avaya is not responsible for the accuracy of any information,statement or content provided on these sites and does not necessarilyendorse the products, services, or information described or offeredwithin them. Avaya does not guarantee that these links will work all thetime and has no control over the availability of the linked pages.
Warranty
Avaya provides a limited warranty on its hardware and Software(“Product(s)”). Refer to your sales agreement to establish the terms ofthe limited warranty. In addition, Avaya’s standard warranty language,as well as information regarding support for this Product while underwarranty is available to Avaya customers and other parties through theAvaya Support website: http://support.avaya.com. Please note that ifyou acquired the Product(s) from an authorized Avaya reseller outsideof the United States and Canada, the warranty is provided to you bysaid Avaya reseller and not by Avaya. “Software” means computerprograms in object code, provided by Avaya or an Avaya ChannelPartner, whether as stand-alone products or pre-installed on hardwareproducts, and any upgrades, updates, bug fixes, or modified versions.
Licenses
THE SOFTWARE LICENSE TERMS AVAILABLE ON THE AVAYAWEBSITE, HTTP://SUPPORT.AVAYA.COM/LICENSEINFO AREAPPLICABLE TO ANYONE WHO DOWNLOADS, USES AND/ORINSTALLS AVAYA SOFTWARE, PURCHASED FROM AVAYA INC.,ANY AVAYA AFFILIATE, OR AN AUTHORIZED AVAYA RESELLER(AS APPLICABLE) UNDER A COMMERCIAL AGREEMENT WITHAVAYA OR AN AUTHORIZED AVAYA RESELLER. UNLESSOTHERWISE AGREED TO BY AVAYA IN WRITING, AVAYA DOESNOT EXTEND THIS LICENSE IF THE SOFTWARE WAS OBTAINEDFROM ANYONE OTHER THAN AVAYA, AN AVAYA AFFILIATE ORAN AVAYA AUTHORIZED RESELLER; AVAYA RESERVES THERIGHT TO TAKE LEGAL ACTION AGAINST YOU AND ANYONEELSE USING OR SELLING THE SOFTWARE WITHOUT A LICENSE.BY INSTALLING, DOWNLOADING OR USING THE SOFTWARE, ORAUTHORIZING OTHERS TO DO SO, YOU, ON BEHALF OFYOURSELF AND THE ENTITY FOR WHOM YOU ARE INSTALLING,DOWNLOADING OR USING THE SOFTWARE (HEREINAFTERREFERRED TO INTERCHANGEABLY AS “YOU” AND “END USER”),AGREE TO THESE TERMS AND CONDITIONS AND CREATE ABINDING CONTRACT BETWEEN YOU AND AVAYA INC. OR THEAPPLICABLE AVAYA AFFILIATE (“AVAYA”).
Avaya grants you a license within the scope of the license typesdescribed below, with the exception of Heritage Nortel Software, forwhich the scope of the license is detailed below. Where the orderdocumentation does not expressly identify a license type, theapplicable license will be a Designated System License. The applicablenumber of licenses and units of capacity for which the license is grantedwill be one (1), unless a different number of licenses or units of capacityis specified in the documentation or other materials available to you.“Designated Processor” means a single stand-alone computing device.“Server” means a Designated Processor that hosts a softwareapplication to be accessed by multiple users.
Licence types
Designated System(s) License (DS). End User may install and useeach copy of the Software only on a number of Designated Processorsup to the number indicated in the order. Avaya may require theDesignated Processor(s) to be identified in the order by type, serialnumber, feature key, location or other specific designation, or to beprovided by End User to Avaya through electronic means establishedby Avaya specifically for this purpose.
Concurrent User License (CU). End User may install and use theSoftware on multiple Designated Processors or one or more Servers,so long as only the licensed number of Units are accessing and usingthe Software at any given time. A “Unit” means the unit on which Avaya,at its sole discretion, bases the pricing of its licenses and can be,without limitation, an agent, port or user, an e-mail or voice mail accountin the name of a person or corporate function (e.g., webmaster orhelpdesk), or a directory entry in the administrative database utilizedby the Software that permits one user to interface with the Software.Units may be linked to a specific, identified Server.
Database License (DL). End User may install and use each copy of theSoftware on one Server or on multiple Servers provided that each ofthe Servers on which the Software is installed communicates with nomore than a single instance of the same database.
CPU License (CP). End User may install and use each copy of theSoftware on a number of Servers up to the number indicated in theorder provided that the performance capacity of the Server(s) does notexceed the performance capacity specified for the Software. End Usermay not re-install or operate the Software on Server(s) with a largerperformance capacity without Avaya’s prior consent and payment of anupgrade fee.
Named User License (NU). You may: (i) install and use the Softwareon a single Designated Processor or Server per authorized NamedUser (defined below); or (ii) install and use the Software on a Server solong as only authorized Named Users access and use the Software.“Named User”, means a user or device that has been expresslyauthorized by Avaya to access and use the Software. At Avaya’s solediscretion, a “Named User” may be, without limitation, designated byname, corporate function (e.g., webmaster or helpdesk), an e-mail orvoice mail account in the name of a person or corporate function, or adirectory entry in the administrative database utilized by the Softwarethat permits one user to interface with the Software.
Shrinkwrap License (SR). You may install and use the Software inaccordance with the terms and conditions of the applicable licenseagreements, such as “shrinkwrap” or “clickthrough” licenseaccompanying or applicable to the Software (“Shrinkwrap License”).
Heritage Nortel Software
“Heritage Nortel Software” means the software that was acquired byAvaya as part of its purchase of the Nortel Enterprise SolutionsBusiness in December 2009. The Heritage Nortel Software currentlyavailable for license from Avaya is the software contained within the listof Heritage Nortel Products located at http://support.avaya.com/LicenseInfo under the link “Heritage Nortel Products”. For HeritageNortel Software, Avaya grants Customer a license to use HeritageNortel Software provided hereunder solely to the extent of theauthorized activation or authorized usage level, solely for the purposespecified in the Documentation, and solely as embedded in, forexecution on, or (in the event the applicable Documentation permits
2 Using Avaya Aura® Conferencing Collaboration Agent February 2013Comments? [email protected]

installation on non-Avaya equipment) for communication with Avayaequipment. Charges for Heritage Nortel Software may be based onextent of activation or use authorized as specified in an order or invoice.
Copyright
Except where expressly stated otherwise, no use should be made ofmaterials on this site, the Documentation, Software, or hardwareprovided by Avaya. All content on this site, the documentation and theProduct provided by Avaya including the selection, arrangement anddesign of the content is owned either by Avaya or its licensors and isprotected by copyright and other intellectual property laws including thesui generis rights relating to the protection of databases. You may notmodify, copy, reproduce, republish, upload, post, transmit or distributein any way any content, in whole or in part, including any code andsoftware unless expressly authorized by Avaya. Unauthorizedreproduction, transmission, dissemination, storage, and or use withoutthe express written consent of Avaya can be a criminal, as well as acivil offense under the applicable law.
Third Party Components
“Third Party Components” mean certain software programs or portionsthereof included in the Software that may contain software (includingopen source software) distributed under third party agreements (“ThirdParty Components”), which contain terms regarding the rights to usecertain portions of the Software (“Third Party Terms”). Informationregarding distributed Linux OS source code (for those Products thathave distributed Linux OS source code) and identifying the copyrightholders of the Third Party Components and the Third Party Terms thatapply is available in the Documentation or on Avaya’s website at: http://support.avaya.com/Copyright. You agree to the Third Party Terms forany such Third Party Components.
Preventing Toll Fraud
“Toll Fraud” is the unauthorized use of your telecommunicationssystem by an unauthorized party (for example, a person who is not acorporate employee, agent, subcontractor, or is not working on yourcompany's behalf). Be aware that there can be a risk of Toll Fraudassociated with your system and that, if Toll Fraud occurs, it can resultin substantial additional charges for your telecommunications services.
Avaya Toll Fraud intervention
If you suspect that you are being victimized by Toll Fraud and you needtechnical assistance or support, call Technical Service Center TollFraud Intervention Hotline at +1-800-643-2353 for the United Statesand Canada. For additional support telephone numbers, see the AvayaSupport website: http://support.avaya.com. Suspected securityvulnerabilities with Avaya products should be reported to Avaya bysending mail to: [email protected].
Trademarks
The trademarks, logos and service marks (“Marks”) displayed in thissite, the Documentation and Product(s) provided by Avaya are theregistered or unregistered Marks of Avaya, its affiliates, or other thirdparties. Users are not permitted to use such Marks without prior writtenconsent from Avaya or such third party which may own the Mark.Nothing contained in this site, the Documentation and Product(s)should be construed as granting, by implication, estoppel, or otherwise,any license or right in and to the Marks without the express writtenpermission of Avaya or the applicable third party.
Avaya is a registered trademark of Avaya Inc.
All non-Avaya trademarks are the property of their respective owners.Linux® is the registered trademark of Linus Torvalds in the U.S. andother countries.
Downloading Documentation
For the most current versions of Documentation, see the AvayaSupport website: http://support.avaya.com.
Contact Avaya Support
See the Avaya Support website: http://support.avaya.com for productnotices and articles, or to report a problem with your Avaya product.For a list of support telephone numbers and contact addresses, go tothe Avaya Support website: http://support.avaya.com, scroll to thebottom of the page, and select Contact Avaya Support.
Using Avaya Aura® Conferencing Collaboration Agent February 2013 3

4 Using Avaya Aura® Conferencing Collaboration Agent February 2013Comments? [email protected]

Contents
Chapter 1: Introduction...................................................................................................... 9About Collaboration Agent........................................................................................................................ 9New features in this release...................................................................................................................... 10
Conference recording and playback................................................................................................. 10Audio/Video in Collaboration Agent.................................................................................................. 11Secure conferences......................................................................................................................... 11Two levels of codes.......................................................................................................................... 11Simple URL links.............................................................................................................................. 12Automatic log in................................................................................................................................ 12
Collaboration Agent user types................................................................................................................. 12Collaboration Agent user roles.................................................................................................................. 13
Real world example.......................................................................................................................... 15Types of conferences................................................................................................................................ 16Main window components......................................................................................................................... 17Conference check list................................................................................................................................ 23Accessing version information.................................................................................................................. 25Accessing online help............................................................................................................................... 25
Chapter 2: Logging into and out of Collaboration Agent................................................ 27System requirements................................................................................................................................ 27
Supported Web browsers................................................................................................................. 27Logging in to Avaya Aura® Conferencing Collaboration Agent................................................................. 28
Logging in to Avaya Aura® Conferencing Collaboration Agent as a guest...................................... 28Logging in to Avaya Aura® Conferencing Collaboration Agent as a member.................................. 29
Logging in to a conference as moderator................................................................................................. 30Logging in to a conference as a participant or presenter.......................................................................... 31Logging in to a conference as an operator............................................................................................... 33Logging out............................................................................................................................................... 34
Chapter 3: Setting default settings for conference features........................................... 35Default settings for conference features................................................................................................... 35Configuring entry and exit tones............................................................................................................... 35Configuring fast start................................................................................................................................. 36Configuring continuation........................................................................................................................... 37Configuring video...................................................................................................................................... 37Configuring automatic recording............................................................................................................... 38Configuring passcodes.............................................................................................................................. 39
Chapter 4: Attending a conference as a participant........................................................ 41Raising and lowering your hand................................................................................................................ 41Muting and unmuting your audio............................................................................................................... 41Muting media............................................................................................................................................. 42Associating your phone and Collaboration Agent login during a conference............................................ 42
Associating your Collaboration Agent login to your phone during a conference.............................. 43Associating your phone to your Collaboration Agent login during a conference.............................. 43Per-conference persisted association.............................................................................................. 44
Ending association of your phone and Collaboration Agent account........................................................ 44
Using Avaya Aura® Conferencing Collaboration Agent February 2013 5

Viewing the dialpad commands................................................................................................................ 45Retrieving the attendance snapshot......................................................................................................... 45Searching for users................................................................................................................................... 47Dropping from a conference...................................................................................................................... 47
Chapter 5: Managing a conference as a moderator......................................................... 49Adding a participant to a conference........................................................................................................ 49Muting and unmuting specific participants................................................................................................ 49Muting media of participants..................................................................................................................... 50Promoting a participant to moderator........................................................................................................ 51Associating and dissociating specific participants.................................................................................... 52Assigning and unassigning presenter capabilities to a participant............................................................ 53Dropping a participant............................................................................................................................... 53Clearing raised hands............................................................................................................................... 54Managing Conference Features............................................................................................................... 54
Enabling and disabling Lecture Mode.............................................................................................. 54Locking and unlocking the conference............................................................................................. 55Enabling and disabling continuation................................................................................................. 56Enabling and disabling entry and exit tones..................................................................................... 56Starting recording............................................................................................................................. 57Stopping recording........................................................................................................................... 57
Chapter 6: Managing an event conference....................................................................... 59Muting and unmuting specific participants................................................................................................ 59Enabling and disabling continuation......................................................................................................... 60Enabling and disabling entry and exit tones............................................................................................. 60Locking and unlocking the conference...................................................................................................... 61Searching for users................................................................................................................................... 61
Chapter 7: Adding additional security to your conference............................................. 63Some concepts related to security............................................................................................................ 63Codes........................................................................................................................................................ 63
Collaboration codes.......................................................................................................................... 64Passcodes........................................................................................................................................ 64
Modifying passcodes................................................................................................................................. 64Configuring passcodes.............................................................................................................................. 65Logging in to a conference that requires passcodes................................................................................ 66
Chapter 8: Sharing information......................................................................................... 69Introduction to Web Collaboration............................................................................................................. 69
Web Collaboration components....................................................................................................... 69Managing your library................................................................................................................................ 71
The Library....................................................................................................................................... 71Supported document formats........................................................................................................... 71Uploading documents....................................................................................................................... 72Viewing documents in the library...................................................................................................... 73Renaming documents...................................................................................................................... 73Deleting documents.......................................................................................................................... 74Sorting documents........................................................................................................................... 74
Sharing a document.................................................................................................................................. 75Sharing a document......................................................................................................................... 75
6 Using Avaya Aura® Conferencing Collaboration Agent February 2013

Navigating shared content................................................................................................................ 75Browsing a presentation as a participant......................................................................................... 77Ending document sharing................................................................................................................. 77Advantages of sharing documents instead of the desktop............................................................... 78
Sharing a whiteboard................................................................................................................................ 78Sharing a whiteboard....................................................................................................................... 78Navigating whiteboards.................................................................................................................... 79Adding a whiteboard......................................................................................................................... 79Deleting a whiteboard....................................................................................................................... 79Ending whiteboard sharing............................................................................................................... 80
Sharing applications and the desktop....................................................................................................... 80Sharing Applications......................................................................................................................... 80Sharing application and desktop controls......................................................................................... 81Ending application and screen sharing............................................................................................ 81
Annotating content.................................................................................................................................... 82Annotating........................................................................................................................................ 82Annotation controls........................................................................................................................... 82
Changing the type of sharing.................................................................................................................... 85Sending a screenshot............................................................................................................................... 85
Chapter 9: Recording and playing back a conference.................................................... 87Introduction to recording........................................................................................................................... 87
Manual recording.............................................................................................................................. 87Automatic recording......................................................................................................................... 88Recording status.............................................................................................................................. 88
Recording a conference............................................................................................................................ 88Starting recording............................................................................................................................. 89Stopping recording........................................................................................................................... 89Configuring automatic recording...................................................................................................... 90Sorting recordings............................................................................................................................ 90Renaming recordings....................................................................................................................... 91Distributing recordings...................................................................................................................... 92
Introduction to playback............................................................................................................................ 92Accessing recordings....................................................................................................................... 93Starting playback.............................................................................................................................. 94Stopping playback............................................................................................................................ 94
Participant activity panel........................................................................................................................... 95Viewing participant activity............................................................................................................... 96Zooming in and out of an activity timeline........................................................................................ 96Muting volume.................................................................................................................................. 97
Playback control panel.............................................................................................................................. 97Rewinding playback......................................................................................................................... 98Forwarding playback........................................................................................................................ 98Controlling the volume of a playback............................................................................................... 98Zooming in and out of playback content........................................................................................... 99
Downloading a recording.......................................................................................................................... 99Downloading audio-only................................................................................................................... 100Downloading collaboration and audio.............................................................................................. 100
Using Avaya Aura® Conferencing Collaboration Agent February 2013 7

Chapter 10: Using embedded audio and video................................................................ 101Audio/Video in Collaboration Agent.......................................................................................................... 101Using embedded audio or video............................................................................................................... 102
Entering a conference...................................................................................................................... 102Muting your microphone................................................................................................................... 103Pausing your video........................................................................................................................... 103Switching to embedded audio and/or video during a conference..................................................... 104
Chapter 11: Sending messages during a conference..................................................... 105The Messages window.............................................................................................................................. 105Opening the Messages window................................................................................................................ 105Sending a message.................................................................................................................................. 106
Chapter 12: Managing meeting minutes........................................................................... 107Meeting minutes........................................................................................................................................ 107
Minutes interface.............................................................................................................................. 107Adding minutes......................................................................................................................................... 108Editing minutes.......................................................................................................................................... 109Deleting minutes....................................................................................................................................... 109
Chapter 13: Managing meeting reports............................................................................ 111Meeting reports......................................................................................................................................... 111Accessing meeting reports........................................................................................................................ 111Sorting Web Collaboration sessions......................................................................................................... 112Deleting meeting reports........................................................................................................................... 112Renaming meeting report sessions.......................................................................................................... 113Generating and sending reports............................................................................................................... 113
Meeting reports custom parameters................................................................................................. 114Chapter 14: Using dialpad commands during a conference.......................................... 117Glossary............................................................................................................................... 121Index..................................................................................................................................... 123
8 Using Avaya Aura® Conferencing Collaboration Agent February 2013

Chapter 1: Introduction
About Collaboration AgentCollaboration Agent is an application that provides tools for managing and participating inconferences and sharing information. In the integral Web Collaboration workspace,participants can share content such as documents, virtual whiteboards and applications.Together, Collaboration Agent and Web Collaboration form part of Avaya Aura®
Conferencing.
Avaya Aura® Conferencing provides web-based conferencing and online meeting tools thatenable your organization’s members and invited guests to join in conference calls and groupmeetings on site or from remote locations.
Participants join the conference quickly by logging into the link provided by Collaboration Agentand then dialing into the bridge number assigned for the conference call. Then, the participantscan easily perform a number of tasks, such as:
• See a list of other participants• Raise their hands
Additional participants can even be invited to join a conference already in progress.
With the Web Collaboration feature, the conference moderator or any selected participant canshare:
• All or some of their desktop• Specific applications• Documents• Virtual whiteboards
When Web Collaboration is running, participants can:
• Send messages• Annotate shared content• Record minutes
Using the Library feature, anyone with an Avaya Aura® Conferencing system account can storethese presentation materials in advance and retrieve them in seconds when “given the floor.”Participants can truly collaborate by viewing these presentations, as well as making notes onany whiteboard. Throughout the conference, anyone who is logged into the CollaborationAgent can see the following:
Using Avaya Aura® Conferencing Collaboration Agent February 2013 9

• Who is on the call• Who is currently speaking• Who is taking part in Web Collaboration• Who is presenting
Best of all, your organization can also use the Avaya Aura® Conferencing tools to boostproductivity and track accountability for action items even after the conference call has ended.Conference moderators can:
• Record all aspects of a conference.• Record and edit meeting minutes• Create and distribute reports based on meeting minutes
At the end of each collaboration session, a transcript or Meeting Report is automaticallygenerated and can be accessed from the Collaboration Agent. These reports contain thefollowing information:
• Meeting minutes (including action items, notes, keywords and questions)• All messages exchanged during the conference• Library files that have been shared (including individual pages and slides)• Whiteboard, desktop, screenshot, and application sharing events
All reports for conferences are stored on the Avaya Aura® Conferencing server for up to 90days, and you can sort through these saved sessions by report name, the date and time of theconference, or the duration of the conference.
New features in this releaseThere are a number of new features in this release of Avaya Aura® Conferencing
Related topics:Conference recording and playback on page 10Audio/Video in Collaboration Agent on page 11Secure conferences on page 11Two levels of codes on page 11Simple URL links on page 12Automatic log in on page 12
Conference recording and playbackUsing Collaboration Agent, moderators can record conferences. The recording captures allaspects of the conference, such as the audio and Web collaboration data. In addition, the
Introduction
10 Using Avaya Aura® Conferencing Collaboration Agent February 2013Comments? [email protected]

recording captures conference events such as participants writing notes, participants joiningor leaving, and participants interacting with each other. All aspects of the conference recordingare synchronized within a conference timeline. When users play a recorded conference, theycan easily jump forward and backwards in the conference timeline.
Related topics:Introduction to recording on page 87
Audio/Video in Collaboration AgentThe Audio/Video in Collaboration Agent (AViCA) feature enables you to receive audio, video,and data content through a single device. You can simply click on a conference URL(hyperlink), log in to the conference, and immediately share audio, video, and data using theCollaboration Agent Web page. You do not need to dial into the conference and you do notneed to configure an additional application in order to share audio and video. This feature isaimed at guests and participants who reside outside of the enterprise and who do not haveany other Avaya software products installed on their computers. The only requirement is thatyour computer must have a microphone.
Related topics:Audio/Video in Collaboration Agent on page 101
Secure conferencesIf a conference is secure, the participants have all dialed into the conference using secureaudio lines. Avaya Aura® Conferencing considers the lines to be secure if it identifies them asencrypted and authentic. If any participant in a given conference is not using a secure audioline, the conference is not secure. Video conferences are not secure. Similarly, the AViCAfeature is not considered secure.
Related topics:Some concepts related to security on page 63
Two levels of codesIf a conference has two codes, participants must enter a collaboration code and a passcodein order to gain access to the conference. Moderators can distribute the passcode and thecollaboration code in separate e-mails, if they wish. You must contact your systemadministrator in order to investigate the possibility of adding a passcode to your conference.You cannot enable or disable the passcode feature without the intervention of your systemadministrator.
New features in this release
Using Avaya Aura® Conferencing Collaboration Agent February 2013 11
Related topics:Codes on page 63
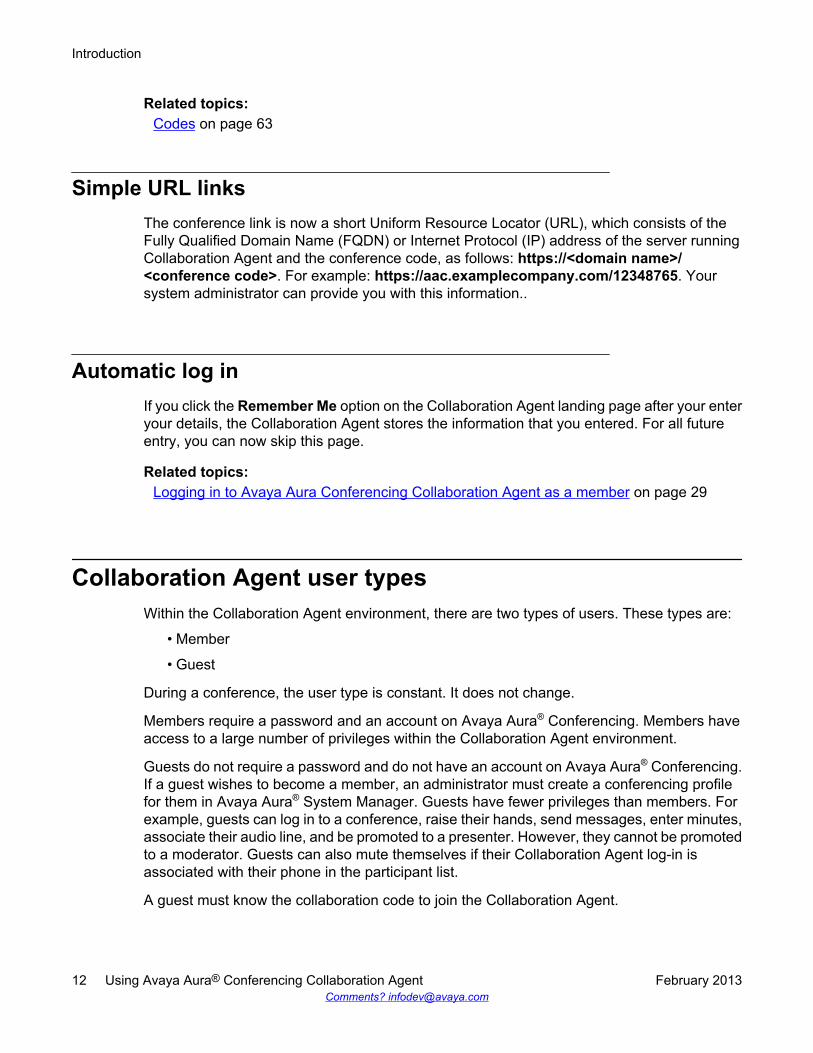
Simple URL linksThe conference link is now a short Uniform Resource Locator (URL), which consists of theFully Qualified Domain Name (FQDN) or Internet Protocol (IP) address of the server runningCollaboration Agent and the conference code, as follows: https://<domain name>/<conference code>. For example: https://aac.examplecompany.com/12348765. Yoursystem administrator can provide you with this information..
Automatic log inIf you click the Remember Me option on the Collaboration Agent landing page after your enteryour details, the Collaboration Agent stores the information that you entered. For all futureentry, you can now skip this page.
Related topics:Logging in to Avaya Aura Conferencing Collaboration Agent as a member on page 29
Collaboration Agent user typesWithin the Collaboration Agent environment, there are two types of users. These types are:
• Member
• Guest
During a conference, the user type is constant. It does not change.
Members require a password and an account on Avaya Aura® Conferencing. Members haveaccess to a large number of privileges within the Collaboration Agent environment.
Guests do not require a password and do not have an account on Avaya Aura® Conferencing.If a guest wishes to become a member, an administrator must create a conferencing profilefor them in Avaya Aura® System Manager. Guests have fewer privileges than members. Forexample, guests can log in to a conference, raise their hands, send messages, enter minutes,associate their audio line, and be promoted to a presenter. However, they cannot be promotedto a moderator. Guests can also mute themselves if their Collaboration Agent log-in isassociated with their phone in the participant list.
A guest must know the collaboration code to join the Collaboration Agent.
Introduction
12 Using Avaya Aura® Conferencing Collaboration Agent February 2013Comments? [email protected]

Collaboration Agent user rolesWithin the Collaboration Agent environment, there are five types of roles. These roles are:
• Owner
• Moderator
• Presenter
• Participant
• Operator
During a conference, user roles are not constant. They are dynamic. For example, a participantcan become a moderator. Further, user roles are not mutually exclusive. A conference ownercan be a moderator and a presenter, all at the same time. In addition, a conference owner canassign moderator or presenter roles to a participant.
Conference ownerA conference owner is a user who has complete control of the conference. You are the ownerof the conference that is associated with your account and collaboration code on Avaya Aura®
Conferencing. Typically, you use these conference details for meetings that you schedule. Inthis conferences, you are the owner, a moderator, and a presenter.
ModeratorA moderator is a user who has access to a wide variety of conference privileges. The moderatorusually signs into the Avaya Aura® conference using a phone or phone application, such as aSIP phone or mobile telephone. The moderator then logs in to the Collaboration Agent usingthe moderator credentials. Moderators may also make any other participant a presenter ormoderator.
In any given conference, there can only be a single moderator on Collaboration Agent and asingle moderator in audio mode. Typically, these roles are occupied by a single individual. TheCollaboration Agent login and the audio login are linked together and one person is themoderator in both modes. However, this is not always the case. As a rule, Collaboration Agentallocates the moderator role to the first person to log in with the moderator code. If severalpeople know the moderator code, it is possible that one person could become the moderatorin Collaboration Agent and another person could become the moderator in audio mode. TheCollaboration Agent moderator has access to all moderator features on the CollaborationAgent. The audio moderator only has access to the moderator features that are accessibleusing the dialpad commands.
There can be multiple presenters and participants. A moderator always has all of the privilegesof a presenter for sharing info.
The moderator can be in one of the following modes:
Collaboration Agent user roles
Using Avaya Aura® Conferencing Collaboration Agent February 2013 13

• Collaboration Agent and Audio• Audio only• Collaboration Agent only
Note:Certain features, such as lecture mode, are not available when the moderator is inCollaboration Agent only mode. Lecture mode functionality is disabled if the conference hasno audio.
PresenterPresenters may share information, but cannot moderate a conference. Presenters can share:
• The entire screen, a portion, or a selected application• Whiteboards: these permit the team to collaborate through drawing• Documents
A private library is maintained for any user with a login. Users can store and retrievepresentation materials here, including PowerPoint files, documents, and graphic files
Presenters can annotate shared content, take screen shots and send to all participants.
Moderators can only promote participants who already joined Web Collaboration to “presenter”role. Moderator can also demote a presenter to normal participant.
ParticipantA participant is a user who is taking part in the conference and has limited control. A participantcan see who else is on the conference, shared content and can only mute themselves, if theirCollaboration Agent is associated with their phone in the participant list. The participant shoulddial in to the audio conference and then sign in to Collaboration Agent. The participant canannotate a whiteboard, but cannot open a new whiteboard.
Participants can raise their hands, send messages, view meeting reports and enter minutes.
The participant can join in one of the following modes:
• Collaboration Agent only• Collaboration Agent and Audio• Audio only
A participant joins a conference by entering a participant code on the phone and/or theCollaboration Agent. A participant may be a guest or an Avaya Aura® account holder.
Participants cannot add users to the conference.
Audio participantAn audio participant joins the audio conference only by dialing in to the bridge and enteringthe collaboration code.
Introduction
14 Using Avaya Aura® Conferencing Collaboration Agent February 2013Comments? [email protected]

OperatorThe conference operator controls every aspect of a conference, including the control of themeeting, in the same manner as a moderator, over any conference the operators select in theCollaboration Agent.
The operator can also:
• Silence, unsilence, and drop specific participants.• Enable and disable conference continuation after the moderator leaves the conference
Some of the moderator controls that the operator can handle include:
• Enable and disable audio entry and exit tones• Lock and unlock the conference• Drop all participants immediately
Note:The operator can only change the default settings of their own conference and cannot startor end a Web Collaboration session. Operator cannot promote themselves to presenter.
Related topics:Real world example on page 15
Real world exampleTo understand some of these concepts, it can be helpful to imagine a real world example. Byseeing how some of these concepts behave in a realistic scenario, you may be able to seetheir potential application in your enterprise.
We have seen that during a conference, user roles are not constant. We have also learnt aboutthe differences between conference owners, moderators, and presenters. Consider a scenarioin which a busy manager, who is running late, asks his assistant to open a Collaboration Agentconference on his behalf. The manager can provide his assistant with the moderator code andany slides that he wishes to share during the conference. The assistant can log in as amoderator, start the conference, and upload the slides to the library. When the manager joins,the assistant can promote him to the presenter or moderator role. Presenters can navigatethrough the slides. Moderators can also change the current conference settings. The slidesreside in the assistant’s personal library, not the manager’s library. Libraries are specific toindividuals, rather than being conference-specific. Each Avaya Aura® Conferencing memberhas a Collaboration Agent library. Once the assistant promotes him to moderator or presenterstatus, the manager may choose to share files from his own library.
Another option available to the busy manager is to provide his assistant with the moderatorcode and ask her to change the default settings for the current conference. She can enableFast Start, which is not enabled, by default. When Fast Start is enabled, participants can talk
Collaboration Agent user roles
Using Avaya Aura® Conferencing Collaboration Agent February 2013 15
to each other before the moderator logs on. The assistant cannot change the settings for futureconferences because she is not the conference owner.
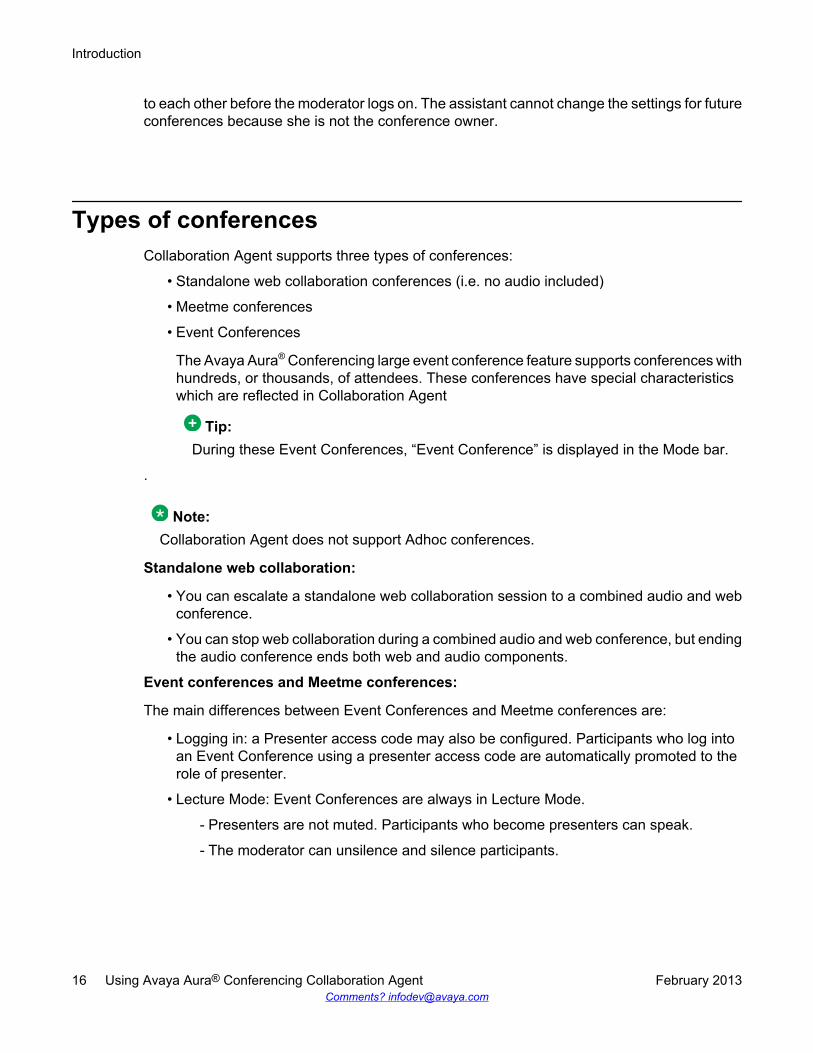
Types of conferencesCollaboration Agent supports three types of conferences:
• Standalone web collaboration conferences (i.e. no audio included)
• Meetme conferences
• Event Conferences
The Avaya Aura® Conferencing large event conference feature supports conferences withhundreds, or thousands, of attendees. These conferences have special characteristicswhich are reflected in Collaboration Agent
Tip:During these Event Conferences, “Event Conference” is displayed in the Mode bar.
.
Note:Collaboration Agent does not support Adhoc conferences.
Standalone web collaboration:
• You can escalate a standalone web collaboration session to a combined audio and webconference.
• You can stop web collaboration during a combined audio and web conference, but endingthe audio conference ends both web and audio components.
Event conferences and Meetme conferences:
The main differences between Event Conferences and Meetme conferences are:
• Logging in: a Presenter access code may also be configured. Participants who log intoan Event Conference using a presenter access code are automatically promoted to therole of presenter.
• Lecture Mode: Event Conferences are always in Lecture Mode.
- Presenters are not muted. Participants who become presenters can speak.
- The moderator can unsilence and silence participants.
Introduction
16 Using Avaya Aura® Conferencing Collaboration Agent February 2013Comments? [email protected]

• Entry and Exit tones are off by default.
• The Participant List contents vary according to role:
- Participants see all callers who are capable of speaking.
- Presenters also see participants who have raised their hands.
- Moderators can see participants who have raised their hands, presenters, andparticipants who can speak on the audio bridge.
Only the total number of participants displays: the Show Dropped Participants, SortParticipants By Roles and Sort Participants By Join Time buttons do not appear.
Main window componentsThe following figure show the components of the Collaboration Agent window for themoderator. In this example, the conference consists of the moderator and two participants.
Main window components
Using Avaya Aura® Conferencing Collaboration Agent February 2013 17

Regular Collaboration Agent Audio/Video in Collaboration Agent
No. Name Description1 Add Participants
buttonDisplays the Add Participants panel, which enables you toadd participants to the conference. When you specify thetelephone number or SIP URI of the participant you want toadd to the conference, Collaboration Agent calls thatparticipant and invites the participant to join theconference.
2 Start WebCollaborationbutton
Starts a web collaboration session. Only the moderator canstart a web collaboration session. Once the moderatorstarts a web collaboration session and shares information(for example, applications or the whiteboard), allparticipants logged in to Collaboration Agent see theshared information.
3 Conference button Displays the Conference Controls panel, which enables youto enable and disable the following features for the currentconference:
Introduction
18 Using Avaya Aura® Conferencing Collaboration Agent February 2013Comments? [email protected]

No. Name Description
• Lecture mode
• Lock conference
• Entry Tone
• Continuation
• Recording
- Record
- Stop
You can also end the conference from the ConferenceControls panel. Ending the conference from the ConferenceControl panel terminates the conference immediately.
4 Mode bar Displays the following information:
• The status of certain features, such as Lecture mode,Lock conference, secure conferencing, and recording
• Error messages
The conference is considered secure only if all participantsare using secure lines. Video conferences are not secure.Similarly, the AViCA feature is not considered secure.This example of a mode bar shows that a conference issecure.
This example of a mode bar shows that a conference islocked and that Web collaboration has begun.
5 Default Settingsbutton
Displays the Default Settings panel, which enables you toconfigure the default settings for the following features:Default Settings:
• Fast Start
• Continuation
• Entry Tone
• Video
• Auto Record
My Passcodes:
• Require participant passcode
• Moderator passcode
• Participant passcode
Main window components
Using Avaya Aura® Conferencing Collaboration Agent February 2013 19

No. Name Description
Note:These settings do not apply to an active conference.
When you close the Collaboration Agent ‘parent’ dialog,any ‘child’ dialogs, such as Default Settings, closeautomatically.
6 Exit button Exits the Collaboration Agent conference.
Note:You remain on the audio bridge.
7 Information button Displays the Information panel. From the Information panel,you can:
• View the telephone number and participant code for theconference bridge.
• View the Uniform Resource Locator (URL) forCollaboration Agent and participant code to log in toCollaboration Agent for this conference.
Tip:You can copy the phone number, URL, and participantcode to an E-mail or other application to save typingthem. You cannot copy the host code to preventaccidental publishing of the information.
• See the list of participants on the conference.
• View the keys you must press to contact the operator forthis conference.
• View the list of conference commands you can enter fromthe dialpad on your telephone.
• View the documentation for Collaboration Agent.
• Access and manage your meeting reports.
When you close the Collaboration Agent ‘parent’ dialog,any ‘child’ dialogs, such as those that display from theInformation panel, close automatically.
8 Active Talkers area Displays the users who are currently speaking or who haverecently spoken during the conference. The current talkershave the Active Talker icon next to their name. More recenttalkers replace the current Active Talkers.
9 Mute myself buttonMute and Pausebutton
Enables you to mute and unmute your audio.If you have chosen to use the embedded audio and videofeature, this button is a Mute and Pause button. It enablesyou to pause your video feed and also mute your audio.
Introduction
20 Using Avaya Aura® Conferencing Collaboration Agent February 2013Comments? [email protected]

No. Name Description10 Select All
Participants buttonSelects all of the participants in the conference.
11 ParticipantControls button
If you are the moderator, the Participant Controls buttondisplays the following actions that you can perform onparticipants in the conference:
• Mute the media of the selected partcipant(s).
• Promote the selected participant to moderator.
• Allow the selected participant to be a presenter (that is,share information using web collaboration).
• Clear the hand raised by the selected participant(s).
• Drop the selected participant(s) from the conference.
• Dissociate audio and Collaboration Agent log-ins for theselected participant(s).
If you are a participant and your audio and CollaborationAgent log-ins are associated, the Participant Controlsbutton displays the following actions that you can performduring the conference:
• Associate or dissociate your audio and CollaborationAgent log-ins.
• Mute your own media.
• Raise or lower your hand.
• Drop from the Call.
12 Participants Listarea
Lists the participants in the conference.
Note:In Event Conferences, the Participant List only shows themoderator, presenters and unmuted participants. Themoderator and presenters also see participants withraised hands.
Each participant is represented by a panel that displays:
• The participant's name or telephone number.
• An icon indication whether the participant is a moderatorfor audio only, Collaboration Agentonly or both audio andCollaboration Agent.
• An icon indicating whether the participant's audio ismuted or unmuted.
• An icon indicating whether the participant's hand israised.
Main window components
Using Avaya Aura® Conferencing Collaboration Agent February 2013 21

No. Name Description
• An icon indicating whether the participant's video ispaused or active.
• An icon indicating whether the participant has webcollaboration open.
13 Show DroppedParticipants button
Displays the participants who have dropped from theconference in the Participant List.
14 Sort ParticipantsBy Roles button
Displays the participants by their roles (that is, moderator,participant, and presenter) in the Participant List.
15 Sort ParticipantsBy Join Time button
Displays the participants in the order of joining theconference in the Participant List.
16 Participants Searchbox
Enables you to search for a participant in the conference.As you enter text in the Participants Search box,Collaboration Agent displays the participants that containthe matching text.
17 AViCA Settingsbutton
Enables you to use the Audio/Video in Collaboration Agentfeature.If you have chosen not to use the Audio/Video inCollaboration Agent feature, you can change your mind andswitch to integrated audio and/or video at any point duringa live conference, using this button.
Table 1: Collaboration Agent status icons
Icon DescriptionParticipant is the operator.
Participant is the conference moderator(audio and Collaboration Agent).
Participant is the conference moderator(audio only).
Participant is the conference moderator(Collaboration Agent only).
Participant is a presenter.
Participant is an active speaker.
Participant is on the audio conference.
Introduction
22 Using Avaya Aura® Conferencing Collaboration Agent February 2013Comments? [email protected]

Icon DescriptionParticipant is using a secure telephone line.
Participant is using a secure telephone lineand is currently muted.
Participant has raised hand.
Participant has joined Web Collaboration.
Participant has joined the conference via alogin for Collaboration Agent but the WebCollaboration feature is not active.
Participant is not logged in to CollaborationAgent.
Participant is muted or silenced.If the participant uses the mute feature ontheir phone, the icon may not be updated.
Participant is on the video conference.
Participant's video is paused.
Conference check listThe moderator, or person organizing a conference call, should complete the following tasks inadvance.
# Task Description1 Review default parameters. Verify the default setting for the
following features:
• Entry/Exit tones
• Fast Start
• Continuation
• Video
Conference check list
Using Avaya Aura® Conferencing Collaboration Agent February 2013 23
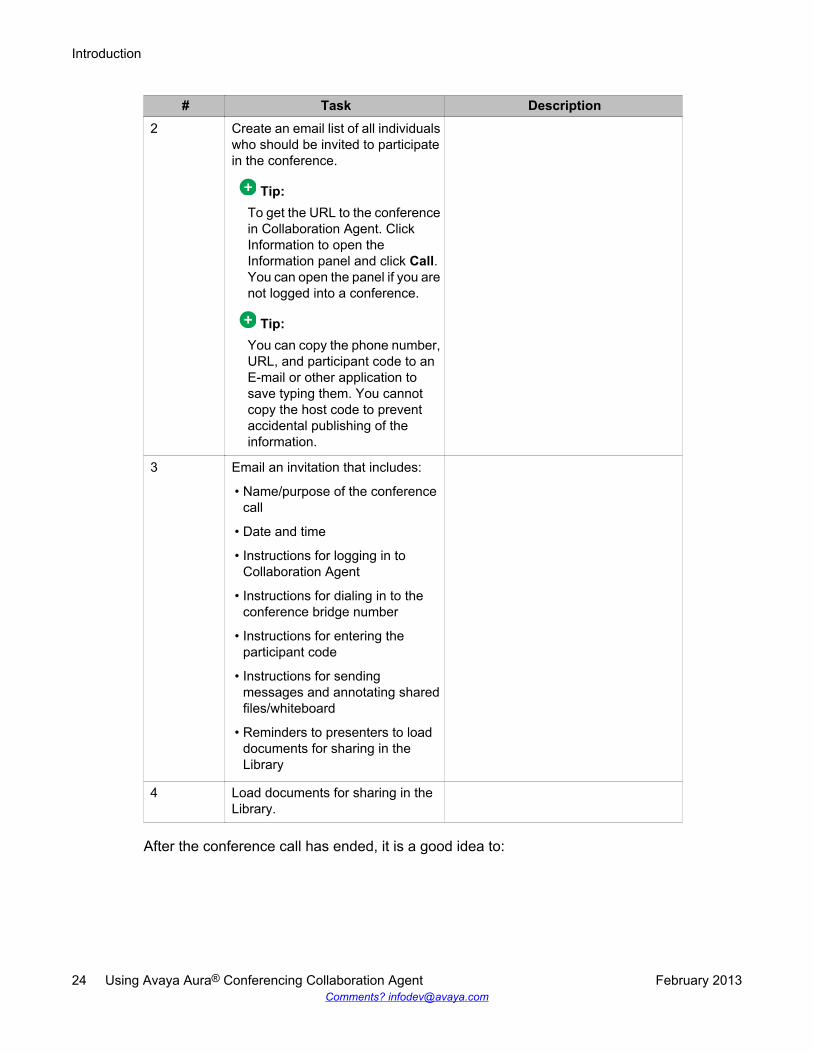
# Task Description2 Create an email list of all individuals
who should be invited to participatein the conference.
Tip:To get the URL to the conferencein Collaboration Agent. ClickInformation to open theInformation panel and click Call.You can open the panel if you arenot logged into a conference.
Tip:You can copy the phone number,URL, and participant code to anE-mail or other application tosave typing them. You cannotcopy the host code to preventaccidental publishing of theinformation.
3 Email an invitation that includes:
• Name/purpose of the conferencecall
• Date and time
• Instructions for logging in toCollaboration Agent
• Instructions for dialing in to theconference bridge number
• Instructions for entering theparticipant code
• Instructions for sendingmessages and annotating sharedfiles/whiteboard
• Reminders to presenters to loaddocuments for sharing in theLibrary
4 Load documents for sharing in theLibrary.
After the conference call has ended, it is a good idea to:
Introduction
24 Using Avaya Aura® Conferencing Collaboration Agent February 2013Comments? [email protected]

• Review (and edit) minutes recorded during the conference call• Distribute minutes to participants and stakeholders• Follow up on action items and questions
Accessing version informationYou can view the current version of Collaboration Agent at any time.
About this taskThe purpose of this task is to view the version information of the Collaboration Agent applicationthat you are currently using.
Procedure
1. Log in to Collaboration Agent and access a conference.You can access your own conference or enter the code(s) required to accessanother conference.
2. Click Start Web Collaboration.
3. On the Web Collaboration pane, right click the mouse button to display aninformation menu.The version information is displayed at the top of the information menu.
Accessing online helpIf you have difficulties accomplishing any task in Collaboration Agent, you can access helpfulinstructions at any time.
About this taskThe purpose of this task is to view helpful information related to the Collaboration Agentapplication.
Procedure
1. Log in to Collaboration Agent and access a conference.You can access your own conference or enter the code(s) required to accessanother conference.
2. In the Collaboration Agent window, click Information.
3. On the Information Panel, click Documentation.
Accessing version information
Using Avaya Aura® Conferencing Collaboration Agent February 2013 25

Collaboration Agent opens a new dialog which contains a comprehensive guide tothe common tasks and important concepts within Collaboration Agent.
Introduction
26 Using Avaya Aura® Conferencing Collaboration Agent February 2013Comments? [email protected]

Chapter 2: Logging into and out ofCollaboration Agent
System requirementsSystem requirements
• For Collaboration Agent: Adobe Flash version 10.2.0 or later• For Web Collaboration: Java 6 update 18 (1.6.0_18) or later.
Related topics:Supported Web browsers on page 27
Supported Web browsersAvaya Aura® Conferencing supports the following browsers for Collaboration Agent users:
Browsers Operating System CollaborationAgent
Microsoft Internet Explorer7.0 and 8.0
Windows XPWindows 7.0
yes
Microsoft Internet Explorer9.0
Windows 7.0 yes
Mozilla Firefoxversion 10 and later
Windows XPWindows 7.0
yes
Google Chromeversion 17 and later
Windows XPWindows 7.0Mac OS 10.7.x—Chrome 17 only
yes
Apple Safari5.x (for Mac)(excluding iPad and iPod)
Mac OS 10.7.x yes
Possible limitationsWhen running the Audio/Video in Collaboration Agent (AViCA) feature, Google Chrome maydemonstrate poor lip synchronization. When Collaboration Agent detects when a user wishes
Using Avaya Aura® Conferencing Collaboration Agent February 2013 27

to use AViCA in Google Chrome, it displays an information message to inform them of thispossible limitation.
In addition, users running Google Chrome for the Mac operating system may experience issueswhen sharing their desktop. Avaya recommends using Apple Safari or Mozilla Firefox fordesktop sharing instead.
Logging in to Avaya Aura® Conferencing CollaborationAgent
You can log in to Collaboration Agent as a member or as a guest.
Related topics:Logging in to Avaya Aura Conferencing Collaboration Agent as a guest on page 28Logging in to Avaya Aura Conferencing Collaboration Agent as a member on page 29
Logging in to Avaya Aura® Conferencing Collaboration Agent as aguest
About this task
Note:If you want to log in to more than one conference, use a different browser application foreach conference.
Procedure
1. Using your web browser, go to the Collaboration Agent address provided by yourSystem Administrator. (For example, https://<IP address or servername>/aacpa, where <IP address or server name> is the logical IP addressor fully-qualified domain name of the server running Collaboration Agent.)
2. In the Avaya Aura® Conferencing Collaboration Agent window, select Entermeeting as a guest.
3. Enter the name you want displayed in the conference in the Display name box. (Theinformation you enter here appears in the Participant List.)You must enter a display name, which is the name that appears in the roster. Thename must be between 2 and 31 characters in length.
4. (Optional) Enter your telephone number in the Telephone box.
Logging into and out of Collaboration Agent
28 Using Avaya Aura® Conferencing Collaboration Agent February 2013Comments? [email protected]

The phone number should be seven to 15 digits long with optional separators (space“ “, period “,”, dash “-”, or parentheses “(“ “)”) and an optional leading plus “+” sign.For example, +1 (555) 555–2234.
5. Click Login.
6. Enter the participant code of the conference you want to join, and click Enter.
• If the Standalone Web Conference has started, the ”Waiting for conference tostart” does not appear, even though there is no audio bridge.
• If the audio conference has started, the Conference tab opens.
• If the audio conference not has started, the message ”Waiting for conferenceto start” appears until the conference starts.
7. (Optional) Select your phone in the Identify my phone window.The manual association feature is not available in event conferences. Automaticassociation is available in event conferences.The association feature is not available for Flare phones.If your phone and Collaboration Agent account are automatically associated, thenthe Identify my phone window does not open.
8. (Optional) Click OK.
Related topics:Logging in to a conference as moderator on page 30Logging in to a conference as a participant or presenter on page 31Logging in to a conference as an operator on page 33Logging in to a conference that requires passcodes on page 66
Logging in to Avaya Aura® Conferencing Collaboration Agent as amember
You must log in to Collaboration Agent before you can log in to a Collaboration Agentconference as:
• The moderator
• The operator
• A participant or presenter
Procedure
1. Using your web browser, go to Collaboration Agent address provided by yourSystem Administrator.
Logging in to Avaya Aura® Conferencing Collaboration Agent
Using Avaya Aura® Conferencing Collaboration Agent February 2013 29

2. In the Avaya Aura® Conferencing Collaboration Agent window, select Entermeeting as a member.
3. Enter your user name in the Username box.
4. Enter your password in the Password box.
5. (Optional) Check Remember Me to retain your login settings.
6. Click Login.
Logging in to a conference as moderatorBefore you beginYou must have logged in to Collaboration Agent.
Note:You can only log in to Avaya Collaboration Agent for a specific conference using onecommunication address.
Note:You can log into a conference with either Avaya Flare® Experience or Avaya CollaborationAgent. Avaya Aura® Conferencing does not support logging into a conference with bothAvaya Flare® Experience and Avaya Collaboration Agent.
Procedure
1. Perform one of the following steps:
• If you are entering your default conference, click Conference.
• If you are not entering your default conference, enter the moderator code inthe Enter conference collaboration code box, and click Enter.
Use the same moderator code to log in to the audio conference and CollaborationAgent.
2. (Optional) Select your phone in the Identify my phone window.The manual association feature is not available in event conferences. Automaticassociation is available in event conferences.The association feature is not available for Flare phones.If your phone and Collaboration Agent account are automatically associated, thenthe Identify my phone window does not open.
3. (Optional) Click OK.
Logging into and out of Collaboration Agent
30 Using Avaya Aura® Conferencing Collaboration Agent February 2013Comments? [email protected]

4. (Optional) Click Remember this number to permanently associate your phonewith your Collaboration Agent account.If the length of the telephone number is less than seven digits, Remember thisnumber is not displayed.
ResultThe Collaboration Agent window opens in Moderator View.
If the audio conference has not started, you can start a standalone Web Collaboration session,or access the Default Settings and Information panels.
Note:You can start Web Collaboration if you log in using moderator or are promoted tomoderator.
Note:Only the first user who logs in using the moderator user name and password enters theconference as moderator. Subsequent users who log in with moderator credentials enter asparticipants.
Related topics:Logging in to Avaya Aura Conferencing Collaboration Agent as a guest on page 28Logging in to a conference as a participant or presenter on page 31Logging in to a conference as an operator on page 33Logging in to a conference that requires passcodes on page 66
Logging in to a conference as a participant or presenterBefore you beginYou must have logged in to Collaboration Agent.
You must have an account on the Avaya Aura® Conferencing system. If you do not have anaccount on the system, you can log into the conference as a guest. See Logging in to AvayaAura Conferencing Collaboration Agent as a guest on page 28.
Note:If you want to log in to more than one conference, use a different browser application foreach conference.
Logging in to a conference as a participant or presenter
Using Avaya Aura® Conferencing Collaboration Agent February 2013 31

Note:You can log into a conference with either Avaya Flare® Experience or Avaya CollaborationAgent. Avaya Aura® Conferencing does not support logging into a conference with bothAvaya Flare® Experience and Avaya Collaboration Agent.
Procedure
1. (Optional) Enter the participant code or presenter code in the Enter a participantcode or moderator code box, and click Enter.Use the same participant code or presenter code to log in to the audio conferenceand Collaboration Agent
• If the Standalone Web Conference has started, the ”Waiting for conference tostart” does not appear, even though there is no audio bridge.
• If the audio conference has started, the Conference tab opens.
• If the audio conference not has started, the message ”Waiting for conferenceto start” appears until the conference starts.
2. (Optional) Select your phone in the Identify my phone window.The manual association feature is not available in event conferences. Automaticassociation is available in event conferences.The association feature is not available for Flare phones.If your phone and Collaboration Agent account are automatically associated, thenthe Identify my phone window does not open.
3. (Optional) Click OK.
4. (Optional) Click Remember this number to permanently associate your phonewith your Collaboration Agent account.If the length of the telephone number is less than seven digits, Remember thisnumber is not displayed.
ResultWhen the conference starts, the Collaboration Agent window opens in Participant View.
Note:If you log in to an Event Conference using a presenter code, the presenter icon appearsnext to your name in the Participant List when Web Collaboration starts.
If you have a permanent association for the conference, you have a single combined entry inthe roster.
Related topics:Logging in to Avaya Aura Conferencing Collaboration Agent as a guest on page 28Logging in to a conference as moderator on page 30
Logging into and out of Collaboration Agent
32 Using Avaya Aura® Conferencing Collaboration Agent February 2013Comments? [email protected]
Logging in to a conference as an operator on page 33Logging in to a conference that requires passcodes on page 66
Logging in to a conference as an operatorBefore you beginThe Enable operator control option under conference user configuration must be active.Contact the system administrator for information.
You must log into Collaboration Agent using an operator-enabled Avaya Aura® Conferencingaccount.
Note:Only one operator can join a conference using Collaboration Agent at a time.
Note:You can log into a conference with either Avaya Flare® Experience or Avaya CollaborationAgent. Avaya Aura® Conferencing does not support logging into a conference with bothAvaya Flare® Experience and Avaya Collaboration Agent.
Procedure
1. (Optional) Enter the user name or participator collaboration code in the Search byusername or collaboration code field.
2. (Optional) Click Search.If you enter valid search information, the moderator code is entered in the field.
3. Use the search result or enter the moderator code for the conference in the field.You must enter the moderator code to get operator control of the conference.
4. Click Enter.
5. (Optional) Select your phone in the Identify my phone window.The manual association feature is not available in event conferences. Automaticassociation is available in event conferences.The association feature is not available for Flare phones.If your phone and Collaboration Agent account are automatically associated, thenthe Identify my phone window does not open.
6. (Optional) Click OK.
7. (Optional) Click Remember this number to permanently associate your phonewith your Collaboration Agent account.
Logging in to a conference as an operator
Using Avaya Aura® Conferencing Collaboration Agent February 2013 33

If the length of the telephone number is less than seven digits, Remember thisnumber is not displayed.
Related topics:Logging in to Avaya Aura Conferencing Collaboration Agent as a guest on page 28Logging in to a conference as moderator on page 30Logging in to a conference as a participant or presenter on page 31Logging in to a conference that requires passcodes on page 66
Logging outProcedure
1. To log out from a Collaboration Agentconference, click in the top right hand cornerof the Collaboration Agent conference window.The Collaboration Agentlog-in window opens. If you plan to log in to anotherCollaboration Agent conference, you can leave this window open.
2. To log out from Collaboration Agent, click Logout in the Collaboration Agentconference log-in window.The Collaboration Agent log-in window opens.
Logging into and out of Collaboration Agent
34 Using Avaya Aura® Conferencing Collaboration Agent February 2013Comments? [email protected]

Chapter 3: Setting default settings forconference features
Default settings for conference features
Note:You cannot change the default settings for Event Conferences.
Setting Default value — Meetmeconference
Default value — EventConference
Fast Start Off Off
Continuation Off On
Entry tones On Off
Video Off Off
Auto Record Off Off
Passcodes Off Off
The default settings do not impact Standalone Web Collaboration. For Standalone WebCollaboration, continuation is on by default and the start up default cannot be changed.
Configuring entry and exit tonesUse this feature to provide a tone when a participant or the moderator joins or leaves theconference. This tone can be helpful to ask who has joined at the start of the conference. Ifthe tone is disturbing, disable it.
Note:This change does not apply to the current conference. To enable or disable the featureduring a conference, click Entry Tone on the Conference Control Panel or press thefeature keys.
Using Avaya Aura® Conferencing Collaboration Agent February 2013 35

Before you beginYou must be the moderator of your own MeetMe conference to modify the default settings.You cannot modify the default settings for someone else’s conferences providing only themoderator code. This restriction is also true when you are moderating an active conference.
Procedure
1. Log in to Collaboration Agent as the moderator.
2. Click .
3. On the Default Settings panel, click Entry Tone to turn the tones on or off.
4. Click Save.
Configuring fast startUse this feature to allow conferences to start before a moderator logs on. A fast startconference that starts without a moderator uses the default settings and does not include webcollaboration.
If Fast Start is on, then the participants can talk to each other before the moderator logs on.
If Fast Start is off, any participants who arrive before a moderator hear an audio promptfollowed by music. The audio prompt informs them that the moderator has yet to arrive. Theconference does not begin until a moderator arrives.
Before you beginYou must be the moderator of your own MeetMe conference to modify the default settings.You cannot modify the default settings for someone else’s conferences providing only themoderator code. This restriction is also true when you are moderating an active conference.
Procedure
1. Log in to Collaboration Agent as the moderator.
2. Click .
3. On the Default Settings panel, click Fast Start to allow or prevent theconference to begin without a moderator.
4. Click Save.
Setting default settings for conference features
36 Using Avaya Aura® Conferencing Collaboration Agent February 2013Comments? [email protected]

Configuring continuationUse this feature to allow the conference to continue after the moderator drops from the audiobridge.
• If this continuation is on: The conference bridge remains active after the audio moderatorexits.
• If continuation is off: The conference ends within a predetermined time after the moderatorleaves. When the moderator leaves, a participant may get automatically promoted tomoderator if the participant tried to log into the conference as a moderator, but was deniedthat role because there was already a moderator present at the time.
Note:For a Standalone Web Collaboration conference, the conference continues after themoderator drops from Collaboration Agent.
Note:This change does not apply to the current conference. To enable or disable the featureduring a conference, click Continuation on the Conference Control Panel or press thefeature keys.
Before you beginYou must be the moderator of your own MeetMe conference to modify the default settings.You cannot modify the default settings for someone else’s conferences providing only themoderator code. This restriction is also true when you are moderating an active conference.
Procedure
1. Log in to Collaboration Agent as the moderator.
2. Click .
3. On the Default Settings panel, click Continuation to allow or prevent theconference continuing after the moderator drops.
4. Click Save.
Configuring videoUse this feature to enable or disable video.
Configuring continuation
Using Avaya Aura® Conferencing Collaboration Agent February 2013 37
Note:This change does not apply to the current conference.
The System Administrator must configure video in the provisioning tool.
Before you beginYou must be the moderator of your own MeetMe conference to modify the default settings.You cannot modify the default settings for someone else’s conferences providing only themoderator code. This restriction is also true when you are moderating an active conference.
Procedure
1. Log in to Collaboration Agent as the moderator.
2. Click .
3. On the Default Settings panel, click Video to turn video on or off.
4. Click Save.
Configuring automatic recordingUse this feature to record all conferences without the need for manual intervention on a per-conference basis.
If Auto Record is on, Avaya Aura® Conferencing records all conferences by default.
If Auto Record is off, Avaya Aura® Conferencing does not record conferences by default.
In both situations, moderators can turn recording on or off, on a per-conference basis.
Procedure
1. Log in to Collaboration Agent as the moderator.
2. Click .
3. On the General panel, click Auto Record to ensure that Avaya Aura®
Conferencing records all conferences.The Auto Record button changes to blue.
4. Click Save.
Setting default settings for conference features
38 Using Avaya Aura® Conferencing Collaboration Agent February 2013Comments? [email protected]
Configuring passcodesYou can add a requirement for mandatory passcodes for your future conferences.
Before you beginYour administrator must enable the passcodes feature in your deployment.
Procedure
1. Log in to Collaboration Agent as the moderator.
2. Click .
3. On the Default Settings panel, click Passcodes to ensure that Avaya Aura®
Conferencing requires passcodes for future conferences.The Passcodes button changes to blue.
4. Click Save.
Related topics:Passcodes on page 64
Configuring passcodes
Using Avaya Aura® Conferencing Collaboration Agent February 2013 39

Setting default settings for conference features
40 Using Avaya Aura® Conferencing Collaboration Agent February 2013Comments? [email protected]

Chapter 4: Attending a conference as aparticipant
Raising and lowering your handUse the Raise Hand button to attract the moderator's attention, for example if you wish to aska question.
Note:The “raising and lowering your hand” feature is not available to the following users:
• The moderator.
• Guests in an Event Conference.
• Participants who do not have a phone associated with their Collaboration Agent login.
Procedure
1. Select your Collaboration Agent entry in the participant list.
2. Click Raise Hand.Audio-only participants must use the dialpad commands.The Raise Hand symbol appears next to your name in the Participants list.
3. To lower your hand, click and then click Raise Hand.The Raise Hand symbol next to your name in the Participants list disappears.
Muting and unmuting your audioBefore you beginMuting and unmuting is only available if you have your phone associated withyourCollaboration Agent login.
Using Avaya Aura® Conferencing Collaboration Agent February 2013 41

Note:If you have logged in to an Event Conference, you are silent and cannot unmute yourself.However, If the moderator unsilences you, you can then mute or unmute yourself.
Procedure
In the Collaboration Agent window, click Mute myself.You can only mute and unmute your own audio.
When your associated phone is muted, the Mute myself button turns blue, and themute icon appears next to your name in the Participants list.
Muting mediaBefore you beginYou can only mute your own media if you have your phone associated with yourCollaborationAgent login. In this context, the term ‘media’ refers to audio and video content.
Procedure
Either:
• Click , and select Mute and Pause, or
• Right click on your entry in the Participants list, and select Mute andPause.
The Mute and Pause icons appear next to your entry in the Participants list.
Associating your phone and Collaboration Agent loginduring a conference
You cannot associate your phone and Collaboration Agent login in an Event conference.
Related topics:Associating your Collaboration Agent login to your phone during a conference on page 43Associating your phone to your Collaboration Agent login during a conference on page 43
Attending a conference as a participant
42 Using Avaya Aura® Conferencing Collaboration Agent February 2013Comments? [email protected]

Per-conference persisted association on page 44
Associating your Collaboration Agent login to your phone during aconference
Procedure
1. Select your Collaboration Agent entry in the participant list.
2. Either:
• Click , or
• Right click your entry in the Participants list
3. Select Identify my phone.
4. Select your phone.
5. (Optional) Click Remember this number to permanently associate your phonewith your Collaboration Agent account.If the length of the telephone number is less than seven digits, Remember thisnumber is not displayed.
6. Click Okay.
ResultThe two entries in the participant list merge and the combined entry has both CollaborationAgent and audio icons.
Associating your phone to your Collaboration Agent login during aconference
Procedure
1. Select your Collaboration Agent entry in the participant list.
2. Either:
• Click , or
• Right click your entry in the Participants list
3. Select This is my phone.
4. (Optional) Click Remember this number to permanently associate your phonewith your Collaboration Agent account.
Associating your phone and Collaboration Agent login during a conference
Using Avaya Aura® Conferencing Collaboration Agent February 2013 43

If the length of the telephone number is less than seven digits, Remember thisnumber is not displayed.
Per-conference persisted associationIn addition to manual and permanent association, there is also the per-conference persistedassociation feature.
Collaboration Agent remembers your manual association request for the duration of aconference and applies it automatically should one of your phones drop from the conference,or if you exit from the conference and re-join. Collaboration Agent also remembers adissociation request you made so that it doesn’t automatically associate you with a phone thatis no longer applicable.
Note:Per-conference persisted associations and dissociations take priority over other auto-association rules (auto-association with matching account IDs, auto-association withpermanently associated number).
Ending association of your phone and Collaboration Agentaccount
Procedure
1. Select your associated phone and entry Collaboration Agent entry in the participantlist.
2. Either:
• Click , or
• Right click your entry in the Participants list
3. Click Not my phone.
4. (Optional) Check Never associate me with this audio point to end permanentassociation of your phone and Collaboration Agent account.
5. Click Yes.
Attending a conference as a participant
44 Using Avaya Aura® Conferencing Collaboration Agent February 2013Comments? [email protected]

ResultThe combined entry in the participant list splits to show your Collaboration Agent and phonedetails as two separate items.
Viewing the dialpad commandsAbout this taskYou can use the dialpad on your telephone (or other phone such as Flare Experience forWindows or Flare Experience for iPad Devices) to enter touch-tone commands to manage aconference. The touch-tone commands you can enter depend on your role (for example,moderator or participant) and the type of conference.
Use this procedure to view the available dialpad commands.
Procedure
1. In the Collaboration Agent window, click Information.
2. On the Information Panel, click Feature Keys.
3. Perform one of the following steps:
• If you are a participant in this conference, click the Participant tab to view theparticipants’ dialpad keys.
• If you are the moderator in this conference, click the Moderator tab to viewthe moderator’s dialpad keys.
Retrieving the attendance snapshotUse the attendance snapshot to capture a list of participants at a specific moment in time. Thelist appears in a pop-up window and contains the attendants' names and entry and exittimes.
Tip:The attendance snapshot only captures the attendance at a single moment during theconference. Avaya recommends using the recording feature to obtain a true representationof the attendance for the full duration of the conference.
Before you beginEnable pop-ups in your browser.
Viewing the dialpad commands
Using Avaya Aura® Conferencing Collaboration Agent February 2013 45

Procedure
1. Click the Information button.
2. Click Attendance .A pop-up window with a detailed list of attendants appears.
3. You can print the window, or right-click and select Select All and then Copy to savethe list to the clipboard. You can open Microsoft Excel and paste the list. MicrosoftExcel preserves the column and row format.
Example
Attending a conference as a participant
46 Using Avaya Aura® Conferencing Collaboration Agent February 2013Comments? [email protected]

Searching for users
Tip:The Participant List is a limited display of all participants. Use this procedure in eventconferences to find participants who are not visible in the Participant List. The searchfeature searches the entire list.
Procedure
1. In the Participants Search box, enter the name of the participant you want to find.If you want to find the moderator, enter moderator.As you enter each letter, the panel of each participant that contains matchinginformation appears in the participant list
2. To cancel the search and view all participants in the participant list, click X in theParticipants Search box.
ExampleTyping “Jo” in the search box will highlight:
• Smith, John• Johnson, Steve• Joanne
Dropping from a conferenceProcedure
1. Select your Collaboration Agent entry in the participant list.
2. Click Drop from call.
ResultDropping from the conference drops all the phones associated with your Collaboration Agentlogin. Therefore you either drop the Collaboration Agent phone only or both the CollaborationAgent and your phone if your phone is associated with your Collaboration Agent login.
Searching for users
Using Avaya Aura® Conferencing Collaboration Agent February 2013 47

Attending a conference as a participant
48 Using Avaya Aura® Conferencing Collaboration Agent February 2013Comments? [email protected]

Chapter 5: Managing a conference as amoderator
Adding a participant to a conferenceProcedure
1. In the Collaboration Agent window, click Add Participants.
2. If you want to call a telephone number:
a. Using the dialpad in the Add Participants panel, enter the telephone number ofthe participant you want to add to the conference. If you do not see the dialpad,click at the bottom of the Add Participants panel.
b. Click .
3. If you want to call a SIP URI:
a. In the text box provided in the Add Participants panel, enter the SIP URI of theparticipant you want to add to the conference. If you do not see the SIP screenin the Add Participants panel, click the SIP button at the bottom of the AddParticipants panel.
b. Click .
ResultIf the invitee accepts the invitation at the prompt, that person appears in the Participants list.
Muting and unmuting specific participantsAbout this taskDuring a conference call, you can silence (mute) participants if there is noise from theparticipant's location, or for some other reason. Similarly, you can “unsilence” (unmute) theparticipant.
Using Avaya Aura® Conferencing Collaboration Agent February 2013 49

Note:If you silence participants in non-Event conferences, those participants can unsilence(unmute) themselves.
Muting and unmuting participants in an Event Conference:
In an Event Conference, all participants except the moderator and presenters are muted andcannot unmute themselves. If the moderator unmutes participants in an Event Conference,those participant can mute or unmute themselves.
Procedure
1. In the Participant list, click on the panel of each participant you want to mute. If youwant to select all of the participants, click .The selected participant panels turn blue.
2. To mute the participants:
• Click , and select Mute, or
• Right click on a selected participant, and select Mute.
When a participant is muted, the Mute icon appears on the participant's panel inParticipants list.
3. To unmute the participants:
• Click , and select Mute, or
• Right click on a selected participant, and select Mute.
When a participant is unmuted, the Mute icon on the participant's panel inParticipants list disappears.
Muting media of participantsProcedure
1. In the Participant list, click on the panel of each participant you want to mute. If youwant to select all of the participants, click .The selected participant panels turn blue.
2. Perform one of the following steps:
• Click , and select Mute and Pause.
• Right click on the selected participants, and select Mute and Pause.
Managing a conference as a moderator
50 Using Avaya Aura® Conferencing Collaboration Agent February 2013Comments? [email protected]

When a participant is muted, the Mute and Pause icons appear on the participant'spanel in Participants list.
Promoting a participant to moderatorYou can promote another participant to moderator during a conference.
Important:This promotion takes place immediately after you click OK in the confirmation dialog boxand is not reversible. The participant you choose is also promoted to moderator of the audioconference.
Note:If you promote an audio-only participant before the participant logs in to Collaboration Agent,the participant enters Collaboration Agent as a participant, not as moderator.
You cannot promote a participant to a moderator in a Standalone Web Collaborationconference.
Procedure
1. In the Participant list, click on the panel of the participant you want to promote.The selected participant panel turns blue.
2. Perform one of the following steps:
• Click , and select Promote to Moderator.
• Right click on the selected participant, and select Promote to moderator.
3. In the confirmation dialog box, click Yes to promote the participant to moderator.
Result
• One of the three moderator icons appears next to the newly promoted moderator.• All phones associated with the participant are promoted.• The moderator icon next to your name is cleared or changes :
- If you are a Collaboration Agent-only or a Collaboration Agent plus audio moderatorpromoting a Collaboration Agent-only, a Collaboration Agent plus audio or Flareuser, you lose the moderator role and your Collaboration Agent-only moderator iconis cleared
Promoting a participant to moderator
Using Avaya Aura® Conferencing Collaboration Agent February 2013 51

- If you are a Collaboration Agent-only moderator promoting an audio-only user, youkeep the Collaboration Agent-only moderator role and your moderator icon does notchange
- If you are an associated Collaboration Agentplus audio moderator promoting anaudio only user, you will lose your audio moderator privileges but not yourCollaboration Agent moderator privileges. In this case, your full moderator icon willchange to a Collaboration Agent-only moderator icon.
Associating and dissociating specific participantsAbout this taskDuring a conference, you can associate participants' phone and Collaboration Agent login.This procedure unifies the two entries into a single entry in the participant list, simplifyingmanagement and simplifying the list for other participants.
Procedure
1. Select the one audio participant and one Collaboration Agent-only participant in theparticipants list.The selected participant panels turn blue.
2. To associate the participant entries:
• Click and select Associate, or
• Right click on the selected participant and select Associate.
The participant or presenter appears as a single entry in the participant list.
3. To dissociate the participant:
• Click and select Dissociate, or
• Right click on the selected participant and select Dissociate.
The participant or presenter appears as a two entries — the phone andCollaboration Agent login in the participant list.
Managing a conference as a moderator
52 Using Avaya Aura® Conferencing Collaboration Agent February 2013Comments? [email protected]

Assigning and unassigning presenter capabilities to aparticipant
About this taskBy default, only the moderator can present content to the participants on a conference. Usethis procedure to promote another participant to a presenter so that participant can sharedocuments, applications or a whiteboard.
Procedure
1. Click Start Web Collaboration.
2. In the Participant list, click on the panel of the appropriate participant.The selected participant panels turn blue.
3. To assign presenter capabilities:
• Click and select Promote to Presenter, or
• Right click on the selected participant, and select Promote to Presenter.
When a participant becomes a presenter, the presenter symbol appears on theparticipant's panel in Participants list.
4. To unassign presenter capabilities:
• Click and select Promote to Presenter, or
• Right click on the selected participant, and select Promote to Presenter.
When a participant is no longer a presenter, the presenter symbol disappears onthe participant's panel in Participants list and the web collaboration session ends.
Dropping a participantProcedure
1. In the Participant list, click on the panel of each participant you want to drop. If youwant to select all of the participants, click .The selected participant panels turn blue.
2. Perform one of the following steps:
• Click , and select Drop from Call.
Assigning and unassigning presenter capabilities to a participant
Using Avaya Aura® Conferencing Collaboration Agent February 2013 53

• Right click on a selected participant, and select Drop from Call.
ResultAll the phones associated with the selected participants drop from the conference and theConnected and Dropped buttons show updated numbers. If the phone and Collaboration Agentlogin are associated, both log-ins are dropped,
Clearing raised handsParticipants can raise their hands during the conference to attract the moderator's attention,for example if they wish to ask a question. As moderator, you can lower raised hands.
Procedure
1. In the Participant list, click on the panel of the appropriate participant. If you wantto select all of the participants, click The selected participant panels turn blue.
2. Perform one of the following steps:
• Click , and select Raise Hand.
• Right click on the selected participant, and select Raise Hand.
ResultThe Raised Hand icon next to the participants in the Participants list disappears.
Managing Conference Features
Enabling and disabling Lecture ModeAbout this taskThere must be an audio moderator or audio and Collaboration Agent moderator.
If you log in as a moderator, you can mute all lines in the conference. In this mode, theparticipants can only listen to the moderator as their lines are on mute and they cannot unmutethemselves.
Managing a conference as a moderator
54 Using Avaya Aura® Conferencing Collaboration Agent February 2013Comments? [email protected]

The moderator can unsilence participants, for example if they raise their hands to ask aquestion. After the moderator has unsilenced a participant, the participant can mute andunmute themselves.
Note:Event conferences automatically start in lecture lode. You cannot disable lecture mode inan event conference.
Procedure
1. In the Collaboration Agent, click Conference.
2. Click Lecture to enable Lecture mode.This mutes the audio for all the participants except the moderator. The Lecturebutton is pressed in, the button color changes to blue, and “Lecture Mode” appearsin the mode bar.
3. Click Lecture again to disable Lecture mode.The audio for all the participants is restored to the previous state. The Lecturebutton is not pressed in, the button color changes to black and “Collaboration Agent”appears in the mode bar.
Locking and unlocking the conferenceAbout this taskIf you are logged in as the moderator, you can lock the conference to new participants. Afteryou lock the conference, participants cannot join the audio conference or the CollaborationAgent conference.
Procedure
1. In the Collaboration Agent, click Conference.
2. Click Lock to lock the conference.New participants cannot join either the audio conference or the Collaboration Agentconference. “Conference locked” appears in the Mode Bar, the Lock button ispressed in, and the button color changes to blue.
3. Click Lock again to unlock the conference.New participants can join the conference.
“Collaboration Agent ” is shown in the Mode Bar, the Lock button is not pressedin and the button color changes to black.
Managing Conference Features
Using Avaya Aura® Conferencing Collaboration Agent February 2013 55

Enabling and disabling continuationAbout this taskWhen you disable continuation, the conference ends a specified number of minutes after themoderator drops. When you enable continuation, the conference continues until the lastparticipant leaves the conference. When the moderator leaves, a participant may getautomatically promoted to moderator if the participant tried to log into the conference as amoderator, but was denied that role because there was already a moderator present at thetime.
Note:This procedure applies to the current conference only. To change the default setting for thecontinuation feature, see Configuring continuation on page 37.
Procedure
1. In the Collaboration Agent, click Conference.
2. Click Continuation to enable continuation.The conference ends when the last participant drops. The Continuation buttonis pressed in and the color changes to blue.
3. Click Continuation again to disable continuation.The conference ends when the moderator exits. The Continuation button is notpressed in and the color changes to black.
Enabling and disabling entry and exit tonesProcedure
1. In the Collaboration Agent, click Conference.
2. Click Entry Tone to enable entry tones.Participants hear tones when others enter or leave the conference. The EntryTone button pressed in and the button color changes to blue.
3. Click Entry Tone to disable entry tones.Participants do not hear tones when others enter or leave the conference. The Entry Tone button is not pressed in and the button color changes to black.
Managing a conference as a moderator
56 Using Avaya Aura® Conferencing Collaboration Agent February 2013Comments? [email protected]

Starting recordingProcedure
1. In the Collaboration Agent, click Conference .
2. Click Record to start recording.Alternatively, press *2 on your telephone dialpad.
The Record button is pressed in, the button color changes to a brighter red color,and “Recording” appears in the mode bar.
Related topics:Using dialpad commands during a conference on page 117
Stopping recordingThe Stop button becomes accessible as soon as a moderator clicks the Record button. Whena moderator stops recording the conference, Avaya Aura® Conferencing automatically savesthe recording file. If the moderator does not stop the recording, Avaya Aura® Conferencingautomatically stops the recording when the conference ends.
Procedure
1. In the Collaboration Agent, click Conference .
2. Click Stop to stop recording the conference.Alternatively, press *2 on your telephone dialpad.
The Record button becomes accessible again. The Stop button becomesinaccessible and “Collaboration Agent” appears in the mode bar.
Avaya Aura® Conferencing automatically saves the recording file.
Related topics:Using dialpad commands during a conference on page 117
Managing Conference Features
Using Avaya Aura® Conferencing Collaboration Agent February 2013 57

Managing a conference as a moderator
58 Using Avaya Aura® Conferencing Collaboration Agent February 2013Comments? [email protected]

Chapter 6: Managing an event conference
Muting and unmuting specific participantsAbout this taskDuring a conference call, you can silence (mute) participants if there is noise from theparticipant's location, or for some other reason. Similarly, you can “unsilence” (unmute) theparticipant.
Note:If you silence participants in non-Event conferences, those participants can unsilence(unmute) themselves.
Muting and unmuting participants in an Event Conference:
In an Event Conference, all participants except the moderator and presenters are muted andcannot unmute themselves. If the moderator unmutes participants in an Event Conference,those participant can mute or unmute themselves.
Procedure
1. In the Participant list, click on the panel of each participant you want to mute. If youwant to select all of the participants, click .The selected participant panels turn blue.
2. To mute the participants:
• Click , and select Mute, or
• Right click on a selected participant, and select Mute.
When a participant is muted, the Mute icon appears on the participant's panel inParticipants list.
3. To unmute the participants:
• Click , and select Mute, or
• Right click on a selected participant, and select Mute.
When a participant is unmuted, the Mute icon on the participant's panel inParticipants list disappears.
Using Avaya Aura® Conferencing Collaboration Agent February 2013 59

Enabling and disabling continuationAbout this taskWhen you disable continuation, the conference ends a specified number of minutes after themoderator drops. When you enable continuation, the conference continues until the lastparticipant leaves the conference. When the moderator leaves, a participant may getautomatically promoted to moderator if the participant tried to log into the conference as amoderator, but was denied that role because there was already a moderator present at thetime.
Note:This procedure applies to the current conference only. To change the default setting for thecontinuation feature, see Configuring continuation on page 37.
Procedure
1. In the Collaboration Agent, click Conference.
2. Click Continuation to enable continuation.The conference ends when the last participant drops. The Continuation buttonis pressed in and the color changes to blue.
3. Click Continuation again to disable continuation.The conference ends when the moderator exits. The Continuation button is notpressed in and the color changes to black.
Enabling and disabling entry and exit tonesProcedure
1. In the Collaboration Agent, click Conference.
2. Click Entry Tone to enable entry tones.Participants hear tones when others enter or leave the conference. The EntryTone button pressed in and the button color changes to blue.
3. Click Entry Tone to disable entry tones.Participants do not hear tones when others enter or leave the conference. The Entry Tone button is not pressed in and the button color changes to black.
Managing an event conference
60 Using Avaya Aura® Conferencing Collaboration Agent February 2013Comments? [email protected]

Locking and unlocking the conferenceAbout this taskIf you are logged in as the moderator, you can lock the conference to new participants. Afteryou lock the conference, participants cannot join the audio conference or the CollaborationAgent conference.
Procedure
1. In the Collaboration Agent, click Conference.
2. Click Lock to lock the conference.New participants cannot join either the audio conference or the Collaboration Agentconference. “Conference locked” appears in the Mode Bar, the Lock button ispressed in, and the button color changes to blue.
3. Click Lock again to unlock the conference.New participants can join the conference.
“Collaboration Agent ” is shown in the Mode Bar, the Lock button is not pressedin and the button color changes to black.
Searching for users
Tip:The Participant List is a limited display of all participants. Use this procedure in eventconferences to find participants who are not visible in the Participant List. The searchfeature searches the entire list.
Procedure
1. In the Participants Search box, enter the name of the participant you want to find.If you want to find the moderator, enter moderator.As you enter each letter, the panel of each participant that contains matchinginformation appears in the participant list
Locking and unlocking the conference
Using Avaya Aura® Conferencing Collaboration Agent February 2013 61

2. To cancel the search and view all participants in the participant list, click X in theParticipants Search box.
ExampleTyping “Jo” in the search box will highlight:
• Smith, John• Johnson, Steve• Joanne
Managing an event conference
62 Using Avaya Aura® Conferencing Collaboration Agent February 2013Comments? [email protected]

Chapter 7: Adding additional security toyour conference
Some concepts related to securityAt this stage, it is a good idea to clarify a number of concepts within the area of security.
Locked conferenceIf a conference is locked, new participants cannot join the audio conference or the CollaborationAgent conference. Moderators can lock and unlock a conference using the Lock button onCollaboration Agent or the *7 keypad command.
Secure conferenceIf a conference is secure, the participants have all dialed into the conference using secureaudio lines. Avaya Aura® Conferencing considers the lines to be secure if it identifies them asencrypted and authentic. If any participant in a given conference is not using a secure audioline, the conference is not secure. Video conferences are not secure. Similarly, the AViCAfeature is not considered secure.
Two levels of codesIf a conference has two codes, participants must enter a collaboration code and a passcodein order to gain access to the conference. Moderators can distribute the passcode and thecollaboration code in separate e-mails, if they wish. You must contact your systemadministrator in order to investigate the possibility of adding a passcode to your conference.You cannot enable or disable the passcode feature without the intervention of your systemadministrator.
CodesTo access a conference, you must enter a code. For example, on the Collaboration Agent login screen, you enter a participant code or a moderator code. Similarly, on your telephonekeypad, you enter a participant code or a moderator code, followed by the pound key. Thesecodes identify a conference and must be unique.
Related topics:Collaboration codes on page 64
Using Avaya Aura® Conferencing Collaboration Agent February 2013 63

Passcodes on page 64
Collaboration codesWe use the term 'collaboration codes' to refer to these participant and moderator codes. If auser enters a participant code on the Collaboration Agent log in screen or on their telephonekeypad, the Collaboration Agent identifies them as a participant and provides them with accessto participant-level features. If a user enters a moderator code, the Collaboration Agentidentifies them as a moderator and provides them with access to the full range of moderator-level features. For most conferences, the collaboration codes are sufficient to ensure that onlyparticipants who have been invited to the conference, are present. However, for someconferences, there is a need for an increased level of security. For example, if the conferencediscussion is sensitive or confidential. For these conferences, the Collaboration Agent offersa second level of validation for each of the participants.
PasscodesWe use the term 'passcodes' to refer to the second level of validation prior to conference entry.A passcode is a numeric code that participants enter on the Collaboration Agent log in screenor on the telephone keypad after they enter the collaboration code.
This second level of authentication is an optional feature. You may not have access to thisfeature. If you do have access to this feature, there are several flavors:
• Mandatory moderator passcode with no participant passcode
• Mandatory moderator and participant passcodes
Depending on the configuration in your deployment, you may be able to edit the passcodes.Also depending on the configuration in your deployment, you may be able to disable and enableparticipant passcodes for future conferences. So, if you previously required mandatoryparticipant passcodes for entry into your conferences, you can choose to remove thisrequirement for future conferences.
During a conference, if you dial out to other participants in order to add them to the conference,they do not have to enter a passcode. The second level of authentication is not requiredbecause you initiated the call and so the invitation is implicit.
Modifying passcodesThe passcode feature is highly configurable. In some deployments, your administrator mayhave disabled passcode modification. For example, this could be the case if your organization
Adding additional security to your conference
64 Using Avaya Aura® Conferencing Collaboration Agent February 2013Comments? [email protected]

manages all passwords and passcodes in a central system, outside of Avaya Aura®
Conferencing.
About this taskYou may not have permission to modify passcodes.
Procedure
1. On the Collaboration Agent window, click Settings.
2. On the Settings dialog, click My Passcodes.If you cannot edit your passcodes, the Moderator passcode and Participantpasscode fields are inaccessible. If you can edit your passcodes, these fields areaccessible.
3. Enter a new moderator passcode in the Moderator passcode field.
4. Enter a new participant passcode in the Participant passcode field.
5. Click Save.
Configuring passcodesYou can add a requirement for mandatory passcodes for your future conferences.
Before you beginYour administrator must enable the passcodes feature in your deployment.
Procedure
1. Log in to Collaboration Agent as the moderator.
2. Click .
3. On the Default Settings panel, click Passcodes to ensure that Avaya Aura®
Conferencing requires passcodes for future conferences.The Passcodes button changes to blue.
4. Click Save.
Related topics:Passcodes on page 64
Configuring passcodes
Using Avaya Aura® Conferencing Collaboration Agent February 2013 65

Logging in to a conference that requires passcodesConferences that have additional security require a collaboration code and a passcode in orderto enter the conference.
Before you beginYou must have logged in to Collaboration Agent.
Note:You can log into a conference with either Avaya Flare® Experience or Avaya CollaborationAgent. Avaya Aura® Conferencing does not support logging into a conference with bothAvaya Flare® Experience and Avaya Collaboration Agent.
Procedure
1. Enter your collaboration code in the Enter conference collaboration code field.Use the same collaboration code to log in to the audio conference and CollaborationAgent
2. Enter your passcode in the appropriate passcode field and click Enter.
Field Name Description
Enter your moderator securitypasscode here:
If you are a moderator for thisconference, enter a moderatorpasscode here.
Enter your participant securitypasscode here:
If you are a participant for thisconference, enter a participantpasscode here.
Use the same passcode to log in to the audio conference and Collaboration AgentIf you are a moderator, the conference opens. If you are a participant:
• If the Standalone Web Conference has started, the ”Waiting for conference tostart” does not appear, even though there is no audio bridge.
• If the audio conference has started, the Conference tab opens.
• If the audio conference not has started, the message ”Waiting for conferenceto start” appears until the conference starts.
3. (Optional) Select your phone in the Identify my phone window.The manual association feature is not available in event conferences. Automaticassociation is available in event conferences.The association feature is not available for Flare phones.
Adding additional security to your conference
66 Using Avaya Aura® Conferencing Collaboration Agent February 2013Comments? [email protected]
If your phone and Collaboration Agent account are automatically associated, thenthe Identify my phone window does not open.
4. (Optional) Click OK.
5. (Optional) Click Remember this number to permanently associate your phonewith your Collaboration Agent account.If the length of the telephone number is less than seven digits, Remember thisnumber is not displayed.
Related topics:Logging in to Avaya Aura Conferencing Collaboration Agent as a guest on page 28Logging in to a conference as moderator on page 30Logging in to a conference as a participant or presenter on page 31Logging in to a conference as an operator on page 33
Logging in to a conference that requires passcodes
Using Avaya Aura® Conferencing Collaboration Agent February 2013 67

Adding additional security to your conference
68 Using Avaya Aura® Conferencing Collaboration Agent February 2013Comments? [email protected]

Chapter 8: Sharing information
Introduction to Web CollaborationDuring a conference, moderators and presenters can share information with participants andguests. Participants can also annotate the virtual whiteboards.
Note:
Moderators and presenters can share the following content and information:
• Documents (from “My Library”)
• Virtual whiteboards
• All or part of the desktop
• Applications
Related topics:Web Collaboration components on page 69
Web Collaboration componentsThe following figure show the components of the Web Collaboration window. In this example,the moderator is sharing a whiteboard.
Using Avaya Aura® Conferencing Collaboration Agent February 2013 69

No. Name Description1 Annotation tools Annotate the whiteboard or shared document.
See Annotation controls on page 82
2 Zoom tools Changes the size of the screen content.See Navigating shared content on page 75.
3 Auto fit Fits the Web Collaboration interface to the window size.
4 Screenshot Sends a shot of the current screen to all participants as aJPG file that participants can download.
5 Navigation tools Navigate the shared content. The buttons changeaccording to the content being shared.See Navigating shared content on page 75.
6 Stop Sharing Stop sharing current content.
7 Hide or show roster Hides or shows the conference roster.
Sharing information
70 Using Avaya Aura® Conferencing Collaboration Agent February 2013Comments? [email protected]

Managing your library
The LibraryYour account on the Avaya Aura® Conferencing system provides a “library” into which you canupload documents, presentations and pictures that you can quickly share during a webcollaboration session. You can upload the following file formats in the Library:
• Adobe® Acrobat® (.pdf)• JPEG (.jpg and .jpeg)• Microsoft® PowerPoint® (.ppt and .pptx)• Microsoft Word® (.doc and .docx)• plain text (.txt)• portable network graphics (.png)
To upload a file into your library, you must log into your Avaya Aura® Conferencing accountwith either Avaya Collaboration Agent using a PC or Avaya Flare® Experience for Windows.For information on uploading files into your library, see Using Avaya Aura® ConferencingCollaboration Agent or your Avaya Flare client documentation. You can download thesedocuments from http://support.avaya.com.
Supported document formatsYou can load documents, presentations and pictures into your documents library for sharing.These are the file formats that the library supports:
Tab Document Type ExtensionsPresentations Microsoft PowerPoint
Note:You can load presentationsof up to 30 Mb.
• .ppt
• .pptx
Documents Microsoft Word
Note:You can load Worddocuments of up to 300pages.
• .doc
• .docx
Managing your library
Using Avaya Aura® Conferencing Collaboration Agent February 2013 71

Tab Document Type ExtensionsAdobe Acrobat • .pdf
Plain text • .txt
Pictures JPEG • .jpg
• .jpeg
Portable Network Graphics • .png
Tip:Use application or desktop sharing for other document formats.
Uploading documentsYou cannot upload documents which are encrypted with a password. In terms of size, yourdocument must be less than 300 pages and the file size must be less than 16 MB. In addition,your library is limited to 50 documents. You must not exceed this total.
Before you beginClose the document before you upload it. You cannot upload a document that is open on yourcomputer.
About this taskIf you want to share a document from the library, you need to upload it.
Procedure
1. Open your document library.
• In the conference log-in screen: click Library
• In Web Collaboration: click My Library.
2. Click Upload.
3. Choose the file you want to upload in the Select file to upload window.
4. Click Open.
Sharing information
72 Using Avaya Aura® Conferencing Collaboration Agent February 2013Comments? [email protected]

Viewing documents in the library
Viewing documents as thumbnails
Procedure
1. Click Start Web Collaboration.
2. Click My Library.
3. Click .The documents appear as a series of thumbnails. The number of pages or slidesin the document or presentation appears.
Viewing documents as a list
Procedure
1. Click Start Web Collaboration.
2. Click My Library.
3. Click .The documents appear as a list.
Renaming documentsBefore you beginYou must be logged in as a moderator, presenter, or participant to rename documents.
Procedure
1. Open your document library.
• In the conference log-in screen: click Library
• In Web Collaboration: click My Library.
2. Select a document.
3. Click Rename.
4. Type the new name in the dialog box.
Managing your library
Using Avaya Aura® Conferencing Collaboration Agent February 2013 73

5. Click Save.
Deleting documentsBefore you beginYou must be logged in as a moderator, presenter, or participant to delete documents.
Procedure
1. Open your document library.
• In the conference log-in screen: click Library
• In Web Collaboration: click My Library.
2. Select a document.
3. Click Delete.
4. Click OK.
Sorting documentsProcedure
1. Open your document library.
• In the conference log-in screen: click Library
• In Web Collaboration: click My Library.
2. Click the column you want to sort by.Clicking the column again reverses the sorting order.The file are sorted according to your choice.
Sharing information
74 Using Avaya Aura® Conferencing Collaboration Agent February 2013Comments? [email protected]

Sharing a document
Sharing a documentBefore you beginIf you want to share documents from the library, you must upload the documents into “MyLibrary” before you can share them.
Procedure
1. Click Start Web Collaboration.
2. Click Begin Sharing, or Sharing.
3. Select Document from library.The My Library window opens.
4. Choose the document type by clicking one of the tabs:
• Presentations.
• Documents.
• Pictures.
5. Select the document.If you want to share the document from a specific page or slide, click Preview andnavigate to the page or slide.
6. Click Share.
ResultThe document sharing workspace opens.
Navigating shared contentUse the navigation keys to browse shared documents. If you want to browse a document inyour workspace without changing the display of the shared document, see Browsing apresentation as a participant on page 77.
The navigation keys are at the top of the screen, above the shared document.
Sharing a document
Using Avaya Aura® Conferencing Collaboration Agent February 2013 75

Icon Name Description
Auto fit Fits the Web Collaborationinterface to the window size.
Zoom out Decreases size of screencontent.
Zoom in Increases size of screencontent.
Magnification slider Changes the size of thescreen content.This slider operatesindependently of the auto fitfeature.
First slide or page Goes to the first page of theshared document.
Previous slide or page Goes to the previous page ofthe shared document.
Next, slide or page Goes to the next page of theshared document.
Last slide or page Goes to the last page of theshared document.
Browse shared content inpop-up window.
Opens a separate windowwith the presentation that thePresenter is sharing. Youcan browse the presentationat your own pace,independently of thePresenter.
Thumbnail view Shows the current documentpage number.Opens a thumbnail gallery ofdocument pages for easynavigation. Click on thethumbnail to open the page.To close the gallery withoutchanging the current page,click on another part of thescreen.
Sharing information
76 Using Avaya Aura® Conferencing Collaboration Agent February 2013Comments? [email protected]

Browsing a presentation as a participantUse this feature to browse a shared document independently of the moderator or presenter.
About this taskParticipants normally follow the presentation at the presenter's pace. However, if you wish tofollow at your own pace, for example if you want to return to a previous slide, you can openthe presentation in a separate window on your computer.
Procedure
1. Click Browse at the top of the Web Collaboration window.The browsing window opens.
You may now page forward or backward through the document.
2. While the document is open:
• Click to toggle between full screen and normal-sized views of thedocument.
• Navigate the document using the arrow keys.
3. To close the window, click Close.The presentation resumes at the current page, and continues with the presenter.
Ending document sharingProcedure
Click Stop sharing.
ResultThe document closes.
The “Sharing is not active” message appears.
The Begin Sharing button appears in the Web Collaboration window.
Sharing a document
Using Avaya Aura® Conferencing Collaboration Agent February 2013 77

Advantages of sharing documents instead of the desktopPresenters may share documents and presentation materials directly from their desktops, sowhy use the library? There are several reasons:
• Presenters can share from anywhere. Simply log in to access your library and its contentsfrom anywhere.
• Speed and quality. When you share from your library, participants experience moreresponsive and higher resolution sessions than when sharing from your desktop.
• Participant flexibility. When you share from your desktop, participants must follow whatappears on your screen. When you instead share a presentation from your library,participants can page forward and backward. This results in fewer requests to roll backand repeat. Note that participants automatically page along with you as you presentunless the participants explicitly attempt to view the presentation pages directly.
Sharing a whiteboard
Sharing a whiteboardUse a virtual whiteboard to share text or drawings with other participants. When the moderatoror presenter has opened the whiteboard, other participants may use it.
Tip:When you hover over the annotation, a pop-up window shows the name of the participantwho added the annotation.
Procedure
1. Click Start Web Collaboration.
2. Click Begin Sharing, or Sharing.
3. Select Whiteboard.
ResultA virtual whiteboard opens. There is a variety of tools you can use to create, delete andannotate white boards.
See Annotation controls on page 82 for information on the tools.
Sharing information
78 Using Avaya Aura® Conferencing Collaboration Agent February 2013Comments? [email protected]

Navigating whiteboards
Icon Name Description
Previous whiteboard Goes to the previouswhiteboard
Next whiteboard Goes to the whiteboard.
Whiteboard title Shows the title of the currentwhiteboard.
Whiteboard list Show a list of the currentwhiteboards. To viewanother whiteboard, select inthe list.
Adding a whiteboardBefore you beginYou must be sharing a whiteboard.
Procedure
Click in the navigation toolbar at the top of the collaboration workspace.A new, empty whiteboard opens.
Deleting a whiteboardBefore you beginYou must be sharing a whiteboard.
Procedure
1. Click in the navigation toolbar at the top of the collaboration workspace.
Sharing a whiteboard
Using Avaya Aura® Conferencing Collaboration Agent February 2013 79

2. Click Ok.The current whiteboard is deleted and the collaboration workspace shows theprevious whiteboard.
Ending whiteboard sharingProcedure
Click Stop sharing.
ResultThe whiteboard closes.
The “Sharing is not active” message appears.
The Begin Sharing button appears in the Web Collaboration window.
Sharing applications and the desktop
Sharing ApplicationsYou can share an application window, your entire desktop, or a portion of your desktop. Onceyou make your selection, it can take a few moments to start sharing. A red border indicatesthe sharing region. You can stop sharing at any time, by clicking the Stop Sharing button onthe Web Collaboration window.
Note:Application sharing is not available in Mac OS 10.
Before you beginYou must enable pop-up windows in your browser to share an application.
Procedure
1. Click Start Web Collaboration.
2. Click Begin Sharing, or Sharing.
3. Choose from the following options:
Sharing information
80 Using Avaya Aura® Conferencing Collaboration Agent February 2013Comments? [email protected]

• Application window
• Entire screen
• Portion of screen
a. If you select Application window, a list of open applications is displayed in apop-up dialog.
b. Select the application from the list.c. Click Share to share the application.
If you select Entire screen or Portion of screen, Web Collaboration begins toshare the screen. The message Desktop sharing is in progress is displayed onthe Web Collaboration window.
Sharing application and desktop controlsWhile sharing an application or the desktop, you can annotate the screen and pause andresume sharing.
Icon Name
Change sharing type (desktop sharing,portion of screen sharing, Applicationsharing).
Color picker tool.
Stamp tool.
Pen tool.
Pause sharing.
Resume sharing.
Ending application and screen sharingProcedure
Click:
Sharing applications and the desktop
Using Avaya Aura® Conferencing Collaboration Agent February 2013 81

• Stop Sharing, or
• The Exit Sharing button, or
• Stop Desktop Sharing in the Sharing menu.
ResultThe shared application or screen closes.
The “Sharing is not active” message appears.
The Begin Sharing button appears in the Web Collaboration window.
Annotating content
AnnotatingWeb Collaboration provides a range of tools for annotating shared content, applications andscreens, and drawing on a virtual whiteboard. You can add text, lines and stamps to clarify orexpand the content.
A presenter and moderator can annotate in all shared content. A participant can annotate onlyon a virtual whiteboard.
The available tools depend on the content you are sharing; however, the icons are thesame.
Annotation controlsThe annotation keys are at left of the screen, next to the shared content.
Icon Name Description
Select tool Selects an annotation. Whenthe arrow changes to a fingercursor, you can move theannotation with the mouse.
Pen tool Draws a freehand line.
Marker tool Highlights text or graphics.
Sharing information
82 Using Avaya Aura® Conferencing Collaboration Agent February 2013Comments? [email protected]
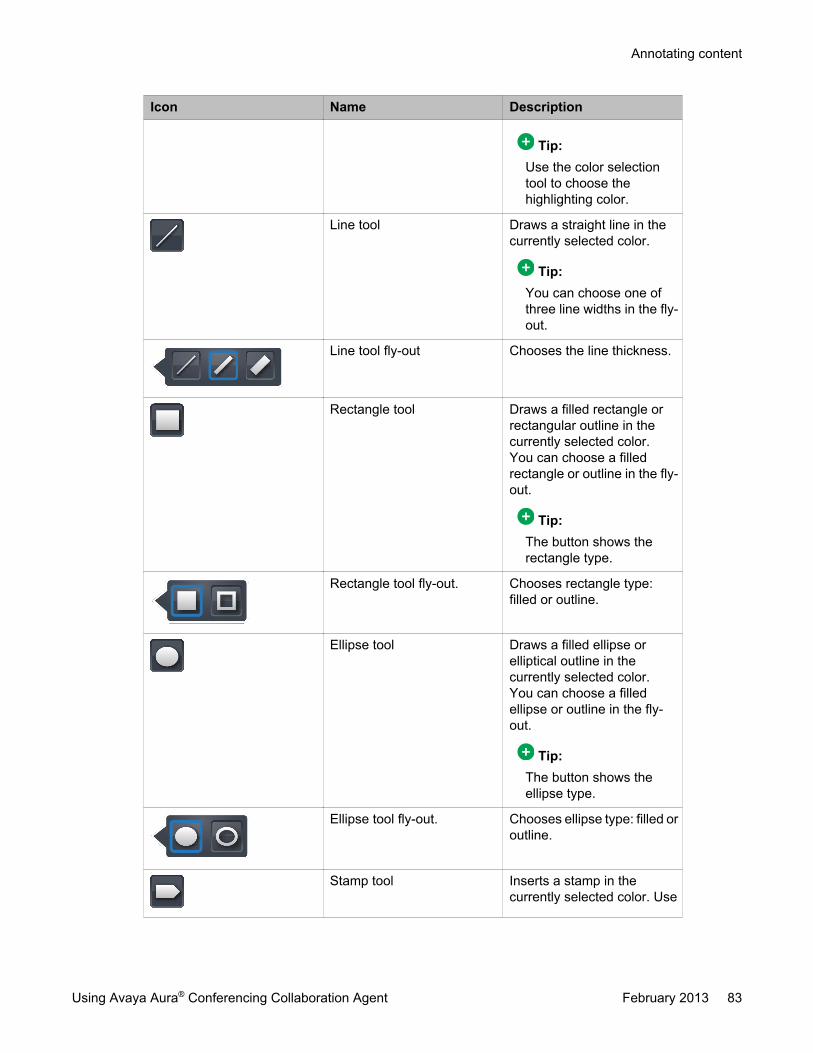
Icon Name Description
Tip:Use the color selectiontool to choose thehighlighting color.
Line tool Draws a straight line in thecurrently selected color.
Tip:You can choose one ofthree line widths in the fly-out.
Line tool fly-out Chooses the line thickness.
Rectangle tool Draws a filled rectangle orrectangular outline in thecurrently selected color.You can choose a filledrectangle or outline in the fly-out.
Tip:The button shows therectangle type.
Rectangle tool fly-out. Chooses rectangle type:filled or outline.
Ellipse tool Draws a filled ellipse orelliptical outline in thecurrently selected color.You can choose a filledellipse or outline in the fly-out.
Tip:The button shows theellipse type.
Ellipse tool fly-out. Chooses ellipse type: filled oroutline.
Stamp tool Inserts a stamp in thecurrently selected color. Use
Annotating content
Using Avaya Aura® Conferencing Collaboration Agent February 2013 83

Icon Name Description
this tool to call attention toitems you are sharing.
Tip:User the color selectiontool to choose the stampcolor.
Text tool Adds text annotation in thecurrently selected color.You can choose one of threetext sizes in the fly-out.
Tip:The button shows the textsize.
Text fly-out. Selects the text size: small,medium or large.
Color picker tool. Selects a color forannotation.Choose the color in the fly-out.
Tip:The current color is shownon the button.
Tip:You cannot edit existingtext. You must delete thetext and type the newtext.
Delete tool
Delete flyout
Delete selection tool Deletes the selectedannotation.
Delete all tool Deletes all drawings.
Sharing information
84 Using Avaya Aura® Conferencing Collaboration Agent February 2013Comments? [email protected]

Icon Name Description
Screenshot Sends a shot of the currentscreen to all participants as aJPG file that participants candownload.
Changing the type of sharingWhile you are sharing, you can change the type of information you are sharing.
Procedure
1. Click Sharing in the Collaboration window.
2. Choose one of the options from the pop-up menu:
• Document from library
• Entire screen
• Portion of screen
• Application window
• Whiteboard
• Share previous document
ResultThe sharing type changes.
Sending a screenshotYou can send a screenshot of the current screen to all participants as a message.
Before you beginYou must be a moderator or presenter to send a screenshot. You must begin sharing beforeyou can send a screenshot.
Procedure
1. Click Start Web Collaboration.
2. Click Begin Sharing, or Sharing.
Changing the type of sharing
Using Avaya Aura® Conferencing Collaboration Agent February 2013 85

3. Click .A confirmation window opens.
4. Click Yes to send the screenshot.
ResultAll the participants receive the screenshot as a JPEG file attachment to message.
Sharing information
86 Using Avaya Aura® Conferencing Collaboration Agent February 2013Comments? [email protected]

Chapter 9: Recording and playing back aconference
Introduction to recordingUsing Collaboration Agent, moderators can record conferences. The recording captures allaspects of the conference, such as the audio and Web collaboration data. In addition, therecording captures conference events such as participants writing notes, participants joiningor leaving, and participants interacting with each other. All aspects of the conference recordingare synchronized within a conference timeline. When users play a recorded conference, theycan easily jump forward and backwards in the conference timeline.
Moderators can initiate recording from the Collaboration Agent window. Alternatively, they canpress *2 on their telephone keypad to initiate recording. *2 is the default keypad pattern. Thekeypad pattern for your deployment may differ.
Related topics:Manual recording on page 87Automatic recording on page 88Recording status on page 88
Manual recordingUsing Collaboration Agent, moderators can start or stop recording at any time during aconference.
Note:Avaya Aura® system administrators can control access to recording functionality. They canallow or deny permissions on an account by account basis. If a moderator does not havepermission to record, the Record button is inaccessible. Similarly, if they attempt to initiaterecording using the *2 telephone keypad command, Avaya Aura® Conferencing plays anaudio message to inform them that recording is not available.
Using Avaya Aura® Conferencing Collaboration Agent February 2013 87

Automatic recordingUsing Collaboration Agent, moderators can configure Avaya Aura® Conferencing to record allof their conferences.
The recording starts as soon as the moderator joins and stops after the moderator leaves.There is a configurable grace period between the departure of the moderator and the stoppingof the recording. If the conference is a fast start conference, the recording starts as soon asthe first participant joins. For conferences that continue after the moderator leaves, therecording stops when the last participant leaves. However, a moderator can also stopautomatic recording at any time during a conference using the Collaboration Agent interfaceor the dialpad.
If a moderator clicks the Record button when automatic recording is set, their action has noeffect.
Related topics:Configuring fast start on page 36
Recording statusIf recording is on, Collaboration Agent displays the text “Recording in progress” as tool tip textover the Record button. In addition, Collaboration Agent displays the text “Recording” in themode bar. The color of the mode bar changes to red.
When a participant joins a conference that is currently being recorded, Avaya Aura®
Conferencing plays an audio message to inform them that the conference is being recorded.This is a legal requirement in many countries. In addition, when a moderator starts recording,Avaya Aura® Conferencing plays an audio message to all conference participants to informthem that recording has started. Similarly, when a moderator stops recording a conference,Avaya Aura® Conferencing plays an audio message to all conference participants to informthem that recording has stopped.
Recording a conferenceModerators can start or stop recording using Collaboration Agent or using their telephonekeypad. The *2 keypad command initiates recording.
Alternatively, moderators can configure Avaya Aura® Conferencing to record all of theirconferences, by default. If moderators use this feature to automatically record theirconferences, they do not need to start recording on a per conference basis.
Recording and playing back a conference
88 Using Avaya Aura® Conferencing Collaboration Agent February 2013Comments? [email protected]

When moderators stop a recording, Avaya Aura® Conferencing automatically saves therecording file to the moderator's Recordings folder. To distribute this recording, moderatorscan download the file or distribute a link to the file. They can also rename the file and specifya portion of the file for playback.
Moderators can record multiple portions of a single conference by starting and stoppingrecording at several time intervals during a conference. However, moderators cannot pause arecording. Collaboration Agent does not currently support ‘pause’ functionality. If a moderatorrecords multiple portions, Avaya Aura® Conferencing produces a number of recording files fora single conference. Each of these files is called My Recording but moderators candifferentiate the files using the timestamps. Moderators can rename the files as they wish.
Related topics:Configuring automatic recording on page 38Starting recording on page 57Stopping recording on page 57Sorting recordings on page 90Renaming recordings on page 91Distributing recordings on page 92
Starting recordingProcedure
1. In the Collaboration Agent, click Conference .
2. Click Record to start recording.Alternatively, press *2 on your telephone dialpad.
The Record button is pressed in, the button color changes to a brighter red color,and “Recording” appears in the mode bar.
Related topics:Using dialpad commands during a conference on page 117
Stopping recordingThe Stop button becomes accessible as soon as a moderator clicks the Record button. Whena moderator stops recording the conference, Avaya Aura® Conferencing automatically savesthe recording file. If the moderator does not stop the recording, Avaya Aura® Conferencingautomatically stops the recording when the conference ends.
Recording a conference
Using Avaya Aura® Conferencing Collaboration Agent February 2013 89

Procedure
1. In the Collaboration Agent, click Conference .
2. Click Stop to stop recording the conference.Alternatively, press *2 on your telephone dialpad.
The Record button becomes accessible again. The Stop button becomesinaccessible and “Collaboration Agent” appears in the mode bar.
Avaya Aura® Conferencing automatically saves the recording file.
Related topics:Using dialpad commands during a conference on page 117
Configuring automatic recordingUse this feature to record all conferences without the need for manual intervention on a per-conference basis.
If Auto Record is on, Avaya Aura® Conferencing records all conferences by default.
If Auto Record is off, Avaya Aura® Conferencing does not record conferences by default.
In both situations, moderators can turn recording on or off, on a per-conference basis.
Procedure
1. Log in to Collaboration Agent as the moderator.
2. Click .
3. On the General panel, click Auto Record to ensure that Avaya Aura®
Conferencing records all conferences.The Auto Record button changes to blue.
4. Click Save.
Sorting recordingsAbout this taskYou can sort the recordings in ascending or descending order by date and time, name, orduration.
Recording and playing back a conference
90 Using Avaya Aura® Conferencing Collaboration Agent February 2013Comments? [email protected]

The selected sort item is shown by an arrow in the column, the arrow also indicates the sortorder: Ascending or descending.
Procedure
1. To access recordings from a Collaboration Agent session:
a. Click Information.b. On the Information panel, click Recordings.
2. To access recordings from the login screen, click Recordings.Collaboration Agent displays a list of recordings.
3. To sort the recordings, click the column.
• Date and time — the date and time of the recording.
• Title — name of the recording.
• Type— the type of recording, such as audio or collaboration.
• Duration — length of the recording.
4. Click the column again to reverse the sort order.
Renaming recordingsBy default, Avaya Aura® Conferencing saves each recording using the name “My Recording”.Avaya Aura® Conferencing also saves the date and time, the duration, and the conferencetype. The Recordings folder also displays an indicator if you have previously shared therecording.
Procedure
1. To access recordings from a Collaboration Agent session:
a. Click Information.b. On the Information panel, click Recordings.
2. To access recordings from the login screen, click Recordings.Collaboration Agent displays a list of recordings.
3. Select a recording that you wish to rename.
4. Click Rename.
5. In the Rename recording dialog, enter a new name for the recording.
6. Click Save.
Recording a conference
Using Avaya Aura® Conferencing Collaboration Agent February 2013 91

Distributing recordingsYou can distribute a link to a recording or you can distribute a recording file. You can includethis link or file in an e-mail in order to share it
About this taskYou can distribute the entire recording or a specific portion of the recording.
Procedure
1. To access recordings from a Collaboration Agent session:a. Click Information.b. On the Information panel, click Recordings.
2. To access recordings from the login screen, click Recordings.Collaboration Agent displays a list of recordings.
3. Select the recording that you wish to share.4. Click Share.5. Ensure that Share this recording is selected.6. If you wish to give your users permission to save a copy of the recording to their
computers, select Allow downloading of recording from playback link.7. Click Playback link.8. (Optional) You can specify a specific portion of the recording for playback.
a. Select Add playback start and end time.b. Enter a start time and an end time.c. Click the Update playback link button.
9. Click Copy link to copy the link to your clipboard.10. Click Close and then Save.11. Open your e-mail application and paste the link into a new e-mail.12. Send the e-mail to the people with whom you wish to share the recording.
Related topics:Downloading a recording on page 99
Introduction to playbackUsing Collaboration Agent, users can play a conference recording. Within this context, the term'users' refers to each of the Collaboration Agent roles, including the guest role. This means
Recording and playing back a conference
92 Using Avaya Aura® Conferencing Collaboration Agent February 2013Comments? [email protected]

that users can distribute the recording to other users who may not have attended the originalconference.
Users play back the recorded conference in the Collaboration Agent window. The CollaborationAgent window displays a conference timeline, called a Playback Control panel and a Webcontent section, called a Participant Activity panel. These panels enable users to:
• View and listen to the entire conference in real-time.
• Rewind or fast forward the conference.
• Zoom in and out of the Web content or the timeline.
• Modify or mute the volume of the recording.
• Navigate slide by slide by playing only those portions for an interesting slide.
• Navigate by conference contributor.
• Navigate by conference events, by locating action items, questions, or notes.
• Search the recording using a large number of search criteria.
• Save a recording to their computer.
Related topics:Collaboration Agent user roles on page 13Accessing recordings on page 93Starting playback on page 94Stopping playback on page 94
Accessing recordingsModerators access their recordings from the Collaboration Agent Recordings section. Fromthe Recordings section, moderators can generate a playback link which they can distributeto users. Users can play the conference using a Web browser. Alternatively, moderators candownload a playback file which they can distribute to users. Users can play the conferenceusing a media player or Web browser. Using these distribution methods, moderators can sharethe recording to people who may not have attended the original meeting.
Before you beginYou must be a conference owner. Moderators can start or stop the recording but only ownerscan access the recording.
About this taskThe recordings folder is constrained by the hard disk space available. An audio conferencetakes up less space than a Web conference. Similarly, a Web conference takes up less spacethan a Video conference. Your Avaya Aura® system administrator can provide you with moreinformation about the space limits of your recordings folder.
Introduction to playback
Using Avaya Aura® Conferencing Collaboration Agent February 2013 93

Procedure
1. To access recordings from a Collaboration Agent session:
a. Click Information.b. On the Information panel, click Recordings.
2. To access recordings from the login screen, click Recordings.Collaboration Agent displays a list of recordings.
Starting playbackThese steps are for moderators. However, typically, moderators distribute recordings to a wideraudience. If moderators distribute a link to the recording, the playback controls are identical.If moderators distribute a recording file, which has the format mp3, recipients of the file canplay it in a variety of media players.
Before you beginBefore you start playback, you must access recordings.
Procedure
1. Select a recording that you wish to play.
2. Click Open.Collaboration Agent opens a new window and begins to play the recording.
Next stepsThe Collaboration Agent media player displays all aspects of the recording, such as the audio,video, and Web collaboration data. In addition, the media players displays conference eventssuch as participants writing notes, participants joining or leaving, and participants interactingwith each other. You can pause, rewind, or fast forward the playback at any time. You canchange the playback volume and zoom in or out of the visual display.
Stopping playbackProcedure
Click Close on the Collaboration Agent media player. Collaboration Agent displaysRecordings folder.
Recording and playing back a conference
94 Using Avaya Aura® Conferencing Collaboration Agent February 2013Comments? [email protected]

Next stepsYou can select another recording to play.
Participant activity panelParticipant activity panelThe Participant activity panel is an information-rich display of conference events such asparticipants writing notes, participants joining or leaving, and participants interacting with eachother. The Participant activity panel takes the form of a timeline from the start of the conferenceto the end.
You can choose to display or hide the Participant activity panel. To display it, select the Activitycheckbox at the top right of the Collaboration Agent media player. To hide it, de-select theActivity checkbox or select the Close button on the Participant activity toolbar.
Using the timeline bar, you can jump to any point in the recording. You can also select whichconference events to display.
Events panelAs an alternative to the Participant activity panel, you can view the Events panel. TheCollaboration Agent media player displays the Events panel as a column on the left of thescreen. The Events panel displays a summary of conference events. As with the Participantactivity panel, you can select which conference events to display. You can jump to any eventin the recording.
You can choose to display or hide the Events panel. To display it, select the Events checkboxat the top right of the Collaboration Agent media player. To hide it, de-select the Eventscheckbox or select the Close button on the Events tab.
Roster panelIn addition to the Events panel, you can display a list of attendees in the Roster panel. TheRoster panel displays the register of participants. You can sort the attendees alphabetically orby role.
Related topics:Viewing participant activity on page 96Zooming in and out of an activity timeline on page 96Muting volume on page 97
Participant activity panel
Using Avaya Aura® Conferencing Collaboration Agent February 2013 95

Viewing participant activityUsing the participant activity panel, you can select which conference events to display. Youcan also zoom in and out of the list of conference events. You can mute the volume of theplayback. You can also pause and restart the playback.
Before you beginBefore you view participant activity, you must start a playback.
Procedure
1. Ensure that the Activity checkbox, at the top right of the Collaboration Agent mediaplayer, is selected.
2. Click the Show: Multiple drop-down list to select which conference events todisplay.You can choose to display all conference events or select from the following:
• Meeting notes
• Messages
• Shared content
• Voice activity
Next stepsYou can move the timeline slider to jump to a specific location in the playback.
Zooming in and out of an activity timelineYou can zoom in and out of the activity timeline. This functionality enables you to view a detaileddisplay of a specific portion of a conference or view the highlights of the entire conference.
Before you beginBefore you zoom in and out of an activity timeline, you must start a playback.
• During a playback, click Zoom In to show more detail of a specific portion of aconference.
• During a playback, click Zoom Out to show less detail of a larger portion of aconference.
Recording and playing back a conference
96 Using Avaya Aura® Conferencing Collaboration Agent February 2013Comments? [email protected]

Muting volumeYou can mute the volume of a playback using the Participant activity panel.
Alternatively, you can raise or lower the volume of a playback using the Playback control panel.You can display the Playback control panel by moving your mouse cursor over the bottom ofthe content display. You can display the Playback control panel even if the conference is anaudio only conference in which nothing is being shared.
Before you beginBefore you mute volume, you must start a playback.
• During a playback, click Toggle Playback Audio to mute the volume.
• When the volume is muted, click Toggle Playback Audio again to unmute thevolume.
Playback control panelThe Playback control panel enables you to control the playback of the video and Webcollaboration aspects of a conference. If the conference is an audio only conference in whichno video or Web collaboration is shared, Collaboration Agent displays the phrase “Nothing isbeing shared” in the playback area.
You can display the Playback control panel by moving your mouse cursor over the bottom ofthe Web collaboration display. You can display the Playback control panel even if theconference is an audio only conference in which nothing is being shared.
The Playback control panel enables you to control many aspects of the playback of aconference.
• You can move a timeline forward and back using your mouse cursor.
• You can play, rewind, or fast forward the playback using arrow buttons.
• You can control the volume.
• You can zoom in and out of the video or Web collaboration data.
• You can display the video or Web collaboration data in fullscreen mode.
Related topics:Rewinding playback on page 98Forwarding playback on page 98Controlling the volume of a playback on page 98Zooming in and out of playback content on page 99
Playback control panel
Using Avaya Aura® Conferencing Collaboration Agent February 2013 97

Rewinding playbackBefore you beginBefore you rewind a playback, you must start a playback.
Procedure
Click the Rewind button.Collaboration Agent rewinds the playback by 30 seconds.
Forwarding playbackBefore you beginBefore you fast forward a playback, you must start a playback.
Procedure
Click the Fast Forward button.Collaboration Agent forwards the playback by 30 seconds.
Controlling the volume of a playbackYou can raise or lower the volume of a playback using the volume controls on the CollaborationAgent media player. The Collaboration Agent media player volume is independent from thevolume controls on your computer.
Before you beginBefore you raise or lower the volume, you must start a playback.
Procedure
Move the volume slider to the right to raise the volume and to the left to lower thevolume.Collaboration Agent adjusts the volume accordingly.
Recording and playing back a conference
98 Using Avaya Aura® Conferencing Collaboration Agent February 2013Comments? [email protected]

Zooming in and out of playback contentUsing the Playback control panel, you can make video or Web collaboration data appear largerin the playback area. For example, you can use this feature to view more detail on a sharedslideshow.
Before you beginYou must be a conference owner. Moderators can start or stop the recording but only ownerscan access the recording.
Before you zoom in and out of a playback content, you must start a playback.
Procedure
Move the Zoom slider to the right to increase the slide size and to the left to reduce theslide size.
Next stepsYou can restore the slide size by clicking the Auto fit displayed content button.Alternatively, you can display the playback in full screen mode by clicking the Togglefullscreen mode button.
Downloading a recordingCollaboration Agent enables you to download a recording file. You can download an audio-only file or you can download a collaboration and audio file. The format of the audio-only fileis mp3. The format of the collaboration and audio file is .swf.
• .mp3 is a common audio format and it plays on most digital audio players.
• .swf is an Adobe Flash file format. SWF files can be played by the Adobe Flash Player,working either as a browser plug-in or as a standalone player.
You can download a recording and distribute this recording to a wider audience using your e-mail application. Alternatively, you can use the Share button on the Collaboration Agentinterface to access an alternative method of distribution, using a link to the file rather thansending the file itself.
Related topics:Distributing recordings on page 92Downloading audio-only on page 100Downloading collaboration and audio on page 100
Downloading a recording
Using Avaya Aura® Conferencing Collaboration Agent February 2013 99
Downloading audio-onlyBefore you beginYou must be a conference owner. Moderators can start or stop the recording but only ownerscan access the recording.
Before you download the recording file, you must start a playback.
Procedure
1. During a playback, click the Download button.
2. Select Audio only.Collaboration Agent displays a File Download dialog.
3. Select a location for the file.
4. Click Save.
Downloading collaboration and audioIf you download collaboration and Web aspects of a conference, the file captures all aspectsof the conference, such as the audio, video, and Web collaboration data. In addition, therecording captures conference events such as participants writing notes, participants joiningor leaving, and participants interacting with each other. All aspects of the conference recordingare synchronized within a conference timeline.
Before you beginYou must be a conference owner. Moderators can start or stop the recording but only ownerscan access the recording.
Before you download the recording file, you must start a playback.
Procedure
1. During a playback, click the Download button.
2. Select Collaboration & audio.Collaboration Agent displays a File Download dialog.
3. Select a location for the file.
4. Click Save.
Recording and playing back a conference
100 Using Avaya Aura® Conferencing Collaboration Agent February 2013Comments? [email protected]

Chapter 10: Using embedded audio andvideo
Audio/Video in Collaboration AgentThe Audio/Video in Collaboration Agent (AViCA) feature enables you to receive audio, video,and data content through a single device. You can simply click on a conference URL(hyperlink), log in to the conference, and immediately share audio, video, and data using theCollaboration Agent Web page. You do not need to dial into the conference and you do notneed to configure an additional application in order to share audio and video. This feature isaimed at guests and participants who reside outside of the enterprise and who do not haveany other Avaya software products installed on their computers. The only requirement is thatyour computer must have a microphone.
Integrated audioCollaboration Agent offers extensive flexibility in terms of the configuration of the audio feedinto your conference. You can choose to dial into the conference using any telephone device.Alternatively, you can choose to use the audio capabilities that are embedded in CollaborationAgent. In this embedded scenario, you do not have to dial the conference telephone numberseparately beforehand. You can simply log in to Collaboration Agent and immediately use theaudio features by speaking through your device microphone and hearing other participantsthrough your device speakers.
Integrated videoIn addition to embedded audio, Collaboration Agent offers embedded video streaming. If youhave a camera, you can share your own live video feed to the conference. You can also receivelive video from the other participants. At any given time, Collaboration Agent transmits the livevideo of the currently active speaker. Collaboration Agent also displays a self-view to showyou what your camera is transmitting. If you do not have a camera, you can still see the livevideo but Collaboration Agent does not show a self-view.
An optional featureAudio/Video in Collaboration Agent is an optional feature. You may not have access to thisfeature.
Tuning wizardCollaboration Agent provides a tuning wizard to help you to optimize your audio and videosettings. You can choose to skip the tuning wizard after you first configure your selections.
Using Avaya Aura® Conferencing Collaboration Agent February 2013 101

Using embedded audio or videoYou can use embedded audio or video or both audio and video by logging in to the conferencein the normal way. When you enter the conference, Collaboration Agent displays a pop-updialog that enables you to choose to use embedded audio or video or both. If you enable audio,you can mute and unmute your microphone using a button on the Collaboration Agent window.If you enable video, you can pause and resume your video stream using a button on theCollaboration Agent window. If you enable audio and video, both buttons are accessible. If youhave chosen not to use the embedded audio or video and you later change your mind, youcan enable embedded audio or video at any time during a conference.
When you are using embedded audio or video, you do not associate or dissociate yourtelephone line and your Collaboration Agent login. These menu options are not available toAViCA users.
Related topics:Entering a conference on page 102Muting your microphone on page 103Pausing your video on page 103Switching to embedded audio and/or video during a conference on page 104
Entering a conferenceAbout this taskYou can choose to use the audio feature or the video feature or both features.
Procedure
1. Log in to the conference.Collaboration Agent displays the Add Web Audio or Video dialog.
2. Choose from the following options:
Choice Option Choice Description
Audio Use my microphone and speakers
Video Use my camera and display
3. (Optional) Select Remember my settings if you want to retain these selectionsfor future conferences.Collaboration Agent displays the Setup dialog. This is the first step of the tuningwizard. It may take several seconds for this dialog to display on your screen.
Using embedded audio and video
102 Using Avaya Aura® Conferencing Collaboration Agent February 2013Comments? [email protected]

4. Click Next to continue to navigate through the tuning wizard. Alternatively, you canclick Skip to bypass the tuning wizard.Ensure that Always show tuning wizard is not selected if you want to bypass thetuning wizard for future conferences.
a. Click Allow on the Adobe Flash Player Settings dialog.b. If you have chosen to use video, select the camera you would like to use from
the Camera drop-down list.c. If you have chosen to use audio, select the microphone you would like to use
from the Microphone drop-down list.d. Click Done.
5. Click Allow on the Adobe Flash Player Settings dialog if you have not alreadydone so.Collaboration Agent displays the Collaboration Agent window.
Next stepsTo leave a conference, you can simply close the Collaboration Agent window.
Related topics:Switching to embedded audio and/or video during a conference on page 104
Muting your microphoneThis function operates at a network level, rather than at the level of your local microphonedevice. As a result, it updates your roster entry.
Procedure
In the Collaboration Agent window, click Mute.The Mute button turns blue, and the mute icon appears next to your name in theParticipants list.
Pausing your videoUsing the Mute Media button, you can pause your video feed. If you are not using theembedded video feature and are simply using the embedded audio feature, the button is calledMute Audio. The Mute Audio button silences your audio feed. This button operates at networklevel and updates your roster entry.
Using embedded audio or video
Using Avaya Aura® Conferencing Collaboration Agent February 2013 103

Procedure
In the Collaboration Agent window, click Mute Media.The Mute Media button turns blue, and the Mute Media icon appears next to your namein the Participants list.
Switching to embedded audio and/or video during a conferenceAbout this taskIf you have chosen not to use the Audio/Video in Collaboration Agent feature, you can changeyour mind and switch to integrated audio and/or video at any point during a live conference.
Procedure
1. In the Collaboration Agent window, click AViCA Settings.Collaboration Agent displays the Add Web Audio or Video dialog.
2. Choose your required options and enter the conference.
Related topics:Entering a conference on page 102
Using embedded audio and video
104 Using Avaya Aura® Conferencing Collaboration Agent February 2013Comments? [email protected]

Chapter 11: Sending messages during aconference
The Messages windowThe Messages window contains a list of messages sent by the moderator and participantsduring the conference. There is also a field for entering text for messages. The maximumnumber of characters you can enter in this field is 1024. You can also paste a text messagein the field.
The messages are shown with the sender's name and the time the message was sent. Themost recent message is at the end of the list.
You can send a message to all the participants.
Figure 1: The Messages Window
Opening the Messages windowProcedure
1. Click Start Web Collaboration.
Using Avaya Aura® Conferencing Collaboration Agent February 2013 105

2. Click Messages.The Messages window opens.
Sending a messageProcedure
1. Click Start Web Collaboration.
2. Open the Message window.
3. Enter the message in the space at the bottom of the Messages window.
4. Click Send.
• The message pops up briefly. Participants can click on the pop-up to open themessage or open the Messages window.
• The message appears in the list with your name and the time you sent themessage. Other participants in the conference see an updated number ofunread messages.
Sending messages during a conference
106 Using Avaya Aura® Conferencing Collaboration Agent February 2013Comments? [email protected]

Chapter 12: Managing meeting minutes
Meeting minutesAll users may record and edit meeting minutes which are available for later review. Themoderator may also create a report, suitable for mailing to attendees, containing any or allelements of the meeting minutes. You can organize your meeting minutes into the followingcategories:
• notes
• keywords
• action items
• questions
Figure 2: Minutes Window
Related topics:Minutes interface on page 107
Minutes interface
Name Description
Enter text here The text you want to appear in the note.
Using Avaya Aura® Conferencing Collaboration Agent February 2013 107

Button Description
View Open the View menu to filter the notes bytype.
Add Makes notes you can later refer to or includein a meeting report.
Note Tag the record as a meeting note.
Keyword Annotates the meeting with tags you cansearch for later.
Action item Assign work items to participants.
Question Record questions as part of the meetingrecords.
Personal Hide the note from other participants in theconference.
Icon Name Description
Edit Edits the selected note.
Delete Deletes the selected note.
Adding minutesProcedure
1. Click Start Web Collaboration.
2. Open the Minutes window by clicking Minutes.
3. Enter the text you wish to add.
4. Select the Minute type.
5. To make the note invisible to other conference participants, check the Personalbox.Personal minutes, except from the moderator, do not appear in meeting reports.
6. Click Add.Web Collaboration adds the minute with the type, your name and a time stamp.Other participants in the conference see the number of unread minutes .
Managing meeting minutes
108 Using Avaya Aura® Conferencing Collaboration Agent February 2013Comments? [email protected]

Editing minutesBefore you beginYou can only edit minutes that you added.
Procedure
1. Click Start Web Collaboration.
2. Open the Minutes window by clicking Minutes.
3. Select the note you wish to edit.
4. Click .The Edit window opens.
5. Edit the text and change the item type and sensitivity.
6. Click Save to save the changes.
Deleting minutesBefore you beginYou can only delete notes that you added.
Procedure
1. Click Start Web Collaboration.
2. Open the Minutes window by clicking Minutes.
3. Select the note you wish to delete.
4. Click .The Confirmation window opens.
5. Click OK to delete the note.
Editing minutes
Using Avaya Aura® Conferencing Collaboration Agent February 2013 109

Managing meeting minutes
110 Using Avaya Aura® Conferencing Collaboration Agent February 2013Comments? [email protected]

Chapter 13: Managing meeting reports
Meeting reportsIntroductionAt the end of each collaboration session, a report is automatically generated which, in additionto the meeting minutes, also includes the different sharing events that took place in thecollaboration session. Users can access the reports of their web collaboration sessions fromthe Collaboration Agent.
The server stores meeting reports for 90 days.
Meeting report contentsThe meeting reports contain the following information for a session:
• Meeting notes (action items, key words, notes, screenshots, and questions, any of whichparticipants or guests can mark private), except for private notes which guests andparticipants add. These private minutes do not appear in the archive for privacyreasons.
• All messages exchanged publicly during the meeting.• Library file sharing events, down to the level of individual pages and slides. The library
files are accessible in the transcript only if the owner (moderator) owns the library filesand the files are available in the library at the time of the reporting. The owner (moderator)does not have access to library files owned by other presenters.
• Whiteboard, application and desktop sharing events, and screenshots.
Accessing meeting reportsBefore you beginYou must be the conference owner.
Procedure
1. To access reports from a Collaboration Agent session:
a. Click Information.b. On the Information panel, click My Reports.
Using Avaya Aura® Conferencing Collaboration Agent February 2013 111

2. To access reports from the login screen, click My Reports.
ResultThe Meeting Reports window opens.
Sorting Web Collaboration sessionsBefore you beginYou must be the conference owner.
About this taskYou can sort the Web Collaboration sessions in ascending or descending order by date andtime, name or duration.
The selected sort item is shown by an arrow in the column, the arrow also indicates the sortorder: ascending or descending.
Procedure
1. To access reports from a Collaboration Agent session:
a. Click Information.b. On the Information panel, click My Reports.
2. To access reports from the login screen, click My Reports.
3. To sort the Web Collaboration sessions, click the column.
• Date and time — the date and time of the Web Collaboration session.
• Name — name of the Web Collaboration report.
• Duration — length of the Web Collaboration session.
4. Click the column again to reverse the sort order.
Deleting meeting reportsBefore you beginYou must be the conference owner.
Managing meeting reports
112 Using Avaya Aura® Conferencing Collaboration Agent February 2013Comments? [email protected]

Procedure
1. To access reports from a Collaboration Agent session:
a. Click Information.b. On the Information panel, click My Reports.
2. To access reports from the login screen, click My Reports.
3. Select the meeting report.
4. Click Delete.
5. Click OK to confirm the deletion.
Renaming meeting report sessionsBefore you beginYou must be the conference owner.
Procedure
1. To access reports from a Collaboration Agent session:
a. Click Information.b. On the Information panel, click My Reports.
2. To access reports from the login screen, click My Reports.
3. Click Rename.
4. Enter the new name in the Rename Session dialog box.
5. Click Save.
Generating and sending reportsBefore you beginYou must be the conference owner.
Procedure
1. To access reports from a Collaboration Agent session:
a. Click Information.
Renaming meeting report sessions
Using Avaya Aura® Conferencing Collaboration Agent February 2013 113

b. On the Information panel, click My Reports.
2. To access reports from the login screen, click My Reports.
3. Select the report.
4. Click Open.
5. (Optional) Customize the report:
• Sort the meeting events by time, author or type in the Layout by: drop-downmenu.
• Select the events for the report in the View: drop-down menu.
See Meeting reports custom parameters on page 114 for information oncustomizing meeting reports.
6. To generate the report, click Export.A pop-up window showing the report layout opens.
7. To copy the report to the clipboard as text, for example to send it in an email, clickCopy.
8. To save the report as an HTML file, click Save.
9. To print the report, click Print.
Related topics:Meeting reports custom parameters on page 114
Meeting reports custom parametersYou may sort events the List by menu.
To sort by... Select...
Event time Time
Participant Name Author
Event type, for example shared document TypeSee View for a list of event types.
You may choose to view all events or select specific event types using the View menu.
Name Description
All All minutes, notes and events.
Action Items
Action items assigned in the meetingminutes.
Managing meeting reports
114 Using Avaya Aura® Conferencing Collaboration Agent February 2013Comments? [email protected]

Name Description
Keywords
Keywords defined in the meeting minutes.
Meeting Events
Events, such as starting or ending sharing orsharing documents.
Messages
Messages sent during the conference.
Notes
Meeting minutes tagged as notes.
Questions
Meeting minutes tagged as questions.
Personal items Include minutes flagged as personal by themoderator.
Generating and sending reports
Using Avaya Aura® Conferencing Collaboration Agent February 2013 115

Managing meeting reports
116 Using Avaya Aura® Conferencing Collaboration Agent February 2013Comments? [email protected]

Chapter 14: Using dialpad commandsduring a conference
You can use the dialpad on your telephone (or other phone such as Flare Experience for Windows orFlare Experience for iPad Devices) to enter touch-tone commands for selected actions during aconference. The touch-tone commands you can enter depend on your role (for example, moderator orparticipant) and the type of conference. From the dialpad, you can perform such actions as:
• mute and unmute your audio
• mute and unmute the audio for all participants in the conference
• enable and disable the Lecture mode feature, Lock feature, Continuation feature, and Entry and Exittones feature
• raise and lower your hand
• add participants to the conference
Note:The features you change using the dialpad apply to the current conference only and are reset whenthe conference ends.
Tip:For the dialpad commands available during the conference, open the Information Panel and clickFeature Keys.
The following dialpad commands are available to the moderator and participants
Name Description Keys
List available keys **
Dial out to operator *0
Toggle both audio and video *6
Toggle audio *61
Toggle media *62
Count participants Counts the number of activeparticipants in the audioconference.
*#
The following dialpad commands are only available to the moderator.
Using Avaya Aura® Conferencing Collaboration Agent February 2013 117
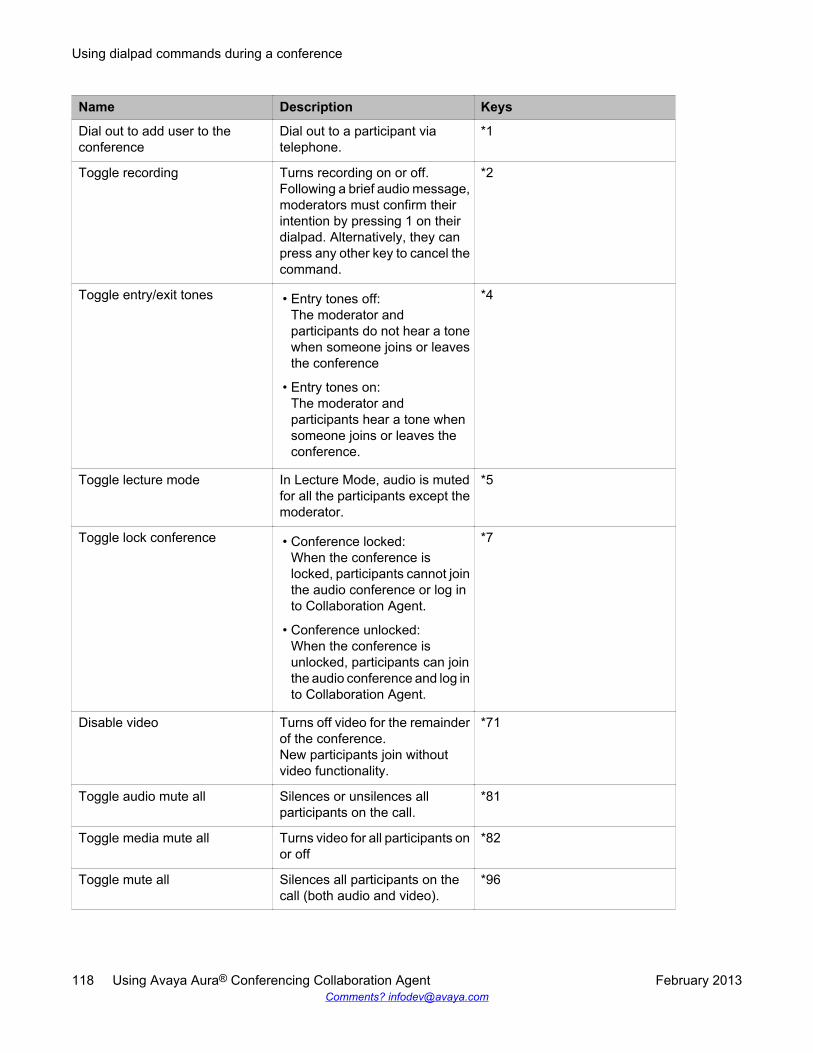
Name Description Keys
Dial out to add user to theconference
Dial out to a participant viatelephone.
*1
Toggle recording Turns recording on or off.Following a brief audio message,moderators must confirm theirintention by pressing 1 on theirdialpad. Alternatively, they canpress any other key to cancel thecommand.
*2
Toggle entry/exit tones • Entry tones off:The moderator andparticipants do not hear a tonewhen someone joins or leavesthe conference
• Entry tones on:The moderator andparticipants hear a tone whensomeone joins or leaves theconference.
*4
Toggle lecture mode In Lecture Mode, audio is mutedfor all the participants except themoderator.
*5
Toggle lock conference • Conference locked:When the conference islocked, participants cannot jointhe audio conference or log into Collaboration Agent.
• Conference unlocked:When the conference isunlocked, participants can jointhe audio conference and log into Collaboration Agent.
*7
Disable video Turns off video for the remainderof the conference.New participants join withoutvideo functionality.
*71
Toggle audio mute all Silences or unsilences allparticipants on the call.
*81
Toggle media mute all Turns video for all participants onor off
*82
Toggle mute all Silences all participants on thecall (both audio and video).
*96
Using dialpad commands during a conference
118 Using Avaya Aura® Conferencing Collaboration Agent February 2013Comments? [email protected]

Name Description Keys
Participants can unmutethemselves.
Allow conference to continueafter moderator leaves.
• Continuation off:The conference ends within apredetermined time after thelast moderator leaves.
• Continuation On:The conference does not endwhen the last moderatorleaves.
*98
End conference After you press ##, you hear aprompt: “Press 1 to confirm thatyou want the conference to endimmediately”.If you press 1, theconference ends.
##
The following dialpad commands are only available to participants.
Name Description Keys
Raise hand *41
Lower hand *42
Set Moderator To set a moderator when none ispresent.The participant enters themoderator code and then the #sign to become the moderator.
*51
Using Avaya Aura® Conferencing Collaboration Agent February 2013 119

Using dialpad commands during a conference
120 Using Avaya Aura® Conferencing Collaboration Agent February 2013Comments? [email protected]

Glossary
Audio/Video inCollaborationAgent
The Audio/Video in Collaboration Agent (AViCA) feature enables you toreceive audio, video, and data content through a single device. You cansimply click on a conference URL (hyperlink), log in to the conference,and immediately share audio, video, and data using the CollaborationAgent Web page. This feature is sometimes called One Touch Video(OTV) or embedded audio and video.
CollaborationCode
The code that you use to access a conference. For example, on theCollaboration Agent log in screen, you enter a participant code or amoderator code. Similarly, on your telephone keypad, you enter aparticipant code or a moderator code, followed by the pound key. Thiscode is called a collaboration code.
Event Calls A type of secure broadcast. Event calls involve the transmission of oftenhighly sensitive information to a group of interested parties, such asinvestors. In a typical investor relations call, the number of participantscan exceed one hundred.
Moderator A moderator is a conference participant who has access to a number ofspecial features during a live conference. These features enablemoderators to control the conference. These features may include theability to start and stop recording, start lecture mode, and dial out to newparticipants. A moderator is often called a Host or a Chairperson.
Participant Participants are people who attend conference calls.
Passcode A second level of code validation prior to conference entry. A passcodeis a numeric code that participants enter on the Collaboration Agent login screen or on the telephone keypad after they enter the collaborationcode.
Using Avaya Aura® Conferencing Collaboration Agent February 2013 121

Passcode
122 Using Avaya Aura® Conferencing Collaboration Agent February 2013Comments? [email protected]

Index
A
About Collaboration Agent ........................................... 9Accessing meeting reports ....................................... 111Activity timeline ...........................................................96Adding a whiteboard ...................................................79Adding minutes .........................................................108Adding participants .....................................................49Annotating .................................................................. 82Annotation controls .....................................................82Apple Safari ................................................................27Applications ................................................................ 80
sharing ................................................................. 80Associating ................................................................. 52
participant ............................................................ 52Attendance snapshot ..................................................45audio .........................................................................103
muting ................................................................ 103Auto-record ..................................................... 38, 88, 90
enabling ..........................................................38, 90AViCA ................................................................. 11, 104
B
Browsers .................................................................... 27supported .............................................................27
Browsing .....................................................................76
C
Changing the type of sharing ..................................... 85Check list ....................................................................23Chrome .......................................................................27codes ..........................................................................63Collaboration Agent ................................................ 9, 29
about ......................................................................9logging in ..............................................................29
Conference .......................................... 36, 37, 55, 61, 88beginning without a moderator .............................36continuing without a moderator ............................37locking ............................................................ 55, 61recording ..............................................................88unlocking ........................................................ 55, 61
Conference check list ................................................. 23Configuring Entry tones ..............................................36Configuring video ....................................................... 38
Continuation ..........................................................56, 60disabling ......................................................... 56, 60enabling ..........................................................56, 60
Continuing conference without a moderator. ..............37
D
Default settings ...........................................................35Deleting a whiteboard .................................................79Deleting documents ....................................................74Deleting meeting reports .......................................... 112Deleting minutes .......................................................109Deskphones ............................................................... 44
ending associating with Collaboration Agentaccount ................................................... 44
Desktop ...................................................................... 78sharing ................................................................. 78
dialpad commands ..................................................... 45viewing .................................................................45
Disabling continuation ...........................................56, 60Disabling entry and exit tones ...............................56, 60Disabling Lecture Mode ..............................................54Dissociating ................................................................ 52
participant ............................................................ 52Document sharing ...................................................... 77
ending .................................................................. 77Documents ...................................................... 71–75, 78
deleting ................................................................ 74list view ................................................................ 73renaming ..............................................................73Renaming documents ..........................................73sharing ............................................................75, 78sorting .................................................................. 74Sorting documents ...............................................74supported formats ................................................71thumbnail view ..................................................... 73uploading ............................................................. 72
Downloading ....................................................... 99, 100recordings .....................................................99, 100
audio and Web ............................................ 100audio only .................................................... 100
Dropping a participant ................................................ 53Dropping from a conference .......................................47
E
Editing minutes ......................................................... 109
Using Avaya Aura® Conferencing Collaboration Agent February 2013 123

embedded video ....................................................... 101Enabling continuation ........................................... 56, 60Enabling entry and exit tones ............................... 56, 60Enabling Lecture Mode .............................................. 54Ending whiteboard sharing .........................................80Entry and exit tones .............................................. 56, 60
disabling ......................................................... 56, 60enabling ..........................................................56, 60
Entry tones ................................................................. 36configuring ........................................................... 36
Event Conference .......................................................16example ......................................................................15
F
Fast start .................................................................... 36Feature Keys ............................................................ 117
summary ............................................................ 117Firefox ........................................................................ 27
G
Generating reports ....................................................113Google Chrome .......................................................... 27guest ..................................................................... 12, 28Guest ..........................................................................28
logging in as .........................................................28Guest mode ................................................................13
H
help .............................................................................25
I
Internet Explorer .........................................................27Introduction to sharing ................................................69
L
Lecture Mode ............................................................. 54disabling ...............................................................54enabling ............................................................... 54
Library ........................................................................ 71Locking the conference .........................................55, 61Logging in as guest .................................................... 28Logging in as moderator .............................................30Logging in as participant ............................................ 31Logging in as presenter ..............................................31logging in automatically .............................................. 12
Logging in to Collaboration Agent .............................. 29Logging out .................................................................34Lowering your hand ....................................................41
M
MAC OS ..................................................................... 27main window ...............................................................17Media .................................................................... 42, 50
muting .............................................................42, 50Meeting reports ................................................. 111–114
accessing ........................................................... 111custom parameters ............................................ 114deleting ...............................................................112renaming ............................................................ 113sorting ................................................................ 112
Meeting Reports ....................................................... 111member .................................................................12, 28Message ................................................................... 106
sending ...............................................................106Messages window .................................................... 105
introduction .........................................................105opening .............................................................. 105
Minutes ..............................................................107–109adding ................................................................ 108deleting ...............................................................109editing .................................................................109
Moderator ............................................................. 30, 51Logging in as ........................................................30promoting to .........................................................51
Moderator role ............................................................ 13Modes .........................................................................13
guest .................................................................... 13Mozilla Firefox ............................................................ 27Muting media ........................................................ 42, 50Muting your audio .......................................................41Muting your playback audio ........................................97
N
Navigating whiteboards .............................................. 79Navigation .................................................................. 76new codes .................................................................. 11new features ...............................................................10
O
Opening the Messages window ................................105Operator ..................................................................... 33
logging in as .........................................................33Operator role .............................................................. 13
124 Using Avaya Aura® Conferencing Collaboration Agent February 2013

OTV .......................................................................... 101
P
Participant ..................................................31, 52, 53, 95activity panel ........................................................ 95associating ...........................................................52dissociating .......................................................... 52dropping ...............................................................53logging in as .........................................................31
Participant role ........................................................... 13Participants .................................................................49
adding .................................................................. 49passcodes ....................................................... 39, 64–66
adding .............................................................39, 65logging in ..............................................................66modifying ..............................................................65
Persisted association ................................................. 44per-conference .....................................................44
Playback .................................................... 92–94, 96–99accessing .............................................................93activity timeline .....................................................96control panel ........................................................ 97forwarding ............................................................ 98introduction .......................................................... 92rewinding ..............................................................98starting ................................................................. 94stopping ............................................................... 94zoom .................................................................... 99
Presenter ....................................................................31logging in as .........................................................31
Presenter role .............................................................13Promoting to moderator ..............................................51PSTN participant role ................................................. 13
R
Raising your hand ...................................................... 41recording .................................................................... 10Recording ........................................................57, 87–92
automatic ............................................................. 88distributing ............................................................92introduction .......................................................... 87manual ................................................................. 87renaming ..............................................................91sorting .................................................................. 90starting ............................................................57, 89status ................................................................... 88stopping ..........................................................57, 90
Renaming meeting reports ....................................... 113Reports ..................................................................... 113
generating .......................................................... 113sending ...............................................................113
Roles .......................................................................... 13moderator .............................................................13operator ................................................................13participant ............................................................ 13presenter ..............................................................13PSTN participant ..................................................13
S
Safari .......................................................................... 27Screenshot ................................................................. 85
sending ................................................................ 85Searching for users ...............................................47, 61secure conferencing ................................................... 64security ....................................................................... 63Sending ...................................................................... 85
screenshot ........................................................... 85Sending a message ..................................................106Sending reports ........................................................ 113settings ....................................................................... 35
default .................................................................. 35Shared content ........................................................... 77
browsing ...............................................................77Sharing ............................................................69, 75, 80
applications ..........................................................80documents ........................................................... 75introduction .......................................................... 69
Sharing documents .................................................... 78Sharing the desktop ................................................... 78Sharing type ............................................................... 85
changing .............................................................. 85Sorting index reports ................................................ 112SRTP ..........................................................................11streaming video ........................................................ 101Supported browsers ................................................... 27System requirements ................................................. 27
T
touch-tone commands ................................................45viewing .................................................................45
Touch-tone commands .............................................117dialpad commands .............................................117
summary ......................................................117summary ............................................................ 117
U
Unlocking the conference ..................................... 55, 61
Using Avaya Aura® Conferencing Collaboration Agent February 2013 125

Unmuting your audio .................................................. 41Uploading documents .................................................72URL ............................................................................ 12user types ...................................................................12Users .................................................................... 47, 61
searching for ...................................................47, 61
V
version ........................................................................25video .......................................................... 101, 102, 104
entering a conference ........................................ 102pausing ...............................................................104switching midcall ................................................ 104
Video .......................................................................... 38configuring ........................................................... 38
Viewing dialpad commands ........................................45Viewing participant activity ......................................... 96Viewing touch-tone commands .................................. 45Volume ....................................................................... 98
of your playback ...................................................98Playback .............................................................. 98
volume ...........................................................98
W
web browser ............................................................... 27Web Collaboration components ................................. 69Whiteboard ........................................................... 78, 79
adding .................................................................. 79deleting ................................................................ 79sharing ................................................................. 78
Whiteboard sharing .................................................... 80ending .................................................................. 80
Whiteboards ............................................................... 79navigating .............................................................79
Windows 7.0 ...............................................................27Windows XP ............................................................... 27
126 Using Avaya Aura® Conferencing Collaboration Agent February 2013


![Aura e imagen dialéctica [final]](https://static.fdokumen.com/doc/165x107/631d416593f371de1901d874/aura-e-imagen-dialectica-final.jpg)