User's Guide - Epson Europe
191
User's Guide
-
Upload
khangminh22 -
Category
Documents
-
view
0 -
download
0
Transcript of User's Guide - Epson Europe
User's Guide
Contents 2
Notations Used in This Guide 8
Using the Manual to Search for Information .................................. 9Searching by Keyword ................................................................................................................... 9Jumping Directly from Bookmarks............................................................................................ 9Printing Only the Pages You Need............................................................................................ 9
Getting the Latest Version of the Documents............................... 10
Introduction to Your Projector 11
Projector Parts and Functions ........................................................ 12Projector Parts - Front/Top ........................................................................................................ 12Projector Parts - Rear.................................................................................................................... 13Projector Parts - Interface........................................................................................................... 14Projector Parts - Base ................................................................................................................... 16
Installing the Safety Wire...................................................................................................... 16Projector Parts - Control Panel ................................................................................................. 17Projector Parts - Remote Control ............................................................................................ 18
Installing Batteries in the Remote Control..................................................................... 21Remote Control Operation .................................................................................................. 21Locking the Remote Control Buttons .............................................................................. 22
Projector Parts - External Camera ........................................................................................... 23
Setting Up the Projector 24
Notes on Transporting..................................................................... 25
Precautions on Installation ............................................................. 26
Attaching and Removing a Lens..................................................... 29Attaching a Lens ............................................................................................................................ 29Removing a Lens ........................................................................................................................... 33
Operating the Projector Power ...................................................... 35Turning On the Projector ........................................................................................................... 35
Turning Off the Projector ........................................................................................................... 36
Wired Network Connection............................................................. 37Connecting to a Wired Network.............................................................................................. 37Selecting Wired Network Settings .......................................................................................... 37
Wireless Network Connection......................................................... 39Installing the Wireless LAN Module ....................................................................................... 39Selecting Wireless Network Settings Manually.................................................................. 40Selecting Wireless Network Settings in Windows ............................................................ 41Selecting Wireless Network Settings in Mac....................................................................... 41Setting Up Wireless Network Security................................................................................... 42
Supported Client and CA Certificates .............................................................................. 43Using a QR Code to Connect a Mobile Device................................................................... 43Using a USB Key to Connect a Windows Computer ........................................................ 44
Secure HTTP...................................................................................... 46Importing a Web Server Certificate Using the Menus..................................................... 46
Supported Web Server Certificates................................................................................... 46
Adjusting the Menu Settings 48
Home Screen..................................................................................... 49
Using the Projector's Menus ........................................................... 50
Using the Displayed Keyboard ....................................................... 51Available Text Using the Displayed Keyboard ................................................................... 51
Using Basic Projector Features ....................................................... 52Setting Up the Projector............................................................................................................. 52
Messages..................................................................................................................................... 52Standby Confirmation............................................................................................................ 52Sleep Mode ................................................................................................................................ 52Beep.............................................................................................................................................. 52Indicators .................................................................................................................................... 53Date & Time ............................................................................................................................... 53Language .................................................................................................................................... 53
Contents 3
On-Screen Display ................................................................................................................... 53Projecting Images.......................................................................................................................... 53
Source Search............................................................................................................................ 53A/V Mute ..................................................................................................................................... 54Freeze........................................................................................................................................... 54Split Screen ................................................................................................................................ 54Volume......................................................................................................................................... 54Test Pattern................................................................................................................................ 55Content Playback..................................................................................................................... 55Display Background................................................................................................................ 55Startup Screen .......................................................................................................................... 55
Adjusting the Image Position and Shape ............................................................................ 55Lens Shift .................................................................................................................................... 56Zoom............................................................................................................................................ 56Aspect .......................................................................................................................................... 56H/V-Keystone............................................................................................................................. 57Quick Corner.............................................................................................................................. 57Curved Surface.......................................................................................................................... 57Corner Wall................................................................................................................................. 57Point Correction ....................................................................................................................... 58Screen Type ............................................................................................................................... 58Projection.................................................................................................................................... 58
Adjusting the Image Quality ..................................................................................................... 58Focus ............................................................................................................................................ 58Color Mode ................................................................................................................................ 59Image Enhancement .............................................................................................................. 59Gamma ........................................................................................................................................ 59RGBCMY....................................................................................................................................... 60Brightness Settings ................................................................................................................. 60
Using Multiple Projectors........................................................................................................... 60Tiling............................................................................................................................................. 60Edge Blending........................................................................................................................... 60Black Level.................................................................................................................................. 61Scale.............................................................................................................................................. 61Color Matching......................................................................................................................... 61
Maintaining the Projector Quality........................................................................................... 61Panel Alignment ...................................................................................................................... 61Color Uniformity....................................................................................................................... 62Refresh Mode ............................................................................................................................ 62Light Source Calibration ....................................................................................................... 62
Managing the Projector's Settings.......................................................................................... 62Memory ....................................................................................................................................... 62Schedule Settings.................................................................................................................... 62Button Lock................................................................................................................................ 63Password Protection............................................................................................................... 64
Copying Menu Settings Between Projectors (Batch Setup) ........ 65Transferring Settings From a USB Flash Drive.................................................................... 65Transferring Settings From a Computer............................................................................... 66Batch Setup Error Notification.................................................................................................. 67
Menu Settings 68
Image Menu...................................................................................... 69Color Mode ...................................................................................................................................... 69Brightness......................................................................................................................................... 69Contrast............................................................................................................................................. 69Color Saturation............................................................................................................................. 70Tint ...................................................................................................................................................... 70Sharpness ......................................................................................................................................... 70White Balance ................................................................................................................................. 704K Enhancement............................................................................................................................ 70Image Preset Mode....................................................................................................................... 71Frame Interpolation...................................................................................................................... 71Deinterlacing................................................................................................................................... 71Noise Reduction............................................................................................................................. 72MPEG Noise Reduction................................................................................................................ 72Super-resolution ............................................................................................................................ 72Detail Enhancement..................................................................................................................... 72Reset (Image Enhancement) ..................................................................................................... 72
Contents 4
Scene Adaptive Gamma ............................................................................................................. 73Gamma .............................................................................................................................................. 73RGBCMY ............................................................................................................................................ 73Dynamic Contrast.......................................................................................................................... 73Lights-Out Control ........................................................................................................................ 74Reset (Image menu) ..................................................................................................................... 74
Signal Menu...................................................................................... 75Resolution......................................................................................................................................... 75Aspect ................................................................................................................................................ 75Tracking............................................................................................................................................. 76Sync. ................................................................................................................................................... 76Position.............................................................................................................................................. 76Auto Setup ....................................................................................................................................... 76Overscan ........................................................................................................................................... 76Blanking ............................................................................................................................................ 77Color Space...................................................................................................................................... 77Dynamic Range .............................................................................................................................. 77Video Range .................................................................................................................................... 77EDID.................................................................................................................................................... 78Scale.................................................................................................................................................... 78Reset (Signal menu)...................................................................................................................... 78
Settings Menu .................................................................................. 79Geometry Correction ................................................................................................................... 79Split Screen ...................................................................................................................................... 80
Split Screen Projection Restrictions.................................................................................. 80Volume .............................................................................................................................................. 81HDMI Link......................................................................................................................................... 81Control Panel Lock........................................................................................................................ 81Lens Lock .......................................................................................................................................... 82Light Source Mode........................................................................................................................ 82Brightness Level ............................................................................................................................. 82Constant Brightness ..................................................................................................................... 82Estimated Remains........................................................................................................................ 82
Constant Brightness Usage Hours..................................................................................... 83
Light Source Operation Time.............................................................................................. 83Remote Receiver ............................................................................................................................ 84User Button...................................................................................................................................... 84Test Pattern...................................................................................................................................... 84Memory ............................................................................................................................................. 85Content Playback........................................................................................................................... 85
Creating Playlists Using Epson Web Control................................................................. 86Content Playback Mode Restrictions ............................................................................... 87
Reset (Settings menu).................................................................................................................. 87
Extended Menu ................................................................................ 88Home Screen................................................................................................................................... 88Menu Position................................................................................................................................. 88Message Position........................................................................................................................... 89Messages .......................................................................................................................................... 89Display Background...................................................................................................................... 89Startup Screen ................................................................................................................................ 89Standby Confirmation ................................................................................................................. 89Air Filter Notice............................................................................................................................... 89Screen ................................................................................................................................................ 89Panel Alignment ............................................................................................................................ 90Color Uniformity ............................................................................................................................ 90OSD Rotation................................................................................................................................... 91User's Logo....................................................................................................................................... 91Projection ......................................................................................................................................... 91Direct Power On............................................................................................................................. 91Sleep Mode...................................................................................................................................... 92Sleep Mode Timer ......................................................................................................................... 92High Altitude Mode...................................................................................................................... 92Auto Source Search ...................................................................................................................... 92Auto Power On............................................................................................................................... 92Startup Source................................................................................................................................ 92Quick Startup .................................................................................................................................. 92USB Power........................................................................................................................................ 93A/V Mute Settings ......................................................................................................................... 93
Contents 5
Beep.................................................................................................................................................... 93Indicators .......................................................................................................................................... 93Log Save Destination ................................................................................................................... 93Batch Setup Range........................................................................................................................ 93AC Voltage Monitoring................................................................................................................ 94Lens Type.......................................................................................................................................... 94Date & Time ..................................................................................................................................... 94Lens Calibration ............................................................................................................................. 94A/V Settings ..................................................................................................................................... 94Standby Mode ................................................................................................................................ 95HDBaseT............................................................................................................................................ 95Color Calibration............................................................................................................................ 95
Conditions for Color Calibration........................................................................................ 95Projector ID...................................................................................................................................... 96Projector Grouping ....................................................................................................................... 96Tiling................................................................................................................................................... 96Edge Blending ................................................................................................................................ 96Black Level........................................................................................................................................ 97Reset (Multi-Projection menu).................................................................................................. 97Screen Matching............................................................................................................................ 97
Conditions for Screen Matching ........................................................................................ 98Color Matching............................................................................................................................... 98Simple Stacking.............................................................................................................................. 98
Conditions for Simple Stacking.......................................................................................... 99Schedule Settings.......................................................................................................................... 99
Schedule Status Icons.......................................................................................................... 100Language ....................................................................................................................................... 100Reset (Extended menu) ............................................................................................................ 100
Network Menu................................................................................ 101Wireless Mode.............................................................................................................................. 101Net. Info. - Wireless LAN........................................................................................................... 101Net. Info. - Wired LAN................................................................................................................ 102Display the QR Code.................................................................................................................. 102Remote Camera Access ............................................................................................................ 102
Projector Name............................................................................................................................ 102PJLink Password .......................................................................................................................... 102Remote Password ....................................................................................................................... 102Web Control Password ............................................................................................................. 102Moderator Password.................................................................................................................. 102Projector Keyword ...................................................................................................................... 103Display Keyword.......................................................................................................................... 103Display LAN Info. ......................................................................................................................... 103Connection Mode ....................................................................................................................... 103Search Access Point ................................................................................................................... 103SSID .................................................................................................................................................. 104Security ........................................................................................................................................... 104Passphrase ..................................................................................................................................... 104EAP Method .................................................................................................................................. 104Channel........................................................................................................................................... 105IP Settings ...................................................................................................................................... 105SSID Display .................................................................................................................................. 106IP Address Display ...................................................................................................................... 106IPv6 Settings ................................................................................................................................. 106Mail Notification .......................................................................................................................... 106
Network Projector E-mail Alert Messages.................................................................... 106SMTP Server .................................................................................................................................. 107Port Number ................................................................................................................................. 107From................................................................................................................................................. 107Address 1 Setting/Address 2 Setting/Address 3 Setting ............................................. 107SNMP ............................................................................................................................................... 107Trap IP Address 1/Trap IP Address 2.................................................................................... 107Community Name ...................................................................................................................... 107PJLink Notification...................................................................................................................... 108Notified IP Address..................................................................................................................... 108Command Communication..................................................................................................... 108Secure HTTP .................................................................................................................................. 108Web Server Certificate............................................................................................................... 108Web API Settings......................................................................................................................... 108Priority Gateway .......................................................................................................................... 109
Contents 6
PJLink............................................................................................................................................... 109AMX Device Discovery .............................................................................................................. 109Crestron Connected................................................................................................................... 109Art-Net............................................................................................................................................. 109Message Broadcasting .............................................................................................................. 109Reset (Network menu) .............................................................................................................. 109
Info Menu........................................................................................ 110Projector Info ................................................................................................................................ 110
Event ID Code List................................................................................................................. 110Light Source Info......................................................................................................................... 111Version ............................................................................................................................................ 111Status Information...................................................................................................................... 111Voltage Warning Info ................................................................................................................ 112Temp Warning Info .................................................................................................................... 112Power On/Off History ................................................................................................................ 112
Reset Menu ..................................................................................... 113Reset All Memories..................................................................................................................... 113Refresh Mode................................................................................................................................ 113Light Source Calibration........................................................................................................... 113NFC Settings.................................................................................................................................. 114Reset All Config............................................................................................................................ 114Reset All (Factory Default) ....................................................................................................... 114
Adjusting Projector Features 116
Multi-Projection Features ............................................................. 117Procedure Overview .................................................................................................................. 117Preparation.................................................................................................................................... 117
Initializing Projectors ........................................................................................................... 117Assigning a Master Projector............................................................................................ 118Calibrating Projectors .......................................................................................................... 118Installing Projectors.............................................................................................................. 118Performing Rough Image Adjustments........................................................................ 118
Connecting Projectors to a Network ............................................................................. 119Image Composition.................................................................................................................... 119
Tiling........................................................................................................................................... 119Stacking .................................................................................................................................... 120
Adjusting Colors .......................................................................................................................... 120
External Camera Usage ................................................................. 122Camera Assist Function ............................................................................................................ 122
Monitoring and Controlling the Projector 124
Projector Monitoring and Control Options................................. 125Epson Projector Management ............................................................................................... 125Epson Web Control .................................................................................................................... 125SNMP ............................................................................................................................................... 125ESC/VP21 Commands .............................................................................................................. 125ESC/VP.net Commands............................................................................................................. 126PJLink............................................................................................................................................... 126Art-Net............................................................................................................................................. 126Crestron Connected Support ................................................................................................. 126Web API .......................................................................................................................................... 127
Accessing a Networked Projector Using a Web Browser........... 128Web Control Options................................................................................................................. 129
Maintaining the Projector 139
Projector Maintenance .................................................................. 140
Cleaning the Lens........................................................................... 141
Cleaning the Projector Case.......................................................... 142
Air Filter and Vent Maintenance .................................................. 143Cleaning the Air Filters and Intake Vents ......................................................................... 143Replacing the Air Filter ............................................................................................................. 145
Contents 7
Solving Problems 148
Projection Problems ...................................................................... 149
Projector Indicator Status ............................................................. 150
Projector Status Display Messages .............................................. 153
Solving Image or Sound Problems............................................... 157Solutions When No Image Appears..................................................................................... 157Solutions When "No Signal" Message Appears ............................................................... 157
Displaying From a Windows Laptop.............................................................................. 158Displaying From a Mac Laptop........................................................................................ 158
Solutions When "Not Supported" Message Appears .................................................... 158Solutions When Only a Partial Image Appears................................................................ 158Solutions When the Image is not Rectangular ................................................................ 159Solutions When the Image Contains Noise or Static..................................................... 159Solutions When the Image is Fuzzy or Blurry .................................................................. 159Solutions When the Image Brightness or Colors are Incorrect ................................. 160Solutions When Automatic Adjustments are not Applied Correctly ...................... 160Solutions When Simple Stacking is not Applied Correctly ......................................... 161Solutions When an Afterimage Remains on the Projected Image .......................... 161Solutions to Sound Problems................................................................................................. 161
Solving Projector or Remote Control Operation Problems....... 163Solutions to Projector Power or Shut-Off Problems...................................................... 163Solutions to Problems with the Remote Control............................................................ 163Solutions to Password Problems........................................................................................... 164Solution When "The Battery that Saves Your Clock Settings is Running Low"Message Appears ........................................................................................................................ 164
Solutions to Problems in Content Playback Mode ..................... 165
Solving Network Problems ........................................................... 166Solutions When Wireless Authentication Fails ................................................................ 166Solutions When You Cannot Access the Projector Through the Web ................... 166Solutions When Network Alert E-Mails are not Received............................................ 166Solutions When the Image Contains Static During Network Projection............... 167
Solutions When You Cannot Monitor and Control the Projector over aNetwork .......................................................................................................................................... 167
Appendix 168
Optional Accessories and Replacement Parts............................. 169Lens .................................................................................................................................................. 169Cables .............................................................................................................................................. 169Mounts ............................................................................................................................................ 170External Devices .......................................................................................................................... 170Replacement Parts...................................................................................................................... 170For Wireless Connection .......................................................................................................... 170
Screen Size and Projection Distance............................................ 171Projection Distance .................................................................................................................... 171
Projector Specifications................................................................. 180
Supported Features for Epson Projector Content Manager...... 183
List of Safety Symbols and Instructions ...................................... 184
Laser Safety Information............................................................... 186Laser Warning Labels................................................................................................................. 186
Hazard Distance according to IEC62471-5 .................................. 188
Notices ............................................................................................ 189FCC Compliance Statement.................................................................................................... 189Indication of the manufacturer and the importer in accordance withrequirements of EU directive.................................................................................................. 190Indication of the manufacturer and the importer in accordance withrequirements of United Kingdom directive...................................................................... 190Restriction of Use ........................................................................................................................ 190Operating System References................................................................................................ 190Trademarks.................................................................................................................................... 190Copyright Notice......................................................................................................................... 191Copyright Attribution................................................................................................................ 191
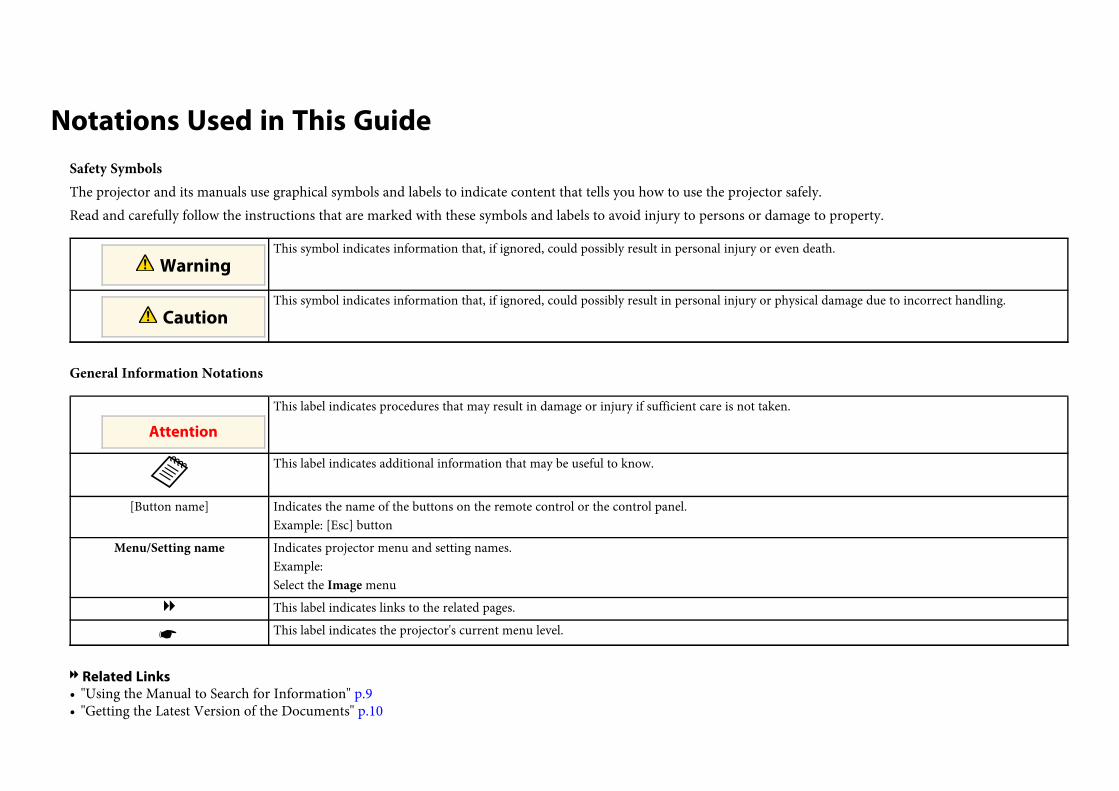
Notations Used in This GuideSafety SymbolsThe projector and its manuals use graphical symbols and labels to indicate content that tells you how to use the projector safely.Read and carefully follow the instructions that are marked with these symbols and labels to avoid injury to persons or damage to property.
WarningThis symbol indicates information that, if ignored, could possibly result in personal injury or even death.
CautionThis symbol indicates information that, if ignored, could possibly result in personal injury or physical damage due to incorrect handling.
General Information Notations
Attention
This label indicates procedures that may result in damage or injury if sufficient care is not taken.
This label indicates additional information that may be useful to know.
[Button name] Indicates the name of the buttons on the remote control or the control panel.Example: [Esc] button
Menu/Setting name Indicates projector menu and setting names.Example:Select the Image menu
This label indicates links to the related pages.
s This label indicates the projector's current menu level.
gg Related Links• "Using the Manual to Search for Information" p.9• "Getting the Latest Version of the Documents" p.10
Using the Manual to Search for Information 9
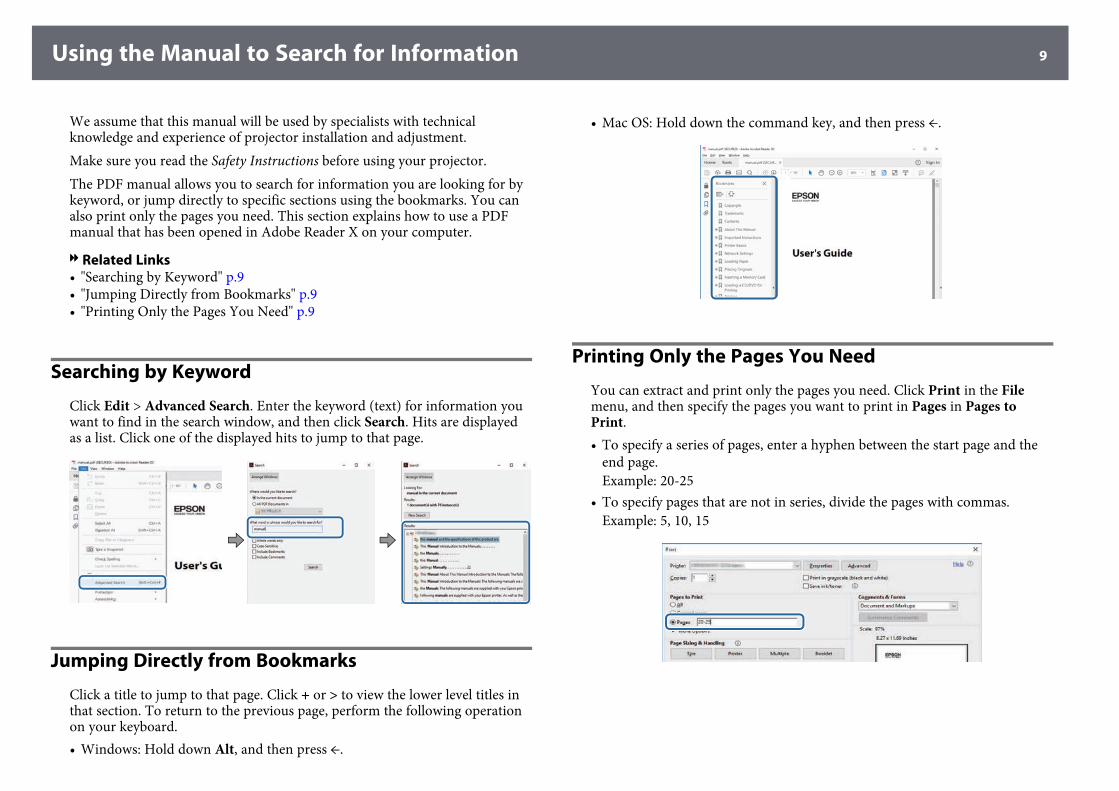
We assume that this manual will be used by specialists with technicalknowledge and experience of projector installation and adjustment.Make sure you read the Safety Instructions before using your projector.The PDF manual allows you to search for information you are looking for bykeyword, or jump directly to specific sections using the bookmarks. You canalso print only the pages you need. This section explains how to use a PDFmanual that has been opened in Adobe Reader X on your computer.
gg Related Links• "Searching by Keyword" p.9• "Jumping Directly from Bookmarks" p.9• "Printing Only the Pages You Need" p.9
Searching by Keyword
Click Edit > Advanced Search. Enter the keyword (text) for information youwant to find in the search window, and then click Search. Hits are displayedas a list. Click one of the displayed hits to jump to that page.
Jumping Directly from Bookmarks
Click a title to jump to that page. Click + or > to view the lower level titles inthat section. To return to the previous page, perform the following operationon your keyboard.• Windows: Hold down Alt, and then press ←.
• Mac OS: Hold down the command key, and then press ←.
Printing Only the Pages You Need
You can extract and print only the pages you need. Click Print in the Filemenu, and then specify the pages you want to print in Pages in Pages toPrint.• To specify a series of pages, enter a hyphen between the start page and the
end page.Example: 20-25
• To specify pages that are not in series, divide the pages with commas.Example: 5, 10, 15
Getting the Latest Version of the Documents 10
You can get the latest version of the manuals and specifications on the EpsonWeb site.Visit epson.sn, and enter your model name.
Introduction to Your ProjectorSee these sections to learn more about your projector.
gg Related Links• "Projector Parts and Functions" p.12
Projector Parts and Functions 12
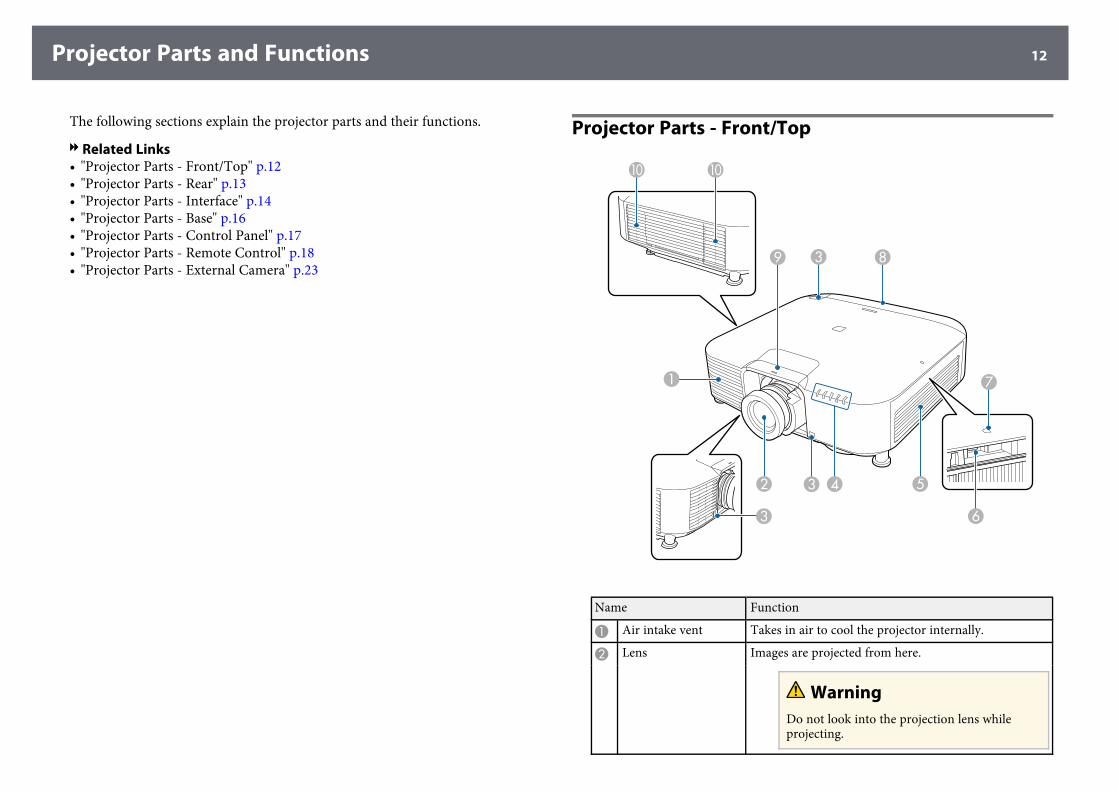
The following sections explain the projector parts and their functions.
gg Related Links• "Projector Parts - Front/Top" p.12• "Projector Parts - Rear" p.13• "Projector Parts - Interface" p.14• "Projector Parts - Base" p.16• "Projector Parts - Control Panel" p.17• "Projector Parts - Remote Control" p.18• "Projector Parts - External Camera" p.23
Projector Parts - Front/Top
Name Function
A Air intake vent Takes in air to cool the projector internally.
B Lens Images are projected from here.
WarningDo not look into the projection lens whileprojecting.
Projector Parts and Functions 13
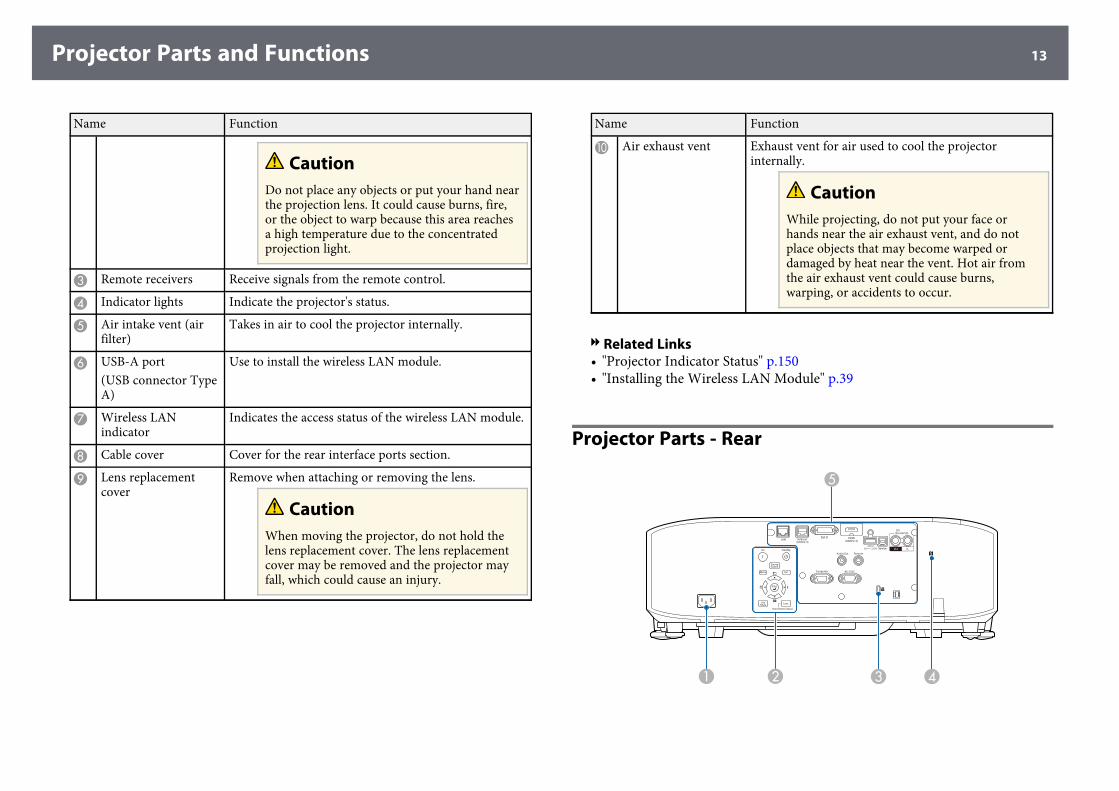
Name Function
CautionDo not place any objects or put your hand nearthe projection lens. It could cause burns, fire,or the object to warp because this area reachesa high temperature due to the concentratedprojection light.
C Remote receivers Receive signals from the remote control.
D Indicator lights Indicate the projector's status.
E Air intake vent (airfilter)
Takes in air to cool the projector internally.
F USB-A port(USB connector TypeA)
Use to install the wireless LAN module.
G Wireless LANindicator
Indicates the access status of the wireless LAN module.
H Cable cover Cover for the rear interface ports section.
I Lens replacementcover
Remove when attaching or removing the lens.
CautionWhen moving the projector, do not hold thelens replacement cover. The lens replacementcover may be removed and the projector mayfall, which could cause an injury.
Name Function
J Air exhaust vent Exhaust vent for air used to cool the projectorinternally.
CautionWhile projecting, do not put your face orhands near the air exhaust vent, and do notplace objects that may become warped ordamaged by heat near the vent. Hot air fromthe air exhaust vent could cause burns,warping, or accidents to occur.
gg Related Links• "Projector Indicator Status" p.150• "Installing the Wireless LAN Module" p.39
Projector Parts - Rear
Projector Parts and Functions 14
Name Function
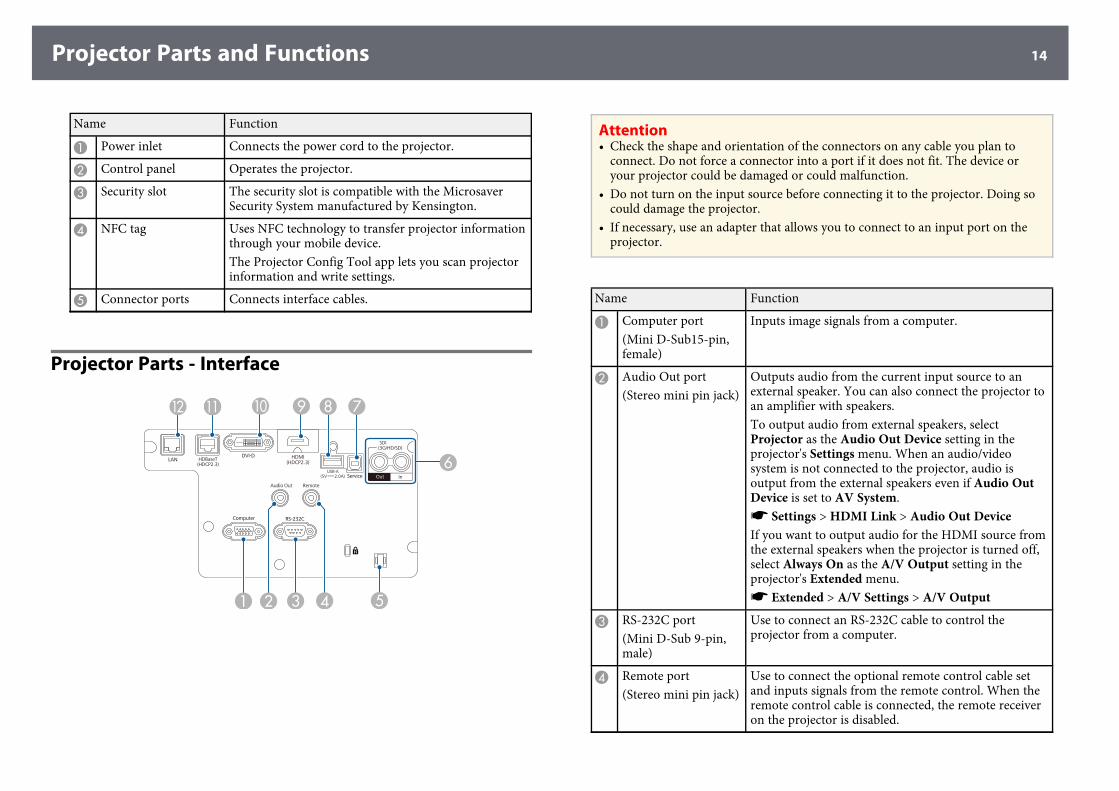
A Power inlet Connects the power cord to the projector.
B Control panel Operates the projector.
C Security slot The security slot is compatible with the MicrosaverSecurity System manufactured by Kensington.
D NFC tag Uses NFC technology to transfer projector informationthrough your mobile device.The Projector Config Tool app lets you scan projectorinformation and write settings.
E Connector ports Connects interface cables.
Projector Parts - Interface
Attention• Check the shape and orientation of the connectors on any cable you plan to
connect. Do not force a connector into a port if it does not fit. The device oryour projector could be damaged or could malfunction.
• Do not turn on the input source before connecting it to the projector. Doing socould damage the projector.
• If necessary, use an adapter that allows you to connect to an input port on theprojector.
Name Function
A Computer port(Mini D-Sub15-pin,female)
Inputs image signals from a computer.
B Audio Out port(Stereo mini pin jack)
Outputs audio from the current input source to anexternal speaker. You can also connect the projector toan amplifier with speakers.To output audio from external speakers, selectProjector as the Audio Out Device setting in theprojector's Settings menu. When an audio/videosystem is not connected to the projector, audio isoutput from the external speakers even if Audio OutDevice is set to AV System.s Settings > HDMI Link > Audio Out DeviceIf you want to output audio for the HDMI source fromthe external speakers when the projector is turned off,select Always On as the A/V Output setting in theprojector's Extended menu.s Extended > A/V Settings > A/V Output
C RS-232C port(Mini D-Sub 9-pin,male)
Use to connect an RS-232C cable to control theprojector from a computer.
D Remote port(Stereo mini pin jack)
Use to connect the optional remote control cable setand inputs signals from the remote control. When theremote control cable is connected, the remote receiveron the projector is disabled.
Projector Parts and Functions 15
Name Function
E Cable holder Pass a commercially available cable tie through here tosecure cables.
WarningDo not bundle the power cord to the othercables. Otherwise, a fire may occur.
F SDI Out/In ports(BNC)
(EB‑PU2010B/EB‑PU2010W only)Inputs video signals from SDI compatible videoequipment.Outputs video signals input from the SDI In port to anexternal monitor.You can connect two projectors in a chain using a SDIcable.If you want to output images to an external monitorwhen the projector is turned off, select Always On asthe A/V Output setting in the projector's Extendedmenu.s Extended > A/V Settings > A/V Output
G Service port(USB connector TypeB)
This port is used for batch settings and firmwareupdate.
H USB-A port(USB connector TypeA)
Use to connect a USB memory device for projectingmovies or images in Content Playback mode.Use to connect the optional camera.Provides a connection for a streaming media player topower it.
Attention• Use the USB cable supplied with or specified
for use with the device.• Do not connect a USB hub or a USB cable
longer than 3 meters, or the device may notoperate correctly.
Name Function
I HDMI port(HDMI)
Inputs video signals from HDMI compatible videoequipment and computers.Connects the optional base unit.This port is compatible with HDCP2.3. (Audio is onlysupported by PCM)
J DVI-D port(DVI-D 24-pinsingle)
Inputs the computer DVI-D signals.This port is compatible with HDCP1.4.
K HDBaseT port(RJ-45)
Use to connect a LAN cable to the optional HDBaseTTransmitter. You can use a network cable up to 100 min length. To ensure proper data transmission, use aCategory 5e STP cable or better. However, operation isnot guaranteed for all input/output devices andenvironments.This port is compatible with HDCP2.3.Check the following settings:• To enable communication from the Ethernet and
serial ports on the transmitter, select On as theControl Communications setting in the projector'sExtended menu.s Extended > HDBaseT > ControlCommunications
• If you have connected an Extron XTP transmitter orswitcher, select On as the Extron XTP setting in theprojector's Extended menu.s Extended > HDBaseT > Extron XTP
L LAN port(RJ-45)
Use to connect a LAN cable to connect to a network.Use a 100Base-TX or 10Base-T network cable.To ensure proper data transmission, use a Category 5shielded cable or better.
Projector Parts and Functions 16
Projector Parts - Base
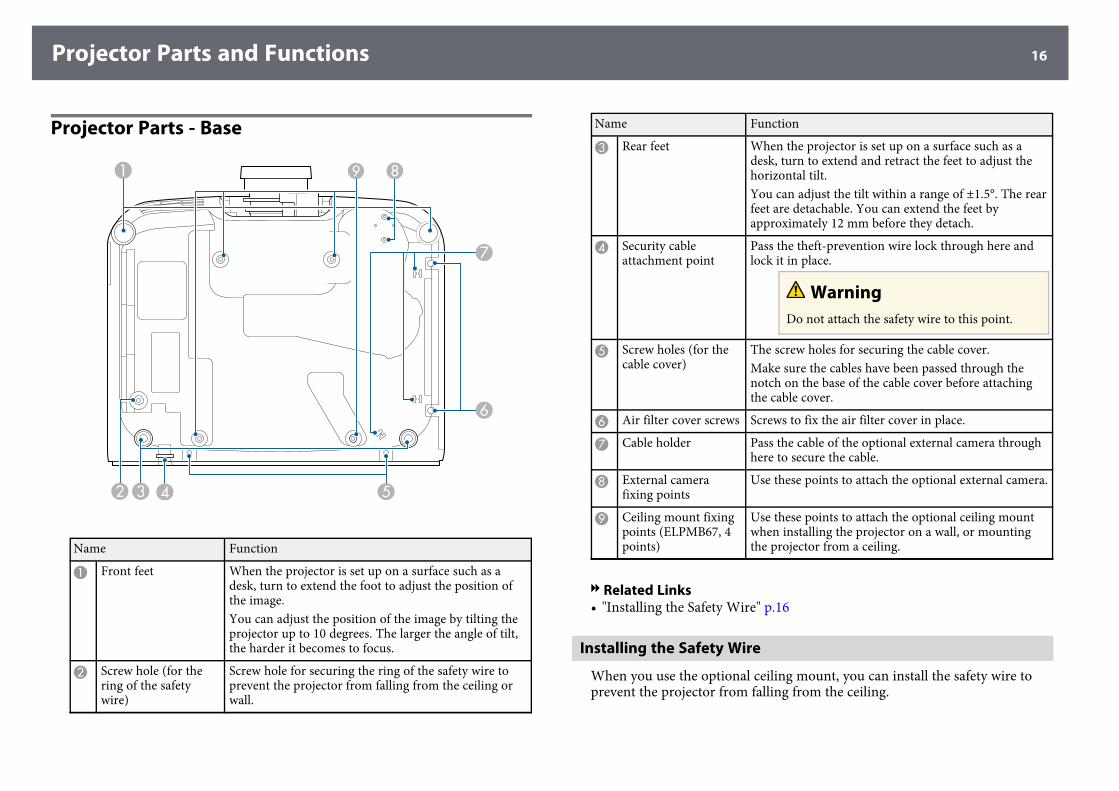
Name Function
A Front feet When the projector is set up on a surface such as adesk, turn to extend the foot to adjust the position ofthe image.You can adjust the position of the image by tilting theprojector up to 10 degrees. The larger the angle of tilt,the harder it becomes to focus.
B Screw hole (for thering of the safetywire)
Screw hole for securing the ring of the safety wire toprevent the projector from falling from the ceiling orwall.
Name Function
C Rear feet When the projector is set up on a surface such as adesk, turn to extend and retract the feet to adjust thehorizontal tilt.You can adjust the tilt within a range of ±1.5°. The rearfeet are detachable. You can extend the feet byapproximately 12 mm before they detach.
D Security cableattachment point
Pass the theft-prevention wire lock through here andlock it in place.
WarningDo not attach the safety wire to this point.
E Screw holes (for thecable cover)
The screw holes for securing the cable cover.Make sure the cables have been passed through thenotch on the base of the cable cover before attachingthe cable cover.
F Air filter cover screws Screws to fix the air filter cover in place.
G Cable holder Pass the cable of the optional external camera throughhere to secure the cable.
H External camerafixing points
Use these points to attach the optional external camera.
I Ceiling mount fixingpoints (ELPMB67, 4points)
Use these points to attach the optional ceiling mountwhen installing the projector on a wall, or mountingthe projector from a ceiling.
gg Related Links• "Installing the Safety Wire" p.16
Installing the Safety Wire
When you use the optional ceiling mount, you can install the safety wire toprevent the projector from falling from the ceiling.
Projector Parts and Functions 17
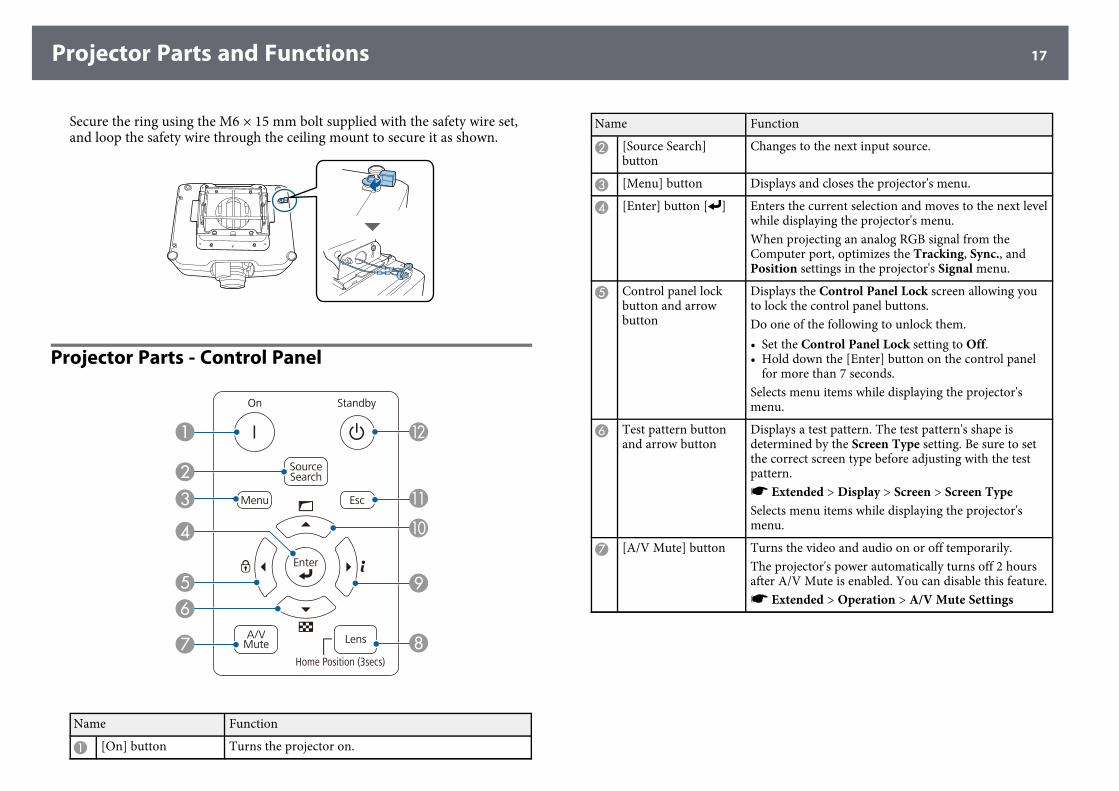
Secure the ring using the M6 × 15 mm bolt supplied with the safety wire set,and loop the safety wire through the ceiling mount to secure it as shown.
Projector Parts - Control Panel
Name Function
A [On] button Turns the projector on.
Name Function
B [Source Search]button
Changes to the next input source.
C [Menu] button Displays and closes the projector's menu.
D [Enter] button [ ] Enters the current selection and moves to the next levelwhile displaying the projector's menu.When projecting an analog RGB signal from theComputer port, optimizes the Tracking, Sync., andPosition settings in the projector's Signal menu.
E Control panel lockbutton and arrowbutton
Displays the Control Panel Lock screen allowing youto lock the control panel buttons.Do one of the following to unlock them.• Set the Control Panel Lock setting to Off.• Hold down the [Enter] button on the control panel
for more than 7 seconds.Selects menu items while displaying the projector'smenu.
F Test pattern buttonand arrow button
Displays a test pattern. The test pattern's shape isdetermined by the Screen Type setting. Be sure to setthe correct screen type before adjusting with the testpattern.s Extended > Display > Screen > Screen TypeSelects menu items while displaying the projector'smenu.
G [A/V Mute] button Turns the video and audio on or off temporarily.The projector's power automatically turns off 2 hoursafter A/V Mute is enabled. You can disable this feature.s Extended > Operation > A/V Mute Settings
Projector Parts and Functions 18
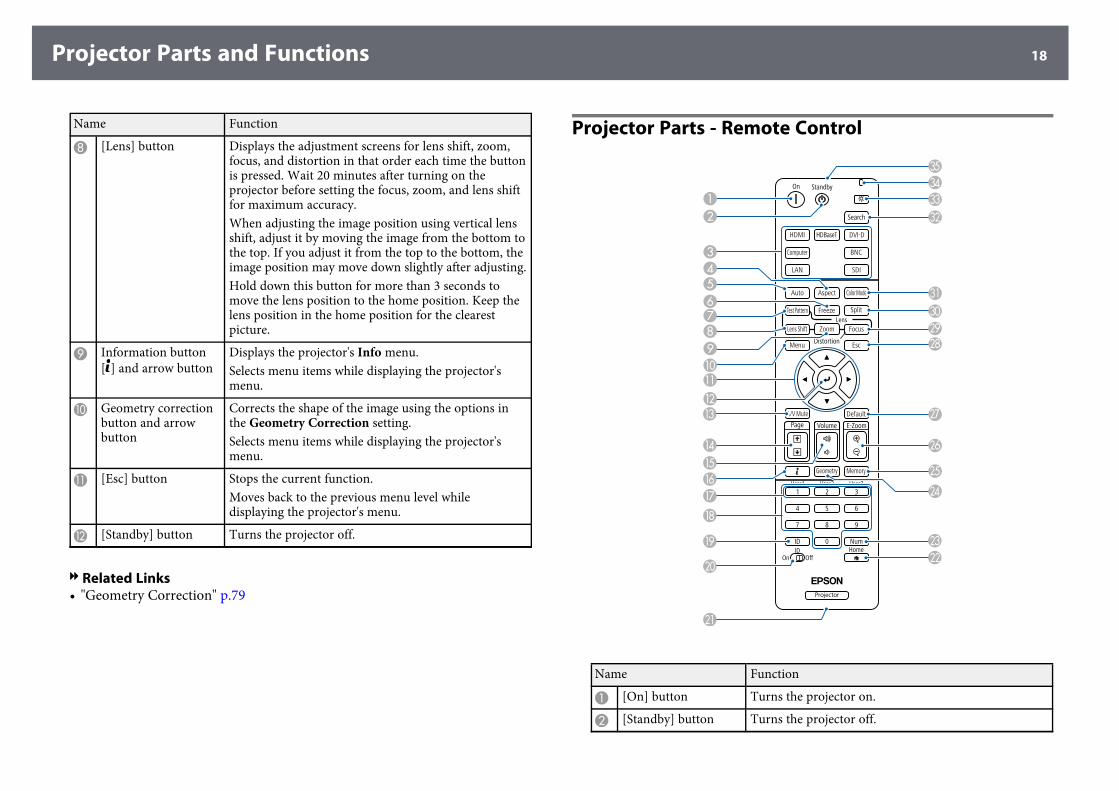
Name Function
H [Lens] button Displays the adjustment screens for lens shift, zoom,focus, and distortion in that order each time the buttonis pressed. Wait 20 minutes after turning on theprojector before setting the focus, zoom, and lens shiftfor maximum accuracy.When adjusting the image position using vertical lensshift, adjust it by moving the image from the bottom tothe top. If you adjust it from the top to the bottom, theimage position may move down slightly after adjusting.Hold down this button for more than 3 seconds tomove the lens position to the home position. Keep thelens position in the home position for the clearestpicture.
I Information button[ ] and arrow button
Displays the projector's Info menu.Selects menu items while displaying the projector'smenu.
J Geometry correctionbutton and arrowbutton
Corrects the shape of the image using the options inthe Geometry Correction setting.Selects menu items while displaying the projector'smenu.
K [Esc] button Stops the current function.Moves back to the previous menu level whiledisplaying the projector's menu.
L [Standby] button Turns the projector off.
gg Related Links• "Geometry Correction" p.79
Projector Parts - Remote Control
Name Function
A [On] button Turns the projector on.
B [Standby] button Turns the projector off.
Projector Parts and Functions 19
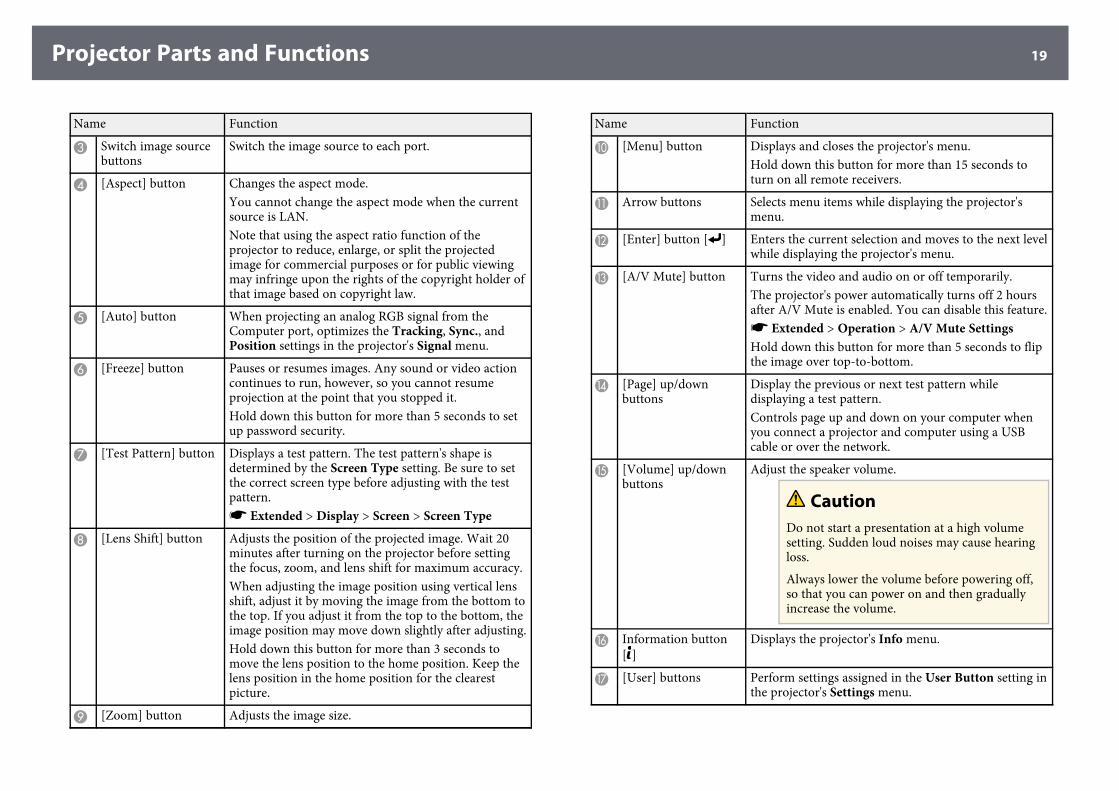
Name Function
C Switch image sourcebuttons
Switch the image source to each port.
D [Aspect] button Changes the aspect mode.You cannot change the aspect mode when the currentsource is LAN.Note that using the aspect ratio function of theprojector to reduce, enlarge, or split the projectedimage for commercial purposes or for public viewingmay infringe upon the rights of the copyright holder ofthat image based on copyright law.
E [Auto] button When projecting an analog RGB signal from theComputer port, optimizes the Tracking, Sync., andPosition settings in the projector's Signal menu.
F [Freeze] button Pauses or resumes images. Any sound or video actioncontinues to run, however, so you cannot resumeprojection at the point that you stopped it.Hold down this button for more than 5 seconds to setup password security.
G [Test Pattern] button Displays a test pattern. The test pattern's shape isdetermined by the Screen Type setting. Be sure to setthe correct screen type before adjusting with the testpattern.s Extended > Display > Screen > Screen Type
H [Lens Shift] button Adjusts the position of the projected image. Wait 20minutes after turning on the projector before settingthe focus, zoom, and lens shift for maximum accuracy.When adjusting the image position using vertical lensshift, adjust it by moving the image from the bottom tothe top. If you adjust it from the top to the bottom, theimage position may move down slightly after adjusting.Hold down this button for more than 3 seconds tomove the lens position to the home position. Keep thelens position in the home position for the clearestpicture.
I [Zoom] button Adjusts the image size.
Name Function
J [Menu] button Displays and closes the projector's menu.Hold down this button for more than 15 seconds toturn on all remote receivers.
K Arrow buttons Selects menu items while displaying the projector'smenu.
L [Enter] button [ ] Enters the current selection and moves to the next levelwhile displaying the projector's menu.
M [A/V Mute] button Turns the video and audio on or off temporarily.The projector's power automatically turns off 2 hoursafter A/V Mute is enabled. You can disable this feature.s Extended > Operation > A/V Mute SettingsHold down this button for more than 5 seconds to flipthe image over top-to-bottom.
N [Page] up/downbuttons
Display the previous or next test pattern whiledisplaying a test pattern.Controls page up and down on your computer whenyou connect a projector and computer using a USBcable or over the network.
O [Volume] up/downbuttons
Adjust the speaker volume.
CautionDo not start a presentation at a high volumesetting. Sudden loud noises may cause hearingloss.
Always lower the volume before powering off,so that you can power on and then graduallyincrease the volume.
P Information button[ ]
Displays the projector's Info menu.
Q [User] buttons Perform settings assigned in the User Button setting inthe projector's Settings menu.
Projector Parts and Functions 20
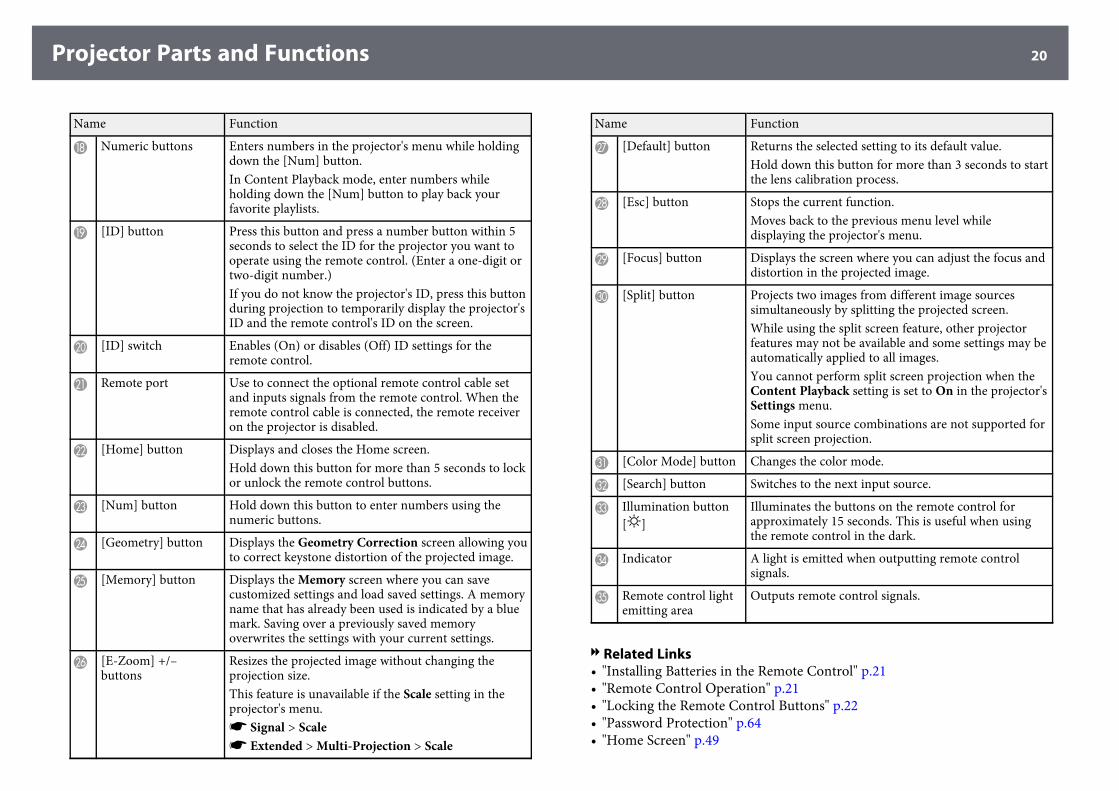
Name Function
R Numeric buttons Enters numbers in the projector's menu while holdingdown the [Num] button.In Content Playback mode, enter numbers whileholding down the [Num] button to play back yourfavorite playlists.
S [ID] button Press this button and press a number button within 5seconds to select the ID for the projector you want tooperate using the remote control. (Enter a one-digit ortwo-digit number.)If you do not know the projector's ID, press this buttonduring projection to temporarily display the projector'sID and the remote control's ID on the screen.
T [ID] switch Enables (On) or disables (Off) ID settings for theremote control.
U Remote port Use to connect the optional remote control cable setand inputs signals from the remote control. When theremote control cable is connected, the remote receiveron the projector is disabled.
V [Home] button Displays and closes the Home screen.Hold down this button for more than 5 seconds to lockor unlock the remote control buttons.
W [Num] button Hold down this button to enter numbers using thenumeric buttons.
X [Geometry] button Displays the Geometry Correction screen allowing youto correct keystone distortion of the projected image.
Y [Memory] button Displays the Memory screen where you can savecustomized settings and load saved settings. A memoryname that has already been used is indicated by a bluemark. Saving over a previously saved memoryoverwrites the settings with your current settings.
Z [E-Zoom] +/–buttons
Resizes the projected image without changing theprojection size.This feature is unavailable if the Scale setting in theprojector's menu.s Signal > Scales Extended > Multi-Projection > Scale
Name Function
a [Default] button Returns the selected setting to its default value.Hold down this button for more than 3 seconds to startthe lens calibration process.
b [Esc] button Stops the current function.Moves back to the previous menu level whiledisplaying the projector's menu.
c [Focus] button Displays the screen where you can adjust the focus anddistortion in the projected image.
d [Split] button Projects two images from different image sourcessimultaneously by splitting the projected screen.While using the split screen feature, other projectorfeatures may not be available and some settings may beautomatically applied to all images.You cannot perform split screen projection when theContent Playback setting is set to On in the projector'sSettings menu.Some input source combinations are not supported forsplit screen projection.
e [Color Mode] button Changes the color mode.
f [Search] button Switches to the next input source.
g Illumination button[ ]
Illuminates the buttons on the remote control forapproximately 15 seconds. This is useful when usingthe remote control in the dark.
h Indicator A light is emitted when outputting remote controlsignals.
i Remote control lightemitting area
Outputs remote control signals.
gg Related Links• "Installing Batteries in the Remote Control" p.21• "Remote Control Operation" p.21• "Locking the Remote Control Buttons" p.22• "Password Protection" p.64• "Home Screen" p.49

Projector Parts and Functions 21
• "Geometry Correction" p.79• "Memory" p.85• "Split Screen" p.80
Installing Batteries in the Remote Control
The remote control uses the two AA batteries that came with the projector.
AttentionMake sure you read the Safety Instructions before handling the batteries.
a
Replace the batteries as soon as they run out. The remote control usestwo AA manganese or alkaline batteries.
a Remove the battery cover as shown.
b Remove the old batteries, if necessary.
a
Dispose of used batteries according to local regulations.
c Insert the batteries.
WarningCheck the positions of the (+) and (–) marks inside the battery holder toensure the batteries are inserted the correct way. If the batteries are not usedcorrectly, they could explode or leak causing a fire, injury, or damage to theproduct.
d Replace the battery cover and press it down until it clicks into place.
Remote Control Operation
The remote control lets you control the projector from almost anywhere inthe room.Make sure that you aim the remote control at the projector's receivers withinthe distance and angles listed here.
Projector Parts and Functions 22
a
• Depending on your installation environment, the available distanceand angles may be shortened.
• Avoid using the remote control in conditions with bright fluorescentlights or in direct sunlight, or the projector may not respond tocommands. If you are not going to use the remote control for a longtime, remove the batteries.
• When you use multiple projectors in the same room or when thereare obstacles around the remote receiver, interference may causeprojector operations to become unstable. Connect the optionalremote control cable set to the projectors. When the cable set isconnected, you can operate projectors stably.
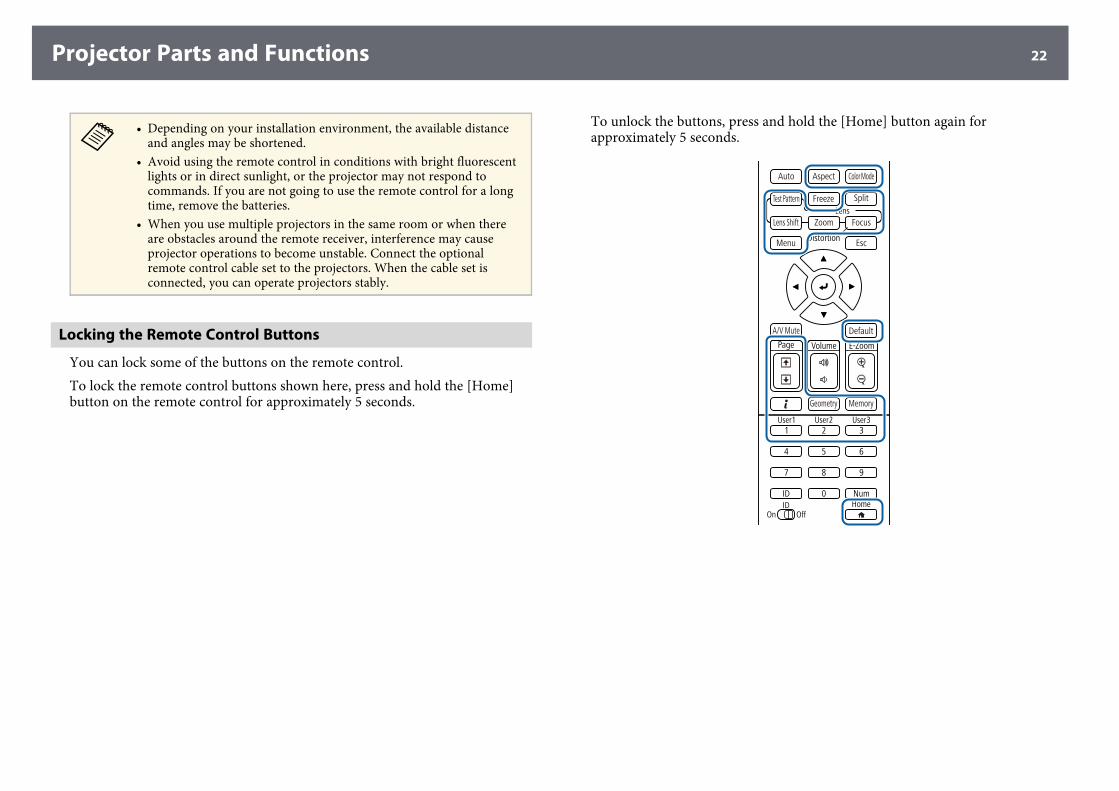
Locking the Remote Control Buttons
You can lock some of the buttons on the remote control.To lock the remote control buttons shown here, press and hold the [Home]button on the remote control for approximately 5 seconds.
To unlock the buttons, press and hold the [Home] button again forapproximately 5 seconds.
Projector Parts and Functions 23
Projector Parts - External Camera
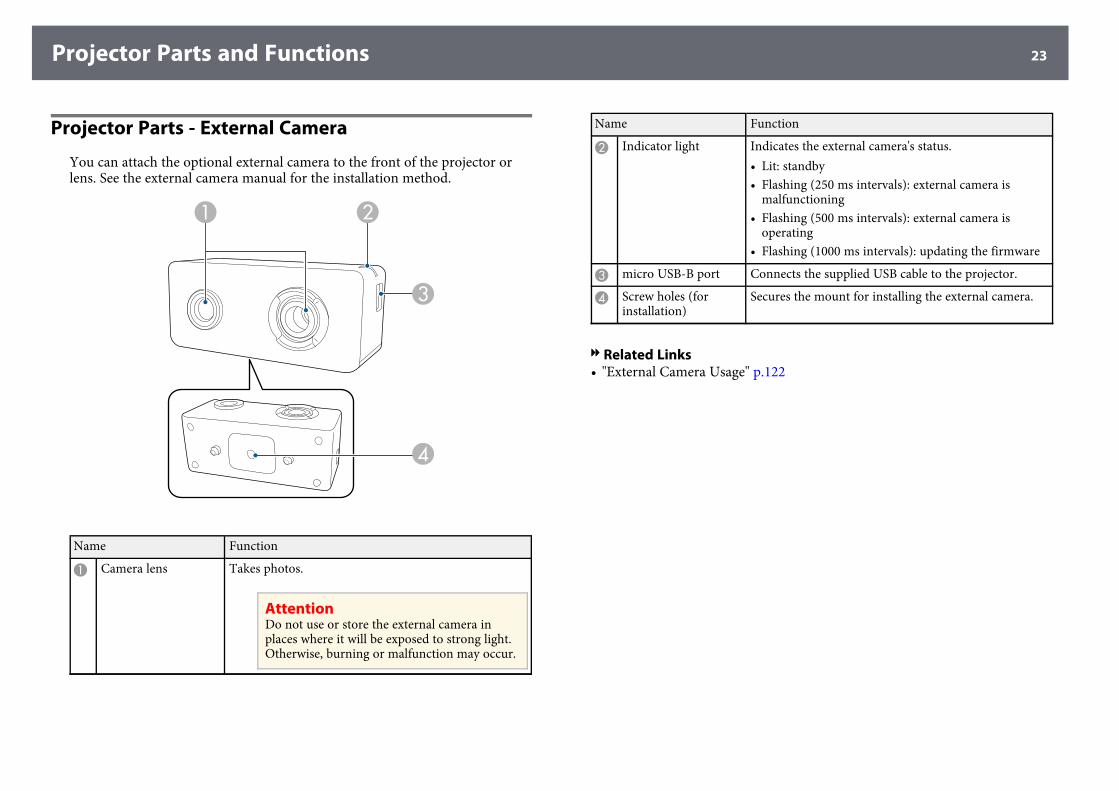
You can attach the optional external camera to the front of the projector orlens. See the external camera manual for the installation method.
Name Function
A Camera lens Takes photos.
AttentionDo not use or store the external camera inplaces where it will be exposed to strong light.Otherwise, burning or malfunction may occur.
Name Function
B Indicator light Indicates the external camera's status.• Lit: standby• Flashing (250 ms intervals): external camera is
malfunctioning• Flashing (500 ms intervals): external camera is
operating• Flashing (1000 ms intervals): updating the firmware
C micro USB-B port Connects the supplied USB cable to the projector.
D Screw holes (forinstallation)
Secures the mount for installing the external camera.
gg Related Links• "External Camera Usage" p.122
Setting Up the ProjectorFollow the instructions in these sections to set up your projector.
gg Related Links• "Notes on Transporting" p.25• "Precautions on Installation" p.26• "Attaching and Removing a Lens" p.29• "Operating the Projector Power" p.35• "Wired Network Connection" p.37• "Wireless Network Connection" p.39• "Secure HTTP" p.46
Notes on Transporting 25
There are many glass parts and precision components inside the projector. Toprevent damage due to impacts when transporting, handle the projector asfollows.
CautionThe projector should not be carried by one person. At least two people are neededto unpack or carry the projector.
Attention• Remove the lens unit if an option lens is installed.• If the projector does not have a lens, attach the cover that was on the lens mount
when you purchased the projector.

Precautions on Installation 26
You can install the projector or mount it to the ceiling at any horizontal orvertical angle. Note the following precautions when installing the projector.
Warning• A special method of installation is required when suspending the projector from
a wall or ceiling. If you do not install the projector correctly, it could fall andcause damage or injury.
• Do not use adhesives on the ceiling mount fixing points to prevent the screwsfrom loosening, or use lubricants, oils, or similar substances on the projector; theprojector case may crack causing it to fall from its ceiling mount. This couldcause serious injury to anyone under the ceiling mount and could damage theprojector.
• Do not install the projector in a location subject to high levels of dust orhumidity, or in a location subject to smoke or steam. Otherwise, it could cause afire or electric shock to occur. The projector's case could also deteriorate and bedamaged causing the projector to fall from the mount.Examples of environments that could cause the projector to fall due to casedeterioration• Locations subject to excessive smoke or airborne oil particles, such as factories
or kitchens• Locations containing volatile solvents or chemicals, such as factories or
laboratories• Locations where the projector could be subjected to detergents or chemicals,
such as factories or kitchens• Locations in which aroma oils are often used, such as relaxation rooms• Near devices that produce excessive smoke, airborne oil particles, or foam at
events
Attention• Use M6 screws (up to a depth of 14 mm) to fix the projector's ceiling mount
fixing points and the mounting hardware at four points.
• Do not stack projectors directly on top of each other.
Precautions on Installation 27
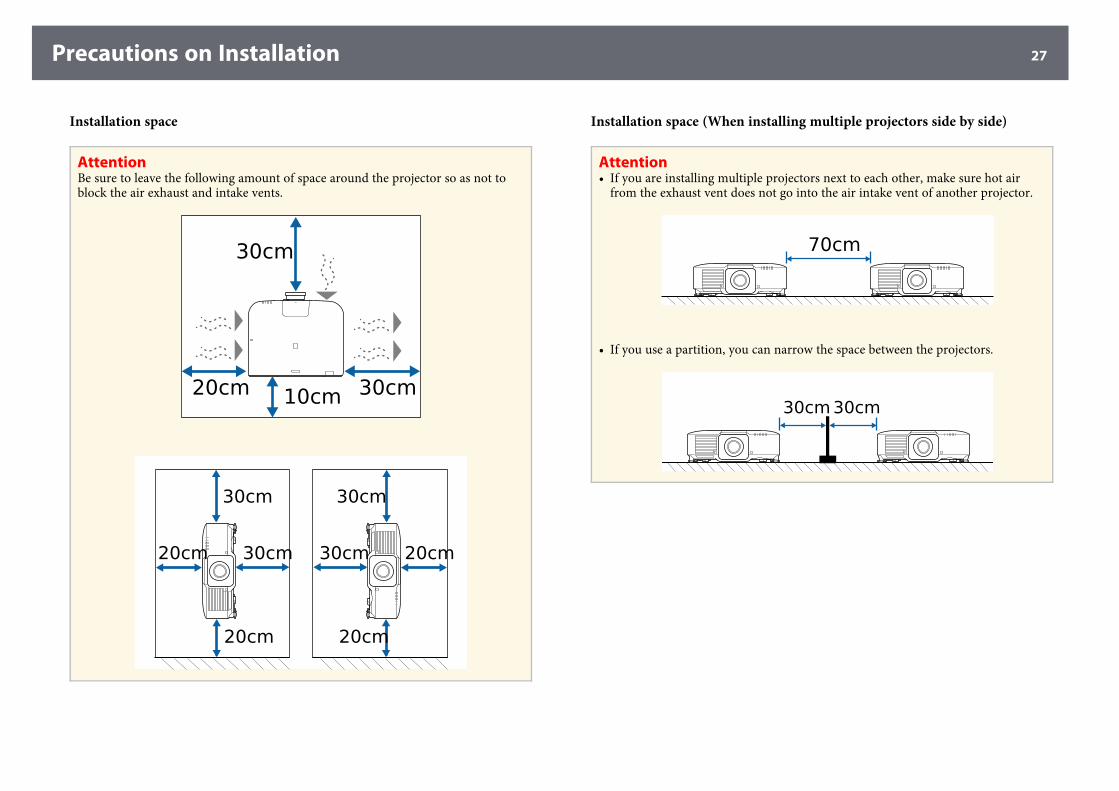
Installation space
AttentionBe sure to leave the following amount of space around the projector so as not toblock the air exhaust and intake vents.
Installation space (When installing multiple projectors side by side)
Attention• If you are installing multiple projectors next to each other, make sure hot air
from the exhaust vent does not go into the air intake vent of another projector.
• If you use a partition, you can narrow the space between the projectors.
Precautions on Installation 28
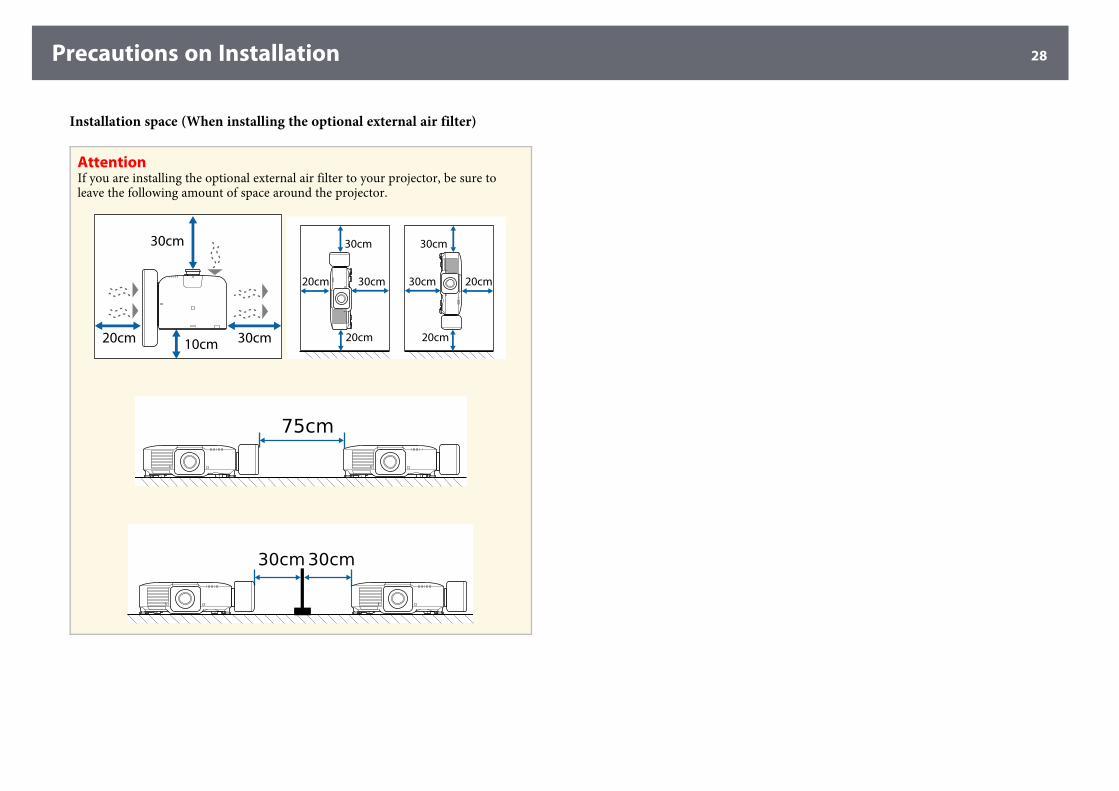
Installation space (When installing the optional external air filter)
AttentionIf you are installing the optional external air filter to your projector, be sure toleave the following amount of space around the projector.
Attaching and Removing a Lens 29
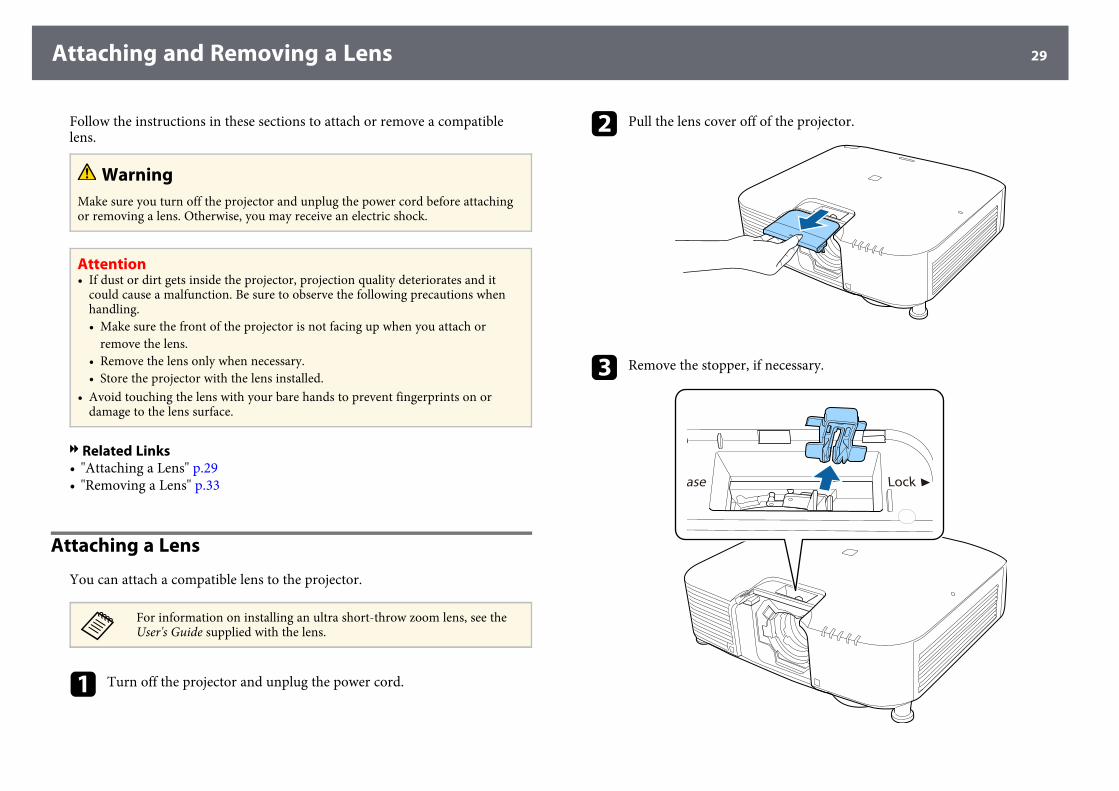
Follow the instructions in these sections to attach or remove a compatiblelens.
WarningMake sure you turn off the projector and unplug the power cord before attachingor removing a lens. Otherwise, you may receive an electric shock.
Attention• If dust or dirt gets inside the projector, projection quality deteriorates and it
could cause a malfunction. Be sure to observe the following precautions whenhandling.• Make sure the front of the projector is not facing up when you attach or
remove the lens.• Remove the lens only when necessary.• Store the projector with the lens installed.
• Avoid touching the lens with your bare hands to prevent fingerprints on ordamage to the lens surface.
gg Related Links• "Attaching a Lens" p.29• "Removing a Lens" p.33
Attaching a Lens
You can attach a compatible lens to the projector.
a
For information on installing an ultra short-throw zoom lens, see theUser's Guide supplied with the lens.
a Turn off the projector and unplug the power cord.
b Pull the lens cover off of the projector.
c Remove the stopper, if necessary.
Attaching and Removing a Lens 30
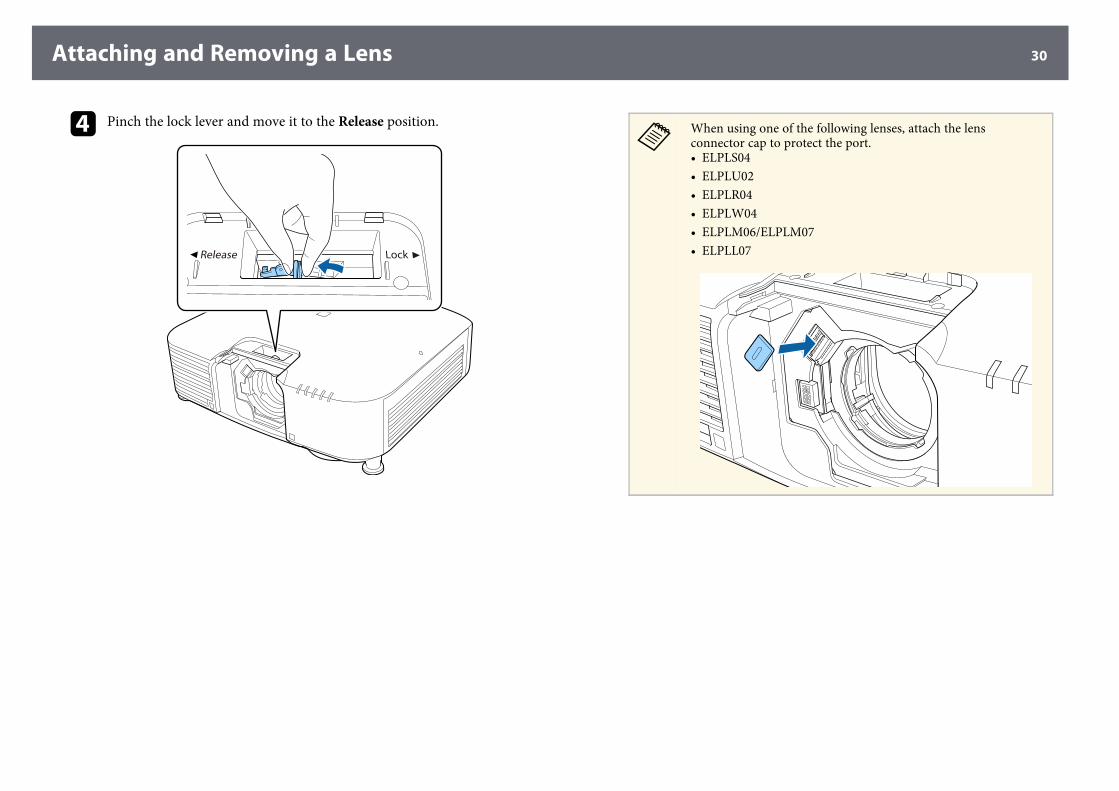
d Pinch the lock lever and move it to the Release position.
a
When using one of the following lenses, attach the lensconnector cap to protect the port.• ELPLS04• ELPLU02• ELPLR04• ELPLW04• ELPLM06/ELPLM07• ELPLL07
Attaching and Removing a Lens 31
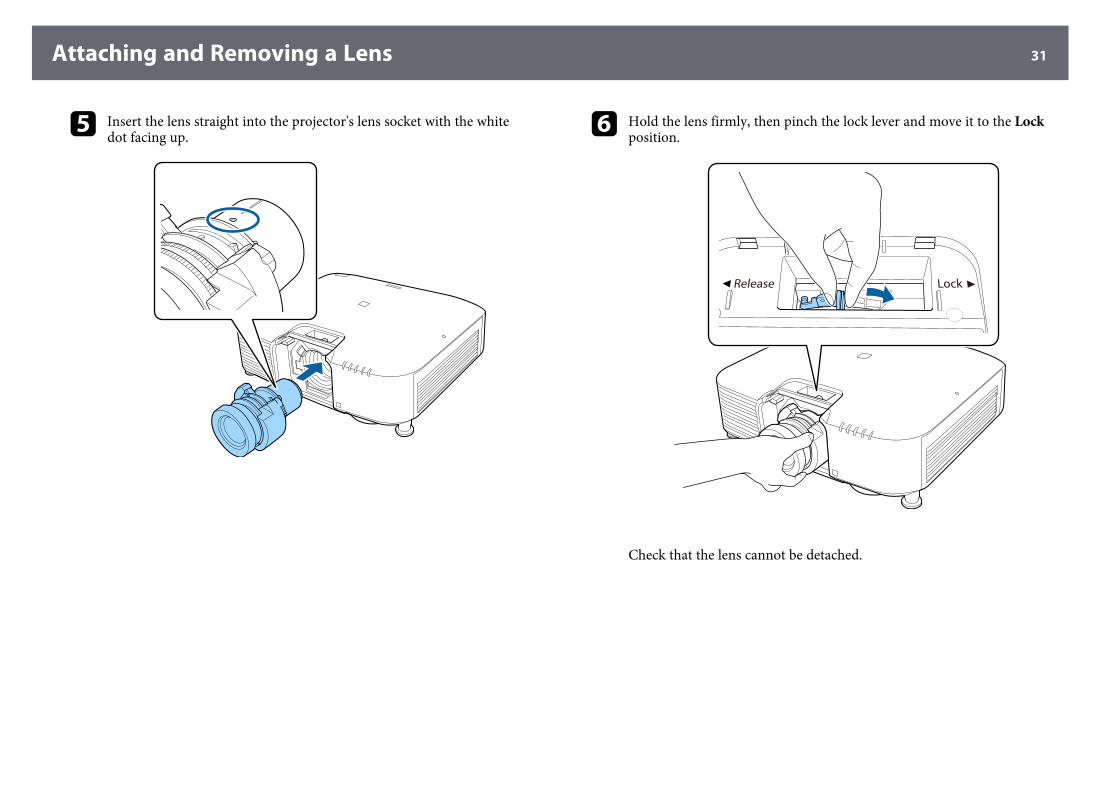
e Insert the lens straight into the projector's lens socket with the whitedot facing up. f Hold the lens firmly, then pinch the lock lever and move it to the Lock
position.
Check that the lens cannot be detached.
Attaching and Removing a Lens 32
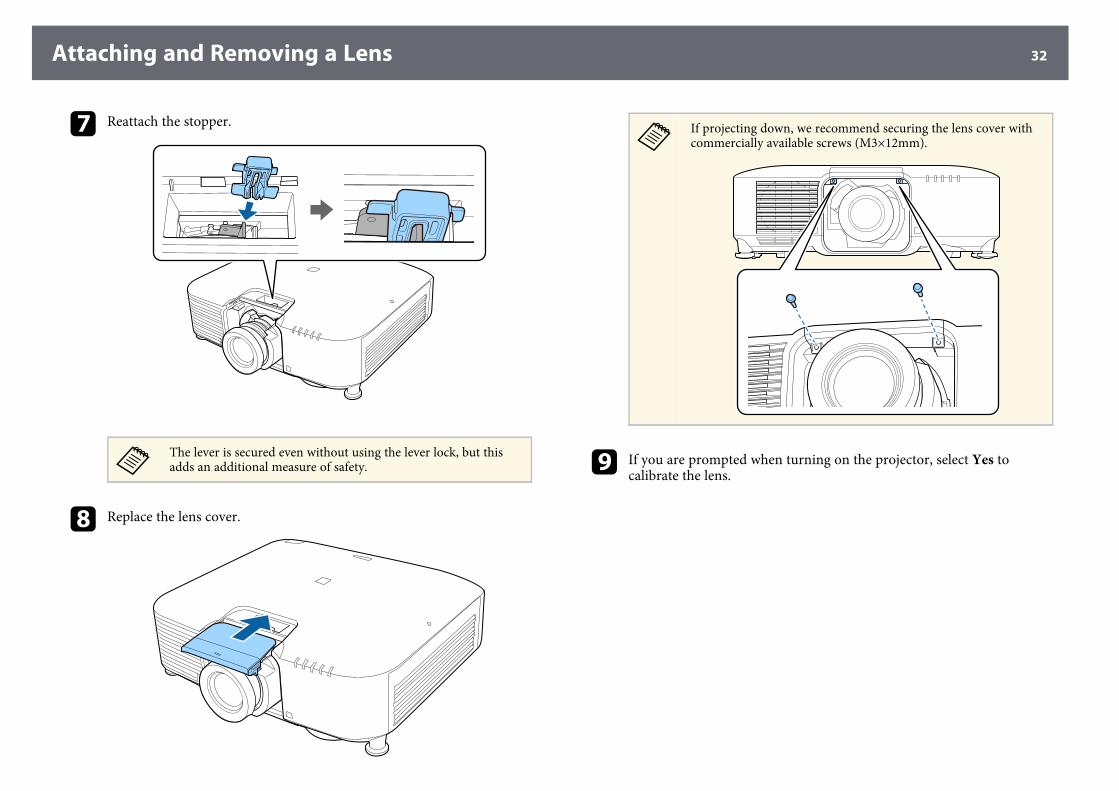
g Reattach the stopper.
a
The lever is secured even without using the lever lock, but thisadds an additional measure of safety.
h Replace the lens cover.
a
If projecting down, we recommend securing the lens cover withcommercially available screws (M3×12mm).
i If you are prompted when turning on the projector, select Yes tocalibrate the lens.

Attaching and Removing a Lens 33
a
• Lens calibration helps the projector to correctly acquire thelens position and adjustment range, and takes up to 100seconds. When calibration is finished, the lens returns to thesame position it was in before calibration.The following lenses return to the standard position.• ELPLX01/01S• ELPLX01W/01WS• ELPLX02/02S• ELPLX02W/02WS
• If no message is displayed after attaching the lens, perform lenscalibration using one of the following methods.• Hold down the [Default] button on the remote control for
approximately 3 seconds.• Change the projector's menu:s Extended > Operation > Lens Calibration
• If you do not calibrate the lens, the following functions maynot operate correctly.• Focus• Distortion• Zoom• Lens Shift• Memory (Lens Position)
AttentionIf the icon indicating that lens calibration has failed is displayed, remove thelens and then reinstall it. If the message continues to be displayed, stopusing the projector, remove the power plug from the electrical outlet, andcontact Epson for help.
j When using one of the following lenses, select the Lens Type in theprojector's menu according to the lens you are using so that distortioncorrection is performed correctly.• ELPLS04• ELPLU02• ELPLR04
• ELPLW04• ELPLM06/ELPLM07• ELPLL07s Extended > Operation > Advanced > Lens Type
a
If you are projecting from a table or other flat surface, the image maybe tilted depending on your lens. Adjust the tilt of the image using thefront and rear feet.
Removing a Lens
You can remove a lens to replace it with a different lens.
CautionWait at least 30 minutes to remove or replace the lens after turning off theprojector. Touching the lens unit before it cools down may cause burns.
a
The projector uses a laser as the light source. As a safety measure, thelight source turns off when the lens is removed. Attach the lens, andthen press the [On] button to turn it back on.
a Hold down the [Lens Shift] (remote control) or [Lens] (control panel)button for approximately 3 seconds to move the lens to the homeposition.
b Turn off the projector and unplug the power cord.
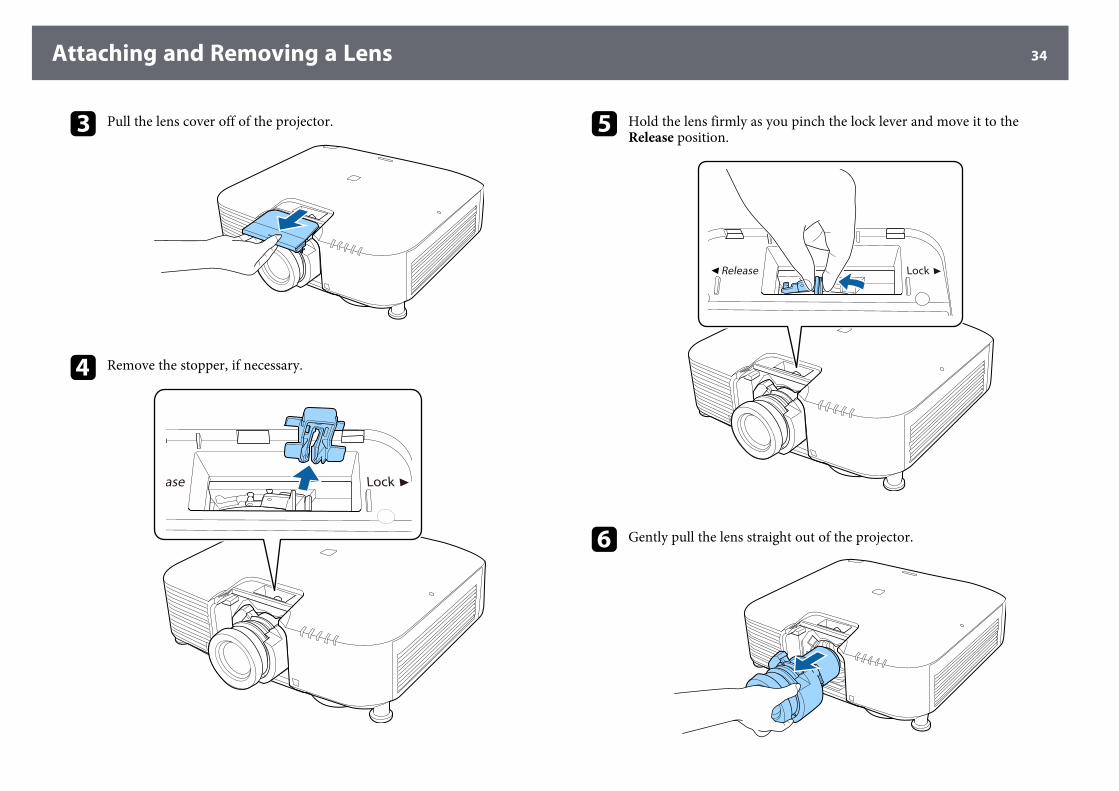
Attaching and Removing a Lens 34
c Pull the lens cover off of the projector.
d Remove the stopper, if necessary.
e Hold the lens firmly as you pinch the lock lever and move it to theRelease position.
f Gently pull the lens straight out of the projector.

Operating the Projector Power 35
Follow the instructions in these sections to operate the projector power.
gg Related Links• "Turning On the Projector" p.35• "Turning Off the Projector" p.36
Turning On the Projector
Turn on the computer or video equipment you want to use after you turn onthe projector.
a Connect the power cord to the projector's power inlet and plug it intoan electrical outlet.
The projector's power indicator turns blue. This indicates that theprojector is receiving power, but is not yet turned on (it is in standbymode).
b Press the [On] button on the control panel or remote control to turn onthe projector.The projector beeps and the status indicator flashes blue as theprojector warms up. Once the projector is warmed up, the statusindicator stops flashing and turns blue.
a
• When Quick Startup is enabled in the projector's Extendedmenu, the projector becomes ready for use in several secondsthe next time you press the power button.s Extended > Operation > Quick Startup
Try the following if you do not see a projected image.• Turn on the connected computer or video device.• Change the screen output from the computer when using a laptop
computer.• Insert a DVD or other video media, and press play (if necessary).• Press the [Search] button on the control panel or remote control to detect
the source.• Press the button for the desired video source on the remote control.• If the Home screen is displayed, select the source you want to project.
Warning• Never look into the projector lens when the light source is on. This can damage
your eyes and is especially dangerous for children.• When turning on the projector at a distance using the remote control, make sure
there is no one looking into the lens.• During projection, do not block the light from the projector with a book or other
objects. If the light from the projector is blocked, the area on which the lightshines becomes hot which could cause it to melt, burn, or start a fire. Also, thelens may get hot due to the reflected light which could cause the projector tomalfunction. To stop projection, use the A/V Mute function, or turn off theprojector.
Operating the Projector Power 36
a
• When the Direct Power On setting is set to On in the projector'sExtended menu, the projector turns on as soon as you plug it in.Note that the projector also turns on automatically in cases such asrecovery from a power outage.s Extended > Operation > Direct Power On
• If you select a specific port as the Auto Power On setting in theprojector's Extended menu, the projector turns on as soon as itdetects a signal or cable connection from that port.s Extended > Operation > Auto Power On
gg Related Links• "Home Screen" p.49
Turning Off the Projector
Turn off the projector after use.
a
• Turn off this product when it is not in use to prolong the life of theprojector. Light source life varies depending on the mode selected,environmental conditions, and usage. Brightness decreases over time.
• Light source calibration starts automatically if you turn off theprojector and the following conditions are present:• The Light Source Calibration setting is set to Run Periodically in
the projector's Reset menu• 100 hours have passed since the last light source calibration• You have used the projector continuously for more than 20
minutes• Since the projector supports the direct shutdown feature, it can be
turned off directly using the breaker.
a Press the [Standby] button on the control panel or remote control.The projector displays a shutdown confirmation screen.
b Press the [Standby] button again. (To leave it on, press any otherbutton.)
The projector beeps twice, the light source turns off, and the statusindicator turns off.
c To transport or store the projector, make sure the status indicator onthe projector is off, and then unplug the power cord.
Wired Network Connection 37
You can send images to your projector, as well as monitor and control yourprojector, over a network.To perform these operations, connect the projector to your network, and thenset up your projector and computer.After connecting and setting up the projector as described here, downloadand install the following network software from the following Web site.epson.sn
• Epson iProjection software sets up your computer for network projection. Italso allows you to hold interactive meetings by projecting the user'scomputer screen over a network. See the Epson iProjection Operation Guide(Windows/Mac) for instructions.
• Epson Projector Management software (Windows only) sets up yourcomputer for monitoring and controlling projectors. See the Epson ProjectorManagement Operation Guide for instructions.
gg Related Links• "Connecting to a Wired Network" p.37• "Selecting Wired Network Settings" p.37
Connecting to a Wired Network
To connect the projector to a wired local area network (LAN), use a 100Base-TX or 10Base-T network cable. To ensure proper data transmission, use aCategory 5 shielded cable or better.
a Connect one end of the network cable to your network hub, switch, orrouter.
b Connect the other end of the cable to the projector's LAN port.
Selecting Wired Network Settings
Before you can project from computers on your network, you need to selectnetwork settings on the projector.
a
Make sure you already connected the projector to your wired networkusing the LAN port.
a Press the [Menu] button, select the Network menu, and press [Enter].
b Select Network Configuration and press [Enter].
c Select the Basic menu and press [Enter].
d Select the basic options as necessary.• Projector Name lets you enter a name up to 16 alphanumeric
characters long to identify the projector over the network.• PJLink Password lets you enter a password up to 32 alphanumeric
characters long for using the PJLink protocol for projector control.• Remote Password lets you enter a password up to 32 alphanumeric
characters long to access the projector using the Basic Control. (Username is EPSONREMOTE; default password is the projector's serialnumber.)
• Web Control Password lets you enter a password up to 32alphanumeric characters long to access the projector over the Web.(User name is EPSONWEB; default password is the projector's serialnumber.)
• Moderator Password lets you enter a four-digit number passwordfor accessing the projector as a moderator using Epson iProjection.(No password is set by default.)
• Projector Keyword lets you turn on a security password to preventaccess to the projector by anyone not in the room with it. You mustenter a displayed, randomized keyword from a computer usingEpson iProjection to access the projector and share the currentscreen.
Wired Network Connection 38
• Display Keyword lets you select whether to display a projectorkeyword on the projected image when accessing the projector usingEpson iProjection.
• Display LAN Info. lets you set the display format for the projector'snetwork information.
a
Use the displayed keyboard to enter numbers and characters.Press the arrow buttons on the remote control to highlightcharacters and press [Enter] to select them.
e Select the Wired LAN menu and press [Enter].
f Assign the IP settings for your network as necessary.• If your network assigns addresses automatically, select IP Settings to
set the DHCP setting to On.• If you must set addresses manually, select IP Settings to set the
DHCP setting to Off, and then enter the projector's IP Address,Subnet Mask, and Gateway Address as necessary.
• If you want to connect the projector to the network using IPv6, selectIPv6 Settings to set the IPv6 setting to On, and then set the AutoConfiguration and Use Temporary Address settings as necessary.
a
To highlight the numbers you want from the displayed keyboard,press the arrow buttons on the remote control. To select ahighlighted number, press [Enter].
g To prevent the IP address from being displayed on the LAN standbyscreen and Home screen, set the IP Address Display setting to Off.
h When you finish selecting settings, select Complete and follow the on-screen instructions to save your settings and exit the menus.
i Press the [LAN] button on the remote control.The wired network settings complete when you see the correct IPaddress on the LAN standby screen.
gg Related Links• "Using the Displayed Keyboard" p.51
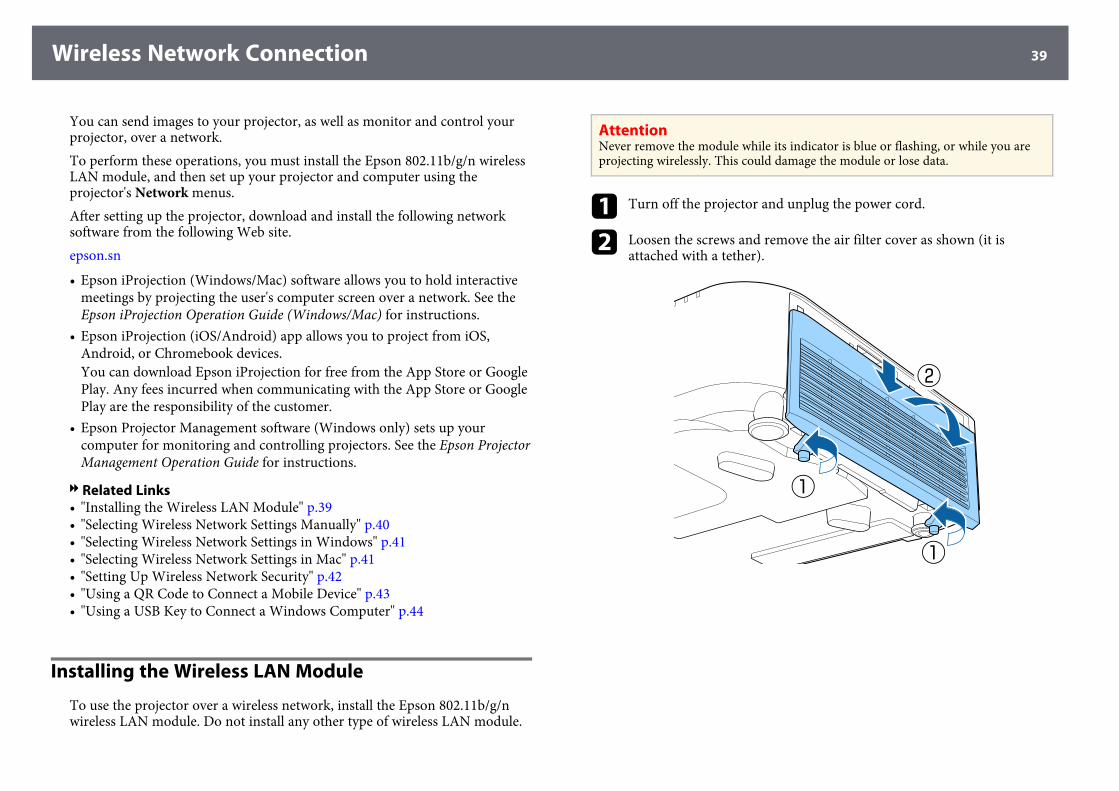
Wireless Network Connection 39
You can send images to your projector, as well as monitor and control yourprojector, over a network.To perform these operations, you must install the Epson 802.11b/g/n wirelessLAN module, and then set up your projector and computer using theprojector's Network menus.After setting up the projector, download and install the following networksoftware from the following Web site.epson.sn
• Epson iProjection (Windows/Mac) software allows you to hold interactivemeetings by projecting the user's computer screen over a network. See theEpson iProjection Operation Guide (Windows/Mac) for instructions.
• Epson iProjection (iOS/Android) app allows you to project from iOS,Android, or Chromebook devices.You can download Epson iProjection for free from the App Store or GooglePlay. Any fees incurred when communicating with the App Store or GooglePlay are the responsibility of the customer.
• Epson Projector Management software (Windows only) sets up yourcomputer for monitoring and controlling projectors. See the Epson ProjectorManagement Operation Guide for instructions.
gg Related Links• "Installing the Wireless LAN Module" p.39• "Selecting Wireless Network Settings Manually" p.40• "Selecting Wireless Network Settings in Windows" p.41• "Selecting Wireless Network Settings in Mac" p.41• "Setting Up Wireless Network Security" p.42• "Using a QR Code to Connect a Mobile Device" p.43• "Using a USB Key to Connect a Windows Computer" p.44
Installing the Wireless LAN Module
To use the projector over a wireless network, install the Epson 802.11b/g/nwireless LAN module. Do not install any other type of wireless LAN module.
AttentionNever remove the module while its indicator is blue or flashing, or while you areprojecting wirelessly. This could damage the module or lose data.
a Turn off the projector and unplug the power cord.
b Loosen the screws and remove the air filter cover as shown (it isattached with a tether).
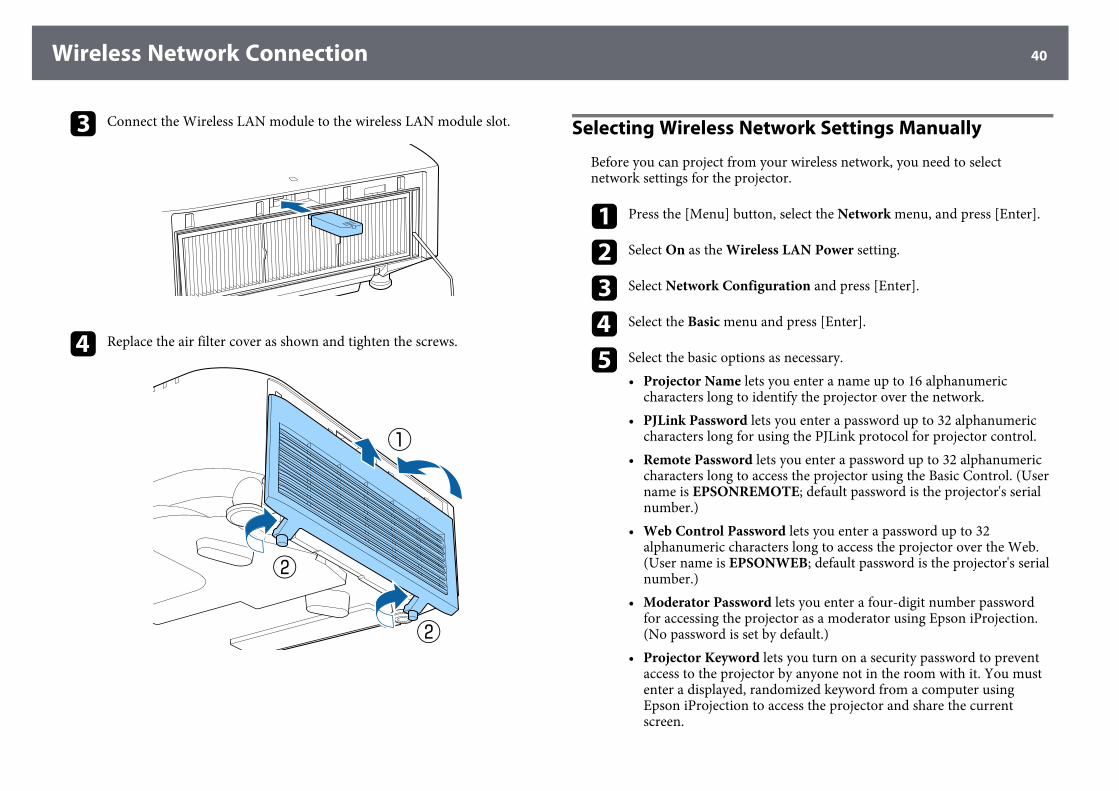
Wireless Network Connection 40
c Connect the Wireless LAN module to the wireless LAN module slot.
d Replace the air filter cover as shown and tighten the screws.
Selecting Wireless Network Settings Manually
Before you can project from your wireless network, you need to selectnetwork settings for the projector.
a Press the [Menu] button, select the Network menu, and press [Enter].
b Select On as the Wireless LAN Power setting.
c Select Network Configuration and press [Enter].
d Select the Basic menu and press [Enter].
e Select the basic options as necessary.• Projector Name lets you enter a name up to 16 alphanumeric
characters long to identify the projector over the network.• PJLink Password lets you enter a password up to 32 alphanumeric
characters long for using the PJLink protocol for projector control.• Remote Password lets you enter a password up to 32 alphanumeric
characters long to access the projector using the Basic Control. (Username is EPSONREMOTE; default password is the projector's serialnumber.)
• Web Control Password lets you enter a password up to 32alphanumeric characters long to access the projector over the Web.(User name is EPSONWEB; default password is the projector's serialnumber.)
• Moderator Password lets you enter a four-digit number passwordfor accessing the projector as a moderator using Epson iProjection.(No password is set by default.)
• Projector Keyword lets you turn on a security password to preventaccess to the projector by anyone not in the room with it. You mustenter a displayed, randomized keyword from a computer usingEpson iProjection to access the projector and share the currentscreen.
Wireless Network Connection 41
• Display Keyword lets you select whether to display a projectorkeyword on the projected image when accessing the projector usingEpson iProjection.
• Display LAN Info. lets you set the display format for the projector'snetwork information.
a
Use the displayed keyboard to enter numbers and characters.Press the arrow buttons on the remote control to highlightcharacters and press [Enter] to select them.
f Select the Wireless LAN menu and press [Enter].
g Select the Connection Mode setting.• Quick lets you connect to multiple smartphones, tablets, or
computers directly using wireless communication.• Advanced lets you connect to smartphones, tablets, or computers
over a wireless network access point.
h If you selected the Advanced connection mode, select Search AccessPoint to select the access point you want to connect to.
a
If you need to assign the SSID manually, select SSID to enter theSSID.
i For the Advanced connection mode, assign the IP settings for yournetwork as necessary.• If your network assigns addresses automatically, select IP Settings to
set the DHCP setting to On.• If you must set addresses manually, select IP Settings to set the
DHCP setting to Off, and then enter the projector's IP Address,Subnet Mask, and Gateway Address as necessary.
• If you want to connect the projector to the network using IPv6, selectIPv6 Settings to set the IPv6 setting to On, and then set the AutoConfiguration and Use Temporary Address settings as necessary.
j To prevent the SSID or IP address from being displayed on the LANstandby screen and Home screen, set the SSID Display setting or the IPAddress Display setting to Off.
k When you finish selecting settings, select Complete and follow the on-screen instructions to save your settings and exit the menus.
l Press the [LAN] button on the remote control.The wireless network settings are complete when you see the correct IPaddress on the LAN standby screen.
When you have finished making wireless settings for your projector, you needto select the wireless network on your computer. Then start the networksoftware to send images to your projector through a wireless network.
gg Related Links• "Using the Displayed Keyboard" p.51
Selecting Wireless Network Settings in Windows
Before connecting to the projector, select the correct wireless network on yourcomputer.
a To access your wireless utility software, click the network icon on theWindows taskbar.
b When connecting in Advanced connection mode, select the networkname (SSID) of the network the projector is connecting to.
c Click Connect.
Selecting Wireless Network Settings in Mac
Before connecting to the projector, select the correct wireless network in Mac.
Wireless Network Connection 42
a Click the Wi-Fi icon on the menu bar at the top of the screen.
b When connecting in Advanced connection mode, make sure Wi-Fi isturned on and select the network name (SSID) of the network theprojector is connecting to.
Setting Up Wireless Network Security
You can set up security for your projector to use on a wireless network. Set upone of the following security options to match the settings used on yournetwork:• WPA2-PSK security *• WPA3-PSK security **• WPA2/WPA3-PSK security **• WPA3-EAP security **• WPA2/WPA3-EAP security *** Available only for the Quick connection mode.** Available only for the Advanced connection mode.
a
Contact your network administrator for guidance on entering thecorrect information.
a If you want to set up the WPA3-EAP or WPA2/WPA3-EAP security,make sure your digital certificate file is compatible with projectorregistration and placed directly on the USB storage device.
b Press the [Menu] button, select the Network menu, and press [Enter].
c Select Network Configuration and press [Enter].
d Select the Wireless LAN menu and press [Enter].
e Select the Security setting and press [Enter].
f Select the security settings to match your network settings.
g Do one of the following according to the security you selected.• WPA2-PSK, WPA3-PSK, or WPA2/WPA3-PSK: Select Complete
and follow the on-screen instructions to save your settings and exitthe menus.
• WPA3-EAP, WPA2/WPA3-EAP: Select EAP Method and press[Enter].
h Select the protocol for authentication as the EAP Type setting.
i To import your certificate, select the certificate type and press [Enter].• Client Certificate for the PEAP-TLS or EAP-TLS type• CA certificate for all EAP types
a
You can also register the digital certificates from your Webbrowser. However, be sure to register just once or the certificatemay not install correctly.
j Select Register and press [Enter].
k Follow the on-screen instructions to connect a USB storage device tothe projector's USB-A port.
l Press [Enter] to display the certificate list.
m Select the certificate to import using the displayed list.A message is displayed prompting you to enter the password for thecertificate.
n Enter a password and press [Enter].The certificate is imported and a completion message appears.
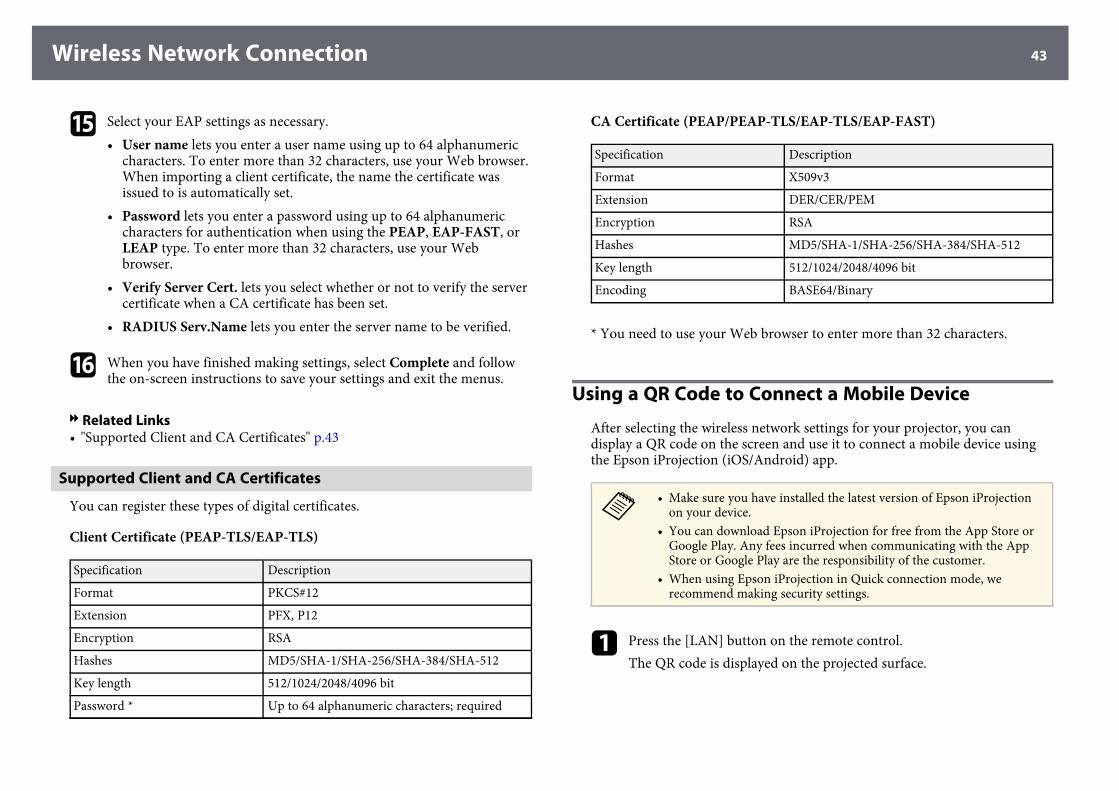
Wireless Network Connection 43
o Select your EAP settings as necessary.• User name lets you enter a user name using up to 64 alphanumeric
characters. To enter more than 32 characters, use your Web browser.When importing a client certificate, the name the certificate wasissued to is automatically set.
• Password lets you enter a password using up to 64 alphanumericcharacters for authentication when using the PEAP, EAP-FAST, orLEAP type. To enter more than 32 characters, use your Webbrowser.
• Verify Server Cert. lets you select whether or not to verify the servercertificate when a CA certificate has been set.
• RADIUS Serv.Name lets you enter the server name to be verified.
p When you have finished making settings, select Complete and followthe on-screen instructions to save your settings and exit the menus.
gg Related Links• "Supported Client and CA Certificates" p.43
Supported Client and CA Certificates
You can register these types of digital certificates.
Client Certificate (PEAP-TLS/EAP-TLS)
Specification Description
Format PKCS#12
Extension PFX, P12
Encryption RSA
Hashes MD5/SHA-1/SHA-256/SHA-384/SHA-512
Key length 512/1024/2048/4096 bit
Password * Up to 64 alphanumeric characters; required
CA Certificate (PEAP/PEAP-TLS/EAP-TLS/EAP-FAST)
Specification Description
Format X509v3
Extension DER/CER/PEM
Encryption RSA
Hashes MD5/SHA-1/SHA-256/SHA-384/SHA-512
Key length 512/1024/2048/4096 bit
Encoding BASE64/Binary
* You need to use your Web browser to enter more than 32 characters.
Using a QR Code to Connect a Mobile Device
After selecting the wireless network settings for your projector, you candisplay a QR code on the screen and use it to connect a mobile device usingthe Epson iProjection (iOS/Android) app.
a
• Make sure you have installed the latest version of Epson iProjectionon your device.
• You can download Epson iProjection for free from the App Store orGoogle Play. Any fees incurred when communicating with the AppStore or Google Play are the responsibility of the customer.
• When using Epson iProjection in Quick connection mode, werecommend making security settings.
a Press the [LAN] button on the remote control.The QR code is displayed on the projected surface.
Wireless Network Connection 44
a
• If you do not see the QR code, set the Display LAN Info.setting to Text & QR Code in the projector's Network menu.s Network > Network Configuration > Basic > DisplayLAN Info.
• To hide the QR code, press [Esc].• When the QR code is hidden, press [Enter] to display the code.
b Start Epson iProjection on your mobile device.
c Read the projected QR code using Epson iProjection to connect it tothe projector.
a
To correctly read the QR code, make sure you face the screensquarely and closely enough so that the projected code fits intothe guide of the mobile device's QR code reader. If you are toofar from the screen, the code may not be read.
When a connection is established, select Contents menu from , andthen select the file you want to project.
Using a USB Key to Connect a Windows Computer
You can set up your USB flash drive as a USB key to quickly connect theprojector to a wireless LAN supported Windows computer. After creating theUSB key, you can quickly project images from the network projector.
a Set up the USB key using USB Key Setup Tool of the Epson iProjection(Windows) software.
a
See the Epson iProjection Operation Guide (Windows/Mac) forinstructions.
b Make sure the wireless LAN module is installed into your projector.
c Turn on the projector.
d Press the [LAN] button on the remote control.The LAN standby screen is displayed. Verify that an SSID and IPaddress are displayed.
e Remove the wireless LAN module from the projector's USB-A port (ifinstalled) and insert the USB key into the same port.You see a projected message that the network information update iscomplete.
f Remove the USB key.If your projector needs the wireless LAN module, reinsert the wirelessLAN module into the projector.
g Connect the USB key to a USB port on your computer.
h Follow the on-screen instructions to install the necessary application.
a
• If the Windows Firewall message is displayed, click Yes todisable the firewall.
• You need administrator authority to install the software.• If it is not installed automatically, double-clickMPPLaunch.exe in the USB key.
After a few minutes, your computer image is displayed by the projector.
i When you have finished projecting wirelessly, select the Safely RemoveHardware option in the Windows taskbar, and then remove the USBkey from your computer.
a
You may need to restart your computer to reactivate yourwireless LAN connection.
Wireless Network Connection 45
gg Related Links• "Getting the Latest Version of the Documents" p.10
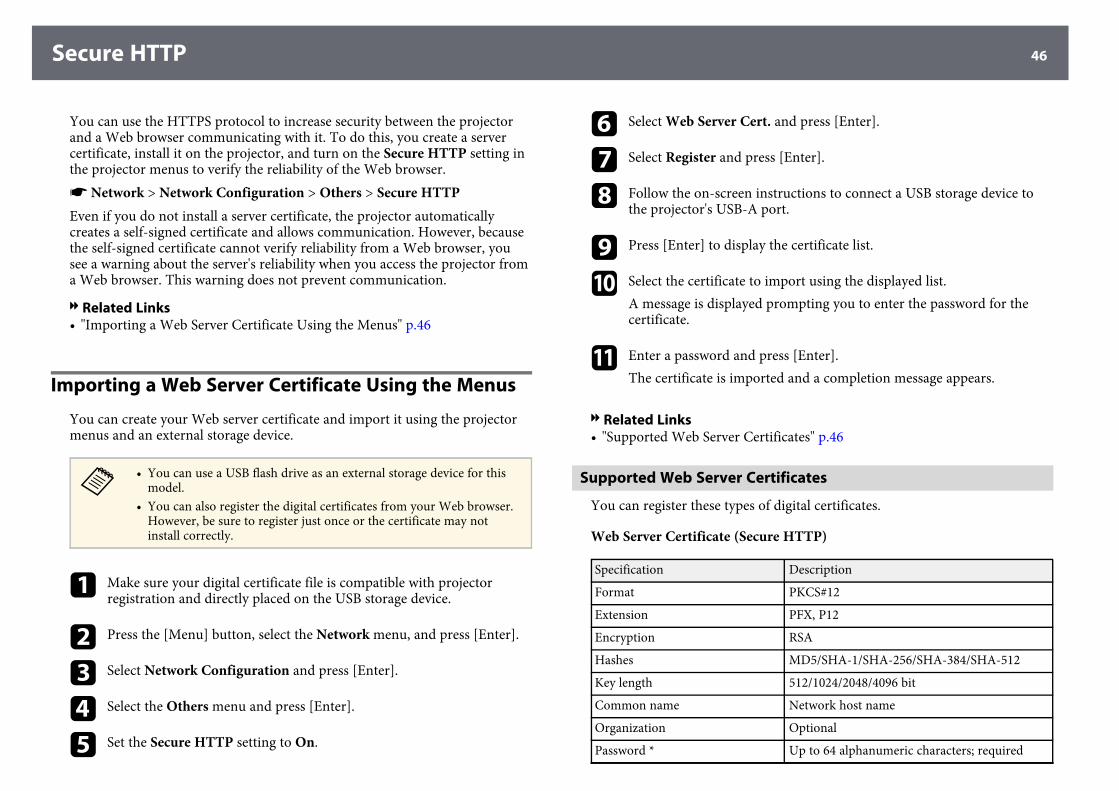
Secure HTTP 46
You can use the HTTPS protocol to increase security between the projectorand a Web browser communicating with it. To do this, you create a servercertificate, install it on the projector, and turn on the Secure HTTP setting inthe projector menus to verify the reliability of the Web browser.s Network > Network Configuration > Others > Secure HTTPEven if you do not install a server certificate, the projector automaticallycreates a self-signed certificate and allows communication. However, becausethe self-signed certificate cannot verify reliability from a Web browser, yousee a warning about the server's reliability when you access the projector froma Web browser. This warning does not prevent communication.
gg Related Links• "Importing a Web Server Certificate Using the Menus" p.46
Importing a Web Server Certificate Using the Menus
You can create your Web server certificate and import it using the projectormenus and an external storage device.
a
• You can use a USB flash drive as an external storage device for thismodel.
• You can also register the digital certificates from your Web browser.However, be sure to register just once or the certificate may notinstall correctly.
a Make sure your digital certificate file is compatible with projectorregistration and directly placed on the USB storage device.
b Press the [Menu] button, select the Network menu, and press [Enter].
c Select Network Configuration and press [Enter].
d Select the Others menu and press [Enter].
e Set the Secure HTTP setting to On.
f Select Web Server Cert. and press [Enter].
g Select Register and press [Enter].
h Follow the on-screen instructions to connect a USB storage device tothe projector's USB-A port.
i Press [Enter] to display the certificate list.
j Select the certificate to import using the displayed list.A message is displayed prompting you to enter the password for thecertificate.
k Enter a password and press [Enter].The certificate is imported and a completion message appears.
gg Related Links• "Supported Web Server Certificates" p.46
Supported Web Server Certificates
You can register these types of digital certificates.
Web Server Certificate (Secure HTTP)
Specification Description
Format PKCS#12
Extension PFX, P12
Encryption RSA
Hashes MD5/SHA-1/SHA-256/SHA-384/SHA-512
Key length 512/1024/2048/4096 bit
Common name Network host name
Organization Optional
Password * Up to 64 alphanumeric characters; required
Secure HTTP 47
* You need to use your Web browser to enter more than 32 characters.
Adjusting the Menu SettingsFollow the instructions in these sections to access the projector menu system and change projector settings.
gg Related Links• "Home Screen" p.49• "Using the Projector's Menus" p.50• "Using the Displayed Keyboard" p.51• "Using Basic Projector Features" p.52• "Copying Menu Settings Between Projectors (Batch Setup)" p.65
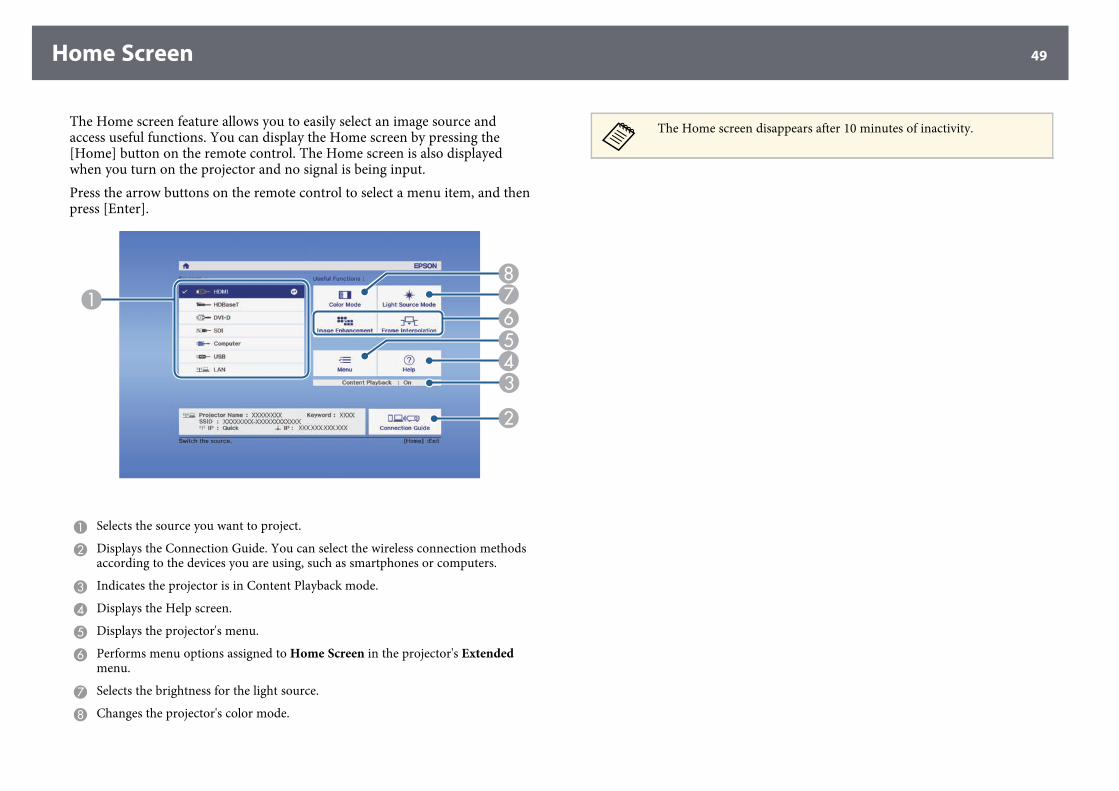
Home Screen 49
The Home screen feature allows you to easily select an image source andaccess useful functions. You can display the Home screen by pressing the[Home] button on the remote control. The Home screen is also displayedwhen you turn on the projector and no signal is being input.Press the arrow buttons on the remote control to select a menu item, and thenpress [Enter].
A Selects the source you want to project.
B Displays the Connection Guide. You can select the wireless connection methodsaccording to the devices you are using, such as smartphones or computers.
C Indicates the projector is in Content Playback mode.
D Displays the Help screen.
E Displays the projector's menu.
F Performs menu options assigned to Home Screen in the projector's Extendedmenu.
G Selects the brightness for the light source.
H Changes the projector's color mode.
a
The Home screen disappears after 10 minutes of inactivity.
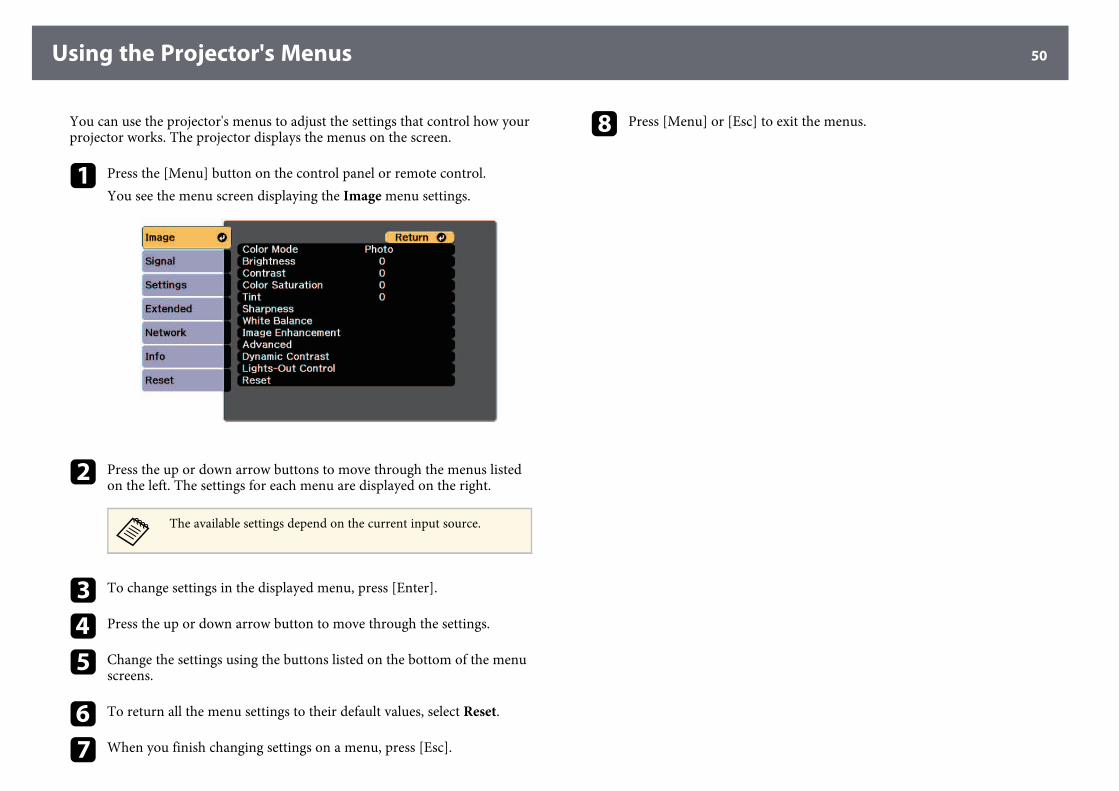
Using the Projector's Menus 50
You can use the projector's menus to adjust the settings that control how yourprojector works. The projector displays the menus on the screen.
a Press the [Menu] button on the control panel or remote control.You see the menu screen displaying the Image menu settings.
b Press the up or down arrow buttons to move through the menus listedon the left. The settings for each menu are displayed on the right.
a
The available settings depend on the current input source.
c To change settings in the displayed menu, press [Enter].
d Press the up or down arrow button to move through the settings.
e Change the settings using the buttons listed on the bottom of the menuscreens.
f To return all the menu settings to their default values, select Reset.
g When you finish changing settings on a menu, press [Esc].
h Press [Menu] or [Esc] to exit the menus.
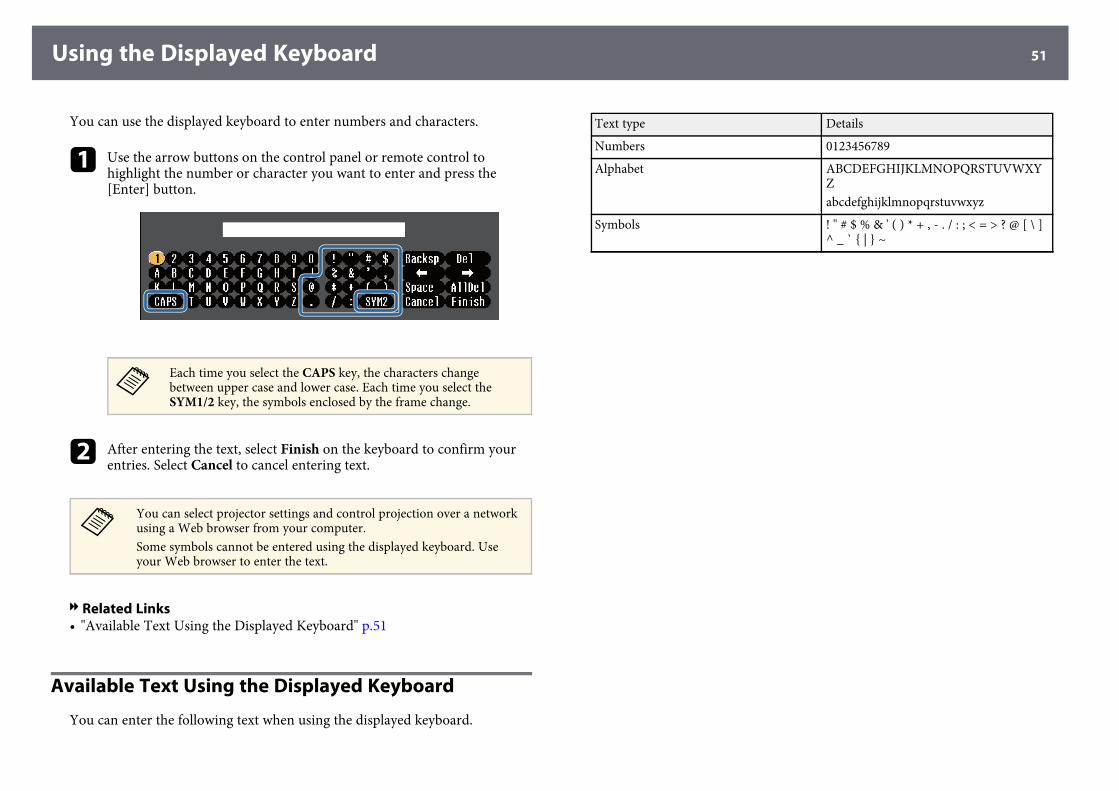
Using the Displayed Keyboard 51
You can use the displayed keyboard to enter numbers and characters.
a Use the arrow buttons on the control panel or remote control tohighlight the number or character you want to enter and press the[Enter] button.
a
Each time you select the CAPS key, the characters changebetween upper case and lower case. Each time you select theSYM1/2 key, the symbols enclosed by the frame change.
b After entering the text, select Finish on the keyboard to confirm yourentries. Select Cancel to cancel entering text.
a
You can select projector settings and control projection over a networkusing a Web browser from your computer.Some symbols cannot be entered using the displayed keyboard. Useyour Web browser to enter the text.
gg Related Links• "Available Text Using the Displayed Keyboard" p.51
Available Text Using the Displayed Keyboard
You can enter the following text when using the displayed keyboard.
Text type Details
Numbers 0123456789
Alphabet ABCDEFGHIJKLMNOPQRSTUVWXYZabcdefghijklmnopqrstuvwxyz
Symbols ! " # $ % & ' ( ) * + , - . / : ; < = > ? @ [ \ ]^ _ ` { | } ~
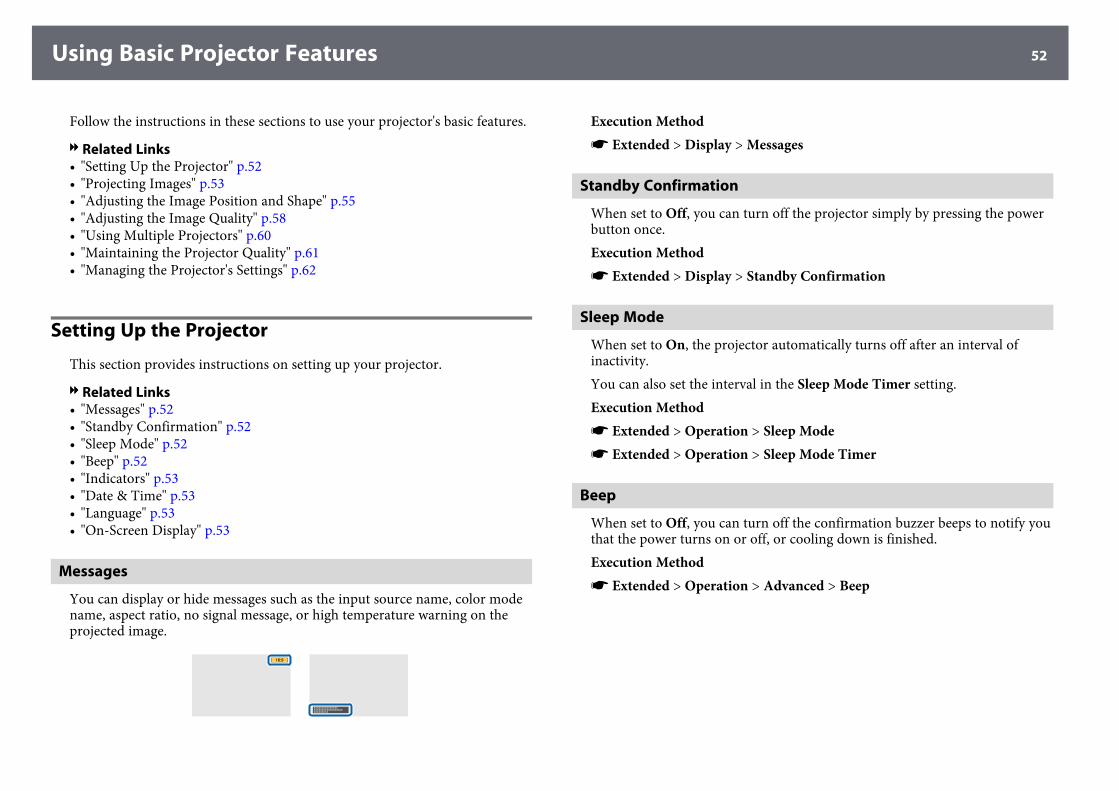
Using Basic Projector Features 52
Follow the instructions in these sections to use your projector's basic features.
gg Related Links• "Setting Up the Projector" p.52• "Projecting Images" p.53• "Adjusting the Image Position and Shape" p.55• "Adjusting the Image Quality" p.58• "Using Multiple Projectors" p.60• "Maintaining the Projector Quality" p.61• "Managing the Projector's Settings" p.62
Setting Up the Projector
This section provides instructions on setting up your projector.
gg Related Links• "Messages" p.52• "Standby Confirmation" p.52• "Sleep Mode" p.52• "Beep" p.52• "Indicators" p.53• "Date & Time" p.53• "Language" p.53• "On-Screen Display" p.53
Messages
You can display or hide messages such as the input source name, color modename, aspect ratio, no signal message, or high temperature warning on theprojected image.
Execution Methods Extended > Display > Messages
Standby Confirmation
When set to Off, you can turn off the projector simply by pressing the powerbutton once.Execution Methods Extended > Display > Standby Confirmation
Sleep Mode
When set to On, the projector automatically turns off after an interval ofinactivity.You can also set the interval in the Sleep Mode Timer setting.Execution Methods Extended > Operation > Sleep Modes Extended > Operation > Sleep Mode Timer
Beep
When set to Off, you can turn off the confirmation buzzer beeps to notify youthat the power turns on or off, or cooling down is finished.Execution Methods Extended > Operation > Advanced > Beep
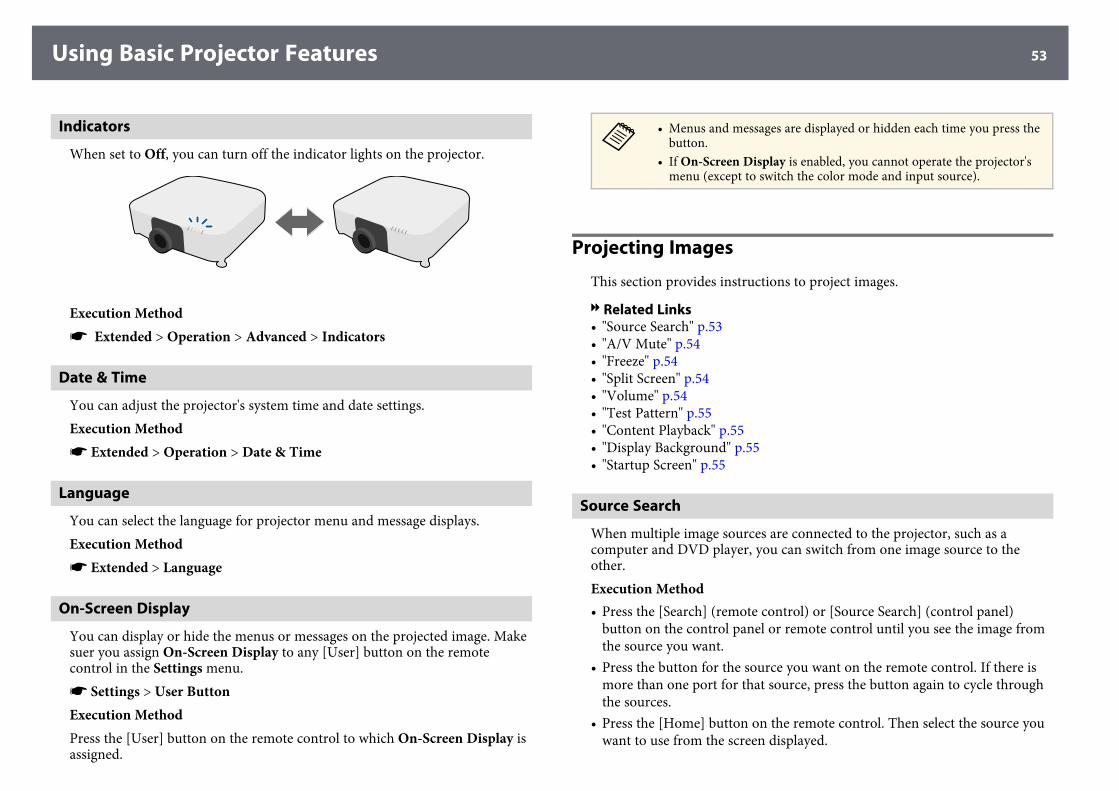
Using Basic Projector Features 53
Indicators
When set to Off, you can turn off the indicator lights on the projector.
Execution Methods Extended > Operation > Advanced > Indicators
Date & Time
You can adjust the projector's system time and date settings.Execution Methods Extended > Operation > Date & Time
Language
You can select the language for projector menu and message displays.Execution Methods Extended > Language
On-Screen Display
You can display or hide the menus or messages on the projected image. Makesuer you assign On-Screen Display to any [User] button on the remotecontrol in the Settings menu.s Settings > User ButtonExecution MethodPress the [User] button on the remote control to which On-Screen Display isassigned.
a
• Menus and messages are displayed or hidden each time you press thebutton.
• If On-Screen Display is enabled, you cannot operate the projector'smenu (except to switch the color mode and input source).
Projecting Images
This section provides instructions to project images.
gg Related Links• "Source Search" p.53• "A/V Mute" p.54• "Freeze" p.54• "Split Screen" p.54• "Volume" p.54• "Test Pattern" p.55• "Content Playback" p.55• "Display Background" p.55• "Startup Screen" p.55
Source Search
When multiple image sources are connected to the projector, such as acomputer and DVD player, you can switch from one image source to theother.Execution Method• Press the [Search] (remote control) or [Source Search] (control panel)
button on the control panel or remote control until you see the image fromthe source you want.
• Press the button for the source you want on the remote control. If there ismore than one port for that source, press the button again to cycle throughthe sources.
• Press the [Home] button on the remote control. Then select the source youwant to use from the screen displayed.
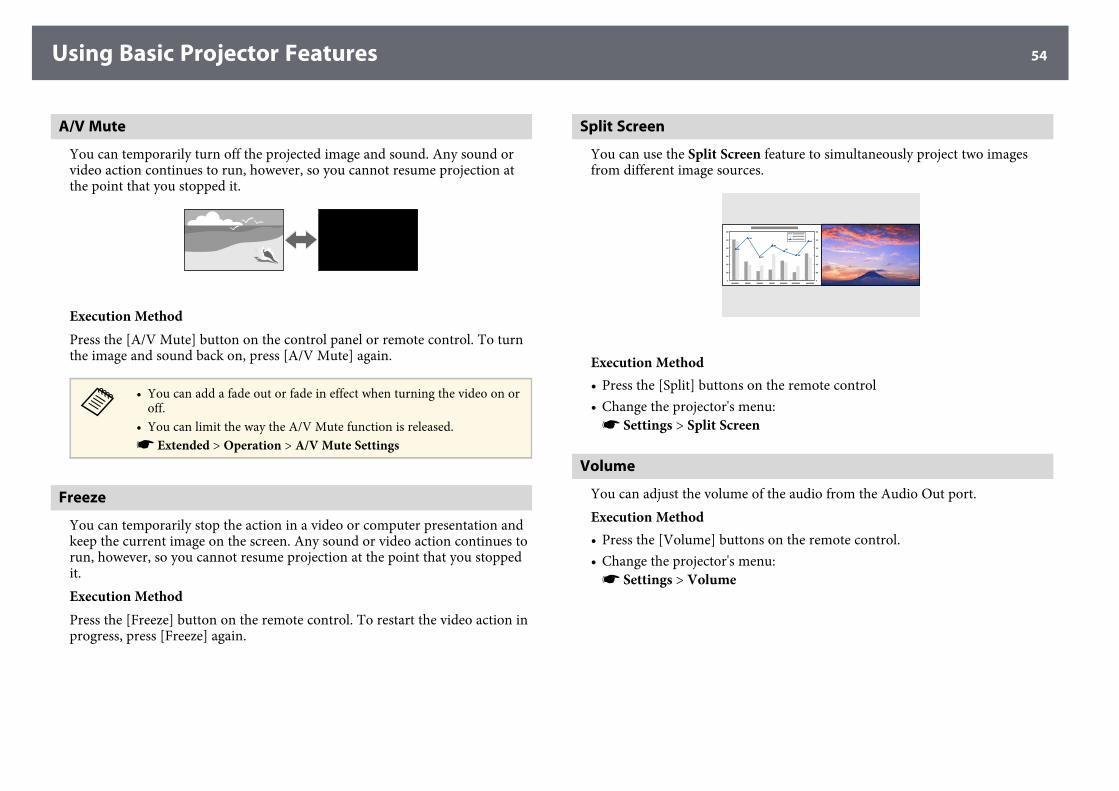
Using Basic Projector Features 54
A/V Mute
You can temporarily turn off the projected image and sound. Any sound orvideo action continues to run, however, so you cannot resume projection atthe point that you stopped it.
Execution MethodPress the [A/V Mute] button on the control panel or remote control. To turnthe image and sound back on, press [A/V Mute] again.
a
• You can add a fade out or fade in effect when turning the video on oroff.
• You can limit the way the A/V Mute function is released.s Extended > Operation > A/V Mute Settings
Freeze
You can temporarily stop the action in a video or computer presentation andkeep the current image on the screen. Any sound or video action continues torun, however, so you cannot resume projection at the point that you stoppedit.Execution MethodPress the [Freeze] button on the remote control. To restart the video action inprogress, press [Freeze] again.
Split Screen
You can use the Split Screen feature to simultaneously project two imagesfrom different image sources.
Execution Method• Press the [Split] buttons on the remote control• Change the projector's menu:s Settings > Split Screen
Volume
You can adjust the volume of the audio from the Audio Out port.Execution Method• Press the [Volume] buttons on the remote control.• Change the projector's menu:s Settings > Volume
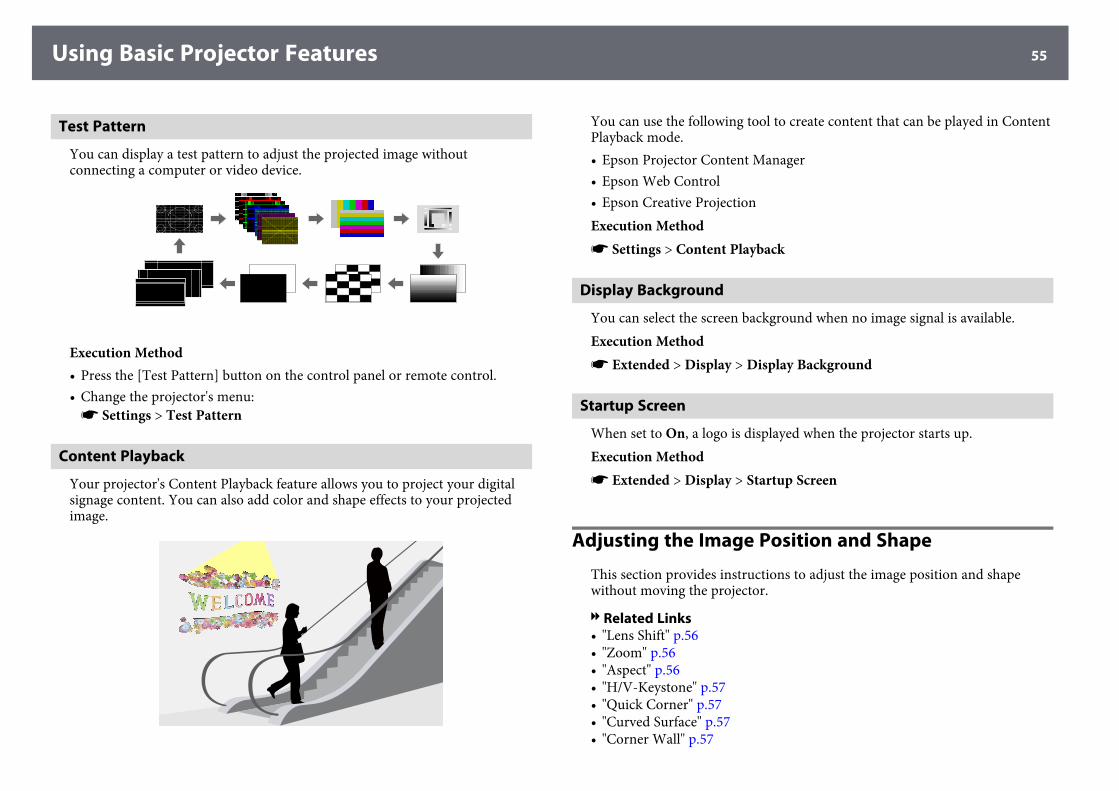
Using Basic Projector Features 55
Test Pattern
You can display a test pattern to adjust the projected image withoutconnecting a computer or video device.
Execution Method• Press the [Test Pattern] button on the control panel or remote control.• Change the projector's menu:s Settings > Test Pattern
Content Playback
Your projector's Content Playback feature allows you to project your digitalsignage content. You can also add color and shape effects to your projectedimage.
You can use the following tool to create content that can be played in ContentPlayback mode.• Epson Projector Content Manager• Epson Web Control• Epson Creative ProjectionExecution Methods Settings > Content Playback
Display Background
You can select the screen background when no image signal is available.Execution Methods Extended > Display > Display Background
Startup Screen
When set to On, a logo is displayed when the projector starts up.Execution Methods Extended > Display > Startup Screen
Adjusting the Image Position and Shape
This section provides instructions to adjust the image position and shapewithout moving the projector.
gg Related Links• "Lens Shift" p.56• "Zoom" p.56• "Aspect" p.56• "H/V-Keystone" p.57• "Quick Corner" p.57• "Curved Surface" p.57• "Corner Wall" p.57
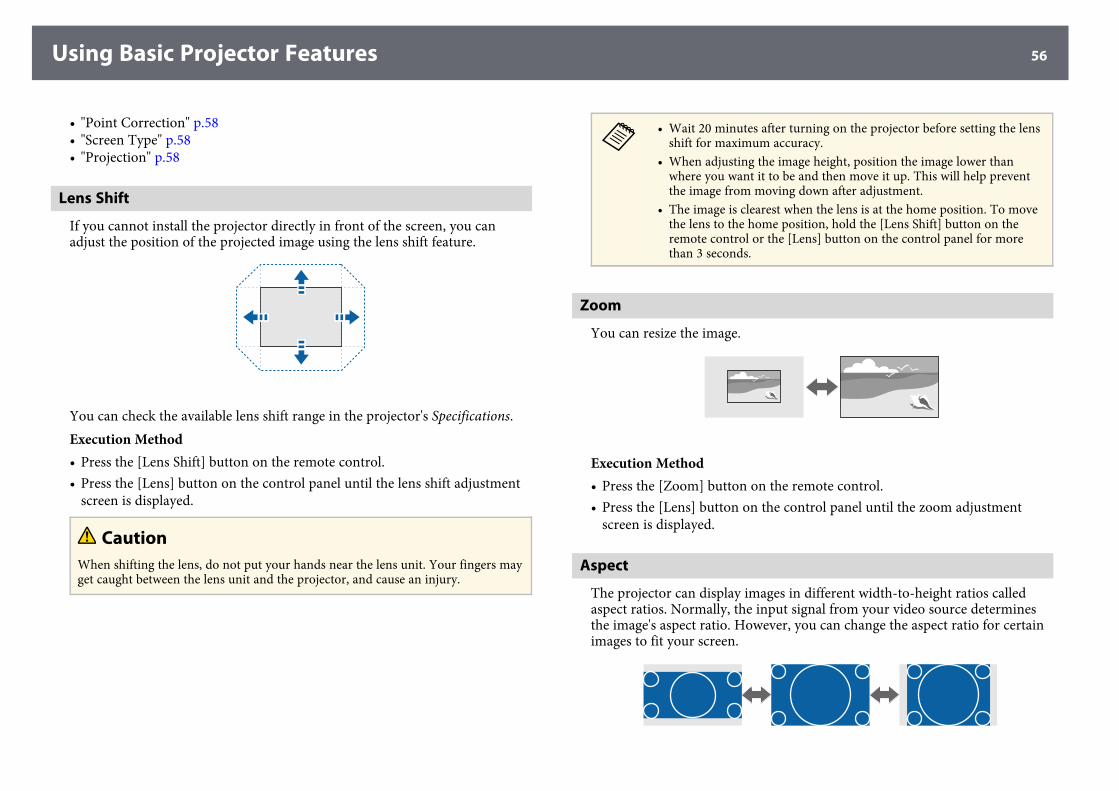
Using Basic Projector Features 56
• "Point Correction" p.58• "Screen Type" p.58• "Projection" p.58
Lens Shift
If you cannot install the projector directly in front of the screen, you canadjust the position of the projected image using the lens shift feature.
You can check the available lens shift range in the projector's Specifications.Execution Method• Press the [Lens Shift] button on the remote control.• Press the [Lens] button on the control panel until the lens shift adjustment
screen is displayed.
CautionWhen shifting the lens, do not put your hands near the lens unit. Your fingers mayget caught between the lens unit and the projector, and cause an injury.
a
• Wait 20 minutes after turning on the projector before setting the lensshift for maximum accuracy.
• When adjusting the image height, position the image lower thanwhere you want it to be and then move it up. This will help preventthe image from moving down after adjustment.
• The image is clearest when the lens is at the home position. To movethe lens to the home position, hold the [Lens Shift] button on theremote control or the [Lens] button on the control panel for morethan 3 seconds.
Zoom
You can resize the image.
Execution Method• Press the [Zoom] button on the remote control.• Press the [Lens] button on the control panel until the zoom adjustment
screen is displayed.
Aspect
The projector can display images in different width-to-height ratios calledaspect ratios. Normally, the input signal from your video source determinesthe image's aspect ratio. However, you can change the aspect ratio for certainimages to fit your screen.
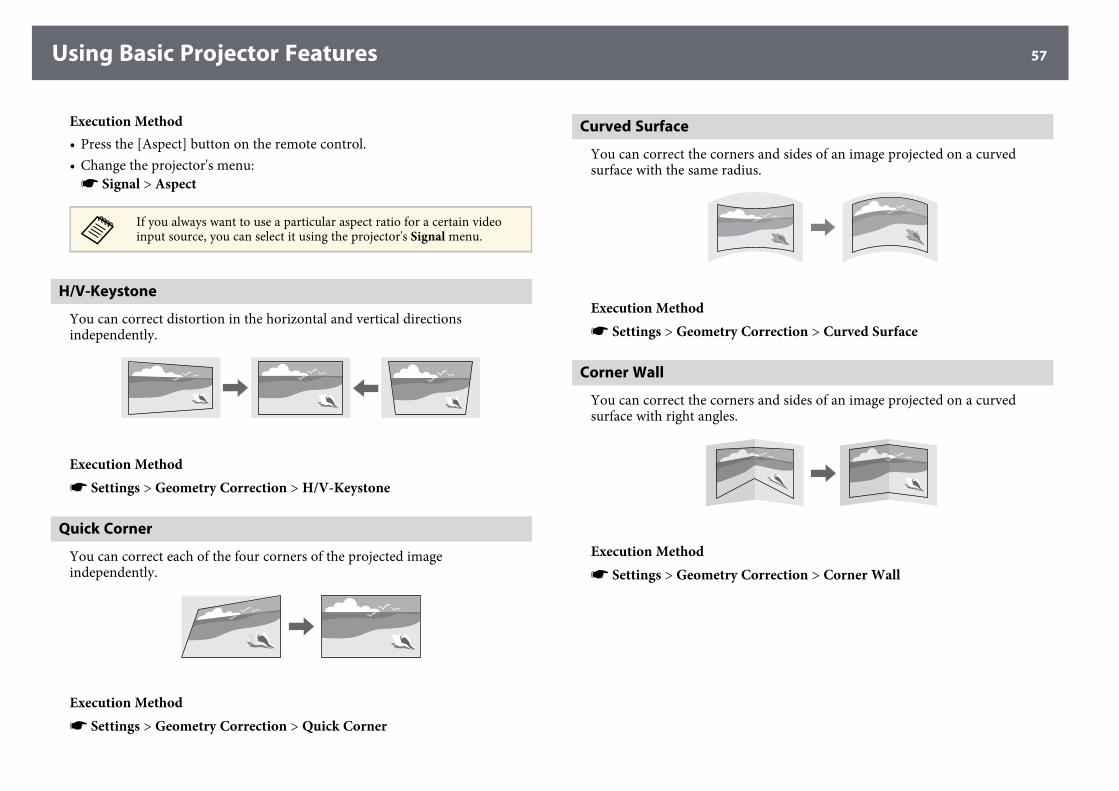
Using Basic Projector Features 57
Execution Method• Press the [Aspect] button on the remote control.• Change the projector's menu:s Signal > Aspect
a
If you always want to use a particular aspect ratio for a certain videoinput source, you can select it using the projector's Signal menu.
H/V-Keystone
You can correct distortion in the horizontal and vertical directionsindependently.
Execution Methods Settings > Geometry Correction > H/V-Keystone
Quick Corner
You can correct each of the four corners of the projected imageindependently.
Execution Methods Settings > Geometry Correction > Quick Corner
Curved Surface
You can correct the corners and sides of an image projected on a curvedsurface with the same radius.
Execution Methods Settings > Geometry Correction > Curved Surface
Corner Wall
You can correct the corners and sides of an image projected on a curvedsurface with right angles.
Execution Methods Settings > Geometry Correction > Corner Wall
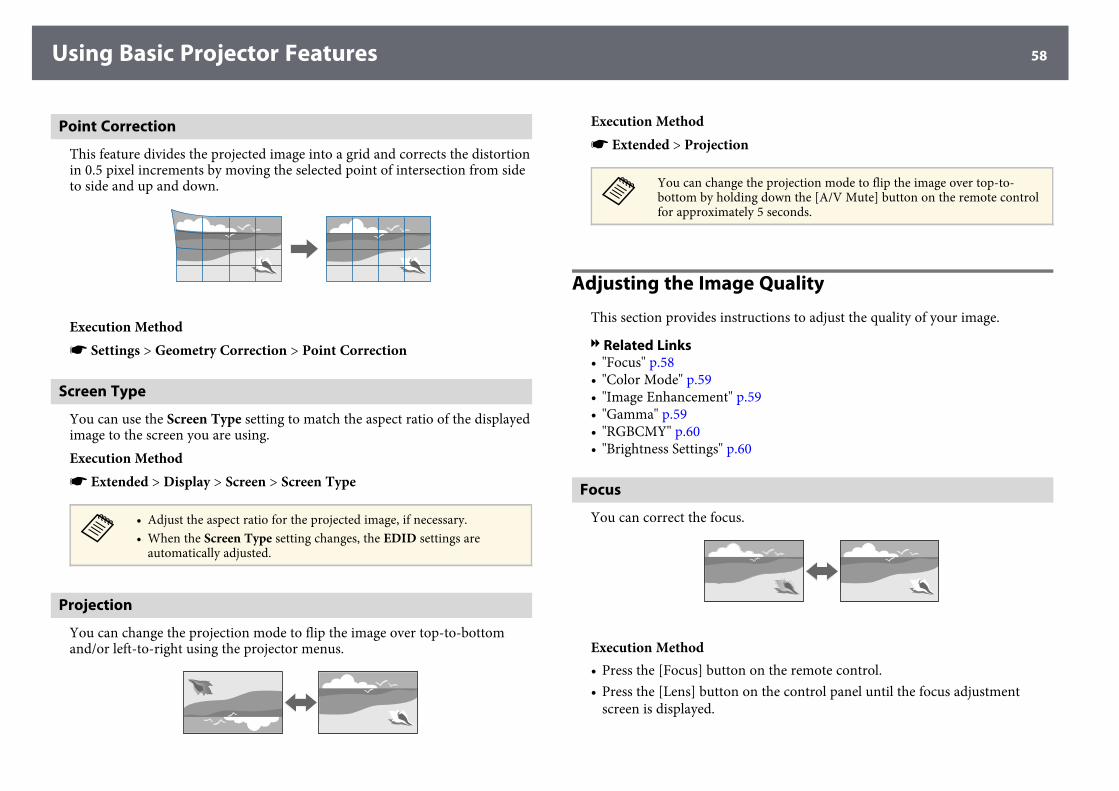
Using Basic Projector Features 58
Point Correction
This feature divides the projected image into a grid and corrects the distortionin 0.5 pixel increments by moving the selected point of intersection from sideto side and up and down.
Execution Methods Settings > Geometry Correction > Point Correction
Screen Type
You can use the Screen Type setting to match the aspect ratio of the displayedimage to the screen you are using.Execution Methods Extended > Display > Screen > Screen Type
a
• Adjust the aspect ratio for the projected image, if necessary.• When the Screen Type setting changes, the EDID settings are
automatically adjusted.
Projection
You can change the projection mode to flip the image over top-to-bottomand/or left-to-right using the projector menus.
Execution Methods Extended > Projection
a
You can change the projection mode to flip the image over top-to-bottom by holding down the [A/V Mute] button on the remote controlfor approximately 5 seconds.
Adjusting the Image Quality
This section provides instructions to adjust the quality of your image.
gg Related Links• "Focus" p.58• "Color Mode" p.59• "Image Enhancement" p.59• "Gamma" p.59• "RGBCMY" p.60• "Brightness Settings" p.60
Focus
You can correct the focus.
Execution Method• Press the [Focus] button on the remote control.• Press the [Lens] button on the control panel until the focus adjustment
screen is displayed.
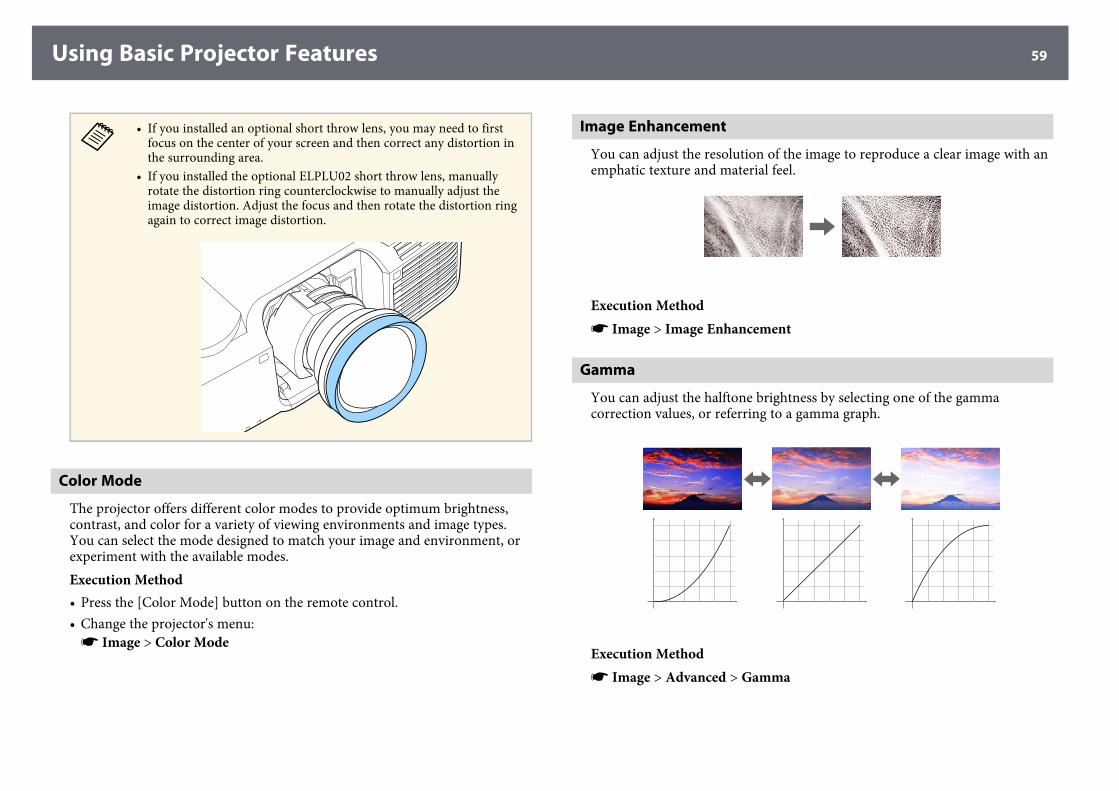
Using Basic Projector Features 59
a
• If you installed an optional short throw lens, you may need to firstfocus on the center of your screen and then correct any distortion inthe surrounding area.
• If you installed the optional ELPLU02 short throw lens, manuallyrotate the distortion ring counterclockwise to manually adjust theimage distortion. Adjust the focus and then rotate the distortion ringagain to correct image distortion.
Color Mode
The projector offers different color modes to provide optimum brightness,contrast, and color for a variety of viewing environments and image types.You can select the mode designed to match your image and environment, orexperiment with the available modes.Execution Method• Press the [Color Mode] button on the remote control.• Change the projector's menu:s Image > Color Mode
Image Enhancement
You can adjust the resolution of the image to reproduce a clear image with anemphatic texture and material feel.
Execution Methods Image > Image Enhancement
Gamma
You can adjust the halftone brightness by selecting one of the gammacorrection values, or referring to a gamma graph.
Execution Methods Image > Advanced > Gamma

Using Basic Projector Features 60
RGBCMY
You can adjust the Hue, Saturation, and Brightness of each color R (red), G(green), B (blue), C (cyan), M (magenta), Y (yellow) individually.
Execution Methods Image > Advanced > RGBCMY
Brightness Settings
You can select the brightness for the light source.
Execution Methods Settings > Brightness Settings
Using Multiple Projectors
You can combine the projected images from two or more projectors to createone unified image area.
gg Related Links• "Tiling" p.60
• "Edge Blending" p.60• "Black Level" p.61• "Scale" p.61• "Color Matching" p.61
Tiling
You can assign a projection position to each projector.
Execution Methods Extended > Multi-Projection > Tiling
Edge Blending
You can use the Edge Blending feature to create a seamless image frommultiple projectors.
Execution Method
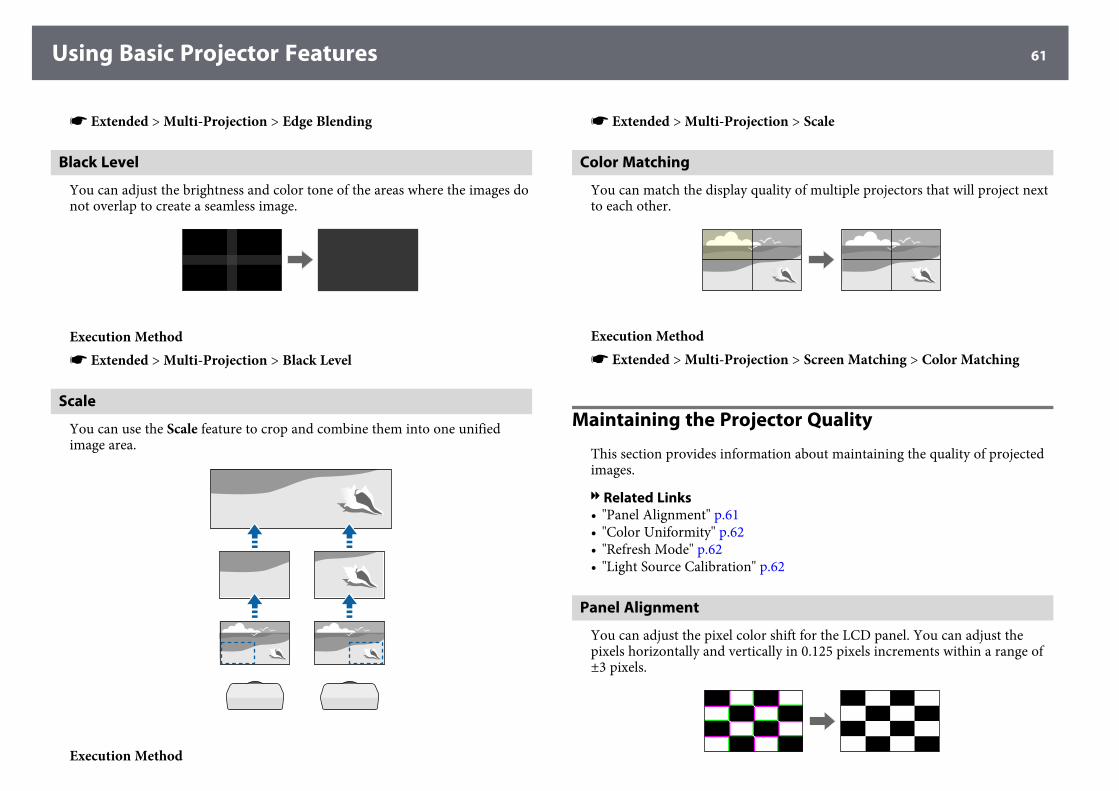
Using Basic Projector Features 61
s Extended > Multi-Projection > Edge Blending
Black Level
You can adjust the brightness and color tone of the areas where the images donot overlap to create a seamless image.
Execution Methods Extended > Multi-Projection > Black Level
Scale
You can use the Scale feature to crop and combine them into one unifiedimage area.
Execution Method
s Extended > Multi-Projection > Scale
Color Matching
You can match the display quality of multiple projectors that will project nextto each other.
Execution Methods Extended > Multi-Projection > Screen Matching > Color Matching
Maintaining the Projector Quality
This section provides information about maintaining the quality of projectedimages.
gg Related Links• "Panel Alignment" p.61• "Color Uniformity" p.62• "Refresh Mode" p.62• "Light Source Calibration" p.62
Panel Alignment
You can adjust the pixel color shift for the LCD panel. You can adjust thepixels horizontally and vertically in 0.125 pixels increments within a range of±3 pixels.

Using Basic Projector Features 62
Execution Methods Extended > Display > Panel Alignment
Color Uniformity
If the color tone of the image is uneven, you can adjust the color tone balance.
Execution Methods Extended > Display > Color Uniformity
Refresh Mode
The refresh mode process clears any projected afterimage and turns off theprojector after a specified period of time.Execution Methods Reset > Refresh Mode
Light Source Calibration
The light source calibration process optimizes the color balance of thecurrently projected image.Execution Methods Reset > Light Source Calibration
Managing the Projector's Settings
This section provides information about managing the projector's settings.
gg Related Links• "Memory" p.62• "Schedule Settings" p.62• "Button Lock" p.63• "Password Protection" p.64
Memory
You can save customized settings and then select the saved settings wheneveryou want to use them.Execution Method• Press the [Memory] button on the remote control.• Change the projector's menu:s Settings > Memory
Schedule Settings
You can schedule up to 30 events to occur automatically on your projector,such as turning the projector on or off or switching the input source. Theprojector performs the selected events on the specified date and time in theschedule you set up.Execution Methods Extended > Schedule Settings

Using Basic Projector Features 63
Button Lock
Button lock security to block operation of the projector using the buttons onthe control panel or remote control.
Even if you can lock the buttons on the control panel, you can still use theremote control as usual.
The remote control buttons lock feature locks the following buttons.
Execution Method• To lock the control panel buttons, hold down the control panel lock button
on the control panel.To unlock the control panel buttons, hold down the [Enter] button on thecontrol panel for approximately 7 seconds.
• To lock the remote control buttons, hold down the [Home] button on theremote control for approximately 5 seconds.To unlock the remote control buttons, hold down the [Home] button againfor approximately 5 seconds.
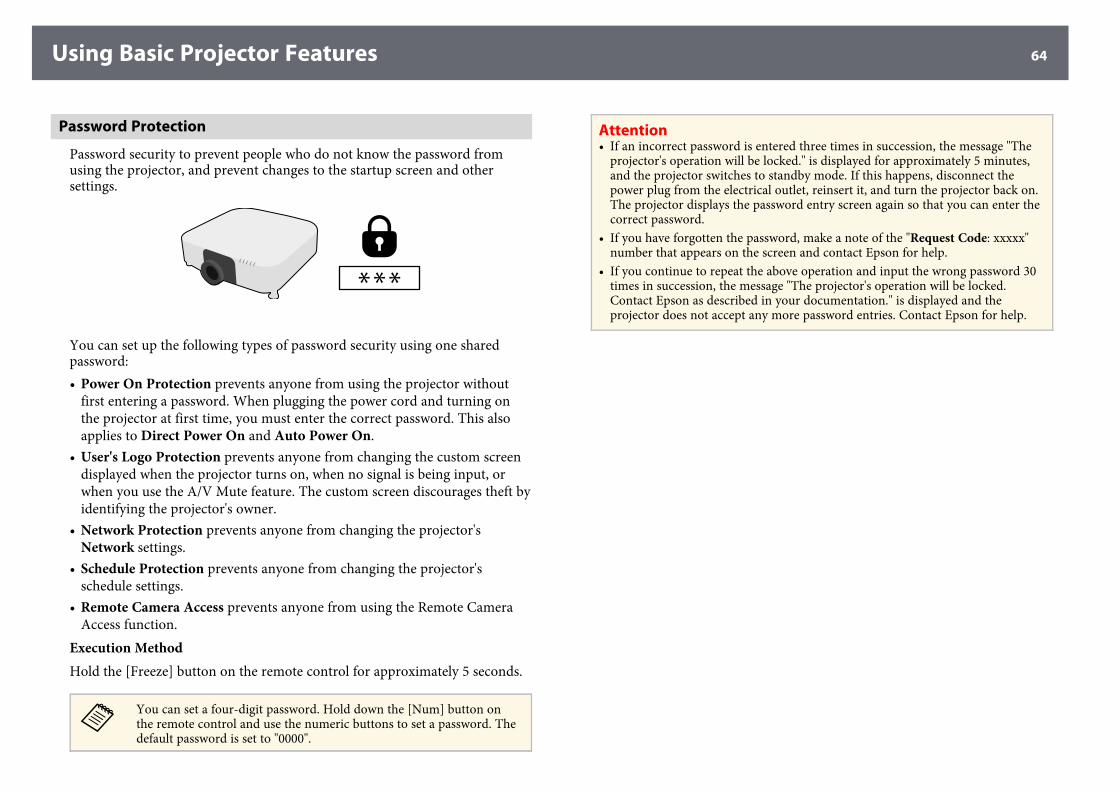
Using Basic Projector Features 64
Password Protection
Password security to prevent people who do not know the password fromusing the projector, and prevent changes to the startup screen and othersettings.
You can set up the following types of password security using one sharedpassword:• Power On Protection prevents anyone from using the projector without
first entering a password. When plugging the power cord and turning onthe projector at first time, you must enter the correct password. This alsoapplies to Direct Power On and Auto Power On.
• User's Logo Protection prevents anyone from changing the custom screendisplayed when the projector turns on, when no signal is being input, orwhen you use the A/V Mute feature. The custom screen discourages theft byidentifying the projector's owner.
• Network Protection prevents anyone from changing the projector'sNetwork settings.
• Schedule Protection prevents anyone from changing the projector'sschedule settings.
• Remote Camera Access prevents anyone from using the Remote CameraAccess function.
Execution MethodHold the [Freeze] button on the remote control for approximately 5 seconds.
a
You can set a four-digit password. Hold down the [Num] button onthe remote control and use the numeric buttons to set a password. Thedefault password is set to "0000".
Attention• If an incorrect password is entered three times in succession, the message "The
projector's operation will be locked." is displayed for approximately 5 minutes,and the projector switches to standby mode. If this happens, disconnect thepower plug from the electrical outlet, reinsert it, and turn the projector back on.The projector displays the password entry screen again so that you can enter thecorrect password.
• If you have forgotten the password, make a note of the "Request Code: xxxxx"number that appears on the screen and contact Epson for help.
• If you continue to repeat the above operation and input the wrong password 30times in succession, the message "The projector's operation will be locked.Contact Epson as described in your documentation." is displayed and theprojector does not accept any more password entries. Contact Epson for help.
Copying Menu Settings Between Projectors (Batch Setup) 65
After selecting the projector's menu settings for one projector, you can use thefollowing methods to copy the settings to other projectors, as long as they arethe same model.
• by using a USB flash drive• by connecting a computer and projector using a USB cable• by using Epson Projector Management• by using Projector Config ToolYou cannot copy any information unique to an individual projector, such asLight Source Hours or Status.
a
• Perform batch setup before adjusting the image settings such askeystone distortion correction. Since image adjustment values arealso copied to another projector, the adjustments you made beforeperforming the batch setup are overwritten and the projected screenyou adjusted may change.
• When copying the menu settings from one projector to another,user's logo is also copied. Do not register the information that you donot want to share between multiple projectors as a user's logo.
• Make sure Batch Setup Range is set to Limited if you do not want tocopy the following settings:• Password Protection settings• EDID in the Signal menu• Network menu settings (except for the Notifications menu and
the Others menu)• You can only copy the following settings using the Projector Config
Tool:• Projector Name• Asset information• IP Address for a wired network• Subnet Mask for a wired network• NFC Write Password
CautionEpson takes no responsibility for batch setup failures and associated repair costsdue to power outages, communication errors, or other problems that may causesuch failures.
gg Related Links• "Transferring Settings From a USB Flash Drive" p.65• "Transferring Settings From a Computer" p.66• "Batch Setup Error Notification" p.67
Transferring Settings From a USB Flash Drive
You can copy menu settings from one projector to another of the same modelusing a USB flash drive.
a
The USB flash drive must use a FAT format and not incorporate anysecurity function. Delete any files on the drive before using it for batchsetup or the settings may not be saved correctly.
a Disconnect the power cord from the projector, and check that all of theprojector's indicators have turned off.
b Connect an empty USB flash drive directly to the projector's USB-Aport.
c Hold down the [Esc] button on the remote control or the control paneland connect the power cord to the projector.
d When all of the projector's indicators other than the filter indicatorturn on, release the [Esc] button.The indicators start flashing and the batch setup file is written to theUSB flash drive. When writing is finished, the projector turns off.
Copying Menu Settings Between Projectors (Batch Setup) 66
CautionDo not disconnect the power cord or the USB flash drive from the projectorwhile the file is being written. If the power cord or USB flash drive isdisconnected, the projector may not start correctly.
e Remove the USB flash drive.
a
The file name for the batch setup file is PJCONFDATA.bin. Ifyou need to change the file name, add text after PJCONFDATAusing only alphanumeric characters. If you change thePJCONFDATA section of the file name, the projector may not beable to recognize the file correctly.
f Disconnect the power cord from the projector to which you want tocopy settings, and check that all of the projector's indicators haveturned off.
g Connect the USB flash drive containing the saved batch setup file to theprojector's USB-A port.
h Hold down the [Menu] button on the remote control or the controlpanel and connect the power cord to the projector.
i When all of the projector's indicators other than the filter indicatorturn on, release the [Menu] button. (The indicators remain on forapproximately 75 seconds.)When all of the indicators start flashing, the settings are being written.When writing is finished, the projector turns off.
CautionDo not disconnect the power cord or the USB flash drive from the projectorwhile the file is being written. If the power cord or USB flash drive isdisconnected, the projector may not start correctly.
j Remove the USB flash drive.
Transferring Settings From a Computer
You can copy menu settings from one projector to another of the same modelby connecting the computer and projector with a USB cable.
a
You can use this batch setup method with the following operatingsystem versions:• Windows 7 and later• OS X 10.11.x and later
a Disconnect the power cord from the projector, and check that all of theprojector's indicators have turned off.
b Connect a USB cable to the computer's USB port and to the projector'sService port.
c Hold down the [Esc] button on the remote control or the control paneland connect the power cord to the projector.
d When all of the projector's indicators other than the filter indicatorturn on, release the [Esc] button.The computer recognizes the projector as a removable disk.
e Open the removable disk icon or folder, and save the batch setup file tothe computer.
a
The file name for the batch setup file is PJCONFDATA.bin. Ifyou need to change the file name, add text after PJCONFDATAusing only alphanumeric characters. If you change thePJCONFDATA section of the file name, the projector may not beable to recognize the file correctly.
f Eject the USB device (Windows) or drag the removable disk icon to theTrash (Mac).
g Disconnect the USB cable.

Copying Menu Settings Between Projectors (Batch Setup) 67
The projector turns off.
h Disconnect the power cord from the projector to which you want tocopy settings, and check that all of the projector's indicators haveturned off.
i Connect the USB cable to the computer's USB port and to theprojector's Service port.
j Hold down the [Menu] button on the remote control or the controlpanel and connect the power cord to the projector.
k When all of the projector's indicators other than the filter indicatorturn on, release the [Menu] button.The computer recognizes the projector as a removable disk.
l Copy the batch setup file (PJCONFDATA.bin) that you saved to yourcomputer to the top level folder of the removable disk.
a
Do not copy any files or folders other than the batch setup file tothe removable disk.
m Eject the USB device (Windows) or drag the removable disk icon to theTrash (Mac).
n Disconnect the USB cable.When all of the indicators start flashing, the settings are being written.When writing is finished, the projector turns off.
CautionDo not disconnect the power cord from the projector while the file is beingwritten. If the power cord is disconnected, the projector may not startcorrectly.
Batch Setup Error Notification
The projector's indicators notify you if an error occurs during a batch setupoperation. Check the status of the projector's indicators and follow theinstructions described in the table here.
Indicator status Problem and solutions
• Laser: Orange - flashingfast
• Temp: Orange - flashingfast
The batch setup file may be corrupt, or the USB flashdrive may not be connected correctly.Disconnect the USB flash drive, unplug and then plugin the projector's power cord, and then try again.
• Power: Blue - flashingfast
• Status: Blue - flashingfast
• Laser: Orange - flashingfast
• Temp: Orange - flashingfast
Writing the settings may have failed and an error mayhave occurred in the projector's firmware.Stop using the projector, remove the power plug fromthe electrical outlet. Contact Epson for help.
Menu SettingsRefer to these sections to learn more about your projector's settings.
gg Related Links• "Image Menu" p.69• "Signal Menu" p.75• "Settings Menu" p.79• "Extended Menu" p.88• "Network Menu" p.101• "Info Menu" p.110• "Reset Menu" p.113
Image Menu 69
Settings on the Image menu let you adjust the quality of your image. Theavailable settings depend on the currently selected color mode and inputsource. The settings are saved separately for each selected color mode.
gg Related Links• "Color Mode" p.69• "Brightness" p.69• "Contrast" p.69• "Color Saturation" p.70• "Tint" p.70• "Sharpness" p.70• "White Balance" p.70• "4K Enhancement" p.70• "Image Preset Mode" p.71• "Frame Interpolation" p.71• "Deinterlacing" p.71• "Noise Reduction" p.72• "MPEG Noise Reduction" p.72• "Super-resolution" p.72• "Detail Enhancement" p.72• "Reset (Image Enhancement)" p.72• "Scene Adaptive Gamma" p.73• "Gamma" p.73• "RGBCMY" p.73• "Dynamic Contrast" p.73• "Lights-Out Control" p.74• "Reset (Image menu)" p.74
Color Mode
s Image > Color Modes Extended > Multi-Projection > Screen Matching > Color ModeYou can adjust the vividness of image colors for various image types andenvironments. The brightness of the image varies depending on the modeselected.
DynamicThis is the brightest mode. Ideal for use in a bright room.
PresentationThe images are vivid and brought to life. Ideal for making presentations orwatching a TV program in a bright room.
NaturalReproduces colors faithfully. Ideal for projecting still pictures such asphotos.
CinemaGives images a natural tone. Ideal for watching films in a dark room.
BT.709Produces images that conform to the ITU-R BT.709.
DICOM SIMThis produces images with clear shadows. Ideal for projecting X-rayphotographs and other medical images. The projector is not a medicaldevice and cannot be used for medical diagnosis.
Multi-ProjectionMinimize the color tone difference between each projected image. Ideal forprojecting from multiple projectors.
a
You can also change the projector's Color Mode using the [ColorMode] button on the remote control.
Brightness
s Image > BrightnessYou can lighten or darken the overall image.
Contrast
s Image > ContrastYou can adjust the difference between light and dark areas of the image.
Image Menu 70
Color Saturation
s Image > Color SaturationYou can adjust the intensity of the image colors.
Tint
s Image > TintYou can adjust the balance of green to magenta tones in the image.
Sharpness
s Image > SharpnessYou can adjust the sharpness or softness of image details.Standard
You can adjust the image sharpness so that it is sufficiently balanced.Thin Line Enhancement
Higher values enhance the details such as hair or fabric patterns.Thick Line Enhancement
Higher values enhance the outline, background, and the other main partsof the objects in the image to show them clearly.
White Balance
s Image > White BalanceYou can adjust the overall tint of the image.Color Temp.
You can adjust the overall tint of the image within a range from 3200K to10000K. Higher values tint the image blue and lower values tint the imagered.
When Color Mode is set to Dynamic, the set Color Temp. may differ fromthe actual Color Temp. of the light from the projector. Use this menu as aguide.
G-M CorrectionHigher values tint the image green and lower values tint the image red.
Offset R/Offset G/Offset B/Gain R/Gain G/Gain BYou can adjust the individual R (red), G (green), and B (blue) componentsof the offset and gain.
4K Enhancement
s Image > Image Enhancement > 4K EnhancementYou can project an image at a doubled resolution by diagonally shifting 1pixel in increments of 0.5 pixels. A high-resolution image signal is projectedin fine detail.Off
If a signal that exceeds the panel resolution of this projector is input, theimage is displayed according to the panel resolution of this projector.
Full HDFor a signal with a resolution of 1080i/1080p/WUXGA or higher.
WUXGA+For a signal with a resolution that exceeds WUXGA. When projecting ahigh-resolution movie, you can project a high-definition image by usingthis setting with Image Preset Mode.

Image Menu 71
a
• You cannot select this setting when the Aspect setting is set toNative in the projector's Signal menu.
• When projecting from multiple projectors, select Off to unify eachimage.
• Off is ideal for projecting presentation materials from computers andso on.
• If you select Full HD or WUXGA+, the status corrected using thefollowing function is canceled.• Edge Blending• Scale• Curved Surface• Point Correction• Corner WallWhen you change the 4K Enhancement setting to Off, the settingsreturn to their previous state.
Image Preset Mode
s Image > Image Enhancement > Image Preset ModeYou can set the Image Enhancement options as a batch using preset values.The following settings are saved in the preset options.• Frame Interpolation• Deinterlacing• Noise Reduction• MPEG Noise Reduction• Super-resolution• Detail Enhancement
a
• To minimize delays, select Off.• If you select Off, you cannot set the other items in the ImageEnhancement setting.
• After selecting Preset 1 to Preset 5, you can fine tune each settingindividually. The settings value in the preset option are overwritten.
• The settings value are overwritten separately when 4K Enhancementis enabled and disabled.
Frame Interpolation
s Image > Image Enhancement > Frame InterpolationYou can play fast moving images smoothly by producing intermediate framesbetween the original frames.If your resulting images contain noise, set to Off.
a
You cannot select this setting in the following cases.• 4K Enhancement is enabled.• A signal with a resolution that exceeds WUXGA is input.• Aspect is set to V-Zoom.• Scale is set to Auto or Manual.• Edge Blending is set to On.• Image Preset Mode is set to Off.
Deinterlacing
s Image > Image Enhancement > DeinterlacingYou can set whether or not to convert interlaced-to-progressive signals forcertain video image types.Off
For fast-moving video images.
Image Menu 72
VideoFor most video images.
Film/AutoFor movies, computer graphics, and animation.
a
Setting is only displayed in the following cases.• The current signal is interlaced signal (480i/576i/1080i).• Image Preset Mode is enabled.
Noise Reduction
s Image > Image Enhancement > Noise ReductionYou can reduce flickering in images when inputting progressive signals orprogressive interlace signals.
a
You cannot select this setting in the following cases.• 4K Enhancement is enabled.• A signal with a resolution that exceeds WUXGA is input.• Image Preset Mode is set to Off.
MPEG Noise Reduction
s Image > Image Enhancement > MPEG Noise ReductionYou can reduce the noise or artifacts seen in MPEG video.
a
You cannot select this setting in the following cases.• 4K Enhancement is enabled.• A signal with a resolution that exceeds WUXGA is input.• Image Preset Mode is set to Off.
Super-resolution
s Image > Image Enhancement > Super-resolutionYou can reduce blurring when projecting low resolution images.Fine Line Adjust
Higher values enhance details such as hair or fabric patterns.Soft Focus Detail
Higher values enhance the outline, background, and the other main partsof the objects in the image to show them clearly.
a
You cannot select this setting when the Image Preset Mode setting isset to Off.
Detail Enhancement
s Image > Image Enhancement > Detail EnhancementYou can create a more emphatic texture and material feel of the image.Strength
Higher values enhance the contrast.Range
Higher values widen the range of detailed enhancement.
a
• Depending on the image, a highlight may be noticeable at the borderbetween colors. If this bothers you, set a smaller value.
• You cannot select this setting when the Image Preset Mode setting isset to Off.
Reset (Image Enhancement)
s Image > Image Enhancement > Reset
Image Menu 73
You can reset the settings on the Image Enhancement setting to their defaultpreset settings.
a
You cannot select this setting when the Image Preset Mode setting isset to Off.
Scene Adaptive Gamma
s Image > Advanced > Scene Adaptive GammaYou can adjust the coloring according to the scene, and obtains a more vividimage.Higher values enhance the more the contrast.
Gamma
s Image > Advanced > GammaYou can adjust the coloring by selecting one of the gamma correction values,or referring to a gamma graph. If you want to make finer adjustments, selectCustomized.When you select a smaller value, you can reduce the overall brightness of theimage to make the image sharper. When you select a larger value, the darkareas of images become brighter, but the color saturation for lighter areas maybecome weaker.
a
• Project a still picture to adjust the Gamma. You cannot adjust theGamma correctly when projecting movies.
• If you set the Color Mode setting to DICOM SIM in the projector'sImage menu, select the adjustment value according to the projectionsize.• If the projection size is 120 inches or less, select a small value.• If the projection size is 120 inches or more, select a large value.
• Medical images may not be reproduced correctly depending on yoursettings and screen specifications.
RGBCMY
s Image > Advanced > RGBCMYYou can adjust the Hue, Saturation, and Brightness of each color R (red), G(green), B (blue), C (cyan), M (magenta), Y (yellow) individually.
Dynamic Contrast
s Image > Dynamic ContrastYou can adjust the projected luminance based on the image brightness.Dynamic Contrast
Set to On to automatically adjust the amount of light.Response Speed
Select High Speed to adjust the amount of light as soon as the scenechanges.
Black LevelSet the black level when the brightness level of the image signal is zero.When you select 0%, the light source turns off.
Image Menu 74
Lights-Out Control
s Image > Lights-Out ControlYou can set the light source to turn off automatically.Lights-Out Control
Set to On to automatically turn off the light source when the signal levelfalls below the reference level for a set period of time.
Lights-Out Signal LevelSet the brightness level for the video signal being controlled. After turningoff automatically, it turns on immediately when exceeding the specifiedimage level.
Lights-Out TimerSet the amount of time before automatically turning off the light source.
Reset (Image menu)
s Image > ResetYou can reset all adjustment values on the Image menu to their defaultsettings.

Signal Menu 75
Normally, the projector automatically detects and optimizes the input signalsettings. If you need to customize the settings, you can use the Signal menu.The available settings depend on the currently selected input source. Thesettings are saved separately for each selected input source.
gg Related Links• "Resolution" p.75• "Aspect" p.75• "Tracking" p.76• "Sync." p.76• "Position" p.76• "Auto Setup" p.76• "Overscan" p.76• "Blanking" p.77• "Color Space" p.77• "Dynamic Range" p.77• "Video Range" p.77• "EDID" p.78• "Scale" p.78• "Reset (Signal menu)" p.78
Resolution
s Signal > ResolutionYou can set the input signal resolution.Auto
Select to automatically identify the resolution of the input signal.If not detected automatically using the Auto option, select the followingoptions.
WideFor wide screens.
NormalFor 4:3 or 5:4 screens depending on the connected computer.
ManualYou can specify the resolution. This is ideal when connected computer isfixed.
a
Setting is only displayed when the current source is Computer.
Aspect
s Signal > AspectThe projector can display images in different width-to-height ratios calledaspect ratios. Normally, the input signal from your video source determinesthe image's aspect ratio. However, for certain images you can change theaspect ratio to fit your screen.Auto
Automatically sets the aspect ratio according to the input signal and theResolution setting.
NormalDisplays images using the full projection area and maintains the aspectratio of the image.
4:3Converts the aspect ratio of the image to 4:3.
16:9Converts the aspect ratio of the image to 16:9.
FullDisplays images using the full size of the projection area, but does notmaintain the aspect ratio.
H-Zoom/V-ZoomDisplays images using the full width (H-Zoom) or full height (V-Zoom) ofthe projection area and maintains the aspect ratio of the image. Areas thatexceed the edges of the projected screen are not projected.
Signal Menu 76
NativeDisplays images as is (aspect ratio and resolution are maintained). Areasthat exceed the edges of the projected screen are not projected.
a
• Setting is only displayed when the current source is Computer orHDMI.
• Available only when the Scale setting is set to Off or the Scale Modesetting is set to Full Display.s Signal > Scale > Scale Mode
• Set the Screen Type setting in the projector's Extended menu beforechanging the aspect ratio.s Extended > Display > Screen > Screen Type
• To display images without black bars, set Resolution to Wide orNormal in the projector’s Signal menu according to the computer’sresolution.
• The available aspect ratio setting varies depending on the selectedScreen Type setting and the input signal from your image source.
• Note that using the aspect ratio function of the projector to reduce,enlarge, or split the projected image for commercial purposes or forpublic viewing may infringe upon the rights of the copyright holderof that image based on copyright law.
• If there are margins between the edge of the image and the projectedscreen frame, you can adjust the position of the image using theScreen Position setting in the projector's Extended menu.s Extended > Display > Screen > Screen Position
• You can change the projector's Aspect using the [Aspect] button onthe remote control.
Tracking
s Signal > TrackingYou can adjust the signal to eliminate vertical stripes in computer images.
a
Setting is only displayed when the current source is Computer.
Sync.
s Signal > Sync.You can adjust the signal to eliminate fuzziness or flickering in computerimages.
a
Setting is only displayed when the current source is Computer.
Position
s Signal > PositionYou can adjust the image location on the screen.
a
Setting is only displayed when the current source is Computer.
Auto Setup
s Signal > Auto SetupSet to On to automatically optimize computer image quality.
a
Setting is only displayed when the current source is Computer.
Overscan
s Signal > Overscan
Signal Menu 77
You can change the projected image ratio to make the edges visible by aselectable percentage or automatically.
a
Setting is only displayed when the input signal is component signal.
Blanking
s Signal > BlankingYou can hide images in the specified area.Use the arrow buttons on the control panel or remote control to adjust thearea. You can hide up to half of the projected image in each direction (exceptfor one pixel).
a
Setting is only displayed when the Content Playback setting is set toOff in the projector's Settings menu.
Color Space
s Signal > Color SpaceYou can switch the color space that can handle the color information of theinput image.Select Auto to apply a suitable color space for the AVI InfoFrame of theimage.
a
Setting is only displayed in the following cases.• The current source is HDMI, HDBaseT, DVI-D, or SDI
(EB‑PU2010B/EB‑PU2010W).• Color Mode is set to other than BT.709 or DICOM SIM.
Dynamic Range
s Signal > Dynamic RangeYou can set the video range to match the setting of input source.Select Auto to automatically identify the dynamic range of the input signal.The result for your selected setting is displayed as Signal Status.HDR10 Setting
You can adjust the PQ curve of the dynamic range in the HDR PQ(Perceptual Quantizer) method.
HLG SettingYou can adjust the HLG curve of the dynamic range in the HDR HLG(Hybrid Log Gamma) method.
a
• Setting is only displayed in the following cases.• The current source is HDMI, HDBaseT, or SDI
(EB‑PU2010B/EB‑PU2010W).• Color Mode is set to other than BT.709 or DICOM SIM.
• HDR10 Setting is only available when Signal Status is set toHDR10.
• HLG Setting is only available when Signal Status is set to HLG.
Video Range
s Signal > Advanced > Video RangeYou can set the video range to match the setting of input source from theHDMI, DVI-D, or HDBaseT port.Limited (16-235)
For the brightness range 16 to 235.Full (0-255)
For the brightness range 0 to 255.
Signal Menu 78
EDID
s Signal > Advanced > EDIDEven if you setup multiple displays with different resolutions, you can set thesame EDID as the standard display and switch the EDID of the current sourceto unify the EDID across the displays.Preset EDID
You can set the EDID options as a batch using preset values.The following settings are saved in the preset options.• Resolution• Refresh Rate• Color DepthYou can change the preset settings if necessary.
a
• Setting is only displayed when the current source is HDMI,HDBaseT, or DVI-D.
• Select Reset to reset all adjustment values for EDID to their defaultvalues.
Scale
s Signal > Scales Extended > Multi-Projection > ScaleYou can enlarge or reduce the image in the vertical and horizontal directions.When using multiple projectors to project one image, you can adjust the scaleof the image displayed by each projector.Scale
When set to Auto, the clip position is set automatically depending on theEdge Blending and Tiling settings. After selecting Auto, you can fine tunemanually.Select Manual to adjust the clip range and position manually.
Scale ModeSelect how to change the magnification.• Zoom Display to maintain the image position and aspect ratio.• Full Display to adjust the image according to the image position and
aspect ratio.Scale Horizontally/Scale Vertically
You can adjust the magnification horizontally and vertically in 0.01xincrements, and enlarge or reduce the image. (Minimum magnification of0.5 to maximum magnification of 10.)
Clip AdjustmentUse the arrow buttons to adjust the coordinates and size of each image asyou view the screen.
Clip RangeYou can view the clipped area you selected.
Reset (Signal menu)
s Signal > ResetYou can reset all adjustment values on the Signal menu to their defaultsettings, except for the following:• EDID
Settings Menu 79
Options on the Settings menu let you customize various projector features.
gg Related Links• "Geometry Correction" p.79• "Split Screen" p.80• "Volume" p.81• "HDMI Link" p.81• "Control Panel Lock" p.81• "Lens Lock" p.82• "Light Source Mode" p.82• "Brightness Level" p.82• "Constant Brightness" p.82• "Estimated Remains" p.82• "Remote Receiver" p.84• "User Button" p.84• "Test Pattern" p.84• "Memory" p.85• "Content Playback" p.85• "Reset (Settings menu)" p.87
Geometry Correction
s Settings > Geometry Corrections Extended > Multi-Projection > Geometry Corrections Extended > Multi-Projection > Simple Stacking > Point CorrectionYou can adjust image shape to rectangular. After correction, your image isslightly smaller.You can check the available adjustment range in the projector's Specifications.Off
Temporarily cancels geometry correction. Even when set to Off, thecorrection values are saved.
H/V-KeystoneManually corrects distortion in the horizontal and vertical directionsindependently. If the image aspect is incorrect, adjust the image balance byusing V-Balance and H-Balance.You cannot combine with other correction methods.
Quick CornerCorrects each of the four corners of the projected image independently.
Curved SurfaceCorrects the corners and sides of an image projected on a curved surfacewith the same radius.
a
• Place the projector so it squarely faces the screen, not at an angle.• Move the lens position to the home position.• If a large amount of adjustment is performed, the focus may not
be uniform even after making adjustments.• If you set the Maintain Aspect Ratio setting to On after
correcting the corrections may not be applied. Reset thecorrections to their default values or reduce the amount ofcorrection, and try it again.
• If you change the standard line during correcting, the presentsettings are reset.
Corner WallCorrects the corners and sides of an image projected on a curved surfacewith right angles.
a
• Place the projector so it squarely faces the screen, not at an angle.• Move the lens position to the home position.• If a large amount of adjustment is performed, the focus may not
be uniform even after making adjustments.• We recommend you adjust the image shape based on the point
nearest to the center of the screen.
Point CorrectionDivides the projected image into a grid and corrects the distortion in 0.5pixel increments by moving the selected point of intersection in any
Settings Menu 80
direction. You can move the points on the grid between 0.5 to 600 pixels inany direction, including outside the projection range.
MemoryYou can save the shape of an image you have adjusted and load it whenneeded.
a
• You can also open the Geometry Correction screen using the[Geometry] button on the control panel or remote control.
• You can also open the Memory screen using the [Memory] buttonon the remote control.
Split Screen
s Settings > Split ScreenYou can simultaneously project two images from different image sources.Screen Size
Select the screen size.
a
Depending on the video signals that are input, the images on the leftand right may not appear to be the same size even if you selectEqual.
SourceSelect the input source.
a
• The following input source combinations cannot be projected ona split screen.• Computer and LAN• DVI-D and HDMI
• Input signals with a horizontal resolution exceeding 1920 are notsupported.
Swap ScreensYou can swap images that are being projected on the left and right.
Audio SourceSelect the screen from which you want to hear audio.When you select Auto, audio is output from the enlarged screen. If thescreen sizes is set to Equal, audio is output from the screen on the left.
a
• While using the split screen feature, other projector features may notbe available and some settings may be automatically applied to allimages.
• You cannot perform split screen projection when the ContentPlayback setting is set to On in the projector's Settings menu.
• You can also open the Split Screen Setup screen using the [Split]button on the remote control.
gg Related Links• "Split Screen Projection Restrictions" p.80
Split Screen Projection Restrictions
Operating restrictionsThe following operations cannot be performed during split screen projection.
• Setting the projector's menu• E-Zoom• Switching the aspect mode (the aspect mode is set to Normal)• Operations using the [User] button on the remote control
Image restrictions
• If you make adjustments such as Brightness, Contrast, Color Saturation,Tint, and Sharpness in the projector's Image menu, you can apply themonly to the image on the left. Default adjustments are applied to the imageon the right. Adjustments that affect the entire projected image such asColor Mode and Color Temp. are applied for both left and right images.
• Even if you make adjustments for Noise Reduction and Deinterlacing inthe projector's Image menu, Noise Reduction is set to 0 and Deinterlacingis set to Off for the image on the right.s Image > Image Enhancement > Noise Reduction
Settings Menu 81
• Even if you set Display Background to Logo in the projector's Extendedmenu, the blue screen appears when no image signal is being input.
Volume
s Settings > VolumeYou can control the speaker volume.
CautionDo not start a presentation at a high volume setting. Sudden loud noises may causehearing loss.
Always lower the volume before powering off, so that you can power on and thengradually increase the volume.
HDMI Link
s Settings > HDMI LinkYou can adjust the HDMI Link options that allow the projector remote tocontrol HDMI-connected devices.Device Connections
The devices connected to the HDMI ports are listed.HDMI Link
Set to On to enable the HDMI Link features.Audio Out Device
You can select whether to output audio from the internal speakers or aconnected audio/video system.
Power On LinkYou can control what happens when you turn on the projector orconnected device.• Bidirectional: automatically turns on the connected device when you
turn on the projector, and vice versa.
• Device -> PJ: automatically turns on the projector when you turn on theconnected device.
• PJ -> Device: automatically turns on the connected device when youturn on the projector.
Power Off LinkYou can control whether connected devices are turned off when you turnoff the projector.
Link BufferYou can improve the performance of the linked operations by changingthe settings if the HDMI Link function is not working correctly.
a
Set the HDMI Link setting to On first to adjust the options.
Control Panel Lock
s Settings > Lock Setting > Control Panel LockYou can control projector button locking to secure the projector.Full Lock
All buttons locked.Except for Power
All buttons except the [On] button locked.Off
No buttons locked.
a
• You can control projector button locking using the control panellock button on the control panel.
• To unlock the buttons, hold down the [Enter] button on the controlpanel for approximately 7 seconds. A message is displayed and thelock is released.
Settings Menu 82
Lens Lock
s Settings > Lock Setting > Lens LockYou can disable [Lens Shift], [Zoom], and [Focus] button operations on theremote control.
Light Source Mode
s Settings > Brightness Settings > Light Source ModeYou can select the brightness for the light source.Normal
Maximum brightness. This makes the light source operation timeapproximately 20,000 hours.
Medium85% brightness with fan noise louder than Quiet. This makes the lightsource operation time approximately 20,000 hours.
Quiet70% brightness with reduced fan noise. This makes the light sourceoperation time approximately 20,000 hours.
Extended70% brightness and extends the life expectancy of the light source. Thismakes the light source operation time approximately 30,000 hours.
CustomYou can select a custom brightness level.
a
Setting is only displayed when Constant Brightness is set to Off.
Brightness Level
s Settings > Brightness Settings > Brightness Level
s Extended > Multi-Projection > Screen Matching > Brightness Settings >Brightness LevelYou can select the Custom brightness level you want.
a
Setting is only displayed when Light Source Mode is set to Custom.
Constant Brightness
s Settings > Brightness Settings > Constant BrightnessYou can maintain the brightness of the light source set in the BrightnessLevel setting.
a
• Setting is only displayed when Light Source Mode is set to Custom.• When set to On, you cannot change the settings for Light SourceMode and Brightness Level.
• When set to Off, the Brightness Level setting changes according tothe status of the light source.
Estimated Remains
s Settings > Brightness Settings > Estimated RemainsYou can check how long the projector can maintain constant brightness.
a
Setting is only displayed when Constant Brightness is set to On.
gg Related Links• "Constant Brightness Usage Hours" p.83• "Light Source Operation Time" p.83

Settings Menu 83
Constant Brightness Usage Hours
If you turn on Constant Brightness, the number of hours the projector canmaintain constant brightness is displayed as Estimated Remains.
Display level Estimated remaining hours
10,000 or more hours
8,000 to 9,999 hours
6,000 to 7,999 hours
4,000 to 5,999 hours
2,000 to 3,999 hours
0 to 1,999 hours
a
The number of hours displayed as Estimated Remains is just a guide.
Light Source Operation Time
The light source operation time varies depending on the Brightness Levelsetting and whether Constant Brightness is on or off.
a
• The light source operation time varies depending on theenvironmental conditions and usage.
• The hours listed here are an approximate and are not guaranteed.• You may need to replace internal parts sooner than the estimated
light source operation time.• If Constant Brightness is turned on, and you have exceeded the
usage hours listed here, you may not be able to select a highBrightness Level setting.
Constant Brightness off
Brightness Level setting Time before the brightness of the light source isreduced by half (approximate)
100% 20,000 hours
90% 21,000 hours
80% 24,000 hours
70% 30,000 hours
60% 37,000 hours
50% 47,000 hours
40% 61,000 hours
30% or less 71,000 hours or more
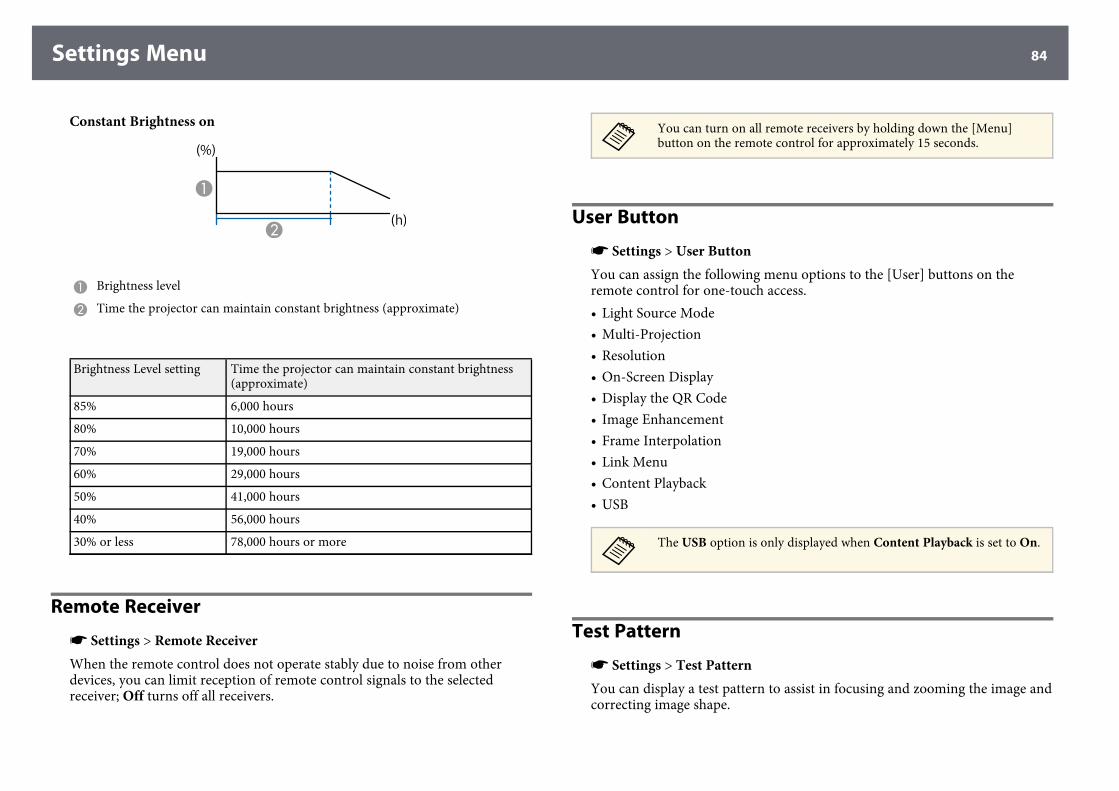
Settings Menu 84
Constant Brightness on
A Brightness level
B Time the projector can maintain constant brightness (approximate)
Brightness Level setting Time the projector can maintain constant brightness(approximate)
85% 6,000 hours
80% 10,000 hours
70% 19,000 hours
60% 29,000 hours
50% 41,000 hours
40% 56,000 hours
30% or less 78,000 hours or more
Remote Receiver
s Settings > Remote ReceiverWhen the remote control does not operate stably due to noise from otherdevices, you can limit reception of remote control signals to the selectedreceiver; Off turns off all receivers.
a
You can turn on all remote receivers by holding down the [Menu]button on the remote control for approximately 15 seconds.
User Button
s Settings > User ButtonYou can assign the following menu options to the [User] buttons on theremote control for one-touch access.• Light Source Mode• Multi-Projection• Resolution• On-Screen Display• Display the QR Code• Image Enhancement• Frame Interpolation• Link Menu• Content Playback• USB
a
The USB option is only displayed when Content Playback is set to On.
Test Pattern
s Settings > Test PatternYou can display a test pattern to assist in focusing and zooming the image andcorrecting image shape.
Settings Menu 85
a
• Press the [Page] button to change the test pattern while displaying atest pattern.
• Press the [Esc] button to cancel pattern display.• The test pattern's shape is determined by the Screen Type setting. Be
sure to set the correct screen type before adjusting with the testpattern.s Extended > Display > Screen > Screen Type
• To set menu items that cannot be set while the test pattern is beingdisplayed or to fine-tune the projected image, project an image fromthe connected device.
• You can also display a test pattern using the [Test Pattern] button onthe control panel or remote control.
Memory
s Settings > MemoryYou can save customized settings and then select the saved settings wheneveryou want to use them.Memory
You can save the following settings. You can register up to 10 memorieswith different names.• Image menu settings• Scale in the Signal menu• Light Source Mode and Brightness Level in the Settings menu• Edge Blending, Color Matching, and Black Level in the Extended
menuLens Position
You can save the position of the lens adjusted using lens shift, zoom, focus,and distortion. You can register up to 10 memories with different names.
Geometry CorrectionYou can save the adjustment value of the geometry correction. You canregister up to 3 memories with different names.
You can use the following options for each memory type.
Load MemoryYou can load the saved memory. The settings applied to the current imageare replaced with the settings in the memory.
Save MemoryYou can save your current settings to memory.
Erase MemoryYou can erase the selected memory settings.
Rename MemoryYou can rename a saved memory.
Reset Memory SettingsYou can delete all saved memories.
a
• A memory name that has already been used is indicated by a bluemark. Saving over a previously saved memory overwrites the settingswith your current settings.
• The lens position when a memory is loaded may not completelymatch the lens position when the memory was saved. If there is alarge discrepancy between the lens position, calibrate the lens.
• You can also open the Memory screen using the [Memory] buttonon the remote control.
Content Playback
s Settings > Content Playback > Content PlaybackYou can easily project your digital signage content: playlists that containimages and movies saved on an external storage device.Content Playback
Set to On to play back a playlist.Overlay Effect
You can add color and shape effects to the projected image.USB Viewer
You can select and play back a playlist saved on the USB flash drive.
Settings Menu 86
a
• You cannot select the Overlay Effect setting in the following cases.• When Edge Blending is set to On in the projector's Extended
menu.• When the current source is USB and there is no playlist being
played.• When the current source is USB and an unwritable error has
occurred.• You can use the following methods to create playlists.
• Using Epson Projector Content Manager on your computer.You can download and install Epson Projector Content Managerfrom the following Web site.epson.sn
• Using Epson Web Control with a Web browser.• Using Epson Creative Projection on iOS devices.
You can download Epson Creative Projection from the App Store.Any fees incurred when communicating with the App Store are theresponsibility of the customer.
• Press the [USB] button on the remote control to project the playlist.If there is a timetable assigned, the playlist will play back accordingto the schedule in the timetable.
• You can also hold down the [Num] and numeric buttons to projectyour favorite playlist. You can set a remote control shortcut keyusing the software you used to create the playlists.
gg Related Links• "Creating Playlists Using Epson Web Control" p.86• "Content Playback Mode Restrictions" p.87
Creating Playlists Using Epson Web Control
In Content Playback mode, you can create playlists using a Web browser andsave them to a USB flash drive connected to a projector on a network.
AttentionDo not remove the USB flash drive from the projector or disconnect the projector'spower cord while creating playlists. Data saved on the USB flash drive may bedamaged.
a Make sure the projector is operating in Content Playback mode.
b Make sure your computer or device is connected to the same networkas the projector.
c Make sure a USB flash drive is connected to the projector's USB-A port.
d Start your Web browser on your computer or device.
e Go to the Epson Web Control screen by entering the projector's IPaddress into the browser's address box. When entering an IPv6 address,wrap the address with [ and ].
f Select USB Memory Device.
g Select Upload New Data.
h Select the images or movies you want to add to the playlist.
a
You can upload .avi, .jpeg (.jpg), .png, .bmp, or .gif files.If you want to add .mp4 or .mov files to the playlist, use theEpson Projector Content Manager software or the EpsonCreative Projection app.
The selected files are copied to the connected USB flash drive.
i Do one of the following:• To add them to the existing playlist, select Add to Playlist and select
the playlist you want to add them to.• To create a new playlist and add them to it, select Create New
Playlist.
j Edit the playlist.
k When you have finished editing the playlist, select Finish.
Settings Menu 87
a
• See the section in this guide covering Web Control Options fordetails.
• You can play the playlist from the Remote or Playlist screen.• When you want to specify when the playlist starts and finishes,
schedule the playlist using the Epson Projector Content Managersoftware.
gg Related Links• "Epson Web Control" p.125
Content Playback Mode Restrictions
Operating restrictionsThe following operations cannot be performed in Content Playback mode.
• Changing the Color Temp. setting in the Image menu (when WarmWhiteor Cool White is selected as Color Filter)
• Split Screen• Blanking• Changing the Display Background setting in the Extended menu• Changing the Screen setting in the Extended menu• Changing the Log Save Destination setting in the Extended menu• Using Edge Blending with Effects feature• Detecting the input signal automatically
Reset (Settings menu)
s Settings > ResetYou can reset all adjustment values on the Settings menu to their defaultsettings, except for the following:• Audio Out Device• Power On Link
• Power Off Link• Link Buffer• User Button
Extended Menu 88
Settings on the Extended menu let you customize various projector setupfeatures.
gg Related Links• "Home Screen" p.88• "Menu Position" p.88• "Message Position" p.89• "Messages" p.89• "Display Background" p.89• "Startup Screen" p.89• "Standby Confirmation" p.89• "Air Filter Notice" p.89• "Screen" p.89• "Panel Alignment" p.90• "Color Uniformity" p.90• "OSD Rotation" p.91• "User's Logo" p.91• "Projection" p.91• "Direct Power On" p.91• "Sleep Mode" p.92• "Sleep Mode Timer" p.92• "High Altitude Mode" p.92• "Auto Source Search" p.92• "Auto Power On" p.92• "Startup Source" p.92• "Quick Startup" p.92• "USB Power" p.93• "A/V Mute Settings" p.93• "Beep" p.93• "Indicators" p.93• "Log Save Destination" p.93• "Batch Setup Range" p.93• "AC Voltage Monitoring" p.94• "Lens Type" p.94• "Date & Time" p.94• "Lens Calibration" p.94• "A/V Settings" p.94• "Standby Mode" p.95
• "HDBaseT" p.95• "Color Calibration" p.95• "Projector ID" p.96• "Projector Grouping" p.96• "Tiling" p.96• "Edge Blending" p.96• "Black Level" p.97• "Reset (Multi-Projection menu)" p.97• "Screen Matching" p.97• "Color Matching" p.98• "Simple Stacking" p.98• "Schedule Settings" p.99• "Language" p.100• "Reset (Extended menu)" p.100
Home Screen
s Extended > Home ScreenYou can adjust settings on the Home screen.Home Screen Auto Disp.
Set to On to display the Home screen automatically when there is no inputsignal when turning on the projector.
Custom Function 1/Custom Function 2Select menu options to be assigned to the Home screen.
Menu Position
s Extended > Display > Menu PositionYou can select the position of the projector menu displayed on the screen.
Extended Menu 89
Message Position
s Extended > Display > Message PositionYou can select the position of messages displayed on the screen.
Messages
s Extended > Display > MessagesYou can control whether messages are displayed on the screen.
Display Background
s Extended > Display > Display BackgroundYou can select the screen color or logo to display when no signal is received.
a
Setting is only displayed when Content Playback is set to Off.
Startup Screen
s Extended > Display > Startup ScreenYou can control whether a special screen appears when the projector startsup.
a
This function is disabled when you turn on the projector in QuickStartup mode.
Standby Confirmation
s Extended > Display > Standby ConfirmationYou can display a confirmation message after pressing the [Standby] buttonon the remote control.When set to Off, you can turn off the projector simply by pressing the[Standby] button once.
Air Filter Notice
s Extended > Display > Air Filter NoticeYou can display a message when a clog in the air filter is detected.
Screen
s Extended > Display > ScreenYou can set the aspect ratio and position of the projected image according tothe type of screen being used.Screen Type
Set the aspect ratio of the screen to fit the image into the projection area.Screen Position
You can shift the image position horizontally and vertically if there aremargins between the edge of the image and the projected screen frame dueto the Screen Type setting.
Extended Menu 90
a
• Adjust the aspect ratio for the projected image, if necessary.• When the Screen Type setting changes, the EDID settings are
automatically adjusted.• Settings are only displayed when Content Playback is set to Off.• This setting is unavailable when projecting images from a computer
over a network.• The Screen Type setting is not supported by the Message
Broadcasting feature in the Epson Projector Management software.• You cannot adjust the screen position if you set the Screen Type
setting to the same aspect ratio as the projector resolution.
Panel Alignment
s Extended > Display > Panel AlignmentYou can use the panel alignment feature to manually adjust the colorconvergence (the alignment of the red and blue colors) in the projected image.You can adjust the pixels horizontally and vertically in increments of 0.125pixels within a range of ±3 pixels.Panel Alignment
Set to On to correct color misalignment in the projected image.Select Color
Select the color you want to adjust.Pattern Color
Select the grid color displayed during adjustments.• R/G/B to display the grid color in white.• R/G to display the grid color in yellow.• G/B to display the grid color in cyan.The available color varies depending on the Select Color setting.
Start AdjustmentsStarts the panel alignment process.The image may become distorted while adjusting. The image is restoredonce adjustments are complete.
• Shift the whole panel to adjust the whole panel roughly.• Adjust the four corners to adjust the four corners of the panel precisely.
If you need to make additional adjustments, select Select intersectionand adjust to adjust more precisely.
ResetYou can reset all adjustment values on the Panel Alignment menu to theirdefault settings.
a
• Image quality may decline after performing alignment.• Images for pixels that extend beyond the edge of the projected screen
are not displayed.
Color Uniformity
s Extended > Display > Color Uniformitys Extended > Multi-Projection > Screen Matching > Color UniformityYou can use the color uniformity feature to manually adjust the color tonebalance in the projected image.Color Uniformity
Set to On to adjust the color tone balance for the whole screen.Adjustment Level
Select the adjustment level you want to adjust.There are eight adjustment levels, from white to gray to black. Adjust eachlevel individually.Set to All to adjust the tint for each color from level 2 to 8 in a batch.(Once the values of red, blue, or green are at maximum or minimum atany level, you cannot perform further adjustments.)
Start AdjustmentsStarts adjustments for the selected adjustment level.The image may become distorted while adjusting. The image is restoredonce adjustments are complete.Adjust the outer areas first, and then adjust the entire screen.
Extended Menu 91
ResetYou can reset all adjustment values on the Color Uniformity menu totheir default settings.
a
The color tone may not be uniform even after adjusting the coloruniformity.
OSD Rotation
s Extended > Display > OSD RotationYou can rotate the menu display 90°.
User's Logo
s Extended > User's LogoYou can save an image on the projector and display it whenever the projectorturns on. You can also display the image when the projector is not receivingan input signal. This image is called the user's logo screen.You can select a photo, graphic, or company logo as the user's logo, which isuseful in identifying the projector's owner to help deter theft. You can preventchanges to the user's logo by setting up password protection.Display the image you want to project as the user's logo and then select thissetting.
a
• If the User's Logo Protection setting in the Password Protectionsetting menu is set to On, set to Off before saving the user's logo.
• When you copy the menu settings from one projector to anotherusing the batch setup feature, user's logo is also copied. Do notregister the information that you do not want to share betweenmultiple projectors as a user's logo.
• You cannot save content that is protected by HDCP.• When Content Playback is set to On, you can display the user's logo
only when the projector starts up.• Adjustments for image shape and display range are temporarily
canceled when you select User's Logo.
Projection
s Extended > ProjectionYou can set the way the projector faces the screen so the image is orientedcorrectly.
a
You can change the projection mode to flip the image over top-to-bottom by holding down the [A/V Mute] button on the remote controlfor approximately 5 seconds.
Direct Power On
s Extended > Operation > Direct Power OnSet to On to turn on the projector by plugging it in without pressing thepower button.Note that the projector also turns on automatically in cases such as recoveryfrom a power outage.
Extended Menu 92
Sleep Mode
s Extended > Operation > Sleep ModeSet to On to automatically turns off the projector after an interval ofinactivity.
Sleep Mode Timer
s Extended > Operation > Sleep Mode TimerYou can set the time before the projector automatically turns off from 1 to 30minutes.
a
Sleep Mode must be turned on.
High Altitude Mode
s Extended > Operation > High Altitude ModeWhen operating the projector at an altitude where the air is thin, the normalrotation speed of the fans is not enough to cool the projector.Set to On to increase the rotation speed of the fans at altitudes above 1500 m.
a
When set to On, the projector's operating temperature will rise.
Auto Source Search
s Extended > Operation > Auto Source Search
Set to On to detect the input signal automatically and project images whenthere is no input signal.
a
• Setting is only displayed when Content Playback is set to Off.• This function is disabled when you turn on the projector in theQuick Startup mode.
Auto Power On
s Extended > Operation > Auto Power OnSet to Computer to automatically turns on the projector when it detects aninput signal from the image source.
Startup Source
s Extended > Operation > Startup SourceYou can select the image source you want to project when the projector isturned on in Content Playback mode.
Quick Startup
s Extended > Operation > Quick StartupYou can set the time period for Quick Startup mode. The projector enters thismode when you turn it off. You can start projecting in approximately 7seconds by pressing the power button.
a
Set A/V Output to While Projecting first.

Extended Menu 93
USB Power
s Extended > Operation > USB PowerSet to Always On to continue supplying power to the streaming media playerwhen the projector is not projecting images. This lets the streaming mediaplayer start earlier, or perform its firmware updates automatically over anetwork if necessary.
a
Set A/V Output to While Projecting first.
A/V Mute Settings
s Extended > Operation > A/V Mute SettingsYou can adjust the A/V Mute settings.Fade-in
Set the number of seconds for a fade-in transition effect when displayingan image.
Fade-outSet the number of seconds for a fade-out transition effect when hiding animage.
A/V Mute TimerTurns off the projector automatically if A/V Mute is enabled and 2 hoursof inactivity has passed.
Release A/V MuteSelect A/V Mute if you want to use only the [A/V Mute] button to turn offA/V mute or if you want to send a command to turn off A/V Mute, orselect Any Button to use any button to turn it off.
Beep
s Extended > Operation > Advanced > Beep
You can control the beep that sounds when you turn the projector on or off.
Indicators
s Extended > Operation > Advanced > IndicatorsSet to Off to turn off the indicator lights on the projector except when anerror or warning occurs.
Log Save Destination
s Extended > Operation > Advanced > Log Save DestinationYou can set where you want to save the operation logs for the projector.Select USB and Internal Memory to save logs as text files (.log) to a USBflash drive inserted into the projector's USB-A port.
a
Setting is only displayed when Content Playback is set to Off.
Batch Setup Range
s Extended > Operation > Advanced > Batch Setup RangeYou can select which menu settings you want copied.All
Select this to copy all of the projector menu settings using the batch setupfeature.
LimitedSelect this if you do not want to copy the EDID and Network menusettings.
Extended Menu 94
AC Voltage Monitoring
s Extended > Operation > Advanced > AC Voltage MonitoringSet to On to monitor the projector's voltage status and obtain a log when awarning, disconnection, or power blockage occurs.If you regularly turn off the projector by turning off the power outlet (directshutdown), set to Off.
a
You can view the log in the projector's Info menu.s Info > Voltage Warning Info
Lens Type
s Extended > Operation > Advanced > Lens TypeSelect the model number for the attached lens when using the followinglenses:• ELPLS04• ELPLU02/ELPLU03S/ELPLU04• ELPLR04• ELPLW04/ELPLW05/ELPLW06/ELPLW08• ELPLM06/ELPLM07/ELPLM08/ELPLM09/ELPLM15/ELPLM10/ELPLM11• ELPLL07/ELPLL08
Date & Time
s Extended > Operation > Date & TimeYou can adjust the projector's system time and date settings.Daylight Saving Time
Adjust the daylight saving time settings for your region.
Internet TimeTurn on this setting to update the date and time automatically through anInternet time server.
a
When you set Schedule Protection to On in the Password Protectionscreen, you cannot change the time and date settings. Set ScheduleProtection to Off first.
Lens Calibration
s Extended > Operation > Lens CalibrationYou can view information about the lens currently in use.It takes up to approximately 100 seconds. When calibration is finished, thelens returns to the same position it was in before calibration.The following lenses return to the standard position.• ELPLX01/01S• ELPLX01W/01WS• ELPLX02/02S• ELPLX02W/02WS
A/V Settings
s Extended > A/V SettingsYou can select to output audio and video to an external device when theprojector is in standby mode.Select Always On to output audio and images to external devices when theprojector does not project any images.
Extended Menu 95
a
• Available only when Quick Startup is set to Off.• When set to Always On, you can move the lens position to the home
position even if the projector is in standby mode.• When set to Always On, communication from the HDBaseT port is
enabled.
Standby Mode
s Extended > Standby ModeSet to Communication On to monitor and control the projector over anetwork.
a
Setting is only displayed when A/V Output is set to While Projecting.
HDBaseT
s Extended > HDBaseTYou can select the communication settings for connections to an HDBaseTtransmitter or switcher.Control Communications
You can enable or disable communication from the Ethernet and serialports on the HDBaseT transmitter or switcher; set to On to disable theprojector's LAN, RS-232C, and Remote ports.
Extron XTPSet to On when you connect an Extron XTP transmitter or switcher to theHDBaseT ports. See the following Extron Web site for more details on theXTP system.http://www.extron.com/
a
• Control Communications is only displayed when Extron XTP is setto Off.
• When Extron XTP is set to On, the cooling fans may run even instandby status. This is not a malfunction.
Color Calibration
s Extended > Color CalibrationThe color calibration process adjusts the color balance and brightness that hasdeteriorated over time based on images taken by the optional external camera,and restores the default image quality.Color Calibration
Set to On to enable the color calibration process.Start Auto Adjustment
Starts auto adjustment.Undo
You can undo auto adjustment.Redo
Select after selecting Undo to restore the image to the status after autoadjustment.
Color UniformityYou can adjust the color tone balance for the whole image.
ResetYou can reset all adjustment values on the Color Calibration menu totheir default settings.
gg Related Links• "Conditions for Color Calibration" p.95
Conditions for Color Calibration
You can use the color calibration feature under the following conditions:
• The optional external camera is installed on each projector.
Extended Menu 96
• You are projecting on a matte white diffusion screen that is flat and even.• The projector is placed so it squarely faces the screen, not at an angle.• Nothing is blocking the optional external camera and the projected image.• Projection size is between 80 to 200 inches.
Projector ID
s Extended > Multi-Projection > Projector IDYou can set the projector to a particular ID number which allows you to use aremote control to individually control projectors. This is useful when youwant to control multiple projectors using one remote control.
a
• You need to set the remote control's ID to match the projector's IDto operate only a particular projector.To set the remote control's ID, set the remote control [ID] switch toOn. Press the [ID] button on the remote control and press thenumeric button that matches the projector's ID within 5 seconds.(Enter a one-digit or two-digit number.)
• If you do not know the projector's ID, press the [ID] button duringprojection to temporarily display the projector's ID and the remotecontrol's ID on the screen.
• You can set up to 30 IDs.
Projector Grouping
s Extended > Multi-Projection > Projector GroupingYou can create a group of projectors that you can control simultaneously.
Tiling
s Extended > Multi-Projection > Tiling
You can project the same image from up to 9 projectors to create one largeimage using the Tiling feature.Tiling
Set to Auto to configure tiling automatically.If you do not install the optional external camera or tiling the imagesautomatically was unsuccessful, select Manual, and then select the Layoutand Location Setup settings individually.
LayoutSelect the number of rows and columns you are setting up.
Location SetupSelect the position of each projected image as follows:• Row Order to layout the screens from top to bottom, starting with 1 at
the top, in sequential order.• Column Order to layout the screens from left to right, starting with A
on the left, in alphabetical order.Location Info
You can view the name, IP address, and ID of the projector you set.
a
• Auto is available only when the optional external camera is installed.• Make sure nothing is blocking the optional external camera while
performing automatic tiling.• Do not change any of the projector names or IP addresses, or the
images will not be adjusted automatically.
Edge Blending
s Extended > Multi-Projection > Edge BlendingYou can blend the border between multiple images to create a seamlessscreen.Edge Blending
Set to On to enable the Edge Blending feature.When not projecting images from multiple projectors, select Off.
Extended Menu 97
Top Edge/Bottom Edge/Right Edge/Left EdgeSelect the edge you want to blend on each projector.• Blending to turn on the Edge Blending feature for the selected edge.
Gradation is applied to the blending range.• Blend Start Position to adjust the point where edge blending begins in 1
pixel increments. The blending start position is displayed with a red line.• Blend Range to select the width of the blended area in 1 pixel
increments. You can select up to 45% of the projector's resolution.• Blend Curve to select a gradient for the shaded area on the projected
image.Line Guide
Set to On to display a guide on the blended area.Pattern Guide
Set to On to display a grid to match the blended area.Guide Color
Select a combination of guide colors.
a
Set the Color Mode setting to Multi-Projection in the projector'sImage menu for all of the projectors.
Black Level
s Extended > Multi-Projection > Black Levels Extended > Multi-Projection > Screen Matching > Black LevelYou can adjust the brightness and tone differences in overlapping images.Color Adjustment
You can adjust the brightness and tone of the areas. The adjustment areasare displayed based on the Edge Blending setting.When multiple screens are overlapping, adjust overlapping areas startingwith the brightest areas first. Adjust the non-overlapping area (darkestpart) last.
Area CorrectionIf the tone for some areas does not match, you can adjust it individually.
ResetYou can reset all adjustment values on the Black Level menu to theirdefault settings.
a
• You cannot adjust the Black Level setting when a test pattern isdisplayed.
• If the Geometry Correction value is very large, you may not be ableto adjust the Black Level correctly.
• The brightness and tone may differ in areas where the images overlapas well as in other areas even after performing Black Leveladjustment.
• If you change the Edge Blending setting, the Black Level settingreturns to its default value.
• Available only when at least one of Top Edge, Bottom Edge, LeftEdge, and Right Edge are set to On in the Edge Blending settings.
Reset (Multi-Projection menu)
s Extended > Multi-Projection > ResetYou can reset all adjustment values on the Multi-Projection menu to theirdefault settings.
Screen Matching
s Extended > Multi-Projection > Screen MatchingYou can adjust the tint, brightness, black level, and blend curve of multipleprojectors so that they match better.If your projectors are on a network, the brightness and tint for multipleprojectors are corrected automatically based on the darkest projector.
Extended Menu 98
If your projectors are not on a network or automatic adjustment wasunsuccessful, you can adjust the tint and brightness of multiple projectorsmanually.
a
• The auto adjustment feature is only available under the followingconditions.• When you set the position of each image• When Color Calibration is set to On
• You can undo or redo the screen matching procedure only whenLight Source Mode is set to Custom.
• The required time for screen matching varies depending on theprojector layout. It takes up to approximately 18 minutes.
gg Related Links• "Conditions for Screen Matching" p.98
Conditions for Screen Matching
You can use the screen matching feature under the following conditions:
• All of the projectors are the same model and the optional external camera isinstalled on each projector.
• You are projecting on a matte white diffusion screen that is flat and even.• The projector is placed so it squarely faces the screen, not at an angle.• Nothing is blocking the optional external camera and the projected image.• More than 20 minutes have passed after turning on the projector.• The projectors to be adjusted are grouped.• The projected images do not overlap or have gaps between them, and create
a rectangular image after tiling.• Projection size is between 80 to 200 inches.• All the projectors are connected to the same network and project images
with the same resolution.• The Blend Range setting is set between 15 to 45%.• Projection in the projector's Extended menu is set to Front orFront/Ceiling for all projectors.
Color Matching
s Extended > Multi-Projection > Screen Matching > Color MatchingYou can adjust the tint and brightness for the color tone from white to black.During color matching, half of the overlapped area is displayed in black sothat you can check the edge of the image easily.Adjustment Level
Select the adjustment level you want to adjust.There are eight adjustment levels, from white to gray to black. Adjust eachlevel individually.Set to All to adjust the tint for each color from level 2 to 8 in a batch.(Once the values of red, blue, or green are at maximum or minimum atany level, you cannot perform further adjustments.)
Red/Green/BlueYou can adjust the tone for each color.
BrightnessYou can adjust the image brightness.
Simple Stacking
s Extended > Multi-Projection > Simple StackingYou can easily and quickly create a bright projected image by overlapping theimages of multiple projectors.Point Correction
Divides the projected image into a grid and corrects the distortion in 0.5pixel increments by moving the selected point of intersection in anydirection. You can move the points on the grid between 0.5 to 600 pixels inany direction, including outside of the projection range.
Start Auto AdjustmentYou can automatically adjust the projected image using the camera assistfunctions.
Extended Menu 99
The projector for which you perform this feature becomes a masterprojector, and the adjustment is performed based on the projector's imageposition and shape.
a
• Connect two projectors using a LAN cable.• Make sure you do the following before adjusting:
• Set the DHCP setting to On in the projector's Network menu fortwo projectors.s Network > Network Configuration > Wired LAN > IPSettings
• Adjust the image position, shape, and focus on the masterprojector. If you adjust the image shape of the master projector,select Point Correction and select Quick Corner to correct theshape.
• The required time for simple stacking varies depending on theprojector layout. It takes up to approximately 4 minutes.
gg Related Links• "Conditions for Simple Stacking" p.99
Conditions for Simple Stacking
You can use the simple stacking feature under the following conditions:
• All of the projectors are the same model and the optional external camera isinstalled on each projector.
• Wait for 2 minutes after turning on two projectors before starting thesimple stacking process.
• You are projecting on a matte white diffusion screen that is flat and even.• The projector is placed so it squarely faces the screen, not at an angle.• Nothing is blocking the optional external camera and the projected image.• The projection size is within the following range according to the brightness
of the light source (when the screen illuminance is 40 lux or less).• Up to 9.9 Klm: 50 to 200 inches• 10 Klm: 60 to 300 inches
• All the projectors are projecting images at the same resolution.
• The illuminance ratio on the screen surface when projecting an all-whitescreen and when projecting an all-black screen is 8:1 or more.
• Projection in the projector's Extended menu is set to Front orFront/Ceiling for all projectors.
Schedule Settings
s Extended > Schedule Settingss Extended > Multi-Projection > Screen Matching > Schedule SettingsYou can schedule various projector tasks.Schedule Settings
Select Add New to schedule events. To save your events, select Setupcomplete and then select Yes.• Event Settings to select the event details you want to perform. Select NoChange for items that you do not want to change when the event occurs.
• Date / Time Settings to select the date and time at which you want theevent to occur. You can schedule events up to 4 weeks later.
Schedule ResetYou can delete all scheduled events. To delete events completely, you needto select Setup complete and select Yes.
Setup completeSaves your changes in the Schedule Settings menu.
a
• In the Schedule menu, you can schedule up to 30 events.• In the Extended Schedule menu, you can schedule only one event
for Color Calibration or Screen Matching.• Light Source Calibration events do not start if the projector is used
continuously for more than 24 hours, or regularly turned off byturning off the power outlet. Set the following events:• Turning on the projector 20 minutes before performing light
source calibration.• Performing light source calibration periodically.

Extended Menu 100
gg Related Links• "Schedule Status Icons" p.100
Schedule Status Icons
The icons in the calender are described in the following table.
Valid schedule
Regular schedule
Invalid schedule
One time schedule
Regular schedule
Standby schedule (turns communication on or off during standby)
Invalid schedule
Language
s Extended > LanguageYou can select the language for projector menu and message displays.
Reset (Extended menu)
s Extended > ResetYou can reset all adjustment values on the Extended menu to their defaultsettings, except for the following:• Point Correction (in the Simple Stacking menu)• Screen• Projection• High Altitude Mode
• Auto Source Search• USB Power• Release A/V Mute• Lens Type• A/V Settings• Standby Mode• HDBaseT• Projector ID• Language
a
When you set User's Logo Protection to On in the PasswordProtection screen, you cannot change the following settings related touser's logo display. Set User's Logo Protection to Off first.• Display Background• Startup Screen
Network Menu 101
Settings on the Network menu let you view network information and set upthe projector for controlling over a network.When you set Network Protection to On from the Password Protectionscreen, you cannot change the network settings. Hold down the [Freeze]button for more than 5 seconds to turn off the Network Protection setting.
gg Related Links• "Wireless Mode" p.101• "Net. Info. - Wireless LAN" p.101• "Net. Info. - Wired LAN" p.102• "Display the QR Code" p.102• "Remote Camera Access" p.102• "Projector Name" p.102• "PJLink Password" p.102• "Remote Password" p.102• "Web Control Password" p.102• "Moderator Password" p.102• "Projector Keyword" p.103• "Display Keyword" p.103• "Display LAN Info." p.103• "Connection Mode" p.103• "Search Access Point" p.103• "SSID" p.104• "Security" p.104• "Passphrase" p.104• "EAP Method" p.104• "Channel" p.105• "IP Settings" p.105• "SSID Display" p.106• "IP Address Display" p.106• "IPv6 Settings" p.106• "Mail Notification" p.106• "SMTP Server" p.107• "Port Number" p.107• "From" p.107• "Address 1 Setting/Address 2 Setting/Address 3 Setting" p.107• "SNMP" p.107
• "Trap IP Address 1/Trap IP Address 2" p.107• "Community Name" p.107• "PJLink Notification" p.108• "Notified IP Address" p.108• "Command Communication" p.108• "Secure HTTP" p.108• "Web Server Certificate" p.108• "Web API Settings" p.108• "Priority Gateway" p.109• "PJLink" p.109• "AMX Device Discovery" p.109• "Crestron Connected" p.109• "Art-Net" p.109• "Message Broadcasting" p.109• "Reset (Network menu)" p.109
Wireless Mode
s Network > Wireless ModeYou can configure your wireless LAN settings.Set to Wireless LAN On to project images via a wireless LAN. If you do notwant to connect via wireless LAN, set to Off to prevent unauthorized accessby others.
a
To connect the projector to the computer using a wireless networksystem, install the optional wireless LAN module.
Net. Info. - Wireless LAN
s Network > Net. Info. - Wireless LANYou can view wireless network status and details.
Network Menu 102
Net. Info. - Wired LAN
s Network > Net. Info. - Wired LANYou can view wired network status and details.
Display the QR Code
s Network > Display the QR CodeYou can view a QR code for connecting with iOS or Android devices usingthe Epson iProjection app.
Remote Camera Access
s Network > Remote Camera AccessYou can display the image taken by the optional external camera using EpsonWeb Control.Remote Camera Access
Set to On to enable the Remote Camera Access function.Password
This is useful for accessing the projector over the Web. (No password is setby default.)Enter a password up to 32 alphanumeric characters long. (Do not use * :spaces.)
Projector Name
s Network > Network Configuration > Basic > Projector NameThis is useful to identify the projector over the network.Enter a name up to 16 alphanumeric characters long. (Do not use " * + , / : ; <= > ? [ \ ] ` | spaces.)
PJLink Password
s Network > Network Configuration > Basic > PJLink PasswordThis is useful for projector control using the PJLink protocol.Enter a password up to 32 alphanumeric characters long. (Do not use spacesand any symbols other than @.)
Remote Password
s Network > Network Configuration > Basic > Remote PasswordThis is useful for accessing the projector using the Web Remote. (User nameis EPSONREMOTE; default password is the projector's serial number.)Enter a password up to 32 alphanumeric characters long. (Do not use * :spaces.)
a
Setting is only displayed when Content Playback is set to Off.
Web Control Password
s Network > Network Configuration > Basic > Web Control PasswordThis is useful for accessing the projector over the Web. (User name isEPSONWEB; default password is the projector's serial number.)Enter a password up to 32 alphanumeric characters long. (Do not use * :spaces.)
Moderator Password
s Network > Network Configuration > Basic > Moderator Password
Network Menu 103
This is useful for accessing the projector as a moderator using EpsoniProjection. (No password is set by default.)Enter a four-digit number password.
Projector Keyword
s Network > Network Configuration > Basic > Projector KeywordYou can turn on a security password to prevent access to the projector byanyone not in the room with it.You must enter a displayed, randomized keyword from a computer usingEpson iProjection to access the projector and share the current screen.
Display Keyword
s Network > Network Configuration > Basic > Display KeywordYou can select whether to display a projector keyword on the projected imagewhen accessing the projector using Epson iProjection.
a
Available when Projector Keyword is set to On.
Display LAN Info.
s Network > Network Configuration > Basic > Display LAN Info.You can select the display format for the projector's network information.By simply reading the QR code with Epson iProjection, you can connect themobile device to the projector through a network. The default value is Text &QR Code.
Connection Mode
s Network > Network Configuration > Wireless LAN > Connection ModeYou can select the type of wireless connection.Quick
You can connect to multiple smartphones, tablets, or computers directlyusing wireless communication.When you select this connection mode, the projector acts as an easy accesspoint. (We recommend limiting the number of devices to six or less tomaintain the projection performance.)
AdvancedYou can connect to multiple smartphones, tablets, or computers over awireless network access point. The connection is established ininfrastructure mode.
Search Access Point
s Network > Network Configuration > Wireless LAN > Search AccessPointYou can search for available wireless network access points in Advancedconnection mode. Depending on the access point settings, they may not bedisplayed in the list.
a
• A blue mark appears for access points that have already been set.• A lock icon appears for access points for which security has been set.
If you select an access point that has not had security set, theWireless LAN menu is displayed. If you select an access point forwhich security has been set, the Security menu is displayed. Selectthe type of security according to the security settings for the accesspoint.

Network Menu 104
SSID
s Network > Network Configuration > Wireless LAN > SSIDYou can set the SSID (network name) of the wireless LAN system theprojector is connecting to.
Security
s Network > Network Configuration > Wireless LAN > SecurityYou can set up security for your projector to use on a wireless network.Open
Security is not set.WPA2-PSK
Communication is performed using WPA2 security. Uses AES method forencryption. When establishing a connection from a computer to theprojector, enter the value set in the passphrase.
WPA3-PSKConnects in WPA3 personal mode. Communication is performed usingWPA3 security. Uses AES method for encryption. When establishing aconnection from a computer to the projector, enter the value set in thepassphrase.
WPA2/WPA3-PSKConnects in WPA2/WPA3 personal mode. Encryption method is selectedautomatically according to the access point settings. Set a passphrase whichis the same for the access point.
WPA3-EAPConnects in WPA3 enterprise mode. Encryption method is selectedautomatically according to the access point settings.
WPA2/WPA3-EAPConnects in WPA2/WPA3 enterprise mode. Encryption method is selectedautomatically according to the access point settings.
a
• WPA2-PSK is available only for Quick connection mode.• WPA3-PSK, WPA2/WPA3-PSK, WPA3-EAP, and WPA2/WPA3-
EAP are available only for Advanced connection mode.• When the Mail Notification is set to Off, you cannot set security.• WPA is an encryption standard that improves the security for
wireless networks. The projector supports TKIP and AES encryptionmethods. WPA also includes user authentication functions. WPAauthentication provides two methods: using an authentication server,or authenticating between a computer and an access point withoutusing a server. This projector supports the latter method, without aserver.
• When setting security, follow the instructions from the administratorof the network system you want to connect to.
Passphrase
s Network > Network Configuration > Wireless LAN > PassphraseFor WPA2-PSK, WPA3-PSK, and WPA2/WPA3-PSK security, enter thepre-shared passphrase used on the network. You can enter variouspassphrases from 8 to 63 alphanumeric characters long.When the passphrase is entered and the [Enter] button is pressed, the value isset and displayed as an asterisk (*).We recommend changing the passphrase periodically for security. If thenetwork settings are initialized, it returns to the initial passphrase.
a
• You can enter up to 32 characters in the projector's menu. To entermore than 32 characters, use your Web browser.
• When Connection Mode is set to Quick, the initial passphrase is set.
EAP Method
s Network > Network Configuration > Wireless LAN > EAP Method
Network Menu 105
You can set the EAP settings for WPA3-EAP and WPA2/WPA3-EAPsecurity.EAP Type
Select the protocol for authentication.PEAP
Authentication protocol widely used in Windows Server.PEAP-TLS
Authentication protocol used in Windows Server. Select this whenusing a client certificate.
EAP-TLSAuthentication protocol widely used to use a client certificate.
EAP-FASTSelect this when these authentication protocols are used.
User nameEnter a user name for the network up to 64 alphanumeric characters long.To include a domain name, add it before the backslash and the user name(domain\username).When importing a client certificate, the name the certificate was issued tois automatically set.
PasswordEnter a password for authentication up to 64 alphanumeric characterslong. After you enter the password and select Finish, the password isdisplayed as an asterisk (*).
Client CertificateImport the client certificate.
Verify Server CertificateYou can verify the server certificate when a CA certificate has been set.
CA certificateImports the CA certificate.
RADIUS Server NameEnter the server name to verify up to 32 alphanumeric characters long.
a
• You can enter up to 32 alphanumeric characters long in the projectormenu. To enter more than 32 characters, use your Web browser.
• Password is only displayed when EAP Type is set to PEAP or EAP-FAST.
• Client Certificate is only displayed when EAP Type is set to PEAP-TLS or EAP-TLS.
Channel
s Network > Network Configuration > Wireless LAN > ChannelSet the frequency band (channel) using in Quick connection mode.If interference from other signals occurs, use a different channel.
IP Settings
s Network > Network Configuration > Wireless LAN > IP Settingss Network > Network Configuration > Wired LAN > IP SettingsSet DHCP to On if your network assigns addresses automatically.Set to Off to manually enter the network's IP Address, Subnet Mask, andGateway Address using 0 to 255 for each address field.Do not use these addresses:• for the IP Address: 0.0.0.0, 127.x.x.x, 192.0.2.x, or 224.0.0.0 through
255.255.255.255• for the Subnet Mask: 255.255.255.255 or 0.0.0.0 through 254.255.255.255• for the Gateway Address: 0.0.0.0, 127.x.x.x, or 224.0.0.0 through
255.255.255.255(where x is a number from 0 to 255)
Network Menu 106
SSID Display
s Network > Network Configuration > Wireless LAN > SSID DisplayYou can select whether to display the SSID on the network standby screenand Home screen.
IP Address Display
s Network > Network Configuration > Wireless LAN > IP AddressDisplayYou can select whether to display the IP address on the network standbyscreen and Home screen.
IPv6 Settings
s Network > Network Configuration > Wireless LAN > IPv6 Settingss Network > Network Configuration > Wired LAN > IPv6 SettingsYou can select IPv6 settings when you connect the projector to the networkusing IPv6.IPv6
Set to On to connect the projector to the network using IPv6.One local link address is always set while using IPv6. This is composed ofthe interface ID created from fe80:: and the projector's MAC address.IPv6 is supported to monitor and control the projector over a networkusing Epson Web Control and PJLink.
Auto ConfigurationSet to On to assign addresses automatically according to the RouterAdvertisement.The address is composed as shown below.
Stateless Address (0 to 6)Created automatically by combining the prefix acquired from the RA(Router Advertisement) and the interface ID created from theprojector's MAC address.
Stateful Address (0 to 1)Created automatically from the DHCP server using DHCPv6.
Use Temporary AddressSet to On if you want to use a temporary IPv6 address.
a
You can set the IPv6 address manually in the Advanced menu inEpson Web Control.
Mail Notification
s Network > Network Configuration > Notifications > Mail NotificationSet to On to send an email to the preset addresses when a problem or warningoccurs with a projector.
gg Related Links• "Network Projector E-mail Alert Messages" p.106
Network Projector E-mail Alert Messages
When a problem occurs with a projector on the network, and you selected toreceive e-mail alerts, you receive an e-mail containing the followinginformation:• The email address set in From as the mail sender• Epson Projector in the subject line• The name of the projector experiencing a problem• The IP address of the affected projector• Detailed information about the problem

Network Menu 107
SMTP Server
s Network > Network Configuration > Notifications > SMTP ServerEnter the IP address for the projector's SMTP server using 0 to 255 for eachaddress field.Do not use these addresses: 127.x.x.x, 192.0.2.x or 224.0.0.0 through255.255.255.255 (where x is a number from 0 to 255).
Port Number
s Network > Network Configuration > Notifications > Port NumberEnter a number for the SMTP server Port Number from 1 to 65535 (default is25).
From
s Network > Network Configuration > Notifications > FromEnter the e-mail address of the sender up to 64 alphanumeric characters long.(Do not use " ( ) , : ; < > [ \] spaces.)
a
You can enter up to 32 alphanumeric characters long in the projectormenu. To enter more than 32 characters, use your Web browser.
Address 1 Setting/Address 2 Setting/Address 3Setting
s Network > Network Configuration > Notifications > Address 1 Settings Network > Network Configuration > Notifications > Address 2 Settings Network > Network Configuration > Notifications > Address 3 Setting
Enter the e-mail address to receive notifications up to 64 alphanumericcharacters long. (Do not use " ( ) , : ; < > [ \] spaces.) And select the alerts youwant to receive.
a
You can enter up to 32 alphanumeric characters long in the projectormenu. To enter more than 32 characters, use your Web browser.
SNMP
s Network > Network Configuration > Notifications > SNMPSet to On to monitor the projector using SNMP. To monitor the projector,you need to install the SNMP manager program on your computer. SNMPshould be managed by a network administrator.
Trap IP Address 1/Trap IP Address 2
s Network > Network Configuration > Notifications > Trap IP Address 1s Network > Network Configuration > Notifications > Trap IP Address 2Enter up to two IP addresses to receive SNMP notifications, using 0 to 255 foreach address field.Do not use these addresses: 127.x.x.x or 224.0.0.0 through 255.255.255.255(where x is a number from 0 to 255).
Community Name
s Network > Network Configuration > Notifications > Community NameEnter the SNMP community name up to 32 alphanumeric characters long.(Do not use spaces and any symbols other than @.)
Network Menu 108
PJLink Notification
s Network > Network Configuration > Notifications > PJLinkNotificationSet to On to enable the PJLink notification function when the PJLink settingis enabled.
Notified IP Address
s Network > Network Configuration > Notifications > Notified IPAddressEnter the IP address to receive the projector's operating status when thePJLink notification function is enabled. Enter the addresses using 0 to 255 foreach address field.Do not use these addresses: 127.x.x.x or 224.0.0.0 through 255.255.255.255(where x is a number from 0 to 255).
Command Communication
s Network > Network Configuration > Others > CommandCommunicationYou can select the authentication method for command communication.Protected
Select when performing a digest authentication using Web ControlPassword. You need to install the latest version of the Epson ProjectorManagement software.
CompatibleSelect when performing plain text authentication using the MonitorPassword (up to 16 alphanumeric characters long).
a
Select Compatible when monitoring projectors with a switcher and asystem controller or using Epson Projector Management ver.5.30 orearlier.
Secure HTTP
s Network > Network Configuration > Others > Secure HTTPTo strengthen security, communication between the projector and computerin Web control is encrypted. When setting security with Web control, it isrecommended to set this to On.
Web Server Certificate
s Network > Network Configuration > Others > Web Server CertificateImports the Web server certificate for secure HTTP.
Web API Settings
s Network > Network Configuration > Others > Web API SettingsYou can select the Web API settings when using Web API communications.Web API
Set to On to enable the Web API function.Authentication
You can set the security for your projector to use during Web APIcommunications.Open
Security is not set.Digest
Communication is performed using API authentication (Digestauthentication).
Network Menu 109
a
See the Web API Specifications for Projectors for details.
Priority Gateway
s Network > Network Configuration > Others > Priority GatewayYou can set the priority gateway.
PJLink
s Network > Network Configuration > Others > PJLinkSet to On to monitor the projector using PJLink.
AMX Device Discovery
s Network > Network Configuration > Others > AMX Device DiscoverySet to On when you want to allow the projector to be detected by AMXDevice Discovery.
Crestron Connected
s Network > Network Configuration > Others > Crestron ConnectedSet to On only when monitoring or controlling the projector over the networkusing Crestron Connected.Restart the projector to enable your changes.
a
Enabling Crestron Connected disables the Epson Message Broadcastingfeature in the Epson Projector Management software.
Art-Net
s Network > Network Configuration > Others > Art-NetSet to On when you want to control the projector using Art-Net.Net
Enter a number for the projector's Net using 0 to 127 (default is 0).Sub-Net
Enter a number for the projector's Sub-Net using 0 to 15 (default is 0).Universe
Enter a number for the projector's Universe using 0 to 15 (default is 0).Start Channel
Enter the start channel that handles Art-Net using 1 to 500 (default is 1).Channel Information
You can view the channel information.
Message Broadcasting
s Network > Network Configuration > Others > Message BroadcastingSet to On to receive the message delivered by Epson Projector Management.See the Epson Projector Management Operation Guide for details.
a
Setting is only displayed when Crestron Connected is set to Off.
Reset (Network menu)
s Network > Network Configuration > ResetYou can reset all adjustment values on the Network menu to their defaultsettings.
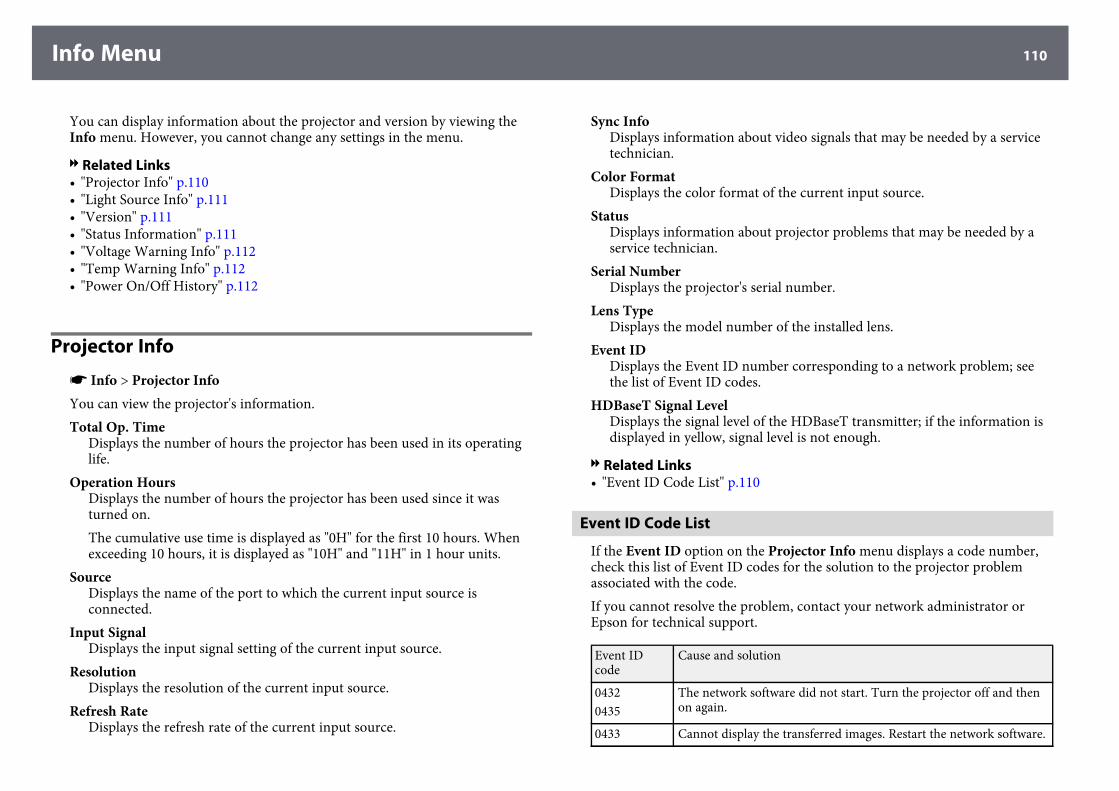
Info Menu 110
You can display information about the projector and version by viewing theInfo menu. However, you cannot change any settings in the menu.
gg Related Links• "Projector Info" p.110• "Light Source Info" p.111• "Version" p.111• "Status Information" p.111• "Voltage Warning Info" p.112• "Temp Warning Info" p.112• "Power On/Off History" p.112
Projector Info
s Info > Projector InfoYou can view the projector's information.Total Op. Time
Displays the number of hours the projector has been used in its operatinglife.
Operation HoursDisplays the number of hours the projector has been used since it wasturned on.The cumulative use time is displayed as "0H" for the first 10 hours. Whenexceeding 10 hours, it is displayed as "10H" and "11H" in 1 hour units.
SourceDisplays the name of the port to which the current input source isconnected.
Input SignalDisplays the input signal setting of the current input source.
ResolutionDisplays the resolution of the current input source.
Refresh RateDisplays the refresh rate of the current input source.
Sync InfoDisplays information about video signals that may be needed by a servicetechnician.
Color FormatDisplays the color format of the current input source.
StatusDisplays information about projector problems that may be needed by aservice technician.
Serial NumberDisplays the projector's serial number.
Lens TypeDisplays the model number of the installed lens.
Event IDDisplays the Event ID number corresponding to a network problem; seethe list of Event ID codes.
HDBaseT Signal LevelDisplays the signal level of the HDBaseT transmitter; if the information isdisplayed in yellow, signal level is not enough.
gg Related Links• "Event ID Code List" p.110
Event ID Code List
If the Event ID option on the Projector Info menu displays a code number,check this list of Event ID codes for the solution to the projector problemassociated with the code.If you cannot resolve the problem, contact your network administrator orEpson for technical support.
Event IDcode
Cause and solution
04320435
The network software did not start. Turn the projector off and thenon again.
0433 Cannot display the transferred images. Restart the network software.
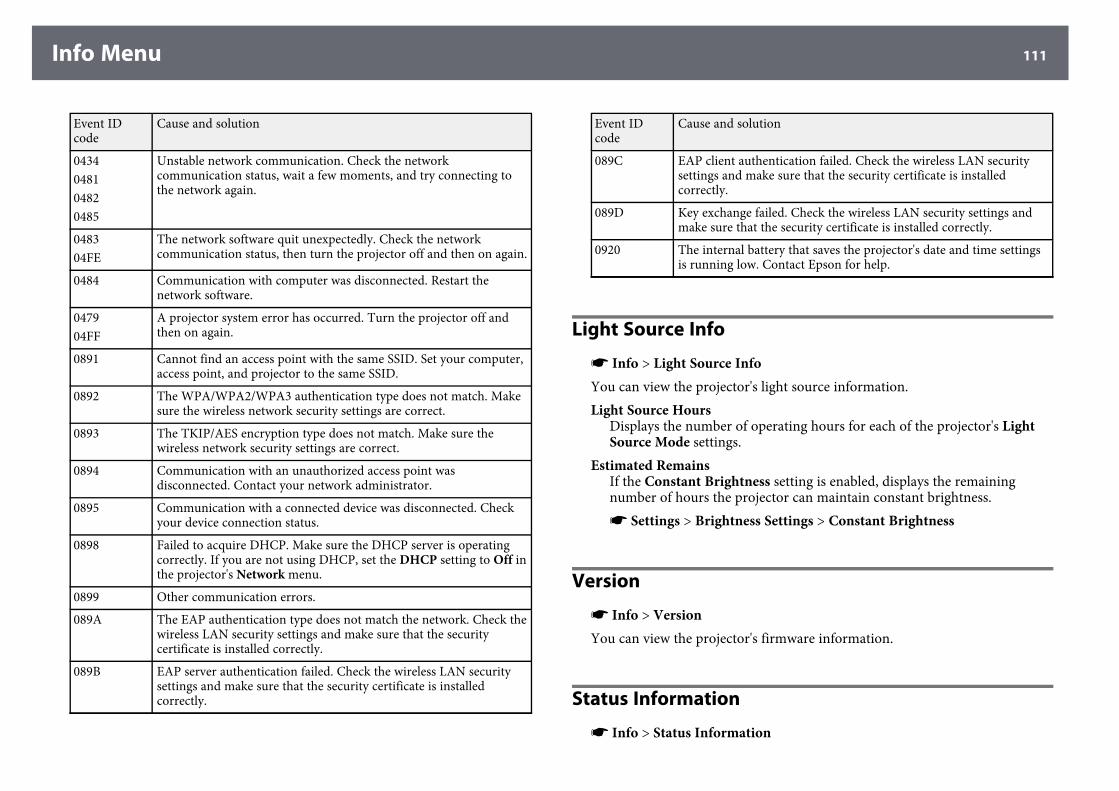
Info Menu 111
Event IDcode
Cause and solution
0434048104820485
Unstable network communication. Check the networkcommunication status, wait a few moments, and try connecting tothe network again.
048304FE
The network software quit unexpectedly. Check the networkcommunication status, then turn the projector off and then on again.
0484 Communication with computer was disconnected. Restart thenetwork software.
047904FF
A projector system error has occurred. Turn the projector off andthen on again.
0891 Cannot find an access point with the same SSID. Set your computer,access point, and projector to the same SSID.
0892 The WPA/WPA2/WPA3 authentication type does not match. Makesure the wireless network security settings are correct.
0893 The TKIP/AES encryption type does not match. Make sure thewireless network security settings are correct.
0894 Communication with an unauthorized access point wasdisconnected. Contact your network administrator.
0895 Communication with a connected device was disconnected. Checkyour device connection status.
0898 Failed to acquire DHCP. Make sure the DHCP server is operatingcorrectly. If you are not using DHCP, set the DHCP setting to Off inthe projector's Network menu.
0899 Other communication errors.
089A The EAP authentication type does not match the network. Check thewireless LAN security settings and make sure that the securitycertificate is installed correctly.
089B EAP server authentication failed. Check the wireless LAN securitysettings and make sure that the security certificate is installedcorrectly.
Event IDcode
Cause and solution
089C EAP client authentication failed. Check the wireless LAN securitysettings and make sure that the security certificate is installedcorrectly.
089D Key exchange failed. Check the wireless LAN security settings andmake sure that the security certificate is installed correctly.
0920 The internal battery that saves the projector's date and time settingsis running low. Contact Epson for help.
Light Source Info
s Info > Light Source InfoYou can view the projector's light source information.Light Source Hours
Displays the number of operating hours for each of the projector's LightSource Mode settings.
Estimated RemainsIf the Constant Brightness setting is enabled, displays the remainingnumber of hours the projector can maintain constant brightness.s Settings > Brightness Settings > Constant Brightness
Version
s Info > VersionYou can view the projector's firmware information.
Status Information
s Info > Status Information
Info Menu 112
You can view the projector's basic status information.Each category contains the following information.Status Information
The projector's operating status.Source
Input signal information.Signal Information
Input digital signal information.Network Wired
Wired LAN settings.Network Wireless
Wireless LAN settings.Maintenance
Operating time for the projector and light source.Version
The projector's firmware version
gg Related Links• "Projector Status Display Messages" p.153
Voltage Warning Info
s Info > Voltage Warning InfoYou can view various voltage warnings.When you select Detail when a Warning or Error is displayed, you can checkdetailed logs for before and after the error was detected.
Temp Warning Info
s Info > Temp Warning InfoYou can view various high temperature warnings.
When you select Detail when a Warning or Error is displayed, you can checkdetailed logs for before and after the error was detected.
Power On/Off History
s Info > Power On/Off HistoryYou can view the power on/off logs.
Reset Menu 113
Settings on the Reset menu let you reset certain projector settings to theirdefault values.
gg Related Links• "Reset All Memories" p.113• "Refresh Mode" p.113• "Light Source Calibration" p.113• "NFC Settings" p.114• "Reset All Config" p.114• "Reset All (Factory Default)" p.114
Reset All Memories
s Reset > Reset All MemoriesYou can delete all memories saved in Memory, Lens Position, and GeometryCorrection.
Refresh Mode
s Reset > Refresh ModeThe refresh mode process clears any projected afterimage and turns off theprojector after a specified period of time.Timer
Set a time period during which the projector displays the refresh image.Messages
Set to On to display a message informing you that the projector is inrefresh mode.
StartStarts the refresh mode process to clear any projected afterimage and turnoff the projector after a specified period of time. Press any button on theremote control to cancel this process.
Light Source Calibration
s Reset > Light Source CalibrationThe light source calibration process optimizes the color balance of thecurrently projected image.Run Now
Starts light source calibration to optimize the color balance of the currentlyprojected image. You may not be able to start calibration if the projector'senvironmental temperature is out of range. (Wait 30 minutes after turningon the projector before starting calibration for the best results.)Light Source Calibration does not start in the following cases.• If the projector is not used continuously for more than 20 minutes.• If the surrounding temperature gets too high, and the brightness has
been automatically dimmed.• If you use the following functions and the brightness of the light source
declines to a specific level or lower.• Dynamic Contrast• Lights-Out Control• A/V Mute
• Within 10 minutes of turning on the projector.• If Brightness Settings is set to 30% or less.
Run PeriodicallySet to On to perform light source calibration periodically every 100 hoursof usage.When set to Off to maintain the projected image that has been adjustedusing Multi-Projection, perform calibration using Run Now or set a LightSource Calibration event to perform it periodically on the ScheduleSettings screen.
Schedule SettingsDisplays the Schedule Settings screen. Set a Light Source Calibrationevent to run periodically.
Last RunDisplays the date and time of the last light source calibration.
Reset Menu 114
NFC Settings
s Reset > NFC SettingsYou can prevent scanning to the projector's settings.NFCWrite Protection
Prevents anyone from scanning the projector's settings.NFCWrite Password
Set a password for scanning the projector's settings up to 32 alphanumericcharacters long.
a
If you do not set an NFC Write Password, NFC Write Protection isenabled automatically when you turn on the projector. If you want toscan the projector's information using the NFC tag on the projector, setthe NFC Write Password setting to Off.
Reset All Config
s Reset > Reset All ConfigYou can reset most of the projector settings to their default values.You cannot reset the following settings:• Memory• Startup Screen *• Panel Alignment• Color Uniformity• User's Logo *• Date & Time• Color Matching• Language• Network menu items• NFC Settings
* Only when you set the User's Logo Protection setting to On in thePassword Protection setting menu.
Reset All (Factory Default)
s Reset > Reset All (Factory Default)You can reset the setting values to the values you set or to their factory defaultvalues.Reset All (User Default)
You can apply the values you set in the User Default Setting menu.Reset All (Factory Default)
You can reset all of the projector settings to their default factory values.You cannot reset the following settings:• Light Source Info• Operation Hours• Password Protection• Password• Schedule Settings ** Only when you set Schedule Protection to On from the PasswordProtection screen.
User Default SettingYou can define the default value used when performing the Reset All(User Default) functions.You can set the values for the following settings:• Color Mode• Light Source Mode• Brightness Level• Constant Brightness• Messages• Standby Confirmation• A/V Mute Timer

Reset Menu 115
• Release A/V Mute• Beep• A/V Settings• Standby Mode• Sleep Mode• Language• Wireless Mode• DHCP (in the Wired LAN menu)• Command Communication
Password SettingYou can set a password when resetting values to the user default settingvalues or to their factory default values. The default password is set to"0000". Change this to your own password.
Adjusting Projector FeaturesFollow the instructions in these sections to use your projector's adjustment features.
gg Related Links• "Multi-Projection Features" p.117• "External Camera Usage" p.122
Multi-Projection Features 117
You can combine the projected images from multiple projectors to create onebright image or a large seamless image.By using the auto adjustment function that uses the optional external cameraand the Epson Project Professional Tool software you can perform virtuallyadjustment-free operation.
a
You can download the Epson Projector Professional Tool software andits manual from the following website.epson.sn
gg Related Links• "Procedure Overview" p.117• "Preparation" p.117• "Image Composition" p.119• "Adjusting Colors" p.120
Procedure Overview
This section explains the recommended procedure for using the optionalexternal camera and the Epson Projector Professional Tool software.Preparation• Initializing projectors• Assigning a master projector• Calibrating projectors• Installing projectors• Performing rough image adjustments• Connecting projectors to a networkImage Composition• Tiling• StackingAdjusting colors
Preparation
This section explains how to perform basic settings before installing theprojector and preparing in advance for easier operations later.You can setup up to 15 projectors to project one large image by compositingseveral images (tiling) and up to 6 projectors to project a bright image byoverlaying images (stacking).
gg Related Links• "Initializing Projectors" p.117• "Assigning a Master Projector" p.118• "Calibrating Projectors" p.118• "Installing Projectors" p.118• "Performing Rough Image Adjustments" p.118• "Connecting Projectors to a Network" p.119
Initializing Projectors
You need to correct the difference in settings for each projector.Do the following operations for all projectors:• Reset the projector settings to their default values.s Reset > Reset All Config
• Reset the values on the Color Uniformity menu to their default settings.s Extended > Display > Color Uniformity > Reset
• Reset the values on the Panel Alignment menu to their default settings.s Extended > Display > Panel Alignment > Reset
• Set the Adjustment Level setting to All in the Color Matching menu, andselect 0 for Red, Green, and Blue.s Extended > Multi-Projection > Screen Matching > Color Matching
a
We recommend you set the Sleep Mode setting to Off in theprojector's Extended menu after all initialization is complete.
gg Related Links• "Sleep Mode" p.92
Multi-Projection Features 118
Assigning a Master Projector
Select one projector to be the basis for adjustment.Display test patterns from all projectors and select the one that has less colorunevenness as the master projector.
a
• You can display the test pattern by pressing the Test Pattern buttonon the control panel or remote control.
• We recommend displaying the following test patterns:Gray Bars V, Gray Bars H, and White
• When using the remote control, we recommend assigning the sameID for the master projector and the remote control to limit thecontrol target.
gg Related Links• "Projector ID" p.96
Calibrating Projectors
Adjust changes that occur over time due to repeated use of projectors.Perform the following operations for all projectors:• Perform light source calibration.s Reset > Light Source Calibration
• Perform color calibration.s Extended > Color Calibration
To extend the adjustment range, set the Color Mode setting to Multi-Projection in the projector's Image menu.
a
• If you do not install the optional external camera or you wereunsuccessful performing color calibration, perform ColorUniformity.
• If you set Run Periodically to On in the Light Source Calibrationmenu, the color adjusted in multi-projection may be changed due toauto calibration.
• You can also change the projector's Color Mode using the [ColorMode] button on the remote control.
Installing Projectors
Install all projectors in an appropriate location.When you install the master projector in the center, you can easily calibratecolors because any unevenness at the center of the projected area is reduced.
Performing Rough Image Adjustments
Perform the following operations for all projectors to adjust the position andthe shape for rectangular projected images.Displaying the test pattern makes it easier to adjust the projection positionand the shape.• For projection position, adjust the location, the angle, and the lens shift.• For projection size, adjust the location and the zoom.• For image focus, adjust the focus.
Multi-Projection Features 119
a
• The projected images are not stable right after turning on theprojector. We recommend adjusting the projector at least 20 minutesafter you start projecting.
• We recommend displaying the following test patterns:Gray Bars V, Gray Bars H, and White
• When adjusting the image height with vertical lens shift, adjust it bymoving the image from the bottom to the top.If you finish adjusting with the projected image at the bottom, theprojected image may be in a low position.
• It is not recommended that you perform geometry correction for thefollowing reasons:• Image quality may decline.• If the correction value is too large, image calibration may be
difficult.
gg Related Links• "Lens Shift" p.56• "Zoom" p.56• "Focus" p.58
Connecting Projectors to a Network
Connect all projectors to the network hub with LAN cables.When a connection is established, check that all projectors have been assignedtheir own IP address assigned.
gg Related Links• "Wired Network Connection" p.37
Image Composition
You can create a bright composite image and a large image from multipleprojectors.Before composing the images, select the following settings in the EpsonProjector Professional Tool software.
• Create a group of projectors in the Layout/Monitoring tab.• Specify each projector's position using Tiling and Stacking Settings on theEdit Group screen.
a
If Epson Projector Professional Tool software is not available, create agroup in the projector's menu.s Extended > Multi-Projection > Projector Grouping
gg Related Links• "Tiling" p.119• "Stacking" p.120• "Projector Grouping" p.96
Tiling
You can project one large image from up to 15 projectors.Start the Geometry Correction Assist - Tiling Function wizard in the EpsonProjector Professional Tool software.s Setting > Camera Assist > Geometry Correction Assist > Tiling > StartWhen the wizard has finished, perform the following operations as necessary:• Screen Matching to correct the tint and brightness of each projected image.• Point Correction to adjust the gaps in the positions of the projected image.• Scale to crop and/or scale portions of the image.
Multi-Projection Features 120
a
• The required time for configuring tiling automatically variesdepending on the layout and number of projectors. It takes up toapproximately 8 minutes.
• The required time for screen matching varies depending on thelayout and number of projectors. It takes up to approximately 18minutes.
• If you have not installed the optional external camera or the EpsonProjector Professional Tool software is not available, select thefollowing settings from the Multi-Projection setting in theprojector's Extended menu:• Tiling• Edge Blending• Screen Matching• Brightness Settings• Color Matching• Black Level
• You can setup up to 9 projectors when using the projector's menu.
gg Related Links• "Point Correction" p.58• "Brightness Settings" p.60• "Tiling" p.96• "Scale" p.78• "Edge Blending" p.96• "Screen Matching" p.97• "Color Matching" p.98• "Black Level" p.97
Stacking
You can create one bright image by overlaying images from up to 6projectors.Start the Geometry Correction Assist - Stacking Function wizard in theEpson Projector Professional Tool software.s Setting > Camera Assist > Geometry Correction Assist > Stacking >Start
When the wizard has finished, if there are any gaps in the pixels of theprojected images, adjust the Point Correction setting manually.
a
• The required time to automatically configure stacking variesdepending on the layout and number of projectors. It takes up toapproximately 9 minutes.
• If the Epson Projector Professional Tool software is not available,start automatic adjustment on the master projector using theprojector's menu. You can setup up to 2 projectors when using theprojector's menu.s Extended > Multi-Projection > Simple Stacking > Start AutoAdjustment
• If you have not installed the optional external camera, adjust thefollowing settings manually:• Focus• Zoom• Lens Shift• Geometry Correction
gg Related Links• "Point Correction" p.58• "Lens Shift" p.56• "Zoom" p.56• "Focus" p.58• "Conditions for Simple Stacking" p.99• "Simple Stacking" p.98• "Geometry Correction" p.79
Adjusting Colors
Display the test patterns from all projectors to check each color tone.If you need adjust the color tone, perform the following operations:
• Adjust the Hue, Saturation, and Brightness settings for individual imagecolors.s Image > Advanced > RGBCMY
Multi-Projection Features 121
• Adjust the overall tint of the image.s Image > White Balance
a
We recommend displaying the following test patterns:Gray Bars V, Gray Bars H, and White
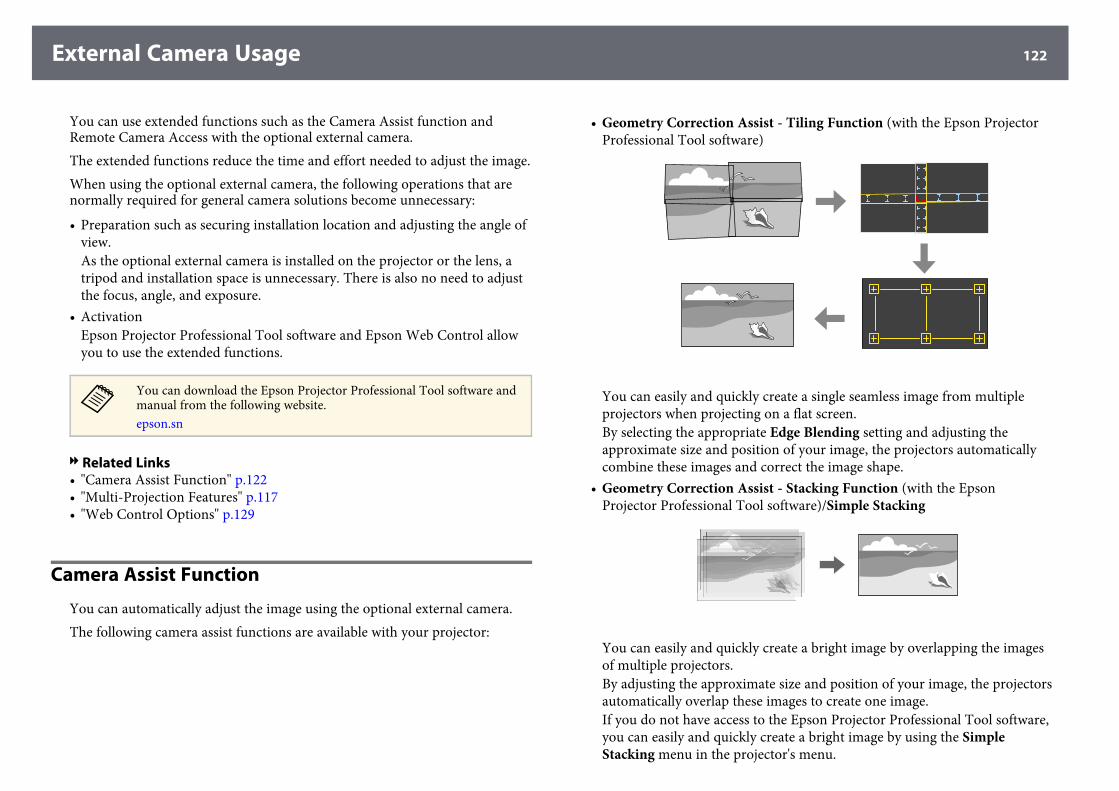
External Camera Usage 122
You can use extended functions such as the Camera Assist function andRemote Camera Access with the optional external camera.The extended functions reduce the time and effort needed to adjust the image.When using the optional external camera, the following operations that arenormally required for general camera solutions become unnecessary:
• Preparation such as securing installation location and adjusting the angle ofview.As the optional external camera is installed on the projector or the lens, atripod and installation space is unnecessary. There is also no need to adjustthe focus, angle, and exposure.
• ActivationEpson Projector Professional Tool software and Epson Web Control allowyou to use the extended functions.
a
You can download the Epson Projector Professional Tool software andmanual from the following website.epson.sn
gg Related Links• "Camera Assist Function" p.122• "Multi-Projection Features" p.117• "Web Control Options" p.129
Camera Assist Function
You can automatically adjust the image using the optional external camera.The following camera assist functions are available with your projector:
• Geometry Correction Assist - Tiling Function (with the Epson ProjectorProfessional Tool software)
You can easily and quickly create a single seamless image from multipleprojectors when projecting on a flat screen.By selecting the appropriate Edge Blending setting and adjusting theapproximate size and position of your image, the projectors automaticallycombine these images and correct the image shape.
• Geometry Correction Assist - Stacking Function (with the EpsonProjector Professional Tool software)/Simple Stacking
You can easily and quickly create a bright image by overlapping the imagesof multiple projectors.By adjusting the approximate size and position of your image, the projectorsautomatically overlap these images to create one image.If you do not have access to the Epson Projector Professional Tool software,you can easily and quickly create a bright image by using the SimpleStacking menu in the projector's menu.
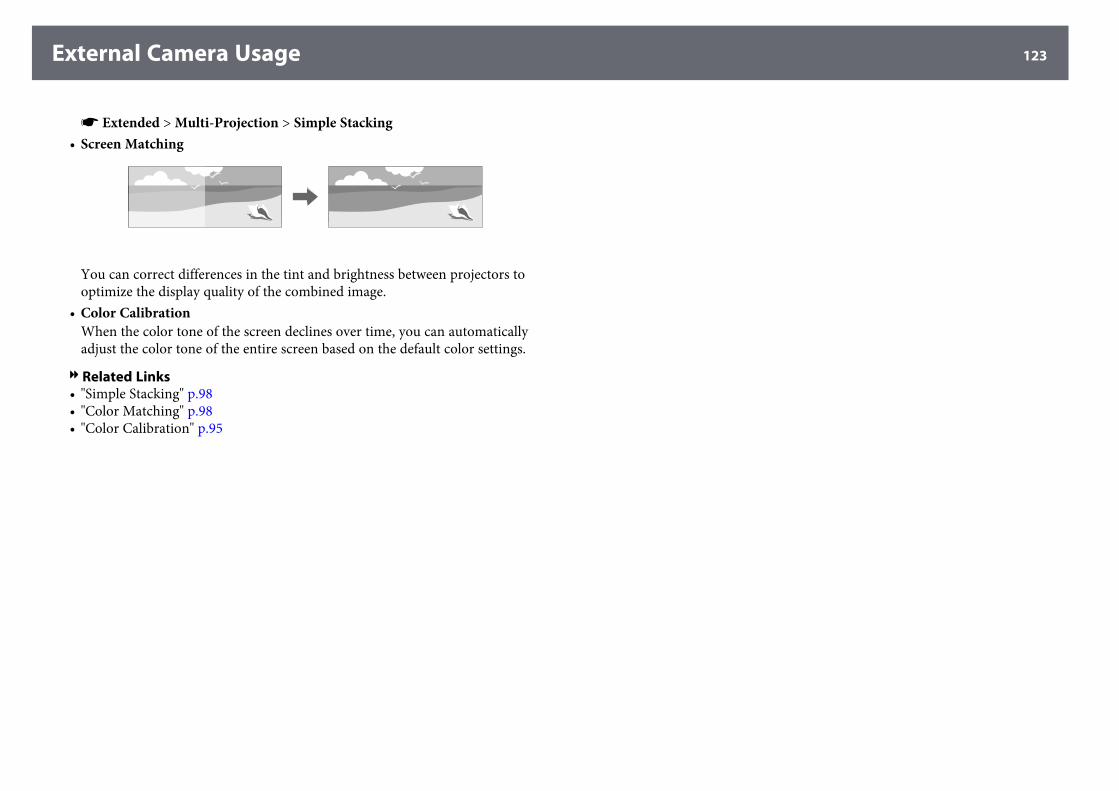
External Camera Usage 123
s Extended > Multi-Projection > Simple Stacking• Screen Matching
You can correct differences in the tint and brightness between projectors tooptimize the display quality of the combined image.
• Color CalibrationWhen the color tone of the screen declines over time, you can automaticallyadjust the color tone of the entire screen based on the default color settings.
gg Related Links• "Simple Stacking" p.98• "Color Matching" p.98• "Color Calibration" p.95
Monitoring and Controlling the ProjectorFollow the instructions in these sections to monitor and control the projector over a network.
gg Related Links• "Projector Monitoring and Control Options" p.125• "Accessing a Networked Projector Using a Web Browser" p.128
Projector Monitoring and Control Options 125
You can monitor and control the projector over a network in various way.
gg Related Links• "Epson Projector Management" p.125• "Epson Web Control" p.125• "SNMP" p.125• "ESC/VP21 Commands" p.125• "ESC/VP.net Commands" p.126• "PJLink" p.126• "Art-Net" p.126• "Crestron Connected Support" p.126• "Web API" p.127
Epson Projector Management
Epson Projector Management software (Windows only) lets you monitor andcontrol your projector through the network. See the Epson ProjectorManagement Operation Guide for instructions.You can download Epson Projector Management from the following Website.epson.sn
a
The authentication method when registering projectors variesdepending on the version of the Epson Projector Management softwareyou are using. For the best results, we recommend that you use thelatest version of the Epson Projector Management software.
Epson Web Control
Once you have connected your projector to your network, you can selectprojector settings and control projection using a compatible Web browser.This lets you access the projector remotely.In Content Playback mode, you can also edit playlists.
a
• You can use the following Web browsers.• Internet Explorer 11 or later (Windows)• Microsoft Edge (Windows)• Safari (Mac, iOS)• Chrome (Android)
• While using the Web browser, do not connect using a proxy server.You cannot select all of the projector menu settings or control allprojector functions using a Web browser.
• If you set Standby Mode to Communication On, you can use a Webbrowser to select settings and control projection even if the projectoris in standby mode (when the power is off).s Extended > Standby Mode
gg Related Links• "Accessing a Networked Projector Using a Web Browser" p.128
SNMP
Network administrators can install SNMP (Simple Network ManagementProtocol) software on network computers so they can monitor projectors. Ifyour network uses this software, you can set up the projector for SNMPmonitoring.s Network > Network Configuration > Notifications > SNMP
a
• This projector supports SNMP agent version 1 (SNMPv1).• You cannot monitor projectors using SNMP in the Quick connection
mode.
ESC/VP21 Commands
You can control the projector from an external device using ESC/VP21.
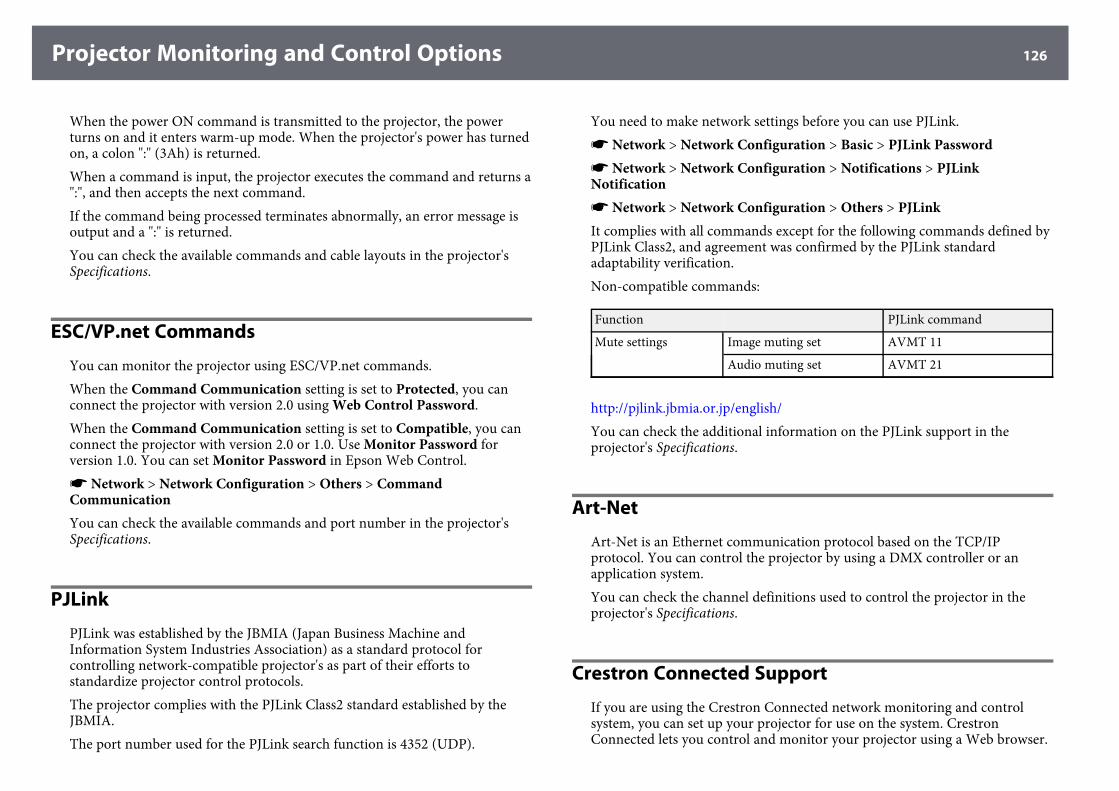
Projector Monitoring and Control Options 126
When the power ON command is transmitted to the projector, the powerturns on and it enters warm-up mode. When the projector's power has turnedon, a colon ":" (3Ah) is returned.When a command is input, the projector executes the command and returns a":", and then accepts the next command.If the command being processed terminates abnormally, an error message isoutput and a ":" is returned.You can check the available commands and cable layouts in the projector'sSpecifications.
ESC/VP.net Commands
You can monitor the projector using ESC/VP.net commands.When the Command Communication setting is set to Protected, you canconnect the projector with version 2.0 using Web Control Password.When the Command Communication setting is set to Compatible, you canconnect the projector with version 2.0 or 1.0. Use Monitor Password forversion 1.0. You can set Monitor Password in Epson Web Control.s Network > Network Configuration > Others > CommandCommunicationYou can check the available commands and port number in the projector'sSpecifications.
PJLink
PJLink was established by the JBMIA (Japan Business Machine andInformation System Industries Association) as a standard protocol forcontrolling network-compatible projector's as part of their efforts tostandardize projector control protocols.The projector complies with the PJLink Class2 standard established by theJBMIA.The port number used for the PJLink search function is 4352 (UDP).
You need to make network settings before you can use PJLink.s Network > Network Configuration > Basic > PJLink Passwords Network > Network Configuration > Notifications > PJLinkNotifications Network > Network Configuration > Others > PJLinkIt complies with all commands except for the following commands defined byPJLink Class2, and agreement was confirmed by the PJLink standardadaptability verification.Non-compatible commands:
Function PJLink command
Mute settings Image muting set AVMT 11
Audio muting set AVMT 21
http://pjlink.jbmia.or.jp/english/You can check the additional information on the PJLink support in theprojector's Specifications.
Art-Net
Art-Net is an Ethernet communication protocol based on the TCP/IPprotocol. You can control the projector by using a DMX controller or anapplication system.You can check the channel definitions used to control the projector in theprojector's Specifications.
Crestron Connected Support
If you are using the Crestron Connected network monitoring and controlsystem, you can set up your projector for use on the system. CrestronConnected lets you control and monitor your projector using a Web browser.
Projector Monitoring and Control Options 127
You can access the Crestron Connected operation window from Epson WebControl. You need to enable Crestron Connected in the projector's Networkmenu before you can use Crestron Connected.s Network > Network Configuration > Others > Crestron Connected
a
• You cannot use the Message Broadcasting feature in Epson ProjectorManagement when you use Crestron Connected.
• If you set the Standby Mode setting to Communication On, you cancontrol the projector even if the projector is in standby mode (whenthe power is off).s Extended > Standby Mode
For additional information on Crestron Connected, visit the Crestron Website.https://www.crestron.com/products/line/crestron-connectedTo monitor devices in the system, you can use Crestron RoomView Expressor Crestron Fusion provided by Crestron. You can communicate with thehelp desk and send emergency messages. See the following Web site fordetails.http://www.crestron.com/getroomview
Web API
You can use Web API to operate the projector. See the Web API Specificationsfor Projectors for details.
a
• You can authenticate Web API communications using APIauthentication (Digest authentication).
• The user name for API authentication is EPSONWEB; use thepassword that is set for Web Control Password.
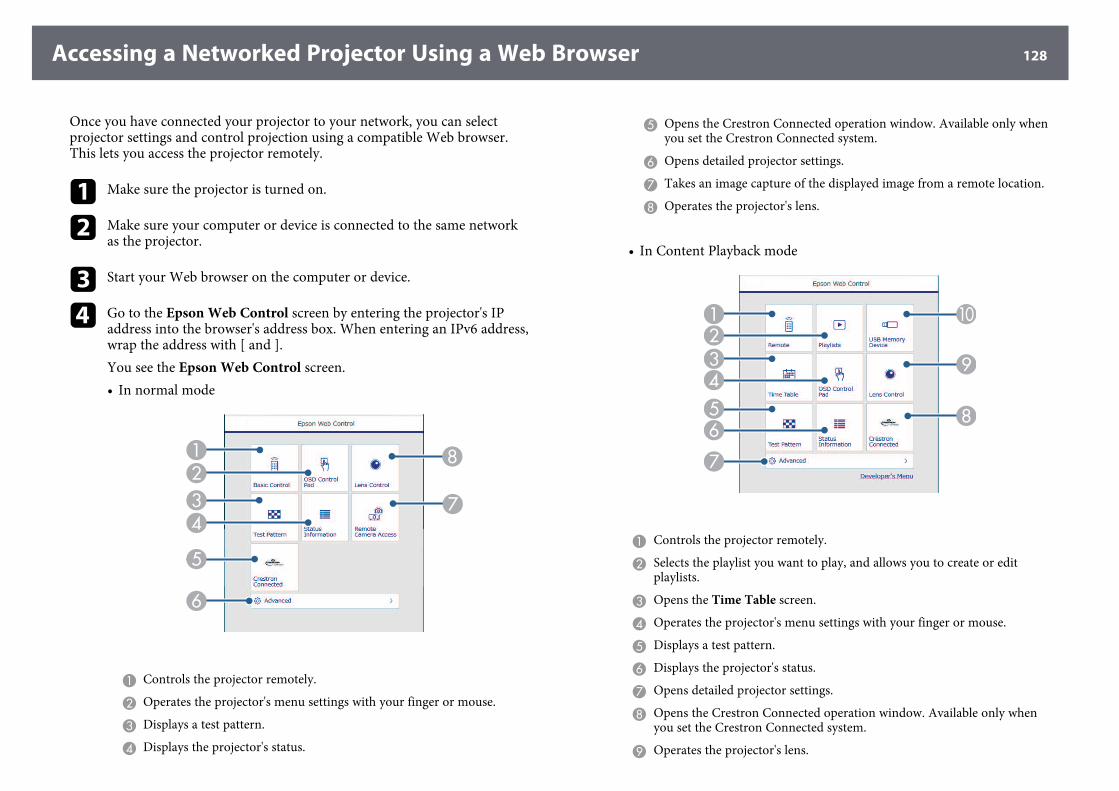
Accessing a Networked Projector Using a Web Browser 128
Once you have connected your projector to your network, you can selectprojector settings and control projection using a compatible Web browser.This lets you access the projector remotely.
a Make sure the projector is turned on.
b Make sure your computer or device is connected to the same networkas the projector.
c Start your Web browser on the computer or device.
d Go to the Epson Web Control screen by entering the projector's IPaddress into the browser's address box. When entering an IPv6 address,wrap the address with [ and ].You see the Epson Web Control screen.• In normal mode
A Controls the projector remotely.
B Operates the projector's menu settings with your finger or mouse.
C Displays a test pattern.
D Displays the projector's status.
E Opens the Crestron Connected operation window. Available only whenyou set the Crestron Connected system.
F Opens detailed projector settings.
G Takes an image capture of the displayed image from a remote location.
H Operates the projector's lens.
• In Content Playback mode
A Controls the projector remotely.
B Selects the playlist you want to play, and allows you to create or editplaylists.
C Opens the Time Table screen.
D Operates the projector's menu settings with your finger or mouse.
E Displays a test pattern.
F Displays the projector's status.
G Opens detailed projector settings.
H Opens the Crestron Connected operation window. Available only whenyou set the Crestron Connected system.
I Operates the projector's lens.
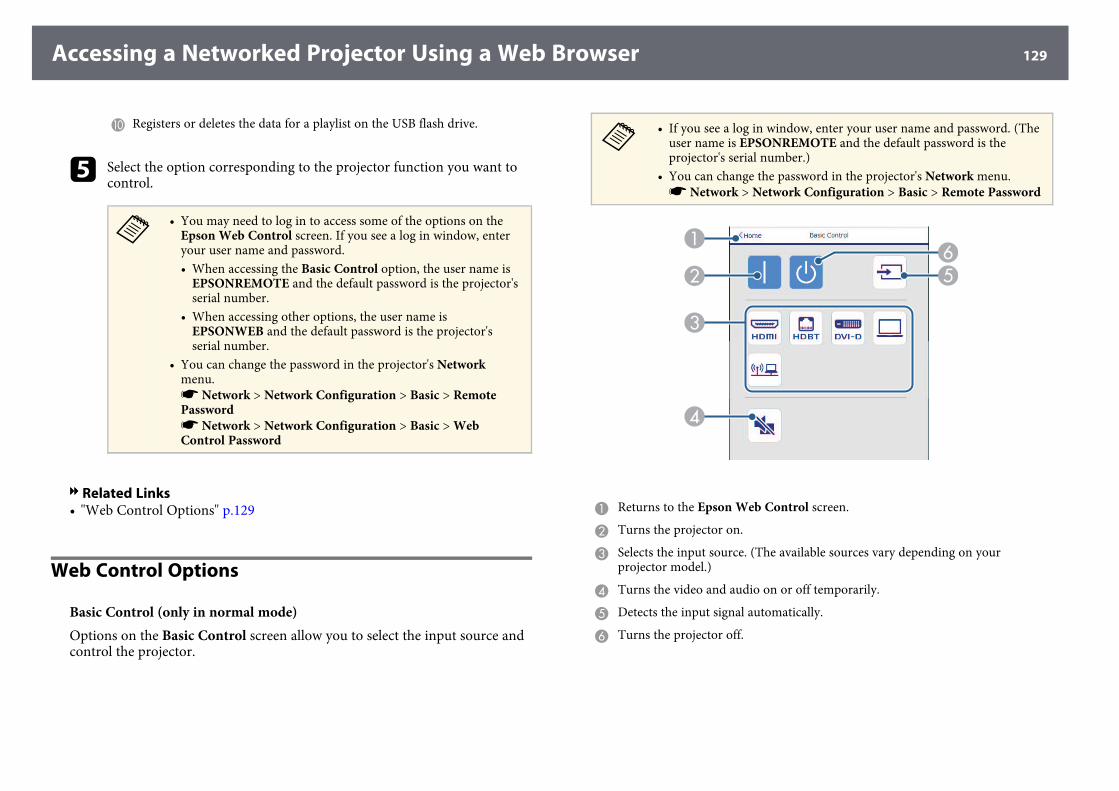
Accessing a Networked Projector Using a Web Browser 129
J Registers or deletes the data for a playlist on the USB flash drive.
e Select the option corresponding to the projector function you want tocontrol.
a
• You may need to log in to access some of the options on theEpson Web Control screen. If you see a log in window, enteryour user name and password.• When accessing the Basic Control option, the user name isEPSONREMOTE and the default password is the projector'sserial number.
• When accessing other options, the user name isEPSONWEB and the default password is the projector'sserial number.
• You can change the password in the projector's Networkmenu.s Network > Network Configuration > Basic > RemotePasswords Network > Network Configuration > Basic > WebControl Password
gg Related Links• "Web Control Options" p.129
Web Control Options
Basic Control (only in normal mode)Options on the Basic Control screen allow you to select the input source andcontrol the projector.
a
• If you see a log in window, enter your user name and password. (Theuser name is EPSONREMOTE and the default password is theprojector's serial number.)
• You can change the password in the projector's Network menu.s Network > Network Configuration > Basic > Remote Password
A Returns to the Epson Web Control screen.
B Turns the projector on.
C Selects the input source. (The available sources vary depending on yourprojector model.)
D Turns the video and audio on or off temporarily.
E Detects the input signal automatically.
F Turns the projector off.
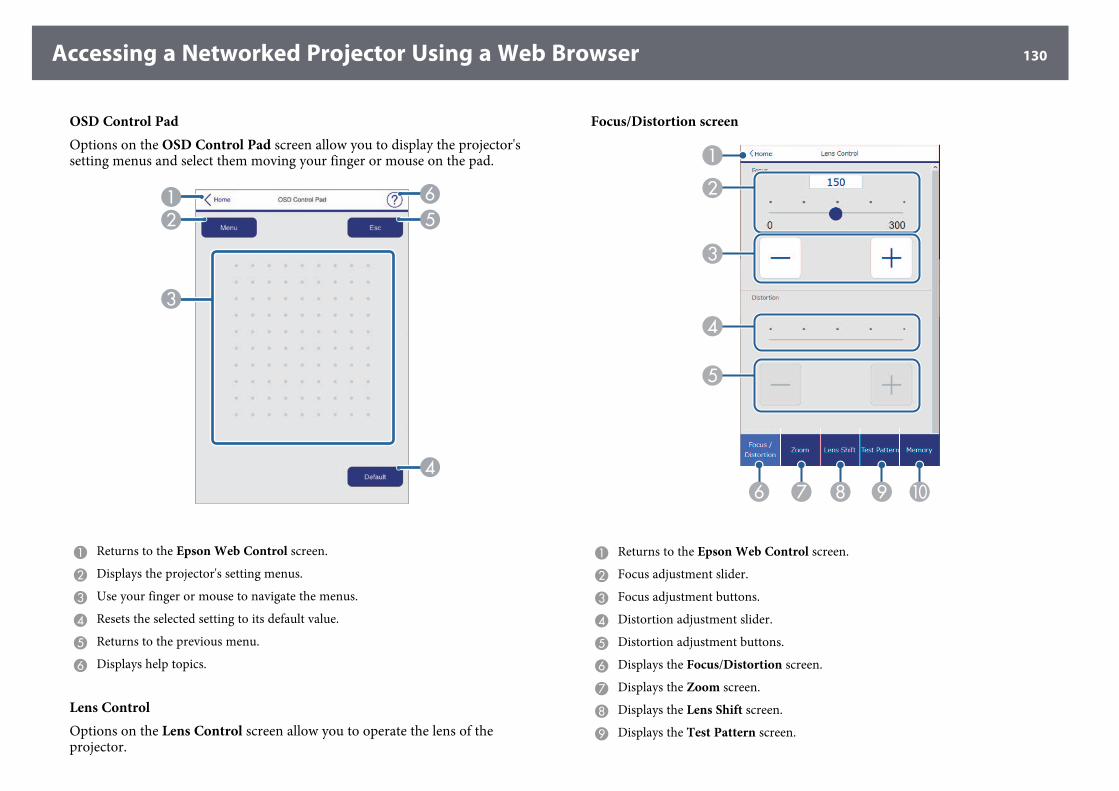
Accessing a Networked Projector Using a Web Browser 130
OSD Control PadOptions on the OSD Control Pad screen allow you to display the projector'ssetting menus and select them moving your finger or mouse on the pad.
A Returns to the Epson Web Control screen.
B Displays the projector's setting menus.
C Use your finger or mouse to navigate the menus.
D Resets the selected setting to its default value.
E Returns to the previous menu.
F Displays help topics.
Lens ControlOptions on the Lens Control screen allow you to operate the lens of theprojector.
Focus/Distortion screen
A Returns to the Epson Web Control screen.
B Focus adjustment slider.
C Focus adjustment buttons.
D Distortion adjustment slider.
E Distortion adjustment buttons.
F Displays the Focus/Distortion screen.
G Displays the Zoom screen.
H Displays the Lens Shift screen.
I Displays the Test Pattern screen.
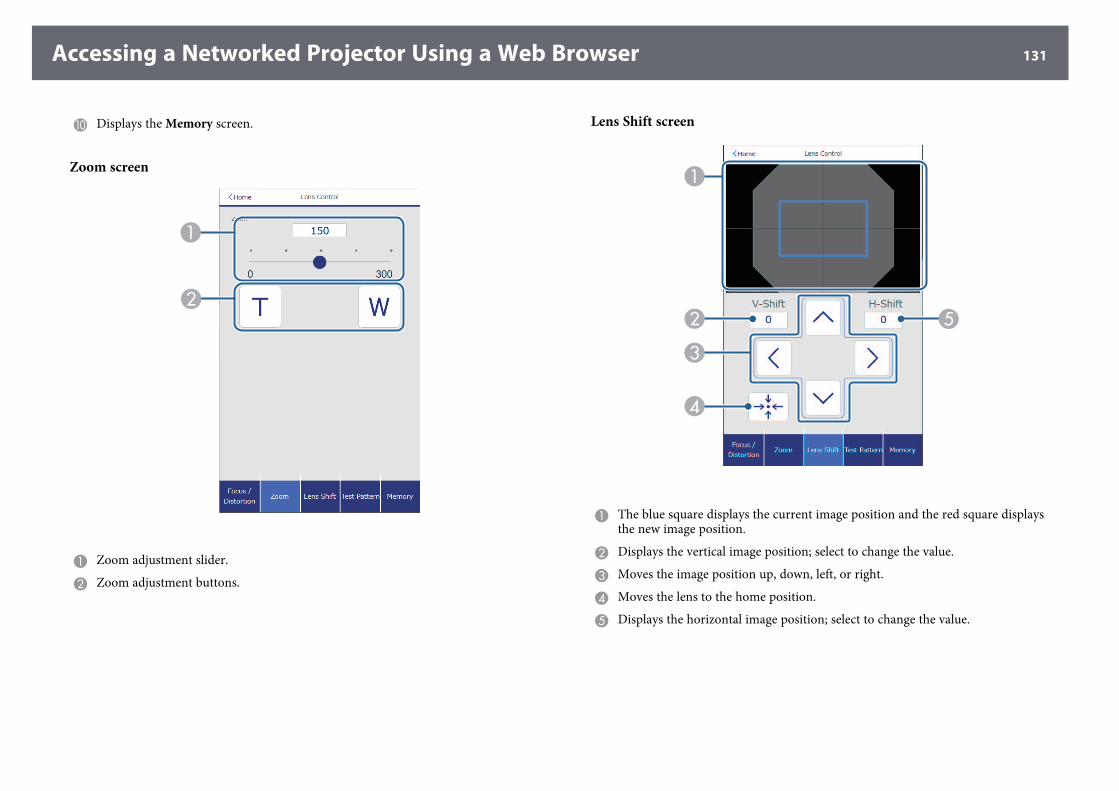
Accessing a Networked Projector Using a Web Browser 131
J Displays the Memory screen.
Zoom screen
A Zoom adjustment slider.
B Zoom adjustment buttons.
Lens Shift screen
A The blue square displays the current image position and the red square displaysthe new image position.
B Displays the vertical image position; select to change the value.
C Moves the image position up, down, left, or right.
D Moves the lens to the home position.
E Displays the horizontal image position; select to change the value.

Accessing a Networked Projector Using a Web Browser 132
Test Pattern screen
A Displays available test patterns; select to project a test pattern.
B Turns off test pattern display.
Memory screen
A Overwrites your current settings with saved settings.
B Saves your current settings to memory.
C Displays a list of saved memories.
D Erases a saved memory.
E Renames a saved memory.

Accessing a Networked Projector Using a Web Browser 133
Status Information
A Returns to the Epson Web Control screen.
B Displays a list of monitored settings.
C Displays the setting status.
D Select to view different status information.
Remote Camera Access (only in normal mode)
A Displays the image you captured using the Shoot button.
B Takes a picture of the projected image using the camera on the front of theprojector.
C Adjusts the image exposure.
D Zooms in or out on the image you captured.
AdvancedThe Advanced screen allow you to select the projector's settings.
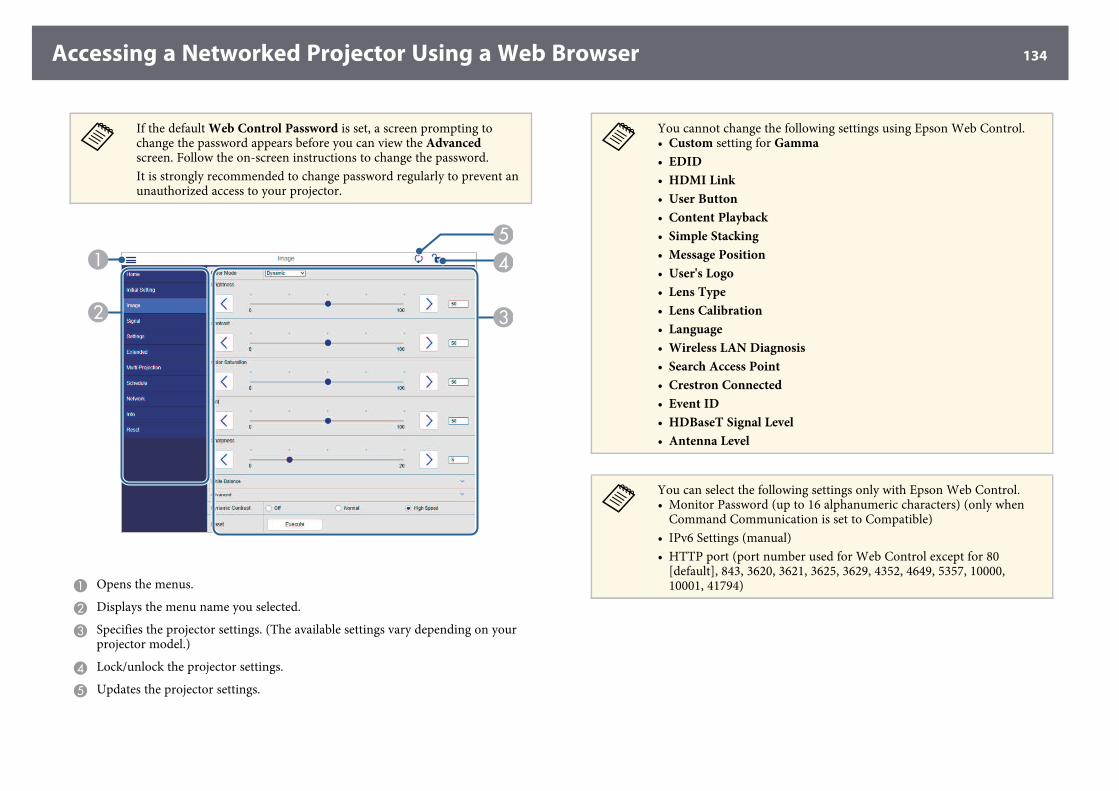
Accessing a Networked Projector Using a Web Browser 134
a
If the default Web Control Password is set, a screen prompting tochange the password appears before you can view the Advancedscreen. Follow the on-screen instructions to change the password.It is strongly recommended to change password regularly to prevent anunauthorized access to your projector.
A Opens the menus.
B Displays the menu name you selected.
C Specifies the projector settings. (The available settings vary depending on yourprojector model.)
D Lock/unlock the projector settings.
E Updates the projector settings.
a
You cannot change the following settings using Epson Web Control.• Custom setting for Gamma• EDID• HDMI Link• User Button• Content Playback• Simple Stacking• Message Position• User's Logo• Lens Type• Lens Calibration• Language• Wireless LAN Diagnosis• Search Access Point• Crestron Connected• Event ID• HDBaseT Signal Level• Antenna Level
a
You can select the following settings only with Epson Web Control.• Monitor Password (up to 16 alphanumeric characters) (only when
Command Communication is set to Compatible)• IPv6 Settings (manual)• HTTP port (port number used for Web Control except for 80
[default], 843, 3620, 3621, 3625, 3629, 4352, 4649, 5357, 10000,10001, 41794)
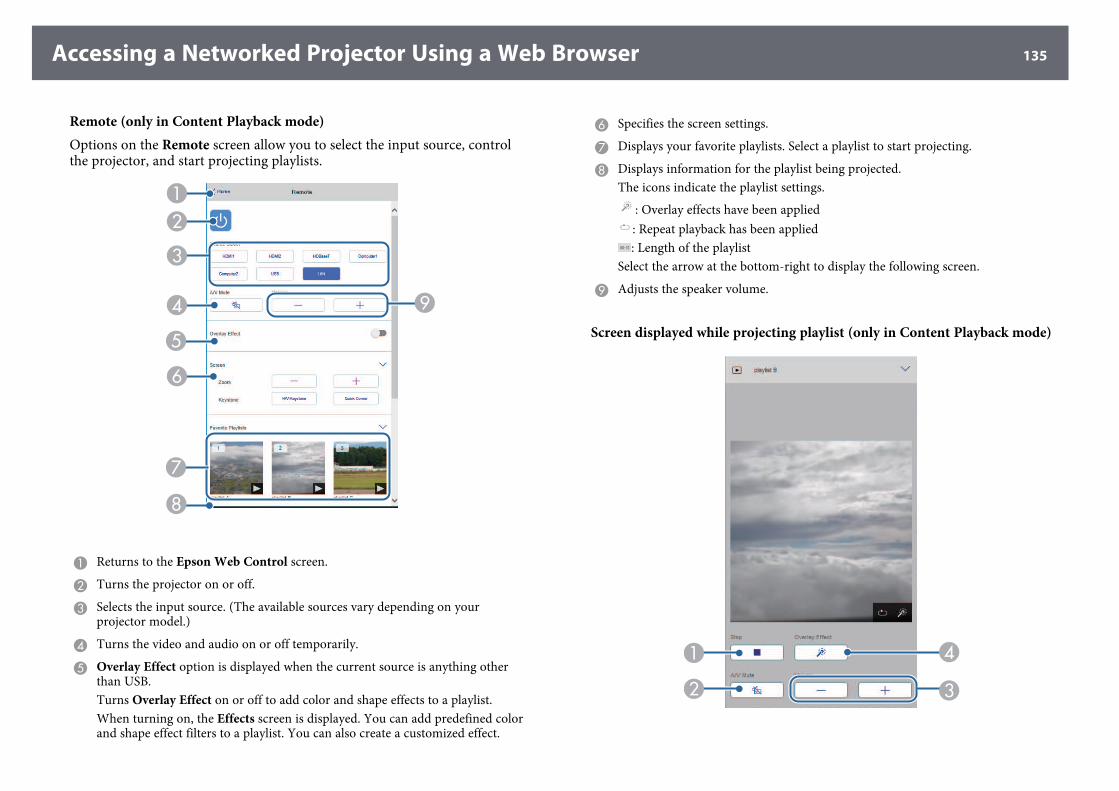
Accessing a Networked Projector Using a Web Browser 135
Remote (only in Content Playback mode)Options on the Remote screen allow you to select the input source, controlthe projector, and start projecting playlists.
A Returns to the Epson Web Control screen.
B Turns the projector on or off.
C Selects the input source. (The available sources vary depending on yourprojector model.)
D Turns the video and audio on or off temporarily.
E Overlay Effect option is displayed when the current source is anything otherthan USB.Turns Overlay Effect on or off to add color and shape effects to a playlist.When turning on, the Effects screen is displayed. You can add predefined colorand shape effect filters to a playlist. You can also create a customized effect.
F Specifies the screen settings.
G Displays your favorite playlists. Select a playlist to start projecting.
H Displays information for the playlist being projected.The icons indicate the playlist settings.
: Overlay effects have been applied: Repeat playback has been applied: Length of the playlist
Select the arrow at the bottom-right to display the following screen.
I Adjusts the speaker volume.
Screen displayed while projecting playlist (only in Content Playback mode)
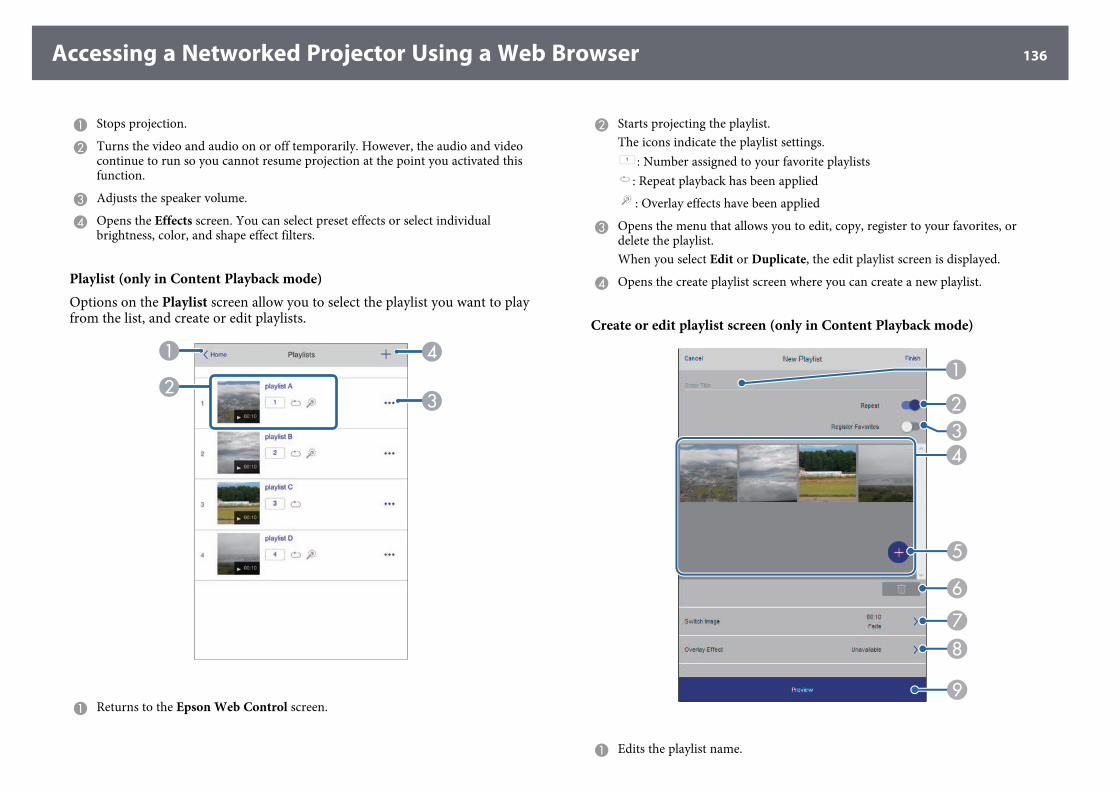
Accessing a Networked Projector Using a Web Browser 136
A Stops projection.
B Turns the video and audio on or off temporarily. However, the audio and videocontinue to run so you cannot resume projection at the point you activated thisfunction.
C Adjusts the speaker volume.
D Opens the Effects screen. You can select preset effects or select individualbrightness, color, and shape effect filters.
Playlist (only in Content Playback mode)Options on the Playlist screen allow you to select the playlist you want to playfrom the list, and create or edit playlists.
A Returns to the Epson Web Control screen.
B Starts projecting the playlist.The icons indicate the playlist settings.
: Number assigned to your favorite playlists: Repeat playback has been applied
: Overlay effects have been applied
C Opens the menu that allows you to edit, copy, register to your favorites, ordelete the playlist.When you select Edit or Duplicate, the edit playlist screen is displayed.
D Opens the create playlist screen where you can create a new playlist.
Create or edit playlist screen (only in Content Playback mode)
A Edits the playlist name.
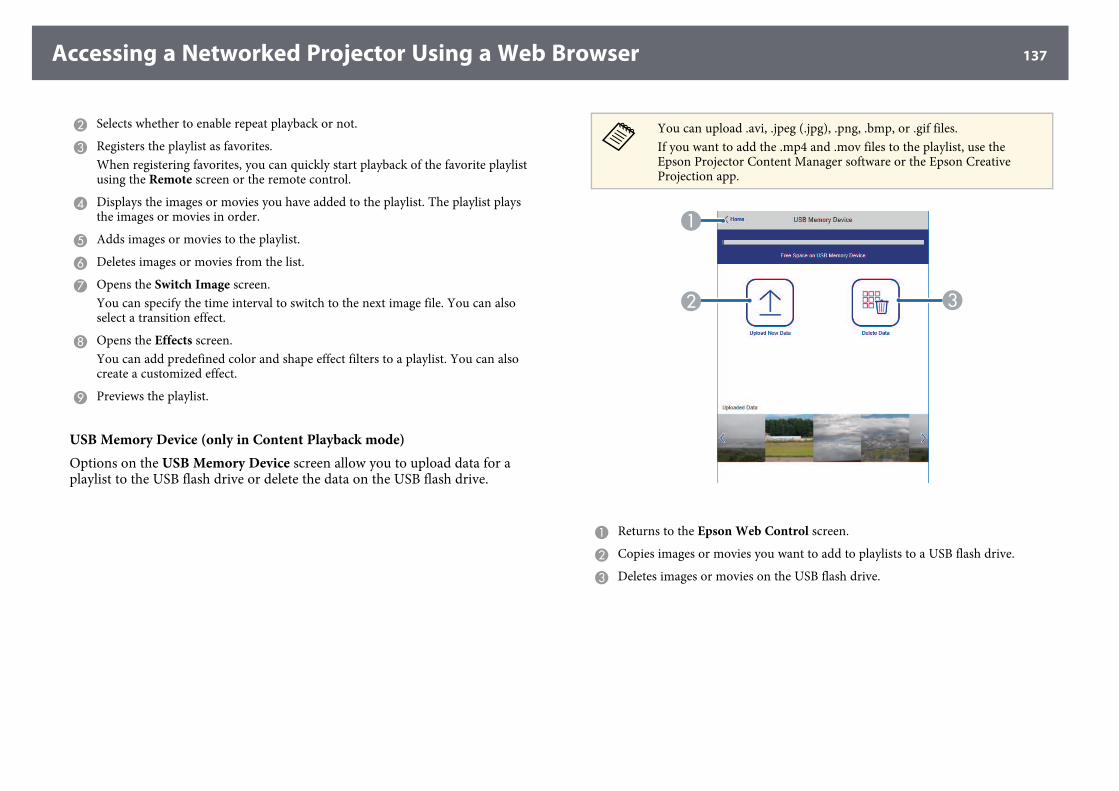
Accessing a Networked Projector Using a Web Browser 137
B Selects whether to enable repeat playback or not.
C Registers the playlist as favorites.When registering favorites, you can quickly start playback of the favorite playlistusing the Remote screen or the remote control.
D Displays the images or movies you have added to the playlist. The playlist playsthe images or movies in order.
E Adds images or movies to the playlist.
F Deletes images or movies from the list.
G Opens the Switch Image screen.You can specify the time interval to switch to the next image file. You can alsoselect a transition effect.
H Opens the Effects screen.You can add predefined color and shape effect filters to a playlist. You can alsocreate a customized effect.
I Previews the playlist.
USB Memory Device (only in Content Playback mode)Options on the USB Memory Device screen allow you to upload data for aplaylist to the USB flash drive or delete the data on the USB flash drive.
a
You can upload .avi, .jpeg (.jpg), .png, .bmp, or .gif files.If you want to add the .mp4 and .mov files to the playlist, use theEpson Projector Content Manager software or the Epson CreativeProjection app.
A Returns to the Epson Web Control screen.
B Copies images or movies you want to add to playlists to a USB flash drive.
C Deletes images or movies on the USB flash drive.
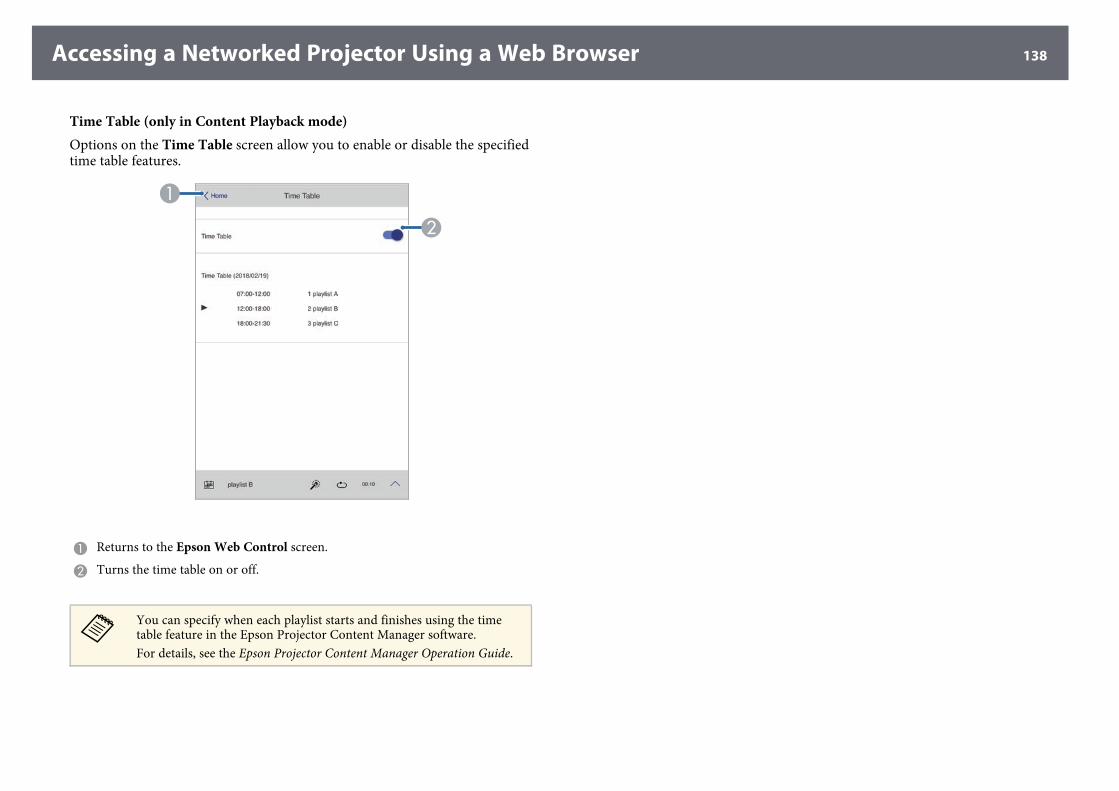
Accessing a Networked Projector Using a Web Browser 138
Time Table (only in Content Playback mode)Options on the Time Table screen allow you to enable or disable the specifiedtime table features.
A Returns to the Epson Web Control screen.
B Turns the time table on or off.
a
You can specify when each playlist starts and finishes using the timetable feature in the Epson Projector Content Manager software.For details, see the Epson Projector Content Manager Operation Guide.
Maintaining the ProjectorFollow the instructions in these sections to maintain your projector.
gg Related Links• "Projector Maintenance" p.140• "Cleaning the Lens" p.141• "Cleaning the Projector Case" p.142• "Air Filter and Vent Maintenance" p.143
Projector Maintenance 140
You may need to clean the projector's lens periodically, and clean the air filterand air vents to prevent the projector from overheating due to blockedventilation.The only parts you should replace are the air filter, remote control batteries,and lens. If any other part needs replacing, contact Epson or an authorizedEpson servicer.
WarningBefore cleaning any part of the projector, turn it off and unplug the power cord.Never open any cover on the projector, except as specifically explained in thismanual. Dangerous electrical voltages in the projector can injure you severely.
Cleaning the Lens 141
Clean the projector's lens periodically, or whenever you notice dust orsmudges on the surface.• To remove dust or smudges, gently wipe the lens with lens-cleaning paper.
If the lens is very dirty, use a vacuum cleaner or a air blower to remove anydust or smudges, and wipe the lens.
• To remove stubborn smudges, moisten a soft, lint-free cloth with lenscleaner and gently wipe the lens. Do not spray any liquid directly on thelens.
WarningDo not use a lens cleaner that contains flammable gas. The high heat generatedby the projector may cause a fire.
Attention• Do not wipe the lens immediately after turning off the light source; otherwise,
it could be damaged.• Do not use glass cleaner or any harsh materials to clean the lens and do not
subject the lens to any impacts; otherwise, it could be damaged. Do not usecanned air, or the gases may leave a flammable residue.
Cleaning the Projector Case 142
Before cleaning the projector case, turn off the projector and unplug thepower cord.• To remove dust or dirt, use a soft, dry, lint-free cloth.• To remove stubborn dirt, use a soft cloth moistened with water and mild
soap. Do not spray liquid directly on the projector.
AttentionDo not use wax, alcohol, benzene, paint thinner, or other chemicals to clean theprojector case. These can damage the case. Do not use canned air, or the gasesmay leave a flammable residue.
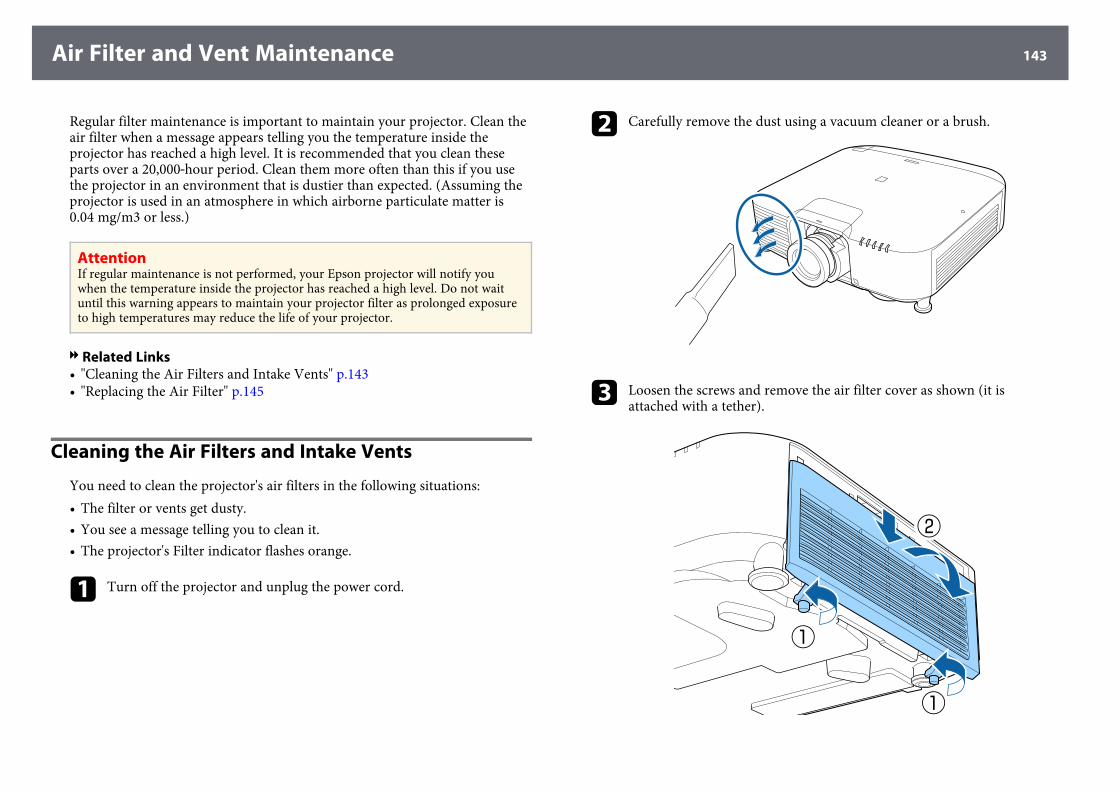
Air Filter and Vent Maintenance 143
Regular filter maintenance is important to maintain your projector. Clean theair filter when a message appears telling you the temperature inside theprojector has reached a high level. It is recommended that you clean theseparts over a 20,000‑hour period. Clean them more often than this if you usethe projector in an environment that is dustier than expected. (Assuming theprojector is used in an atmosphere in which airborne particulate matter is0.04 mg/m3 or less.)
AttentionIf regular maintenance is not performed, your Epson projector will notify youwhen the temperature inside the projector has reached a high level. Do not waituntil this warning appears to maintain your projector filter as prolonged exposureto high temperatures may reduce the life of your projector.
gg Related Links• "Cleaning the Air Filters and Intake Vents" p.143• "Replacing the Air Filter" p.145
Cleaning the Air Filters and Intake Vents
You need to clean the projector's air filters in the following situations:• The filter or vents get dusty.• You see a message telling you to clean it.• The projector's Filter indicator flashes orange.
a Turn off the projector and unplug the power cord.
b Carefully remove the dust using a vacuum cleaner or a brush.
c Loosen the screws and remove the air filter cover as shown (it isattached with a tether).
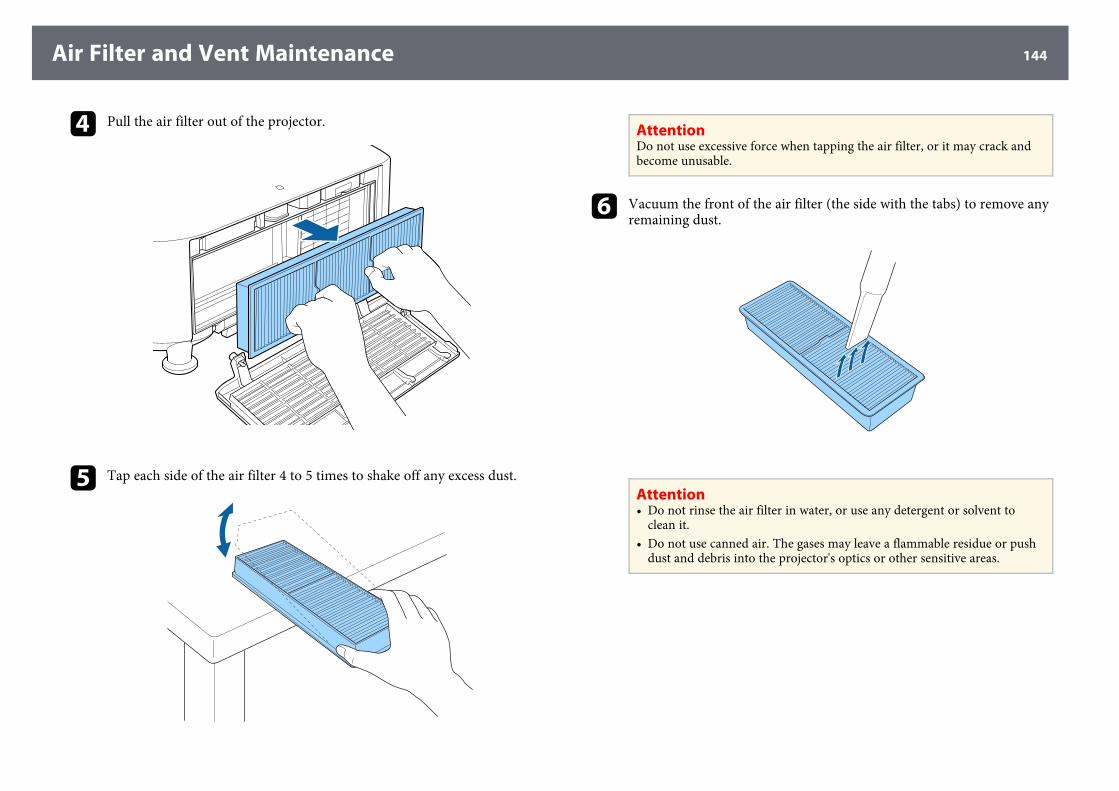
Air Filter and Vent Maintenance 144
d Pull the air filter out of the projector.
e Tap each side of the air filter 4 to 5 times to shake off any excess dust.
AttentionDo not use excessive force when tapping the air filter, or it may crack andbecome unusable.
f Vacuum the front of the air filter (the side with the tabs) to remove anyremaining dust.
Attention• Do not rinse the air filter in water, or use any detergent or solvent to
clean it.• Do not use canned air. The gases may leave a flammable residue or push
dust and debris into the projector's optics or other sensitive areas.
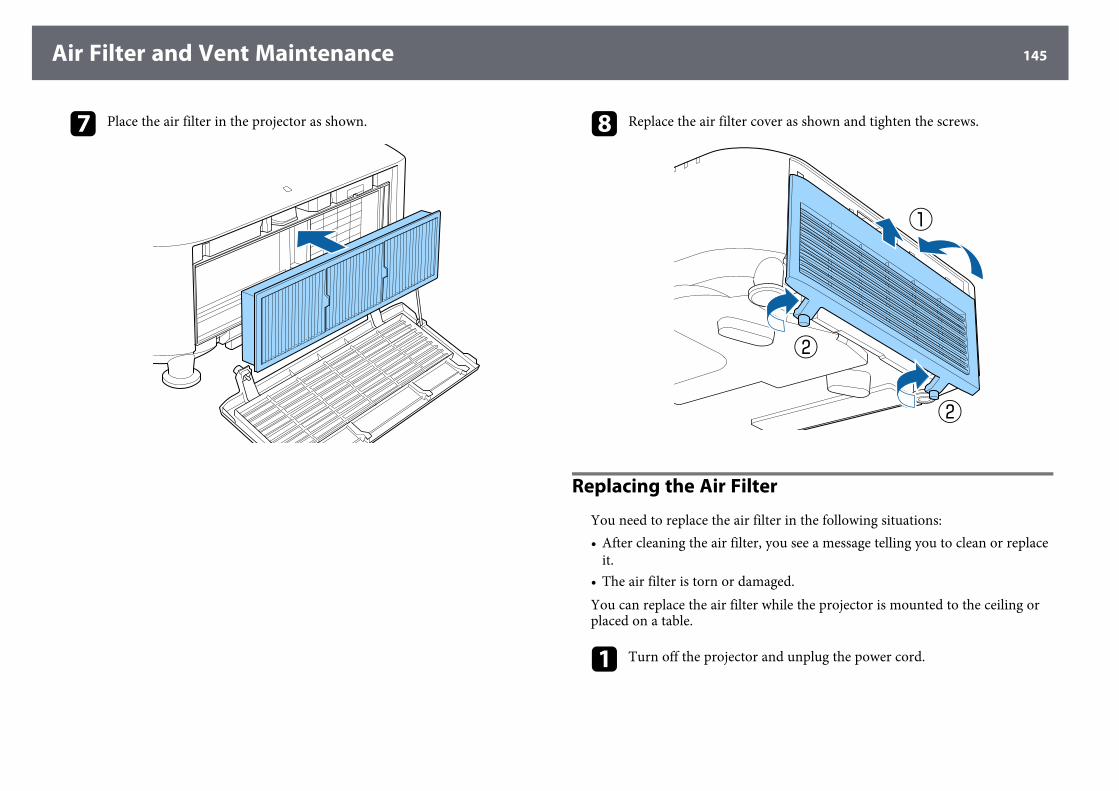
Air Filter and Vent Maintenance 145
g Place the air filter in the projector as shown. h Replace the air filter cover as shown and tighten the screws.
Replacing the Air Filter
You need to replace the air filter in the following situations:• After cleaning the air filter, you see a message telling you to clean or replace
it.• The air filter is torn or damaged.You can replace the air filter while the projector is mounted to the ceiling orplaced on a table.
a Turn off the projector and unplug the power cord.
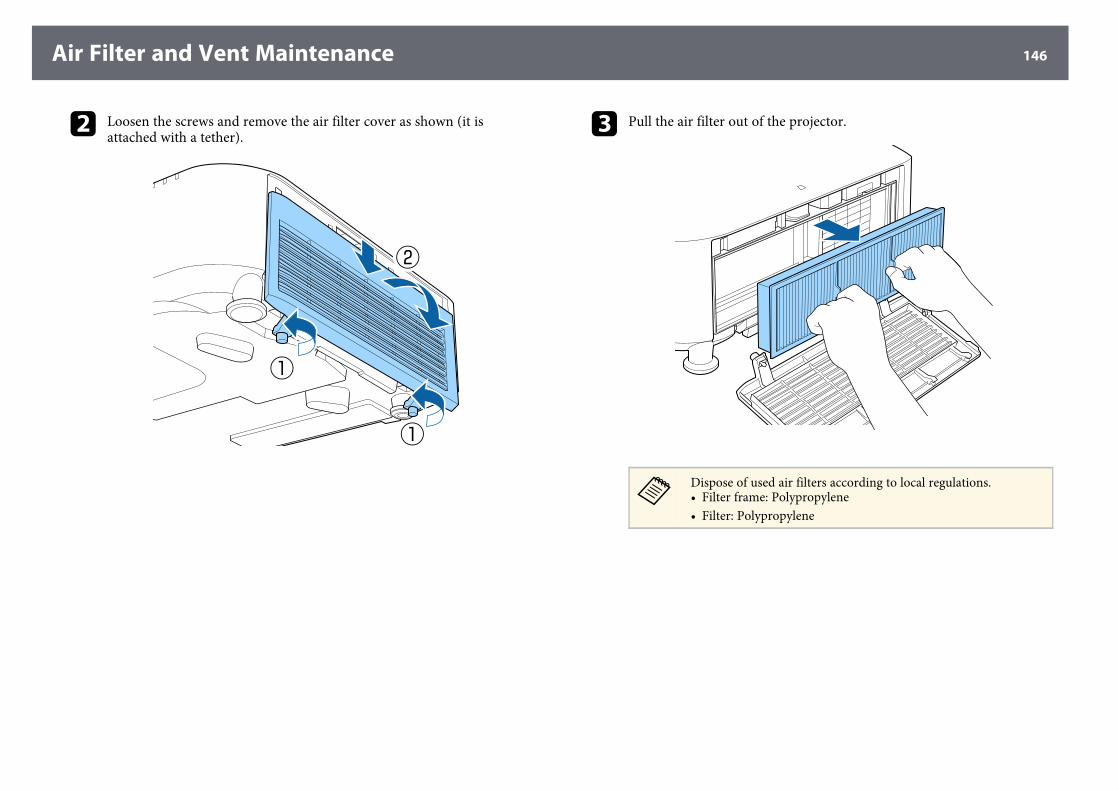
Air Filter and Vent Maintenance 146
b Loosen the screws and remove the air filter cover as shown (it isattached with a tether). c Pull the air filter out of the projector.
a
Dispose of used air filters according to local regulations.• Filter frame: Polypropylene• Filter: Polypropylene
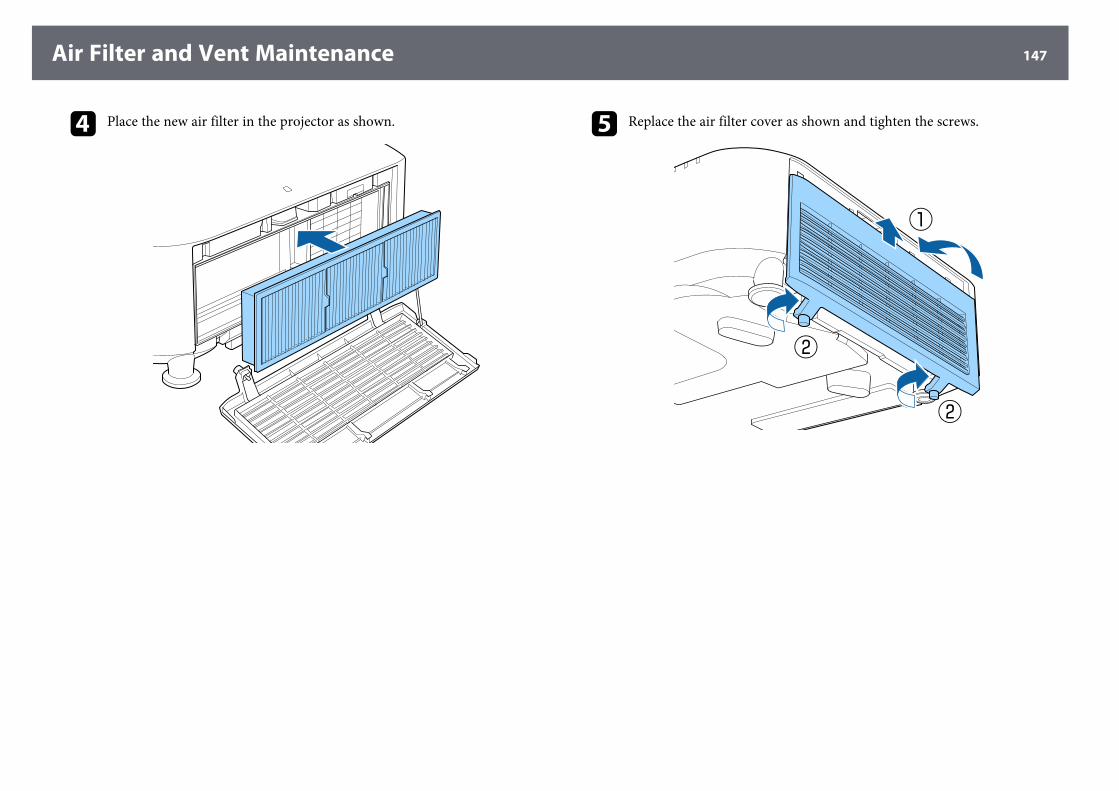
Air Filter and Vent Maintenance 147
d Place the new air filter in the projector as shown. e Replace the air filter cover as shown and tighten the screws.
Solving ProblemsCheck the solutions in these sections if you have any problems using the projector.
gg Related Links• "Projection Problems" p.149• "Projector Indicator Status" p.150• "Projector Status Display Messages" p.153• "Solving Image or Sound Problems" p.157• "Solving Projector or Remote Control Operation Problems" p.163• "Solutions to Problems in Content Playback Mode" p.165• "Solving Network Problems" p.166
Projection Problems 149
If the projector is not working properly, turn it off, unplug it, and then plug itback in and turn it on.If this does not solve the problem, check the following:• The indicators on the projector may indicate the problem.• The Help option on the Home screen can display information about
common problems, if the projector is operating.• The solutions in this manual can help you solve many problems.If none of these solutions help, contact Epson for technical support.
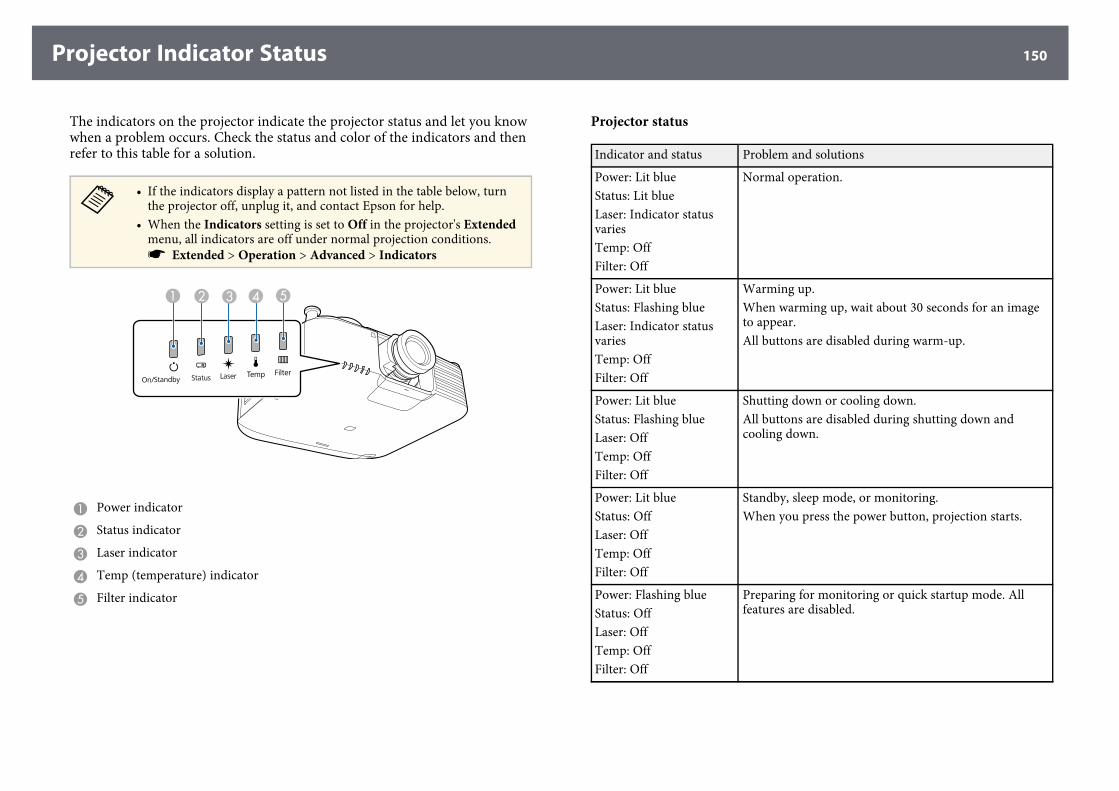
Projector Indicator Status 150
The indicators on the projector indicate the projector status and let you knowwhen a problem occurs. Check the status and color of the indicators and thenrefer to this table for a solution.
a
• If the indicators display a pattern not listed in the table below, turnthe projector off, unplug it, and contact Epson for help.
• When the Indicators setting is set to Off in the projector's Extendedmenu, all indicators are off under normal projection conditions.s Extended > Operation > Advanced > Indicators
A Power indicator
B Status indicator
C Laser indicator
D Temp (temperature) indicator
E Filter indicator
Projector status
Indicator and status Problem and solutions
Power: Lit blueStatus: Lit blueLaser: Indicator statusvariesTemp: OffFilter: Off
Normal operation.
Power: Lit blueStatus: Flashing blueLaser: Indicator statusvariesTemp: OffFilter: Off
Warming up.When warming up, wait about 30 seconds for an imageto appear.All buttons are disabled during warm-up.
Power: Lit blueStatus: Flashing blueLaser: OffTemp: OffFilter: Off
Shutting down or cooling down.All buttons are disabled during shutting down andcooling down.
Power: Lit blueStatus: OffLaser: OffTemp: OffFilter: Off
Standby, sleep mode, or monitoring.When you press the power button, projection starts.
Power: Flashing blueStatus: OffLaser: OffTemp: OffFilter: Off
Preparing for monitoring or quick startup mode. Allfeatures are disabled.
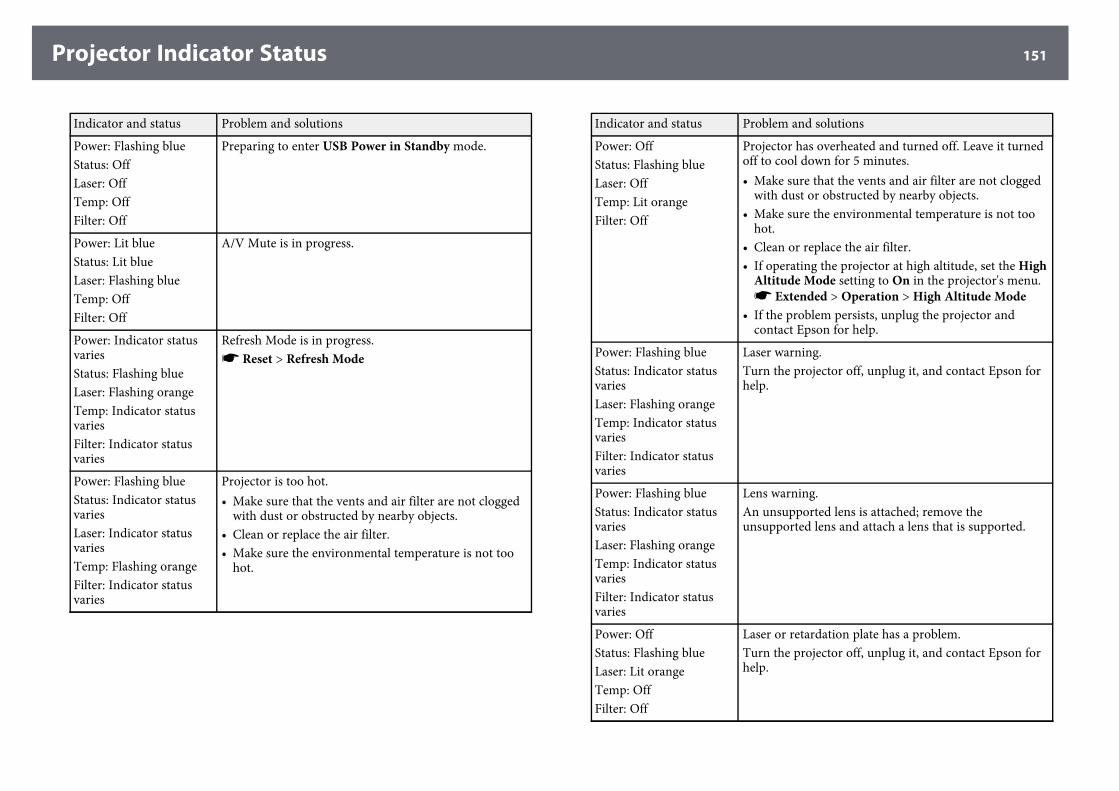
Projector Indicator Status 151
Indicator and status Problem and solutions
Power: Flashing blueStatus: OffLaser: OffTemp: OffFilter: Off
Preparing to enter USB Power in Standby mode.
Power: Lit blueStatus: Lit blueLaser: Flashing blueTemp: OffFilter: Off
A/V Mute is in progress.
Power: Indicator statusvariesStatus: Flashing blueLaser: Flashing orangeTemp: Indicator statusvariesFilter: Indicator statusvaries
Refresh Mode is in progress.s Reset > Refresh Mode
Power: Flashing blueStatus: Indicator statusvariesLaser: Indicator statusvariesTemp: Flashing orangeFilter: Indicator statusvaries
Projector is too hot.• Make sure that the vents and air filter are not clogged
with dust or obstructed by nearby objects.• Clean or replace the air filter.• Make sure the environmental temperature is not too
hot.
Indicator and status Problem and solutions
Power: OffStatus: Flashing blueLaser: OffTemp: Lit orangeFilter: Off
Projector has overheated and turned off. Leave it turnedoff to cool down for 5 minutes.• Make sure that the vents and air filter are not clogged
with dust or obstructed by nearby objects.• Make sure the environmental temperature is not too
hot.• Clean or replace the air filter.• If operating the projector at high altitude, set the HighAltitude Mode setting to On in the projector's menu.s Extended > Operation > High Altitude Mode
• If the problem persists, unplug the projector andcontact Epson for help.
Power: Flashing blueStatus: Indicator statusvariesLaser: Flashing orangeTemp: Indicator statusvariesFilter: Indicator statusvaries
Laser warning.Turn the projector off, unplug it, and contact Epson forhelp.
Power: Flashing blueStatus: Indicator statusvariesLaser: Flashing orangeTemp: Indicator statusvariesFilter: Indicator statusvaries
Lens warning.An unsupported lens is attached; remove theunsupported lens and attach a lens that is supported.
Power: OffStatus: Flashing blueLaser: Lit orangeTemp: OffFilter: Off
Laser or retardation plate has a problem.Turn the projector off, unplug it, and contact Epson forhelp.
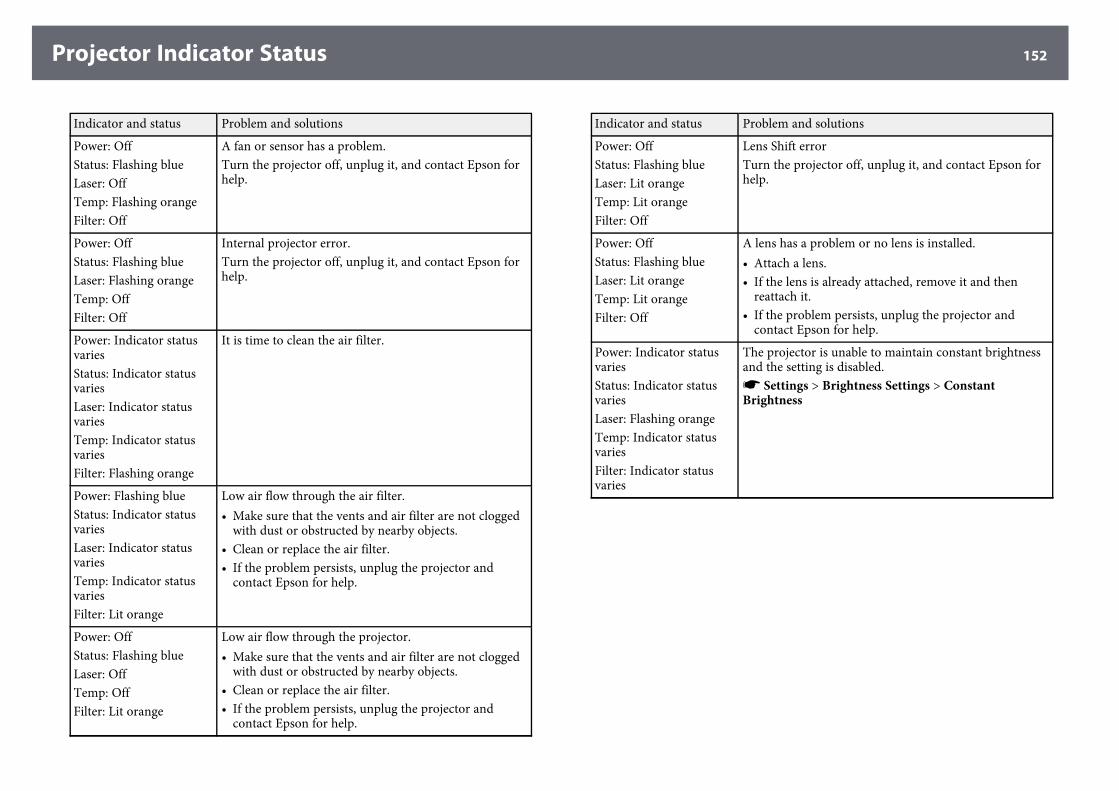
Projector Indicator Status 152
Indicator and status Problem and solutions
Power: OffStatus: Flashing blueLaser: OffTemp: Flashing orangeFilter: Off
A fan or sensor has a problem.Turn the projector off, unplug it, and contact Epson forhelp.
Power: OffStatus: Flashing blueLaser: Flashing orangeTemp: OffFilter: Off
Internal projector error.Turn the projector off, unplug it, and contact Epson forhelp.
Power: Indicator statusvariesStatus: Indicator statusvariesLaser: Indicator statusvariesTemp: Indicator statusvariesFilter: Flashing orange
It is time to clean the air filter.
Power: Flashing blueStatus: Indicator statusvariesLaser: Indicator statusvariesTemp: Indicator statusvariesFilter: Lit orange
Low air flow through the air filter.• Make sure that the vents and air filter are not clogged
with dust or obstructed by nearby objects.• Clean or replace the air filter.• If the problem persists, unplug the projector and
contact Epson for help.
Power: OffStatus: Flashing blueLaser: OffTemp: OffFilter: Lit orange
Low air flow through the projector.• Make sure that the vents and air filter are not clogged
with dust or obstructed by nearby objects.• Clean or replace the air filter.• If the problem persists, unplug the projector and
contact Epson for help.
Indicator and status Problem and solutions
Power: OffStatus: Flashing blueLaser: Lit orangeTemp: Lit orangeFilter: Off
Lens Shift errorTurn the projector off, unplug it, and contact Epson forhelp.
Power: OffStatus: Flashing blueLaser: Lit orangeTemp: Lit orangeFilter: Off
A lens has a problem or no lens is installed.• Attach a lens.• If the lens is already attached, remove it and then
reattach it.• If the problem persists, unplug the projector and
contact Epson for help.
Power: Indicator statusvariesStatus: Indicator statusvariesLaser: Flashing orangeTemp: Indicator statusvariesFilter: Indicator statusvaries
The projector is unable to maintain constant brightnessand the setting is disabled.s Settings > Brightness Settings > ConstantBrightness
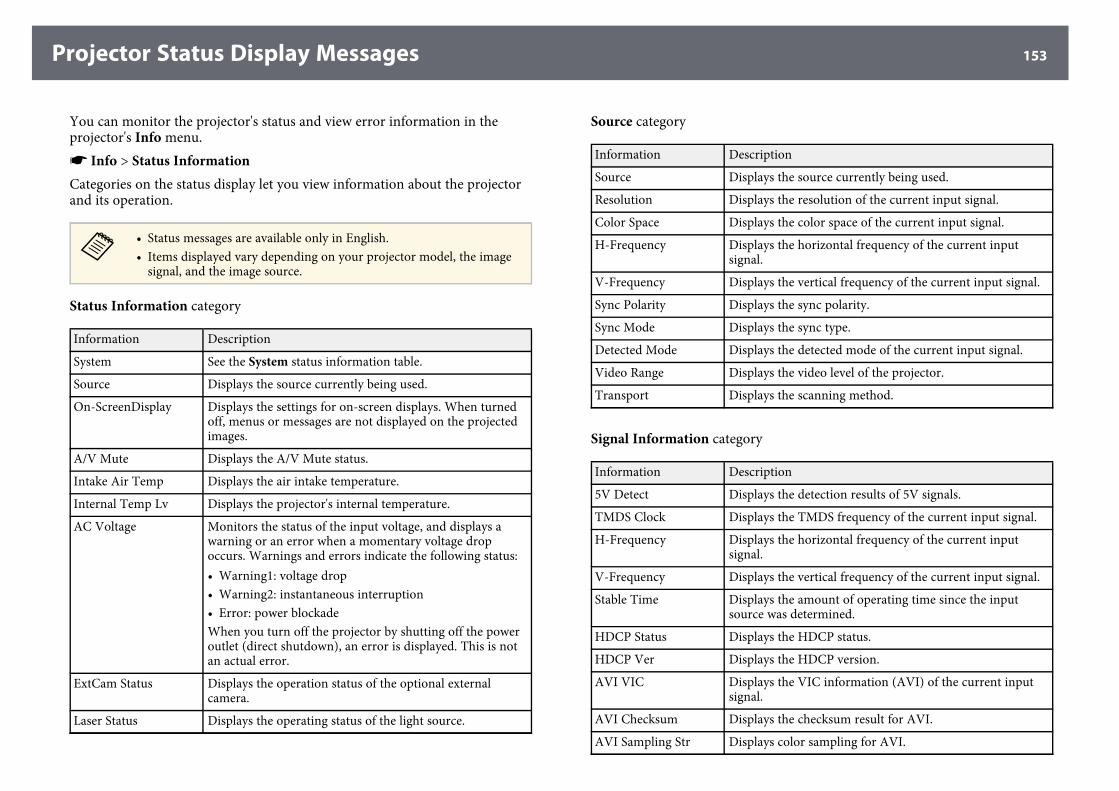
Projector Status Display Messages 153
You can monitor the projector's status and view error information in theprojector's Info menu.s Info > Status InformationCategories on the status display let you view information about the projectorand its operation.
a
• Status messages are available only in English.• Items displayed vary depending on your projector model, the image
signal, and the image source.
Status Information category
Information Description
System See the System status information table.
Source Displays the source currently being used.
On-ScreenDisplay Displays the settings for on-screen displays. When turnedoff, menus or messages are not displayed on the projectedimages.
A/V Mute Displays the A/V Mute status.
Intake Air Temp Displays the air intake temperature.
Internal Temp Lv Displays the projector's internal temperature.
AC Voltage Monitors the status of the input voltage, and displays awarning or an error when a momentary voltage dropoccurs. Warnings and errors indicate the following status:• Warning1: voltage drop• Warning2: instantaneous interruption• Error: power blockadeWhen you turn off the projector by shutting off the poweroutlet (direct shutdown), an error is displayed. This is notan actual error.
ExtCam Status Displays the operation status of the optional externalcamera.
Laser Status Displays the operating status of the light source.
Source category
Information Description
Source Displays the source currently being used.
Resolution Displays the resolution of the current input signal.
Color Space Displays the color space of the current input signal.
H-Frequency Displays the horizontal frequency of the current inputsignal.
V-Frequency Displays the vertical frequency of the current input signal.
Sync Polarity Displays the sync polarity.
Sync Mode Displays the sync type.
Detected Mode Displays the detected mode of the current input signal.
Video Range Displays the video level of the projector.
Transport Displays the scanning method.
Signal Information category
Information Description
5V Detect Displays the detection results of 5V signals.
TMDS Clock Displays the TMDS frequency of the current input signal.
H-Frequency Displays the horizontal frequency of the current inputsignal.
V-Frequency Displays the vertical frequency of the current input signal.
Stable Time Displays the amount of operating time since the inputsource was determined.
HDCP Status Displays the HDCP status.
HDCP Ver Displays the HDCP version.
AVI VIC Displays the VIC information (AVI) of the current inputsignal.
AVI Checksum Displays the checksum result for AVI.
AVI Sampling Str Displays color sampling for AVI.

Projector Status Display Messages 154
Information Description
Signal Mode Displays the signal mode.
HDR Mode Displays the HDR mode.
EDID Mode Displays the EDID mode.
HDBaseT Level Displays the image signal information from the HDBaseTport.
SDI Link Mode Displays the linking type for SDI.
Sync Detect Displays the results of signal detection for each 3G/HD/SDSDI port.
PayloadID Detect Displays the results of SDI payload ID detection.
Resolution Displays the resolution.
Refresh Rate Displays the refresh rate for SDI.
Color Sampling Displays the color sampling.
Pixel Depth Displays the color depth for SDI.
SDI Type Displays the type of SDI.
3G Mapping Level Displays the mapping level for 3G-SDI.
Color Space Displays the color space conversion method.
Network Wired category
Information Description
Projector Name Displays the name used to identify the projector whenconnected to a network.
Connection Mode Displays the connection path for the LAN.
DHCP Displays the DHCP settings.
IP Display Displays the IP address display settings.
IP Address Displays the IP address.
MAC Address Displays the MAC address.
Network Wireless category
Information Description
Projector Name Displays the name used to identify the projector whenconnected to a network.
Connection Mode Displays the connection mode to use when connecting theprojector and a computer over a wireless LAN.
SSID Display Displays the SSID display settings.
SSID Displays the SSID.
DHCP Displays the DHCP settings.
IP Display Displays the IP address display settings.
IP Address Displays the IP address.
MAC Address Displays the MAC address.
Security Displays the security settings.
Antenna Level Displays the reception status for Wi-Fi.
Maintenance category
Information Description
Operation Time Displays the projector's total operation time.
Laser Op. Time Displays the laser operating time for each Light SourceMode setting.
Version category
Information Description
Serial No. Displays the projector's serial number.
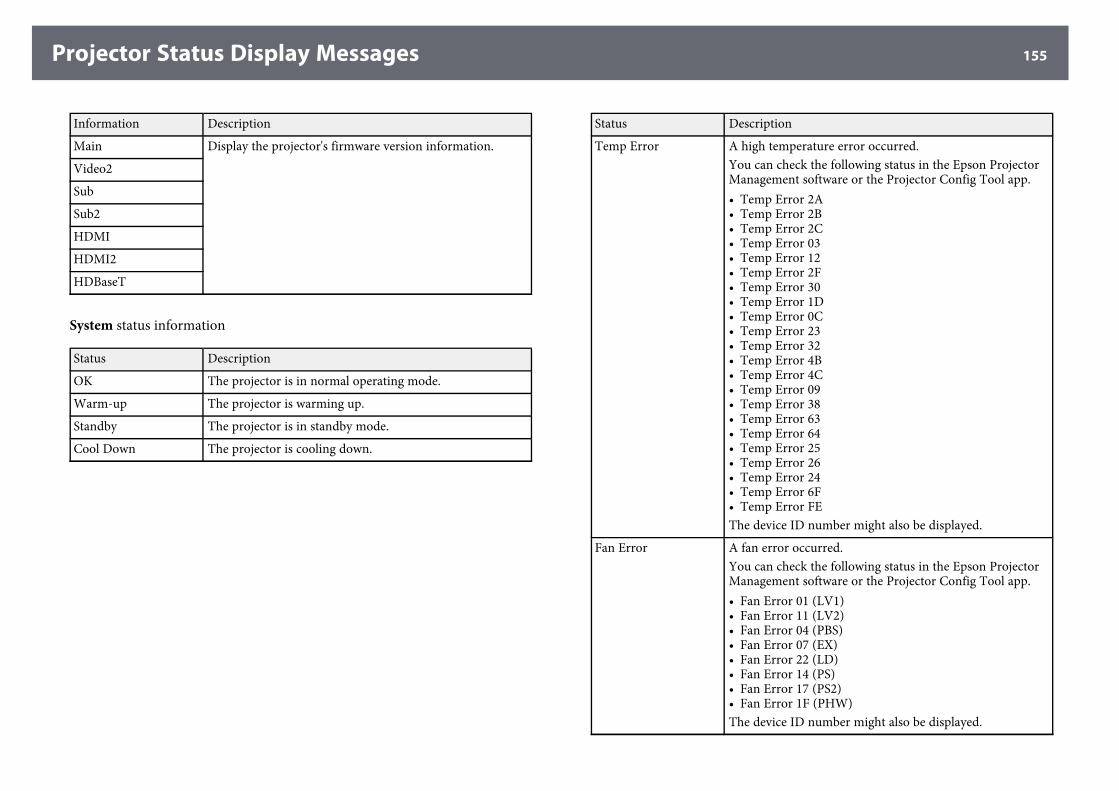
Projector Status Display Messages 155
Information Description
Main Display the projector's firmware version information.
Video2
Sub
Sub2
HDMI
HDMI2
HDBaseT
System status information
Status Description
OK The projector is in normal operating mode.
Warm-up The projector is warming up.
Standby The projector is in standby mode.
Cool Down The projector is cooling down.
Status Description
Temp Error A high temperature error occurred.You can check the following status in the Epson ProjectorManagement software or the Projector Config Tool app.• Temp Error 2A• Temp Error 2B• Temp Error 2C• Temp Error 03• Temp Error 12• Temp Error 2F• Temp Error 30• Temp Error 1D• Temp Error 0C• Temp Error 23• Temp Error 32• Temp Error 4B• Temp Error 4C• Temp Error 09• Temp Error 38• Temp Error 63• Temp Error 64• Temp Error 25• Temp Error 26• Temp Error 24• Temp Error 6F• Temp Error FEThe device ID number might also be displayed.
Fan Error A fan error occurred.You can check the following status in the Epson ProjectorManagement software or the Projector Config Tool app.• Fan Error 01 (LV1)• Fan Error 11 (LV2)• Fan Error 04 (PBS)• Fan Error 07 (EX)• Fan Error 22 (LD)• Fan Error 14 (PS)• Fan Error 17 (PS2)• Fan Error 1F (PHW)The device ID number might also be displayed.
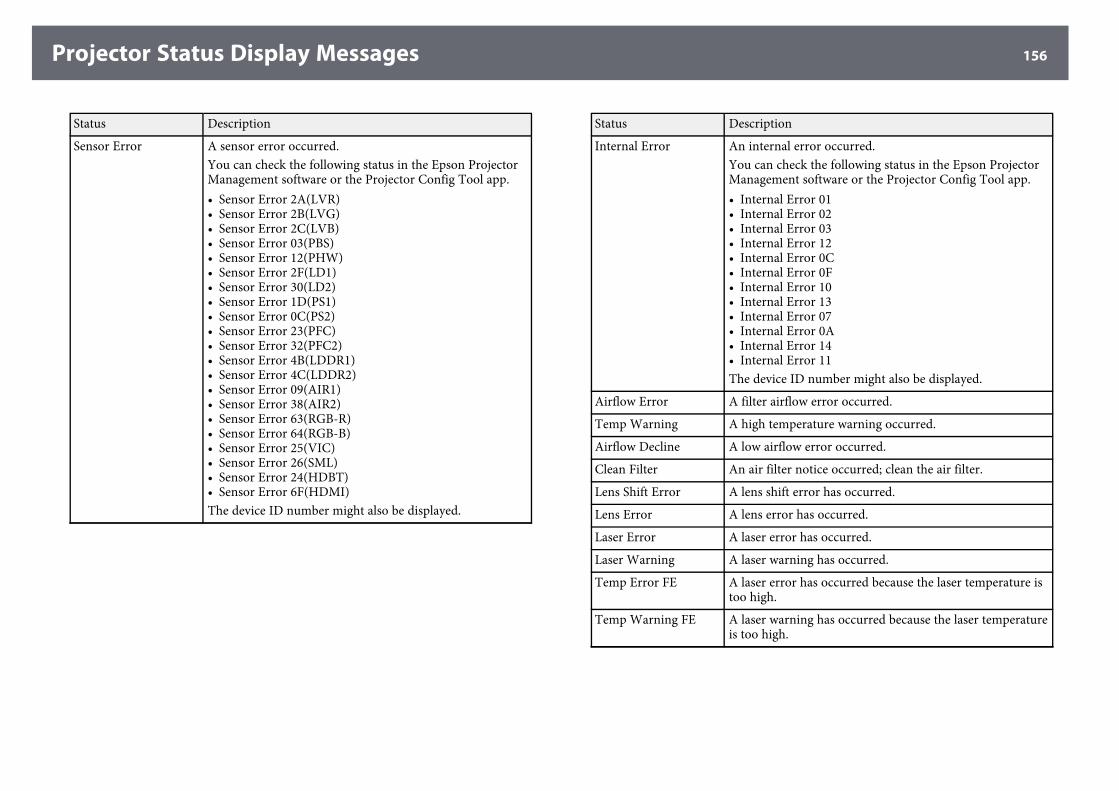
Projector Status Display Messages 156
Status Description
Sensor Error A sensor error occurred.You can check the following status in the Epson ProjectorManagement software or the Projector Config Tool app.• Sensor Error 2A(LVR)• Sensor Error 2B(LVG)• Sensor Error 2C(LVB)• Sensor Error 03(PBS)• Sensor Error 12(PHW)• Sensor Error 2F(LD1)• Sensor Error 30(LD2)• Sensor Error 1D(PS1)• Sensor Error 0C(PS2)• Sensor Error 23(PFC)• Sensor Error 32(PFC2)• Sensor Error 4B(LDDR1)• Sensor Error 4C(LDDR2)• Sensor Error 09(AIR1)• Sensor Error 38(AIR2)• Sensor Error 63(RGB-R)• Sensor Error 64(RGB-B)• Sensor Error 25(VIC)• Sensor Error 26(SML)• Sensor Error 24(HDBT)• Sensor Error 6F(HDMI)The device ID number might also be displayed.
Status Description
Internal Error An internal error occurred.You can check the following status in the Epson ProjectorManagement software or the Projector Config Tool app.• Internal Error 01• Internal Error 02• Internal Error 03• Internal Error 12• Internal Error 0C• Internal Error 0F• Internal Error 10• Internal Error 13• Internal Error 07• Internal Error 0A• Internal Error 14• Internal Error 11The device ID number might also be displayed.
Airflow Error A filter airflow error occurred.
Temp Warning A high temperature warning occurred.
Airflow Decline A low airflow error occurred.
Clean Filter An air filter notice occurred; clean the air filter.
Lens Shift Error A lens shift error has occurred.
Lens Error A lens error has occurred.
Laser Error A laser error has occurred.
Laser Warning A laser warning has occurred.
Temp Error FE A laser error has occurred because the laser temperature istoo high.
Temp Warning FE A laser warning has occurred because the laser temperatureis too high.
Solving Image or Sound Problems 157
Check the solutions in these sections if you have any problems with projectedimages or sound.
gg Related Links• "Solutions When No Image Appears" p.157• "Solutions When "No Signal" Message Appears" p.157• "Solutions When "Not Supported" Message Appears" p.158• "Solutions When Only a Partial Image Appears" p.158• "Solutions When the Image is not Rectangular" p.159• "Solutions When the Image Contains Noise or Static" p.159• "Solutions When the Image is Fuzzy or Blurry" p.159• "Solutions When the Image Brightness or Colors are Incorrect" p.160• "Solutions When Automatic Adjustments are not Applied Correctly" p.160• "Solutions When Simple Stacking is not Applied Correctly" p.161• "Solutions When an Afterimage Remains on the Projected Image" p.161• "Solutions to Sound Problems" p.161
Solutions When No Image Appears
If no image appears, try the following solutions:• Press the [A/V Mute] button on the remote control to see if the image was
temporarily turned off.• Make sure all necessary cables are securely connected and the power is on
for the projector and connected video sources.• Press the projector's power button to wake it from standby or sleep mode.
Also, check if the connected computer is in sleep mode or displaying ablank screen saver.
• If the projector does not respond when you press the control panel buttons,the buttons may be locked for security. Unlock the buttons in the ControlPanel Lock setting or use the remote control to turn on the projector.s Settings > Lock Setting > Control Panel Lock
• If the projector does not respond when you press any buttons on theprojector, an internal error may have occurred in the projector. ContactEpson for help.
• Adjust the Brightness setting in the projector's Image menu.
• Adjust the brightness of your projector's light source.s Settings > Brightness Settings
• Make sure Messages is set to On in the projector's Extended menu.s Extended > Display > Messages
• The projector may not be able to project copyrighted videos that you playback on a computer. For more details, see the manual supplied with thecomputer.
• For images projected with Windows Media Center, reduce the screen sizefrom full screen mode.
• For images projected from applications using Windows DirectX, turn offDirectX functions.
Solutions When "No Signal" Message Appears
If the "No Signal" message appears, try the following solutions:• Press the [Search] (remote control) or [Source Search] (control panel)
button on the control panel or remote control until you see the image fromthe source you want.
• Turn on the connected computer or video source, and press play to beginyour presentation, if necessary.
• Check that all cables required for projection are securely connected.• If you are projecting from a laptop computer, make sure it is set up to
display on an external monitor.• If necessary, turn off the projector and the connected computer or video
source, and then turn them back on.• If you are projecting from an HDMI source, replace the HDMI cable with
the shorter one.
gg Related Links• "Displaying From a Windows Laptop" p.158• "Displaying From a Mac Laptop" p.158
Solving Image or Sound Problems 158
Displaying From a Windows Laptop
If the message "No Signal" is displayed when projecting from a laptop, youneed to set up the Windows laptop to display on an external monitor.
a Hold down the Windows key and press P on your keyboard at the sametime, then click Duplicate.
b If the same image is not displayed by the laptop and projector, checkthe Windows Display utility to make sure the external monitor port isenabled and extended desktop mode is disabled.
c If necessary, check your video card settings and set the multiple displayoption to Mirror or Duplicate.
Displaying From a Mac Laptop
If the message "No Signal" is displayed when projecting from a Mac laptop,you need to set up the laptop for mirrored display. (See your laptop manualfor details.)
a Open the System Preferences utility and select Displays.
b Select the Display or Color LCD option, if necessary.
c Click the Arrange or Arrangement tab.
d Select Mirror Displays.
Solutions When "Not Supported" Message Appears
If the message "Not supported" is displayed, try the following solutions:• Make sure the computer's display resolution does not exceed the projector's
resolution and frequency limits. If necessary, select a different displayresolution for your computer.
Solutions When Only a Partial Image Appears
If only a partial computer image appears, try the following solutions:• If you are projecting from a computer using a VGA computer cable, press
the [Auto] button on the remote control to optimize the image signal.• Make sure you selected the correct Screen Type setting for the screen you
are using.s Extended > Display > Screen > Screen TypeIf there are margins between the edge of the image and the projected screenframe, adjust the position of the image.s Extended > Display > Screen > Screen Position
• Make sure the Scale setting is turned off in the projector's Signal menu.• Try adjusting the image position using the Position setting in the
projector's Signal menu.• Press the [Aspect] button on the remote control to select a different image
aspect ratio.• Change the Resolution setting in the projector's Signal menu according to
the signal for the connected equipment.• Change the Blanking setting in the projector's Signal menu so that the
image appears as you expect.• If you zoomed into or out of the image using the [E-Zoom] buttons, press
the [Esc] button until the projector returns to a full display.• Check your computer display settings to disable dual display and set the
resolution within the projector's limits.• Check the resolution assigned to your presentation files to see if they are
created for a different resolution.• When projecting in Content Playback mode, make sure you are using the
appropriate Overlay Effect settings.s Settings > Content Playback > Overlay Effect
• Make sure you selected the correct Projection setting in the projector'sExtended menu.
Solving Image or Sound Problems 159
Solutions When the Image is not Rectangular
If the projected image is not evenly rectangular, try the following solutions:• Place the projector directly in front of the center of the screen, facing it
squarely, if possible.• Press the [Geometry] button on the control panel or remote control to
adjust the image shape.• Adjust the H/V-Keystone setting to correct the image shape.s Settings > Geometry Correction > H/V-Keystone
• Adjust the Quick Corner setting to correct the image shape.s Settings > Geometry Correction > Quick Corner
• Adjust the Curved Surface setting to correct the corners and sides of animage projected on a curved surface with the same radius.s Settings > Geometry Correction > Corner Wall
• Adjust the Corner Wall setting to correct the corners and sides of an imageprojected on a curved surface with right angles.s Settings > Geometry Correction > Curved Surface
• Adjust the Point Correction setting to correct slight distortion whichoccurs partially.s Settings > Geometry Correction > Point Correction
Solutions When the Image Contains Noise or Static
If the projected image contains electronic interference (noise) or static, try thefollowing solutions:• Check the cables connecting your computer or video source to the
projector. They should be:• Separated from the power cord to prevent interference• Securely connected at both ends• Not connected to an extension cable
• Check the settings in the projector's Signal menu to make sure they matchthe video source.
• Adjust the Image Enhancement settings in the projector's Image menu.s Image > Image Enhancement > Noise Reductions Image > Image Enhancement > MPEG Noise Reductions Image > Image Enhancement > Deinterlacing
• Set the Resolution setting to Auto in the projector's Signal menu.• Select a computer video resolution and refresh rate that are compatible with
the projector.• If you are projecting from a computer using a VGA computer cable, press
the [Auto] button on the remote control to automatically adjust theTracking and Sync. settings. If the images are not adjusted correctly,manually adjust the Tracking and Sync. settings in the projector's Signalmenu.
• If you adjusted the image shape using the projector controls, try decreasingthe Sharpness setting in the projector's Image menu to improve imagequality.
• If you connected an extension power cable, try projecting without it to see ifit caused interference in the signal.
• Make sure you selected the correct Video Range or EDID setting in theprojector's Signal menu, if available for your image source.s Signal > Advanced > Video Ranges Signal > Advanced > EDID
Solutions When the Image is Fuzzy or Blurry
If the projected image is fuzzy or blurry, try the following solutions:• Adjust the image focus.• Position the projector close enough to the screen.• Position the projector so the keystone adjustment angle is not so wide that it
distorts the image.• Clean the projector lens.
Solving Image or Sound Problems 160
a
To avoid condensation on the lens after bringing the projector infrom a cold environment, let the projector warm up to roomtemperature before using it.
• Adjust the Sharpness setting in the projector's Image menu to improveimage quality.
• If you are projecting from a computer using a VGA computer cable, pressthe [Auto] button on the remote control to automatically adjust theTracking and Sync. settings. If any bands or overall blurriness remain,display a uniformly patterned image on the screen and manually adjust theTracking and Sync. settings in the projector's Signal menu.
• If you are projecting from a computer, use a lower resolution or select aresolution that matches the projector's native resolution.
Solutions When the Image Brightness or Colors areIncorrect
If the projected image is too dark or light, or the colors are incorrect, try thefollowing solutions:• Press the [Color Mode] button on the remote control to try different color
modes for the image and environment.• Check your video source settings.• Adjust the available settings in the projector's Image menu for the current
input source, such as Brightness, Contrast, Tint, and Color Saturation.• Make sure you selected the correct Video Range or EDID setting in the
projector's Signal menu, if available for your image source.s Signal > Advanced > Video Ranges Signal > Advanced > EDID
• Make sure you selected the correct RGBCMY setting in the projector'sImage menu.s Image > Advanced > RGBCMY
• Make sure all the cables are securely connected to the projector and yourvideo device. If you connected long cables, try connecting shorter cables.
• Make sure Brightness Settings are set correctly.s Settings > Brightness Settings
• Position the projector close enough to the screen.• When using multiple projectors, make sure Light Source Calibration in theReset menu is set correctly in all of the projectors. If light source calibrationis performed only in some of the projectors, the white balance and thebrightness level of the projected image may differ between the projectors.
Solutions When Automatic Adjustments are notApplied Correctly
If you have problems with automatic adjustments not being applied correctly,try the following solutions:• Be sure to wait at least 20 minutes after turning on the projector before
performing automatic adjustments. This gives the projector's temperature achance to stabilize.
• Check that the camera area is clean.• Make sure the cable of the optional external camera is securely connected to
the projector.• The optional external camera may be defective. Contact Epson for help.• Depending on the lens you installed, automatic adjustments may not be
available. Automatic adjustment is not available for the following lenses:ELPLR04, ELPLL07, ELPLL08.
• If you are projecting from an analog input source, the changing color andbrightness of the image may cause automatic adjustments to not be appliedcorrectly.
• Make sure that a powerful spotlight or source of strong natural light is notshining into the projection environment and interfering with automaticadjustments.
• Check that your image correction and image blending settings are withinreasonable ranges. If the projection angle is very large, try turning off theGeometry Correction setting or reduce the projection angle. If you are
Solving Image or Sound Problems 161
using the Edge Blending setting, make sure the blending width is between15 to 43%.
• If you see an error message during automatic adjustments, check the errorcodes in the message.During Screen Matching:• 0101: Measurement value error• 0102: Measurement failure• 0103: Switch camera failure• 0104/0105: Model mismatch• 0108: Camera errorDuring Color Matching:• 0201: Measurement value error• 0202: Measurement failure• 0203: Switch camera failure• 0208: Camera errorContact Epson for support for details.
Solutions When Simple Stacking is not AppliedCorrectly
If you have problems with simple stacking not being applied correctly, try thefollowing solutions:• Make sure the projectors are placed correctly and connected using a LAN
cable.• Make sure the optional external camera is installed correctly and the cable is
securely connected to the projector.• The optional external camera may be defective. Contact Epson for help.• Depending on the lens you installed, simple stacking may not be available.
Simple stacking is not available for the following lenses: ELPLL07, ELPLL08.
• Make sure that a powerful spotlight or source of strong natural light is notshining into the projection environment and interfering with simplestaking.
• Resize the projection size.• If you see an error message during the simple stacking process, check the
error codes in the message.• 0302: Measurement failure• 0306: Geometry correction error• 0308: Communication errorContact Epson for support for details.
gg Related Links• "Conditions for Simple Stacking" p.99
Solutions When an Afterimage Remains on theProjected Image
If you see an afterimage in the projected image, use the Refresh Mode featureto clear it. Select Refresh Mode > Start in the projector's Reset menu.
Solutions to Sound Problems
If there is no sound or the volume is too low or high, try the followingsolutions:• Adjust the projector's volume settings.• Press the [A/V Mute] button on the remote control to resume video and
audio if they were temporarily stopped.• Check your computer or video source to make sure the volume is turned up
and the audio output is set for the correct source.• Check the audio cable connections between the projector and your video
source.• Make sure any connected audio cables are labeled "No Resistance".
Solving Image or Sound Problems 162
• If you want to use a connected audio source when the projector is off, setthe Standby Mode option to Communication On and make sure the A/VSettings options are set correctly in the projector's Extended menu.
• If you want to output audio from a connected audio source when theprojector does not project any images, select these settings in the projector'smenus:• Turn off Quick Startup in the Extended menu.s Extended > Operation > Quick Startup
• Set the A/V Output setting to Always On in the Extended menu.s Extended > A/V Settings > A/V Output
• If you do not hear sound from an HDMI source, set the connected device toPCM output.
• When you are connecting the projector to a Mac using an HDMI cable,make sure your Mac supports audio through the HDMI port. If not, youneed to connect an audio cable.
• If the volume for the computer is set to the minimum while the projector isset to the maximum, the noise may be mixed. Turn up the computer'svolume and turn down the projector's volume. (When you use EpsoniProjection (Windows/Mac).)
Solving Projector or Remote Control Operation Problems 163
Check the solutions in these sections if you have problems operating theprojector or remote control.
gg Related Links• "Solutions to Projector Power or Shut-Off Problems" p.163• "Solutions to Problems with the Remote Control" p.163• "Solutions to Password Problems" p.164• "Solution When "The Battery that Saves Your Clock Settings is Running
Low" Message Appears" p.164
Solutions to Projector Power or Shut-Off Problems
If the projector does not turn on when you press the power button or it turnsoff unexpectedly, try the following solutions:• Make sure the power cord is securely connected to the projector and to a
working electrical outlet.• If the power button on the remote control does not turn on the projector,
check its batteries and make sure at least one of the remote receivers areavailable in the Remote Receiver setting in the projector's Settings menu.
• The projector's buttons may be locked for security. Unlock the buttons inthe Control Panel Lock setting or use the remote control to turn on theprojector.
• If the projector's light source turns off unexpectedly, it may have enteredsleep mode after a period of inactivity. Perform any operation to wake theprojector. To turn off sleep mode, set the Sleep Mode setting to Off.s Extended > Operation > Sleep Mode
• If the projector's light source turns off unexpectedly, the A/V mute timermay be enabled. To turn off the A/V mute timer, set the A/V Mute Timersetting to Off.s Extended > Operation > A/V Mute Settings > A/V Mute Timer
• If the projector's light source turns off, the status indicator is flashing, andthe temp (temperature) indicator is lit, the projector has overheated andturned off.
• The cooling fans may run in standby status depending on the projectorsettings. Also, when the projector wakes from standby status, the fans maycause an unexpected noise. This is not a malfunction.
• The power cord may be defective. Disconnect the cord and contact Epsonfor help.
Solutions to Problems with the Remote Control
If the projector does not respond to remote control commands, try thefollowing solutions:• Check that the remote control batteries are installed correctly and have
power. If necessary, replace the batteries.• Make sure you are operating the remote control within the reception angle
and range of the projector.• Make sure the projector is not warming up or shutting down.• Check to see if a button on the remote control is stuck down, causing it to
enter sleep mode. Release the button to wake the remote control up.• Strong fluorescent lighting, direct sunlight, or infrared device signals may be
interfering with the projector's remote receivers. Dim the lights or move theprojector away from the sun or interfering equipment.
• Make sure at least one of the remote receivers are available in the RemoteReceiver setting in the projector's Settings menu.
• If you enabled the remote control button lock, press and hold the [Home]button for about 5 seconds to turn it off.
• If you assigned an ID number to the projector to operate multiple projectorsfrom the remote control, you may need to check or change the ID setting.
• Sed the remote control [ID] switch to Off. You can operate all of theprojectors regardless of the projector ID settings.
• Make sure the optional remote control cable set is not attached to theprojector's Remote port. If you leave the cable connected to the port, theremote control cannot control the projector.
Solving Projector or Remote Control Operation Problems 164
• Make sure the Control Communications or Extron XTP setting in theExtended menu is set to Off if you are using the optional remote controlcable set.s Extended > HDBaseT > Control Communicationss Extended > HDBaseT > Extron XTP
• If you lose the remote control, you can order another one from Epson.
Solutions to Password Problems
If you cannot enter or remember a password, try the following solutions:• You may have turned on password protection without first setting a
password. Try entering 0000 using the remote control.• If you have entered an incorrect password too many times and see a
message displaying a request code, write down the code and contact Epsonfor help. Provide the request code and proof of ownership for assistance inunlocking the projector.
• If you set an Epson Web Control password and forgot the user ID orpassword, try entering the following:• User ID: EPSONWEB• Default password: the projector's serial number
• If you set a Remote password (in Epson Web Control) and forgot the userID or password, try entering the following:• User ID: EPSONREMOTE• Default password: the projector's serial number
• If you lose the remote control you cannot enter a password. Order a newone from Epson.
Solution When "The Battery that Saves Your ClockSettings is Running Low" Message Appears
If the message "The battery that saves your clock settings is running low." isdisplayed, contact Epson for help.
Solutions to Problems in Content Playback Mode 165
If you cannot play back a playlist correctly, try the following solutions:• Make sure Content Playback is set to On.s Settings > Content Playback > Content Playback
• Make sure the USB flash drive contains a playlist.• Make sure the USB flash drive is directly connected to the projector. Do not
use a multi-card reader or a USB hub to expand a USB port.• If the USB flash drive is partitioned, you may not be able to play back
playlists. Delete all of the partitions before saving the playlists on the USBflash drive.
• Do not share a playlist between projectors that are different in resolution.Color and shape effects added by using Overlay Effect may not bereproduced correctly.s Settings > Content Playback > Overlay Effect
Solving Network Problems 166
Check the solutions in these sections if you have problems using the projectoron a network.
gg Related Links• "Solutions When Wireless Authentication Fails" p.166• "Solutions When You Cannot Access the Projector Through the Web" p.166• "Solutions When Network Alert E-Mails are not Received" p.166• "Solutions When the Image Contains Static During Network Projection"
p.167• "Solutions When You Cannot Monitor and Control the Projector over a
Network" p.167
Solutions When Wireless Authentication Fails
If you are having trouble with the authentication, try the following solutions:• If the wireless settings are correct, but authentication fails, you may need to
update the Date & Time settings.s Extended > Operation > Date & Time
• Check the Security settings in the projector's Network menu.s Network > Network Configuration > Wireless LAN
• If the access point security is WPA3-EAP, change the access point setting toWPA2/WPA3-EAP.
Solutions When You Cannot Access the ProjectorThrough the Web
If you are unable to access the projector through a Web browser, make sureyou are using the correct ID and password.• For the user ID, enter EPSONWEB. (You cannot change the user ID.)• For the password, enter the password set in the projector's Network menu.
The default password is the projector's serial number.• Make sure you have access to the network the projector is on.
• If your Web browser is set up to connect via a proxy server, the Epson WebControl screen cannot be displayed. Make settings for a connection withoutusing a proxy server.
• If you set the Standby Mode setting to Communication On in theprojector's menu in standby mode, make sure the network device is turnedon. After turning on the network device, turn on the projector.s Extended > Standby ModeAnd connect to a wired LAN, or to a wireless LAN with the ConnectionMode setting set to Advanced.s Network > Network Configuration > Wireless LAN > ConnectionMode
a
The user ID and password are case sensitive.
Solutions When Network Alert E-Mails are notReceived
If you do not receive an e-mail alerting you to problems with a projector overthe network, try the following solutions:• Make sure the projector is turned on and connected to the network
correctly. (If an error shuts down the projector, the email may not bedelivered.)
• Make sure you set up the projector e-mail alert settings correctly in theprojector's network Notifications menu or in the network software.
• Set the Standby Mode setting to Communication On so that the networksoftware can monitor the projector in standby mode.s Extended > Standby ModeAnd connect to a wired LAN, or to a wireless LAN with the ConnectionMode setting set to Advanced.s Network > Network Configuration > Wireless LAN > ConnectionMode
Solving Network Problems 167
Solutions When the Image Contains Static DuringNetwork Projection
If the projected image contains static during network projection, try thefollowing solutions:• Check for any obstacles between the access point, the computer, the mobile
device, and the projector, and change their positions to improvecommunication.
• Make sure that the access point, the computer, the mobile device and theprojector are not too far apart. Move them closer together and try toconnect again.
• Check for interference from other equipment, such as a Bluetooth device ormicrowave. Move the interfering device farther away or expand yourwireless bandwidth.
• Reduce the number of connected devices if the connection speed declines.
Solutions When You Cannot Monitor and Control theProjector over a Network
If you are unable to monitor and control the projector with commandcommunication using ESC/VP.net, set the Command Communicationsetting to Compatible.s Network > Network Configuration > Others > CommandCommunication
AppendixCheck these sections for the technical specifications and important notices about your product.
gg Related Links• "Optional Accessories and Replacement Parts" p.169• "Screen Size and Projection Distance" p.171• "Projector Specifications" p.180• "Supported Features for Epson Projector Content Manager" p.183• "List of Safety Symbols and Instructions" p.184• "Laser Safety Information" p.186• "Hazard Distance according to IEC62471-5" p.188• "Notices" p.189
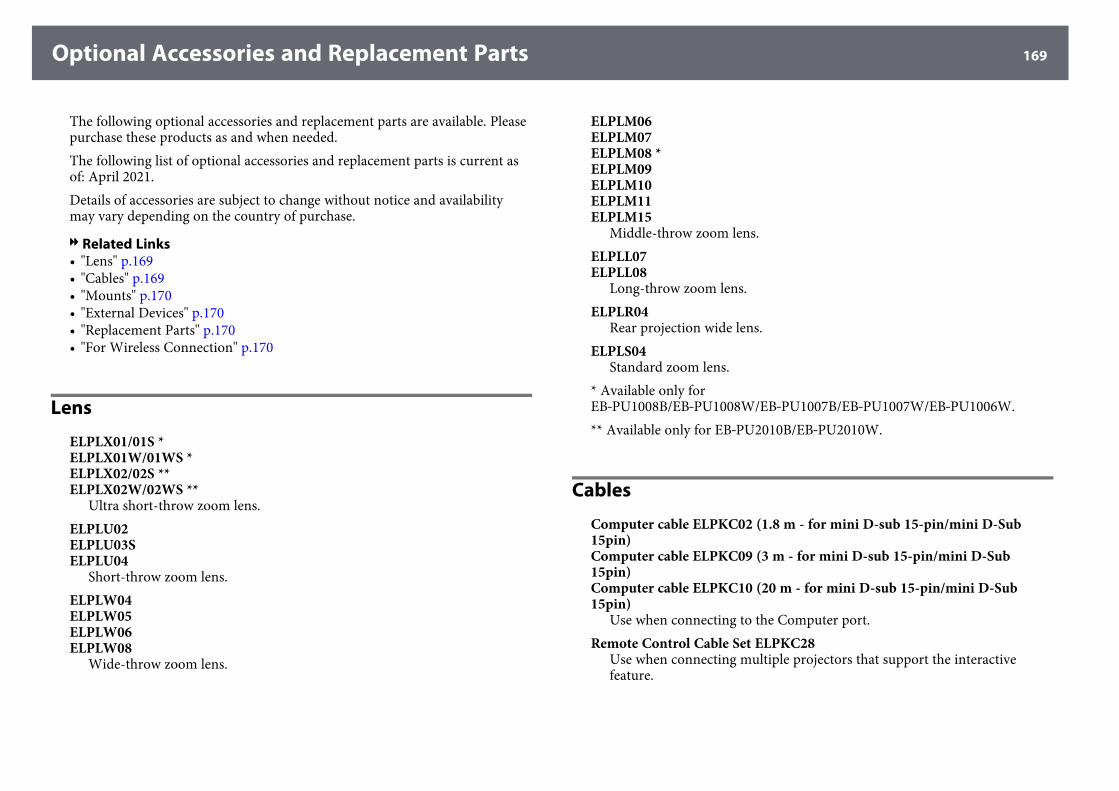
Optional Accessories and Replacement Parts 169
The following optional accessories and replacement parts are available. Pleasepurchase these products as and when needed.The following list of optional accessories and replacement parts is current asof: April 2021.Details of accessories are subject to change without notice and availabilitymay vary depending on the country of purchase.
gg Related Links• "Lens" p.169• "Cables" p.169• "Mounts" p.170• "External Devices" p.170• "Replacement Parts" p.170• "For Wireless Connection" p.170
Lens
ELPLX01/01S *ELPLX01W/01WS *ELPLX02/02S **ELPLX02W/02WS **
Ultra short-throw zoom lens.ELPLU02ELPLU03SELPLU04
Short-throw zoom lens.ELPLW04ELPLW05ELPLW06ELPLW08
Wide-throw zoom lens.
ELPLM06ELPLM07ELPLM08 *ELPLM09ELPLM10ELPLM11ELPLM15
Middle-throw zoom lens.ELPLL07ELPLL08
Long-throw zoom lens.ELPLR04
Rear projection wide lens.ELPLS04
Standard zoom lens.* Available only forEB‑PU1008B/EB‑PU1008W/EB‑PU1007B/EB‑PU1007W/EB‑PU1006W.** Available only for EB‑PU2010B/EB‑PU2010W.
Cables
Computer cable ELPKC02 (1.8 m - for mini D-sub 15-pin/mini D-Sub15pin)Computer cable ELPKC09 (3 m - for mini D-sub 15-pin/mini D-Sub15pin)Computer cable ELPKC10 (20 m - for mini D-sub 15-pin/mini D-Sub15pin)
Use when connecting to the Computer port.Remote Control Cable Set ELPKC28
Use when connecting multiple projectors that support the interactivefeature.
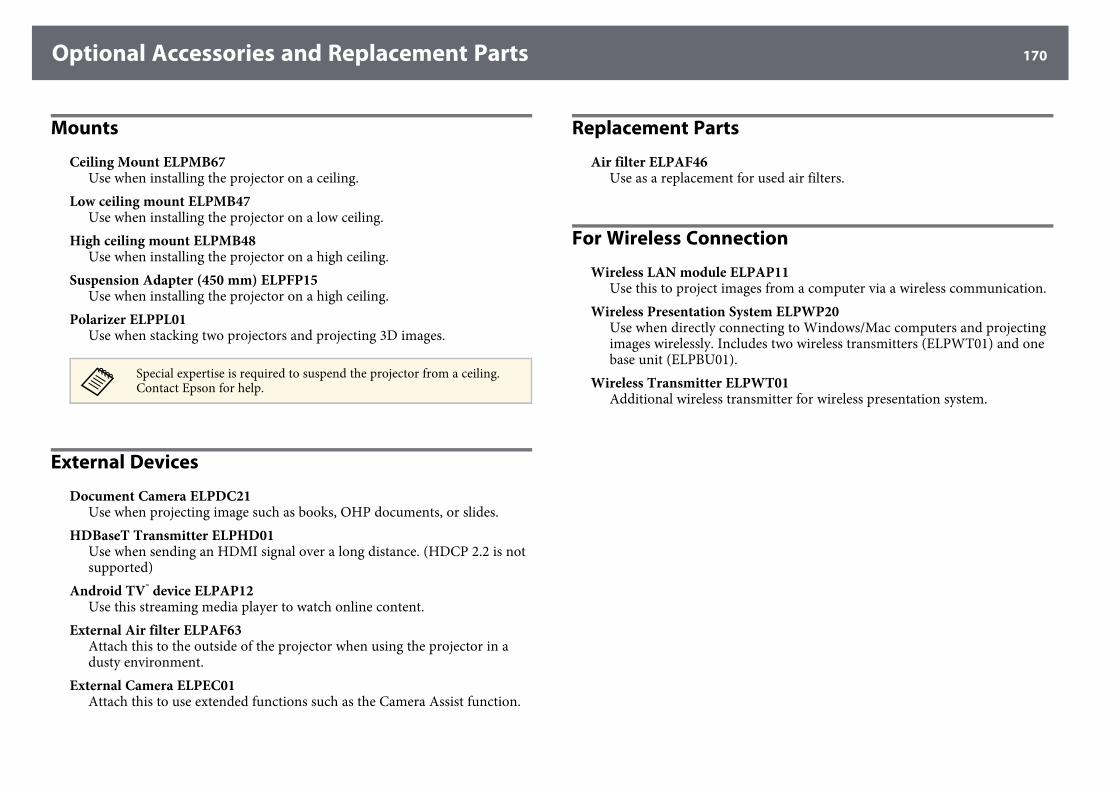
Optional Accessories and Replacement Parts 170
Mounts
Ceiling Mount ELPMB67Use when installing the projector on a ceiling.
Low ceiling mount ELPMB47Use when installing the projector on a low ceiling.
High ceiling mount ELPMB48Use when installing the projector on a high ceiling.
Suspension Adapter (450 mm) ELPFP15Use when installing the projector on a high ceiling.
Polarizer ELPPL01Use when stacking two projectors and projecting 3D images.
a
Special expertise is required to suspend the projector from a ceiling.Contact Epson for help.
External Devices
Document Camera ELPDC21Use when projecting image such as books, OHP documents, or slides.
HDBaseT Transmitter ELPHD01Use when sending an HDMI signal over a long distance. (HDCP 2.2 is notsupported)
Android TV™ device ELPAP12Use this streaming media player to watch online content.
External Air filter ELPAF63Attach this to the outside of the projector when using the projector in adusty environment.
External Camera ELPEC01Attach this to use extended functions such as the Camera Assist function.
Replacement Parts
Air filter ELPAF46Use as a replacement for used air filters.
For Wireless Connection
Wireless LAN module ELPAP11Use this to project images from a computer via a wireless communication.
Wireless Presentation System ELPWP20Use when directly connecting to Windows/Mac computers and projectingimages wirelessly. Includes two wireless transmitters (ELPWT01) and onebase unit (ELPBU01).
Wireless Transmitter ELPWT01Additional wireless transmitter for wireless presentation system.
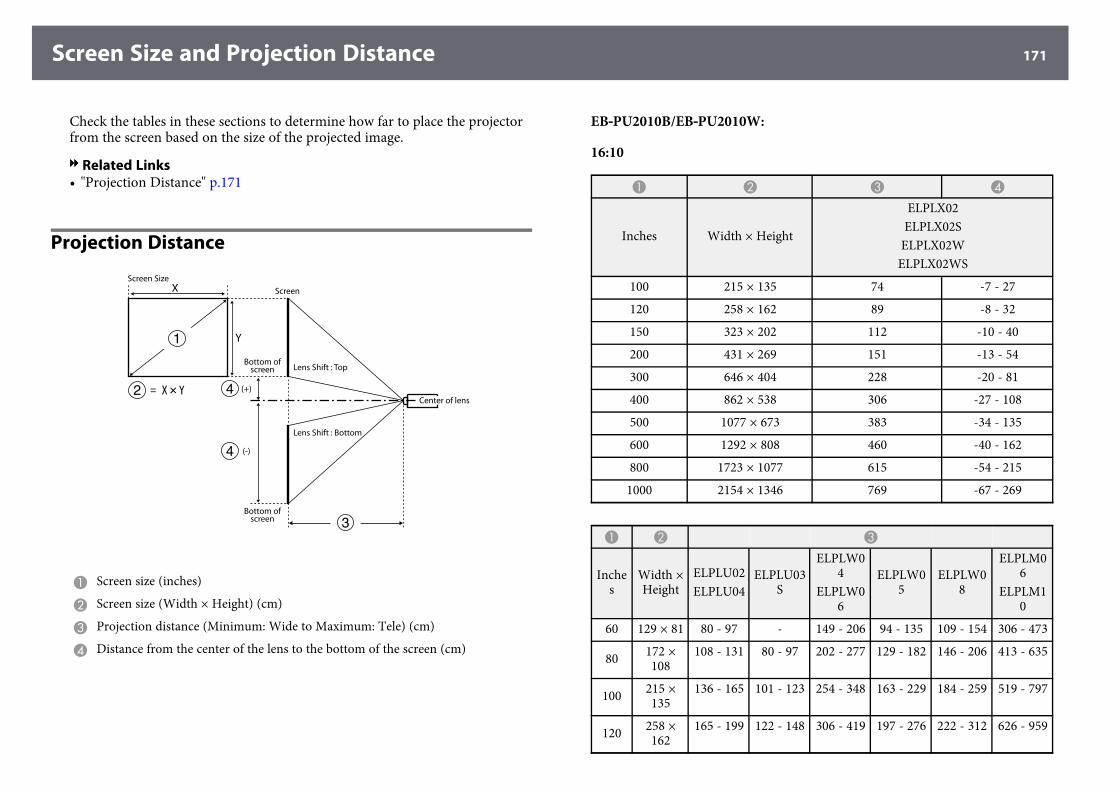
Screen Size and Projection Distance 171
Check the tables in these sections to determine how far to place the projectorfrom the screen based on the size of the projected image.
gg Related Links• "Projection Distance" p.171
Projection Distance
A Screen size (inches)
B Screen size (Width × Height) (cm)
C Projection distance (Minimum: Wide to Maximum: Tele) (cm)
D Distance from the center of the lens to the bottom of the screen (cm)
EB‑‑PU2010B/EB‑‑PU2010W:
16:10
A B C D
Inches Width × Height
ELPLX02ELPLX02SELPLX02WELPLX02WS
100 215 × 135 74 -7 - 27
120 258 × 162 89 -8 - 32
150 323 × 202 112 -10 - 40
200 431 × 269 151 -13 - 54
300 646 × 404 228 -20 - 81
400 862 × 538 306 -27 - 108
500 1077 × 673 383 -34 - 135
600 1292 × 808 460 -40 - 162
800 1723 × 1077 615 -54 - 215
1000 2154 × 1346 769 -67 - 269
A B C
Inches
Width ×Height
ELPLU02ELPLU04
ELPLU03S
ELPLW04
ELPLW06
ELPLW05
ELPLW08
ELPLM06
ELPLM10
60 129 × 81 80 - 97 - 149 - 206 94 - 135 109 - 154 306 - 473
80 172 ×108
108 - 131 80 - 97 202 - 277 129 - 182 146 - 206 413 - 635
100 215 ×135
136 - 165 101 - 123 254 - 348 163 - 229 184 - 259 519 - 797
120 258 ×162
165 - 199 122 - 148 306 - 419 197 - 276 222 - 312 626 - 959
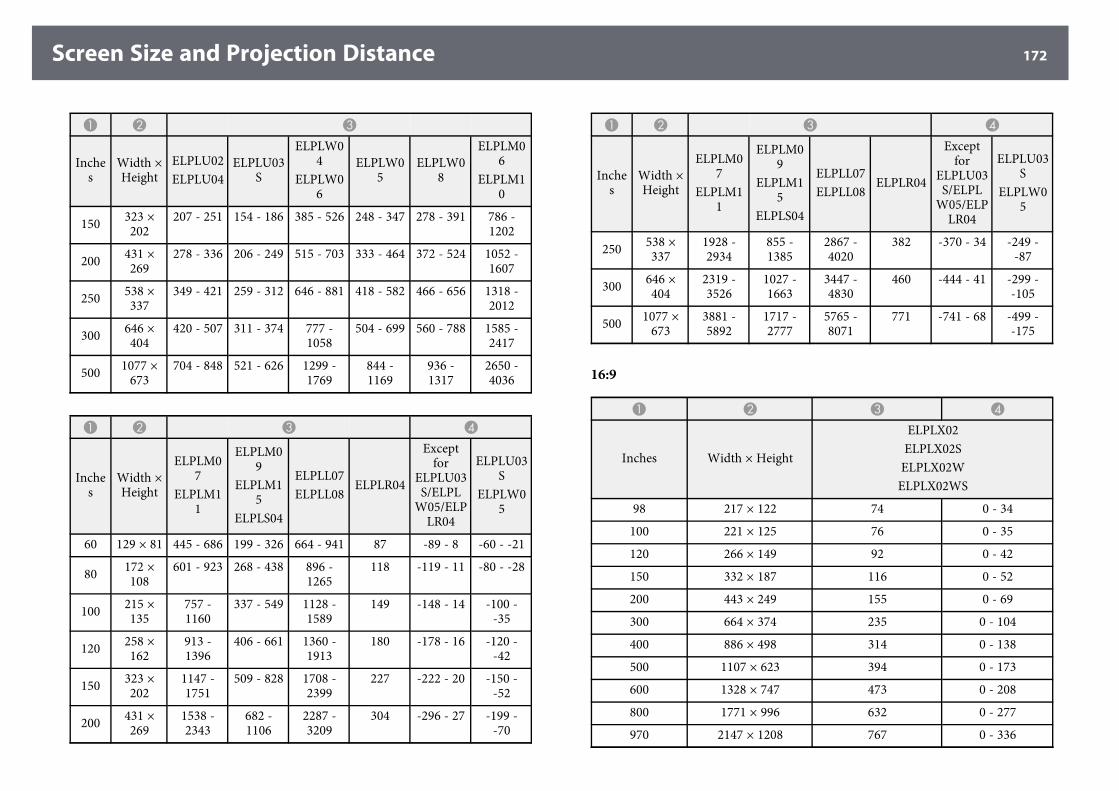
Screen Size and Projection Distance 172
A B C
Inches
Width ×Height
ELPLU02ELPLU04
ELPLU03S
ELPLW04
ELPLW06
ELPLW05
ELPLW08
ELPLM06
ELPLM10
150 323 ×202
207 - 251 154 - 186 385 - 526 248 - 347 278 - 391 786 -1202
200 431 ×269
278 - 336 206 - 249 515 - 703 333 - 464 372 - 524 1052 -1607
250 538 ×337
349 - 421 259 - 312 646 - 881 418 - 582 466 - 656 1318 -2012
300 646 ×404
420 - 507 311 - 374 777 -1058
504 - 699 560 - 788 1585 -2417
500 1077 ×673
704 - 848 521 - 626 1299 -1769
844 -1169
936 -1317
2650 -4036
A B C D
Inches
Width ×Height
ELPLM07
ELPLM11
ELPLM09
ELPLM15
ELPLS04
ELPLL07ELPLL08
ELPLR04
Exceptfor
ELPLU03S/ELPL
W05/ELPLR04
ELPLU03S
ELPLW05
60 129 × 81 445 - 686 199 - 326 664 - 941 87 -89 - 8 -60 - -21
80 172 ×108
601 - 923 268 - 438 896 -1265
118 -119 - 11 -80 - -28
100 215 ×135
757 -1160
337 - 549 1128 -1589
149 -148 - 14 -100 --35
120 258 ×162
913 -1396
406 - 661 1360 -1913
180 -178 - 16 -120 --42
150 323 ×202
1147 -1751
509 - 828 1708 -2399
227 -222 - 20 -150 --52
200 431 ×269
1538 -2343
682 -1106
2287 -3209
304 -296 - 27 -199 --70
A B C D
Inches
Width ×Height
ELPLM07
ELPLM11
ELPLM09
ELPLM15
ELPLS04
ELPLL07ELPLL08
ELPLR04
Exceptfor
ELPLU03S/ELPL
W05/ELPLR04
ELPLU03S
ELPLW05
250 538 ×337
1928 -2934
855 -1385
2867 -4020
382 -370 - 34 -249 --87
300 646 ×404
2319 -3526
1027 -1663
3447 -4830
460 -444 - 41 -299 --105
500 1077 ×673
3881 -5892
1717 -2777
5765 -8071
771 -741 - 68 -499 --175
16:9
A B C D
Inches Width × Height
ELPLX02ELPLX02SELPLX02WELPLX02WS
98 217 × 122 74 0 - 34
100 221 × 125 76 0 - 35
120 266 × 149 92 0 - 42
150 332 × 187 116 0 - 52
200 443 × 249 155 0 - 69
300 664 × 374 235 0 - 104
400 886 × 498 314 0 - 138
500 1107 × 623 394 0 - 173
600 1328 × 747 473 0 - 208
800 1771 × 996 632 0 - 277
970 2147 × 1208 767 0 - 336
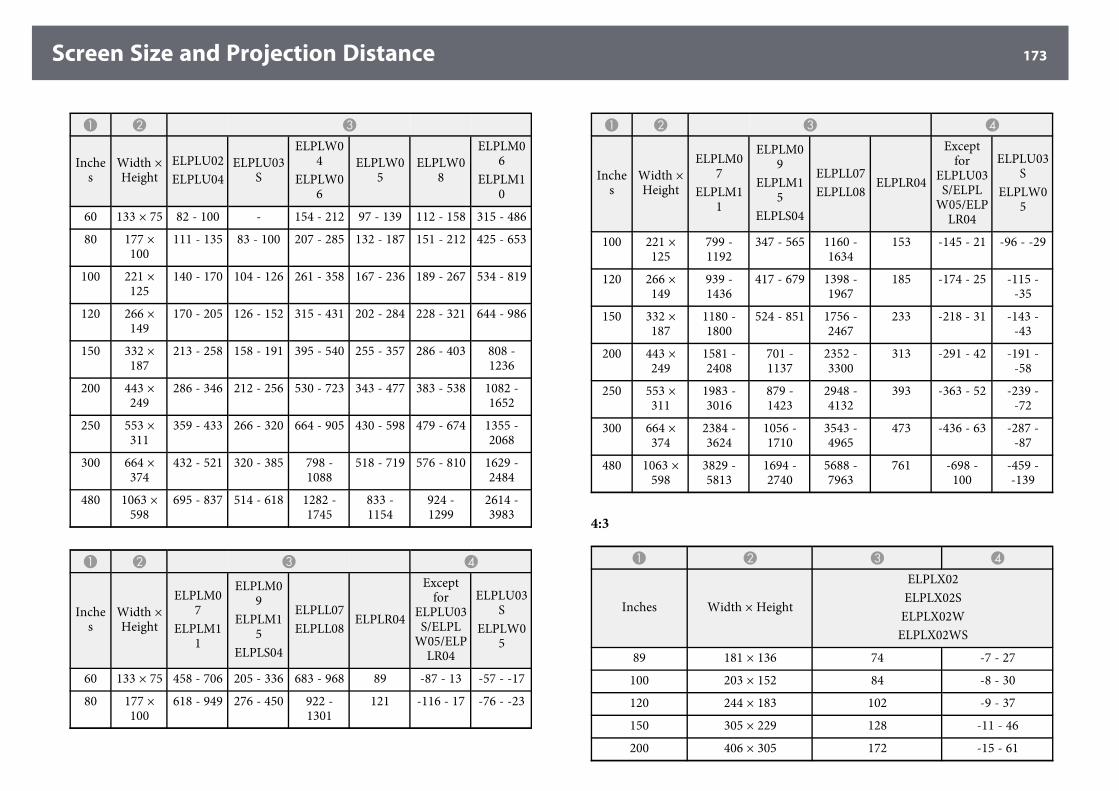
Screen Size and Projection Distance 173
A B C
Inches
Width ×Height
ELPLU02ELPLU04
ELPLU03S
ELPLW04
ELPLW06
ELPLW05
ELPLW08
ELPLM06
ELPLM10
60 133 × 75 82 - 100 - 154 - 212 97 - 139 112 - 158 315 - 486
80 177 ×100
111 - 135 83 - 100 207 - 285 132 - 187 151 - 212 425 - 653
100 221 ×125
140 - 170 104 - 126 261 - 358 167 - 236 189 - 267 534 - 819
120 266 ×149
170 - 205 126 - 152 315 - 431 202 - 284 228 - 321 644 - 986
150 332 ×187
213 - 258 158 - 191 395 - 540 255 - 357 286 - 403 808 -1236
200 443 ×249
286 - 346 212 - 256 530 - 723 343 - 477 383 - 538 1082 -1652
250 553 ×311
359 - 433 266 - 320 664 - 905 430 - 598 479 - 674 1355 -2068
300 664 ×374
432 - 521 320 - 385 798 -1088
518 - 719 576 - 810 1629 -2484
480 1063 ×598
695 - 837 514 - 618 1282 -1745
833 -1154
924 -1299
2614 -3983
A B C D
Inches
Width ×Height
ELPLM07
ELPLM11
ELPLM09
ELPLM15
ELPLS04
ELPLL07ELPLL08
ELPLR04
Exceptfor
ELPLU03S/ELPL
W05/ELPLR04
ELPLU03S
ELPLW05
60 133 × 75 458 - 706 205 - 336 683 - 968 89 -87 - 13 -57 - -17
80 177 ×100
618 - 949 276 - 450 922 -1301
121 -116 - 17 -76 - -23
A B C D
Inches
Width ×Height
ELPLM07
ELPLM11
ELPLM09
ELPLM15
ELPLS04
ELPLL07ELPLL08
ELPLR04
Exceptfor
ELPLU03S/ELPL
W05/ELPLR04
ELPLU03S
ELPLW05
100 221 ×125
799 -1192
347 - 565 1160 -1634
153 -145 - 21 -96 - -29
120 266 ×149
939 -1436
417 - 679 1398 -1967
185 -174 - 25 -115 --35
150 332 ×187
1180 -1800
524 - 851 1756 -2467
233 -218 - 31 -143 --43
200 443 ×249
1581 -2408
701 -1137
2352 -3300
313 -291 - 42 -191 --58
250 553 ×311
1983 -3016
879 -1423
2948 -4132
393 -363 - 52 -239 --72
300 664 ×374
2384 -3624
1056 -1710
3543 -4965
473 -436 - 63 -287 --87
480 1063 ×598
3829 -5813
1694 -2740
5688 -7963
761 -698 -100
-459 --139
4:3
A B C D
Inches Width × Height
ELPLX02ELPLX02SELPLX02WELPLX02WS
89 181 × 136 74 -7 - 27
100 203 × 152 84 -8 - 30
120 244 × 183 102 -9 - 37
150 305 × 229 128 -11 - 46
200 406 × 305 172 -15 - 61
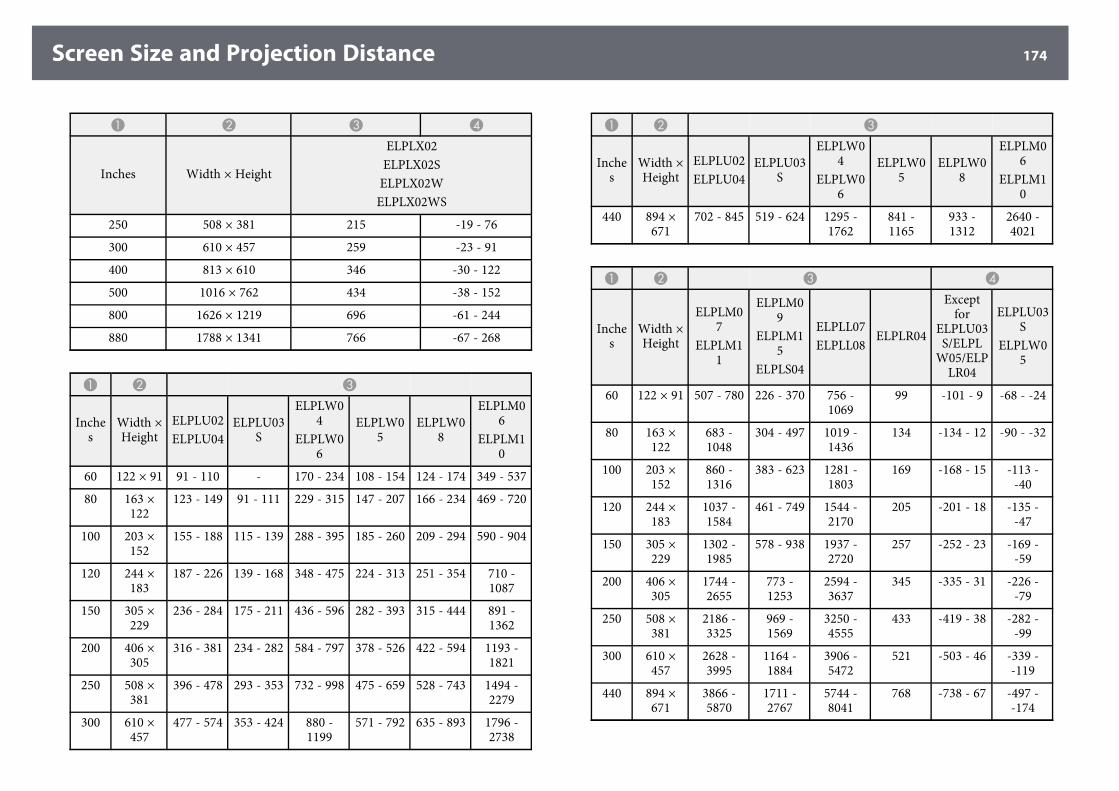
Screen Size and Projection Distance 174
A B C D
Inches Width × Height
ELPLX02ELPLX02SELPLX02WELPLX02WS
250 508 × 381 215 -19 - 76
300 610 × 457 259 -23 - 91
400 813 × 610 346 -30 - 122
500 1016 × 762 434 -38 - 152
800 1626 × 1219 696 -61 - 244
880 1788 × 1341 766 -67 - 268
A B C
Inches
Width ×Height
ELPLU02ELPLU04
ELPLU03S
ELPLW04
ELPLW06
ELPLW05
ELPLW08
ELPLM06
ELPLM10
60 122 × 91 91 - 110 - 170 - 234 108 - 154 124 - 174 349 - 537
80 163 ×122
123 - 149 91 - 111 229 - 315 147 - 207 166 - 234 469 - 720
100 203 ×152
155 - 188 115 - 139 288 - 395 185 - 260 209 - 294 590 - 904
120 244 ×183
187 - 226 139 - 168 348 - 475 224 - 313 251 - 354 710 -1087
150 305 ×229
236 - 284 175 - 211 436 - 596 282 - 393 315 - 444 891 -1362
200 406 ×305
316 - 381 234 - 282 584 - 797 378 - 526 422 - 594 1193 -1821
250 508 ×381
396 - 478 293 - 353 732 - 998 475 - 659 528 - 743 1494 -2279
300 610 ×457
477 - 574 353 - 424 880 -1199
571 - 792 635 - 893 1796 -2738
A B C
Inches
Width ×Height
ELPLU02ELPLU04
ELPLU03S
ELPLW04
ELPLW06
ELPLW05
ELPLW08
ELPLM06
ELPLM10
440 894 ×671
702 - 845 519 - 624 1295 -1762
841 -1165
933 -1312
2640 -4021
A B C D
Inches
Width ×Height
ELPLM07
ELPLM11
ELPLM09
ELPLM15
ELPLS04
ELPLL07ELPLL08
ELPLR04
Exceptfor
ELPLU03S/ELPL
W05/ELPLR04
ELPLU03S
ELPLW05
60 122 × 91 507 - 780 226 - 370 756 -1069
99 -101 - 9 -68 - -24
80 163 ×122
683 -1048
304 - 497 1019 -1436
134 -134 - 12 -90 - -32
100 203 ×152
860 -1316
383 - 623 1281 -1803
169 -168 - 15 -113 --40
120 244 ×183
1037 -1584
461 - 749 1544 -2170
205 -201 - 18 -135 --47
150 305 ×229
1302 -1985
578 - 938 1937 -2720
257 -252 - 23 -169 --59
200 406 ×305
1744 -2655
773 -1253
2594 -3637
345 -335 - 31 -226 --79
250 508 ×381
2186 -3325
969 -1569
3250 -4555
433 -419 - 38 -282 --99
300 610 ×457
2628 -3995
1164 -1884
3906 -5472
521 -503 - 46 -339 --119
440 894 ×671
3866 -5870
1711 -2767
5744 -8041
768 -738 - 67 -497 --174
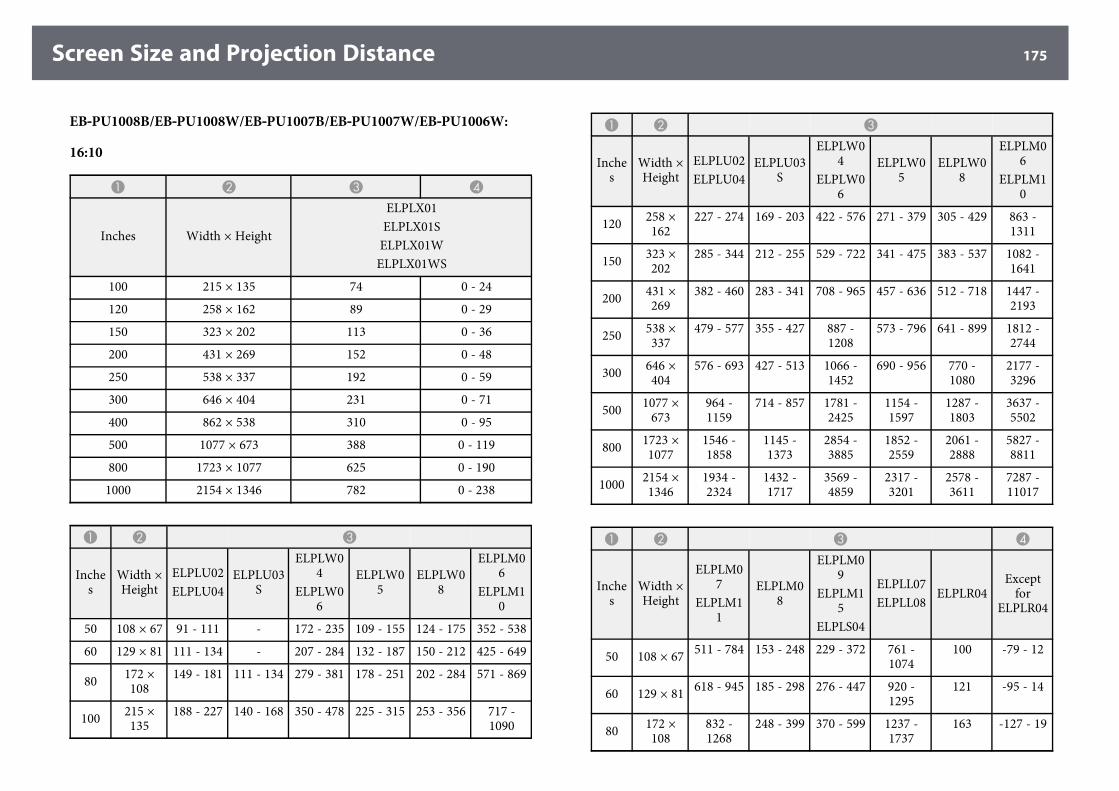
Screen Size and Projection Distance 175
EB‑‑PU1008B/EB‑‑PU1008W/EB‑‑PU1007B/EB‑‑PU1007W/EB‑‑PU1006W:
16:10
A B C D
Inches Width × Height
ELPLX01ELPLX01SELPLX01WELPLX01WS
100 215 × 135 74 0 - 24
120 258 × 162 89 0 - 29
150 323 × 202 113 0 - 36
200 431 × 269 152 0 - 48
250 538 × 337 192 0 - 59
300 646 × 404 231 0 - 71
400 862 × 538 310 0 - 95
500 1077 × 673 388 0 - 119
800 1723 × 1077 625 0 - 190
1000 2154 × 1346 782 0 - 238
A B C
Inches
Width ×Height
ELPLU02ELPLU04
ELPLU03S
ELPLW04
ELPLW06
ELPLW05
ELPLW08
ELPLM06
ELPLM10
50 108 × 67 91 - 111 - 172 - 235 109 - 155 124 - 175 352 - 538
60 129 × 81 111 - 134 - 207 - 284 132 - 187 150 - 212 425 - 649
80 172 ×108
149 - 181 111 - 134 279 - 381 178 - 251 202 - 284 571 - 869
100 215 ×135
188 - 227 140 - 168 350 - 478 225 - 315 253 - 356 717 -1090
A B C
Inches
Width ×Height
ELPLU02ELPLU04
ELPLU03S
ELPLW04
ELPLW06
ELPLW05
ELPLW08
ELPLM06
ELPLM10
120 258 ×162
227 - 274 169 - 203 422 - 576 271 - 379 305 - 429 863 -1311
150 323 ×202
285 - 344 212 - 255 529 - 722 341 - 475 383 - 537 1082 -1641
200 431 ×269
382 - 460 283 - 341 708 - 965 457 - 636 512 - 718 1447 -2193
250 538 ×337
479 - 577 355 - 427 887 -1208
573 - 796 641 - 899 1812 -2744
300 646 ×404
576 - 693 427 - 513 1066 -1452
690 - 956 770 -1080
2177 -3296
500 1077 ×673
964 -1159
714 - 857 1781 -2425
1154 -1597
1287 -1803
3637 -5502
800 1723 ×1077
1546 -1858
1145 -1373
2854 -3885
1852 -2559
2061 -2888
5827 -8811
1000 2154 ×1346
1934 -2324
1432 -1717
3569 -4859
2317 -3201
2578 -3611
7287 -11017
A B C D
Inches
Width ×Height
ELPLM07
ELPLM11
ELPLM08
ELPLM09
ELPLM15
ELPLS04
ELPLL07ELPLL08
ELPLR04Except
forELPLR04
50 108 × 67 511 - 784 153 - 248 229 - 372 761 -1074
100 -79 - 12
60 129 × 81 618 - 945 185 - 298 276 - 447 920 -1295
121 -95 - 14
80 172 ×108
832 -1268
248 - 399 370 - 599 1237 -1737
163 -127 - 19
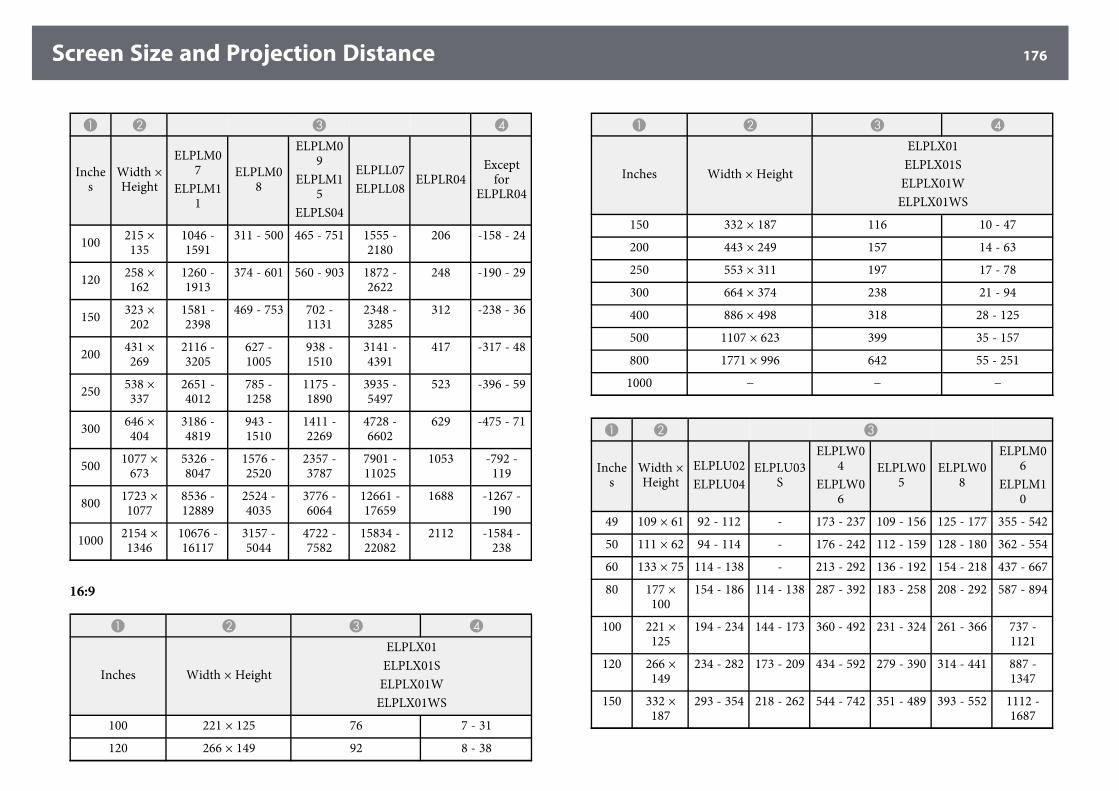
Screen Size and Projection Distance 176
A B C D
Inches
Width ×Height
ELPLM07
ELPLM11
ELPLM08
ELPLM09
ELPLM15
ELPLS04
ELPLL07ELPLL08
ELPLR04Except
forELPLR04
100 215 ×135
1046 -1591
311 - 500 465 - 751 1555 -2180
206 -158 - 24
120 258 ×162
1260 -1913
374 - 601 560 - 903 1872 -2622
248 -190 - 29
150 323 ×202
1581 -2398
469 - 753 702 -1131
2348 -3285
312 -238 - 36
200 431 ×269
2116 -3205
627 -1005
938 -1510
3141 -4391
417 -317 - 48
250 538 ×337
2651 -4012
785 -1258
1175 -1890
3935 -5497
523 -396 - 59
300 646 ×404
3186 -4819
943 -1510
1411 -2269
4728 -6602
629 -475 - 71
500 1077 ×673
5326 -8047
1576 -2520
2357 -3787
7901 -11025
1053 -792 -119
800 1723 ×1077
8536 -12889
2524 -4035
3776 -6064
12661 -17659
1688 -1267 -190
1000 2154 ×1346
10676 -16117
3157 -5044
4722 -7582
15834 -22082
2112 -1584 -238
16:9
A B C D
Inches Width × Height
ELPLX01ELPLX01SELPLX01WELPLX01WS
100 221 × 125 76 7 - 31
120 266 × 149 92 8 - 38
A B C D
Inches Width × Height
ELPLX01ELPLX01SELPLX01WELPLX01WS
150 332 × 187 116 10 - 47
200 443 × 249 157 14 - 63
250 553 × 311 197 17 - 78
300 664 × 374 238 21 - 94
400 886 × 498 318 28 - 125
500 1107 × 623 399 35 - 157
800 1771 × 996 642 55 - 251
1000 − − −
A B C
Inches
Width ×Height
ELPLU02ELPLU04
ELPLU03S
ELPLW04
ELPLW06
ELPLW05
ELPLW08
ELPLM06
ELPLM10
49 109 × 61 92 - 112 - 173 - 237 109 - 156 125 - 177 355 - 542
50 111 × 62 94 - 114 - 176 - 242 112 - 159 128 - 180 362 - 554
60 133 × 75 114 - 138 - 213 - 292 136 - 192 154 - 218 437 - 667
80 177 ×100
154 - 186 114 - 138 287 - 392 183 - 258 208 - 292 587 - 894
100 221 ×125
194 - 234 144 - 173 360 - 492 231 - 324 261 - 366 737 -1121
120 266 ×149
234 - 282 173 - 209 434 - 592 279 - 390 314 - 441 887 -1347
150 332 ×187
293 - 354 218 - 262 544 - 742 351 - 489 393 - 552 1112 -1687

Screen Size and Projection Distance 177
A B C
Inches
Width ×Height
ELPLU02ELPLU04
ELPLU03S
ELPLW04
ELPLW06
ELPLW05
ELPLW08
ELPLM06
ELPLM10
200 443 ×249
393 - 473 291 - 350 728 - 992 470 - 653 526 - 738 1488 -2254
250 553 ×311
493 - 593 365 - 439 912 -1242
590 - 818 659 - 924 1863 -2821
300 664 ×374
592 - 713 439 - 527 1096 -1492
709 - 983 792 -1110
2238 -3388
500 1107 ×623
991 -1192
734 - 881 1831 -2493
1187 -1642
1323 -1853
3738 -5655
800 1771 ×996
1589 -1910
1177 -1412
2934 -3994
1903 -2631
2119 -2969
5989 -9056
1000 2214 ×1245
- - - - − -
A B C D
Inches
Width ×Height
ELPLM07
ELPLM11
ELPLM08
ELPLM09
ELPLM15
ELPLS04
ELPLL07ELPLL08
ELPLR04Except
forELPLR04
49 109 × 61 515 - 789 154 - 250 230 - 374 767 -1082
101 -76 - 15
50 111 × 62 526 - 806 157 - 255 235 - 382 784 -1105
103 -78 - 16
60 133 × 75 636 - 972 190 - 307 284 - 460 947 -1332
124 -94 - 19
80 177 ×100
856 -1304
255 - 411 381 - 616 1273 -1787
168 -125 - 25
100 221 ×125
1076 -1635
320 - 514 478 - 772 1599 -2241
212 -156 - 31
A B C D
Inches
Width ×Height
ELPLM07
ELPLM11
ELPLM08
ELPLM09
ELPLM15
ELPLS04
ELPLL07ELPLL08
ELPLR04Except
forELPLR04
120 266 ×149
1296 -1967
385 - 618 575 - 928 1925 -2696
255 -187 - 38
150 332 ×187
1626 -2465
482 - 774 721 -1162
2414 -3378
320 -234 - 47
200 443 ×249
2176 -3294
645 -1033
964 -1552
3230 -4514
429 -312 - 63
250 553 ×311
2726 -4124
807 -1293
1207 -1942
4045 -5650
538 -390 - 78
300 664 ×374
3276 -4953
970 -1552
1450 -2332
4860 -6787
647 -468 - 94
500 1107 ×623
5475 -8271
1620 -2590
2423 -3893
8122 -11333
1082 -779 -157
800 1771 ×996
8774 -13248
2595 -4147
3881 -6233
13014 -18151
1735 -1247 -251
1000 2214 ×1245
- - - - - -1559 -313
4:3
A B C D
Inches Width × Height
ELPLX01ELPLX01SELPLX01WELPLX01WS
90 183 × 137 75 0 - 24
100 203 × 152 84 0 - 27
120 244 × 183 102 0 - 32
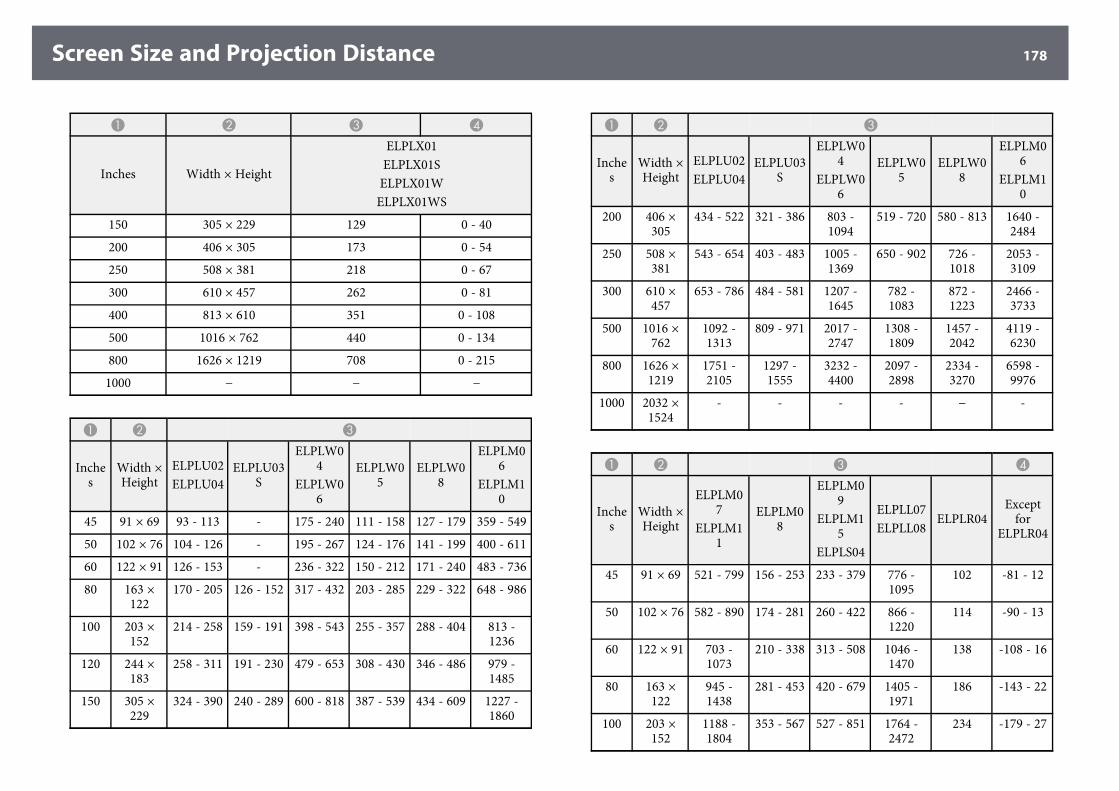
Screen Size and Projection Distance 178
A B C D
Inches Width × Height
ELPLX01ELPLX01SELPLX01WELPLX01WS
150 305 × 229 129 0 - 40
200 406 × 305 173 0 - 54
250 508 × 381 218 0 - 67
300 610 × 457 262 0 - 81
400 813 × 610 351 0 - 108
500 1016 × 762 440 0 - 134
800 1626 × 1219 708 0 - 215
1000 − − −
A B C
Inches
Width ×Height
ELPLU02ELPLU04
ELPLU03S
ELPLW04
ELPLW06
ELPLW05
ELPLW08
ELPLM06
ELPLM10
45 91 × 69 93 - 113 - 175 - 240 111 - 158 127 - 179 359 - 549
50 102 × 76 104 - 126 - 195 - 267 124 - 176 141 - 199 400 - 611
60 122 × 91 126 - 153 - 236 - 322 150 - 212 171 - 240 483 - 736
80 163 ×122
170 - 205 126 - 152 317 - 432 203 - 285 229 - 322 648 - 986
100 203 ×152
214 - 258 159 - 191 398 - 543 255 - 357 288 - 404 813 -1236
120 244 ×183
258 - 311 191 - 230 479 - 653 308 - 430 346 - 486 979 -1485
150 305 ×229
324 - 390 240 - 289 600 - 818 387 - 539 434 - 609 1227 -1860
A B C
Inches
Width ×Height
ELPLU02ELPLU04
ELPLU03S
ELPLW04
ELPLW06
ELPLW05
ELPLW08
ELPLM06
ELPLM10
200 406 ×305
434 - 522 321 - 386 803 -1094
519 - 720 580 - 813 1640 -2484
250 508 ×381
543 - 654 403 - 483 1005 -1369
650 - 902 726 -1018
2053 -3109
300 610 ×457
653 - 786 484 - 581 1207 -1645
782 -1083
872 -1223
2466 -3733
500 1016 ×762
1092 -1313
809 - 971 2017 -2747
1308 -1809
1457 -2042
4119 -6230
800 1626 ×1219
1751 -2105
1297 -1555
3232 -4400
2097 -2898
2334 -3270
6598 -9976
1000 2032 ×1524
- - - - − -
A B C D
Inches
Width ×Height
ELPLM07
ELPLM11
ELPLM08
ELPLM09
ELPLM15
ELPLS04
ELPLL07ELPLL08
ELPLR04Except
forELPLR04
45 91 × 69 521 - 799 156 - 253 233 - 379 776 -1095
102 -81 - 12
50 102 × 76 582 - 890 174 - 281 260 - 422 866 -1220
114 -90 - 13
60 122 × 91 703 -1073
210 - 338 313 - 508 1046 -1470
138 -108 - 16
80 163 ×122
945 -1438
281 - 453 420 - 679 1405 -1971
186 -143 - 22
100 203 ×152
1188 -1804
353 - 567 527 - 851 1764 -2472
234 -179 - 27
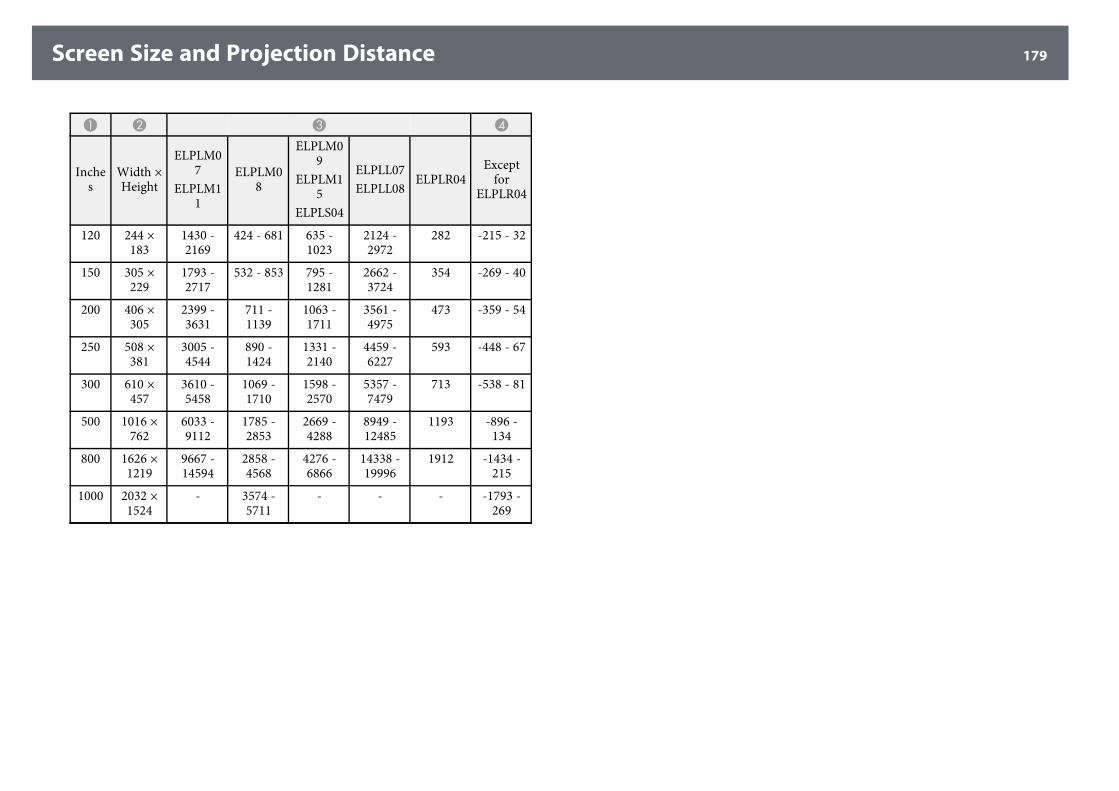
Screen Size and Projection Distance 179
A B C D
Inches
Width ×Height
ELPLM07
ELPLM11
ELPLM08
ELPLM09
ELPLM15
ELPLS04
ELPLL07ELPLL08
ELPLR04Except
forELPLR04
120 244 ×183
1430 -2169
424 - 681 635 -1023
2124 -2972
282 -215 - 32
150 305 ×229
1793 -2717
532 - 853 795 -1281
2662 -3724
354 -269 - 40
200 406 ×305
2399 -3631
711 -1139
1063 -1711
3561 -4975
473 -359 - 54
250 508 ×381
3005 -4544
890 -1424
1331 -2140
4459 -6227
593 -448 - 67
300 610 ×457
3610 -5458
1069 -1710
1598 -2570
5357 -7479
713 -538 - 81
500 1016 ×762
6033 -9112
1785 -2853
2669 -4288
8949 -12485
1193 -896 -134
800 1626 ×1219
9667 -14594
2858 -4568
4276 -6866
14338 -19996
1912 -1434 -215
1000 2032 ×1524
- 3574 -5711
- - - -1793 -269
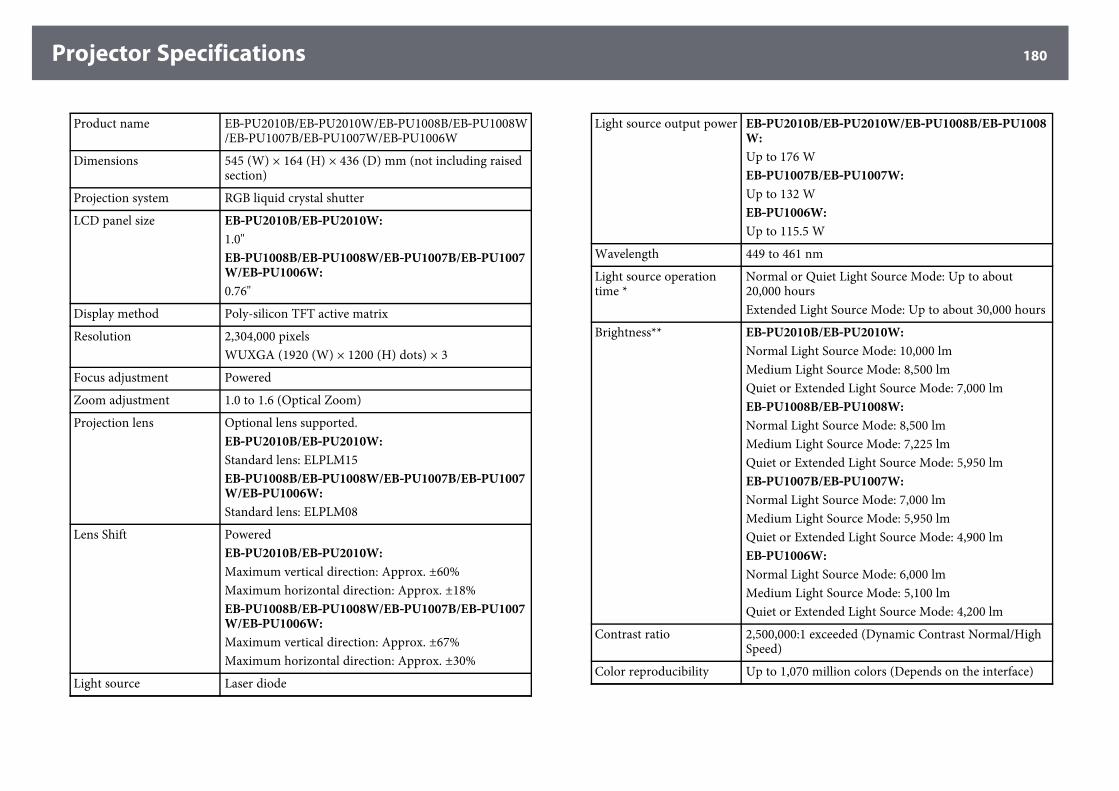
Projector Specifications 180
Product name EB‑PU2010B/EB‑PU2010W/EB‑PU1008B/EB‑PU1008W/EB‑PU1007B/EB‑PU1007W/EB‑PU1006W
Dimensions 545 (W) × 164 (H) × 436 (D) mm (not including raisedsection)
Projection system RGB liquid crystal shutter
LCD panel size EB‑‑PU2010B/EB‑‑PU2010W:1.0"EB‑‑PU1008B/EB‑‑PU1008W/EB‑‑PU1007B/EB‑‑PU1007W/EB‑‑PU1006W:0.76"
Display method Poly-silicon TFT active matrix
Resolution 2,304,000 pixelsWUXGA (1920 (W) × 1200 (H) dots) × 3
Focus adjustment Powered
Zoom adjustment 1.0 to 1.6 (Optical Zoom)
Projection lens Optional lens supported.EB‑‑PU2010B/EB‑‑PU2010W:Standard lens: ELPLM15EB‑‑PU1008B/EB‑‑PU1008W/EB‑‑PU1007B/EB‑‑PU1007W/EB‑‑PU1006W:Standard lens: ELPLM08
Lens Shift PoweredEB‑‑PU2010B/EB‑‑PU2010W:Maximum vertical direction: Approx. ±60%Maximum horizontal direction: Approx. ±18%EB‑‑PU1008B/EB‑‑PU1008W/EB‑‑PU1007B/EB‑‑PU1007W/EB‑‑PU1006W:Maximum vertical direction: Approx. ±67%Maximum horizontal direction: Approx. ±30%
Light source Laser diode
Light source output power EB‑‑PU2010B/EB‑‑PU2010W/EB‑‑PU1008B/EB‑‑PU1008W:Up to 176 WEB‑‑PU1007B/EB‑‑PU1007W:Up to 132 WEB‑‑PU1006W:Up to 115.5 W
Wavelength 449 to 461 nm
Light source operationtime *
Normal or Quiet Light Source Mode: Up to about20,000 hoursExtended Light Source Mode: Up to about 30,000 hours
Brightness** EB‑‑PU2010B/EB‑‑PU2010W:Normal Light Source Mode: 10,000 lmMedium Light Source Mode: 8,500 lmQuiet or Extended Light Source Mode: 7,000 lmEB‑‑PU1008B/EB‑‑PU1008W:Normal Light Source Mode: 8,500 lmMedium Light Source Mode: 7,225 lmQuiet or Extended Light Source Mode: 5,950 lmEB‑‑PU1007B/EB‑‑PU1007W:Normal Light Source Mode: 7,000 lmMedium Light Source Mode: 5,950 lmQuiet or Extended Light Source Mode: 4,900 lmEB‑‑PU1006W:Normal Light Source Mode: 6,000 lmMedium Light Source Mode: 5,100 lmQuiet or Extended Light Source Mode: 4,200 lm
Contrast ratio 2,500,000:1 exceeded (Dynamic Contrast Normal/HighSpeed)
Color reproducibility Up to 1,070 million colors (Depends on the interface)
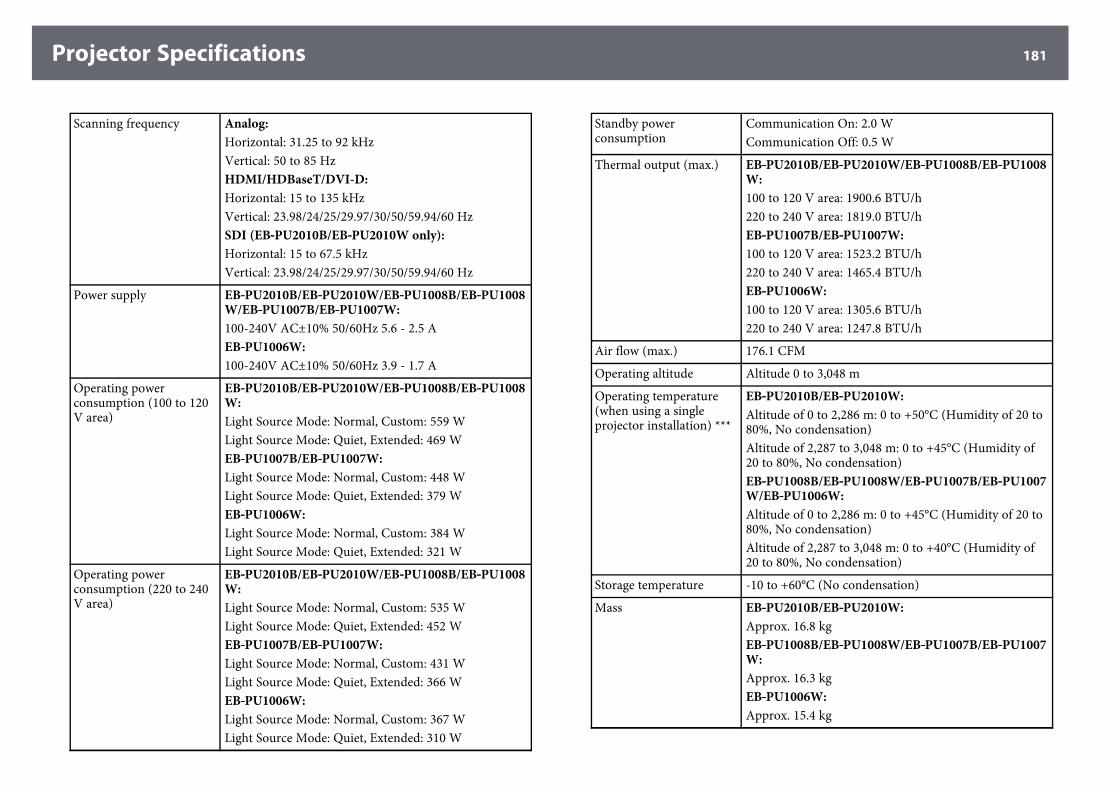
Projector Specifications 181
Scanning frequency Analog:Horizontal: 31.25 to 92 kHzVertical: 50 to 85 HzHDMI/HDBaseT/DVI-D:Horizontal: 15 to 135 kHzVertical: 23.98/24/25/29.97/30/50/59.94/60 HzSDI (EB‑‑PU2010B/EB‑‑PU2010W only):Horizontal: 15 to 67.5 kHzVertical: 23.98/24/25/29.97/30/50/59.94/60 Hz
Power supply EB‑‑PU2010B/EB‑‑PU2010W/EB‑‑PU1008B/EB‑‑PU1008W/EB‑‑PU1007B/EB‑‑PU1007W:100-240V AC±10% 50/60Hz 5.6 - 2.5 AEB‑‑PU1006W:100-240V AC±10% 50/60Hz 3.9 - 1.7 A
Operating powerconsumption (100 to 120V area)
EB‑‑PU2010B/EB‑‑PU2010W/EB‑‑PU1008B/EB‑‑PU1008W:Light Source Mode: Normal, Custom: 559 WLight Source Mode: Quiet, Extended: 469 WEB‑‑PU1007B/EB‑‑PU1007W:Light Source Mode: Normal, Custom: 448 WLight Source Mode: Quiet, Extended: 379 WEB‑‑PU1006W:Light Source Mode: Normal, Custom: 384 WLight Source Mode: Quiet, Extended: 321 W
Operating powerconsumption (220 to 240V area)
EB‑‑PU2010B/EB‑‑PU2010W/EB‑‑PU1008B/EB‑‑PU1008W:Light Source Mode: Normal, Custom: 535 WLight Source Mode: Quiet, Extended: 452 WEB‑‑PU1007B/EB‑‑PU1007W:Light Source Mode: Normal, Custom: 431 WLight Source Mode: Quiet, Extended: 366 WEB‑‑PU1006W:Light Source Mode: Normal, Custom: 367 WLight Source Mode: Quiet, Extended: 310 W
Standby powerconsumption
Communication On: 2.0 WCommunication Off: 0.5 W
Thermal output (max.) EB‑‑PU2010B/EB‑‑PU2010W/EB‑‑PU1008B/EB‑‑PU1008W:100 to 120 V area: 1900.6 BTU/h220 to 240 V area: 1819.0 BTU/hEB‑‑PU1007B/EB‑‑PU1007W:100 to 120 V area: 1523.2 BTU/h220 to 240 V area: 1465.4 BTU/hEB‑‑PU1006W:100 to 120 V area: 1305.6 BTU/h220 to 240 V area: 1247.8 BTU/h
Air flow (max.) 176.1 CFM
Operating altitude Altitude 0 to 3,048 m
Operating temperature(when using a singleprojector installation) ***
EB‑‑PU2010B/EB‑‑PU2010W:Altitude of 0 to 2,286 m: 0 to +50°C (Humidity of 20 to80%, No condensation)Altitude of 2,287 to 3,048 m: 0 to +45°C (Humidity of20 to 80%, No condensation)EB‑‑PU1008B/EB‑‑PU1008W/EB‑‑PU1007B/EB‑‑PU1007W/EB‑‑PU1006W:Altitude of 0 to 2,286 m: 0 to +45°C (Humidity of 20 to80%, No condensation)Altitude of 2,287 to 3,048 m: 0 to +40°C (Humidity of20 to 80%, No condensation)
Storage temperature -10 to +60°C (No condensation)
Mass EB‑‑PU2010B/EB‑‑PU2010W:Approx. 16.8 kgEB‑‑PU1008B/EB‑‑PU1008W/EB‑‑PU1007B/EB‑‑PU1007W:Approx. 16.3 kgEB‑‑PU1006W:Approx. 15.4 kg
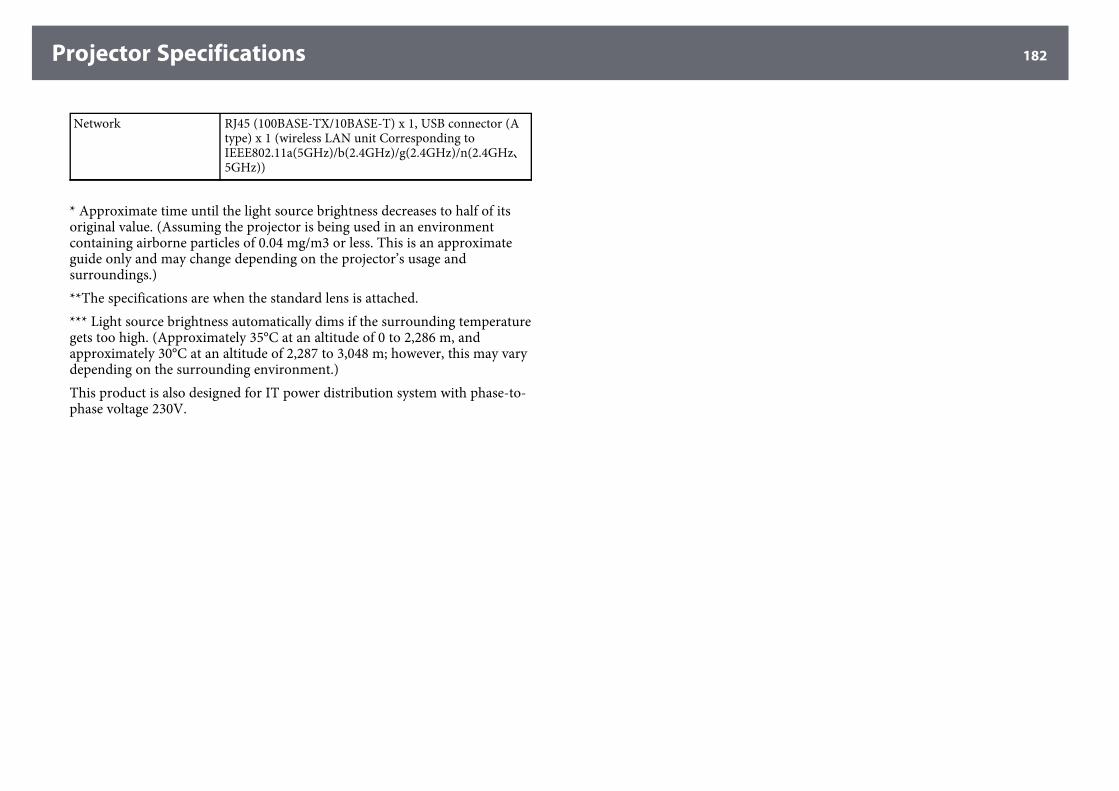
Projector Specifications 182
Network RJ45 (100BASE-TX/10BASE-T) x 1, USB connector (Atype) x 1 (wireless LAN unit Corresponding toIEEE802.11a(5GHz)/b(2.4GHz)/g(2.4GHz)/n(2.4GHz、5GHz))
* Approximate time until the light source brightness decreases to half of itsoriginal value. (Assuming the projector is being used in an environmentcontaining airborne particles of 0.04 mg/m3 or less. This is an approximateguide only and may change depending on the projector’s usage andsurroundings.)**The specifications are when the standard lens is attached.*** Light source brightness automatically dims if the surrounding temperaturegets too high. (Approximately 35°C at an altitude of 0 to 2,286 m, andapproximately 30°C at an altitude of 2,287 to 3,048 m; however, this may varydepending on the surrounding environment.)This product is also designed for IT power distribution system with phase-to-phase voltage 230V.
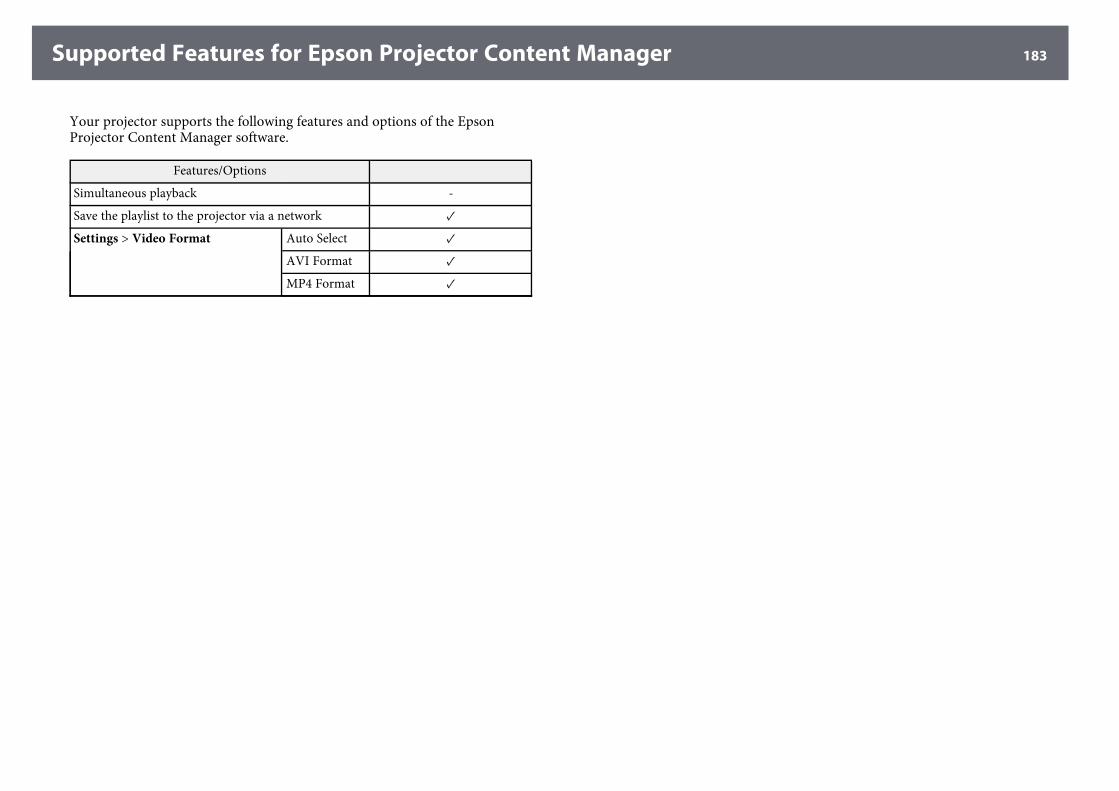
Supported Features for Epson Projector Content Manager 183
Your projector supports the following features and options of the EpsonProjector Content Manager software.
Features/Options
Simultaneous playback -
Save the playlist to the projector via a network ✓
Settings > Video Format Auto Select ✓
AVI Format ✓
MP4 Format ✓
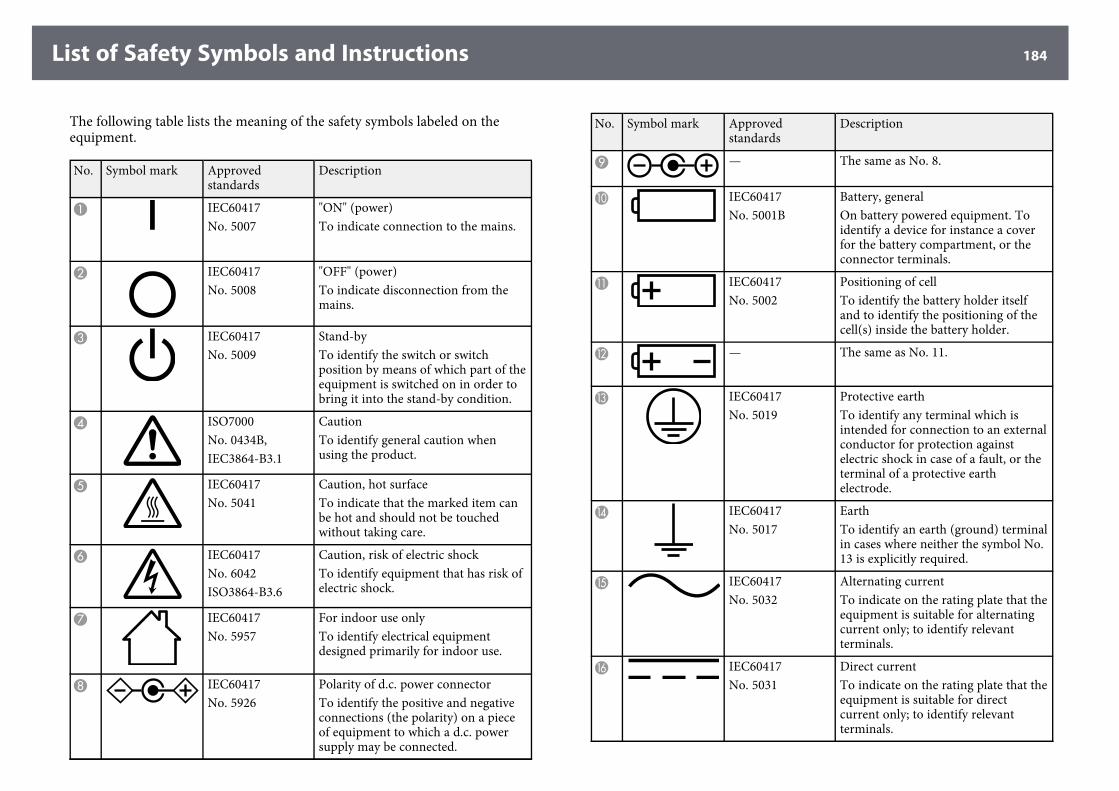
List of Safety Symbols and Instructions 184
The following table lists the meaning of the safety symbols labeled on theequipment.
No. Symbol mark Approvedstandards
Description
A IEC60417No. 5007
"ON" (power)To indicate connection to the mains.
B IEC60417No. 5008
"OFF" (power)To indicate disconnection from themains.
C IEC60417No. 5009
Stand-byTo identify the switch or switchposition by means of which part of theequipment is switched on in order tobring it into the stand-by condition.
D ISO7000No. 0434B,IEC3864-B3.1
CautionTo identify general caution whenusing the product.
E IEC60417No. 5041
Caution, hot surfaceTo indicate that the marked item canbe hot and should not be touchedwithout taking care.
F IEC60417No. 6042ISO3864-B3.6
Caution, risk of electric shockTo identify equipment that has risk ofelectric shock.
G IEC60417No. 5957
For indoor use onlyTo identify electrical equipmentdesigned primarily for indoor use.
H IEC60417No. 5926
Polarity of d.c. power connectorTo identify the positive and negativeconnections (the polarity) on a pieceof equipment to which a d.c. powersupply may be connected.
No. Symbol mark Approvedstandards
Description
I — The same as No. 8.
J IEC60417No. 5001B
Battery, generalOn battery powered equipment. Toidentify a device for instance a coverfor the battery compartment, or theconnector terminals.
K IEC60417No. 5002
Positioning of cellTo identify the battery holder itselfand to identify the positioning of thecell(s) inside the battery holder.
L — The same as No. 11.
M IEC60417No. 5019
Protective earthTo identify any terminal which isintended for connection to an externalconductor for protection againstelectric shock in case of a fault, or theterminal of a protective earthelectrode.
N IEC60417No. 5017
EarthTo identify an earth (ground) terminalin cases where neither the symbol No.13 is explicitly required.
O IEC60417No. 5032
Alternating currentTo indicate on the rating plate that theequipment is suitable for alternatingcurrent only; to identify relevantterminals.
P IEC60417No. 5031
Direct currentTo indicate on the rating plate that theequipment is suitable for directcurrent only; to identify relevantterminals.
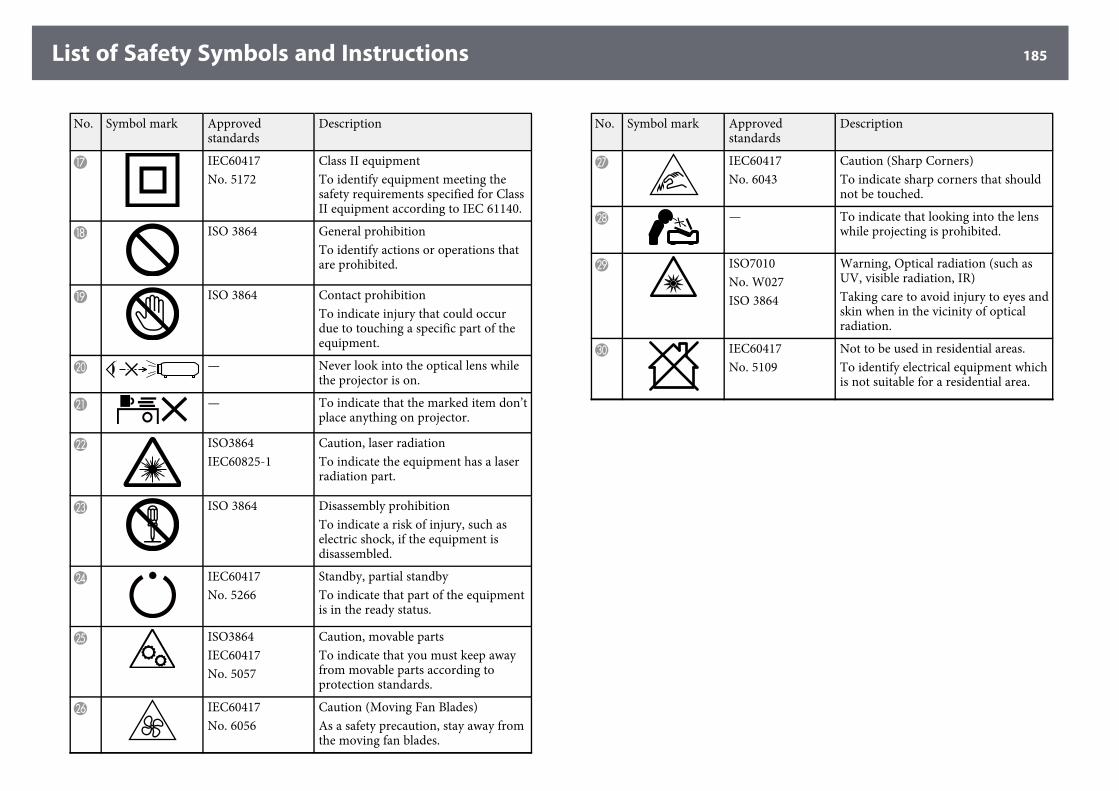
List of Safety Symbols and Instructions 185
No. Symbol mark Approvedstandards
Description
Q IEC60417No. 5172
Class II equipmentTo identify equipment meeting thesafety requirements specified for ClassII equipment according to IEC 61140.
R ISO 3864 General prohibitionTo identify actions or operations thatare prohibited.
S ISO 3864 Contact prohibitionTo indicate injury that could occurdue to touching a specific part of theequipment.
T — Never look into the optical lens whilethe projector is on.
U — To indicate that the marked item don’tplace anything on projector.
V ISO3864IEC60825-1
Caution, laser radiationTo indicate the equipment has a laserradiation part.
W ISO 3864 Disassembly prohibitionTo indicate a risk of injury, such aselectric shock, if the equipment isdisassembled.
X IEC60417No. 5266
Standby, partial standbyTo indicate that part of the equipmentis in the ready status.
Y ISO3864IEC60417No. 5057
Caution, movable partsTo indicate that you must keep awayfrom movable parts according toprotection standards.
Z IEC60417No. 6056
Caution (Moving Fan Blades)As a safety precaution, stay away fromthe moving fan blades.
No. Symbol mark Approvedstandards
Description
a IEC60417No. 6043
Caution (Sharp Corners)To indicate sharp corners that shouldnot be touched.
b — To indicate that looking into the lenswhile projecting is prohibited.
c ISO7010No. W027ISO 3864
Warning, Optical radiation (such asUV, visible radiation, IR)Taking care to avoid injury to eyes andskin when in the vicinity of opticalradiation.
d IEC60417No. 5109
Not to be used in residential areas.To identify electrical equipment whichis not suitable for a residential area.
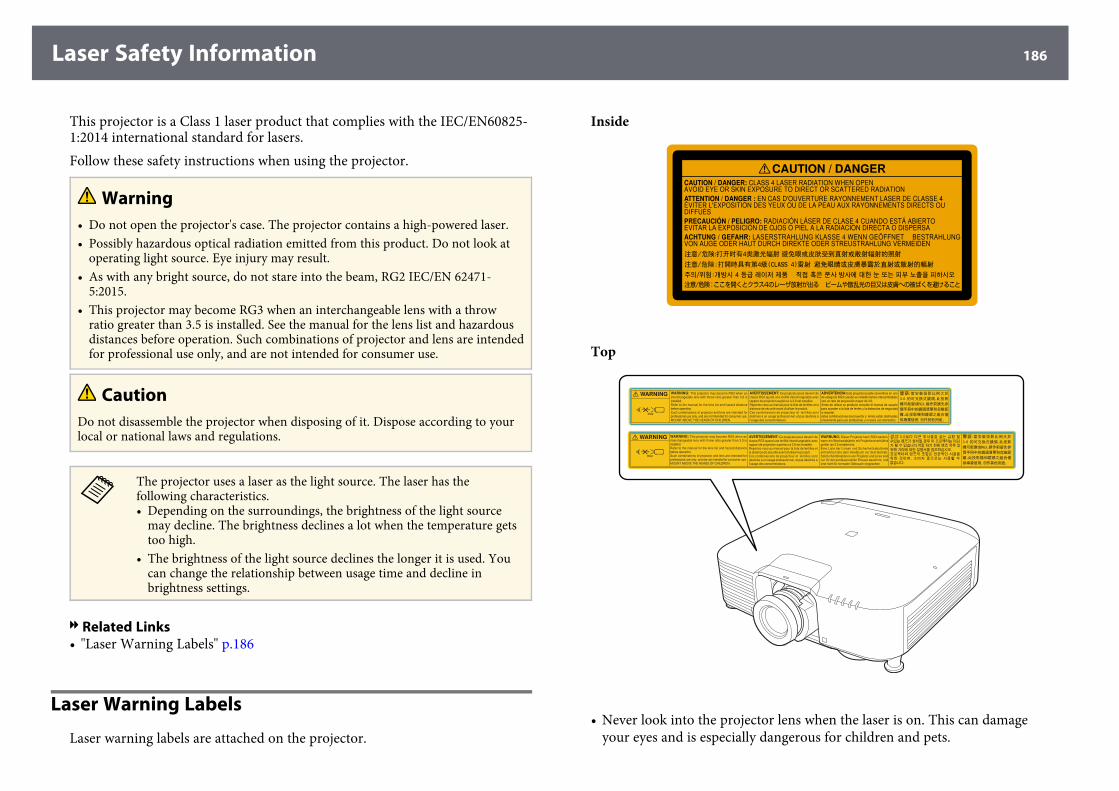
Laser Safety Information 186
This projector is a Class 1 laser product that complies with the IEC/EN60825-1:2014 international standard for lasers.Follow these safety instructions when using the projector.
Warning• Do not open the projector's case. The projector contains a high-powered laser.• Possibly hazardous optical radiation emitted from this product. Do not look at
operating light source. Eye injury may result.• As with any bright source, do not stare into the beam, RG2 IEC/EN 62471-
5:2015.• This projector may become RG3 when an interchangeable lens with a throw
ratio greater than 3.5 is installed. See the manual for the lens list and hazardousdistances before operation. Such combinations of projector and lens are intendedfor professional use only, and are not intended for consumer use.
CautionDo not disassemble the projector when disposing of it. Dispose according to yourlocal or national laws and regulations.
a
The projector uses a laser as the light source. The laser has thefollowing characteristics.• Depending on the surroundings, the brightness of the light source
may decline. The brightness declines a lot when the temperature getstoo high.
• The brightness of the light source declines the longer it is used. Youcan change the relationship between usage time and decline inbrightness settings.
gg Related Links• "Laser Warning Labels" p.186
Laser Warning Labels
Laser warning labels are attached on the projector.
Inside
Top
• Never look into the projector lens when the laser is on. This can damageyour eyes and is especially dangerous for children and pets.
Laser Safety Information 187
• When turning on the projector at a distance using the remote control, makesure no one is looking into the lens.
• Do not allow small children to operate the projector. Children must beaccompanied by an adult.
• Do not look into the lens during projection. Also, do not look into the lensusing optical devices, such as a magnifying glass or telescope. This couldcause visual impairment.
For North/South America
WarningMOUNT ABOVE THE HEADS OF CHILDREN. The use of a ceiling mount isrecommended with this product to place it above the eyes of children.
Complies with FDA performance standards for laser products except forconformance as a Risk Group 2 LIP as defined in IEC 62471-5: Ed. 1.0. Formore information see Laser Notice No. 57, dated May 8, 2019.
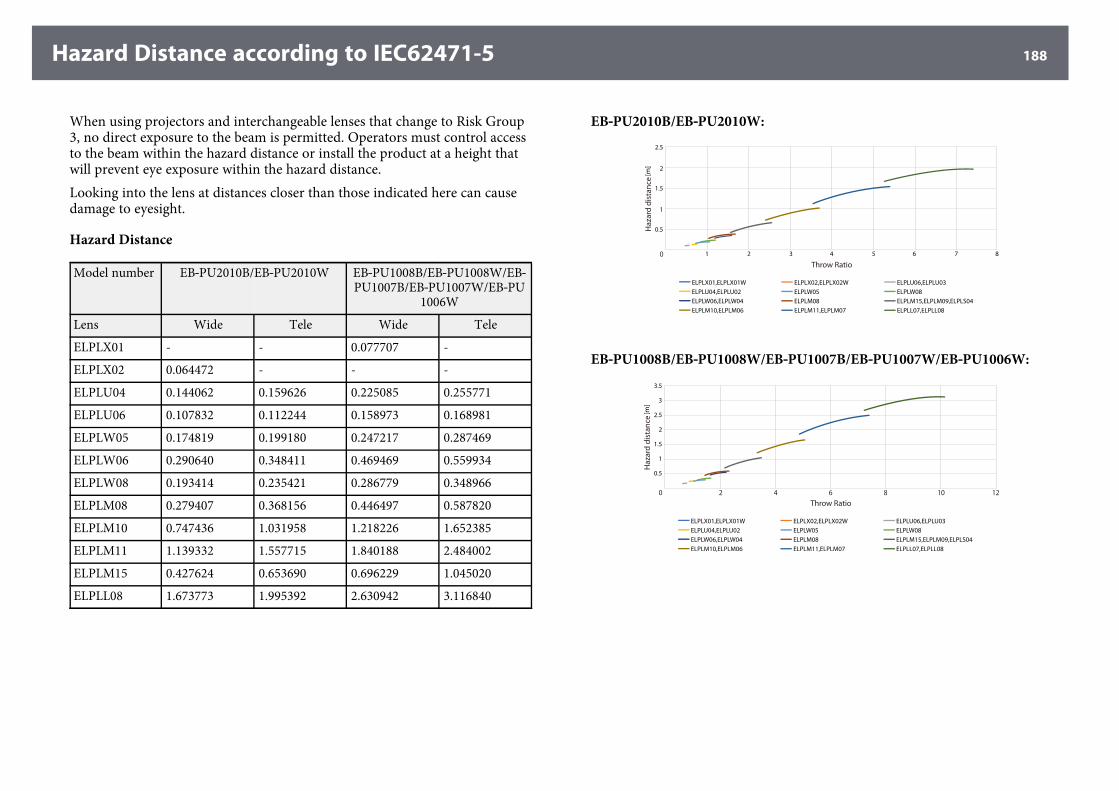
Hazard Distance according to IEC62471-5 188
When using projectors and interchangeable lenses that change to Risk Group3, no direct exposure to the beam is permitted. Operators must control accessto the beam within the hazard distance or install the product at a height thatwill prevent eye exposure within the hazard distance.Looking into the lens at distances closer than those indicated here can causedamage to eyesight.
Hazard Distance
Model number EB‑PU2010B/EB‑PU2010W EB‑PU1008B/EB‑PU1008W/EB‑PU1007B/EB‑PU1007W/EB‑PU
1006W
Lens Wide Tele Wide Tele
ELPLX01 - - 0.077707 -
ELPLX02 0.064472 - - -
ELPLU04 0.144062 0.159626 0.225085 0.255771
ELPLU06 0.107832 0.112244 0.158973 0.168981
ELPLW05 0.174819 0.199180 0.247217 0.287469
ELPLW06 0.290640 0.348411 0.469469 0.559934
ELPLW08 0.193414 0.235421 0.286779 0.348966
ELPLM08 0.279407 0.368156 0.446497 0.587820
ELPLM10 0.747436 1.031958 1.218226 1.652385
ELPLM11 1.139332 1.557715 1.840188 2.484002
ELPLM15 0.427624 0.653690 0.696229 1.045020
ELPLL08 1.673773 1.995392 2.630942 3.116840
EB‑‑PU2010B/EB‑‑PU2010W:
EB‑‑PU1008B/EB‑‑PU1008W/EB‑‑PU1007B/EB‑‑PU1007W/EB‑‑PU1006W:
Notices 189
Check these sections for important notices about your projector.
gg Related Links• "FCC Compliance Statement" p.189• "Indication of the manufacturer and the importer in accordance with
requirements of EU directive" p.190• "Indication of the manufacturer and the importer in accordance with
requirements of United Kingdom directive" p.190• "Restriction of Use" p.190• "Operating System References" p.190• "Trademarks" p.190• "Copyright Notice" p.191• "Copyright Attribution" p.191
FCC Compliance Statement
Supplier's DECLARATION of CONFORMITYAccording to 47CFR, Part 2 and 15Class B Personal Computers and Peripherals; and/orCPU Boards and Power Supplies used with Class B Personal Computers
We: Epson America, Inc.Located at: 3131 Katella Avenue, Los Alamitos, CATel: 562-981-3840Declare under sole responsibility that the product identified herein, complieswith 47CFR Part 2 and 15 of the FCC rules as a Class B digital device. Eachproduct marketed, is identical to the representative unit tested and found tobe compliant with the standards. Records maintained continue to reflect theequipment being produced can be expected to be within the variationaccepted, due to quantity production and testing on a statistical basis asrequired by 47CFR 2.906. Operation is subject to the following twoconditions: (1) this device may not cause harmful interference, and (2) thisdevice must accept any interference received, including interference that maycause undesired operation.
Trade Name: EPSONType of Product: LCD ProjectorModel: HA33B/HA34B/HA35B/HA52B
FCC Compliance Statement For United States UsersThis device complies with part 15 of the FCC Rules. Operation is subject tothe following two conditions: (1) This device may not cause harmfulinterference, and (2) this device must accept any interference received,including interference that may cause undesired operation.This equipment has been tested and found to comply with the limits for aClass B digital device, pursuant to Part 15 of the FCC Rules. These limits aredesigned to provide reasonable protection against harmful interference in aresidential installation. This equipment generates, uses, and can radiate radiofrequency energy and, if not installed and used in accordance with theinstructions, may cause harmful interference to radio communications.However, there is no guarantee that interference will not occur in a particularinstallation. If this equipment does cause interference to radio and televisionreception, which can be determined by turning the equipment off and on, theuser is encouraged to try to correct the interference by one or more of thefollowing measures.
• Reorient or relocate the receiving antenna.• Increase the separation between the equipment and receiver.• Connect the equipment into an outlet on a circuit different from that to
which the receiver is connected.• Consult the dealer or an experienced radio/TV technician for help.
WARNINGThe connection of a non-shielded equipment interface cable to thisequipment will invalidate the FCC Certification or Declaration of this deviceand may cause interference levels which exceed the limits established by theFCC for this equipment. It is the responsibility of the user to obtain and use ashielded equipment interface cable with this device. If this equipment hasmore than one interface connector, do not leave cables connected to unusedinterfaces. Changes or modifications not expressly approved by themanufacturer could void the user's authority to operate the equipment.
Notices 190
Indication of the manufacturer and the importer inaccordance with requirements of EU directive
Manufacturer: SEIKO EPSON CORPORATIONAddress: 3-5, Owa 3-chome, Suwa-shi, Nagano-ken 392-8502 JapanTelephone: 81-266-52-3131http://www.epson.com/
Importer: EPSON EUROPE B.V.Address: Atlas Arena, Asia Building, Hoogoorddreef 5,1101 BA AmsterdamZuidoostThe NetherlandsTelephone: 31-20-314-5000http://www.epson.eu/
Indication of the manufacturer and the importer inaccordance with requirements of United Kingdomdirective
Manufacturer: SEIKO EPSON CORPORATIONAddress: 3-5, Owa 3-chome, Suwa-shi, Nagano-ken 392-8502 JapanTelephone: 81-266-52-3131http://www.epson.com/
Importer: Epson (UK) Ltd.Address: Westside, London Road, Hemel Hempstead, Hertfordshire, HP3 9TD,United Kingdomhttp://www.epson.co.uk
Restriction of Use
When this product is used for applications requiring high reliability/safetysuch as transportation devices related to aviation, rail, marine, automotiveetc.; disaster prevention devices; various safety devices etc; orfunctional/precision devices etc, you should use this product only after givingconsideration to including fail-safes and redundancies into your design tomaintain safety and total system reliability. Because this product was notintended for use in applications requiring extremely high reliability/safetysuch as aerospace equipment, main communication equipment, nuclearpower control equipment, or medical equipment related to direct medical careetc, please make your own judgment on this product’s suitability after a fullevaluation.
Operating System References
• Microsoft® Windows® 8.1 operating system• Microsoft® Windows® 10 operating systemIn this guide, the operating systems above are referred to as "Windows 8.1"and "Windows 10". Furthermore, the collective term "Windows" is used torefer to them all.
• macOS 10.13.x• macOS 10.14.x• macOS 10.15.x• macOS 11.0.xIn this guide, the collective term "Mac" is used to refer to all of the operatingsystems above.
Trademarks
EPSON is a registered trademark, EXCEED YOUR VISION and its logos areregistered trademarks or trademarks of Seiko Epson Corporation.Mac, OS X, and macOS are trademarks of Apple Inc.
Notices 191
Microsoft and Windows are trademarks or registered trademarks of MicrosoftCorporation in the United States and/or other countries.WPA2® and WPA3® are trademarks of Wi-Fi Alliance®.App Store is a service mark of Apple Inc.Chrome, Chromebook, and Google Play are trademarks of Google LLC.HDMI, the HDMI Logo and High-Definition Multimedia Interface aretrademarks or registered trademarks of HDMI Licensing Administrator, Inc.
"QR Code" is a registered trademark of DENSO WAVE INCORPORATED.PJLink trademark is a trademark applied for registration or is alreadyregistered in Japan, the United States of America and other countries andareas.Crestron®, Crestron Connected®, Crestron Fusion®, Crestron Control®, andCrestron RoomView® are registered trademarks of Crestron Electronics, Inc.Art-Net™ Designed by and Copyright Artistic Licence Holdings Ltd.Intel® is a registered trademark of Intel Corporation in the U.S. and/or othercountries.Extron® and XTP® are registered trademarks of RGB Systems. Incorporated.HDBaseT™ and the HDBaseT Alliance logo are trademarks of the HDBaseTAlliance.The N-Mark is a trademark or registered trademark of NFC Forum, Inc. inthe United States and in other countries.Android TV™ is a trademark of Google LLC.Other product names used herein are also for identification purposes onlyand may be trademarks of their respective owners. Epson disclaims any andall rights in those marks.
Copyright Notice
All rights reserved. No part of this publication may be reproduced, stored in aretrieval system, or transmitted in any form or by any means, electronic,mechanical, photocopying, recording, or otherwise, without the prior written
permission of Seiko Epson Corporation. No patent liability is assumed withrespect to the use of the information contained herein. Neither is any liabilityassumed for damages resulting from the use of the information containedherein.Neither Seiko Epson Corporation nor its affiliates shall be liable to thepurchaser of this product or third parties for damages, losses, costs, orexpenses incurred by the purchaser or third parties as a result of: accident,misuse, or abuse of this product or unauthorized modifications, repairs, oralterations to this product, or (excluding the U.S.) failure to strictly complywith Seiko Epson Corporation's operating and maintenance instructions.Seiko Epson Corporation shall not be liable against any damages or problemsarising from the use of any options or any consumable products other thanthose designated as Original Epson Products or Epson Approved Products bySeiko Epson Corporation.The contents of this guide may be changed or updated without further notice.
Copyright Attribution
This information is subject to change without notice.© 2021 Seiko Epson Corporation2021.4 414136100EN