EPSON Stylus Photo 935 - IIS Windows Server
134
-
Upload
khangminh22 -
Category
Documents
-
view
3 -
download
0
Transcript of EPSON Stylus Photo 935 - IIS Windows Server


All rights reserved. No part of this publication may be reproduced, stored in a retrieval system, or transmitted in any form or by any means, electronic, mechanical, photocopying, recording, or otherwise, without the prior written permission of SEIKO EPSON CORPORATION. The information contained herein is designed only for use with this EPSON printer. EPSON is not responsible for any use of this information as applied to other printers.
Neither SEIKO EPSON CORPORATION nor its affiliates shall be liable to the purchaser of this product or third parties for damages, losses, costs, or expenses incurred by the purchaser or third parties as a result of accident, misuse, or abuse of this product or unauthorized modifications, repairs, or alterations to this product, or (excluding the U.S.) failure to strictly comply with SEIKO EPSON CORPORATION's operating and maintenance instructions.
SEIKO EPSON CORPORATION shall not be liable for any damages or problems arising from the use of any options or any consumable products other than those designated as Original EPSON Products or EPSON Approved Products by SEIKO EPSON CORPORATION.
SEIKO EPSON CORPORATION shall not be held liable for any damage resulting from electromagnetic interference that occurs from the use of any interface cables other than those designated as EPSON Approved Products by SEIKO EPSON CORPORATION.
EPSON is a registered trademark and EPSON Stylus is a trademark of SEIKO EPSON CORPORATION.
Copyright 2001 SEIKO EPSON CORPORATION. All rights reserved. PRINT Image Matching is a trademark of SEIKO EPSON CORPORATION. The PRINT Image Matching logo is a trademark of SEIKO EPSON CORPORATION.
Copyright 2002 SEIKO EPSON CORPORATION. All rights reserved.USB DIRECT-PRINT is a trademark of SEIKO EPSON CORPORATION.The USB DIRECT-PRINT logo is a trademark of SEIKO EPSON CORPORATION.
Microsoft and Windows are registered trademarks of Microsoft Corporation.
Apple and Macintosh are registered trademarks of Apple Computer, Inc.
DPOF is a trademark of CANON INC., Eastman Kodak Company, Fuji Photo Film Co., Ltd. and Matsushita Electric Industrial Co., Ltd.
Zip® is a registered trademark of Iomega Corporation.
The BLUETOOTH trademarks are owned by Bluetooth SIG, Inc., U.S.A. and licensed to SEIKO EPSON CORPORATION.
Panorama Stitcher is developed by SANYO Electric Co., Ltd. and SANYO Electric Software Co., Ltd.
SD is a trademark.
General Notice: Other product names used herein are for identification purposes only and may be trademarks of their respective owners. EPSON disclaims any and all rights in those marks.
Copyright © 2003 by SEIKO EPSON CORPORATION, Nagano, Japan.
i

ii

Contents
Important Safety Instructions . . . . . . . . . . . . . . . . . . . . . . . . . . . . . . . .1Warnings, Cautions, and Notes . . . . . . . . . . . . . . . . . . . . . . . . . . . . . .8
Printer Parts and Control Panel Functions . . . . . . . . . .9Printer Parts . . . . . . . . . . . . . . . . . . . . . . . . . . . . . . . . . . . . . . . . . . . . . . .9Buttons . . . . . . . . . . . . . . . . . . . . . . . . . . . . . . . . . . . . . . . . . . . . . . . . . .11Control panel . . . . . . . . . . . . . . . . . . . . . . . . . . . . . . . . . . . . . . . . . . . . .12Lights . . . . . . . . . . . . . . . . . . . . . . . . . . . . . . . . . . . . . . . . . . . . . . . . . . .14
Direct Printing Basics . . . . . . . . . . . . . . . . . . . . . . . . . .15Introduction . . . . . . . . . . . . . . . . . . . . . . . . . . . . . . . . . . . . . . . . . . . . . .15Loading the Paper . . . . . . . . . . . . . . . . . . . . . . . . . . . . . . . . . . . . . . . .16Loading Memory Cards . . . . . . . . . . . . . . . . . . . . . . . . . . . . . . . . . . . .18Printing a Selected Photo . . . . . . . . . . . . . . . . . . . . . . . . . . . . . . . . . . .21Ejecting Memory Cards . . . . . . . . . . . . . . . . . . . . . . . . . . . . . . . . . . . .26
Various Setting Options . . . . . . . . . . . . . . . . . . . . . . . .28Using the LCD Panel . . . . . . . . . . . . . . . . . . . . . . . . . . . . . . . . . . . . . .28Using the Print Mode Settings . . . . . . . . . . . . . . . . . . . . . . . . . . . . . .33Advanced Settings . . . . . . . . . . . . . . . . . . . . . . . . . . . . . . . . . . . . . . . .37PRINT Image Matching . . . . . . . . . . . . . . . . . . . . . . . . . . . . . . . . . . . .49DPOF Settings . . . . . . . . . . . . . . . . . . . . . . . . . . . . . . . . . . . . . . . . . . . .50PRINT Image Framer . . . . . . . . . . . . . . . . . . . . . . . . . . . . . . . . . . . . . .51Digital Camera Direct Printing . . . . . . . . . . . . . . . . . . . . . . . . . . . . . .53Using The Bluetooth unit . . . . . . . . . . . . . . . . . . . . . . . . . . . . . . . . . .56Storing and Loading the Settings . . . . . . . . . . . . . . . . . . . . . . . . . . . .57Printing with an External Device . . . . . . . . . . . . . . . . . . . . . . . . . . . .58Exif Print . . . . . . . . . . . . . . . . . . . . . . . . . . . . . . . . . . . . . . . . . . . . . . . .60Printing with PRINT Image Matching . . . . . . . . . . . . . . . . . . . . . . .61
Using Roll Paper . . . . . . . . . . . . . . . . . . . . . . . . . . . . . .63Precautions for Using Roll Paper . . . . . . . . . . . . . . . . . . . . . . . . . . . .63
iii

Loading Roll Paper . . . . . . . . . . . . . . . . . . . . . . . . . . . . . . . . . . . . . . . 64Attaching the Catcher for 210 mm Roll Paper . . . . . . . . . . . . . . . . 69Printing Area and Margins . . . . . . . . . . . . . . . . . . . . . . . . . . . . . . . . 71Printing on Roll Paper . . . . . . . . . . . . . . . . . . . . . . . . . . . . . . . . . . . . 72Cutting the Remaining Last Photo after Printing . . . . . . . . . . . . . . 73Removing Roll Paper . . . . . . . . . . . . . . . . . . . . . . . . . . . . . . . . . . . . . 74Storing EPSON Roll Paper . . . . . . . . . . . . . . . . . . . . . . . . . . . . . . . . . 75
Replacing Ink Cartridges . . . . . . . . . . . . . . . . . . . . . . 76Checking the Ink Supply . . . . . . . . . . . . . . . . . . . . . . . . . . . . . . . . . . 76Replacing an Ink Cartridge . . . . . . . . . . . . . . . . . . . . . . . . . . . . . . . . 77
Maintenance . . . . . . . . . . . . . . . . . . . . . . . . . . . . . . . . 84Checking the Print Head Nozzles . . . . . . . . . . . . . . . . . . . . . . . . . . . 84Cleaning the Print Head . . . . . . . . . . . . . . . . . . . . . . . . . . . . . . . . . . . 85Aligning the Print Head . . . . . . . . . . . . . . . . . . . . . . . . . . . . . . . . . . . 87Adjusting the Cutting Position . . . . . . . . . . . . . . . . . . . . . . . . . . . . . 89Cleaning the Printer . . . . . . . . . . . . . . . . . . . . . . . . . . . . . . . . . . . . . . 90Transporting the Printer . . . . . . . . . . . . . . . . . . . . . . . . . . . . . . . . . . . 91
Troubleshooting . . . . . . . . . . . . . . . . . . . . . . . . . . . . . . 93Error/Warning Display . . . . . . . . . . . . . . . . . . . . . . . . . . . . . . . . . . . 93Print Quality Problems . . . . . . . . . . . . . . . . . . . . . . . . . . . . . . . . . . . . 96Printout Problems Not Related to Print Quality . . . . . . . . . . . . . . . 99Paper Does Not Feed Correctly . . . . . . . . . . . . . . . . . . . . . . . . . . . . 100Printer Does Not Print . . . . . . . . . . . . . . . . . . . . . . . . . . . . . . . . . . . 104Printing Problem when Using Bluetooth Unit . . . . . . . . . . . . . . . 106Cancelling Printing . . . . . . . . . . . . . . . . . . . . . . . . . . . . . . . . . . . . . . 106
Contacting Customer Support . . . . . . . . . . . . . . . . . 107Technical Support Web Site . . . . . . . . . . . . . . . . . . . . . . . . . . . . . . . 107Regional Customer Services . . . . . . . . . . . . . . . . . . . . . . . . . . . . . . 107
Options and Consumable Products . . . . . . . . . . . . . 110Options . . . . . . . . . . . . . . . . . . . . . . . . . . . . . . . . . . . . . . . . . . . . . . . . 110Consumable Products . . . . . . . . . . . . . . . . . . . . . . . . . . . . . . . . . . . . 113
iv

Printer Specifications . . . . . . . . . . . . . . . . . . . . . . . . .117Printing . . . . . . . . . . . . . . . . . . . . . . . . . . . . . . . . . . . . . . . . . . . . . . . . .117Paper . . . . . . . . . . . . . . . . . . . . . . . . . . . . . . . . . . . . . . . . . . . . . . . . . . .117Ink Cartridges . . . . . . . . . . . . . . . . . . . . . . . . . . . . . . . . . . . . . . . . . . .121Mechanical . . . . . . . . . . . . . . . . . . . . . . . . . . . . . . . . . . . . . . . . . . . . . .122Electrical . . . . . . . . . . . . . . . . . . . . . . . . . . . . . . . . . . . . . . . . . . . . . . . .123Environmental . . . . . . . . . . . . . . . . . . . . . . . . . . . . . . . . . . . . . . . . . . .123Built-in card slots . . . . . . . . . . . . . . . . . . . . . . . . . . . . . . . . . . . . . . . .124External Storage Devices . . . . . . . . . . . . . . . . . . . . . . . . . . . . . . . . . .125Standards and Approvals . . . . . . . . . . . . . . . . . . . . . . . . . . . . . . . . .125
v

vi

Safety Instructions
Important Safety Instructions
Read all of the instructions in this section before using your printer. Also, be sure to follow all warnings and instructions marked on the printer.
When setting up your printer
Observe the following when setting up the printer:
❏ Do not block or cover the openings in the printer.
❏ Use only the type of power source indicated on the printer’s label.
❏ Use only the power cord that comes with this product. Use of another card may result in fire or electric shock.
❏ This product’s power cord is for use with this product only. Use with other equipment may result in fire or electric shock.
❏ Be sure your AC power cord meets the relevant local safety standards.
❏ Connect all equipment to properly grounded power outlets. Avoid using outlets on the same circuit as photocopiers or air control systems that regularly switch on and off.
❏ Avoid electrical outlets controlled by wall switches or automatic timers.
1

❏ Keep the entire computer system away from potential sources of electromagnetic interference, such as loudspeakers or the base units of cordless telephones.
❏ Do not use a damaged or frayed power cord.
❏ If you use an extension cord with the printer, make sure that the total ampere rating of the devices plugged into the extension cord does not exceed the cord’s ampere rating. Also, make sure that the total ampere rating of all devices plugged into the wall outlet does not exceed the wall outlet’s ampere rating.
❏ Do not attempt to service the printer yourself.
❏ Unplug the printer and refer servicing to qualified service personnel under the following conditions:
The power cord or plug is damaged; liquid has entered the printer; the printer has been dropped or the cabinet damaged; the printer does not operate normally or exhibits a distinct change in performance.
When choosing a place for the printer
Observe the following when choosing a place for the printer:
❏ Place the printer on a flat, stable surface that extends beyond the printer base in all directions. If you place the printer by the wall, leave more than 10 cm between the back of the printer and the wall. The printer will not operate properly if it is tilted at an angle.
❏ Leave enough space in front of the printer for the paper to be fully ejected.
2

❏ When storing or transporting the printer, do not tilt it, stand it on its side, or turn it upside down. Otherwise, ink may leak from the cartridges.
❏ Avoid places subject to rapid changes in temperature and humidity. Also, keep the printer away from direct sunlight, strong light and heat sources.
❏ Avoid places subject to dust, shocks, and vibrations.
❏ Leave enough room around the printer to allow for sufficient ventilation.
❏ Place the printer near a wall outlet where the power cord can be easily unplugged.
When using the printer
Observe the following when using the printer:
❏ Do not block or cover the openings in the printer.
❏ Do not insert objects through the slots in the printer.
❏ Take care not to spill liquid on the printer.
❏ Do not put your hand inside the printer or touch the ink cartridges during printing.
❏ Do not move the print head by hand; otherwise, you may damage the printer.
❏ Always turn the printer off using the P power button. When this button is pressed, the LCD panel goes out. Do not unplug the printer or turn off the power to the outlet until the LCD panel goes out.
3
❏ Before transporting the printer, make sure that the print head is in the home (far right) position and the ink cartridges are in place.
❏ Leave the ink cartridges installed. Removing the cartridges can dehydrate the print head and may prevent the printer from printing.
❏ Unplug the printer and refer servicing to qualified service personal under the following conditions:
The power cord or plug is damaged; liquid has entered the printer; the printer has been dropped or the cabinet damaged; the printer does not operate normally or exhibits a distinct change in performance.
When using a memory card
❏ Do not remove the memory card or turn off the printer while the computer and the memory card are communicating (when the memory card light is flashing).
❏ The methods for using memory cards vary according to card type. Be sure to refer to the documentation packaged with your memory card for details.
❏ Use only memory cards compatible with the printer. Refer to Loading Memory Cards.
When using LCD panel or the optional Preview Monitor
❏ The LCD panel or optional Preview Monitor may contain a few small bright or dark spots. These are normal and do not mean that the LCD monitor is damaged in any way.
4

❏ Only use a dry, soft cloth to clean the LCD panel or the optional Preview Monitor. Do not use liquid or chemical cleansers.
❏ If the LCD panel on your printer’s control panel or optional Preview Monitor is damaged, contact your dealer. If the liquid crystal solution gets on your hands, wash them thoroughly with soap and water. If the liquid crystal solution gets into your eyes, flush them immediately with water. If discomfort or vision problems remain after a thorough flushing, see a doctor immediately.
❏ Do not remove the Preview Monitor slot cover unless you are using the optional Preview Monitor.
When using the optional Bluetooth™ unit
Refer to Bluetooth Unit User’s Guide for the safety instructions when using the Bluetooth unit.
When handling the ink cartridges
Observe the following when handling the ink cartridges:
❏ Keep ink cartridges out of the reach of children. Do not allow children to drink from or otherwise handle the cartridges.
❏ Do not open the ink cartridge packages until just before you install them.
❏ Do not shake the ink cartridge; this can cause leakage.
❏ You must remove the yellow tape seals from the cartridges before installing them; otherwise, the cartridges will become unusable.
5
❏ Do not remove the blue portion of the tape seal from the top of the cartridges.
❏ Do not remove the tape seals from the bottom of the cartridges.
❏ Be careful when you handle used ink cartridges, as there may be some ink remaining around the ink supply port. If ink gets onto your skin, wash the area thoroughly with soap and water. If ink gets into your eyes, flush them immediately with water. If discomfort or vision problems remain after a thorough flushing, see a doctor immediately.
❏ Install the ink cartridge immediately after you remove it from its package. If you leave a cartridge unpacked for a long time before using it, normal printing may not be possible.
❏ Do not use an ink cartridge beyond the date printed on the cartridge carton: otherwise, it may result in reduced print quality. For best results, use all of the ink in the cartridge with in six months of installation.
❏ Do not dismantle the ink cartridges or try to refill them. This could damage the print head.
❏ After bringing an ink cartridge inside from a cold storage site, allow it to warm up at room temperature for at least three hours before using it.
❏ Store ink cartridges in a cool, dark place.
❏ Do not touch the green IC chip on the back of the cartridge. Doing so may prevent normal operation and printing.
❏ Each time the cartridge is inserted, some ink is consnmed because the printer autometically performs a reliability check.
6
❏ The IC chip on this ink cartridge retains a variety of cartridge-related information, such as the amount of ink remaining, so that the cartridge may be removed and reinserted. However, each time the cartridge is reinstalled, some ink is consumed because the printer automatically performs a reliability check.
❏ If you remove an ink cartridge for later use, protect the ink supply area from dirt and dust and store it in the same environment as the printer. A valve in the ink supply port makes covers or plugs unnecessary, but the ink may stain items that come in contact with this area of the cartridge. Do not touch the ink supply port or surrounding area.
When using the Automatic Roll Paper Cutter
❏ Keep the cutter out of the reach of children.
❏ Do not touch the paper ejection slot and cutter blade.
❏ Do not disassemble or modify the cutter.
ENERGY STAR® Compliance
As an ENERGY STAR® Partner, EPSON has determined that this product meets the ENERGY STAR® guidelines for energy efficiency.
The International ENERGY STAR® Office Equipment Program is a voluntary partnership with the computer and office equipment industry to promote the introduction of energy-efficient personal computers, monitors, printers, fax machines, copiers, and scanners in an effort to reduce air pollution caused by power generation.
7

Warnings, Cautions, and Notes
wWarnings must be followed carefully to avoid bodily injury.
cCautions must be observed to avoid damage to your equipment.
Notes contain important information and useful tips on the operation of your printer.
8

Printer Parts and Control Panel Functions
Printer Parts
Memory card slot (enlarged figure)
edge guides
output tray
paper supportprinter coversheet feeder
output tray extension
memory card slot
card eject button
Memory Stick/SD/MultiMediaCard memory card slot
SmartMedia memory card slot
CompactFlash memory card slot
Memory Stick/SD/MultiMedia Card memory card light
SmartMedia memory card light
CompactFlash memory card light
9

roll paper holder
preview monitor cable connector computer USB connector
preview monitor slot
adjust lever
external device USB connector
Bluetooth port
ink cartridge clamps
control panel
LCD panel
print head
10

Buttons
Buttons
Button Function
P
power
Turns the printer on and off.
b
maintenance
Displays instructions to resolve errors, or cleans the following errors:
No inkNo ink cartridge/abnormalityNo paper (cut sheet only)Paper jam
Starts the Ink Cartridge Replacement utility.
Displays the Advanced Settings menu when the ( maintenance light is off and the button is pressed.
z
roll paper
Loads and ejects the roll paper.
Cuts and ejects the roll paper when the print job is finished, then rewinds the roll paper to the startposition for printing.
When held down for more than 3 seconds, rewinds the roll paper to a position where it can be removed from the sheet feeder.
Prints a nozzle check pattern when pressed while turning on the printer.
11

Control panel
Control panel
2
6
7
3
4
5
1
10
9 8
12

Buttons
1. LCD panel: Shows the items and settings you change with the buttons on the control panel.
2. Up/Down arrow buttons: Move the cursor on the LCD panel. Increase and decrease numbers being entered.
3.Back button: Returns to the main menu on the LCD panel.
4. Select button: Opens the setting menu and selects the item to be set on the LCD panel.
5. Custom buttons: Store the current settings on the LCD panel when held down for more than two seconds. Load the stored settings when pressed.
6. Cancel button: Cancels print operations, or the settings on the LCD panel.
7. Print button: Starts printing with the settings on the LCD panel selected via the buttons on the control panel.
8. Maintenance button: Refer to “Buttons” on page 11 for details.
9. Roll paper button: Refer to “Buttons” on page 11 for details.
10. Power button: Refer to “Buttons” on page 11 for details.
Note:With the exception of the maintenance button, the roll paper button, and the power button, the control panel buttons are used only with direct printing from a memory card.
13

Lights
cCaution:Use only one type of memory card at a time. Eject the loaded memory card before inserting another memory card.
Light Description
Maintenance
(
On or flashes when an error occurs. On the LCD panel, check the description of the error.
SmartMedia memory card
On when a SmartMedia memory card is inserted into the SmartMedia memory card slot.
Flashes when the printer is accessing the SmartMedia memory card.
Memory Stick memory card/SD/MultiMediaCard
On when a Memory Stick memory card is inserted into the Memory Stick memory card slot.
On when an SD or MultiMediaCard memory card is inserted into the SD/MultiMediaCard memory card slot.
Flashes when the printer is accessing the Memory Stick, SD or MultiMediaCard memory card.
CompactFlash memory card
On when a CompactFlash memory card is inserted into the CompactFlash memory card slot.
Flashes when the printer is accessing the CompactFlash memory card.
14
Direct Printing Basics
Introduction
This section provides information on how to print directly from a memory card using settings on the LCD panel and without the use of a computer.
The instructions below provide an example of how to make settings to print a selected photo directry from a memory card. Before you start, you need the paper used in this example (A4-size plain paper) and memory card containing suitable digital photo data.
Note:❏ Before printing large jobs, print a single sheet to confirm quality.
❏ Disconnecting the USB cable is recommended when printing directly from a memory card.
For printing from a computer, refer to the Reference Guide on the CD-ROM.
15

Loading the Paper
1. Lower the output tray and slide out the extension. Next, slide the left edge guide so that the distance between the edge guides is slightly wider than the width of your paper.
2. Fan a stack of plain paper, then tap it on a flat surface to even the edges.
16
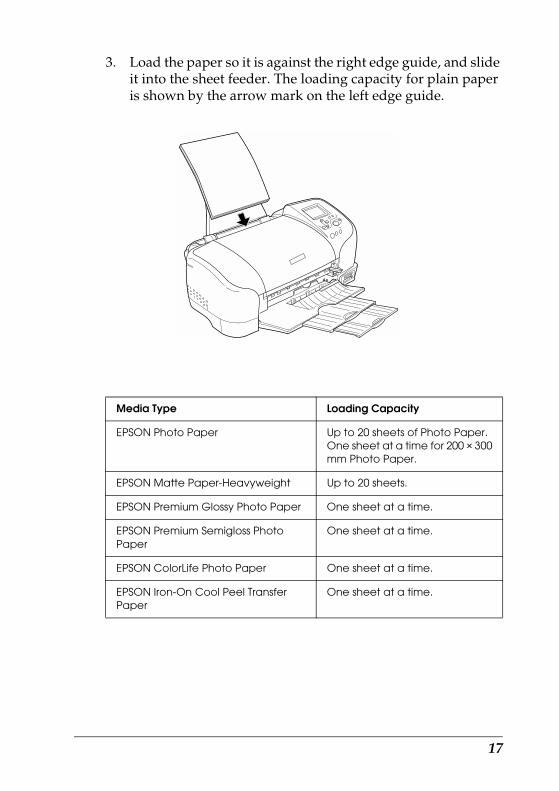
3. Load the paper so it is against the right edge guide, and slide it into the sheet feeder. The loading capacity for plain paper is shown by the arrow mark on the left edge guide.
Media Type Loading Capacity
EPSON Photo Paper Up to 20 sheets of Photo Paper.One sheet at a time for 200 × 300 mm Photo Paper.
EPSON Matte Paper-Heavyweight Up to 20 sheets.
EPSON Premium Glossy Photo Paper One sheet at a time.
EPSON Premium Semigloss Photo Paper
One sheet at a time.
EPSON ColorLife Photo Paper One sheet at a time.
EPSON Iron-On Cool Peel Transfer Paper
One sheet at a time.
17

4. Slide the left edge guide against the left edge of the paper.
Note:Be sure to make the left edge guide flush against the paper or the paper will not feed properly into the printer.
Loading Memory Cards
Loadable storage media
Digital photographs are stored either in the digital camera’s built-in memory or in loadable storage media called memory cards. Memory cards can be inserted into and removed from the camera. The types of storage media that can be used with this printer are shown below.
Loadable storage media
CompactFlash MemoryStick
Microdrive MultiMediaCard
SD Card SmartMedia
18

cCaution:The methods for using memory cards vary according to card type. Be sure to refer to the documentation packaged with your memory card for details.
Note:See “Memory card data format” on page 19 for the specifications of memory cards that can be used with the printer.
Memory card data format
You can use image files that meet the following requirements.
*1:DCF stands for the “Design rule for Camera File system” standard, set by the Japan Electronics and Information Technology Industries Association (JEITA).
*2:Supports Exif Version 2.1/2.2.
Note:File names containing double-byte characters are not valid when printing directly from a memory card.
Inserting memory cards
Turn the printer on, then insert a memory card, as shown in the illustration. When the memory card is inserted correctry, the memory card light corresponding to the card comes on.
Digital camera DCF version 1.0 compliant*1
File format JPEG format image files*2 taken with a DCF version 1.0 compliant digital camera
Image size Vertical 120 to 4600 pixels, horizontal 120 to 4600 pixels
Number of files Up to 999
19
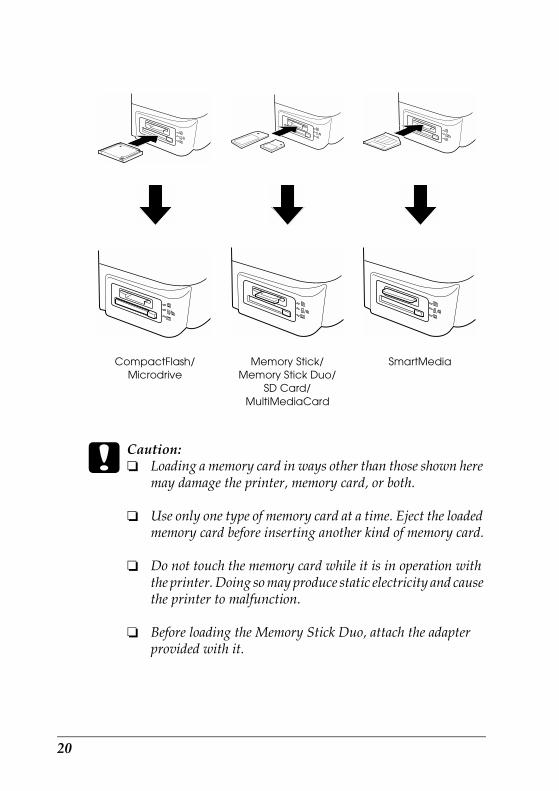
cCaution:❏ Loading a memory card in ways other than those shown here
may damage the printer, memory card, or both.
❏ Use only one type of memory card at a time. Eject the loaded memory card before inserting another kind of memory card.
❏ Do not touch the memory card while it is in operation with the printer. Doing so may produce static electricity and cause the printer to malfunction.
❏ Before loading the Memory Stick Duo, attach the adapter provided with it.
CompactFlash/Microdrive
Memory Stick/Memory Stick Duo/
SD Card/MultiMediaCard
SmartMedia
20

Printing a Selected Photo
Printing an index
You can print one or more copies of an index of all the photographs on a loaded memory card. An index can be helpful in selecting which photos you want to print.
1. Make sure that Print Mode is set to Index.
Note:If Print Mode is not currently set to Index, press the u or d button to select Print Mode, then press the Select button to open the Print Mode menu. Press the u or d button again to select Index and press the Select button.
2. Press the u or d button to select Paper Type, then press the Select button to open the Paper Type menu.
1
21

3. Press the u or d button to select Plain, then press the Select button.
4. Press the u or d button to select Paper Size, then press the Select button to open the Paper Size menu.
5. Press the u or d button to select A4, then press the Select button.
3
54
22
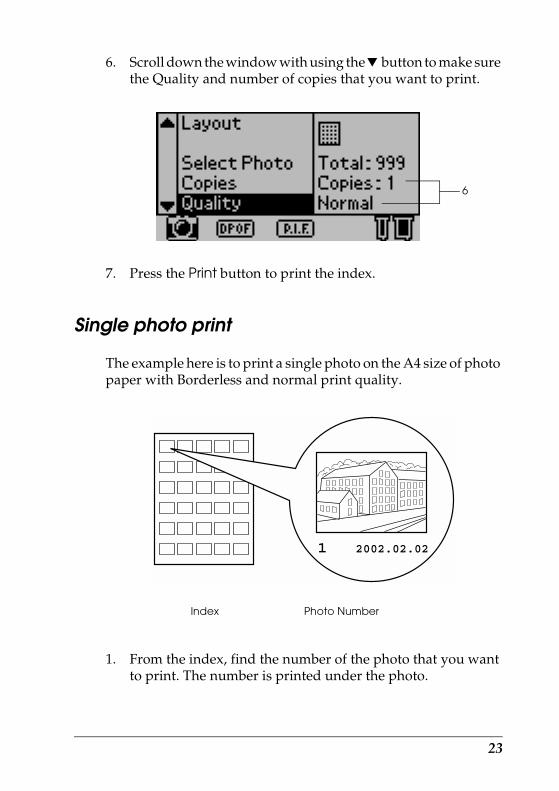
6. Scroll down the window with using the d button to make sure the Quality and number of copies that you want to print.
7. Press the Print button to print the index.
Single photo print
The example here is to print a single photo on the A4 size of photo paper with Borderless and normal print quality.
1. From the index, find the number of the photo that you want to print. The number is printed under the photo.
Index Photo Number
6
23

2. Press the u or d button to select Print Mode, then press the Select button to open the Print Mode menu.
Select One, then press the Select button.
3. Select Photo as the Paper Type setting, then select A4 as the Paper Size setting.
4. Select Layout then press the Select button to open the Layout menu.
Select , then press the Select button. It means borderless printing of cut sheet.
5. Select Select Photo, press the Select button, select the number of the photo that you want to print, and then press the Select button.
4
3
2
5
24

6. Select Copies, press the Select button to open the Copies counter, select Copies:1 from the Copies counter, and then press the Select button.
7. Select Quality, press the Select button to open the Quality menu, select Normal, and then press the Select button.
8. Confirm all of the panel settings, and then press the Print button to print the selected photo.
Cancelling printing
To stop printing in progress, press the Cancel button. The printer will cancel all print jobs, stop printing, and eject any pages that were printing. Depending on the printer’s status, printing may not stop immediately.
6
7
25

Ejecting Memory Cards
After printing all of the jobs, eject the memory card.
1. Make sure that the memory card light is not flashing.
2. Press the eject button as shown in the illustration to eject a CompactFlash memory card or Microdrive.
Pull the card out as shown in the illustration to eject a Memory Stick, SD Memory Card, MultiMediaCard or SmartMedia memory card.
Compact Flash/Microdrive
Memory Stick/Memory Stick Duo/
SD Card/MultiMediaCard
SmartMedia
26

cCaution:Do not remove memory cards or turn off power to the printer while printing or while the memory card light is flashing. Doing so can cause data to be lost.
27
Various Setting Options
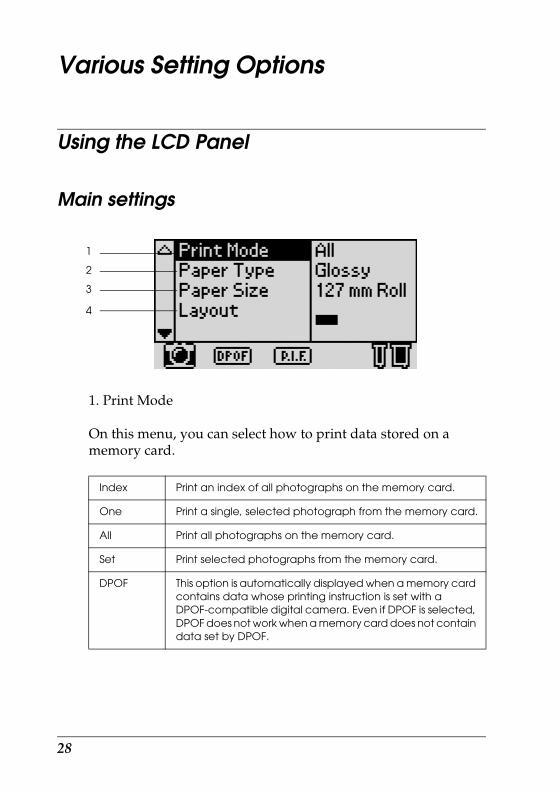
Using the LCD Panel
Main settings
1. Print Mode
On this menu, you can select how to print data stored on a memory card.
Index Print an index of all photographs on the memory card.
One Print a single, selected photograph from the memory card.
All Print all photographs on the memory card.
Set Print selected photographs from the memory card.
DPOF This option is automatically displayed when a memory card contains data whose printing instruction is set with a DPOF-compatible digital camera. Even if DPOF is selected, DPOF does not work when a memory card does not contain data set by DPOF.
1
2
3
4
28

2. Paper Type
On this menu, the paper type can be selected.
3. Paper Size
On this menu, the paper size can be selected. The print size is automatically scaled up/down depending on the combination of selected paper size and layout.
Glossy Print on EPSON Premium Glossy Photo Paper or EPSON Premium Semigloss Photo Paper.
Photo Print on EPSON Photo Paper.
Matte Print on EPSON Matte Paper Heavyweight.
ColorLife Print on EPSON ColorLife Photo Paper.
Plain Print on plain paper, EPSON Premium Ink Jet Plain Paper, or EPSON Bright White Ink Jet Paper.
Iron-on Print on EPSON Iron-On Cool Peel Transfer Paper.
89 mm Roll Print on 89 mm width roll paper.
100 mm Roll Print on 100 mm width roll paper.
127 mm Roll Print on 127 mm width roll paper.
210 mm Roll Print on 210 mm width roll paper.
89 × 127 mm Print on 89 × 127 mm size sheets of paper.
127 × 178 mm Print on 127 × 178 mm size sheets of paper when Glossy is selected as the Paper Type setting.
100 × 150 mm Print on 100 × 150 mm size sheets of paper.
A4 Print on A4 size (210 × 297 mm) sheets of paper.
29

4. Layout
On this menu, the print layout can be specified.
Borderless, Portrait Prints without margins. Portrait layout.
Borderless, Landscape Prints without margins. Landscape layout. Available with roll paper only.
Single Prints with 3-mm margins on all sides. Portrait layout.
Double Prints two images (landscape) on one page.
Triple Prints three images (landscape) on one page.
Quarter Prints four images (portrait) on one page.
Octet Prints eight images (landscape) on one page.
20 Prints 20 images ((landscape) on one page.
Panoramic Prints one image on one page as a panorama picture by cropping horizontally or vertically. This is available with roll paper only.
Variable size Prints multiple sizes on one page.
30

When Borderless printing, note the following:
❏ Printing without margins takes longer than printing with margins.
❏ Because this setting enlarges the image to a size slightly larger than the paper size, the portion of the image that extends beyond the edges of the paper will not be printed.
❏ Print quality may decline in the top and bottom areas of the printout, or the area may be smeared when printing.
❏ Before printing large jobs, print a single sheet to confirm quality.
5. Select Photo
This specifies the photo you want to print when One or Set is selected as the Print Mode. The total number of photographs on the memory card is displayed when All or Index is selected in Print Mode. To confirm the photo number, print the index or use the optional Preview Monitor.
5
6
7
8
31
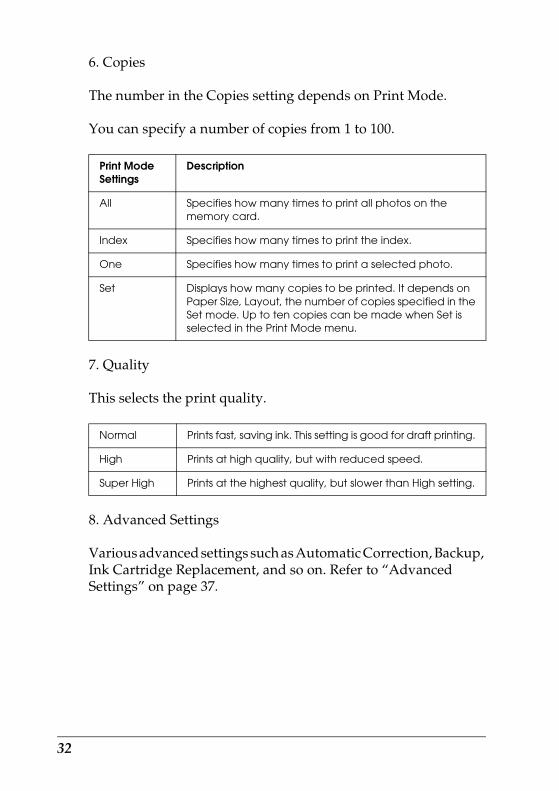
6. Copies
The number in the Copies setting depends on Print Mode.
You can specify a number of copies from 1 to 100.
7. Quality
This selects the print quality.
8. Advanced Settings
Various advanced settings such as Automatic Correction, Backup, Ink Cartridge Replacement, and so on. Refer to “Advanced Settings” on page 37.
Print Mode Settings
Description
All Specifies how many times to print all photos on the memory card.
Index Specifies how many times to print the index.
One Specifies how many times to print a selected photo.
Set Displays how many copies to be printed. It depends on Paper Size, Layout, the number of copies specified in the Set mode. Up to ten copies can be made when Set is selected in the Print Mode menu.
Normal Prints fast, saving ink. This setting is good for draft printing.
High Prints at high quality, but with reduced speed.
Super High Prints at the highest quality, but slower than High setting.
32
Using the Print Mode Settings
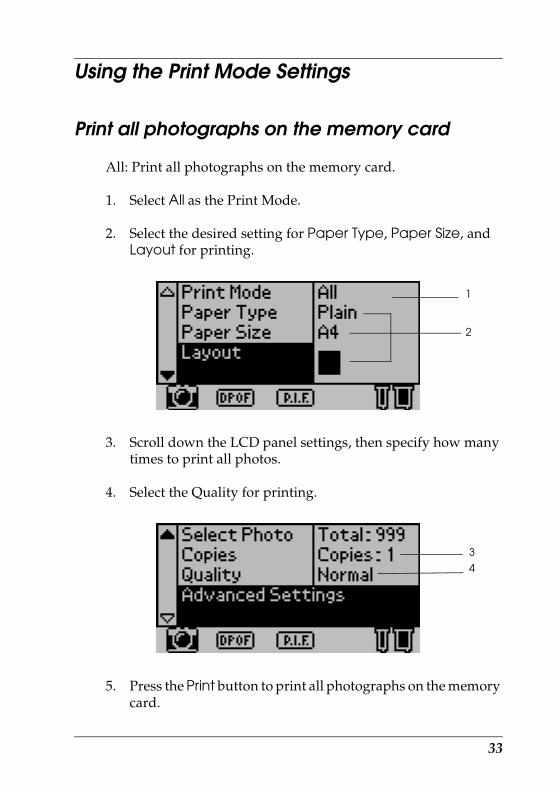
Print all photographs on the memory card
All: Print all photographs on the memory card.
1. Select All as the Print Mode.
2. Select the desired setting for Paper Type, Paper Size, and Layout for printing.
3. Scroll down the LCD panel settings, then specify how many times to print all photos.
4. Select the Quality for printing.
5. Press the Print button to print all photographs on the memory card.
1
2
3
4
33
Print index from the memory card
Index: Print an index of all photographs on a memory card.
Refer to “Printing an index” on page 21.
Single photo print
One: Print a single, selected photograph from the memory card.
Refer to “Single photo print” on page 23.
Print multiple selected photographs
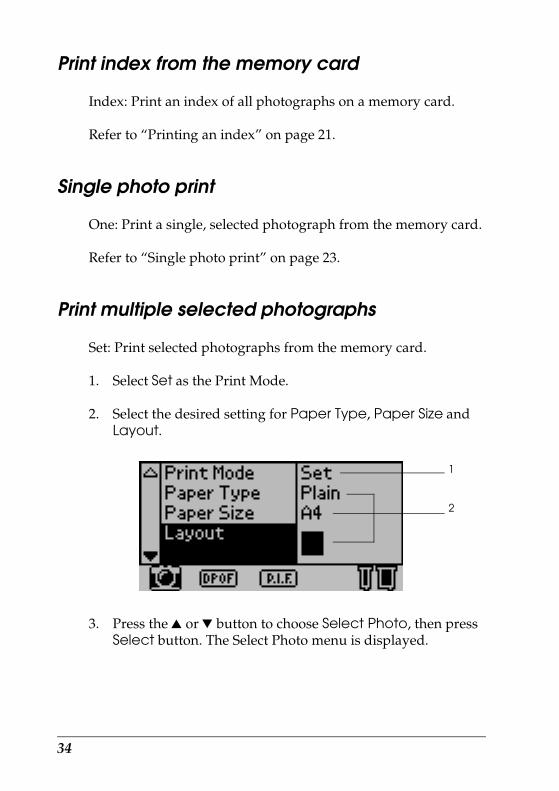
Set: Print selected photographs from the memory card.
1. Select Set as the Print Mode.
2. Select the desired setting for Paper Type, Paper Size and Layout.
3. Press the u or d button to choose Select Photo, then press Select button. The Select Photo menu is displayed.
1
2
34

4. Press the u or d button to choose Select and press the Select button.
5. Press the u or d button to select No., then press the Select button.
6. Press the u or d button to select the photo number you want to print, then press the Select button.
4
5
6
35

7. Press the u or d button to select Copies, then choose the number of copies you want to print using the same buttons. You can choose up to 10 copies.
8. Press the u or d button to select Enter, then press the Select button. The photo number and number of copies you selected are registered.
9. Repeat steps 4 through 8 to register other photos.
10. When all the photo numbers you want to print have been registered, and then select Close, then press the Select button. The screen returns to the main menu.
11. Select Quality, then choose the desired print quality.
12. Press the Print button to print the selected photographs.
7
8
10
36

Advanced Settings
Photo Number
When All or Set is selected as the Print Mode, this setting allows you to specify the number of the photo that you want to enhance or correct using the Advanced Settings. The default setting here is ALL, which means the settings will affect all of the photos to print.
Automatic Correction
This printer is able to correct the color of printouts automatically. There are two kinds of correction available. By default, the setting is P.I.M.
For printing with PRINT Image Matching, see “Printing with PRINT Image Matching” on page 61.
P.I.M.(PRINT Image Matching)
Print with the PRINT Image Matching or the Exif Print function. If the photo data does not include PRINT Image Matching data, try printing with PhotoEnhance.
PhotoEnhance Images imported from the memory card are automatically enhanced. Printing requires more time, but the image is enhanced to ensure higher picture quality.
None Print without automatic correction.
37
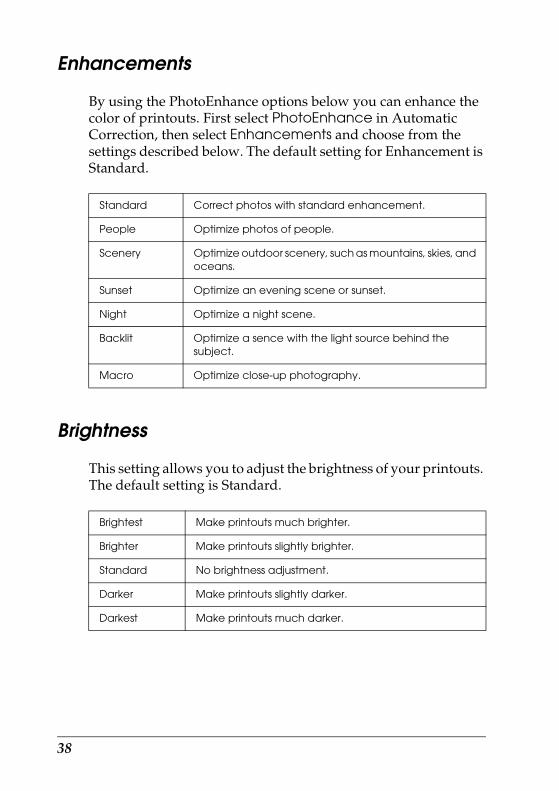
Enhancements
By using the PhotoEnhance options below you can enhance the color of printouts. First select PhotoEnhance in Automatic Correction, then select Enhancements and choose from the settings described below. The default setting for Enhancement is Standard.
Brightness
This setting allows you to adjust the brightness of your printouts. The default setting is Standard.
Standard Correct photos with standard enhancement.
People Optimize photos of people.
Scenery Optimize outdoor scenery, such as mountains, skies, and oceans.
Sunset Optimize an evening scene or sunset.
Night Optimize a night scene.
Backlit Optimize a sence with the light source behind the subject.
Macro Optimize close-up photography.
Brightest Make printouts much brighter.
Brighter Make printouts slightly brighter.
Standard No brightness adjustment.
Darker Make printouts slightly darker.
Darkest Make printouts much darker.
38

Saturation
This setting allows you to adjust the vividness of your printouts. Then default setting is Standard.
Sharpness
This setting allows you to adjust the sharpness of your printouts. The default setting is Standard.
Image Noise Reduction
This setting is to remove the digital noise in photos and to enhance the resolution of low-resolution photos. The default setting is Off.
Most Make printouts much more vivid.
More Make printouts slightly more vivid.
Standard No saturation adjustment.
Less Make printouts slightly duller.
Least Make printouts much duller.
Sharpest Make the outline of subjects sharper.
Sharper Make the outline of subjects slightly sharper.
Standard No sharpness adjustment.
Softer Make the outline of subjects slightly softer.
Softest Make the outline of subjects softer.
On Removes the digital noise and enhances the resolution.
Off Does not remove digital noise nor use fast resolution enhancement.
39

Note:❏ This setting is only available when P.I.M. or PhotoEnhance is
selected as the Automatic Correction setting.
❏ If On is selected, printing takes a longer time.
Zoom
This setting allows you to zoom in on a specific point in a photo and print out the image. The printed region of the image is trimmed to the size of the original photo.
The base point can be selected from nine options: Upper Left, Center Left, Lower Left, Upper Center, Center, Lower Center, Upper Right, Center Right, and Lower Right. You can select either 1.2 or 1.5 times magnification.
Note:❏ It is possible to check the area to be trimmed by viewing the yellow
frame in the optional Preview Monitor. See “Preview Monitor” on page 111 for details.
❏ When the photo is zoomed, the image may become blurry depending on the resolution of the original photo.
Example. Center 1.5×
40

Roll Paper Cut
When roll paper is used for printing, whether the paper is cut automatically by page can be selected. This setting is not lost when the printer is turned off. The default setting is None.
Cut After Last Page
When roll paper is used for printing, whether the paper is cut automatically at the end of page can be selected. This setting is not lost when the printer is turned off. The default setting is On.
None The roll paper is printed without being cut between pages. No space is left between pages.
Single cut The paper is cut at the boundary between images (the boundary between pages). However, the cutting position may shift slightly.
Double cut If you have selected Single Cut and are unhappy with the gap of the cutting position, select Double Cut. In this mode, the space between images is extended and the paper is cut twice inside this space. By cutting twice, an 18 mm slip of paper is left.
On Cuts the last page.
This is enabled when the Single cut or Double cut is selected as the Roll Paper Cut setting.
Off Does not cut the last page.
Press the <Roll Paper button TP icon> Roll Paper button to cut the remaining page in the printer.
41
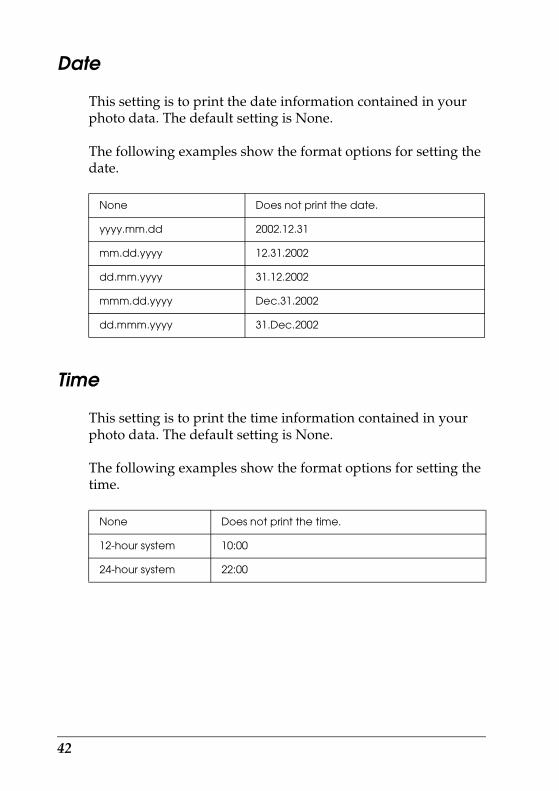
Date
This setting is to print the date information contained in your photo data. The default setting is None.
The following examples show the format options for setting the date.
Time
This setting is to print the time information contained in your photo data. The default setting is None.
The following examples show the format options for setting the time.
None Does not print the date.
yyyy.mm.dd 2002.12.31
mm.dd.yyyy 12.31.2002
dd.mm.yyyy 31.12.2002
mmm.dd.yyyy Dec.31.2002
dd.mmm.yyyy 31.Dec.2002
None Does not print the time.
12-hour system 10:00
24-hour system 22:00
42

Photo Information
If your photo data contains the photo information conforms to Exif standard, the information can be printed with this setting. Following information will be printed:
Exposure time/Shutter speed (Exposure time takes precedence if both values exist. ex. 1/30s)
F number (ex. F2.8)
ISO speed rate (ex. ISO100)
The default setting is Off.
Fit to Frame
This setting automatically trims the parts of an image that extend beyond the margins of the selected print size. Either the top and bottom areas or the left and right areas of the image will be trimmed, depending on the aspect ratio of the original photo and the selected print size. The default setting is On.
Resize each photo (without trimming it) so that it fits inside the print area specified on the Layout menu. Margins may appear at the left and right of the photo, depending on the print size and aspect ratio.
Off Does not print any photo information.
On Prints photo information: Exposure time/Shutter speed/
On Trims the image.
Off Does not trim the image
43

Crop Marks
This function prints crop marks on each page, which make it easier to cut the photos after printing. The default setting is None.
Ink Cartridge Replacement
The ink cartridge can be replaced by selecting this option.
See “Replacing an Ink Cartridge” on page 77.
Head Cleaning
The print head can be cleaned by selecting this option.
See “Cleaning the Print Head” on page 85.
Nozzle Check
A nozzle check pattern can be printed by selecting this option.
See “Checking the Print Head Nozzles” on page 84.
Paper Feed/Paper Eject
This option feeds or ejects the paper. The action is the same as pressing the z roll paper button.
None Does not print crop marks.
Include Prints crop marks.
44

Print Head Alignment
The print head can be aligned by selecting this option.
See “Aligning the Print Head” on page 87.
LCD Contrast
The contrast of the LCD panel can be adjusted by selecting this option.
Backup
It is possible to store the contents of a memory card in an external storage device, such as an MO (magneto-optical) drive, Zip® drive, or CD-R/RW drive, by connecting it to the printer.
Note:❏ The media must have enough free space for backup.
❏ The media must have only one partition.
❏ You cannot back up while printing from the computer to the printer.
❏ Do not connect the external storage device while the computer is accessing the memory card in the printer.
❏ The message “Cannot recognize the loaded media.” is displayed on the LCD panel if the storage media is not formatted for DOS or Windows. Follow the instructions on the LCD panel to format the storage media.
❏ The available MO disk capacities are 128, 230, and 640 MB.
❏ The available Zip disk capacities are 100 and 250 MB.
❏ You can back up 512 times to one storage medium except CD-R.
❏ The available CD-R capacities are 640 and 700 MB.
45

❏ The media except CD-R must be formatted for DOS or Windows.
❏ The format for writing to CD-R is Multisession (Mode 1) and the file system is ISO 9660. Due to the ISO 9660 file system, the contents of a memory card that has 8 or more folder levels cannot be backed up to CD-R.
❏ The characters that can be used for folder and file names on the CD-R are capitals and the underscore (_). Other characters are changed to underscores when backing up to CD-R.
❏ One session is created with each backup when backing up to CD-R.
❏ You can back up up to 47 times to one CD-R.
Connect the external storage device to the printer and operate according to the instructions displayed on the LCD panel. To learn more about connecting an external storage device, see “Connecting an external device” on page 58.
cCaution:Do not remove the storage media from the external storage device or disconnect the cable from the printer while backing up.
Print P.I.F. Index
By selecting this option, it is possible to print a list of PRINT Image Framer frames stored in the memory card when the memory card is in the printer.
Follow the instructions displayed on the LCD panel to print the list of the layouts.
Under the right of each of the printed layouts, the paper size which is appropriate to use with each layout, will also be printed.
46

Memory Card Overwrite
This option sets whether or not writing from a computer to a memory card is allowed when the printer is connected to the computer. By default, the setting is Enable.
Bidirectional Printing
This setting activates bidirectional printing so your printer prints both left-to-right and right-to-left. Bidirectional printing speeds up printing, but decreases print quality. By default, this setting is On.
Note:If misaligned, vertical lines appear during bidirectional printing, you may need to align the print head. To align the print head, see “Aligning the Print Head” on page 87.
Cutting Position Adjustment
The cutting position of the automatic roll paper cutter can be adjusted by selecting this option.
See “Adjusting the Cutting Position” on page 89.
Version Information
The printer version information is displayed.
Enable Writing to the card from computer is allowed. Writing, deleting, formatting, and creation of files/directories are possible.
Disable Writing to the card from computer is prohibited. Writing, deleting, formatting, and creation of files/directories are not possible.
47

Language
The language displayed on the LCD panel can be selected with this option.
Device Name Setting
This setting is available when the optional Bluetooth unit is connected to the printer.
Assigning a device name to a printer allows it to be distinguished separately when multiple printers are enabled with Bluetooth and within the same communication range.
For more details, refer to the Bluetooth Unit User’s Guide.
Communication Mode
This setting is available when the optional Bluetooth unit is connected to the printer.
This setting selects, the mode of communication with Bluetooth wireless technology.
For more details, refer to the Bluetooth Unit User’s Guide.
Encryption
This setting is available when the optional Bluetooth unit is connected to the printer.
This setting determines whether the content of communication can be encrypted.
For more details, refer to the Bluetooth Unit User’s Guide.
48
Passkey Setting
This setting is available when the optional Bluetooth unit is connected to the printer.
Setting the Bluetooth passkey prevents interference from other products with Bluetooth wireless technology.
For more details, refer to the Bluetooth Unit User’s Guide.
Device Address
This setting is available when the optional Bluetooth unit is connected to the printer.
This setting displays the unique Bluetooth communication address for the printer.
For more details, refer to the Bluetooth Unit User’s Guide.
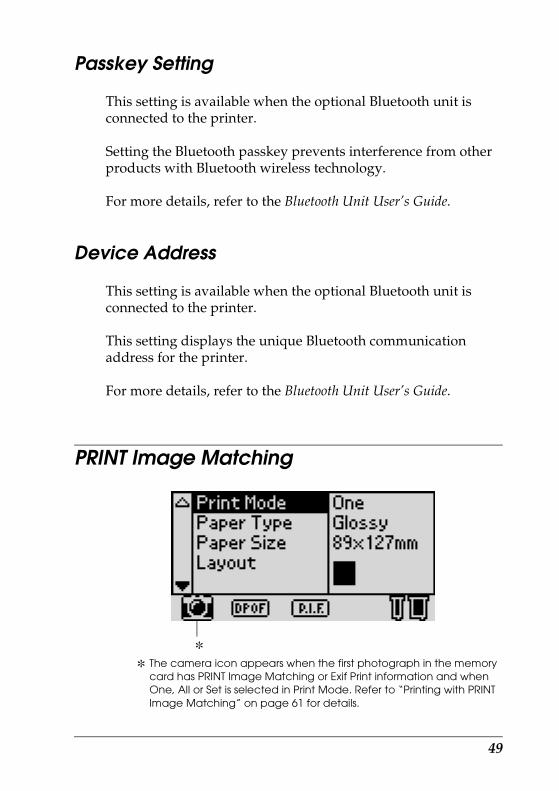
PRINT Image Matching
✽ The camera icon appears when the first photograph in the memory card has PRINT Image Matching or Exif Print information and when One, All or Set is selected in Print Mode. Refer to “Printing with PRINT Image Matching” on page 61 for details.
✽
49

DPOF Settings
This printer conforms to DPOF (Digital Print Order Format) version 1.10. DPOF lets you set the photo numbers and the number of copies for photos on the digital camera before you print. To create DPOF data that supports DPOF, you must use a digital camera that supports DPOF. For the details about DPOF settings, see your digital camera’s documentation.
1. Load paper and a memory card which contains DPOF data. DPOF icon appears and Print Mode turns into DPOF as soon as you load the memory card. To exit DPOF mode, select the other settings as the Print Mode.
2. Make Paper Type, Paper Size, Page Layout, Quality settings. The copies menu shows the number of sheets of paper required for the selected layout.
Note:Page Layout setting is not available when the DPOF settings are for an Index print.
3. Press the Print button to start printing.
1
2
50

PRINT Image FramerNote:This feature is not available with Mac OS X.
1. Insert the memory card containing digital photo data and PRINT Image Framer data into the printer’s card slot. If you have saved or deleted data on the memory card via your computer and have not ejected the memory card from the printer since, eject and reinsert the memory card before printing.
Note:Be sure to properly save the PRINT Image Framer data to the memory card using the EPSON PRINT Image Framer Tool; otherwise the P.I.F. icon will not appear on the printer's LCD panel.
2. Select One, All, or Set from the Print Mode menu. Index cannot be used with PRINT Image Framer data.
3. Select the type of paper loaded in the printer from the Paper Type menu.
4. Select the size of paper loaded in the printer from the Paper Size menu. Be sure the size of paper loaded matches that specified for the PRINT Image Framer data. The paper sizes available in the Paper Size menu change according to the Paper Type selected, therefore with certain types of paper the size appropriate for the PRINT Image Framer data may not be listed.
51

5. Select the desired PRINT Image Framer data from the Layout menu. The PRINT Image Framer data file is displayed. PRINT Image Framer data is located at the bottom of the Layout menu.
Note:You can view PRINT Image Framer layout images on the optional Preview Monitor. The printer’s LCD panel does not display PRINT Image Framer layout images.
6. Specify the photos that you want to print and the number of copies of each using the Select Photo and Copies menus.
7. Press the Print button to start printing.
52
Digital Camera Direct Printing
This printer features the USB DIRECT-PRINT function, which enables you to print photos directly from a digital camera that also has the USB DIRECT-PRINT function, by connecting the camera to the printer with a USB cable.
Operations before connecting
On the digital camera
It is necessary to perform the following operations on the digital camera before connecting it to the printer. For more details on the operation of the digital camera, refer to its manual.
❏ Select the photo you want to print.
❏ Select the paper size and type you want to use.
❏ Select the appropriate layout setting.
❏ Select any other printing settings. (Settings will be different, depending on the make of your digital camera.)
Note:❏ Depending on the make of your digital camera, some of the options
above may not be available.
❏ If the options above are not available on the digital camera, make the selections on the printer’s LCD panel. For more details, see “On the printer’s LCD panel” on page 53.
On the printer’s LCD panel
If the operations to be performed before connecting are not available on the digital camera, peform them on the printer’s control panel.
53

1. Select All, One or Set from the Print Mode menu.
2. Make the desired Paper Type, Paper Size, Layout, and Quality settings.
3. Change the Advanced Settings if necessary.
Connecting the digital camera to the printer
Note:❏ Do not print from the computer or from a memory card in the
printer’s memory card slot before and while connecting.
❏ Do not backup before and while connecting.
❏ Make sure that the no error has occured before connecting.
1. Connect the USB cable to the digital camera.
2. Connect the USB cable to the printer’s external device USB connector.
3. Turn on the digital camera if it is turned off.
54

The following message appears for one second on the LCD panel when the connection is established.
Printing
Print from the digital camera. For more details on printing from the digital camera, refer to its manual.
Note:When printing is finished, disconnect the USB cable from the printer if you will be inserting a memory card into the printer’s memory card slot.
Canceling printing
On the digital camera
For more details canceling printing from the digital camera, refer to its manual.
On the printer’s LCD panel
Press the Cancel button on the printer’s control panel.
55

Using The Bluetooth unit
The optional Bluetooth™ unit is a wireless communication module used to print from digital cameras and other devices with Bluetooth wireless technology without cables when connected with the printer.
While this product complies with the Bluetooth Specification, it is not guaranteed to work with all devices enabled with Bluetooth wireless technology.
The following settings for the Bluetooth unit are displayed under Advanced Settings on the LCD panel when connecting the optional Bluetooth unit to the printer:
❏ Device Name Setting
❏ Communication Mode
❏ Encryption
❏ Passkey Setting
❏ Device Address
For more details, refer to Bluetooth Unit User’s Guide.
56

Storing and Loading the Settings
You can store the settings on the LCD panel you use frequently to each of two Custom buttons and load the stored settings easily by pressing the Custom buttons.
You can store the following settings:
❏ Print Mode
❏ Paper Type
❏ Paper Size
❏ Layout
❏ Automatic Correction in Advanced Settings
❏ Enhancement in Advanced Settings
❏ Brightness in Advanced Settings
❏ Saturation in Advanced Settings
❏ Sharpness in Advanced Settings
Note:❏ You cannot store or load the settings when an error occurs, printing
the nozzle check pattern and cleaning the print head.
❏ You cannot store the settings for Automatic Correction, Enhancement, Brightness, Saturation and Sharpness when All is set as Photo Number in Advanced Settings.
Follow the steps below to store the settings on the LCD panel to the Custom buttons.
1. Make the settings that you want to use.
2. Press the Custom 1 or Custom 2 button for more than two seconds. The message “The present settings have been saved as Custom 1 (or Custom 2)” is displayed in the LCD panel.
If you want to load the stored settings, press the Custom 1 or Custom 2 button.
57

Printing with an External Device
Connecting an external device
cCaution:❏ Not all of the devices that can be connected with USB cable
are supported. Contact your regional customer support for details.
❏ Do not connect USB devices other than an external storage device, such as a printer or mouse. The printer may fail.
❏ Do not connect the external storage device while the computer is accessing the memory card inserted in the printer.
Note:❏ A USB cable is necessary in order to connect the printer with the
external storage device.
❏ Use a USB cable of 2m or less.
❏ A USB hub cannot be used.
❏ Even if the printer is connected to a computer, the computer cannot recognize the external storage device.
Insert the USB cable to the external device USB connector and insert the other connector into the external storage device.
58
Printing from an external device
1. Insert a medium that contains photo data into the external storage device.
2. If a memory card has been inserted in the memory card slot, remove it.
Note:❏ If a memory card is inserted in the memory card slot, the printer
does not recognize the external storage device; it prints out the photo data in the memory card.
❏ Select the folder in which the photo data you want to print out is registered using the Folder Selection menu if data in the external storage device has been backed up using the backup function of the printer. The Folder Selection menu is displayed when data in the external storage device is recognized and pressing the Back button.
3. Set the individual items using the same procedure as when printing from a memory card, and perform printing.
59

60
Exif Print
This product supports Exif Print. When used in combination with Exif Print compatible digital still cameras, printer’s unique strength and features result in high-quality prints.
Printing with PRINT Image Matching
How is PRINT Image Matching used?
This product supports PRINT Image Matching and PRINT Image Matching II. When used in combination, PRINT Image Matching or PRINT Image Matching II enabled digital still cameras, printers and software help photographers to produce images more faithful to their intentions.
The PRINT Image Matching function can be utilized if this EPSON printer is used to print images from input devices, such as digital cameras, loaded with the PRINT Image Matching function. Print commands are attached to image data for printing if photos are taken with an input device loaded with the PRINT Image Matching function.
Note:❏ For more details on the use of input devices that support the PRINT
Image Matching function, refer to their manuals.
❏ If necessary, contact the input device manufacturer to determine whether the device supports the PRINT Image Matching function.
Printing without a PC
Insert the digital camera memory card into the memory card slot, specify the image to be printed to retrieve print commands registered in the image file and print.
61
Media for which PRINT Image Matching is enabled
PRINT Image Matching is enabled when the following media are used:
Plain Paper/EPSON Premium Ink Jet Plain Paper/EPSON Bright White Ink Jet Paper/EPSON Photo Paper/EPSON Matte Paper-Heavyweight/EPSON Premium Glossy Photo Paper/EPSON Premium Semigloss Photo Paper/EPSON ColorLife Photo Paper
62

Using Roll Paper
Precautions for Using Roll Paper
When printing on roll paper, you can print panoramic photographs or print documents continuously.
When you are printing using the roll paper holder, keep the following in mind:
❏ Load the paper printable side up.
❏ Use flat, undamaged paper. If the paper is curled, flatten it before loading to avoid paper feeding problems.
❏ Always handle the paper by the edges.
❏ Provide ample space in front of the printer for the paper to eject fully.
❏ Make sure that the output tray is lowered and the output tray extension is out all the way.
❏ Check that the end of the paper is cut cleanly, perpendicular to the long axis of the paper. If it is cut on a diagonal or not cleanly, the paper may not feed smoothly or the print may extend off the edge of the paper.
❏ EPSON recommends using media distributed by EPSON to ensure high-quality results.
63
Loading Roll Paper
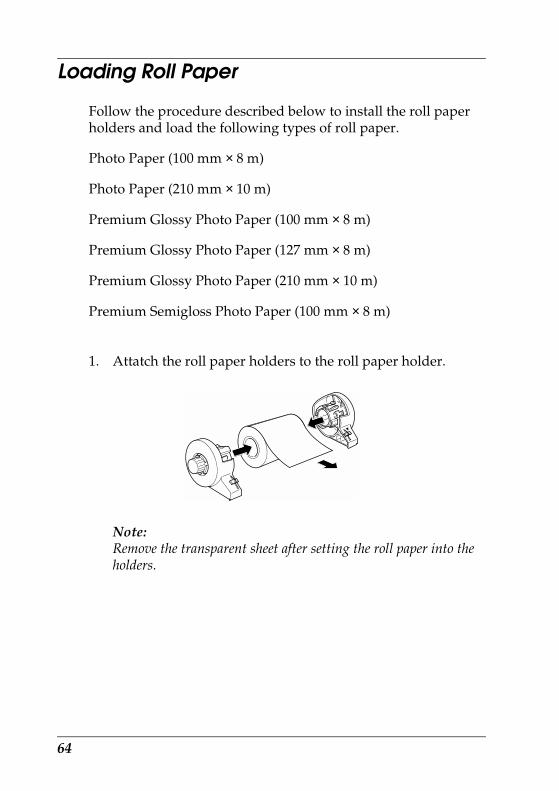
Follow the procedure described below to install the roll paper holders and load the following types of roll paper.
1. Attatch the roll paper holders to the roll paper holder.
Note:Remove the transparent sheet after setting the roll paper into the holders.
Photo Paper (100 mm × 8 m)
Photo Paper (210 mm × 10 m)
Premium Glossy Photo Paper (100 mm × 8 m)
Premium Glossy Photo Paper (127 mm × 8 m)
Premium Glossy Photo Paper (210 mm × 10 m)
Premium Semigloss Photo Paper (100 mm × 8 m)
64

2. Check that the end of the roll is cut perpendicularly to the edges as shown below.
cCaution:Always use a T sguare or similar tool to ensure that the end of the roll is cut perpendicularly at a right angle. A diagonal cut may cause paper feed problems.
3. To flatten the roll paper, place it printable-side up between the pages of the instruction booklet packaged with the roll paper to protect it. Then, roll the booklet in the direction opposite of the paper’s curl.
4. Remove the paper support, lower the output tray, slide out the extension (for other than 210 mm roll paper) or attach the catcher (for 210 mm roll paper), and then turn on the printer.
cCaution:❏ Care should be taken not to damage your eyes with the
tip of the catcher.
❏ Keep the catcher out of the reach of children.
65

Note:For details on attaching the catcher for 210 mm roll paper, refer to “Attaching the Catcher for 210 mm Roll Paper” on page 69.
For roll paper other than 210 mm
For 210 mm roll paper
66
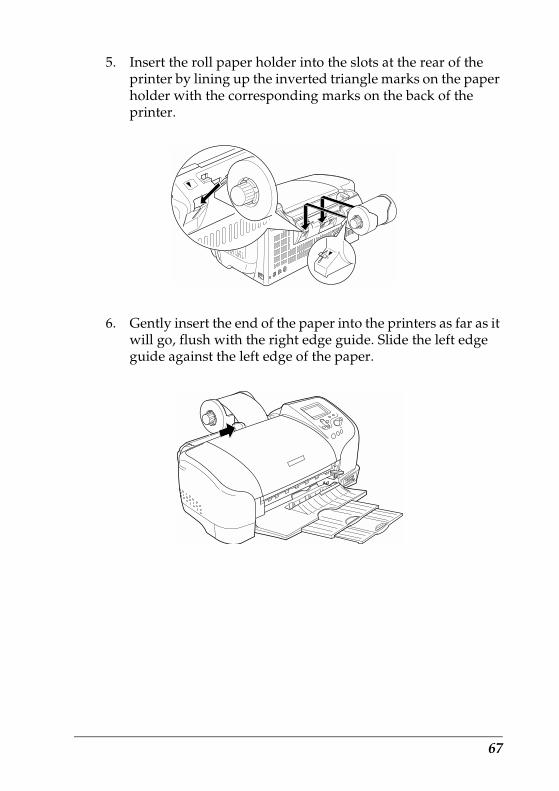
5. Insert the roll paper holder into the slots at the rear of the printer by lining up the inverted triangle marks on the paper holder with the corresponding marks on the back of the printer.
6. Gently insert the end of the paper into the printers as far as it will go, flush with the right edge guide. Slide the left edge guide against the left edge of the paper.
67

7. To load the paper correctly, you must hold the paper in place with your hand while you press the z roll paper button. The paper will feed into the printer.
8. Open the printer cover and make sure that the paper is feeding correctly. If it is not straight, press the z roll paper button for at least three seconds to eject the paper. The maintenance light comes on. Press the z roll paper button to clear the error, then feed the paper again.
The roll paper is now loaded. Next, set up the printer software and try printing. For details on setting up the printer software, refer to “Printing on Roll Paper” in the online Reference Guide.
68

Attaching the Catcher for 210 mm Roll Paper
To receive the 210 mm roll paper cut off by the cutter, attach the catcher. Follow the steps below.
cCaution:❏ When using the catcher, move the printer to the edge of the
desk or table. Be careful not to let the printer fall from the desk or table when moving it. In addition, do not place the printer on an unstable surface.
❏ Care should be taken not to damage your eyes with the tip of the catcher.
❏ Keep the catcher out of the reach of children.
Note:You do not need to attach the catcher when cutting the roll paper other than 210 mm.
1. Remove the protective cap from the tip of the catcher.
Note:❏ Store the removed protective cap in a safe place.
❏ Attach the protective cap when storing the catcher.
69
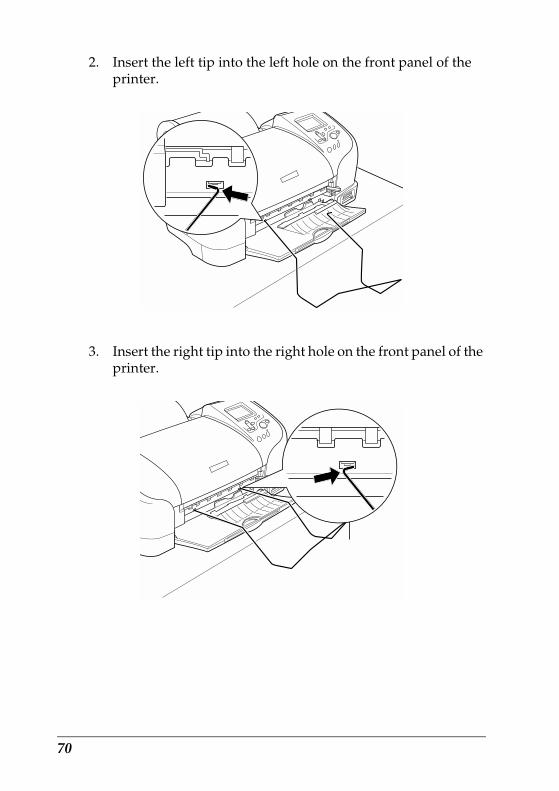
2. Insert the left tip into the left hole on the front panel of the printer.
3. Insert the right tip into the right hole on the front panel of the printer.
70
cCaution:❏ The catcher can hold only one sheet. When one sheet is
printed, immediately remove the sheet from the catcher.
❏ To remove the catcher, pull out the tip of the catcher being inserted in the printer hole diagonally.
Printing Area and Margins
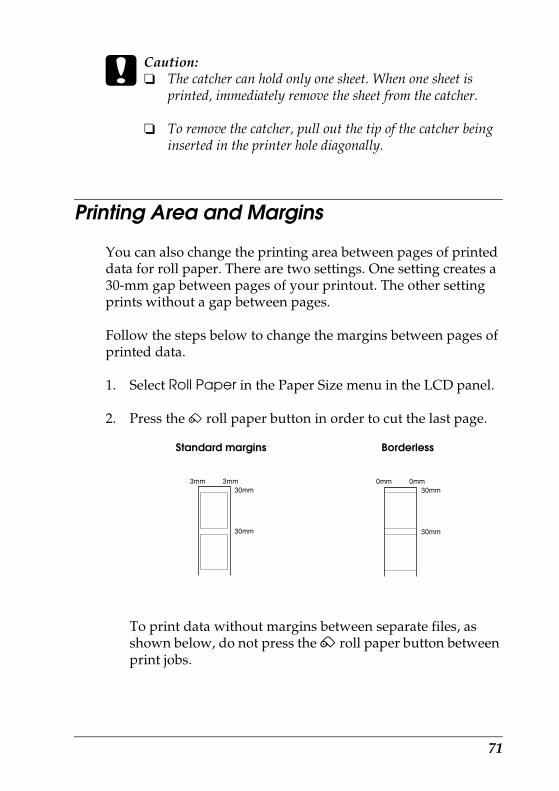
You can also change the printing area between pages of printed data for roll paper. There are two settings. One setting creates a 30-mm gap between pages of your printout. The other setting prints without a gap between pages.
Follow the steps below to change the margins between pages of printed data.
1. Select Roll Paper in the Paper Size menu in the LCD panel.
2. Press the z roll paper button in order to cut the last page.
To print data without margins between separate files, as shown below, do not press the z roll paper button between print jobs.
Standard margins Borderless
71

Note:The top margin is automatically set to 30 mm, regardless of the margin setting.
You can change the margins for roll paper with the printer in the LCD panel. Refer to “Using the Print Mode Settings” on page 33 to print without margins on either side of your printout.
Printing on Roll Paper
Once you have prepared your roll paper and it is loaded in the printer, you must make settings in the LCD panel in order to print.
Note:❏ Always check the ink levels before printing on roll paper as replacing
ink cartridges while the roll paper is loaded can smear the paper.
❏ We recommend replacing the roll paper with a new roll when there is 20 cm remaining. Otherwise, print quality may be compromised on the remaining portion.
❏ Do not select A4, 100 × 150 mm, 89 × 127 mm or 127 × 178 mm sheet paper for the Paper Size setting when roll paper is loaded in the sheet feeder. Doing so causes unnecessary paper to be fed after each print job. If you have already started printing, press the Cancel button. Wait until the printer stops printing and feeding paper. Cut off the paper at the back of the printer, then turn off the printer. The remaining paper is ejected.
Standard margins Borderless
72
Cutting the Remaining Last Photo after Printing
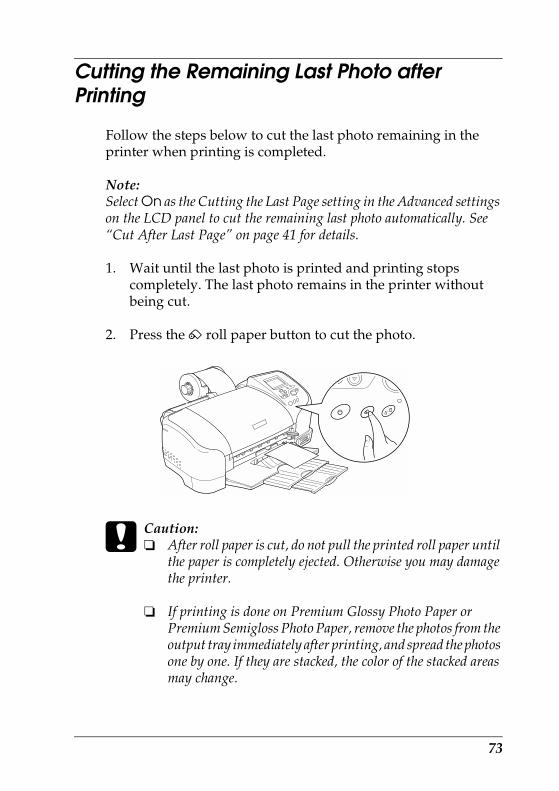
Follow the steps below to cut the last photo remaining in the printer when printing is completed.
Note:Select On as the Cutting the Last Page setting in the Advanced settings on the LCD panel to cut the remaining last photo automatically. See “Cut After Last Page” on page 41 for details.
1. Wait until the last photo is printed and printing stops completely. The last photo remains in the printer without being cut.
2. Press the z roll paper button to cut the photo.
cCaution:❏ After roll paper is cut, do not pull the printed roll paper until
the paper is completely ejected. Otherwise you may damage the printer.
❏ If printing is done on Premium Glossy Photo Paper or Premium Semigloss Photo Paper, remove the photos from the output tray immediately after printing, and spread the photos one by one. If they are stacked, the color of the stacked areas may change.
73

Removing Roll Paper
Follow the steps below to remove the paper from the printer.
1. After printing is completed, the last photo printed remains in the printer without being cut. Press the z roll paper button to cut the photo remaining in the printer.
Note:Depending on the size of the photos, two photos may remain in the printer without being cut. Press the roll paper button in this case as well; both photos are cut.
2. Hold down the z roll paper button for about 3 seconds. The paper feeds in reverse to a position where it can be easily removed from the sheet feeder at the back of the printer. If it does not feed to this position, repeat this step. A message indicating that the roll paper is removed appears on the display.
74
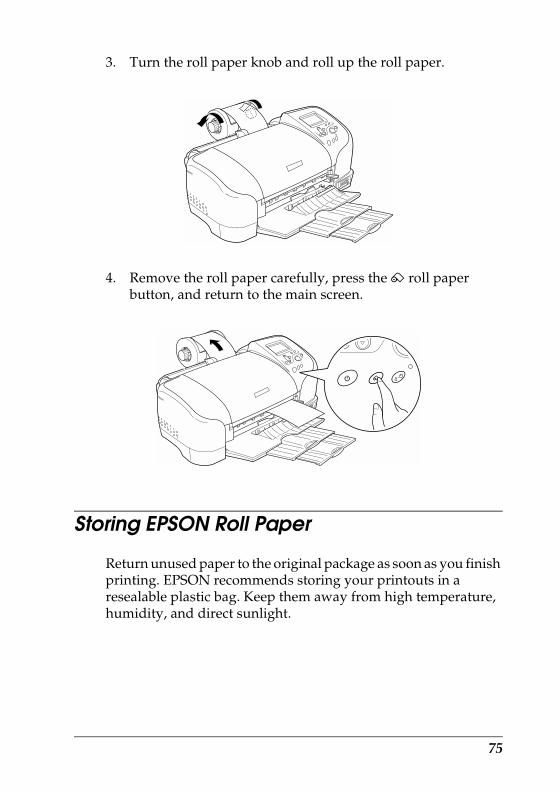
3. Turn the roll paper knob and roll up the roll paper.
4. Remove the roll paper carefully, press the z roll paper button, and return to the main screen.
Storing EPSON Roll Paper
Return unused paper to the original package as soon as you finish printing. EPSON recommends storing your printouts in a resealable plastic bag. Keep them away from high temperature, humidity, and direct sunlight.
75

Replacing Ink Cartridges
Checking the Ink Supply
Using the LCD panel
To check which cartridge requires replacing, check the LCD panel.
Ink icon indicates the amount of the ink remaining as follows:
✽ Black ink icon
✽✽ Color ink icon
Black ink icon Color ink icon Status
blinks blinks Ink cartridge is empty. Replace with a new one.
and blinks and blinks Ink cartridge is nearly empty.
comes on comes on Ink remaining
✽ ✽✽
76

Replacing an Ink Cartridge
This printer uses ink cartridges equipped with IC chips. The IC chip accurately monitors the amount of ink used by each cartridge, so even if a cartridge is removed and later inserted again, all of its ink can be used. However, some ink is consumed each time the cartridge is inserted because the printer automatically checks reliability.
You can replace an ink cartridge by using the printer’s LCD panel or by using the Status Monitor utility. To replace an ink cartridge using the b maintenance button on the printer’s control panel, follow the steps below. To replace an ink cartridge or check ink levels using the LCD panel.
wWarning:❏ Keep ink cartridges out of the reach of children. Do not allow
children to drink from or otherwise handle the cartridges.
❏ Be careful when you handle the used ink cartridges, as there may be some ink around the ink supply port. If ink gets on your skin, wash the area thoroughly with soap and water. If ink gets into your eyes, flush them immediately with water. If discomfort or vision problems remain after a thorough flushing, see a doctor immediately.
77

cCaution:❏ EPSON recommends the use of genuine EPSON ink
cartridges. Other products not manufactured by EPSON may cause damage to your printer not covered by EPSON's warranties.
❏ Leave the old cartridge installed in the printer until you have obtained a replacement; otherwise, ink remaining in the print head nozzles may dry out.
❏ Do not refill the ink cartridges. The printer calculates the amount of ink remaining using an IC chip on the ink cartridge. Even if the cartridge is refilled, the amount of ink remaining will not be recalculated by the IC chip and the amount of ink available for use will not change.
Note:❏ You cannot continue printing with one ink cartridge empty, even if
the other cartridge still contains ink. Before printing, replace the empty cartridge.
❏ In addition to the ink used during document printing, ink is consumed during the print head cleaning operation, during the self-cleaning cycle which is performed when the printer is turned on, and during ink charging when the ink cartridge is installed in the printer.
For more information about ink cartridges, see “When handling the ink cartridges” on page 5.
1. Make sure that the printer is on, but not printing, then open the printer cover.
Note:You can identify the status of the printer condition. The ink part of the black or color ink icon displayed in the LCD panel flashes when the ink runs low. When the ink runs out, the entire ink icon flashes and a message is displayed.
78

2. Check that the message “ink out” is displayed in the LCD panel and press the maintenance button. This message is not displayed if there is some ink left. In this case, press the maintenance button, make sure Ink Cartridge Replacement is selected, and press the Select button. To find out which cartridge requires replacing, see “Checking the Ink Supply” on page 76.
3. Follow the instructions on the screen and press the Custom 1 button. The ink cartridge moves slowly to the ink replacement position.
cCaution:Do not move the print head by hand, as this may damage the printer. Always press the ( maintenance button to move it.
79
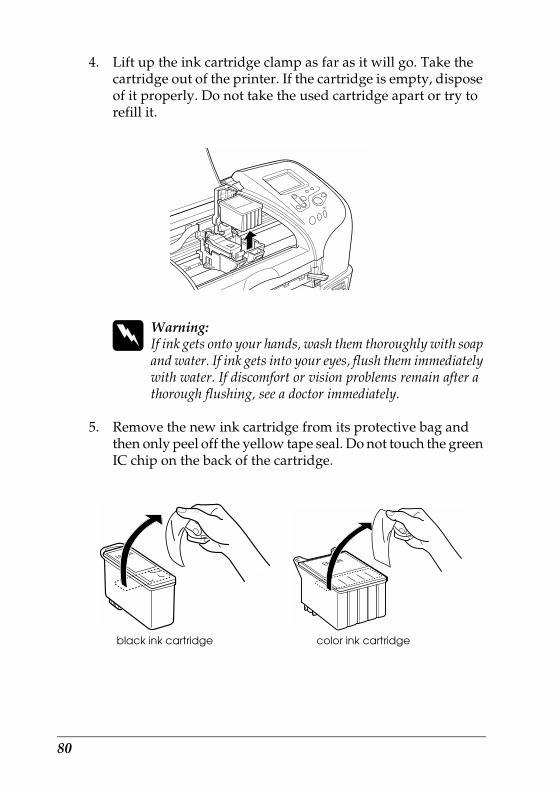
4. Lift up the ink cartridge clamp as far as it will go. Take the cartridge out of the printer. If the cartridge is empty, dispose of it properly. Do not take the used cartridge apart or try to refill it.
wWarning:If ink gets onto your hands, wash them thoroughly with soap and water. If ink gets into your eyes, flush them immediately with water. If discomfort or vision problems remain after a thorough flushing, see a doctor immediately.
5. Remove the new ink cartridge from its protective bag and then only peel off the yellow tape seal. Do not touch the green IC chip on the back of the cartridge.
black ink cartridge color ink cartridge
80

cCaution:❏ You must remove the yellow tape seal from the cartridge
before installing it; otherwise, the cartridge will become unusable and you will be unable to print.
❏ If you have installed an ink cartridge without removing the yellow tape seal, you must remove the cartridge and install a new one. Prepare the new cartridge by removing the yellow tape seal, then install it in the printer.
❏ Do not remove the blue portion of the tape seal from the top of the cartridge; otherwise, the print head may become clogged and be unable to print.
❏ Do not remove the tape seal from the bottom of the cartridge; otherwise, ink will leak.
❏ Do not touch the green IC chip on the back of the cartridge. This can damage the ink cartridge.
❏ If you remove an ink cartridge for later use, be sure to protect the ink supply area from dirt and dust; store it in the same environment as the printer. Be sure to store the cartridge as shown in the illustration. Note that there is a valve in the ink supply port, making covers or plugs unnecessary, but care is needed to prevent the ink from staining items that the cartridge touches. Do not touch the ink cartridge ink supply port or surrounding area.
Do not touch this part.
81
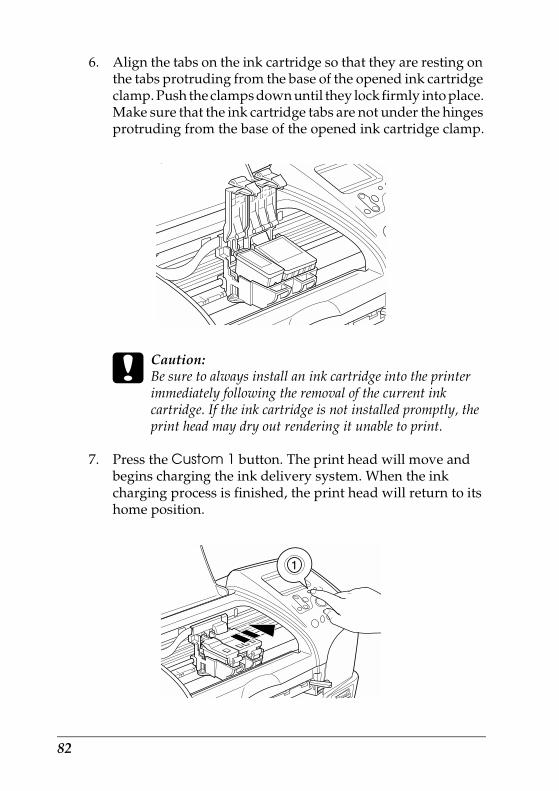
6. Align the tabs on the ink cartridge so that they are resting on the tabs protruding from the base of the opened ink cartridge clamp. Push the clamps down until they lock firmly into place. Make sure that the ink cartridge tabs are not under the hinges protruding from the base of the opened ink cartridge clamp.
cCaution:Be sure to always install an ink cartridge into the printer immediately following the removal of the current ink cartridge. If the ink cartridge is not installed promptly, the print head may dry out rendering it unable to print.
7. Press the Custom 1 button. The print head will move and begins charging the ink delivery system. When the ink charging process is finished, the print head will return to its home position.
82

cCaution: The progress meter is displayed in the LCD panel while the ink is being charged. Never turn the power supply to the printer off before the completion message is displayed. Doing so can result in incomplete charging of ink.
8. When the message “Ink cartridge replacement is complete” is displayed in the LCD panel, press the Custom 1 button.
9. Close the printer cover.
83

Maintenance
Checking the Print Head Nozzles
If you find that the printed image is unexpectedly faint or dots in the printed image are missing, you may be able to identify the problem by checking the print head nozzles.
Using the control panel buttons
Follow the steps below to check the print head nozzles using the control panel buttons.
1. Check that no warnings or errors are displayed on the LCD panel.
2. Make sure that A4 or Letter size paper is loaded in the sheet feeder.
3. Press the ( maintenance button.
4. Press the d button to position the cursor at Nozzle Check and press the Select button.
5. Follow the instructions displayed in the LCD panel and press the Custom 1 button.
6. The nozzle check pattern is printed out. See the following illustration. If it is necessary to clean the print head, press the Custom 1 button to clean the print head.
84
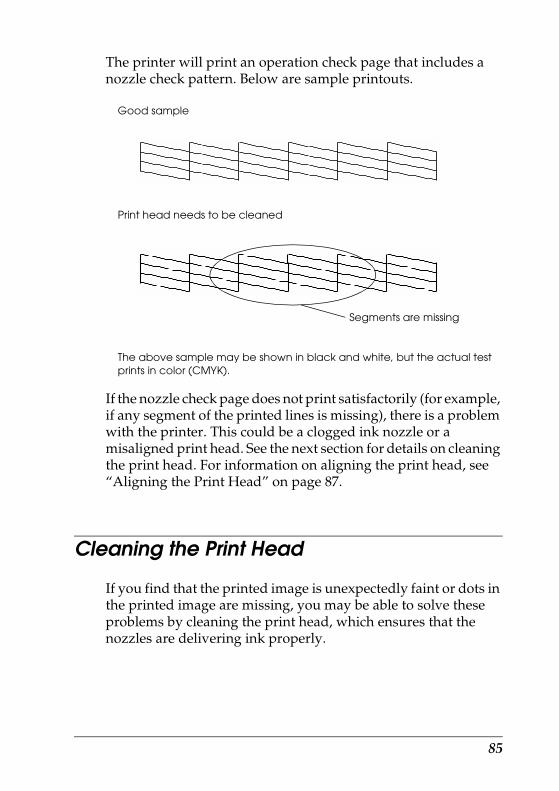
The printer will print an operation check page that includes a nozzle check pattern. Below are sample printouts.
Good sample
Print head needs to be cleaned
The above sample may be shown in black and white, but the actual test prints in color (CMYK).
If the nozzle check page does not print satisfactorily (for example, if any segment of the printed lines is missing), there is a problem with the printer. This could be a clogged ink nozzle or a misaligned print head. See the next section for details on cleaning the print head. For information on aligning the print head, see “Aligning the Print Head” on page 87.
Cleaning the Print Head
If you find that the printed image is unexpectedly faint or dots in the printed image are missing, you may be able to solve these problems by cleaning the print head, which ensures that the nozzles are delivering ink properly.
Segments are missing
85

Note:❏ Print head cleaning uses both color and black ink. To avoid wasting
ink, clean the print head only if print quality declines (for example, if the printout is blurry or the color is incorrect or missing).
❏ Use the Nozzle Check utility first to confirm that the print head needs to be cleaned. This saves ink.
❏ You cannot clean the print head if the message “ink out” is displayed or the ink icon flashes to show ink out or ink low on the LCD panel. Replace the appropriate ink cartridge first.
Using the control panel buttons
Follow the steps below to clean the print head using the control panel buttons.
1. Check that no warnings or errors are displayed on the LCD panel.
Note:You cannot clean the print head if the message “ink out” is displayed or the ink icon flashes to show ink low on the LCD panel. In case of ink out, the ink cartridge replacement procedure will start. If you do not want to replace an ink cartridge at this moment, press Custom 2 button to return the print head to its home position.
2. Press the ( maintenance button.
3. Press d button to position the cursor at Head Cleaning and press the Select button.
cCaution:Never turn the power supply to the printer off while the progress meter is displayed in the LCD panel. Doing so may damage the printer.
86

4. Follow the instructions displayed in the LCD panel and press the Custom 1 button.
5. The print head cleaning starts.
If print quality has not improved after repeating this procedure four or five times, turn the printer off and leave it alone overnight, then try head cleaning again.
If the print quality still has not improved, one or both of your ink cartridges may be old or damaged and may need to be replaced. To replace an ink cartridge before it is empty, see “Replacing an Ink Cartridge” on page 77.
If print quality remains a problem after replacing the ink cartridges, contact your dealer.
Note:To maintain print quality, we recommend turning on the printer for at least one minute every month.
Aligning the Print Head
If you notice misalignment of vertical lines, you may be able to solve this problem from the LCD panel.
Using the control panel buttons
Follow the steps below to align the print head using the control panel buttons.
1. Check that no warnings or errors are displayed on the LCD panel.
2. Press the ( maintenance button.
87

3. Press d button to position the cursor at Print Head Alignment and press the Select button.
4. Follow the instructions displayed on the LCD panel and press the Custom 1 button. The following alignment sheet is printed.
5. From the alignment pattern in set #1 on the printed test sheet, choose the vertical line that is aligned best. Press the u or d button to select the corresponding line number and press the Select button.
6. Repeat step 5 for the alignment patterns in sets #2 and #3.
7. Press the Custom 1 button to finish.
88

Adjusting the Cutting Position
Follow the steps below in order to adjust the cutting position of the auto cutter.
Note:❏ Before doing the following, it is necessary to turn the printer on and
set the roll paper.
❏ See “Loading Roll Paper” on page 64 for more details about roll paper setting.
❏ If you want to maintain a precise cutting position, it is recommended that you adjust the cutting position each time you change the type or size (width) of roll paper.
Using the control panel buttons
1. Check that no warnings or errors are displayed on the LCD panel.
2. Press the ( maintenance button to display the Advanced Settings menu.
3. Press the d button to position the cursor at the Cutting Position Adjustment and press the Select button.
4. Check that the roll paper is set and press the Custom 1 button.
The cutting position adjustment pattern is printed out and cut off.
5. By using the cut roll paper, check the most precisely printed number among the color boundaries.
6. Press the u or d button to position the cursor at the number identified in step 4, and press the Select button.
89

Cleaning the Printer
To keep your printer operating at its best, clean it thoroughly several times a year as follows.
1. Unplug the printer’s power cord.
2. Remove any paper from the sheet feeder.
3. Use a soft brush to carefully clean away all dust and dirt from the sheet feeder.
4. If the outer case or the inside of the sheet feeder is dirty, wipe it with a soft, clean cloth dampened with mild detergent. Keep the printer cover closed to prevent water from getting inside.
5. If the inside of the printer accidentally gets soiled with ink, wipe it off with a damp cloth.
wWarning:Be careful not to touch the gears or rollers inside the printer.
90
cCaution:❏ Be careful not to wipe grease on the metal parts under the ink
carriage passage.
❏ Never use alcohol or thinner to clean the printer, as these chemicals can damage the components as well as the case.
❏ Be careful not to get water on the printer mechanism or electronic components.
❏ Do not use a hard or abrasive brush.
❏ Do not spray the inside of the printer with lubricants. Unsuitable oils can damage the mechanism. Contact your dealer or a qualified service person if lubrication is needed.
❏ Only use a dry, soft cloth to clean the display and the optional Preview Monitor. Do not use liquid or chemical cleansers.
Transporting the Printer
If you need to transport your printer, carefully prepare and repack it as described below using the original box (or a similar box that the printer fits snugly into) and packing materials. Follow the steps below.
cCaution:❏ When storing or transporting the printer, do not tilt it, put
it vertically or turn it upside down. Otherwise, ink may leak from the cartridge.
❏ Leave the ink cartridges installed. Removing the cartridges can dehydrate the printer head and may prevent the printer from printing.
91
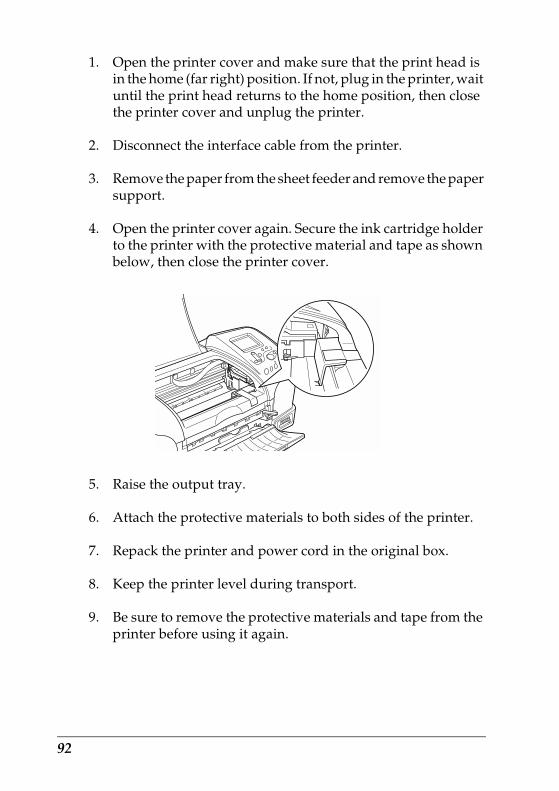
1. Open the printer cover and make sure that the print head is in the home (far right) position. If not, plug in the printer, wait until the print head returns to the home position, then close the printer cover and unplug the printer.
2. Disconnect the interface cable from the printer.
3. Remove the paper from the sheet feeder and remove the paper support.
4. Open the printer cover again. Secure the ink cartridge holder to the printer with the protective material and tape as shown below, then close the printer cover.
5. Raise the output tray.
6. Attach the protective materials to both sides of the printer.
7. Repack the printer and power cord in the original box.
8. Keep the printer level during transport.
9. Be sure to remove the protective materials and tape from the printer before using it again.
92

Troubleshooting
The solutions herein are for problems when printing directly from a memory card.
If a problem occurs while printing from a computer, refer to the online Reference Guide.
Error/Warning DisplayYou can identify many common printer problems using the display on your printer’s LCD panel.
Error
Display Solution
Black ink out.Black: T026The genuine EPSON ink cartridge listed above is recommended. Press the Maintenance button for ink cartridge replacement.
Replace the black ink cartridge with a new one.
Color ink out.Color: T027The genuine EPSON ink cartridge listed above is recommended. Press the Maintenance button for ink cartridge replacement.
Replace the color ink cartridge with a new one.
Black and Color inks out.Black: T026Color: T027The genuine EPSON ink cartridges listed above are recommended. Press the Maintenance button for ink cartridge replacement.
Replace the black and color ink cartridges with new ones.
Paper is not set correctly.Set the paper correctly, then press the Roll Paper button if using roll paper, or press the Maintenance button if using sheet paper.
Load paper in the sheet feeder, and press the ( maintenance button to turn this light off. The printer resumes printing.
93
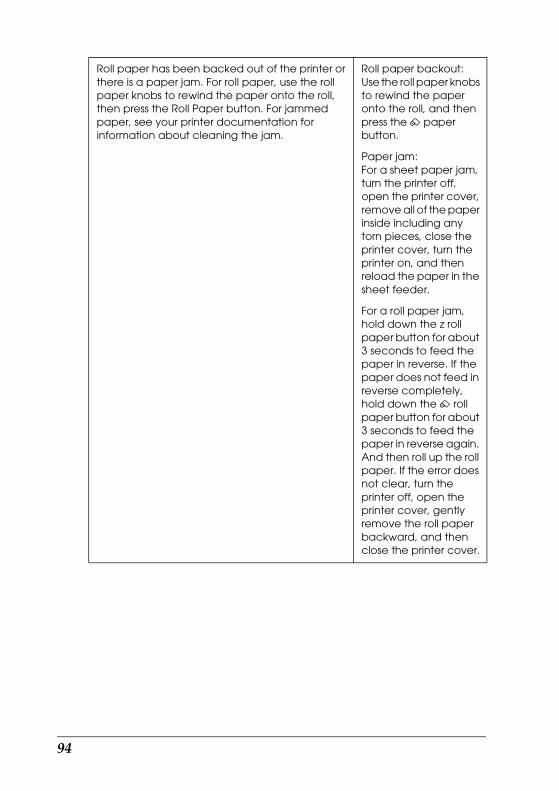
Roll paper has been backed out of the printer or there is a paper jam. For roll paper, use the roll paper knobs to rewind the paper onto the roll, then press the Roll Paper button. For jammed paper, see your printer documentation for information about cleaning the jam.
Roll paper backout:Use the roll paper knobs to rewind the paper onto the roll, and then press the z paper button.
Paper jam:For a sheet paper jam, turn the printer off, open the printer cover, remove all of the paper inside including any torn pieces, close the printer cover, turn the printer on, and then reload the paper in the sheet feeder.
For a roll paper jam, hold down the z roll paper button for about 3 seconds to feed the paper in reverse. If the paper does not feed in reverse completely, hold down the z roll paper button for about 3 seconds to feed the paper in reverse again. And then roll up the roll paper. If the error does not clear, turn the printer off, open the printer cover, gently remove the roll paper backward, and then close the printer cover.
94
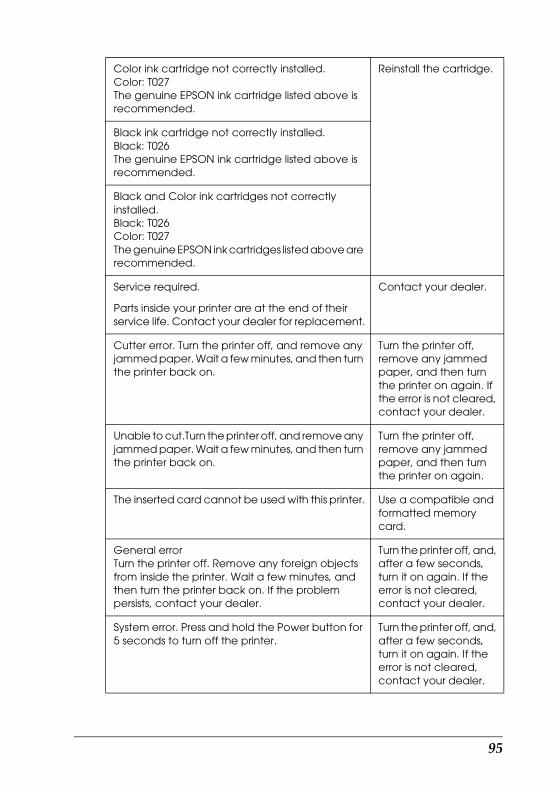
Color ink cartridge not correctly installed.Color: T027The genuine EPSON ink cartridge listed above is recommended.
Reinstall the cartridge.
Black ink cartridge not correctly installed.Black: T026The genuine EPSON ink cartridge listed above is recommended.
Black and Color ink cartridges not correctly installed.Black: T026Color: T027The genuine EPSON ink cartridges listed above are recommended.
Service required.
Parts inside your printer are at the end of their service life. Contact your dealer for replacement.
Contact your dealer.
Cutter error. Turn the printer off, and remove any jammed paper. Wait a few minutes, and then turn the printer back on.
Turn the printer off, remove any jammed paper, and then turn the printer on again. If the error is not cleared, contact your dealer.
Unable to cut.Turn the printer off, and remove any jammed paper. Wait a few minutes, and then turn the printer back on.
Turn the printer off, remove any jammed paper, and then turn the printer on again.
The inserted card cannot be used with this printer. Use a compatible and formatted memory card.
General errorTurn the printer off. Remove any foreign objects from inside the printer. Wait a few minutes, and then turn the printer back on. If the problem persists, contact your dealer.
Turn the printer off, and, after a few seconds, turn it on again. If the error is not cleared, contact your dealer.
System error. Press and hold the Power button for 5 seconds to turn off the printer.
Turn the printer off, and, after a few seconds, turn it on again. If the error is not cleared, contact your dealer.
95

*1 This warning appears when the Print button is pushed, and it disappears after three seconds.
*2 This warning is displayed for one second every 3 seconds.
Print Quality Problems
Horizontal banding
Try one or more of these solutions:
❏ Make sure that the printable side of the paper is face up in the sheet feeder.
❏ Run the Head Cleaning utility to clear any clogged ink nozzles.& See “Cleaning the Print Head” on page 85.
❏ Make sure that the Media Type selected in the LCD panel is appropriate for the type of media loaded in the printer.
❏ Make sure that the position of the adjust lever is appropriate for the media type. When printing on media of normal thickness, set the adjust lever to the m position. When printing on envelopes or thick media, set the position to ^.
Error Display Other
Ink low Ink icon blinks Obtain a replacement ink cartridge.
Printing from computer*1
Communicating with computer. Please wait.
Start printing from the LCD panel after printing from the computer is completed.
Irregular external device.*2
Connected device cannot be used.
Connect on external storage device that is compatible with the printer.
96

Vertical misalignment or banding
Try one or more of these solutions:
❏ Make sure that the printable side of the paper is face up in the sheet feeder.
❏ Run the Head Cleaning utility to clear any clogged ink nozzles.& See “Cleaning the Print Head” on page 85.
❏ Make sure that the Media Type setting selected in the LCD panel is appropriate for the type of media loaded in the printer.
❏ Make sure that the position of the adjust lever is appropriate for the media type. When printing on media of normal thickness, set the adjust lever to the m position. When printing on envelopes or thick media, set the position to ^.
Color gaps
Try one or more of these solutions:
❏ Make sure that your paper is not damaged, dirty, or too old. Also, make sure that the printable side of the paper is face up in the sheet feeder.
❏ Run the Head Cleaning utility to clear any clogged ink nozzles.& See “Cleaning the Print Head” on page 85.
❏ Check the LCD panel. If the ink icon is flashing or a message is displayed, replace the appropriate ink cartridge.& See “Replacing an Ink Cartridge” on page 77.
❏ Make sure that the Media Type setting selected in the LCD panel is appropriate for the type of media that is loaded in the printer.
97

Incorrect or missing colors
Try one or more of these solutions:
❏ Run the Head Cleaning utility. If colors are still incorrect or missing, replace the color ink cartridge. If the problem persists, replace the black ink cartridge.& See “Replacing an Ink Cartridge” on page 77 for details.& See “Cleaning the Print Head” on page 85.
❏ Make sure that you are not using an ink cartridge with an expired date printed on the cartridge carton. Also, if you have not used the printer for a long time, replace with new ink cartridges.& See “Replacing an Ink Cartridge” on page 77.
Blurry or smeared printout
Try one or more of these solutions:
❏ Make sure that the printer is on a flat, stable surface that extends beyond the printer base in all directions. The printer will not operate properly if it is tilted.
❏ Make sure that your paper is dry and that the printable side is facing up. Also, make sure that you are using an acceptable paper type. See “Paper” on page 117 for specifications.
❏ If the paper is curled toward the printable side, flatten it or curl it slightly in the opposite direction.
❏ Set the adjust lever to the ^ position, and make sure the Media Type setting in the LCD panel is correct.
❏ Remove each sheet from the output tray as it is printed, especially if you are using transparencies.
❏ If you are printing on glossy media, place a support sheet (or a sheet of plain paper) beneath the stack, or load only one sheet at a time.
98
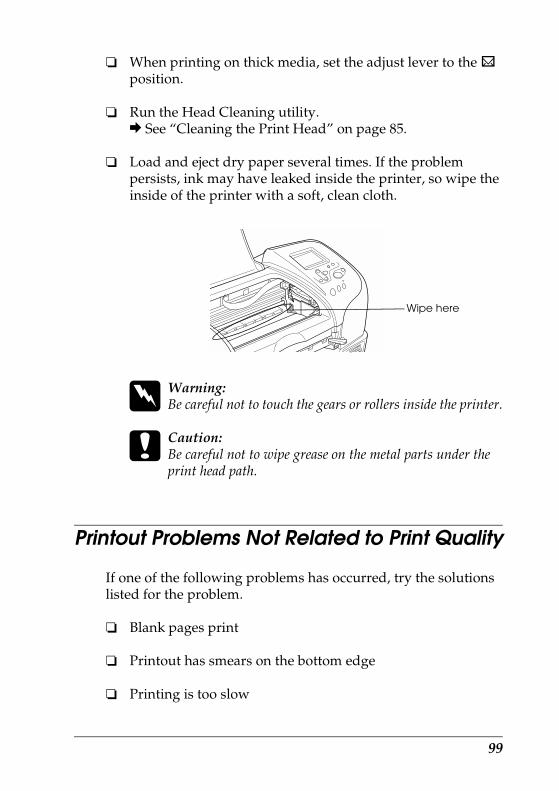
❏ When printing on thick media, set the adjust lever to the ^ position.
❏ Run the Head Cleaning utility.& See “Cleaning the Print Head” on page 85.
❏ Load and eject dry paper several times. If the problem persists, ink may have leaked inside the printer, so wipe the inside of the printer with a soft, clean cloth.
wWarning:Be careful not to touch the gears or rollers inside the printer.
cCaution:Be careful not to wipe grease on the metal parts under the print head path.
Printout Problems Not Related to Print Quality
If one of the following problems has occurred, try the solutions listed for the problem.
❏ Blank pages print
❏ Printout has smears on the bottom edge
❏ Printing is too slow
Wipe here
99
Blank pages print
❏ Run the Head Cleaning utility to clear any clogged nozzles.& See “Cleaning the Print Head” on page 85.
Printout has smears on the bottom edge
❏ If the paper is curled toward the printable side, flatten it or curl it slightly in the opposite direction.
❏ Set the adjust lever to the ^ position.
Printing is too slow
❏ Make sure that the Media Type setting in the LCD panel is correct.
Paper Does Not Feed Correctly
If one of the following problems has occurred, try the solution(s) listed for that problem.
❏ Paper does not feed
❏ Multiple pages feed
❏ The paper jams
❏ Paper is not ejected fully or is wrinkled
100

Paper does not feed
Remove the stack of paper and make sure of the following:
❏ The paper is not curled or creased.
❏ The paper is not too old. See the instructions that came with the paper for more information.
❏ The paper is not loaded higher than the arrow on the left edge guide.
❏ Paper is not jammed inside the printer. If it is, remove the jammed paper.
❏ The black and/or color ink cartridges are not empty. If one is, replace the appropriate cartridge. To determine which cartridge is empty, see “Replacing an Ink Cartridge” on page 77.
❏ Load the paper again. Make sure that you follow any special loading instructions that came with your paper. Also see “Paper Handling” in the online Reference Guide and “Media Types” on page 113.
Multiple pages feed
❏ For the users directly printing from memory card, do not select A4, 100 × 150 mm, 89 × 127 mm or 127 × 178 mm sheet paper for the Paper Size setting when roll paper is loaded in the sheet feeder. Doing so causes unnecessary paper to be fed after each print job. If you have already started printing, press the Cancel button. Wait until the printer stops printing and feeding paper. Cut off the paper at the back of the printer, then turn off the printer. The remaining paper is ejected.
101

❏ Make sure that the paper stack fits under the arrow mark located on the inside surface on the left edge guide.
❏ Make sure that the left edge guide is snug to the left edge of the paper.
❏ Make sure that the paper is not curled or folded. If so, flatten it or curl it slightly toward the opposite side before loading.
❏ Make sure that the position of the adjust lever is appropriate for the media type. When printing on media of normal thickness, set the adjust lever to the m position. When printing on envelopes and thick media, set the position to ^.
❏ Remove the stack of paper and make sure that the paper is not too thin. See “Paper” on page 117 for specifications. Fan the edges of the stack to separate the sheets, then reload the paper.
Paper jams
For a sheet paper jam, turn the printer off, open the printer cover, remove all of the paper inside including any torn pieces, close the printer cover, turn the printer on, and then reload the paper in the sheet feeder.
For a roll paper jam, hold down the z roll paper button for about 3 seconds to feed the paper in reverse. If the paper does not feed in reverse completely, hold down the z roll paper button for about 3 seconds to feed the paper in reverse again. And then roll up the roll paper. If the error does not clear, turn the printer off, open the printer cover, gently remove the roll paper backward, and then close the printer cover.
Note:If you cannot remove a foreign object easily by yourself, do not use force and do not disassemble the printer. Call your dealer for assistance.
102

If your paper jams frequently, make sure of the following:
❏ The paper is smooth, not curled or wrinkled.
❏ The printable side of the paper is face up in the sheet feeder.
❏ The paper stack was fanned before loading.
❏ The paper is not loaded above the arrow on the left edge guide.
❏ The number of sheets in the paper stack does not exceed the limit specified for that media.
❏ The left edge guide is adjusted to fit your paper.
❏ The printer is on a flat, stable surface that extends beyond the printer base in all directions. The printer will not operate properly if it is tilted.
Paper improperly loaded
If you have loaded the paper too far into the printer, the printer cannot feed the paper correctly. Turn the printer off and gently remove the paper. Then turn the printer on and reload the paper properly.
Paper is not ejected fully or is wrinkled
Try one or more of these solutions:
❏ If the paper does not eject fully, press the ( maitenance button, then open the printer cover and remove the paper. Also, check the Paper Size setting in the LCD panel.
❏ If the paper is wrinkled when it comes out, it may be damp or too thin. Load a new stack.
103

Note:Store any unused paper in its original packaging in a dry area. See “Paper” on page 117 for specifications.
Printer Does Not Print
If the printer does not print, check and see if one of the following error indications is displayed, then try the solutions listed.
❏ LCD panel is off.
❏ The ( maintenance light is flashing or on
❏ One of the ink out lights is flashing or on
❏ Ink out lights are on and the other lights are flashing
LCD panel is off
Try one or more of these solutions:
❏ Press the P power button to make sure that the printer is on.
❏ Turn off the printer and make sure that the power cord is securely plugged in.
❏ Make sure that your outlet works and is not controlled by a wall switch or timer.
LCD panel displays a warning or error message
If the LCD panel displays a warning or error message, follow the instructions. See “Error/Warning Display” on page 93 for the explanation of warnings and error messages.
104

LCD panel came on and then went out
The printer’s voltage may not match the outlet rating. Turn off the printer and unplug it immediately, then check the printer labels.
If the voltage does not match, DO NOT PLUG YOUR PRINTER BACK IN. Contact your dealer.
Maintenance light is flashing or on
Try one or more of these solutions:
❏ Make sure that there is no packing material in the printer.
❏ If the printer sounds like it is trying to print, but is unable to, run the Head Cleaning utility. See “Cleaning the Print Head” on page 85.
❏ If the ( maintenance light is on and paper is jammed in the printer, remove the paper from the printer.
❏ If the ( maintenance light is on and no paper is loaded, load more paper in the sheet feeder.
❏ If the ( maintenance light is flashing, ink is low. Obtain a replacement cartridge of the appropriate type. To determine which cartridge is low, see “Replacing an Ink Cartridge” on page 77.
❏ If the ( maintenance light is on and ink is out, replace the appropriate ink cartridge. To determine which ink cartridge is empty, see “Replacing an Ink Cartridge” on page 77.
105

Printing Problem when Using Bluetooth Unit
If you are having difficulties using your printer with the Bluetooth unit connected, refer to Bluetooth Unit User’s Guide.
Cancelling Printing
If you encounter problems while printing, you may need to cancel printing.
To stop printing in progress, press Cancel button. The printer will cancel all print jobs and stop printing, and eject any pages which is printing. Depending on the printer’s status, printing may not stop immediately.
106
Contacting Customer Support
Technical Support Web Site
EPSON's Technical Support Web Site provides help with problems that cannot be solved using the troubleshooting information in your product’s documentation. If you have a Web browser and can connect to the Internet, access that site at:
http://support.epson.net/StylusPhoto935/
Regional Customer Services
If your EPSON product is not operating properly and you cannot solve the problem using the troubleshooting information in your product documentation, contact customer support services for assistance. If customer support for your area is not listed below, contact the dealer where you purchased your product.
Customer support will be able to help you much more quickly if you give them the following information:
❏ Product serial number(The serial number label is usually on the back of the product.)
❏ Product model
❏ Product software version(Click About, Version Info, or similar button in the product software.)
❏ Brand and model of your computer
❏ Your computer operating system name and version
❏ Names and versions of the software applications you normally use with your product
107

Note:For more information on Contacting Customer Support, see the Online Reference Guide included in the software CD-ROM.
For users in Australia
For users in Singapore
For users in Thailand
For users in Indonesia
For users in Hong Kong
URL http://www.epson.com.au
Telephone 1300 361 054
Fax (02) 9903 9189
URL http://www.epson.com.sg
Telephone (65) 6586 3111
URL http://www.epson.co.th
Telephone (66)2-670-0333
URL http://www.epson.co.id
Telephone/Fax Jakarta (62) 21-5357159
Bandung (62) 22-7303766
Surabaya (62) 31-5458562
Telephone Yogyakarta (62) 274-566353/22-143
URL http://www.epson.com.hk
Phone (852) 2585-4399
Fax (852) 2827-4383
108
For users in Malaysia
For users in India
For users in the Philippines
URL http://www.epson.com.my
Phone 603-56288333
URL http://www.epson.co.in
Phone 1600 440011
URL http://www.epson.com.ph
Phone (63) 2-813-6567
Fax (63) 2-813-6545
E-mail [email protected]
109
Options and Consumable Products
Options
The following options are available for your printer.
Interface cables
EPSON supplies the following interface cable for your printer. However, you can use any interface cables that meet these specifications. See your computer manual for any additional requirements.
USB Interface Cable (shielded) C83623✽ from Series A 4-pin (computer) to series B 4-pin (printer).
Note:❏ The asterisk (✽ ) is a substitute for the last digit of the product
number, which varies by location.
❏ Depending on your geographic location, this cable may not be supplied.
cCaution:Use only interface cables which meet the specifications listed above. Using other cables not covered by EPSON warranties may cause the printer to malfunction.
110

Preview Monitor
When printing directly from a memory card, the Preview Monitor C860✽✽✽ lets you easily find photos on the memory card. This monitor displays the photo on the memory card settings on the LCD panel.
Option: 2.5-inch monitor
cCaution:Be sure to turn off your printer and unplug the printer’s power cord before attaching or removing the Preview Monitor. Failure to do so can damage the Preview Monitor.
Note:❏ The asterisk (✽ ) is a substitute for the last digit of the product
number, which varies by location.
❏ To adjust the tilt of the Preview Monitor, loosen the knob on the right side of the Preview Monitor.
❏ A 1.6-inch monitor is also available for this printer.
111

Bluetooth unit
The optional Bluetooth unit is a wireless communication module used to print from digital cameras and other devices that support Bluetooth wireless technology without cables when connected with the printer.
Bluetooth unit C824✽✽✽
Note:The asterisk is a substitute for the last digit of the product number, which varies by location.
The following profile is available with the Bluetooth unit:
Basic Imaging Profile (BIP)
112
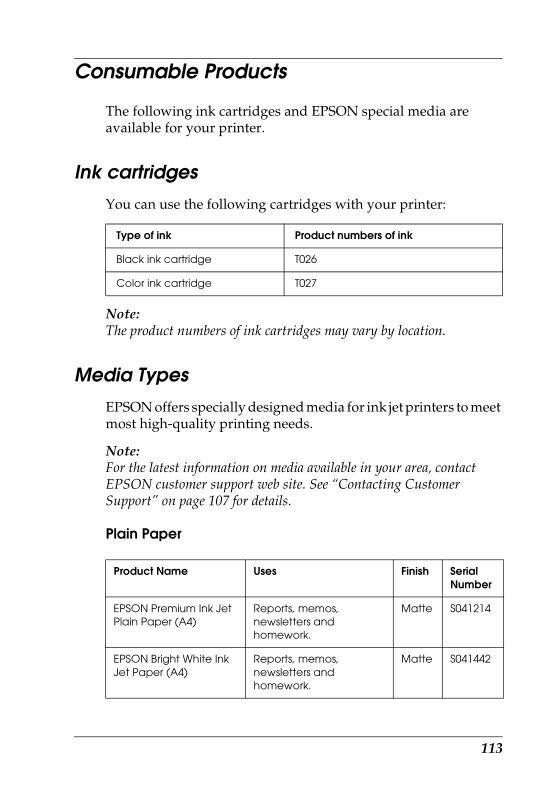
Consumable Products
The following ink cartridges and EPSON special media are available for your printer.
Ink cartridges
You can use the following cartridges with your printer:
Note:The product numbers of ink cartridges may vary by location.
Media Types
EPSON offers specially designed media for ink jet printers to meet most high-quality printing needs.
Note:For the latest information on media available in your area, contact EPSON customer support web site. See “Contacting Customer Support” on page 107 for details.
Plain Paper
Type of ink Product numbers of ink
Black ink cartridge T026
Color ink cartridge T027
Product Name Uses Finish Serial Number
EPSON Premium Ink Jet Plain Paper (A4)
Reports, memos, newsletters and homework.
Matte S041214
EPSON Bright White Ink Jet Paper (A4)
Reports, memos, newsletters and homework.
Matte S041442
113

Iron-On
Matte Paper-Heavyweight
Photo Paper
Product Name Uses Finish Serial Number
EPSON Iron-On Cool Peel Transfer Paper (A4)
Transfer photos or graphics onto fabric
Matte S041154
Product Name Uses Finish Serial Number
EPSON Matte Paper-Heavyweight (A4)
Enlargements and framing of cherished photos.
Matte S041256S041258S041259
Product Name Uses Finish Serial Number
EPSON Photo Paper (A4) Reprints and everyday photos.
Glossy S041140
EPSON Photo Paper (100 × 150 mm)
Reprints and everyday photos.
Glossy S041255
EPSON Photo Paper (100 mm × 8 m)
Panoramic prints and customized cards.
Glossy S041279
EPSON Photo Paper (210 mm × 10 m)
Panoramic prints and customized cards.
Glossy S041280
EPSON Photo Paper Cards (A4)
8 pre cut business sized cards on A4 photo finish card. For one off run of business cards or alternative business cards or passes.
Glossy S041177
114

Preimum Glossy Photo Paper
ColorLife Photo Paper
Note:The availability of special media varies by location. For the latest information on media available in your area, contact EPSON customer services. See “Contacting Customer Support” on page 107.
Product Name Uses Finish Serial Number
EPSON Premium Glossy Photo Paper (A4)
Enlargements and framing of cherished photos.
High Gloss S041287S041297S041285
EPSON Premium Glossy Photo Paper (100 x 150 mm)
Enlargements and framing of cherished photos.
High Gloss S041692
EPSON Premium Glossy Photo Paper(89 x 127 mm)
Enlargements and framing of cherished photos.
High Gloss S041710
EPSON Premium Glossy Photo Paper (100 mm x 8 m)
Digital photo enlargements
High Gloss S041302
EPSON Premium Glossy Photo Paper (127 mm x 8 m)
Digital photo enlargements
High Gloss S041474
EPSON Premium Glossy Photo Paper (210 mm x 10 m)
Digital photo enlargements
High Gloss S041376S041377
EPSON Premium Semigloss Photo Paper (A4)
Create brilliant pictures
Semigloss S041332
EPSON Premium Semigloss Photo Paper (100 mm x 8 m)
Digital photo enlargements
Semigloss S041330
Product Name Uses Finish Serial Number
EPSON ColorLife Photo Paper (A4)
Long lasting enlargements and reprints.
Semigloss S041560
115

Precautions on paper storage
❏ Store paper flat where it is not exposed to high temperature, high humidity, or direct sunlight.
❏ Do not let the paper get wet.
❏ Keep unused paper in its original packaging and store it in a cool, dry place to preserve quality.
116
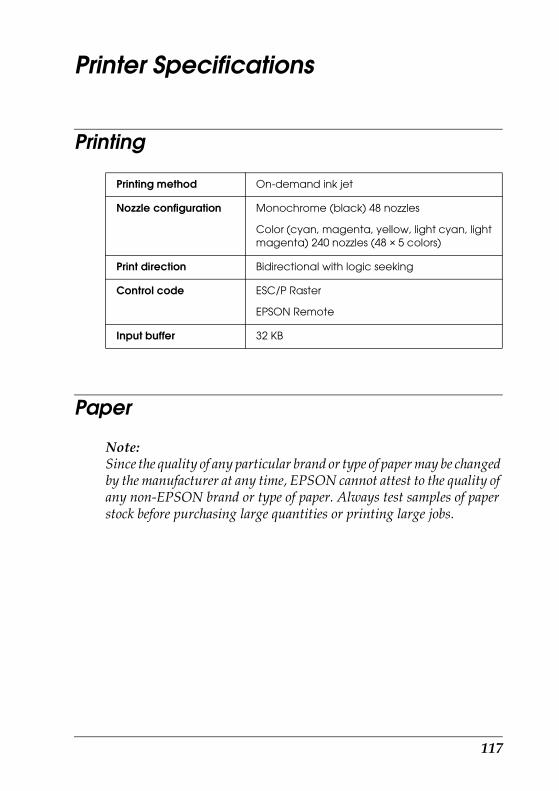
Printer Specifications
Printing
Paper
Note:Since the quality of any particular brand or type of paper may be changed by the manufacturer at any time, EPSON cannot attest to the quality of any non-EPSON brand or type of paper. Always test samples of paper stock before purchasing large quantities or printing large jobs.
Printing method On-demand ink jet
Nozzle configuration Monochrome (black) 48 nozzles
Color (cyan, magenta, yellow, light cyan, light magenta) 240 nozzles (48 × 5 colors)
Print direction Bidirectional with logic seeking
Control code ESC/P Raster
EPSON Remote
Input buffer 32 KB
117
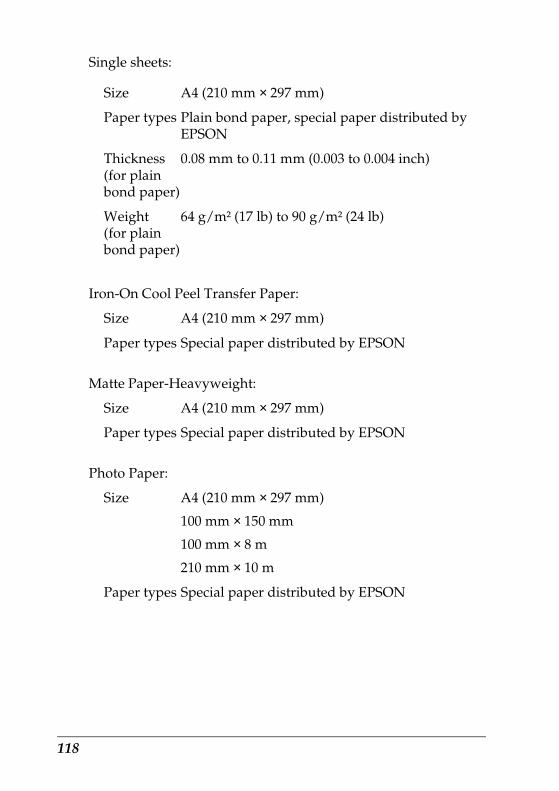
Single sheets:
Iron-On Cool Peel Transfer Paper:
Matte Paper-Heavyweight:
Photo Paper:
Size A4 (210 mm × 297 mm)
Paper types Plain bond paper, special paper distributed by EPSON
Thickness(for plain bond paper)
0.08 mm to 0.11 mm (0.003 to 0.004 inch)
Weight(for plain bond paper)
64 g/m² (17 lb) to 90 g/m² (24 lb)
Size A4 (210 mm × 297 mm)
Paper types Special paper distributed by EPSON
Size A4 (210 mm × 297 mm)
Paper types Special paper distributed by EPSON
Size A4 (210 mm × 297 mm)
100 mm × 150 mm
100 mm × 8 m
210 mm × 10 m
Paper types Special paper distributed by EPSON
118

Premium Glossy Photo Paper:
Premium Semigloss Photo Paper:
ColorLife Photo Paper:
Note:❏ Poor quality paper may reduce print quality and cause paper jams
or other problems. If you encounter problems, switch to a higher grade of paper.
❏ Do not load curled or folded paper.
❏ Use paper under normal conditions:Temperature 15 to 25° C (59 to 77° F)Humidity 40 to 60% RH
Size A4 (210 mm × 297 mm)
100 mm × 150 m
89 mm × 127 m
100 mm × 8 m
127 mm × 8 m
210 mm × 10 m
Paper types Special paper distributed by EPSON
Size A4 (210 mm × 297 mm)
100 mm × 8 m
Paper types Special paper distributed by EPSON
Size A4 (210 mm × 297 mm)
Paper types Special paper distributed by EPSON
119

Single sheets
Note:Always load paper into the sheet feeder short edge first. Load envelopes flap edge first with the flap side down.
Normal Borderless✽✽
Diagonal lines show printable area.
A: The minimum top margin is 3.0 mm (0.12").
B-L: The minimum left margin is 3.0 mm (0.12").
B-R: The minimum right margin is 3.0 mm (0.12").
C: The minimum bottom margin is 14.0 mm (0.55").
✽✽ : When printing with the borderless feature, print quality may decline in the top and bottom areas of the printout, or the area may be smeared.
A
B-L B-R
C
120
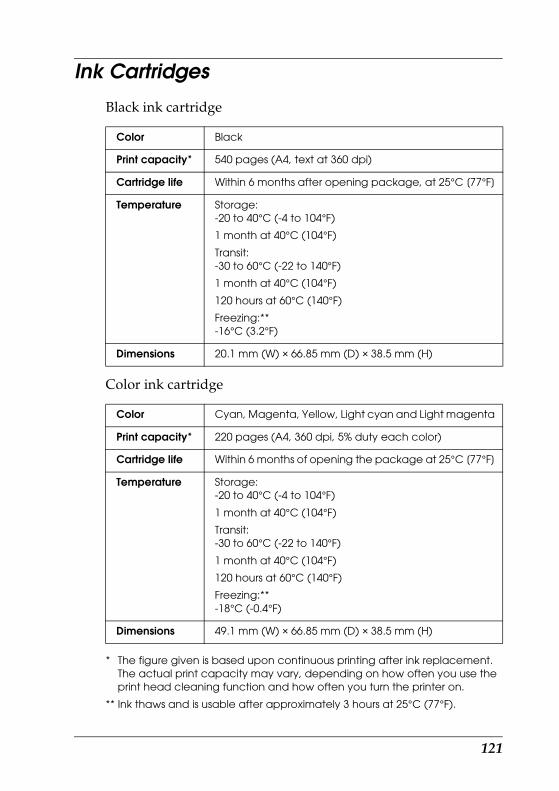
Ink Cartridges
Black ink cartridge
Color ink cartridge
* The figure given is based upon continuous printing after ink replacement. The actual print capacity may vary, depending on how often you use the print head cleaning function and how often you turn the printer on.
** Ink thaws and is usable after approximately 3 hours at 25°C (77°F).
Color Black
Print capacity* 540 pages (A4, text at 360 dpi)
Cartridge life Within 6 months after opening package, at 25°C [77°F]
Temperature Storage:-20 to 40°C (-4 to 104°F)
1 month at 40°C (104°F)
Transit:-30 to 60°C (-22 to 140°F)
1 month at 40°C (104°F)
120 hours at 60°C (140°F)
Freezing:**-16°C (3.2°F)
Dimensions 20.1 mm (W) × 66.85 mm (D) × 38.5 mm (H)
Color Cyan, Magenta, Yellow, Light cyan and Light magenta
Print capacity* 220 pages (A4, 360 dpi, 5% duty each color)
Cartridge life Within 6 months of opening the package at 25°C [77°F]
Temperature Storage:-20 to 40°C (-4 to 104°F)
1 month at 40°C (104°F)
Transit:-30 to 60°C (-22 to 140°F)
1 month at 40°C (104°F)
120 hours at 60°C (140°F)
Freezing:**-18°C (-0.4°F)
Dimensions 49.1 mm (W) × 66.85 mm (D) × 38.5 mm (H)
121

cCaution:❏ EPSON recommends the use of original EPSON ink
cartridges only. Products not manufactured by EPSON may cause damage to your printer not covered by EPSON's warranties.
❏ Do not use an ink cartridge if the date on the package has expired.
❏ Do not refill the ink cartridge. The printer calculates the amount of ink remaining using an IC chip on the ink cartridge, so even if the cartridge is refilled, the IC chip will report that it is empty.
Mechanical
Paper feed method
Friction
Paper path Sheet feeder, rear entry
Sheet feeder capacity
About 100 sheets at 64 g/m² (17 lb) paper
Dimensions Storage
Width: 492 mm (19.4 inches)
Depth: 290 mm (11.4 inches)
Height: 228 mm (9 inches)
Printing
Width: 492 mm (19.4 inches)
Depth: 595 mm (23.4 inches)
Height: 310 mm (12.2 inches)
Weight 6.4 kg (14.1 lb) without the ink cartridges
122
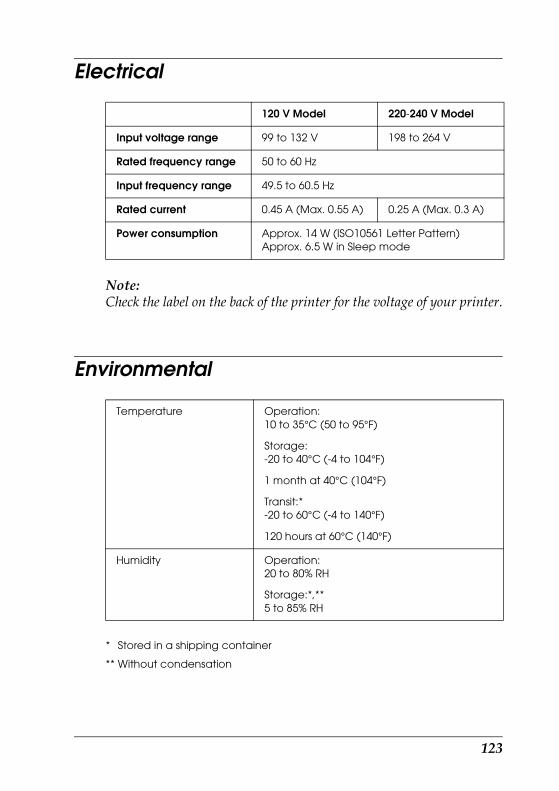
Electrical
Note:Check the label on the back of the printer for the voltage of your printer.
Environmental
* Stored in a shipping container
** Without condensation
120 V Model 220-240 V Model
Input voltage range 99 to 132 V 198 to 264 V
Rated frequency range 50 to 60 Hz
Input frequency range 49.5 to 60.5 Hz
Rated current 0.45 A (Max. 0.55 A) 0.25 A (Max. 0.3 A)
Power consumption Approx. 14 W (ISO10561 Letter Pattern)Approx. 6.5 W in Sleep mode
Temperature Operation: 10 to 35°C (50 to 95°F)
Storage: -20 to 40°C (-4 to 104°F)
1 month at 40°C (104°F)
Transit:*-20 to 60°C (-4 to 140°F)
120 hours at 60°C (140°F)
Humidity Operation: 20 to 80% RH
Storage:*,** 5 to 85% RH
123
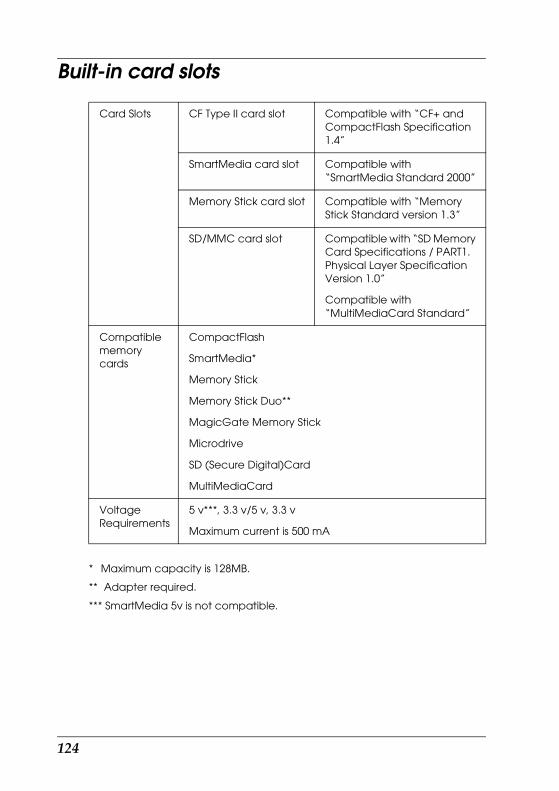
Built-in card slots
* Maximum capacity is 128MB.
** Adapter required.
*** SmartMedia 5v is not compatible.
Card Slots CF Type II card slot Compatible with “CF+ and CompactFlash Specification 1.4”
SmartMedia card slot Compatible with “SmartMedia Standard 2000”
Memory Stick card slot Compatible with “Memory Stick Standard version 1.3”
SD/MMC card slot Compatible with “SD Memory Card Specifications / PART1. Physical Layer Specification Version 1.0”
Compatible with “MultiMediaCard Standard”
Compatible memory cards
CompactFlash
SmartMedia*
Memory Stick
Memory Stick Duo**
MagicGate Memory Stick
Microdrive
SD (Secure Digital)Card
MultiMediaCard
Voltage Requirements
5 v***, 3.3 v/5 v, 3.3 v
Maximum current is 500 mA
124

External Storage Devices
* Not all USB devices are supported. Contact your regional customer support for details.
Standards and Approvals
U.S. model:
European model:
Australian model:
Connectivity Universal Serial Bus*
Bit rate: 12 Mbps (Full speed device)
Connector type: USB Series A
Recommended cable length: 2 meters
Power supply Maximum current is 500 mA.
Safety UL 1950CSA C22.2 No.950
EMC FCC Part 15 Subpart B Class BCSA C108.8 Class B
Low Voltage Directive 73/23/EEC
EN 60950
EMC Directive 89/336/EEC
EN 55022 Class B
EN 55024
EN 61000-3-2
EN 61000-3-3
EMC AS/NZS 3548 Class B
125

126