Stylus COLOR IIs - User Manual - Epson
114
COLOR INK JET PRINTER User’s Guide All rights reserved. No part of this publication may be reproduced, stored in a retrieval system, or transmitted in any form or by any means, electronic, mechanical, photocopying, recording, or otherwise, without the prior written permission of Seiko Epson Corporation. No patent liability is assumed with respect to the use of the information contained herein. Neither is any liability assumed for damages resulting from the use of the information contained herein. Neither Seiko Epson Corporation nor its affiliates shall be liable to the purchaser of this product or third parties for damages, losses, costs, or expenses incurred by purchaser or third parties as a result of: accident, misuse, or abuse of this product or unauthorized modifications, repairs, or alterations to this product, or (excluding the U.S.) failure to strictly comply with Seiko Epson Corporation’s operating and maintenance instructions. Seiko Epson Corporation shall not be liable against any damages or problems arising from the use of any options or any consumable products other than those designated as Original EPSON Products or EPSON Approved Products by Seiko Epson Corporation. EPSON, EPSON Stylus, and EPSON ESC/P are registered trademarks and EPSON ESC/P 2 is a trademark of Seiko Epson Corporation. EPSON Connection is a service mark of Epson America, Inc. Windows Printer driver copyright Software 2000 Ltd Oxford, England. Portions copyright Seiko Epson Corporation. General Notice: Other product names used herein are for identification purposes only and may be trademarks of their respective owners. EPSON disclaims any and all rights in those marks. The Energy Star emblem does not represent EPA endorsement of any product or service. Copyright © 1995 by Epson America, Inc. 10/95 Printed on recycled paper with at least 10% post-consumer content
-
Upload
khangminh22 -
Category
Documents
-
view
2 -
download
0
Transcript of Stylus COLOR IIs - User Manual - Epson

COLOR INK JET PRINTER
User’s Guide
All rights reserved. No part of this publication may be reproduced, stored in a retrievalsystem, or transmitted in any form or by any means, electronic, mechanical, photocopying,recording, or otherwise, without the prior written permission of Seiko Epson Corporation.No patent liability is assumed with respect to the use of the information contained herein.Neither is any liability assumed for damages resulting from the use of the informationcontained herein.
Neither Seiko Epson Corporation nor its affiliates shall be liable to the purchaser of thisproduct or third parties for damages, losses, costs, or expenses incurred by purchaser orthird parties as a result of: accident, misuse, or abuse of this product or unauthorizedmodifications, repairs, or alterations to this product, or (excluding the U.S.) failure tostrictly comply with Seiko Epson Corporation’s operating and maintenance instructions.
Seiko Epson Corporation shall not be liable against any damages or problems arising fromthe use of any options or any consumable products other than those designated asOriginal EPSON Products or EPSON Approved Products by Seiko Epson Corporation.
EPSON, EPSON Stylus, and EPSON ESC/P are registered trademarks andEPSON ESC/P 2 is a trademark of Seiko Epson Corporation.
EPSON Connection is a service mark of Epson America, Inc.
Windows Printer driver copyright Software 2000 Ltd Oxford, England. Portions copyrightSeiko Epson Corporation.
General Notice: Other product names used herein are for identification purposes only andmay be trademarks of their respective owners. EPSON disclaims any and all rights inthose marks.
The Energy Star emblem does not represent EPA endorsement of any product or service.
Copyright © 1995 by Epson America, Inc. 10/95
Printed on recycled paper with at least 10% post-consumer content
Proof Sign-off:Mary _______Nancy _______Moira _______Cindy _______ title page
stylusc0
RHudson User’s GuideA5 size Front10-28-95 DR, pass 2-Rev1
part #4004913-01

FCC Compliance StatementFor United States Users
This equipment has been tested and found to comply with the limits for a Class B digitaldevice, pursuant to Part 15 of the FCC Rules. These limits are designed to providereasonable protection against harmful interference in a residential installation. Thisequipment generates, uses, and can radiate radio frequency energy and, if not installedand used in accordance with the instructions, may cause harmful interference to radio ortelevision reception. However, there is no guarantee that interference will not occur in aparticular installation. If this equipment does cause interference to radio and televisionreception, which can be determined by turning the equipment off and on, the user isencouraged to try to correct the interference by one or more of the following measures.
Reorient or relocate the receiving antenna. Increase the separation between the equipment and receiver. Connect the equipment into an outlet on a circuit different from that to which the
receiver is connected. Consult the dealer or an experienced radio/TV technician for help.
WARNINGThe connection of a non-shielded equipment interface cable to this equipment willinvalidate the FCC Certification of this device and may cause interference levels whichexceed the limits established by the FCC for this equipment. It is the responsibility of theuser to obtain and use a shielded equipment interface cable with this device. If thisequipment has more than one interface connector, do not leave cables connected to unusedinterfaces. Changes or modifications not expressly approved by the manufacturer couldvoid the user’s authority to operate the equipment.
For Canadian UsersThis digital apparatus does not exceed the Class B limits for radio noise emissions fromdigital apparatus as set out in the radio interference regulations of the CanadianDepartment of Communications.
Le présent appareil numérique n’émet pas de bruits radioélectriques dépassant les limitesapplicables aux appareils numériques de Classe B prescrites dans le règlement sur lebrouillage radioélectrique édicté par le Ministère des Communications du Canada.
L Hudson User’s GuideA5 size Front10-28-95 DR, pass 2-Rev1
part #4004913-01
ii

Contents
Introduction
Getting the Most Out of Your Printer . . . . . . . . . . . . . . . 1Three Resolutions to Choose From . . . . . . . . . . . . . . 1Special Papers . . . . . . . . . . . . . . . . . . . . . . . . . . 2Specially Formulated Ink . . . . . . . . . . . . . . . . . . . . 2Automatic Printer Driver Settings . . . . . . . . . . . . . . 2MicroWeave for Superior Output . . . . . . . . . . . . . . . 3High Speed Mode for Fast Printing . . . . . . . . . . . . . . 3
Energy Star Compliance . . . . . . . . . . . . . . . . . . . . . . 3Energy-saving Tips . . . . . . . . . . . . . . . . . . . . . . . 4
How to Use This Manual . . . . . . . . . . . . . . . . . . . . . . 4Where to Get Help . . . . . . . . . . . . . . . . . . . . . . . . . 5
Electronic Support Services . . . . . . . . . . . . . . . . . . 6Important Safety Instructions . . . . . . . . . . . . . . . . . . . 7
Chapter 1 Paper Handling
Choosing Paper and Other Media . . . . . . . . . . . . . . . . . 1-2Setting the Paper Thickness and Adjustment Levers . . . . . . 1-3
Paper Thickness Lever . . . . . . . . . . . . . . . . . . . . . 1-3Thickness Adjustment Lever . . . . . . . . . . . . . . . . . . 1-4
Loading Plain Paper . . . . . . . . . . . . . . . . . . . . . . . . . 1-6Feeding Paper One Sheet at a Time . . . . . . . . . . . . . . . . 1-8Loading Special Papers and Other Media . . . . . . . . . . . . 1-9
Loading Special Papers and Transparencies . . . . . . . . 1-10Loading Envelopes . . . . . . . . . . . . . . . . . . . . . . . 1-13
RHudson User’s GuideA5 size Front10-28-95 DR, pass 2-Rev1
part #4004913-01
iii

Chapter 2 Controlling the Printer
Using the Printer Driver . . . . . . . . . . . . . . . . . . . . . . . 2-2Accessing the Driver . . . . . . . . . . . . . . . . . . . . . . . 2-3Using the Driver Dialog Box . . . . . . . . . . . . . . . . . . 2-5Changing Settings . . . . . . . . . . . . . . . . . . . . . . . . 2-7Document Type . . . . . . . . . . . . . . . . . . . . . . . . . . 2-8Paper Settings . . . . . . . . . . . . . . . . . . . . . . . . . . . 2-10Printing Mode/Options Settings . . . . . . . . . . . . . . . . 2-12Image Settings . . . . . . . . . . . . . . . . . . . . . . . . . . . 2-14Halftoning Settings . . . . . . . . . . . . . . . . . . . . . . . . 2-16
Managing Print Jobs . . . . . . . . . . . . . . . . . . . . . . . . . 2-17Using the Printer’s Control Panel . . . . . . . . . . . . . . . . . . 2-19
Lights . . . . . . . . . . . . . . . . . . . . . . . . . . . . . . . . 2-20Buttons . . . . . . . . . . . . . . . . . . . . . . . . . . . . . . . 2-20
Using the Default Setting Mode . . . . . . . . . . . . . . . . . . 2-23
Chapter 3 Maintenance
Cleaning the Print Head . . . . . . . . . . . . . . . . . . . . . . . 3-2Replacing the Print Head Unit . . . . . . . . . . . . . . . . . . . 3-3Replacing an Ink Cartridge . . . . . . . . . . . . . . . . . . . . . 3-7
Selecting the Correct Ink Cartridges . . . . . . . . . . . . . . 3-8Removing and Installing an Ink Cartridge . . . . . . . . . . 3-9
Cleaning the Printer . . . . . . . . . . . . . . . . . . . . . . . . . 3-13Transporting the Printer . . . . . . . . . . . . . . . . . . . . . . . 3-14Calibrating the Printer . . . . . . . . . . . . . . . . . . . . . . . . 3-15
Chapter 4 Troubleshooting
Print Quality Problems . . . . . . . . . . . . . . . . . . . . . . . . 4-3Problems with Printing . . . . . . . . . . . . . . . . . . . . . . . 4-7Paper Handling Problems . . . . . . . . . . . . . . . . . . . . . . 4-12
Paper Jam Problems . . . . . . . . . . . . . . . . . . . . . . . 4-12Paper Feeding Problems . . . . . . . . . . . . . . . . . . . . . 4-12Other Paper Handling Problems . . . . . . . . . . . . . . . . 4-13
L Hudson User’s GuideA5 size Front10-28-95 DR, pass 2-Rev1
part #4004913-01
iv
Appendix A Technical Specifications
Printing . . . . . . . . . . . . . . . . . . . . . . . . . . . . . . . . A-2Paper . . . . . . . . . . . . . . . . . . . . . . . . . . . . . . . . . A-3Ink Cartridges . . . . . . . . . . . . . . . . . . . . . . . . . . . . A-6Mechanical . . . . . . . . . . . . . . . . . . . . . . . . . . . . . . A-7Electrical . . . . . . . . . . . . . . . . . . . . . . . . . . . . . . . A-7Environmental . . . . . . . . . . . . . . . . . . . . . . . . . . . . A-8Safety Approvals . . . . . . . . . . . . . . . . . . . . . . . . . . A-8Fonts . . . . . . . . . . . . . . . . . . . . . . . . . . . . . . . . . A-8Interface Specifications . . . . . . . . . . . . . . . . . . . . . . . A-9
Pin Assignments . . . . . . . . . . . . . . . . . . . . . . . . . A-10Timing Chart . . . . . . . . . . . . . . . . . . . . . . . . . . . A-12
Initialization . . . . . . . . . . . . . . . . . . . . . . . . . . . . . A-12Default Settings . . . . . . . . . . . . . . . . . . . . . . . . . . . A-13
Appendix B Commands and Character Tables
Command List . . . . . . . . . . . . . . . . . . . . . . . . . . . . B-2Character Tables . . . . . . . . . . . . . . . . . . . . . . . . . . . B-3
International Character Sets . . . . . . . . . . . . . . . . . . B-7Characters Available with ESC (^ Command . . . . . . . . B-8
Glossary
Index
RHudson User’s GuideA5 size Front10-28-95 DR, pass 2-Rev1
part #4004913-01
v

Printer Parts
Proof Sign-off:Writer _______Moira _______Mary _______Cindy _______
paper support
control panel
printer cover
transparency guide
output trayoutput trayextension
sheet feeder
edgeguides
cover-1t
parallel interfaceconnector
power switch
paperthicknesslever
cover-2
ink cartridgeclamp
print headunit releaselever
print head unit
thicknessadjustment lever
cover-3
L Hudson User’s GuideA5 size Inside front cover10-28-95 DR, pass 2-Rev1
Introduction
The EPSON® Stylus® COLOR IIs is an affordable, high-qualityink jet printer. It can print up to 16 million colors at highresolution to produce photo-quality color images. The printeralso produces realistic grayscale images, sharp text, and lineart. The printer’s ink jet technology allows it to operate quietly,keeping your workspace peaceful.
The Stylus COLOR IIs is easy to install and use. You simply setit up, connect it to your computer, and install the printer driversoftware, as described in the Setup Guide. The printer has abuilt-in parallel interface so you can connect it to any IBM® PCor compatible computer.
Getting the Most Out of Your Printer
The printer supports a wide variety of settings that let youimprove print quality or speed up printing. You customizethese settings using the printer driver. Before using yourprinter, read this section to learn more about the print optionsavailable to you.
Also click on the ReadMe icon in the EPSON program group inMicrosoft® Windows® for the latest information.
Three Resolutions to Choose From
Resolution is a measure of the amount of detail that can berepresented. The higher the resolution, the more detailed andrealistic the image, and the longer it takes to print. For printedimages, resolution is measured in dots per inch (dpi).
Proof Sign-off:Mary _______Nancy _______Moira _______Cindy _______
RHudson User’s GuideA5 size Introduction10-28-95 DR, pass 2-Rev1
Introduction 1

Your printer has three resolutions: 720 dpi, 360 dpi, and180 dpi. Use 720 dpi for the best possible images. Forhigh-quality images in less time, use 360 dpi. When speed isimportant and draft quality is good enough, use 180 dpi. Forguidelines on selecting the best resolution for your print jobs,see Chapter 2.
Special Papers
The type of paper you use is very important. Although you getgood results with plain bond paper, you will get better resultsby using coated papers because they do not absorb as muchink.
To ensure the best possible quality, EPSON offers specialcoated papers, glossy papers, and transparencies that areformulated specifically for the inks used by the printer. You canorder these products from EPSON Accessories at (800) 873-7766(U.S. sales only). In Canada, call (800) BUY-EPSON for saleslocations. For information about special papers and othermedia, see Chapter 1.
Specially Formulated Ink
EPSON’s black and color ink cartridges are speciallyformulated to work with EPSON paper and the driver todeliver the best looking images. Always use genuine EPSONink cartridges and do not refill them. Other products may causedamage not covered by EPSON’s warranty.
Automatic Printer Driver Settings
The printer driver includes an Automatic Document Typeoption that sets various printer driver settings for you. Whenyou select this feature, the driver analyzes the elements on thepage to be printed and adjusts the driver settings so yourprinted results are appropriate for each image type.
L Hudson User’s GuideA5 size Introduction10-28-95 DR, pass 2-Rev1
2 Introduction
MicroWeave for Superior Output
The printer’s MicroWeave feature is a special printing modeyou can use to enhance your printed output. WhenMicroWeave is on, the printer selectively applies ink in anintricate pattern to eliminate the possibility of banding (light,horizontal lines which mar an image) that can sometimes occurin normal mode.
High Speed Mode for Fast Printing
High Speed mode increases the print speed. When it is on, theprinter prints bidirectionally; that is, it prints a line from rightto left and the next line from left to right. When High Speedmode is off, all lines are printed in the same direction.
Printing is faster with High Speed mode on. However, thevertical alignment may not be as precise. For this reason, turnoff High Speed mode when you need to improve print quality.
Energy Star Compliance
As an Energy Star Partner, EPSON has determinedthat this product meets the Energy Star guidelines
for energy efficiency.
The EPA estimates that if all desktop computers, printers, andother peripheral devices met Energy Star standards, energycost savings would exceed $1 billion annually and carbondioxide emissions would be reduced by 20 million tons.
All of EPSON’s ink jet printers conform to Energy Starstandards.
RHudson User’s GuideA5 size Introduction10-28-95 DR, pass 2-Rev1
Introduction 3

Energy-saving Tips
Here are a few tips you can use to be even more energy-wise:
If your monitor isn’t Energy Star compliant, turn it offwhen you’re not using it.
Turn off your computer, printer, and monitor each daywhen you are done using them.
Use the print preview option in your software so you cancatch errors before you print something.
If you have an electronic mail system available to you, sendE-mail rather than memos. Not only is this faster, but you’llsave paper and storage space too.
How to Use This Manual
This manual explains how to use your printer once you haveset it up. First follow the instructions in the Setup Guide toinstall your printer; then refer to this manual as needed foroperation and maintenance information.
Chapter 1, “Paper Handling,” explains how to select the rightpaper or other media for your print job and how to load it inyour printer.
Chapter 2, “Controlling the Printer,” provides instructions formanaging the printer’s operation through the printer driversoftware and the printer’s control panel. It also tells you how tomanage print jobs and access the Default Setting mode.
Chapter 3, “Maintenance,” gives instructions for cleaning theprint heads, replacing an ink cartridge, calibrating the printer,cleaning the printer, and transporting it.
L Hudson User’s GuideA5 size Introduction10-28-95 DR, pass 2-Rev1
4 Introduction

Chapter 4, “Troubleshooting,” contains troubleshootingguidelines for any print quality or printer operation problemsyou may have.
Appendix A, “Technical Specifications,” contains thespecifications for the Stylus COLOR IIs printer.
Appendix B, “Commands and Character Tables,” lists theESC/P 2 emulation commands supported by the printer andshows the printer’s built-in character tables.
A Glossary and Index are included at the end of the manual.
Where to Get Help
If you purchased your printer in the United States or Canadaand you need technical assistance, you can call an EPSONColor Specialist at (800) 788-0343.
EPSON also provides customer support and service through anetwork of Authorized EPSON Customer Care Centers andprovides the following services when you dial (800) 922-8911:
EPSON technical information library fax service
Product literature on current and new products
Assistance in locating your nearest Authorized EPSONReseller or Customer Care Center
Technical information on the installation, configuration,and operation of EPSON products
Customer relations.
You can purchase ink cartridges, paper, parts, printed manuals,and accessories for EPSON products from EPSON Accessoriesat (800) 873-7766 (U.S. sales only). In Canada, call(800) BUY-EPSON.
RHudson User’s GuideA5 size Introduction10-28-95 DR, pass 2-Rev1
Introduction 5

If you purchased your printer outside the United States orCanada, contact your EPSON dealer or the marketing locationnearest you for customer support and service.
If you need help with any software program you are using, see the documentation for that program for technical supportinformation.
Electronic Support Services
If you have a modem, the fastest way to access helpful tips,specifications, drivers, application notes, and bulletins forEPSON products is through the online services below.
World Wide Web
If you are connected to the Internet and have a Web browser,you can access EPSON’s World Wide Web site athttp://www.epson.com. EPSON’s home page links users toWhat’s New, EPSON Products, EPSON Connection,SM CorporateInfo and EPSON Contacts. Link to the EPSON Connection forthe latest drivers and FAQs (Frequently Asked Questions) andthe EPSON Chat area. To get in touch with EPSON around theworld, EPSON Contacts includes Contact Information for localEPSON subsidiaries.
EPSON Bulletin Board ServiceYou can call the EPSON Bulletin Board Service (BBS) at(310) 782-4531. No membership is required. Make sure yourcommunications software is set to 8 data bits with 1 stop bit,no parity bit, and a modem speed of 28.8 Kbps or less. See thedocumentation that came with your communications softwarefor more information.
L Hudson User’s GuideA5 size Introduction10-28-95 DR, pass 2-Rev1
6 Introduction

CompuServe online supportCompuServe® members can call the Epson America Forumon CompuServe. If you are already a member, simply typeGO EPSON at the menu prompt to reach the Forum.
If you are not currently a member, you are eligible for a freeintroductory membership as an owner of an EPSON product.This membership entitles you to:
An introductory credit on CompuServe
Your own user ID and password
A complimentary subscription to CompuServe Magazine,CompuServe’s monthly publication.
To take advantage of this offer, call (800) 848-8199 in the UnitedStates and Canada and ask for representative #529. In othercountries, call the following U.S. telephone number:(614) 529-1611, or your local CompuServe access number.
Important Safety Instructions
Before using your printer, read the following safetyinstructions to make sure you use the printer safely andeffectively.
Turn off and unplug the printer before cleaning. Clean witha damp cloth only. Do not spill liquid on the printer.
Do not place the printer on an unstable surface or near aradiator or heating vent.
Do not block or cover the openings in the printer’s cabinetor insert objects through the slots.
Use only the type of power source indicated on theprinter’s label.
RHudson User’s GuideA5 size Introduction10-28-95 DR, pass 2-Rev1
Introduction 7

Connect all equipment to properly grounded poweroutlets. Avoid using outlets on the same circuit asphotocopiers or air control systems that regularly switch on and off.
Do not let the power cord become damaged or frayed.
If you use an extension cord with the printer, make sure thetotal ampere rating of the devices plugged into theextension cord does not exceed the cord’s ampere rating.Also, make sure the total of all devices plugged into thewall outlet does not exceed 15 amperes.
Except as specifically explained in the User’s Guide, do notattempt to service the printer yourself.
Unplug the printer and refer servicing to qualified servicepersonnel under the following conditions:
If the power cord or plug is damaged; if liquid has entered the printer; if the printer has been dropped or the cabinetdamaged; if the printer does not operate normally orexhibits a distinct change in performance. Adjust only thosecontrols that are covered by the operating instructions.
L Hudson User’s GuideA5 size Introduction10-28-95 DR, pass 2-Rev1
8 Introduction

Chapter 1Paper Handling
Proof Sign-off:Mary _______Nancy _______Moira _______Cindy _______
Choosing Paper and Other Media . . . . . . . . . . . . . . . . . 1-2
Setting the Paper Thickness and Adjustment Levers . . . . . . 1-3Paper Thickness Lever . . . . . . . . . . . . . . . . . . . . . 1-3Thickness Adjustment Lever . . . . . . . . . . . . . . . . . . 1-4
Loading Plain Paper . . . . . . . . . . . . . . . . . . . . . . . . 1-6
Feeding Paper One Sheet at a Time . . . . . . . . . . . . . . . . 1-8
Loading Special Papers and Other Media . . . . . . . . . . . . 1-9Loading Special Papers and Transparencies . . . . . . . . 1-10Loading Envelopes . . . . . . . . . . . . . . . . . . . . . . . 1-13
1
RHudson User’s GuideA5 size Chapter 110-28-95 DR, pass 2-Rev1
Paper Handling 1-1
Read this chapter for information about choosing the bestpaper and other media for your printing needs and forinstructions on loading them.
Choosing Paper and Other Media
You can use most plain bond paper with your printer andachieve good results. Coated papers give you better resultsbecause they reduce the amount of ink that is absorbed.However, if the coated paper does not absorb enough ink, theink can smear.
To ensure the best results, EPSON provides special papers andtransparencies that are formulated for the inks used in EPSONink jet printers. These papers include the following:
EPSON special coated paper for 360 dpi. Use this paper forbest results when printing at 360 dpi.
EPSON special coated paper for 720 dpi. Use this paper forbest results when printing at 720 dpi. Five sample sheetsare included with the printer.
EPSON high-quality glossy paper. Use this paper with720 dpi to produce camera-ready composites. Whenprinting on glossy paper, use only EPSON high-qualityglossy paper.
EPSON transparency film. When printing transparencies,use only EPSON transparencies. For best results, usetransparencies within six months of opening the package.Do not select 720 dpi when printing transparencies.
To order EPSON papers and transparencies, contact yourdealer or call EPSON Accessories at (800) 873-7766 (U.S. only).In Canada, call (800) BUY-EPSON for sales locations.
L Hudson User’s GuideA5 size Chapter 110-28-95 DR, pass 2-Rev1
1-2 Paper Handling

Use the following part numbers when ordering:
Paper Size Part Number
Special coated paper for720 dpi
Letter (8.5 x 11 inches)Legal (8.5 x 14 inches)
S041062S041048
Special coated paper for360 dpi
Letter (8.5 x 11 inches) S041060
High-quality glossy paper Letter (8.5 x 11 inches) S041072
Transparency film Letter (8.5 x 11 inches) S041064
Setting the Paper Thickness and Adjustment Levers
Before you start printing, you should check the paper thicknessand adjustment levers to make sure they are set correctly forthe type of paper or other media you are loading.
c Caution:Before you change the lever settings, make sure there is nopaper in the paper path and that printing is paused. To do this,press the Pause button or turn off the printer.
Paper Thickness Lever
The paper thickness lever on the right side of the sheet feederhas two settings: plain paper and thick paper. Set the lever tothe position that best suits the paper or other media you planto use, as shown in the following table and illustration.
Paper type Paper thickness lever position
Standard paper Plain paper
Transparency film Plain paper
Envelopes or labels Thick paper
Manually fed paper Thick paper
RHudson User’s GuideA5 size Chapter 110-28-95 DR, pass 2-Rev1
Paper Handling 1-3

Thickness Adjustment Lever
You need to change the position of the thickness adjustmentlever when you print on thick paper, such as envelopes, or ifyour documents smear, as shown in the following table.
Paper type Thickness adjustment lever position
Standard paper 0
Transparency film 0
Envelopes or labels +
Previously smeared documents +
plain papersetting
thick papersetting
2-1t
L Hudson User’s GuideA5 size Chapter 110-28-95 DR, pass 2-Rev1
1-4 Paper Handling

To access the lever, open the printer cover; the lever is in theleft back corner, as shown below.
If a document is smeared, set the thickness adjustment lever tothe + position (regardless of the paper type) and print it again.
If your document still smears, press the Alt and Load/Ejectbuttons on the printer’s control panel to enable the non-smearprinting mode. See “Using the Printer’s Control Panel” inChapter 2 for more information.
2-2t
RHudson User’s GuideA5 size Chapter 110-28-95 DR, pass 2-Rev1
Paper Handling 1-5

Loading Plain Paper
This section explains how to load plain bond paper in theprinter. For instructions on loading coated or glossy paper,envelopes, and transparencies, or on feeding paper one sheet ata time, see page 1-8.
You can load up to 100 sheets of plain paper in the sheet feeder.Be sure to load it with the printable surface facing up. Theprintable surface is marked with an arrow on most plain paperpackaging.
Note:You can use these instructions for printing on labels; however, be sureto set the paper thickness lever to the thick paper position and thethickness adjustment lever to the + position. Also make sure no labelsare curled or peeling away from the backing when you load them.
1. Slide out the output tray located at the bottom of the printer;then pull out the extension.
HW 16t
L Hudson User’s GuideA5 size Chapter 110-28-95 DR, pass 2-Rev1
1-6 Paper Handling

2. Slide the left edge guide on the sheet feeder to the left as faras it will go.
3. Fan a stack of paper; then tap it on a flat surface to even theedges.
4. Load the stack of paper, printable side up, so that its rightedge rests against the right side of the sheet feeder.
HW 18t
HW 18at
RHudson User’s GuideA5 size Chapter 110-28-95 DR, pass 2-Rev1
Paper Handling 1-7
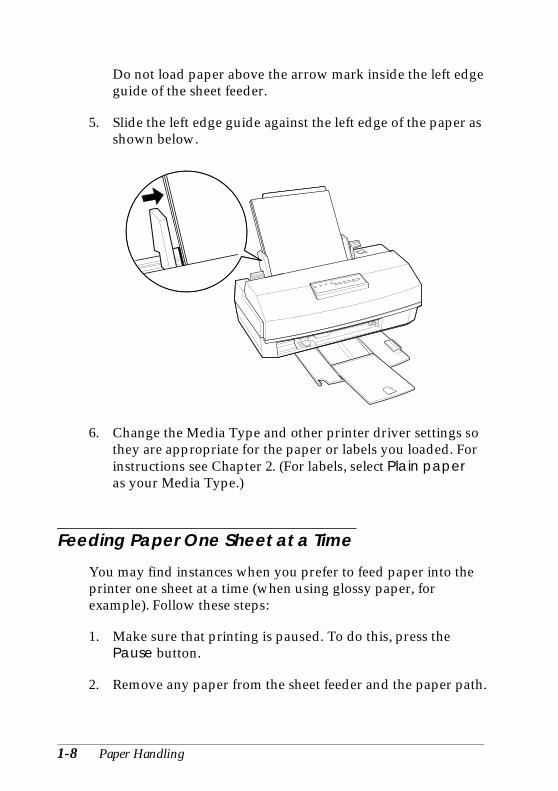
Do not load paper above the arrow mark inside the left edgeguide of the sheet feeder.
5. Slide the left edge guide against the left edge of the paper asshown below.
6. Change the Media Type and other printer driver settings sothey are appropriate for the paper or labels you loaded. Forinstructions see Chapter 2. (For labels, select Plain paperas your Media Type.)
Feeding Paper One Sheet at a Time
You may find instances when you prefer to feed paper into theprinter one sheet at a time (when using glossy paper, forexample). Follow these steps:
1. Make sure that printing is paused. To do this, press thePause button.
2. Remove any paper from the sheet feeder and the paper path.
HW 19
L Hudson User’s GuideA5 size Chapter 110-28-95 DR, pass 2-Rev1
1-8 Paper Handling

3. Move the paper thickness lever to the thick paper position.
4. Set the thickness adjustment lever for the type of paper youare loading.
5. Feed the paper one sheet at a time into the sheet feeder.
Loading Special Papers and Other Media
When using special coated paper, glossy paper, envelopes, andtransparencies, keep the following in mind:
Do not touch the printable surface of the paper; hold thesheets by their edges. The moisture and oils on your handscan reduce print quality.
Use special coated paper and glossy papers within one yearof purchase. Use transparencies within six months.
Before printing on EPSON high-quality glossy paper, orspecial coated paper for 720 or 360 dpi, make sure the colorprint head unit is installed and Color Head Unit is selectedin the driver’s Document Type dialog box. If you areloading glossy paper, make sure to set Super - 720 dpi asthe printing mode in the driver’s Printing Mode/Optionsdialog box. (See Chapter 2 for instructions on using thedriver.)
When printing on high-quality glossy paper ortransparencies, remove each sheet from the output trayimmediately after it is printed. Make sure each sheet is drybefore stacking.
You can print on sheets of labels in your printer; just followthe instructions for loading plain paper on page 1-6.
Return unused sheets and envelopes to their original packageas soon as possible after you finish printing. Unfavorablestorage conditions—especially high temperature, humidity,and direct sunlight—can damage the media.
RHudson User’s GuideA5 size Chapter 110-28-95 DR, pass 2-Rev1
Paper Handling 1-9

Follow any other special loading procedures included inthe rest of this section.
Loading Special Papers and Transparencies
The following procedure explains how to load coated papers,glossy paper, and transparencies. You can load up to thefollowing number of sheets in the sheet feeder:
70 sheets of special coated paper. If you load legal-sizespecial coated paper for 720 dpi, do not load it more thanhalfway to the arrow mark on the left edge guide of thesheet feeder.
30 sheets of EPSON high-quality glossy paper with a sheetof plain paper beneath the last sheet in the stack; to avoidprinting on the plain paper, print your document one pageat a time. If you load a single sheet of glossy paper, place asheet of plain paper beneath it and print one page at a time.
Note:If you load multiple sheets of glossy paper, the minimum topmargin is 1.2 inches (30 mm). To print with a smaller topmargin, load and print glossy paper one sheet at a time.
50 sheets of transparency film, printed one at a time, withone sheet of plain paper beneath the last transparency inthe stack.
L Hudson User’s GuideA5 size Chapter 110-28-95 DR, pass 2-Rev1
1-10 Paper Handling

Follow these steps to load special paper or transparency film:
1. Slide out the output tray located at the bottom of the printer;then pull out the extension.
2. If you are loading transparencies, raise the transparencyguide on the output tray, as shown.
HW 16t(2)
2-3a
RHudson User’s GuideA5 size Chapter 110-28-95 DR, pass 2-Rev1
Paper Handling 1-11
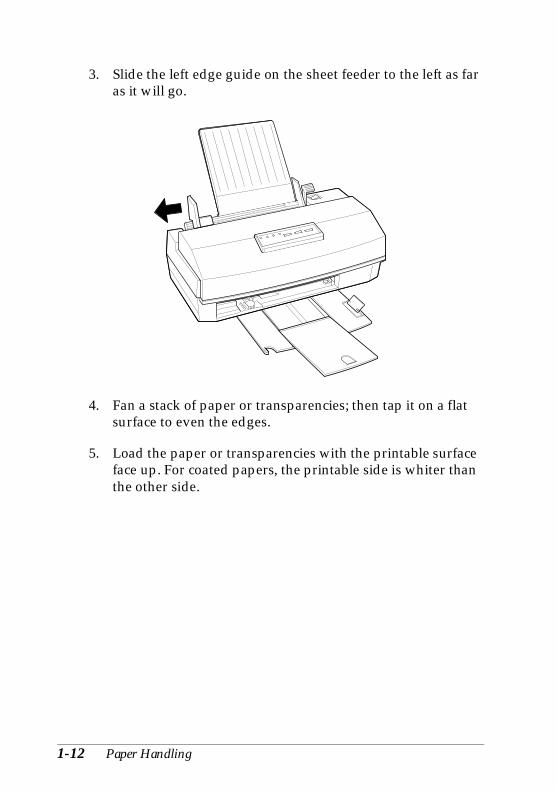
3. Slide the left edge guide on the sheet feeder to the left as faras it will go.
4. Fan a stack of paper or transparencies; then tap it on a flatsurface to even the edges.
5. Load the paper or transparencies with the printable surfaceface up. For coated papers, the printable side is whiter thanthe other side.
HW 18tu
L Hudson User’s GuideA5 size Chapter 110-28-95 DR, pass 2-Rev1
1-12 Paper Handling

For glossy paper and transparencies, the printable side is face up when the cut corner is positioned as shown in theillustration below.
6. Change the Media Type and other printer driver settings sothey are appropriate for the paper or transparency film youloaded. (See Chapter 2 for instructions.)
Loading Envelopes
For detailed specifications on the thickness and weight of theenvelopes you can load, see Appendix A. Do not use envelopesthat are curled or folded, or ones that are too thin; they maycurl during printing. Also, do not choose 720 dpi resolution forenvelope printing.
2-3
RHudson User’s GuideA5 size Chapter 110-28-95 DR, pass 2-Rev1
Paper Handling 1-13

Follow these steps to load envelopes:
1. Make sure you set the paper thickness and thicknessadjustment levers to the correct positions for envelopeprinting, as described on page 1-3.
2. You can load up to 10 envelopes in the sheet feeder with theprintable side facing up (forward) as shown.
3. Adjust the left edge guide so the envelopes feed straight intothe paper path.
4. Change the Media Type and other printer driver settings so they are appropriate for the envelopes you loaded. (SeeChapter 2 for instructions.)
EPSON AMERICA, INC.
20770 Madrona Avenue
Torrance, CA 90509
LJO 20010 Madrona Avenue
Torrance, CA 90509
2-4
L Hudson User’s GuideA5 size Chapter 110-28-95 DR, pass 2-Rev1
1-14 Paper Handling

Chapter 2Controlling the Printer
Proof Sign-off:Mary _______Nancy _______Moira _______Cindy _______
Using the Printer Driver . . . . . . . . . . . . . . . . . . . . . . 2-2Accessing the Driver . . . . . . . . . . . . . . . . . . . . . . 2-3Using the Driver Dialog Box . . . . . . . . . . . . . . . . . . 2-5Changing Settings . . . . . . . . . . . . . . . . . . . . . . . . 2-7Document Type . . . . . . . . . . . . . . . . . . . . . . . . . 2-8Paper Settings . . . . . . . . . . . . . . . . . . . . . . . . . . 2-10Printing Mode/Options Settings . . . . . . . . . . . . . . . 2-12Image Settings . . . . . . . . . . . . . . . . . . . . . . . . . . 2-14Halftoning Settings . . . . . . . . . . . . . . . . . . . . . . . 2-16
Managing Print Jobs . . . . . . . . . . . . . . . . . . . . . . . . 2-17
Using the Printer’s Control Panel . . . . . . . . . . . . . . . . . 2-19Lights . . . . . . . . . . . . . . . . . . . . . . . . . . . . . . . 2-20Buttons . . . . . . . . . . . . . . . . . . . . . . . . . . . . . . 2-20
Using the Default Setting Mode . . . . . . . . . . . . . . . . . . 2-23
2
RHudson User’s GuideA5 size Chapter 210-28-95 DR, pass 2-Rev1
Controlling the Printer 2-1

This chapter explains how to control the printer. It is dividedinto four sections:
“Using the Printer Driver” describes how to use the printerdriver to control settings such as paper type, documenttype, printing mode, and halftoning.
“Managing Print Jobs” explains how you can use theEPSON Spool Manager to monitor, cancel, or change theorder of print jobs.
“Using the Printer’s Control Panel” covers the printerfunctions available through the control panel on the topfront of the printer.
“Using the Default Setting Mode” describes how to accessthe printer’s Default setting mode. In rare cases, you mayneed to specify the print direction, use a different charactertable, or adjust the paper loading position. To make theseand other changes, see this section for instructions.
Using the Printer Driver
The printer driver contains settings that allow you to controlyour print job. The printer comes with default values for all thesettings, as listed in the table on page 2-6. Change the printerdriver settings only if you want to use values different from thedefault ones.
The driver includes an Automatic setting (default) when youset the Document Type option. This setting lets the printerdriver analyze each page of the document you will print andthen select the appropriate printing mode (resolution), colormatching, and halftoning settings automatically.
L Hudson User’s GuideA5 size Chapter 210-28-95 DR, pass 2-Rev1
2-2 Controlling the Printer
Accessing the Driver
You can access the driver in different ways, depending on howyou want to use the settings you select:
If you want the settings to apply to all your Windowsapplications, access the driver as described below for eitherWindows 3.1 or Windows 95.
If you want the changes to apply only to the document(s)you will print in a particular Windows application, followthe steps on page 2-4.
Accessing the driver from Windows 3.1
Follow these steps to access the driver and change settings forall Windows 3.1 applications:
1. Double-click the Control Panel icon in the Main programgroup.
2. Double-click the Printers icon.
3. Choose the EPSON Stylus COLOR IIs driver in the list ofInstalled Printers.
4. Choose Setup. You see the printer driver dialog box shownon page 2-5.
Accessing the driver from Windows 95Follow these steps to access the driver and change its settingsfor all Windows 95 applications:
1. Open the My Computer icon.
2. Double-click the Printers icon.
3. Double-click the EPSON Stylus COLOR IIs icon.
RHudson User’s GuideA5 size Chapter 210-28-95 DR, pass 2-Rev1
Controlling the Printer 2-3

4. Pull down the Printer menu and select Properties.
5. Click the Details tab.
6. Click the Setup button. You see the printer driver dialog box, shown on page 2-5.
Accessing the driver from Windows applications
If you want to change the settings only for the application youare currently using, access the driver by choosing Print or PrintSetup from the File menu of your software program. If youchoose Print Setup, you access the printer driver directly andsee the dialog box shown on page 2-5.
If you choose Print, you see a Print dialog box similar to the one shown below (depending on your software program).
The Print dialog box contains the settings you change mostoften, including the number of copies and the print range. Toaccess the printer driver settings, choose the Setup, Options, orPrinter button. (You may need to select another option,depending on your software program.)
L Hudson User’s GuideA5 size Chapter 210-28-95 DR, pass 2-Rev1
2-4 Controlling the Printer

Note:The printer driver settings you select through your Windowsapplication apply only for the duration of your session with thatapplication. Once you exit the application, the driver settings returnto the default values you have selected through the Windows 3.1Control Panel or Windows 95.
Using the Driver Dialog Box
However you accessed the printer driver, you see the followingdialog box:
(If you do not see this dialog box, the driver has not been installedcorrectly. See the Setup Guide for installation instructions.)
HW 29
RHudson User’s GuideA5 size Chapter 210-28-95 DR, pass 2-Rev1
Controlling the Printer 2-5

At the top of the screen are tabs that open various dialog boxes.The table below summarizes the settings in each dialog box.(Factory defaults are in bold type.) Detailed descriptions ofeach setting follow the table.
Driver settings
Dialog box Setting Options
DocumentType
Document Types AutomaticPresentationPhotographDrawingText
Print Head Unit MonochromeColor
Paper Paper Size A4 210 × 297 mmA4 (Centered) 210 × 297 mmLetter 81⁄2 × 11 inLetter (Centered) 81⁄2 × 11 inLegal 81⁄2 × 14 inLegal (Centered) 81⁄2 × 14 in Envelope #10 41⁄8 × 91⁄2 inEnvelope DL 110 × 220 mmStatement 51⁄2 × 81⁄2 inExecutive 71⁄2 ×10 inA6 Index card (not used)User Defined
(Orientation) Portrait or Landscape
Paper Source Auto Sheet Feeder/Manual
Copies Number (1-99)Collate (on, off)Reverse page order (on, off)
PrintingMode/Options
Printing Mode(resolution)
Super - 720 dpiBest - 360 dpiDraft - 180 dpi
Media Type Plain paper Special coated paper for 360 dpiSpecial coated paper for 720 dpi High-quality glossy paperTransparency
Print Options High Speed (on, off)MicroWeave (on, off)
L Hudson User’s GuideA5 size Chapter 210-28-95 DR, pass 2-Rev1
2-6 Controlling the Printer

Dialog box Setting Options
ImageSettings
Brightness –50% - 0% - 50%
Contrast –50% - 0% - 50%
Color Matching* OffVividPhoto-realisticStandard
Halftoning Halftone* No halftoningError diffusionDithering ADithering B
About — Contains version information aboutthe driver
* These options have no default setting; the setting is determinedautomatically by the Document Types setting.
Changing Settings
To change a printer setting, open the appropriate dialog box bychoosing the tab. Change one or more settings and then moveto the next tab you want to change. When you have made allchanges in one or more dialog boxes, choose the OK button tosave all the settings. This closes the printer driver and returnsyou to your application program or Windows.
Note:The availability of some settings or options in a dialog box maydepend on the setting selected in another dialog box; so not all optionsor settings may be listed, or some may be displayed in backgroundtype.
If you want to return all printer driver settings to their factorydefaults, choose Defaults. To exit the printer driver withoutsaving your settings, choose Cancel.
For more information about the settings, see this chapter,choose the Help button in the driver dialog box, or select theEPSON Stylus ReadMe icon in the EPSON program group.
RHudson User’s GuideA5 size Chapter 210-28-95 DR, pass 2-Rev1
Controlling the Printer 2-7

Document Type
These settings tell the printer what type of document you areprinting and which print head unit is installed.
Document Types
Select the document type that most closely matches the type ofdocument you are printing or let the printer driver select itautomatically.
Automatic is the default setting and produces the best printedresults. This setting lets the printer driver analyze the data oneach page of your document and adjust the Printing Mode(resolution), Color Matching, and Halftone settingsautomatically. The driver selects the resolution and halftonesettings based on data contained on each entire page, butselects the color matching setting based on each object on apage, such as each graphic or block of text.
You achieve the best results using the Automatic setting.However, if you prefer to set the document type manually,choose one of the following options:
Select Presentation when you are printing documentscontaining many graphic elements, such as charts inpresentations.
Select Photograph when you are printing photographs.
Select Drawing when you are printing computer-generatedilllustrations.
Select Text when you are printing documents that containtext only.
L Hudson User’s GuideA5 size Chapter 210-28-95 DR, pass 2-Rev1
2-8 Controlling the Printer

Each of the manually set document types select predefinedsettings for Color Matching and Halftone, as listed in thefollowing table.
Document Type Color Matching Halftone
Presentation Vivid Error diffusion
Photograph Photo-realistic Error diffusion
Drawing Standard Error diffusion
Text Standard Error diffusion
If you change a predefined Color Matching or Halftonesetting, the driver erases the currently selected document typeand uses your settings instead.
Print Head Unit
Specifies Color Head Unit for printing in CMY color. CMYrefers to the printer’s colored inks: cyan (blue-green), magenta,and yellow. (A blend of all three produces composite black.)When you select Monochrome Head Unit, the printer printsusing only black ink. If you are printing a color image andMonochrome Head Unit is selected, the printer convertscolor data to grayscale values. If you are printing a black andwhite image and Color Head Unit is selected, the printing timeincreases significantly.
Note:If the Print Head Unit setting does not match the installed printhead unit, the quality of your printed output may decline.
RHudson User’s GuideA5 size Chapter 210-28-95 DR, pass 2-Rev1
Controlling the Printer 2-9

Paper Settings
The Paper settings determine the size of the document, itsorientation, and copying information.
Paper Size
By default, the printer expects letter-size (8.5 × 11 inches)paper. To select a different paper or envelope size, choose fromthe following predefined sizes:
Note:If you selected a country other than the United States in the WindowsControl Panel International utility, the default paper size may bedifferent. In addition, the measurement units displayed in theprintable area example (beneath the Paper Size box) may be metric.
Use one of the Centered paper sizes only if you want the imageto be centered on the page and your software program does nothave a setting that lets you do this. Centered images have aslightly smaller printable area.
If you select User Defined, you can create a custom paper sizein the pop-up box that appears beneath the Paper Size box.Change the current Paper Width and Paper Height settingsto the values you want. You can select a width from 3.93 to9.5 inches (100 to 241.3 mm) and a height from 3.93 to 44 inches(100 to 1117.6 mm).
A4 210 × 297 mmA4 (Centered) 210 × 297 mmLetter 81⁄2 × 11 inLetter (Centered) 81⁄2 × 11 inLegal 8 1⁄2 × 14 inLegal (Centered) 81⁄2 × 14 in
Envelope #10 41⁄8 × 91⁄2 inEnvelope DL 110 × 220 mmStatement 51⁄2 × 81⁄2 inExecutive 71⁄2 × 10 inUser Defined
L Hudson User’s GuideA5 size Chapter 210-28-95 DR, pass 2-Rev1
2-10 Controlling the Printer

Portrait or Landscape
Select either the Portrait or Landscape button to specify theorientation of the image on the page. In portrait orientation, thetop of the page is parallel to the short edge of the paper. Inlandscape orientation, the top of the page is parallel to the longedge of the paper.
Normally you should select the page orientation in yoursoftware application, not with the driver.
Paper source
For your printer, the paper source is always Auto SheetFeeder/Manual.
Copies
Allows you to specify the number of copies to be printed,whether to collate them (print them in sets), and whether youwant to print the pages in reverse order (from last page to firstpage).
Normally you should select these three settings from the Printdialog box in your software program, not with the driver. Besure you do not choose multiple copies in both the Print dialogbox and the driver.
Note:The Copies options may require additional system memory. If yousee an error message or are unable to print using these options, tryclosing any unnecessary applications, reducing the size of your printjob, turning off the Copies options, or increasing system memory.
RHudson User’s GuideA5 size Chapter 210-28-95 DR, pass 2-Rev1
Controlling the Printer 2-11

Printing Mode/Options Settings
The Printing Mode/Options settings let you define theresolution, media type, and printing options for your document.The following table shows how these settings are related to eachother and which options are available in the different modes.
Printing Mode setting Media Type setting Default Print Options*
Super - 720 dpi Special coatedpaper for 720 dpi
MicroWeave OnHigh Speed Off
High-quality glossypaper
MicroWeave OnHigh Speed Off
Plain paper MicroWeave OnHigh Speed Off
Best - 360 dpi Special coatedpaper for 360 dpi
MicroWeave OnHigh Speed Off
Special coatedpaper for 720 dpi
MicroWeave OnHigh Speed Off
Plain paper MicroWeave OffHigh Speed On
Transparency MicroWeave OnHigh Speed Off
Draft - 180 dpi Plain paper MicroWeave OffHigh Speed On
* You may not be able to change these options to a setting other than thedefault setting.
Be sure to select the Printing Mode before the Media Type.
Printing Mode
Specifies a resolution of 720 dpi, 360 dpi, or 180 dpi. Resolutionis the amount of detail used to create an image. The higher theresolution, the sharper and finer the image.
L Hudson User’s GuideA5 size Chapter 210-28-95 DR, pass 2-Rev1
2-12 Controlling the Printer

For the best possible resolution, choose Super - 720 dpi. Whenyou select this resolution, MicroWeave is automatically turnedon and High Speed mode is turned off. For the best possibleresults at 720 dpi, load EPSON special coated paper for 720 dpi,or EPSON high-quality glossy paper.
For most color printing, select Best - 360 dpi. This resolutionproduces good-quality, full-color images using less memoryand in less time than 720 dpi. For the best results at 360 dpi, useEPSON special coated paper for 360 dpi.
When speed is important and draft quality is good enough, useDraft - 180 dpi resolution.
Note:Printing at lower resolutions also conserves ink.
Media Type
Sets up the printer for the type of paper loaded. Depending onthe Printing Mode setting, Media Type can be one of thefollowing:
Plain paperSpecial coated paper for 360 dpiSpecial coated paper for 720 dpiHigh-quality glossy paperTransparency
For specific information on when to use each paper type, seeChapter 1.
Print Options
Allows you to turn the MicroWeave and High Speed modesettings on or off.
RHudson User’s GuideA5 size Chapter 210-28-95 DR, pass 2-Rev1
Controlling the Printer 2-13

MicroWeave reduces the possibility of banding, the lighthorizontal lines that can mar an image. When you turn onMicroWeave, the printer produces superior output becausegraphics data is reordered and printed in fine increments. Itslows the print speed but is recommended for printing colorand grayscale images. Because it does not improve the printquality for text and line art, turn it off to print these kinds ofimages faster.
When you turn on High Speed mode, the printer usesbidirectional printing, reducing the time it takes to print animage. Bidirectional printing is fast, but for highest qualityalways turn off High Speed mode.
Note:If the vertical lines appear misaligned when you print with HighSpeed mode on, calibrate the printer as described in Chapter 3.
Image Settings
The Image Settings options allow you to adjust a document’sbrightness, contrast, and color correction settings. Wheneverpossible, use your software program to make these adjustments.
If you use the printer driver, it is best to let its AutomaticDocument Type setting select the appropriate image settingsfor you. If your original image is of poor quality, however, youcan adjust the image settings to improve the printed output.
To help you decide on the best settings, a preview of a sampleimage appears in the Image Settings dialog box. As you changesettings, the preview image is updated accordingly.
L Hudson User’s GuideA5 size Chapter 210-28-95 DR, pass 2-Rev1
2-14 Controlling the Printer

If you want to change the sample image to another bitmap(.BMP) image file, double-click the preview image area. Then,in the dialog box that appears, select any other bitmap file youmay have. The image must be a 1-, 4-, or 8-bit per pixel bitmapformat. If the image size is different from the original, it mayappear small or not display completely in the preview imagearea.
Image
Adjusts the brightness and contrast of your color or grayscaleprinted images.
Brightness
Controls the lightness or darkness of an image. Increasebrightness to lighten an image; decrease it to darken an image.
Contrast
Controls the degree of difference between the light and darkareas of an image. When you increase contrast, the light areasbecome very light and the dark areas become very dark. Whenyou decrease contrast, the difference in intensity is more subtle,making the whites and bright colors appear more muted andthe blacks appear very dark gray.
Color Matching
Controls the printer’s color correction features based on theselected Document Type. Color Matching is automatically setto the most appropriate setting when you select a particulardocument type or use the Automatic setting. It is best to leaveColor Matching set to the driver’s selection.
To use color matching, make sure the Color Print Head isselected in the Document Type tab. If Monochrome PrintHead is selected, Color Matching is not available.
RHudson User’s GuideA5 size Chapter 210-28-95 DR, pass 2-Rev1
Controlling the Printer 2-15

The settings perform the following functions:
Off turns off color matching so you can use yourapplication program’s color correction features.
Vivid intensifies the colors and lightens the midtones ofimages such as presentation graphics and charts.
Photo-realistic increases the contrast in images such ascolor photographs.
Standard adjusts colors so they closely match the originalscreen colors in images such as illustrations.
Halftoning Settings
You achieve the best halftoning results when you let the printerdriver’s Document Type setting select the appropriate halftonemethod. If you selected the Automatic Document Type option,the driver selects halftone settings appropriate to each page itprints.
If you selected one of the other document types, the driverselects a predefined halftone setting. If you change apredefined halftone setting, the driver erases the currentlyselected Document Type option and uses the halftone settingyou selected.
Note:It is recommended that you set halftoning in the driver rather thanthe halftone or dithering settings available in your software.
L Hudson User’s GuideA5 size Chapter 210-28-95 DR, pass 2-Rev1
2-16 Controlling the Printer

If you prefer to set the halftoning method manually, followthese guidelines:
Use No halftoning to speed printing for text ormonochrome line art. Do not use it when printing in color.
Error diffusion is best for photographic images. It createscolor by randomly distributing the dots, making edges andcolors softer. It takes longer to print, but it produces thebest print quality for photographic images.
Dithering A and Dithering B arrange dots in orderlypatterns. The dithering method is relatively fast and is best suited for printing charts, graphs, and other imagesthat require precise, solid areas of bright colors. UseDithering A for images with limited detail and shading.Use Dithering B for images with significant detail butlimited shading.
Managing Print Jobs
The EPSON Spool Manager was automatically copied to yourhard disk drive when you installed the printer software. Whenyou print a document, the printer uses the EPSON SpoolManager to send data to the printer. This allows you tocontinue working in your software program while printing.
Whenever you send a print job to the printer, the Despoolerstatus box appears in the bottom right corner of your screenand an icon for the EPSON Spool Manager appears in thebottom portion of your screen. The Spool Manager icon is alsoincluded in the EPSON group so you can manage print queuesor perform other operations when you are not sending a printjob.
RHudson User’s GuideA5 size Chapter 210-28-95 DR, pass 2-Rev1
Controlling the Printer 2-17

Note:You may not see the EPSON Spool Manager icon in the bottomportion of your screen if the Windows Program Manager window oran application window is maximized. Reduce the window size toreveal the icon.
The Despooler status box, which is similar to the one shownbelow, allows you to monitor the progress of the print job andcancel ( ), pause ( ), or restart ( ) the print job.
If you do not want the Despooler status box to appear eachtime you print, double-click the EPSON Spool Manager iconto open it. Then open the View menu and select Show DespoolPopup to turn it off; the check mark next to the optiondisappears.
Other options in the EPSON Spool Manager allow you to holdand cancel print jobs, choose what information to display in theSpool Manager Window, and manage print queues and printjobs on a network. Click Help for more information.
Spoolmgr.img
L Hudson User’s GuideA5 size Chapter 210-28-95 DR, pass 2-Rev1
2-18 Controlling the Printer

You can also access the EPSON Spool Manager when you arenot printing. Double-click the Spool Manager icon in theEPSON Program group.
Note:If you get an error message while trying to print, the problem may becaused by conflicts with other temporary files or directories. SeeChapter 4 for more information.
Using the Printer’s Control Panel
The printer’s control panel contains lights for displaying theprinter status and buttons for controlling certain functions, asdescribed in this section.
Since most printer settings can be controlled from yoursoftware, you do not often need to use the control panel.Normally you need to use it only to do the following:
Clean the black or color print heads
Replace an ink cartridge or print head
Turn on economy or condensed mode
Pause the printer temporarily or reset it.
1-1
RHudson User’s GuideA5 size Chapter 210-28-95 DR, pass 2-Rev1
Controlling the Printer 2-19

Lights
Power On when the printer is on.
Error On or flashes in combination with other lights toindicate printing problems or errors. For help withprinting errors, see Chapter 4.
Condensed On when condensed mode is selected. In this mode,the printer prints selected fonts at 60% of their widthso that more characters can fit on a page.
Economy On when economy printing mode is selected. Ineconomy mode the printer uses less ink by printingfewer dots per character. It also makes black printingappear gray. Use this mode for rough drafts of textonly that are printed from DOS applications.
Pause On when printing is paused and flashes when youclean the print heads or replace a print head unit orink cartridge. Never turn off the printer when thePause light is flashing.
The Pause light also flashes when an error occurs.
Buttons
This section describes the control panel button functions aswell as certain button combinations and power-on sequences.
Alt Used alone or in combination with other buttons toclean the print heads, replace the print head unit orink cartridge, and other functions.
L Hudson User’s GuideA5 size Chapter 210-28-95 DR, pass 2-Rev1
2-20 Controlling the Printer

Load/Eject Loads or ejects a sheet of paper. The printernormally loads and ejects paper automatically.
Pause Stops printing temporarily. Press it again to resumeprinting. To reset the printer, hold down this buttonfor about five seconds until all the lights turn on.This clears the printer’s buffer and restores thefactory default settings.
Button combinations and power-on functionsThe button combinations below let you perform additionalfunctions to control your printer.
Alt + POWER switch
Prints a demonstration page of the printer’s fontsand colors. (Paper must be loaded in the printer.)Hold down Alt until the printer feeds a page. To exitdemonstration mode, wait until the Pause lightcomes on; then turn off the printer.
Load/Eject + POWER switch
Checks the paper length and performs a printer selftest at 360 dpi. Hold down Load/Eject until theprinter feeds a page. To stop the self test, press thePause button and then turn off the printer. See“Testing the Printer” in the Setup Guide for moreinformation.
Alt + Pause Starts the print head cleaning cycle; see “Cleaningthe Print Head” in Chapter 3.
Pause + POWER switch
Enters the printer’s Default setting mode and printsan instruction page; see “Using the Default SettingMode” on page 2-23 for more information. Holddown Pause until the printer feeds a page. To exitthe Default setting mode, press the Pause buttonand turn off the printer.
RHudson User’s GuideA5 size Chapter 210-28-95 DR, pass 2-Rev1
Controlling the Printer 2-21

Alt + Load/Eject
Selects a combination of economy printing andcondensed printing modes, as shown below. Hold down the buttons together to enterEconomy/Condensed mode. Then hold them downagain until the Economy and Condensed lightsindicate the appropriate selection.
StatusEconomy light
Condensed light
Economy and Condensedprinting off
Off Off
Condensed printing on Off On
Economy printing on On Off
Economy and Condensedprinting on
On On
Alt +Load/Eject +POWERswitch
Enables the non-smear printing feature, whichreduces the chance of smeared pages by decreasingthe per-line printing speed. This mode is helpfulwhen printing on coated paper because it allowsmore time for the ink to dry. To exit the non-smearmode, press the Pause button and turn off theprinter.
Load/Eject +Pause +POWERswitch
Prints a page containing a hexadecimalrepresentation (hex dump) of the data received bythe printer for troubleshooting purposes. SeeChapter 4 for more information. Hold downLoad/Eject and Pause until the printer feeds apage. To exit the hex dump mode, press the Pausebutton and turn off the printer.
L Hudson User’s GuideA5 size Chapter 210-28-95 DR, pass 2-Rev1
2-22 Controlling the Printer

Using the Default Setting Mode
Additional printer functions are available through the Defaultsetting mode. Because the printer’s factory default settings aredesigned to meet the needs of almost all users, you rarely needto change the additional printer functions listed below. Ifnecessary, however, you can turn on the Default setting modeand change the settings using the control panel buttons.
Character table. Selects the set of characters and symbolsthat can be printed. The default is the U.S.A. charactertable. If you commonly use a language containing accents,symbols, or other characters not available in the U.S.A.character table, change to a different character table. For alist of character tables, see Appendix B.
Network interface mode. If you’re having trouble printingwhen the printer is connected to multiple computers, turnon network interface mode. By default, network interfacemode is off.
Print direction. Specifies how the print head moves acrossthe page. The options are Uni-D, Bi-D, and Auto (default).When Uni-D is on, the print head prints in only onedirection to provide the most precise alignment forgraphics and text. In Bi-D printing, the print head prints inboth directions. Bi-D is faster, but the vertical alignmentmay not be as precise as Uni-D. When Auto is selected, theprinter switches automatically between Uni-D and Bi-D asnecessary when it receives data.
Auto line feed. Specifies that a carriage return characterencountered in the print file be accompanied by a line feedcommand. By default, auto line feed is off. If text lines printon top of one another, turn on auto line feed.
RHudson User’s GuideA5 size Chapter 210-28-95 DR, pass 2-Rev1
Controlling the Printer 2-23

Loading position. Determines the top margin by defininghow close to the paper edge the first line can print. Theloading position can be 3 mm or 8.5 mm (default).Normally you should use your software to adjust your topmargin.
Font and Pitch. Select the built-in printer font and characterpitch used as the default setting. The factory default pitch is10 cpi; the default font is Courier . Generally you use yoursoftware to select the font and pitch.
Thick paper. Select Envelope (default) if you print on thickpaper or envelopes.
To turn on the Default setting mode and print instructions, turnoff the printer. Then hold down the Pause button while youturn the printer back on. Follow the instructions the printerprints to change the default settings by pressing the buttons onthe control panel. When you are finished, press Pause and turnoff the printer to exit Default setting mode. (If a partial pagefeeds before you press Pause, press Load/Eject to clear thepaper path.)
L Hudson User’s GuideA5 size Chapter 210-28-95 DR, pass 2-Rev1
2-24 Controlling the Printer

Chapter 3Maintenance
Proof Sign-off:Mary _______Nancy _______Moira _______Cindy _______
Cleaning the Print Head . . . . . . . . . . . . . . . . . . . . . . 3-2
Replacing the Print Head Unit . . . . . . . . . . . . . . . . . . . 3-3
Replacing an Ink Cartridge . . . . . . . . . . . . . . . . . . . . 3-7Selecting the Correct Ink Cartridges . . . . . . . . . . . . . 3-8Removing and Installing an Ink Cartridge . . . . . . . . . . 3-9
Cleaning the Printer . . . . . . . . . . . . . . . . . . . . . . . . . 3-13
Transporting the Printer . . . . . . . . . . . . . . . . . . . . . . 3-14
Calibrating the Printer . . . . . . . . . . . . . . . . . . . . . . . 3-15
3
RHudson User’s GuideA5 size Chapter 310-28-95 DR, pass 2-Rev1
Maintenance 3-1

The instructions in this chapter tell you how to do thefollowing to maintain and care for your printer:
Clean the print head
Replace the print head unit
Replace an ink cartridge
Clean the printer
Transport the printer
Calibrate the printer.
Cleaning the Print Head
The printer periodically cleans the print head automatically, sonormally you should not need to manually run a cleaningcycle. However, if print quality diminishes, run the print headcleaning cycle to unclog the print head so the nozzles deliverink properly.
The cleaning cycle takes about one minute, during which thecarriage moves and you hear the printer recharging the printhead. The Pause light flashes throughout the cleaning cycleand then stays on when the cycle is finished.
Follow these steps to clean either print head:
1. Make sure the printer is turned on and press the Pausebutton.
2. Hold down the Alt button and press Pause. The cleaningcycle begins.
3. When the cleaning cycle is done, press the Pause button toresume printing.
L Hudson User’s GuideA5 size Chapter 310-28-95 DR, pass 2-Rev1
3-2 Maintenance

After you clean the print head, turn off the printer; then holddown the Alt button as you turn the printer back on. Thisprints a demonstration page so you can see if your print qualityhas improved. (After the page prints, the Pause light comeson; turn off the printer to exit demonstration mode.)
It can sometimes take up to five cleaning cycles to improveprint quality. If the print quality does not improve after youclean the print heads five times (printing a demonstration pageto check after each cycle), contact your dealer or authorizedEPSON servicer.
To clean the other print head, replace the one currentlyinstalled (as described below). Then repeat the steps in thissection.
Replacing the Print Head Unit
When you need to switch between color and monochromeprinting, follow the instructions in this section to remove oneprint head unit and replace it with the other.
c Caution:When you switch between print heads, always leave the inkcartridges installed in the print head unit. Once you removean ink cartridge from its print head unit, it becomes unusable.
1. Make sure the printer is turned on and press the Pausebutton. The Pause light comes on.
RHudson User’s GuideA5 size Chapter 310-28-95 DR, pass 2-Rev1
Maintenance 3-3
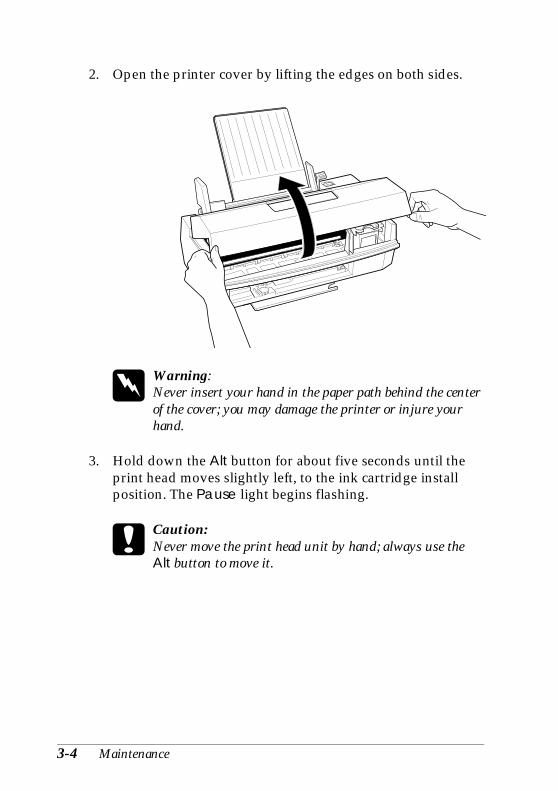
2. Open the printer cover by lifting the edges on both sides.
w Warning:Never insert your hand in the paper path behind the centerof the cover; you may damage the printer or injure yourhand.
3. Hold down the Alt button for about five seconds until theprint head moves slightly left, to the ink cartridge installposition. The Pause light begins flashing.
c Caution:Never move the print head unit by hand; always use theAlt button to move it.
HW 5
L Hudson User’s GuideA5 size Chapter 310-28-95 DR, pass 2-Rev1
3-4 Maintenance

4. Raise the blue print head unit release lever as far as it will go.
c Caution:Do not lift up the ink cartridge clamp; the ink cartridgeand print head become unusable.
5. Grasp both sides of the print head unit and carefully lift it outof the printer. Place the unit on a flat, clean surface.
c Caution:Do not touch the electrical contacts on the back andbottom of the print head unit or inside the printer; youmay damage them.
release lever
5-1
5-2
RHudson User’s GuideA5 size Chapter 310-28-95 DR, pass 2-Rev1
Maintenance 3-5
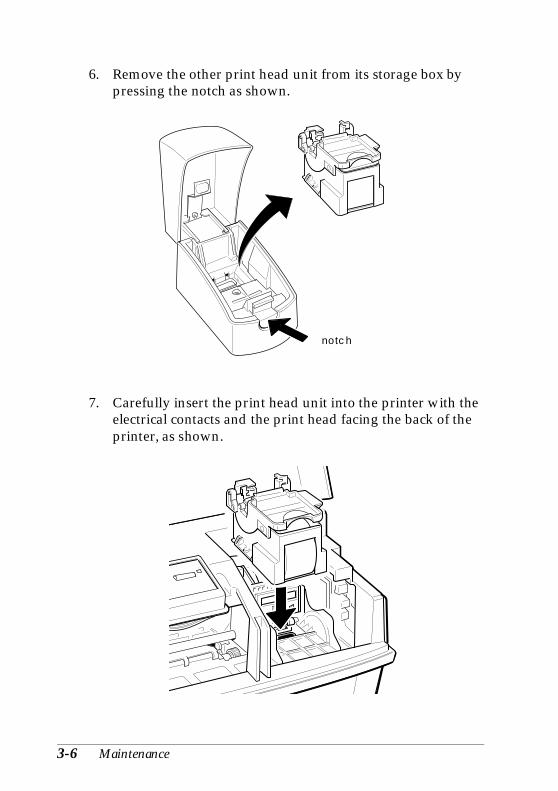
6. Remove the other print head unit from its storage box bypressing the notch as shown.
7. Carefully insert the print head unit into the printer with theelectrical contacts and the print head facing the back of theprinter, as shown.
notch
5-3
5-4
L Hudson User’s GuideA5 size Chapter 310-28-95 DR, pass 2-Rev1
3-6 Maintenance
8. When the print head unit is fully seated, press the blue leverdown until it clicks into place.
c Caution:If the Error and Pause lights start flashing, remove theprint head unit (beginning with step 4) and reinsert it.
9. Press the Alt button to return the print head to its homeposition. (Even if you do not press Alt, the printer movesthe print head back to its home position about 60 secondsafter you close the clamp.)
10. Place the print head unit you removed in the storage box.Always store the unused print head unit in this box toprotect its delicate components.
11. When the Pause light stops flashing, press the Pause button.
12. Close the printer cover.
Replacing an Ink Cartridge
The printer’s Error light tells you when an ink cartridge is lowon ink and when you need to replace the cartridge. If the Errorlight flashes, the cartridge is low on ink. If the printer stops, thePause light comes on, and the Error light flashes rapidly, thecartridge is empty.
Before replacing a cartridge, try cleaning the print head asdescribed on page 3-2.
RHudson User’s GuideA5 size Chapter 310-28-95 DR, pass 2-Rev1
Maintenance 3-7

c Caution:Do not replace an ink cartridge unless the Error light tells youto. If you replace a cartridge before the light flashes, the sensorthat tells you when ink is out will not work with the newcartridge.
Leave the old cartridge installed in the printer until you areready to replace it with a new one. Attempting to printwithout a cartridge installed can damage the printer.
When you discard your used ink cartridge, always remove itfrom the print head unit first. Do not discard the print headunit.
Once you install an ink cartridge, do not open the clamp orremove the cartridge except to replace it with a new one. Onceyou remove a cartridge, you cannot reuse it.
Selecting the Correct Ink Cartridges
Use only these EPSON ink cartridges:
Black ink cartridge S020047Color ink cartridge S020049
When you need new ink cartridges, contact your dealer or callEPSON Accessories at (800) 873-7766 (U.S. only). In Canada,call (800) BUY-EPSON for sales locations.
c Caution:Use only genuine EPSON cartridges and do not refill them.Other products may cause damage not covered by EPSON’swarranty.
L Hudson User’s GuideA5 size Chapter 310-28-95 DR, pass 2-Rev1
3-8 Maintenance

Removing and Installing an Ink Cartridge
Follow these steps to replace an ink cartridge:
1. Make sure the printer is on and the Error light is flashing.
2. Press the Pause button; the Pause light comes on.
3. Open the printer cover by lifting the edges on both sides.
4. Hold down the Alt button for about five seconds until theprint head moves slightly left, to the ink cartridge installposition. The Pause light begins flashing.
The carriage returns to the home position after 60 seconds if the ink cartridge is not removed.
c Caution:Never move the print head by hand; always use the Altbutton to move it.
5. Raise the ink cartridge clamp to open it. The cartridge risespartially out of the printer.
ink cartridge clamp
5-4a
RHudson User’s GuideA5 size Chapter 310-28-95 DR, pass 2-Rev1
Maintenance 3-9

6. Lift the cartridge out of the printer and dispose of it carefullyso any excess ink does not spill out. Do not take the usedcartridge apart or try to refill it.
w Warning:If ink gets on your hands, wash them thoroughly with soapand water. If ink gets into your eyes, flush themimmediately with water.
7. Open the package containing the ink cartridge and removethe cartridge from its foil wrapper. Remove the tape sealfrom the top of the cartridge.
c Caution:You must remove the tape seal from the top of thecartridge; leaving the tape on will permanently damage it.Do not remove the clear tape seal from the bottom of thecartridge; ink will leak out.
5-5
colorcartridge
blackcartridge
5-6
L Hudson User’s GuideA5 size Chapter 310-28-95 DR, pass 2-Rev1
3-10 Maintenance

8. Lower the ink cartridge into the print head unit with the label facing up and the arrow on the top of the cartridgepointing toward the back of the printer.
9. Press down the ink cartridge clamp until it locks in place. You will feel some resistance.
c Caution:Once you install an ink cartridge, do not open the inkcartridge clamp again or remove the cartridge except toreplace it with a new one. Once you remove a cartridge, donot reuse it. Reusing a cartridge that has been removedmay damage the print head.
5-6a
HW 10-3
RHudson User’s GuideA5 size Chapter 310-28-95 DR, pass 2-Rev1
Maintenance 3-11

10. Press the Alt button again to return the print head to itshome position. (Even if you do not press Alt, the printermoves the print head back to its home position about 60seconds after you close the clamp.)
The Pause light flashes as the printer charges the inkdelivery system.
11. Close the printer cover. When the charging cycle finishes,the Pause light stops flashing and stays on. Press thePause button to turn off the light and resume printing.
c Caution:Never turn off the printer while the Pause light is flashing.
When you discard an ink cartridge, always remove it from theprint head unit first. Do not discard the print head unit.
Use only genuine EPSON ink cartridges and do not refillthem. Other products may cause damage not covered byEPSON’s warranty.
In order to maintain optimum print quality, the printerperiodically performs a cleaning operation. You may notice thecleaning cycle being performed when the printer has been onfor a while without being used or when you turn on the printerafter it has been off for a while.
You may also need to manually activate a cleaning cycle if younotice a decline in print quality. See page 3-2 for more information.
L Hudson User’s GuideA5 size Chapter 310-28-95 DR, pass 2-Rev1
3-12 Maintenance

Cleaning the Printer
If you want to clean the printer, follow these steps:
1. Turn off the printer and disconnect any cables connected to it. Be sure to keep the printer cover closed as you clean it.
2. Remove any paper or other media from the sheet feeder.
3. Carefully clean away loose dust and dirt with a soft brush.
4. Clean the exterior of the printer with a soft cloth dampenedwith mild detergent.
5. To clean ink out of the printer’s interior, wipe it gently with a damp cloth.
c Caution:Never use alcohol or thinner to clean the printer; thesechemicals can damage the components and the printer case.
Do not use a hard or abrasive brush; these can scratch theprinter surfaces.
Do not allow water to get on the printer mechanism or anyelectronic components.
Do not touch the gears inside the printer.
Do not spray inside the printer with lubricants or oils; theycan damage the printer mechanisms.
RHudson User’s GuideA5 size Chapter 310-28-95 DR, pass 2-Rev1
Maintenance 3-13

Transporting the Printer
If you need to transport your printer, carefully repack it in theoriginal box and packing materials as follows:
1. Turn off the printer, if you have not already done so.
2. Open the printer cover and make sure that the print head is locked in the far right position. If it isn’t, turn on theprinter, wait about 10 seconds, and turn it off.
c Caution:Do not remove the ink cartridges when transporting theprinter. Transporting the printer without the cartridgesinstalled can damage the printer.
3. Use a strong adhesive tape to secure the print head to the side of the printer.
4. Unplug the power cord from the electrical outlet.
5. Disconnect the interface cable from the printer.
6. Remove any paper from the sheet feeder and remove thepaper support.
7. Push in the output tray extension and rotate the output trayuntil it is beneath the printer.
8. Attach the protective materials to the printer. See the NoticeSheet that was packed with the printer.
9. Repack the printer and attachments in the original box.
Be sure to keep the printer flat as you transport it. If you noticeproblems with the printed image after transporting the printer,clean the print head as described on page 3-2. If the printedimage is misaligned, calibrate the printer as described in thenext section.
L Hudson User’s GuideA5 size Chapter 310-28-95 DR, pass 2-Rev1
3-14 Maintenance

Calibrating the Printer
Your printer has been calibrated at the factory so that verticallines in your text and graphics are properly aligned. If younotice misaligned images in printouts, however, you cancalibrate the printer with the Bi-D Calibration Utility. You mayneed to do this after moving the printer to a new location, forexample.
You can copy the Bi-D Calibration Utility from the Windowsprinter driver diskette to your hard disk, or run it from thediskette when needed. You calibrate the printer twice—oncewith the monochrome print head installed and once with thecolor print head installed. Follow these steps:
1. If you did not install the Bi-D Calibration Utility on your hard disk, insert the driver diskette in your computer’sdiskette drive.
2. Make sure Windows is running.
3. To start the Bi-D Calibration Utility using Windows 3.1Program Manager, choose Run from the File menu. TheRun dialog box appears.
To start it using Windows 95, click Start; then choose Run.
4. In the Command Line box (Windows 3.1) or the Open field(Windows 95) type the drive and directory name where theutility is located. For example, type A:CALIBRAT (orC:\directory\CALIBRAT if it is on your hard disk). Thenchoose OK.
5. When you see the Calibration Utility screen, verify that Stylus COLOR IIs is selected as the printer for calibration. Ifit isn’t, use ↑ or ↓ to select it.
Also make sure Print Calibration Pattern is selected at thebottom of the screen. (Use the Tab key to move down and ↑to select it, if necessary.)
RHudson User’s GuideA5 size Chapter 310-28-95 DR, pass 2-Rev1
Maintenance 3-15

6. Press Enter to select Calibrate. The printer starts calibrating.
7. The next screen prompts you to enter an offset value to alignthe print head.
Wait for 1 minute while the printer prints a page of multiplepatterns of vertical lines, each of which is assigned an offsetvalue. Look for the pattern that is most closely aligned.
| || |
Aligned Not aligned
8. Enter the offset value of the pattern that is most closelyaligned and press Enter. The printer prints another sheet toverify that the alignment is correct.
9. If the vertical lines on the sheet are aligned, select Done. If the lines are not aligned, select Re-calibrate; then pressEnter to repeat the calibration.
If you notice later that the vertical alignment of your printedpages is off, repeat the calibration procedure.
L Hudson User’s GuideA5 size Chapter 310-28-95 DR, pass 2-Rev1
3-16 Maintenance

Chapter 4Troubleshooting
Proof Sign-off:Mary _______Nancy _______Moira _______Cindy _______
Print Quality Problems . . . . . . . . . . . . . . . . . . . . . . . 4-3
Problems with Printing . . . . . . . . . . . . . . . . . . . . . . . 4-7
Paper Handling Problems . . . . . . . . . . . . . . . . . . . . . 4-12Paper Jam Problems . . . . . . . . . . . . . . . . . . . . . . . 4-12Paper Feeding Problems . . . . . . . . . . . . . . . . . . . . 4-12Other Paper Handling Problems . . . . . . . . . . . . . . . 4-13
4
RHudson User’s GuideA5 size Chapter 410-28-95 DR, pass 2-Rev1
Troubleshooting 4-1

This chapter describes what you can do if you are havingproblems printing. It is divided into these sections:
Print quality problems. See this section if the print qualityis not good or not what you expect.
Problems with printing. See this section if your printer ishaving trouble printing.
Paper handling problems. See this section if you havepaper jams or other problems with paper handling.
Check the table below to read the status of the control panellights and help you identify the problem.
ProblemControl panel light status
Error Condensed Economy Pause
Ink low Flashing Off Off Off
Ink out Flashing Off Off On
Paper out On Off Off On
Paper jammed Off Off Flashing On
Print head unit or inkcartridge installationerror
Flashing Off Off Flashing
Carriage error Flashing Flashing Off Flashing
Fatal error Flashing Flashing Flashing Flashing
If you have a printing problem, check the appropriate sectionand follow all suggestions that apply to your problem. Alsocheck the ReadMe icon in the EPSON program group for thelatest information. If none of the suggested solutions solve yourproblem, see “Where to Get Help” in the Introduction.
L Hudson User’s GuideA5 size Chapter 410-28-95 DR, pass 2-Rev1
4-2 Troubleshooting

Print Quality Problems
To help you determine the nature of the problem, you maywant to print a demonstration page and analyze the elementson it. See Chapter 2 for instructions.
Print quality problems can often be solved by cleaning theprint head as described earlier in this chapter. Note that it maytake as many as five cleaning cycles to solve a print qualityproblem. If cleaning the print head does not improve the printquality, try the following:
Check the status of the Error and Pause lights to seewhether the ink cartridge is low on ink or is empty. If so,replace the cartridge as described in Chapter 3.
For color or complex grayscale images, turn onMicroWeave and turn off High Speed mode.
Use a higher quality paper. For best print quality, useEPSON special coated papers for 360 and 720 dpi orEPSON high-quality glossy paper (720 dpi only).
Note:Do not use high-quality glossy paper when you print at 360 dpi.
Make sure the Media Type setting matches the type ofpaper or other media loaded in the printer.
If you’re printing a scanned image and the colors are notright, first try to fix the problem using your scanningsoftware program.
If print quality does not improve, see the following specificproblems.
RHudson User’s GuideA5 size Chapter 410-28-95 DR, pass 2-Rev1
Troubleshooting 4-3

Printed output is not what you expect or is faint or blurred. You may not be printing on the correct side of the paper. Oncoated paper, print only on the white coated side; on glossypaper or transparencies, print only with the cut corner facingthe right side of the sheet feeder. If you’re not sure which sideis the printable surface, test both sides to determine which sidegives you the best print quality. Also remove each sheet as it isprinted to prevent smearing by the next sheet.
Check that the paper thickness and thickness adjustment leversare set correctly for the media type. (See “Setting the PaperThickness and Adjustment Levers” in Chapter 1 for moreinformation.) Faint or blurred printouts can result if you printon plain paper or labels with these levers in incorrect positions.
Use a higher quality paper. Also, check that the Media Typesetting in the driver is set for the type of paper or other mediayou loaded. If you are using 720 dpi resolution, you get betterresults if you use EPSON special coated paper for 720 dpi orEPSON high-quality glossy paper.
Check whether economy printing mode is on. To turn off thismode, press the Alt and Load/Eject buttons as described inChapter 2 until the Economy mode is turned off.
Turn on non-smear printing mode, if necessary, as described inChapter 2.
Check whether your paper is moist or damp. Ink jet printersare sensitive to moisture absorbed by paper. Do not store paperin damp or humid places.
If you are printing color graphics at 360 or 720 dpi, make sureMicroWeave is on and High Speed mode is off. Check that theBrightness and Contrast settings are appropriate for the image.
L Hudson User’s GuideA5 size Chapter 410-28-95 DR, pass 2-Rev1
4-4 Troubleshooting

Make sure the correct print head is selected in the printerdriver. Select Color Head Unit for the color print head andMonochrome Head Unit for monochrome.
Try using the printer driver’s Automatic feature to let thedriver determine the appropriate image settings.
Your Windows video driver might not be compatible with theprinter. Use the standard Windows VGA driver or contact themanufacturer of your video card for an updated driver. Forinformation on changing the video driver, see your Windowsdocumentation.
Clean the print head as described earlier in this chapter.
Replace the ink cartridge.
Vertical lines do not align.
Calibrate your printer as described in Chapter 3.
You see white banding in your printed output.
Turn on MicroWeave in the printer driver. If you still see whitebanding, clean the print head as described earlier in thischapter. You may need to run two or three cleaning cycles.
The printout contains incorrect or garbled characters.Make sure EPSON Stylus COLOR IIs is selected as the defaultWindows printer driver.
If you are running Windows, make sure the Print Manager isturned off in the Control Panel Printers utility; see yourWindows documentation or online help for instructions.
Print jobs may be held in the EPSON Spool Manager. Selectany print jobs marked pending, waiting, or held; then selectDelete or Cancel Printing.
RHudson User’s GuideA5 size Chapter 410-28-95 DR, pass 2-Rev1
Troubleshooting 4-5

If you still see incorrect or garbled characters, try printing ademonstration page to see if the problem is with your printer;see Chapter 2 for instructions. If the demonstration page prints,you may have a problem with your application software oryour printer cable. Make sure your cable is connected securelyand see your program’s documentation for troubleshootinginformation. If no demonstration page prints, you may have aproblem with your printer; contact your EPSON dealer orauthorized EPSON servicer.
You see incorrect colors in your printout.Make sure EPSON Stylus COLOR IIs is selected as the defaultWindows printer driver.
Check that the printer driver’s Brightness and Contrastsettings are appropriate for the image.
If you scanned the image, the different color interpretationtechnologies used by your scanner, monitor, and printer cannever produce an exact color match with the original image.However, check your scanner documentation for utilities youcan use to calibrate your scanner to your monitor and printer tomore closely match colors.
If you are printing from a DOS application using economymode, black text or graphics will appear gray on your printout;turn off economy mode to achieve deeper blacks.
Printing starts too high or too low on the page, or the pagelength or margins are not what you expect.
Make sure you selected the correct Paper Size option in theprinter driver; see Chapter 2 for instructions.
Use your software program to adjust the margins, or changethe number of lines per page, or change the page length settingto match the paper you are using.
L Hudson User’s GuideA5 size Chapter 410-28-95 DR, pass 2-Rev1
4-6 Troubleshooting

If necessary, change the loading position of the paper using theDefault setting mode as described in Chapter 2.
Problems with Printing
If you cannot get the printer to print, first check that paper isloaded in the printer. Then check that the printer is pluggedinto a working electrical outlet that is not controlled by aswitch or timer. Verify that the interface cable is securelyconnected to the printer and computer.
After you have done all this, see the following specificproblems.
Printing stops and the Error and Pause lights are on.
No paper is loaded in the printer. Load paper in the sheetfeeder; then press the Pause button to turn the Pause light offand resume printing.
Printing stops and the Economy light is flashing, but the Errorlight is off.
Paper may have jammed in the printer. Turn off the printerand gently pull out the paper. If it tears and remains inside theprinter, open the printer cover and remove the paper. See“Paper Handling Problems” later in this chapter forinformation on preventing paper jams.
The Error light is flashing.The ink cartridge is low on ink; replace the ink cartridge asdescribed in Chapter 3.
RHudson User’s GuideA5 size Chapter 410-28-95 DR, pass 2-Rev1
Troubleshooting 4-7
Printing stops and the Error, Condensed, and Pause lightsare flashing.
There is a carriage error. Turn off the printer; then, after a fewseconds, turn it on and try printing again. If the same lightsflash again, contact your dealer or an authorized EPSONservicer.
Printing stops and all lights are flashing (except the Powerlight).
There is a fatal error; contact your dealer or an authorizedEPSON servicer.
The Error and Pause lights flash.
You may have pressed the Alt button when the ink cartridge orthe print head unit was not installed or not installed correctly.Check the installation steps in Chapter 3 to reinstall the inkcartridge or print head unit.
The printer sounds like it is printing, but nothing prints.The print head may need cleaning. See Chapter 3 forinstructions.
The ink cartridge may be too old. A cartridge is too old if it hasbeen used longer than six months or beyond the date on itspackaging. First clean the print head as described earlier in thischapter. If this does not solve the problem, replace the inkcartridge.
The cable between the printer and computer may not meet thespecifications for the printer or computer. See “SystemRequirements” in the Setup Guide for cable guidelines.
Turn off the printer and perform a self test as described inChapter 1 of the Setup Guide. If the self test does not print, theproblem is with the printer. If the self test prints correctly, theproblem is probably caused by your software.
L Hudson User’s GuideA5 size Chapter 410-28-95 DR, pass 2-Rev1
4-8 Troubleshooting

The printer driver installed with Windows 3.1 does not workcorrectly after you upgrade to Windows 95.
You need to reinstall the printer driver after upgrading toWindows 95 so the driver is set up correctly for Windows 95.See the Setup Guide for instructions.
You see error messages because of printing conflicts.Before sending print jobs to the printer, the EPSON SpoolManager stores them in a temporary directory. If you seeconflict error messages or printing is very slow, the problemmay be caused by other temporary files in this directory. Tochange the EPSON Spool Manager default directory, followthese steps:
1. Make a directory on your hard disk where you would like theSpool Manager to place the files, for example, C:\SPLTEMP.
2. Open the EPSON program group and double-click the Spool Manager icon.
3. Make sure Stylus COLOR IIs is selected, and then open theQueue menu.
4. Select Setup. In the Queue Setup dialog box, change the spool directory to the one you created in step 1.
5. Also make sure the Use Print Manager for this portcheckbox is checked. Then select OK.
6. Open the Options menu and select Default Spool Directory.
7. In the dialog box, change the spool directory to the one youcreated in step 1. Then select OK.
8. Close the Spool Manager.
RHudson User’s GuideA5 size Chapter 410-28-95 DR, pass 2-Rev1
Troubleshooting 4-9

The printer prints blank pages.Make sure EPSON Stylus COLOR IIs is selected as the defaultWindows printer driver.
Make sure you selected the correct Paper Size option in theprinter driver; see your Setup Guide for instructions. Also makesure the margins you selected in your application software fitthe paper size you’re using.
Text printing is slow.You may be using printer driver settings that are more suitablefor graphics printing and unnecessarily slowing down textprinting. First make sure Monochrome print head is installed inyour printer and selected in the printer driver.
To speed up text printing only, turn off MicroWeave mode andturn on High Speed mode. Some combinations of PrintingMode (resolution) and Media Type do not allow you to selectthese settings; if this is the case for your settings, select a lowerresolution, possibly using 180 dpi for drafts and 360 dpi foryour final output. However, do not turn off MicroWeave whenprinting final copies of high-quality graphics or photographs.
Ink cartridges do not last as long as expected.
The ink cartridge life depends on the amount of ink used inprinting. If you often print pages with large graphics and densetext with little white space, you will use up cartridges fasterthan if you print pages with lots of white space.
The printer also uses ink during print head cleaning operations,so do not perform them unless necessary.
If you replace an ink cartridge before the Error light flashes, thesensor that tells you when ink is out will not work with thenew cartridge.
L Hudson User’s GuideA5 size Chapter 410-28-95 DR, pass 2-Rev1
4-10 Troubleshooting

The printer does not seem to receive print jobs sent by thecomputer.
Release any print jobs that may be held in the EPSON SpoolManager. Start Spool Manager and click any job markedpending or held. Then open the Document menu and selectDelete. Verify that the EPSON Stylus COLOR IIs print queueis not held, open the Queue menu and click Hold if there is acheck mark beside the option.
Make sure EPSON Stylus COLOR IIs is selected as the defaultWindows printer driver.
If you still get no output, try printing a demonstration page tosee if the problem is with your printer; see Chapter 2 forinstructions. If no demonstration page prints, you may have aproblem with your printer; contact your EPSON dealer orauthorized EPSON servicer.
If the demonstration page prints, you may have a problem withyour application software or your printer cable. Make sureyour cable is connected securely and see your program’sdocumentation for troubleshooting information. You can usethe printer’s hex dump mode to pinpoint communicationproblems between the printer and a software program. To turnon hex dump mode, first turn off the printer. Then hold downthe Load/Eject and Pause buttons, turn on the printer, andsend a print job. The printer prints the exact codes it receivesfrom the computer in hexadecimal format. Report the codes toyour support technician.
RHudson User’s GuideA5 size Chapter 410-28-95 DR, pass 2-Rev1
Troubleshooting 4-11

Paper Handling Problems
This section describes how to prevent paper jams inside yourprinter and ensure that paper feeds properly.
Paper Jam Problems
If paper jams inside the printer frequently, try the following:
Use a higher quality paper that is suitable for ink jetprinters and is not too thin, too thick, or rough. For bestquality, use EPSON special coated and high-quality glossypapers. See Chapter 1 for more information about loadingpaper and Appendix A for paper specifications.
Fan the stack of paper before you load it.
Do not load too many sheets in the sheet feeder. You canload up to 100 sheets of plain paper, 70 sheets of specialcoated paper, 10 envelopes, 50 sheets of transparency film(with one sheet of plain paper beneath the stack), or 30sheets of high-quality glossy paper (with one sheet of plainpaper beneath the stack).
If you loaded plain paper, try turning the stack over. Theprintable side may have been facing down.
Paper Feeding Problems
If paper is not feeding properly, the most likely causes are thefollowing:
Paper is curled or folded. Use flat, undamaged paper.
The paper is of poor quality; use a better quality paper.
The paper is too thin or thick; see Appendix A for papersize and type specifications.
L Hudson User’s GuideA5 size Chapter 410-28-95 DR, pass 2-Rev1
4-12 Troubleshooting

The paper was exposed to excess humidity, over 60%. SeeAppendix A for specifications on required environmentalconditions.
The edge guides are too tight or too loose. Adjust the leftedge guide for the size of the paper.
Too many sheets are loaded in the sheet feeder. You canload up to 100 sheets of plain paper, 70 sheets of specialcoated paper, 10 envelopes, 50 sheets of transparency film(with one sheet of plain paper beneath the stack), or 30sheets of high-quality glossy paper (with one sheet of plainpaper beneath the stack).
Other Paper Handling Problems
If you have other paper handling problems, see the followingsuggestions.
The printer loads more than one sheet at a time.Remove the stack of paper and fan it. Tap it on a flat surface toeven the edges. Then reload the paper.
The paper is too thin or thick, or was exposed to excesshumidity; see Appendix A for exact specifications.
Make sure the paper thickness and thickness adjustment leversare set correctly for your media type; see Chapter 1 forinstructions.
Make sure the printer driver’s Copies setting and the copiessetting in your application software are set to print one copy ata time. Also verify that you have selected the correct paper sizein the driver and in your application software.
RHudson User’s GuideA5 size Chapter 410-28-95 DR, pass 2-Rev1
Troubleshooting 4-13

Ejected paper is wrinkled.The paper is too thin or damp. Do not store paper in damp orhumid places.
Paper does not fully eject.
Use the Load/Eject button to eject the page.
The paper may be too long. Use paper that is within thespecified size. See Appendix A for exact specifications.
Paper is feeding crooked.The paper is old or creased. Use only new, smooth sheets ofpaper.
Too much paper is loaded in the sheet feeder. Remove a fewsheets.
The paper is not the proper size and quality; see Appendix Afor exact specifications.
L Hudson User’s GuideA5 size Chapter 410-28-95 DR, pass 2-Rev1
4-14 Troubleshooting

Appendix ATechnical Specifications
Proof Sign-off:Mary _______Nancy _______Moira _______Cindy _______
Printing . . . . . . . . . . . . . . . . . . . . . . . . . . . . . . . . A-2
Paper . . . . . . . . . . . . . . . . . . . . . . . . . . . . . . . . . A-3
Ink Cartridges . . . . . . . . . . . . . . . . . . . . . . . . . . . . A-6
Mechanical . . . . . . . . . . . . . . . . . . . . . . . . . . . . . . A-7
Electrical . . . . . . . . . . . . . . . . . . . . . . . . . . . . . . . A-7
Environmental . . . . . . . . . . . . . . . . . . . . . . . . . . . . A-8
Safety Approvals . . . . . . . . . . . . . . . . . . . . . . . . . . A-8
Fonts . . . . . . . . . . . . . . . . . . . . . . . . . . . . . . . . . A-8
Interface Specifications . . . . . . . . . . . . . . . . . . . . . . . A-9Pin Assignments . . . . . . . . . . . . . . . . . . . . . . . . . A-10Timing Chart . . . . . . . . . . . . . . . . . . . . . . . . . . . A-12
Initialization . . . . . . . . . . . . . . . . . . . . . . . . . . . . . A-12
Default Settings . . . . . . . . . . . . . . . . . . . . . . . . . . . A-13
A
RHudson User’s GuideA5 size Appendix A10-28-95 DR, pass 2-Rev1
Technical Specifications A-1

Printing
Printing method: On-demand ink jet
Nozzle configuration: 64 monochrome (black) nozzles (16 × 4 staggered)
60 color nozzles(20 × 3, cyan, magenta, yellow)
Printable columns and printing speed (color, letter-size paper)*:
Character pitch(characters per inch)
Printablecolumns
Printing speed (characters per second)
Monochrome Color
10 80 125 170
12 96 150 204
15 120 188 255
17 (10 condensed) 136 214 290
20 (12 condensed) 160 250 340
* Print speeds vary depending on system configuration, software application, resolution, and amount of page covered.
Resolution: Maximum 360 dpi on a 720 × 720 dpimatrix. Dots are printed in an alternatingpattern in which horizontal and verticaldots are non-contiguous. Contiguousprinting of dots is available only on thediagonal, which yields an effectiveresolution greater than 360 dpi.
Paper feed speed: 102 milliseconds per 1⁄6-inch line
Input buffer: 0.5KB to 15KB depending onmonochrome/color head unit selection
Print direction: Bidirectional with logic seeking for text andgraphics; unidirectional and autodirectionalmodes available in Default setting mode
Control code: ESC/P 2 and expanded raster graphics code
Paper feeding: Auto sheet feeder
L Hudson User’s GuideA5 size Appendix A10-28-95 DR, pass 2-Rev1
A-2 Technical Specifications
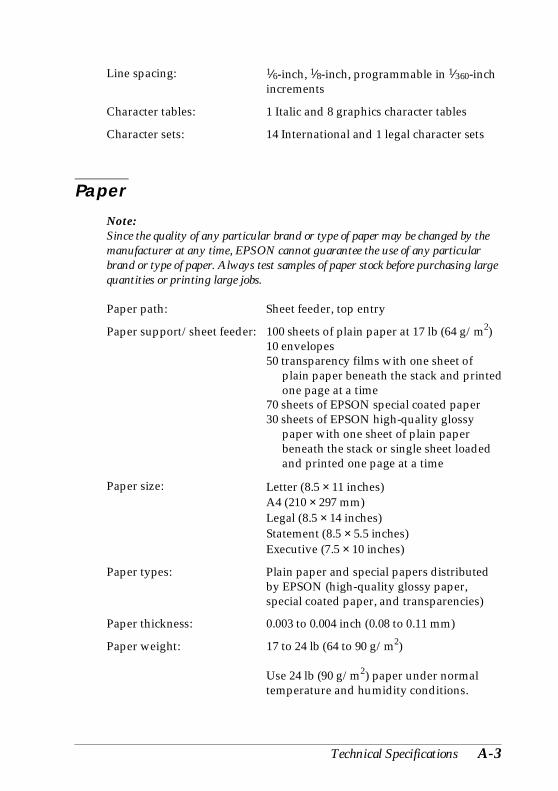
Line spacing: 1⁄6-inch, 1⁄8-inch, programmable in 1⁄360-inchincrements
Character tables: 1 Italic and 8 graphics character tables
Character sets: 14 International and 1 legal character sets
Paper
Note:Since the quality of any particular brand or type of paper may be changed by themanufacturer at any time, EPSON cannot guarantee the use of any particularbrand or type of paper. Always test samples of paper stock before purchasing largequantities or printing large jobs.
Paper path: Sheet feeder, top entry
Paper support/sheet feeder: 100 sheets of plain paper at 17 lb (64 g/m2) 10 envelopes50 transparency films with one sheet of
plain paper beneath the stack and printed one page at a time
70 sheets of EPSON special coated paper30 sheets of EPSON high-quality glossy
paper with one sheet of plain paper beneath the stack or single sheet loaded and printed one page at a time
Paper size: Letter (8.5 × 11 inches)A4 (210 × 297 mm)Legal (8.5 × 14 inches)Statement (8.5 × 5.5 inches)Executive (7.5 × 10 inches)
Paper types: Plain paper and special papers distributedby EPSON (high-quality glossy paper,special coated paper, and transparencies)
Paper thickness: 0.003 to 0.004 inch (0.08 to 0.11 mm)
Paper weight: 17 to 24 lb (64 to 90 g/m2)
Use 24 lb (90 g/m2) paper under normaltemperature and humidity conditions.
RHudson User’s GuideA5 size Appendix A10-28-95 DR, pass 2-Rev1
Technical Specifications A-3
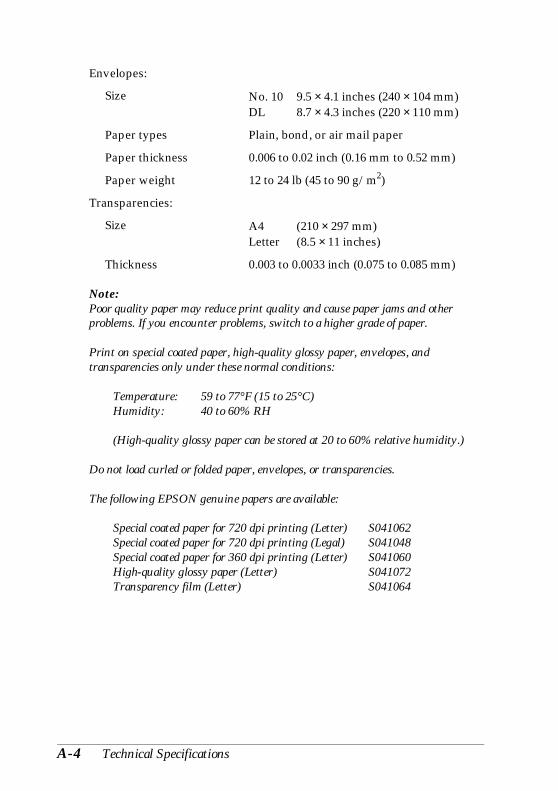
Envelopes:
Size No. 10 9.5 × 4.1 inches (240 × 104 mm)DL 8.7 × 4.3 inches (220 × 110 mm)
Paper types Plain, bond, or air mail paper
Paper thickness 0.006 to 0.02 inch (0.16 mm to 0.52 mm)
Paper weight 12 to 24 lb (45 to 90 g/m2)
Transparencies:
Size A4 (210 × 297 mm)Letter (8.5 × 11 inches)
Thickness 0.003 to 0.0033 inch (0.075 to 0.085 mm)
Note:Poor quality paper may reduce print quality and cause paper jams and otherproblems. If you encounter problems, switch to a higher grade of paper.
Print on special coated paper, high-quality glossy paper, envelopes, andtransparencies only under these normal conditions:
Temperature: 59 to 77°F (15 to 25°C)Humidity: 40 to 60% RH
(High-quality glossy paper can be stored at 20 to 60% relative humidity.)
Do not load curled or folded paper, envelopes, or transparencies.
The following EPSON genuine papers are available:
Special coated paper for 720 dpi printing (Letter) S041062 Special coated paper for 720 dpi printing (Legal) S041048 Special coated paper for 360 dpi printing (Letter) S041060 High-quality glossy paper (Letter) S041072 Transparency film (Letter) S041064
L Hudson User’s GuideA5 size Appendix A10-28-95 DR, pass 2-Rev1
A-4 Technical Specifications

Printable area:
Single sheets
Envelopes
A The minimum top margin is 0.12 inch (3.0 mm).
BL The minimum left margin is 0.12 inch (3.0 mm).
Note: When printing multiple sheets of glossy paper, the minimum top margin is 1.2 inches (30 mm).
BR The minimum right margin is:0.12 inch (3.0 mm) for Statement and Executive paper,
and Transparencies 0.38 inch (9.7 mm) for Letter and Legal paper, and transparencies0.15 inch (3.8 mm) for A4 paper0.54 inch (13.8 mm) for DL envelopes1.38 inches (35.1 mm) for #10 envelopes
C The minimum bottom margin is 0.54 inches (14.0 mm).
Note:Always load paper into the sheet feeder short edge first except envelopes. Loadenvelopes long edge first.
A
BR
C
BLA-1
A
BL BR
C
A-2
RHudson User’s GuideA5 size Appendix A10-28-95 DR, pass 2-Rev1
Technical Specifications A-5

Ink Cartridges
Black ink cartridge (S020047):
Color Black
Print capacity* 540 pages (A4 paper; text)
Cartridge life 2 years from production date and up to 6months after opening the package at 77°F (25°C).
Temperature Storage: –4 to 104°F (–20 to 40°C)1 month at 104°F (40°C)
Transit: –22 to 140°F (–30 to 60°C)1 month at 104°F (40°C)120 hours at 140°F (60°C)
Freezing:** 24.8°F (–4°C)
Dimensions 1.8 inches (W) × 2.3 inches (D) × 1.5 inches (H)
Color ink cartridge (S020049):
Colors Cyan, magenta, and yellow
Print capacity* 320 pages (A4 paper; 360 dpi; 5% eachcolor)
Cartridge life 2 years from production date and up to 6 months after opening the package at 77°F (25°C).
Temperature Storage: –4 to 104° F (−20 to 40°C) 1 month at 104°F (40°C)
Transit: –22 to 140°F (−30 to 60°C)1 month at 104°F (40°C)120 hours at 140°F (60°C)
Freezing:** 24.8°F (−4°C)
Dimensions 1.7 inches (W) × 2.2 inches (D) × 1.5 inches (H)
* The print capacity may vary depending on how often you use the printhead cleaning function. Also, if you print large graphics and dense textwith little white space, you use ink faster.
** The ink thaws and is usable after approximately 3 hours at 77°F (25°C).
L Hudson User’s GuideA5 size Appendix A10-28-95 DR, pass 2-Rev1
A-6 Technical Specifications

c Caution:Use only genuine EPSON cartridges and do not refill them. Otherproducts may cause damage not covered by EPSON’s warranty.
Do not use an ink cartridge after the expiration date on the package.
Mechanical
Paper feed method: Friction with auto/manual sheet feeder, topentry
Total print volume: 25,000 pages
Dimensions: Without paper support and output trayWidth 15.6 inches (396.7 mm) Depth 8.1 inches (205.6 mm) Height 5.7 inches (144.0 mm)
With paper support and output trayWidth 15.6 inches (396.7 mm) Depth 20.8 inches (528.5 mm) Height 10.5 inches (267.3 mm)
Weight: 8.6 lb (3.9 kg) without the ink cartridge andprint head unit
Electrical
Input voltage range: 103.5 to 132 V
Rated frequency range: 50 to 60 Hz
Input frequency range: 49.5 to 60.5 Hz
Rated current: 0.5A
Power consumption: Approx. 13 W (during self test printing at10 cpi)
RHudson User’s GuideA5 size Appendix A10-28-95 DR, pass 2-Rev1
Technical Specifications A-7
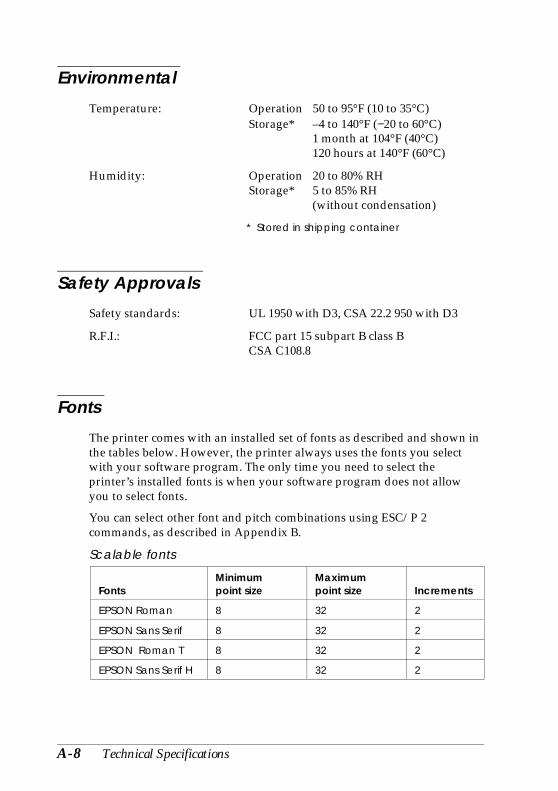
Environmental
Temperature: Operation 50 to 95°F (10 to 35°C)Storage* –4 to 140°F (−20 to 60°C)
1 month at 104°F (40°C)120 hours at 140°F (60°C)
Humidity: Operation 20 to 80% RHStorage* 5 to 85% RH
(without condensation)
* Stored in shipping container
Safety Approvals
Safety standards: UL 1950 with D3, CSA 22.2 950 with D3
R.F.I.: FCC part 15 subpart B class BCSA C108.8
Fonts
The printer comes with an installed set of fonts as described and shown inthe tables below. However, the printer always uses the fonts you selectwith your software program. The only time you need to select theprinter’s installed fonts is when your software program does not allowyou to select fonts.
You can select other font and pitch combinations using ESC/P 2commands, as described in Appendix B.
Scalable fonts
FontsMinimum point size
Maximumpoint size Increments
EPSON Roman 8 32 2
EPSON Sans Serif 8 32 2
EPSON Roman T 8 32 2
EPSON Sans Serif H 8 32 2
L Hudson User’s GuideA5 size Appendix A10-28-95 DR, pass 2-Rev1
A-8 Technical Specifications

Bitmap fonts
Fonts 10 cpi 12 cpi 15 cpi Proportional
EPSON Roman √ √ √ √
EPSON Sans Serif √ √ √ √
EPSON Courier √ √ √ N/A
Font samples
Interface Specifications
Your printer is equipped with an 8-bit parallel interface.
Data format: 8-bit parallel, IEEE P1284 compatible mode
Synchronization: STROBE pulse
Handshake timing: BUSY and ACKNLG signals
Signal level: TTL compatible
Connector: 36-pin Centronics connector or equivalent
font2&
RHudson User’s GuideA5 size Appendix A10-28-95 DR, pass 2-Rev1
Technical Specifications A-9

Pin Assignments
Signalpin
Returnpin Signal Direction Description
1 19 STROBE IN STROBE pulse to read data.
23456789
2021222324252627
DATA 1DATA 2DATA 3DATA 4DATA 5DATA 6DATA 7DATA 8
ININININININININ
These signals representinformation in bits 0 to 7 ofparallel data respectively.Each signal is at HIGH levelwhen data is logical 1 andLOW when it is logical 0.
10 28 ACKNLG OUT About a 5-µs pulse. LOWindicates data has beenreceived and the printer isready to accept more data.
11 29 BUSY OUT A HIGH signal indicates theprinter cannot receive data.The signal goes HIGH in thefollowing cases:1) During data entry (for each character) 2) During initialization3) During self test, demonstration, and default setting printing4) During a printer-error state
12 28 PE OUT A HIGH signal indicates theprinter is in a paper-out stateor in an error state.
13 28 SLCT OUT Pulled up to +5 V through1 kΩ resistance
14 30 AFXT IN Not used
15 - NC - Not used
16 - GND - Logic ground level
17 - CHASSISGND
- Printer’s chassis ground,which is connected to thelogic ground
18 - Logic H OUT Not used
19-30 - GND - Twisted-pair return signalground level
L Hudson User’s GuideA5 size Appendix A10-28-95 DR, pass 2-Rev1
A-10 Technical Specifications
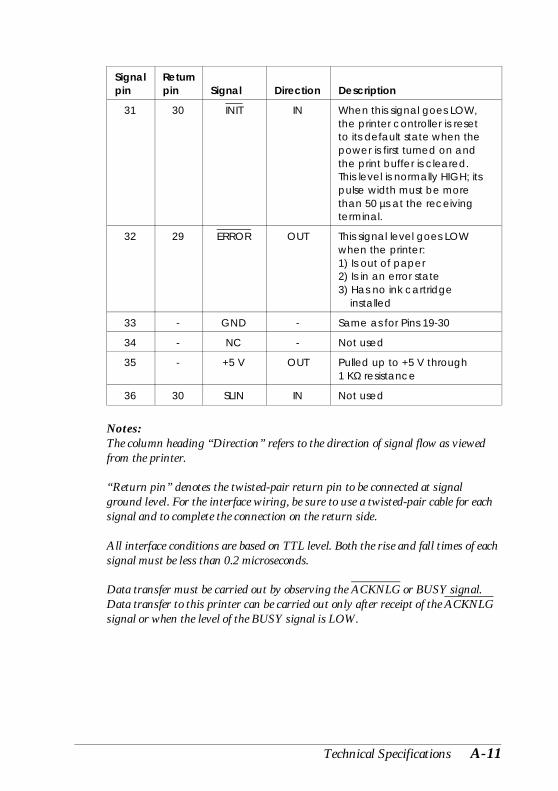
Signalpin
Returnpin Signal Direction Description
31 30 INIT IN When this signal goes LOW,the printer controller is resetto its default state when thepower is first turned on andthe print buffer is cleared.This level is normally HIGH; itspulse width must be morethan 50 µs at the receivingterminal.
32 29 ERROR OUT This signal level goes LOWwhen the printer:1) Is out of paper2) Is in an error state3) Has no ink cartridge installed
33 - GND - Same as for Pins 19-30
34 - NC - Not used
35 - +5 V OUT Pulled up to +5 V through1 KΩ resistance
36 30 SLIN IN Not used
Notes:The column heading “Direction” refers to the direction of signal flow as viewedfrom the printer.
“Return pin” denotes the twisted-pair return pin to be connected at signalground level. For the interface wiring, be sure to use a twisted-pair cable for eachsignal and to complete the connection on the return side.
All interface conditions are based on TTL level. Both the rise and fall times of eachsignal must be less than 0.2 microseconds.
Data transfer must be carried out by observing the ACKNLG or BUSY signal.Data transfer to this printer can be carried out only after receipt of the ACKNLGsignal or when the level of the BUSY signal is LOW.
RHudson User’s GuideA5 size Appendix A10-28-95 DR, pass 2-Rev1
Technical Specifications A-11

Timing Chart
Transition time (both the rise and the fall) of every signal must be less than 0.2 µs.
Initialization
The printer can be initialized (returned to a fixed set of conditions) inthese ways:
Hardware initialization ∗ The printer is turned on∗ The printer receives an INIT signal from the parallel interface: pin 31 goes LOW
Software initialization ∗ Software sends the ESC @ (initialize the printer) command; the last panel settings are kept
Control panel initialization ∗ Hold down the Alt button and press the Pause button (buffer clear); the last panel settings are kept
All three initialization methods reset the font according to the defaultsettings selected using the control panel. However, ESC @ does notinitialize the printer mechanism, clear the input data buffer, or clear theuser-defined character set. The control panel initialization does notinitialize the printer mechanism or clear the user-defined character set.
BUSY
DATA
0.5 µs (Min.)0 µs (Min.)
5 µs (Typ.)0 µs (Min.)
ACKNLG
STROBEAAR03A
L Hudson User’s GuideA5 size Appendix A10-28-95 DR, pass 2-Rev1
A-12 Technical Specifications

Default Settings
The table below shows the default settings that take effect when theprinter is initialized.
Item Default setting
Top-of-form position Current paper position
Page length Single sheets:61 lines for letter-size paper65 lines for A4-size paper
Left and right margins Cancelled
Line spacing 1⁄6-inch line spacing
Character pitch Last font selected using default setting
Vertical tab position Cleared
Horizontal tab positions Every eight characters
Font selection Last font selected using default setting
Special printing effects Cancelled (except condensed andeconomy printing)
User-defined character set Hardware/control panel initialization: clearedSoftware initialization: deselected only
Graphic mode assignment ESC K = ESC ∗ 0, ESC L = ESC ∗ 1,ESC Y = ESC ∗ 2, ESC Z = ESC ∗ 3
In addition, hardware and control panel initialization erases any text inthe data buffer.
RHudson User’s GuideA5 size Appendix A10-28-95 DR, pass 2-Rev1
Technical Specifications A-13

L Hudson User’s GuideA5 size Appendix A10-28-95 DR, pass 2-Rev1
A-14 Technical Specifications

Appendix BCommands and Character Tables
Proof Sign-off:Mary _______Nancy _______Moira _______Cindy _______
Command List . . . . . . . . . . . . . . . . . . . . . . . . . . . . B-2
Character Tables . . . . . . . . . . . . . . . . . . . . . . . . . . . B-3International Character Sets . . . . . . . . . . . . . . . . . . B-7Characters Available with ESC (^ Command . . . . . . . . B-8
B
RHudson User’s GuideA5 size Appendix B10-28-95 DR, pass 2-Rev1
Commands and Character Tables B-1

Command List
This printer works with the following ESC/P 2 commands. Ifyou need more information about using printer commands,you can purchase the ESC/P 2 Reference Manual (ESCP2REF)from EPSON Accessories by calling (800) 873-7766 (in the U.S.only). In Canada, call (800) BUY-EPSON for sales locations.
General operation:ESC @, ESC U, ESC EM
Paper feedingCR, FF, LF, ESC 0, ESC 2, ESC 3 , ESC +
Page formatESC ( C, ESC C, ESC C 0, ESC Q, EXC 1, ESC (c, ESC N, ESC O
Print position motionESC $, ESC \, ESC ( V, ESC ( v, ESC D, HT, ESC B, ESC J, VT
Font selectionESC k, ESC x, ESC X, ESC P, ESC g, ESC p, ESC 4, ESC 5, ESC E, ESC F,ESC !, ESC M
Font enhancementESC W, DC4, SO, DC2, SI, ESC w, ESC G, ESC H, ESC T, ESC S, ESC -,ESC q
SpacingESC SP, ESC c, ESC ( U
Character handlingESC t , ESC (t, ESC R, ESC %, ESC &, ESC :, ESC 6, ESC 7, ESC ( ^
Bit imageESC *
GraphicsESC ( G, ESC ., ESC (e
ColorESC r
MicroWeaveESC (i
L Hudson User’s GuideA5 size Appendix B10-28-95 DR, pass 2-Rev1
B-2 Commands and Character Tables

Character Tables
The printer comes with an installed set of character tables.However, when printing from Windows and most DOSsoftware programs, the printer prints the characters you see onscreen and does not use its built-in character tables. Unlessyou’re printing from a DOS program, and cannot print thecharacter you need, you should never have to change thecharacter table.
These character tables are selected using the printer’s Defaultsetting mode or by using software commands.
All tables except the italic are the same as the PC437 table forhex codes 00 through 7F, so only the PC437 table is showncompletely. The rest of the tables show only the characters forhex codes 80 through FF.
PC437 (U.S., Standard Europe)
pc437
RHudson User’s GuideA5 size Appendix B10-28-95 DR, pass 2-Rev1
Commands and Character Tables B-3

PC850 (Multilingual) PC860 (Portuguese)
PC861 (Icelandic) PC863 (Canadian-French)
850,860
861,863
L Hudson User’s GuideA5 size Appendix B10-28-95 DR, pass 2-Rev1
B-4 Commands and Character Tables

PC865 (Nordic) Abicomp
BRASCII
865, Abicomp
BRASCII
RHudson User’s GuideA5 size Appendix B10-28-95 DR, pass 2-Rev1
Commands and Character Tables B-5

Italic
No characters are available forhex code 15 in the italic charactertable.
Italic
L Hudson User’s GuideA5 size Appendix B10-28-95 DR, pass 2-Rev1
B-6 Commands and Character Tables
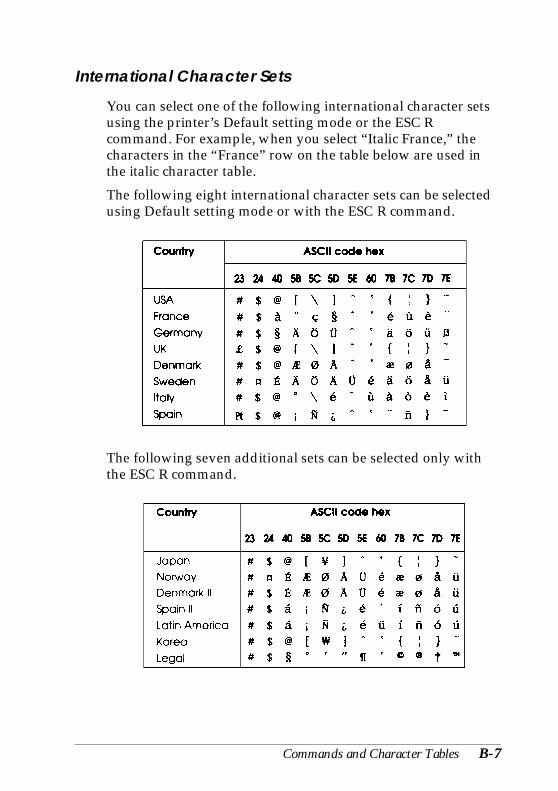
International Character Sets
You can select one of the following international character setsusing the printer’s Default setting mode or the ESC Rcommand. For example, when you select “Italic France,” thecharacters in the “France” row on the table below are used inthe italic character table.
The following eight international character sets can be selectedusing Default setting mode or with the ESC R command.
The following seven additional sets can be selected only withthe ESC R command.
inset10
intset20
RHudson User’s GuideA5 size Appendix B10-28-95 DR, pass 2-Rev1
Commands and Character Tables B-7

Characters Available with ESC (^ Command
To print the characters in the table below, use the ESC ( ^command.
ESC ( caret
L Hudson User’s GuideA5 size Appendix B10-28-95 DR, pass 2-Rev1
B-8 Commands and Character Tables

Glossary
auto line feedWhen this feature is selected in the printer’s Default setting mode, eachcarriage return (CR) code is automatically followed by a line feed (LF)code.
bidirectional printing Printing in which the print head prints in both directions (bidirectionally).This increases print speed but may reduce precise vertical alignment. Alsocalled high speed printing.
brightnessThe lightness or darkness level of an image.
character tableThe collection of letters, numbers, and symbols that constitute the set ofcharacters used in a particular language.
CMYA method of specifying and creating colors using Cyan (blue-green),Magenta, and Yellow.
condensed printingPrinting in which the width of each character is approximately 60% of thewidth of standard characters. Useful for fitting wide tables orspreadsheets on a page.
contrastThe range of difference between the darkest and lightest colors in animage. The greater the difference, the higher the contrast.
control codeA special code used to control a printer function such as performing acarriage return or line feed.
defaultA value or setting that takes effect when the equipment is turned on,reset, or initialized.
ditheringA way of arranging dots on a page to simulate a shade or tone. See alsohalftoning.
Proof Sign-off:Mary _______Nancy _______Moira _______Cindy _______
RHudson User’s GuideA5 size Glossary10-28-95 DR, pass 2-Rev1
Glossary 1
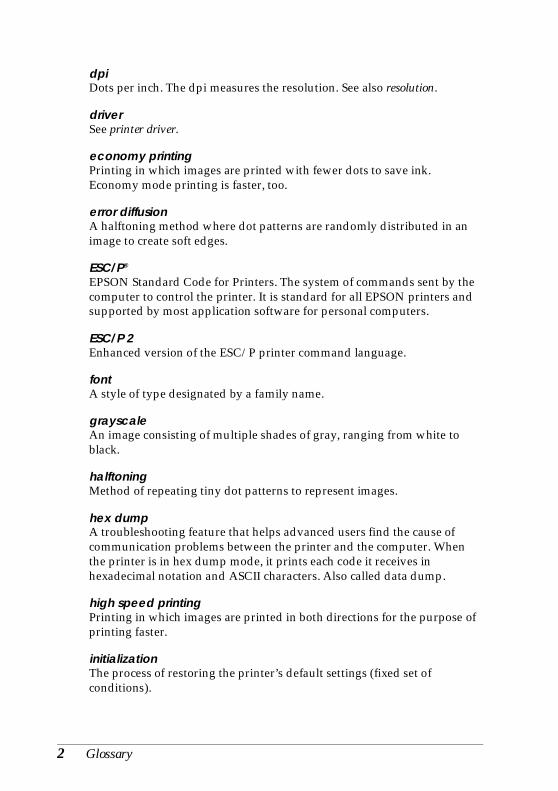
dpiDots per inch. The dpi measures the resolution. See also resolution.
driverSee printer driver.
economy printingPrinting in which images are printed with fewer dots to save ink.Economy mode printing is faster, too.
error diffusionA halftoning method where dot patterns are randomly distributed in animage to create soft edges.
ESC/P®
EPSON Standard Code for Printers. The system of commands sent by thecomputer to control the printer. It is standard for all EPSON printers andsupported by most application software for personal computers.
ESC/P 2Enhanced version of the ESC/P printer command language.
fontA style of type designated by a family name.
grayscaleAn image consisting of multiple shades of gray, ranging from white toblack.
halftoningMethod of repeating tiny dot patterns to represent images.
hex dumpA troubleshooting feature that helps advanced users find the cause ofcommunication problems between the printer and the computer. Whenthe printer is in hex dump mode, it prints each code it receives inhexadecimal notation and ASCII characters. Also called data dump.
high speed printingPrinting in which images are printed in both directions for the purpose ofprinting faster.
initializationThe process of restoring the printer’s default settings (fixed set ofconditions).
L Hudson User’s GuideA5 size Glossary10-28-95 DR, pass 2-Rev1
2 Glossary
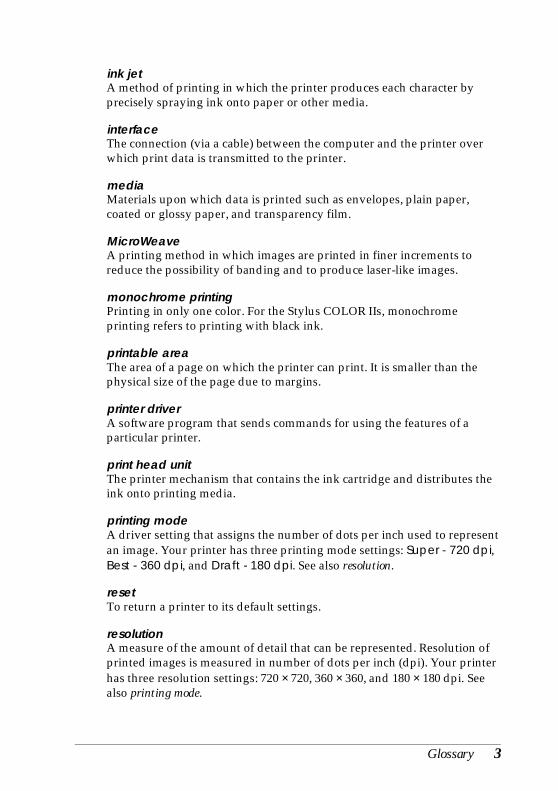
ink jetA method of printing in which the printer produces each character byprecisely spraying ink onto paper or other media.
interfaceThe connection (via a cable) between the computer and the printer overwhich print data is transmitted to the printer.
mediaMaterials upon which data is printed such as envelopes, plain paper,coated or glossy paper, and transparency film.
MicroWeaveA printing method in which images are printed in finer increments toreduce the possibility of banding and to produce laser-like images.
monochrome printingPrinting in only one color. For the Stylus COLOR IIs, monochromeprinting refers to printing with black ink.
printable areaThe area of a page on which the printer can print. It is smaller than thephysical size of the page due to margins.
printer driverA software program that sends commands for using the features of aparticular printer.
print head unitThe printer mechanism that contains the ink cartridge and distributes theink onto printing media.
printing modeA driver setting that assigns the number of dots per inch used to representan image. Your printer has three printing mode settings: Super - 720 dpi,Best - 360 dpi, and Draft - 180 dpi. See also resolution.
resetTo return a printer to its default settings.
resolutionA measure of the amount of detail that can be represented. Resolution ofprinted images is measured in number of dots per inch (dpi). Your printerhas three resolution settings: 720 × 720, 360 × 360, and 180 × 180 dpi. Seealso printing mode.
RHudson User’s GuideA5 size Glossary10-28-95 DR, pass 2-Rev1
Glossary 3

RGBA method of specifying color by its component proportion of red, green,and blue. Computer monitors use this method to represent colors.
saturationThe degree to which a color is undiluted by white light. The moresaturated the color, the more pure and bright it is.
self testA method for checking the operation of the printer. When you run the selftest, the printer prints the characters stored in its memory.
subtractive colorsColors produced by pigments that absorb some colors of light and reflectothers.
unidirectional printingPrinting in which the print head prints in one direction only.Unidirectional printing is useful for printing graphics because it allowsprecise vertical alignment.
L Hudson User’s GuideA5 size Glossary10-28-95 DR, pass 2-Rev1
4 Glossary

Index
AAccessories, purchasing, Intro-2,
Intro-5Adjusting the paper thickness lever,
1-3–4Adjusting the thickness adjustment
lever, 1-3–4Aligning vertical lines, 2-14, 2-23,
3-16, 4-5Alt button, 2-20–22Auto line feed, 2-23Auto setting, 2-23Auto sheet feeder
capacity, 1-6, A-3driver setting, 2-6, 2-11loading, 1-6specifications, A-2
Automatic printer driver settings,Intro-2, 4-5
BBanding, Intro-3, 2-14, 4-5Bi-D Calibration Utility, 3-15–16Bi-D setting, 2-23Bidirectional printing, Intro-3, 2-14,
2-23Black ink cartridge, see Ink cartridgesBlurred images, 4-4Bottom margin, 4-6, A-5Brightness, 2-7, 2-15, 4-4, 4-6Buffer, input, A-2Built-in interface, Intro-1, A-9–12Bulletin Board Service, Intro-6Buttons, control panel, 2-19–22
CCable, printer, 4-7–8Calibrating the printer, 2-14, 3-15–16Canceling print jobs, 2-18Carriage return character, 2-23Cartridges, see Ink cartridgesCharacter pitch, 2-24, A-13Character tables
available, A-3, B-3–6ESC (^ command, B-8international, B-7selecting, 2-23
Choosing paper, 1-3Clarity, see Print qualityCleaning
print heads, 3-2, 3-8printer, 3-13
Cleaning cycle, 3-2–3, 3-12CMY, 2-9Coated papers, see Special papersCollate setting, 2-6, 2-11Color
image settings, 2-14improving, 4-3ink cartridges, see Ink cartridgesmatching, 2-15, 4-6
CommandsESC ( ^, B-8ESC @, A-12ESC R, B-7ESC/P 2, B-2
CompuServe, Intro-7Condensed light, 2-20, 4-2Contrast, 2-7, 2-14–15, 4-4, 4-6Control panel, 2-19–24Controlling the printer
with the control panel, 2-19–24with the printer driver, 2-2–17
Copies, number of, 2-6, 2-11, 4-13Customer support, Intro-5–7
Proof Sign-off:Moira _______Mary _______Nancy T. _______Cindy _______
RHudson User’s GuideA5 size Index11-1-95 DR, pass 2-Rev1
Index 1
DDampness, see HumidityDefault setting mode, 2-23–24Default settings
at initialization, A-13printer, 2-23–24printer driver, 2-2, 2-6–7, 4-5–6, 4-11
Demonstration page, printing, 2-21,3-3, 4-3, 4-6, 4-11
Despooler status box, 2-17–18Diffusion, error, 2-7, 2-17Dithering, 2-7, 2-17Document Type settings, 2-8–9Dpi, Intro-1–2, A-2
Media Type settings, 2-6, 2-13Printing Mode settings, 2-6, 2-12–13specifications, A-2
Draft printing, 2-6, 2-12–13, 2-22, see also Economy
Driver, see Printer driver
EEconomy
light, 2-20, 4-2mode, 2-19–20, 4-4, 4-6printing, 2-20
Edge guides, 1-7–8, 1-12, 4-13Eject, see Load/Eject buttonElectrical specifications, A-7Electronic support services, Intro-6–7Energy Star compliance, Intro-3Energy, conserving, Intro-3–4Envelopes
loading, 1-13–14printable area, A-5size, 2-10, A-4specifications, A-4–5
Environmental specifications, A-8
EPSONAccessories, Intro-2, Intro-5, 3-8America Forum, Intro-7Bulletin Board Service, Intro-6Customer Care Centers, Intro-5papers, Intro-2, 1-2, see also
Special papersSpool Manager, 2-17–19, 4-5, 4-11
Error diffusion, 2-7, 2-17Error handling, see TroubleshootingError light, 2-20, 4-2ESC ( ^ command, B-8ESC @ command, A-12ESC R command, B-7ESC/P 2 commands, B-2
FFactory defaults, 2-23–24, A-13Faint images, 4-4Fast printing, Intro-3, 2-14, 2-23Feeder, see Auto sheet feederFeeding problems, 4-12–14Feeding single sheets, 1-8Film, see TransparenciesFonts
default selection, 2-24, A-13list of, A-8samples, A-9selecting, A-8
GGlossy paper, see Special papersGraphic mode assignment, A-13Grayscale, see Color
HHalftoning settings, 2-7, 2-16–17Handshake timing, A-9Heads, see Print headsHelp, where to get, Intro-5–7Hex dump mode, 4-11
L Hudson User’s GuideA5 size Index11-1-95 DR, pass 2-Rev1
2 Index

High Speed mode, Intro-3, 2-6, 2-14,4-3
Horizontal tab positions, A-13Humidity, 4-4, 4-13, A-4, A-8
IImage settings, 2-7, 2-14–16Initialization, A-12Ink cartridges
conserving ink, 2-13empty, 4-3install position, 3-9life expectancy, 4-8, 4-10, A-6old, 4-8, 4-10ordering, Intro-5, 3-8print capacity, A-6removing, 3-9–10replacing, 3-9–10, 4-7–8selecting, 3-8specifications, A-6–7
Ink delivery system, charging, 3-12Input buffer, A-2Interface, Intro-1, A-9–12International character sets, B-7Internet, Intro-6
JJammed paper, preventing, 4-12–13
LLabels, 1-6, 1-9Landscape setting, 2-6, 2-11Left edge guide, 1-7–8, 1-12, 4-13Left margin, A-5, A-13Lights
control panel, 2-20flashing, 4-2
Line feed, auto, 2-23Line spacing, A-3, A-13
Lines, aligning, see Vertical lines,aligning
Lines, white, see BandingLoad/Eject button, 2-21–22Loading
coated papers, 1-9–13envelopes, 1-13–14glossy paper, 1-9–13plain paper, 1-6–8transparencies, 1-9–13
Loading position, adjusting, 2-24
MMaintenance, 3-1–16Managing print jobs, 2-17–19Manuals, how to use, Intro-4–5Margins
left and right, A-5, A-13top and bottom, 2-24, 4-6, A-5
Media Type, 2-6, 2-13, 4-3Microsoft Windows VGA driver, 4-5MicroWeave, Intro-3, 2-6, 2-13–14,
4-3, 4-5Monitoring print jobs, 2-17–19Monochrome ink cartridges, see Ink
cartridgesMoving the printer, see Transporting
the printer
NNetwork interface mode, 2-23No Halftoning option, 2-7, 2-17Non-smear printing mode, 1-5
OOffset value, 3-16Online support, Intro-7Orientation of paper, 2-6, 2-11Output tray, extending, 1-6, 1-11
RHudson User’s GuideA5 size Index11-1-95 DR, pass 2-Rev1
Index 3
PPage
ejecting, 2-21length, A-13order, reverse, 2-6, 2-11
Papercoated, 1-2, 1-13, see also
Special papersfeed speed, A-2feeding problems, 4-12–13feeding single sheets, 1-8handling problems, 4-12–14high-quality glossy, see
Special papersjam problems, 4-12loading envelopes, 1-13–14loading plain paper, 1-6–7, 1-9loading special paper, 1-9–13ordering, Intro-5, 1-3orientation, 2-6, 2-11plain, 1-2, 1-6–8, 2-6, 2-13printable area, A-5printable surface, 1-6, 1-9, 1-13, 4-4settings, 2-10–11size, 2-6, 4-6, 4-10, A-3source, 2-6, 2-11special, see Special papersspecifications, A-3–5storing special paper, 1-9, 4-4transparencies, see Special paperstypes, 1-2–3, 2-6, 2-13, 4-3, A-3weight, A-3–4wrinkled, 4-14
Paper jams, preventing, 4-12–13Paper support, see Auto sheet feederPaper thickness lever, 1-3–4, 4-4Paper tray, see Auto sheet feederParallel interface, Intro-1, A-9–12Pause button, 2-21–22, 4-7Pause light, 2-20, 4-2, 4-7Pausing
print jobs, 2-18printer, 2-19–21
Photo-realistic option, 2-16Pin assignments, A-10–11Pitch, character, 2-24, A-13Plain paper, 1-2, 1-6–8, 2-6, 2-13Portrait setting, 2-6, 2-11Power consumption, A-7Power light, 2-20Power switch, 2-21–22Print dialog box, 2-4, 2-6Print direction, 2-14, 2-23, A-2Print heads
cleaning, 2-20, 3-2, 3-8driver settings, 2-6, 2-9home position, 3-7, 3-12nozzle, A-2replacing, 3-3–7
Print jobs, managing, 2-17–19Print options, 2-6, 2-13–14Print quality
improving, 3-2, 3-12problems with, 3-15–16, 4-2–4, 4-7
Print speedincreasing, 2-14, 2-23specifications, A-2
Printable area, A-5Printable surface, 1-6, 1-9, 1-13, 4-4Printer
cable, 4-7calibrating, 3-15–16cleaning, 3-13cleaning the print heads, 3-2, 3-8control panel, 2-19–22defaults, 2-23–24dimensions, A-7driver, see Printer driverfeeding single sheets, 1-8managing print jobs, 2-17–19pausing, 2-20problems, see Troubleshootingresetting, 2-21self test, 2-21, 3-8, 4-8specifications, A-2–13transporting, 3-14weight, A-7
L Hudson User’s GuideA5 size Index11-1-95 DR, pass 2-Rev1
4 Index

Printer driver, 2-2–17accessing, 2-3–5Automatic setting, Intro-2, 2-8changing settings, 2-7–17default settings, 2-6–7, 4-5–6, 4-11dialog box, 2-5–7installing, 4-9print head selection, 2-9, 4-5
Printingbidirectional, Intro-3, 2-14, 2-23draft, Intro-2, 2-6, 2-13, 2-22,
see also Economyfast, Intro-3, 2-14, 2-23managing, 2-17–19non-smear mode, 1-5problems with, see Troubleshootingspecifications, A-2unidirectional, 2-14, 2-23
Printing Mode/Options settings,2-12–14
Problems, see Troubleshooting
QQuality, see Print quality
RReadMe icon, Intro-1, 2-7, 4-2Rear edge guide, see Edge guidesResetting the printer, 2-21Resolution
Automatic setting, 2-8envelope printing, 1-13selecting, Intro-1, 4-4settings, 2-6, 2-12–14specifications, A-2
Restarting print jobs, 2-18Reverse page order, 2-6, 2-11Right margin, A-5, A-13
SSafety approvals, A-8Safety instructions, Intro-7–8Self test, 4-8Self test, printer, 2-21, 3-8Service, Intro-5Settings, default, see Default settingsShading, see ColorSheet feeder, auto, see Auto sheet
feederSingle sheets, feeding, 1-8Smeared ink, 1-5Spacing, line, A-3Special papers
improving print quality, 4-3–7loading, 1-9–14ordering, 1-3paper jams, 4-12selecting, Intro-2, 1-2, 4-3, 4-12settings, 2-6, 2-13specifications, A-3–5storing, 4-4
Special printing effects, A-13Specifications, A-2–13Speed, see Print speedSpool Manager, 2-17–19, 4-5, 4-11Support services
CompuServe, Intro-7customer, Intro-7EPSON Bulletin Board, Intro-6
TTab positions, A-13Technical assistance, Intro-5Telephone, toll-free number, Intro-5Temperature, A-4, A-6, A-8Testing the printer, 2-21, 3-8Thickness adjustment lever, 1-3–5Timing chart, A-12Timing, handshake, A-9
RHudson User’s GuideA5 size Index11-1-95 DR, pass 2-Rev1
Index 5

Top margin, 2-24, 4-6, A-5Transparencies
loading, 1-9–13printing problems, 4-4, 4-12–13selecting, 1-2setting, 2-6, 2-13specifications, A-4
Transparency guide, 1-11Transporting the printer, 3-14Tray, see Auto sheet feederTroubleshooting, 4-2–9, 4-12–14
UUni-D setting, 2-23Unidirectional printing, 2-14, 2-23User-defined character set, A-13
VVertical lines, aligning, 2-14, 2-23,
3-16, 4-5Vertical tab position, A-13VGA driver, Microsoft Windows, 4-5
WWeight
paper, A-3–4printer, A-7
Windowscontrol panel, 2-3version, 2-3–4, 4-9VGA driver, 4-5
World Wide Web, Intro-6Wrinkled paper, 4-14
L Hudson User’s GuideA5 size Index11-1-95 DR, pass 2-Rev1
6 Index